Safety Instructions
. . . . . . . . . . 2, 3
Operating Instructions
Care and Cleaning
of the Washer . . . . . . . . . . . . . . . . . . . . 11
Features . . . . . . . . . . . . . . . . . . . . . . . . . . 10
Loading and Using
the Washer . . . . . . . . . . . . . . . . . . . . . . . . 9
Operating instructions . . . . . . . . . .4–8
Installation Instructions
. 12–16
Troubleshooting Tips
. . . . . 17–19
Consumer Support
Consumer Help Indicator . . . . . . . . . 11
Consumer Support . . . . . . . . . . . . . . . . 21
Parts and Accessories. . . . . . . . . . .3, 21
Warranty . . . . . . . . . . . . . . . . . . . . . . . . . . 20
Printed in Mexico
English/Français/Español
Write the model and serial
numbers here:
Model # _____________
Serial # ______________
You can find
them on the
right side of
the washer.
Owner’s Manual &
Installation Instructions
GTW680
GTW685
GTW690
GTW681
29-6500
29-6500
MAC ID (GTW690
only) ________________
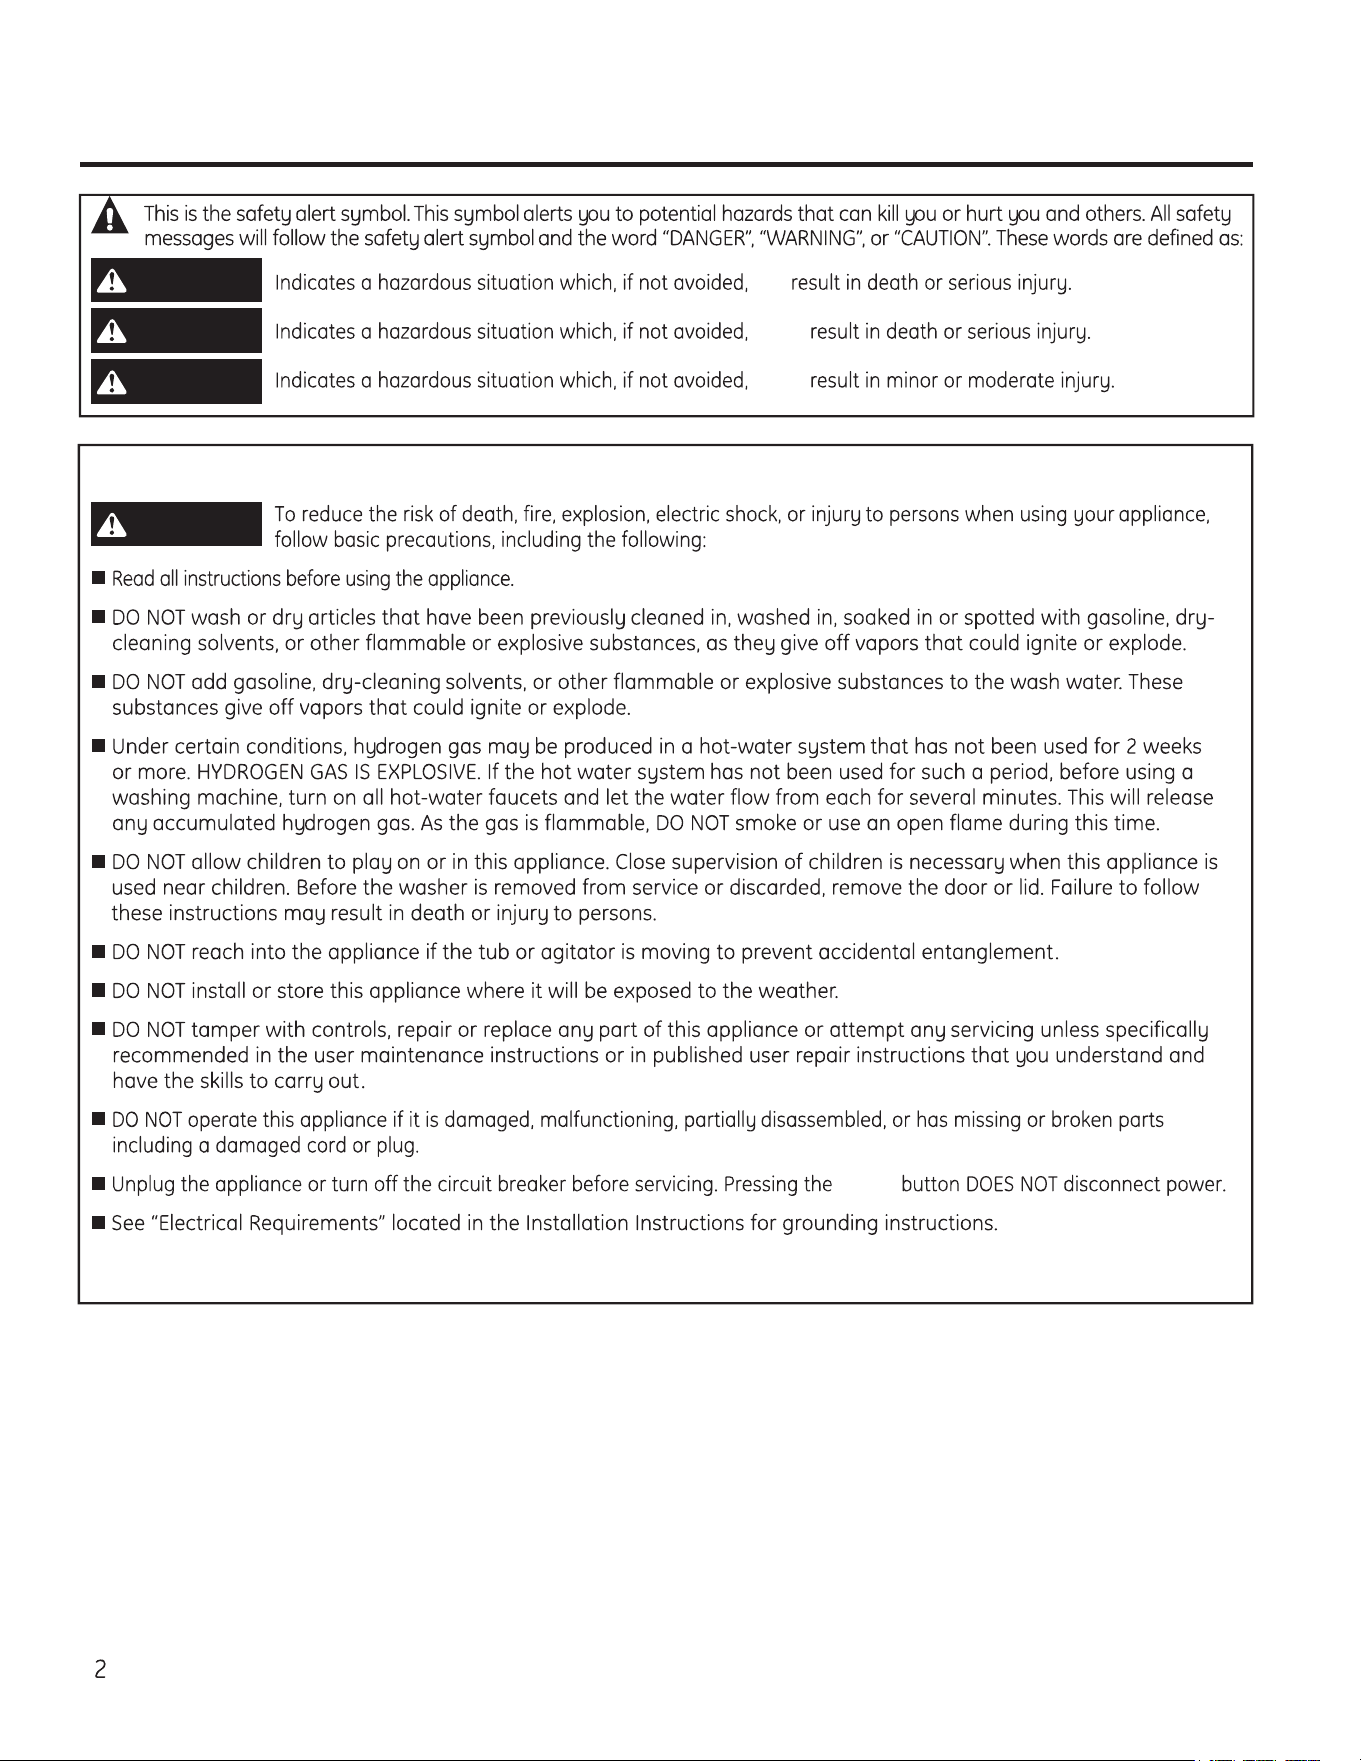
IMPORTANT SAFETY INFORMATION.
READ ALL INSTRUCTIONS BEFORE USING.
will
could
could
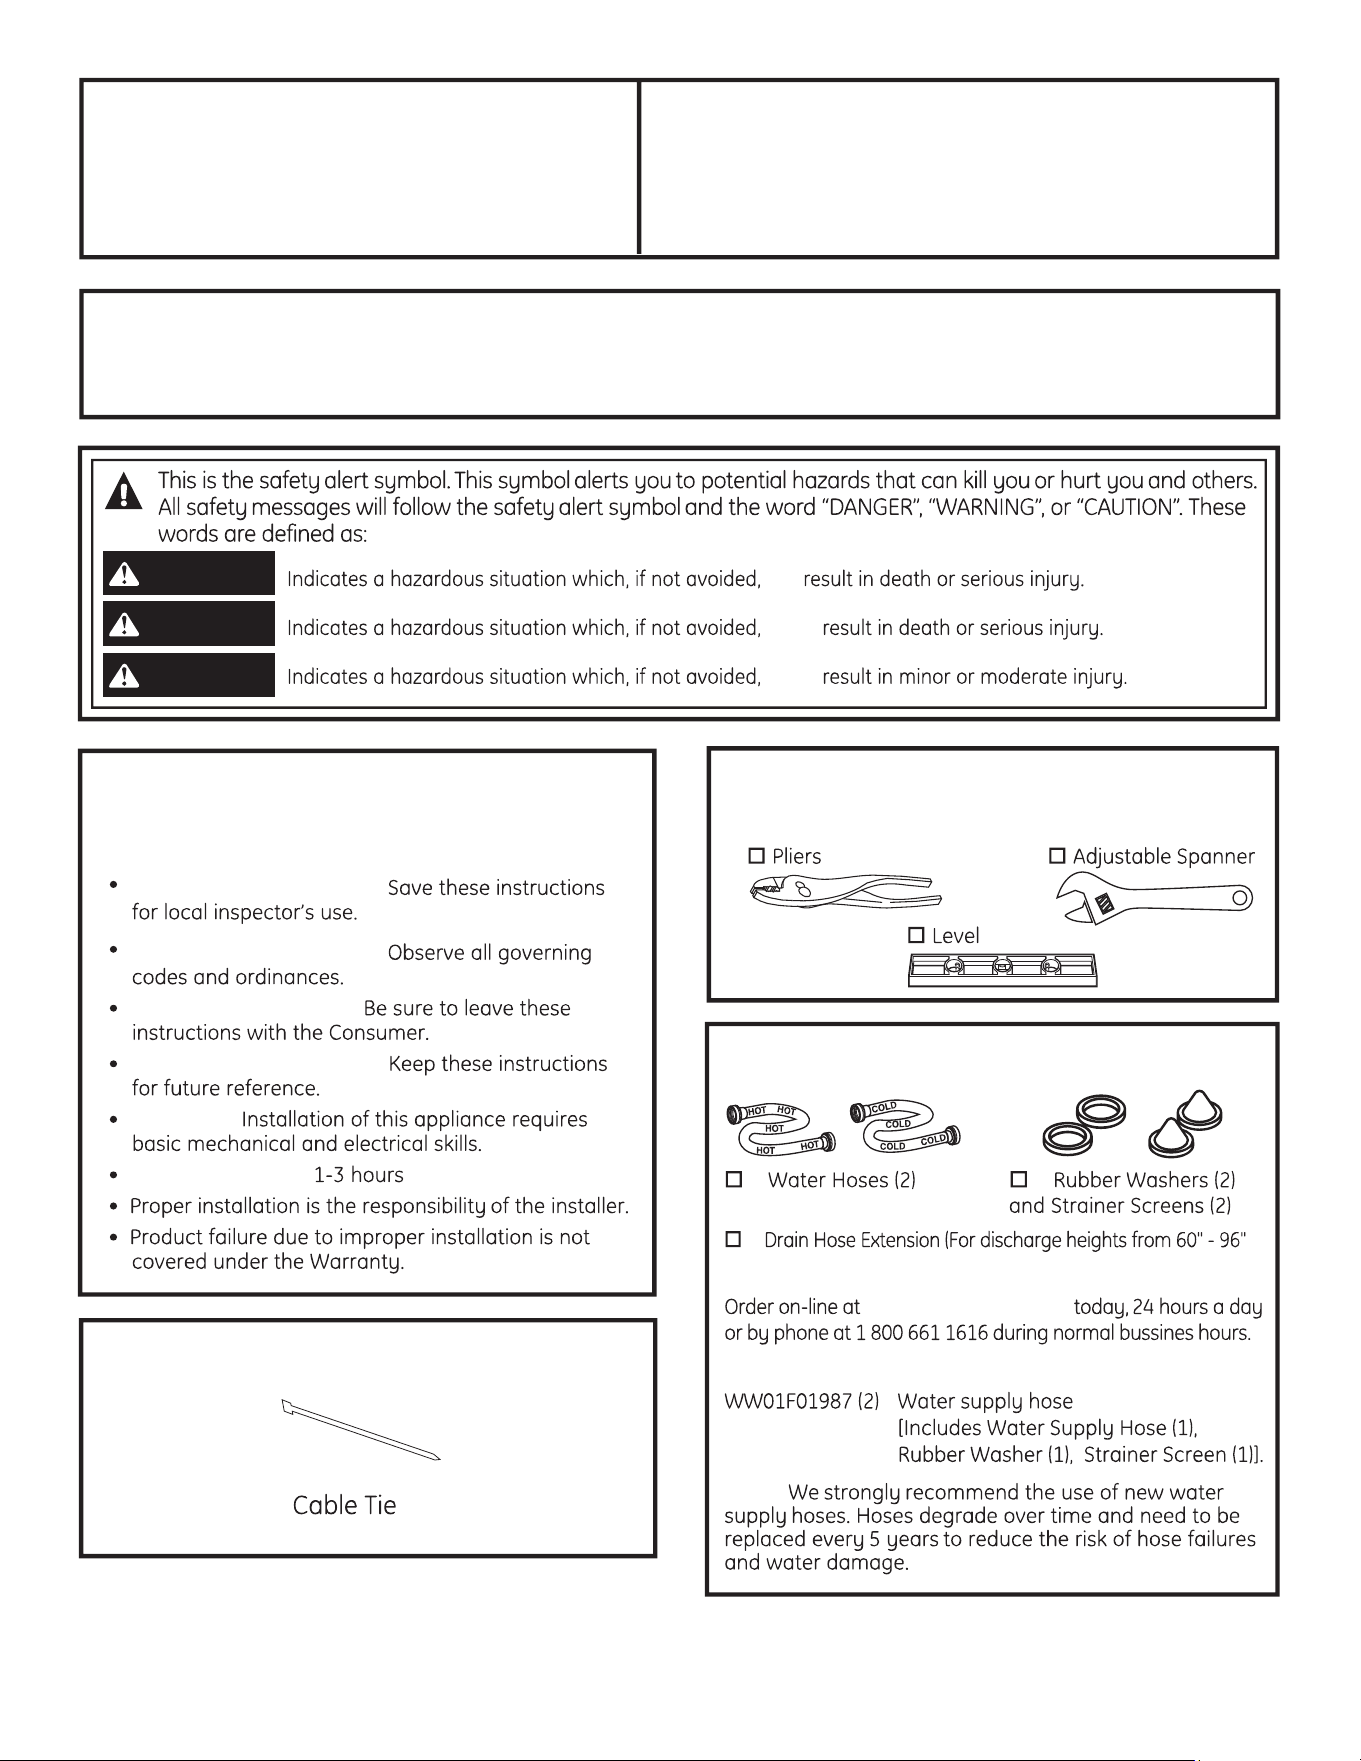
DANGER
WARNING
CAUTION
IMPORTANT SAFETY INSTRUCTIONS
Power
SAVE THESE INSTRUCTIONS
WARNING
GEAppliances.ca
SAVE THESE INSTRUCTIONS
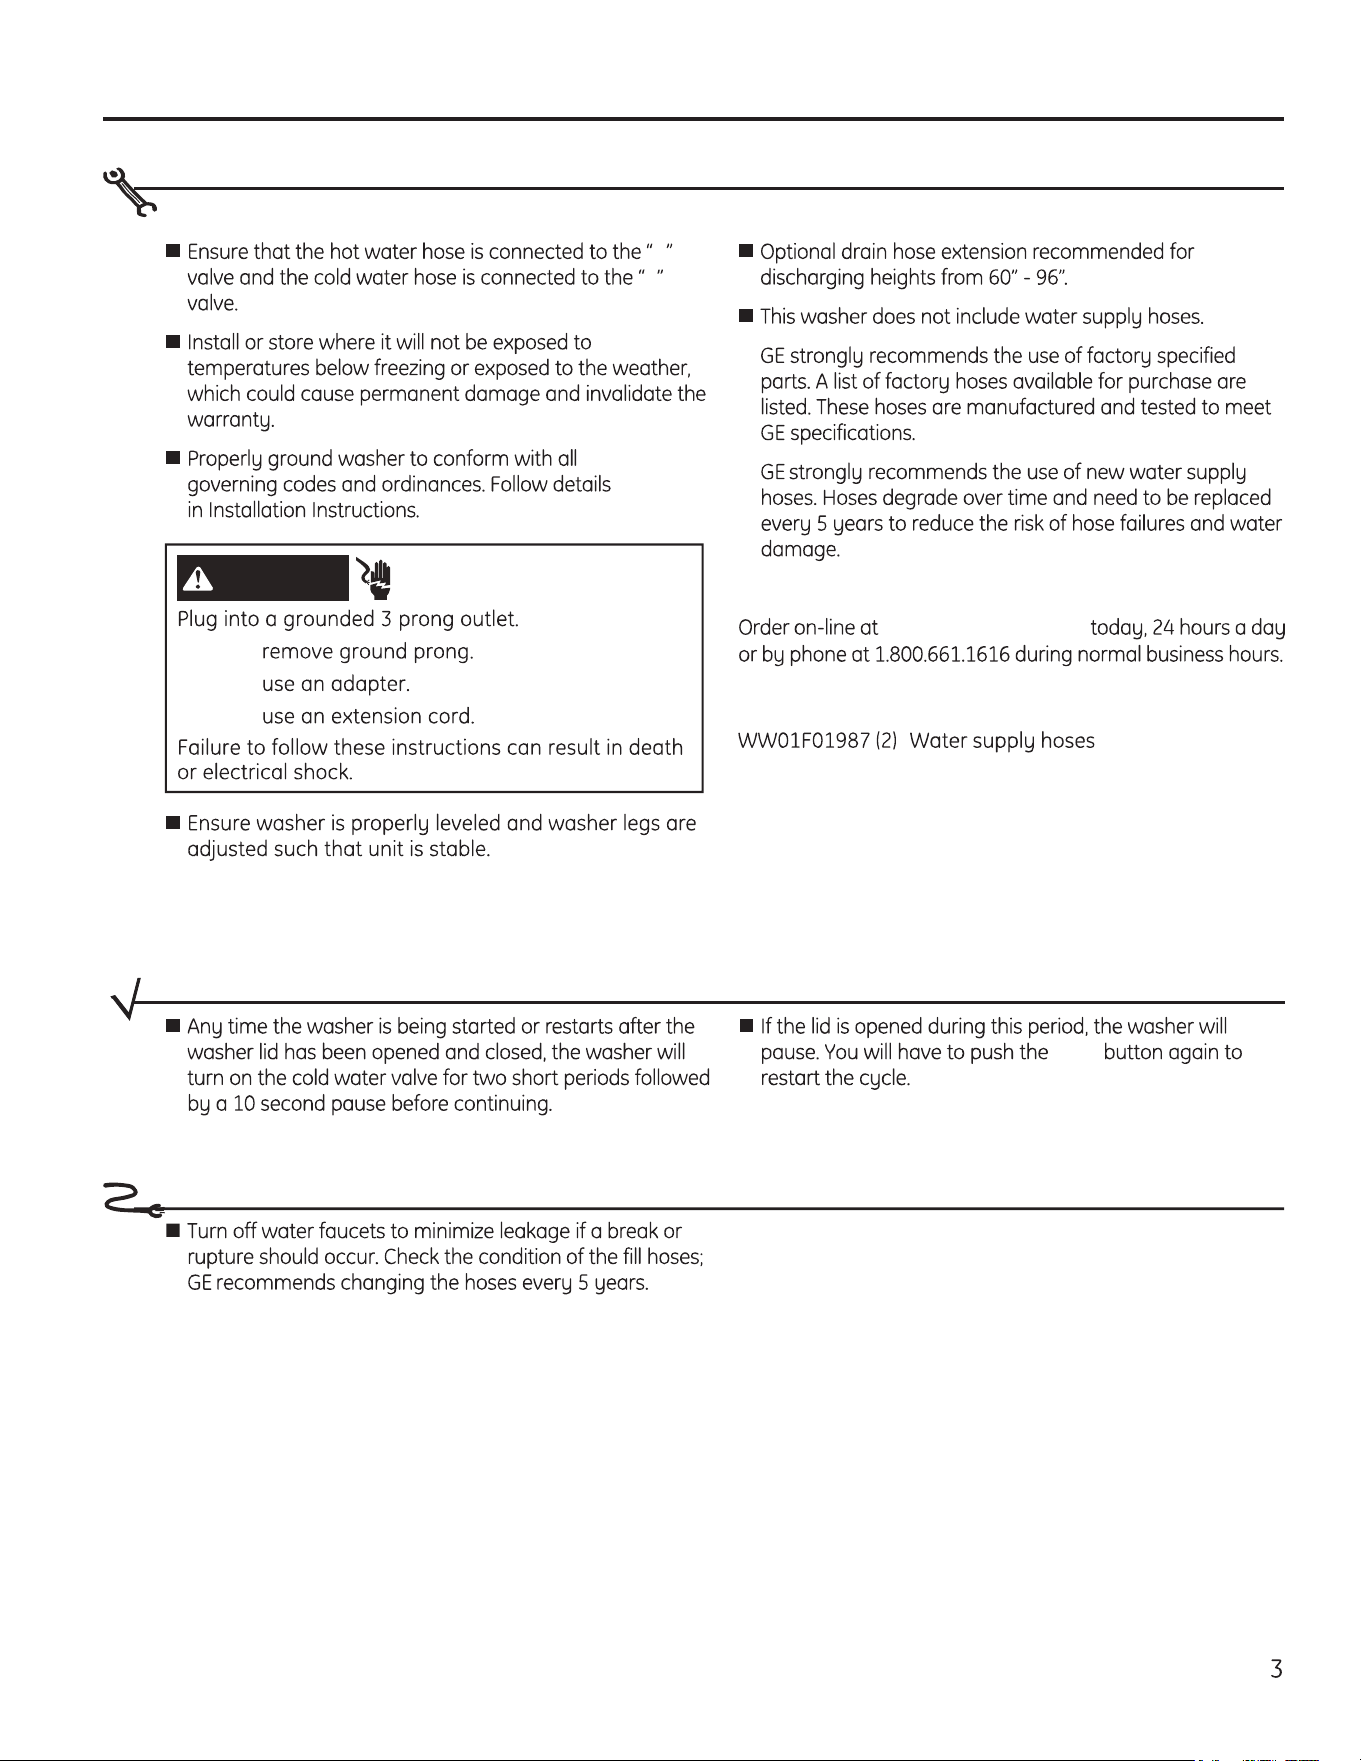
WHEN NOT IN USE
H
C
Parts and Accessories
www.geappliances.ca
PROPER INSTALLATION
This washer must be properly installed and located in accordance with the Installation Instructions before it is used.
Start
START-UP SEQUENCE
- Electrical Shock Hazard
WARNING
DO NOT
DO NOT
DO NOT
Part Number Accessory
Throughout this manual, features and appearance may vary from your model.
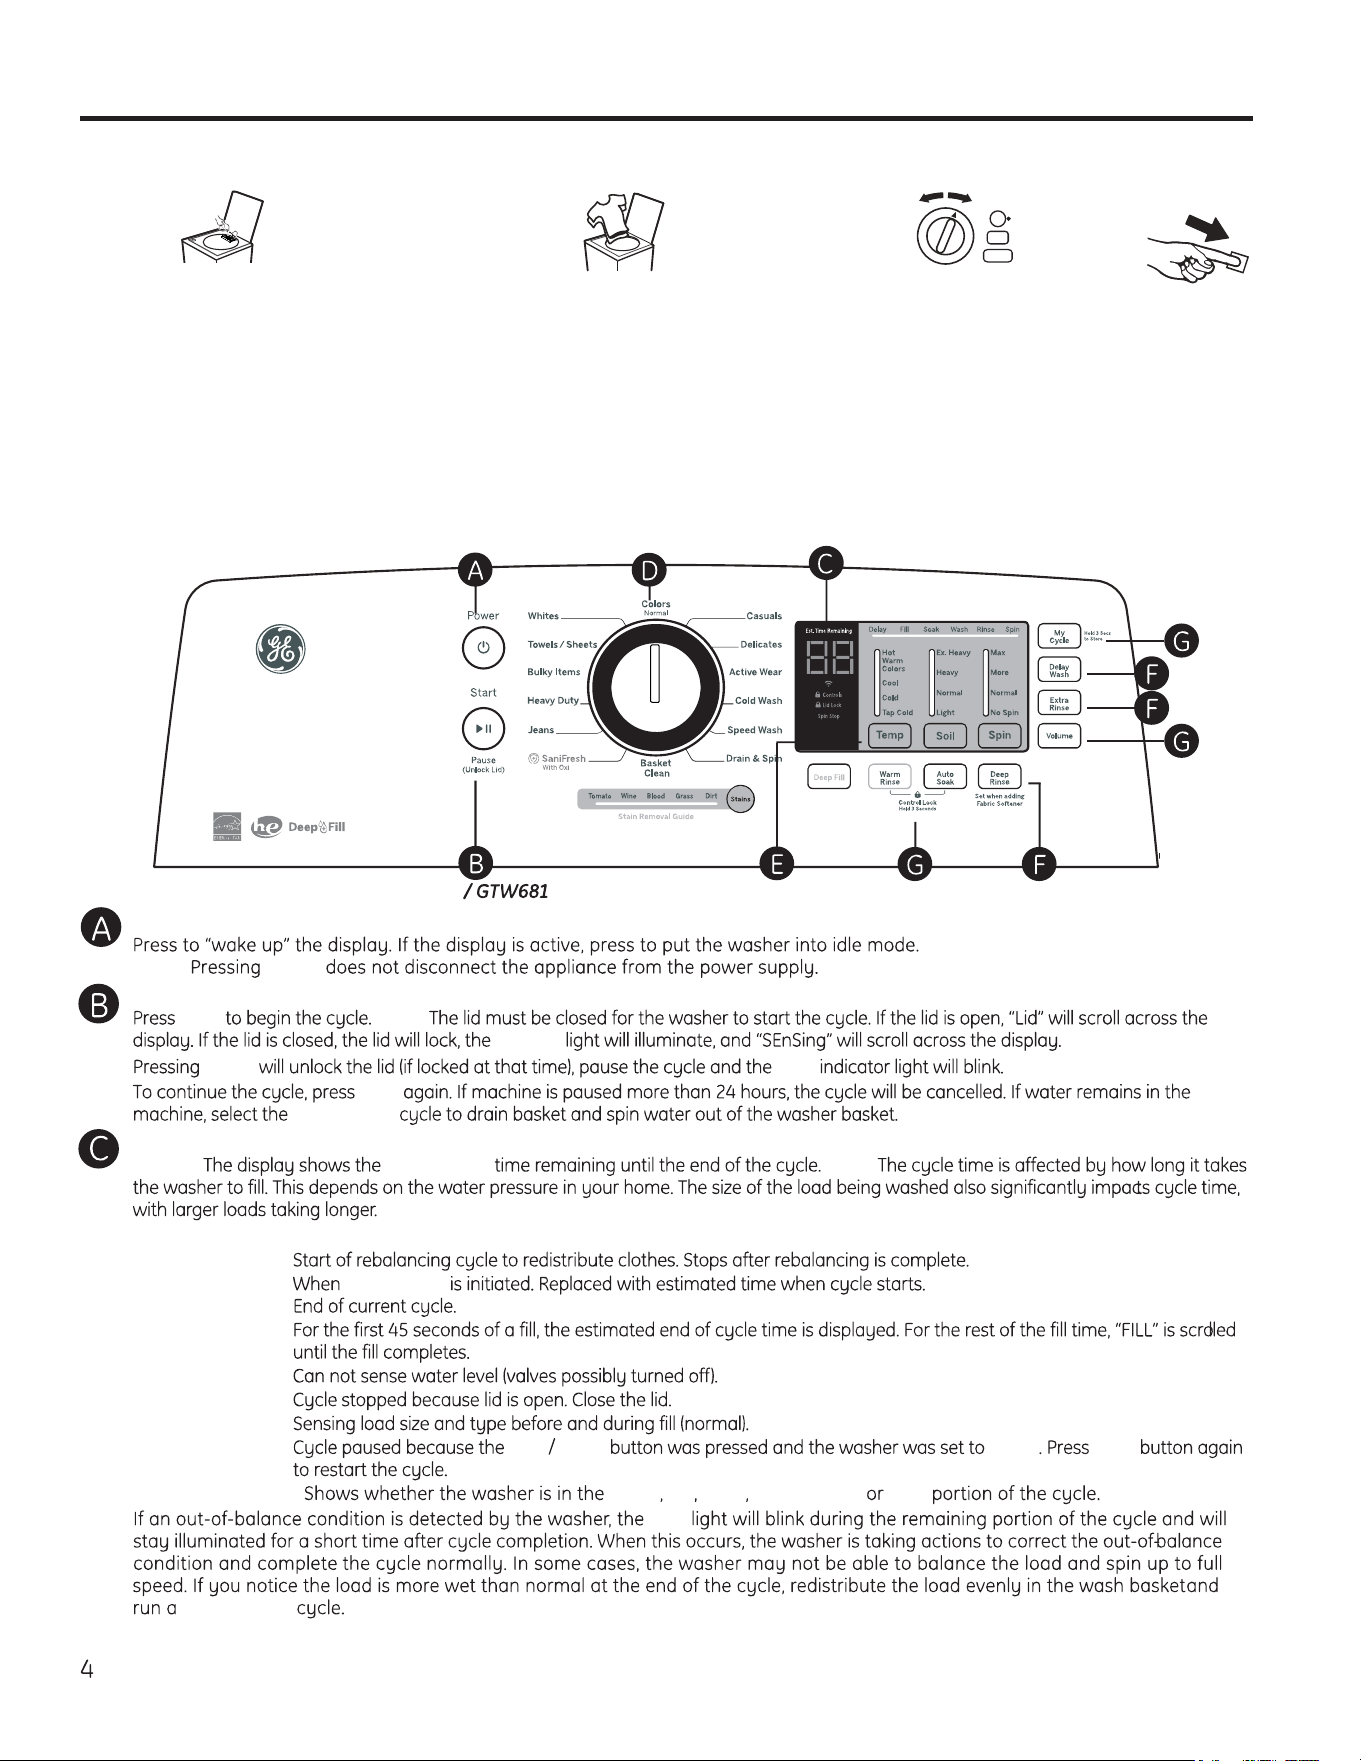
Operating instructions.
Power
NOTE: Power
Start/Pause
Start NOTE:
Lid Lock
Pause Start
Start
Drain & Spin
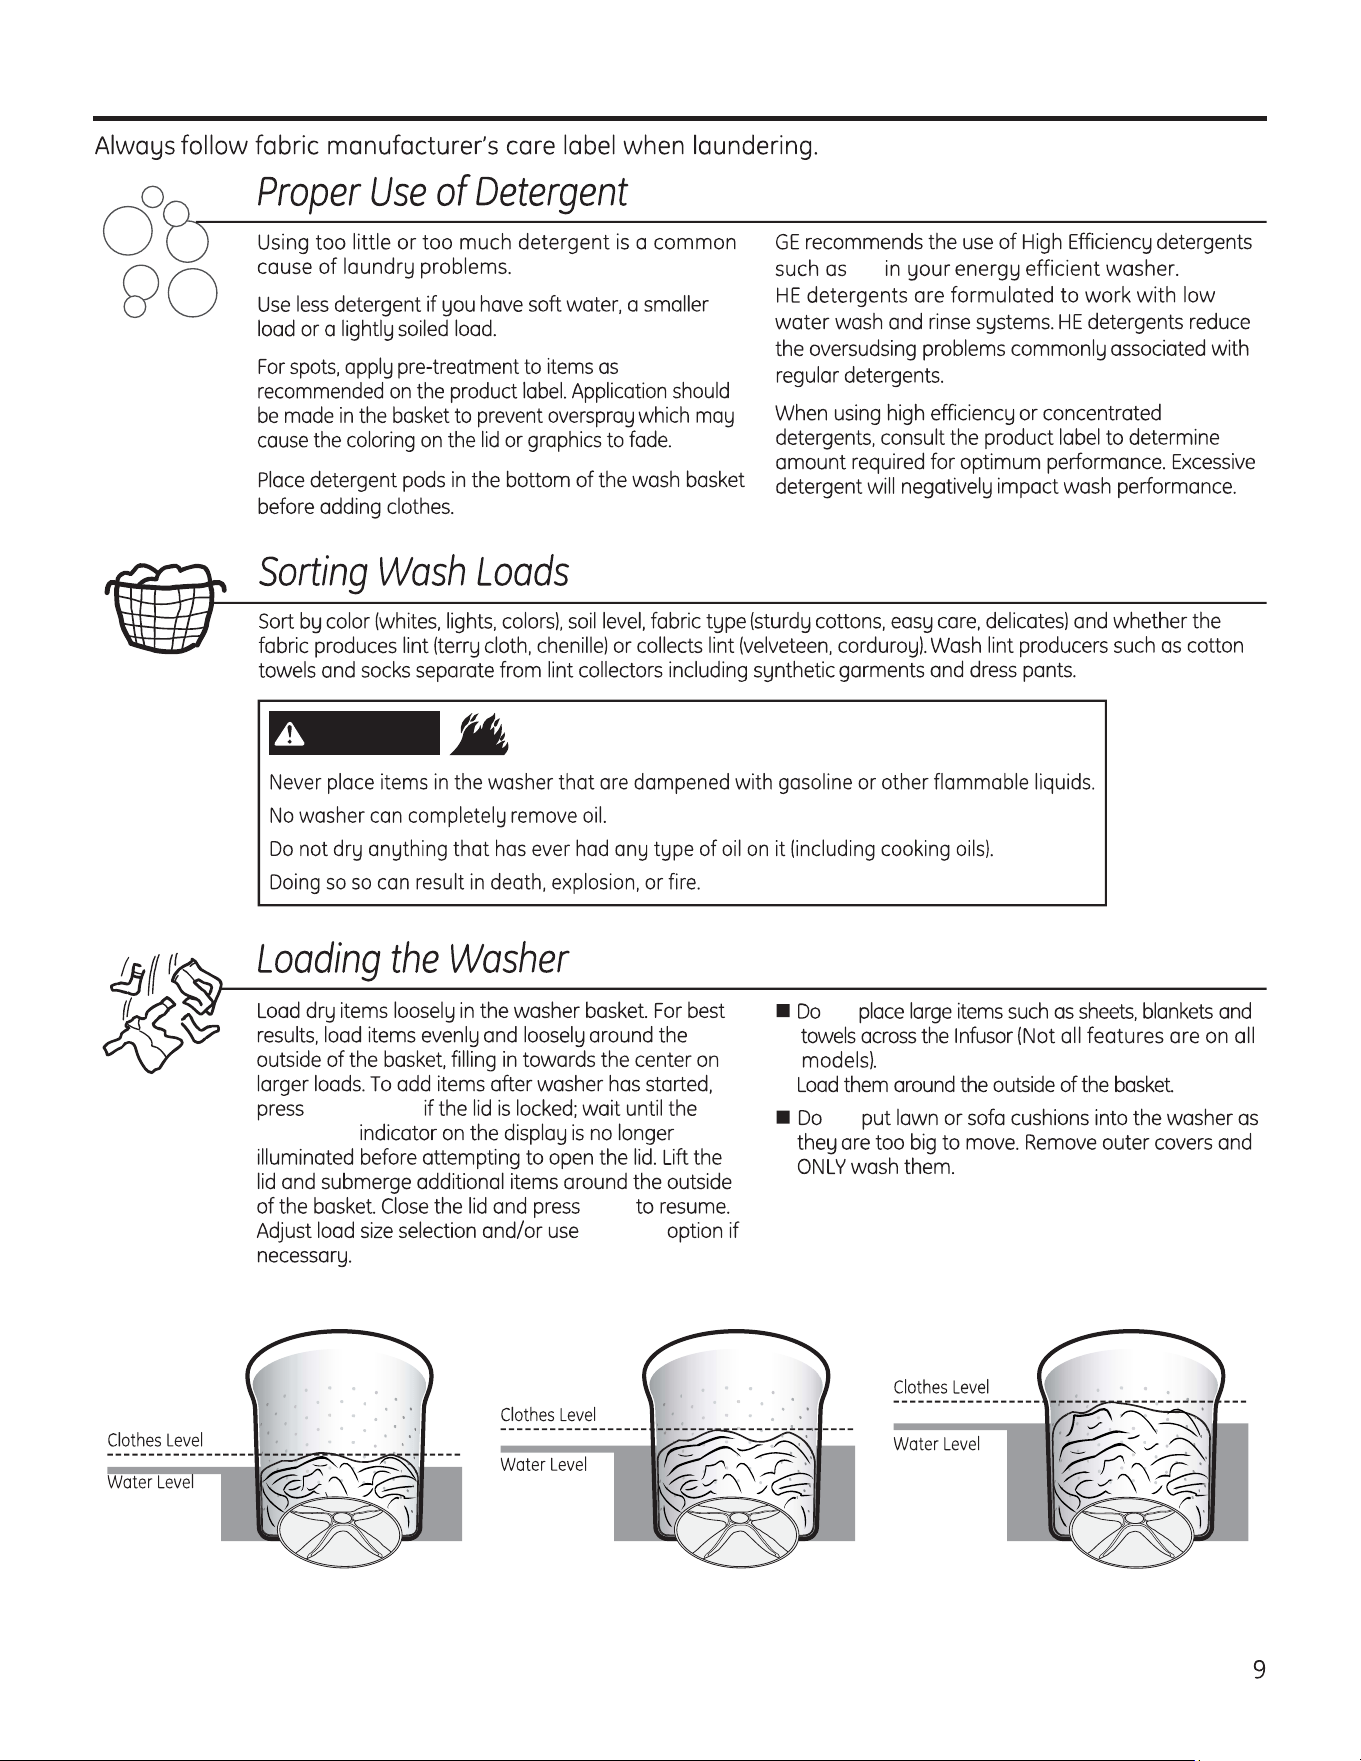
•
Loosely add items around Infusor.
Overloading may negatively impact
wash performance. See page 9 for
suggested loading examples.
•
Close lid.
NOTE: Washer will not start with lid
open.
Step 2
Step 3
Step 4
Step 1
• Select wash cycle.
• Select wash options,
including Deep Rinse option
when using fabric softener.
• Select options.
• Press Start.
• Add fabric softener to the fabric
softener dispenser; see page 10.
• Add the manufacturer’s recommended
amount of detergent. GE recommends
the use of High Efficiency
detergents
such as
he
in your energy efficient
washer. Place detergent pods in the
bottom of the wash basket before
adding clothes.
Display and Status Lights
Display: approximate NOTE:
In addition, this display will, “scroll” the washer status:
• bALAnCIN
g
• dELAY Delay Wash
• End
• FILL
• H2O SUPPLY
• LId
• SEnSIng
• PAUSE Start Pause Pause Start
Cycle status lights: Delay Fill Soak Wash, Rinse Spin
Spin
Drain & Spin
GTW680 / GTW685 / GTW690 (WiFi)
Feature status lights indicate (see sections F and G for more details):
Pause
Controls
Lid Lock Control Lock
Spin Stop
GEAppliances.ca
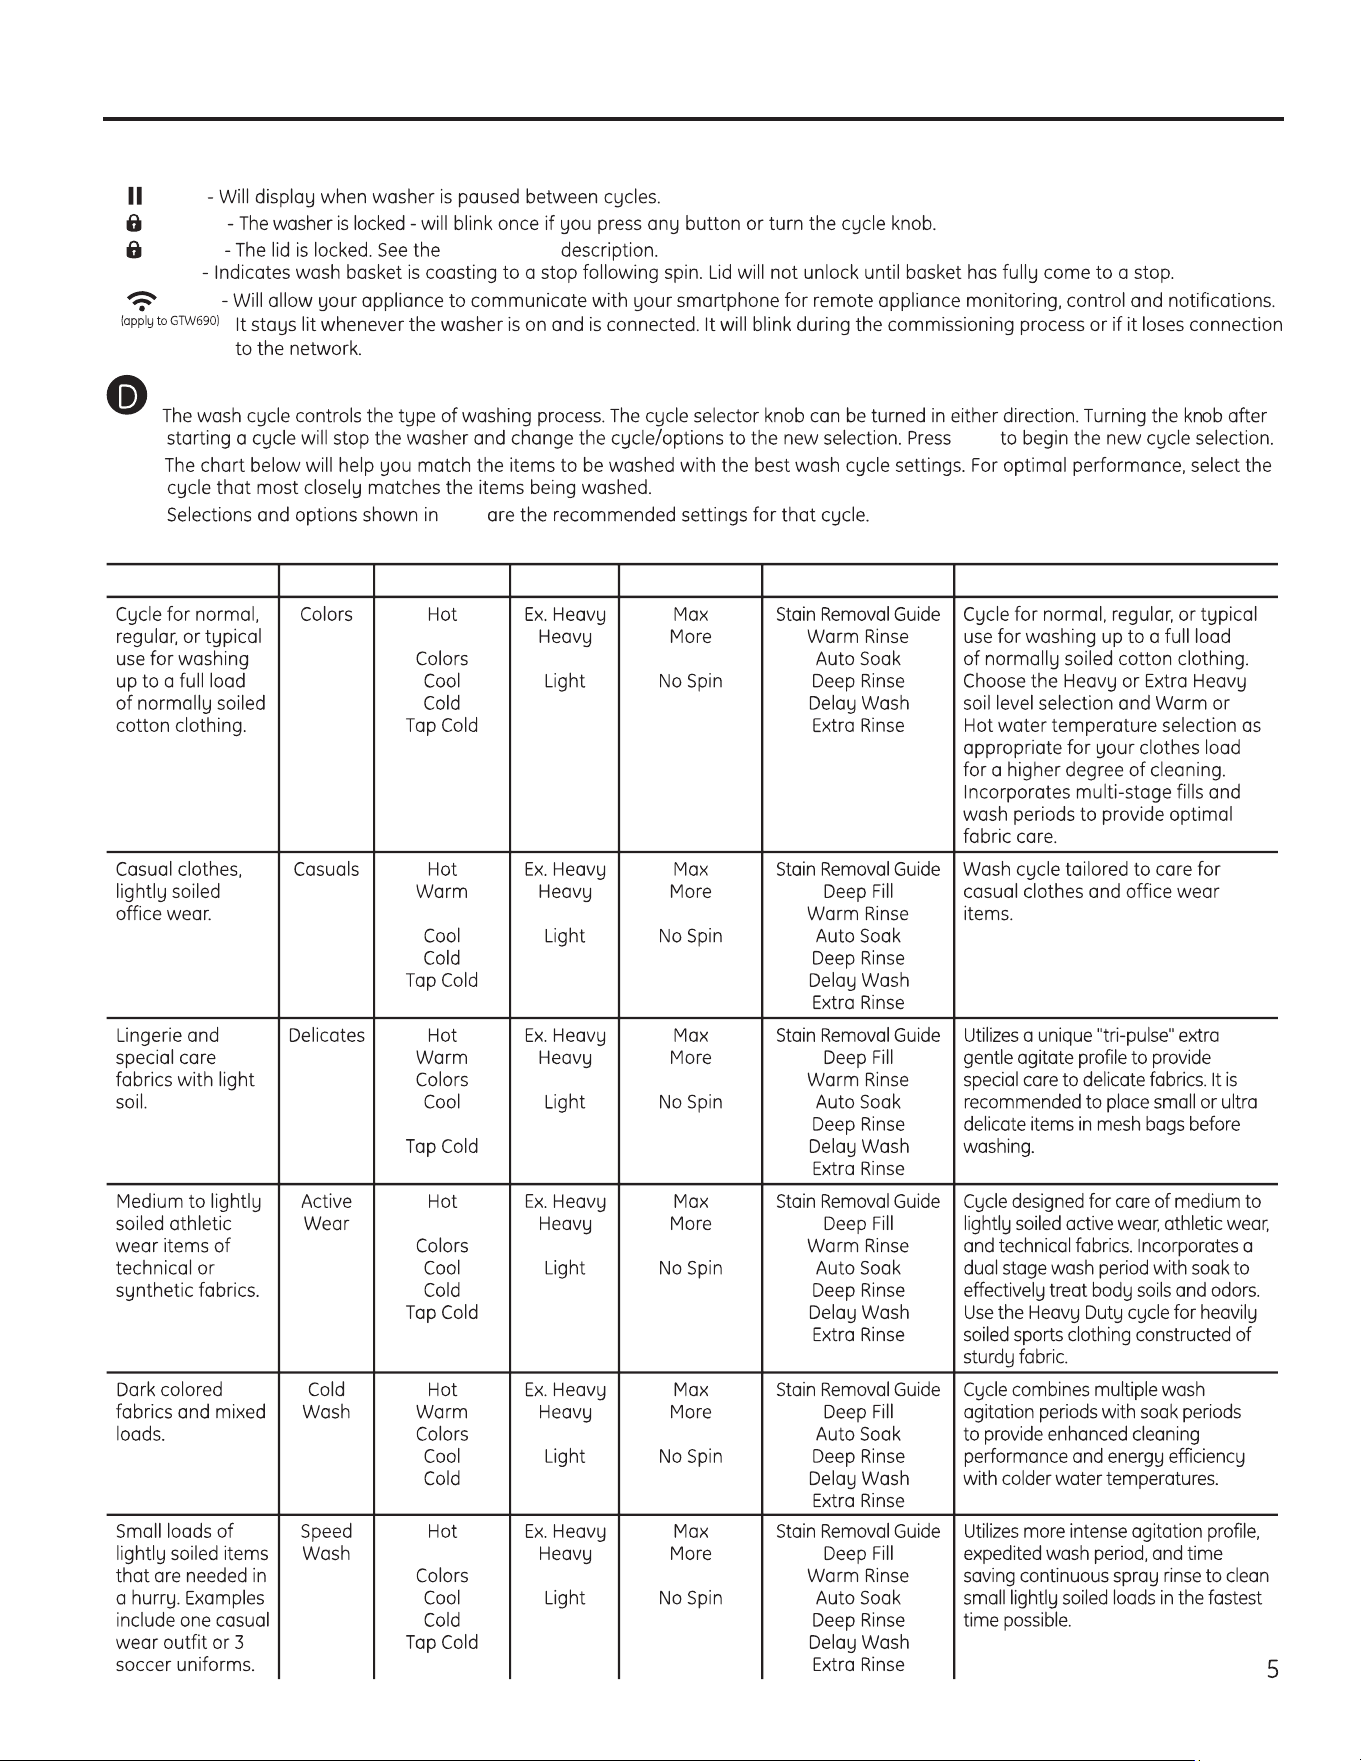
Items to Wash Cycle Wash Temp Soil Level Spin Selection Options Available Cycle Details
Warm
Normal Normal
Colors Normal Normal
Cold
Normal Normal
Warm
Normal Normal
Tap Cold
Normal Normal
Wash Cycles-Cycle Selector Knob
Start
bold
Some cycles and options may not be available on some models.
Warm
Normal Normal
(WiFi)

Normal
Wash Cycles-Cycle Selector Knob - Continued
Items to Wash Cycle Wash Temp Soil Level Spin Selection Options Available Cycle Details
Garments with a
high cotton content
and / or heat
resistant; for
example, towels,
demin, sheets,
robes, etc.
Operating instructions.
Cold Plus*Dark Colored
Fabrics and mixed
loads
Hot
Warm
Colors
Cool
Cold **
Tap Cold
Wet load of items.
For items that need
only to be rinsed,
use this cycle with
Deep Rinse option.
Ex. Heavy
Heavy
Normal/
Medium
Light
Ex. Light
Max/Extra
More
Normal
No Spin
Stain Pre Treat
Guide
Deep Feel
Auto Soak
Deep Rinse/
Extra Rinse
2nd Rinse
Cycle combines multiple extended
wash agitation periods to provide
enhancedcleaning performance and
energy efficiency with colder water
temperatures
*COLD PLUS saves energy by consuming less energy from the water heater for cold water than with any other cold water cycle. Selecting
COLD PLUS will add additional agitation time to improve cleaning performance compared to any other cold water cycle.
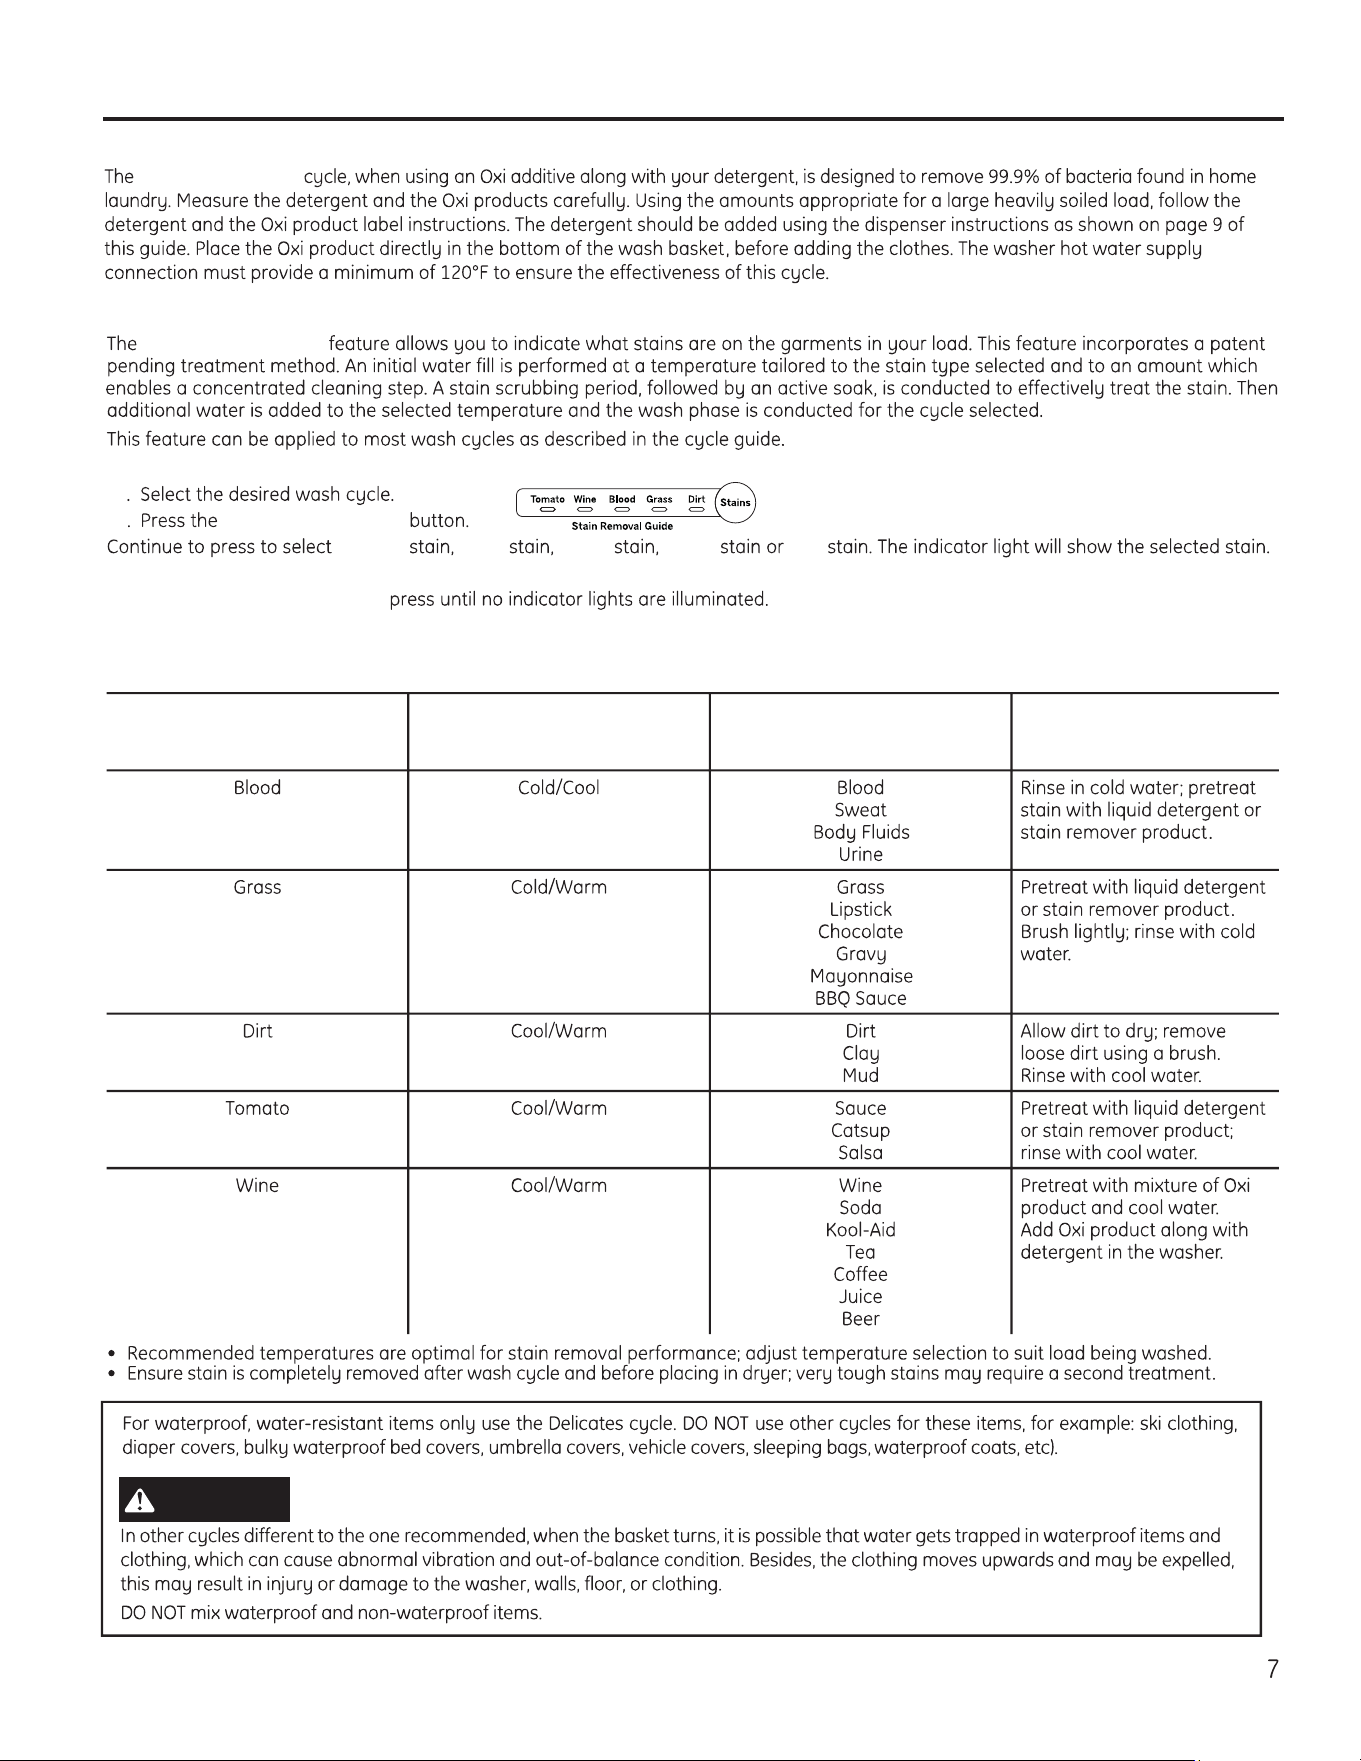
SaniFresh with Oxi
SaniFresh with Oxi
GEAppliances.ca
Stain Removal Guide
Stain Removal Guide
To use Stain Removal Guide:
1
2 Stain Removal Guide
Tomato Wine Blood Grass Dirt
To select a different stain, press the Stain Removal Guide button until desired stain to be removed is lit.
To turn off Stain Removal Guide,
NOTE: The Soil and Temperature levels will be changed to match the recommended default setting for each stain type. Turning off Stain
Removal Guide will return the settings to default.
Stain Removal Guide
Category
Recommended
Temperatures
Treatment/Wash
Stain
For best results,
before placing in washer:
WARNING
Operating instructions.
Cycle Options
Deep Fill
Deep Fill
Deep Fill Deep Fill
To cancel the option if desired, Deep Fill
NOTE: Deep Fill
To stop the extra fill, Deep Fill
Warm Rinse
Auto Soak
Soak
Deep Rinse
Spin
Delay Wash
Delay Wash
Delay Wash
Extra Rinse
Extra Rinse
NOTE:
Additional Options
My Cycle Settings
Temp Soil Spin
My Cycle
My Cycle
My
Cycle My Cycle
My Cycle My
Cycle My Cycle
My Cycle My Cycle
NOTE: Temp Soil Spin Extra Rinse Deep Fill Warm Rinse Auto Soak Deep Rinse
Stain Removal Guide
Volume
Volume
Control Lock
To lock/unlock the washer controls, Warm Rinse Auto Soak
NOTE: The Power button can still be used when the machine is locked.
Settings
Soil Temp Spin
NOTE: Spin
WiFi Temp* WiFi Connect
GEAppliances.ca
- Fire Hazard
WARNING
he
Loading and using the washer.
Start/Pause
Lid Locked
Start
Deep Fill
not
Average Small Load Average Medium Load Average Large Load
not
About washer features.
Automatic Load Sensing
NOTE: Automatic Load Sensing
NOTE: This is a high efficiency washing machine with Infusor wash action. This system requires less water while providing effective cleaning
action. You may notice that the water level is lower than on your previous washer. This is normal for an Infusor-equipped washer.
right
side
right compartment
NOTE:
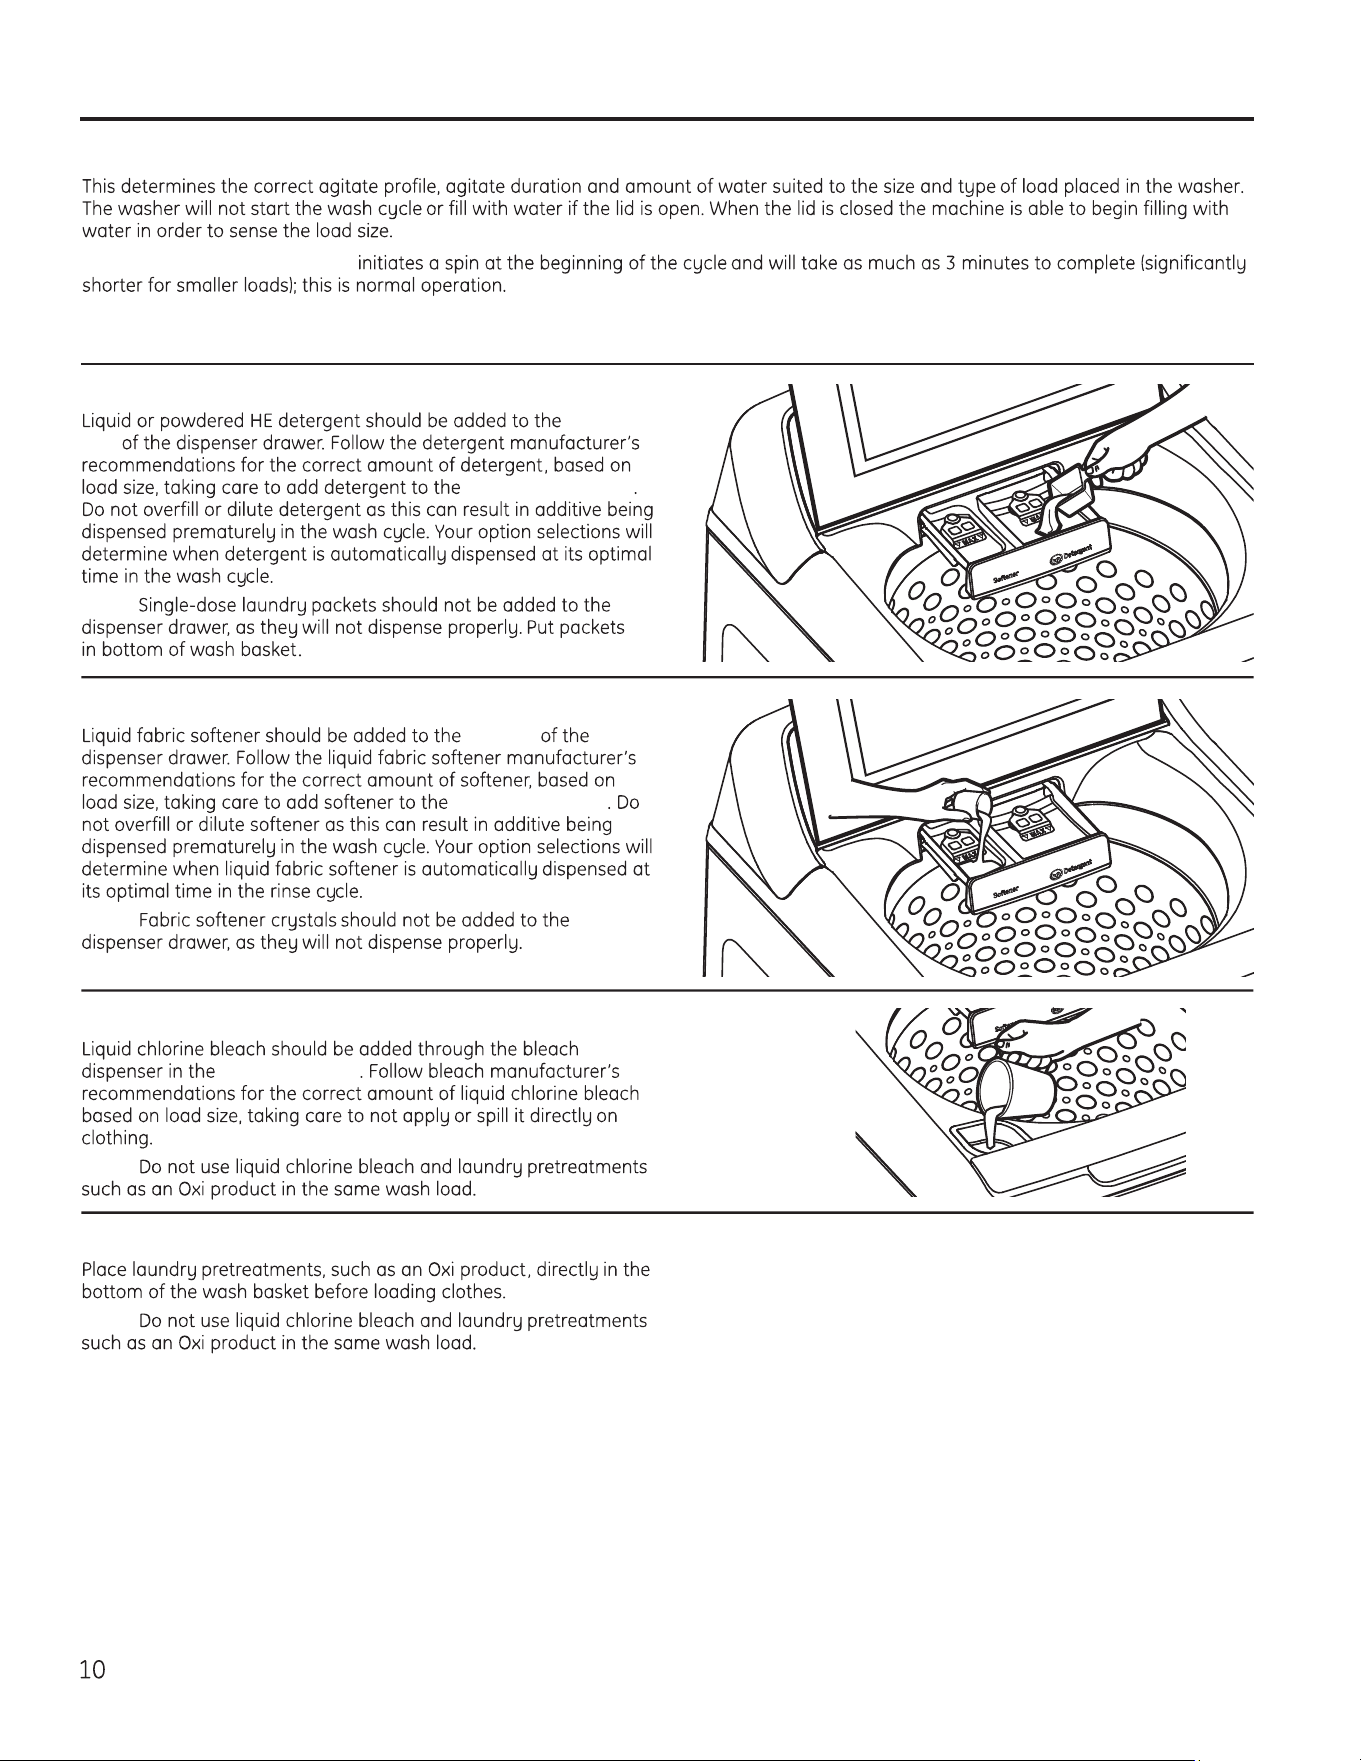
Detergent Dispenser
left side
left compartment
NOTE:
Liquid Fabric Softener Dispenser
front left corner
NOTE:
Liquid Bleach
NOTE:
Pretreatment
Water Supply Hoses
Moving and Storage
Long Vacations
Care and cleaning of the washer.
GEAppliances.ca
Basket Clean
Basket Clean
NOTE:
Basket Clean
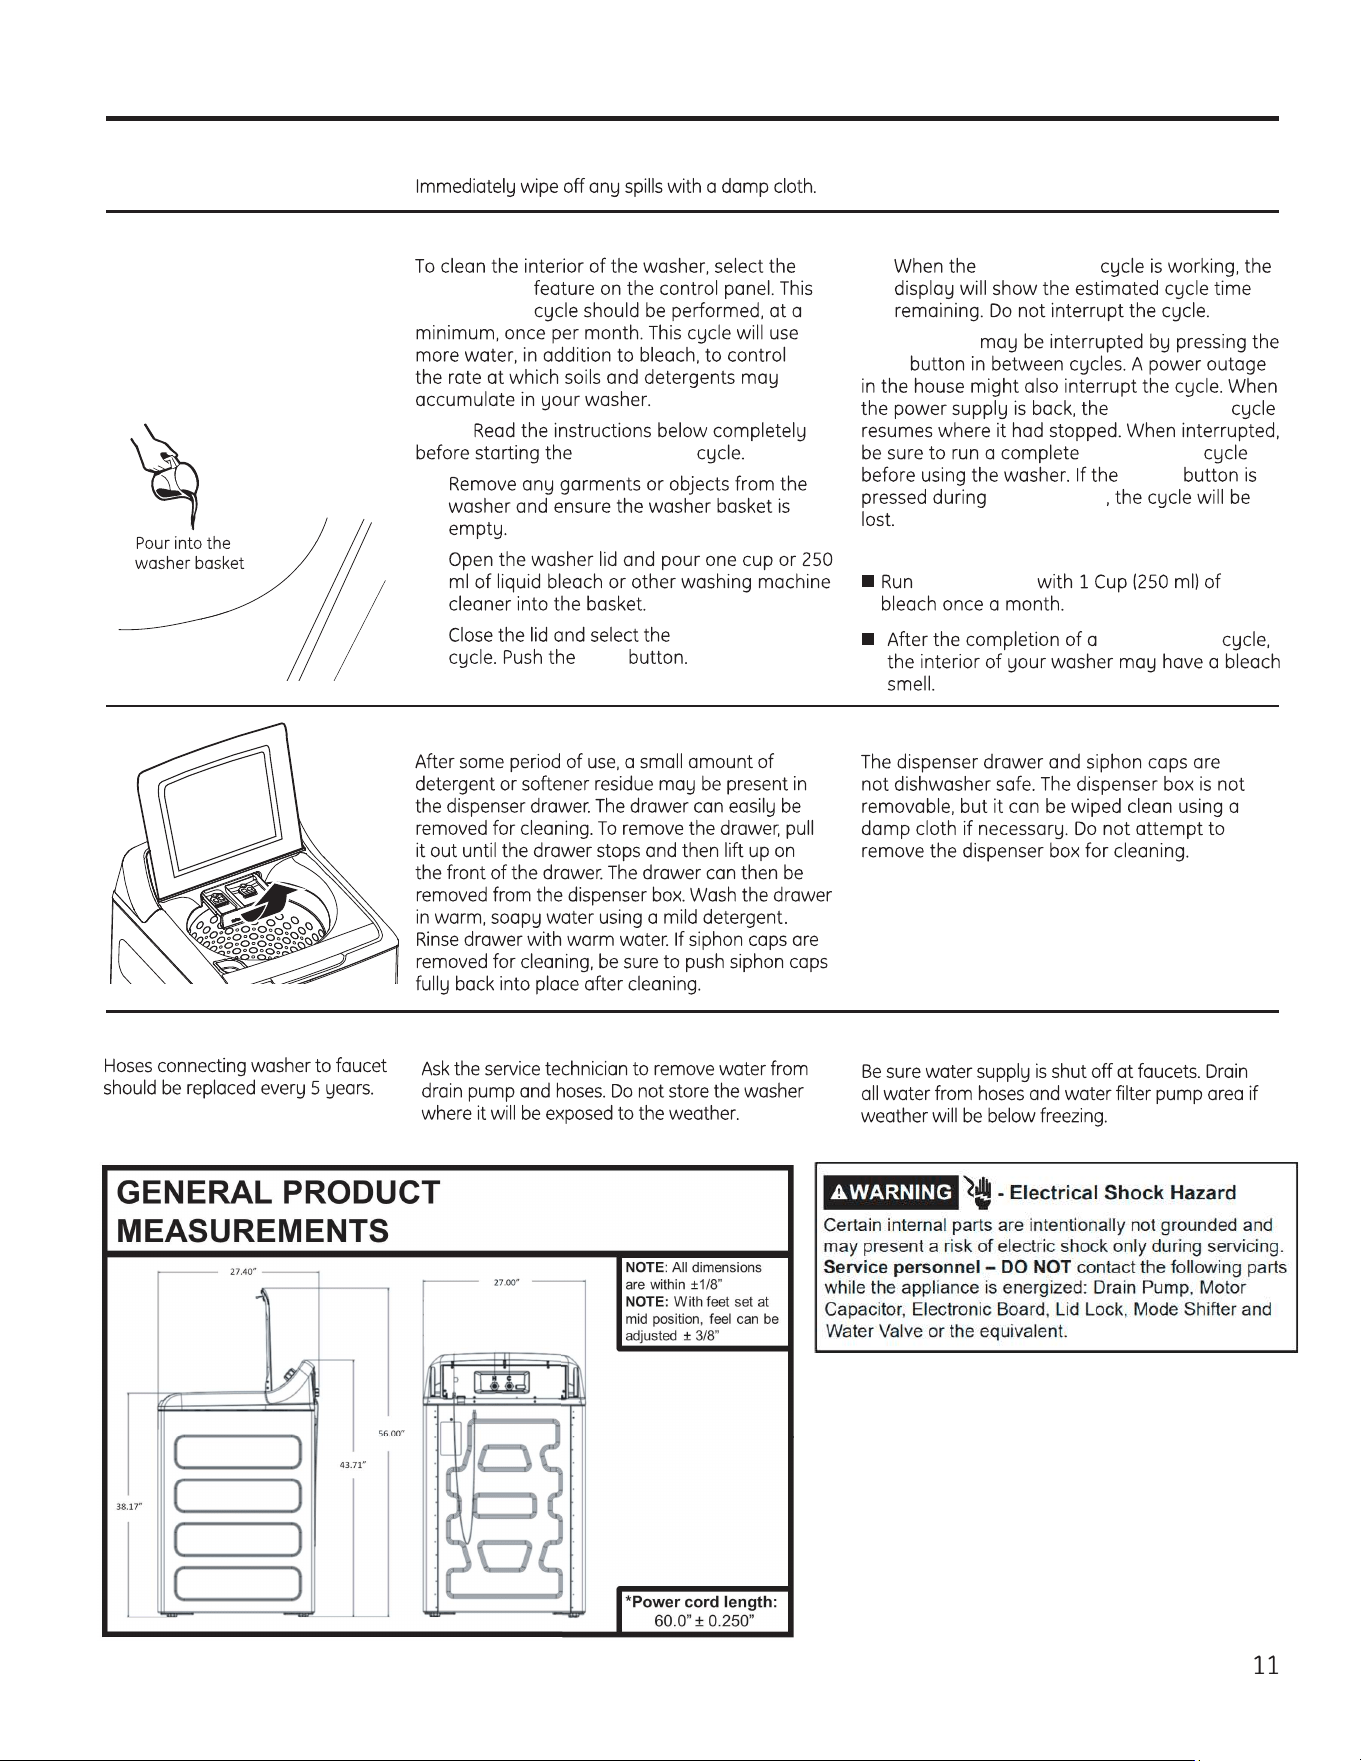
1.
2.
3. Basket Clean
Start
4. Basket Clean
Basket Clean
Start
Basket Clean
Basket Clean
Power
Basket Clean
IMPORTANT:
Basket Clean
Basket Clean
Cleaning the Dispenser Drawer
Exterior of the Washer
Interior of the Washer
Spin Spin
Drain & Spin
H2O SUPPLY
CAnCELEd
Lid
Consumer Help Indicator
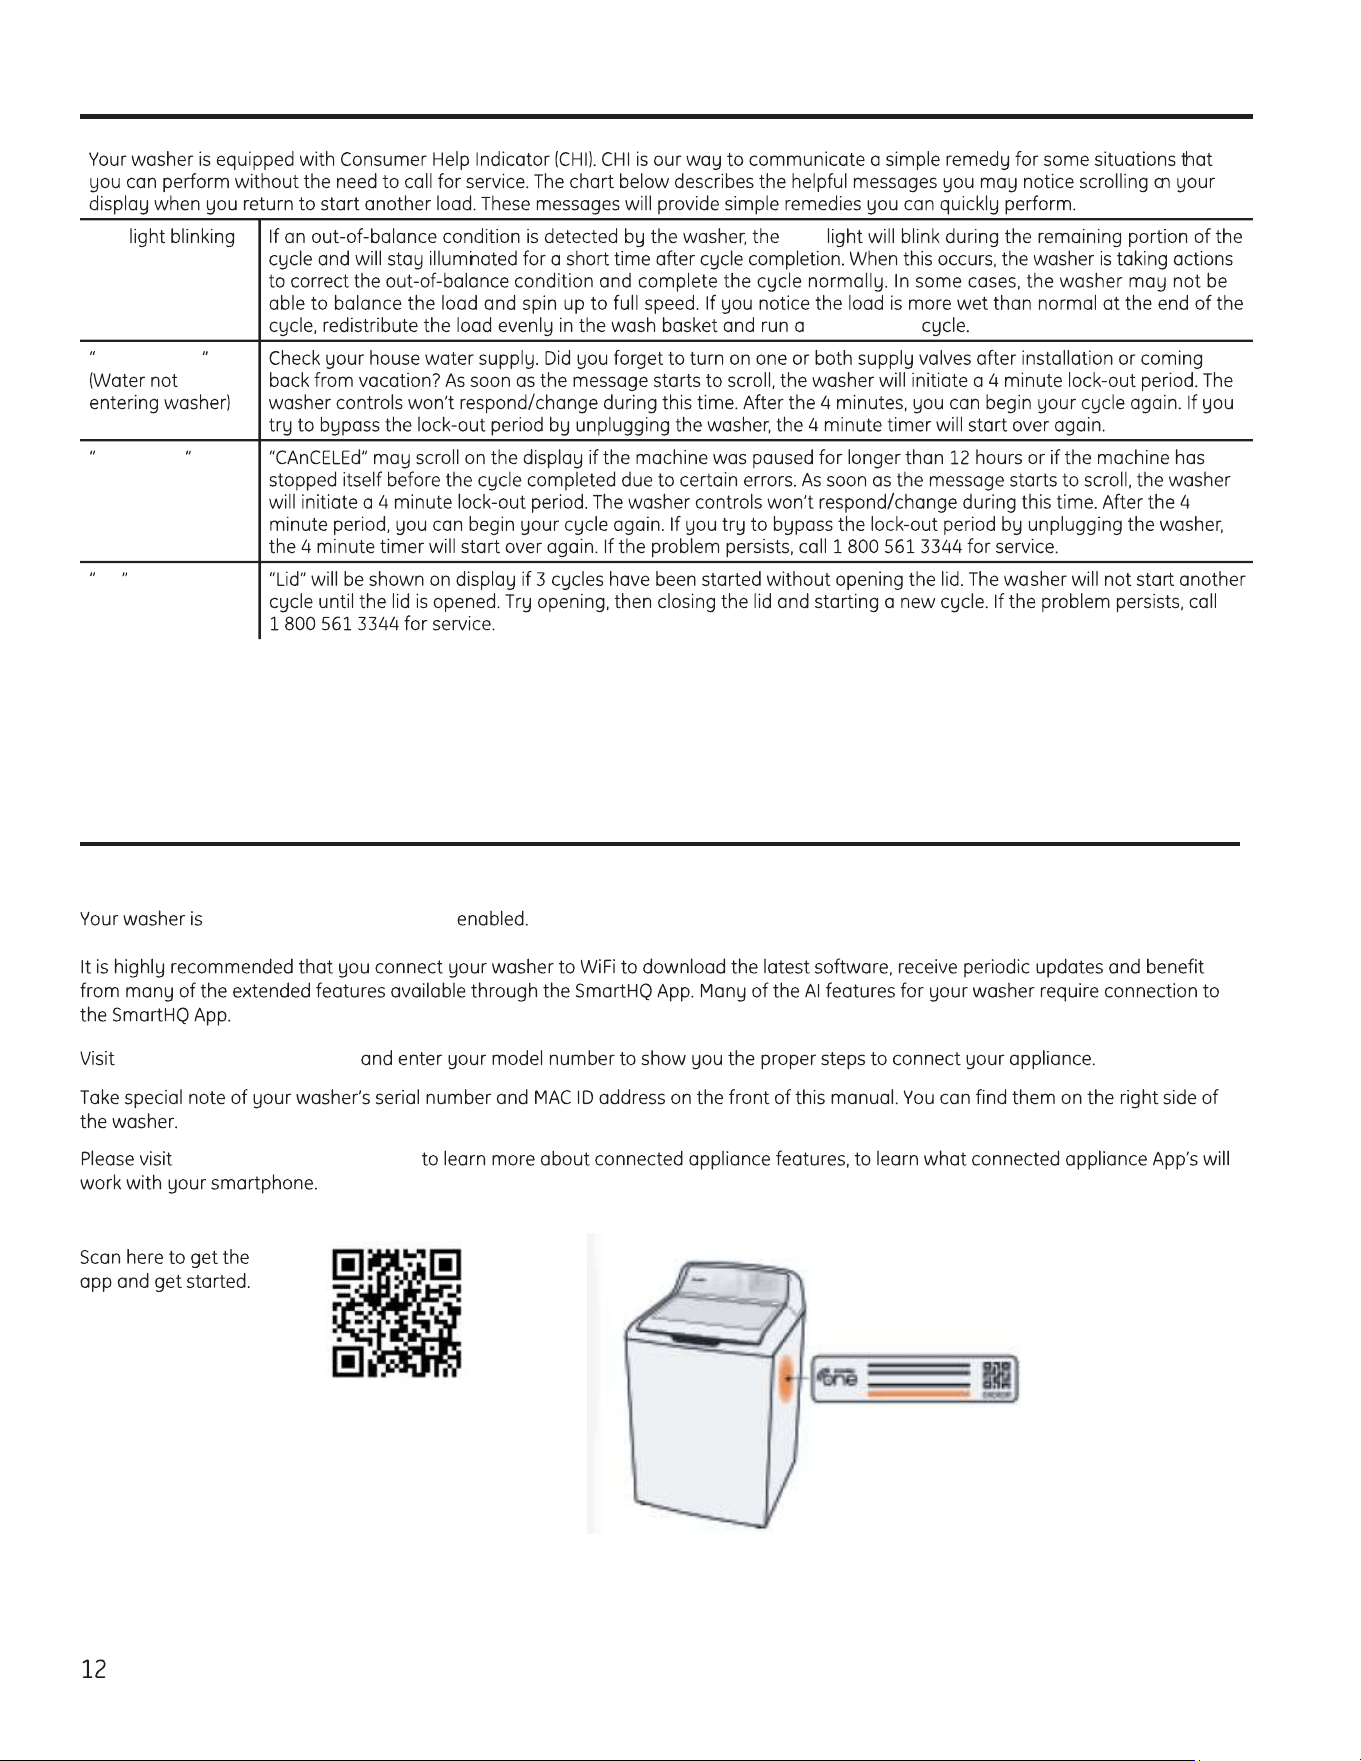
Appliance Communication
WiFi Connect
GE Appliances WiFi Connect
geappliances.com/connect
GEAppliances.com/connect
Installation
Washer
Instructions
If you have any questions, call
1.800.561.3344
or visit
www.GEAppliances.ca
TOOLS REQUIRED FOR
WASHER INSTALLATION
PARTS REQUIRED
(Sold separately)
GE Parts and Accessories
GEApplianceparts.com
Part Number Accessory
will
could
could
DANGER
WARNING
CAUTION
NOTE:
BEFORE YOU BEGIN
Read these instructions completely and carefully.
IMPORTANT –
IMPORTANT –
Note to Installer –
Note to Consumer –
Skill level –
Completion time –
PARTS SUPPLIED
13
14
Installation Instructions
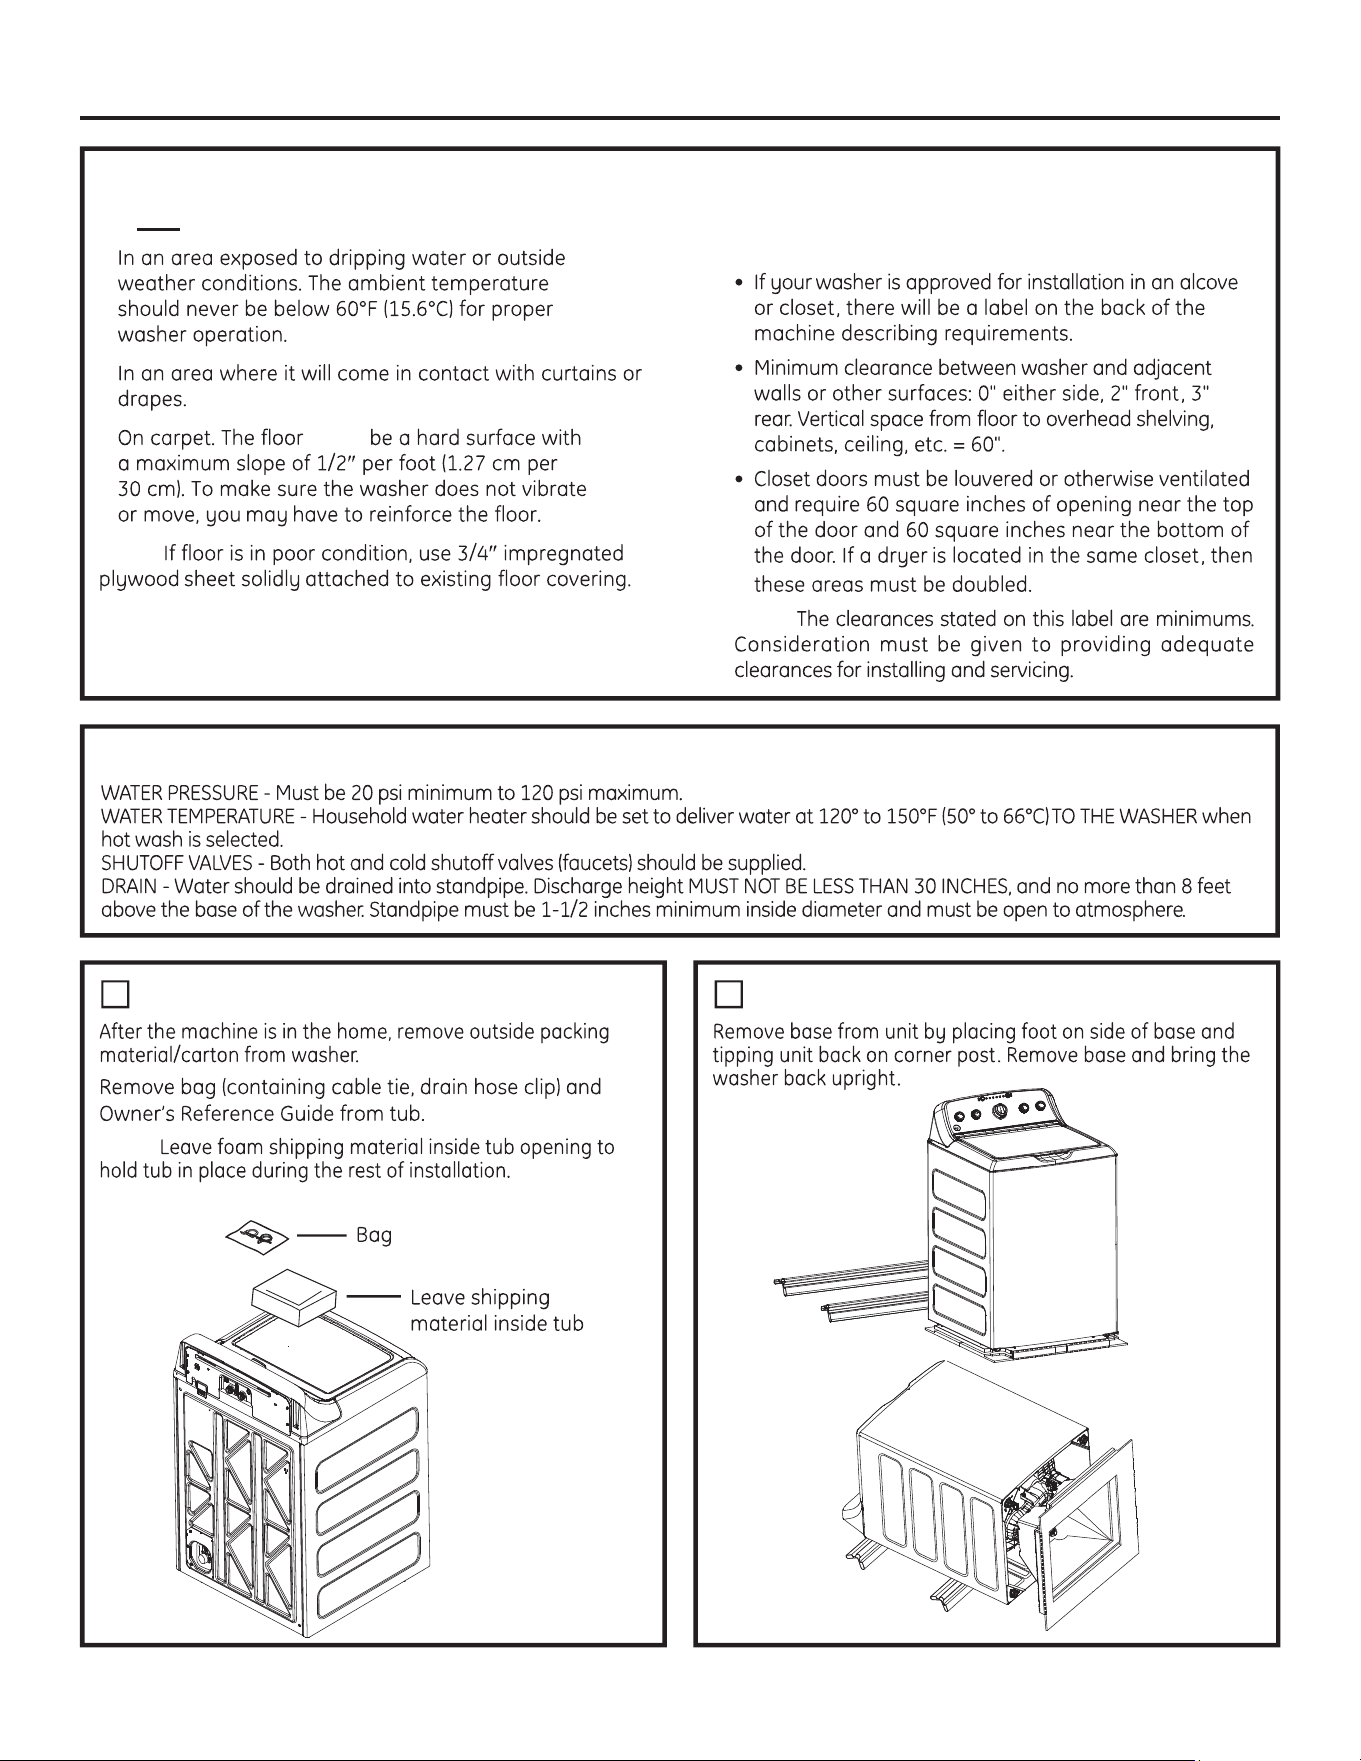
LOCATION OF YOUR WASHER
Do Not Install the Washer:
1.
2.
3. MUST
NOTE:
IMPORTANT: Minimum Installation Clearances
- Alcove or Closet
NOTE:
NOTE:
1
UNPACKING THE WASHER
2
REMOVE THE BASE
WATER SUPPLY REQUIREMENTS
Installation Instructions
H
C C
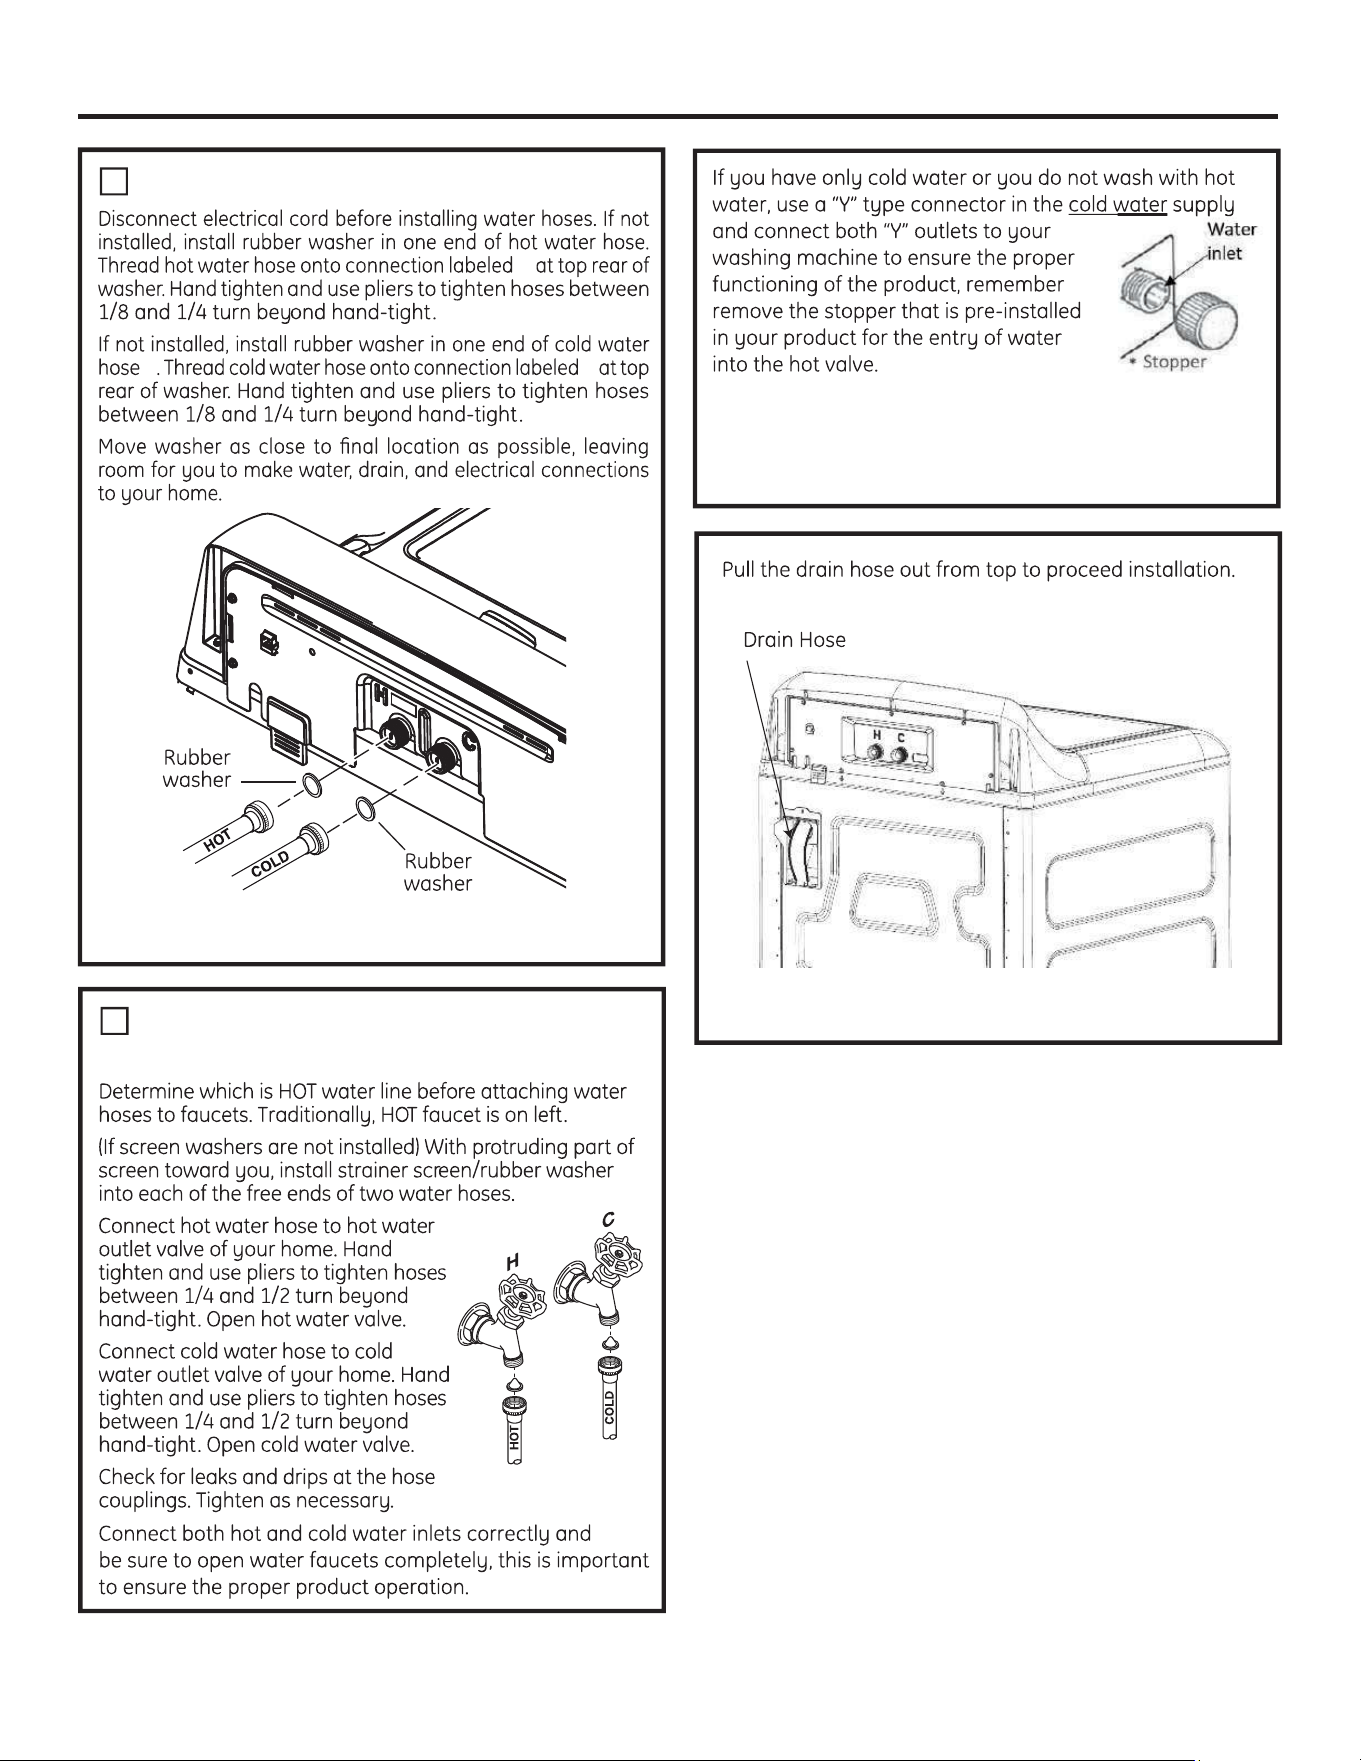
3
CONNECT WATER HOSES TO WASHER
We recommend cleaning both water inlets of your
washing machine at least once a month.
* Check the table “Wash cycles – Cycle selector knob"
15
4
CONNECT WATER HOSES TO OUTLET
VALVES
5
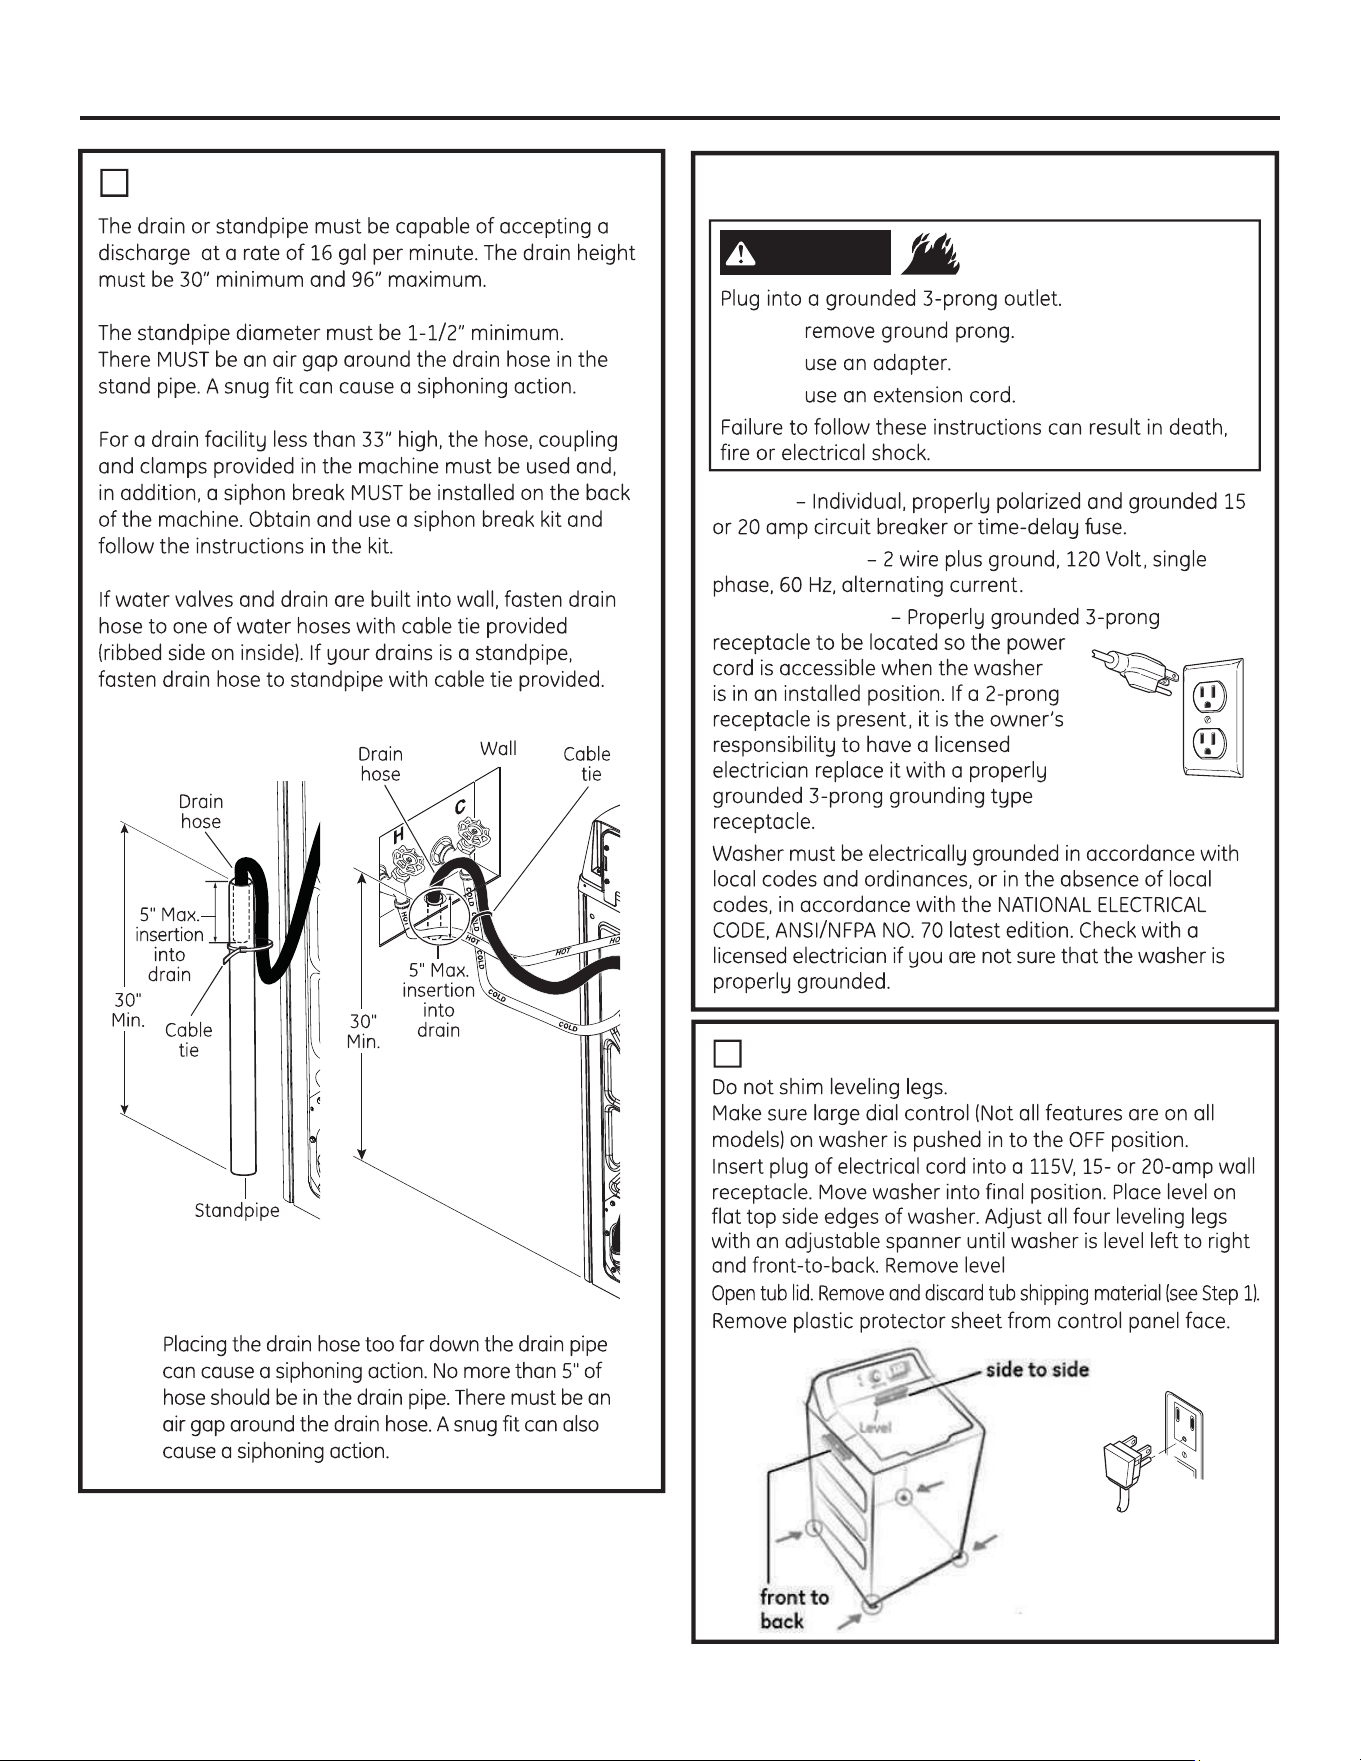
CONNECT TO DRAIN
NOTE:
16
Installation Instructions
ELECTRICAL REQUIREMENTS
- Fire Hazard
WARNING
DO NOT
DO NOT
DO NOT
CIRCUIT
POWER SUPPLY
Outlet Receptacle
7
CONNECT POWER AND INSTALL
Before starting the washer, check to make sure:
Run the washer through a complete cycle.
FINAL CHECKLIST
Installation Instructions
17
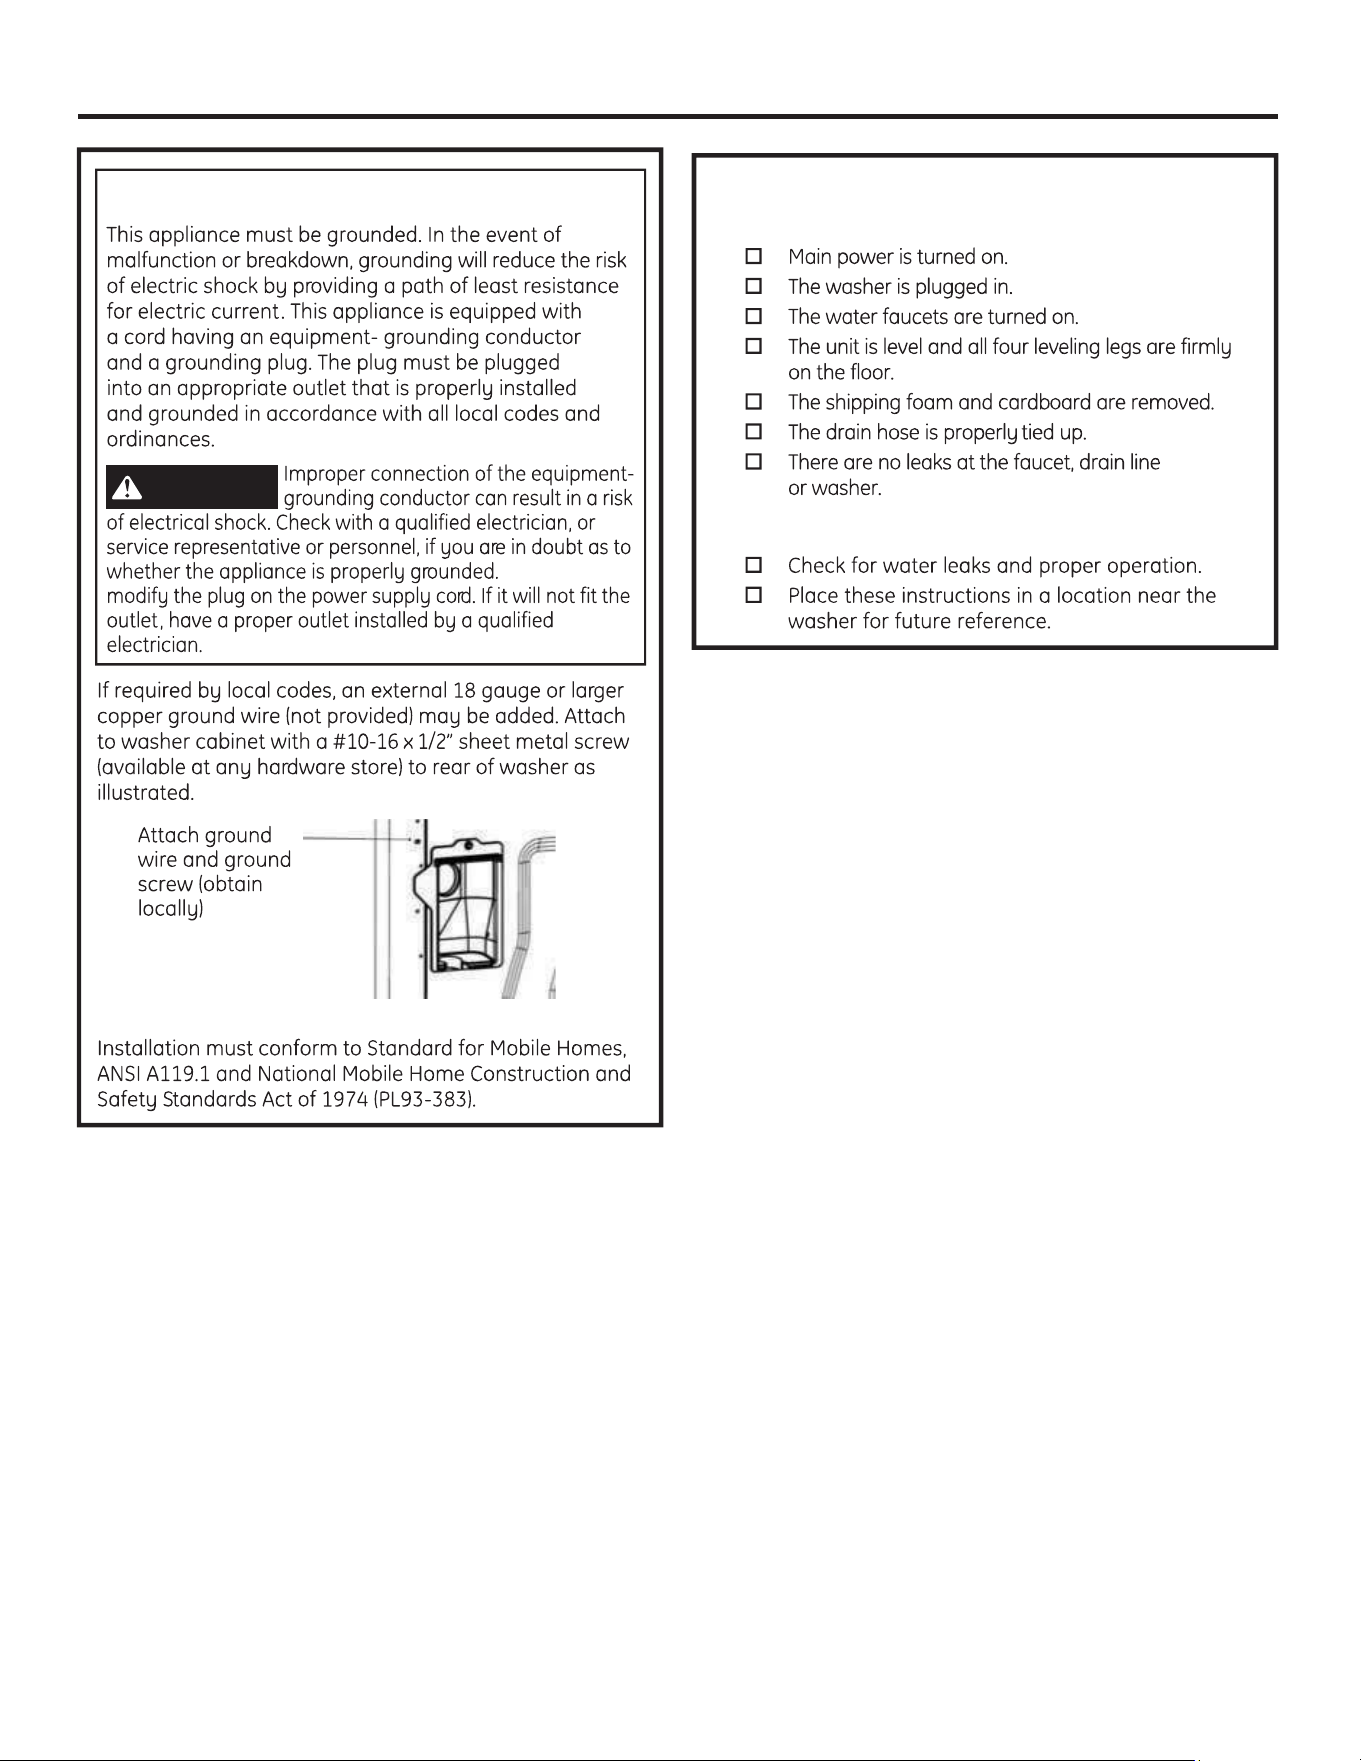
Mobile Home Installation:
GROUNDING INSTRUCTIONS
WARNING
DO NOT
Save time and money! Review the charts on the following pages, or visit GEAppliances.ca. You may not need to call for service.
Before you call for service…Troubleshooting Tips
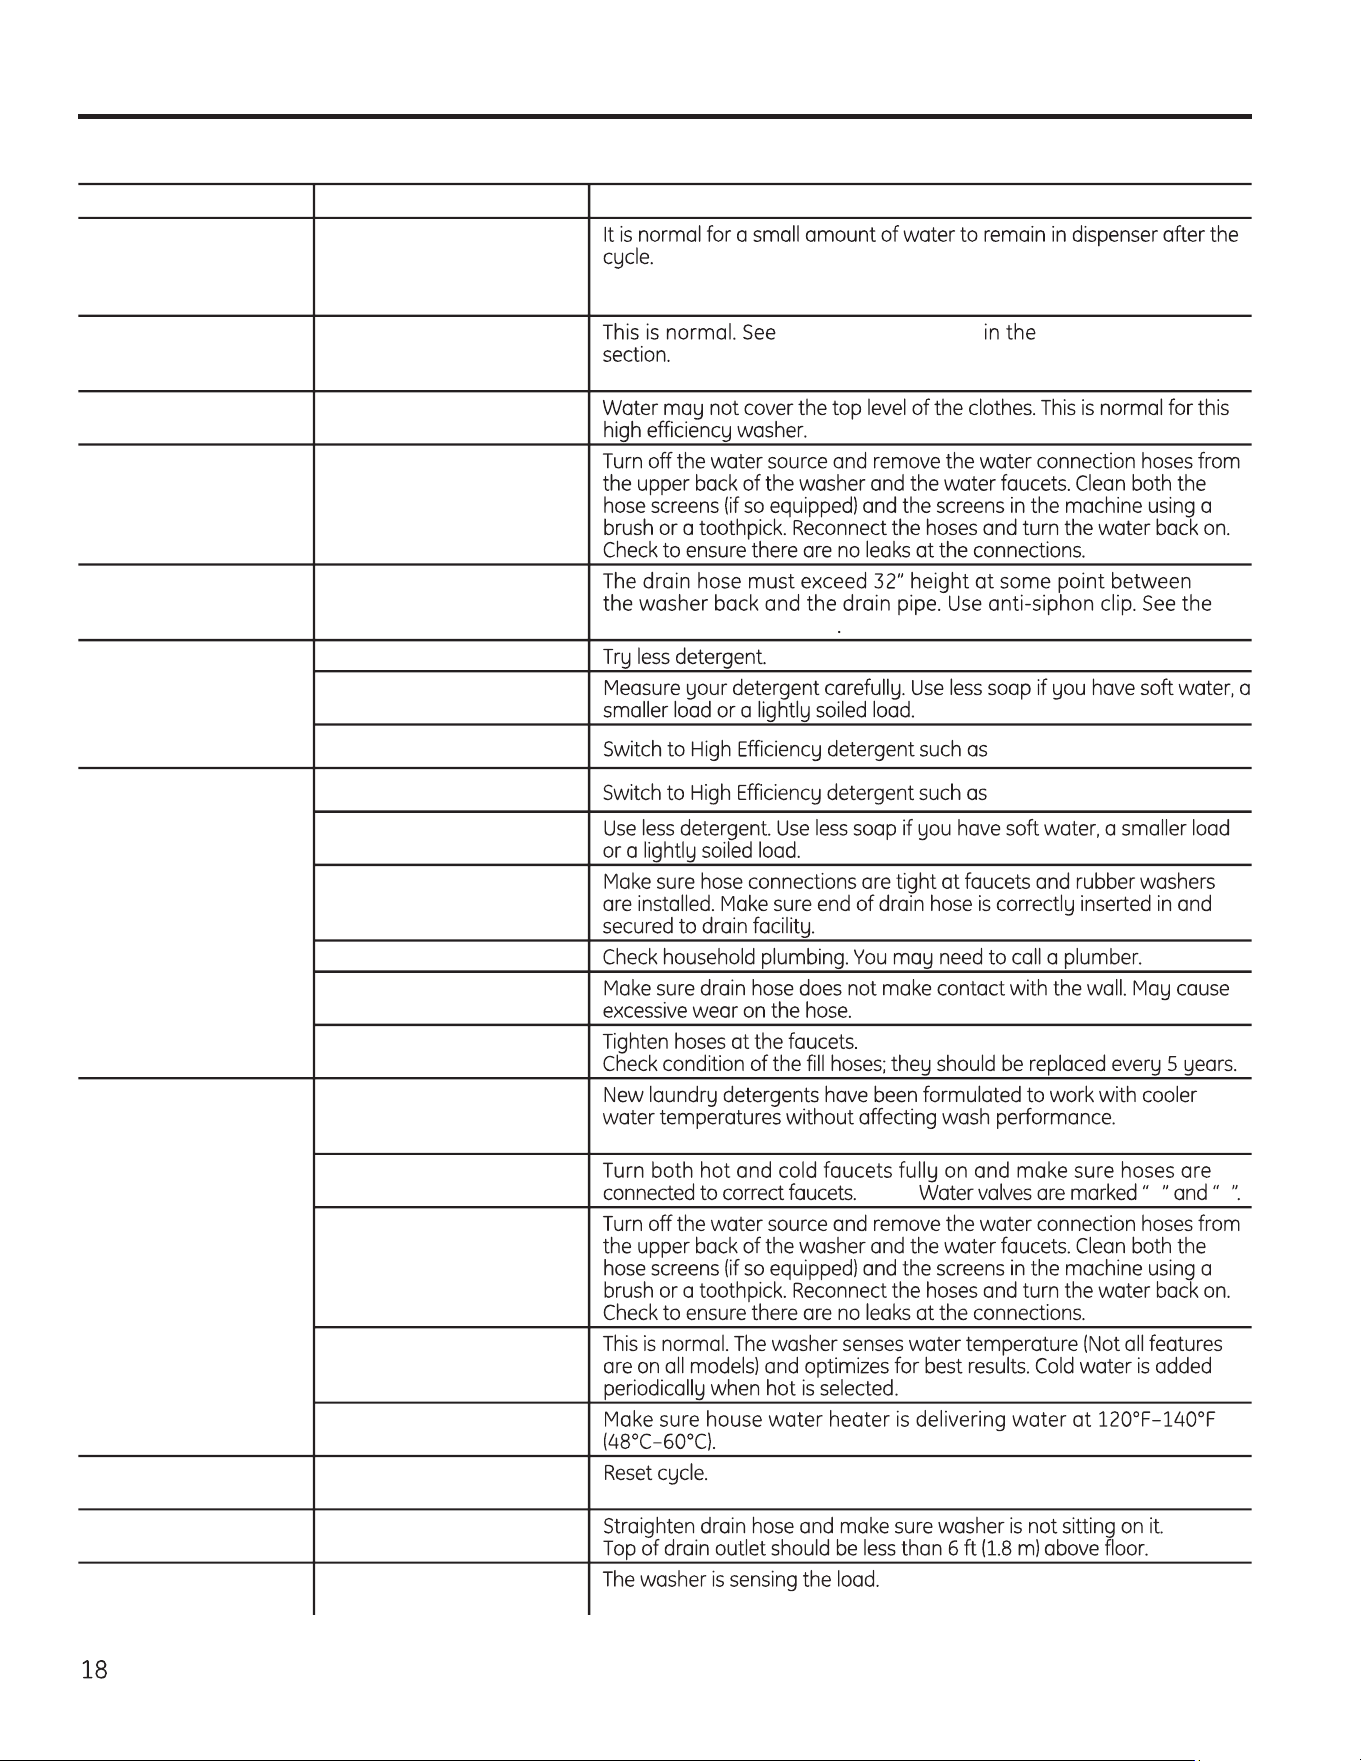
WATER Possible Causes What To Do
Small amount of water
remaining in dispenser
(Not all features are on
all models) at end of cycle
Normal dispenser
operation
Short spray and delay
after pushing the Start
button
Lid was opened and closed
between cycle selection
and start
START-UP SEQUENCE Safety Instructions
Water level seems low This is normal
Low water flow Water valve screens are
stopped up
Water siphoning out
of washer
Drain standpipe is too
low or hose too far into
standpipe Installation Instructions
Too many suds Soft water
Too much detergent
Type of detergent
he
Water leaks Type of detergent
he
Using too much detergent
in washer
Fill hoses or drain hose is
improperly connected
Household drain clogged
Drain hose rubs on wall
Constant water pressure to
fill hoses at water source
Water temperature
seems incorrect
Cooler water temperatures
provide improved energy
efficiency
Water supply is turned off
or improperly connected NOTE: H C
Water valve screens are
stopped up
Cool/Cold Water when
selecting Hot
House water heater is not
set properly
Water pumped out
before cycle is complete
Lid lifted or cycle was put
in pause for over 24 hours
Water won’t drain Drain hose is kinked or
improperly connected
Washer spins and pauses
at the beginning of cycles
This is normal
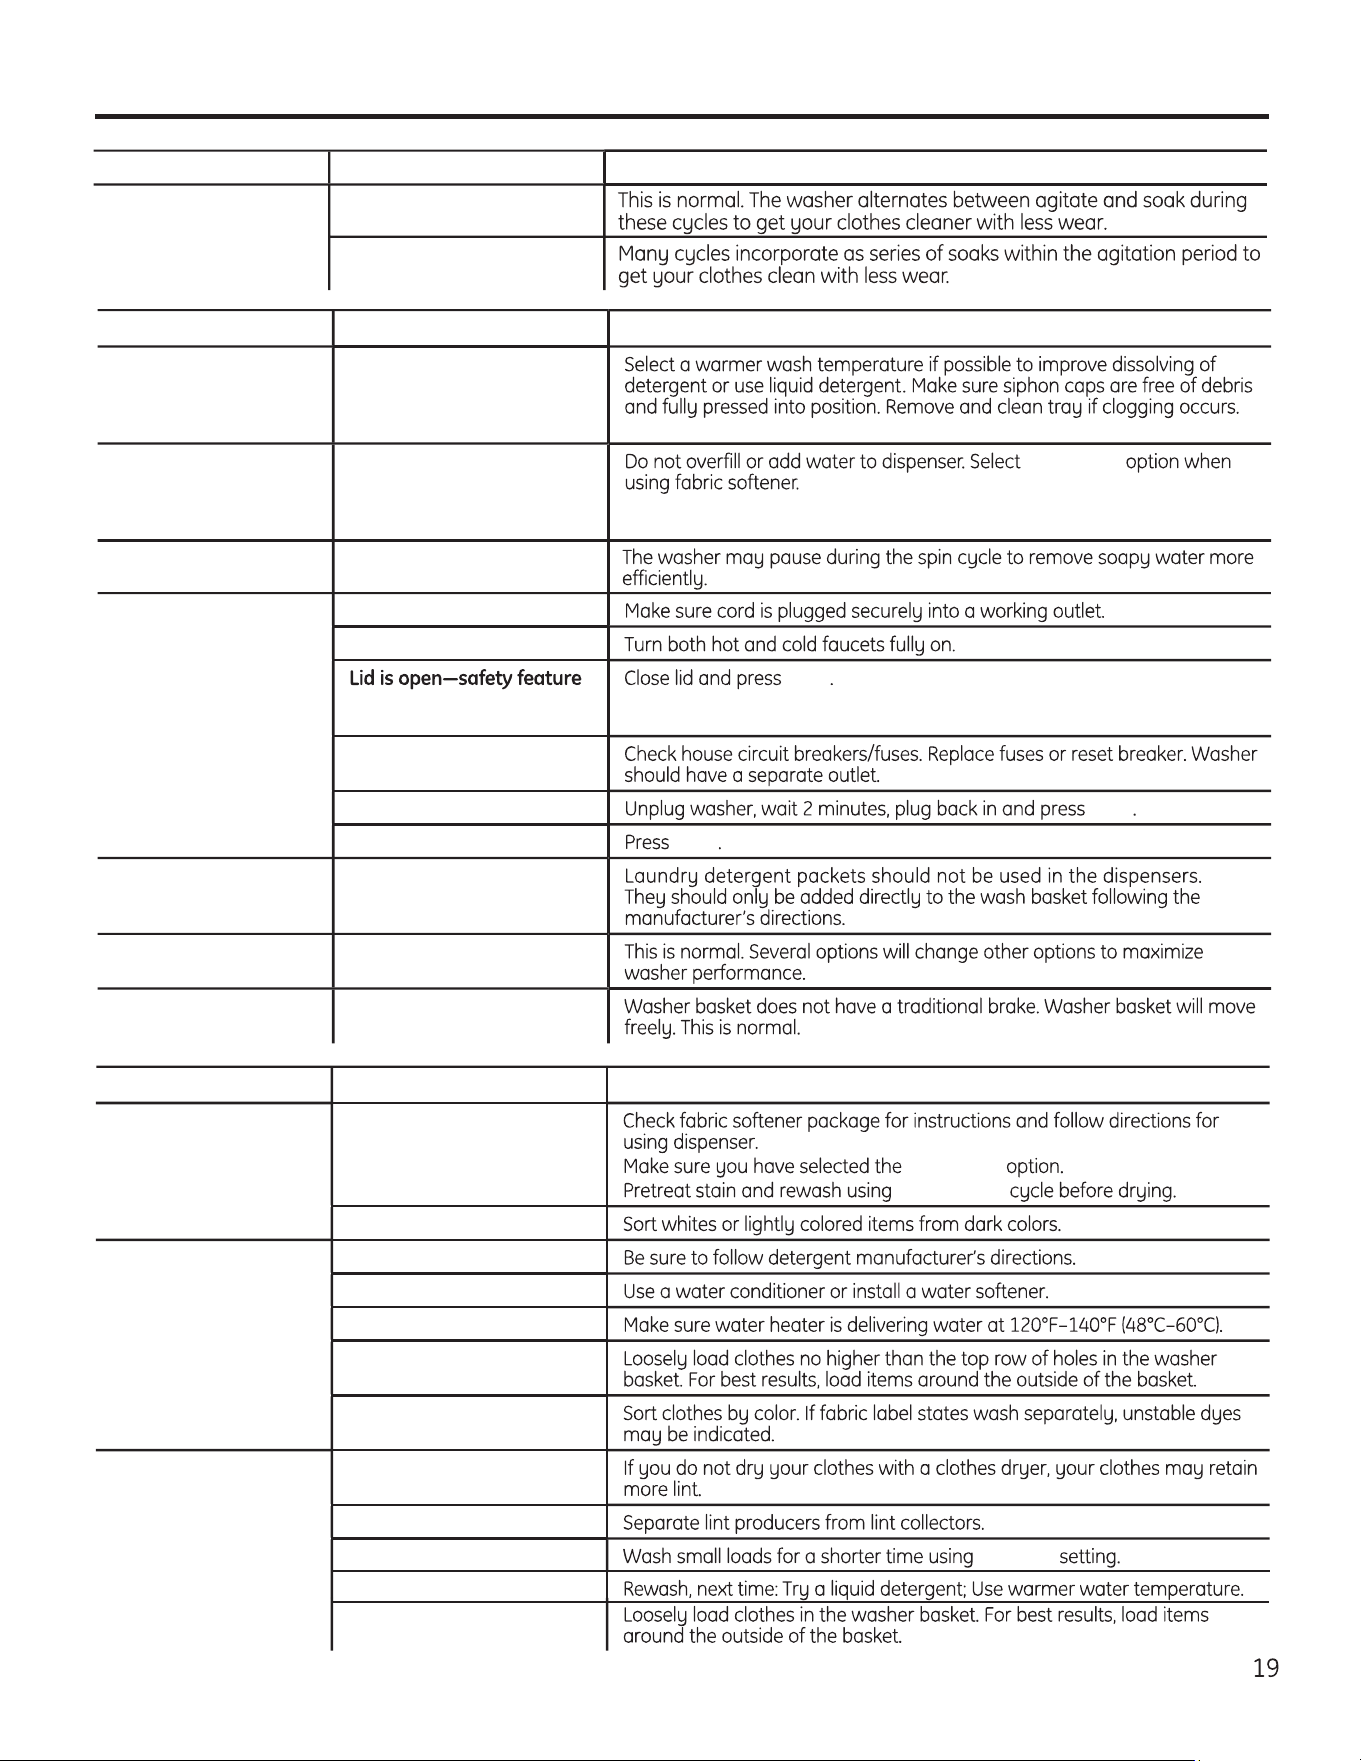
Washer pauses during
wash cycle
The Soak Option was
chosen
This is normal
OPERATION Possible Causes What To Do
Residual powder in
dispenser or clogging
of dispensers (Not all
features are on all models)
Wash water too cold or low
home water pressure
Laundry additives
dispensing too soon
(Dispensers Not all
features are on all models)
Overfilling of dispensers Deep Rinse
Washer pauses during
spin cycle
This is normal
Washer won’t operate Washer is unplugged
Water supply is turned off
prevents agitation and
spinning when lid is up
Start
Circuit breaker/fuse is
tripped/blown
Electronics need to be reset Start
Start was not pressed Start
Detergent packets
not dissolving
Laundry detergent packet
placed in dispenser
Unexplained time and/
or settings changes
Changing options (Not all
features are on all models)
Basket seems loose Basket moves or rotates
freely
Before you call for service…Troubleshooting Tips
PERFORMANCE
Possible Causes What To Do
Colored spots Incorrect use of fabric
softener
Deep Rinse
Speed Wash
Dye transfer
Grayed or yellowed
clothes
Detergent amount
Hard water
Water is not hot enough
Washer is overloaded
Dye transfer
Lint or residue on
clothes
Clothes are air or line dried
Incorrect sorting
Washing too long Light Soil
WATER Possible Causes What To Do
Detergent not dissolving
Overloading
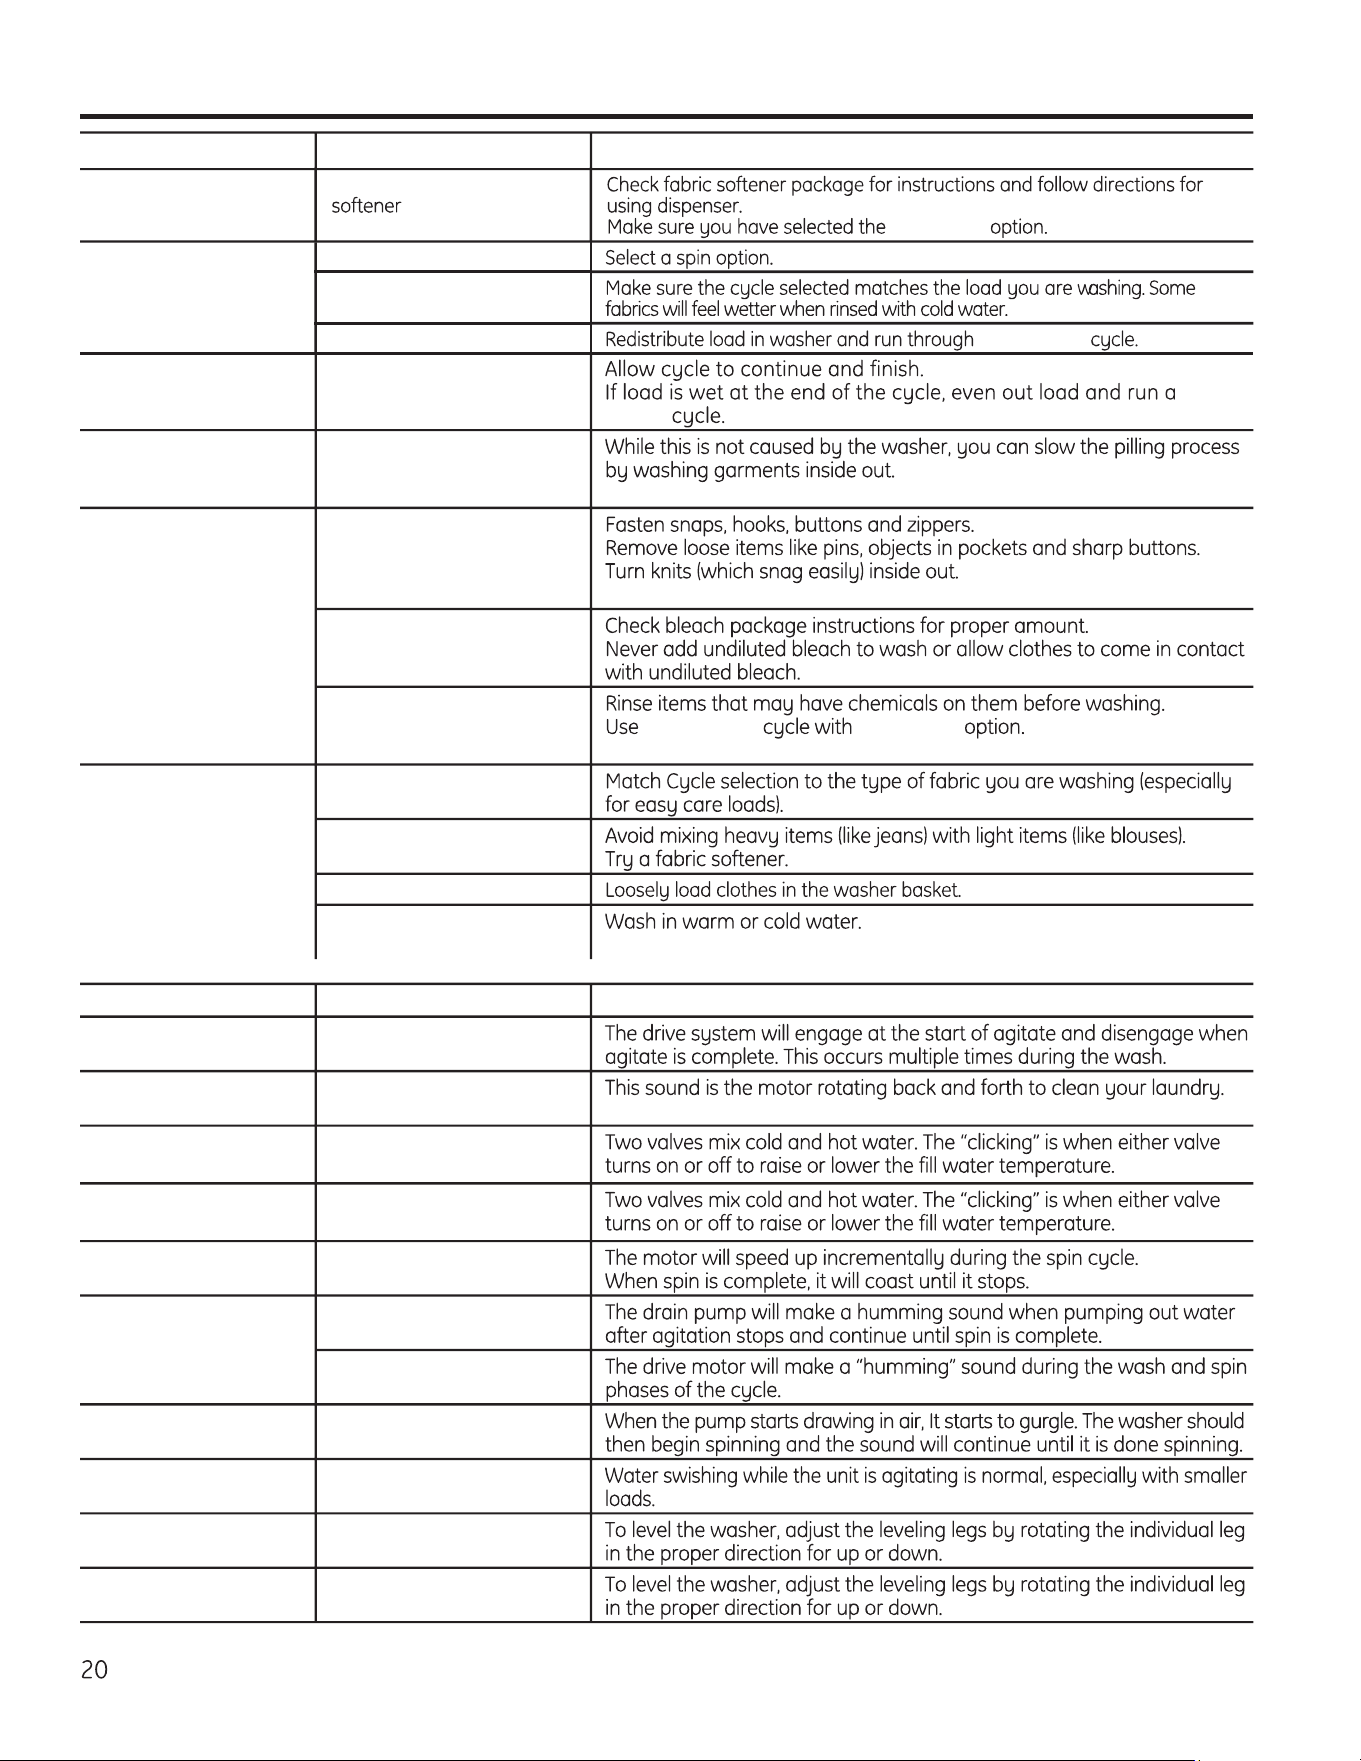
Clothes too wet No spin selected
Incorrect cycle selected
Wash load out of balance Drain & Spin
Lint or residue on
clothes
Incorrect use of fabric
Deep Rinse
GEAppliances.ca
PERFORMANCE
Possible Causes What To Do
Blinking Spin light or
Spin light on at end
of cycle
Out of balance condition
has been detected Drain
& Spin
Pilling Result of normal wear on
poly-cotton blends and
fuzzy fabrics
Snags, holes, tears,
rips or excessive wear
Pins, snaps, hooks, sharp
buttons, belt buckles,
zippers and sharp objects
left in pockets
Undiluted chlorine bleach
Chemicals like hair bleach
or dye, permanent wave
solution
Speed Wash Extra Rinse
Wrinkling Incorrect wash and dry
cycles
Improper sorting
Overloading
Repeated washing in water
that is too hot
SOUNDS Possible Causes Reason
“Clicking” Shifter mechanism is
engaging or disengaging
Back and forth
“swoosh”
Electric motor reversing
direction
“Clicking” behind
Control during fill
Automatic Temperature
Control Valve
Water flow changes
during fill
Automatic Temperature
Control Valve
Motor sounds during
spin
Motor ramping up/down
during spin cycle
“Humming” Water drain pump
Drive motor
“Gurgling” Water drain pump
Water “swishing”
Washing process
Washer rocking/
moving
Washer leveling legs
uneven
“Squeaking” sound Washer not level and
rubbing on cabinet
Service trips to your home to teach you how to use
the product.
Improper installation, delivery or maintenance.
Failure of the product if it is abused, misused, or
used for other than the intended purpose or used
commercially.
Replacement of house fuses or resetting of circuit breakers.
Products which are not defective or broken, or which are
working as described in the Owner’s Manual.
Damage to the product caused by accident, fire, floods
or acts of God.
Incidental or consequential damage caused by possible
defects with this appliance.
Defects or damage due to operation in freezing
temperatures.
Damage caused after delivery.
Product not accessible to provide required service.
What Is Not Covered:
GE Appliances Washer Warranty.
Servicing your appliance may require the use of the onboard data port for diagnostics. This gives a GE
Factory Service technician the ability to quickly diagnose any issues with your appliance and helps GE
improve its products by providing GE with information on your appliance. If you do not want your appliance
data to be sent to GE, please advise your technician NOT to submit the data to GE at the time of service.
In Canada:
This warranty is extended to the original purchaser and any succeeding owner for products purchased in Canada for
home use within Canada. If the product is located in an area where service by a GE Authorized Servicer is not available,
you may be responsible for a trip charge or you may be required to bring the product to an Authorized GE Service location.
Some provinces do not allow the exclusion or limitation of incidental or consequential damages. This warranty gives you
specific legal rights, and you may also have other rights which vary from province to province. To know what your legal
rights are, consult your local or provincial consumer affairs office.
Warrantor: MC COMMERCIAL INC., BURLINGTON, ON L7R 5B6
All warranty service provided by our Factory Service Centers,
visit us on-line at GEAppliances.ca, or call 1.800.561.3344
Please have serial number and model number available when calling
for service.
For The Period Of: We Will Replace:
One Year Any factory specified part
limited one year warranty free of charge
Ten Years
The motor, additional
nine-year limited warranty
Applies only to hybrid models (One knob and digital control)
Consumer Support.
GE Appliances Website
GEAppliances.ca
In Canada: www.GEAppliances.ca
Schedule Service
GEAppliances.ca
In Canada, 1.800.561.3344
Real Life Design Studio
GEAppliances.ca
1-800-561-3344.
In Canada, contact:
Extended Warranties
GEAppliances.ca
1-800-561-3344.
Consult your local listings for an extended
warranty provider.
Parts and Accessories
GEAppliances.ca
1 800 661 1616
Contact Us
GEAppliances.ca
1-800-561-3344 (Canada).
Register Your Appliance
GEAppliances.ca
In Canada: GEAppliances.ca
