Opera Plus
User Manual
Model No.: BTHT-6190P
EN
Video Guide
Prefer to watch a video tutorial? Scan the QR code below or visit avantree.com/
opera-plus/video for a step by step guide.
DE
Video-Anleitung
Möchten Sie lieber ein Video Tutorial ansehen? Scannen Sie den QR Code unten
oder besuchen Sie avantree.com/opera-plus/video für eine Schritt für Schritt
Anleitung.
FR
Guide Vidéo
Vous préférez un didacticiel vidéo? Scannez le code QR ci dessous ou visitez
avantree.com/opera-plus/video pour un guide pas à pas.
IT
Videoguida
Preferisci guardare un video tutorial? Scansiona il codice QR qui sotto o visita
avantree.com/opera-plus/video per una guida dettagliata.
ES
Videoguía
Preeres ver un video tutorial? Escanee el código QR a continuación o visite
avantree.com/opera-plus/video para obtener una guía detallada.

EN
Book an Appointment
You can also book a 1-on-1 setup appointment with one of our support agents
at avantree.com/book-a-call
DE
Buchen Sie einen Termin
Vereinbaren Sie einen persönlichen Einrichtungstermin mit einem Support
Mitarbeiter unter avantree.com/book-a-call und wählen Sie Ihre passende Zeit.
FR
Prenez Rendez-Vous
Vous pouvez également réserver un rendez-vous d’installation individuel avec
l’un de nos agents de support via avantree.com/book-a-call
IT
Prendi un Appuntamento
Puoi anche prenotare un appuntamento con uno dei nostri agenti del
supporto tecnico su: avantree.com/book-a-call
ES
Haga una Cita
También puede reservar una cita con uno de nuestros agentes de soporte
técnico en: avantree.com/book-a-call

User Manual
2
Opera plus
EN
Table of Contents
Box Contents ••••••••••••••••••••••••••••••••••••••••••••••••••••••• 3
Product Introduction (Headphones) •••••••••••••••••••••••••••••••••••4
Product Overview •••••••••••••••••••••••••••••••••••••••••••••4
Button Functions ••••••••••••••••••••••••••••••••••••••••••••••4
LED Indicators ••••••••••••••••••••••••••••••••••••••••••••••••5
Product Introduction (Transmitter) ••••••••••••••••••••••••••••••••••••6
Product Overview •••••••••••••••••••••••••••••••••••••••••••••6
Button Functions ••••••••••••••••••••••••••••••••••••••••••••••7
LED Indicators ••••••••••••••••••••••••••••••••••••••••••••••••7
Charging the Headphones & Powering the Transmitter ••••••••••••••••••8
Setting up •••••••••••••••••••••••••••••••••••••••••••••••••••••••••9
Connecting to Your TV •••••••••••••••••••••••••••••••••••••••••9
Connecting the Headphones •••••••••••••••••••••••••••••••••••12
Setting Up Your TV ••••••••••••••••••••••••••••••••••••••••••••13
Advanced Features ••••••••••••••••••••••••••••••••••••••••••••••••14
Listening with a Soundbar •••••••••••••••••••••••••••••••••••••14
Adding Another Pair of Headphones ••••••••••••••••••••••••••••15
Use the Headphones lndependently with a phone •••••••••••••••••16
Troubleshooting ••••••••••••••••••••••••••••••••••••••••••••••••••• 17
Specications •••••••••••••••••••••••••••••••••••••••••••••••••••••18
Contact Us ••••••••••••••••••••••••••••••••••••••••••••••••••••••••91
User Manual Opera plus
3
EN
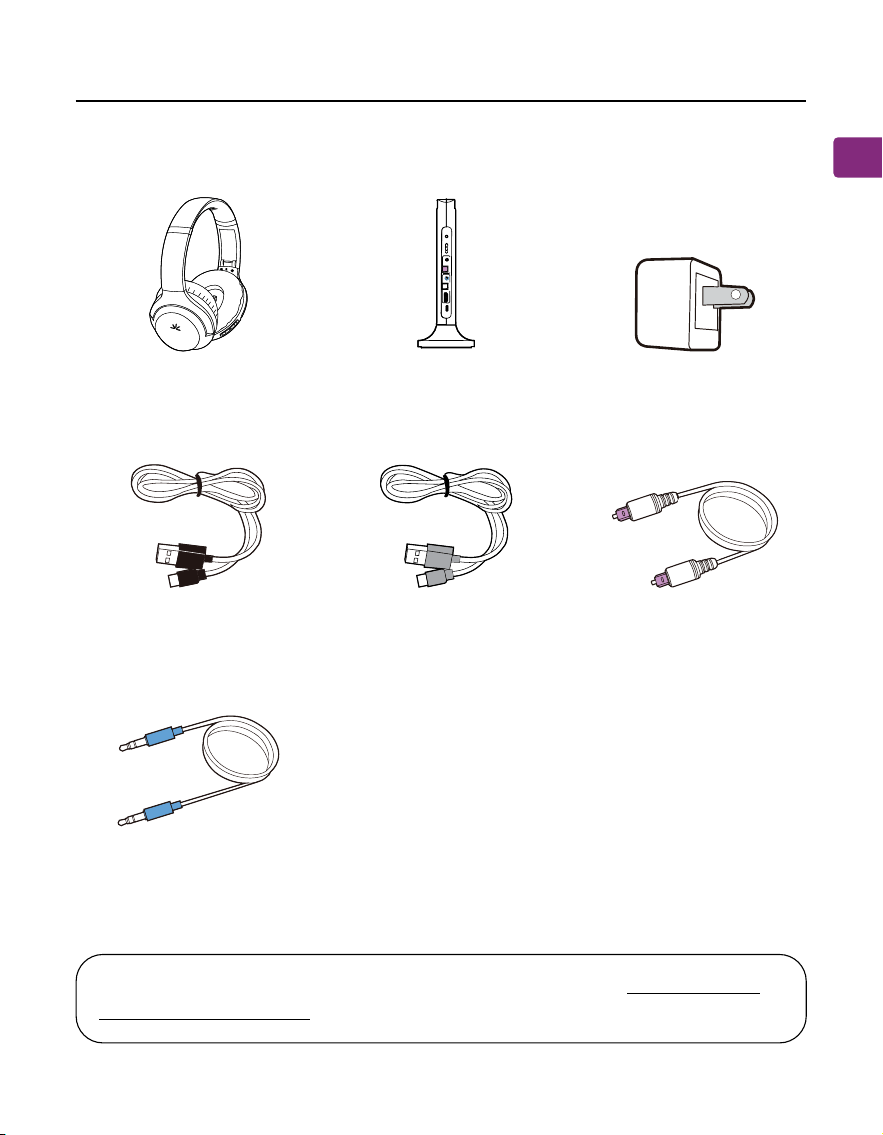
Box Contents
Headphones Transmitter & Charging
Dock
USB C Charging Cable
for Headphones
AUX 3.5mm Audio
Cable
Optical Audio
Cable
USB Adapter
Power Cable for
Transmittet
re
kaep
S
oT
tu
p
tuO
ssa
p
yBVT
morF
tu
pnI
VO
L
B
o
o
s
t
D
C
I
N
O
P
T
A
U
X
H
D
MI
A
R
C
I
n
p
u
t
S
e
l
e
c
t
o
r
O
P
T
A
U
X
CRA
IMDH
O
P
T
AUX
To view and purchase Opera Plus accessories, please visit avantree.com/
opera-plus/accessories
User Manual
4
Opera plus
EN
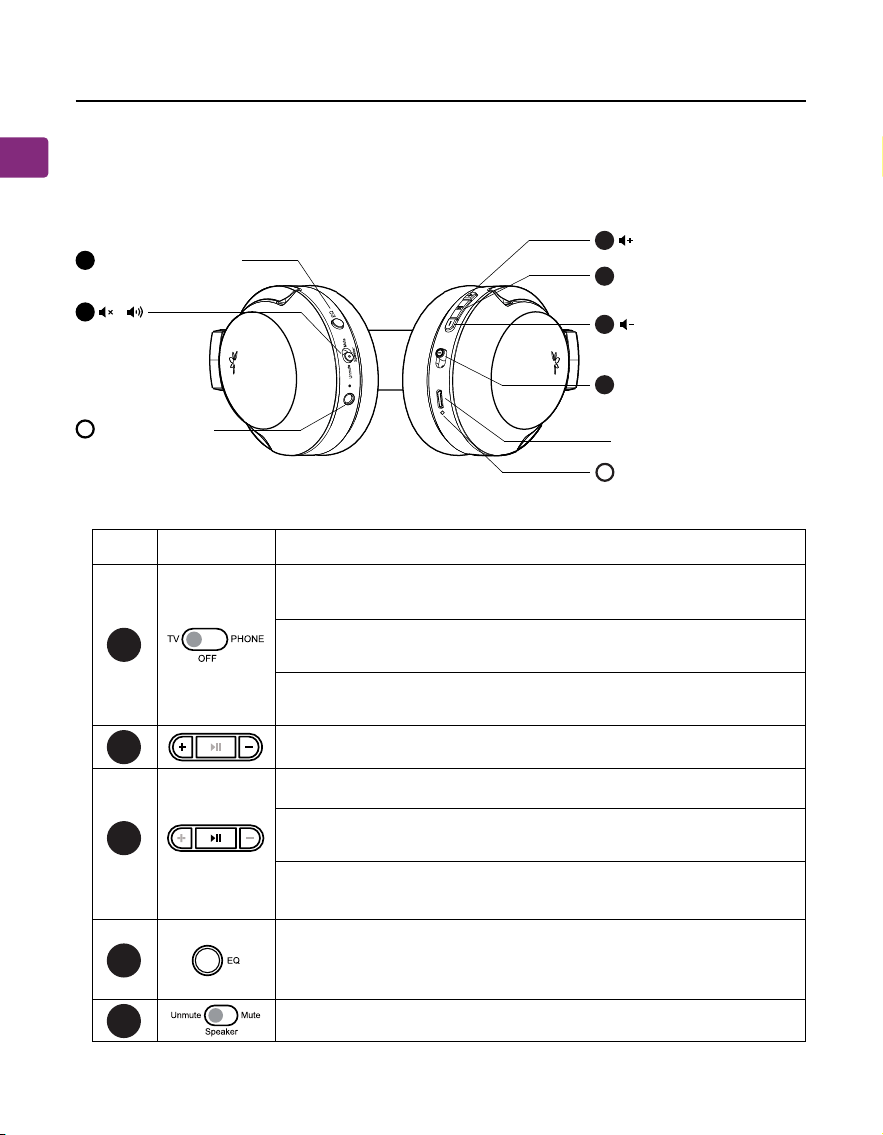
Button Functions
Switch to “TV” to connect to the transmitter, you will hear
“ TV mode”
Product Introduction (Headphones)
Product Overview
5
4
3
2
1
No. Button Functions
Switch to “PHONE” to connect to one’s phone / tablet,
you will hear “Phone mode”.
Switch to “OFF” to turn o the headphones, you will hear
“Goodbye”.
If the headphones fail to reconnect, press once to reconnect.
Press and hold to manually enter pairing mode, you will hear
“pairing”.
Press once to play / pause audio (when being used with
phone / tablet).
Switch to mute / unmute audio from the headphones.
Press once to switch between balanced / clear voice / cinema
sound modes, you will hear “balanced / clear voice / cinema
sound”.
Click or hold to adjust volume.
11
22
33
22
EQ Mode Button
Pair / Reconnect /Play /
Pause
O / TV mode /Phone
mode
LED lndicator
Charging Port
LED lndicator
/
A
44
55
B
P
H
O
N
E
O
F
F
T
V
User Manual Opera plus
5
EN
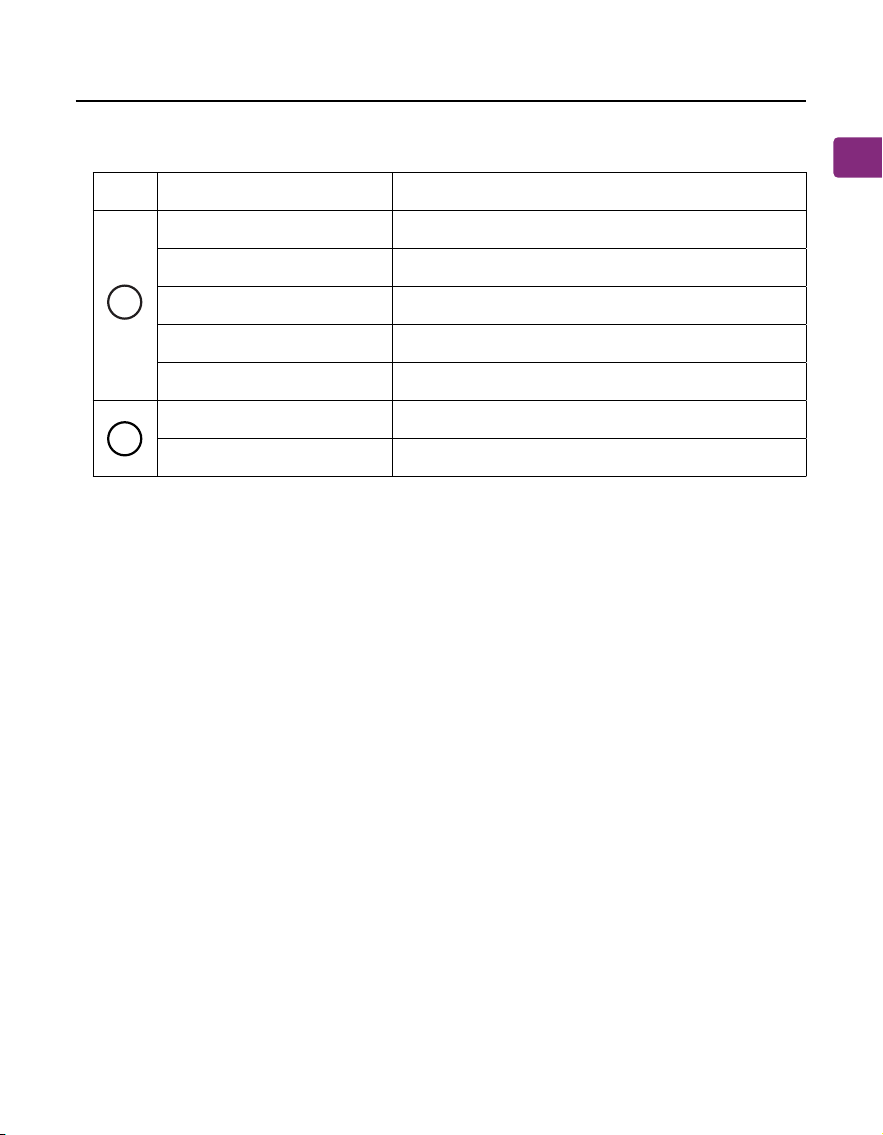
LED Indicators
Solid blue
Flashing blue
Flashing red and blue
Solid red
O
O
Orange
Connected, you will hear “connected”
Reconnecting or disconnected
Pairing mode, you will hear “pairing”
Charging
Charging complete
Headphones muted
Unmuted
A
B
No.
Indicator Status
User Manual
6
Opera plus
EN
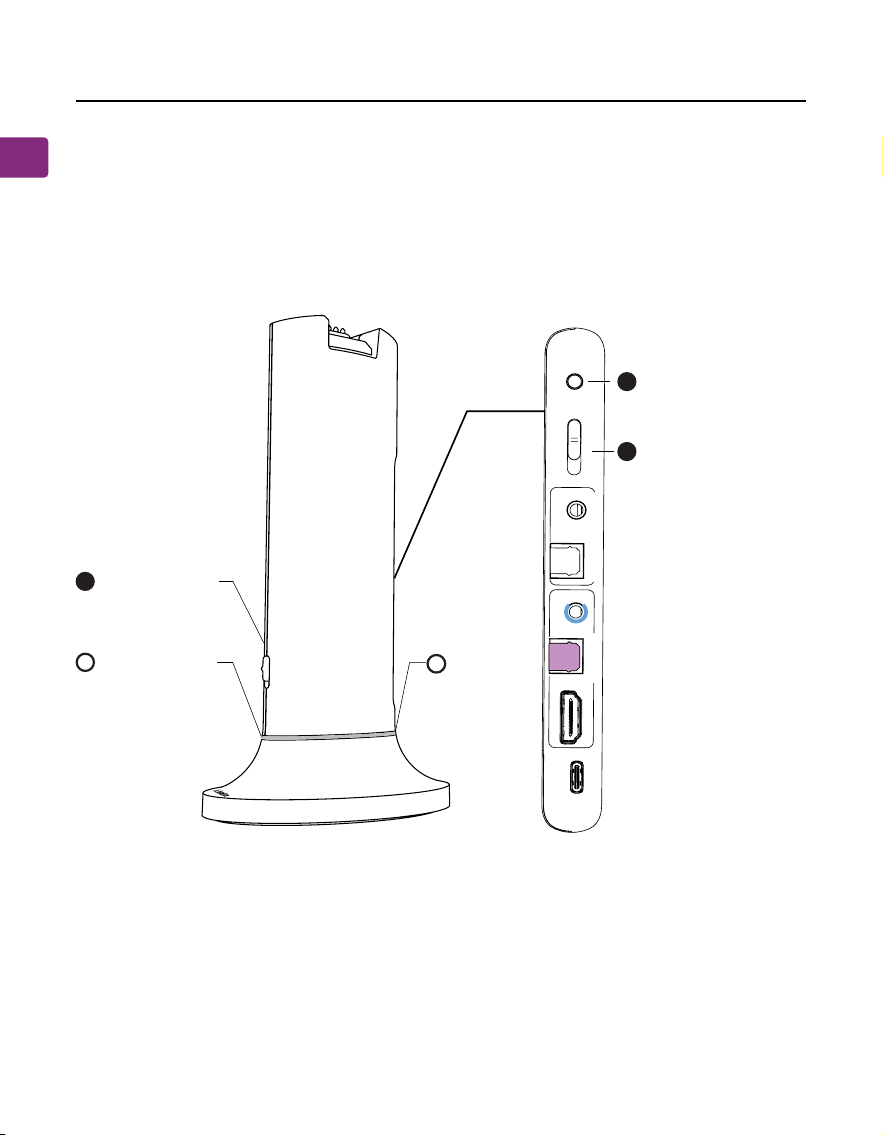
Normal / Boosted
Volume Switch
On / O / Pair
LED Indicator
LED
Indicator
lnput Format Switch
(AUX / OPT / HDMI
ARC)
77
88
66
D
ON
PAIR
OFF
r
e
k
a
e
p
S
o
T
t
u
p
t
u
O
ss
a
p
y
B
V
T
m
o
r
F
t
u
p
n
I
VOL Boost
DC I
N
OP
T
AU
X
H
D
M
I
A
R
C
Input
Selecto
r
OP
T
AU
X
C
R
A
I
M
D
H
OP
T
AUX
Product Introduction (Transmitter)
Product Overview
C
User Manual Opera plus
7
EN
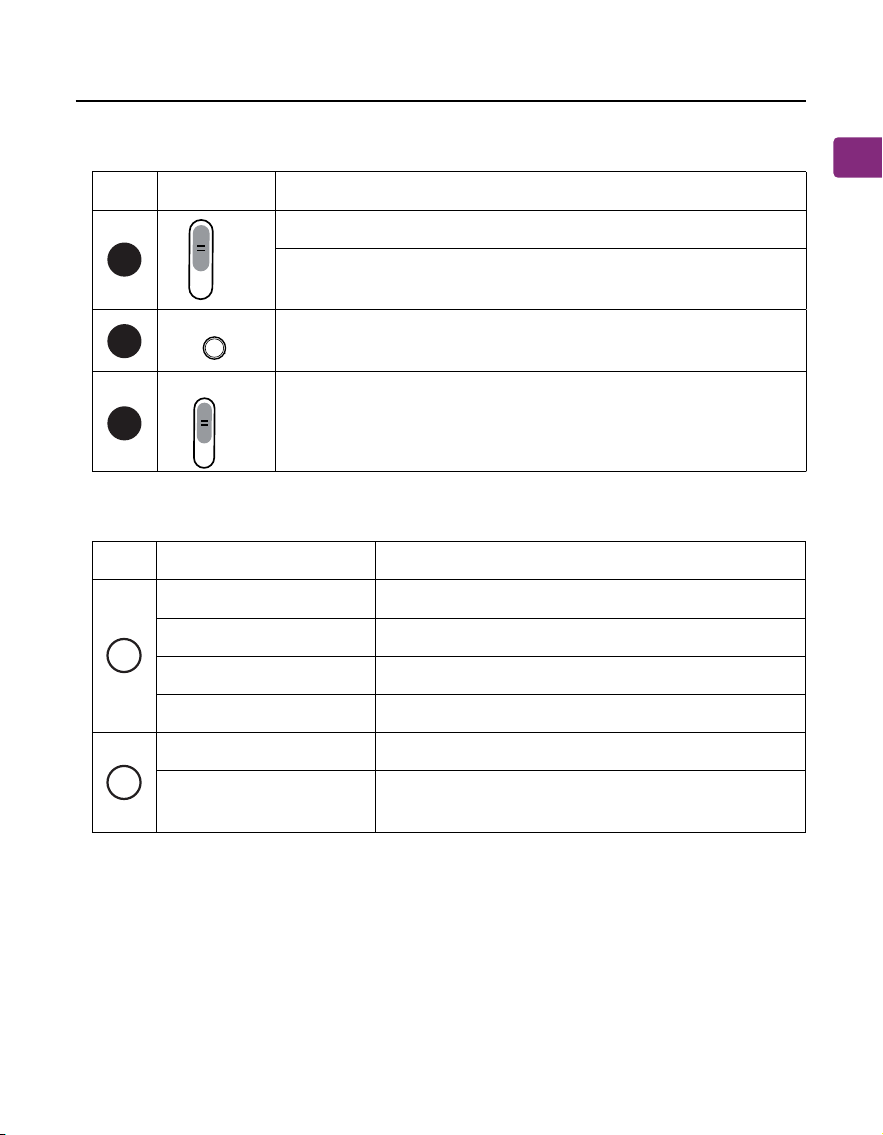
Button Functions
LED Indicators
No.
No.
Button
Indicators
Functions
Status
Solid blue
Flashing red & blue
Connected
Pairing mode
Headphones charging
Charging complete
Valid audio signal detected
No valid audio signal detected; please
adjust the TV’s audio settings
Solid red
O
Solid white
Flashing white
6
7
8
VOL Boost
O
F
F
P
A
I
R
O
N
A
U
X
H
D
M
A
R
C
In
p
u
t
S
e
le
c
to
r
O
P
T
Switch to “ON / OFF” to turn the transmitter on /o
Hold at the "PAIR" position for 5 seconds to enter pairing
mode
Press once to switch between normal and boosted volume
modes
Switch to match your desired audio input method
C
D
User Manual
8
Opera plus
EN
OPTION 2
OPTION 1
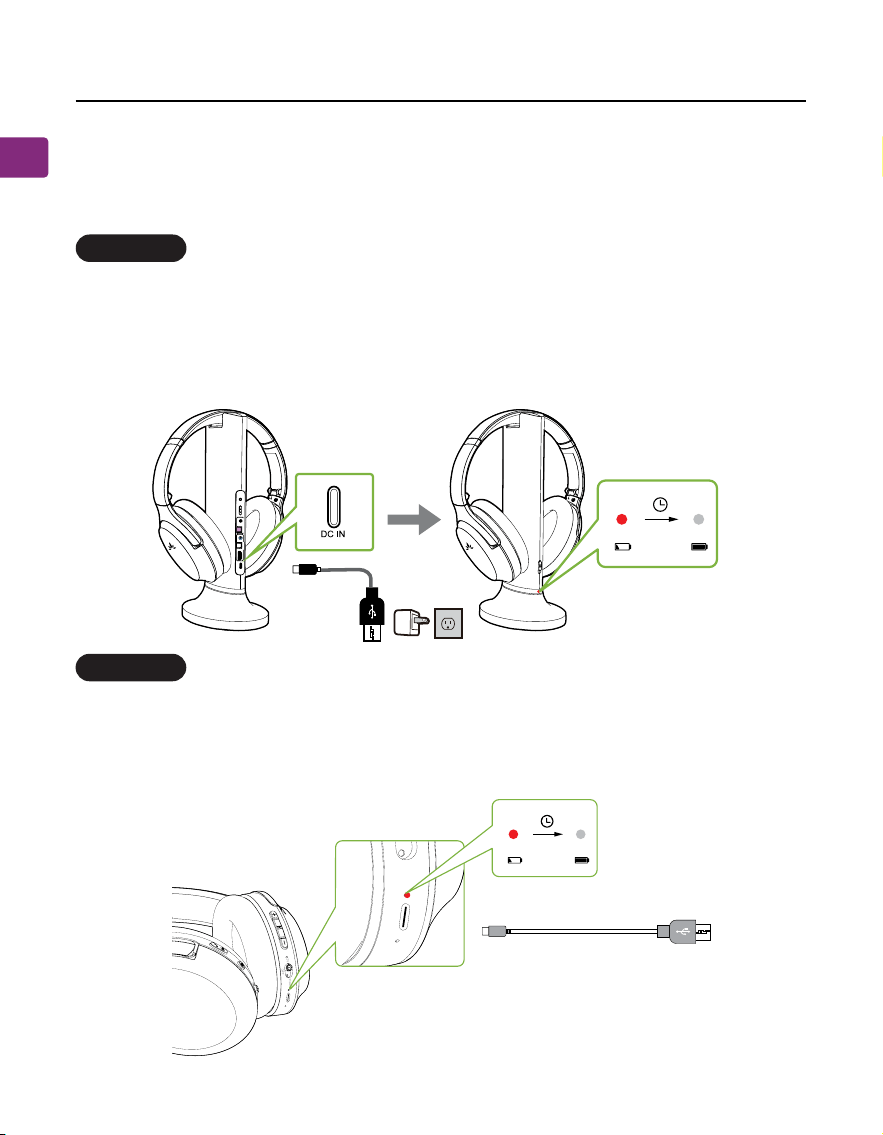
Charging the Headphones & Powering the
Transmitter
Simply put the headphone back on the charging dock to recharge them.
The charging dock’s front LED will turn red while charging, and turn o once
charging is complete. Normally, it takes about 3 hours to fully charge the
headphones.
You can also charge the headphones directly through their power port using a
USB C charging cable and USB adapter. A solid red light indicates that charging
is in progress; once the light turns o, your headphones are at full battery.
rekaepS
oT
tupt
uO
s
sapyBV
T
morF
tupnI
V
O
L
B
o
o
s
t
D
C
I
N
O
P
T
A
U
X
HDMI
A
R
C
I
n
p
u
t
S
e
l
e
c
t
o
r
O
P
T
A
U
X
CRA
IMDH
O
P
T
A
U
X
User Manual Opera plus
9
EN
Setting up
Charging the Headphones & Powering the
Transmitter
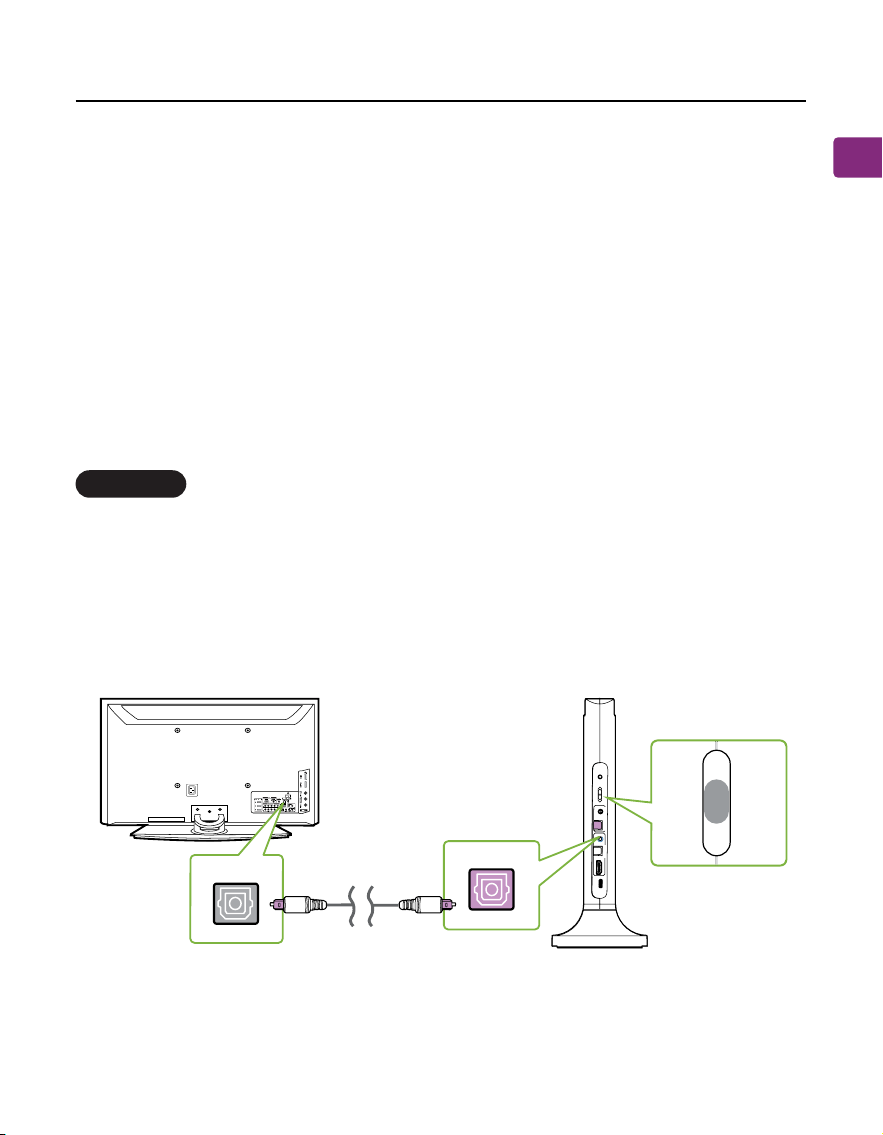
Connecting to Your TV
Once the transmitter is connected to a power source, next is to connect it to
your TV’s audio output ports. You can choose one of 4 options to do this:
Powering the Transmitter
To power the transmitter, connect it to a wall outlet via the provided power
cables and wall adapter. It doesn’t hold a charge, so it needs to be connected to
power in order to function.
Optical port (Recommended)
Plug the provided optical audio cable into the TV’s optical OUT or “OPT / OUT”
port, then plug the other end into the transmitter’s optical port in the “INPUT
FROM TV” section.
On your transmitter, switch the “AUDIO INPUT SELECTOR” to the “OPT”
postion.
OPTION 1
y
B t
uO
s
sa
p
t
u
p
o
T
r
ekaep
Spn
I
Ft
u
or T
m V
VOL Boost
DC
IN
OPT
AUX
HDMI
AR
C
Input
Sele
ctor
OPT
AUX
H RA
I
M
D C
OPT
OPT
InputFromTV
OPT/OUT
TV
OPT
AUX
HDMI
AR
C
User Manual
10
Opera plus
EN
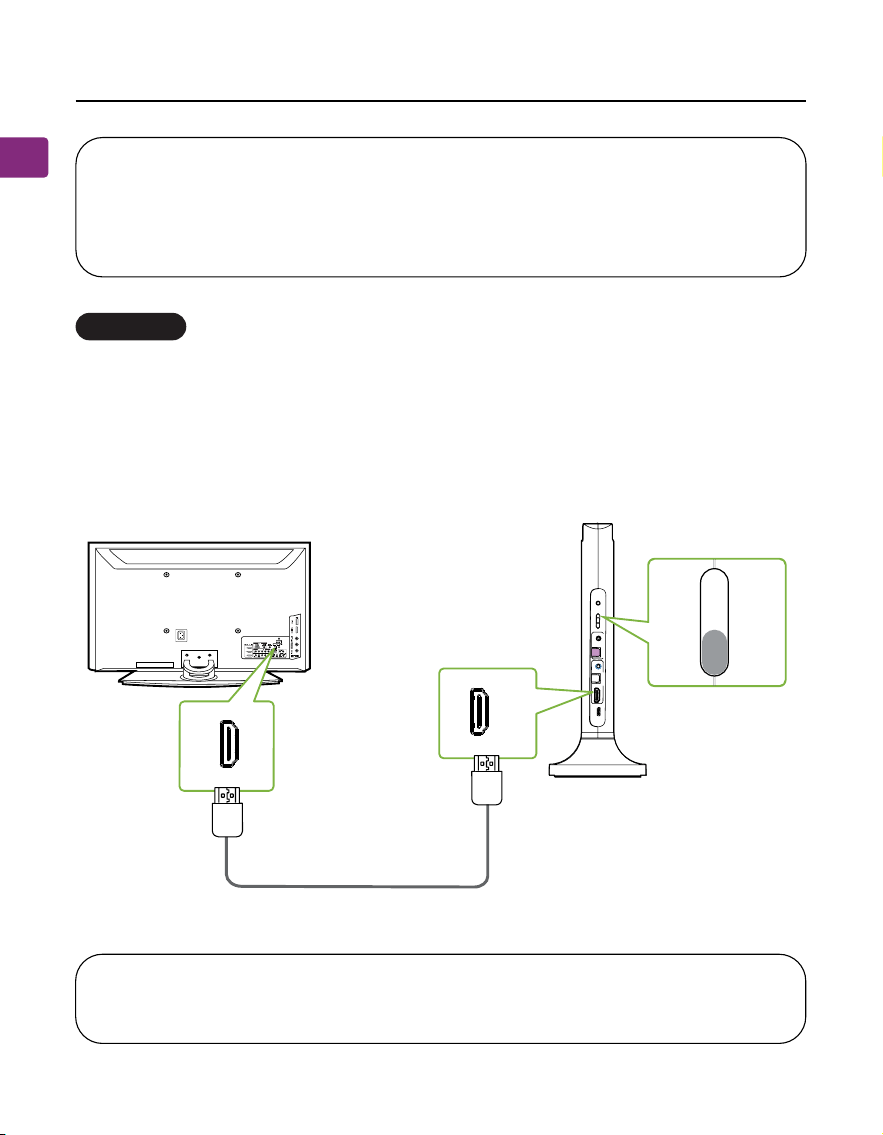
HDMI ARC port (Recommended)
NOTE 1: The HDMI ARC port only supports TV HDMI ports labeled “ARC”
NOTE 2: The HDMI cable should be HDMI 1.4 or above.
Plug your HDMI cable (not provided) into the TV’s “HDMI ARC” port, then plug
the other end into the transmitter’s HDMI ARC port in the “INPUT FROM TV”
section.
On your transmitter, switch the “AUDIO INPUT SELECTOR” to the “HDMI ARC”
position.
OPTION 2
reka
epSoTtupt
uOs
sa
p
yBVTm
o
rFt
u
p
n
I
VOL Boost
DC IN
OPT
AUX
HDMI
ARC
Input
Selector
OPT
AUX
CRA
IMDH
OPT
AUX
Input From TV
TV
AUX
HDMI
ARC
CRAIMDH
not inclucded
OPT
NOTE: Most TVs support audio output through only one digital output port
at a time, so if your TV’s HDMI ARC port is in use, the optical port may be
disabled. You can either unplug the HDMI ARC cable, or try connecting the
transmitter via RCA / AUX.
User Manual Opera plus
11
EN
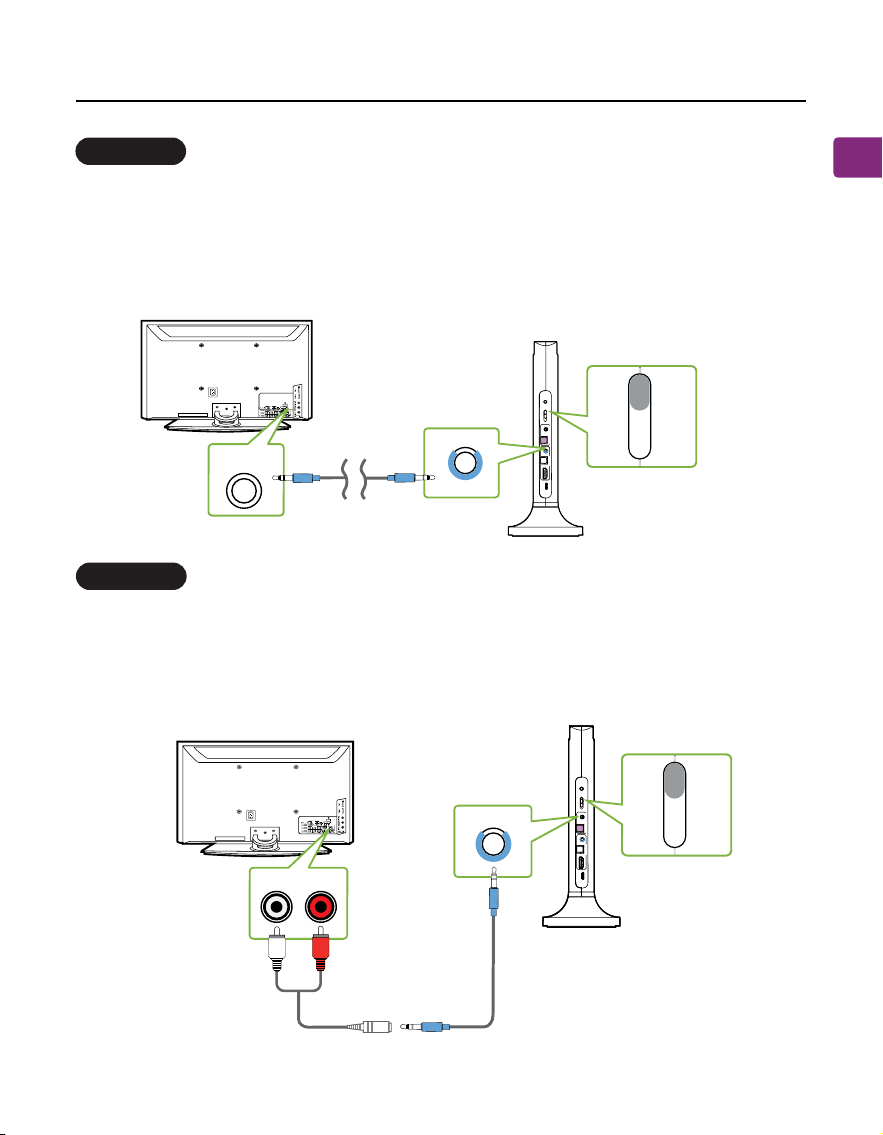
AUX 3.5mm port
RCA port
Plug the provided AUX 3.5mm audio cable into the TV’s AUX 3.5mm output
port, then plug the other end into the transmitter’s AUX 3.5mm input port in
the “INPUT FROM TV” section.
On your transmitter, switch the “AUDIO INPUT SELECTOR” to the “AUX” position.
Connect the RCA adapter to the AUX 3.5mm audio cable. Plug the red & white
RCA connectors into the TV’s “AUDIO OUT” ports, then plug the other end into
the transmitter’s AUX 3.5mm input port in the“INPUT FROM TV” section.
On your transmitter, switch the “AUDIO INPUT SELECTOR” to the “AUX” position.
OPTION 3
OPTION 4
p
yB
a
u
p
t
u
O
ss
t
So
T
k
p
a
e
re
u
I
pn
VT
mor
F
t
V
O
L
B
oost
D
C IN
O
P
T
AU
X
H
DM
I
A
RC
I
n
p
ut
S
e
l
ecto
r
OP
T
A
UX
IMD RH
C
A
O
PT
A
UX
Input FromTV
AUX
AUX 3.5mm
TV
AUX
H
DMI
A
R
C
OPT
B
ypas
s
O
utput T
o S
p
eake
r
Inp
ut From
T
V
V
O
L
Bo
os
t
D
C IN
O
PT
A
U
X
H
D
M
I
A
R
C
Inp
u
t
Se
le
cto
r
O
P
T
A
U
X
H
D
M
I A
RC
O
P
T
A
U
X
AUDIOOUT
TV
AUX
HDMI
A
R
C
O
P
T
Input From TV
AUX
(not inclucded)
User Manual
12
Opera plus
EN
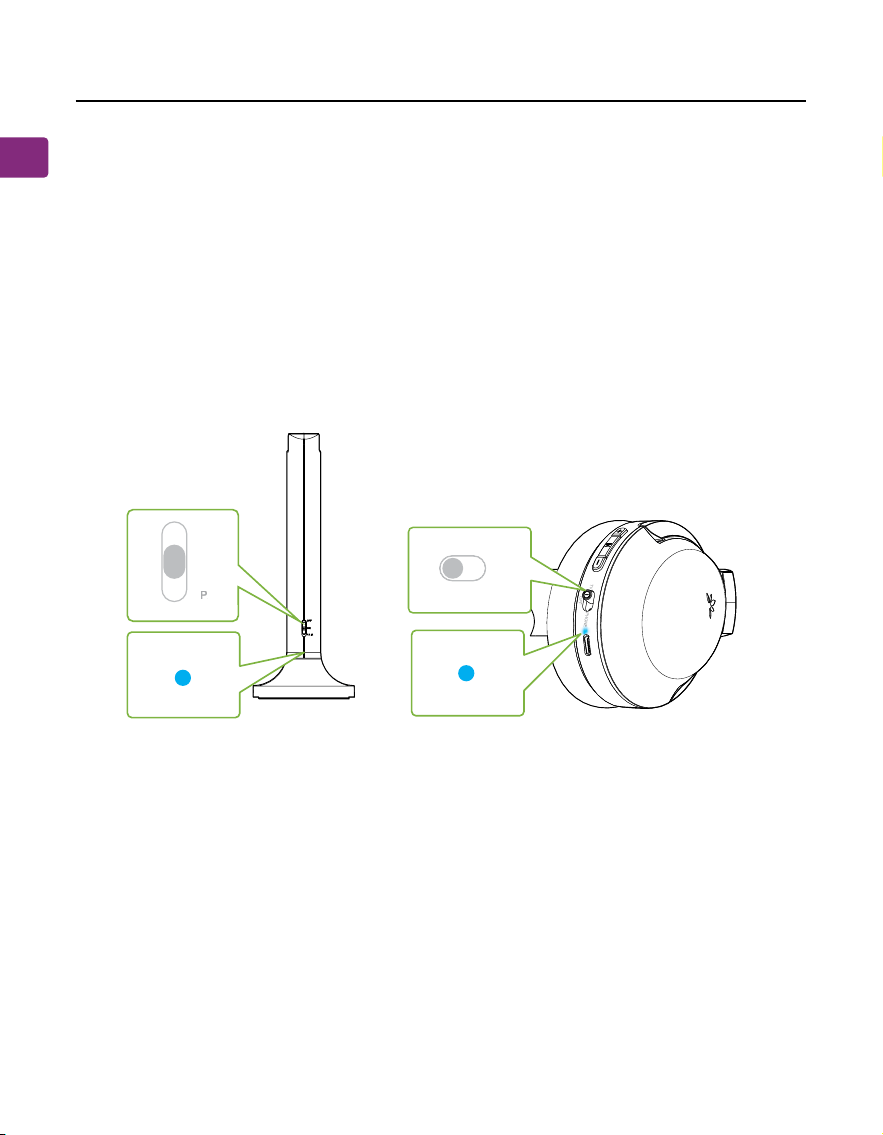
Connecting the Headphones
Now that your transmitter is set up, all that’s left is to connect the headphones.
STEP 1
First, power on both the transmitter and headphones (slide to the TV postion).
STEP 2
The transmitter and headphones will auto-connect. Once connected, the
headphones’ & transmitter’s LEDs will turn solid blue.
O
F
F
ON
P
AIR
P
P
P
H
O
NE
TV
O
F
F
User Manual Opera plus
13
EN
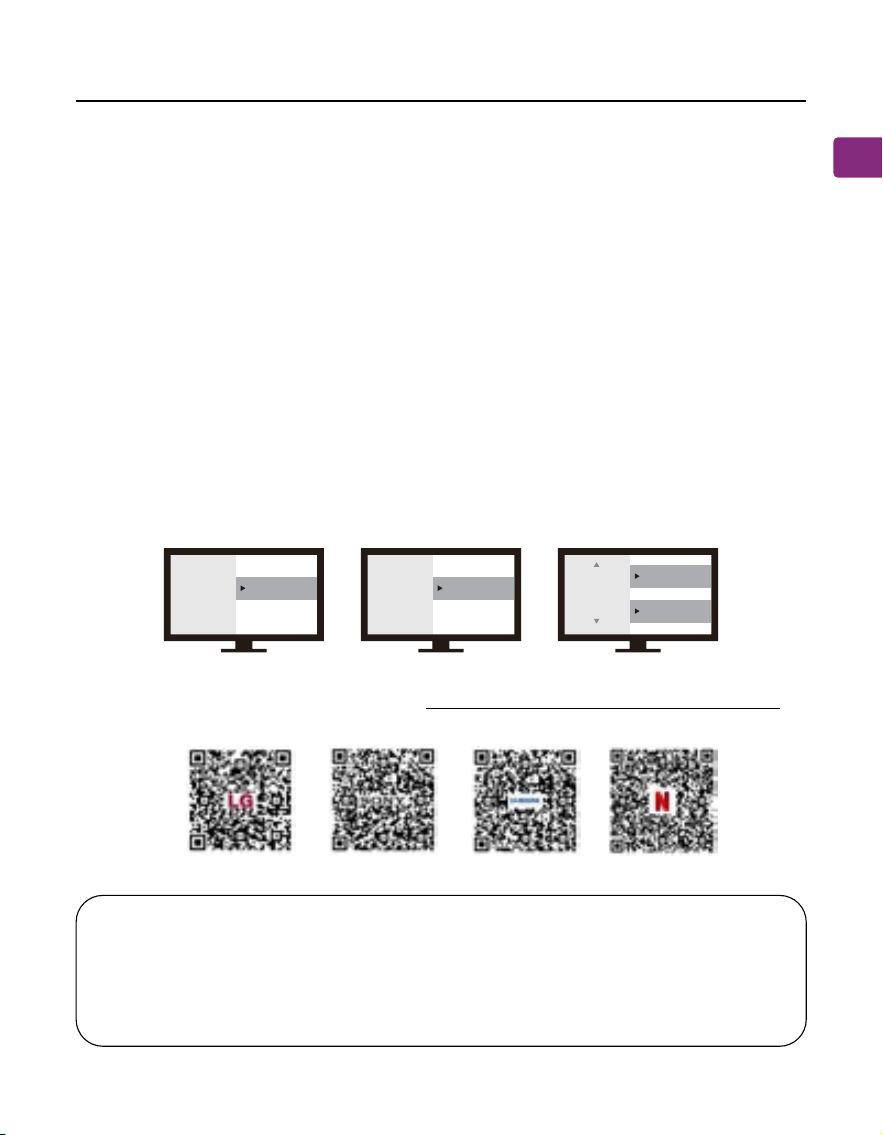
Setting Up Your TV(For Optical&HDMI ARC Connections only)
If you’re having trouble nding these settings, you can scan the QR code
correlating to your TV’s brand OR visit avantree.com/opera/tv-audio-settings
for a more detailed guide.
If you connected to your TV via the optical OUT, OPT / OUT or HDMI ARC port,
you’ll need to congure your TV settings before you receive audio.
STEP 1
Using your TV’s remote control, press the SETTINGS button and navigate to the
AUDIO tab within the settings menu. (Please note that there may be
dierences in the setting names depending on your brand of TV).
STEP 2
Proceed to AUDIO OUTPUT and select “OPTICAL OUT / DIGITAL OUT/ HDMI
ARC”. Many TVs will do this automatically; skip this step as needed.
STEP 3
Set Audio Output format to “PCM / STEREO” ON or “DOLBY” OFF.
NOTE 1: Smart TVs automatically reset their settings after system updates.
If you’re not getting sound, make sure your audio output / input format is
set to “PCM” and NOT “AUTO” or “Dolby.”
NOTE 2: When using Netix or Amazon Prime, you may need to start the
movie / show before changing the audio settings to “PCM.”
Sound
Audio Out Optical Out
Sound
Audio Out HDMI ARC Out
Digital
Audio
Format
or
PCM/Stereo
Dolby - OFF
LG SONY SAMSUNG NETFLIX/
AMAZON PRIME
User Manual
14
Opera plus
EN
Advanced Features
STEP 1
Set up the transmitter and connect it to your TV.
STEP 2
Plug an additional optical, 3.5mm AUX, or RCA audio cable into the correlating
audio port in the transmitter’s “BYPASS OUTPUT TO SPEAKER” section.
STEP 3
Plug the other end into your external sound system, then you’re good to go!
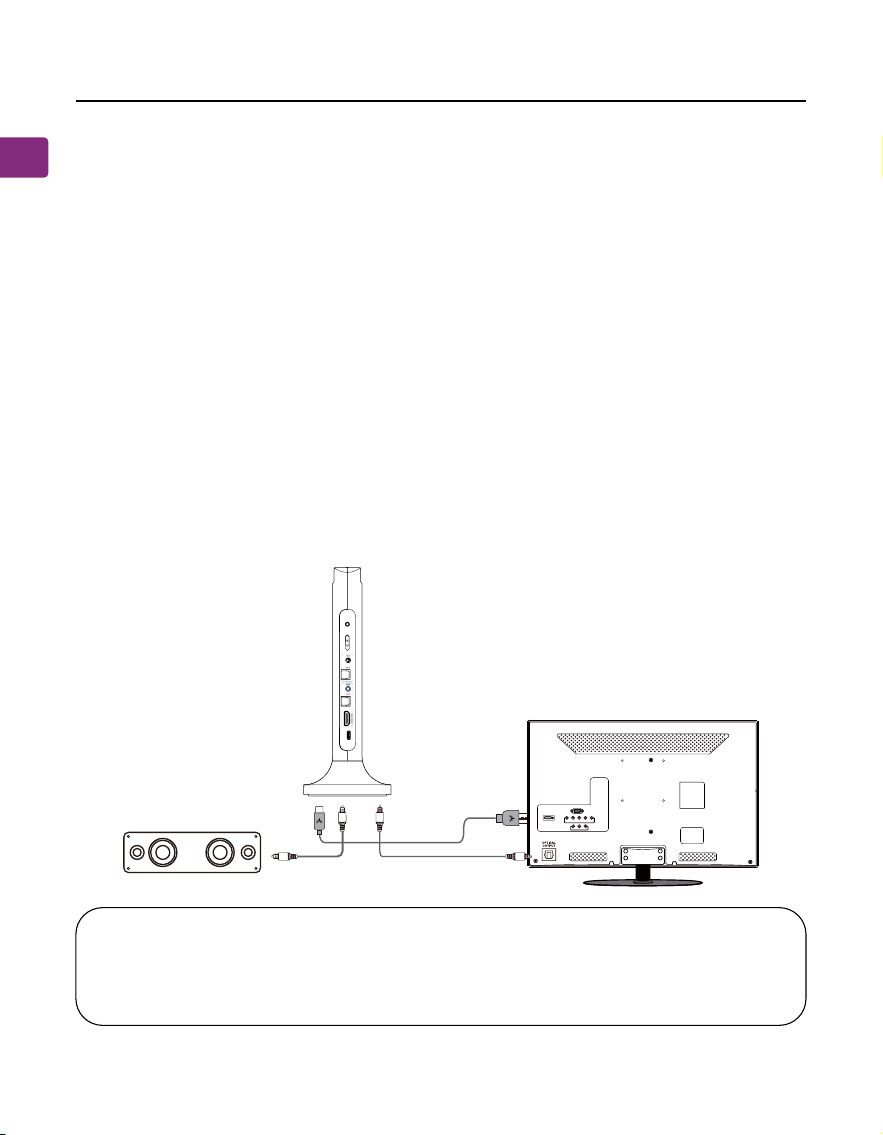
Listening with a Soundbar(Only for Optical and AUX Connection)
The pass-through function allows you to listen through both the headphones
and an external soundbar / stereo AVR simultaneously.
NOTE : Bypass only works with the same type of input / output, i.e. if you
connect to your TV via OPT, you’ll need to connect to your speaker via OPT
as well.
Bypass Output To SpeakerInput From TV
VOL Boost
DC IN
OPT
AUX
HDMI
ARC
Input
Selector
OPT
AUX
HDMI ARC
OPT
AUX
TV/Audio Source
Sound System
User Manual Opera plus
15
EN
Adding Another Pair of Headphones
STEP 1
On your transmitter, slide and hold the power switch to the “PAIR” position until
the LED indicator ashes red & blue.
STEP 2
On your second pair of Opera Plus headphones, slide the power switch to the
“TV” position. When using for the 1st time, it will enter pairing mode
automatically, and the LED will ash red & blue alternately. If not, press and
hold the button to manually enter pairing mode.
STEP 3
Keep them close and wait for 2 seconds. Once connected, the headphones’ &
transmitter’s LED indicators will turn solid blue.
To purchase a 2nd Opera Plus headphones (AS90-K), scan the QR code below.
You can add a second pair of Opera Plus headphones (AS90-K) to your setup
while maintaining low latency.
Please note that ONLY Opera Plus headphones (AS90-K) are compatible due to
private protocal connections.

User Manual
16
Opera plus
EN
Use the Headphones lndependently with a phone
STEP 1
On your headphones, slide the power switch to the “PHONE” position. For the
1st time, it will enter pairing mode automatically, and the LED will ash red &
blue alternately. If not, press and hold the button for 5 seconds to
manually enter pairing mode.
STEP 2
Turn on your Phone’s Bluetooth and select “Avantree Opera Plus” from the
Bluetooth menu.

User Manual Opera plus
17
EN
Troubleshooting
Below are some of the most common questions people have during setup.
Can I have audio through my TV’s speakers and wireless headphones at
the same time?
This completely depends on whether or not your TV supports the ability to
output audio to 2 sources simultaneously. You can try a few dierent methods
to test if your TV is capable of this or not -- please refer to avantree.com/opera-
plus/sound for more details.
Why don’t I get sound when watching Netix / Prime Video?
You may need to change your TV’s audio settings an additional time when
watching Netix / Prime Video. This can be due to the movie being in Dolby
Digital Surround Sound format, or because you’re watching with a separate
streaming device / cable box. While Netix / Prime Video is open, go into
your TV’s audio settings and make sure that the audio output is set to “PCM /
STEREO” and that “DOLBY” is turned OFF.
Why aren’t my headphones connecting to the transmitter?
……
For answers to questions like these and for a full FAQ list, you can visit
avantree.com/support/opera-plus, or you can contact us directly for additional
assistance.

User Manual
18
Opera plus
EN
Specications
Transmitter & Headphones
Headphones
Carrier frequency 2.4GHz
20Hz - 20KHz
Up to 164ft / 50m
Type C
5V/500mA-2A
Frequency response
Operating range
Power port
Input
Wireless tech 2.4G RF & BT5.2
HFP 1.7, HSP 1.2, A2DP 1.3, AVRCP 1.6
Lithium polymer battery, 650mAh
20H
3H
40mm
32Ω
96 dB
245g
BT supported proles
Battery life
Time to full charge
Battery
Driver size
Impedance
Sensitivity
Net weight
91
Contact Us
Support Tickets
Video Guide
Product Registration
Support Email
Support Numbers
FAQ
avantree.com/submit-a-ticket
avantree.com/opera-plus/video
See QR code on the product tag.
support@avantree.com
avantree.com/support/opera-plus
CA +1 800 232 2078 9am-6pm PST
US +1 800 232 2078 9am-6pm PST
UK +44 208 068 2023 9am-6pm GMT
DE
+49 322 2109 7297
11am-9pm CET
FR +33 17 634 0312 11am-9pm CET
IT +39 069 4803 330 9am-6pm CET
ES +34 93 1786 261 9am-6pm CET
AU +61 2 8310 9897 11am-7pm AEST
Mon-Fri
Mon-Fri
Mon-Sat
Mon-Sat
Mon-Sat
Mon-Sat
Mon-Sat
Mon-Fri

Manufacturer:
Avantronics Limited
Luohu District, Shenzhen 518000 China
+ 86 755 8228 5022 [email protected]
US Importer:
Avantree Corporation
San Jose, California 95119 USA
+1 800 232 2078 [email protected]
UK Importer:
Avantree Limited
Watford, WD180 0HQ UK
+44 20 8068 2023 [email protected]
Servicer in Europe:
GizmexGmbH,
Sternstr.67, 40479Dusseldorf,Germany
+49 322 2109 7297 [email protected]
EC REP
Model No.: BTHT-6190-P
Dispose of the packaging and this product in accordance with the latest provisions.
Z-PKQG-6190-P-V0