EN
FR
DE
IT
ES
NL
PL
PT
TR
SV
AR
Symbols
X7 Smart AFib (HEM-7380T1-EOSL)
ΏϳϓΕέΎϣγ7αϛ
Symboles/ Symbole/ Simboli/ Símbolos/
Symbolen/ Semboller/ Símbolos/ Symbole/
Symboler/
ίϭϣέϟ
Instruction Manual 1: Safety and Other Information
Mode d’emploi 1: Sécurité et autres informations
Gebrauchsanweisung1: Sicherheitshinweise und andere Informationen
Manuale di istruzioni 1: Sicurezza e altre informazioni
Manual de instrucciones 1: Seguridad y otra información
Gebruiksaanwijzing 1: Veiligheid en andere informatie
Kullanım kılavuzu 1: Güvenlik bilgileri ve diğer bilgiler.
Manual de Instruções 1: Segurança e outras informações
Instrukcja obsługi 1: bezpieczeństwo iinne informacje
Bruksanvisning1: Säkerhet och annan information
ϯέΧΕΎϣϭϠόϣϭϥΎϣϷ1ΕΩΎηέϹϝϳϟΩ
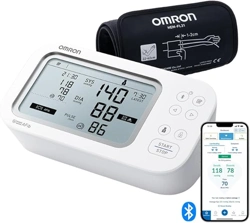
Automatic Upper Arm Blood Pressure Monitor
Tensiomètre automatique brassard
Automatisches Oberarm-Blutdruckmessgerät
Misuratore automatico di pressione arteriosa da braccio
Monitor de presión arterial automático de brazo
Automatische bovenarmbloeddrukmeter
Otomatik Üst Kol Kan Basıncı Ölçüm Cihazı
Medidor de tensão arterial automático de braço
Automatyczny ciśnieniomierz naramienny
Automatisk blodtrycksmätare för överarmen
ωέΫϟϰϠϋ΄ΑΕϳΑΛΗϠϟϝΑΎϘϟϲϟϵϡΩϟρϐοαΎϳϗίΎϬΟ

Overview
FR
Présentation générale
TR
Genel Bakış
DE
Überblick
PT
Descrição geral
IT
Presentazione del prodotto
PL
Przegląd
ES
Descripción general
SV
Översikt
NL
Overzicht
ΔϣΎϋΓέυϧ
AR
f
a
d
c
b
e
g
h
i
j
k
a Display Display Ekran Bildskärm
Affichage Pantalla Visor
ΔηΎηϟ
Display Scherm Wyświetlacz
b [Connection] button (Date/Time)
Bouton [Connexion] (Date/Heure)
Verbindungstaste (Datum/Uhrzeit)
Pulsante [Connessione] (Data/Ora)
Botón [Conexión] (Fecha/Hora)
Knop [Verbinding] (Datum/tijd)
[Bağlantı] düğmesi (Tarih/Saat)
Botão de [Ligação] (Data/Hora)
Przycisk [Połączenie] (Data/godzina)
[Anslutning]-knapp, (datum/tid)
ΕϗϭϟΦϳέΎΗϟ>ϝΎλΗϻ@έίϟ
c [Memory] button [Hafıza] düğmesi
Bouton [Mémoire] Botão [Memória]
Taste [Speicher] Przycisk [Pamięć]
Pulsante [Memoria] [Minne]-knapp
Botón [Memoria]
>ΓέϛΫϟ@έίϟ
Knop [Geheugen]
d [Forward]/[Backward] buttons
Boutons [Avant]/[Arrière]
Vor-/Zurück-Tasten
Pulsanti [Avanti]/[Indietro]
Botones [Siguiente]/[Atrás]
Knoppen [Vooruit]/[Terug]
[İleri]/[Geri] düğmeleri
Botões [Avançar]/[Retroceder]
Przyciski [Dalej]/[Wstecz]
[Framåt]/[Bakåt]-knappar
>ωϭΟέϟϡΩϘΗϟ@ϥέίϟ

e [User ID 1]/[User ID 2] buttons
Boutons [ID Utilisateur 1]/[ID Utilisateur 2]
Tasten für Benutzer-ID 1/2
Pulsanti [ID utente 1]/[ID utente 2]
Botones [ID de usuario 1]/[ID de usuario 2]
Knoppen [Gebruikers-ID 1]/[Gebruikers-ID 2]
[Kullanıcı Kimliği 1]/[Kullanıcı Kimliği 2] düğmeleri
Botões [ID de utilizador 1]/[ID de utilizador2]
Przyciski [Użytkownik1]/[Użytkownik2]
[Användar-ID1]/[Användar-ID2]-knappar
>˻ϡΩΧΗγϣϟΔϳϭϫ˺ϡΩΧΗγϣϟΔϳϭϫ@ϥέίϟ
f [START/STOP] button [START/STOP] düğmesi
Bouton [START/STOP] Botão [START/STOP]
[START/STOP]-Taste Przycisk [START/STOP]
Pulsante [START/STOP] [START/STOP]-knapp
Botón [START/STOP]
[START/STOP]
έίϟ
Knop [START/STOP]
g Air jack Hava jakı
Prise à air Tomada de ar
Luftschlauchbuchse Przyłącze powietrza
Presa per il tubo dell’aria Luftingång
Toma de aire
˯ϭϬϟϡϭρέΧαΑϘϣ
Luchtslangaansluiting
h AC adapter jack (for optional AC adapter)
Prise pour l’adaptateur secteur (pour adaptateur secteur en option)
Netzteilanschluss (für das optionale Netzteil)
Presa per l’alimentatore CA (per l’alimentatore CA opzionale)
Toma del adaptador de CA (para el adaptador de CA opcional)
Netadapteraansluiting (voor de optionele netadapter)
ACadaptörü jakı (isteğe bağlı ACadaptörü için)
Tomada de adaptador de CA (para adaptador de CA opcional)
Gniazdo zasilacza (do podłączania opcjonalnego zasilacza)
Nätadapterjack (för tillvalet nätadapter)
ϱέΎϳΗΧϻΩΩέΗϣϟέΎϳΗϟΊϳΎϬϣϟΩΩέΗϣϟέΎϳΗϟΊϳΎϬϣαΑϘϣ
i Battery compartment Pil bölmesi
Compartiment des piles Compartimento das pilhas
Batteriefach Komora baterii
Vano batterie Batterifack
Compartimento de las pilas
ΕΎϳέΎρΑϟΓέϳΟΣ
Batterijvak
j Air plug Hava tıpası
Prise de gonflage Ficha de ar
Luftschlauchstecker Wtyczka przewodu powietrza
Attacco del tubo dell’aria Luftkontakt
Conector para tubo de aire
˯ϭϬϟϡϭρέΧαΑΎϗ
Plug van de luchtslang
k Air tube Hava borusu
Tuyau à air Tubo de ar
Luftschlauch Przewód powietrza
Tubo dell’aria Luftslang
Tubo de aire
˯ϭϬϟϡϭρέΧ
Luchtslang
EN1
EN
EN
1. Introduction
Thank you for purchasing the OMRON Automatic Upper Arm Blood Pressure
Monitor. This blood pressure monitor uses the oscillometric method of blood
pressure measurement. This means this monitor detects your blood movement
through your brachial artery and converts the movements into a digital reading.
1.1 Safety Instructions
This instruction manual provides you with important information about the
OMRON Automatic Upper Arm Blood Pressure Monitor. To ensure the safe and
proper use of this monitor, READ and UNDERSTAND all of these instructions. If
you do not understand these instructions or have any questions, contact
your OMRON retail outlet or distributor before attempting to use this
monitor. For specific information about your own blood pressure, consult
with your physician.
1.2 Intended Use
Intended Purpose
This device is a digital monitor intended for use in measuring blood pressure and
pulse rate in adult patient population. The device can detect an irregular pulse
suggestive of Atrial Fibrillation (AFib). Please note that the device is not intended
to diagnose AFib. A diagnosis of AFib can only be confirmed by a physician
with an Electrocardiogram (ECG). If the AFib symbol appears, consult with your
physician.
Intended Patients
Adult patient population
Intended Users
Adult population who can understand this instruction manual.
Clinical Benefit
Patient’s blood pressure can be measured non-invasively and simply in the
home environment, and the possibility of AFib is detected from the pulse wave
obtained from the blood pressure measurement and provided to the user.
Type of Use
This monitor is intended to be multiple patient multiple use.
Limitation
Patient’s arm circumference must be 22-42cm.
Indication
This device is used by healthy individuals, patients with hypertension, patients
with health-conscious individuals, in a general household situation for the
following purpose.
- measure blood pressure and pulse rate
- evaluate the possibility of AFib
1.3 Receiving and Inspection
Remove this monitor and other components from the packaging and inspect
for damage. If this monitor or any other components is damaged, DO NOT USE
and consult with your OMRON retail outlet or distributor.
2. Important Safety Information
Read the Important Safety Information in this instruction manual before using
this monitor. Follow this instruction manual thoroughly for your safety.
Keep for future reference. For specific information about your own blood
pressure, consult with your physician.
2.1 Contraindications
• DO NOT use this monitor on an injured arm or an arm under medical
treatment.
• DO NOT apply the arm cuff on your arm while on an intravenous drip or
blood transfusion.
• DO NOT use this monitor on infants, toddlers, children or persons who
cannot express themselves.
2.2 Side Effects
• Taking measurements more often than necessary may cause bruising due to
blood flow interference.
• Inflating to a higher pressure than necessary may result in bruising of the
arm where the cuff is applied. NOTE: refer to “If your systolic pressure is
more than 210
mmHg” in section10 of instruction manual 2 for additional
information.
• Stop using this monitor and consult with your physician if you experience
skin irritation or discomfort.
2.3 Warning
Indicates a potentially hazardous situation
which, if not avoided, could result in death or
serious injury.
• DO NOT adjust medication (including altering your use of any drug or
treatment) based on readings from this blood pressure monitor. Take
medication as prescribed by your physician. ONLY a physician is qualified to
diagnose and treat high blood pressure and heart related conditions.
• NEVER diagnose or treat yourself based on your readings. ALWAYS consult
with your physician.
• The possible AFib screening feature evaluates for a possibility of AFib ONLY.
It will NOT detect other potentially life-threatening arrhythmias or diseases,
such as a possibility of other cardiac arrhythmias or heart attack.
• If you are experiencing any symptoms or concerns, consult with your
physician.
• DO NOT postpone/stop regular checkups or physician visits based on the
results that you are getting from this monitor.
• The possible AFib screening feature is not intended to be used for the users
who have already been diagnosed with AFib.

EN2
• This monitor may not detect a possibility of AFib in people with pacemakers
or defibrillators. People with pacemakers or defibrillators should therefore
not use this monitor to detect a possibility of AFib.
• DO NOT use this monitor in areas containing high frequency (HF) surgical
equipment, magnetic resonance imaging (MRI) equipment, computerized
tomography (CT) scanners. This may result in incorrect operation of the
monitor and/or cause an inaccurate reading.
• DO NOT use this monitor in oxygen rich environments or near flammable gas.
• Consult with your physician before using this monitor if you have common
arrhythmias such as atrial or ventricular premature beats or atrial fibrillation;
arterial sclerosis; poor perfusion; diabetes; pregnancy; pre-eclampsia or renal
disease. NOTE that any of these conditions in addition to patient motion,
trembling, or shivering may affect the measurement reading.
• To help avoid strangulation, keep the air tube and ACadapter cable away
from infants, toddlers and children.
• This product contains small parts that may cause a choking hazard if
swallowed by infants, toddlers and children.
Data Transmission
• After the pairing process is completed, this product always emits radio
frequencies (RF) in the 2.4GHz band. DO NOT use this product in locations
where RF is restricted, such as on an aircraft or in hospitals. Disable the
Bluetooth® feature in this monitor, or remove the batteries and unplug the
ACadapter when in RF restricted areas.
ACAdapter (optional accessory) Handling and Usage
• DO NOT use the ACadapter if this monitor or the ACadapter cable is
damaged. If this monitor or the cable is damaged, turn off the power and
unplug the ACadapter immediately.
• Plug the ACadapter into the appropriate voltage outlet. DO NOT use in a
multi-outlet plug.
• NEVER plug in or unplug the ACadapter from the electric outlet with wet hands.
• DO NOT disassemble or attempt to repair the ACadapter.
Battery Handling and Usage
• Keep the batteries out of the reach of infants, toddlers and children.
2.4
Precaution
Indicates a potentially hazardous situation which,
if not avoided, may result in minor or moderate
injury to the user or patient, or cause damage to
the equipment or other property.
• Consult with your physician before using this monitor on an arm where
intravascular access or therapy, or an arterio-venous (A-V) shunt, is present
because of temporary interference to blood flow and could result in injury.
• Consult with your physician before using this monitor if you have had a mastectomy
or lymph node clearance.
• Consult with your physician before using this monitor if you have severe
blood flow problems or blood disorders as cuff inflation can cause bruising.
• ONLY inflate the arm cuff when it is applied on your upper arm.
• Remove the arm cuff if it does not start deflating during a measurement.
• DO NOT use this monitor for any purpose other than measuring blood pressure
and/or detecting a possibility of AFib.
• During measurement, make sure that no mobile device or any other
electrical device that emits electromagnetic fields is within 30cm of this
monitor. This may result in incorrect operation of the monitor and/or cause
an inaccurate reading.
• DO NOT disassemble or attempt to repair this monitor or other components.
This may cause an inaccurate reading.
• DO NOT use in a location where there is moisture or a risk of water splashing
this monitor. This may damage this monitor.
• DO NOT use this monitor in a moving vehicle such as in a car or on an aircraft.
• DO NOT drop or subject this monitor to strong shocks or vibrations.
• DO NOT use this monitor in places with high or low humidity or high or low
temperatures. Refer to section6.
• During measurement, observe the arm to ensure that the monitor is not
causing prolonged impairment to blood circulation.
• DO NOT use this monitor in high-use environments such as medical clinics or
physician offices.
• DO NOT use this monitor with other medical electrical (ME) equipment
simultaneously. This may result in incorrect operation of the devices and/or
cause an inaccurate reading.
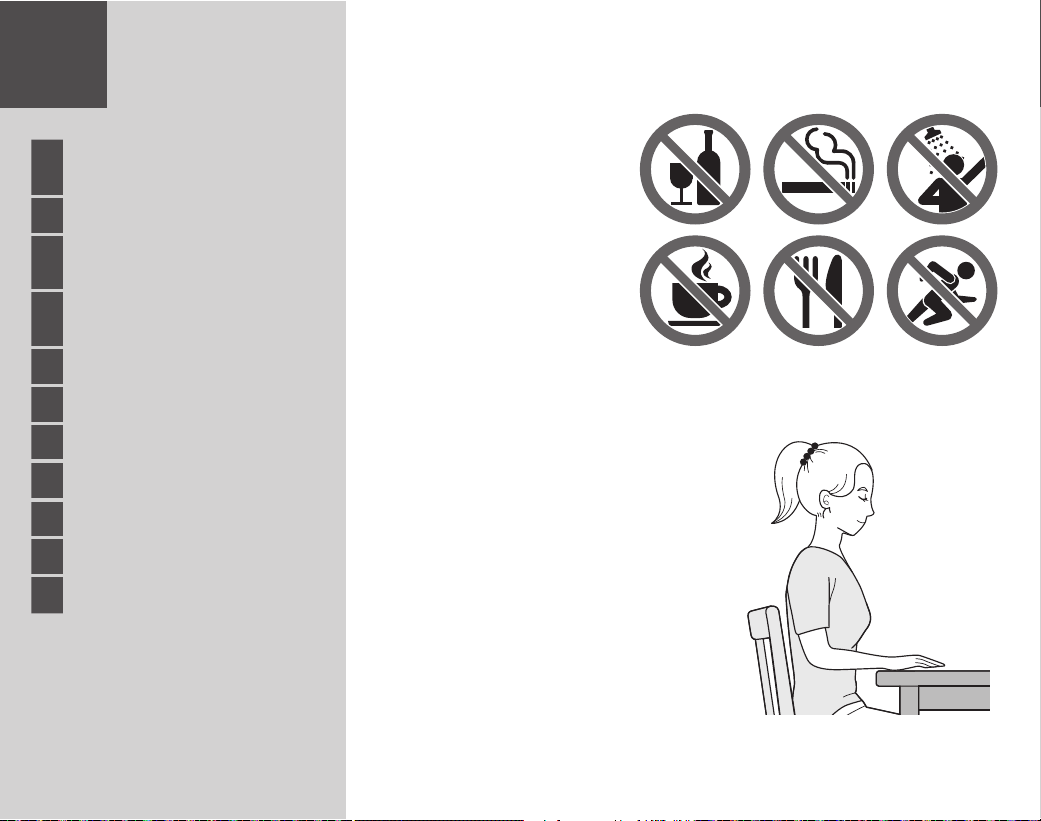
• Avoid bathing, drinking alcohol or caffeine, smoking, exercising and eating
for at least 30 minutes before taking a measurement.
• Rest for at least 5 minutes before taking a measurement.
• Remove tight-fitting or thick clothing from your arm while taking a
measurement.
• Remain still and DO NOT talk while taking a measurement.
• ONLY use the arm cuff on persons whose arm circumference is within the
specified range of the cuff.
• Ensure that this monitor has acclimated to room temperature before taking
a measurement. Taking a measurement after an extreme temperature
change could lead to an inaccurate reading. It is recommended that you wait
for approximately 2 hours for the monitor to warm up or cool down when
the monitor is used in an environment within the temperature specified
as operating conditions after it is stored either at the maximum or at the
minimum storage temperature. For additional information on operating and
storage / transport temperature, refer to section6.
• DO NOT use this monitor after the durable period has ended. Refer to
section6.
• DO NOT crease the arm cuff or the air tube excessively.
• DO NOT fold or kink the air tube while taking a measurement. This may cause
an injury by interrupting blood flow.
• To unplug the air plug, pull on the plastic air plug at the base of the tube, not
the tube itself.
EN3
EN
• ONLY use the ACadapter, arm cuff, batteries and accessories specified for
this monitor. Use of unsupported ACadapters, arm cuffs and batteries may
damage and/or may be hazardous to this monitor.
• ONLY use the approved arm cuff for this monitor. Use of other arm cuffs may
result in incorrect readings.
• Read and follow the “Correct Disposal of This Product” in section7 when
disposing of the device and any used accessories or optional parts.
Data Transmission
• DO NOT replace the batteries or unplug the ACadapter while your readings
are being transferred to your smart device. This may result in incorrect
operation of this monitor and failure to transfer your blood pressure data.
ACAdapter (optional accessory) Handling and Usage
• Fully insert the ACadapter into the outlet.
• When unplugging the ACadapter from the outlet, be sure to safely pull from
the ACadapter. DO NOT pull from the ACadapter cable.
• When handling the ACadapter cable:
DO NOT damage it. / DO NOT break it. / DO NOT tamper with it. / DO NOT
pinch it. / DO NOT forcibly bend or pull it. / DO NOT twist it. / DO NOT use it if
it is gathered in a bundle. / DO NOT place it under heavy objects.
• Wipe any dust off of the ACadapter.
• Unplug the ACadapter when not in use.
• Unplug the ACadapter before wiping this monitor.
Battery Handling and Usage
• DO NOT insert batteries with their polarities incorrectly aligned.
• ONLY use 4 “AA” alkaline or manganese batteries with this monitor. DO NOT
use other types of batteries. DO NOT use new and used batteries together.
DO NOT use different brands of batteries together.
• Remove the batteries if this monitor will not be used for a long period of
time.
• If battery fluid should get in your eyes, immediately rinse with plenty of clean
water. Consult with your physician immediately.
• If battery fluid should get on your skin, wash your skin immediately with
plenty of clean, lukewarm water. If irritation, injury or pain persists, consult
with your physician.
• DO NOT use batteries after their expiration date.
• Periodically check the batteries to ensure they are in good working
condition.
2.5 General Notices
• To stop a measurement, press the [START/STOP] button while taking a
measurement.
• When you take a measurement on the right arm, the air tube should be at
the side of your elbow. Be careful not to rest your arm on the air tube.
• Blood pressure may differ between the right and left arm, and may result in a
different measurement value. Always use the same arm for measurements. If
the values between both arms differ substantially, check with your physician
on which arm to use for your measurements.
• Be aware that OMRON will not be responsible for the loss of data and/or
information in the app.
• “OMRONconnect” is the only app that we recommend to use with your
monitor to transfer data correctly.
• When using an optional ACadapter, make sure not to place your monitor in
a location where it is difficult to plug and unplug the ACadapter.
Battery Handling and Usage
• Disposal of used batteries should be carried out in accordance with local
regulations.
• The supplied batteries may have a shorter life span than new batteries.
• Replacing batteries will not delete previous readings.
EN4
•
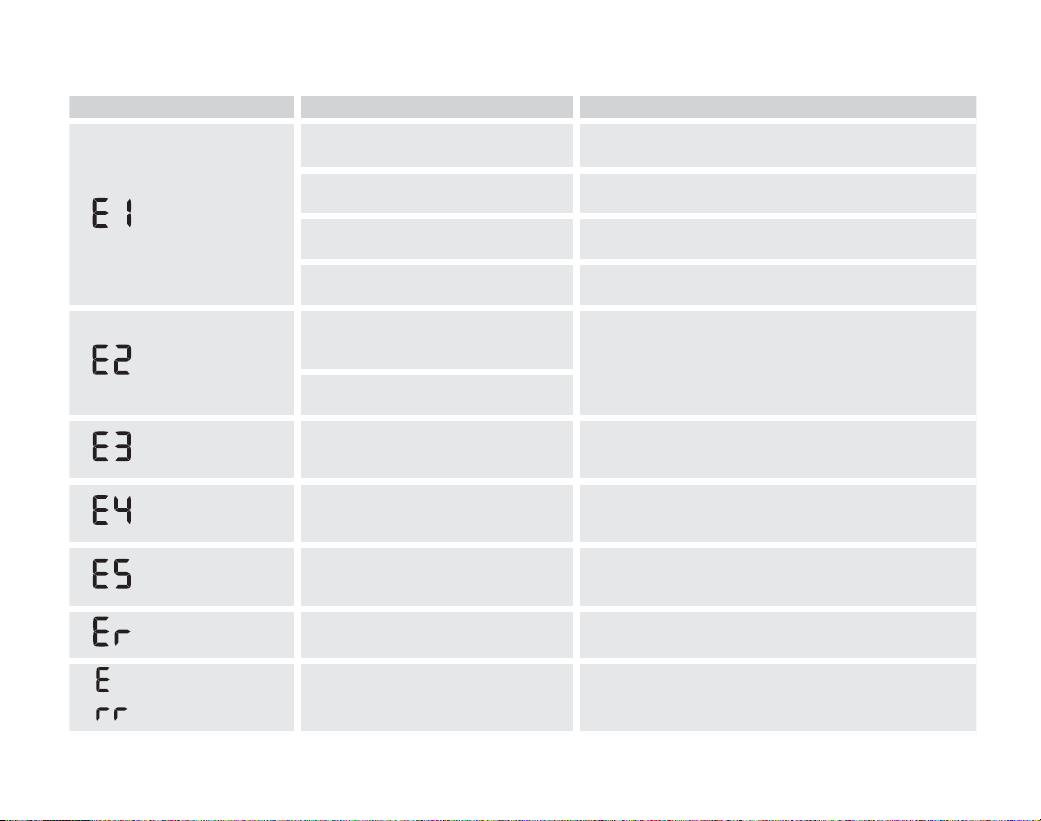
3. Error Messages and Troubleshooting
If any of the below problems occur during measurement, check to make sure that no other electrical device is within 30cm. If the problem persists, please refer to
the table below.
Display/Problem Possible Cause Solution
appears or the arm
cuff does not inflate.
The [START/STOP] button was pressed
while the arm cuff is not applied.
Press the [START/STOP] button again to turn the monitor
off.
Air plug is not completely plugged
intothe monitor.
Insert the air plug securely.
The arm cuff is not applied correctly. Apply the arm cuff correctly, then take another
measurement. Refer to section8 of instruction manual 2.
Air is leaking from the arm cuff. Replace the arm cuff with a new one. Refer to section15 of
instruction manual 2.
appears or a
measurement
cannot be
completed after the
arm cuff inflates.
Moving or talking during a measurement
causes the arm cuff to not inflate
sufficiently.
Remain still and do not talk during a measurement. If “E2”
appears repeatedly, inflate the arm cuff manually until the
systolic pressure is 30 to 40mmHg above your previous
readings. Refer to section10 of instruction manual 2.
The systolic pressure is above 210mmHg
and a measurement cannot be taken.
appears
The arm cuff is inflated exceeding the
maximum allowable pressure.
Do not touch the arm cuff and/or bend the air tube while
taking a measurement. If inflating the arm cuff manually,
refer to section10 of instruction manual 2.
appears
Moving or talking during a measurement
results in vibrations that disrupt the
measurement.
Remain still and do not talk during a measurement.
appears
The pulse rate is not detected correctly. Apply the arm cuff correctly, then take another
measurement. Refer to section8 of instruction manual 2.
Remain still and sit correctly during a measurement.
appears
The monitor has malfunctioned. Press the [START/STOP] button again. If “Er” still appears,
contact your OMRON retail outlet or distributor.
appears
The monitor cannot connect to a smart
device or transmit data correctly.
Follow the instructions shown in the “OMRONconnect” app.
If the “Err” still appears after checking the app, contact your
OMRON retail outlet or distributor.
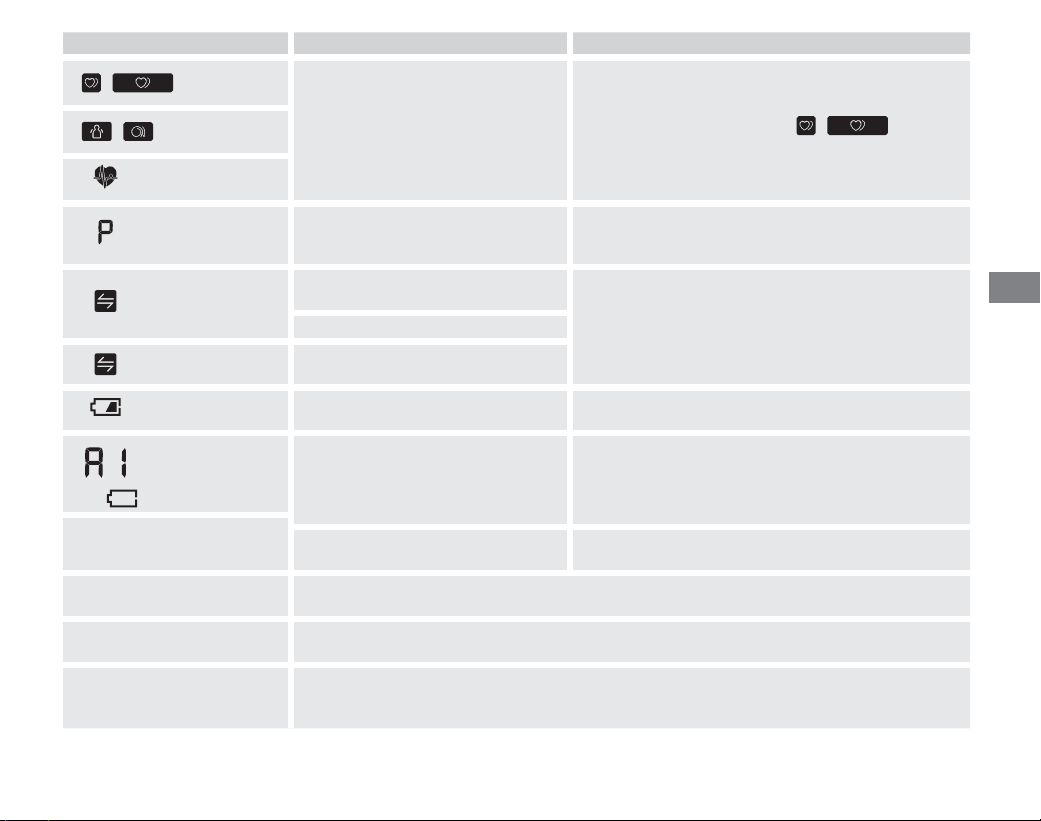
EN5
EN
Display/Problem Possible Cause Solution
/ appears
The pulse rate is not detected correctly. Apply the arm cuff correctly, then take another
measurement. Refer to section8 of instruction manual 2.
Remain still and sit correctly during a measurement.
If the irregular heartbeat symbol “
/ ” continues
to appear, it is recommended that you consult with your
physician.
/ appears
does not flash during
a measurement
flashes
The monitor is waiting for pairing with
the smart device.
Refer to section5 of instruction manual 2 for pairing your
monitor with your smart device, or press the [START/STOP]
button to cancel pairing and turn your monitor off.
flashes
There are more than 80 readings stored
in memory.
Pair or transfer your readings to the “OMRONconnect”
app so you can keep them in memory in the app, and this
symbol disappears.
The date and time is not set.
appears
100 readings are stored in memory, and
new readings will replace the old readings.
flashes
Batteries are low. Replacing all 4 batteries with new ones is recommended.
Refer to section4 of instruction manual 2.
and
appears, or the
monitor is turned off
unexpectedly during
a measurement.
Batteries are depleted. Immediately replace all 4 batteries with new ones. Refer to
section4 of instruction manual 2.
Nothing appears on the display
of the monitor.
Battery polarities are not properly
aligned.
Check the battery installation for proper placement. Refer to
section4 of instruction manual 2.
Readings appear too high or too
low.
Blood pressure varies constantly. Many factors including stress, time of day, and/or how you apply the
arm cuff, may affect your blood pressure. Review sections 2, 8 and 9 of instruction manual 2.
Any other communication issue
occurs.
Follow the instructions shown in the smart device, or visit the “Help” section in the “OMRONconnect”
app for further help. If the problem still persists, contact your OMRON retail outlet or distributor.
Any other problem occurs.
Press the [START/STOP] button to turn the monitor off, then press it again to take a measurement. If
the problem continues, remove all batteries and wait for 30seconds. Then re-install the batteries. If the
problem still persists, contact your OMRON retail outlet or distributor.

EN6
4. Limited Warranty
Thank you for buying an OMRON product. This product is constructed of
high quality materials and great care has been taken in its manufacturing.
Itis designed to give you a high level of comfort, provided that it is properly
operated and maintained as described in the instruction manual.
This product is warranted by OMRON for a period of 5 years after the date of
purchase. The proper construction, workmanship and materials of this product
is warranted by OMRON. During this period of warranty OMRON will, without
charge for labour or parts, repair or replace the defect product or any defective
parts.
The warranty does not cover any of the following:
A. Transport costs and risks of transport.
B. Costs for repairs and / or defects resulting from repairs done by unauthorised
persons.
C. Periodic check-ups and maintenance.
D. Failure or wear of optional parts or other attachments other than the main
device itself, unless explicitly warranted above.
E. Costs arising due to non-acceptance of a claim (those will be charged for).
F. Damages of any kind including personal caused accidentally or from misuse.
G. Calibration service is not included within the warranty.
H. Optional parts have a one (1) year warranty from date of purchase. Optional
parts include, but are not limited to the following items: cuff and cuff tube.
Should warranty service be required please apply to the dealer whom the
product was purchased from or an authorised OMRON distributor. For the
address refer to the product packaging / literature or to your specialised
retailer. If you have difficulties in finding OMRON customer services, visit our
website (www.omron-healthcare.com) for contact information.
Repair or replacement under the warranty does not give rise to any extension
or renewal of the warranty period.
The warranty will be granted only if the complete product is returned together
with the original invoice / cash ticket issued to the consumer by the retailer.
5. Maintenance
5.1 Maintenance
To protect your monitor from damage, follow the directions below:
Changes or modifications not approved by the manufacturer will void the user
warranty.
Precaution
DO NOT disassemble or attempt to repair this monitor or other components.
This may cause an inaccurate reading.
5.2 Storage
• Keep your monitor and other components in the storage case when not in
use.
• Store your monitor and other components in a clean, safe location.
1. Remove the arm cuff from the monitor.
The air plug is designed to fit securely into the monitor so it does not
accidentally unplug from the monitor when in use.
When removing the arm cuff from the monitor, pull the air plug out from the
monitor in a straight motion, holding the plug and not using the tube. You
will hear a “click” sound as the cuff plug is removed from the monitor.
Precaution
To unplug the air plug, pull on the plastic air plug at the base of the tube, not
the tube itself.
2. Gently fold the air tube into the arm cuff. Note: Do not bend or crease the
air tube excessively.
3. Place your monitor and other components in the storage case.
• Do not store your monitor and other components:
• If your monitor and other components are wet.
• In locations exposed to extreme temperatures, humidity, direct sunlight,
dust or corrosive vapors such as bleach.
• In locations exposed to vibrations or shocks.
5.3 Wiping the Monitor
• Do not use any abrasive or volatile cleaners.
• Use a soft dry cloth or a soft cloth moistened with mild (neutral) detergent to
wipe your monitor and arm cuff, and then wipe them with a dry cloth.
• Do not wash or immerse your monitor and arm cuff or other components in
water.
• Do not use gasoline, thinners or similar solvents to wipe your monitor and
arm cuff or other components.
5.4 Calibration and Service
• The accuracy of this blood pressure monitor has been carefully tested and is
designed for a long service life.
• It is generally recommended to have the unit inspected every two years to
ensure correct functioning and accuracy. Please consult your authorised
OMRON dealer or the OMRON Customer Service at the address given on the
packaging or attached literature.
EN7
EN
6. Specifications
Product Category Electronic Sphygmomanometers
Product description Automatic Upper Arm Blood Pressure
Monitor
Model (Code) X7Smart AFib (HEM-7380T1-EOSL)
Display LCD digital display
Cuff pressure range 0 to 299mmHg
Blood pressure
measurement range
SYS: 60 to 260mmHg
DIA: 40 to 215mmHg
Pulse measurement range
40 to 180 beats / min.
Accuracy Pressure: ±3mmHg
Pulse: ±5% of display reading
Inflation Automatic by electric pump
Deflation Automatic pressure release valve
Measurement method Oscillometric method
Transmission method Bluetooth
®
Low Energy
Wireless communication Frequency range:
2.4GHz (2400 - 2483.5 MHz) /
Modulation: GFSK
Effective radiated power: <20dBm
Operation mode Continuous operation
IP classification Monitor: IP21
Optional ACadapter: IP21 (HHP-CM01)
or IP22 (HHP-BFH01)
Rating DC6V 4W
Power source 4 “AA” batteries 1.5 V or optional
ACadapter (INPUT AC 100 - 240V
50 - 60Hz 0.12 - 0.065A)
Battery life Approx. 700 measurements
(using new alkaline batteries)
The number of times may decrease when
using TruRead mode because one TruRead
mode consists of 3 regular measurements.
Durable period (Service
life)
Monitor: 5 years or the time when
reaching 30000times of use. /
Cuff: 5 years or the time when
reaching10000times of use. /
Optional ACadapter: 5 years
Operating conditions +10 to +40°C / 15 to 90% RH
(non-condensing) / 800 to 1060hPa
Storage / Transport
conditions
-20 to +60°C / 10 to 90% RH
(non-condensing)
Weight Monitor: approx. 440g
(notincluding batteries)
Arm cuff: approx. 163g
Dimensions Monitor: approx. 191mm (W) × 85mm
(H) × 117mm (L) / Arm cuff: approx.
145mm × 532mm (air tube: 750mm)
Cuff circumference
applicable to the monitor
22 to 42cm
Memory Stores up to 100 readings per user
Contents Monitor, arm cuff (HEM-FL31), 4 “AA”
batteries, Instruction Manual 1 and 2,
storage case
Protection against
electric shock
Internally powered ME equipment
(When using only batteries)
Class II ME equipment (Optional
ACadapter)
Applied part Type BF (arm cuff)
Note
• These specifications are subject to change without notice.

EN8
• This monitor is clinically investigated according to the requirements
of ENISO81060-2:2014 and complies with ENISO81060-2:2014 and
ENISO81060-2:2019 + A1:2020 (excluding pregnant and pre-eclampsia
patients). In the clinical validation study, K5 was used on 85 subjects for
determination of diastolic blood pressure.
• This device has been validated for use on pregnant and pre-eclampsia patients
according to the Modified European Society of Hypertension Protocol*.
• This device has been validated for use on diabetic (Type II) population**.
• IP classification is degrees of protection provided by enclosures in
accordance with IEC60529. This monitor and optional ACadapter are
protected against solid foreign objects of 12.5mm diameter and greater such
as a finger. The monitor and optional ACadapter HHP-CM01 are protected
against vertically falling water drops which may cause issues during a normal
operation. The optional ACadapter HHP-BFH01 is protected against oblique
falling water drops which may cause issues during a normal operation.
• Operation mode classification complies with IEC 60601-1.
• Communication with a smart device is paired and encrypted according to
Bluetooth Low Energy specifications. Pairing requires user interaction.
* Topouchian J et al. Vascular Health and Risk Management 2018:14189-197
** Chahine M.N. et al. Medical Devices: Evidence and Research 2018:1111-20
About a wireless communication interference
The Bluetooth option in the product is used to connect to dedicated apps
on mobile devices to synchronize date/time data from mobile device to the
product, and to synchronize measurement data from the product to mobile
device. Further handling of the data on the mobile device is up to the user’s
discretion. This product operates in an unlicensed ISM band at 2.4GHz where
any third party can intercept the radio waves, willfully or accidentally, for any
unknown purpose. In the event this product is used near other wireless devices
such as microwave and wireless LAN, which operate on the same frequency
band as this product, there is a possibility that interference may occur. If
interference occurs, stop the operation of the other devices or relocate this
product away from other wireless devices before attempting to use it.
7. Correct Disposal of This Product
(WasteElectrical & Electronic Equipment)
This marking shown on the product or its literature, indicates that
it should not be disposed of, with other household wastes at the
end of its working life.
To prevent possible harm to the environment or human health
from uncontrolled waste disposal, please separate this product
from other types of wastes and recycle it responsibly to promote
the sustainable reuse of material resources.
Household users should contact either the retailer where they purchased this
product, or their local government office, for details of where and how they can
return this item for environmentally safe recycling.
Business users should contact their supplier and check the terms and
conditions of the purchase contract. This product should not be mixed with
other commercial waste for disposal.
8. Important Information regarding
Electromagnetic Compatibility (EMC)
HEM-7380T1-EOSL conforms to the EN60601-1-2 Electromagnetic
Compatibility (EMC) standard.
Further documentation in accordance with this EMC standard is available at:
https://healthcare.omron.com/electro-magnetic-compatibility.
Refer to the EMC information for HEM-7380T1-EOSL on the website.
9. Guidance and Manufacturer’s Declaration
• Hereby, OMRONHEALTHCARECo.,Ltd., declares that the radio equipments
type HEM-7380T1-EOSL is in compliance with Directive 2014/53/EU.
• The full text of the EU declaration of conformity is available at the following
internet address: www.omron-healthcare.com
• This OMRON product is produced under the strict quality system of
OMRONHEALTHCARECo.,Ltd., Japan. The Core component for OMRON
blood pressure monitors, which is the Pressure Sensor, is produced in Japan.
The AFib algorithm was developed using several databases published by
PhysioNet that are available under the ODC Attribution License.
For more information, please visit the product page:
www.omron-healthcare.com
• Please report to the manufacturer and the competent authority of the
Member State in which you are established about any serious incident that
has occurred in relation to this device.
EN9
EN
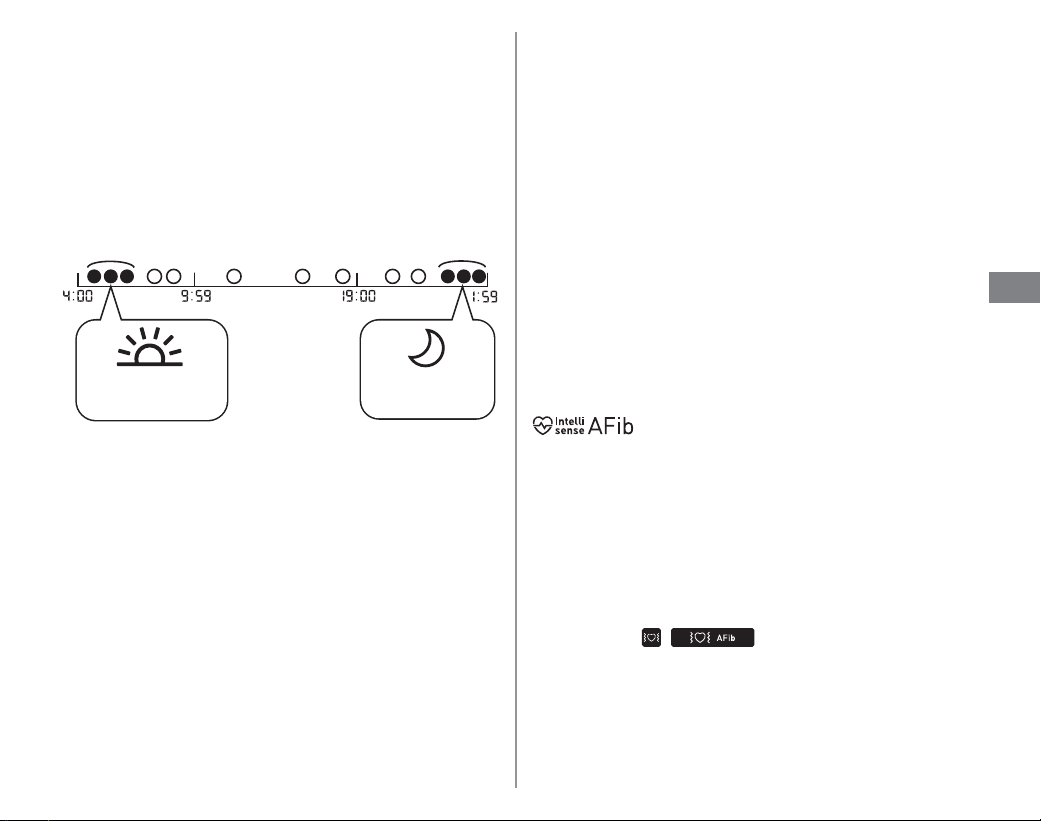
10. How to Calculate Weekly Averages
Morning Weekly Average Calculation
This is the average for the measurements taken during the morning (4:00-9:59)
between Sunday and Saturday. The 2 or 3 readings taken within the first
10minute timeframe in the morning between 4:00-9:59 will be used to
calculate the morning average for each day.
Evening Weekly Average Calculation
This is the average for the measurements taken during the evening (19:00-1:59)
between Sunday and Saturday. The 2 or 3 readings taken within the last
10minute timeframe in the evening between 19:00-1:59 will be used to
calculate the evening average for each day.
Within 10 min.
Measurements
in the morning
Measurements
in the evening
Within 10 min.
11. Additional Information
What is Blood Pressure?
Blood pressure is a measure of the force of blood flowing against the walls of
the arteries. Arterial blood pressure is constantly changing during the course of
the heart’s cycle.
The highest pressure in the cycle is called the Systolic Blood Pressure; the lowest
is the Diastolic Blood Pressure. Both pressures, the Systolic and Diastolic, are
necessary to enable a physician to evaluate the status of a patient’s blood pressure.
What is Arrhythmia?
Arrhythmia is a condition where the heartbeat rhythm is abnormal due to flaws in
the bio-electrical system that drives the heartbeat. Typical symptoms are skipped
heartbeats, premature contraction, an abnormally rapid (tachycardia) or slow
(bradycardia) pulse.
What is AFib?
Atrial fibrillation (AFib) means the most common type of non-sinus
tachyarrhythmia. This symptom may create blood clots. This can lead to major
health problems, including strokes, transient ischemic attacks (TIAs), and
pulmonary emboli (PEs); depending which chamber of the heart has the blood
clot in it.
Possible AFib Detection
OMRON’s trademarked technology alerts you once possible AFib is detected,
even with a single measurement.
The monitor will notify you of a possibility of AFib if your monitor determines
an irregularity from pulse to pulse intervals during a measurement.
The possible AFib screening feature ONLY evaluates for a possibility of AFib
after taking a measurement. It does NOT continuously monitor your heart
and therefore cannot alert you if AFib happens at any other time. This monitor
cannot detect all forms of AFib. If the irregularity of the heart rhythm is too
small, it may not be detected. For example, if there is an abnormality in the
conduction between the atria and the ventricle, the heart rhythm may be in
sinus rhythm, in which case a possibility of AFib cannot be detected by this
monitor.
The state in which “
/ ” symbol is displayed can influence
your blood pressure measurements and make it difficult to get an accurate
reading. If this occurs, it is recommended that you consult with your physician.
EN10
What is the difference between the possible AFib screening
feature and ECG?
The possible AFib screening feature uses pulse wave detection to detect a
possibility of AFib. ECG measures the electrical activity of the heart and can be
used by a physician to diagnose AFib.
If the “ / ” symbol does not appear, does it mean
there is no possibility of AFib?
Even if the “ / ” symbol does not appear, there is still a
possibility of AFib. If taking a measurement at a time when AFib does not occur,
possible AFib might not be detectable. This monitor cannot detect all forms of
AFib.
Warning
• The possible AFib screening feature evaluates for a possibility of AFib ONLY.
It will NOT detect other potentially life-threatening arrhythmias or diseases,
such as a possibility of other cardiac arrhythmias or heart attack.
Should I consult with my physician if the “ / ”
symbol appears?
It is recommended that you consult with your physician if the
“
/ ” symbol appears. This symbol may be displayed for other
reasons, such as other heart arrhythmias.
What should I do if the “ / ” symbol sometimes
appears?
AFib does not always have symptoms. It is recommended that you consult
with, and follow the directions of your physician.
I have been diagnosed with AFib by my physician, but the
“
/ ” symbol does not appear.
AFib may not occur at the time of specific blood pressure measurements.
It is recommended that you consult with your physician regularly.
Is the blood pressure reading reliable when the
“
/ ” symbol or the irregular heartbeat symbol
“
/ ” appears?
AFib
or an irregular heartbeat can influence your blood pressure measurements
and make it difficult to get an accurate reading. Repeated measurements
may be required to overcome variabilities.* The monitor will indicate an error
message (E5) if the influence of the irregular heartbeat is too severe to give
a measurement result. If this occurs repeatedly, it is recommended that you
consult with your physician.
* O’Brien E, et al.; J Hypertens. 2003;21:821-848.
SD1
Symbols Description
FR
Description des symboles
TR
Simgelerin Açıklaması
DE
Beschreibung der Symbole
PT
Descrição dos símbolos
IT
Descrizione dei simboli
PL
Opis symboli
ES
Descripción de los símbolos
SV
Beskrivning av symboler
NL
Beschrijving van symbolen
ίϭϣέϟΡέη
AR
1.
2. 3.
IP XX
4.
5. 6. 7.
UDI
8.
9. 10. 11. 12.
13. 14. 15. 16.
,
17. 18. 19. 20.
21. 22. 23. 24.
25. 26. 27.
X
YYY
1.
Applied part - Type BF Degree of protection against electric shock
(leakage current)
Pièce appliquée - Type BF Degré de protection contre les chocs électriques
(courant de fuite)
Anwendungsteil– Typ BF Schutz vor Stromschlägen (Ableitstrom)
Parti applicate - Tipo BF Livello di protezione contro le folgorazioni (corrente
di dispersione)
Partes en contacto: Tipo BF Grado de protección contra descargas eléctricas
(corriente de fuga)
Toegepast onderdeel - Type BF-beschermingsgraad tegen elektrische
schokken (lekstroom)
Uygulanan parça - Tip BF Elektrik çarpmasına karşı koruma derecesi (kaçak
akım)
Parte aplicada - Tipo BF Grau de proteção contra choques elétricos (corrente
de fuga)
Część wchodząca w kontakt z ciałem pacjenta — typu BF (stopień ochrony
przed porażeniem prądem (prąd upływu))
Patientansluten del. Skyddsnivå mot elstöt (läckström): typ BF
%)ωϭϧϠϟΏέγΗϣϟέΎϳΗϟΔϳΎΑέϬϛϟΕΎϣΩλϟΩοΔϳΎϣΣϟΔΟέΩϖΑρϣϟ˯ίΟϟ
2.
Class II equipment. Protection against electric shock
Équipement de classe II. Protection contre les chocs électriques
Gerät der Klasse II. Schutz vor Stromschlägen
Apparecchiatura di Classe II. Protezione contro le folgorazioni
Equipo de Clase II. Protección contra descargas eléctricas
Apparatuur van Klasse II. Bescherming tegen elektrische schokken
Sınıf II ünite. Elektrik çarpmasına karşı koruma
Equipamento da Classe II. Proteção contra choques elétricos
Urządzenie klasy II. Ochrona przed porażeniem prądem
Klass II-apparat. Skydd mot elstöt
ΔϳΎΑέϬϛϟΕΎϣΩλϟΩοΔϳΎϣΣϟ,,ΔϔϟϥϣίΎϬΟ

SD2
3.
Ingress protection degree provided by IEC60529
Degré de protection selon CEI60529
Grad des Eindringschutzes gemäß IEC60529
Livello di protezione IP in base a IEC60529
Grado de protección según la norma internacional IEC60529
Beschermingsklasse volgens IEC60529
Su girmesine karşı koruma derecesi IEC 60529 tarafından verilmiştir
Grau de proteção contra entradas indicado pela IEC60529
Stopień ochrony wg IEC60529
Kapslingsklass i enlighet med IEC60529
,(&έΎϳόϣΔργϭΑΔϣΩϘϣϟϝϭΧΩϟΔϳΎϣΣΔΟέΩ
4.
CE Marking
Marquage CE
CE-Kennzeichnung
Contrassegno CE
Marcado CE
CE-merkteken
CE İşareti
Marca CE
Oznaczenie CE
CE-märkning
(CEΔϳΑϭέϭϷΔϧΟϠϟϊϣϖϓϭΗϟΔϣϼϋ
5.
UKCA Marking
Marquage UKCA
UKCA-Kennzeichnung
Marchio UKCA
Marcado UKCA
UKCA-markering
UKCA İşareti
Marcação UKCA
Oznakowanie UKCA
UKCA-märkning
8.&$Δϣϼϋ
6.
Serial number
Numéro de série
Seriennummer
Numero di serie
Número de serie
Serienummer
Seri numarası
Número de série
Numer serii
Serienummer
ϝγϠγΗϣϟϡϗέϟ
7.
Unique device identifier
Identifiant unique des dispositifs
Produktidentifizierungsnummer
Identificatore univoco del dispositivo
Identificador único del producto
Unieke apparaat-ID
Benzersiz cihaz tanımlayıcısı
Identificador de dispositivo único
Niepowtarzalny kod identyfikacyjny
wyrobu
Unik produktidentifiering
ΩϳέϔϟίΎϬΟϟϑ
˷
έόϣ
8.
Medical device
Dispositif médical
Medizinprodukt
Dispositivo medico
Producto sanitario
Medisch apparaat
Tıbbi cihaz
Dispositivo médico
Wyrób medyczny
Medicinteknisk produkt
ϲΑρίΎϬΟ
9.
Temperature limitation
Limitation de température
Temperaturbegrenzung
Limite di temperatura
Limitación de la temperatura
Temperatuurbegrenzing
Sıcaklık sınırlaması
Limite de temperatura
Ograniczenia dot. temperatury
Temperaturgräns
ΔΑγΎϧϣϟΓέέΣϟΔΟέΩΩϭΩΣ
10.
Humidity limitation
Limitation d’humidité
Luftfeuchtigkeitsbegrenzung
Limite di umidità
Limitación de la humedad
Vochtigheidsbegrenzing
Nem sınırlaması
Limite de humidade
Ograniczenia dot. wilgotności
Fuktighetsgräns
ΔΑγΎϧϣϟΔΑϭρέϟΩϭΩΣ
11.
Atmospheric pressure limitation
Limitation de pression atmosphérique
Luftdruckbegrenzung
Limite di pressione atmosferica
Limitación de la presión atmosférica
Luchtdrukbegrenzing
Atmosferik basınç sınırlaması
Limite de pressão atmosférica
Ograniczenia dot. ciśnienia
atmosferycznego
Gräns för atmosfäriskt tryck
ΏγΎϧϣϟϱϭΟϟρϐοϟΩϭΩΣ
12.
Indication of connector polarity
Indication de la polarité des connecteurs
Anzeige der Steckerpolarität
Indicazione della polarità dei connettori
Indicación de la polaridad del conector
Indicatie van polariteit van aansluiting
Bağlantı polarite göstergesi
Indicação da polaridade do conector
Oznaczenie biegunowości złącza
Indikering av kontaktpoler
ϝλϭϣϟΔϳΑρϘϟέϳηΗΔϣϼϋ

SD3
13.
For indoor use only
Pour un usage à l’intérieur uniquement
Nur für die Nutzung in Innenbereichen
Solo per uso in interni
Para uso solo en interiores
Alleen voor gebruik binnenshuis
Sadece iç mekanda kullanım için
Apenas para utilização em interior
Wyłącznie do użytku wewnętrznego
Endast för inomhusbruk
ρϘϓΔϘϠϐϣϟϖρΎϧϣϟϲϓϡΩΧΗγϼϟϟΎλ
14.
OMRON’s trademarked technology alerts you once possible AFib is detected, even with a
single measurement.
La technologie brevetée d’OMRON vous alerte dès qu’un risque de fibrillation auriculaire est
détecté, même avec une seule mesure.
Die markenrechtlich geschützte Technologie von OMRON warnt bei möglichem
Vorhofflimmern– auch bei einer Einzelmessung.
La tecnologia brevettata da OMRON avvisa l’utilizzatore una volta rilevata la potenziale
presenza di fibrillazione atriale, anche con una misurazione singola.
La tecnología de OMRON le notifica la detección de una posible fibrilación auricular incluso
con una única medición.
De technologie voor bloeddrukmeting onder handelsmerk van OMRON waarschuwt u
wanneer mogelijk AFib is gedetecteerd, zelfs bij een enkele meting.
OMRON'un ticari markalı teknolojisi, tek bir ölçümle bile olası AFib tespit edildiğinde sizi uyarır.
A tecnologia protegida por marca comercial da OMRON alerta-o se for detetada uma possível
fibrilhação auricular, mesmo com uma única medição.
Opatrzona znakiem towarowym technologia firmy OMRON ostrzega o wykryciu potencjalnego
migotania przedsionków, nawet w przypadku pojedynczego pomiaru.
OMRONs varumärkesskyddade teknik varnar dig när möjligt AFib detekteras, redan efter en
enda mätning.
ΩΣϭαΎϳϗϊϣϰΗΣˬϝϣΗΣϣϲϧϳΫϥΎϔΟέϑΎηΗϛΩέΟϣΑϙϬϳΑϧΗΑˬΔϳέΎΟΗΔϣϼόΑΔϠΟγϣϟ20521ΔϳϧϘΗϡϭϘΗ
15.
Identifier of cuffs compatible for the device
Identificateur des brassards compatibles avec l’appareil
Kennzeichnung der mit dem Gerät kompatiblen Manschetten
Identifica i bracciali compatibili con il dispositivo
Identificador para manguitos compatibles con el dispositivo
Identificatie van manchetten die compatibel zijn met het apparaat
Cihaz ile uyumlu kollukların tanıtım işareti
Identificador de braçadeiras compatíveis com o dispositivo
Sposób identyfikacji mankietów zgodnych z urządzeniem
Identifiering av manschetter som är kompatibla med enheten
ίΎϬΟϟϊϣΔϘϓϭΗϣϟΔρϏΎοϟρέηϟΩϳΩΣΗΕΎϣϼϋ
16.
Artery mark
Marque d’artère
Arterienmarkierung
Contrassegno per l’arteria
Marca de la arteria
Adersymbool
Arter işareti
Marca da artéria
Znacznik tętnicy
Artärmarkering
ϥΎϳέηϟϰϠϋΔϟΩΔϣϼϋ
17.
Not made with natural rubber latex
Ne contient pas de latex de caoutchouc naturel
Enthält kein Naturlatex
Non contiene lattice di gomma naturale
No contiene látex de caucho natural
Bevat geen natuurrubberlatex
Doğal kauçuk lateksten üretilmemiştir
Não é fabricado em látex de borracha natural
Wyprodukowane bez użycia naturalnego lateksu
Inte gjord av naturlig gummilatex
ϲόϳΑρϟρΎρϣϟαϛϳΗϻϡΩΧΗγϥϭΩϊϳϧλΗϟϡΗ
18.
Arm circumference
Circonférence du bras
Armumfang
Circonferenza del braccio
Perímetro de brazo
Armomtrek
Kol çevresi
Circunferência do braço
Obwód ramienia
Armens omkrets
ωέΫϟρϳΣϣ

SD4
19.
Need for the user to consult this instruction manual
L’utilisateur doit consulter le présent mode d’emploi
Der Benutzer muss diese Gebrauchsanweisung lesen
L’utente deve consultare il presente manuale di istruzioni
Es necesario que el usuario consulte este manual de instrucciones
Noodzaak voor de gebruiker om deze gebruiksaanwijzing te raadplegen
Kullanıcının bu kullanım kılavuzuna başvurması gerekir
O utilizador tem de consultar este manual de instruções
Użytkownik powinien zapoznać się z niniejszą instrukcją obsługi.
Användaren behöver läsa igenom denna bruksanvisning
ΫϫΕΩΎηέϹϝϳϟΩΑΓΩέϭϟΕΎϣϭϠόϣϟϰϟ·ωϭΟέϟϰϟ·ϡΩΧΗγϣϟΔΟΎΣ
20.
Need for the user to follow this instruction manual thoroughly for your
safety. (Background: blue)
L’utilisateur doit suivre attentivement ce mode d’emploi pour votre sécurité.
(Fond: bleu)
Damit die Sicherheit gewährleistet ist, muss der Benutzer diese
Gebrauchsanweisung sorgfältig befolgen. (Hintergrund: blau)
Per la propria sicurezza, l’utente deve seguire attentamente il presente manuale
di istruzioni. (Sfondo: blu)
Es necesario que el usuario siga rigurosamente este manual de instrucciones
para su seguridad. (Fondo: azul)
Noodzaak voor de gebruiker om zich voor de eigen veiligheid zorgvuldig aan
deze gebruiksaanwijzing te houden (Achtergrond: blauw)
Güvenlik açısından kullanıcının bu kullanım kılavuzuna dikkatle uyması gerekir.
(Arka plan: mavi)
O utilizador tem de seguir cuidadosamente este manual de instruções para sua
própria segurança. (Fundo: azul)
Dla zachowania bezpieczeństwa użytkownik musi ściśle przestrzegać niniejszej
instrukcji obsługi. (Tło: niebieskie)
Användaren måste följa denna bruksanvisning noga av säkerhetsskäl.
(Bakgrund: blå)
ΔϣϼγϟϰϠϋυΎϔΣϠϟΫϫϝϣΎϛϟΎΑΕΩΎηέϹϝϳϟΩϲϓΓΩέϭϟΕΩΎηέϹωΎΑΗϰϟ·ϡΩΧΗγϣϟΔΟΎΣ
˯ΎϗέίΔϳϔϠΧϟ
21.
Direct current
Courant continu
Gleichstrom
Corrente diretta
Corriente directa
Gelijkstroom
Doğru akım
Corrente direta
Prąd stały
Likström
έηΎΑϣϟέΎϳΗϟ
22.
Alternating current
Courant alternatif
Wechselstrom
Corrente alternata
Corriente alterna
Wisselstroom
Alternatif akım
Corrente alterna
Prąd zmienny
Växelström
ΏϭΎϧΗϣϟέΎϳΗϟ
23.
Date of manufacture
Date de fabrication
Herstellungsdatum
Data di fabbricazione
Fecha de fabricación
Productiedatum
Üretim tarihi
Data de fabrico
Data produkcji
Tillverkningsdatum
ϊϳϧλΗϟΦϳέΎΗ
24.
Efficiency level of power supply
Niveau d’efficacité de l’alimentation électrique
Effizienz der Stromversorgung
Livello di efficienza dell’alimentazione
Grado de eficiencia de la alimentación
Efficiëntieniveau van de voeding
Güç kaynağının verimlilik seviyesi
Nível de eficiência da fonte de alimentação
Poziom sprawności źródła zasilania
Strömförsörjningens effektivitetsnivå
ΔϗΎρϟέΩλϣΓ˯ΎϔϛϯϭΗγϣ
25.
Prohibited action
Action interdite
Verbotene Aktion
Operazione proibita
Acción prohibida
Verboden handeling
Yasaklanmış eylem
Ação proibida
Czynność niedozwolona
Förbjuden åtgärd
έϭυΣϣ˯έΟ·

SD5
26.
To indicate generally elevated, potentially hazardous, levels of non-ionizing radiation, or to indicate equipment or systems. e.g. in the medical electrical
area that include RF transmitters or that intentionally apply RF electromagnetic energy for diagnosis or treatment.
Indique des niveaux de rayonnement non ionisant, potentiellement dangereux, généralement élevés, ou un équipement ou des systèmes, par exemple dans le
domaine médical électrique, incluant des émetteurs RF ou utilisant intentionnellement de l’énergie électromagnétique RF pour le diagnostic ou le traitement.
Als Hinweis auf allgemein erhöhte, potenziell gefährliche Stufen nicht-ionisierender Strahlung oder als Hinweis auf Geräte oder Systeme zum Beispiel im
medizinisch-elektrischen Bereich, etwa HF-Übertragungsgeräte, bzw. auf solche, die elektromagnetische HF-Strahlung zur Diagnose oder Behandlung verwenden.
Indica livelli generalmente elevati, potenzialmente pericolosi, di radiazioni non ionizzanti oppure indica apparecchiature o sistemi, ad esempio per le aree
elettromedicali in cui sono presenti trasmettitori RF o in cui viene intenzionalmente applicata energia elettromagnetica a radiofrequenza per la diagnosi o il
trattamento.
Para indicar niveles de radiación no ionizante generalmente elevados y potencialmente peligrosos, o bien para indicar equipos o sistemas, como los usados en
el ámbito electromédico, que incorporen transmisores de radiofrecuencia o que apliquen energía electromagnética de radiofrecuencia intencionadamente para
diagnósticos o tratamientos.
Geeft in het algemeen verhoogde, potentieel gevaarlijke niveaus aan van niet-ioniserende straling of duidt op apparatuur of systemen, bijvoorbeeld in de
medische elektrische omgeving, die RF-zenders bevatten of die opzettelijk elektromagnetische RF-energie toepassen voor diagnose of behandeling.
Genellikle yüksek ve zararlı olabilecek iyonlaşmayan radyasyon seviyelerini belirtir veya RF vericileri içeren veya tanı ya da tedavi amacıyla bilinçli olarak RF
elektromanyetik enerji uygulayan (örneğin medikal elektrik alanında bulunan) ekipman ve sistemleri belirtir.
Para indicar níveis de radiação não ionizante geralmente elevados, potencialmente perigosos, ou para indicar equipamentos ou sistemas, por exemplo, na área da
eletromedicina que incluam transmissores de RF ou que apliquem intencionalmente energia eletromagnética de RF em diagnóstico ou tratamento.
Symbol ogólnie podwyższonych, potencjalnie niebezpiecznych poziomów promieniowania niejonizującego lub oznaczenie urządzeń lub systemów, np.
medycznych obszarów elektrycznych, które obejmują nadajniki częstotliwości radiowych lub urządzenia celowo wykorzystujące energię elektromagnetyczną do
diagnostyki lub leczenia.
Anger allmänt förhöjda och potentiellt farliga nivåer av icke-joniserande strålning, eller anger utrustning eller system i exempelvis områden med medicinsk
elektrisk utrustning som innefattar RF-sändare eller som avsiktligt använder elektromagnetisk RF-strålning för diagnostik eller behandling.
ΔϳΑρΓίϬΟϰϠϋΔϳϭΗΣϣϟϥϛΎϣϷϲϓΩΟϭΗϲΗϟϙϠΗϝΛϣˬΔϣυϧϷϭΓίϬΟϷϰϟ·ΓέΎηϺϟϭˬΓέρΧϥϭϛΗϥϝϣΗΣϣϟϥϣϲΗϟΔϧϳ΅ϣϟέϳϏΔόηϷϥϣΩΎΗόϣϟΩΣϟϥϋΔόϔΗέϣϟΕΎϳϭΗγϣϟϰϟ·ϡΎϋϪΟϭΑΓέΎηϺϟ
ΝϼόϟϭιϳΧηΗϟνέϏϷΩϣϋϥϋΔϳϛϠγϼϟΕΩΩέΗϟΕΫΔϳγϳρΎϧϐϣϭέϬϛϟΔϗΎρϟϡΩΧΗγϡΗϳΙϳΣϭΔϳϛϠγϻΕΩΩέΗΎϬϧϣΙόΑϧΗϝΎγέ·ΓίϬΟϰϠϋϝϣΗηΗΔϳΎΑέϬϛ
27.
Recycle mark X: Material number Y: Material abbreviation Refer to 97/129/EC for more information.
Marque de recyclage X: Numérotation des matériaux Y : Abréviation pour les matériaux Voir 97/129/CE pour plus d’informations.
Recyclingsymbol X: Materialnummer Y: Materialabkürzung Weitere Informationen siehe 97/129/EG.
Simbolo di riciclaggio X: Codice materiale Y: Abbreviazione materiale Fare riferimento a 97/129/CE per ulteriori informazioni.
Marca de reciclaje X: Número de material Y: Abreviatura del material Consulte 97/129/CE para más información.
Recycleer markering X: Materiaalnummer Y: Materiaalafkorting Raadpleeg 97/129/EG voor meer informatie.
Geri dönüşüm işareti X: Malzeme numarası Y: Malzeme kısaltması Daha fazla bilgi için bkz. 97/129/EC.
Marca de reciclagem X: Número de material Y: Abreviatura de material Consultar a Diretiva 97/129/CE para obter mais informações.
Znak recyklingu X: Numer materiału Y: Skrócona nazwa materiału Więcej informacji można znaleźć w dyrektywie 97/129/WE.
Återvinningsmärke X: Materialnummer Y: Materialförkortning Se 97/129/EG för ytterligare information.
ΕΎϣϭϠόϣϟϥϣΩϳίϣϠϟ(&ϊΟέΓΩΎϣϟέΎλΗΧYΓΩΎϣϟϡϗέXέϳϭΩΗϟΓΩΎϋ·Δϣϼϋ

SD6
The Bluetooth® word mark and logos are registered trademarks owned by Bluetooth SIG, Inc. and any use of such marks by OMRONHEALTHCARECo.,Ltd.
is under license. Apple and the Apple logo are trademarks of Apple Inc., registered in the U.S. and other countries and regions. App Store is a service
mark of Apple Inc. Google Play and the Google Play logo are trademarks of Google LLC. Other trademarks and trade names are those of their respective
owners.
La marque verbale et les logos Bluetooth® sont des marques déposées détenues par Bluetooth SIG, Inc. et l’utilisation de ces marques par OMRONHEALTHCARECo.,Ltd.
se fait sous licence. Apple et le logo Apple sont des marques commerciales d’Apple Inc., déposées aux États-Unis et dans d’autres pays et régions. App Store est une
marque de service d’AppleInc. GooglePlay et le logoGooglePlay sont des marques commerciales de GoogleLLC. Les autres marques commerciales et noms de
marque sont ceux de leurs détenteurs respectifs.
Die Bluetooth®-Wortmarke und Logos sind eingetragene Marken der Bluetooth SIG, Inc. und die Verwendung solcher Marken durch OMRONHEALTHCARECo.,Ltd.
erfolgt in Lizenz. Apple und das Apple-Logo sind Marken von Apple Inc., die in den USA und anderen Ländern und Regionen eingetragen sind. App Store ist
eine Dienstleistungsmarke der Apple Inc. Google Play und das Google Play-Logo sind Marken von Google LLC. Andere Marken und Markennamen gehören ihren
jeweiligen Eigentümern.
Il marchio e i logotipi Bluetooth® sono marchi commerciali registrati di Bluetooth SIG, Inc. e l’utilizzo di tali marchi da parte di OMRONHEALTHCARECo.,Ltd. è
stato concesso in licenza. Apple e il logo Apple sono marchi commerciali di Apple Inc., registrati negli Stati Uniti e in altri Paesi e aree geografiche. App Store è un
marchio di servizio di Apple Inc. Google Play e il logo Google Play sono marchi commerciali di Google LLC. Gli altri marchi e nomi commerciali sono di proprietà dei
rispettivi titolari.
El nombre y los logotipos de Bluetooth® son marcas registradas de Bluetooth SIG, Inc. y cualquier uso de dichas marcas hecho por OMRONHEALTHCARECo.,Ltd.
se ha llevado a cabo con su licencia correspondiente. Apple y el logo de Apple son marcas comerciales registradas de Apple Inc. en EE.UU. y en otros países y
zonas. App Store es una marca de servicio de Apple Inc. Google Play y el logotipo de Google Play son marcas comerciales de Google LLC. Otras marcas registradas
también pertenecen a sus respectivos propietarios.
Het woordmerk en de logo’s van Bluetooth® zijn gedeponeerde handelsmerken van Bluetooth SIG, Inc. en enig gebruik hiervan door OMRONHEALTHCARECo.,Ltd.
geschiedt onder licentie. Apple en het logo van Apple zijn handelsmerken van Apple Inc., die zijn gedeponeerd in de V.S. en in andere landen en regio's. App Store
is een dienstmerk van Apple Inc. Google Play en het logo van Google Play zijn handelsmerken van Google LLC. Overige handelsmerken en handelsnamen zijn van
hun respectievelijke eigenaren.
Bluetooth® marka adı ve logoları, BluetoothSIG, Inc. kuruluşunun tescilli ticari markalarıdır ve OMRONHEALTHCARECo.,Ltd. bu markaları lisans kapsamında
kullanmaktadır. Apple ve Apple logosu, AppleInc. şirketinin ABD ve diğer ülkelerde kayıtlı ticari markalarıdır. AppStore, AppleInc. şirketinin bir hizmet markasıdır.
GooglePlay ve GooglePlay logosu, GoogleLLC firmasının ticari markalarıdır. Diğer ticari markalar ve ticari isimler, ilgili sahiplerine aittir.
A marca e os logótipos da palavra Bluetooth® são marcas registadas da Bluetooth SIG, Inc. e a utilização destas marcas pela OMRONHEALTHCARECo.,Ltd. é feita
mediante licença. Apple e o logótipo Apple são marcas comerciais da Apple Inc., registadas nos EUA e noutros países e regiões. App Store é uma marca de serviço
da Apple Inc. Google Play e o logótipo Google Play são marcas comerciais Google LLC. Outras marcas ou nomes comerciais pertencem aos respetivos proprietários.
Nazwa i logo Bluetooth® są zarejestrowanymi znakami towarowymi będącymi własnością firmy Bluetooth SIG, Inc. Wszelkie użycie tych znaków przez firmę
OMRONHEALTHCARECo.,Ltd. podlega licencji. Nazwa i logo Apple są znakami towarowymi firmy Apple Inc., zarejestrowanymi w USA i innych krajach/regionach.
Nazwa App Store jest znakiem usługowym firmy Apple Inc. Nazwa i logo Google Play są znakami towarowymi firmy Google LLC. Inne znaki i nazwy towarowe
należą do ich odpowiednich właścicieli.
Bluetooth®-märket och -logotyperna är registrerade varumärken som tillhör Bluetooth SIG, Inc. och all användning av dessa märken av OMRONHEALTHCARECo.,Ltd.
sker under licens. Apple och Apple-logotypen är varumärken som tillhör Apple Inc., och är registrerade USA och andra länder och regioner. App Store är ett
servicemärke som tillhör Apple Inc. Google Play och Google Play-logotypen är varumärken som tillhör Google LLC. Andra varumärken och handelsbeteckningar
tillhör sina respektive ägare.
20521+($/7+&$5(&R/WGΔϛέηΔργϭΑΕΎϣϼόϟϩΫϬϟϡΩΧΗγϱϥϭϛϳϭ%OXHWRRWK6,*,QFΔϛέηϟΔϛϭϠϣϣΔϠΟγϣΔϳέΎΟΗΕΎϣϼϋϲϫΎϬΗέΎόηϭBluetooth
®
ΔϣϠϛΔϣϼϋϥ·
Ωό
˵
Η$SSOH,QFΔϛέηϟΔϛϭϠϣϣΔϣΩΧΔϣϼϋ$SS6WRUHϯέΧϖρΎϧϣϭϥΩϠΑϭΔϳϛϳέϣϷΓΩΣΗϣϟΕΎϳϻϭϟϲϓΔϠΟγϣϟ$SSOH,QFΔϛέηϟΔϳέΎΟΗΕΎϣϼϋ$SSOHέΎόηϭ$SSOHΩόΗιϳΧέΗΏΟϭϣΑ
ϪϳϛϟΎϣΑΔλΎΧΞΗϧϣϟΫϬϟΔϳέΎΟΗϟ˯ΎϣγϷϭϯέΧϷΔϳέΎΟΗϟΕΎϣϼόϟϥϭϛΗ*RRJOH//&ΔϛέηϟϥΎΗϛϭϠϣϣϥΎΗϳέΎΟΗϥΎΗϣϼϋ*RRJOH3OD\έΎόηϭ*RRJOH3OD\

Issue Date:
2023-12-15
Date de publication:
Ausgabedatum:
Data di pubblicazione:
Fecha de publicación:
Uitgiftedatum
Teslim Tarihi:
Data de edição:
Data publikacji:
Utgivningsdatum:
έΩλϹΦϳέΎΗ
IM1-HEM-7380T1-EOSL-01-09/2023
3298928-9A
M7 Intelli IT AFib (HEM-7380T1-EBK)
ΏϳϓϲΗϱϲϠΗϧ7ϡ
X7 Smart AFib (HEM-7380T1-EOSL)
ΏϳϓΕέΎϣγ7αϛ
Automatic Upper Arm Blood Pressure Monitor
Tensiomètre automatique brassard
Automatisches Oberarm-Blutdruckmessgerät
Misuratore automatico di pressione arteriosa da braccio
Monitor de presión arterial automático de brazo
Automatische bovenarmbloeddrukmeter
Измеритель артериального давления и частоты пульса автоматический
Otomatik Üst Kol Kan Basıncı Ölçüm Cihazı
Medidor de tensão arterial automático de braço
Automatyczny ciśnieniomierz naramienny
Automatisk blodtrycksmätare för överarmen
ωέΫϟϰϠϋ΄ΑΕϳΑΛΗϠϟϝΑΎϘϟϲϟϵϡΩϟρϐοαΎϳϗίΎϬΟ
Read Instruction Manual 1 and 2 before use.
Lire les modes d’emploi 1 et 2 avant l’utilisation.
Lesen Sie vor der Verwendung Gebrauchsanweisung 1 und 2.
Leggere il manuale di istruzioni 1 e 2 prima dell’uso.
Lea el manual de instrucciones 1 y 2 antes del uso.
Lees gebruiksaanwijzing 1 en 2 voor gebruik.
Прочтите руководства по эксплуатации 1 и 2 перед использованием.
Kullanmadan önce, kullanım kılavuzu 1 ve 2'yi okuyun.
Leia o Manual de instruções 1 e 2 antes de utilizar.
Przed użyciem należy przeczytać instrukcję obsługi 1 i 2.
Läs bruksanvisning 1 och 2 före användning.
ϡΩΧΗγϻϝΑϗ˻ϭ˺ΕΩΎηέϹϝϳϟΩέϗ
Instruction Manual 2: Operational Instructions
FR Mode d’emploi 2: Instructions de fonctionnement
DE Gebrauchsanweisung 2: Betriebsanweisungen
IT Manuale di istruzioni 2: Istruzioni operative
ES Manual de instrucciones 2: Instrucciones operativas
NL Gebruiksaanwijzing 2: Operationele instructies
RU Руководство по эксплуатации 2: Инструкция по эксплуатации
TR Kullanım kılavuzu 2: Çalıştırma talimatları
PT Manual de instruções 2: Instruções operacionais
PL Instrukcja obsługi 2: Instrukcje operacyjne
SV Instruktionsmanual 2: Driftsinstruktioner
AR
ϝϳϐηΗϟΕΩΎηέ·˻ΕΩΎηέϹϝϳϟΩ

1
1
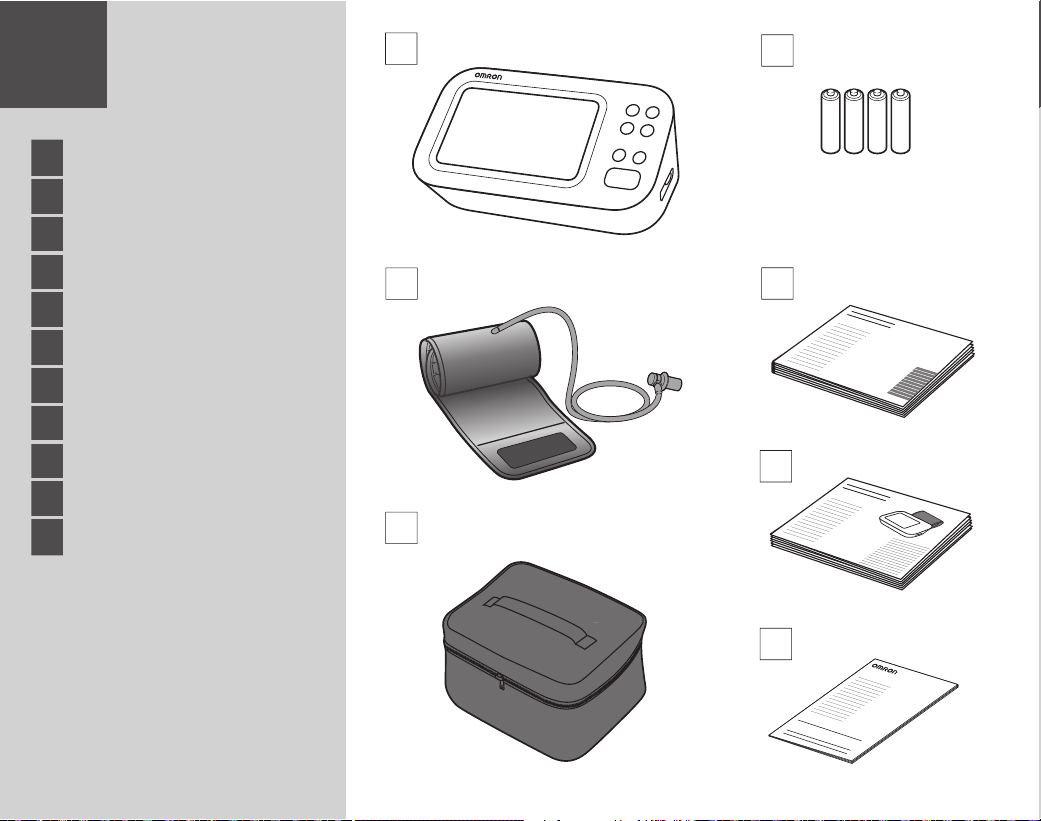
Package Contents..........
3
Contenu de l’emballage
Packungsinhalt
Contenuto della confezione
Contenido del envase
Inhoud van de verpakking
Комплект поставки
Paketin İçindekiler
Conteúdo da embalagem
Zawartość opakowania
Förpackningens innehåll
ΓϭΑόϟΕΎϳϭΗΣϣ
2
Preparing for a Measurement..4
Préparation pour une prise de mesure
Vorbereiten einer Messung
Preparazione per la misurazione
Preparación para una medición
Een meting voorbereiden
Подготовка к измерению
Ölçüm Hazırlığı
Preparação de uma medição
Przygotowanie do pomiaru
Förbereder för en mätning
αΎϳϘϟΔϳϠϣόϟίϳϬΟΗϟ
3
Downloading the App.....
5
Téléchargement de l’application
Herunterladen der App
Download dell'app
Descarga de la aplicación
De app downloaden
3
Загрузка приложения
Uygulamasını İndirme
Transferência da aplicação
Pobieranie aplikacji
Ladda ner appen
ϖϳΑρΗϟϝϳίϧΗ
4
Inserting Batteries..........
6
Mise en place des piles
Einlegen von Batterien
Inserimento delle batterie
Introducción de las pilas
De batterijen plaatsen
Установка элементов питания
Pilleri Takma
Inserção de pilhas
Wkładanie baterii
Sätta i batterier
ΕΎϳέΎρΑϟϝΎΧΩ·
5
Pairing..............................7
Couplage
Paarung
Accoppiamento
Emparejamiento
Koppelen
Сопряжение
Eşleştirme
Emparelhamento
Parowanie
Parning
ϥέϗϹ
6
Setting the Date and Time
Manually......................
8
Réglage manuel de la date et de l’heure
Manuelles Einstellen von Datum und Uhrzeit
Impostazione manuale di data e ora
Ajuste manual de la fecha y la hora
Datum en tijd handmatig instellen
Установка даты и времени вручную
Tarih ve Saatin Manuel Olarak Ayarlanması
Acerto manual da data e hora
Ręczne ustawianie daty igodziny
Ställa in datum och tid manuellt
Ύ
˱
ϳϭΩϳΕϗϭϟϭΦϳέΎΗϟρΑο
7
Setting the TruRead Mode
Interval......................
9
Définition de l'intervalle du mode TruRead
Festlegen des TruRead-Modusintervalls
Impostazione dell'intervallo della modalità TruRead
Configuración del intervalo del modo TruRead
Het TruRead-modusinterval instellen
Настройка интервала режима TruRead
TruRead Modu Aralığını Ayarlama
Definição do intervalo do modo TruRead
Ustawianie interwału trybu TruRead
Ställa in TruRead-lägesintervallet
TruReadϊοϭϟΔϠλΎϔϟΓέΗϔϟρΑο
8
Applying the Arm Cuff....
11
Pose du brassard
Anbringen der Manschette
Applicazione del bracciale
Colocación del manguito

2
8
De manchet aanbrengen
Расположение манжеты
Kolluğun Takılması
Colocar a braçadeira
Zakładanie mankietu
Applicering av armmanschetten
ωέΫϠϟρϏΎοϟρϳέηϟϊοϭ
9
Sitting Correctly.............
13
Position assise correcte
Korrekte Körperhaltung
Come sedersi nel modo corretto
Cómo sentarse correctamente
Correct zitten
Сядьте правильно
Düzgün Oturma
Como sentar-se corretamente
Prawidłowa pozycja
Rätt sittställning
ϳΣλϝϛηΑαϭϠΟϟ
10
Taking a Measurement...
15
Réalisation d’une mesure
Eine Messung vornehmen
Misurazione
Realizar una medición
Een meting verrichten
Выполнение измерений
Bir Ölçüm Yapma
Realização de uma medição
Wykonywanie pomiaru
Ta en mätning
αΎϳϘϟ˯έΟ·
11
Checking Readings.........
21
Vérification des mesures
Überprüfen von Messwerten
Controllo dei risultati
Comprobación de las lecturas
Metingen bekijken
Проверка результатов измерений
Ölçüm Değerlerini Kontrol Etme
Verificar leituras
Sprawdzanie odczytów
Kontrollera avläsningar
Ε˯έϘϟϥϣϖϘΣΗϟ
12
Using Memory Functions..
27
Utilisation des fonctions de mémoire
Verwendung der Speicherfunktionen
Uso delle funzioni di memoria
Uso de las funciones de memoria
Geheugenfuncties gebruiken
Использование функций памяти
Hafıza Fonksiyonunun Kullanılması
Utilização das funções de memória
Korzystanie z funkcji pamięci
Använda minnesfunktioner
ΓέϛΫϟϑΎυϭϡΩΧΗγ
13
Disabling/Enabling
Bluetooth.....................
35
Désactivation/activation de Bluetooth
Deaktivieren/Aktivieren der Bluetooth-Funktion
Disattivazione/attivazione della funzione Bluetooth
Activar o desactivar el Bluetooth
Bluetooth uitschakelen/inschakelen
13
Выключение/включение Bluetooth
Bluetooth'u Devre Dışı Bırakma/Etkinleştirme
Desativação/ativação do Bluetooth
Wyłączanie/włączanie Bluetootha
Inaktivera/aktivera Bluetooth
BluetoothΓίϳϣϥϳϛϣΗϝϳρόΗ
14
Restoring to the Default
Settings......................
36
Réinitialisation aux réglages par défaut
Wiederherstellen der Standardeinstellungen
Ripristino delle impostazioni predefinite
Restablecimiento a los ajustes de fábrica
De standaardinstellingen herstellen
Восстановление настроек по умолчанию
Varsayılan Ayarları Geri Yükleme
Restauração das predefinições
Przywracanie ustawień domyślnych
Återställer till standardinställningarna
ΔϳοέΗϓϻΕΩΩϋϹΓΩΎόΗγ
15
Optional Medical Accessories..
37
Accessoires médicaux en option
Medizinisches optionales Zubehör
Accessori medicali opzionali
Accesorios médicos opcionales
Optionele medische accessoires
Дополнительные принадлежности
Opsiyonel Tıbbi Aksesuarlar
Acessórios médicos opcionais
Opcjonalne akcesoria medyczne
Medicinska tillbehör som tillval
ΔϳέΎϳΗΧϻΔϳΑρϟΕΎϘΣϠϣϟ
3
FR
Contenu de l’emballage
DE
Packungsinhalt
IT
Contenuto della confezione
ES
Contenido del envase
NL
Inhoud van de verpakking
RU
Комплект поставки
TR
Paketin İçindekiler
PT
Conteúdo da embalagem
PL
Zawartość opakowania
SV
Förpackningens innehåll
AR
ΓϭΑόϟΕΎϳϭΗΣϣ
1
Package
Contents
(M7 Intelli IT AFib)
Blood
p
r
essu
re
pass
4
FR
Préparation pour une prise de
mesure
DE
Vorbereiten einer Messung
IT
Preparazione per la
misurazione
ES
Preparación para una
medición
NL
Een meting voorbereiden
RU
Подготовка к измерению
TR
Ölçüm Hazırlığı
PT
Preparação de uma medição
PL
Przygotowanie do pomiaru
SV
Förbereder för en mätning
AR
αΎϳϘϟΔϳϠϣόϟίϳϬΟΗϟ
2
Preparing for a
Measurement
30 minutes before
30minutes avant
30 Minuten vorher
30 minuti prima
30minutos antes
30 minuten ervoor
За 30 минут до
30 dakika önce
30 minutos antes
30 minut wcześniej
30 minuter innan
ΔϘϳϗΩ˼˹ώϠΑΗΓΩϣΑαΎϳϘϟϝΑϗ
5 minutes before: Relax and rest.
5minutes avant: détente et repos.
5 Minuten vorher: ruhig hinsetzen.
5 minuti prima: rilassarsi e stare a riposo.
5minutos antes: relájese y descanse.
5 minuten ervoor: ontspan en rust.
За 5 минут до: расслабьтесь и отдохните.
5 dakika önce: Gevşeyin ve dinlenin.
5 minutos antes: descontrair e repousar.
5 minut wcześniej: Zrelaksuj się i odpocznij.
5 minuter innan: Slappna av och vila.
˶
ΥέΗγϭΡέΗγϖΎϗΩ˾ώϠΑΗΓΩϣΑαΎϳϘϟϝΑϗ
5
FR
Téléchargement de
l’application
DE
Herunterladen der App
IT
Download dell'app
ES
Descarga de la aplicación
NL
De app downloaden
RU
Загрузка приложения
TR
Uygulamasını İndirme
PT
Transferência da aplicação
PL
Pobieranie aplikacji
SV
Ladda ner appen
AR
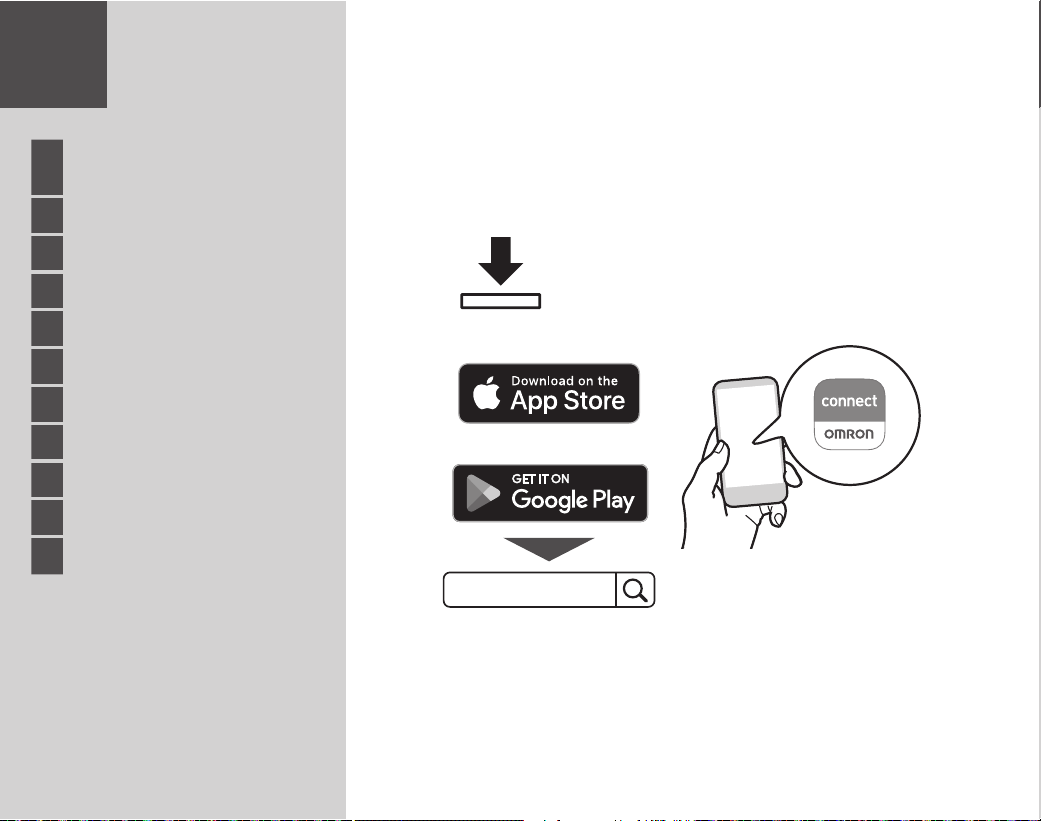
ϖϳΑρΗϟϝϳίϧΗ
3
Downloading
the App
omron connect
OMRON connect
6
FR
Mise en place des piles
DE
Einlegen von Batterien
IT
Inserimento delle batterie
ES
Introducción de las pilas
NL
De batterijen plaatsen
RU
Установка элементов
питания
TR
Pilleri Takma
PT
Inserção de pilhas
PL
Wkładanie baterii
SV
Sätta i batterier
AR
ΕΎϳέΎρΑϟϝΎΧΩ·
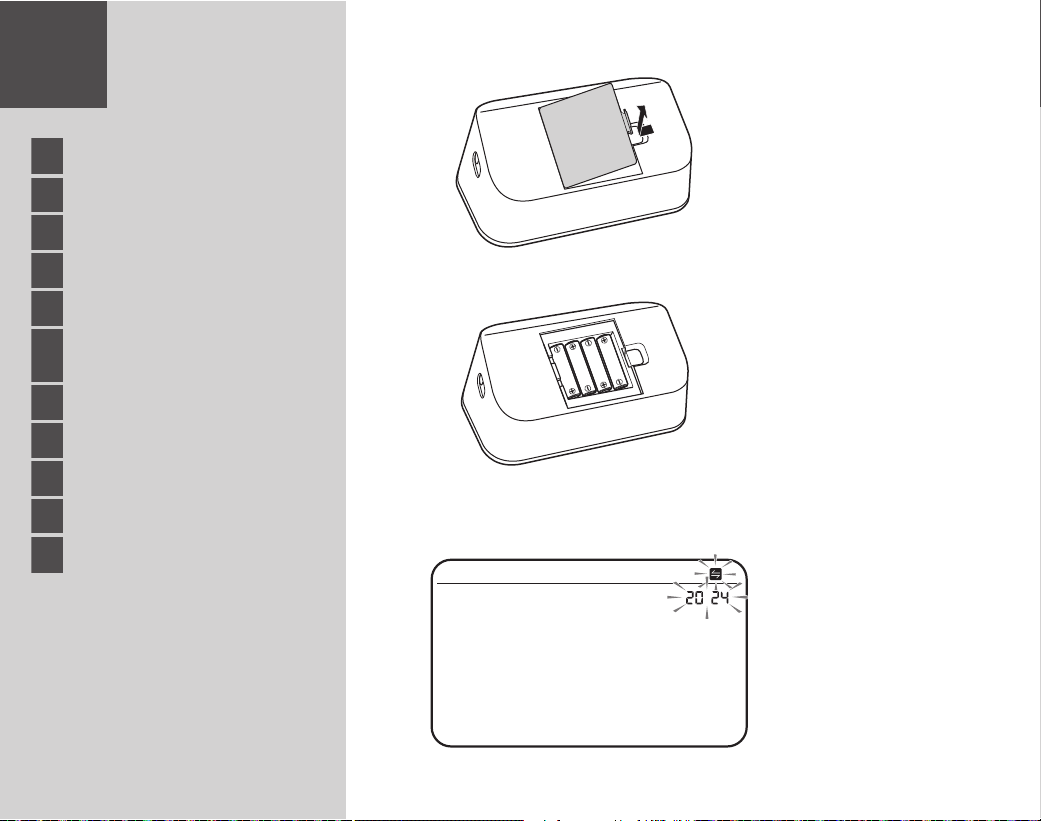
4
Inserting
Batteries
1
2
AA, 1.5V × 4
3
Your monitor automatically turns off
after 3 minutes.
Votre tensiomètre s'éteint
automatiquement après 3 minutes.
Ihr Monitor schaltet sich nach 3 Minuten
automatisch aus.
Il monitor si spegne automaticamente
dopo 3 minuti.
Su monitor se apaga automáticamente
después de 3 minutos.
Uw monitor wordt na 3 minuten
automatisch uitgeschakeld.
Монитор автоматически выключается
через 3 минуты.
Ölçüm cihazınız 3 dakika sonra otomatik
olarak kapanır.
O medidor desliga-se automaticamente
após 3 minutos.
Monitor wyłączy się automatycznie po
3minutach.
Din bildskärm stängs av automatiskt efter
3 minuter.
ϖΎϗΩ˼έϭέϣΩόΑΎ
˱
ϳΎϘϠΗαΎϳϘϟίΎϬΟϝϳϐηΗϑΎϘϳ·ϡΗϳ
7
FR
Couplage
DE
Paarung
IT
Accoppiamento
ES
Emparejamiento
NL
Koppelen
RU
Сопряжение
TR
Eşleştirme
PT
Emparelhamento
PL
Parowanie
SV
Parning
AR
ϥέϗϹ
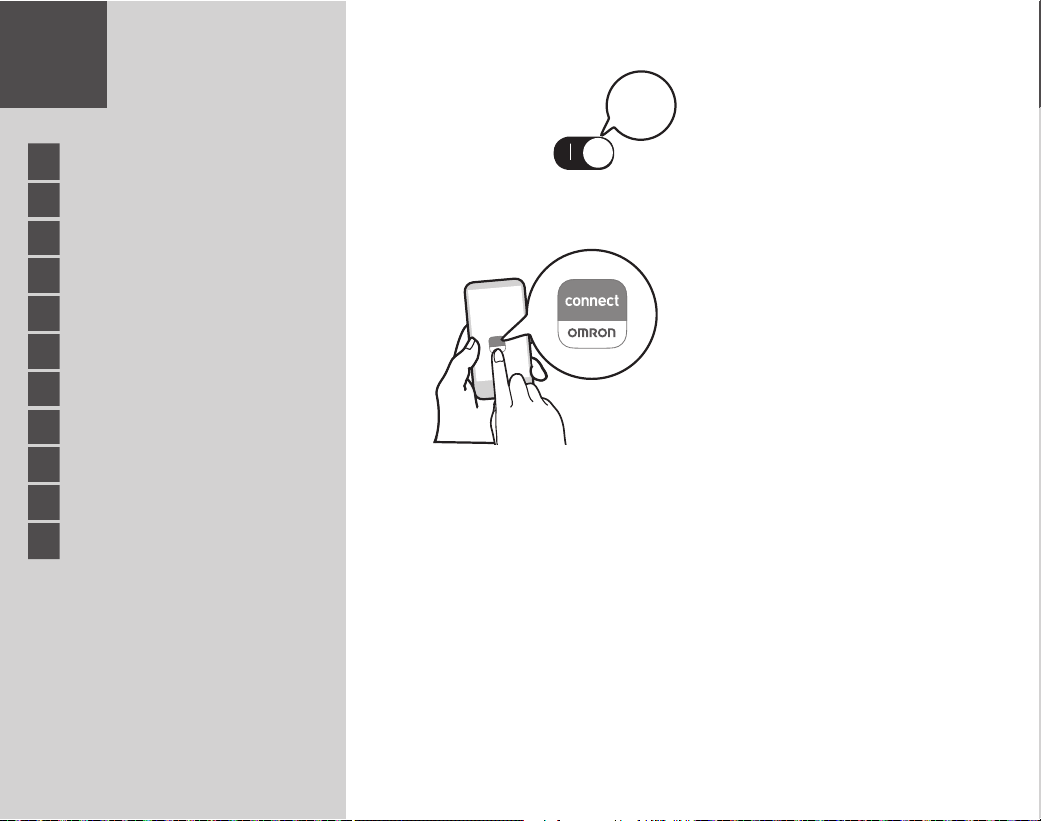
5
Pairing
1
2
3
Bluetooth
ON
The date and time will automatically be set
when your monitor is paired with the app.
La date et l’heure seront automatiquement
réglées lorsque votre tensiomètre sera couplé
avec l’application.
Wenn Ihr Messgerät mit der App verknüpft
ist, werden Datum und Uhrzeit automatisch
eingestellt.
La data e l’ora verranno impostate
automaticamente una volta che il misuratore
verrà associato alla app.
La fecha y la hora se ajustarán
automáticamente cuando el monitor se
sincronice con la aplicación.
De datum en tijd worden automatisch
ingesteld wanneer uw bloeddrukmeter is
gekoppeld aan de app.
Дата и время установятся автоматически
после синхронизации с приложением.
Ölçüm cihazınız uygulamayla eşleştirildiğinde
tarih ve saat otomatik olarak ayarlanır.
A data e hora serão automaticamente
acertadas se o medidor for emparelhado com
a aplicação.
Data i godzina zostaną ustawione automatycznie
po sparowaniu monitora z aplikacją.
Datum och tid ställs in automatiskt när din
monitor paras ihop med appen.
αΎϳϘϟίΎϬΟϥέϗ·ΩϧϋΎ
˱
ϳΎϘϠΗΦϳέΎΗϟϭΕϗϭϟρΑοϡΗϳγ
ϖϳΑρΗϟΎΑϙΑιΎΧϟ
Follow the instructions.
Suivez les instructions.
Befolgen Sie die Anweisungen.
Attenersi alle istruzioni.
Siga las instrucciones.
Volg de instructies.
Выполняйте инструкции.
Talimatları izleyin.
Siga as instruções.
Postępuj zgodnie z instrukcją.
Följ instruktionerna.
ΕΩΎηέϹϊΑΗ
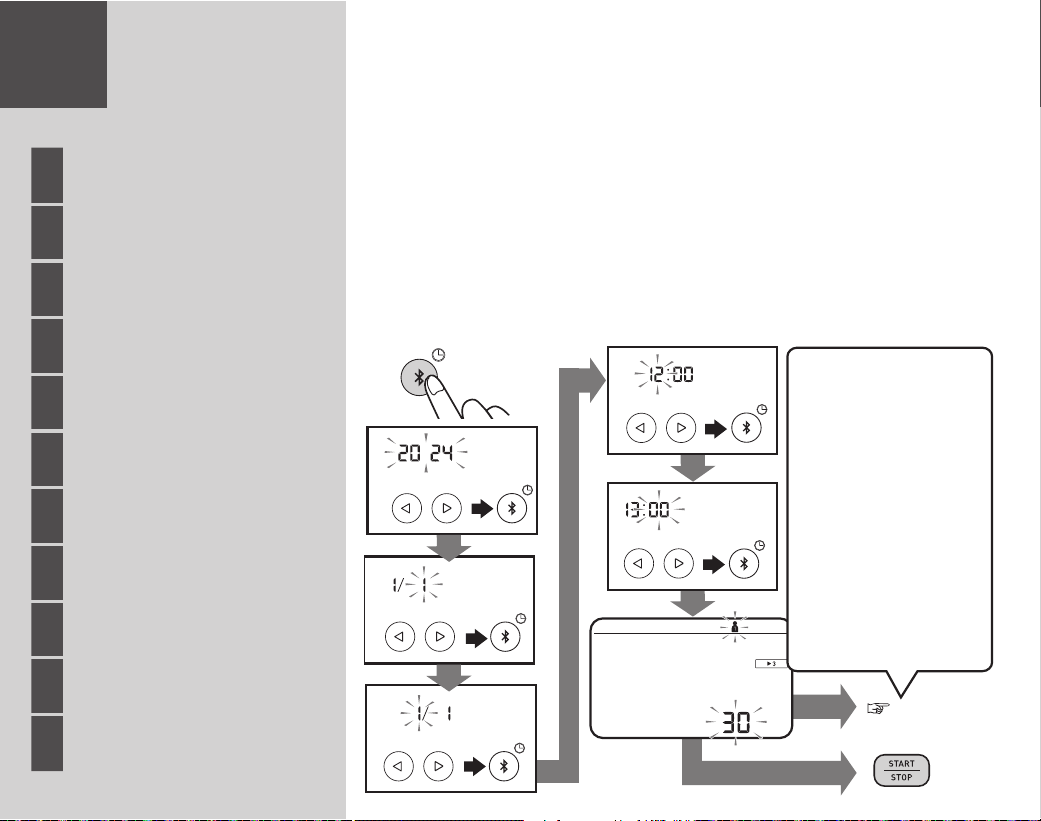
8
FR
Réglage manuel de la date et
de l’heure
DE
Manuelles Einstellen von
Datum und Uhrzeit
IT
Impostazione manuale di
data e ora
ES
Ajuste manual de la fecha y la
hora
NL
Datum en tijd handmatig
instellen
RU
Установка даты и времени
вручную
TR
Tarih ve Saatin Manuel Olarak
Ayarlanması
PT
Acerto manual da data e hora
PL
Ręczne ustawianie daty
igodziny
SV
Ställa in datum och tid
manuellt
AR
Ύ
˱
ϳϭΩϳΕϗϭϟϭΦϳέΎΗϟρΑο
6
Setting the
Date and Time
Manually
Only for non-smart device users. Skip this step if you
paired with your smart device.
Только для пользователей не смарт-устройств.
Пропустите этот шаг при сопряжении с
интеллектуальным устройством.
Uniquement pour les utilisateurs sans appareil intelligent.
Sautez cette étape si vous avez procédé au couplage avec
votre appareil intelligent.
Yalnızca akıllı olmayan cihaz kullanıcıları için. Akıllı
cihazınızla eşleştirdiyseniz bu adımı atlayın.
Nur für Benutzer von Nicht-Smart-Geräten. Überspringen
Sie diesen Schritt, wenn Sie ein Pairing mit Ihrem Smart
Device durchgeführt haben.
Apenas para utilizadores de dispositivos não
inteligentes. Ignore este passo se tiver emparelhado
com o seu dispositivo inteligente.
Solo per gli utenti di dispositivi non intelligenti. Saltare
questo passaggio se è stato effettuato l'accoppiamento
con il vostro dispositivo intelligente.
Tylko dla użytkowników urządzeń innych niż
inteligentne. Pomiń ten krok, jeśli sparowano
urządzenie inteligentne.
Sólo para usuarios de dispositivos no inteligentes.
Sáltese este paso si lo ha emparejado con su dispositivo
inteligente.
Endast för användare som inte har smarta enheter.
Hoppa över det här steget om du har parat med din
smarta enhet.
Alleen voor niet-gebruikers van slimme apparaten. Sla
deze stap over als u hebt gekoppeld met uw slimme
apparaat.
ϥέϗϹΎΑΕϣϗΫ·ΓϭρΧϟϩΫϫίϭΎΟΗρϘϓΔϳϛΫϟέϳϏΓίϬΟϷϲϣΩΧΗγϣϟ
ϲϛΫϟϙίΎϬΟϊϣ
Year
Month
Day
Minute
Hour
OFF
To set TruRead interval
Pour définir l'intervalle TruRead
Zum Festlegen des TruRead-
Intervalls
Per impostare l'intervallo TruRead
Para configurar el intervalo TruRead
TruRead-interval instellen
Чтобы установить интервал
TruRead
TruRead aralığını ayarlamak için
Para definir o intervalo TruRead
Aby ustawić interwał TruRead
För att ställa in TruRead-intervall
TruRead˰ϟΔϠλΎϔϟΓέΗϔϟΩΩϋϹ
P. 9
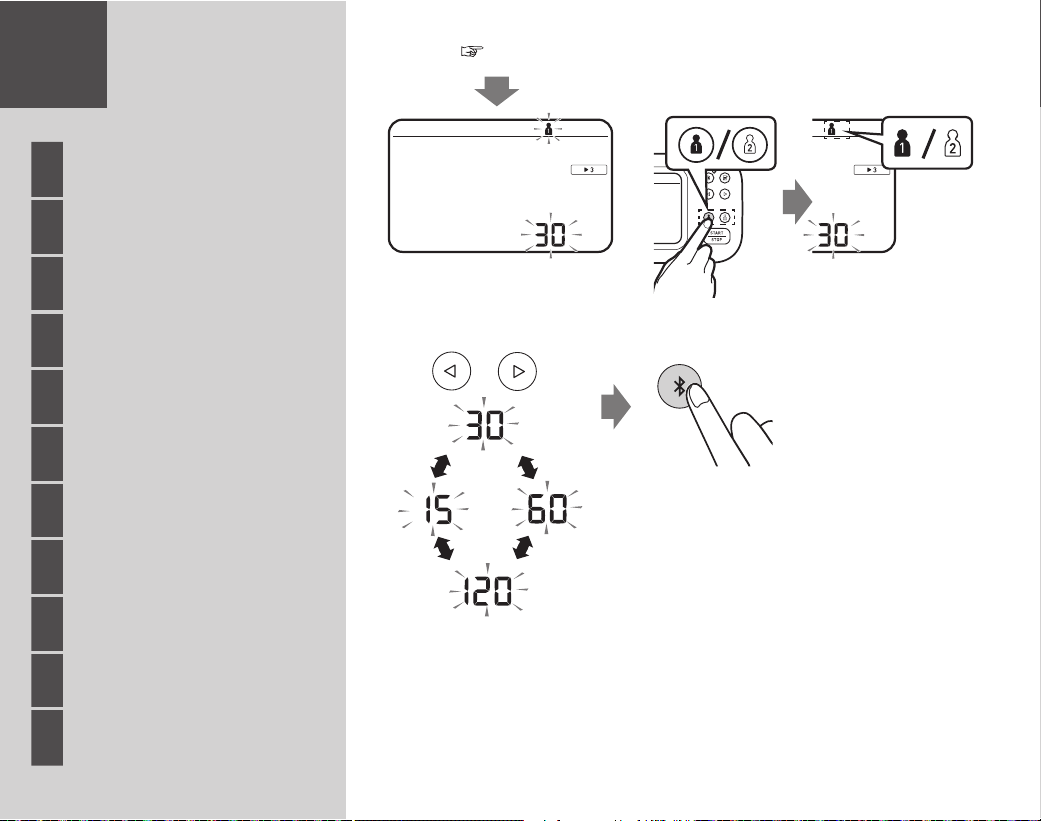
9
FR
Définition de l'intervalle du
mode TruRead
DE
Festlegen des TruRead-
Modusintervalls
IT
Impostazione dell'intervallo
della modalità TruRead
ES
Configuración del intervalo
del modo TruRead
NL
Het TruRead-modusinterval
instellen
RU
Настройка интервала
режима TruRead
TR
TruRead Modu Aralığını
Ayarlama
PT
Definição do intervalo do
modo TruRead
PL
Ustawianie interwału trybu
TruRead
SV
Ställa in
TruRead-lägesintervallet
AR
TruReadϊοϭϟΔϠλΎϔϟΓέΗϔϟρΑο
7
Setting the TruRead
Mode Interval
1
2
P. 8
In the TruRead mode, your monitor automatically takes 3
consecutive readings at selected intervals and displays the
average. The interval is set to 30 seconds by default.
Refer to "Taking a measurement in TruRead mode" on page 17.

10
En mode TruRead, votre tensiomètre prend automatiquement 3
mesures consécutives à des intervalles sélectionnés et affiche la
moyenne. L'intervalle est défini par défaut sur 30 secondes.
Reportez-vous à «Réalisation d’une mesure en mode TruRead» à la
page 17.
Im TruRead-Modus nimmt Ihr Monitor automatisch drei
aufeinanderfolgende Messwerte in ausgewählten Intervallen vor
und zeigt den Durchschnitt an. Das Intervall ist standardmäßig auf
30 Sekunden eingestellt.
Siehe „Vornehmen einer Messung im TruRead-Modus“ auf Seite 17.
Nella modalità TruRead, il monitor effettua automaticamente 3
letture consecutive a intervalli selezionati e visualizza la media. Per
impostazione predefinita, l'intervallo è impostato su 30 secondi.
Fare riferimento a "Misurazione in modalità TruRead" a pagina 17.
En el modo TruRead, su monitor toma automáticamente 3 lecturas
consecutivas a intervalos seleccionados y muestra el promedio. El
intervalo está establecido en 30 segundos de forma predeterminada.
Consulte "Obtención de una lectura en modo TruRead" en la
página17.
In de TruRead-modus voert uw monitor automatisch 3
opeenvolgende metingen uit met geselecteerde intervallen en
geeft het gemiddelde weer. Het interval is standaard ingesteld op
30 seconden.
Zie "Een meting in TruRead-modus afnemen" op pagina 17.
В режиме TruRead ваш монитор автоматически снимает 3
последовательных показания через выбранные интервалы
и отображает среднее значение. По умолчанию интервал
установлен на 30 секунд.
См. «Выполнение измерений в режиме TruRead» на странице
17
.
TruRead modunda ölçüm cihazınız seçilen aralıklarla otomatik olarak
ardışık 3 ölçüm alır ve ortalamasını görüntüler. Aralık varsayılan
olarak 30 saniyeye ayarlanmıştır.
Bkz. “TruRead modunda ölçüm yapma” sayfa 17.
No modo TruRead, o medidor faz automaticamente 3 leituras
consecutivas em intervalos selecionados e apresenta a média. O
intervalo está predefinido nos 30 segundos.
Consulte "
Realização de uma medição no modo TruRead
" na
página17.
W trybie TruRead monitor automatycznie wykonuje 3 kolejne
odczyty w wybranych odstępach czasu i wyświetla średnią.
Domyślnie odstęp jest ustawiony na 30 sekund.
Patrz „Wykonywanie pomiaru w trybie TruRead” na stronie 17.
I TruRead-läget gör din monitor automatiskt 3 avläsningar i följd
med valda intervall och visar medelvärdet. Intervallet är inställt på
30 sekunder som standard.
Se "Gör en mätning i TruRead-läge" på sidan 17.
ΕέΗϓϰϠϋΎ
˱
ϳΎϘϠΗΔόΑΎΗΗϣΕ˯έϗ˼ρΎϘΗϟΎΑαΎϳϘϟίΎϬΟϡϭϘϳˬTruReadϊοϭϲϓ
ϲοέΗϓΩΩϋΈϛΔϳϧΎΛ˼˹ϰϠϋΔϠλΎϔϟΓέΗϔϟΩΩϋ·ϡΗϳϝΩόϣϟνέόϳϡΛϥϣϭˬΔϣυΗϧϣ
.˺ΔΣϔλϟϲϓ©TruReadϊοϭϲϓαΎϳϗϝϳΟγΗªϰϟ·ϊΟέ
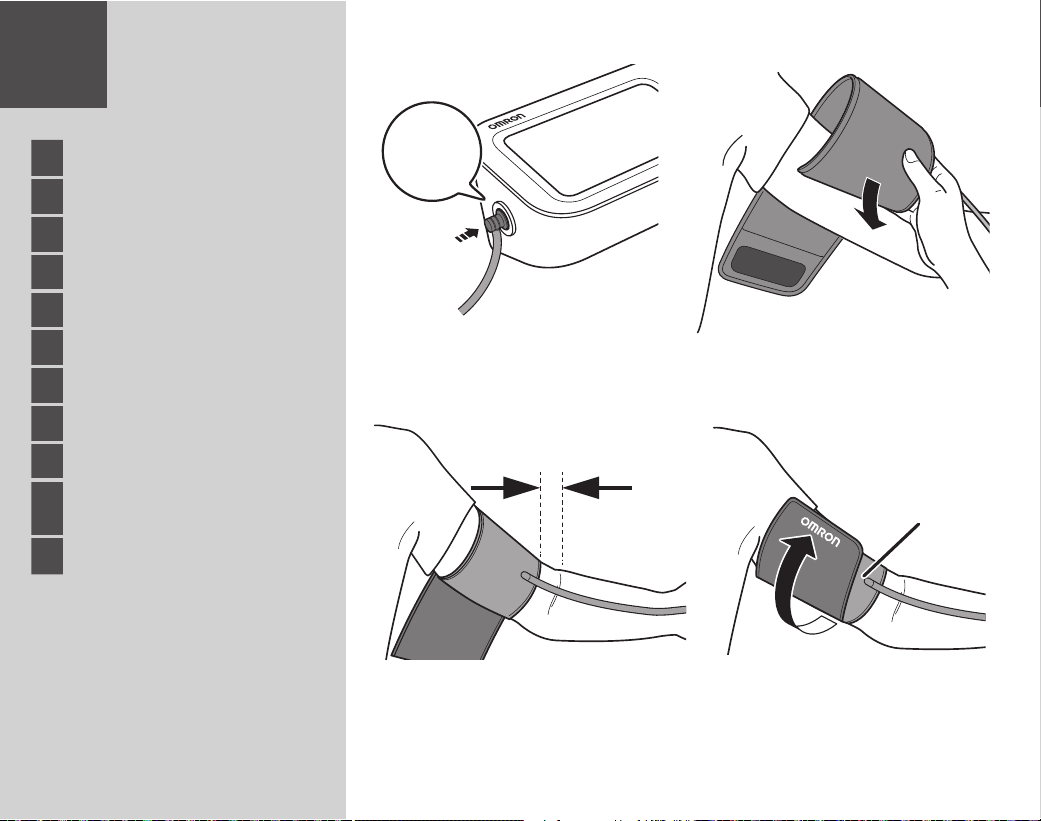
11
FR
Pose du brassard
DE
Anbringen der Manschette
IT
Applicazione del bracciale
ES
Colocación del manguito
NL
De manchet aanbrengen
RU
Расположение манжеты
TR
Kolluğun Takılması
PT
Colocar a braçadeira
PL
Zakładanie mankietu
SV
Applicering av
armmanschetten
AR
ωέΫϠϟρϏΎοϟρϳέηϟϊοϭ
8
Applying the
Arm Cuff
A 1-2 cm
34
12
B
Click
A. Tube side of the cuff should be 1 - 2cm
above the inside elbow.
B. Make sure that the air tube is on the
inside of your arm and wrap the cuff
securely so it can no longer slip round.

12
A. Le côté tuyau du brassard doit être
positionné 1 à 2cm au-dessus de
l’intérieur du coude.
B. Assurez-vous que le tuyau à air se trouve
du côté intérieur de votre bras et enroulez
fermement le brassard de manière qu’il ne
puisse plus tourner.
A. Das Manschettenstück mit dem Schlauch
muss 1 bis 2cm oberhalb des Ellbogens
liegen.
B. Stellen Sie sicher, dass der Luftschlauch an
der Arminnenseite sitzt, und befestigen
Sie die Manschette sicher, so dass sie nicht
verrutscht.
A.
Il lato del bracciale con il tubo deve
trovarsi al di sopra del gomito interno, a
una distanza di circa 1 o 2cm.
B. Assicurarsi che il tubo dell’aria si trovi
all’interno del braccio e avvolgere il
bracciale saldamente in modo che non
possa ruotare.
A.
El lado del tubo del manguito deberá
quedar 1 o 2cm por encima de la parte
interna del codo.
B. Asegúrese de que el tubo de aire se
encuentra en la cara interna del brazo y
enrolle el manguito con firmeza para que
no pueda deslizarse.
A.
De kant met de slang van de manchet
moet 1 - 2 cm boven de binnenkant van
de elleboog liggen.
B. Zorg ervoor dat de luchtslang zich aan de
binnenkant van uw arm bevindt en wikkel
If taking measurements on the right
arm, refer to:
Pour la prise de mesures au bras droit,
voir:
Bei Messungen am rechten Arm siehe
:
Se la misurazione viene eseguita al
braccio destro, fare riferimento a
:
Si va a realizar mediciones en el brazo
derecho, consulte
:
Als u metingen aan de rechterarm
uitvoert, raadpleeg dan
:
При измерении на правой руке см.
Sağ koldan ölçüm yapıyorsanız
aşağıdakilere bakın
:
Se fizer as medições no braço direito,
consulte:
Jeśli dokonujesz pomiarów na prawym
ramieniu, zapoznaj się z:
Om du gör mätningar på höger arm, se:
ϰϟ·ϊΟέˬϥϣϳϷωέΫϟϰϠϋαΎϳϘϟ˯έΟ·ϝΎΣϲϓ
Instruction Manual 1 2.5
de manchet stevig rond uw arm zodat
deze niet meer kan wegglijden.
A.
Край манжеты с трубкой должен
находиться на 1 - 2см выше локтевого
сгиба.
B. Убедитесь, что воздуховодная трубка
находится на внутренней поверхности
плеча и надежно оберните манжету,
чтобы она не прокручивалась вокруг
руки.
A.
Kolluğun boru tarafı, dirsek içinin 1-2 cm
üstünde olmalıdır.
B. Hava borusunun kolunuzun iç tarafında
olduğundan emin olun ve kolluğu
kaymayacak şekilde sabit şekilde sarın.
A. O lado do tubo da braçadeira deve estar
1- 2 cm acima do interior do cotovelo.
B. Certifique-se de que o tubo de ar está
na parte interior do braço e enrole a
braçadeira firmemente, para que não
deslize.
A. Rurka mankietu powinna znajdować się
1–2 cm powyżej wewnętrznego łokcia.
B. Upewnij się, że przewod powietrza
znajduje się po wewnętrznej stronie
ramienia, i owiń mocno mankiet, tak aby
nie mogł się już ślizgać.
A. Manschettens rörsida ska vara 1–2cm
ovanför insidan av armbågen.
B. Se till att luftslangen är på insidan av
armen och linda manschetten ordentligt
så att den inte längre kan glida runt.
ϥϣρϏΎοϟρϳέηϟϥϣϡϭρέΧϟΏϧΎΟϊϔΗέϳϥΏΟϳA
ϖϓέϣϟϥϋϡγ˻ϰϟ·˺
ϥϣϲϠΧΩϟΏϧΎΟϟϰϠϋ˯ϭϬϟϡϭρέΧϥϥϣΩϛ΄ΗB
ϖϟίϧϳϻΙϳΣΑϡΎϛΣΈΑρϏΎοϟρϳέηϟϑϟϭˬϙϋέΫ
ωέΫϟϝϭΣ
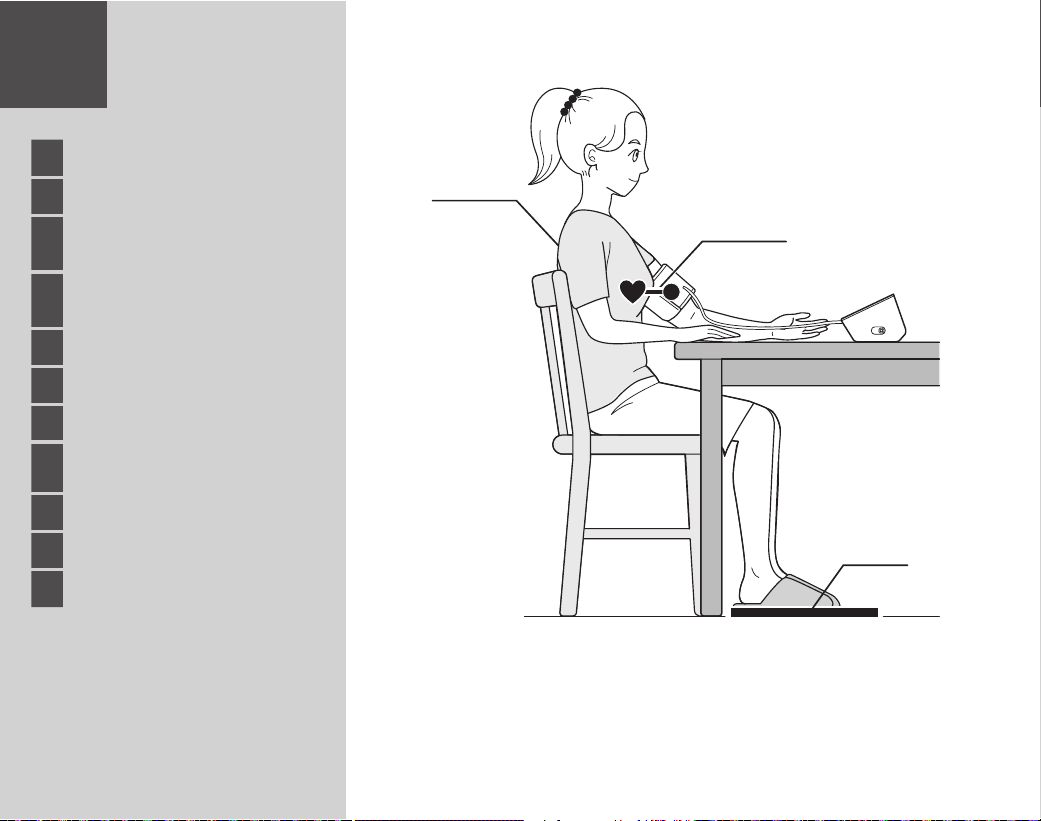
13
FR
Position assise correcte
DE
Korrekte Körperhaltung
IT
Come sedersi nel modo
corretto
ES
Cómo sentarse
correctamente
NL
Correct zitten
RU
Сядьте правильно
TR
Düzgün Oturma
PT
Como sentar-se
corretamente
PL
Prawidłowa pozycja
SV
Rätt sittställning
AR
ϳΣλϝϛηΑαϭϠΟϟ
9
Sitting
Correctly
1
2
3
Relax and sit comfortably. Remain still and do not talk.
1. Keep your back and arm supported.
2. Keep the arm cuff at the same level as your heart.
3. Keep your feet flat and your legs uncrossed.

14
Détendez-vous et asseyez-vous confortablement. Restez immobile
et ne parlez pas.
1. Gardez votre dos et vos bras soutenus.
2. Gardez le brassard au même niveau que votre cœur.
3. Gardez vos pieds à plat et vos jambes décroisées.
Entspannen Sie sich und sitzen Sie bequem. Bleiben Sie still und
reden Sie nicht.
1. Halten Sie Rücken und Arm gestützt.
2. Halten Sie die Armmanschette auf Herzhöhe.
3. Halten Sie Ihre Füße flach und die Beine nicht übereinander
gekreuzt.
Rilassarsi e sedersi comodamente. Rimanere fermi e non parlare.
1. Mantenere la schiena e il braccio supportati.
2. Mantenere il bracciale allo stesso livello del cuore.
3. Tenere i piedi piatti e le gambe non incrociate.
Relájese y siéntese cómodamente. Quédese quieto y no hable.
1. Mantenga la espalda y el brazo apoyados.
2. Mantenga el manguito al mismo nivel que su corazón.
3. Mantenga los pies planos y las piernas sin cruzar.
Ontspan en zit comfortabel. Zit stil en praat niet.
1. Houd uw rug en arm ondersteund.
2. Houd de armmanchet op dezelfde hoogte als uw hart.
3. Houd uw voeten plat en uw benen niet over elkaar.
Расслабьтесь и сядьте удобно. Сохраняйте спокойствие и не
разговаривайте.
1. Обопритесь спиной и рукой.
2. Держите манжету на уровне сердца.
3. Держите ступни ровно и не скрещенными.
Rahatlayın ve rahatça oturun. Hareketsiz kalın ve konuşmayın.
1. Sırtınızı ve kolunuzu destekleyin.
2. Kolluğu kalbinizle aynı seviyede tutun.
3. Ayaklarınızı düz tutun ve bacaklarınızı çaprazlamayın.
Descontraia e sente-se confortavelmente. Mantenha-se imóvel e
não fale.
1. Mantenha as costas e o braço apoiados.
2. Mantenha a braçadeira no mesmo nível do coração.
3. Mantenha os pés assentes no chão e as pernas descruzadas.
Zrelaksuj się i usiądź wygodnie. Pozostań nieruchomo i nie rozmawiaj.
1. Trzymaj plecy i ramiona podparte.
2. Trzymaj mankiet na tym samym poziomie co serce.
3. Trzymaj stopy płasko i nie skrzyżowane.
Koppla av och sitt bekvämt. Förbli stilla och prata inte.
1. Håll ryggen och armen stödda.
2. Håll armmanschetten på samma nivå som ditt hjärta.
3. Håll fötterna platta och benen okorsade.
ΙΩΣΗΗϻϭΎ
˱
ϧϛΎγϖΑΎ
˱
ϣΎϣΗΥέΗγϭϙΗγϠΟϲϓΡέΗγ
ΩΎϧΗγϊοϭϲϓϙϋέΫϭϙέϬυϥϭϛϳϥΏΟϳ1
ΏϠϘϟϯϭΗγϣαϔϧϲϓωέΫϠϟρϏΎοϟρϳέηϟϥϭϛϳϥΏΟϳ2
ϥϳΗόρΎϘΗϣέϳϏϙϳϗΎγϭϥϳΗργΑϧϣϙϳϣΩϗϰϠϋυϓΎΣ3
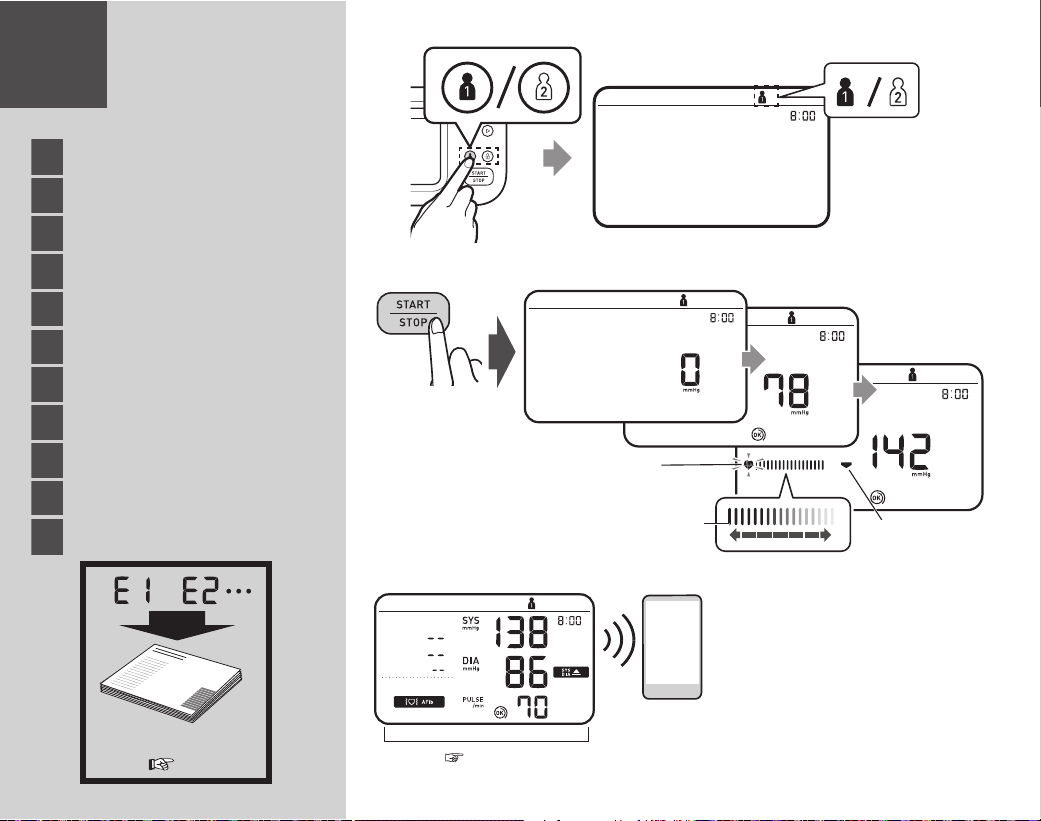
15
10
FR
Réalisation d’une mesure
DE
Eine Messung vornehmen
IT
Misurazione
ES
Realizar una medición
NL
Een meting verrichten
RU
Выполнение измерений
TR
Bir Ölçüm Yapma
PT
Realização de uma medição
PL
Wykonywanie pomiaru
SV
Ta en mätning
AR
αΎϳϘϟ˯έΟ·
Instruction Manual 1
3.
Taking a
Measurement
1
2
A
B
3
C
1. Select your user ID from buttons "1" or "2".
2. Press the [START/STOP] button.
A: Flashes at every heartbeat.
B: Moves along with the pulse strength
while the cuff is deflating.
C: Appears while the cuff is deflating.
3. The reading is saved automatically.
Open the app to transfer the reading.
P.21~

16
1. Sélectionnez votre identifiant utilisateur à
l'aide des boutons « 1 » ou « 2 ».
2. Appuyez sur le bouton [START/STOP].
A : Clignote à chaque battement de cœur.
B : Se déplace avec la force du pouls
pendant que le brassard se dégonfle.
C : S'affiche pendant que le brassard se
dégonfle.
3. La mesure est enregistrée automatiquement.
Ouvrez l'application pour transférer la mesure.
1. Wählen Sie über die Schaltflächen „1“ oder
„2“ Ihre Benutzer-ID aus.
2. Drücken Sie die Taste [START/STOP].
A: Blinkt bei jedem Herzschlag.
B: Bewegt sich mit der Pulsstärke, während
die Manschette entlüftet wird.
C: Blinkt, während die Manschette
entlüftet wird.
3. Der Messwert wird automatisch
gespeichert. Öffnen Sie die App, um den
Messwert zu übertragen.
1. Selezionare il proprio ID utente dai
pulsanti "1" o "2".
2. Premere il pulsante [START/STOP].
A: Lampeggia ad ogni battito cardiaco.
B: Si muove insieme alla forza del polso
mentre il bracciale si sgonfia.
C: Lampeggia mentre il bracciale si sta
sgonfiando.
3. La lettura viene salvata automaticamente.
Aprire l'app per trasferire la lettura.
1. Seleccione su ID de usuario en los botones
"1" o "2".
2. Presione el botón [START/STOP].
A: Parpadea con cada latido del corazón.
B: Se mueve junto con la fuerza del pulso
mientras el manguito se desinfla.
C: Aparece mientras el manguito se está
desinflando.
3. La lectura se guarda automáticamente.
Abra la aplicación para transferir la lectura.
1. Selecteer uw gebruikers-ID via knop "1" of "2".
2. Druk op de [START/STOP]-knop.
A: Knippert bij elke hartslag.
B: Beweegt mee met de polssterkte terwijl
de manchet leegloopt.
C: Knippert terwijl de manchet leegloopt.
3. De meting wordt automatisch opgeslagen.
Open de app om de meting over te dragen.
1. Выберите свой идентификатор пользователя
с помощью кнопок «1» или «2».
2. Нажмите кнопку [START/STOP].
A: Мигает при каждом ударе сердца.
B: Изменяется вместе с силой пульса,
пока манжета сдувается.
C: Мигает во время спуска воздуха из
манжеты.
3. Показания сохраняются автоматически.
Откройте приложение, чтобы передать
показания.
1. “1” veya “2” tuşlarından kullanıcı kimliğinizi seçin.
2. [START/STOP] düğmesine basın.
A: Her kalp atışında yanıp söner.
B: Kolluğun havası sönerken nabız
kuvvetiyle birlikte hareket eder.
C: Kolluğun havası inerken yanıp söner.
3. Okuma otomatik olarak kaydedilir.
Okumayı aktarmak için uygulamayı açın.
1. Selecione a ID de utilizador nos botões "1"
ou "2".
2. Prima o botão [START/STOP].
A: Pisca a cada batimento cardíaco.
B: Move-se juntamente com a força do
pulso enquanto a braçadeira está a esvaziar.
C: Pisca enquanto a braçadeira está a
esvaziar.
3. A leitura é gravada automaticamente. Abra
a aplicação para transferir a leitura.
1. Wybierz swój identyfikator użytkownika za
pomocą przycisków „1” lub „2”.
2. Naciśnij przycisk [START/STOP].
A: Miga przy każdym uderzeniu serca.
B: Porusza się wraz z siłą tętna podczas
opróżniania mankietu.
C: Miga podczas opróżniania mankietu.
3. Odczyt zostaje zapisany automatycznie.
Otwórz aplikację, aby przesłać odczyt.
1. Välj ditt användar-ID från knapparna "1"
eller "2".
2. Tryck på knappen [START/STOP].
A: Blinkar vid varje hjärtslag.
B: Rör sig med pulsstyrkan medan
manschetten töms.
C: Blinkar medan manschetten töms.
3. Avläsningen sparas automatiskt. Öppna
appen för att överföra läsningen.
©˻ªϭ©˺ªϙΑΔλΎΧϟϡΩΧΗγϣϟΔϳϭϫΩΩΣ 1
ϑΎϘϳ·˯ΩΑ>67$576723@έίϰϠϋρϐο 2
ΏϠϗΔοΑϧϝϛϊϣνϣϭϳ A
ρϏΎοϟρϳέηϟώϳέϔΗ˯ΎϧΛΔοΑϧϟΓϭϗϊϣϙέΣΗϳ B
ρϏΎοϟρϳέηϟώϳέϔΗ˯ΎϧΛνϣϭϳ C
Γ˯έϘϟϝϘϧϟϖϳΑρΗϟΗϓΎ
˱
ϳΎϘϠΗΓ˯έϘϟυϔΣϡΗϳ 3
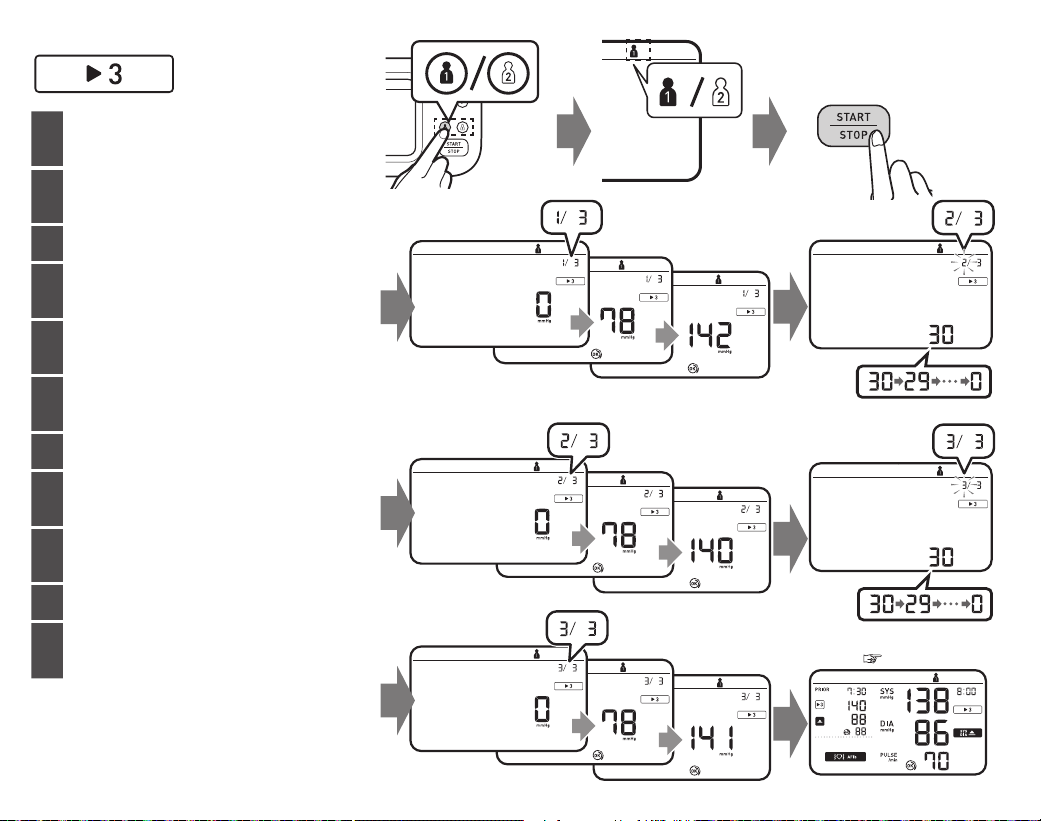
17
3 sec+
Taking a
measurement in
TruRead mode
FR
Réalisation d’une mesure en mode
TruRead
DE
Vornehmen einer Messung im
TruRead-Modus
IT Misurazione in modalità
TruRead
ES
Obtención de una lectura en modo
TruRead
NL
Een meting in TruRead-modus
afnemen
RU
Выполнение измерений в режиме
TruRead
TR
TruRead
modunda ölçüm yapma
PT
Realização de uma medição no modo
TruRead
PL
Wykonywanie pomiaru w trybie
TruRead
SV
Gör en mätning i TruRead-läge
AR
TruReadϊοϭϲϓαΎϳϗϝϳΟγΗ
P.21~

18
In the TruRead mode, your monitor automatically takes 3
consecutive readings at selected intervals and displays the
average. The interval is set to 30 seconds by default.
Refer to "Setting the TruRead Mode Interval" on page 9.
En mode TruRead, votre tensiomètre prend automatiquement
3mesures consécutives à des intervalles sélectionnés et affiche la
moyenne. L'intervalle est défini par défaut sur 30 secondes.
Reportez-vous à «Définition de l'intervalle du mode TruRead» à la
page 9.
Im TruRead-Modus nimmt Ihr Monitor automatisch drei
aufeinanderfolgende Messwerte in ausgewählten Intervallen vor
und zeigt den Durchschnitt an. Das Intervall ist standardmäßig auf
30 Sekunden eingestellt.
Siehe „Festlegen des TruRead-Modusintervalls“ auf Seite 9.
Nella modalità TruRead, il monitor effettua automaticamente
3letture consecutive a intervalli selezionati e visualizza la media. Per
impostazione predefinita, l'intervallo è impostato su 30 secondi.
Fare riferimento a "Impostazione dell'intervallo della modalità
TruRead" a pagina 9.
En el modo TruRead, su monitor toma automáticamente 3 lecturas
consecutivas a intervalos seleccionados y muestra el promedio. El
intervalo está establecido en 30 segundos de forma predeterminada.
Consulte "Configuración del intervalo del modo TruRead" en la
página 9.
In de TruRead-modus voert uw monitor automatisch 3
opeenvolgende metingen uit met geselecteerde intervallen en
geeft het gemiddelde weer. Het interval is standaard ingesteld op
30 seconden.
Raadpleeg "Het TruRead-modusinterval instellen" op pagina 9.
В режиме TruRead ваш монитор автоматически снимает 3
последовательных показания через выбранные интервалы
и отображает среднее значение. По умолчанию интервал
установлен на 30 секунд.
См. «Настройка интервала режима TruRead» на странице 9.
TruRead modunda ölçüm cihazınız seçilen aralıklarla otomatik olarak
ardışık 3 ölçüm alır ve ortalamasını görüntüler. Aralık varsayılan
olarak 30 saniyeye ayarlanmıştır.
Bkz. “TruRead Modu Aralığını Ayarlama” sayfa 9.
No modo TruRead, o medidor faz automaticamente 3 leituras
consecutivas em intervalos selecionados e apresenta a média.
Ointervalo está predefinido nos 30 segundos.
Consulte "Definição do intervalo do modo TruRead" na página 9.
W trybie TruRead monitor automatycznie wykonuje 3 kolejne
odczyty w wybranych odstępach czasu i wyświetla średnią.
Domyślnie odstęp jest ustawiony na 30 sekund.
Patrz „Ustawianie interwału trybu TruRead” na stronie 9.
I TruRead-läget gör din monitor automatiskt 3 avläsningar i följd
med valda intervall och visar medelvärdet. Intervallet är inställt på
30 sekunder som standard.
Se "Ställa in TruRead-lägesintervallet" på sidan 9.
ΕέΗϓϰϠϋΎ
˱
ϳΎϘϠΗΔόΑΎΗΗϣΕ˯έϗ˼ρΎϘΗϟΎΑαΎϳϘϟίΎϬΟϡϭϘϳˬTruReadϊοϭϲϓ
ϲοέΗϓΩΩϋΈϛΔϳϧΎΛ˼˹ϰϠϋΔϠλΎϔϟΓέΗϔϟΩΩϋ·ϡΗϳϝΩόϣϟνέόϳϡΛϥϣϭˬΔϣυΗϧϣ
.ΔΣϔλϟϲϓ©TruReadϊοϭϟΔϠλΎϔϟΓέΗϔϟρΑοªϰϟ·ϊΟέ
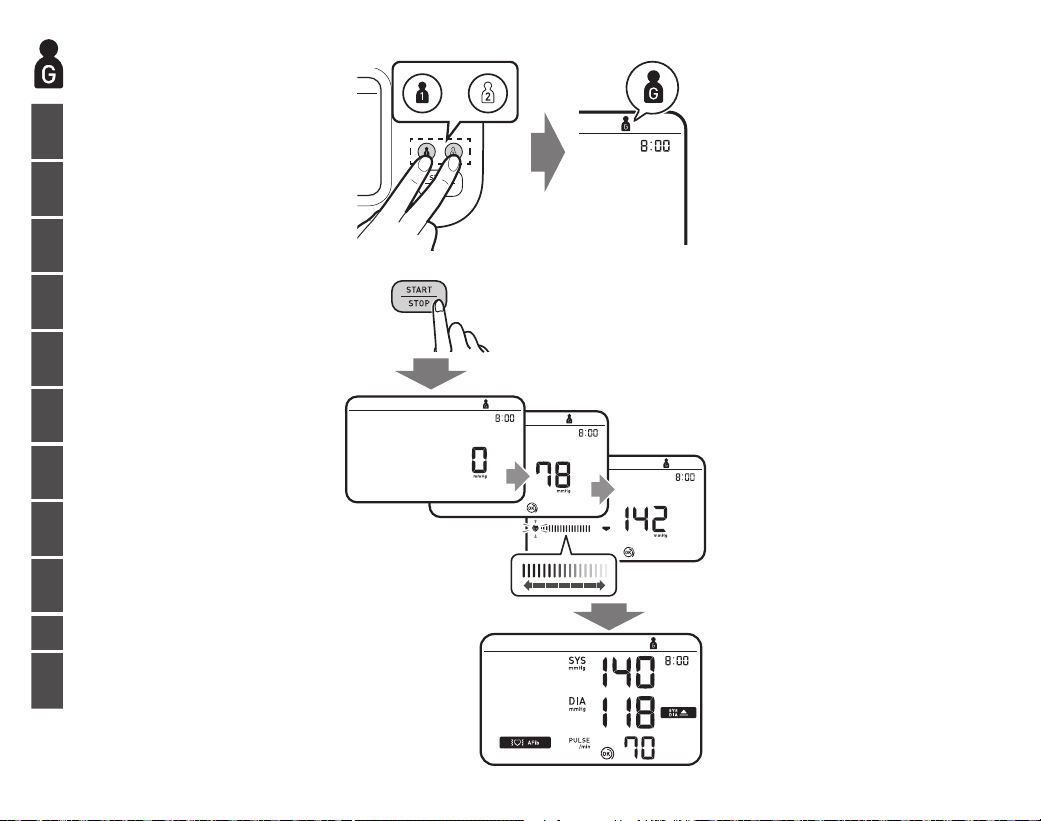
19
Taking a measurement
in guest mode
FR
Réalisation d’une mesure en
mode Invité
DE
Vornehmen einer Messung im
Gast-Modus
IT
Misurazione in modalità
Ospite
ES
Realizar una medición en
modo de invitado
NL
Een meting in gastmodus
afnemen
RU
Выполнение измерений в
гостевом режиме
TR
Konuk modunda ölçüm
yapma
PT
Realização de uma medição
no modo de convidado
PL
Wykonanie pomiaru w trybie
gościa
SV
Gör en mätning i gästläget
AR
ϑϳοϟϊοϭϲϓαΎϳϗϝϳΟγΗ
2
1
+
Takes a single measurement for another
user. No readings are stored in the
memory and TruRead mode is unavailable.
Prend une seule mesure pour un autre utilisateur.
Aucune mesure n'est stockée dans la mémoire et le
mode TruRead n'est pas disponible.
Führt eine einzelne Messung für einen anderen
Benutzer durch. Es werden keine Messwerte im
Speicher gespeichert und der TruRead-Modus ist
nicht verfügbar.
Effettua una singola misurazione per un altro
utente. Nessuna lettura viene archiviata nella
memoria e la modalità TruRead non è disponibile.
Toma una sola medida para otro usuario. No se
almacenan lecturas en la memoria y el modo
TruRead no está disponible.
Voert een enkele meting uit voor een andere
gebruiker. Er worden geen metingen in het
geheugen opgeslagen en de TruRead-modus is
niet beschikbaar.
Выполняет одно измерение для другого
пользователя. Показания не сохраняются в
памяти, а режим TruRead недоступен.
Başka bir kullanıcı için tek bir ölçüm alır. Bellekte
hiçbir okuma saklanmaz ve TruRead modu
kullanılamaz.
Realiza uma única medição para outro utilizador.
Nenhuma leitura é gravada na memória e o modo
TruRead não está disponível.
Wykonuje pojedynczy pomiar dla innego
użytkownika. W pamięci nie są przechowywane
żadne odczyty, a tryb TruRead jest niedostępny.
Gör en enda mätning för en annan användare. Inga
avläsningar lagras i minnet och TruRead-läget är
inte tillgängligt.
ˬΓέϛΫϟϲϓΕ˯έϗϥϳίΧΗϡΗϳϻέΧϡΩΧΗγϣϟϱΩέϓαΎϳϗϝΟγϳ
έϓϭΗϣέϳϏTruReadϊοϭϭ

20
If your systolic pressure is more than 210mmHg:
After the arm cuff starts to inflate, press and hold the [START/STOP]
button until the monitor inflates 30 to 40mmHg higher than your
expected systolic pressure. Do not inflate above 299mmHg.
Si votre pression systolique est supérieure à 210mmHg:
Lorsque le brassard commence à se gonfler, appuyer sur le bouton
[START/STOP] et le maintenir enfoncé jusqu’à ce que le tensiomètre
atteigne une pression de gonflage supérieure de 30 à 40mmHg à votre
pression systolique attendue. Ne pas gonfler à plus de 299 mmHg.
Wenn Ihr systolischer Druck höher ist als 210mmHg:
Nachdem die Manschette begonnen hat, sich aufzupumpen, drücken
Sie die [START/STOP]-Taste, und halten Sie sie gedrückt, bis ein Druck
von 30bis 40mmHg über Ihrem erwarteten systolischen Druck erreicht
ist. Die Manschette darf nicht auf über 299mmHg aufgepumpt werden.
Se la pressione sistolica è superiore a 210mmHg:
Quando il bracciale inizia a gonfiarsi, premere e mantenere premuto
il pulsante [START/STOP] finché il misuratore non raggiunge una
pressione da 30a40mmHg superiore rispetto al valore di pressione
sistolica atteso. Non gonfiare a una pressione superiore a 299mmHg.
En caso de que su presión arterial sistólica esté por encima de 210mmHg:
Una vez que el manguito comience a inflarse, mantenga pulsado
el botón [START/STOP] hasta que el monitor indique que el inflado
está entre 30 y 40mmHg por encima de la presión arterial sistólica
estimada. No infle por encima de 299mmHg.
Als uw systolische druk hoger is dan 210mmHg:
Zodra de armmanchet wordt opgepompt, houdt u de knop
[START/STOP] ingedrukt totdat de meter 30 tot 40mmHg hoger
aangeeft dan uw verwachte systolische druk. Blaas de manchet niet
verder op dan tot 299 mmHg.
После того, как началось автоматическое наполнение манжеты
воздухом, нажмите и удерживайте кнопку [START/STOP] до тех пор,
покаприбор не поднимет давление до значения, превышающего
ожидаемое систолическое давление на 30-40мм.рт.ст. Манжету
нужно наполнять воздухом так, чтобы давление в ней не
превышало 299 мм рт.ст.
Sistolik basıncınız 210mmHg'den fazlaysa:
Kolluk şişmeye başladıktan sonra, [START/STOP] düğmesine basın ve
ölçüm cihazı beklediğiniz sistolik basınç değerinden 30 ila 40mmHg
daha fazla şişene kadar basılı utun. 299mmHg'den fazla şişirmeyin.
Se a tensão sistólica estiver acima dos 210mmHg:
Depois de a braçadeira começar a insuflar, prima e mantenha premido
o botão [START/STOP] até que o medidor insufle 30 a 40mmHg acima
da tensão sistólica esperada. Não insufle acima de 299mmHg.
Jeśli Twoje ciśnienie skurczowe przekracza 210mmHg:
Gdy mankiet zacznie się napełniać, naciśnij i przytrzymaj przycisk
[START/STOP], aż monitor napełni się o 30 do 40mmHg wyżej niż
oczekiwane ciśnienie skurczowe. Nie nadmuchuj powyżej 299mmHg.
Om ditt systoliska tryck är mer än 210mmHg:
När armmanschetten börjar blåsa upp trycker du på och håller ned
[START/STOP]-knappen tills monitorn blåses upp 30 till 40mmHg högre
än ditt förväntade systoliska tryck. Blås inte upp över 299mmHg.
ΔϳϘΑίΕέΗϣϳϠϠϣ˻˺˹ϥϣέΛϛϲοΎΑϘϧϻϡΩϟρϐοϥΎϛΫ·
>67$576723@έίϟϰϠϋέέϣΗγϻϊϣρϐοˬωέΫϠϟρϏΎοϟρϳέηϟΥΎϔΗϧ˯ΩΑΩόΑ
ϲοΎΑϘϧϻϡΩϟρϐοΔϣϳϗϥϣϰϠϋΎ
˱
ϳϘΑί
˱
έΗϣϳϠϠϣ˽˹ϰϟ·˼˹ϥϣΦϔϧϟΎΑίΎϬΟϟϡϭϘϳϰΗΣ
Ύ
˱
ϳϘΑί
˱
έΗϣϳϠϠϣ˻ϕϭϓ˯ϭϬϟΦϔϧΗϻΔόϗϭΗϣϟ
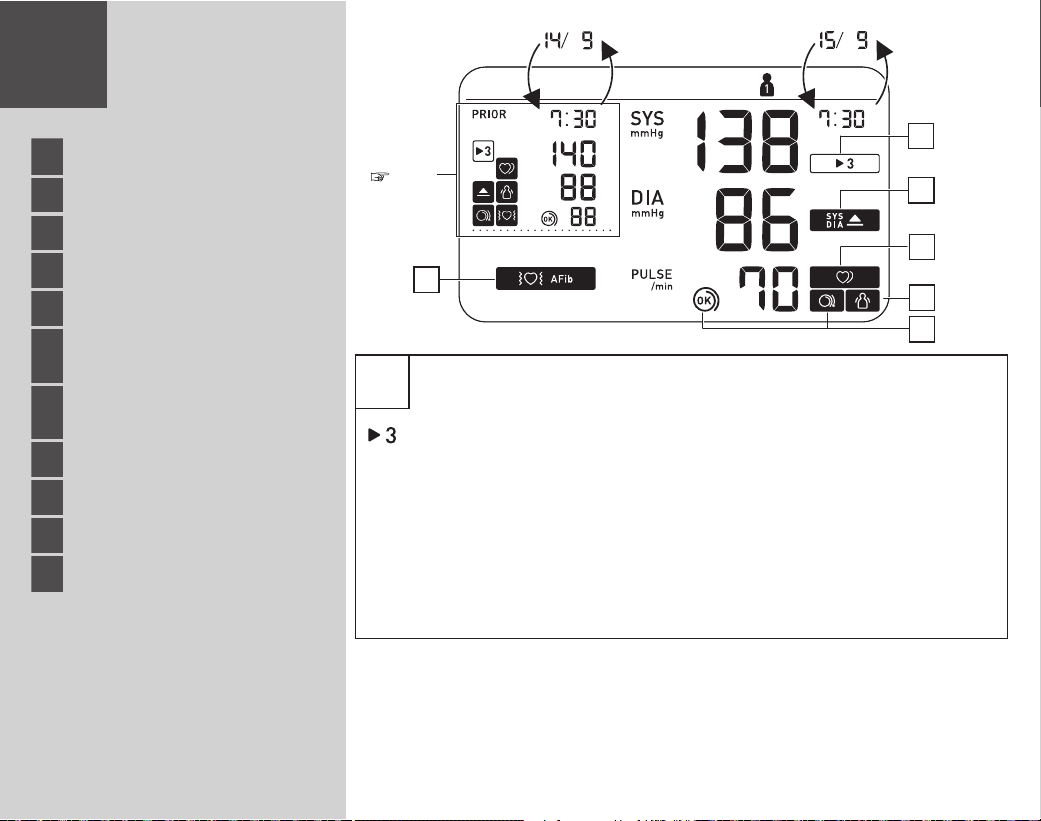
21
11
FR
Vérification des mesures
DE
Überprüfen von Messwerten
IT
Controllo dei risultati
ES
Comprobación de las lecturas
NL
Metingen bekijken
RU
Проверка результатов
измерений
TR
Ölçüm Değerlerini Kontrol
Etme
PT
Verificar leituras
PL
Sprawdzanie odczytów
SV
Kontrollera avläsningar
AR
Ε˯έϘϟϥϣϖϘΣΗϟ
Checking
Readings
3
4
1
2
5
6
1
Appears when the reading
was taken in TruRead
mode.
S’affiche lorsque la mesure
a été effectuée en mode
TruRead.
Erscheint, wenn der
Messwert im TruRead-
Modus ermittelt wurde.
Appare quando la
misurazione è stata
effettuata in modalità
TruRead.
Aparece cuando la lectura
fue realizada en el modo
TruRead.
Verschijnt wanneer de
meting in de TruRead-modus
werd verricht.
Отображается, если
значение получено в
режиме TruRead.
Ölçüm TruRead moduna
alınınca görünür.
Aparece quando a leitura foi
efetuada no modo TruRead.
Pojawia się, gdy odczyt
został dokonany w trybie
TruRead.
Visas när avläsningen
gjordes i TruRead-läge.
ϰϠϋϝϭλΣϟϡΗϳΎϣΩϧϋέϬυϳ
.TruReadϊοϭϲϓΓ˯έϘϟ
P.26

22
2
Appears if "SYS" is 135mmHg or above
and/or "DIA" is 85mmHg* or above.
S’affiche si «SYS» est égale ou supérieure à
135mmHg et/ou «DIA» égale ou supérieure
à 85mmHg*.
Wird angezeigt, wenn „SYS“ 135mmHg
oder mehr beträgt und/oder wenn „DIA“
85mmHg* oder mehr beträgt.
Viene visualizzato se la pressione sistolica
“SYS” è pari o superiore a 135mmHg e/o la
pressione diastolica “DIA” è pari o superiore a
85mmHg*.
Aparece si “SYS” es 135mmHg o superior y/o
“DIA” es 85mmHg* o superior.
Verschijnt als “SYS” 135mmHg of hoger is en/
of “DIA” 85mmHg* of hoger is.
Отображается, если «SYS» 135мм рт. ст. и
выше и/или «DIA» 85мм рт. ст.* и выше.
“SYS” 135mmHg ya da üstünde olduğunda
ve/veya “DIA” 85mmHg* ya da üstünde
olduğunda görünür.
Aparece se o valor de "SYS" for de
135mmHg ou superior e/ou o valor de "DIA"
for de 85 mmHg* ou superior.
Pojawia się, jeśli „SYS” wynosi 135mmHg
lub więcej i/lub „DIA” wynosi 85mmHg* lub
więcej.
Visas om "SYS" är 135mmHg eller högre
och/eller "DIA" är 85mmHg* eller högre.
έΛϛϭΎ
˱
ϳϘΑί
˱
έΗϣϳϠϠϣ˺˼˾ώϠΑϳ©SYSªϥΎϛΫ·έϬυΗ
έΛϛϭΎ
˱
ϳϘΑί
˱
έΗϣϳϠϠϣ˾ώϠΑϳ©DIAªϭϭ
3
Appears when an irregular rhythm** is
detected during a measurement. If it
continues to appear, consulting with your
physician is recommended.
S’affiche lorsqu’un rythme irrégulier** est
détecté pendant une mesure. S’il continue
d’apparaître, il est recommandé de consulter
votre médecin.
Wird angezeigt, wenn während einer Messung
ein unregelmäßiger Herzschlag** erkannt wird.
Wird das Symbol weiterhin angezeigt, sollten
Sie sich an Ihren Arzt wenden.
Viene visualizzato se nel corso di una
misurazione viene rilevato un ritmo cardiaco
irregolare**. Se il simbolo continua ad apparire
è consigliabile rivolgersi al proprio medico
curante.
Aparece cuando se detecta un ritmo
irregular** durante una medición. Si esto sigue
apareciendo, le recomendamos que consulte a
su médico.
Verschijnt wanneer tijdens een meting een
onregelmatig ritme** wordt gedetecteerd.
Neem contact op met uw arts als dit blijft
verschijnen.
Отображается, если при измерении
определяется нерегулярный ритм**. Если
этот значок продолжает отображаться,
рекомендуем обратиться к лечащему врачу.
Bir ölçüm esnasında düzensiz ritim**
saptandığında görünür. Görünmeye devam
ederse doktorunuza danışmanız önerilir.
Aparece quando um ritmo irregular** é
detetado durante uma medição. Se continuar
a aparecer, recomenda-se que consulte o seu
médico.
Pojawia się, gdy podczas pomiaru wykryty
zostanie nieregularny rytm**. Jeśli nadal się
pojawia, zaleca się konsultację z lekarzem.
Visas när en oregelbunden rytm** detekteras
under en mätning. Om det fortsätter att dyka
upp, rekommenderas att konsultera med din
läkare.
˯ΎϧΛϲϓΏϠϘϟΕΎΑέοϡΎυΗϧϡΩϋϑΎηΗϛΩϧϋέϬυΗ
ΓέΎηΗγΎΑϰλϭ
˵
ϳˬέϭϬυϟϲϓΕέϣΗγΫ·αΎϳϘϟΔϳϠϣϋ
ιΗΧϣϟϙΑϳΑρ
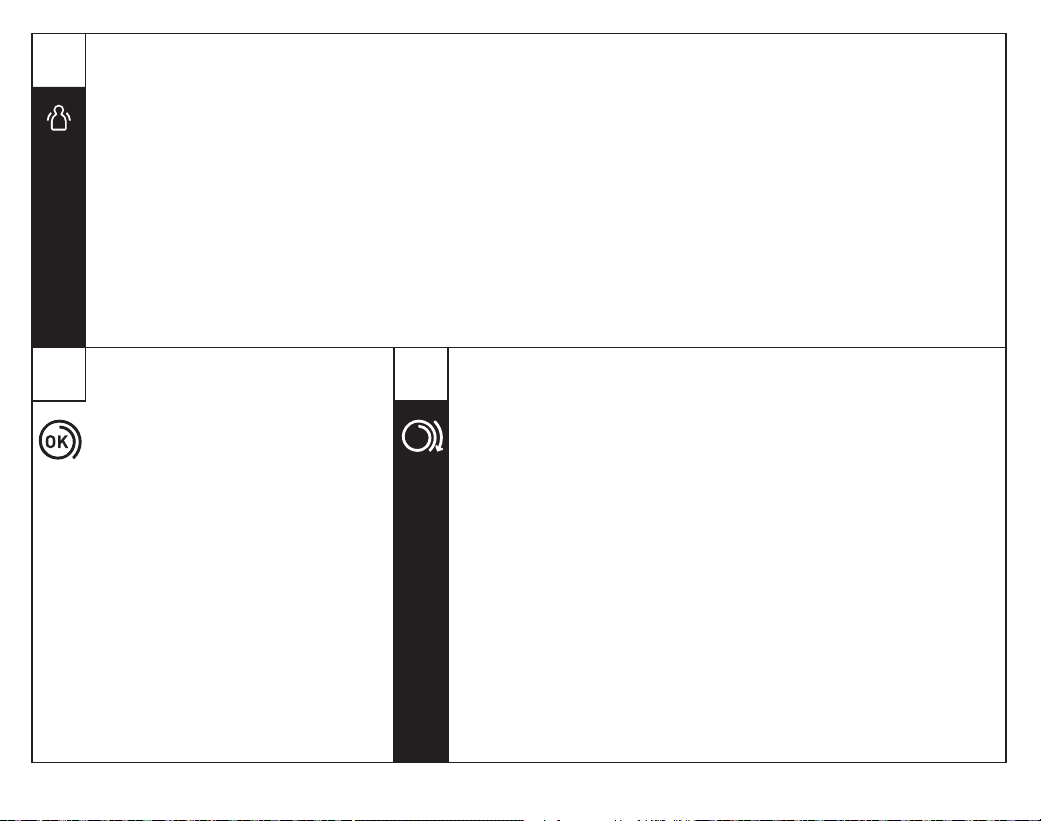
23
4
Appears when your body moves during
a measurement***. Remove the arm cuff,
wait 2-3minutes and try again.
S’affiche si vous bougez pendant une
mesure***. Retirer le brassard, attendre
2à3minutes et essayer à nouveau.
Wird angezeigt, wenn Sie sich während
der Messung*** bewegen. Nehmen Sie die
Manschette ab, warten Sie 2–3Minuten und
versuchen Sie es erneut.
Viene visualizzato se l’utilizzatore si muove
durante la misurazione***. Rimuovere il
bracciale, attendere 2-3minuti e riprovare.
Aparece cuando se mueve el cuerpo durante
una medición***. Retire el manguito, espere
unos 2 o 3minutos e inténtelo de nuevo.
Verschijnt wanneer uw lichaam tijdens een
meting*** beweegt. Verwijder de armmanchet,
wacht 2-3 minuten en probeer het opnieuw.
Отображается при движении тела во время
измерения***. Снимите манжету, подождите
2-3минуты и попробуйте еще раз.
Bir ölçüm esnasında vücudunuz hareket
ettiğinde görünür***. Kolluğu çıkarın,
2-3dakika bekleyip tekrar deneyin.
Aparece quando o corpo se mexe durante
uma medição***. Retire a braçadeira, aguarde
2-3 minutos e tente de novo.
Pojawia się, gdy ciało porusza się podczas
pomiaru***. Zdejmij mankiet, odczekaj
2–3minuty i spróbuj ponownie.
Visas när din kropp rör sig under en
mätning***. Ta bort armmanschetten, vänta
2–3minuter och försök igen.
αΎϳϘϟΔϳϠϣϋ˯ΎϧΛϲϓϙϣγΟϙέΣΗϳΎϣΩϧϋέϬυΗ
ϖΎϗΩ˼ϰϟ·˻ϥϣέυΗϧϭωέΫϠϟρϏΎοϟρϳέηϟΔϟίΈΑϡϗ
ϯέΧΓέϣϝϭΎΣϭ
5
The cuff is tight enough.
Le brassard est suffisamment serré.
Manschette sitzt ausreichend straff.
Il bracciale è stretto a sufficienza.
El manguito está lo suficientemente prieto.
Manchet zit strak genoeg.
Манжета затянута достаточно туго.
Kolluk yeterince sıkıdır.
A braçadeira está bem apertada.
Mankiet jest wystarczająco ciasny.
Manschetten är tillräckligt stram.
ϲϔϛϳΎϣΑϡϛΣϣρϏΎοϟρϳέηϟ
5
Apply the cuff again MORE TIGHTLY.
Poser le brassard en le serrant davantage.
Manschette STRAFFER ziehen.
Applicare di nuovo il bracciale STRINGENDOLO DI PIÙ.
Vuelva a poner el manguito MÁS PRIETO.
Breng de manchet STRAKKER aan.
Наложите манжету еще раз БОЛЕЕ ТУГО.
Kolluğu tekrar, DAHA SIKI bir şekilde takın.
Aplique a braçadeira de novo MAIS APERTADA.
Załóż mankiet ponownie, MOCNIEJ zaciskając.
Applicera manschetten igen STRAMARE.
Ύ
˱
ϣΎϛΣ·έΛϛϝϛηΑϯέΧΓέϣρϏΎοϟρϳέηϟϑϠΑϡϗ
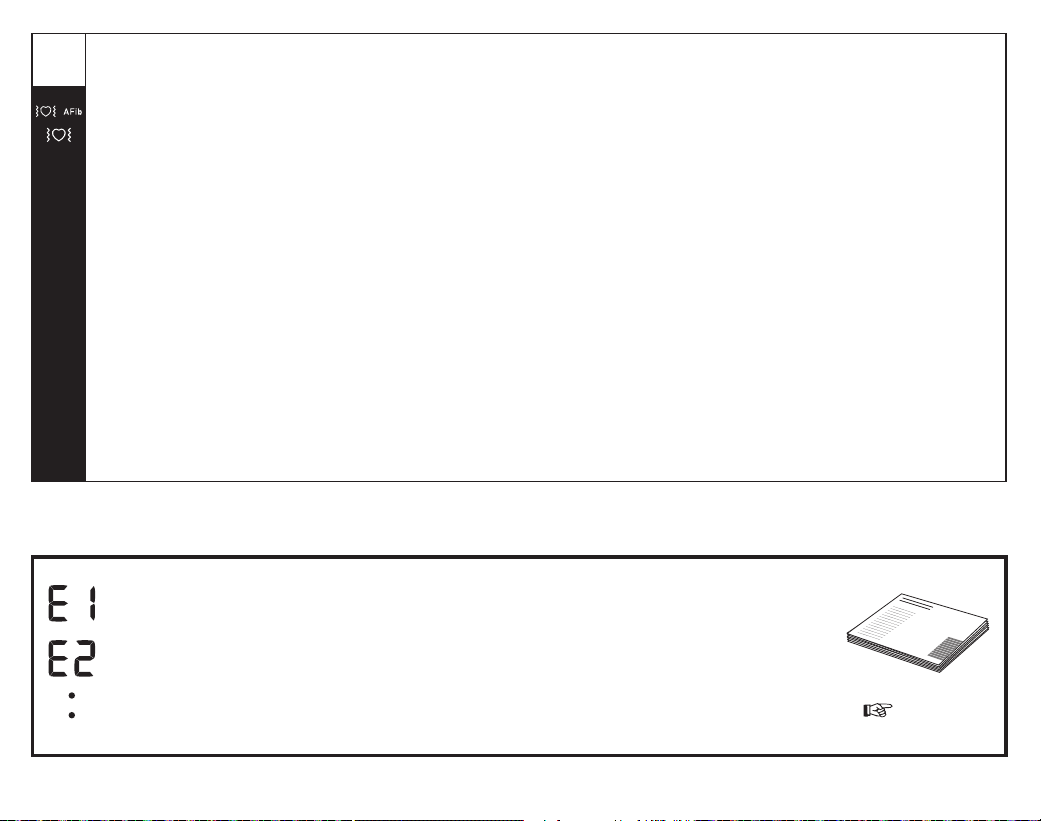
24
6
Appears if a possibility of AFib was
detected during a measurement. This
is not a diagnosis, it is only a potential
finding for AFib. You should contact your
physician to discuss the findings.
Apparaît si une possibilité de fibrillation
auriculaire a été détectée lors d'une mesure.
Il ne s’agit pas d’un diagnostic, mais
seulement d’une découverte potentielle de
fibrillation auriculaire. Vous devriez contacter
votre médecin pour discuter des résultats.
Erscheint, wenn während einer Messung die
Möglichkeit von Vorhofflimmern festgestellt
wurde. Dies ist keine Diagnose, sondern nur
ein möglicher Befund für Vorhofflimmern.
Sie sollten Ihren Arzt kontaktieren, um den
Befund zu besprechen.
Appare se durante una misurazione è stata
rilevata la possibilità di fibrillazione atriale.
Questa non è una diagnosi, è solo un
potenziale riscontro di fibrillazione atriale.
È consigliabile contattare il proprio medico
per discutere i risultati.
Aparece si se detectó la posibilidad de fibrilación
auricular durante una medición. Esto no es un
diagnóstico, es sólo un hallazgo potencial de
fibrilación auricular. Debe comunicarse con su
médico para discutir los hallazgos.
Verschijnt als tijdens een meting de
mogelijkheid van AFib is gedetecteerd. Dit is
geen diagnose, het is slechts een mogelijke
bevinding voor AFib. U dient contact op te
nemen met uw arts om de bevindingen te
bespreken.
Появляется, если во время измерения
была обнаружена возможность ФП. Это не
диагноз, это всего лишь потенциальный
признак мерцательной аритмии. Вам
следует связаться со своим врачом, чтобы
обсудить результаты.
Bir ölçüm sırasında AFib olasılığı tespit edilirse
görünür. Bu bir tanı değil, yalnızca AFib için
potansiyel bir bulgudur. Bulguları tartışmak
için doktorunuzla iletişime geçmelisiniz.
Aparece se tiver sido detetada a
possibilidade de fibrilhação auricular (AFib)
durante uma medição. Não se trata de
um diagnóstico, apenas de uma potencial
identificação de AFib. Deve contactar o seu
médico para falar sobre este assunto.
Pojawia się, jeśli podczas pomiaru wykryto
możliwość wystąpienia AFib. To nie jest
diagnoza, to jedynie potencjalne odkrycie
AFib. Należy skontaktować się z lekarzem
wcelu omówienia wyników.
Visas om en möjlighet för AFib upptäcktes
under en mätning. Detta är inte en diagnos,
det är bara ett potentiellt fynd för AFib. Du
bör kontakta din läkare för att diskutera
fynden.
ϲϧϳΫϷϥΎϔΟέϟΎΑΔΑΎλϹϝΎϣΗΣϑΎηΗϛΔϟΎΣϲϓέϬυΗ
ϭϫΎϣϓˬΎ
˱
λϳΧηΗ˯έΟϹΫϫΩό
˵
ϳϻαΎϳϘϟ˯έΟ·ϝϼΧ
ΏΟϳˬ
˷
ϡΛϥϣϭϲϧϳΫϥΎϔΟέΙϭΩΣϟϝϣΗΣϣϑΎηΗϛϻ·
ΞΎΗϧϟΔηϗΎϧϣϟΏϳΑρϟΎΑϝΎλΗϻϙϳϠϋ
Error messages or other problems? Refer to:
Messages d’erreur ou autres problèmes? Voir:
Weitere Fehlermeldungen oder Probleme siehe:
Messaggi di errore o altri problemi? Fare riferimento a:
¿Hay mensajes de error u otros problemas? Consulte:
Foutmeldingen of andere problemen? Raadpleeg:
Сообщения об ошибках или другие
неисправности? См.
Hata mesajları veya başka sorunlar mı var? Bkz:
Mensagens de erro ou outros problemas? Consulte:
Komunikaty o błędach lub inne problemy? Odnosić
się do:
Felmeddelanden eller andra problem? Hänvisa till:
ϰϟ·ϊΟέˮϯέΧϷΕϼϛηϣϟϭ΄ρΧϟϝΎγέ
Instruction Manual 1
3.

25
* The high blood pressure definition is based on the 2021ESH/ESC
Guidelines.
* La définition de l’hypertension est basée sur les recommandations
ESH/ESC2021.
* Die Definition für Bluthochdruck basiert auf den 2021ESH/ESC-Richtlinien.
* La definizione di alta pressione arteriosa si basa sulle linee guida 2021 di
ESH/ESC.
* La definición de presión arterial alta se basa en las guías 2021ESH/ESC.
* De definitie van hoge bloeddruk is gebaseerd op de ESH/ESC-richtlijnen uit
2021.
* Определение высокого артериального давления основано на
Рекомендациях 2021ESH/ESC.
* Yüksek tansiyon tanımı, 2021ESH/ESC Kılavuzlarını temel alır.
* A definição de tensão arterial alta baseia-se nas Orientações de 2021 da
ESH/ESC.
* Definicja wysokiego ciśnienia krwi opiera się na wytycznych ESH/ESC 2021.
* Definitionen av högt blodtryck är baserad på 2021 års ESH/ESC-riktlinjer.
ϡΩϟρϐορέϔϟΔϳΑϭέϭϷΔϳόϣΟϟΕΩΎηέ·ϰϟ·ΩϧΗγϳϊϔΗέϣϟϡΩϟρϐοϑϳέόΗ
.2021ϡΎόϟESCΏϠϘϟΏρϟΔϳΑϭέϭϷΔϳόϣΟϟESH
** An irregular heartbeat rhythm is defined as a rhythm that is 25 % less or 25 %
more than the average rhythm detected while your monitor is measuring blood
pressure.
** Les pulsations cardiaques irrégulières sont des pulsations dont la fréquence est
supérieure ou inférieure de 25 % par rapport à la moyenne détectée lorsque l’appareil
mesure la pression artérielle.
** Unregelmäßiger Herzschlag ist definiert als ein Herzrhythmus, der 25 % unter oder
25 % über dem mittleren Herzrhythmus liegt, der während der Blutdruckmessung
erkannt wird.
** Per battito cardiaco irregolare si intende la presenza di variazioni inferiori del
25% osuperiori del 25% nel ritmo rispetto al ritmo medio rilevato dall’apparecchio
durante la misurazione della pressione arteriosa.
** Un ritmo de latido cardíaco irregular se define como aquel ritmo que es el 25%
inferior o el 25% superior al ritmo cardíaco medio detectado mientras el monitor
mide la presión arterial.
** Onregelmatige hartslag is gedefinieerd als een hartritme dat meer dan 25% lager
of 25% hoger is dan het gemiddelde hartritme tijdens het meten van de bloeddruk
door de meter.
** нерегулярный ритм сердцебиения — это ритм, который на 25 % медленнее
или на 25 % быстрее среднего ритма, определенного прибором при измерении
артериального давления.
** Düzensiz kalp atışı ritmi, ölçüm cihazınız tansiyon ölçümü yaparken saptanan
ortalama ritme göre %25’ten az ya da %25'ten fazla sapma gösteren ritim olarak
tanımlanır.
** Um ritmo de batimento cardíaco irregular é definido como um ritmo 25% inferior
ou 25% superior ao ritmo médio detetado enquanto o medidor está a medir a tensão
arterial.
** Nieregularny rytm bicia serca definiuje się jako rytm o 25% mniejszy lub o
25%większy od średniego rytmu wykrytego podczas pomiaru ciśnienia krwi
przezmonitor.
** En oregelbunden hjärtrytm definieras som en rytm som är 25 % mindre eller 25 %
mer än den genomsnittliga rytmen som upptäcks när din monitor mäter blodtrycket.
ϡΗϳϱΫϟϭˬργϭΗϣϟωΎϘϳϹϥϋˬ˻˾ΔΑγϧΑΩϳίϳϭˬ˻˾ΔΑγϧΑϝϘϳωΎϘϳ·ϭϫΏϠϘϟΕΎΑέοΏέρο
ϡΩϟρϐοϟίΎϬΟϟαΎϳϗ˯ΎϧΛϲϓϪϓΎηΗϛ
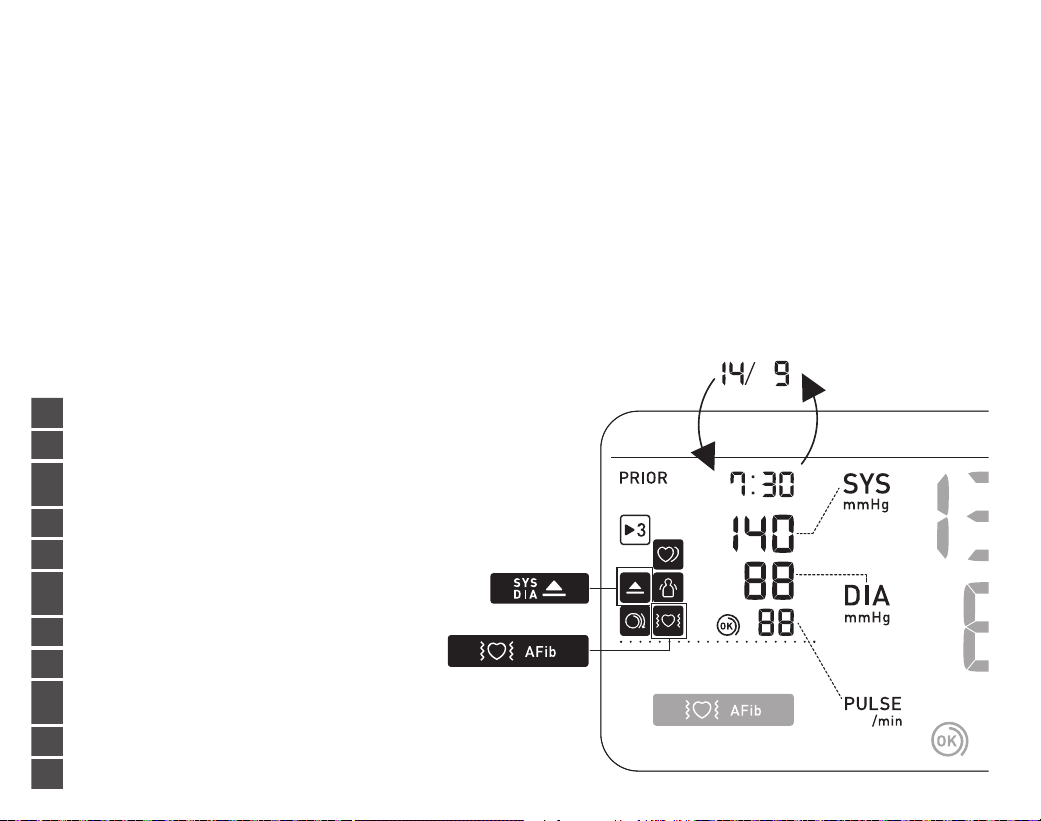
26
*** The body movement function is disabled when a possibility of AFib or irregular heartbeat is detected during a measurement.
*** La fonction de détection des mouvements du corps est désactivée lorsqu’une possibilité d'AFib ou de pulsations cardiaques irrégulières est détectée durant une mesure.
*** Die Bewegungserkennung wird deaktiviert, wenn bei einer Messung ein mögliches AFib oder unregelmäßiger Herzschlag erkannt wird.
*** La funzione di rilevamento del movimento del corpo viene disattivata qualora vengano rilevati una potenziale AFib o un battito cardiaco irregolare durante una misurazione.
*** La función de movimiento corporal se inhabilita cuando se detecta la posibilidad de fibrilación auricular o latido cardíaco irregular durante una medición.
*** De lichaamsbewegingsfunctie wordt uitgeschakeld wanneer de mogelijkheid van AFib of een onregelmatige hartslag wordt gedetecteerd tijdens een meting.
*** Если при измерении в режиме AFib определяется вероятность AFib или нерегулярного сердцебиения, функция обнаружения движения тела отключается.
*** AFib modunda ölçüm sırasında AFib olasılığı veya düzensiz kalp atışı tespit edildiğinde vücut hareketi işlevi devre dışı bırakılır.
*** A função de movimento do corpo é desativada quando a possibilidade de fibrilhação auricular ou batimento cardíaco irregular for detetada durante uma medição.
*** Funkcja ruchu ciała jest wyłączona, jeśli podczas pomiaru wykryta zostanie możliwość wystąpienia AFib lub nieregularnego bicia serca.
*** Kroppsrörelsefunktionen är inaktiverad när en risk för AFib eller oregelbundet hjärtslag detekteras under en mätning.
αΎϳϘϟ˯ΎϧΛΏϠϘϟΕΎΑέοΕΎΑέροϭˬϲϧϳΫϷϥΎϔΟέϟΎΑΔΑΎλϹϝΎϣΗΣϑΎηΗϛϡΗϳΎϣΩϧϋϡγΟϟΔϛέΣΔϔϳυϭϝϳρόΗϡΗϳ
Comparison Display (PRIOR Reading)
FR
Affichage de comparaison (mesure précédente)
DE
Vergleichsanzeige (vorheriger Messwert)
IT
Visualizzazione comparativa (lettura
precedente)
ES
Visualización de comparación (lectura previa)
NL
Vergelijkingsweergave (eerdere meting)
RU
Сравнительный дисплей
(предварительноепоказание)
TR
Karşılaştırma Ekranı (Ön Okuma)
PT
Visualização de comparação (leitura anterior)
PL
Wyświetlacz porównawczy (wcześniejszy
odczyt)
SV
Jämförelsevisning (före läsning)
AR
Γ˯έϘϟϝΑϗΔϧέΎϘϣϟνέϋ
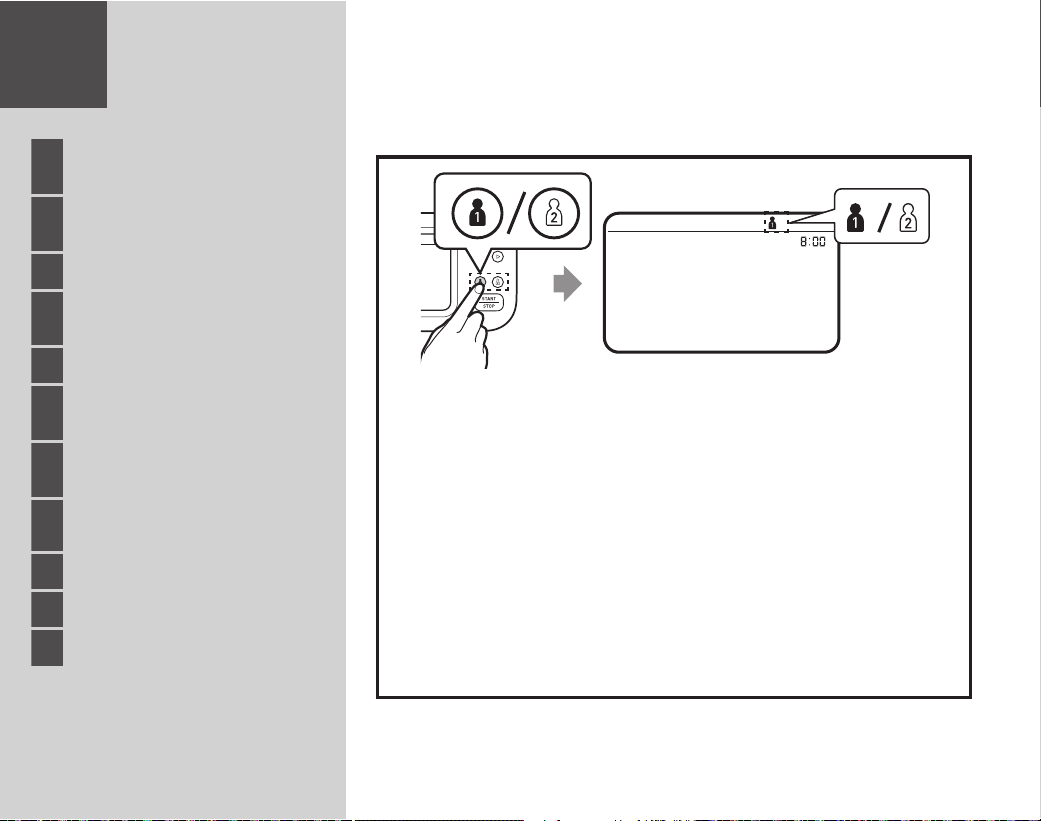
27
12
FR
Utilisation des fonctions de
mémoire
DE
Verwendung der
Speicherfunktionen
IT
Uso delle funzioni di memoria
ES
Uso de las funciones de
memoria
NL
Geheugenfuncties gebruiken
RU
Использование функций
памяти
TR
Hafıza Fonksiyonunun
Kullanılması
PT
Utilização das funções de
memória
PL
Korzystanie z funkcji pamięci
SV
Använda minnesfunktioner
AR
ΓέϛΫϟϑΎυϭϡΩΧΗγ
Using Memory
Functions
Before using memory functions, select your user ID.
Avant d’utiliser les fonctions de mémoire, sélectionner votre ID Utilisateur.
Wählen Sie vor dem Verwenden der Speicherfunktionen Ihre Benutzer-ID aus.
Prima di utilizzare le funzioni di memoria selezionare il proprio ID utente.
Antes de usar las funciones de memoria, seleccione su ID de usuario.
Selecteer uw gebruikers-ID voordat u geheugenfuncties gebruikt.
Перед использованием функций памяти выберите идентификатор пользователя.
Hafıza fonksiyonunu kullanmadan önce kullanıcı kimliğinizi seçin.
Antes de utilizar as funções de memória, selecione a identificação de utilizador.
Przed użyciem funkcji pamięci wybierz swój identyfikator użytkownika.
Innan du använder minnesfunktioner, välj ditt användar-ID.
ϙΑιΎΧϟϡΩΧΗγϣϟϑέόϣΩΩΣˬΓέϛΫϟϑΎυϭϡΩΧΗγϝΑϗ
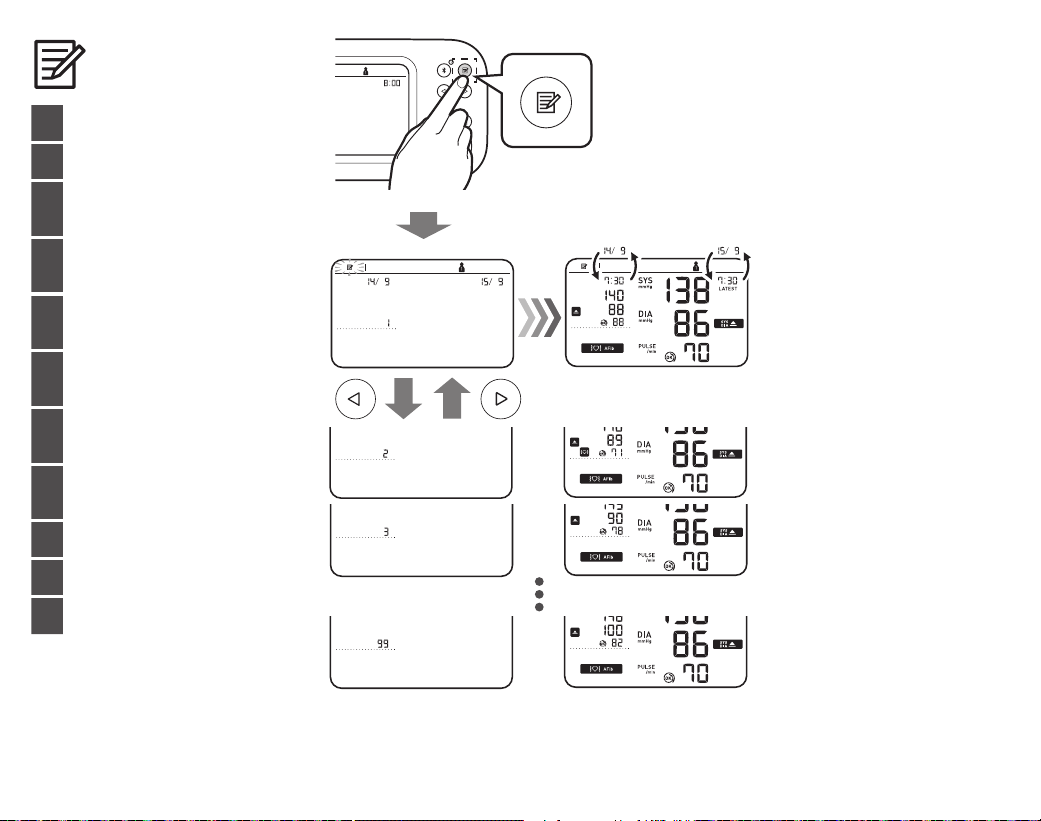
28
Readings Stored in
Memory
FR
Mesures stockées en mémoire
DE
Gespeicherte Messungen
IT
Risultati conservati in
memoria
ES
Lecturas guardadas en la
memoria
NL
Meetwaarden opgeslagen in
het geheugen
RU
Сохранение показаний в
памяти
TR
Hafızada Saklanan Ölçüm
Değerleri
PT
Leituras guardadas na
memória
PL
Odczyty zapisane w pamięci
SV
Avläsningar lagrade i minnet
AR
ΓέϛΫϟϲϓΕ˯έϘϟϥϳίΧΗϡΗ
Stores up to 100 readings.
Mémorise jusqu’à 100mesures.
Es werden bis zu 100Messwerte
gespeichert.
Conserva fino a 100 risultati.
Almacena hasta 100lecturas
.
Slaat tot maximaal 100metingen op.
Сохраняется до 100 показаний.
100 adede kadar ölçüm değeri saklar.
Guarda até 100 leituras.
Przechowuje do 100 odczytów.
Lagrar upp till 100 avläsningar.
Γ˯έϗ˺˹˹ϰϟ·ϝλϳΎϣϥϳίΧΗΑϡϭϘΗ
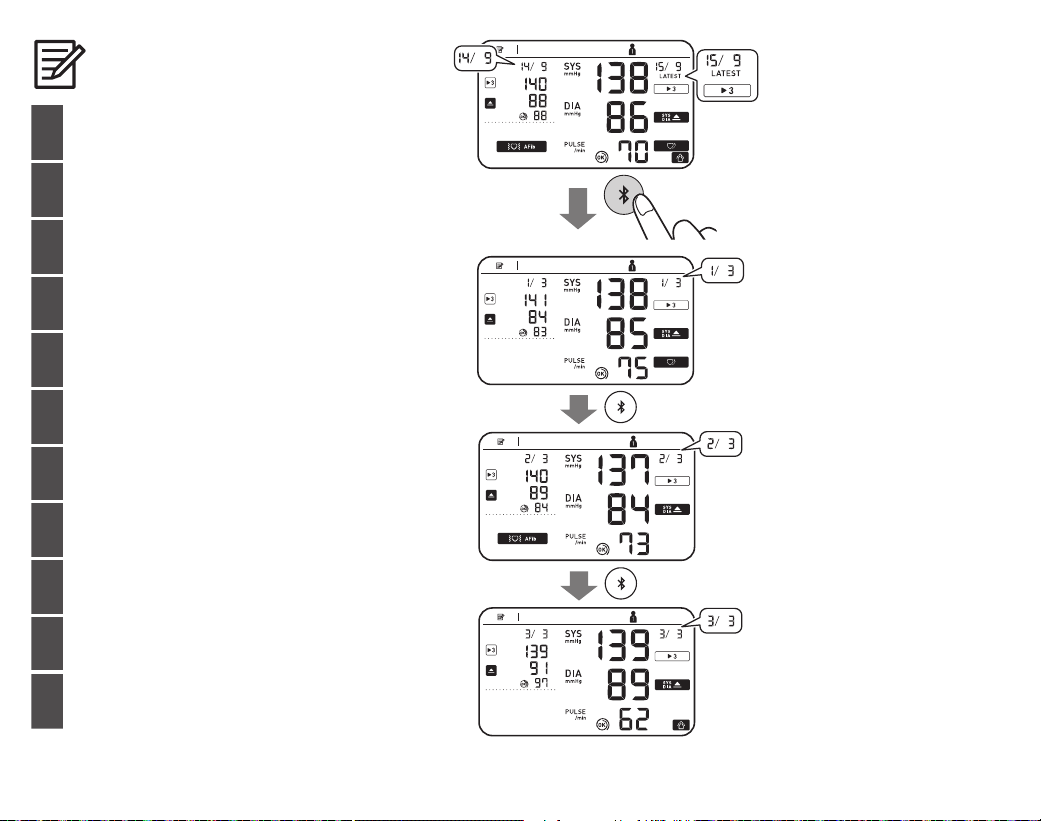
29
Individual TruRead
Readings in Memory
FR
Mesures TruRead individuelles
en mémoire
DE
Individuelle TruRead-
Messwerte im Speicher
IT
Letture TruRead individuali in
memoria
ES
Lecturas individuales de
TruRead en la memoria
NL
Individuele TruRead-
metingen in het geheugen
RU
Индивидуальные показания
TruRead в памяти
TR
Bellekteki Bireysel TruRead
Okumaları
PT
Leituras TruRead individuais
na memória
PL
Indywidualne odczyty
TruRead w pamięci
SV
Individuella TruRead-
avläsningar i minnet
AR
ΓέϛΫϟϲϓΔϳΩέϔϟTruReadΕ˯έϗ
30
While viewing the reading taken in TruRead mode, press
to view
the individual readings. Individual TruRead readings will appear
with
symbol on the left for the past, and on the right for the
latest readings.
Tout en affichant une mesure prise en mode TruRead, appuyez sur
pour
afficher les mesures individuelles. Les mesures TruRead individuelles
apparaîtront avec le symbole
à gauche pour les mesures passées et
à droite pour les mesures les plus récentes.
Während Sie den im TruRead-Modus erfassten Messwert anzeigen,
drücken Sie
, um die einzelnen Messwerte anzuzeigen. Einzelne
TruRead-Messwerte werden mit dem
-Symbol links für die
vergangenen und rechts für die neuesten Messwerte angezeigt.
Durante la visualizzazione della lettura effettuata in modalità TruRead,
premere
per visualizzare le singole letture. Le letture individuali
TruRead appariranno con il simbolo
a sinistra per le letture passate e
a destra per le ultime letture.
Mientras visualiza la lectura tomada en el modo TruRead, presione
para ver las lecturas individuales. Las lecturas individuales de TruRead
aparecerán con el símbolo
a la izquierda para las lecturas pasadas y
a la derecha para las últimas lecturas.
Terwijl u de meting in de TruRead-modus bekijkt, drukt u op
om de
afzonderlijke metingen te bekijken. Individuele TruRead-metingen
verschijnen met het
-symbool aan de linkerkant voor de afgelopen
en aan de rechterkant voor de laatste metingen.
При просмотре показаний, снятых в режиме TruRead, нажмите
,
чтобы просмотреть отдельные показания. Отдельные показания
TruRead будут отображаться с символом
слева для прошлых
показаний и справа для последних показаний.
TruRead modunda alınan okumayı görüntülerken, bireysel okumaları
görüntülemek için
tuşuna basın. Bireysel TruRead okumaları, geçmiş
için solda, en son okumalar için ise sağda
sembolüyle görünecektir.
Ao visualizar a leitura efetuada no modo TruRead, prima
para
visualizar as leituras individuais. As leituras individuais no modo TruRead
aparecerão com o símbolo
à esquerda para as leituras anteriores e à
direita para as leituras mais recentes.
Przeglądając odczyty wykonane w trybie TruRead, naciśnij
, aby
wyświetlić poszczególne odczyty. Poszczególne odczyty TruRead będą
wyświetlane z symbolem
po lewej stronie dla poprzednich i po
prawej stronie dla najnowszych odczytów.
Medan du tittar på avläsningen som tagits i TruRead-läge, tryck på
för
att se de individuella avläsningarna. Individuella TruRead-avläsningar
kommer att visas med
-symbolen till vänster för det förflutna och till
höger för de senaste avläsningarna.
ϑϭγΔϳΩέϔϟΕ˯έϘϟνέόϟ
ρϐοˬTruReadϊοϭϲϓΓΫϭΧ΄ϣϟΓ˯έϘϟνέϋ˯ΎϧΛ
ˬΔϣϳΩϘϟΕ˯έϘϠϟΔΑγϧϟΎΑέΎγϳϟϰϟ·
ίϣέϟΩϭΟϭϊϣΔϳΩέϔϟTruReadΕ˯έϗέϬυΗ
Ε˯έϘϟΙΩΣϷΔΑγϧϟΎΑϥϳϣϳϟϰϟ·ϭ
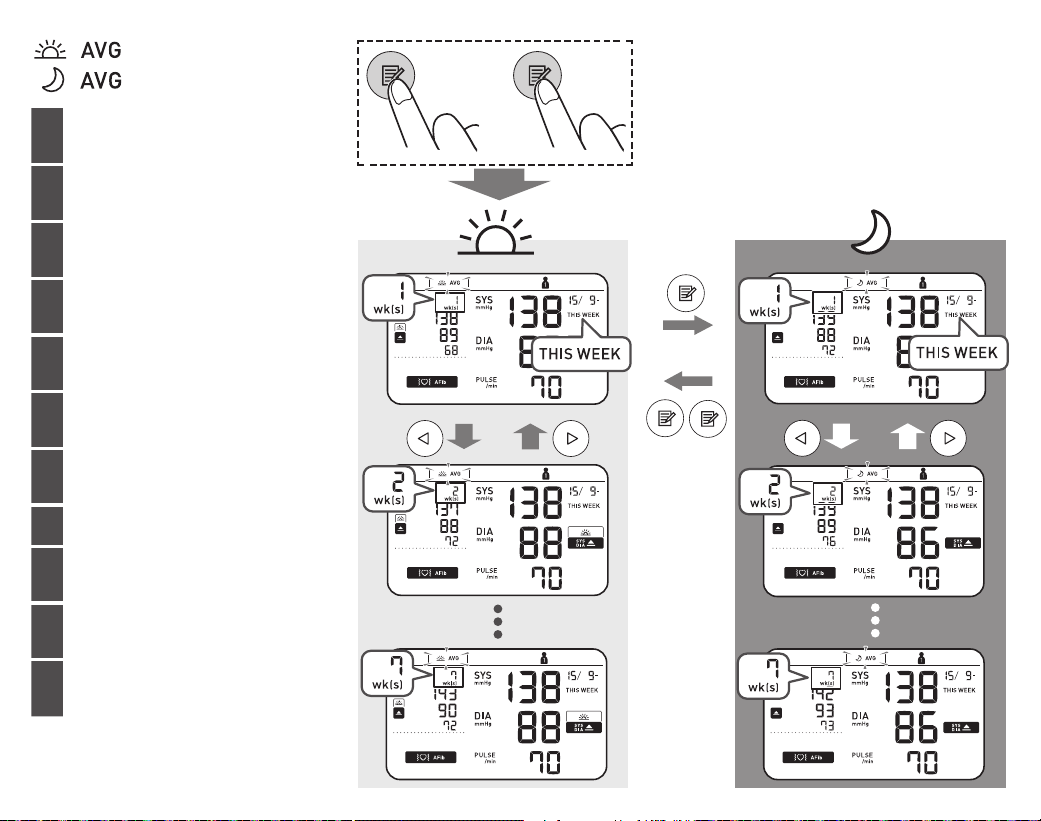
31
Morning/Evening
Weekly Averages
FR
Moyennes hebdomadaires matin/
soir
DE
Wöchentliche Morgen-/
Abendmittelwerte
IT
Media settimanale mattutina e
serale
ES
Valor promedio semanal de
mañana y noche
NL
Weekgemiddelden van ochtend-
en avondwaarden
RU
Утренние/вечерние средние
значения за неделю
TR
Sabah/Akşam Haftalık
Ortalamaları
PT
Médias semanais da manhã/noite
PL
Średnie tygodniowe rano/
wieczorem
SV
Veckomedelvärden för morgon/
kväll
AR
ΔϳΎγϣϟΔϳΣΎΑλϟΔϳϋϭΑγϷΕϻΩόϣϟ
2 wks. ago
7 wks. ago
+

32
Appears if "SYS" is 135mmHg or above and/or "DIA" is 85mmHg
or above in the morning weekly average.
S’affiche si «SYS» est égale ou supérieure à 135mmHg et/ou «DIA»
égale ou supérieure à 85mmHg dans la moyenne hebdomadaire du
matin.
Wird angezeigt, wenn im wöchentlichen Morgenmittelwert „SYS“
135mmHg oder mehr und/oder „DIA“ 85mmHg oder mehr beträgt.
Viene visualizzato se la pressione sistolica “SYS” è pari o superiore
a 135mmHg e/o la pressione diastolica “DIA” è pari o superiore a
85mmHg nellamedia mattutina settimanale.
Aparece si “SYS” es 135mmHg o superior y/o “DIA” es 85mmHg o
superior en el promedio semanal de mañana.
Verschijnt als “SYS” 135mmHg of hoger is en/of “DIA” 85mmHg of
hoger is in het ochtendweekgemiddelde.
Отображается, если средние утренние значения за неделю
«SYS»—135мм рт. ст. и выше и/или «DIA»—85мм рт. ст. и выше.
Sabah haftalık ortalamasında “SYS” 135mmHg ya da üstünde
olduğunda ve/veya “DIA” 85mmHg ya da üstünde olduğunda
görünür.
Aparece se o valor de "SYS" for de 135 mmHg ou superior e/ou o
valor de "DIA" for de 85 mmHg ou superior na média semanal da
manhã.
Pojawia się, jeśli „SYS” wynosi 135mmHg lub więcej i/lub „DIA”
wynosi 85mmHg lub więcej w porannej średniej tygodniowej.
Visas om "SYS" är 135mmHg eller högre och/eller "DIA" är 85mmHg
eller högre på morgonens veckomedelvärde.
έΛϛϭΎ
˱
ϳϘΑί
˱
έΗϣϳϠϠϣ˺˼˾ώϠΑϳ©ϲοΎΑϘϧϻρϐοϟªϥΎϛΫ·έϬυΗ
ϲΣΎΑλϟϲϋϭΑγϷϝΩόϣϟϲϓέΛϛϭΎ
˱
ϳϘΑί
˱
έΗϣϳϠϠϣ˾©ϲρΎγΑϧϻρϐοϟªϭϭ
To know how to calculate weekly averages, refer to section10 of
the Instruction Manual 1.
Pour savoir comment calculer les moyennes hebdomadaires, se
reporter à la section10 du Mode d’emploi 1.
Wie die wöchentlichen Mittelwerte berechnet werden, ist in
Abschnitt10 der Gebrauchsanweisung 1 beschrieben.
Per sapere come calcolare le medie settimanali, consultare la
sezione10 del manuale di istruzioni 1.
Para saber cómo calcular mediciones semanales, consulte la
sección10 del manual de instrucciones 1.
Zie paragraaf 10 van de gebruiksaanwijzing 1 voor aanwijzingen
hoe u het wekelijkse gemiddelde kunt berekenen.
О том, как рассчитываются средние значения за неделю, см.
раздел10 этого руководства по эксплуатации 1.
Haftalık ortalamaların nasıl hesaplanacağını öğrenmek için, Kullanım
Kılavuzu 1'de bölüm 10'a bakın.
Para saber como calcular médias semanais, consulte a secção 10 do
Manual de instruções 1.
Aby dowiedzieć się, jak obliczyć średnie tygodniowe, zapoznaj się
zsekcją 10 Instrukcji obsługi 1.
För att veta hur man beräknar veckomedelvärden, se avsnitt10 i
bruksanvisningen 1.
.˺ΕΩΎηέϹϝϳϟΩϥϣ˺˹ϡγϘϟϰϟ·ϊΟέˬΔϳϋϭΑγϷΕϻΩόϣϟΏΎγΣΔϳϔϳϛΔϓέόϣϟ
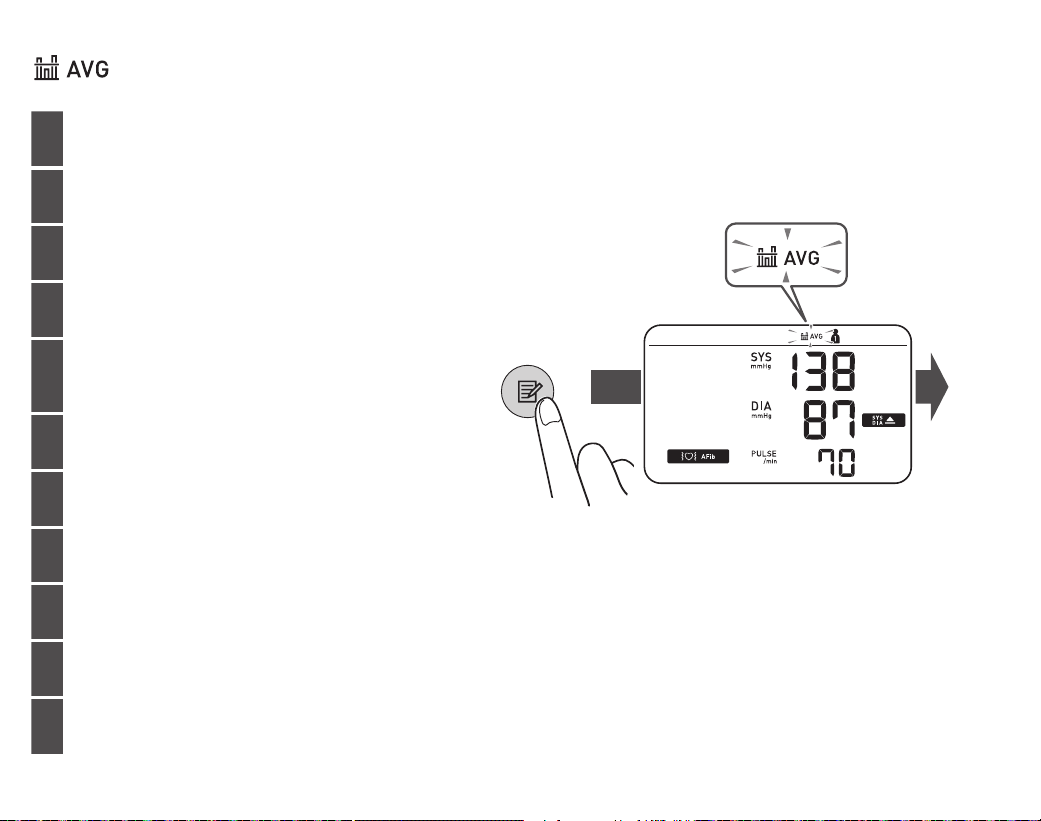
33
Average of the Latest 2 or
3 Readings Taken within a
10Minute Span
FR
Moyenne des 2 ou 3 dernières mesures prises en
l’espace de 10 minutes
DE
Mittelwert der letzten 2 oder 3 Messwerte, die in
einem 10-Minuten-Zeitrahmen erfasst wurden
IT
Media degli ultimi 2 o 3 risultati ottenuti
nell’arco di 10 minuti
ES
Promedio de las 2 o 3 últimas lecturas realizadas
en un intervalo de 10 minutos
NL
Gemiddelde van de laatste 2 of 3 metingen
uitgevoerd binnen een tijdspanne van
10minuten
RU
Среднее значение последних 2-х или 3-х
показаний, полученных в течение 10 минут
TR
10 Dakika Aralıkta Alınan Son 2 veya 3 Ölçüm
Değerinin Ortalaması
PT
Média das últimas 2 ou 3 leituras efetuadas num
intervalo de 10 minutos
PL
Średnia z ostatnich 2 lub 3 odczytów
wykonanych w ciągu 10 minut
SV
Genomsnitt av de senaste 2 eller 3 avläsningarna
som tagits inom ett intervall på 10minuter
AR
ώϠΑΗΔϳϧϣίΓΩϣϝϼΧΔϠΟγϣΕ˯έϗ˼έΧϭϥϳΗ˯έϗέΧϝΩόϣ
ϖΎϗΩ˺˹
4 sec+
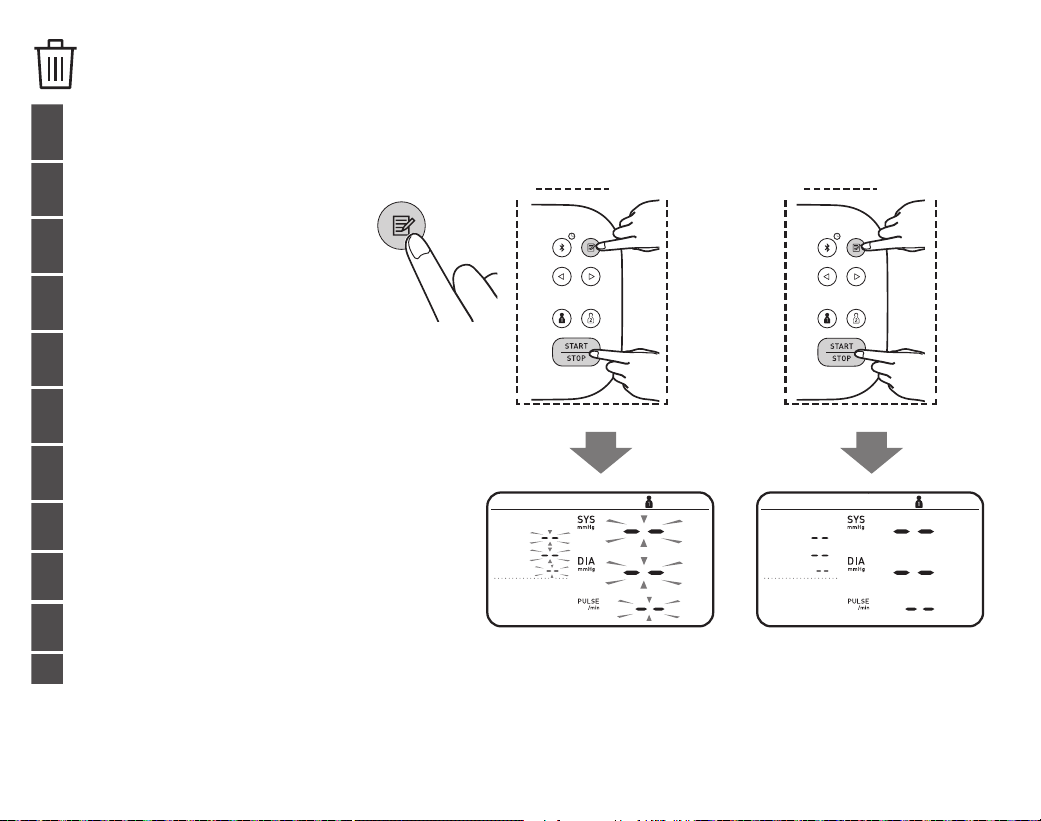
34
Deleting All Readings
for 1 User
FR
Suppression de toutes les
mesures pour 1 utilisateur
DE
Löschen aller Messwerte für
1Benutzer
IT
Eliminazione di tutti i risultati
relativi a 1 utente
ES
Eliminación de todas las
lecturas de un usuario
NL
Alle meetresultaten voor
1gebruiker wissen
RU
Удаление всех показаний
одного пользователя
TR
1 Kullanıcı için Tüm Ölçüm
Değerlerini Silme
PT
Eliminação de todas as leituras
de 1 utilizador
PL
Usuwanie wszystkich odczytów
dla 1 użytkownika
SV
Ta bort alla avläsningar för
1användare
AR
ΩΣϭϡΩΧΗγϣΑΔλΎΧϟΕ˯έϘϟϊϳϣΟγϣ
1
4sec+
2
4sec+
3
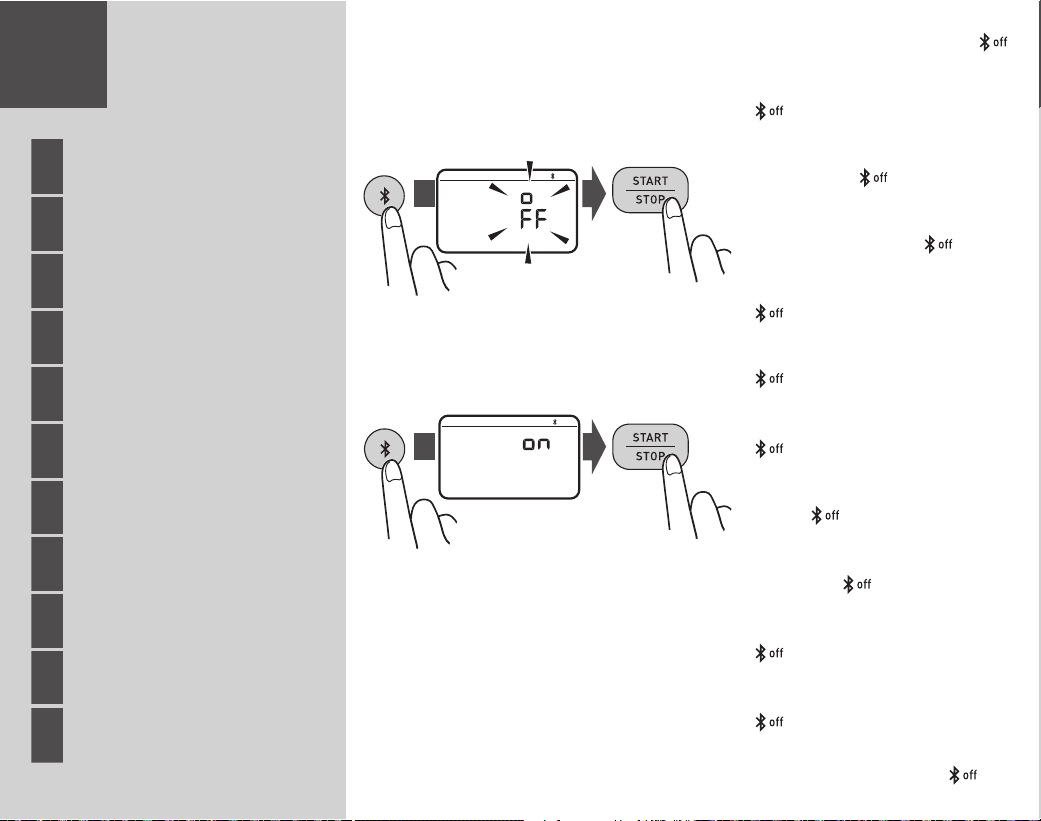
35
13
FR
Désactivation/activation de
Bluetooth
DE
Deaktivieren/Aktivieren der
Bluetooth-Funktion
IT
Disattivazione/attivazione
della funzione Bluetooth
ES
Activar o desactivar el
Bluetooth
NL
Bluetooth uitschakelen/
inschakelen
RU
Выключение/включение
Bluetooth
TR
Bluetooth'u Devre Dışı
Bırakma/Etkinleştirme
PT
Desativação/ativação do
Bluetooth
PL
Wyłączanie/włączanie
Bluetootha
SV
Inaktivera/aktivera
Bluetooth
AR
BluetoothΓίϳϣϥϳϛϣΗϝϳρόΗ
Disabling/Enabling
Bluetooth
10 sec+
3 sec+
Bluetooth is enabled by default.
appears while Bluetooth is disabled.
Bluetooth est activé par défaut.
s’affiche quand Bluetooth est
désactivé.
Die Bluetooth-Funktion ist standard-
mäßig aktiviert.
erscheint, wenn
Bluetooth deaktiviert ist.
La funzione Bluetooth è attiva per
impostazione predefinita.
appare
quando il Bluetooth è disattivato.
El Bluetooth está activado por defecto.
aparece mientras el Bluetooth
está desactivado.
Bluetooth is standaard ingeschakeld.
verschijnt terwijl Bluetooth is
uitgeschakeld.
Bluetooth включен по умолчанию.
появляется, когда Bluetooth
отключен.
Bluetooth varsayılan olarak
etkindir.
, Bluetooth devre dışı
bırakıldığında görünür.
O Bluetooth está ativado por
predefinição.
aparece quando o
Bluetooth está desativado.
Bluetooth jest domyślnie włączony.
pojawia się, gdy funkcja Bluetooth
jest wyłączona.
Bluetooth är aktiverat som standard.
visas när Bluetooth är inaktiverat.
ϲοέΗϓϝϛηΑBluetoothΔϳλΎΧϥϳϛϣΗϡΗϳ
.BluetoothΓίϳϣϝϳρόΗΩϧϋ
έϬυϳ
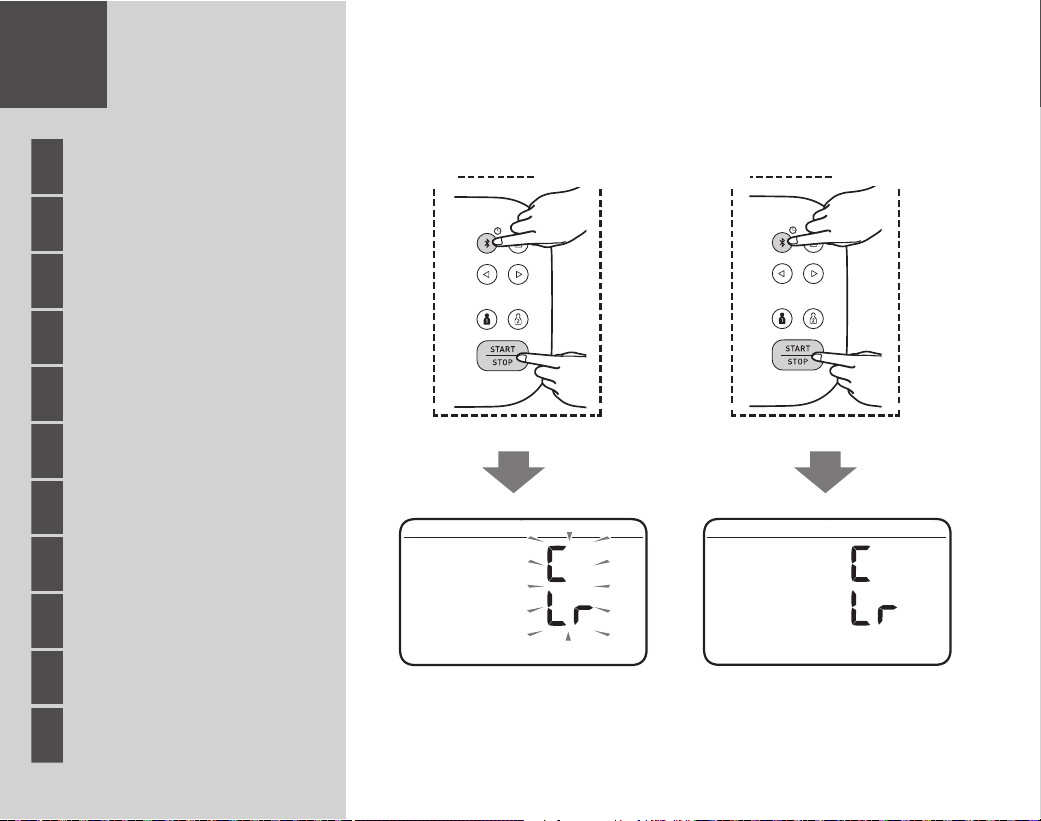
36
14
FR
Réinitialisation aux réglages
par défaut
DE
Wiederherstellen der
Standardeinstellungen
IT
Ripristino delle impostazioni
predefinite
ES
Restablecimiento a los
ajustes de fábrica
NL
De standaardinstellingen
herstellen
RU
Восстановление настроек
по умолчанию
TR
Varsayılan Ayarları Geri
Yükleme
PT
Restauração das
predefinições
PL
Przywracanie ustawień
domyślnych
SV
Återställer till
standardinställningarna
AR
ΔϳοέΗϓϻΕΩΩϋϹΓΩΎόΗγ
Restoring to the
Default Settings
4sec+
4sec+
1
2
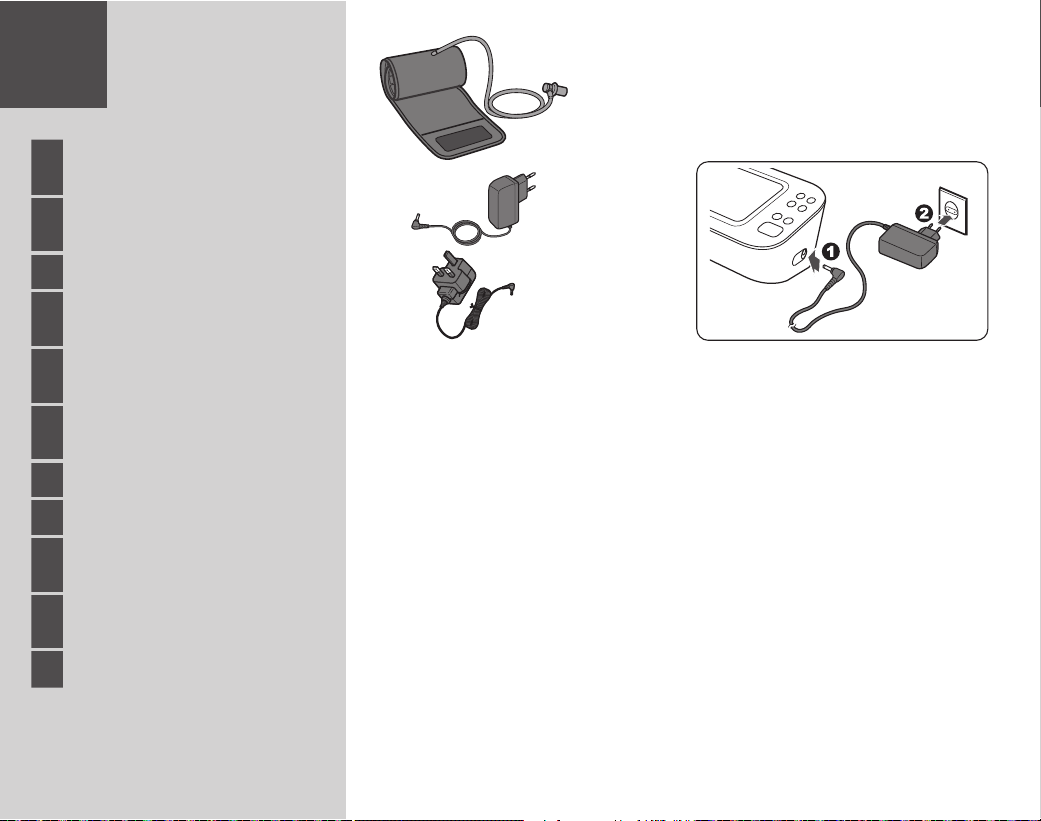
37
15
FR
Accessoires médicaux en
option
DE
Medizinisches optionales
Zubehör
IT
Accessori medicali opzionali
ES
Accesorios médicos
opcionales
NL
Optionele medische
accessoires
RU
Дополнительные
принадлежности
TR
Opsiyonel Tıbbi Aksesuarlar
PT
Acessórios médicos opcionais
PL
Opcjonalne akcesoria
medyczne
SV
Medicinska tillbehör som
tillval
AR
ΔϳέΎϳΗΧϻΔϳΑρϟΕΎϘΣϠϣϟ
Optional Medical
Accessories
(HHP-CM01)
(HHP-BFH01)
AC Adapter
Arm Cu
(HEM-FL31)
22 - 42 cm
Do not throw the air plug away. The air plug can be applicable to the optional cuff.
Ne pas jeter la prise de gonflage. La prise de gonflage peut être utilisée pour le brassard en option.
Entsorgen Sie den Luftschlauchstecker nicht. Der Luftschlauchstecker wird für die optionale
Manschette verwendet.
Non gettare via l’attacco del tubo dell’aria. L’attacco del tubo dell’aria può essere applicato al
bracciale opzionale.
No tire el conector para tubo de aire. El conector para tubo de aire puede ser utilizado con el
manguito opcional.
Gooi de plug van de luchtslang niet weg. De plug van de luchtslang kan worden gebruikt op de
optionele manchet.
Не выбрасывайте воздушный штекер. Он может подойти к дополнительной манжете.
Hava tıpasını atmayın. Hava tıpası isteğe bağlı kolluğa uygulanabilir.
Não deite fora a ficha de ar. A ficha de ar pode ser aplicável à braçadeira opcional.
Nie wyrzucaj wtyczki powietrza. Wtyczkę powietrzną można zastosować w opcjonalnym mankiecie.
Släng inte luftpluggen. Luftpluggen kan appliceras på den valfria manschetten.
ϱέΎϳΗΧϻρϏΎοϟρϳέηϟϊϣ˯ϭϬϟΓΩΩγϝΎϣόΗγϥϛϣϳ˯ϭϬϟΓΩΩγϥϣιϠΧΗΗϻ
Manufacturer
Fabricant
Hersteller
Produttore
Fabricante
Fabrikant
Производитель
Üretici
Fabricante
Producent
Tillverkare
Δόϧλ
˵
ϣϟΔϛέηϟ
OMRON HEALTHCARE Co., Ltd.
53, Kunotsubo, Terado-cho, Muko, KYOTO, 617-0002 JAPAN
ΓΩϭΩΣϣϟέϳϛΙϠϳϫϥϭέϣΔϛέη
ϭΗϭϳΎϛˬϭϛϭϣϭηϭΩέΗϭΑϭγΗϭϧϭϛ53
ϥΎΑΎϳϟ
EU-representative
Mandataire dans l’UE
EU-Repräsentant
Rappresentante per l’UE
Representante en la UE
Vertegenwoordiging in de EU
Представитель в ЕС
AB temsilcisi
Representante na UE
Przedstawiciel UE
EU-representant
ϲΑϭέϭϷΩΎΣΗϻΎΑϝϳΛϣΗϟΔϬΟ
OMRON HEALTHCARE EUROPE B.V.
Wegalaan 73, 2132 JD Hoofddorp, THE NETHERLANDS
www.omron-healthcare.com
Importer in EU
Importateur dans l’UE
Importeur in der EU
Importatore per l’UE
Importador en la UE
Importeur in de EU
Импортер в ЕС
AB’de İthalatçı
Importador na UE
Importer w UE
Importör i EU
ϲΑϭέϭϷΩΎΣΗϻϲϓΩέϭΗγϣϟ
Production facility
Site de production
Produktionsstätte
Stabilimento di
produzione
Planta de producción
Productiefaciliteit
Производственное
подразделение
Üretim Tesisi
Instalações de produção
Zakład produkcyjny
Produktionsanläggning
ϊϳϧλΗϟΓ΄ηϧϣ
OMRON HEALTHCARE MANUFACTURING VIETNAM CO., LTD.
No.28 VSIP II, Street 2, Vietnam-Singapore Industrial Park II,
Binh Duong Industry-Services-Urban Complex, Hoa Phu Ward,
Thu Dau Mot City, Binh Duong Province, Vietnam
Subsidiaries
Succursales
Niederlassungen
Consociate
Empresas filiales
Dochteronder nemingen
Филиалы
Yan Kuruluşlar
Sucursais
Spółki zależne
Dotterbolag
ΔόΑΎΗϟΕΎϛέηϟ
Importer in the United
Kingdom and UK
responsible person
OMRON HEALTHCARE UK LTD.
Opal Drive, Fox Milne, Milton Keynes, MK15 0DG, UK
www.omron-healthcare.com/distributors
OMRON MEDIZINTECHNIK HANDELSGESELLSCHAFT mbH
www.omron-healthcare.com/distributors
OMRON SANTÉ FRANCE SAS
www.omron-healthcare.com/distributors
Made in Vietnam/ Fabriqué au Vietnam/ Hergestellt in Vietnam/ Prodottoin Vietnam/ Fabricado en Vietnam/ Geproduceerd in Vietnam/ Сделано во Вьетнаме/
Vietnam'da Üretilmiştir/ Fabricado no Vietname/ Wyprodukowane w Wietnamie/ Tillverkad i Vietnam/
ϡΎϧΗϳϓϲϓϊϧλ
Issue Date/ Date de publication/ Ausgabedatum/ Datadipubblicazione/ Fecha de publicación/ Uitgiftedatum/ Датавыпуска/ Teslim Tarihi/ Data de edição/
Datapublikacji/ Utgivningsdatum/
έΩλϹΦϳέΎΗ
: 2023-12-15

https://www.omron-healthcare.com/
IM2-HEM-7380T1-E-02-09/2023
3146849-8B
