EN
MULTIFUNCTIONAL STAND MIXER
Translation of the original manual
STM 3740WH
STM 3741BK

STM 3740WH
STM 3741BK
A
9
2
3
4
5
7
6
8
10
11
1
12*
13*
14
3
4
5
7
6
* EN Accessory not included. Can be purchased separately. / CZ Toto příslušenství není součástí dodávky. Lze dokoupit samostatně. / SK Toto
príslušenstvo nie je súčasťou dodávky. Je možné dokúpiť samostatne. / HU Ez a tartozék nem része a terméknek. Külön kell megvásárolni. /
PL Wyposażenie to nie jest dostarczane wraz z produktem. Można go zakupić oddzielnie. / RU Данные аксессуары не входят в комплект
поставки. Можно приобрести отдельно. / HR Dodatni pribor nije priložen. Može se kupiti zasebno. / GR Το πρόσθετο εξάρτημα δεν
περιλαμβάνεται. Μπορείτε να το προμηθευτείτε ξεχωριστά.
C*
7
6
4
2
3
1
5
B
2
3
4
1
3
4
5
7
6
* EN Accessory not included. Can be purchased separately. / CZ Toto příslušenství není součástí dodávky. Lze dokoupit samostatně. / SK Toto
príslušenstvo nie je súčasťou dodávky. Je možné dokúpiť samostatne. / HU Ez a tartozék nem része a terméknek. Külön kell megvásárolni. /
PL Wyposażenie to nie jest dostarczane wraz z produktem. Można go zakupić oddzielnie. / RU Данные аксессуары не входят в комплект
поставки. Можно приобрести отдельно. / HR Dodatni pribor nije priložen. Može se kupiti zasebno. / GR Το πρόσθετο εξάρτημα δεν
περιλαμβάνεται. Μπορείτε να το προμηθευτείτε ξεχωριστά.
D
4
5
1
2
3
7
6
8
9
10
12
11*
13
E*
2
3
4
5
6
1
F*
2
34
1
3
4
5
7
6
* EN Accessory not included. Can be purchased separately. / CZ Toto příslušenství není součástí dodávky. Lze dokoupit samostatně. / SK Toto
príslušenstvo nie je súčasťou dodávky. Je možné dokúpiť samostatne. / HU Ez a tartozék nem része a terméknek. Külön kell megvásárolni. /
PL Wyposażenie to nie jest dostarczane wraz z produktem. Można go zakupić oddzielnie. / RU Данные аксессуары не входят в комплект
поставки. Можно приобрести отдельно. / HR Dodatni pribor nije priložen. Može se kupiti zasebno. / GR Το πρόσθετο εξάρτημα δεν
περιλαμβάνεται. Μπορείτε να το προμηθευτείτε ξεχωριστά.
G*
2
34
1
I*
H
3
4
5
7
6
* EN Accessory not included. Can be purchased separately. / CZ Toto příslušenství není součástí dodávky. Lze dokoupit samostatně. / SK Toto
príslušenstvo nie je súčasťou dodávky. Je možné dokúpiť samostatne. / HU Ez a tartozék nem része a terméknek. Külön kell megvásárolni. /
PL Wyposażenie to nie jest dostarczane wraz z produktem. Można go zakupić oddzielnie. / RU Данные аксессуары не входят в комплект
поставки. Можно приобрести отдельно. / HR Dodatni pribor nije priložen. Može se kupiti zasebno. / GR Το πρόσθετο εξάρτημα δεν
περιλαμβάνεται. Μπορείτε να το προμηθευτείτε ξεχωριστά.

- 1 -
04/2024
2024, .
EN Multifunctional stand mixer
Important safety instructions
READ CAREFULLY AND STORE FOR FUTURE USE.
General warnings
• This appliance may be used by persons with physical,
sensory or mental impairments or by persons with
insufficient experience and knowledge, if they are
properly supervised or have been informed about how
to use the appliance in asafe manner and understand
the potential dangers.
• This appliance may not be used by children. Keep the
appliance and its power cord away from children.
• Children must not play with the appliance. Cleaning
and maintenance performed by the user must not be
performed by unsupervised children.
• In the event that the power cord is damaged, have it
repaired at a professional service centre to prevent
causing adangerous situation. It is forbidden to use the
appliance if it has adamaged power cord.
Warning:
Incorrect use may lead to injuries.
•
• Be especially careful not to injure yourself on the sharp
cutting edges when handling the chopping blades,

- 2 -
04/2024
2024, .
especially when removing the blades from the blending
jar or smoothie jar, when emptying the container and
when cleaning it.
• The surfaces of the appliance that come into contact
with food must always be cleaned according to the
instructions in this user’smanual.
• Always turn off the appliance and disconnect it from
the power socket if you will not be using it and if you
will be leaving it without supervision, before assembly,
disassembly, cleaning or moving it.
• Before replacing the accessories or accessible parts that
move during use, turn the appliance off and disconnect
it from the power supply.
Electrical safety
• Before connecting this appliance to apower socket, make sure that the voltage stated on its rating label corresponds to the voltage in your power
socket.
• Connect the appliance only to aproperly grounded socket. Do not use an extension cord.
• Do not connect and disconnect the power cord to and from the power socket with wet hands.
• Ensure that the power plug contacts do not come into contact with water or moisture.
• Do not disconnect the appliance from the power socket by pulling on the power cord. This could damage the power cord or the power socket.
Disconnect the cord from the power socket by gently pulling the plug of the power cord.
• Do not place heavy items on the power cord. Make sure the power cord does not hang over the edge of atable and that it is not touching ahot surface
or sharp objects.
• To avoid the danger of injury by electrical shock, do not repair the appliance yourself or make any adjustments to it. Have all repairs or adjustments of
the appliance performed at an authorised service centre. Tampering with the appliance during the warranty period may void the warranty.
• Do not spray the appliance with water or any other liquid. Never wash it under running water or submerge it in water or another liquid.
• Always turn off the appliance and disconnect it from the power socket when you have finished using it.
• This appliance is not designed to be controlled using aprogrammed device, external timer switch or remote control.
• Only start the appliance after submerging the accessories into the container with the ingredients. To prevent food from splashing out, keep the
attachments submerged in the container while the appliance is running.
• If food sticks to the attachments or the inside of the bowl, turn off the appliance and disconnect it from the power socket. Use aspatula to clean the
attachments and the sides of the bowl.
• Avoid coming into contact with the rotating parts of the appliance. Do not place hands, forks or any other utensils into the bowl with the ingredients,
and keep hair, clothing, etc. at asufficient distance from the rotating parts of the appliance during use. If afork or another utensil falls into the container
while the appliance is running, immediately it off.
• Make sure that no hair, clothing or other items enter the feed tube of the meat grinder or grater while it is running. Do not put anything other than the
ingredients that are to be processed into the feed tube.
• Never use your fingers or other items to push ingredients through the feed tube of the meat grinder or grater. For this purpose there is apusher included
as an accessory.
• Do not tilt open the multi-function head during operation.
• Be especially careful when handling hot liquids and foods. Hot steam or splashing hot foods and liquids may cause scalding. For reasons of increased
safety, it is recommended to allow hot liquids and foods to cool down before processing them.
• If you have just processed hot foods, the removable attachments may be hot after they are used.
• Before attaching attachments to the appliance, removing or replacing them, ensure that the appliance is turned off and disconnected from the power
socket.
• To prevent injury caused by sharp edges, be especially careful when handling the grinding blade of the meat grinder and the blade assembly of the
blender. Increased attention must also be paid when emptying out the blending jar, when removing the blade assembly from the blending jar, when
removing the grinding blade from the grinding chamber, and when cleaning the appliance.
• Do not attempt to grind bones, nut shells or other hard ingredients.
• Hot liquids up to atemperature of 80 °Cmay be processed in the stainless steel bowl. Be especially careful when handling hot liquids. Hot steam or
splashing hot foods and liquids may cause scalding. Never start the blender without the lid properly seated in position. When processing hot liquids,
do not remove the inner cap during operation. Do not touch the hot surface. Use the handle to carry the blending jar when it is hot.

- 3 -
04/2024
2024, .
• The maximum continuous operating time is 10 minutes. Do not exceed the maximum operating time of 5 minutes when in the kneading mode and do
not exceed the maximum operating time of 1 minute when using the blender. Before starting it again, allow the appliance to cool down for 30minutes.
Safety during maintenance
• Allow the appliance to always fully cool down before cleaning it.
• Regularly clean the appliance after each use according to the instructions in chapter Maintenance and cleaning. Do not perform any maintenance on
the appliance apart from the maintenance procedure described in chapter Maintenance and cleaning.
• Do not wash the multi-function head or stand under running water or submerge it in water or another liquid. The stand mixer is not designed to be
washed in adishwasher.
• The removable attachments are intended for short term contact with food (including beverages), i.e. max. 4 hours. To prevent damaging their surface,
do not leave them submerged, for example in water for extended periods of time.
• Before storing the appliance, check that the multi-function head is tilted to the horizontal position.
- 4 -
04/2024
2024, .
• Thank you for purchasing our SENCOR product; we hope you will be
satisfied with it.
• Prior to using this appliance, please read the user'smanual
thoroughly, even in cases, when one has already familiarised
themselves with previous use of similar types of appliances. Use the
appliance only as described in this user'smanual. Keep the manual
for future reference. In the event that you hand this appliance over to
somebody else, make sure to also include this user'smanual.
• Carefully unpack the appliance and take care not to throw away any
part of the packaging before you find all its parts. It is recommended
to keep the original shipping carton, packing material, receipt and
confirmation of the extent of the seller'sliability or warranty certificate
at least for the duration of the legal right of defective performance or
quality guarantee. When transporting the appliance, we recommend
packaging it again in the original box provided by the manufacturer.
. . . . . . . . . . . . . . . . . . . . . . . . . . . . . . . . . . . . . . . . . . . . . . . . . . . . . . . . . . . . . . . . . . . .
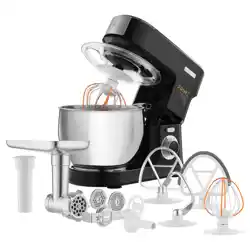
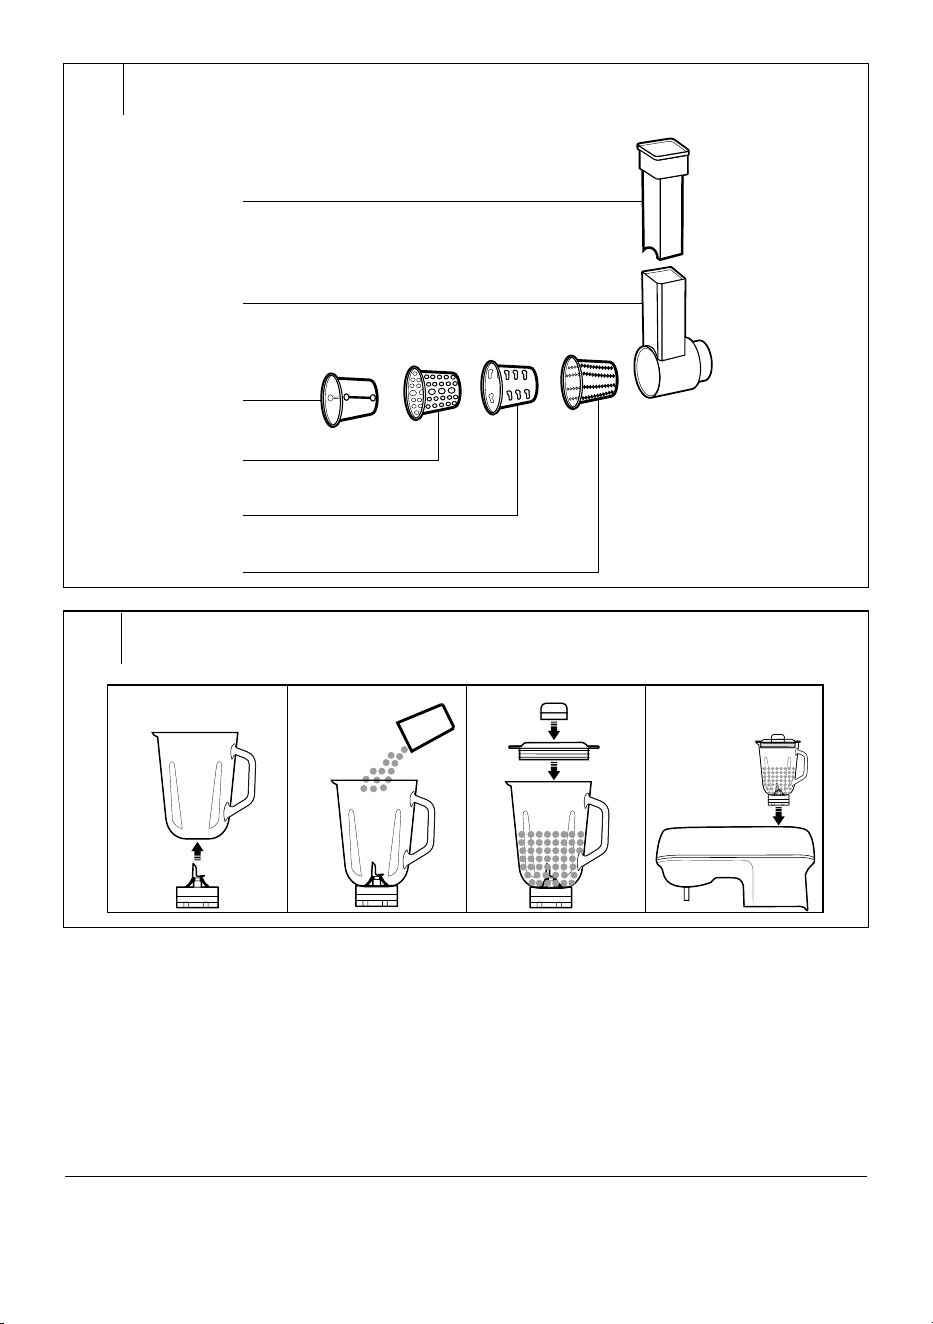
DESCRIPTION OF THE APPLIANCE AND ACCESSORIES
A1 Tilt-out multi-function head
A2 Removable cover of the
front meat grinder or grater
attachment hub
A3 Button for releasing the meat
grinder from the attachment
hub
A4 Front attachment hub for
meat grinder and grater
A5 Fastening shaft for
attachments
A6 Base for stainless steel bowl
A7 Anti-slip feet
A8 Tilt-open cover of the top
blender attachment hub
A9 Light
A10 Multi-function head tilt-out
and tilt-down button
A11 Control knob with light
- 0 (turned off, stand-by
mode)
- speed levels 1-2-3-4-5-6,
- blender mode in blending jar
( )
- blender mode in smoothie
jar ( )
- light ( )
A12* Transparent anti-splash cover
with feed hole
A13* Stainless steel bowl lid
A14 5-litre stainless steel bowl for
processing food
*Accessory not included. Can be purchased separately.
. . . . . . . . . . . . . . . . . . . . . . . . . . . . . . . . . . . . . . . . . . . . . . . . . . . . . . . . . . . . . . . . . . . .
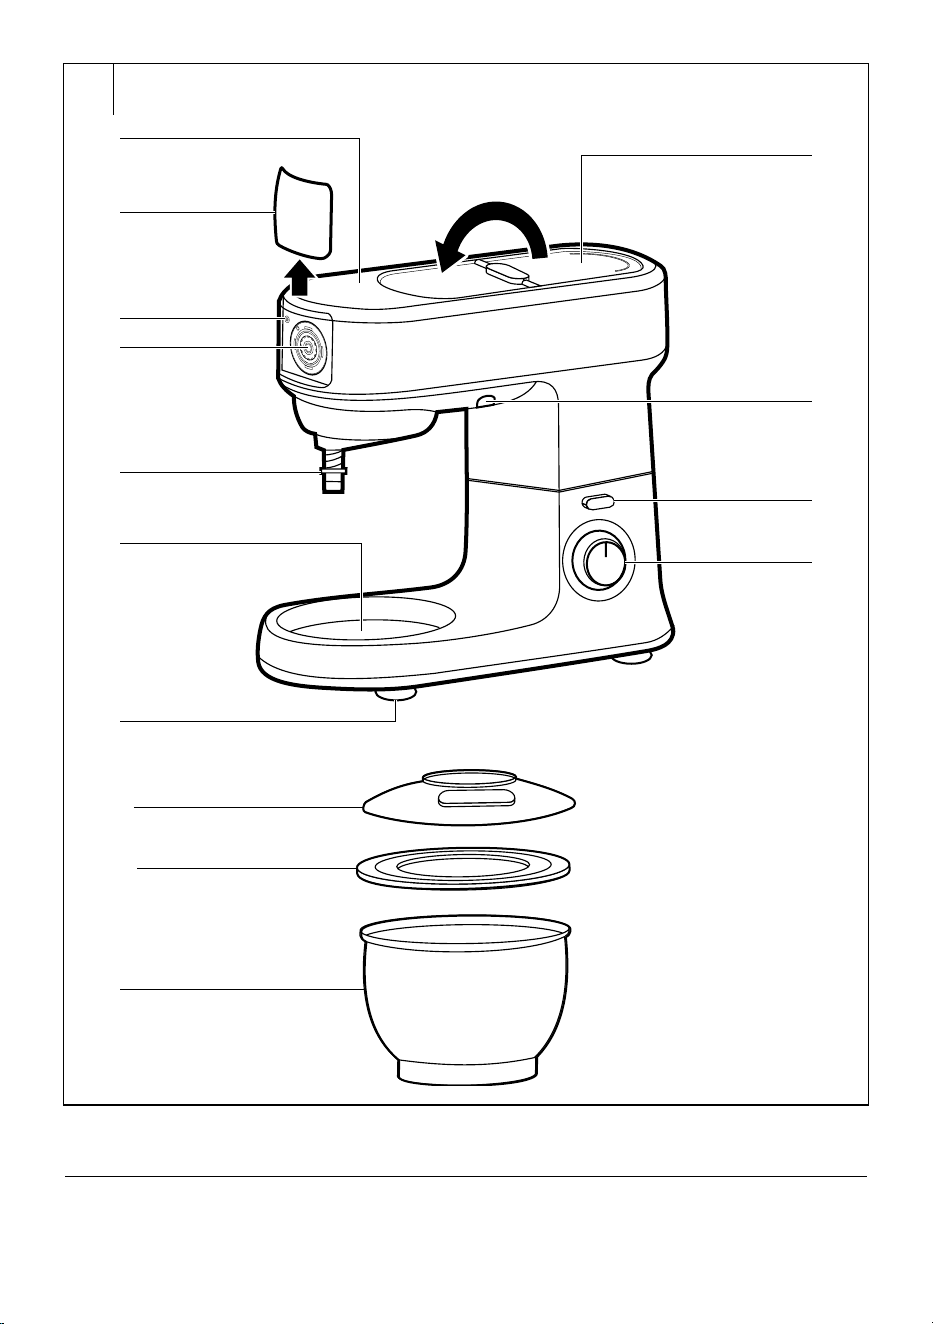
B1 Balloon whisk
B2 Beater
B3 Kneading hook
B4 Elastic beater
. . . . . . . . . . . . . . . . . . . . . . . . . . . . . . . . . . . . . . . . . . . . . . . . . . . . . . . . . . . . . . . . . . . .
C1* Inner cap
C2* Outer lid with ahole for adding
ingredients
C3* 1.5-litre blending jar
C4* Blade assembly
C5* Base for mounting/removing
the blender from the
attachment hub
C6* 0.6-litre smoothie jar for
nutritional drinks
C7* Base for nutritional drink jar
*Accessory not included. Can be purchased separately.
. . . . . . . . . . . . . . . . . . . . . . . . . . . . . . . . . . . . . . . . . . . . . . . . . . . . . . . . . . . . . . . . . . . .
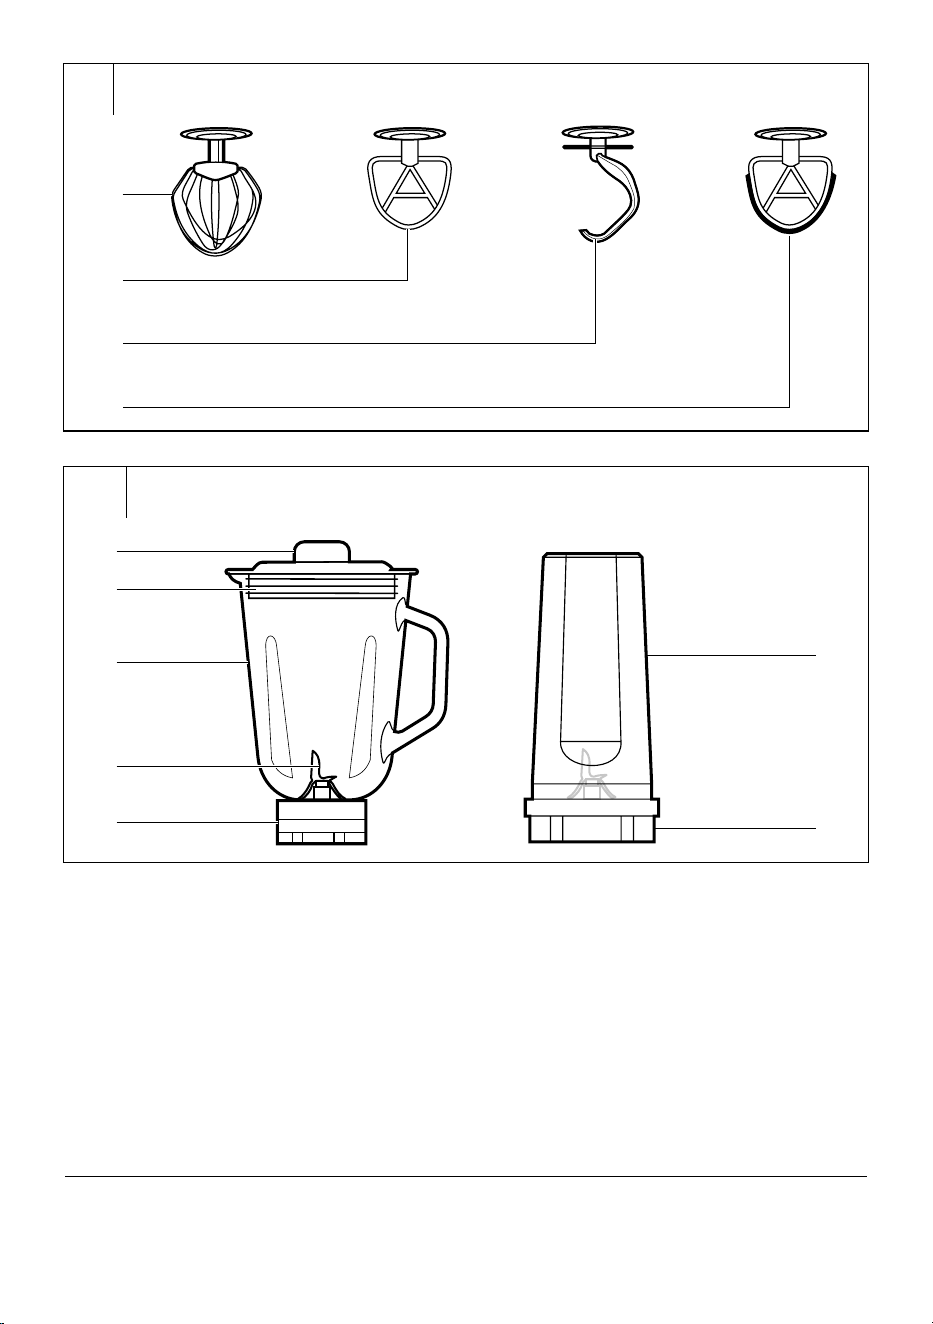
D1 Grinder
D2 Screw shaft
D3 Grinding blade
D4 Fine grinding plate
D5 Screw ring
D6 Medium grinding plate
D7 Coarse grinding plate
D8 Pusher
D9 Hopper
D10 Grinding chamber
D11* Pasta making attachments
D12 Cookie maker with holder
D13 Sausage stuffer attachment
*Accessory not included. Can be purchased separately.
. . . . . . . . . . . . . . . . . . . . . . . . . . . . . . . . . . . . . . . . . . . . . . . . . . . . . . . . . . . . . . . . . . . .
E1* Pusher
E2* Grater
E3* Slicing cone
E4* Coarse grating cone
E5* Potato grating cone
E6* Fine grating cone
*Accessory not included. Can be purchased separately.
. . . . . . . . . . . . . . . . . . . . . . . . . . . . . . . . . . . . . . . . . . . . . . . . . . . . . . . . . . . . . . . . . . . .
INTENDED USE OF THE APPLIANCE
• The stand mixer is intended and designed for processing a standard
amount of food in the household. It is suitable for blending, beating,
kneading, grinding and grating.
. . . . . . . . . . . . . . . . . . . . . . . . . . . . . . . . . . . . . . . . . . . . . . . . . . . . . . . . . . . . . . . . . . . .
BEFORE FIRST USE
• Before first use, thoroughly wash all parts that come into contact with food in hot
water using neutral dishwashing detergent. Then rinse everything with clean
water and allow to dry naturally or wipe dry thoroughly using awiping cloth.
Attention:
Accessories B1 to B4, the meat grinder D1, grater E2
and all components that contain metal parts are not
intended to be washed in adishwasher. Other plastic
parts may be washed in adishwasher.
When washing the blade assembly C4, take special
care to avoid injury on the sharp cutting edges.
• Use a lightly dampened wiping cloth to wipe the outside parts of the
stand mixer.
Attention:
Do not rinse the stand mixer or its power cord under
water or submerge it in water. Neither the stand nor
the multi-function head are intended for washing in
adishwasher.
• The grater and its accessories are factory coated with a protective
coating. For this reason, before first use, grate the food that will not be
consumed. When grating food, follow the instructions in the GRATING
section and observe all safety precautions in this instruction manual.
. . . . . . . . . . . . . . . . . . . . . . . . . . . . . . . . . . . . . . . . . . . . . . . . . . . . . . . . . . . . . . . . . . . .
BEATING, WHIPPING AND KNEADING
PLANETARY MIXING SYSTEM
• The planetary mixing system is based on the principle of dual rotation
of the attachment. The attachment rotates anticlockwise along the inner
perimeter of the bowl while rotating around its own axis in the opposite
direction. This ensures that ingredients inside the bowl are processed
thoroughly and evenly.
. . . . . . . . . . . . . . . . . . . . . . . . . . . . . . . . . . . . . . . . . . . . . . . . . . . . . . . . . . . . . . . . . . . .
PREPARING FOR OPERATION
Warning:
Before you start assembling or disassembling the
accessories of the stand mixer, check that it is turned
off and disconnected from the power socket. Attaching
an attachment while the multi-function head is
connected to mains power, may result in it being
accidentally turned on and serious subsequent injuries.
Selecting an attachment type
Attachment type Operation
Balloon whisk B1
It is used for whisking whole eggs or egg whites,
whipped cream, foamy creams, etc. Do not use it
for beating or kneading doughs.
Beater B2
It is used for beating light and medium heavy
yeast-free doughs, for preparing sauces,
creams, cake mixes, fillings, etc. Do not use it for
kneading heavy doughs.
Kneading hook B3
It is used for kneading various types of doughs
including heavy and thick doughs such as for example
bread dough, pizza dough, fresh pastry doughs, etc.
Elastic beater B4
It is used for beating dessert creams, instant
puddings, mayonnaise, sponge cake dough, etc.
Do not use it for kneading heavy doughs.
EN
Multifunctional stand mixer
User’sManual
- 5 -
04/2024
2024, .
Adding ingredients into the bowl
• Put the ingredients that you wish to process into the stainless steel bowl.
In asingle batch, it is possible to process no more than 0.8kg of heavy
dough or 2.7kg of light dough.
• The maximum number of egg whites that can be whisked at once is 8.
• We recommend filling the bowl no higher than the 4-litre level mark.
• If an insufficient amount of ingredients are put in the bowl (less than
0.3litres of dough), then they may not be optimally processed.
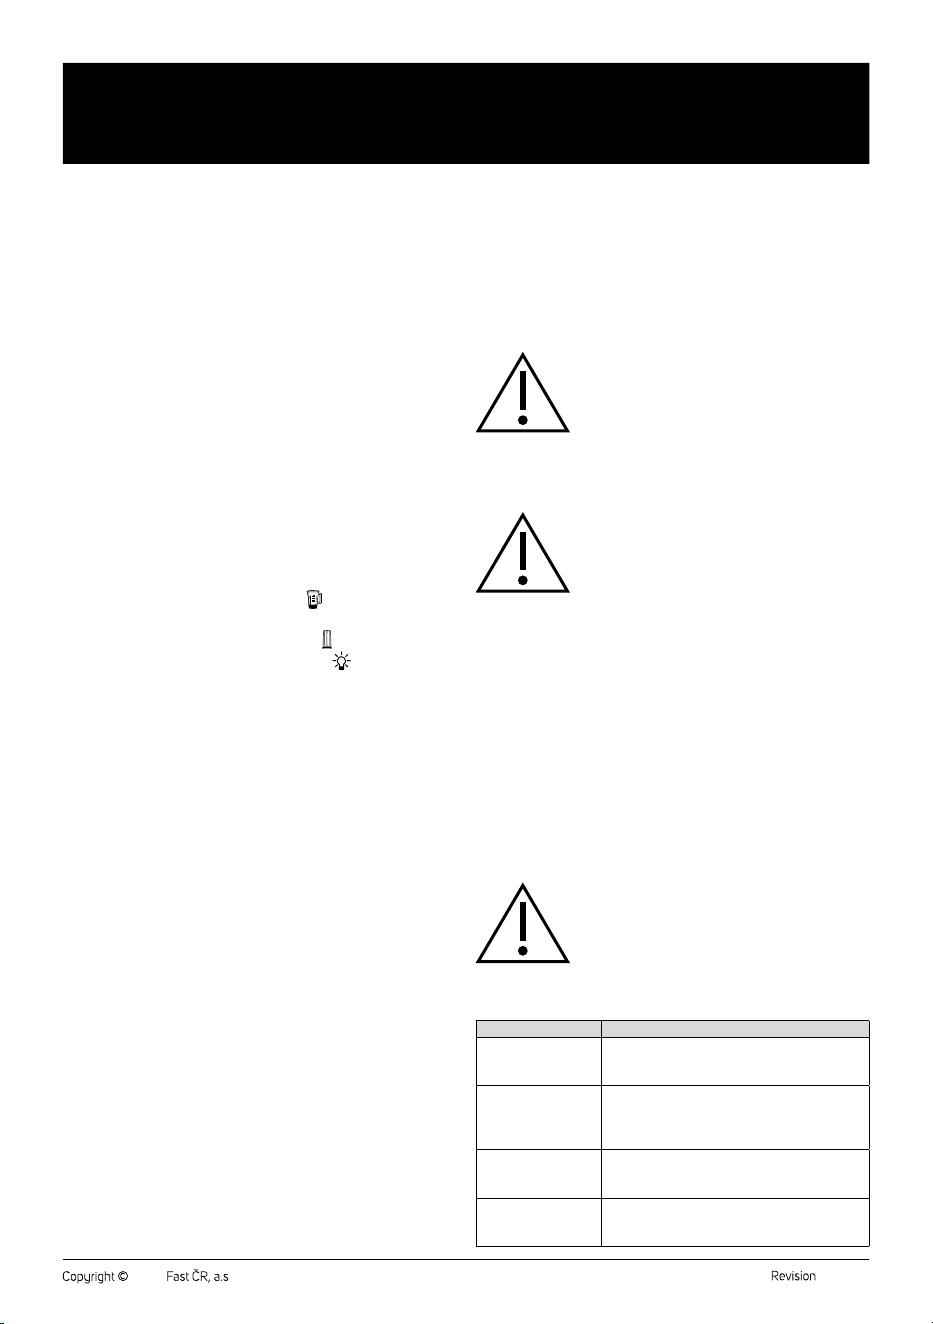
Mounting attachments
• Place the stand mixer on an even, dry and stable surface, for example
on akitchen countertop.
• Press button A10. This will release the multi-function head. Tilt the multi-
function head upwards all the way, so that aclick is heard.
• If you wish to use the transparent anti-splash cover A12then you must
attach it before mounting an attachment. Put the lid on the bottom side
of the head with the shaft and turn it anticlockwise to secure it in place.
• Select an attachment and slide it on to the mounting shaft A5. Turn
the attachment anticlockwise to secure it in position. Lightly pull the
attachment downwards with one hand to check that it is properly attached.
Mounting the stainless steel bowl
• Insert the stainless steel bowl into the base unit A6 and secure it in place
by turning it clockwise When the bowl is properly attached, it cannot be
separately lifted out of the base.
• Use one hand to push down the button A10 and the other to push down
the head so that it clicks into place.
. . . . . . . . . . . . . . . . . . . . . . . . . . . . . . . . . . . . . . . . . . . . . . . . . . . . . . . . . . . . . . . . . . . .
OPERATION
• Connect the power cord to an el. power socket.
• Use the control knob to set the required speed level from 1 to 6. We
recommend to start at alower speed and to increase it gradually. You
can change the speed setting even while the appliance is running. We
recommend that runny doughs and sauces are processed at lower
speed levels; this will prevent ingredients from splashing out. As soon as
they are mixed together, increase the speed to the required level.
Attention:
Items such as spoons, kitchen knives, forks, etc. must
not be placed into the appliance during operation as
this could result in injury or damage to the appliance.
Releasing stuck-on ingredients
• In the event that an ingredient (e.g. dough) sticks to the edge of the bowl,
turn off the stand mixer and disconnect it from the power socket.
• Tilt open the head. For better visibility into the bowl, it is possible to turn
on the light by setting the control knob to position
.
• Using an ordinary scraper, remove the stuck-on ingredient on the edge of
the bowl and put it into the middle of the bowl.
• Tilt the head back into the operating position and reconnect it to mains
power. Continue processing.
Operating time of the stand mixer
• When beating, whisking or kneading, do not leave the appliance in
continuous operation for longer than 10 minutes.
• When kneading thick, heavy dough, do not allow the appliance to run for
longer than 6 minutes.
• After one of the mentioned times has elapsed, turn off the appliance and
allow it to cool down. The appliance can be used again after 30 minutes.
Quick guide to processing ingredients
Attachment type Ingredients Speed
Processing
time
Balloon whisk B1
Light mixtures (for example
cream, egg whites,
pudding, carrot)
5-6 4 min
Beater B2 and
elastic beater B4
Moderately heavy mixtures
(for example cake dough,
pancake mixes or sponge
cake dough)
3-4 6 min
Kneading hook
B3
Heavy mixtures (for example
bread and pastry dough)
1-3 4–5 min
Note:
The above processing times are only areference. To prevent
ingredients from splattering out of the bowl, select an initial
speed level of 1 or 2. Then set ahigher
speed as required. For easier mixing of dough we
recommended soft margarine or butter.
When whipping egg whites, the bowl and the beater must
be perfectly clean and dry. Even asmall amount of fat may
result in that the egg whites will not be whipped to the desired
snowy consistency.
Whipping cream should be cooled to atemperature of
6°Cprior to being whipped.
Prior to processing them, allow the ingredients used for
making various doughs to rest at room temperature.
. . . . . . . . . . . . . . . . . . . . . . . . . . . . . . . . . . . . . . . . . . . . . . . . . . . . . . . . . . . . . . . . . . . .
ENDING OPERATION AND DISASSEMBLING THE
ACCESSORIES
• After you have finished using the appliance, set the control knob to the
0 position (off) and disconnect the power cord from the power socket.
• Push down button A10 and tilt the head upwards all the way, so that
aclick is heard.
• Turn the attachment clockwise to release it, and then remove it.
• Turn the stainless steel bowl anticlockwise and remove it from the base
unit.
• Remove the transparent anti-splash cover A12 by turning it clockwise.
• Tilt the head back down to the horizontal position.
• Clean out the stand mixer and the used accessories after each use
according to the instructions in chapter CLEANING AND MAINTENANCE.
. . . . . . . . . . . . . . . . . . . . . . . . . . . . . . . . . . . . . . . . . . . . . . . . . . . . . . . . . . . . . . . . . . . .
BLENDING
USING THE BLENDER
• The blender is intended for preparing meals and drinks such as
milkshakes, creamy soups, sauces, spreads, fresh baby foods, nutritional
drinks, etc. It is not intended for juicing fruit and vegetables, preparing
potato purée, yeast dough or for whipping egg whites.
• Either the blending jar C3 (volume 1.5litres) or smoothie jar C6 (volume
0.6litres) can be used for blending.
. . . . . . . . . . . . . . . . . . . . . . . . . . . . . . . . . . . . . . . . . . . . . . . . . . . . . . . . . . . . . . . . . . . .
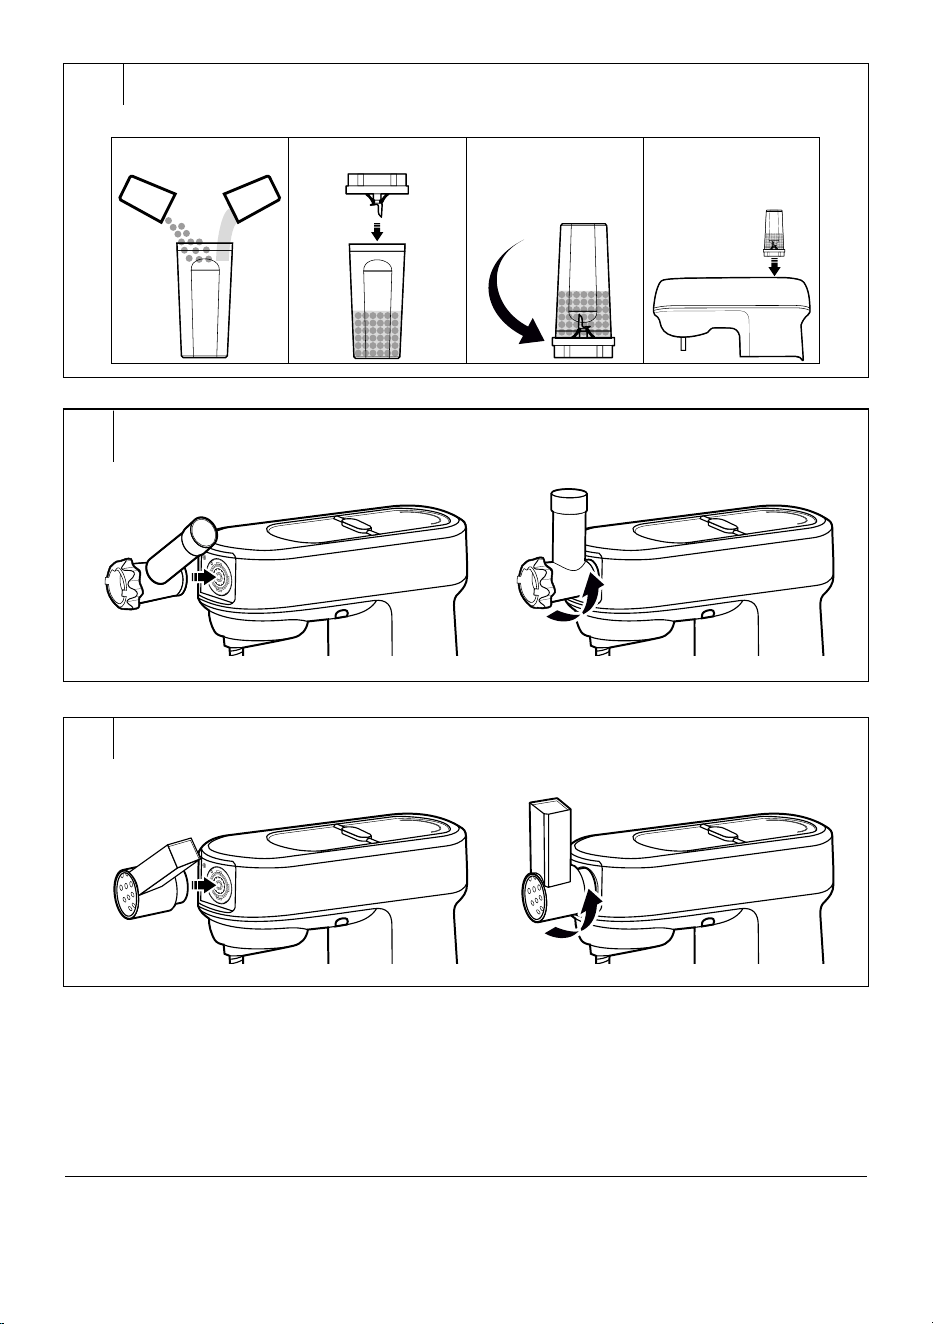
ASSEMBLING THE BLENDER
Preparing the stand mixer for blending
• In order to be able to assemble and subsequently use the blender, it
necessary to meet the following conditions:
- place the stand mixer on an even, dry and stable surface, for example
on a- countertop.
- the stand mixer must be disconnected from the power socket
- the multi-function head must be tilted down into the horizontal
position and no other attachment may be mounted on it
- the stainless steel bowl must be mounted on the base unit
• Tilt open the cover A8. Underneath this cover there is ahub for mounting
the blending or smoothie jar.
1.5-litre blending jar – assembling and mounting (fig. F)
• Prior to putting on the blending jar on to the hub, first check that the base
with the blade unit is correctly mounted in the jar.
• Place the blending jar on to the top hub and turn it clockwise to secure
it in place. The safety mechanism will prevent the blender from starting
unless the jar is correctly mounted on the hub.
• Place ingredients into the jar. We recommend cutting larger ingredients
into smaller pieces before blending them.
Note:
Never fill the jar past the maximum mark.
When processing hot liquids or liquids that expand in volume
during the blending process, it is recommended to fill the
blending jar to no more than 2/3 of its maximum capacity.
• Seat the outer lid C2 on to the blending jar and push it down so that it
firmly adheres to the edges of the jar. Place the inner cap C1 into the
opening in the lid and secure it in place by turning it clockwise.
- 6 -
04/2024
2024, .
0.6-litre smoothie jar – assembling and mounting (fig. G)
• The smoothie jar is intended for preparing fruit and vegetable smoothie
drinks.
• Add the liquids and/or food that you wish to blend into the smoothie jar.
Larger ingredients must be first cut into cubes measuring approximately
2 cm. Never fill the jar past the maximum mark.
• Place the base with the cutting assembly C7 on to the neck of the jar so
that the blades point into the jar, screw in the base and tighten securely.
• Turn the smoothie jar assembled in this way upside down so that the
base with the blade assembly is underneath. Ensure that the base is
securely attached and that nothing is leaking out of the jar.
• Place the smoothie jar on to the hub of the stand mixer and turn it
clockwise all the way.
. . . . . . . . . . . . . . . . . . . . . . . . . . . . . . . . . . . . . . . . . . . . . . . . . . . . . . . . . . . . . . . . . . . .
QUICK GUIDE TO PROCESSING INGREDIENTS
Ingredients Speed selection
Recommended
blending time
Fruit, vegetables cut
into smaller pieces
or 5-6
30 s
Baby food
or 5-6
40 s
Spreads, dressings,
marinades
or 5-6
30 s
Soups
or 5-6
40 s
Smoothies and cocktails
30 s
Ice cubes
As necessary
Note:
The above food processing times are only areference. The
actual mixing time depends on the size of the ingredients, their
amount and the required final consistency.
. . . . . . . . . . . . . . . . . . . . . . . . . . . . . . . . . . . . . . . . . . . . . . . . . . . . . . . . . . . . . . . . . . . .
ADVICE AND TIPS FOR BLENDING
• First cut food with afirm consistency such as fruit and vegetables into
smaller pieces measuring 3 cm and only then blend it.
• First, blend asmaller amount of ingredients and then gradually add more
ingredients through the hole in the lid C1 while blending. In this way, you
will achieve better results than by adding all ingredients into the blending
jar at once.
• If you need to blend food of asolid consistency together with liquids, we
recommend that you first blend the food of solid consistency and apart
of the liquids. Then gradually add the remaining liquids through the hole
in the lid while blending.
• When blending very think liquids, start the blender repeatedly in short
interval bursts.
• Ice cubes must be processed immediately upon being removed from the
freezer. When the ice starts to melt, the ice cubes will stick together and
it will not be possible to blend them.
. . . . . . . . . . . . . . . . . . . . . . . . . . . . . . . . . . . . . . . . . . . . . . . . . . . . . . . . . . . . . . . . . . . .
BLENDING
• Check that control knob is set to position 0 (off). Connect the power cord
to apower socket.
• Use the control knob to set the desired speed level or mode. We
recommend to first set aslower speed to allow the ingredients to mix
together. Then the speed may be increased.
Attention:
Do not process hot liquids that are hotter than 80°Cin
the blending jar.
The maximum operating time of the blender is
1minute. Do not leave the stand mixer in continuous
operation for longer than indicated above. After
blending, allow the stand mixer to cool down for
approx. 30 minutes.
The shaft of the head A5 will move when the smoothie
jar is used.
• If you wish to add more ingredients to the blending jar during the
blending process, remove the inner cap C1 and add the ingredients
through the hole in the outer lid C2. However, never remove the outer
lid while blending. When processing hot liquids, the inner cap C1 must
remain closed.
• In the event that food is sticking to the blade assembly or the walls of
the blending jar, turn off the stand mixer by turning the control knob to
the 0 position (off) and disconnect it from the power socket. Make sure
that the blade assembly has stopped rotating. Carefully remove the jar
from the multi-function head by turning it anticlockwise and pulling it
upwards. Remove the lid and, using aspatula, clean the blade assembly
and the walls of the blending jar. Put the lid back on and reattach the jar
to the multi-function head. Plug the power cord into apower socket and
continue blending.
. . . . . . . . . . . . . . . . . . . . . . . . . . . . . . . . . . . . . . . . . . . . . . . . . . . . . . . . . . . . . . . . . . . .
ENDING BLENDING AND DISASSEMBLING THE JARS
• After you have finished blending, set the control knob to the 0 position
(off) and disconnect the power cord from the power socket. Before
performing any other activity, check that the blade assembly inside the
jar has stopped rotating.
1.5-litre blending jar – disassembly
• Release the blending jar by turning it anticlockwise and take it off by
lifting it vertically upwards off the top hub.
• If you wish to prepare the blending jar for cleaning, pour the blended
contents out into asuitable bottle or bowl, and wash out the blending jar
using water and wipe it dry.
• Turn the blending jar upside down
• Use one hand to grasp the handle of the blending jar and with the other
hand release the base with the blade assembly by turning it clockwise.
• In the event that it is not possible to release the base by hand, mount
the blending jar back on to the hub of the stand mixer. Use one hand to
hold the base with the blade assembly and the second hand to turn the
blending jar anticlockwise. The blending jar should release and it should
be possible to screw it off the base. After screwing off the blending jar,
release the base from the hub. Put the hub cover back in its place.
• Clean the individual parts of the blending jar according to the instructions
in chapter CLEANING AND MAINTENANCE.
0.6-litre smoothie jar – disassembly
• The smoothie jar must be removed from the stand mixer carefully so that
the base with the blade assembly is not released from the neck of the jar,
causing the contents to spill out.
• Release the jar by turning it anticlockwise and take it off by lifting it
vertically upwards off the top hub. Put the hub cover back in its place.
• Turn the smoothie jar upside down so that the base with the blade
assembly is on the top side.
• Screw the base out of the neck of the jar.
• Clean the individual parts of the smoothie jar according to the instructions
in chapter CLEANING AND MAINTENANCE.
. . . . . . . . . . . . . . . . . . . . . . . . . . . . . . . . . . . . . . . . . . . . . . . . . . . . . . . . . . . . . . . . . . . .
- 7 -
04/2024
2024, .
GRINDING MEAT
USING THE GRINDER
• The grinder is intended for grinding all types of meat that is free of bones,
tendons and skin, and it can also grind fruit and vegetables. It also serves to
make pasta, cookies and to stuff sausages.
• The grinder is not intended for crushing bones, nuts or other hard ingredients
or frozen food.
. . . . . . . . . . . . . . . . . . . . . . . . . . . . . . . . . . . . . . . . . . . . . . . . . . . . . . . . . . . . . . . . . . . .
ASSEMBLING THE GRINDER
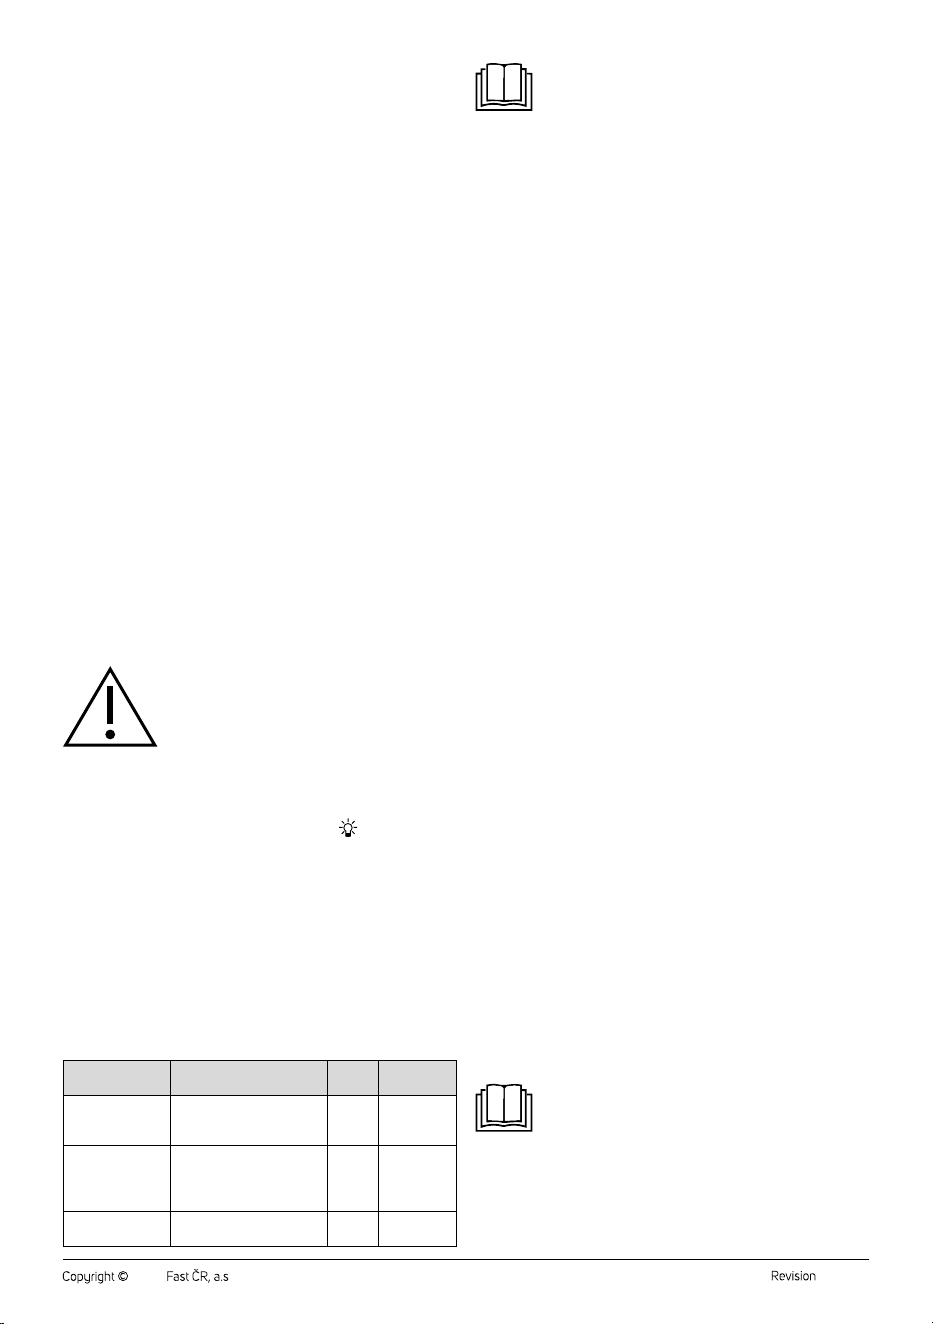
Preparing the stand mixer for grinding
• In order to be able to assemble and subsequently use the grinder, it
necessary to meet the following conditions:
- place the stand mixer on an even, dry and stable surface, for example
on a- countertop.
- the stand mixer must be disconnected from the power socket
- the multi-function head must be tilted down into the horizontal
position and no other attachment may be mounted on it
• Remove the cover A2. The front attachment hub for mounting the grinder
is found underneath this cover.
Assembling and mounting the grinder (fig. H)
• Insert the screw shaft D2 into the grinding chamber D11 with the cogged
wheel entering first.
• Place the grinding blade D3 on to the shaft (with the cutting edge facing
outwards from the chamber) and on to it attach agrinding plate. Make
sure that the notch in the grinding chamber slides into the groove in the
grinding plate.
Attention:
When mounting the grinding blade, be very careful not
to injure yourself on the sharp edge.
• Place the screw ring D5 on to the grinding chamber and tighten it
securely by screwing it clockwise.
• Tilt the assembled grinder to the right at an angle of 45°, push it against
the front attachment hub A4 and turn it anticlockwise to set it into the
operating position. The operating position is indicated by button A3
popping out and an audible click.
Note:
The stand mixer is equipped with asafety mechanism that
prevents it from being started unless the grinder is properly
mounted and secured on the front attachment hub.
• Seat the hopper D9 on to the top feed tube of the grinder and place
asuitable container underneath the grinder for capturing the processed
food.
. . . . . . . . . . . . . . . . . . . . . . . . . . . . . . . . . . . . . . . . . . . . . . . . . . . . . . . . . . . . . . . . . . . .
GRINDING
• First prepare the meat for grinding in the following way: Remove all
bones, tendons, cartilage and cut the meat into 2 × 2 × 6 cm size pieces
that will freely pass through the top feed tube of the grinder.
Attention:
Do not process frozen meat. Allow it to defrost before
grinding it.
• Check that control knob is set to position 0 (off). Connect the power cord
to apower socket.
• Use the control knob to set the desired speed. We recommend to initially
set speed 3 and then increase it as required. Gradually place the meat
pieces into the feed tube and push them in using the pusher D8. Take
care not to clog up the feed tube by alarge amount of meat. Do not
process more than 5kg of meat per batch. The processing time is only
several minutes.
Warning:
Do not use fingers or other items to push the meat in.
Always use the pusher D8 designed for this purpose.
The maximum operating time of the grinder is 6
minutes. Do not leave the stand mixer in continuous
operation for longer than indicated above. After
grinding, allow the stand mixer to cool down for approx.
30 minutes.
The shaft of the head A5 will move during the grinding
process.
• The ground meat will fall into the prepared bowl. The meat that remains
in the grinding chamber can be removed by grinding aslice of bread or
abread roll.
. . . . . . . . . . . . . . . . . . . . . . . . . . . . . . . . . . . . . . . . . . . . . . . . . . . . . . . . . . . . . . . . . . . .
PASTA MAKING, COOKIE SHAPING AND CASING FILLING
• This chapter contains additional information on the grinder when
it is used for making pasta, shaping cookies or filling casing. Basic
instructions for setting up and using the grinder robot are given in the
chapters ASSEMBLY OF THE GRINDER andGRINDING.
When assembling the grinder:
• for pasta production, insert the D2 screw shaft into the D10 grinding
chamber. Attach one of the D11 pasta attachments to the screw shaft
D2. Screw the D5 ring onto the D10 grinding chamber and tighten it with
adequate force.
• to shape the cookies, insert the D2 screw shaft into the grinding chamber
D10. Mount the D7 coarse grinding disc on the D2 screw shaft. Insert
the holder of the cookie mould into the D5 screw ring. Screw the D5 ring
with the mould holder onto the D10 grinding chamber and tighten it with
adequate force. Insert the sliding cookie mould into the holder.
• to fill the casings, insert the D2 screw shaft into the D10 grinding chamber.
Fit the D13 sausage stuffer attachment (consisting of two parts) onto the
D2 screw shaft. Screw the D5 ring onto the D10 grinding chamber and
tighten it with adequate force.
Instructions for making pasta
• Prepare the dough and press it through the filling opening of the grinder
with D8 pusher. The result will be the shape of the pasta according to
the selected type of D11 attachment. It is recommended to hold atray or
palm under the extruded dough.
Instructions for shaping cookies
• Slide the cookie cutter to the left or right to set the desired shape. Push
the dough through the filling opening of the grinder with the D8 pusher.
The result will be adough in the shape you have set with the mould. It is
recommended to hold atray or palm under the extruded dough. Then cut
the shaped dough into smaller pieces.
Instructions for filling casings
• Prepare a casing to be filled with pre-ground meat and let it soak in
lukewarm water for about 10 minutes. Remove the spray from the water
and pinch or tie off one end. Slide the other end like an accordion onto the
D13 sausage stuffer attachment. Hold the spout on the D13 attachment
with one hand and push the ground meat mixture through the filling
opening of the grinder with the other hand using the D8 pusher.
. . . . . . . . . . . . . . . . . . . . . . . . . . . . . . . . . . . . . . . . . . . . . . . . . . . . . . . . . . . . . . . . . . . .
ENDING OPERATION AND DISASSEMBLING THE GRINDER
• After you have finished grinding, set the control knob to the 0 position
(off) and disconnect the power cord from the power socket.
• Remove the hopper D9. Then press the button A2 and remove the meat
grinder by turning it clockwise and sliding it out of the hub. After removing
the grinder, put the cover A2 back in its place.
• When disassembling the meat grinder into its individual parts, proceed
in the reverse sequence.
• Clean out the grinder and the used accessories after each use according
to the instructions in chapter CLEANING AND MAINTENANCE.
. . . . . . . . . . . . . . . . . . . . . . . . . . . . . . . . . . . . . . . . . . . . . . . . . . . . . . . . . . . . . . . . . . . .
- 8 -
04/2024
2024, .
GRATING
USING THE GRATER
• The grater is intended for grating practically all types of fruit and
vegetables, cheeses, peeled nuts, cooking chocolate and similar foods
that are normally used in the household.
. . . . . . . . . . . . . . . . . . . . . . . . . . . . . . . . . . . . . . . . . . . . . . . . . . . . . . . . . . . . . . . . . . . .
ASSEMBLING THE GRATER
Preparing the stand mixer for grating
• In order to be able to assemble and subsequently use the grinder, it
necessary to meet the following conditions:
- place the stand mixer on an even, dry and stable surface, for example
on a- countertop.
- the stand mixer must be disconnected from the power socket
- the multi-function head must be tilted down into the horizontal
position and no other attachment may be mounted on it
• Remove the cover A2. The front attachment hub for mounting the grater
is found underneath this cover.
Assembling and mounting the grater (fig. I)
• Insert asuitable grating cone (E3 to E6) into the grating chamber.
Attention:
When inserting acone into the grater, be very careful
not to injure yourself on its sharp blades.
• Tilt the assembled grater to the right at an angle of 45°, push it against
the front attachment hub A4 and turn it anticlockwise to set it into the
operating position. The operating position is indicated by button A3
popping out and an audible click.
Note:
The stand mixer is equipped with asafety mechanism that
prevents it from being started unless the grater is properly
mounted and secured on the front attachment hub.
. . . . . . . . . . . . . . . . . . . . . . . . . . . . . . . . . . . . . . . . . . . . . . . . . . . . . . . . . . . . . . . . . . . .
GRATING
• Prepare the food and cut it into pieces that will pass through the top feed
tube of the grater. Kernels and stones may need to be removed from
certain types of fruit and vegetables.
• Place asuitable container underneath the grater for capturing the grated
food.
• Check that control knob is set to position 0 (off). Connect the power cord
to apower socket.
• Start by gradually placing ingredients into the feed tube. Use the
supplied pusher to push ingredients through the feed tube E1.
Warning:
Do not use fingers or other items to push in the food.
Always use the pusher E1 designed for this purpose.
The shaft of the head A5 will move during the grating
process.
• Always insert the individual pieces of ingredients into the feed tube, and
with appropriate force gently push down on the pusher. During operation,
ensure that the ingredients are passing through the attachment by
looking into the feed tube. Never fill the feed tube up to its top edge
with ingredients. Processing large amounts of ingredients at once may
overload the multi-function head of the stand mixer.
Useful advice for grating
• To achieve the best possible results, process fresh not overly ripened
fruit. The same applies to vegetables.
• Softer fruit such as strawberries can be put into the freezer for a few
minutes prior to processing.
• Semi-hard cheese will be processed better if placed it in a refrigerator
over night or in afreezer for 30 minutes.
• We do not recommend processing soft or already grated cheese as this
could clog up the feed tube.
• When using the fine grating cone or the slicing cone for long straight
slices, push the ingredients through the feed tube gently. When using
the coarse grating cone or the slicing cone for thick wavy slices, it is
necessary to push the ingredients through with greater force.
. . . . . . . . . . . . . . . . . . . . . . . . . . . . . . . . . . . . . . . . . . . . . . . . . . . . . . . . . . . . . . . . . . . .
ENDING OPERATION AND DISASSEMBLING THE GRATER
• After you have finished grating, set the control knob to the 0 position (off)
and disconnect the power cord from the power socket.
• When disassembling the grater, first remove the pusher. Then press the
button A2 and remove the grater by turning it clockwise and sliding it out
of the hub. After removing the grinder, put the cover A2 back in its place.
• When disassembling the grater into its individual parts, proceed in the
reverse sequence.
• Clean out the grater and the used accessories after each use according to
the instructions in chapter CLEANING AND MAINTENANCE.
. . . . . . . . . . . . . . . . . . . . . . . . . . . . . . . . . . . . . . . . . . . . . . . . . . . . . . . . . . . . . . . . . . . .
CLEANING AND MAINTENANCE
Attention:
Prior to cleaning or maintenance, always disconnect
the appliance from the power supply and allow it to
cool down completely.
The stand mixer and its tilt-out head and its power cord
are not intended for washing in adishwasher.
Do not spray these parts with water or any other liquid
or submerge them in water or any another liquid.
• After using it, thoroughly wash all parts that came into contact with food
in hot water using neutral dishwashing detergent. Then rinse everything
with clean water and allow to dry naturally or wipe dry thoroughly using
a wiping cloth. After washing and drying, we recommend to coat the
grinding blade D3 and the grinding plate D4 with cooking oil.
• If you whisked egg whites, first rinse the stainless steel bowl and the
used whisk under cold water. If you were to use hot water, the egg white
remains would harden and their removal would be more difficult.
Attention:
Accessories B1 to B4, the meat grinder D1, grater E2
and all components that contain metal parts are not
intended to be washed in adishwasher. Other plastic
parts may be washed in adishwasher.
When washing the grinding blade and the blade
assembly of the blending or smoothie jar take special
care to avoid injury on the sharp cutting edges.
• Clean the blending jar C3 or the smoothie jar C6 by filling it with clean
water and a few drops of kitchen detergent and then mounting it on
the hub of the stand mixer and running it for 10 to 15 seconds. Then
turn off the stand mixer, disconnect it from the power socket, and after
the rotating parts have come to astop, remove the jar. Empty out the
contents of the jar and then thoroughly rinse it out with clean water and
wipe it dry.
• Wipe the outer parts of the stand mixer and the multi-function head using
alightly dampened wiping cloth or sponge.
Attention:
Never use chemicals, dishwashing wool, steel wool
or cleaning agents with an abrasive component since
these may seriously damage the surface of the stand
mixer or the multi-function head.
. . . . . . . . . . . . . . . . . . . . . . . . . . . . . . . . . . . . . . . . . . . . . . . . . . . . . . . . . . . . . . . . . . . .
STORAGE
• Before storing it, the appliance and its accessories must be completely
cool, turned off and disconnected from the power supply, clean and dry.
• Place the stainless steel bowl into the base on the stand and into it you
can place the beater, whisk and kneading hood. Tilt the multi-function
head to the horizontal position. Store the stand mixer and all the
accessories in aclean, dry place out of children’sreach.
- 9 -
04/2024
2024, .
Attention:
Keep the stored stand mixer away from extreme
temperatures, direct sunlight and excessive humidity
and do not store it in an overly dusty environment. Do
not place anything on to the stored stand mixer.
. . . . . . . . . . . . . . . . . . . . . . . . . . . . . . . . . . . . . . . . . . . . . . . . . . . . . . . . . . . . . . . . . . . .
TECHNICAL SPECIFICATIONS
Rated voltage range ....................................................................... 220−240 VAC
Rated frequency ..........................................................................................50/60 Hz
Rated power input .......................................................................................... 1,200 W
Volume of the stainless steel bowl ...................................................................... 5 l
Volume of the glass blending jar ......................................................................... 1.5 l
Volume of the smoothie jar ................................................................................. 0.6 l
Electrical shock protection class .............................................................................. II
Noise level ...................................................................................................... 92 dB(A)
The declared noise emission level of the appliance is 92 dB(A), which
represents alevel Aof acoustic power with respect to areference acoustic
power of 1pW.
Explanation of technical terminology
Safety class for electrical shock protection:
Class II – Electrical shock protection is provided by double or heavy-duty
insulation.
Changes to text and technical parameters are reserved.
. . . . . . . . . . . . . . . . . . . . . . . . . . . . . . . . . . . . . . . . . . . . . . . . . . . . . . . . . . . . . . . . . . . .
INSTRUCTIONS AND INFORMATION REGARDING THE
DISPOSAL OF USED PACKAGING MATERIALS
Dispose of used packaging material at asite designated for waste in your
municipality.
DISPOSAL OF USED ELECTRICAL AND ELECTRONIC
EQUIPMENT
This symbol on products or original documents means that
used electric or electronic products must not be added to
ordinary municipal waste. For proper disposal, renewal and
recycling, hand over these appliances to determined
collection points. Alternatively, in some European Union
states or other European countries you may return your
appliances to the local retailer when buying an equivalent
new appliance.
Correct disposal of this product helps save valuable natural resources
and prevents potential negative effects on the environment and human
health, which could result from improper waste disposal. Ask your local
authorities or collection facility for more details.
In accordance with national regulations penalties may be imposed for the
incorrect disposal of this type of waste.
For business entities in European Union states
If you want to dispose of electric or electronic equipment, ask your retailer
or supplier for the necessary information.
Disposal in other countries outside the European Union.
This symbol is valid in the European Union. If you wish to dispose of this
product, request the necessary information about the correct disposal
method from the local council or from your retailer.
This product meets all the basic requirements of EU
directives related to it.

FAST ČR, a.s.
U Sanitasu 1621
CZ-251 01 Říčany
www.sencor.eu