
PJSTAR5-V1.0
Jump Starter & Air Compressor
JS-5
USER MANUAL
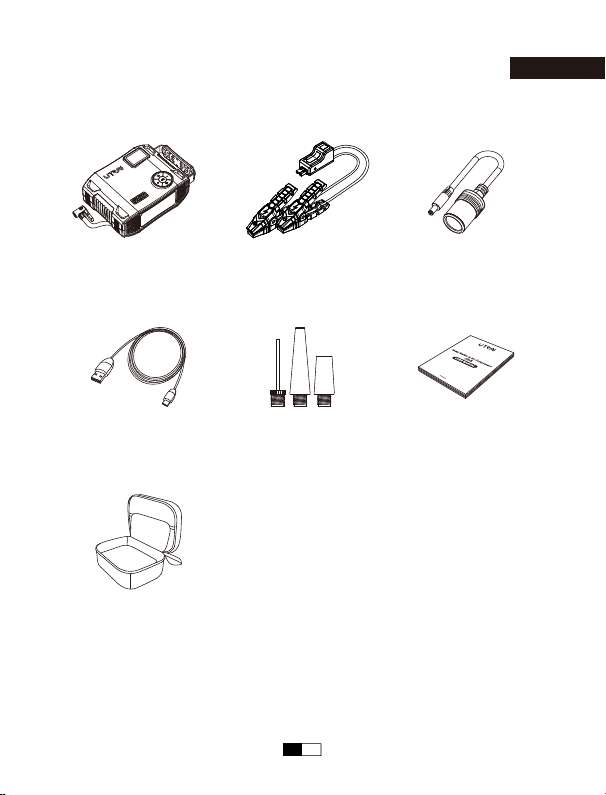
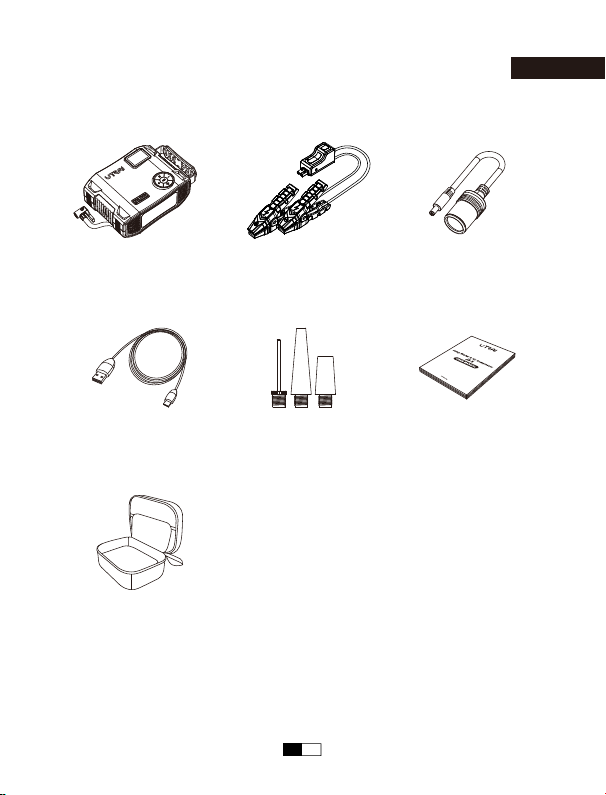
Packing List
English
Carrying Case
USB To
USB-C Cable
Valve Adapter x 3 User Manual
Jump Starter &
Air Compressor
Smart Clamps
DC Cigarette
Lighter Adapter
EN 01
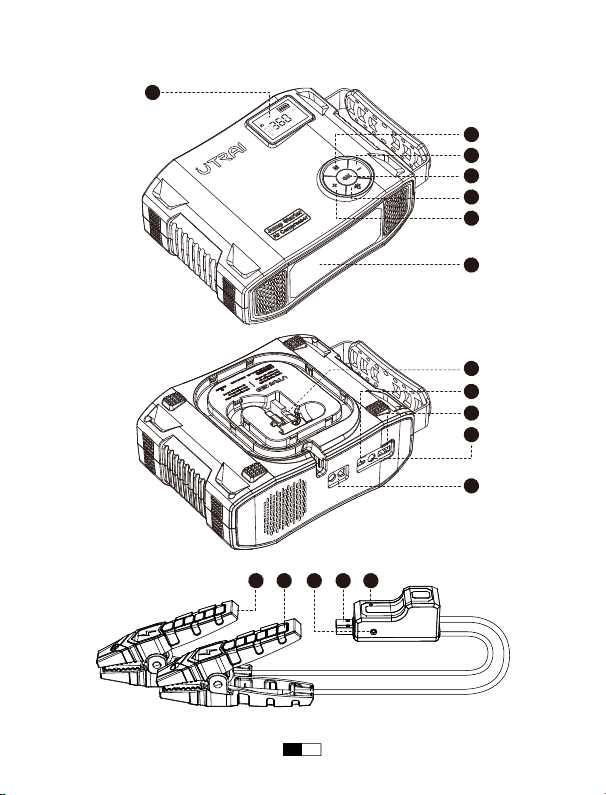
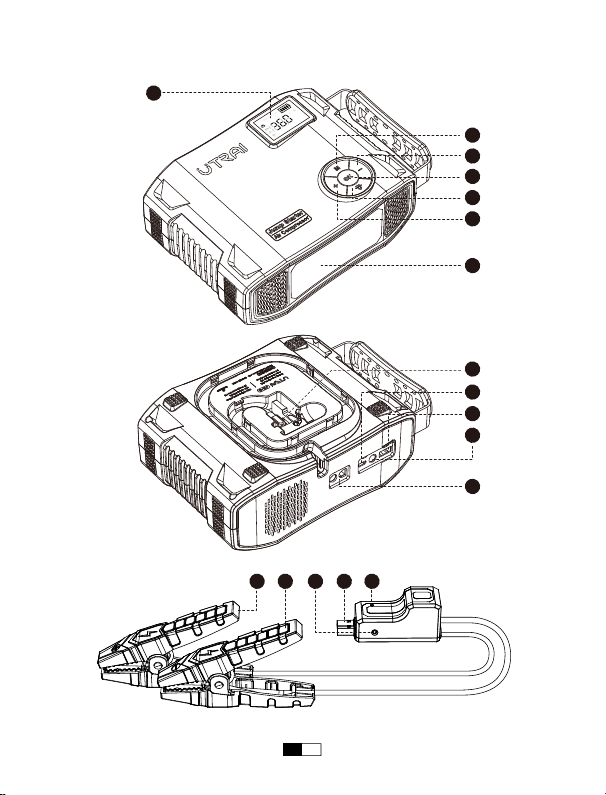
Layout
1
2
3
4
5
6
7
9
10
11
12
13 1415 16 17
PSI
USB
BAR KPA
kg/cm
2
IN
DC
OUT
OUT
8
EN 02

Function
7 LED Light
13
USB-C Input Port
12
DC 12V-16V /
10A Output Port
9 Air Hose
5 - Button
6 Button
2 OK Button
1
LCD Display Screen
14
EC5 Output Port
11
10
8
USB Output Port
4
+ Button
3
M Button
16
LED Indicator
15
Battery Clamp Plug
Red Battery Clamp
Black Battery Clamp
Operation
Illumination
Show the remaining power and check air pressure
of the connected tire
Charge the starter
Insert the plug into the jump starting port
Charge your devices
Connect car tires
Decrease the air pressure value
Turn on / off the LED light and switch lighting mode
Show the working status of the battery clamp
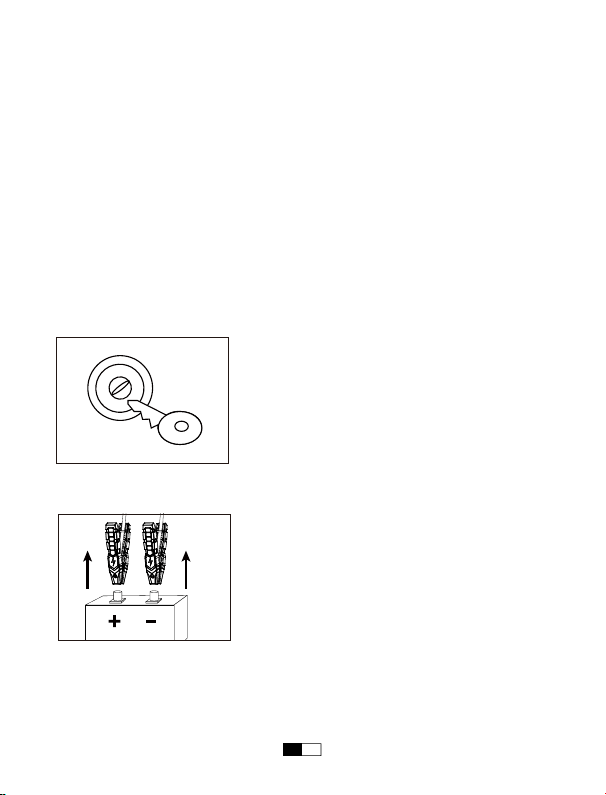
Insert the plug completely into the jump starter
Connect to positive terminal of the car battery
Connect to negative terminal of the car battery
17
Force Start Button
Forcibly start the vehicle when the smart battery
clamp cannot recognize the car battery
Turn on / off the device or the air compressor
Charge your devices with USB cable
Increase the air pressure value
Switch the inflating modes and the unit of output
air pressure
EN 03

Specifications
Battery Capacity
Jump Start Output
DC Output
USB-C Input
USB Output
Charging Time
Unite Size (L*W*H)
Air Compressor
99.9Wh
12V
12V-16V / 10A
5V / 3A, 9V / 2A
5V / 2.4A
4-6 hours
201mm*153.5mm*77mm
Maximum Air Pressure 150PSI
EN 04
Operation Guide
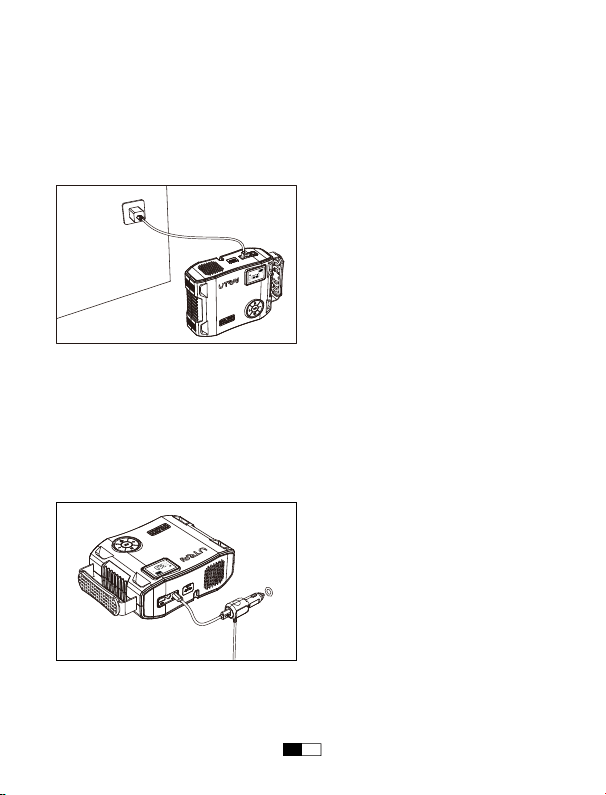
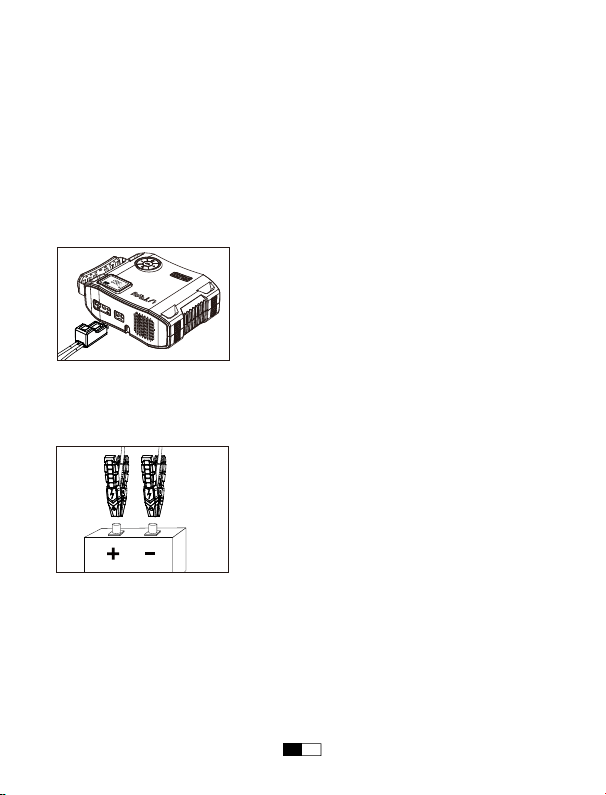
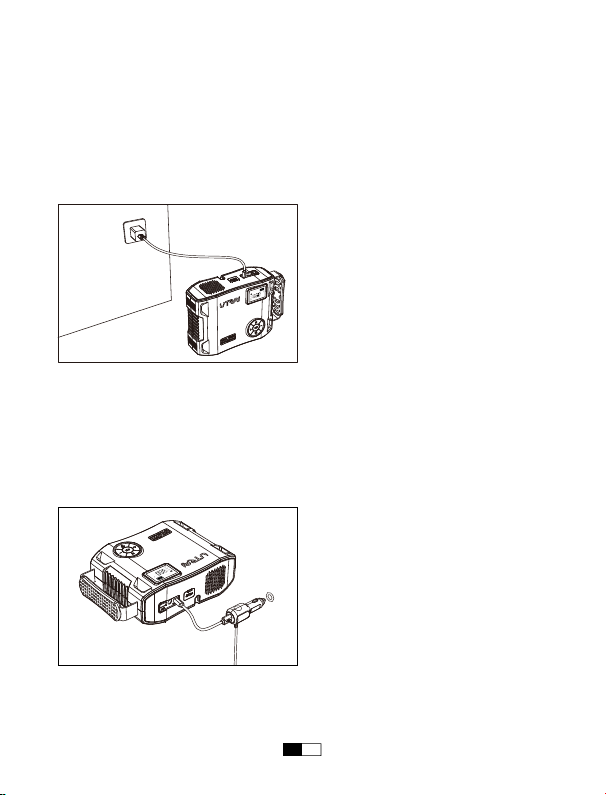
Charging Your Jump Starter
• At Home :
1. Plug the USB cable into computer or any USB wall adaptor(not included).
2. Connect the USB-C port into the Jump Starter.
• In Car :
1. Plug the car adaptor (not included) into the socket.
2. Connect the USB-C port into the Jump Starter.
NOTE: It is recommended to recharge the Jump Starter every 3-4 months to
maintain the efficiency and prolong the service life of the internal battery even if the
unit has not been used.
PSI
USB
BARKPA
kg/cm
2
IN
DC
OUT
OUT
PSI
USB
BAR KPA
kg/cm
2
IN
DC
OUT
OUT
EN 05

Charging Your Devices
The jump starter comes with a USB output port and a DC output port.
1. Plug the USB cable into the USB output port of your jump starter or or plug DC
cigarette lighter adapter into DC output port of it.
2. Connect it to your phone, tablet, or other 12V auto devices.
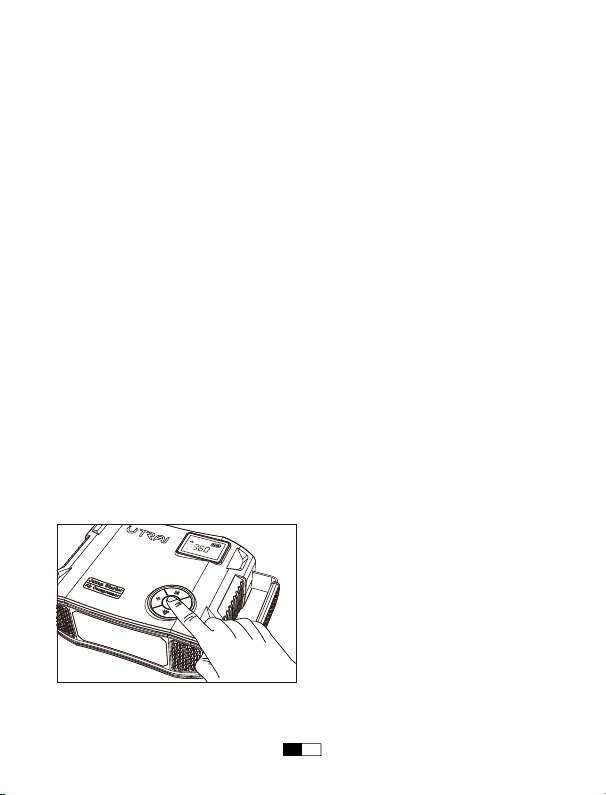
3. Press the OK Button to turn on your jump starter to start charging.
LED Light
1. Press the OK button to activate the machine.
2. Press the button to turn on the LED light.
3. In the light mode, press the button to switch modes (Normal, strobe, SOS,
off).
Safety Precautions
By owning a Jump Starter, you have everything you need to jump start a vehicle
— no need to wait for help, JS-5 to the rescue!
We know you’re excited, but before jumping your vehicle, please be sure to take
some precautionary steps:
• Read your vehicle owner’s manual first as the manufacturer may have specific
steps and precautions that pertain to your vehicle.
• Be sure to turn off all electronics in your car (radio, lights, etc.) before jump
starting.
• Make sure you are in a dry, well-ventilated area. Never jump start a vehicle in an
enclosed area.
• Remove any moisture from your jump starter unit, accessories, and your vehicle’s
battery. Never attempt to jump start a vehicle when moisture is present.
• Check that the vehicle’s battery terminals are clean to ensure the best
conductivity.
• Properly identify the vehicle battery’s positive (+, red) and negative (-, black)
terminals before connecting the clamps.
• When using the clamps, do not allow the metal teeth of the black clamp to touch
the metal teeth of the red clamp.
• When using the clamps, DO NOT connect the RED clamp to the vehicle battery’s
negative (-) terminal, or the BLACK clamp to the vehicle battery’s positive (+)
terminal.
EN 06
• When connecting smart clamps to the battery terminals, ensure the copper teeth
on each side of the clamp make good contact with the terminal. The better the
connection, the easier it will be to start your vehicle.
NOTE: When adjusting the clamps please be sure to disconnect your Jump Starter
first. This will prevent the occurrence of minor sparks.
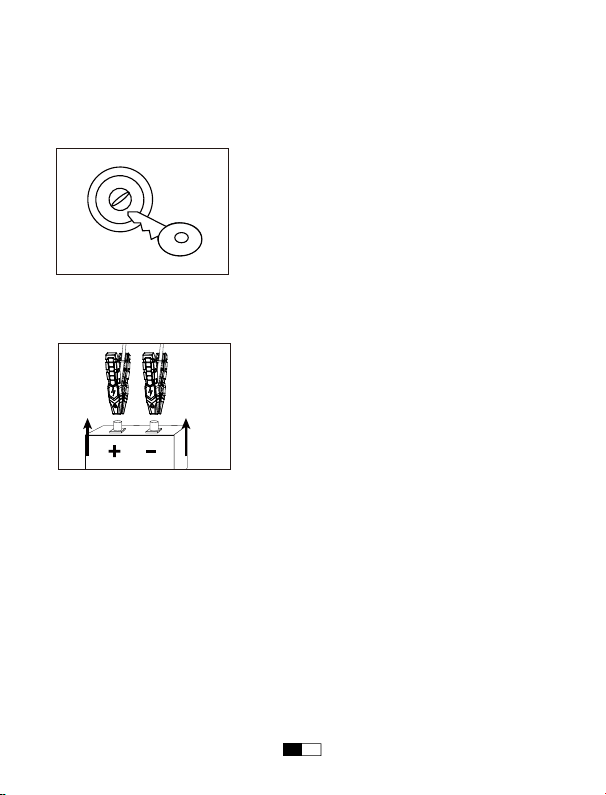
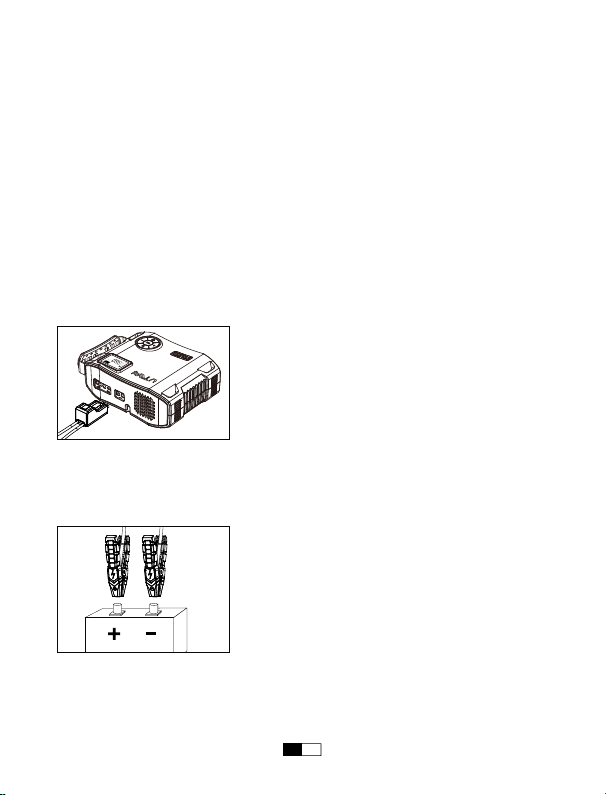
Jump Starting a Vehicle
Step 1: Insert the plug of the battery clamps completely into the jump starter, the
red and green lights flashing alternately.
Step 2: Connect the red clamp to the positive electrode (+) of the car battery and
the black clamp to negative one (-).The green indicator is always on and the
battery clamp makes a clicking sound.
Note: 1. If you finish step 2, but the green indicator isn't always on and the battery
clamp doesn't make a sound, please try using the force start function. Press and
hold the force start button for 3 seconds, if the green indicator is always on and the
battery clamp makes a sound, please continue with step 3.
2. For safety’s sake, please don't connect the clamps together or reversely connect
the clamp to the car battery after you turn on the force start button to avoid short
circuit or reverse connection.
RED BLACK
PSI
USB
BAR KPA
kg/cm
2
IN
DC
OUT
OUT
EN 07
Step 3: Start the vehicle in 60 seconds when the green indicator light is always on
and the clamp makes a sound every 5 seconds.
If the engine does not start on the first try, disconnect it from the car battery and
wait for at least 20 seconds before reconnecting.
Step 4: When the vehicle is started, remove the battery clamp from the car battery
and the jump starter within 30 seconds.
Note: To prevent the clamp plug from coming loose, refrain from shaking it when
unplugging or plugging in, as excessive movement may result in easy detachment.
START
EN 08
Inflating the Vehicle Tire
Please read safety instructions carefully before use:
• For safety reasons, the device should be KEPT OUT OF REACH OF CHILDREN.
• Inspect the JS-5 Jump Starter before each inflates, ensuring the valve and the air
hose are not damaged.
• Do not bend or restrict the air hose while the compressor is in use.
• Avoid using in rainy or wet conditions as water entering the unit can cause
internal damage and premature failure.
• In case of an electrical or mechanical fault, immediately switch off and unplug the
compressor.
• Only use on tires and inflatable items.
• Take extra care not to over-inflate when inflating other inflatable items such as
sports ball, bike tires, air bed, etc.
• Please refer to your vehicle handbook for the correct tire pressure required for
your vehicle.
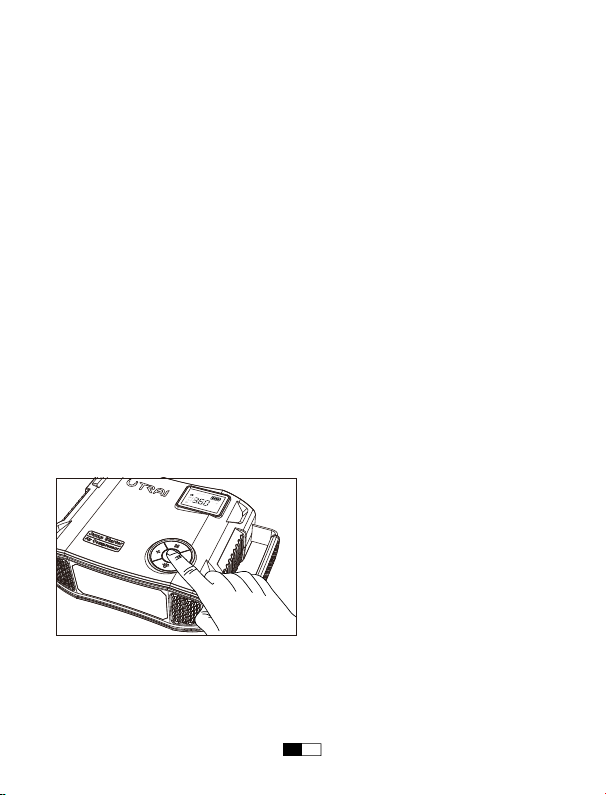
Step 1: Press the OK button to activate the device. Then press the M button to
switch the inflating modes. Press and hold the M button until the pressure unit
flashes and then press it again to switch the pressure unit to PSI, BAR, KPA or
kg/cm².
PSI
USB
BAR KPA
kg/cm
2
IN
DC
OUT
OUT
EN 09

Step 2: Press the + / - button to increase / decrease the air pressure value until
your desired air pressure is reached.
NOTE: Check your car’s standard tire pressure before you set your desired
pressure. The standard tire pressure is usually displayed in the vehicle user
manual, the label next to the cab door (near the B pillar), the drawer next to the
driver's seat, the fuel door, etc.
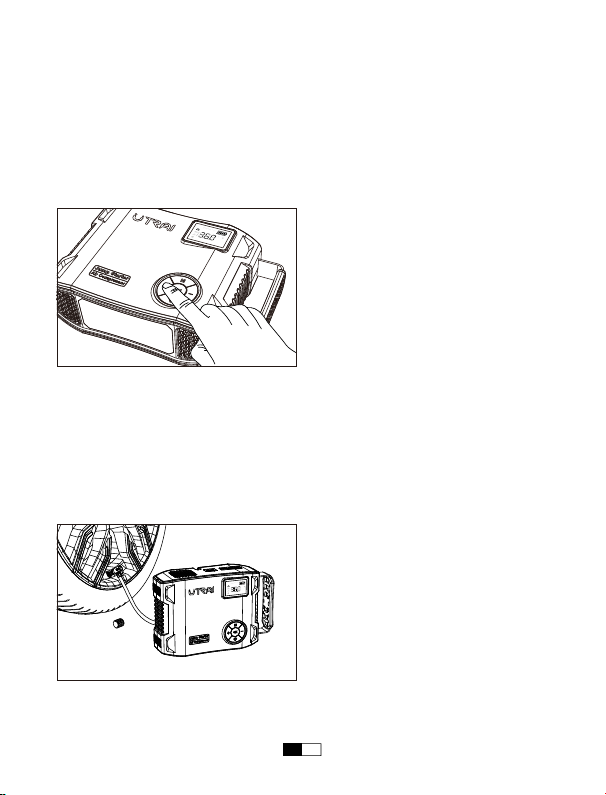
Step 3: Remove the dust cap from the tire valve. Carefully remove the air hose
from JS-5 and connect it securely onto the tire valve, then press down the handle
to fix the air hose. Once attached, your tire pressure will be displayed on the LCD
display.
NOTE: The high temperature will pressurize the tire, so please inflate when the tire
cools.
PSI
USB
BAR KPA
kg/cm
2
IN
DC
OUT
OUT
PSI
USB
BARKPA
kg/cm
2
IN
DC
OUT
OUT
EN 10

Step 4: Press and hold the OK button to start inflating. Once the preset pressure
has been reached, the device will automatically shut itself off. Just press / press
and hold the OK button to manually stop inflating. Then press the OK button the
turn off the device completely, disconnect the air hose and replace the dust cap
you have taken off.
NOTE: To extend the service life, please let the device rest for 10 minutes to cool
down:
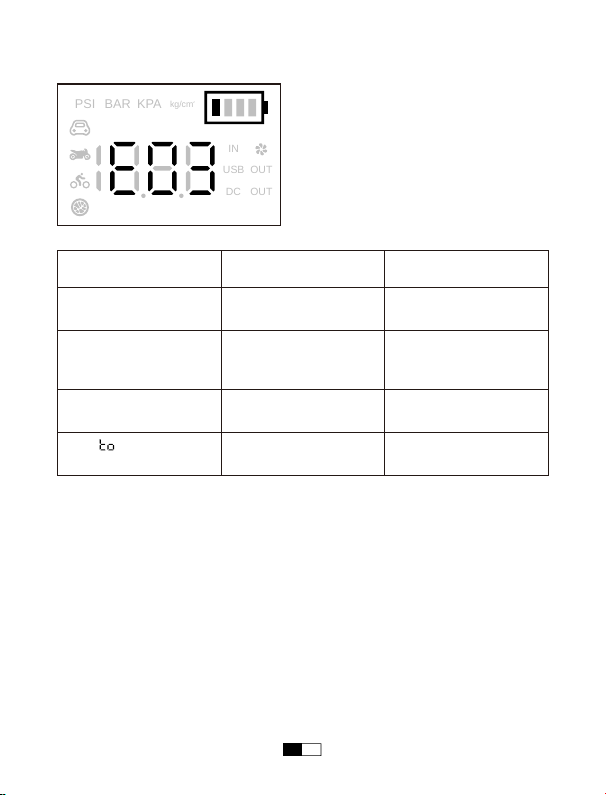
Inflating Air Pressure
Range
The Maximum Duration
of Continuous Inflating
Downtime
<38PSI
38PSI~60PSI
60PSI~110PSI
110PSI~150PSI
15 Minutes
8 Minutes
4 Minutes
2 Minutes
10 Minutes
10 Minutes
10 Minutes
10 Minutes
EN 11

In any of the following situations, the smart clamp turns protection on.
1. Ready to work.
2. The jump starter is connected to the car more than 60
seconds. Please disconnect them.
3. The clamp comes loose after being connected to the
car battery.
The red and green
indicators flash
alternately
1. Low voltage protection:
The voltage of jump starter battery is too low, please fully
charge it then use.
2. Over voltage protection:
The voltage of jump starter is too high. Please don’t use
it.
3. High temperature protection:
The temperature of jump starter is too high, please don’t
use it. Retry after cooling down.
4. Reverse connection protection:
The battery clamp is reversely connected. Please
reconnect the clamp to the car battery.
5. Short circuit protection:
The red clamp and the black clamp are clipped together.
Please disconnect them.
The red indicator is
always on and beeps
for a long time
Working status.
Situation
The green indicator
is always on
LED Indicator of
The Smart Battery
Clamp
EN 12
Troubleshooting
LCD Display
Problem
Internal sensor error
High temperature
protection
Overload / short circuit
protection
The “ ” flashes 3
times and stop inflating
Please contact our
customer service
Please wait for it to cool
down then press the
button to continue
Please disconnect the
external device
Tire inflating timeout Please check the tires for
air leaks
Instruction
E01
E02
E03
PSI
USB
BAR
KPA
kg/cm
2
IN
DC
OUT
OUT
EN 13

Important Safety Information
WARNING: Read all instructions and warnings prior to using this product.
Improper use of this product may result in product damage, excess heat,
toxic fumes, fire or explosion, for which Corporation is not responsible.
• Always read all instructions carefully before using your Jump Starter.
• Do not submerge your Jump Starter in water, or expose it to rain or moisture.
• Never open or disassemble your Jump Starter as it will void your warranty.
• Do not expose your Jump Starter to fire, intense heat, or flammable liquids.
• Keep away from and out of reach of children.
• Do not insert foreign objects into ANY inputs or outputs.
• Do not allow the metal teeth of the red clamp to touch the metal teeth of the black
clamp when connected to your Jump Starter.
• Do not connect the black clamp to the vehicle battery’s positive(+) terminal when
connected to your Jump Starter. Do not connect the red clamp to the vehicle
battery’s negative(-) terminal when connected to your Jump Starter.
• Do not open your Jump Starter to replace the internal battery. No user-replace-
able parts are inside your Jump Starter.
• Always disconnect the jump start cables from your Jump Starter after use and
store separately.
• For protecting this unit, make sure the battery capacity of jump starter is above
75% before jumping start your car.
• Check the power of the product at least every three months, and charge the
product in time.
EN 14
Contenuto del pacco
Italiano
Contenitore Portatile
Cavo USB a USB-C Adattatore valvola x 3 Guíade InicioRápido
Avviatore d'emergenza Adattatore per
accendisigari DC
Cavo di Avviamento
Intelligente
IT 43
La Apariencia
1
2
3
4
5
6
7
9
10
11
12
13 1415 16 17
PSI
USB
BAR KPA
kg/cm
2
IN
DC
OUT
OUT
8
IT 44

7
13
12
9
5 - Pulsante
6 Pulsante
2 Pulsante OK
1
Schermo LCD
14
11
10
8 USB Output Port
4
Tasto +
3
Pulsante M
16
15
Mostra la potenza residua e controlla la pressione
dell'aria del pneumatico collegato
Diminuisce il valore della pressione dell'aria
Accendere/spegnere la luce LED e cambiare
modalità di illuminazione
17
Pulsante di avviamento
forzato
Avviamento forzato del veicolo quando il morsetto
intelligente della batteria non è in grado di
riconoscere la batteria dell'auto
Accendere/spegnere il dispositivo o il compressore
d'aria
Carica i dispositivi con il cavo USB
Aumenta il valore della pressione dell'aria
Commuta le modalità di gonfiaggio e l'unità di
misura della pressione dell'aria in uscita
Funzione Operazione
Torcia a LED
Porta di ingresso
USB-C
Porta di output DC
12-16V/10A
Tubo dell'aria
Porta di uscita EC5
Indicatore LED
Pinze di Avviamento
Pinza smart rossa
Pinza smart nera
Illuminazione
Caricare lo starter
Inserire la spina nella porta di inizio del salto
Caricare i dispositivi mobili
Collegare le gomme dell'auto
Mostra Io stato della pinza smart
Inserire la spina nella porta di awio del salto
Collegare agli elettrodi positivi della batteria auto
Collegare agli elettrodi negativi della batteria auto
IT 45

Capacità della batteria
Uscita Jump Start
Uscita CC
Ingresso USB-C
Uscita USB
Tempo di ricarica
Dimensioni dell'unità (L*W*H)
Compressore d'aria
99.9Wh
12V
12V-16V / 10A
5V / 3A, 9V / 2A
5V / 2.4A
4-6 ore
201mm*153.5mm*77mm
Pressione massima dell'aria 150PSI
Specifiche tecniche
IT 46
PSI
USB
BARKPA
kg/cm
2
IN
DC
OUT
OUT
PSI
USB
BAR KPA
kg/cm
2
IN
DC
OUT
OUT
Guida operativa
Caricare il vostro Jump Starter
• A casa:
1. Collegare il cavo USB con una porta USB del computer o qualsiasi adattatore di
alimentazione USB (non incluso).
2. Collegare la porta USB-C all'Avviatore d'emergenza.
• In auto:
1. Inserire l'adattatore da auto (non incluso) nella presa.
2. Collegare la porta USB-C all'Avviatore d'emergenza.
Nota: Si consiglia di caricare una volta l'Avviatore d'emergenza ogni 3-4 mesi per
mantenere le prestazioni e prolungare la durata della sua batteria integrata.
IT 47

Ricarica dei dispositivi
L'avviatore è dotato di una porta di uscita USB e di una porta di uscita CC.
1. Collegare il cavo USB alla porta di uscita USB dell'avviatore o collegare
l'adattatore per accendisigari DC alla porta di uscita DC.
2. Collegarlo al telefono, al tablet o ad altri dispositivi auto a 12 V.
3. Premere il pulsante OK per accendere l'avviatore di emergenza e iniziare la
ricarica.
Luci a LED
1. Premere il pulsante OK per attivare l'apparecchio.
2. Premere il pulsante per accendere la luce LED.
3. In modalità luce, premere il pulsante per cambiare modalità (normale,
stroboscopica, SOS, spenta).
Misure di sicurezza
Prima di avviare l'auto con il prodotto, occorrere sempre prendere alcune
precauzioni:
• Innanzitutto, leggere attentamente il manuale di istruzioni dell'auto, in quanto il
costruttore potrebbe prescrivere dei passaggi e precauzioni specifici relativi al
veicolo.
• Spegnere sempre tutti i dispositivi elettronici (radio, luci, ecc.) in auto prima di
avviarla.
• Verificare che l'auto si trovi in un'area asciutta e ben ventilata. Non avviare il
veicolo in un ambiente chiuso.
• Rimuovere l'umidità dall'Avviatore d'emergenza, dagli accessori e dalle batterie
del veicolo. Non avviare mai il veicolo in caso di umidità.
• Verificare che la porta della batteria del veicolo sia pulita per garantire un'ottima
conduttività elettrica.
• Prima di collegare le pinze di avviamento, individuare correttamente i poli positivo
(+, rosso) e negativo (-, nero) della batteria del veicolo.
• Evitare che i denti metallici della pinza di avviamento nera vengano in contatto
con i denti metallici della pinza di avviamento rossa.
IT 48
RED BLACK
PSI
USB
BAR KPA
kg/cm
2
IN
DC
OUT
OUT
• Quando si collegano le pinze di avviamento, fare attenzione a non collegare la
pinza di avviamento rossa al polo negativo (-) della batteria del veicolo, né
collegare la pinza di avviamento nera al polo positivo (+) della batteria del veicolo.
• Quando si collegano le pinze di avviamento intelligenti ai terminali della batteria,
assicurarsi che i denti di rame su entrambi i lati delle pinze siano in buon contatto
con i terminali. Migliore è il collegamento, più facile è avviare il veicolo.
Nota: Prima di regolare le pinze, occorrere sempre scollegare prima l'Avviatore
d'emergenza, in questo modo, si possono evitare eventuali scintille minori.
Avviare l’auto
Passo 1: Inserire completamente la spina della pinza della batteria intelligence
nelfawiatore auto. Se gli indicatori di luce verde e rossa sulla pinza della batteria
lampeggiano altemativamente, si 4 sicuri di passare alia fiase successiva.
Passo 2: Attaccare correttamente le pinze rossa e nera agli elettrodi della batteria
auto (rosso sul positivo e nero sul negativo). L'indicatore verde è sempre acceso e
il morsetto della batteria emette un segnale acustico.
IT 49
START
Nota:1. Se, al termine del passaggio 2, l'indicatore verde non è sempre acceso e il
morsetto della batteria non emette alcun suono, provare a utilizzare la funzione di
avvio forzato. Tenere premuto il pulsante di avvio forzato per 3 secondi; se
l'indicatore verde è sempre acceso e il morsetto della batteria emette un suono,
proseguire con il passaggio 3.
2. Per sicurezza, non collegare i morsetti tra loro e non invertire il collegamento del
morsetto alla batteria dell'auto dopo aver attivato il pulsante di avviamento forzato,
per evitare cortocircuiti o collegamenti inversi.
Passo 3: Avviare il veicolo entro 60 secondi quando la spia verde è sempre
accesa e la pinza emette un suono ogni 5 secondi.
Se l'auto non viene avviata con successo quando viene avviata con l'Avviatore
d'emergenza per la prima volta, scollegarlo dalla batteria dell'auto, attendere
almeno 20 secondi e ricollegare l'Avviatore d'emergenza con l'auto.
Passo 4: Quando il veicolo è acceso, rimuovere il cavo dell’avviatore dalla batteria
del veicolo.
Nota: Per evitare che la spina a clip si allenti, evitare di scuoterla quando si
scollega o si collega la spina, poiché un movimento eccessivo potrebbe causare
un facile distacco.
IT 50
PSI
USB
BAR KPA
kg/cm
2
IN
DC
OUT
OUT
Gonfiare la gomma del veicolo
Leggere attentamente le istruzioni di sicurezza prima dell'uso:
• Per motivi di sicurezza, il dispositivo deve essere tenuto fuori dalla portata dei
bambini.
• Ispezionare il Jump Starter JS-5 prima di gonfiare ciascuno, assicurandosi che la
valvola e il tubo dell'aria non siano danneggiati.
• Non piegare o restringere il tubo dell'aria mentre il compressore è in uso.
• Evitare l'uso in condizioni di pioggia o bagnato poiché l'acqua che penetra
nell'unità può causare danni interni e guasti prematuri.
• In caso di guasto elettrico o meccanico, spegnere e scollegare immediatamente il
compressore.
• Utilizzare solo su pneumatici e oggetti gonfiabili.
• Prestare particolare attenzione a non gonfiare eccessivamente quando si
gonfiano altri oggetti gonfiabili come palloni sportivi, pneumatici per biciclette,
materassini pneumatici, ecc.
• Fare riferimento al manuale del veicolo per la corretta pressione dei pneumatici
richiesta per il proprio veicolo.
Passaggio 1: Premere il pulsante OK per attivare il dispositivo. Quindi premere il
pulsante M per cambiare le modalità di gonfiaggio. Tenere premuto il pulsante M
finché l'unità di pressione non lampeggia, quindi premerlo nuovamente per passare
all'unità di pressione PSI, BAR, KPA o kg/cm².
IT 51
PSI
USB
BAR KPA
kg/cm
2
IN
DC
OUT
OUT
PSI
USB
BARKPA
kg/cm
2
IN
DC
OUT
OUT
Passaggio 2: Premere il pulsante + / - per aumentare / diminuire il valore della
pressione dell'aria fino a raggiungere la pressione desiderata.
Nota: Controlla la pressione dei pneumatici standard della tua auto prima
d'impostare la pressione desiderata. La pressione dei pneumatici standard viene
solitamente visualizzata nel manuale dell'utente del veicolo, l'etichetta accanto alla
portiera della cabina (vicino al montante B), il cassetto accanto al sedile del
conducente, la portiera del carburante, ecc.
Passaggio 3: Rimuovere il cappuccio antipolvere dalla valvola del pneumatico.
Rimuovere con cautela il tubo dell'aria da JS-5 e collegarlo saldamente alla valvola
del pneumatico, quindi premere l'impugnatura per fissare il tubo dell'aria. Una volta
collegato, la pressione degli pneumatici verrà visualizzata sul display LCD.
Nota: l'alta temperatura pressurizza lo pneumatico, quindi gonfiare quando lo
pneumatico si raffredda.
IT 52

Gamma di pressione
dell'aria di gonfiaggio
Durata massima del
gonfiaggio continuo
Tempo di inattività
<38PSI
38PSI~60PSI
60PSI~110PSI
110PSI~150PSI
15 minuti
8 minuti
4 minuti
2 minuti
10 minuti
10 minuti
10 minuti
10 minuti
Passaggio 4: tenere premuto il pulsante OK per avviare il gonfiaggio. Una volta
raggiunta la pressione preimpostata, il dispositivo si spegne automaticamente. È
sufficiente premere/tenere premuto il pulsante OK per interrompere manualmente il
gonfiaggio. Quindi premere il pulsante OK per spegnere completamente il
dispositivo, scollegare il tubo dell'aria e rimettere il cappuccio antipolvere tolto.
Nota: per prolungare la durata del dispositivo, lasciarlo riposare per 10 minuti per
raffreddarlo:
IT 53

In una delle seguenti situazioni, la pinza intelligente attiva la protezione.
1. Pronto a funzionare.
2. L'avviatore è collegato all'auto da più di 60 secondi. Si
prega di scollegarlo.
3. Il morsetto si allenta dopo essere stato collegato alla
batteria dell'auto.
Gli indicatori rosso
e verde
lampeggiano
alternativamente
1.Protezione da bassa tensione:
La tensione della batteria di avviamento è troppo bassa,
si prega di caricarla completamente e di utilizzarla.
2. Protezione da sovratensione:
La tensione della batteria di avviamento è troppo alta.
Non utilizzarlo.
3. Protezione da alta temperatura:
La temperatura del dispositivo di avviamento è troppo
alta, quindi non utilizzarlo. Riprovare dopo il raffredda-
mento.
4. Protezione da collegamento inverso:
Il morsetto della batteria è collegato in modo inverso.
Ricollegare il morsetto alla batteria dell'auto.
5. Protezione da cortocircuito:
Il morsetto rosso e il morsetto nero sono collegati tra
loro. Scollegarli.
L'indicatore rosso è
sempre acceso e
emette un segnale
acustico prolungato
Stato di lavoro.
Situazione
L'indicatore verde è
sempre acceso
Indicatore LED della
pinza intelligente
per batterie
IT 54

Risoluzione dei problemi
Display LCD
Problema
Errore del sensore
interno
Protezione da alta
temperatura
Protezione da
sovraccarico/cortocircuito
Il simbolo " "
lampeggia 3 volte e il
gonfiaggio si interrompe
Contattare il nostro
servizio clienti
Attendere che si
raffreddi, quindi premere
il pulsante per continuare
Scollegare il dispositivo
esterno
Timeout gonfiaggio
pneumatici
Controllare che i
pneumatici non abbiano
perdite d'aria
Istruzioni
E01
E02
E03
PSI
USB
BAR
KPA
kg/cm
2
IN
DC
OUT
OUT
IT 55

Indicazioni di sicurezza
Attenzione: Leggere tutte le istruzioni e le avvertenze prima di utilizzare il
prodotto. Un uso improprio del prodotto potrebbe causare danni o
surriscaldamento al prodotto, smog tossico, incendio o esplosione, in tal
caso, noi non ci assumiamo alcuna responsabilità.
• Occorrere leggere attentamente tutte le istruzioni prima di utilizzare l'Avviatore
d'emergenza.
• Non immergere mai l'Avviatore d'emergenza in acqua né esporlo a pioggia o
umidità.
• Non aprire o smontare l'Avviatore d'emergenza in quanto si potrebbero causare
danni.
• Non esporre l'Avviatore d'emergenza a fuoco, alte temperature o liquidi
infiammabili.
• Quando si collegano le pinze di avviamento, fare attenzione a non collegare la
pinza di avviamento rossa al polo negativo (-) della batteria del veicolo, né
collegare la pinza di avviamento nera al polo positivo (+) della batteria del veicolo.
• Non aprire l'Avviatore d'emergenza per sostituire la batteria integrata.
• Dopo l'uso, si deve scollegare il cavo dall'Avviatore d'emergenza e riporlo
separatamente.
• Per proteggere il prodotto, il livello di carica della batteria dell'Avviatore
d'emergenza non deve superare il 75% prima di avviare l'auto.
• Tenerlo lontano dalla portata dei bambini e collocarlo in un luogo fuori dalla
portata dei bambini.
• Non inserire alcun oggetto estraneo in nessuna porta di input o di output.
• Evitare che i denti metallici della pinza di avviamento nera vengano in contatto
con i denti metallici della pinza di avviamento rossa.
• Controllare il livello di carica della batteria dell'Avviatore d'emergenza almeno
ogni tre mesi e caricare tempestivamente l'Avviatore d'emergenza.
IT 56

Official Website
www.utrai.com
Facebook
@utraicompany
Youtube
UTRAI Company
CUSTOMER SUPPORT
If you meet any questions or problems, please feel free to contact us by
Email or Facebook anytime, we will try our best to help you as soon as
possible.
Contact Us by Email:
US
Marketplace:[email protected]
UK Marketplace:[email protected]
DE Marketplace:[email protected]
FR Marketplace:[email protected]
IT Marketplace:[email protected]
ES Marketplace:[email protected]
JP Marketplace:[email protected]
Find News, Deals, and Events on our official website and social medias.
You can also download Electronic User Manual on our official website.
Watch product Unboxing Videos by influencers and How-to Videos on our
Youtube channel.
