7753845- 00
,
For Enquiries, Please Call 7038-100-400 or write to customercare.lhi@liebherr.com
DC..19..20..22..
@
Direct Cool
1. Appliance at a Glance 1
1.1 Description of appliance & Equipment 1
1.2 Range of Appliance use 1
1.3 External Dimensions of the appliance 2
1.4
Saving Energy
2
2. General Safety Information 2
3.
Putting into Operation
3
3.1 Transporting the appliance 3
3.2 Installing the appliance 3
3.3 Disposing of packaging 4
3.4 Appliance Leveling & leg adjustment 4
3.5
Connecting the appliance
5
4.
Temperature setting & control
5
4.1 Food refrigeration 5
4.2 Freezer compartment 5
4.3.1 Setting the Temperature 5
4.3.2 UI Temperature Settings 5
4.3.3 UI Fault Indication 6
4.4 Door rack 6
4.5
Ice making
6
- Ice tray
6
4.6
Door locking
6
5. Maintenance 7
5.1
5.2
Defrosting the Refrigerator 7
5.3
Cleaning the appliance 7
5.4
Customer Service
Adjustable Drain Water Tray
7
8
6. Foot Pedal / Base Stand 8
8 Decommissioning 9
8.1 Switching off the appliance 9
8.2 Taking the appliance out of service 9
9.
Disposing of the appliance
9
Contents
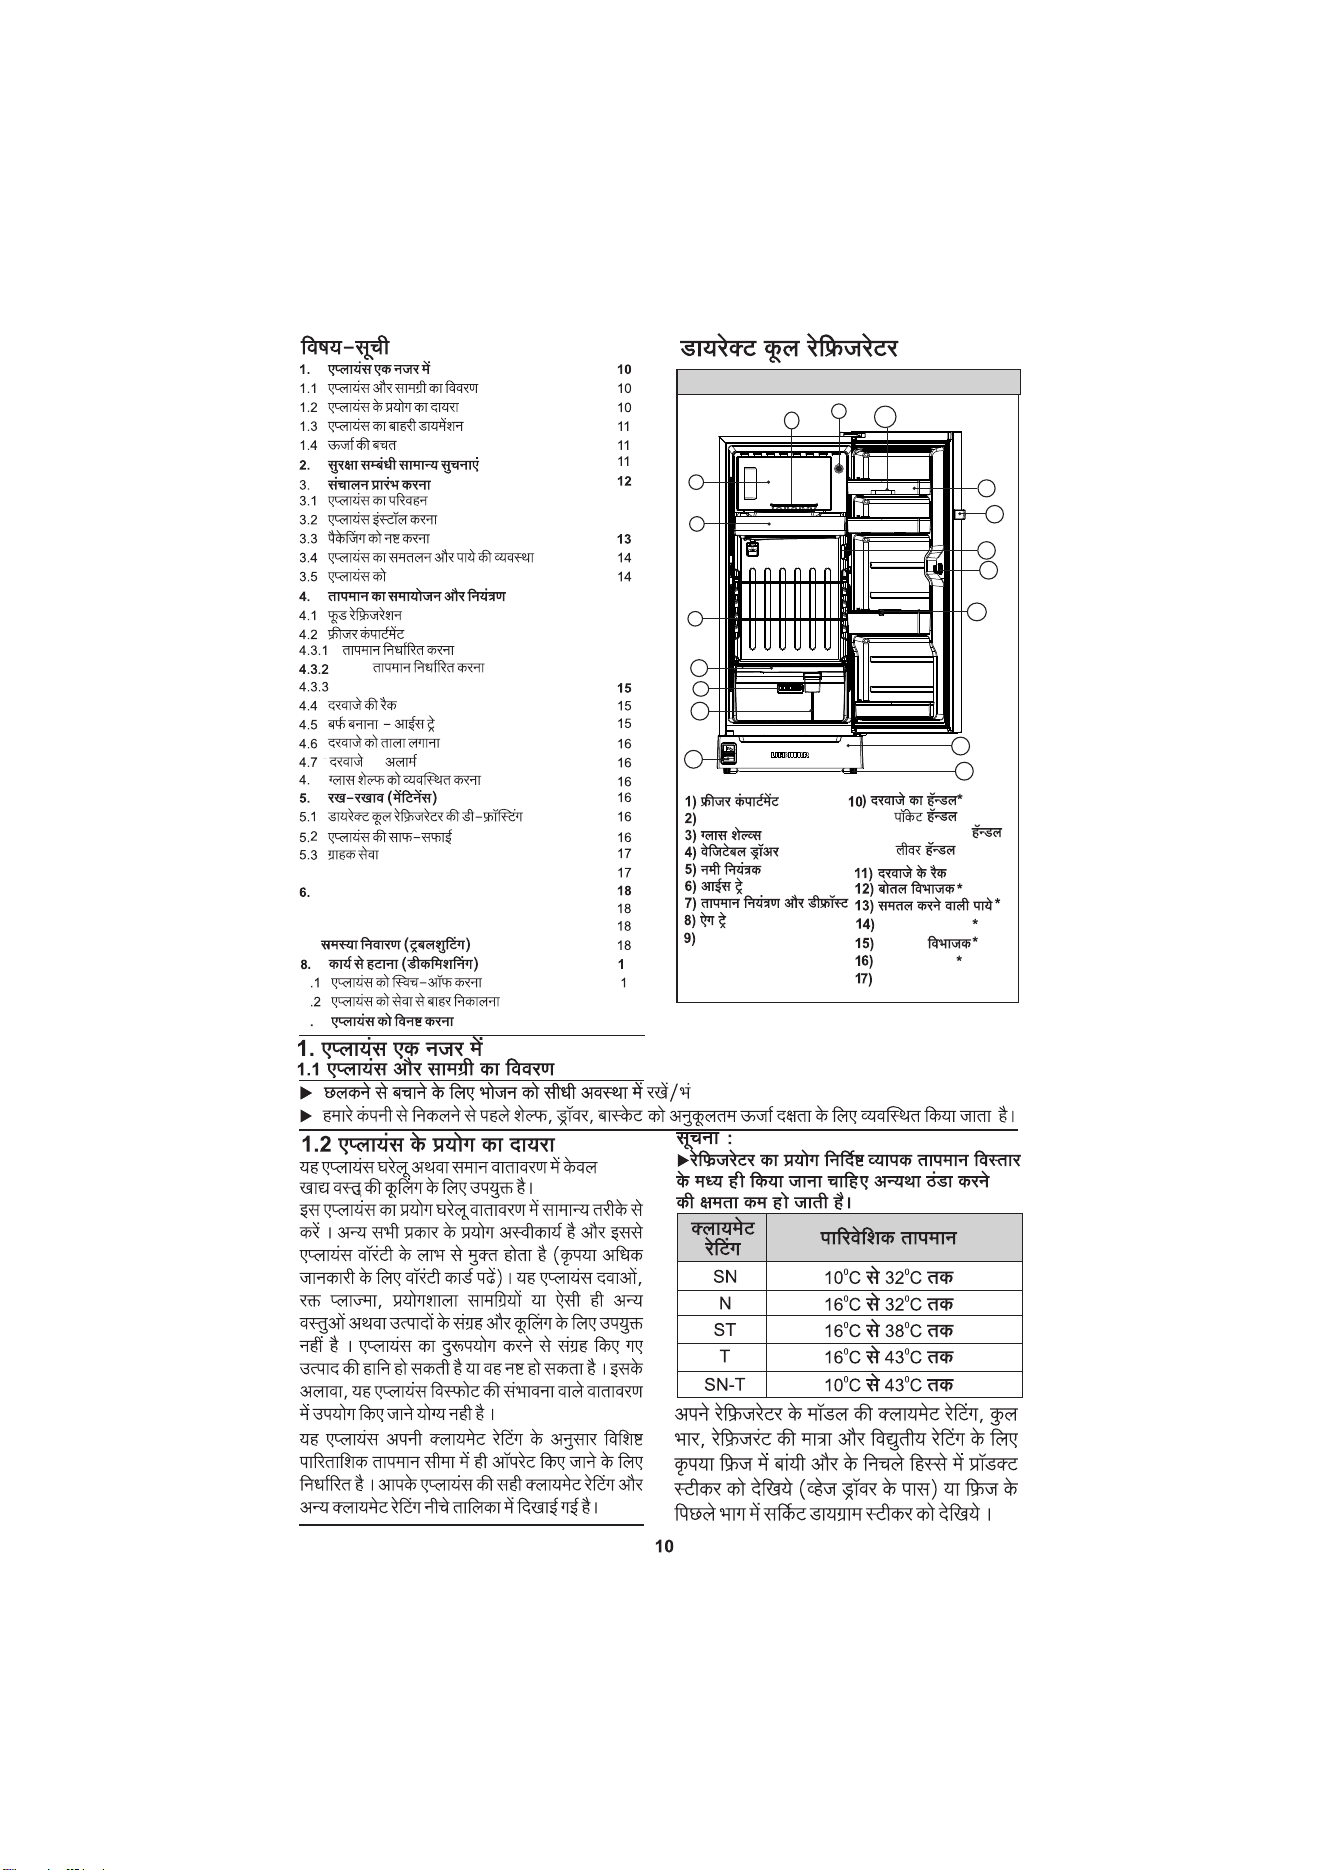
Direct Cool Refrigerator
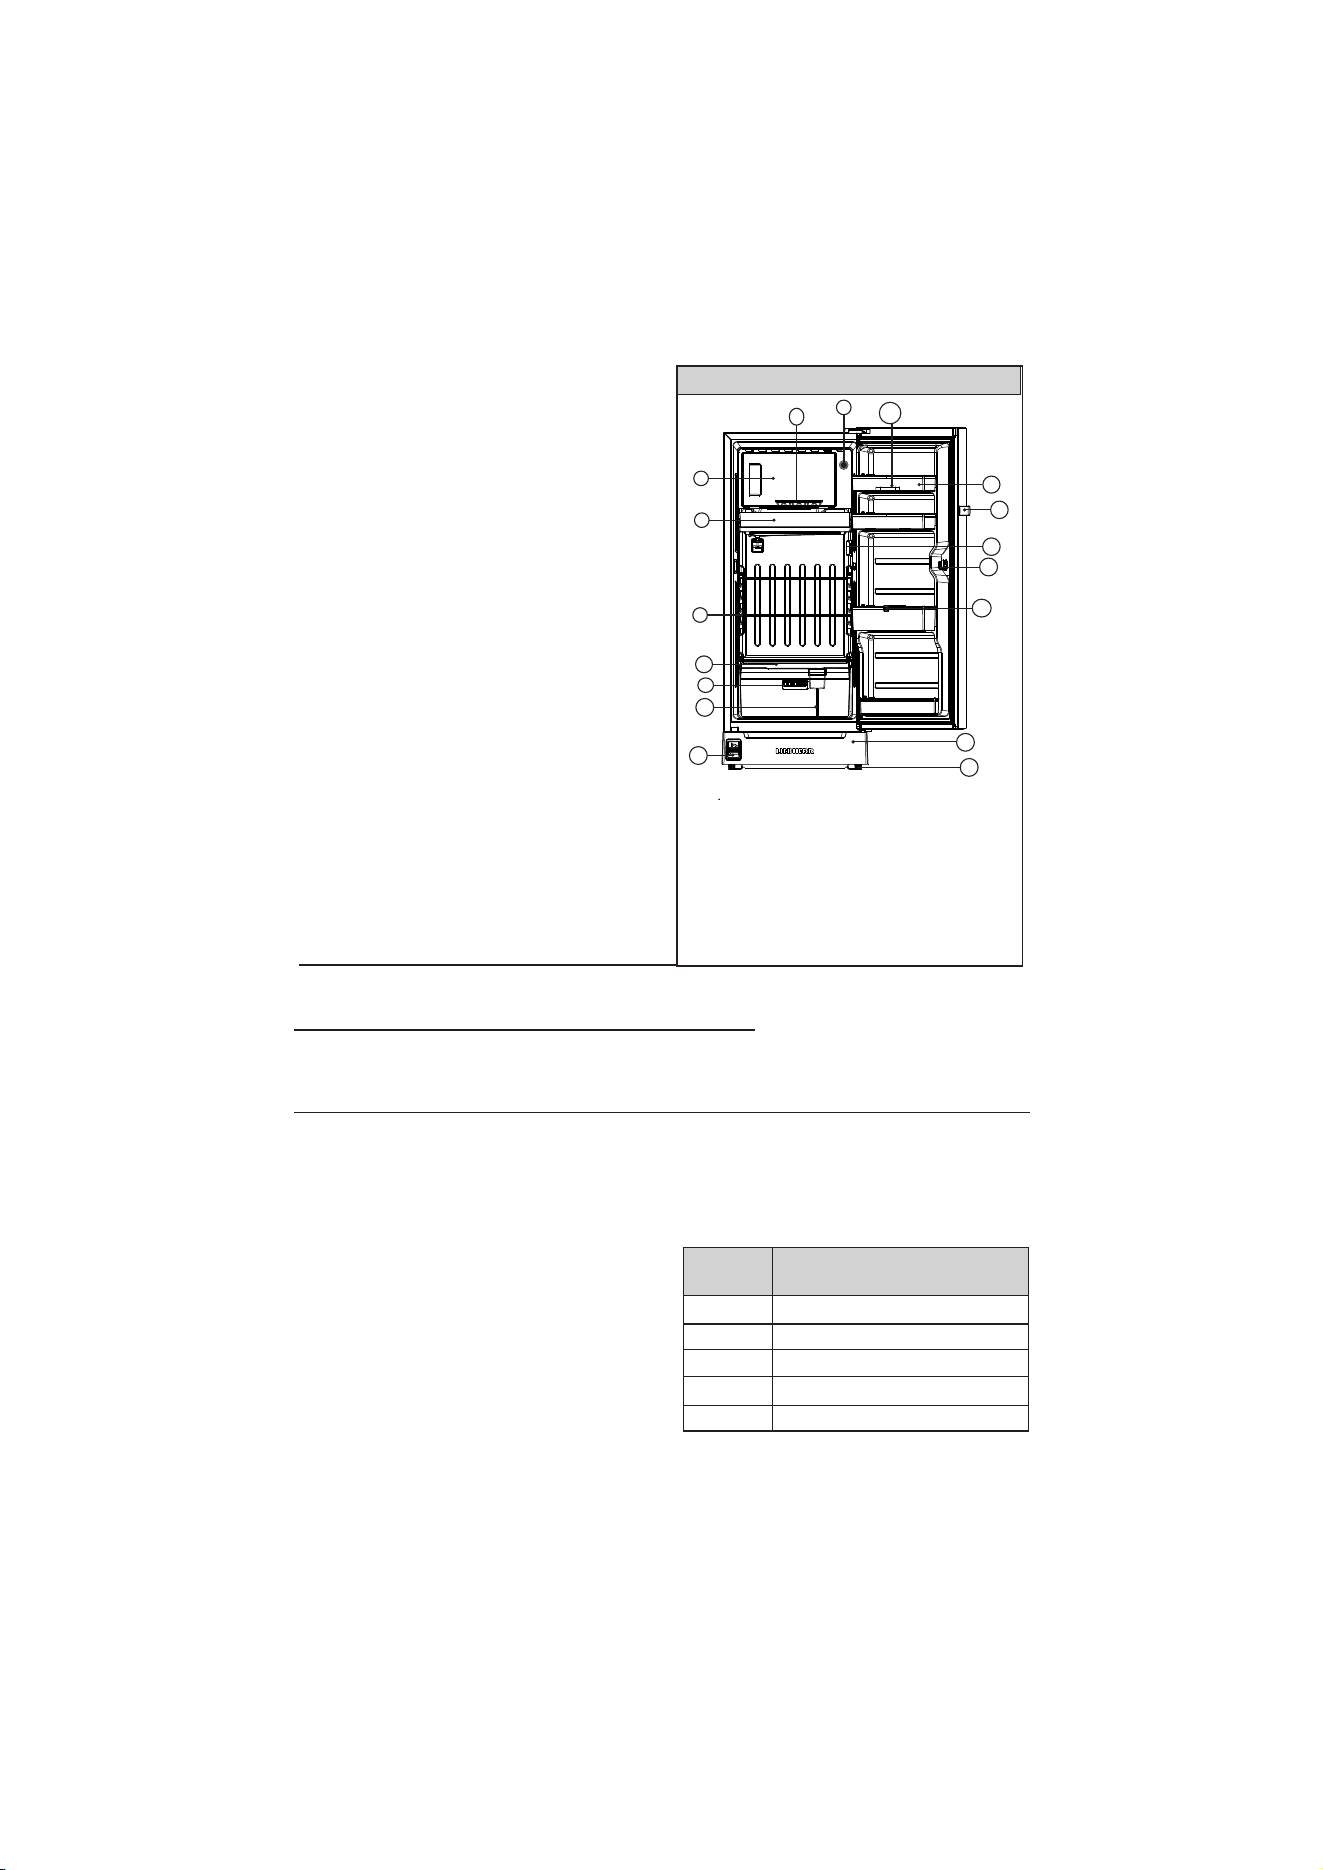
1. Appliance at a glance
u Place / store food in upright condition to
prevent any spillage.
u Shelves, drawers and baskets are
arranged for optimum energy efficiency before leaving
our manufacturing facility.
1.1 Description of appliance and
equipment
1
DC
19..20..22...
..
4.7
Door Alarm
6
1.2 Range of appliance use
The appliance is suitable solely for cooling
food in a domestic environment or similar.
Use the appliance solely as is customary
within a domestic environment. All other
more details). The appliance is not suitable
for storing and cooling medicines, blood
plasma, laboratory preparations or similar
substances and products. Misuse of the
appliance can deteriorate or spoil the stored
suitable for operation in potentially explosive
atmospheres.
ambient temperature limits according to its
climate
rating.
Refer
below
table and
information regarding various climate rating
and relevant rating for your product.
types of use are not permitted & make cause
warranty to be void (refer warranty T & C's for
food items. Furthermore, the appliance is not
The appliance is set to operate within specific
Note
u Refrigerator should be used within the
indicated ambient temperature range
otherwise the cooling performance is
reduced.
Climate
rating
for ambient temperatures of
SN
N
ST
T
0
0
10 C to 32 C
0
0
16C to 32C
0 0
16C to 38C
0
0
16C to 43C
SN-T
For climate rating, refrigerant quantity and
electrical rating of your refrigerator model, Please
refer product
circuit diagram sticker on the back-
side of the refrigerator.
0 0
10C to 43C
10
8)
10)
11)
Egg Tray
Door Handle*
Door Racks
12) Bottle Separator
13) Leveling Legs
1) Freezer Compartment
2) Dairy Safe
3) Glass Shelves
5) Humidity Controller
4) Vegetable Drawer
6) Ice Tray
7) Temp. Control & Defrost
14) Base Stand Assy
15) Veg Separator
*
*
*
*
I) Pocket handle
ii) Horizontal bar Handle
iii) Lever handle
*
16) Pedal Mechanism
*
Adjusting Glass Shelf
6
4.8
7. Troubleshooting 9
6.1 Do’s & Don’ts 9
6.2 Base Stand Drawer 9
9)
LED
1
2
3
4
14
6
7
8
11
12
131
5
15
16
9
17
17) Door Lock
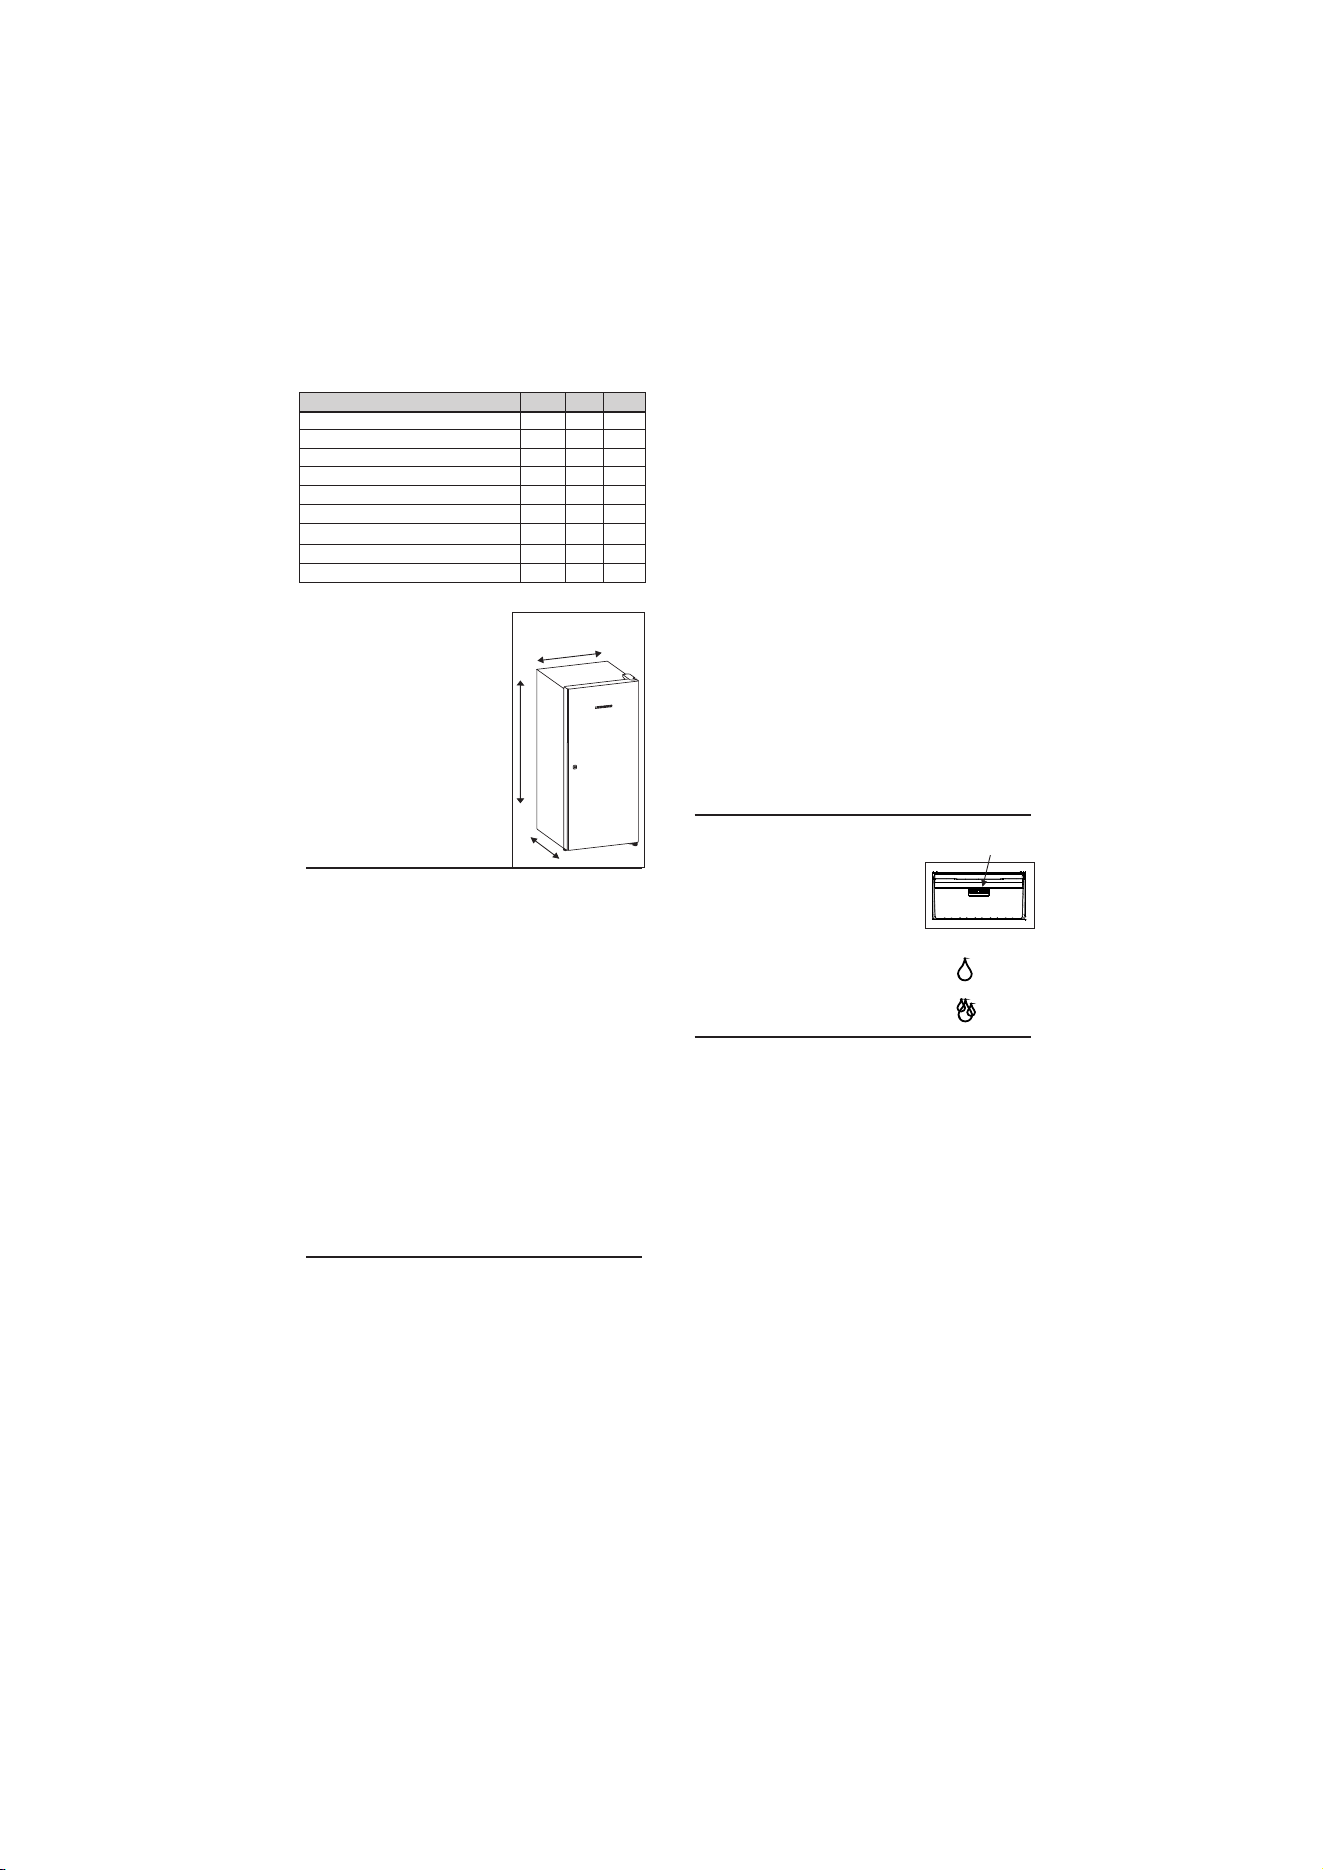
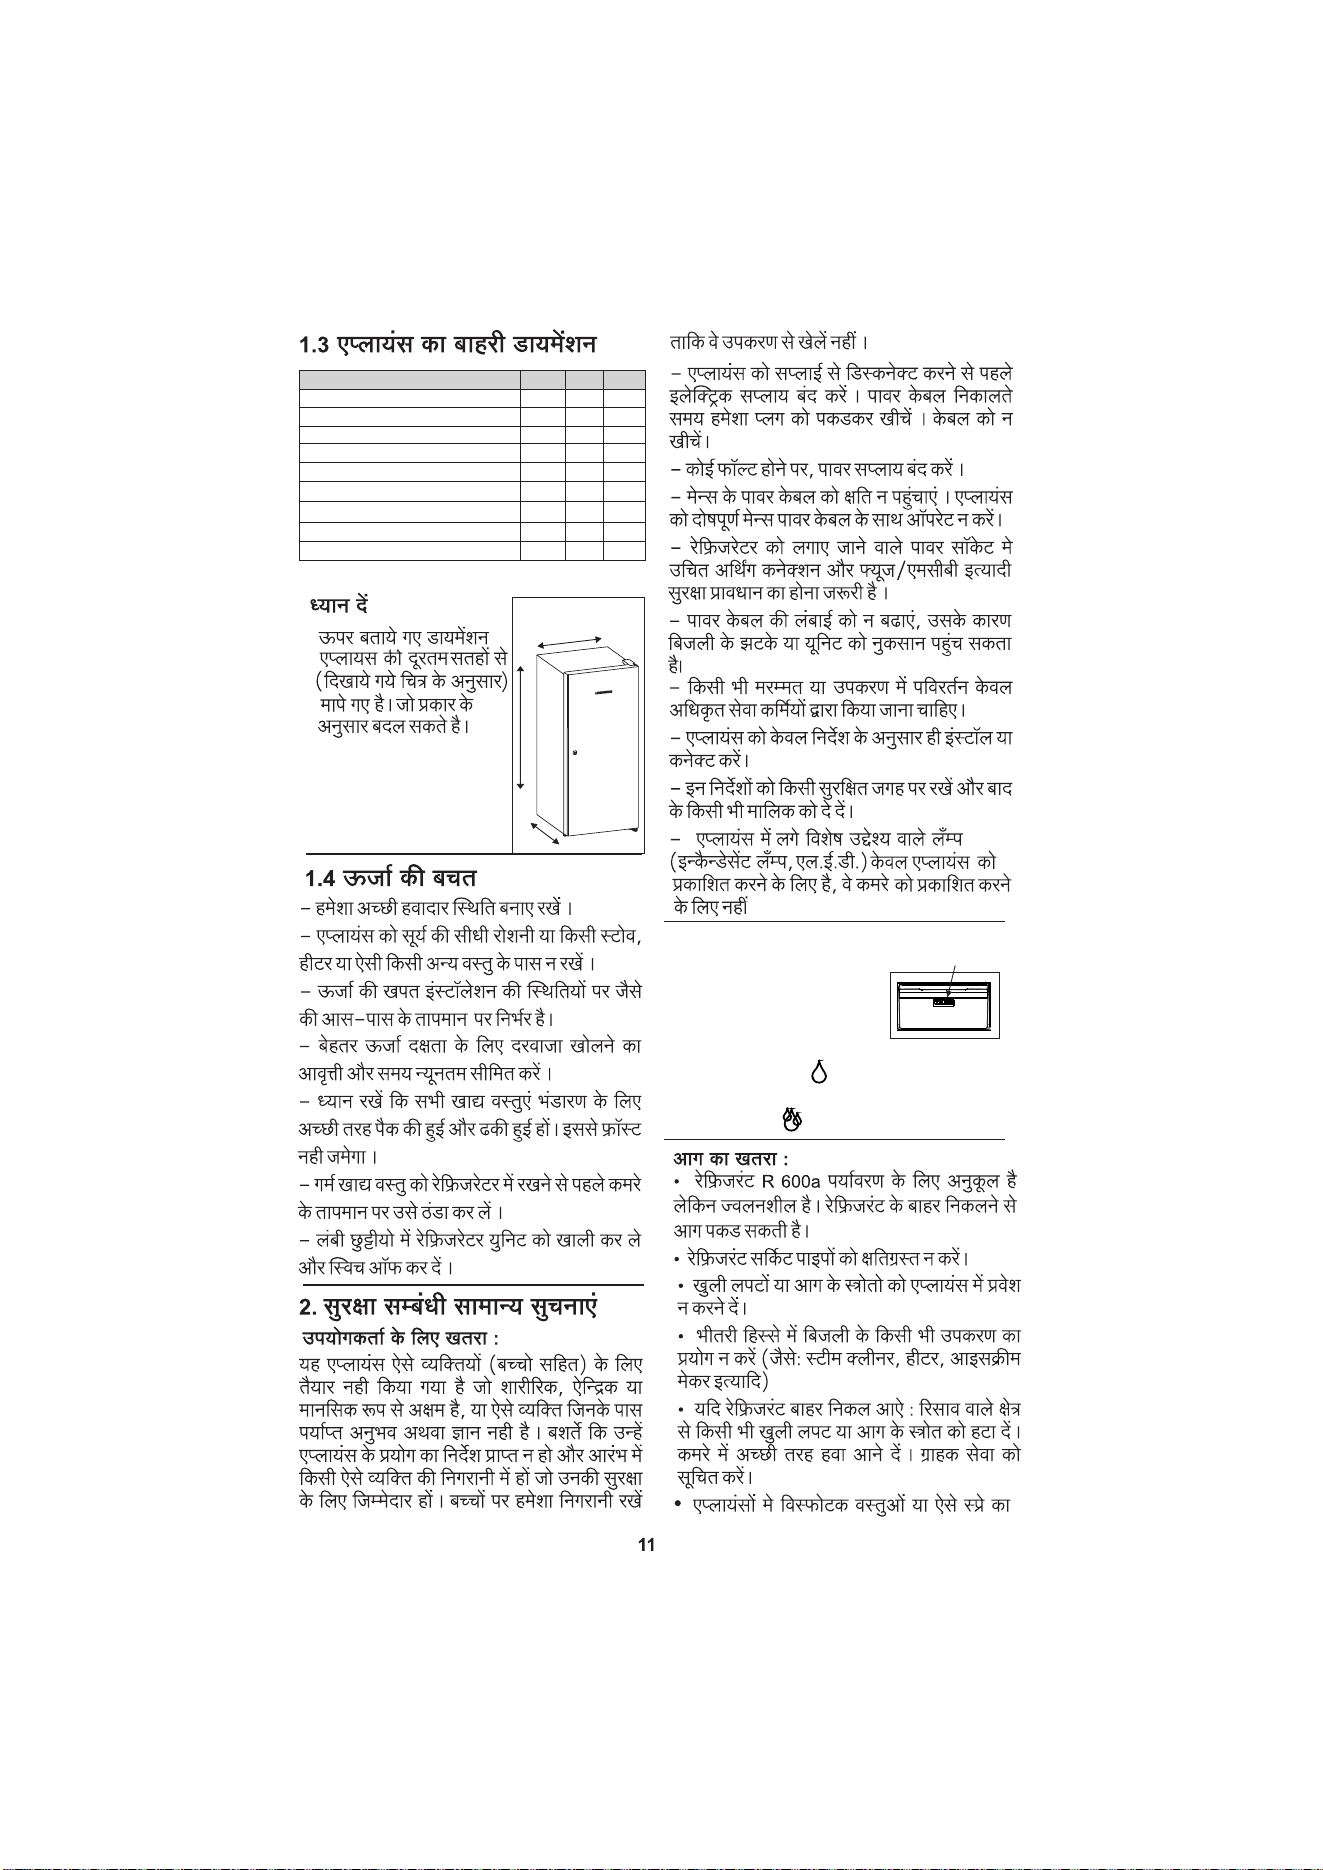
1.3 External dimensions of
the appliance
Always ensure good ventilation from all sides.
- Do not place appliance in areas of direct
sunlight or next to a stove, heater or similar
object.
1.4 Saving energy
2
Note
u Above mentioned dim-
ensions are
measured
image and are subjec-
variant.
Models
191 202 222
588
W-Bar Handle with BS
W
H
D
DC..19..20..22..
from extreme surfaces
of product as shown in
ted to change as per
- The energy consumption depends on the
installation conditions, e.g. the ambient
temperature.
- Limit the frequency and time of door
opening to minimum for better energy
efficiency.
- Ensure that all food is well packed and
covered for storage. This will prevent frost
formation.
- Cool warm food to room temperature
before storing it inside refrigerator.
- Empty and switch off refrigerating unit for
longer vacation periods.
2 General Safety Information
This appliance is not designed for persons
(including children) with physical or mental
impairment or persons not having sufficient
experience and knowledge, unless they are
instructed in the use of the appliance and are
initially supervised by a person responsible
for their safety. Keep children under
supervision to ensure they do not play with
the appliance.
Danger for the user:
- When disconnecting the appliance, make
sure that electric supply is turned off. Always
take hold of the plug while pulling plug out of
the socket. Do not pull the cable.
- In the event of a fault, turn off the power
supply.
not operate the appliance with a defective
mains power cable.
- The power socket where refrigerator is
plugged in must be provided with proper
earth connection and suitable safety
provisions such as Fuse / MCB.
- Do not extend or modify the power
length, damage power cable may cause
electric shock or damage the unit.
- Any repairs or change in the appliance
must be carried out by authorised service
personnel only.
- Install and connect the appliance only as
instructed.
- Lamps (incandescent
ation.
cable
- The refrigerant R 600a is environmentally
friendly but flammable. Leaking refrigerant
may ignite.
Fire hazard:
- Do not damage the mains power cable. Do
• Do not damage the refrigerant circuit
pipes.
• Do not allow naked flames or ignition
sources to enter the appliance.
• Do not use any electrical appliances in the
interior (e.g. steam cleaners, heaters, ice
cream maker etc.)
• If refrigerant leaks : remove any naked
flames or sources of ignition from the
leakage area. Ventilate the room well. Notify
the customer service.
- Do not store explosives or sprays
containing combustible propellants such as
butane, propane, pentane, etc. in the applia-
ces. To identify these spray cans, look for
the contents printed on the can, or a flame
symbol. Gases in the refrigerator possibly
588588
W-Bar Handle & No BS
584 584 584
W-Pocket Handle with BS
584 584 584
W-Pocket Handle & No BS
578 578 578
H-with Base Stand
1367 1422 1522
H-No Base Stand
1245 1300 1400
D-Bar Handle with BS & No BS
650 650 650
D-Pocket Handle with BS
623 623 623
D-Pocket Handle & No BS
605 605 605
-W-Width,H-Height,D-Depth,BS-base Stand
appliance serve to the
suited for room illumin
lamps, LEDs ) in the
appliances
are not
Humidity Controller Instruction:
- It helps to maintain consi-
Humidity slider
stent temperature for long
duration and you get farm
fresh fruits & vegetables
straight from your refrigera-
tor. For less humidity requirement inside the
drawer, move the slider towards this sym-
bol. For high humidity requirement inside the
drawer, move the slider towards this sym-
bol.
Danger of tipping and falling:
- Do not misuse the plinth, drawers, doors,
shelves etc. as a step or for support. This
applies particularly to children.
Danger of frostbite, numbness and pain:
- Avoid lasting skin contact with cold surfaces
or refrigerated / frozen food or take protective
steps, e.g. wear gloves. Do not consume ice
cream, water ice or ice cubes immediately
after taking out of the refrigerator and do not
consume them too cold.
Please observe the specific information in
sections:
3
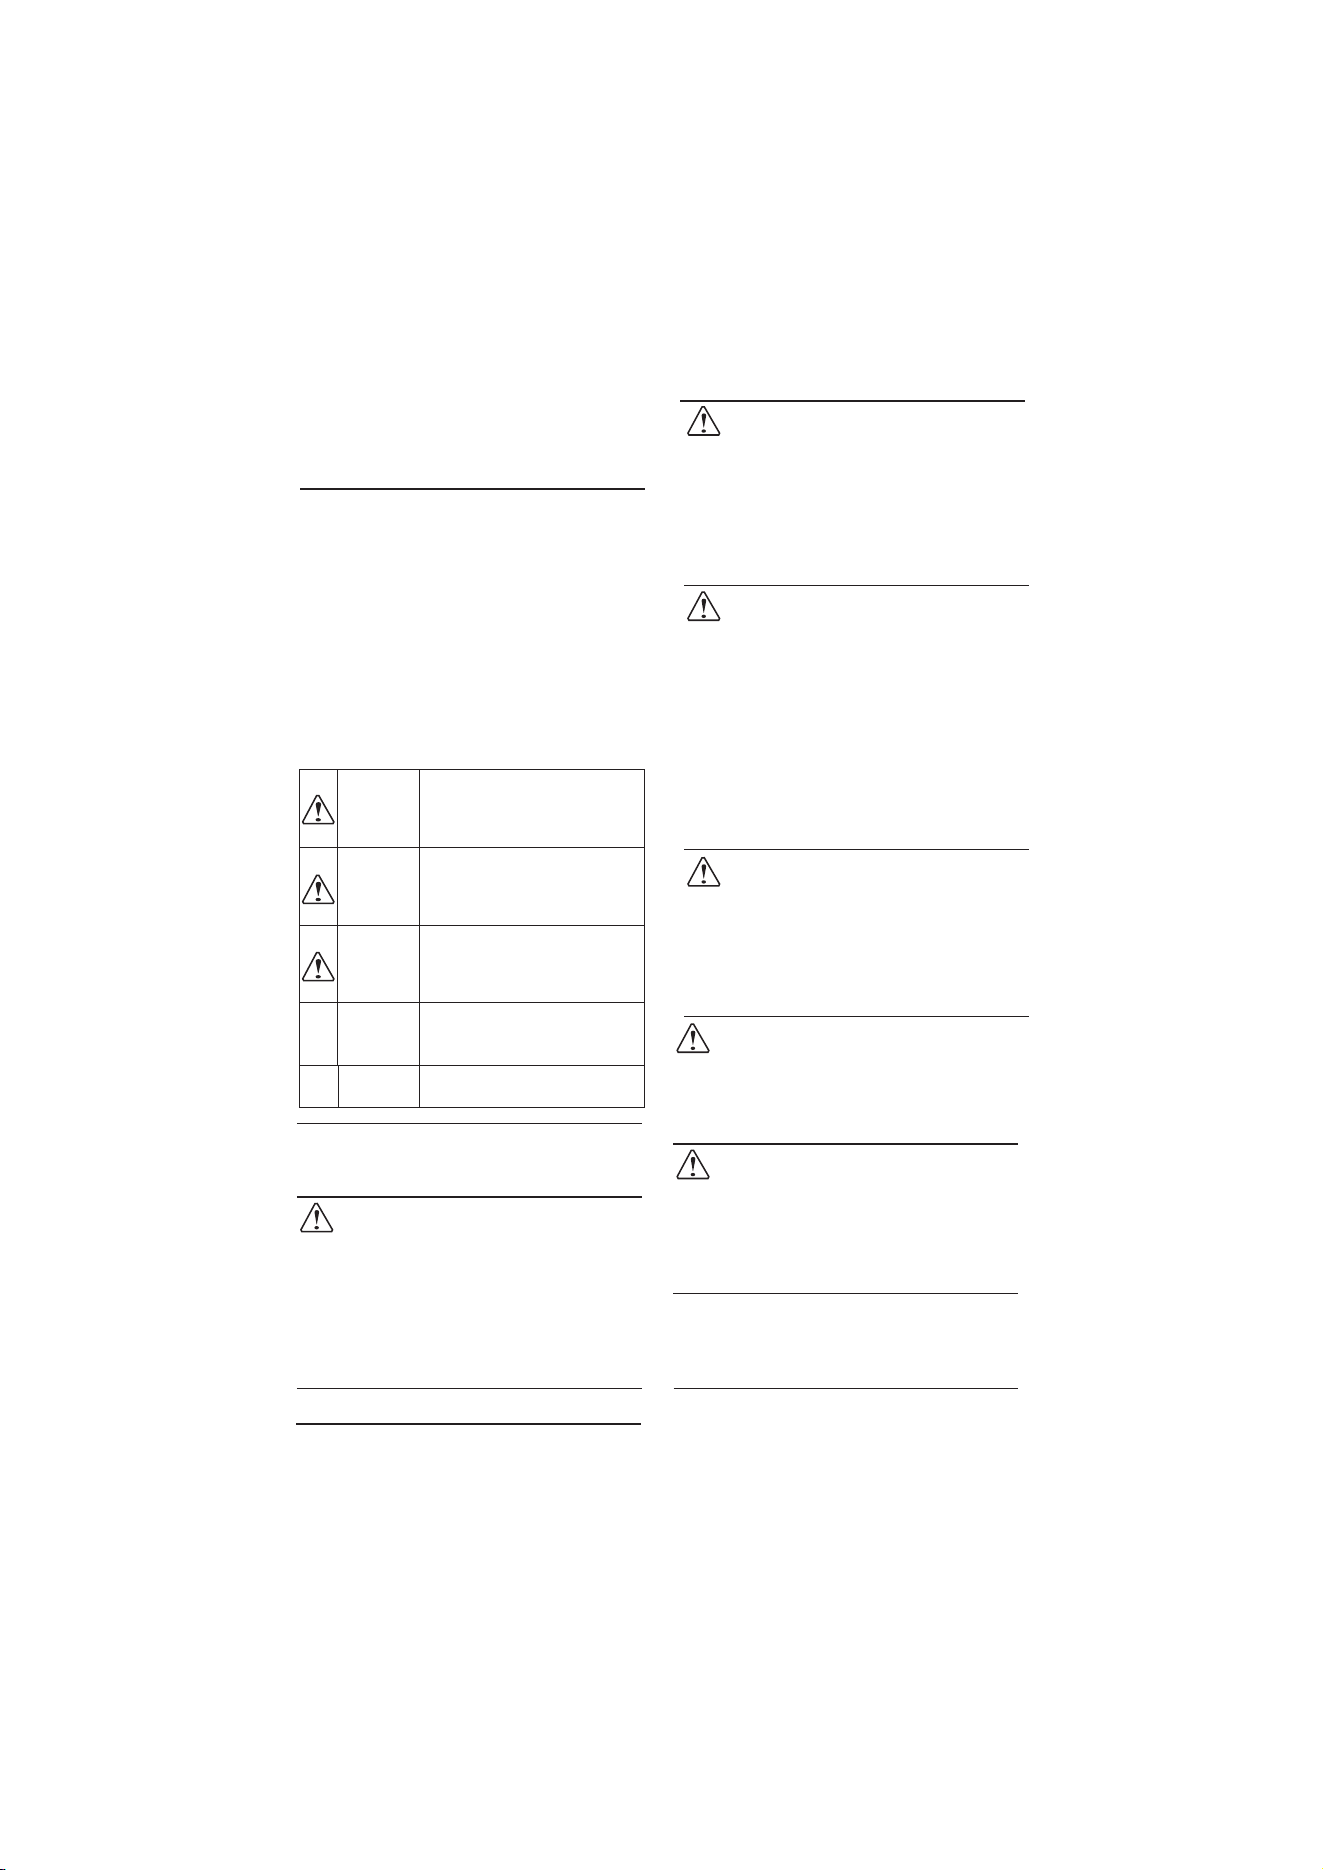
WARNING
CAUTION
NOTICE
DANGER
identifies a situation involving
direct danger which, if not
obviated, may result in death or
severe bodily injury.
identifies a dangerous situation
which, if not obviated, may
result in death or severe bodily
injury.
identifies a dangerous situation
which, if not obviated, may
result in minor or medium bodily
injury.
identifies a dangerous situation
which, if not obviated, may
result in damage to property.
NOTE
identifies useful information
and tips.
3 Putting into operation
3.1 Transporting the appliance
Risk of injury and danger of damage as a
result of incorrect transport !
Transport the appliance in a packed
condition.
Transport the appliance upright.
Do not transport the appliance without
assistance.
u
u
u
CAUTION
3.2 Installing the appliance
u After Transporting the appliance, we
recommend to keep appliance in a stand
NOTE
Fire hazard due to dampness!
If live parts or the mains plug become damp
this may cause short circuits.
The appliance is designed for use in
enclosed areas. Do not operate the
appliance outdoors or in areas where it is
exposed to water or damp conditions.
u
WARNING
Risk of fire due to short circuit!
If the mains cable/connector of the appliance
or of another appliance touch the rear of the
appliance, the mains cable/connector may
be damaged by the appliance vibrations,
leading to a short circuit.
Stand the appliance so that it is not
touched by connectors or main cables.
Do not plug the appliance plug or any
others plugs into sockets located near the
rear of the appliance.
u
u
WARNING
Fire hazard due to refrigerant!
The refrigerant R600a is environmentally
friendly but flammable. Leaking refrigerant
may ignite.
Do not damage the piping of the
ration circuit.
u
WARNING
Fire hazard and danger of damage!
Do not place appliances emitting heat
e.g. microwaves, toasters etc. near the
appliance.
u
WARNING
Blocked ventilation openings pose a risk of
fire and damage!
Always keep the ventilation openings
clear. Always ensure that the appliance is
properly ventilated!
u
WARNING
Risk of damage due to condensate!
Do not install the appliance directly
alongside a further refrigerator/freezer.
u
NOTICE
= In the event that the appliance is
contact service immediately. Do
power plug to the mains.
= The floor at which refrigerator is to be kept
must be flat & in level.
- Always store high-percentage alcohol in
tightly sealed, upright containers.
still position for minimum 8 hours. Run the
appliance empty for minimum 3 hours before
storing food items.
- Keep burning candles, lamps and other
items with naked flames away from the
appliance.
escaping may ignite due to electrical
components.
refrige-
damaged,
not connect
4
= Do not install the appliance in a location
where it is exposed to direct radiation of the
sun, next to a cooker, heater, microwave
oven and similar appliances.
= Always stand the appliance with its back
directly to the wall.
= The appliance must be moved only when
it is empty.
= Standard EN 378 specifies that the room
in which you install your appliance must have
3
a volume of 1m per 8g of R 600a refrigerant
used in the appliance, if the room in which the
appliance is installed is too small,
a
gas-air mixture may form in the
event of in the refrigeration circuit.
The quantity of refrigerant used in your
appliance is indicated on the sticker on the
appliance (back side).
3.3 Disposing of Packaging
WARNING
Danger of suffocation due to packing material
and plastic film !
Do not allow children to play with packing
material.
u
The packaging is made of following
materials :
- corrugated board/cardboard
- expanded polystyrene parts
- polythene bags and sheets
- polypropylene straps
The Refrigerator doors are provided with a
high-quality surface coating and must be
cleaned using non corrosive cleaning agent.
Do not wipe the door with too much pressure
as it may lead to scratches / damages.
u Wipe the coated door surfaces using a
soft, clean micro fiber cloth only.
u Apply a stainless steel cleaner to the
stainless steel side surface evenly, wiping
with the grain. As a result cleaning becomes
easier.
NOTICE
u
u
u
Wipe side walls with using a soft, clean
cloth only.
Remove all transit supports.
Align the appliance so that it stands
firmly and on a level by adjusting the legs
given at the bottom of refrigerator.
If the appliance is installed in a very damp
environment, condensation may form on the
outside of the appliance.
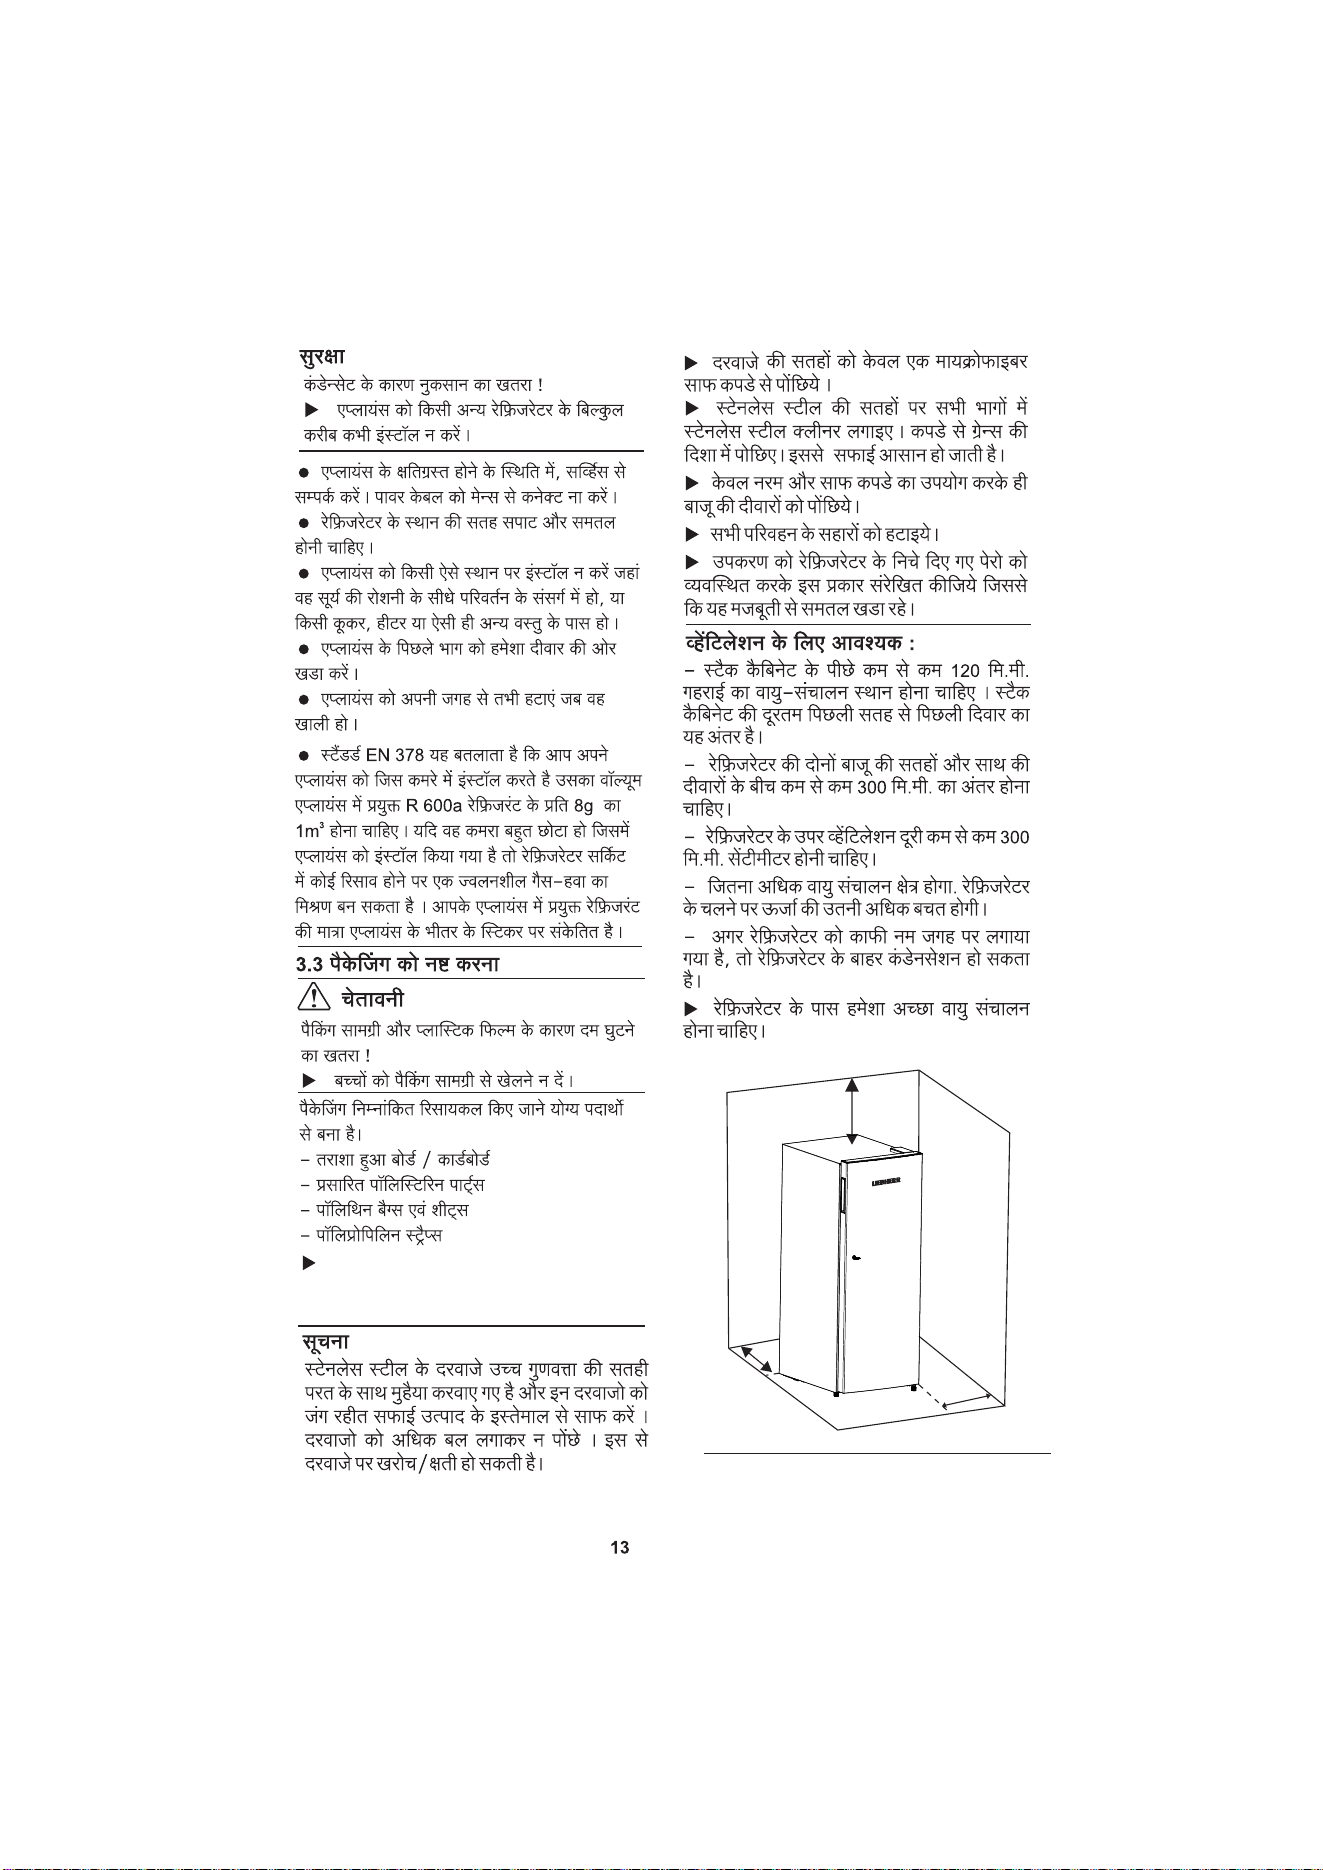
Always see to good ventilation near the
refrigerator.
u
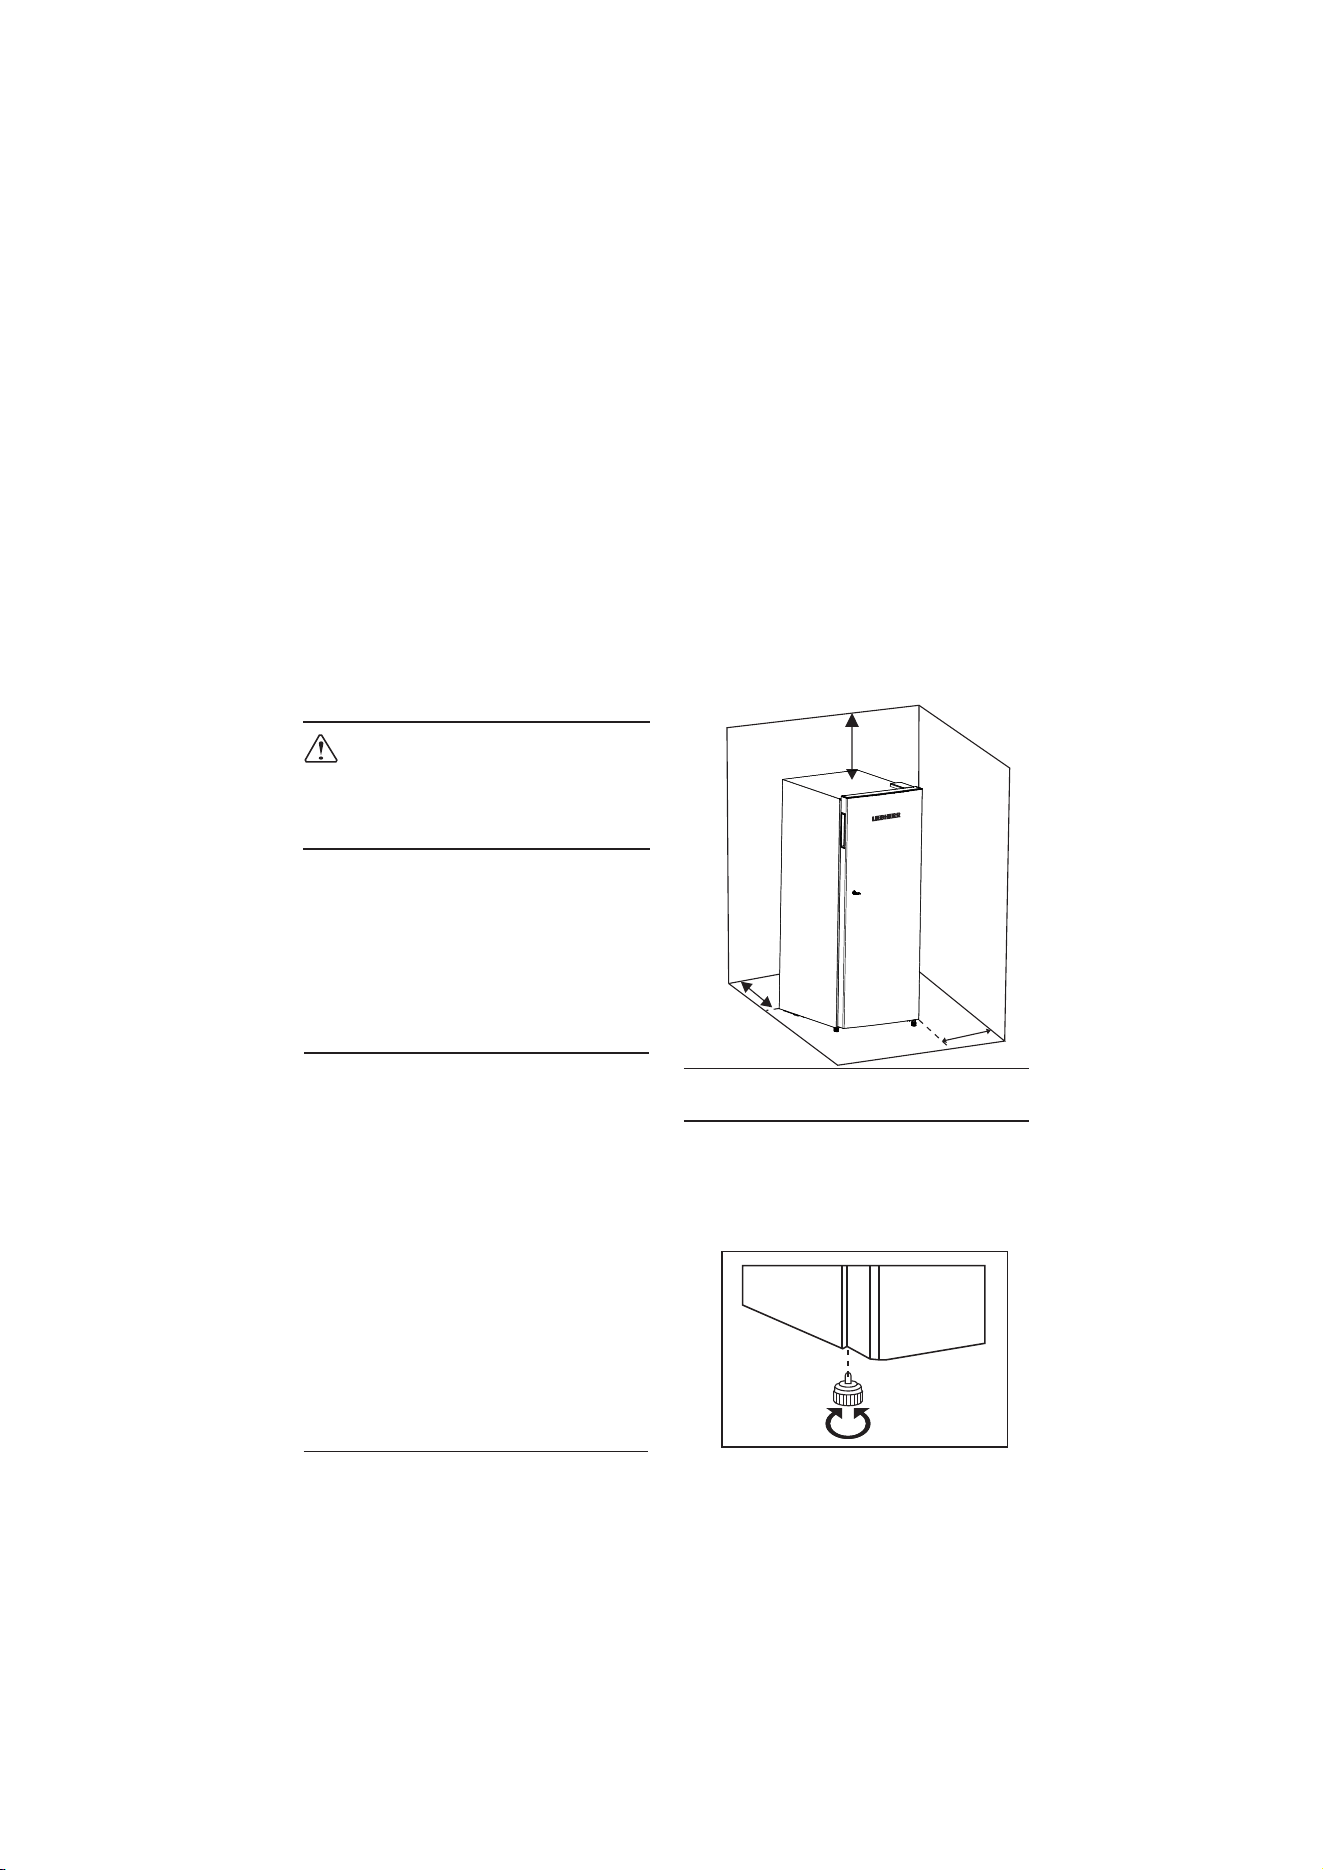
- There has to be at least 300mm gap from
Both sides of Refrigerator surface and side
wall.
- The ventilation gap over the top has to be
at least 300mm.
- The larger the ventilation space, the
more energy-saving the appliance is in
operation.
300mm
120mm
300mm
Align appliance so that it stands firmly and in
level by rotating adjustable leveling legs
provided at the front bottom corners of the
refrigerator (see appliance at a glance) in
clockwise and counter clockwise direction as
shown below.
3.4 Appliance Leveling & Leg
adjustment
Rotated in clockwise
& counter clockwise
direction
flammable
event of a
Important for the ventilation:
- At the back of the stack cabinet there has
to be a ventilation area of at least 120mm
depth throughout the width of the stack
cabinet from its extreme back surface.
recyclable
u
There is high density rubber provided for
packaging purpose only, after unpacking the
product please dispose it off.
3.5 Connecting the appliance
Risk of damage to the electronic control
system!
u We do not suggest use of stand-alone
inverters (conversion of D.C. to A.C./ three-
phase) or energy saving plugs.
NOTICE
WARNING
Fire and overheating hazard!
Do not use extension cables or multiple
socket outlets.
u
The recommended type of current
current) and voltage for the
confirm with the data on the
circuit diagram.
The power socket where refrigerator is
plugged in must be provided with proper
earth connection and suitable safety
provisions such as Fuse / MCB.
It must be easily accessible so that the
appliance can be quickly disconnected from
the supply in an emergency.
u Check the electrical connection.
u Plug in the power plug.
4 Temperature Setting &
Control
4.1 Food refrigeration
The energy consumption increases and the
cooling performance decreases if the
ventilation is inadequate.
NOTE
u Do not store food too close to each other
for good air
circulation.
u To safeguard bottles from tipping over:
adjust the bottle separator.
4.2 Freezer compartment
You can store frozen food, make ice cubes
and freeze fresh food in the freezer
compartment.
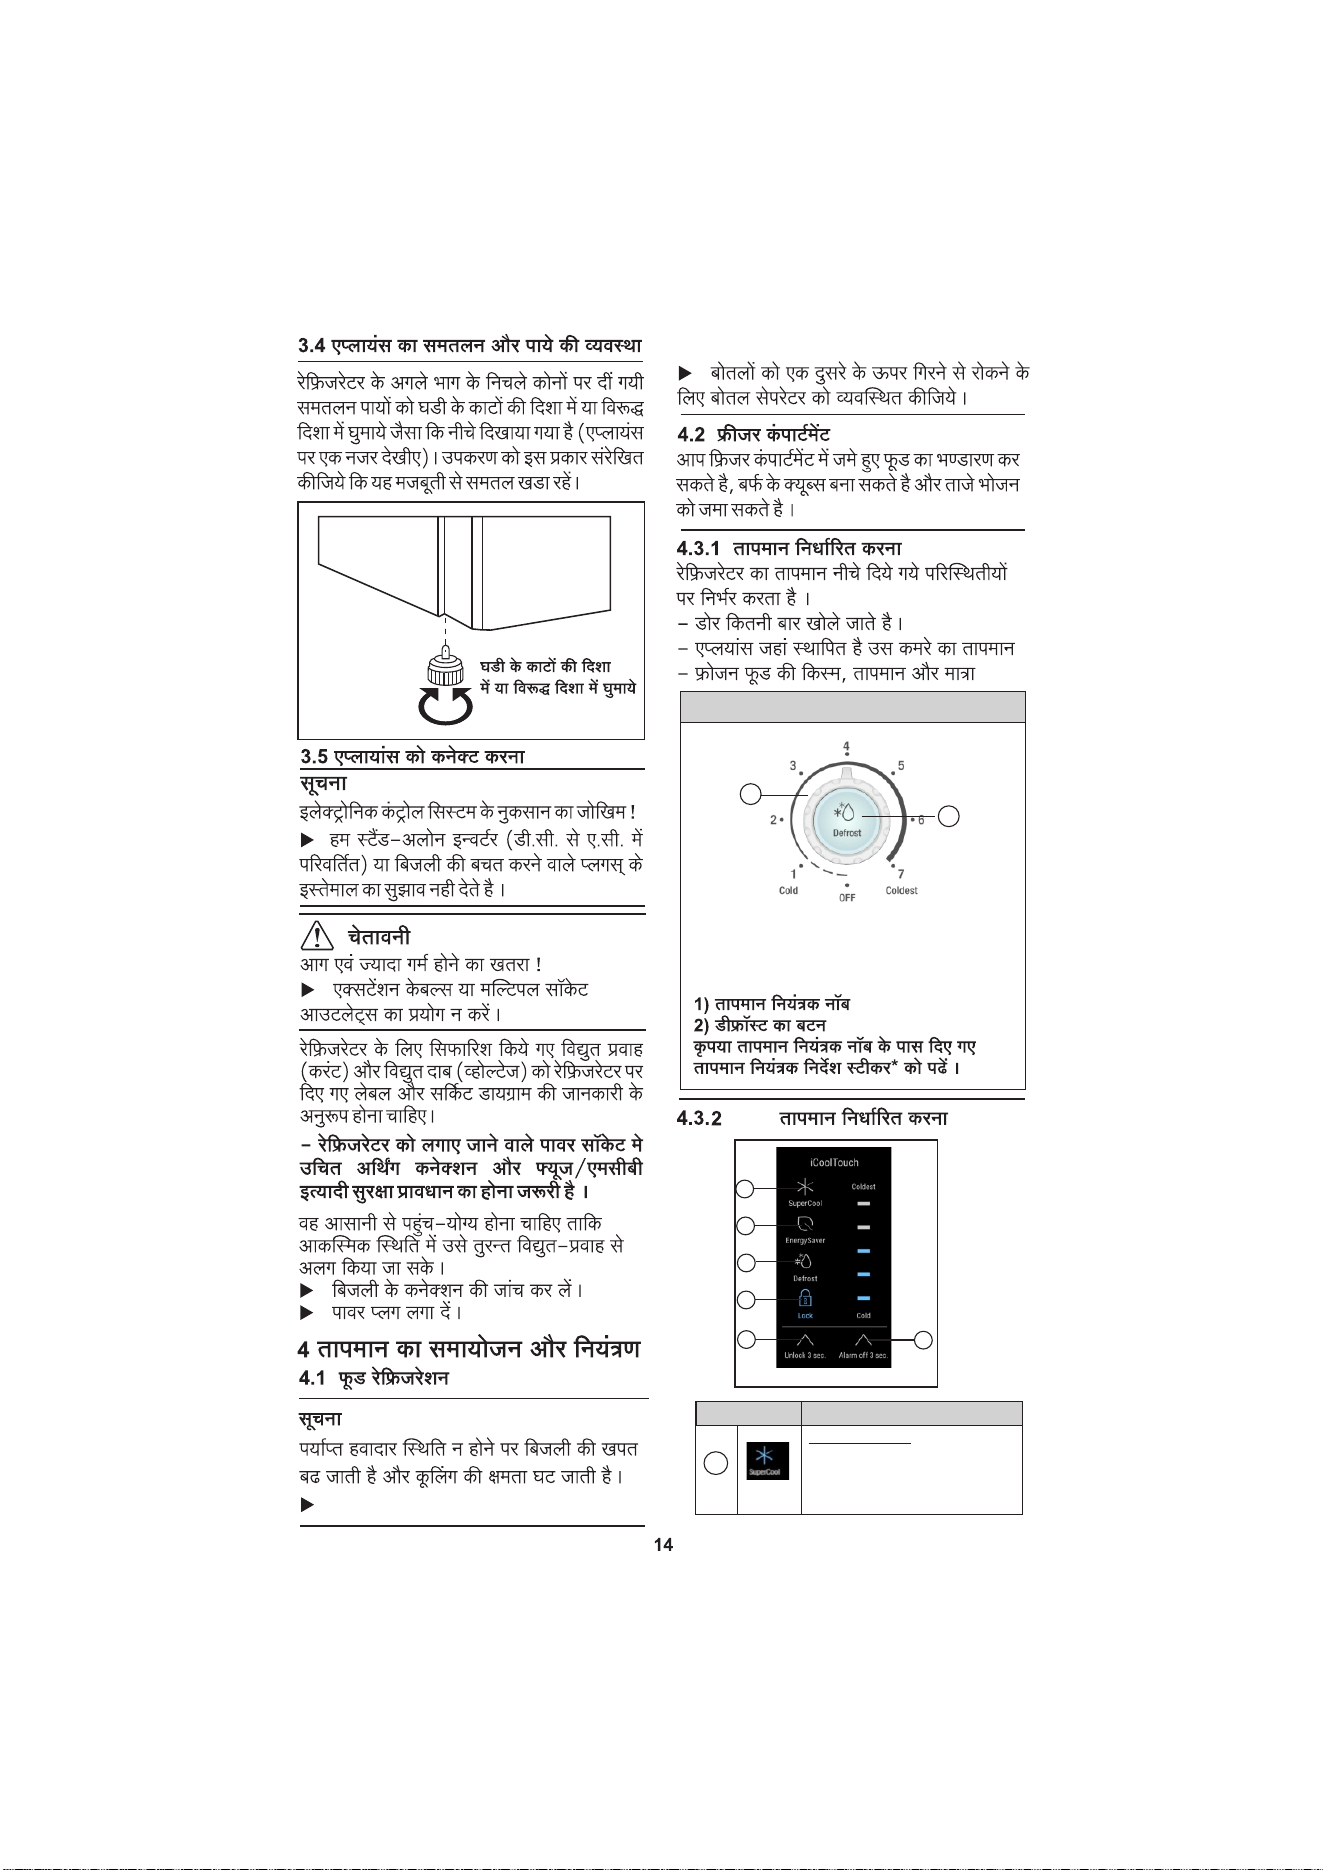
- the door opening frequency
- the room temperature at the site where the
appliance is installed
- the type, temperature and quantity of
food considering above factors, user
adjust temperature settings as per
requirement.
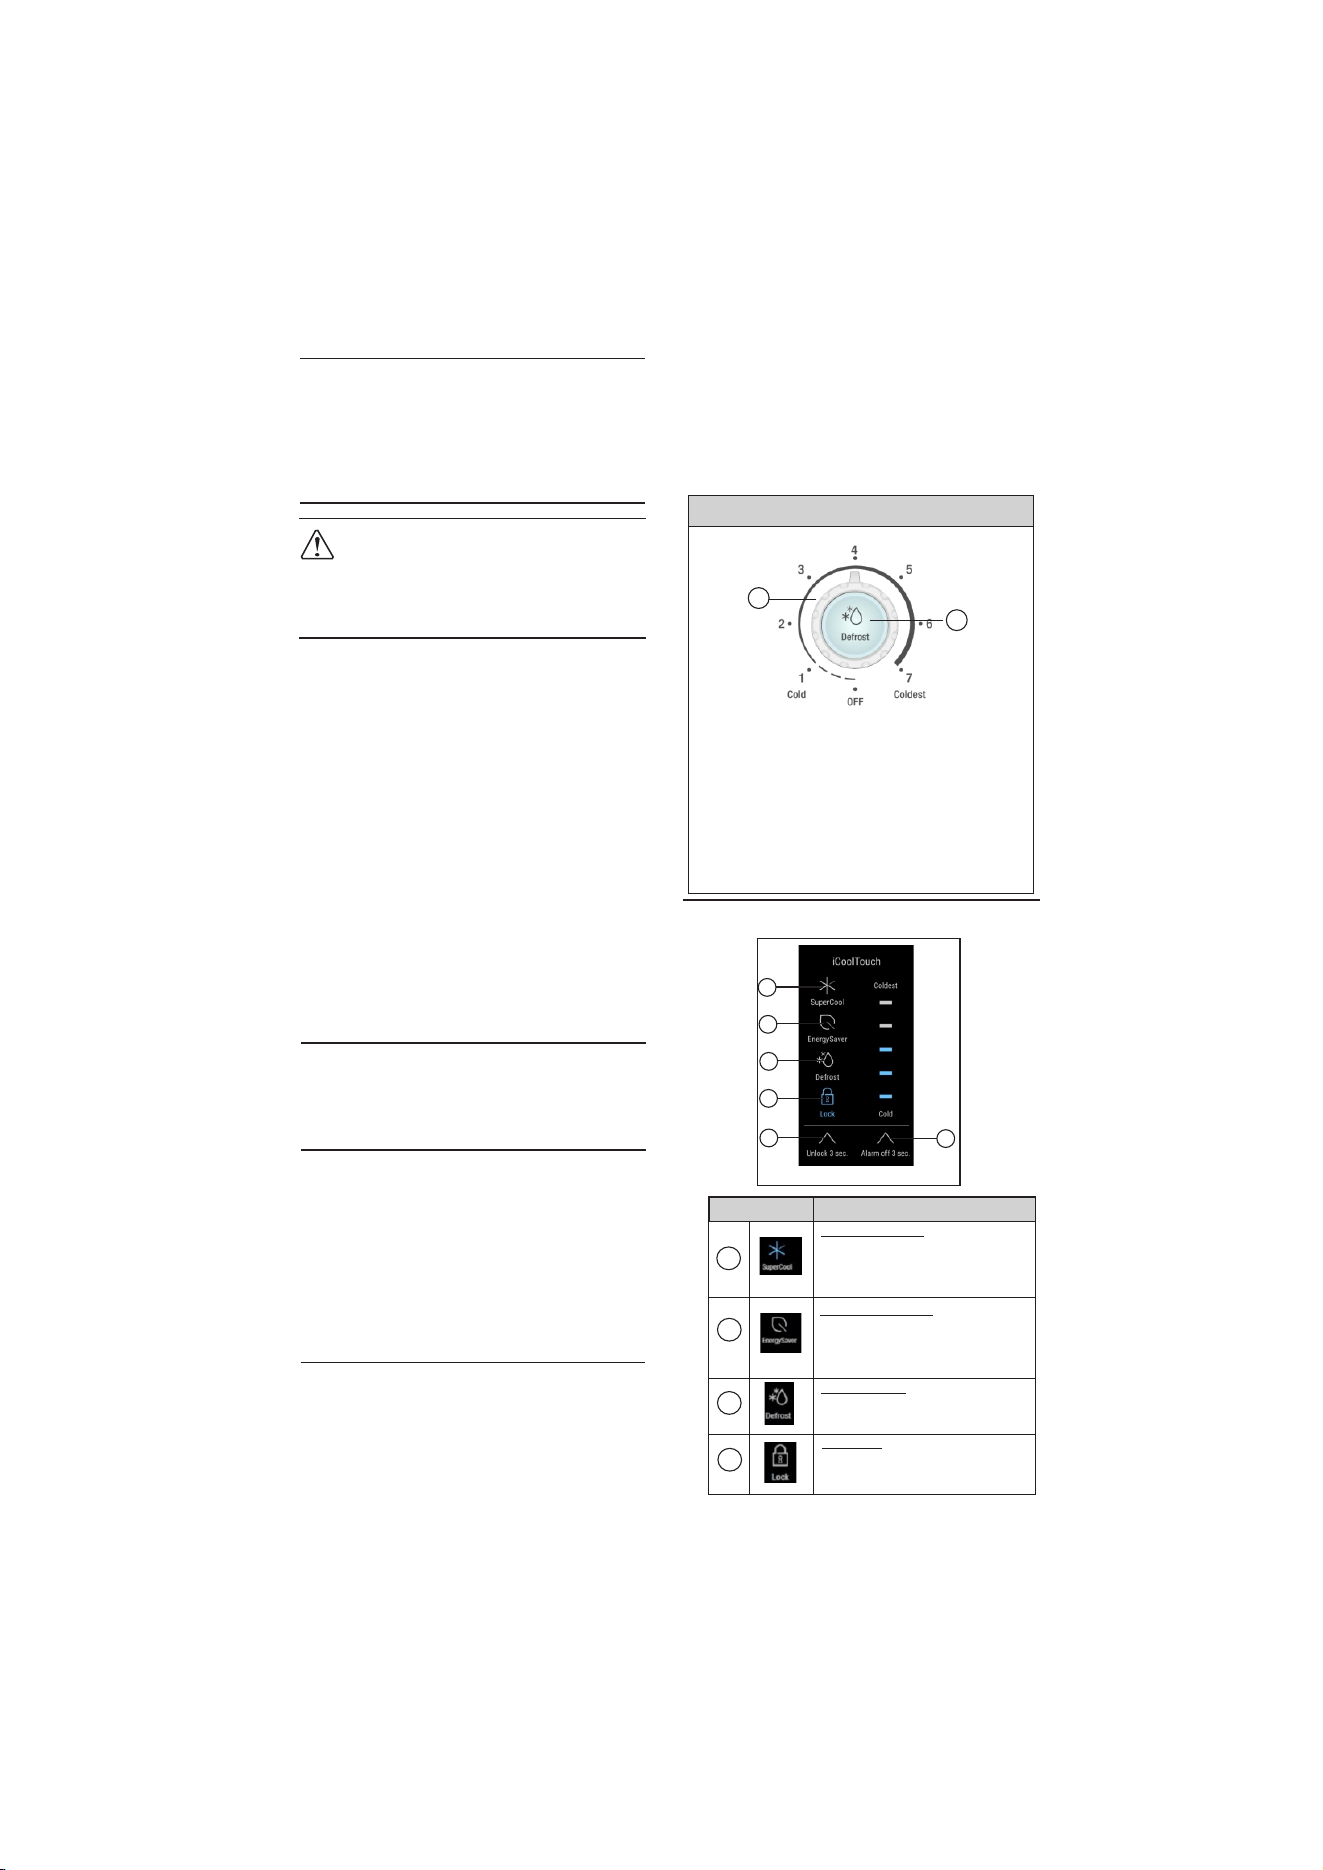
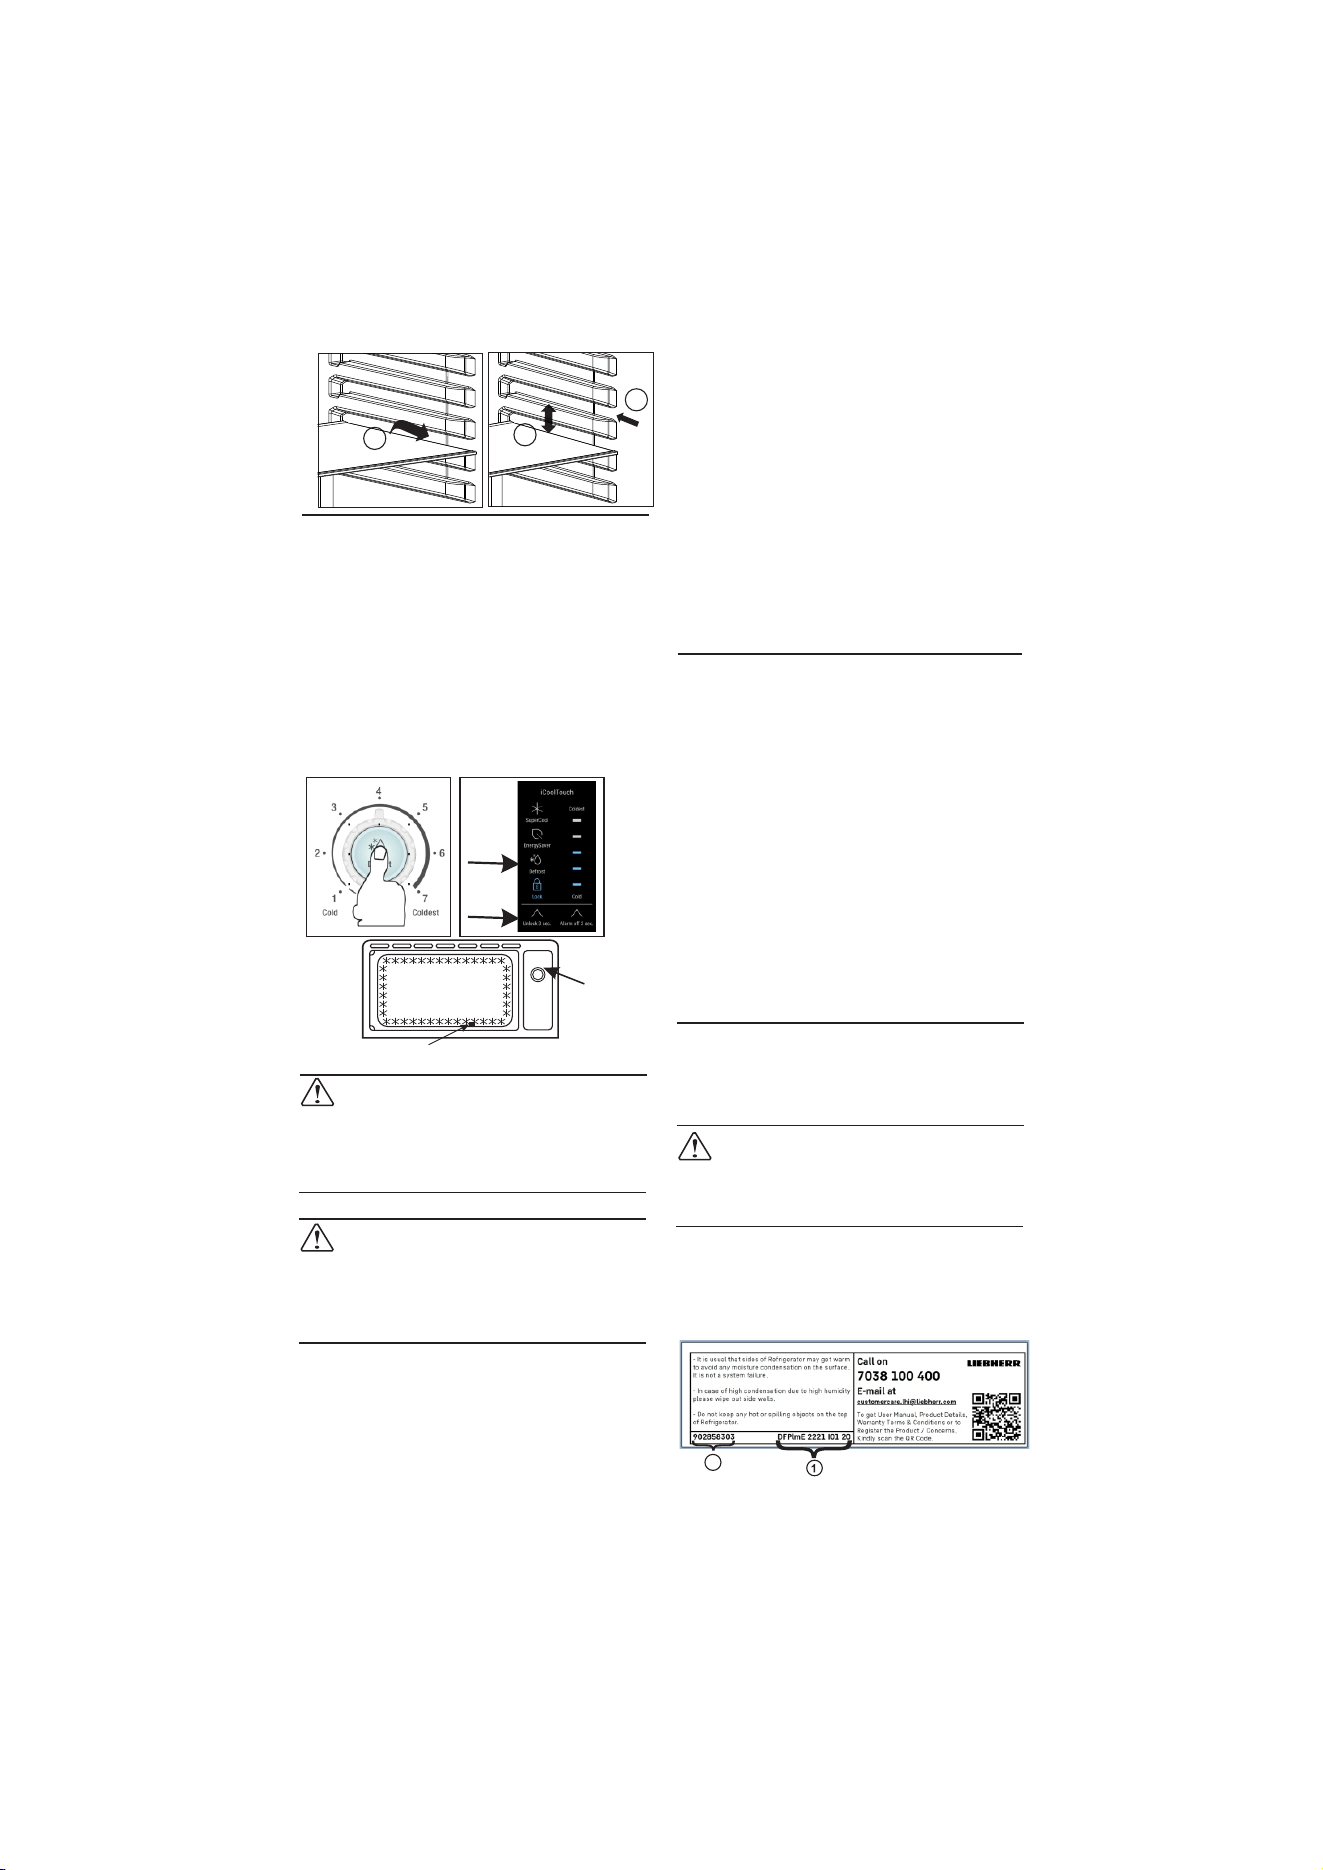
For DC.. 19..20..22..
1) Temperature Setting Knob
2) Defrost Button
1
Please refer Temperature setting instructions
sticker* provided near temperature setting knob.
2
4.3.2 UI Temperature Setting
*
1
6
2
3
4
5
When this mode is
When this mode is
activated, the
activated, the
cooling temperature reaches
will run at a cold
its coldest value.
energy consumption.
When this mode is active, pressing
When this mode is activated, the
Key
Operating Functions
will go in defrost mode.
key is invalid .
SUPER COOL
ENERGY SAVER
DEFROST ICON
LOCK
1
refrigerator
resulting in lower
2
3
temperature
refrigerator
4
any other
ICON
ICON
ICON
5
4.3.1 Setting the temperature
The temperature depends on the following
factors:
*
1 - 3 Winter
3 - 5 Monsoon
5 - 7 Summer
have to
(alternating
refrigerator must
product lable and
6
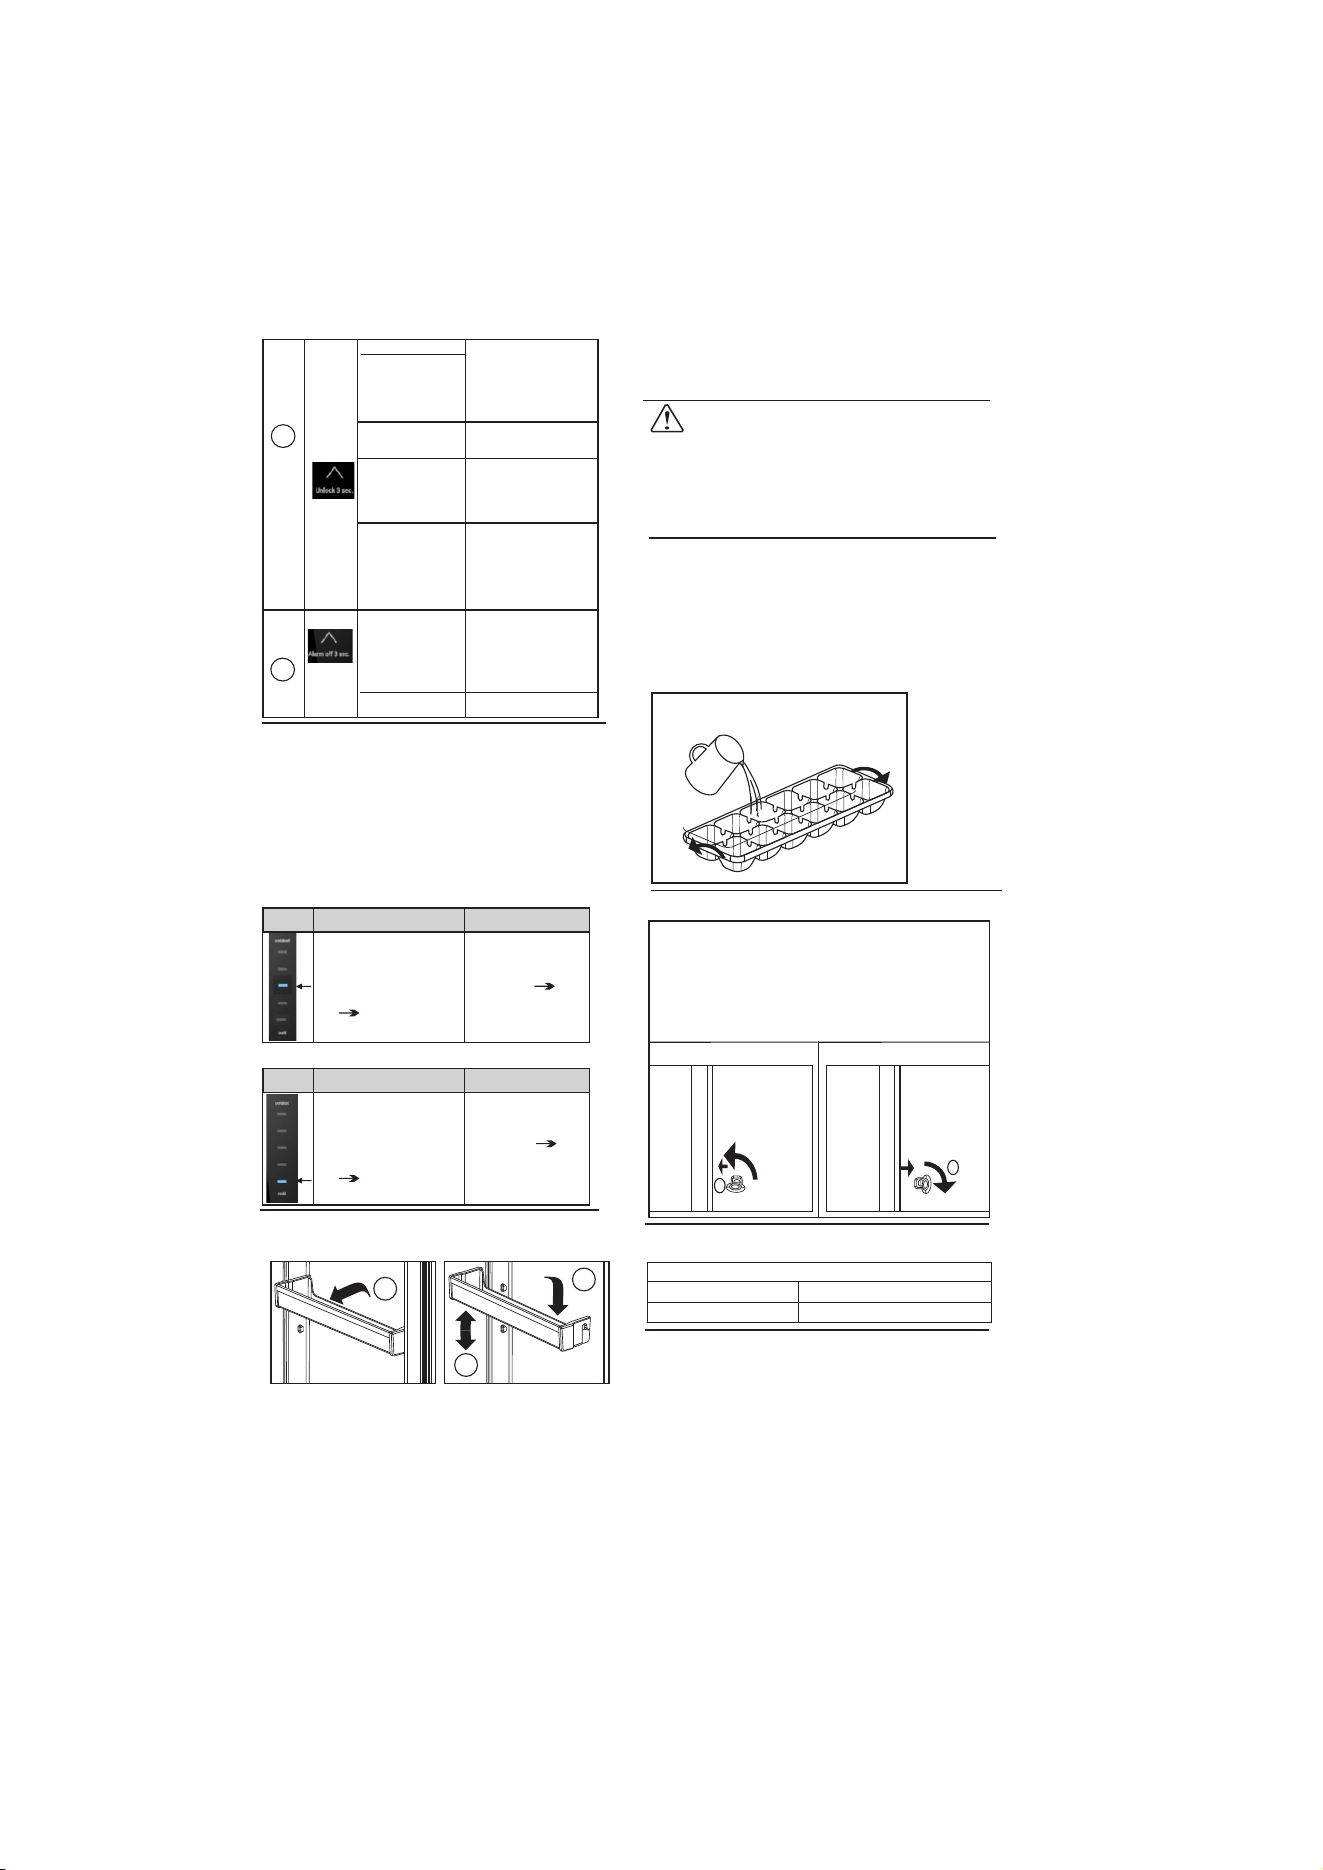
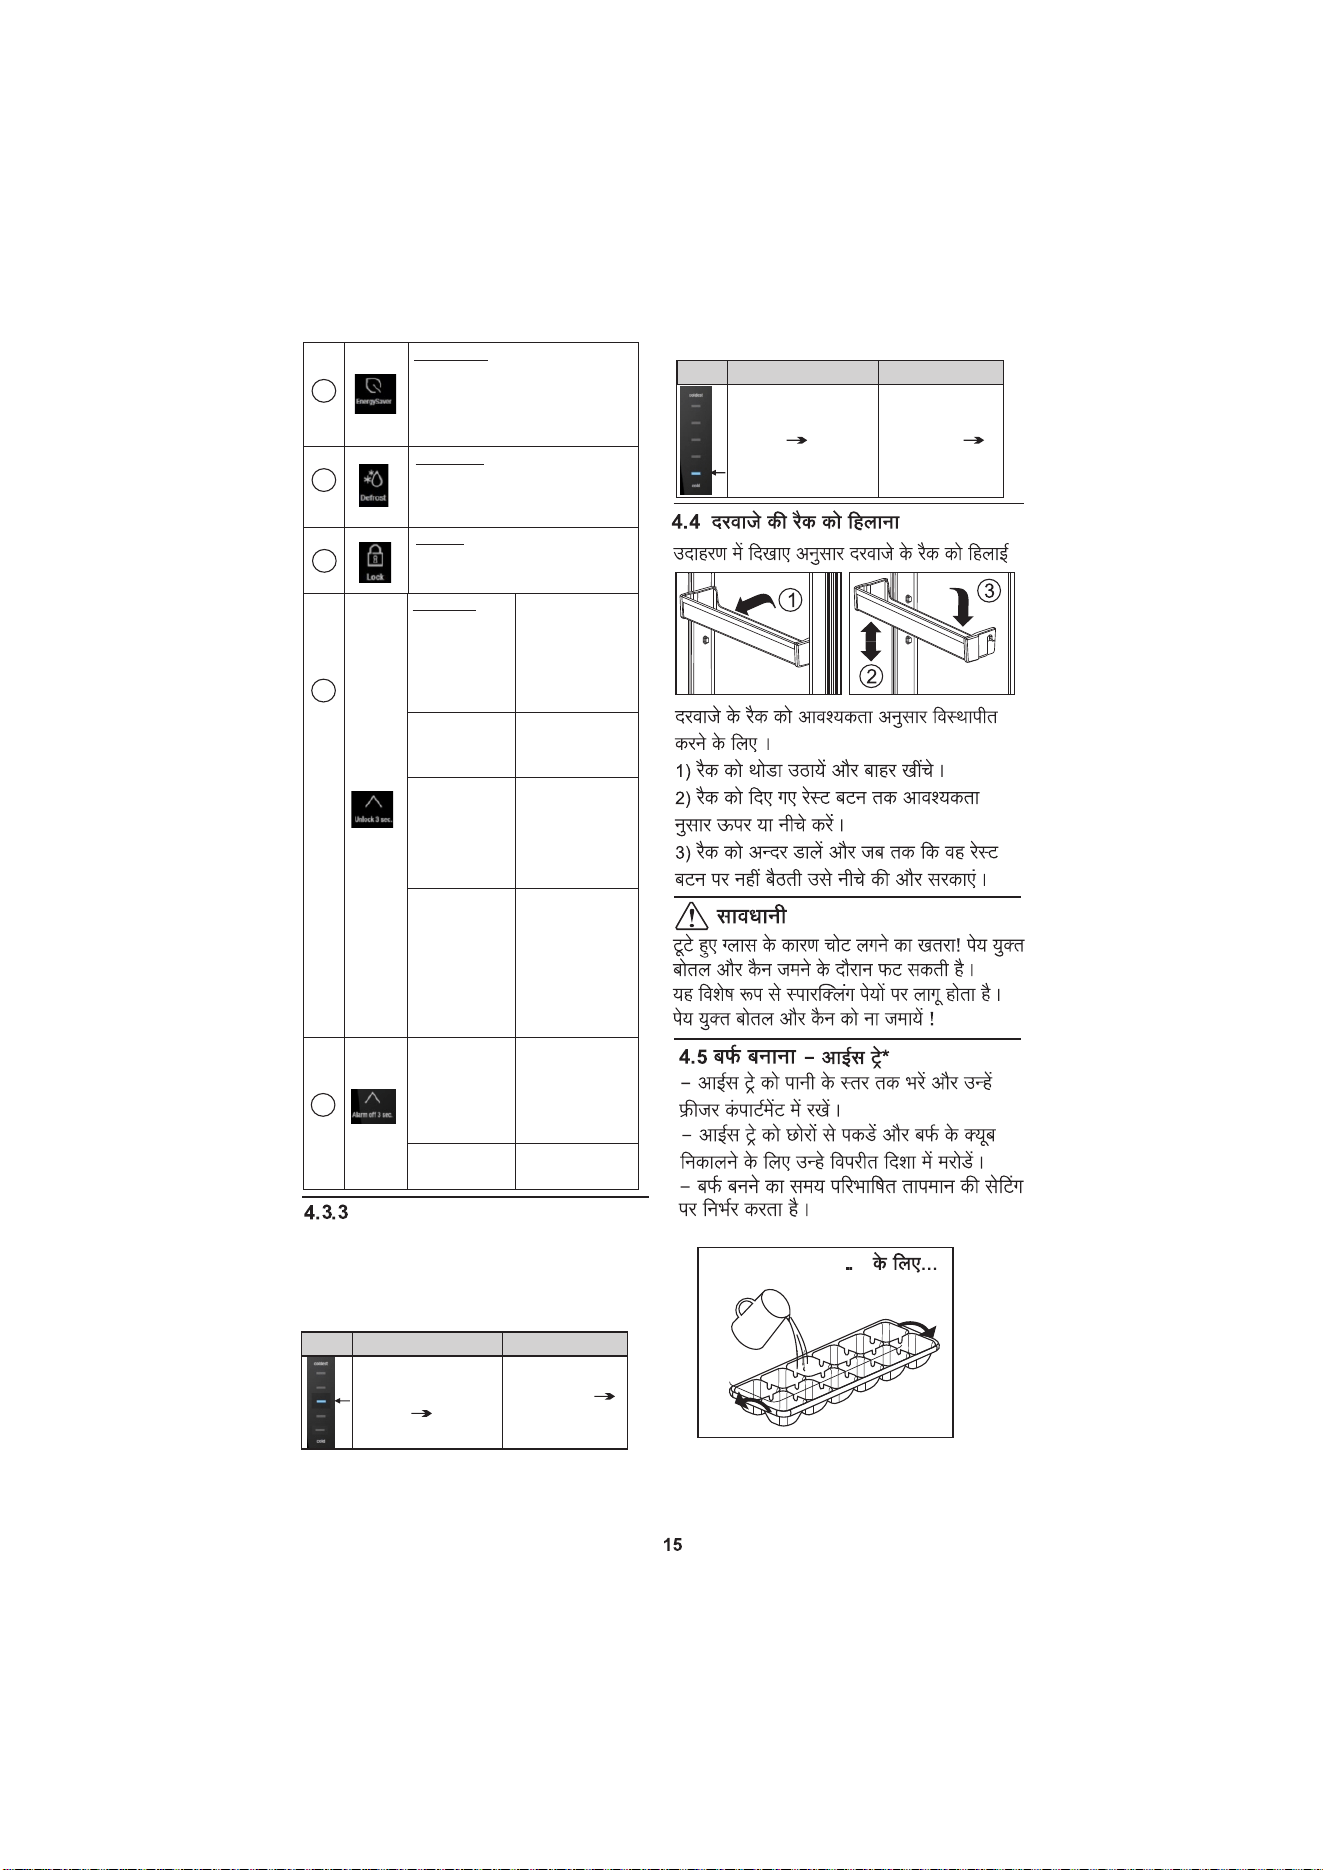
To adjust door rack depending on storage
requirement -
1) Lift the rack slightly and pull it out .
2) Move the rack upward or downward
depend on requirement upto provided rest
button.
4.4 Door rack
Remove door rack according to illustration.
2
3
1
CAUTION
When the refrigerator fails, the buzzzer will
Bottles and cans containing drinks may
burst when being frozen.
This applies particularly to sparkling drinks.
Do not freeze bottles and cans containing
drinks!
u
4.6 Door locking*
For locking door, (1) Gently push the key
For DC..19..20..22
0
90
1
4.7 Door Alarm
Tone
Meaning
Beep Tone*
Door Open for longer time
For DC..19..20..22..
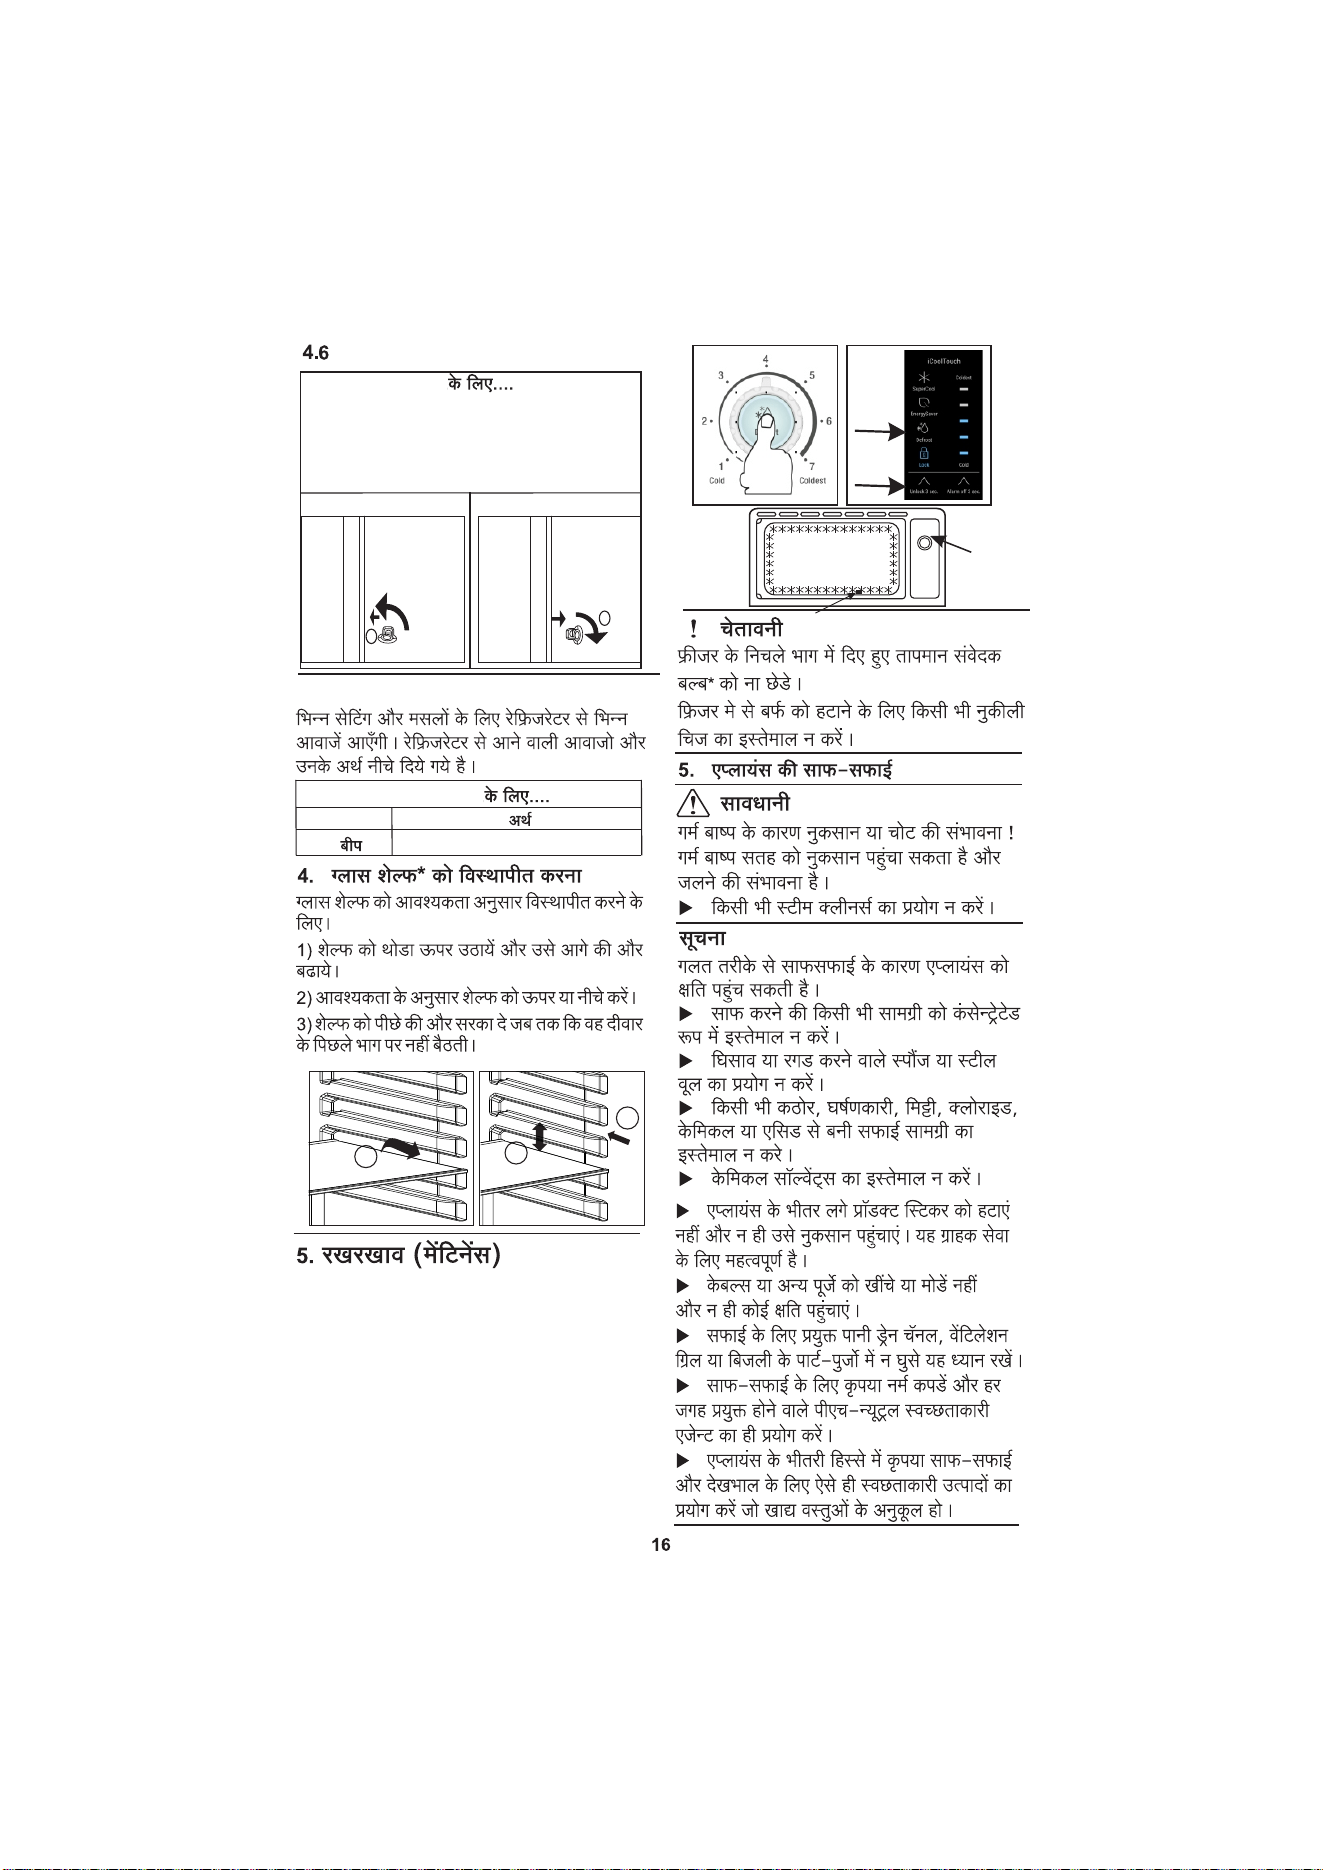
4.8 Adjusting Glass Shelf *
To adjust glass shelves depending on
storage requirement -
1) Lift the shelf slightly and draw it out
forwards.
2) Move the shelf upward or downward
depend on requirement.
3) Move shelf backward until it rest on back
side of wall.
*
- Fill up the Ice Tray with water up to water
level and place it in freezer compartment.
- Ice making time depends on defined
temperature setting.
- Hold Ice tray at the ends and twist it in
opposite direction to dispense ice cubes.
- Ice Tray*
For DC..19..20..22..
4.3.3 UI Fault Indication
*
a) Fault type - FC Temp Sensor failure.
Temperature Bar
Buzzer
The 3rd LED light from
top to bottom of the
temperature bar flashes
according to “0.25 sec
ON 0.25 sec OFF”
“1 sec ON 14
sec OFF” cyclic
beeping.
b) Fault type - Communication on failure.
Temperature Bar
Buzzer
The 5th LED light from
top to bottom of the
temperature bar flashes
according to “0.25 sec
ON 0.25 sec OFF”
“1 sec ON 4
sec OFF” cyclic
beeping.
Will sound the
alarm.
Will sound the
alarm.
sound an alarm, and the LED indicator light
specified by the temperature bar will flash &
other LED indicators will be off. the corres-
ponding warning information is shown in the
following table.
4.5 Ice Making
inside the lock and rotate it by
90
0
in counter
clockwise direction.
For unlocking door, (2) Gently rotate the key
by clockwise direction.
2
Locking Door Un locking Door
3) Move rack inside and slide it downward
until it rest on rest button.
5
ICON
Mode select
UN-LOCK KEY
Unlock button
Long Press for 3s the
left arrow .
Manual defrost
Long Press for 10s
the left arrow.After
6
Temperature
Alarm off button
button
mode exit
Super cool Mode
Press the “mode sel -
arrow (A beep will
Short Press the left
sound every time &
blue LED position wi-
ll change)
Adjust Button
arrow (A beep will
Short Press the left
sound every time &
blue LED position wi-
ll change)
Long Press for 3s
exit
ection button” or tem-
perature adjustment.
Maximum time is 150.
min.
power failure this
mode will exit.
After
power failure
mode will exit. this
5.2 Cleaning the appliance
CAUTION
Risk of injury and damage as a result of hot
steam! Hot steam may damage the surfaces
and cause burns.
Do not use any steam cleaners!u
Incorrect cleaning damages the appliance!
Do not use cleaning agents in
trated form.
abrasive, sand-,chloride-,chemical- or acid-
based cleaning agents.
Do not use chemical solvents.
u
u
NOTICE
After cleaning:
u Wipe dry the appliance and interior
accessories with dry soft cloth.
u Connect the appliance and switch it on
again.
u When the temperature is sufficiently
cold: Put the food back inside.
u Switch off Refrigerator mains
supply.
u Pull out the power plug.
u Empty appliance.
u Clean plastic outer and inner surfaces
with soft clean cloth soaked in lukewarm
water and a little washing-up liquid.
u Clean glass shelves and interior
accessories with soft clean cloth soaked in
lukewarm water and a little washing-up
liquid.
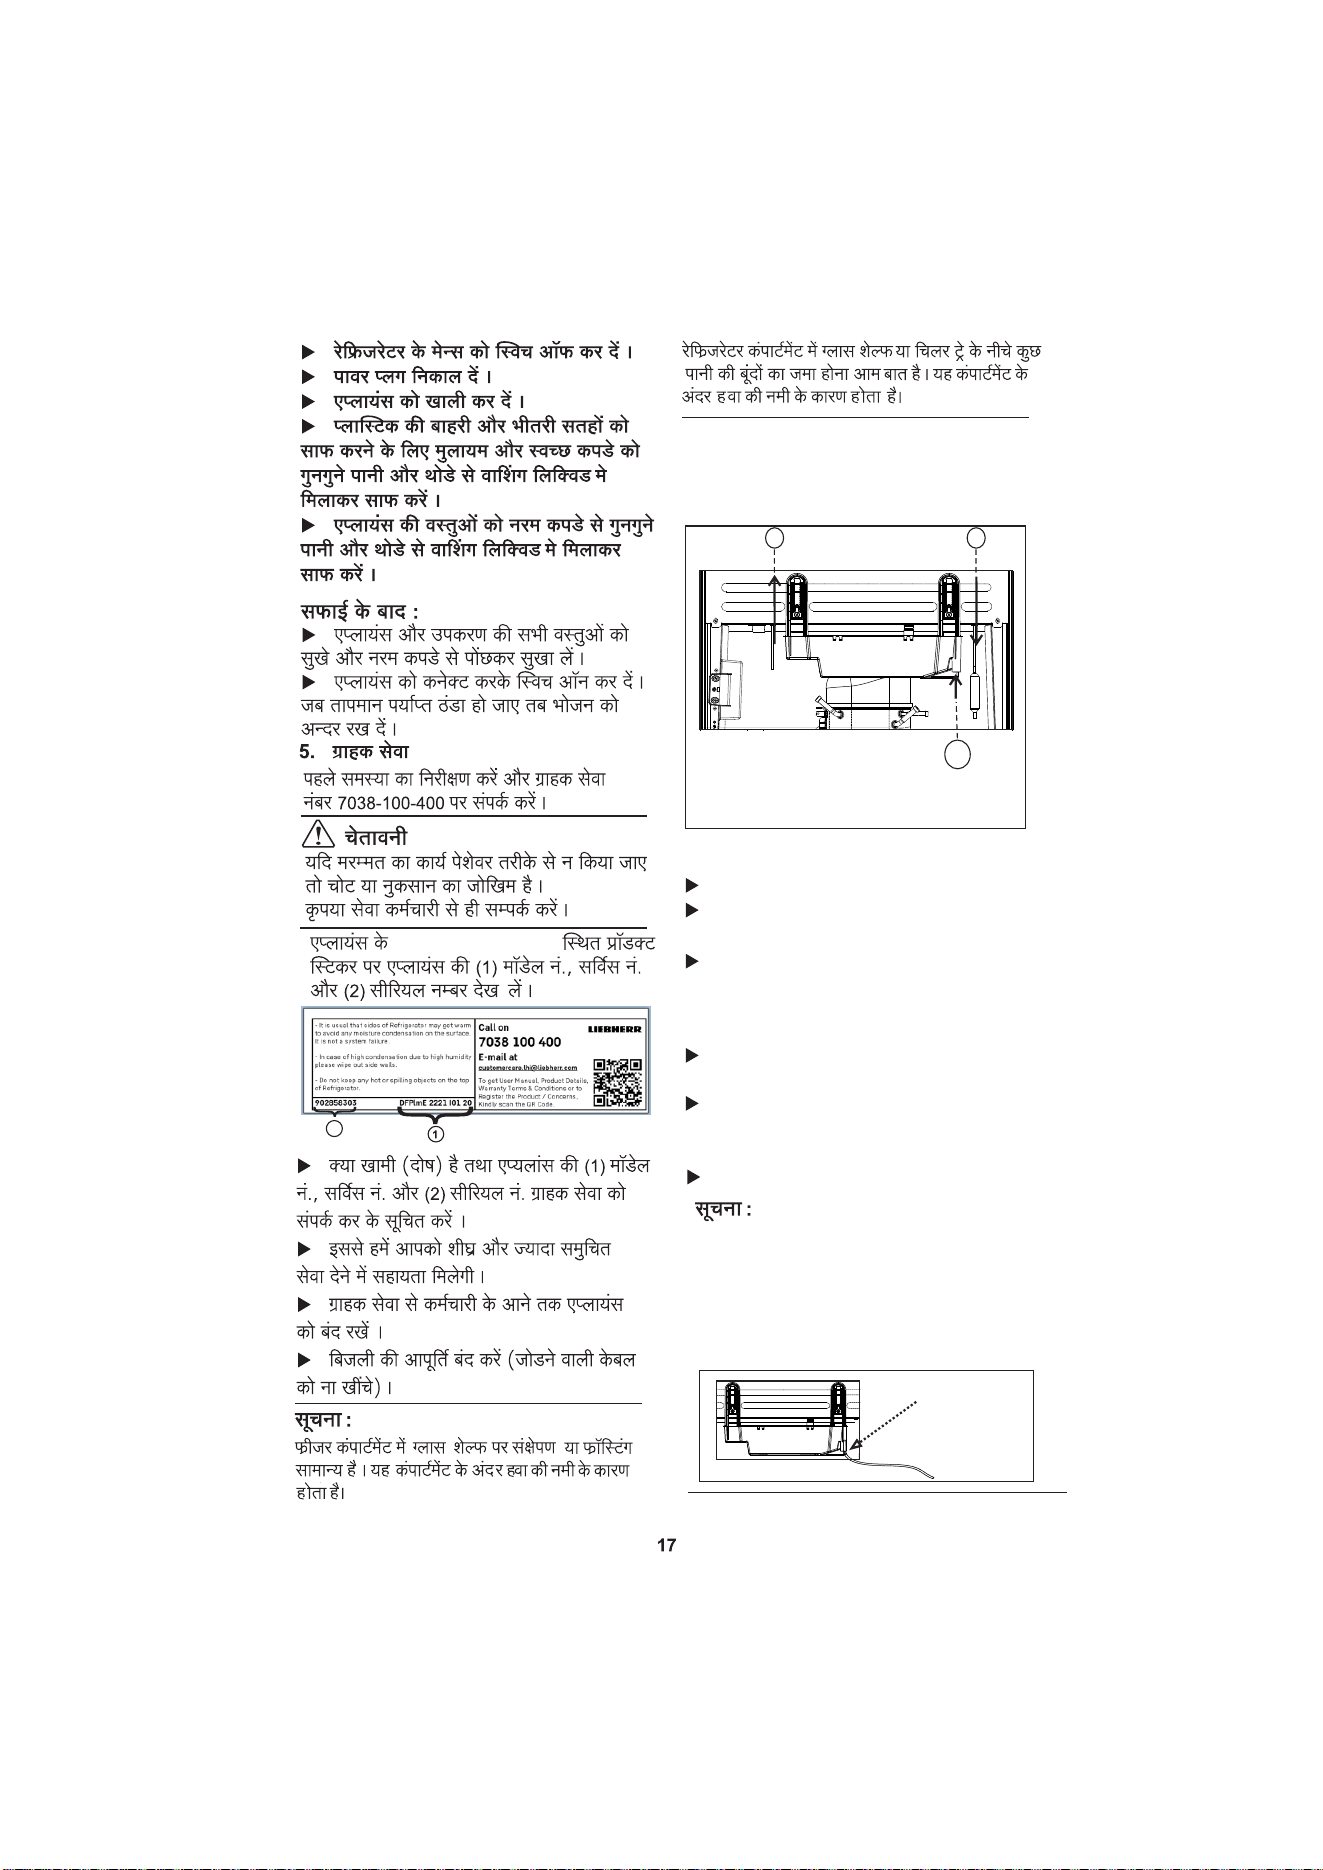
5.3 Customer service
First observe the problem and please contact
the customer care number.
7038-100-400
WARNING
Risk of injury if repair work is not carried out
professionally!
Please contact service personnel only.
u Read the appliance (1) Model Nos.,
and (2) serial No. on the product
sticker located on the appliance at the left
top side. (As shown in below fig. for
reference purpose only)
7
For non UI Model Press the defrost button as
compartment as shown below image (5c) or in
the
sticker provided inside
refrige -
Defrost Immediately if frost
level more than indicator
WARNING
Do not tamper with temperature sensing
bulb* provided at the bottom side of freezer.
Do not use any sharp object to remove Ice
formation from Freezer.
5 Maintenance
5.1 Defrosting the Refrigerator
u
u
u
u
u
Do not damage or remove the instruction
sticker in the inside of the appliance. It is
important for the customer.
Do not pull off, bend or damage cables or
other components.
Do not allow any cleaning water to enter
the
electrical parts.
Please use soft cleaning cloths and a
universal pH-neutral cleaning agent.
Please use food grade cleaning and care
products in the appliance interior for
cleaning.
For defrosting refrigerator, push defrost
button every 3rd Day.
1
2
3
Do not use any abrasive sponges or
steel wool.
u
Please do not use any aggressive,
u
2
5a 5b
5c
Defrost
icon
to unlock & then select the defrost icon,when
shown in image (5a) and for UI Models press
the left key as shown image (5b) upto 3 sec
instruction
Left Key
concen-
the indicator level is covered with Ice in freezer
rator.
8
u
u
u
u
Notify the customer service, specifying
the fault, appliance model No and serial No.
This will help us to provide you with a
faster and more accurate service.
Keep the appliance closed until the
customer service arrives.
Disconnect the power supply (not by
pulling the connecting cable).
NOTE
In freezer compartment condensation or
frosting on back wall, and glass shelf is
normal, this is due to humidity of air inside
the compartment.
In refrigerator compartment condensation or
formation of few water droplets on glass
shelves or below chiller tray is normal, this
is due to humidity of air inside refrigerator
compartment.
Condensation on dairy safe & drain tray might.
overflow if defrost not done in every 3rd day..
u
downwards to lock as show in image
(arrow no 2) to the refrigerator by using
both hands.
rator.
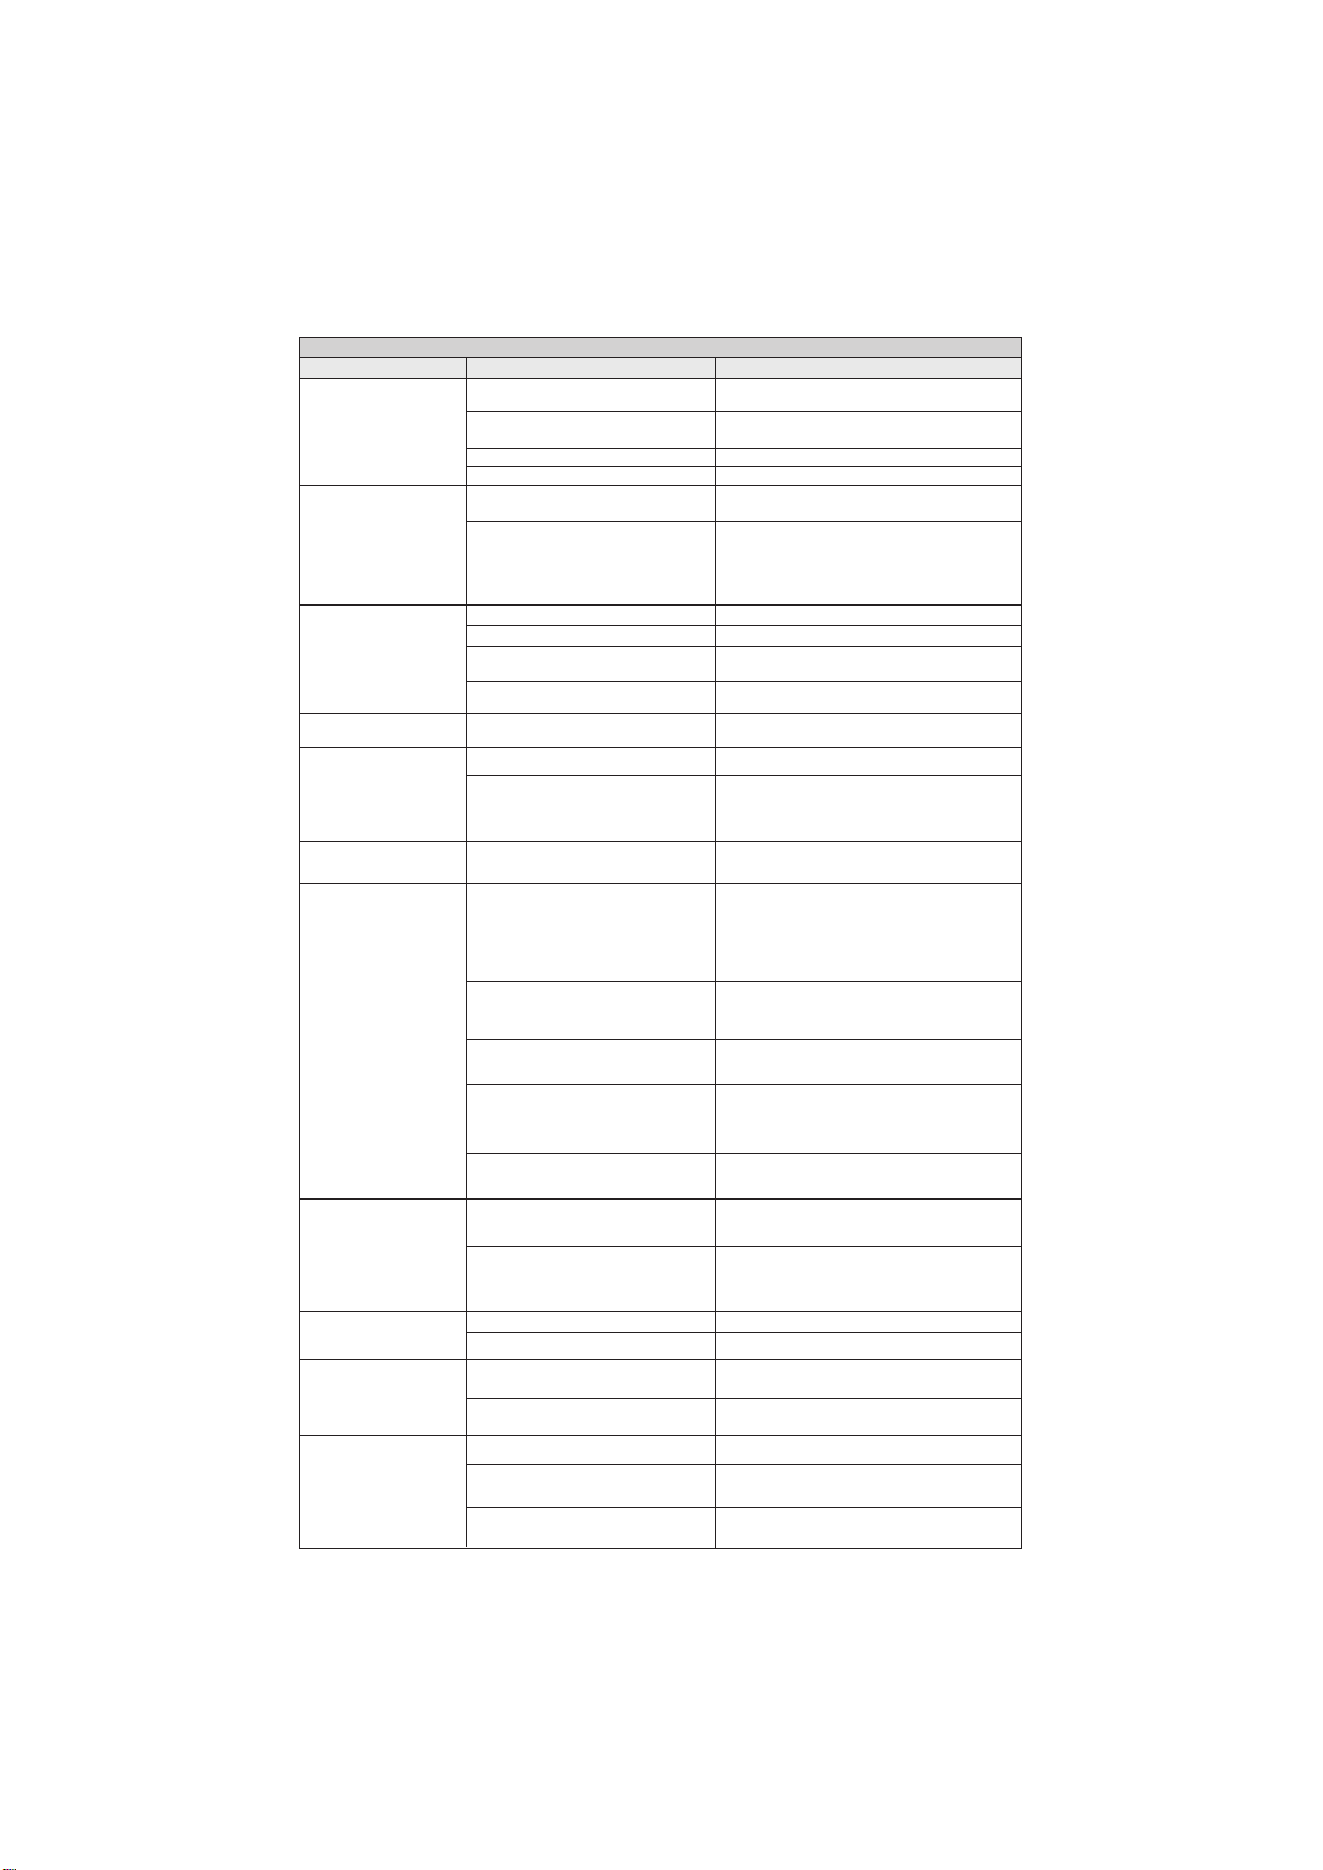
6 Foot Pedal / Base stand
11
2
1) Foot Pedal Mechanism.
2) Base stand Drawer.
The foot pedal mechanism allows to
open the refrigerator door with the foot rather
than hands. This can be useful feature in
situations where hands are occupied or me-
ssy, such as during cooking or cleaning.
The foot pedal is installed at the base
of the refrigerator in the front. It is connected
to rod that runs through the door and conn-
ects to the door latch mechanism. When
you press down on the pedal with foot, it
pulls the rod, which releases the door latch
and allows you to open the door.
However, it’s important to note that not all
refrigerator model in this category come with
a foot pedal as a standard feature, and retro-
fitting a foot pedal onto an existing refrigerator
may not be possible or pratical.
some users may find it difficult
rtable to use a foot pedal, esep
have mobility or balance issues.
Pocket
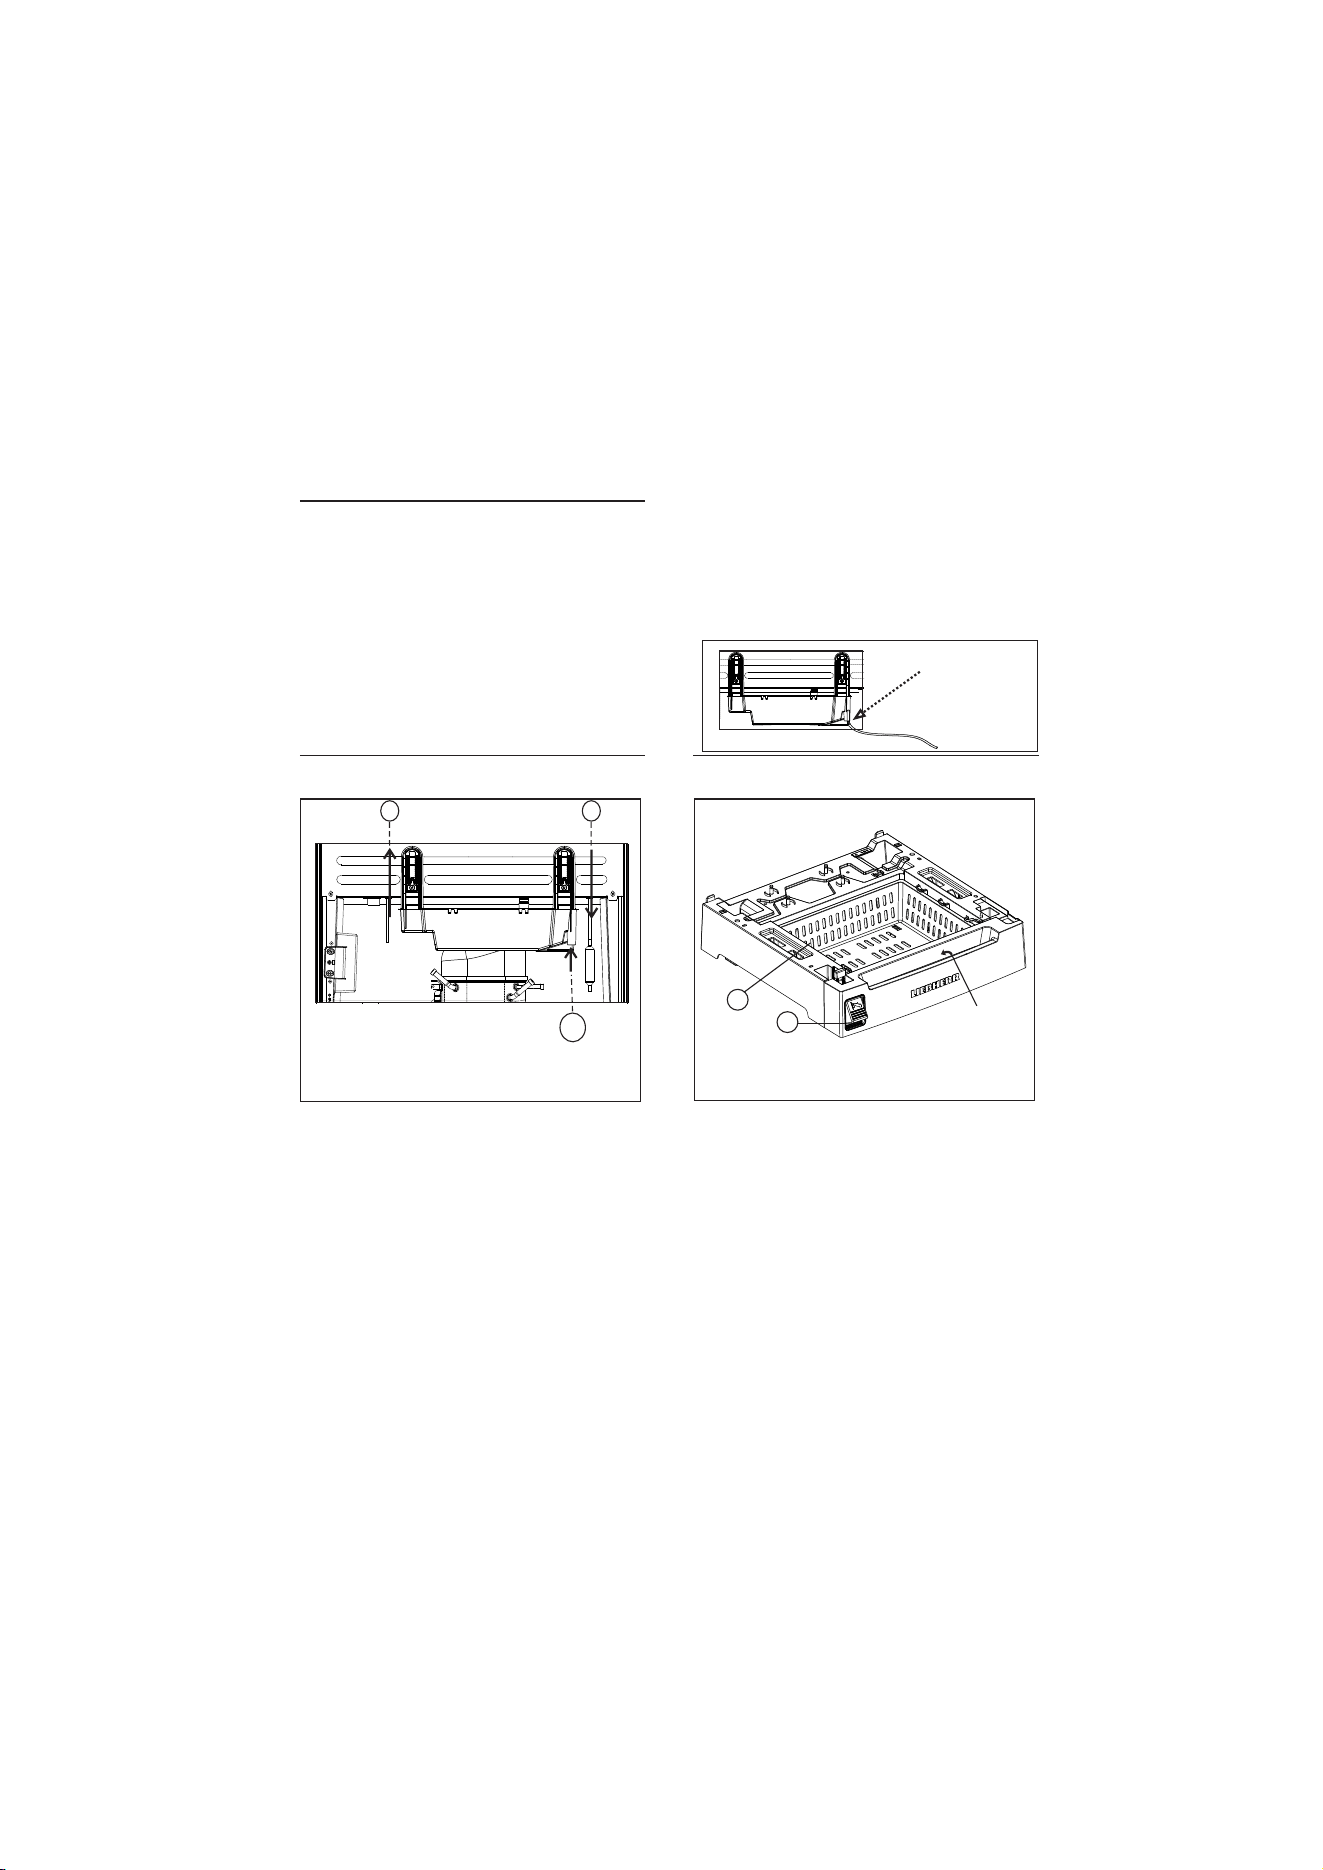
5.4 Adjustable Drain water tray
11
2
3
*
*
It is a Unique feature, where we can
remove and re-align very easily for cleaning
purpose or incase of water over flow from .
Steps & precautions for Cleaning :-
u
drain tray .
Drain tray situated back side of the ref-
rigerator.
u
Turn off and unplug the refrigerator for
safety purpose.
1) Upwards to unlock.
2) Downwards to lock.
3) Additional drain pipe.
u
Gently slide the drain tray upwards to
unlock as shown in image (arrow 1) to
take out from the refrigerator by using
both hands.
u
Throw the water into the sink from drain
tray, if required clean the drain tray with
cloth.
u
After cleaning gently slide the drain tray
After that plug in to start the refrige-
u
vided as shown in image point no 3 (addit-
Note: There is Additional feature also pro-
itional drain pipe).
With this feature water can continu-
ously drain via external pipe.
(external pipe - the pipe should be con-
nected to the additional pipe of drain tray
and other end of the external pipe should
be connected to sink or drain area.)
Pipe Inner dia 15mm
Additionally,
or uncomfor-
ecially if they
6a.

9
A bubbling and gurgling noise.
" This noise comes from the refrigerant
flowing in the refrigeration circuit.
u The sound is normal.
8 Decommissioning
8.1 Switching off the appliance
u Switch off the main power supply.
Wait until the external temperature of
refrigerator becomes ambient (equal to room
temperature).
u
8.2 Taking the appliance out of
service
u Pull out the power plug.
Empty the appliance.
Clean the appliance.
Leave the door open to prevent odour.
u
u
u
The outside surfaces of the appliance are
warm
The heat of the refrigeration circuit is
used to prevent condensation.
This is normal.
The temperature is not cold enough.
The door of the appliance is not properly
closed.
Close the door of the appliance.
Insufficient ventilation.
Clear ventilation windows.
The appliance was opened too
tly or for too long.
Wait until the appliance reaches the
required temperature itself. If not, contact the
customer service.
"
u
"
u
"
u
u
Vibratory noise.
The appliance is not fixed to the ground.
The running of the cooling unit therefore
makes objects and adjacent furniture vibrate.
Adjust appliance via the height
able legs.
Move bottles and containers apart.
"
u
u
9 Disposing of the appliance
The appliance contains some reusable
materials and should be disposed of
properly. Appliances which are no longer
needed must be disposed of in a professional
and appropriate way, in accordance with the
current local regulations and laws as per
guidelines of the Central Government of
India, E-Waste (Management) rules 2022
have been notified.
When disposing of the appliance, ensure
that the refrigeration circuit is not damaged to
prevent uncontrolled leaking of the
refrigerant and oil.
6.1 Do’s & Don’ts
Gently press the foot pedal with foot
u
Check the lock condition while pressing
u
the foot pedal, it should be in open co-
ndition.
Don’t overstuff the drawer above it level
u
and operate.
Don’t operate the pedal assembly, when
u
the drawer is not properly assembled.
Don’t use any external base stand or
u
any cloth below the drawer, it may ca-
use unbalance.
for easy opening.
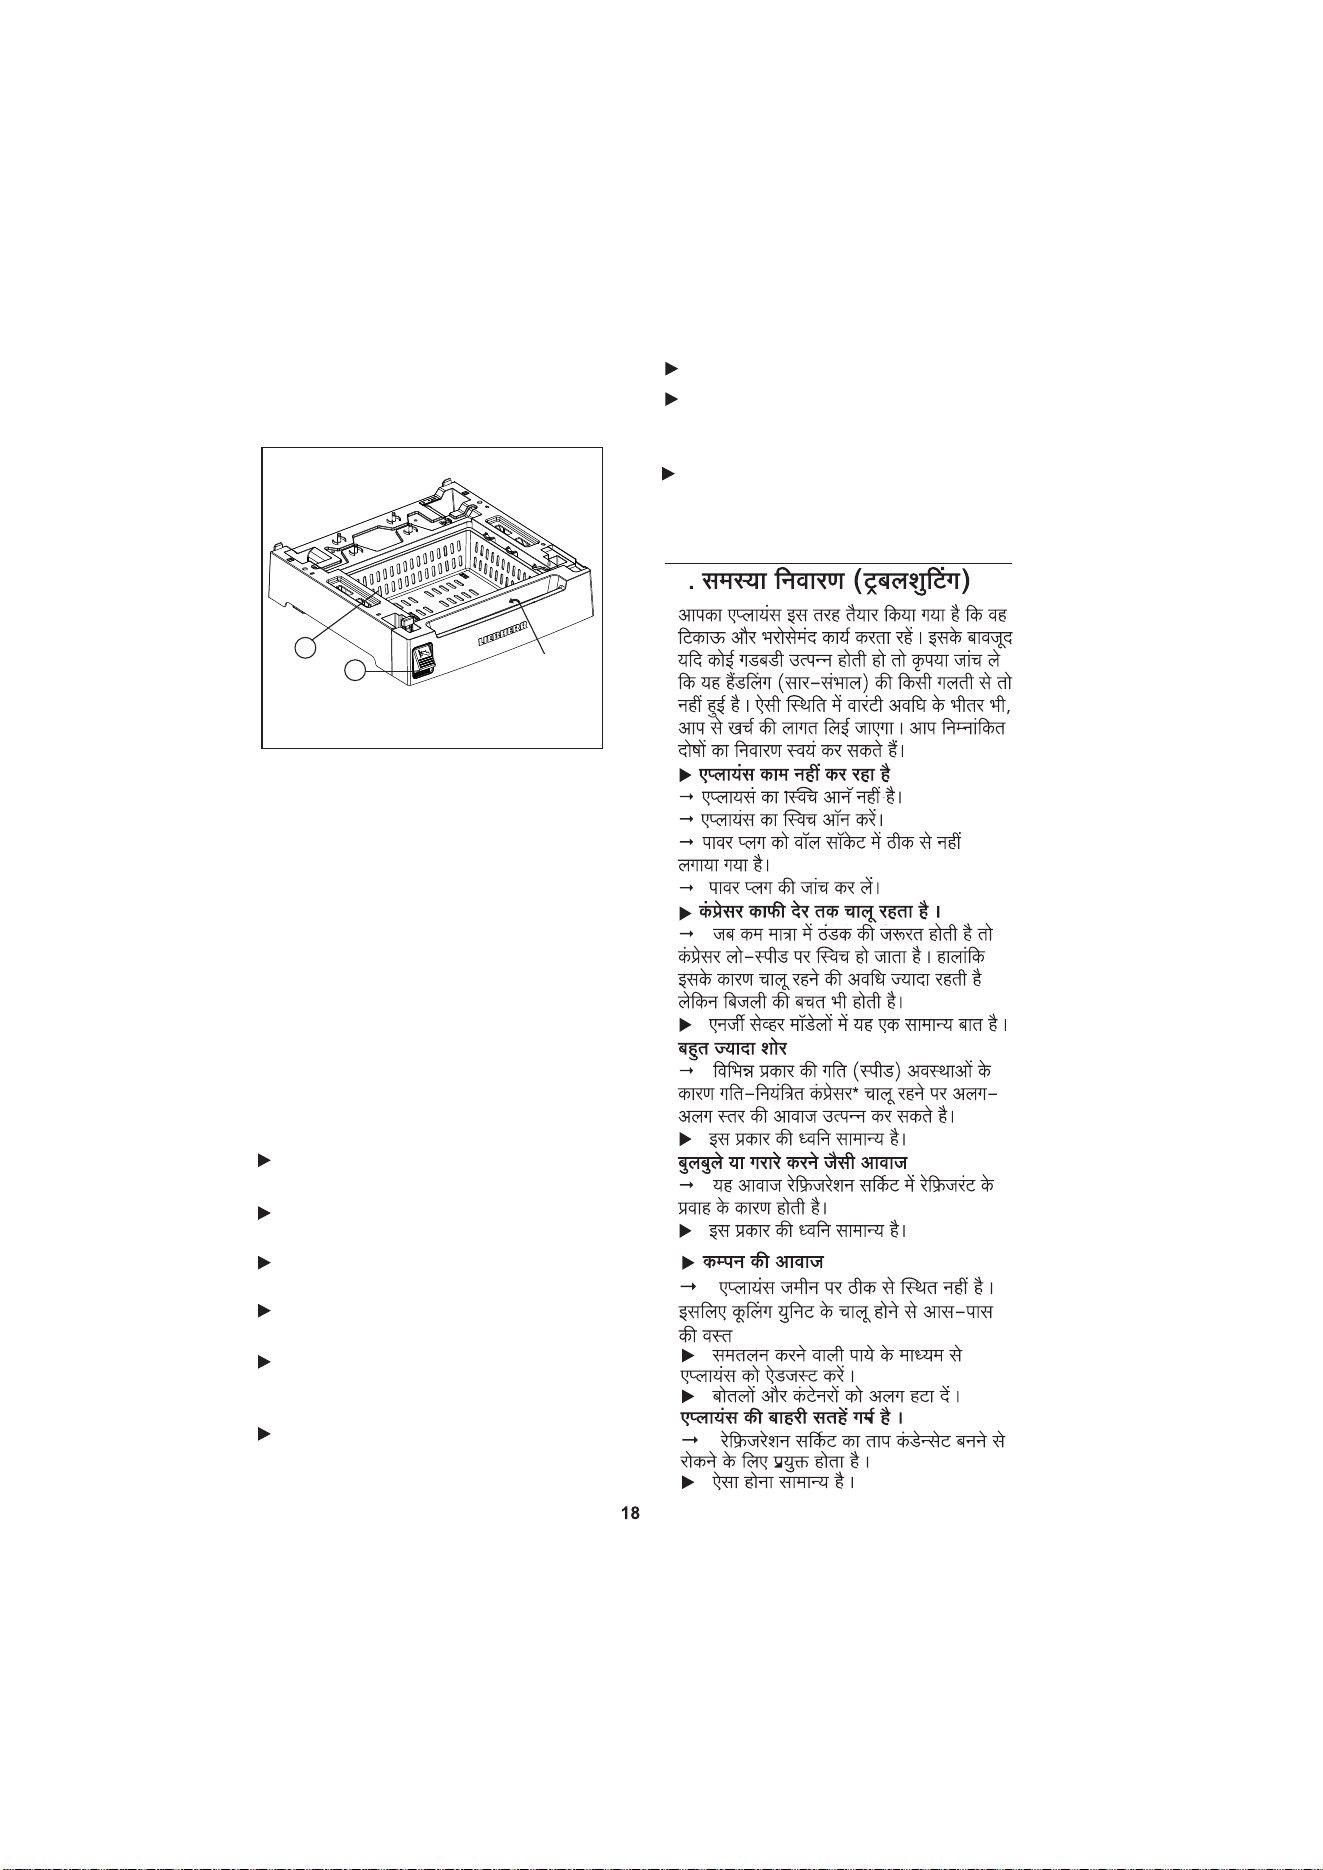
6.2 Base Stand Drawer
To keep upto 6 kg onion or potato.
u
Don’t move the refrigerator with base
u
stand/drawer, it might damage the
drawer.
Gently pull/push the drawer by us-
u
ing pocket (as shown in picture (6a)) to
use or after use.
Note:- Operate by hand only.
Do not keep any liquid stuffs or any
u
leafy vegetables, it may get spoiled
in span of less time.
7 Troubleshooting
Your appliance is designed and
for a long life span and reliable
operation.
If a malfunction nonetheless
operation, check whether it is
error. In this case you will
for the costs incurred,
period. You may be
following faults yourself:
Appliance does not work.
" The appliance is not switched on.
u Switch on the appliance.
" The power plug is not properly inserted in
the wall socket.
u Check power plug.
The compressor runs for a long time.
" The compressor switches to a low speed
depending on requirement. Although the
running time is increased as a result, energy
is saved.
u This is normal in energy-saving models.
Excessive noise.
" Speed-controlled* compressors may
produce varying running noise due to
different speed steps.
u The sound is normal.
*
adjust-
frequen-
manufactured
occurs during
due to a handling
have to be charged
even during the warranty
able to rectify the following
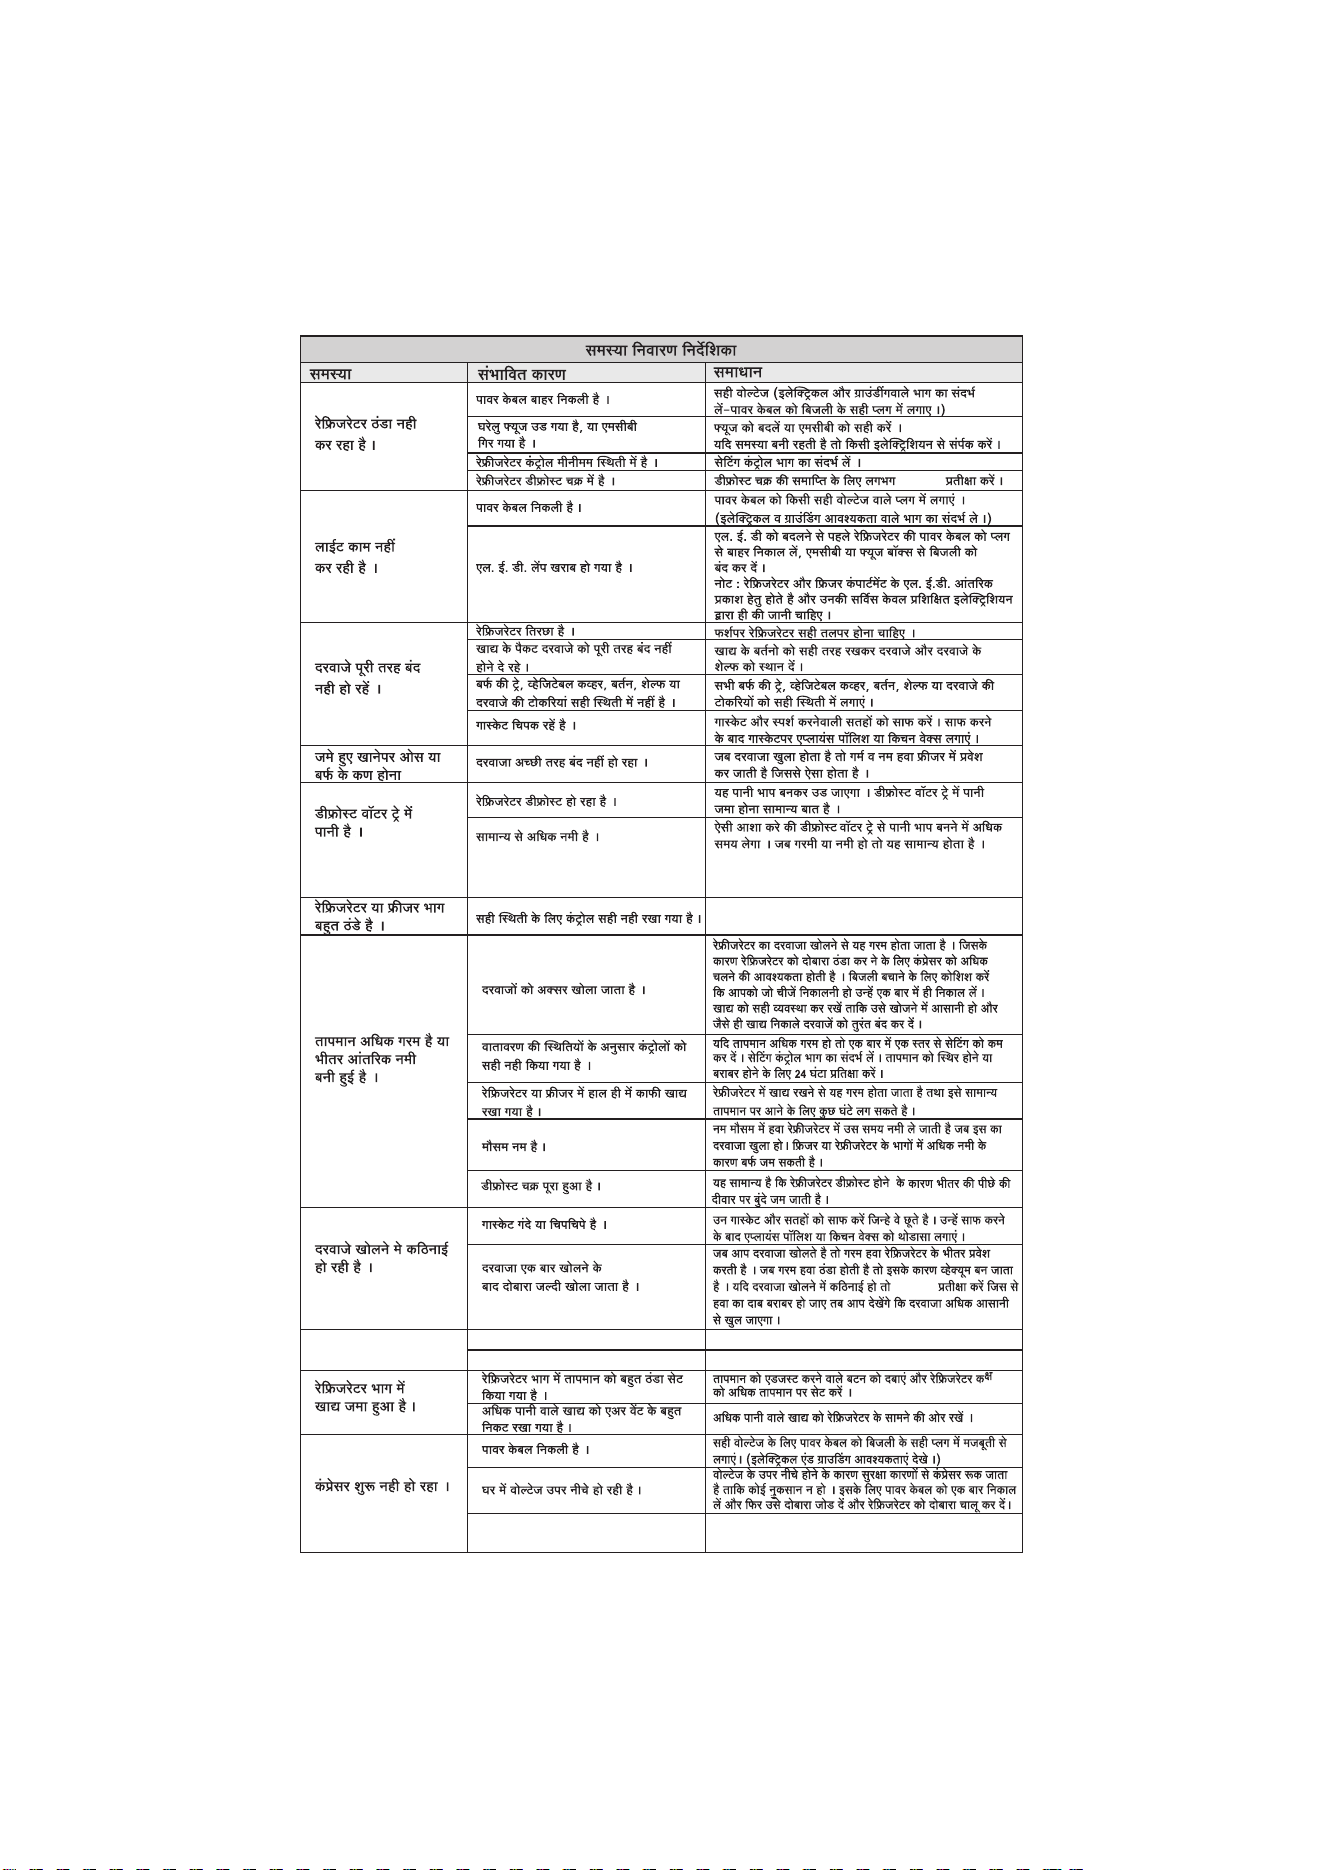
Frost or ice crystals on
Refrigerator or Freezer
The doors are difficult to open.
Frozen food in refrigerator
Refrigerator is not cooling.
Trouble Shoong Guide
Lights do not work
Doors will not close
There is water in the
Temperature is too warm
buildup.
Compressor Not Starng
Problem
The power cable is unplugged.
Check the Electrical condions if found any dislocaon of
the power cable, plug in the power cable again properly.
A household fuse has blown or a
MCB has tripped.
Replace the fuse or reset the MCB. If the problem
persists, contact an electrician.
The refrigerator control is set to off posion. Refer to the Seng the Controls secon.
The refrigerator is in the defrost cycle.
Wait for 2-4 hrs, aer that compressor will restart automacally.
The is unplugged.power cable
Firmly plug the into a live outlet power cable with proper
voltage Grounding Requirements).(refer to Electrical &
An LED light has malfunconed.
Before proceeding to replace LED, unplug the refrigerator or
turn off power at the MCB or fuse box.
NOTE: The refrigerator and freezer compartment lamps are
LED interior lighng, and service should only be performed
by a qualified technician.
The refrigerator is not level.
Food packages are blocking the door open. Rearrange food containers to clear door and door shelves.
The ice tray, vegetable cover, pans, shelves, or
door baskets are out of posion.
Push all the way ice tray, vegetable cover, pans, shelves, or
door baskets into their correct posions.
The gaskets are scking / Rolling.
Clean gaskets and the surfaces that they touch. Rub a thin coat
of appliance polish or kitchen wax on the gaskets aer cleaning.
Ensure that door should be properly closed.
The refrigerator is defrosng.
The water will evaporate. It is normal for water to drip into
the defrost water tray.
It is more humid than normal.
Expect that the water in the defrost water tray will take longer
to evaporate. This is normal when
it is hot or humid. Also given
Check the temperature sengs and make the sengs towards
the warm as per given in instrucon scker.
The doors are opened oen.
Opening the door warms the refrigerator, requiring the
compressor to run longer in order to cool the refrigerator
back down. In order to conserve energy, try to get everything
you need out of the refrigerator at once, keep food organized
so it is easy to find, and close the door as soon as the food is
removed, or also can use external pipe to drain the water.
The control is not set correctly for the
surrounding condions.
If the temperature is too warm, change the seng one
increment at a me. Refer to the Seng the Controls secon.
Wait 24 hours for temperatures to stabilize or even out.
A large amount of food has just been
added to the refrigerator or freezer.
Adding food warms the refrigerator. It can take a few hours
for the refrigerator to return to normal temperature.
The weather is humid.
In humid weather, air carries moisture into the refrigerator
when the doors are opened. Increased humidity in the
freezer or refrigerator compartments can lead to frost or
condensaon.
An defrost cycle was completed.
It is normal for droplets to form on the interior back wall
aer the refrigerator defrosts.
The gaskets are dirty or scky.
Clean the gaskets and the surfaces that they touch. Rub a thin
coat of appliance polish or kitchen wax on the gasket aer
cleaning.
The door is reopened within a short me
aer having been opened.
When you open the door, warmer air enters the refrigerator.
As vacuum. If the door the warm air cools, it can create a
is hard to open, wait 10 seconds to allow the air pressure to
equalize, then see if it opens more easily.
The temperature control in the refrigerator
compartment is set too cold.
Press the Temperature Adjust buon to set the refrigerator
compartment to a warmer temperature.
Food with a high water content was placed
too close to the cold air discharge vent.
Place food with a high water content toward
the front of the refrigerator.
The power cable is unplugged.
Proper voltage (see Electrical & Grounding Firmly
plug the into a live outlet with Requirements).power cable
Voltage Fluctuaon at house
Due to voltage fluctuaon compressor stop for safety
purpose to avoid any damage , for that 1 me unplug
& plug & again switch on the refrigerator.power cable
Leveling should be proper at floor.
The door is not closing properly .
Controls are not set correctly for condions.
Possible Causes Solution
compartment
or there is interior moisture
secon is too cold.
defrost water tray.
frozen food.
completely.
(External & Freezer door)
it is hot or humid. Also given provision to remove the drain tray
and clean or also can use external drain pipe to drain the water
UI Not Working
Communicaon error.
Restart the Appliance.
UI Display PCB Failure.
Check the cable behind the UI main PCB or replace the UI & PCB.
OLP Trip
Need to check the OLP connecons & connuity & also need
to check the PTC resistance as specificaon.
from the drain tray.
DC
19..20..22...
..
1
2
3
4
14
6
7
8
11
12
131
5
15
16
9
10
I)
II)
III)
12
12
14
14
14
14
14
8
5.4
/ :
6.1
6.2
7
9
9
9
19
19
8
8
17
Models
191 202 222
588
W-Bar Handle with BS
588588
W-Bar Handle & No BS
584 584 584
W-Pocket Handle with BS
584 584 584
W-Pocket Handle & No BS
578 578 578
H-with Base Stand
1367 1422 1522
H-No Base Stand
1245 1300 1400
D-Bar Handle with BS & No BS
650 650 650
D-Pocket Handle with BS
623 623 623
D-Pocket Handle & No BS
605 605 605
-W-Width,H-Height,D-Depth,BS-base Stand
u
W
H
D
DC..19..20..22..
:
I
I
I

,
I
300mm
120mm
300mm
-
I
For DC.. 19..20..22..
1
2
1 - 3
3 - 5
5 - 7
1
6
2
3
4
5
Key
Operating Functions
1
,
2
3
4
,
I
,
I
,
I
5
6
3
I
10
I
I
150 I
I
3
I
, ,
,
i) - I
0.25
0.25
I
1
14
ii) -
Temperature Bar
Buzzer
I
0.25
0.25
I
1
4
DC..19..20..22..
DC..19..20..22
1
2
3
5a 5b
5c
5.1
DC..19..20..22
0
90
1
90
0
2
I
I
4.7
8
2
(
(5a) (5)
3
(
(5) )
I
2
5.4 :
11
2
3
1)
2)
3) I
,
I
I
:
I
I
( 1)
I
( 2)
I
3 I ( )
I
( -
I
3
15 mm
11
2
1)
6a.
2)
,
,
I I
,
,
,
6.1
I
, I
/ ,
I
6.2
6 I
,
I
( )
I
:
7
6. / :
,
19
9
2
4
-
I
10
I
I
I I
I
I
LIEBHERR's E-waste Recycling Policy
Under the guidelines of the Central Government of India, E-
Waste (Management) Rules 2022 have been notified.
LIEBHERR stands committed to implement E-
Waste Rules. E-waste has been defined as: "Waste electrical
and electronic equipment, whole or in part or rejects from
their manufacturing and repair process, which are intended
to be discarded". Whereas, Electrical and electronic
equipment has been defined as: "Equipment which is
dependent on electrical currents or electro-magnetic fields to
fully functional". In general terms e-waste is any end of life
electronic product which is scrap and can not be used in any
manner e.g. air conditioners, refrigerator, batteries,
television, mobiles, etc. Managing of e-waste from cooling
appliances is most important because it contains harmful
substances like oil or refrigerant which can endanger the
environment and human health. By scientific disposal of
e-waste we can save our environment and also prevent its potential negative
consequences on human health. There is need to encourage recycling of all useful and
valuable material from e-waste so as to conserve the ever depleting natural resources.
Recycling end-of-life products is vital if we are to save resources and minimize waste.
Impact of improper handling/ dumping/disposal/accidental breakage/recycling of
E- waste:
• Toxic material present in e-waste get mixed with earth, air, water etc and causes
health issues.
• Oil & Gases which are present in the appliances can cause environmental pollution.
• Batteries contains highly hazardous substances.
• Burning of rubber and plastics (including foam) can cause air pollution and can have a
bad impact on human being and animals.
• Wastage of natural resources.
How can you recycle the E-Waste Products? (Do's):
• All electrical and electronic products are required to be handed over only to the
authorized recycler for recycling and disposal.
• Keep the e-waste in isolated area, after it becomes non-functional/un-repairable so as
to prevent its accidental breakage.
• You can deposit your appliance for e-waste directly at the collection centers. For
information of collection centers, please call on Customer Care number .
Don'ts for E- Waste:
• The product should not be opened by the User himself/herself, but only by authorized
service personnel.
• To protect the environment neither the cooling circuit shouldn't be damaged nor the
compressor removed before the oil and refrigerant was suck up professionally.
• The product is not meant for re-sale to any unauthorized agencies/scrap dealer.
• The product is not meant for mixing into household waste stream.
• Do not keep any replaced spare part(s) from the product in exposed area.
This product is complied with the Reduction of Hazardous Substances and doesn’t use any hazardous
substances as specified under the E-Waste (Management) Rules, 2022”.
For any assistance/guidance for disposal of e-waste please call on Customer Care
number .
7038-100-400
7038-100-400


Warranty Classification
The Liebherr Refrigerator (“Refrigerator”)manufactured by Liebherr Appliances India
Private Limited (“LIEBHERR”) comes with a TEN years warranty on compressor and a ONE
year warranty on all other parts (except LED, glass, add-on plastic parts and accessories).
Warranty will be applicable only against defective material or workmanship & will be effective
from date of purchase. Incase of any such defect found during the first year from the date of
purchase, LIEBHERR will undertake repairs to the warranted part free of charge, subject to the
terms & conditions below. In the warranty period beyond the first year from the date of
purchase, only the Compressor will be provided free of cost and any other part(s) can be
repaired or replaced on payment of applicable charges. Warranty is confined to the first
purchase of the Refrigerator only & is non-transferable.
The maximum liability of LIEBHERR through this warranty is limited to the Refrigerator
purchase value/MRP (whichever is lower).
The warranty is exclusive and in lieu of any other warranty whether statutory, expressed or
implied.
Instructions for the Customer
1. To avail the warranty, Refrigerator needs to be registered with LIEBHERR Customer care.
Customer needs to call on 7038-100-400 for Refrigerator registration & installation. The
necessary purchase invoice/purchase receipt needs to be produced by the Customer at the
time of claiming the warranty.
2. Free installation or demo of the Refrigerator (Only for selected models), if applicable, can
be availed only once and within 6 months from the date of purchase. In case of installation, any
additional material required over and above the standard installation kit shall be on chargeable
basis.
3. Earthing provision is necessary for personal safety & proper working of the Refrigerator.
Please check earthing through certified electrician before switching ON the Refrigerator.
4. The Refrigerator must be maintained to ensure hygiene. If there are any insects, rodents
in it causing obstruction to the functioning of the Refrigerator, LIEBHERR shall not be
responsible & in turn, warranty stands terminated.
5. Any extended/additional warranty offered by LIEBHERR has to be supported by relevant
proofs.
6. Usage not as per Instruction Manual shall be beyond the scope of warranty.
Note: At times you may face some issues related with water seepage from the back of the
Refrigerator. This is due to improper defrosting, water evaporation or improper drain. This can
be corrected by draining the excess water and by defrosting the refrigerator as mentioned in
the Instruction Manual or you can contact LIEBHERR Customer care, who can guide you
through the process. This will not be treated as a defect in the Refrigerator.
Terms
1. The Refrigerator has to be purchased from an Authorized LIEBHERR Sales Dealer in India
only.
2. Warranty can be claimed only if the repair was carried out by the LIEBHERR Authorized
Service Partner.
3. LIEBHERR shall not be liable for any loss, cost, expense, inconvenience or damage that
may result from use or inability to use the Refrigerator.
4. Warranty shall entitle the customer only for repair or replacement of the
Refrigerator/component and not for costs of installation, removal or damage to customer's
property or other liabilities including any remote or consequential damages. LIEBHERR shall
decide to repair or replace a Product at its sole discretion considering the extent of damage to a
Refrigerator/ component.
5. In the event of any unforeseen circumstance, and spares not being available LIEBHERR's
prevailing depreciation rules will be binding on the Customer, and same shall be considered as
a commercial solution in lieu of repairs.
6. Complaints related to printability, compatibility with external accessories shall not be
considered as defect in Refrigerator and are not covered under warranty.
Conditions
1. The defective parts/Refrigerators which were replaced by LIEBHERR under this warranty
shall be the property of LIEBHERR.
WARRANTY TERMS AND CONDITIONS
Product Details & Serial No. :
Model No. :
Date of Purchase :
Customer Name : Contact No. :
Customer Address :
Dealer's Stamp & Signature
2. In case of a defective accessory, only the accessory will be repaired or replaced.
3. In case of repairs or replacement of any part/s of the Refrigerator, this warranty will
thereafter continue and remain in force only for the unexpired period of the warranty. In
particular, any performance of services subject to this warranty will not extend or renew the
warranty period.
4. Expenses in relation to transportation and handling while repairing shall be borne by the
Customer.
5. LIEBHERR shall not be liable for any losses or consequential losses due to Refrigerator
failure or the installed software.
6. The Customer shall bear the necessary costs for any repairs of Sealed System gas
charging after one year from the date of Purchase.
7. LIEBHERR shall strive but not be obligated to repair the Refrigerator at the earliest.
8. In case, the Refrigerator is used beyond the municipal limits of the jurisdiction of the
authorized Customer Service Centre, charges incurred towards technician's visit will be borne
by the Customer.
9. Refrigerator Warranty shall be Null &Void in below cases:
a. Installation / Repairs carried by any agency other than Liebherr Authorized Service
Partner.
b. Refrigerator Serial number is removed, defaced or altered.
c. Improper ventilation, improper voltage, use of external material, normal wear & tear
d. Site (premises where the Refrigerator is kept / Installed) conditions that do not conform to
the recommended operations of the Refrigerator. Negligence / omission of the Customer on
account of periodic maintenance(s)/periodic servicing as mentioned in the Instruction Manual
of the Refrigerator.
e. Exposure to moisture/dampness / extreme thermal or environmental conditions or rapid
changes in such conditions/corrosions/oxidations/spillage of food/ liquid/influence of chemical
substances.
f. Defects due to causes beyond control like lightning, abnormal voltage, spikes, external
sources or cables, fire, water logging, natural calamities, commotion, riots, theft, anti-social
actions, acts of God.
g. Defects caused by abuse, misuse, accident, casualty, alteration, negligence, tampering to
parts, use on current or voltages other than those specified by Liebherr India, or application or
installation not in accordance with published instruction manuals.
h. The Refrigerator is being used for commercial purpose OR if the Refrigerator has been
used excessively and beyond reasonable usage as permitted within the Refrigerator
Instruction Manual.
i. In any Circumstances, warranty will not be applicable if Refrigerator is operated outside of
India.
Jurisdiction
1. All disputes arising out of this warranty are subject to Aurangabad, Maharashtra
jurisdiction only.

Liebherr Appliances India Pvt. Ltd. * A-1/6, Shendra MIDC, Aurangabad - 431 154
Contact Us :
Customer Care Number
7038-100-400
E-mail : customercare.lhi@liebherr.com
Website : home.liebherr.com
