
MA310 MA510 MA710 AV Receivers
Owner's Manual
www.jbl.com/specialtyaudio
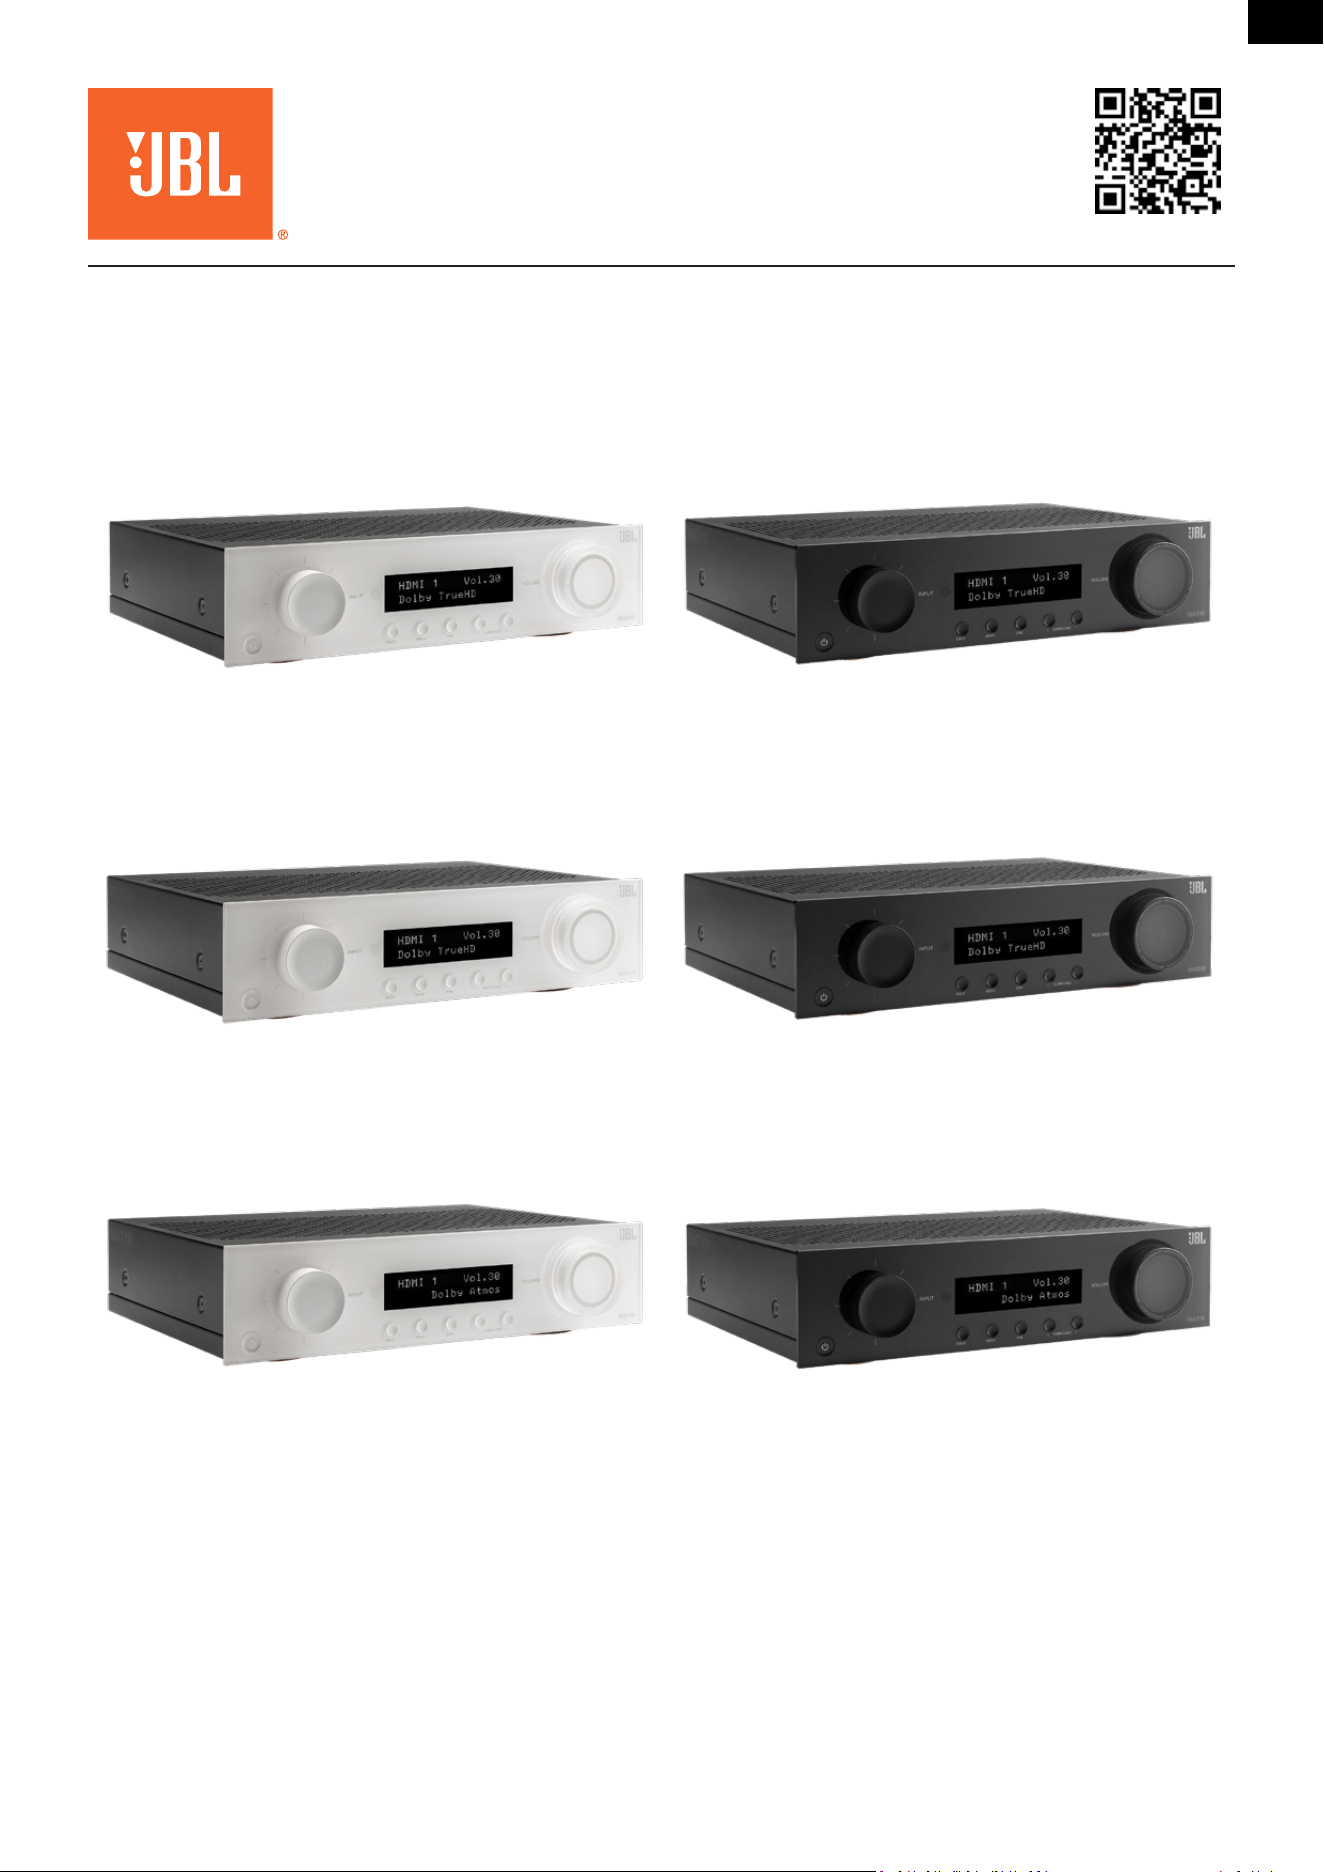
MA310 | 5.1-channel 4K AV Receiver
MA510 | 5.1-channel 8K AV Receiver
MA710 | 7.1-channel 8K AV Receiver
Rev 1.4 | 20250211
©2024 Harman International | Features, Specifications, and Appearance subject to change without notice.
EN

Pg 2 of 42
©2024 Harman International | Features, Specifications, and Appearance subject to change without notice.
MA310 | MA510 | MA710 Owner's Manual | rev 1.4 20250211
EN
Table of Contents ................................................................................................................................................................... 2
Introduction .......................................................................................................................................................................... 4
What's in the box .......................................................................................................................................................................4
Download The JBL Premium Audio Setup App (Applies to MA510 and MA710 only) ...............................................................4
Product Overview .................................................................................................................................................................. 5
Front Panel ................................................................................................................................................................................5
Remote Control .........................................................................................................................................................................6
Rear Panel ............................................................................................................................................................................. 7
MA310 and MA510 ....................................................................................................................................................................7
MA710 .......................................................................................................................................................................................7
Speaker Placement ................................................................................................................................................................ 8
Left And Right Channels .............................................................................................................................................................8
5.1-Channel System ...................................................................................................................................................................9
Subwoofer Placement And Positioning In-Room .....................................................................................................................10
7.1-Channel System
(MA710) .................................................................................................................................................10
Wiring and Connections .......................................................................................................................................................11
Network Connection (Applies to MA510 and MA710 only) ....................................................................................................11
Bluetooth Operation ................................................................................................................................................................ 12
Connecting Audio/Video Inputs ..............................................................................................................................................13
Wiring Output Connectors .......................................................................................................................................................15
Binding post termination ......................................................................................................................................................... 15
Connecting a Subwoofer..........................................................................................................................................................15
Essential Operation ..............................................................................................................................................................16
Placing The Unit ....................................................................................................................................................................... 16
Power .......................................................................................................................................................................................16
Standby Power ......................................................................................................................................................................... 16
Operating Your Receiver ..........................................................................................................................................................17
Selecting A Source ...................................................................................................................................................................17
Main Menu Overview ..............................................................................................................................................................17
Volume Control ........................................................................................................................................................................ 18
System Feedback .....................................................................................................................................................................18
Essential Setup .....................................................................................................................................................................19
Speaker Types ..........................................................................................................................................................................19
Speaker Levels .........................................................................................................................................................................20
Speaker Distances .................................................................................................................................................................... 20
Setup Menus ........................................................................................................................................................................21
Entering Setup Mode ............................................................................................................................................................... 21
Navigating the Setup Menu .....................................................................................................................................................21
Source Setup ............................................................................................................................................................................ 22
Speaker Setup .......................................................................................................................................................................... 23
Table of Contents

Pg 3 of 42
©2024 Harman International | Features, Specifications, and Appearance subject to change without notice.
MA310 | MA510 | MA710 Owner's Manual | rev 1.4 20250211
EN
System Setup ...........................................................................................................................................................................25
Network Status ........................................................................................................................................................................26
Software Setup ........................................................................................................................................................................26
Decoding Modes ..................................................................................................................................................................27
Modes For Digital Sources .......................................................................................................................................................27
Modes For Analog Sources ......................................................................................................................................................27
Multi-Channel Source Modes ..................................................................................................................................................27
Decoding Modes (Cont'd) ........................................................................................................................................................28
Room Correction – EZ Set EQ ................................................................................................................................................29
How Does EZ Set EQ Room Correction Work? .........................................................................................................................29
USING Subwoofers ...................................................................................................................................................................29
Calibrating The System With EZ Set EQ ...................................................................................................................................30
Specifications .......................................................................................................................................................................36
MA310 .....................................................................................................................................................................................36
MA510 .....................................................................................................................................................................................37
MA710 .....................................................................................................................................................................................38
Troubleshooting and Maintenance .......................................................................................................................................39
General Troubleshooting .........................................................................................................................................................39
Maintenance ............................................................................................................................................................................39
Trademarks and Licenses ......................................................................................................................................................40
Regulatory Communications .................................................................................................................................................41

Pg 4 of 42
©2024 Harman International | Features, Specifications, and Appearance subject to change without notice.
MA310 | MA510 | MA710 Owner's Manual | rev 1.4 20250211
EN
Introduction
Thank you for purchasing a JBL MA series AV Receiver. For over 75 years, JBL has been creating best in class audio equipment for concerts,
studios, theaters, and homes around the world. JBL is the trusted choice of leading recording artists and sound engineers. The MA series AVRs
are designed, engineered, and manufactured to the industry's highest quality standards and offer core features and fundamental connectivity
for exceptional home cinema and music experiences.
For more information on the set-up and operation of this product refer to the product page on the jbl.com website. Should further assistance
be required feel free to contact customer support at the numbers below.
Inside the US and Canada: +1 888.691.4171
Outside the US and Canada: +44 1707 668 012
WHAT'S IN THE BOX
1. 1x JBL MA310, MA510 or MA710 AV Receiver
2. 1x Quick-start guide and safety sheet
3. 1x IR remote
4. 2x AAA batteries for remote control
5. 1x Antenna for Bluetooth
6. Antennas for Wi-Fi (1x MA510 and 2x MA710)
7. 1x Power Cord
DOWNLOAD THE JBL PREMIUM AUDIO SETUP APP (APPLIES TO MA510 AND MA710
ONLY)
To setup your receiver on your home network, download the JBL PREMIUM AUDIO app to your smartphone or tablet. (See Network
Connection (Applies to MA510 and MA710 only))

Pg 5 of 42
©2024 Harman International | Features, Specifications, and Appearance subject to change without notice.
MA310 | MA510 | MA710 Owner's Manual | rev 1.4 20250211
EN
Product Overview
FRONT PANEL
❶ ❹ ❺ ❻ ❼
❽❸❷
1. STANDBY ON/OFF BUTTON
Activates and deactivates standby mode
when the Receiver is connected to AC
power.
When in standby mode, the display is
blank and the front panel LED glows
orange. While switched on, the front
panel LED will glow white.
2. INPUT DIAL/MENU NAVIGATION/PRESS
SELECT
Rotate to select an input source until
that source is shown on the front panel.
Press to select.
Use to navigate and steer the cursor in
Setup menus or on-screen menus.
Press to select.
3. UNIT DISPLAY
The display window shows the currently
selected source and current volume
setting.
The front panel display is also used for
unit setup after pressing the MENU key
on the front panel or remote.
4. BACK MENU BUTTON
Use the Back button to go navigate to
previous page(s) in Setup menus or on-
screen menus.
5. SHOW/HIDE MENU BUTTON
The Menu button displays the unit's
setup menu on the On-Screen Display
and front panel of the device.
6. DIM BUTTON
This switches the display brightness
between bright/dim/off.
7. SURROUND MODE CYCLE
Selects between stereo and the available
surround modes for the current source.
8. VOLUME DIAL/PRESS MUTE
Rotate to adjust the volume of the
Receiver.
Press to mute all audio outputs.
Pg 6 of 42
©2024 Harman International | Features, Specifications, and Appearance subject to change without notice.
MA310 | MA510 | MA710 Owner's Manual | rev 1.4 20250211
EN
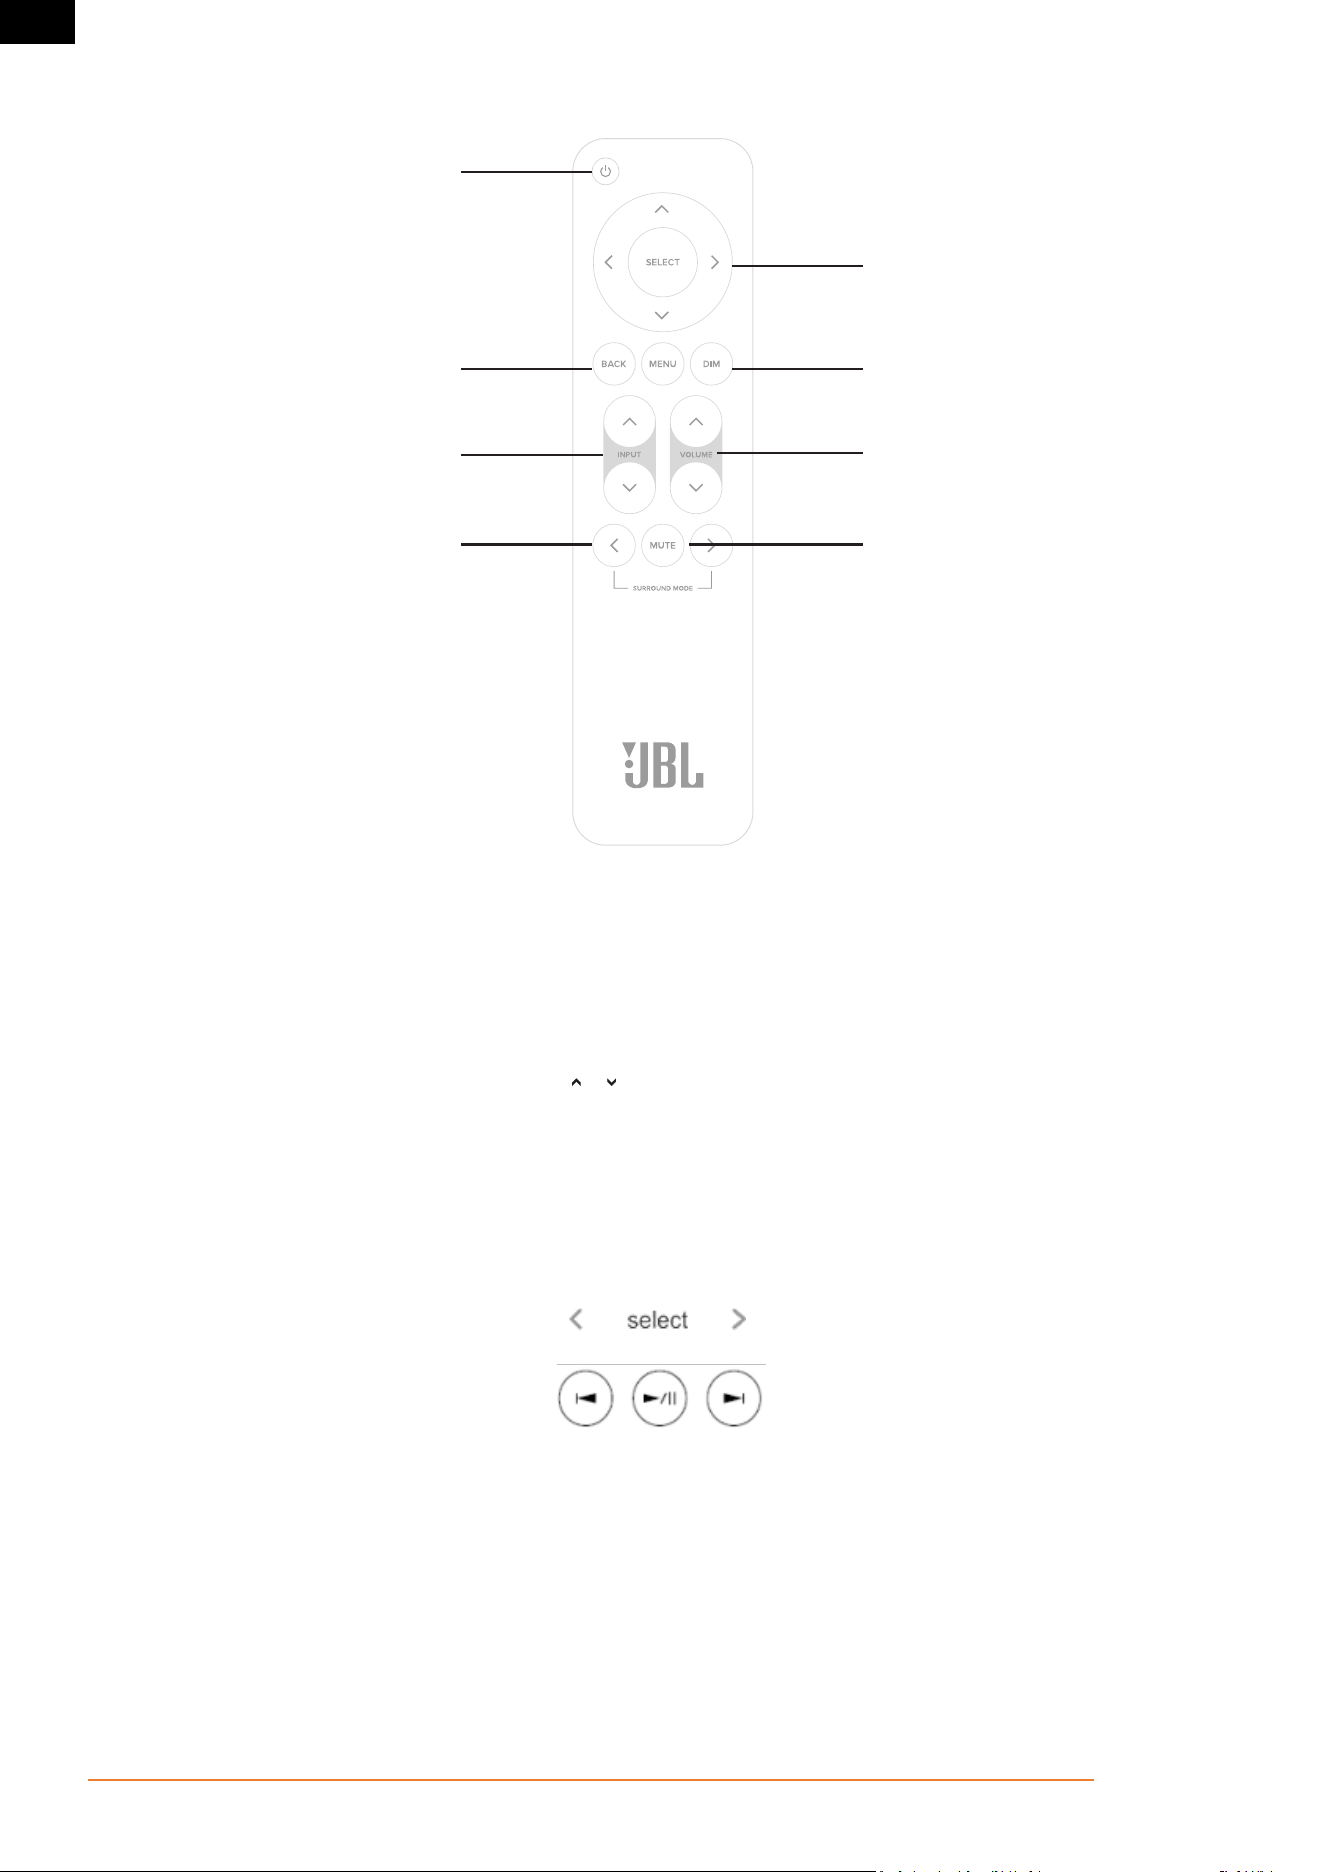
REMOTE CONTROL
❶
❹
❺
❻
❼
❽
❸
❷
1. STANDBY ON/OFF BUTTON
Activates and deactivates standby mode
when the Receiver is connected to AC
power.
2. MENU NAVIGATION/SELECT AND
TRANSPORT CONTROL*
The Navigation keys steer the cursor in
Setup menus or on-screen menus.
Press center button to select.
3. MENU BACK & MENU ON/OFF
The Menu button displays the unit's
setup menu on the On-Screen Display
and front panel of the device.
Use the Back button to go navigate to
previous page(s).
4. DIM FRONT PANEL DISPLAY
This switches the display brightness
between bright/dim/off.
5. INPUT UP/DOWN
To select an input source, press the
INPUT or buttons until that source is
shown on the front panel or On-Screen
Display.
Press SELECT to select.
6. VOLUME UP/DOWN
Use the volume controls on the remote
to adjust the volume of the Receiver.
7. SURROUND MODE CYCLE
Selects between stereo and the available
surround modes for the current source.
8. MUTE
Mutes all audio outputs.
*Use Select, and Left/Right curser buttons on the remote control as transport keys for Bluetooth and Network Audio streaming sources
Notes on batteries:
• Incorrect use of batteries can result in hazards such as leakage and bursting.
• Do not mix old and new batteries together.
• Do not use non-identical batteries together – although they may look similar, different batteries may have different voltages.
• Ensure the plus (+) and minus (-) ends of each battery match the direction indicated in the battery compartment.
• Remove batteries from equipment that is not going to be used for a month or more.
• When disposing of used batteries, please comply with governmental or local regulations that apply in your country or area.
Pg 7 of 42
©2024 Harman International | Features, Specifications, and Appearance subject to change without notice.
MA310 | MA510 | MA710 Owner's Manual | rev 1.4 20250211
EN
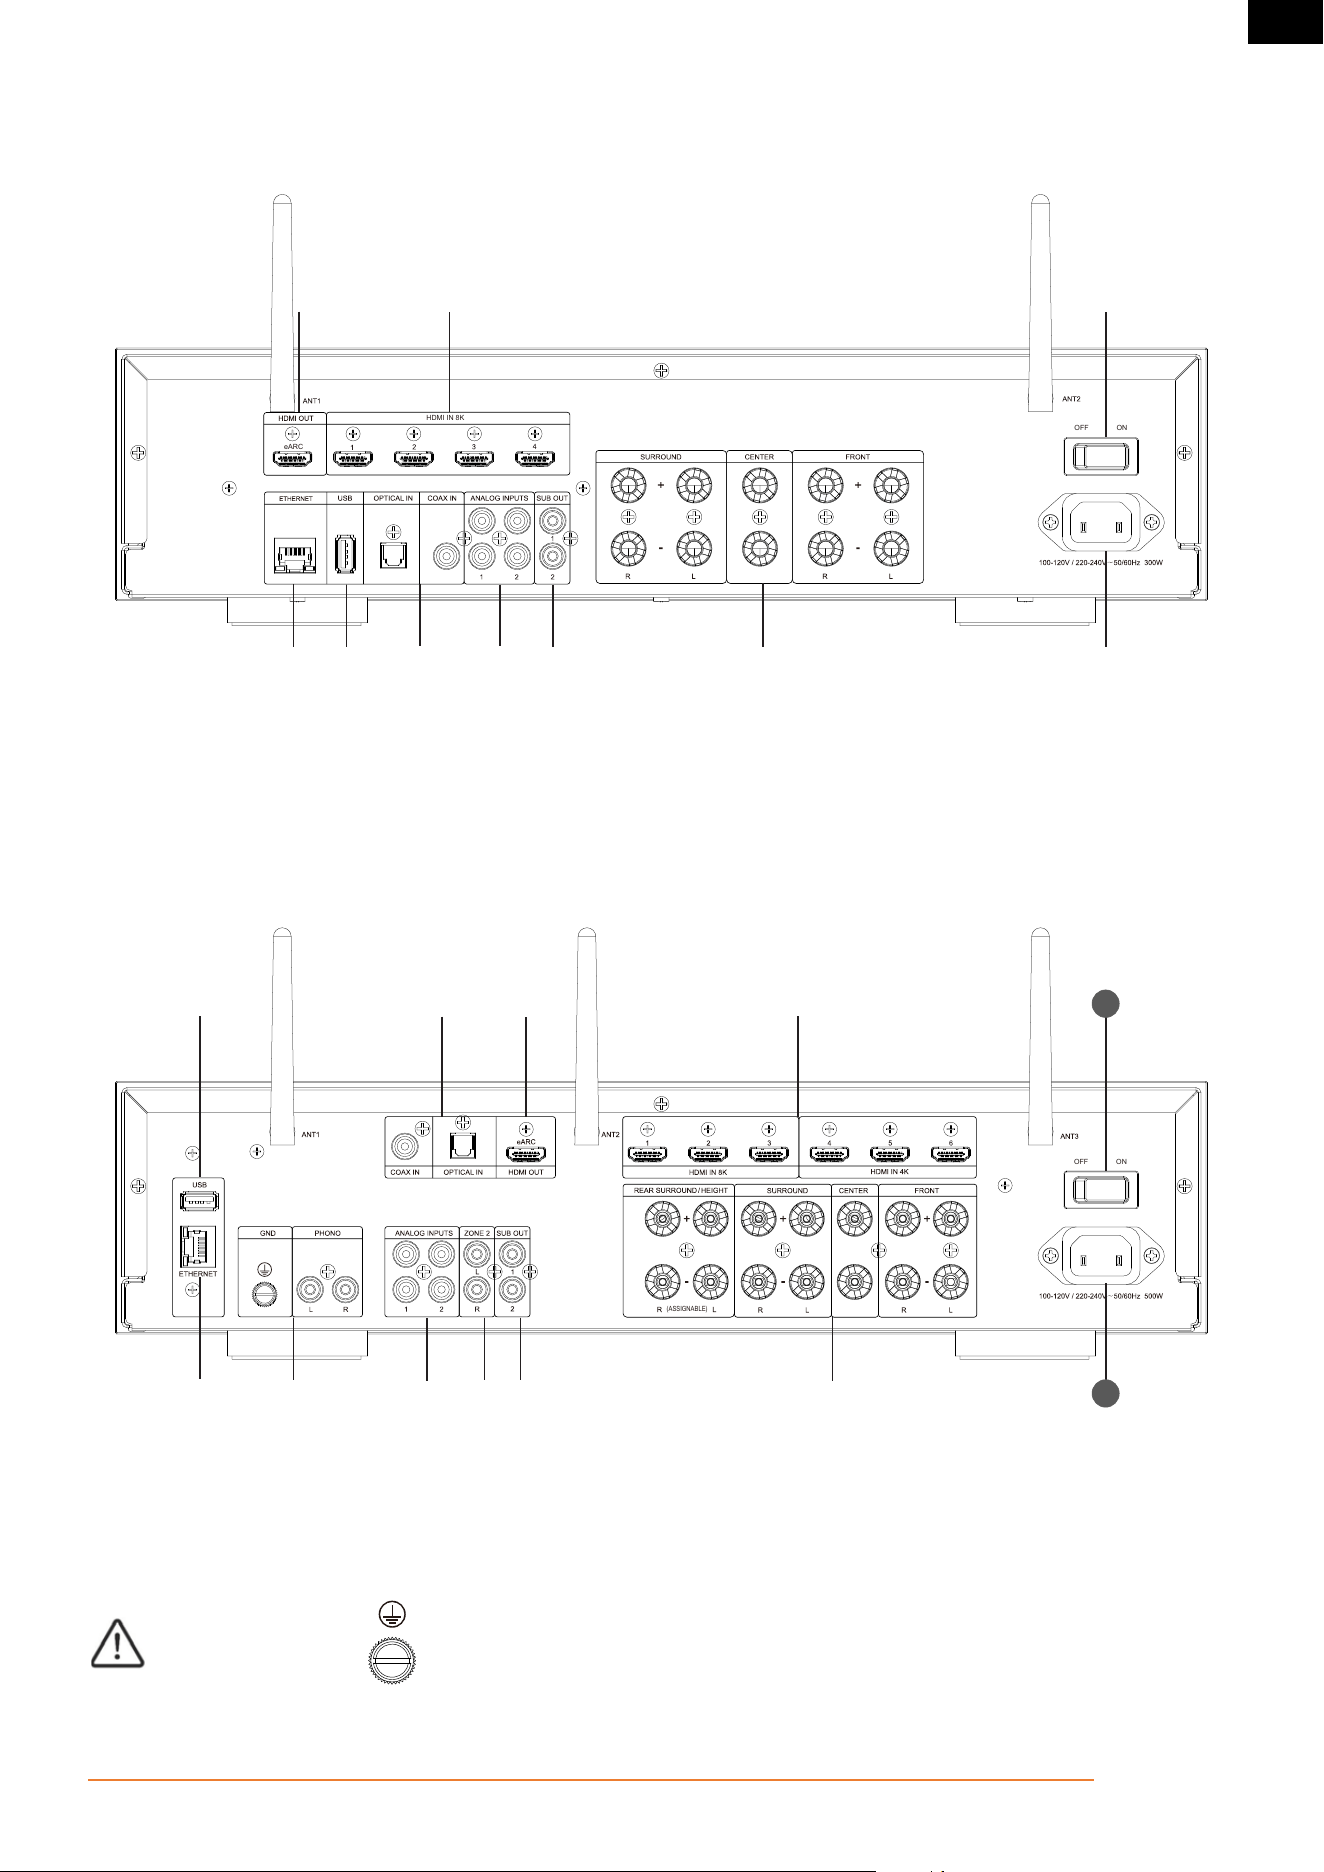
Rear Panel
MA310 AND MA510
ONOFF
HDMI IN 8K
eARC
❷ ❾❶
❸ ❹ ❻
❺
❼ ❽ ❿
1. HDMI Output
2. HDMI Inputs
3. Ethernet Socket (
MA510 only
)
4. USB Input
5. Digital Inputs
6. Analog Inputs
7. Subwoofer Outputs
8. Speaker Level Output Connectors
9. Power Switch
10. Power Input
MA710
(ASSIGNABLE)
ONOFF
❽ ❾❺❶
11
❷ ❸ ❹ ❻ ❼ ❿
12
1. USB Input
2. Ethernet Socket
3. Phono Input and Ground
4. Analog Inputs
5. Digital Inputs
6. Zone 2 "PARTY" Output
7. Subwoofer Outputs
8. HDMI Output
9. HDMI Inputs
10. Speaker Level Output Connectors
11. Power Switch
12. Power Input
Phono Ground This terminal must not be used as a safety earth.
Pg 8 of 42
©2024 Harman International | Features, Specifications, and Appearance subject to change without notice.
MA310 | MA510 | MA710 Owner's Manual | rev 1.4 20250211
EN
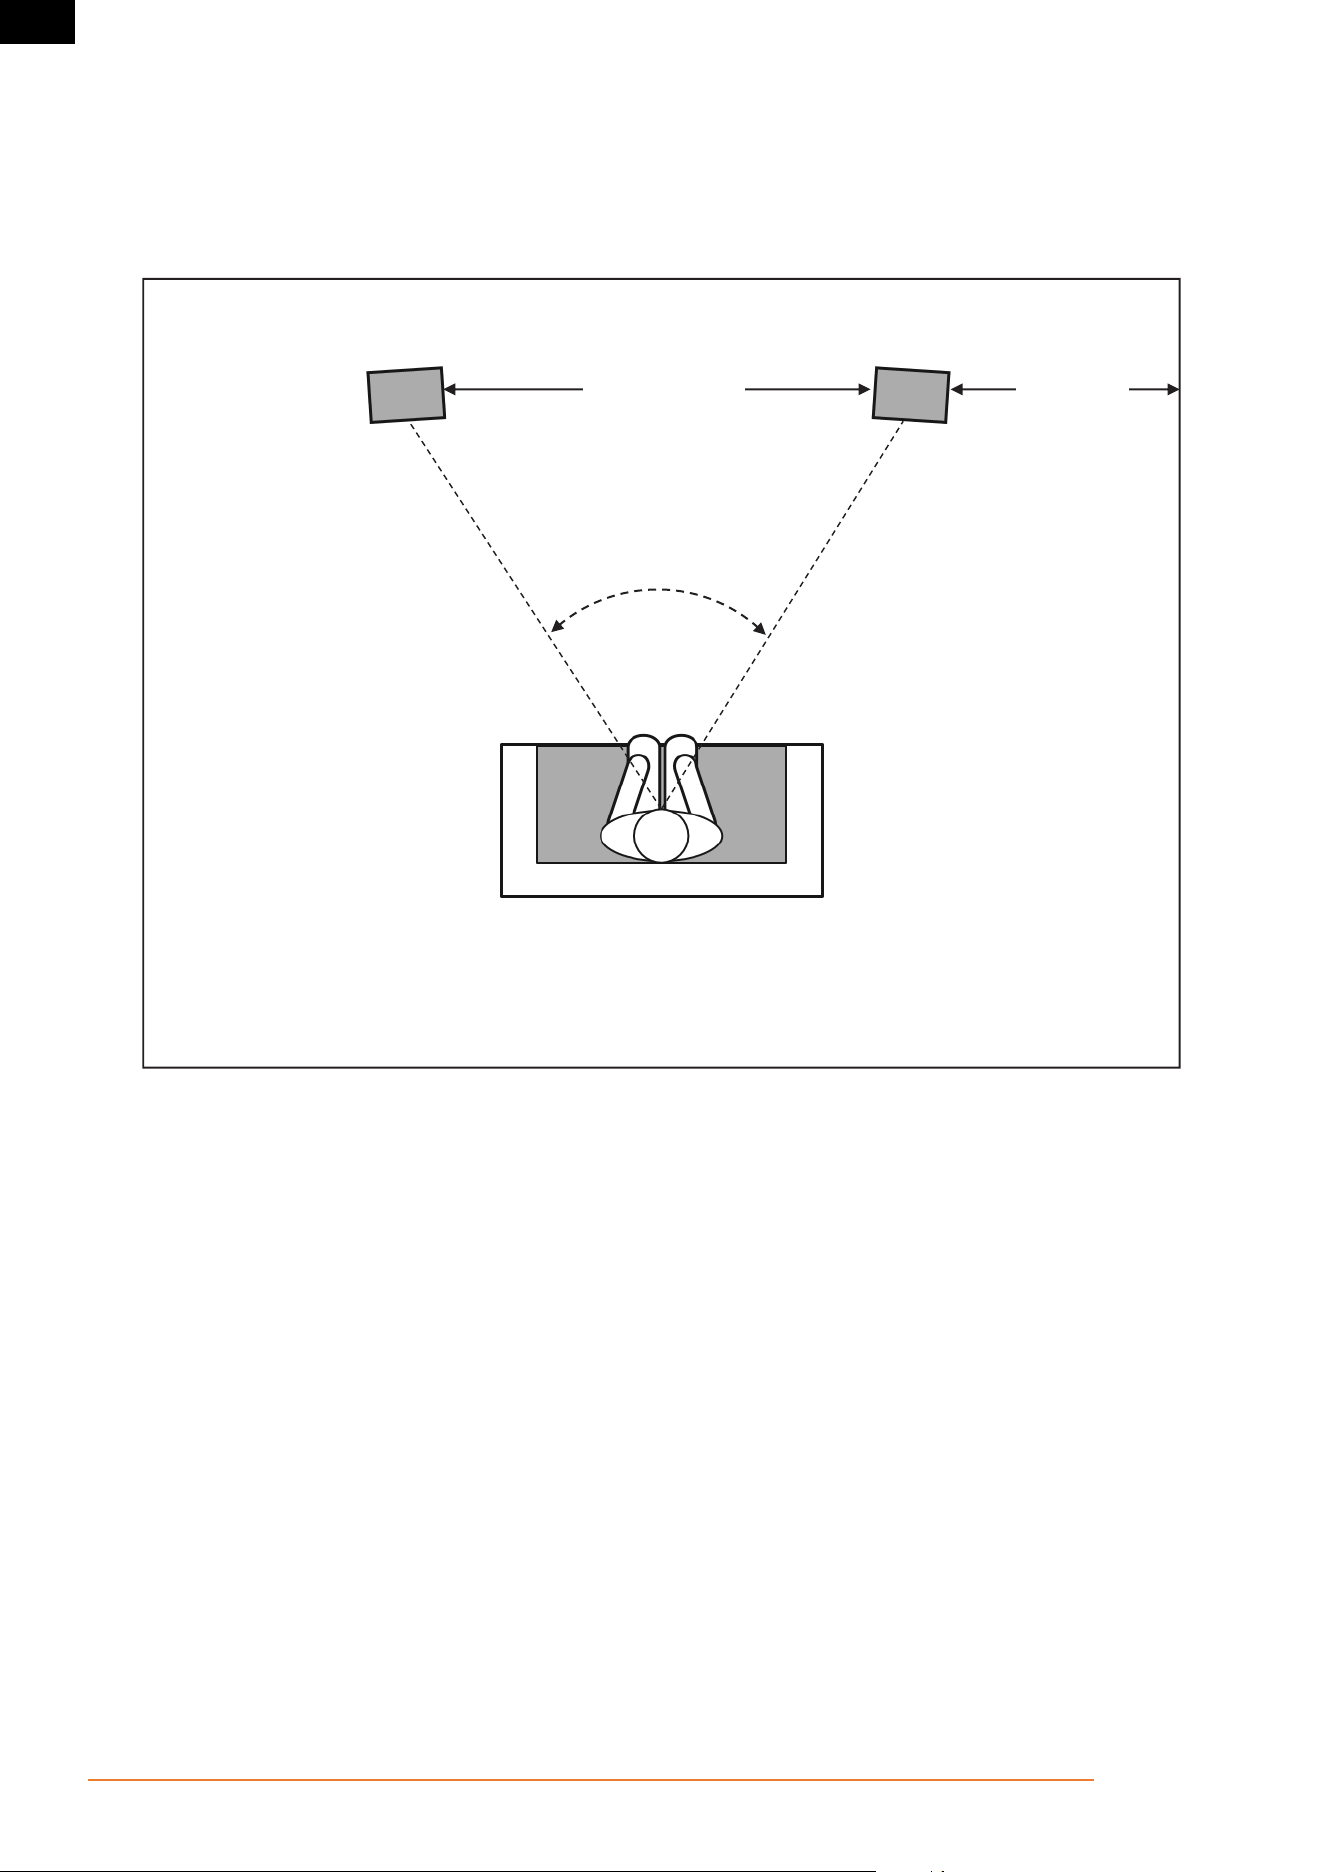
Speaker Placement
LEFT AND RIGHT CHANNELS
For the best results, place the speakers 6 – 10 feet (1.8m – 3m) apart. Angling the speakers toward the listening position improves imaging.
The speakers will produce the most accurate soundstage when the angle between the listener and the speakers is between 40 and
60 degrees.
6 - 10 ft
(1.8 m - 3 m)
>20 in
(>51 cm)
40° - 60°
Pg 9 of 42
©2024 Harman International | Features, Specifications, and Appearance subject to change without notice.
MA310 | MA510 | MA710 Owner's Manual | rev 1.4 20250211
EN
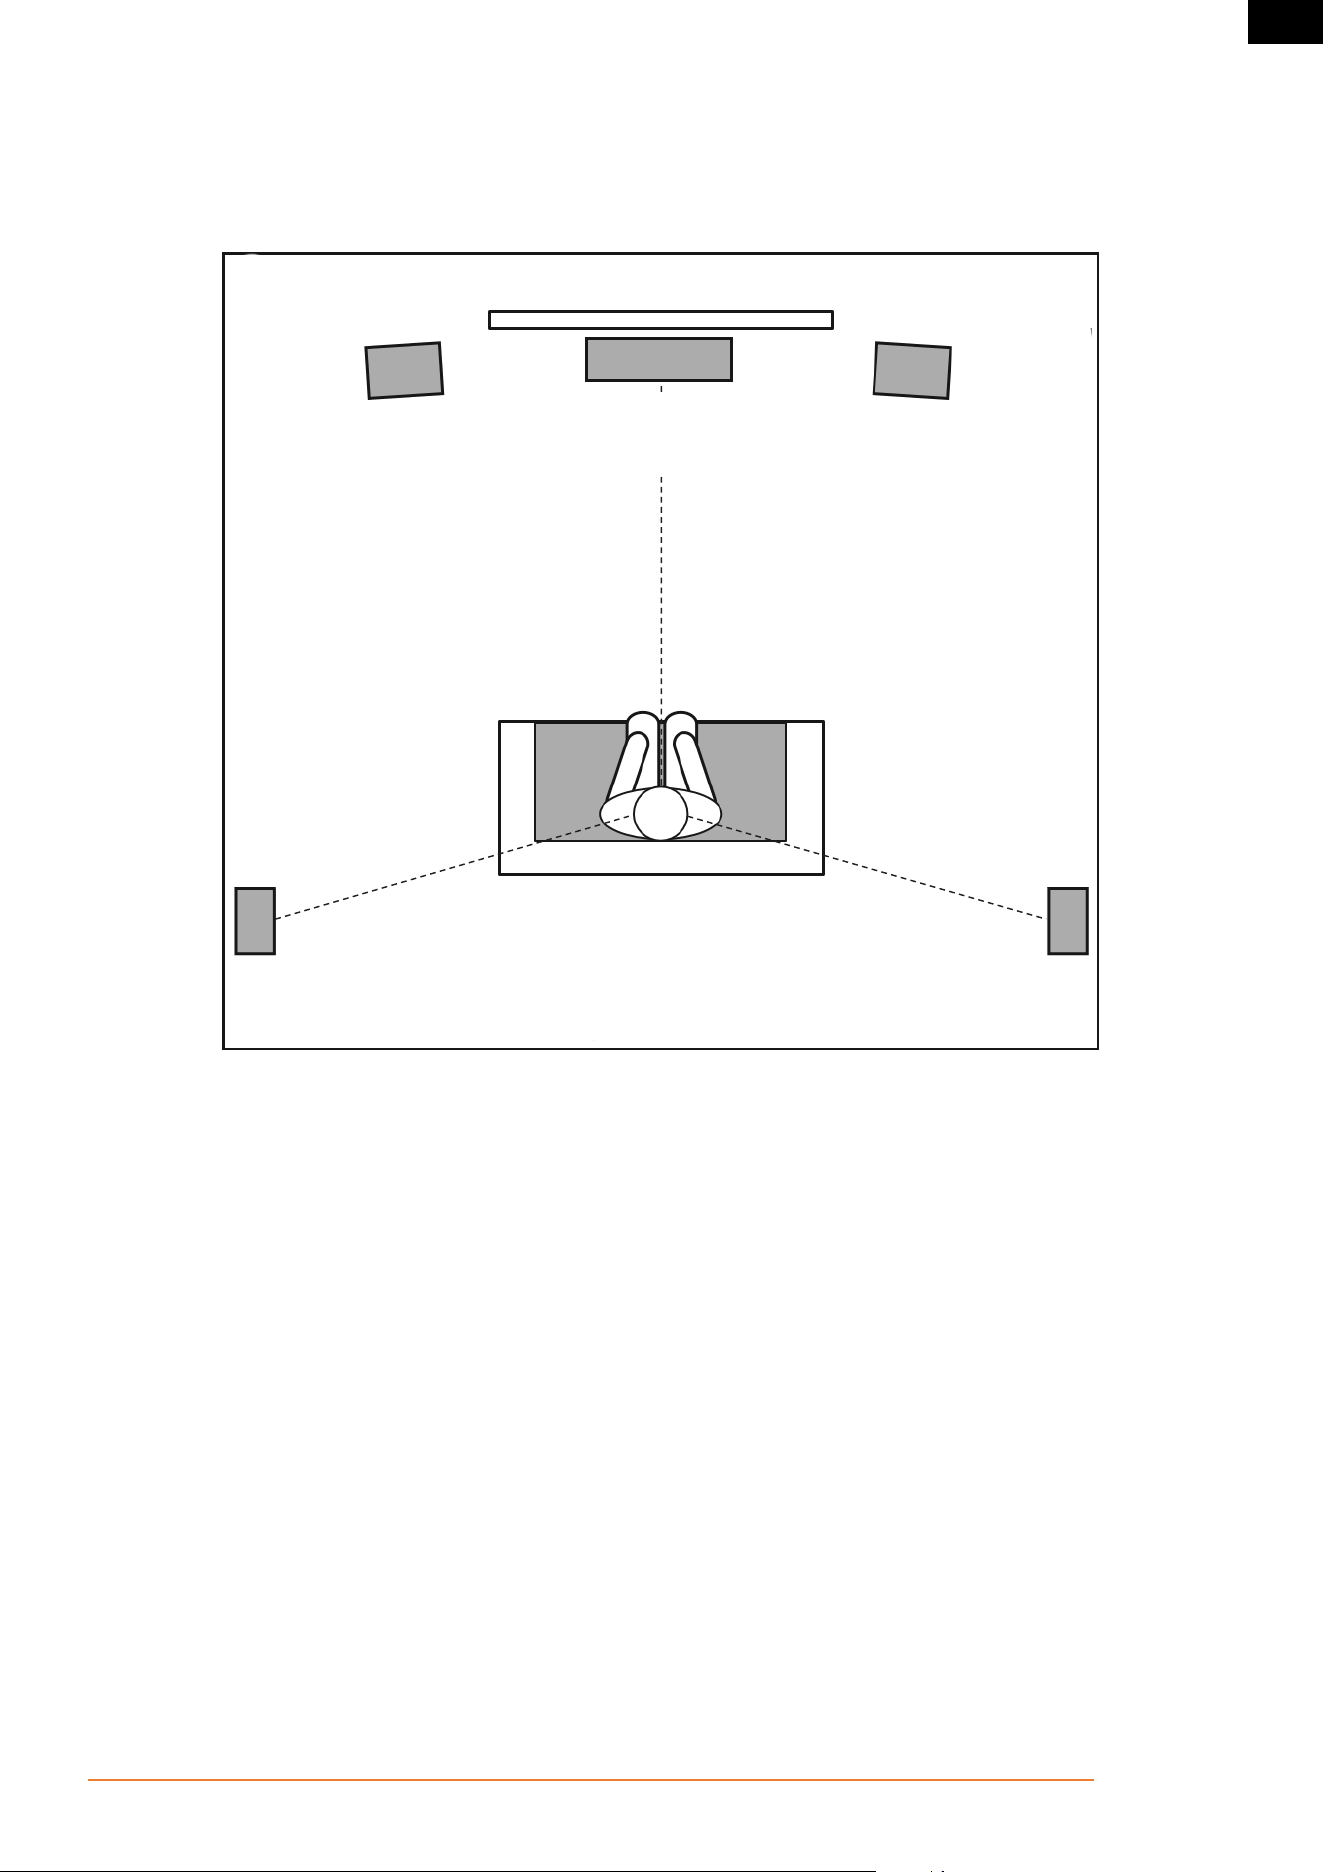
5.1-CHANNEL SYSTEM
When using surround-channel speakers in a 5.1-channel system, place them slightly behind the listening position, facing each other. Ideally,
they should be 5-6 feet (1.5m-1.8m) above the floor. An alternate location would be on a wall behind the listening position, facing forward.
The surround speakers should not call attention to themselves while they're playing. Experiment with their placement until you hear a
diffuse, ambient sound accompanying the sounds that you hear from the front left, front right and center speakers.
Front Left
Speaker
Front Right
Speaker
Left Surround
Speaker
Right Surround
Speaker
Center
Speaker
TV
0°
110°- 120° 110°- 120°
Pg 10 of 42
©2024 Harman International | Features, Specifications, and Appearance subject to change without notice.
MA310 | MA510 | MA710 Owner's Manual | rev 1.4 20250211
EN
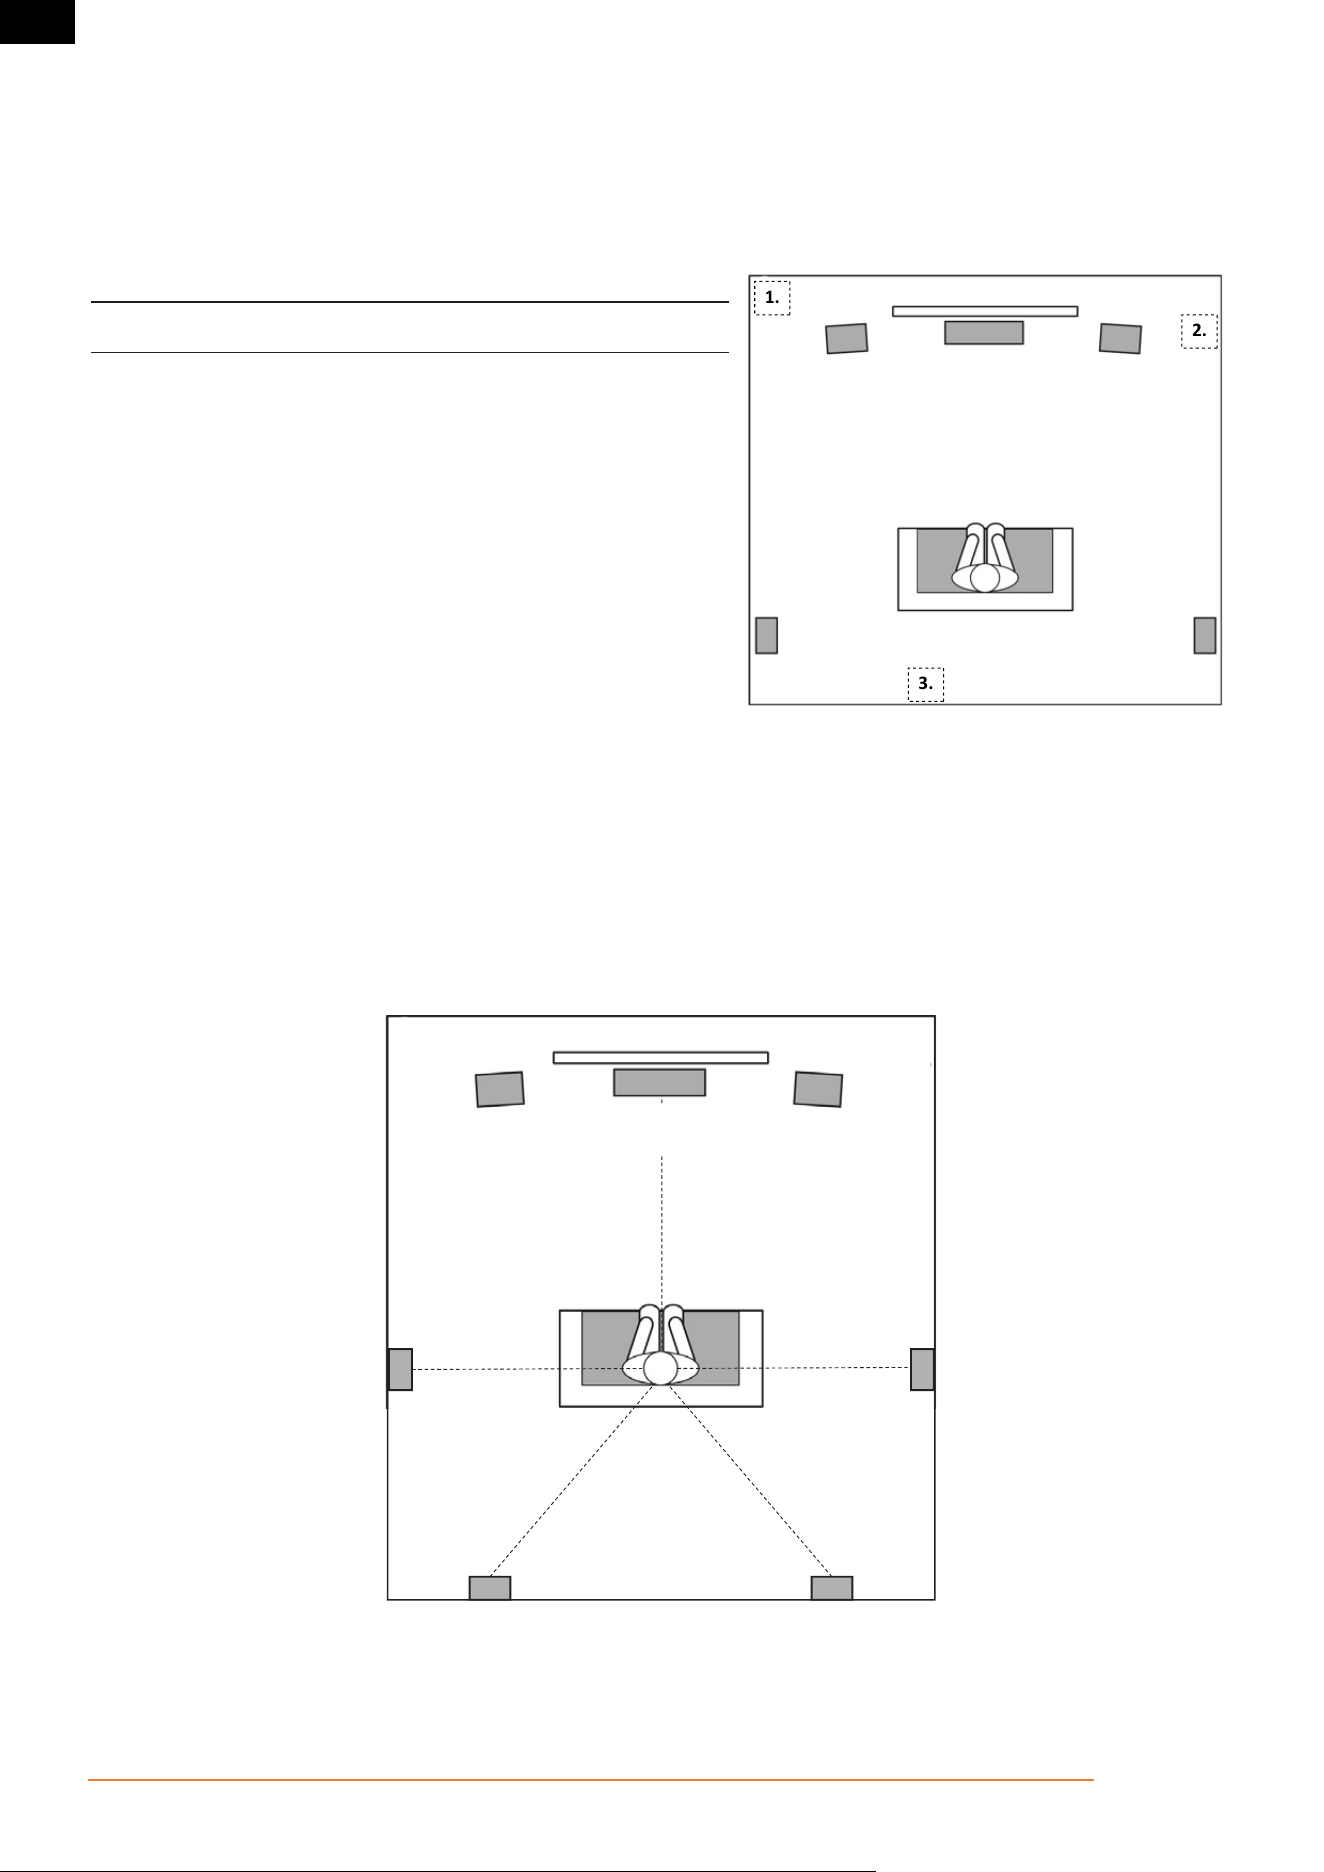
SUBWOOFER PLACEMENT AND POSITIONING IN-ROOM
The goal of proper subwoofer placement is to achieve a smooth, extended
bass response. We strongly recommend that you experiment with placement
before choosing a final location for your subwoofer.
• Place next to a wall to increase the amount of deep bass.
• Placing in a corner (1) for even more deep bass.
Note: Placing in a corner (1) also activates room modes which can make
the bass response less smooth.
• Placing the subwoofer along the same plane as the left and right speakers
(2) produces the best acoustic integration with the main speakers.
• Placing the subwoofer close to the listening position (3) helps remove
poor bass response caused by room variations.
The best way to determine the location for the subwoofer is by temporarily
placing it in the listening position and playing music with strong bass and
midbass content. Then listen while moving around to the various available
positions for the subwoofer in the room. Putting your ears where the
subwoofer would be placed is best. The best subwoofer location is the one
where you perceive the best bass performance and midbass blend, due to
acoustic reciprocity. Place the subwoofer in that location.
While it is true that in general our ears do not hear directional sounds at the
low frequencies where subwoofers operate, when installing a subwoofer
within the limited confines of a room, the reflections, standing waves, and
absorptions generated within the room will strongly influence the performance
of any subwoofer system. As a result, the specific location of the subwoofer
in the room does become important to the amount and quality of bass that is
produced.
1.
2.
3.
Front Left
Speaker
Front Right
Speaker
Left Surround
Speaker
Right Surround
Speaker
Center
Speaker
TV
7.1-CHANNEL SYSTEM
(MA710)
When you use surround-channel speakers in a 7.1-channel system, place the side surround side speakers directly to the sides of the listening
position. Ideally, they should be 5-6 feet (1.5m-1.8m) above the floor.
Front Left
Speaker
Front Right
Speaker
Left Rear Surround
Speaker
Left Surround
Speaker
Right Rear
Surround Speaker
Right Surround
Speaker
Center Speaker
TV
0°
135° - 150°
90° - 110°
90° - 110°
135° - 150°
Pg 11 of 42
©2024 Harman International | Features, Specifications, and Appearance subject to change without notice.
MA310 | MA510 | MA710 Owner's Manual | rev 1.4 20250211
EN
Wiring and Connections
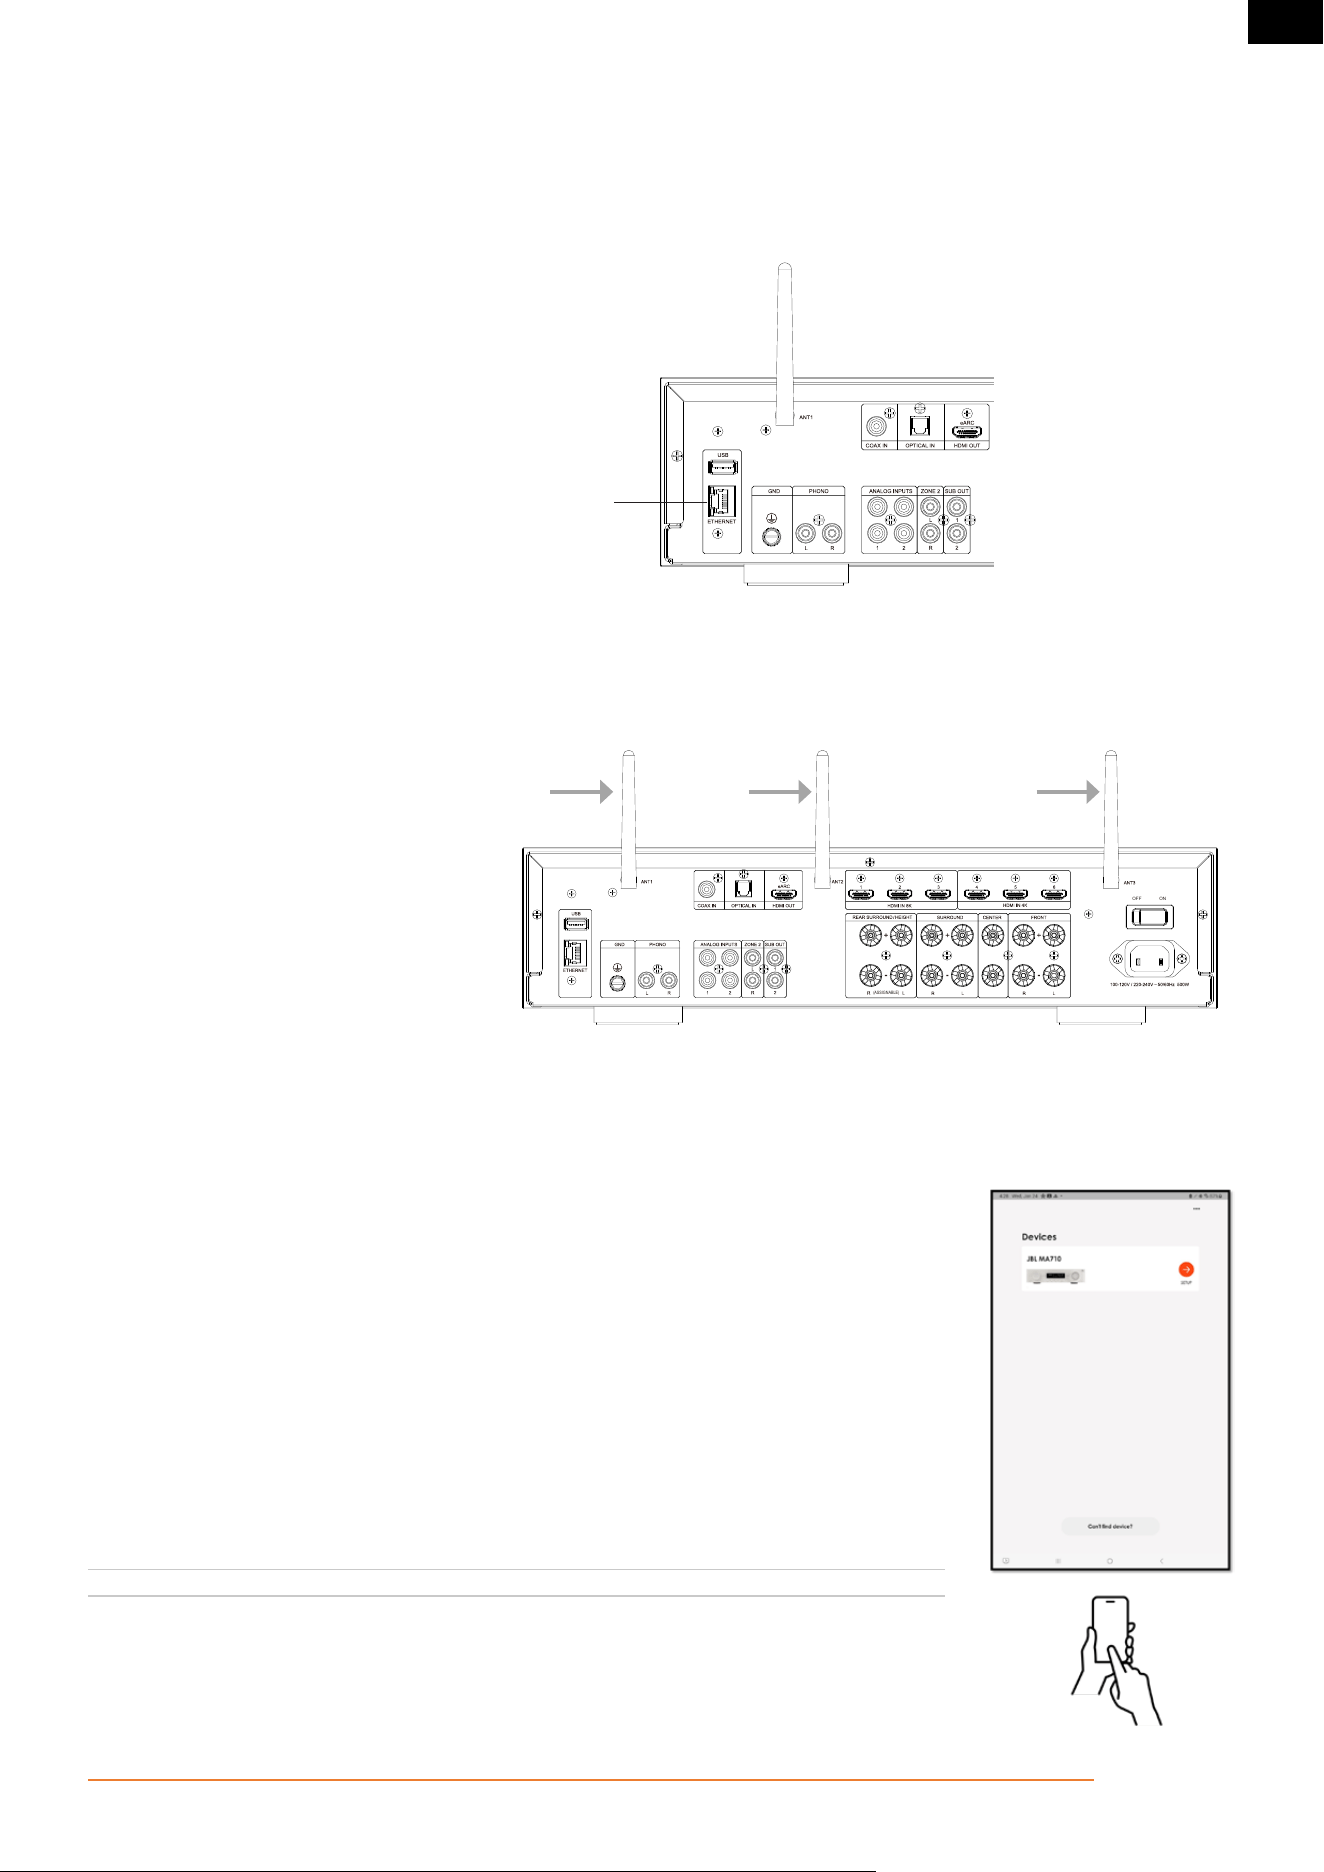
NETWORK CONNECTION (APPLIES TO MA510 AND MA710 ONLY)
For a Wired Connection
Connect the Ethernet port on the back of the AVR to any of the open ports on your network router using a CAT-5e or higher cable.
Ethernet Socket
Connect this to your home network
using a Cat 5e or Cat 6 cable
(MA710 shown*)
(ASSIGNABLE)
ONOFF
For a Wi-Fi Connection:
To make a Wi-Fi connection, download the JBL PREMIUM AUDIO app to your smartphone or tablet. QR codes are on the front page of this
manual.
Connect the supplied external antennas for Bluetooth/Wireless connectivity to connectors on the rear panel.
1. Place the external antennas for Bluetooth/
wireless connectivity evenly over the screw
terminal of rear.
2. Turn clockwise until the antenna is fully
connected.
3. Rotate the antenna upwards for best
reception.
(ASSIGNABLE)
ONOFF
Power on the AVR and open the JBL Premium Audio app to discover it after the AVR is ready. Select it and follow the prompts to connect it to
your Wi-Fi network.
Alternatively, you can connect the JBL AVR to your Wi-Fi network using Apple AirPlay speaker setup in the Wi-Fi settings of your Apple device.
Network Audio Playback
The JBL AVR can be connected to, and play music from the following apps and services:
• Spotify Connect
• Tidal Connect
• Apple AirPlay
• Chromecast (requires acceptance of Google terms in the JBL PREMIUM AUDIO app or additional setup
steps in the Google Home app)
• Roon (requires additional setup in Roon app)
• Works With SmartThings (requires setup with a SmartThings Hub and the SmartThings App)
From the JBL PREMIUM AUDIO app, you can access setup favorites and access other services including but
not limited to:
Internet Radio | Podcasts | Connected USB media | Local network storage (UPnP)
Pg 12 of 42
©2024 Harman International | Features, Specifications, and Appearance subject to change without notice.
MA310 | MA510 | MA710 Owner's Manual | rev 1.4 20250211
EN
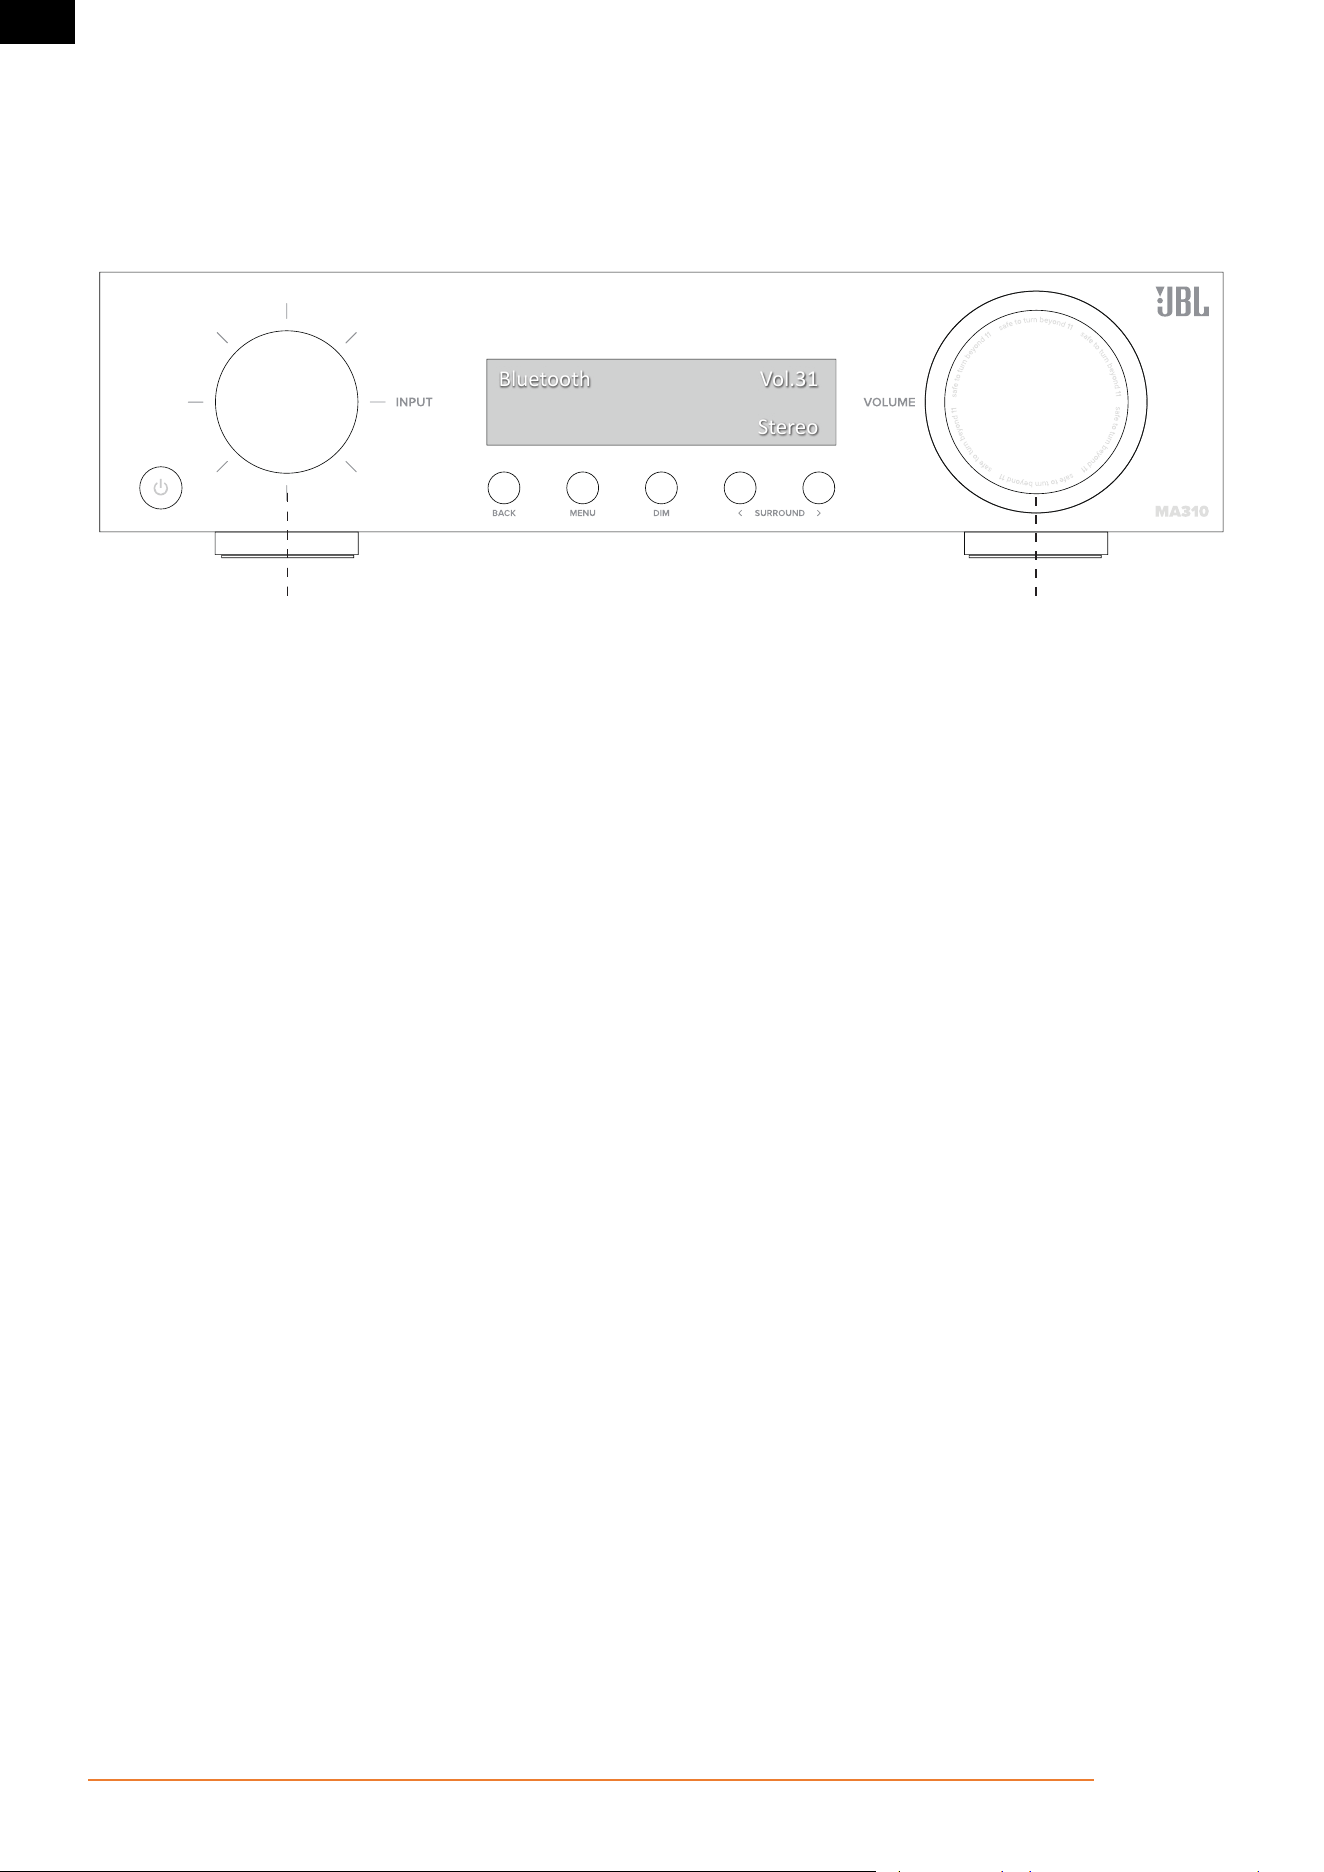
BLUETOOTH OPERATION
Connecting your phone or tablet:
• Select the Bluetooth input on the AVR for Bluetooth pairing of a source device. Push and Hold the Input knob to initiate Pairing Mode.
• To pair your Bluetooth source device, open the Bluetooth settings on your source device and scan for MA310/MA510/MA710 ######
from the list. Each product has a unique ID.
Bluetooth
Stereo
Vol.31
1. Rotate Input Carousel
2. Push to Select "Bluetooth"
3. Push and Hold to activate Pairing Mode
4. Open the Bluetooth settings on your phone/tablet. Scan for
MA310/MA510/MA710 ###### and select from the list. Each
product has a unique ID.
Rotate to Control Volume
Push to Mute/Unmute
• The AVR can recall 7 device pairings. If 7 are in memory already, the oldest will be replaced.
• Because portable devices often have a volume slider. Upon pairing, there is a default volume setting in the amplifier to prevent excessive
volume output being selected accidentally. The default is 20.
Pg 13 of 42
©2024 Harman International | Features, Specifications, and Appearance subject to change without notice.
MA310 | MA510 | MA710 Owner's Manual | rev 1.4 20250211
EN
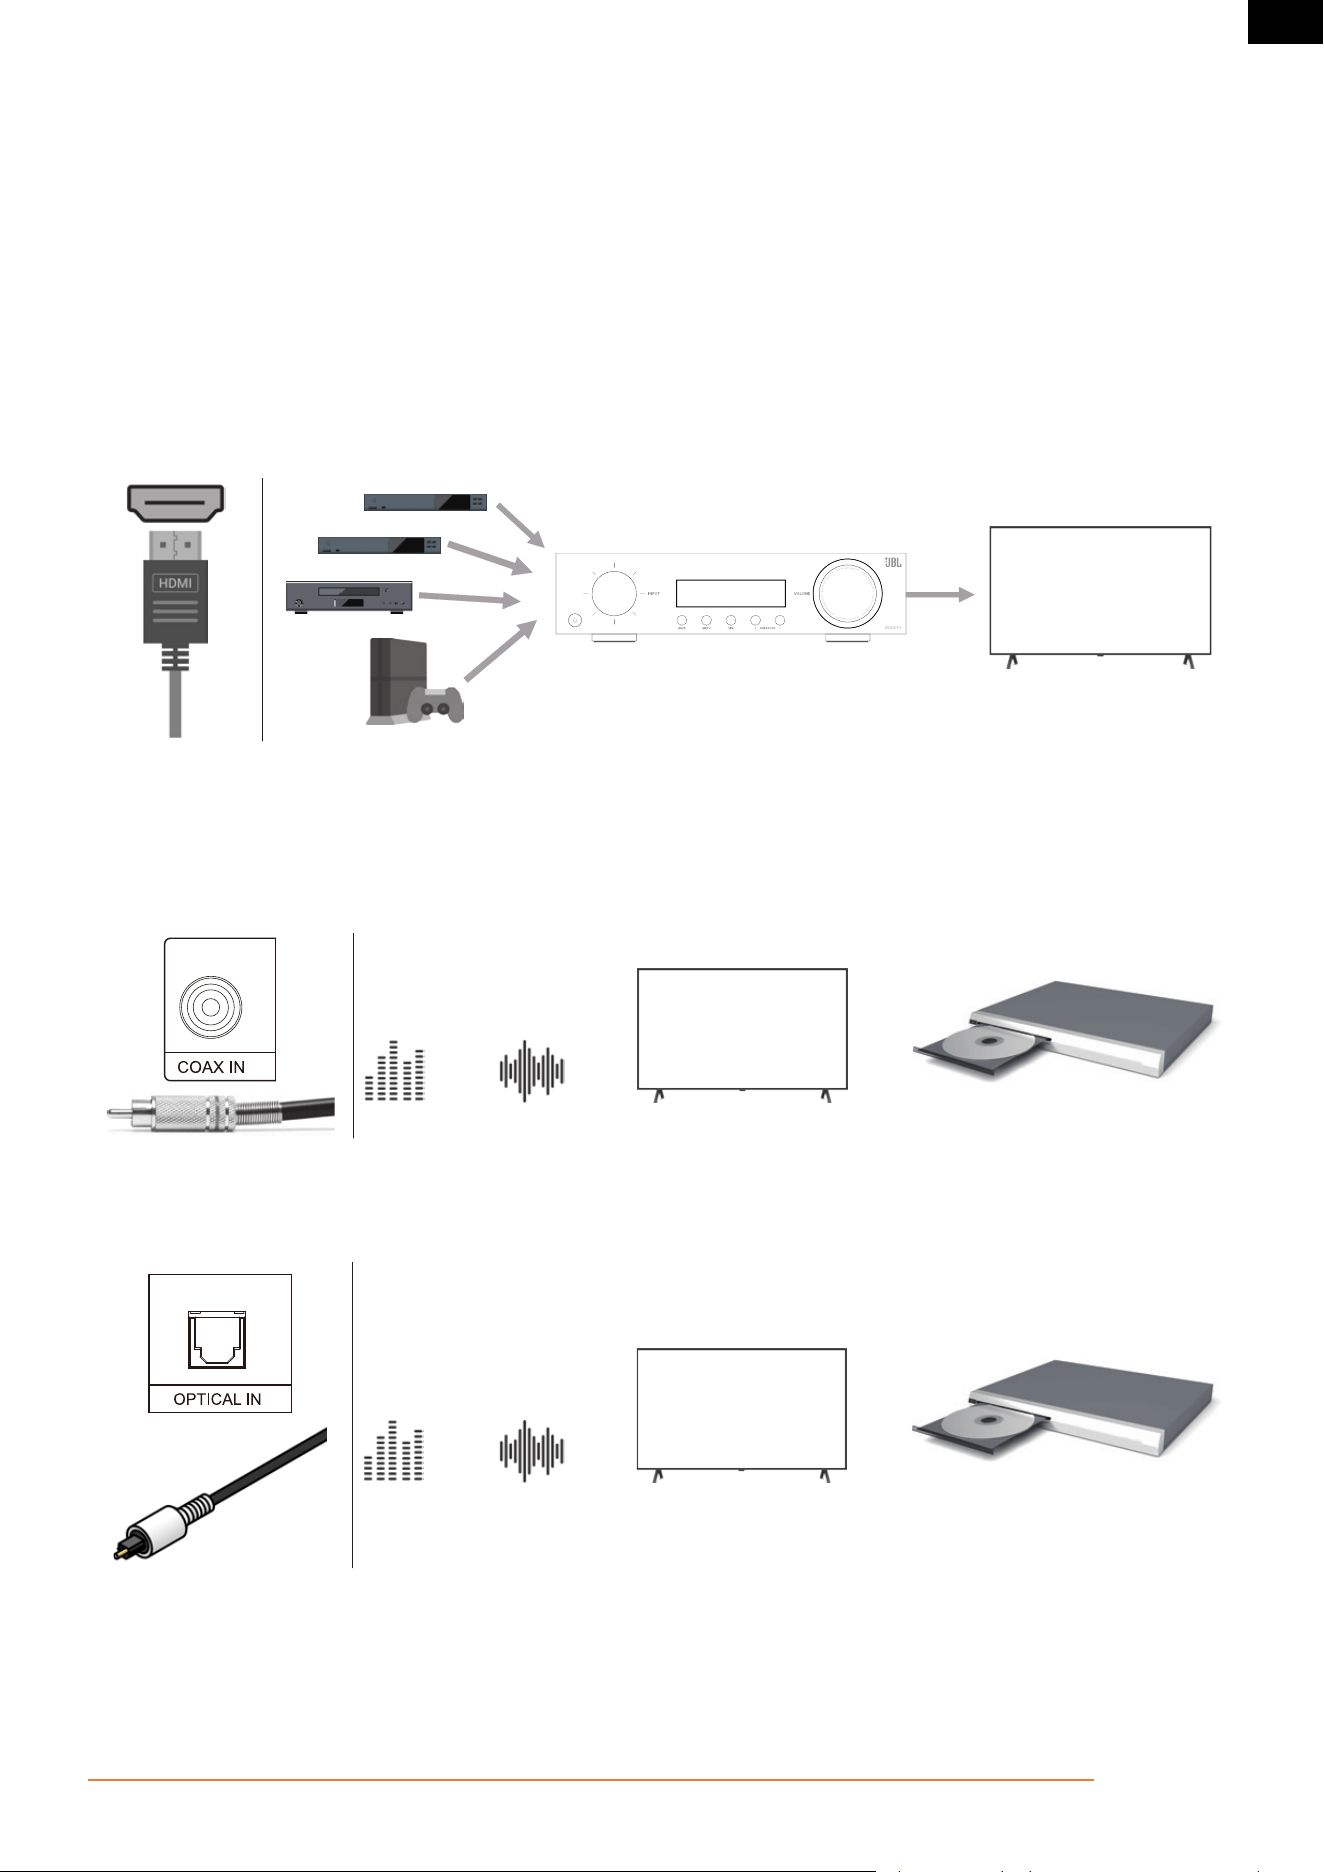
CONNECTING AUDIO/VIDEO INPUTS
JBL recommends using pre-built or professionally wired cables.
Cables Used for Connections
HDMI™
HDMI In: Enables connections to various digital AV devices. This unit is equipped with HDMI input connectivity for various HDMI compatible
devices such as media players, set-top box, DVD/BD players, game consoles, and more. Connect the HDMI video outputs of your source
equipment to the corresponding HDMI inputs.
HDMI Out: Connect the HDMI output to your TV. When a TV with ARC support is connected, be sure to set "ARC" in the TV menu to "On".
When a TV with eARC support is connected, the eARC function of this unit is enabled automatically, and the television audio is played back
(
MA510 and MA710 only
). Keep in mind, it is necessary to connect the Receiver's HDMI output to the HDMI input on the TV that is labelled
as ARC or eARC to use those features.
*For 4K TVs we recommend using an HDMI cable labeled "High Speed" and "with Ethernet".
*For 8K TVs we recommend using an HDMI cable labeled "Ultra High Speed".
COAX
Provides a digital audio input connection (S/PDIF) using a coaxial digital cable with an RCA-type connector (75-ohm impedance). This can be
used to receive digital audio from a TV that is not compatible with ARC/eARC or HDMI incompatible devices such as a CD transport.
OPTICAL
Provides a digital audio input connection using a fiber-optical cable with TOSLINK connectors. This can be used to receive digital audio from a
TV that is not compatible with ARC/eARC or HDMI incompatible devices such as a CD transport.
Pg 14 of 42
©2024 Harman International | Features, Specifications, and Appearance subject to change without notice.
MA310 | MA510 | MA710 Owner's Manual | rev 1.4 20250211
EN
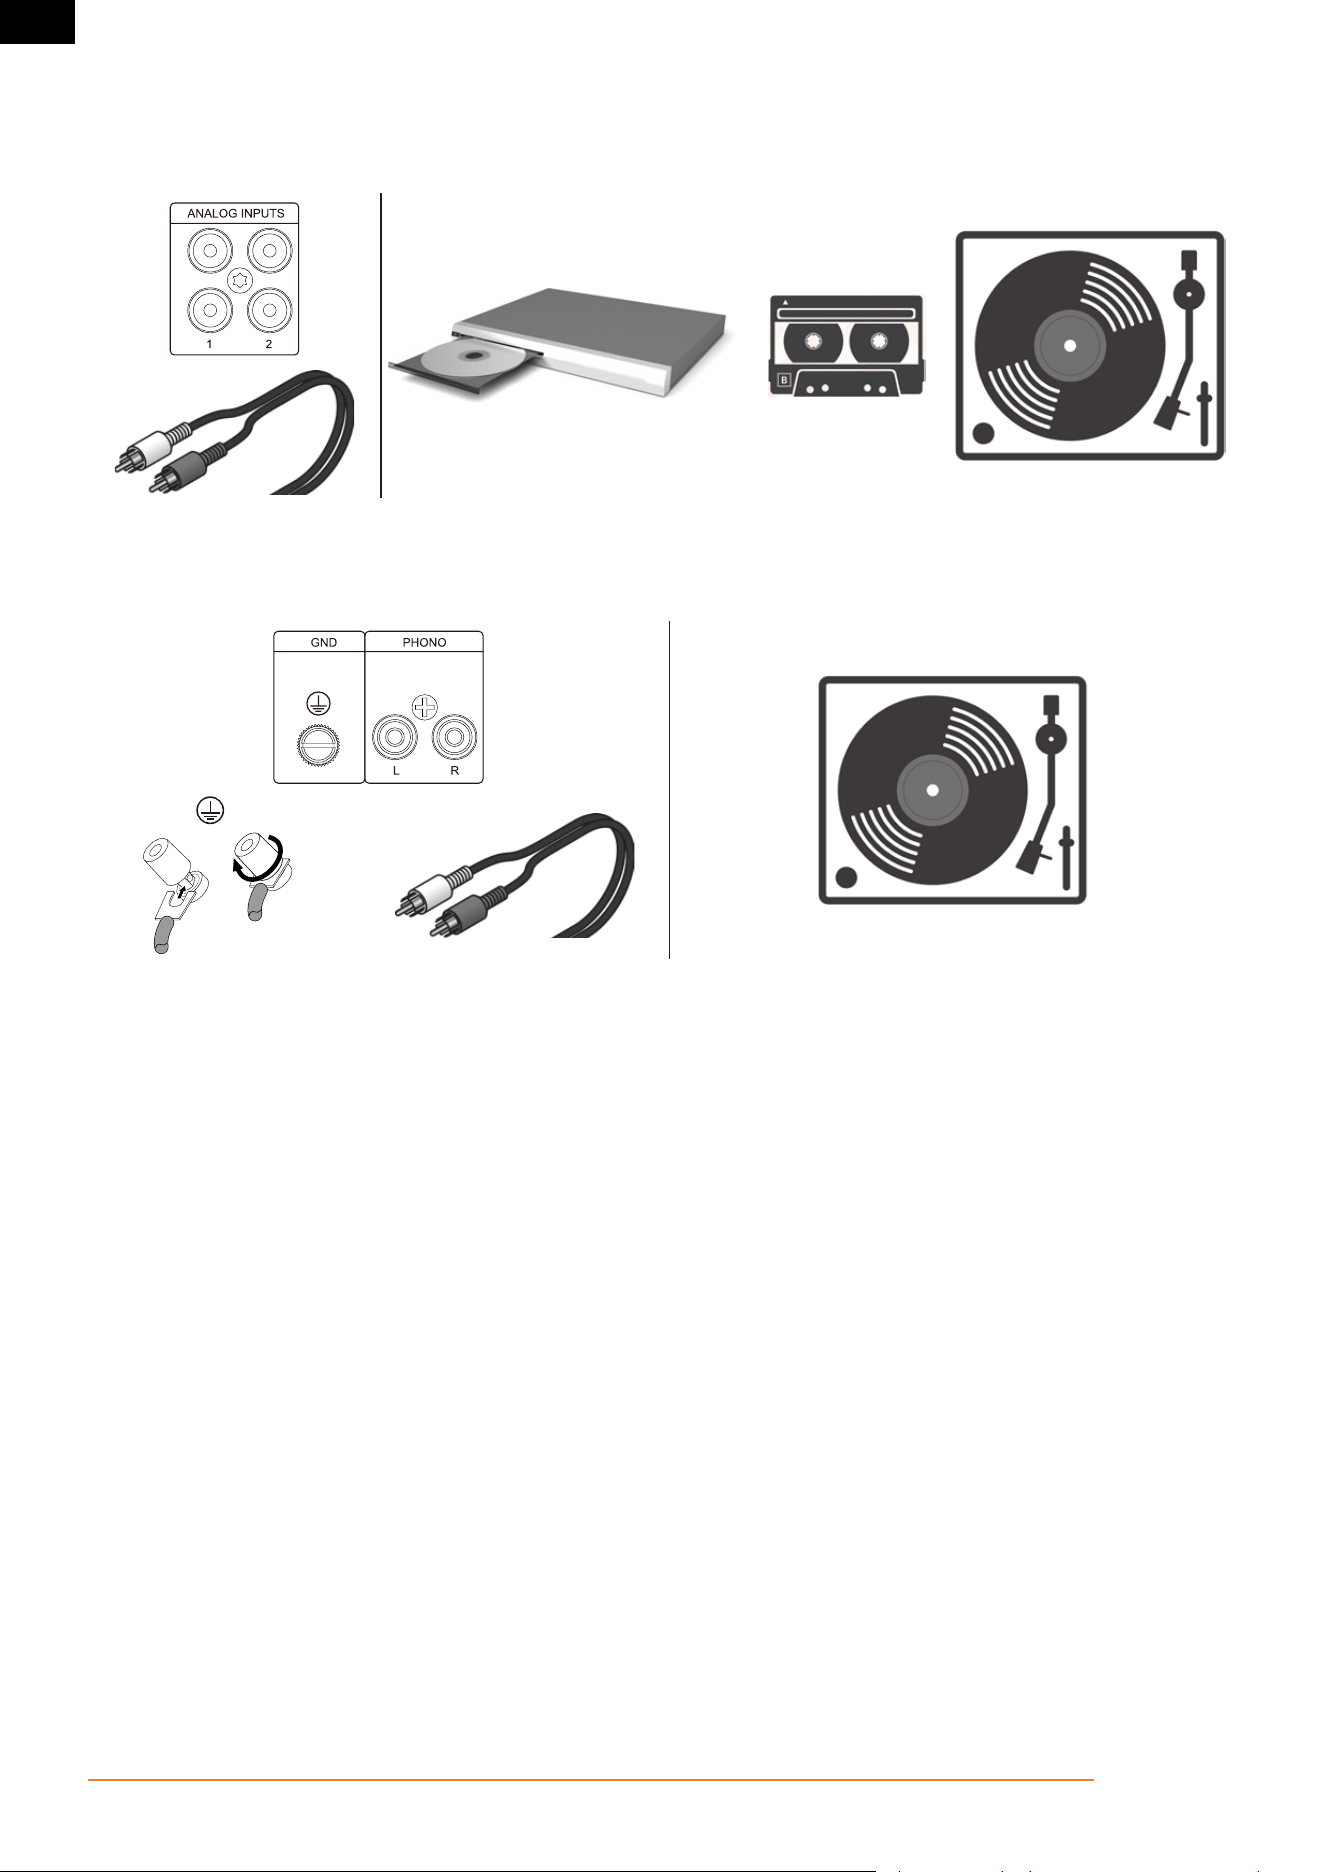
ANALOG
Provides a line-level RCA-type connection (singe-ended plus shield). The most common sources of analog playback are compact-discs,
cassette tapes and pre-amplified vinyl records.
PHONO
(MA710 only*)
Provides an RCA-type connection (singe-ended plus shield) and a ground terminal, for turntables equipped with a moving magnet (MM)
phono cartridge.
Note: The ground terminal (GND) of this unit is not for safety grounding purposes. Depending on the turntable, connecting the ground line to this terminal may
reduce a significant amount of noise.
Pg 15 of 42
©2024 Harman International | Features, Specifications, and Appearance subject to change without notice.
MA310 | MA510 | MA710 Owner's Manual | rev 1.4 20250211
EN
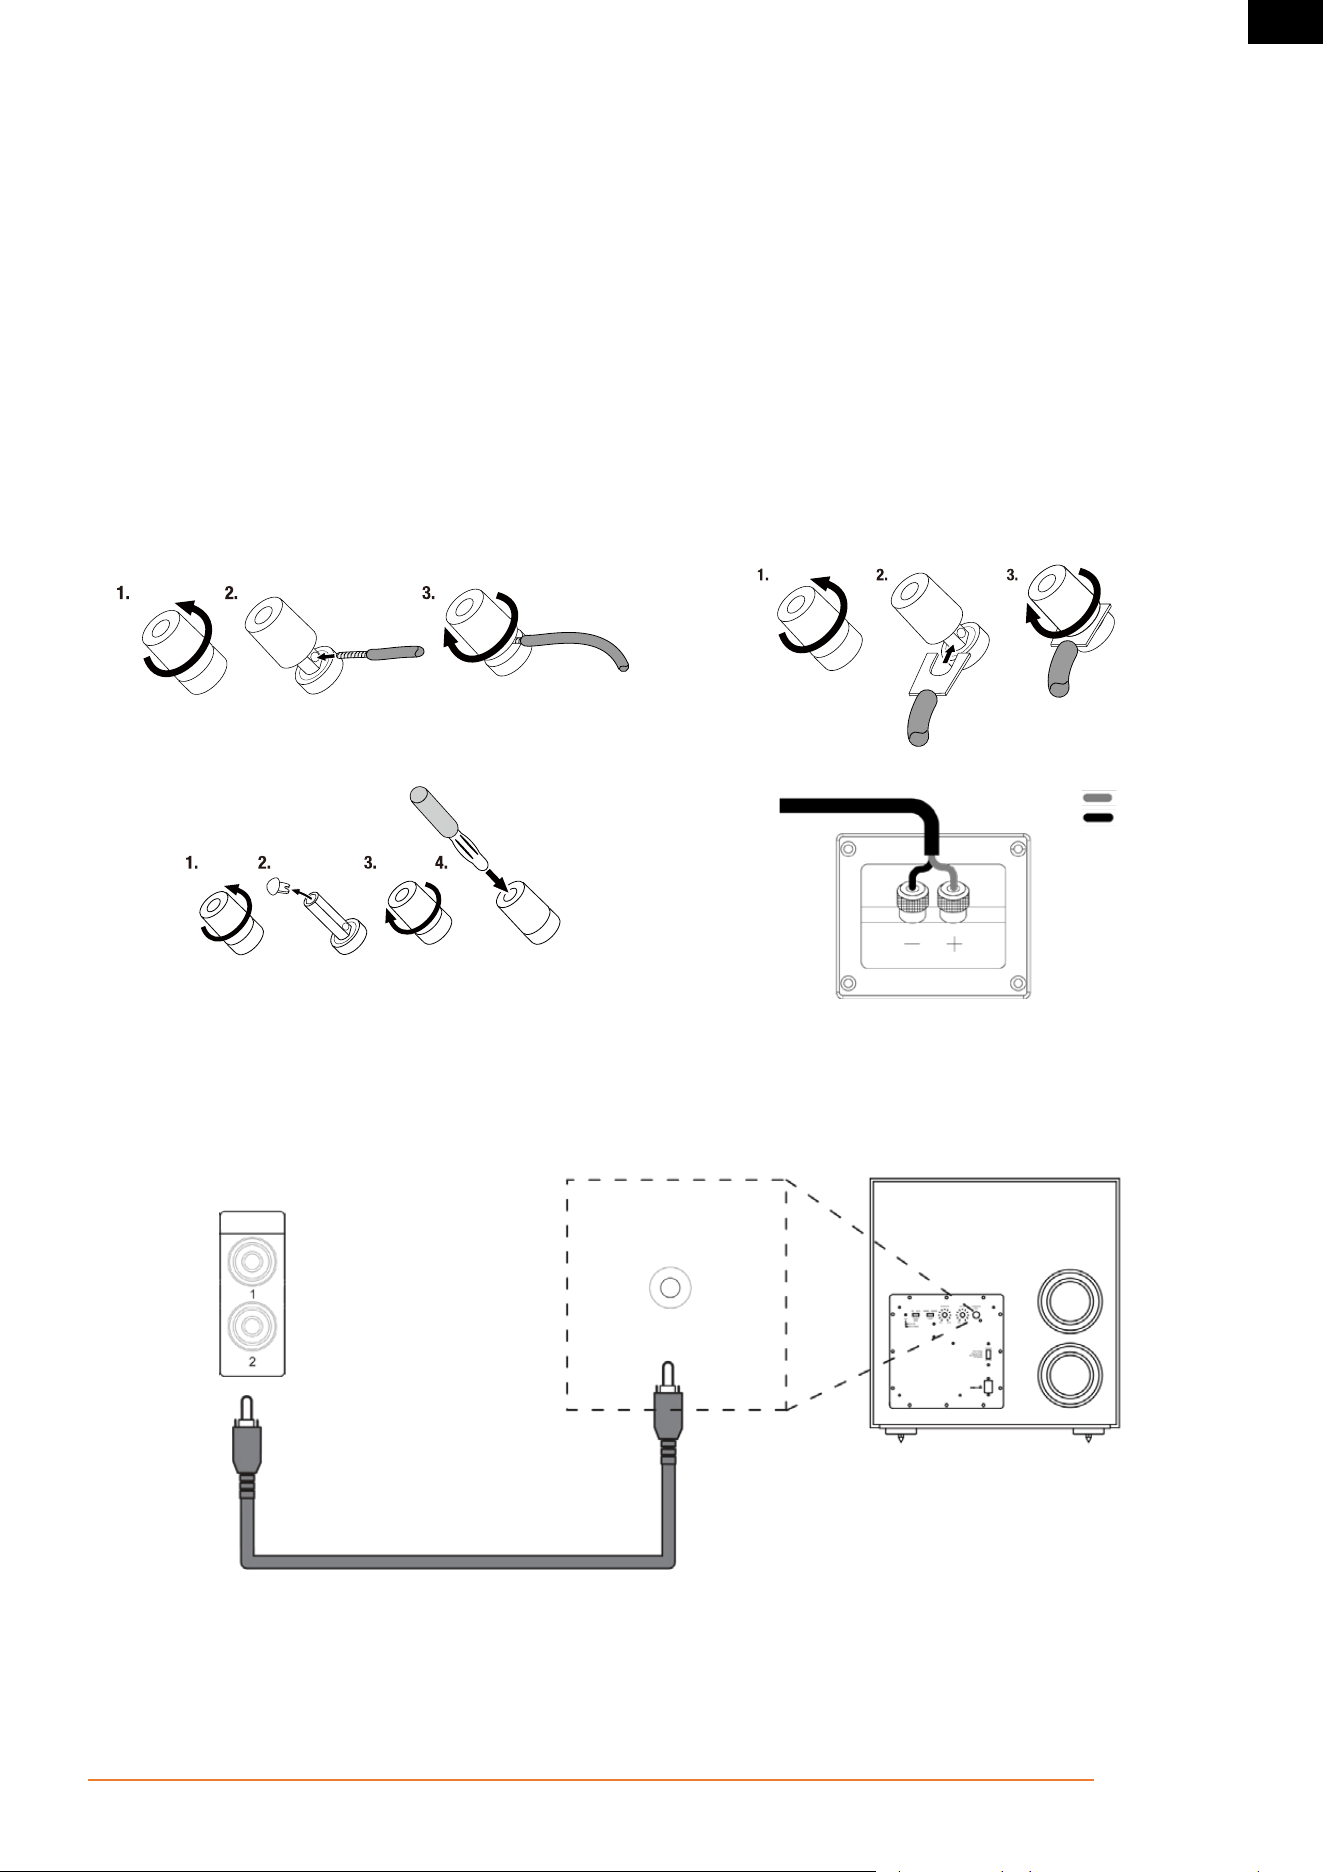
WIRING OUTPUT CONNECTORS
Before making any output connections, ensure the power cord is disconnected from the amplifier and carefully review the total impedance
for loudspeakers connected to each amplifier output.
JBL recommends using two-conductor or four-conductor, heavy gauge speaker wire up to 12 AWG.
Speaker outputs provide connection to passive loudspeakers via binding post-type connectors that accept bare wire, spade or banana plug
terminations. The connectors are grouped in pairs. Each pair consists of two wire terminations: positive (+) and negative (–)
To attach speaker cables to a binding post using bare wire, strip approximately 3/8-inch (10 mm) of insulation from the end of the positive
and negative leads of the cable and insert the bare ends into the corresponding binding post connector, tightening the screw terminals to
secure the termination. Repeat this procedure for each speaker.
Note: Connect so that the speaker cable core wires do not protrude from the speaker terminal. The protection circuit may be activated if the
bare wire touches the rear panel or if the + and - sides touch each other.
BINDING POST TERMINATION
Using Bare Wire Connectors Using Spade Connectors
Using Banana Connectors Connection To Speaker
Positive + Red
Negative - Black
CONNECTING A SUBWOOFER
Use a subwoofer cable to connect the subwoofer. Two subwoofers can be connected to this unit. The same signal is output from the
respective subwoofer terminals.
SUB OUT
SUBWOOFER
INPUT

Pg 16 of 42
©2024 Harman International | Features, Specifications, and Appearance subject to change without notice.
MA310 | MA510 | MA710 Owner's Manual | rev 1.4 20250211
EN
Essential Operation
PLACING THE UNIT
CAUTION: Before you begin, make sure your amplifier is disconnected from the power source.
• Place the AVR on a level, firm surface, avoiding direct sunlight and sources of heat or dampness.
• Do not place the AVR on top of an amplifier or other source of heat.
• Make sure the remote-control receiver to the left of the front panel display is unobstructed, otherwise this will impair the use of the
remote-control.
• Do not place your record deck on top of this unit. Record decks are very sensitive to the noise generated by mains power supplies which
will be heard as a background 'hum' if the record deck is too close.
• The normal function of the unit may be disturbed by strong electromagnetic interference. If this occurs, simply reset the unit with the
power button, or move the unit to another location.
This product offers the user the option to deactivate power management functions. Note that doing this this will increase energy
consumption of the product.
POWER
The Receiver is supplied with an AC plug already attached to the cord. Check that the plug supplied fits your outlet – should you require a
new power cord, please contact your JBL dealer.
Push the IEC plug end of the power cord into the socket on the back of the amplifier, making sure that it is pushed in firmly. Plug the other
end of the cord into your AC outlet. The Receiver can be turned on using the power switch on the rear panel. While switched on, the front
panel LED will glow orange indicating that the unit is in Standby.
STANDBY POWER
The Receiver has a low power standby mode which can be entered by pressing on the remote control. When in standby mode, the display
is blank and the front panel LED glows orange.
If the unit is to be left unused for an extended period, we recommend that you disconnect it from AC power to save power.
The unit can be brought out of standby mode by pressing the button on the remote control, button on the front panel or rotate the
Input or Volume knob. While switched on, the front panel LED will glow white.
Pg 17 of 42
©2024 Harman International | Features, Specifications, and Appearance subject to change without notice.
MA310 | MA510 | MA710 Owner's Manual | rev 1.4 20250211
EN
OPERATING YOUR RECEIVER
For set up, configuration and information display we recommend you use the OSD (On-Screen Display) on your TV whenever possible.
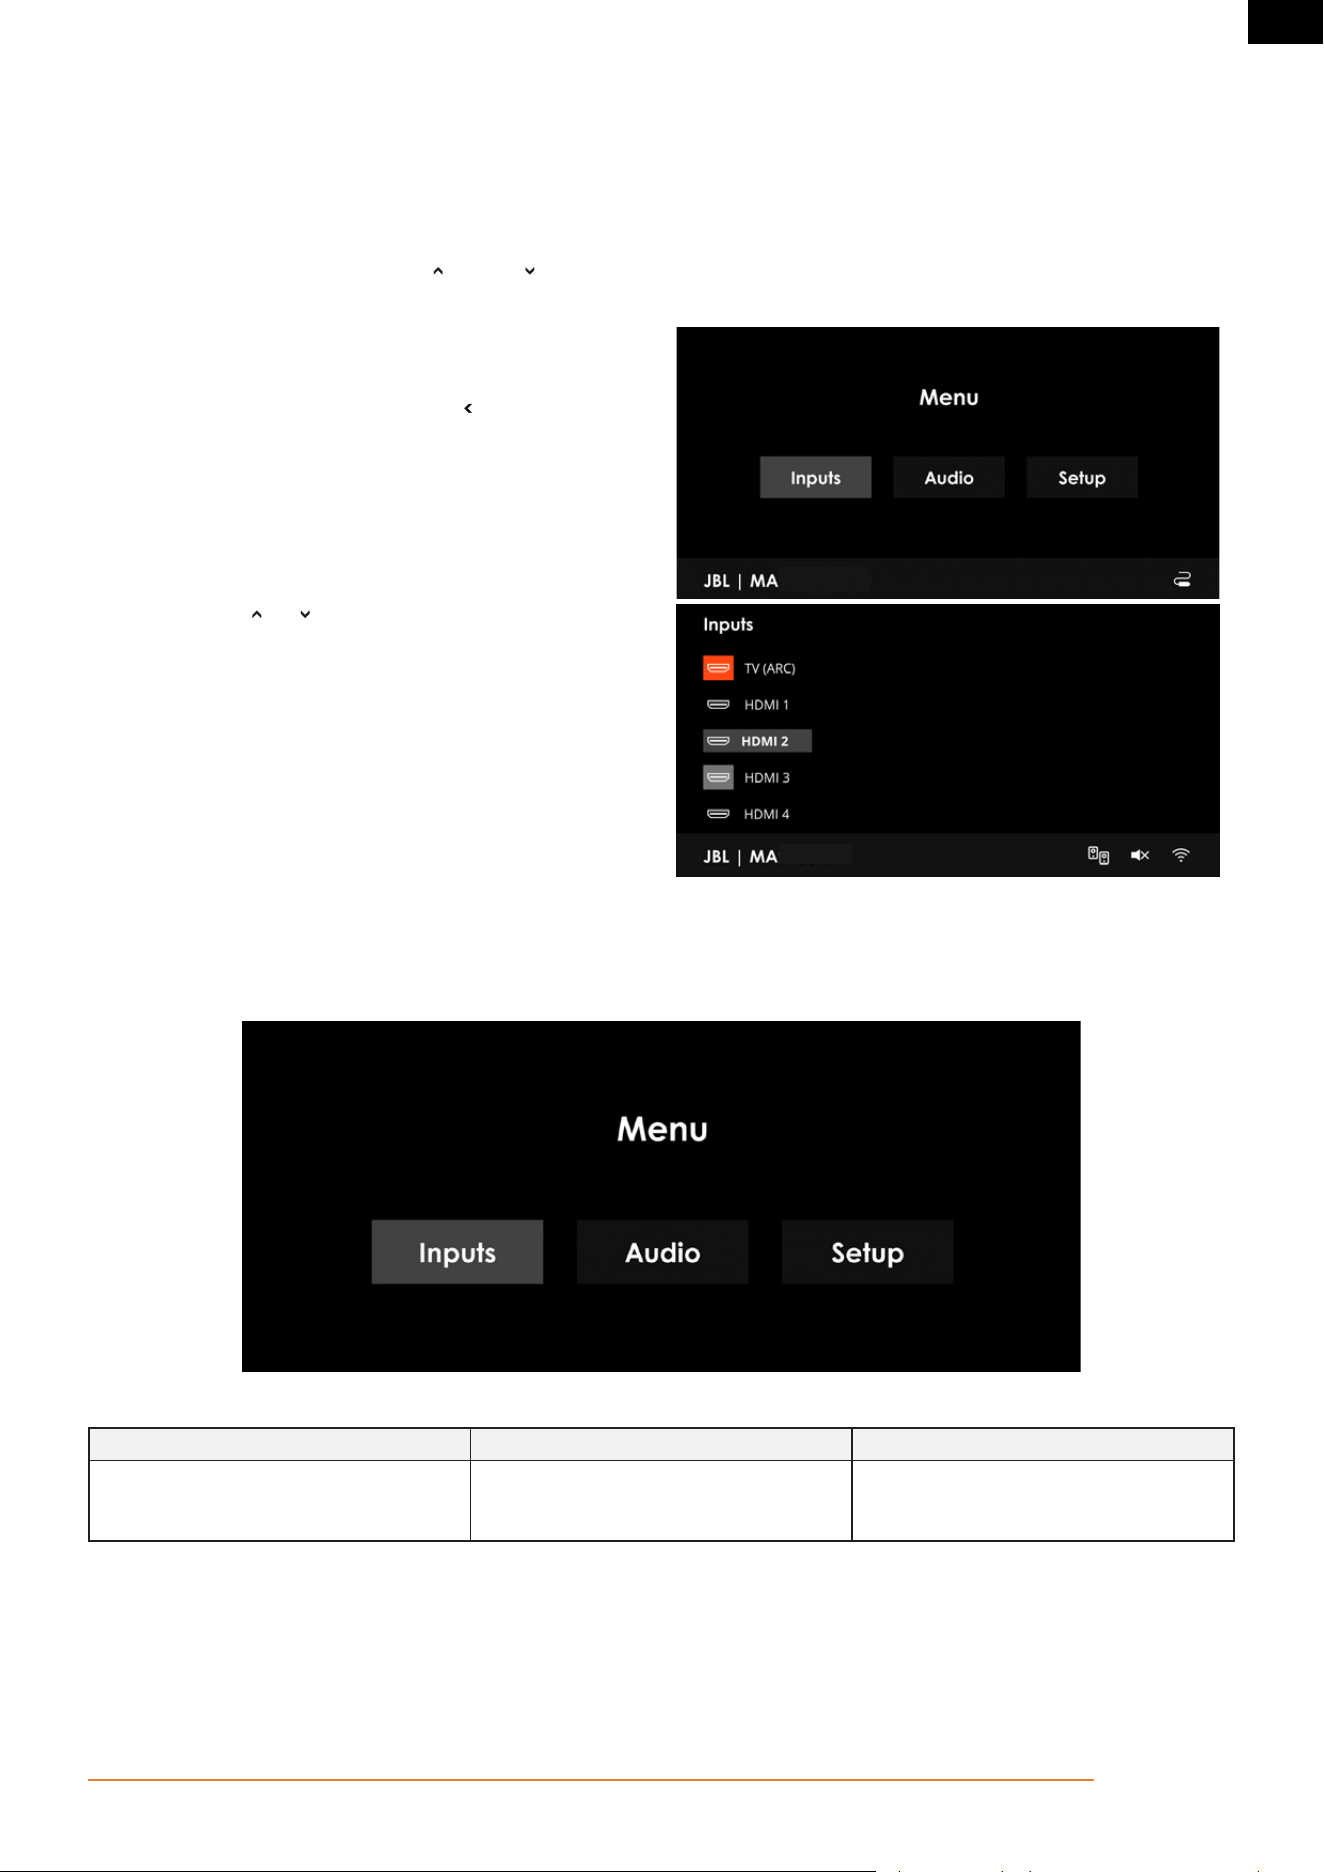
SELECTING A SOURCE
To select an input source, press the INPUT or INPUT buttons on the remote, or rotate the front panel Input knob until that source is shown
on the front panel display. Press SELECT on the remote or push the front panel Input knob to select.
Alternatively, you may browse input sources using the Inputs screen
from the On-Screen Display Main Menu.
Press the MENU button on the remote, scroll (left) to Inputs and
press the SELECT button to enter.
From here, use the and keys to browse input sources. Press
SELECT on the remote to select a source.
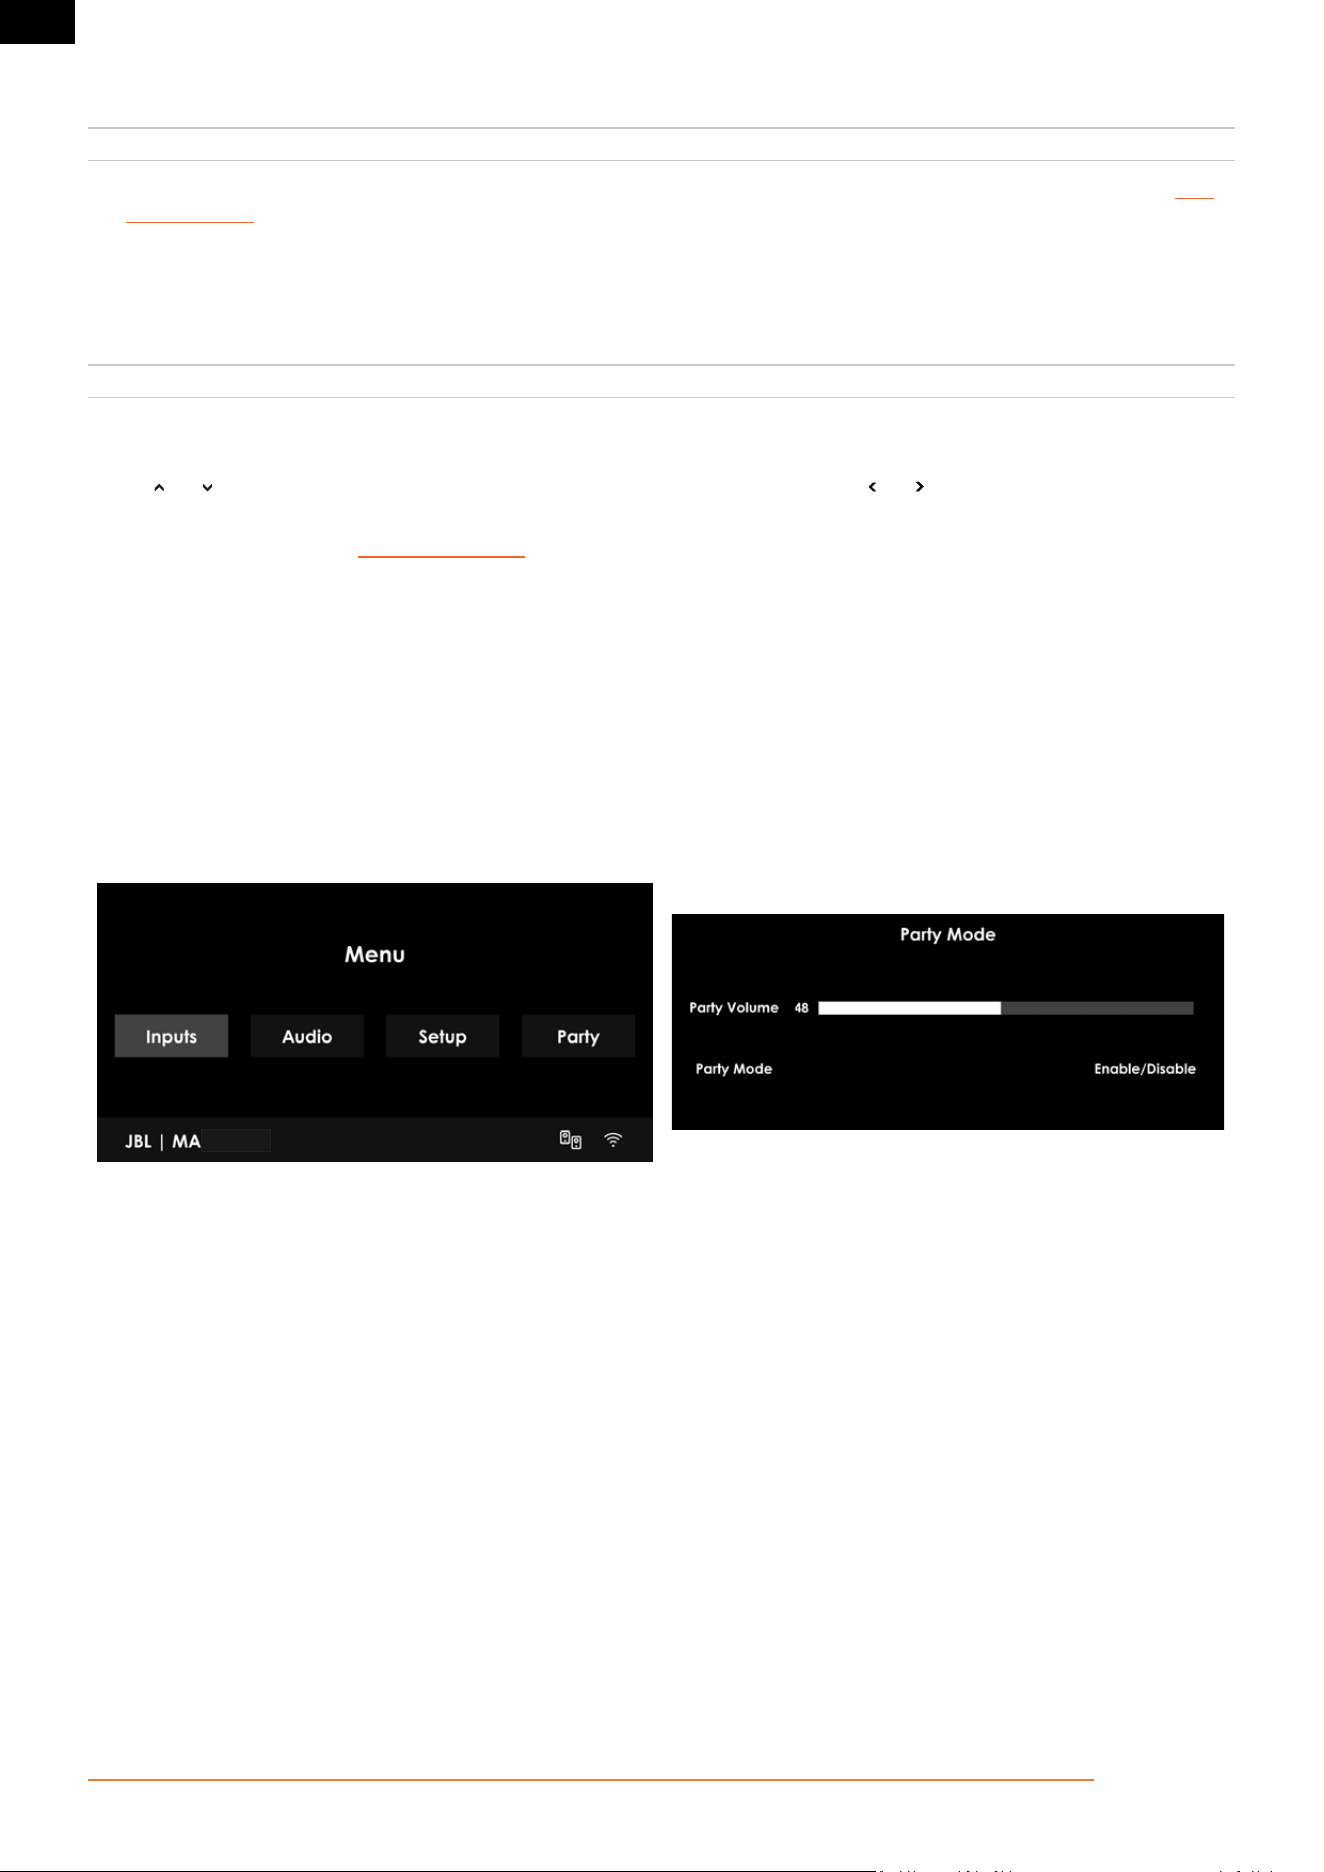
MAIN MENU OVERVIEW
Provides access to the main features of the Receiver.
Inputs Audio Setup
Browse and select input sources. Quick access to apply audio effects,
equalization, and surround modes on-the-fly.
Essential tools and settings. Most of the
setup menus need only be configured once
when you first install the system.

Pg 18 of 42
©2024 Harman International | Features, Specifications, and Appearance subject to change without notice.
MA310 | MA510 | MA710 Owner's Manual | rev 1.4 20250211
EN
VOLUME CONTROL
It is important to realize that the level of the volume indicator is not an accurate indication of the power delivered to your loudspeakers.
The Receiver often delivers its full output power long before the volume control reaches its maximum position, particularly when listening
to heavily recorded music. In comparison, some movie soundtracks can appear very quiet, as many directors like to keep maximum levels in
reserve for special effects sequences.
SYSTEM FEEDBACK
Provides information to the user of the current state of the Receiver.
Front Panel Display – "Now Playing" info.
Volume IndicatorInput Source
Surround Mode
Incoming Audio
Format
Mini OSD Pop-Up
Input Source
Volume Indicator
Surround Mode
On-Screen Display (OSD) Main Menu - bar icons
Applies to MA310, MA510, MA710
System output muted
Applies to MA510, MA710
Wireless LAN connection
No wireless LAN connection
Wired ethernet LAN connection
Applies to MA710
PARTY Mode enabled

Pg 19 of 42
©2024 Harman International | Features, Specifications, and Appearance subject to change without notice.
MA310 | MA510 | MA710 Owner's Manual | rev 1.4 20250211
EN
Essential Setup
Before you use your Receiver, it is essential that you enter some information into the Setup menus about your speaker configuration. This
allows the Receiver to process any surround sound digital source to exactly match your system and give you the ultimate surround sound
experience.
There are three pieces of vital information which are outlined in the sections: 'Speaker Types', 'Speaker Distances' and 'Speaker Levels'.
The way you enter this information manually into the Receiver is given later in the 'Setup Menus' section. When calibrated using EZ Set EQ
calibration app, the speaker levels and delays will NOT be established automatically when the equalization is turned on. The speaker size,
speaker distance and speaker levels settings must be entered manually. It is important to understand why these speaker settings must be
entered, which is why this section is presented before the section on equalization.
SPEAKER TYPES
You need to set the type of speakers that you have connected to your Receiver:
Large Capable of full frequency range reproduction.
Small Not capable of full frequency range reproduction at the low frequency end.
None Speaker not present in your configuration.
The terms 'Large' and 'Small' do not necessarily relate to the physical size of your speakers. As a rule of thumb, if a speaker cannot reproduce
a flat frequency response down to about 40Hz (and very few can!) it is often better to consider them as 'Small' for setup purposes of home
cinema.
When a speaker is set to 'Small', very low frequency sounds are redirected away from that speaker to a 'Large' speaker or a subwoofer, which
are far better suited to reproducing these low frequency sounds. Many prefer to set even very full-range speakers to 'Small' to optimize the
dynamic range of the system and to more fully utilize the EZ Set EQ with bass management enabled to ensure smooth subwoofer to main
loudspeaker blending.
Note that it is not possible to set all speakers to 'Small' unless there is a subwoofer in your speaker configuration. If you do not have a
subwoofer, you will be forced to set your front speakers to 'Large'. (Some users may wish to automatically override the 'Small' speaker setting
for purely stereo music listening when not watching movies. This can be achieved in the 'Source Setup' menu (see Source Setup)
Speaker Crossover
If you have set any speakers as being 'Small', then you will be required to set a value for the crossover frequency. This is the frequency below
which signals are filtered away from these Small speakers and redirected to the subwoofer. 80Hz is usually the best crossover frequency, since
it sends non-directional low frequencies to the subwoofers which are best-suited to handle low frequencies and can be placed optimally to
reproduce only the lowest frequencies.
Amp Assign (MA710 only)
It is possible to assign your rear surround amplifier channels to Front Height or Top Middle for Dolby Atmos speaker configuration.
In addition, the rear surround amplifier channels can be assigned to provide a stereo downmix of the Main zone to a secondary location of
the home, called Party mode. You can also assign these channels to bi-amplify the front left/right channels.

Pg 20 of 42
©2024 Harman International | Features, Specifications, and Appearance subject to change without notice.
MA310 | MA510 | MA710 Owner's Manual | rev 1.4 20250211
EN
SPEAKER LEVELS
The levels of all the speakers in the system need to be adjusted to match each other at the listening position to create a proper surround
effect. To help with this, the Receiver can generate a test noise for each speaker which should be measured with a sound pressure level (SPL)
meter. The meter should be set to 'C' weighting and slow response.
Several smartphone/tablet apps are available which can also perform this function. The level of noise measured at the listening position from
each speaker should be adjusted on the Speaker Levels page of the 'Speaker Setup' menu so that the meter reads 75dB SPL. Adjust the main
system volume of the Receiver before turning the test noise on, as the Speaker Level setting is based on the overall level of the system for the
duration of the speaker noise test.
NOTE: Mobile phone apps are limited in accuracy unless an external microphone is used. Consult your dealer for recommendations.
There are several basic SPL meters on the market at reasonable prices aimed at home cinema enthusiasts. Check your local technology store,
search online or ask your dealer.
If you do not have an SPL meter or suitable app, you can try to adjust the noise level of each speaker by ear. In this case it is not possible to
adjust the speakers to the absolute 75dB SPL volume level, but you should aim for all speakers sounding equally loud. Setting speaker test
noise levels by ear is not recommended as it is very difficult to do accurately.
SPEAKER DISTANCES
Finally, it is essential for the distance from each speaker to the listening position to be accurately measured and entered into the 'Setup'
menu. This ensures that the sounds from the various speakers arrive at the listening position at the correct time to recreate a realistic
surround effect. The distance can be entered in inches, centimeters, or milliseconds.

Pg 21 of 42
©2024 Harman International | Features, Specifications, and Appearance subject to change without notice.
MA310 | MA510 | MA710 Owner's Manual | rev 1.4 20250211
EN
Setup Menus
The Setup menus allow you to configure all aspects of your Receiver. The next few pages will go through the menu items accessible via the
front panel or IR remote and explain their function. Most of the Setup menus need only be configured once when you first install the system (or
if your system changes, you move any large furniture or the listening locations, or you move).
ENTERING SETUP MODE
To enter the setup menu, press the MENU button on the remote control or font panel. We recommend you use the OSD (On-Screen Display)
on your TV whenever possible. Alternatively, the front panel display shows the setup menu one line at a time.
NAVIGATING THE SETUP MENU
…using the remote control
The setup menu can be navigated by using the cursor (arrow) keys on the remote control. This is by far the easiest method.
1. To enter the setup menu, press the MENU button (which is located immediately under the navigation buttons).
2. Use the and keys to navigate left and right the main menu section headings.
3. Once you have the main section that you require highlighted, use the SELECT key to enter the section.
4. Use the and keys to navigate up and down the section settings. Some settings may be greyed out. These are either for information
only (e.g. incoming sampling frequency) or are not currently selectable. Page numbers on the bottom right of the OSD menu indicate
your position in the settings list where there are more items than can be displayed at once.
5. Pressing SELECT chooses a setting to change it, pressing SELECT again or BACK de-selects the setting.
6. At any time, press the MENU button to exit the menu. Any changes to settings are saved.
…using the keys on the front panel
The Receiver front panel controls can be used to configure the unit. Follow the instructions for using the remote control, in this case using the
Input rotary knob for up, down, left and right. Press the Input knob to select.

Pg 22 of 42
©2024 Harman International | Features, Specifications, and Appearance subject to change without notice.
MA310 | MA510 | MA710 Owner's Manual | rev 1.4 20250211
EN
SOURCE SETUP
The audio and video settings on this page of the Setup menu can be tailored specifically and independently for each input source.
When a different input source is selected in the Source Setup menu, all the source-specific settings for that input are displayed. These settings
are applied to the named Input only and are stored in memory and recalled each time the unit is powered up and whenever that input is
selected.
Name – The display name of the input source. You can change the name of any input to more closely match your setup. Preset names
include: TV, Media, Cable Box, Blu Ray, Game, PC, UHD, DVD, CD, AV, SAT, Turntable, Cassette, and AUX. It is then clearer to users of your
Receiver which inputs they wish to select when scrolling though.
Panel Selectable – Allows you to hide unused inputs. Hidden inputs do not appear as input choices when scrolling through inputs. An input
source can be hidden by selecting "No" in this menu. If you hid inputs and want to show them again, they can be restored by selecting "Yes"
for the individual input sources.
Lip Sync – Each input can have its own setting to add a time delay between the audio and video signals to compensate for the sound and
picture not being synchronized. This is normally required when video processing is used in the system for scaling or de-interlacing video. The
range of lip sync delay is 0 to 250 milliseconds.
The lip sync adjustment can only correct for delayed video. If the audio is late set lip sync to its minimum.
Room EQ – When the EZ Set EQ app is run and EQ filters are downloaded into the Receiver, this can be selected.
Not Calculated (Information only) There are no EQ filters, so cannot be selected.
On EZ Set EQ calibration is applied to the current source.
Off EZ Set EQ calibration is not applied to the current source.
Default Surround Mode – Sets the default listening mode for this input. Choose between Stereo 2.0, Stereo 2.1, All Stereo, and the available
surround modes.
Bass and Treble – These allow you to alter the bass and treble tone controls for all currently active speakers for each individual input. For
example, if your turntable source sounds a little bass light, you can always correct for this by selecting the source in the Source Setup menu
and add 2 or 3dB to the Bass control. Then, whenever the Turntable input is selected, the bass is automatically boosted for as long as that
input is selected.
Dialog Enhance – A proprietary JBL audio enhancement setting to improve the intelligibility of spoken dialog for cinema applications using a
center channel. Note: if you are not using a center channel speaker, this setting will have no effect.
Direct Mode (MA310 & MA510, analog sources only) – This mode disables any digital signal processing parameters.
Pure Analog (MA710, analog sources only) – This mode bypasses all digital signal processing for a pure analog signal path.
Level – Sets the relative level of each input source. This is adjusted manually and can help keep the various sources sounding about the same
level for any given Receiver volume control setting.

Pg 23 of 42
©2024 Harman International | Features, Specifications, and Appearance subject to change without notice.
MA310 | MA510 | MA710 Owner's Manual | rev 1.4 20250211
EN
SPEAKER SETUP
The settings on this page define your speaker configuration and adjustment setting based on their performance and placement in the room.
These settings are applied to all audio inputs and are stored in memory and recalled each time the unit is powered up.
Speaker Types – Define the types of loudspeakers you have connected in your configuration. Here you set the type of speakers that you have
connected to your Receiver.
Large Capable of full frequency range reproduction.
Small Not capable of full frequency range reproduction at the low frequency end.
None Speaker not present in your configuration.
Note: It is not possible to set all speakers to Small unless there is a subwoofer in your speaker configuration. If you do not have a subwoofer,
you will be forced to set your front speakers to Large.
□ Rear Config. (MA710 only) – It is possible to assign your rear surround amplifier channels to Top Front or Top Middle for a Dolby Atmos
speaker configuration.
In addition, the rear surround amplifier channels can be assigned to provide a stereo downmix of the Main zone to a secondary location
of the home, called Party mode. You can also assign these channels to bi-amp the front left/right channels.
Back Panel Output Labels
Fixed
Front
Center
Surround
Assignable Rear Surround Top Front Top Middle Party Bi-Amp
□ Subwoofer – Configures the subwoofer outputs when a subwoofer is present. Both subwoofer outputs 1 & 2 are enabled when set to
"Present". The same signal is sent to both subwoofer outputs.
□ Height Type (MA710 only) – Configures the type of height speakers - ceiling mounted or Dolby-enabled.
Note: Dolby Atmos-enabled speakers direct sound upward and reflect off the ceiling to produce overhead sound.
Pg 24 of 42
©2024 Harman International | Features, Specifications, and Appearance subject to change without notice.
MA310 | MA510 | MA710 Owner's Manual | rev 1.4 20250211
EN
Speaker Distances – Calibration settings for the distances between the loudspeakers and the listening position.
NOTE: Speakers that are not present in your configuration will be greyed out
□ Units – Select how you wish to measure distances in imperial or metric units, or in milliseconds. As described in "Essential Setup" (see
Essential Setup). Measure the distance from each loudspeaker in your system to your ear in the main listening position and enter the
values. This allows the Receiver to calculate the correct relative delay for each loudspeaker.
Speaker Level – These settings allow adjustment of individual speaker levels. They should be adjusted using either internally generated test
noise or an external source, such as a setup test disc.
NOTE: Speakers that are not present in your configuration will be greyed out
□ Test Tone – Selects the internal test tone generator or allows the use of an external test tone form the currently selected input source (e.g.
BD player in HDMI source).
Use the and navigation buttons on the remote control to select the relevant speaker. Use the and navigation buttons to adjust the noise
level from each speaker.
As described in "Essential Setup" (see Essential Setup), adjust the level of the test noise from each speaker so that an SPL meter at the
listening position measures 75dB SPL.
Speaker Crossover – This is the frequency below which signals are filtered away from these Small speakers and redirected to 'Large' speakers
or the subwoofer (if present). 80 Hz is usually the best crossover frequency, since it sends non-directional low frequencies to the subwoofers
which are best suited to handle low frequencies and can be placed optimally to reproduce only the lowest frequencies.
Zone2 Line Out (
MA710 only
) – Select "Party On" to route the Main Zone to the Zone 2 line-level output. Party mode follows the Main Zone, i.e.
a stereo downmix of the same source as currently selected in the Main Zone.
When Party is selected for either the Line Out or Rear Configuration Amp Assignment, you will have the option to enter the Party Mode
settings from the Main Menu as shown below, which provides an independent volume control.

Pg 25 of 42
©2024 Harman International | Features, Specifications, and Appearance subject to change without notice.
MA310 | MA510 | MA710 Owner's Manual | rev 1.4 20250211
EN
SYSTEM SETUP
General Setup – General information and system controls
□ Max On Volume – Limits the maximum volume the system operates in the main zone when it is switched on or comes out of Standby.
The system comes on at this stored volume setting if the last used (possibly very loud) volume exceeds this value. It is stored in memory
and recalled each time the unit is powered up.
□ Display On Time – Sets the time that the front panel display remains illuminated after receiving a command. The default is always on.
□ Power Mode – Determines how the unit powers on in Standby mode.
Green NET Off, Bluetooth Off, HDMI Off Any activity associated with network streaming or Bluetooth are disabled.
Low Power NET On, Bluetooth On, HDMI Off
Network and Bluetooth activities remain On. System will transition from
Standby to On by any activity derived from Streaming services, app control
and/or Bluetooth.
HDMI Pass Through NET On, Bluetooth On, HDMI On
Enables the unit to pass-through any video connected to last source, as
applicable, the rest of the features connected to Low power standby mode
remain.
□ Language – Select the language for the setup menu - English, French, Spanish, Portugues, Korean, Japanese, Simplified Chinese.
HDMI Settings – The settings in this menu control the HDMI behavior for control and audio. These settings are applied to all video inputs and
are stored in memory and recalled each time the unit is powered up.
□ HDMI CEC – Selects if CEC control is enabled on HDMI output.
□ Audio to TV – This setting controls the audio being sent direct to the TV.
Mini OSD Pop-Up – Selects whether the pop-up OSD messages are On or Off.
On
All user adjustments that are made during the general use of the Receiver are displayed on screen as well as the
front panel display. This includes the adjustment of volume, mute, input source, and surround mode.
Off
The above user adjustments will not appear on screen, only on the front panel display. This leaves the picture on
your display device clear of pop-up text. However, regardless of this setting the Setup menus are always displayed
on screen.
Assign Video In - Settings to optionally assign a video source to each of the normally audio-only inputs. These settings are stored in memory
and recalled each time the unit is powered up.
The default for each of the audio-only inputs is 'None'. You could, however, associate HDMI video with NET internet radio audio to receive
radio commentary of a sports game with pictures from cable coverage, for example.

Pg 26 of 42
©2024 Harman International | Features, Specifications, and Appearance subject to change without notice.
MA310 | MA510 | MA710 Owner's Manual | rev 1.4 20250211
EN
NETWORK STATUS
(Does not apply to MA310)
The Receiver is fitted with a network audio client which is capable of AirPlay 2, and Google Chromecast built-in as well as stored music on a
network storage device such as a PC, or on NAS drive.
The wireless network is configured using the Apple AirPlay setup or the JBL Premium Audio app.
Type – (Information only) Shows if and/or how the device is connected to a network.
Wireless Device is using a wireless LAN (Wi-Fi) function to connect to a network.
Wired Device is using an ethernet LAN cable to connect to a network.
Not Configured Device has not been configured for Wi-Fi connection, and LAN cable is not connected.
Status – (Information only) Display network information.
Network Name/ IP Address/ MAC Address (Wi-Fi)/ MAC Address (Ethernet)/ Build Version (Network Software)
Network Reset – Clears the Receiver's network connection settings and restores the device's Network Name. Makes the Receiver
discoverable for a new Wi-Fi network setup using the JBL Premium Audio App and Apple AirPlay.
SOFTWARE SETUP
Note: On the MA510 and MA710, software updates occur automatically by regularly checking for an over-the-air firmware update (requires
external network connection). Do not power off the Receiver while an update is in progress.
Firmware Version – (Information only) Displays the current firmware version.
Main Host/ Decoding DSP / OSD Font/ Bluetooth/ Network
USB Update – Used for updating the firmware via USB. The firmware in your Receiver can be updated from a USB flash drive containing a
firmware update file. A manual software update should not be performed unless instructed by JBL Customer Support.
Reset to Default – This option allows you to restore all settings on your Receiver to the defaults from which it left the factory.

Pg 27 of 42
©2024 Harman International | Features, Specifications, and Appearance subject to change without notice.
MA310 | MA510 | MA710 Owner's Manual | rev 1.4 20250211
EN
Decoding Modes
Your Receiver provides all the key decoding and processing modes for analog and digital signals, including the latest high-definition audio
formats over HDMI.
MODES FOR DIGITAL SOURCES
Digital recordings are usually encoded to include information about their format type. The Receiver automatically detects the relevant format
in a digital signal – such as Dolby Atmos, TrueHD, Dolby Digital Plus, DTS:X, DTS-HD Master Audio, Dolby Digital, or DTS – and switches to the
appropriate decoding.
MODES FOR ANALOG SOURCES
Analog recordings do not contain information about their encoding formats, so the desired mode – such as Dolby Surround – needs to be
selected manually.
Stereo
In this mode the Receiver works as a conventional high quality audio amplifier. Note that if the subwoofer is enabled in stereo mode, then
some processing of the signal is carried out.
□ Stereo 2.0 – Conventional two-channel stereo mode, with full-range signal sent to corresponding Front Left and Right speaker outputs.
□ Stereo 2.1 – Only selectable if a subwoofer is present. Conventional two-channel stereo mode with low frequencies redirected to the
subwoofer.
□ All Stereo - This produces an output from all speakers by copying the left output to all left speakers and the right output to all right
speakers. The center speaker outputs a mix of left and right.
Native
In this mode, the incoming format is unchanged. In the case of analog and digital stereo recordings, the Receiver will default to Stereo 2.0.
Dolby Surround
Dolby Surround allows the Receiver to derive up to 5 or 7 outputs from a two or multi-channel source to take better advantage of all
amplifiers and speakers in your setup.
DTS
(MA710 only)
DTS Neural:X is an advanced upmixer that renders up to 7.1.4 channels of immersive audio from nearly any lower channel count content.
MULTI-CHANNEL SOURCE MODES
For many years, digital multi-channel source material was often provided as '5.1 audio'. The '5.1 channels' are comprised of: left, center and
right front speakers, two surround speakers and a low frequency effects (LFE) channel. Since the LFE channel is not a full range channel, it is
referred to as '.1'.
MA710 Note: Dolby Atmos, DTS:X, and DTS-HD are high-resolution immersive surround formats which use object-oriented audio technology
to deliver additional sonic locations for the sound requiring additional speakers including height speakers.

Pg 28 of 42
©2024 Harman International | Features, Specifications, and Appearance subject to change without notice.
MA310 | MA510 | MA710 Owner's Manual | rev 1.4 20250211
EN
DECODING MODES (CONT'D)
The modes given in the following table are available for multi-channel digital sources.
For Dolby Digital Sources
Dolby Digital 5.1
Dolby Digital 5.1 sources deliver sound with five discrete full-range channels; left, center, right,
surround left, surround right, plus LFE channel.
Dolby Digital Stereo Downmix Provides a stereo downmix of the source material for use with headphones.
Dolby Digital 5.1 + Dolby Surround
(MA710 only)
This mode is used to derive information for the individual surround back channels from the
surround channels, using the Dolby Surround decoder.
For DTS sources
DTS 5.1
Less common than the Dolby Digital format, but generally recognized within the audio industry
as being of superior sound quality. DTS 5.1 delivers surround sound with five full range channels
plus an LFE channel.
DTS96/24
Provides up to 5.1 channels of audio at 96kHz, 24bit resolution for superior sound quality
compared to standard DTS 5.1.
MA710 Only
High resolution audio sources
Dolby Atmos
Dolby Atmos content is mixed as audio objects instead of traditional channels, so can take full
advantage of the number and placement of your speakers.
Dolby TrueHD
Provides up to 7.1 full channels at 96kHz, 24bit resolution, with no losses in the compression
process. Data rates can be up to 18Mbps.
Dolby Digital Plus
Provides up to 7.1 discrete channels of audio with less compression than traditional Dolby Digital
encoding. Data rates can be up to 6Mbps.
DTS-HD Master Audio
Provides up to 7.1 full channels at 96kHz, 24bit resolution, with no losses in the compression
process. Data rates can be up to 24.5Mbps.
DTS:X
DTS:X is a decoder package that renders immersive content which has been encoded with DTS:X
encoding. DTS:X content consists of audio objects or a combination of audio channels and
objects. The DTS:X decoder package also plays back legacy DTS formats including DTS-HD Master
Audio lossless and lossy streams.
Supports greater than 7.1 channel output configurations (including height speakers)
Provides "Dialog Control" so consumers can adjust the sound to their preference or the listening
environment.
Remaps any DTS content to any speaker layout.
Supports Blu-ray Disc (BD), DVD and streaming media formats, and legacy streams up to 192kHz.
Includes Neural:X, the latest upmixing/downmixing technology from DTS.

Pg 29 of 42
©2024 Harman International | Features, Specifications, and Appearance subject to change without notice.
MA310 | MA510 | MA710 Owner's Manual | rev 1.4 20250211
EN
Room Correction – EZ Set EQ
Loudspeakers and room interaction inevitably introduce unwanted coloration to the sound during playback – colorations which are
sometimes either difficult or impossible to remove with traditional electronics or room treatments. The free EZ Set EQ app provides easy-
to-use room equalization for optimized sound quality for all MA series AV Receivers. The calibration collects room acoustics data for each
speaker group in under 2 minutes and can be done by anyone, using an iOS or Android mobile device.
Room Correction using the EZ Set EQ app should be performed after system setup is completed. The system setup is considered complete
after the initial system configuration is performed (Menu > Setup > Speaker Setup > Types, Distances and Level) and the system is fully
functional.
HOW DOES EZ SET EQ ROOM CORRECTION WORK?
Using a microphone to analyze the audio system and room, EZ Set EQ builds an acoustic model of the listening environment. The built-in
microphone of an iOS device can be used for the calibration. For Android users, JBL recommends using a third-party microphone for the best
results since every Android device has different a microphone/frequency response.
Recommended calibrated microphone for Android users: Dayton Audio iMM-6C USB-C
EZ Set EQ primarily addresses room interactions in the low frequency bands, that way it has minimal effect on overall loudspeaker voicing.
The low frequency response can be adjusted according to the loudspeaker's natural low frequency extension to avoid boosting lower than
the speaker can handle, and by the size of the room.
EZ Set EQ does not affect delay or level adjustment; so, it is recommended to make the necessary adjustments manually prior to using the
room EQ app.
USING SUBWOOFERS
If your system includes active subwoofers, you may need to set the subwoofer output level/gain control set to a higher or lower value.
EZ Set EQ does not calibrate the subwoofer separate from the main loudspeakers. The system is calibrated full-range with the subwoofer
output active to capture the "system" acoustic data to blend the subwoofer more effectively for each channel. In this way, the system takes a
snapshot of the combined performance of the loudspeaker and subwoofer system integration.
You may ask - "What if I want to listen to traditional 2-channel Stereo without a subwoofer?"
EZ Set EQ allows correction of the Front Left and Right loudspeakers both with and without a subwoofer. In this case, you will take two
measurements of the Front Left and Right loudspeakers, labelled as Front (Small) and Front (Large). The system will automatically select the
Front (Large) calibration any time you change the surround mode to Stereo 2.0 for optimized full-range 2-channel performance without a
subwoofer.
Full-range calibration with subwoofer and the chosen crossover Full-range calibration without subwoofer

Pg 30 of 42
©2024 Harman International | Features, Specifications, and Appearance subject to change without notice.
MA310 | MA510 | MA710 Owner's Manual | rev 1.4 20250211
EN
CALIBRATING THE SYSTEM WITH EZ SET EQ
The EZ Set EQ app will automatically try to establish a connection with the AVR.
Connectivity between the mobile device and the JBL MA Series AV Receiver models are as follows:
Bluetooth Network Audio
MA310 MA510
MA710
If the auto-connect fails:
MA310
Confirm the mobile device has successfully paired via Bluetooth to the AVR via and that Bluetooth is selected as the input source.
MA510, MA710
Confirm that the mobile device and the AVR are connected to the same network. Check that the IP address of the AVR is on the same subnet
in network settings. You can confirm this by navigating to Menu > Setup > Network Status > Status. Network should be selected as the input
source.
Pg 31 of 42
©2024 Harman International | Features, Specifications, and Appearance subject to change without notice.
MA310 | MA510 | MA710 Owner's Manual | rev 1.4 20250211
EN
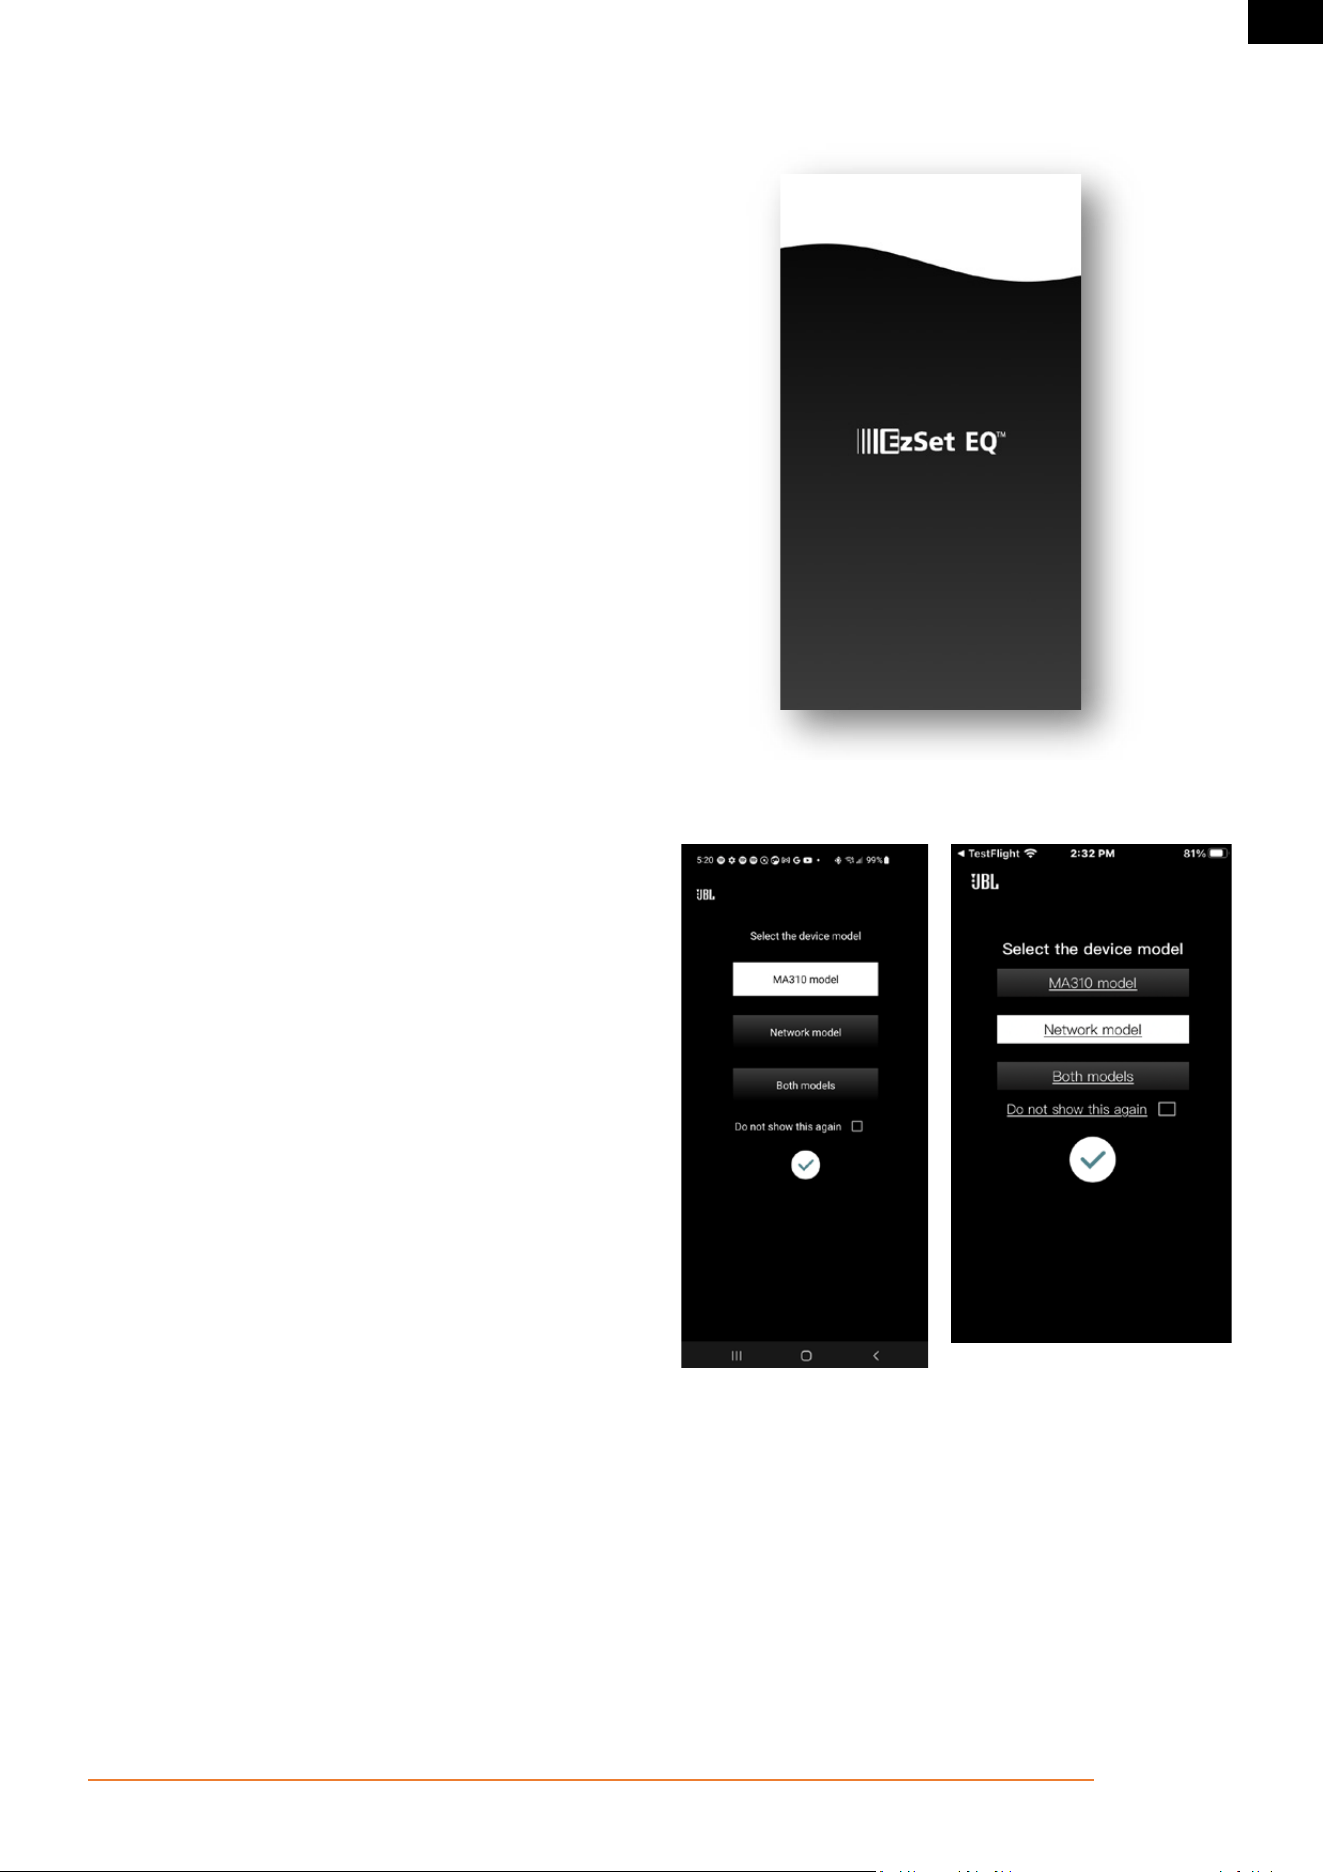
Step 1 – Launch the App
(App loading screen shown above*)
Select the model of AVR
Tap the white "check" icon to load the Room EQ home page
MA310
MA510, MA710
Pg 32 of 42
©2024 Harman International | Features, Specifications, and Appearance subject to change without notice.
MA310 | MA510 | MA710 Owner's Manual | rev 1.4 20250211
EN
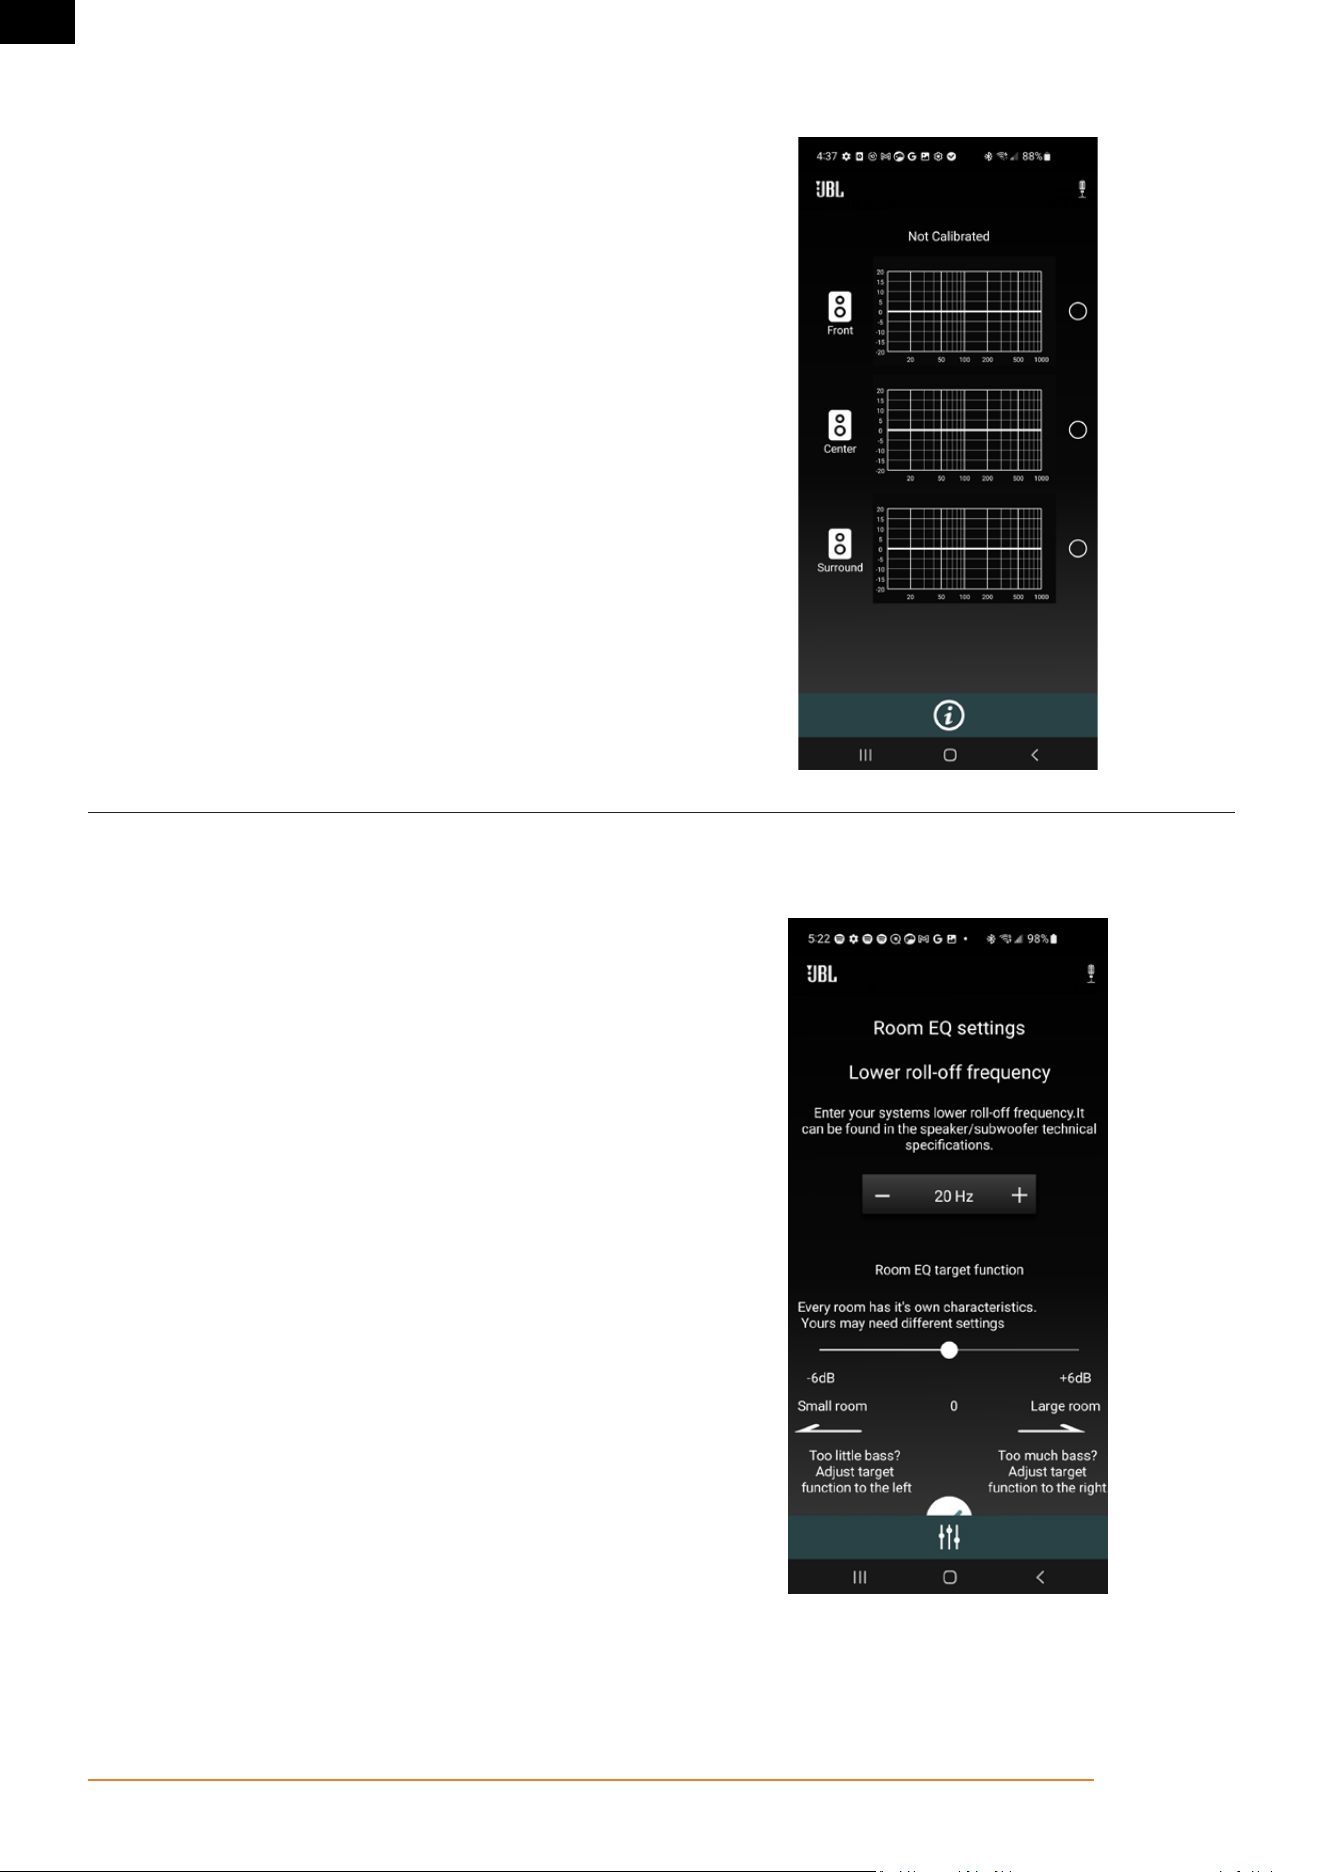
Step 2- Select the speaker group to calibrate
The EQ Home page displays the Room EQ curves of all the channels
in the current layout.
Click on the graph of speaker group you want to set up.
Step 3 – Enter Room EQ settings
Enter the lower natural roll-off frequency of your loudspeakers. This
can be found in the loudspeakers' technical specifications.
The natural roll-off frequency ensures the system only corrects issues
caused by the room during room measurement.
Pg 33 of 42
©2024 Harman International | Features, Specifications, and Appearance subject to change without notice.
MA310 | MA510 | MA710 Owner's Manual | rev 1.4 20250211
EN
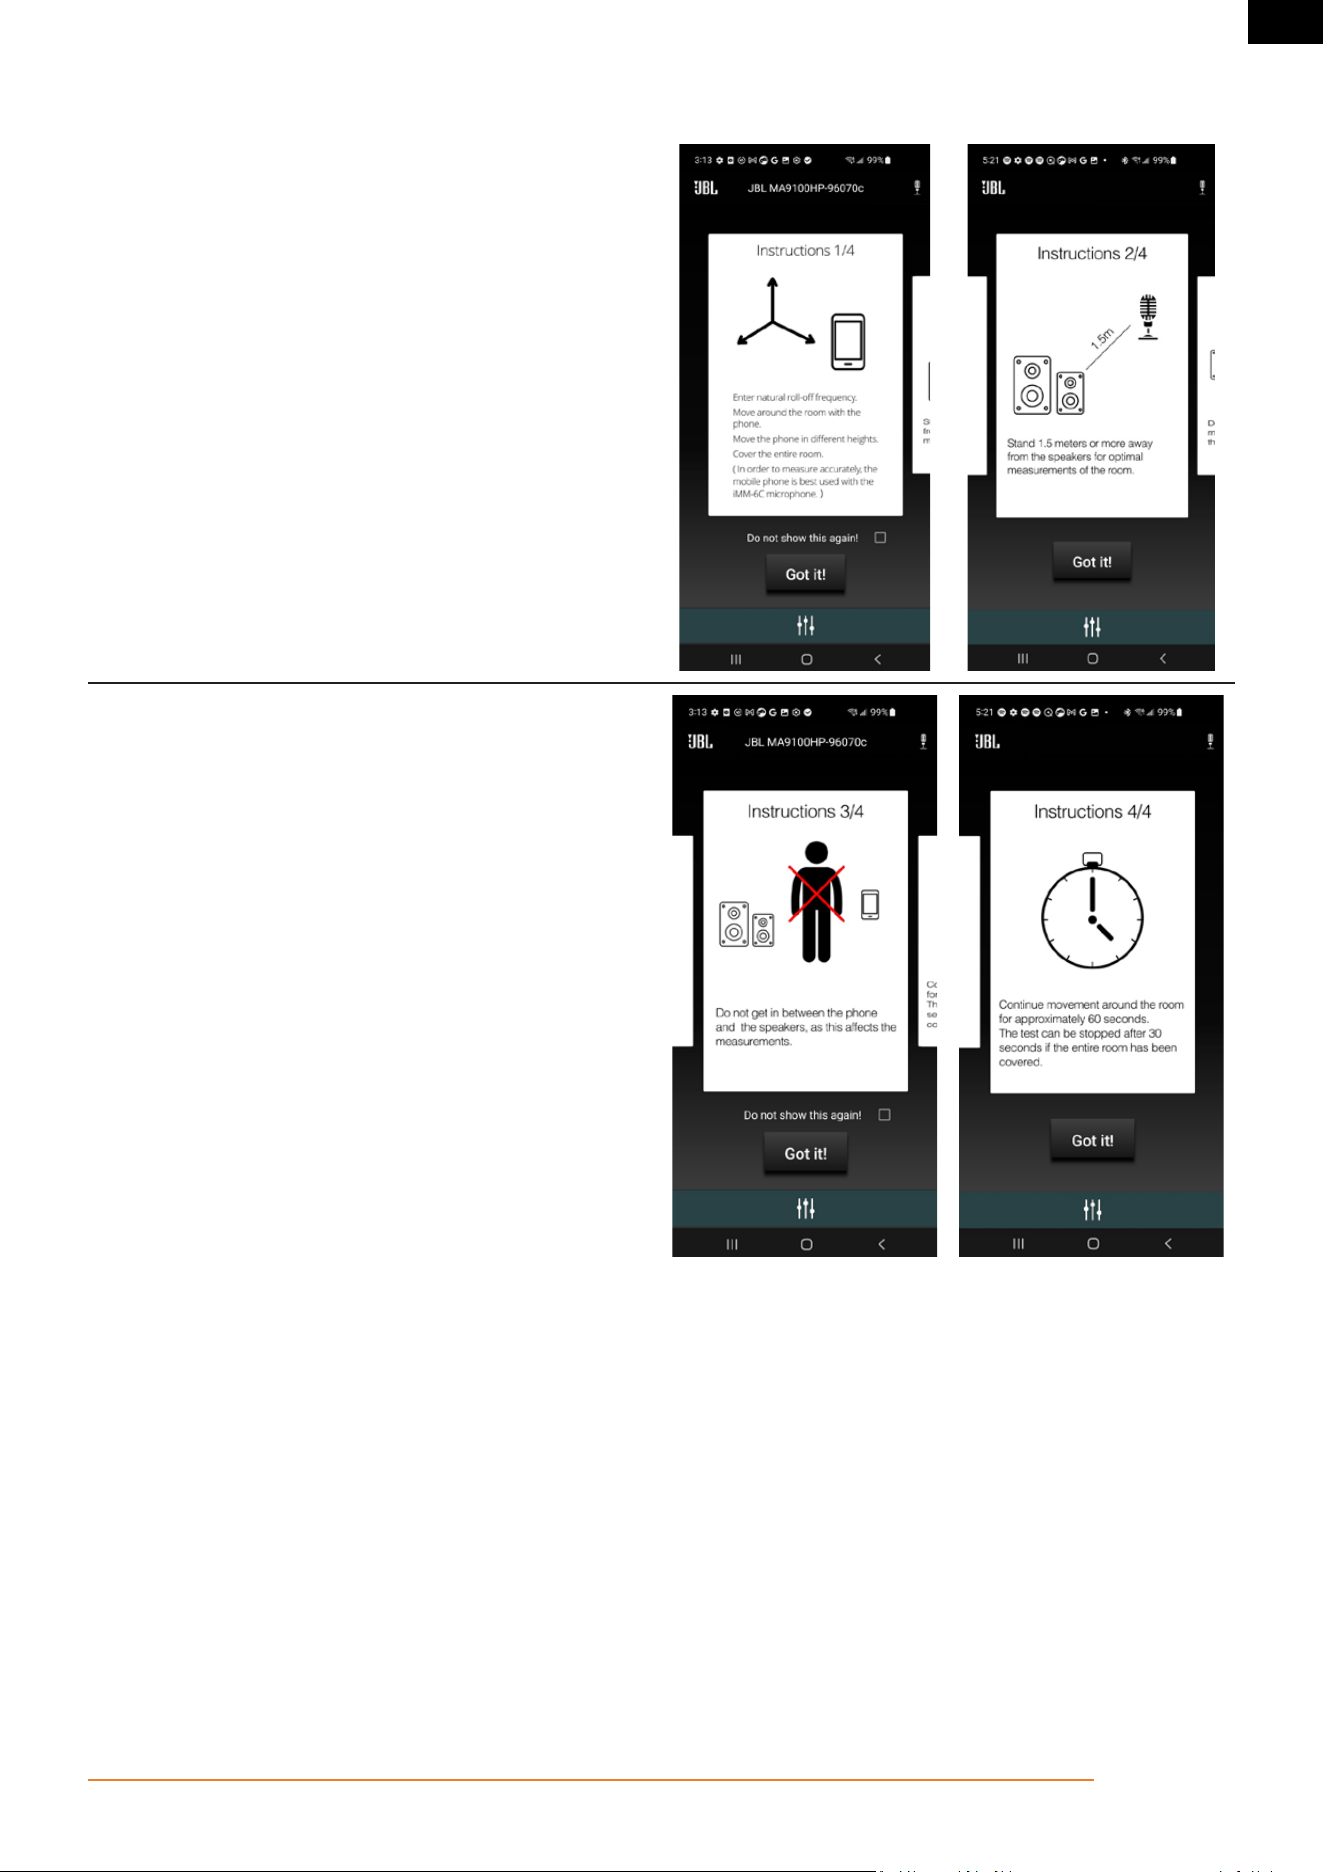
Step 4 – Read instructions for best results
The first instruction is to move around the entire listening area, with
the phone in different angles and heights, as it is important to get an
understanding of all listening locations.
The next instruction page can be seen by swiping the shown
instruction to the left. This allows you to go through the instructions
multiple times if needed.
The second instruction is to make sure the mobile device is always at
least 1.5 meters away from the speaker. This is important to create a
more accurate understanding of the room acoustics.
The instructions can be skipped, and the process can proceed by
pressing 'Got It!'
The third instruction is to make sure that there are no obstructions
between the phone and the speaker. This is important to create a
more accurate understanding of the room acoustics.
Lastly, the process can take up to 60 seconds. If you are calibrating
for a small room, 30 seconds will be enough.
A button will present itself after 30 seconds allowing you to stop the
measuring if finished.
Pg 34 of 42
©2024 Harman International | Features, Specifications, and Appearance subject to change without notice.
MA310 | MA510 | MA710 Owner's Manual | rev 1.4 20250211
EN
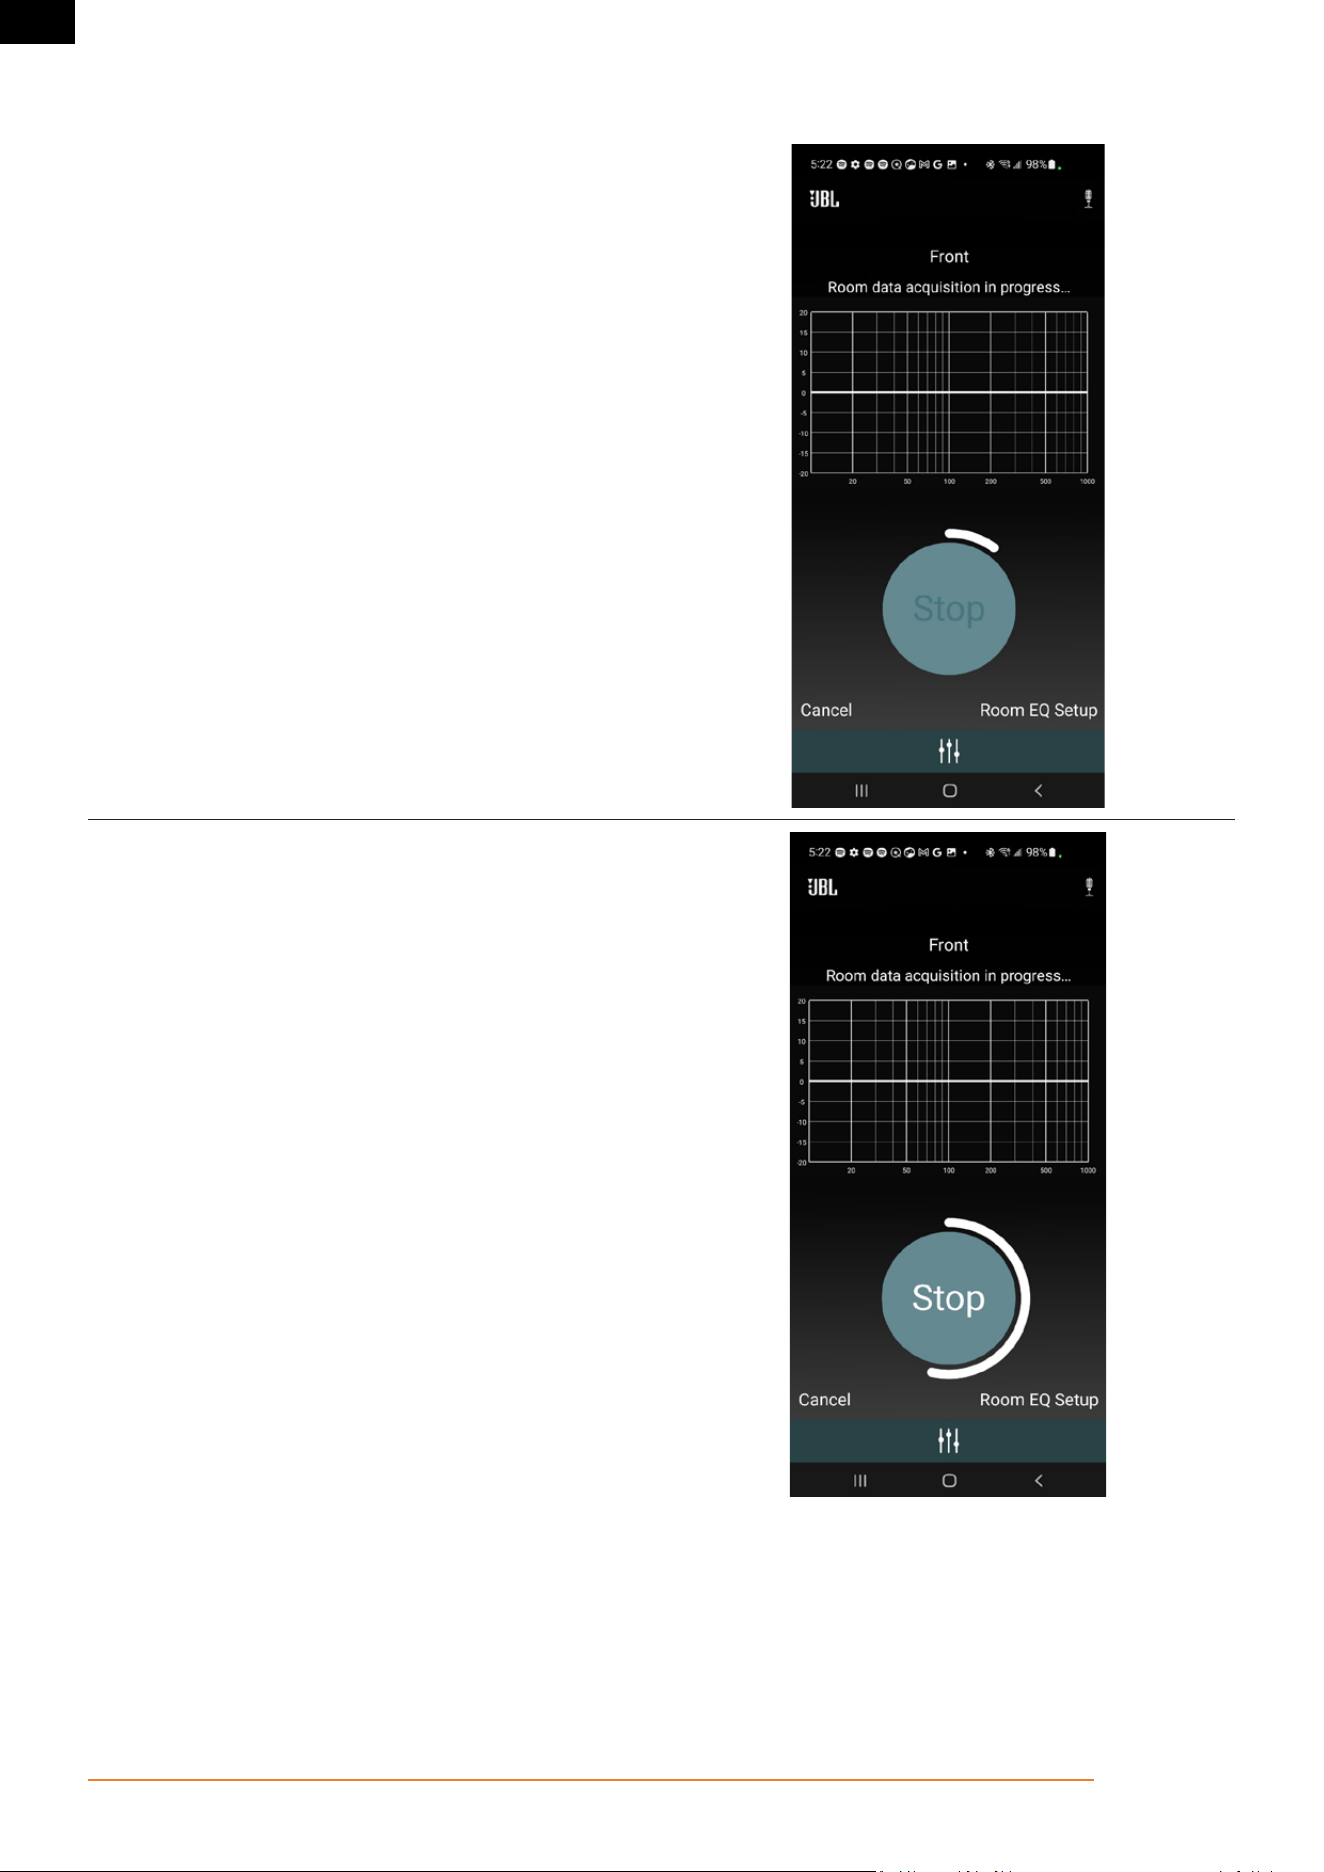
Step 5 - Measurement
After having read the instructions, press 'Begin' when ready.
The 60 seconds is illustrated by a bar wrapping the button.
After 30 seconds (when the bar has wrapped half the circle) the
button will be active, and 'Stop' will be white.
30 seconds has passed. The button is now active, and the
measurement can be stopped.
When 60 seconds have passed, the app will go to the next screen
automatically.
Pg 35 of 42
©2024 Harman International | Features, Specifications, and Appearance subject to change without notice.
MA310 | MA510 | MA710 Owner's Manual | rev 1.4 20250211
EN
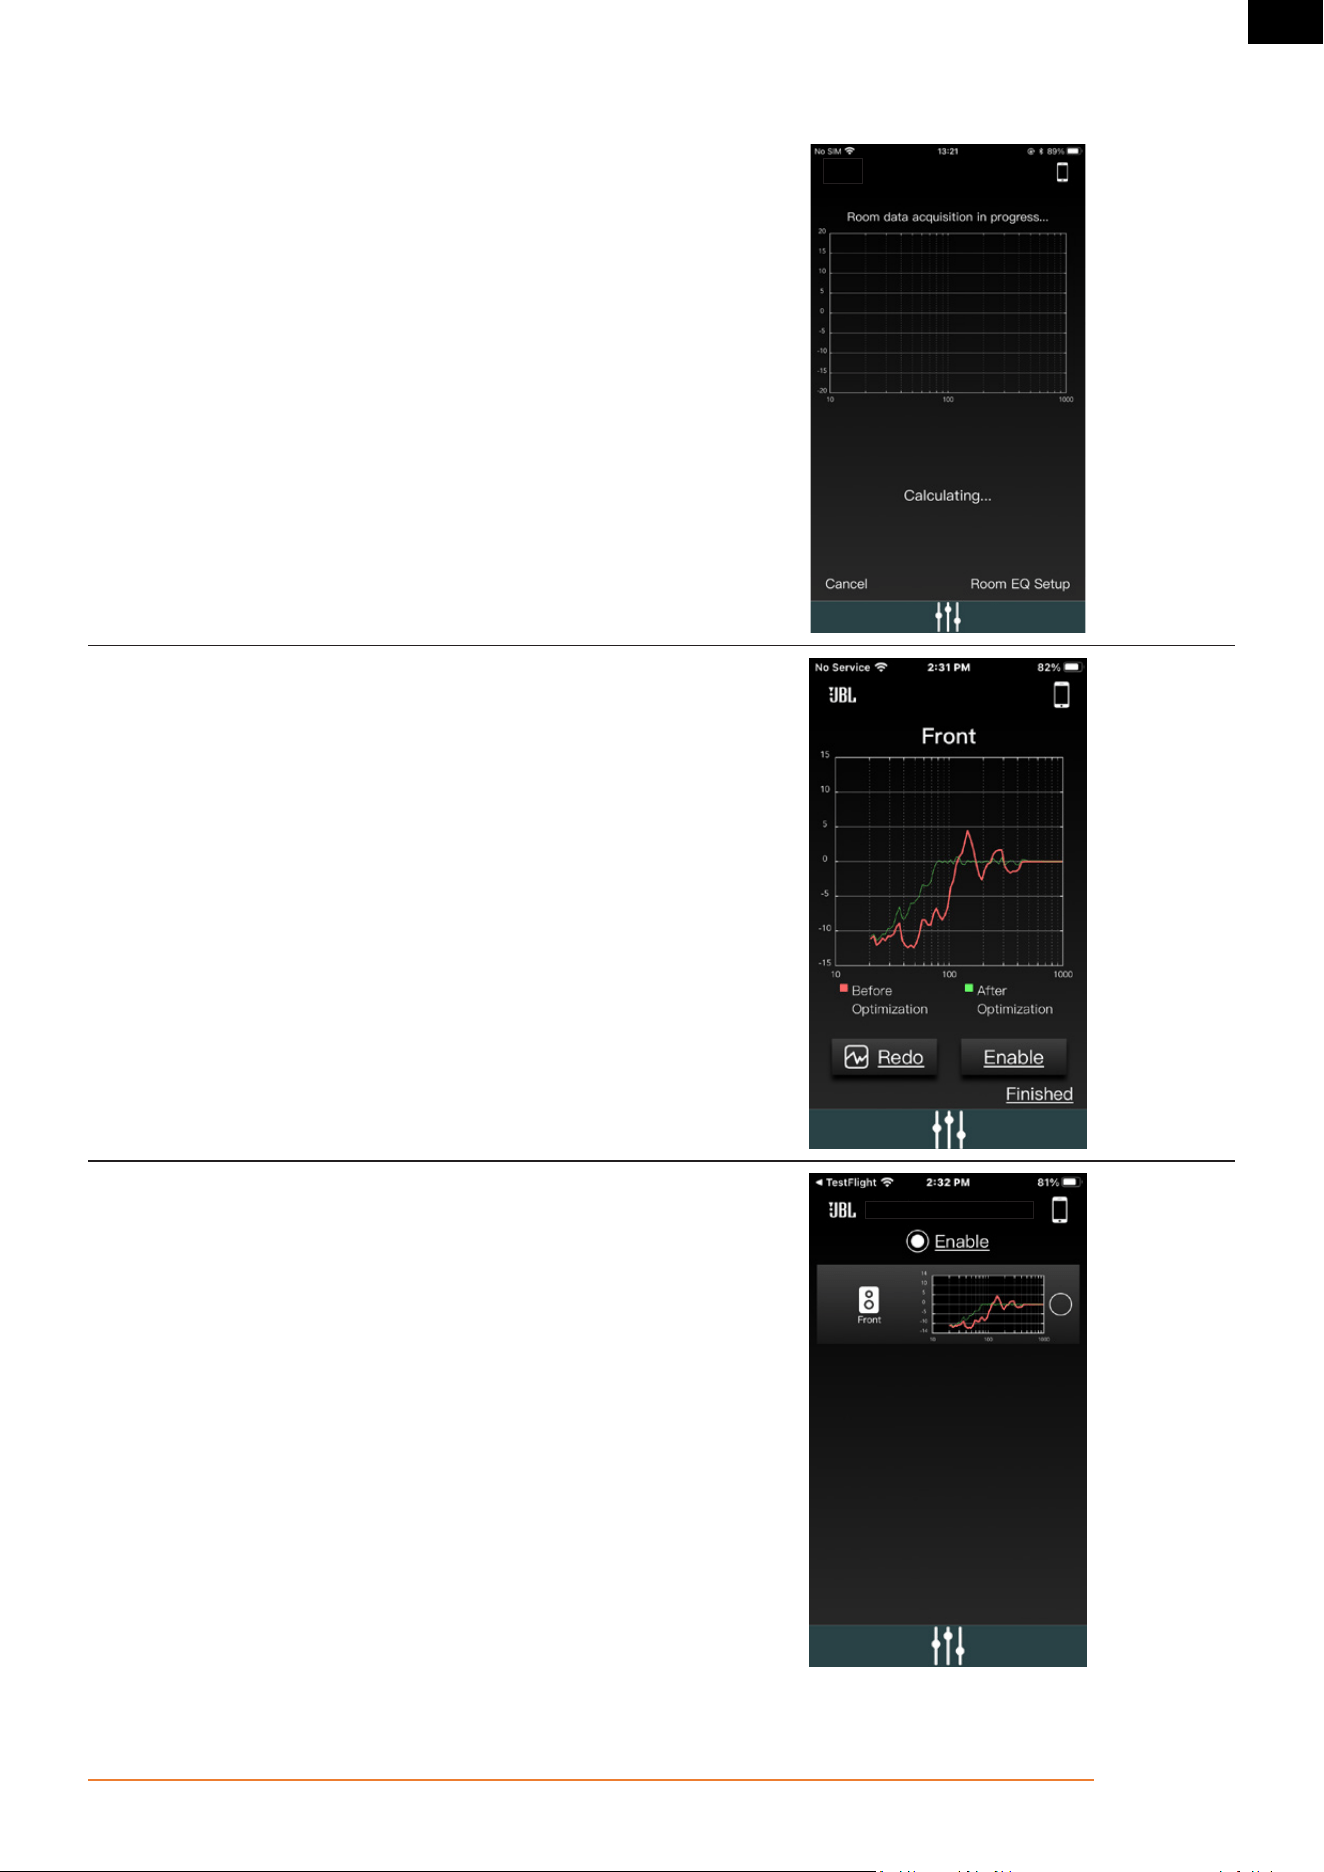
Step 6 - Calculate
The app will need 10 seconds to generate the curve. The graph will
illustrate a curve that is moving, indicating that the graph is being
generated.
Once the curve has been generated, a red EQ curve of the room is
shown. Press 'Calibrate' to continue.
By pressing 'Calibrate' a green optimized curve appears which shows
the improved low frequency response of the speakers.
The red curve represents before optimization, and the green is the
optimized.
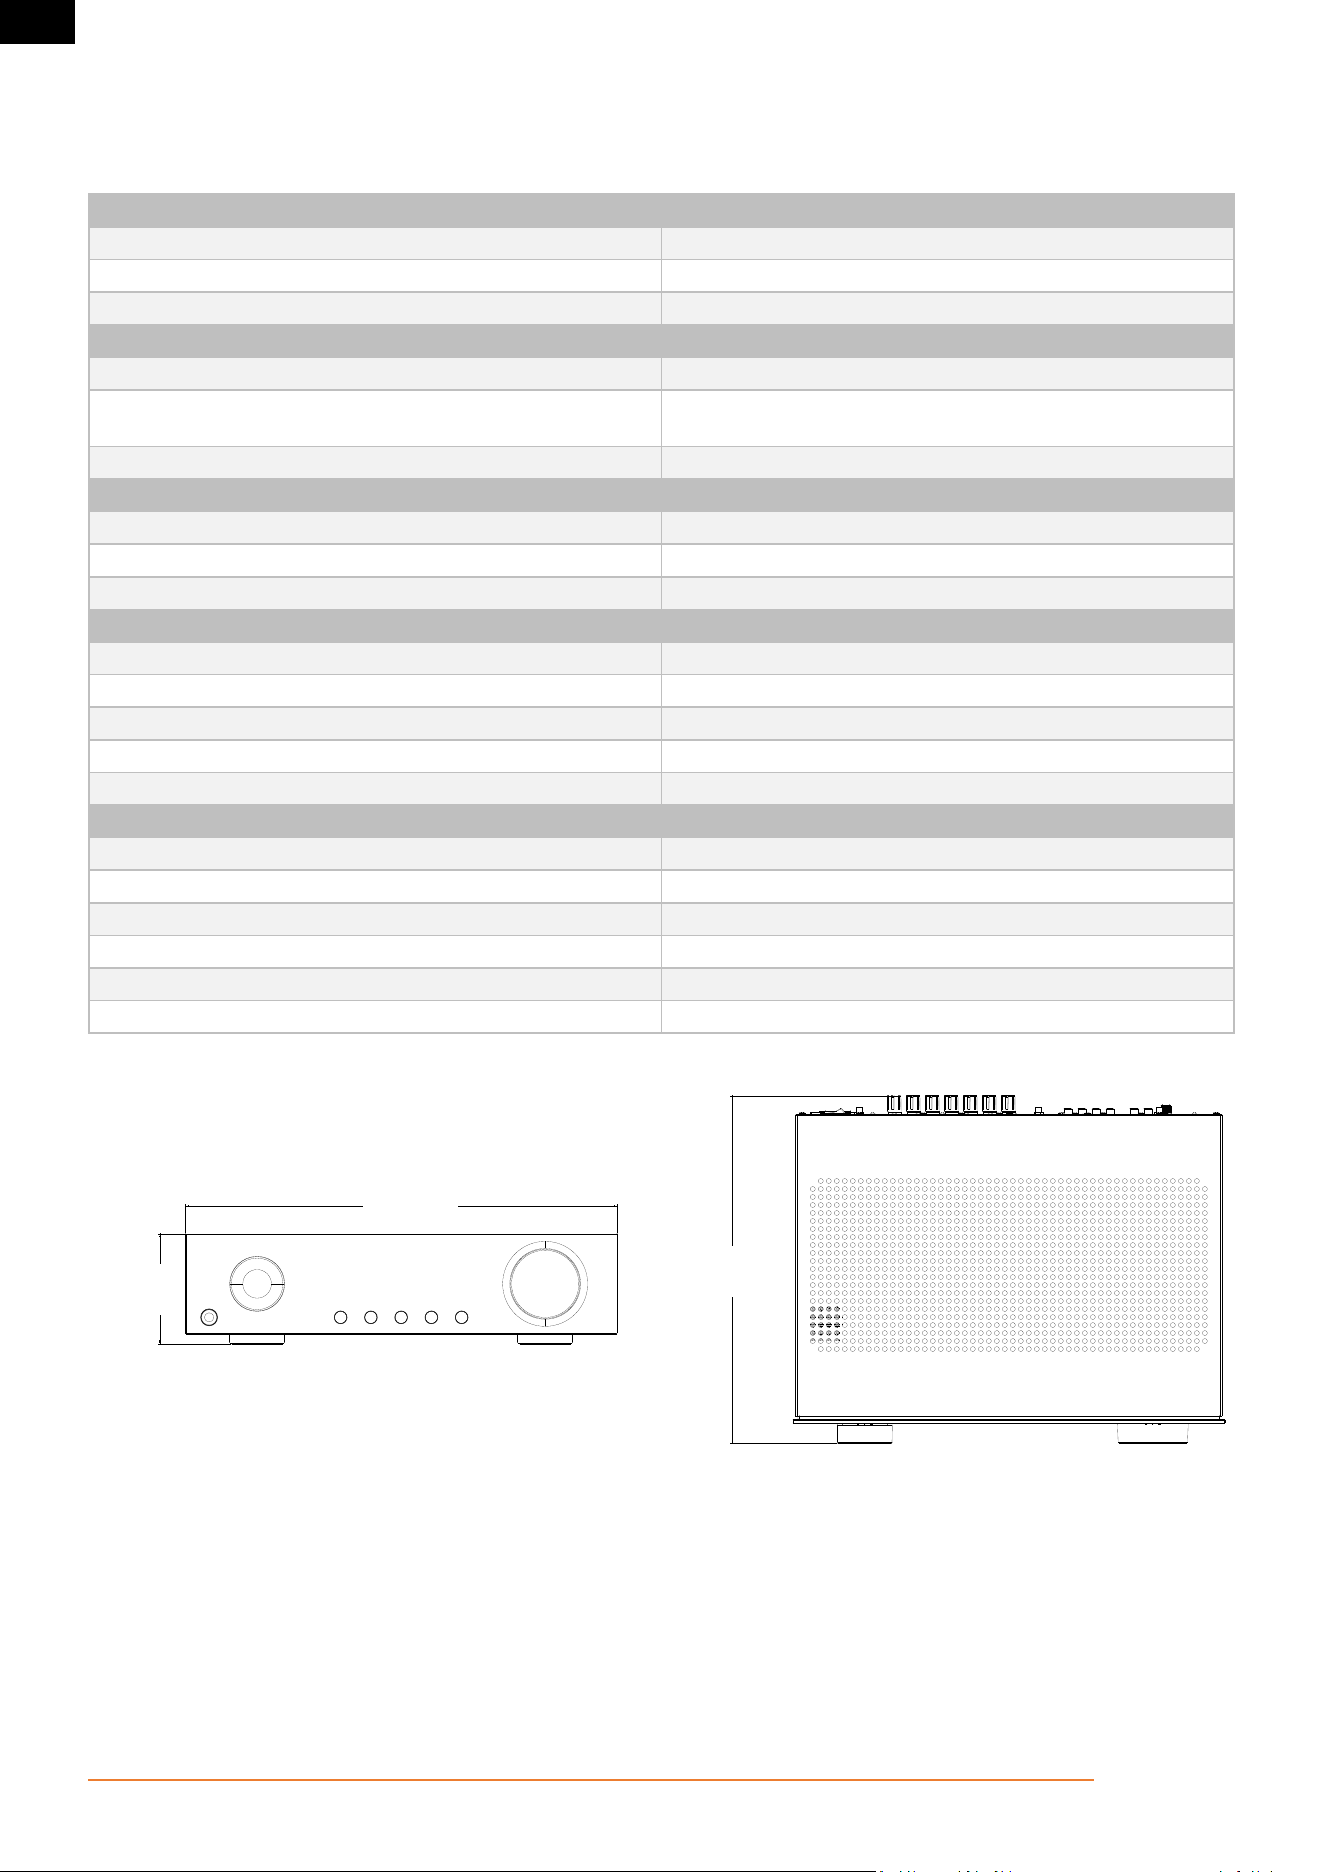
By pressing 'Enable' the green curve is activated, and the audio
experience is improved.
By pressing 'Disable' the green curve is deactivated.
By pushing 'Redo' you will be sent back to the INSTRUCTIONS to
restart the measurement for that speaker group.
Click "Finished" to save your progress and go back to the Home
screen.
After the calibration, you can enable/disable the Room EQ while
playing music from the Home screen.
If you would like to redo the calibration, click on the speaker group
once more, and select Redo.
This process can be completed for each speaker group for the current
layout.
Pg 36 of 42
©2024 Harman International | Features, Specifications, and Appearance subject to change without notice.
MA310 | MA510 | MA710 Owner's Manual | rev 1.4 20250211
EN
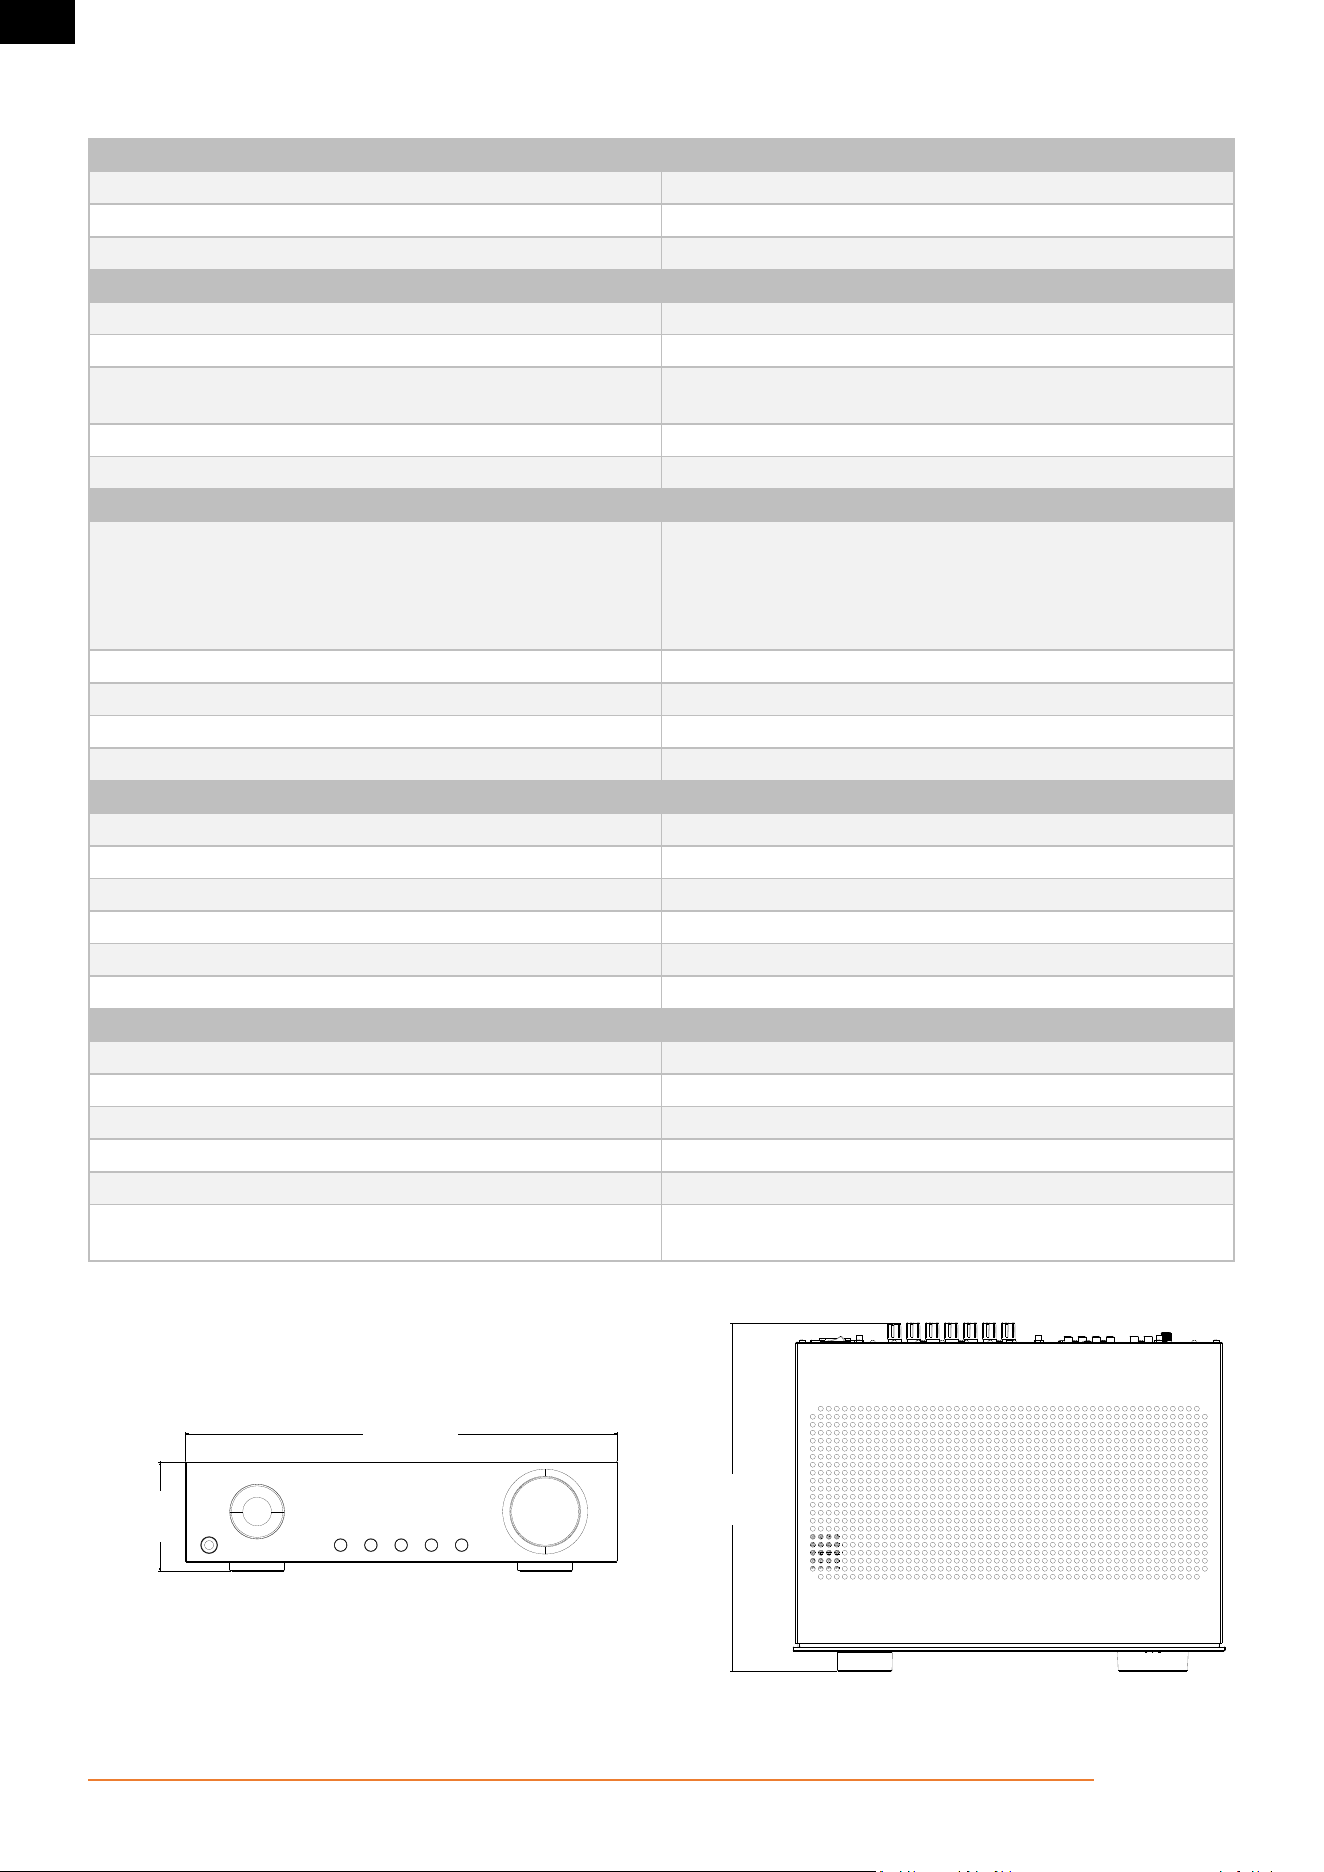
Specifications
MA310
Amplifier Section
Channels 5.2
Rated Power @ 8Ω (1kHz, 2 channels driven, 0.5% THD max) 60 W RMS
Rated Power @ 4Ω (1kHz, 2 channels driven, 0.5% THD max) 100 W RMS
Video Features
HDMI Audio Return Channel Yes
4K HDMI input connectors (HDMI 2.0, HDCP 2.2 up to 4K/60Hz Ultra
HD)
4
HDR 10 Yes
Audio Features
Pure Direct Yes
EZ Set EQ Yes
DA converter 192kHz/24-bit
Connectivity
HDMI Input/Output 4 / 1
Bluetooth receive Yes (v5.1, Low Energy)
Digital Audio Input 1 Coax, 1 Optical
Stereo analog input 2 single-ended RCA
Pre-Out (single ended RCA) Subwoofer 1, Subwoofer 2
General
Mains voltage 110 – 240V, 50–60Hz
Max. power consumption 200W
Standby power consumption <0.5W
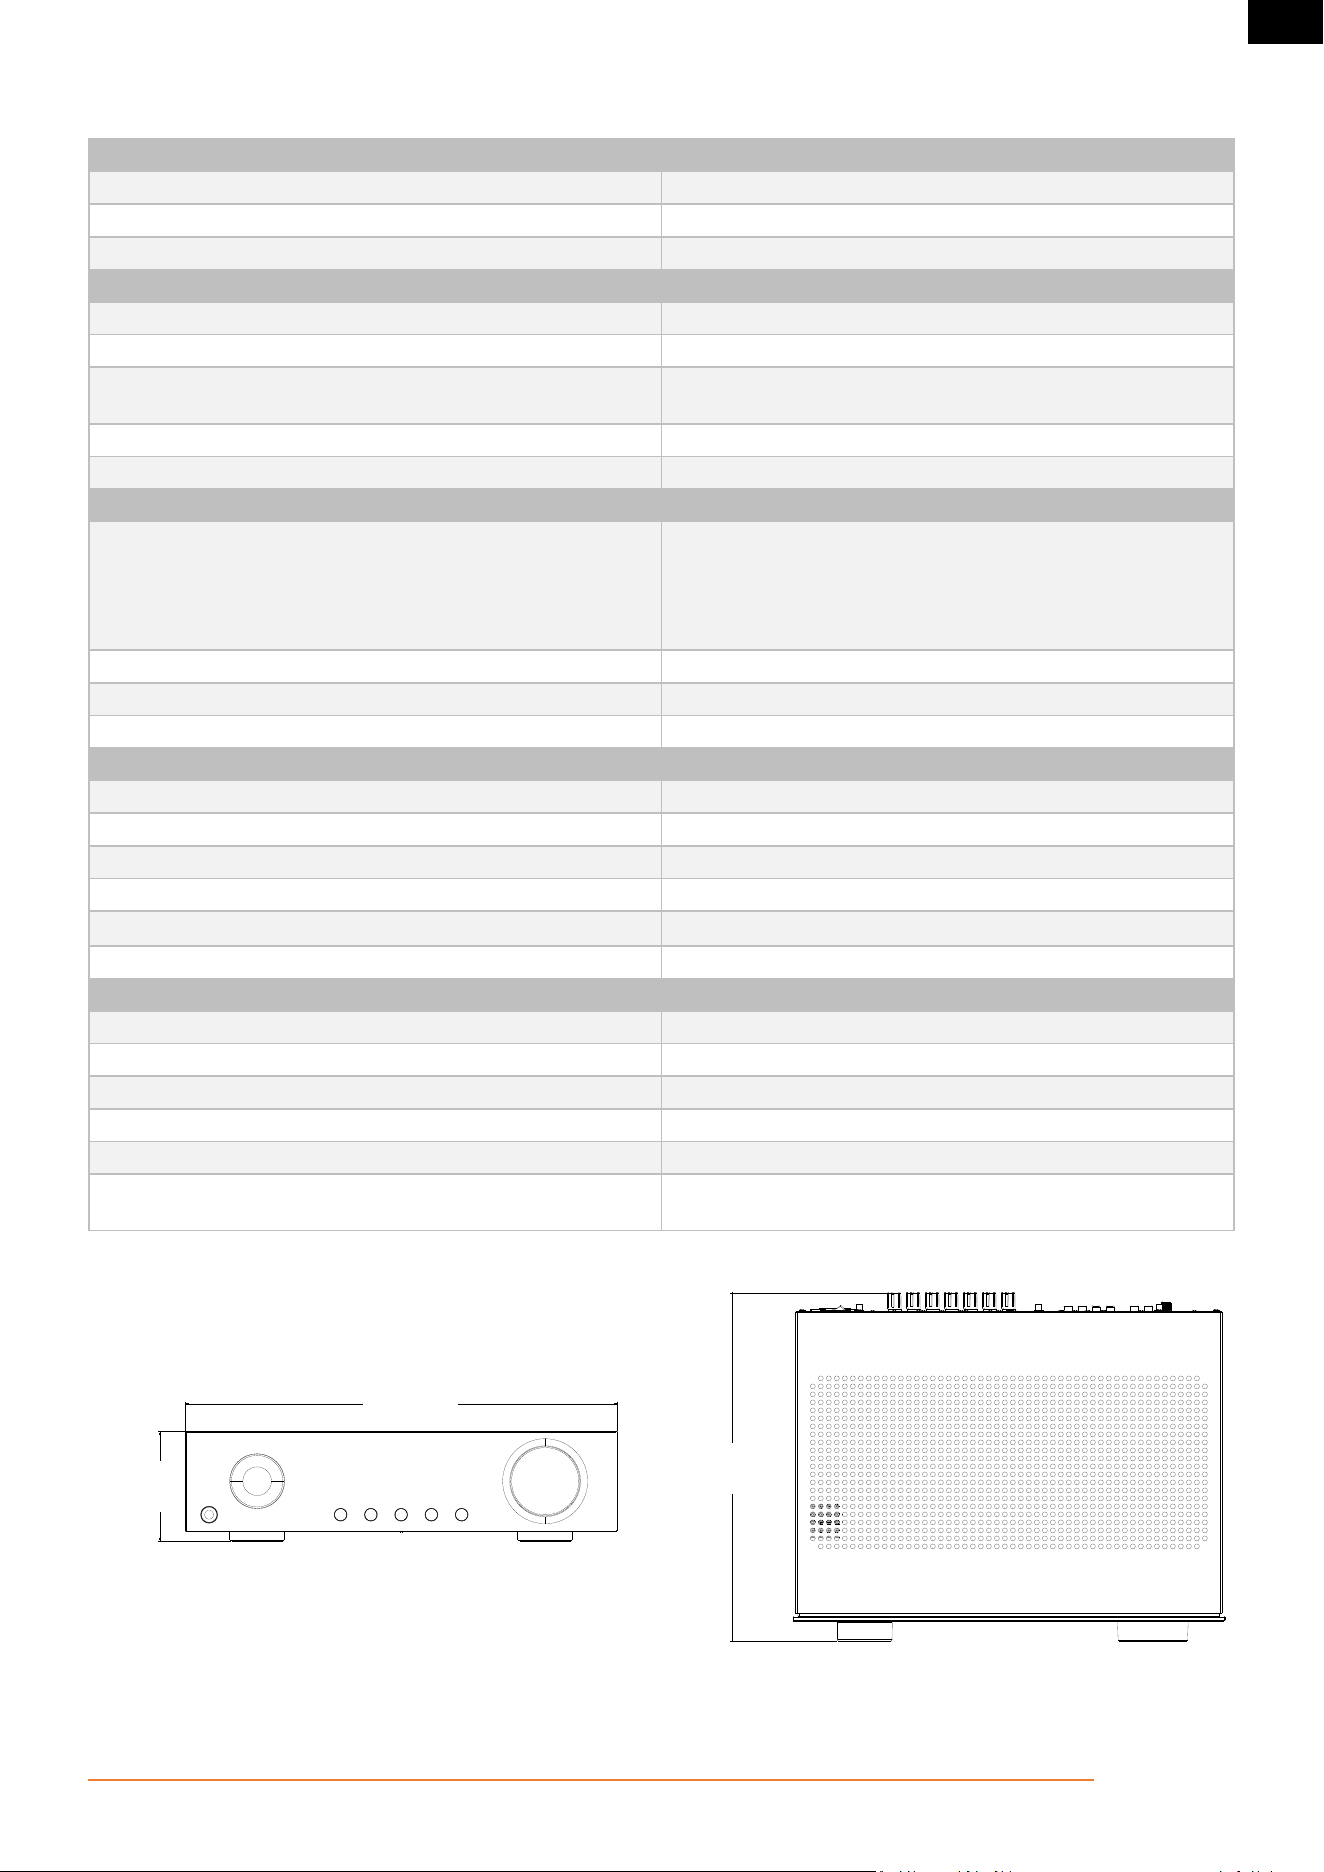
Dimensions incl. feet and speaker terminals (H x W x D) 4.3" x 17.0" x 13.7" (109.9mm x 432.0mm x 347.6mm)
Weight 11.3lb (5.1kg)
Supplied accessories IR remote, 2x AAA batteries, Bluetooth antenna, power cord
DIMENSIONS
[347.6mm]
13.7"
[432.0mm]
17"
[109.9mm]
4.3"
Pg 37 of 42
©2024 Harman International | Features, Specifications, and Appearance subject to change without notice.
MA310 | MA510 | MA710 Owner's Manual | rev 1.4 20250211
EN
MA510
Amplifier Section
Channels 5.2
Rated Power @ 8Ω (20Hz – 20kHz, 2 channels driven, 0.5% THD max) 75 W RMS
Rated Power @ 4Ω (20Hz – 20kHz, 2 channels driven, 0.5% THD max) 100 W RMS
Video Features
HDMI eARC Yes
HDMI Audio Return Channel Yes
8K HDMI input connectors (HDMI 2.1, HDCP 2.3 up to 8K/60Hz,
4K/120Hz)
4
HDMI 2.1 enhanced gaming features Gaming-VRR, ALLM, QFT, HFR (4K@120Hz)
HDR 10+, Dolby Vision Yes, Yes
Audio Features
File format MP3 / MPEG-4 AAC: up to 48 kHz / 320kbps
WMA: up to 48 kHz / 192kbps
ALAC: up to 192 kHz / 24-bit
FLAC: up to 192 kHz / 24-bit
PCM / WAV / AIFF: up to192 kHz / 24-bit
Pure Direct Yes
EZ Set EQ Yes
DA converter 192kHz/24-bit
Connectivity
HDMI Input/Output 4 / 1
Wi-Fi Yes (2.4 / 5GHz)
Bluetooth receive Yes (v4.1, Low Energy)
Digital Audio Input 1 Coax, 1 Optical
Stereo analog input 2 single-ended RCA
Pre-Out (single ended RCA) Subwoofer 1, Subwoofer 2
General
Mains voltage 110 – 240V, 50–60Hz
Max. power consumption 300W
Standby power consumption <0.5W
Dimensions incl. feet and speaker terminals (H x W x D) 4.3" x 17.0" x 13.7" (109.9mm x 432.0mm x 347.6mm)
Weight 12lb (5.4kg)
Supplied accessories IR remote, 2x AAA batteries, Bluetooth antenna, 2x Wi-Fi antenna,
power cord
DIMENSIONS
[347.6mm]
13.7"
[432.0mm]
17"
[109.9mm]
4.3"
Pg 38 of 42
©2024 Harman International | Features, Specifications, and Appearance subject to change without notice.
MA310 | MA510 | MA710 Owner's Manual | rev 1.4 20250211
EN
MA710
Amplifier Section
Channels 7.2
Rated Power @ 8Ω (20Hz – 20kHz, 2 channels driven, 0.5% THD max) 110 W RMS
Rated Power @ 4Ω (20Hz – 20kHz, 2 channels driven, 0.5% THD max) 160 W RMS
Video Features
HDMI eARC Yes
HDMI Audio Return Channel Yes
8K HDMI input connectors (HDMI 2.1, HDCP 2.3 up to 8K/60Hz,
4K/120Hz)
3
HDMI 2.1 enhanced gaming features Gaming-VRR, ALLM, QFT, HFR (4K@120Hz)
HDR 10+, Dolby Vision Yes, Yes
Audio Features
File format MP3 / MPEG-4 AAC: up to 48 kHz / 320kbps
WMA: up to 48 kHz / 192kbps
ALAC: up to 192 kHz / 24-bit
FLAC: up to 192 kHz / 24-bit
PCM / WAV / AIFF: up to192 kHz / 24-bit
Pure Direct Yes
EZ Set EQ Yes
Front channel bi-amp Yes
DA converter 192kHz/24-bit
Connectivity
HDMI Input/Output 6 / 1
Wi-Fi Yes (2.4 / 5GHz)
Bluetooth receive Yes (v5.3, Low Energy, APTX HD, APTX Adaptive)
Digital Audio Input 1 Coax, 1 Optical
Stereo analog input 2 single-ended RCA
Pre-Out (single ended RCA) Stereo Zone 2, Subwoofer 1, Subwoofer 2
General
Mains voltage 110 – 240V, 50–60Hz
Max. power consumption 500W
Standby power consumption <0.5W
Dimensions incl. feet and speaker terminals (H x W x D) 4.3" x 17.0" x 13.7" (109.9mm x 432.0mm x 347.6mm)
Weight 13.8lb (6.3kg)
Supplied accessories IR remote, 2x AAA batteries, Bluetooth antenna, 2x Wi-Fi antenna,
power cord
DIMENSIONS
[347.6mm]
13.7"
[432.0mm]
17"
[109.9mm]
4.3"

Pg 39 of 42
©2024 Harman International | Features, Specifications, and Appearance subject to change without notice.
MA310 | MA510 | MA710 Owner's Manual | rev 1.4 20250211
EN
Troubleshooting and Maintenance
GENERAL TROUBLESHOOTING
The AVR does not power on.
1. Attempt to power on the amplifier with the rear panel Power Switch, then the front panel Standby/On button.
2. Examine the power cord to ensure a good connection between the rear panel AC input connector and the wall outlet.
3. Check the wall outlet.
No Sound
1. Is the AVR correctly plugged in and switched on?
2. Is the audio/video source correctly connected, with the correct input selected?
3. Is the AVR muted?
4. Is the AVR in protection mode (as described below)?
Sound cuts-out unexpectedly
The AVR may enter a protection mode. In protection mode, the amplifier will turn itself off and power to the speakers will be removed. To
continue using the amplifier, the fault must be treated, and the AVR must be turned OFF then back ON from the power switch on the rear
panel. Possible faults include:
• DC OFFSET: The amplifier detected an overload. Power off and reduce the volume after turning back on.
• SHORT (CIRCUIT): The amplifier detected a speaker short circuit. Inspect all the speaker cables to make sure none of them are shorted
together (touching). This fault is more common when exposed wires are being used to make speaker connections.
• OVER TEMP: The internal temperature of the unit reached an unsafe level. Allow the AVR to cool.
Audio sounds "thin" and is lacking proper bass response.
Check to ensure proper polarity of the speaker cables and connections.
The amplifier does not respond to the remote control
1. Are there fresh batteries in the remote control?
2. Are you pointing the remote control towards the amplifier window without obstruction?
The front panel display is blank
1. Is the AVR correctly plugged in and switched on?
2. Is the AVR in standby?
3. Is the display dimmed to "Off"? Press the "DIM" button on the remote control.
A humming sound is present on an analog input
Audible hum, or a discernable low frequency noise is one of the most common problems within audio/video systems. This problem, even
when the volume is at a low level, is usually caused by a common problem known as a "ground loop". A ground loop occurs when there is a
difference in ground voltages between two or more components that are connected electrically. In most cases, one or more of the following
suggestions below will solve the hum problem.
1. Disconnect components one at a time to isolate the problem. Once the problem is identified, make sure the associated component is
properly grounded and connected to the same electrical ground as the AVR.
2. Turn off all components within your system and then disconnect the analog input cables on the AVR. Turn the amplifier back on. If the
hum disappears the fault may be with the input cables that are being used. Make sure the cables are properly shielded or use a cable
that has better shielding. Make sure the cable is not running or laying on top of any AC power cords.
3. If the Hum stops when the source is disconnected, the problem is most likely to be in the cable or the source device to which it is
connected.
If all else fails…
1. Contact an authorized JBL dealer.
2. Contact JBL Customer Technical Support
MAINTENANCE
Routine maintenance should be performed on a periodic basis. Clean the exterior surfaces of the unit with a soft, dry, lint-free cloth. Do not
use alcohol, benzene, acetone-based cleaners, or strong commercial cleaners. Do not use a cloth made with steel wool or metal polish. If the
unit is exposed to a dusty environment, a low-pressure blower may be used to remove dust from its exterior.

Pg 40 of 42
©2024 Harman International | Features, Specifications, and Appearance subject to change without notice.
MA310 | MA510 | MA710 Owner's Manual | rev 1.4 20250211
EN
Trademarks and Licenses
Apple®, AirPlay® and the AirPlay Logo™, iPod®, iPhone® and iPad® are trademarks of Apple Inc., registered in the
U.S. and other countries. App Store is a service mark of Apple Inc.
AirPlay 2 works with iPhone®, iPad®, and iPod touch® with iOS 11.4 or later, Mac with OS X® Mountain Lion or
later, and PC with iTunes® 10.2.2 or later.
The Spotify software is subject to third party licenses that can be found here: https://developer.spotify.com/legal/
third-party-licenses/
The Wi-Fi CERTIFIED™ logo is a registered trademark of Wi-Fi Alliance®
Google, Google Play, Chromecast, and other related marks are trademarks of Google LLC. The Google Assistant
requires an internet connection and is not available in certain countries and languages. Availability and react of
certain features and services are device, service, and network-dependent and may not be available in all areas.
Controlling certain devices in your home requires compatible smart devices. Subscriptions for services and
applications may be required and additional terms, conditions and/or charges may apply.
HDMI, the HDMI logo and High-Definition Multimedia Interface are trademarks or registered trademarks of HDMI
Licensing LLC.
MP3
MPEG Layer-3 audio decoding technology licensed from Fraunhofer IIS and Thomson multimedia.
SmartThings® is a registered trademark of SmartThings, Inc. WWST is a Certification Mark of SmartThings, Inc. All
other trademarks or registered trademarks are the property of their respective owners.
FLAC
FLAC Decoder Copyright © 2000, 2001, 2002, 2003, 2004, 2005, 2006, 2007, 2008 Josh Coalson
• Redistribution and use in source and binary forms, with or without modification, are permitted provided that
the following conditions are met:
• Redistribution of source code must retain the above copyright notice, this list of conditions and the following
disclaimer.
• Redistributions in binary form must reproduce the above copyright notice, this list of conditions and the
following disclaimer in the documentation and/or other materials provided with the distribution.
• Neither the name of the Xiph.org Foundation nor the names of its contributors may be used to endorse or
promote products derived from this software without specific prior written permission.
THIS SOFTWARE IS PROVIDED BY THE COPYRIGHT HOLDERS AND CONTRIBUTORS 'AS IS' AND ANY EXPRESS OR
IMPLIED WARRANTIES, INCLUDING, BUT NOT LIMITED TO, THE IMPLIED WARRANTIES OF MERCHANTABILITY AND
FITNESS FOR A PARTICULAR PURPOSE ARE DISCLAIMED. IN NO EVENT SHALL THE FOUNDATION OR CONTRIBUTORS
BE LIABLE FOR ANY DIRECT, INDIRECT, INCIDENTAL, SPECIAL, EXEMPLARY, OR CONSEQUENTIAL DAMAGES
(INCLUDING, BUT NOT LIMITED TO, PROCUREMENT OF SUBSTITUTE GOODS OR SERVICES; LOSS OF USE, DATA,
OR PROFITS; OR BUSINESS INTERRUPTION) HOWEVER CAUSED AND ON ANY THEORY OF LIABILITY, WHETHER IN
CONTRACT, STRICT LIABILITY, OR TORT (INCLUDING NEGLIGENCE OR OTHERWISE) ARISING IN ANY WAY OUT OF
THE USE OF THIS SOFTWARE, EVEN IF ADVISED OF THE POSSIBILITY OF SUCH DAMAGE.
The Bluetooth® word mark and logos are registered trademarks owned by Bluetooth SIG, Inc. and any use of such
marks by HARMAN International Industries, Incorporated is under license.
Other trademarks and trade names are those of their respective owners.
(MA310/MA510)
For DTS patents, see http://patents.dts.com. Manufactured under license from DTS Licensing Limited. DTS, DTS-
HD Master Audio, DTS-HD, and the DTS-HD logo are registered trademarks or trademarks of DTS, Inc. in the United
States and other countries. © 2020 DTS, Inc. ALL RIGHTS RESERVED.
(MA710)
For DTS patents, see http://patents.dts.com. Manufactured under license from DTS Licensing Limited. DTS, DTS:X,
and the DTS:X logo are registered trademarks or trademarks of DTS, Inc. in the United States and other countries.
© 2021 DTS, Inc. ALL RIGHTS RESERVED.
(MA310/MA510)
Manufactured under license from Dolby Laboratories. Dolby, Dolby Audio, Pro Logic, and the double-D symbol are
trademarks of Dolby Laboratories Licensing Corporation.
(MA710)
Dolby, Dolby Atmos, and the double-D symbol are registered trademarks of Dolby Laboratories Licensing
Corporation. Manufactured under license from Dolby Laboratories. Confidential unpublished works. Copyright ©
2012-2020 Dolby Laboratories. All rights reserved.
Pg 41 of 42
©2024 Harman International | Features, Specifications, and Appearance subject to change without notice.
MA310 | MA510 | MA710 Owner's Manual | rev 1.4 20250211
EN
Regulatory Communications
Restrictions in
the 5 GHz band:
According to Article 10 (10) of Directive 2014/53/EU, the packaging shows that this radio equipment will be subject to some
restrictions when placed on the market in Belgium (BE), Bulgaria (BG), the Czech Republic (CZ),Denmark (DK), Germany (DE),
Estonia (EE), Ireland (IE), Greece (EL), Spain(ES), France (FR), Croatia (HR), Italy (IT), Cyprus (CY), Latvia (LV), Lithuania(LT),
Luxembourg (LU), Hungary (HU), Malta (MT), Netherlands(NL), Austria(AT), Poland (PL), Portugal (PT), Romania (RO),
Slovenia (SI), Slovakia (SK),Finland (FI), Sweden (SE), the Turkey (TR), Norway(NO), Switzerland (CH), Iceland (IS), and
Liechtenstein (LI), the United Kingdom in respect of Northern Ireland (UK(NI)).
MA310:
Este equipamento não tem direito à proteção contra interferência prejudicial e não pode causar interferência em sistemas
devidamente autorizados.
Este produto está homologado pela ANATEL, de acordo com os procedimentos regulamentados pela Resolução 242/2000, e
atende aosrequisitos técnicos aplicados.
Para maiores informações, consulte o site da ANATEL - http://www.anatel.gov.br
MA510:
Incorpora produto homologado pela Anatel sob número: 21447-22-06506 - (Módulo Bluetooth&Wifi AP72598V)
Este equipamento não tem direito à proteção contra interferência prejudicial e não pode causar interferência em sistemas
devidamente autorizados. Para mais informações, consulte o site da Anatel: https://www.gov.br/anatel/pt-br
MA710:
Incorpora produto homologado pela Anatel sob números: 24327-23-07120 - (Módulo Bluetooth QCC5181)/21447-22-06506
- (Módulo Wifi AP72598V)
Este equipamento não tem direito à proteção contra interferência prejudicial e não pode causar interferência em sistemas
devidamente autorizados. Para mais informações, consulte o site da Anatel:
https://www.gov.br/anatel/pt-br
Atenção: conforme lei brasileira n° 11.291, a exposição prolongada a ruídos superiores a 85 dB pode causar danos ao
sistema auditivo.
MA310 wireless
specification
Bluetooth profile: a2dp, avrcp, avdtp, avctp
Bluetooth Max. transmitting power: < 3dBm (EIRP)
Bluetooth:
• Bluetooth operation in 2402MHz to 2480MHz with max power 13dBm e.i.r.p
• Bluetooth LE operation in 2402MHz to 2480MHz with max power 12dBm e.i.r.p
MA510 wireless
specification
Bluetooth profile: SPP; A2DP; ARCP
Bluetooth Max. transmitting power: < 4dBm (EIRP)
Bluetooth:
• Bluetooth operation in 2402MHz to 2480MHz with max power 13dBm e.i.r.p
• Bluetooth LE operation in 2402MHz to 2480MHz with max power 12dBm e.i.r.p
Wi-Fi:
• 802.11b/g/n operation in 2412MHz to 2472MHz with max power 20 dBm e.i.r.p
• 5GHz RLAN 802.11a/n/ac: operation in 5180MHz - 5240MHz with max power 23 dBm e.i.r.p; 5260MHz - 5320MHz;
5500MHz - 5700MHz with max power: 20 dBm e.i.r.p
• 5.8G RLAN operation in 5745MHz to 5825MHz with max power 14 dBm e.i.r.p
Note: The device is restricted to indoor use when operated in the 5150-5350Mhz frequency range
MA710 wireless
specification
Bluetooth profile: a2dp, avrcp, avdtp, avctp, vcp, vcs, mcp, mcs
Bluetooth Max. transmitting power: < 3dBm (EIRP)
Bluetooth:
• Bluetooth operation in 2402MHz to 2480MHz with max power 13dBm e.i.r.p
• Bluetooth LE operation in 2402MHz to 2480MHz with max power 12dBm e.i.r.p
Wi-Fi:
• 802.11b/g/n operation in 2412MHz to 2472MHz with max power 20 dBm e.i.r.p
• 5GHz RLAN 802.11a/n/ac: operation in 5180MHz - 5240MHz with max power 23 dBm e.i.r.p; 5260MHz - 5320MHz;
5500MHz - 5700MHz with max power: 20 dBm e.i.r.p
• 5.8G RLAN operation in 5745MHz to 5825MHz with max power 14 dBm e.i.r.p
Note: The device is restricted to indoor use when operated in the 5150-5350Mhz frequency range
This equipment should be installed and operated with minimum distance 20cm between the radiator & your body

EN
This equipment complies with European COMMISSION REGULATION (EU) 2023/826
Model: MA310
Power supply: 110-240V, 50-60Hz
Standby consumption: <0.5W
Max. operating temperature: 35°C
Model: MA510
Power supply: 110-240 V, 50-60Hz
Standby consumption (NET Off/NET On): <0.5W / <2W
Max. operating temperature: 35°C
Model: MA710
Power supply: 110-240 V, 50-60Hz
Standby consumption (NET Off/NET On): <0.5W / <2W
Max. operating temperature: 35°C
Standby time
When there is no audio input and no user operation, after 20 minutes, unit will enter standby mode.
User can change the standby mode through the menu, "Setup" -> "System Setup" -> "General Setup" -> "Standby Mode"
User also can change the auto standby time through the menu, "Setup" -> "System Setup" -> "General Setup" -> "Auto Standby".
How to turn off the wireless network
The default network mode is set as 'Auto' mode, in this mode, wired connection will be used if network cable is plugged in, otherwise Wi-Fi
will be used. User can change the network mode from the product web interface.
Harman International Industries, Incorporated.
8500 Balboa Blvd, Northridge CA 91329 United States.
European Representative: Harman International Industries, Incorporated.
EMEA Liaison Office, Danzigerkade 16G, 1013 AP Amsterdam, The Netherlands.
UK Business Address: Ground Floor, Westside 2, London Road, Apsley, Hemel Hempstead, Hertfordshire, HP3 9TD,
United Kingdom.
© 2024 Harman International Industries, Incorporated. All Rights Reserved.
JBL is a trademark of Harman International Industries, Incorporated registered in the United States and other
countries.
Features, Specifications, and Appearance subject to change without notice.
Pg 42 of 42MA310 | MA510 | MA710 Quick Start Guide | Rev 1.4 20250211 | Features, Specifications, and Appearance subject to change without notice.
