
Technical Support and E-Warranty Certificate www.vevor.com/support
ATV SPRAYER
USER MANUAL
MODEL:BS60
We continue to be committed to provide you tools with competitive price.
"Save Half", "Half Price" or any other similar expressions used by us only represents an
estimate of savings you might benefit from buying certain tools with us compared to the major
top brands and does not necessarily mean to cover all categories of tools offered by us. You
are kindly reminded to verify carefully when you are placing an order with us if you are
actually saving half in comparison with the top major brands.

1
MODEL:BS60
Have product questions? Need technical support? Please feel free to
contact us:
Technical Support and E-Warranty Certificate
www.vevor.com/support
NEED HELP? CONTACT US!
This is the original instruction, please read all manual instructions
carefully before operating. VEVOR reserves a clear interpretation of our
user manual. The appearance of the product shall be subject to the
product you received. Please forgive us that we won't inform you again if
there are any technology or software updates on our product.
ATV SPRAYER

2
SAFETY INSTRUCTIONS
Points for attention and warning
1. Warning!!! This product is designed to apply chemicals that may be
harmful and could cause serious personal injury if inhaled or brought into
contact with the user failure to read and follow owner's manual instructions
before use and/or misuse of this product could result in unexpected failure
with major injuries.
2. Do not use insoluble powder with this sprayer the solid matter is easy to
block the screen and hose to pump do not operate with strong acids,strong
based or flammable liquids.
3. Do not use high-resistant and very toxic pesticides for pest-controlling
purposes on vegetables, fruit trees, and plants.
4. Do not operate sprayer in temperatures exceeding 45°c or lower than
-10°c.
5. Trial spraying with clean water is necessary for initial us to make.
6. It is strictly prohibited to keep this sprayer near fire or expose base to
water or immerse the sprayer in the water to clean or fill it with water.
7. Wear a mask and gloves to protect the skin and avoid direct contact
with pesticides or harmful liquids.do not spray pesticides against the wind
or spray toward humans, animals, or food.do not operate for extended
periods of time under high temperatures
8. After use for half a year you should dismantle the base and check
whether the screw s loose if it is please tighten them also be sure to switch
off power before storage.After spraying please make use to treat the waste
according to the manual provided by the pesticide Warning!!!
This sprayer is designed to apply chemicals that may be harmful and could
cause serious personal injury if careless operation.The user should wear
masks and gloves to protect skin. Strict compliance with safety instructions
of pesticides is required.

3
FEATURES
1. Smooth and steam line appearance. The sprayer is ergonomically
designed to conform to the human back making it easy to carry.
2. The sprayer comes with a mini diaphragm pump which is lightweight and
compact, creating high pressure and extended service life. It features a
pressure protection switch (micro switch) to protect the battery the supplied
charging socket can be used as a 12-volt power supply in addition to a
charging unit.
3. The highly-efficient sprayer is suitable for controlling pests in crops,
flowers and garden epidemics controlling livestock and poultry houses and
sanitation of public places. This sprayer saves labor time and attains 3 to 4
times more efficiency than a manual sprayer.
4. Hard to leak better airproof compared with gasoline machine sprayers
no exhaust gas/low noise no environmental pollution etc and durable
power.
NOTE:
1. Please tighten the filler cap after filling the liquid into the tank. Make sure
no liquid will be out during the operation.
2. When releasing the switch handle, the spraying will stop automatically.
The pump also stops working accordingly. While spraying out the liquid
from the tank, the pump will continue to work without water, so please
remember to close the power switch. The switch handle fixes the auto-lock
key to reduce the work of users.
3. Two of three kinds of nozzles are supplied for the sprayer. The fan
nozzles are designed for spraying pesticides. Follow the wind and move in
a parallel manner on one side while spraying. The cone nozzles are best
for controlling pests. Follow the wind moves in a cross manner on one side
while spraying the multi-hole nozzles is best for spraying high plants and
fruit trees however, it may result in insignificant loss of pesticide since it
covers a wider area
Three filters prevent foreign matter or particles from clogging the 4 nozzles
the filter is uniquely designed to allow easy dismantling and cleaning.
SAVE THIS MANUAL
5
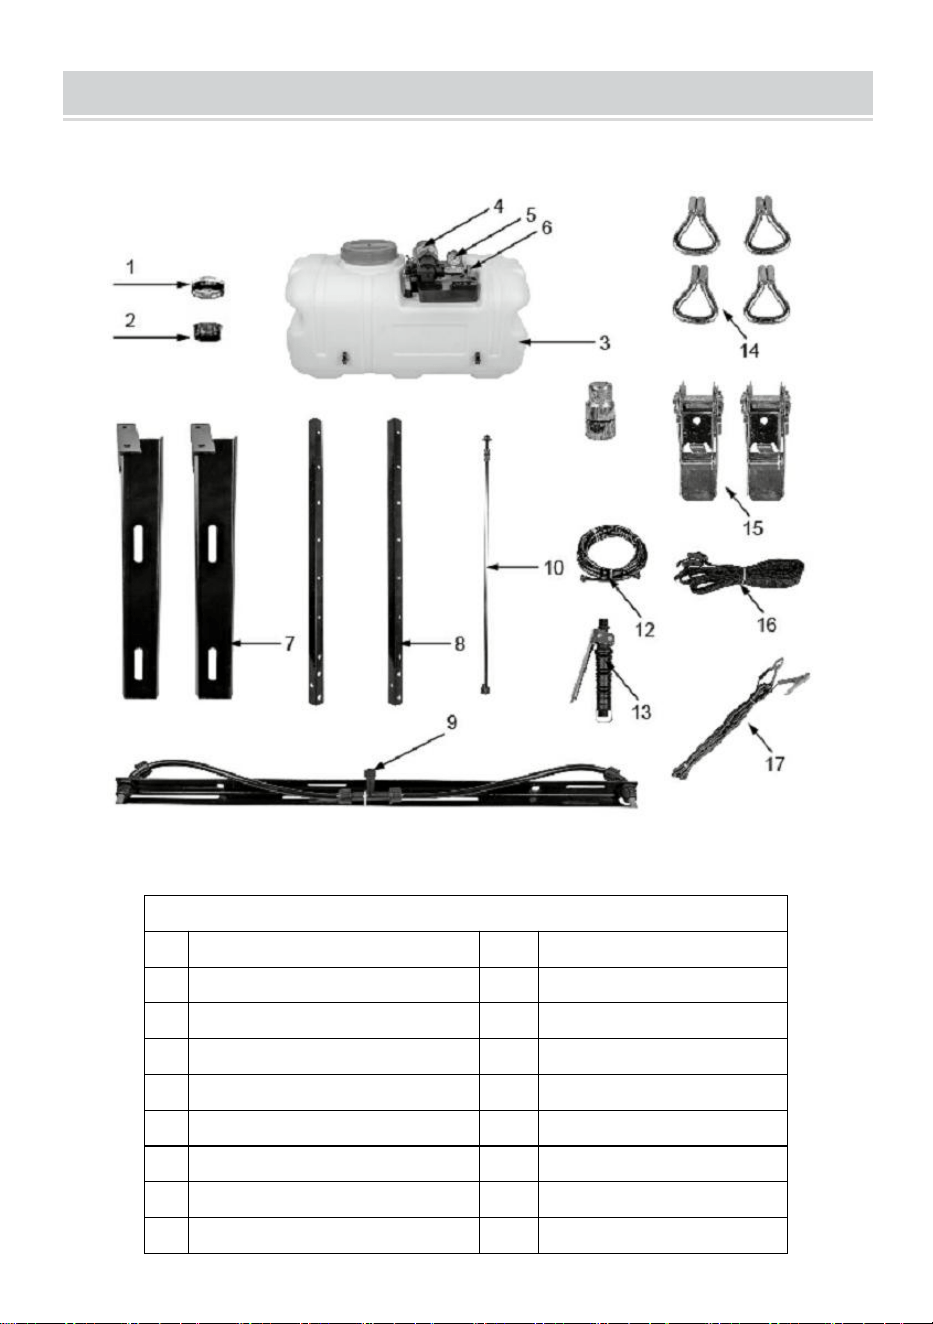
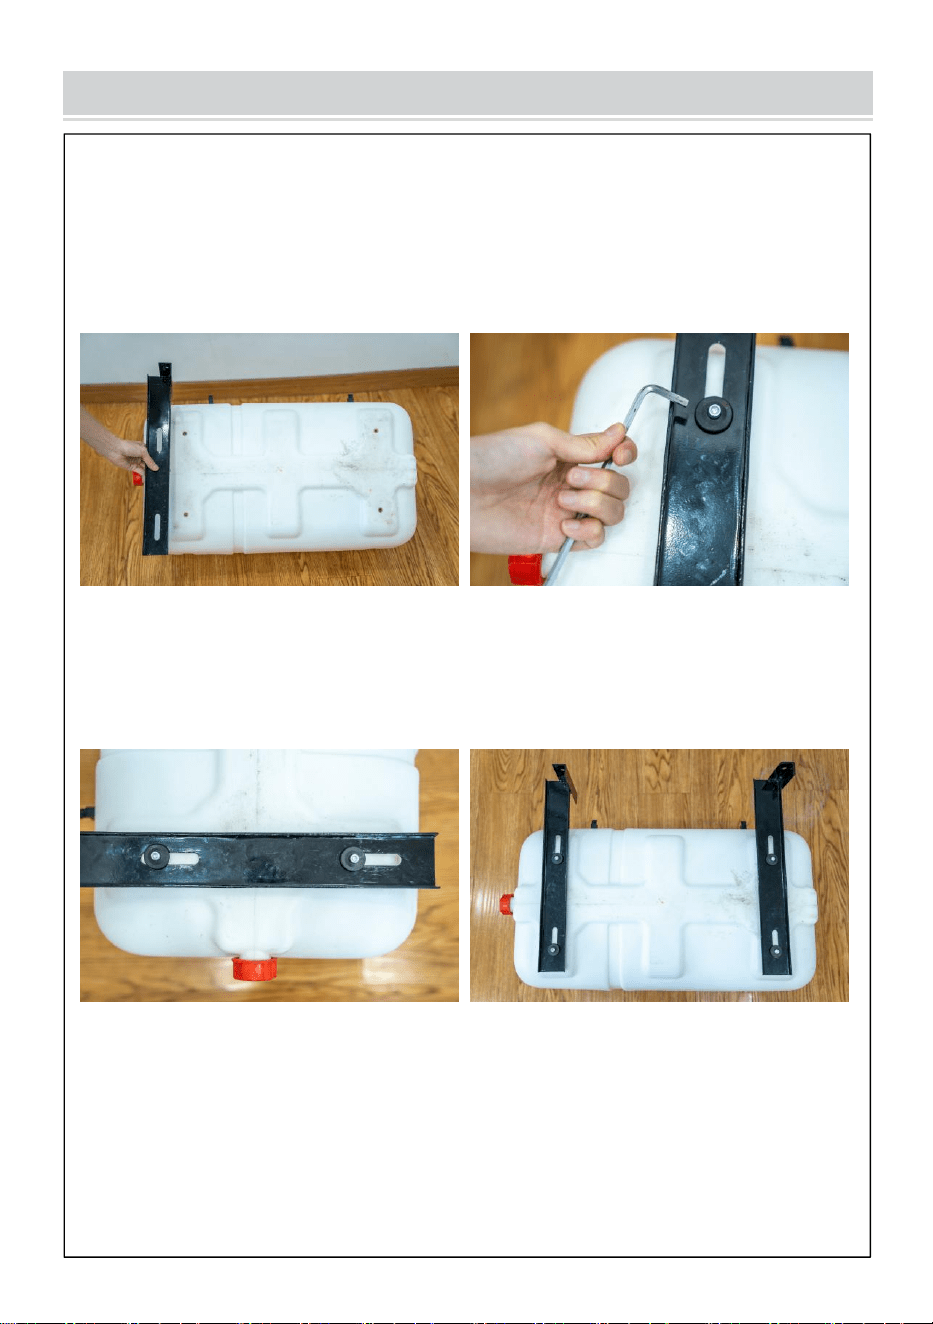
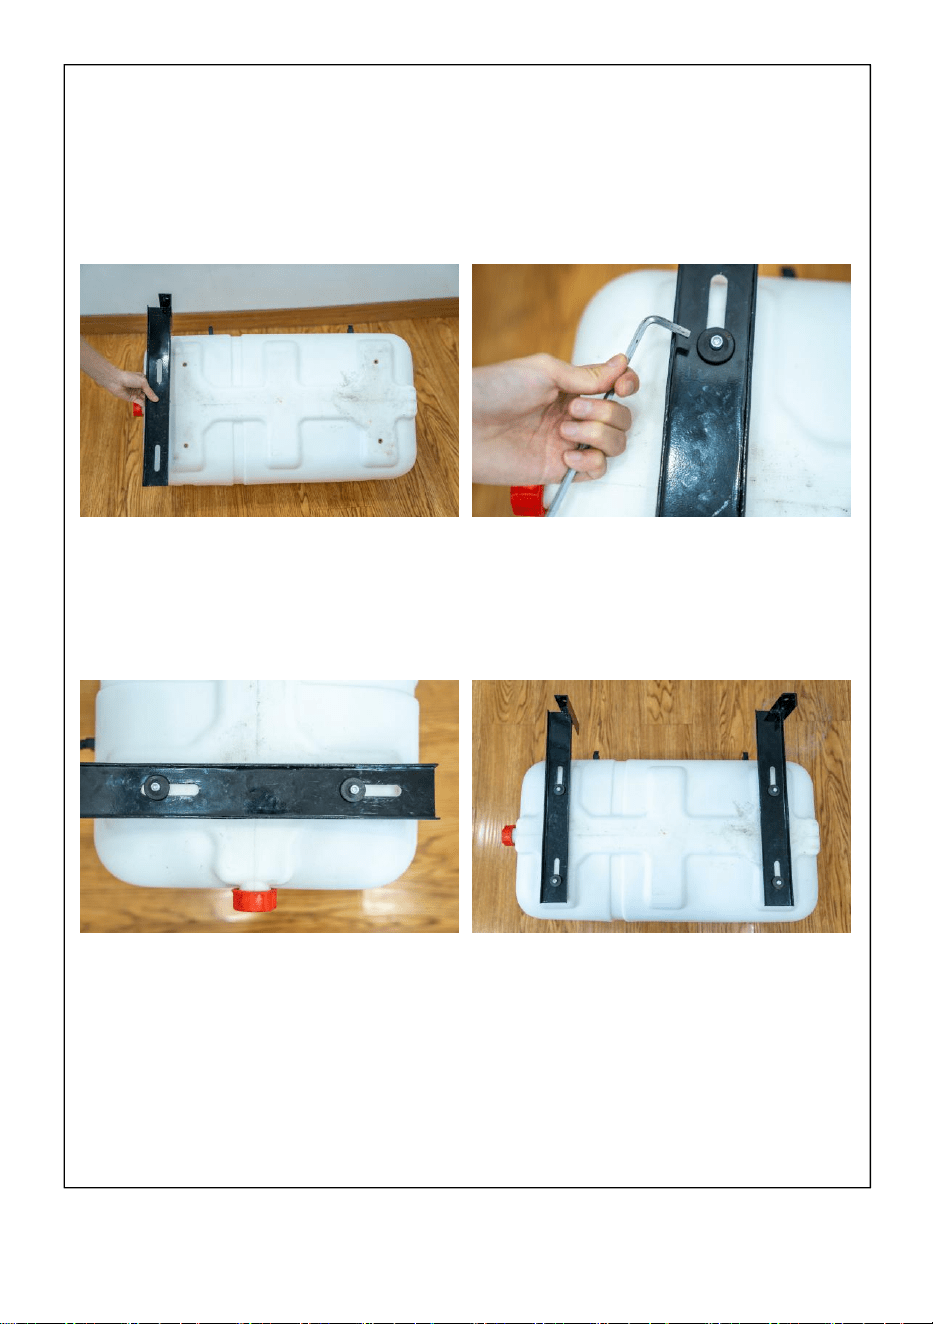
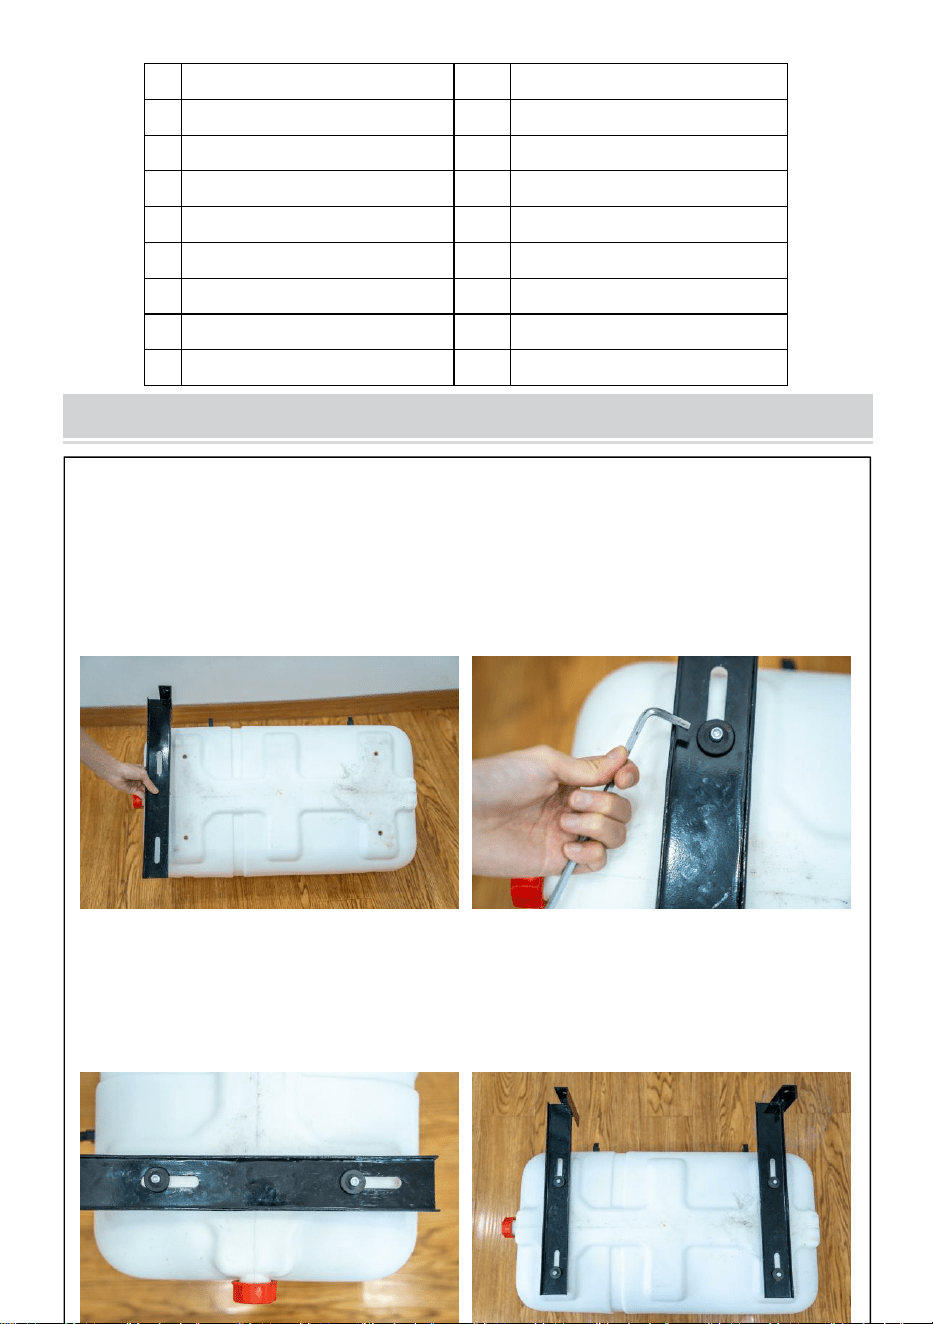
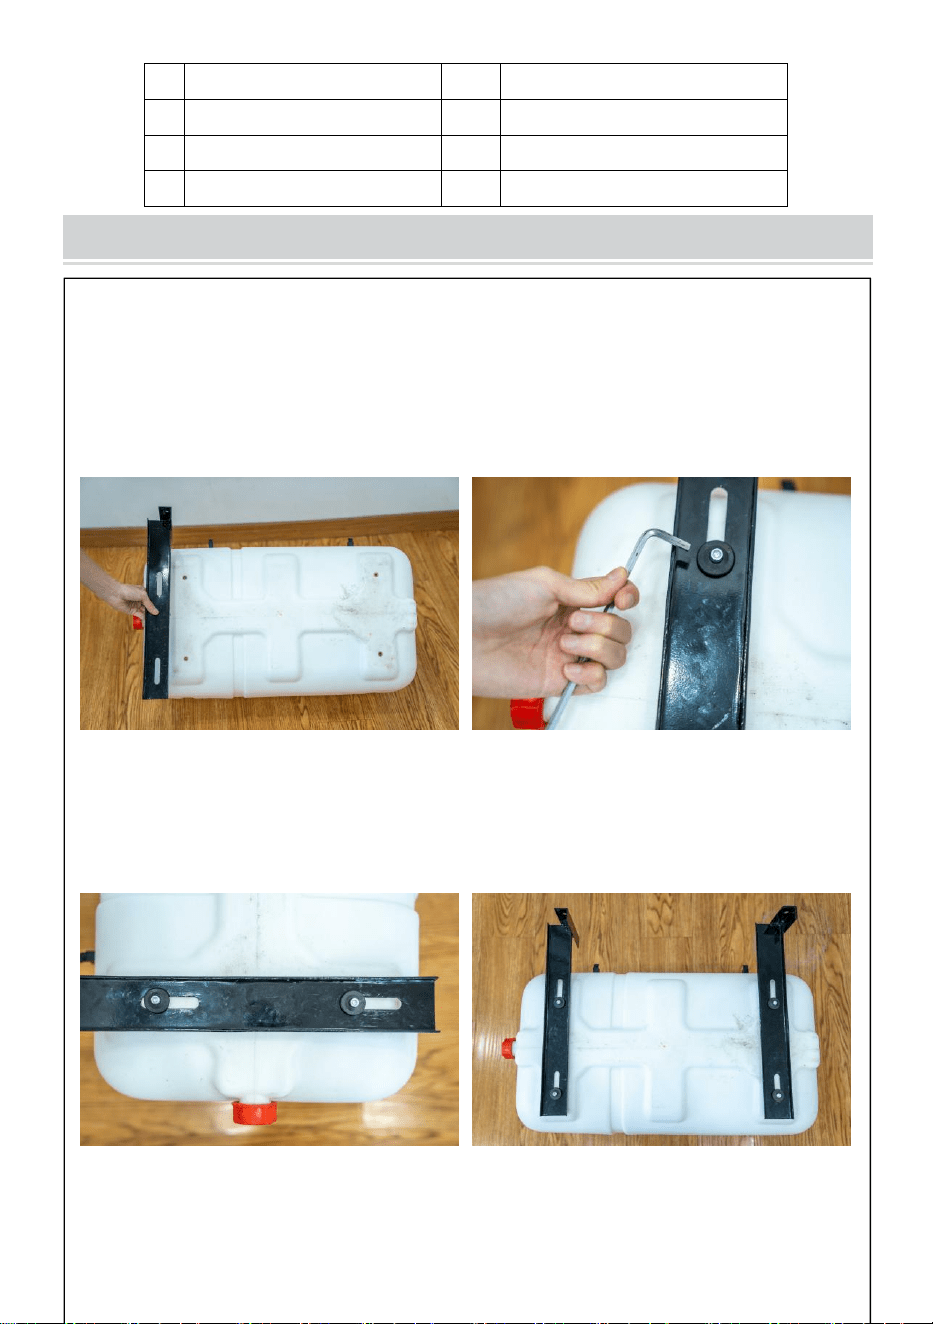
ASSEMBLY STEP
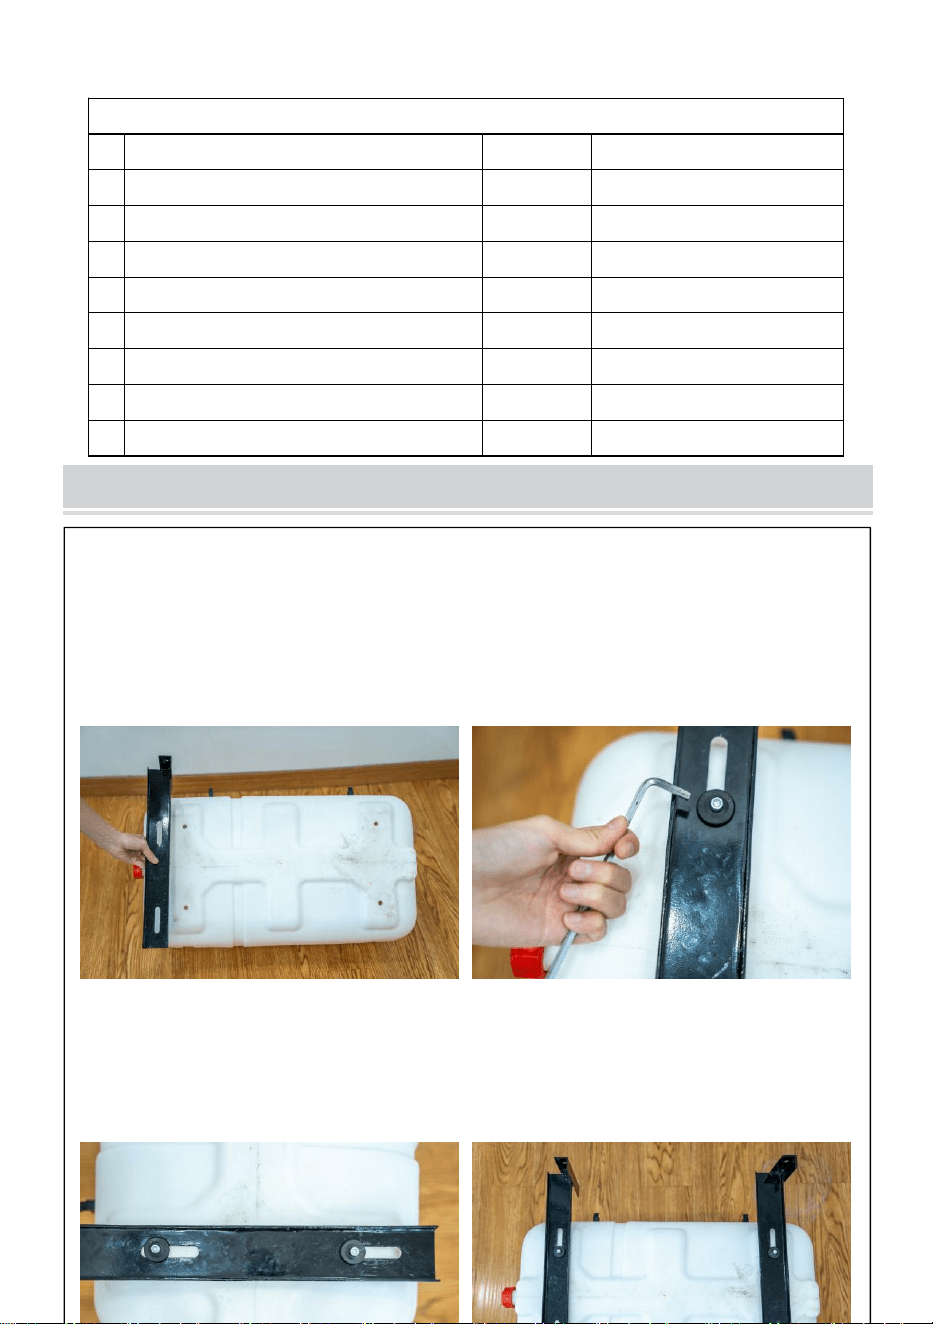
Step1
With the help of an Allen wrench, install BTACKET 7 on the left and right sides
of the bottom of the TANK 3 with bolts.

6
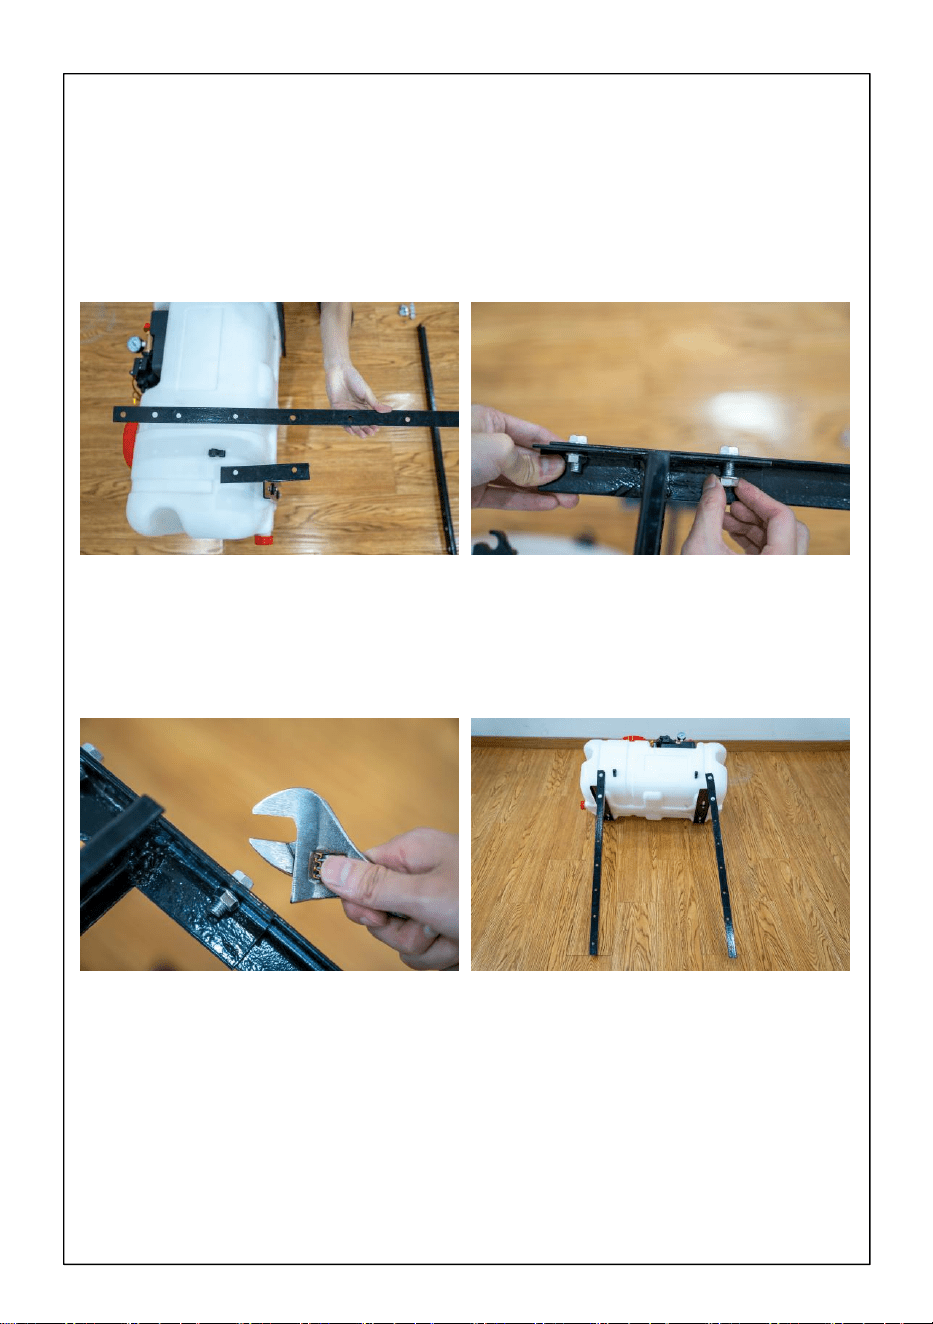
Step2
With the help of an open wrench, install BRACKET 8 on BRACKET 7 and
secure it with bolts and nuts.

7
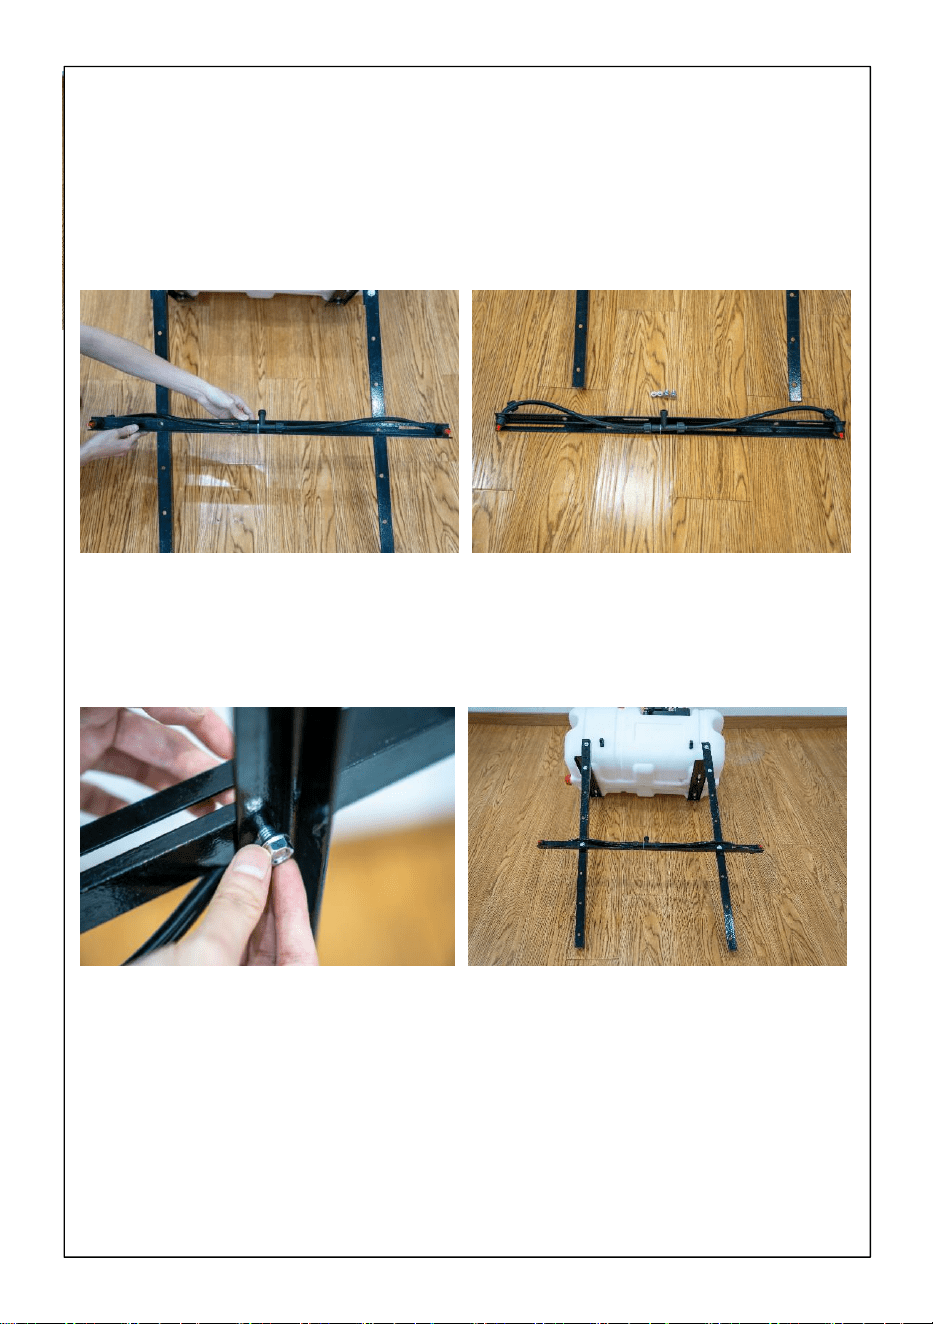
Step3
With the help of an open end wrench, install SPRAY NOZZLE 9 in a suitable
position on BRACKET 8 and secure it with bolts and nuts


9
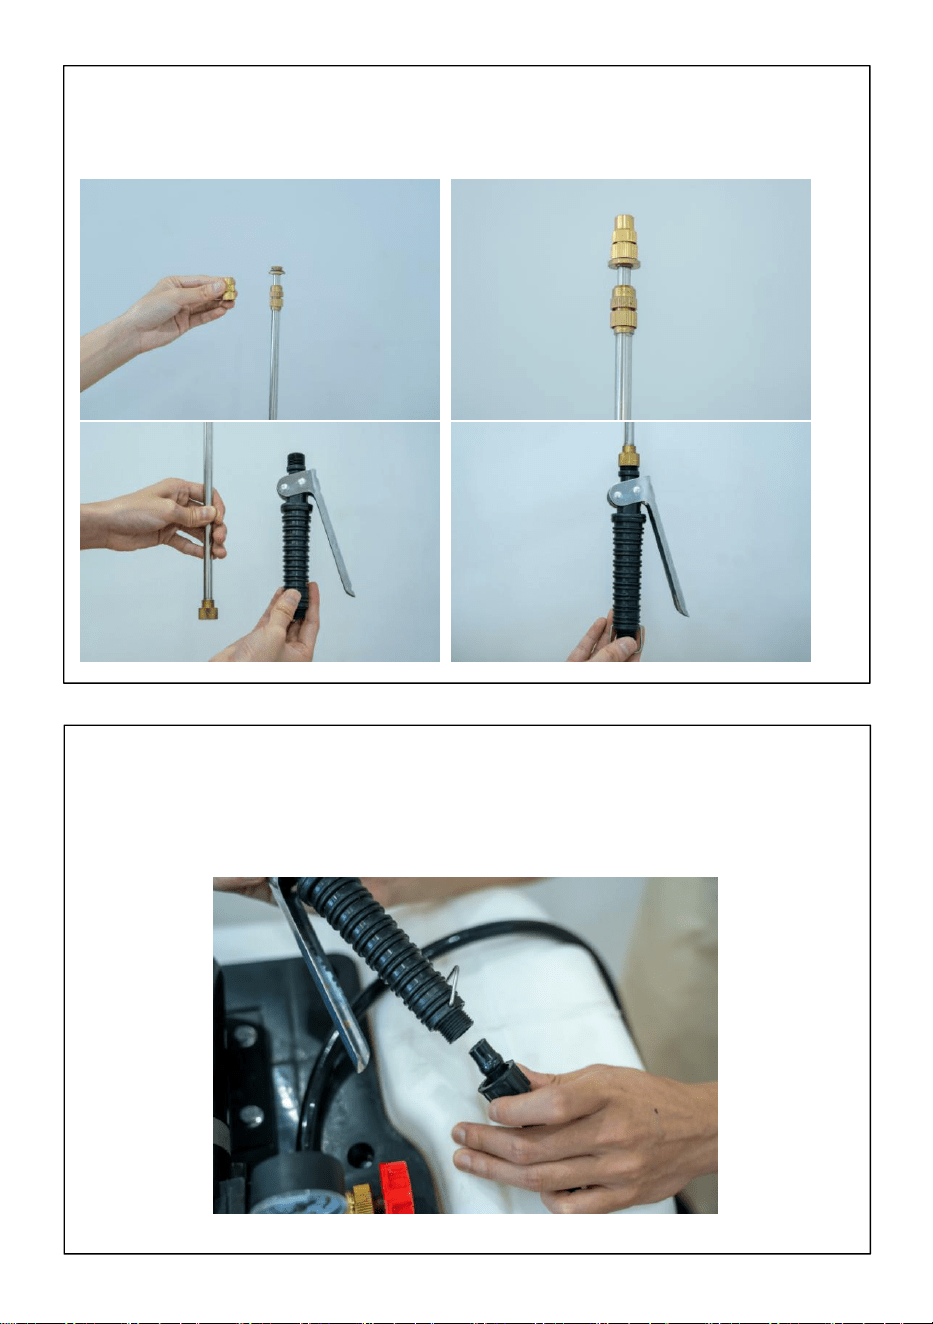
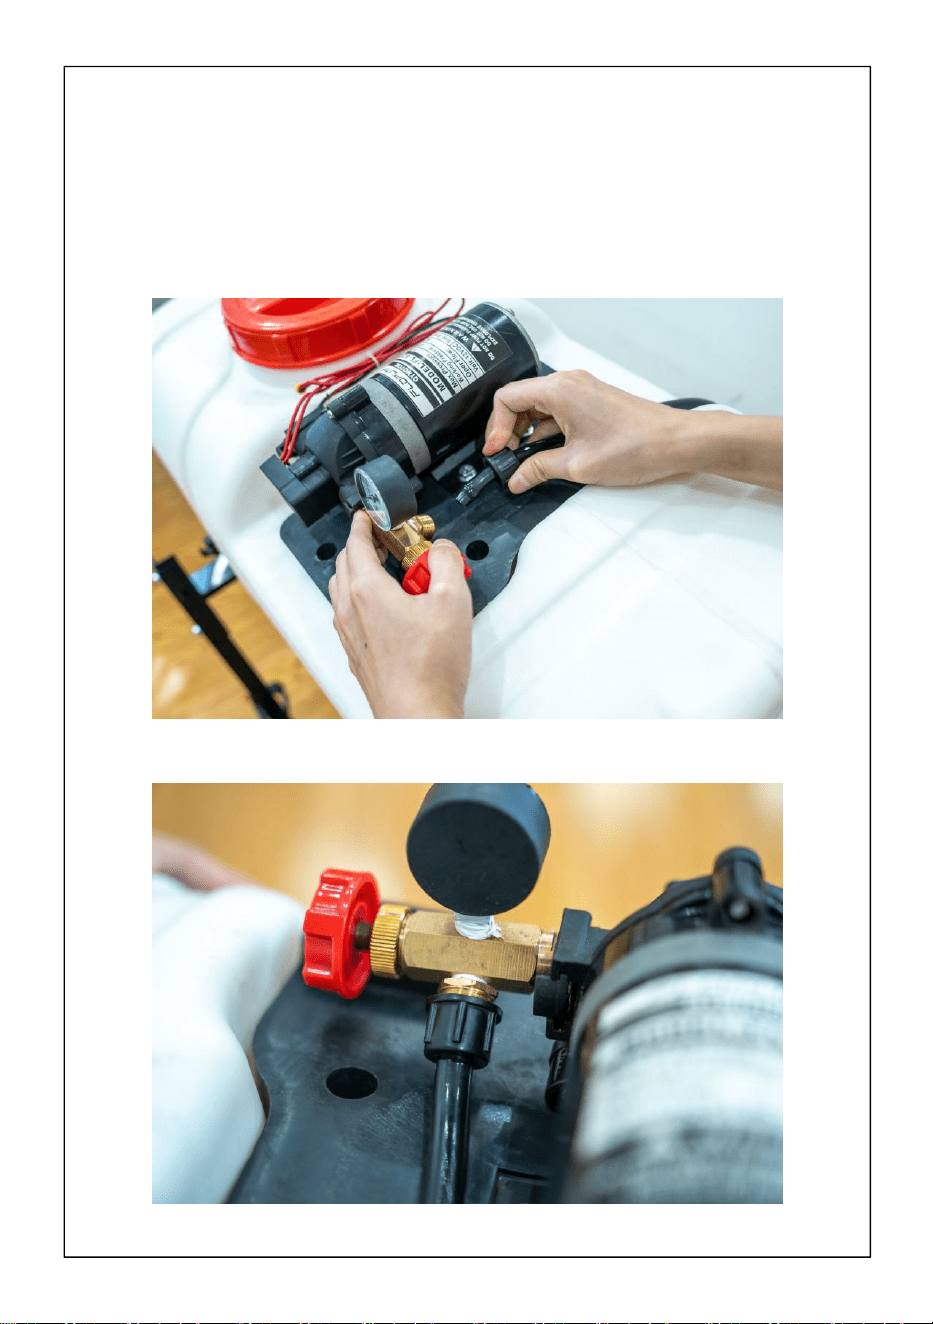
Step5
Connect BRASS NOZZLE 11 and SWITCH 13 and LANCE 10 respectively to
form a complete spray gun.
Step6
Connect and tighten the joint of the tail of the spray gun assembled by step5
and the other end of the water outlet, to complete the installation of the ATV
sprayer.

10
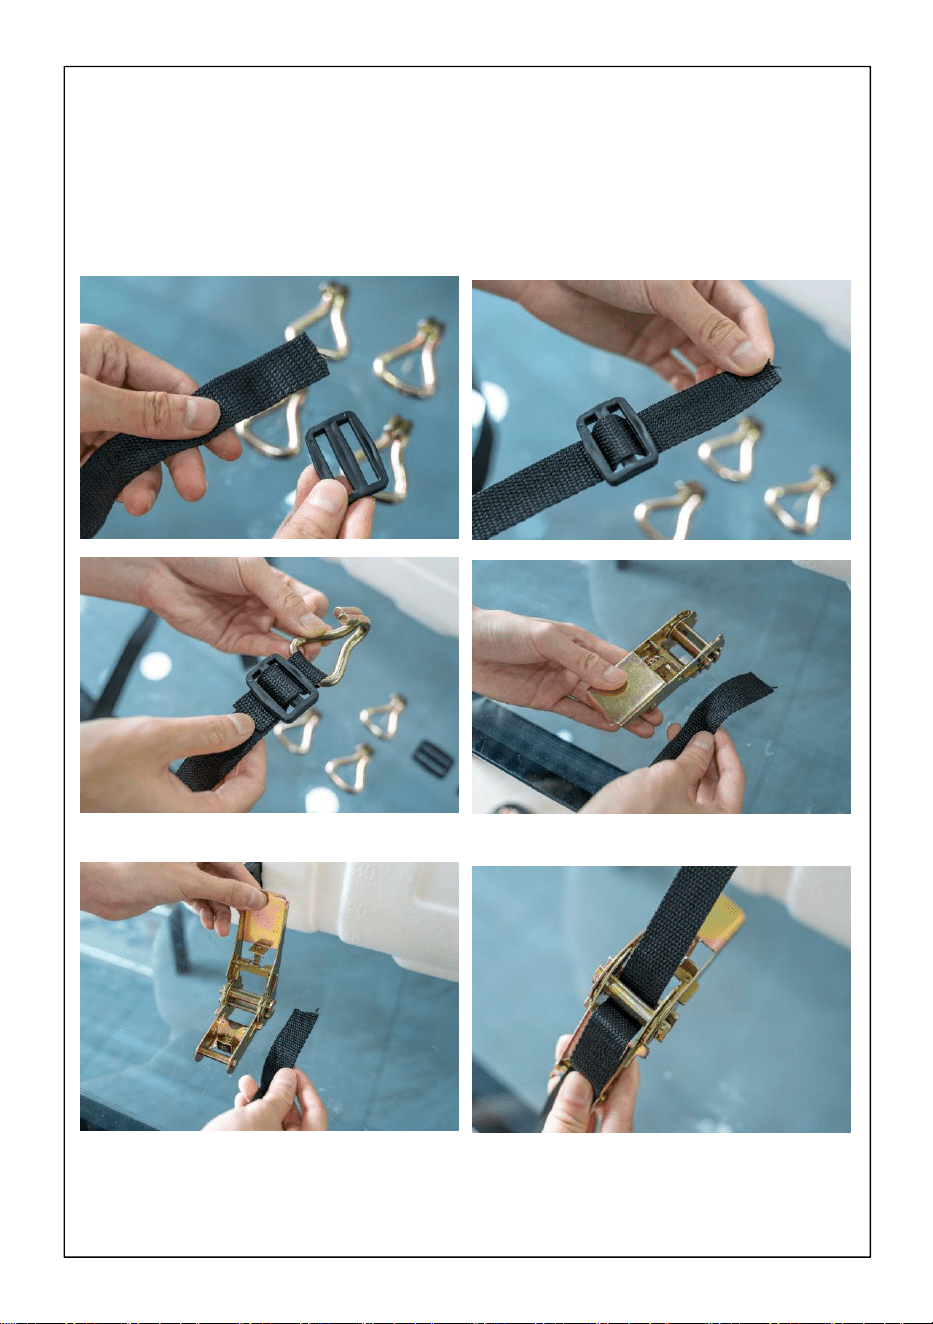
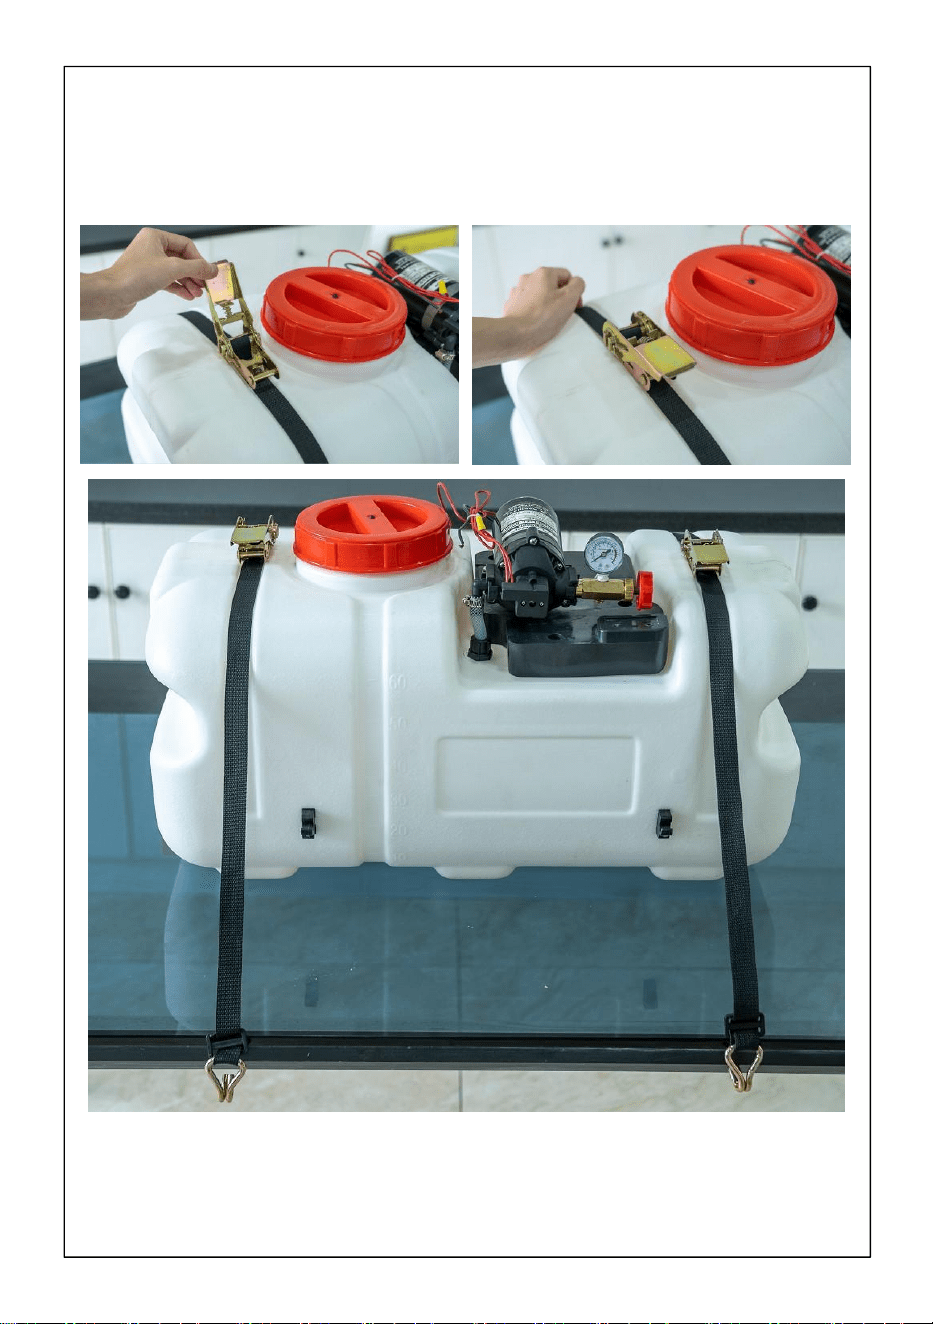
Step7
Install the HOOK 14 to one end of the BELT 16 and pass the other end through
the BUCKLE 15.

11
Step8
The TANK 3 is securely secured to the ATV with tightening BELTS 16 and the
BUCKLES 15 and HOOKS 14.
12
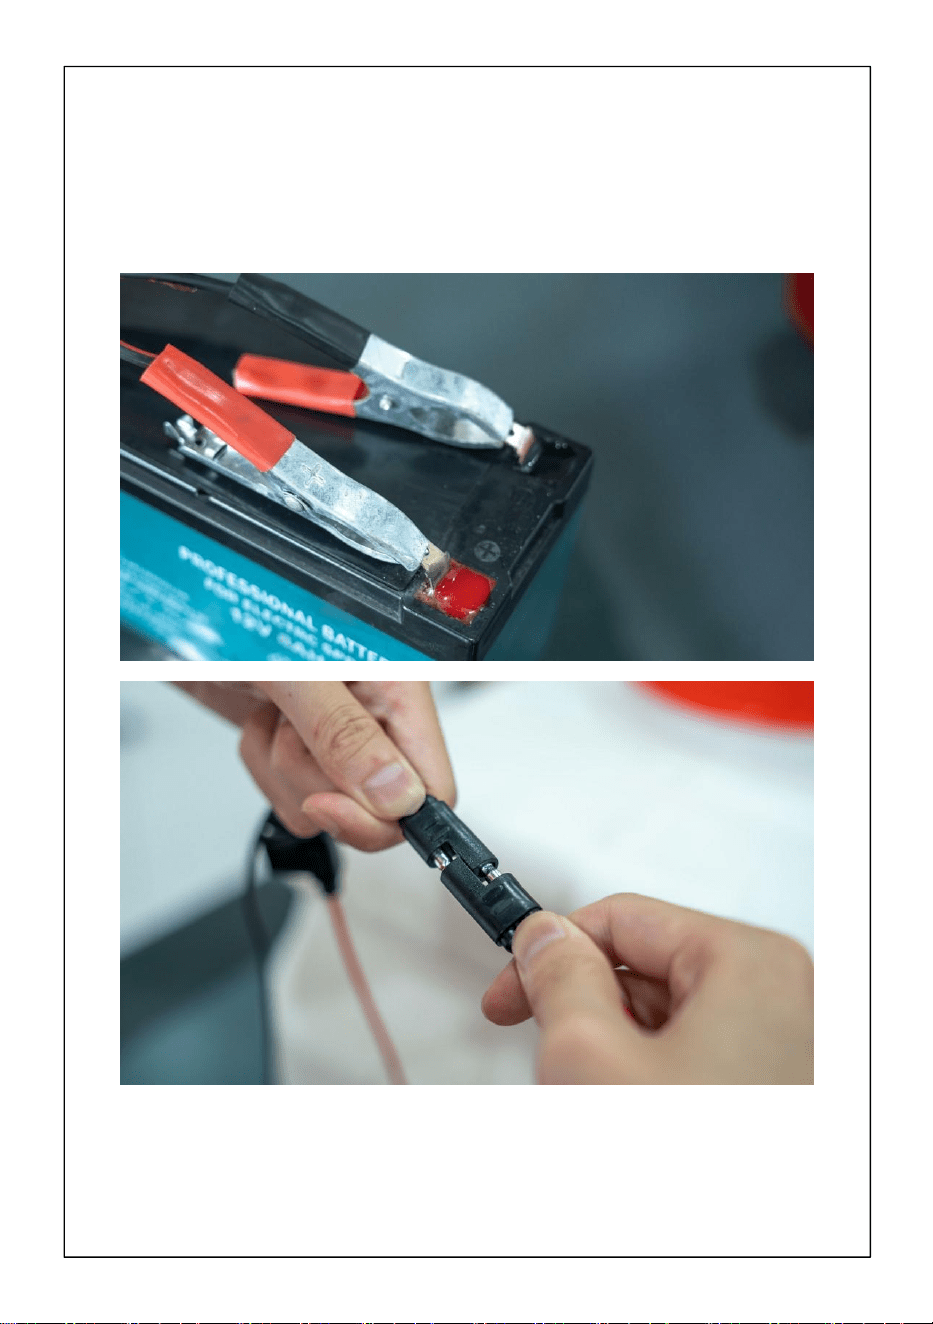
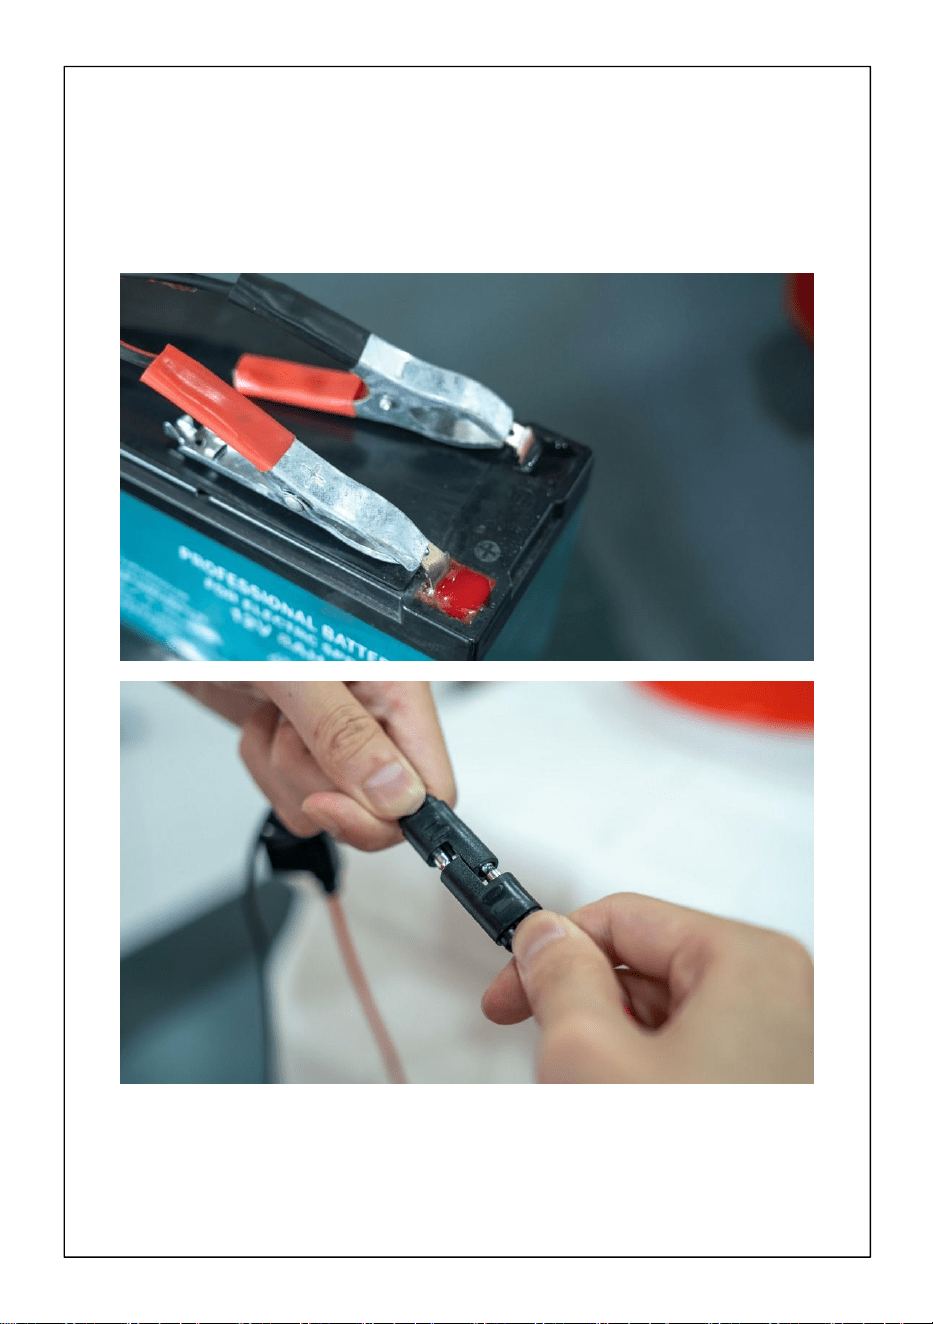
Step9
Tighten the BATTERY CABLE 17 respectively on the positive (red) and
negative (black) poles of the battery, and then connect the plug on the end of
BATTERY CABLE17 and the connector of the sprayer to use it normally.


Technique Assistance et certificat de garantie électronique
www.vevor.com/support
PULVÉRISATEUR POUR VTT
MANUEL D' utilisation
MODÈLE : BS60
We continue to be committed to provide you tools with competitive price.
"Save Half", "Half Price" or any other similar expressions used by us only represents an
estimate of savings you might benefit from buying certain tools with us compared to the major
top brands and does not necessarily mean to cover all categories of tools offered by us. You
are kindly reminded to verify carefully when you are placing an order with us if you are
actually saving half in comparison with the top major brands.


1
MODÈLE : BS60
Have product questions? Need technical support? Please feel free to
contact us:
Technical Support and E-Warranty Certificate
www.vevor.com/support
NEED HELP? CONTACT US!
This is the original instruction, please read all manual instructions
carefully before operating. VEVOR reserves a clear interpretation of our
user manual. The appearance of the product shall be subject to the
product you received. Please forgive us that we won't inform you again if
there are any technology or software updates on our product.
ATV SPRAYER

2
SAFETY INSTRUCTIONS
Points d'attention et d'avertissement
9. Avertissement!!! Ce produit est conçu pour appliquer des produits
chimiques qui peuvent être nocifs et causer des blessures graves s'ils sont
inhalés ou mis en contact avec l'utilisateur. Le défaut de lire et de suivre les
instructions du manuel du propriétaire avant utilisation et/ou une mauvaise
utilisation de ce produit pourrait entraîner une panne inattendue avec des
conséquences majeures. blessures .
10.Ne pas utiliser de poudre insoluble avec ce pulvérisateur la matière
solide est facile à bloquer le tamis et le tuyau vers la pompe ne
fonctionnent pas avec acides forts, liquides à base forte ou inflammables .
11.N'utilisez pas pesticides hautement résistants et très toxiques destinés
à lutter contre les ravageurs des légumes, des arbres fruitiers et des
plantes.
12.Ne pas faire fonctionner le pulvérisateur à des températures
supérieures à 45°C ou inférieures à -10°C.
13.Un essai de pulvérisation avec de l'eau propre est nécessaire pour
réaliser les premiers essais.
14.Il est strictement interdit de garder ce pulvérisateur près d'un feu ou
d'exposer la base arroser ou plonger le pulvérisateur dans l'eau pour
nettoyer ou remplir il avec de l'eau.
15.Porter un masque et des gants pour protéger la peau et éviter tout
contact direct
avec des pesticides ou des liquides nocifs. ne pas pulvériser de pesticides
contre le vent ni vers des humains, des animaux ou des aliments. ne pas
utiliser pendant de longues périodes à des températures élevées.
16.Après utilisation pendant une demi-heure année vous devriez démonter
la base et vérifier si la vis est desserrée Si c'est s'il te plaît, serre-les
assurez-vous également pour couper l'alimentation avant le stockage .
Après pulvérisation veuillez faire en sorte de traiter les déchets
conformément le manuel fourni par le pesticide Attention !!!
Ce pulvérisateur est conçu pour appliquer des produits chimiques cela

3
peut être nocif et causer blessures graves en cas d'opération imprudente.
L'utilisateur doit porter des masques et des gants pour protéger la peau. Le
strict respect de la sécurité des instructions sur les pesticides sont
requises .
FEATURES
1. Aspect de ligne lisse et vapeur. Le pulvérisateur est conçu de manière
ergonomique pour s'adapter au dos humain, ce qui le rend facile à
transporter.
2. Le pulvérisateur est livré avec une mini pompe à membrane légère et
compacte, créant une haute pression et une durée de vie prolongée. Il
dispose d'un interrupteur de protection contre la pression
(micro-interrupteur) pour protéger la batterie. La prise de charge fournie
peut être utilisée comme alimentation 12 volts en plus d'un chargeur.
3. Le pulvérisateur très efficace convient à la lutte contre les parasites
dans les cultures, les fleurs et les épidémies de jardins, au contrôle des
poulaillers et des poulaillers et à l'assainissement des lieux publics. Ce
pulvérisateur permet d'économiser du temps de travail et atteint 3 à 4 fois
plus d'efficacité qu'un pulvérisateur manuel.
4. Difficile de fuir, meilleure étanchéité à l'air par rapport aux pulvérisateurs
de machines à essence, pas de gaz d'échappement/faible bruit, pas de
pollution environnementale, etc. et puissance durable.
NOTE:
1. Veuillez serrer le bouchon de remplissage après avoir rempli le liquide
dans le réservoir. Assurez-vous qu'aucun liquide ne s'échappera pendant
l'opération.
2. Lorsque vous relâchez la poignée de l'interrupteur, la pulvérisation
s'arrête automatiquement. La pompe cesse également de fonctionner en
conséquence. Pendant la pulvérisation du liquide du réservoir, la pompe
continuera à fonctionner sans eau, n'oubliez donc pas de fermer
l'interrupteur d'alimentation. La poignée de commutation corrige la clé de

4
verrouillage automatique pour réduire le travail des utilisateurs.
3. Deux des trois types de buses sont fournis pour le pulvérisateur. Les
buses à jet plat sont conçues pour pulvériser des pesticides. Suivez le vent
et déplacez-vous de manière parallèle d’un côté pendant la pulvérisation.
Les buses coniques sont les meilleures pour lutter contre les parasites.
Suivez le mouvement du vent de manière transversale d'un côté pendant
que la pulvérisation avec les buses multi-trous est la meilleure solution
pour pulvériser les plantes hautes et les arbres fruitiers. Cependant, cela
peut entraîner une perte insignifiante de pesticide car il couvre une zone
plus large.
Trois filtres empêchent les corps étrangers ou les particules d'obstruer les
4 buses. Le filtre est spécialement conçu pour permettre un démontage et
un nettoyage faciles.
CONSERVEZ CE MANUEL
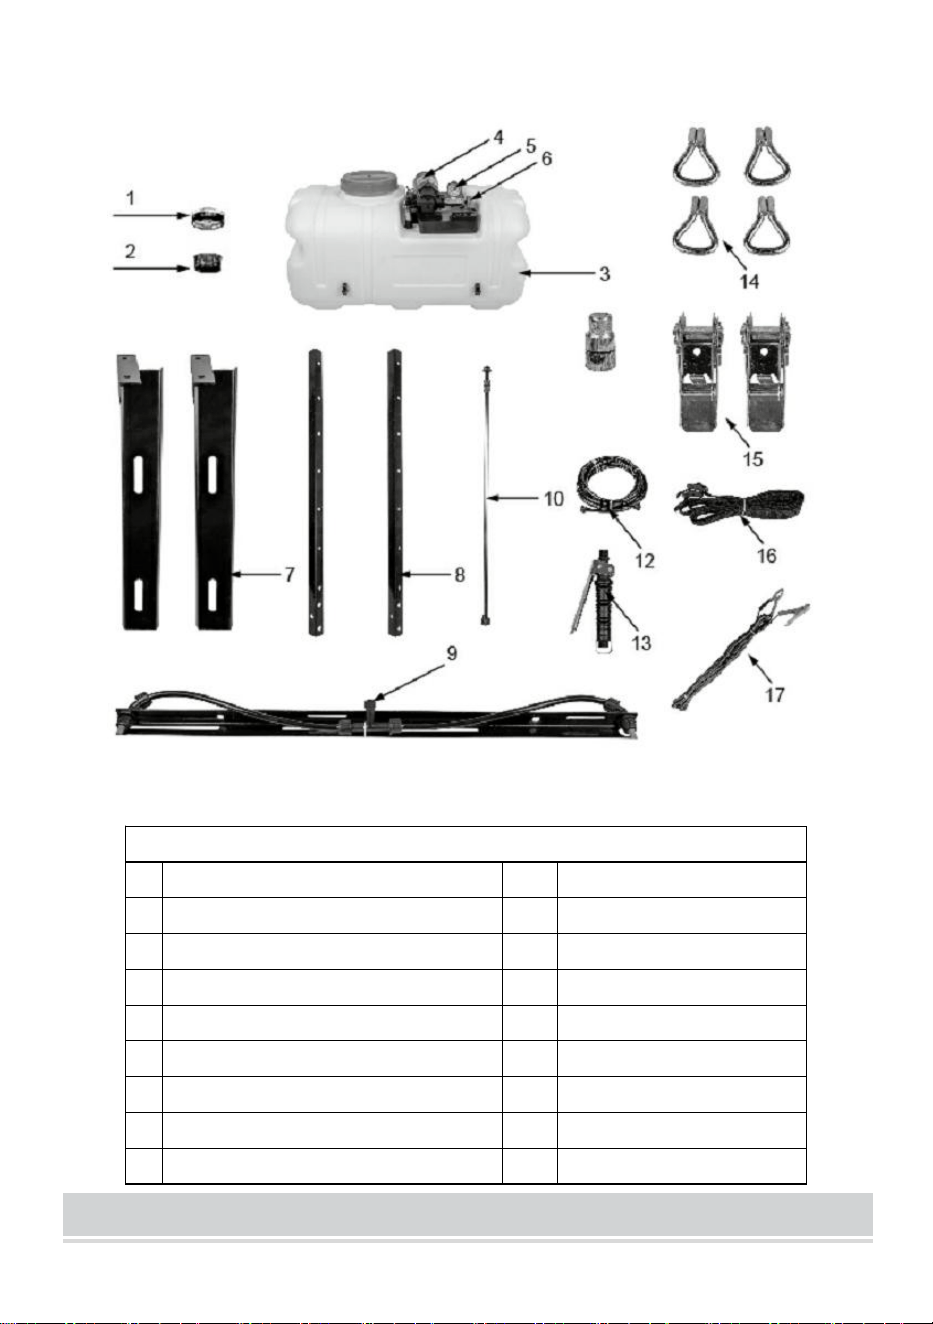
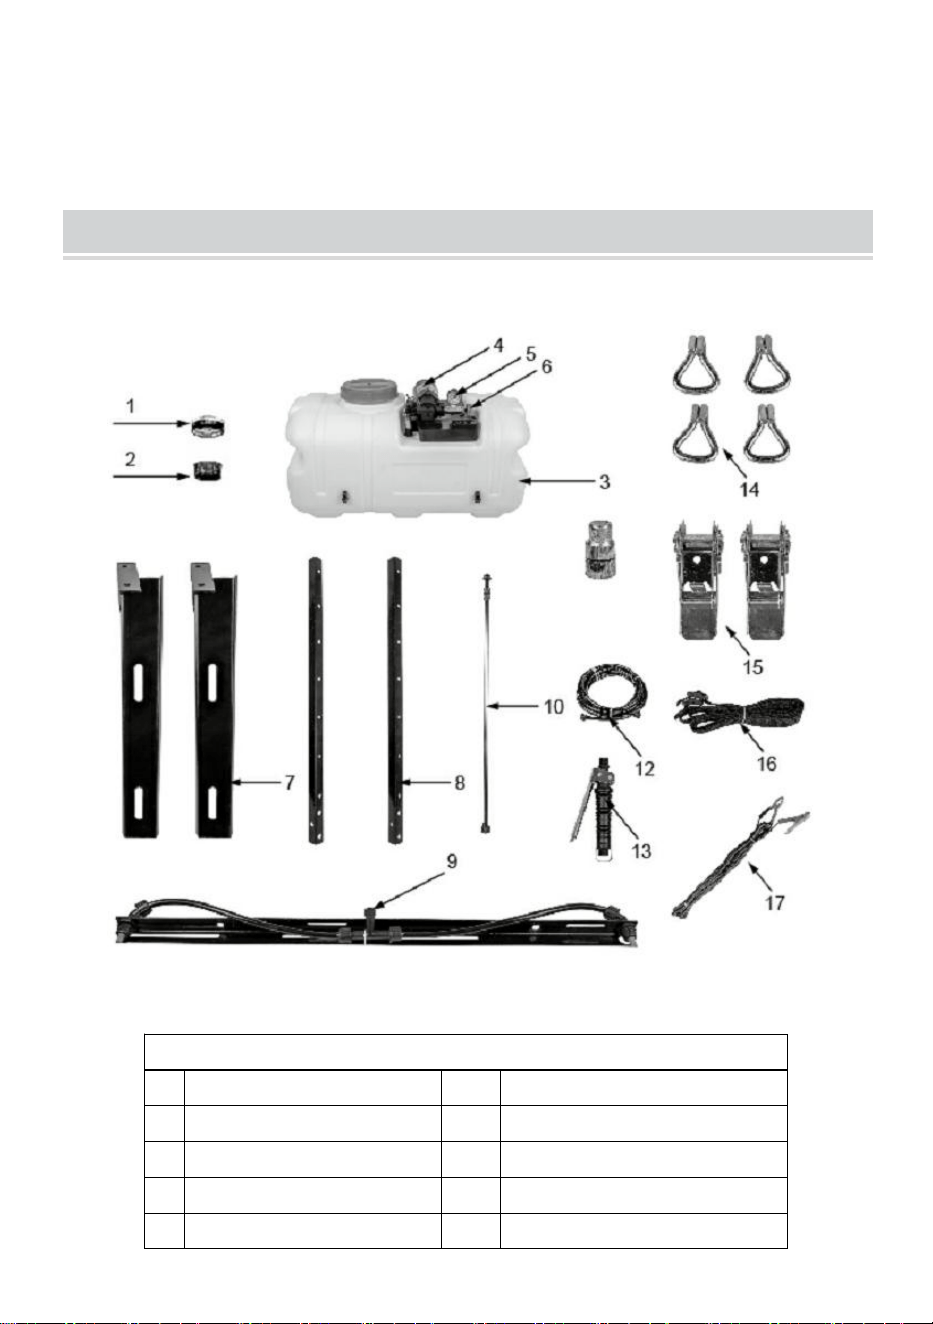
PARTS LIST
6
Step1
With the help of an Allen wrench, install BTACKET 7 on the left and right sides
of the bottom of the TANK 3 with bolts.

7
Step2
With the help of an open wrench, install BRACKET 8 on BRACKET 7 and
secure it with bolts and nuts.

8
Step3
With the help of an open end wrench, install SPRAY NOZZLE 9 in a suitable
position on BRACKET 8 and secure it with bolts and nuts


10
Step5
Connect BRASS NOZZLE 11 and SWITCH 13 and LANCE 10 respectively to
form a complete spray gun.
Step6
Connect and tighten the joint of the tail of the spray gun assembled by step5
and the other end of the water outlet, to complete the installation of the ATV
sprayer.

11
Step7
Install the HOOK 14 to one end of the BELT 16 and pass the other end through
the BUCKLE 15.

12
Step8
The TANK 3 is securely secured to the ATV with tightening BELTS 16 and the
BUCKLES 15 and HOOKS 14.

13
Step9
Tighten the BATTERY CABLE 17 respectively on the positive (red) and
negative (black) poles of the battery, and then connect the plug on the end of
BATTERY CABLE17 and the connector of the sprayer to use it normally.

14
PRODUCT PARAMETER
Taille du paquet (mm)
81 0 × 418 × 425
Taille (mm)
700 × 370 ×4 15
NW
(
kg
)
12h15
GW
(
kg
)
14.2
Tension de travail
DC12V
Capacité
60L
Couler
7,2 L/min
Pompe
Pompe à membrane
Puissance de la pompe
150W
pression de service (MPa)
0,1-0,5
Pression maximale (MPa)
0,8
Plage de manomètre
0 ~ 1,0MPa
Durée de vie
5 ans
Fabriqué en Chine


Technisch Support- und E-Garantie-Zertifikat www.vevor.com/support
ATV-SPRITZGERÄT
Benutzerhandbuch _
MODELL: BS60
We continue to be committed to provide you tools with competitive price.
"Save Half", "Half Price" or any other similar expressions used by us only represents an
estimate of savings you might benefit from buying certain tools with us compared to the major
top brands and does not necessarily mean to cover all categories of tools offered by us. You
are kindly reminded to verify carefully when you are placing an order with us if you are
actually saving half in comparison with the top major brands.

1
MODELL: BS60
Have product questions? Need technical support? Please feel free to
contact us:
Technical Support and E-Warranty Certificate
www.vevor.com/support
NEED HELP? CONTACT US!
This is the original instruction, please read all manual instructions
carefully before operating. VEVOR reserves a clear interpretation of our
user manual. The appearance of the product shall be subject to the
product you received. Please forgive us that we won't inform you again if
there are any technology or software updates on our product.
ATV SPRAYER

2
SAFETY INSTRUCTIONS
Hinweise zur Aufmerksamkeit und Warnung
17.Warnung!!! Dieses Produkt ist für den Einsatz von Chemikalien
konzipiert, die gesundheitsschädlich sein können und schwere
Verletzungen verursachen können, wenn sie eingeatmet werden oder mit
dem Benutzer in Berührung kommen. Wenn die Bedienungsanleitung vor
der Verwendung nicht gelesen und befolgt wird und/oder ein Missbrauch
dieses Produkts erfolgt, kann dies zu unerwarteten Ausfällen mit
schwerwiegenden Folgen führen Verletzungen .
18.Verwenden Sie mit diesem Sprühgerät kein unlösliches Pulver die feste
Materie ist Das Sieb kann leicht blockiert werden und der Schlauch zur
Pumpe darf nicht verwendet werden Starke Säuren, stark basierte oder
brennbare Flüssigkeiten .
19.Nicht verwenden Hochresistente und sehr giftige Pestizide zur
Schädlingsbekämpfung an Gemüse, Obstbäumen und Pflanzen.
20.Betreiben Sie das Spritzgerät nicht bei Temperaturen über 45 °C oder
unter -10 °C.
21.Zu Beginn ist ein Probesprühen mit sauberem Wasser erforderlich .
22.Es ist strengstens verboten, dieses Spritzgerät in der Nähe von Feuer
oder freiliegender Basis aufzubewahren zum Bewässern oder tauchen Sie
das Sprühgerät zum Reinigen oder Befüllen ins Wasser Es mit Wasser.
23.Tragen Sie eine Maske und Handschuhe, um die Haut zu schützen und
direkten Kontakt zu vermeiden
mit Pestiziden oder schädlichen Flüssigkeiten. Sprühen Sie Pestizide nicht
gegen den Wind oder auf Menschen, Tiere oder Lebensmittel. Betreiben
Sie das Gerät nicht über einen längeren Zeitraum bei hohen Temperaturen
24.Nach einer halben Gebrauchsdauer Jahr Sie sollten die Basis
demontieren und überprüfen ob die Schraube locker ist wenn ja Bitte
ziehen Sie sie fest Seien Sie auch sicher Vor der Lagerung den Strom
ausschalten . Nach dem Sprühen Bitte behandeln Sie den Abfall
entsprechend die Anleitung des Pestizids Achtung!!!
Dieses Sprühgerät ist zum Auftragen von Chemikalien konzipiert Das kann

3
schädlich sein und verursachen Bei unachtsamer Bedienung kann es zu
schweren Verletzungen kommen. Der Benutzer sollte dazu Masken und
Handschuhe tragen Haut schützen. Strikte Einhaltung der Sicherheit
Anweisungen zu Pestiziden sind erforderlich .
FEATURES
1. Glattes und dampfförmiges Erscheinungsbild. Das Sprühgerät ist
ergonomisch so gestaltet, dass es sich an den menschlichen Rücken
anpasst und somit leicht zu tragen ist.
2. Das Spritzgerät ist mit einer Mini-Membranpumpe ausgestattet, die
leicht und kompakt ist und hohen Druck und eine längere Lebensdauer
erzeugt. Zum Schutz der Batterie verfügt es über einen
Druckschutzschalter (Mikroschalter). Die mitgelieferte Ladebuchse kann
zusätzlich zum Ladegerät als 12-Volt-Stromversorgung genutzt werden.
3. Das hocheffiziente Sprühgerät eignet sich zur Bekämpfung von
Schädlingen in Nutzpflanzen, Blumen und Gärten, zur Kontrolle von Vieh-
und Geflügelställen sowie zur Hygiene öffentlicher Plätze. Dieses
Sprühgerät spart Arbeitszeit und erreicht eine drei- bis viermal höhere
Effizienz als ein manuelles Sprühgerät.
4. Schwer zu lecken, bessere Luftdichtigkeit im Vergleich zu
Benzin-Maschinenspritzen, keine Abgase/geringer Lärm, keine
Umweltverschmutzung usw. und langlebige Leistung.
NOTIZ:
1. Bitte ziehen Sie den Einfülldeckel fest, nachdem Sie die Flüssigkeit in
den Tank eingefüllt haben. Stellen Sie sicher, dass während des Vorgangs
keine Flüssigkeit austritt.
2. Beim Loslassen des Schaltergriffs stoppt der Sprühvorgang automatisch.
Dementsprechend hört auch die Pumpe auf zu arbeiten. Während die
Flüssigkeit aus dem Tank versprüht wird, arbeitet die Pumpe auch ohne
Wasser weiter. Denken Sie daher bitte daran, den Netzschalter zu
schließen. Der Schaltergriff fixiert den Auto-Lock-Schlüssel, um die Arbeit

4
der Benutzer zu reduzieren.
3. Für das Spritzgerät werden zwei von drei Arten von Düsen mitgeliefert.
Die Fächerdüsen sind zum Versprühen von Pestiziden konzipiert. Folgen
Sie dem Wind und bewegen Sie sich beim Sprühen parallel auf einer Seite.
Die Kegeldüsen eignen sich am besten zur Schädlingsbekämpfung.
Folgen Sie den Windbewegungen kreuzweise auf einer Seite, während Sie
mit den Mehrlochdüsen sprühen. Dies eignet sich am besten zum
Besprühen hoher Pflanzen und Obstbäume, kann jedoch zu einem
unbedeutenden Pestizidverlust führen, da eine größere Fläche abgedeckt
wird
Drei Filter verhindern, dass Fremdkörper oder Partikel die 4 Düsen
verstopfen. Der Filter ist speziell für eine einfache Demontage und
Reinigung konzipiert.
Bewahren Sie dieses Handbuch auf
PARTS LIST


6
Step1
With the help of an Allen wrench, install BTACKET 7 on the left and right sides
of the bottom of the TANK 3 with bolts.
7
Step2
With the help of an open wrench, install BRACKET 8 on BRACKET 7 and
secure it with bolts and nuts.

8
Step3
With the help of an open end wrench, install SPRAY NOZZLE 9 in a suitable
position on BRACKET 8 and secure it with bolts and nuts


10
Step5
Connect BRASS NOZZLE 11 and SWITCH 13 and LANCE 10 respectively to
form a complete spray gun.
Step6
Connect and tighten the joint of the tail of the spray gun assembled by step5
and the other end of the water outlet, to complete the installation of the ATV
sprayer.
11
Step7
Install the HOOK 14 to one end of the BELT 16 and pass the other end through
the BUCKLE 15.

12
Step8
The TANK 3 is securely secured to the ATV with tightening BELTS 16 and the
BUCKLES 15 and HOOKS 14.

13
Step9
Tighten the BATTERY CABLE 17 respectively on the positive (red) and
negative (black) poles of the battery, and then connect the plug on the end of
BATTERY CABLE17 and the connector of the sprayer to use it normally.

14
PRODUCT PARAMETER
Packungsgröße (mm)
81 0× 418 × 425
Größe (mm)
700 × 370 × 4 15
NW (kg)
12.15
GW (kg)
14.2
Betriebsspannung
DC12V
Kapazität
60 L
Fließen
7,2 l/min
Pumpe
Membranpumpe _
Pumpenleistung
150W
Arbeitsdruck (MPa)
0,1-0,5
Maximaler Druck (MPa)
0,8
Manometerbereich
0~1,0 MPa
Lebensdauer
5 Jahre
In China hergestellt


Tecnico Supporto e certificato di garanzia elettronica www.vevor.com/support
SPRUZZATORE PER QUAD
MANUALE D' uso
MODELLO: BS60
We continue to be committed to provide you tools with competitive price.
"Save Half", "Half Price" or any other similar expressions used by us only represents an
estimate of savings you might benefit from buying certain tools with us compared to the major
top brands and does not necessarily mean to cover all categories of tools offered by us. You
are kindly reminded to verify carefully when you are placing an order with us if you are
actually saving half in comparison with the top major brands.

1
MODELLO: BS60
Have product questions? Need technical support? Please feel free to
contact us:
Technical Support and E-Warranty Certificate
www.vevor.com/support
NEED HELP? CONTACT US!
This is the original instruction, please read all manual instructions
carefully before operating. VEVOR reserves a clear interpretation of our
user manual. The appearance of the product shall be subject to the
product you received. Please forgive us that we won't inform you again if
there are any technology or software updates on our product.
ATV SPRAYER

2
SAFETY INSTRUCTIONS
Punti di attenzione e avvertimento
25.Avvertimento!!! Questo prodotto è progettato per applicare sostanze
chimiche che potrebbero essere dannose e causare gravi lesioni personali
se inalate o messe a contatto con l'utente. La mancata lettura e
osservanza delle istruzioni del manuale del proprietario prima dell'uso e/o
l'uso improprio di questo prodotto potrebbero causare guasti imprevisti con
gravi conseguenze. lesioni .
26.Non utilizzare polvere insolubile con questo spruzzatore la materia
solida è è facile bloccare lo schermo e il tubo con cui la pompa non
funziona acidi forti, liquidi a base forte o infiammabili .
27.Non utilizzare pesticidi altamente resistenti e molto tossici per scopi di
controllo dei parassiti su ortaggi, alberi da frutto e piante.
28.Non utilizzare lo spruzzatore a temperature superiori a 45°C o inferiori a
-10°C.
29.Per la realizzazione iniziale è necessaria una spruzzatura di prova con
acqua pulita.
30.È severamente vietato tenere lo spruzzatore vicino al fuoco o esporre la
base per innaffiare o immergere lo spruzzatore nell'acqua per pulire o
riempire Esso con acqua.
31.Indossare maschera e guanti per proteggere la pelle ed evitare il
contatto diretto
con pesticidi o liquidi nocivi. Non spruzzare pesticidi contro il vento o
spruzzare verso esseri umani, animali o alimenti. Non utilizzare per periodi
di tempo prolungati a temperature elevate
32.Dopo l'uso per mezza giornata anno dovresti smontare la base e
controllare se la vite è allentata se è per favore stringili anche essere
sicuro per spegnere l'alimentazione prima di riporla . Dopo la spruzzatura
si prega di trattare i rifiuti secondo le norme il manuale fornito
dall'antiparassitario Attenzione!!!
Questo spruzzatore è progettato per applicare prodotti chimici ciò potrebbe
essere dannoso e potrebbe causare gravi lesioni personali in caso di

3
utilizzo imprudente. L'utente deve indossare maschere e guanti proteggere
la pelle. Rispetto rigoroso della sicurezza sono necessarie istruzioni sui
pesticidi .
FEATURES
1. Aspetto della linea liscia e vaporosa. Lo spruzzatore è progettato
ergonomicamente per adattarsi alla schiena umana e facilitarne il
trasporto.
2. Lo spruzzatore è dotato di una mini pompa a membrana leggera e
compatta, che crea alta pressione e durata prolungata. È dotato di un
interruttore di protezione dalla pressione (microinterruttore) per proteggere
la batteria. La presa di ricarica in dotazione può essere utilizzata come
alimentatore da 12 volt oltre a un'unità di ricarica.
3. Lo spruzzatore altamente efficiente è adatto per il controllo dei parassiti
nelle colture, nei fiori e nelle epidemie dei giardini che controllano gli
allevamenti di bestiame e pollame e i servizi igienico-sanitari dei luoghi
pubblici. Questo spruzzatore consente di risparmiare tempo di
manodopera e raggiunge un'efficienza da 3 a 4 volte maggiore rispetto a
uno spruzzatore manuale.
4. Difficile da perdere, migliore resistenza all'aria rispetto agli spruzzatori a
benzina, senza gas di scarico/bassa rumorosità, senza inquinamento
ambientale, ecc. e potenza duratura.
NOTA:
1. Stringere il tappo del serbatoio dopo aver riempito il liquido nel serbatoio.
Assicurarsi che durante l'operazione non fuoriesca alcun liquido.
2. Quando si rilascia la maniglia dell'interruttore, la spruzzatura si
interromperà automaticamente. Anche la pompa smette di funzionare di
conseguenza. Mentre si spruzza il liquido dal serbatoio, la pompa
continuerà a funzionare senza acqua, quindi ricordarsi di chiudere
l'interruttore di alimentazione. La maniglia dell'interruttore fissa la chiave di
blocco automatico per ridurre il lavoro degli utenti.

4
3. Per lo spruzzatore vengono forniti due o tre tipi di ugelli. Gli ugelli a
ventola sono progettati per spruzzare pesticidi. Seguire il vento e muoversi
parallelamente su un lato mentre si spruzza. Gli ugelli a cono sono i
migliori per il controllo dei parassiti. Seguire i movimenti del vento in modo
trasversale su un lato mentre la spruzzatura con gli ugelli multi-foro è la
soluzione migliore per spruzzare piante alte e alberi da frutto, tuttavia
potrebbe comportare una perdita insignificante di pesticidi poiché copre
un'area più ampia
Tre filtri impediscono a corpi estranei o particelle di intasare i 4 ugelli. Il
filtro è progettato appositamente per consentire un facile smontaggio e
pulizia.
CONSERVA QUESTO MANUALE
PARTS LIST


6
Step1
With the help of an Allen wrench, install BTACKET 7 on the left and right sides
of the bottom of the TANK 3 with bolts.

7
Step2
With the help of an open wrench, install BRACKET 8 on BRACKET 7 and
secure it with bolts and nuts.

8
Step3
With the help of an open end wrench, install SPRAY NOZZLE 9 in a suitable
position on BRACKET 8 and secure it with bolts and nuts


10
Step5
Connect BRASS NOZZLE 11 and SWITCH 13 and LANCE 10 respectively to
form a complete spray gun.
Step6
Connect and tighten the joint of the tail of the spray gun assembled by step5
and the other end of the water outlet, to complete the installation of the ATV
sprayer.

11
Step7
Install the HOOK 14 to one end of the BELT 16 and pass the other end through
the BUCKLE 15.

12
Step8
The TANK 3 is securely secured to the ATV with tightening BELTS 16 and the
BUCKLES 15 and HOOKS 14.

13
Step9
Tighten the BATTERY CABLE 17 respectively on the positive (red) and
negative (black) poles of the battery, and then connect the plug on the end of
BATTERY CABLE17 and the connector of the sprayer to use it normally.

14
PRODUCT PARAMETER
Dimensioni confezione (mm)
810 × 418 × 425
Dimensioni (mm)
700 × 370 ×4 15
NO (kg)
12.15
GW
(
kg
)
14.2
Tensione di lavoro
CC 12 V
Capacità
60 litri
Fluire
7,2 l/min
Pompa
Pompa a membrana
Potenza della pompa
150 W
pressione di esercizio (MPa)
0,1-0,5
Pressione massima (MPa)
0,8
Gamma del manometro
0~1,0MPa
Durata
5 anni
Made in China


We continue to be committed to provide you tools with competitive price.
"Save Half", "Half Price" or any other similar expressions used by us only represents an
estimate of savings you might benefit from buying certain tools with us compared to the major
top brands and does not necessarily mean to cover all categories of tools offered by us. You
are kindly reminded to verify carefully when you are placing an order with us if you are
actually saving half in comparison with the top major brands.

1
MODELO: BS60
Have product questions? Need technical support? Please feel free to
contact us:
Technical Support and E-Warranty Certificate
www.vevor.com/support
NEED HELP? CONTACT US!
This is the original instruction, please read all manual instructions
carefully before operating. VEVOR reserves a clear interpretation of our
user manual. The appearance of the product shall be subject to the
product you received. Please forgive us that we won't inform you again if
there are any technology or software updates on our product.
ATV SPRAYER

2
SAFETY INSTRUCTIONS
Puntos de atención y advertencia.
33.¡¡¡Advertencia!!! Este producto está diseñado para aplicar productos
químicos que pueden ser dañinos y causar lesiones personales graves si
se inhalan o entran en contacto con el usuario. Si no se leen y siguen las
instrucciones del manual del propietario antes de usar y/o el mal uso de
este producto, se podrían producir fallos inesperados en importantes
lesiones .
34.No utilice polvo insoluble con este pulverizador. la materia solida es
fácil de bloquear la pantalla y la manguera a la bomba no funcionan con
Ácidos fuertes, líquidos de base fuerte o inflamables .
35.No usar pesticidas muy resistentes y muy tóxicos para el control de
plagas en hortalizas, árboles frutales y plantas.
36.No utilice el pulverizador a temperaturas superiores a 45 °C o inferiores
a -10 °C.
37.Es necesario realizar una prueba de pulverización con agua limpia para
realizar las pruebas iniciales .
38.Está estrictamente prohibido mantener este pulverizador cerca del
fuego o exponer la base Regar o sumergir el pulverizador en el agua para
limpiar o llenar. él con agua.
39.Utilice mascarilla y guantes para proteger la piel y evitar el contacto
directo.
con pesticidas o líquidos dañinos. no rocíe pesticidas contra el viento ni
hacia humanos, animales o alimentos. no opere durante períodos
prolongados de tiempo bajo altas temperaturas
40.Después de su uso durante medio año debes desmontar la base y
comprobar si el tornillo está flojo si esto es por favor apriételos también
asegúrate para apagar la alimentación antes del almacenamiento .
Después de pulverizar utilice para tratar los residuos de acuerdo con el
manual proporcionado por el pesticida ¡¡¡Advertencia!!!
Este pulverizador está diseñado para aplicar productos químicos. que
puede ser perjudicial y causar Lesiones personales graves si se realiza

3
una operación descuidada. El usuario debe usar máscaras y guantes para
proteger la piel. Cumplimiento estricto de la seguridad Se requieren
instrucciones de pesticidas .
FEATURES
1. Apariencia de línea suave y vaporosa. El pulverizador está diseñado
ergonómicamente para adaptarse a la espalda humana, lo que facilita su
transporte.
2. El pulverizador viene con una mini bomba de diafragma que es liviana y
compacta, lo que genera alta presión y una vida útil prolongada. Dispone
de un interruptor de protección de presión (microinterruptor) para proteger
la batería. El enchufe de carga suministrado se puede utilizar como fuente
de alimentación de 12 voltios además de como unidad de carga.
3. El rociador altamente eficiente es adecuado para controlar plagas en
cultivos, flores y epidemias en jardines, control de ganado y gallineros y
saneamiento de lugares públicos. Este pulverizador ahorra tiempo de
mano de obra y logra de 3 a 4 veces más eficiencia que un pulverizador
manual.
4. Difícil de filtrar, mejor hermético en comparación con los pulverizadores
de máquinas de gasolina, sin gases de escape/bajo nivel de ruido, sin
contaminación ambiental, etc. y potencia duradera.
NOTA:
1. Apriete el tapón de llenado después de llenar el líquido en el tanque.
Asegúrese de que no salga líquido durante la operación.
2. Al soltar la manija del interruptor, la pulverización se detendrá
automáticamente. En consecuencia, la bomba también deja de funcionar.
Mientras rocía el líquido del tanque, la bomba seguirá funcionando sin
agua, así que recuerde cerrar el interruptor de encendido. La manija del
interruptor fija la llave de bloqueo automático para reducir el trabajo de los
usuarios.
3. Se suministran dos de tres tipos de boquillas para el pulverizador. Las
4
boquillas en abanico están diseñadas para pulverizar pesticidas. Siga el
viento y muévase de manera paralela hacia un lado mientras pulveriza.
Las boquillas cónicas son las mejores para controlar las plagas. Siga los
movimientos del viento de manera transversal en un lado mientras rocía
con las boquillas de orificios múltiples. Es mejor para rociar plantas altas y
árboles frutales; sin embargo, puede resultar en una pérdida insignificante
de pesticida, ya que cubre un área más amplia.
Tres filtros evitan que materias extrañas o partículas obstruyan las 4
boquillas. El filtro está diseñado exclusivamente para permitir un fácil
desmontaje y limpieza.
GUARDE ESTE MANUAL
PARTS LIST
5
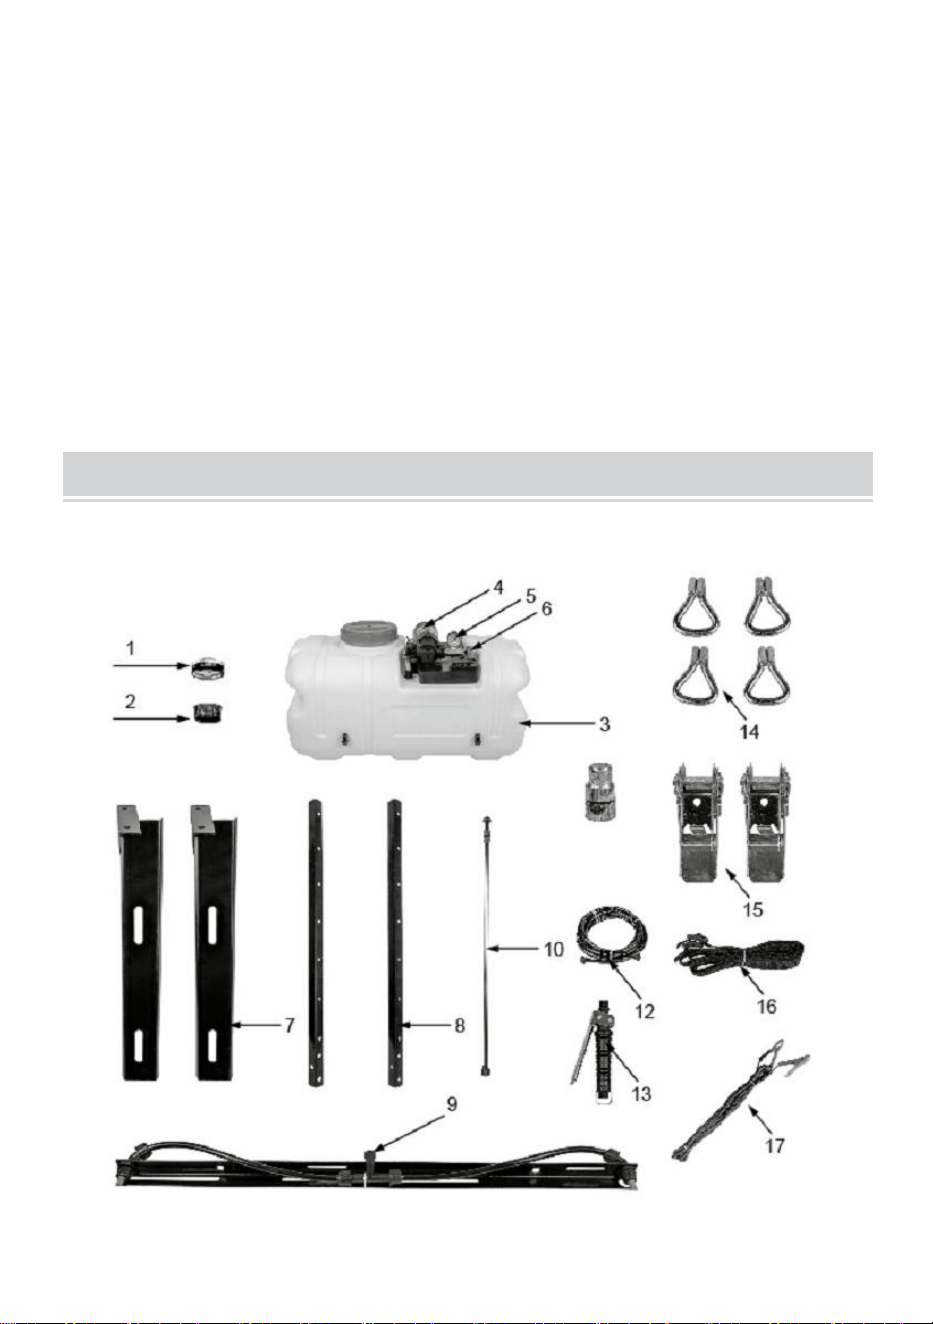
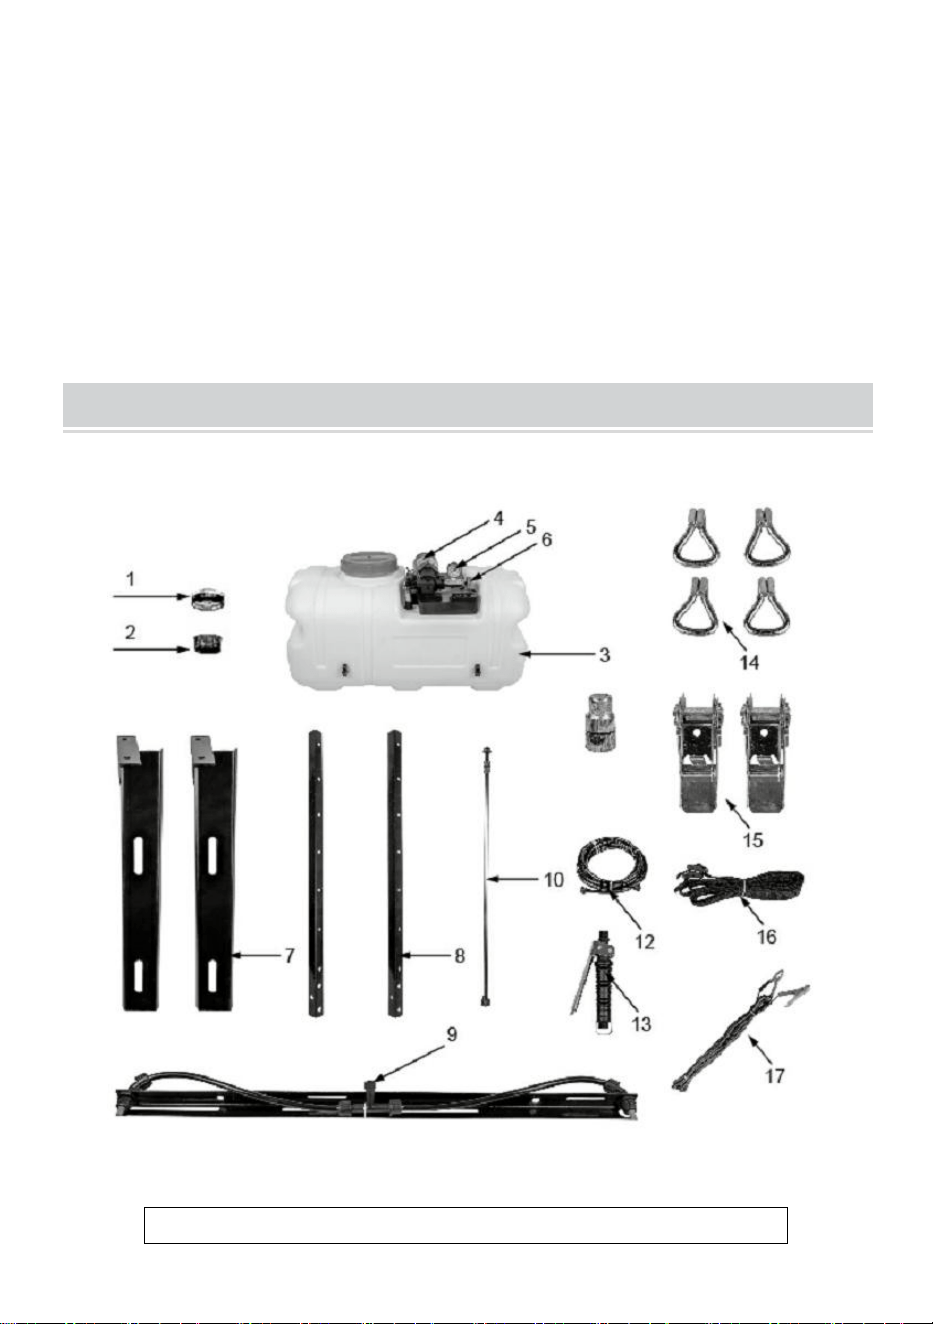
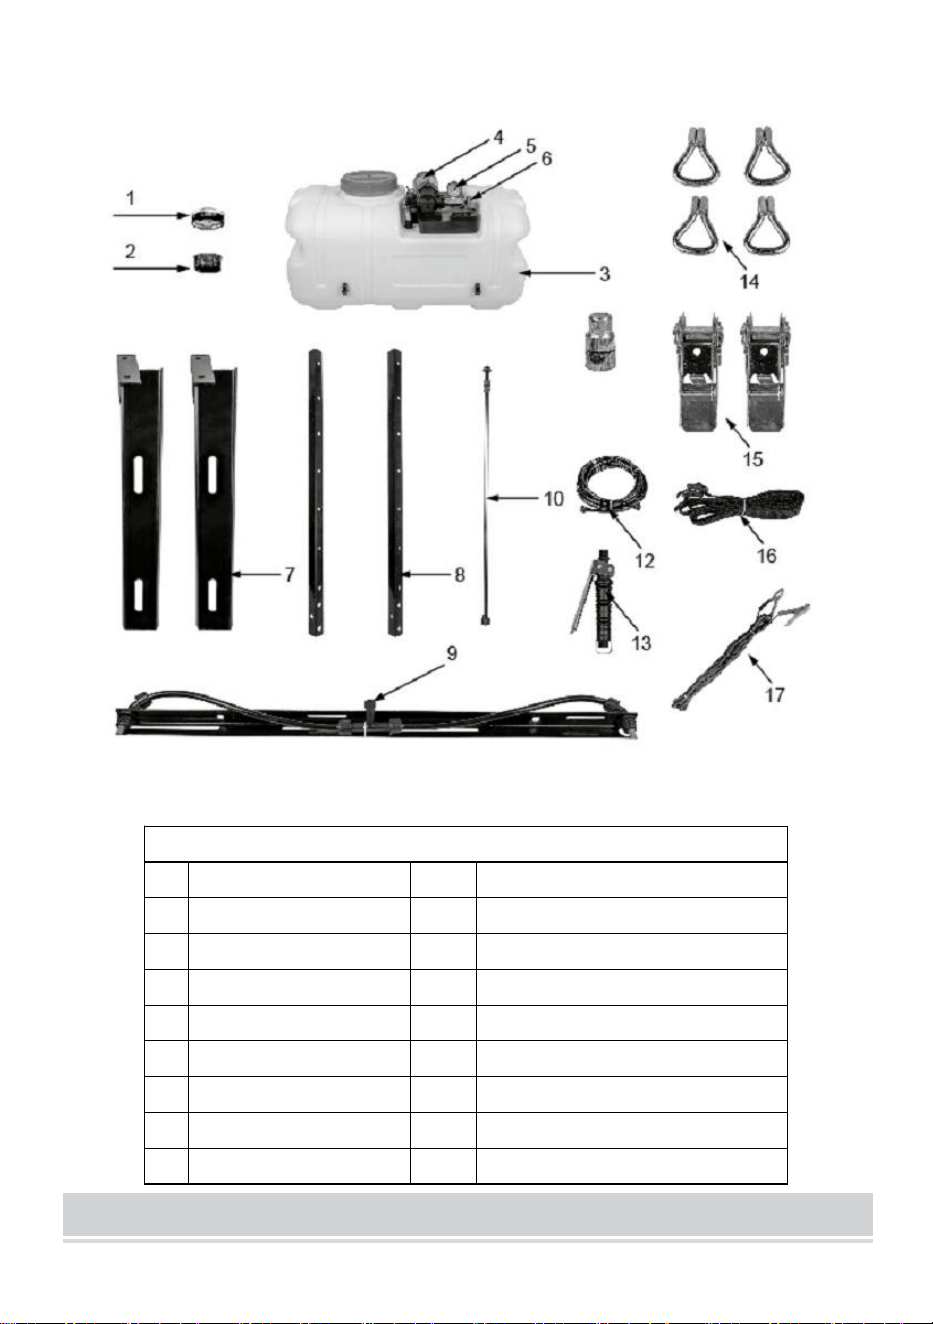
LISTA DE PARTES S
1
TAPA
10
LANZA
2
FILTRAR
11
BOQUILLA DE LATON
3
TANQUE
12
MANGUERA
4
BOMBA
13
CAMBIAR
5
MANÓMETRO DE PRESIÓN
1 4
MANOS
6
VÁLVULA REGULADORA
1 5
HEBILLA
7
SOPORTE 1
dieciséis
CINTURONES
8
SOPORTE 2
17
CABLE DE BATERÍA
9
BOQUILLA DE PULVERIZACIÓN
ASSEMBLY STEP
Step1
With the help of an Allen wrench, install BTACKET 7 on the left and right sides
of the bottom of the TANK 3 with bolts.

6

7
Step2
With the help of an open wrench, install BRACKET 8 on BRACKET 7 and
secure it with bolts and nuts.

8
Step3
With the help of an open end wrench, install SPRAY NOZZLE 9 in a suitable
position on BRACKET 8 and secure it with bolts and nuts


10
Step5
Connect BRASS NOZZLE 11 and SWITCH 13 and LANCE 10 respectively to
form a complete spray gun.
Step6
Connect and tighten the joint of the tail of the spray gun assembled by step5
and the other end of the water outlet, to complete the installation of the ATV
sprayer.

11
Step7
Install the HOOK 14 to one end of the BELT 16 and pass the other end through
the BUCKLE 15.

12
Step8
The TANK 3 is securely secured to the ATV with tightening BELTS 16 and the
BUCKLES 15 and HOOKS 14.
13
Step9
Tighten the BATTERY CABLE 17 respectively on the positive (red) and
negative (black) poles of the battery, and then connect the plug on the end of
BATTERY CABLE17 and the connector of the sprayer to use it normally.

14
PRODUCT PARAMETER
Tamaño del paquete (mm)
81 0 × 418 × 425
Tamaño (mm)
700 × 370 ×4 15
NO (kg)
12.15
GW
(
kg
)
14.2
Tensión de trabajo
12 V CC.
Capacidad
60 litros
Fluir
7,2 l/min
Bomba
Bomba de diafragma
potencia de la bomba
150W
presión de trabajo (MPa)
0,1-0,5
Presión máxima (MPa)
0,8
Rango de manómetro
0~1.0MPa
Esperanza de vida
5 años
Hecho en china


Techniczny Certyfikat wsparcia i e-gwarancji www.vevor.com/support
OPRYSKIWACZ QUADOWY
INSTRUKCJA obsługi
MODEL: BS60
We continue to be committed to provide you tools with competitive price.
"Save Half", "Half Price" or any other similar expressions used by us only represents an
estimate of savings you might benefit from buying certain tools with us compared to the major
top brands and does not necessarily mean to cover all categories of tools offered by us. You
are kindly reminded to verify carefully when you are placing an order with us if you are
actually saving half in comparison with the top major brands.

1
MODEL: BS60
Have product questions? Need technical support? Please feel free to
contact us:
Technical Support and E-Warranty Certificate
www.vevor.com/support
NEED HELP? CONTACT US!
This is the original instruction, please read all manual instructions
carefully before operating. VEVOR reserves a clear interpretation of our
user manual. The appearance of the product shall be subject to the
product you received. Please forgive us that we won't inform you again if
there are any technology or software updates on our product.
ATV SPRAYER

2
SAFETY INSTRUCTIONS
Punkty za uwagę i ostrzeżenie
41.Ostrzeżenie!!! Ten produkt jest przeznaczony do stosowania substancji
chemicznych, które mogą być szkodliwe i mogą spowodować poważne
obrażenia ciała w przypadku wdychania lub kontaktu z użytkownikiem.
Nieprzeczytanie i przestrzeganie instrukcji obsługi przed użyciem i/lub
niewłaściwe użycie tego produktu może spowodować nieoczekiwaną
awarię z poważnymi urazy .
42.W tym opryskiwaczu nie należy używać nierozpuszczalnego proszku
jest materia stała łatwo zablokować ekran, a wąż do pompy nie działa
mocne kwasy, mocne ciecze lub łatwopalne ciecze .
43.Nie używaj wysoce odporne i bardzo toksyczne pestycydy do
zwalczania szkodników na warzywach, drzewach owocowych i roślinach.
44.Nie używać opryskiwacza w temperaturach przekraczających 45°C lub
niższych niż -10°C.
45.wykonania konieczne jest próbne spryskanie czystą wodą .
46.Surowo zabrania się trzymania opryskiwacza w pobliżu ognia lub
odsłonięcia podstawy do podlewania lub zanurzenia opryskiwacza w
wodzie w celu oczyszczenia lub napełnienia To z wodą.
47.Nosić maskę i rękawiczki w celu ochrony skóry i unikać bezpośredniego
kontaktu
z pestycydami lub szkodliwymi cieczami. Nie rozpylać pestycydów pod
wiatr ani w stronę ludzi, zwierząt lub żywności. Nie używać przez dłuższy
czas w wysokich temperaturach
48.Po użyciu przez pół roku rok należy rozebrać podstawę i sprawdzić czy
śruba jest poluzowana Jeśli to jest proszę je dokręcić także bądź pewien
aby wyłączyć zasilanie przed przechowywaniem . Po oprysku prosimy o
utylizację odpadów zgodnie z instrukcja obsługi pestycydów Uwaga!!!
Opryskiwacz przeznaczony jest do aplikacji środków chemicznych które
mogą być szkodliwe i powodować poważne obrażenia ciała w przypadku
nieostrożnej obsługi. Użytkownik powinien nosić maski i rękawiczki chronić
skórę. Ścisłe przestrzeganie zasad bezpieczeństwa wymagane są

3
instrukcje dotyczące pestycydów .
FEATURES
1. Gładki i parowy wygląd linii. Opryskiwacz jest ergonomicznie
zaprojektowany, aby dopasować się do ludzkich pleców, co ułatwia
przenoszenie.
2. Opryskiwacz jest wyposażony w minipompę membranową, która jest
lekka i kompaktowa, zapewniając wysokie ciśnienie i dłuższą żywotność.
Posiada wyłącznik ciśnieniowy (mikroprzełącznik), który chroni akumulator.
Dostarczone gniazdo ładowania może być używane jako źródło zasilania
12 V oprócz ładowarki.
3. Wysoce wydajny opryskiwacz nadaje się do zwalczania szkodników w
uprawach, kwiatach i epidemii ogrodowych, kontrolowania zwierząt
gospodarskich i kurników oraz sanitacji miejsc publicznych. Opryskiwacz
ten oszczędza czas pracy i osiąga 3 do 4 razy większą wydajność niż
opryskiwacz ręczny.
4. Trudno przeciekać, lepsza szczelność w porównaniu z opryskiwaczami
benzynowymi, brak gazów spalinowych/niski poziom hałasu, brak
zanieczyszczeń środowiska itp. oraz trwała moc.
NOTATKA:
1. Po napełnieniu zbiornika płynem należy dokręcić korek wlewu. Upewnij
się, że podczas operacji nie wypłynie żaden płyn.
2. Po zwolnieniu uchwytu przełącznika oprysk zatrzyma się automatycznie.
Pompa również przestaje działać odpowiednio. Podczas wytryskiwania
cieczy ze zbiornika pompa będzie nadal pracować bez wody, dlatego
należy pamiętać o zamknięciu wyłącznika zasilania. Uchwyt przełącznika
mocuje klucz automatycznej blokady, aby zmniejszyć pracę użytkowników.
3. Do opryskiwacza dostarczane są dwa z trzech rodzajów dysz. Dysze
wachlarzowe przeznaczone są do opryskiwania środkami ochrony roślin.
Podczas opryskiwania podążaj za wiatrem i poruszaj się równolegle po
jednej stronie. Dysze stożkowe najlepiej nadają się do zwalczania
4
szkodników. Podążanie za wiatrem w jedną stronę w sposób krzyżowy,
podczas opryskiwania dyszami wielootworowymi jest najlepsze do
opryskiwania wysokich roślin i drzew owocowych, może jednak
powodować nieznaczne straty pestycydów, ponieważ pokrywają większy
obszar
Trzy filtry zapobiegają zatykaniu się ciał obcych lub cząstek. 4 dysze. Filtr
został specjalnie zaprojektowany, aby umożliwić łatwy demontaż i
czyszczenie.
ZACHOWAJ TĘ INSTRUKCJĘ
PARTS LIST
LISTA CZĘŚCI _
5
1
KOREK WLEWU
10
LANCA
2
FILTR
11
DYSZA MOSIĘŻNA
3
CZOŁG
12
WĄŻ GUMOWY
4
POMPA
13
PRZEŁĄCZNIK
5
MIERNIK CIŚNIENIA
1 4
HACZYKI
6
ZAWÓR REGULATORA
1 5
KLAMRA
7
WSPORNIK 1
16
PASY
8
WSPORNIK 2
17
KABEL AKUMULATORA
9
SPRYSKIWACZ
ASSEMBLY STEP
Step1
With the help of an Allen wrench, install BTACKET 7 on the left and right sides
of the bottom of the TANK 3 with bolts.

6

7
Step2
With the help of an open wrench, install BRACKET 8 on BRACKET 7 and
secure it with bolts and nuts.

8
Step3
With the help of an open end wrench, install SPRAY NOZZLE 9 in a suitable
position on BRACKET 8 and secure it with bolts and nuts


10
Step5
Connect BRASS NOZZLE 11 and SWITCH 13 and LANCE 10 respectively to
form a complete spray gun.
Step6
Connect and tighten the joint of the tail of the spray gun assembled by step5
and the other end of the water outlet, to complete the installation of the ATV
sprayer.

11
Step7
Install the HOOK 14 to one end of the BELT 16 and pass the other end through
the BUCKLE 15.
12
Step8
The TANK 3 is securely secured to the ATV with tightening BELTS 16 and the
BUCKLES 15 and HOOKS 14.

13
Step9
Tighten the BATTERY CABLE 17 respectively on the positive (red) and
negative (black) poles of the battery, and then connect the plug on the end of
BATTERY CABLE17 and the connector of the sprayer to use it normally.

14
PRODUCT PARAMETER
Rozmiar opakowania (mm)
81 0× 418 × 425
Rozmiar (mm)
700 × 370 ×4 15
NW (kg)
12.15
GW (kg)
14.2
Napięcie robocze
DC12V
Pojemność
60 l
Przepływ
7,2 l/min
Pompa
Pompa membranowa
Moc pompy
150 W
ciśnienie robocze (MPa)
0,1-0,5
Maksymalne ciśnienie (MPa)
0,8
Zakres manometru
0 ~ 1,0 MPa
Długość życia
5 lat
Wyprodukowano w Chinach


Technisch Ondersteuning en e-garantiecertificaat www.vevor.com/support
ATV-SPROEIER
Gebruikershandleiding _
MODEL: BS60
We continue to be committed to provide you tools with competitive price.
"Save Half", "Half Price" or any other similar expressions used by us only represents an
estimate of savings you might benefit from buying certain tools with us compared to the major
top brands and does not necessarily mean to cover all categories of tools offered by us. You
are kindly reminded to verify carefully when you are placing an order with us if you are
actually saving half in comparison with the top major brands.

1
MODEL: BS60
Have product questions? Need technical support? Please feel free to
contact us:
Technical Support and E-Warranty Certificate
www.vevor.com/support
NEED HELP? CONTACT US!
This is the original instruction, please read all manual instructions
carefully before operating. VEVOR reserves a clear interpretation of our
user manual. The appearance of the product shall be subject to the
product you received. Please forgive us that we won't inform you again if
there are any technology or software updates on our product.
ATV SPRAYER

2
SAFETY INSTRUCTIONS
Aandachtspunten en waarschuwingen
49.Waarschuwing!!! Dit product is ontworpen om chemicaliën toe te
passen die schadelijk kunnen zijn en ernstig persoonlijk letsel kunnen
veroorzaken als ze worden ingeademd of in contact komen met de
gebruiker. Het niet lezen en opvolgen van de instructies in de
gebruikershandleiding vóór gebruik en/of misbruik van dit product kan
resulteren in een onverwachte storing met ernstige gevolgen.
verwondingen .
50.Gebruik geen onoplosbaar poeder met dit spuitapparaat de vaste stof is
gemakkelijk om het scherm te blokkeren en de slang om te pompen werkt
niet sterke zuren, sterke of brandbare vloeistoffen .
51.Niet gebruiken zeer resistente en zeer giftige pesticiden voor
ongediertebestrijding op groenten, fruitbomen en planten.
52.Gebruik het spuitapparaat niet bij temperaturen hoger dan 45°C of lager
dan -10°C.
53.Proefspuiten met schoon water is voor ons in eerste instantie
noodzakelijk .
54.Het is ten strengste verboden om dit spuitapparaat in de buurt van vuur
te houden of de basis bloot te stellen om water te geven of de spuit in het
water te dompelen om te reinigen of te vullen Het met water.
55.Draag een masker en handschoenen om de huid te beschermen en
direct contact te vermijden
met pesticiden of schadelijke vloeistoffen. spuit geen pesticiden tegen de
wind in en spuit niet in de richting van mensen, dieren of voedsel. gebruik
ze niet gedurende langere tijd bij hoge temperaturen
56.Na gebruik gedurende een halve jaar u moet de basis demonteren en
controleren of de schroef los zit als het is draai ze alstublieft vast wees ook
zeker om de stroom uit te schakelen vóór opslag . Na het spuiten maak er
gebruik van om het afval te behandelen volgens de handleiding van het
pesticide Waarschuwing!!!
Dit spuitapparaat is ontworpen voor het aanbrengen van chemicaliën dat

3
schadelijk kan zijn en kan veroorzaken ernstig persoonlijk letsel bij
onzorgvuldig gebruik. De gebruiker moet maskers en handschoenen
dragen bescherm de huid. Strikte naleving van de veiligheid instructies
voor pesticiden zijn vereist .
FEATURES
1. Glad en stoomlijnuiterlijk. De sproeier is ergonomisch ontworpen om
zich aan te passen aan de menselijke rug, waardoor hij gemakkelijk te
dragen is.
2. Het spuitapparaat wordt geleverd met een mini-membraanpomp die licht
en compact is, waardoor een hoge druk en een langere levensduur
ontstaat. Het beschikt over een drukbeveiligingsschakelaar
(microschakelaar) om de accu te beschermen. Het meegeleverde
laadstopcontact kan naast een laadeenheid ook als 12 volt voeding
worden gebruikt.
3. De zeer efficiënte spuitmachine is geschikt voor het bestrijden van
ongedierte in gewassen, bloemen en tuinepidemieën, het controleren van
vee- en pluimveestallen en de sanitaire voorzieningen van openbare
plaatsen. Deze spuit bespaart arbeidstijd en bereikt 3 tot 4 keer meer
efficiëntie dan een handmatige spuit.
4. Moeilijk te lekken, beter luchtdicht vergeleken met sproeiers op
benzinemachines, geen uitlaatgas / laag geluidsniveau, geen
milieuvervuiling enz. En duurzame kracht.
OPMERKING:
1. Draai de vuldop vast nadat u de vloeistof in de tank heeft gevuld. Zorg
ervoor dat er tijdens de operatie geen vloeistof naar buiten komt.
2. Wanneer u de schakelhendel loslaat, stopt het spuiten automatisch. De
pomp stopt ook met werken. Terwijl de vloeistof uit de tank wordt gespoten,
blijft de pomp werken zonder water, dus vergeet niet de aan/uit-schakelaar
uit te zetten. De schakelhendel fixeert de automatische
vergrendelingssleutel om het werk van gebruikers te verminderen.

4
3. Er worden twee of drie soorten spuitdoppen meegeleverd voor het
spuitapparaat. De waaiersproeiers zijn ontworpen voor het spuiten van
pesticiden. Volg de wind en beweeg tijdens het spuiten parallel aan één
kant. De kegelvormige sproeiers zijn het beste voor het bestrijden van
ongedierte. Volg de windbewegingen aan één kant kruislings terwijl het
spuiten van de sproeikoppen met meerdere gaten het beste is voor het
spuiten van hoge planten en fruitbomen, maar dit kan resulteren in een
onbeduidend verlies aan pesticiden, omdat het een groter gebied bestrijkt
Drie filters voorkomen dat vreemde stoffen of deeltjes de 4 sproeiers
verstoppen. Het filter is uniek ontworpen om eenvoudige demontage en
reiniging mogelijk te maken.
BEWAAR DEZE HANDLEIDING
PARTS LIST

6
Step1
With the help of an Allen wrench, install BTACKET 7 on the left and right sides
of the bottom of the TANK 3 with bolts.

7
Step2
With the help of an open wrench, install BRACKET 8 on BRACKET 7 and
secure it with bolts and nuts.

8
Step3
With the help of an open end wrench, install SPRAY NOZZLE 9 in a suitable
position on BRACKET 8 and secure it with bolts and nuts

10
Step5
Connect BRASS NOZZLE 11 and SWITCH 13 and LANCE 10 respectively to
form a complete spray gun.
Step6
Connect and tighten the joint of the tail of the spray gun assembled by step5
and the other end of the water outlet, to complete the installation of the ATV
sprayer.

11
Step7
Install the HOOK 14 to one end of the BELT 16 and pass the other end through
the BUCKLE 15.

12
Step8
The TANK 3 is securely secured to the ATV with tightening BELTS 16 and the
BUCKLES 15 and HOOKS 14.

13
Step9
Tighten the BATTERY CABLE 17 respectively on the positive (red) and
negative (black) poles of the battery, and then connect the plug on the end of
BATTERY CABLE17 and the connector of the sprayer to use it normally.


Teknisk Support och e-garanticertifikat www.vevor.com/support
ATV-SPRUTA
Användarmanual _
MODELL: BS60
We continue to be committed to provide you tools with competitive price.
"Save Half", "Half Price" or any other similar expressions used by us only represents an
estimate of savings you might benefit from buying certain tools with us compared to the major
top brands and does not necessarily mean to cover all categories of tools offered by us. You
are kindly reminded to verify carefully when you are placing an order with us if you are
actually saving half in comparison with the top major brands.

1
MODELL: BS60
Have product questions? Need technical support? Please feel free to
contact us:
Technical Support and E-Warranty Certificate
www.vevor.com/support
NEED HELP? CONTACT US!
This is the original instruction, please read all manual instructions
carefully before operating. VEVOR reserves a clear interpretation of our
user manual. The appearance of the product shall be subject to the
product you received. Please forgive us that we won't inform you again if
there are any technology or software updates on our product.
ATV SPRAYER

2
SAFETY INSTRUCTIONS
Punkter för uppmärksamhet och varning
57.Varning!!! Denna produkt är utformad för att applicera kemikalier som
kan vara skadliga och kan orsaka allvarliga personskador om den andas in
eller kommer i kontakt med användaren om man inte läser och följer
bruksanvisningens instruktioner före användning och/eller felaktig
användning av denna produkt kan resultera i oväntade fel med större
skador .
58.Använd inte olösligt pulver med denna spruta den fasta materien är lätt
att blockera skärmen och slangen till pumpen fungerar inte med starka
syror, starkt baserade eller brandfarliga vätskor .
59.Använd inte högresistenta och mycket giftiga bekämpningsmedel för
skadedjursbekämpning på grönsaker, fruktträd och växter.
60.Använd inte sprutan i temperaturer som överstiger 45°c eller lägre än
-10°c.
61.Provsprutning med rent vatten är nödvändigt för att vi ska kunna göra
det .
62.Det är strängt förbjudet att förvara denna spruta nära eld eller exponera
basen att vattna eller sänka ner sprutan i vattnet för att rengöra eller fylla
på Det med vatten.
63.Bär mask och handskar för att skydda huden och undvika direktkontakt
med bekämpningsmedel eller skadliga vätskor. Spraya inte
bekämpningsmedel mot vinden eller spraya mot människor, djur eller mat.
Använd inte under längre perioder under höga temperaturer
64.Efter användning i ett halvt år du bör demontera basen och kontrollera
om skruven är lös om den är snälla dra åt dem också vara säker för att
stänga av strömmen före förvaring . Efter sprutning vänligen använd för att
behandla avfallet enligt manualen som tillhandahålls av
bekämpningsmedlet Varning!!!
Denna spruta är designad för att applicera kemikalier som kan vara
skadligt och kan orsaka allvarlig personskada vid vårdslös hantering.
Användaren bör bära masker och handskar för att skydda huden. Strikt

3
efterlevnad av säkerhet instruktioner för bekämpningsmedel krävs .
FEATURES
1. Slät och ånglinje utseende. Sprutan är ergonomiskt utformad för att
anpassa sig till den mänskliga ryggen vilket gör den lätt att bära.
2. Sprutan levereras med en minimembranpump som är lätt och kompakt,
vilket skapar högt tryck och förlängd livslängd. Den har en
tryckskyddsbrytare (mikrobrytare) för att skydda batteriet. Det medföljande
laddningsuttaget kan användas som en 12-volts strömkälla förutom en
laddningsenhet.
3. Den högeffektiva sprutan är lämplig för att bekämpa skadedjur i grödor,
blommor och trädgårdsepidemier som kontrollerar boskap och fjäderfähus
och sanitet på offentliga platser. Denna spruta sparar arbetstid och uppnår
3 till 4 gånger mer effektivitet än en manuell spruta.
4. Svår att läcka bättre lufttät jämfört med bensinsprutor inga avgaser/lågt
ljud ingen miljöförorening etc och hållbar kraft.
NOTERA:
1. Dra åt påfyllningslocket efter att du har fyllt på vätskan i tanken. Se till att
ingen vätska kommer ut under operationen.
2. När man släpper omkopplarhandtaget, stoppas sprutningen automatiskt.
Pumpen slutar också att fungera i enlighet med detta. Medan du sprutar ut
vätskan från tanken kommer pumpen att fortsätta att fungera utan vatten,
så kom ihåg att stänga strömbrytaren. Omkopplarhandtaget fixerar
autolåsnyckeln för att minska användarnas arbete.
3. Två av tre typer av munstycken levereras till sprutan. Fläktmunstyckena
är avsedda för sprutning av bekämpningsmedel. Följ vinden och rör dig
parallellt på ena sidan medan du sprutar. Konmunstyckena är bäst för att
bekämpa skadedjur. Följ vinden rör sig i kors på ena sidan medan
sprutning av flerhålsmunstyckena är bäst för att spruta höga växter och
fruktträd, men det kan resultera i obetydlig förlust av bekämpningsmedel
eftersom det täcker ett större område
4
Tre filter förhindrar att främmande material eller partiklar täpper till de 4
munstyckena. filtret är unikt utformat för att möjliggöra enkel demontering
och rengöring.
SPARA DENNA MANUAL
PARTS LIST
DEL S LISTA
1
PÅFYLLNINGSLOCK
10
LANS
2
FILTRERA
11
MÄSSINGSMUSTYCKE
3
TANK
12
SLANG
4
PUMP
13
VÄXLA
5
TRYCKMÄTARE
1 4
KROKAR
5
6
REGELVENTIL
1 5
SPÄNNE
7
FÄSTE 1
16
BÄLTEN
8
FÄSTE 2
17
BATTERIKABELL
9
SPRAYMUS
ASSEMBLY STEP
Step1
With the help of an Allen wrench, install BTACKET 7 on the left and right sides
of the bottom of the TANK 3 with bolts.

6

7
Step2
With the help of an open wrench, install BRACKET 8 on BRACKET 7 and
secure it with bolts and nuts.
8
Step3
With the help of an open end wrench, install SPRAY NOZZLE 9 in a suitable
position on BRACKET 8 and secure it with bolts and nuts

10
Step5
Connect BRASS NOZZLE 11 and SWITCH 13 and LANCE 10 respectively to
form a complete spray gun.
Step6
Connect and tighten the joint of the tail of the spray gun assembled by step5
and the other end of the water outlet, to complete the installation of the ATV
sprayer.

11
Step7
Install the HOOK 14 to one end of the BELT 16 and pass the other end through
the BUCKLE 15.

12
Step8
The TANK 3 is securely secured to the ATV with tightening BELTS 16 and the
BUCKLES 15 and HOOKS 14.

13
Step9
Tighten the BATTERY CABLE 17 respectively on the positive (red) and
negative (black) poles of the battery, and then connect the plug on the end of
BATTERY CABLE17 and the connector of the sprayer to use it normally.


