
Write the model and serial
numbers here:
Model # _________________
Serial # _________________
You can find the rating label
underneath the cooktop.
OWNER’S MANUAL
AND INSTALLATION
INSTRUCTIONS
RANGE OVEN
Propane Gas RV
49-2001566 Rev. 1 06-25
SAFETY INFORMATION .......... 3
USING THE RANGE
Cooktop ............................... 7
Oven .................................. 8
Oven and Control Knob Lights ...........9
Oven Racks ............................ 9
Aluminum Foil and Oven Liners ........... 9
Oven Vents ............................ 9
Oven Cooking Guide ....................10
CARE AND CLEANING
Cooktop Surfaces .......................11
Exterior Surfaces .......................12
Interior Surfaces ........................12
Oven Light .............................14
INSTALLATION INSTRUCTIONS
Before You Begin .......................15
Cabinet And Counter Cutout Dimensions . .16
Installation Clearances ..................17
Gas Installation Locations ................18
Oven Installation .......................18
TROUBLESHOOTING TIPS ....... 22
LIMITED WARRANTY ............ 23
CONSUMER SUPPORT ...........24
GE is a trademark of the General Electric Company. Manufactured under trademark license.
PLD617RW
PLD617DW
PLD617EW
PLD621RW
PLD621DW
PLD621EW
ENGLISH/FRANÇAIS/
ESPAÑOL

2 49-2001566 Rev. 1
THANK YOU FOR MAKING GE APPLIANCES A PART OF YOUR RV.
Whether you grew up with GE Appliances, or this is your first, we’re happy to have you in the family.
We take pride in the craftsmanship, innovation and design that goes into every GE Appliances
product, and we think you will too. Among other things, registration of your appliance ensures that we
can deliver important product information and warranty details when you need them.
Register your GE appliance now online. Helpful websites and phone numbers are available in the
Consumer Support section of this Owner’s Manual.
49-2001566 Rev. 1 3
READ AND SAVE THESE INSTRUCTIONS
IMPORTANT SAFETY INFORMATION
READ ALL INSTRUCTIONS BEFORE USING THE APPLIANCE
SAFETY INFORMATION
WARNING
If the information in this manual is not followed exactly, a fire or
explosion may result, causing property damage, personal injury or death.
- Do not store or use gasoline or other flammable vapors and liquids in the vicinity of
this or any other appliance.
- WHAT TO DO IF YOU SMELL GAS
Ŷ'RQRWWU\WROLJKWDQ\DSSOLDQFH
Ŷ'RQRWWRXFKDQ\HOHFWULFDOVZLWFK
Ŷ'RQRWXVHDQ\SKRQHLQ\RXUUHFUHDWLRQDOYHKLFOH
Ŷ&OHDUWKHUHFUHDWLRQDOYHKLFOHRIDOORFFXSDQWV
Ŷ7XUQRIIWKHJDVVXSSO\WDQNYDOYHVRUPDLQJDVVXSSO\
Ŷ,PPHGLDWHO\FDOO\RXUJDVVXSSOLHUIRULQVWUXFWLRQV
Ŷ,I\RXFDQQRWUHDFK\RXUJDVVXSSOLHUFDOOWKHILUHGHSDUWPHQW
+DYHWKHJDVV\VWHPFKHFNHGDQGOHDNDJHVRXUFHFRUUHFWHGE\DTXDOLILHGLQVWDOOHU
service agency, manufacturer, dealer or the gas supplier.
WARNING
Read all safety instructions before using the product. Failure to follow these instructions may result
in fire, electrical shock, serious injury or death.
4 49-2001566 Rev. 1
SAFETY INFORMATION
READ AND SAVE THESE INSTRUCTIONS
IMPORTANT SAFETY INFORMATION
READ ALL INSTRUCTIONS BEFORE USING THE APPLIANCE
WARNING
GENERAL SAFETY INSTRUCTIONS
WARNING
Carbon Monoxide Poisoning.
Never use this appliance as a space heater
to heat or warm the room. Doing so may
result in Carbon Monoxide poisoning or
overheating of the oven.
A window or air vent should be open slightly
while using this appliance. Gas flames
consume oxygen which must be replaced to
assure proper combustion.
Ŷ 8VHWKLVDSSOLDQFHIRULWVLQWHQGHGSXUSRVHDV
described in this owner’s manual.
Ŷ +DYH\RXUUDQJHLQVWDOOHGE\DTXDOLILHGLQVWDOOHU
in accordance with the provided installation
instructions.
Ŷ $Q\DGMXVWPHQWDQGVHUYLFHVKRXOGEHSHUIRUPHG
RQO\E\DTXDOLILHGJDVUDQJHLQVWDOOHURUVHUYLFH
technician. Do not attempt to repair or replace
any part of your range unless it is specifically
recommended in this manual.
Ŷ <RXUUDQJHLVVKLSSHGIURPWKHIDFWRU\VHWIRUXVH
with propane gas. It can not be converted to any
other gas.
Ŷ +DYHWKHLQVWDOOHUVKRZ\RXWKHORFDWLRQRIWKH
range gas shut-off valve and how to turn it off if
necessary.
Ŷ %HVXUHDOOSDFNLQJPDWHULDOVDUHUHPRYHGIURPWKH
range before operating to prevent ignition of these
materials.
Ŷ $YRLGVFUDWFKLQJRULPSDFWLQJJODVVGRRUV
cooktops, or control panels. Doing so may lead
to glass breakage. Do not cook on a product with
broken glass. Shock, fire, or cuts may occur.
Ŷ 'RQRWOHDYHFKLOGUHQDORQHRUXQDWWHQGHGLQDQ
area where an appliance is in use. They should
never be allowed to climb, sit or stand on any part
of the appliance.
Ŷ
CAUTION
Do not store items of interest
to children in cabinets above an oven - children
climbing on the oven to reach items could be
seriously injured.
Ŷ 1HYHUEORFNWKHYHQWVDLURSHQLQJVRIWKHUDQJH
They provide the air inlets and outlets that are
necessary for the range to operate properly with
correct combustion. Air openings are located at the
rear of the cooktop, at the top and bottom of the
oven door, and at the bottom of the range.
Ŷ 8VHRQO\GU\SRWKROGHUV²PRLVWRUGDPSSRW
holders on hot surfaces may result in burns from
steam. Do not let pot holders touch surface burners,
burner grate, or oven heating element. Do not use a
towel or other bulky cloth in place of pot holders.
Ŷ 'RQRWWRXFKWKHKHDWLQJHOHPHQWVRUWKHLQWHULRU
surface of the oven. These surfaces may be hot
enough to burn even though they are dark in color.
During and after use, do not touch, or let clothing
or other flammable materials contact any interior
area of the oven; allow sufficient time for cooling
first. Other surfaces of the appliance may become
hot enough to cause burns. Potentially hot surfaces
include the burners, grates, oven vent opening,
surfaces near the opening, and crevices around the
oven door.
Ŷ 'RQRWKHDWXQRSHQHGIRRGFRQWDLQHUV3UHVVXUH
could build up and the container could burst,
causing an injury.
Ŷ &RRNIRRGWKRURXJKO\WRKHOSSURWHFWDJDLQVW
foodborne illness. Minimum safe food temperature
recommendations can be found at
IsItDoneYet.gov and fsis.usda.gov.8VHDIRRG
thermometer to take food temperatures and check
several locations.
Ŷ 'RQRWDOORZDQ\RQHWRFOLPEVWDQGRUKDQJRQWKH
oven door, drawer or cooktop. They could damage
the range or tip it over causing severe injury or death.
49-2001566 Rev. 1 5
WARNING
KEEP FLAMMABLE MATERIALS AWAY FROM THE RANGE
Failure to do so may result in fire or personal injury.
Ŷ 'RQRWVWRUHRUXVHIODPPDEOHPDWHULDOVLQDQRYHQ
or near the cooktop, including paper, plastic, pot
holders, linens, wall coverings, curtains, drapes and
JDVROLQHRURWKHUIODPPDEOHYDSRUVDQGOLTXLGV
Ŷ 1HYHUZHDUORRVHILWWLQJRUKDQJLQJJDUPHQWVZKLOH
using the appliance. These garments may ignite if
they contact hot surfaces causing severe burns.
Ŷ 'RQRWOHWFRRNLQJJUHDVHRURWKHUIODPPDEOH
materials accumulate in or near the range. Grease
in the oven or on the cooktop may ignite.
READ AND SAVE THESE INSTRUCTIONS
WARNING
IN THE EVENT OF A FIRE, TAKE THE FOLLOWING
STEPS TO PREVENT INJURY AND FIRE SPREADING
Ŷ 'RQRWXVHZDWHURQJUHDVHILUHV1HYHUSLFNXS
a flaming pan. Turn the controls off. Smother a
flaming pan on a surface unit by covering the pan
completely with a well-fitting lid, cookie sheet or flat
WUD\8VHDPXOWLSXUSRVHGU\FKHPLFDORUIRDPW\SH
fire extinguisher.
Ŷ ,IWKHUHLVDILUHLQWKHRYHQGXULQJEDNLQJVPRWKHU
the fire by closing the oven door and turning the
oven off or by using a multi-purpose dry chemical or
foam-type fire extinguisher.
WARNING
COOKTOP SAFETY INSTRUCTIONS
Ŷ 1HYHUOHDYHWKHVXUIDFHEXUQHUVXQDWWHQGHG)RRGV
especially oily foods, may ignite resulting in fire that
could spread to surrounding cabinets.
Ŷ 1HYHUOHDYHRLOXQDWWHQGHGZKLOHIU\LQJ,IDOORZHG
to heat beyond its smoking point, oil may ignite
resulting in fire that may spread to surrounding
FDELQHWV8VHDGHHSIDWWKHUPRPHWHUZKHQHYHU
possible to monitor oil temperature.
Ŷ 7RDYRLGRLOVSLOORYHUDQGILUHXVHWKHPLQLPXP
amount of oil when using a shallow pan-frying
and avoid cooking frozen foods with excessive
amounts of ice.
Ŷ 8VHSURSHUSDQVL]HDQGDYRLGSDQVWKDWDUH
unstable or easily tipped. Select cookware that is
PDWFKHGWRWKHVL]HRIWKHEXUQHU%XUQHUIODPHV
should be adjusted so that they do not extend
beyond the bottom of the pan. Excessive flame may
be hazardous.
Ŷ $OZD\VXVHWKH+,SRVLWLRQZKHQLJQLWLQJWKHWRS
burners and make sure the burners have ignited.
Ŷ :KHQXVLQJJODVVFHUDPLFFRRNZDUHPDNHVXUHLW
is suitable for cooktop service; others may break
because of sudden change in temperature.
Ŷ 7RPLQLPL]HWKHSRVVLELOLW\RIEXUQVLJQLWLRQRI
flammable materials and spillage, the handle of a
container should be turned toward the center of the
range without extending over nearby burners.
Ŷ 'RQRWXVHDZRN'RLQJVRPD\WUDSKHDWDQG
block air to the burner resulting in a carbon
monoxide hazard.
Ŷ 'RQRWXVHDOXPLQXPIRLOWRFRYHUWKHJUDWHVRU
line any part of the cooktop. Doing so may result
in carbon monoxide poisoning, overheating of the
cooktop surfaces, or a potential fire hazard.
SAFETY INFORMATION
IMPORTANT SAFETY INFORMATION
READ ALL INSTRUCTIONS BEFORE USING THE APPLIANCE
6 49-2001566 Rev. 1
WARNING
FIRE OR EXPLOSION HAZARD
If the information in this manual is not followed
exactly, a fire or explosion may result causing property
damage, personal injury or death.
,QVWDOODWLRQPXVWEHSHUIRUPHGE\DTXDOLILHGLQVWDOOHU
Read these instructions completely and carefully.
Installation of this appliance must conform with state
and other codes or, in the absence of such codes,
with:
,QWKH86$WKH6WDQGDUGIRU5HFUHDWLRQDO9HKLFOHV
$16,1)3$
,Q&DQDGD&$1&6$=,QVWDOODWLRQ
5HTXLUHPHQWVIRU3URSDQH$SSOLDQFHVDQG(TXLSPHQW
LQ5HFUHDWLRQDO9HKLFOHV
This range has been design-certified by CSA
,QWHUQDWLRQDODFFRUGLQJWR$16,=ODWHVWHGLWLRQ
DQG&$10ODWHVWHGLWLRQ
When installing a gas appliance, the use of old flexible
connectors can cause gas leaks and personal injury.
Always use a NEW flexible connector.
Leak testing of the appliance shall be conducted
according to the manufacturer instructions.
If an external electrical source is utilized, the
appliance, when installed, must be electrically
grounded in accordance with state or, in the absence
RIVXFKFRGHVZLWKWKH1DWLRQDO(OHFWULFDO&RGH$16,
1)3$
Do not install this product with an air curtain hood or
other range hood that operates by blowing air down on
the cooktop. This airflow may interfere with operation
of the gas burners resulting in fire or explosion hazard.
SAFETY INFORMATION
IMPORTANT SAFETY INFORMATION
READ ALL INSTRUCTIONS BEFORE USING THE APPLIANCE
READ AND SAVE THESE INSTRUCTIONS
WARNING
OVEN SAFETY INSTRUCTIONS
WARNING
NEVER cover any slots,
holes, or passages in the oven bottom or
FRYHUDQHQWLUHUDFNZLWKPDWHULDOVVXFKDV
DOXPLQXPIRLORURYHQOLQHUV'RLQJVREORFNV
air flow through the oven and may cause
carbon monoxide poisoning. Never place foil
or oven liners on the oven bottom. They can
WUDSKHDWFDXVLQJULVNRIVPRNHRUILUH
Ŷ 6WDQGDZD\IURPWKHUDQJHZKHQRSHQLQJWKHRYHQ
door. Hot air or steam which escapes can cause
EXUQVWRKDQGVIDFHDQGRUH\HV
Ŷ 1HYHUSODFHFRRNLQJXWHQVLOVSL]]DRUEDNLQJVWRQHV
or any type of foil or liner on any surface other than
racks. These items can trap heat or melt, resulting in
damage to the product and risk of shock, smoke or
fire.
Ŷ 3ODFHRYHQUDFNVLQGHVLUHGORFDWLRQZKLOHRYHQLV
cool. If rack must be moved while oven is hot, be
careful to avoid touching hot surfaces.
Ŷ 'RQRWOHDYHLWHPVVXFKDVSDSHUFRRNLQJXWHQVLOV
or food in the oven when not in use. Items stored in
an oven can ignite.
Ŷ 'RQRWOHDYHLWHPVRQWKHFRRNWRSQHDUWKHRYHQ
vent. Items may overheat resulting in a risk of fire or
burns.
PROPER DISPOSAL OF YOUR APPLIANCE
Dispose of or recycle your appliance in accordance with Federal and Local Regulations. Contact your local
authorities for the environmentally safe disposal or recycling of your appliance.
49-2001566 Rev. 1
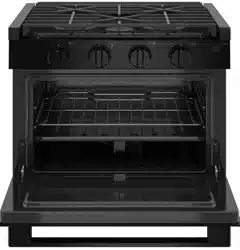
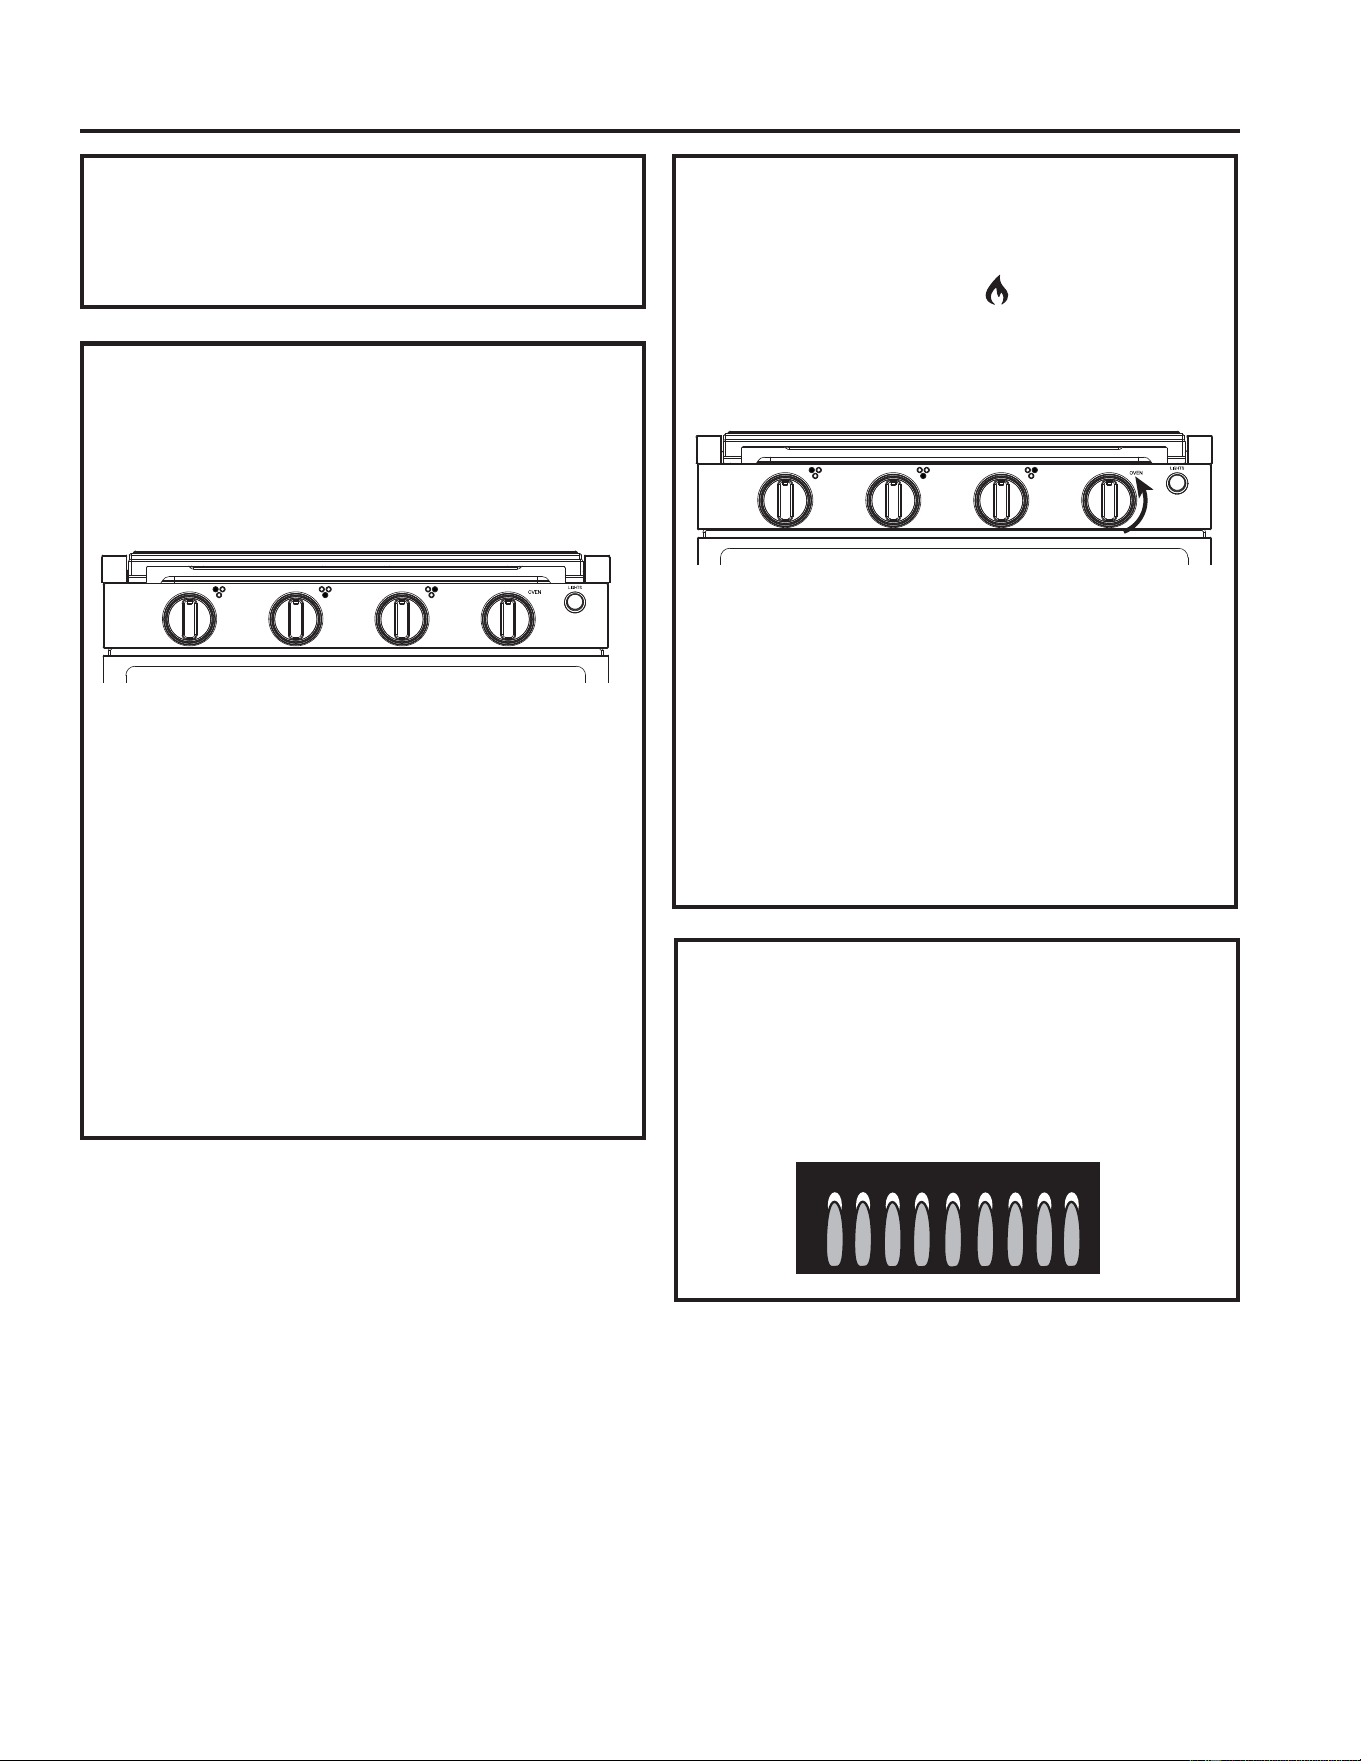
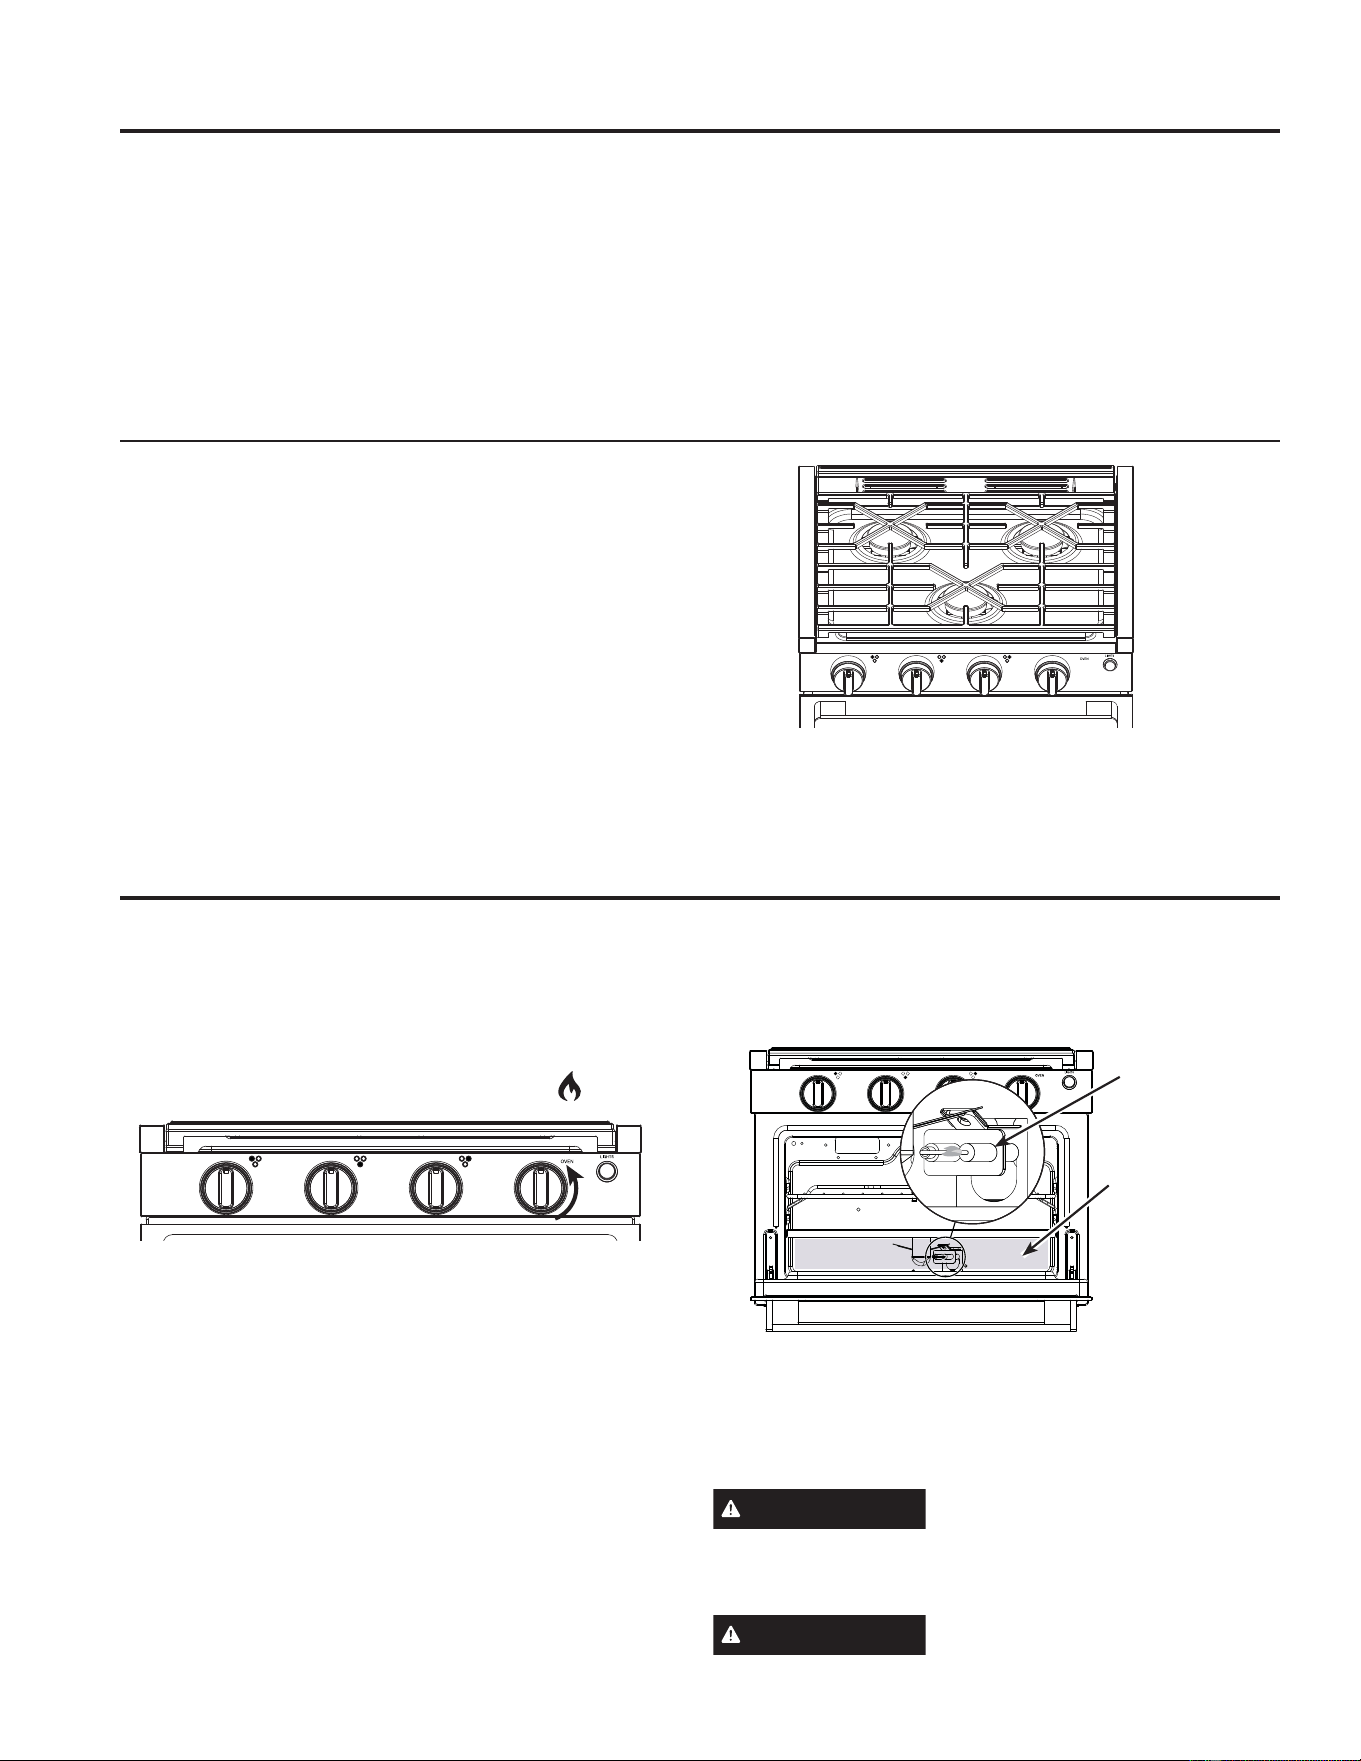
&RRNWRS
%HIRUH OLJKWLQJ FRQILUP DOO FRQWURO NQREV DUH LQ WKH 2)) SRVLWLRQ 0DNH VXUH WKH PDLQ JDV WDQN YDOYH LV RSHQ
Ŷ 'R QRW RSHUDWH WKH EXUQHU IRU DQ H[WHQGHG SHULRG RI WLPH ZLWKRXW FRRNZDUH RQ WKH JUDWH 7KH ILQLVK RQ WKH JUDWH
may discolor or chip without cookware to absorb the heat.
Ŷ &RRNZDUH VKRXOG EH SRVLWLRQHG RYHU WKH JUDWHV DQG QRW RYHUKDQJLQJ WKH VLGH WULP RU FRXQWHUWRS
Ŷ %H VXUH WKH EXUQHUV DQG JUDWHV DUH FRRO EHIRUH \RX SODFH \RXU KDQG D SRW KROGHU RU FOHDQLQJ PDWHULDOV RQ WKHP
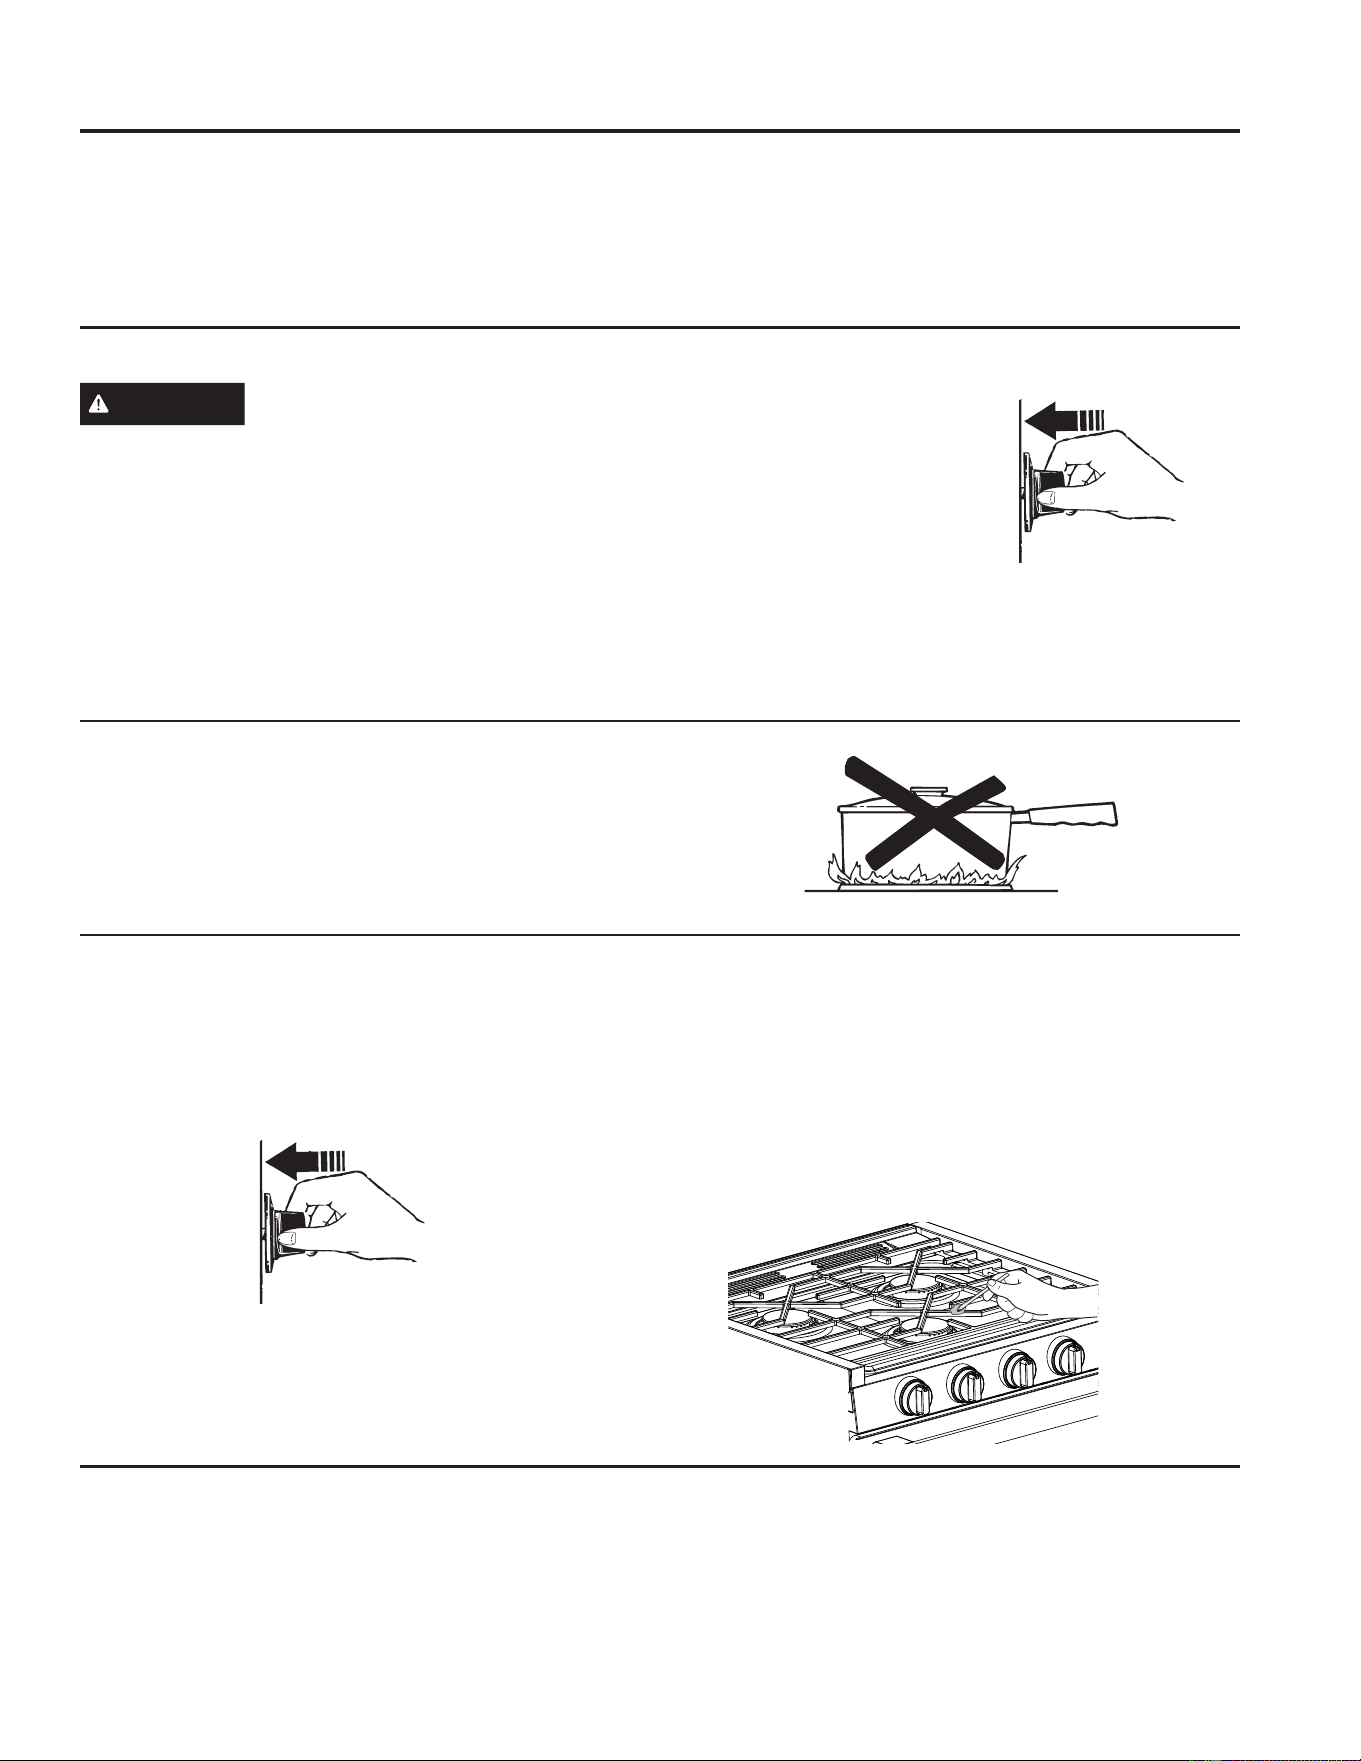
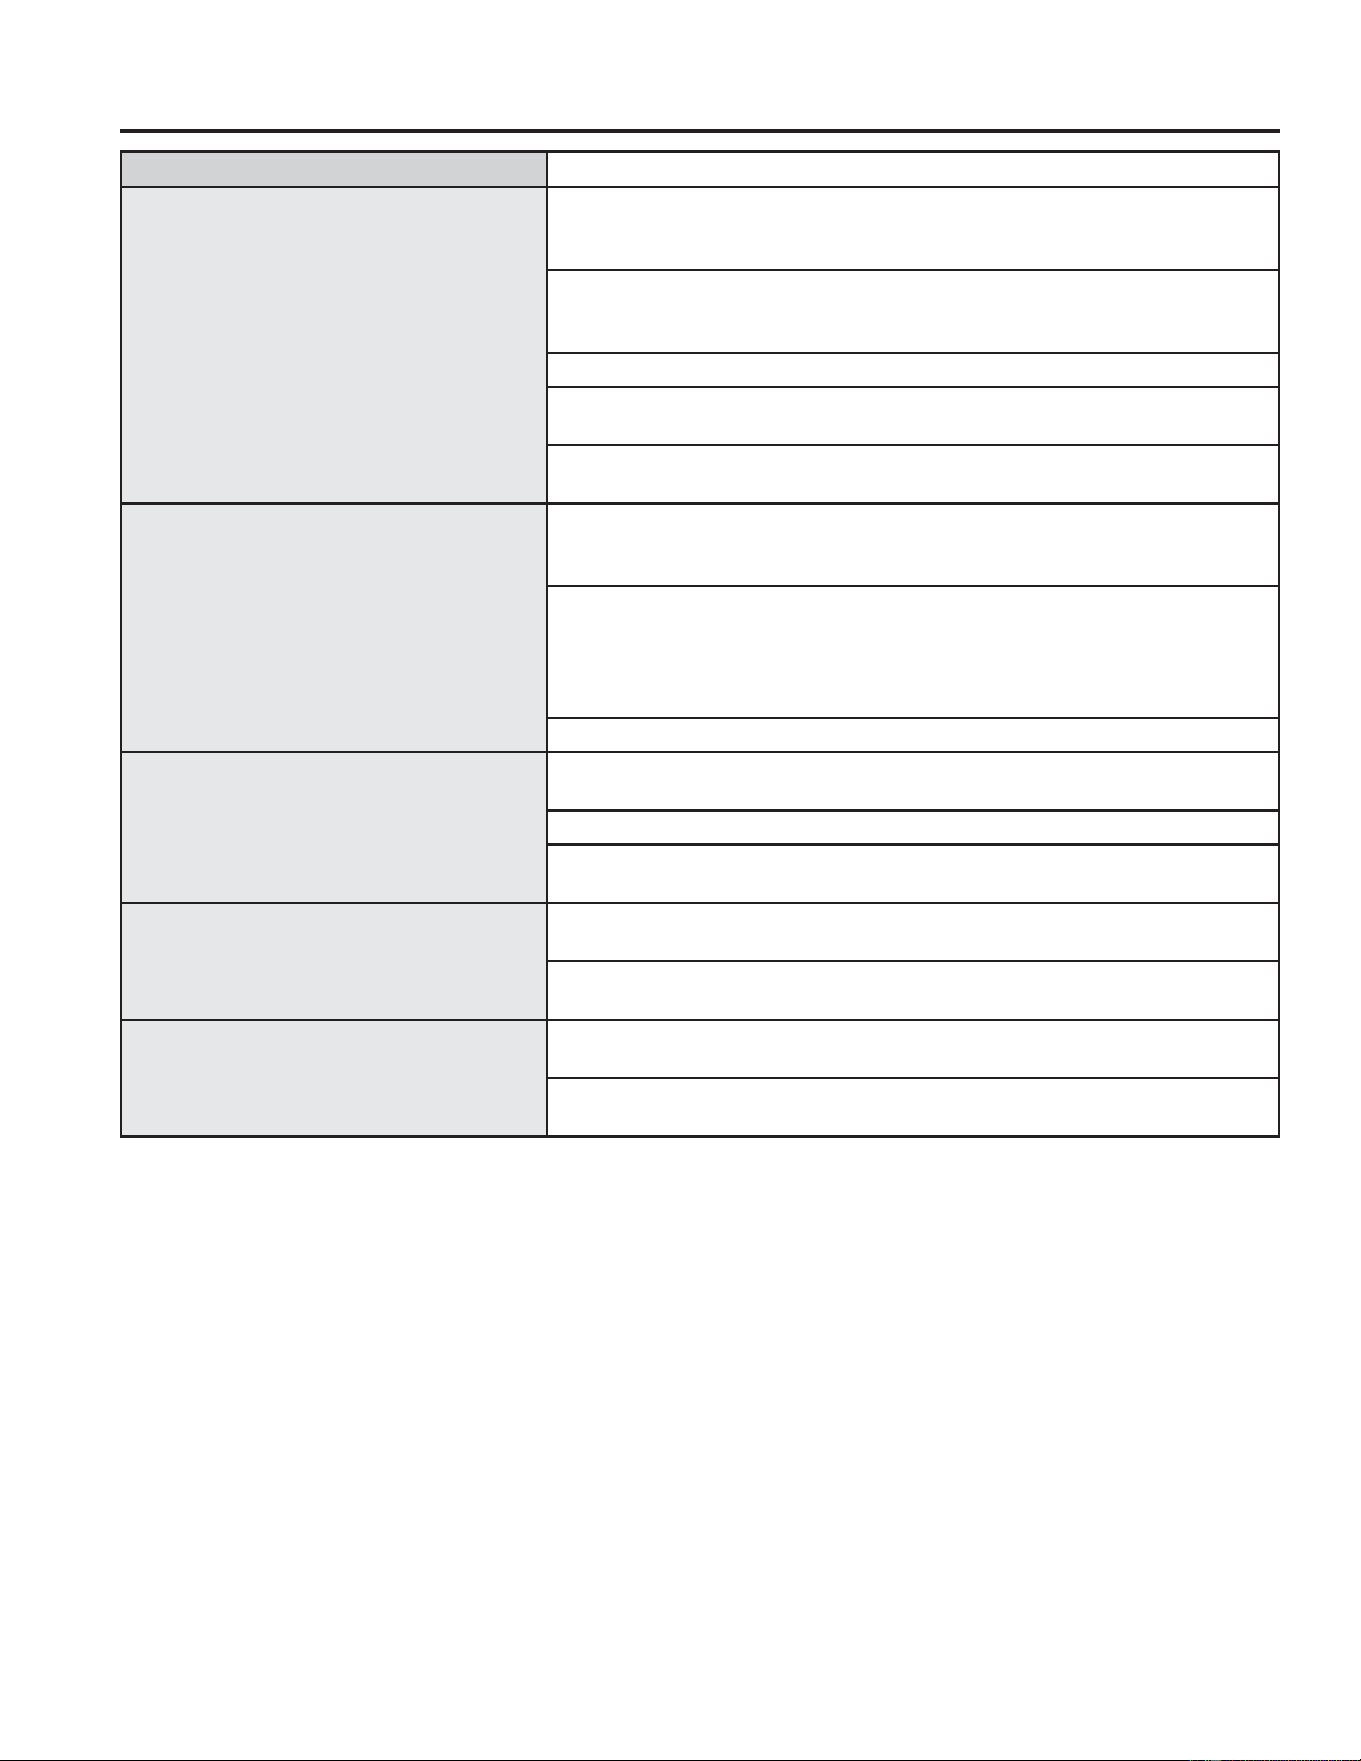
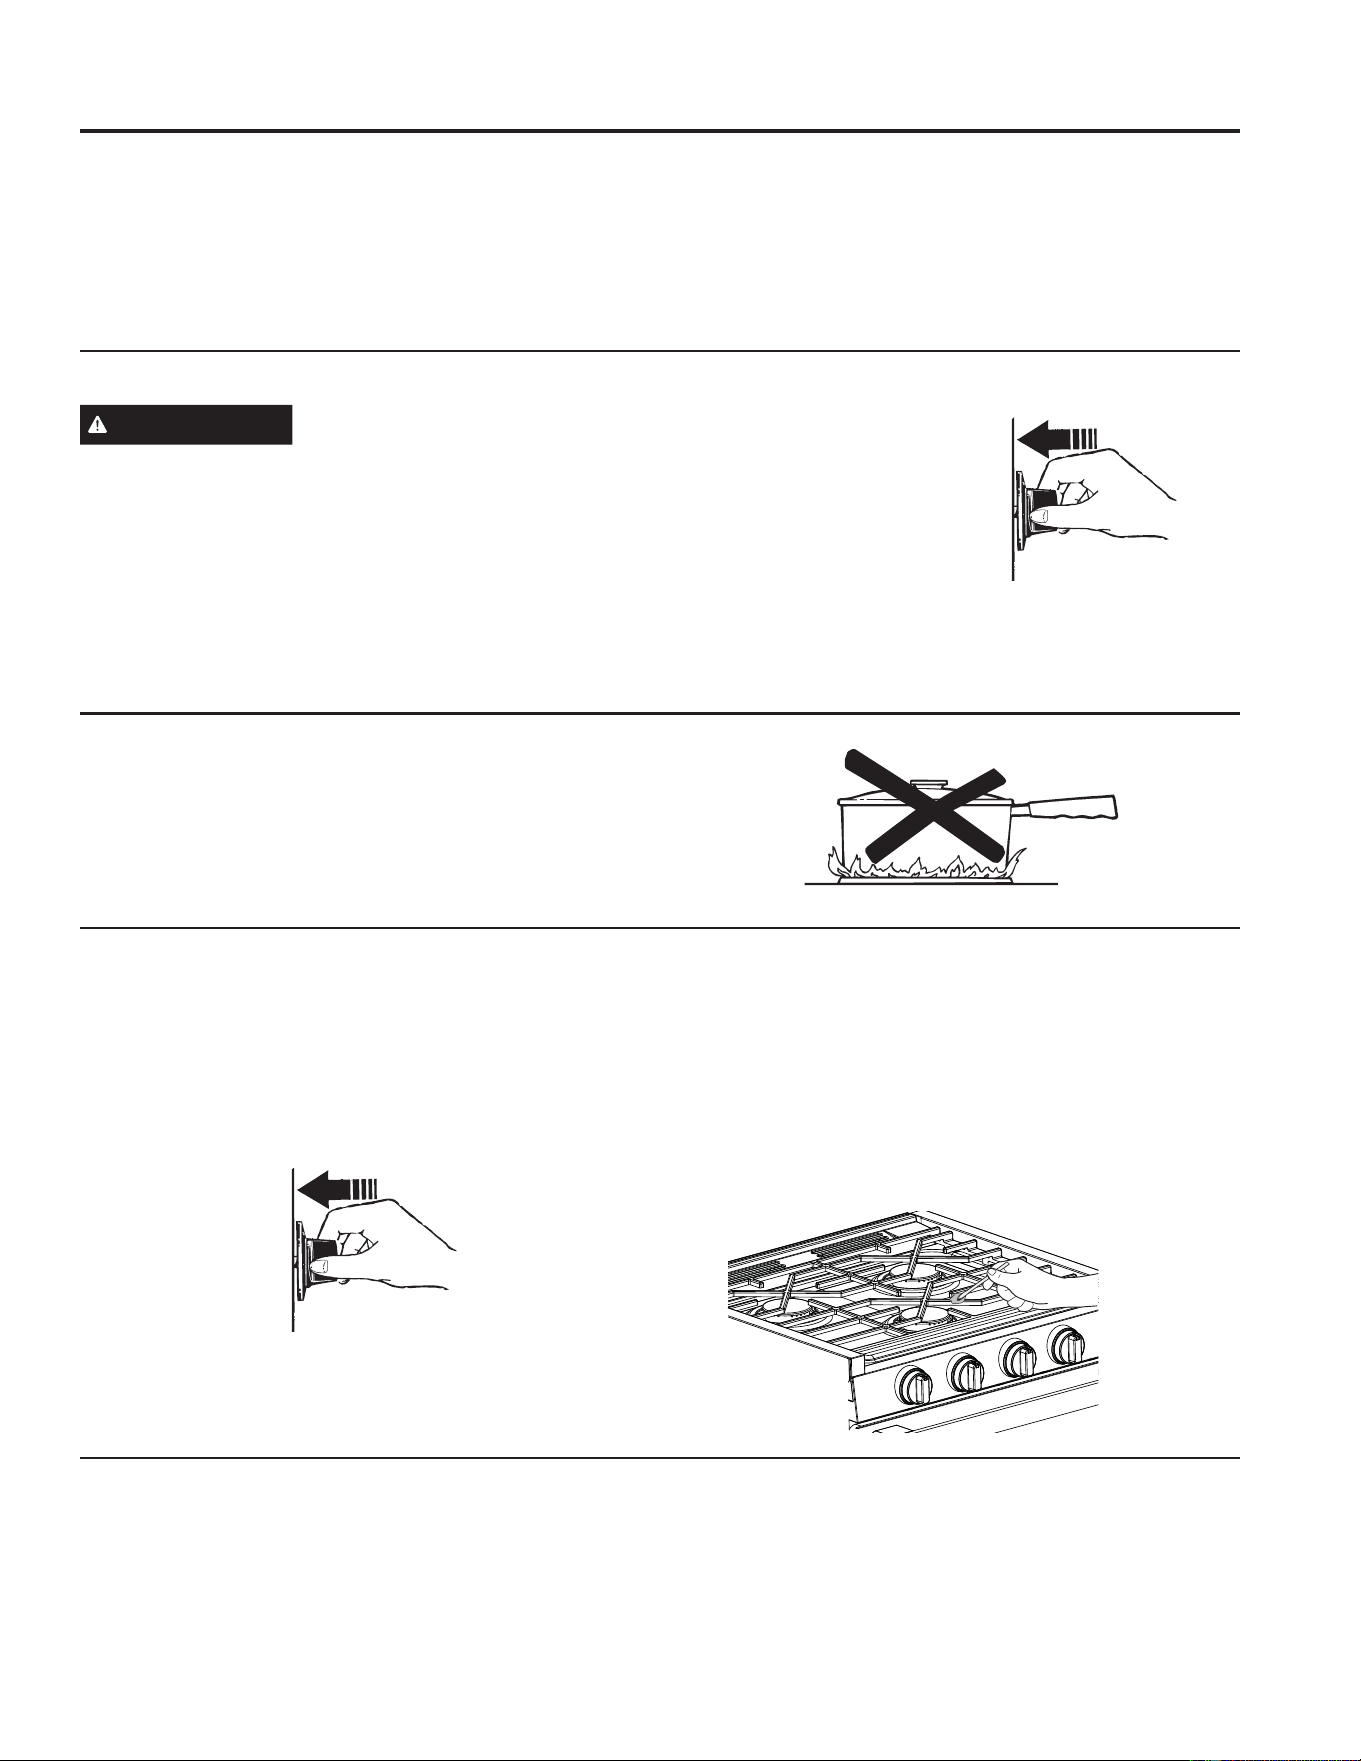
Selecting a Flame Size
Watch the flame, not the knob, as you adjust heat. When
rapid heating is desired, the flame size should match the
size of the cookware you are using. Flames larger than
the bottom of the cookware will not heat faster and may
be hazardous.
These flames are too large for the pot
USING THE RANGE: Cooktop
If the Flame Goes Out
Immediately turn the control knob to OFF position. Wait
at least 5 minutes and light the burner again.
7XUQLQJ 2II WKH &RRNWRS
To turn the cooktop burners off, rotate the control knobs
clockwise to the OFF position. Do not touch or place any
objects on the grates until the cooktop has cooled.
Lighting a Surface Burner
WARNING
Burners should be operated only
ZKHQ FRYHUHG E\ FRRNZDUH %XUQHU IODPHV QRW
FRYHUHG E\ FRRNZDUH SUHVHQW D ULVN RI ILUH RU
clothing ignition. Never let flames extend beyond the
VLGHV RI WKH FRRNZDUH )DLOXUH WR FRPSO\ PD\ UHVXOW
in serious injury.
Select a burner and find its control knob. Push and turn
the appropriate burner control knob counterclockwise
to the HI position. Sparking will continue as long as
the knob remains pressed. Once burner is lit, continue
pressing knob for at least
5 seconds until the flame
sensor is heated. Release
the knob and confirm the
burner remains lit. If the
burner remains lit, rotate
the knob to adjust the
flame. If the burner does
not remain lit, refer to the
Troubleshooting Tips section.
Push the control knob in and
turn it to the HI position.
/LJKWLQJ WKH &RRNWRS 0DQXDOO\
If a cooktop burner fails to ignite, you may light the
burner manually by following the instructions below:
Push and turn the appropriate burner control knob
counterclockwise to the HI position.
While continuing to press the knob, immediately strike
and place a burning long wooden match or a gas lighter
near the burner to light. Once burner is lit, continue
pressing knob for at least 5 seconds until the flame
sensor is heated. Release the knob and confirm the
burner remains lit. If the burner remains lit, rotate the
knob to adjust the flame. If the burner does not remain
lit, refer to the Troubleshooting Tips section.
Push the control knob in and
turn it to the HI position.
49-2001566 Rev. 1
USING THE RANGE:&RRNWRS2YHQ
&RRNWRS
Oven
&RRNWRS%XUQHU8VDJH
8VHWKHIURQWEXUQHUIRUODUJHFRRNZDUHDQGIDVWHU
boiling. The rear burners are intended for general
cooking and simmering.
Ŷ'RQRWRSHUDWHWKHEXUQHUIRUDQH[WHQGHGWLPH
without cookware on the grate. The finish on the grate
may discolor or chip without cookware to absorb the
heat.
Ŷ'RQRWDWWHPSWWRGLVDVVHPEOHDQ\EXUQHUZKLOH
another burner is on. Damage to the product may
occur.
Ŷ%HVXUHWKHEXUQHUVDQGJUDWHVDUHFRROEHIRUH\RX
place you hand, a pot holder or cleaning materials on
the cooktop.
Size cookware appropriately to the flames. The rear
burners are intended for general cooking and simmering.
8VHWKHIURQWEXUQHUIRUODUJHUFRRNZDUHDQGIDVWHU
ERLOLQJ&RYHU\RXUFRRNZDUHZLWKDOLGWREULQJOLTXLGVWR
a boil faster.
&RRNWRS*UDWH2ULHQWDWLRQ
The proper install orientation for the grate is as shown.
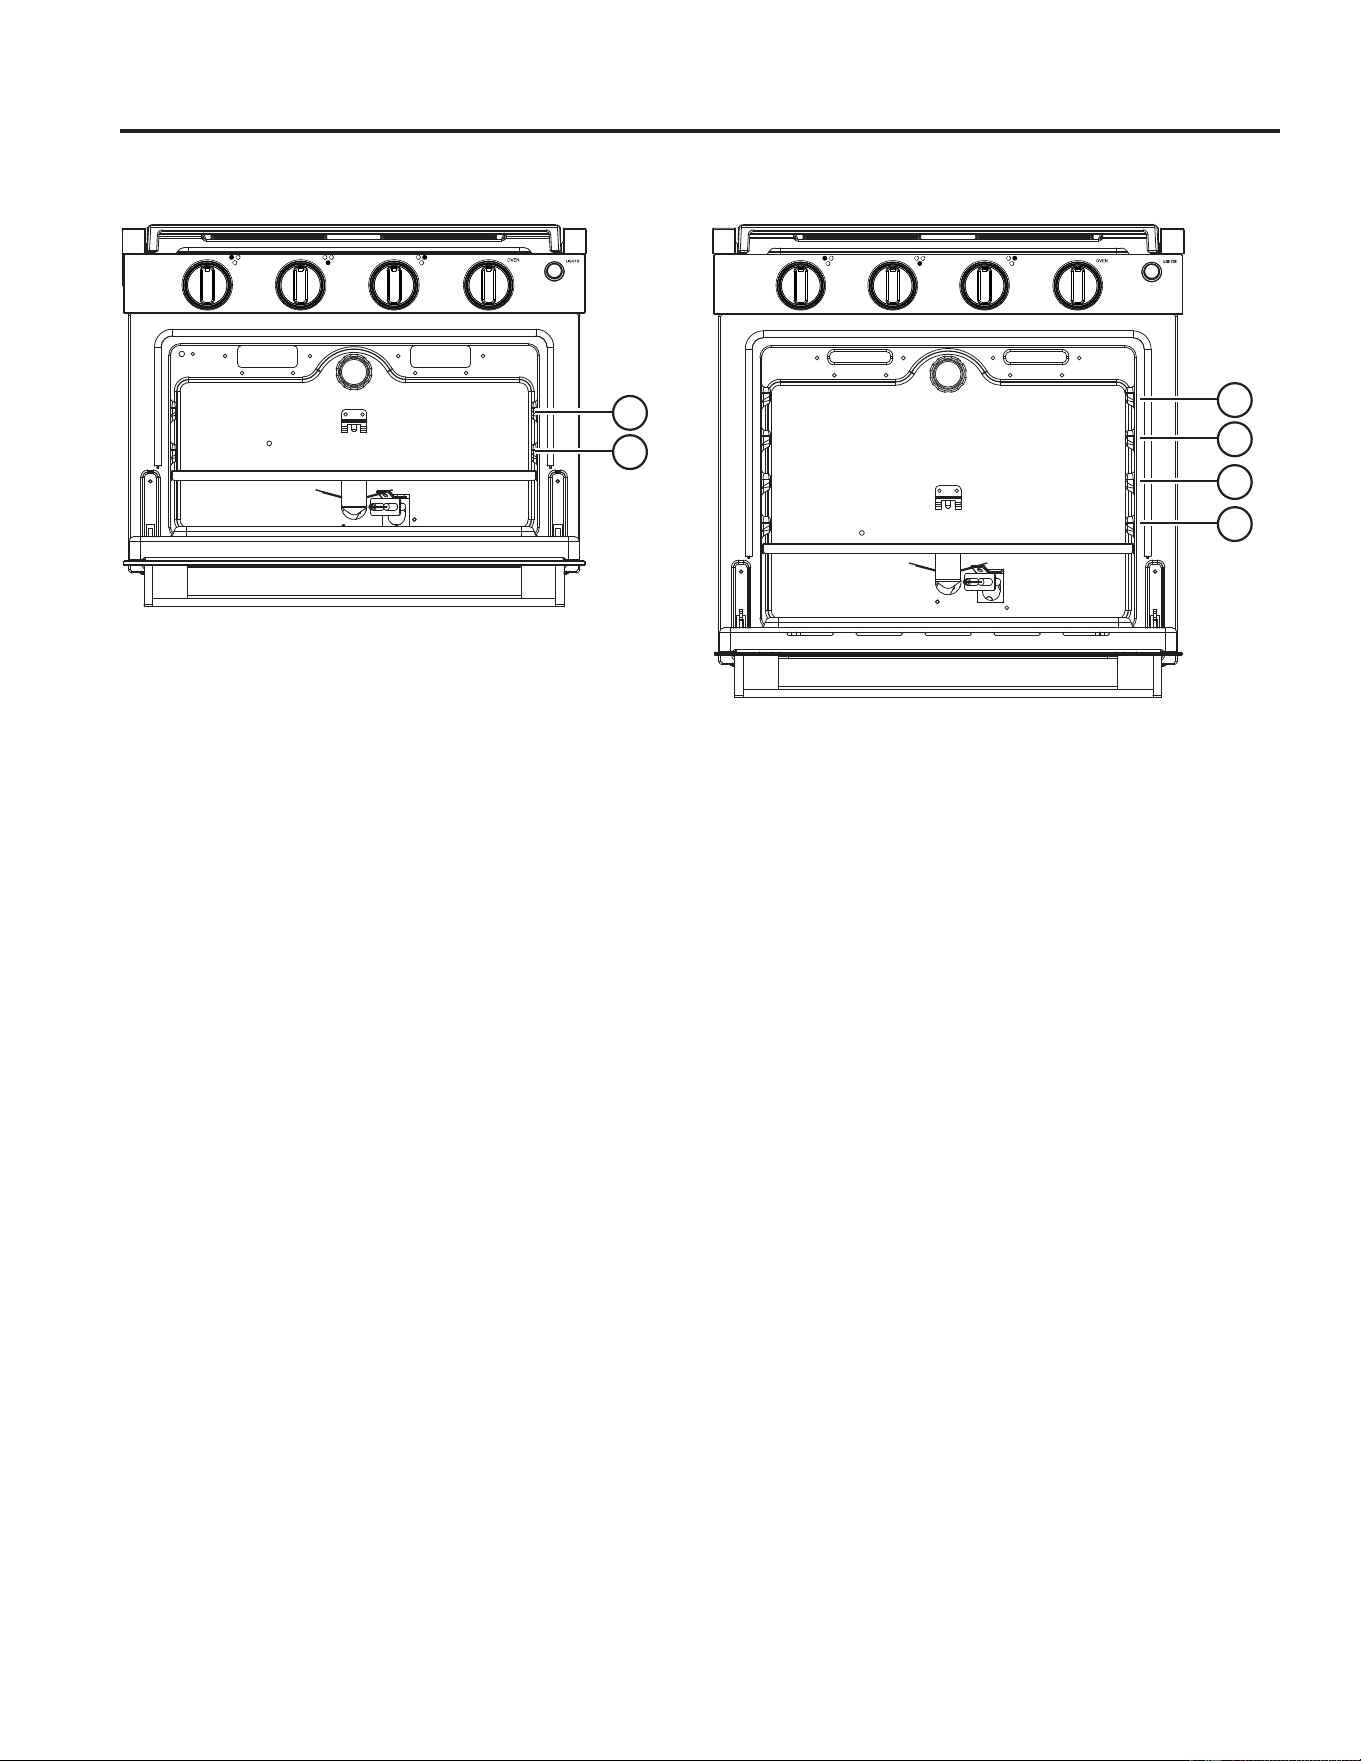
Lighting the Oven
NOTE:%HIRUHOLJKWLQJPDNHVXUHWKHPDLQJDVWDQN
valve is opened.
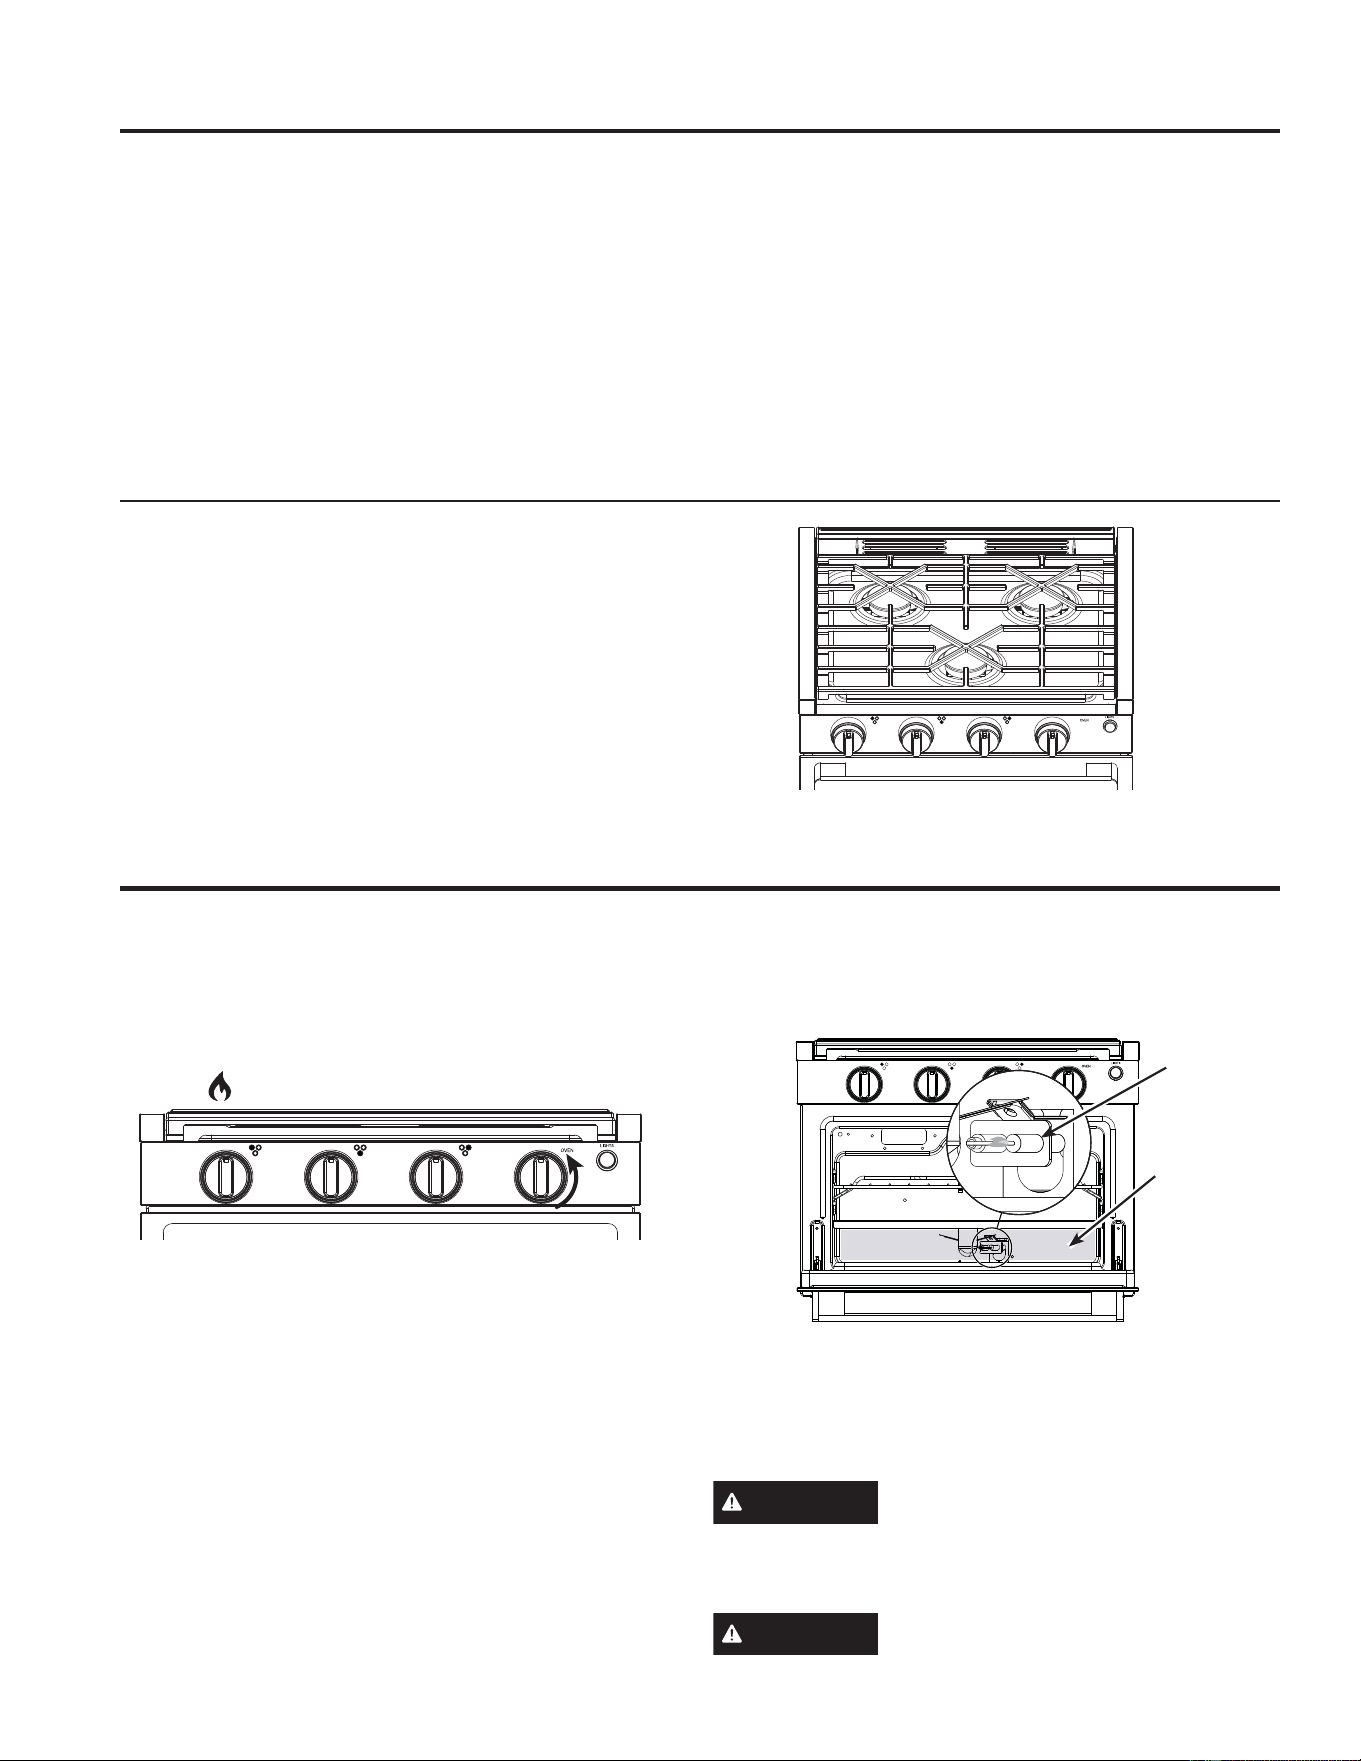
3XOOWKHRYHQKDQGOHWRRSHQWKHGRRU
2. Push and turn the oven control knob counterclockwise
to the position.
.HHSWKHRYHQFRQWURONQRESUHVVHGIRUDWOHDVW
seconds until the oven pilot is lit and the pilot sensor
is heated. If air is in the supply line, it may take up to
a minute for the air to purge and the oven pilot to light.
4. Release oven control knob and visually confirm
oven pilot remains lit. If oven pilot goes out, repeat
steps 3 and 4.
5. Rotate the oven control knob to the highest oven
temperature and visually confirm that the pilot has
ignited the bake burner.
6. Rotate the oven control knob to desired temperature.
Close oven door
WARNING
In the event of an ignition system
failure, the oven is inoperable and no attempt should
be made to operate it. Do not attempt to light the
oven manually.
WARNING
Do not store objects in burner
compartment.
%XUQHU
Compartment
Oven Pilot
49-2001566 Rev. 1
USING THE RANGE:
2YHQDQG&RQWURO.QRE/LJKWV2YHQ5DFNV$OXPLQXP)RLODQG2YHQ/LQHUV2YHQ9HQWV
Oven and Control Knob Lights
Oven
2YHQ5DFNV
Aluminum Foil and Oven Liners
Oven Vents
If the Flame Goes Out
Immediately turn the oven control knob to the OFF
position. Wait at least 5 minutes before trying to re-light
the oven burner.
Turning Off the Oven
To turn off the oven, rotate the oven control knob
clockwise to the OFF position.
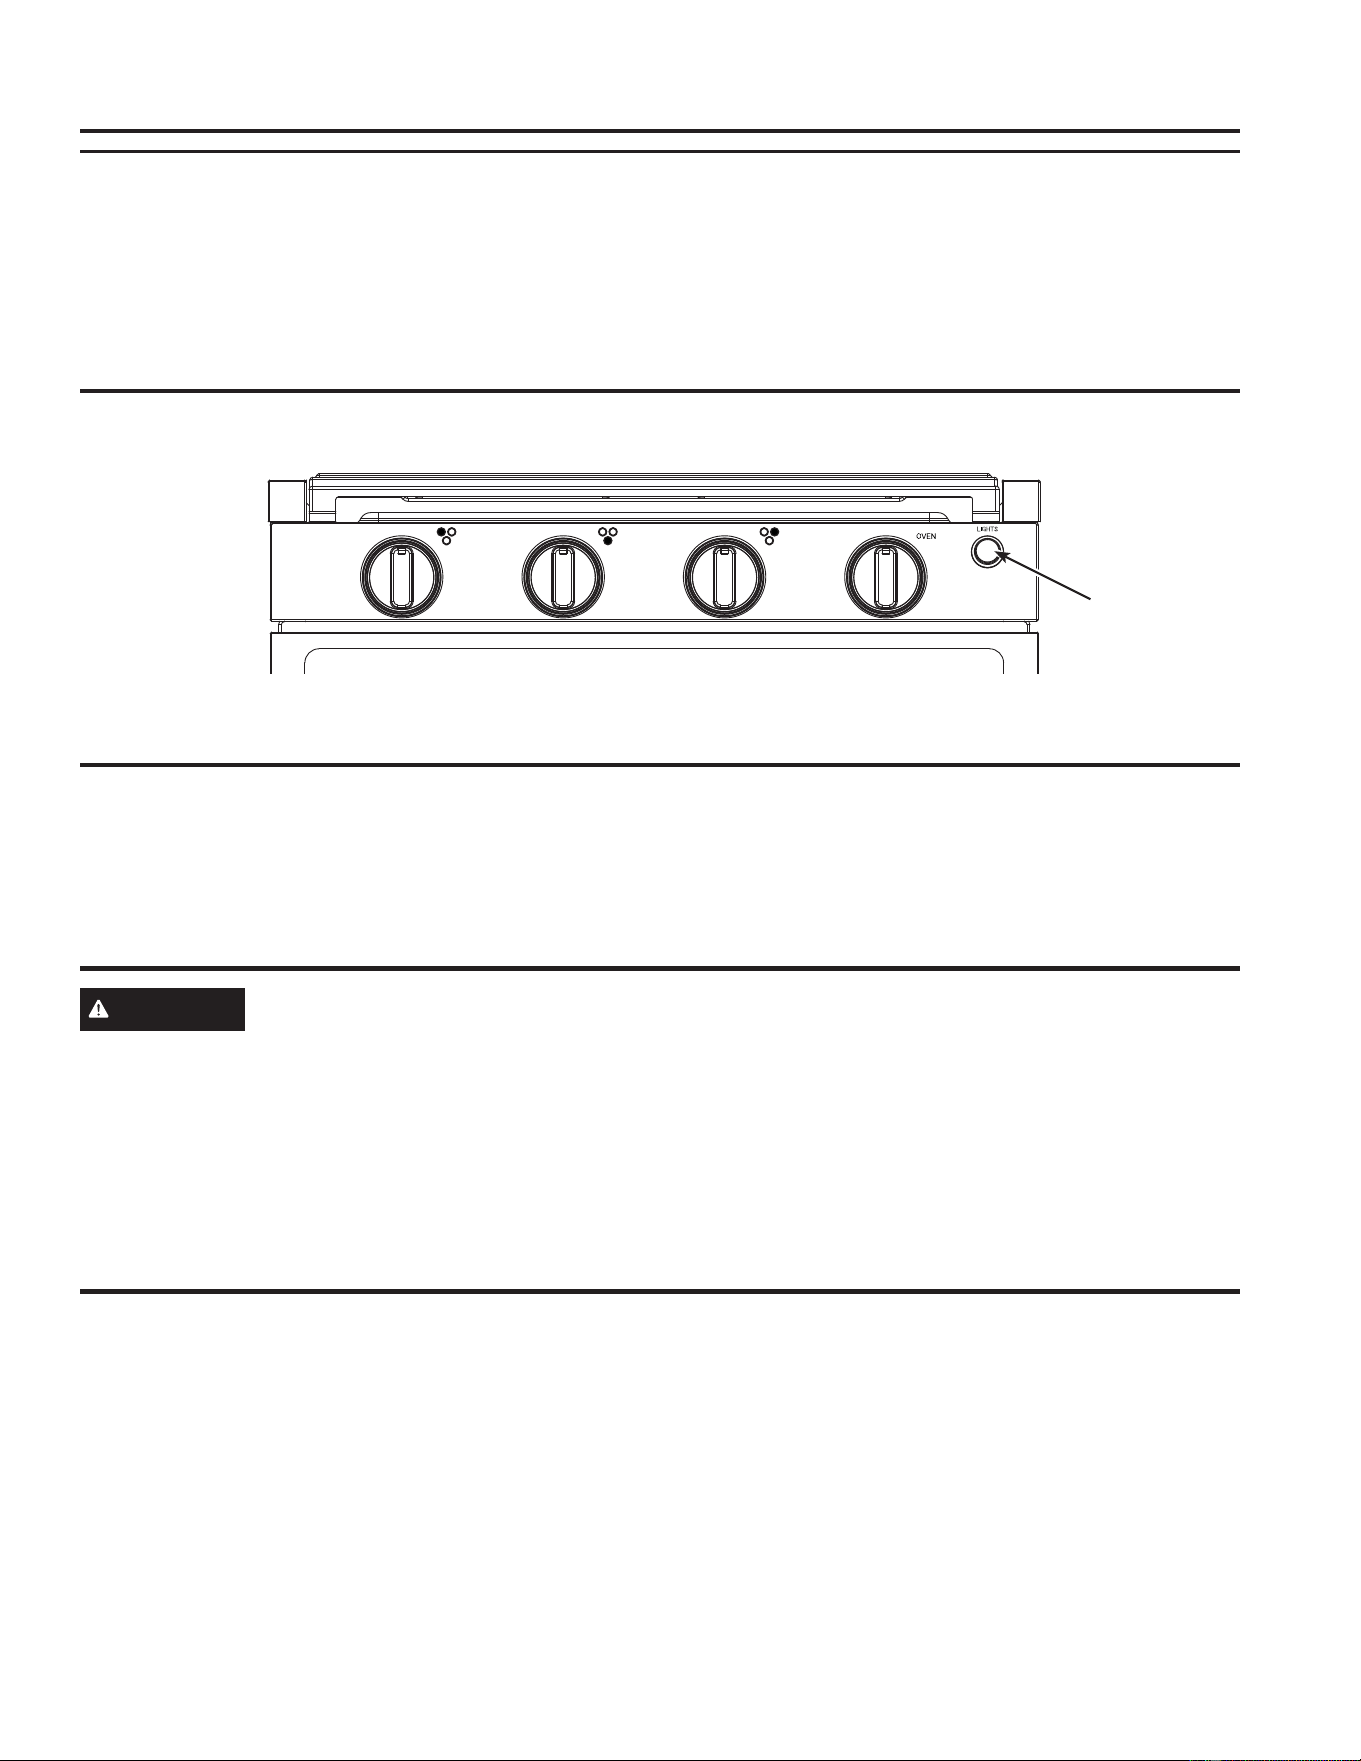
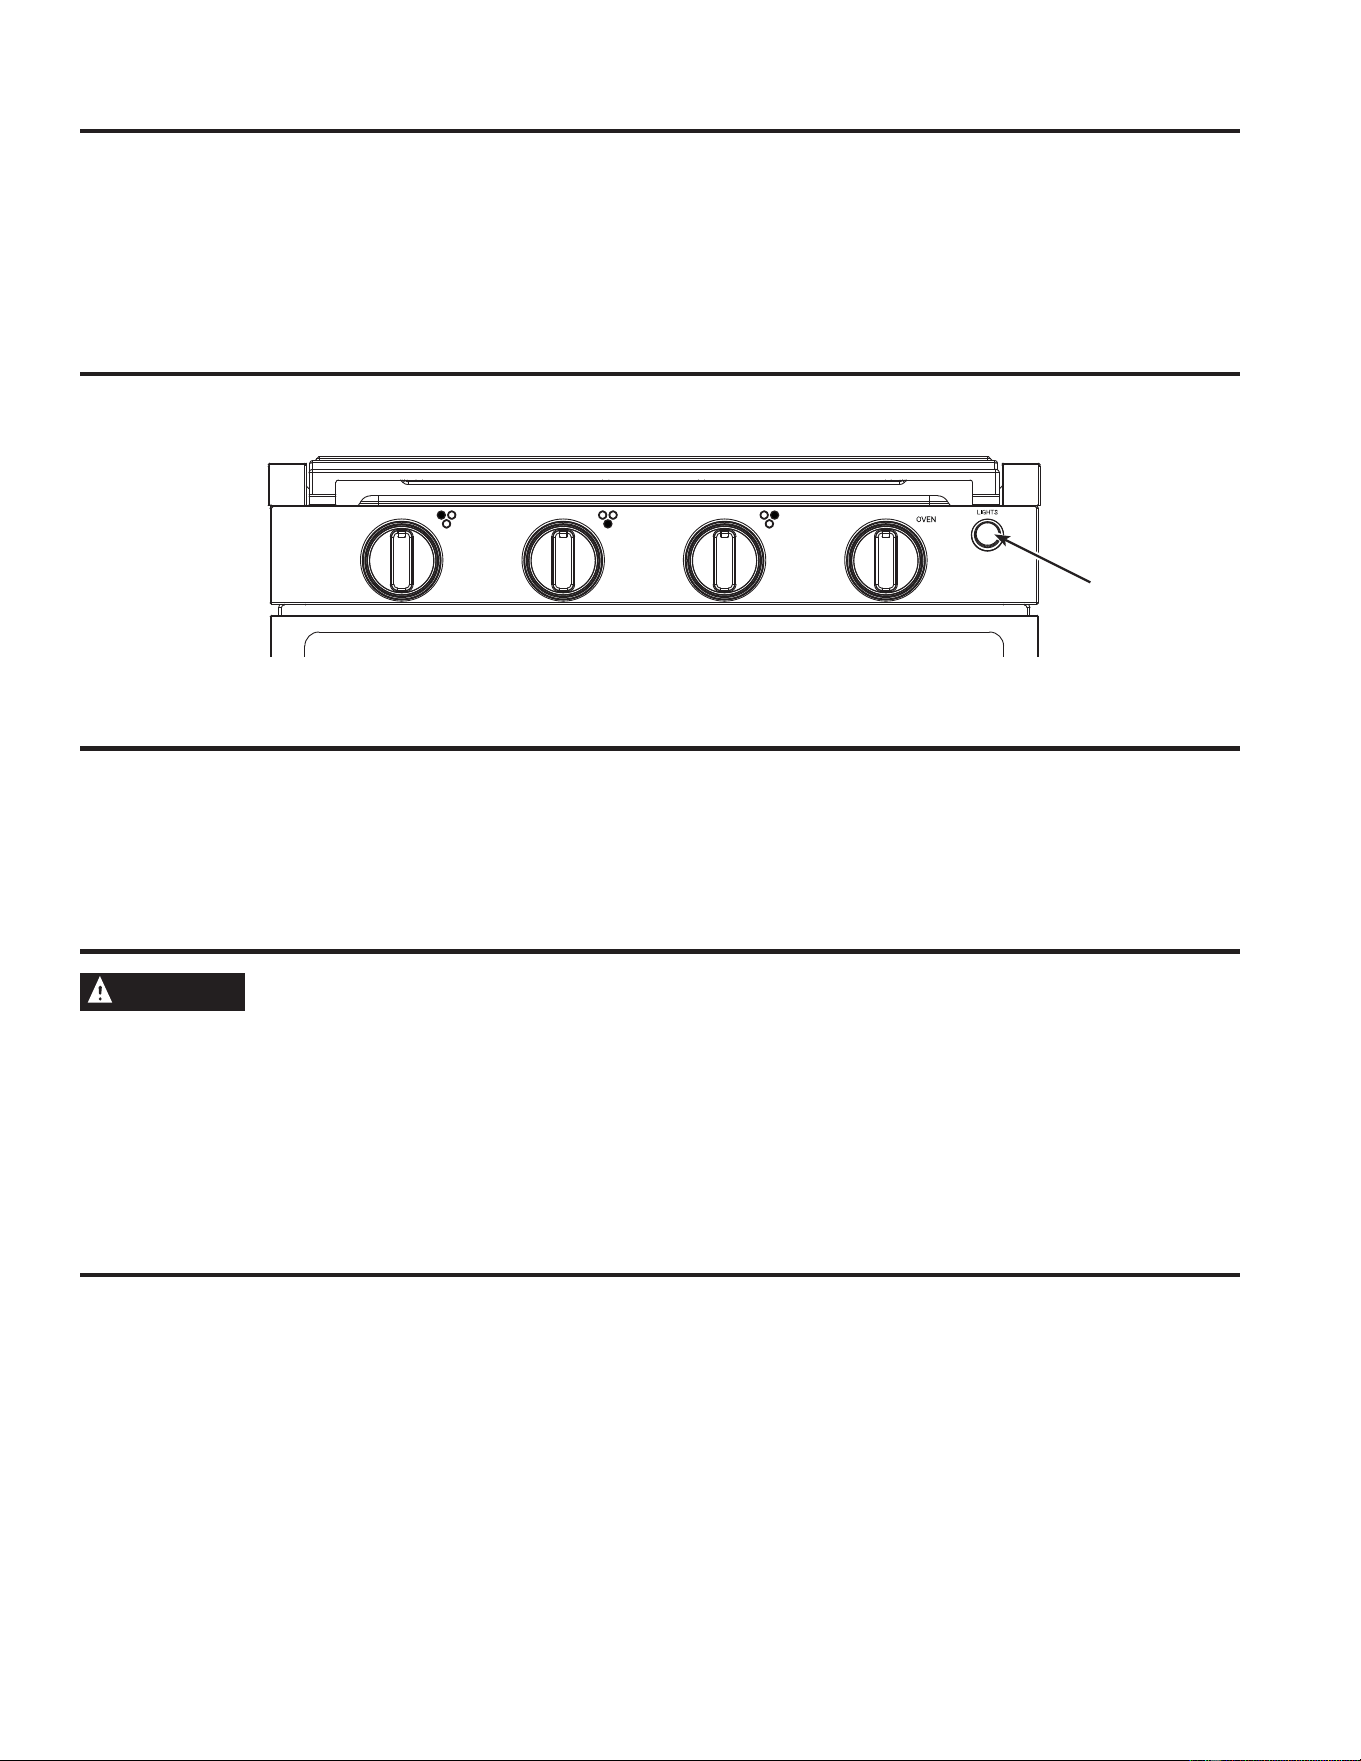
Press the LightEXWWRQRQWKHFRQWUROSDQHOWRWXUQRQRIIWKHRYHQDQGFRQWURONQREOLJKWV$OOOLJKWVWXUQRQDQG
off together.
1HYHUEORFNWKHYHQWVDLURSHQLQJVRIWKHUDQJH7KH\SURYLGHWKHDLUIRUWKHLQOHWDQGRXWOHWWKDWDUHQHFHVVDU\IRU
WKHUDQJHWRNHHSFRRODQGRSHUDWHSURSHUO\ZLWKFRUUHFWFRPEXVWLRQ1HYHUFRYHUWKHRSHQLQJZLWKDOXPLQXPIRLORU
DQ\RWKHUPDWHULDO9HQWVDUHORFDWHGDORQJWKHUHDURIWKHFRRNWRS
CAUTION
Do not use any type of foil or oven
OLQHUWRFRYHUDQ\RYHQVXUIDFHRWKHUWKDQUDFNV
These items can trap heat or melt, resulting in
GDPDJHWRWKHSURGXFWDQGULVNRIVKRFNVPRNHRU
fire. Damage from improper use of these items is not
covered by the product warranty.
Do not use more foil than necessary and never entirely
cover an oven rack with aluminum foil. Keep foil at least
´IURPRYHQZDOOVWRSUHYHQWSRRUKHDWFLUFXODWLRQ
:KHQSODFLQJDQGUHPRYLQJFRRNZDUHSXOOWKHUDFNRXWWRWKHEXPSVWRSSRVLWLRQRQWKHUDFNVXSSRUW7RUHPRYH
a rack, raise the rear of the rack above the rack supports, pull the rack towards you until it is free. To replace a rack,
place the rear of the rack above the rack support, then push the rack to the rear of the oven until the rack falls into
place.
/LJKW%XWWRQ
49-2001566 Rev. 1
2YHQ&RRNLQJ*XLGH
3UHKHDWRYHQIRUPLQXWHVEHIRUHLQVHUWLQJIRRG8VHUDFNSRVLWLRQIRUVWDQGDUGEDNLQJ$GMXVWSRVLWLRQDV
needed. Limit door openings as much as possible to retain heat in the oven.
USING THE RANGE: Oven Cooking Guide
2
4
2
3
3/'5:
3/'':
3/'(:
3/'5:
3/'':
3/'(:
2YHQ&RRNZDUH
The material, finish, and size of cookware affect baking performance. Dark, coated and dull pans absorb heat more
readily than light, shiny pans. Pans that absorb heat more readily can result in a browner, crisper and thicker crust. If
using dark and coated cookware check food earlier than the minimum cook time.
49-2001566 Rev. 1
&RRNWRS6XUIDFHV
CARE AND CLEANING: Cooktop Surfaces
%HVXUHDOOFRQWUROVDUHRIIDQGDOOVXUIDFHVDUHFRROEHIRUHFOHDQLQJDQ\SDUWRIWKHUDQJH
3RUFHODLQ(QDPHO&RRNWRS
Do not use oven cleaners, abrasive cleansers, strong
OLTXLGFOHDQVHUVVWHHOZRROSODVWLFVFRXULQJSDGVRU
cleaning powders on the cooktop surface. Clean with a
PLOGVRDSDQGZDWHURUDVROXWLRQRIYLQHJDUDQG
water. Rinse with clean water and dry with a soft cloth.
When cleaning surfaces, make sure that they are at
room temperature. Spillage of marinades, fruit juices,
WRPDWRVDXFHVDQGEDVWLQJOLTXLGVFRQWDLQLQJDFLGVPD\
cause discoloration and should be wiped up as soon as
KRWVXUIDFHVFRROWKHQFOHDQDQGULQVH8VHFDXWLRQWR
not spill water into cooktop openings.
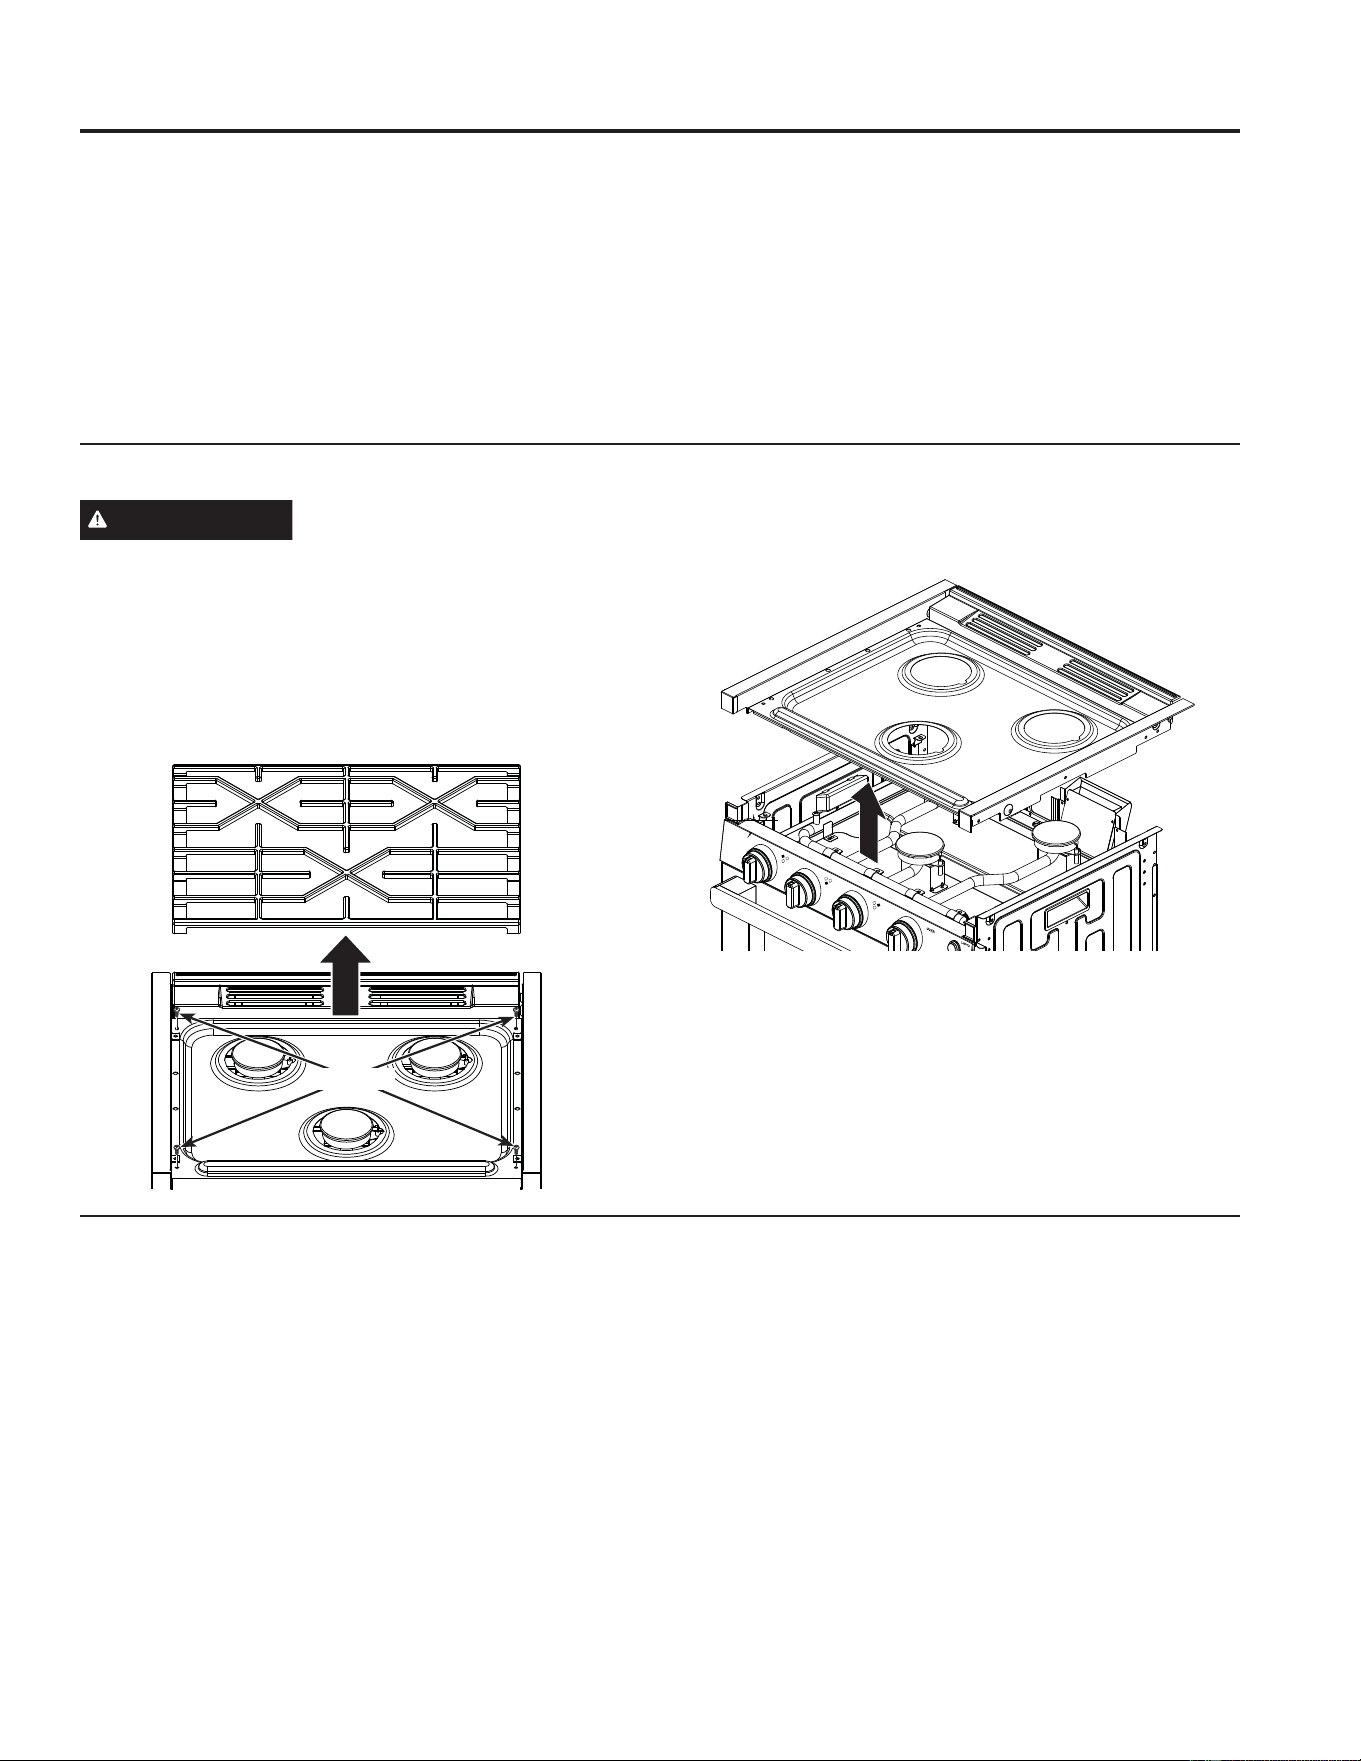
5HPRYLQJWKH&RRNWRSIRU&OHDQLQJLQ&DVHRI6SLOODJH
WARNING
&DUHVKRXOGEHWDNHQWRQRWGDPDJH
RUPRGLI\JDVWXELQJDQGZLULQJXQGHUFRRNWRS
Doing so may result in fire or explosion hazard.
'LVFRQQHFWSRZHUDWWKHPDLQIXVHRUFLUFXLWEUHDNHU
panel before removing cooktop.
2. Lift up and remove grate from cooktop.
3. Remove the 4 screws on the cooktop with a Phillips
screwdriver, then lift up on the cooktop to remove.
4. Clean with a mild soap and water solution with a
damp cloth. Rinse with clean water and dry with soft
cloth.
5. Place the cooktop back into position and attach with
the 4 screws using a Phillips screwdriver.
Burner Caps
Wipe burner caps with hot, soapy water and rinse with
FOHDQZDWHU<RXPD\VFRXUZLWKDSODVWLFVFRXULQJSDG
to remove burned-on food particles.
Burner Heads
Wipe the burner heads routinely, especially after bad
spillovers which could clog the burner openings. Wipe
with hot, soapy water. Rinse with clean water. For more
stubborn stains, use a brush with plastic bristles.
NOTE: Do not use steel wool or scouring pads to clean
the burner parts as these may clog the openings. The
ports in the burner heads must be kept clean at all times
for an even, unhampered flame. Clogged or dirty burner
ports or electrodes will not allow the burner to operate
properly.
Burner Grates
Grates should be washed in hot, soapy water and rinsed
with clean water. To soften burned-on food, place grates
in a solution containing ¼-cup of household ammonia
for several hours. Afterward, scrub grates with a plastic
scouring pad soaked in hot, soapy water. Rinse well
DQGGU\'2127XVHEOHDFKRUUXVWUHPRYHUVRQWKH
cooktop or burner grates.
27°
Remove Grate
4 Screws

49-2001566 Rev. 1
Exterior Surfaces
Interior Surfaces
CARE AND CLEANING:([WHULRU6XUIDFHV,QWHULRU6XUIDFHV
%HVXUHDOOFRQWUROVDUHRIIDQGDOOVXUIDFHVDUHFRROEHIRUHFOHDQLQJDQ\SDUWRIWKHUDQJH
Control Knobs
The control knobs may be removed for easier cleaning.
Make sure the knobs are in the OFF positions and pull
them straight off the stems for cleaning. The knobs can
be washed with soap and water. Make sure the insides
of the knobs are dry before replacing. Replace the knobs
in the OFF position to ensure proper placement.
3DLQWHG&RRNWRS7ULP
Clean cooktop trim with soap and water or a vinegar and
water solution. Do not use commercial oven cleaners,
cleaning powders, steel wool or harsh abrasives on any
painted surface.
Stainless Steel Surfaces
Do not use a steel wool pad; it will scratch the surface.
To clean the stainless steel surface, use warm sudsy
water or a stainless steel cleaner or polish. Always
wipe the surface in the direction of the grain. Follow
the cleaner instructions for cleaning the stainless steel
VXUIDFH&OHDQHUVZLWKR[DOLFDFLGVXFKDV%DU.HHSHUV
Friend Soft Cleanser will remove surface rust, tarnish,
DQGVPDOOEOHPLVKHV8VHRQO\DOLTXLGFOHDQVHUIUHH
of grit and rub in the direction of the brush lines with a
damp, soft sponge.
Oven Interior
Do not use oven cleaners, abrasive cleaners, strong
OLTXLGFOHDQVHUVVWHHOZRROVFRXULQJSDGVRUFOHDQLQJ
powders on the interior of the oven. Spillage of
PDULQDGHVIUXLWMXLFHVWRPDWRVDXFHVDQGEDVWLQJOLTXLGV
containing acids may cause discoloration and should
be wiped up immediately. Let hot surfaces cool, then
clean and rinse. Clean with a mild soap and water or
vinegar and water solution. Rinse with clean water and
dry with a soft cloth. When cleaning surfaces, make sure
that they are at room temperature. Do not rub or clean
the door gasket - it has an extremely low resistance to
abrasion. If you notice the gasket becoming worn, frayed
or damaged in any way or if it has become displaced on
the door, you should have it replaced.
2YHQ5DFNV
All racks can be washed with warm, soapy water. Racks
may be more difficult to slide over time. Put some
vegetable oil on a soft cloth or paper towel and rub onto
the left and right edges. NOTE: 8VLQJRWKHUFRRNLQJRLOV
will cause a discoloring or a rust like color residue on the
racks and cavity sides. To clean this residue, use a soap
and water or a vinegar and water solution. Rinse with
clean water and dry with a soft cloth.
49-2001566 Rev. 1
Interior Surfaces
Oven Door
Door Interior and Exterior
Do not allow excess water to run into any of the holes
or slots in the door. Wipe dish soap over any baked-on
VSDWWHUV RQ WKH JODVV 8VH D VLQJOH VLGHG VDIHW\ UD]RU
blade to clean it off. Then wipe over the glass with a
soapy cloth to remove any residue and dry off.
To Remove the Door:
)XOO\ RSHQ WKH GRRU
2. Pull the hinge locks up and away from the range
frame to the unlocked position.
3. Firmly grasp both sides of the door near the top.
&ORVH GRRU XQWLO WKH WRS RI WKH GRRU LV DSSUR[LPDWHO\ ´
from the range frame.
5. Lift door up and away from the range until both hinge
arms are clear of the slots in the range frame.
To Replace the Door
)LUPO\ JUDVS ERWK VLGHV RI WKH GRRU QHDU WKH WRS
2. With the door at the same angle as the removal
position, rest the notch on the underside of the left
hinge arm on the bottom edge of the left hinge slot.
The notch in the hinge arm must be fully seated into
the bottom of the slot. Repeat for the right side.
3. Fully open the door. If the door will not fully open, the
notches in the bottoms of the hinge arms have not
seated correctly in the bottom edge of the slot. Lift the
door off the range and repeat previous step.
4. Push the hinge locks toward the range cavity and
down to the locked position.
5. Close the oven door.
CARE AND CLEANING: Interior Surfaces
Pull hinge locks up to unlock
Removal position
Rest notch on bottom edge
of hinge slot
1RWFK
%RWWRP
edge of
slot
Hinge arm
Push hinge locks down to lock
49-2001566 Rev. 1
Oven Light
CARE AND CLEANING: Oven Light
CAUTION
BURN HAZARD: The glass cover and bulb should be removed when cool. Touching hot glass with
bare hands or a damp cloth can cause burns.
%HIRUHUHSODFLQJWKHEXOEGLVFRQQHFWHOHFWULFDOSRZHUWR
the oven. Let the bulb cool completely before removing
it. For your safety do not touch a hot bulb with a damp
cloth. If you do the bulb may break.
'LVFRQQHFWSRZHUWRRYHQEHIRUHFKDQJLQJEXOE
2. Remove the glass cover of the lamp-holder by
unscrewing counter-clockwise.
3. Remove the lamp and replace with a lamp resistant to
KLJKWHPSHUDWXUHV&)ZLWKWKHIROORZLQJ
FKDUDFWHULVWLFV9ROWDJH9:DWWDJH:7\SH
G4 - Lamp Type: Halogen
4. Replace the glass cover by screwing the cover
clockwise.
5. Reconnect the power to the oven.

49-2001566 Rev. 1
INSTALLATION INSTRUCTIONS
WHAT'S IN THE BOX
Make sure you have all the following items included
in the packaging. If any item is damaged or missing,
contact your dealer.
Ɣ5DQJH2YHQ[
Ɣ&RRNWRS*UDWH[
Ɣ&RRNLQJ5DFN[
Ɣ[´ZRRGVFUHZ[
Ɣ2ZQHUV0DQXDODQG,QVWDOODWLRQ,QVWUXFWLRQV[
TOOLS YOU WILL NEED
MATERIALS YOU WILL NEED
Ŷ3LSHMRLQWVHDODQWRU8/DSSURYHGSLSHWKUHDG
tape with Teflon* that resists action of natural and
propane gases
Ŷ/LTXLGOHDNGHWHFWRURUVRDS\ZDWHU
Ŷ3URSDQHVXSSO\OLQHZLWKD´IODUHIHPDOH
connection
*Teflon: Registered trademark of DuPont
Installation Instructions
Questions? Visit GEAppliances.com. In Canada, visit GEAppliances.ca.
BEFORE YOU BEGIN
IMPORTANT
— Save these instructions for
local inspector’s use.
IMPORTANT — Observe all governing
codes and ordinances.
IMPORTANT — Remove all packing
material and literature from oven before connecting
gas and electrical supply to range.
IMPORTANT — To avoid damage to your
cabinets, check with your builder or cabinet supplier
to make sure that the materials used will not discolor,
delaminate or sustain other damage. This oven has
EHHQGHVLJQHGLQDFFRUGDQFHZLWKWKHUHTXLUHPHQWV
of CSA International and complies with the maximum
DOORZDEOHZRRGFDELQHWWHPSHUDWXUHVRI)&
Note to Installer±%HVXUHWROHDYHWKHVHLQVWUXFWLRQV
with consumer.
Note to consumer – Keep these instructions for
future reference.
Proper installation is the responsibility of the installer.
Product failure due to improper installation is not
covered under warranty.
Phillips
screwdriver
$GMXVWDEOHZUHQFK
(OHFWULFGULOOZLWK´GULOOELW
Safety glasses
Gloves
WARNING
Certain Detection Equipment
is Required in Recreation Vehicles per NFPA
1192. Required equipment shall be UL
approved for use in recreational vehicles. Install
and use equipment in accordance with the
manufacturer's instructions.
6PRNH$ODUP6HFWLRQLGHQWLILHVWKDWDOO
UHFUHDWLRQDOYHKLFOHVVKDOOEHHTXLSSHGZLWKD
smoke alarm.
Carbon Monoxide Alarm - Section 6.3.2 identifies
WKDWDOOUHFUHDWLRQDOYHKLFOHVVKDOOEHHTXLSSHGZLWK
a Carbon Monoxide alarm.
Propane Detector - Section 6.3.3 identifies that all
recreational vehicles with a propane appliance shall
EHHTXLSSHGZLWKDSURSDQHGHWHFWRU
49-2001566 Rev. 1
Installation Instructions
INSTALLATION INSTRUCTIONS
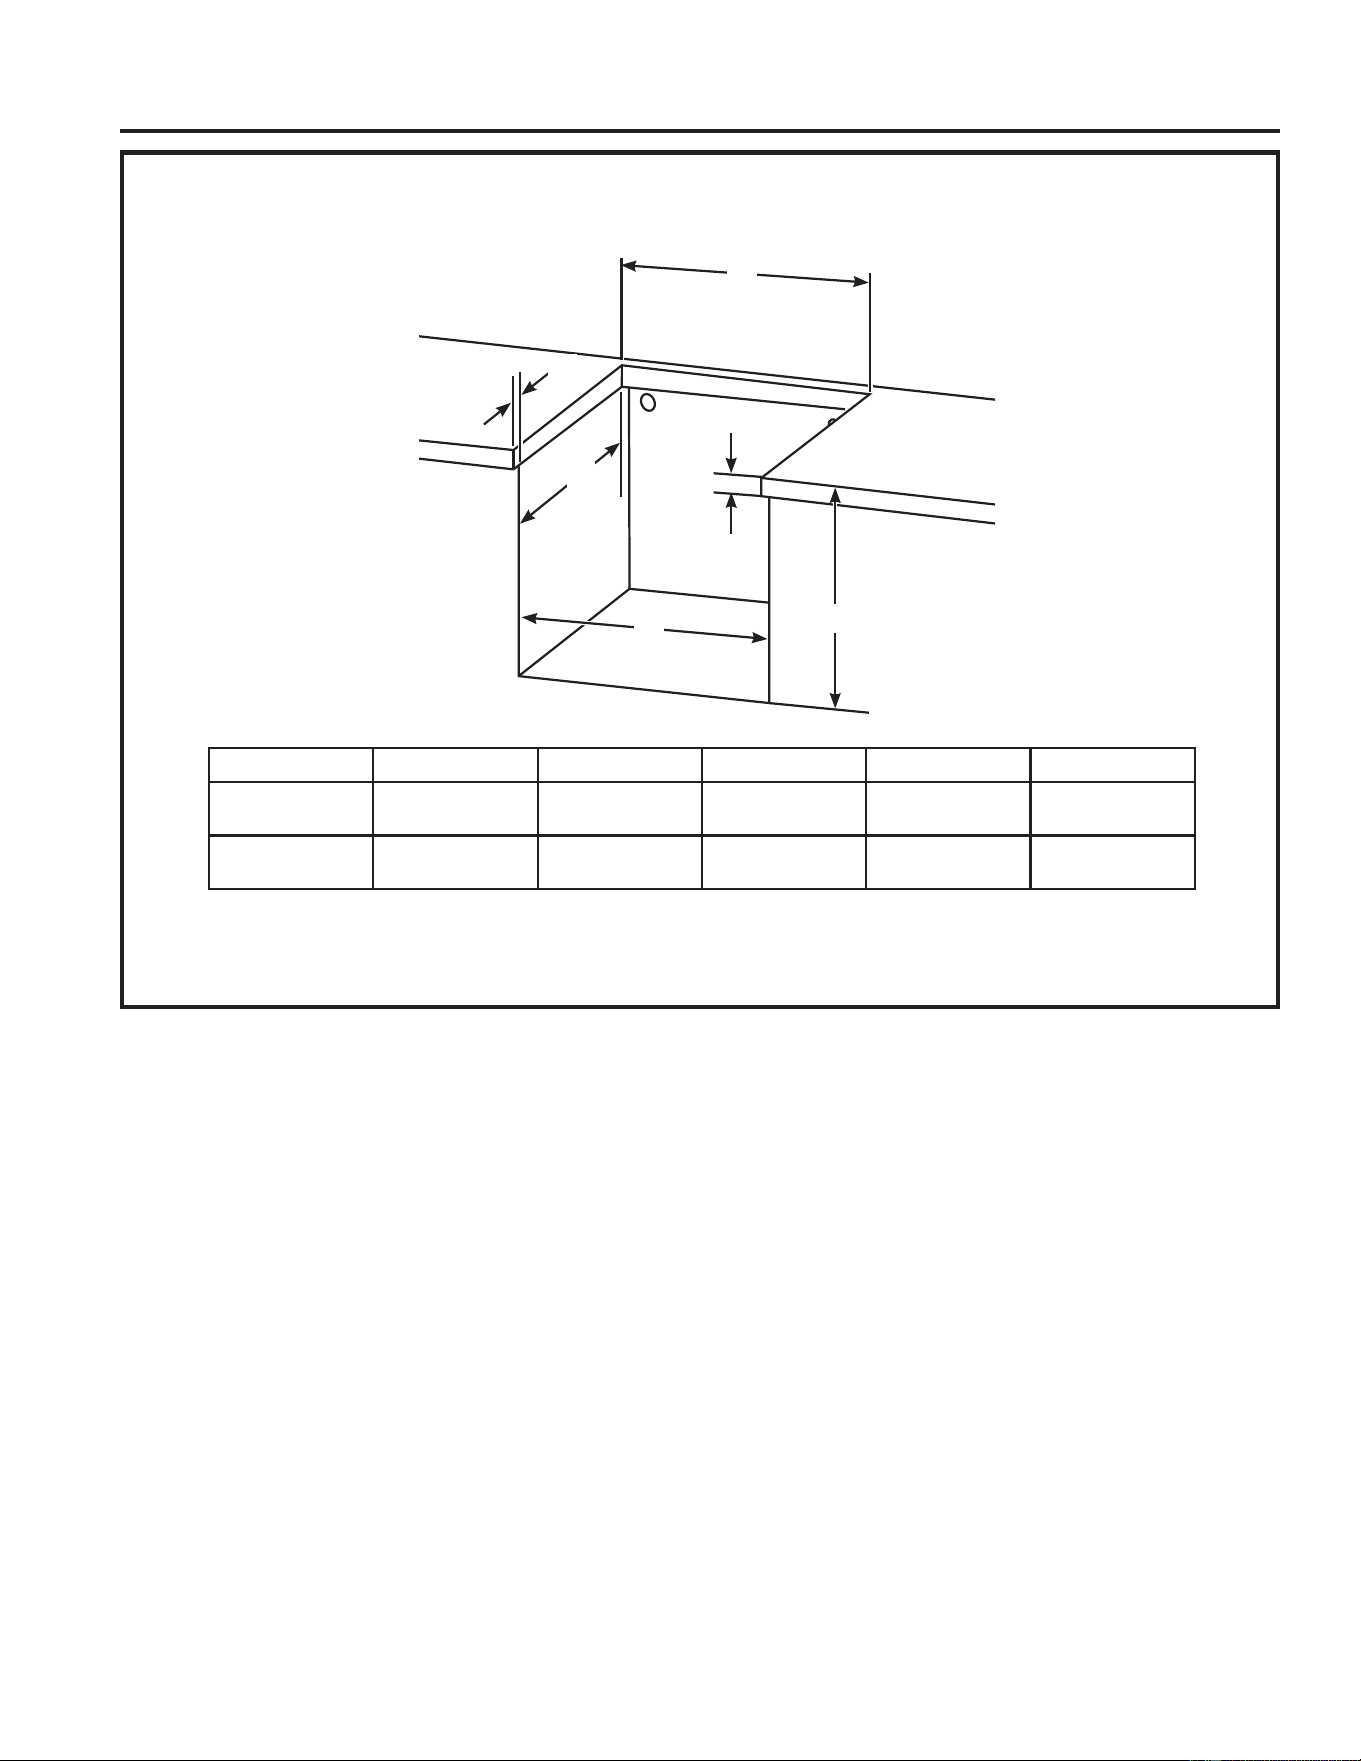
CABINET AND COUNTER CUTOUT DIMENSIONS
(QVXUHFDELQHWVDQGFRXQWHUWRSPHHWWKHUHTXLUHPHQWVIURPWKHWDEOHEHIRUHLQVWDOOLQJWKHUDQJHRYHQ
NOTE: The back and sides of the range below the countertop can be flush to the cabinets. Oven to be framed in
or guarded to prevent creation of storage space around the recessed portion of the appliance.
Model $GHSWK %ZLGWK &KHLJKW 'RYHUKDQJ (WKLFNQHVV
3/'57 ´ ´ ´PLQ ´PD[ ´PD[
3/'57 ´ ´ ´PLQ ´PD[ ´PD[
A
B
C
E
D
B
49-2001566 Rev. 1
Installation Instructions
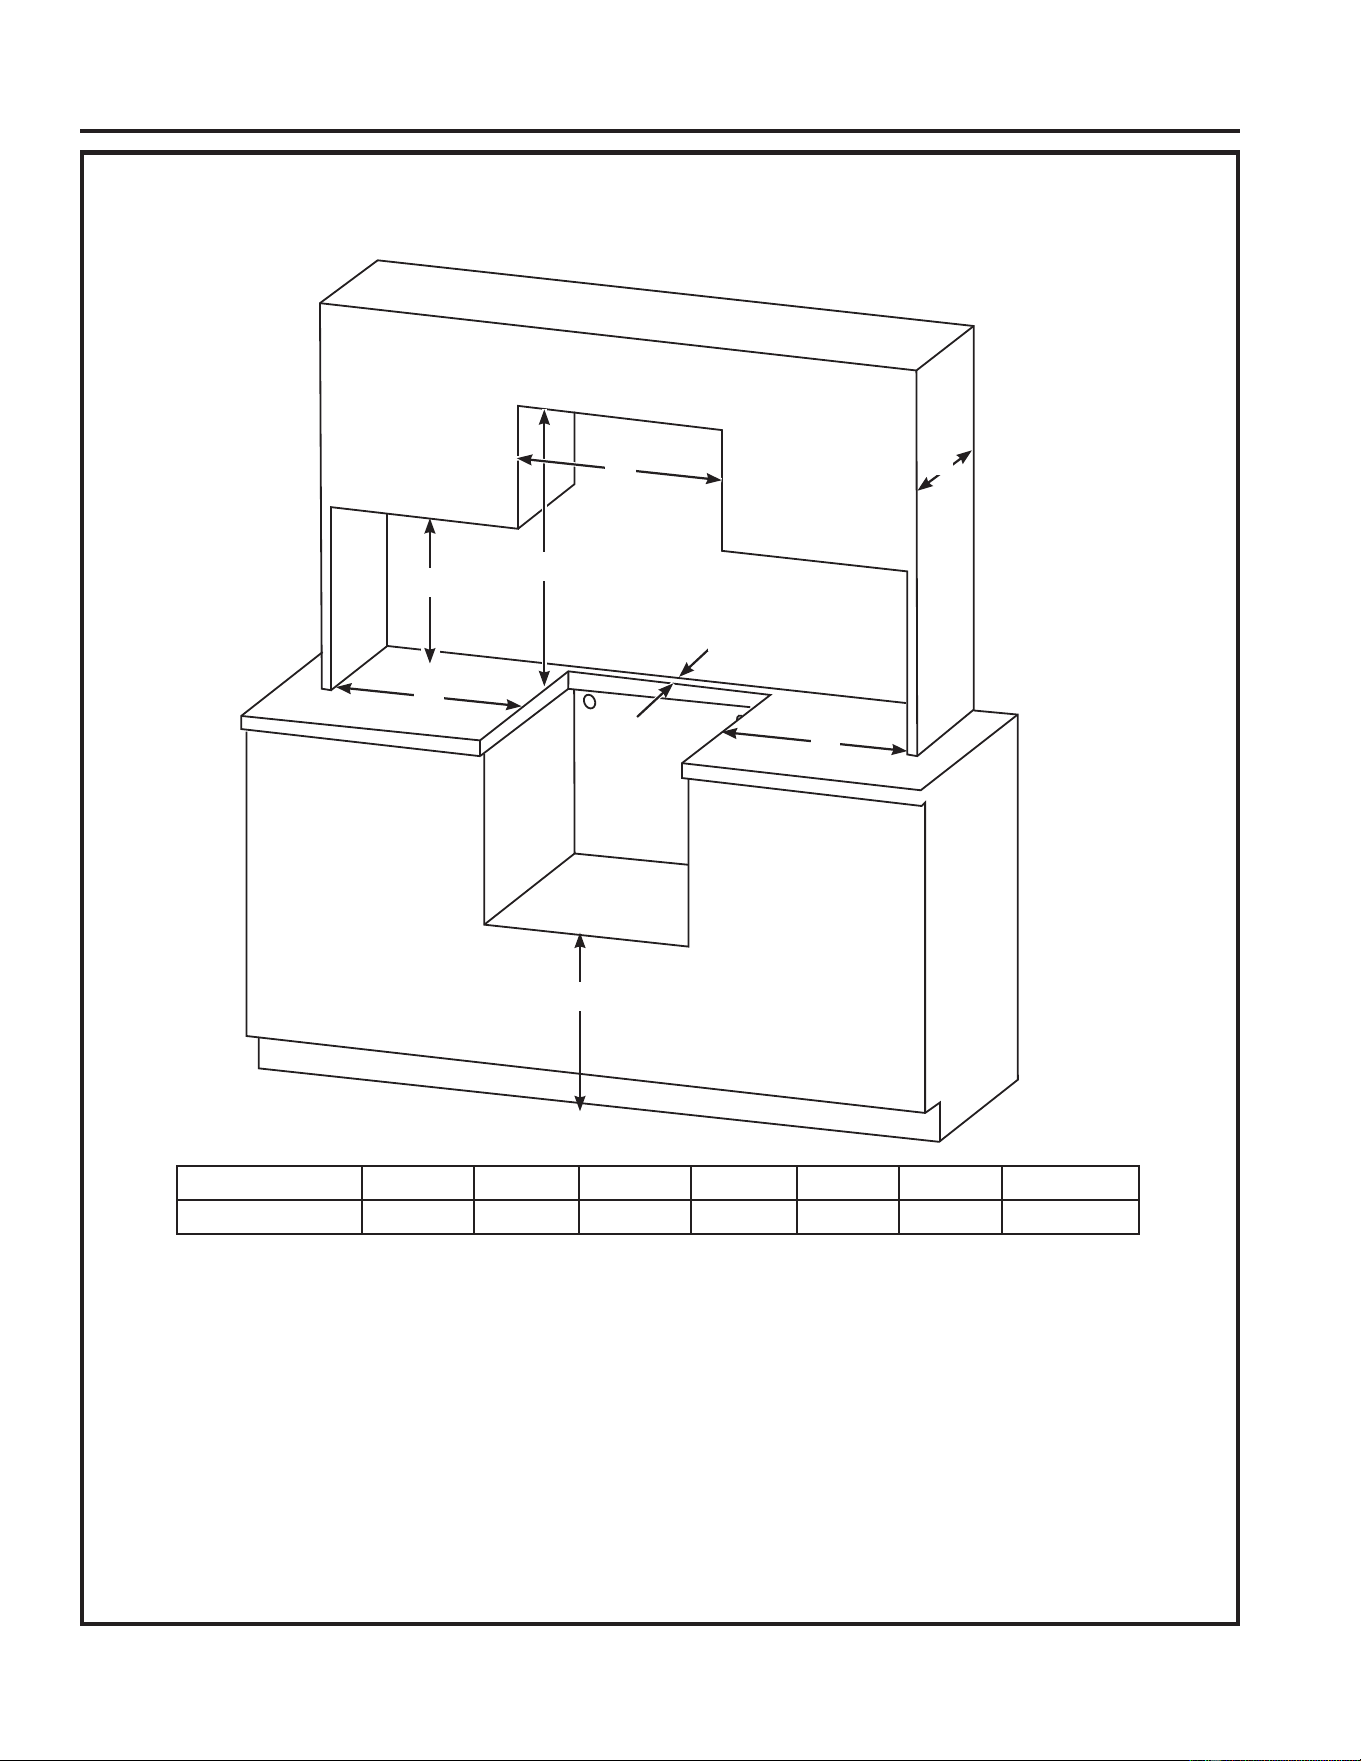
INSTALLATION CLEARANCES
(QVXUHFDELQHWVDQGFRXQWHUWRSPHHWWKHUHTXLUHPHQWVIURPWKHWDEOHEHIRUHLQVWDOOLQJWKHUDQJHRYHQ
A: $OORZ´PLQLPXPYHUWLFDOFOHDUDQFHEHWZHHQWKH
countertop and combustible construction above the
appliance. For alternative vertical clearances, refer
WR1)3$7DEOHIRUKRRGUHTXLUHPHQWV
B:$OORZ´PLQLPXPYHUWLFDOFOHDUDQFHEHWZHHQWKH
countertop and combustible construction to the left
and right sides of the appliance.
C: The maximum allowable depth of overhead
FDELQHWVLV)RURYHUKHDGFDELQHWGHSWKV
H[FHHGLQJUHIHUWR1)3$7DEOH
IRUKRRGUHTXLUHPHQWV
D:$OORZDPLQLPXPRI´RIKRUL]RQWDOFOHDUDQFH
between the appliance cutout and combustible
construction extending from the cooking surface to
´DERYHWKHFRRNLQJVXUIDFH
E:$OORZDPLQLPXPRI´RIFOHDUDQFHEHWZHHQ
adjacent combustible construction and the back of
the appliance cutout.
F: The minimum vertical distance between the floor
DQGERWWRPRIWKHFDELQHWFXWRXWLV´
G:7KHZLGWKRI9HUWLFDO&OHDUDQFH$VKDOOQRWEHOHVV
WKDQ´
A
G
B
F
D
D
C
E
Models A % CDEF G
All Models ´PLQ ´PLQ ´PD[ ´PLQ ´PLQ ´PLQ ´PLQ
INSTALLATION INSTRUCTIONS
49-2001566 Rev. 1
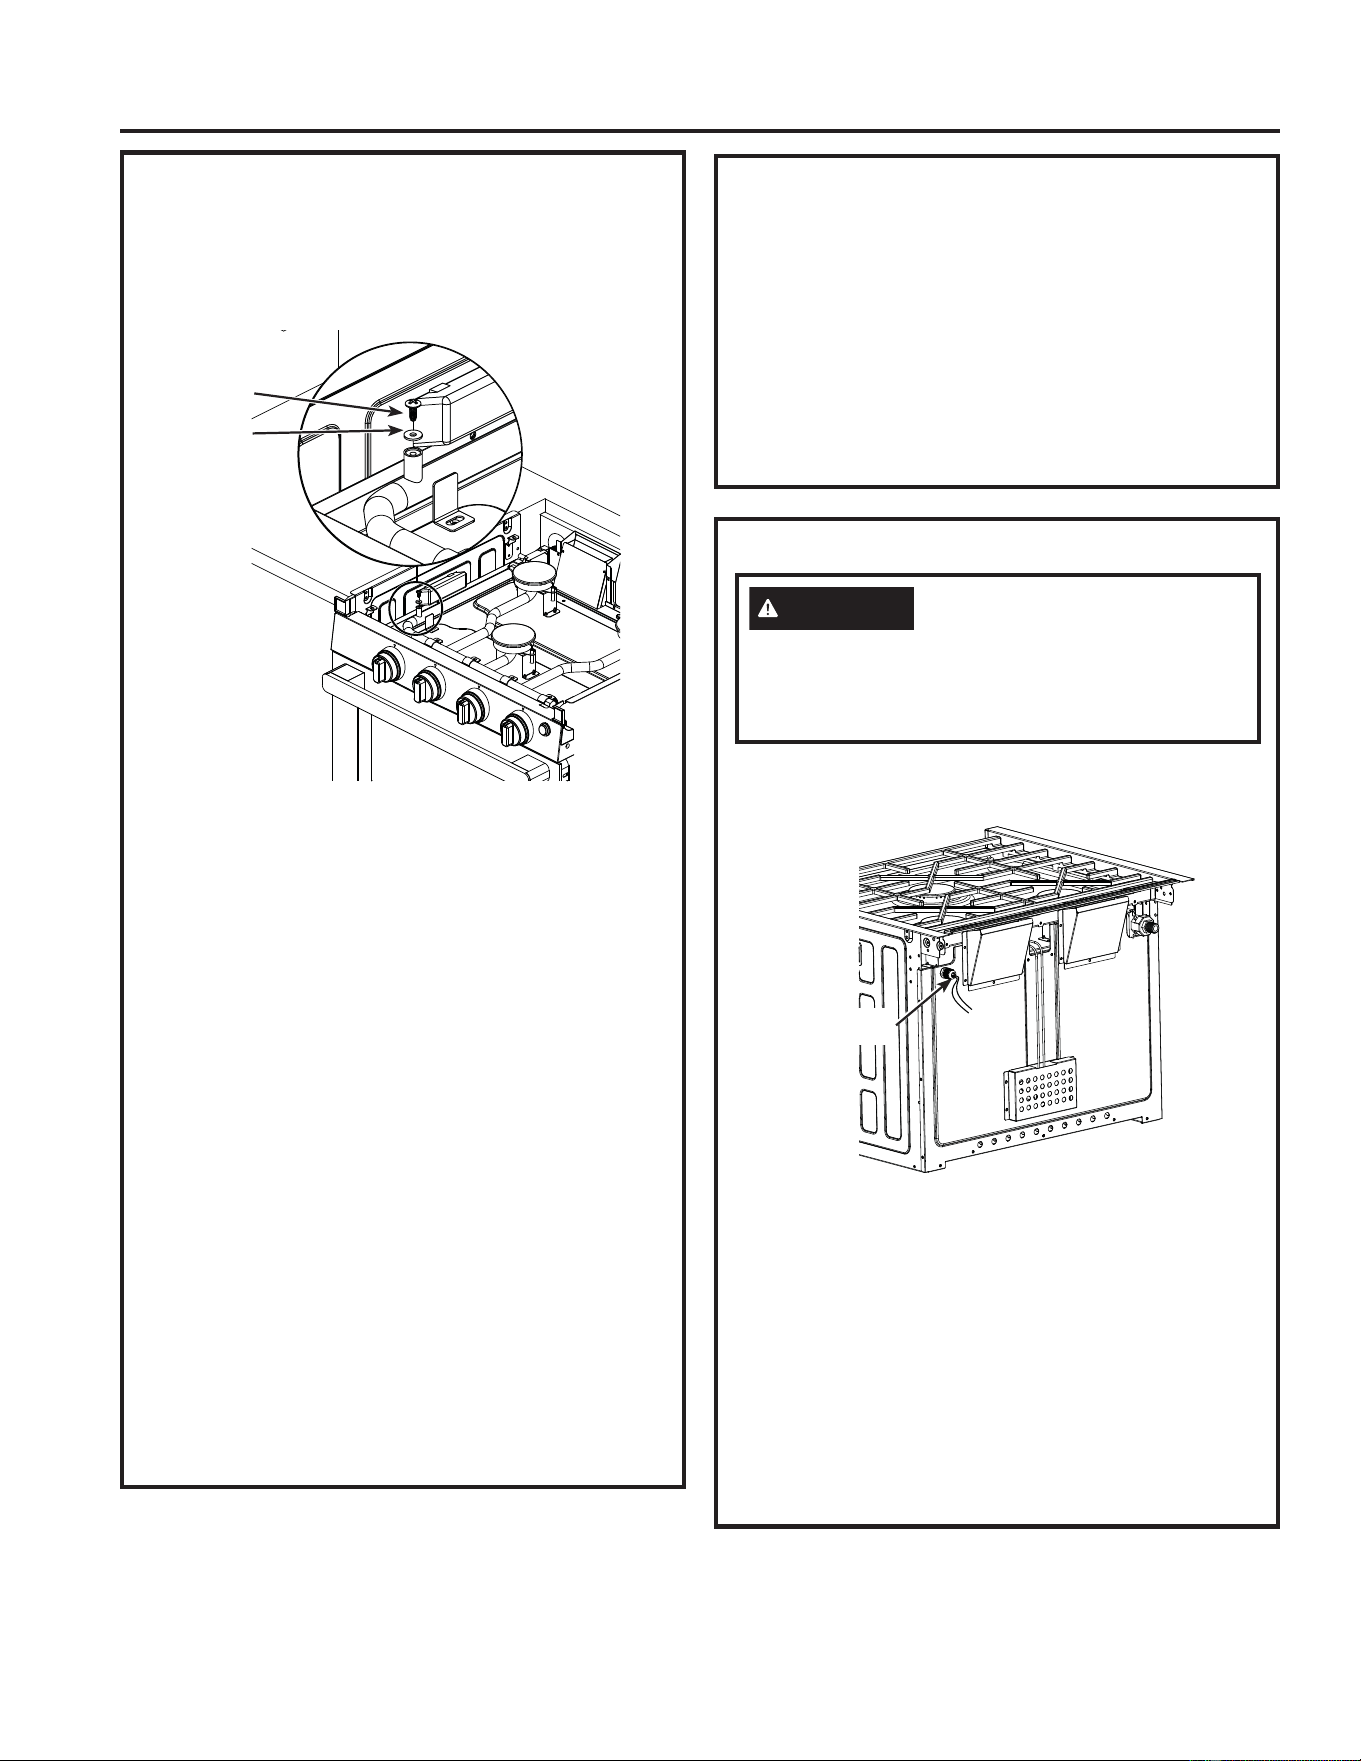
GAS AND POWER SUPPLY INSTALLATION LOCATIONS
Installation Instructions
INSTALLATION INSTRUCTIONS
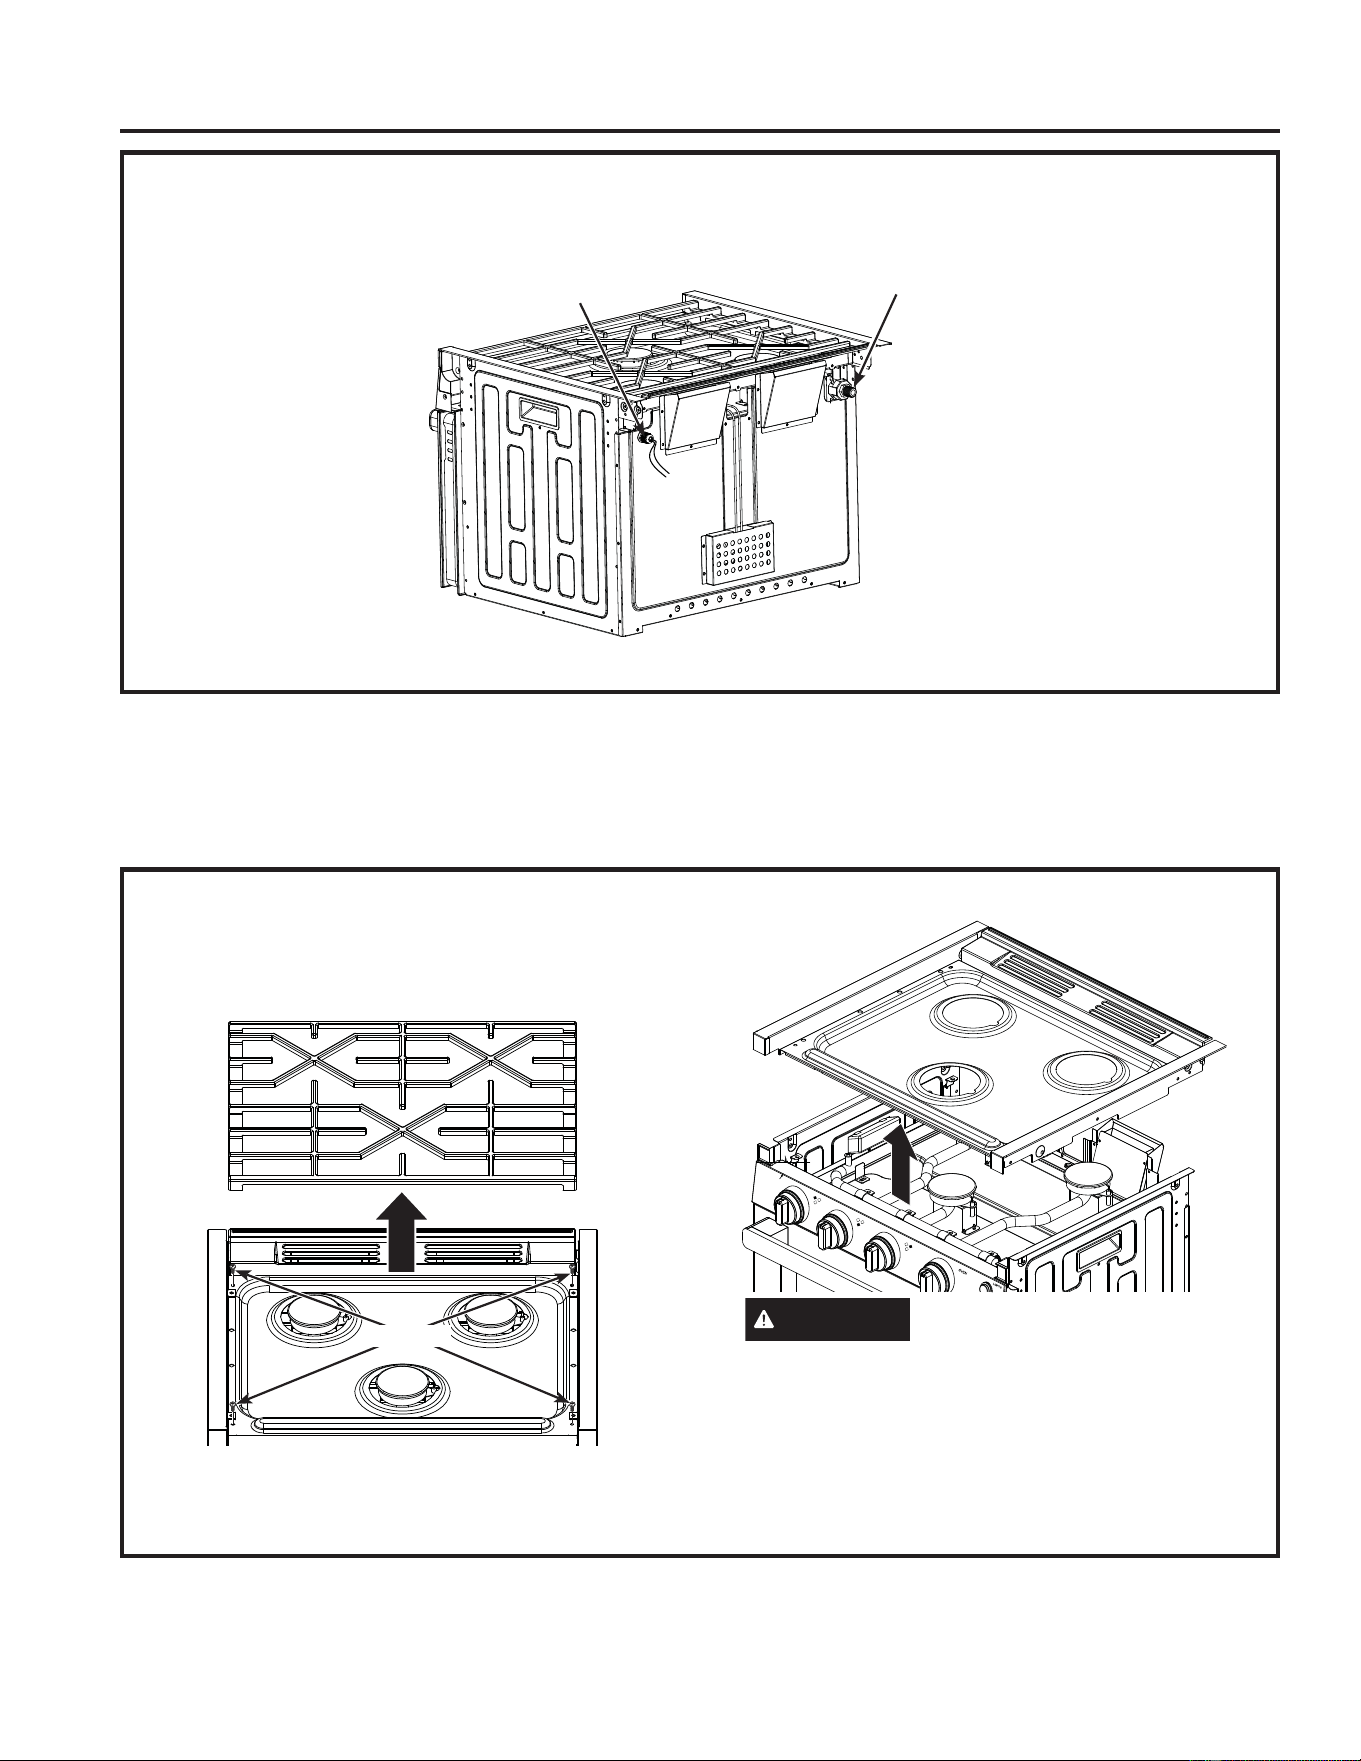
1. OVEN PREPARATION
Ŷ Take your range oven out of the carton and place
on a flat surface. Remove the packing materials.
Ŷ Lift up and remove grate from cooktop.
Ŷ Remove the 4 screws on the cooktop with a
Phillips screwdriver, then lift up on the cooktop to
remove.
WARNING
&DUHVKRXOGEHWDNHQWRQRW
GDPDJHRUPRGLI\JDVWXELQJXQGHUFRRNWRS
Doing so may result in fire or explosion hazard.
Ŷ Lift the range oven by the side handles and set
into the cabinet opening. Slide range oven back
until the front cavity flanges contact the cabinet
face.
OVEN INSTALLATION
NOTE: Prior to performing installation, wear safety gloves and glasses.
Complete the following steps when the cabinet has been prepared according to the dimensions given and the gas line
and electrical connections are in place.
Propane Supply
Line Connection
Power Supply
Connection
Remove Grate
4 Screws
27°
49-2001566 Rev. 1
Installation Instructions
1. 29(135(3$5$7,21&RQW
Ŷ Attach the range oven in the cabinet opening
by driving four screws into the countertop.
Install 2 screws per side using preferred hole
options based on countertop construction. If
countertop is wooden, start by drilling pilot
KROHVZLWKDGULOOELW'ULYHWKHSURYLGHG
screws into the holes to attach.
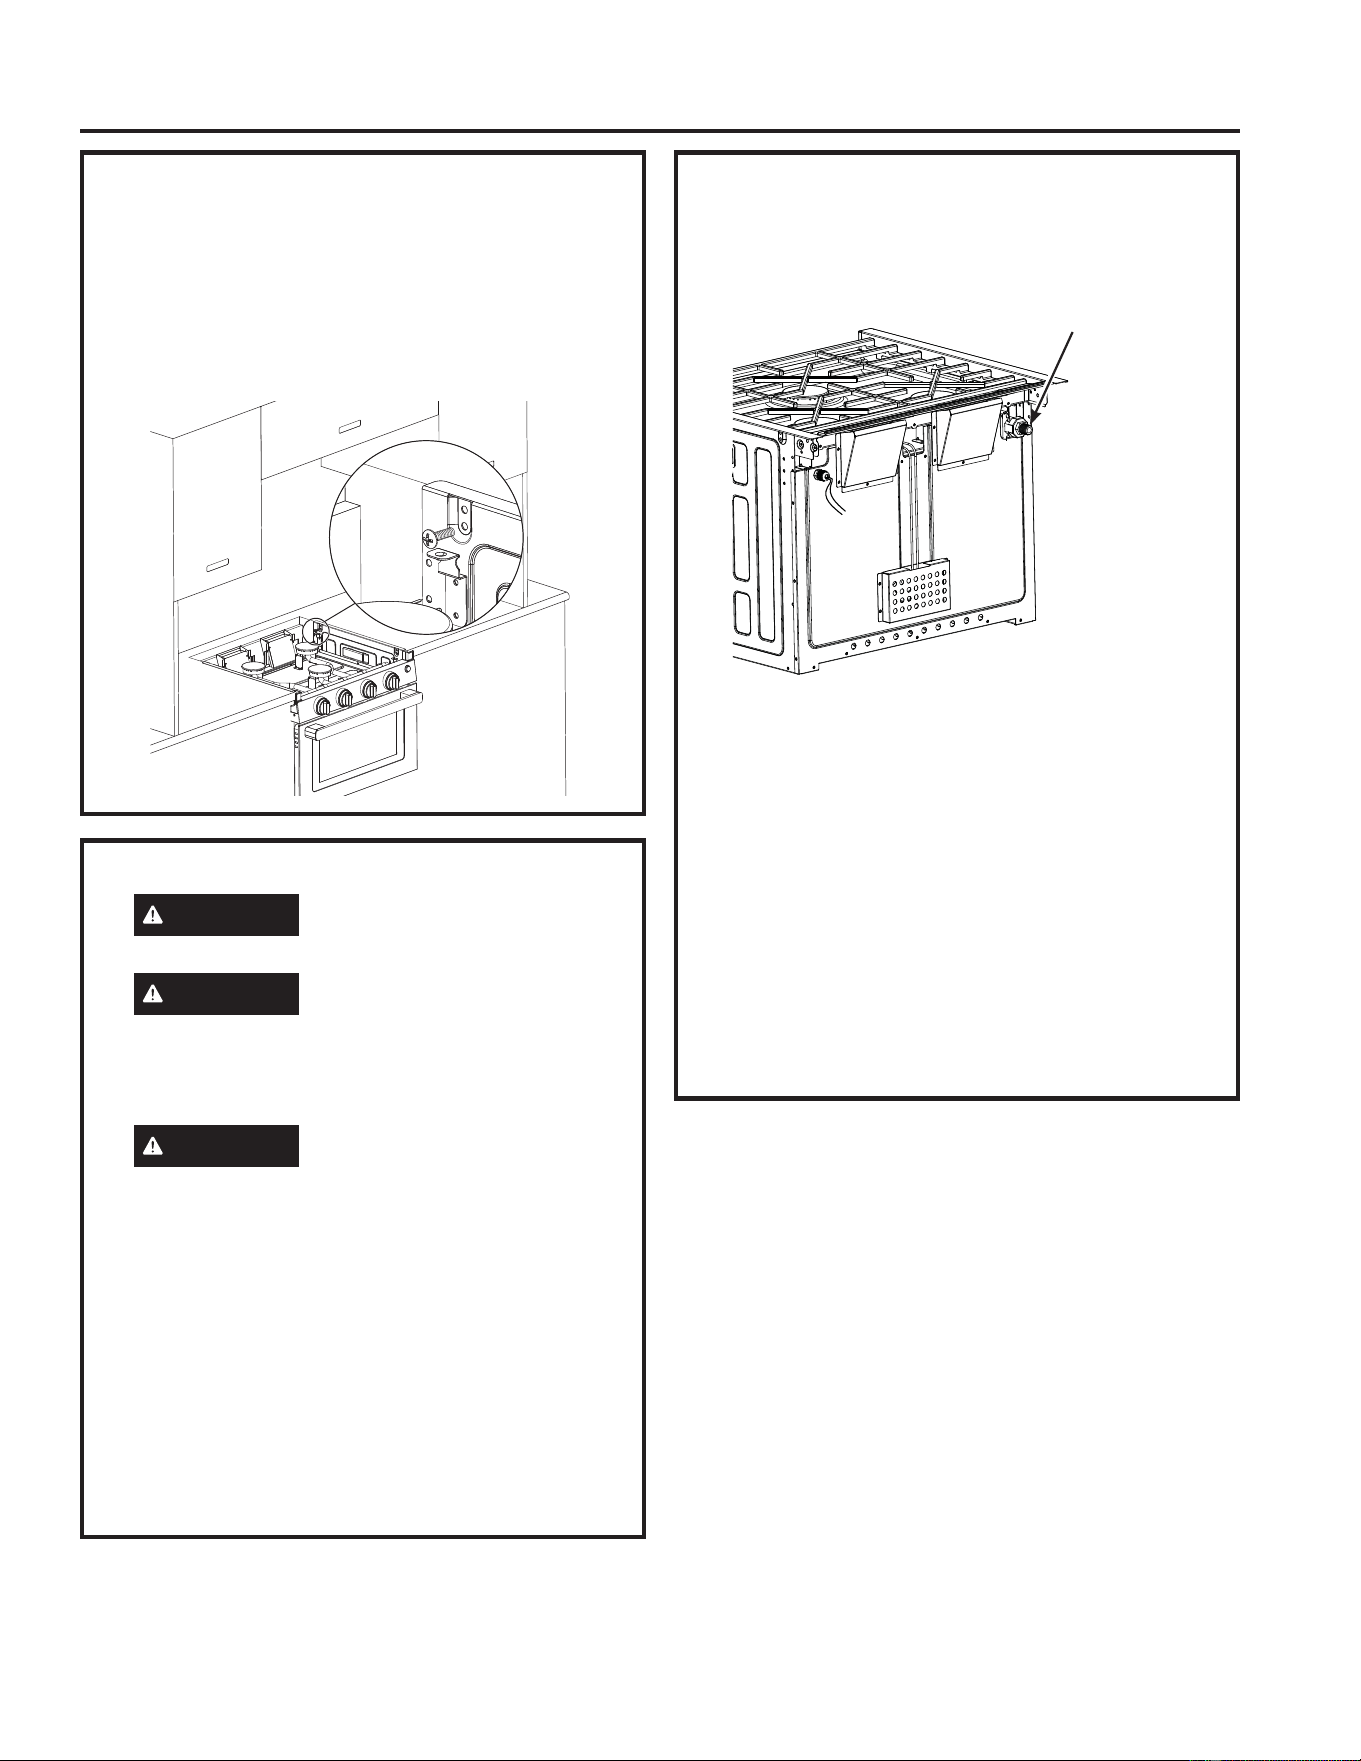
2. *$66833/<&RQW
&RQQHFWDSURSDQHVXSSO\OLQHZLWKD´)ODUH
Female connection to the regulator in the upper
right rear corner of the cabinet
Tighten the gas line to the regulator using 2
wrenches.
IMPORTANT:/HDYHDGHTXDWHVSDFHDURXQG
the gas supply pipe in case of bend or damage
during installation. Make sure the gas supply
pipe cannot contact any moving parts after
installed.
When using pressures greater than ½ psi
N3DWRWHVWWKHJDVVXSSO\V\VWHPRIWKH
59GLVFRQQHFWWKHUDQJHDQGLQGLYLGXDOVKXWRII
valve from the gas supply piping. When using
SUHVVXUHVRIòSVLN3DRUOHVVWRSUHVVXUH
test the gas supply system, simply isolate the
range from the gas supply system by closing the
individual shut-off valve.
2. GAS SUPPLY
WARNING
Fire Hazard: Do not use a
IODPHWRFKHFNIRUJDVOHDNV
WARNING
Explosion Hazard: Do not
H[FHHGIWOEVRIWRUTXHZKHQPDNLQJJDV
OLQHFRQQHFWLRQV2YHUWLJKWHQLQJPD\FUDFN
the pressure regulator resulting in fire or
explosion hazard.
WARNING
*DVOHDNVPD\QRWEH
detected by smell alone. Gas suppliers
recommend your purchase and install an
UL approved gas detector. Install and use
in accordance with the manufacturer's
instructions.
Gas Pressure Regulator
<RXPXVWXVHWKHSURSDQHJDVSUHVVXUH
regulator supplied with this range. For proper
operations the inlet pressure to the regulator
should be as follows:
0LQLPXPSUHVVXUH´RI:DWHU&ROXPQ
0D[LPXPSUHVVXUH´RI:DWHU&ROXPQ
INSTALLATION INSTRUCTIONS
Propane Supply
Line Connection
49-2001566 Rev. 1
Installation Instructions
INSTALLATION INSTRUCTIONS
3. PRESSURE CHECK
Ŷ Ensure propane gas is turned off to the
appliance.
Ŷ Remove the screw with the sealing gasket from
the pressure test port on the range.
Ŷ8VLQJWKHUXEEHUWXEHIURPDSUHVVXUHFKHFN
measuring device, slide the rubber tube down
over the gas pressure test port. The rubber
tube should seal around the pressure test port.
Ŷ Turn on the propane gas to the appliance.
Ŷ The pressure gauge tester should measure
EHWZHHQ´:&WR´:&
Ŷ Turn off the propane gas to the appliance.
Ŷ Remove the rubber tube of the pressure check
measuring device.
Ŷ Replace the screw with the gasket removed
LQWKHVWHSDERYH%HIRUHUHSODFLQJWKHVFUHZ
inspect the rubber gasket seal for any signs of
damage.
Ŷ Hand tighten the screw ensuring not to
damage the seal.
NOTE: Ensure the product is gas leak checked
after the pressure check test is completed by
also testing the pressure check port screw. If
any leaks are detected around the pressure test
port screw and sealing gasket, a new one can be
SXUFKDVHG&DOO*($SSOLDQFHVDW
for a replacement.
5. ELECTRICAL CONNECTION
The power supply wires are located at the top left
corner of the rear of the appliance.
&RQQHFWDSRVLWLYH9SRZHUVXSSO\ZLUHWRWKH
DSSOLDQFHEODFN9ZLUHDQGDQHJDWLYH9
SRZHUVXSSO\ZLUHWRWKHDSSOLDQFHZKLWH9ZLUH
0D[LPXPFXUUHQWGUDZLVOHVVWKDQDPS
NOTE: Ensure to connect the wires with the
FRUUHFWSRODULW\%ODFNLV³´DQG:KLWHLV³´
Ensure electrical connections are properly
secured.
Ensure electrical supply lines are disconnected,
or power removed at the main fuse or circuit
breaker panel, before servicing the appliance.
4. LEAK CHECK
Ŷ Make sure all control knobs are in the OFF
position.
Ŷ$SSO\DJDVOHDNGHWHFWLRQOLTXLGWRWKH
connections. Any gas leaks will be indicated by
bubbles.
Ŷ If a gas leak is detected, tighten the loose joint,
or replace the faulty part with a replacement
part recommended by a GE Appliances
authorized retailer.
CAUTION
PRODUCT DAMAGE HAZARD
• Connect to 12V DC service only.
• Connect only to protected circuit fused for
not more than 15 Amps.
Screw
Sealing
Gasket
Power Supply
Connection
49-2001566 Rev. 1
Installation Instructions
INSTALLATION INSTRUCTIONS
6. REPLACE COOKTOP
Place the cooktop back into position and attach
ZLWKWKHVFUHZVUHPRYHGLQ6WHSXVLQJD
Phillips screwdriver.
9. FLAME QUALITY
The burner flames for the cooktop and bake
burners should be blue with yellow tips. Long,
EULJKW\HOORZIODPHVDUHQRWQRUPDO1RUPDO
flames may show signs of an orange tint when
well heated or signs of flickering orange due to
particles in the gas or air.
7. TEST COOKTOP BURNERS
Ŷ Push and turn the appropriate burner control
knob counterclockwise to the HI position until
the burner is lit. If air is in the supply line, it
may take up to a minute for the air to purge
and the burner to light.
Once burner is lit, continue pressing knob for 5
seconds until the flame sensor is heated.
Ŷ The flame may burn yellow for a few seconds,
then it should turn blue. If the burner continues
to burn mostly or completely yellow, see
³7URXEOHVKRRWLQJ´RUFRQWDFWDTXDOLILHGVHUYLFH
technician.
Ŷ Rotate the burner control knob to LO. Make
sure that the flame completely surrounds the
burner. There should be a flame at the burner
ports and no air gap between the flame and
the burner. If the burner does not meet this
FULWHULDVHH³7URXEOHVKRRWLQJ´RUFRQWDFWD
TXDOLILHGVHUYLFHWHFKQLFLDQ
Ŷ Repeat these steps to test each burner.
8. TEST OVEN BURNER
Ŷ Pull the oven handle to open the door.
Ŷ Push and turn the oven control knob
counterclockwise to the position. Keep the
oven control knob pressed until the oven pilot
is lit. If air is in the supply line, it may take up
to a minute for the air to purge and the oven
pilot to light.
Ŷ Once the pilot is lit, keep the oven control knob
SUHVVHGIRUDWOHDVWVHFRQGVXQWLOWKHRYHQ
pilot sensor becomes heated.
Ŷ Release oven control knob and visually confirm
oven pilot remains lit. If oven pilot goes out,
repeat bullets 2 and 3.
Ŷ Rotate the oven control knob to each
temperature and inspect the burner flame. If
the flame is completely or mostly yellow, see
³7URXEOHVKRRWLQJ´RUFRQWDFWDTXDOLILHGVHUYLFH
technician.
22 49-2001566 Rev. 1
Troubleshooting Tips ... %HIRUH\RXFDOOIRUVHUYLFH
TROUBLESHOOTING TIPS
Problem Possible Cause/Solution
Surface burners do not light, do not
light fully, or do not stay lit.
Ensure any gas supply valves and propane tank valve are opened. If
air is in the supply line, it may take up to a minute for the air to purge
and the burner to light.
(QVXUHNQRELVSUHVVHGZKLOHVHWWRWKH+,SRVLWLRQ<RXVKRXOGKHDU
the clicking of the ignition system when the knob is pressed. Continue
pressing for at least 5 seconds until the flame sensor is heated
Gas pressure is either too low or too high.
%XUQHUSRUWVRULJQLWHUDUHGLUW\5HIHUWR%XUQHU+HDGVLQWKH&DUH
and Cleaning section.
Moisture is present on the burner. With burner off and cool, dry burner
thoroughly.
%DNHEXUQHUGRHVQRWOLJKW Ensure gas supply valves and propane tank valve are opened. If air is
in the supply line, it may take up to a minute for the air to purge and
the burner to light.
(QVXUHRYHQFRQWURONQRELVSUHVVHGZKLOHVHWWRWKHIODPHSRVLWLRQ
<RXVKRXOGKHDUWKHFOLFNLQJRIWKHLJQLWLRQV\VWHPZKHQWKHNQRELV
SUHVVHG.HHSWKHNQRESUHVVHGIRUDOHDVWVHFRQGVWRDOORZWLPH
for the oven pilot to light and for the pilot sensor to become heated. If
air is in the gas line, this process may take over a minute.
Gas pressure is either too low or too high.
Flames are completely or mostly yellow
or orange.
1RUPDOIODPHVPD\VKRZVLJQVRIDQRUDQJHWLQWZKHQZHOOKHDWHGRU
signs of flickering orange due to dust particles in the gas or air.
Gas pressure is too low.
%XUQHUSRUWVDUHGLUW\5HIHUWR%XUQHU+HDGVLQWKH&DUHDQG
Cleaning section.
.QREEDFNOLJKWLQJGRHVQRWWXUQRQ
when light button is pressed.
(QVXUHXQLWLVFRQQHFWHGWR9'&6HH(OHFWULFDO&RQQHFWLRQLQWKH
Installation Instructions.
LED board or switch needs to be replaced. Contact GE Appliances for
service.
Oven light does not turn on when light
button is pressed.
(QVXUHXQLWLVFRQQHFWHGWR9'&5HIHUWR(OHFWULFDO&RQQHFWLRQLQ
the Installation Instructions.
2YHQEXOEQHHGVWREHUHSODFHG5HIHUWR2YHQ/LJKWLQWKH&DUHDQG
Cleaning section.
49-2001566 Rev. 1 23
LIMITED WARRANTY
Staple your receipt here. Proof of the original purchase
date is needed to obtain service under the warranty.
Limited Warranty
ŶImproper installation, delivery or maintenance. If you
have an installation problem, contact your dealer or
installer. You are responsible for providing adequate
electrical connecting facilities.
ŶFailure of the product resulting from modifications
to the product or due to unreasonable use including
failure to provide reasonable and necessary
maintenance.
Ŷ/DERUQHFHVVDU\WRPRYHWKHXQLWWRDORFDWLRQZKHUH
it is accessible for service by an individual technician.
ŶReplacement of RV fuses or resetting of circuit
EUHDNHUV
ŶDamage to the product caused by improper power
supply voltage, accident, fire, floods or acts of God.
ŶDamage caused after delivery.
ŶIn-person product education.
What GE Appliances Will Not Cover:
This limited warranty is extended to the original purchaser and any succeeding owner for personal recreational
YHKLFOHRUVLPLODUXVHZLWKLQWKH86$DQG&DQDGD,IWKHSURGXFWLVORFDWHGLQDQDUHDZKHUHVHUYLFHE\DQDXWKRUL]HG
59VHUYLFHULVQRWDYDLODEOH\RXPD\EHUHTXLUHGWREULQJWKHSURGXFWWRDQDXWKRUL]HG*($VHUYLFHORFDWLRQIRU
service.
6RPHVWDWHVGRQRWDOORZWKHH[FOXVLRQRUOLPLWDWLRQRILQFLGHQWDORUFRQVHTXHQWLDOGDPDJHV7KLVOLPLWHGZDUUDQW\
gives you specific legal rights, and you may also have other rights which vary from state to state. To know what your
legal rights are, consult your local or state consumer affairs office or your state’s Attorney General.
Warrantor: GE Appliances, a Haier company
Louisville, KY 40225
To schedule service call 866.835.0179.
Have serial number and model number available when calling for service.
EXCLUSION OF IMPLIED WARRANTIES—Your sole and exclusive remedy is product repair as provided in this
Limited Warranty. Any implied warranties, including the implied warranties of merchantability or fitness for a
particular purpose, are limited to two years or the shortest period allowed by law.
For The Period Of: GE Appliances Will Replace:
Two Years
From the date of the
original purchase
Any part RIWKH59UDQJHRYHQZKLFKIDLOVGXHWRDGHIHFWLQPDWHULDOVRUZRUNPDQVKLS
During this limited two-year warranty, GE Appliances will also cover all labor and
related service to replace the defective part.

24 49-2001566 Rev. 1
Consumer Support
CONSUMER SUPPORT
GE Appliances Website
+DYHDTXHVWLRQRUQHHGDVVLVWDQFHZLWK\RXUDSSOLDQFH"7U\WKH*($SSOLDQFHV:HEVLWHKRXUVDGD\DQ\GD\
RIWKH\HDU<RXFDQDOVRVKRSIRUPRUHJUHDW*($SSOLDQFHVSURGXFWVDQGWDNHDGYDQWDJHRIDOORXURQOLQHVXSSRUW
VHUYLFHVGHVLJQHGIRU\RXUFRQYHQLHQFH,QWKH86GEAppliances.com In Canada: GEAppliances.ca
Register Your Appliance
Register your new appliance on-line at your convenience! Timely product registration will allow for enhanced
FRPPXQLFDWLRQDQGSURPSWVHUYLFHXQGHUWKHWHUPVRI\RXUZDUUDQW\VKRXOGWKHQHHGDULVH<RXPD\DOVRPDLOLQ
the pre-printed registration card included in the packing material.
,QWKH86GEAppliances.com/register
In Canada: geappliances.ca/after-sales-support
Schedule Service
Expert GE Appliances repair service is only one step away from your door. Get on-line and schedule your service at
\RXUFRQYHQLHQFHDQ\GD\RIWKH\HDU,QWKH86GEAppliances.com/serviceRUFDOOGXULQJQRUPDO
business hours.
In Canada: geappliances.ca/after-sales-supportRUFDOO
Parts and Accessories
,QGLYLGXDOVTXDOLILHGWRVHUYLFHWKHLURZQDSSOLDQFHVFDQKDYHSDUWVRUDFFHVVRULHVVHQWGLUHFWO\WRWKHLUKRPHV
9,6$0DVWHU&DUGDQG'LVFRYHUFDUGVDUHDFFHSWHG2UGHURQOLQHWRGD\KRXUVHYHU\GD\
,QWKH86GEApplianceparts.comRUE\SKRQHDWGXULQJQRUPDOEXVLQHVVKRXUV
Instructions contained in this manual cover procedures to be performed by any user. Other servicing
generally should be referred to qualified service personnel. Caution must be exercised, since improper
servicing may cause unsafe operation.
Customers in Canada should consult the yellow pages for the nearest authorized GE Appliances service parts
distributor, visit our website at geappliances.ca/parts-filters-accessoriesRUFDOO
Contact Us
If you are not satisfied with the service you receive from GE Appliances, contact us on our Website with all the
details including your phone number, or write to:
,QWKH86*HQHUDO0DQDJHU&XVWRPHU5HODWLRQV_*($SSOLDQFHV$SSOLDQFH3DUN_/RXLVYLOOH.<
GEAppliances.com/contact
,Q&DQDGD'LUHFWRU&RQVXPHU5HODWLRQV0&&RPPHUFLDO,QF_6XLWH)DFWRU\/DQH_0RQFWRQ1%(&0
GEAppliances.ca/contact-us

Inscrivez les numéros de modèle et
de série ici :
No de modèle ___________
No de série _____________
Vous trouverez l'étiquette
signalétique sous la table de
cuisson.
GUIDE D'UTILISATION
ET INSTRUCTIONS
D’INSTALLATION
CUISINIÈRE
au gaz propane pour véhicules récréatifs (VR)
49-2001566 Rev. 1 06-25
CONSIGNES DE SÉCURITÉ ....... 3
UTILISATION DE LA CUISINIÈRE
Table de cuisson ........................ 7
Four .................................. 8
Éclairage du four et des boutons
de commande ........................ 9
Grilles du four .......................... 9
Papier d'aluminium et doublures de four . . . 9
Évents du four .........................9
Guide de cuisson au four ................10
ENTRETIEN ET NETTOYAGE
Surfaces de la table de cuisson ...........11
Surfaces extérieures ....................12
Surfaces intérieures .....................12
Éclairage du four .......................14
INSTRUCTIONS D'INSTALLATION
Avant de commencer ...................15
Dimensions des découpes d’armoire
et de comptoir .......................16
Dégagements pour l’installation ..........17
Emplacements des connexions
de gaz et d’alimentation électrique ......18
Installation de la cuisinière avec four ......18
CONSEILS DE DÉPANNAGE ..... 22
GARANTIE LIMITÉE .............. 23
SOUTIEN
AU CONSOMMATEUR ..........24
GE est une marque de commerce de General Electric Company. Fabriqué sous licence de marque.
PLD617RW
PLD617DW
PLD617EW
PLD621RW
PLD621DW
PLD621EW
FRANÇAIS

2 49-2001566 Rev. 1
NOUS VOUS REMERCIONS D’INTÉGRER GE APPLIANCES
À VOTRE VÉHICULE RÉCRÉATIF.
Que vous ayez grandi avec des électroménagers GE Appliances ou qu’il s’agisse de votre première
acquisition, nous sommes heureux de vous accueillir dans notre famille.
Nous sommes fiers du savoir-faire, de l’innovation et du design qui constituent chaque
électroménager GE, et nous pensons que vous le serez aussi. Nous vous rappelons que
l’enregistrement de votre électroménager vous assure de recevoir des renseignements importants
sur le produit et la garantie lorsque vous en avez besoin.
Enregistrez votre électroménager GE en ligne dès maintenant. Des sites Web et des numéros de
téléphone utiles figurent dans la section Soutien au consommateur de ce manuel d’utilisation.

49-2001566 Rev. 1 3
LISEZ ET CONSERVEZ CES INSTRUCTIONS
CONSIGNES DE SÉCURITÉ IMPORTANTES
LISEZ TOUTES LES INSTRUCTIONS AVANT D'UTILISER L'APPAREIL
CONSIGNES DE SÉCURITÉ
AVERTISSEMENT
L’omission d’observer intégralement les informations de ce
manuel peut poser un risque d’incendie ou d’explosion pouvant causer des
dommages à la propriété et des blessures graves ou mortelles.
- Abstenez-vous d’entreposer et d’utiliser de l'essence ou d'autres vapeurs ou liquides
inflammables à proximité de cet électroménager ou de tout autre appareil.
- QUE FAIRE SI VOUS SENTEZ UNE ODEUR DE GAZ
Ŷ1DOOXPH]DXFXQDSSDUHLO
Ŷ1HWRXFKH]jDXFXQLQWHUUXSWHXUpOHFWULTXH
Ŷ1¶XWLOLVH]DXFXQWpOpSKRQHGDQVYRWUHYpKLFXOHUpFUpDWLI
Ŷ)DLWHVVRUWLUWRXVOHVRFFXSDQWVGXYpKLFXOHUpFUpDWLI
Ŷ)HUPH]OHRXOHVURELQHWVGHVUpVHUYRLUVGHJD]RXFHOXLGHO¶DOLPHQWDWLRQHQJD]
principale.
Ŷ$SSHOH]LPPpGLDWHPHQWYRWUHIRXUQLVVHXUGHJD]SRXUGHVGLUHFWLYHV
Ŷ6LYRXVQHSRXYH]SDVMRLQGUHOHIRXUQLVVHXUGHJD]DSSHOH]OHVHUYLFHGHV
incendies.
- Faites vérifier le système de gaz et réparer la source de la fuite par un personnel
FRPSpWHQWHQODPDWLqUHWHFKQLFLHQIRXUQLVVHXUGHVHUYLFHVIDEULFDQW
concessionnaire ou fournisseur de gaz.
AVERTISSEMENT
Veuillez lire toutes les consignes de sécurité avant d’utiliser le produit. L’omission d'observer ces
consignes peut poser une risque d’incendie, de choc électrique, des blessures graves ou mortelles.
4 49-2001566 Rev. 1
CONSIGNES DE SÉCURITÉ
LISEZ ET CONSERVEZ CES INSTRUCTIONS
CONSIGNES DE SÉCURITÉ IMPORTANTES
LISEZ TOUTES LES INSTRUCTIONS AVANT D'UTILISER L'APPAREIL
AVERTISSEMENT
CONSIGNES DE SÉCURITÉ GÉNÉRALES
AVERTISSEMENT
Empoisonnement au
dioxyde de carbone: N’utilisez JAMAIS cet
pOHFWURPpQDJHUFRPPHDSSDUHLOGHFKDXIIDJH
SRXUUpFKDXIIHUODSLqFH$XWUHPHQWFHODSRXUUDLW
occasionner un risque d’empoisonnement au
PRQR[\GHGHFDUERQHHWGHVXUFKDXIIHGXIRXU
Une fenêtre ou une grille d’aération doit être
légèrement ouverte pendant l’utilisation de
cet appareil ménager. Les flammes de gaz
consomment l’oxygène qui doit être remplacée
pour assurer une combustion adéquate.
Ŷ 8WLOLVH]FHWpOHFWURPpQDJHUDX[ILQVDX[TXHOOHVLOHVWIDLW
mention dans ce manuel d’utilisation.
Ŷ )DLWHVLQVWDOOHUYRWUHFXLVLQLqUHSDUXQLQVWDOODWHXUTXDOLILp
en conformité avec les instructions d’installation fournies.
Ŷ 7RXWUpJODJHHQWUHWLHQRXWRXWHUpSDUDWLRQGRLYHQWrWUH
effectués seulement par un installateur ou un technicien
qualifiés en matière de cuisinière au gaz.
Ŷ 1HWHQWH]SDVGHUpSDUHURXGHUHPSODFHUXQHSLqFHGH
la cuisinière sauf si cela est spécifiquement recommandé
dans ce manuel.
Ŷ 9RWUHFXLVLQLqUHHVWFRQILJXUpHSRXUOHJD]SURSDQH
ORUVTX¶HOOHTXLWWHO¶XVLQH(OOHQHSHXWSDVrWUHFRQYHUWLH
pour un autre type de gaz.
Ŷ 'HPDQGH]jO¶LQVWDOODWHXUGHYRXVPRQWUHUO¶HPSODFHPHQW
GXURELQHWG¶DUUrWGXJD]GHODFXLVLQLqUHHWFRPPHQWOH
fermer en cas de besoin.
Ŷ $VVXUH]YRXVTXHWRXWOHPDWpULHOG¶HPEDOODJHHVW
retiré de la cuisinière avant l’utilisation afin de prévenir
l’inflammation de ce matériel.
Ŷ eYLWH]GHUD\HURXGHKHXUWHUOHVSRUWHVGHYHUUHOHV
tables de cuisson ou les panneaux de commande.
Autrement cela pourrait mener au bris du verre. Ne
cuisez pas d’aliments sur un produit qui présente du verre
EULVp8QFKRFpOHFWULTXHXQLQFHQGLHRXGHVFRXSXUHV
pourraient survenir.
Ŷ 1HODLVVH]SDVG¶HQIDQWVVHXOVRXVDQVVXUYHLOODQFHGDQV
la zone où l’électroménager est en cours d’utilisation. On
ne devrait jamais leur permettre de grimper, s’asseoir ou
se tenir sur quelque partie de l’électroménager que ce
soit.
Ŷ
ATTENTION
Ne rangez pas des articles qui attirent
les enfants dans des armoires au-dessus d’une cuisinière,
un enfant qui grimpe sur la cuisinière pour atteindre un
article peut se blesser gravement.
Ŷ 1¶REVWUXH]MDPDLVOHVpYHQWVRULILFHVG¶DLUGHOD
cuisinière. Ils procurent les entrées et les sorties d’air qui
VRQWQpFHVVDLUHVDXERQIRQFWLRQQHPHQWGXIRXUJUkFHj
XQHFRPEXVWLRQDGpTXDWH/HVRULILFHVG¶DLUVRQWVLWXpVj
l’arrière de la table de cuisson, dans le haut et le bas de
la porte du four, et dans le bas de la cuisinière.
Ŷ 8WLOLVH]XQLTXHPHQWGHVPLWDLQHVGHIRXUVqFKHVOH
contact de mitaines humides ou mouillées sur des
surfaces très chaudes peut causer des brûlures par la
vapeur. Ne laissez pas les mitaines toucher les brûleurs,
la grille des brûleurs ou l’élément chauffant du four.
N’utilisez pas une serviette ou un autre linge volumineux
jODSODFHGHPLWDLQHVGHIRXU
Ŷ 1HWRXFKH]SDVDX[pOpPHQWVFKDXIIDQWVRXjODVXUIDFH
intérieure du four. Ces surfaces peuvent s’avérer
VXIILVDPPHQWFKDXGHVSRXUEUOHUPrPHVLHOOHVVRQW
d’une couleur foncée. Pendant et après l’utilisation, ne
WRXFKH]SDVjO¶LQWpULHXUGXIRXUHWQHODLVVH]SDVGHV
YrWHPHQWVRXG¶DXWUHVPDWLqUHVLQIODPPDEOHVHQWUHUHQ
contact avec celui-ci; laissez d’abord le four se refroidir
suffisamment. D’autres surfaces de l’électroménager
peuvent devenir suffisamment chaudes pour causer
des brûlures. Parmi les surfaces pouvant devenir très
chaudes, mentionnons les brûleurs, la grille des brûleurs,
les évents du four, les surfaces près des ouvertures et les
interstices autour de la porte du four.
Ŷ 1HFKDXIIH]SDVGHVFRQWHQDQWVGDOLPHQWVQRQRXYHUWV
La pression accumulée peut faire éclater le contenant et
causer des blessures.
Ŷ &XLVH]OHVDOLPHQWVjIRQGSRXUYRXVSUpPXQLUFRQWUH
les maladies d’origine alimentaire. On peut trouver des
recommandations de températures minimales sécuritaires
pour la cuisson des aliments sur les sites IsItDoneYet.gov
HWIVLVXVGDJRY8WLOLVH]XQWKHUPRPqWUHSRXUDOLPHQWVHW
YpULILH]jSOXVLHXUVHQGURLWV
Ŷ 1HODLVVH]SHUVRQQHJULPSHUVHWHQLURXV¶DJULSSHUVXUOD
porte du four, le tiroir ou la table de cuisson. La personne
pourrait endommager la cuisinière, ou la faire basculer et
s’infliger des blessures.
49-2001566 Rev. 1 5
AVERTISSEMENT
GARDEZ LES MATIÈRES INFLAMMABLES À DISTANCE DE LA CUISINIÈRE
L’omission de prendre cette précaution peut causer un incendie ou une blessure corporelle.
Ŷ $EVWHQH]YRXVGHUDQJHURXGXWLOLVHUGHVPDWLqUHV
inflammables dans un four ou près de la table de cuisson,
y compris le papier, le plastique, les mitaines de four, le
OLQJHGHPDLVRQOHVUHYrWHPHQWVPXUDX[OHVULGHDX[
les draperies, l’essence ou d’autres vapeurs ou liquides
inflammables.
Ŷ 1HSRUWH]MDPDLVGHYrWHPHQWVDPSOHVRXSHQGDQWV
ORUVTXHYRXVXWLOLVH]O¶pOHFWURPpQDJHU&HVYrWHPHQWV
peuvent prendre feu au contact de surfaces chaudes et
causer des brûlures graves.
Ŷ 1HODLVVH]SDVODJUDLVVHGHFXLVVRQRXG¶DXWUHVPDWLqUHV
LQIODPPDEOHVV¶DFFXPXOHUGDQVRXjSUR[LPLWpGHOD
cuisinière. La graisse dans le four ou sur la table de
cuisson peut prendre feu.
LISEZ ET CONSERVEZ CES INSTRUCTIONS
AVERTISSEMENT
'$16/¶e9(178$/,7e'¶81,1&(1',(35(1(=/(60(685(6
SUIVANTES AFIN DE PRÉVENIR LES BLESSURES ET LA
PROPAGATION DU FEU
Ŷ 1HYHUVH]SDVGHDXVXUXQIHXGHJUDLVVH1HSUHQH]
MDPDLVXQHFDVVHUROHHQIODPPHVeWHLJQH]OHV
FRPPDQGHV2IIeWRXIIH]XQHFDVVHUROHHQIODPPHV
sur un brûleur de surface en la recouvrant complètement
DYHFXQFRXYHUFOHELHQDMXVWpXQHW{OHjELVFXLWVRXXQ
SODWHDXSODW8WLOLVH]XQH[WLQFWHXUjSRXGUHVqFKHRXj
mousse polyvalent.
Ŷ 6LXQIHXVHGpFODUHGDQVOHIRXUSHQGDQWODFXLVVRQ
étouffez-le en fermant la porte du four et en éteignant le
IRXU2))RXHQXWLOLVDQWXQH[WLQFWHXUjSRXGUHVqFKH
RXjPRXVVH
AVERTISSEMENT
CONSIGNES DE SÉCURITÉ RELATIVES À LA TABLE DE
CUISSON
Ŷ 1HODLVVH]MDPDLVOHVEUOHXUVGHVXUIDFHVDQV
surveillance. Les aliments, en particulier s’ils sont huileux,
peuvent s’enflammer et propager le feu dans les armoires
environnantes.
Ŷ 1HODLVVH]MDPDLVO¶KXLOHVDQVVXUYHLOODQFHORUVG¶XQH
IULWXUH'HO¶KXLOHFKDXIIpHDXGHOjGXSRLQWGHIXPpH
peut s’enflammer et propager le feu dans les armoires
environnantes. Dans la mesure du possible, utilisez un
WKHUPRPqWUHjJUDLVVHORQJSRXUPHVXUHUODWHPSpUDWXUH
de l’huile.
Ŷ $ILQG¶pYLWHUOHVGpERUGHPHQWVG¶KXLOHTXLSUHQQHQWIHX
utilisez une quantité minimale d’huile si la casserole est
peu profonde et évitez de cuire des aliments congelés qui
contiennent une quantité de glace excessive.
Ŷ 8WLOLVH]XQHFDVVHUROHGHWDLOOHDSSURSULpHHWpYLWH]
les casseroles instables ou qui basculent facilement.
&KRLVLVVH]GHVUpFLSLHQWVTXLFRUUHVSRQGHQWjODWDLOOHGX
EUOHXU/HVIODPPHVGXEUOHXUGRLYHQWrWUHUpJOpHVGH
IDoRQTX¶HOOHVQHV¶pWHQGHQWSDVDXGHOjGXIRQGGHOD
casserole. Des flammes excessives peuvent constituer un
danger.
Ŷ 8WLOLVH]WRXMRXUVODSRVLWLRQ+,KDXWORUVTXHYRXVDOOXPH]
les brûleurs du dessus et assurez-vous qu’ils se sont
vraiment allumés.
Ŷ 6LYRXVXWLOLVH]XQHEDWWHULHGHFXLVLQHHQYHUUHRX
FpUDPLTXHDVVXUH]YRXVTX¶HOOHFRQYLHQWjXQXVDJHVXU
WDEOHGHFXLVVRQFHUWDLQHVSHXYHQWFDVVHUjFDXVHG¶XQ
changement de température soudain.
Ŷ 3RXUUpGXLUHODSUREDELOLWpGHEUOXUHVGHGpERUGHPHQWV
et d’embrasement de matières inflammables, la
SRLJQpHGXUpFLSLHQWGRLWrWUHWRXUQpHYHUVOHFHQWUH
de la cuisinière sans la placer au-dessus des brûleurs
environnants.
Ŷ 1¶XWLOLVH]SDVXQZRN$XWUHPHQWFHODSRXUUDLW
emprisonner la chaleur et bloquer l’air au brûleur d’où un
risque d’empoisonnement au monoxyde de carbone.
Ŷ 1¶XWLOLVH]SDVGHSDSLHUDOXPLQLXPSRXUUHFRXYULUODJULOOH
des brûleurs ou doubler une partie quelconque de la
table de cuisson. Autrement cela pourrait occasionner
un empoisonnement au monoxyde de carbone, une
surchauffe des surfaces de la table de cuisson ou un
risque d’incendie.
CONSIGNES DE SÉCURITÉ
CONSIGNES DE SÉCURITÉ IMPORTANTES
LISEZ TOUTES LES INSTRUCTIONS AVANT D'UTILISER L'APPAREIL
6 49-2001566 Rev. 1
AVERTISSEMENT
RISQUE D’INCENDIE OU D’EXPLOSION
L’omission d’observer intégralement les informations de
ce manuel peut poser un risque d’incendie ou d’explosion
SRXYDQWFDXVHUGHVGRPPDJHVjODSURSULpWpHWGHV
blessures graves ou mortelles.
7RXWHUpSDUDWLRQGRLWrWUHHIIHFWXpHSDUXQLQVWDOODWHXU
qualifié.
Veuillez lire ces instructions attentivement et en totalité.
L’installation de cet électroménager doit satisfaire les codes
nationaux et locaux ou, en l’absence de tels codes :
$X[eWDWV8QLV/DQRUPH$16,1)3$UHODWLYHDX[
véhicules récréatifs.
$X&DQDGD/DQRUPH&$1&6$=([LJHQFHV
UHODWLYHVjO¶LQVWDOODWLRQGHVDSSDUHLOVHWGHO¶DSSDUHLOODJHDX
propane dans les véhicules de camping.
La conception de cette cuisinière a été certifiée par CSA
,QWHUQDWLRQDOFRQIRUPpPHQWjODQRUPH$16,=
GHUQLqUHpGLWLRQHW&$10GHUQLqUHpGLWLRQ
Lors de l’installation d’un électroménager au gaz, l’utilisation
de vieux raccords flexibles peut causer des fuites de gaz
HWGHVEOHVVXUHVFRUSRUHOOHV8WLOLVH]WRXMRXUVXQUDFFRUG
IOH[LEOH1(8)
/HVWHVWVG¶pWDQFKpLWpGHO¶pOHFWURPpQDJHUGRLYHQWrWUH
exécutés selon les instructions du fabricant.
Si une source électrice extérieure est utilisée,
O¶pOHFWURPpQDJHUXQHIRLVLQVWDOOpGRLWrWUHPLVjODWHUUH
conformément aux codes provinciaux et locaux ou, en
l’absence de tels codes, au Code national de l’électricité.
1¶LQVWDOOH]SDVFHSURGXLWDYHFXQHKRWWHjULGHDXG¶DLU
ou une autre hotte qui fonctionne en soufflant de l’air sur
ODWDEOHGHFXLVVRQ&HWWHSURMHFWLRQGDLUSHXWJrQHUOH
fonctionnement des brûleurs au gaz et poser un risque
d’incendie ou d’explosion.
AVERTISSEMENT
CONSIGNES DE SÉCURITÉ RELATIVES AU FOUR
AVERTISSEMENT
Ne recouvrez JAMAIS
XQHIHQWHGHVWURXVRXGHVYRLHVGDQVOHEDV
GXIRXURXXQHJULOOHHQWLqUHDYHFXQPDWpULHO
tel que du papier d’aluminium ou des doublures
GHIRXU$XWUHPHQWFHODHPSrFKHUDO¶DLUGH
circuler à travers le four et posera un risque
d’empoisonnement au monoxyde de carbone.
1HSODFH]MDPDLVGXSDSLHUGDOXPLQLXPRXGHV
doublures de four dans le fond du four. Cela
SHXWHPSULVRQQHUODFKDOHXUHWSRVHUXQULVTXH
d’enfumage ou d'incendie
Ŷ 7HQH]YRXVjO¶pFDUWGHODFXLVLQLqUHORUVTXHYRXV
ouvrez la porte du four. La vapeur ou l’air chauds qui
V¶pFKDSSHQWSHXYHQWEUOHUOHVPDLQVODILJXUHHWRXOHV
yeux.
Ŷ 1HSODFH]MDPDLVGHVXVWHQVLOHVGHFXLVVRQGHVSLHUUHVj
pizza ou de cuisson, ni tout type de papier ou de doublure
sur une surface autre que les grilles. Ces articles peuvent
emprisonner la chaleur ou fondre, endommageant le
produit et causant un risque de décharge électrique,
d'enfumage ou d'incendie.
Ŷ /HIRXUGRLWrWUHUHIURLGLDYDQWGHSODFHUOHVJULOOHVGX
IRXUDX[HPSODFHPHQWVGpVLUpV6LXQHJULOOHGRLWrWUH
GpSODFpHDORUVTXHOHIRXUHVWFKDXGYHLOOH]jQHSDV
toucher les surfaces chaudes.
Ŷ 1HODLVVH]GHVDUWLFOHVWHOVTXHGXSDSLHUGHVXVWHQVLOHV
de cuisson ou des aliments dans le four lorsqu’il n’est
pas utilisé. Les articles rangés dans le four peuvent
s’enflammer.
Ŷ 1HODLVVH]SDVG¶DUWLFOHVVXUODWDEOHGHFXLVVRQSUqVG¶XQ
évent de four. Ces articles peuvent surchauffer d’où un
risque d'incendie ou de brûlures.
MISE AU REBUT ADÉQUATE DE VOTRE ÉLECTROMÉNAGER
Recyclez ou mettez votre électroménager au rebut conformément aux réglementations fédérales et locales. Communiquez
avec les autorités locales compétentes pour la mise au rebut écologique de votre électroménager.
CONSIGNES DE SÉCURITÉ
LISEZ ET CONSERVEZ CES INSTRUCTIONS
CONSIGNES DE SÉCURITÉ IMPORTANTES
LISEZ TOUTES LES INSTRUCTIONS AVANT D'UTILISER L'APPAREIL
49-2001566 Rev. 1
Table de cuisson
$YDQW O¶DOOXPDJH YpULILH] TXH WRXV OHV ERXWRQV GH FRPPDQGH VRQW GDQV OD SRVLWLRQ G¶DUUrW 2)) $VVXUH]YRXV TXH OH URELQHW GH
gaz principal est ouvert.
Ŷ 1H IDLWHV SDV IRQFWLRQQHU OH EUOHXU GXUDQW XQH ORQJXH SpULRGH VDQV UpFLSLHQW GH FXLVVRQ VXU OD JULOOH GX EUOHXU /H ILQL GH OD
grille peut se décolorer ou s’écailler sans récipient pour absorber la chaleur.
Ŷ /H UpFLSLHQW GH FXLVVRQ GRLW rWUH SODFp DXGHVVXV GHV JULOOHV GHV EUOHXUV HW QH SDV GpSDVVHU OD JDUQLWXUH ODWpUDOH RX OH GHVVXV
du comptoir.
Ŷ $VVXUH]YRXV TXH OHV EUOHXUV HW OHV JULOOHV VRQW UHIURLGLV DYDQW G¶\ SODFHU YRWUH PDLQ XQH PLWDLQH GH IRXU RX GHV DJHQWV
nettoyants.
Sélection de la taille de flamme
Regardez la flamme, et non le bouton, lorsque vous réglez
la chaleur. Si vous désirez un chauffage rapide, la taille de la
IODPPH GRLW FRUUHVSRQGUH j OD WDLOOH GX UpFLSLHQW GH FXLVVRQ
que vous utilisez. Des flammes plus grandes que le bas du
récipient ne chaufferont pas plus rapidement et elles peuvent
s’avérer dangereuses.
7KHVH IODPHV DUH WRR ODUJH IRU WKH SRW
UTILISATION DE LA CUISINIÈRE : 7DEOH GH FXLVVRQ
Si la flamme s’éteint
7RXUQH] LPPpGLDWHPHQW OH ERXWRQ GH FRPPDQGH MXVTX¶j OD
SRVLWLRQ G¶DUUrW 2)) $WWHQGH] DX PRLQV PLQXWHV HW DOOXPH]
le brûleur de nouveau.
Extinction de la table de cuisson
Pour éteindre les brûleurs de la table de cuisson, tournez les
ERXWRQV GH FRPPDQGH GDQV OH VHQV GHV DLJXLOOHV MXVTX¶j OD
position OFF. Abstenez-vous de toucher ou placer tout objet
sur les grilles des brûleurs avant que la table de cuisson ne se
soit refroidie.
Allumage de la table de cuisson
AVERTISSEMENT
Il faut utiliser les brûleurs
uniquement lorsqu’ils sont recouverts d’un récipient de
cuisson. Les flammes de brûleur non recouvertes par un
récipient de cuisson présentent un risque d’incendie ou
G¶LQIODPPDWLRQ GH YrWHPHQW 1H ODLVVH] MDPDLV OHV IODPPHV
dépasser des côtés du récipient. L'omission d'observer
cette directive peut occasionner des blessures graves.
Sélectionnez un brûleur et trouvez son bouton de commande.
3RXVVH] OH ERXWRQ HW WRXUQH]OH MXVTX¶j OD SRVLWLRQ +,
DOOXPDJH /HV pPLVVLRQV G¶pWLQFHOOHV FRQWLQXHURQW WDQW TXH OH
ERXWRQ HVW HQIRQFp 8QH IRLV
le brûleur allumé, continuez
d’enfoncer le bouton pendant
DX PRLQV VHFRQGHV MXVTX¶j
ce que le capteur de flamme
se réchauffe. Relâchez le
bouton et assurez-vous que
le brûleur est toujours allumé
et tournez le bouton pour
régler la flamme. Si le brûleur
s’éteint, consultez la section
des conseils de dépannage.
Poussez le bouton de
commande et tournez-le
MXVTX¶j OD SRVLWLRQ HI.
Ces flammes sont trop grandes pour le récipient
Si le brûleur de la table de cuisson ne s’allume pas, vous
pourriez devoir l’allumer manuellement en suivant les
instructions ci-dessous :
Enfoncez et tournez le bouton de commande du brûleur
approprié dans le sens contraire des aiguilles d’une montre,
MXVTX¶j OD SRVLWLRQ © +,ª
7RXW HQ PDLQWHQDQW OH ERXWRQ HQIRQFp IURWWH] LPPpGLDWHPHQW
XQH DOOXPHWWH HQ ERLV RX DOOXPH] XQ EULTXHW j HVVHQFH HW
SODFH] OD VRXUFH GH IODPPH SUqV GX EUOHXU SRXU O¶DOOXPHU 8QH
fois le brûleur allumé, maintenez le bouton enfoncé pendant
DX PRLQV VHFRQGHV MXVTX¶j FH TXH OH FDSWHXU GH IODPPH VH
réchauffe. Relâchez le bouton et assurez-vous que le brûleur
est toujours allumé et tournez le bouton pour régler la flamme.
Si le brûleur s’éteint, consultez la section des conseils de
dépannage.
Poussez le bouton de commande
HW WRXUQH]OH j OD SRVLWLRQ HI.
49-2001566 Rev. 1
UTILISATION DE LA CUISINIÈRE :7DEOHGHFXLVVRQ)RXU
Table de cuisson
Four
Usage des brûleurs de la table de cuisson
8WLOLVH]OHEUOHXUGHGHYDQWSRXUOHVJUDQGVUpFLSLHQWVHWXQH
ébullition plus rapide. Les brûleurs arrière sont prévus pour la
cuisson générale et le mijotage.
Ŷ1HIDLWHVSDVIRQFWLRQQHUOHEUOHXUGXUDQWXQHORQJXH
période sans récipient de cuisson sur la grille du brûleur. Le
fini de la grille peut se décolorer ou s’écailler sans récipient
pour absorber la chaleur.
Ŷ1HWHQWH]SDVGHGpPRQWHUXQEUOHXUSHQGDQWTX¶XQDXWUH
brûleur est allumé. Vous risquez d’endommager le produit.
Ŷ$VVXUH]YRXVTXHOHVEUOHXUVHWOHVJULOOHVVRQWUHIURLGLV
avant de placer votre main, une mitaine de four ou des
agents nettoyants sur la table de cuisson.
8WLOLVH]GHVXVWHQVLOHVGHFXLVVRQDGDSWpVDX[IODPPHV/HV
brûleurs arrière sont conçus pour la cuisson et le mijotage
JpQpUDOH8WLOLVH]OHEUOHXUDYDQWSRXUOHVJUDQGVXVWHQVLOHV
et pour bouillir rapidement. Couvrez vos ustensiles avec leur
couvercle pour accélérer l’ébullition des liquides.
Orientation des grilles des brûleurs
L’orientation appropriée des grilles des brûleurs est illustrée
ci-contre.
Allumage du four
REMARQUE : Avant l’allumage, assurez-vous que le robinet
de gaz principal est ouvert.
7LUH]ODSRLJQpHGXIRXUSRXURXYULUODSRUWH
2. Poussez et tournez le bouton de commande du four dans le
VHQVFRQWUDLUHGHVDLJXLOOHVMXVTX¶jODSRVLWLRQ
.
3. Gardez le bouton de commande du four enfoncé durant
DXPRLQVVHFRQGHVMXVTX¶jFHTXHODYHLOOHXVHGXIRXU
s’allume et que son capteur se réchauffe. S’il y a présence
G¶DLUGDQVOHWX\DXGHJD]LOSHXWV¶pFRXOHUMXVTX¶jXQH
minute pour la purger et allumer la veilleuse.
4. Relâchez le bouton de commande du four et confirmez
visuellement que la veilleuse reste allumée. Si la veilleuse
du four s’éteint, répétez les étapes 3 et 4.
7RXUQH]OHERXWRQGHFRPPDQGHGXIRXUjODWHPSpUDWXUH
la plus élevée et confirmez visuellement que la veilleuse a
allumé le brûleur de cuisson.
7RXUQH]OHERXWRQGHFRPPDQGHGXIRXUjODWHPSpUDWXUH
désirée. Fermez la porte du four.
AVERTISSEMENT
Dans l’éventualité d’une défaillance
GXV\VWqPHG¶DOOXPDJHLOGHYLHQWLPSRVVLEOHGHIDLUH
fonctionner le four et il ne faut pas tenter de le faire.
N’allumez pas le pilote du four manuellement.
AVERTISSEMENT
1HUDQJH]SDVG¶REMHWVGDQVOH
compartiment du brûleur.
Compartiment
du brûleur
Veilleuse
du four
49-2001566 Rev. 1
UTILISATION DE LA CUISINIÈRE :
eFODLUDJHGHFRPPDQGH*ULOOHV3DSLHUGDOXPLQLXPeYHQWVGXIRXU
Éclairage du four et des boutons de commande
Grilles du four
Papier d'aluminium et doublures de four
Évents du four
Si la flamme s’éteint
7RXUQH]LPPpGLDWHPHQWOHERXWRQGHFRPPDQGHGXIRXU
MXVTX¶jODSRVLWLRQOFF. Attendez au moins 5 minutes
avant de tenter de rallumer le brûleur du four.
Extinction du four
Pour éteindre le four, tournez son bouton de commande
GDQVOHVHQVGHVDLJXLOOHVMXVTX¶jODSRVLWLRQOFF.
3UHVVH]OHERXWRQ/LJKWpFODLUDJHVXUOHSDQQHDXGHFRPPDQGHSRXUDFWLYHURXGpVDFWLYHUO¶pFODLUDJHGXIRXUHWGHV
ERXWRQVGHFRPPDQGH7RXWHVOHVOXPLqUHVV¶DOOXPHQWHWV¶pWHLJQHQWHQVHPEOH
1¶REVWUXH]MDPDLVOHVpYHQWVRULILFHVG¶DLUGHODFXLVLQLqUH,OVSURFXUHQWO¶HQWUpHHWODVRUWLHG¶DLUQpFHVVDLUHVSRXUUHIURLGLU
la cuisinière et procurer la combustion nécessaire au bon fonctionnement. Ne recouvrez jamais ces orifices avec du papier
d’aluminium ou tout autre matériel. Les évents sont situés le long de l’arrière de la table de cuisson.
ATTENTION
Abstenez-vous d'utiliser tout type
de papier d’aluminium ou de doublure pour recouvrir
XQHVXUIDFHTXHOFRQTXHGXIRXUjO¶H[FHSWLRQGHV
JULOOHV&HVDUWLFOHVSHXYHQWHPSULVRQQHUODFKDOHXURX
IRQGUHHQGRPPDJHDQWOHSURGXLWHWFDXVDQWXQULVTXH
GHGpFKDUJHpOHFWULTXHGHQIXPDJHRXGLQFHQGLH/HV
dommages résultant de l'usage inapproprié de ces articles
ne sont pas couverts par la garantie du produit.
N'utilisez pas plus de papier d'aluminium que nécessaire et ne
recouvrez jamais la totalité d'une grille avec le papier. Laissez
XQHGLVWDQFHGDXPRLQVòSRFPHQWUHOHSDSLHUHW
les parois du four pour permettre une bonne distribution de
chaleur.
/RUVTXHYRXVSODFH]RXUHWLUH]GHVUpFLSLHQWVGHFXLVVRQWLUH]ODJULOOHYHUVYRXVMXVTX¶jODERVVHSRVLWLRQG¶DUUrWVXUOHVXSSRUW
GHJULOOH3RXUUHWLUHUXQHJULOOHVRXOHYH]O¶DUULqUHGHODJULOOHDXGHVVXVGHVVXSSRUWVGHJULOOHWLUH]ODJULOOHYHUVYRXVMXVTX¶jOD
OLEpUHU3RXUUpLQVWDOOHUXQHJULOOHSODFH]O¶DUULqUHGHODJULOOHVXUOHVXSSRUWGHJULOOHSXLVSRXVVH]ODYHUVO¶DUULqUHGXIRXUMXVTX¶j
ce qu’elle s’insère en place.
Bouton light
Four
49-2001566 Rev. 1
Guide de cuisson au four
3UpFKDXIIH]OHIRXUGXUDQWjPLQXWHVDYDQWG¶LQVpUHUOHVDOLPHQWV8WLOLVH]ODSRVLWLRQGHJULOOHSRXUODFXLVVRQVWDQGDUG
$MXVWH]ODSRVLWLRQDXEHVRLQeYLWH]O¶RXYHUWXUHIUpTXHQWHGHODSRUWHDILQGHFRQVHUYHUODFKDOHXUjO¶LQWpULHXUGXIRXU
UTILISATION DE LA CUISINIÈRE : Guide de cuisson au four
Ustensiles de cuisson pour le four
Le matériau, le fini et la dimension des ustensiles de cuisson ont une incidence sur les performances de cuisson. Les plaques
foncées, les enduits et mates absorbent la chaleur plus rapidement que les plaques pâles ou luisantes. Les plaques absorbant
la chaleur plus rapidement peuvent produire une croûte plus foncée, plus croustillante et plus épaisse. Si vous utilisez des
XVWHQVLOHVGHFXLVVRQDYHFXQUHYrWHPHQWDVVXUH]YRXVGHYpULILHUODFXLVVRQDYDQWODILQGHODGXUpHPLQLPXPGHFXLVVRQ]
2
4
2
3
3/'5:
3/'':
3/'(:
3/'5:
3/'':
3/'(:
49-2001566 Rev. 1
Surfaces de la table de cuisson
ENTRETIEN ET NETTOYAGE : Surfaces de la table de cuisson
$VVXUH]YRXVTXHWRXWHVOHVFRPPDQGHVVRQWIHUPpHV2))HWTXHWRXWHVOHVVXUIDFHVVRQWUHIURLGLHVDYDQWGHQHWWR\HUXQH
partie quelconque de la cuisinière.
Table de cuisson en émail vitrifié
N’utilisez pas des nettoyants pour le four, des nettoyants
abrasifs, des nettoyants liquides corrosifs, de la laine d’acier,
GHVWDPSRQVjUpFXUHUHQSODVWLTXHRXGHVSRXGUHVGH
QHWWR\DJHVXUODVXUIDFHGHODWDEOHGHFXLVVRQ1HWWR\H]j
O¶DLGHG¶XQHVROXWLRQVDYRQQHXVHGRXFHRXG¶XQHVROXWLRQ
G¶HDXHWGHYLQDLJUH5LQFH]jO¶HDXFODLUHHWVpFKH]DYHFXQ
linge doux.
$VVXUH]YRXVTXHOHVVXUIDFHVVRQWjWHPSpUDWXUHDPELDQWH
lorsque vous les nettoyez. Les renversements de marinades,
de jus de fruits, de sauce tomate et de liquides d’arrosage
contenant des acides peuvent causer de la décoloration
HWGRLYHQWrWUHHVVX\pVGqVTXHOHVVXUIDFHVFKDXGHVVH
UHIURLGLVVHQWSXLVQHWWR\H]HWULQFH]9HLOOH]jQHSDVUHQYHUVHU
d’eau dans les ouvertures de la table de cuisson.
Retrait de la table de cuisson en cas de renversement
AVERTISSEMENT
Prenez soin de ne pas endommager
ou modifier la tuyauterie de gaz et le câblage électrique
sous la table de cuisson. Autrement cela pourrait entraîner
un risque d’incendie ou d'explosion.
Débranchez l’alimentation depuis le fusible ou le disjoncteur
principal du panneau électrique avant de retirer la surface de
cuisson.
2. Soulevez et retirez la grille des brûleurs de la table de
cuisson.
5HWLUH]OHVYLVVXUODWDEOHGHFXLVVRQjO¶DLGHG¶XQ
WRXUQHYLVjSRLQWHFUXFLIRUPHSXLVVRXOHYH]ODWDEOHGH
cuisson pour la retirer.
4. Nettoyez avec un linge imbibé d’une solution d’eau
VDYRQQHXVHGRXFH5LQFH]jO¶HDXFODLUHHWVpFKH]DYHF
linge doux.
5. Replacez la table de cuisson dans sa position initiale et
UpLQVWDOOH]OHVYLVDYHFOHPrPHWRXUQHYLV
&KDSHDX[GHVEUOHXUV
Essuyez les chapeaux de brûleur avec une solution d’eau
VDYRQQHXVHFKDXGHHWULQFH]jO¶HDXFODLUH9RXVSRXYH]
récurer les particules alimentaires cuites avec un tampon en
plastique.
Têtes des brûleurs
(VVX\H]OHVWrWHVGHEUOHXUUpJXOLqUHPHQWHQSDUWLFXOLHUORUV
de débordements salissants qui pourraient obstruer les orifices.
Essuyez avec un linge imbibé d’eau savonneuse chaude.
5LQFH]jO¶HDXFODLUH3RXUOHVWDFKHVUpFDOFLWUDQWHVXWLOLVH]
XQHEURVVHjSRLOVHQSODVWLTXH
REMARQUE : N’utilisez pas de laine d'acier ou des tampons
jUpFXUHUSRXUQHWWR\HUOHVSDUWLHVGHEUOHXUFDULOVSHXYHQW
REVWUXHUOHVRULILFHV/HVRULILFHVGDQVOHVWrWHVGHEUOHXU
GRLYHQWrWUHSURSUHVHQWRXWWHPSVDILQG¶REWHQLUXQHIODPPH
uniforme et sans obstructions. Des orifices ou des électrodes
GHEUOHXUREVWUXpVRXVDOHVHPSrFKHQWOHEUOHXUGH
fonctionner correctement.
Grille des brûleurs
/DJULOOHGHVEUOHXUVGRLWrWUHODYpHDYHFGHO¶HDXVDYRQQHXVH
FKDXGHHWULQFpHjO¶HDXFODLUH3RXUDPROOLUOHVUpVLGXV
alimentaires cuits, placez la grille, durant plusieurs heures,
GDQVXQHVROXWLRQTXLFRQWLHQWGHWDVVHG¶DPPRQLDF
)URWWH]HQVXLWHODJULOOHDYHFXQWDPSRQjUpFXUHUHQSODVWLTXH
WUHPSpGDQVO¶HDXVDYRQQHXVHFKDXGH5LQFH]jIRQGHW
séchez. N'utilisez PAS de javellisant ou d’antirouille sur la table
de cuisson ou la grille des brûleurs.
27°
Retire la grille
6FUHZV

49-2001566 Rev. 1
Surfaces extérieures
Surfaces intérieures
ENTRETIEN ET NETTOYAGE :6XUIDFHVH[WpULHXUHV6XUIDFHVLQWpULHXUHV
$VVXUH]YRXVTXHWRXWHVOHVFRPPDQGHVVRQWIHUPpHV2))HWTXHWRXWHVOHVVXUIDFHVVRQWUHIURLGLHVDYDQWGHQHWWR\HUXQH
partie quelconque de la cuisinière.
Boutons de commande
Les boutons de commande sont amovibles pour faciliter le
nettoyage. Assurez-vous que les boutons sont dans la position
G¶DUUrW2))HWWLUH]OHVGHOHXUDUEUHHQOLJQHGURLWHSRXUOHV
nettoyer. Vous pouvez laver les boutons avec du savon et
de l’eau. Assurez-vous de bien sécher l’intérieur des boutons
avant de les replacer. Replacez les boutons dans la position
OFF pour assurer leur bonne orientation.
Garniture peinte de la table de cuisson
Nettoyez cette garniture avec de l’eau savonneuse ou une
solution d'eau et de vinaigre. N’utilisez pas des nettoyants
pour four du commerce, des nettoyants en poudre, de la laine
d’acier ou des abrasifs durs sur une surface peinte.
Surfaces en acier inoxydable
1¶XWLOLVH]SDVGHWDPSRQjUpFXUHUHQDFLHUFDULOVUD\HURQWOD
surface. Pour nettoyer la surface en acier inoxydable, utilisez
une eau tiède savonneuse ou un nettoyant ou poli pour acier
inoxydable. Frottez toujours la surface dans la direction du
grain. Suivez les instructions du fabricant du nettoyant pour
acier inoxydable. Les nettoyants qui contiennent de l’acide
oxalique tels que Bar Keepers Friend Soft Cleanser vont
pOLPLQHUODURXLOOHOHWHUQLVVHPHQWHWOHVSHWLWHVWDFKHV8WLOLVH]
uniquement un nettoyant liquide exempt d'abrasif et frottez
GDQVODGLUHFWLRQGHVOLJQHVGHEURVVHjODLGHGXQHpSRQJH
douce et humide.
Intérieur du four
N’utilisez pas des nettoyants pour le four, des nettoyants
abrasifs, des nettoyants liquides corrosifs, de la laine d’acier,
GHVWDPSRQVjUpFXUHURXGHVSRXGUHVGHQHWWR\DJHVXU
l’intérieur du four. Les renversements de marinades, de jus
de fruits, de sauce tomate et de liquides d’arrosage contenant
des acides peuvent causer de la décoloration et doivent
rWUHHVVX\pVLPPpGLDWHPHQW/DLVVH]UHIURLGLUOHVVXUIDFHV
chaudes, puis nettoyez et rincez. Nettoyez avec du savon
doux et de l’eau, ou une solution d'eau et de vinaigre. Rincez
jO¶HDXFODLUHHWVpFKH]DYHFXQOLQJHGRX[$VVXUH]YRXVTXH
OHVVXUIDFHVVRQWjWHPSpUDWXUHDPELDQWHORUVTXHYRXVOHV
nettoyez. Ne frottez pas et ne nettoyez pas le joint d’étanchéité
GHODSRUWHFDULORIIUHXQHWUqVIDLEOHUpVLVWDQFHjO¶DEUDVLRQ
Vous devez remplacer le joint d'étanchéité si vous observez
qu’il est usé, effiloché ou autrement endommagé.
Grilles du four
7RXWHVOHVJULOOHVGRLYHQWrWUHODYpHVDYHFGHOHDX
savonneuse modérément chaude. Les grilles peuvent
V¶DYpUHUGLIILFLOHVjJOLVVHUDYHFOHWHPSV(QGXLVH]XQ
linge doux ou une serviette en papier d’un peu d’huile
YpJpWDOHHWIURWWH]OHVERUGVODWpUDX[5(0$548(
D’autres types d’huiles de cuisson peuvent causer de
la décoloration ou des résidus de couleur rouille sur les
grilles et les parois de la cavité. Nettoyez ces résidus
avec de l’eau savonneuse ou une solution d'eau et de
YLQDLJUH5LQFH]jO¶HDXFODLUHHWVpFKH]DYHFXQOLQJH
doux.
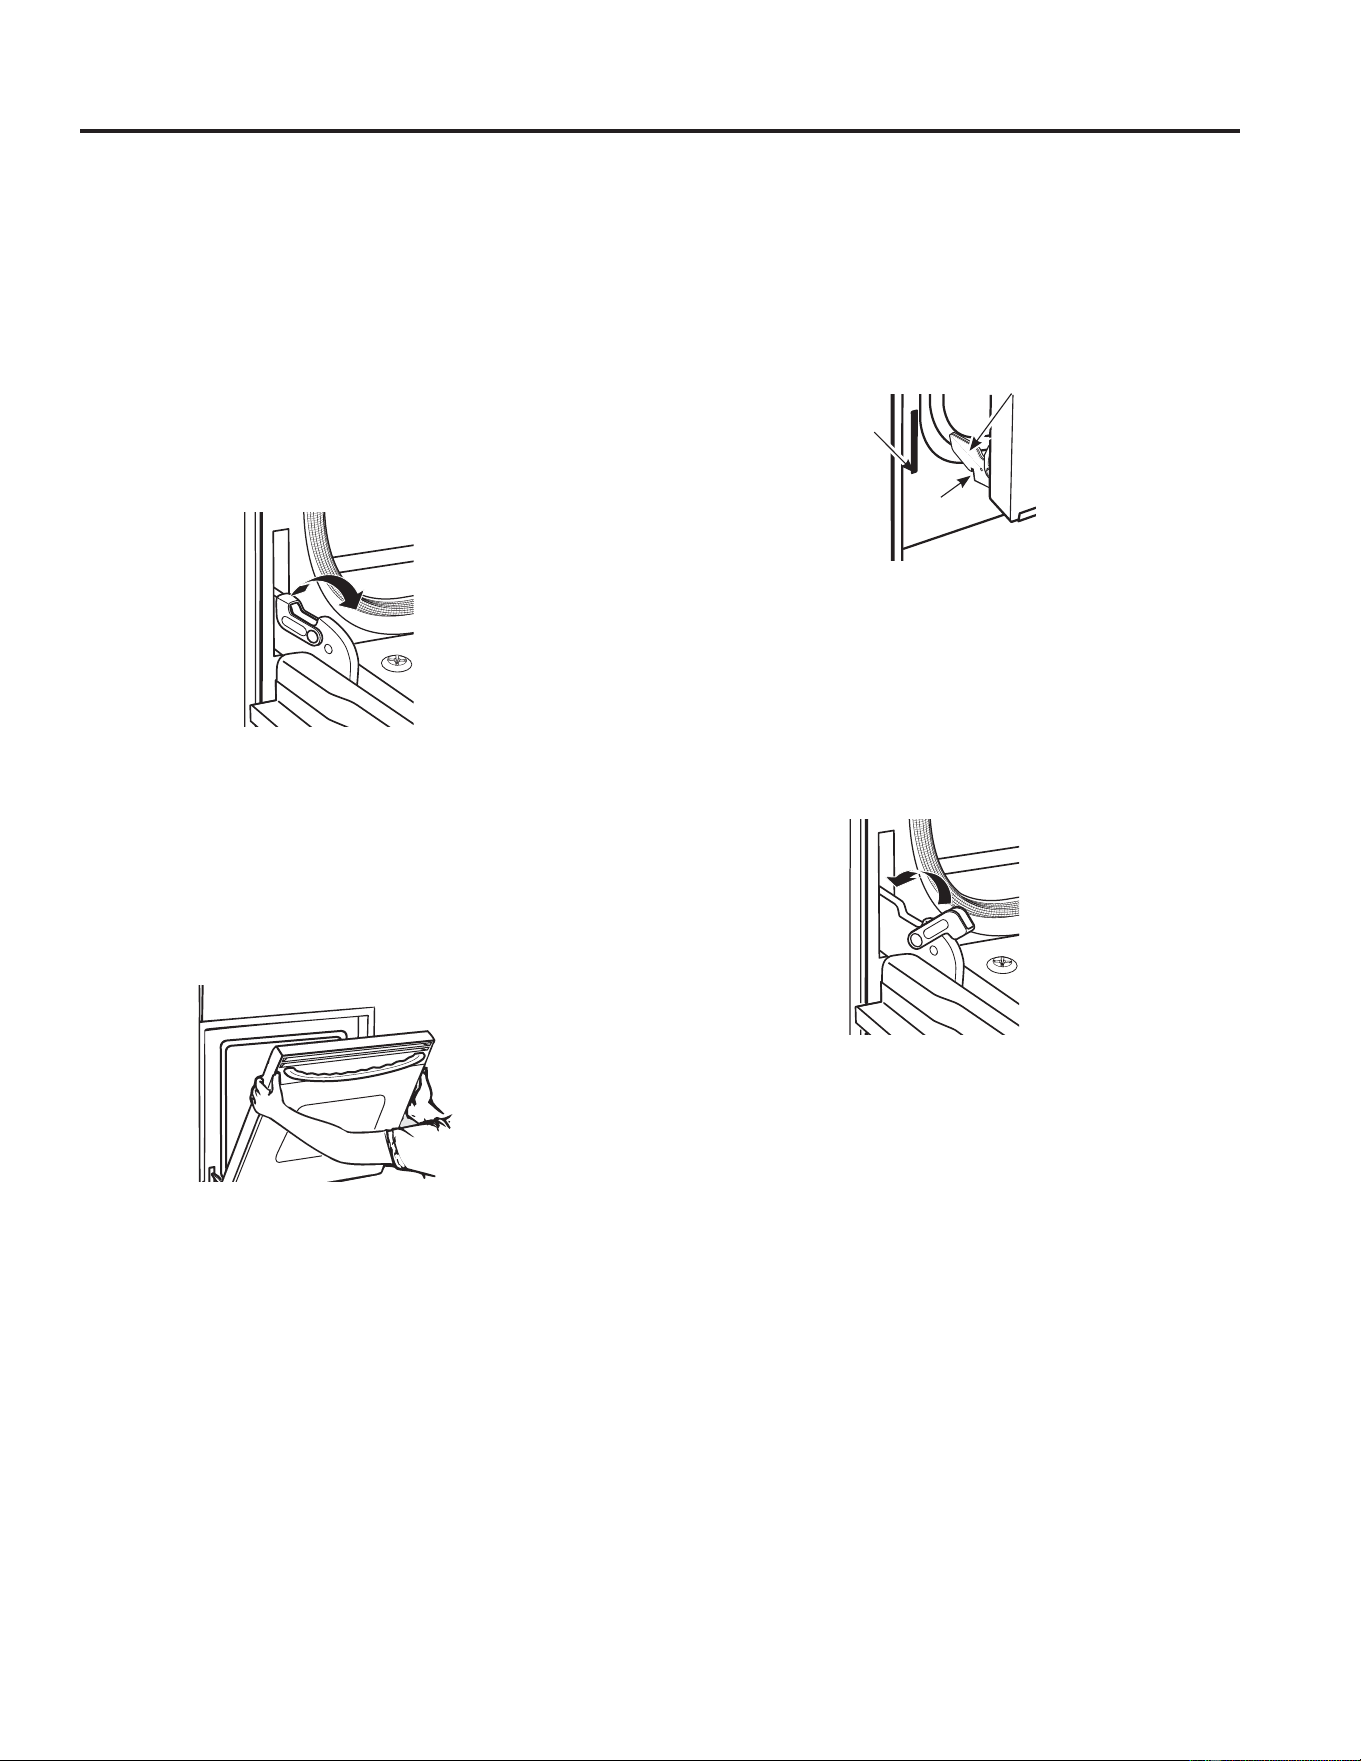
49-2001566 Rev. 1
Surfaces intérieures
Porte du four
Porte intérieure et extérieure
Ne laissez pas l'eau excédentaire pénétrer dans les trous ou
OHV IHQWHV GH OD SRUWH $YHF GX VDYRQ j YDLVVHOOH HVVX\H]
WRXWH pFODERXVVXUH VXU OH YHUUH 8WLOLVH] XQH ODPH j UDVRLU
VpFXULWDLUH j XQ VHXO F{Wp FRXSDQW SRXU OHV pOLPLQHU (VVX\H]
HQVXLWH OH YHUUH j O¶DLGH G¶XQ OLQJH VDYRQQHX[ SRXU UHWLUHU WRXW
résidu puis séchez bien.
Pour retirer la porte :
2XYUH] OD SRUWH FRPSOqWHPHQW
7LUH] OHV YHUURXV GHV FKDUQLqUHV YHUV OH KDXW HW j O¶pFDUW GX
FKkVVLV GH OD FXLVLQLqUH j OD SRVLWLRQ GH GpYHUURXLOODJH
3. Agrippez fermement les deux côtés de la porte près du haut.
)HUPH] OD SRUWH MXVTX¶j FH TXH VRQ GHVVXV VH WURXYH j
HQYLURQ SR FP GX FDGUH GH OD FXLVLQLqUH
6RXOHYH] OD SRUWH YHUV OH KDXW HW j O¶pFDUW GH OD FXLVLQLqUH
MXVTX¶j FH TXH OHV GHX[ EUDV GHV FKDUQLqUHV VRUWHQW GHV
fentes du cadre
Pour replacer la porte :
$JULSSH] IHUPHPHQW OHV GHX[ F{WpV GH OD SRUWH SUqV GX KDXW
$YHF OD SRUWH GDQV OH PrPH DQJOH TXH OD SRVLWLRQ GH UHWUDLW
placez l’encoche du dessous du bras de charnière gauche
sur le bord inférieur de la fente de la charnière gauche.
/¶HQFRFKH GRLW rWUH FRPSOqWHPHQW LQVpUpH GDQV OH EDV GH OD
fente. Répétez pour le côté droit.
3. Ouvrez la porte complètement. Si la porte ne s’ouvre pas
complètement, c’est que les encoches dans le bas des
bras de charnière ne reposent pas correctement sur le bord
inférieur de la fente. Soulevez la porte pour la retirer de la
cuisinière et répétez l’étape précédente.
4. Poussez les verrous de charnière vers la cavité du four et
YHUV OH EDV MXVTX¶j OD SRVLWLRQ GH YHUURXLOODJH
5. Fermez la porte du four.
ENTRETIEN ET NETTOYAGE : Surfaces intérieures
Pousser les verrous de charnière vers
le haut pour déverrouiller
Position de retrait
L’encoche doit reposer sur le bord
inférieur de la fente de charnière
Encoche
Bord inférieur
de la fente
Bras de charnière
Pousser les verrous de charnière
vers le bas pour verrouiller

49-2001566 Rev. 1
Éclairage du four
ENTRETIEN ET NETTOYAGE :eFODLUDJHGXIRXU
ATTENTION
RISQUE DE BRÛLURE : Attendez que le couvercle de verre et l’ampoule soient refroidis avant de les retirer.
7RXFKHUGXYHUUHFKDXGDYHFOHVPDLQVQXHVRXXQOLQJHKXPLGHSHXWFDXVHUGHVEUOXUHV
Avant de replacer l’ampoule, coupez l’alimentation électrique
du four. Laissez l’ampoule refroidir complètement avant de
ODUHWLUHU3RXUYRWUHVpFXULWpQHWRXFKH]SDVjXQHDPSRXOH
chaude avec un linge humide. L'ampoule pourrait éclater.
'pEUDQFKH]O¶DOLPHQWDWLRQpOHFWULTXHGXIRXUDYDQWGH
changer l’ampoule.
2. Retirez le couvercle en verre du support d’ampoule en le
dévissant dans le sens contraire des aiguilles.
3. Retirez l’ampoule et remplacez-la par une neuve qui résiste
DX[KDXWHVWHPSpUDWXUHV&)HWSUpVHQWHOHV
FDUDFWpULVWLTXHVVXLYDQWHV7HQVLRQ93XLVVDQFH
:&XORW*7\SHG¶pFODLUDJH+DORJqQH
4. Replacez le couvercle en verre en le vissant dans le sens
des aiguilles.
5. Rétablissez l’alimentation électrique du four.
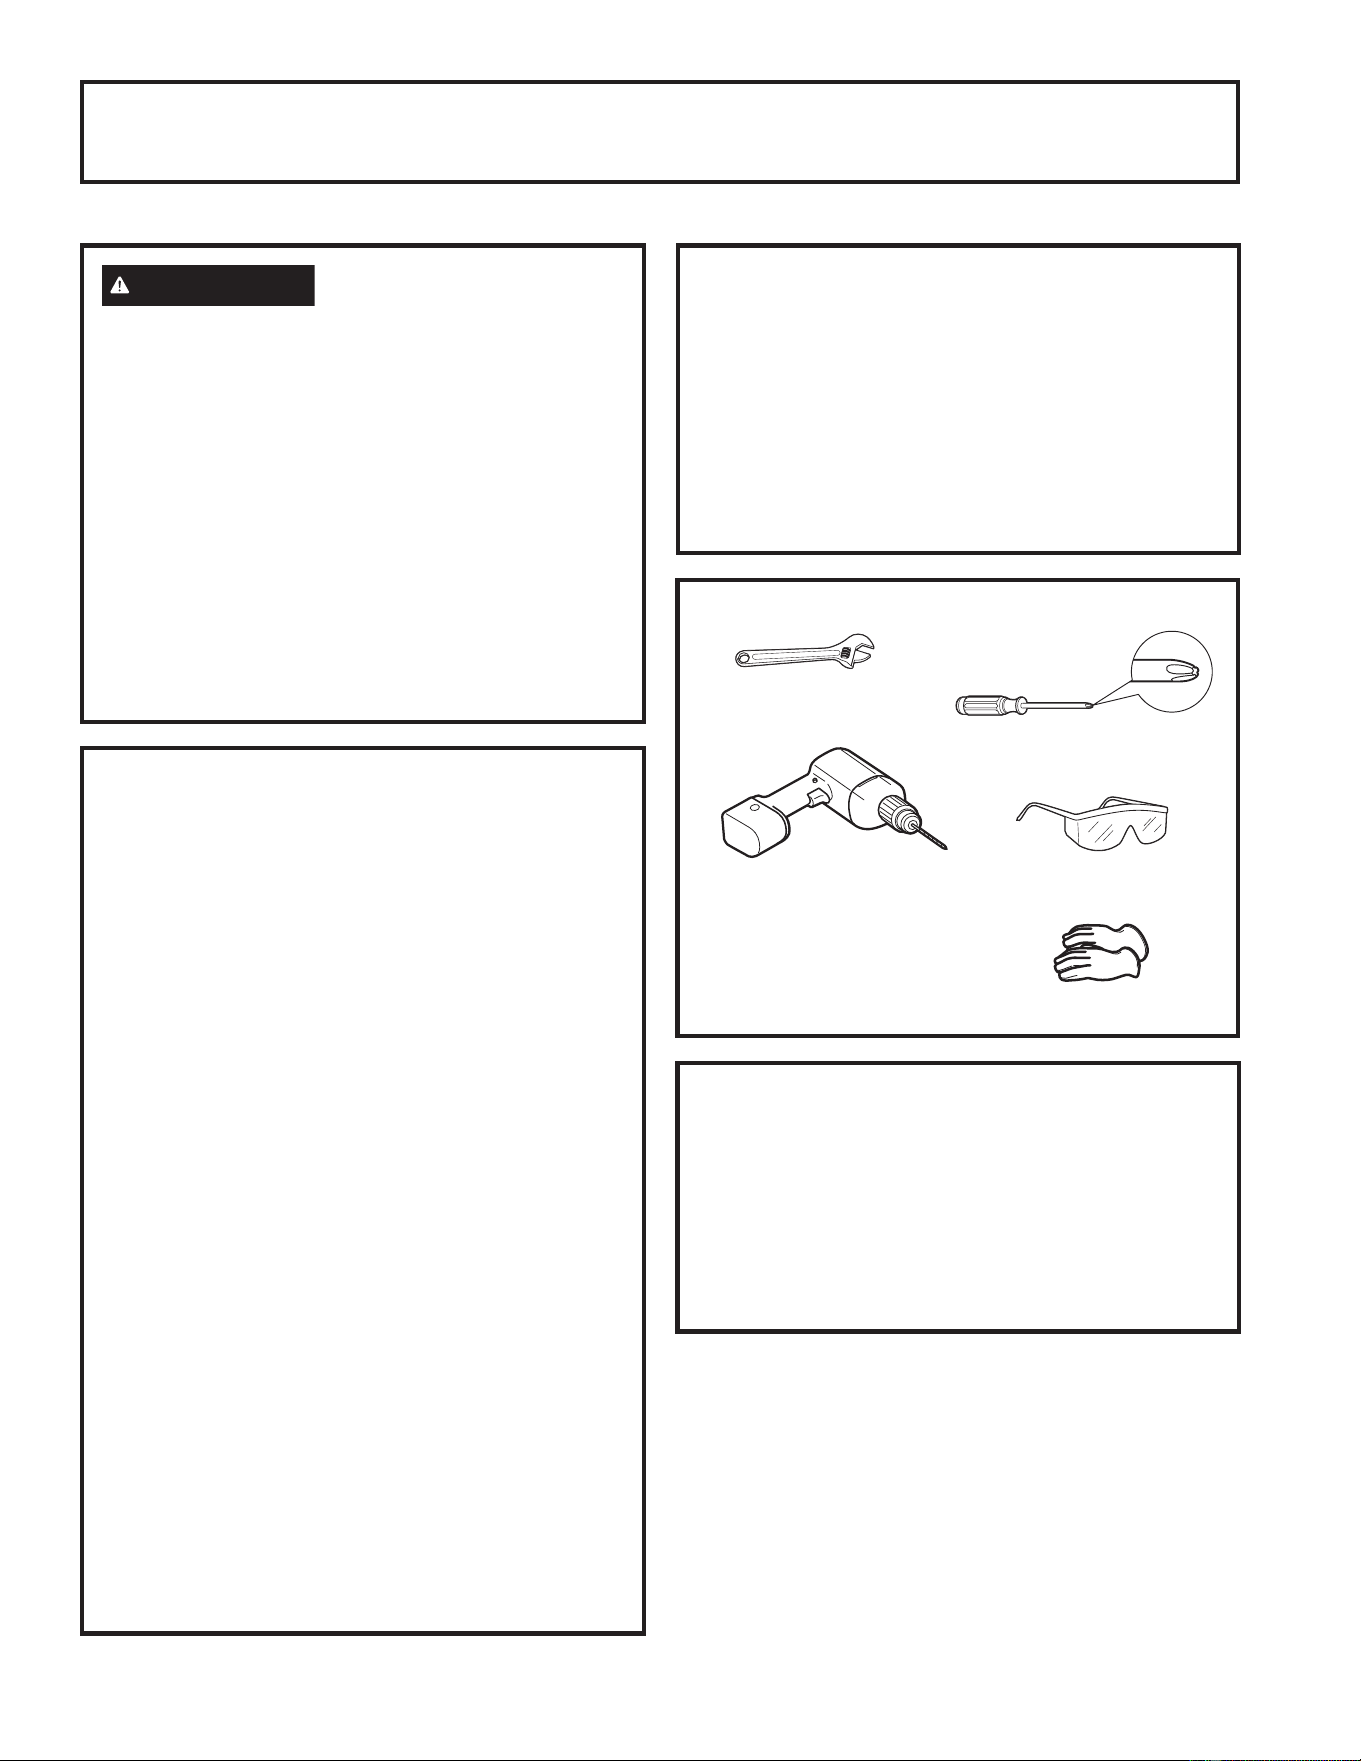
49-2001566 Rev. 1
INSTRUCTIONS D'INSTALLATION
QU’Y A-T-IL DANS LA BOÎTE?
Assurez-vous d’avoir tous les articles suivants dans
l’emballage. Si un article est endommagé ou manquant,
contactez votre concessionnaire.
Ɣ)RXUGHFXLVLQLqUH[
Ɣ*ULOOHGHWDEOHGHFXLVVRQJULOOHGHVEUOHXUV[
Ɣ*ULOOHGHFXLVVRQJULOOHGHIRXU[
Ɣ9LVjERLVQR[SR[
Ɣ0DQXHOGHO¶XWLOLVDWHXUHWLQVWUXFWLRQVGLQVWDOODWLRQ[
OUTILS DONT VOUS AUREZ BESOIN
MATÉRIEL DONT VOUS AUREZ BESOIN
Ŷ6FHOODQWjMRLQWVSRXUWX\DX[RXUXEDQjMRLQWVSRXU
WX\DX[DSSURXYp8/DYHF7HIORQTXLUpVLVWHjO¶DFWLRQGHV
gaz naturel et propane
Ŷ'pWHFWHXUGHIXLWHOLTXLGHRXHDXVDYRQQHXVH
Ŷ7X\DXG¶DOLPHQWDWLRQHQSURSDQHDYHFUDFFRUGpYDVp
IHPHOOHSR
7HIORQ0DUTXHGpSRVpHGH'X3RQW
Instructions d’installation
'HVTXHVWLRQV"9LVLWH]*($SSOLDQFHVFRP$X&DQDGDYLVLWH](OHFWURPHQDJHUV*(FD
AVANT DE COMMENCER
IMPORTANT — Conservez ces
LQVWUXFWLRQVjO¶XVDJHGHO¶LQVSHFWHXUORFDO
IMPORTANT — Observez tous les codes
et règlements en vigueur.
IMPORTANT — Retirez tout le matériel
d’emballage et la documentation du four avant de
raccorder les alimentations en électricité et en gaz sur
la cuisinière.
IMPORTANT — Assurez-vous, auprès de
votre entrepreneur ou votre fournisseur d’armoires,
que les matériaux utilisés n’endommageront pas vos
armoires par décoloration, délaminage ou autrement.
La conception de ce four a été réalisée conformément
aux exigences des organismes de certification CSA
,QWHUQDWLRQDOUHODWLYHVjXQHWHPSpUDWXUHPD[LPDOH
DGPLVVLEOHGH)&SRXUOHVDUPRLUHVHQ
bois.
Note à l’installateur – Assurez-vous de laisser ces
instructions au consommateur.
Note au consommateur - Conservez ces instructions
pour référence ultérieure.
L'exactitude de l'installation est la responsabilité de
l’installateur.
La garantie ne couvre pas les défectuosités du
produit causées par une installation incorrecte.
7RXUQHYLVjSRLQWH
cruciforme
&OpUpJODEOH
Perceuse électrique avec foret
SR
Lunettes de
protection
Gants
AVERTISSEMENT
Certains appareils de
GpWHFWLRQVRQWUHTXLVGDQVOHVYpKLFXOHV
UpFUpDWLIVVHORQODQRUPHGHOD1)3$
L’équipement requis doit être approuvé pour
O¶XVDJHLQWpULHXUGHVYpKLFXOHVUpFUpDWLIVSDU
la UL. Installez et utilisez un tel équipement
conformément aux instructions du fabricant.
Détecteur de fumée – /HFKDSLWUHLQGLTXHTXH
WRXVOHVYpKLFXOHVUpFUpDWLIVGRLYHQWrWUHpTXLSpV
d’un détecteur de fumée.
Détecteur de fumée – /HFKDSLWUHLQGLTXHTXH
WRXVOHVYpKLFXOHVUpFUpDWLIVGRLYHQWrWUHpTXLSpV
d’un détecteur de fumée.
Détecteur de gaz propane - Le chapitre 6.3.3
LQGLTXHTXHWRXVOHVYpKLFXOHVUpFUpDWLIVGRLYHQWrWUH
équipés d’un détecteur de gaz propane.

49-2001566 Rev. 1
Instructions d’installation
INSTRUCTIONS D'INSTALLATION
DIMENSIONS DES DÉCOUPES D’ARMOIRE ET DE COMPTOIR
Assurez-vous que l’armoire et le comptoir satisfont les exigences du tableau avant d’installer le four de cuisinière.
REMARQUE : /¶DUULqUHHWOHVF{WpVGHODFXLVLQLqUHVRXVOHGHVVXVGXFRPSWRLUSHXYHQWrWUHjpJDOLWpDYHFOHVDUPRLUHV
/HIRXUGRLWrWUHHQFDGUpRXVRXVFDFKHDILQGHSUpYHQLUODFUpDWLRQG¶HVSDFHGHUDQJHPHQWDXWRXUGHODSDUWLHHQUHWUDLWGH
l’appareil.
Modèle A (prof.) B (Larg.) C (Haut.) D (surplomb) E (épaiss.)
3/'57 SR SR SRPLQ SRPD[ SRPD[
3/'57 SR SR SRPLQ SRPD[ SRPD[
A
B
C
E
D
B
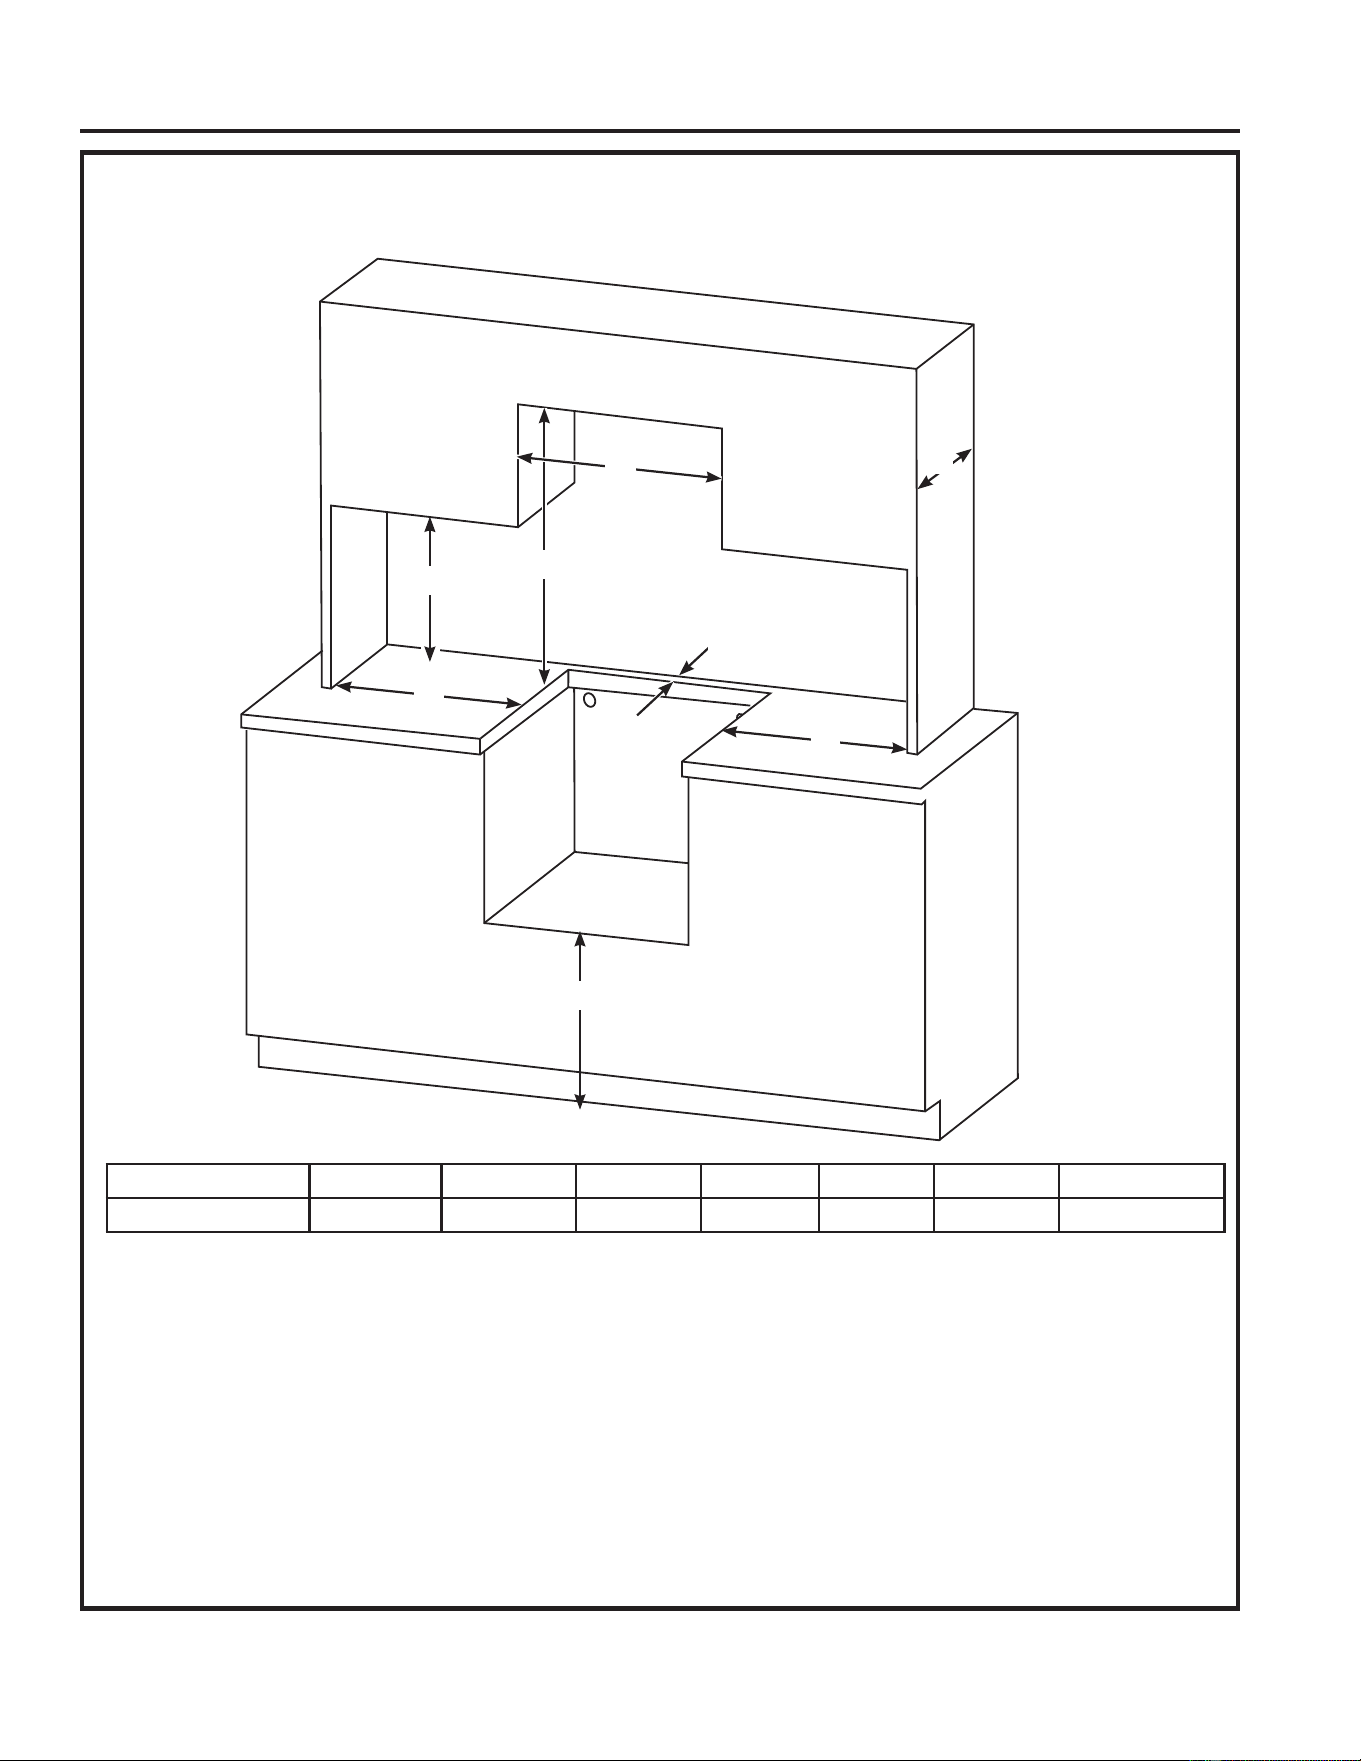
49-2001566 Rev. 1
Instructions d’installation
DÉGAGEMENTS POUR L’INSTALLATION
Assurez-vous que l’armoire et le comptoir satisfont les exigences du tableau avant d’installer le four de cuisinière.
A : /DLVVH]XQGpJDJHPHQWYHUWLFDOPLQLPXPGHSRHQWUH
le dessus de comptoir et la construction au-dessus de
l’appareil ménager. Pour d’autres espaces verticaux
DOWHUQDWLIVFRQVXOWH]ODQRUPHGHOD1)3$OH
tableau 5.6.6.5 pour connaître les exigences de la hotte.
B :/DLVVH]XQGpJDJHPHQWYHUWLFDOPLQLPXPGHSRHQWUH
OHGHVVXVGHFRPSWRLUHWODFRQVWUXFWLRQFRPEXVWLEOHjOD
gauche et la droite de l’appareil.
C : La profondeur admissible maximale des armoires du
GHVVXVHVWGHSR6LODSURIRQGHXUGHO¶DUPRLUH
VXSpULHXUHHVWGHSOXVGHFPSRFRQVXOWH]
ODQRUPHGHOD1)3$OHWDEOHDXSRXU
connaître les exigences de la hotte.
D : Laissez un dégagement horizontal minimum de 2
po entre la découpe de l’appareil et la construction
FRPEXVWLEOHTXLV¶pWHQGGHODVXUIDFHGHFXLVVRQMXVTX¶j
SRDXGHVVXV
E : Laissez un dégagement minimal de 2 po entre la
construction combustible adjacente et l’arrière de la
découpe de l’appareil.
F : La distance verticale minimum entre le plancher et le bas
de la découpe d’armoire est de 4 po.
G :/DODUJHXUGXGpJDJHPHQWYHUWLFDO$QHGRLWSDVrWUH
LQIpULHXUHjSR
A
G
B
F
D
D
C
E
0RGqOHV ABCDEF G
7RXVOHVPRGqOHV SRPLQ SRPLQ SRPD[ 2 po min 2 po min 4 po min. SRPLQ
INSTRUCTIONS D'INSTALLATION
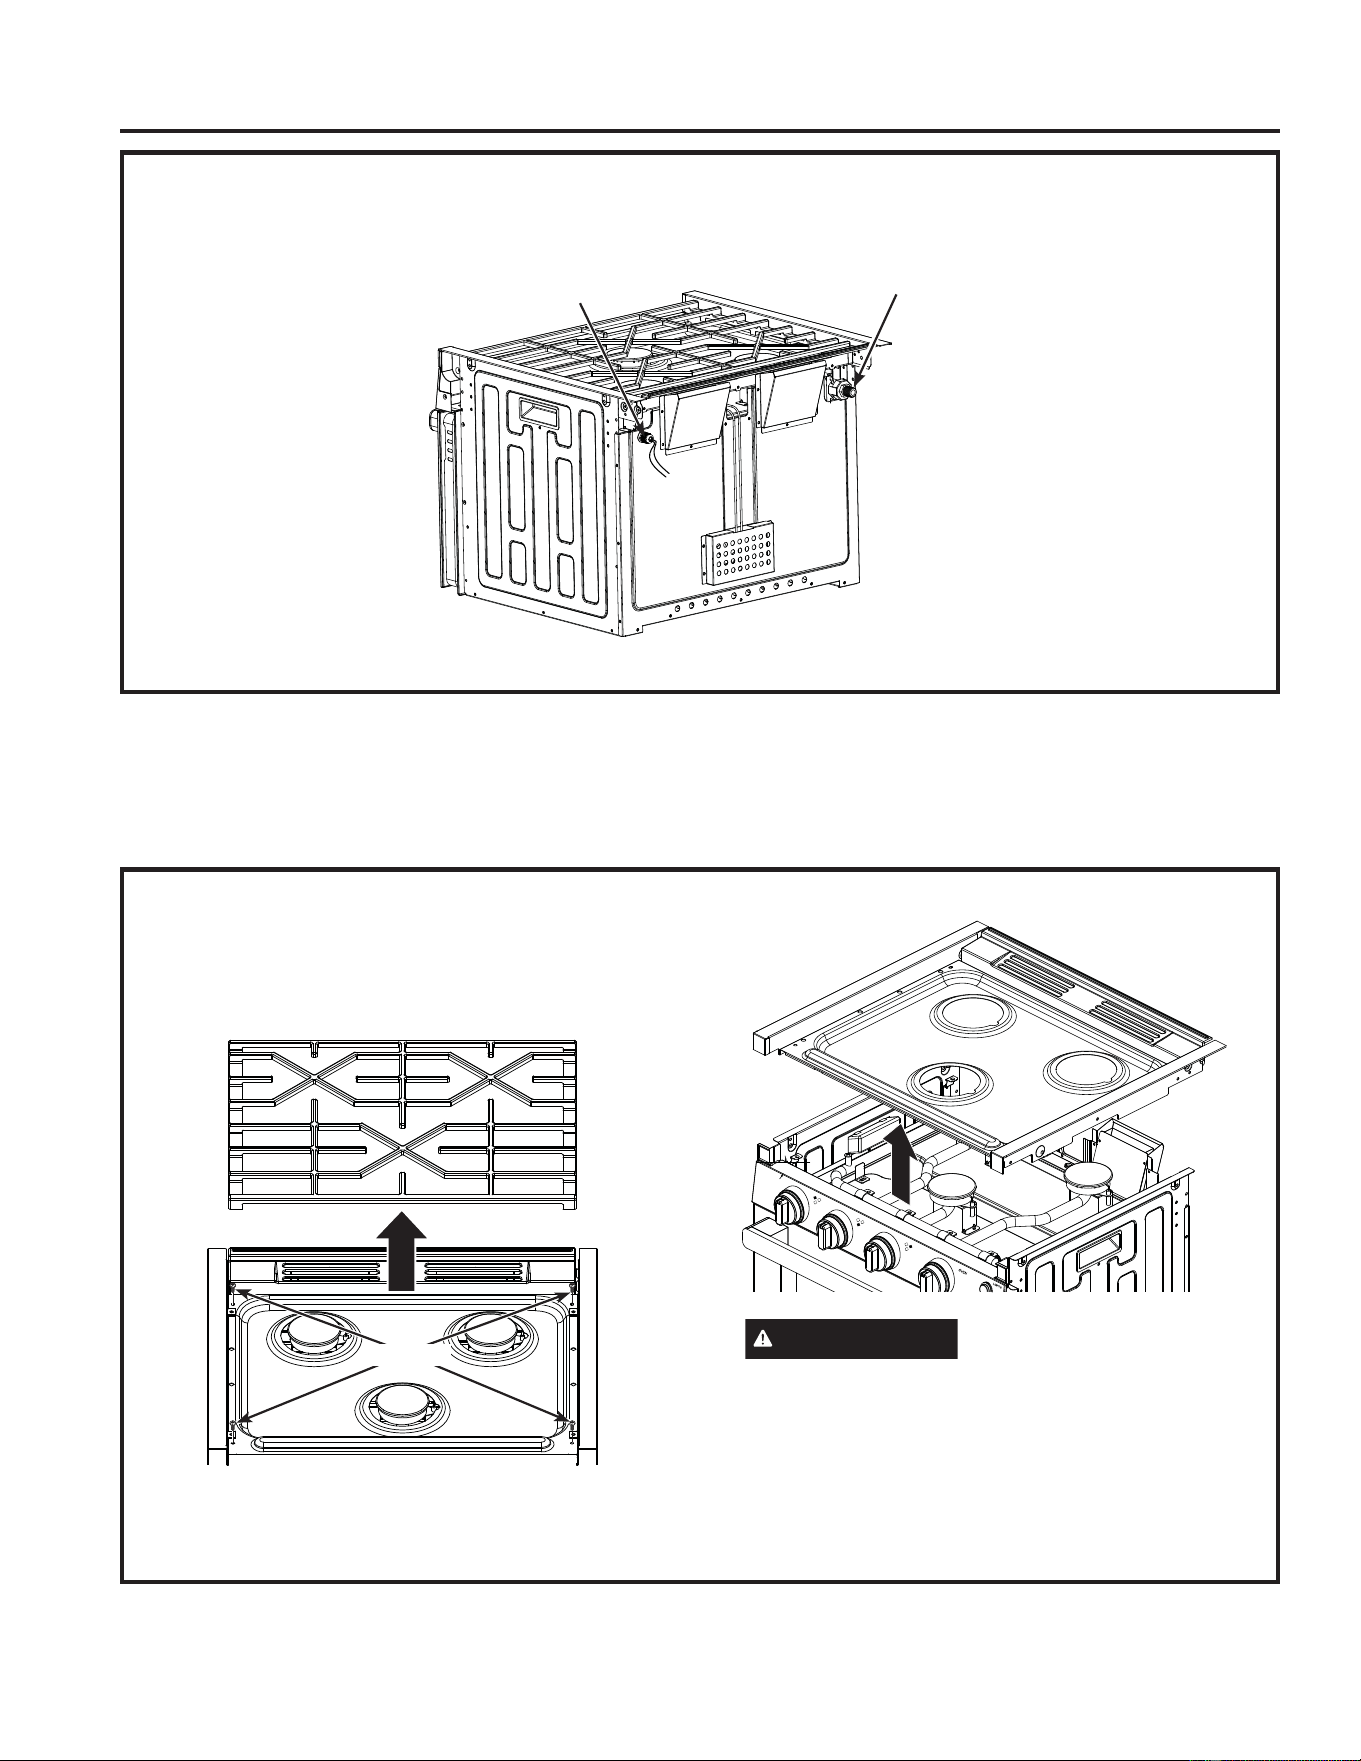
49-2001566 Rev. 1
EMPLACEMENTS DES CONNEXIONS DE GAZ ET D’ALIMENTATION
ÉLECTRIQUE
Instructions d’installation
INSTRUCTIONS D'INSTALLATION
PRÉPARATION DU FOUR
Ŷ Sortez le four de cuisinière de la boîte et placez-le sur
une surface plate. Retirez le matériel d’emballage.
Ŷ Soulever la grille des brûleurs pour la retirer de la table
de cuisson.
Ŷ5HWLUH]OHYLVGHODWDEOHGHFXLVVRQjO¶DLGHG¶XQ
WRXUQHYLVjSRLQWHFUXFLIRUPHSXLVVRXOHYH]ODWDEOH
pour la retirer. e.
AVERTISSEMENT
Prenez soin de ne pas
endommager ni modifier la tuyauterie de gaz sous la
table de cuisson. Autrement cela pourrait entraîner un
risque d’incendie ou d'explosion.
Ŷ Soulevez la cuisinière par les poignées latérales et
placez-la dans l’ouverture de l’enceinte. Glissez la
FXLVLQLqUHYHUVOHIRQGMXVTX¶jFHTXHOHVUHERUGV
frontaux de sa cavité touchent la face des armoires.
INSTALLATION DE LA CUISINIÈRE AVEC FOUR
REMARQUE : Avant de commencer l’installation, portez des gants et des lunettes de protection.
$YDQWGHUpDOLVHUOHVpWDSHVVXLYDQWHVO¶HQFHLQWHGRLWrWUHGpFRXSpHDX[GLPHQVLRQVSUHVFULWHVHWOHVDOLPHQWDWLRQVpOHFWULTXHHWHQ
JD]GRLYHQWrWUHHQSODFH
Connexion de
l’alimentation en propane
Connexion de
l’alimentation électrique
Retire la grille
6FUHZV
27°
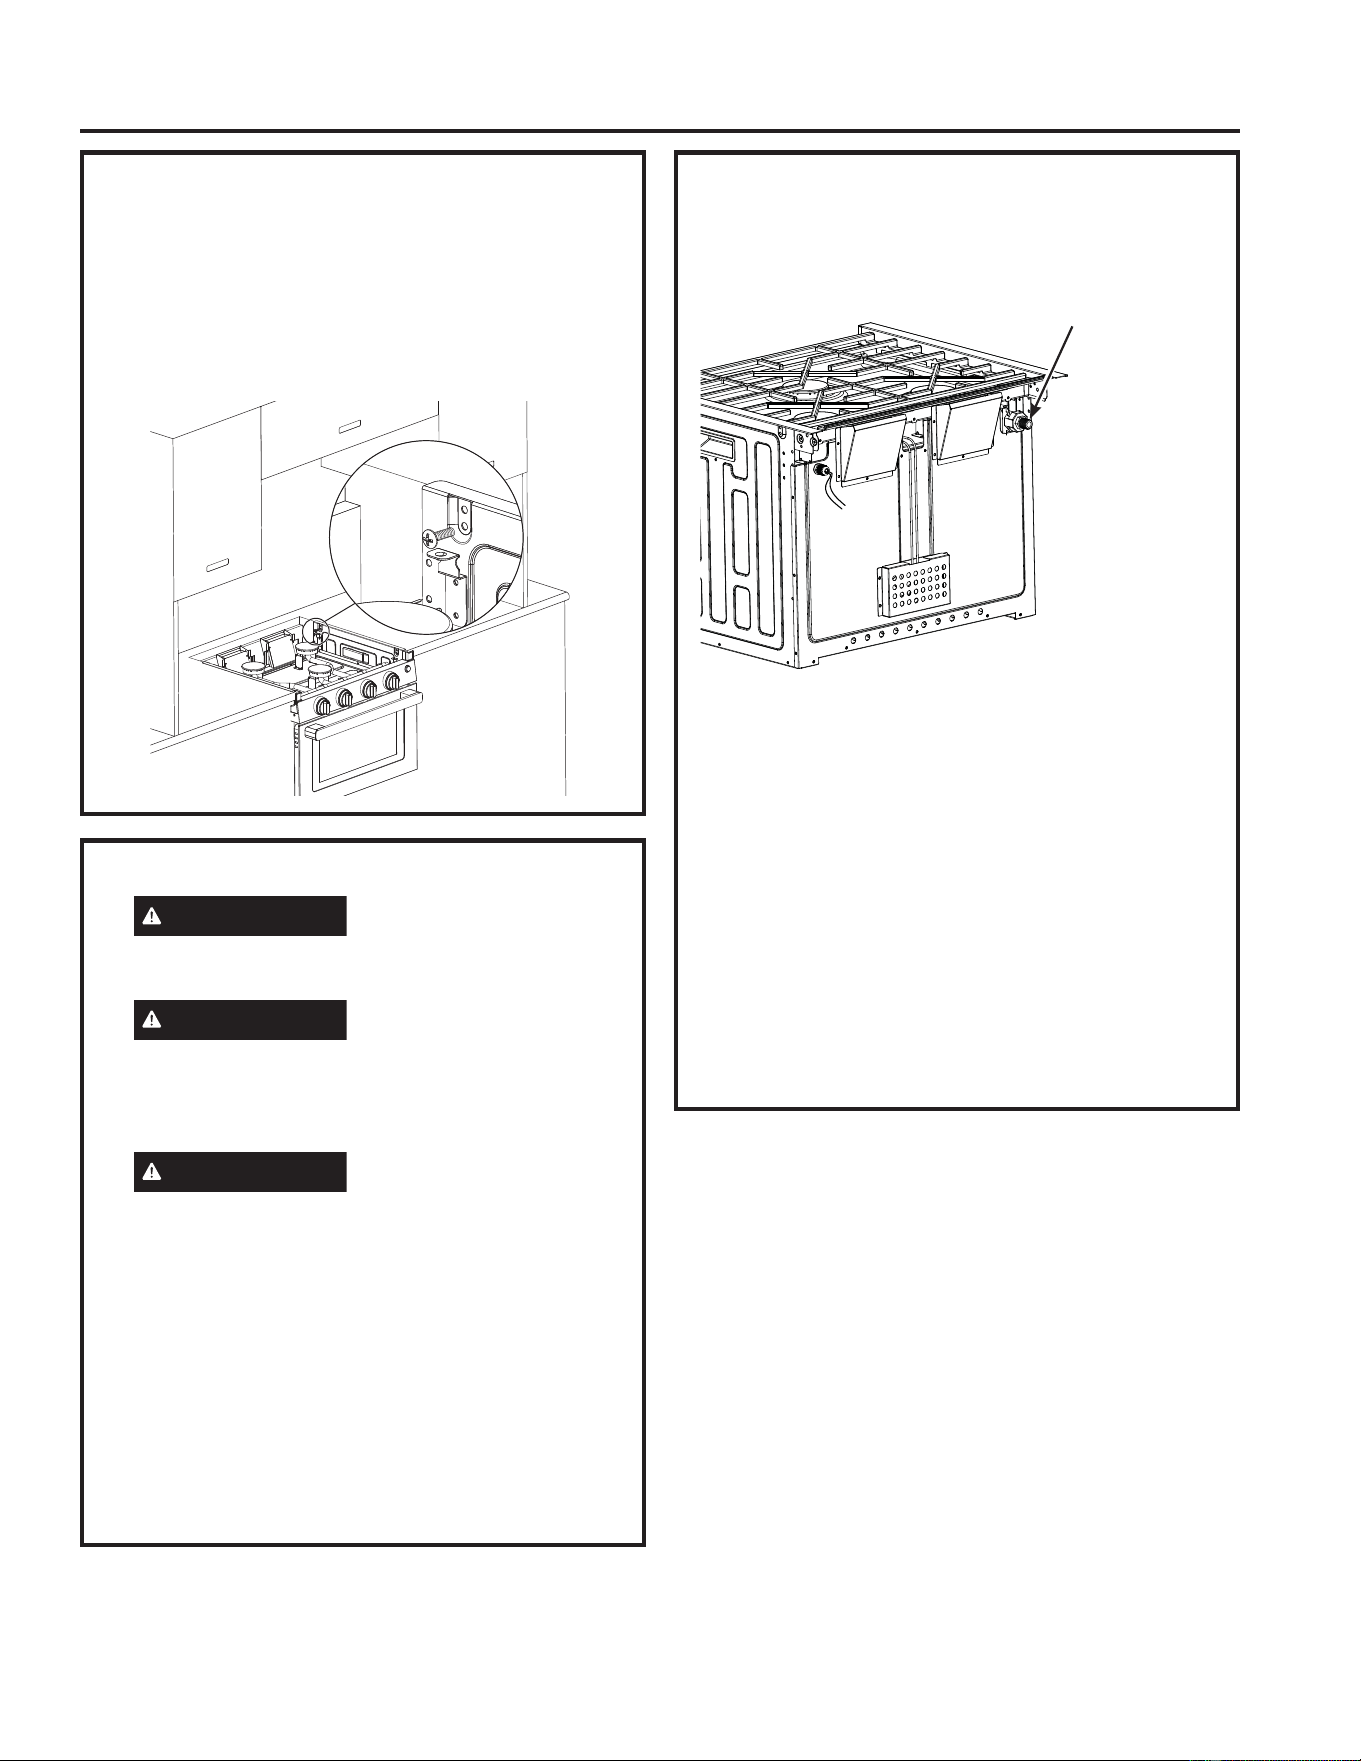
49-2001566 Rev. 1
Instructions d’installation
PRÉPARATION DU FOUR (suite)
Ŷ Fixez la cuisinière dans l’enceinte en installant
quatre vis dans le comptoir. Installez 2 vis par
côté en utilisant les positions de trous préférées
en fonction de la construction du comptoir. Si le
comptoir est composé de bois, percez des trous
GHJXLGDJHDYHFXQIRUHWSR,QVWDOOH]OHVYLV
fournies dans les trous pour fixer l’appareil.
ALIMENTATION EN GAZ (suite)
8WLOLVH]XQUDFFRUGFRQLTXHIHPHOOHGHSRSRXU
connecter le tuyau de gaz propane sur le régulateur
dans le coin arrière supérieur droit de l’appareil.
6HUUH]OHWX\DXGHJD]VXUOHUpJXODWHXUjO¶DLGHGH
clés.
IMPORTANT : Laissez suffisamment d’espace
autour du tuyau de gaz en cas de courbement ou de
dommages pendant l’installation. Assurez-vous que le
tuyau de gaz ne peut pas toucher aux pièces mobiles
après l’installation.
/RUVTXHYRXVXWLOLVH]XQHSUHVVLRQVXSpULHXUHj
SVLN3DSRXUWHVWHUOHV\VWqPHG¶DOLPHQWDWLRQ
en gaz du VR, déconnectez la cuisinière et le
URELQHWG¶DUUrWLQGLYLGXHOGXWX\DXGHJD]/RUVTXH
YRXVXWLOLVH]XQHSUHVVLRQGHSVLN3DRX
inférieure pour tester le système d’alimentation en gaz
du VR, isolez simplement la cuisinière du système
G¶DOLPHQWDWLRQHQJD]HQIHUPDQWOHURELQHWG¶DUUrW
individuel.
ALIMENTATION EN GAZ
AVERTISSEMENT
Risque d’incendie :
N’utilisez pas une flamme pour vérifier l’absence
de fuites.
AVERTISSEMENT
Risque d'explosion : Le
FRXSOHGHVHUUDJHQHGRLWSDVH[FpGHUSLOE
lors de la connexion du tuyau de gaz. Un serrage
excessif peut fissurer le régulateur de pression et
poser un risque d’incendie ou d'explosion.
AVERTISSEMENT
Les fuites de gaz ne
se détectent pas seulement à l’odeur. Les
IRXUQLVVHXUVGHJD]UHFRPPDQGHQWO¶DFKDWHW
l’installation d’un détecteur de gaz approuvé par
l’UL. Installez et utilisez-le conformément aux
instructions du fabricant.
Régulateur de pression de gaz
Vous devez utiliser le régulateur de pression de gaz
propane fourni avec cette cuisinière. Pour un bon
fonctionnement, la pression d’entrée au régulateur doit
se mesurer comme suit :
3UHVVLRQPLQLPDOHSRGHFRORQQHG¶HDX
3UHVVLRQPD[LPDOHSRGHFRORQQHG¶HDX
INSTRUCTIONS D'INSTALLATION
Connexion du tuyau
de gaz propane
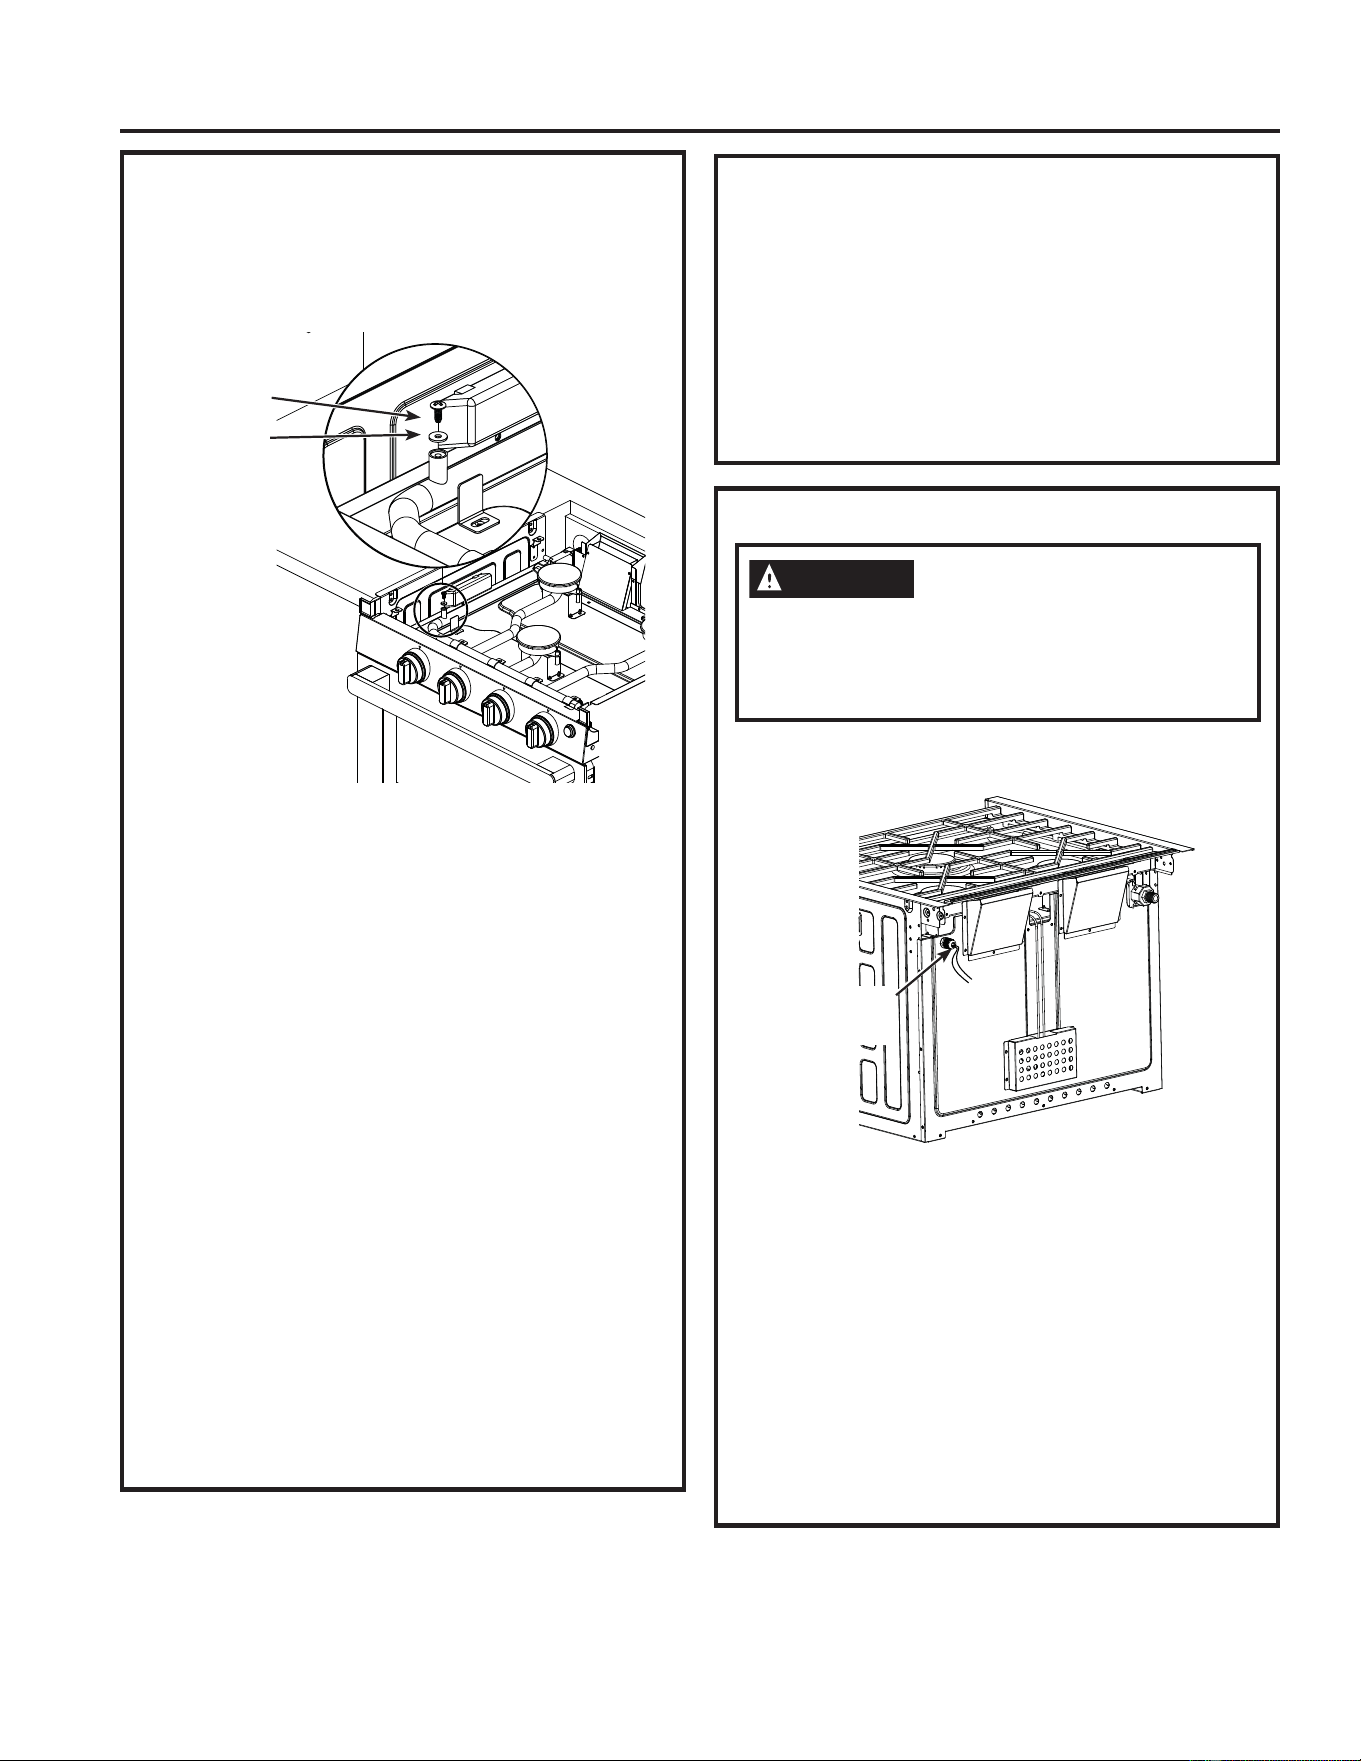
49-2001566 Rev. 1
Instructions d’installation
INSTRUCTIONS D'INSTALLATION
3. VÉRIFICATION DE LA PRESSION
Ŷ$VVXUH]YRXVTXHOHJD]SURSDQHjODFXLVLQLqUHHVW
bien fermé.
Ŷ Retirez la vis et la rondelle d'étanchéité de l’orifice
de test de pression de la cuisinière.
Ŷ*OLVVH]OHWXEHHQFDRXWFKRXFGXPDQRPqWUHGH
pression du gaz vers le bas sur l’orifice de test
GHSUHVVLRQ/HWXEHHQFDRXWFKRXFGRLWrWUHELHQ
étanche autour de l’orifice de test.
Ŷ2XYUH]O¶DOLPHQWDWLRQHQJD]SURSDQHGHOD
cuisinière.
Ŷ/HPDQRPqWUHGHSUHVVLRQGXJD]GRLWPHVXUHU
HQWUHSR&(HWSR&(
Ŷ)HUPH]O¶DOLPHQWDWLRQHQJD]SURSDQHGHOD
cuisinière.
Ŷ5HWLUH]OHWXEHHQFDRXWFKRXFGXPDQRPqWUHGH
pression du gaz.
Ŷ5HSODFH]ODURQGHOOHG¶pWDQFKpLWpHWODYLVUHWLUpHV
plus tôt. Avant de replacer la vis, vérifiez que la
rondelle d’étanchéité ne comporte aucun signe de
détérioration.
Ŷ9LVVH]ODYLVjODPDLQHQSUHQDQWVRLQGHQHSDV
endommager la rondelle d’étanchéité.
REMARQUE : Après le test de pression, assurez-
vous de l’absence de fuites autour de la vis et de
la rondelle d’étanchéité de l’orifice de test. Si une
fuite est détectée autour de la vis et de la rondelle,
vous devez les remplacer. Appelez GE Appliances
DXSRXUYRXVSURFXUHUFHVSLqFHVGH
rechange.
RACCORDEMENT ÉLECTRIQUE
Le câblage électrique est situé dans le coin supérieur
gauche de la face arrière de la cuisinière.
&RQQHFWH]XQILOG¶DOLPHQWDWLRQpOHFWULTXH9SRVLWLIj
XQILO9QRLUGHODFXLVLQLqUHHWXQILOG¶DOLPHQWDWLRQ
pOHFWULTXH9QpJDWLIjXQILO9EODQFGHOD
FXLVLQLqUH/¶DSSHOGHFRXUDQWPD[LPDOHVWPRLQVGH
ampère.
REMARQUE : Assurez-vous de connecter des fils
GHERQQHSRODULWp1RLUHVW©ªHWEODQFHVW©ª
Assurez-vous que les connexions électriques sont
correctement fixées.
Assurez-vous que les cordons d’alimentation électrique
sont débranchés ou que l’alimentation électrique est
coupée depuis le fusible ou le disjoncteur principal de
ODERLWHpOHFWULTXHDYDQWGHSURFpGHUjODUpSDUDWLRQGH
l’appareil ménager.
4. VÉRIFICATION DES FUITES
Ŷ$VVXUH]YRXVTXHWRXVOHVERXWRQVGHFRPPDQGH
VRQWGDQVODSRVLWLRQG¶DUUrW2))
Ŷ$SSOLTXH]GXOLTXLGHGHGpWHFWLRQGHVIXLWHVGHJD]
VXUOHVUDFFRUGV7RXWHIXLWHVHUDUpYpOpHSDUOD
présence de bulles.
Ŷ6LXQHIXLWHGHJD]HVWGpWHFWpHVHUUH]OHMRLQWOkFKH
ou remplacez la pièce défectueuse par une pièce
de rechange recommandée par un revendeur GE
Appliances autorisé.
ATTENTION
RISQUE DE DOMMAGE AU
PRODUIT
•&RQQHFWH]YRXVjXQHWHQVLRQ9&&VHXOHPHQW
• Connectez-vous seulement à un circuit dont la
SURWHFWLRQSDUIXVLEOHQHGpSDVVHSDVDPSqUHV
Connexion de
l’alimentation
électrique
Vis
Rondelle
d’étanchéité
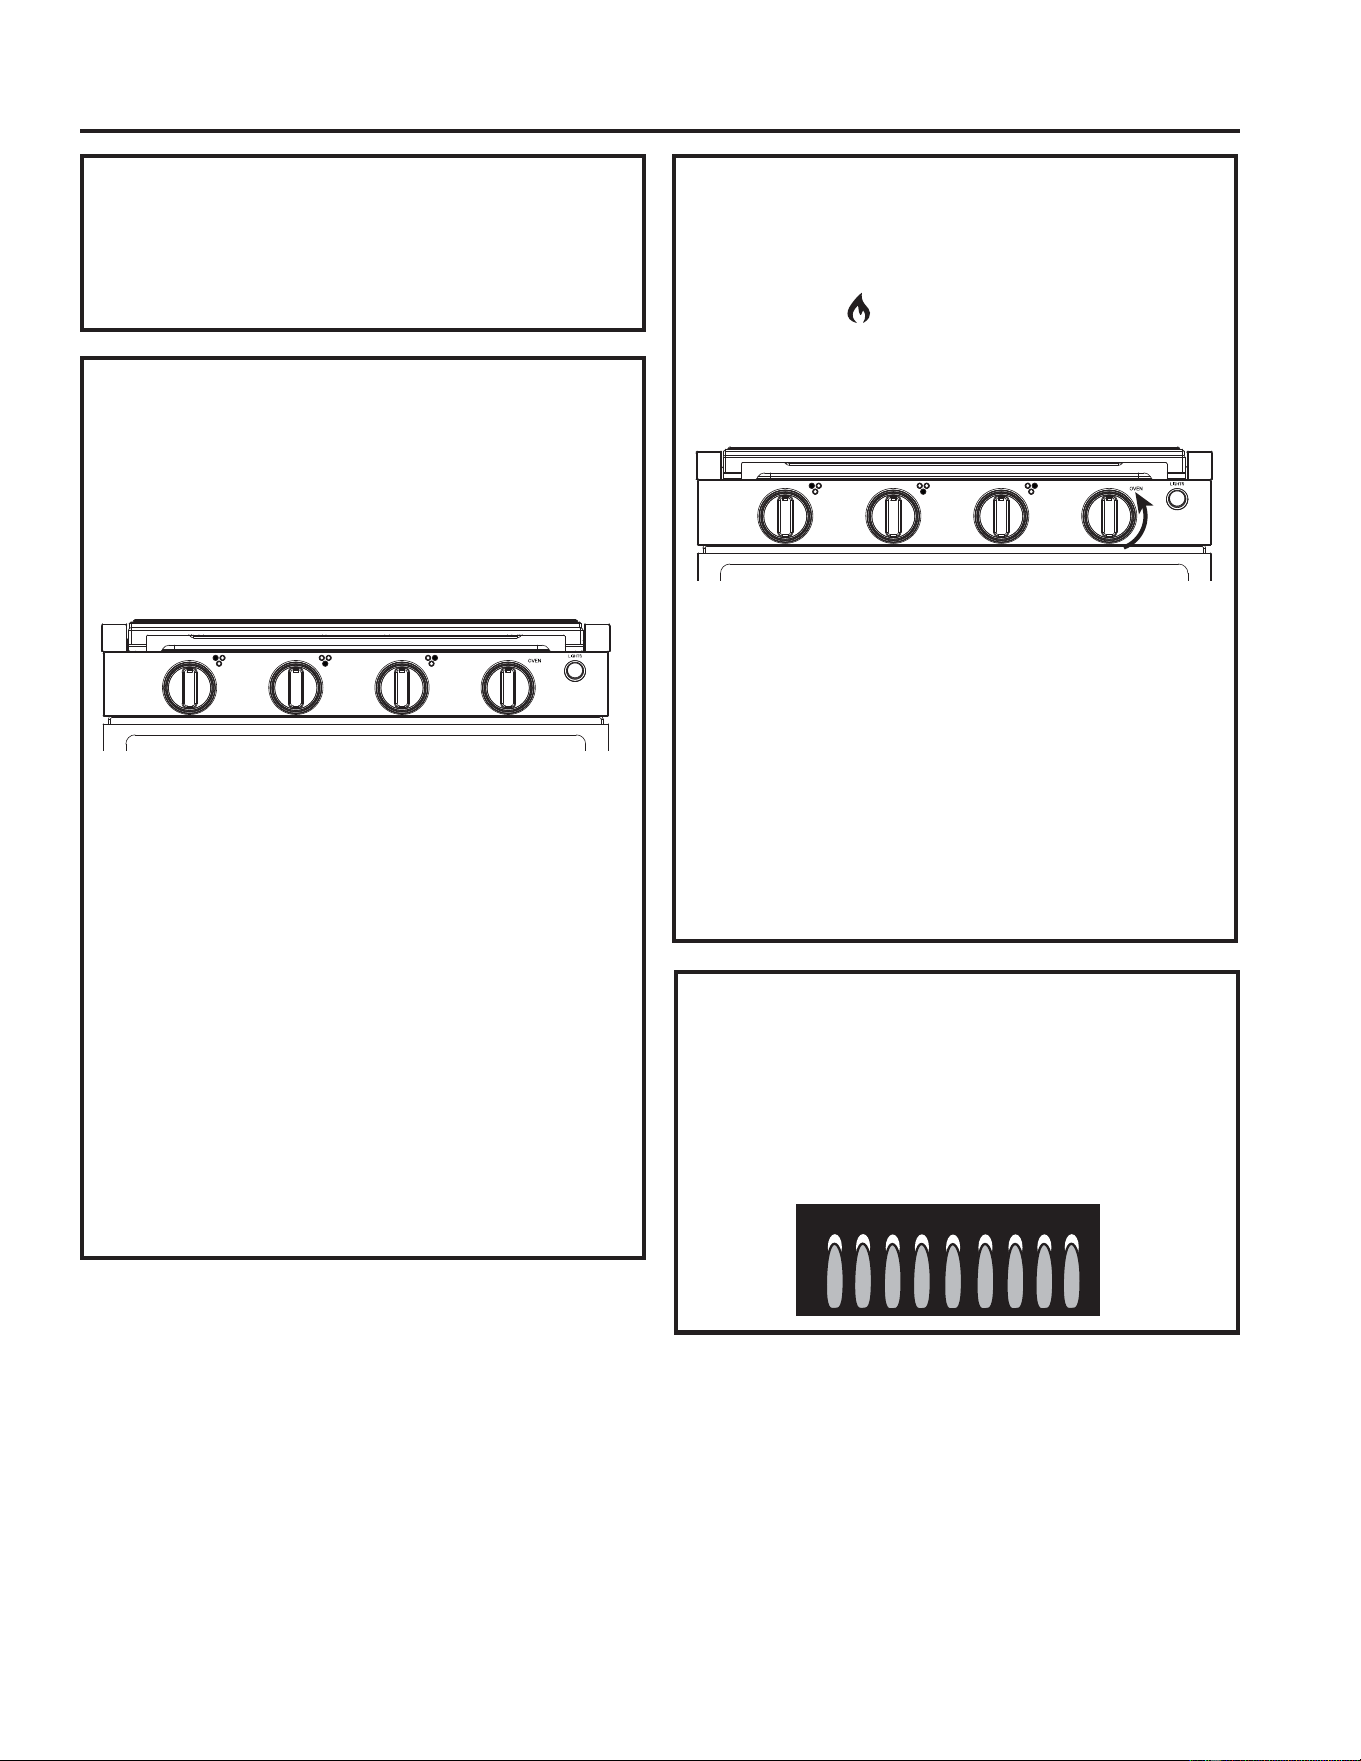
49-2001566 Rev. 1
Instructions d’installation
INSTRUCTIONS D'INSTALLATION
6. REPLACER LA TABLE DE
CUISSON
Remettez la table de cuisson dans sa position initiale
HWXWLOLVH]XQWRXUQHYLVjSRLQWHFUXFLIRUPHSRXUODIL[HU
DYHFOHVYLVUHWLUpHVjO¶pWDSH
QUALITÉ DE LA FLAMME
Les flammes des brûleurs de la table de cuisson et du
IRXUGRLYHQWrWUHEOHXHVDYHFGHVSRLQWHVMDXQHV'HV
flammes vives et longues ne sont pas normales. Des
flammes normales peuvent présenter des signes d’une
teinte orange lorsqu’elles sont bien chauffées ou des
signes d’un vacillement orange en raison de particules
dans le gaz ou l’air.
7. TESTEZ LES BRÛLEURS DE LA
TABLE DE CUISSON
Ŷ Poussez et tournez le bouton de commande
du brûleur approprié dans le sens contraire des
DLJXLOOHVjODSRVLWLRQ+,MXVTX¶jFHTXHOHEUOHXU
s’allume. S’il y a présence d’air dans le tuyau de
JD]LOSHXWV¶pFRXOHUMXVTX¶jXQHPLQXWHSRXUOD
purger et allumer la veilleuse.
8QHIRLVOHEUOHXUDOOXPpFRQWLQXH]GHSRXVVHU
OHERXWRQGXUDQWVHFRQGHVMXVTX¶jFHTXHOH
capteur de flamme soit réchauffé.
Ŷ La flamme peut apparaître jaune durant quelques
secondes, puis elle devrait devenir bleue. Si
le brûleur continue de générer une flamme
principalement ou complètement jaune, voyez la
VHFWLRQ©'pSDQQDJHªRXFRQWDFWH]XQWHFKQLFLHQ
en réparation qualifié.
Ŷ7RXUQH]OHERXWRQGHFRPPDQGHGXEUOHXUMXVTX¶j
/2EDV$VVXUH]YRXVTXHODIODPPHHQWRXUH
complètement le brûleur. Il doit y avoir une flamme
aux orifices du brûleur et aucun espace d’air entre
la flamme et le brûleur. Si le brûleur ne correspond
SDVjFHFULWqUHYR\H]ODVHFWLRQ©'pSDQQDJHªRX
contactez un technicien en réparation qualifié.
Ŷ Répétez ces étapes pour tester chaque brûleur.
8. TESTER LE BRÛLEUR DU FOUR
Ŷ7LUH]ODSRLJQpHGXIRXUSRXURXYULUODSRUWH
Ŷ Poussez et tournez le bouton de commande du
IRXUGDQVOHVHQVFRQWUDLUHGHVDLJXLOOHVMXVTX¶j
la position
. Gardez le bouton de commande
GXIRXUHQIRQFpMXVTXjFHTXHODYHLOOHXVHGX
four soit allumée. S'il y a de l'air dans la conduite
GDOLPHQWDWLRQFHODSHXWSUHQGUHMXVTXjXQHPLQXWH
pour que l'air soit purgé et que la veilleuse du four
s'allume.
Ŷ8QHIRLVODYHLOOHXVHDOOXPpHPDLQWHQH]OHERXWRQ
GHFRPPDQGHGXIRXUHQIRQFpSHQGDQWDXPRLQV
VHFRQGHVMXVTXjFHTXHOHFDSWHXUGHODYHLOOHXVH
du four chauffe.
Ŷ5HOkFKH]OHERXWRQGHFRPPDQGHGXIRXUHWYpULILH]
visuellement que la veilleuse du four reste allumée.
Si la veilleuse du four s'éteint, répétez les points 2
et 3.
Ŷ7RXUQH]OHERXWRQGHFRPPDQGHGXIRXUjFKDTXH
température et inspectez la flamme du brûleur. Si la
flamme est principalement ou complètement jaune,
YR\H]ODVHFWLRQ©'pSDQQDJHªRXFRQWDFWH]XQ
technicien en réparation qualifié.

22 49-2001566 Rev. 1
Conseils de dépannage…Avant d’appeler un réparateur
CONSEILS DE DÉPANNAGE
Problème Cause probable/Solution
Allumage absent ou incomplet des brûleurs
de surface.
Assurez-vous que les robinets de gaz sont ouverts, y compris celui du réservoir de
propane. S’il y a présence d’air dans la conduite d’alimentation, le délai de purge
SHXWGXUHUMXVTX¶jXQHPLQXWHDYDQWTXHOHEUOHXUV¶DOOXPH
$VVXUH]YRXVGHSUHVVHUOHERXWRQGHFRPPDQGHHWGHOHWRXUQHUjODSRVLWLRQ
+,WRXWHQWRXUQDQWOHERXWRQG¶DOOXPDJH9RXVGHYULH]HQWHQGUHOHFOLTXHWLVGX
système d’allumage lorsque le bouton est pressé. Continuez de presser durant
DXPRLQVVHFRQGHVMXVTX¶jFHTXHOHFDSWHXUGHIODPPHVRLWUpFKDXIIp
La pression de gaz est soit trop basse, soit trop élevée.
/HVRULILFHVGXEUOHXURXGHODYHLOOHXVHVRQWWURSHQFUDVVpV9R\H]ODUXEULTXH©
7rWHVGHVEUOHXUVªGDQVODVHFWLRQ(QWUHWLHQHWQHWWR\DJH
Présence d'humidité sur le brûleur. En vous assurant qu’il est éteint et refroidi,
VpFKH]OHEUOHXUjIRQG
Le brûleur du four ne s’allume pas. Assurez-vous que les robinets de gaz sont ouverts, y compris celui du
réservoir de propane.
S’il y a présence d’air dans la conduite d’alimentation, le
GpODLGHSXUJHSHXWGXUHUMXVTX¶jXQHPLQXWHDYDQWTXHOHEUOHXUV¶DOOXPH
$VVXUH]YRXVGHSUHVVHUOHERXWRQGHFRPPDQGHGXIRXUORUVTX¶LOHVWj
ODSRVLWLRQG¶DOOXPDJHIODPPHV9RXVGHYULH]HQWHQGUHOHFOLTXHWLVGX
V\VWqPHG¶DOOXPDJHORUVTXHOHERXWRQHVWSUHVVp0DLQWHQH]ODSUHVVLRQGX
ERXWRQGXUDQWDXPRLQVVHFRQGHVSRXUSHUPHWWUHjODYHLOOHXVHGXIRXU
de s’allumer et au capteur de flammes de se réchauffer. Si le tuyau de gaz
contient de l’air, le processus peut prendre plus d’une minute.
La pression de gaz est soit trop basse, soit trop élevée.
Les flammes sont totalement ou
SULQFLSDOHPHQWMDXQHVRXRUDQJH
Des flammes normales peuvent présenter des signes d’une teinte orange
lorsqu’elles sont bien chauffées ou des signes d’un vacillement orange en raison de
particules de poussière dans le gaz ou l’air.
La pression de gaz est trop basse.
/HVRULILFHVGXEUOHXUVRQWHQFUDVVpV9R\H]ODUXEULTXH7rWHVGHVEUOHXUV
dans la section Entretien et nettoyage.
Je presse le bouton d’éclairage mais les
boutons de commande ne s’illuminent pas.
$VVXUH]YRXVTXHODFXLVLQLqUHHVWFRQQHFWpHjXQHDOLPHQWDWLRQpOHFWULTXH
9&&9R\H]ODVHFWLRQ©5DFFRUGHPHQWpOHFWULTXHªGDQVOHVLQVWUXFWLRQV
d'installation.
/HSDQQHDXG¶pFODLUDJH'(/RXO¶LQWHUUXSWHXUGRLWrWUHUHPSODFp&RQWDFWH]*(
Appliances pour une réparation.
Je presse le bouton d’éclairage mais
l’éclairage du four ne fonctionne pas.
$VVXUH]YRXVTXHODFXLVLQLqUHHVWFRQQHFWpHjXQHDOLPHQWDWLRQpOHFWULTXH
9&&9R\H]ODVHFWLRQ©5DFFRUGHPHQWpOHFWULTXHªGDQVOHVLQVWUXFWLRQV
d'installation.
,OIDXWUHPSODFHUODPSRXOHGXIRXU9R\H]ODUXEULTXH©eFODLUDJHGXIRXUª
dans la section Entretien et nettoyage.

49-2001566 Rev. 1 23
GARANTIE LIMITÉE
Brochez votre reçu ici. Pour obtenir le service sous garantie,
vous devez fournir la preuve de la date d’achat initial.
Garantie limitée
Ŷ8QHLQVWDOODWLRQXQHOLYUDLVRQRXXQHQWUHWLHQ
inadéquats. Si vous rencontrez un problème
G¶LQVWDOODWLRQFRQWDFWH]OHUHYHQGHXURXO¶LQVWDOODWHXU
Vous avez la responsabilité de fournir une installation
adéquate pour le raccordement électrique.
Ŷ8QHGpIHFWXRVLWpGXSURGXLWUpVXOWDQWG¶XQH
modification du produit ou d’une utilisation
déraisonnable y compris de l’omission d’effectuer un
entretien raisonnable et nécessaire.
Ŷ/DPDLQG¶°XYUHQpFHVVDLUHSRXUWUDQVSRUWHU
l’appareil à un emplacement où il pourra être
accessible aux fins de réparation ou d’entretien par
XQWHFKQLFLHQ
Ŷ/HUHPSODFHPHQWGHVIXVLEOHVGX95RXOH
UpDUPHPHQWGHVGLVMRQFWHXUV
Ŷ7RXWGRPPDJHRFFDVLRQQpSDUXQHWHQVLRQ
G¶DOLPHQWDWLRQpOHFWULTXHLQDSSURSULpHXQDFFLGHQW
XQLQFHQGLHXQHLQRQGDWLRQRXG¶DXWUHVFDWDVWURSKHV
naturelles.
Ŷ/HVGRPPDJHVVXUYHQXVDSUqVODOLYUDLVRQ
Ŷ
Formation en personne sur les produits.
Ce que GE Appliances ne garantit pas :
&HWWHJDUDQWLHOLPLWpHHVWDFFRUGpHDXSUHPLHUDFKHWHXUHWjWRXWSURSULpWDLUHVXFFHVVLIGXQYpKLFXOHUpFUpDWLI
SHUVRQQHORXGXQXVDJHVLPLODLUHDX[eWDWV8QLVHWDX&DQDGD6LOHSURGXLWHVWVLWXpGDQVXQHUpJLRQRXQ
UpSDUDWHXUGH95DXWRULVpQ¶HVWSDVGLVSRQLEOHQRXVSRXUULRQVYRXVGHPDQGHUG¶H[SpGLHUOHSURGXLWjXQFHQWUHGH
service GE Appliances autorisé pour les réparations.
&HUWDLQVeWDWVRXSURYLQFHVQHSHUPHWWHQWSDVOH[FOXVLRQRXODUHVWULFWLRQGHVGRPPDJHVDFFHVVRLUHVRXLQGLUHFWV
Certains droits particuliers vous sont dévolus en vertu de la présente garantie et peuvent s'accompagner d'autres
droits qui varient selon votre lieu de résidence. Pour connaître la nature exacte de vos droits, consultez l’organisme
GHSURWHFWLRQGXFRQVRPPDWHXUGHYRWUHUpJLRQRXHQFRUHOHEXUHDXGXSURFXUHXUJpQpUDOGHO¶eWDW
*DUDQW*($SSOLDQFHVa Haier company
/RXLVYLOOH.<
3RXUSURJUDPPHUXQHYLVLWHGHVHUYLFHFRPSRVH]OH
$\H]OHVQXPpURVGHVpULHHWGHPRGqOHjSRUWpHGHODPDLQDXPRPHQWGHIIHFWXHUO¶DSSHOGHVHUYLFH
EXCLUSION DES GARANTIES IMPLICITES — Votre seul et unique recours consiste dans la réparation du
SURGXLWWHOTXHVWLSXOpGDQVODSUpVHQWH*DUDQWLHOLPLWpH7RXWHJDUDQWLHLPSOLFLWH\FRPSULVOHVJDUDQWLHV
LPSOLFLWHVUHODWLYHVjODTXDOLWpPDUFKDQGHRXjO¶DGpTXDWLRQjXQXVDJHSDUWLFXOLHUVHOLPLWHUDjXQHSpULRGHGH
deux ans ou à la période la plus courte prescrite par la loi.
Durant la période de : GE Appliances remplacera :
Deux ans
À partir de la date d’achat
initial
Toute pièce de la cuisinière pour VR qui s’avère défectueuse en raison d’un vice de
fabrication ou de main-d'œuvre. Pendant cette JDUDQWLHOLPLWpHGHGHX[DQV,
GE Appliances couvrira aussi tous les frais de main-d'œuvre et de service connexe
encourus pour remplacer la pièce défectueuse.

24 49-2001566 Rev. 1
Soutien au consommateur
SOUTIEN AU CONSOMMATEUR
Site Web de GE Appliances
Vous avez une question ou vous avez besoin d’assistance concernant votre électroménager? Visitez le site Web
de GE Appliances 24 heures par jour, tous les jours de l’année! Vous pouvez aussi y trouver d'autres formidables
produits GE Appliances et tirer avantage de tous nos services d'assistance en ligne.
$X[eWDWV8QLVGEAppliances.com Au Canada : ElectromenagersGE.ca
Enregistrez votre électroménager
Enregistrez votre nouvel électroménager en ligne au moment qui vous convient le mieux! L’enregistrement de
votre produit dans les plus brefs délais permet une meilleure communication et un service rapide en vertu de votre
garantie, le cas échéant. Vous pouvez également envoyer par courrier la carte d’enregistrement pré-imprimée qui se
trouve dans l’emballage de votre appareil.
$X[eWDWV8QLVGEAppliances.com/register
Au Canada : electromenagersge.ca/soutien-apres-vente
Programmez une visite de service
8QVHUYLFHGHUpSDUDWLRQH[SHUW*($SSOLDQFHVVHWURXYHjTXHOTXHVSDVGHFKH]YRXV5HQGH]YRXVVXUQRWUHVLWH
HWSURJUDPPH]jYRWUHFRQYHQDQFHXQHYLVLWHGHVHUYLFHjQ¶LPSRUWHTXHOMRXUGHO¶DQQpH
$X[eWDWV8QLVGEAppliances.com/serviceRXFRPSRVH]OHSHQGDQWOHVKHXUHVQRUPDOHVGH
bureau.
Au Canada : electromenagersge.ca/soutien-apres-venteRXFRPSRVH]OH
Pièces et accessoires
/HVSHUVRQQHVD\DQWOHVFRPSpWHQFHVUHTXLVHVSRXUUpSDUHUHOOHVPrPHVOHXUVDSSDUHLOVSHXYHQWUHFHYRLU
GLUHFWHPHQWjODPDLVRQGHVSLqFHVRXDFFHVVRLUHVOHVFDUWHV9,6$0DVWHU&DUGHW'LVFRYHUVRQWDFFHSWpHV
&RPPDQGH]HQOLJQHKHXUHVSDUMRXUHQWRXWWHPSV$X[eWDWV8QLVGEApplianceparts.com ou par téléphone
DXGXUDQWOHVKHXUHVQRUPDOHVGHEXUHDX
Les instructions contenues dans le présent manuel comportent des procédures que tout utilisateur peut
HIIHFWXHU/HVDXWUHVW\SHVGHUpSDUDWLRQRXG¶HQWUHWLHQGRLYHQWJpQpUDOHPHQWrWUHFRQILpVjXQWHFKQLFLHQ
qualifié. Usez de prudence : une réparation ou un entretien mal réalisés peuvent rendre l’utilisation de
l’appareil dangereuse.
Les consommateurs du Canada doivent consulter les pages jaunes pour connaître le distributeur de pièces de
rechange GE Appliances autorisé le plus près; ils peuvent aussi se procurer les pièces sur electromenagersge.ca/
pieces-filtres-et-accessoiresRXHQFRPSRVDQWOH
Communiquez avec nous
6LYRXVQ¶rWHVSDVVDWLVIDLWGXVHUYLFHUHoXGH*($SSOLDQFHVFRQWDFWH]QRXVYLDQRWUHVLWH:HEDYHFWRXVOHV
GpWDLOV\FRPSULVYRWUHQXPpURGHWpOpSKRQHRXHQFRUHpFULYH]j
$X[eWDWV8QLV*HQHUDO0DQDJHU&XVWRPHU5HODWLRQV_*($SSOLDQFHV$SSOLDQFH3DUN_/RXLVYLOOH.<
GEAppliances.com/contact
$X&DQDGD'LUHFWHXU5HODWLRQVDYHFOHFRQVRPPDWHXU0&&RPPHUFLDO,QF_6XLWH)DFWRU\/DQH_0RQFWRQ
1%(&0
Electromenagersge.ca/contactez-nous

Escriba los números de modelo y
de serie aquí:
Nº de Modelo ____________
Nº de Serie ______________
Usted podrá encontrar la etiqueta
de especificaciones técnicas
debajo de la placa de cocción.
MANUAL
DEL PROPIETARIO E
INSTRUCCIONES DE
INSTALACIÓN
ESTUFA PARA VEHÍCULO
RECREATIVO
a Gas Propano
49-2001566 Rev. 1 06-25
INFORMACIÓN DE SEGURIDAD .3
USO DE LA ESTUFA
Placa de Cocción ....................... 7
Horno ................................. 8
Luces del Horno y de la Perilla de Control . 9
Parrillas del Horno ...................... 9
Papel de Aluminio y Revestimientos
para Horno ........................... 9
Ventilaciones del Horno .................9
Guía de Cocción en Horno ...............10
CUIDADO Y LIMPIEZA
Superficies de la Placa de Cocción ........11
Superficies Exteriores ...................12
Superficies Interiores ....................12
Luz del Horno ..........................14
INSTRUCCIONES DE INSTALACIÓN
Antes de Comenzar .....................15
Dimensiones de Espacios Libres
del Gabinete y la Encimera .............16
Espacios Libres de la Instalación ..........17
Ubicaciones de la Instalación de Gas ......18
Instalación del Horno ....................18
CONSEJOS PARA SOLUCIONAR
PROBLEMAS ...................... 22
GARANTÍA LIMITADA ........... 23
SOPORTE AL CONSUMIDOR ....24
GE Appliances es una marca registrada de General Electric Company. Fabricado bajo licencia de la marca registrada.
PLD617RW
PLD617DW
PLD617EW
PLD621RW
PLD621DW
PLD621EW
ESPAÑOL

2 49-2001566 Rev. 1
GRACIAS POR HACER A GE APPLIANCES PARTE
DE SU VEHÍCULO RECREATIVO
Ya sea que haya crecido con GE Appliances, o que ésta sea su primera vez,
estamos felices de tenerlo en la familia.
Sentimos orgullo por la creación, innovación y diseño de cada producto de GE Appliances, y creemos
que usted también. Entre otras cosas, el registro de su electrodoméstico nos asegura que podamos
entregarle información importante del producto y detalles de la garantía cuando los necesite.
Registre su electrodoméstico GE Appliances a través de Internet ahora. Sitios Web útiles y números
telefónicos están disponibles en la sección de Soporte al Consumidor de este Manual del Propietario.
49-2001566 Rev. 1 3
LEA Y GUARDE ESTAS INSTRUCCIONES
INFORMACIÓN IMPORTANTE DE SEGURIDAD
LEA TODAS LAS INSTRUCCIONES ANTES DE USAR ESTE ELECTRODOMÉSTICO
INFORMACIÓN DE SEGURIDAD
ADVERTENCIA
Si la información de este manual no se sigue exactamente, se
podrá producir un incendio o explosión, ocasionando daños sobre la propiedad,
lesiones o la muerte.
- No guarde ni use gasolina u otros vapores inflamables y líquidos cerca de éste o de
otros electrodomésticos.
- QUÉ DEBE HACER SI HUELE GAS
Ŷ1RLQWHQWHHQFHQGHUQLQJ~QHOHFWURGRPpVWLFR
Ŷ1RWRTXHQLQJ~QLQWHUUXSWRUHOpFWULFR
Ŷ1RXVHQLQJ~QWHOpIRQRHQVXYHKtFXORUHFUHDWLYR
Ŷ+DJDVDOLUDWRGRVORVRFXSDQWHVGHOYHKtFXORUHFUHDWLYR
Ŷ&LHUUHODYiOYXODVGHOWDQTXHGHVXPLQLVWURGHJDVRHOVXPLQLVWURSULQFLSDOGH
gas.
Ŷ'HIRUPDLQPHGLDWDOODPHDVXSURYHHGRUGHJDVSDUDVROLFLWDULQVWUXFFLRQHV
Ŷ6LQRVHSXHGHFRPXQLFDUFRQVXSURYHHGRUGHJDVOODPHDOGHSDUWDPHQWRGH
bomberos.
- Solicite que un instalador calificado, agencia de servicios, fabricante o comerciante o
al proveedor de gas que controlen su sistema de gas y que se corrija la fuente de la
pérdida.
ADVERTENCIA
Lea todas las instrucciones antes de usar el producto. Si no se siguen estas instrucciones se
podrán producir incendios, descargas eléctricas, lesiones graves o la muerte.
4 49-2001566 Rev. 1
INFORMACIÓN DE SEGURIDAD
LEA Y GUARDE ESTAS INSTRUCCIONES
INFORMACIÓN IMPORTANTE DE SEGURIDAD
LEA TODAS LAS INSTRUCCIONES ANTES DE USAR ESTE ELECTRODOMÉSTICO
ADVERTENCIA
INSTRUCCIONES GENERALES DE SEGURIDAD
ADVERTENCIA
Envenenamiento
con Monóxido de Carbono:
NUNCA use
este electrodoméstico para calefaccionar el
ambiente. Como consecuencia de esto, se
podrá producir envenenamiento con monóxido
GHFDUERQR\HOVREUHFDOHQWDPLHQWRGHOKRUQR
'HEHUiKDEHUXQDYHQWDQDRYHQWLODFLyQ
de aire abiertas levemente al usar este
electrodoméstico. Las llamas de gas
consumen oxígeno, el cual debe ser
reemplazado para asegurar una combustión
adecuada.
Ŷ 8VHHVWHHOHFWURGRPpVWLFRVyORSDUDVXSURSyVLWRRULJLQDO
como se describe en el manual del propietario.
Ŷ 6ROLFLWHTXHXQLQVWDODGRUFDOLILFDGRLQVWDOHVXHVWXIDGH
acuerdo con las instrucciones de instalación provistas.
Ŷ &XDOTXLHUDMXVWH\WUDEDMRGHOVHUYLFLRWpFQLFRGHEHUiVHU
realizado únicamente por un instalador de estufas a gas
calificado o por un técnico del servicio. No intente reparar
o reemplazar ninguna parte de la estufa, a menos que
esto se recomiende específicamente en este manual.
Ŷ 6XHVWXIDHVHQYLDGDGHIiEULFDHQODFRQILJXUDFLyQSDUD
uso con gas propano. No se podrá convertir a ningún otro
tipo de gas.
Ŷ 6ROLFLWHTXHHOLQVWDODGRUOHPXHVWUHODXELFDFLyQGHOD
válvula de cierre de gas de la estufa y cómo apagarla en
caso de ser necesario.
Ŷ $VHJ~UHVHGHTXHWRGRVORVPDWHULDOHVGHHPEDODMHVHDQ
retirados de la estufa antes de su uso, a fin de evitar que
estos materiales se incendien.
Ŷ (YLWHUD\RQHVRLPSDFWRVVREUHODVSXHUWDVGHYLGULR
placas de cocción o paneles de control. Hacer esto podrá
producir la rotura de vidrios. No cocine sobre un producto
con un vidrio roto. Se podrán producir descargas,
incendios o cortes.
Ŷ 1RGHMHDORVQLxRVVRORVRIXHUDGHVXUDGLRGHDWHQFLyQ
en el área donde el electrodoméstico se encuentre en
uso. Nunca se les deberá permitir trepar, sentarse o
pararse sobre ninguna parte del electrodoméstico.
Ŷ
PRECAUCIÓN
No coloque artículos de interés
para los niños sobre los gabinetes que están sobre un
horno – si los niños se trepan sobre el horno para llegar a
estos artículos podrían sufrir lesiones graves.
Ŷ 1XQFDEORTXHHODVYHQWLODFLRQHVDEHUWXUDVGHDLUHGHOD
estufa. Las mismas brindan las entradas y salidas de aire
que son necesarias para que la estufa funcione de forma
correcta con la combustión adecuada. Las aberturas
de aire se encuentran ubicadas en la parte trasera de
la estufa, en la parte superior e inferior de la puerta del
horno, y en la parte inferior de la estufa.
Ŷ 8VHVyORPDQJRVGHROODVVHFRV±ORVPDQJRVGHROODV
húmedos sobre superficies calientes podrán producir
quemaduras debido al vapor. No permita que los mangos
de ollas tengan contacto con los quemadores de la
superficie, las parrillas de los quemadores, o el elemento
de calefacción del horno. No use una toalla u otra tela
voluminosa para reemplazar el mango de las cacerolas.
Ŷ 1RWRTXHHOHOHPHQWRSDUDFDOHQWDUQLODVXSHUILFLH
interior del horno. Es posible que estas superficies estén
demasiado calientes como para quemar, aunque su
color sea oscuro. Durante y después del uso, no toque ni
permita que telas u otros materiales inflamables toquen
cualquier área interior del horno; espere a que haya
pasado un tiempo suficiente hasta que se enfríen. Otras
superficies del electrodoméstico se podrán calentar lo
suficiente como para ocasionar lesiones. Las superficies
potencialmente calientes incluyen quemadores, parrillas,
la abertura de la ventilación del horno, superficies
cercanas a la abertura y aberturas alrededor de la puerta
del horno.
Ŷ 1RFDOLHQWHHQYDVHVGHFRPLGDTXHQRKD\DQVLGR
abiertos. Se podría acumular presión y el envase podría
explotar, ocasionando una lesión.
Ŷ &RFLQHODFRPLGDFRPSOHWDPHQWHSDUDHYLWDUTXHVH
produzcan enfermedades a partir de la comida. Podrá
encontrar recomendaciones sobre temperatura mínima
segura de la comida en IsItDoneYet.gov y en fsis.usda.
JRY8VHXQWHUPyPHWURGHFRPLGDSDUDFDOFXODUVX
temperatura y realizar controles en diferentes áreas.
Ŷ 1RSHUPLWDTXHQDGLHVHWUHSHSDUHRFXHOJXHGHOD
puerta del horno, del cajón o la placa de cocción. Se
podrá dañar la estufa o provocar su caída, ocasionando
lesiones graves o la muerte.
49-2001566 Rev. 1 5
ADVERTENCIA
KMANTENGA CUALQUIER MATERIAL INFLAMABLE ALEJADO
DE LA ESTUFA
Si esto no se cumple, se podrán sufrir lesiones personales
graves o incendios.
Ŷ 1RJXDUGHQLXVHPDWHULDOHVLQIODPDEOHVHQXQKRUQRR
cerca de la placa de cocción, incluyendo papel, plástico,
mangos de ollas, trapos, cobertores de pared, cortinas,
paños y gasolina u otros vapores y líquidos inflamables.
Ŷ 1XQFDXVHSUHQGDVKROJDGDVRTXHFXHOJXHQPLHQWUDV
usa el electrodoméstico. Estas prendas se podrán
incendiar si entran en contacto con superficies calientes,
ocasionando quemaduras graves.
Ŷ 1RSHUPLWDTXHODJUDVDGHODFRFFLyQXRWURVPDWHULDOHV
inflamables se acumulen en o cerca de la estufa. La
grasa del horno o sobre la estufa se podrá incendiar.
LEA Y GUARDE ESTAS INSTRUCCIONES
ADVERTENCIA
EN CASO DE INCENDIO, SIGA LOS SIGUIENTES PASOS PARA
EVITAR LESIONES Y LA PROPAGACIÓN DEL FUEGO
Ŷ 1RXVHDJXDVREUHHOIXHJRGHODJUDVD1XQFD
tome una olla que se esté incendiando. Apague los
controles. Extinga la olla que se esté incendiando
sobre un quemador de la superficie, cubriendo la olla
completamente con su tapa correspondiente, una charola
PHWiOLFDGHJDOOHWDVRXQDFKDURODSODQD8VHXQTXtPLFR
seco multiuso o un extintor de chorro de espuma.
Ŷ 6LKD\XQLQFHQGLRHQHOKRUQRGXUDQWHHOKRUQHDGR
ahogue el fuego cerrando la puerta del horno y apagando
el mismo o usando un químico seco multipropósito o un
extintor de incendio con espuma.
ADVERTENCIA
INSTRUCCIONES DE SEGURIDAD DE LA ESTUFA
Ŷ 1XQFDGHMHGHVDWHQGLGRVORVTXHPDGRUHVGHOD
VXSHUILFLH/DVFRPLGDVHVSHFLDOPHQWHODVFRPLGDVFRQ
DFHLWHVHSXHGHQLQFHQGLDUORFXDOSXHGHRFDVLRQDUXQ
incendio que se propague a los gabinetes próximos.
Ŷ 1XQFDSLHUGDGHYLVWDHODFHLWHFXDQGRHVWpIULHQGR6L
se calienta más allá de su punto de cocción, el aceite se
puede incendiar y provocar un incendio que se puede
SURSDJDUDORVJDELQHWHVSUy[LPRV8VHXQWHUPyPHWUR
para grasas profundas siempre que sea posible, a fin de
monitorear la temperatura del aceite.
Ŷ $ILQGHHYLWDUGHUUDPHVHLQFHQGLRVXVHXQDFDQWLGDG
mínima de aceite cuando esté friendo en una olla que
no sea profunda y evite cocinar comidas congeladas con
cantidades excesivas de hielo.
Ŷ 8VHHOWDPDxRGHROODDGHFXDGRSDUDHYLWDUTXHVHDQ
inestables o que sufran caídas fácilmente. Seleccione
utensilios que coincidan con el tamaño del quemador.
Las llamas del quemador se deberán ajustar de modo
que no se extiendan más allá de la parte inferior de la
ROOD8QDFDQWLGDGH[FHVLYDGHOODPDSXHGHUHSUHVHQWDU
un riesgo.
Ŷ 6LHPSUHXVHODSRVLFLyQ+,$OWRDOHQFHQGHUORV
quemadores superiores y asegúrese de que estos se
hayan encendido.
Ŷ $OXVDUXWHQVLOLRVGHYLGULRFHUiPLFDDVHJ~UHVHGH
que sean adecuados para el servicio de de la placa de
cocción; otros se podrán romper debido a un cambio
repentino de temperatura.
Ŷ $ILQGHPLQLPL]DUSRVLEOHVTXHPDGXUDVLQFHQGLRGH
materiales inflamables y derrames, la manija de un
envase deberá ser inclinada hacia el centro de la estufa
sin que se extienda sobre los quemadores cercanos.
Ŷ 1RXVHXQZRN+DFHUHVWRSRGUiDWUDSDUFDORU\
bloquear el aire hacia el quemador, produciendo el riesgo
de emisión de monóxido de carbono.
Ŷ 1RXVHSDSHOGHDOXPLQLRSDUDFXEULUODVSDUULOODVRHO
revestimiento de cualquier parte de la superficie de
cocción. Hacer esto podrá producir envenenamiento
con monóxido de carbono, sobrecalentamiento de la
superficie de cocción, o un posible riesgo de incendio.
INFORMACIÓN DE SEGURIDAD
INFORMACIÓN IMPORTANTE DE SEGURIDAD
LEA TODAS LAS INSTRUCCIONES ANTES DE USAR ESTE ELECTRODOMÉSTICO

6 49-2001566 Rev. 1
ADVERTENCIA
RIESGO DE INCENDIO O EXPLOSIÓN
Si la información de este manual no se sigue exactamente,
se podrá producir un incendio o explosión, ocasionando
daños sobre la propiedad, lesiones o la muerte.
La instalación deberá ser realizada por un instalador
calificado.
Lea estas instrucciones en su totalidad y atentamente.
La instalación de este electrodoméstico deberá cumplir con
los códigos estatales y con otros códigos o, en ausencia
GHHVWRVFRQ(Q((88HO(VWiQGDUSDUD9HKtFXORV
5HFUHDWLYRV$16,1)3$
(Q&DQDGi&$1&6$=5HTXLVLWRVGH
Instalación para Electrodomésticos y Equipamiento de
9HKtFXORV5HFUHDWLYRVTXH8VDQ3URSDQR
(VWDHVWXIDIXHGLVHxDGDFHUWLILFDGDSRU&6$,QWHUQDWLRQDO
HQFXPSOLPLHQWRFRQ$16,=HGLFLyQPiVUHFLHQWH\
&$10HGLFLyQPiVUHFLHQWH
Al instalar un electrodoméstico a gas, el uso de conectores
flexibles viejos podrá ocasionar pérdidas de gas y lesiones
SHUVRQDOHV6LHPSUHXVHXQFRQHFWRUIOH[LEOH18(92
La prueba de goteras del electrodoméstico se deberá
realizar de acuerdo con las instrucciones del fabricante.
Si se utiliza una fuente eléctrica externa, el
electrodoméstico, al ser instalado, deberá contar con una
conexión eléctrica a tierra en cumplimiento con el estado o,
en ausencia de dichos códigos, con el Código Nacional de
(OHFWULFLGDG1DWLRQDO(OHFWULFDO&RGH$16,1)3$
No instale este producto con una campana con cortina de
aire u otra campana de estufa que funcione con circulación
de aire hacia la placa de cocción. Esta circulación de aire
podrá interferir con el funcionamiento de los quemadores a
gas, produciendo riesgos de incendio o explosión.
INFORMACIÓN DE SEGURIDAD
INFORMACIÓN IMPORTANTE DE SEGURIDAD
LEA TODAS LAS INSTRUCCIONES ANTES DE USAR ESTE ELECTRODOMÉSTICO
LEA Y GUARDE ESTAS INSTRUCCIONES
ADVERTENCIA
INSTRUCCIONES DE SEGURIDAD DEL HORNO
ADVERTENCIA
NUNCA cubra ranuras,
DJXMHURVRFRQGXFWRVHQHOIRQGRGHOKRUQR
ni cubra toda una parrilla con materiales tales
como papel de aluminio o revestimientos para
KRUQR+DFHUHVWREORTXHDUiODFLUFXODFLyQ
GHDLUHDWUDYpVGHOKRUQR\SRGUiRFDVLRQDU
envenenamiento con monóxido de carbono.
Nunca coloque papel de aluminio o revestimientos
SDUDKRUQRVREUHHOIRQGRGHOKRUQR(VWRVSRGUi
DWUDSDUHOFDORURFDVLRQDQGRULHVJRVGHKXPRR
incendio.
Ŷ 0DQWpQJDVHDOHMDGRGHODHVWXIDDODEULUODSXHUWDGHO
horno. El aire caliente o el vapor que sale podrá causar
TXHPDGXUDVHQODVPDQRVURVWUR\XRMRV
Ŷ 1XQFDFRORTXHXWHQVLOLRVGHFRFFLyQSLHGUDVSDUDSL]]DV
u horneados, o cualquier tipo de papel de aluminio o
revestimiento sobre cualquier superficie que no sean
parrillas. Estos ítems podrán atrapar el calor o derretirse,
ocasionando daños sobre el producto y el riesgo de
descarga, humo o incendio.
Ŷ &RORTXHODVSDUULOODVGHOKRUQRHQODXELFDFLyQGHVHDGD
mientras éste se encuentra frío. Si es necesario retirar
la parrilla mientras el horno se encuentra caliente, evite
tocar las superficies calientes.
Ŷ 1RGHMHSURGXFWRVWDOHVFRPRSDSHOXWHQVLOLRVGHFRFLQD
ni comida en el horno cuando no estén en uso. Los
artículos guardados en el horno se podrán incendiar.
Ŷ 1RGHMHDUWtFXORVVREUHODVXSHUILFLHGHFRFFLyQ
central de la ventilación del horno. Los ítems se
podrán sobrecalentar, y existe el riesgo de incendio o
quemaduras.
FORMA ADECUADA DE DESCARTAR SU ELECTRODOMÉSTICO
Descarte o recicle su electrodoméstico de acuerdo con las Regulaciones Federales y Locales. Comuníquese con las
autoridades locales para descartar o reciclar su electrodoméstico de forma ambientalmente segura.
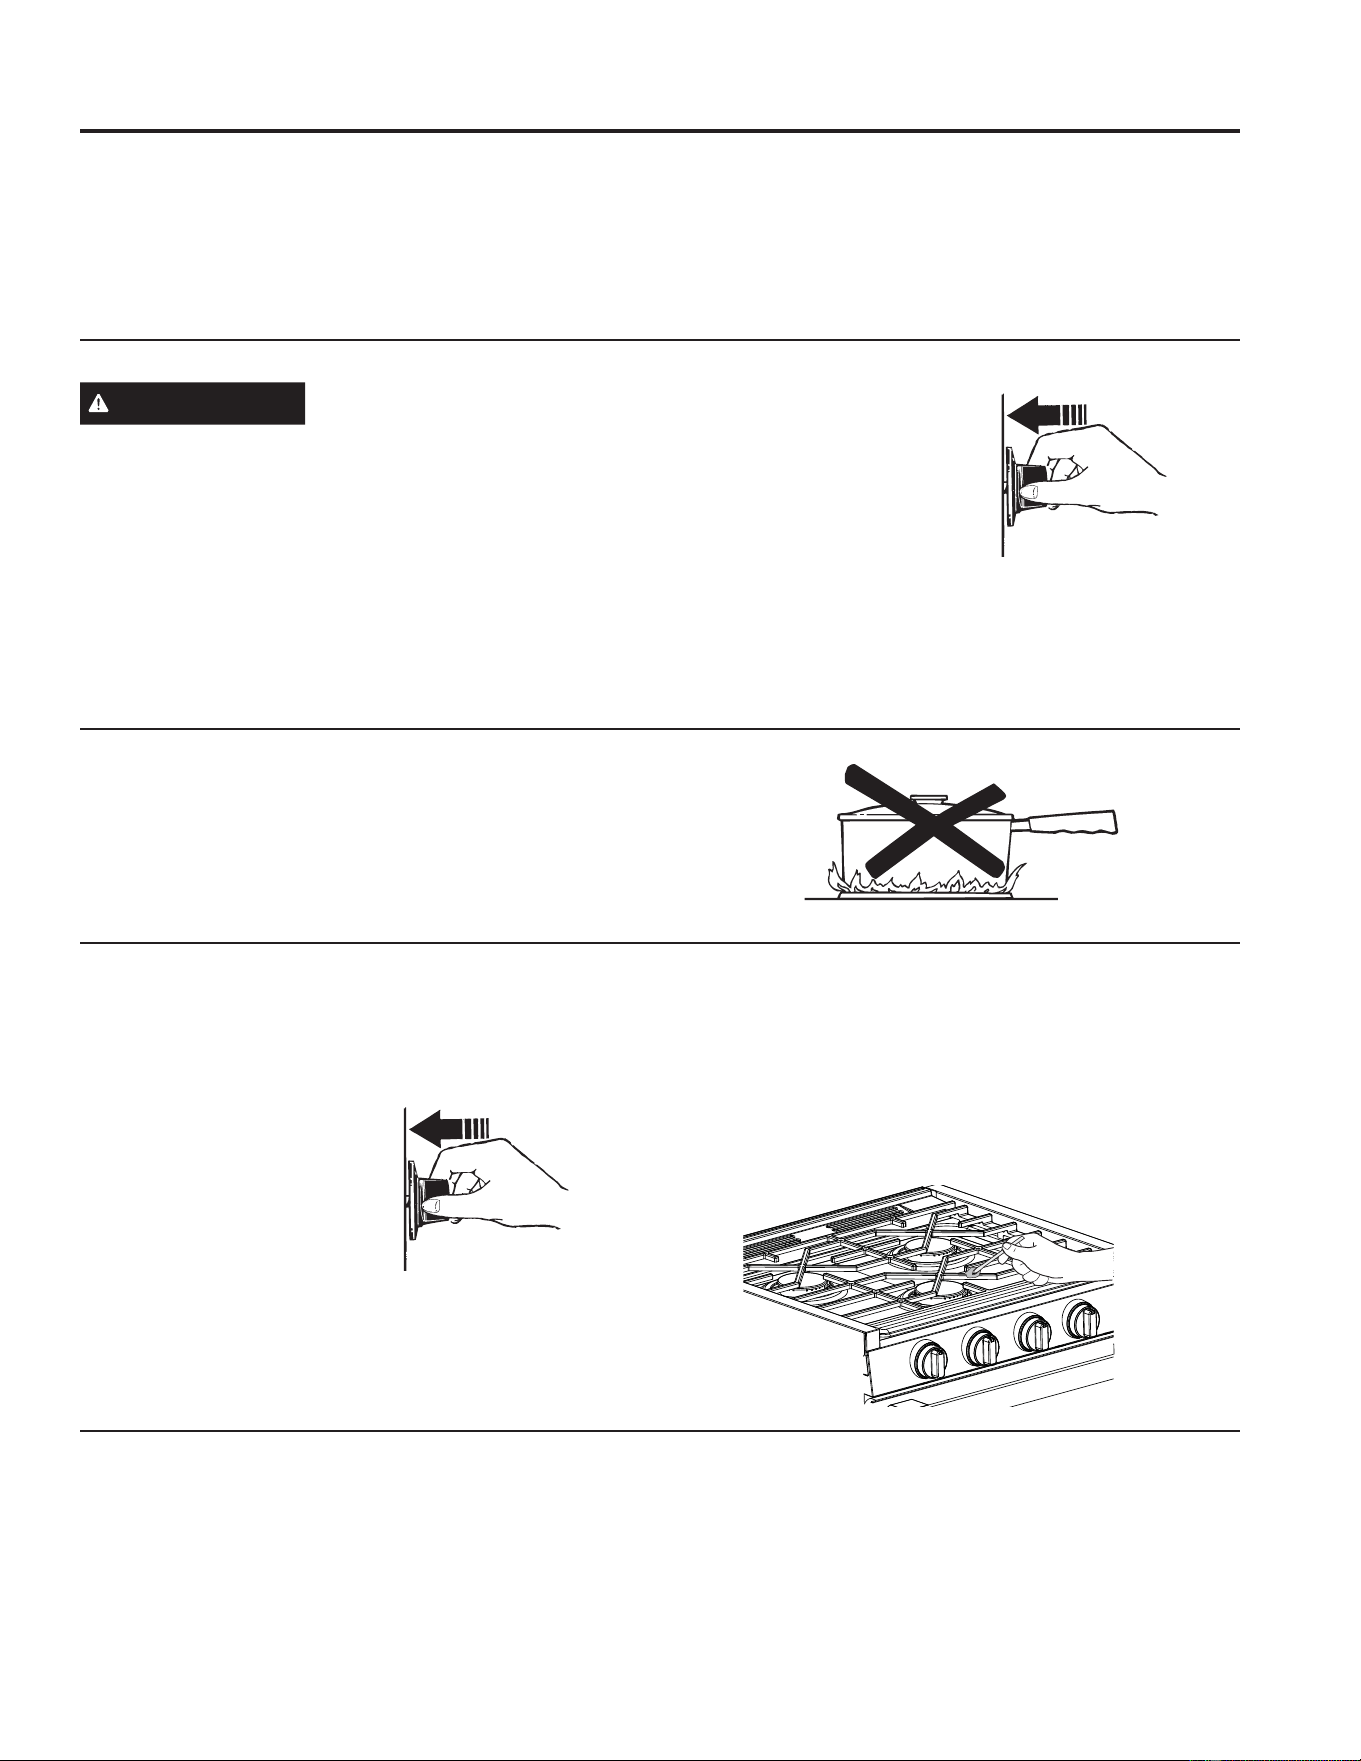
49-2001566 Rev. 1
Placa de Cocción
$QWHV GHO HQFHQGLGR FRQILUPH TXH WRGDV ODV SHULOODV GH FRQWURO HVWpQ HQ OD SRVLFLyQ 2)) $SDJDGR $VHJ~UHVH GH TXH OD YiOYXOD
principal del tanque de gas esté abierta.
Ŷ 1R XWLOLFH HO TXHPDGRU GXUDQWH XQ SHUtRGR GH WLHPSR SURORQJDGR VLQ XQ XWHQVLOLR GH FRFLQD VREUH OD SDUULOOD (O DFDEDGR GH OD
parrilla se podrá resquebrajar si no hay un utensilio de cocina que absorba el calor.
Ŷ (O XWHQVLOLR VH GHEHUi SRVLFLRQDU VREUH ODV SDUULOODV VLQ VREUHVDOLU GHO ERUGH ODWHUDO R GH OD HQFLPHUD
Ŷ $VHJ~UHVH GH TXH ORV TXHPDGRUHV \ ODV SDUULOODV HVWpQ IUtRV DQWHV GH FRORFDU OD PDQR XQ PDQJR GH ROOD R PDWHULDOHV GH
limpieza sobre estos.
Selección del Tamaño de la Llama
Observe la llama, no la perilla, a medida que ajusta el nivel de
calor. Cuando se desee calentar de forma rápida, el tamaño
de la llama deberá ser equivalente al utensilio de cocina que
esté usando. Las llamas más grandes que la parte inferior
del utensilio no calentarán con mayor rapidez y podrán ser
peligrosas.
Estas llamas son demasiado grandes para la olla.
USO DE LA ESTUFA: Placa de Cocción
Si la Llama se Apaga
De forma inmediata, gire la perilla de control hasta la posición
2)) $SDJDGR (VSHUH SRU OR PHQRV PLQXWRV \ YXHOYD D
encender el quemador.
Apagado de la Placa de Cocción
Para apagar los quemadores de la placa de cocción, gire las
perillas de control en sentido horario hasta la posición OFF
$SDJDGR 1R WRTXH QL FRORTXH REMHWRV VREUH ODV SDUULOODV
hasta que la placa de cocción de encuentre fría.
Encendido de la Placa de Cocción
ADVERTENCIA
Los quemadores sólo se deberán
usar cuando estén cubiertos por los utensilios. Las llamas
de los quemadores que no estén cubiertas por utensilios
presentan riesgos de incendio o de encendido de telas.
Nunca permita que las llamas se extiendan más allá de los
costados del utensilio. Si esto no se cumple, se podrán
producir lesiones graves.
Seleccione un quemador y busque su perilla de control.
Presione la perilla y gire la misma hasta la posición HI
$OWR (O FKLVSHR FRQWLQXDUi PLHQWUDV VH PDQWHQJD OD SHULOOD
SUHVLRQDGD 8QD YH] HQFHQGLGR HO TXHPDGRU FRQWLQ~H
presionando la perilla durante por lo menos 5 segundos hasta
que el sensor de la llama
esté caliente. Libere
la perilla y confirme
que el quemador
queda encendido. Si
el quemador queda
encendido, gire la perilla
para ajustar la llama. Si
el quemador no queda
encendido, consulte la
sección de Consejos para
Solucionar Problemas.
Presione la perilla de control y gire la
PLVPD KDVWD OD SRVLFLyQ +, $OWR
Encendido Manual de la Placa de Cocción
Si no se logra encender un quemador, usted podrá encender
el quemador de forma manual siguiendo los pasos que figuran
a continuación:
Presione y gire la perilla
de control del quemador
correspondiente en
sentido antihorario hasta la
SRVLFLyQ +L $OWR
Mientras continúa
presionando la perilla, de
forma inmediata raspe
y coloque un cerillo
de madera largo o un
encendedor de gas cerca
GHO TXHPDGRU SDUD UHDOL]DU HO HQFHQGLGR 8QD YH] HQFHQGLGR
el quemador, continúe presionando la perilla durante por
lo menos 5 segundos hasta que el sensor de la llama esté
caliente. Libere la perilla y confirme que el quemador queda
encendido. Si el quemador queda encendido, gire la perilla
para ajustar la llama. Si el quemador no queda encendido,
consulte la sección de Consejos para Solucionar Problemas.
Presione la perilla de control y gire la
PLVPD KDVWD OD SRVLFLyQ +, $OWR
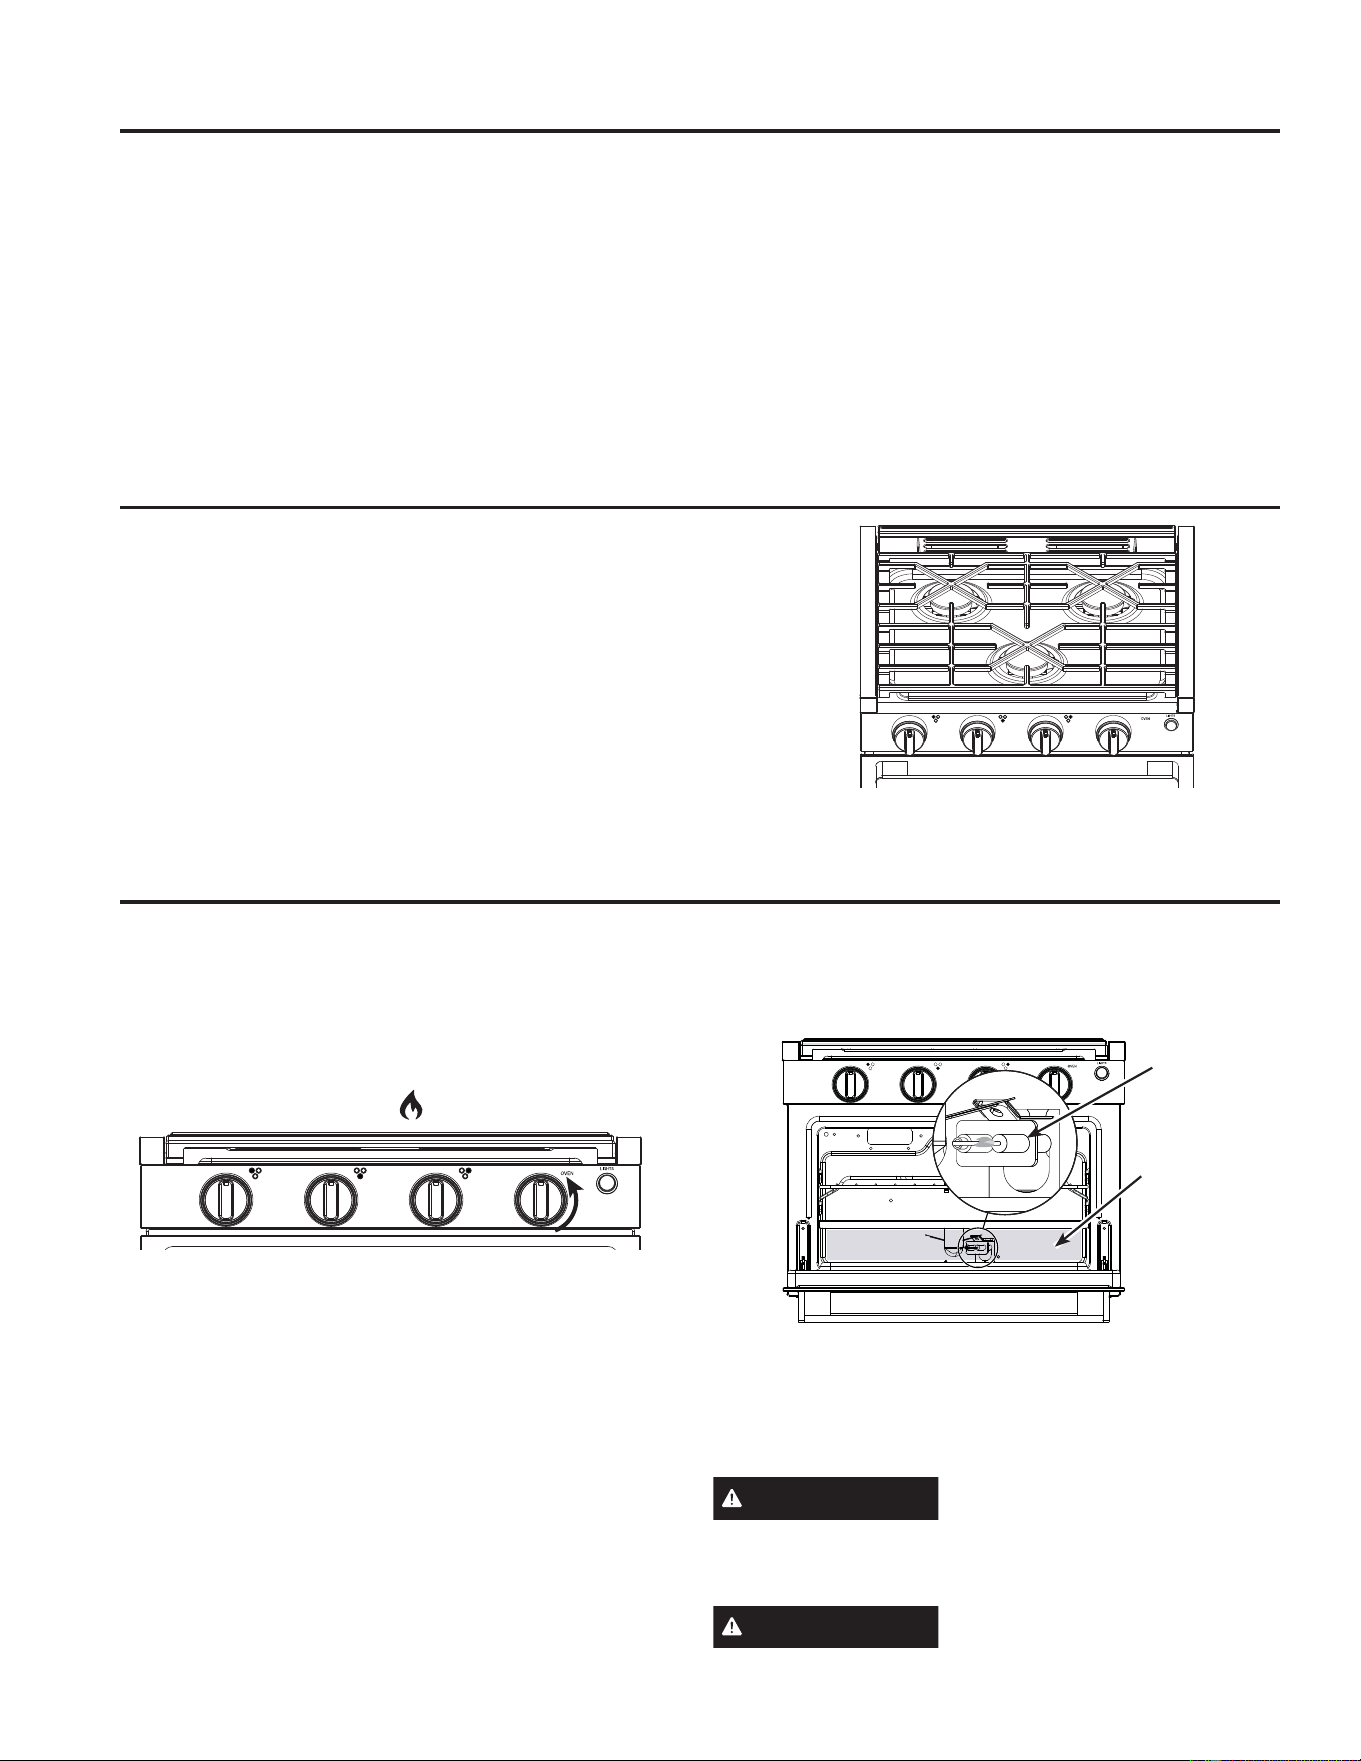
49-2001566 Rev. 1
USO DE LA ESTUFA:3ODFDGH&RFFLyQ+RUQR
Placa de Cocción
Horno
Uso de los Quemadores de la Estufa
8VHHOTXHPDGRUIURQWDOSDUDXWHQVLOLRVGHFRFLQDJUDQGHV\
para un hervor más rápido. Los quemadores traseros fueron
diseñados para realizar la cocción general y hervores a fuego
lento.
Ŷ1RXWLOLFHHOTXHPDGRUGXUDQWHXQSHUtRGRGHWLHPSR
prolongado sin un utensilio de estufa sobre la parrilla. El
acabado de la parrilla podrá perder color o resquebrajarse
si no se cuenta con un utensilio de estufa que absorba el
calor.
Ŷ1RLQWHQWHGHVHQVDPEODUXQTXHPDGRUPLHQWUDVRWUR
quemador está encendido. Se podrán producir daños sobre
el producto.
Ŷ$VHJ~UHVHGHTXHORVTXHPDGRUHV\ODVSDUULOODVHVWpQIUtRV
antes de colocar la mano, un mango de olla o materiales de
limpieza sobre la superficie de cocción.
Adapte el tamaño del utensilio de forma proporcional a las
llamas. Los quemadores traseros fueron diseñados para
UHDOL]DUODFRFFLyQJHQHUDO\KHUYRUHVDIXHJROHQWR8VHHO
quemador frontal para utensilios de cocina grandes y para
un hervor más rápido. Cubra su utensilio con una tapa para
que los líquidos hiervan de forma más rápida.
Orientación de las Parrillas de la Placa de Cocción
La orientación adecuada de la instalación de la parrilla es
como se muestra.
Encendido del Horno
NOTA: Antes de realizar el encendido, asegúrese de que la
válvula principal del tanque de gas esté abierta.
3UHVLRQHKDFLDXVWHGODPDQLMDGHOKRUQRSDUDDEULUOD
puerta.
2. Presione y gire la perilla de control del horno en sentido
antihorario hasta la posición .
3. Mantenga la perilla de control del horno presionada durante
SRUORPHQRVVHJXQGRVKDVWDTXHHOSLORWRGHOKRUQR
esté encendido y el sensor del piloto esté caliente. De
haber aire en la tubería de suministro, podrá tomar hasta un
minuto que el aire sea purgado y que el piloto del horno se
encienda.
4. Libere la perilla de control del horno y visualmente
confirme que el piloto del horno se mantiene encendido.
Si el piloto del horno se apaga, repita los pasos 3 y 4.
5. Gire la perilla de control del horno hasta la temperatura
más alta del horno y de forma visual confirme que el piloto
encendió el quemador para hornear.
6. Gire la perilla de control del horno hasta la temperatura
deseada. Cierre la puerta del horno.
ADVERTENCIA
En caso de falla en el sistema de
HQFHQGLGRHOKRUQRTXHGDUiLQRSHUDEOH\QRVHGHEHUi
LQWHQWDURSHUDUHOPLVPR1RLQWHQWHHQFHQGHUHOKRUQRGH
forma manual.
ADVERTENCIA
No guarde objetos en el
compartimiento de los quemadores.
Compartimiento
de los
Quemadores
Piloto del
Horno
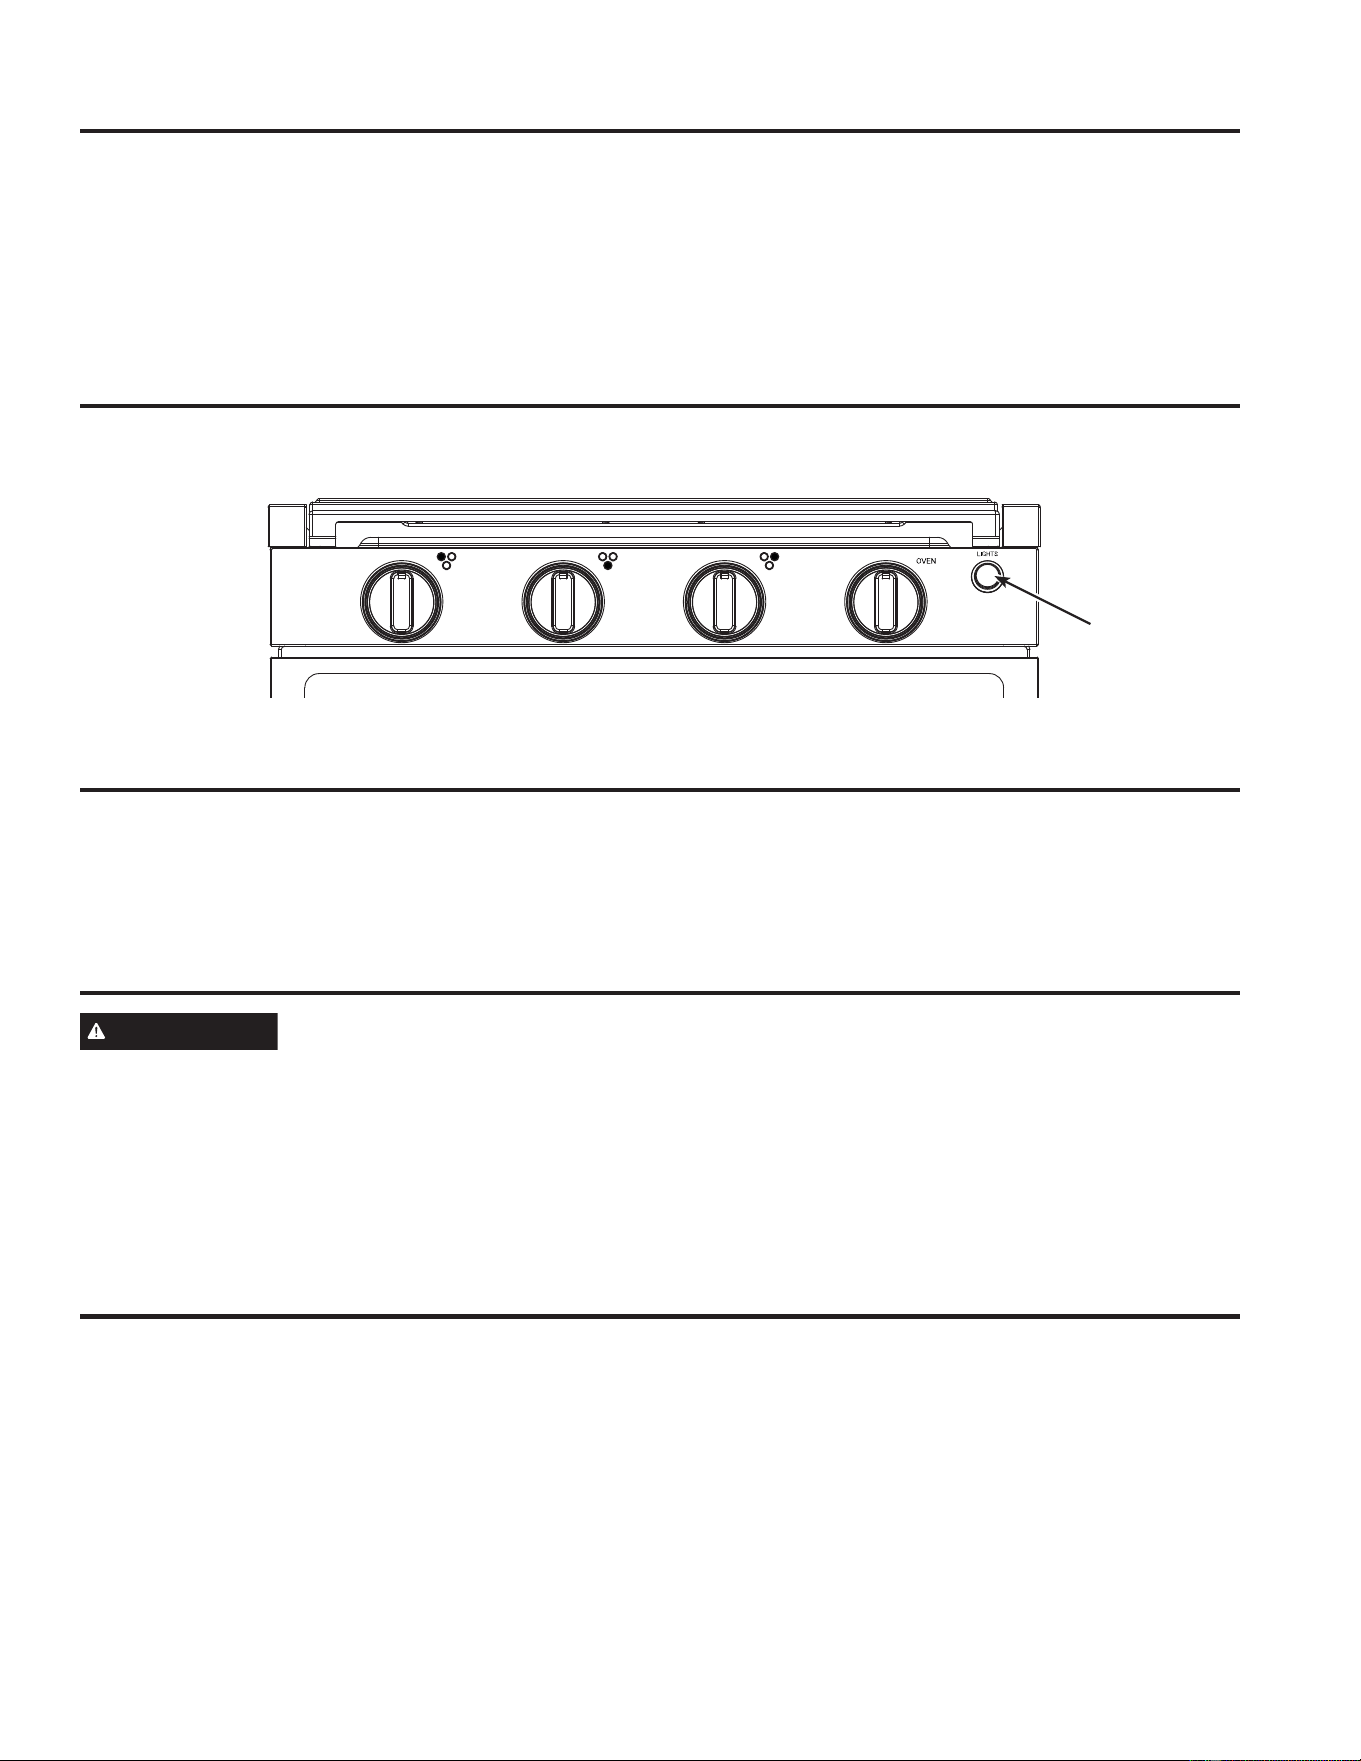
49-2001566 Rev. 1
USO DE LA ESTUFA: /XFHVGHO+RUQR3DUULOODV3DSHOGH$OXPLQLR\5HYHVWLPLHQWRV9HQWLODFLRQHVGHO+RUQR
Luces del Horno y de la Perilla de Control
Parrillas del Horno
Papel de Aluminio y Revestimientos para Horno
Ventilaciones del Horno
Si la Llama se Apaga
De forma inmediata, gire la perilla de control del horno hasta la
posición OFF$SDJDGR(VSHUHSRUORPHQRVPLQXWRVDQWHV
de intentar volver a encender el quemador del horno.
Apagado del Horno
Para apagar el horno, gire la perilla de control del horno en
sentido horario hasta la posición OFF$SDJDGR
3UHVLRQHHOERWyQ/LJKW/X]VREUHHOSDQHOGHFRQWUROSDUDHQFHQGHUDSDJDUODVOXFHVGHOKRUQR\GHODSHULOODGHFRQWURO
Todas las luces se encienden y apagan juntas.
1XQFDEORTXHHODVYHQWLODFLRQHVDEHUWXUDVGHDLUHGHODHVWXIDeVWDVEULQGDQODVHQWUDGDV\VDOLGDVGHDLUHTXHVRQQHFHVDULDV
para que la estufa se mantenga fresca y funcione de forma correcta con la combustión adecuada. Nunca cubra la abertura con
papel de aluminio o cualquier otro material. Las ventilaciones se encuentran ubicadas a lo largo de la parte trasera de la placa de
cocción.
PRECAUCIÓN
1RXVHQLQJ~QWLSRGHSDSHOGH
DOXPLQLRQLUHYHVWLPLHQWRGHKRUQRSDUDFXEULUFXDOTXLHU
superficie que no sean las parrillas. Estos ítems podrán
atrapar el calor o derretirse, ocasionando daños sobre
HOSURGXFWR\HOULHVJRGHGHVFDUJDKXPRRLQFHQGLR
Los daños por uso inadecuado de estos ítems no están
cubiertos por la garantía del producto.
No use más aluminio que el necesario y nunca cubra
totalmente el estante de un horno con papel de aluminio.
0DQWHQJDHODOXPLQLRDSRUORPHQRVò´GHODVSDUHGHVGHO
horno, para evitar una circulación deficiente del calor.
$OFRORFDU\UHWLUDUXWHQVLOLRVGHFRFLQDHPSXMHHOHVWDQWHKDFLDDIXHUDGHOWRSHSRVLFLyQGHGHWHQFLyQVREUHHOVRSRUWHGHOD
parrilla. Para retirar una parrilla, levante la parte trasera de ésta sobre los soportes de parrilla, y empuje la misma hacia usted
hasta que se libere. Para volver a colocar una parrilla, coloque su parte trasera sobre el soporte de parrilla, y presione la parrilla
hasta la parte trasera del horno hasta que calce en su posición.
Botón Light
Horno

49-2001566 Rev. 1
Guía de Cocción en Horno
3UHFDOLHQWHGHOKRUQRHQWUH\PLQXWRVDQWHVGHLQVHUWDUODFRPLGD8VHODSRVLFLyQGHOHVWDQWHSDUDXQKRUQHDGR
estándar. Ajuste la posición según sea necesario. Limite las aperturas de puerta tanto como sea posible para retener el calor
dentro del horno.
USO DE LA ESTUFA: Guía de Cocción en Horno
Utensilio del Horno
El material, el acabado y el tamaño de los utensilios afectan el horneado. Las charolas oscuras, revestidas y opacas absorben el
calor más rápidamente que las charolas claras y brillantes. Al usar charolas que absorben el calor más rápidamente, las comidas
podrán resultar más doradas, crocantes y con una capa más gruesa. Si utiliza utensilios oscuros y revestidos, controle la comida
antes del tiempo mínimo de cocción.
2
4
2
3
3/'5:
3/'':
3/'(:
3/'5:
3/'':
3/'(:
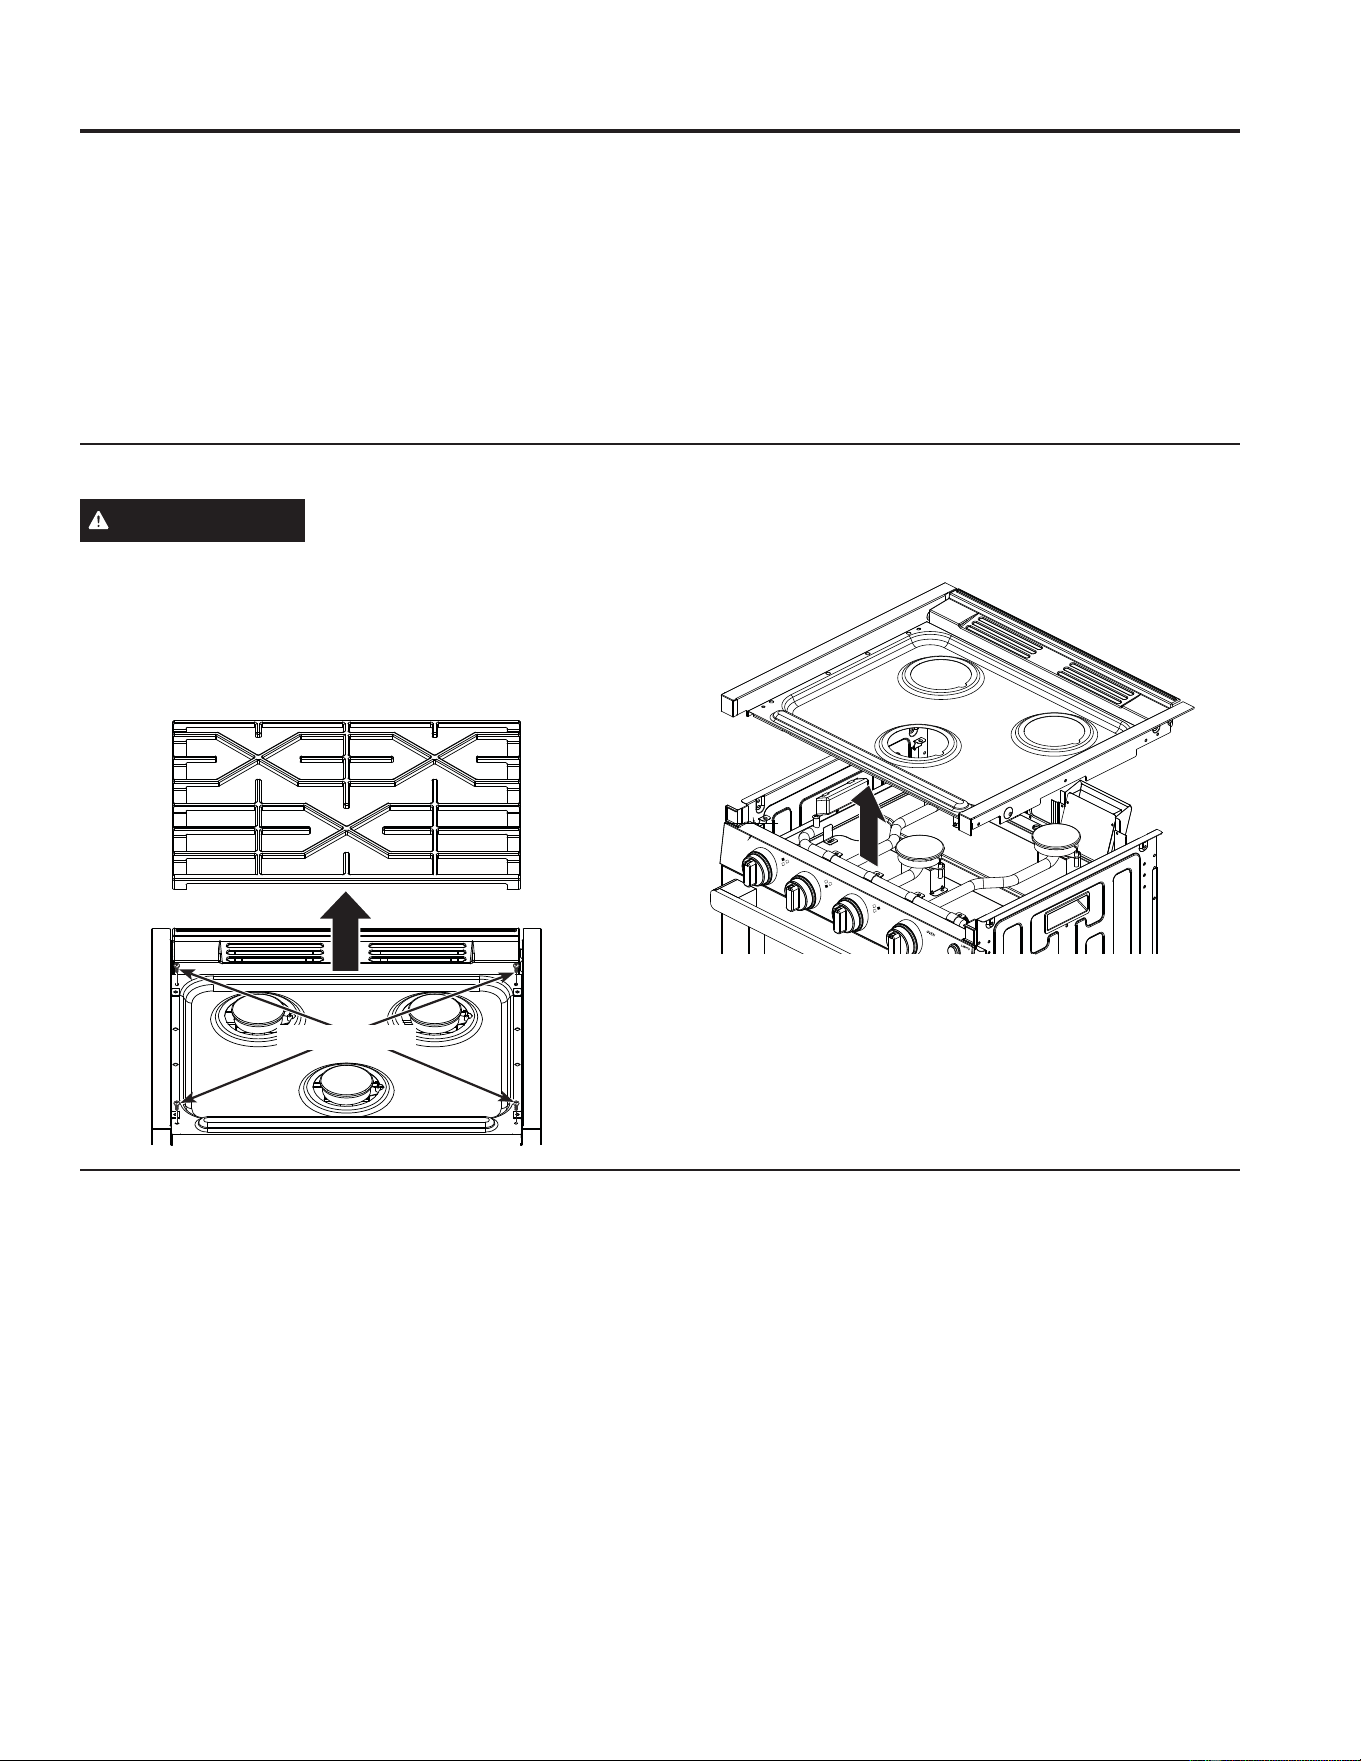
49-2001566 Rev. 1
Superficies de la Placa de Cocción
CUIDADO Y LIMPIEZA: Superficies de la Placa de Cocción
Asegúrese de que todos los controles estén apagados y que todas las superficies se enfríen antes de limpiar cualquier parte de
la estufa.
Placa de Cocción de Porcelana Esmaltada
No use limpiadores de horno, limpiadores abrasivos,
limpiadores líquidos fuertes, estropajos de acero, almohadillas
para fregar de plástico, ni polvos limpiadores sobre la placa de
cocción. Limpie con un jabón suave y agua o con una solución
que sea mitad de vinagre y mitad de agua. Enjuague con agua
limpia y seque con una tela seca.
Al limpiar las superficies, asegúrese de que se encuentren a
temperatura ambiente. El derrame de adobo, jugos de fruta,
salsas de tomate y líquidos para humedecer que contengan
ácidos podrán ocasionar descoloración y se deberán quitar en
cuanto las superficies calientes se enfríen, y luego se deberán
lavar y enjuagar. Tenga cuidado de no derramar agua en las
aberturas de la placa de cocción.
Retiro de la Placa de Cocción para su Limpieza en Caso de Derrame
ADVERTENCIA
Se deberá tener cuidado de no
dañar ni modificar la tubería de gas y el cableado que se
encuentra debajo de la placa de cocción. Hacer esto podrá
ocasionar un incendio o riesgos de explosión.
'HVFRQHFWHODFRUULHQWHGHVGHHOIXVLEOHSULQFLSDORGHOSDQHO
del disyuntor antes de retirar la superficie de cocción.
2. Levante y retire la parilla de la placa de cocción.
3. Retire los 4 tornillos sobre la superficie de cocción con un
destornillador Phillips, y luego levante la placa de cocción
para su retiro.
4. Realice la limpieza con un jabón suave, una solución a base
de agua y una tela húmeda. Enjuague con agua limpia y
seque con una tela seca.
9XHOYDDFRORFDUODSODFDGHFRFFLyQHQVXSRVLFLyQ
y adhiera la misma con los 4 tornillos, usando un
destornillador Phillips.
Tapas de los Quemadores
Lave las tapas de los quemadores con agua caliente y jabón,
y enjuague con agua limpia. Puede fregar con una base de
fregado plástica para eliminar partículas de comida quemadas.
Cabezas de los Quemadores
Limpie las cabezas de los quemadores de forma rutinaria,
especialmente luego de derrames importantes, que podrían
bloquear las aberturas de los quemadores. Limpie con agua
caliente y jabón. Enjuague con agua limpia. Para eliminar las
manchas más rebeldes, use un cepillo con cerda plástica.
NOTA: No use estropajos de acero ni bases para fregar para
limpiar las partes del quemador, ya que podrán bloquear sus
partes. Las hendiduras de las cabezas de los quemadores
se deberán mantener limpias en todo momento para obtener
una llama pareja y sin obstrucción. Los puertos o electrodos
atascados o sucios de un quemador no permitirán que éste
funcione de forma correcta.
Parrillas de los Quemadores
Las parrillas se deberán lavar con agua caliente y jabón y
deberán ser enjuagadas con agua limpia. Para ablandar la
comida quemada, coloque las parrillas en una solución que
contenga ¼ de taza de amoníaco hogareño durante varias
horas. Luego, fregue las parrillas con un estropajo de plástico
con agua caliente y jabón. Enjuague a fondo y seque. NO
use blanqueador ni removedores de óxido sobre la placa de
cocción o las parrillas de los quemadores.
27°
Retire la Parrilla
Retire la Parrilla

49-2001566 Rev. 1
Superficies Exteriores
Superficies Interiores
CUIDADO Y LIMPIEZA: 6XSHUILFLHV([WHULRUHV6XSHUILFLHV,QWHULRUHV
Asegúrese de que todos los controles estén apagados y que todas las superficies se enfríen antes de limpiar cualquier parte de
la estufa.
Perillas de Control
Las perillas de control se pueden retirar para facilitar la
limpieza. Asegúrese de que las perillas estén en las posiciones
2))$SDJDGR\HPSXMHODVPLVPDVGHVGHORVYiVWDJRVGH
forma recta para su limpieza. Las perillas se podrán lavar
con agua y jabón. Asegúrese que los interiores de las perillas
HVWpQVHFRVDQWHVGHYROYHUDFRORFDUODV9XHOYDDFRORFDU
ODVSHULOODVHQODSRVLFLyQ2))$SDJDGRSDUDDVHJXUDUXQD
ubicación adecuada.
Borde Pintado de la Placa de Cocción
Limpie la misma con agua y jabón o con una solución de
vinagre y agua. No use limpiadores comerciales para horno,
polvos de limpieza, estropajos de acero o abrasivos duros
sobre cualquier superficie pintada.
Superficies de Acero Inoxidable
No use una viruta de acero; ésta dañará la superficie. Para
limpiar la superficie de acero inoxidable, use agua tibia con
jabón o un limpiador o pulidor para acero inoxidable. Siempre
limpie la superficie en la dirección del veteado. Siga las
instrucciones del limpiador para limpiar la superficie de acero
inoxidable. Los limpiadores con ácido oxálico tales como Bar
Keepers Friend Soft Cleanser eliminarán el óxido, deslustres
\SHTXHxDVPDQFKDVGHODVXSHUILFLH8VHVyORXQOLPSLDGRU
líquido libre de material abrasivo y frote en la dirección de las
líneas del cepillo con una esponja suave y húmeda.
Interior del Horno
No use limpiadores de horno, limpiadores abrasivos,
limpiadores líquidos fuertes, estropajos de acero, almohadillas
para fregar, ni polvos limpiadores en el interior del horno. El
derrame de adobo, jugos de fruta, salsas de tomate y líquidos
para humedecer que contengan ácidos podrán ocasionar
descoloración y se deberán limpiar de inmediato. Espere
a que las superficies calientes se enfríen, y luego limpie y
enjuague. Limpie con agua y jabón o una solución de vinagre
y agua. Enjuague con agua limpia y seque con una tela seca.
Al limpiar las superficies, asegúrese de que se encuentren a
temperatura ambiente. No frote ni limpie la junta de la puerta;
ésta posee una resistencia extremadamente baja a la abrasión.
Si observa que la junta comienza a gastarse, se deshilacha o
daña de cualquier forma y si quedó fuera de la puerta, deberá
reemplazar la misma.
Parrillas del Horno
Los estantes planos se podrán lavar con agua caliente y jabón.
Es posible que sea más difícil deslizar las parrillas con el paso
del tiempo. Coloque aceite vegetal en una tela húmeda o en
una toalla de papel y frote las mismas sobre los extremos
izquierdo y derecho. NOTA: El uso de otros aceites de cocina
ocasionará descoloración o un residuo de color similar al óxido
sobre las parrillas y los laterales de las cavidades. Para limpiar
este residuo, use agua y jabón o una solución de vinagre y
agua. Enjuague con agua limpia y seque con una tela seca.
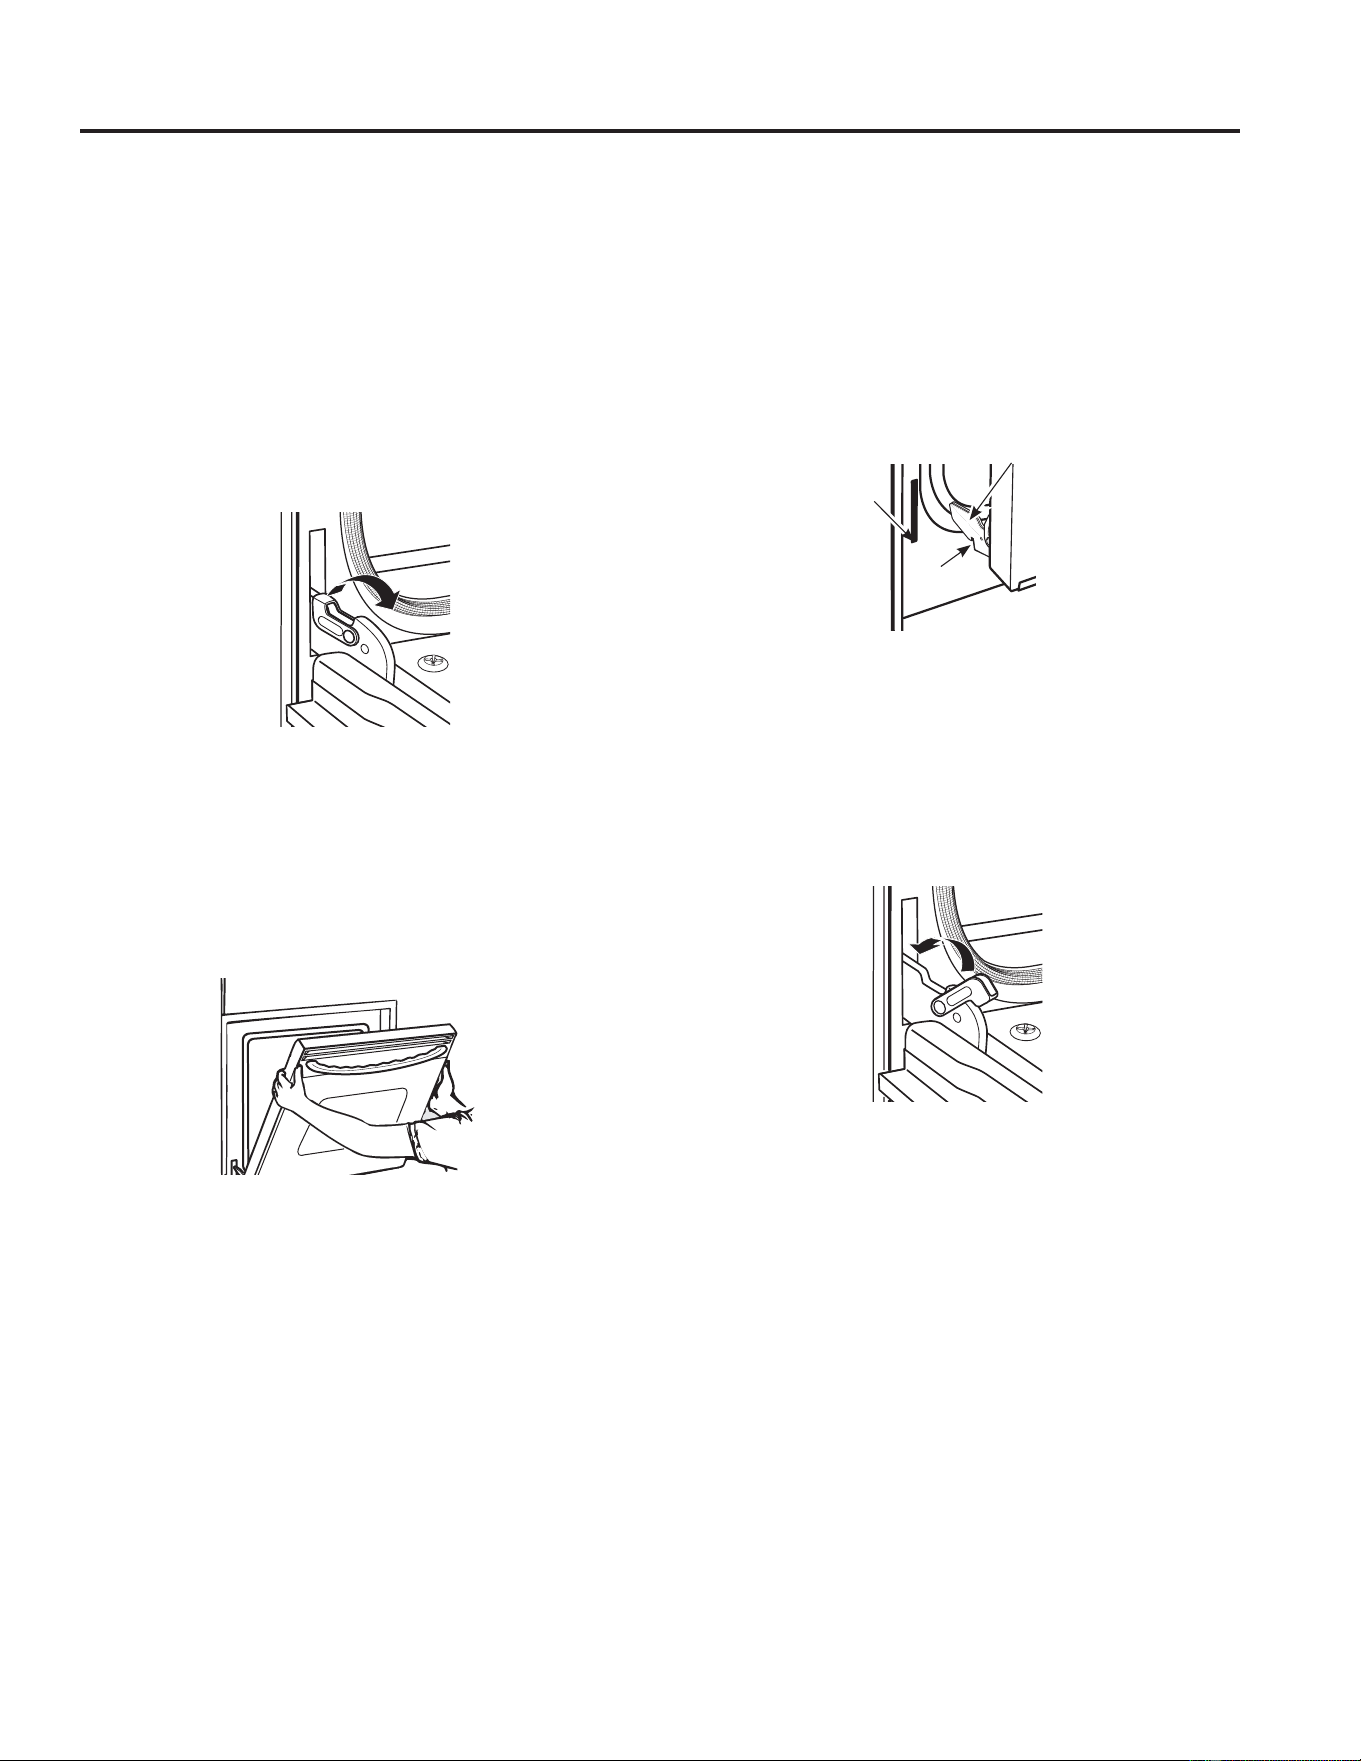
49-2001566 Rev. 1
Superficies Interiores
Puerta del Horno
Interior y Exterior de la Puerta
No permita que el excedente de agua entre a ningún agujero
o ranuras de la puerta. Aplique detergente para lavar platos
sobre cualquier salpicadura que haya en el vidrio debido al
KRUQHDGR 8VH HO ILOR GH XQD QDYDMD GHO ODGR VHJXUR SDUD
retirarlo. Luego limpie el vidrio con una tela con jabón para
eliminar cualquier residuo y seque.
Para Retirar la Puerta:
$EUD OD SXHUWD WRWDOPHQWH
2. Empuje los bloqueos de la bisagra hacia arriba y afuera de
la estructura de la estufa, hasta la posición de desbloqueo.
3. De manera firme, tome ambos lados de la puerta cerca de
la parte superior.
4. Cierre la puerta hasta que la parte superior de la misma
TXHGH D DSUR[LPDGDPHQWH D ´ GH OD HVWUXFWXUD GH OD HVWXID
5. Levante la puerta hacia arriba y afuera de la estufa, hasta
que ambos brazos de las bisagras estén fuera de las
ranuras de la estructura de la estufa.
Para Volver a Colocar la Puerta
'H PDQHUD ILUPH WRPH DPERV ODGRV GH OD SXHUWD FHUFD GH
la parte superior.
2. Con la puerta en el mismo ángulo que en la posición de
retiro, coloque la abertura sobre el lado inferior del brazo de
la bisagra izquierda en el extremo inferior de la ranura de
la bisagra izquierda. La abertura en el brazo de la bisagra
deberá estar totalmente apoyada en la parte inferior de la
ranura. Repita este procedimiento del lado derecho.
3. Abra la puerta totalmente. Si la puerta no se abre
completamente, entonces las aberturas en las partes
inferiores de los brazos de las bisagras no se apoyaron de
forma correcta sobre el extremo inferior de la ranura. Retire
la puerta de la estufa y repita el paso anterior.
4. Empuje los bloqueos de las bisagras hacia la cavidad de la
estufa y hacia abajo hasta la posición de bloqueo.
5. Cierre la puerta del horno.
CUIDADO Y LIMPIEZA: Superficies Interiores
Empuje los bloqueos de bisagra hacia arriba para desbloquear.
Posición de retiro
Apoye la abertura en el extremo inferior
de la ranura de la bisagra
Abertura
Extremo
inferior de la
ranura
Brazo de la bisagra
Empuje los bloqueos de la bisagra
hacia abajo para bloquear.
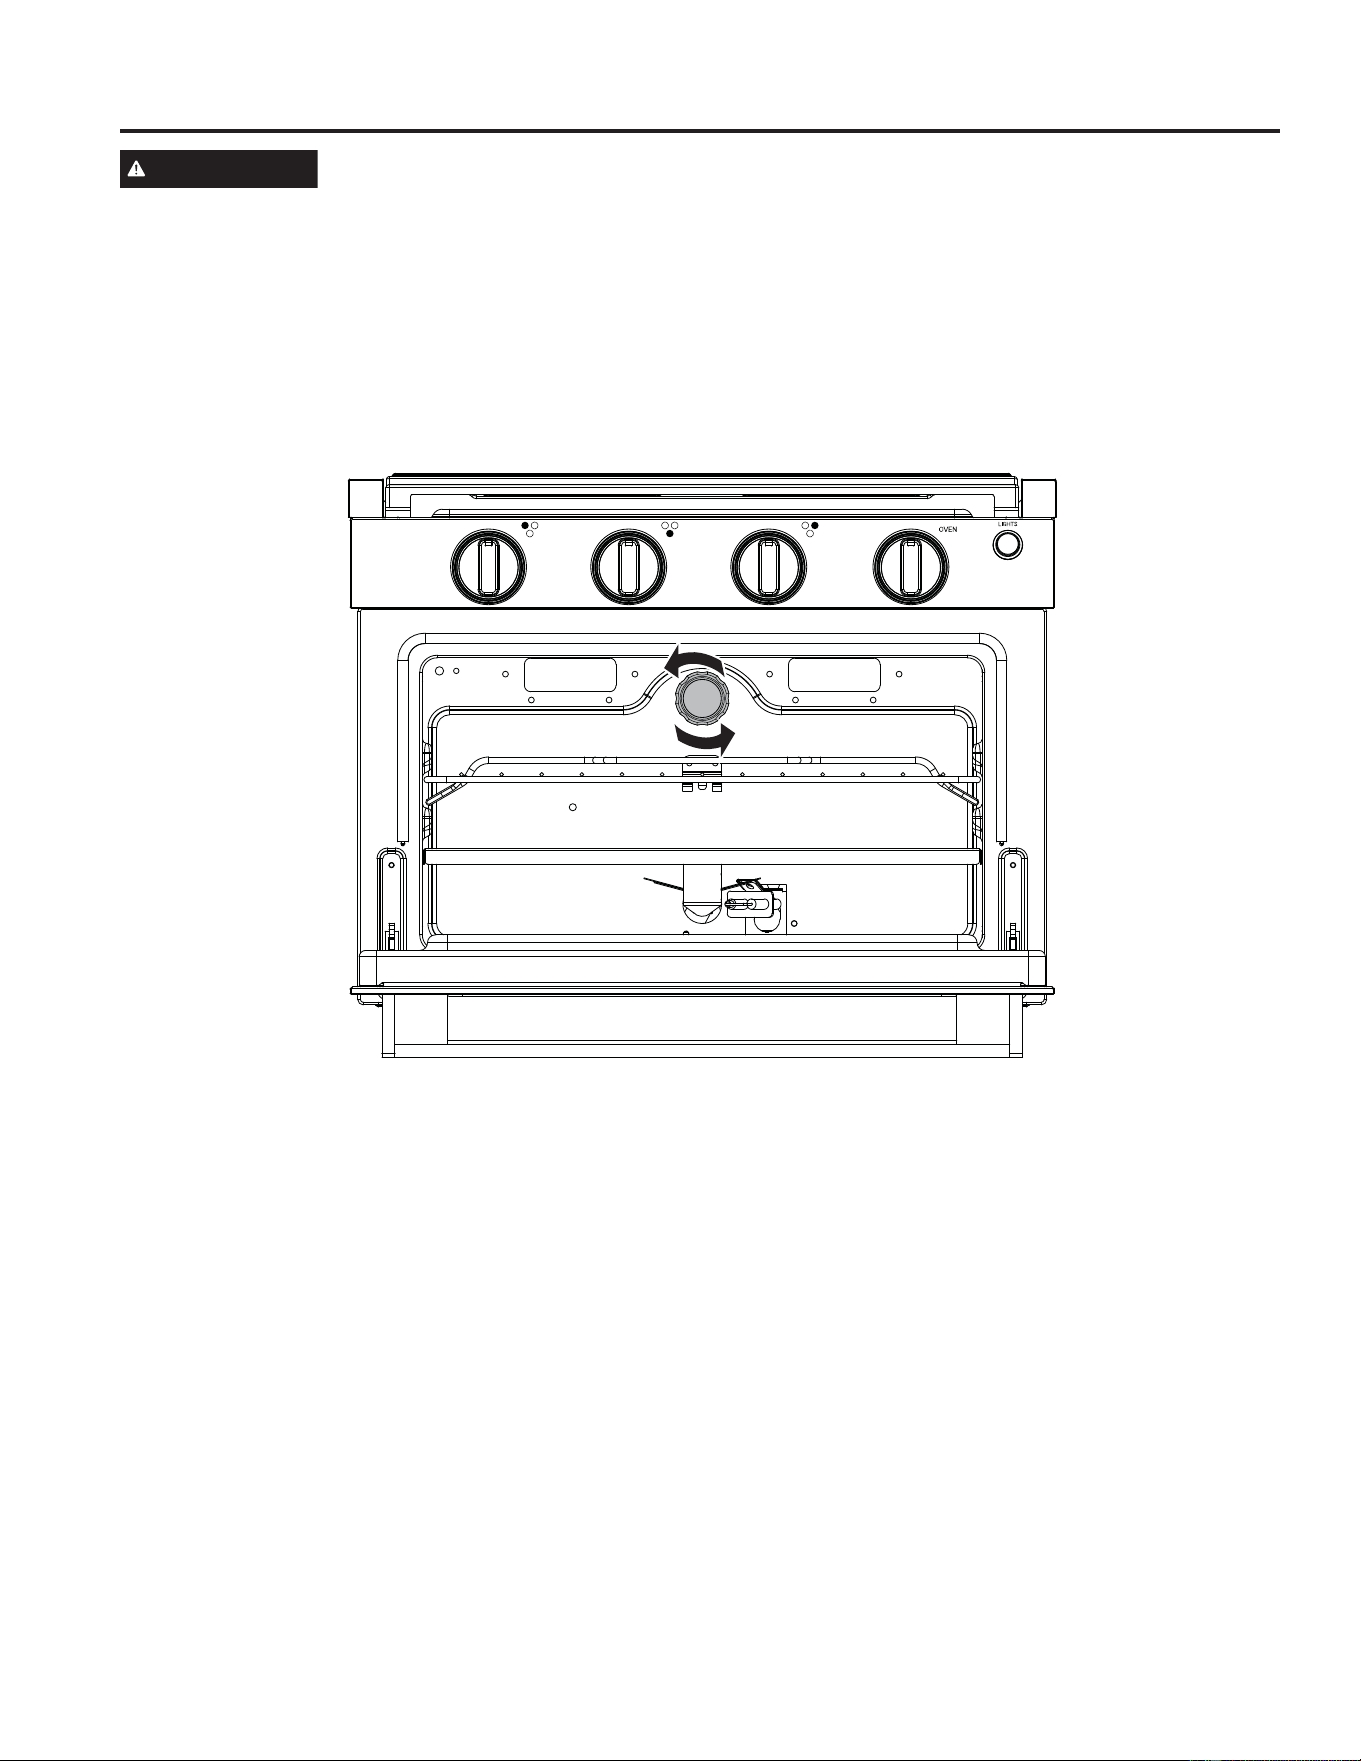
49-2001566 Rev. 1
Luz del Horno
CUIDADO Y LIMPIEZA: Luz del Horno
PRECAUCIÓN
RIESGO DE INCENDIO: La tapa de vidrio y el bombillo se deberán retirar cuando estén fríos. Tocar el
vidrio caliente sin protección en las manos o con un trapo húmedo podrá ocasionar quemaduras.
Antes de reemplazar el bombillo, desconecte la corriente
eléctrica del horno. Espere hasta que el bombillo se enfríe
completamente antes de retirar el mismo. Para su seguridad,
no toque un bombillo caliente con una tela húmeda. Si lo hace,
éste se podrá romper.
'HVFRQHFWHODFRUULHQWHGHOKRUQRDQWHVGHFDPELDUHO
bombillo.
2. Retire la tapa de vidrio del porta bombillos, desenroscando
en sentido antihorario.
3. Retire el bombillo y reemplace el mismo por uno resistente
DDOWDVWHPSHUDWXUDV&)FRQODVVLJXLHQWHV
FDUDFWHUtVWLFDV9ROWDMH9:DWWV:7LSR*±7LSR
de Bombillo: Halógeno
4. Reemplace la tapa de vidrio desenroscando la misma en
sentido horario.
9XHOYDDFRQHFWDUHOKRUQRDODFRUULHQWH
49-2001566 Rev. 1
INSTRUCCIONES DE INSTALACIÓN
QUÉ HAY EN LA CAJA
Asegúrese de que los siguientes ítems estén todos incluidos
con el embalaje. Si un ítem se encuentra dañado o no esté
presente, comuníquese con su vendedor minorista.
Ɣ(VWXID[
Ɣ3DUULOODGH3ODFDGH&RFFLyQ[
Ɣ3DUULOODGH&RFFLyQ[
Ɣ7RUQLOORGHPDGHUDQ[´[
Ɣ0DQXDOGHO3URSLHWDULRH,QVWUXFFLRQHVGH,QVWDODFLyQ[
HERRAMIENTAS NECESARIAS
MATERIALES NECESARIOS
Ŷ6HOODGRUSDUDMXQWDGHWXEHUtDRFLQWDSDUDWXEHUtD
URVFDGDDSUREDGDSRU8/FRQ7HIOyQUHVLVWHQWHDOD
acción del gas natural o LP.
Ŷ'HWHFWRUGHSpUGLGDVGHOtTXLGRRDJXDFRQMDEyQ
Ŷ7XEHUtDGHVXPLQLVWURGHSURSDQRFRQFRQH[LyQKHPEUD
DERFDUGDGDGH´
7HIOyQ0DUFDUHJLVWUDGDSRU'X3RQW
Instrucciones de Instalación
¿Preguntas? Visite GEAppliances.com. En Canadá, visite GEAppliances.ca.
ANTES DE COMENZAR
IMPORTANTE — Guarde estas
instrucciones para uso del inspector local.
IMPORTANTE — Cumpla con todos los
códigos y ordenanzas gubernamentales.
IMPORTANTE — Retire todo el material
de embalaje y el material escrito del horno antes
de conectar el gas y el suministro de corriente a la
estufa.
IMPORTANTE — A fin de evitar daños
en los gabinetes, controle con su constructor o
proveedor de gabinetes que los materiales usados
no se descolorarán, deslaminarán ni sufrirán otro
daño. Este horno fue diseñado de acuerdo con los
requisitos de CSA International y cumple con las
temperaturas máximas permitidas para gabinetes de
PDGHUDGH)&
Nota para el Instalador – Asegúrese de entregar
estas instrucciones al consumidor.
Nota para el consumidor – Conserve estas
instrucciones para referencia futura.
La correcta instalación del producto es
responsabilidad del instalador.
Si se producen fallas en el producto debido a una
instalación inadecuada, la garantía no cubrirá las
mismas.
Destornillador Phillips
/ODYHDMXVWDEOH
Taladro eléctrico con broca de
´
Gafas de seguridad
Guantes
ADVERTENCIA
Se Requieren Ciertos
(TXLSRVGH'HWHFFLyQHQ9HKtFXORV5HFUHDWLYRV
de acuerdo con NFPA 1192. El equipamiento
requerido deberá estar aprobado por UL para
VXXVRHQYHKtFXORVUHFUHDWLYRV,QVWDOH\XVH
el equipo de acuerdo con las instrucciones del
fabricante.
Alarma de Humo – (QODVHFFLyQVHLQGLFD
que todos los vehículos recreativos deberán estar
equipados con una alarma de humo.
Alarma de Humo – (QODVHFFLyQVHLQGLFD
que todos los vehículos recreativos deberán estar
equipados con una alarma de humo.
Detector de Propano – En la sección 6.3.3 se
indica que todos los vehículos recreativos con un
electrodoméstico a gas propano deberán estar
equipado con un detector de propano.

49-2001566 Rev. 1
Instrucciones de Instalación
INSTRUCCIONES DE INSTALACIÓN
DIMENSIONES DE LOS ESPACIOS LIBRES DE LOS GABINETES Y LA
ENCIMERA
Asegúrese de que los gabinetes y la encimera cumplan con los requisitos de la mesa, antes de realizar la instalación de la estufa.
NOTA: La partes trasera y los laterales de la estufa debajo de la encimera podrán estar nivelados con los gabinetes. El
horno se deberá enmarcar o proteger a fin de evitar la creación de un espacio de almacenamiento alrededor de la parte
empotrada del electrodoméstico.
Modelo $SURIXQGLGDG %DQFKR &DOWR 'YRODGR (JURVRU
3/'57 ´ ´ 0tQGH´ 0i[GH´ 0i[GH´
3/'57 ´ ´ 0tQGH´ 0i[GH´ 0i[GH´
A
B
C
E
D
B
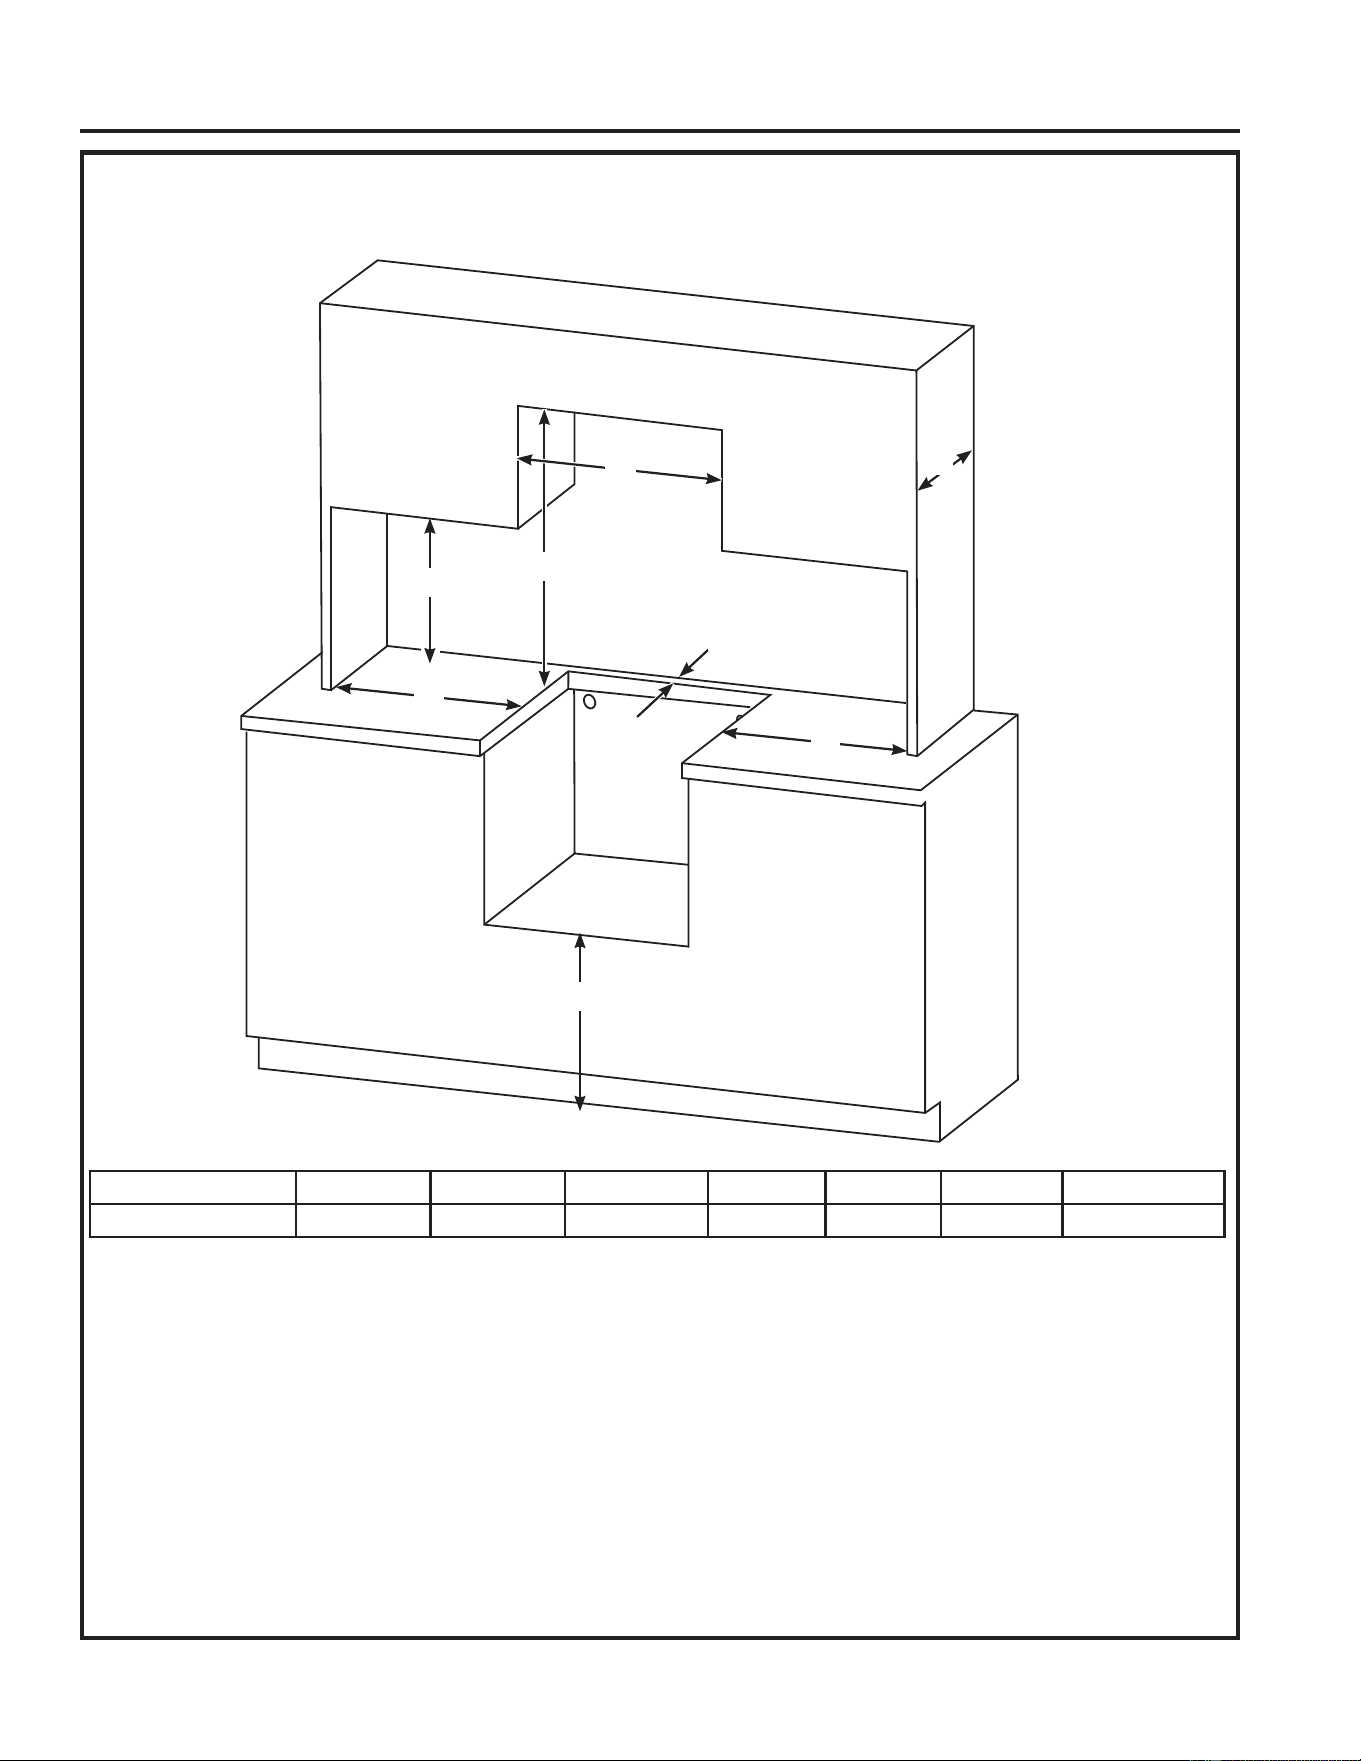
49-2001566 Rev. 1
Instrucciones de Instalación
ESPACIOS LIBRES DE LA INSTALACIÓN
Asegúrese de que los gabinetes y la encimera cumplan con los requisitos de la mesa, antes de realizar la instalación de la estufa.
$'HMHXQHVSDFLROLEUHYHUWLFDOGHXQPtQLPRGH´
entre la encimera y la construcción inflamable sobre el
electrodoméstico. Para contar con espacios verticales
alternativos libres, consulte la Tabla 5.6.6.5 de NFPA
SDUDUHTXLVLWRVVREUHFDPSDQDV
B: 'HMHXQHVSDFLROLEUHYHUWLFDOGHXQPtQLPRGH´
entre la encimera y la construcción inflamable sobre los
laterales izquierdo y derecho del electrodoméstico.
C: La profundidad máxima permitida para los gabinetes
VXSHULRUHVHVGH&XDQGRVHWUDWHGHSURIXQGLGDGHV
de gabinete sobre la altura de la cabeza que superen
´FRQVXOWHOD7DEODGH1)3$SDUD
requisitos sobre campanas.
D: 'HMHXQHVSDFLROLEUHKRUL]RQWDOPtQLPRGH´HQWUHHO
espacio libre del electrodoméstico y la construcción
inflamable que se extiende desde la superficie de cocción
KDVWDSRUHQFLPDGHODVXSHUILFLHGHFRFFLyQ
E: 'HMHXQHVSDFLROLEUHGHXQPtQLPRGH´HQWUHOD
construcción inflamable adyacente y la parte trasera del
espacio libre del electrodoméstico.
F: La distancia vertical mínima entre el piso y la parte
WUDVHUDGHOHVSDFLROLEUHGHOJDELQHWHHVGH´
G: (ODQFKRGHO(VSDFLR9HUWLFDO$QRGHEHUiVHULQIHULRUD
´
A
G
B
F
D
D
C
E
Modelos A B C D E F G
Todos los Modelos 0tQGH´ 0tQGH´ 0i[GH´ 0tQGH´ 0tQGH´ 0tQGH´ 0tQGH´
INSTRUCCIONES DE INSTALACIÓN
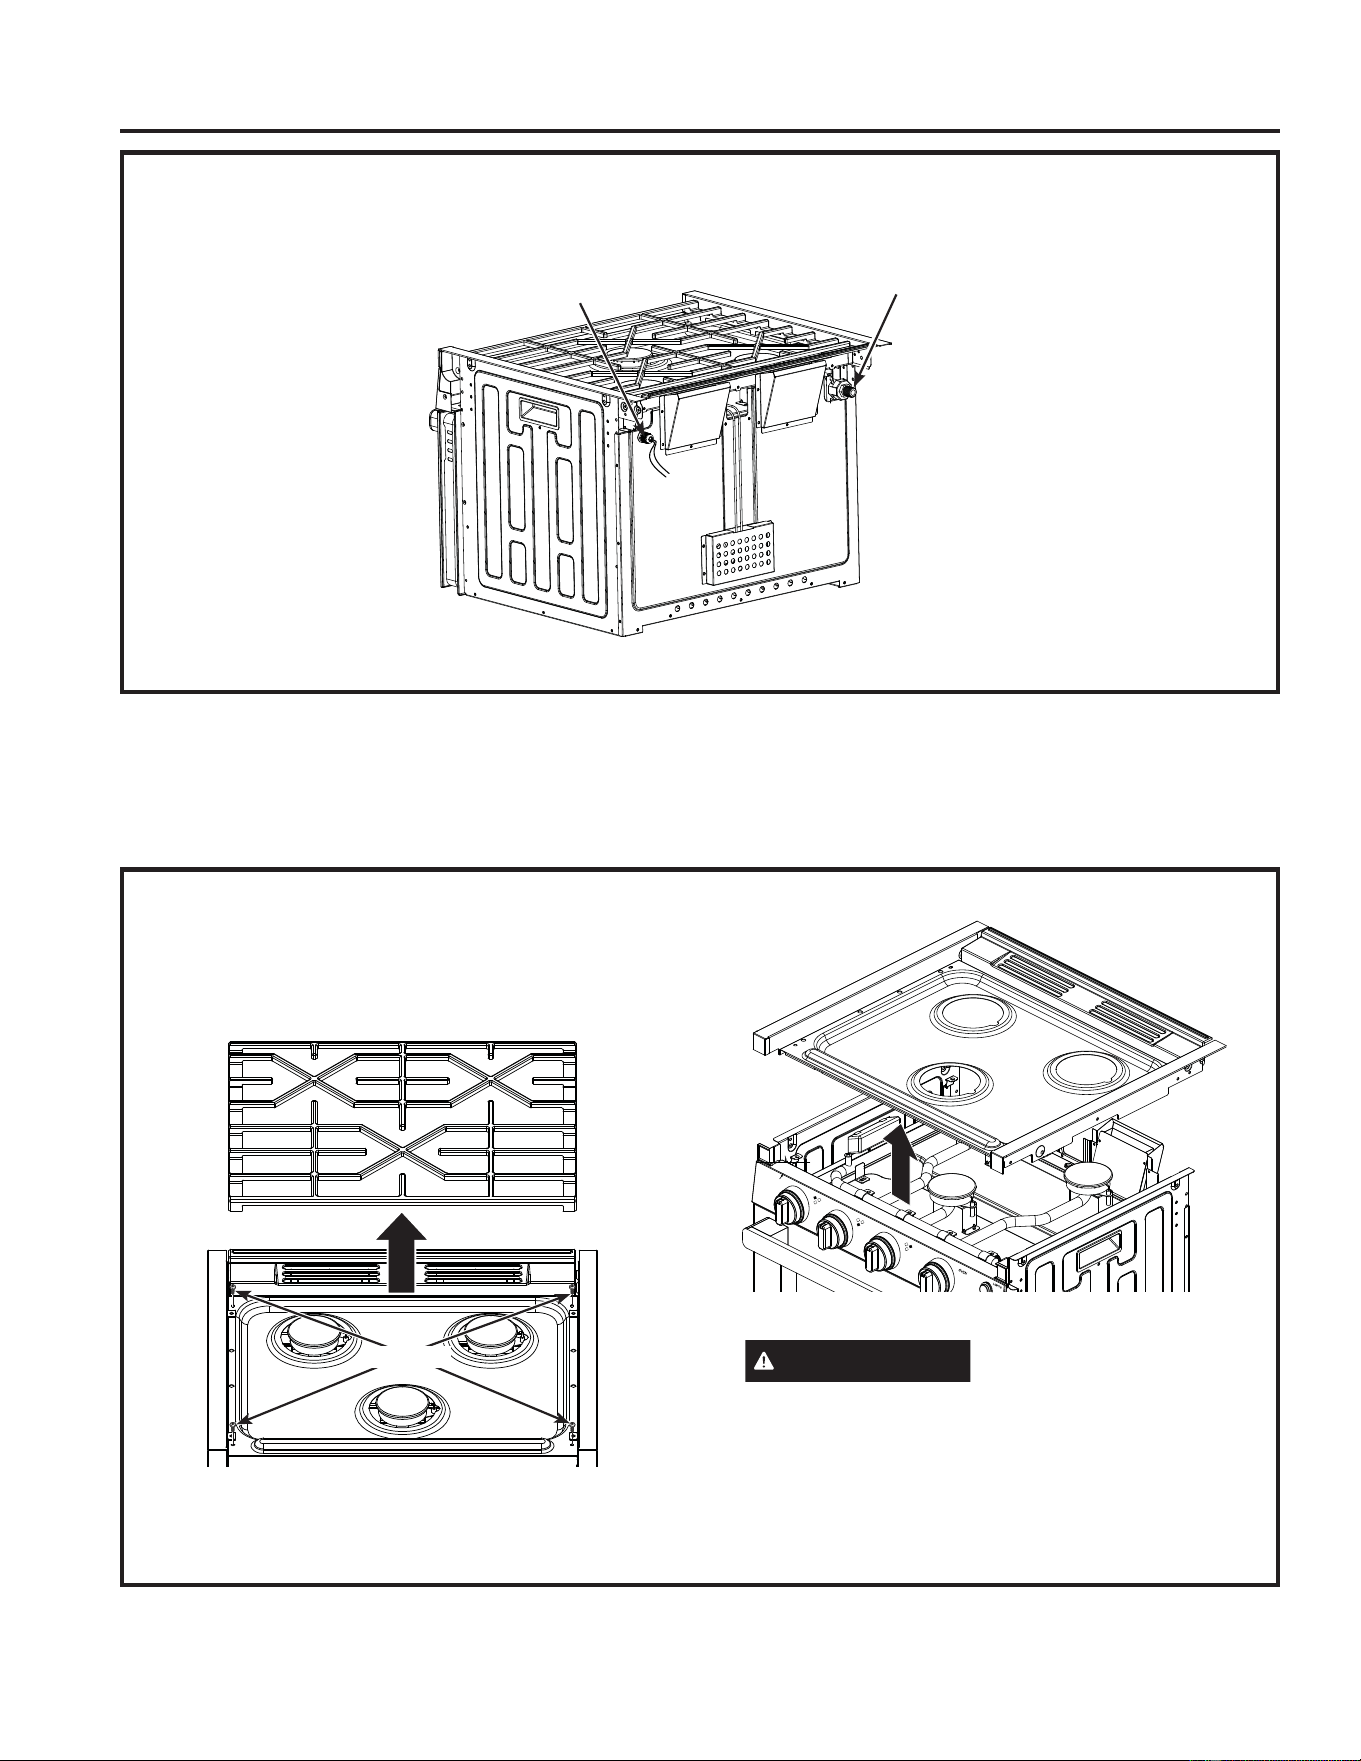
49-2001566 Rev. 1
UBICACIONES PARA LA INSTALACIÓN DE LOS SUMINISTROS DE GAS Y
CORRIENTE
Instrucciones de Instalación
INSTRUCCIONES DE INSTALACIÓN
1. PREPARACIÓN DEL HORNO
Ŷ Retire la estufa de la caja de cartón y coloque
la misma sobre una superficie plana. Retire los
materiales del embalaje.
Ŷ Levante y retire la parrilla de la placa de cocción.
Ŷ Retire los 4 tornillos sobre la superficie de cocción con
un destornillador Phillips, y luego levante la placa de
cocción para su retiro.
ADVERTENCIA
Se deberá tener cuidado
de no dañar ni modificar la tubería de gas que se
encuentra debajo de la placa de cocción. Hacer esto
podrá ocasionar un incendio o riesgos de explosión.
Ŷ Levante la estufa tomando las manijas laterales y
FRORTXHHOPLVPRHQODDEHUWXUDGHOJDELQHWH9XHOYDD
deslizar la estufa hasta que las pestañas de la cavidad
frontal tengan contacto con la cara del gabinete.
INSTALACIÓN DEL HORNO
NOTA: Antes de realizar la instalación, use guantes y gafas de seguridad.
Complete los siguientes pasos cuando el gabinete se encuentre preparado de acuerdo con las dimensiones dadas, y cuando la
tubería de gas y las conexiones eléctricas se encuentren preparadas.
Conexión de la Tubería
de Suministro de Propano
Conexión del Sumi
nistro de Corriente
Retire la Parrilla
6FUHZV
27°
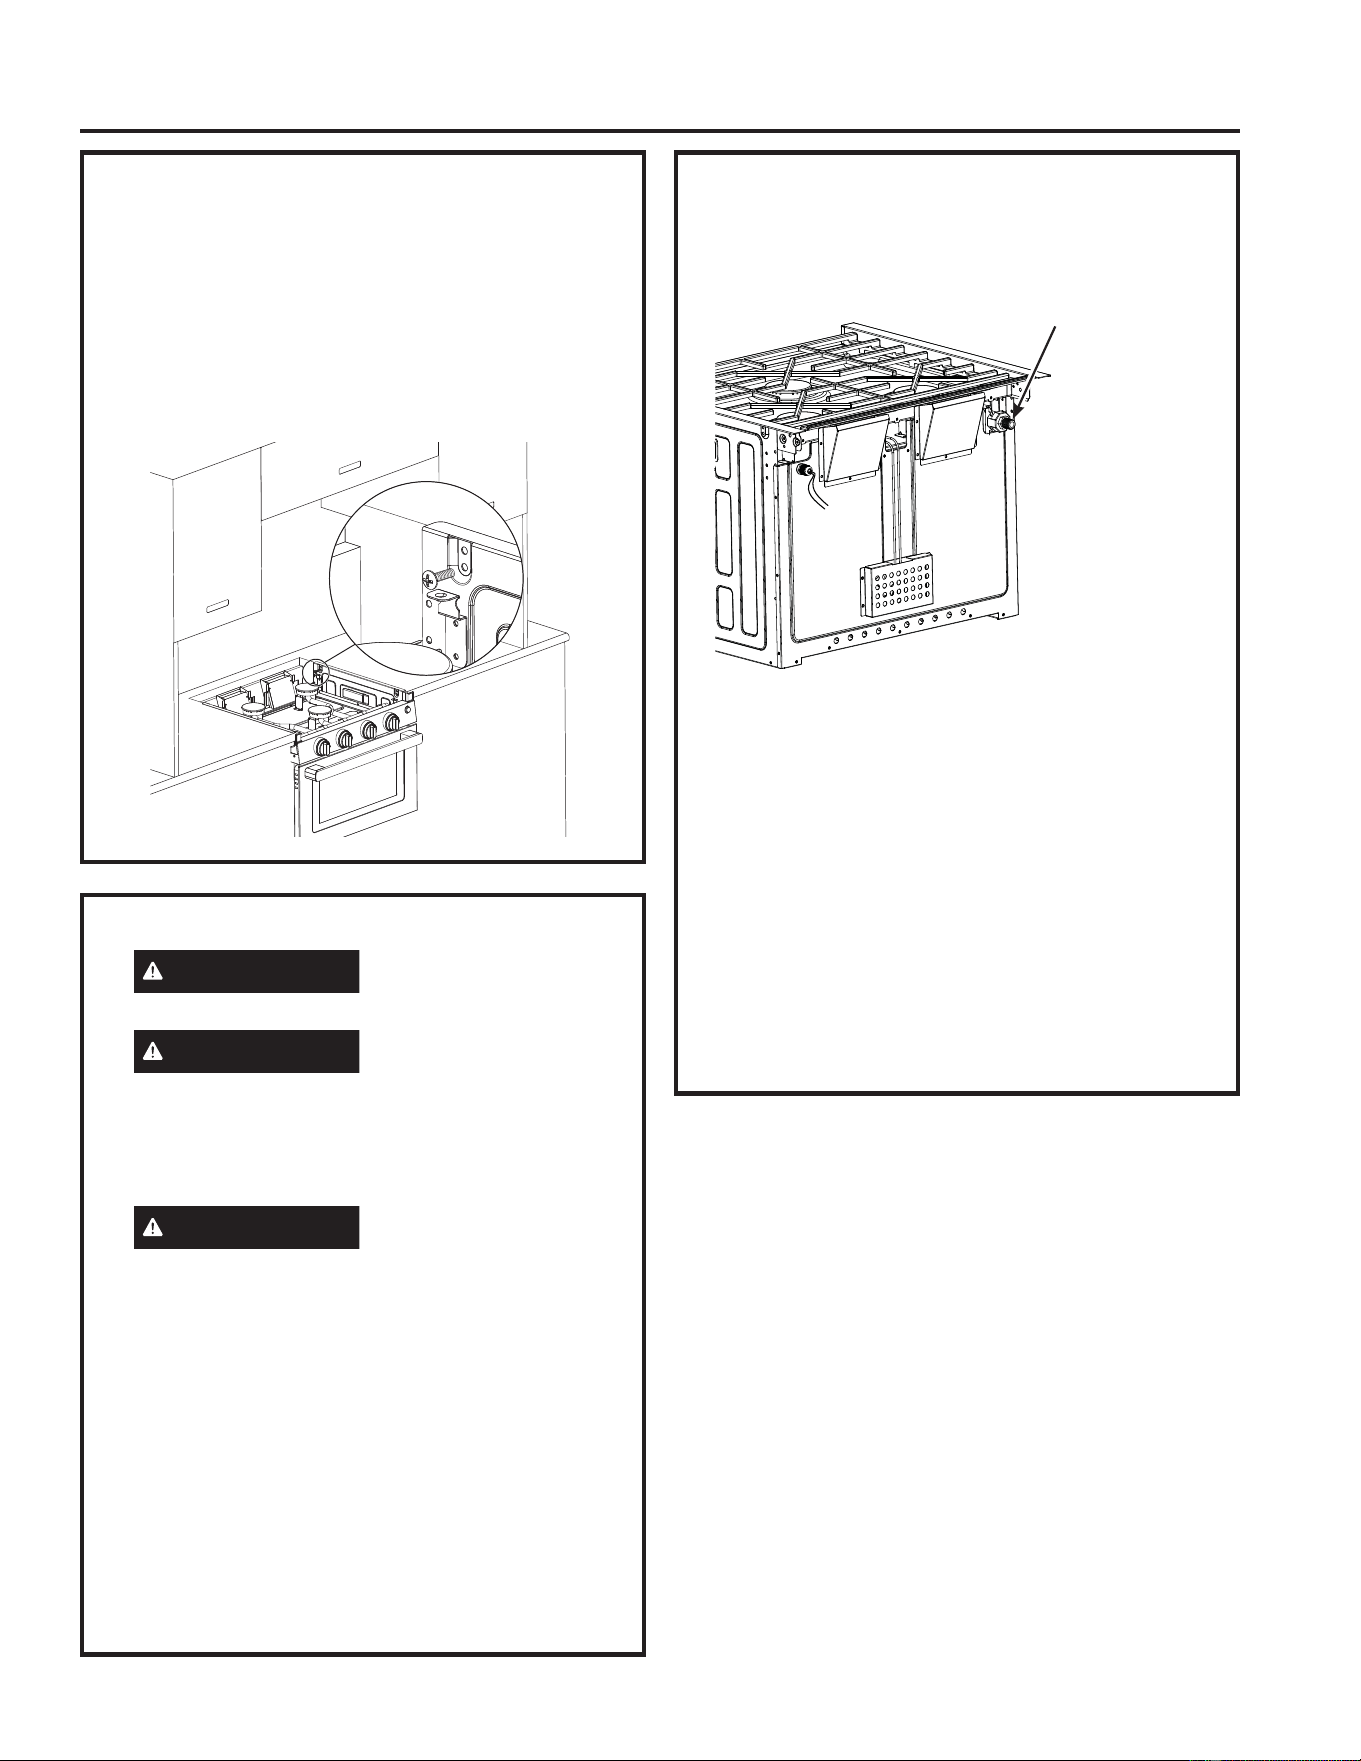
49-2001566 Rev. 1
Instrucciones de Instalación
1. PREPARACIÓN DEL HORNO
FRQW
Ŷ Adhiera la estufa a la abertura del gabinete,
colocando cuatro tornillos en la encimera. Instale 2
tornillos por lado usando las opciones de agujeros
preferidas en base a la construcción de la encimera.
Si la encimera es de madera, comience perforando
FXDWURDJXMHURVSLORWRFRQXQDEURFDGH´
Coloque los 4 tornillos provistos en los agujeros
para su adhesión.
2. 680,1,6752'(*$6FRQW
Conecte una tubería de suministro de propano con
XQDFRQH[LyQKHPEUDDERFDUGDGDGH´DOUHJXODGRU
en la esquina superior trasera derecha del gabinete.
Ajuste la tubería de gas al regulador usando 2 llaves.
IMPORTANTE: Deje un espacio adecuado alrededor
de la tubería de suministro de gas en caso de
torcedura o daños durante la instalación. Asegúrese
de que la tubería de suministro de gas no pueda
tener contacto con ninguna pieza móvil luego de la
instalación.
$OXVDUSUHVLRQHVVXSHULRUHVDòSVLJSDUDFRQWURODUHO
sistema de suministro de gas del vehículo recreativo,
desconecte la estufa y la válvula de cierre individual
de la tubería de suministro de gas. Al usar las
SUHVLRQHVGHSUXHEDGHòSVLJN3DRPHQRV
para controlar el sistema de suministro de gas,
simplemente aísle la estufa del sistema de suministro
de gas cerrando la válvula de cierre individual.
2. SUMINISTRO DE GAS
ADVERTENCIA
Riesgo de Incendio: No
use una llama para controlar las pérdidas de gas.
ADVERTENCIA
Riesgo de Explosión: No
supere una torsión máxima de 25 pies-libras al
realizar conexiones de tuberías de gas. Cualquier
ajuste en exceso podrá romper el regulador
de presión, resultando en riesgo de incendio o
explosión.
ADVERTENCIA
Es posible que las
pérdidas de gas no se puedan detectar sólo
a través del olfato. Los proveedores de gas
recomiendan la adquisición e instalación de un
detector de gas aprobado por UL. Instale y use
el equipo de acuerdo con las instrucciones del
fabricante.
Regulador de Presión de Gas
Se deberá usar el regulador de presión de gas
propano suministrado con esta estufa. Para un
funcionamiento adecuado, la presión de entrada al
regulador deberá ser la siguiente:
3UHVLyQPtQLPD´GH&ROXPQDGH$JXD
0D[LPXPSUHVVXUH´RI:DWHU&ROXPQ
3UHVLyQPi[LPD´GH&ROXPQDGH$JXD
INSTRUCCIONES DE INSTALACIÓN
Conexión de la Tubería
de Suministro de Propano
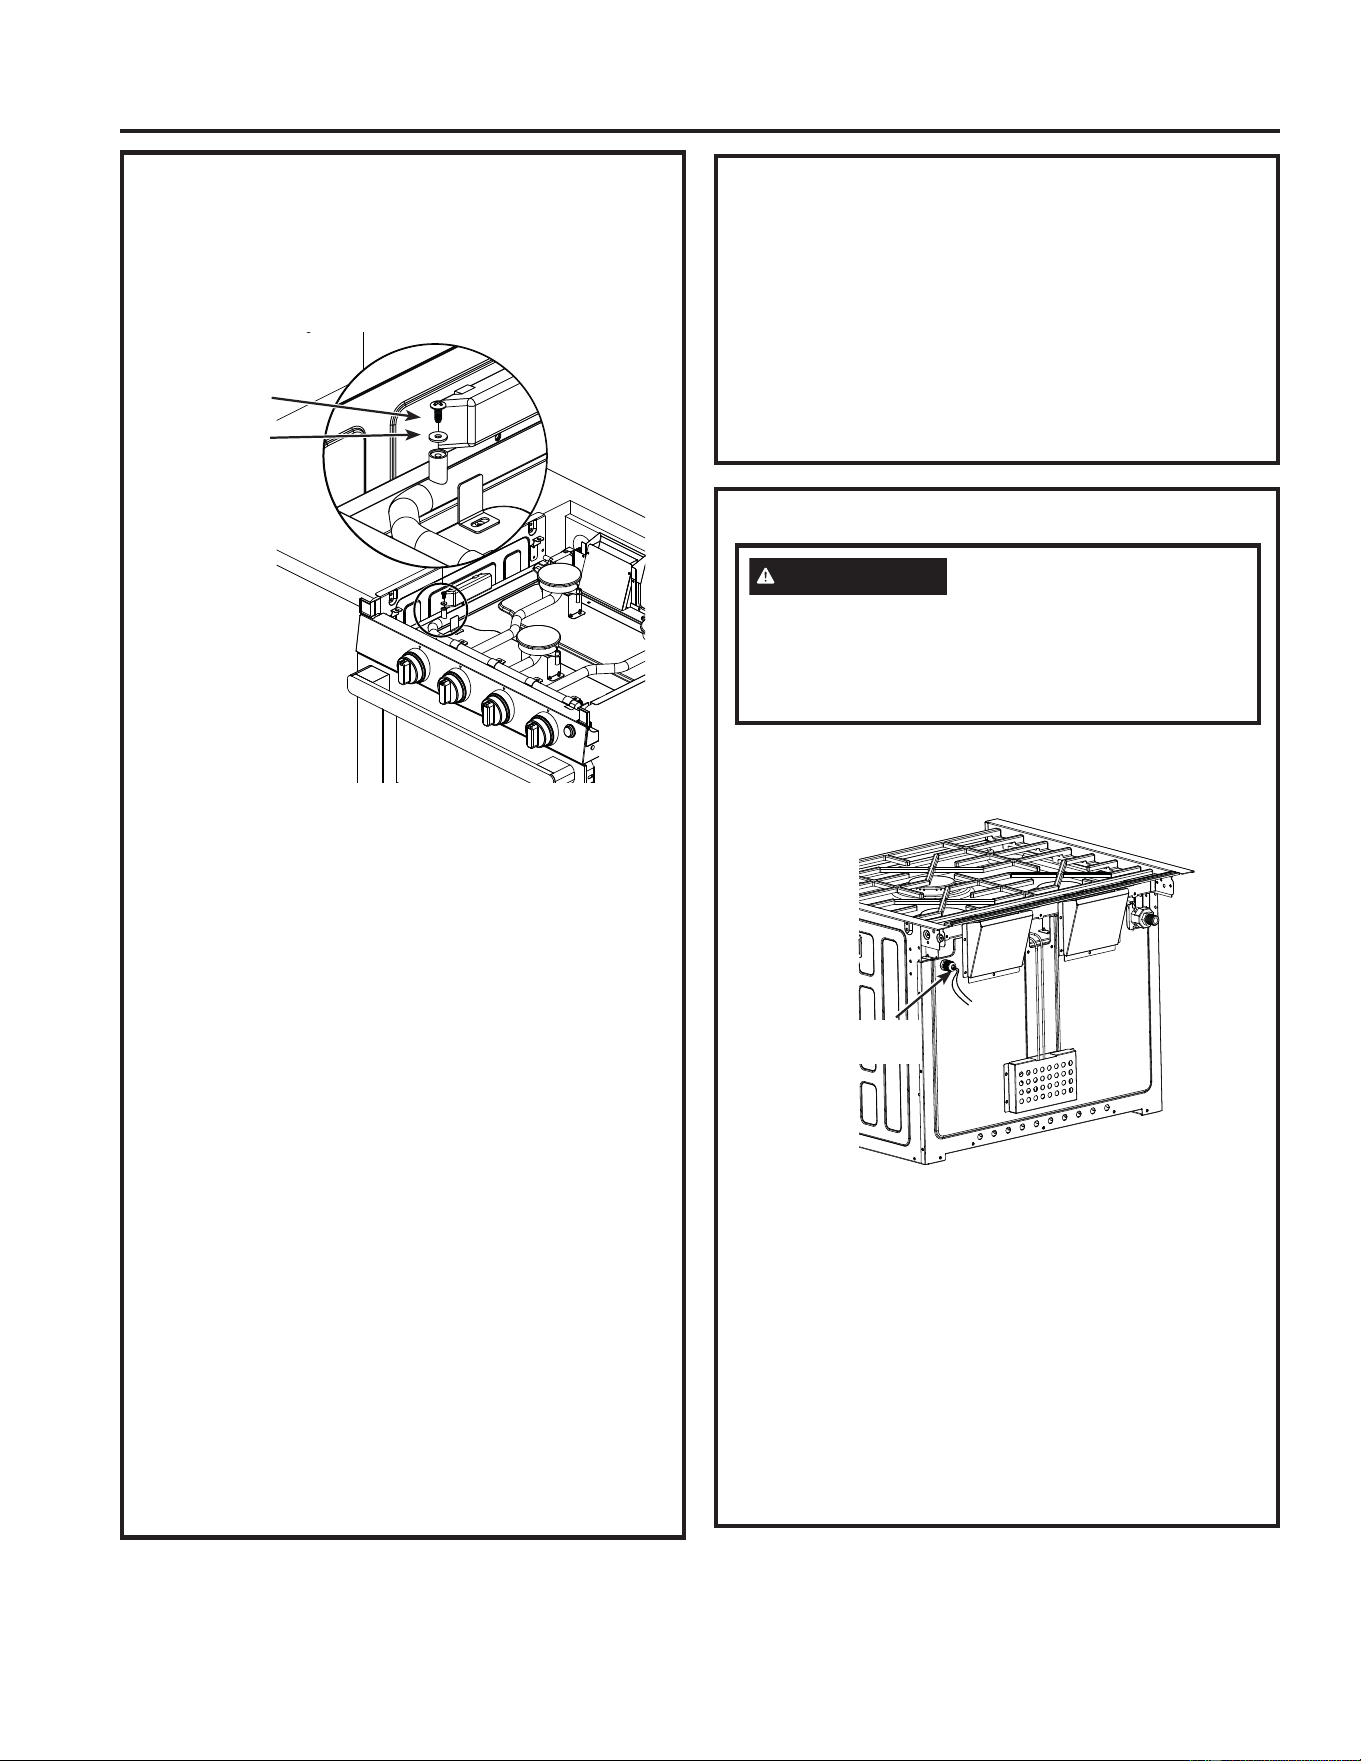
49-2001566 Rev. 1
Instrucciones de Instalación
INSTRUCCIONES DE INSTALACIÓN
3. CONTROL DE PRESIÓN
Ŷ Asegúrese de que el gas propano sea cerrado para
el electrodoméstico.
Ŷ Retire el tornillo con la junta sellada desde el puerto
de prueba de presión de la estufa.
Ŷ8WLOL]DQGRODWXEHUtDGHJRPDGHVGHXQGLVSRVLWLYR
de medición de control de presión, deslice la tubería
de goma por el puerto de prueba de presión de gas.
La tubería de goma se deberá sellar alrededor del
puerto de prueba de presión.
Ŷ Abra la entrada de gas propano al electrodoméstico
Ŷ El medidor de calibre de presión deberá medir entre
´GHFROXPQDGHDJXD\´GHFROXPQDGH
agua.
Ŷ Cierre la entrada de gas propano al
electrodoméstico.
Ŷ Retire la tubería de goma del dispositivo de
medición de control de presión.
Ŷ9XHOYDDFRORFDUHOWRUQLOORFRQODMXQWDUHWLUDGDHQHO
paso anterior. Antes de volver a colocar el tornillo,
inspeccione que el sellado de la junta de goma no
posea signos de daños.
Ŷ Ajuste de forma manual el tornillo, asegurándose de
que no se dañe el sellado.
NOTA: Asegúrese de que se haya controlado
que el producto no posee pérdidas de gas, una
vez completada la prueba de control de presión
controlando también el tornillo del puerto de control de
presión. Si se detectan pérdidas alrededor del tornillo
del puerto de prueba de presión y de la junta sellada,
se podrá adquirir uno nuevo. Llame a GE Appliances
DOSDUDVROLFLWDUXQUHHPSOD]R
5. CONEXIÓN ELÉCTRICA
Los cables de suministro de corriente se encuentran
ubicados en la esquina superior izquierda de la parte
trasera del electrodoméstico.
&RQHFWHXQFDEOHGHVXPLQLVWURGHFRUULHQWHGH9
SRVLWLYRDOFDEOHQHJURGH9GHOHOHFWURGRPpVWLFR\
XQFDEOHGHVXPLQLVWURGHFRUULHQWHGH9QHJDWLYRDO
FDEOHEODQFRGH9GHOHOHFWURGRPpVWLFR(OFRQVXPR
Pi[LPRGHFRUULHQWHHVLQIHULRUD$PSHU
NOTA: Asegúrese de conectar los cables con la
SRODULGDGFRUUHFWD(O1HJURHV³´\HO%ODQFRHV
³´$VHJ~UHVHGHTXHODVFRQH[LRQHVHOpFWULFDVVH
encuentren correctamente aseguradas.
Asegúrese de que las tuberías de suministro de gas
se encuentren desconectadas, o de haber cortado la
conexión desde el panel del fusible o disyuntor, antes
de realizar el servicio técnico del electrodoméstico.
4. CONTROL DE PÉRDIDAS
Ŷ$VHJ~UHVHGHTXHWRGDVODVSHULOODVGHFRQWUROVH
HQFXHQWUHQHQODSRVLFLyQ2))&HUUDGD
Ŷ$SOLTXHXQOtTXLGRGHGHWHFFLyQGHJDVVREUHODV
conexiones. Cualquier pérdida de gas será indicada
a través de las burbujas.
Ŷ6LVHGHWHFWDXQDSpUGLGDGHJDVDMXVWHODMXQWD
floja o reemplace la pieza defectuosa con una
pieza de reemplazo recomendada por un vendedor
minorista autorizado de GE Appliances.
PRECAUCIÓN
RIESGO DE DAÑOS SOBRE
EL PRODUCTO
•&RQHFWDUDGLVSRVLWLYRVGH9'&~QLFDPHQWH
• Conectar sólo un circuito protegido con fusible de
no más de 15 Amperios.
Conexión del Suministro
de Corriente
Tornillo
Junta
Sellada
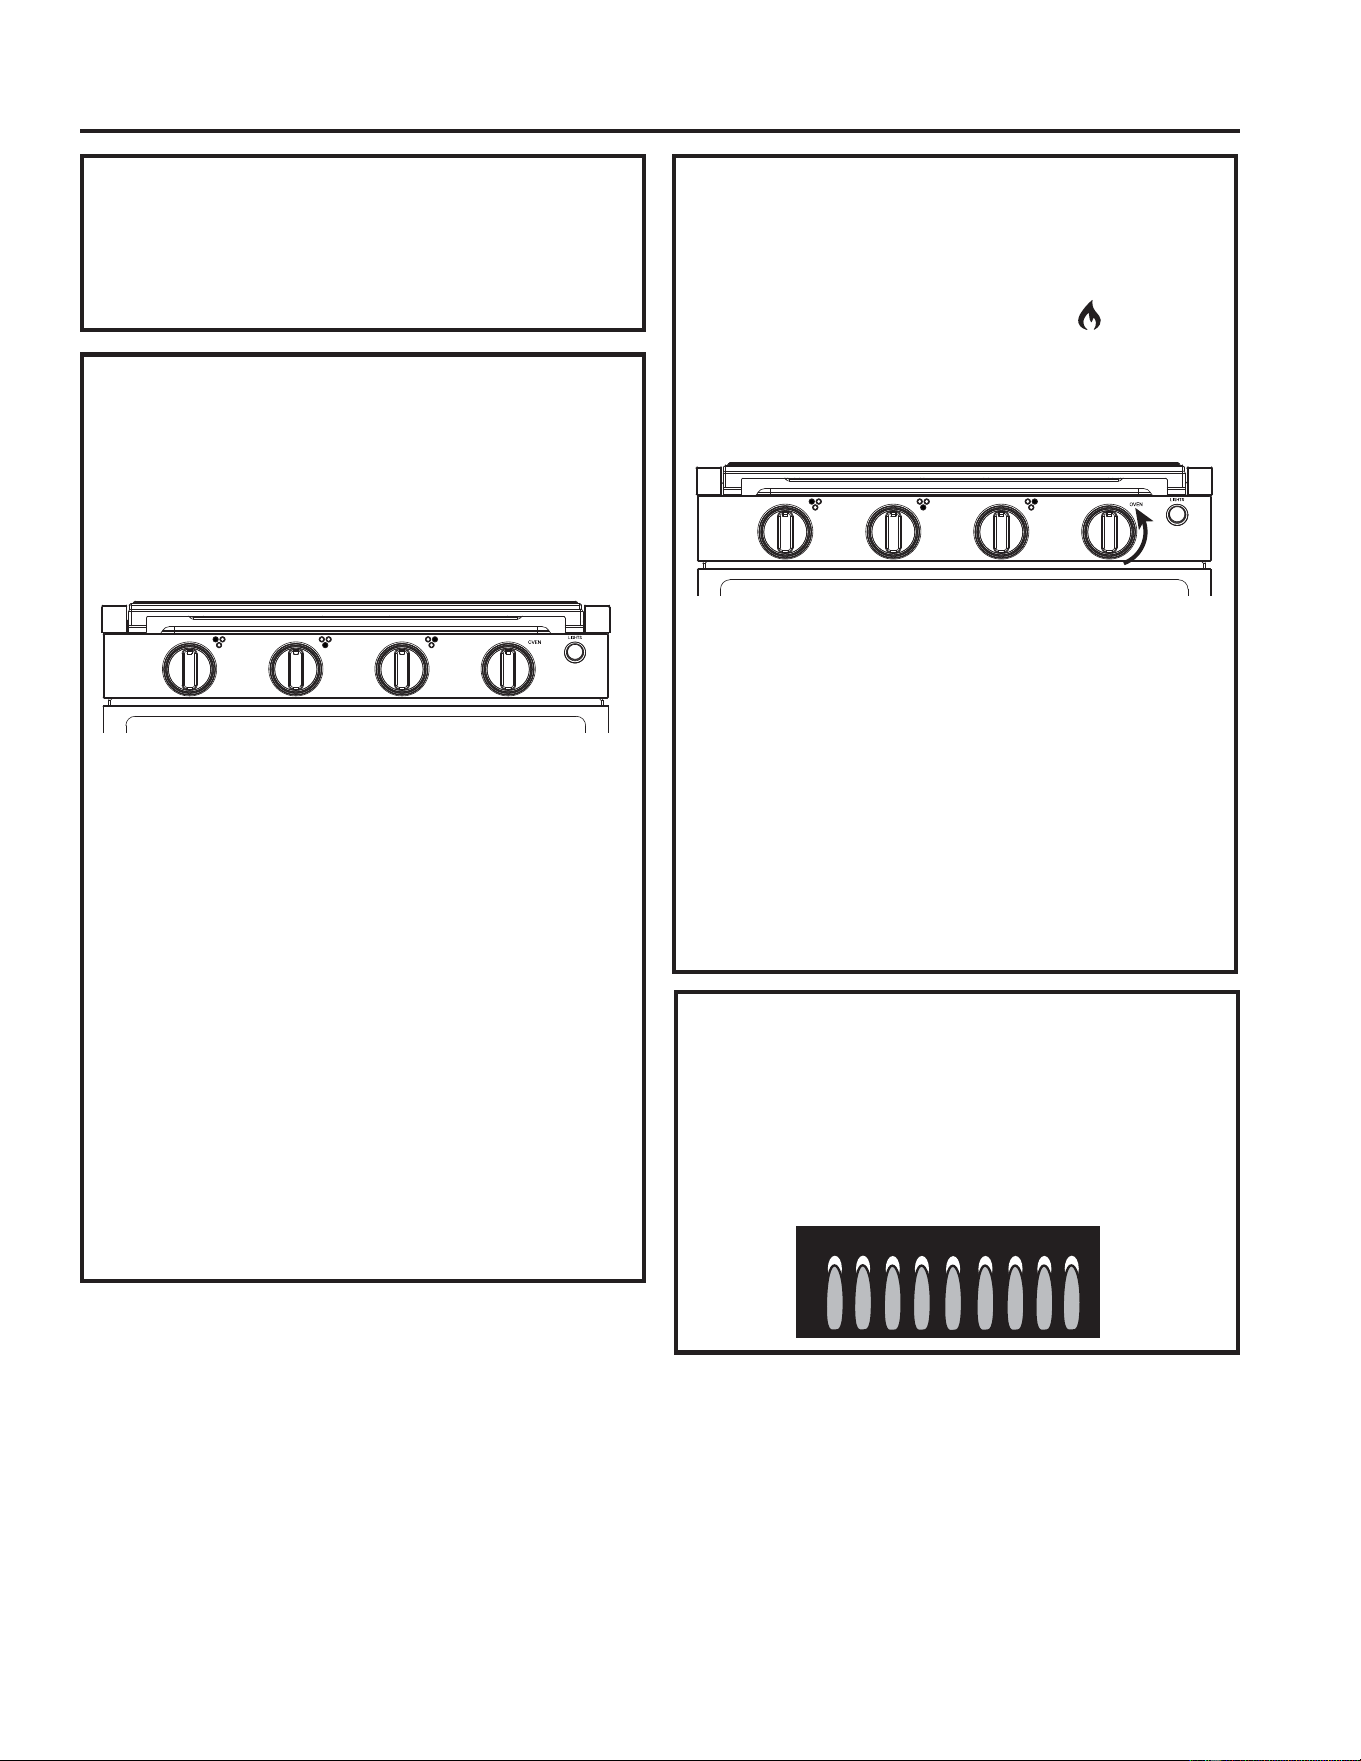
49-2001566 Rev. 1
Instrucciones de Instalación
INSTRUCCIONES DE INSTALACIÓN
6. VUELVA A COLOCAR LA PLACA
DE COCCIÓN
9XHOYDDFRORFDUODSODFDGHFRFFLyQHQVXSRVLFLyQ
y adhiera la misma con los 4 tornillos, retirados en el
3DVRXVDQGRXQGHVWRUQLOODGRU3KLOOLSV
9. CALIDAD DE LA LLAMA
Las llamas del quemador de la placa de cocción y los
quemadores del horno deberán ser azules con puntas
amarillas. Las llamas largas de color amarillo brillante
no son normales. Las llamas normales podrán mostrar
signos de un tinte anaranjado cuando estén bien
quemadas, o signos de color anaranjado parpadeante
debido a las partículas en el gas o en el aire.
7. PRUEBE LOS QUEMADORES DE
LA ESTUFA
Ŷ Presione y gire la perilla de control del quemador
correspondiente en sentido antihorario hacia
ODSRVLFLyQ+L$OWRKDVWDTXHHOTXHPDGRUVH
encienda. De haber aire en la tubería de suministro,
podrá tomar hasta un minuto que el aire sea
purgado y que el quemador se encienda.
8QDYH]HQFHQGLGRHOTXHPDGRUFRQWLQ~H
SUHVLRQDQGRODSHULOODGXUDQWHVHJXQGRVKDVWD
que el sensor de la llama esté caliente.
Ŷ Es posible que la llama sea amarilla durante unos
pocos segundos, pero luego deberá ser azul. Si se
observa una llama en su mayoría o completamente
amarilla en el quemador, consulte la sección de
³6ROXFLyQGH3UREOHPDVRFRPXQtTXHVHFRQXQ
técnico calificado del servicio.
Ŷ Gire la perilla de control del quemador hasta
/2%DMR$VHJ~UHVHGHTXHODOODPDURGHH
completamente el quemador. Deberá haber una
llama en los puertos del quemador y no haber
brecha de aire entre la llama y el quemador. Si
el quemador no reúne estos criterios, consulte la
VHFFLyQGH³6ROXFLyQGH3UREOHPDV´RFRPXQtTXHVH
con un técnico calificado del servicio.
Ŷ Repita estos pasos para controlar cada quemador.
8. CONTROLE EL QUEMADOR DEL
HORNO
Ŷ Presione la manija del horno para abrir la puerta.
Ŷ Presione y gire la perilla de control del horno en
sentido antihorario hasta la posición
. Mantenga
presionada la perilla de control del horno hasta
que se encienda el piloto del horno. Si hay aire en
la línea de suministro, es posible que el aire tarde
hasta un minuto en purgarse y el piloto del horno se
encienda.
Ŷ8QDYH]TXHHOSLORWRHVWpHQFHQGLGRPDQWHQJD
presionada la perilla de control del horno durante al
PHQRVVHJXQGRVKDVWDTXHHOVHQVRUGHOSLORWR
del horno se caliente.
ŶXHOWHODSHULOODGHFRQWUROGHOKRUQR\FRQILUPH
visualmente que el piloto del horno permanezca
encendido. Si el piloto del horno se apaga, repita los
puntos 2 y 3.
Ŷ Gire la perilla de control del horno sobre cada
temperatura e inspeccione la llama del quemador.
Si se observa una llama en su mayoría o
completamente amarilla, consulte la sección de
³6ROXFLyQGH3UREOHPDVRFRPXQtTXHVHFRQXQ
técnico calificado del servicio.
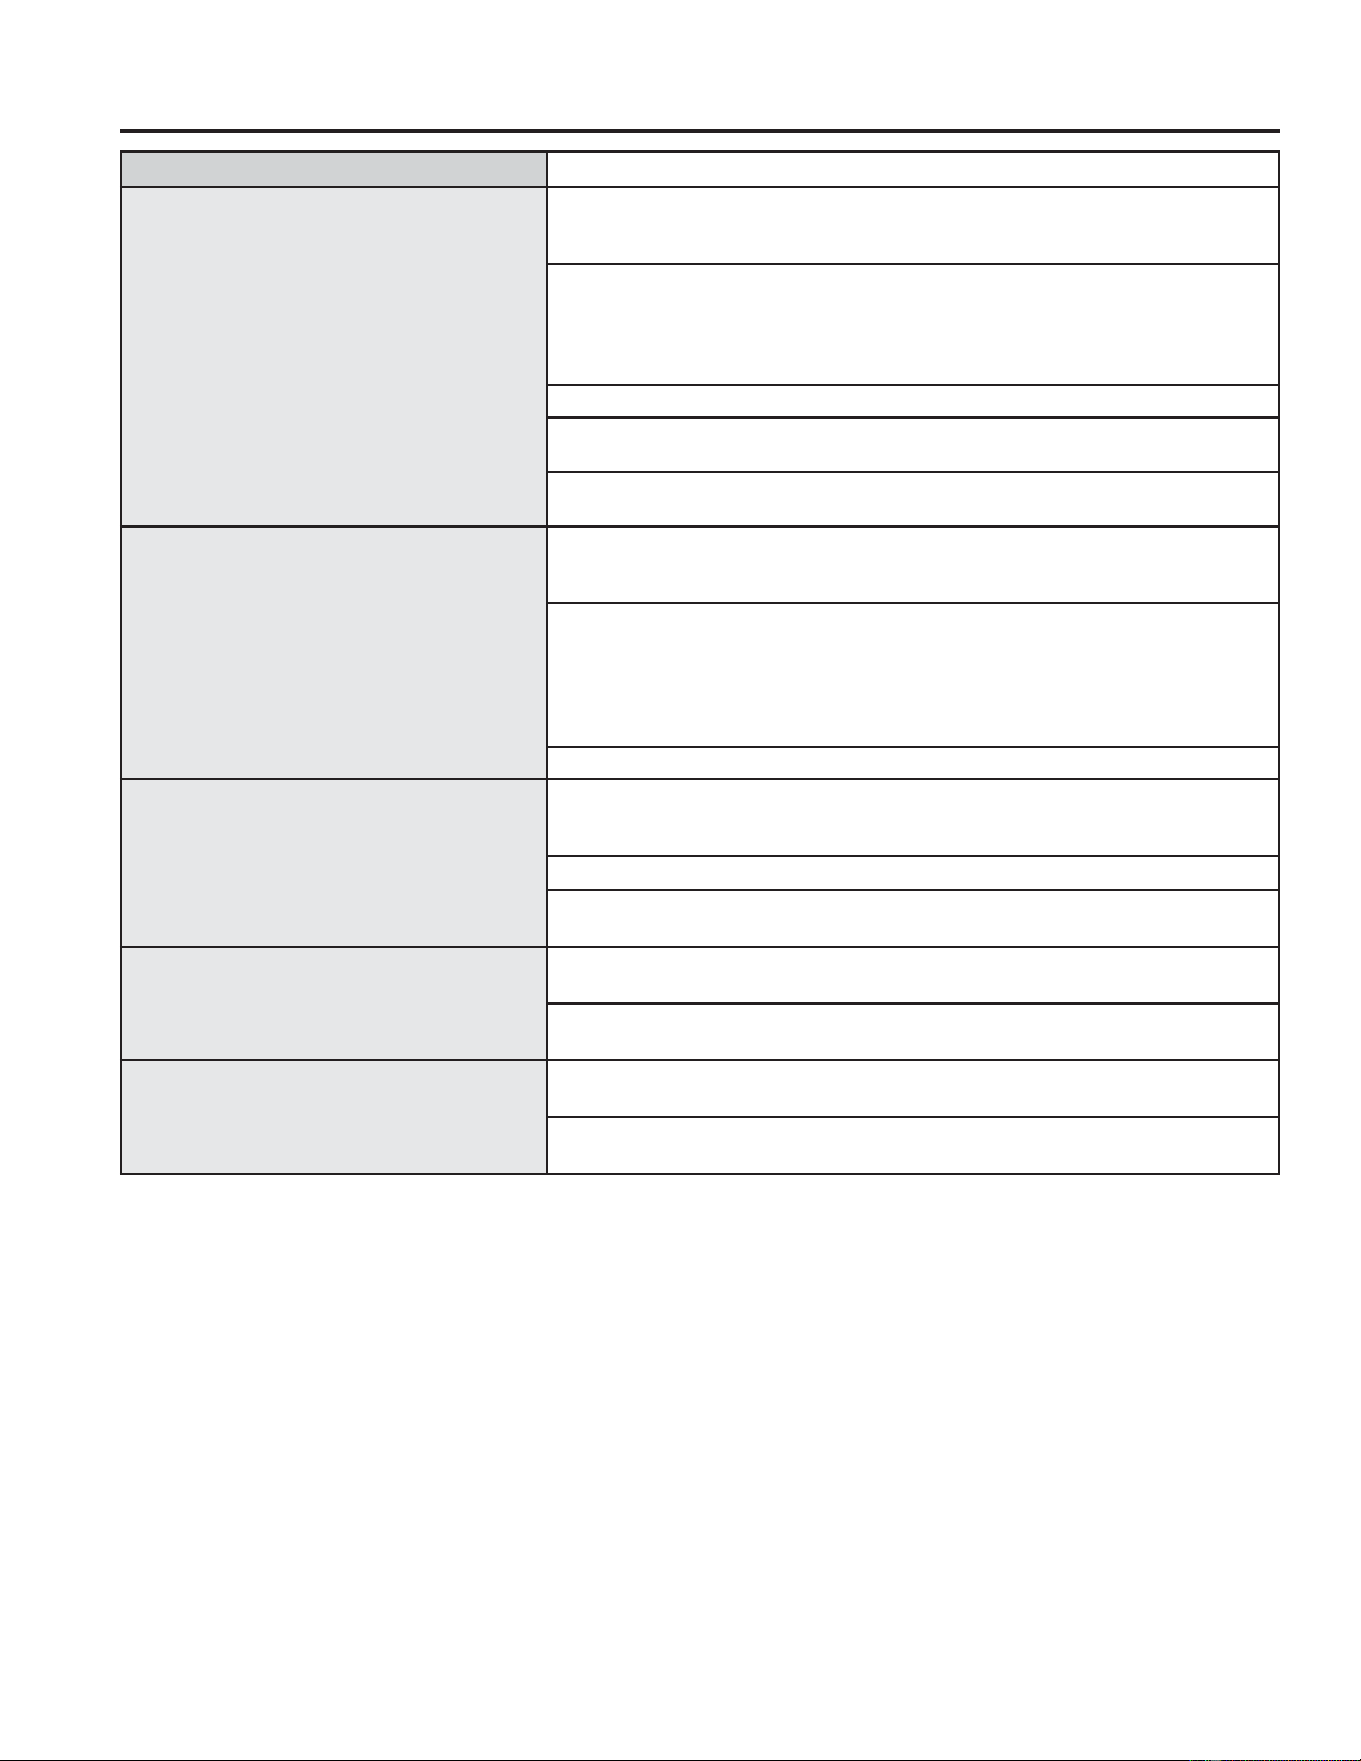
22 49-2001566 Rev. 1
Consejos para Solucionar Problemas… Antes de solicitar el servicio técnico
CONSEJOS PARA SOLUCIONAR PROBLEMAS
Problema Causa Posible/ Solución
Los quemadores de la superficie no se
encienden o no se encienden totalmente.
Asegúrese de que las válvulas de suministro de gas y la válvula del tanque de
propano estén abiertas.
De haber aire en la tubería de suministro, podrá tomar
hasta un minuto que el aire sea purgado y que el quemador se encienda.
Asegúrese de que la perilla sea presionada y ajustada hasta la posición HI
$OWRPLHQWUDVVHJLUDODSHULOODGHHQFHQGLGR'HEHUiHVFXFKDUHOVRQLGR
de clic del sistema de encendido cuando se presione la perilla. Continúe
presionando durante por los menos 5 segundos hasta que el sensor de la
llama esté caliente.
La presión del gas es demasiado baja o demasiado alta.
Los puertos del quemador o el arrancador están sucios. Consulte sobre las
³&DEH]DVGHORV4XHPDGRUHV´HQODVHFFLyQGH&XLGDGR\/LPSLH]D
Hay humedad presente en el quemador. Con el quemador apagado y frío, seque el
mismo en su totalidad.
(OTXHPDGRUSDUDKRUQHDUQRVHHQFLHQGH Asegúrese de que las válvulas de suministro de gas y la válvula del tanque de
propano estén abiertas. De haber aire en la tubería de suministro, podrá tomar
hasta un minuto que el aire sea purgado y que el quemador se encienda.
Asegúrese de que la perilla de control del horno se presione mientras se
DMXVWDVREUHODSRVLFLyQGHODOODPD'HEHUiHVFXFKDUHOVRQLGRGHFOLFGHO
sistema de encendido cuando se presione la perilla. Mantenga presionada la
SHULOODGXUDQWHSRUORPHQRVVHJXQGRVDILQGHGDUOHWLHPSRDOSLORWRGHO
horno para que se encienda y para que el sensor del piloto se caliente. De
haber aire en la tubería de gas, este proceso podrá tomar hasta un minuto.
La presión del gas es demasiado baja o demasiado alta.
Las llamas son completamente o en su
mayoría amarillas o anaranjadas.
Las llamas normales podrán mostrar signos de un tinte anaranjado cuando estén
bien quemadas, o signos de color anaranjado parpadeante debido a las partículas
en el gas o en el aire.
La presión del gas es demasiado baja.
Los puertos del quemador están sucios. Consulte sobre las “Cabezas de los
4XHPDGRUHV´HQODVHFFLyQGHFXLGDGR\OLPSLH]D
La luz de fondo de la perilla no se enciende
cuando se presiona el botón de la luz.
$VHJ~UHVHGHTXHODXQLGDGVHHQFXHQWUHFRQHFWDGDD9'&&RQVXOWHVREUH
OD³&RQH[LyQ(OpFWULFD´HQODV,QVWUXFFLRQHVGH,QVWDODFLyQ
Es necesario reemplazar el tablero LED o el interruptor. Comuníquese con GE
Appliances para solicitar el servicio técnico.
/DOX]GHOKRUQRQRVHHQFLHQGHFXDQGRVH
presiona el botón de la luz.
$VHJ~UHVHGHTXHODXQLGDGVHHQFXHQWUHFRQHFWDGDD9'&&RQVXOWHVREUH
OD³&RQH[LyQ(OpFWULFD´HQODV,QVWUXFFLRQHVGH,QVWDODFLyQ
(VQHFHVDULRUHHPSOD]DUHOERPELOOR&RQVXOWHVREUHOD³/X]GHO+RUQR´HQOD
sección de Cuidado y Limpieza.
49-2001566 Rev. 1 23
GARANTÍA LIMITADA
Abroche su recibo aquí. Para acceder al servicio técnico de acuerdo con
la garantía deberá contar con la prueba de la fecha original de compra.
Garantía Limitada
ŶInstalación, entrega o mantenimiento inadecuados. Si
tiene un problema con la instalación, comuníquese
con su vendedor o instalador. Usted es responsable
de brindar instalaciones de conexiones eléctricas
adecuadas.
Ŷ)DOODGHOSURGXFWRFRPRUHVXOWDGRGHPRGLILFDFLRQHV
sobre el mismo o debido a un uso irrazonable,
incluyendo la falta de mantenimiento razonable o
necesario.
Ŷ(OWUDEDMRQHFHVDULRSDUDWUDVODGDUODXQLGDGDXQD
ubicación donde esté accesible para que un técnico
pueda brindarle el servicio.
Ŷ5HHPSOD]RGHIXVLEOHVGHODYHKtFXORUHFUHDWLYRR
reinicio de disyuntores.
Ŷ'DxRVRFDVLRQDGRVVREUHHOSURGXFWRSRUQLYHOGH
voltaje inadecuado en el suministro de corriente,
accidente, incendio, inundaciones o catástrofes
naturales.
Ŷ'DxRFDXVDGRGHVSXpVGHODHQWUHJD
Ŷ Educación sobre el producto de forma personalizada.
Qué No Cubrirá GE Appliances:
Esta garantía limitada se extiende al comprador original y a cualquier dueño posterior de productos para vehículos
UHFUHDWLYRVSHUVRQDOHVRXVRVLPLODUGHQWURGH((88\&DQDGi6LHOSURGXFWRVHHQFXHQWUDXELFDGRHQXQiUHD
donde el servicio de un técnico autorizado para vehículos recreativos no está disponible, se le podrá solicitar que
traiga el producto a una ubicación del Servicio Autorizado de GE Appliances para acceder al servicio técnico.
Algunos estados no permiten la exclusión o limitación de daños fortuitos o consecuentes. Esta garantía limitada le
da derechos legales específicos y es posible que tenga otros derechos legales que varían entre un estado y otro.
Para conocer cuáles son sus derechos legales, consulte a la oficina de asuntos del consumidor local o estatal o al
Fiscal de su estado.
Garante: GE Appliances, a Haier company
Louisville, KY 40225
Para programar el servicio técnico, llame al 866.835.0179.
Cuando llame para solicitar el servicio, tenga los números de serie y modelo disponibles.
(;&/86,Ï1'(*$5$17Ë$6,03/Ë&,7$6²6X~QLFD\H[FOXVLYDDOWHUQDWLYDHVODUHSDUDFLyQGHOSURGXFWR
como se indica en esta Garantía Limitada. Las garantías implícitas, incluyendo garantías implícitas de
comerciabilidad o conveniencia sobre un propósito particular, se limitan a dos años o al período más corto
permitido por la ley.
Por el Período de: GE Appliances Reemplazará:
Dos Años
Desde la fecha de la
compra original
Cualquier parte de la estufa del vehículo recreativo que falle debido a un defecto
en los materiales o la fabricación. Durante esta garantía limitada de dos años, GE
Appliances también cubrirá todo el trabajo y el servicio relacionado con el reemplazo de
la parte que presente defectos.

24 49-2001566 Rev. 1
Soporte al Cliente
SOPORTE AL CONSUMIDOR
Sitio Web de Electrodomésticos de GE Appliances
¿Desea realizar una consulta o necesita ayuda con su electrodoméstico? ¡Intente a través del Sitio Web de
Electrodomésticos de GE Appliances las 24 horas del día, cualquier día del año! También puede comprar más
productos grandiosos de GE Appliances y sacar ventaja de todos nuestros servicios de apoyo a través de Internet,
GLVHxDGRVSDUDVXFRQYHQLHQFLD(Q((88GEAppliances.com. En Canadá: GEAppliances.ca
Registre su Electrodoméstico
£5HJLVWUHVXHOHFWURGRPpVWLFRQXHYRDWUDYpVGH,QWHUQHWGHDFXHUGRDVXFRQYHQLHQFLD8QUHJLVWURSXQWXDOGHVX
producto permitirá una mejor comunicación y un servicio más puntual de acuerdo con los términos de su garantía,
en caso de surgir la necesidad. También puede enviar una carta en la tarjeta de inscripción impresa previamente
que se incluye con el material embalado.
(Q((88GEAppliances.com/register
En Canadá: geappliances.ca/after-sales-support
Servicio Programado
El servicio de reparación de expertos de GE Appliances está a sólo un paso de su puerta. Conéctese a través de
,QWHUQHW\SURJUDPHHOVHUYLFLRDVXFRQYHQLHQFLDFXDOTXLHUGtDGHODxR(Q((88GEAppliances.com/service
VHUYLFHROODPHDOGXUDQWHHOKRUDULRGHDWHQFLyQFRPHUFLDO
En Canadá: geappliances.ca/after-sales-supportROODPHDO
Piezas y Accesorios
Aquellos individuos calificados para realizar el servicio técnico de sus propios electrodomésticos podrán solicitar el
HQYtRGHSLH]DVRDFFHVRULRVGLUHFWDPHQWHDVXVKRJDUHVVHDFHSWDQODVWDUMHWDV9,6$0DVWHU&DUG\'LVFRYHU
2UGHQHDWUDYpVGH,QWHUQHWODVKRUDVGHOGtD(Q((88GEAppliancesparts.com o telefónicamente al
GXUDQWHHOKRUDULRGHDWHQFLyQFRPHUFLDO
Las instrucciones que figuran en este manual cubren los procedimientos que serán realizados por cualquier
usuario. Otros servicios técnicos generalmente deberán ser derivados a personal calificado del servicio
WpFQLFR6HGHEHUiWHQHUFXLGDGR\DTXHXQDUHSDUDFLyQLQGHELGDSRGUiKDFHUTXHHOIXQFLRQDPLHQWRQRVHD
seguro.
Los clientes de Canadá deberán buscar en las páginas amarillas al distribuidor de piezas del servicio técnico de GE
$SSOLDQFHVPiVFHUFDQRYLVLWHQXHVWURVLWLRZHEHQgeappliances.ca/parts-filters-accessories o comuníquese al
Contáctenos
Si no se encuentra satisfecho con el servicio que recibió de GE Appliances, comuníquese con nosotros a través de
nuestro sitio Web con todos los detalles, incluyendo su número telefónico, o escriba a:
(Q((88*HQHUDO0DQDJHU&XVWRPHU5HODWLRQV_*($SSOLDQFHV$SSOLDQFH3DUN_/RXLVYLOOH.<
GEAppliances.com/contact
(Q&DQDGi'LUHFWRU&RQVXPHU5HODWLRQV0&&RPPHUFLDO,QF_6XLWH)DFWRU\/DQH_0RQFWRQ1%(&0
GEAppliances.ca/contact-us