

XS Wireless 1 | XS Wireless 2
Instruction Manual
Sennheiser electronic GmbH & Co. KG
Am Labor 1, 30900 Wedemark, Germany, www.sennheiser.com
XSW 1 | XSW 2 - v1.0

1
PRODUCT INFORMATION 4
Products of the XS Wireless line 4
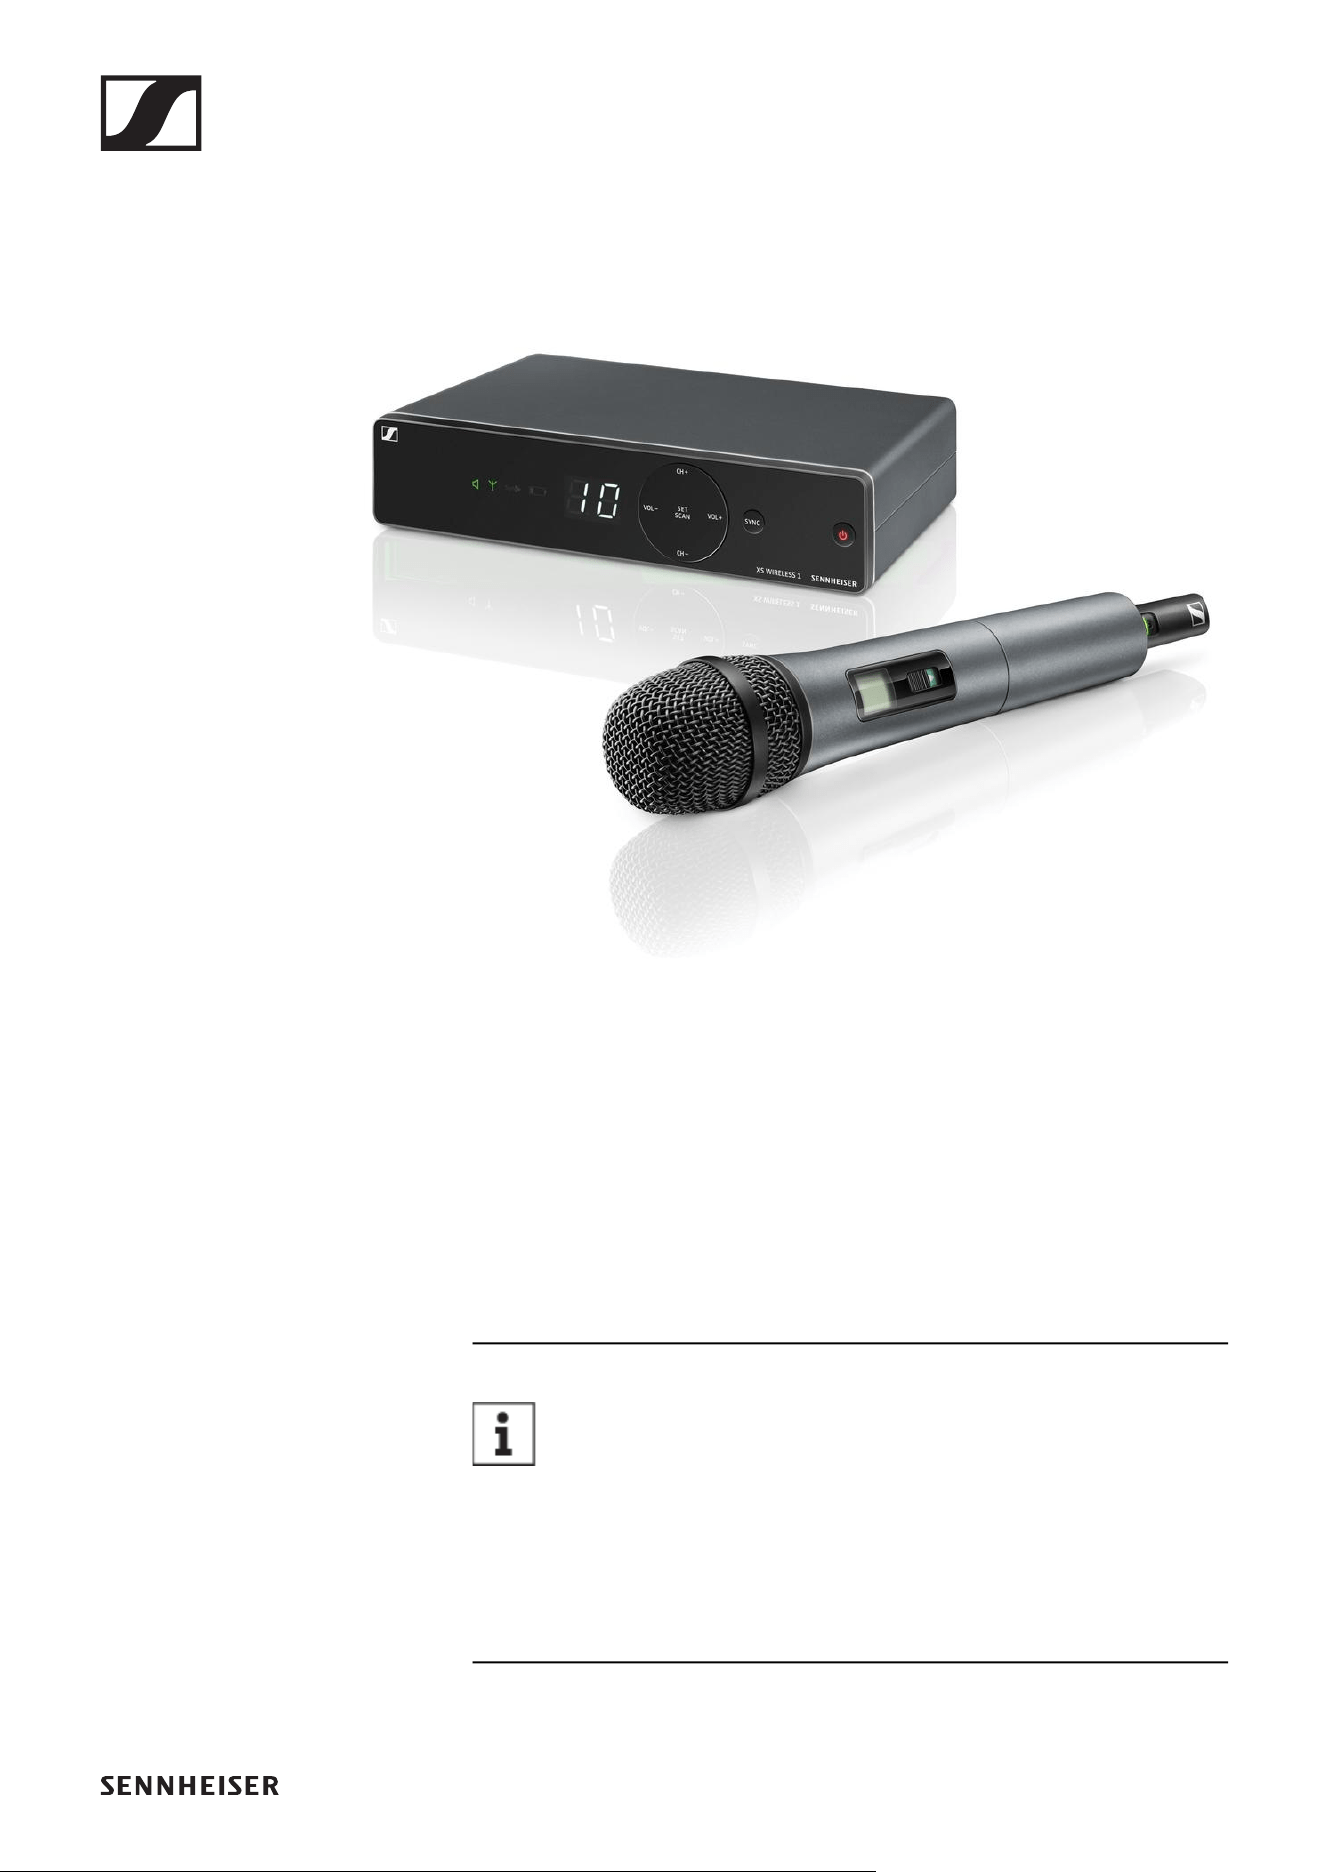
EM-XSW 1 stationary receiver 5
EM-XSW 1 DUAL rack receiver 5
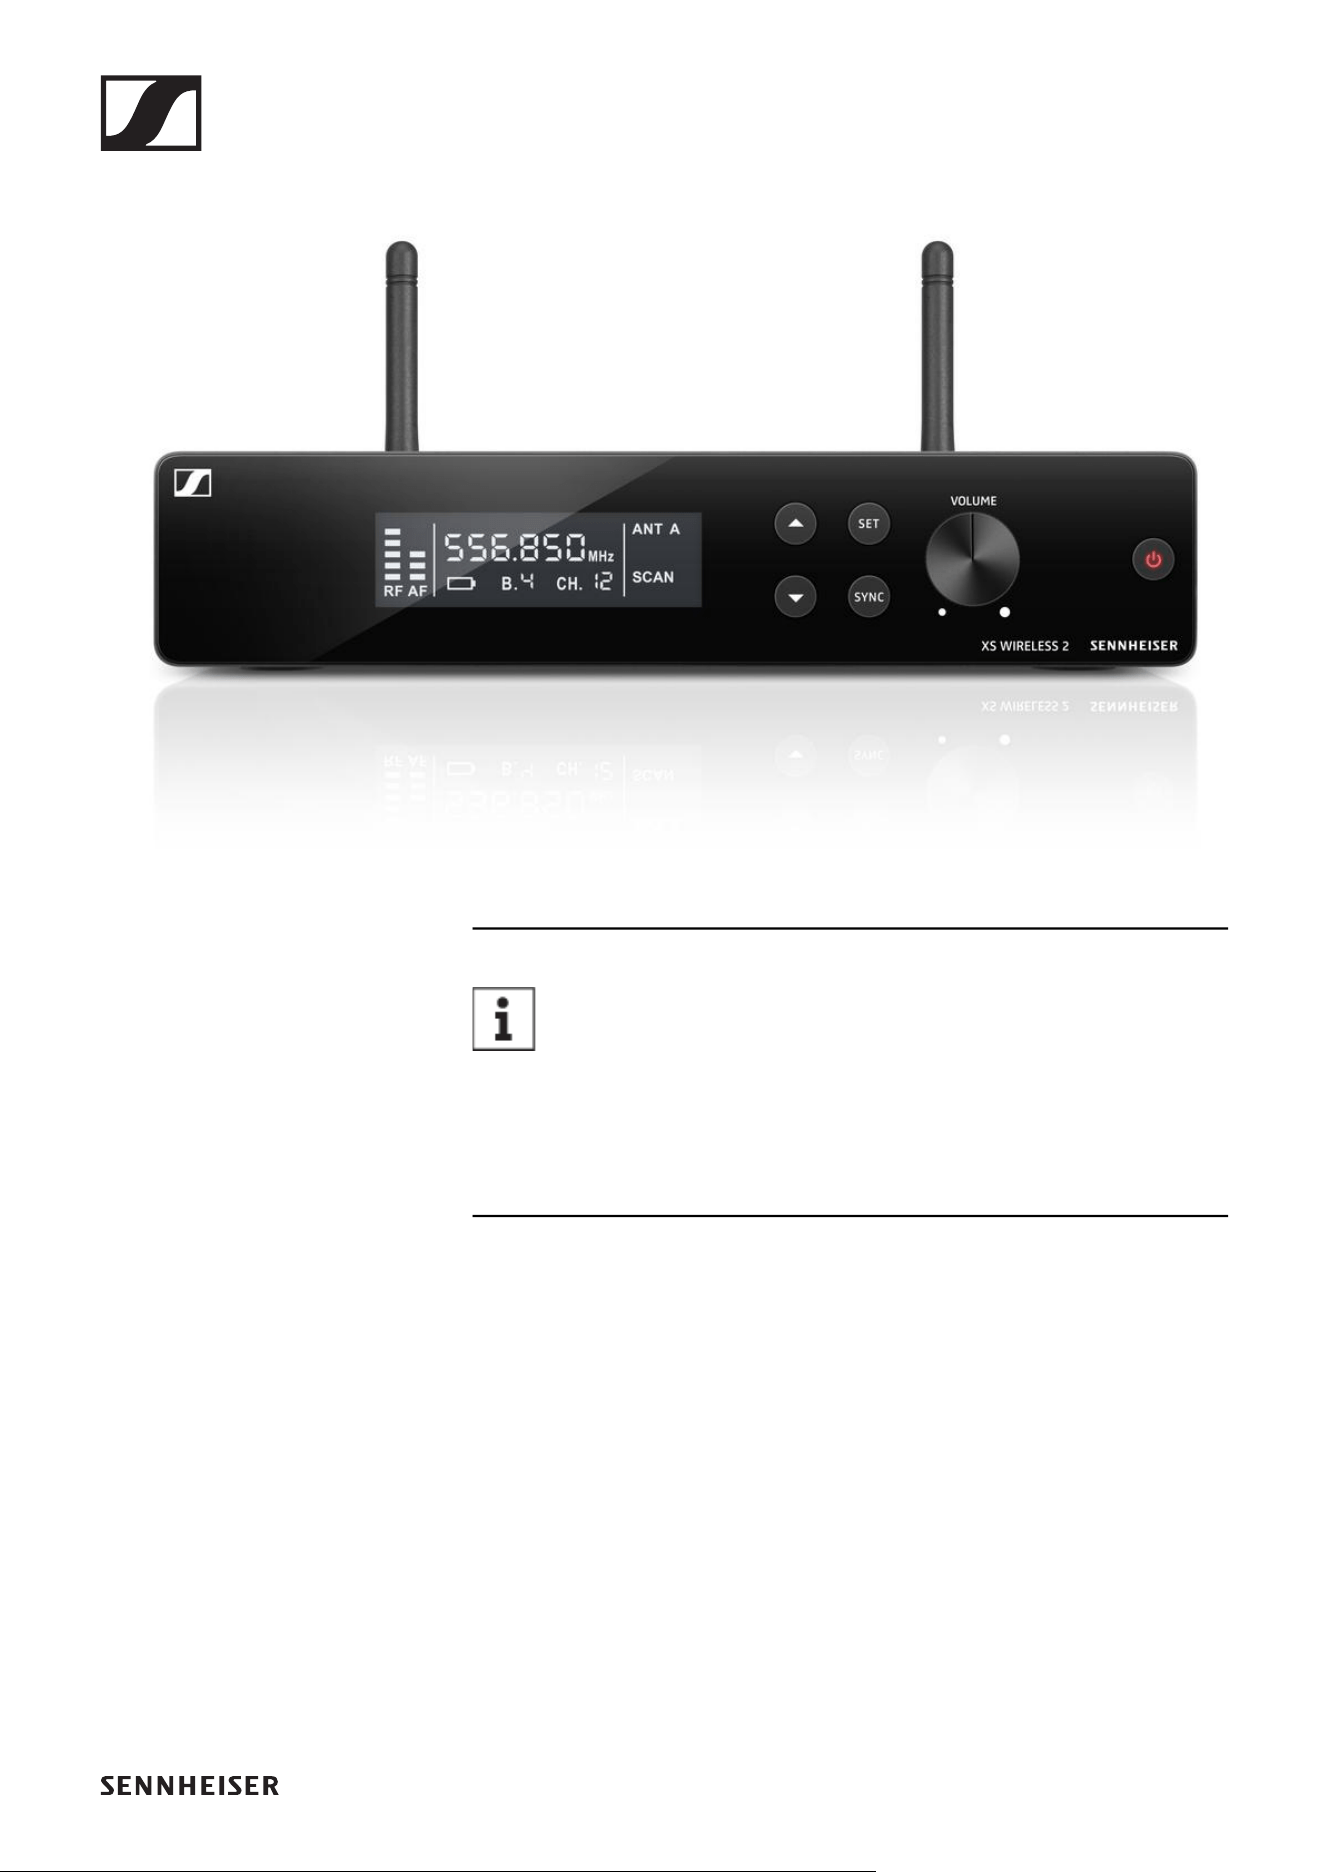
EM-XSW 2 stationary receiver 6
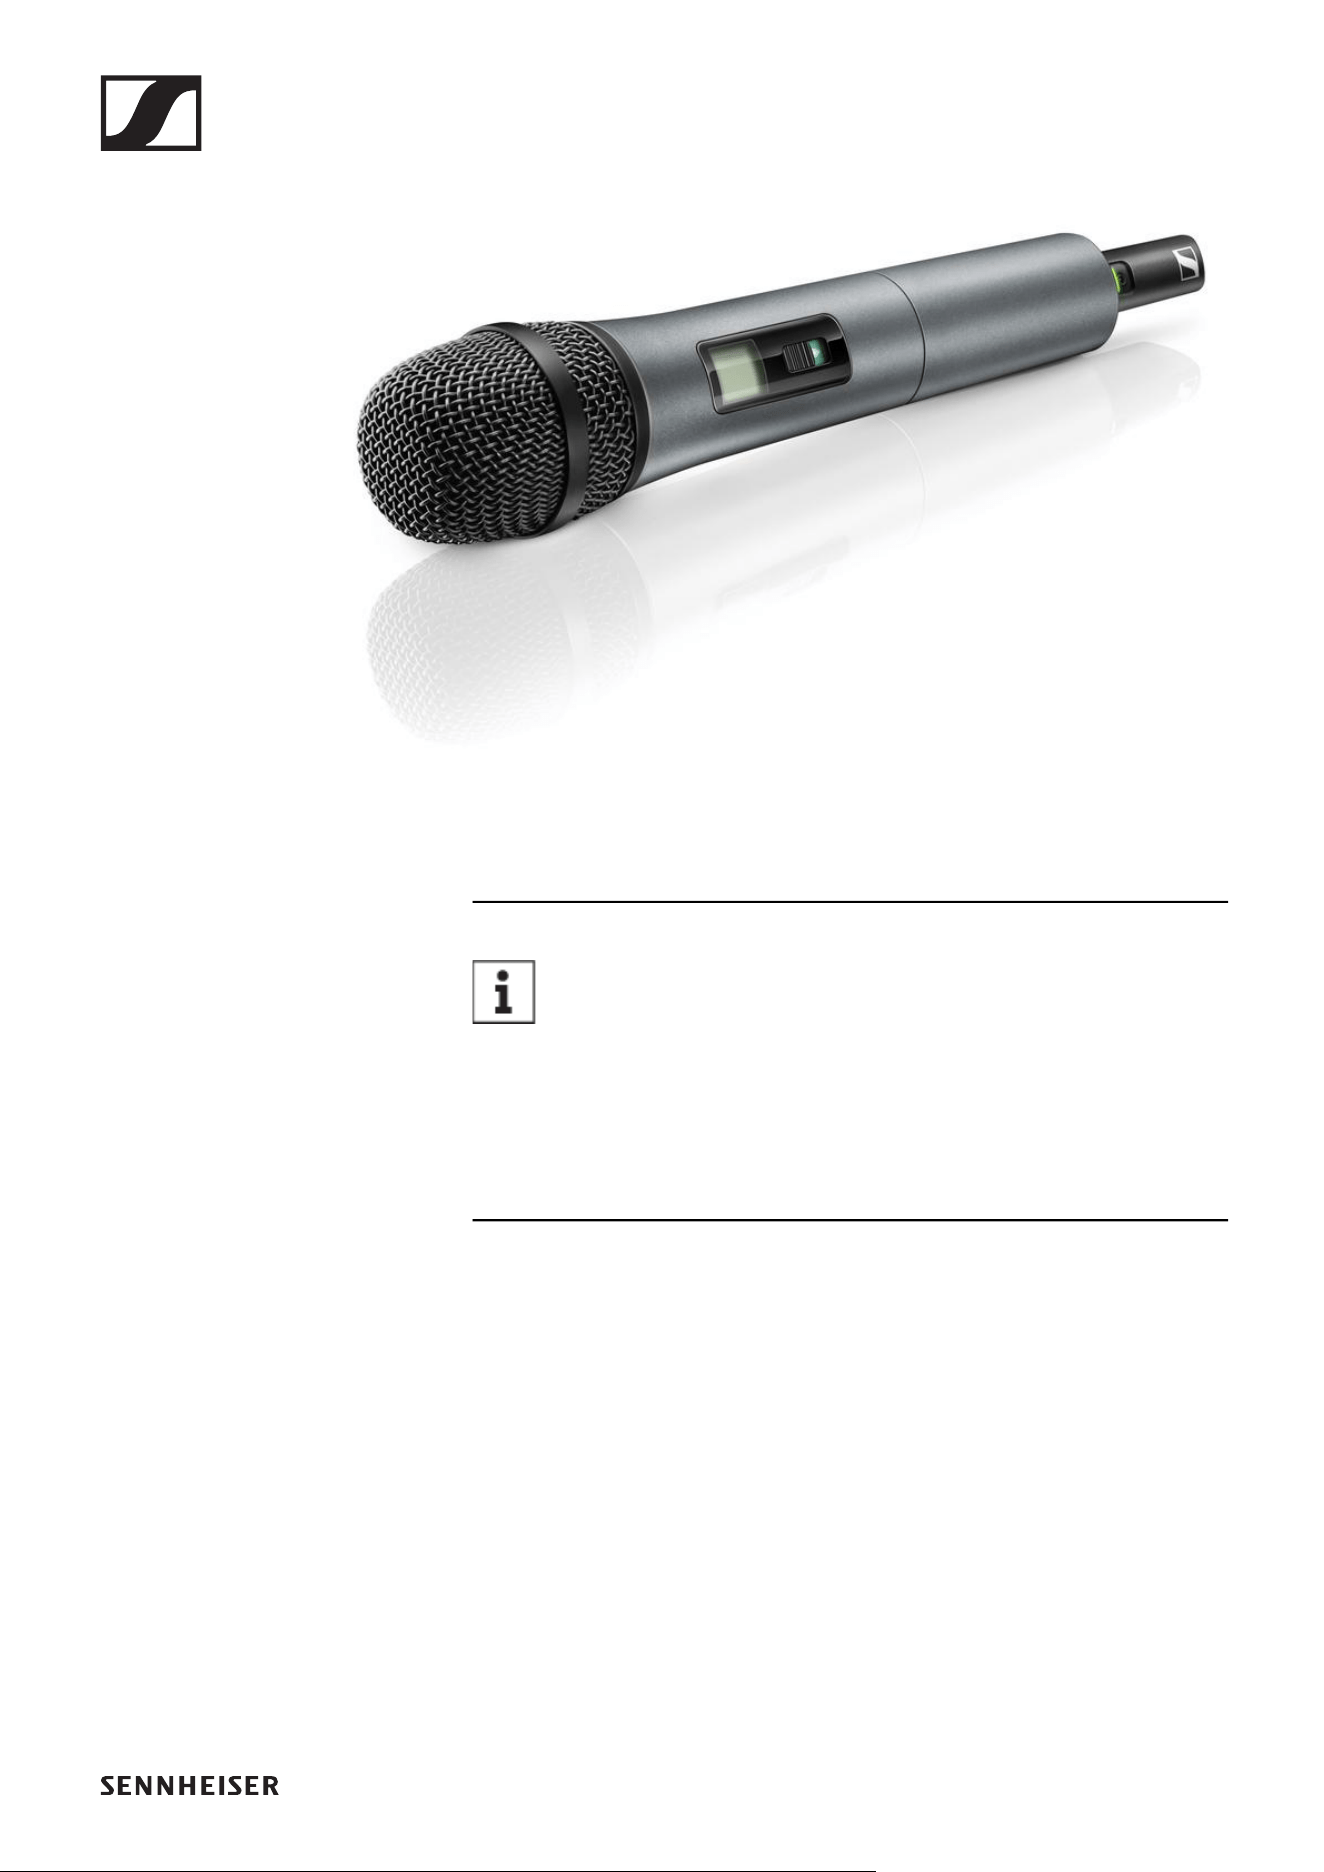
SKM 825-XSW handheld transmitter 7
SKM 835-XSW handheld transmitter 8
SKM 865-XSW handheld transmitter 9
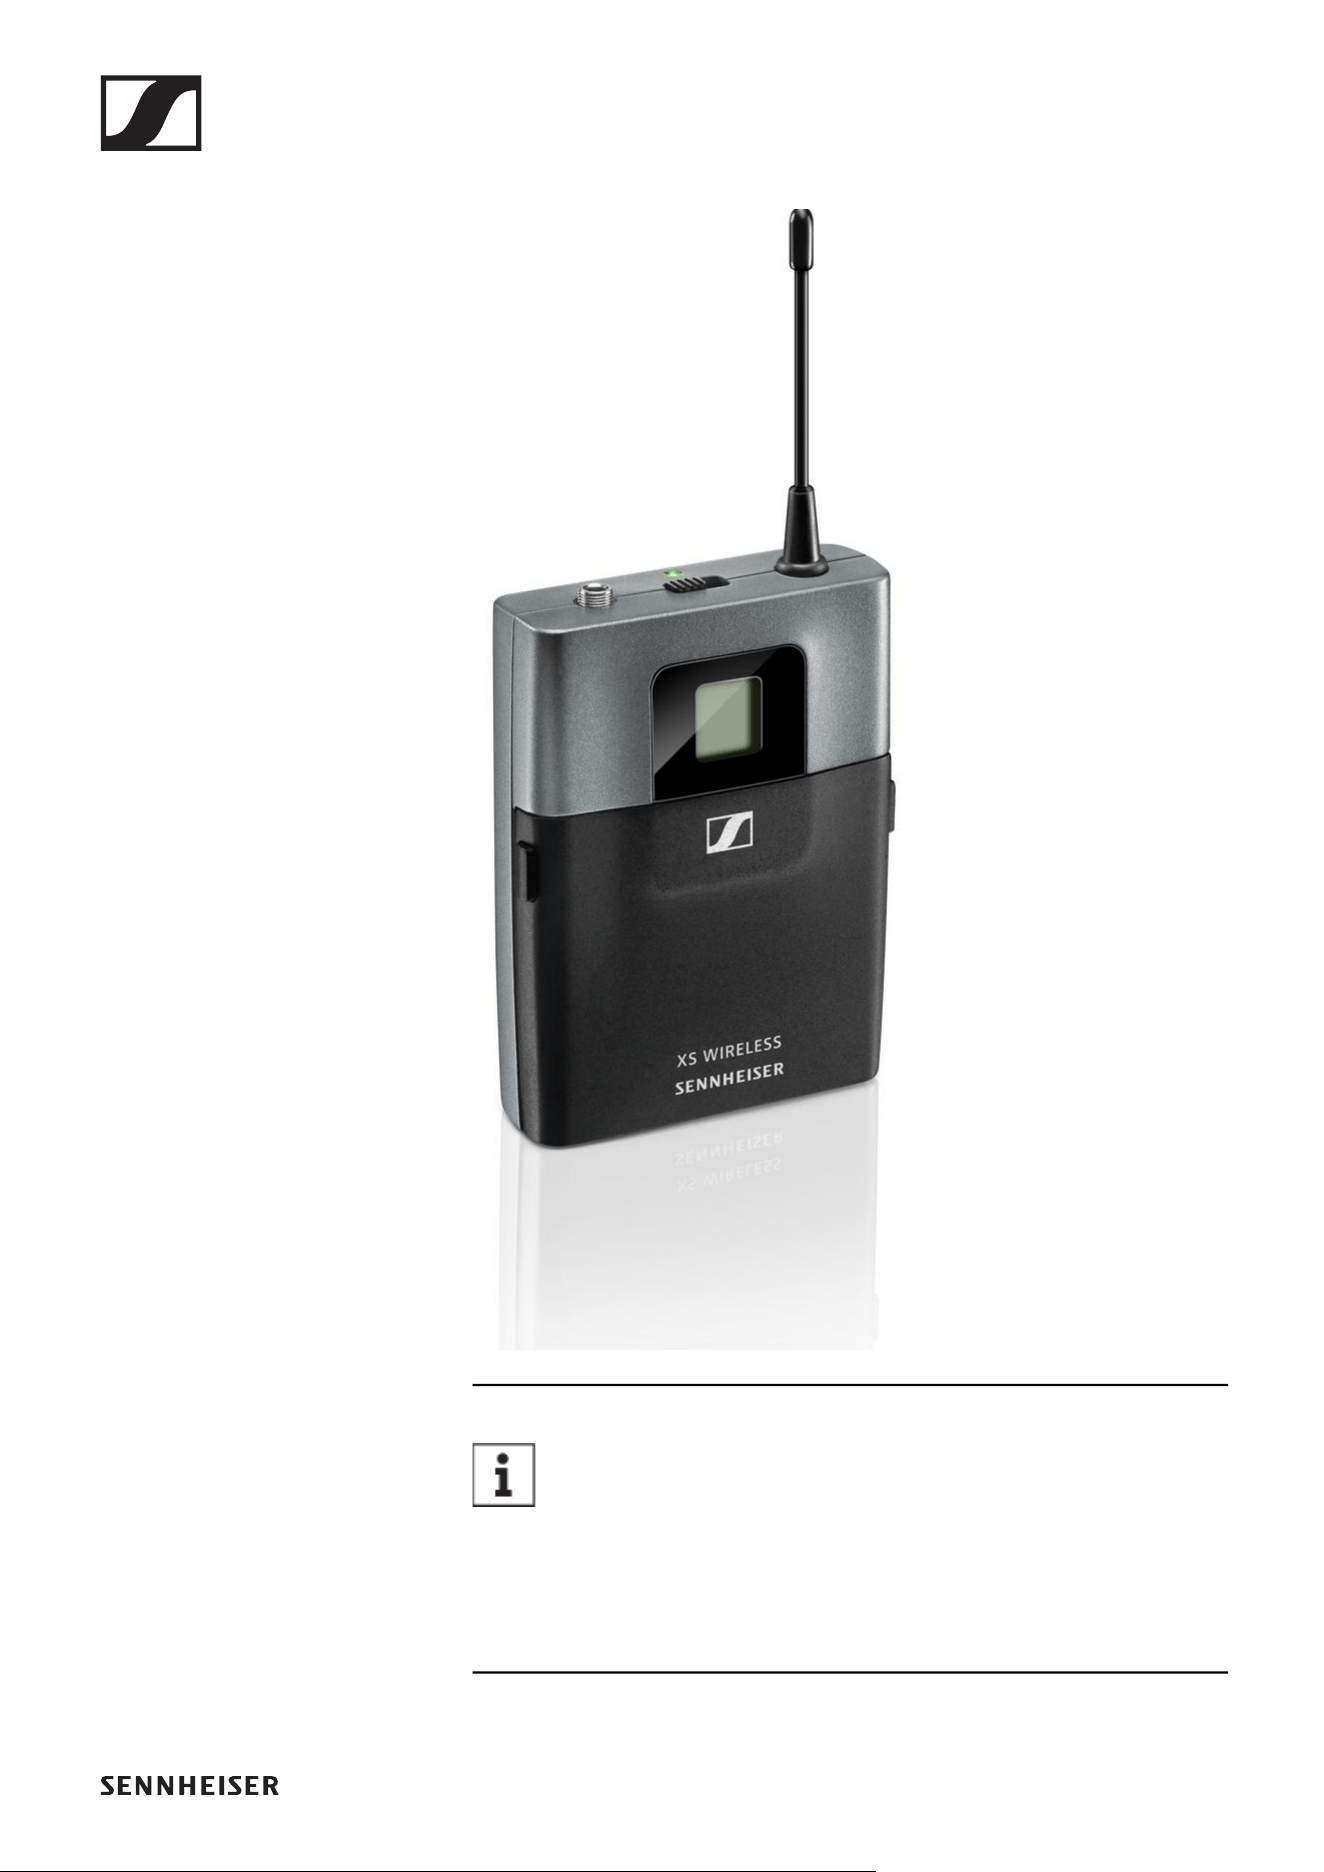
SK-XSW bodypack transmitter 10
Available sets 11
XSW 1-825 | Vocal Set 11
XSW 1-835 | Vocal Set 12
XSW 1-825 DUAL | Vocal Set 13
XSW 1-835 DUAL | Vocal Set 14
XSW 1-CI1 | Instrument Set 15
XSW 1-908 | Instrument Set 16
XSW 1-ME2 | Lavalier Set 17
XSW 1-ME3 | Headmic Set 18
XSW 2-835 | Vocal Set 19
XSW 2-865 | Vocal Set 20
XSW 2-CI1 | Instrument Set 21
XSW 2-ME2 | Lavalier Set 22
XSW 2-ME3 | Headmic Set 23
Accessories 24
GA 1-XSW 2 rack mount kit 24
GA 2-XSW 2 antenna front mount kit 24
Frequency ranges 25
INSTRUCTION MANUAL 26
Starting up and operating devices of the
XS Wireless line 26
EM-XSW 1 rack receiver 28
Connectors and controls 28
Front 28
Back 29
Connecting/disconnecting the receiver to/from the po-
wer supply system 30
Outputting audio signals 31
Switching the receiver on and off 32
Information on the receiver’s display 33
Setting options on the front of the device 35
Navigation buttons 35
Setting the frequency automatically (AUTO SCAN) 35
Setting the frequency manually 36
Adjusting the volume of the audio outputs 38
Setting options on the rear of the device 39
Selecting the signal type (Mic/Line) 39
Setting the squelch 39
Configuring a multi-channel system 40
EM-XSW 1 DUAL rack receiver 41
Connectors and controls 41

2
Front 41
Back 42
Connecting/disconnecting the receiver to/from the po-
wer supply system 43
Outputting audio signals 44
Switching the receiver on and off 45
Information on the receiver’s display 46
Setting options on the front of the device 48
Navigation buttons 48
Setting the frequency automatically (AUTO SCAN) 48
Setting the frequency manually 50
Adjusting the volume of the audio outputs 52
Setting options on the rear of the device 53
Selecting the signal type (Mic/Line) 53
Setting the squelch 53
Configuring a multi-channel system 54
EM-XSW 2 rack receiver 55
Connectors and controls 55
Front 55
Back 56
Connecting/disconnecting the receiver to/from the po-
wer supply system 57
Connecting antennas 58
Outputting audio signals 59
Installing receivers in a rack 60
Mounting a single receiver in a rack 61
Mounting two receivers side by side in a rack 62
Switching the receiver on and off 63
Information on the receiver’s display 64
Further information 64
Setting options on the front of the device 66
Navigation buttons 66
SCAN menu item 67
PRESET menu item 68
TUNE menu item 70
Adjusting the volume of the audio outputs 71
Setting options on the rear of the device 72
Selecting the signal type (Mic/Line) 72
Setting the squelch 72
Configuring a multi-channel system 73
Handheld transmitters SKM 825-XSW | SKM 835-
XSW | SKM 865-XSW 74
Product overview 74
Inserting and removing the batteries 75
Battery status 76
Switching the handheld transmitter on and off 77
Establishing a connection to the receiver 77
Information on the handheld transmitter’s display 78
Further information 78
Setting the input sensitivity 79
Muting the handheld transmitter 80

3
SK-XSW bodypack transmitter 81
Product overview 81
Inserting and removing the batteries 82
Battery status 83
Connecting a microphone to the bodypack transmitter 84
Connecting an instrument or line source to the bodypack
transmitter 84
Switching the bodypack transmitter on and off 86
Establishing a connection to the receiver 86
Information on the bodypack transmitter’s display 87
Further information 87
Setting the input sensitivity 88
Muting the bodypack transmitter 89
Establishing a radio link | Synchronizing the receiver
and transmitter 90
Cleaning and maintenance 92
SPECIFICATIONS 94
System 94
EM-XSW 1 stationary receiver 96
EM-XSW 1 DUAL rack receiver 98
EM-XSW 2 stationary receiver 100
SKM-XSW handheld transmitter 102
SK-XSW bodypack transmitter 104
Microphones 105
ME 2-2 105
ME 3-II 105
e 908T 106
NT 12-5 CW power supply unit 107
CONTACT 109
Questions about the product / Help with technical
issues 109
Feedback on the instruction manual 109

PRODUCT INFORMATION
4
PRODUCT INFORMATION
Products of the XS Wireless line
►
For information about the available accessories, see „Acces-
sories“.
For information about the available sets, see „Available sets“.
For information about the frequency ranges, see „Frequency
ranges“.
You can find technical specifications for the series and the in-
dividual products under „SPECIFICATIONS“.
You can find information about starting up and operating the
products under „Starting up and operating devices of the
XS Wireless line“.

Products of the XS Wireless line
5
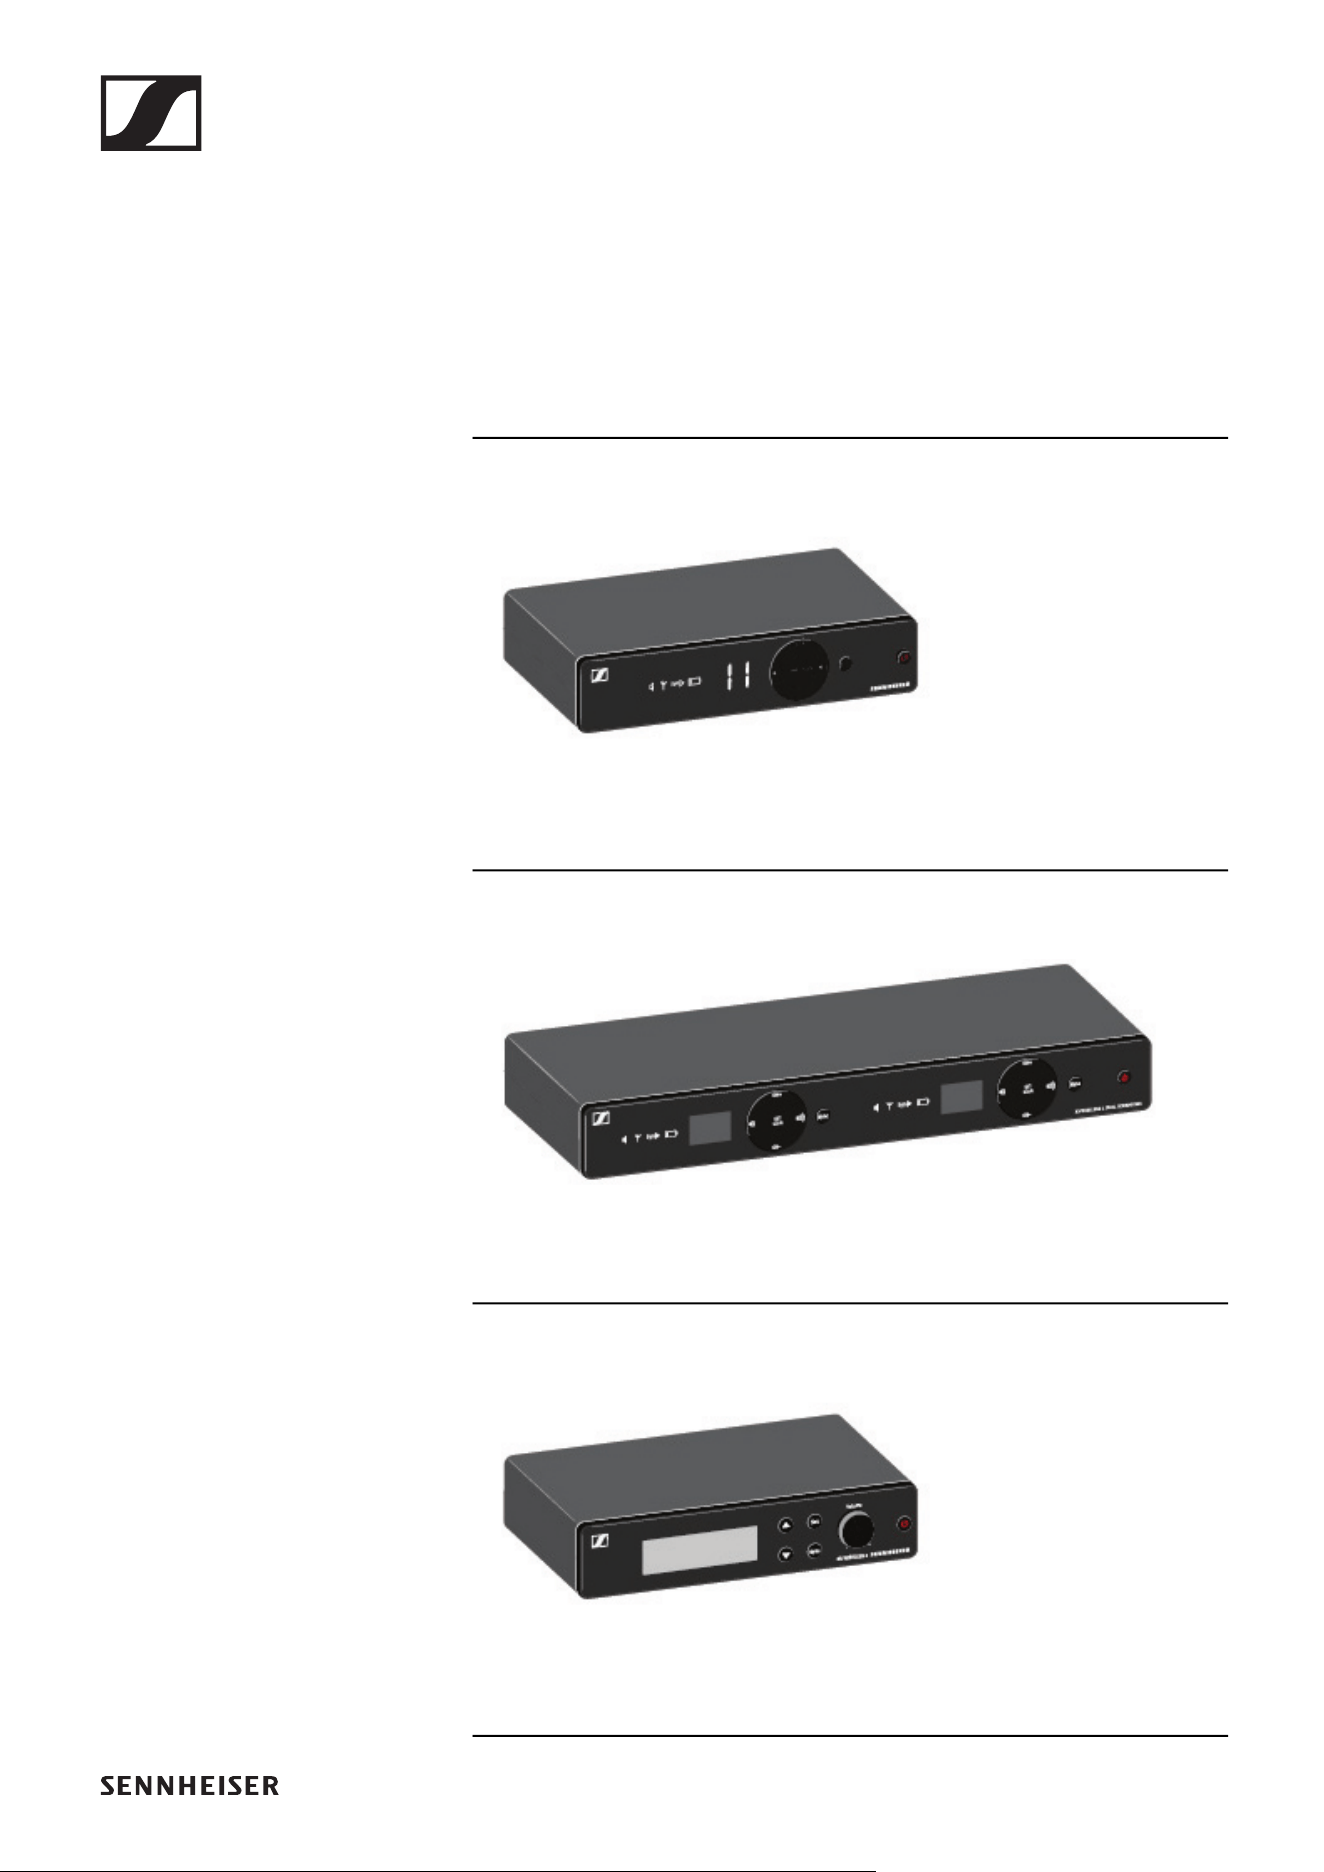
EM-XSW 1 stationary receiver
►
You can find more detailed information about the EM-
XSW 1 in the following sections:
▷ Startup and operation: „EM-XSW 1 rack receiver“
▷ Specifications: „EM-XSW 1 stationary receiver“
EM-XSW 1 DUAL rack receiver
►
You can find more detailed information about the EM-
XSW 1 DUAL in the following sections:
▷ Startup and operation: „EM-XSW 1 DUAL rack receiver“
▷ Specifications: „EM-XSW 1 DUAL rack receiver“
Products of the XS Wireless line
7
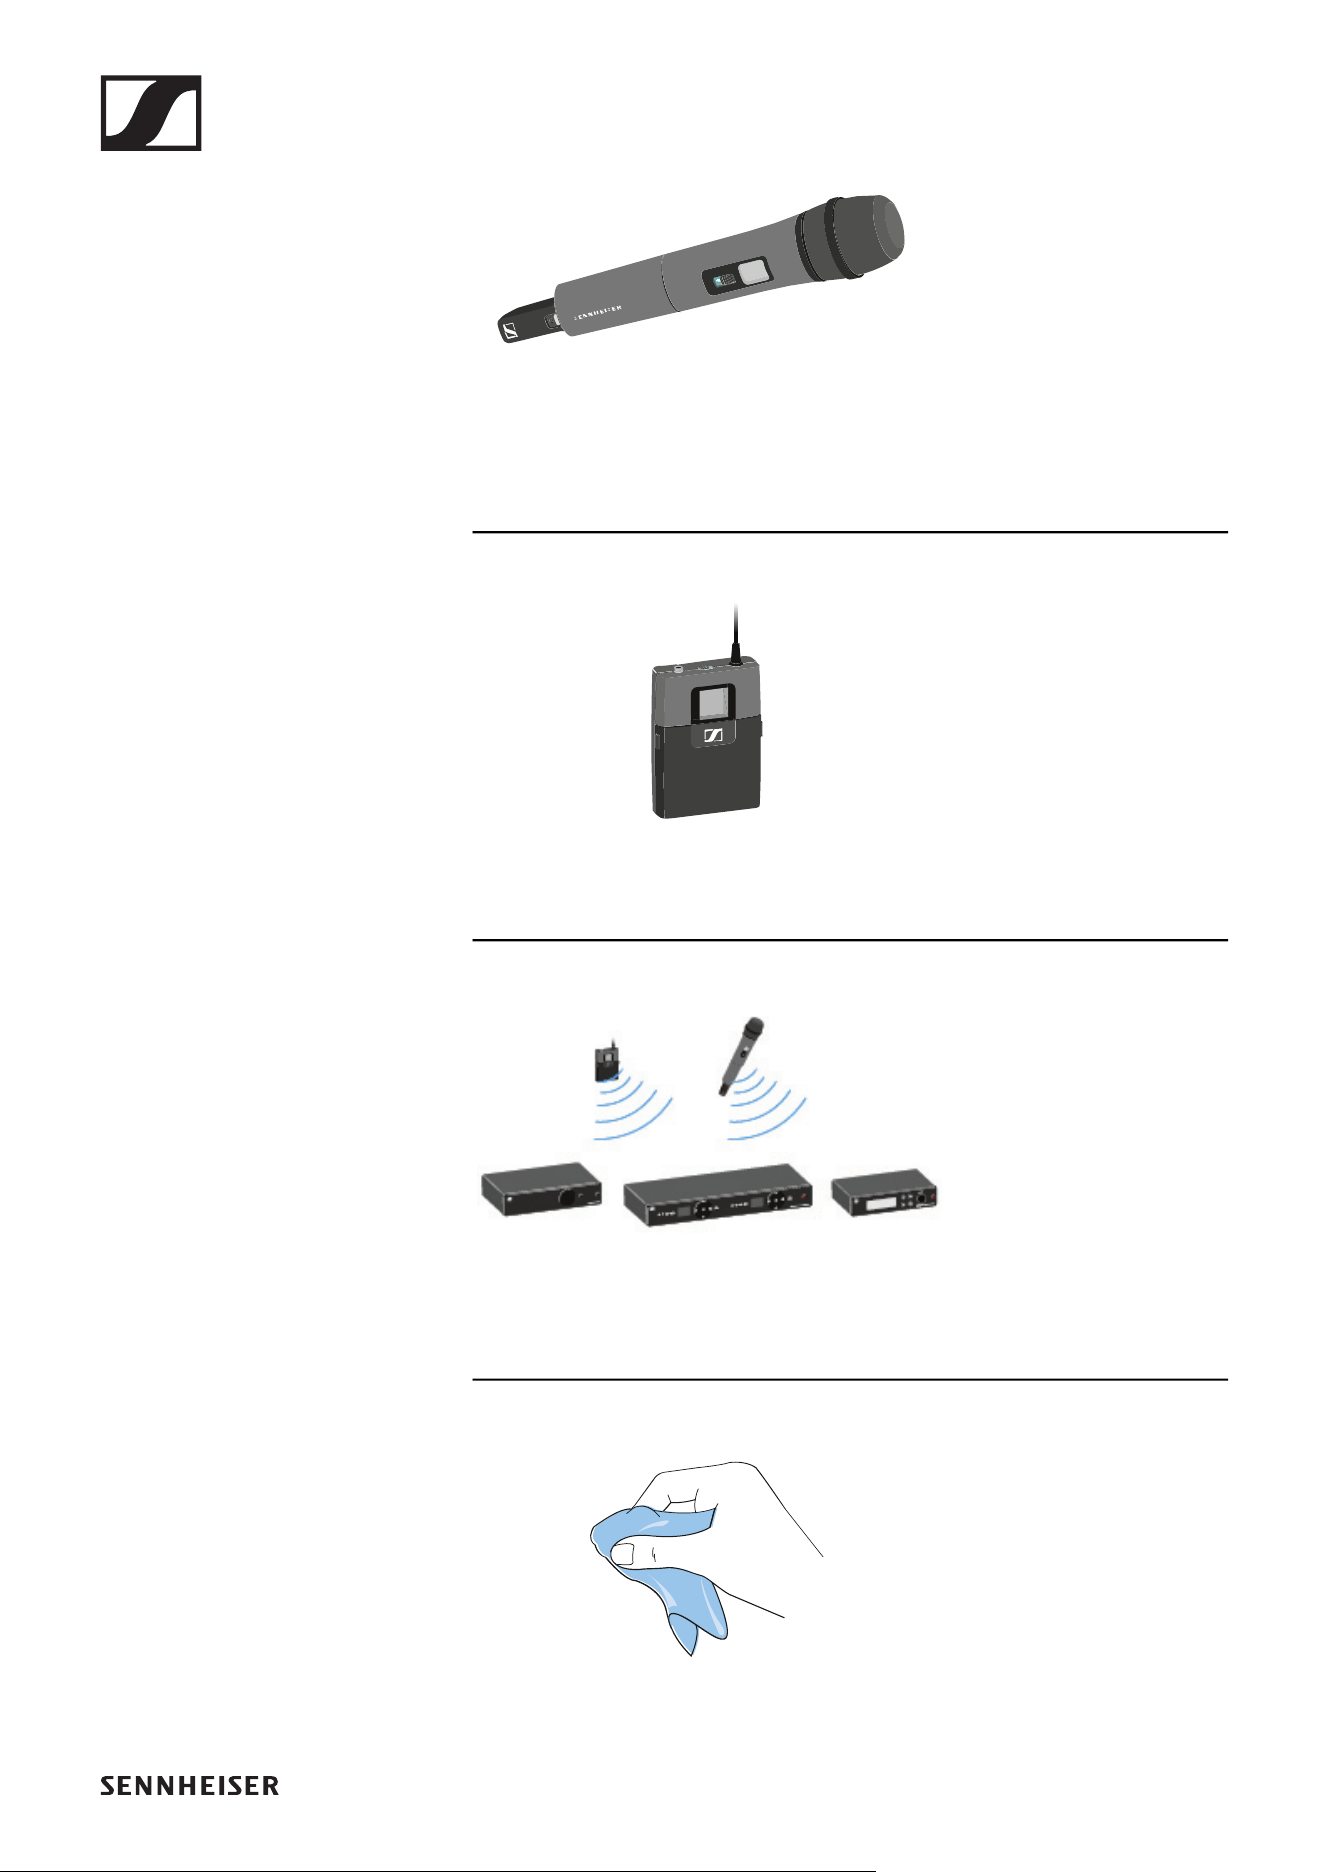
SKM 825-XSW handheld transmitter
►
Handheld transmitter with e825 microphone capsule
You can find more detailed information about the SKM-
XSW in the following sections:
▷ Startup and operation: „Handheld transmitters SKM 825-
XSW | SKM 835-XSW | SKM 865-XSW“
▷ Specifications: „SKM-XSW handheld transmitter“

Products of the XS Wireless line
8
SKM 835-XSW handheld transmitter
►
Handheld transmitter with e835 microphone capsule
You can find more detailed information about the SKM-
XSW in the following sections:
▷ Startup and operation: „Handheld transmitters SKM 825-
XSW | SKM 835-XSW | SKM 865-XSW“
▷ Specifications: „SKM-XSW handheld transmitter“

Products of the XS Wireless line
9
SKM 865-XSW handheld transmitter
►
Handheld transmitter with e865 microphone capsule
You can find more detailed information about the SKM-
XSW in the following sections:
▷ Startup and operation: „Handheld transmitters SKM 825-
XSW | SKM 835-XSW | SKM 865-XSW“
▷ Specifications: „SKM-XSW handheld transmitter“
Available sets
11
Available sets
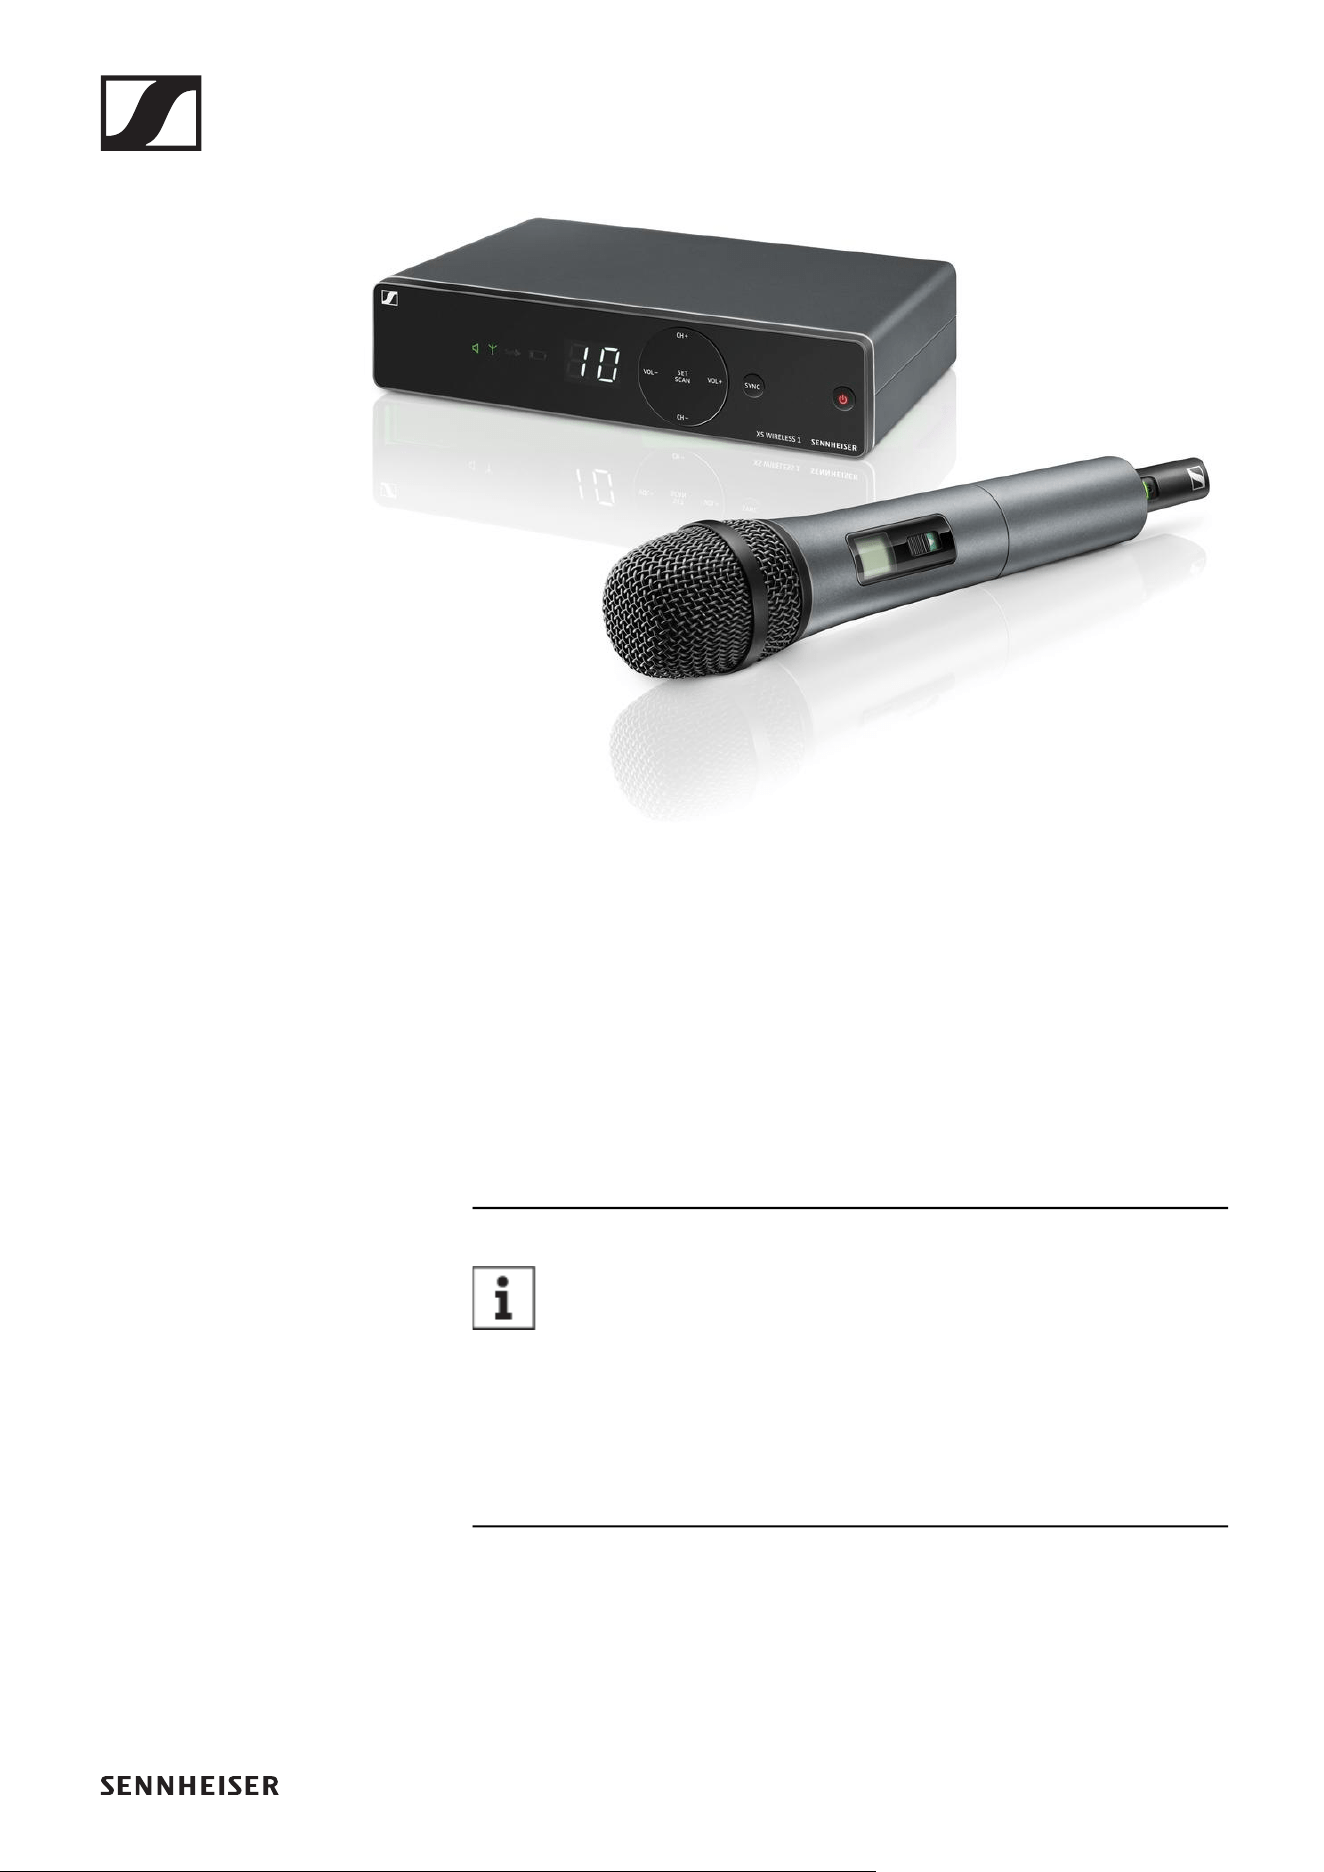
XSW 1-825 | Vocal Set
►
The set consists of the following components:
• „EM-XSW 1 stationary receiver“
• „SKM 825-XSW handheld transmitter“
• MZQ 1 microphone clamp
• Power supply with country adapters
• 2 AA LR6 batteries, 1.5 V
You can find more detailed information about the set in
the following sections:
▷ Startup and operation: „Starting up and operating devices
of the XS Wireless line“
▷ Specifications: „SPECIFICATIONS“
Available sets
12
XSW 1-835 | Vocal Set
►
The set consists of the following components:
• „EM-XSW 1 stationary receiver“
• „SKM 835-XSW handheld transmitter“
• MZQ 1 microphone clamp
• Power supply with country adapters
• 2 AA LR6 batteries, 1.5 V
You can find more detailed information about the set in
the following sections:
▷ Startup and operation: „Starting up and operating devices
of the XS Wireless line“
▷ Specifications: „SPECIFICATIONS“

Available sets
13
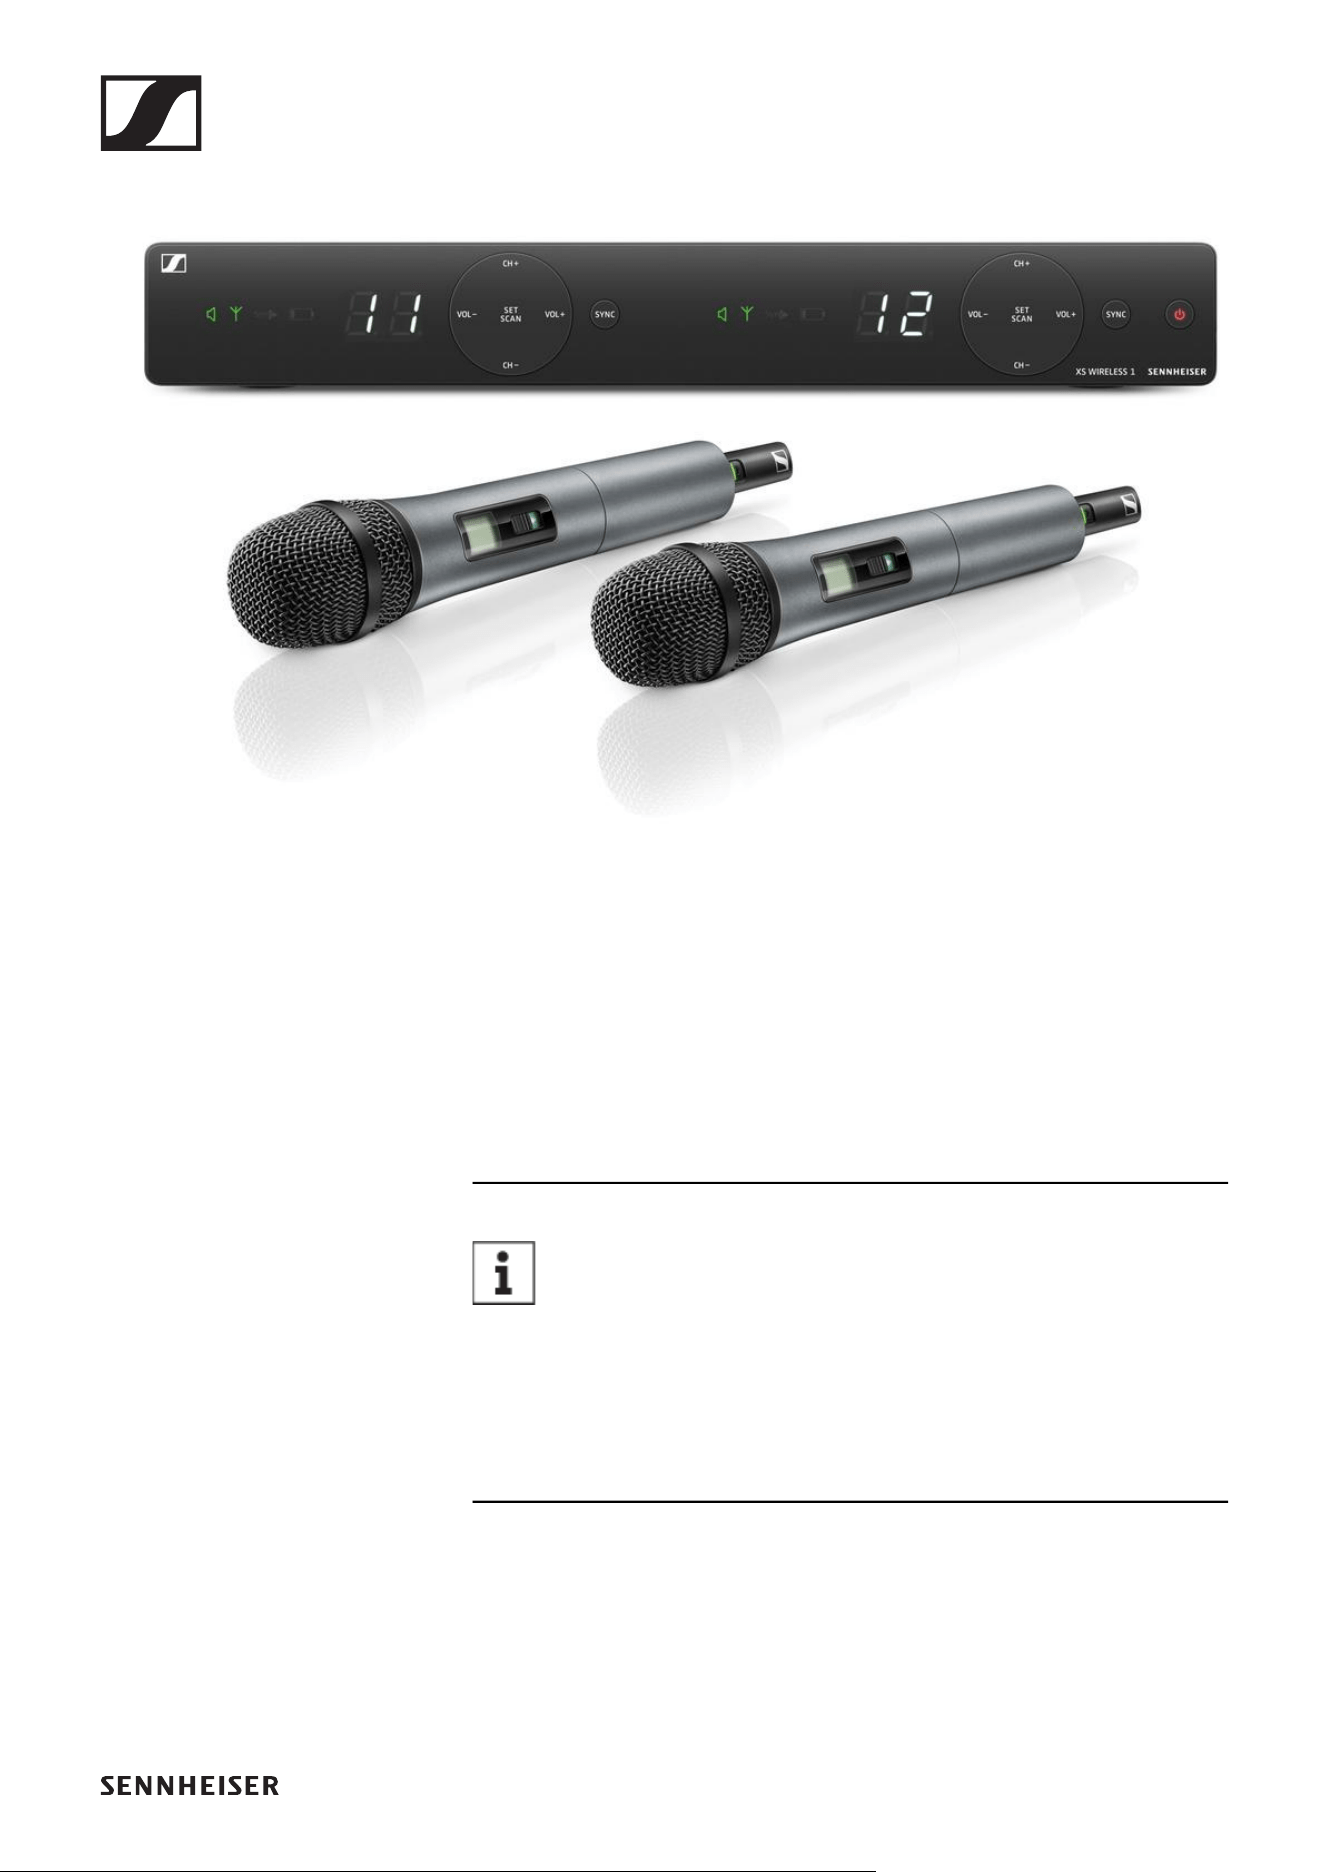
XSW 1-825 DUAL | Vocal Set
►
The set consists of the following components:
• „EM-XSW 1 DUAL rack receiver“
• 2x „SKM 825-XSW handheld transmitter“
• 2x MZQ 1 microphone clamp
• Power supply with country adapters
• 4 AA LR6 batteries, 1.5 V
You can find more detailed information about the set in
the following sections:
▷ Startup and operation: „Starting up and operating devices
of the XS Wireless line“
▷ Specifications: „SPECIFICATIONS“
Available sets
14
XSW 1-835 DUAL | Vocal Set
►
The set consists of the following components:
• „EM-XSW 1 DUAL rack receiver“
• 2x „SKM 835-XSW handheld transmitter“
• 2x MZQ 1 microphone clamp
• Power supply with country adapters
• 4 AA LR6 batteries, 1.5 V
You can find more detailed information about the set in
the following sections:
▷ Startup and operation: „Starting up and operating devices
of the XS Wireless line“
▷ Specifications: „SPECIFICATIONS“
Available sets
15
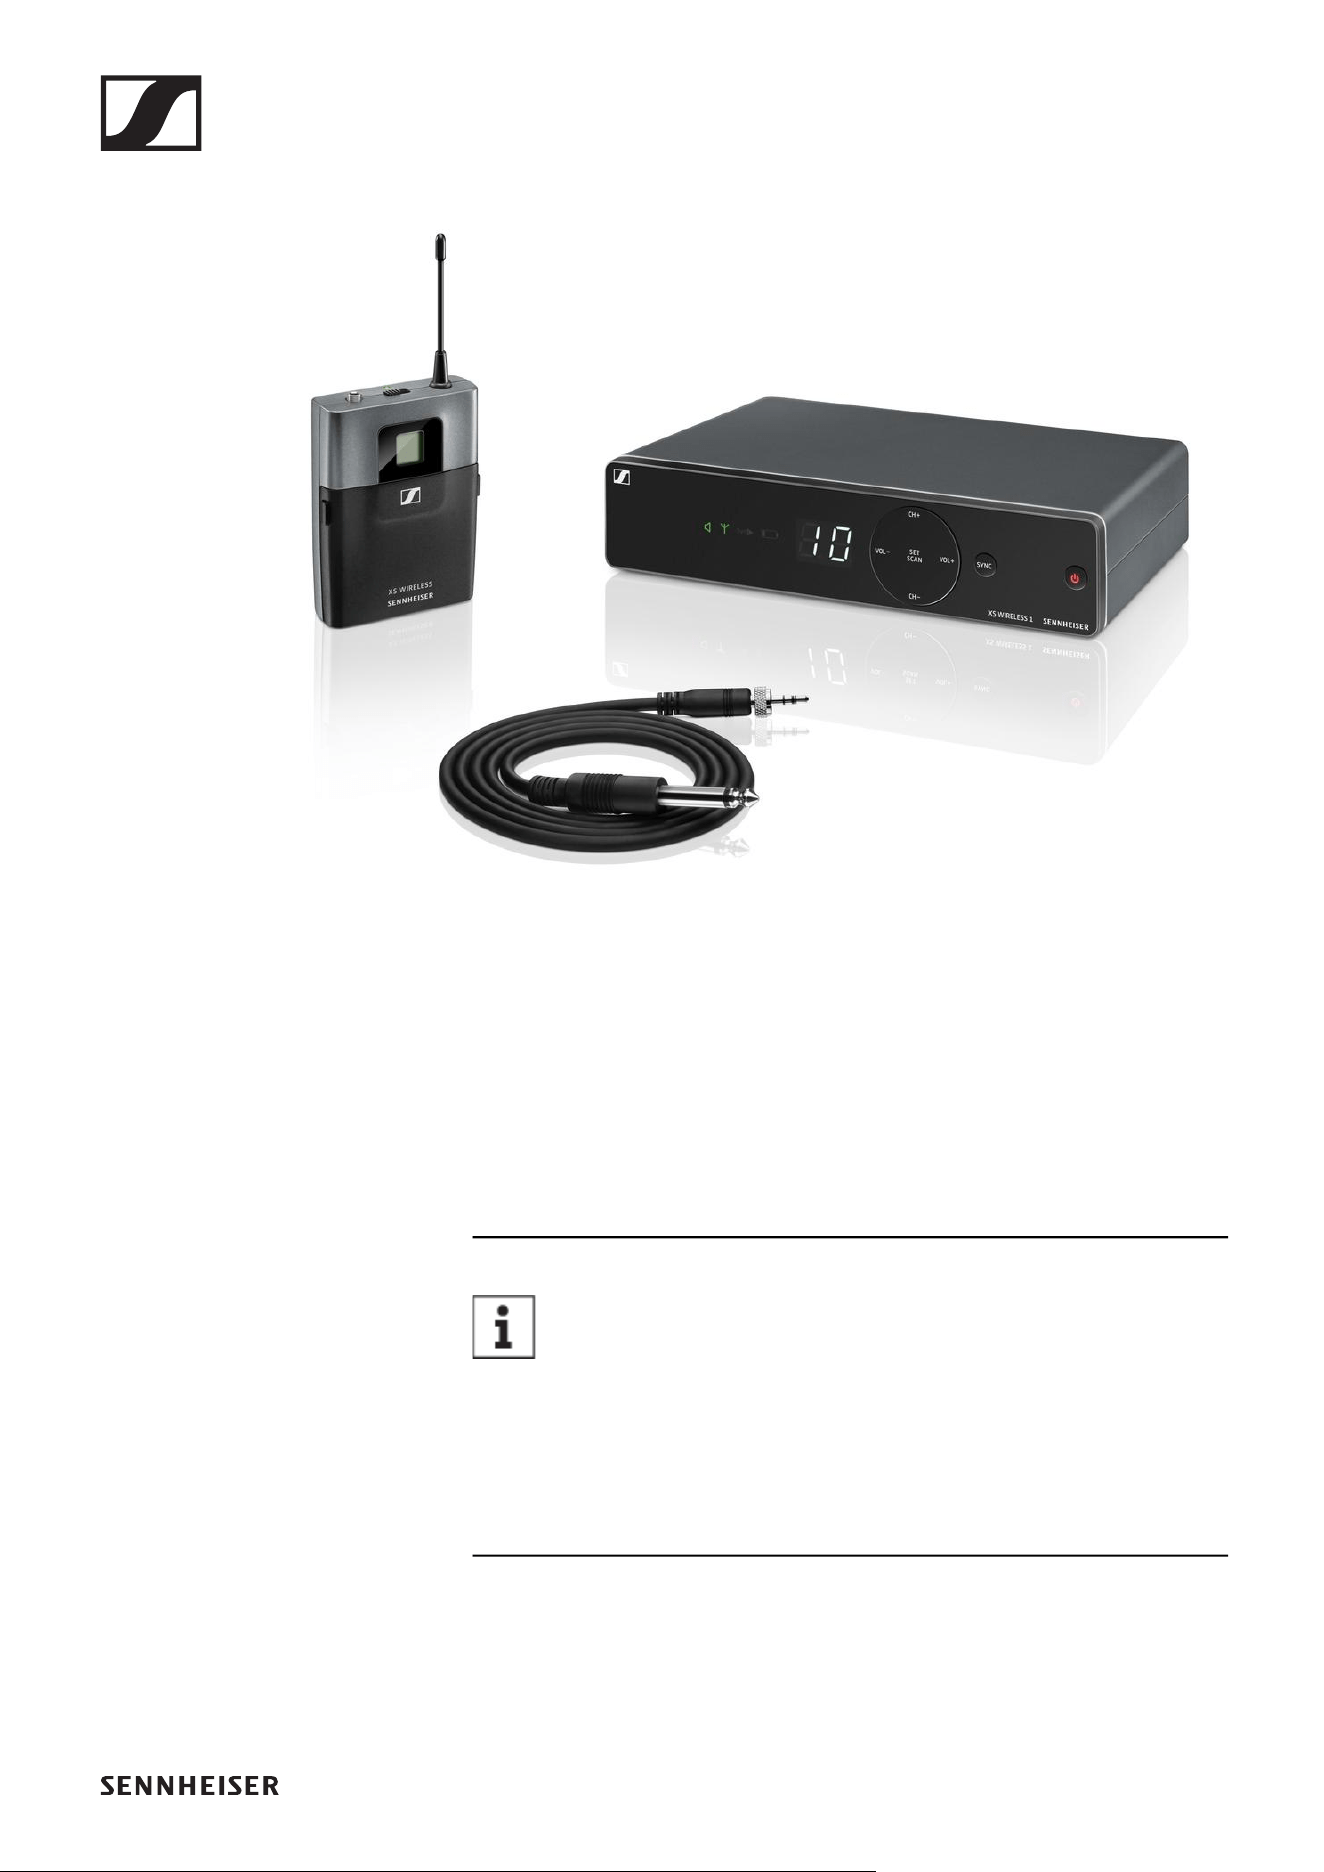
XSW 1-CI1 | Instrument Set
►
The set consists of the following components:
• „EM-XSW 1 stationary receiver“
• „SK-XSW bodypack transmitter“
• CI 1 instrument cable
• Power supply with country adapters
• 2 AA LR6 batteries, 1.5 V
You can find more detailed information about the set in
the following sections:
▷ Startup and operation: „Starting up and operating devices
of the XS Wireless line“
▷ Specifications: „SPECIFICATIONS“
Available sets
16
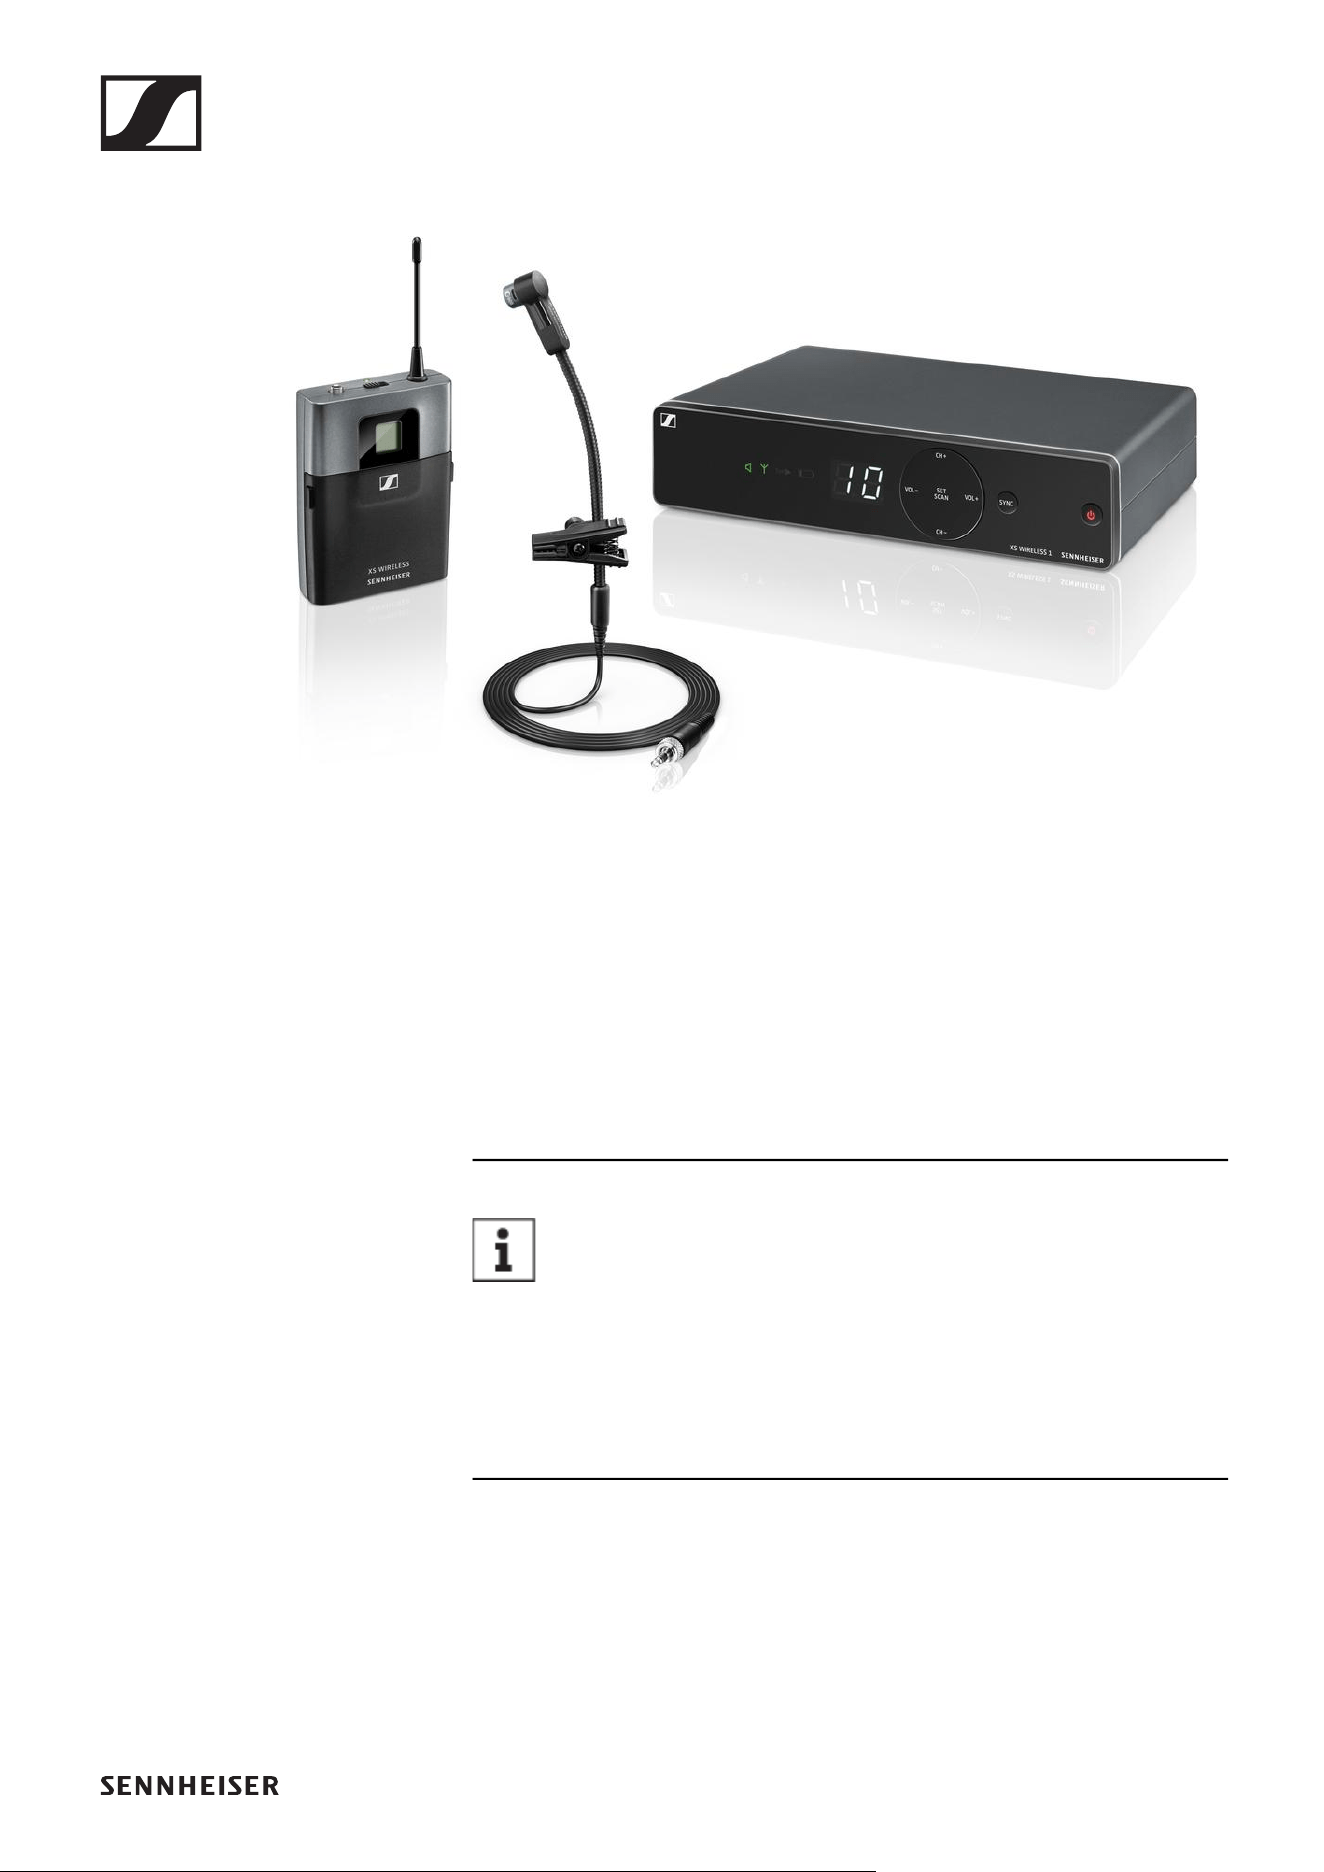
XSW 1-908 | Instrument Set
►
The set consists of the following components:
• „EM-XSW 1 stationary receiver“
• „SK-XSW bodypack transmitter“
• e 908T instrument microphone
• Power supply with country adapters
• 2 AA LR6 batteries, 1.5 V
You can find more detailed information about the set in
the following sections:
▷ Startup and operation: „Starting up and operating devices
of the XS Wireless line“
▷ Specifications: „SPECIFICATIONS“
Available sets
17
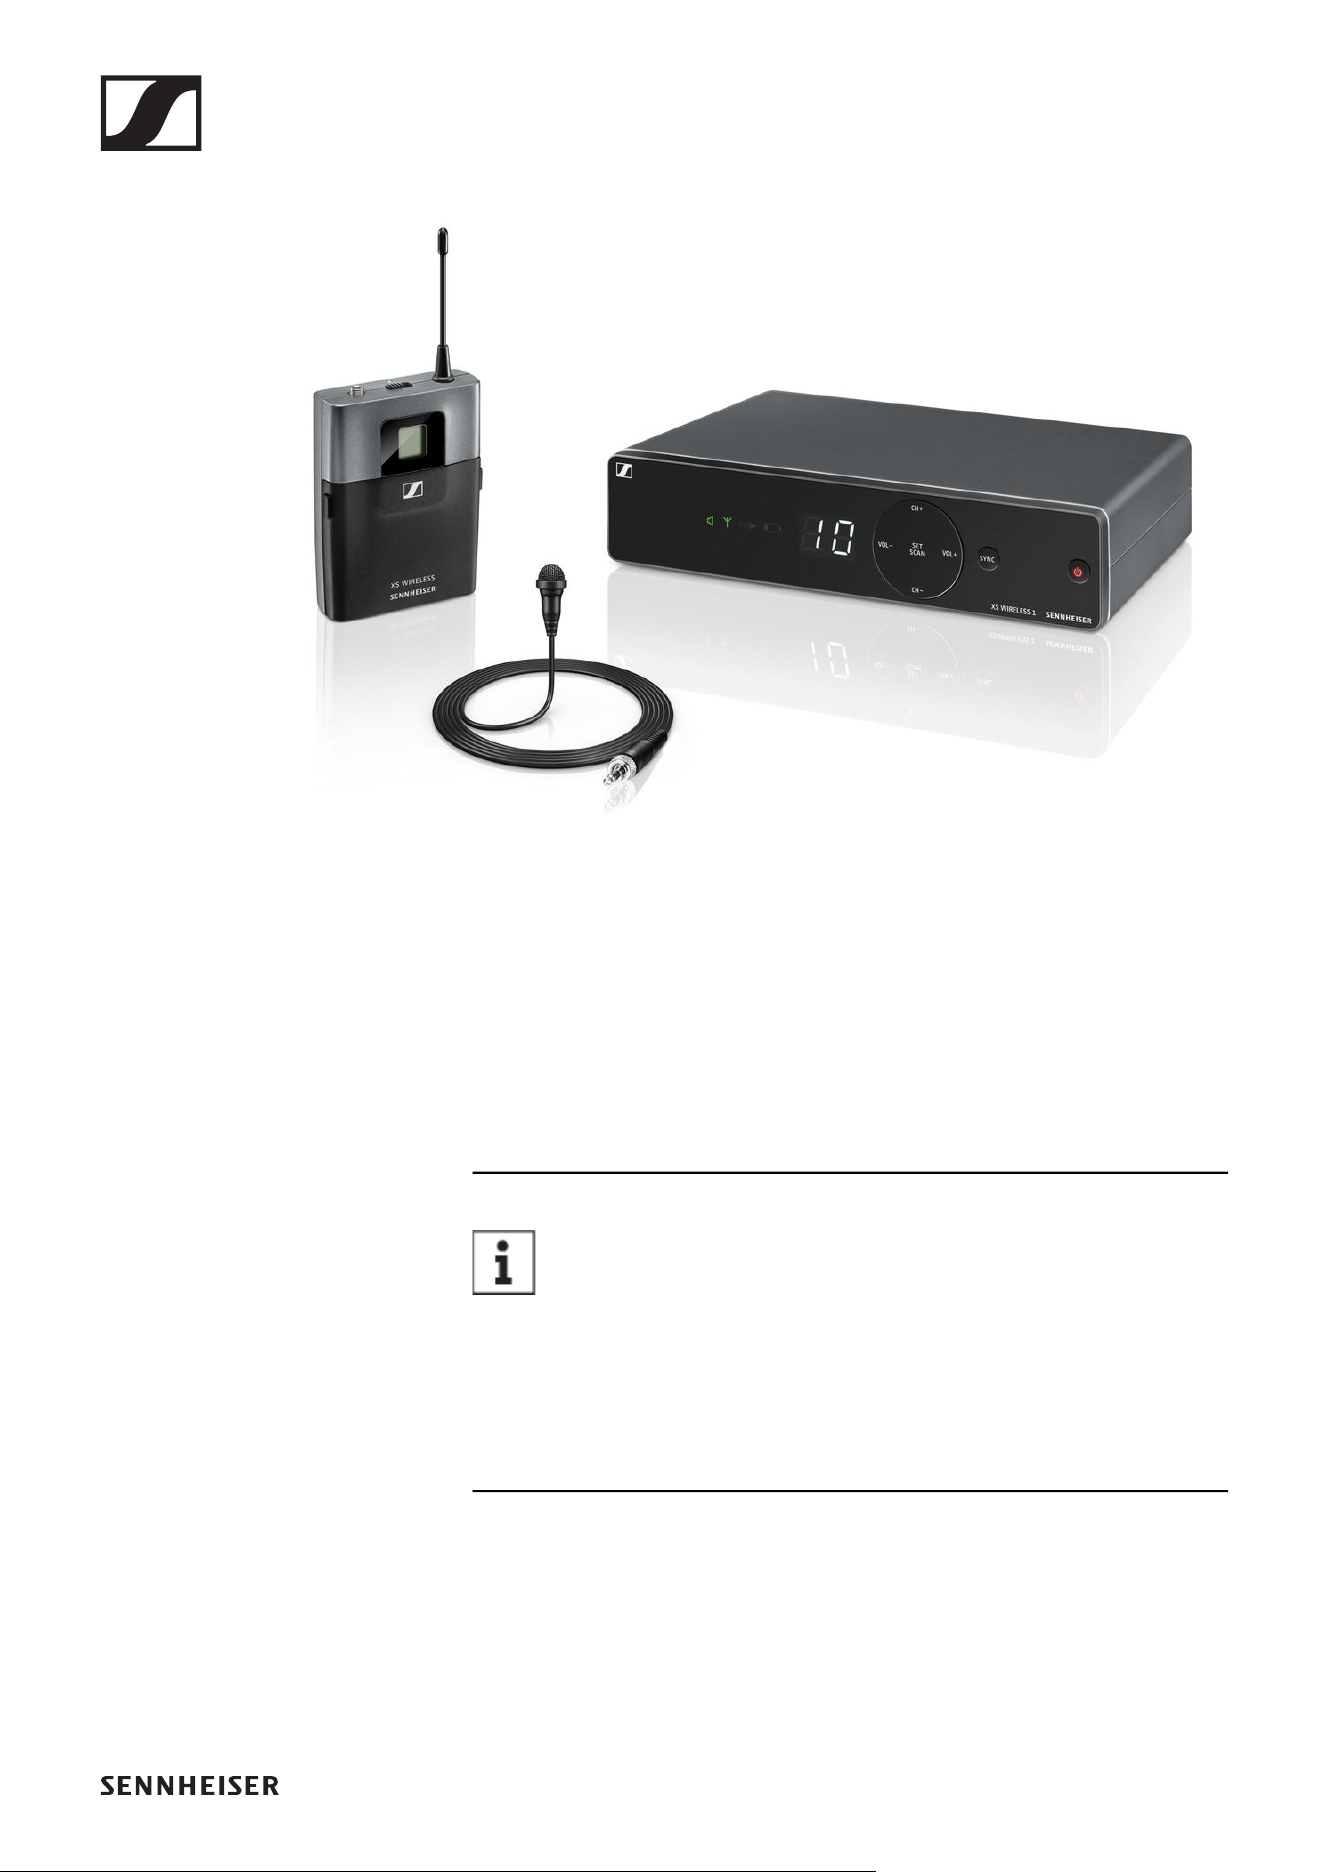
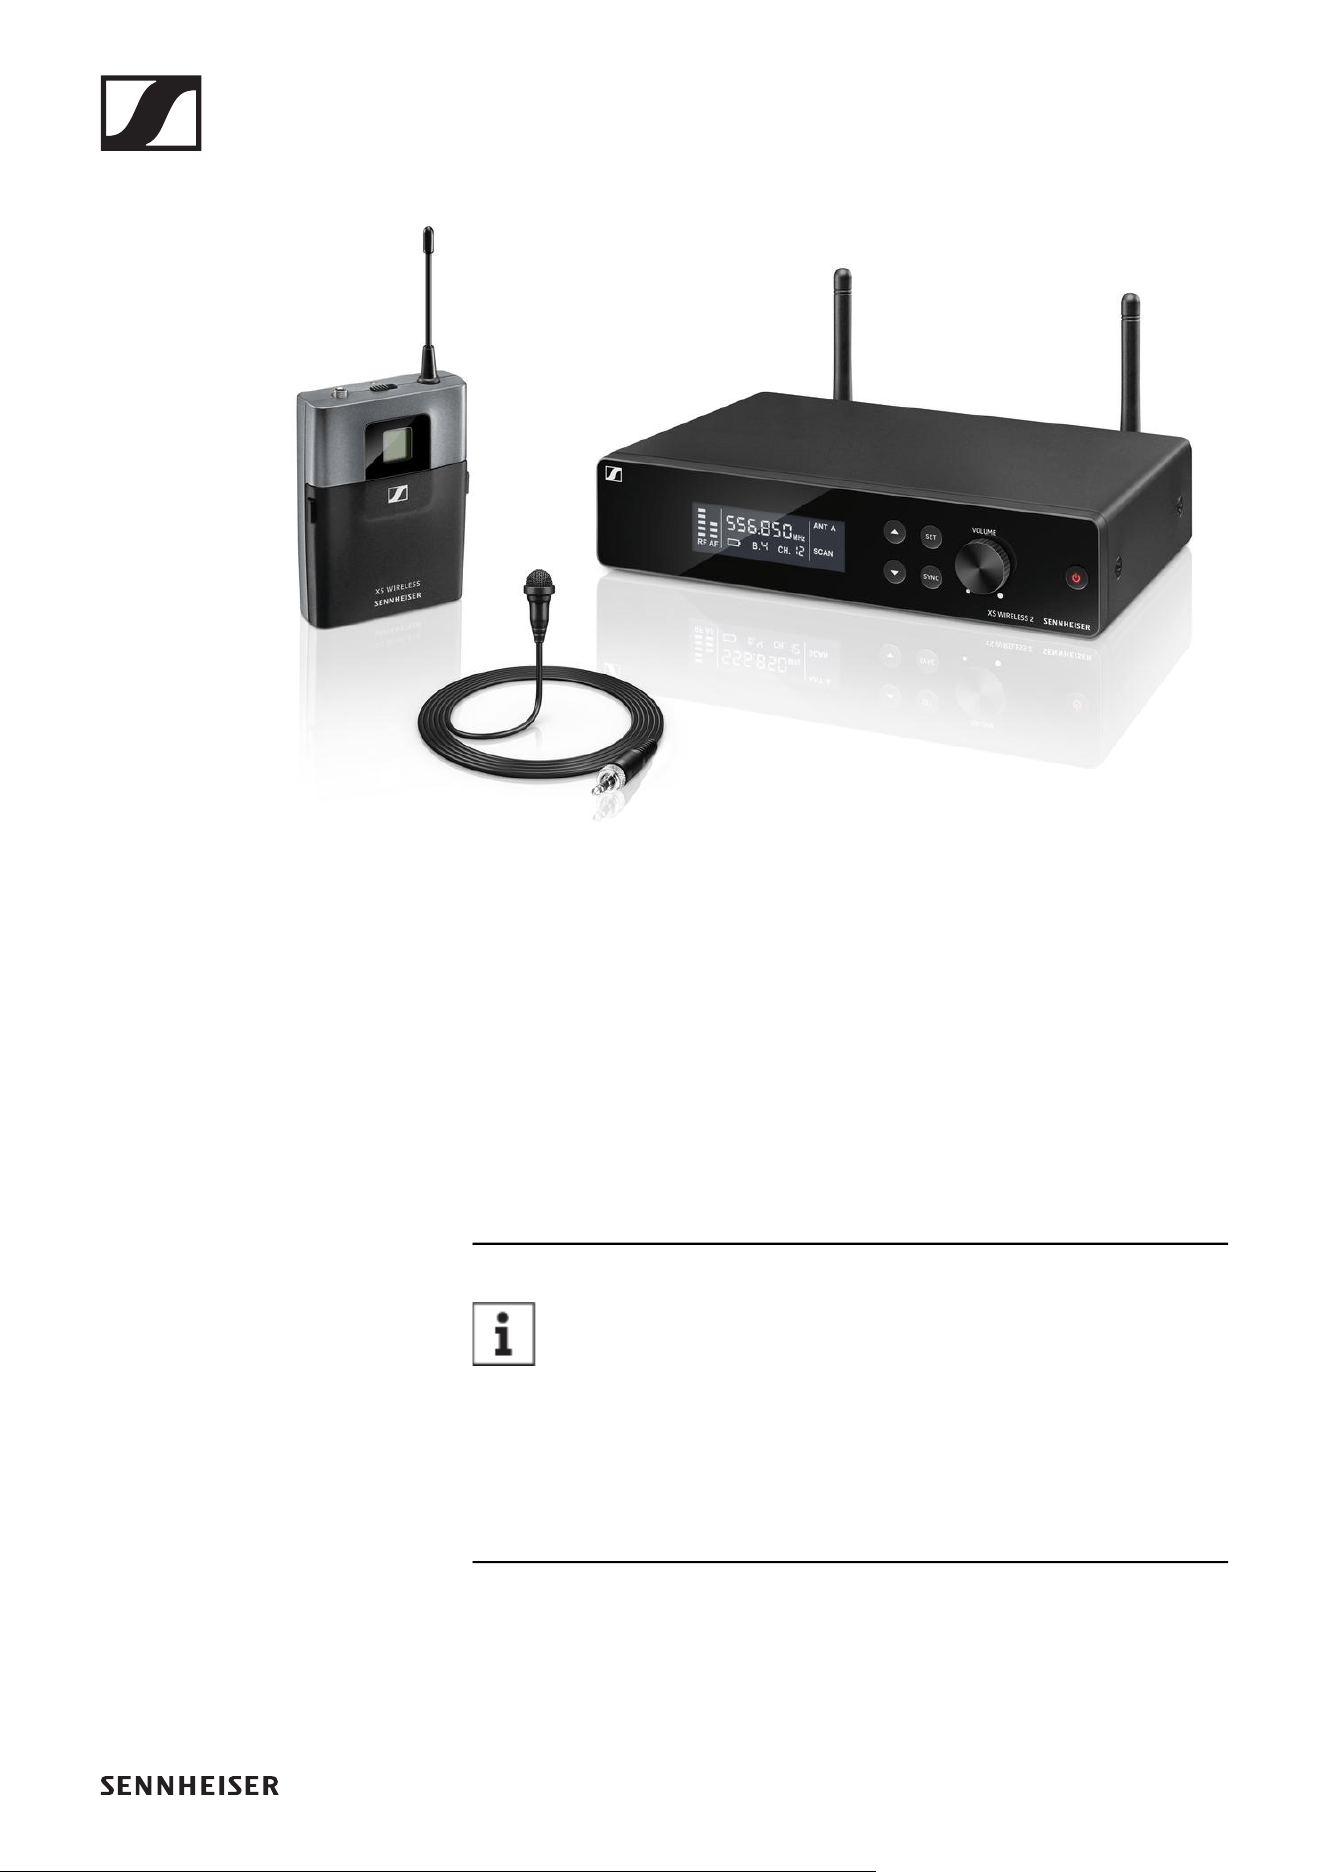
XSW 1-ME2 | Lavalier Set
►
The set consists of the following components:
• „EM-XSW 1 stationary receiver“
• „SK-XSW bodypack transmitter“
• ME 2 lavalier microphone
• Power supply with country adapters
• 2 AA LR6 batteries, 1.5 V
You can find more detailed information about the set in
the following sections:
▷ Startup and operation: „Starting up and operating devices
of the XS Wireless line“
▷ Specifications: „SPECIFICATIONS“
Available sets
18
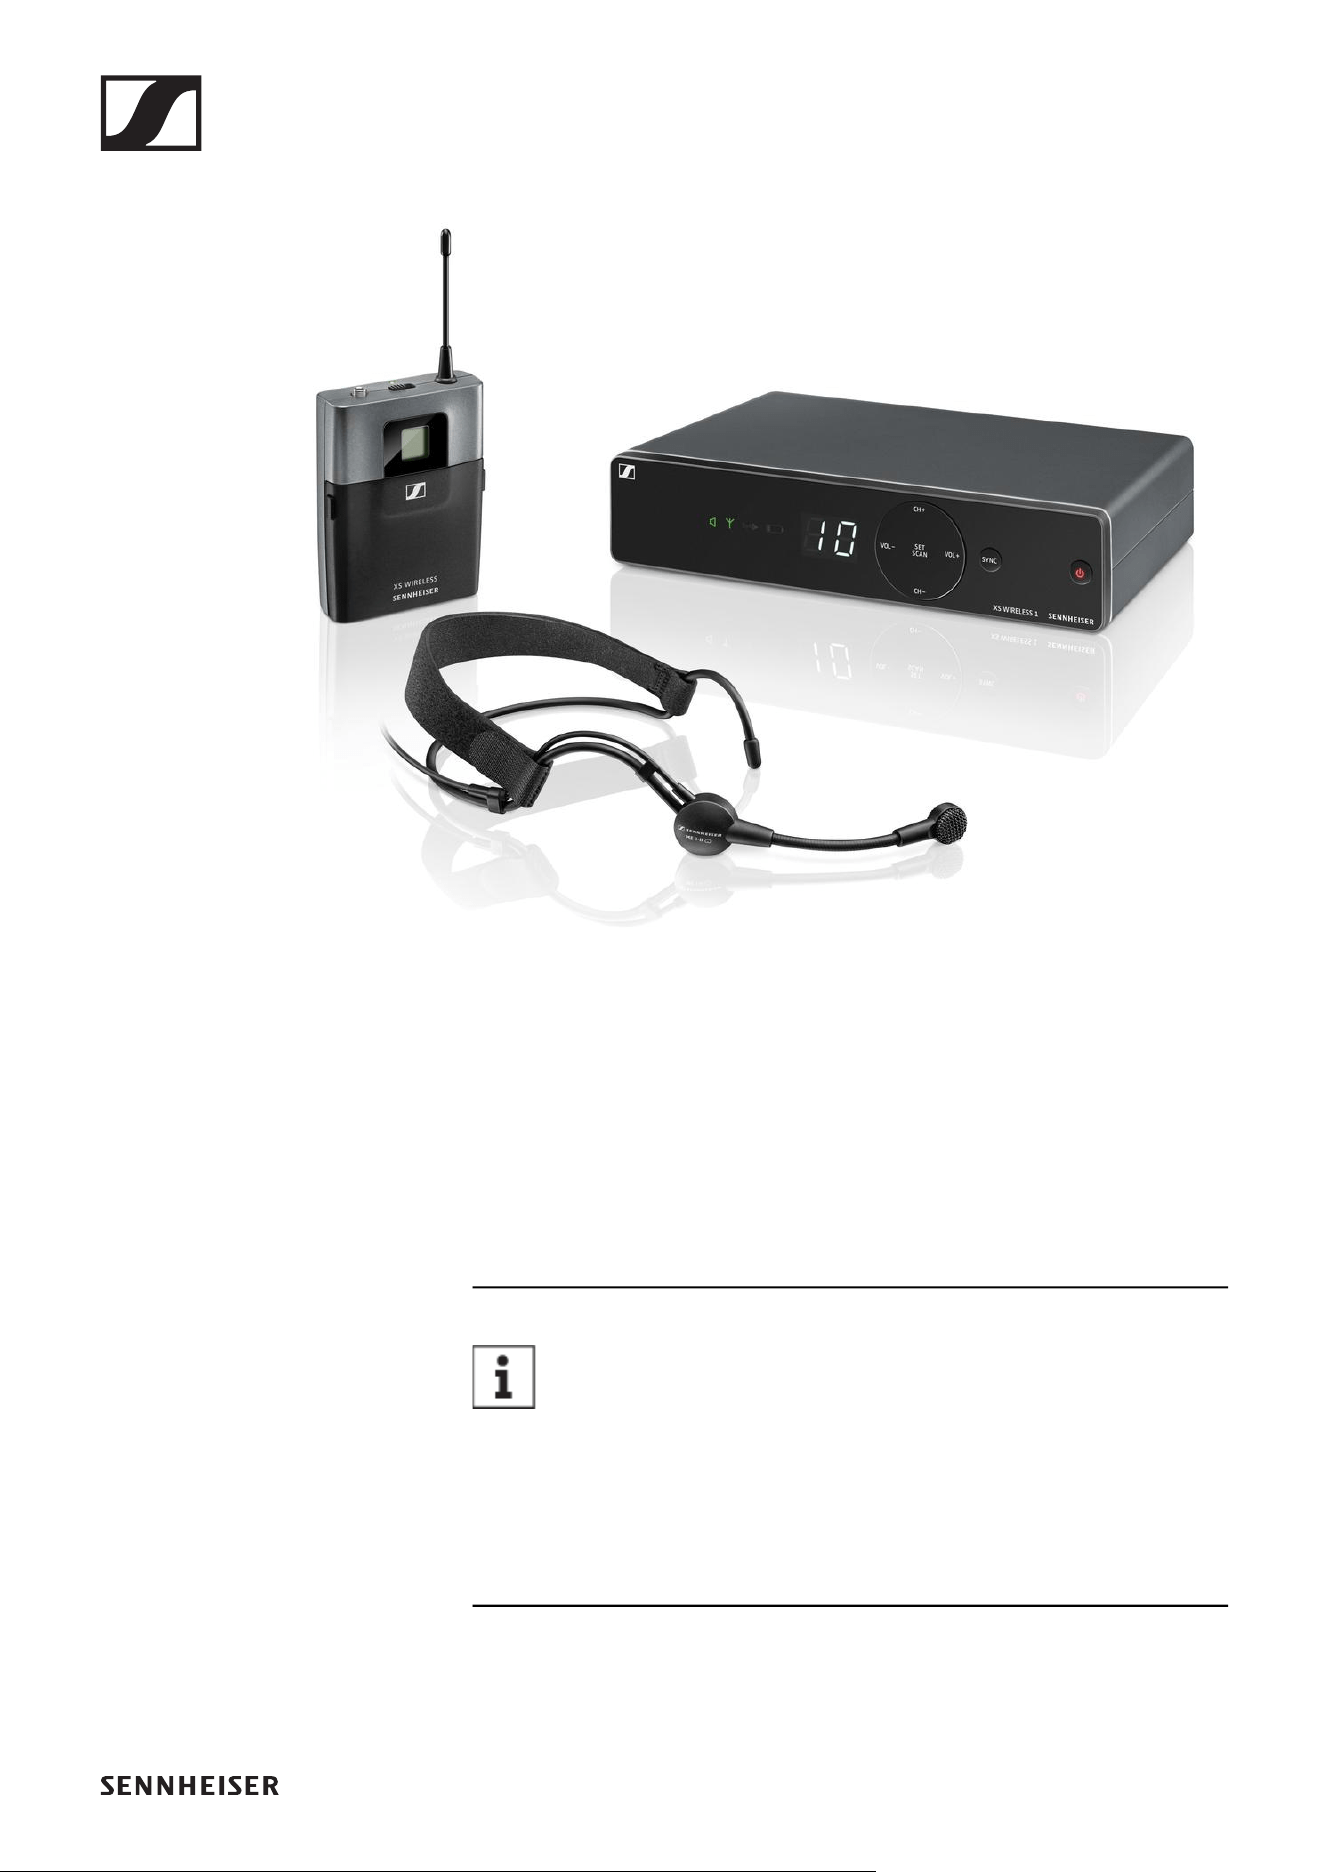
XSW 1-ME3 | Headmic Set
►
The set consists of the following components:
• „EM-XSW 1 stationary receiver“
• „SK-XSW bodypack transmitter“
• ME 3 headset microphone
• Power supply with country adapters
• 2 AA LR6 batteries, 1.5 V
You can find more detailed information about the set in
the following sections:
▷ Startup and operation: „Starting up and operating devices
of the XS Wireless line“
▷ Specifications: „SPECIFICATIONS“

Available sets
19
XSW 2-835 | Vocal Set
►
The set consists of the following components:
• „EM-XSW 2 stationary receiver“
• „SKM 835-XSW handheld transmitter“
• MZQ 1 microphone clamp
• Rack mount kit
• Power supply with country adapters
• 2 AA LR6 batteries, 1.5 V
You can find more detailed information about the set in
the following sections:
▷ Startup and operation: „Starting up and operating devices
of the XS Wireless line“
▷ Specifications: „SPECIFICATIONS“
Available sets
20
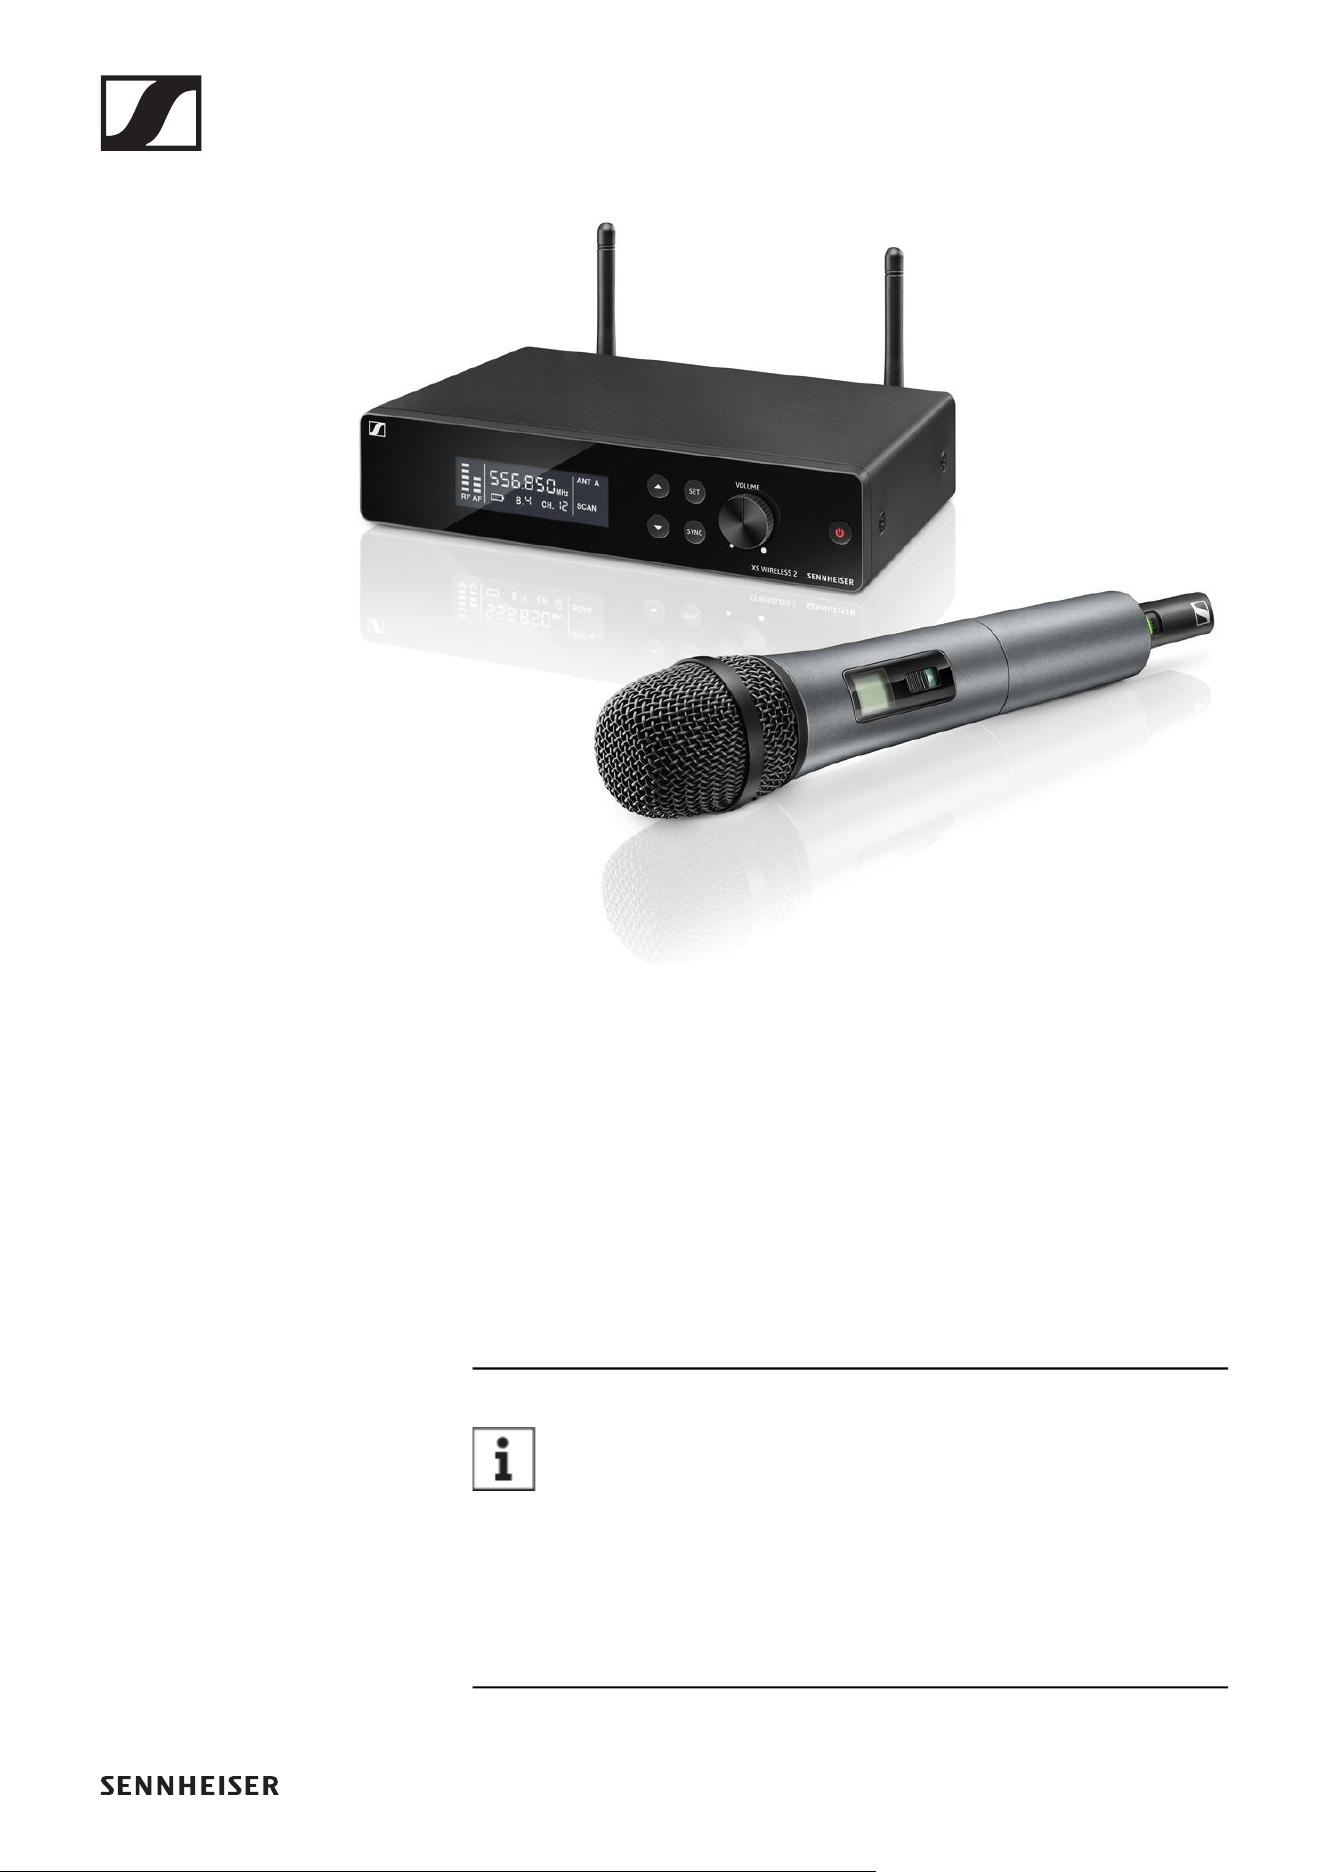
XSW 2-865 | Vocal Set
►
The set consists of the following components:
• „EM-XSW 2 stationary receiver“
• „SKM 865-XSW handheld transmitter“
• MZQ 1 microphone clamp
• Rack mount kit
• Power supply with country adapters
• 2 AA LR6 batteries, 1.5 V
You can find more detailed information about the set in
the following sections:
▷ Startup and operation: „Starting up and operating devices
of the XS Wireless line“
▷ Specifications: „SPECIFICATIONS“
Available sets
21
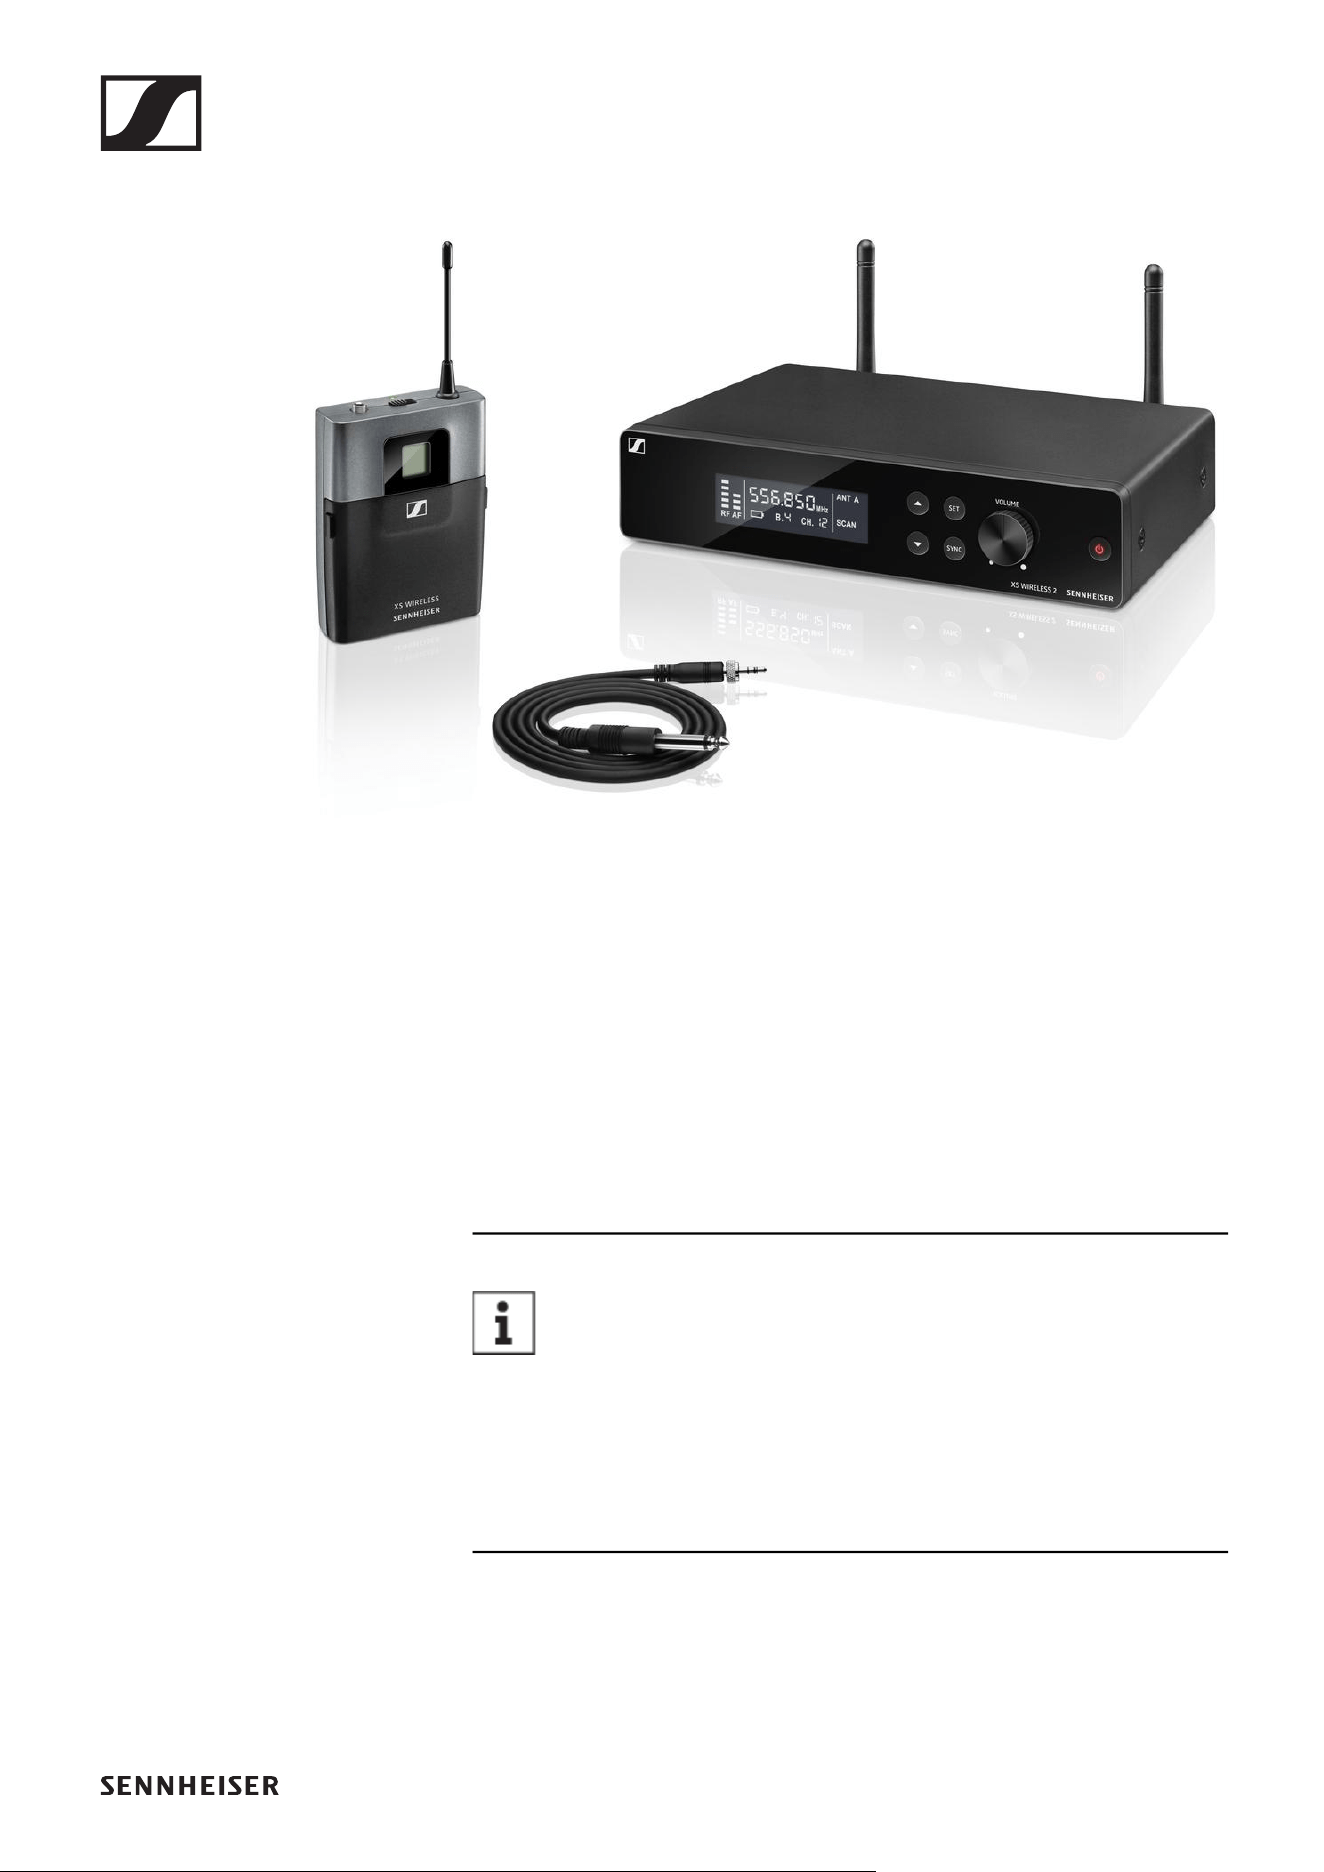
XSW 2-CI1 | Instrument Set
►
The set consists of the following components:
• „EM-XSW 2 stationary receiver“
• „SK-XSW bodypack transmitter“
• CI 1 instrument cable
• Rack mount kit
• Power supply with country adapters
• 2 AA LR6 batteries, 1.5 V
You can find more detailed information about the set in
the following sections:
▷ Startup and operation: „Starting up and operating devices
of the XS Wireless line“
▷ Specifications: „SPECIFICATIONS“
Available sets
22
XSW 2-ME2 | Lavalier Set
►
The set consists of the following components:
• „EM-XSW 2 stationary receiver“
• „SK-XSW bodypack transmitter“
• ME 2 lavalier microphone
• Rack mount kit
• Power supply with country adapters
• 2 AA LR6 batteries, 1.5 V
You can find more detailed information about the set in
the following sections:
▷ Startup and operation: „Starting up and operating devices
of the XS Wireless line“
▷ Specifications: „SPECIFICATIONS“
Available sets
23
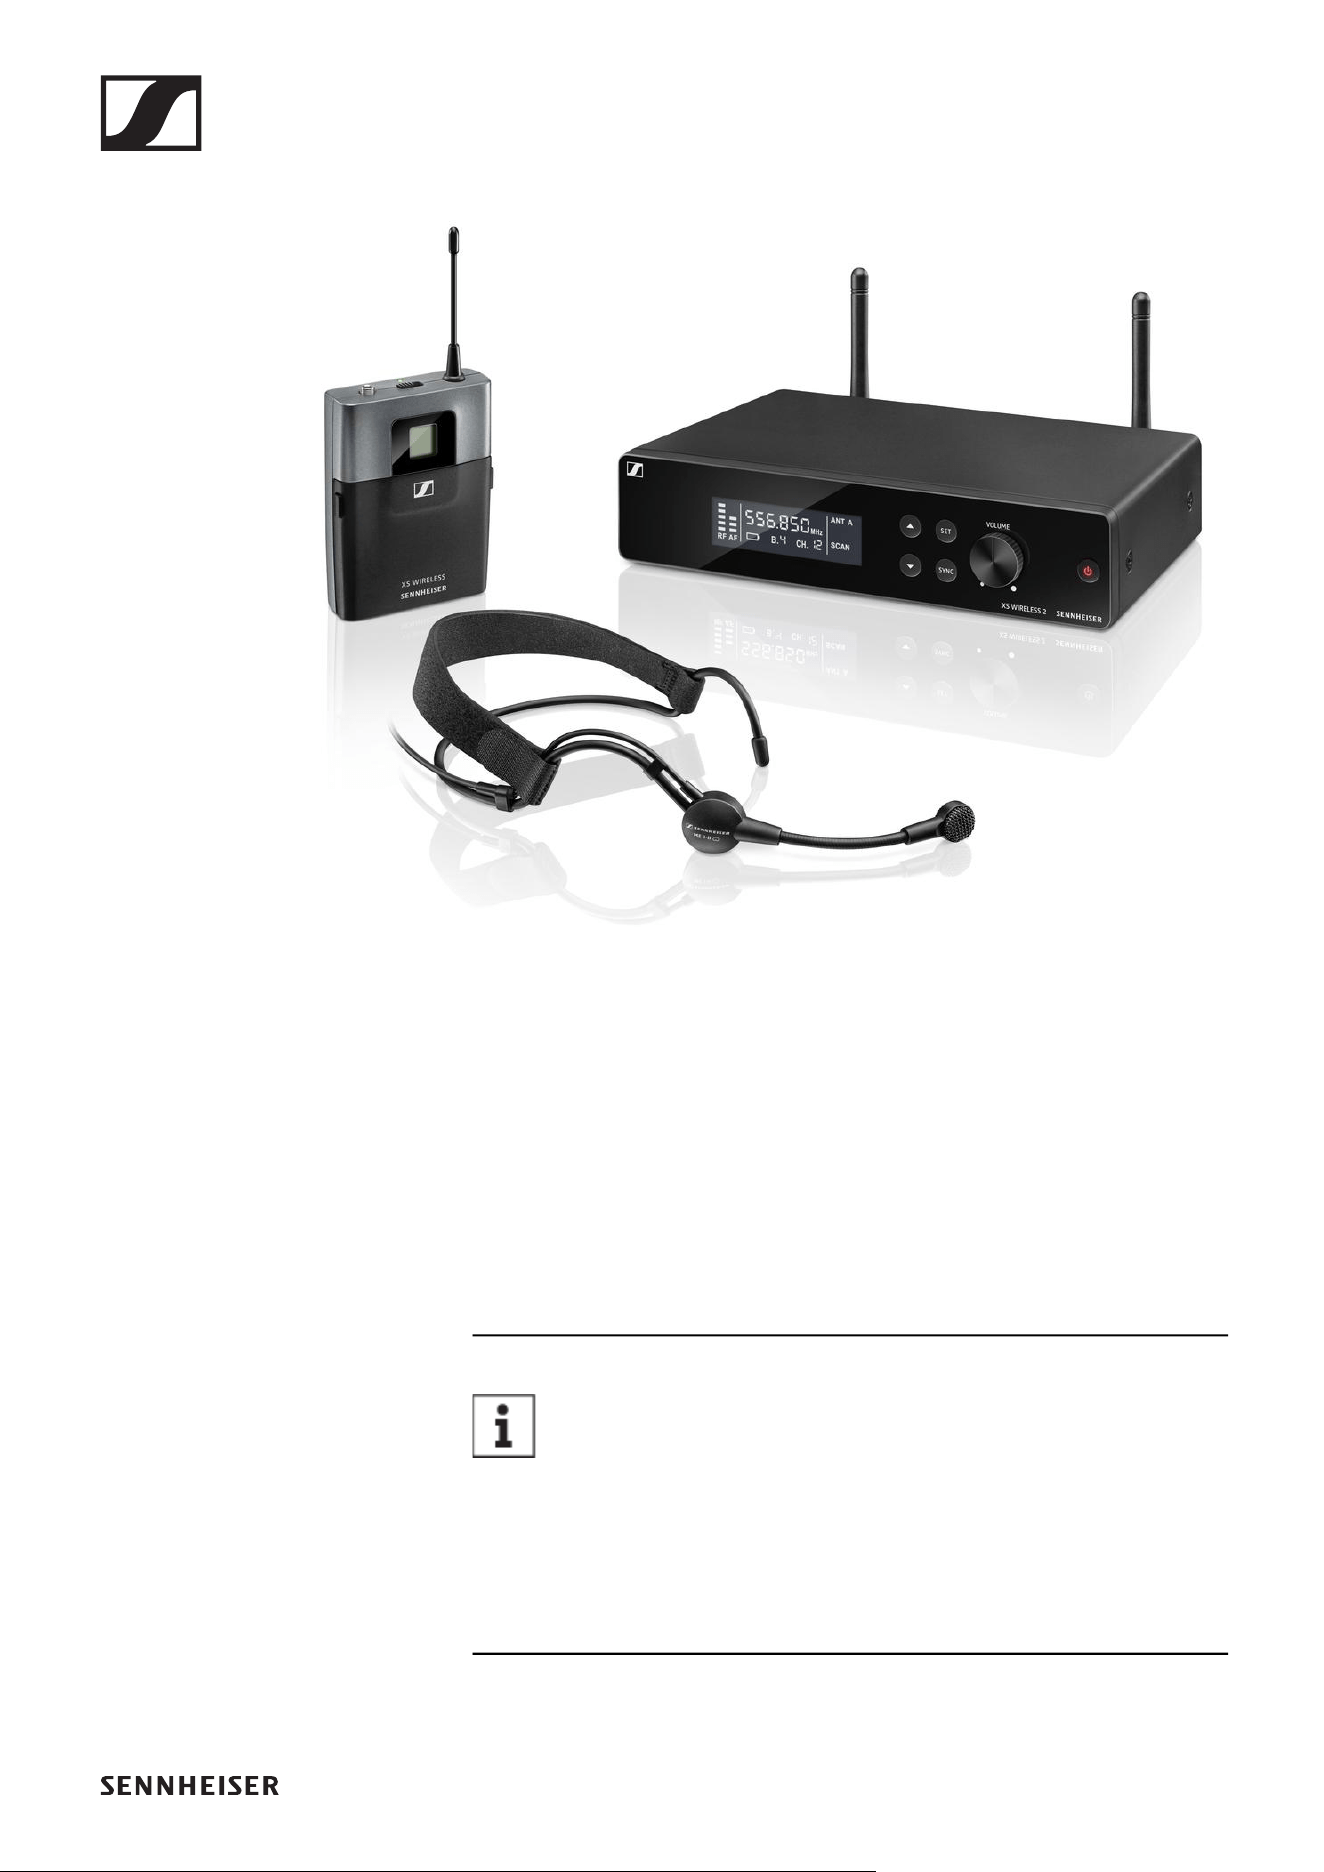
XSW 2-ME3 | Headmic Set
►
The set consists of the following components:
• „EM-XSW 2 stationary receiver“
• „SK-XSW bodypack transmitter“
• ME 3 headset microphone
• Rack mount kit
• Power supply with country adapters
• 2 AA LR6 batteries, 1.5 V
You can find more detailed information about the set in
the following sections:
▷ Startup and operation: „Starting up and operating devices
of the XS Wireless line“
▷ Specifications: „SPECIFICATIONS“
Accessories
24
Accessories
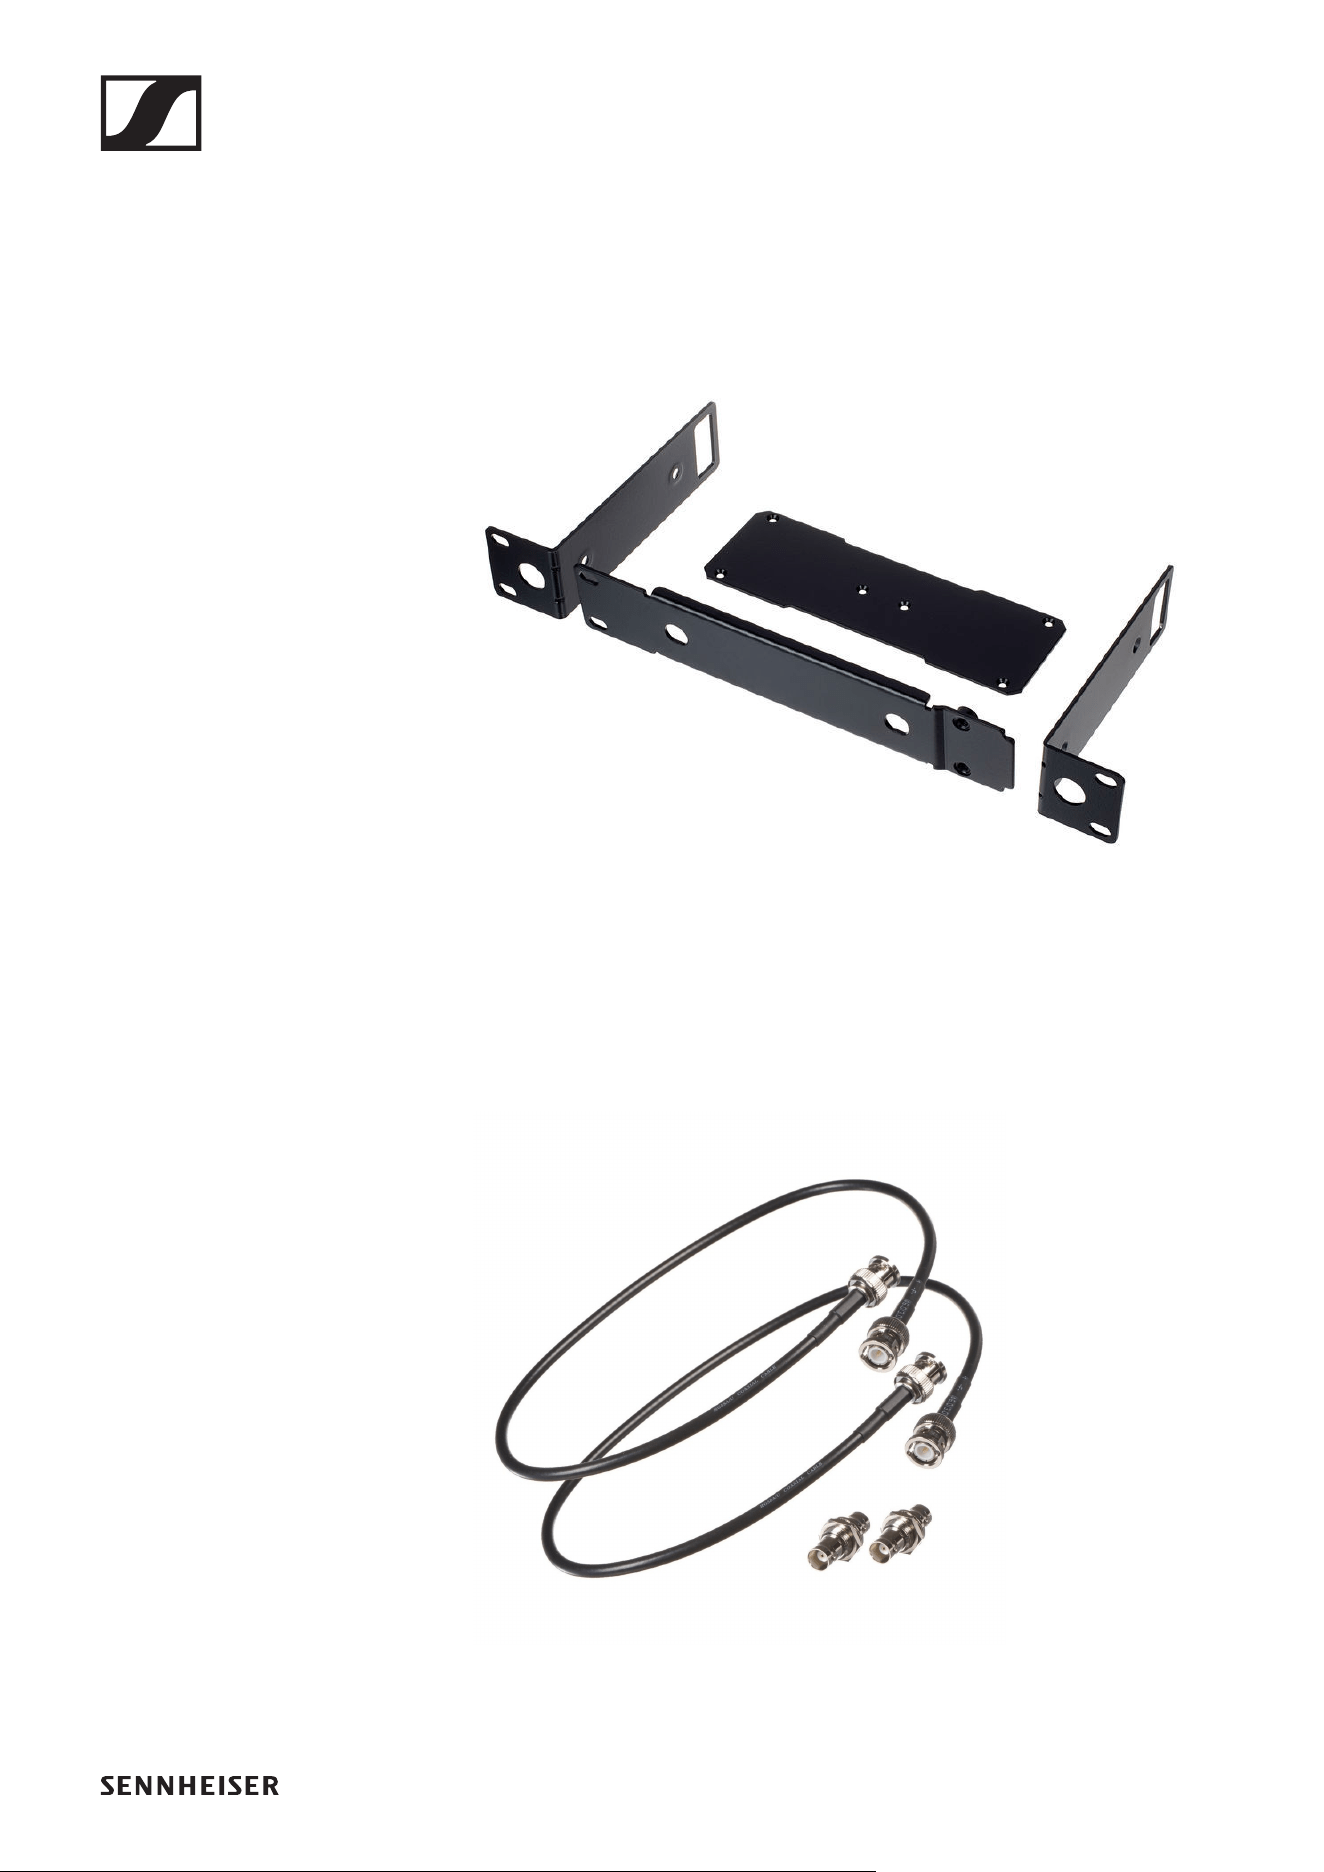
GA 1-XSW 2 rack mount kit
19" rack adapter for mounting the EM-XSW 2 in a 19" rack.
Art. no. 507351
►
GA 2-XSW 2 antenna front mount kit
Antenna front mount kit for installing antenna connections on
the front of the rack when using the EM-XSW 2 together with
the GA 1-XSW 2 rack mount kit.
Art. no. 507468
►
Frequency ranges
25
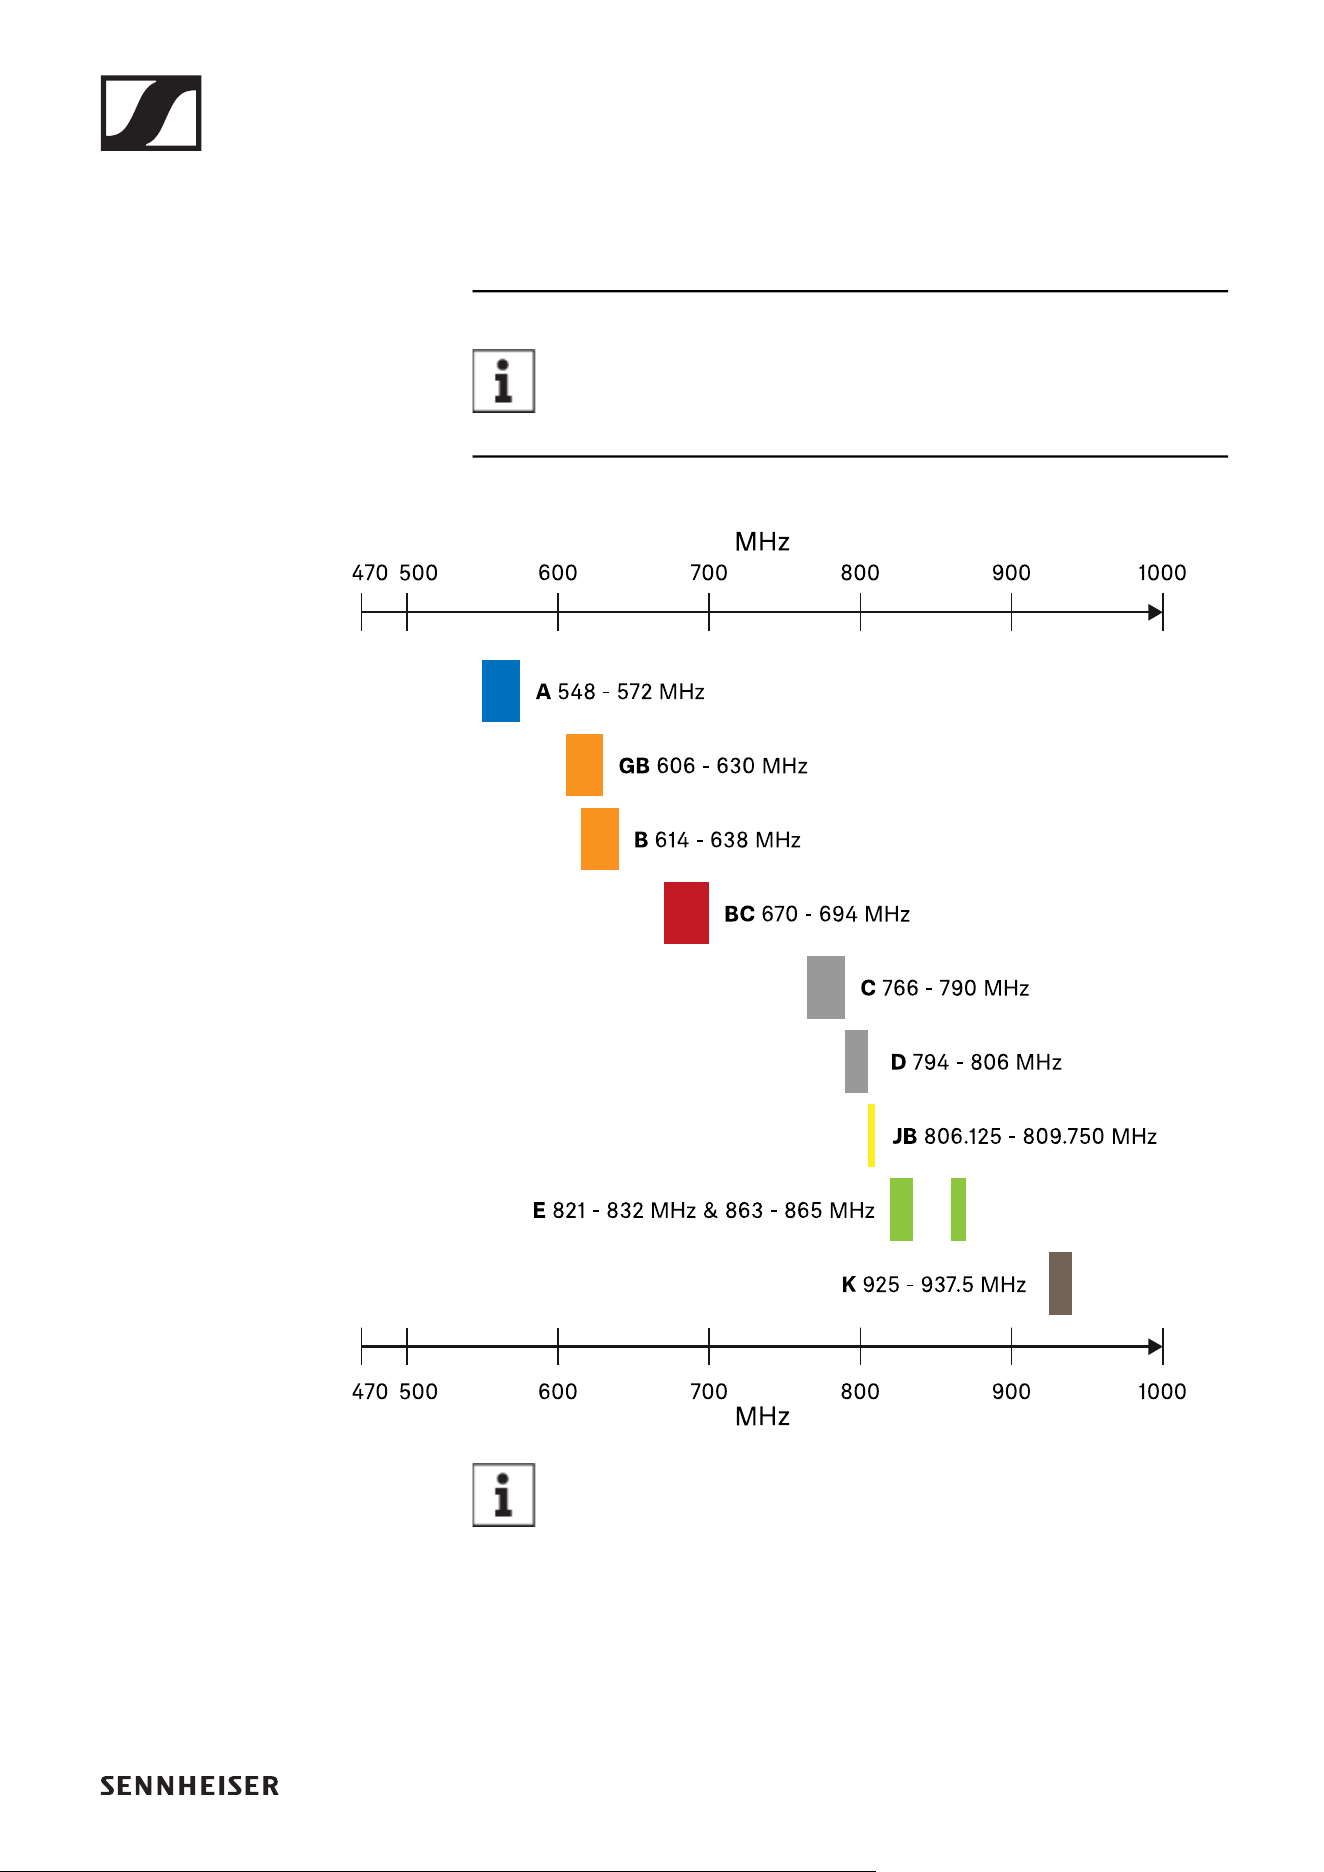
Frequency ranges
The products are available in the following frequency ranges.
Click a frequency range in the list to open a frequency
table with factory presets for this frequency range.
►
►
►
►
►
►
►
►
►
►
►
Conditions and restrictions for using frequencies
There may be special conditions and restrictions for us-
ing frequencies in your country.
Before putting the product into operation, find the information
for your country at the following address:
www.sennheiser.com/sifa

EM-XSW 1 rack receiver
28
EM-XSW 1 rack receiver
Connectors and controls
Front
1 Display for status information
• See „Information on the receiver’s display“
2 Control buttons for selecting channels and adjusting vol-
ume
• See „Setting options on the front of the device“
3 SYNC button for synchronizing the transmitter and receiver
• See „Establishing a radio link | Synchronizing the receiver
and transmitter“
4 ON/OFF button for switching the device on and off
• See „Switching the receiver on and off“
EM-XSW 1 rack receiver
29
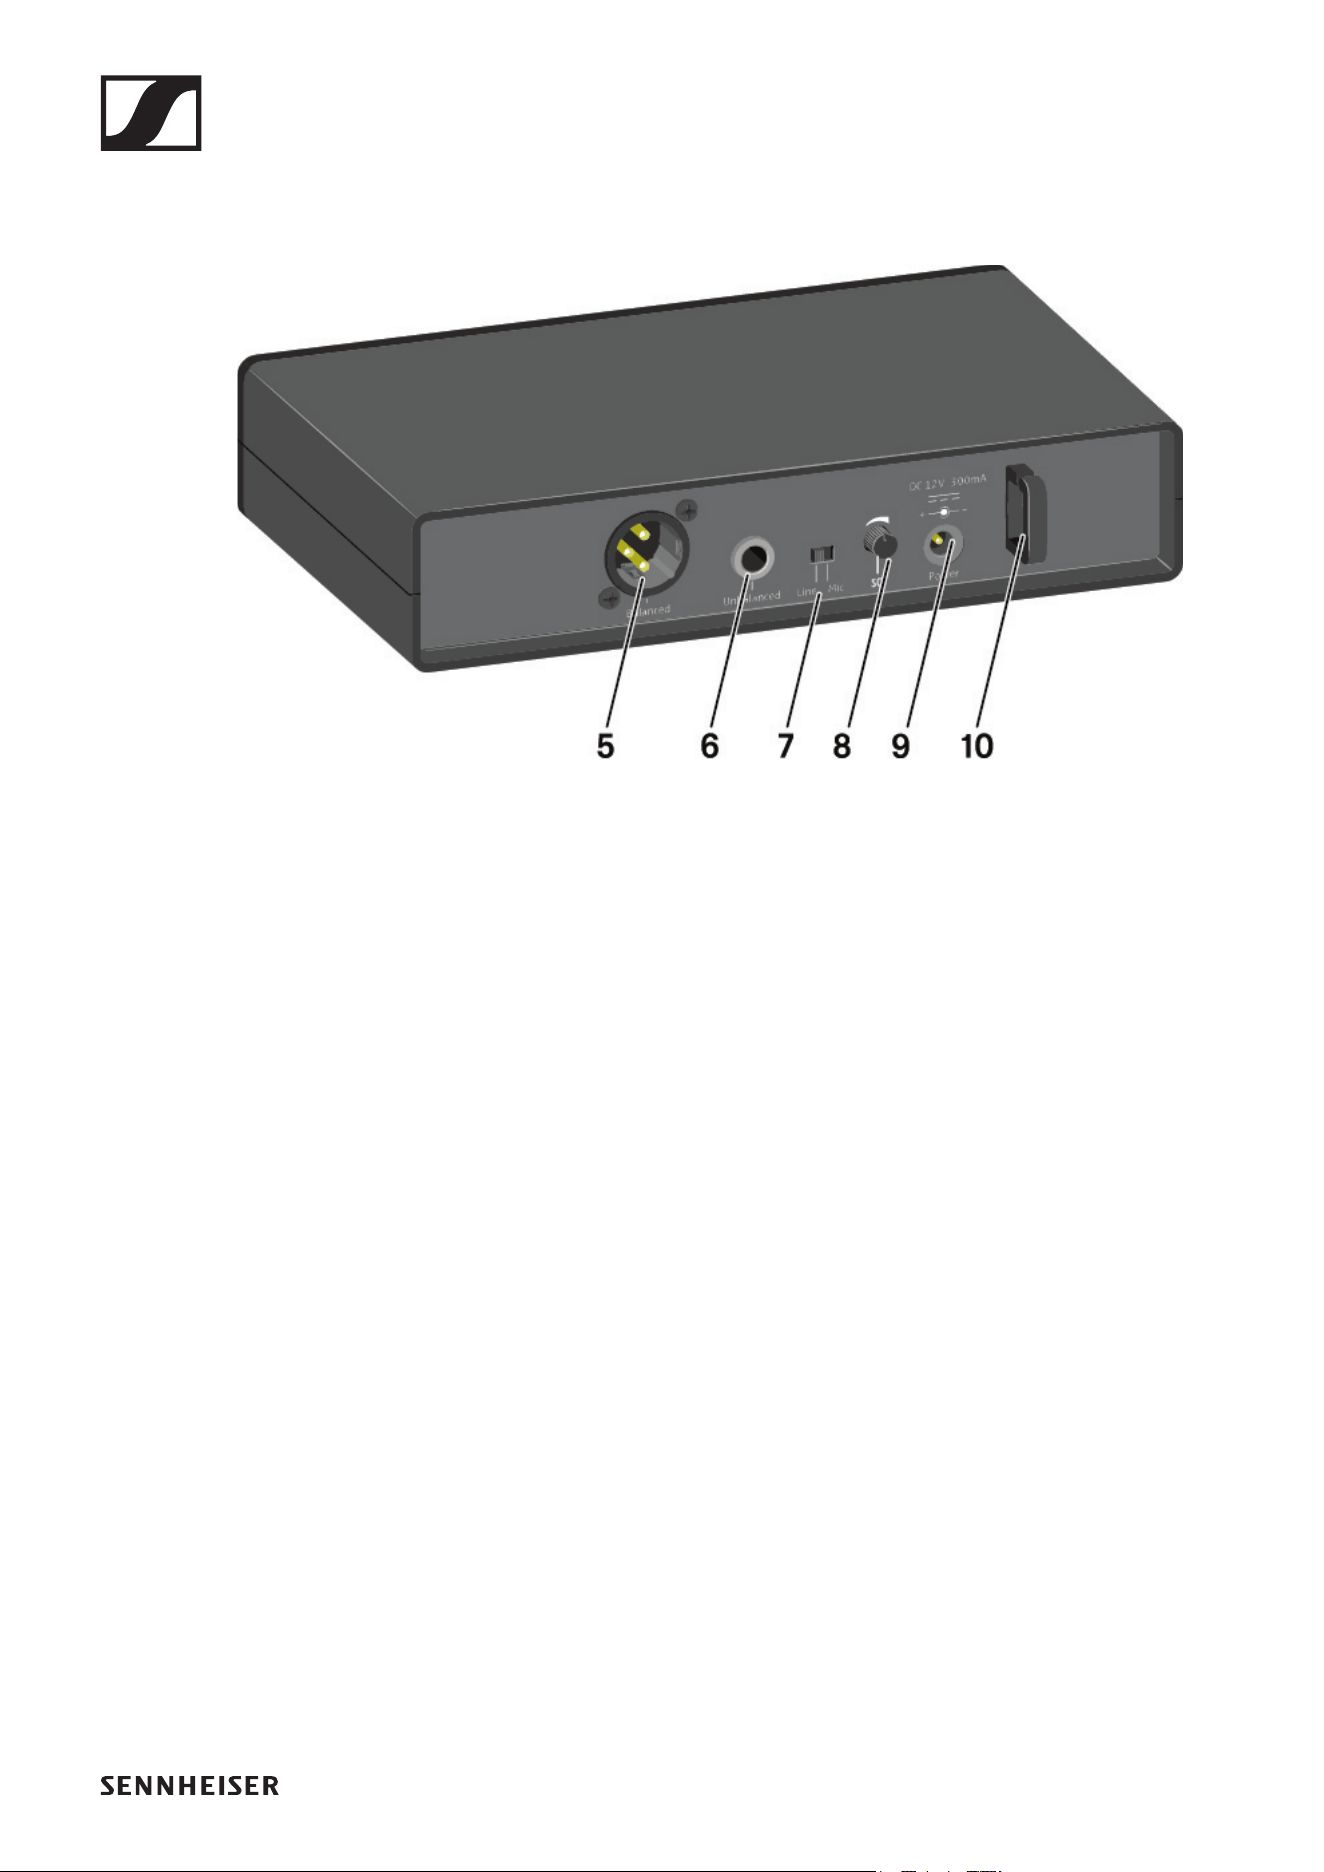
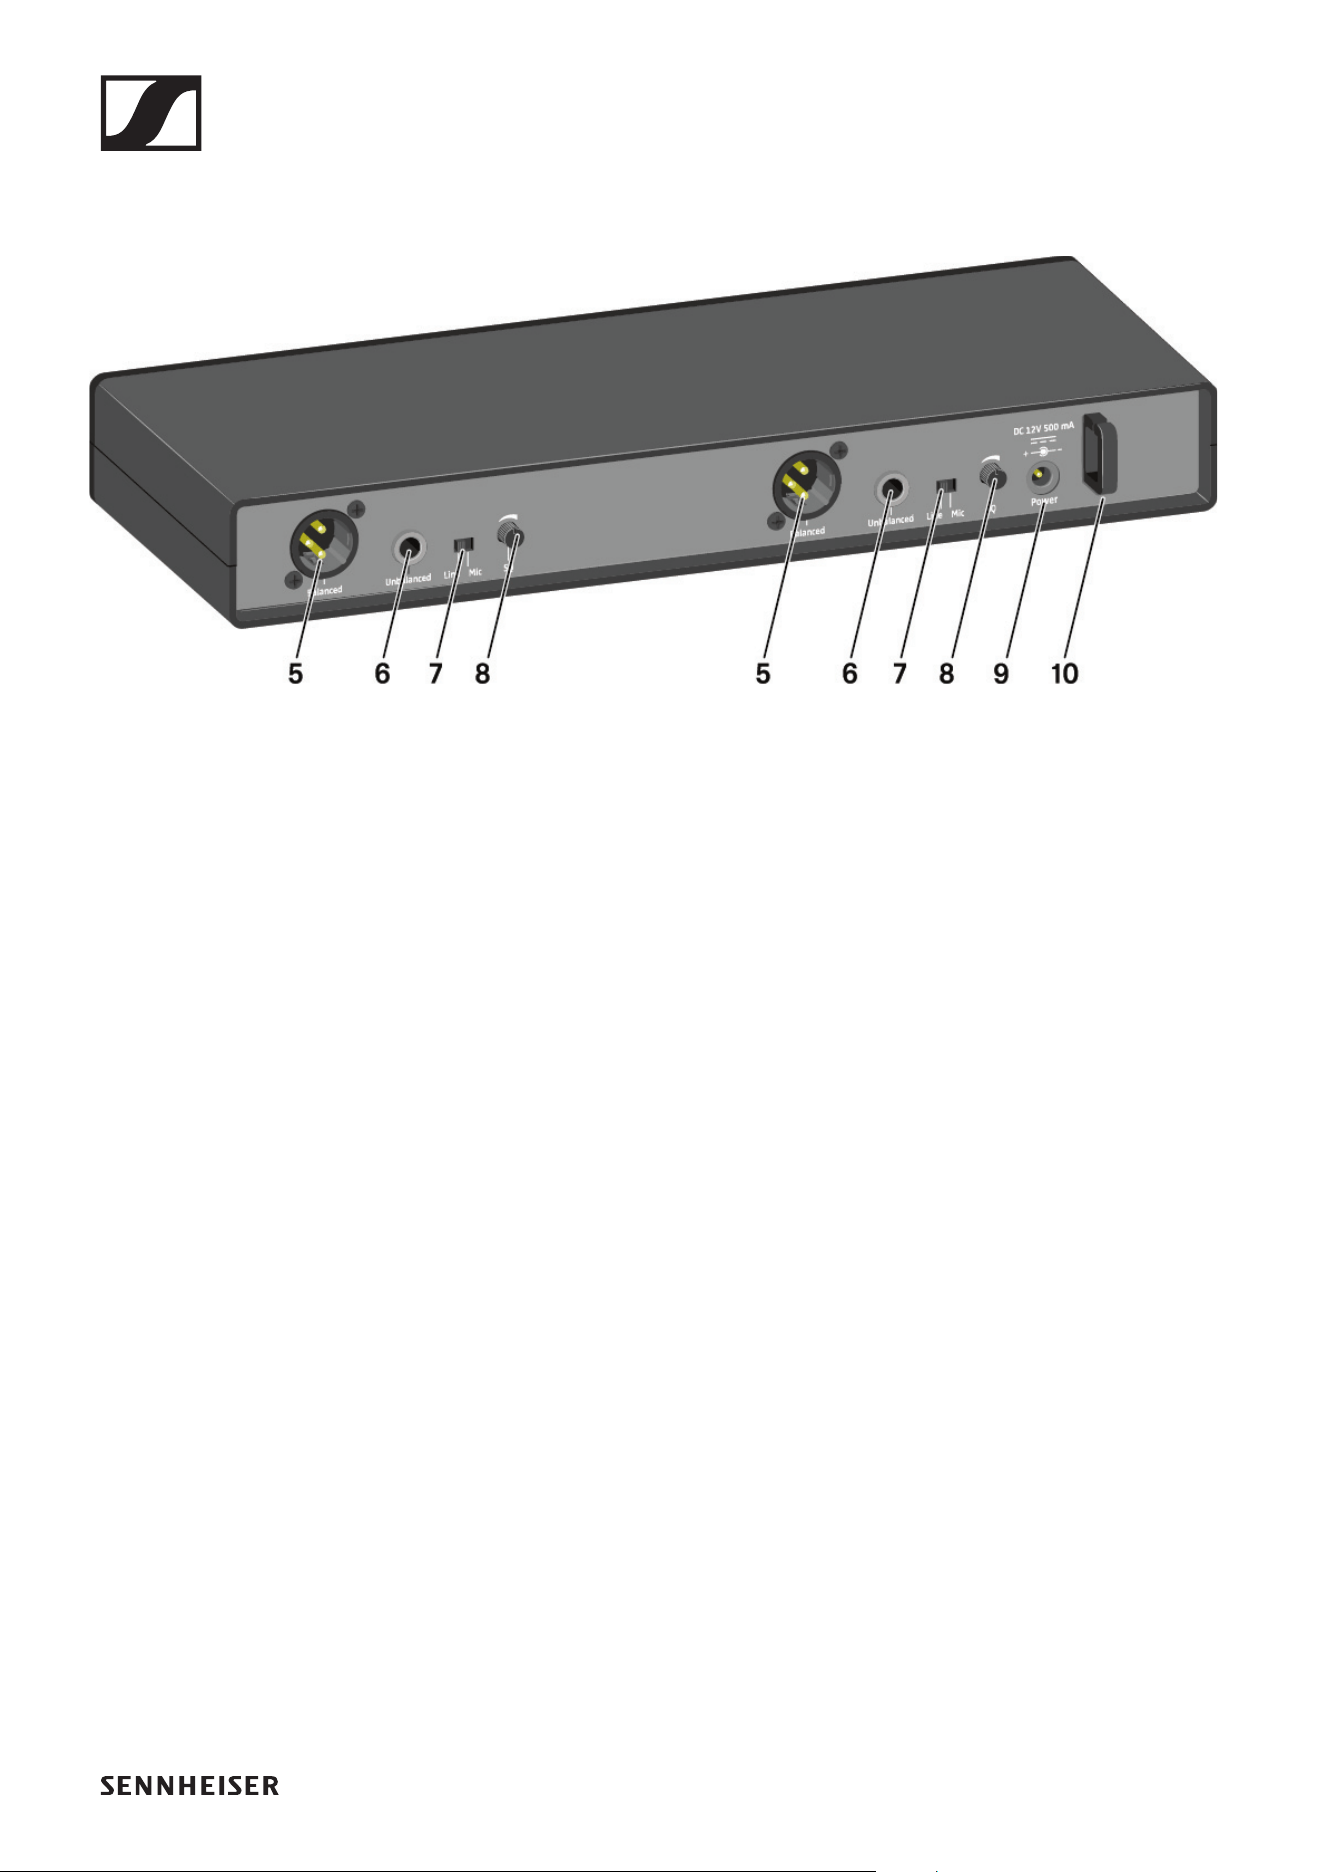
Back
5 XLR-3 socket for Balanced audio output
• See „Outputting audio signals“
6 6.3 mm jack socket for Unbalanced audio output
• See „Outputting audio signals“
7 Line/Mic switch for selecting the signal type
• See „Setting options on the rear of the device“
• See „Outputting audio signals“
8 SQ control knob for adjusting the squelch value
• See „Setting options on the rear of the device“
9 Power connection socket for the power supply unit
• See „Connecting/disconnecting the receiver to/from the
power supply system“
10Strain relief for the connection cable of the power supply
unit
• See „Connecting/disconnecting the receiver to/from the
power supply system“
EM-XSW 1 rack receiver
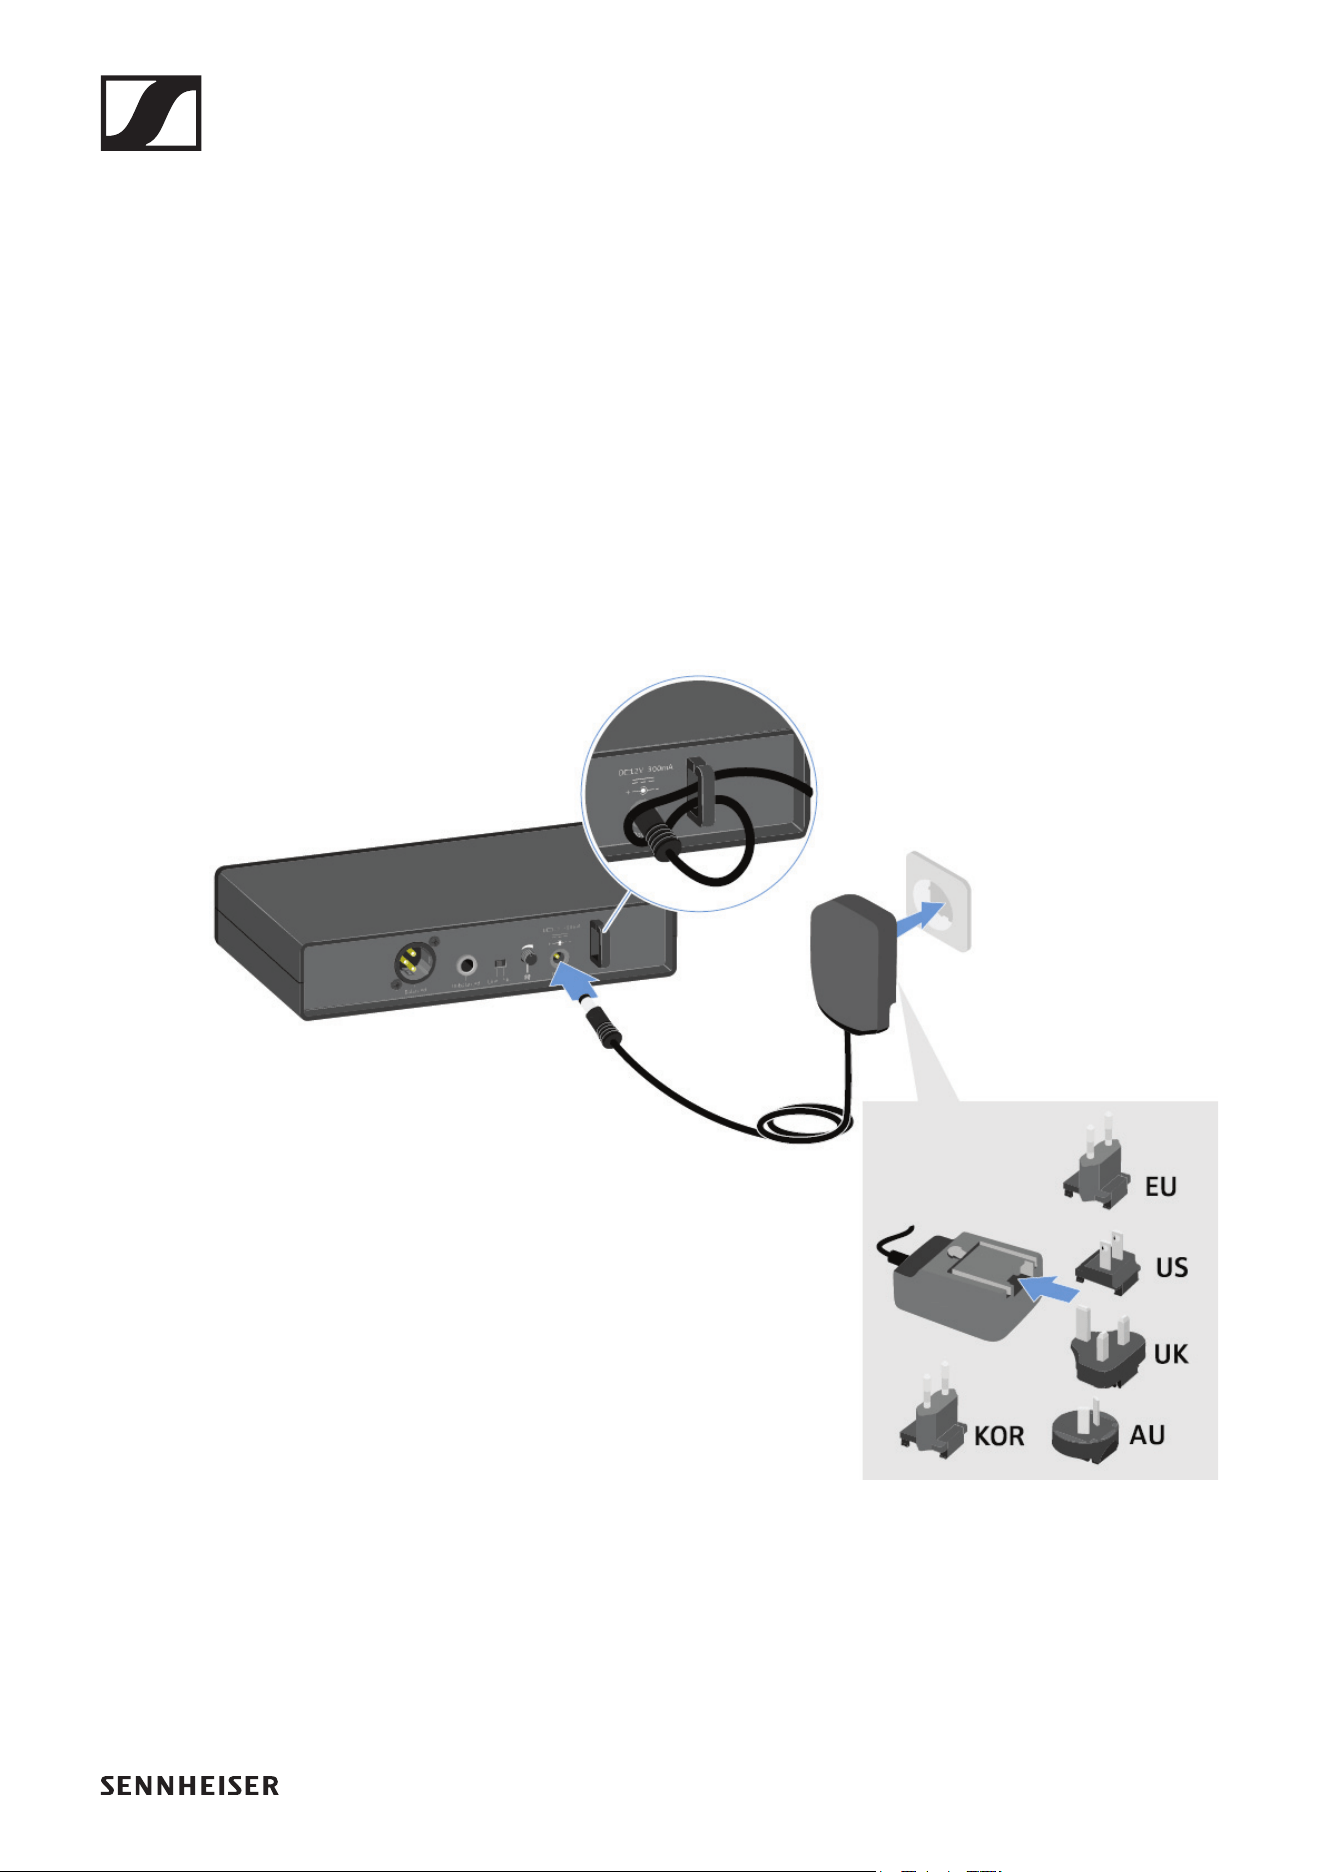
30
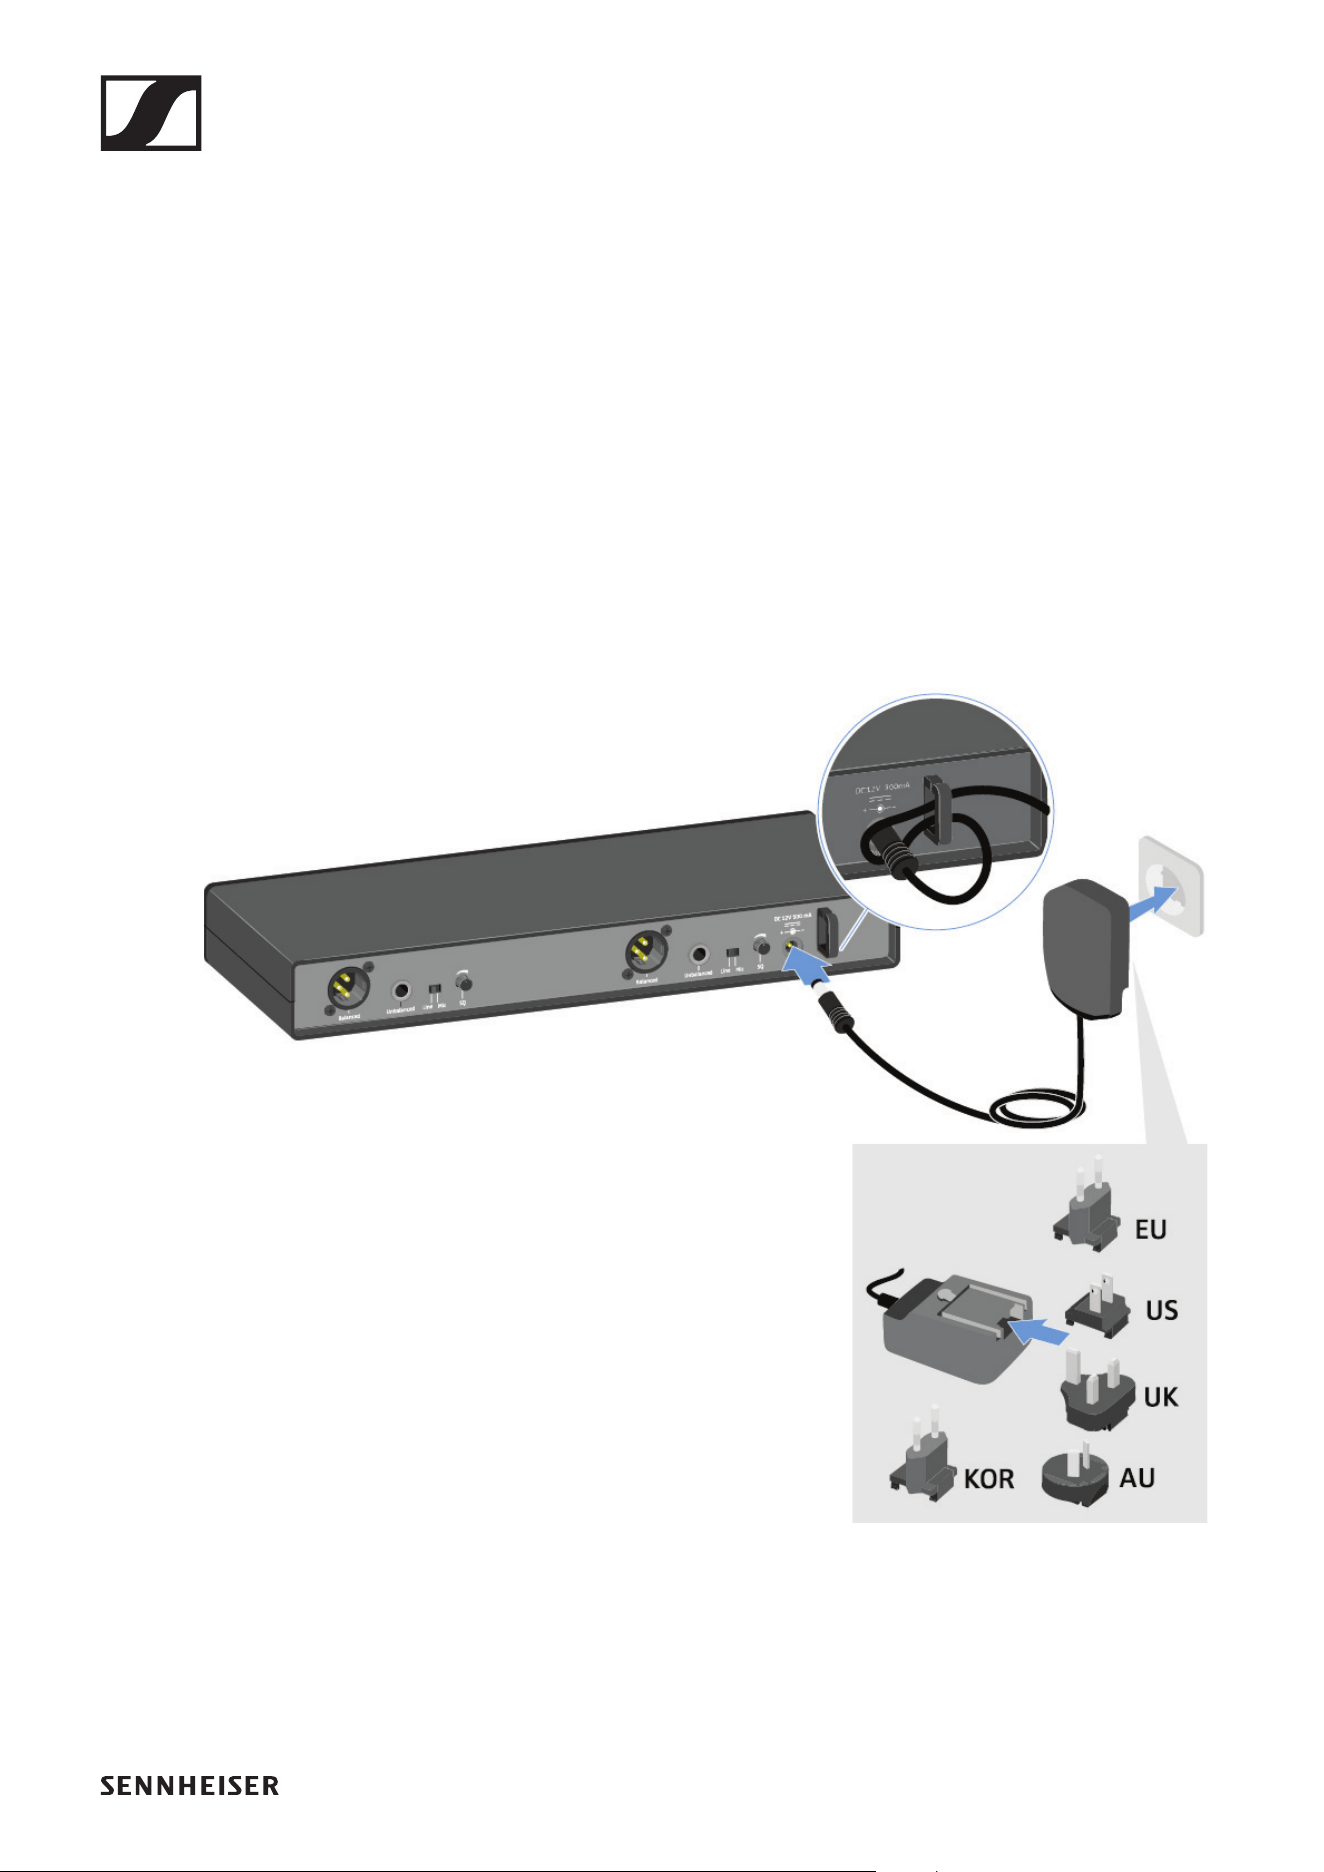
Connecting/disconnecting the receiver to/
from the power supply system
Only use the supplied power supply unit. It is designed for your
receiver and ensures safe operation.
To connect the receiver to the power supply system:
▷ Pass the cable of the power supply unit through the strain
relief.
▷ Insert the plug of the power supply unit into the Power
socket on the receiver.
▷ Slide the supplied country adapter onto the power supply
unit.
▷ Plug the power supply unit into the wall socket.
►
To completely disconnect the receiver from the power supply
system:
▷ Unplug the power supply unit from the wall socket.
▷ Unplug the power supply unit from the Power socket on the
receiver.
EM-XSW 1 rack receiver
31
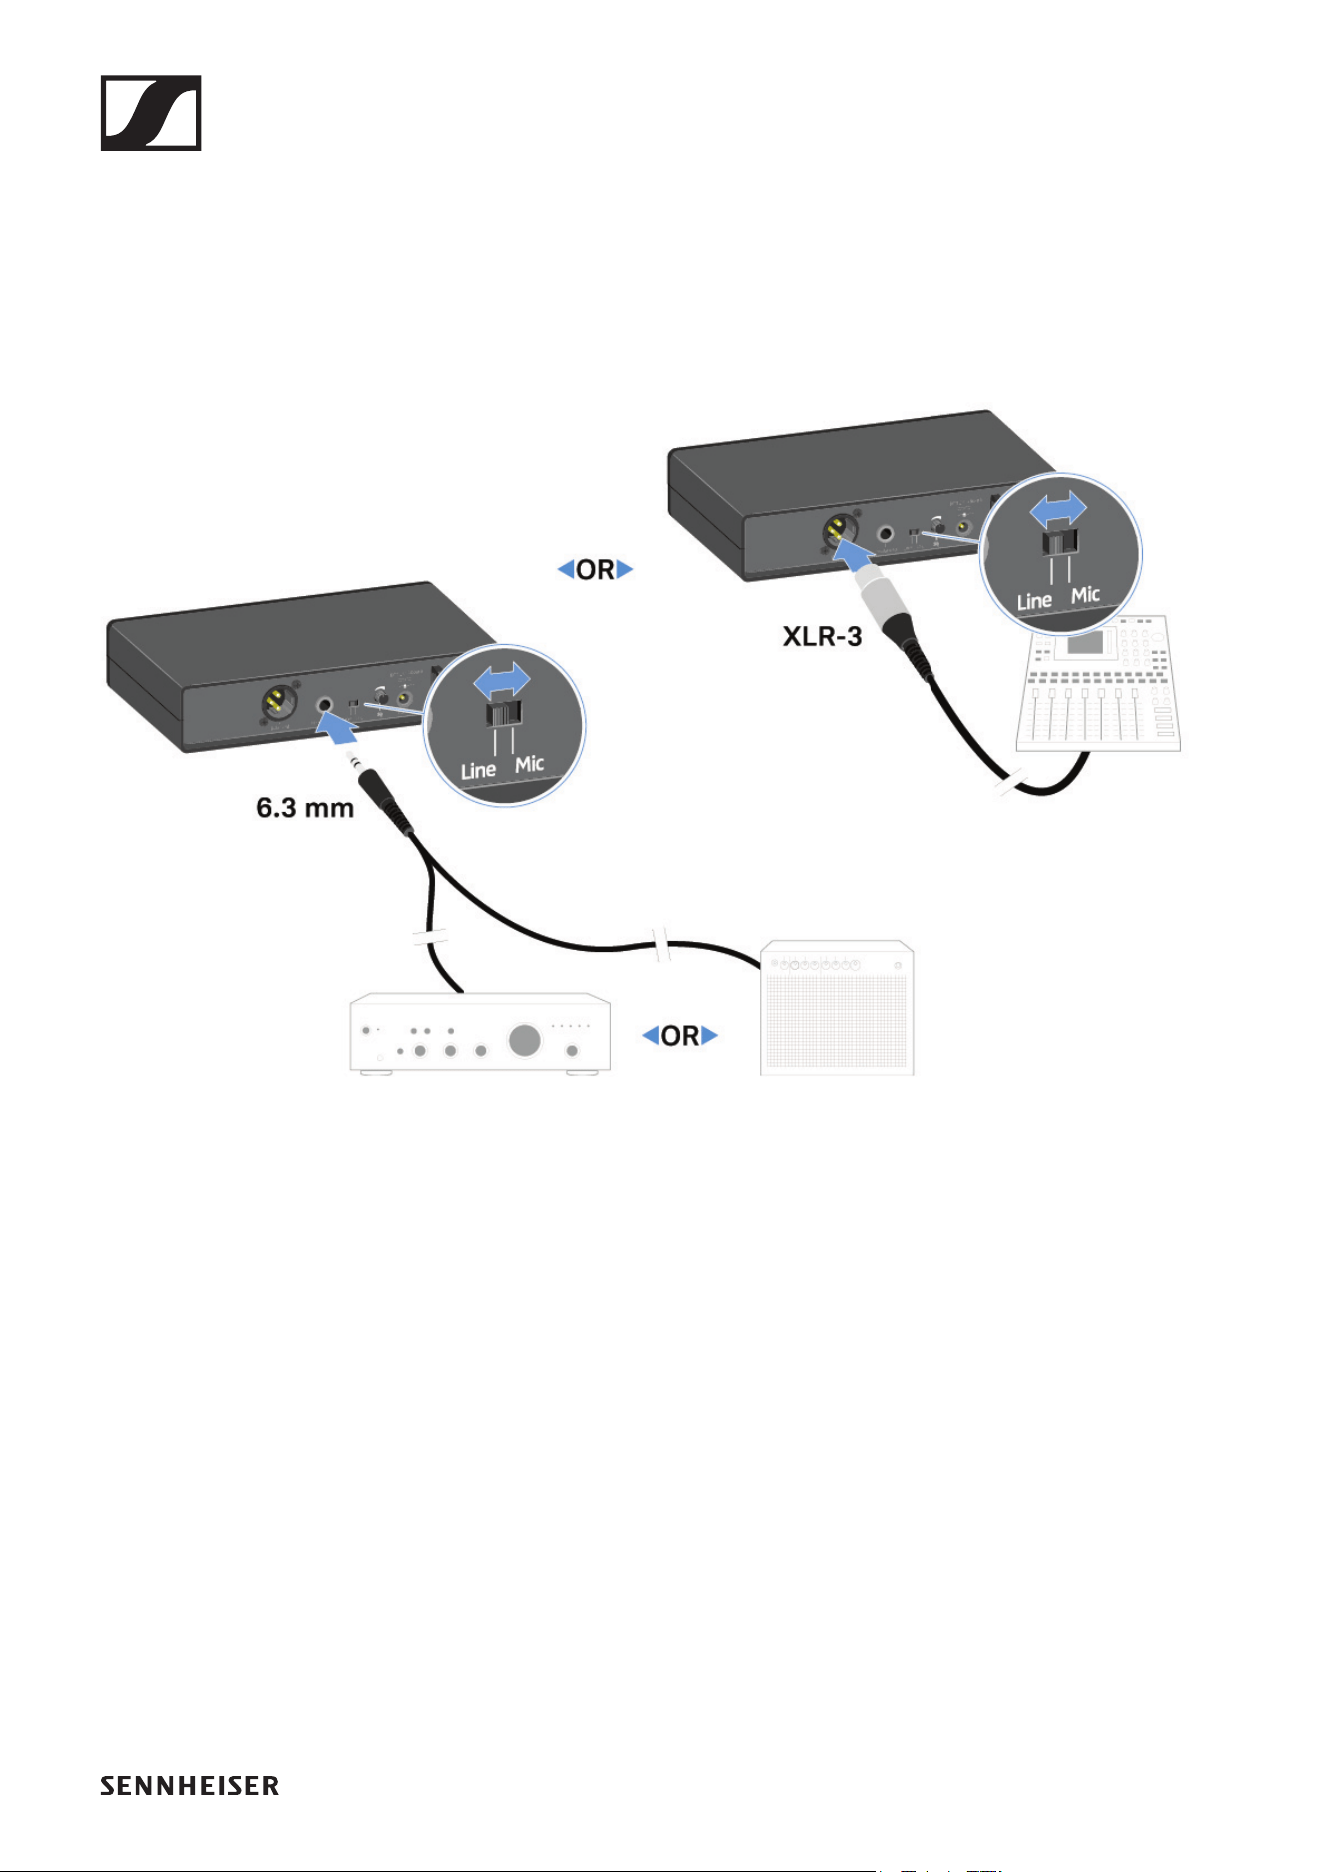
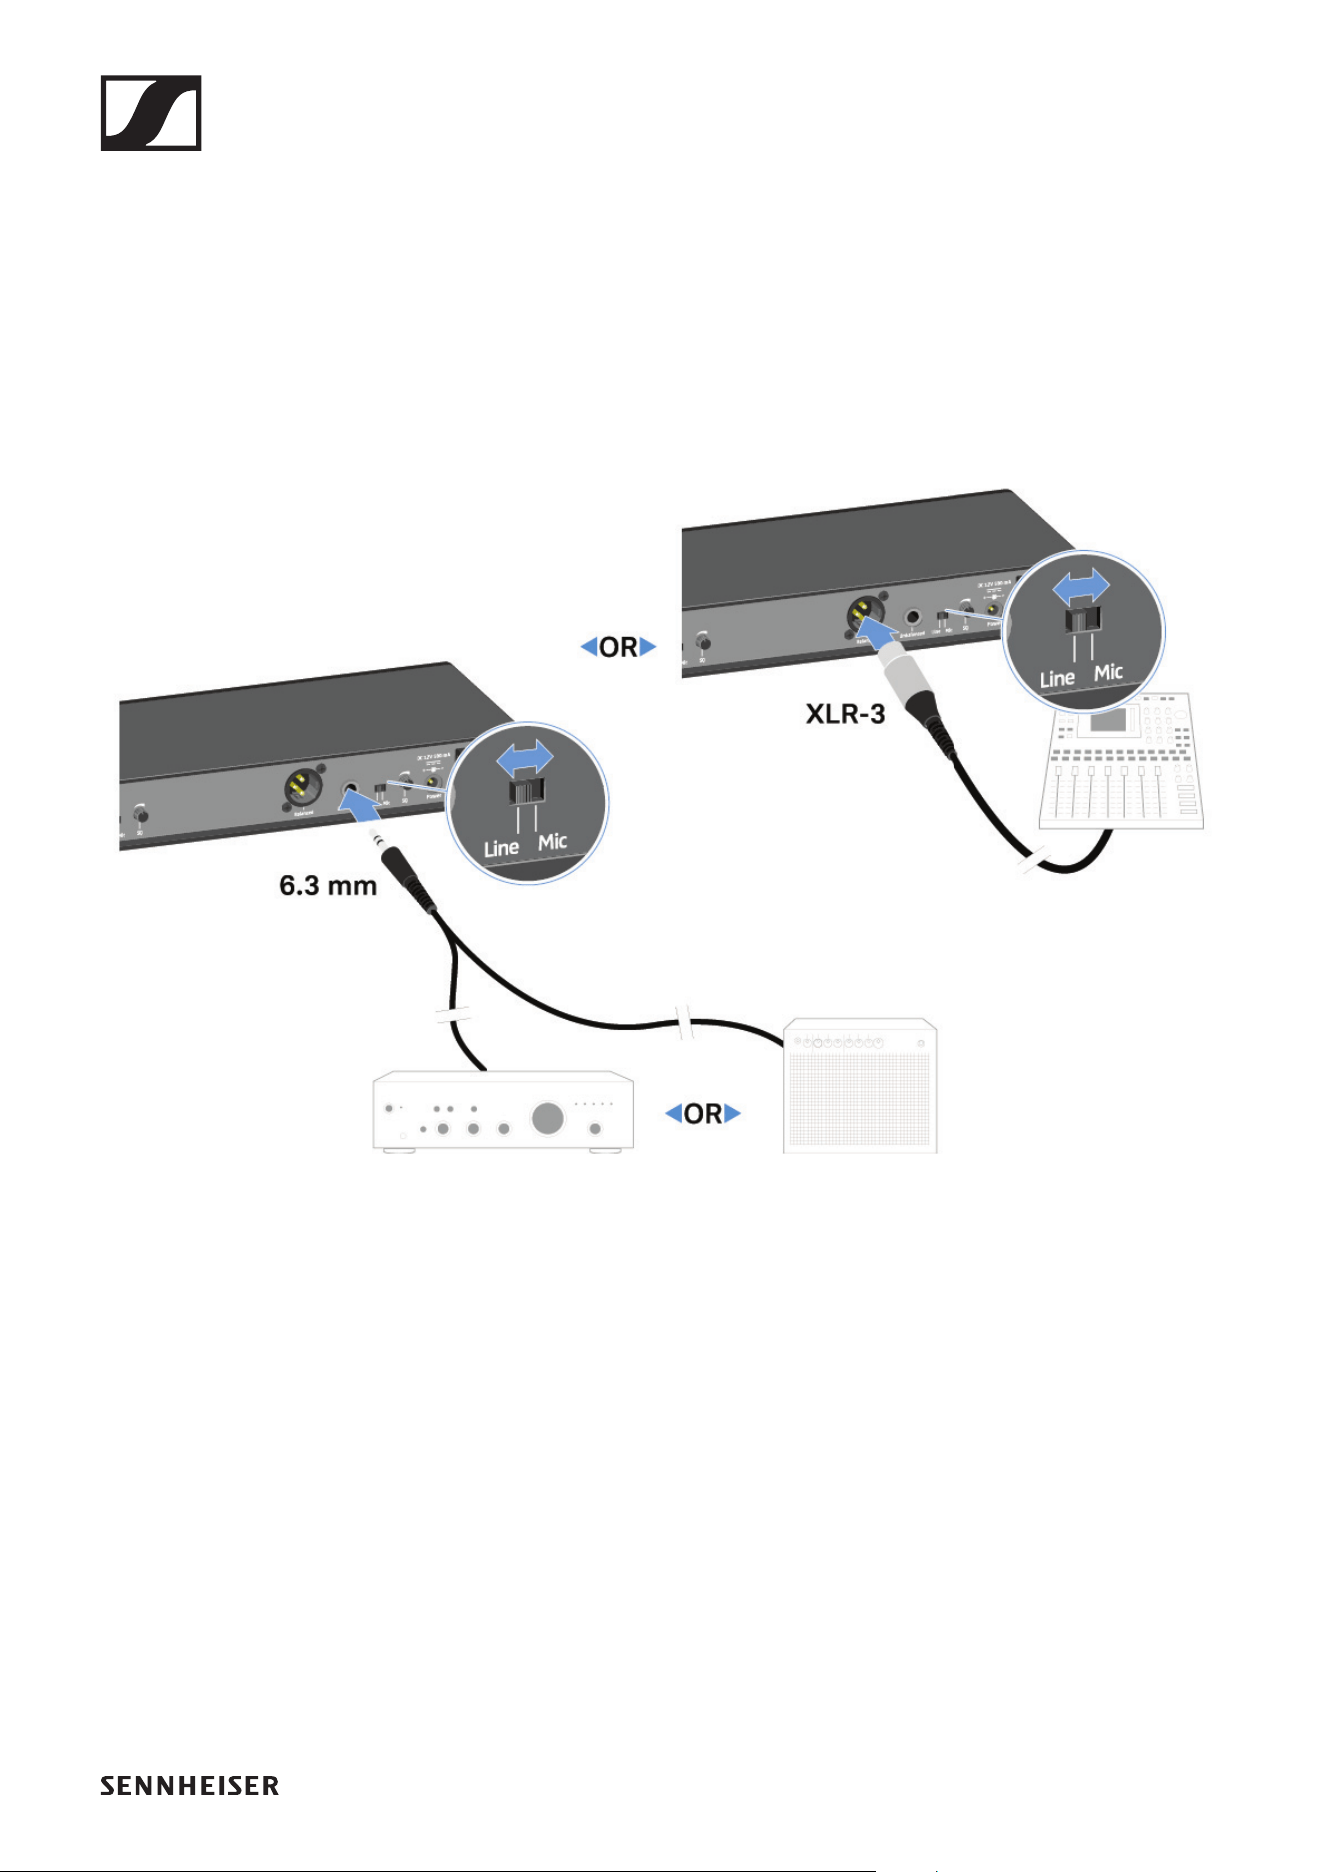
Outputting audio signals
The EM-XSW 1 has a balanced XLR-3M output socket and an
unbalanced 6.3 mm jack output socket.
▷ Always use only one of the two output sockets.
To connect an XLR cable:
▷ Plug the XLR cable into the Balanced socket on the EM-
XSW 1.
To connect a jack cable:
▷ Plug the jack cable into the Unbalanced socket on the EM-
XSW 1.
▷ Set the Line/Mic switch to the desired position.
• Line: when using instruments or other line sources with
the SK-XSW bodypack transmitter
• Mic: when using the SKM 825/835-XSW handheld trans-
mitter or a microphone with the SK-XSW bodypack trans-
mitter

EM-XSW 1 rack receiver
32
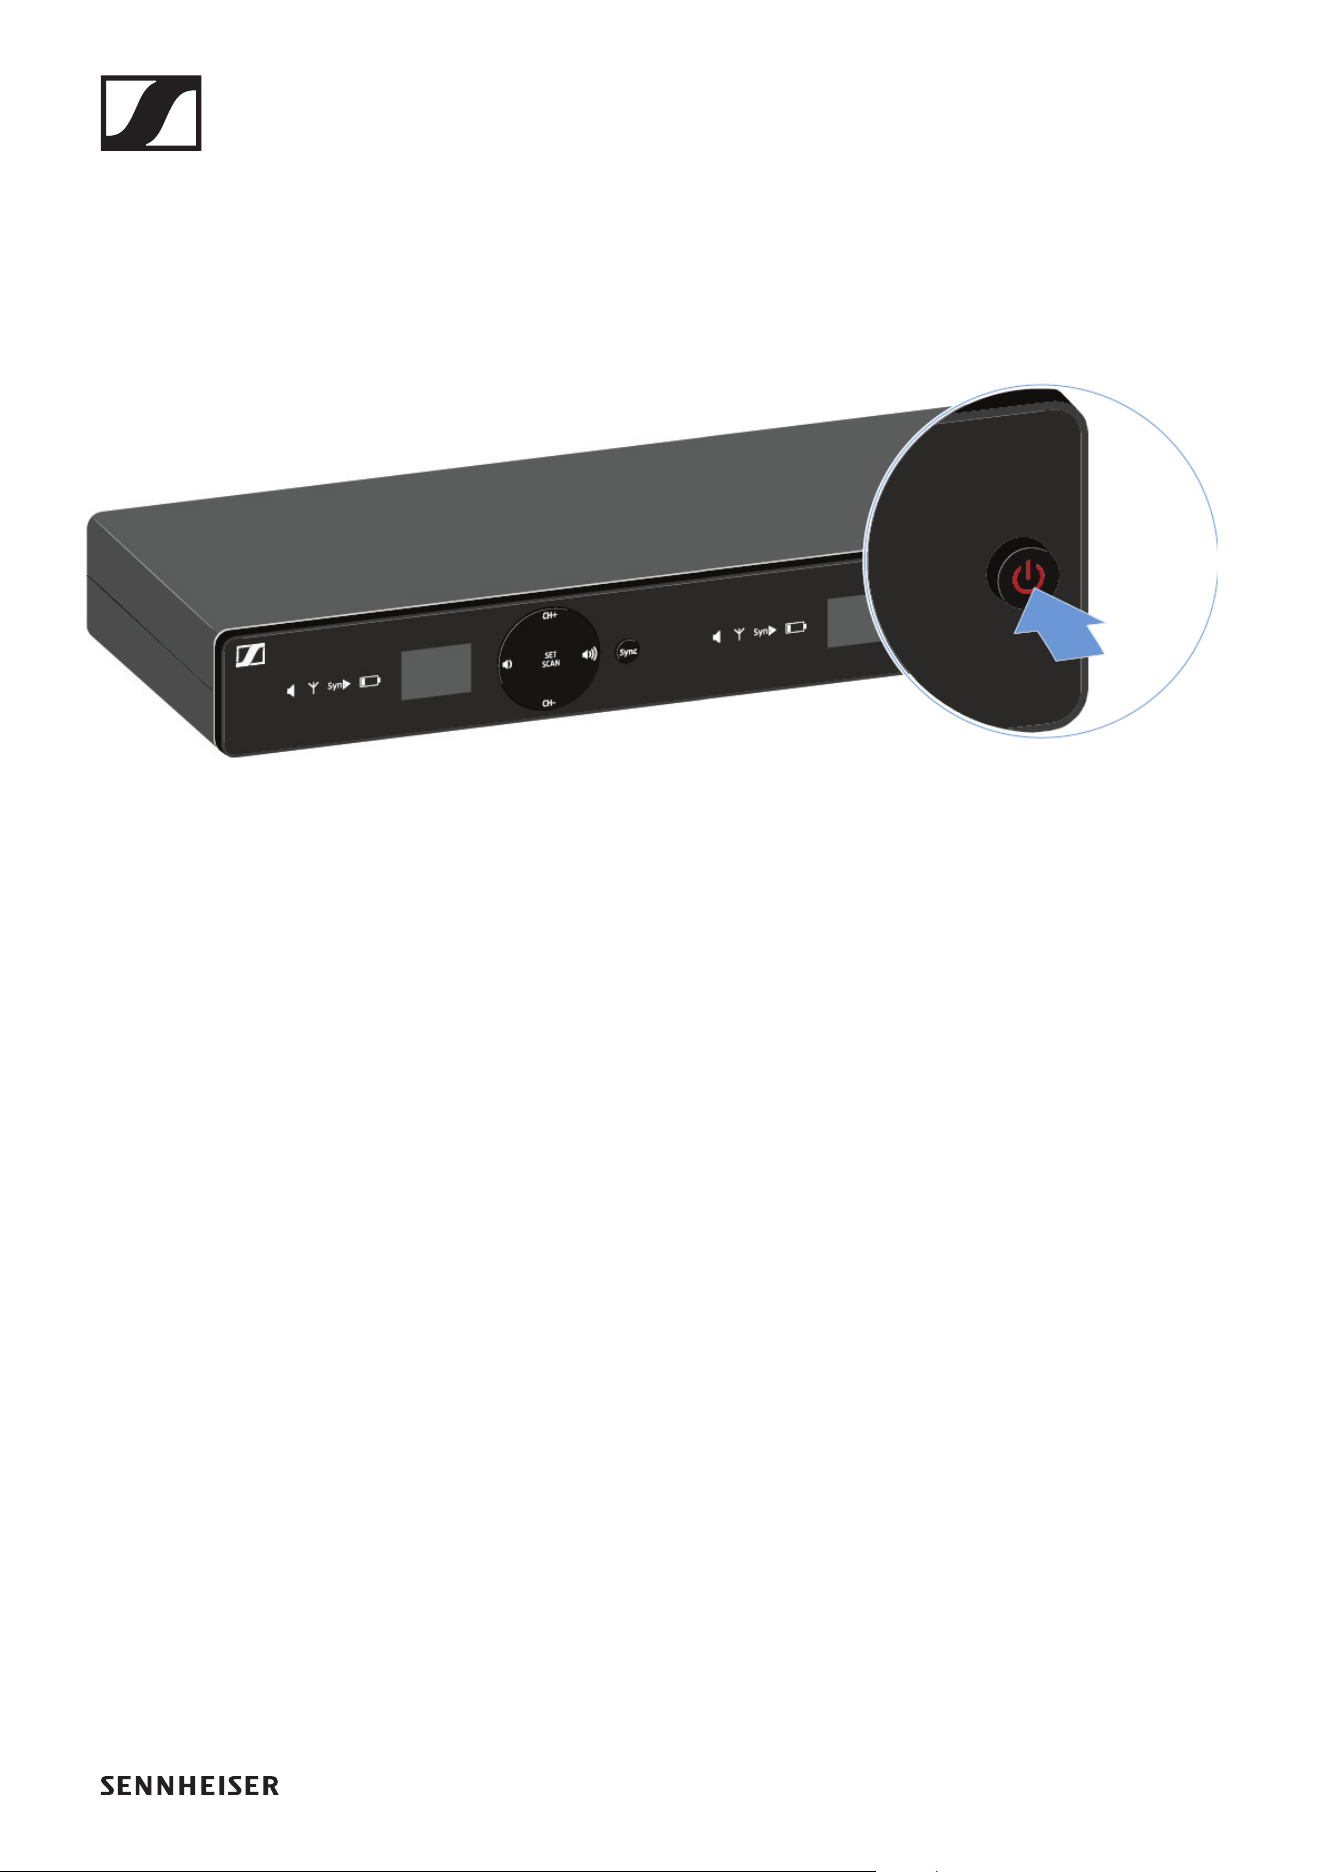
Switching the receiver on and off
To switch the receiver on:
▷ Short-press the ON/OFF button.
The receiver switches on.
To switch the receiver to standby mode:
▷ Hold down the ON/OFF button until the display switches
off.
To switch the receiver off completely:
▷ Disconnect the receiver from the power supply system by
unplugging the power supply unit from the wall socket.
EM-XSW 1 rack receiver
33
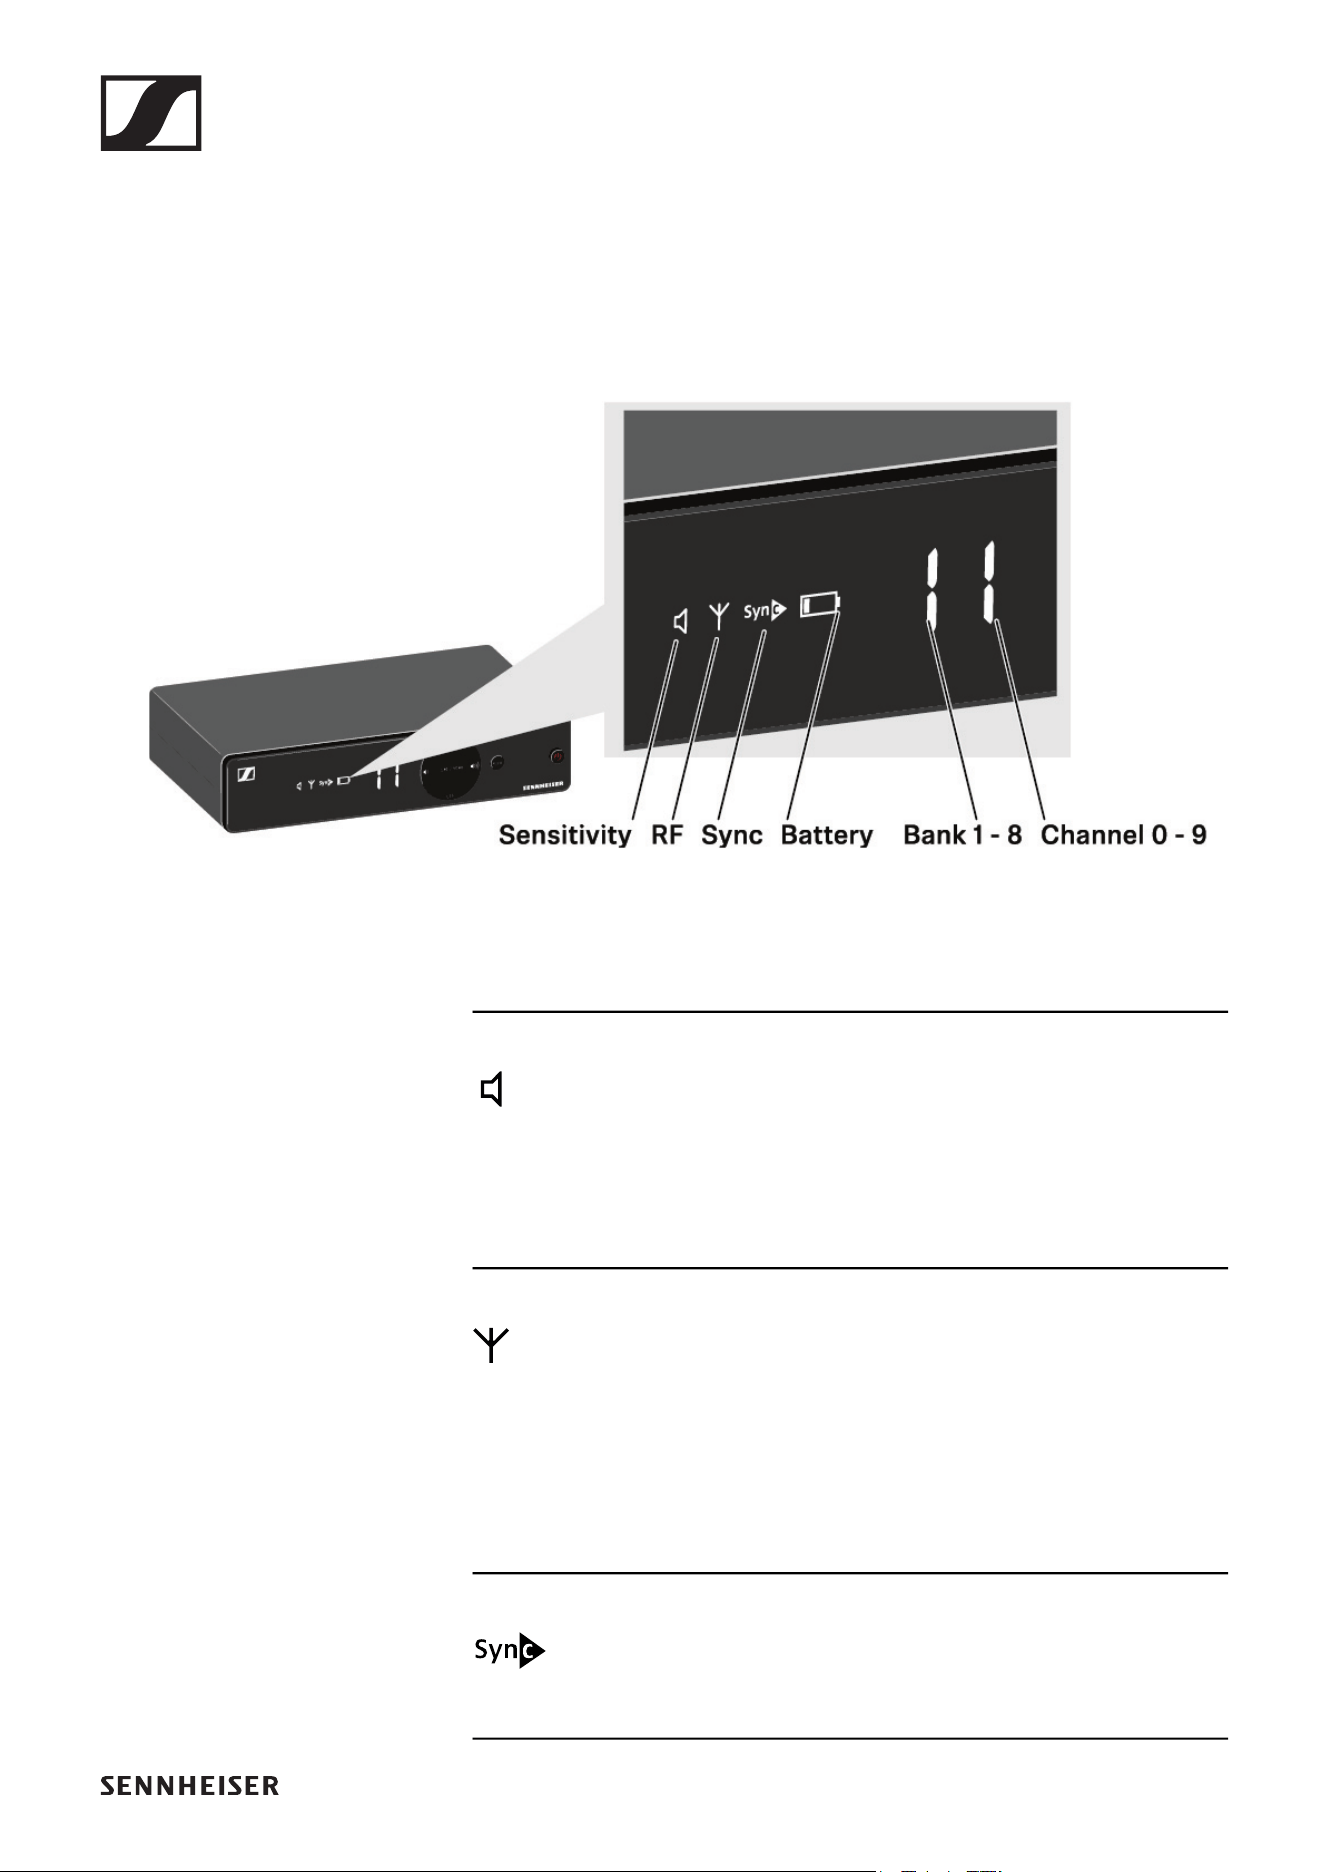
Information on the receiver’s display
Status information such as frequency, reception quality, bat-
tery status and audio level is shown on the display.
Sensitivity:
Indicates the sensitivity of the connected transmitter
• SKM: „Setting the input sensitivity“
• SK: „Setting the input sensitivity“
RF:
If the antenna symbol is displayed, the radio link is active.
• „Establishing a radio link | Synchronizing the receiver and
transmitter“
Sync: „Establishing a radio link | Synchronizing the re-
ceiver and transmitter“

EM-XSW 1 rack receiver
35
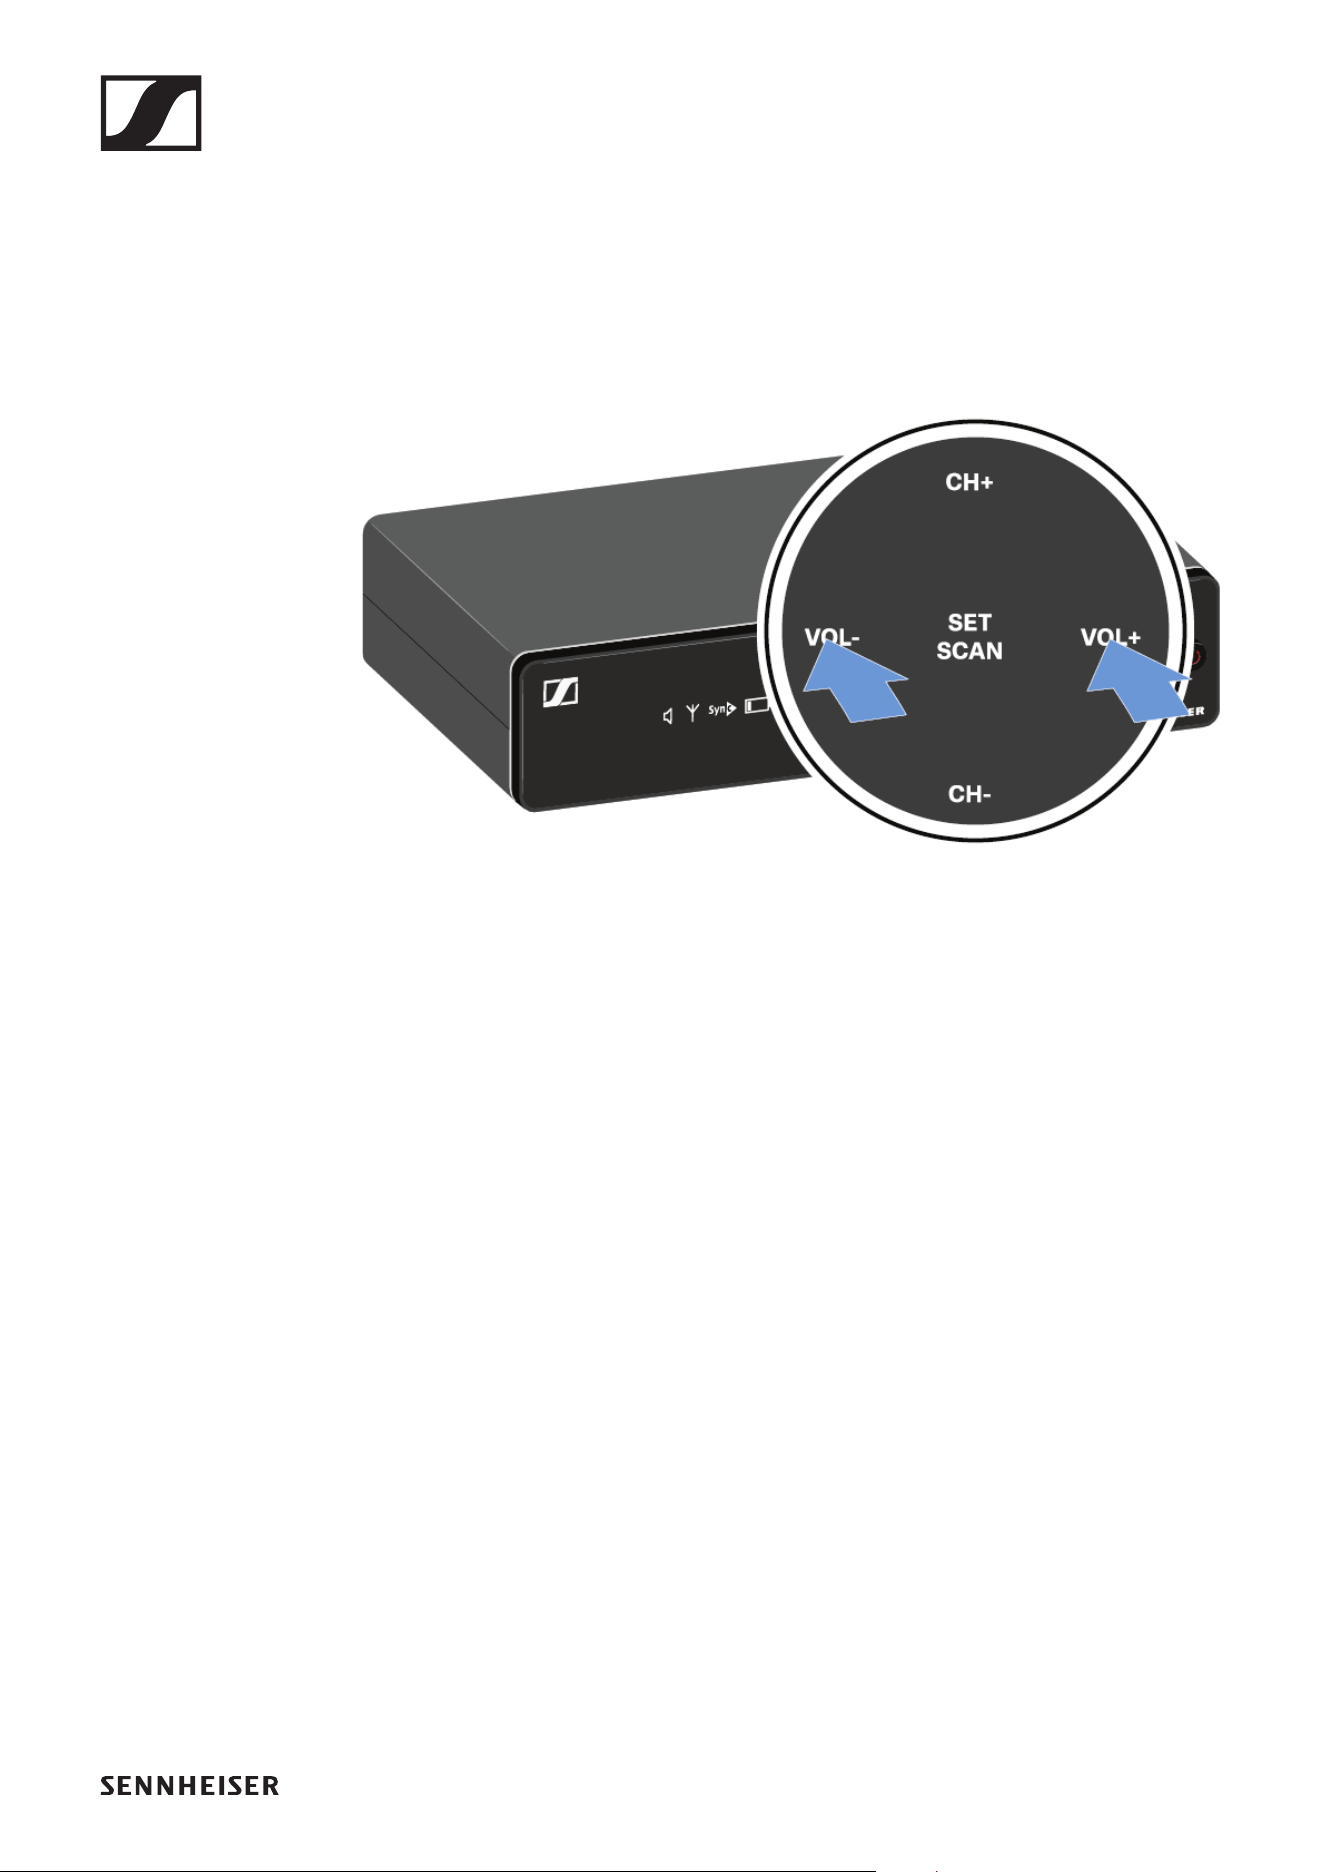
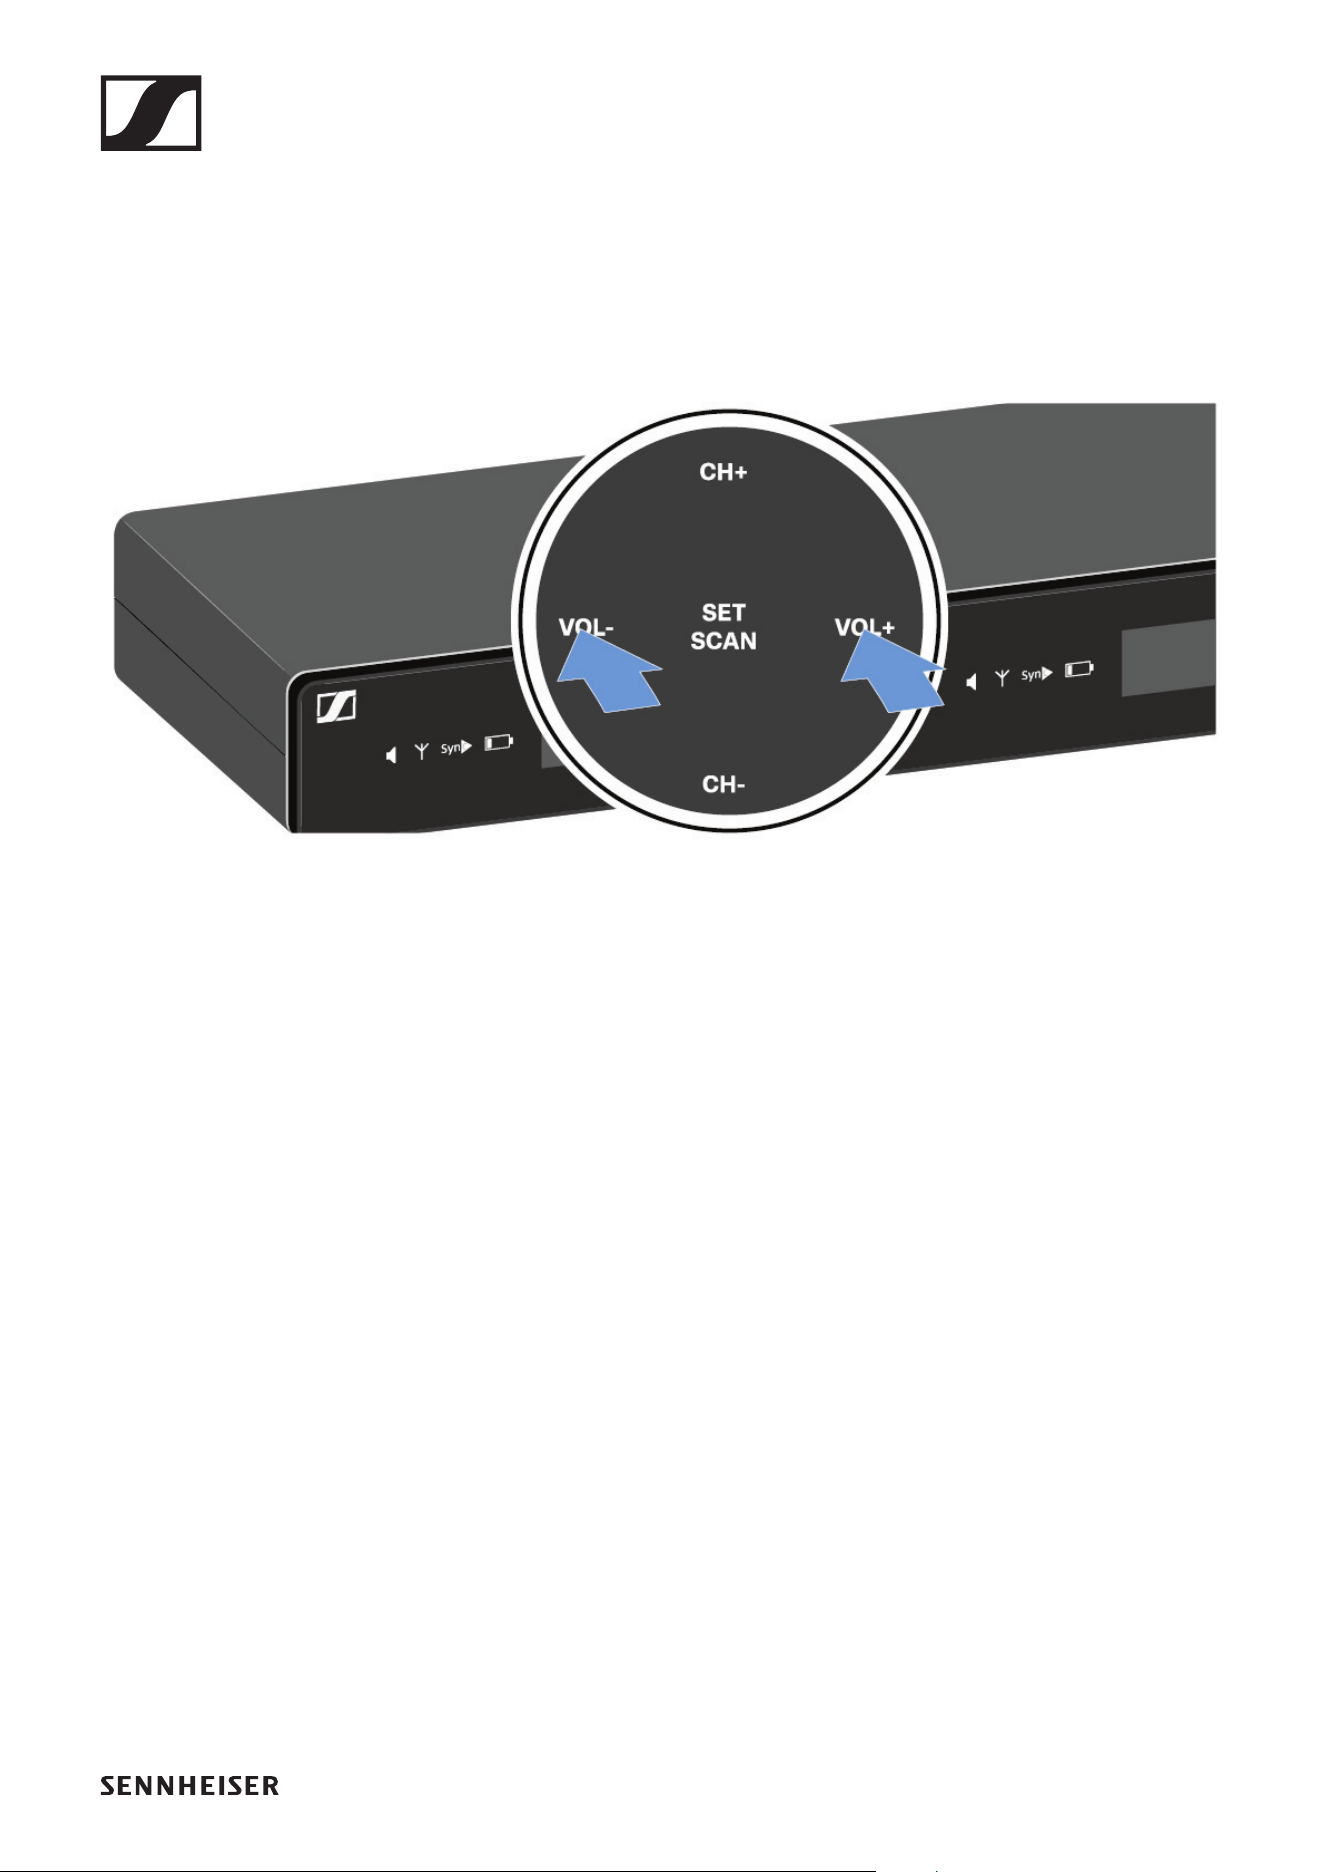
Setting options on the front of the device
Navigation buttons
Use the following buttons to navigate through the receiver’s
settings.
►
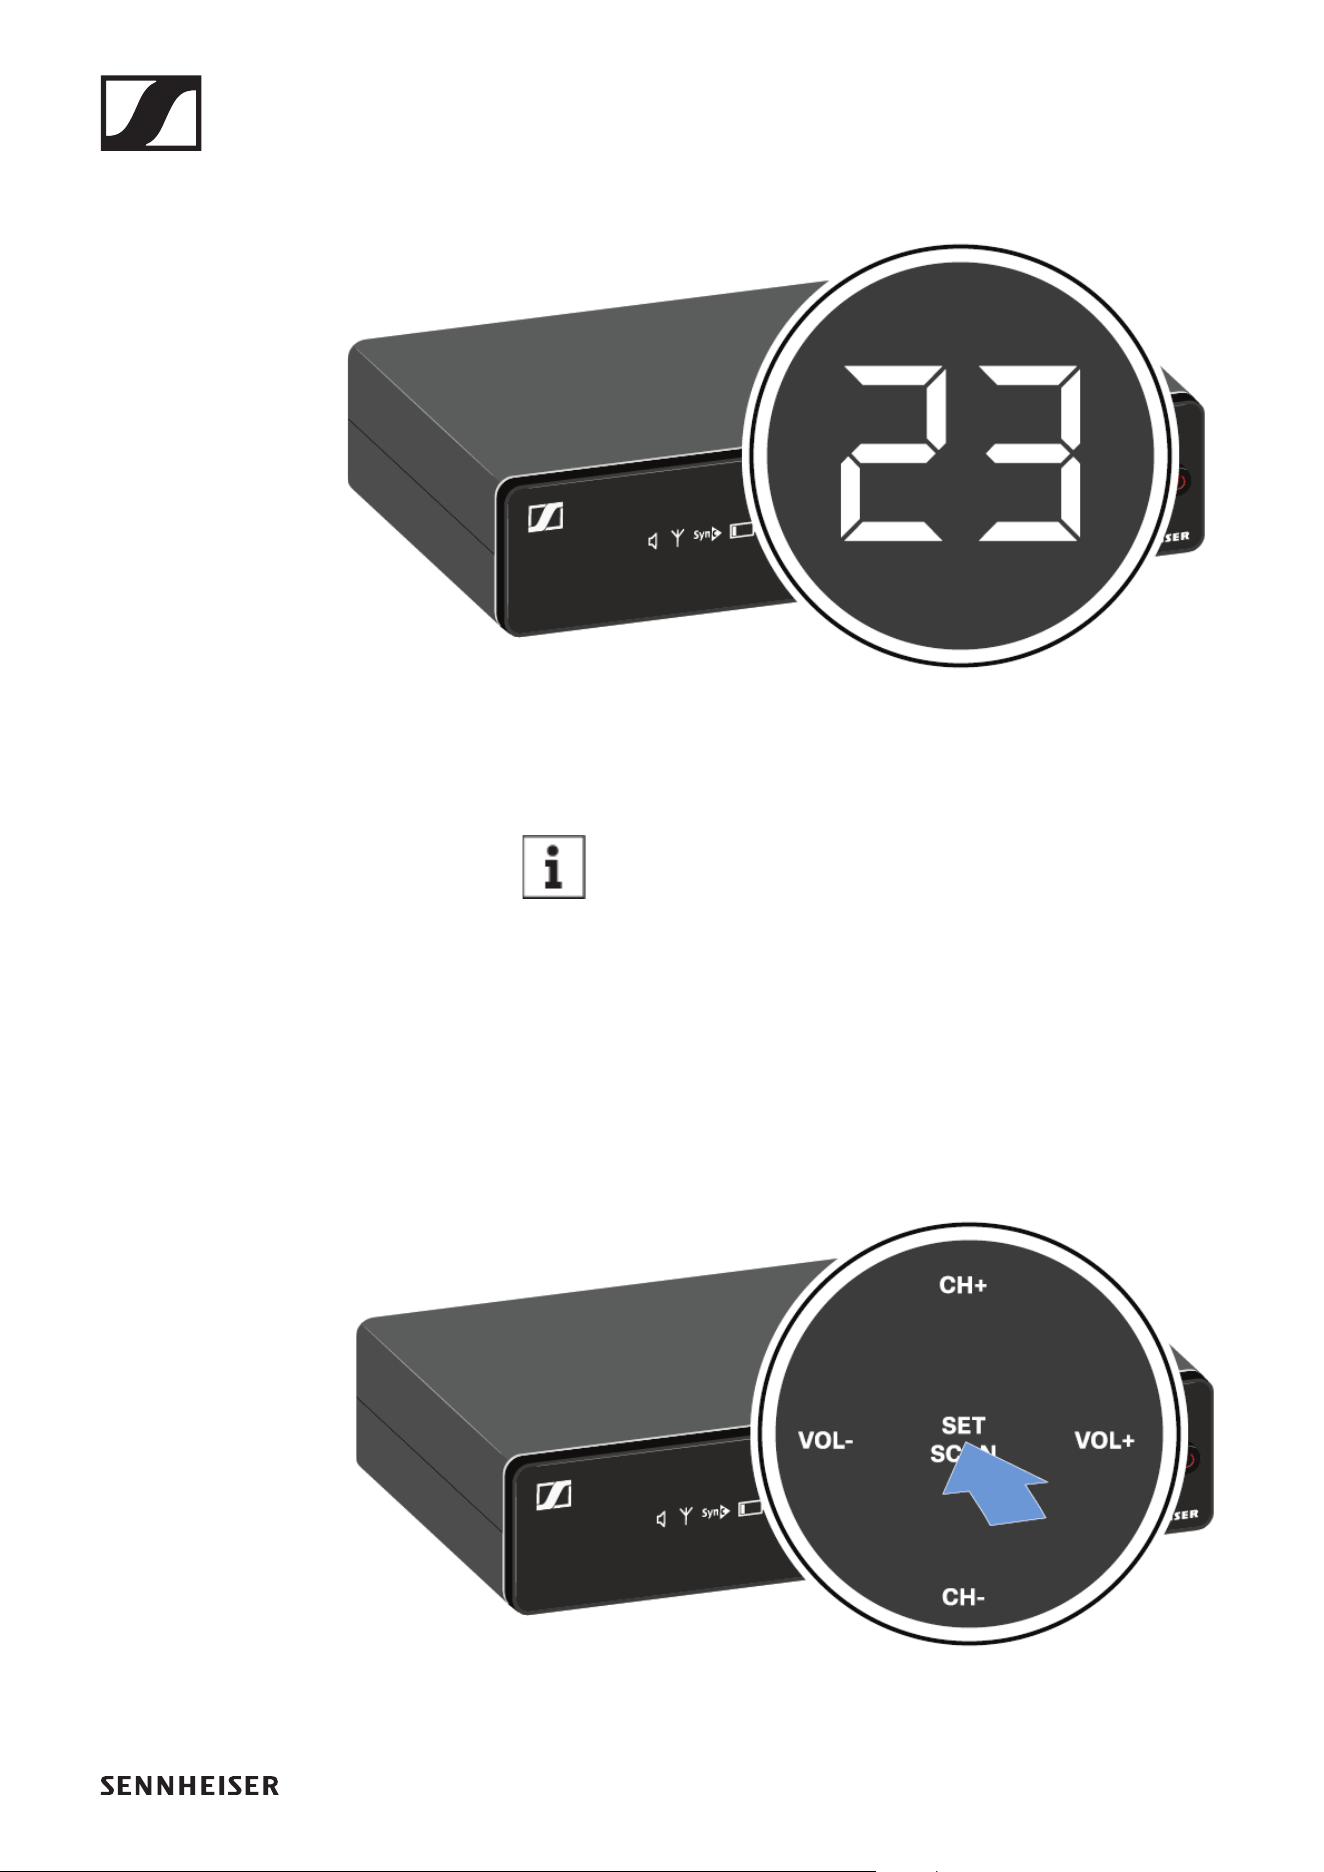
Setting the frequency automatically (AUTO SCAN)
Performs an automatic frequency scan of your area. This en-
ables you to easily find and assign free radio frequencies.
▷ Switch off all transmitters before you perform the scan. If
transmitters are still switched on, they are detected as un-
available frequencies and the frequencies that are actually
available cannot then be used.
▷
▷
Press the SET/SCAN button for approx. 3 seconds.
►
EM-XSW 1 rack receiver
36
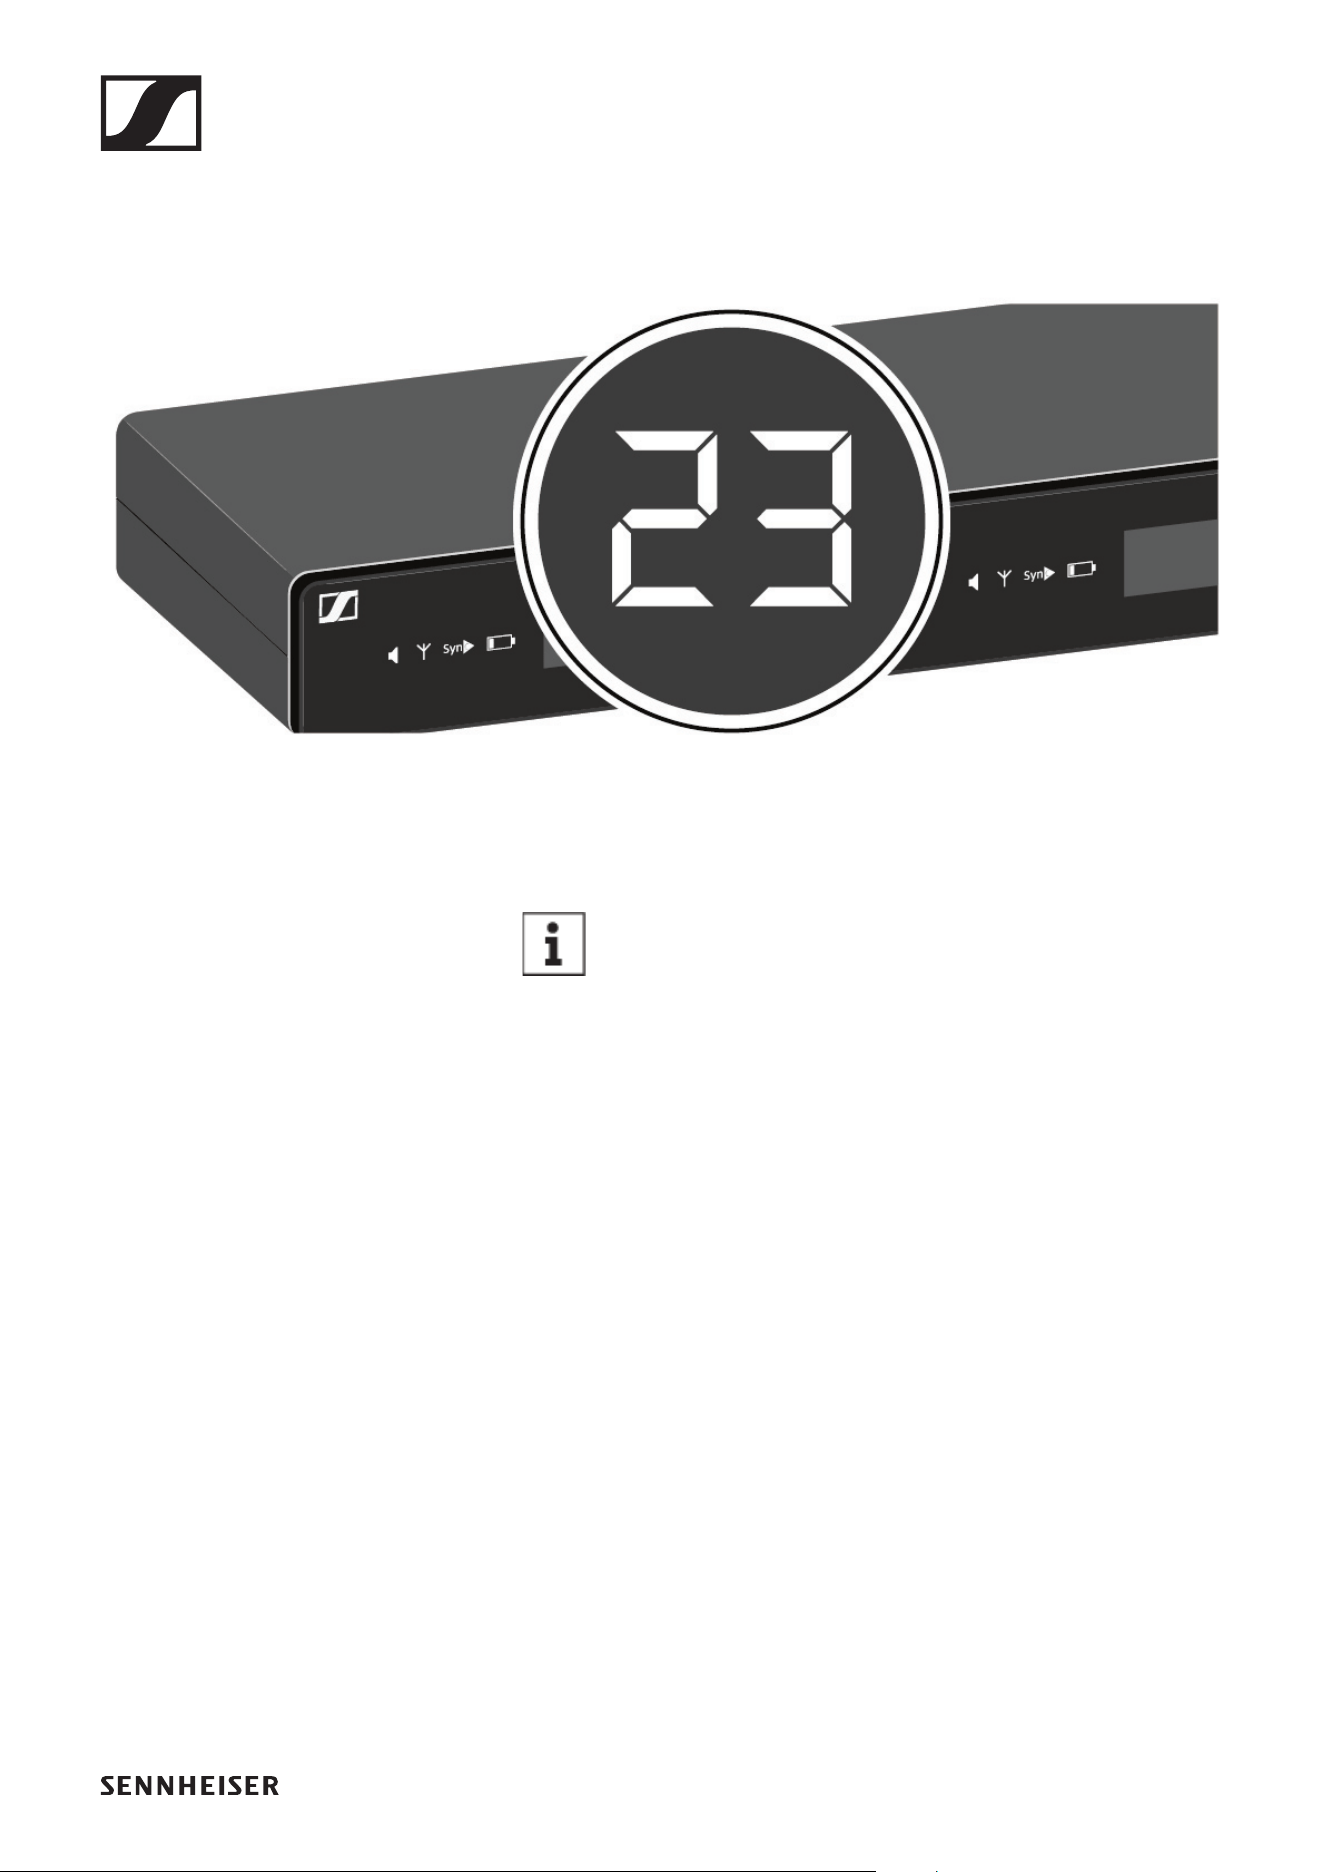
The scan starts automatically. An open channel is then
shown in the display (e.g. bank 2, channel 3).
►
►
▷ Press the SET/SCAN button to accept the displayed chan-
nel.
If you have set a new frequency, you must still syn-
chronize the receiver with the transmitter to es-
tablish the radio link (see „Establishing a radio link
| Synchronizing the receiver and transmitter“).
Setting the frequency manually
▷ Press the SET/SCAN button.
►

EM-XSW 1 rack receiver
37
▷ Press the CH+/CH- buttons to select a frequency bank (1 to
8).
►
▷ Press the SET/SCAN button to accept the selected fre-
quency bank.
▷ Press the CH+/CH- buttons to select a channel (0 to 9) in
the selected frequency bank.
The selected bank and channel are shown in the display
(e.g. bank 2, channel 3).
►
►
▷ Press the SET/SCAN button to accept the selected chan-
nel.
If you have set a new frequency, you must still syn-
chronize the receiver with the transmitter to es-
tablish the radio link (see „Establishing a radio link
| Synchronizing the receiver and transmitter“).
EM-XSW 1 rack receiver
38
Adjusting the volume of the audio outputs
Use the VOL+/VOL- buttons to set the level of the audio signal
coming from the receiver’s audio outputs (Balanced/Unbal-
anced). This audio signal can be output to a mixing console or
an amplifier, for example.
▷ Press the VOL+/VOL- buttons to adjust the volume.
►
▷ Make sure that the signal in the next device in the signal
chain (e.g. mixing console, power amplifier, guitar amplifi-
er, etc.) is not overdriven.
EM-XSW 1 rack receiver
39
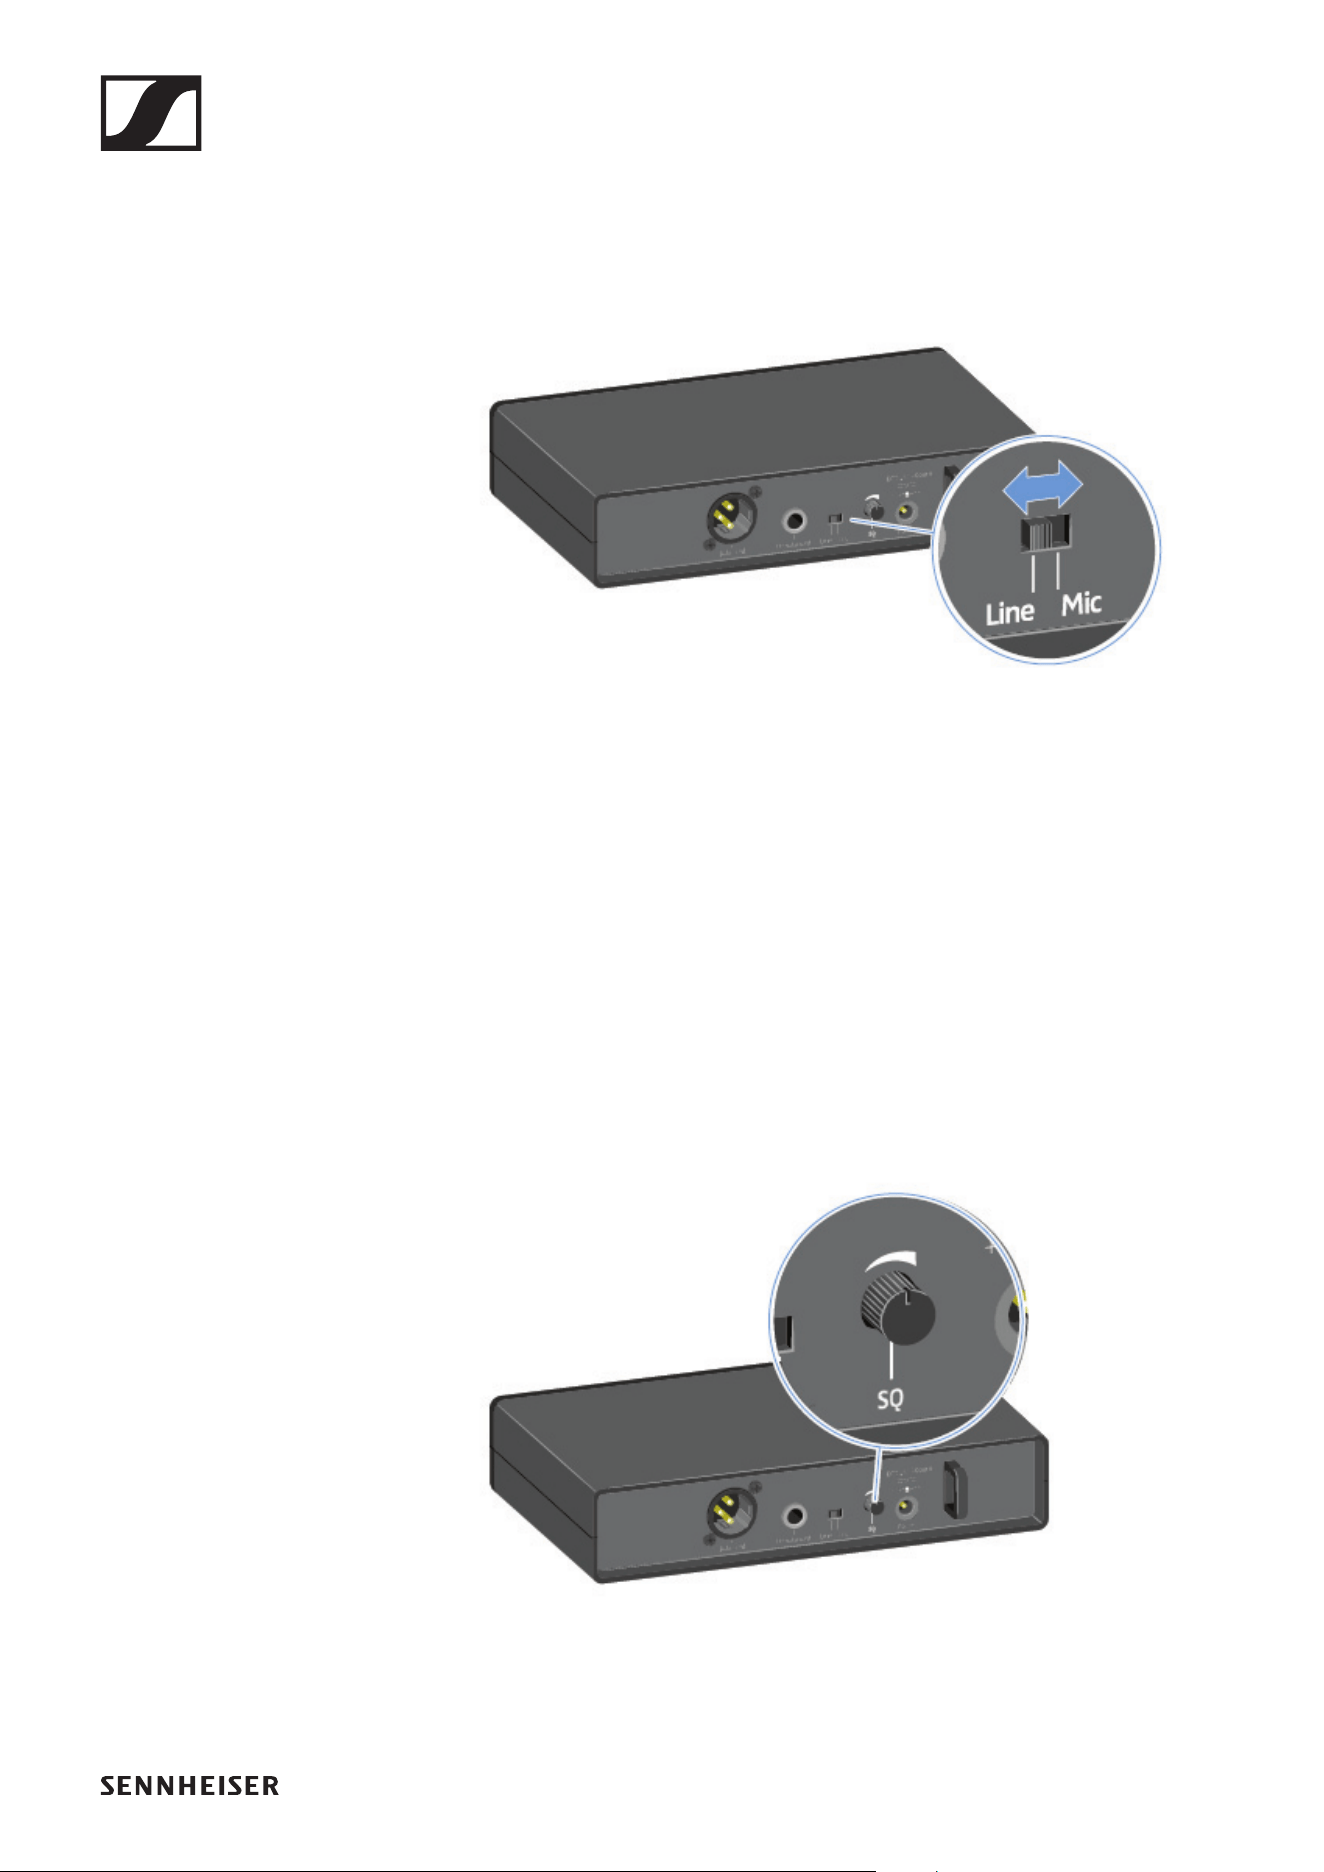
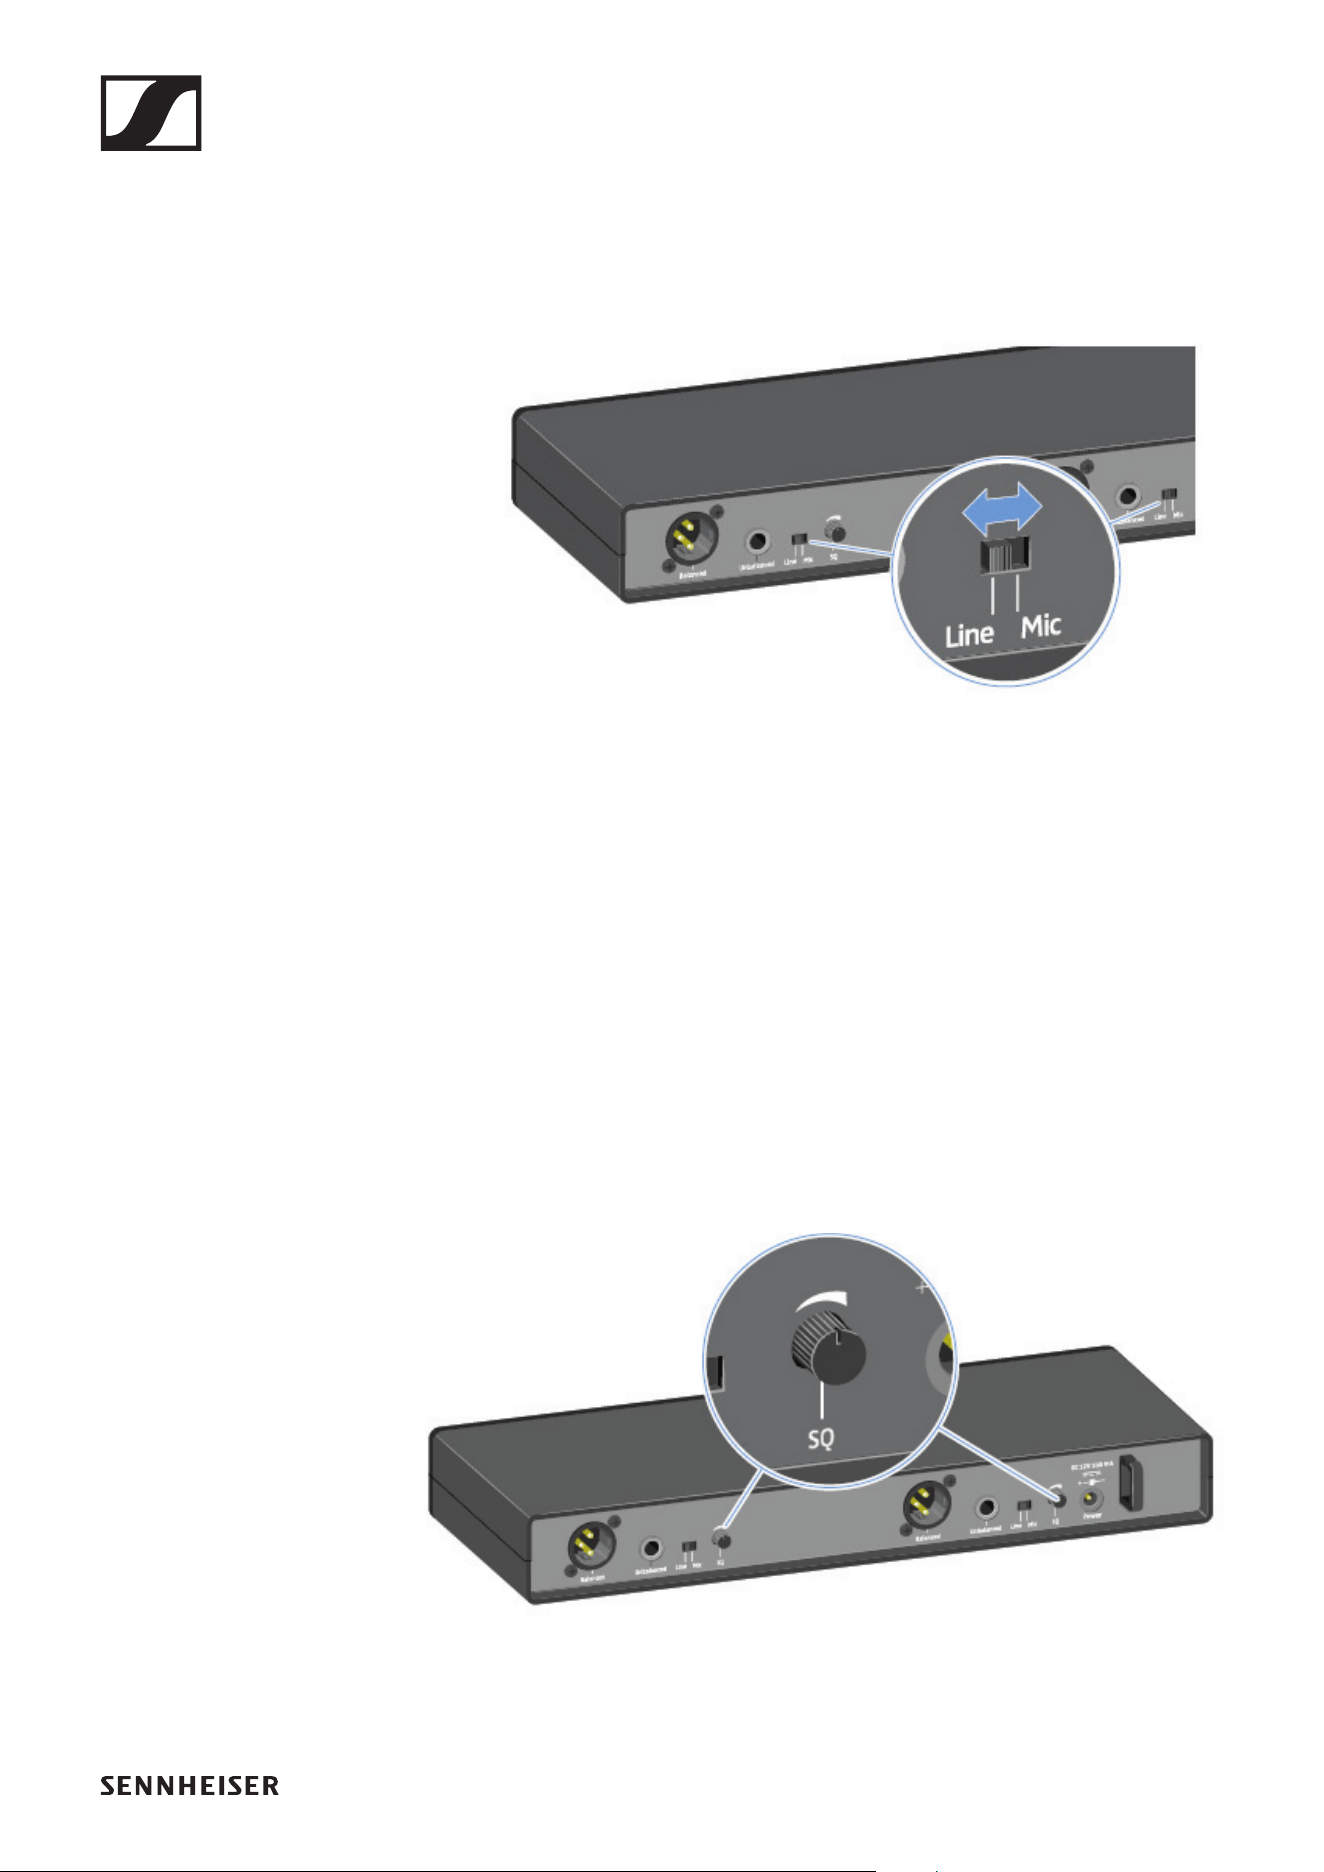
Setting options on the rear of the device
Selecting the signal type (Mic/Line)
▷ Set the Line/Mic switch to the desired position.
• Line: when using instruments or other line sources with
the SK-XSW bodypack transmitter
• Mic: when using the SKM-XSW handheld transmitter or a
microphone with the SK-XSW bodypack transmitter
Setting the squelch
The squelch function can be used to suppress disturbing noise
during transmission, such as hiss. If the signal level is below
the squelch threshold, the signal is muted.
If the squelch threshold is set very high, this will shorten the
radio range.
▷ Turn the control knob to the left or right to adjust the
squelch.
EM-XSW 1 rack receiver
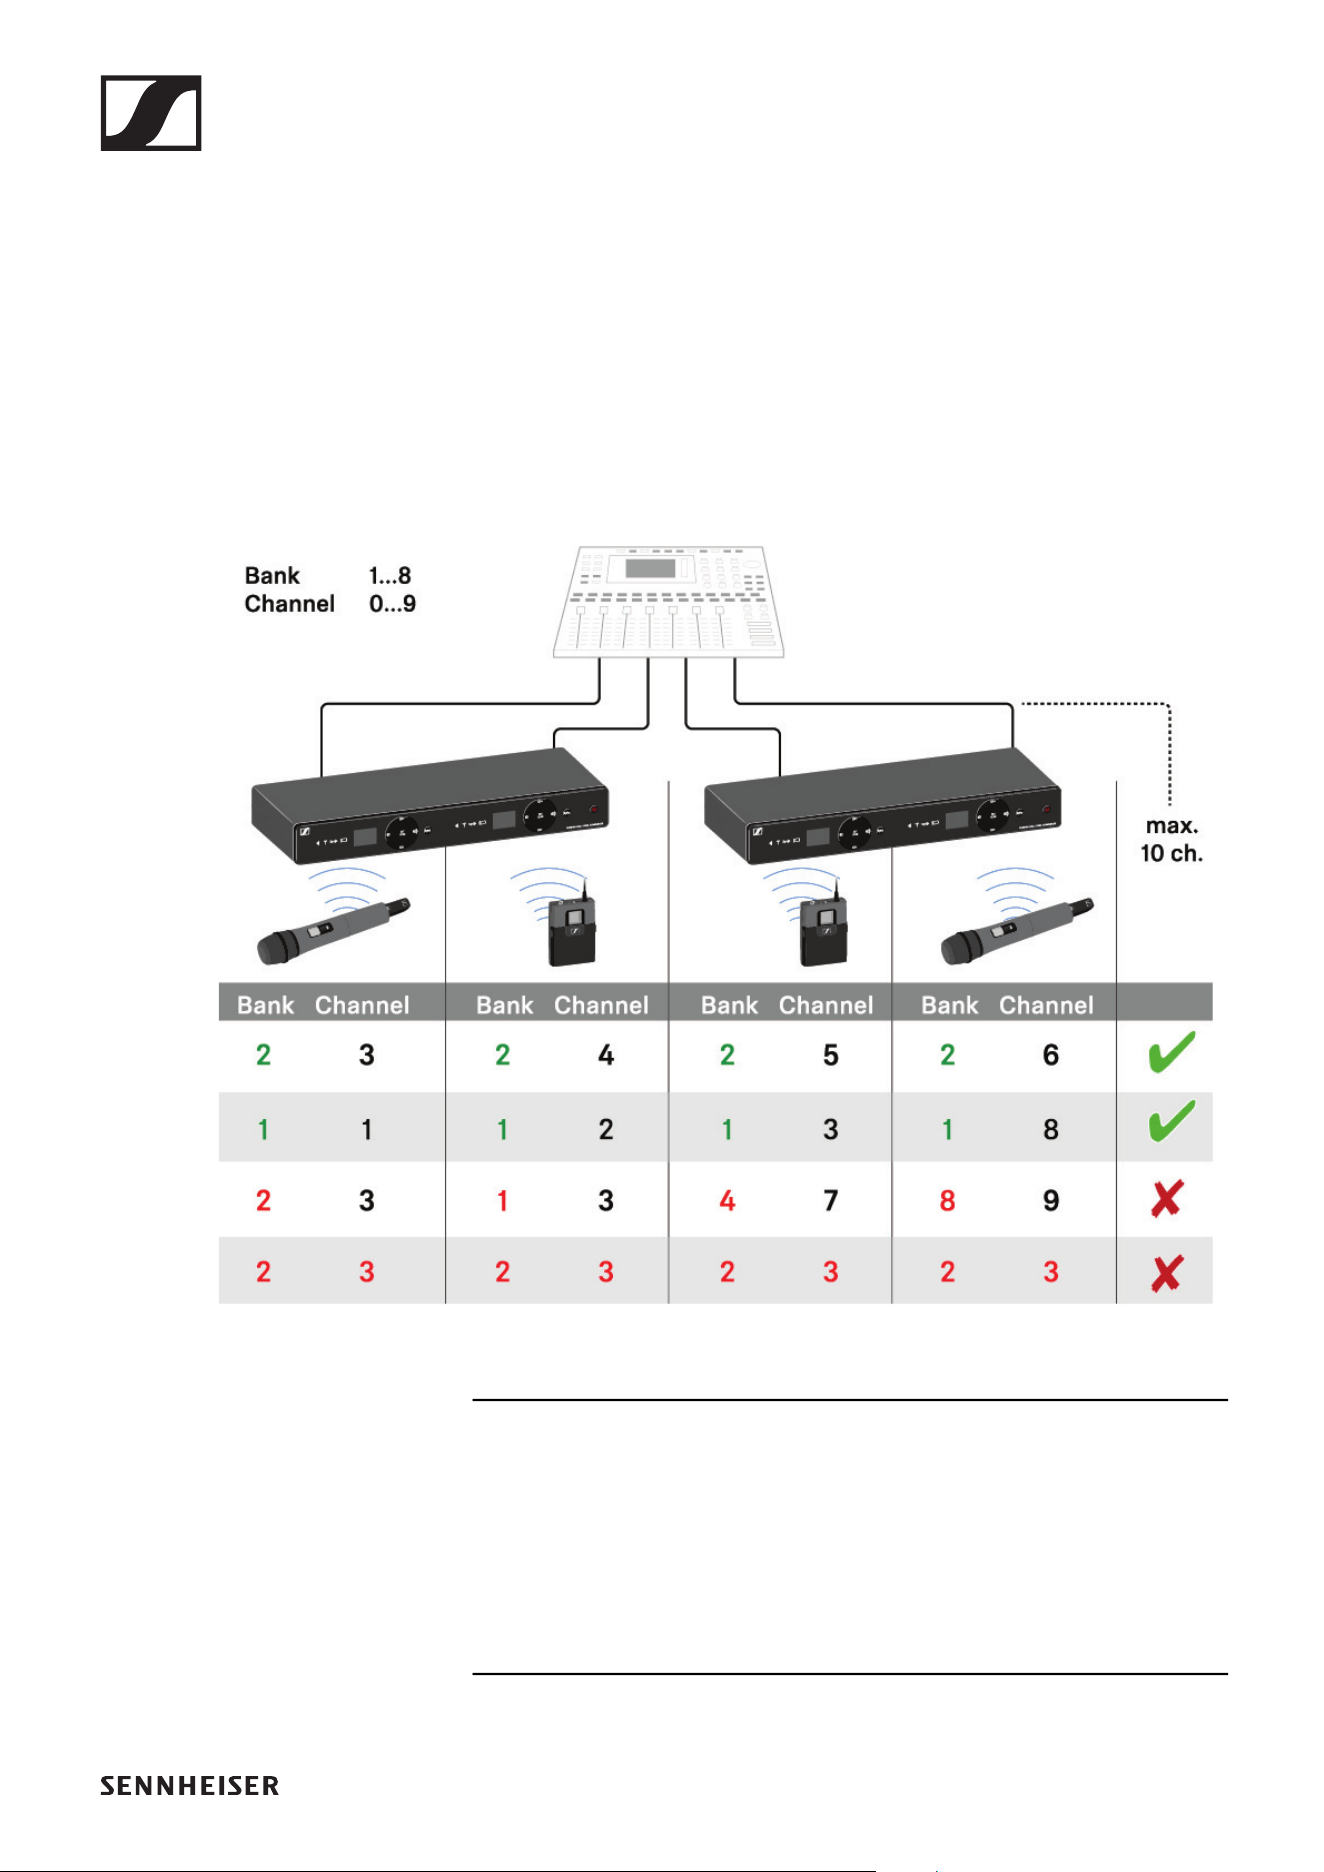
40
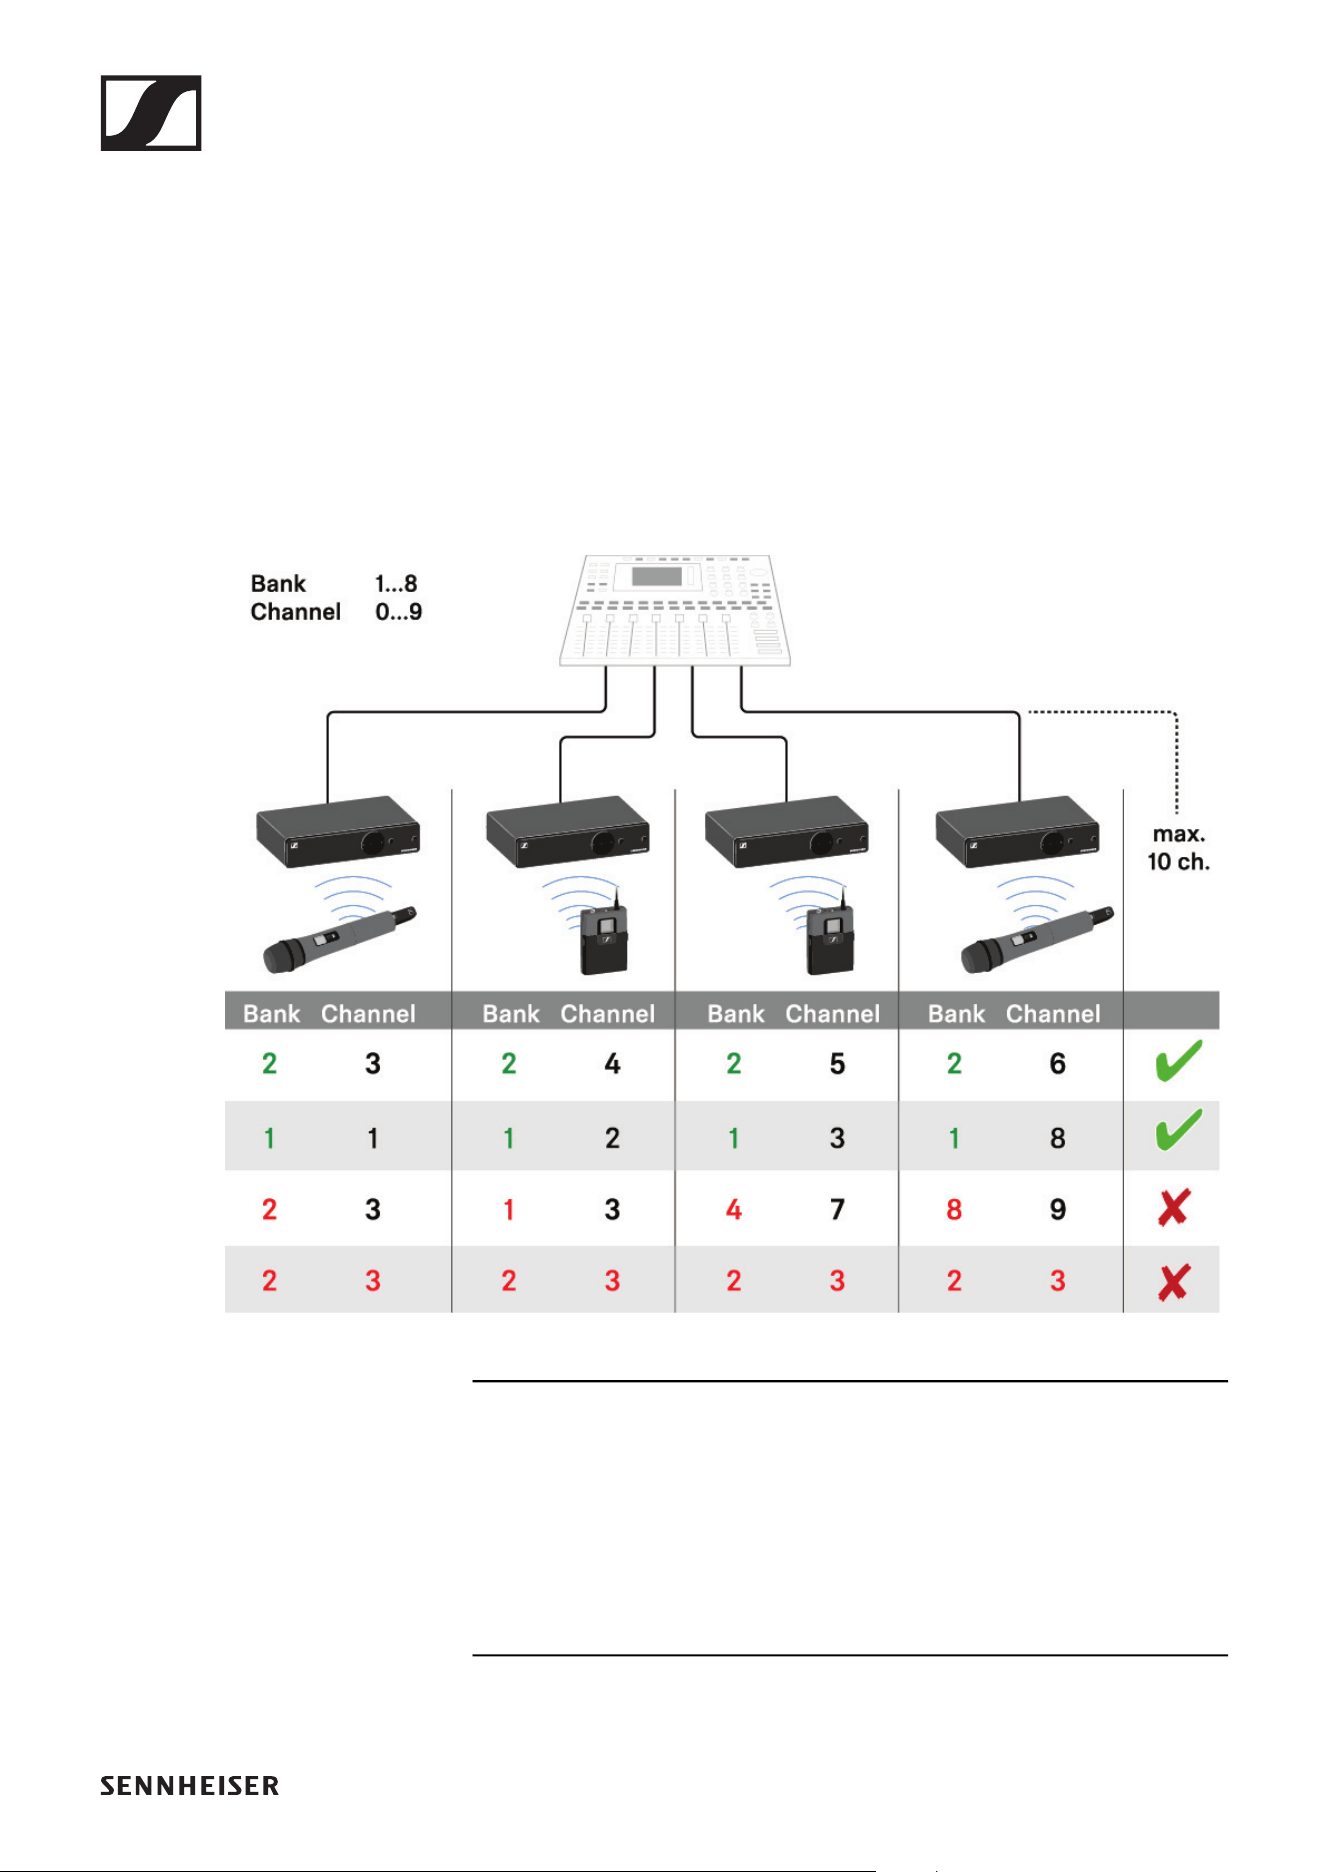
Configuring a multi-channel system
Please note when creating multi-channel systems:
Only the factory-preset transmission frequencies within one
frequency bank are intermodulation-free.
▷ Set the same channel bank for all receivers.
▷ Assign one channel from this channel bank to each receiv-
er.
We recommend using the AUTO SCAN function, as this is the
most reliable way to identify free frequencies (see „Setting the
frequency automatically (AUTO SCAN)“).
If you know free frequencies in your area, you can also set the
frequency manually (see „Setting the frequency manually“).
EM-XSW 1 DUAL rack receiver
41
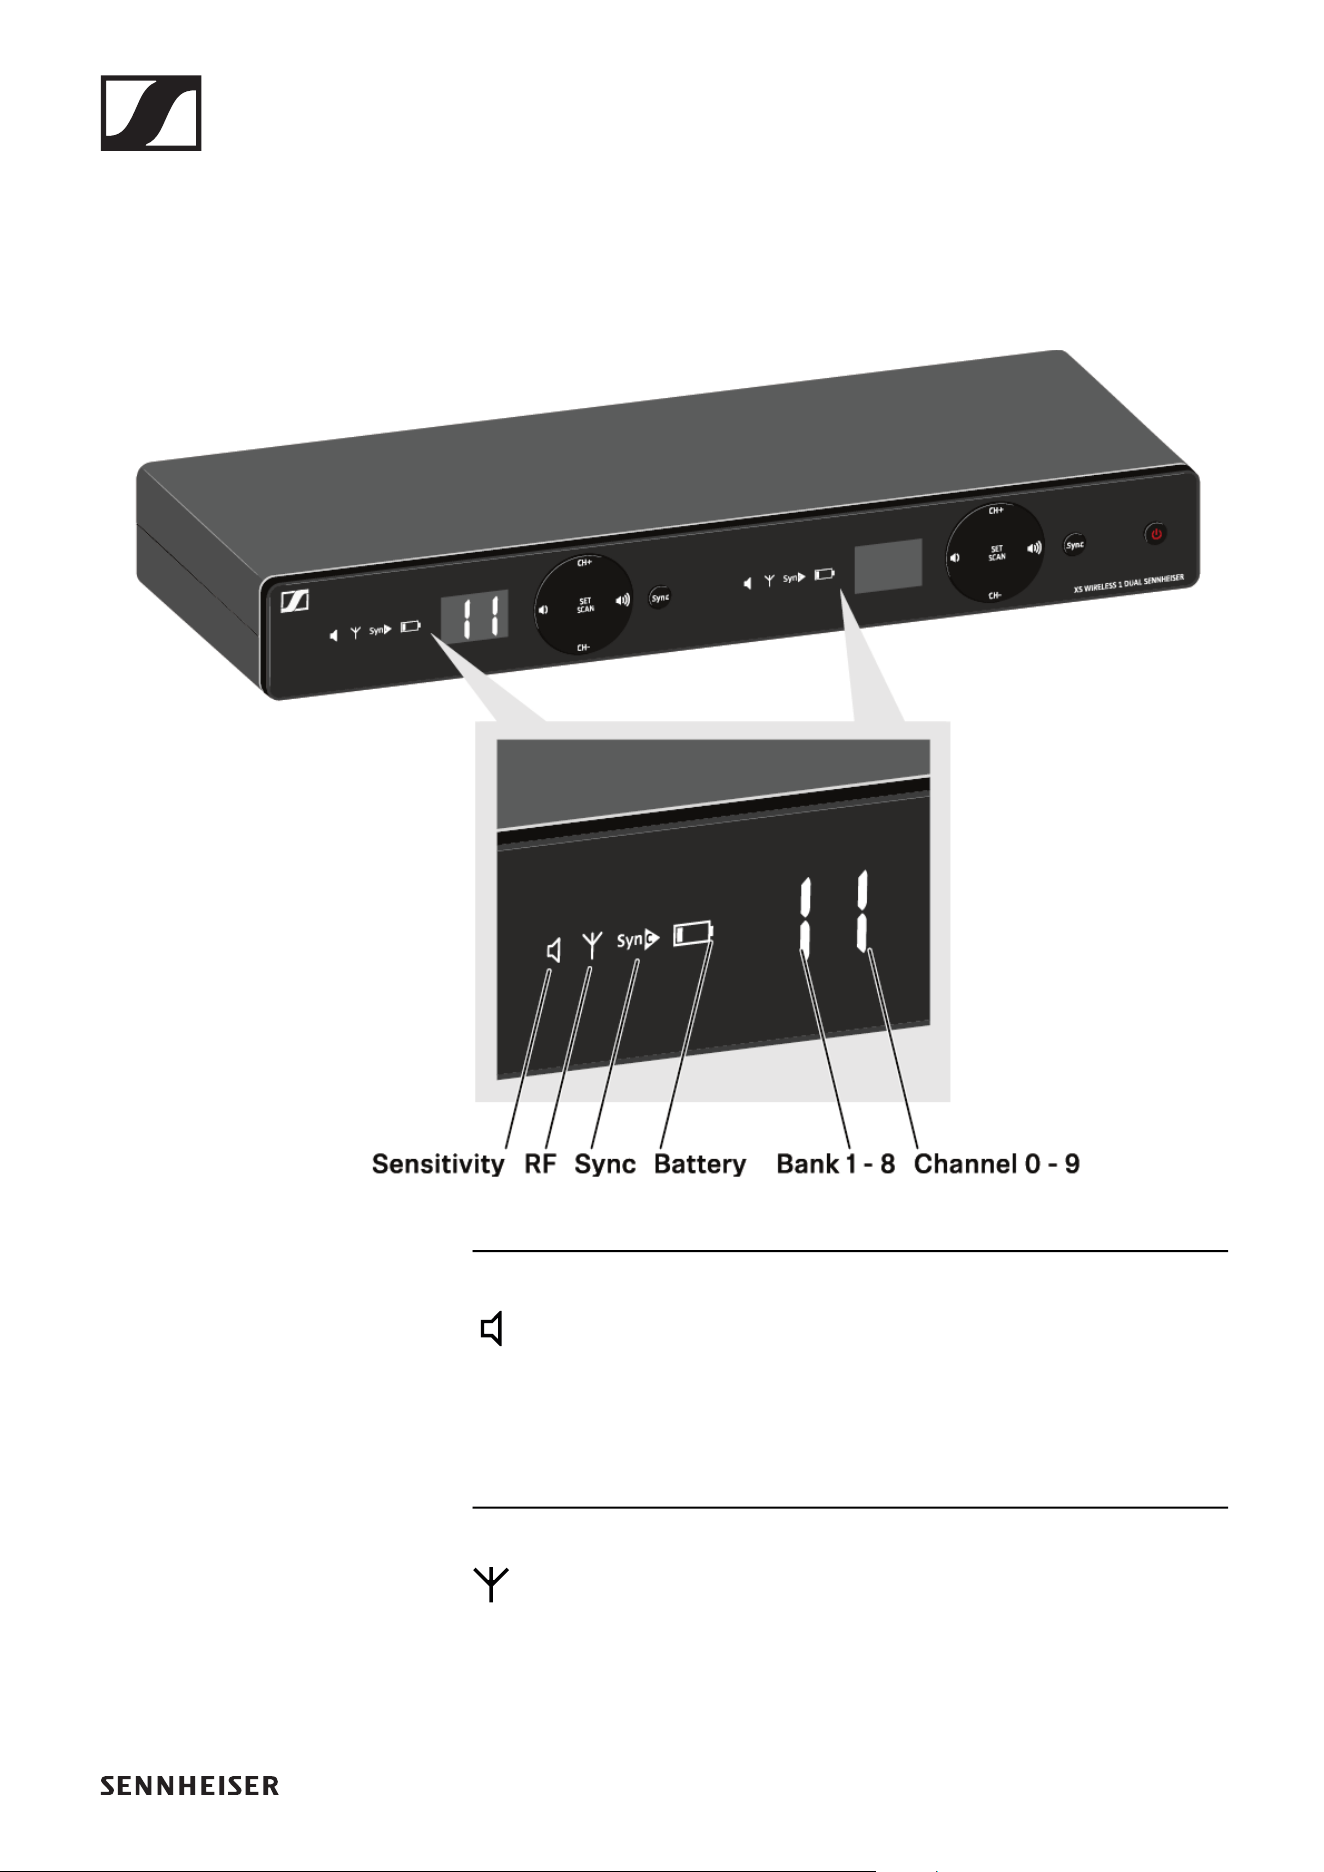
EM-XSW 1 DUAL rack receiver
Connectors and controls
The EM-XSW 1 DUAL two-channel receiver is essentially two
individual EM-XSW 1 receivers in one housing.
Each of the two receiver channels has separate connectors
and setting options.
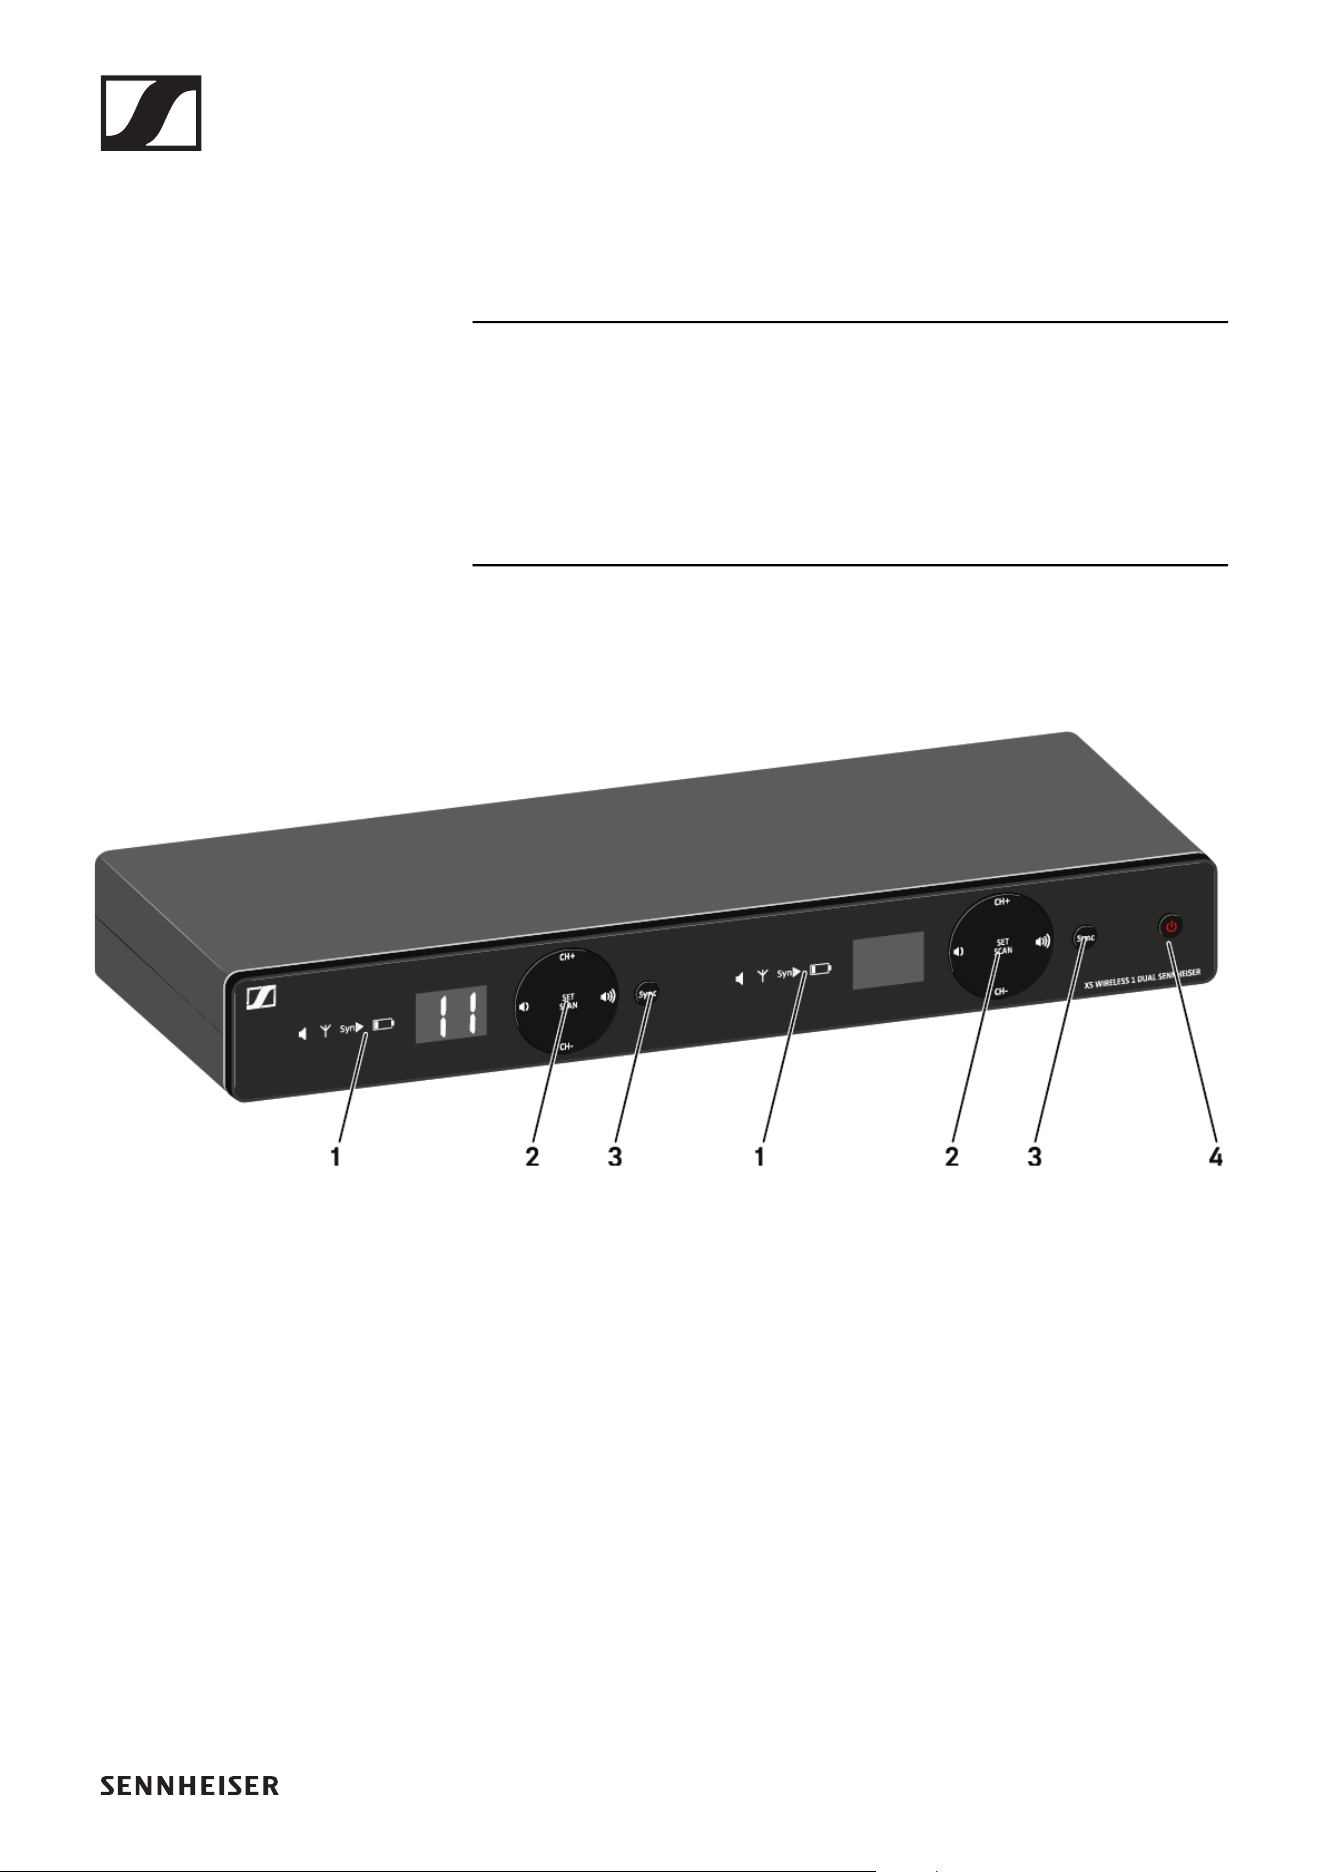
Front
1 Display for status information
• For each of the two channels
• See „Information on the receiver’s display“
2 Control buttons for selecting channels and adjusting vol-
ume
• For each of the two channels
• See „Setting options on the front of the device“
3 SYNC button for synchronizing the transmitter and receiver
• For each of the two channels
• See „Establishing a radio link | Synchronizing the receiver
and transmitter“
4 ON/OFF button for switching the device on and off
• See „Switching the receiver on and off“
EM-XSW 1 DUAL rack receiver
42
Back
5 XLR-3 socket for Balanced audio output
• For each of the two channels
• See „Outputting audio signals“
6 6.3 mm jack socket for Unbalanced audio output
• For each of the two channels
• See „Outputting audio signals“
7 Line/Mic switch for selecting the signal type
• For each of the two channels
• See „Setting options on the rear of the device“
• See „Outputting audio signals“
8 SQ control knob for adjusting the squelch value
• For each of the two channels
• See „Setting options on the rear of the device“
9 Power connection socket for the power supply unit
• See „Connecting/disconnecting the receiver to/from the
power supply system“
10Strain relief for the connection cable of the power supply
unit
• See „Connecting/disconnecting the receiver to/from the
power supply system“
EM-XSW 1 DUAL rack receiver
43
Connecting/disconnecting the receiver to/
from the power supply system
Only use the supplied power supply unit. It is designed for your
receiver and ensures safe operation.
To connect the receiver to the power supply system:
▷ Pass the cable of the power supply unit through the strain
relief.
▷ Insert the plug of the power supply unit into the Power
socket on the receiver.
▷ Slide the supplied country adapter onto the power supply
unit.
▷ Plug the power supply unit into the wall socket.
To completely disconnect the receiver from the power supply
system:
▷ Unplug the power supply unit from the wall socket.
▷ Unplug the power supply unit from the Power socket on the
receiver.
EM-XSW 1 DUAL rack receiver
44
Outputting audio signals
Each of the two channels on the EM-XSW1 DUAL has both a
balanced XLR-3M output socket and an unbalanced 6.3 mm
(1/4") jack output socket.
The EM-XSW 1 has a balanced XLR-3M output socket and an
unbalanced 6.3 mm jack output socket.
▷ Always use only one of the two output sockets for each
channel.
►
To connect an XLR cable:
▷ Plug the XLR cable into the Balanced socket for the respec-
tive channel on the EM-XSW 1 DUAL.
To connect a jack cable:
▷ Plug the jack cable into the Unbalanced socket for the re-
spective channel on the EM-XSW 1 DUAL.
▷ Set the Line/Mic switch to the desired position for each of
the two channels.
• Line: when using instruments or other line sources with
the SK-XSW bodypack transmitter
• Mic: when using the SKM 825/835-XSW handheld trans-
mitter or a microphone with the SK-XSW bodypack trans-
mitter
EM-XSW 1 DUAL rack receiver
45
Switching the receiver on and off
To switch the receiver on:
▷ Short-press the ON/OFF button.
The receiver switches on.
To switch the receiver to standby mode:
▷ Hold down the ON/OFF button until the display switches
off.
To switch the receiver off completely:
▷ Disconnect the receiver from the power supply system by
unplugging the power supply unit from the wall socket.
EM-XSW 1 DUAL rack receiver
46
Information on the receiver’s display
Status information such as frequency, reception quality, bat-
tery status and audio level is shown on the display for each of
the two channels.
Sensitivity:
Indicates the sensitivity of the connected transmitter
• SKM: „Setting the input sensitivity“
• SK: „Setting the input sensitivity“
RF:
If the antenna symbol is displayed, the radio link is active.
• „Establishing a radio link | Synchronizing the receiver and
transmitter“

EM-XSW 1 DUAL rack receiver
47
Sync: „Establishing a radio link | Synchronizing the re-
ceiver and transmitter“
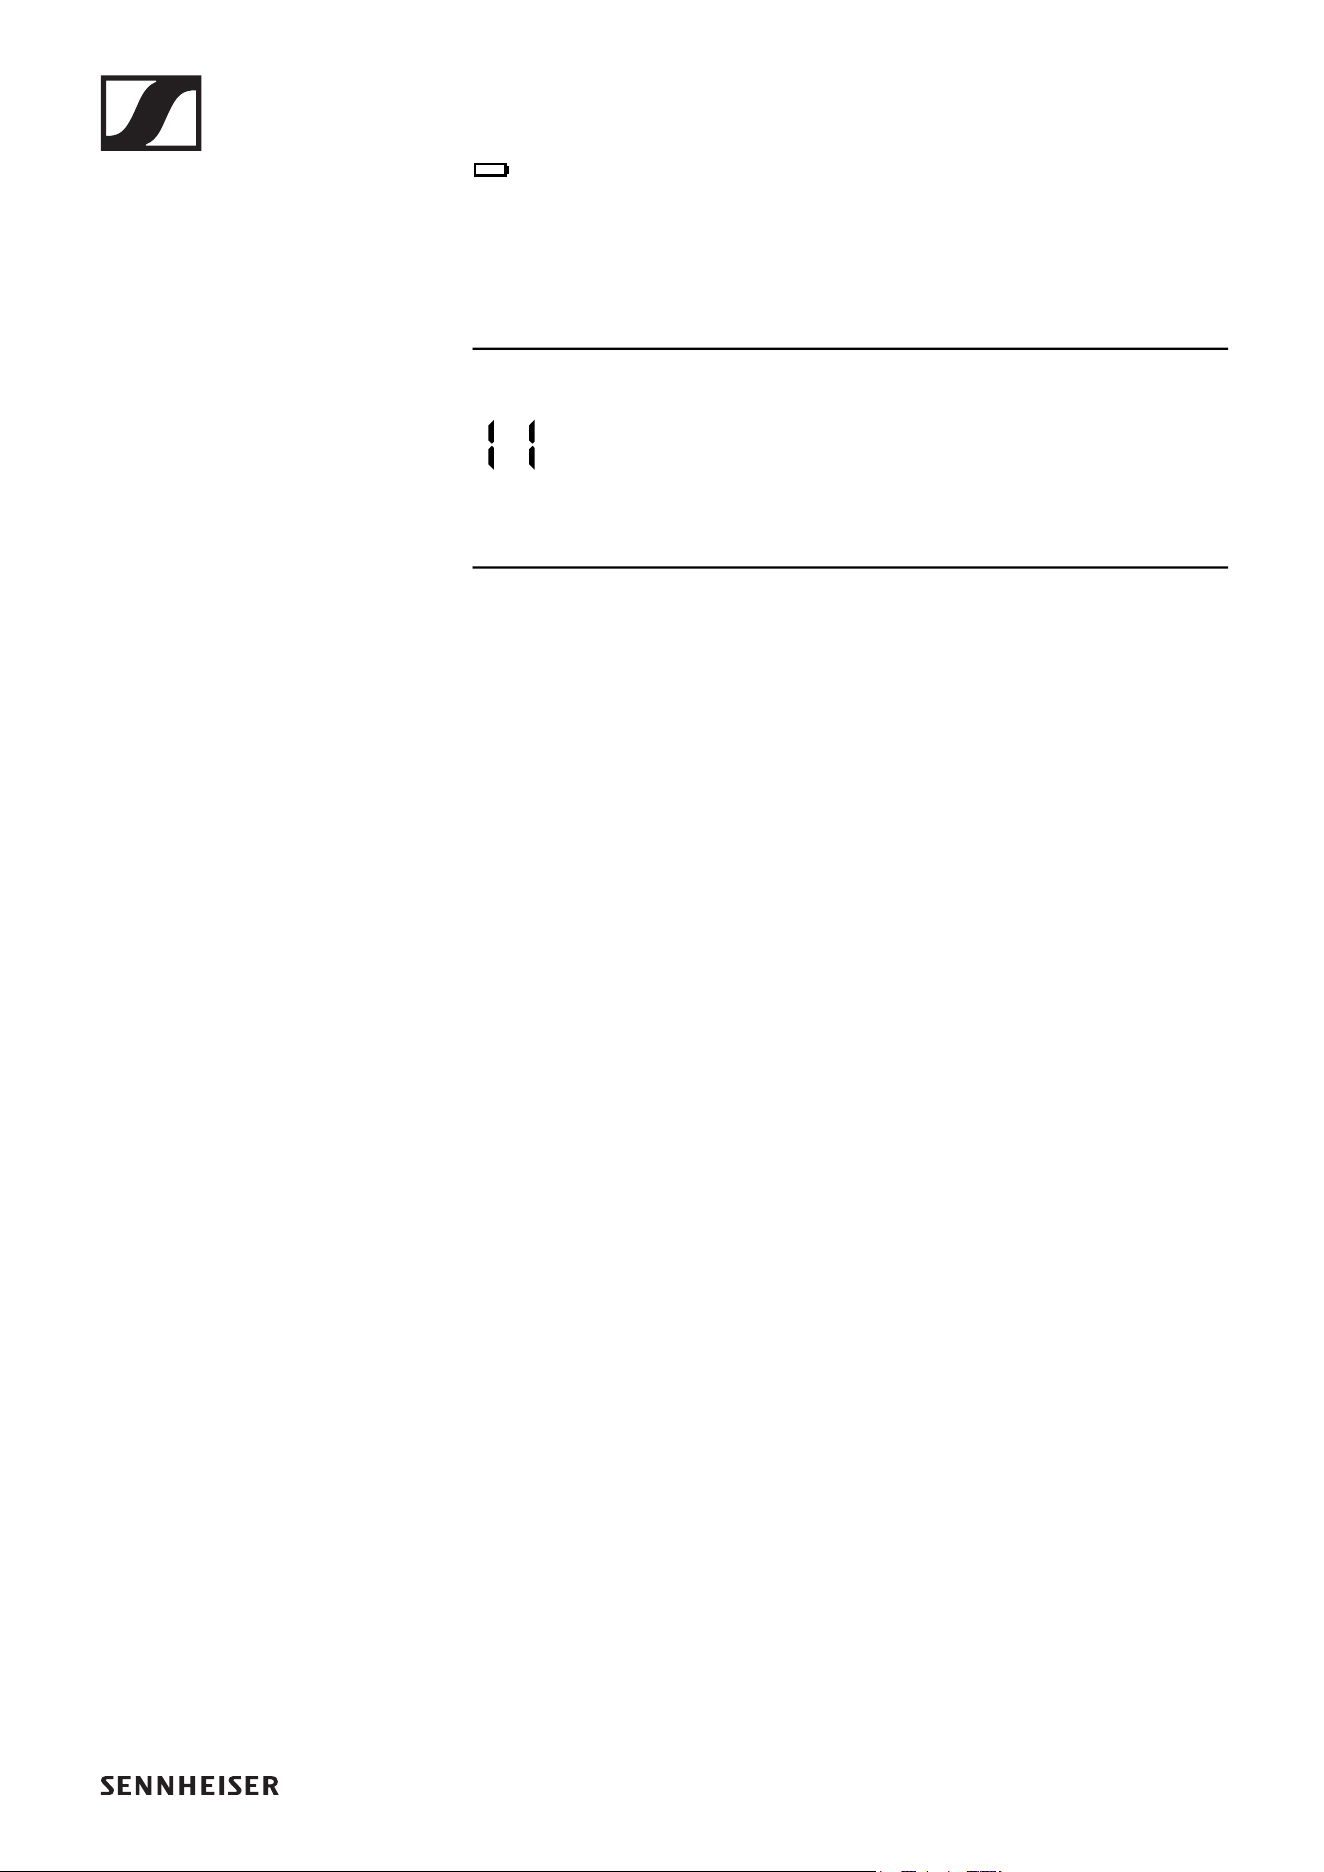
Battery:
Battery status of the connected transmitter
• SKM: „Inserting and removing the batteries“
• SK: „Inserting and removing the batteries“
Bank/Channel:
Frequency bank and channel of the radio link
• „Setting options on the front of the device“
EM-XSW 1 DUAL rack receiver
48
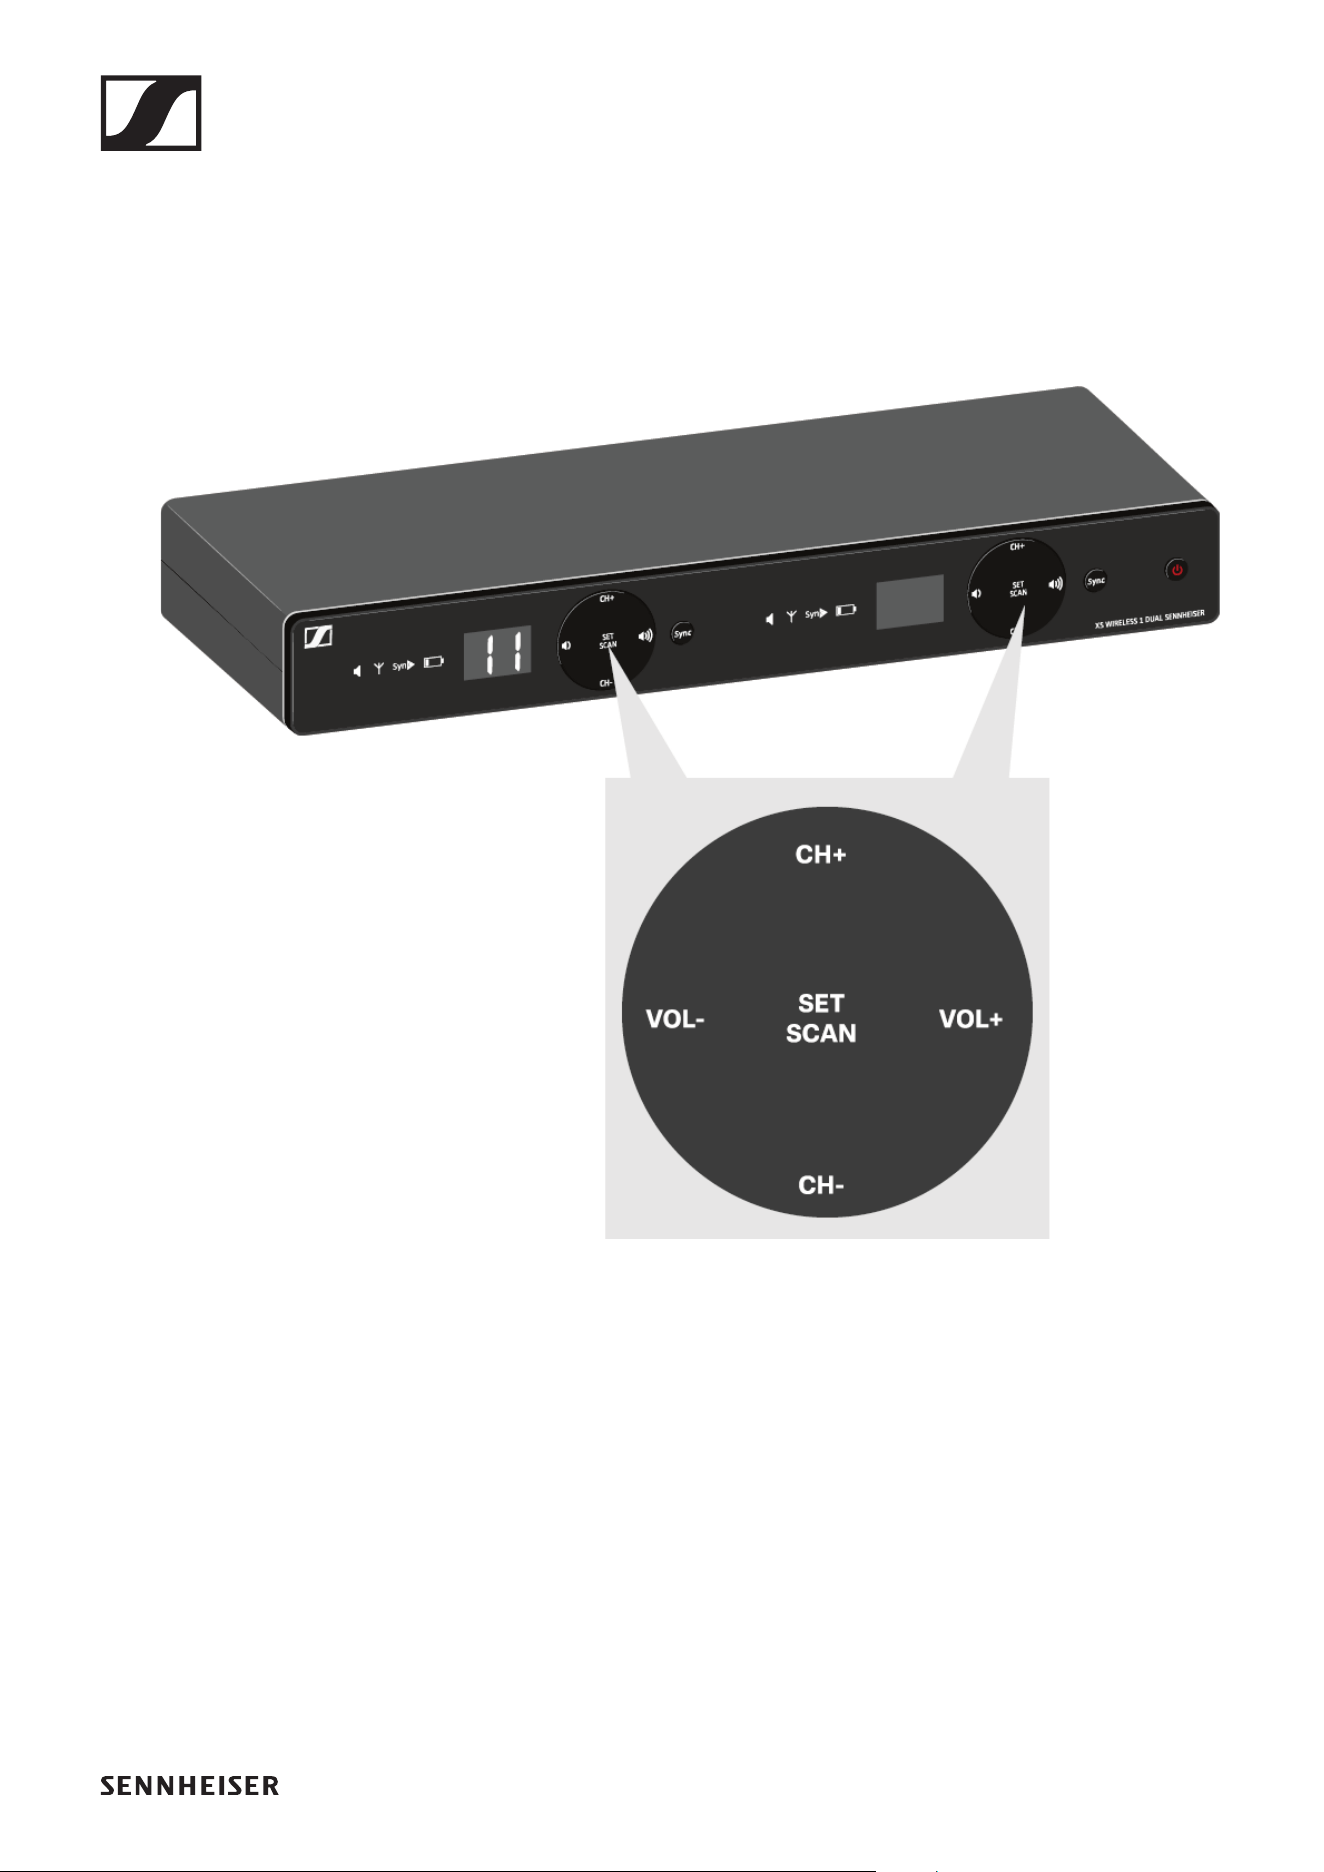
Setting options on the front of the device
Navigation buttons
Use the following buttons to navigate through the receiver’s
settings.
►
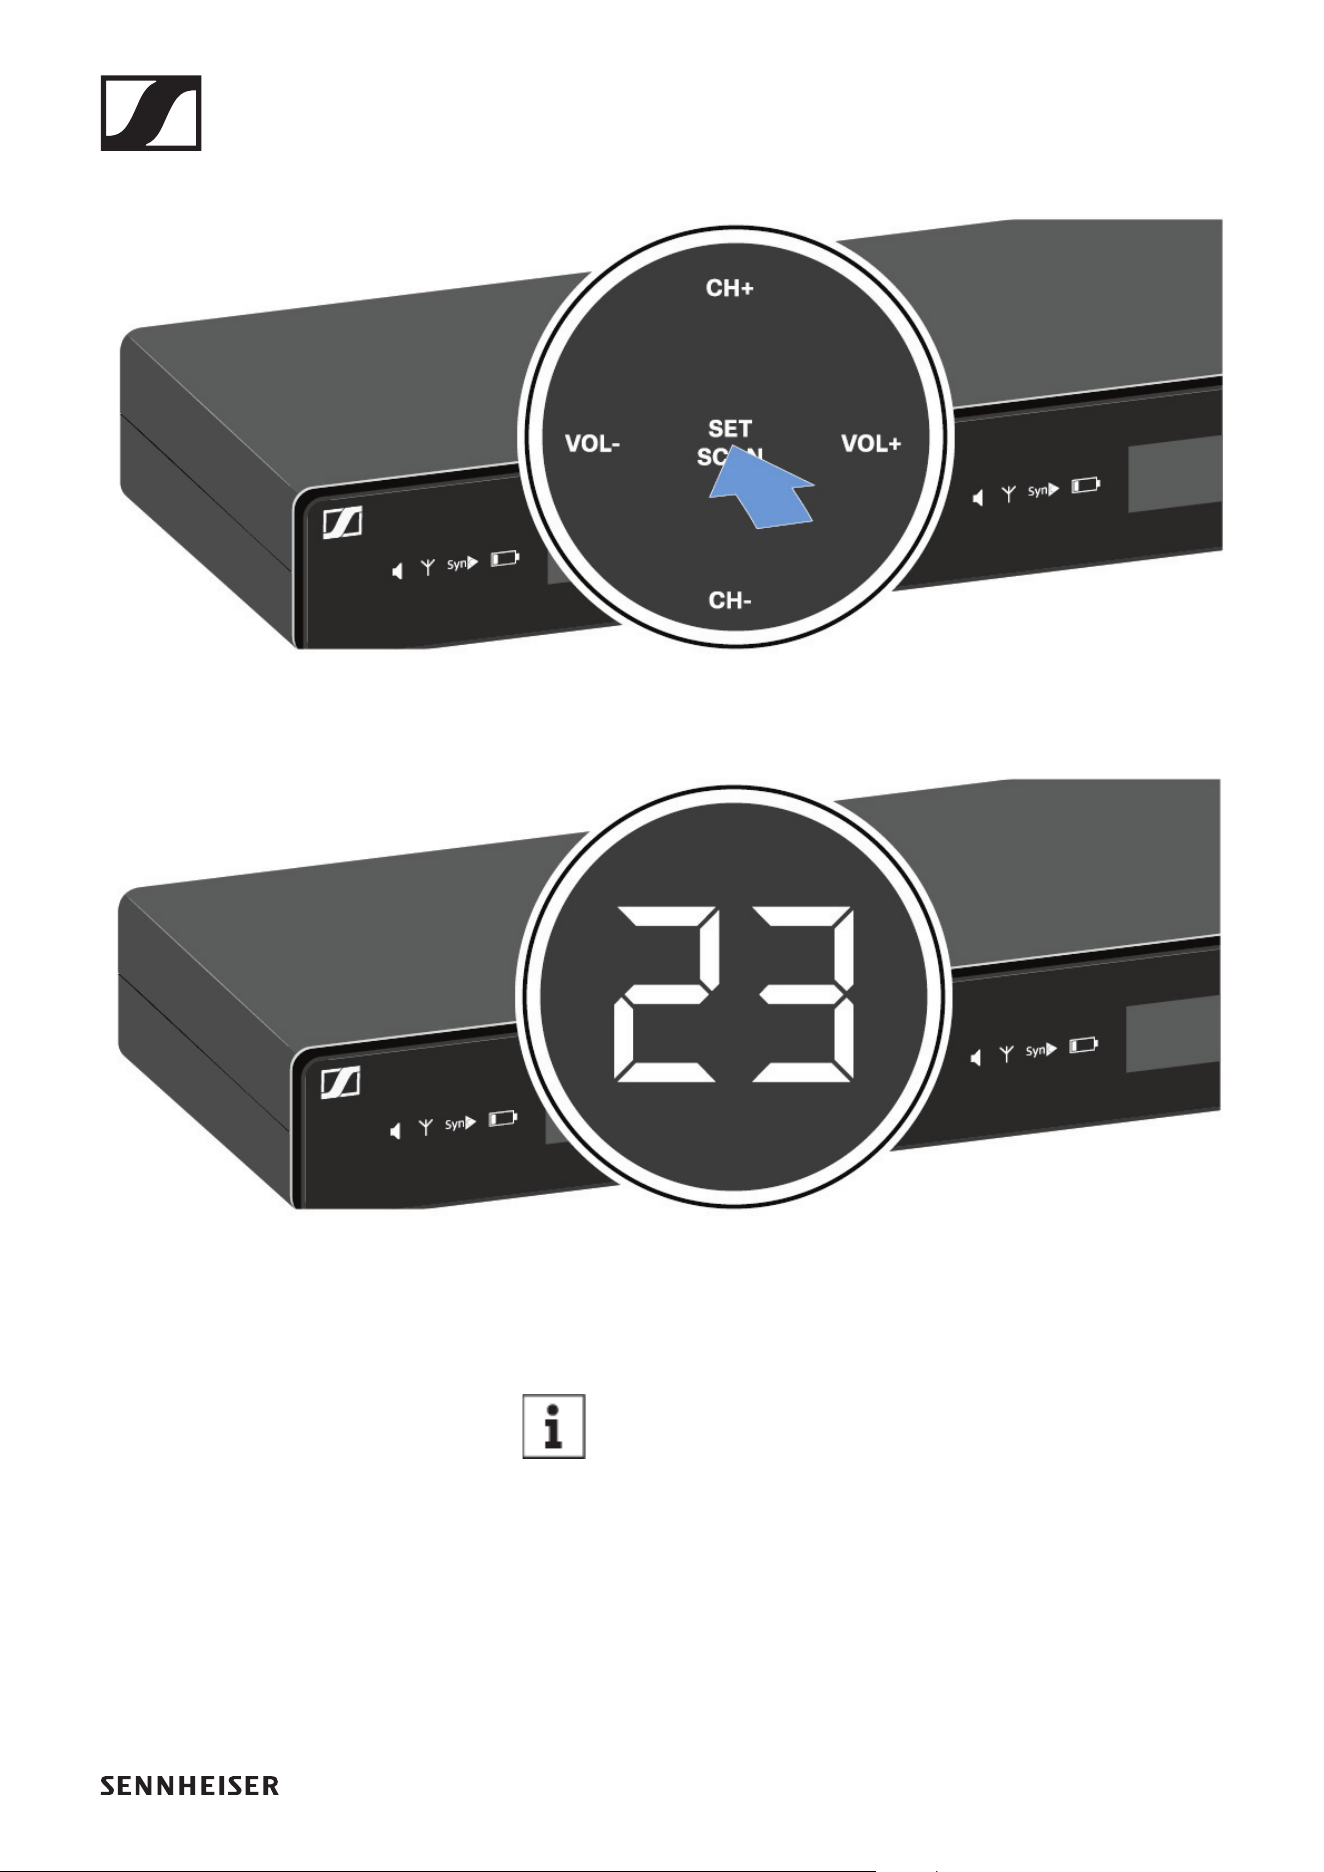
Setting the frequency automatically (AUTO SCAN)
Performs an automatic frequency scan of your area. This en-
ables you to easily find and assign free radio frequencies.
▷ Switch off all transmitters before you perform the scan. If
transmitters are still switched on, they are detected as un-
available frequencies and the frequencies that are actually
available cannot then be used.
EM-XSW 1 DUAL rack receiver
49
▷ Press the SET/SCAN button for approx. 3 seconds.
►
The scan starts automatically. An open channel is then
shown in the display (e.g. bank 2, channel 3).
►
►
▷ Press the SET/SCAN button to accept the displayed chan-
nel.
If you have set a new frequency, you must still syn-
chronize the receiver with the transmitter to es-
tablish the radio link (see „Establishing a radio link
| Synchronizing the receiver and transmitter“).
EM-XSW 1 DUAL rack receiver
50
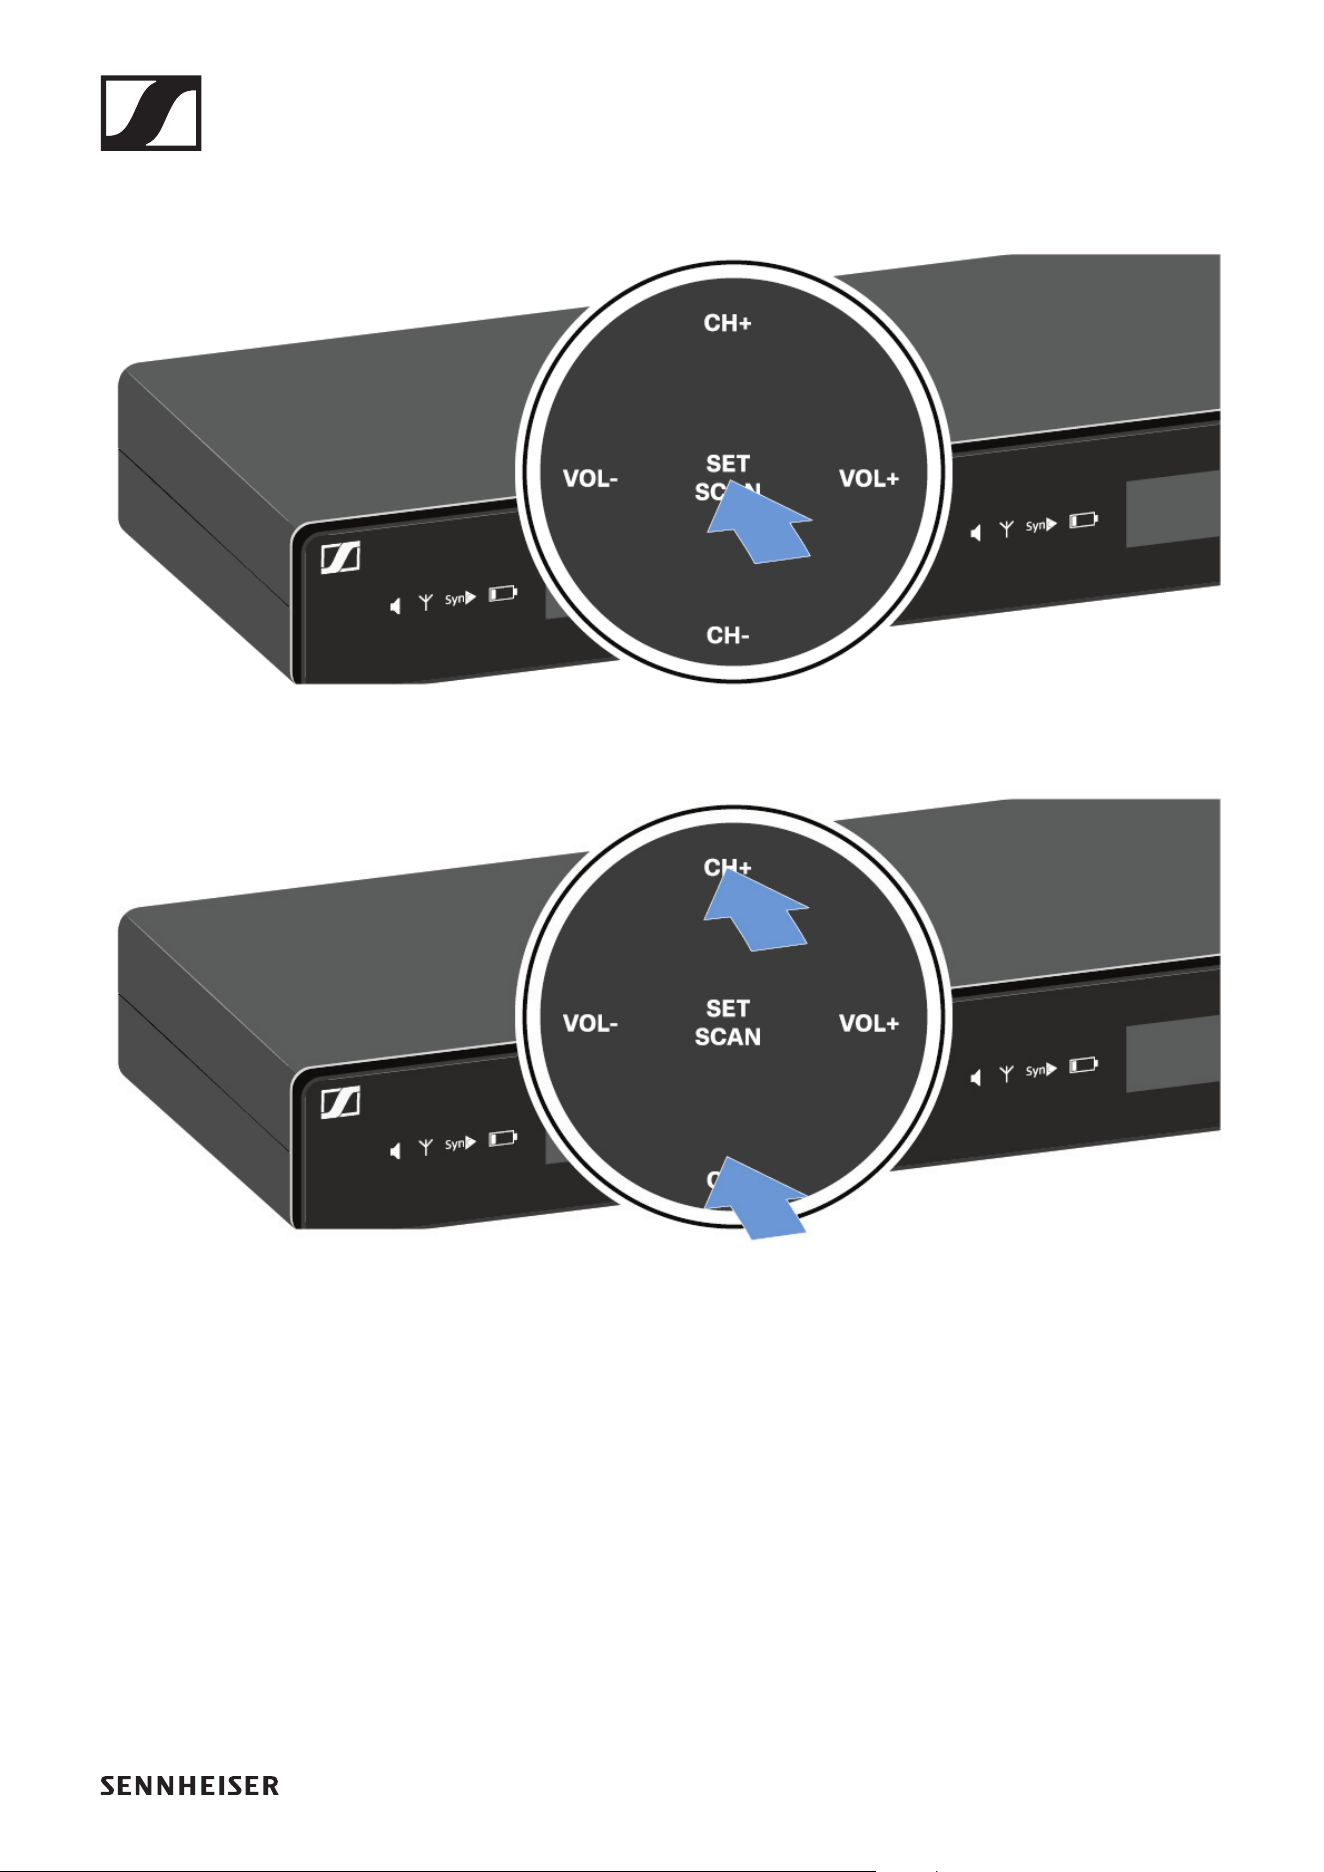
Setting the frequency manually
▷ Press the SET/SCAN button.
►
▷ Press the CH+/CH- buttons to select a frequency bank (1 to
8).
►
▷ Press the SET/SCAN button to accept the selected fre-
quency bank.
EM-XSW 1 DUAL rack receiver
51
▷ Press the CH+/CH- buttons to select a channel (0 to 9) in
the selected frequency bank.
The selected bank and channel are shown in the display
(e.g. bank 2, channel 3).
►
►
▷ Press the SET/SCAN button to accept the selected chan-
nel.
If you have set a new frequency, you must still syn-
chronize the receiver with the transmitter to es-
tablish the radio link (see „Establishing a radio link
| Synchronizing the receiver and transmitter“).
EM-XSW 1 DUAL rack receiver
52
Adjusting the volume of the audio outputs
Use the VOL+/VOL- buttons to set the level of the audio signal
coming from the receiver’s audio outputs (Balanced/Unbal-
anced). This audio signal can be output to a mixing console or
an amplifier, for example.
▷ Press the VOL+/VOL- buttons to adjust the volume.
►
▷ Make sure that the signal in the next device in the signal
chain (e.g. mixing console, power amplifier, guitar amplifi-
er, etc.) is not overdriven.
EM-XSW 1 DUAL rack receiver
53
Setting options on the rear of the device
Selecting the signal type (Mic/Line)
▷ Set the Line/Mic switch to the desired position for each of
the two channels.
• Line: when using instruments or other line sources with
the SK-XSW bodypack transmitter
• Mic: when using the SKM-XSW handheld transmitter or a
microphone with the SK-XSW bodypack transmitter
Setting the squelch
The squelch function can be used to suppress disturbing noise
during transmission, such as hiss. If the signal level is below
the squelch threshold, the signal is muted.
If the squelch threshold is set very high, this will shorten the
radio range.
▷ Turn the control knob to the left or right to adjust the
squelch.
EM-XSW 1 DUAL rack receiver
54
Configuring a multi-channel system
Please note when creating multi-channel systems:
Only the factory-preset transmission frequencies within one
frequency bank are intermodulation-free.
▷ Set the same channel bank for all receivers.
▷ Assign one channel from this channel bank to each receiv-
er.
We recommend using the AUTO SCAN function, as this is the
most reliable way to identify free frequencies (see „Setting the
frequency automatically (AUTO SCAN)“).
If you know free frequencies in your area, you can also set the
frequency manually (see „Setting the frequency manually“).
EM-XSW 2 rack receiver
55
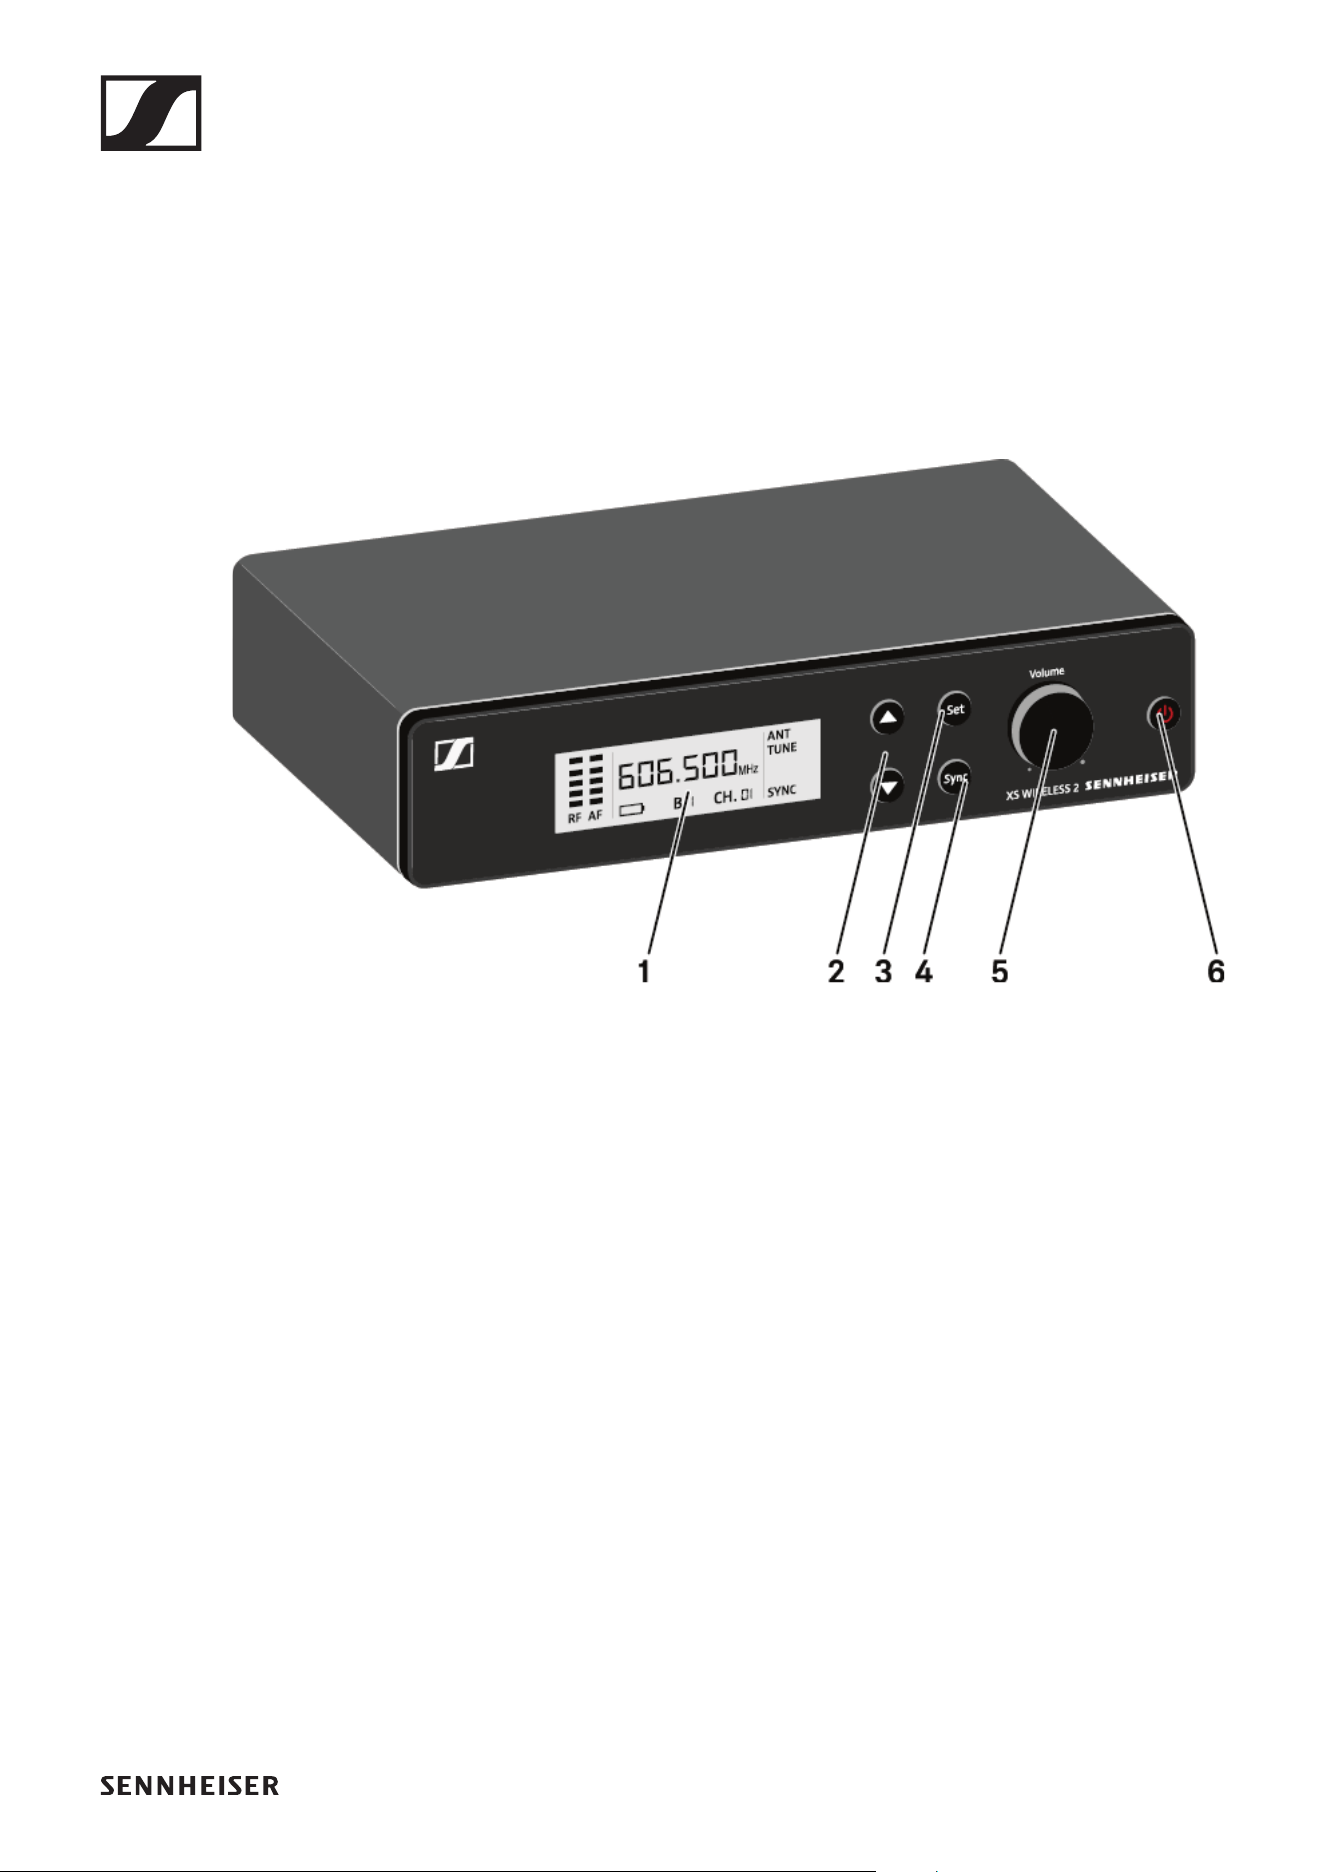
EM-XSW 2 rack receiver
Connectors and controls
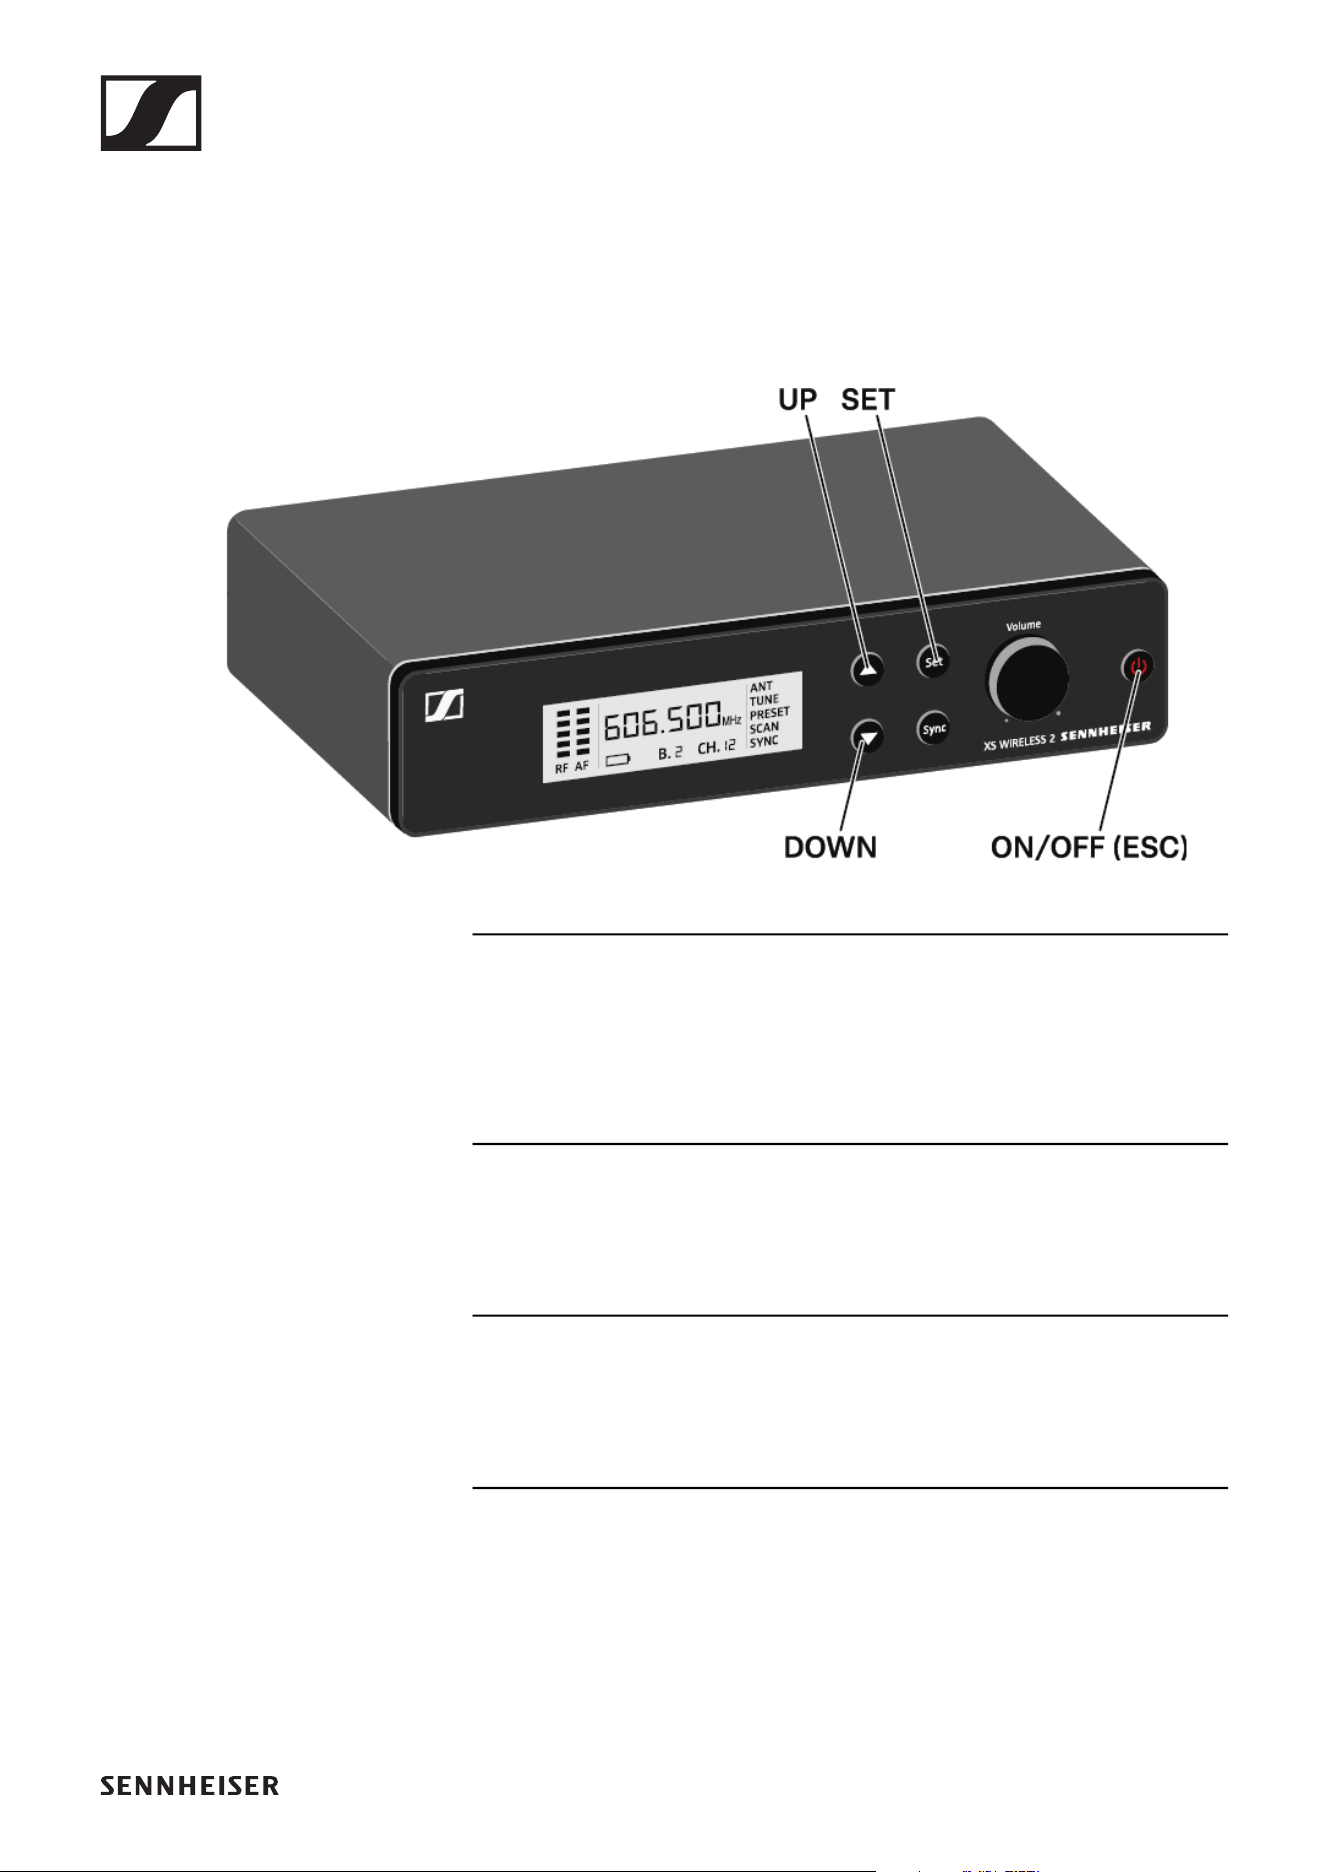
Front
1 Display for status information
• See „Information on the receiver’s display“
2 UP/DOWN menu buttons for navigating the operating
menu
• See „Setting options on the front of the device“
3 SET menu button for navigating the operating menu
• See „Setting options on the front of the device“
4 SYNC button for synchronizing the transmitter and receiver
• See „Establishing a radio link | Synchronizing the receiver
and transmitter“
5 Control knob for adjusting the volume
• See „Adjusting the volume of the audio outputs“
6 ON/OFF button for switching the device on and off and can-
celing an action in the menu
• See „Switching the receiver on and off“
• See „Setting options on the front of the device“
EM-XSW 2 rack receiver
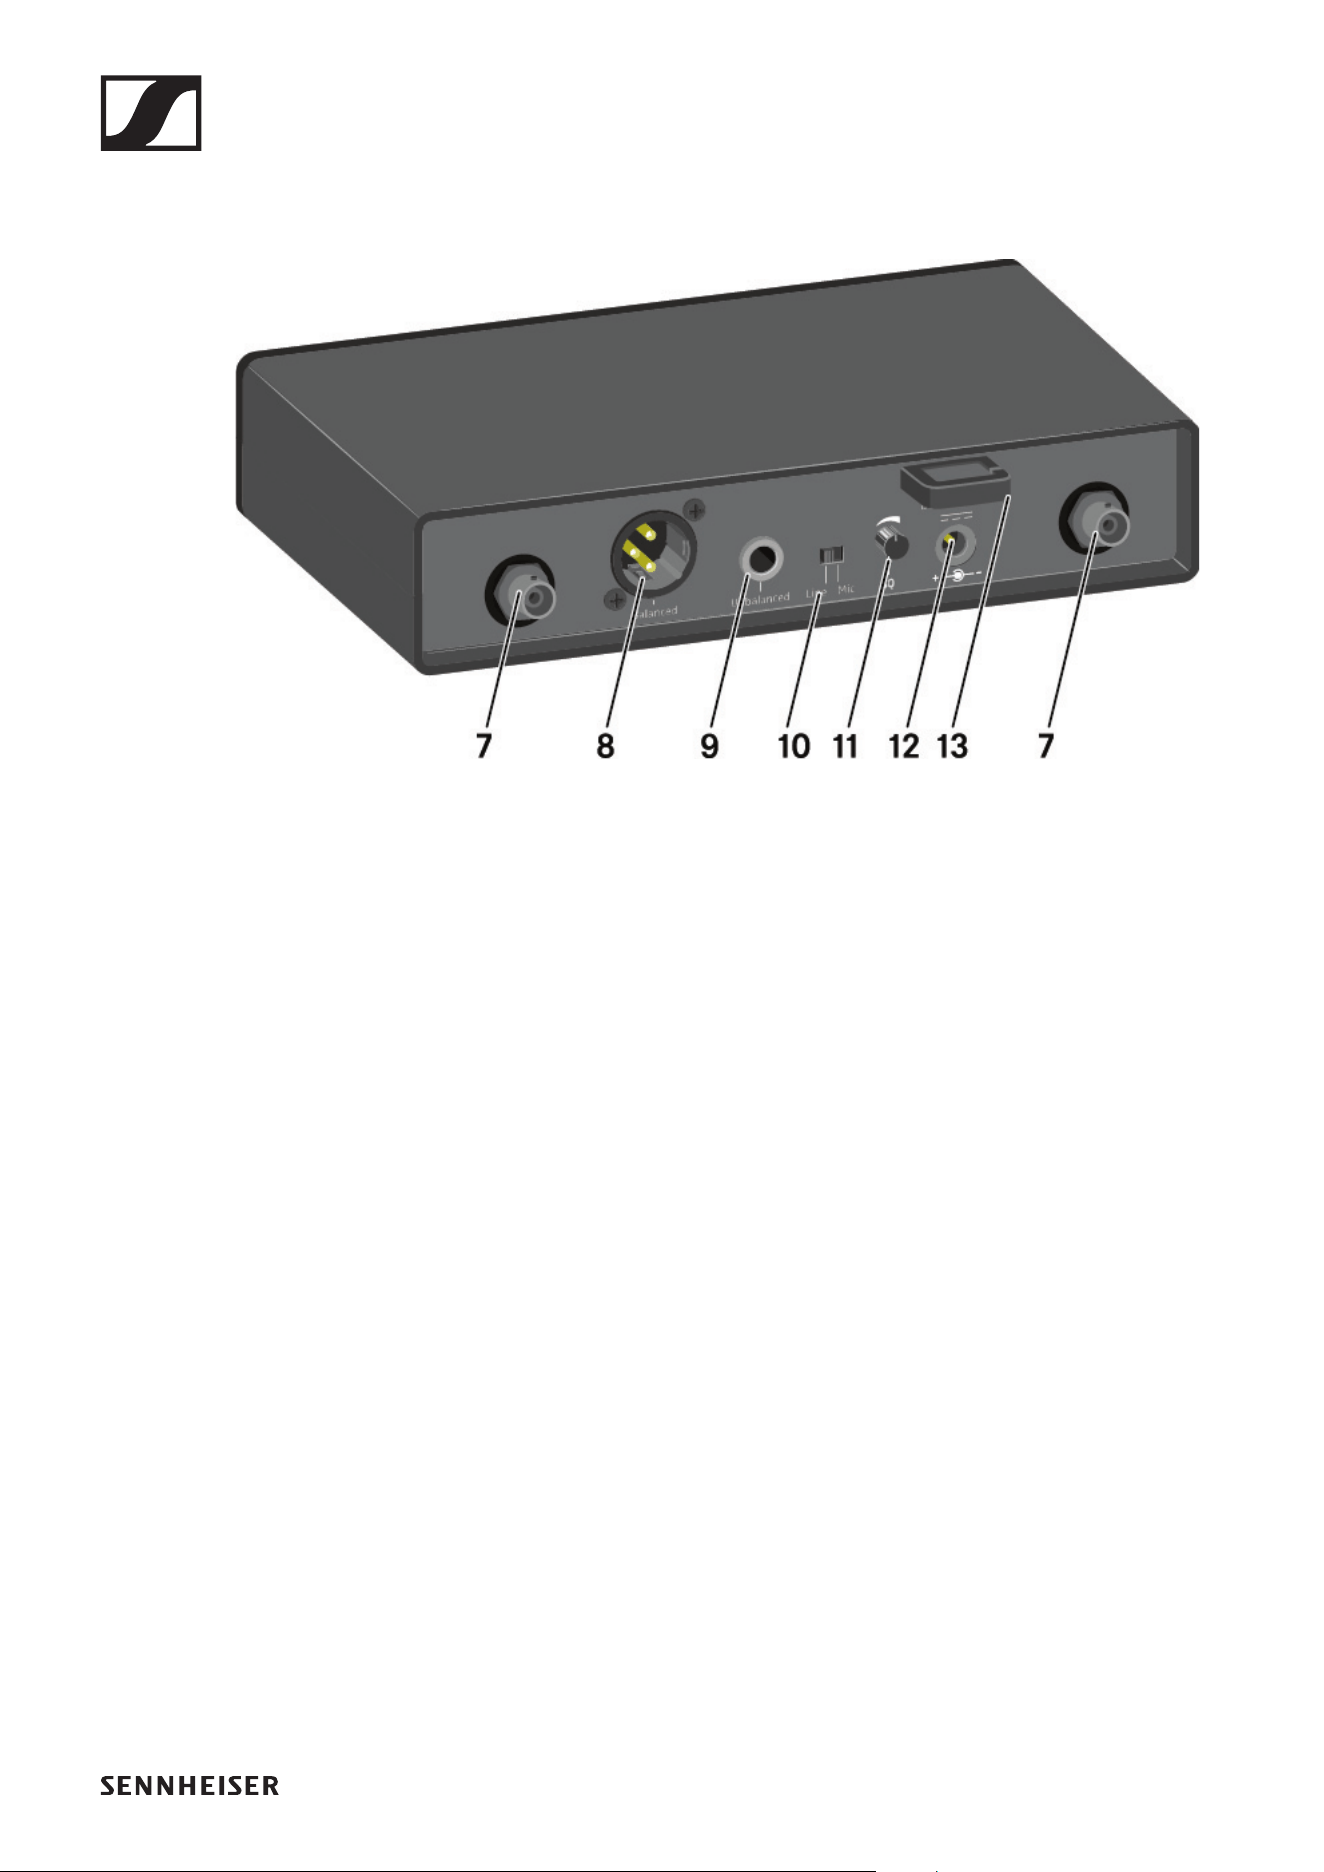
56
Back
7 BNC sockets, antenna inputs
• See „Connecting antennas“
8 XLR-3 socket for Balanced audio output
• See „Outputting audio signals“
9 6.3 mm jack socket for Unbalanced audio output
• See „Outputting audio signals“
10Line/Mic switch for selecting the signal type
• See „Setting options on the rear of the device“
• See „Outputting audio signals“
11SQ control knob for adjusting the squelch value
• See „Setting options on the rear of the device“
12Power connection socket for the power supply unit
• See „Connecting/disconnecting the receiver to/from the
power supply system“
13Strain relief for the connection cable of the power supply
unit
• See „Connecting/disconnecting the receiver to/from the
power supply system“
EM-XSW 2 rack receiver
57
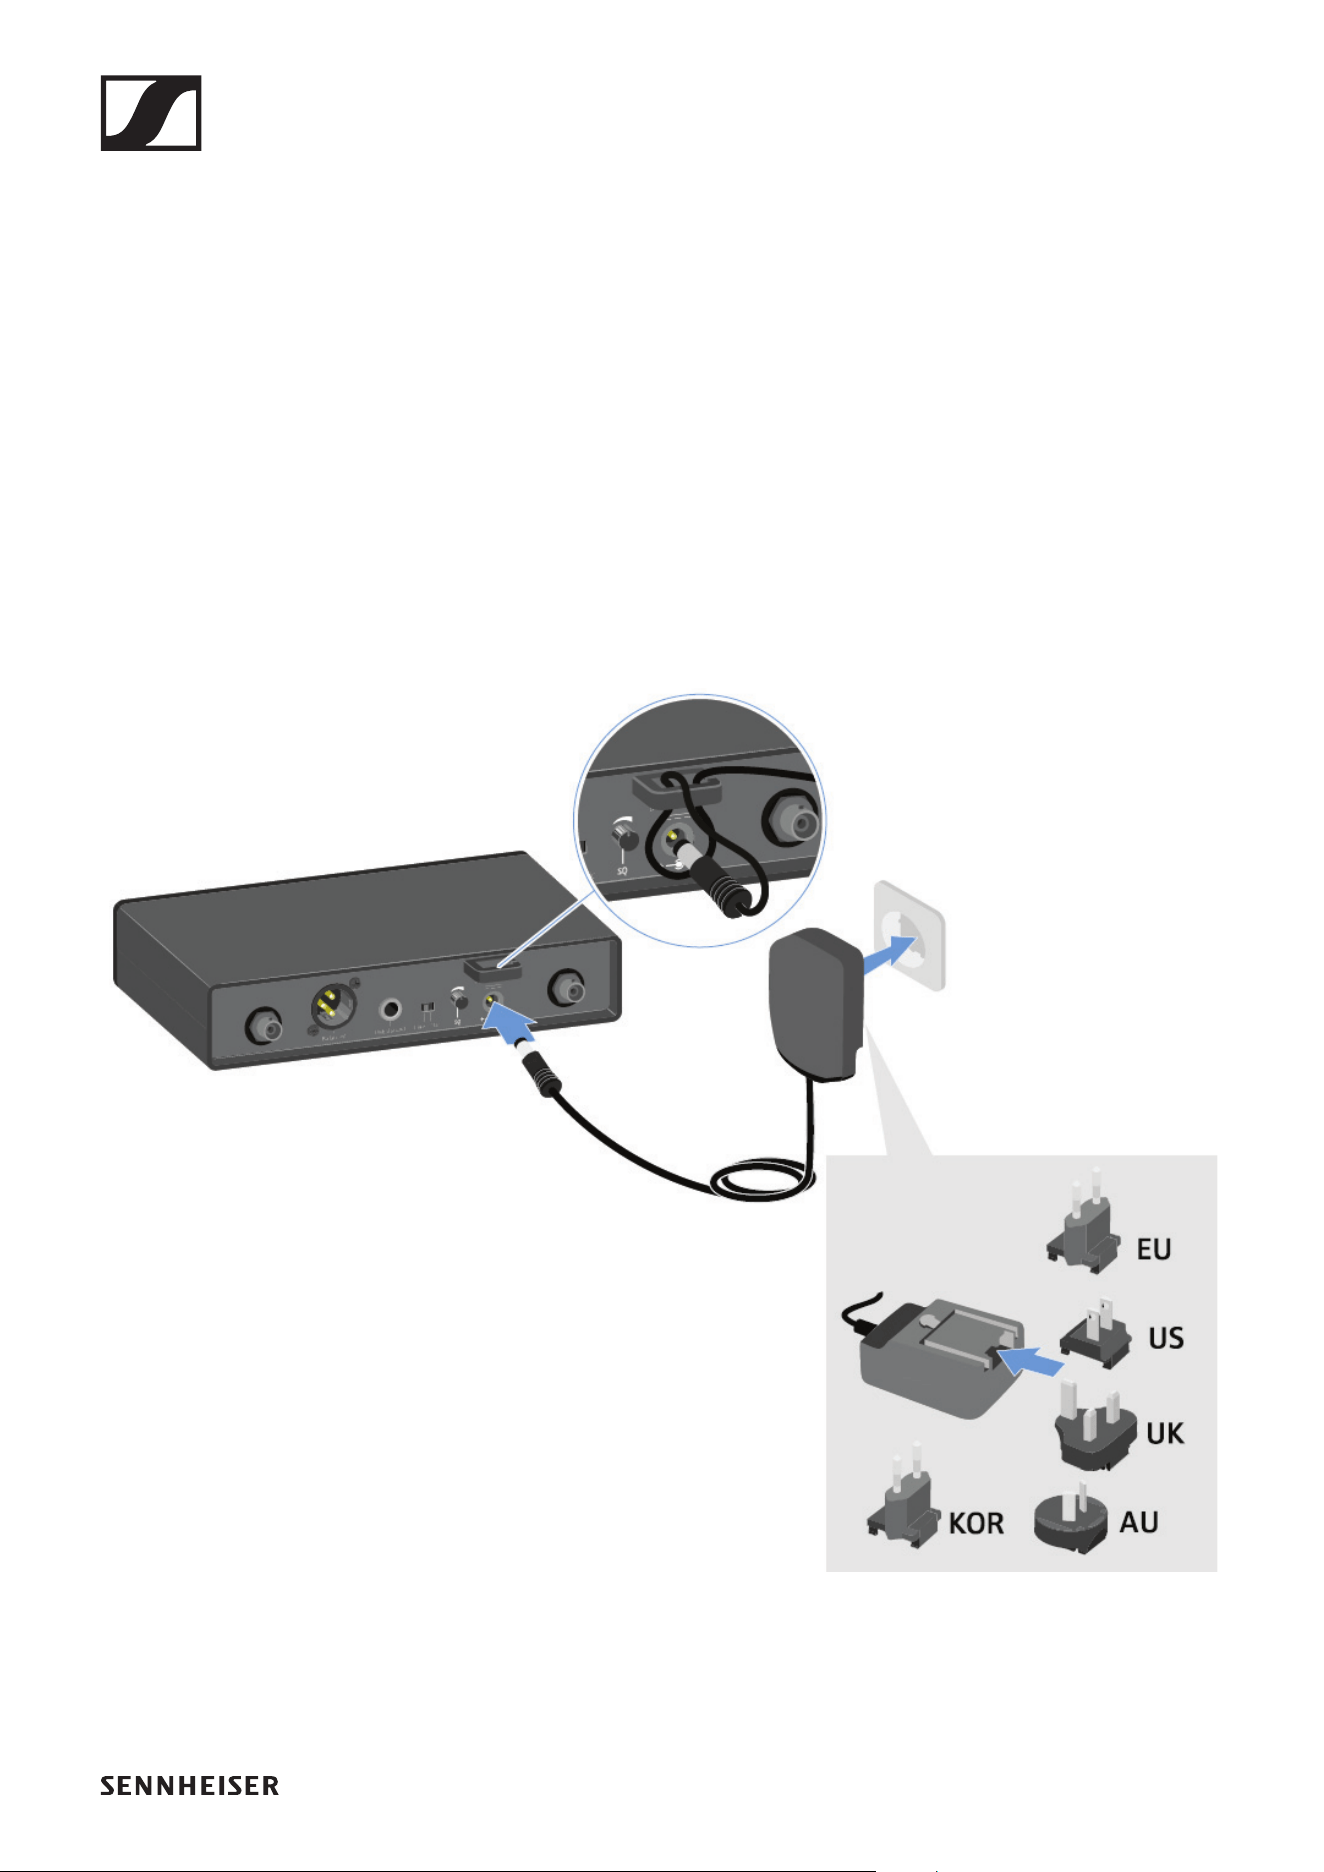
Connecting/disconnecting the receiver to/
from the power supply system
Only use the supplied power supply unit. It is designed for your
receiver and ensures safe operation.
To connect the receiver to the power supply system:
▷ Pass the cable of the power supply unit through the strain
relief.
▷ Insert the plug of the power supply unit into the Power
socket on the receiver.
▷ Slide the supplied country adapter onto the power supply
unit.
▷ Plug the power supply unit into the wall socket.
To completely disconnect the receiver from the power supply
system:
▷ Unplug the power supply unit from the wall socket.
▷ Unplug the power supply unit from the Power socket on the
receiver.

EM-XSW 2 rack receiver
58
Connecting antennas
To connect the supplied rod antennas:
▷ Connect the antennas to the two antenna inputs on the re-
ceiver as shown in the figure.
▷ Slightly angle the antennas to the left and right as shown in
the figure.
EM-XSW 2 rack receiver
59
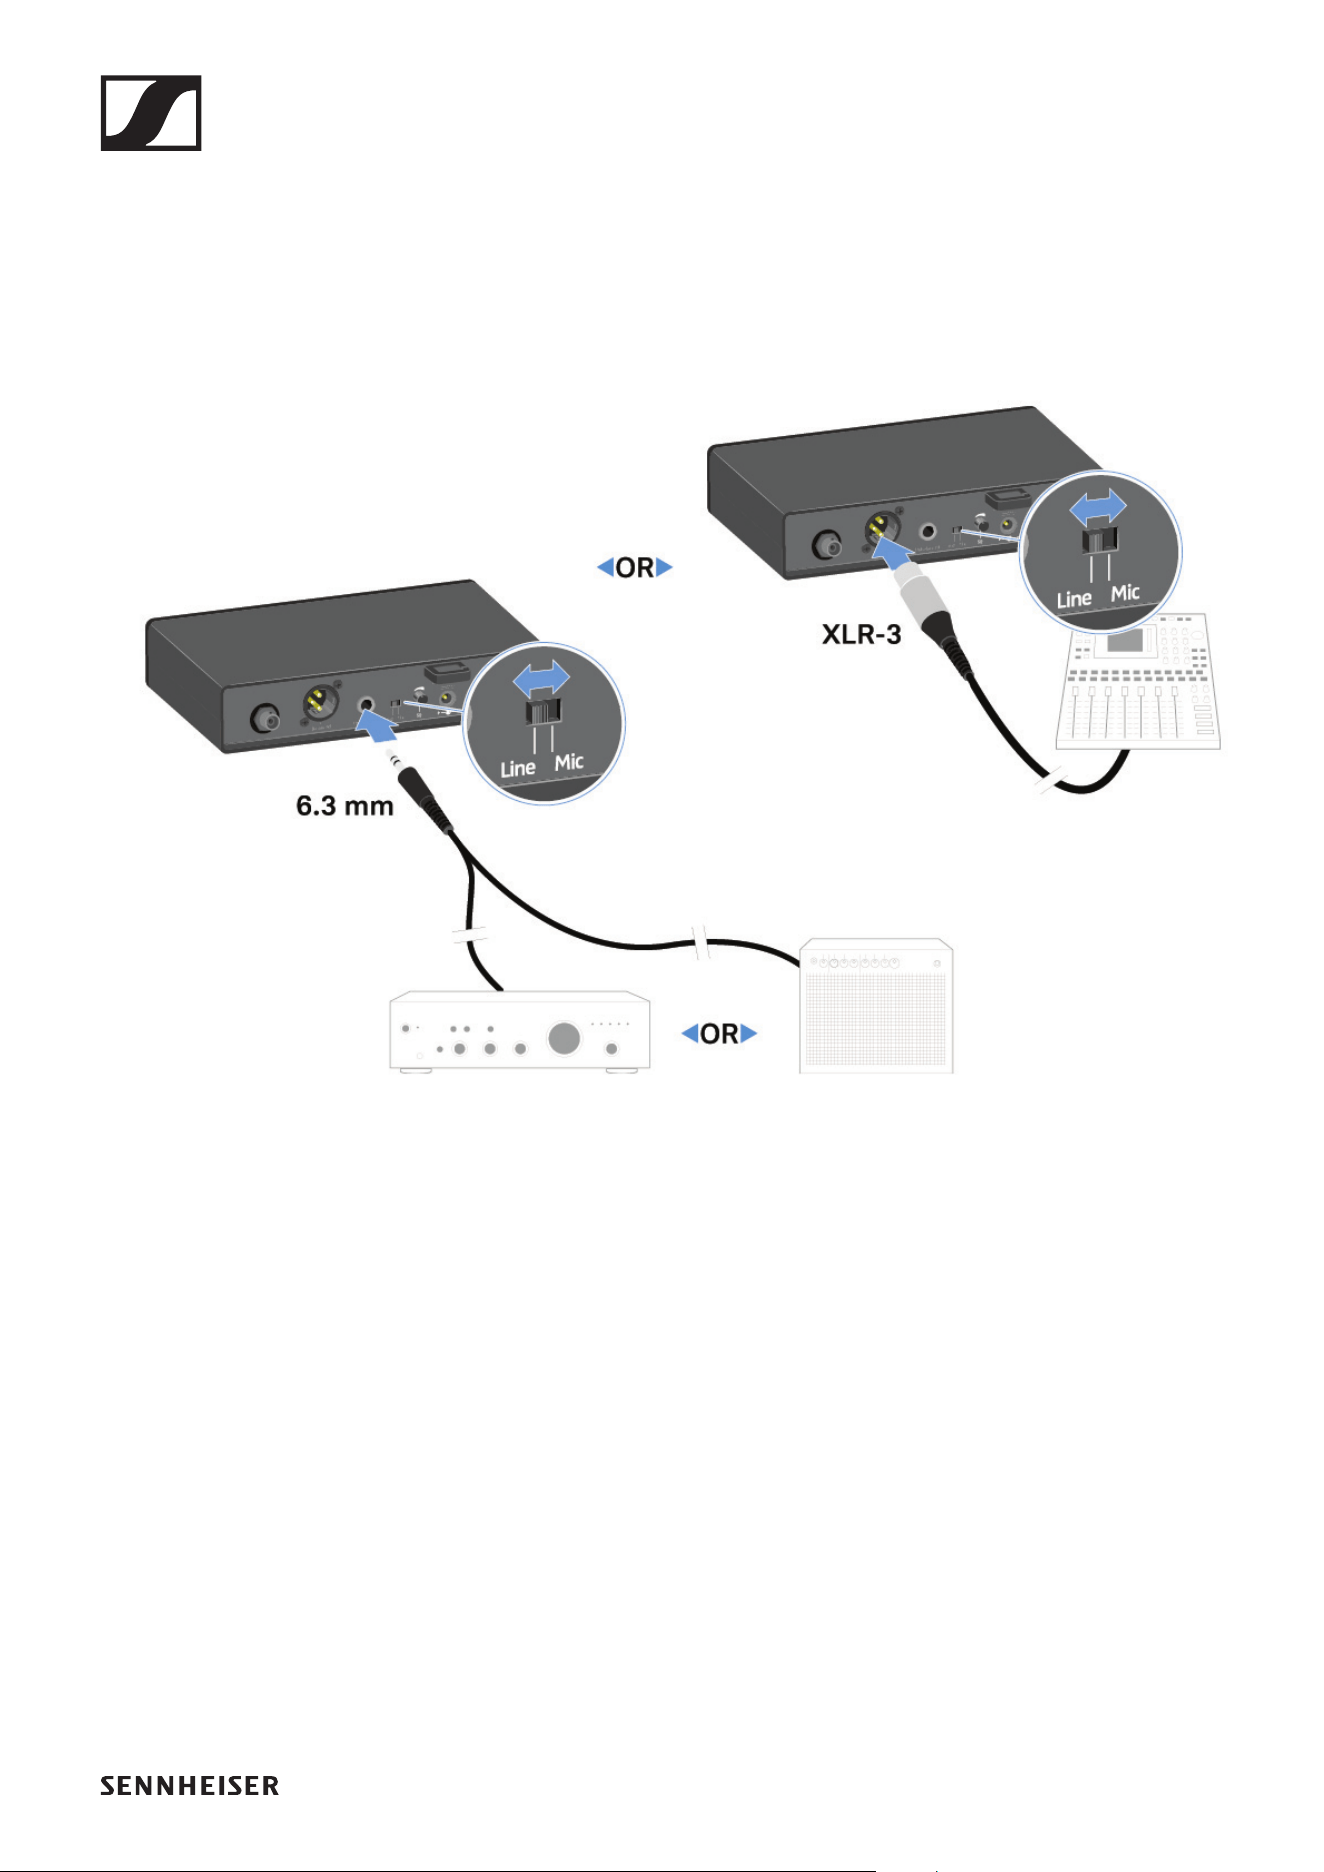
Outputting audio signals
The EM-XSW 2 has a balanced XLR-3M output socket and an
unbalanced 6.3 mm jack output socket.
▷ Always use only one of the two output sockets.
To connect an XLR cable:
▷ Plug the XLR cable into the Balanced socket on the EM-
XSW 2.
To connect a jack cable:
▷ Plug the jack cable into the Unbalanced socket on the EM-
XSW 2.
▷ Set the Line/Mic switch to the desired position.
• Line: when using instruments or other line sources with
the SK-XSW bodypack transmitter
• Mic: when using the SKM 835/865-XSW handheld trans-
mitter or a microphone with the SK-XSW bodypack trans-
mitter

EM-XSW 2 rack receiver
60
Installing receivers in a rack
CAUTION
Rack mounting poses risks
When installing the device in a closed 19" rack or multi-rack
assembly, please consider that, during operation, the ambient
temperature, the mechanical load and the electrical potentials
will be different from those of devices which are not mounted
into a rack.
▷ Make sure that the ambient temperature within the rack
does not exceed the permissible temperature limit stated
in the specifications. See „SPECIFICATIONS“.
▷ Ensure sufficient ventilation; if necessary, provide addi-
tional ventilation.
▷ Make sure that the mechanical load of the rack is even.
▷ When connecting to the power supply system, observe the
information indicated on the type plate. Avoid overloading
the circuits. If necessary, provide overcurrent protection.
▷ When mounting in a rack, please note that intrinsically
harmless leakage currents of the individual power supply
units may accumulate, thereby exceeding the permissible
limit value. As a remedy, ground the rack via an additional
ground connection.
To mount the receiver in a rack, you will need the GA 1-XSW 2
rack mount kit (see „Accessories“).
EM-XSW 2 rack receiver
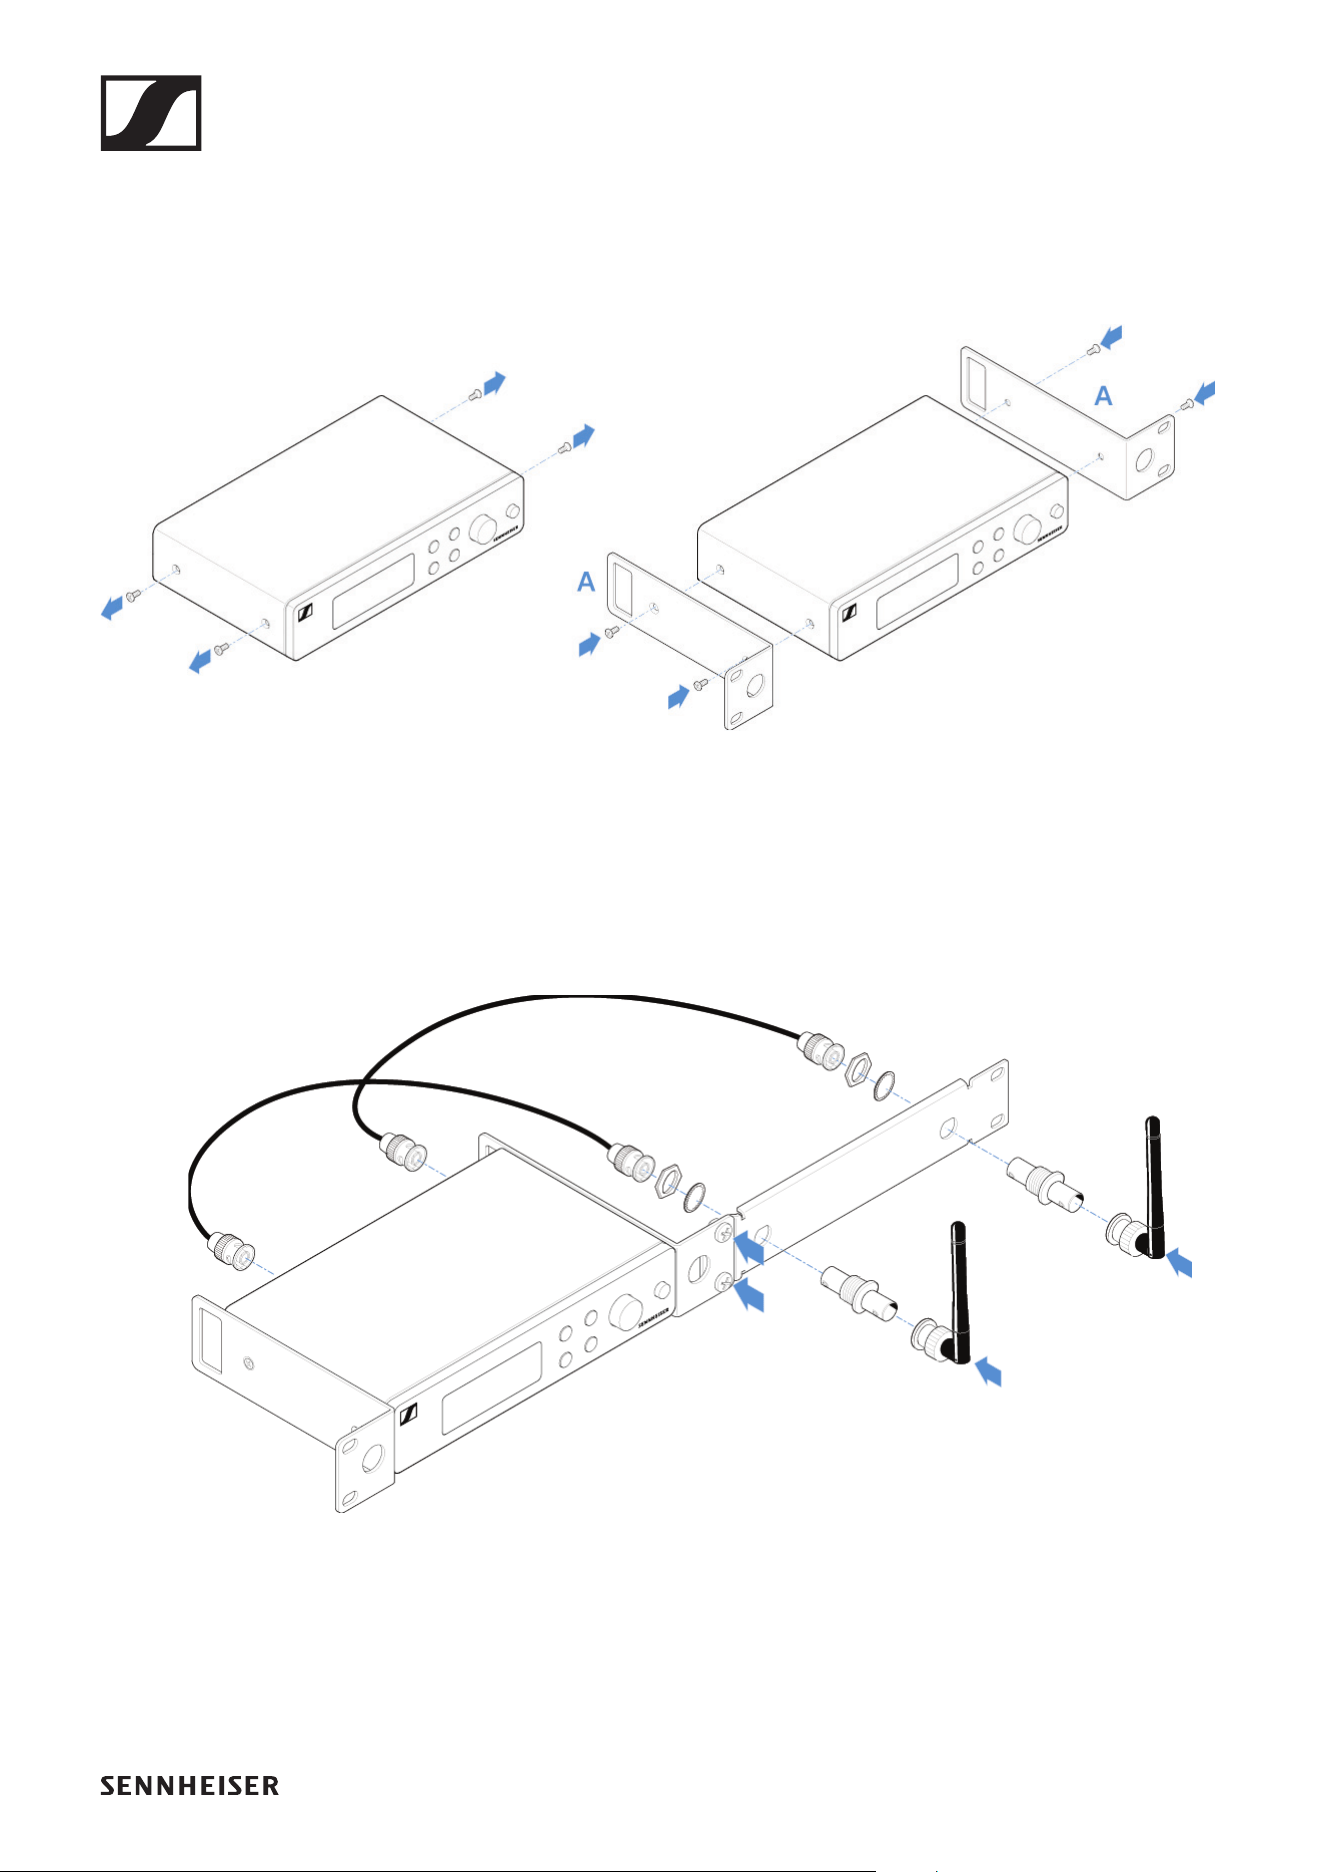
61
Mounting a single receiver in a rack
▷ Connect the mounting brackets to the sides of the receiver
as shown in the figure.
►
▷ Attach the front panel as shown in the figure.
▷ If desired, attach the antennas to the front panel as shown
in the figure.
This requires the optional GA 2-XSW 2 antenna front
mount kit (see „Accessories“).
►
EM-XSW 2 rack receiver
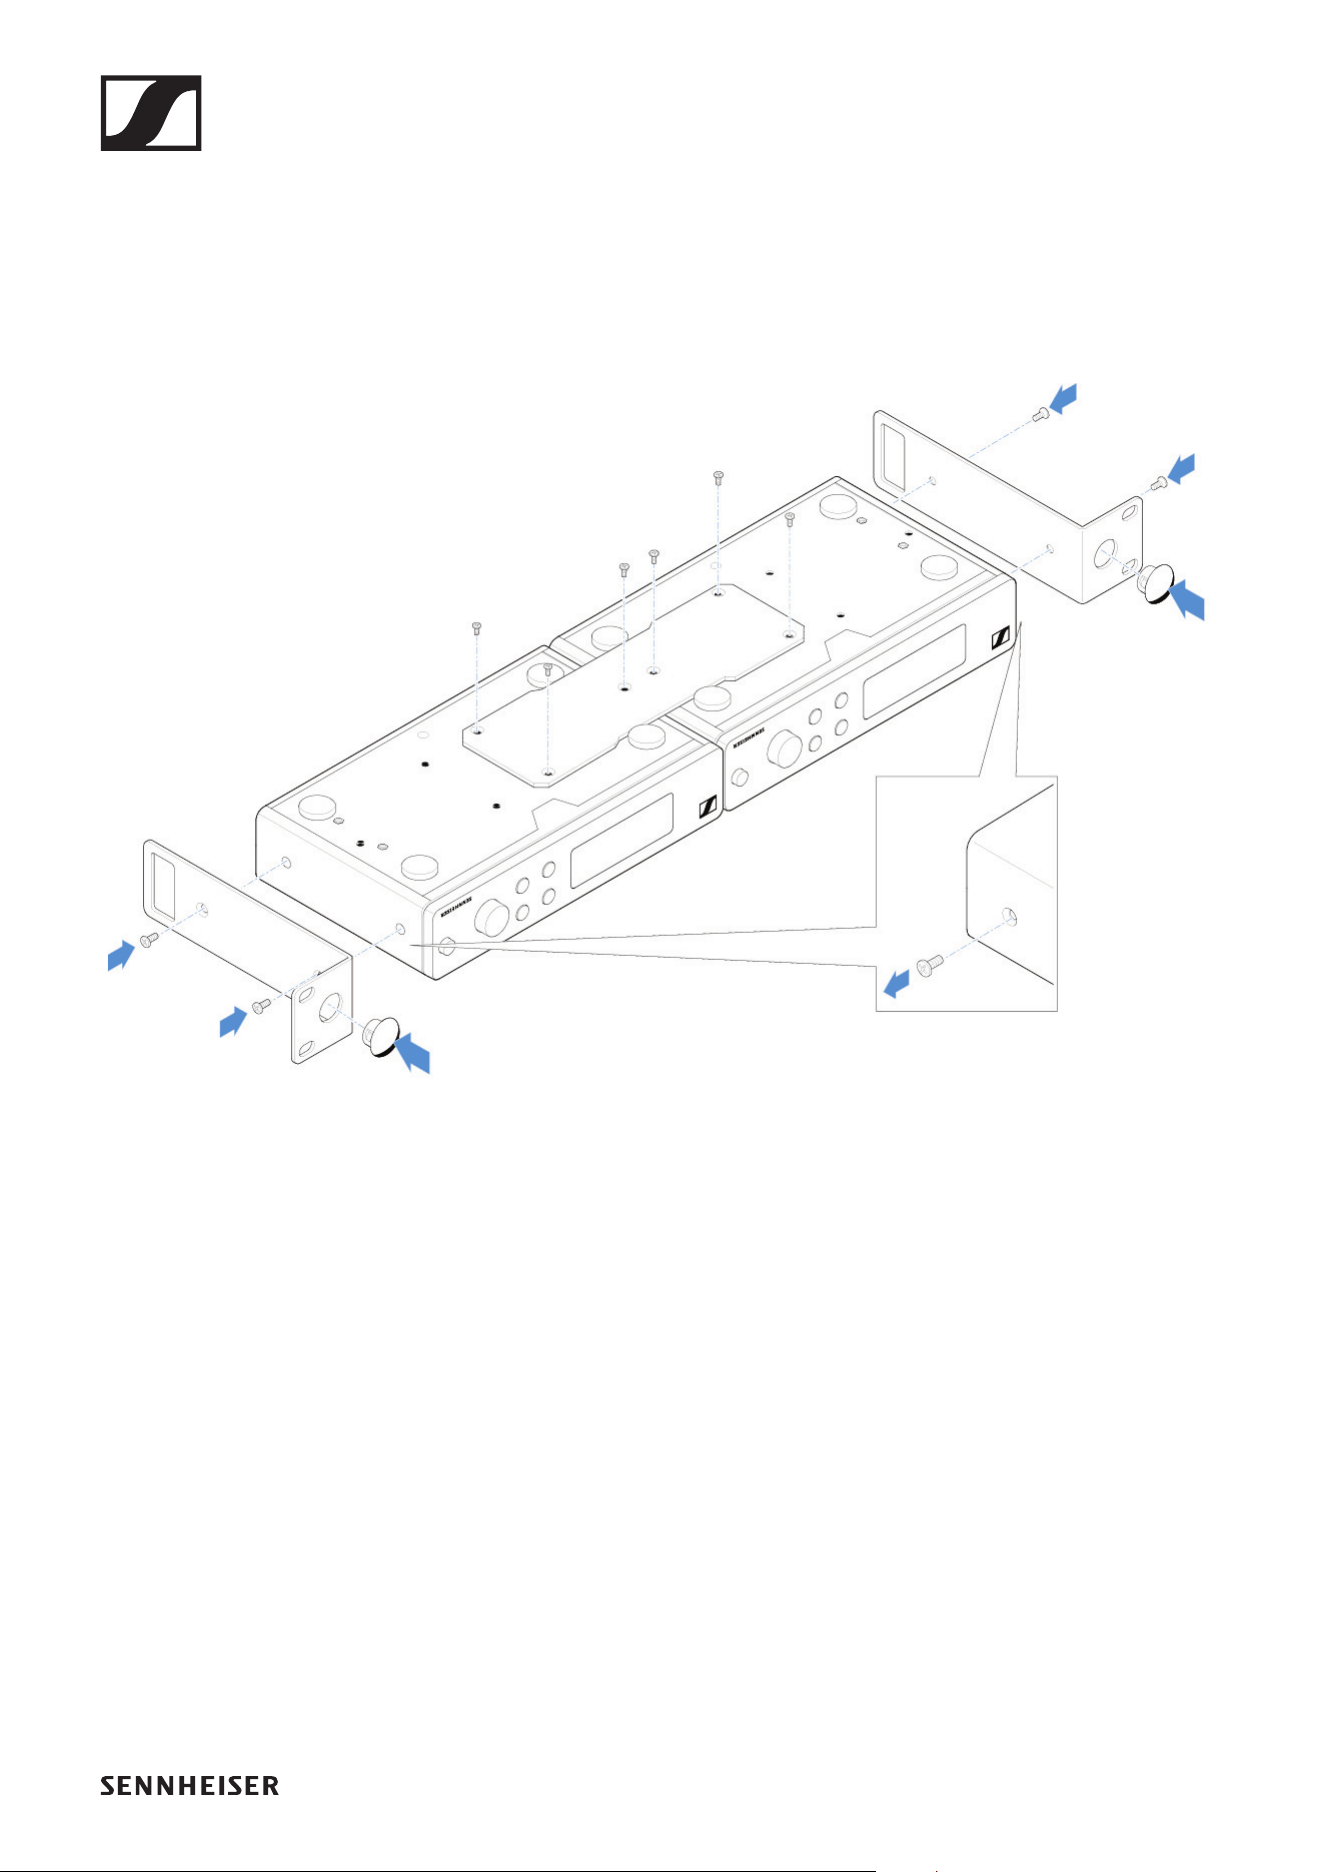
62
Mounting two receivers side by side in a rack
▷ Place both receivers upside down and side by side on an
even surface.
▷ Tighten the jointing plate as shown in the figure.
▷ Attach the mounting brackets as shown in the figure.
►
EM-XSW 2 rack receiver
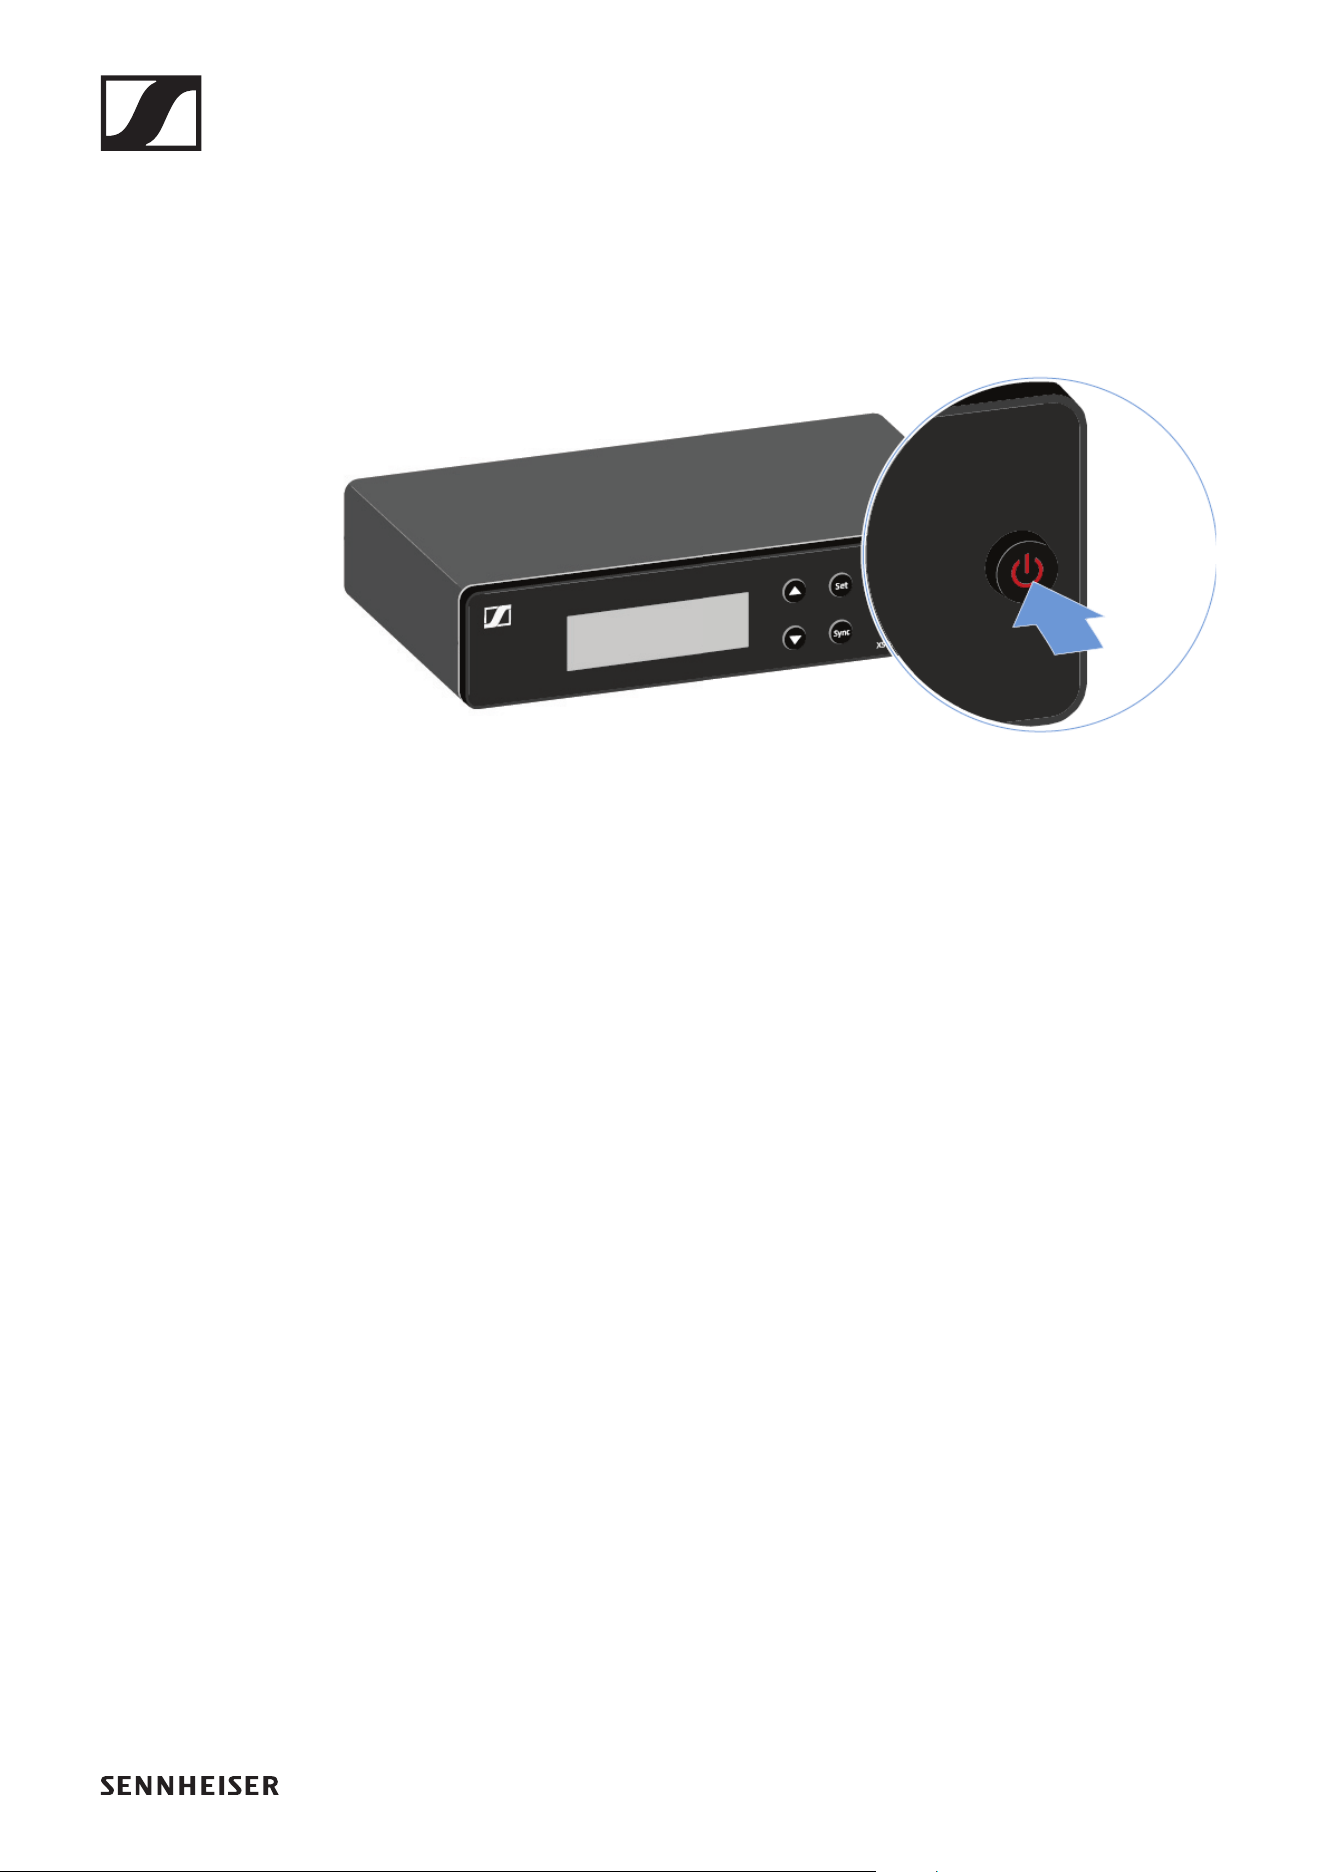
63
Switching the receiver on and off
To switch the receiver on:
▷ Short-press the ON/OFF button.
The receiver switches on.
To switch the receiver to standby mode:
▷ Hold down the ON/OFF button until the display switches
off.
To switch the receiver off completely:
▷ Disconnect the receiver from the power supply system by
unplugging the power supply unit from the wall socket.
EM-XSW 2 rack receiver
64
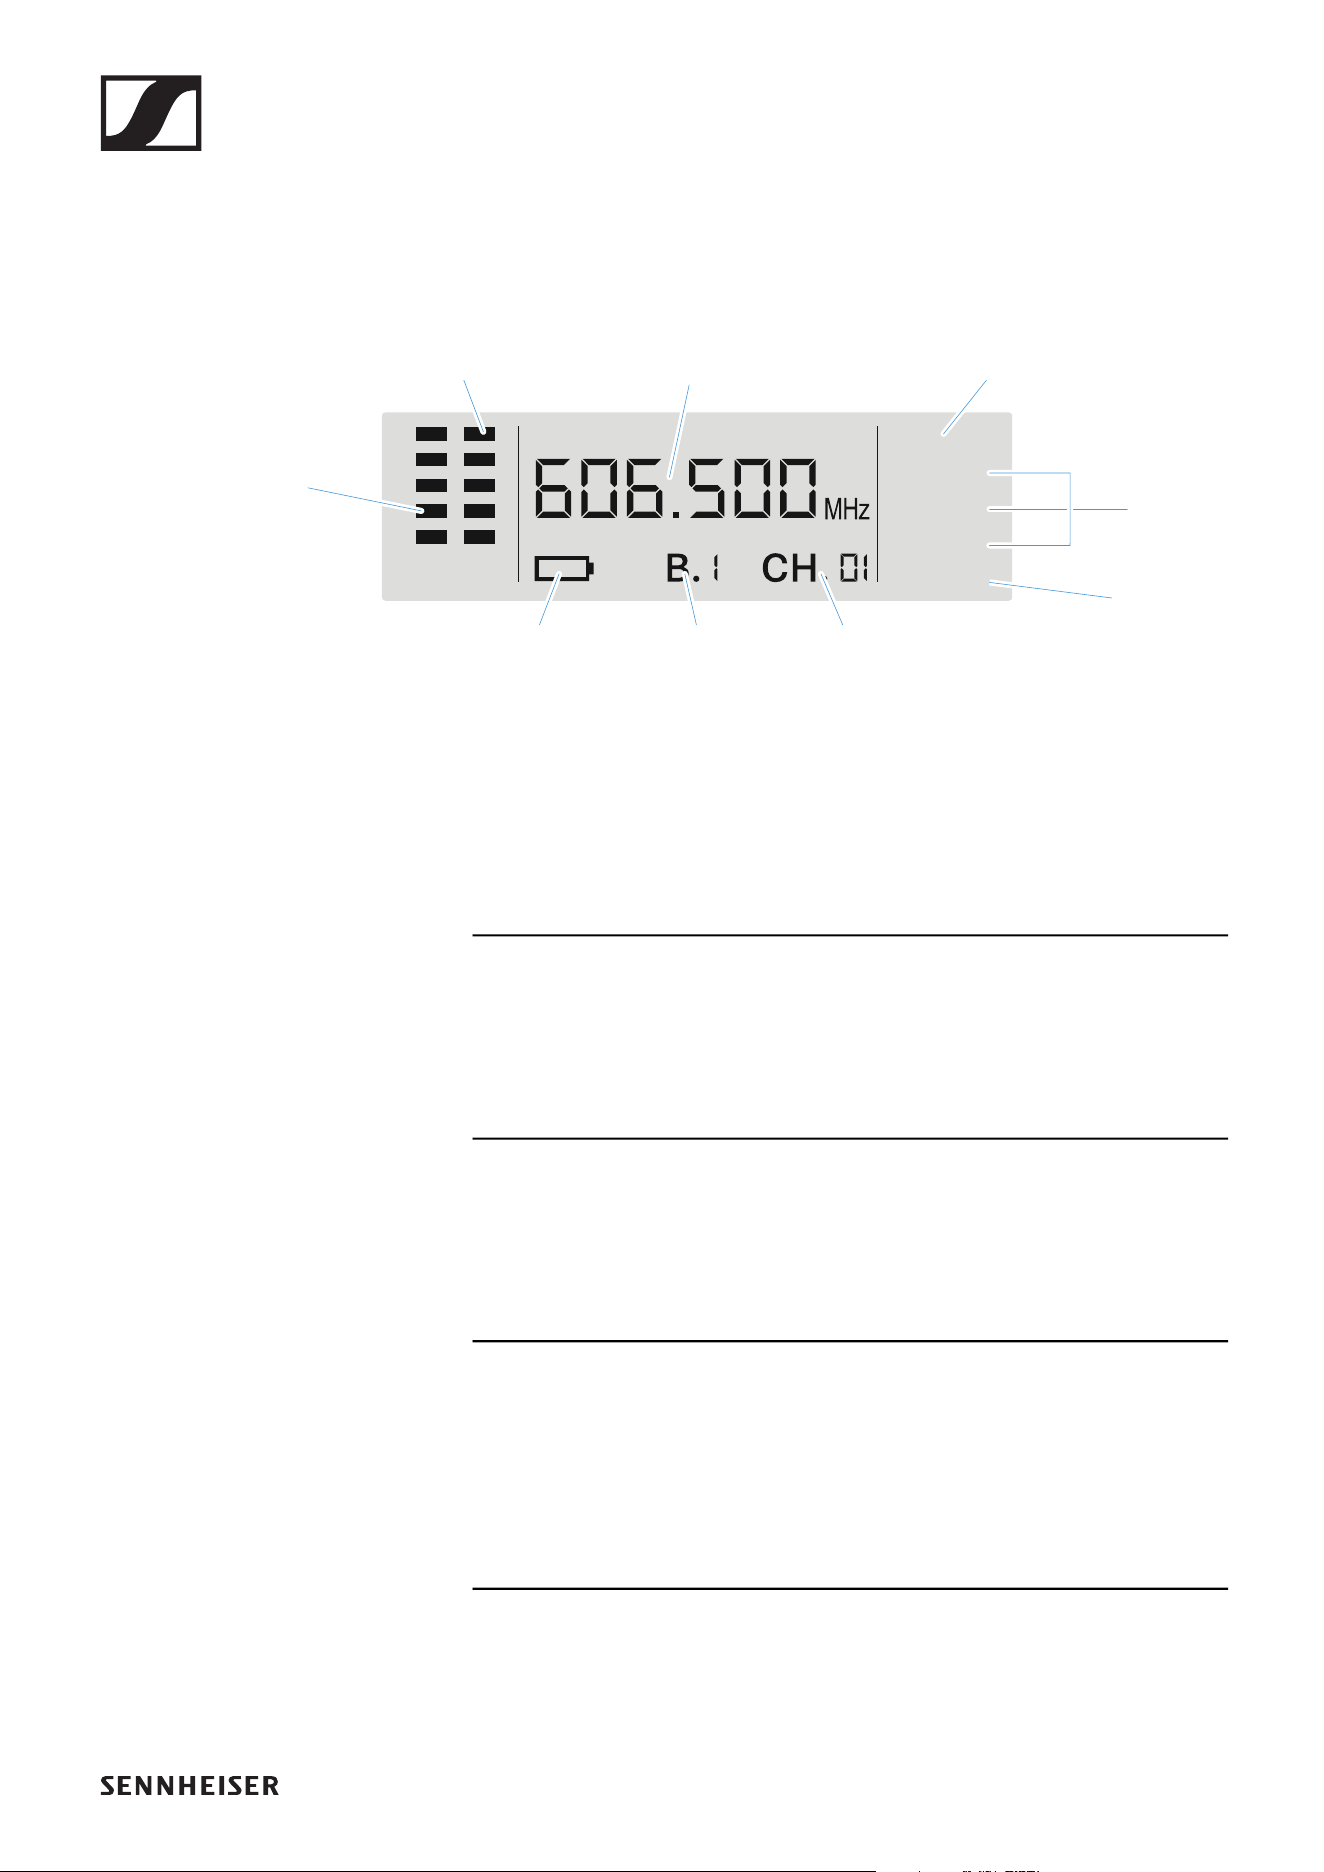
Information on the receiver’s display
Status information such as frequency, reception quality, bat-
tery status and audio level is shown on the display.
Further information
Antenna diversity:
• Shows which of the two antennas is currently being used
for the radio link (ANT A or ANT B)
Radio frequency level / Sync:
• „Establishing a radio link | Synchronizing the receiver and
transmitter“
Frequency / Bank / Channel:
• „SCAN menu item“
• „PRESET menu item“
• „TUNE menu item“
Menu:
• „Setting options on the front of the device“
ANT AB
TUNE
PRESET
SCAN
SYNC
RF AF
Radio
frequency
level
Transmitter
audio level
Antenna
diversity
Frequency
Menu
Sync
BankTransmitter
battery
Channel

EM-XSW 2 rack receiver
66
Setting options on the front of the device
Navigation buttons
Use the following buttons to navigate through the receiver’s
settings.
►
Press the UP or DOWN button
• Changes to the previous or next menu item
• Changes the setting of a menu item
Press the SET button
• Save settings in a menu item
Press the ON/OFF (ESC) button
• Cancel input
EM-XSW 2 rack receiver
67
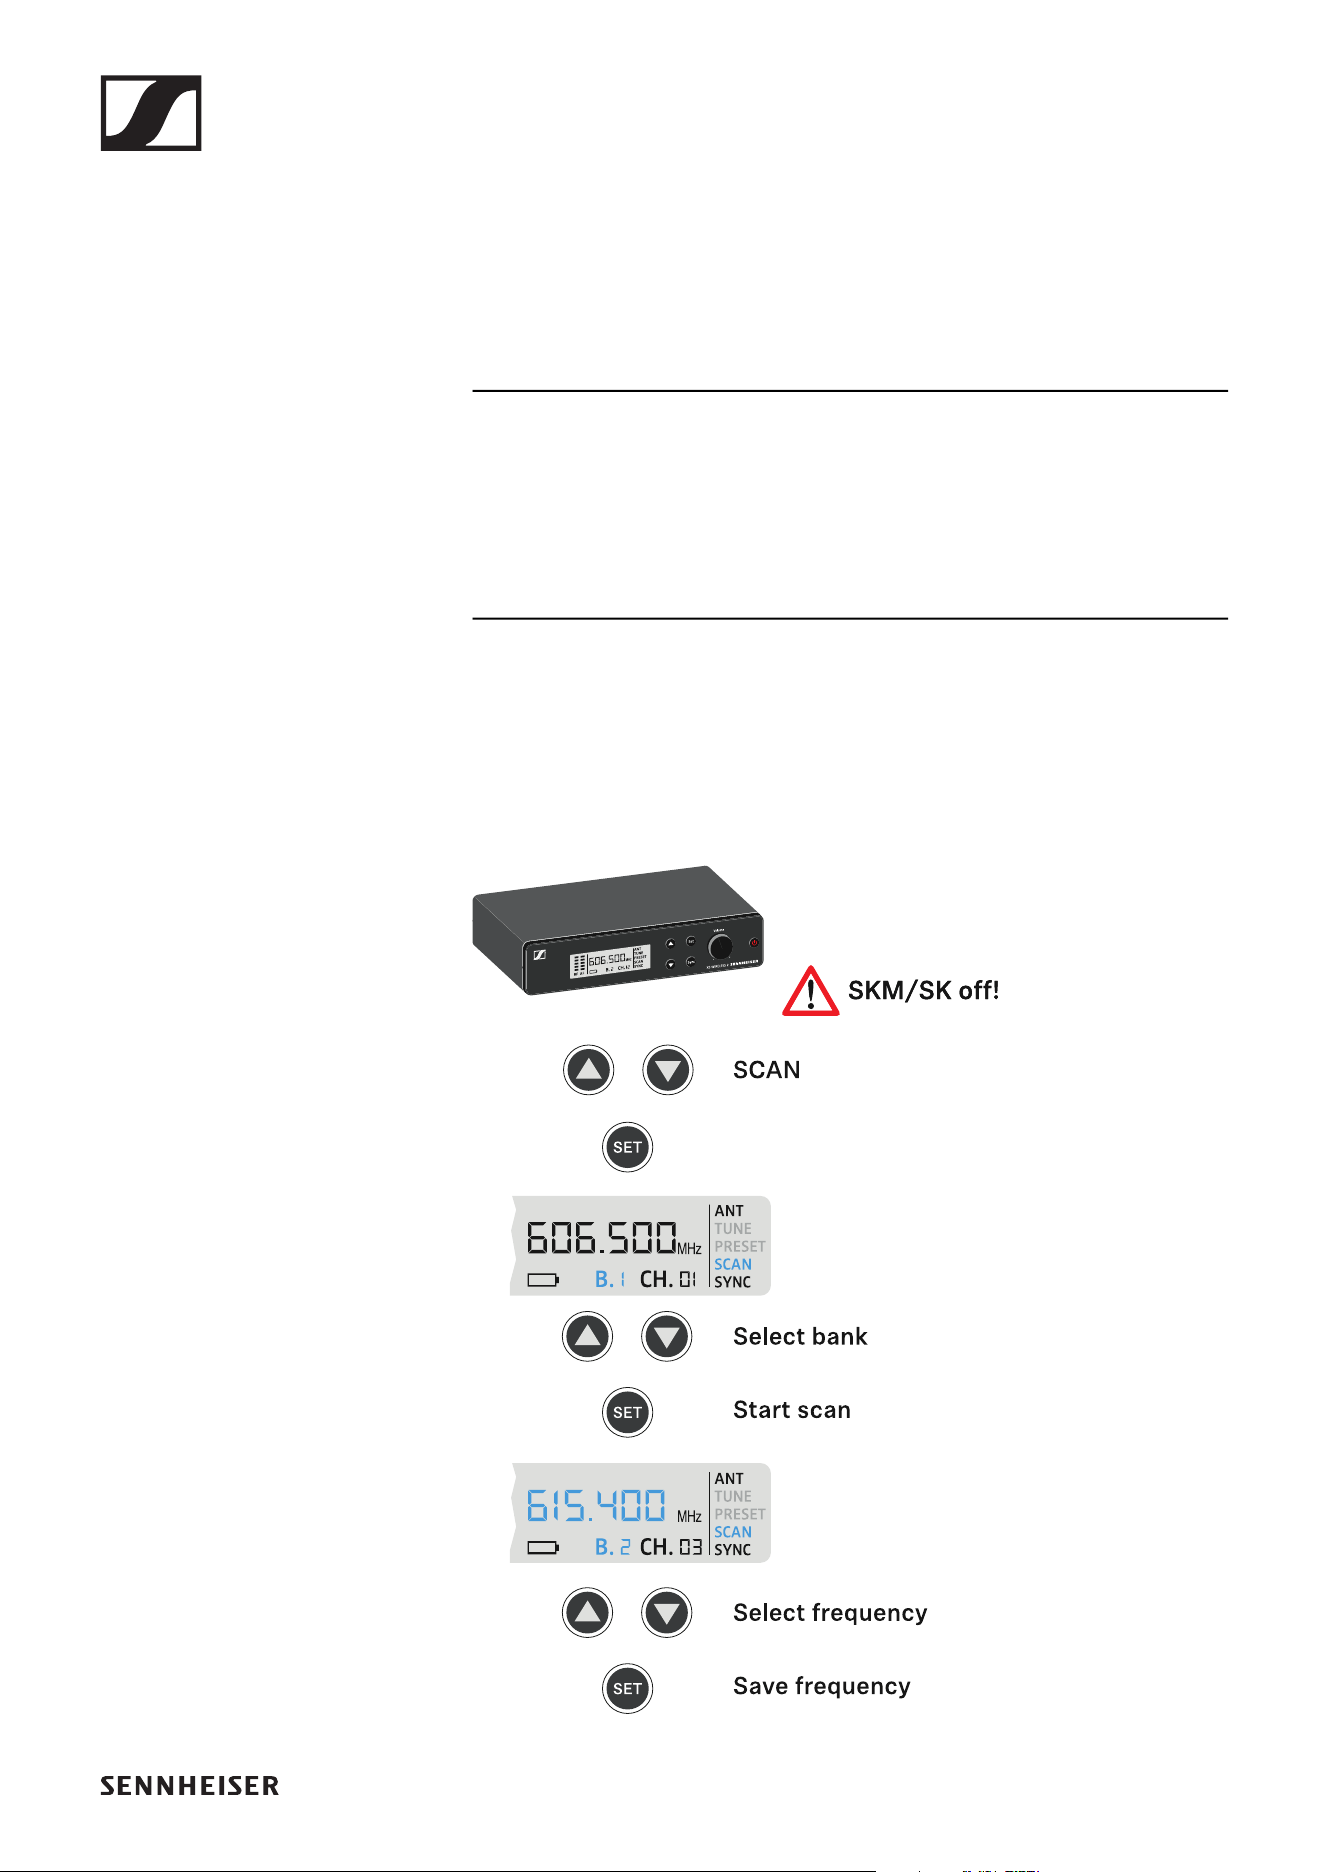
SCAN menu item
Under the SCAN menu item, you can perform an automatic
frequency scan of your area. This enables you to easily find
and assign free radio frequencies.
Switch off all transmitters before you perform the scan. If
transmitters are still switched on, they are detected as un-
available frequencies and the frequencies that are actually
available cannot then be used.
▷ Press the UP or DOWN button until the SCAN menu item
appears in the display.
▷ Press the SET button to open the menu item.
EM-XSW 2 rack receiver
68
▷ Press the UP or DOWN button to select a frequency bank.
▷ Press the SET button to start the frequency scan in the se-
lected bank.
The next free frequency is shown on the display.
▷ Press the SET button to accept the displayed frequency.
or
▷ Press the UP or DOWN button to display the next free fre-
quency.
or
▷ Press the ON/OFF (ESC) button to cancel the scan.
The previous frequency remains unchanged.
If you have set a new frequency, you must still syn-
chronize the receiver with the transmitter to es-
tablish the radio link (see „Establishing a radio link
| Synchronizing the receiver and transmitter“).
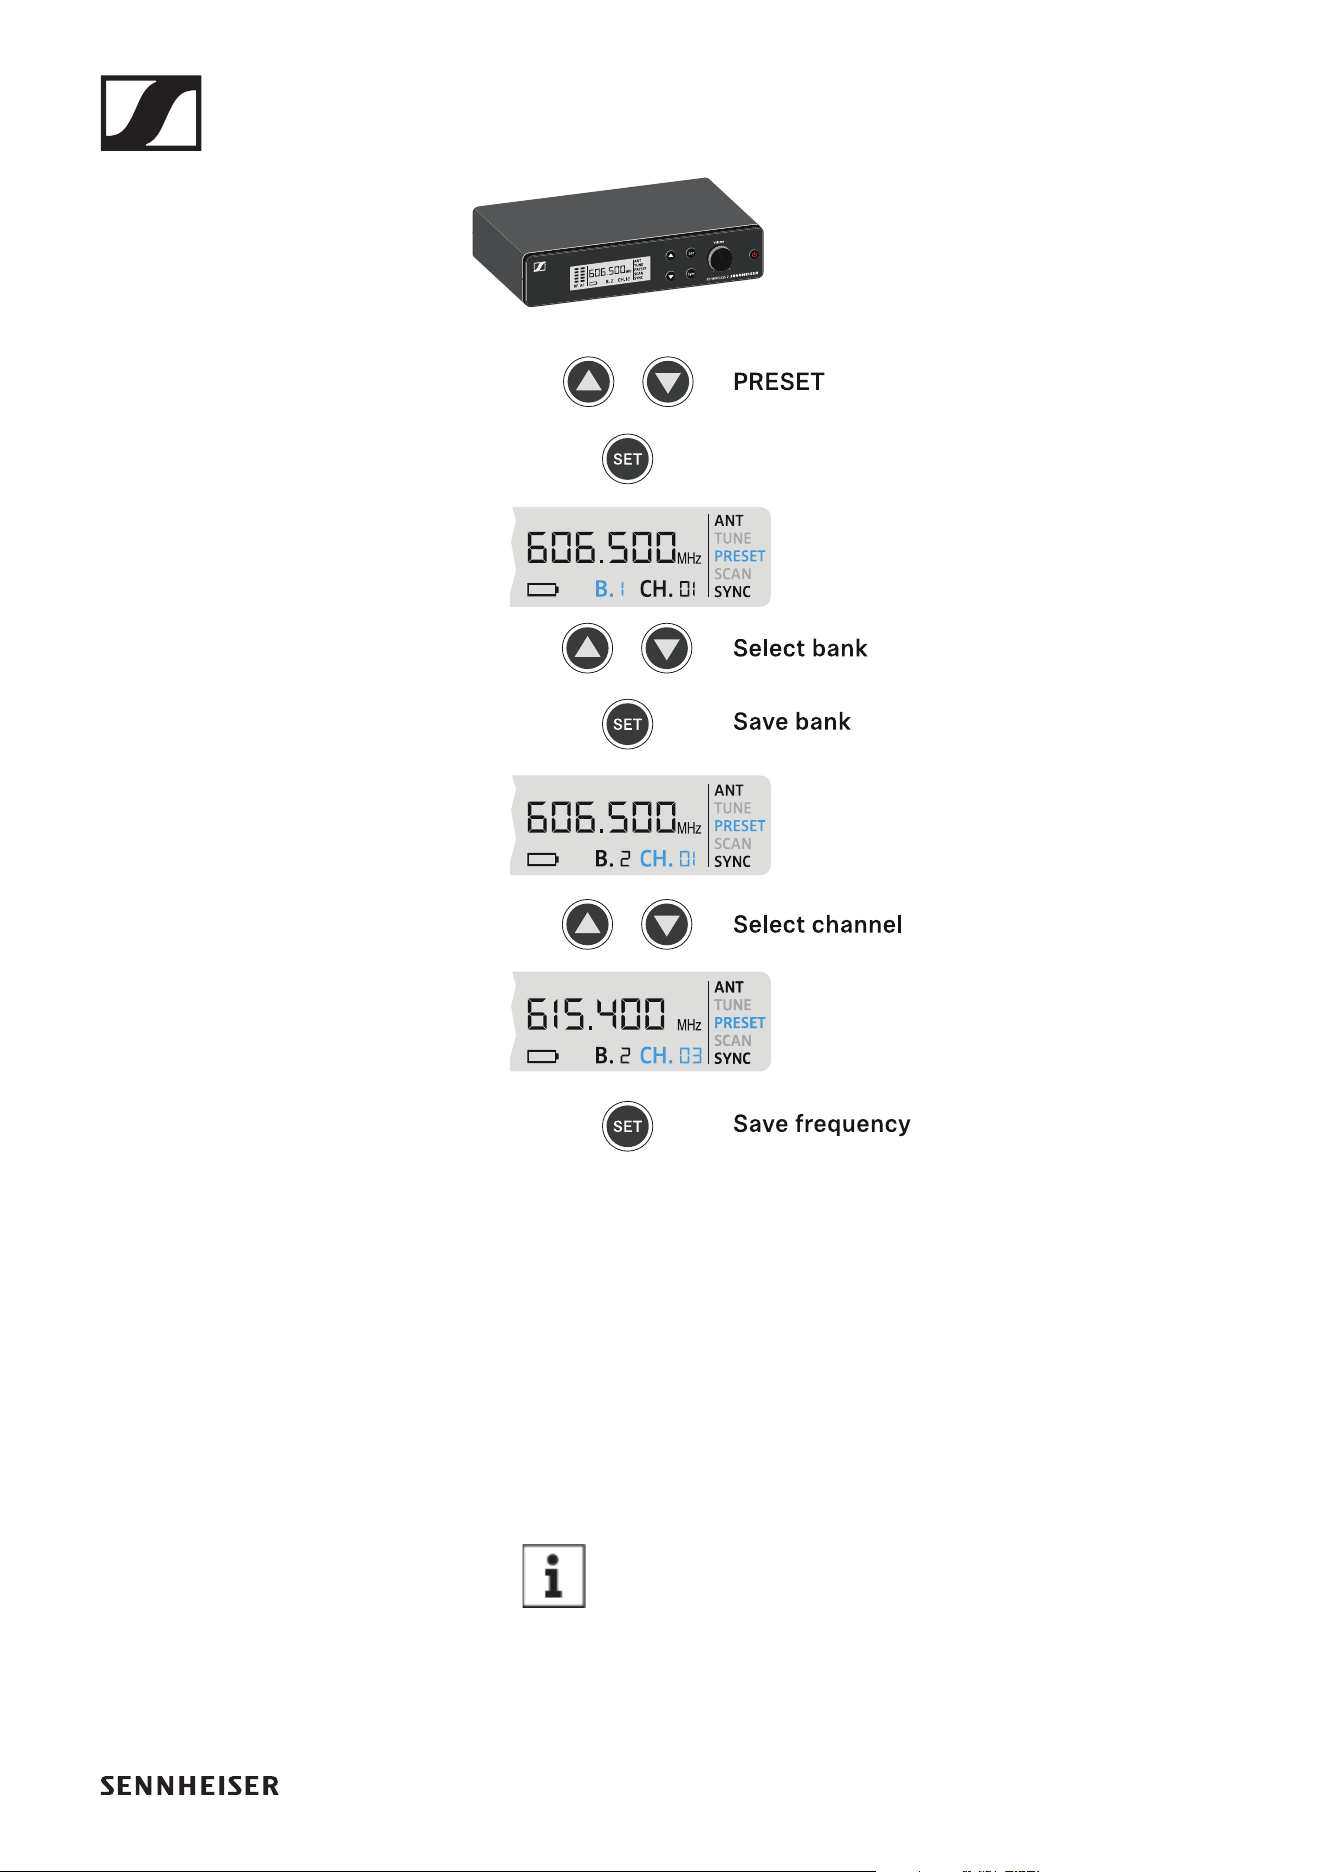
PRESET menu item
Under the PRESET menu item, you can set the radio frequency
by selecting a preset channel.
If you are not sure whether the selected frequency
is free, we recommend performing a scan to detect
all free frequencies: „SCAN menu item“.
▷ Press the UP or DOWN button until the PRESET menu item
appears in the display.
▷ Press the SET button to open the menu item.
EM-XSW 2 rack receiver
69
▷ Press the UP or DOWN button to select a frequency bank.
▷ Press the SET button to save the selected frequency bank.
▷ Press the UP or DOWN button to select a channel in the fre-
quency bank.
▷ Press the SET button to save the selected channel.
or
▷ Press the ON/OFF (ESC) button to cancel the setting.
▷ The previous frequency remains unchanged.
If you have set a new frequency, you must still syn-
chronize the receiver with the transmitter to es-
tablish the radio link (see „Establishing a radio link
| Synchronizing the receiver and transmitter“).
EM-XSW 2 rack receiver
70
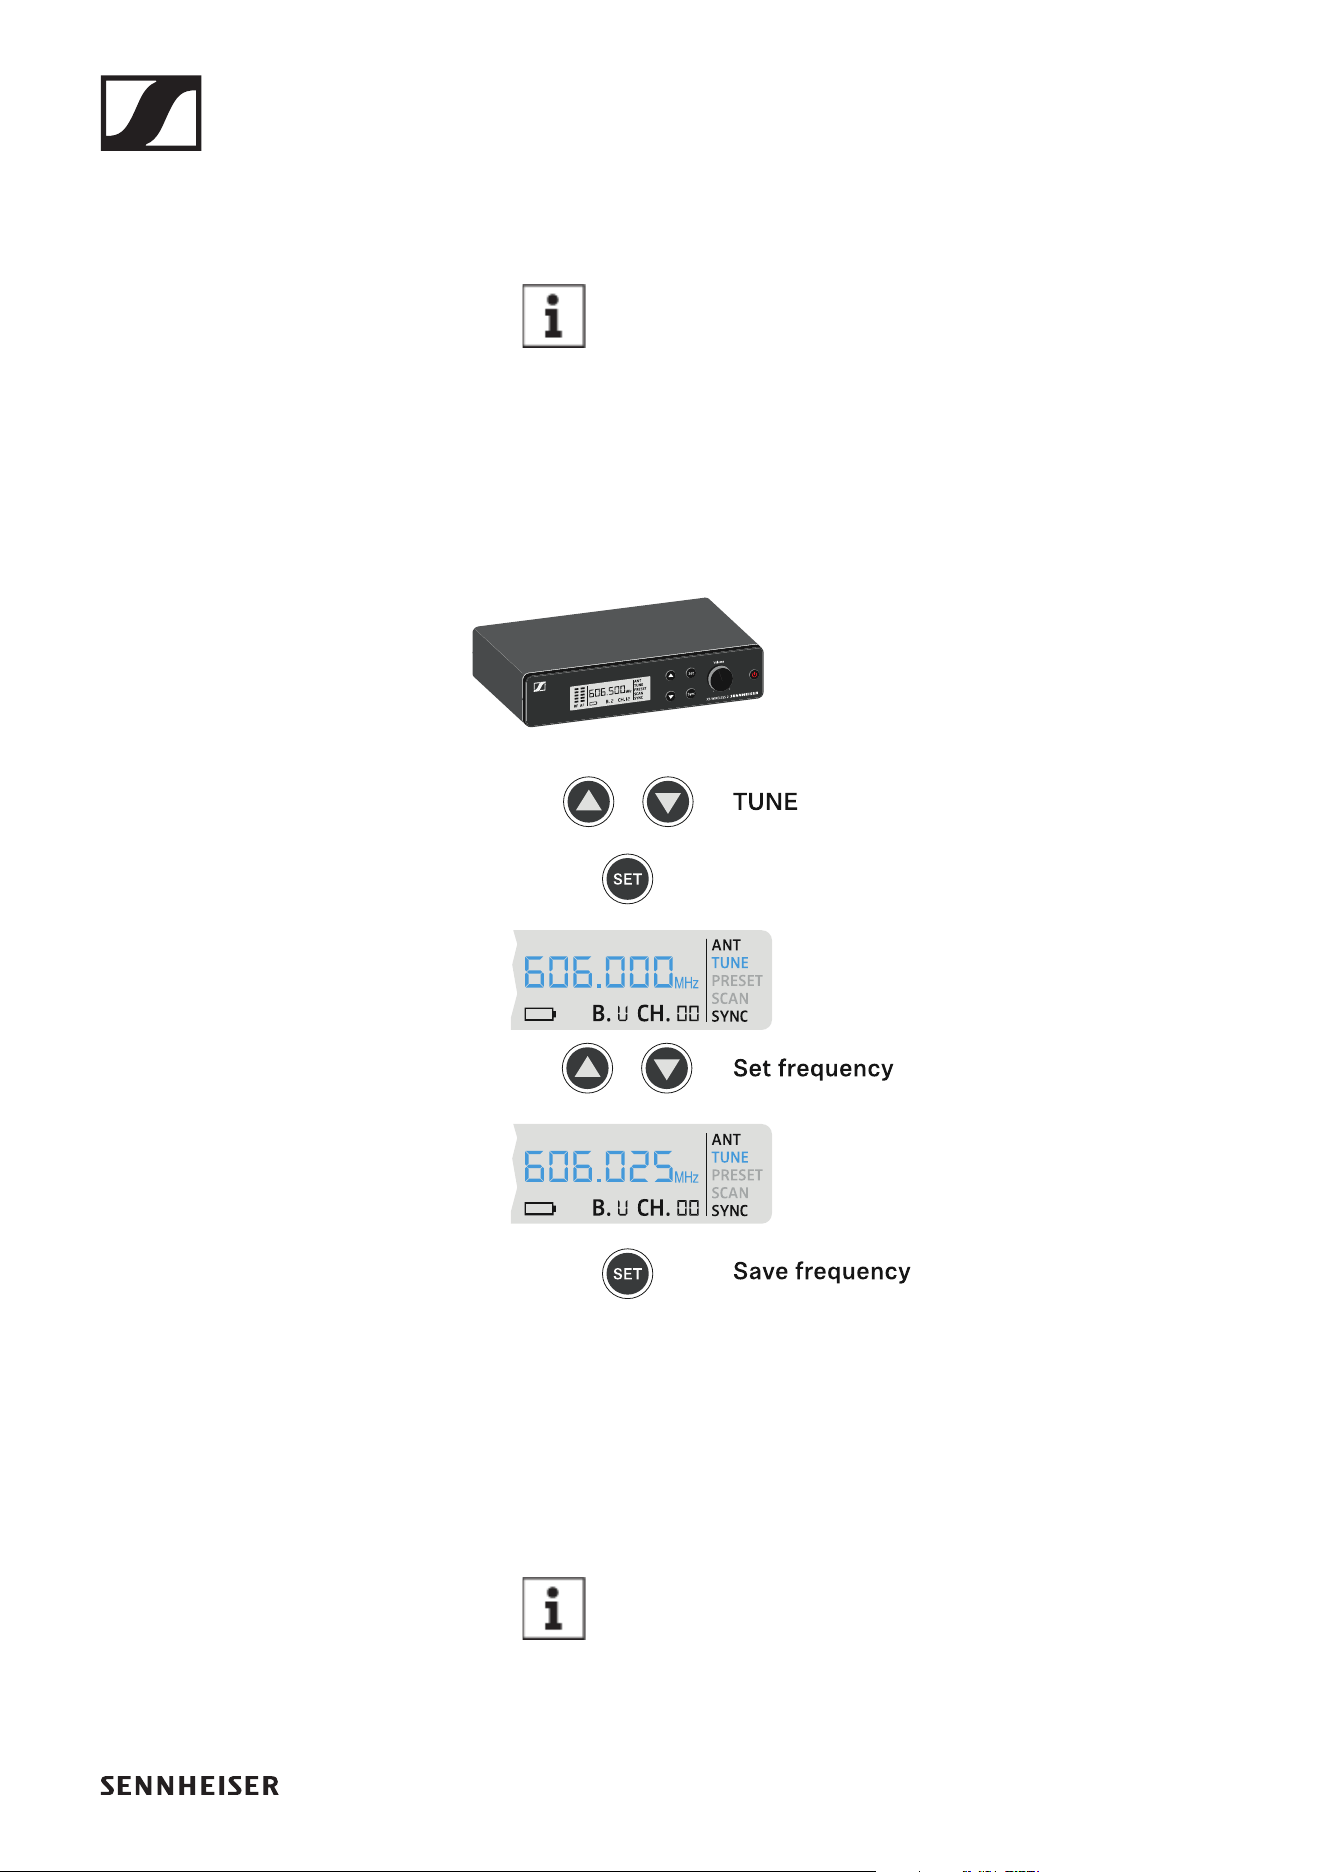
TUNE menu item
Under the TUNE menu item, you can manually set the radio
frequency independently of the preset channels.
If you are not sure whether the selected frequency
is free, we recommend performing a scan to detect
all free frequencies: „SCAN menu item“.
▷ Press the UP or DOWN button until the TUNE menu item
appears in the display.
▷ Press the SET button to open the menu item.
▷ Press the UP or DOWN button to set the frequency.
▷ Press the SET button to accept the displayed frequency.
or
▷ Press the ON/OFF (ESC) button to cancel the setting.
▷ The previous frequency remains unchanged.
If you have set a new frequency, you must still syn-
chronize the receiver with the transmitter to es-
tablish the radio link (see „Establishing a radio link
| Synchronizing the receiver and transmitter“).
EM-XSW 2 rack receiver
71
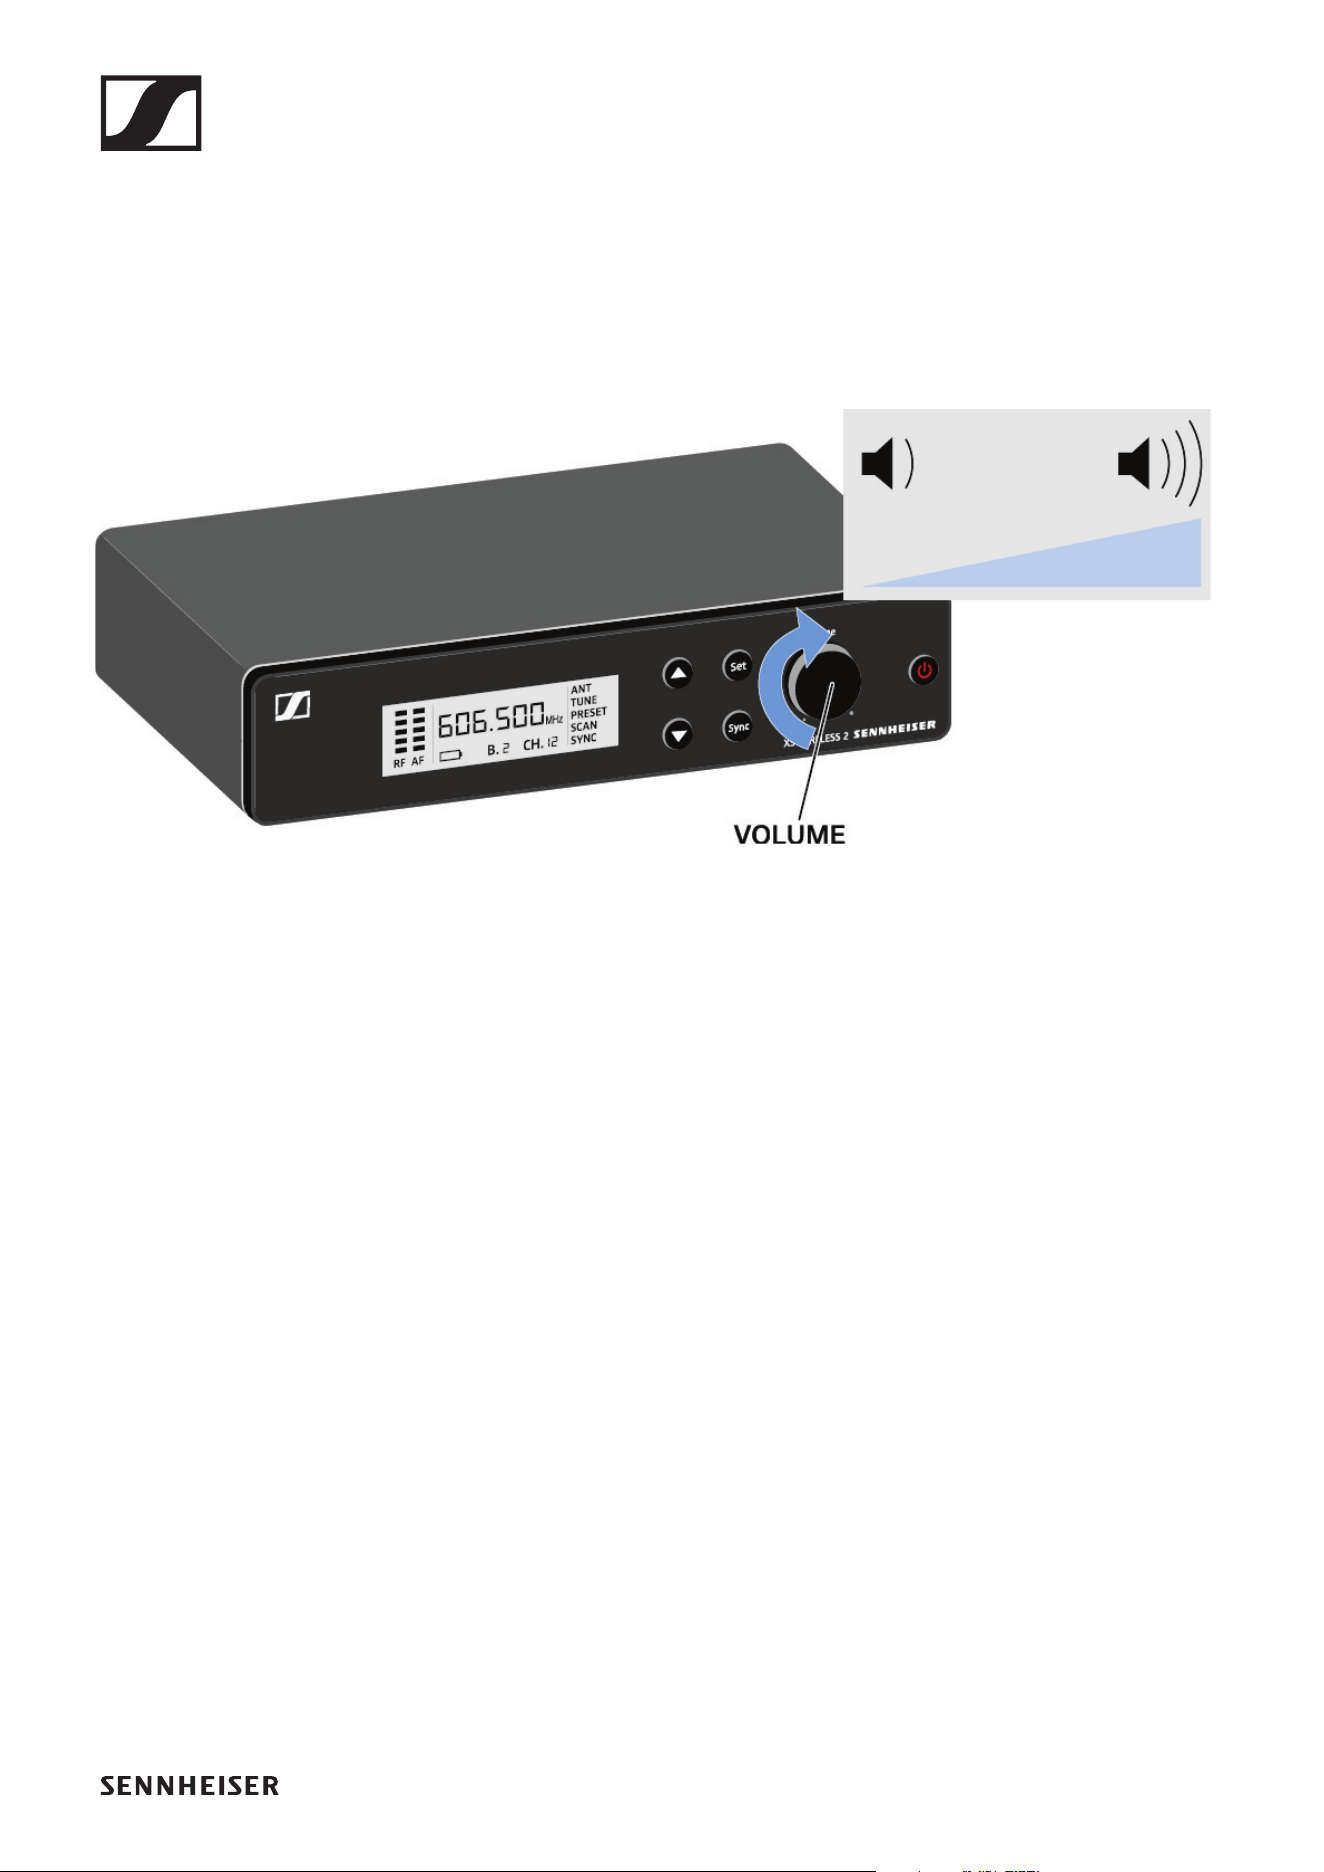
Adjusting the volume of the audio outputs
Use the VOLUME control knob to set the level of the audio sig-
nal coming from the receiver’s audio outputs (Balanced/Un-
balanced). This audio signal can be output to a mixing console
or an amplifier, for example.
▷ Turn the VOLUME control knob to adjust the volume.
►
▷ Make sure that the signal in the next device in the signal
chain (e.g. mixing console, power amplifier, guitar amplifi-
er, etc.) is not overdriven.
EM-XSW 2 rack receiver
72
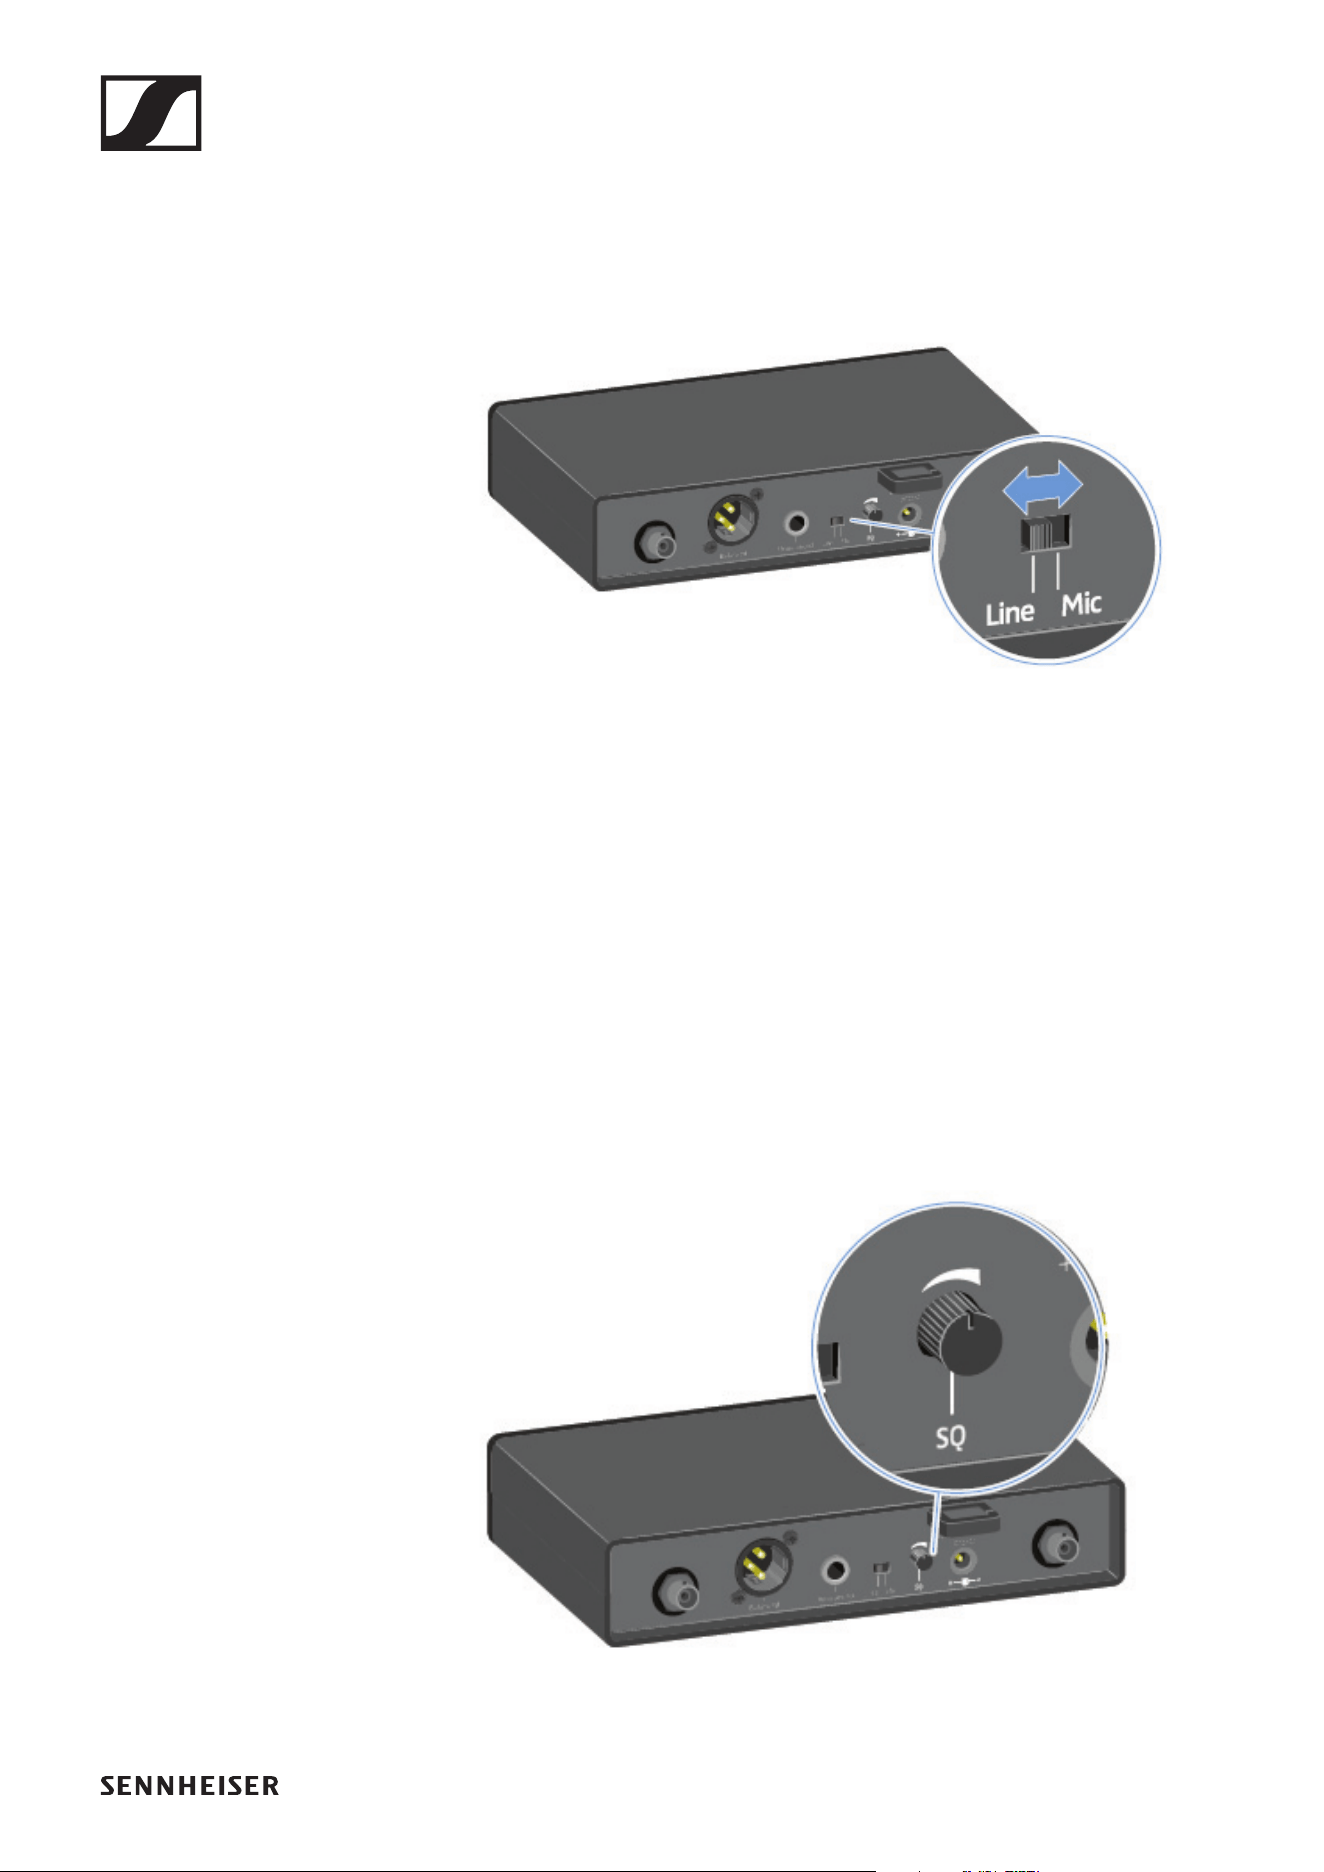
Setting options on the rear of the device
Selecting the signal type (Mic/Line)
▷ Set the Line/Mic switch to the desired position.
• Line: when using instruments or other line sources with
the SK-XSW bodypack transmitter
• Mic: when using the SKM-XSW handheld transmitter or a
microphone with the SK-XSW bodypack transmitter
Setting the squelch
The squelch function can be used to suppress disturbing noise
during transmission, such as hiss. If the signal level is below
the squelch threshold, the signal is muted.
If the squelch threshold is set very high, this will shorten the
radio range.
▷ Turn the control knob to the left or right to adjust the
squelch.
EM-XSW 2 rack receiver
73
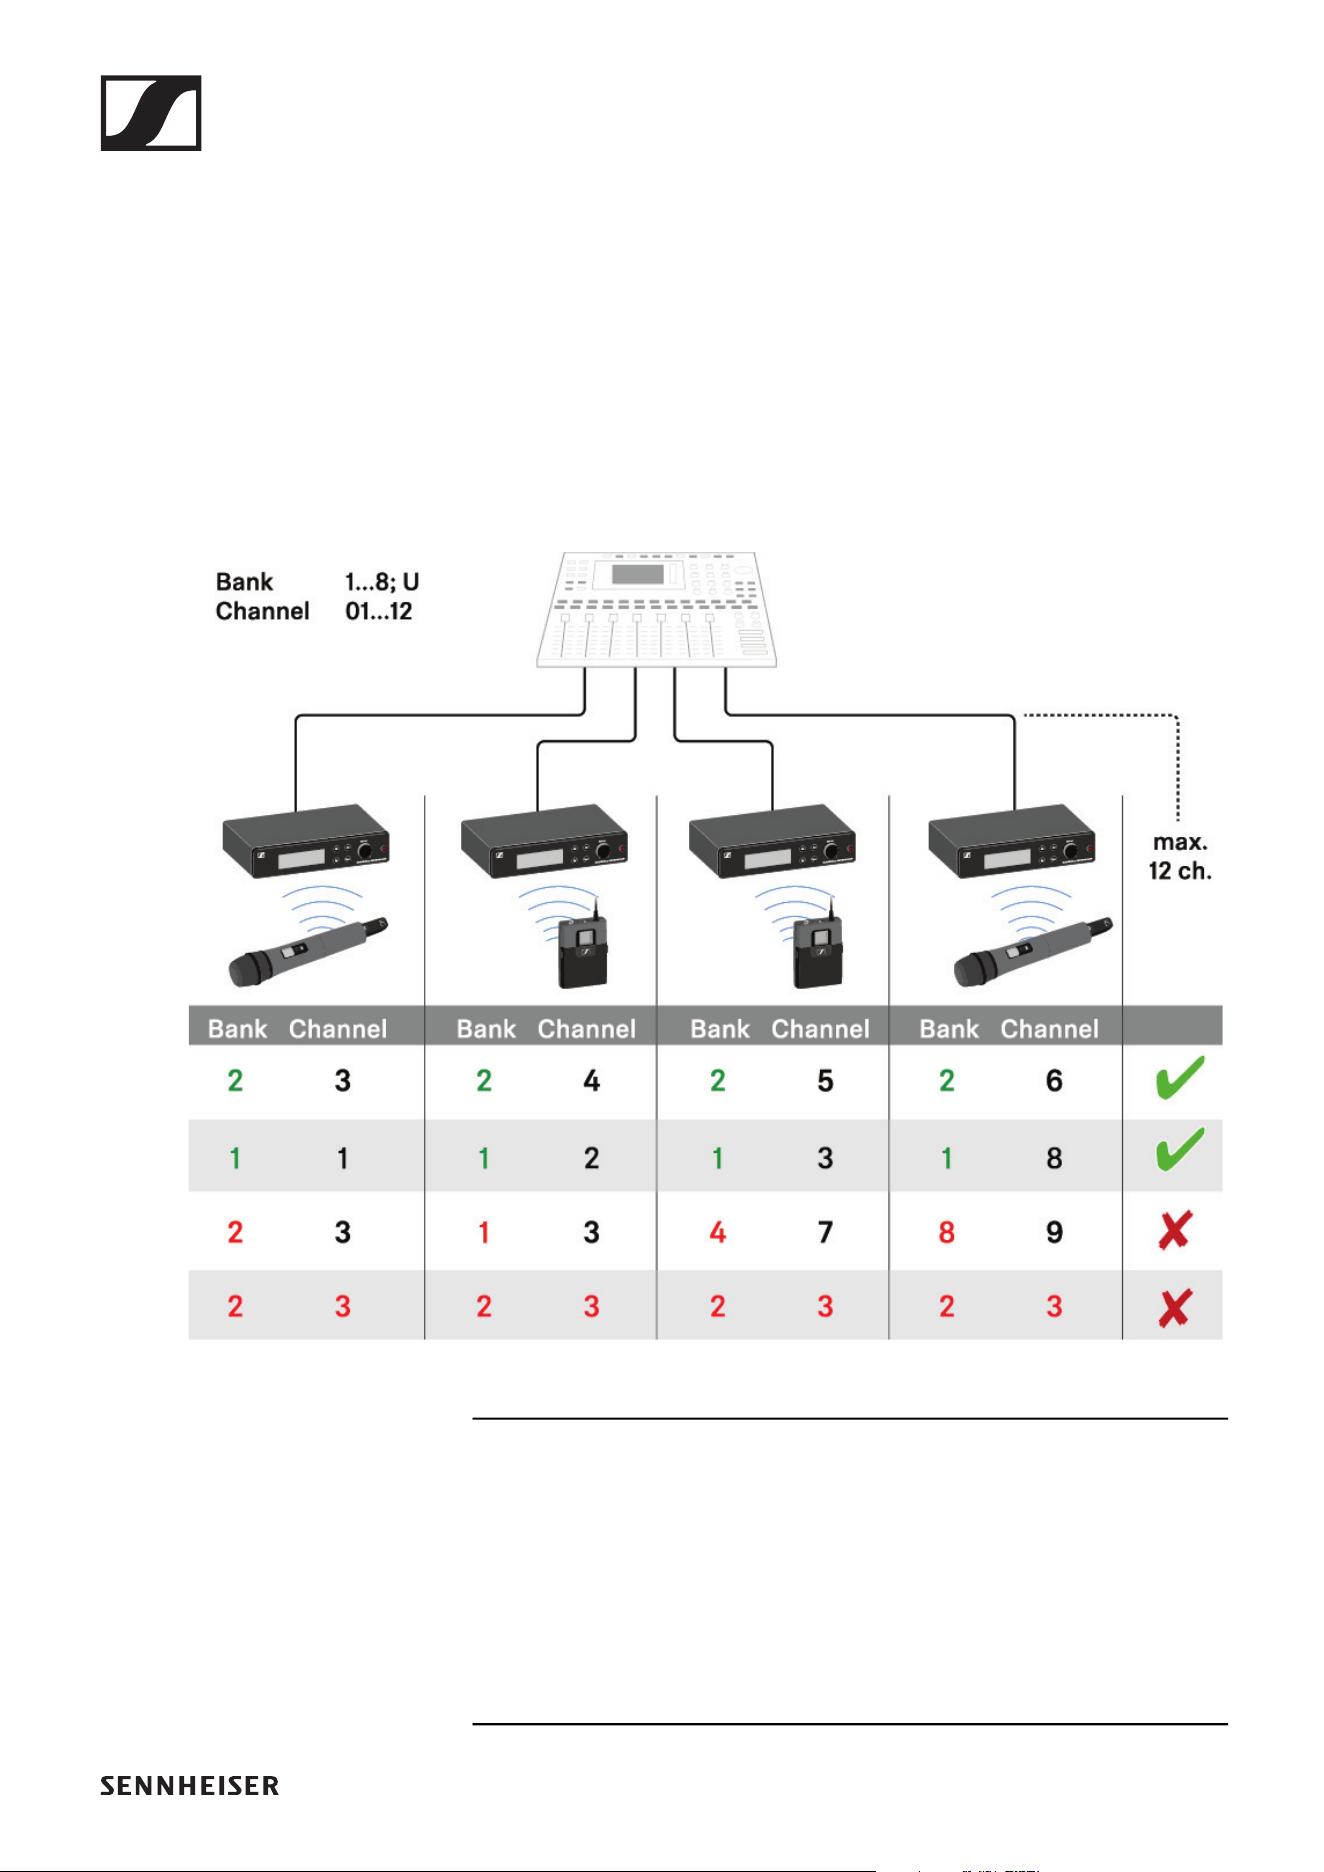
Configuring a multi-channel system
Please note when creating multi-channel systems:
Only the factory-preset transmission frequencies within one
frequency bank are intermodulation-free.
▷ Set the same channel bank for all receivers.
▷ Assign one channel from this channel bank to each receiv-
er.
We recommend using the SCAN function, as this is the most
reliable way to identify free frequencies (see „SCAN menu
item“).
If you know free frequencies in your area, you can also set the
frequency manually (see „PRESET menu item“ and „TUNE
menu item“).
Handheld transmitters SKM 825-XSW | SKM 835-XSW | SKM 865-XSW
74
Handheld transmitters SKM 825-XSW |
SKM 835-XSW | SKM 865-XSW
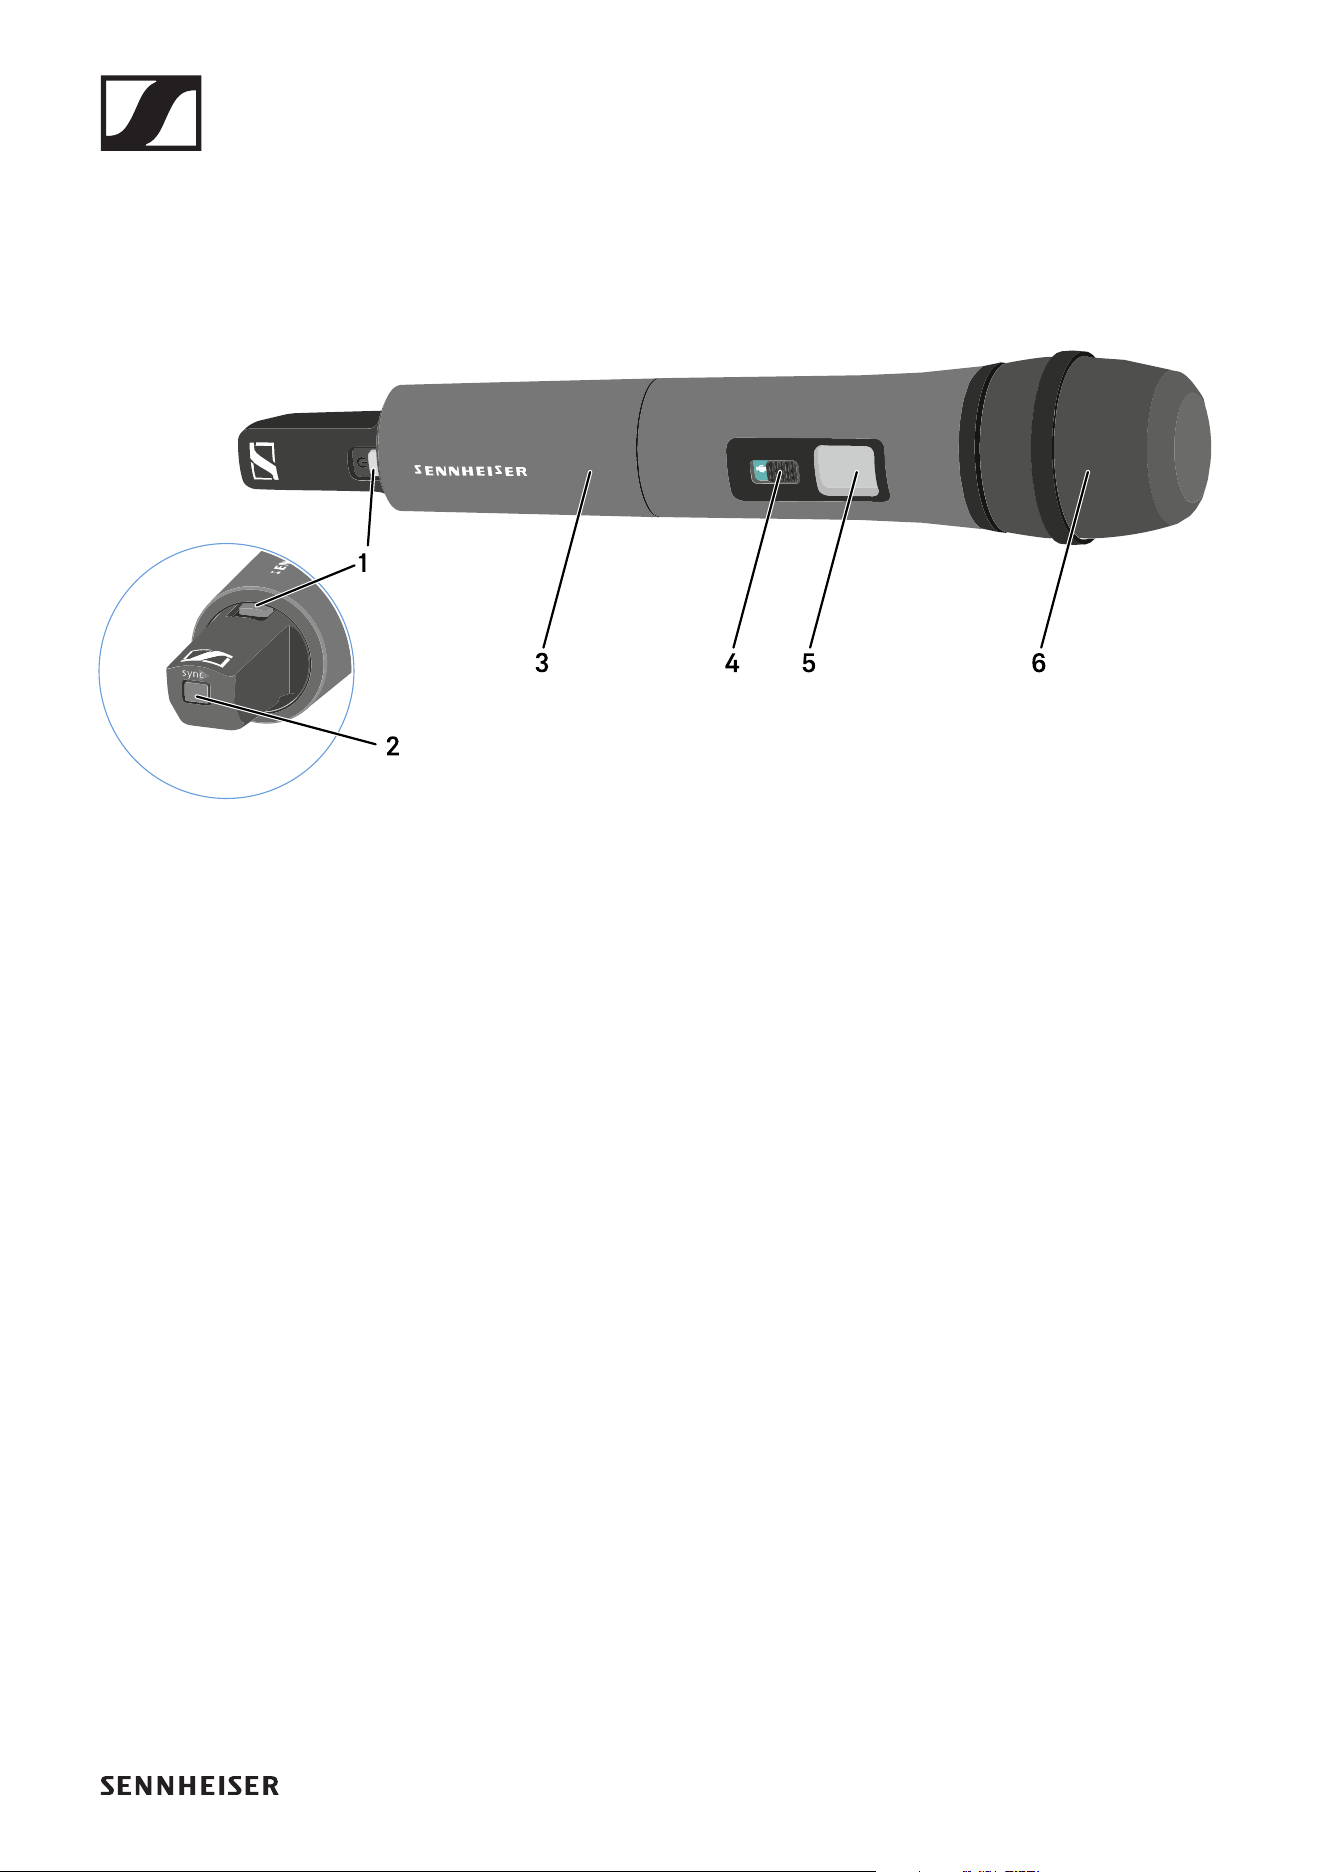
Product overview
►
1 ON/OFF button with LED
• See „Switching the handheld transmitter on and off“
• Green: the radio link is established
• Flashing red/green: pairing active (see „Establishing a ra-
dio link | Synchronizing the receiver and transmitter“)
• Flashing red: low battery (see „Inserting and removing the
batteries“)
2 SYNC button
• See „Establishing a radio link | Synchronizing the receiver
and transmitter“
3 Unscrewable cover for accessing the battery compartment
and Sensitivity switch
• See „Inserting and removing the batteries“
• See „Setting the input sensitivity“
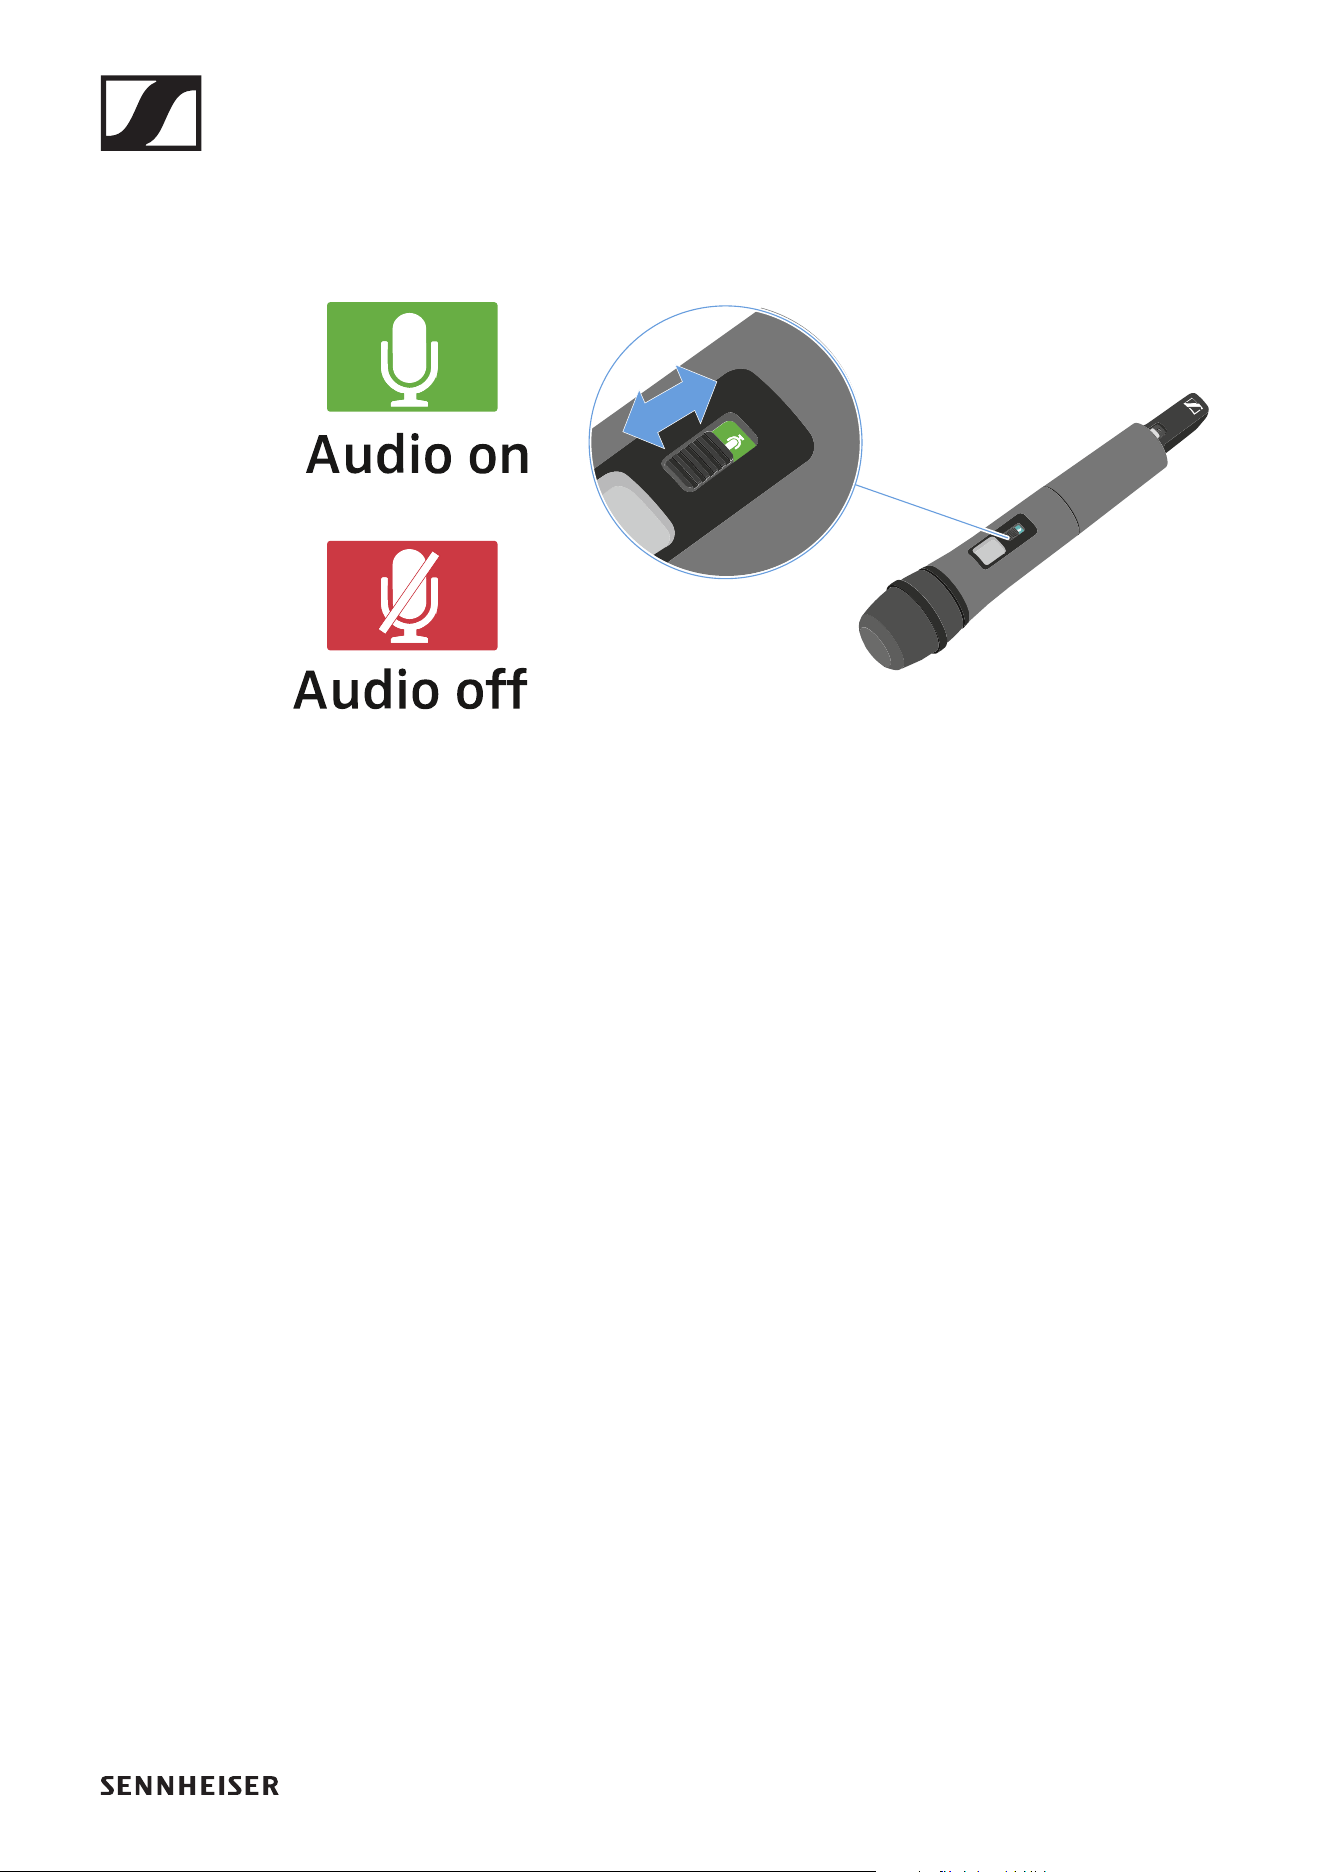
4 Mute switch
• See „Muting the handheld transmitter“
5 Display panel
• See „Information on the handheld transmitter’s display“
6 Microphone module
• With capsule 825, 835 or 865
Handheld transmitters SKM 825-XSW | SKM 835-XSW | SKM 865-XSW
75
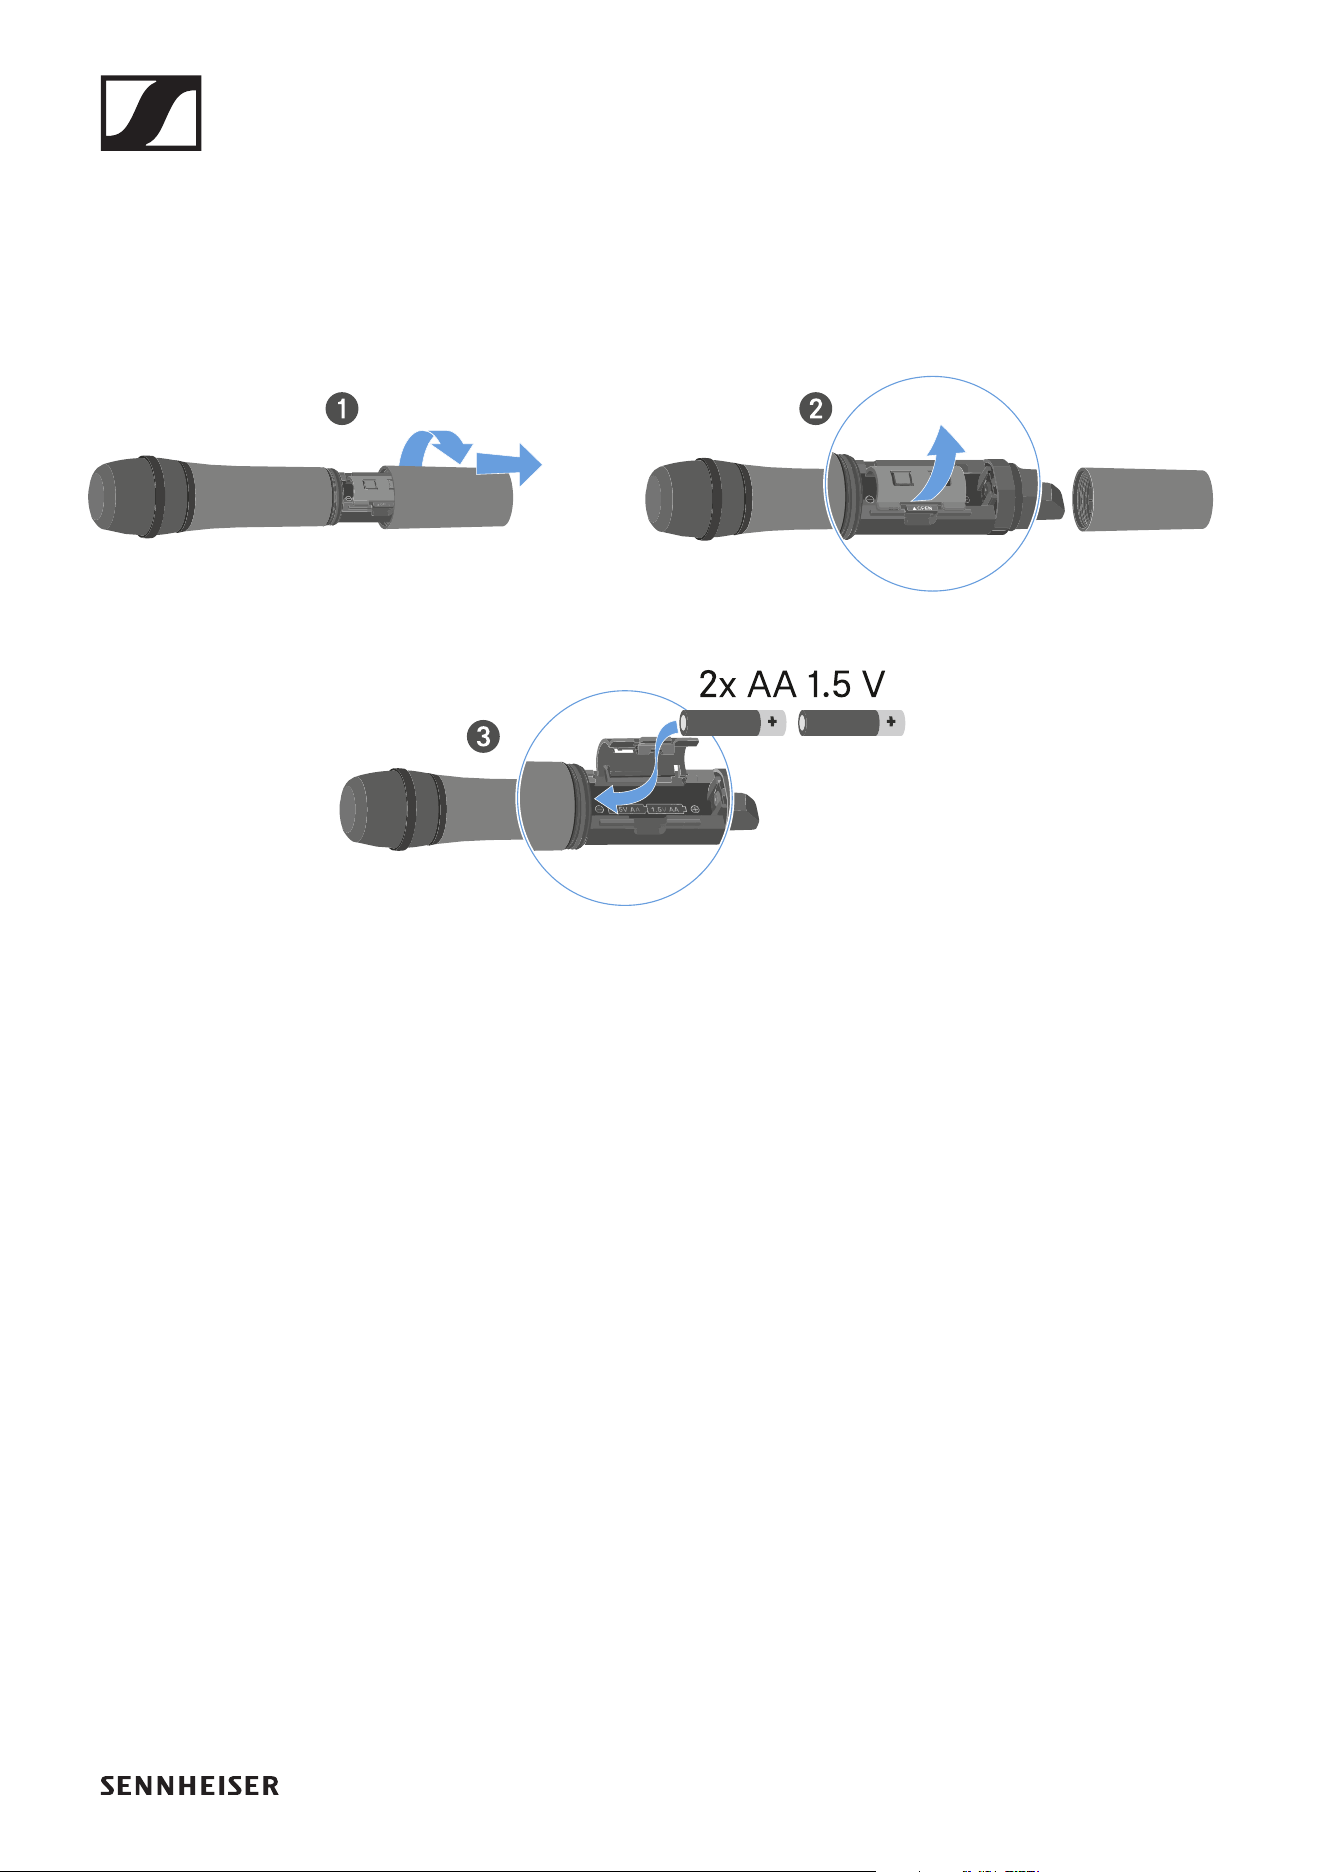
Inserting and removing the batteries
You need two AA 1.5 V batteries to operate the handheld
transmitter.
▷ Unscrew the microphone housing as shown in the figure
and pull it downward.
▷ Insert the batteries as indicated in the battery compart-
ment. Observe correct polarity.
▷ Screw the microphone housing back on.
Handheld transmitters SKM 825-XSW | SKM 835-XSW | SKM 865-XSW
76
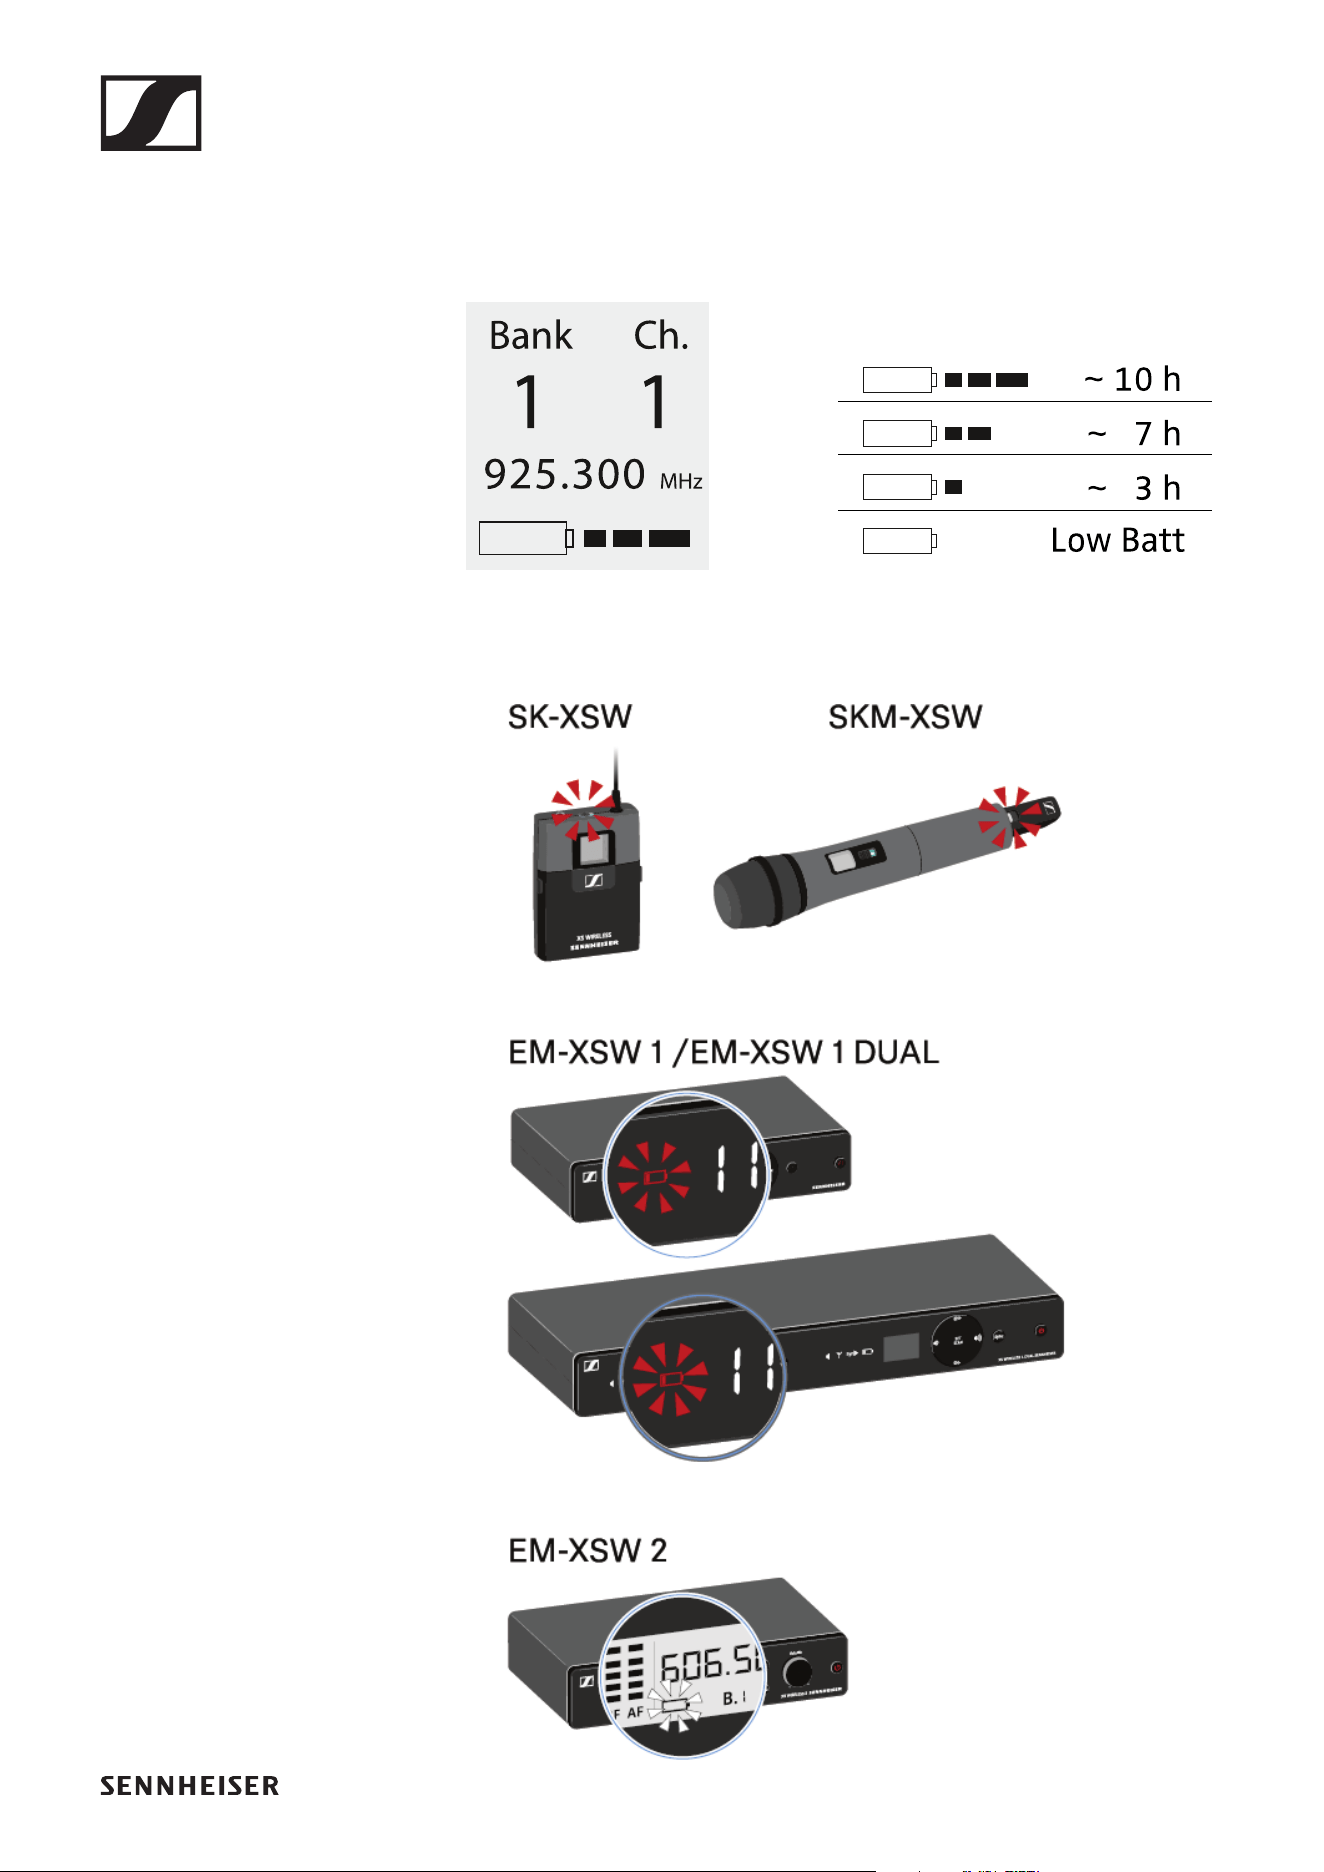
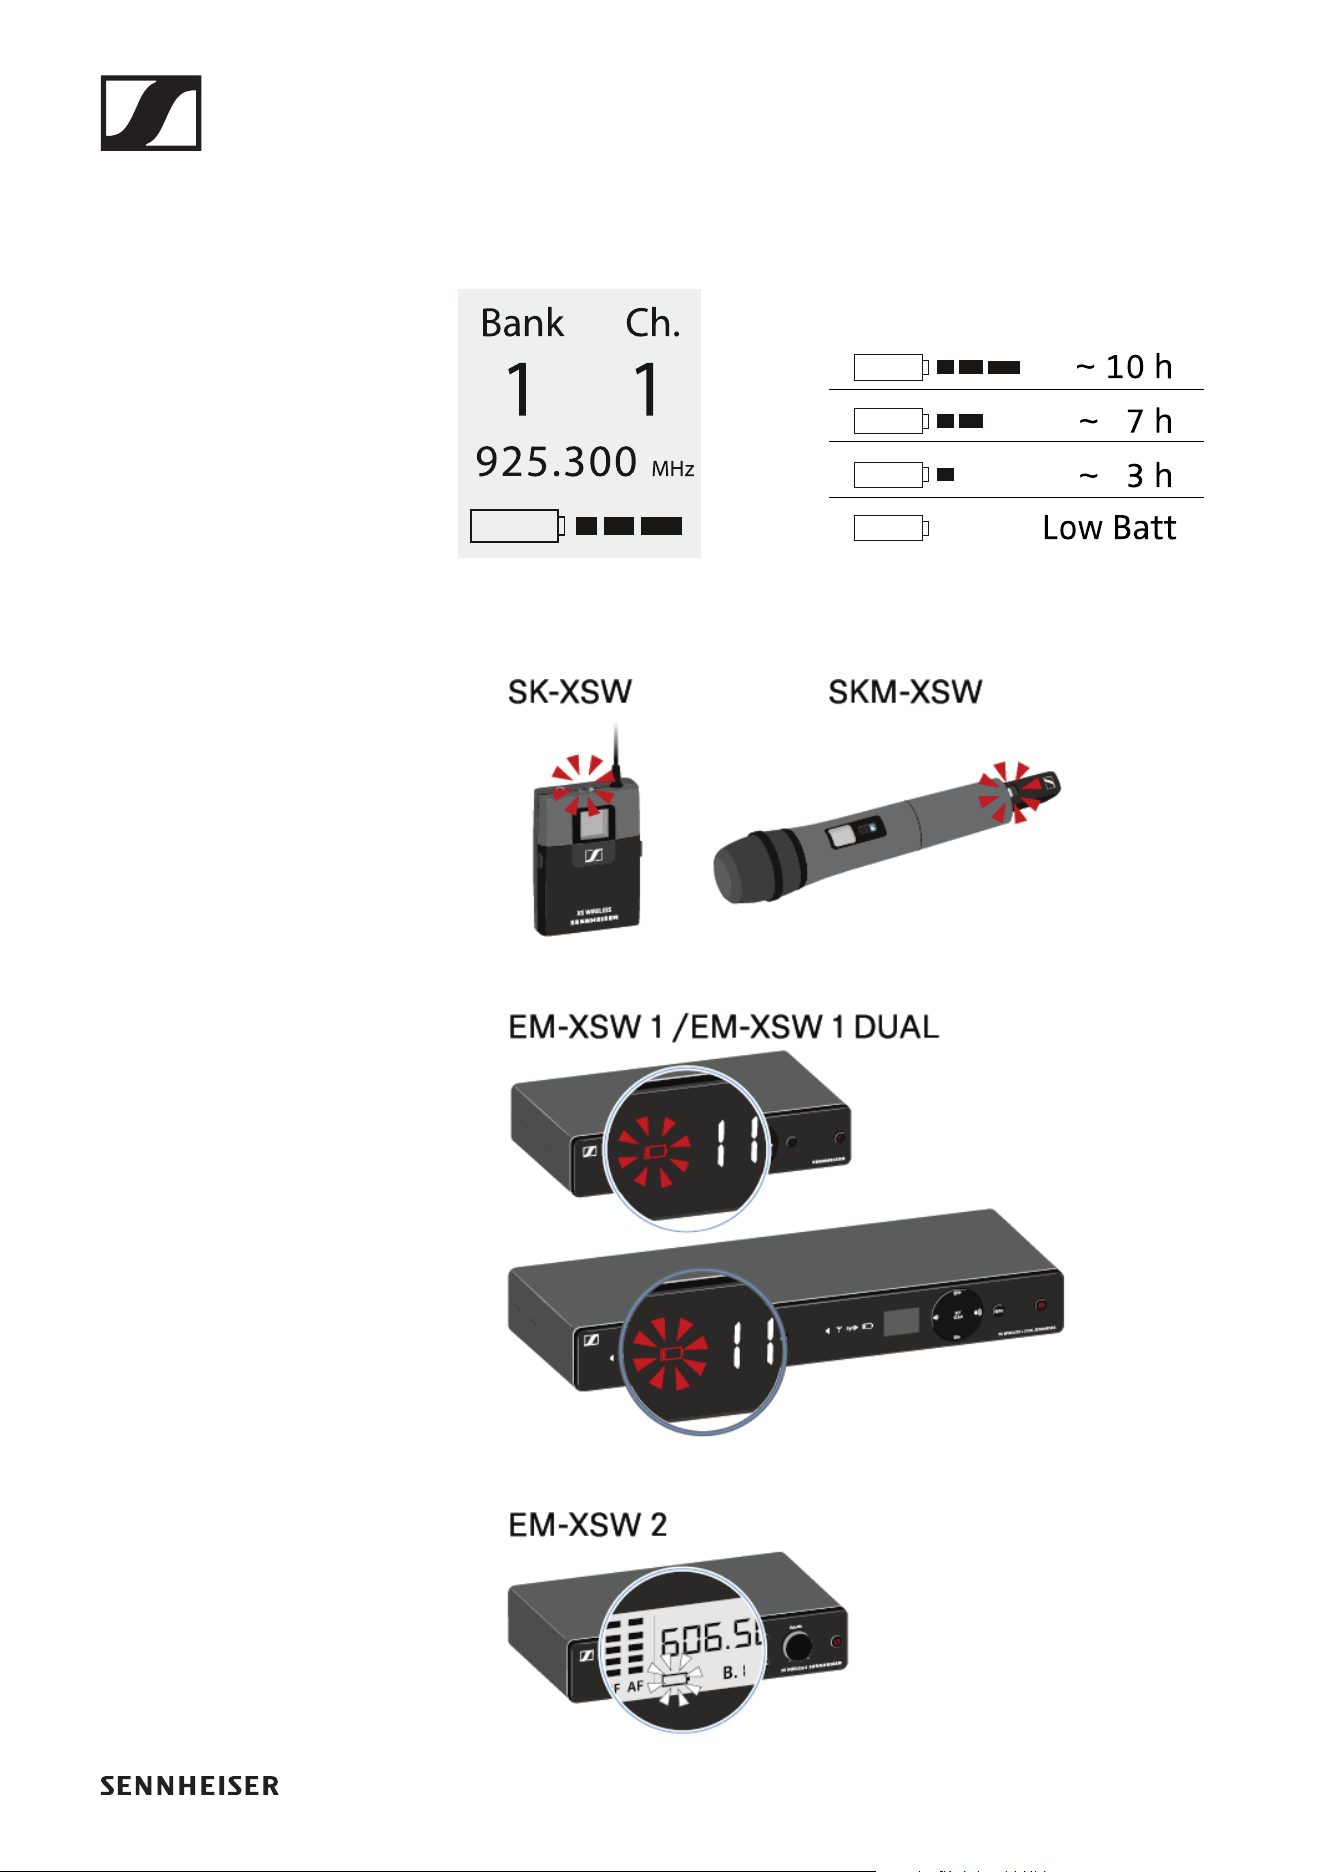
Battery status
Battery charge status in the display:
►
Charge status is critical (LOW BATT):
►
Handheld transmitters SKM 825-XSW | SKM 835-XSW | SKM 865-XSW
77
Switching the handheld transmitter on and
off
To switch the handheld transmitter on:
▷ Short-press the ON/OFF button.
The transmitter switches on. The ON/OFF button lights up.
►
To switch the handheld transmitter off:
▷ Hold down the ON/OFF button until the light in the ON/OFF
button disappears.
Establishing a connection to the receiver
To establish a radio link between the transmitter and the re-
ceiver, the devices must be synchronized.
See „Establishing a radio link | Synchronizing the receiver and
transmitter“.
Conditions and restrictions for using frequencies
There may be special conditions and restrictions for us-
ing frequencies in your country.
Before putting the product into operation, find the information
for your country at the following address:
www.sennheiser.com/sifa

Handheld transmitters SKM 825-XSW | SKM 835-XSW | SKM 865-XSW
78
Information on the handheld transmitter’s
display
You can view the following information on the transmitter dis-
play.
Further information
Frequency bank / Channel / Frequency:
• EM-XSW 1: „Setting the frequency automatically (AUTO
SCAN)“ | „Setting the frequency manually“
• EM-XSW 1 DUAL: „Setting the frequency automatically (AU-
TO SCAN)“ | „Setting the frequency manually“
• EM-XSW 2: „SCAN menu item“ | „PRESET menu item“ |
„TUNE menu item“
Battery:
• „Inserting and removing the batteries“
Bank Ch.
1 1
925.300
MHz
~ 10 h
~ 7 h
~ 3 h
Low Batt
Frequency
bank
Channel
Battery
Frequency

Handheld transmitters SKM 825-XSW | SKM 835-XSW | SKM 865-XSW
79
Setting the input sensitivity
Use the Sensitivity switch to adjust the level of the audio sig-
nal sent to the receiver.
▷ Unscrew the microphone housing and pull it downward.
▷ Adjust the input sensitivity using the Sensitivity switch.
▷ Pay attention to the level indicator on the receiver display.
Handheld transmitters SKM 825-XSW | SKM 835-XSW | SKM 865-XSW
80
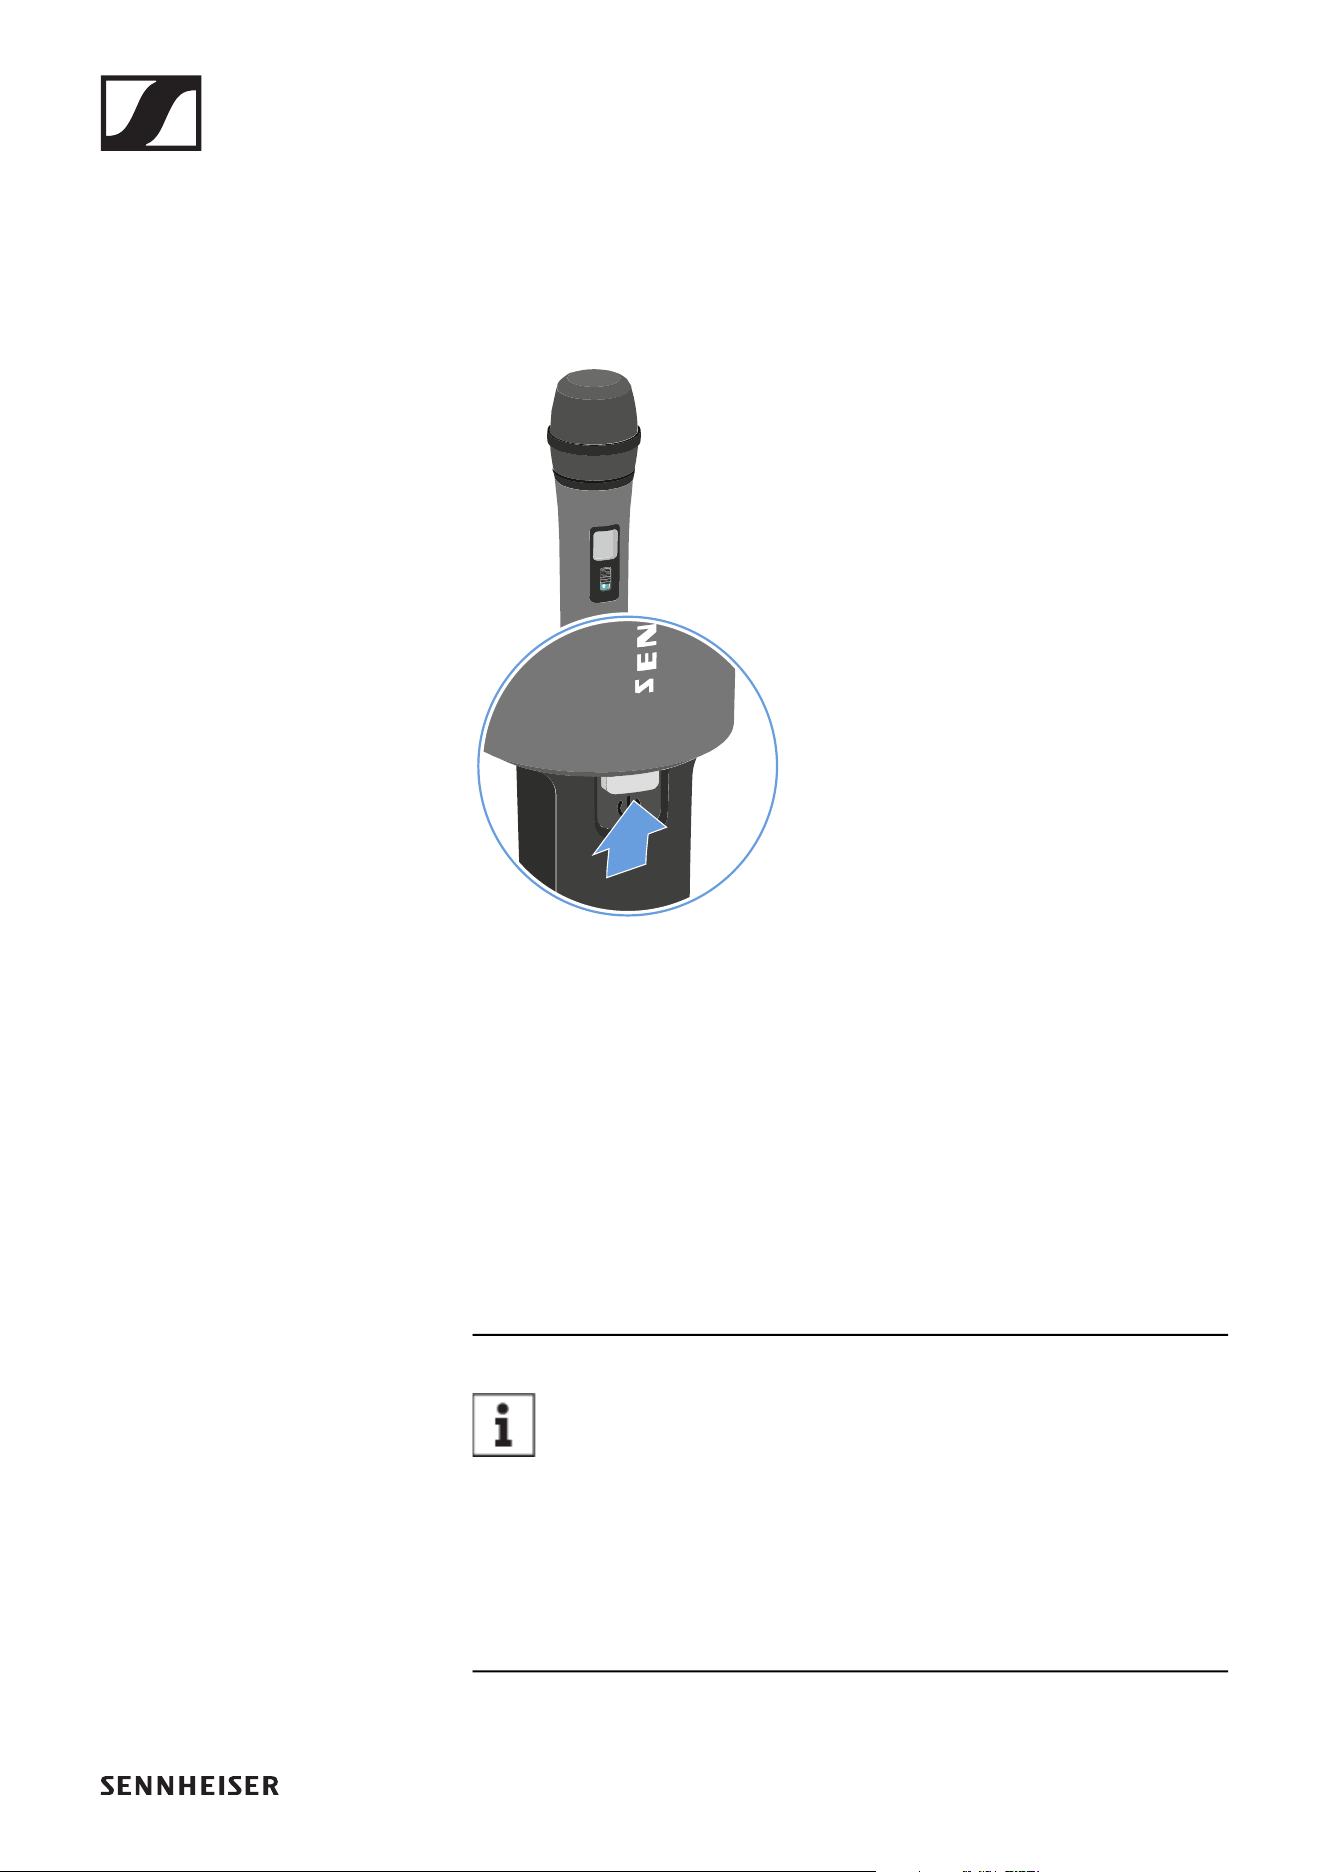
Muting the handheld transmitter
You can mute the audio signal using the mute switch.
►
▷ Slide the mute switch to the desired position to mute or ac-
tivate the audio signal.
SK-XSW bodypack transmitter
81
SK-XSW bodypack transmitter
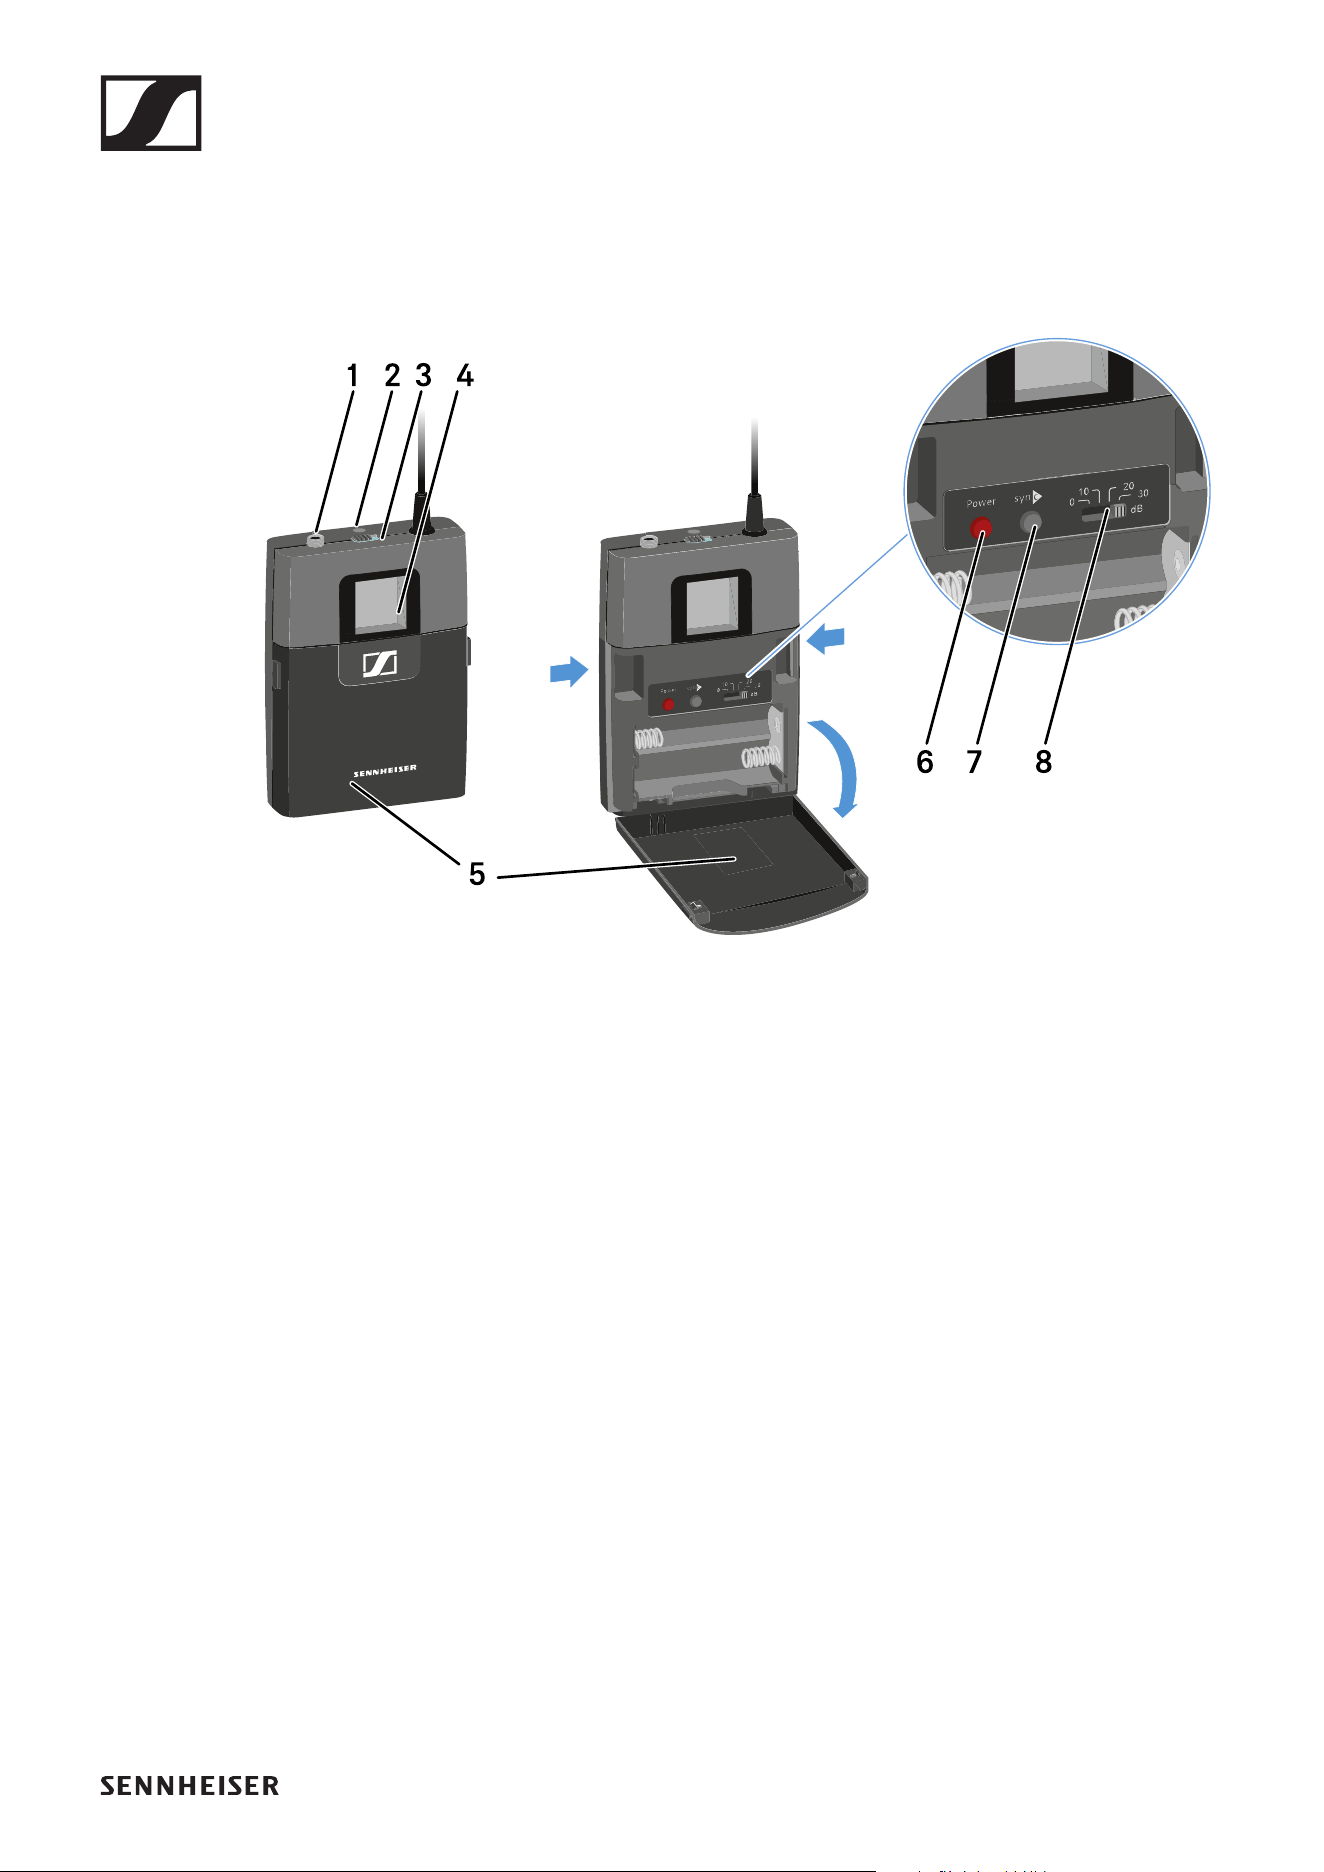
Product overview
►
1 3.5 mm input jack socket
• See „Connecting a microphone to the bodypack transmit-
ter“
• See „Connecting an instrument or line source to the
bodypack transmitter“
2 LED
• Green: the radio link is established
• Flashing red/green: pairing active (see „Establishing a ra-
dio link | Synchronizing the receiver and transmitter“)
• Flashing red: low battery (see „Inserting and removing the
batteries“)
3 Mute switch
• See „Muting the bodypack transmitter“
4 Display panel
• See „Information on the bodypack transmitter’s display“
5 Battery compartment cover
• See „Inserting and removing the batteries“
6 ON/OFF (Power) button
• See „Switching the bodypack transmitter on and off“

SK-XSW bodypack transmitter
82
7 SYNC button
• See „Establishing a radio link | Synchronizing the receiver
and transmitter“
8 Sensitivity switch
• See „Setting the input sensitivity“
Inserting and removing the batteries
You need two AA 1.5 V batteries to operate the handheld
transmitter.
▷ Press the two catches and open the battery compartment
cover.
▷ Insert the batteries as shown in the figure. Observe correct
polarity.
▷ Close the battery compartment.
The cover locks into place with an audible click.
SK-XSW bodypack transmitter
83
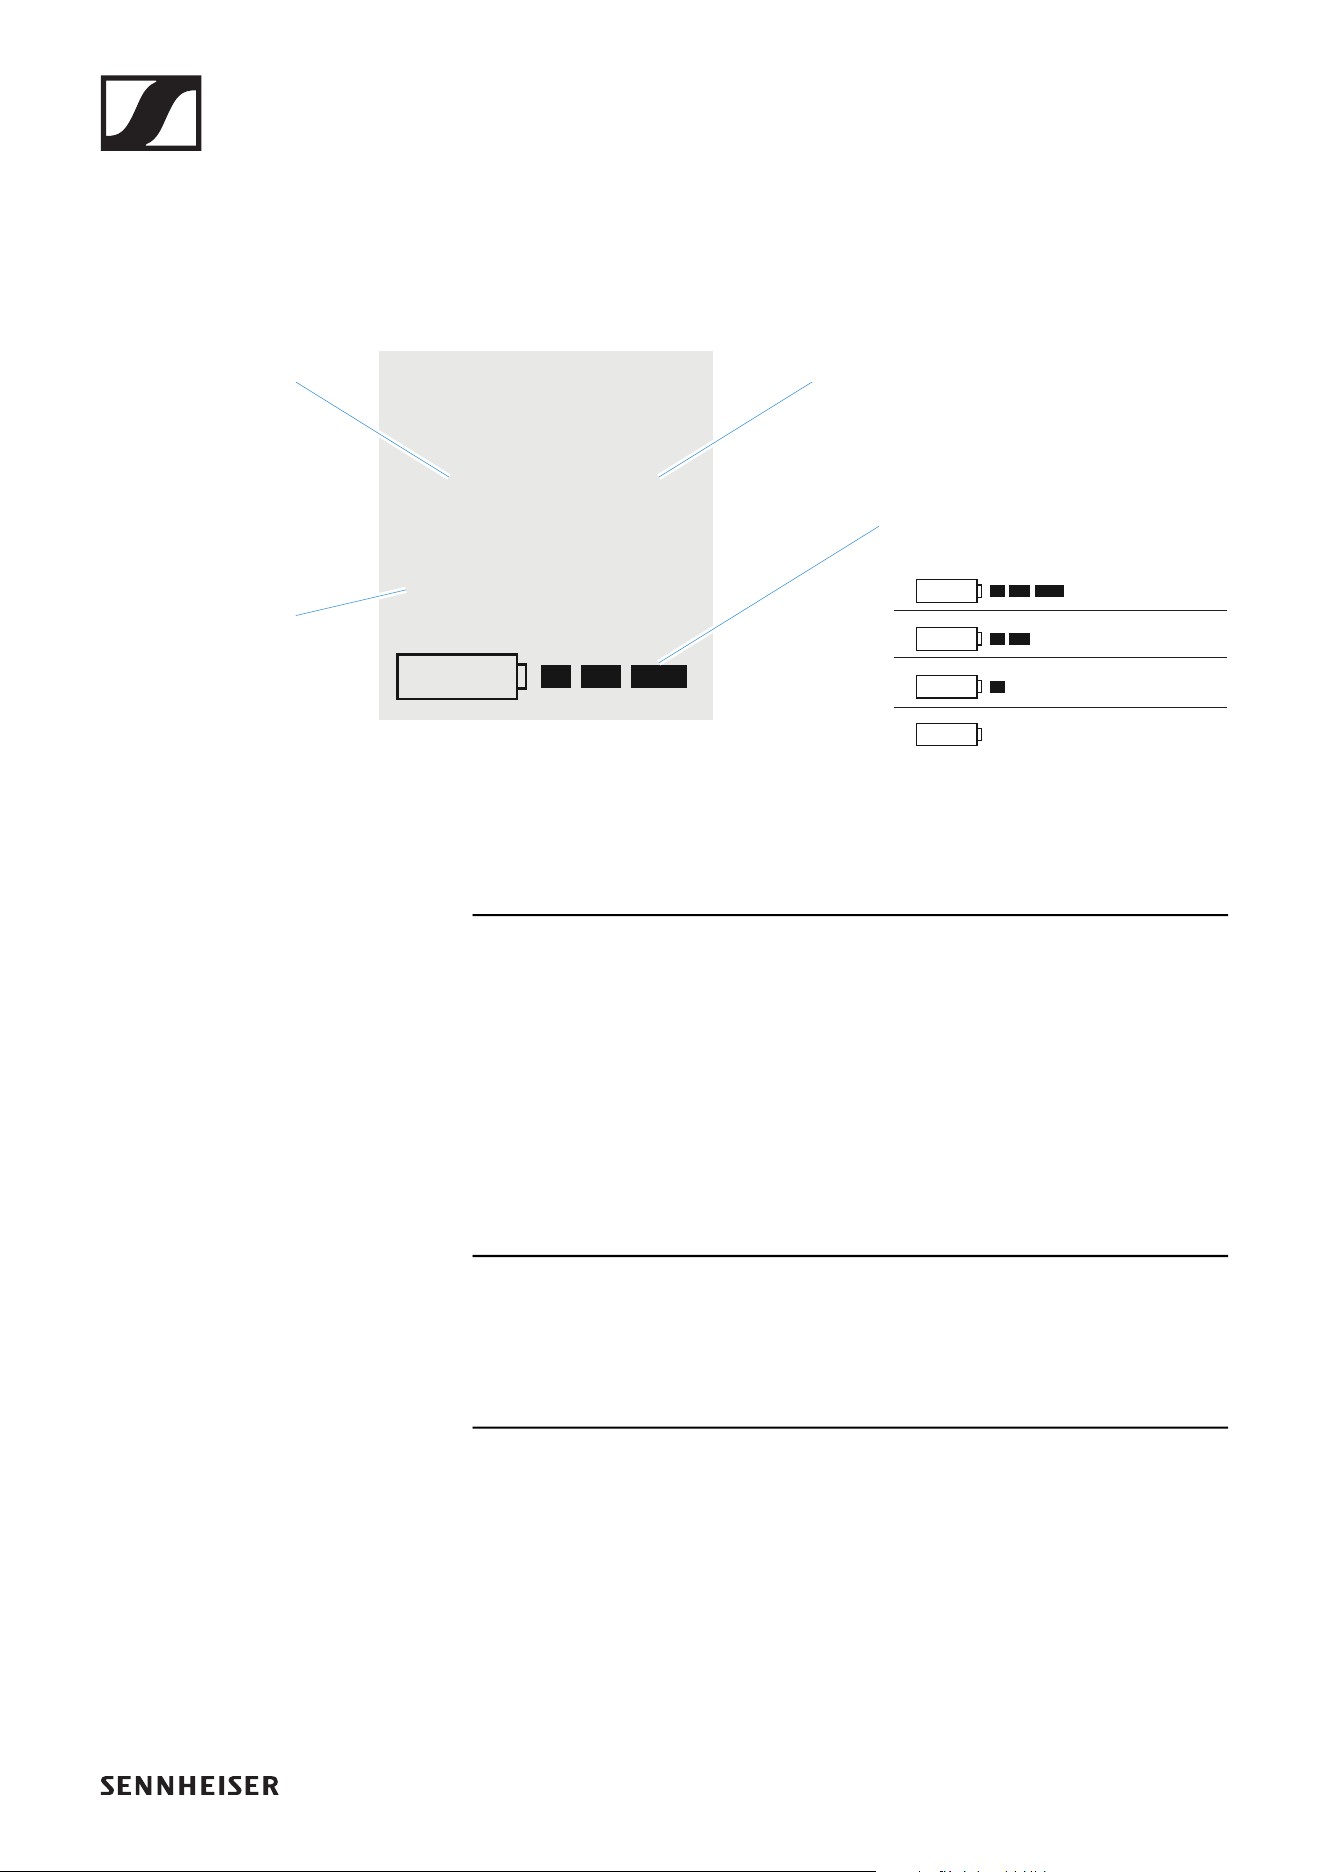
Battery status
Battery charge status in the display:
►
Charge status is critical (LOW BATT):
►
SK-XSW bodypack transmitter
84
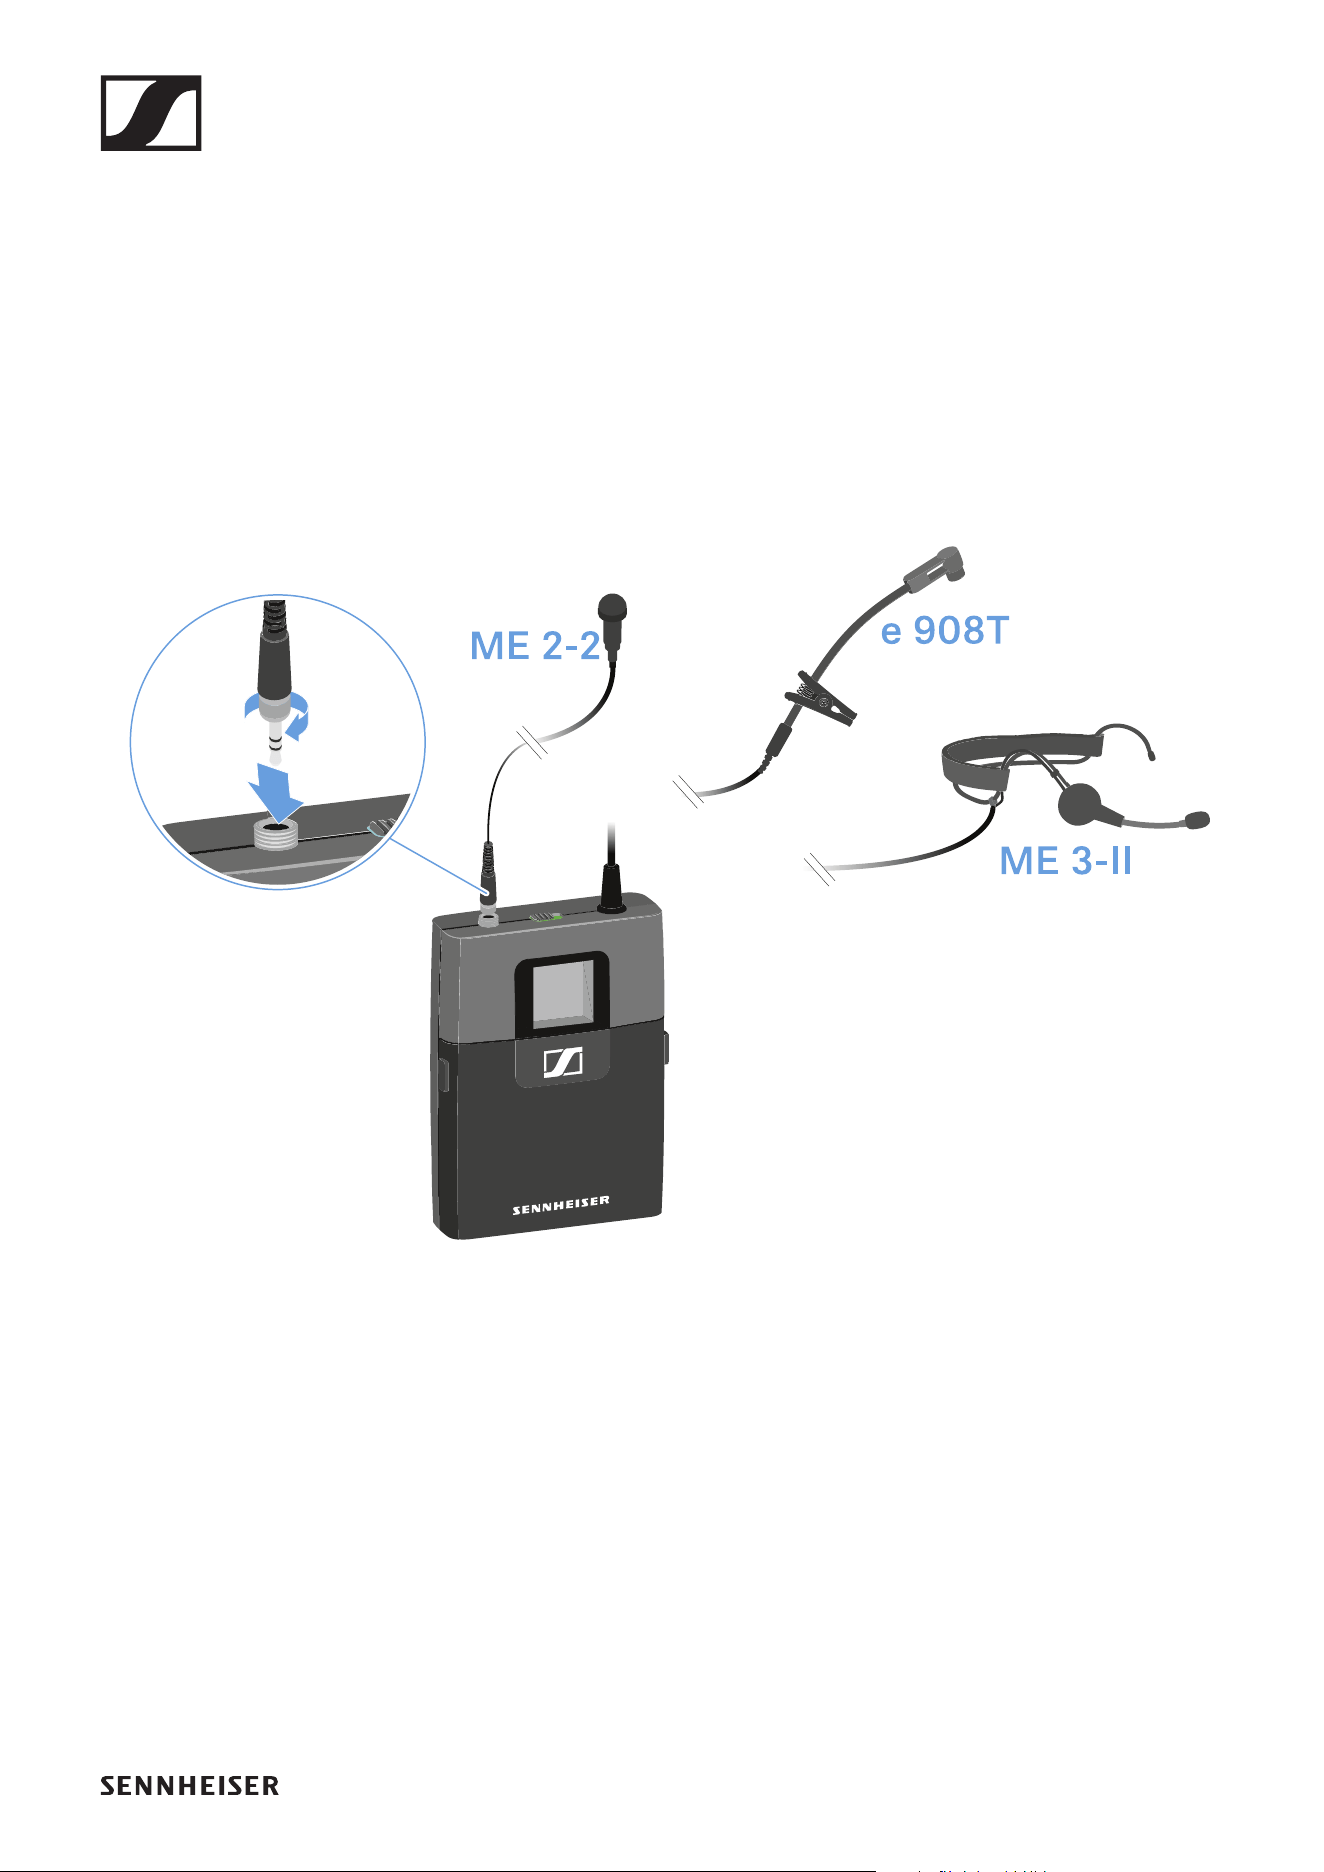
Connecting a microphone to the bodypack
transmitter
To connect a microphone to the bodypack transmitter:
▷ Insert the cable’s 3.5 mm jack plug into the socket on the
bodypack transmitter as shown in the diagram.
▷ Screw the plug’s coupling ring onto the audio socket thread
of the bodypack transmitter.
Connecting an instrument or line source to
the bodypack transmitter
You can connect instruments or audio sources with a line level
to the bodypack transmitter.
To do so, you require the Sennheiser CI 1-N cable (6.3 mm jack
plug to lockable 3.5 mm jack plug).
To connect an instrument or line source to bodypack transmit-
ter:
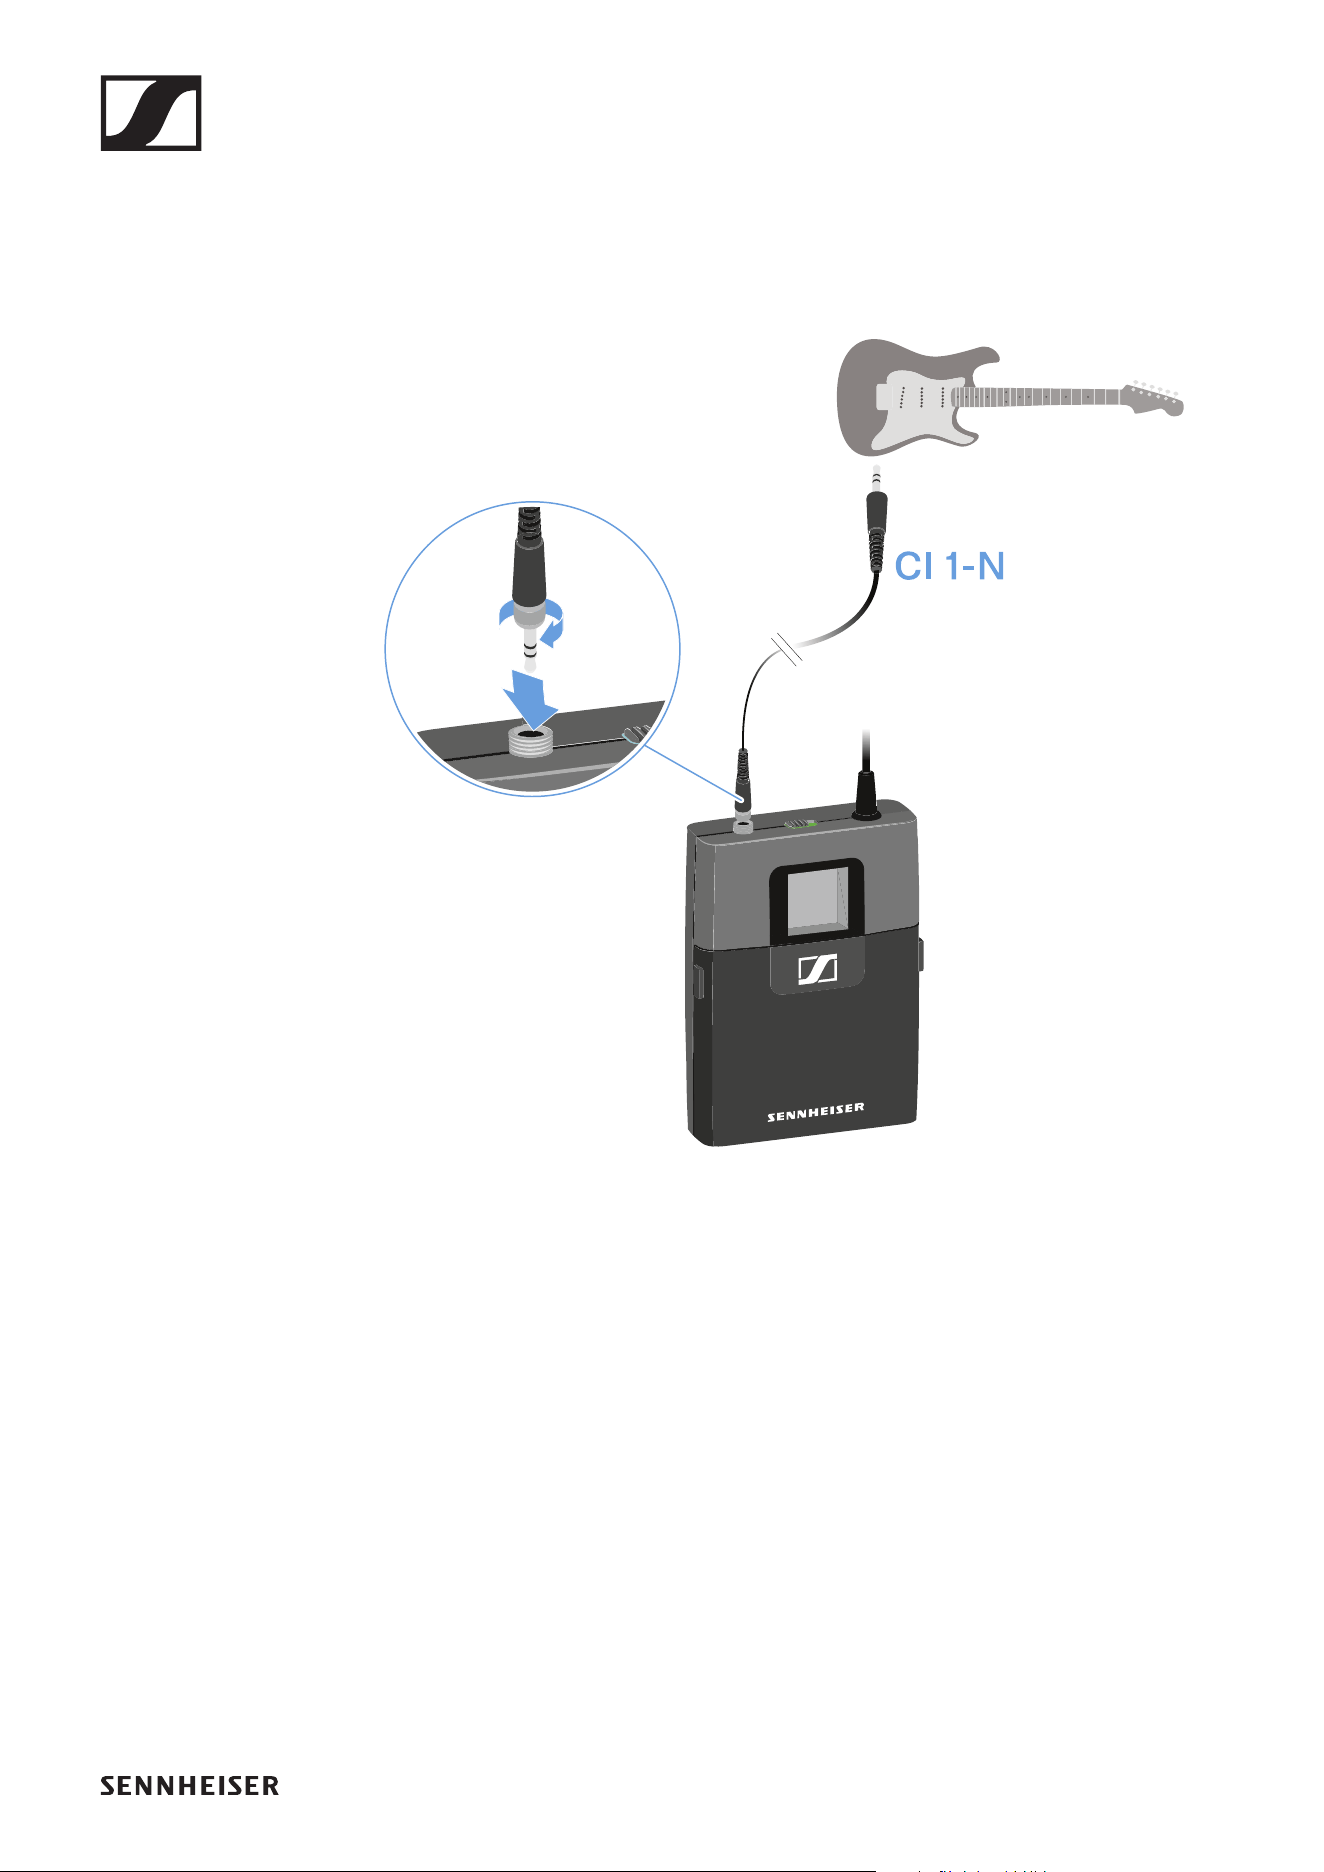
SK-XSW bodypack transmitter
85
▷ Insert the cable’s 3.5 mm jack plug into the socket on the
bodypack transmitter as shown in the diagram.
▷ Screw the plug’s coupling ring onto the audio socket thread
of the bodypack transmitter.
SK-XSW bodypack transmitter
86
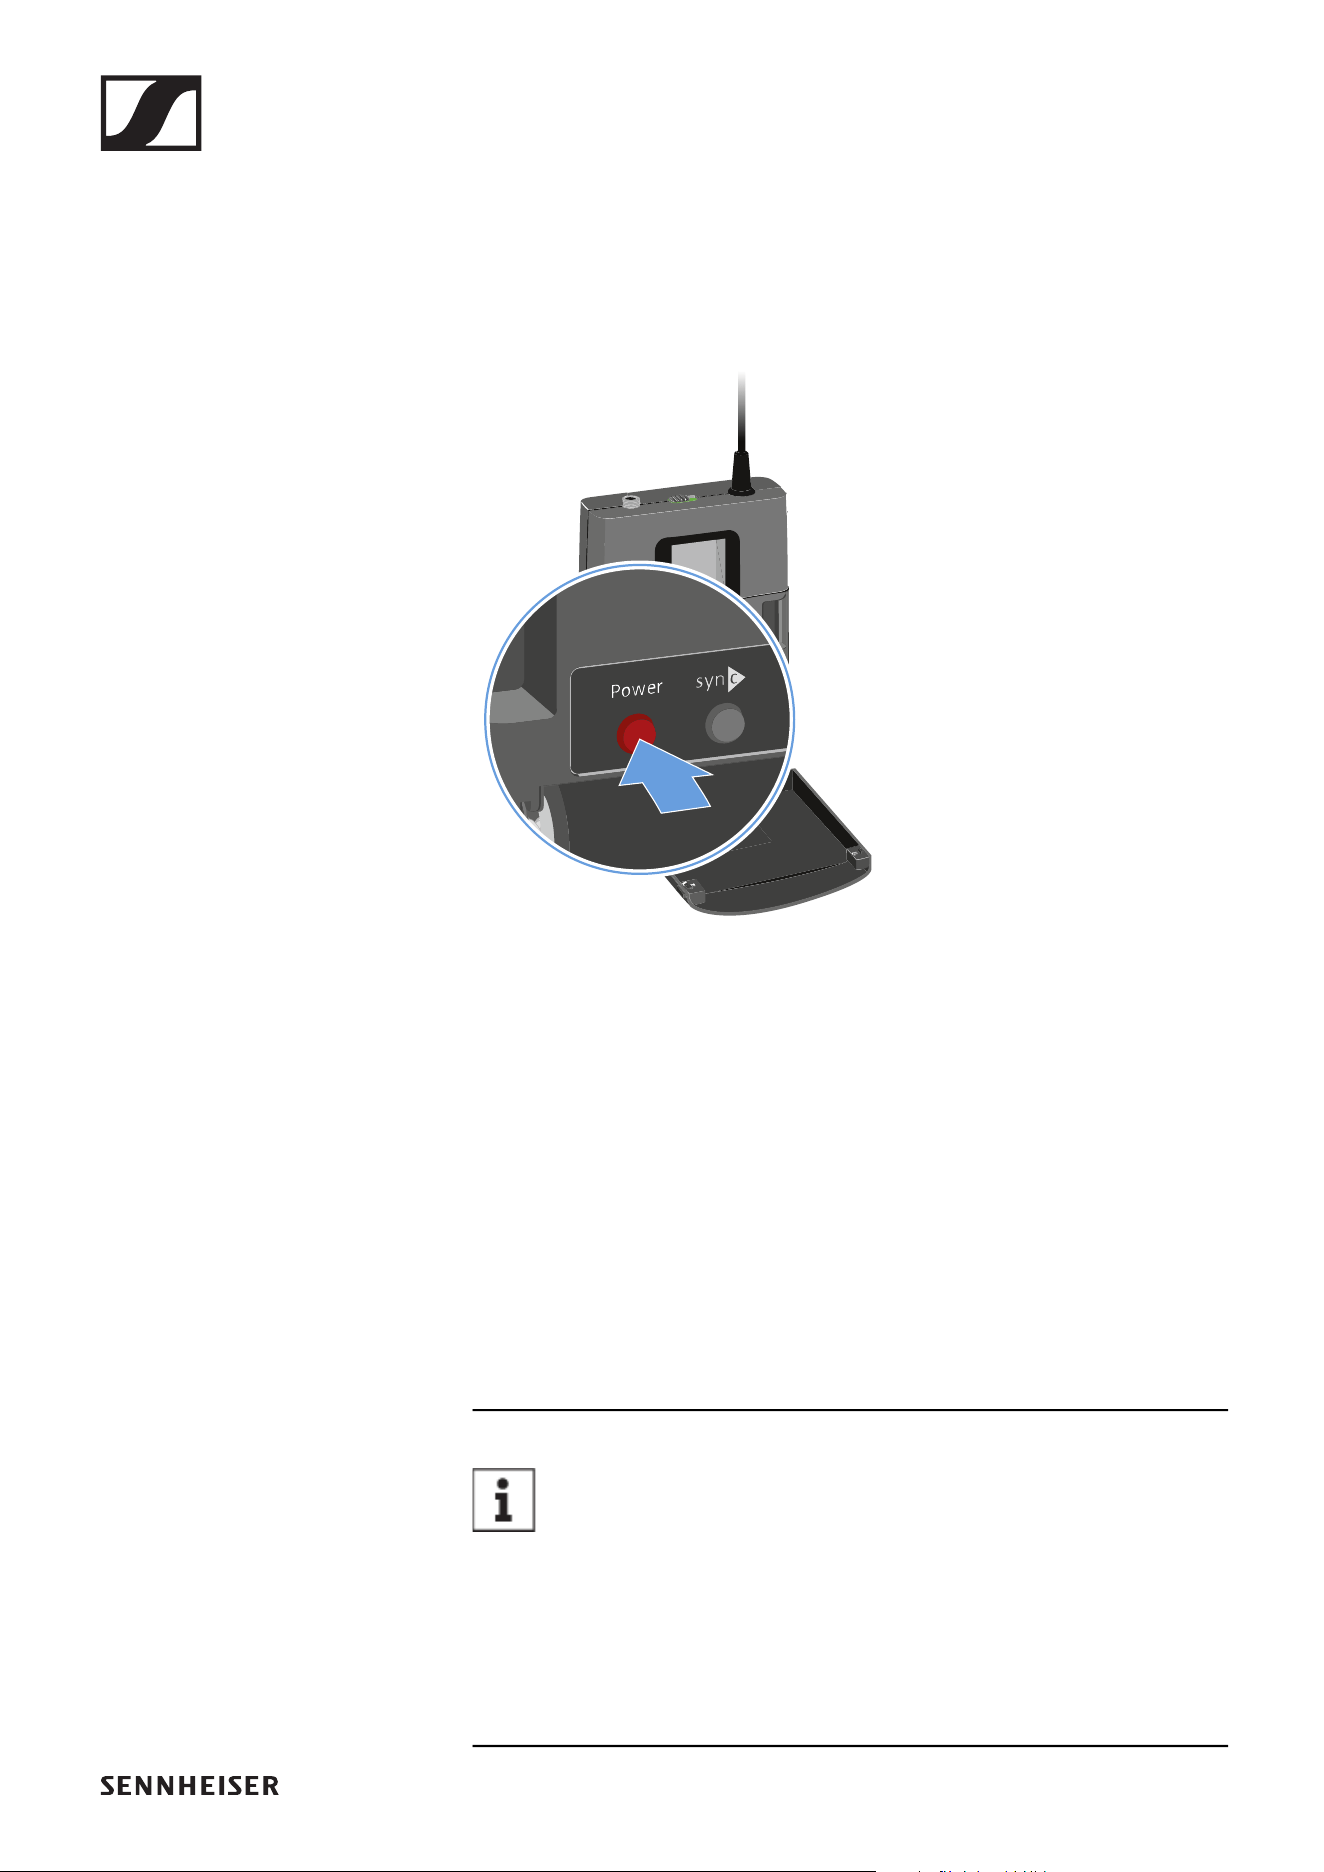
Switching the bodypack transmitter on and
off
To switch the bodypack transmitter on:
▷ Short-press the ON/OFF button.
The transmitter switches on. The LED lights up.
►
To switch the bodypack transmitter off:
▷ Hold down the ON/OFF button until the LED switches off.
Establishing a connection to the receiver
To establish a radio link between the transmitter and the re-
ceiver, the devices must be synchronized.
See „Establishing a radio link | Synchronizing the receiver and
transmitter“.
Conditions and restrictions for using frequencies
There may be special conditions and restrictions for us-
ing frequencies in your country.
Before putting the product into operation, find the information
for your country at the following address:
www.sennheiser.com/sifa
SK-XSW bodypack transmitter
87
Information on the bodypack transmitter’s
display
You can view the following information on the transmitter dis-
play.
Further information
Frequency bank / Channel / Frequency:
• EM-XSW 1: „Setting the frequency automatically (AUTO
SCAN)“ | „Setting the frequency manually“
• EM-XSW 1 DUAL: „Setting the frequency automatically (AU-
TO SCAN)“ | „Setting the frequency manually“
• EM-XSW 2: „SCAN menu item“ | „PRESET menu item“ |
„TUNE menu item“
Battery:
• „Inserting and removing the batteries“
Bank Ch.
1 1
925.300
MHz
~ 10 h
~ 7 h
~ 3 h
Low Batt
Frequency
bank
Channel
Battery
Frequency

SK-XSW bodypack transmitter
88
Setting the input sensitivity
Use the Sensitivity switch to adjust the level of the audio sig-
nal sent to the receiver.
▷ Press the two catches and open the battery compartment
cover.
▷ Adjust the input sensitivity using the Sensitivity switch.
▷ Pay attention to the level indicator on the receiver display.
SK-XSW bodypack transmitter
89
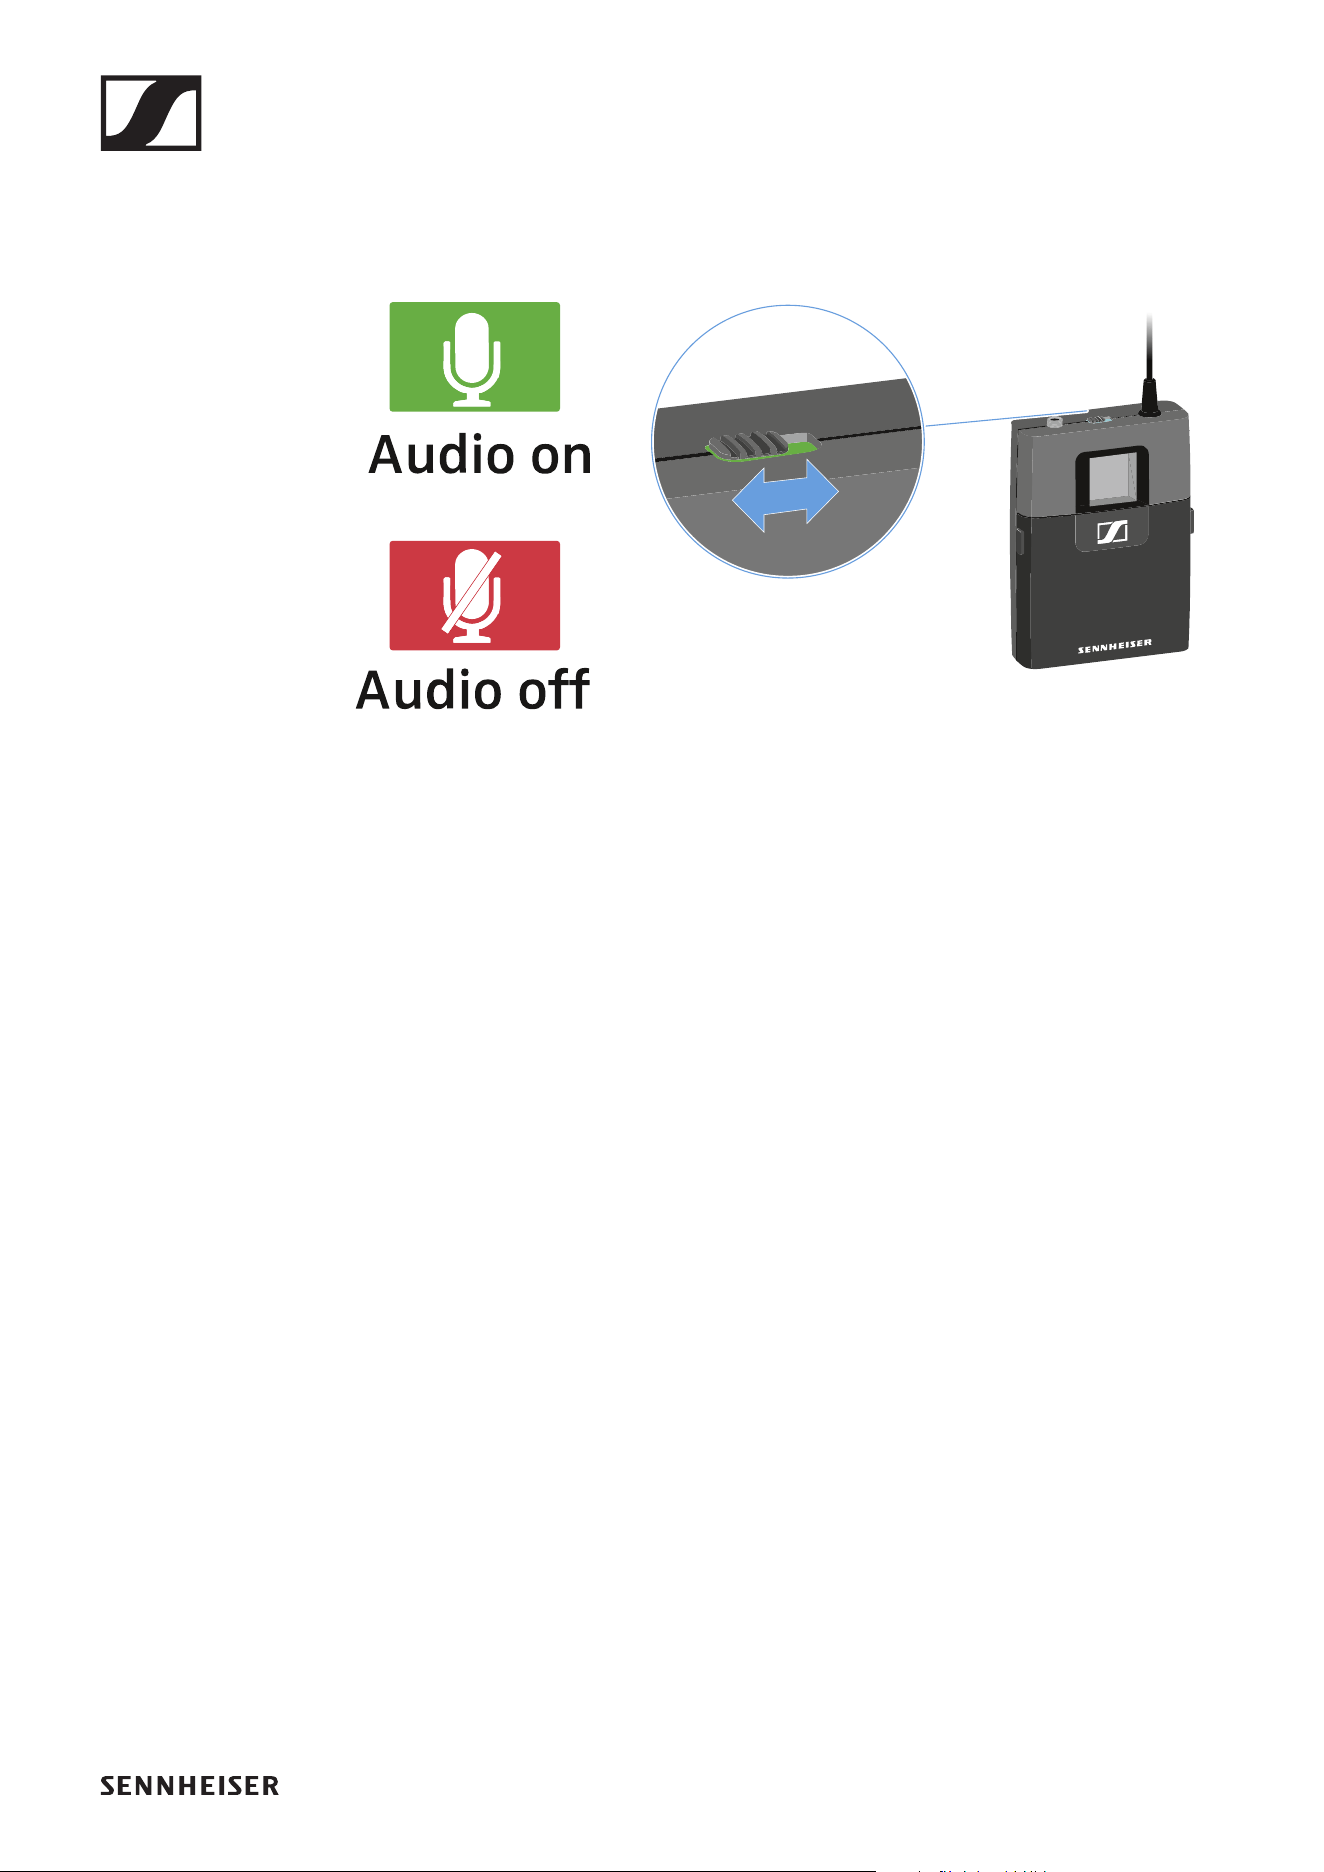
Muting the bodypack transmitter
You can mute the audio signal using the mute switch.
►
▷ Slide the mute switch to the desired position to mute or ac-
tivate the audio signal.
Establishing a radio link | Synchronizing the receiver and transmitter
90
Establishing a radio link | Synchronizing
the receiver and transmitter
Conditions and restrictions for using frequencies
There may be special conditions and restrictions for us-
ing frequencies in your country.
Before putting the product into operation, find the information
for your country at the following address:
www.sennheiser.com/sifa
To establish a radio link between the transmitter and receiver,
we recommend the following procedure.
To successfully pair a receiver and a transmitter, both
devices must have the same frequency range.
Step 1: Set a free frequency on the receiver
We recommend using the AUTO SCAN function, as this is the
most reliable way to identify free frequencies (EM-XSW 1:
„Setting the frequency automatically (AUTO SCAN)“ | EM-
XSW 1 DUAL: „Setting the frequency automatically (AUTO
SCAN)“ | EM-XSW 2: „SCAN menu item“).
If you know free frequencies in your area, you can also set the
frequency manually (EM-XSW 1: „Setting the frequency manu-
ally“ | EM-XSW 1 DUAL: „Setting the frequency manually“ |
EM-XSW 2: „PRESET menu item“ or „TUNE menu item“).
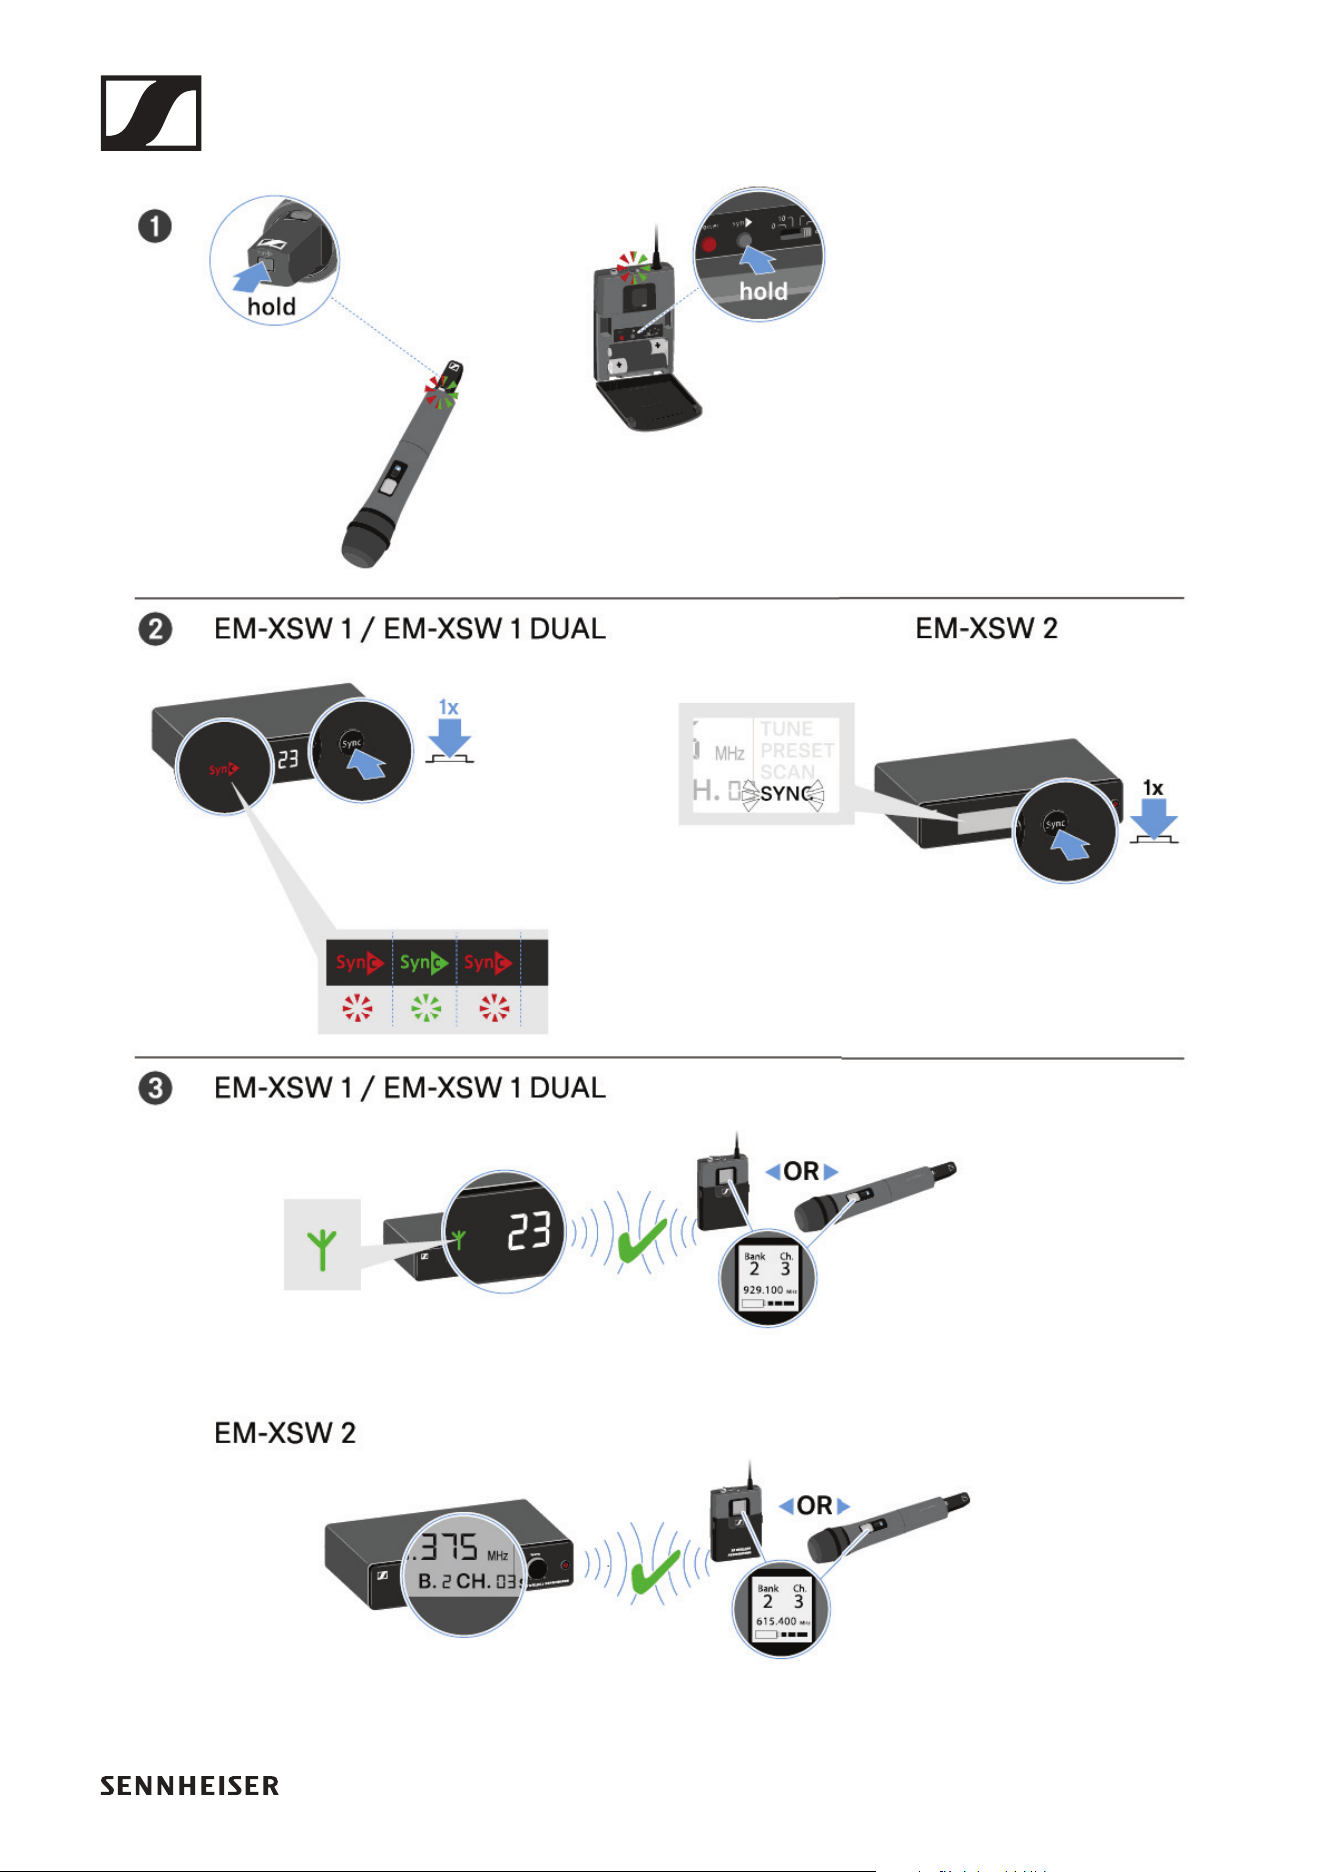
Step 2: Synchronize the receiver and transmitter
▷ Press and hold the SYNC button on the transmitter.
The LED flashes alternately red and green.
▷ While the LED is flashing, short-press the SYNC button on
the receiver.
The transmitter and receiver are synchronized and the con-
nection is established.
Establishing a radio link | Synchronizing the receiver and transmitter
91
►

Cleaning and maintenance
92
Cleaning and maintenance
Note the following information when cleaning and maintaining
products of the Evolution Wireless Digital series.
CAUTION
Liquids can damage the products’ electronics.
Liquids entering the product housing can cause a short-circuit
and damage the electronics.
▷ Keep all liquids away from the products.
▷ Do not use any solvents or cleansing agents.
▷ Disconnect the products from the power supply system
and remove rechargeable batteries and batteries before
you begin cleaning.
▷ Clean all products only with a soft, dry cloth.
▷ Note the special cleaning instructions below for the follow-
ing products.
Cleaning the sound inlet basket of the microphone
module
▷ Unscrew the top sound inlet basket from the microphone
module by turning it counterclockwise.
▷ Remove the foam insert.
You can clean the sound inlet basket in two ways:
• Use a slightly damp cloth to clean the top sound inlet basket
from the inside and outside.
• Use a brush and rinse with clean water.
▷ If necessary, clean the foam insert with a mild detergent or
replace the foam insert.
▷ Dry the top sound inlet basket and foam insert.
▷ Reinsert the foam insert.
▷ Screw the sound inlet basket back onto the microphone
module.

Cleaning and maintenance
93
From time to time, you should also clean the microphone mod-
ule contacts:
▷ Wipe the contacts of the microphone module with a soft,
dry cloth.
Cleaning the bodypack transmitter contacts
Wipe the contacts with a dry cloth.

SPECIFICATIONS
94
SPECIFICATIONS
System
Modulation
Wideband FM
Frequency ranges
• A: 548 – 572 MHz
• GB: 606 – 630 MHz
• B: 614 – 638 MHz
• BC: 670 – 694 MHz
• C: 630 – 662 MHz
• D: 766 – 790 MHz
• JB: 806.125 – 809.750 MHz
• E: 821 – 832 MHz & 863 – 865 MHz
• K: 925 – 937.5 MHz
Further details: „Frequency ranges“
Switching bandwidth
up to 24 MHz
Frequencies
• XSW 1:
• 8 frequency banks, each with up to 10 factory-preset
channels
• XSW 2:
• adjustable in 25 kHz steps
• 8 frequency banks, each with up to 12 factory-preset
channels
Transmitter synchronization
• XSW 1:
• 2.4 GHz, RF power < 3 mW, MSK (only active during syn-
chronization)
• XSW 2:
• 2.4 GHz, RF power < 3 mW, Low Power OQPSK (only ac-
tive during synchronization)

System
95
Signal-to-noise ratio
≥
103 dBA
Audio THD
≤ 0.9 %
Operating temperature range
0 °C – +40 °C (14 °F – 131 °F)
Storage temperature range
-20 °C – +70 °C (14 °F – 131 °F)
Relative humidity
max. 95 % (non-condensing)

EM-XSW 1 stationary receiver
96
EM-XSW 1 stationary receiver
Receiver principle
double superheterodyne
Diversity principle
Antenna switching diversity via internal antennas
Sensitivity (at peak deviation)
< 3 µV at 52 dB(A)eff S/N
AF frequency response
50 – 16,000 Hz (-3 dB)
Max. AF output voltage (at peak deviation, 1 kHz AF)
• 6.3 mm jack socket (unbalanced): +6 dBu
• XLR socket (balanced): +12 dBu
Audio adjustment range
45 dB, adjustable in 5 dB steps
Power supply
DC 12 V nom. / 300 mA
Squelch
Adjustable from 3 dBµV up to 28 dBµV (combined with pilot
tone)
Line/Mic level
20 dB, switchable
Housing material
rugged ABS housing

EM-XSW 1 stationary receiver
97
Dimensions
Approx. 200 x 42 x 127 mm
Weight
Approx. 340 g

EM-XSW 1 DUAL rack receiver
98
EM-XSW 1 DUAL rack receiver
Receiver principle
double superheterodyne
Diversity principle
Antenna switching diversity via internal antennas
Sensitivity (at peak deviation)
< 3 µV at 52 dB(A)eff S/N
AF frequency response
50 – 16,000 Hz (-3 dB)
Max. AF output voltage (at peak deviation, 1kHz AF)
• 6.3 mm jack socket (unbalanced): +6 dBu
• XLR socket (balanced): +12 dBu
Audio adjustment range
45 dB, adjustable in 5 dB steps
Power supply
DC 12 V nom. / 500 mA
Squelch
Adjustable from 3 dBµV up to 28 dBµV (combined with pilot
tone)
Line/Mic level
20 dB, switchable
Housing material
rugged ABS housing

EM-XSW 1 DUAL rack receiver
99
Dimensions
Approx. 320 x 42 x 127 mm
Weight
Approx. 610 g

EM-XSW 2 stationary receiver
100
EM-XSW 2 stationary receiver
Receiver principle
double superheterodyne
Diversity principle
True diversity
Sensitivity (at peak deviation)
< 3 µV at 52 dB(A)eff S/N
AF frequency response
50 – 16,000 Hz (-3 dB)
Max. AF output voltage (at peak deviation, 1kHz AF)
• 6.3 mm jack socket (unbalanced): +6 dBu
• XLR socket (balanced): +12 dBu
Audio adjustment range
40 dB, continuously adjustable with control knob
Power supply
DC 12 V nom. / 300 mA
Squelch
Adjustable from 3 dBµV up to 28 dBµV (combined with pilot
tone)
Line/Mic level
20 dB, switchable
Housing material
Rugged metal housing

EM-XSW 2 stationary receiver
101
Dimensions
Approx. 200 x 42 x 127 mm
Weight
Approx. 680 g

SKM-XSW handheld transmitter
102
SKM-XSW handheld transmitter
Transmission power
10 mW
AF frequency response
• SKM 825-XSW
• 80 – 14,000 Hz
• SKM 835-XSW
• 80 – 16,000 Hz
• SKM 865-XSW
• 80 – 16,000 Hz
Power supply
2 AA batteries, 1.5 V
Operating time
approx. 10 hours
Microphone type
• SKM 825-XSW
• Dynamic
• SKM 835-XSW
• Dynamic
• SKM 865-XSW
• Capacitor, pre-polarized
Input sensitivity (capsule)
• SKM 825-XSW
• 1.5 mV/Pa
• SKM 835-XSW
• 1.5 mV/Pa
• SKM 865-XSW
• 1.8 mV/Pa

SKM-XSW handheld transmitter
103
Pick-up pattern
• SKM 825-XSW
• Cardioid
• SKM 835-XSW
• Cardioid
• SKM 865-XSW
• Super-cardioid
Adjustment range of transmitter sensitivity
0 to -30 dB, adjustable in 10 dB steps
Housing material
rugged ABS housing
Dimensions
Approx. 260 x 50 mm
Weight
Approx. 245 g

SK-XSW bodypack transmitter
104
SK-XSW bodypack transmitter
Transmission power
10 mW
AF frequency response
• 50 – 16,000 Hz (Line)
• 80 – 16,000 Hz (Mic)
Audio input
3.5 mm jack socket
Max. input voltage (Mic/Line) at 3% THD
• Typically 1.5 V rms Mic @ -30 dB gain
• Typically 2.6 V rms Line @ -30 dB gain
Power supply
2 AA batteries, 1.5 V
Operating time
approx. 10 hours
Adjustment range of transmitter sensitivity
0 to -30 dB, adjustable in 10 dB steps
Housing material
rugged ABS housing
Dimensions
Approx. 71 x 96 x 28 mm
Weight
Approx. 95 g

Microphones
105
Microphones
ME 2-2
Transducer principle
Capacitor, pre-polarized
Sensitivity
20 mV/Pa
Pick-up pattern
Omni-directional
Max. sound pressure level (SPL)
130 dB
ME 3-II
Transducer principle
Capacitor, pre-polarized
Sensitivity
1.6 mV/Pa
Pick-up pattern
Cardioid
Max. sound pressure level (SPL)
150 dB

Microphones
106
e 908T
Transducer principle
Capacitor, pre-polarized
Sensitivity
0.6 mV/Pa
Pick-up pattern
Cardioid
Max. sound pressure level (SPL)
147 dB

NT 12-5 CW power supply unit
107
NT 12-5 CW power supply unit
Nominal input voltage
AC 100 – 240 V
Power frequency
50 or 60 Hz
Input current
≤ 200 mA
Nominal output voltage
DC 12 V
Output current
≤ 500 mA
Standby power consumption
≤ 0.075 W @ AC 230 V
≤ 0.1 W @ AC 115 V
Energy efficiency level
DOE Level VI
Weight (without adapter)
Approx. 65 g
Cable length
approx. 1.83 m
Operating temperature range
0 °C – +40 °C (14 °F – 131 °F)

NT 12-5 CW power supply unit
108
Storage temperature range
-20 °C – +60 °C (14 °F – 131 °F)
Relative humidity
max. 95 % (non-condensing)

CONTACT
109
CONTACT
►
Sennheiser electronic GmbH & Co. KG
Am Labor 1, 30900 Wedemark, Germany
www.sennheiser.com
Questions about the product / Help with
technical issues
If you have any technical questions or problems with the prod-
uct, please contact Sennheiser customer service.
www.sennheiser.com/service-support
Feedback on the instruction manual
Do you have any questions or suggestions about this instruc-
tion manual? Write to us at:
techcomm@sennheiser.com
