
HP company notices
Copyright and License
THE INFORMATION CONTAINED HEREIN IS
SUBJECT TO CHANGE WITHOUT NOTICE.
ALL RIGHTS RESERVED. REPRODUCTION,
ADAPTATION, OR TRANSLATION OF THIS
MATERIAL IS PROHIBITED WITHOUT PRIOR
WRITTEN PERMISSION OF HP, EXCEPT AS
ALLOWED UNDER THE COPYRIGHT LAWS. THE
ONLY WARRANTIES FOR HP PRODUCTS AND
SERVICES ARE SET FORTH IN THE EXPRESS
WARRANTY STATEMENTS ACCOMPANYING SUCH
PRODUCTS AND SERVICES. NOTHING HEREIN
SHOULD BE CONSTRUED AS CONSTITUTING AN
ADDITIONAL WARRANTY. HP SHALL NOT BE
LIABLE FOR TECHNICAL OR EDITORIAL ERRORS
OR OMISSIONS CONTAINED HEREIN.
© Copyright 2022 HP Development Company,
L.P.
Trademark Credits
Microsoft and Windows are either registered
trademarks or trademarks of Microsoft
Corporation in the United States and/or other
countries.
Mac, OS X, macOS, and AirPrint are trademarks
of Apple Inc., registered in the U.S. and other
countries.
ENERGY STAR and the ENERGY STAR mark
are registered trademarks owned by the U.S.
Environmental Protection Agency.
Android and Chromebook are trademarks of
Google LLC.
iOS is a trademark or registered trademark of
Cisco in the U.S. and other countries and is used
under license.
Safety information
Always follow basic safety precautions when
using this product to reduce risk of injury from
re re or electric shock.
- Read and understand all instructions in the
documentation that comes with the printer.
- Observe all warnings and instructions marked
on the product.
- Unplug this product from wall outlets before
cleaning.
- Do not install or use this product near water,
or when you are wet.
- Install the product securely on a stable
surface.
- Install the product in a protected location
where no one can step on or trip over the line
cord, and the line cord cannot be damaged.
- If the product does not operate normally, see
Solve problems in this guide.
- There are no user-serviceable parts inside.
Refer servicing to qualied service personnel.

Table of contents
Get started........................................................................................................................................................1
Printer views......................................................................................................................................................................1
Printer front views.....................................................................................................................................................1
Printer rear view .......................................................................................................................................................2
Printer inner view ......................................................................................................................................................2
Control panel features.......................................................................................................................................................4
Control panel display icons ....................................................................................................................................... 5
Perform common tasks from the printer control panel ...................................................................................................7
USB-only models ....................................................................................................................................................... 8
Wi-Fi models..............................................................................................................................................................8
Print reports from the printer control panel.....................................................................................................................9
USB-only models ....................................................................................................................................................... 9
Wi-Fi models..............................................................................................................................................................9
Change printer settings...................................................................................................................................................10
HP Smart (iOS, Android, and Windows 10)..............................................................................................................10
The embedded web server (EWS) (Wi-Fi models)...................................................................................................11
Change printer language from EWS (Wi-Fi models) ...............................................................................................11
Find the default printer password or PIN ........................................................................................................................11
Install and use the HP printer software ..........................................................................................................................11
Use the HP Smart app to print, scan, and manage .........................................................................................................12
Install HP Smart and open the app..........................................................................................................................12
Get more information about HP Smart ...................................................................................................................13
Connect your printer ........................................................................................................................................ 14
Before you begin (Wi-Fi models) .....................................................................................................................................14
Connect your printer to a Wi-Fi network using HP Smart (Wi-Fi models) ......................................................................14
Connect your printer to a Wi-Fi network using HP printer software ..............................................................................15
Connect your printer to a Wi-Fi network using Wi-Fi Protected Setup (WPS) (Wi-Fi models) .......................................15
Connect your printer using a USB cable ..........................................................................................................................16
Change the connection from USB to wireless (Wi-Fi models).........................................................................................16
Load media...................................................................................................................................................... 17
Load paper .......................................................................................................................................................................17
Load envelopes................................................................................................................................................................20
Load original ....................................................................................................................................................................22
Change paper settings from the embedded web server (Wi-Fi models)........................................................................24
Paper basics.....................................................................................................................................................................24
Recommended papers for printing .........................................................................................................................24
iii

Order HP paper supplies..........................................................................................................................................25
Print ............................................................................................................................................................... 27
Print from a Windows computer .....................................................................................................................................27
Print from a Mac computer (Wi-Fi models) .....................................................................................................................27
Print with mobile devices (Wi-Fi models)........................................................................................................................27
Print while connected to same Wi-Fi network ........................................................................................................28
Print without connecting to same Wi-Fi network (Wi-Fi Direct).............................................................................28
Copy, Scan, and Mobile Fax ............................................................................................................................... 29
Copy from the printer ......................................................................................................................................................29
Copy an identication (ID) card........................................................................................................................................29
Scan using the HP Smart app (iOS, Android, Windows 10, and macOS) .........................................................................32
Scan using HP printer software.......................................................................................................................................32
Scan a document or photo to a le or email (Windows) .........................................................................................32
Change scan settings (Windows).............................................................................................................................32
Create a new scan shortcut (Windows) ...................................................................................................................33
Scan using Webscan (Wi-Fi models)................................................................................................................................33
Enable Webscan.......................................................................................................................................................33
Scan using Webscan ................................................................................................................................................34
Tips for successful scanning and copying.......................................................................................................................34
Mobile Fax ........................................................................................................................................................................34
Congure your printer ...................................................................................................................................... 36
Access and use EWS.........................................................................................................................................................36
HP Smart (iOS, Android, and Windows 10)..............................................................................................................37
Open EWS using an IP address (Wi-Fi connection)..................................................................................................37
Open EWS using an IP address (Wi-Fi Direct connection) .......................................................................................37
HP printer software (Windows 7) ............................................................................................................................37
Congure IP network settings.........................................................................................................................................38
View or change network settings............................................................................................................................38
Rename the printer on a network ...........................................................................................................................38
Manually congure IPv4 TCP/IP parameters...........................................................................................................38
Assign or change the system password..........................................................................................................................38
Use Web Services (Wi-Fi models) ....................................................................................................................................39
Remove Web Services using EWS............................................................................................................................39
Manage ink supplies......................................................................................................................................... 40
Check ink levels................................................................................................................................................................40
HP printer software (Windows) ...............................................................................................................................40
Rell ink tanks .................................................................................................................................................................40
Order ink supplies............................................................................................................................................................44
Print with black ink only (Windows) ................................................................................................................................44
Move printer ....................................................................................................................................................................45
iv

Solve a problem ............................................................................................................................................... 46
Update the printer ...........................................................................................................................................................46
HP Smart (Wi-Fi models) .........................................................................................................................................46
Download from the HP support website ................................................................................................................46
The embedded web server (EWS) (Wi-Fi models)...................................................................................................46
Interpret error codes, lights, and icons...........................................................................................................................47
Error codes...............................................................................................................................................................47
Power button light...................................................................................................................................................49
Document icon and paper errors.............................................................................................................................49
Printhead icons and errors ......................................................................................................................................50
Printhead alignment icon ........................................................................................................................................51
Ink icons and errors .................................................................................................................................................52
Wi-Fi status, light, and icons (Wi-Fi models) ..........................................................................................................53
Jams and paper-feed issues............................................................................................................................................54
Possible jam locations.............................................................................................................................................54
Remove jammed paper ...........................................................................................................................................55
Clean the paper-pick rollers manually ....................................................................................................................63
Solve paper-feed problems .....................................................................................................................................64
Learn how to avoid jams and paper-feed issues.....................................................................................................65
Printhead issues ..............................................................................................................................................................65
Verify that the printheads are installed properly ...................................................................................................66
Clean printhead contacts.........................................................................................................................................68
Printing issues .................................................................................................................................................................72
Resolve print issues (Windows)...............................................................................................................................72
Resolve print issues (macOS) (Wi-Fi models)..........................................................................................................74
Fix print quality issues.............................................................................................................................................74
Copy and scan issues.......................................................................................................................................................77
Network and connection issues (Wi-Fi models)..............................................................................................................77
Fix network connection issues ................................................................................................................................77
Fix Wi-Fi Direct connection issues...........................................................................................................................78
Restore original factory defaults and settings ...............................................................................................................78
To restore printer factory defaults from the control panel (network models) ......................................................78
Restore printer network settings from the control panel (Wi-Fi models)..............................................................79
Restore printer factory defaults or network settings from EWS (Wi-Fi models)...................................................79
Web Services issues (Wi-Fi models) ................................................................................................................................79
Printer hardware issues...................................................................................................................................................79
Printer maintenance ........................................................................................................................................................80
Clean the scanner glass...........................................................................................................................................80
Clean the scanner lid sensor ...................................................................................................................................82
Clean the exterior ...................................................................................................................................................83
HP support .......................................................................................................................................................................83
Contact HP ...............................................................................................................................................................83
Register printer........................................................................................................................................................84
Additional warranty options....................................................................................................................................84
v

HP EcoSolutions (HP and the Environment) ........................................................................................................ 85
Power Management.........................................................................................................................................................85
Auto-O ...................................................................................................................................................................85
Energy Save Mode or Sleep mode ...........................................................................................................................85
Quiet Mode.......................................................................................................................................................................86
Change Quiet Mode settings from EWS (Wi-Fi models)..........................................................................................86
Technical information ...................................................................................................................................... 87
Specications...................................................................................................................................................................87
Regulatory notices...........................................................................................................................................................88
Regulatory Model Number ......................................................................................................................................88
FCC statement..........................................................................................................................................................89
Power cord instructions...........................................................................................................................................89
VCCI (Class B) compliance statement for users in Japan ........................................................................................89
Notice to users in Japan about the power cord.......................................................................................................89
Visual display workplaces statement for Germany ................................................................................................90
Noise emission statement for Germany .................................................................................................................90
European Union and United Kingdom Regulatory Notice.......................................................................................90
Declaration of conformity .......................................................................................................................................90
Regulatory wireless statements .............................................................................................................................90
Accessibility .....................................................................................................................................................................93
Environmental product stewardship program................................................................................................................93
HP tips for reducing environmental impact............................................................................................................93
Eco-Tips ...................................................................................................................................................................94
European Union Commission Regulation 1275/2008 ............................................................................................94
Paper .......................................................................................................................................................................94
Plastics.....................................................................................................................................................................94
Safety data sheets...................................................................................................................................................94
Recycling program...................................................................................................................................................94
HPinkjet supplies recycling program......................................................................................................................95
Power consumption.................................................................................................................................................95
Disposal of waste equipment by users ...................................................................................................................95
Waste disposal for Brazil.........................................................................................................................................95
Chemical substances ...............................................................................................................................................96
The Table of Hazardous Substances/Elements and their Content (China).............................................................97
Declaration of the Presence Condition of the Restricted Substances Marking (Taiwan Region)...........................98
Restriction of hazardous substance (India) ............................................................................................................98
Restriction on hazardous substances statement (Turkey).....................................................................................99
EPEAT .......................................................................................................................................................................99
SEPA Ecolabel User Information (China) .................................................................................................................99
China Energy Label for Printer, Fax and Copier .......................................................................................................99
vi
Get started
Learn about printer parts, control panel features, and other printer functionalities.
Printer views
Printer parts and their descriptions.
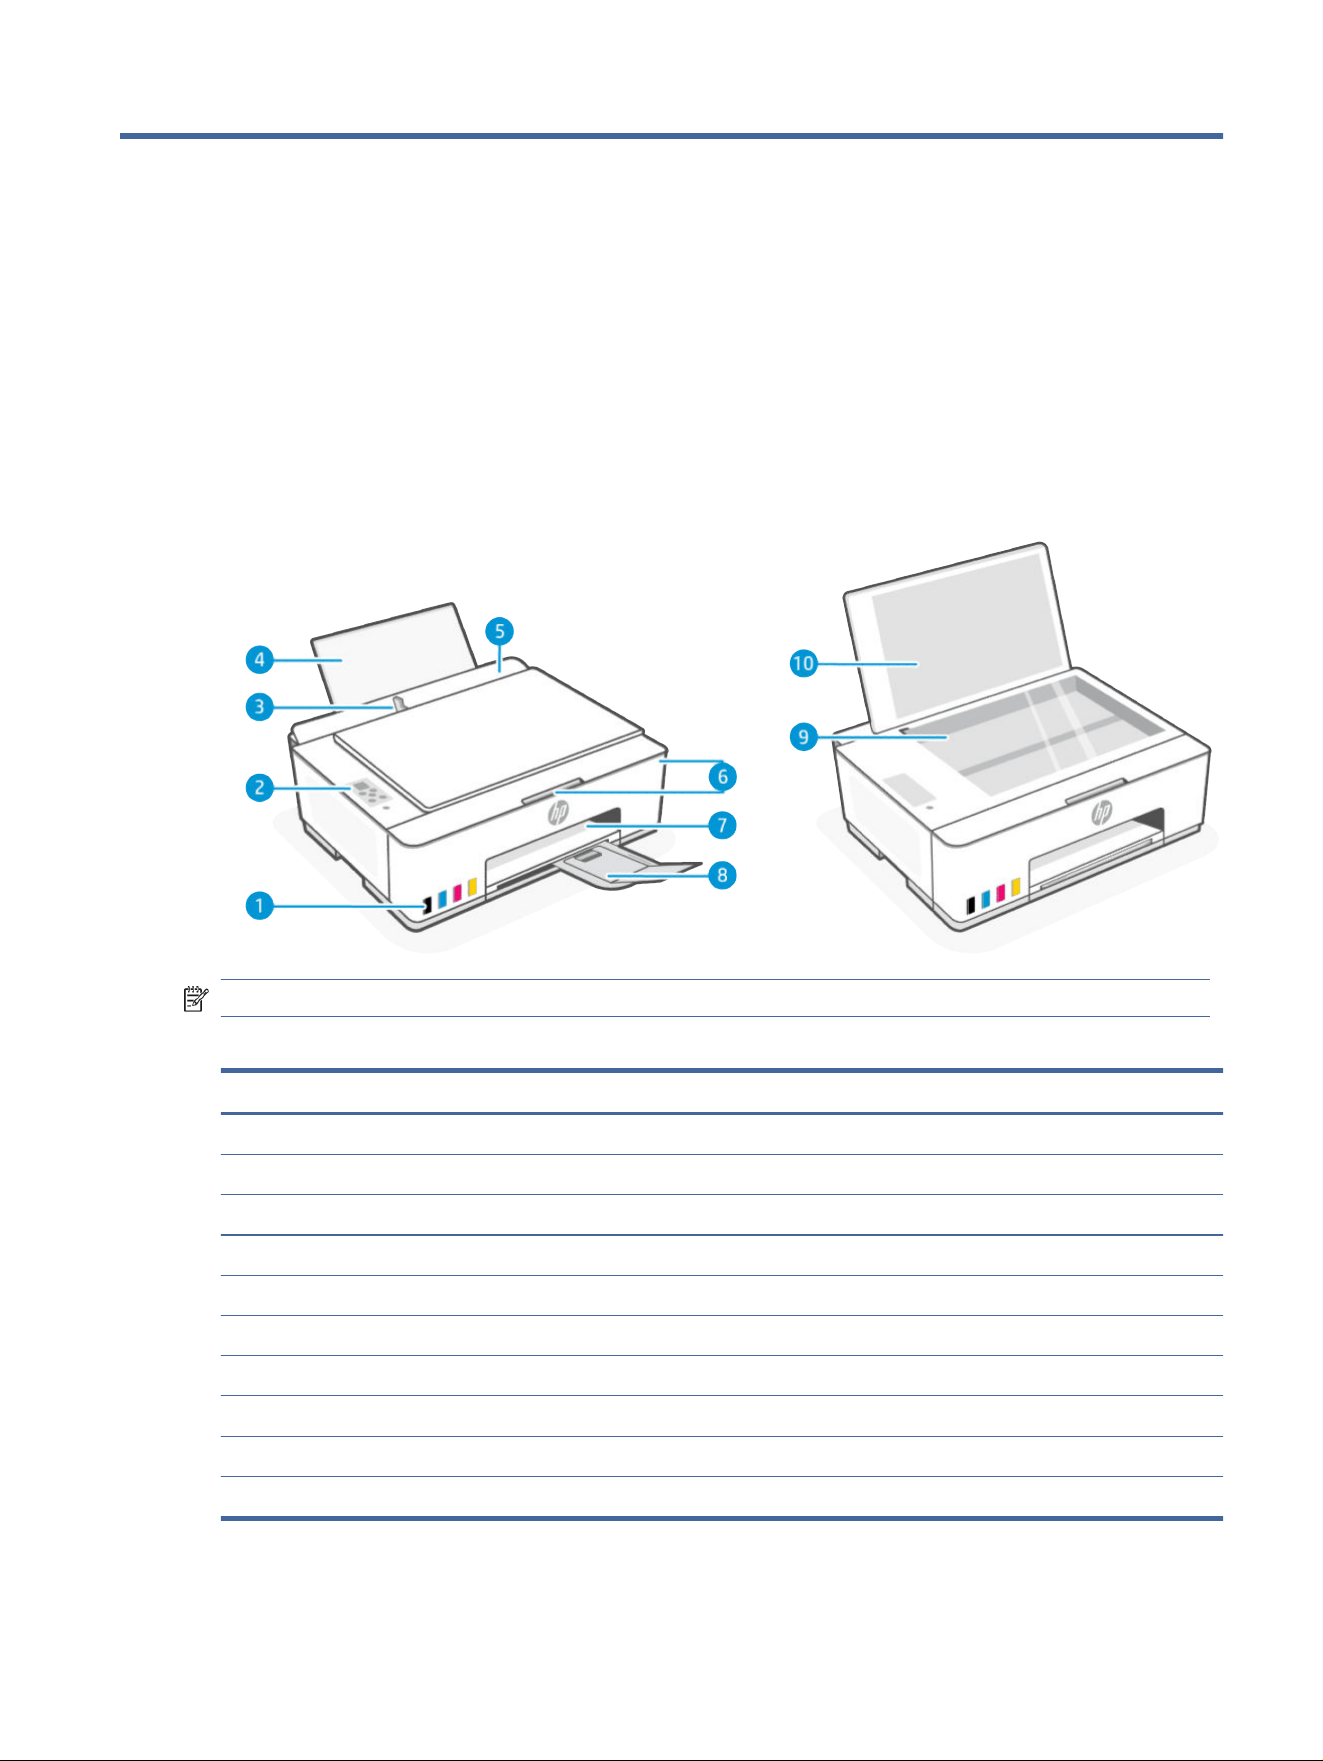
Printer front views
NOTE: The printer images and details may vary depending on your printer model.
Table 1-1
Printer front view
Feature Description
1 Ink tanks
2 Control panel
3 Paper-width guide
4 Input tray
5 Input tray shield
6 Front door and access
7 Output tray
8 Output tray extender
9 Scanner glass
10 Scanner lid
Get started 1
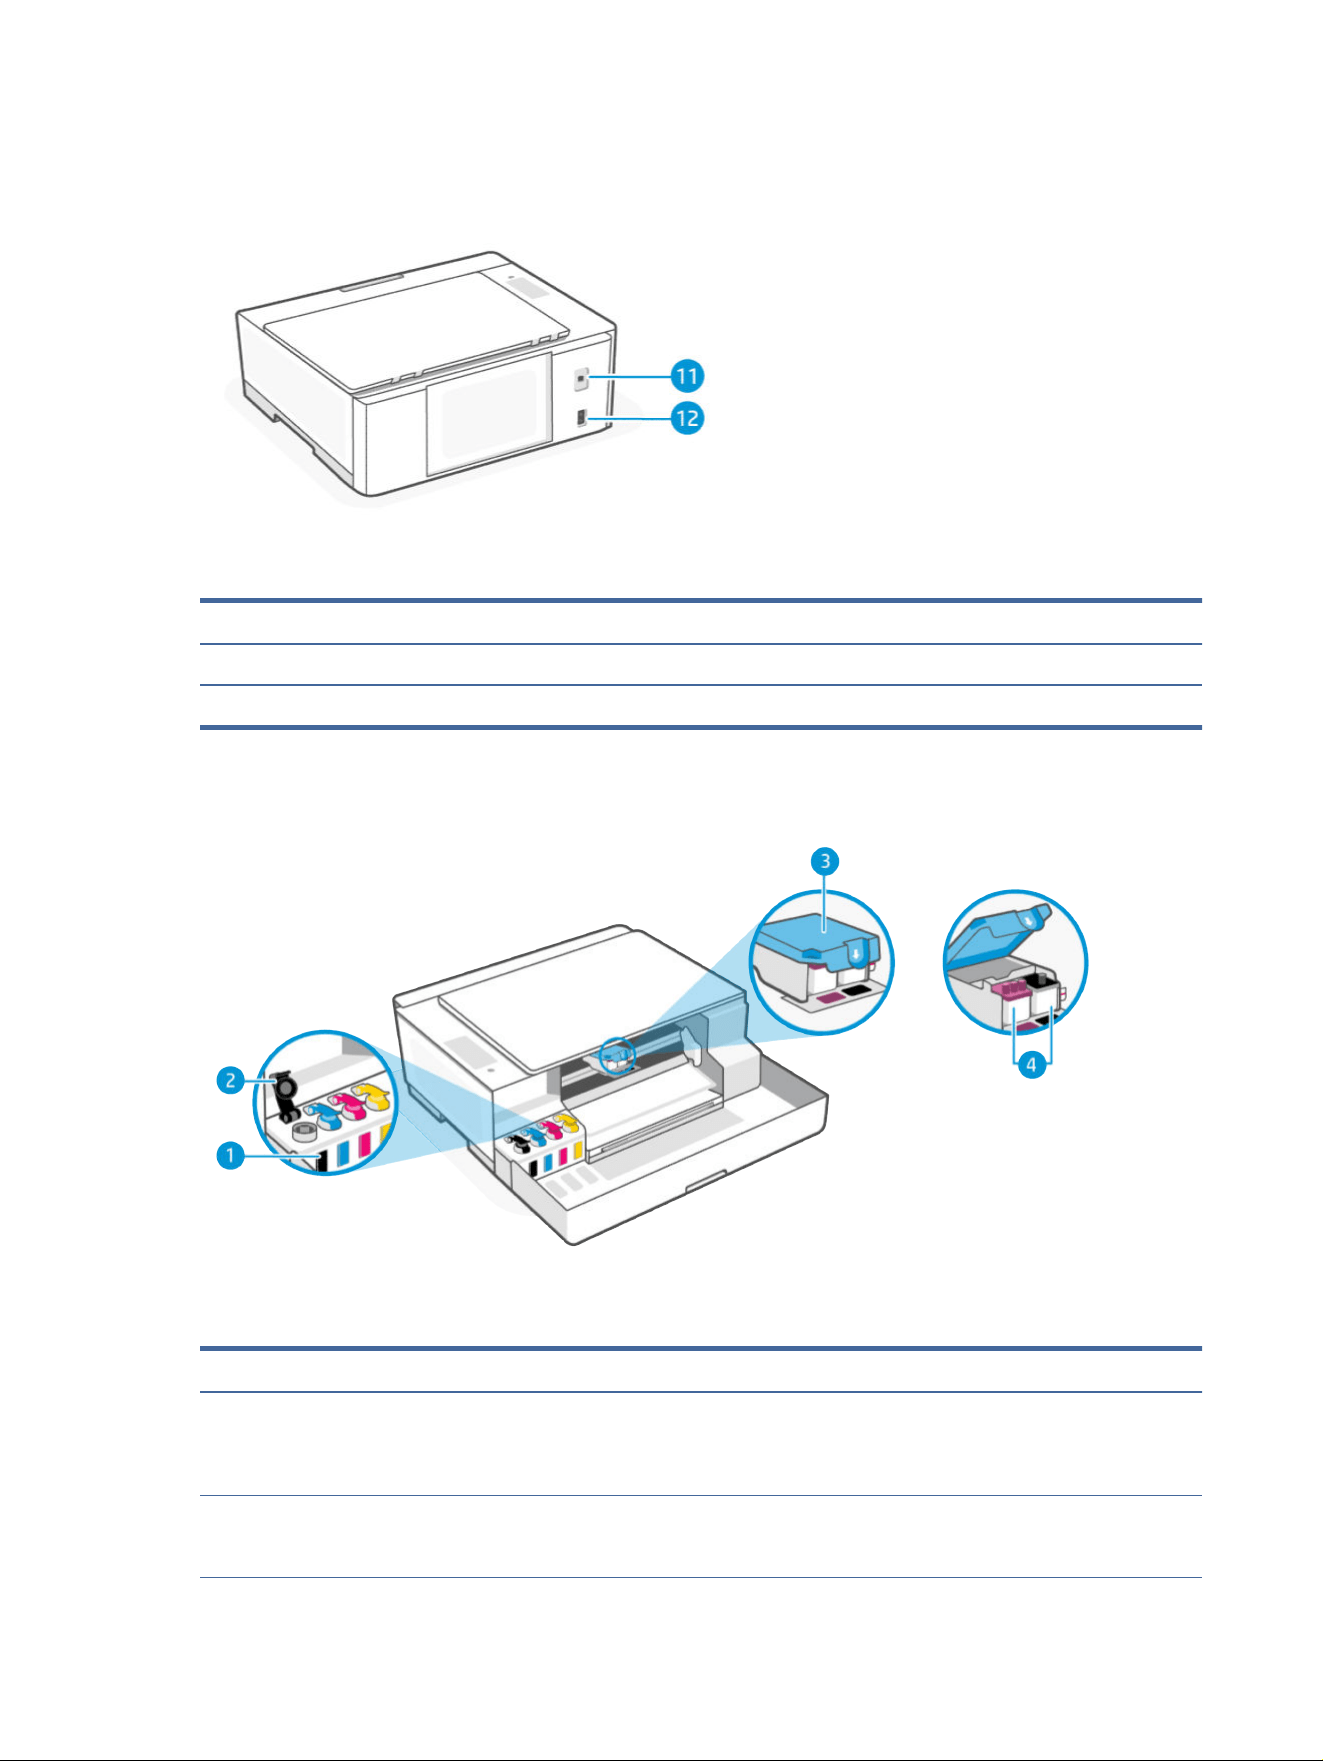
Printer rear view
Table 1-2 Printer rear view
Feature Description
11 USB port
12 Power connection
Printer inner view
Table 1-3 Printer inner view
Feature Description
1 Ink tanks
There are four ink tanks. Each tank contains a dierent colored ink: black, cyan, magenta, and
yellow.
2 Tank caps
The ink tank caps cover the opening of the ink tanks.
2 Chapter 1Get started

Table 1-3 Printer inner view (continued)
Feature Description
3 Printhead cover
The printhead cover on the print carriage secures the printheads in the carriage. Make sure the
printhead cover is properly closed to avoid problems such as carriage jams.
CAUTION:
● After you have set up the printer, do not open the printhead cover unless instructed.
● To prevent printer damage when moving printer, specic instructions must be followed to open
the printhead cover.
See Move printer .
4 Printheads
The printheads are the components in the print mechanism that apply ink to the paper. There are
two printheads: a color printhead and a black printhead.
Printer inner view 3
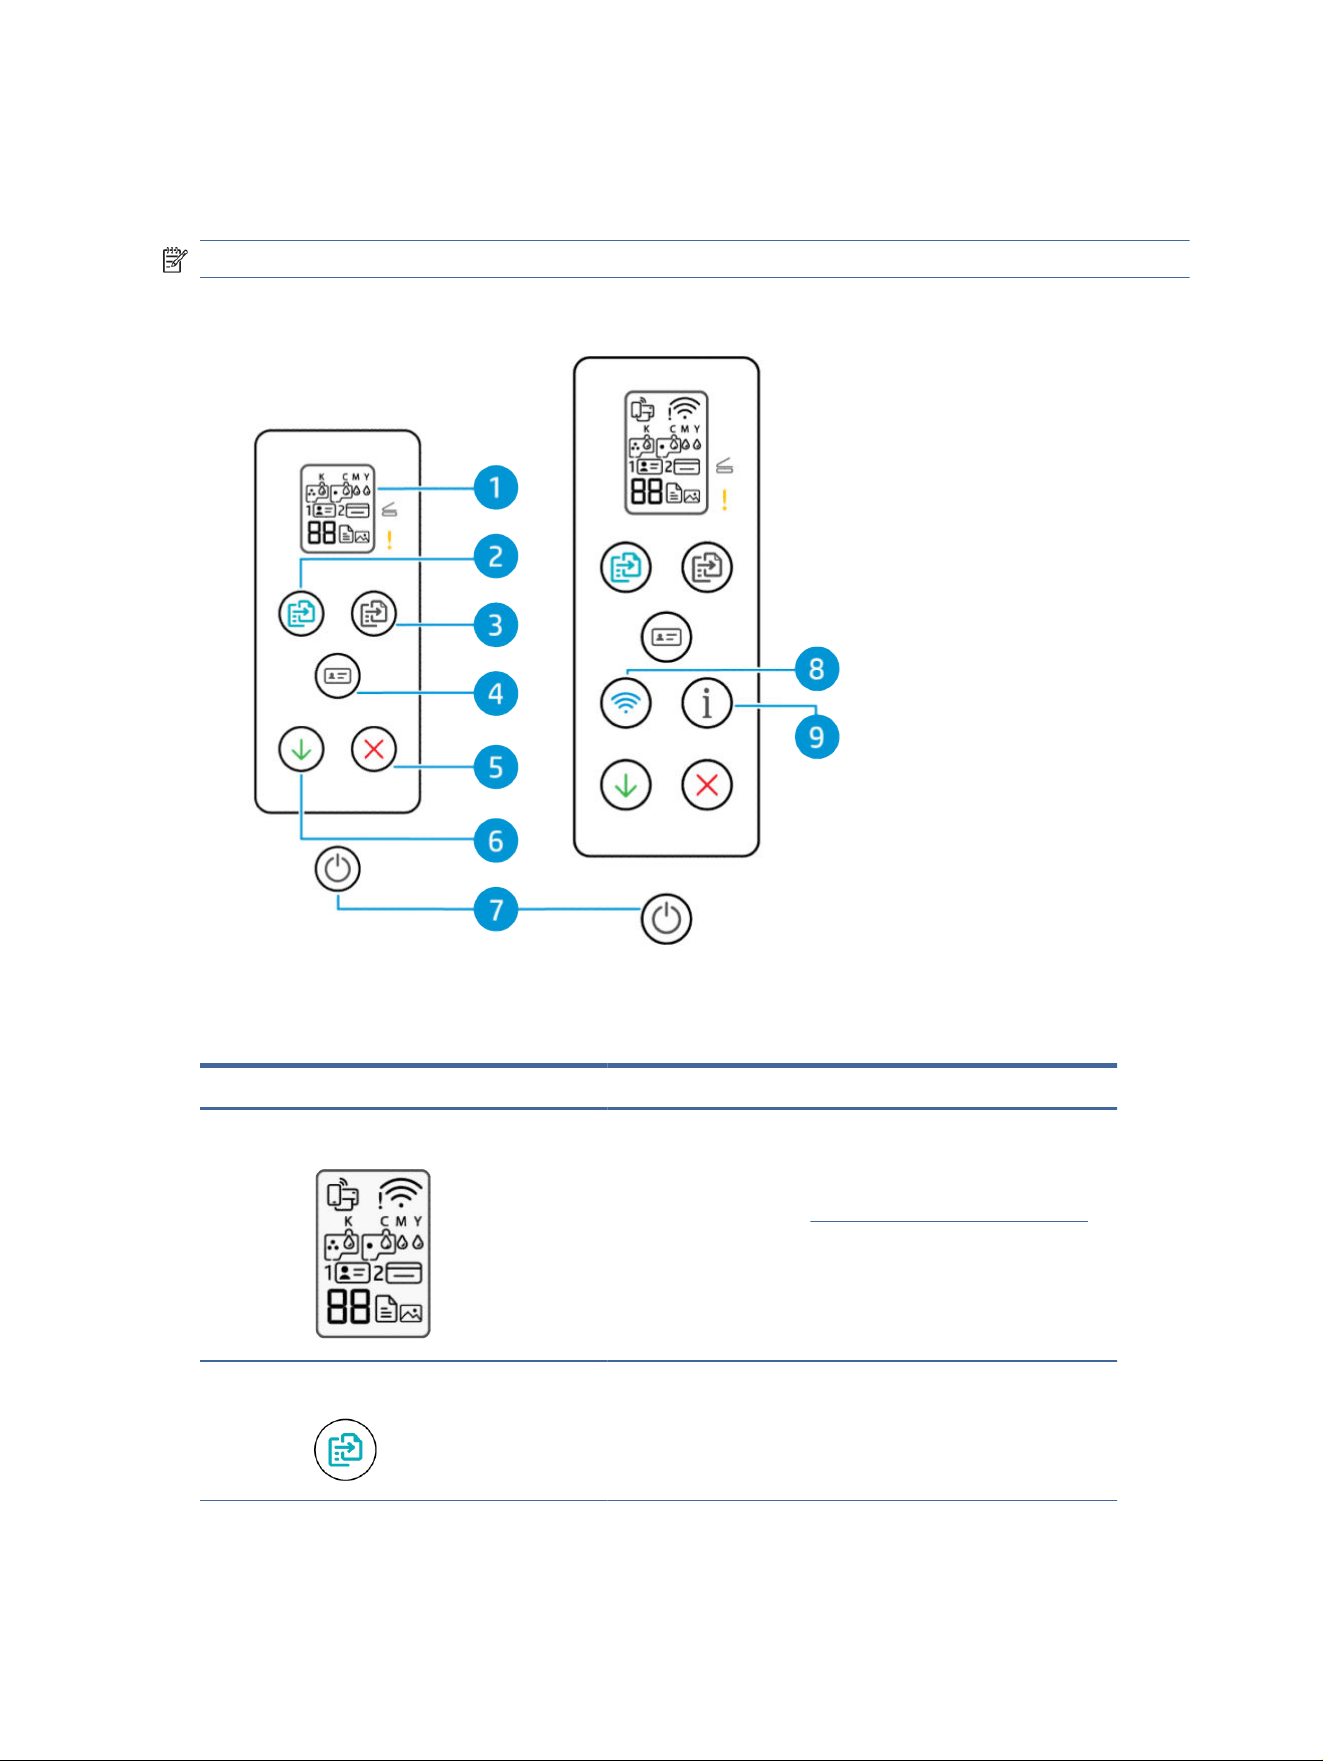
Control panel features
The control panel has buttons for direct interaction and lights to indicate printer status, errors, and more.
NOTE: The printer images and details may vary depending on your printer model.
Figure 1-1 USB-only models (left) and Wi-Fi models (right)
Table 1-4 Overview of buttons and lights
Feature Button Description
1 Control panel display Shows the number counter or error codes, dierent copy modes,
issues relating to ink, printheads, or paper, and the printer
connection status.
For more information, see Interpret error codes, lights, and icons.
2 Color Copy button Start a color copy job. To increase the number of copies, press and
hold the button or press it multiple times.
Copying starts 2 seconds after the last button press.
4 Chapter 1Get started
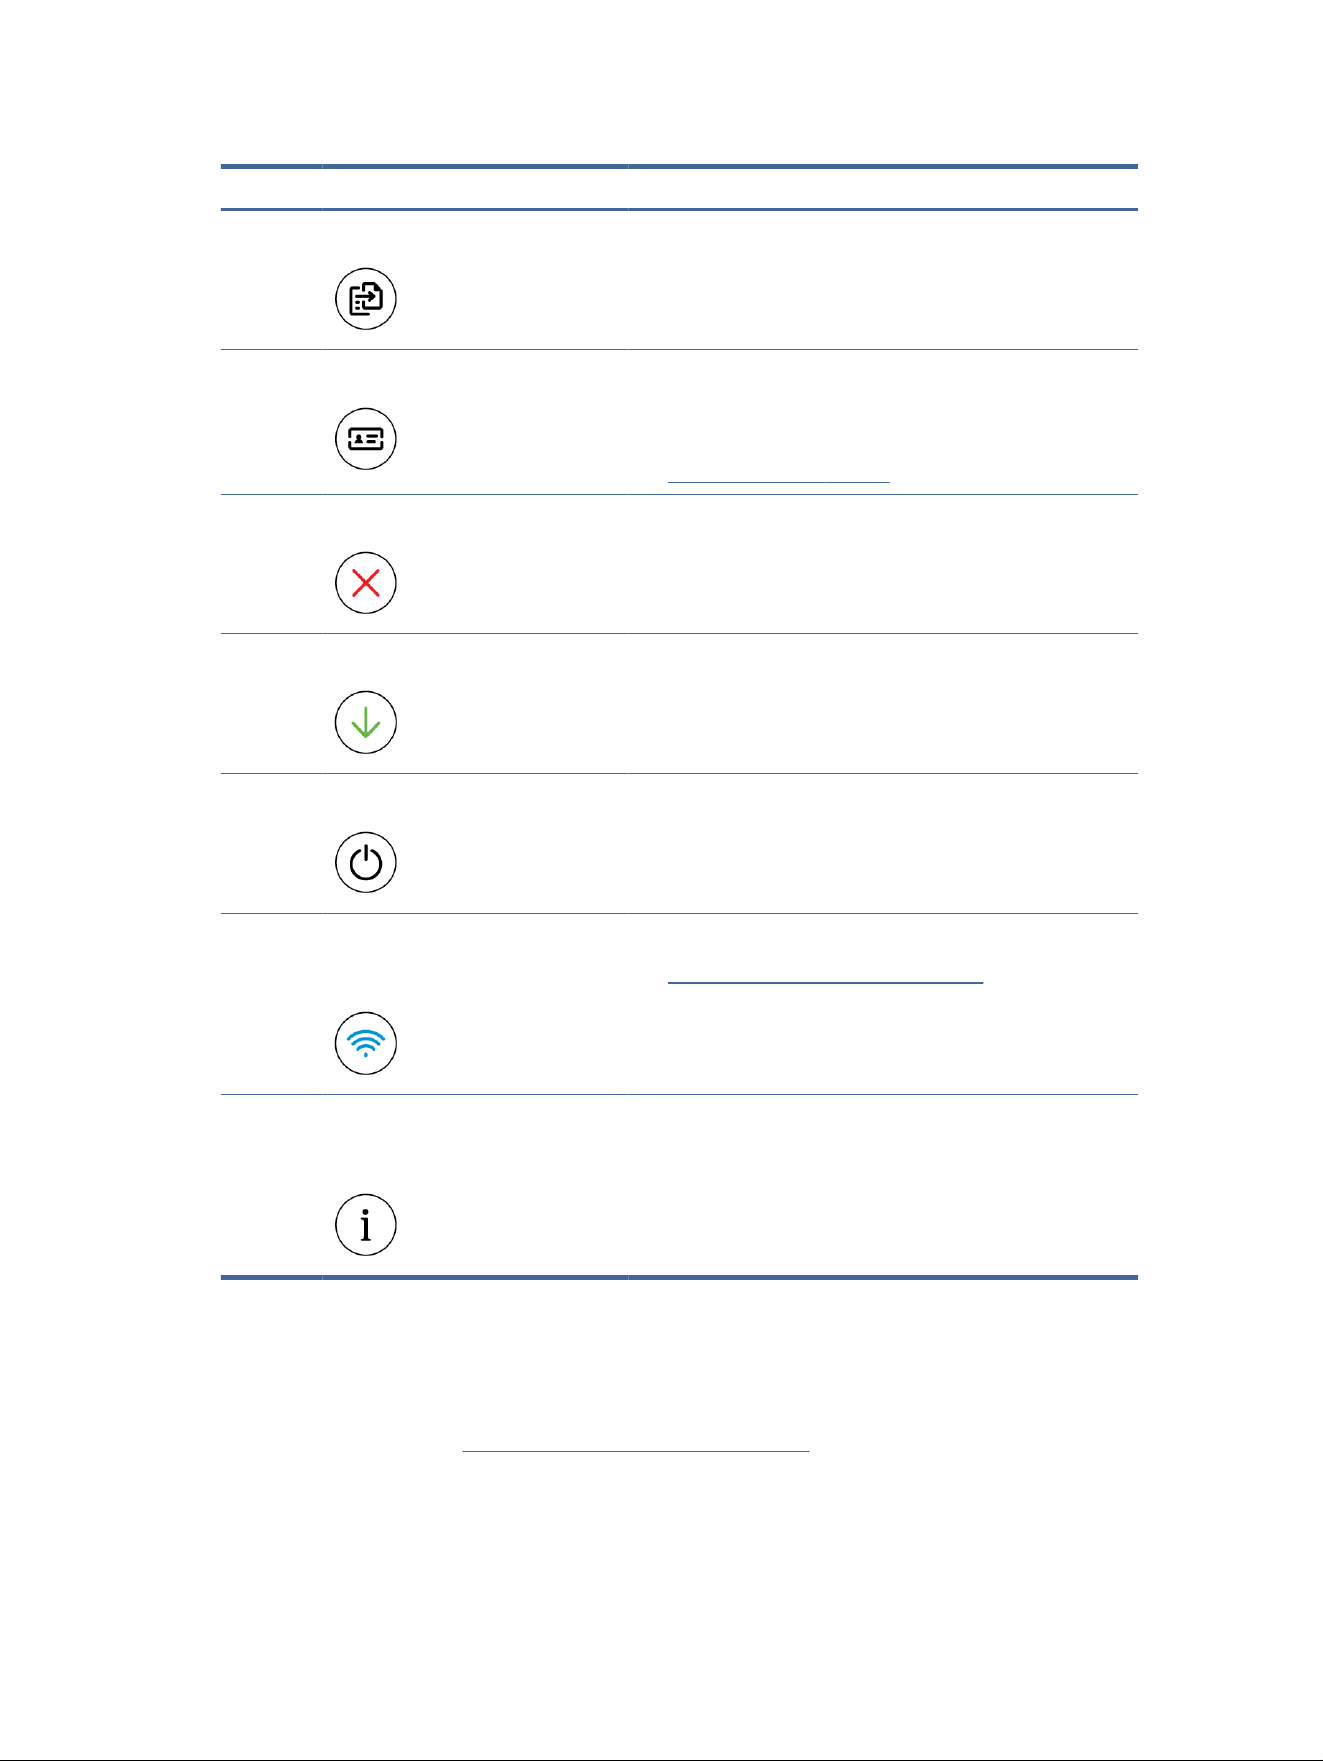
Table 1-4 Overview of buttons and lights (continued)
Feature Button Description
3 Black Copy button Start a black-and-white copy job. To increase the number of copies,
press and hold the button or press it multiple times.
Copying starts 2 seconds after the last button press.
4 ID Copy button The ID Copy feature allows you to place a card or small-size
document anywhere on the scanner glass to copy both sides onto
the same page.
See Copy an identication (ID) card.
5 Cancel button Stop the current operation.
6 Resume button Resume a job after a disruption (for example, after loading paper
or clearing a paper jam).
7 Power button Turn the printer on or o.
8 Wi-Fi button
(Wi-Fi models)
Turn on or o the wireless capability of the printer.
See Wi-Fi status, light, and icons (Wi-Fi models).
9 Information button
(Wi-Fi models)
Print an information page. The information page provides a
summary of the printer information and its current status
(including network, Wi-Fi Direct, Web Services, ink, and so on).
Control panel display icons
The control panel display has a number counter and several helpful status icons.
For more information, see Interpret error codes, lights, and icons.
Control panel display icons
5

Figure 1-2 USB-only models (left) and Wi-Fi models (right)
Table 1-5 Control panel display icons
Feature Icon Description
1 Printhead icons A blinking left icon indicates a problem with the color printhead.
A blinking right icon indicates a problem with the black printhead.
2 ID Copy Front and ID
Copy Back icons
Indicates the side of the card to place on the scanner glass.
3 Number Counter ● Displays the letter E and a number when the printer is in an error state.
● Shows the number of copies during a copy job.
● Changes to the letter A when the printer is doing printhead alignment.
● Shows when the printer is in the ready state.
6 Chapter 1Get started
Table 1-5 Control panel display icons (continued)
Feature Icon Description
4 Document icon
Photo icon
● Blank Document icon: Indicates the status of paper in the input tray or any
related issues (including out of paper, paper jam, and so on).
● Document icon with horizontal lines: Indicates the status of the original on
the scanner glass or any related issues.
It also appears when the printer is in the Document Copy mode, for copying
on plain paper.
● Photo icon: This appears when the printer is in the Photo Copy mode, for
copying on photo paper.
To switch between the Document Copy and the Photo Copy modes, see Perform
common tasks from the printer control panel.
5 Attention light Indicates an error or warning state.
6 Open Lid light Prompts you to open the scanner lid during printhead alignment or when doing an
identication card copy.
7 KCMY and Ink icons The KCMY letters and Ink drops are used to indicate status of the four ink tanks in
the printer.
Each set of icons corresponds to an ink tank: black, cyan, magenta, and yellow.
8 Wi-Fi status icons
(Wi-Fi models)
Shows the Wi-Fi status and signal strength.
9 Wi-Fi Direct icon
(Wi-Fi models)
Indicates the Wi-Fi Direct status.
● On: Wi-Fi Direct is turned on and ready to use.
● O: Wi-Fi Direct is o.
See Print without connecting to same Wi-Fi network (Wi-Fi Direct).
Perform common tasks from the printer control panel
Perform common tasks using buttons on the control panel.
If you need to restart the Wi-Fi setup mode, see Restore original factory defaults and settings.
Perform common tasks from the printer control panel
7
USB-only models
Table 1-6 Common tasks on the printer control panel
Task Instructions
Enter printer support mode
NOTE: For some printer tasks, the printer needs to
be placed in the support mode.
Press and hold the Resume button for 3 seconds.
All button lights on the printer control panel will light up.
Exit printer support mode
Press the Cancel button once, do not hold the button.
All button lights will turn o if there are no printer errors.
Switch between the Photo Copy mode and the
Document Copy mode
1. Press and hold the Resume button for 3 seconds
until the control panel buttons light up.
2. Press and hold both Copy buttons at the same time for 3
seconds.
Wi-Fi models
Table 1-7 Common tasks on the printer control panel
Task Instructions
Enter printer support mode
NOTE: For some printer tasks, the printer needs to be
placed in the support mode.
Press and hold the Information button for at least 5 seconds.
All button lights on the printer control panel will light up.
Exit printer support mode
Press the Cancel button once, do not hold the button.
All button lights will turn o if there are no printer errors.
Switch between the Photo Copy mode and the Document
Copy mode
1. Press and hold the Information button for 5 seconds until
the control panel buttons light up.
2. Press and hold both Copy buttons at the same time for 3 seconds.
Turn on or o the wireless capability of the printer When the wireless capability is turned on, the Wi-Fi button lights up.
● If the blue Wi-Fi light is o, press the Wi-Fi button to turn it
on.
● To turn o the Wi-Fi function, press the button again.
Enter Wi-Fi Protected Setup (WPS) Push Button mode
Press and hold the Wi-Fi button for at least 3 seconds.
8 Chapter 1Get started

Table 1-7 Common tasks on the printer control panel (continued)
Task Instructions
Turn Wi-Fi Direct on or o
1. Press and hold the Information button for 5 seconds until
the control panel buttons light up.
2. Press the Wi-Fi button and the Resume button at
the same time.
See Print without connecting to same Wi-Fi network (Wi-Fi Direct).
Print reports from the printer control panel
Learn about the reports you can print directly from the printer and how to print them.
Before you print, make sure paper is loaded in the input tray.
USB-only models
Table 1-8 Print reports
Printer report Description How to print
Printer Status Report Provides a summary of printer
information, current status, and
settings, including connectivity
settings, as well as print or scan
settings and usage.
1. Press and hold the Resume button for 3
seconds until the control panel buttons light up.
2. Press the Resume button .
Print Quality Diagnostic
Report
Print a diagnostics page to determine
if cleaning or aligning the printheads is
recommended to improve print quality.
1. Press and hold the Resume button for 3
seconds until the control panel buttons light up.
2. Press and hold the Cancel button for 3
seconds.
Also see Print a print quality diagnostics page
(Windows) .
Wi-Fi models
Printer information page
The information page provides a summary of the printer information and its current status (including
network, Wi-Fi Direct, Web Services, ink, and so on).
To print the page, press the Information button from the printer control panel.
Print reports from the printer control panel
9
Place the printer in support mode to print other reports.
1. Press and hold the Information button for 5 seconds until the control panel buttons light up.
2. See the following instructions to print the desired report.
Table 1-9 Print reports
Printer report Description How to print (must be in support mode)
Printer Status Report Provides a summary of printer
information, current status, and settings,
including connectivity settings, as well as
print or scan settings and usage.
Press the Resume button .
Wi-Fi Network Test Report
and Network Conguration
Page
Wi-Fi Network Test Report shows the
diagnostics results for the status of the Wi-
Fi network, Wi-Fi signal strength, detected
networks, and more.
Network Conguration Page shows the
network status, hostname, network name,
and more.
Press the Information button and the Resume
button
at the same time.
Wi-Fi Quick Start Guide Provides instructions to help you connect
your printer to a Wi-Fi network.
Press the Information button .
Wi-Fi Direct Guide Provides instructions to help you set up
and use Wi-Fi Direct.
Also contains the Wi-Fi Direct name and
password.
Press the Information button and the Cancel
button
at the same time.
For more information on Wi-Fi Direct printing, see Print
without connecting to same Wi-Fi network (Wi-Fi Direct).
Web Services Report Depending on Web Services status, the
report provides instructions to help you
turn on or set up Web Services, and also
x connection issues.
Press the Resume button and the Cancel
button
at the same time.
Print Quality Diagnostic
Report
Print a diagnostics page to determine
if cleaning or aligning the printheads is
recommended to improve print quality.
Press and hold the Color Copy button for 3
seconds.
Also see Print a print quality diagnostics page (Windows) .
Change printer settings
You can also view or change the printer settings using the HP printer software.
See Install and use the HP printer software.
HP Smart (iOS, Android, and Windows 10)
1. Open the HP Smart app on your computer or mobile device. If prompted, create or sign in to an HP
account.
For more information on HP Smart, see Use the HP Smart app to print, scan, and manage.
10
Chapter 1Get started
2. Select your printer, and then click or tap Printer Settings.
3. Select the desired option and make the necessary changes.
The embedded web server (EWS) (Wi-Fi models)
1. Open EWS. See Access and use EWS.
2. Search for a setting. Or click the desired function or tab, and then select a setting from the left menu.
3. Make the necessary changes.
Change printer language from EWS (Wi-Fi models)
1. Open EWS. See Access and use EWS.
2. Click the Settings tab.
3. From the left menu, click Preferences.
4. Click Printer Language Settings, and then select the desired language.
5. Click Apply.
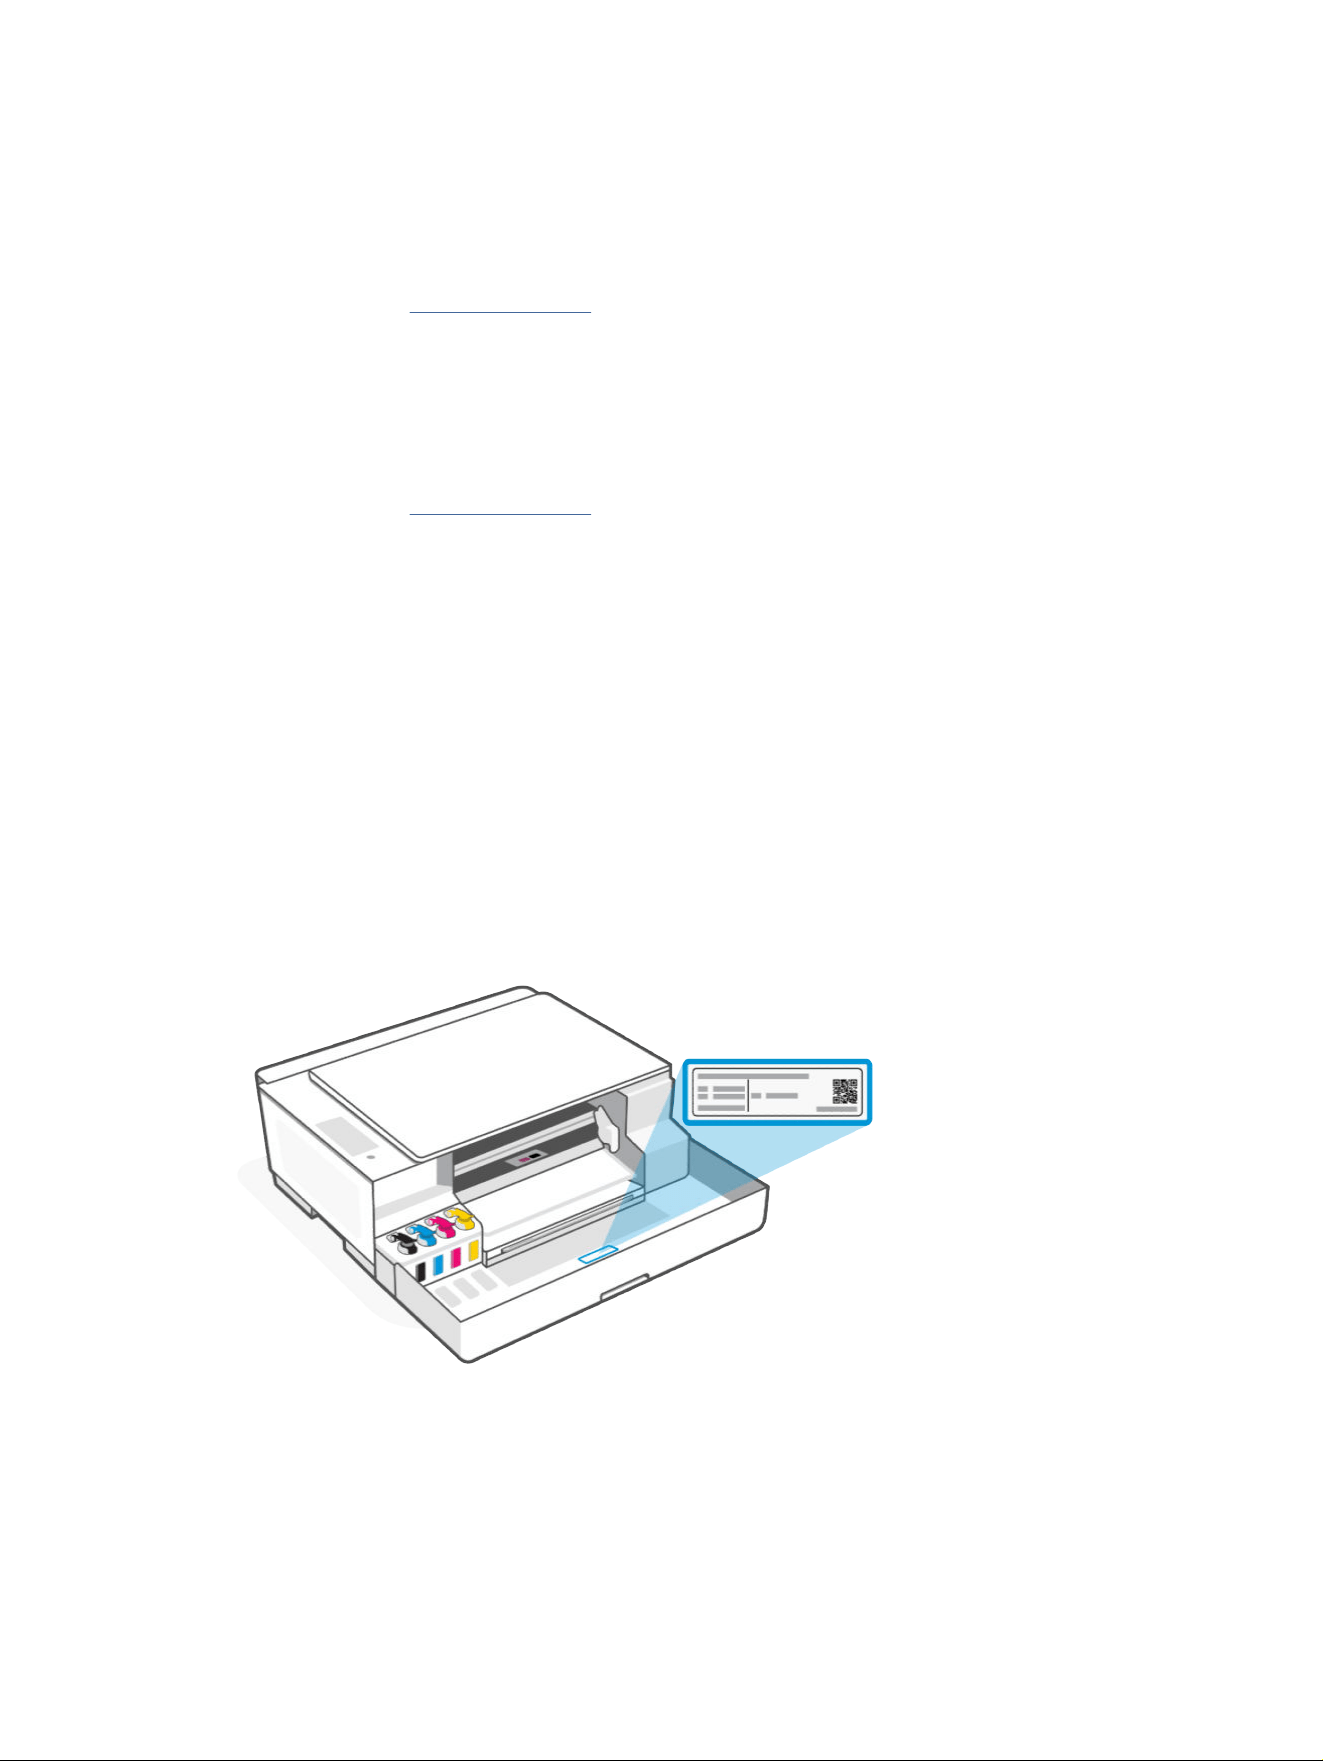
Find the default printer password or PIN
When setting up or connecting the printer, if you are prompted for a password, enter the default PIN which is
available from a label on the printer.
Open the front door of the printer to locate the label.
If you have changed the password in the embedded web server (EWS), enter your password when prompted.
Install and use the HP printer software
You can use the HP printer software to change printer settings, check estimated ink levels, order printing
supplies, maintain the printer, resolve printing issues, and more.
The embedded web server (EWS) (Wi-Fi models)
11

● If you are using the HP Smart app instead of the printer software, see Use the HP Smart app to print, scan,
and manage.
● Each device must have the app or software installed in order to print.
● If you are using Windows 7, Service Pack 1 (SP1) is required to install HP printer software.
Do the following:
1. Visit 123.hp.com to download the software and install on your computer.
2. Open the software.
● Windows 10: From the computer desktop, click Start, select HP from the app list, and then select
the icon with the printer name.
● Windows 7: From the computer desktop, click Start, select All Programs, click HP, click the folder
for the printer, and then select the icon with the printer name.
Use the HP Smart app to print, scan, and manage
The HP Smart app can help you perform many dierent printer tasks, including the following:
● Set up and connect your printer.
● Print and scan documents and photos.
● Share documents through email and other applications.
● Manage printer settings, check printer status, print reports, and order supplies.
NOTE:
● HP Smart is supported on mobile devices and computers running on some versions of iOS, Android,
Windows 10, and macOS.
Visit the HP support website at hp.com/support for details.
● HP Smart for iOS, Android, and macOS is only available for the Wi-Fi models of this printer.
● HP Smart app might not be available in all languages. Some features are only available with some
printer models.
Install HP Smart and open the app
1. Visit 123.hp.com to download and install HP Smart on your device.
NOTE: iOS, Android, Windows 10, and macOS devices: You can also download HP Smart from the
respective app stores for the device.
2. Open HP Smart after installation.
● iOS/Android: From the mobile device desktop or app menu, tap HP Smart.
● Windows 10: From the computer desktop, click Start, and then select HP Smart from the app list.
12
Chapter 1Get started

● macOS: From the Launchpad, select HP Smart.
3. If prompted, create an HP account and register the printer.
4. Connect your printer wirelessly using HP Smart. See Connect your printer to a Wi-Fi network using HP
Smart (Wi-Fi models).
If prompted for a password, enter the default PIN available from a label on the printer. See Find the
default printer password or PIN.
Get more information about HP Smart
To learn how to connect, print, and scan using HP Smart, visit the website for your device:
● iOS/iPadOS/Android: www.hp.com/go/hpsmart-help
● Windows 10 and above: www.hp.com/go/hpsmartwin-help
● macOS: www.hp.com/go/hpsmartmac-help
Get more information about HP Smart 13

Connect your printer
Learn about dierent ways to connect your printer.
Before you begin (Wi-Fi models)
Ensure the following:
● Your Wi-Fi network is set up and working properly.
● Wi-Fi capability of the printer is turned on. Press the Wi-Fi button to turn it on.
For Wi-Fi status, see Wi-Fi status, light, and icons (Wi-Fi models).
● The printer is in Wi-Fi setup mode. In setup mode, the Wi-Fi light should blink blue.
If not, restore the printer network settings. See Restore original factory defaults and settings.
● The printer and the devices that use the printer are on the same network (subnet).
While connecting the printer, you might be prompted to enter the Wi-Fi network name (SSID) and a Wi-Fi
password.
● SSID is the name of your Wi-Fi network.
● The Wi-Fi password prevents other people from connecting to your Wi-Fi network without your
permission. Depending on the level of security required, your Wi-Fi network might use either a WPA
passphrase or WEP key.
● If you have not changed the network name or the security passkey since setting up your Wi-Fi network,
you might nd them on the back or side of the wireless router.
● If you cannot nd or remember your network credentials, see the documentation provided with your
computer or with the wireless router; or contact your network administrator or the person who set up the
Wi-Fi network.
NOTE: To resolve network connection issues, see Fix network connection issues.
Connect your printer to a Wi-Fi network using HP Smart (Wi-Fi
models)
Install the HP Smart app on your computer or mobile device and use the app to set up or connect the printer to
your Wi-Fi network.
For information on HP Smart, see Use the HP Smart app to print, scan, and manage.
1. Make sure your computer or mobile device is connected to your Wi-Fi network. On your device, turn on
Bluetooth and/or location services.
NOTE: HP Smart uses Bluetooth for printer setup. It does not support print using Bluetooth.
14
Chapter 2Connect your printer

2. If your printer Wi-Fi was previously turned o, press the Wi-Fi button to turn it on. For Wi-Fi status,
see Wi-Fi status, light, and icons (Wi-Fi models).
3. Make sure the printer is in Wi-Fi setup mode. The Wi-Fi light should blink blue. If not, restore the printer
network settings. See Restore original factory defaults and settings.
4.
On the app Home screen, click or tap the Plus icon or Add Printer, and follow the onscreen
instructions to add or connect the printer.
NOTE:
● If prompted for the printer password, enter the default PIN available from a label on the printer. See
Find the default printer password or PIN.
● When the printer is connected successfully, the Wi-Fi light stops blinking and remains lit.
Connect your printer to a Wi-Fi network using HP printer
software
To connect the printer to an integrated wireless WLAN 802.11 network, make sure you have the following:
● A wireless 802.11a/b/g/n/ac network that includes a wireless router or access point.
NOTE: The printer only supports 2.4GHz connection.
● A computer that is already connected to the Wi-Fi network that you want to use to connect your printer.
● Network name (SSID).
● WEP key or WPA Passphrase (if needed).
Do the following:
1. In the HP printer software (available from the Start menu), click Tools.
For information about the software, see Install and use the HP printer software.
2. Click Device Setup & Software.
3. Click Connect a new device.
4. Select Manual Setup, select the wireless option, and then follow the on-screen instructions.
Connect your printer to a Wi-Fi network using Wi-Fi Protected
Setup (WPS) (Wi-Fi models)
This Wi-Fi setup method can be used if your router has a WPS button.
If the router does not have this button, it is recommended that you connect the printer using the HP Smart
app. See Connect your printer to a Wi-Fi network using HP Smart (Wi-Fi models).
1. Make sure your router and printer are not too far from each other.
Connect your printer to a Wi-Fi network using HP printer software
15

2. From the printer control panel, press and hold the Wi-Fi button for at least 3 seconds to start WPS.
3. Press the WPS button on your router.
NOTE: Be sure to press the WPS button on the router within 2 minutes.
4. Open the HP Smart app on your computer or mobile device. If prompted, create or sign in to an HP
account.
5. On the app Home screen, click or tap the Plus icon or Add Printer, and follow the onscreen
instructions to add or connect the printer.
NOTE:
● If prompted for the printer password, enter the default PIN available from a label on the printer. See
Find the default printer password or PIN.
● When the printer is connected successfully, the Wi-Fi light stops blinking and remains lit.
Connect your printer using a USB cable
1. If necessary, remove the label covering the USB port at the back of the printer.
2. Connect the printer and computer using a USB cable.
3. Open the HP Smart app on your computer. If prompted, create or sign in to an HP account.
4. On the app Home screen, click or tap the Plus icon or Add Printer, and follow the onscreen
instructions to add the printer.
Change the connection from USB to wireless (Wi-Fi models)
Unplug the USB cable from the printer, and then follow the instructions in Connect your printer to a Wi-Fi
network using HP Smart (Wi-Fi models).
16 Chapter 2Connect your printer
Load media
Learn how to load paper and change media settings.
Load paper
Take note of the following before you begin.
NOTE:
● Do not load paper while the printer is printing.
● If there is other paper in the input tray, remove the paper before loading a dierent paper type or size.
● For a complete list of supported media, refer to the printer software. For network printers, you can also
check the embedded web server (EWS). To open EWS, see Access and use EWS.
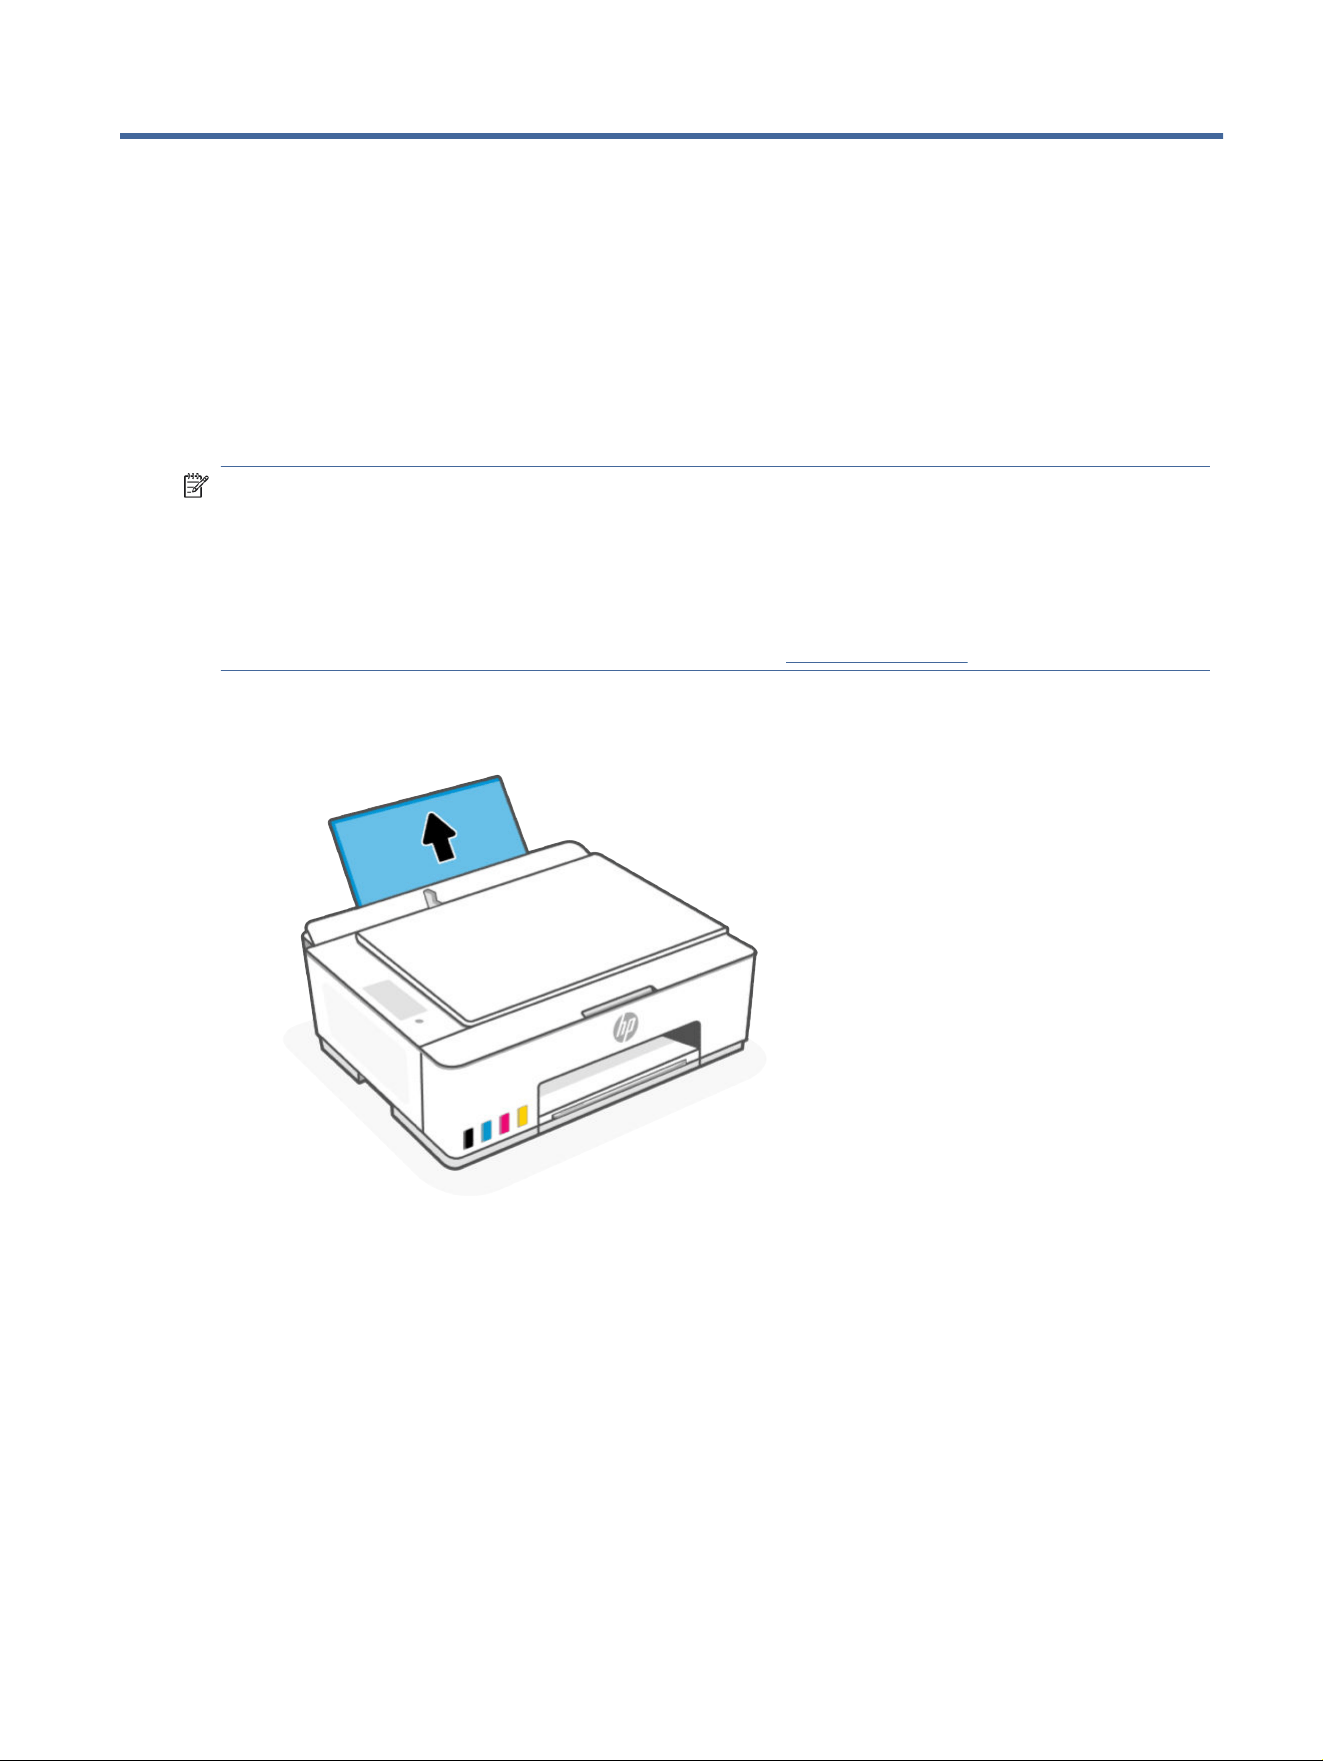
1. Raise the input tray.
Load media 17
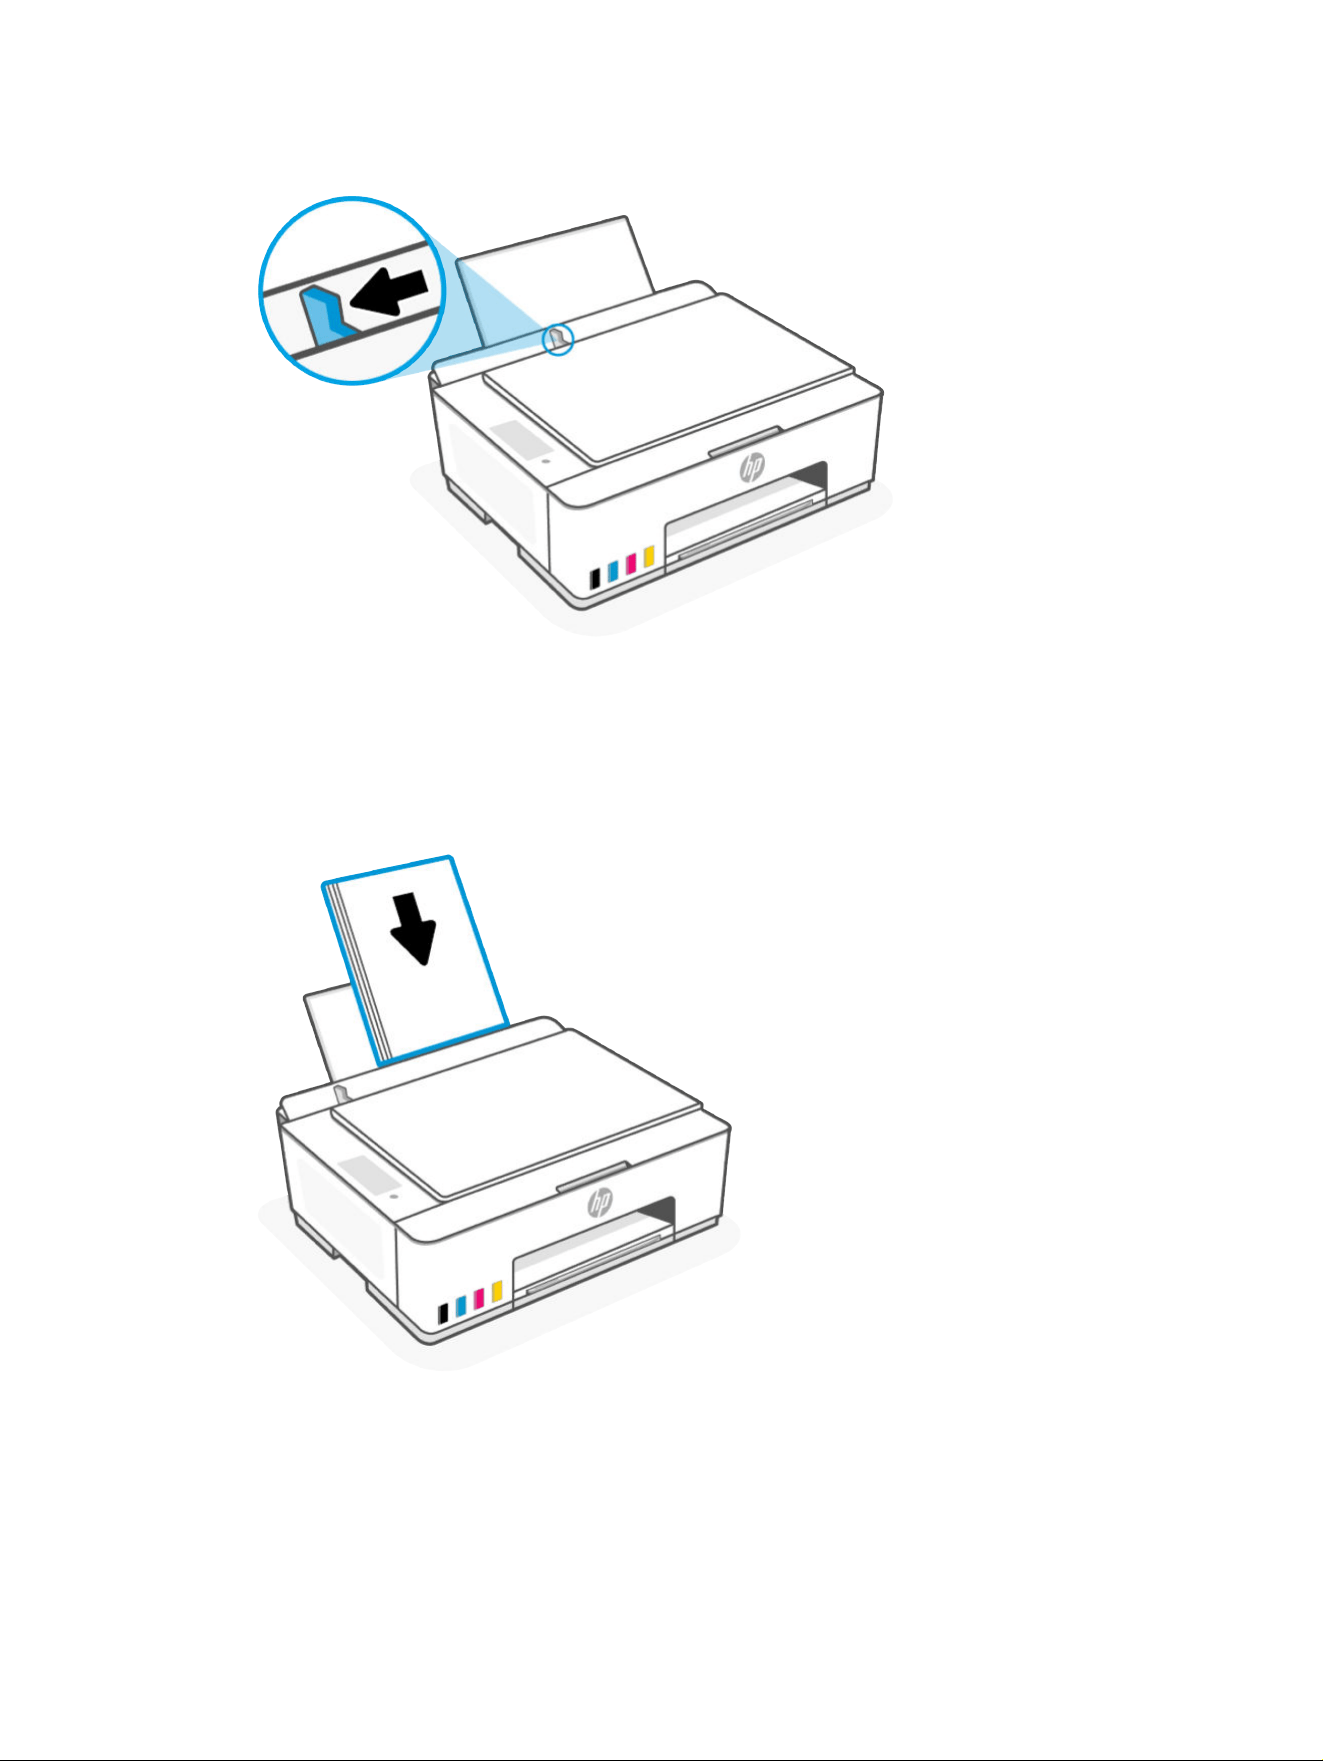
2. Slide the paper-width guide to the left.
3. Insert paper into the input tray until it stops. Make sure paper is inserted in portrait orientation with the
side to be printed facing up.
If you are loading small-size paper (like photo paper), make sure the paper stack is aligned with the
far-right side of the tray.
18 Chapter 3Load media
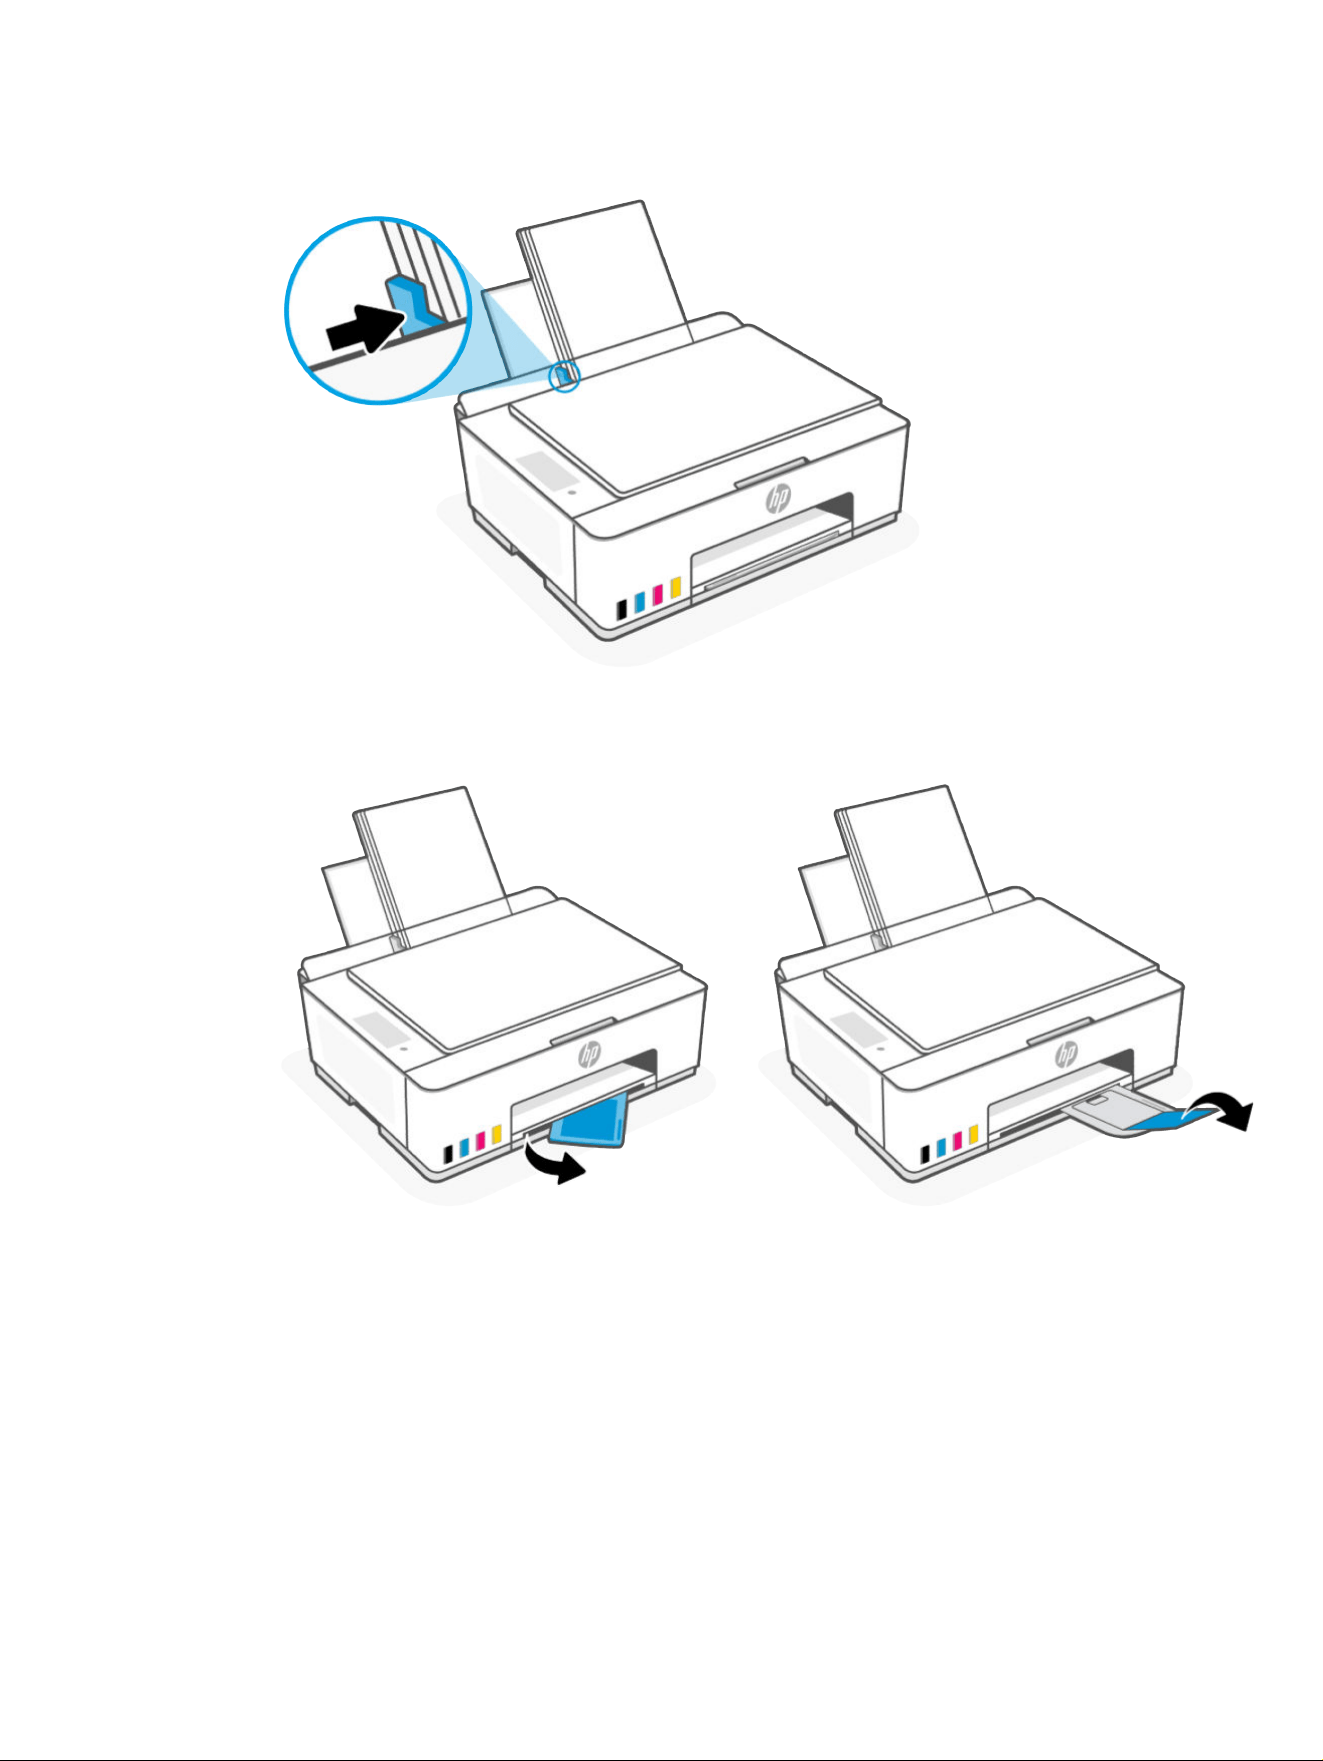
4. Slide the paper-width guide to the right until it stops at the edge of the paper.
5. Pull out the output tray extender as shown.
Load paper 19
Load envelopes
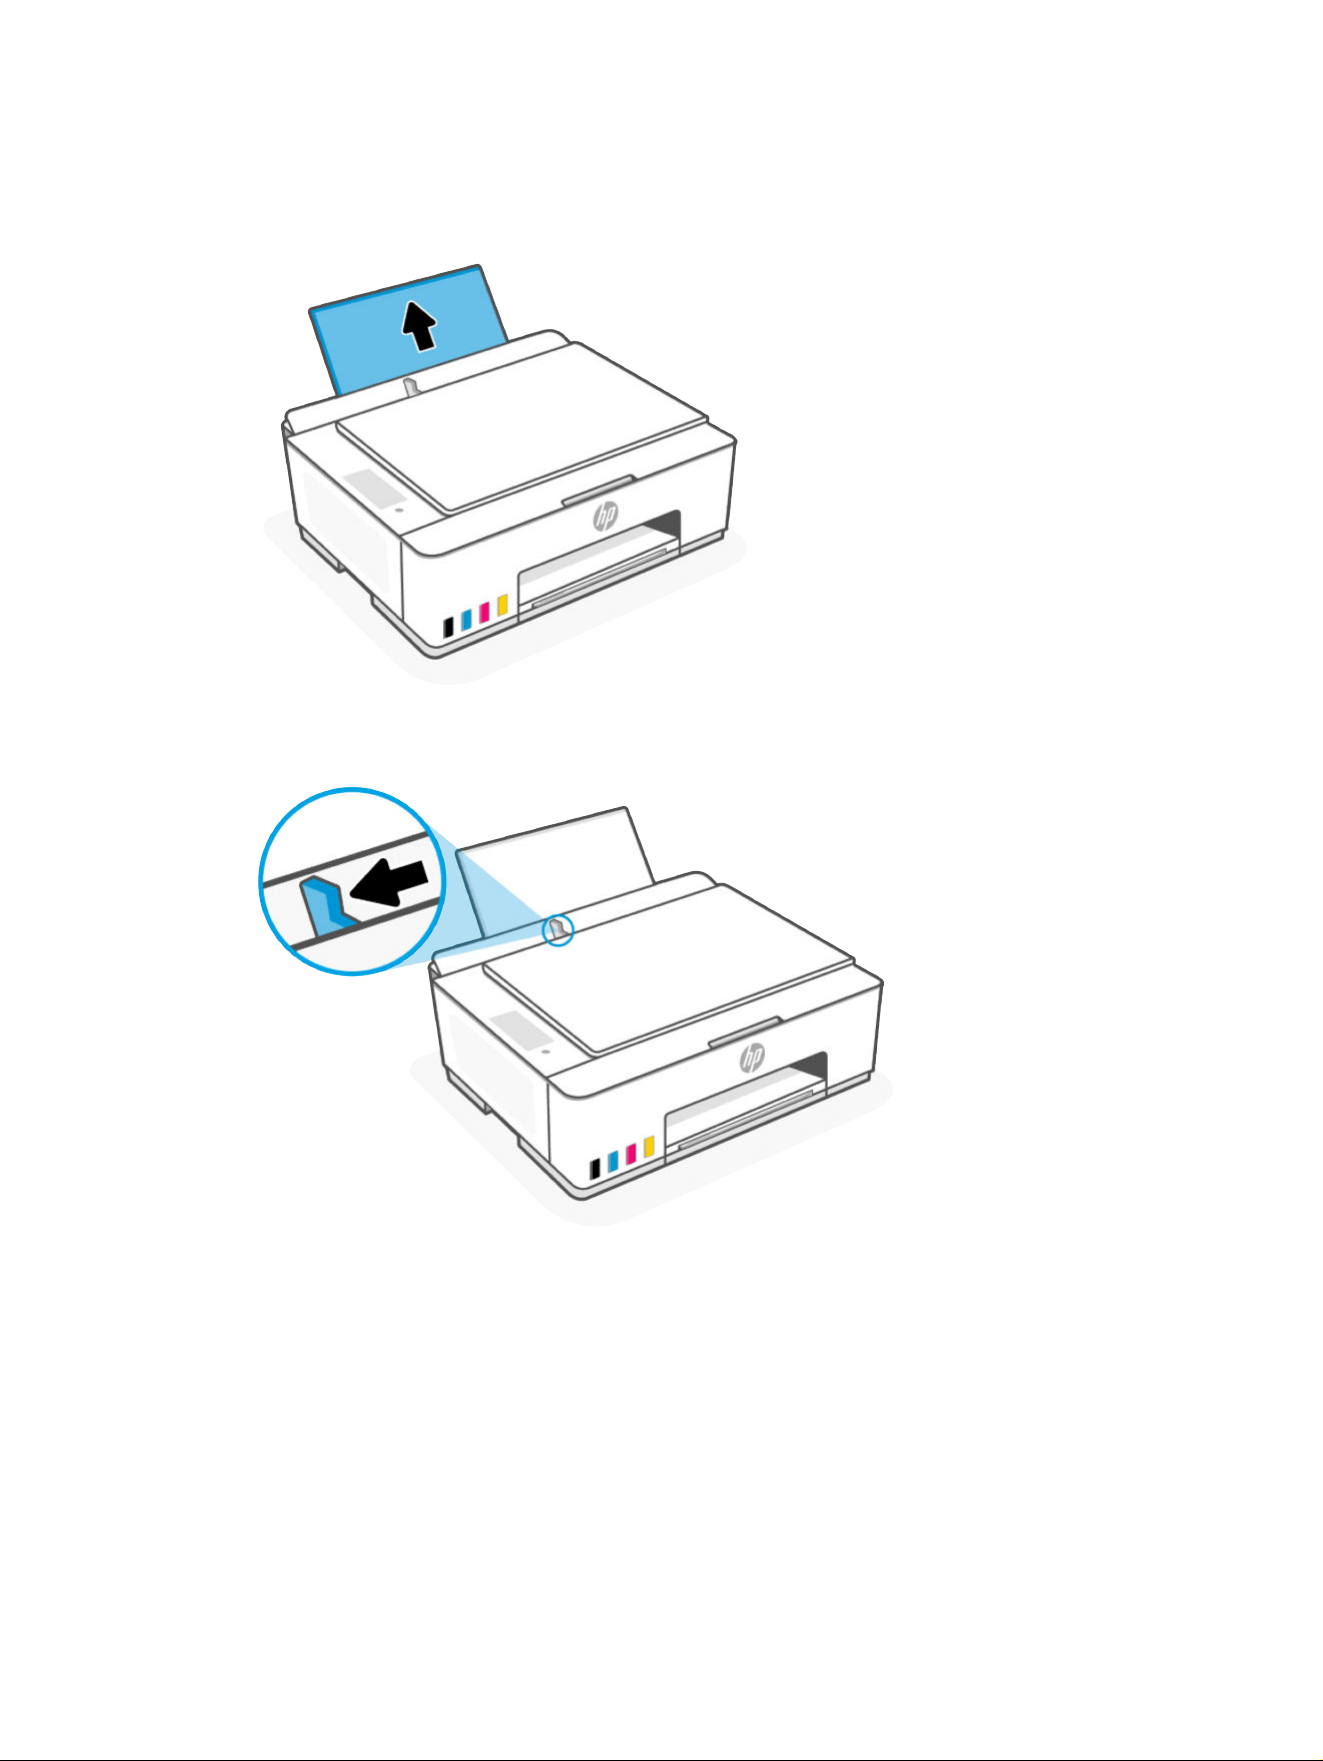
1. Raise the input tray.
2. Slide the paper-width guide to the left.
3. Insert one or more envelopes into the far-right side of the input tray, and slide the stack down until it
stops.
The side to be printed on should face up.
20
Chapter 3Load media
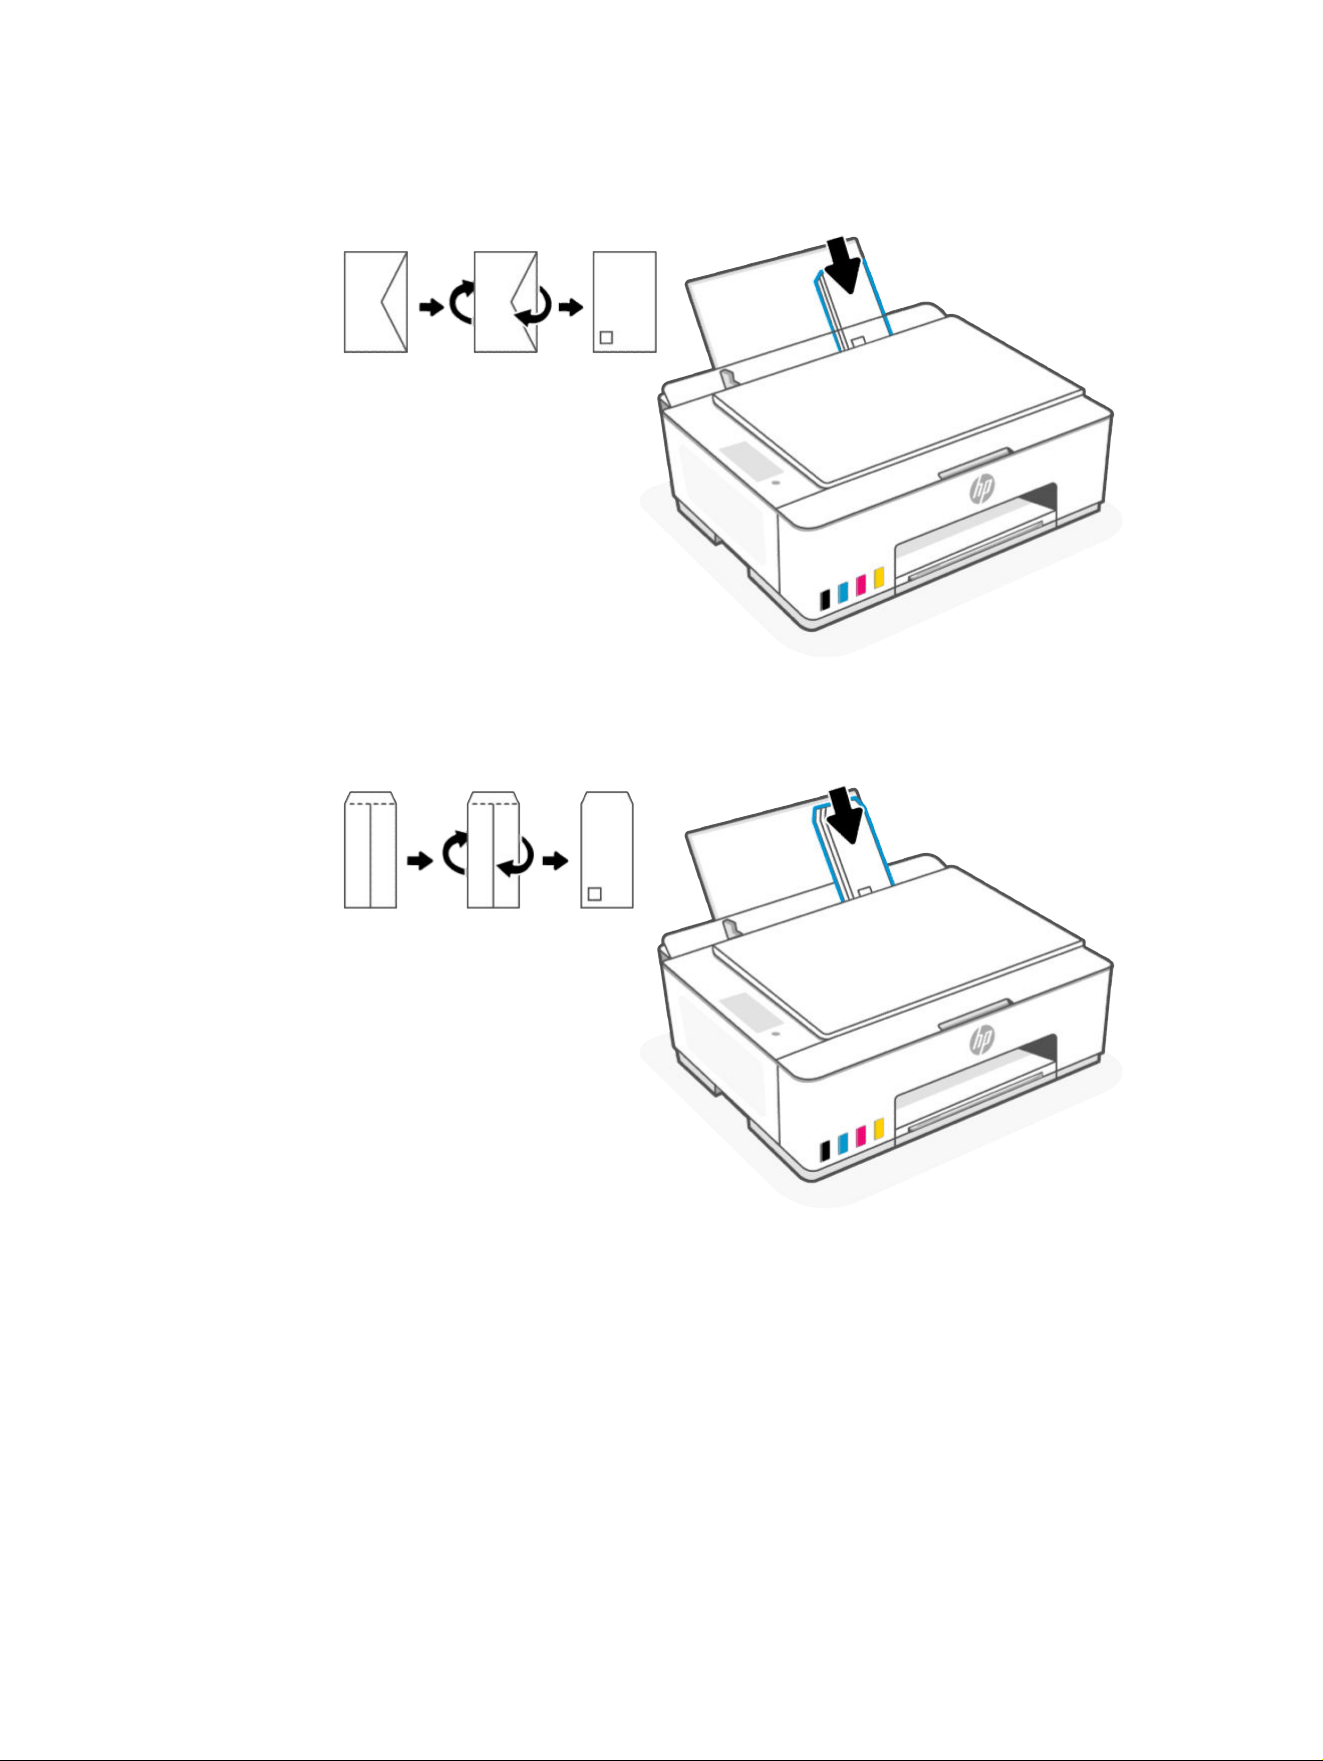
a. For envelopes with a ap on the long edge, insert vertically with the ap on the left side and facing
down.
b. For envelopes with a ap on the short edge, insert vertically with the ap on top and facing down.
Load envelopes 21
4. Slide the paper-width guide to the right against the stack of envelopes until it stops.
5. Pull out the output tray extender.
Load original
Learn how to load an original on the scanner glass.
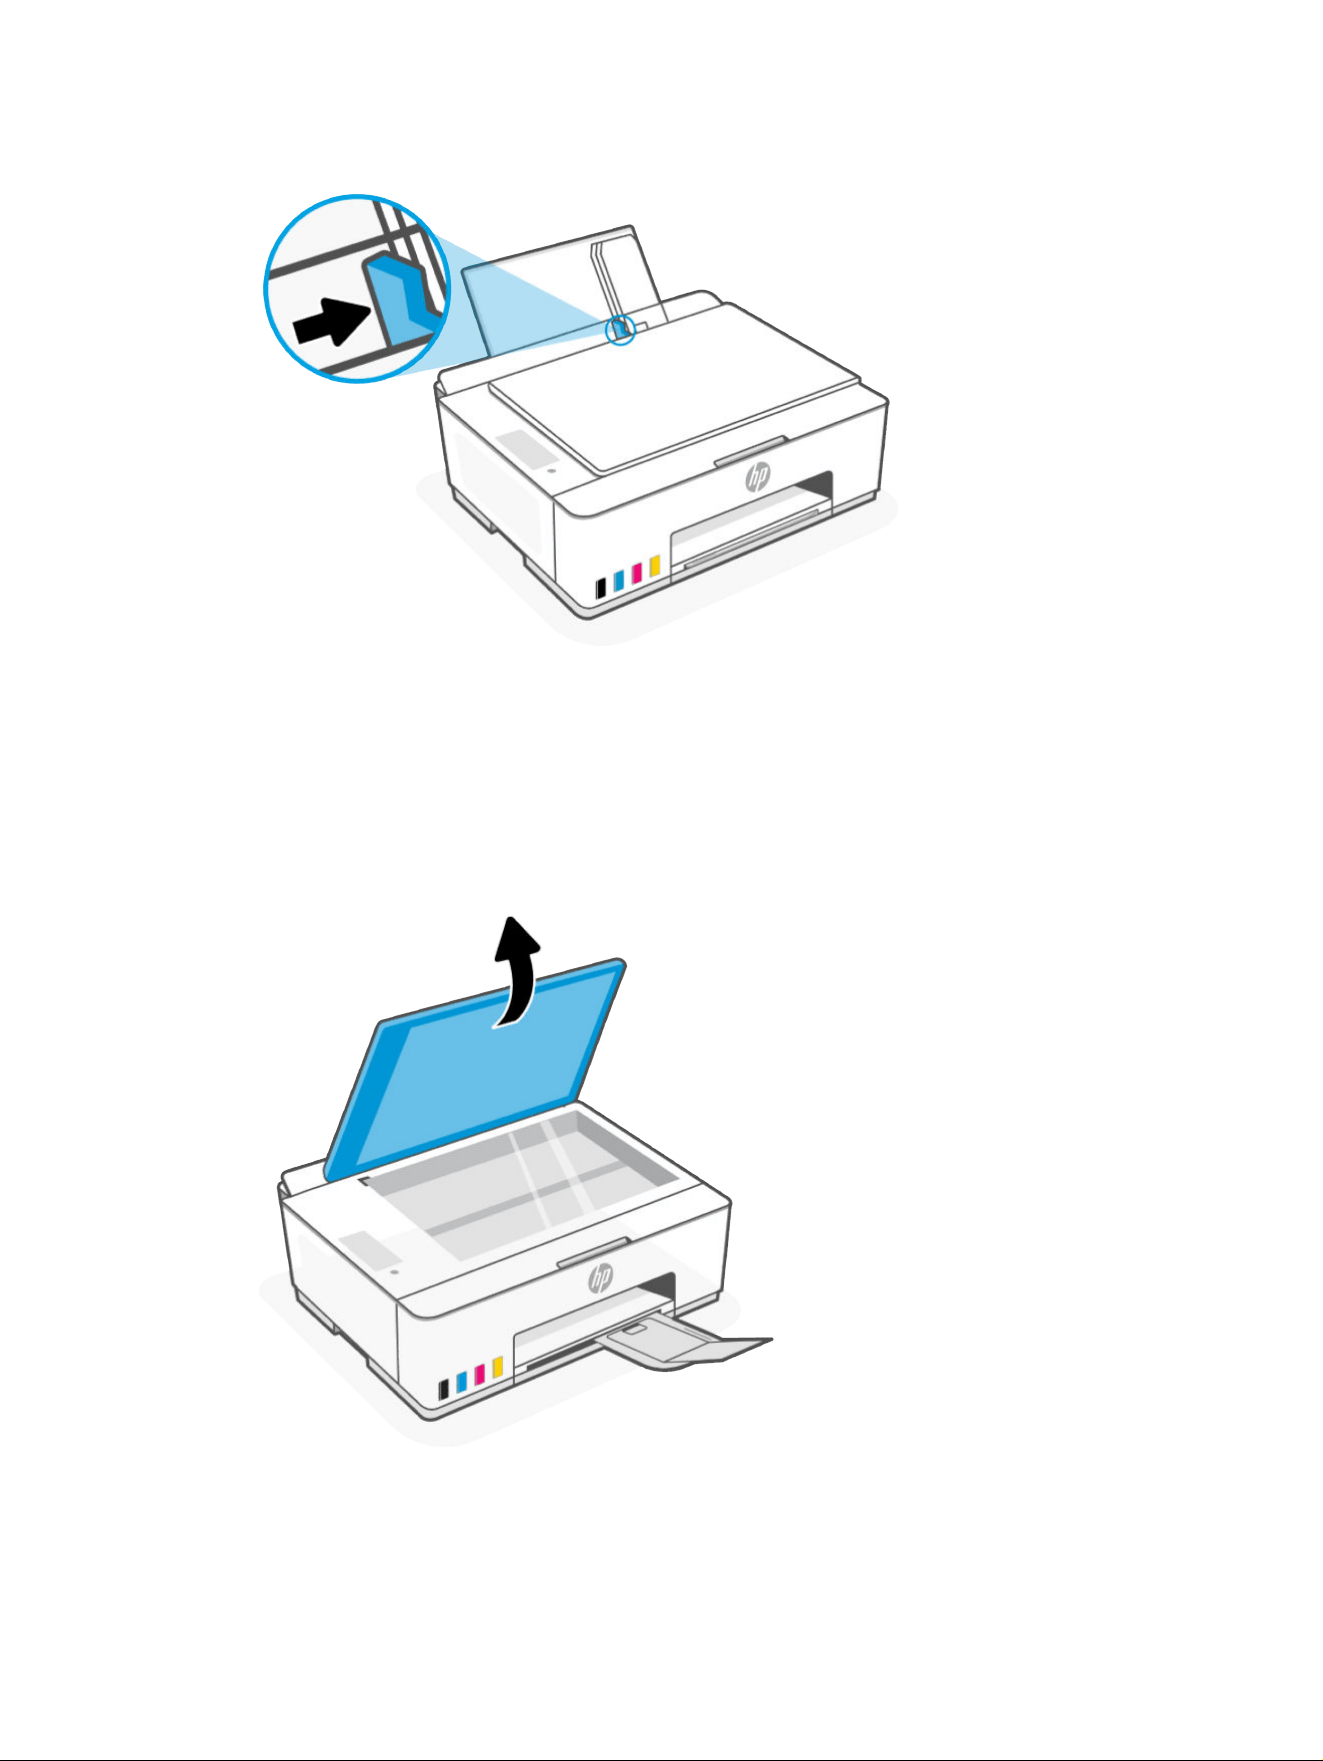
1. Lift the scanner lid.
22 Chapter 3Load media
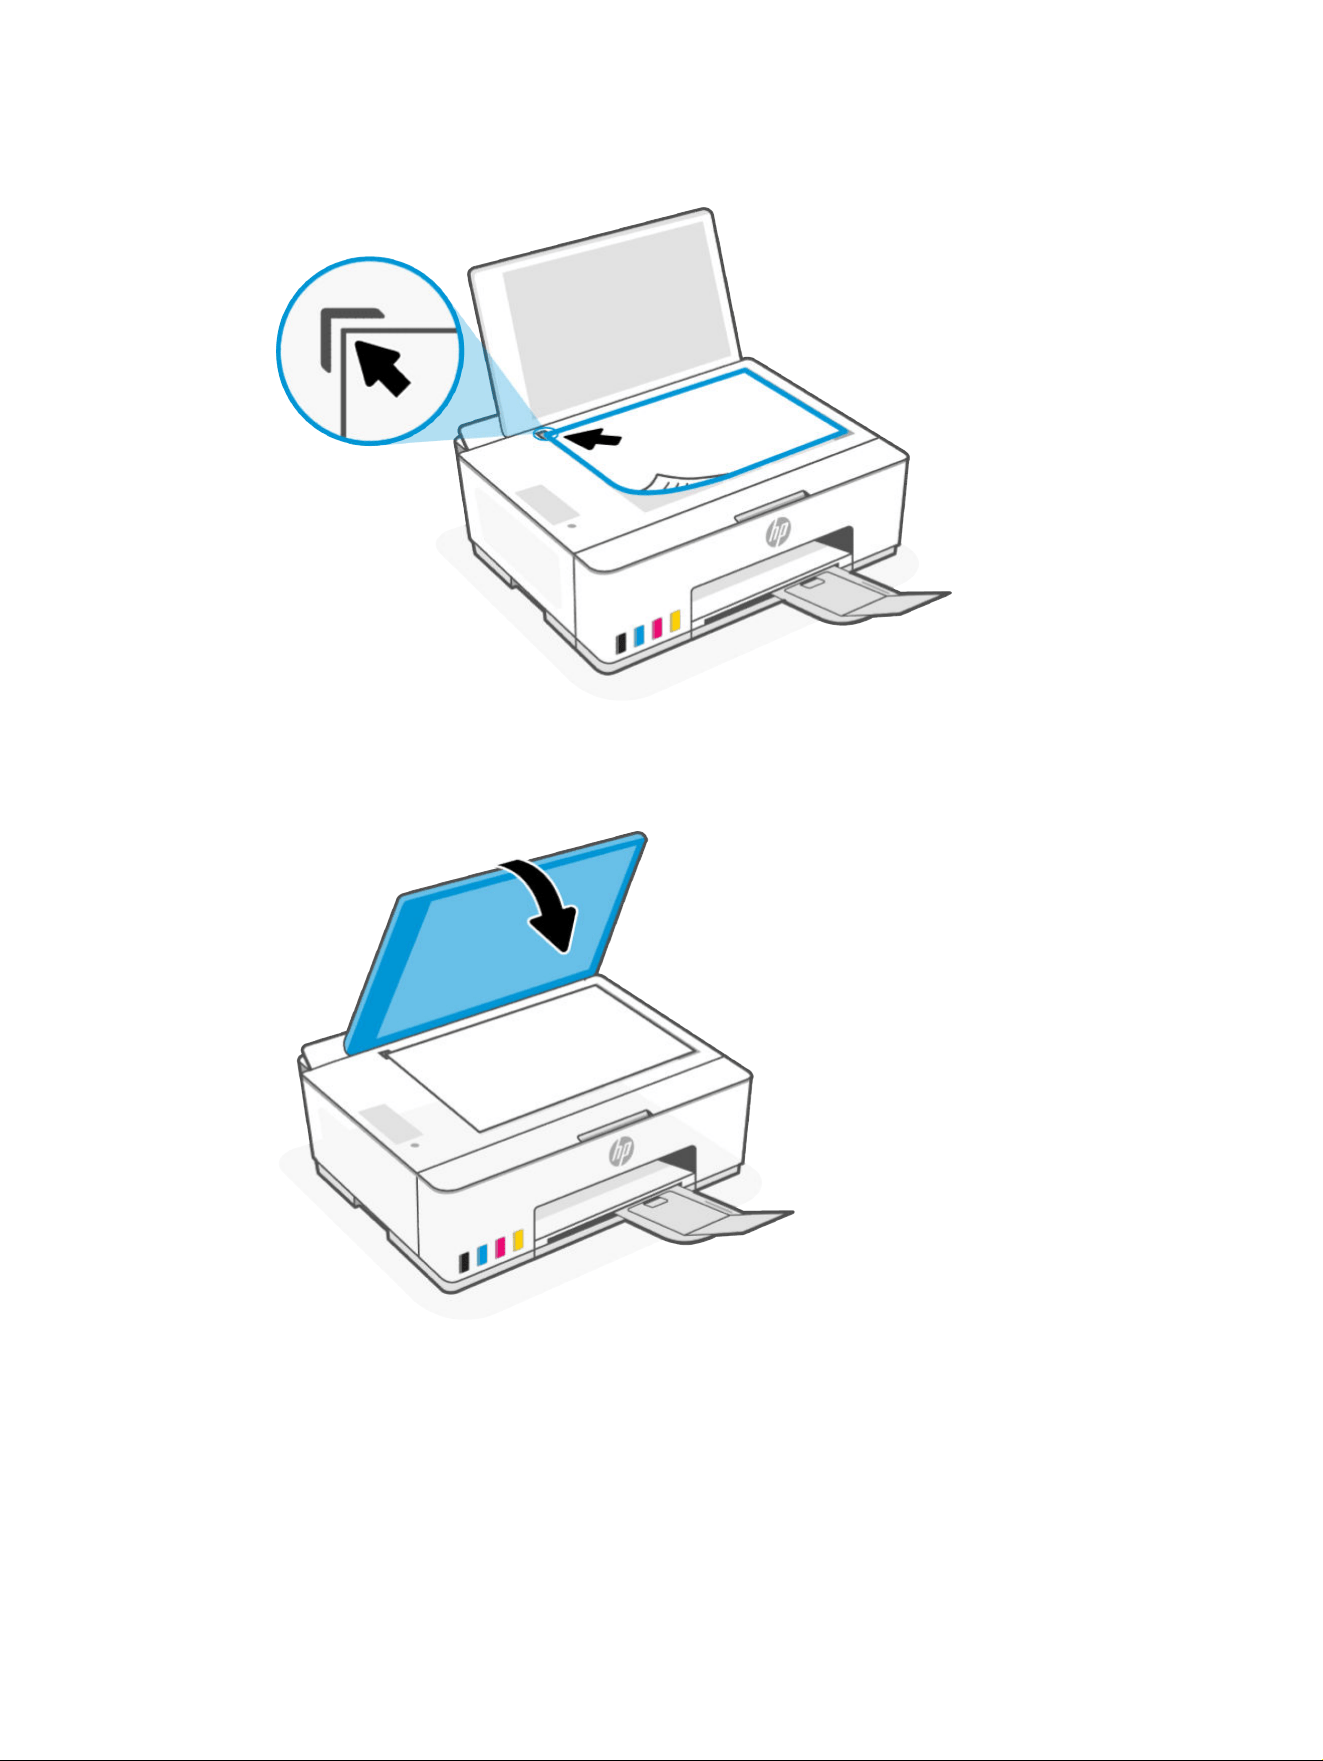
2. Load the original print-side down on the scanner glass (aligned to the indicated corner).
3. Close the scanner lid.
Load original 23

Change paper settings from the embedded web server (Wi-Fi
models)
To prevent issues, change the paper settings to match the paper loaded in the input tray.
NOTE: For your security, some settings in the embedded web server (EWS) are password-protected. Enter
the password if prompted. See Access and use EWS.
1. Open EWS. See Access and use EWS.
2. Click the Settings tab.
3. From the left menu, click Preferences.
4. Click Tray and Paper Management, and then make the necessary changes.
5. Click Apply.
Paper basics
The printer is designed to work well with most types of oice paper. It is best to test avariety of print paper
types before buying large quantities.
Use HP paper for optimum print quality. Visit the HP website at www.hp.com for more information about HP
paper.
HP recommends plain papers with the ColorLok logo for printing everyday
documents. All papers with the ColorLok logo are independently tested to meet
high standards of reliability and print quality, and produce documents with crisp,
vivid color, bolder blacks, and that dry faster than ordinary plain papers. Look for
papers with the ColorLok logo in avariety of weights and sizes from major paper
manufacturers.
Recommended papers for printing
If you want the best print quality, HP recommends using HP papers that are specically designed for the type
of project you are printing. Depending on your country/region, some of these papers might not be available.
Photo printing
● HPAdvanced Photo Paper
This glossy photo paper features an instant-dry nish for easy handling without smudging. It resists
water, smears, ngerprints, and humidity. Your prints have a look and feel comparable to a store-
processed photo. It is available in several sizes, including A4, 8.5 x 11inches, 10 x 15cm (4 x 6inches), 13
x 18cm (5 x 7inches). It is acid-free for longer lasting documents.
● HPEveryday Photo Paper
24
Chapter 3Load media

Print colorful, everyday snapshots at a low cost, using paper designed for casual photo printing. This
aordable photo paper dries quickly for easy handling. Get sharp, crisp images when you use this paper
with any inkjet printer. It is available in glossy nish in several sizes, including A4, 8.5 x 11inches, 5 x 7
inches, and 4 x 6 inches (10 x 15 cm). It is acid-free for longer lasting documents.
● HP Photo Value Packs
HP Photo Value Packs conveniently package original HP ink cartridges and HP Advanced Photo Paper to
save you time and take the guesswork out of printing aordable, lab-quality photos with your HP printer.
Original HP inks and HP Advanced Photo Paper have been designed to work together so your photos are
long lasting and vivid, print after print. Great for printing out an entire vacation's worth of photos or
multiple prints to share.
Business documents
● HP Enhanced Laser Matte Paper 150g
This paper is a heavy matte laser paper, ideal for printing professional-color marketing materials
including brochures.
● HPBrochure Paper 180g Glossy or HP Professional Paper 180 Glossy
These papers are glossy-coated on both sides for two-sided use. They are the perfect choice for near-
photographic reproductions and business graphics for report covers, special presentations, brochures,
mailers, and calendars.
Everyday printing
All the papers listed for everyday printing feature ColorLok Technology for less smearing, bolder blacks, and
vivid colors.
● HPBright White Inkjet Paper
HPBright White Inkjet Paper delivers high-contrast colors and sharp text. It is opaque enough for
two-sided color usage with no show-through, which makes it ideal for newsletters, reports, and yers.
● HPPrinting Paper
HPPrinting Paper is a high-quality multifunction paper. It produces documents that look and feel more
substantial than documents printed on standard multipurpose or copy paper. It is acid-free for longer
lasting documents.
● HPOice Paper
HPOice Paper is a high-quality multifunction paper. It is suitable for copies, drafts, memos, and other
everyday documents. It is acid-free for longer lasting documents.
● HPOice Recycled Paper
HP Oice Recycled Paper is a high-quality multifunction paper made with 30% recycled ber.
Order HP paper supplies
The printer is designed to work well with most types of oice paper. Use HP paper for optimum print quality.
To order HP papers and other supplies, go to www.hp.com. At this time, some portions of the HP website are
available in English only.
Order HP paper supplies
25

HP recommends plain papers with the ColorLok logo for printing and copying of everyday documents. All
papers with the ColorLok logo are independently tested to meet high standards of reliability and print quality,
and produce documents with crisp, vivid color, bolder blacks and shorter dry-time than ordinary plain papers.
Look for papers with the ColorLok logo in a variety of weights and sizes from major paper manufacturers.
26 Chapter 3Load media

Print
Learn how to print from your computer or mobile device.
This printer is designed to work with the HP Smart app, a software application that makes it easy to print,
scan, and manage your printer from a smartphone, laptop, desktop computer, or other devices.
You can print and manage the printer from all of your devices by installing the app on each device. For more
information about the app, see Use the HP Smart app to print, scan, and manage.
Print from a Windows computer
1. Make sure you have installed the HP Smart. See Use the HP Smart app to print, scan, and manage.
2. Open the document you wish to print.
3. From the File menu in your software program, select the Print option.
4. Click the button that opens the Properties dialog box.
Depending on your software application, this button might be called Properties, Options, Setup, or
Preferences.
5. Make sure your printer is selected.
6. Change any print settings, and click OK.
7. Click Print or the OK button to print.
Print from a Mac computer (Wi-Fi models)
1. Make sure you have installed the HP Smart app. See Use the HP Smart app to print, scan, and manage.
2. From the computer, open System Preference, and select Printers and Scanners.
3. Click the Add button/icon + , select the printer from the printer list, and then click Add.
4. Once connected, open the document you wish to print and use the Print command.
5. Make sure the desired printer is selected.
6. Change any print settings.
7. Click Print to print the document.
Print with mobile devices (Wi-Fi models)
You can use the HP Smart app to print documents and photos from your mobile device, social media account,
or cloud storage.
See Use the HP Smart app to print, scan, and manage.
Print
27

You can also print directly from your mobile devices using AirPrint (iOS) or HP Print Service Plugin (Android):
● iOS: Devices running iOS 4.2 or later have AirPrint pre-installed.
● Android: Download the HP Print Service Plugin from the Google Play Store or your favorite app store, and
then enable it on your device.
NOTE: You can print using HP Smart or AirPrint/HP Print Service Plugin when the mobile device is on the
same network as the printer or a dierent network (using Wi-Fi Direct).
Print while connected to same Wi-Fi network
You can print documents and photos from your mobile device when the device and the printer are on the same
Wi-Fi network.
Visit hp.com/go/mobileprinting for more information on mobile printing.
Print without connecting to same Wi-Fi network (Wi-Fi Direct)
With Wi-Fi Direct, you can directly connect your computer or mobile device to the printer and print wirelessly
—without connecting your computer or mobile device to an existing wireless network.
Visit www.hp.com/go/widirectprinting for more information on Wi-Fi Direct.
Take note of the following before you begin.
● Make sure Wi-Fi Direct on your printer is turned on, the Wi-Fi Direct icon should appear on the printer
display.
● To turn on Wi-Fi Direct, see the relevant instructions under Wi-Fi models .
● When you turn on Wi-Fi Direct for the rst time, the printer automatically prints a Wi-Fi Direct guide. The
guide provides instructions about how to use Wi-Fi Direct.
● You can also nd the Wi-Fi Direct name and password on the Wi-Fi Direct guide.
● To print the guide manually, see Wi-Fi models.
● Up to 5 computers and mobile devices can connect to the printer using Wi-Fi Direct connection.
Change Wi-Fi Direct security settings
1. Open EWS. See Access and use EWS.
2. Click the Network tab.
3. From the left menu, click Wi-Fi Direct, and then click the Edit Settings button.
4. Make the necessary changes.
5. Click Apply.
28
Chapter 4Print

Copy, Scan, and Mobile Fax
Learn how to use the copy, scan, and mobile fax features.
Before you begin, see Tips for successful scanning and copying. If you encounter issues, see Copy and scan
issues.
Copy from the printer
All documents are copied in normal quality print mode. You cannot change the print mode quality when
copying.
1. Load paper in the input tray.
See Load paper.
2. Place the original print-side down on the scanner glass (aligned to the corner with an icon).
See Load original.
3. From the printer control panel, press the Black Copy button or the Color Copy button to start
copying.
To increase the number of copies, press and hold the button or press it multiple times.
Copying starts 2 seconds after the last button press.
Copy an
identication (ID) card
The ID Copy feature allows you to place a card or small-size document anywhere on the scanner glass to copy
both sides onto the same page.
1. Load paper in the input tray.
See Load paper.
2. Place the card anywhere on the scanner glass, away from the edges or corners of the glass.
Copy, Scan, and Mobile Fax 29
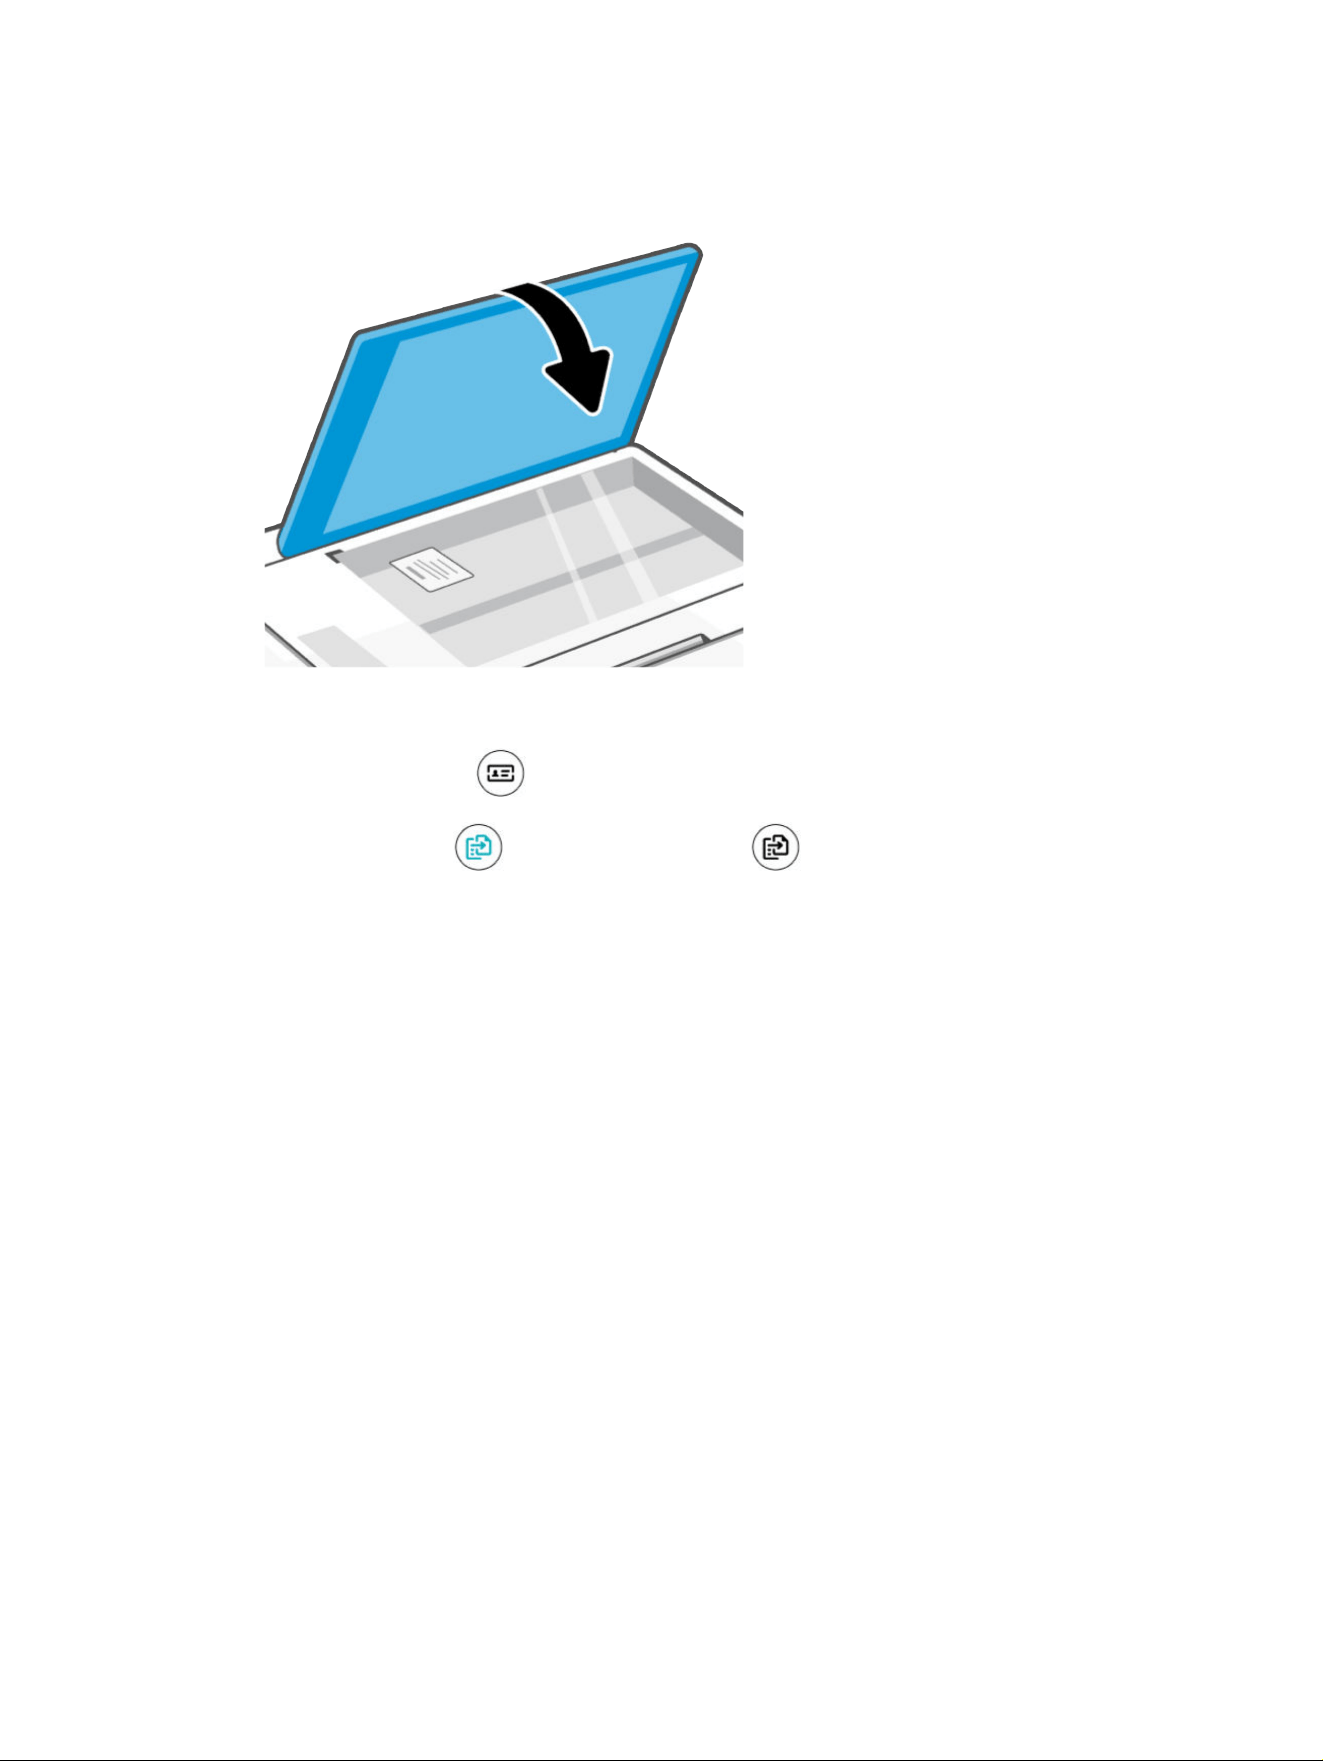
3. Close the scanner lid.
4. Press the ID Copy button to enter the ID Copy mode.
The Color Copy button and the Black Copy button will blink or light up.
5. Press the desired Copy button to copy one side of the card.
To increase the number of copies, press and hold the button or press it multiple times.
30 Chapter 5Copy, Scan, and Mobile Fax
6. When the Open Lid light blinks or lights up, open the scanner lid, ip the card on the scanner glass,
and then close the scanner lid.
7. Press the Copy button that is blinking or lit to copy the other side.
8. Wait for the page to print.
Copy an
identication (ID) card 31

Scan using the HP Smart app (iOS, Android, Windows 10, and
macOS)
You can use the HP Smart app to scan documents or photos from the printer's scanner, and you can also scan
using your device camera. HP Smart includes editing tools that allow you to adjust the scanned image before
saving or sharing. You can print, save your scans locally or in cloud storage, and share them via email, SMS,
Facebook, Instagram, etc. To scan with HP Smart, follow the instructions provided in the appropriate URLs
below, depending on the type of device you are using.
● iOS/Android: www.hp.com/go/hpsmart-help
● Windows 10: www.hp.com/go/hpsmartwin-help
● macOS: www.hp.com/go/hpsmartmac-help
NOTE: HP Smart for iOS, Android, and macOS is only available for the Wi-Fi models of this printer.
Scan using HP printer software
Learn how to scan from a computer using the HP printer software.
Make sure you have already installed the HP recommended printer software on your computer. The printer
and computer must be connected and turned on.
Scan a document or photo to a
le or email (Windows)
1. Place the original print-side down on the scanner glass (aligned to the corner with an icon).
2. In the HP printer software (available from the Start menu), click Scan, and then click Scan a Document
or Photo.
3. Select the type of scan you want, and then click Scan.
If you are scanning to a le, choose the le format to save the document (or photo).
NOTE:
● Click the More link at the top right corner of the Scan dialog to review and modify settings for any
scan. See Change scan settings (Windows).
● If Show Viewer After Scan is selected, you can make adjustments to the scanned image in the
preview screen.
Change scan settings (Windows)
You can modify any of the scan settings either for a singular use or save the changes to use permanently.
These settings include options such as page size and orientation, scan resolution, contrast, and the folder
location for saved scans.
1. Place the original print-side down on the scanner glass (aligned to the corner with an icon).
2. In the HP printer software (available from the Start menu), click Scan, and then click Scan a Document
or Photo.
32
Chapter 5Copy, Scan, and Mobile Fax

3. Click the More link in the top right corner of the HP Scan dialog.
The detailed settings pane appears on the right. The left column summarizes the current settings for
each section. The right column allows you to change the settings in the highlighted section.
4. Click each section at the left of the detailed settings pane to review the settings in that section.
You can review and change most settings using drop-down menus.
Some settings allow greater exibility by displaying a new pane. These are indicated by a + (plus sign) at
the right of the setting. You must either click OK to accept or click Cancel to cancel any changes on this
pane to return to the detailed settings pane.
5. When you have nished changing settings, do one of the following:
● Click Scan. You are prompted to save or reject the changes to the shortcut after the scan is nished.
● Click the save icon to the right of the shortcut, and then click Scan.
Create a new scan shortcut (Windows)
You can create your own scan shortcut to make scanning easier. For example, you might want to regularly
scan and save photos in PNG format, rather than JPEG.
1. Place the original print-side down on the scanner glass (aligned to the corner with an icon).
2. In the HP printer software (available from the Start menu), click Scan, and then click Scan a Document
or Photo.
3. Click Create New Scan Shortcut.
4. Enter a descriptive name, choose an existing shortcut on which to base your new shortcut, and then click
Create.
5. Change the settings for your new shortcut to meet your needs, and then click the save icon to the right of
the shortcut.
NOTE: Click the More link at the top right corner of the Scan dialog to review and modify settings for
any scan.
For more information, see Change scan settings (Windows).
Scan using Webscan (Wi-Fi models)
Webscan is a feature of EWS that lets you scan photos and documents from your printer to your device using a
web browser.
NOTE: For your security, some settings in EWS are password-protected. Enter the password if prompted.
This is the password you have set in EWS or the default PIN available from a label on the printer. See Find the
default printer password or PIN.
Enable Webscan
1. Open EWS. For more information, see Access and use EWS.
2. Click the Settings tab.
3. From the left menu, click Security, and then select Administrator Settings.
Create a new scan shortcut (Windows)
33

4. Select the option to enable Webscan.
5. Click Apply.
Scan using Webscan
Scanning using Webscan oers basic scan options. For additional scan options or functionality, scan from the
HP printer software.
1. Place the original print-side down on the scanner glass (aligned to the corner with an icon). See Load
original.
2. Open EWS. For more information, see Access and use EWS.
3. Click the Scan tab.
4. From the left menu, click Webscan.
5. Select the desired options, and then click Start Scan.
Tips for successful scanning and copying
Follow these tips to avoid copy and scan issues.
● Keep the scanner glass and the back of the scanner lid clean. The scanner interprets anything it detects
on the glass as part of the image.
● Load the original print-side down on the scanner glass (aligned to the corner with an icon).
● To make a large copy of a small original, scan the original into the computer, resize the image in the
scanning software, and then print a copy of the enlarged image.
● To avoid incorrect or missing scanned text, make sure the brightness is set appropriately in the software.
● Make sure to select the correct source (for example, scanner glass) for scanning when using HP software.
Mobile Fax
Use the HP Smart app to quickly scan and fax multiple pages at once from your mobile device or computer.
For more information about Mobile Fax, visit the HP Smart website.
1. Make sure your mobile device or computer are connected to a network. Launch the HP Smart app and
sign into or create your HP account.
2. Select the Mobile Fax tile.
If you do not see the Mobile Fax tile, enable it as follows:
● On a mobile device: Tap Personalize Tiles, tap the Mobile Fax toggle to enable the tile, and then go
back to the Home screen.
● On a Windows 10 device: Click the Settings , select Personalize Tiles, and click the Mobile Fax
toggle to enable the tile. Then, go back to the Home screen.
34
Chapter 5Copy, Scan, and Mobile Fax

● On a Mac device: From the menu bar, select HP Smart >Personalize Tiles. Set the Mobile Fax option
to On.
NOTE: Mobile Fax is available in specic countries/regions. If you do not see a Mobile Fax option in
the Personalize Menu, Mobile Fax might not be available in your country/region.
3. Fill out the necessary mobile fax information.
4. To add a cover page, tap the Add a cover page toggle, and then type a subject and message.
5. Scan the item you want to fax using your printer or mobile device camera, or attach a supported le type.
Send the fax when ready.
Your fax will be securely delivered and you can track the status in the HP Smart app.
Mobile Fax 35

Congure your printer
Learn how to congure your printer using the embedded web server (EWS).
Use the embedded web server (EWS) to manage printing functions from your computer.
NOTE: EWS is only available for network printers.
● View printer status information
● Check the information and status of the printing supplies
● Receive notication of printer and supplies events
● View and change the network and the printer settings
Access and use EWS
You can open EWS using one of the following:
● HP Smart app
● HP printer software
● Web browser using IP address
● Web browser using Wi-Fi Direct connection
Take note of the following before you begin.
● If the web browser displays a message indicating that the website is unsafe, select the option to continue.
Accessing the website will not harm your device.
● The default username is “admin”.
● For your security, some settings in the printer home page or EWS are password-protected.
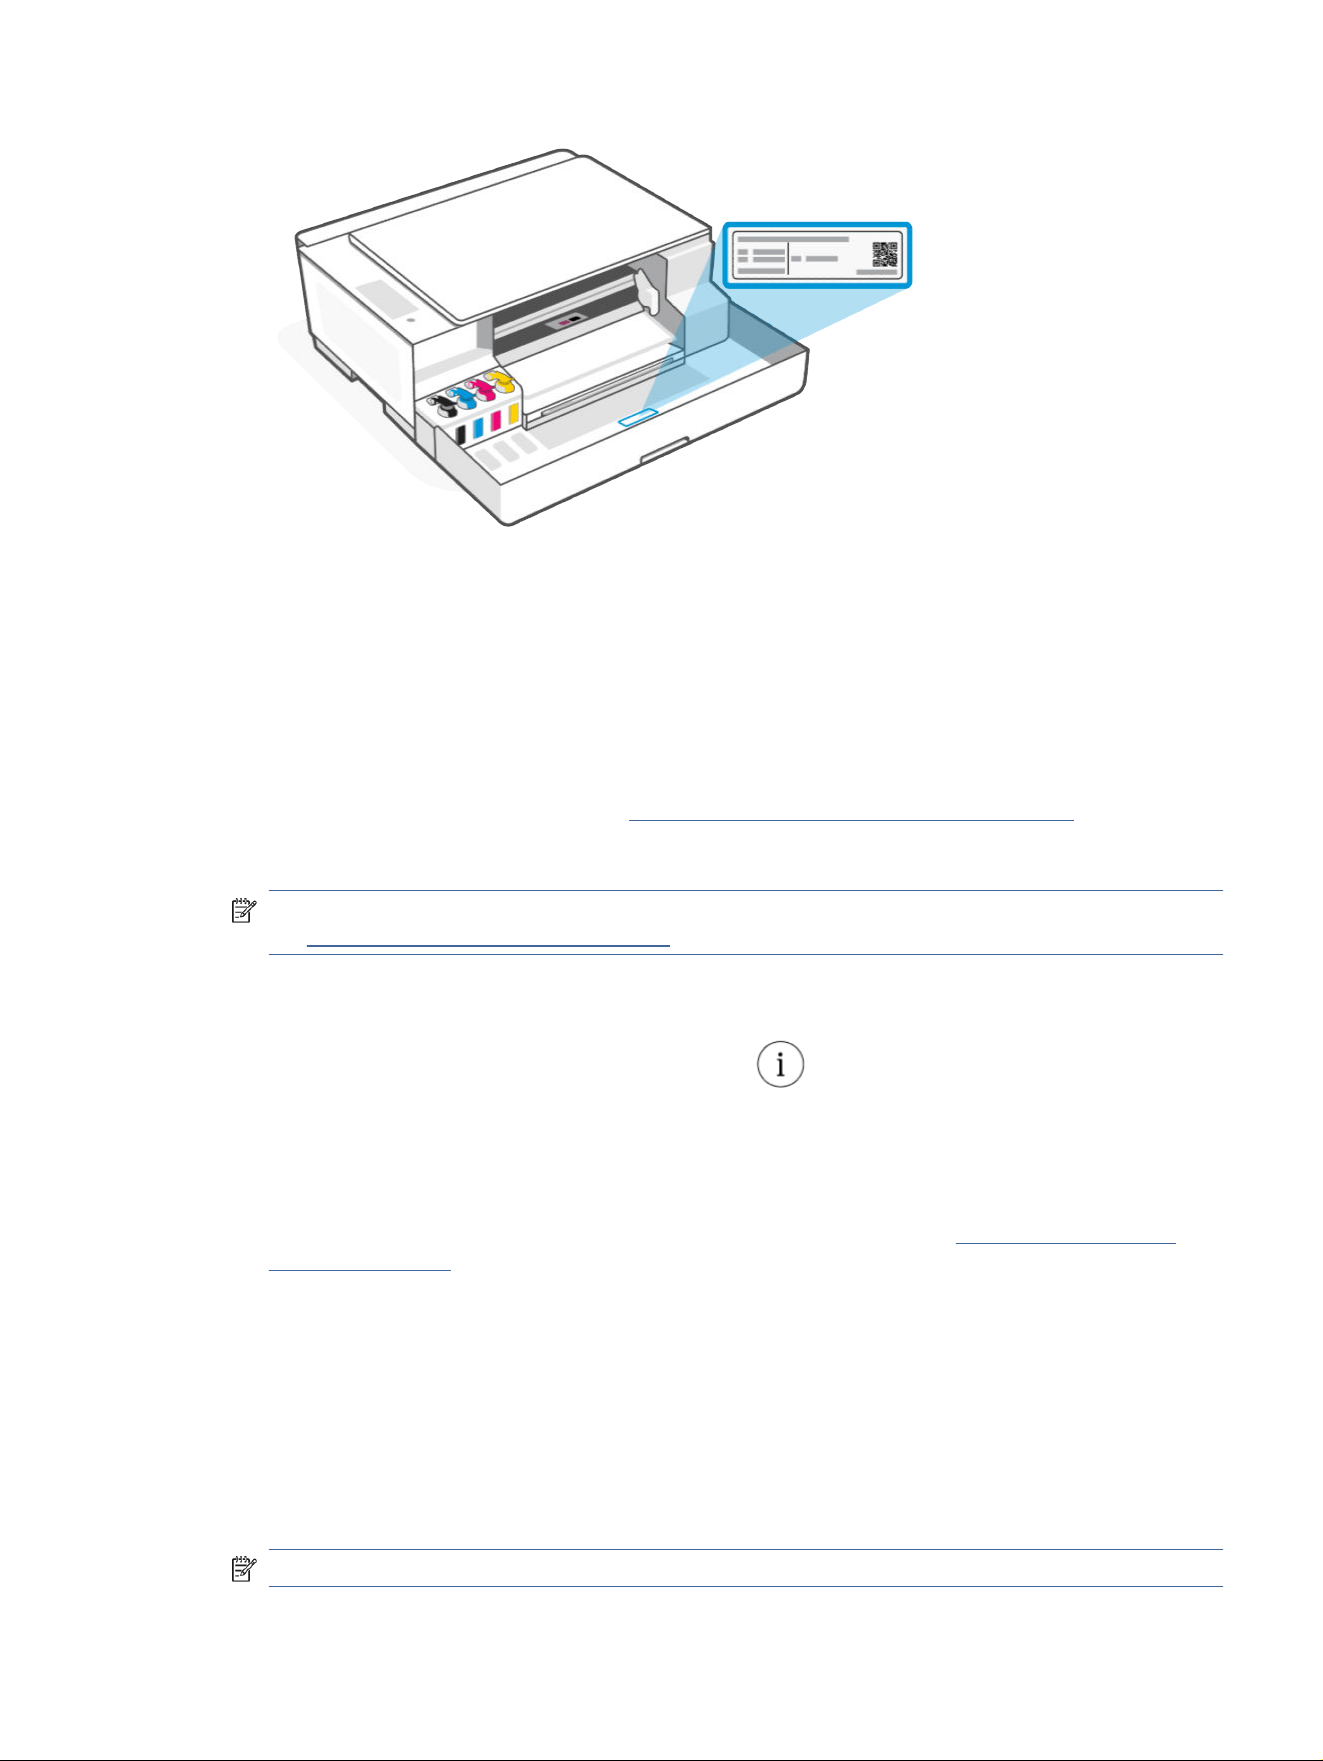
– When accessing EWS for the rst time, enter the PIN if prompted. This personal identication number
(PIN) is available from a label in the printer.
– Open the front door to locate the label.
– Once you have access to EWS, you can change the password from EWS.
36
Chapter 6Congure your printer
● Depending on how the printer is connected, some features in EWS might not be available.
● EWS is not accessible beyond the network rewall.
HP Smart (iOS, Android, and Windows 10)
1.
Open the HP Smart app on your computer or mobile device. If prompted, create or sign in to an HP
account.
For more information on HP Smart, see Use the HP Smart app to print, scan, and manage.
2. On the app Home screen, select your printer, and then click or tap Advanced Settings.
NOTE: If prompted for the printer password, enter the default PIN available from a label on the printer.
See Find the default printer password or PIN.
Open EWS using an IP address (Wi-Fi connection)
1. Find out the IP address. Press the Information button on the printer to print an information page.
2. Open a web browser, type the IP address or hostname in the address bar, and then click or tap Enter.
Open EWS using an IP address (Wi-Fi Direct connection)
1. Make sure your device and the printer are connected using Wi-Fi Direct. See Print while connected to
same Wi-Fi network.
2. Open a web browser, type the following IP address or hostname of the printer in the address bar, and
then click or tap Enter.
IP Address: 192.168.223.1
HP printer software (Windows 7)
1. From the computer desktop, click Start, select All Programs, click HP, click the folder for the printer,
select the icon with the printer's name, and then open HP Printer Assistant.
NOTE: Windows 7 Service Pack 1 (SP1) is required to install HP printer software.
HP Smart (iOS, Android, and Windows 10)
37

2. In the HP Printer Assistant, select Print tab.
3. Select Printer Home Page (EWS).
Congure IP network settings
Use the following sections to congure the printer network settings.
If prompted for a password, enter the PIN available from a label on the printer. See Find the default printer
password or PIN.
View or change network settings
View or change IP conguration settings.
1. Open EWS.
2. Click the Network tab to obtain network information. Change settings as needed.
Rename the printer on a network
Rename the printer on a network so that it can be uniquely identied.
1. Open EWS.
2. Click the Network tab.
3. From the left menu, click General.
4. Click Network Identication.
5. Make the necessary changes, and then click Apply.
Manually
congure IPv4 TCP/IP parameters
Manually set an IPv4 address, subnet mask, and default gateway.
1. Open EWS.
2. Click the Network tab.
3. From the left menu, click the wireless option.
4. Click IPv4 Conguration.
5. Make the necessary changes, and then Apply.
Assign or change the system password
Assign an administrator password for access to the printer and EWS so that unauthorized users cannot change
the printer settings.
1. Open EWS.
2. Click the Settings tab.
3. From the left menu, click Security.
38
Chapter 6Congure your printer

4. Click Password Settings.
5. Make the necessary changes, and then click Apply.
NOTE: Make note of the password and store it in a safe place.
Use Web Services (Wi-Fi models)
Web Services is enabled during printer setup. You can remove it from the printer home page or embedded web
server (EWS).
NOTE: For your security, some settings in the embedded web server (EWS) are password-protected. Enter
the password if prompted. This is the password you have set in EWS or the default PIN available from a label
on the printer. See Find the default printer password or PIN.
Remove Web Services using EWS
1. Open EWS. See Access and use EWS.
2. Click the Web Services tab.
3. From the left menu, click Web Services Settings, click Remove Web Services, and then follow the
on-screen instructions.
Use Web Services (Wi-Fi models) 39

Manage ink supplies
Rell ink tanks and order ink supplies.
Check ink levels
Ink levels are visible from the ink tanks on the front of the printer. If you are using the HP Smart app, the
estimated ink levels of the selected printer are displayed on the Home screen.
You can also check the printer control panel or HP printer software to determine when the tanks need to be
relled.
HP printer software (Windows)
1. In the HP printer software (available from the Start menu), click Estimated Levels at the top of the
window.
2. In the Toolbox, click the Estimated Levels tab.
Rell
ink tanks
Rell the ink tanks when the printer is low on ink.
See Ink icons and errors.
Take note of the following before you begin.
NOTE:
● Product service or repairs required as a result of lling the ink tanks improperly and/or using non-HP ink
will not be covered under warranty.
● Keep the ink bottles beyond the reach of children.
● Do not drink or place in mouth.
● Open the ink bottles only when you plan to ll the ink tanks.
● Do not tilt, shake, or squeeze the ink bottle when it is open to prevent ink leaks.
● Store the ink bottles in a cool, dark place.
40 Chapter 7Manage ink supplies
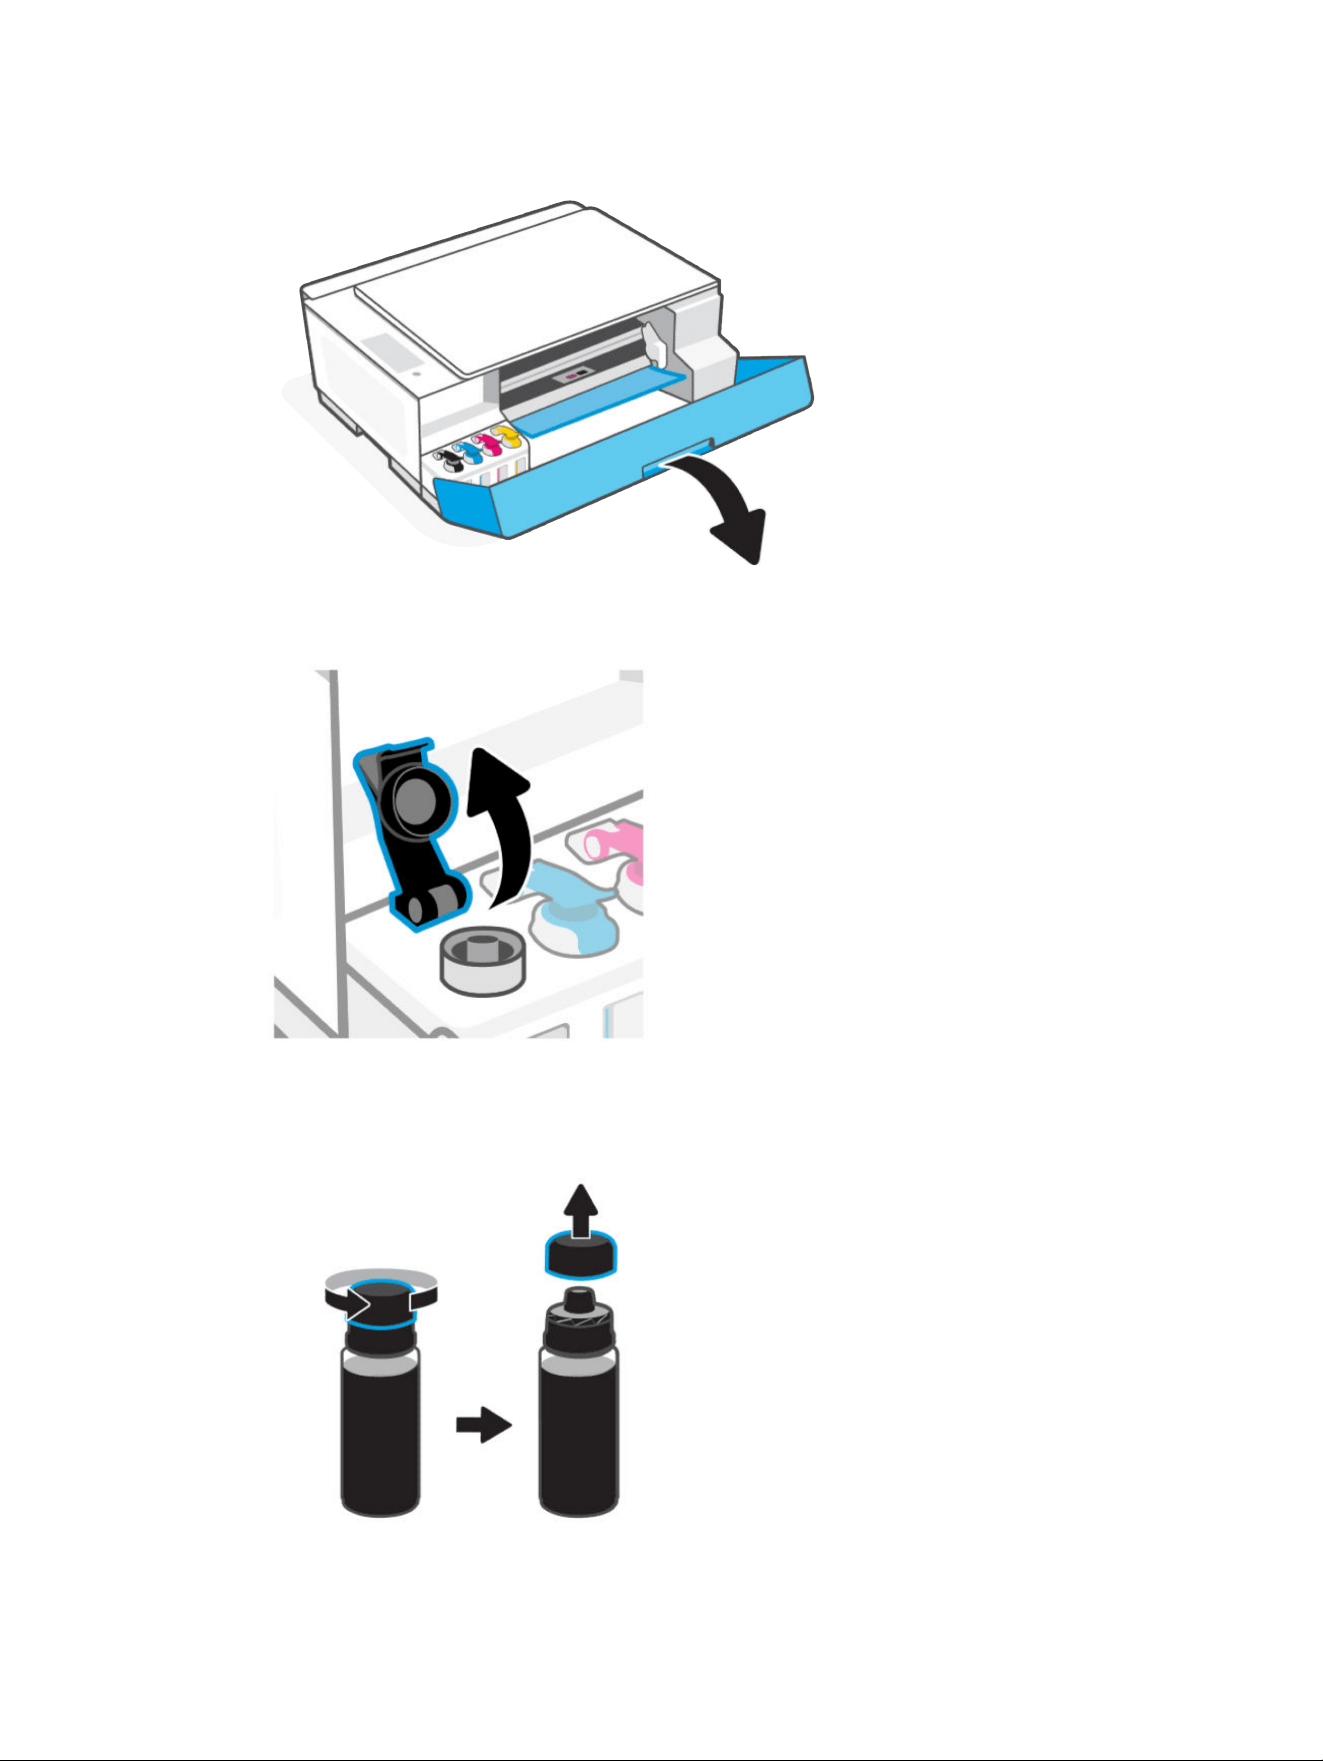
1. Open the front door.
2. Open the cap on the ink tank you want to ll.
3. Open the ink bottle.
● If your ink bottles have a colored twist-cap, twist open the cap.
Rell ink tanks 41
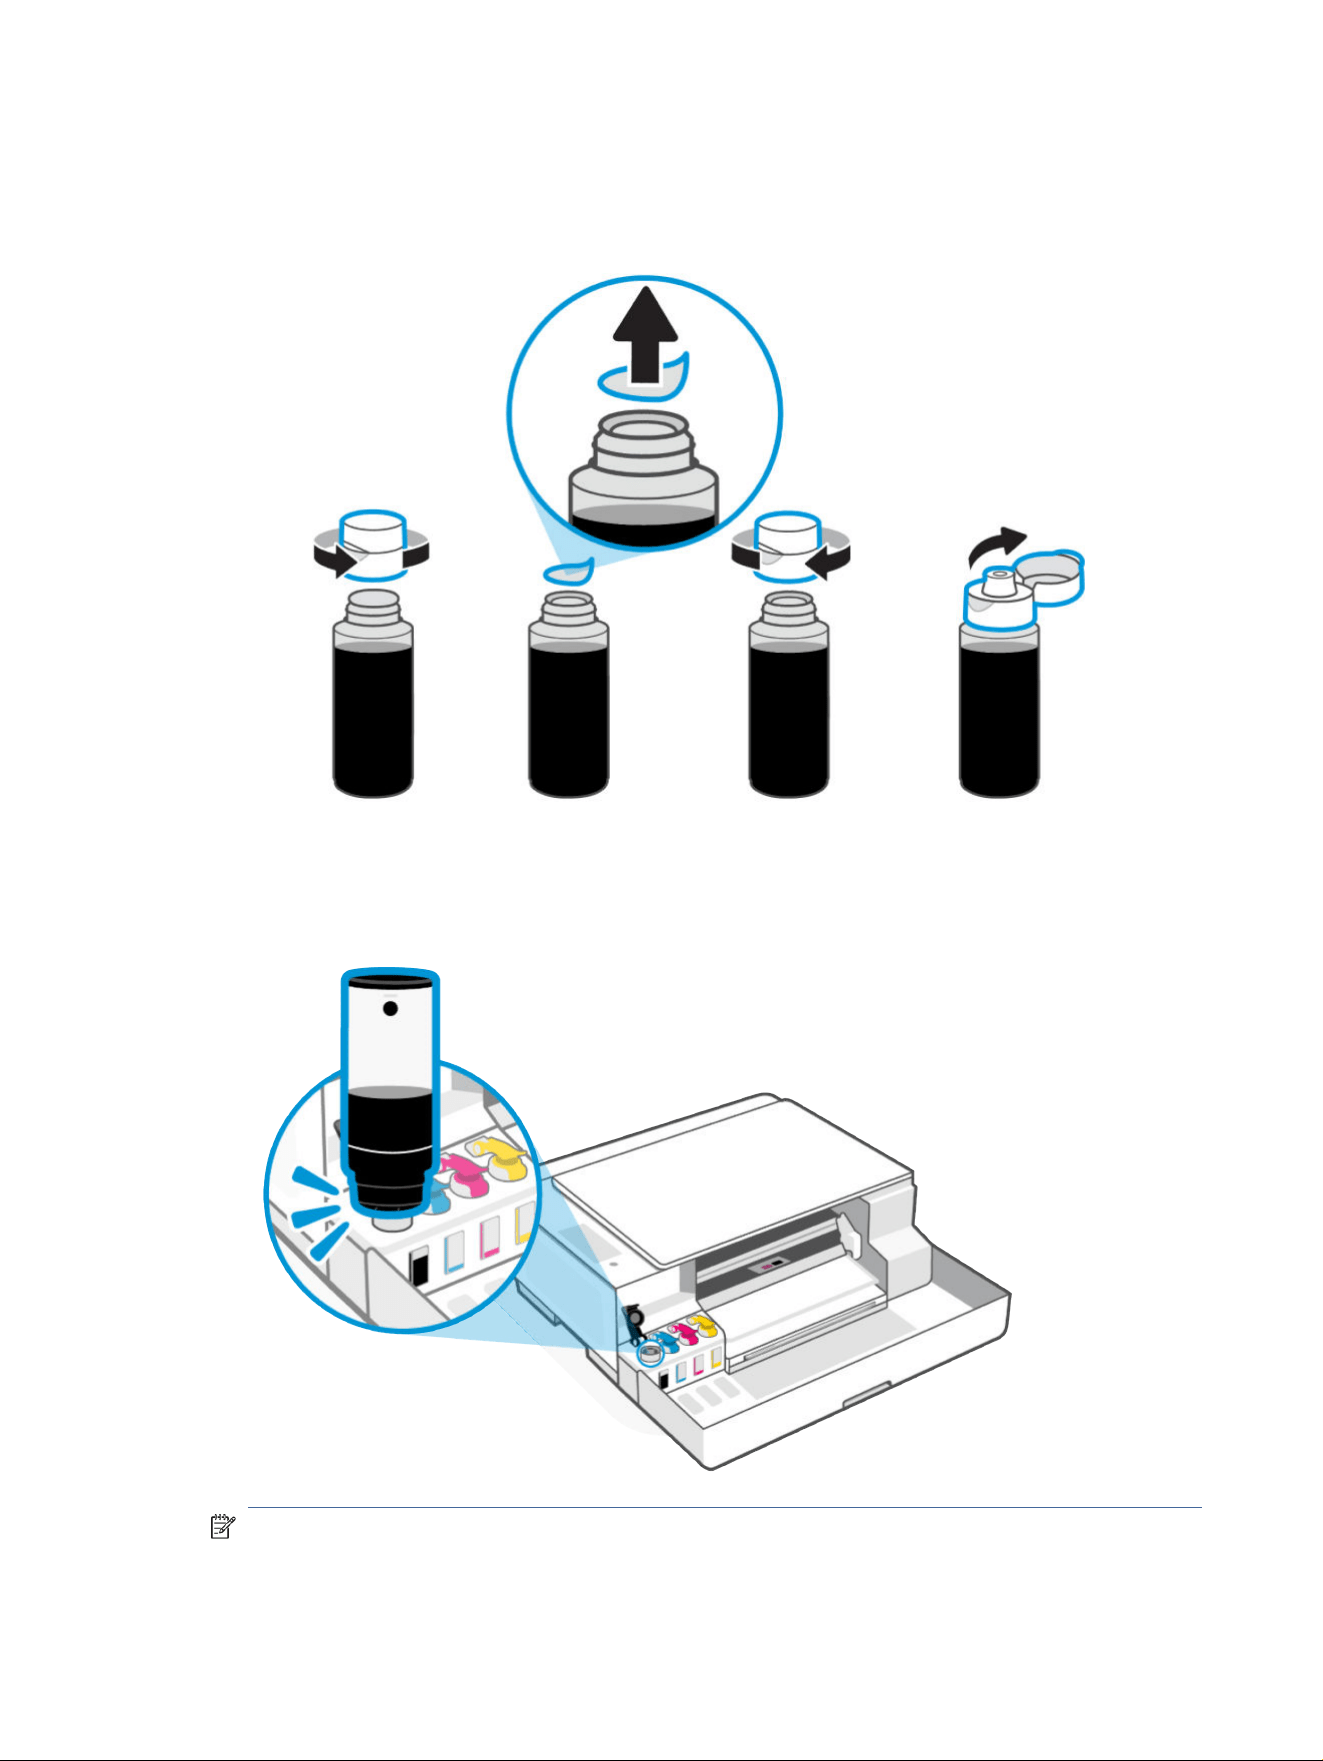
● If your ink bottles have a white ip-cap, ip open the top of the cap.
(If this is a new bottle, rst twist open the cap and remove the seal. Replace and tighten the cap on
the bottle, and then ip open the cap.)
4. Match the color of the bottle with the tank.
Place the bottle upside down on the tank and click into place. Wait for the ink to ll the tank.
NOTE:
● If the ink does not drain immediately, remove the bottle and properly reinsert onto the tank.
42
Chapter 7Manage ink supplies
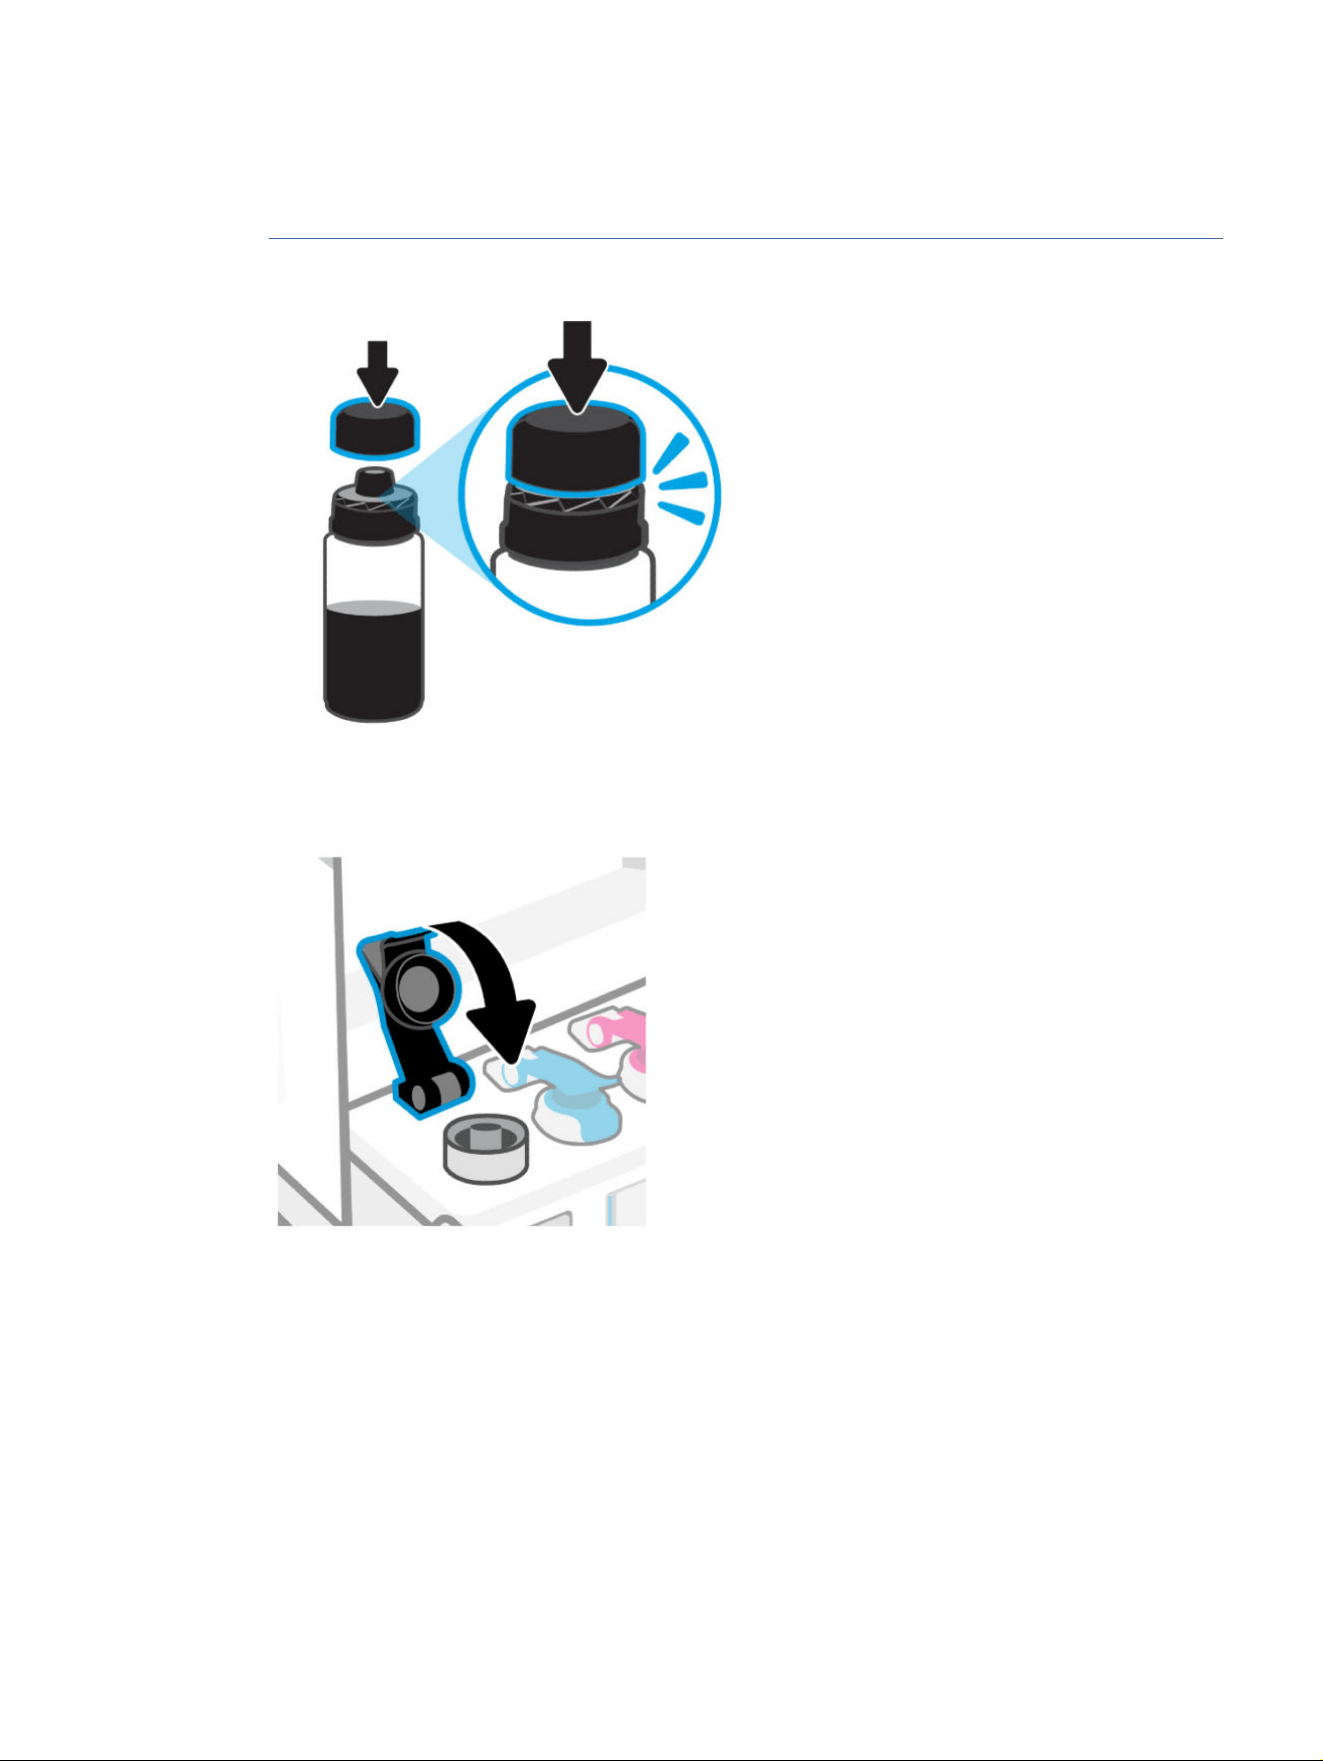
● Do not squeeze the bottle when lling ink.
● If there is ink left in the bottle, close the bottle properly and store upright in a cool, dark place. For
bottles with a colored twist-cap, replace the cap by rmly pushing it back onto the bottle.
5. Close the tank cap rmly.
6. Repeat the steps to ll other ink tanks.
Rell ink tanks 43
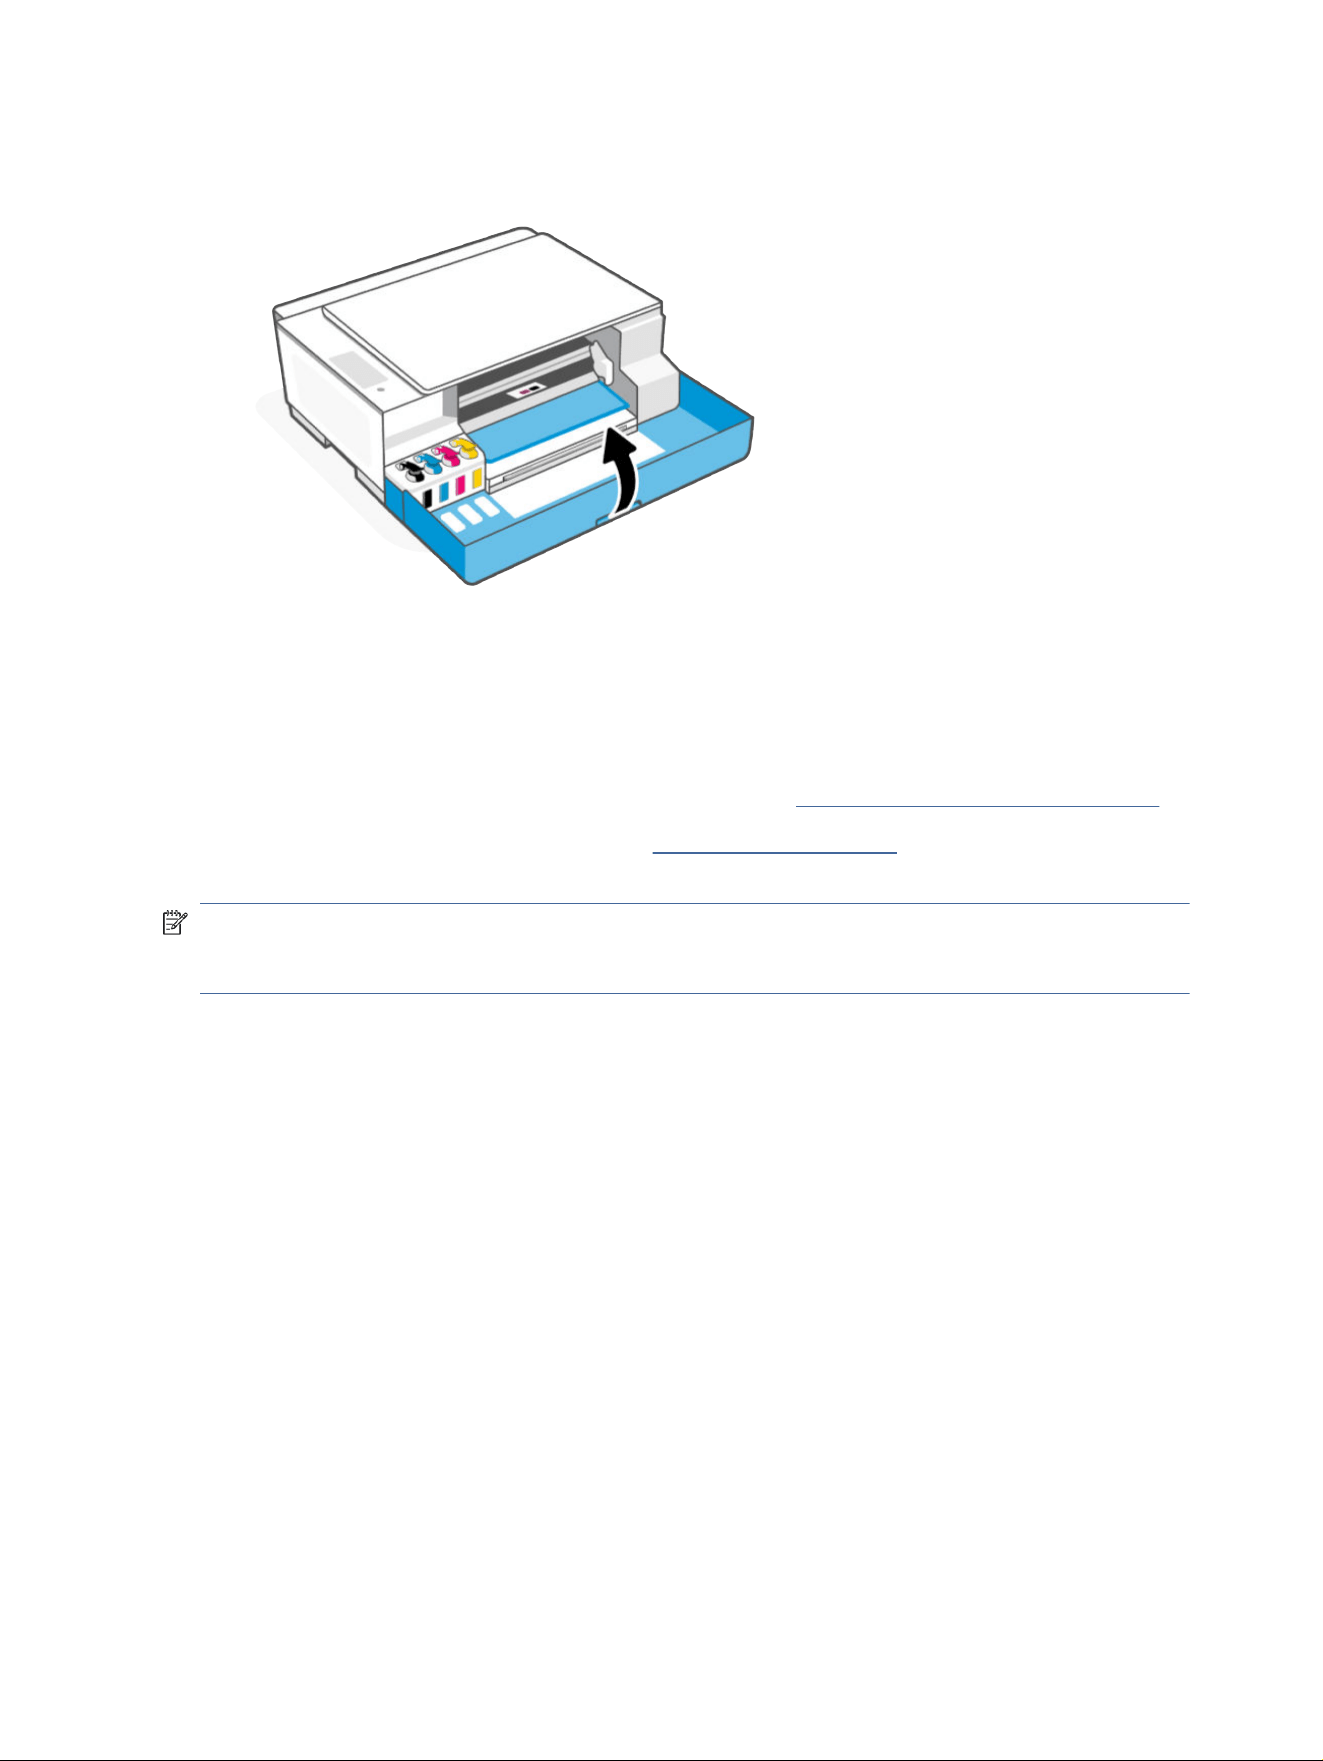
7. Close the front door of the printer.
Order ink supplies
Before ordering ink bottles, visually check the labels on the ink bottles to locate the ink bottle numbers.
You can also nd this information from a label on the printer. See Find the default printer password or PIN.
To order original HP supplies for the printer, go to www.hp.com/buy/supplies. If prompted, choose your
country/region, and then follow the prompts to nd the right ink bottles for your printer.
NOTE: Ordering ink bottles online is not supported in all countries/regions. If it is not available in your
country/region, you may still view supplies information and print a list for reference when shopping at a local
HP reseller.
Print with black ink only (Windows)
1. From your software, select Print.
2. Make sure your printer is selected.
3. Click the button that opens the Properties dialog box.
Depending on your software application, this button might be called Properties, Options, Printer Setup,
Printer Properties, Printer, or Preferences.
4. Select the appropriate options.
● Windows 10
– Click Paper/Quality tab.
– Under Print in Grayscale, select Black Ink Only from the list, and then click OK.
44
Chapter 7Manage ink supplies

● Windows 7
– On the Layout or Paper/Quality tab, click the Advanced button to open the Advanced Options
dialog box.
– From the Print in Grayscale drop-down list, select Black Ink Only, and then click OK.
Move printer
To prevent printer damage or ink leaks, follow these instructions.
If you are moving the printer within your home or oice, keep the printhead cover closed and the printer
horizontal.
To move the printer to a dierent location outside of your home or oice, refer to the instructions in the inbox
manual provided with the printer, or visit hp.com/support/movingsmarttank.
Move printer 45

Solve a problem
Solve common printer problems.
You can also get help from the HP Smart app and printer control panel:
● Printer control panel: See Interpret error codes, lights, and icons.
● HP Smart: Provides alerts for printer issues (jams and other problems), links to help content, and options
to contact support for additional assistance.
See Use the HP Smart app to print, scan, and manage.
If the suggestions do not solve the problems, try getting help using one of the support services. See contact
HP.
Update the printer
HP periodically releases rmware updates to enhance product functionality and x issues.
By default, if the printer (Wi-Fi models) or the connected computer has Internet connection, the printer
automatically checks for updates at regular intervals.
To update the printer manually, follow the instructions in the next sections.
HP Smart (Wi-Fi models)
1. Open the HP Smart app on your computer or mobile device. If prompted, create or sign in to an HP
account.
2. On the home screen of HP Smart, select your printer. If need, click or tap Printer Settings.
3. Select Advanced Settings.
This opens the printer home page (EWS) in a Web browser.
4. In EWS, click or tap Tools.
5. Click or tap Printer Updates.
6. Select Firmware Updates and follow the onscreen instructions.
Download from the HP support website
1.
Make sure the printer is on and connected to your computer.
2. Visit the HP support website on your computer.
3. Locate your product to download and install the latest rmware.
The embedded web server (EWS) (Wi-Fi models)
You can update the printer or change the settings from EWS for network printers.
46
Chapter 8Solve a problem
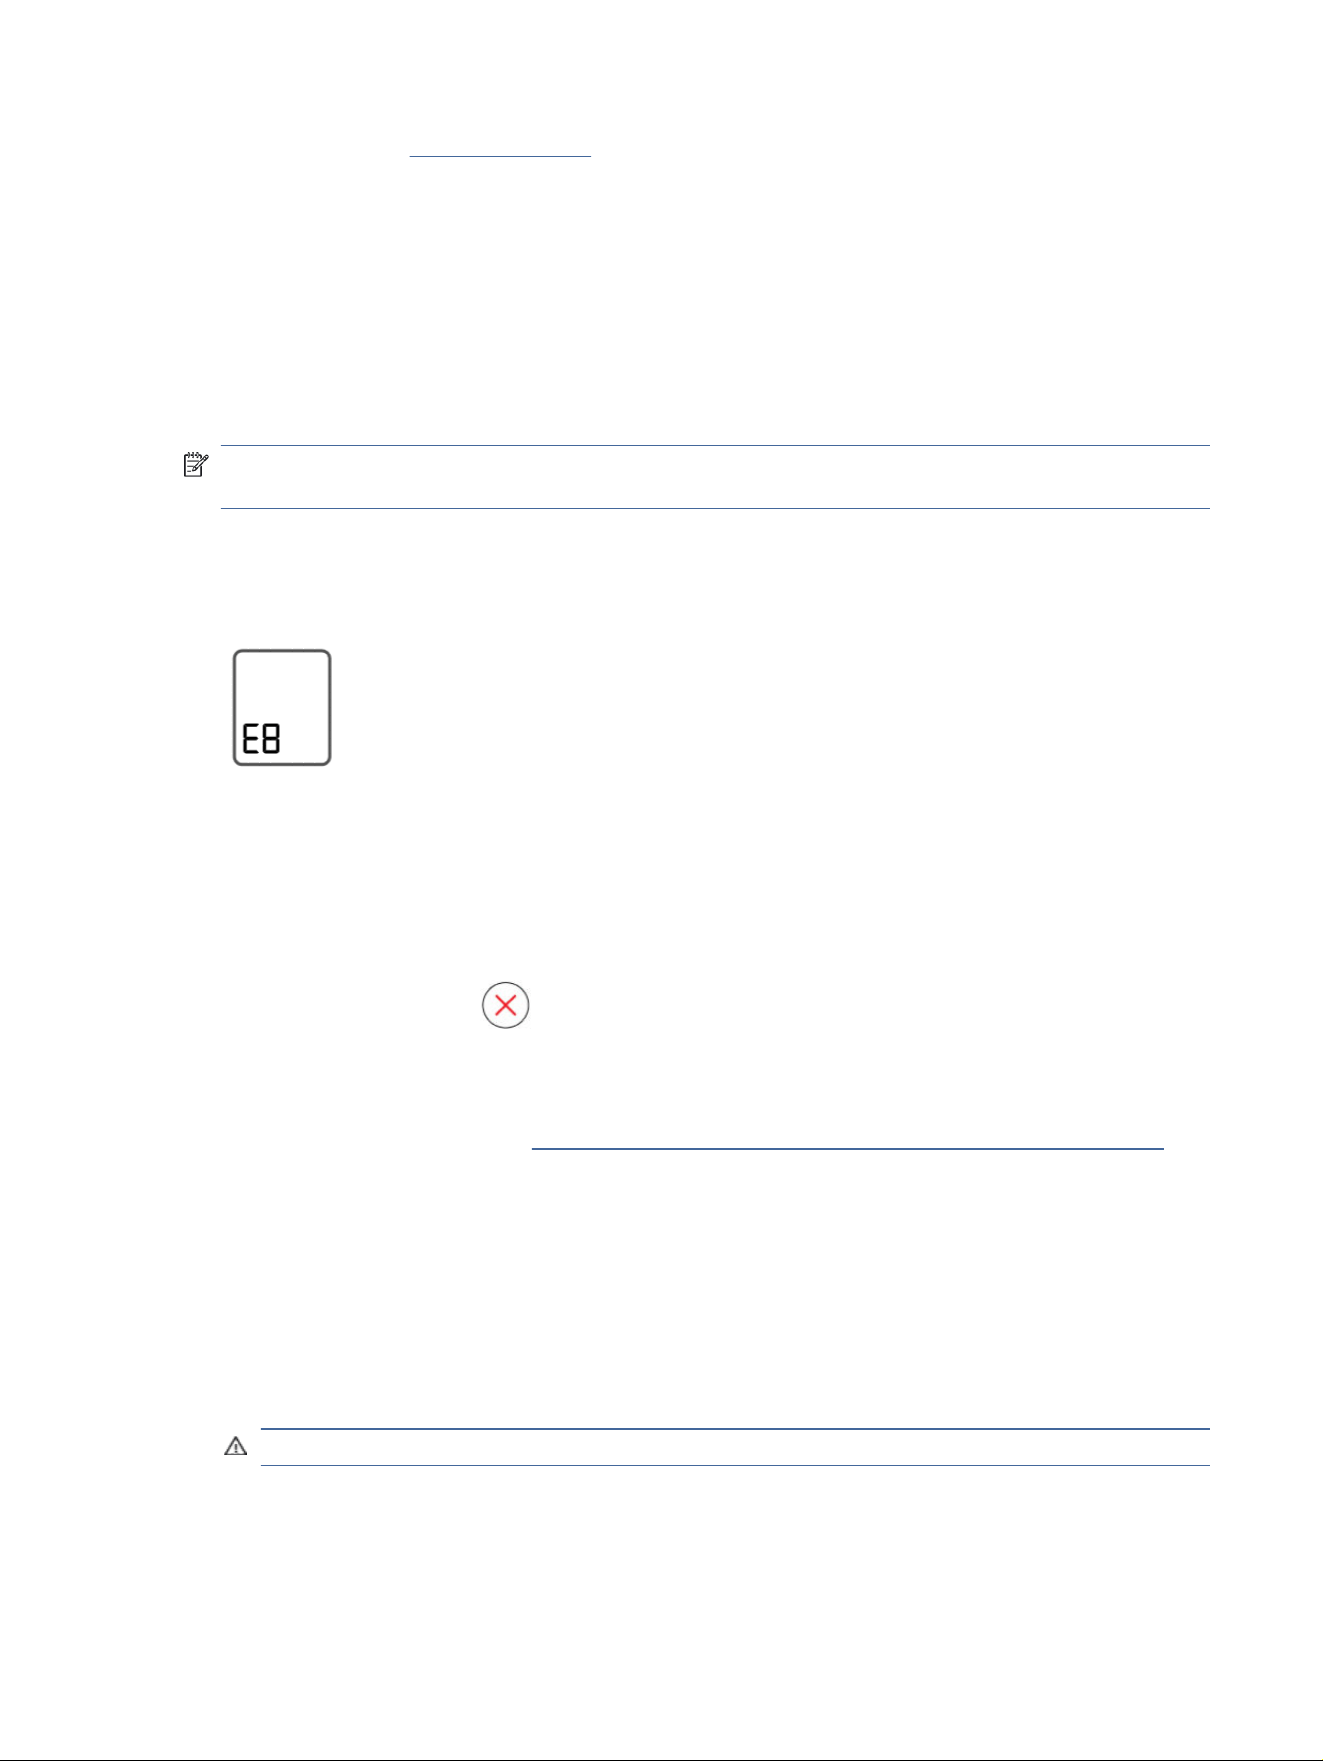
1. Open EWS. See Access and use EWS.
2. Click the Tools tab.
3. From the left menu, click Printer Updates, and then select Firmware Updates.
4. Select the desired options, and then click Apply.
Interpret error codes, lights, and icons
Understand error codes, control panel lights, and display icons, and then take any actions if needed.
NOTE: When all control panel lights on the printer blink, the printer is in an error state. Turn the printer o,
and then on again.
Error codes
When the control panel display shows a letter E, the printer is in an error state.
Error E1/E2
Paper size mismatch (E1) or Paper length mismatch (E2) has occurred.
When printing, the printer detects that the paper size of the printing job does not match the width or length of
the paper loaded.
1. Press the Cancel button to cancel printing.
2. Load paper that matches the size of the page you want to print, or change the paper size settings in your
application to match the size of the paper you are using.
To change the paper size, see Change paper settings from the embedded web server (Wi-Fi models).
3. Print the document again.
Error E3
The print carriage inside the printer has jammed or stalled.
1. Open the front door.
2. Make sure the printhead cover is properly closed and the print carriage is not obstructed.
CAUTION: Do not open the printhead cover.
3. Remove any jammed paper or other objects blocking the carriage.
4. Close the front door.
Interpret error codes, lights, and icons
47

5. Press the Resume button to continue printing or press the Cancel button .
6. If the problem persists, turn the printer o and on again, or contact HP.
Error E4
There is a paper jam.
Clear the jam.
See Jams and paper-feed issues.
CAUTION: Do not open the printhead cover.
Error E5
The scanner is not working.
1. Press the Cancel button , and then try scanning again.
2. If scanning still fails, turn the printer o, and then on again.
The printer can still print even if the scanner is not working.
Error E6
The printer is in an error state.
Restart the printer.
1. Turn o the printer.
2. Unplug the power cord.
3. Wait a minute, and then plug the power cord back in.
4. Turn on the printer.
If the problem persists, contact HP.
Error E7
One or more ink tanks are out of ink.
1. Open the front door and ink tank cap.
2. Open the ink bottle, place it upside down on the tank, and click into place.
Wait for the ink to ll the tank.
3. Close the bottle cap, tank cap, and the front door.
For more information, see Rell ink tanks.
48
Chapter 8Solve a problem

Error E8
A fatal error has occurred.
Turn the printer o, and then on again.
If the problem persists, contact HP.
Error E9
A rmware or printer update error has occurred.
Turn the printer o, and then on again.
If this does not solve the problem, download the latest printer rmware. Visit the HP support website for more
information. You might need a USB cable to temporarily connect the printer to your computer.
Power button light
Various states of the Power button light.
Status
Cause and Solution
On The printer is on.
O The printer is powered o.
Dimmed The printer is in Sleep mode.
See Energy Save Mode or Sleep mode.
Blinking The printer is turning on or o, or processing a job.
To cancel the job, press the Cancel button .
Fast blinking If the front door is open, close it.
If the front door is closed, and the light is blinking fast, the
printer is in an error state. Check your computer or device
for any messages that can help provide more information.
If needed, try printing a page to generate an onscreen
message.
Document icon and paper errors
For errors relating to paper mismatch or jams, see Error codes.
Error E8
49
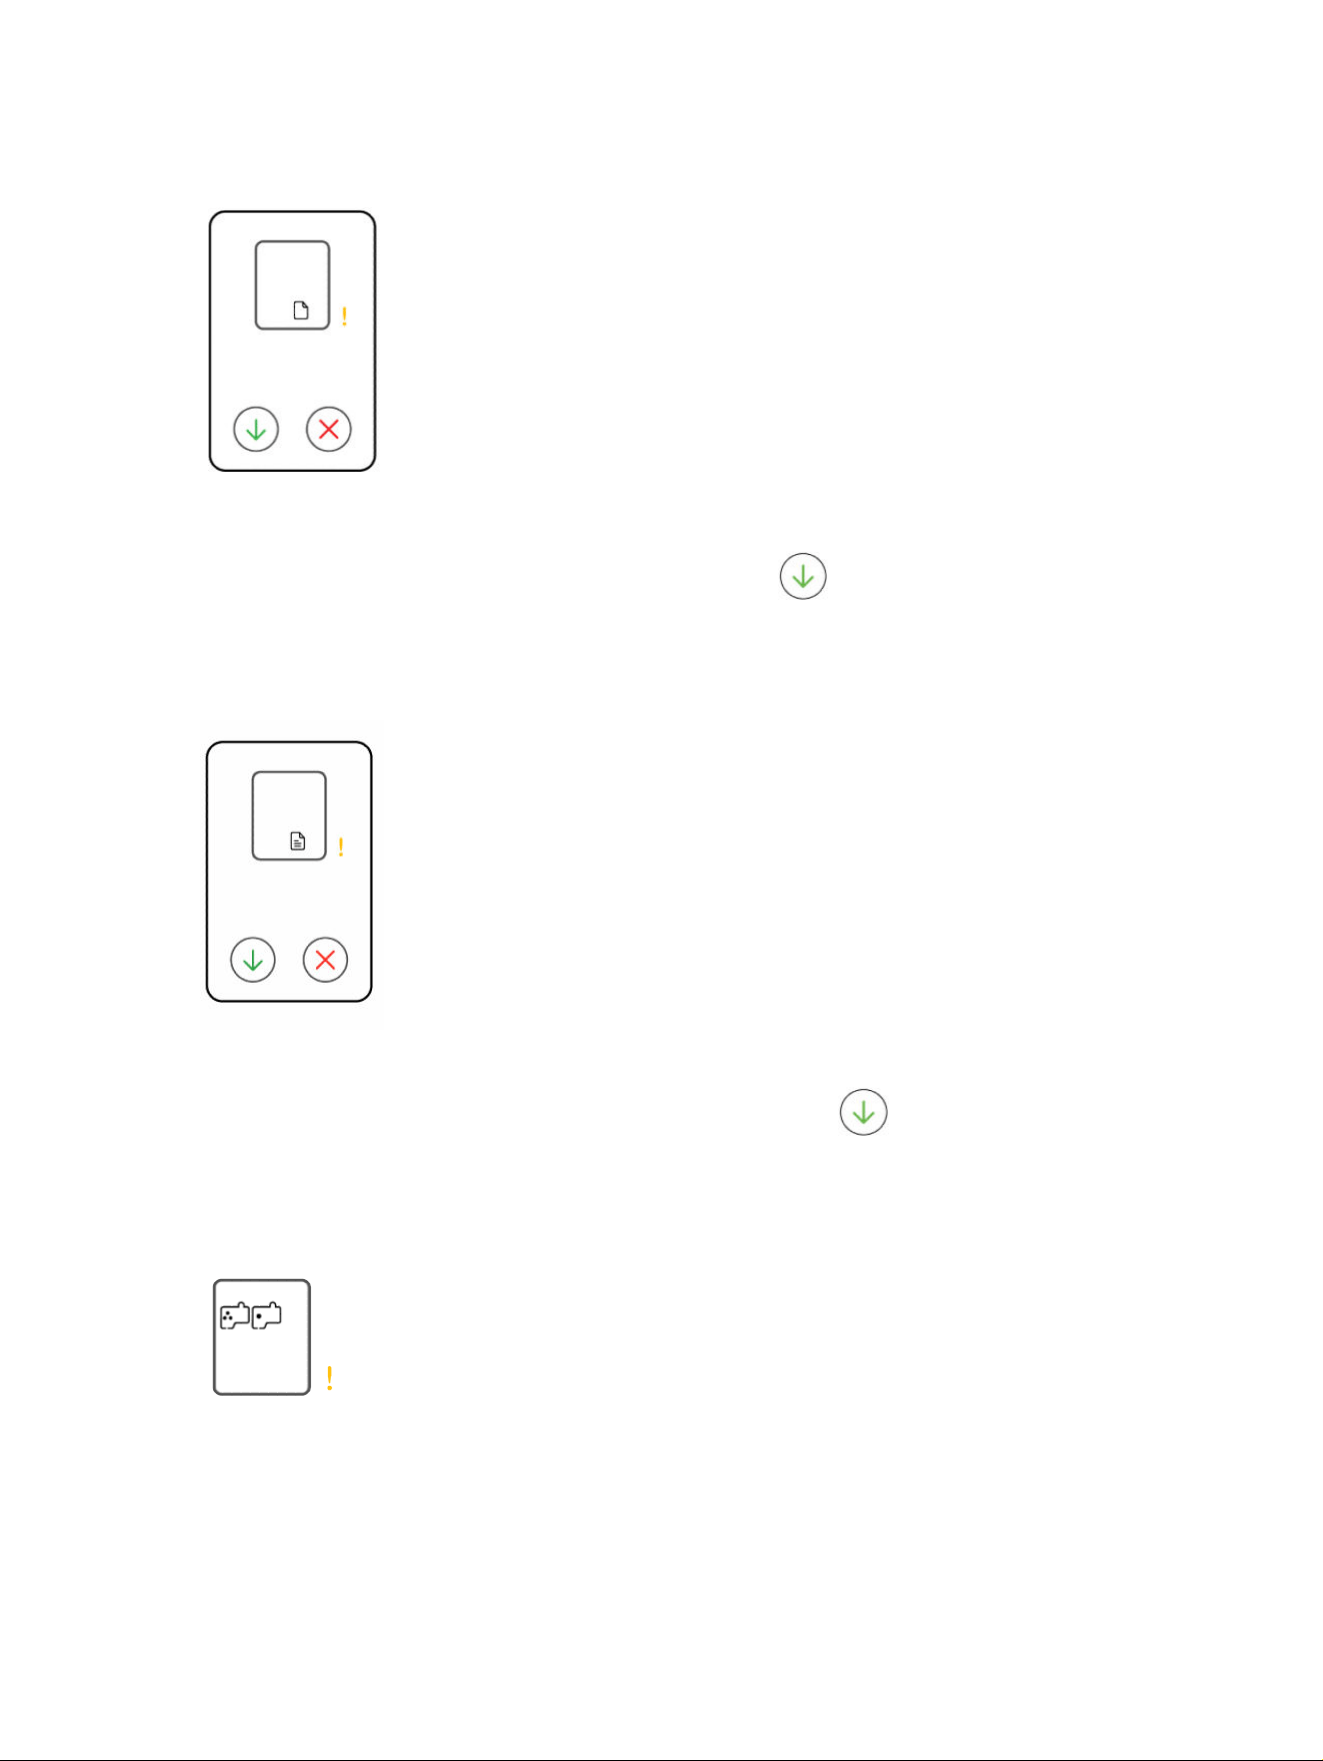
The Attention light and Blank Document icon are blinking. The Resume light and Cancel light are on.
The printer receives a printing job and detects that the printer is out of paper.
Load paper in the input tray, and then press the Resume button to continue.
The Attention light and Document icon with horizontal lines are blinking. The Resume light and Cancel
light are on.
The printer receives a copy or scan job and detects that there is no original on the scanner glass.
Load original on the scanner glass, and then press the Resume button to continue.
Printhead icons and errors
The Attention light and one or both the Printhead icons are blinking.
50 Chapter 8Solve a problem
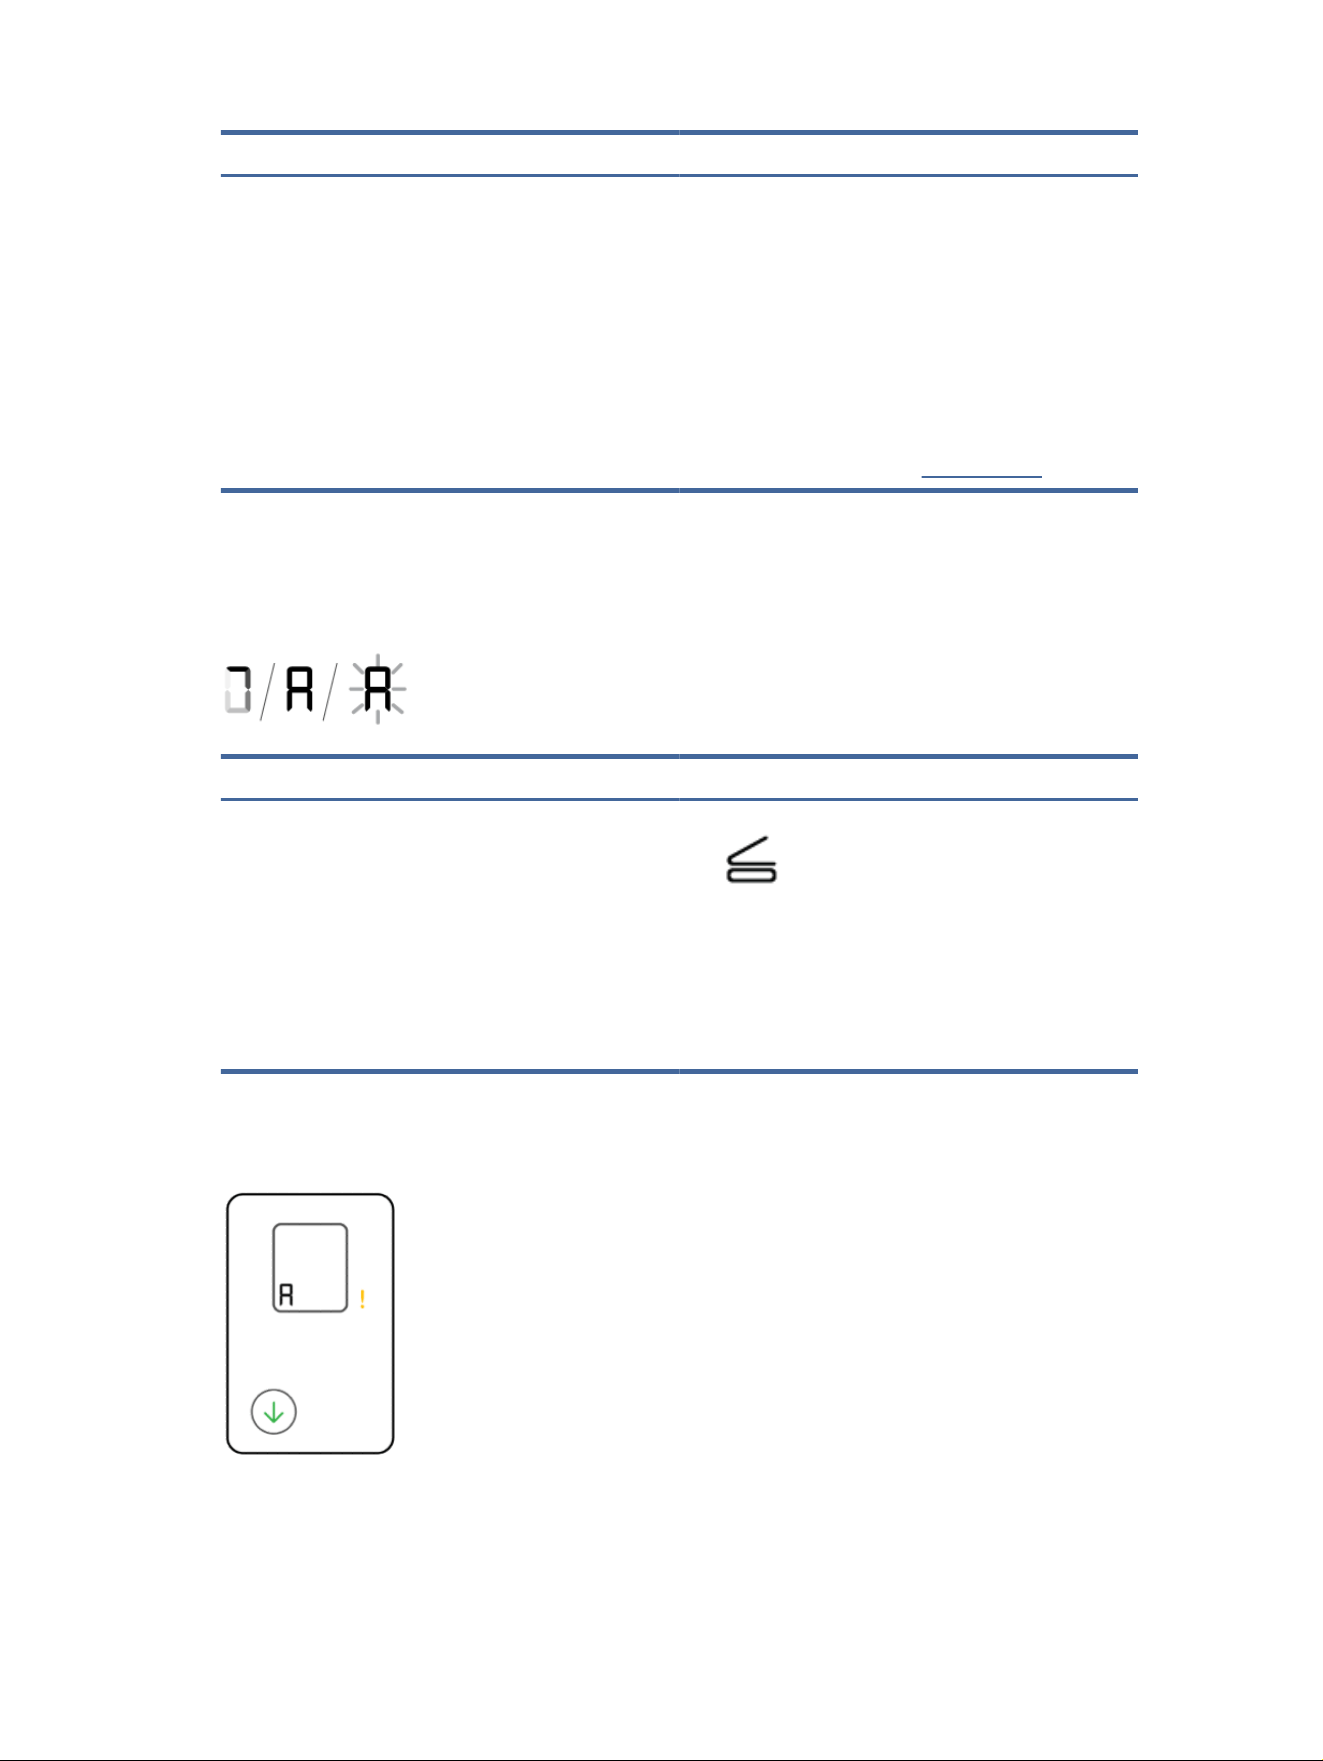
Cause Solution
One of the following might have occurred:
● One or both printheads are missing.
● One or both printheads are installed incorrectly.
● One or both printheads still have an orange plug or
plastic tape on them.
● One or both printheads are incompatible or damaged.
● Make sure both printheads are properly installed.
● Install any missing printhead.
● If both printheads are installed, remove the printhead
indicated, make sure there is no orange plug or plastic
tape on it, and then reinsert the printhead securely.
● Make sure that you are using the correct HP printheads
for your printer.
NOTE: Do not open the printhead cover unless
instructed.
For more information, see Printhead issues.
Printhead alignment icon
The Number Counter shows an A or a blinking A, or a “racecourse animation”.
Cause Solution
The printer is doing printhead alignment.
A racecourse animation appears on the display when the
printer is printing a printhead alignment page.
A solid "A" appears when the alignment page is printed.
A blinking "A" appears when the printer is scanning the
alignment page.
"A" disappears after the scan when printhead alignment is
complete.
After the alignment page is printed and the Open Lid
light blinks, place the printed page print-side down
on the scanner glass, close the scanner lid, and then press
the blinking Copy button to scan the page.
Printhead alignment is complete after the scan.
The Number Counter shows a blinking A. The Attention light and Resume light are blinking.
Printhead alignment icon 51
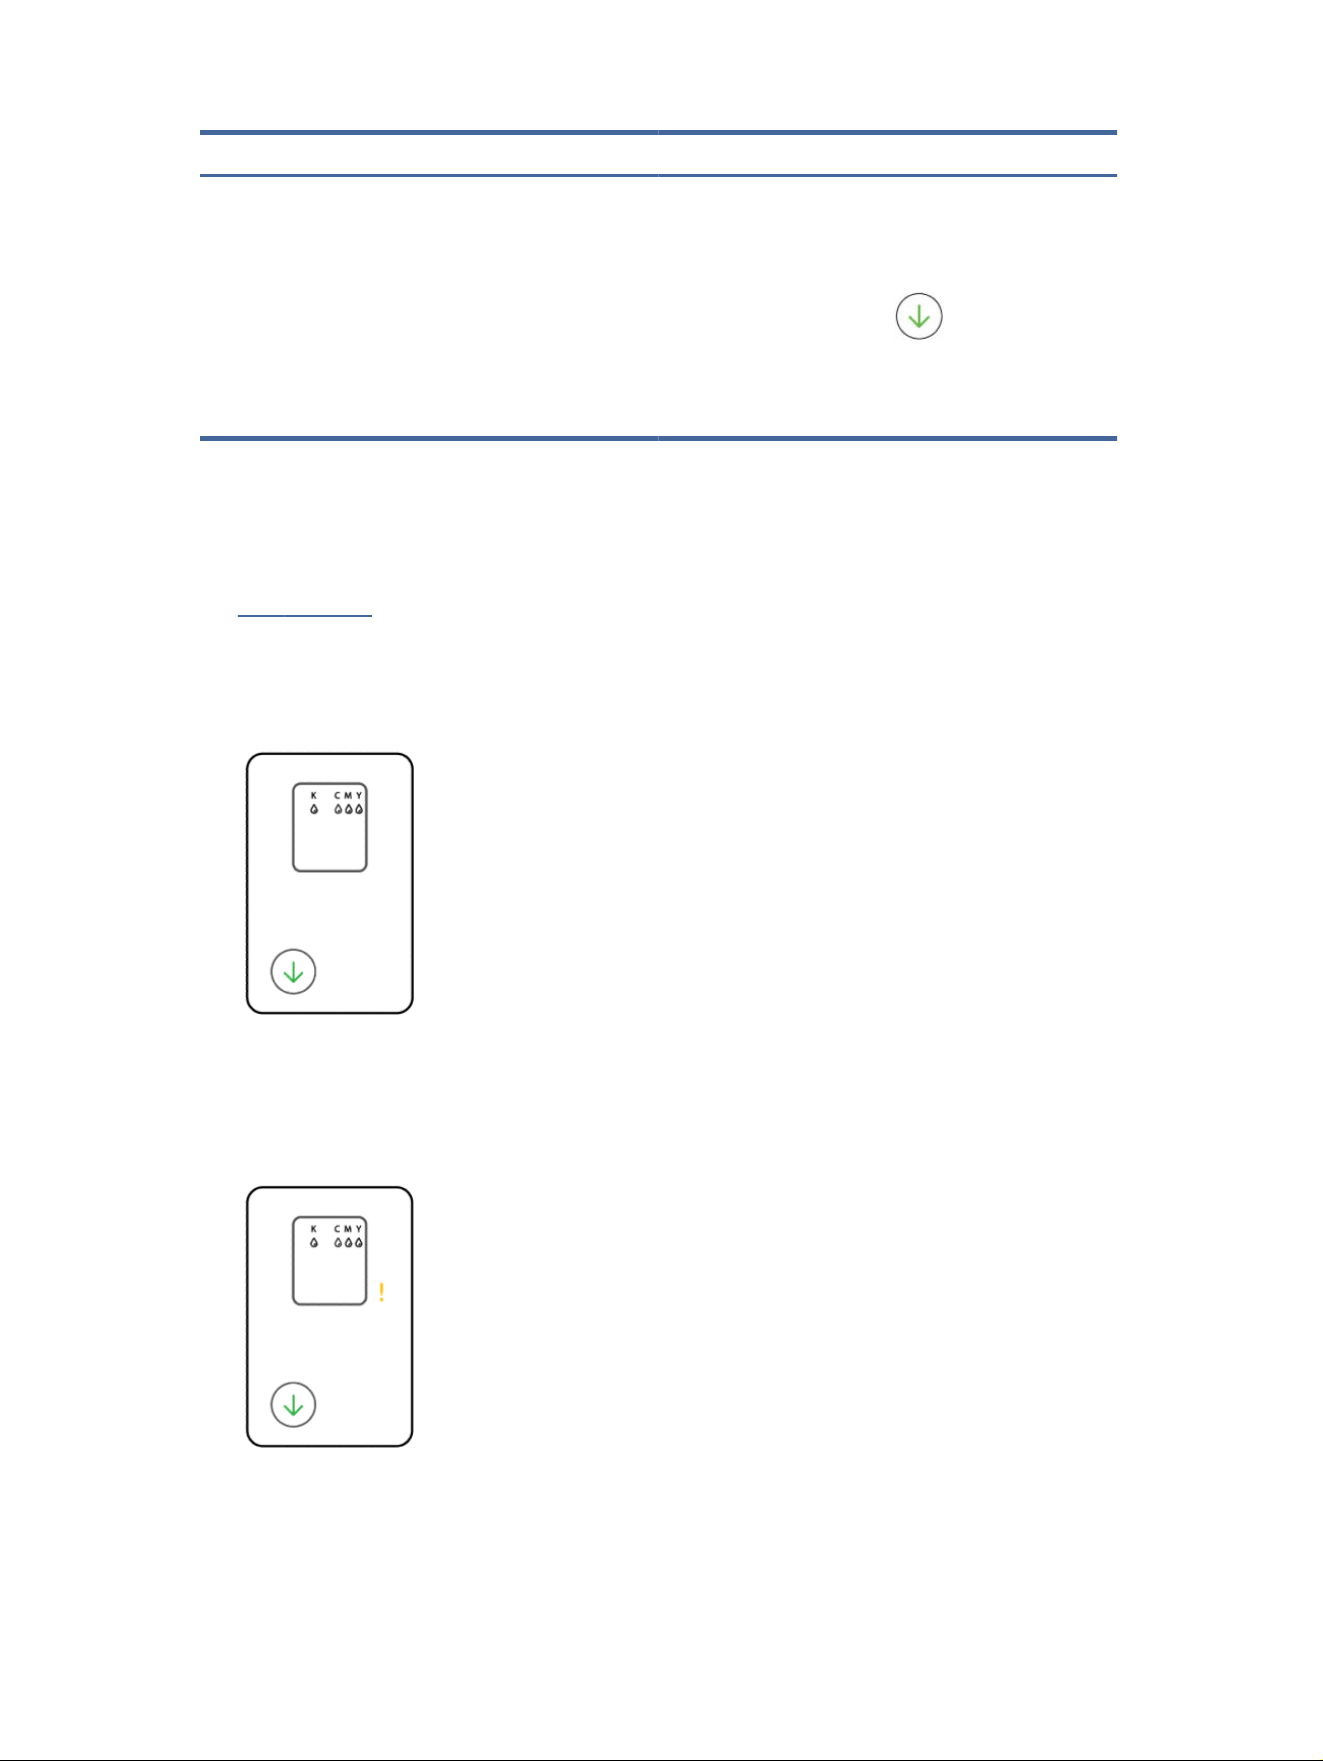
Cause Solution
Printhead alignment failed.
This could occur after you have scanned the alignment page.
Try one of the following:
● Press one of the Copy buttons to rescan the alignment
page.
● Press the Resume button to reprint the
alignment page.
If you do not do anything, printhead alignment gets
canceled after some time.
Ink icons and errors
For the following printer status, rell the indicated ink tank.
See Rell ink tanks.
● One or more Ink icons and the Resume light are on.
One or more ink tanks are low on ink.
● The Attention light is on, one or more Ink icons are blinking, and the Resume light is on.
One or more ink tanks are very low on ink.
● The Attention light, error code E7, and one or more Ink icons are blinking.
One or more ink tanks are out of ink.
52
Chapter 8Solve a problem
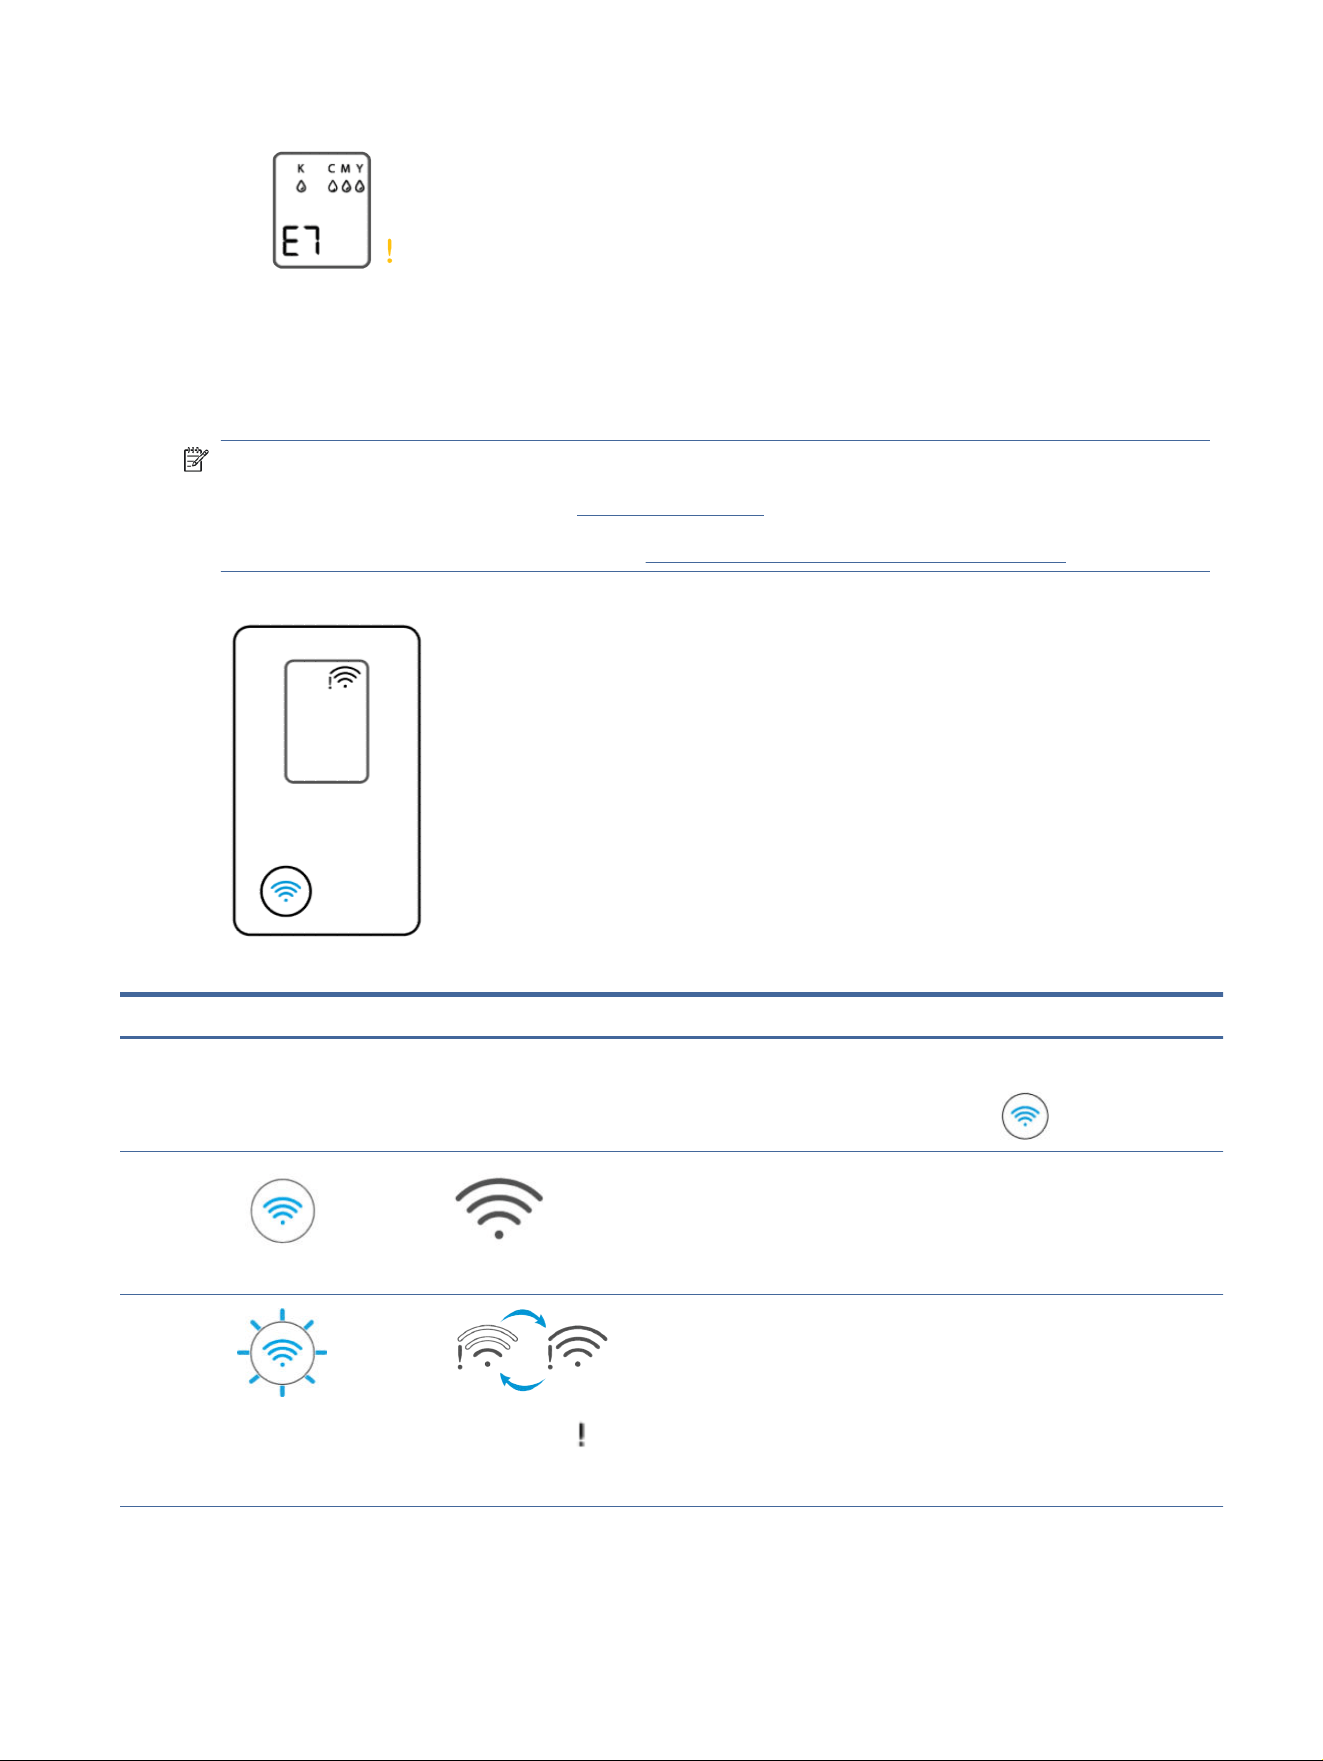
Wi-Fi status, light, and icons (Wi-Fi models)
The Wi-Fi light and the Wi-Fi status icons on the printer control panel together indicate the Wi-Fi connection
status of the printer.
NOTE:
● To connect to a Wi-Fi network, see Connect your printer.
● To resolve wireless connection issues, see Network and connection issues (Wi-Fi models).
Table 8-1 Wi-Fi status, light, and icons
Wi-Fi light Wi-Fi icons Wi-Fi status
O O The printer is not connected to the Wi-Fi network.
To turn on Wi-Fi, press the Wi-Fi button .
On Wi-Fi icon is on.
The printer is connected to a Wi-Fi network.
Blinks
● Wi-Fi alert is on.
● Wi-Fi signal bars cycle.
The printer is not connected or is trying to connect to a Wi-Fi
network.
Wi-Fi status, light, and icons (Wi-Fi models) 53
Table 8-1 Wi-Fi status, light, and icons (continued)
Wi-Fi light Wi-Fi icons Wi-Fi status
Blinks
Wi-Fi signal bars cycle.
The printer is in Wi-Fi setup mode or is trying to connect to a Wi-Fi
network.
● A blinking Wi-Fi light indicates that the printer is not connected
to a network or is trying to connect.
● During printer setup, a blinking Wi-Fi light also indicates that
the printer is in Wi-Fi setup mode.
In setup mode, the Wi-Fi light blinks blue, the Wi-Fi
signal bars cycle, and the Wi-Fi alert
is o. If the setup mode
times out after some time, you can restart it by restoring the
printer network settings.
See Restore original factory defaults and settings.
Blinks
● Wi-Fi dot and bottom bar
are on.
● Wi-Fi alert blinks.
A Wi-Fi error could have occurred.
Blinks
Wi-Fi icon blinks.
The printer is in WPS mode.
Fast blinks
● Wi-Fi dot is on.
● Wi-Fi alert and signal
bars fast blink.
An error has occurred in WPS mode.
Jams and paper-feed issues
Look inside all paper paths and remove any jammed paper or foreign objects found.
Possible jam locations
Paper jams can occur in the following areas of the printer.
54
Chapter 8Solve a problem
Table 8-2 Jam locations
Feature Description
1 Input tray
2 Output tray
3 Printhead access area
4 Bottom of the printer
Remove jammed paper
Look in all areas where jams can occur and remove any jammed paper or foreign objects found.
CAUTION:
● Do not use sharp objects, such as tweezers or needle-nose pliers, to remove jammed objects.
● When removing jammed paper, use both hands to pull the paper straight out from the printer.
Remove jammed paper
55
Input tray
Remove any jammed paper from the input tray.
1.
Press the Cancel button to cancel printing. If this does not clear the error, complete the following
steps to clear the jam manually.
2. Remove any jammed paper found.
3. Make sure there is no foreign object in the paper path, and then reload paper.
CAUTION: Do not remove the input tray shield. It can prevent debris from falling into the paper path
and causing jams or other problems.
Output tray
Remove any jammed paper from the output tray.
1. Press the Cancel button to cancel printing. If this does not clear the error, complete the following
steps to clear the jam manually.
56 Chapter 8Solve a problem
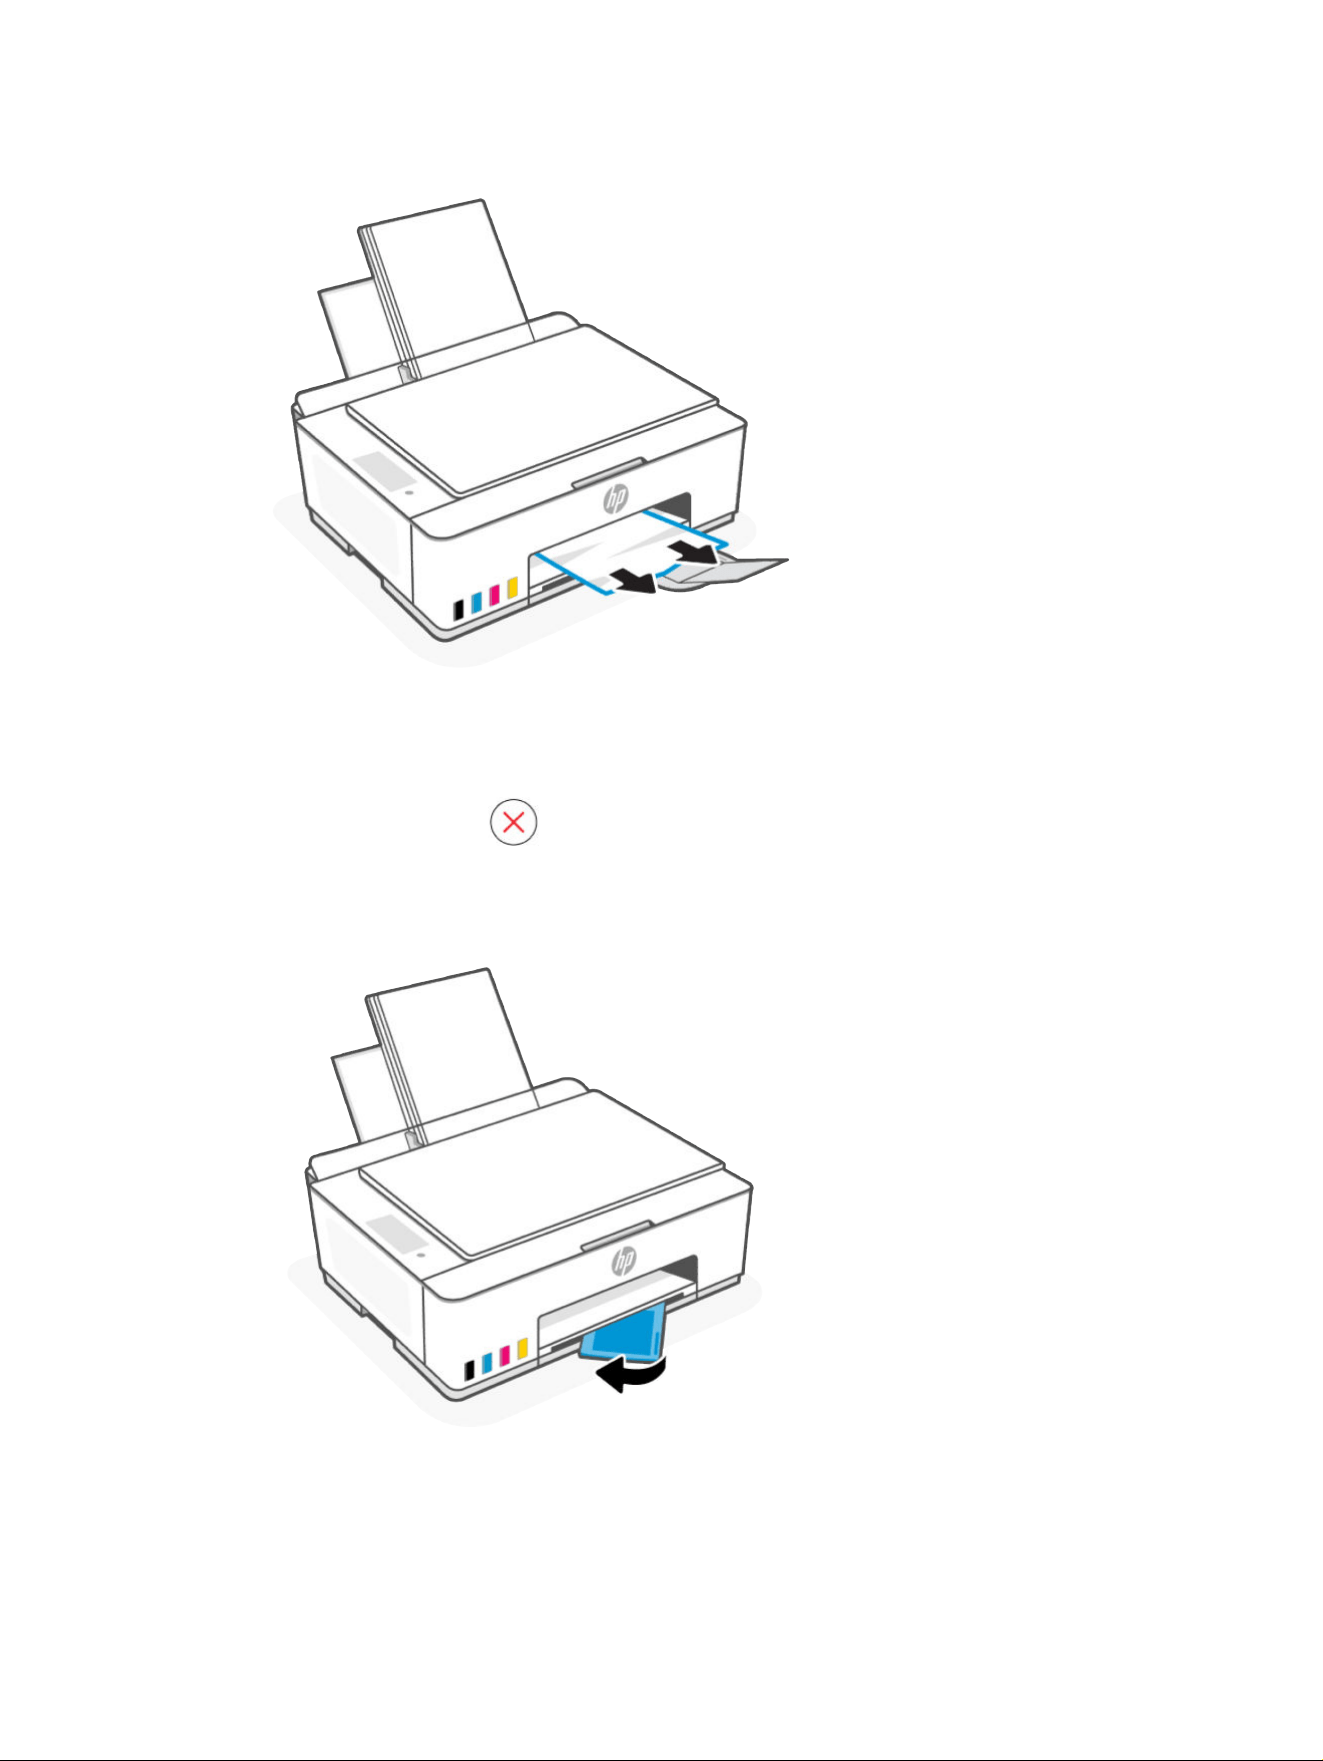
2. Pull the paper gently out of the output tray.
Printhead access area
Open the front door, look inside, and remove any jammed paper.
1. Press the Cancel button to cancel printing. If this does not clear the error, complete the following
steps to clear the jam manually.
2. Close the output tray extender.
Printhead access area 57
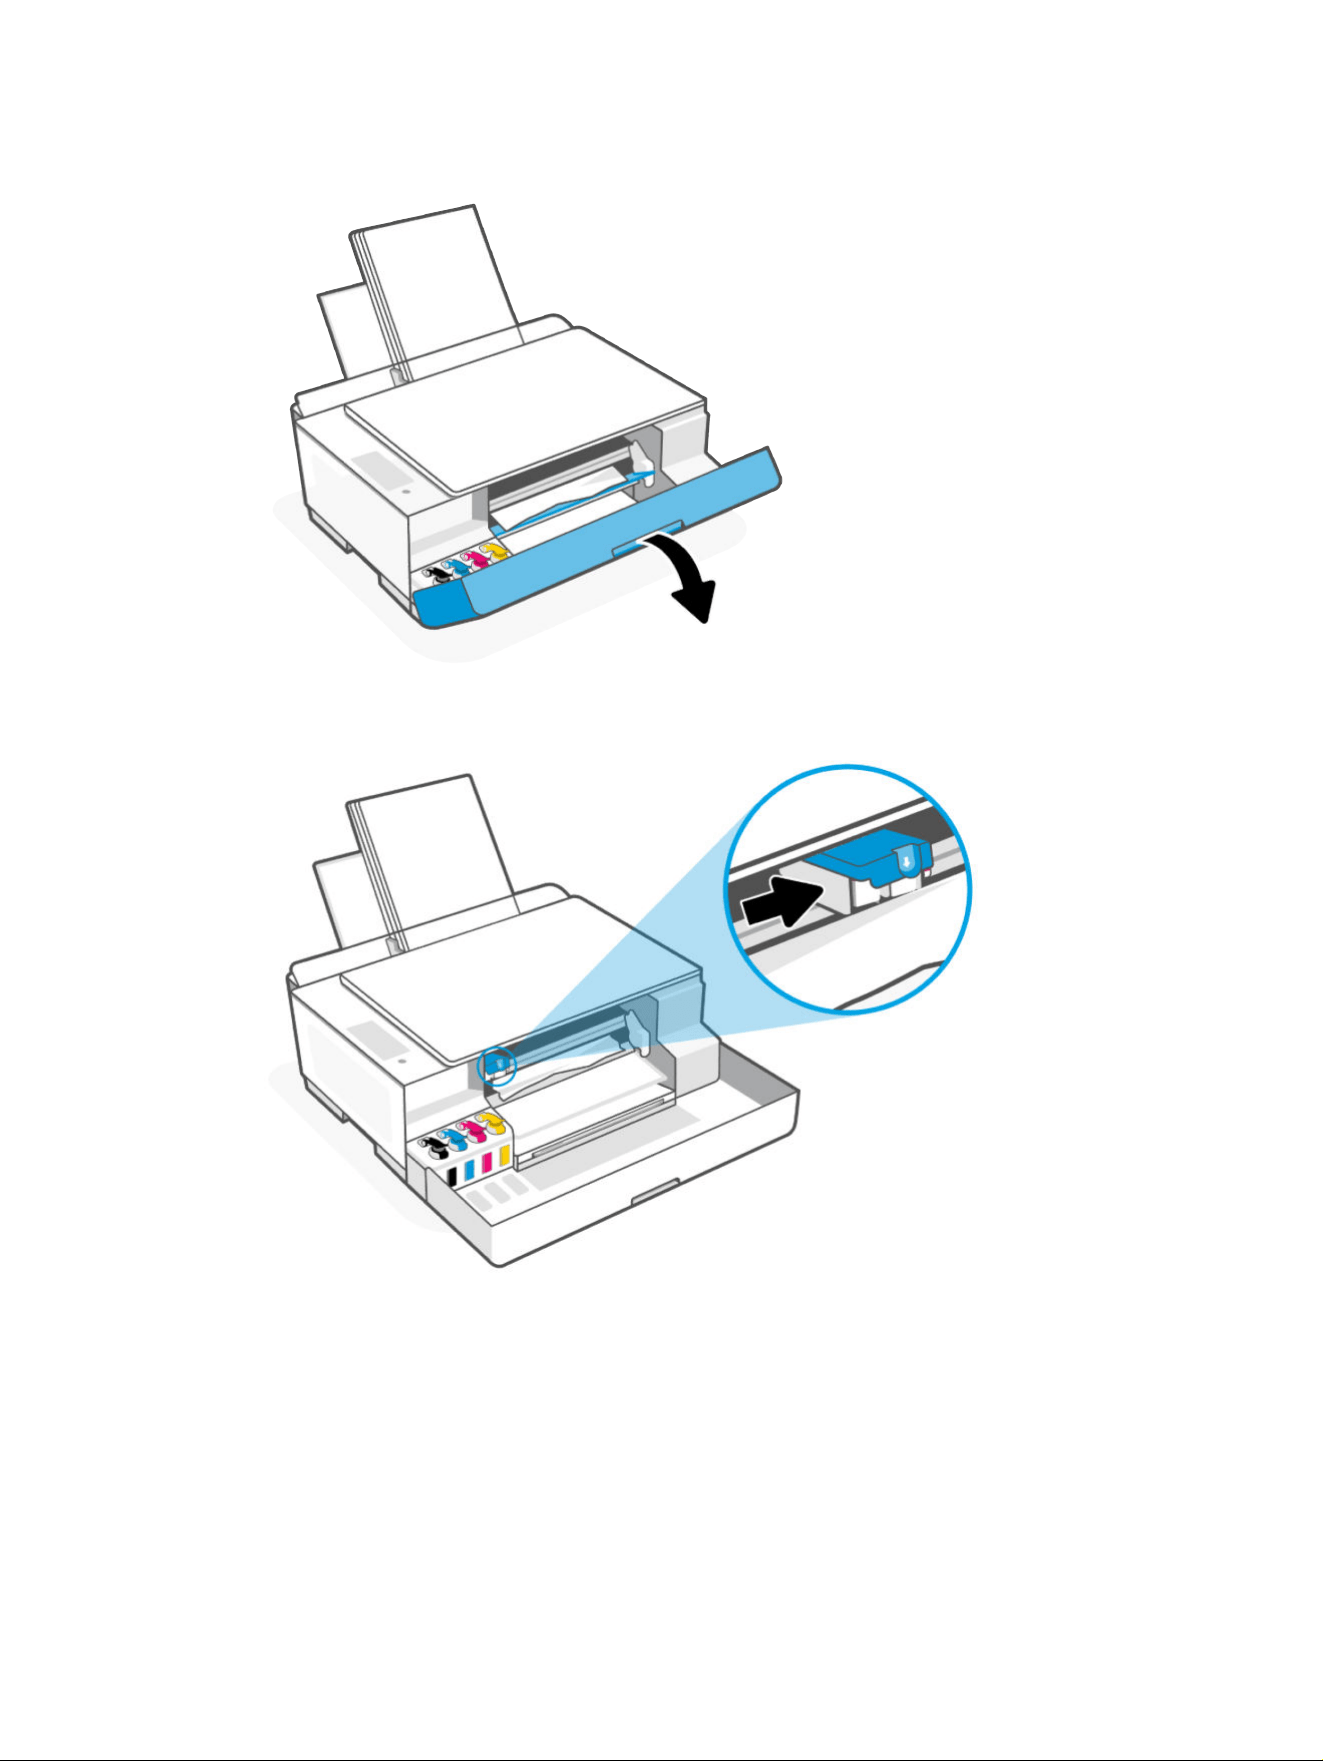
3. Open the front door of the printer.
4. Make sure the print carriage is not obstructed. You might need to slide the carriage to the right side.
Remove any jammed paper or other objects blocking the carriage.
58
Chapter 8Solve a problem
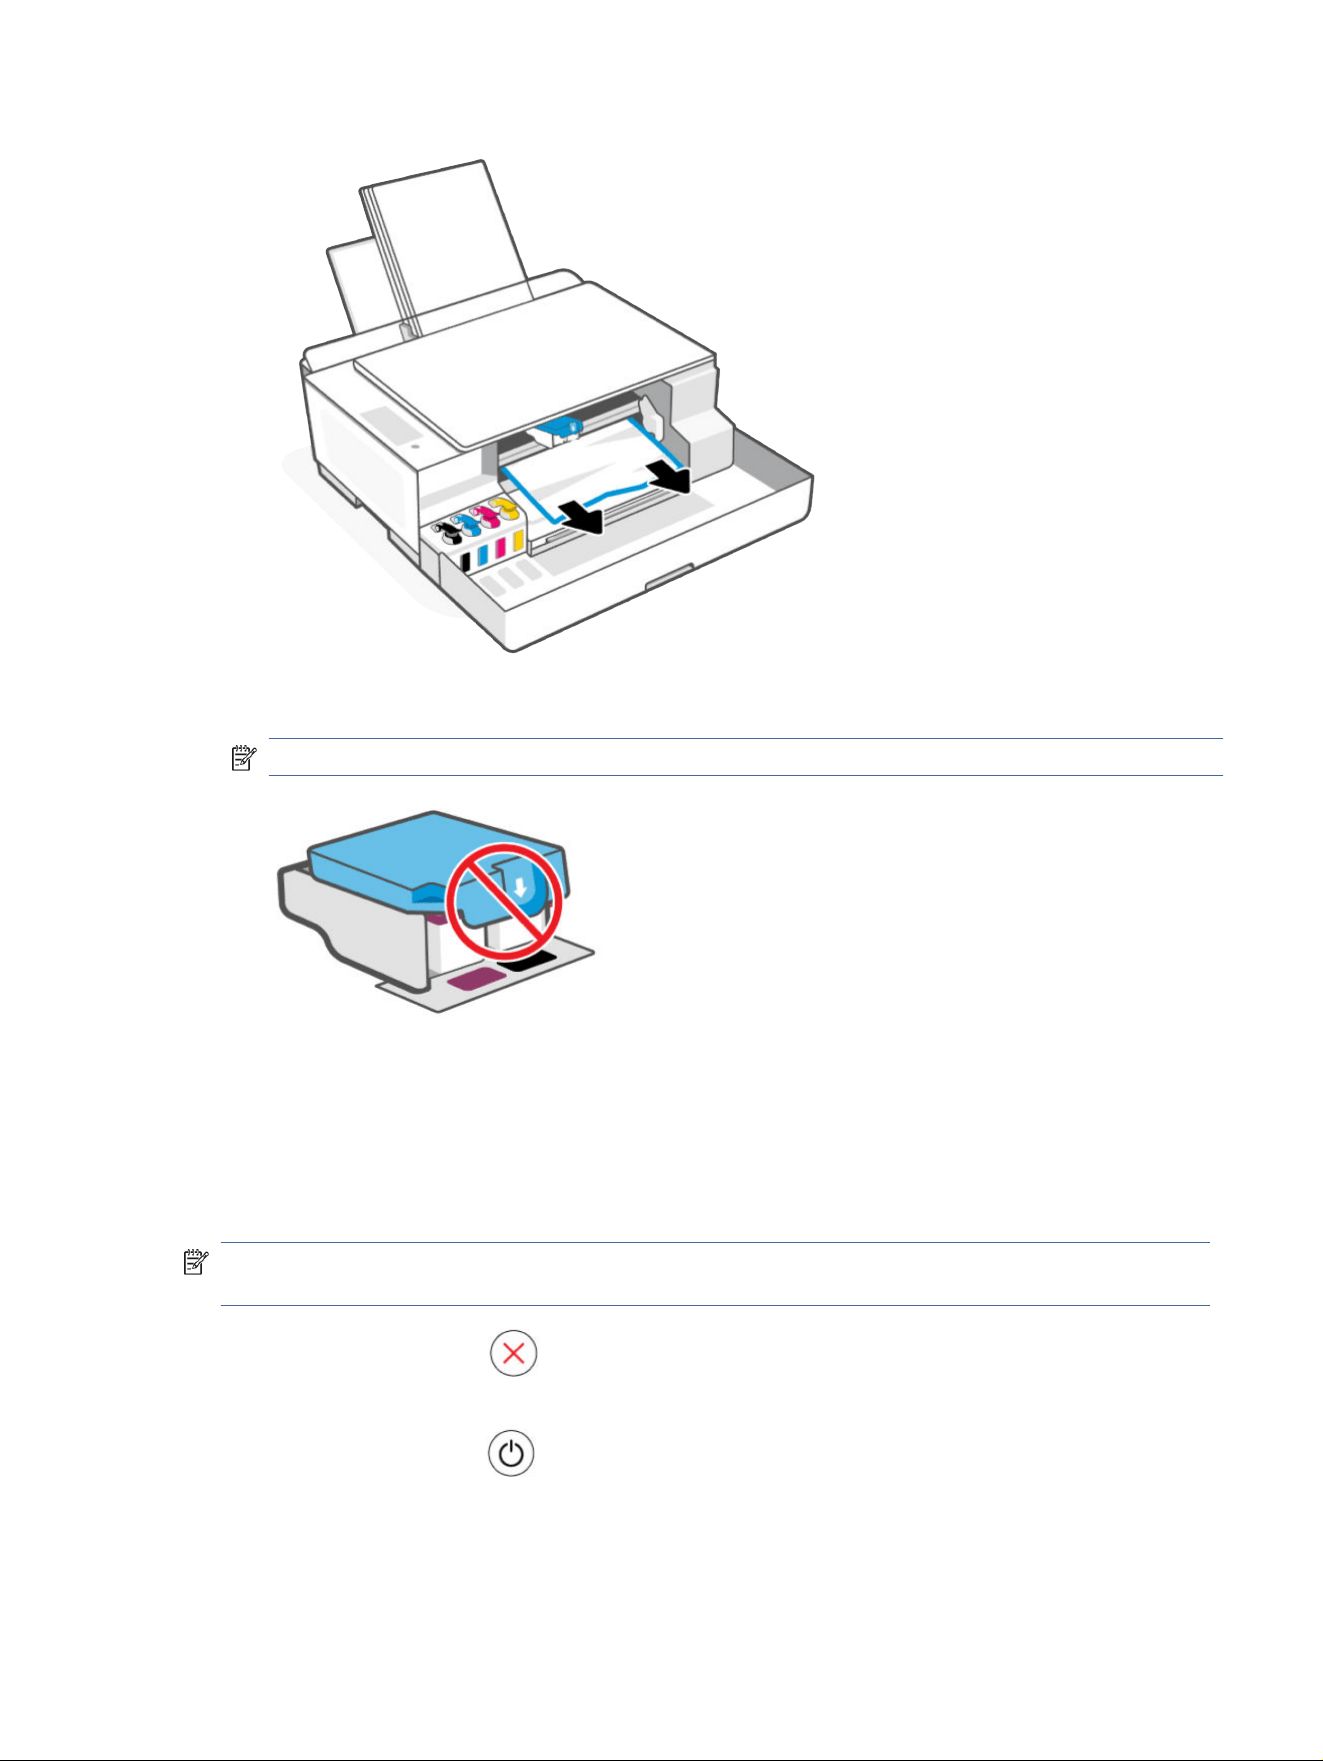
5. Make sure the printhead cover is properly closed.
NOTE: After you have set up the printer, do not open the printhead cover unless instructed.
6. Close the front door.
7. Open the output tray extender.
Bottom of the printer
Open the bottom access door and remove any jammed paper.
NOTE: Follow the instructions in this section after you have tried other ways to clear paper jams. Before
you begin, make sure the ink tank caps are rmly closed to prevent ink leaks.
1. Press the Cancel button to cancel printing. If this does not clear the error, complete the following
steps to clear the jam manually.
2. Press the Power button to turn o the printer, and then unplug the power cord.
Bottom of the printer
59
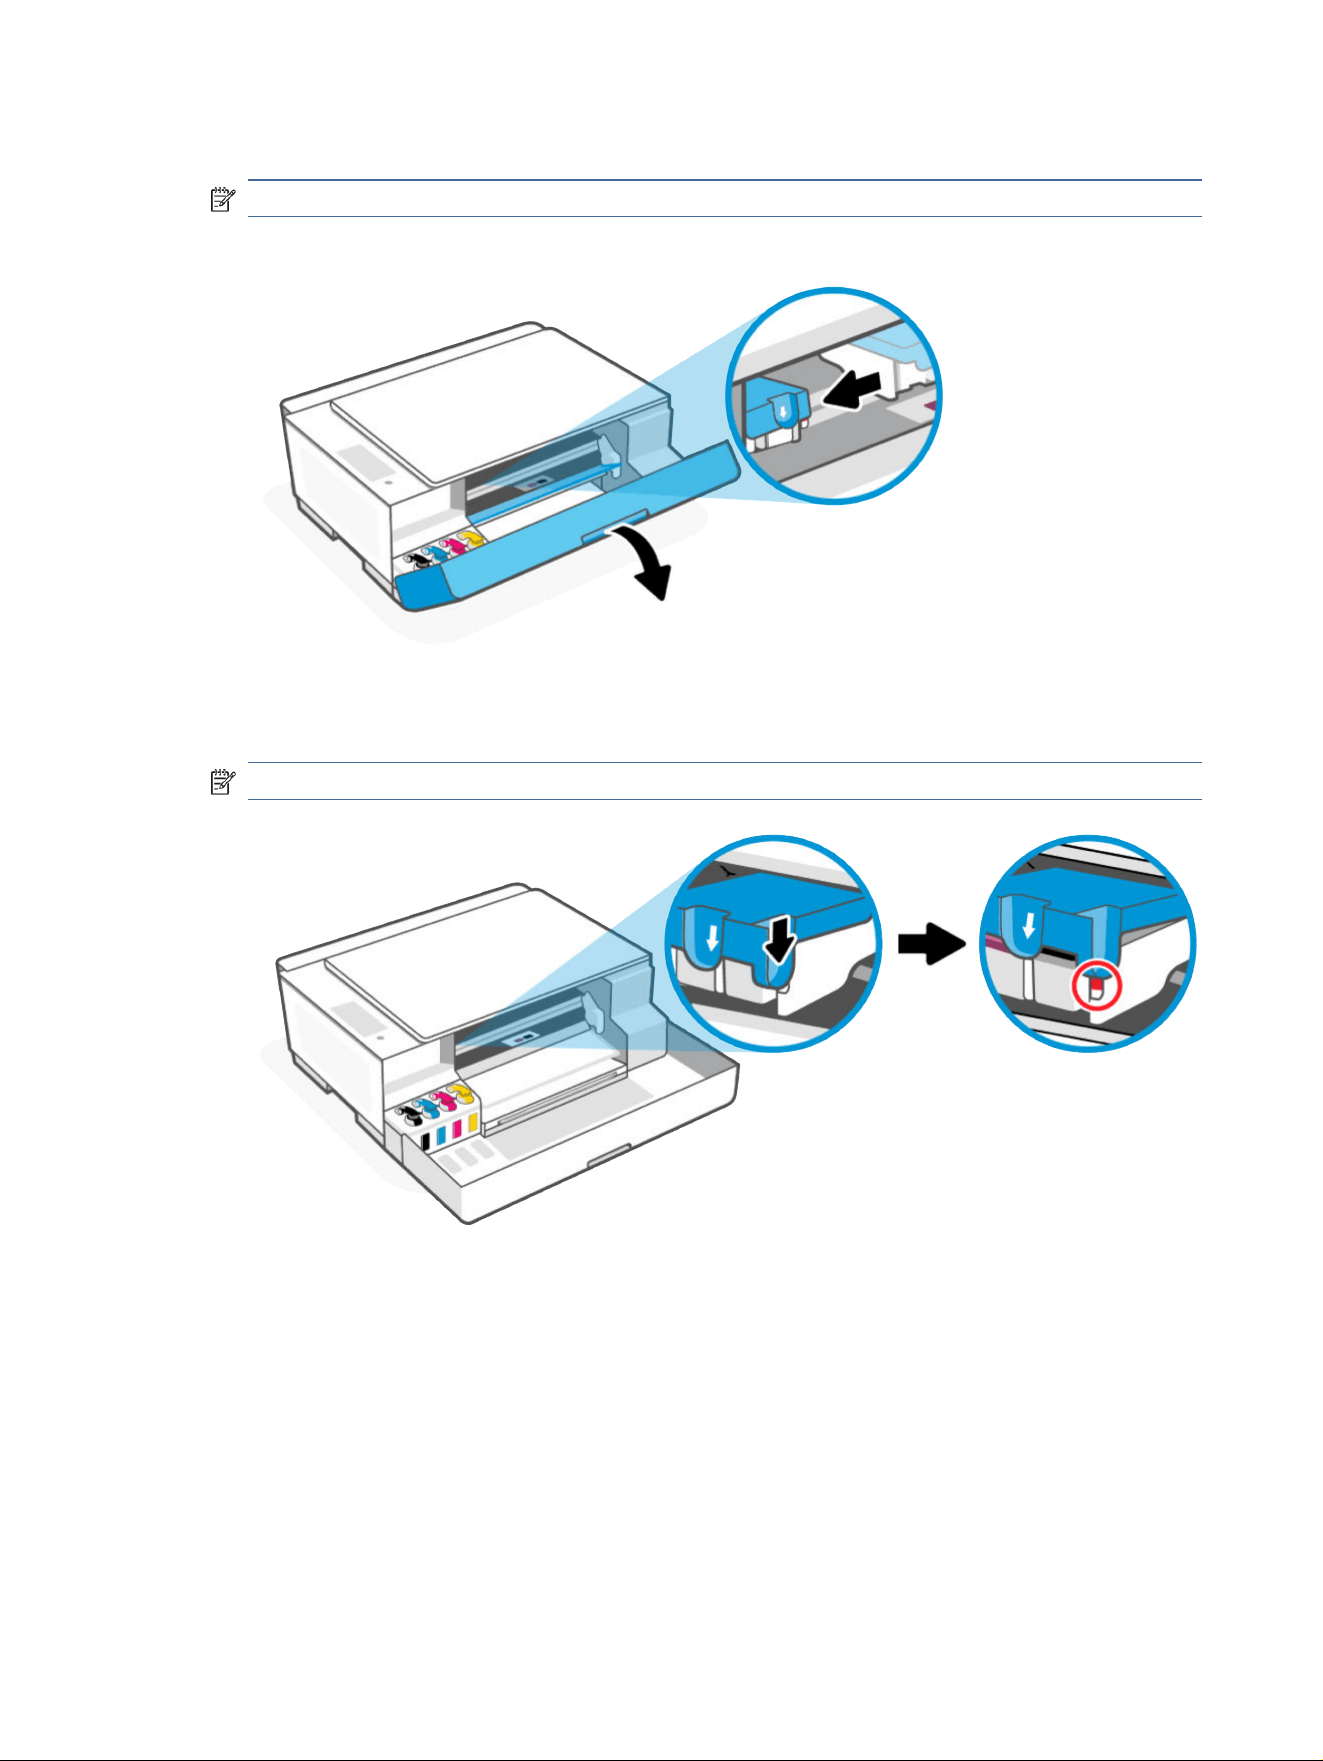
3. Open the front door.
NOTE: Make sure the print carriage is all the way to the left; if not, manually move it to the left.
4. Press down on the side of the printhead cover to release the cover.
NOTE: After you have set up the printer, do not open the printhead cover unless instructed.
60 Chapter 8Solve a problem

5. Close the front door.
6. Turn the printer, and then lift the rear of the printer so that the printer rests on its front.
NOTE: Do not keep the printer in a tilted position for too long to prevent printer damage or ink leaks.
7. Locate two tabs at the bottom of the printer.
Push the two tabs to release, and then open the bottom access door.
Bottom of the printer 61
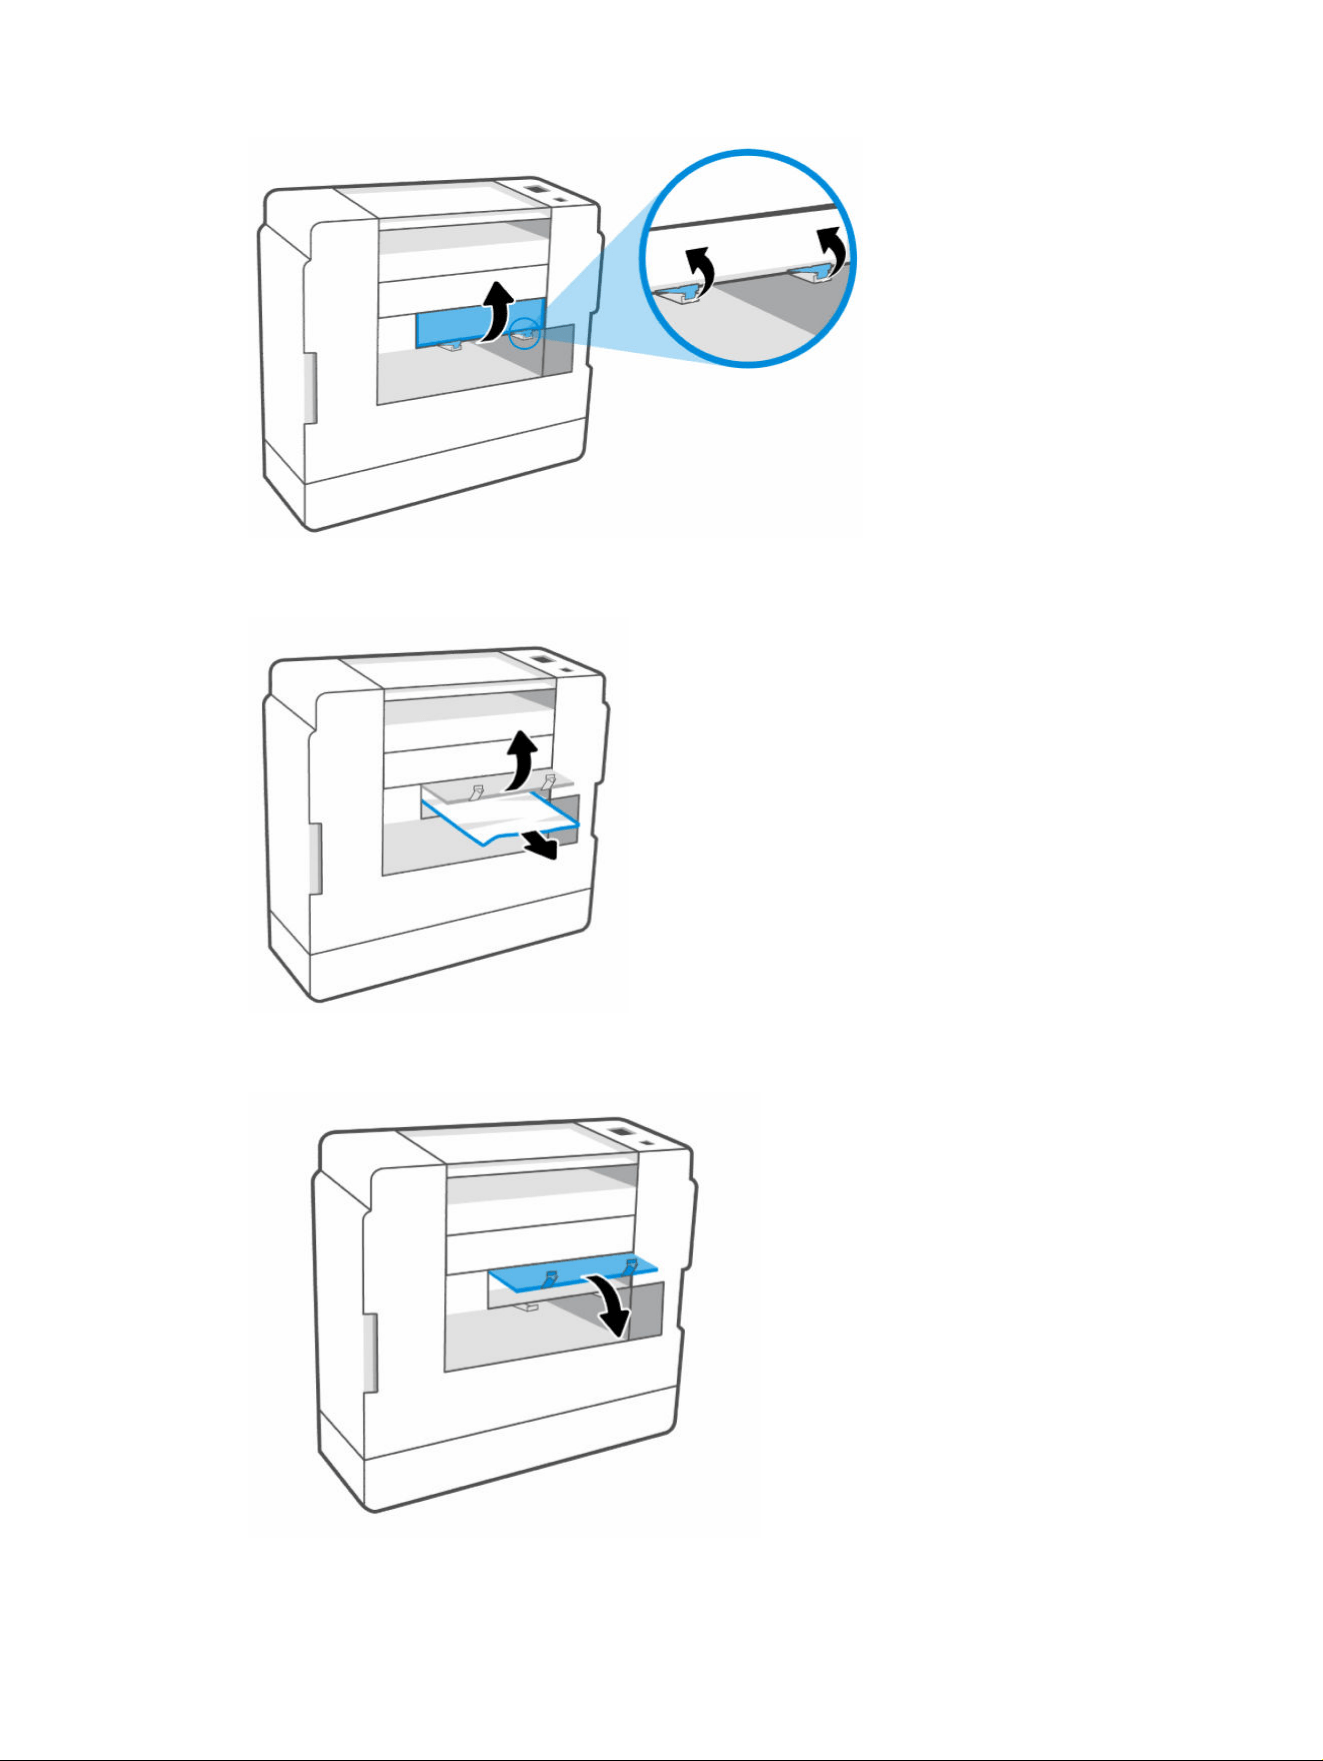
8. Remove any paper found by slowly pulling it away from the printer.
9. Close the bottom access door, making sure the two tabs click into place.
10. Place the printer back in the horizontal position.
62
Chapter 8Solve a problem
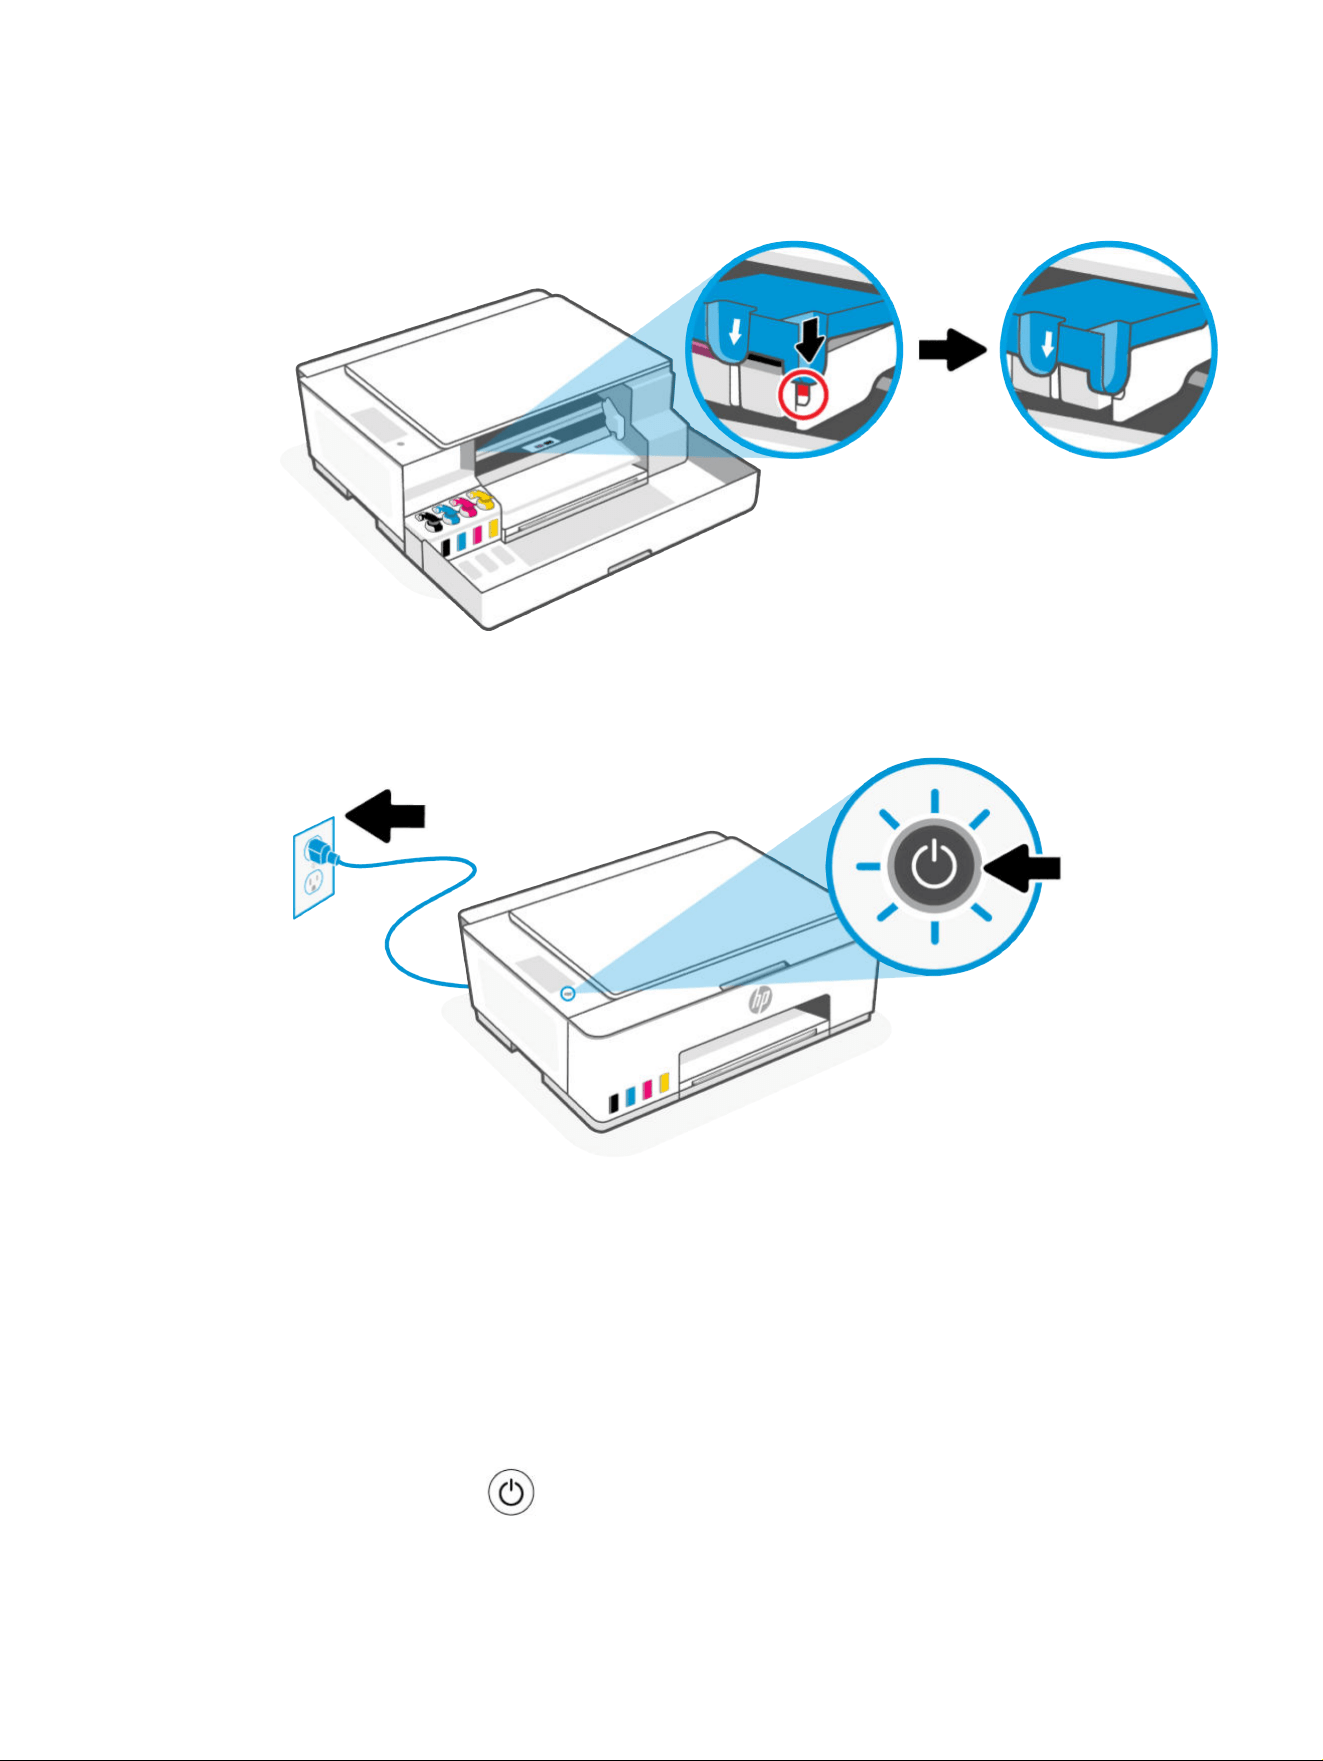
11. Open the front door.
12. Close the printhead cover, and then close the front door.
13. Connect the power cord, and then turn on the printer.
Clean the paper-pick rollers manually
Clean the paper-pick rollers to help prevent paper feed issues, such as no paper pick, paper jams, and print
skew.
1. Gather the following materials:
● A long, lint-free cotton swab
● Distilled, ltered, or bottled water (tap water might damage the printer)
2. Press the Power button to turn o the printer, and then unplug the power cord.
3. Unplug any other cable from the printer.
Clean the paper-pick rollers manually
63
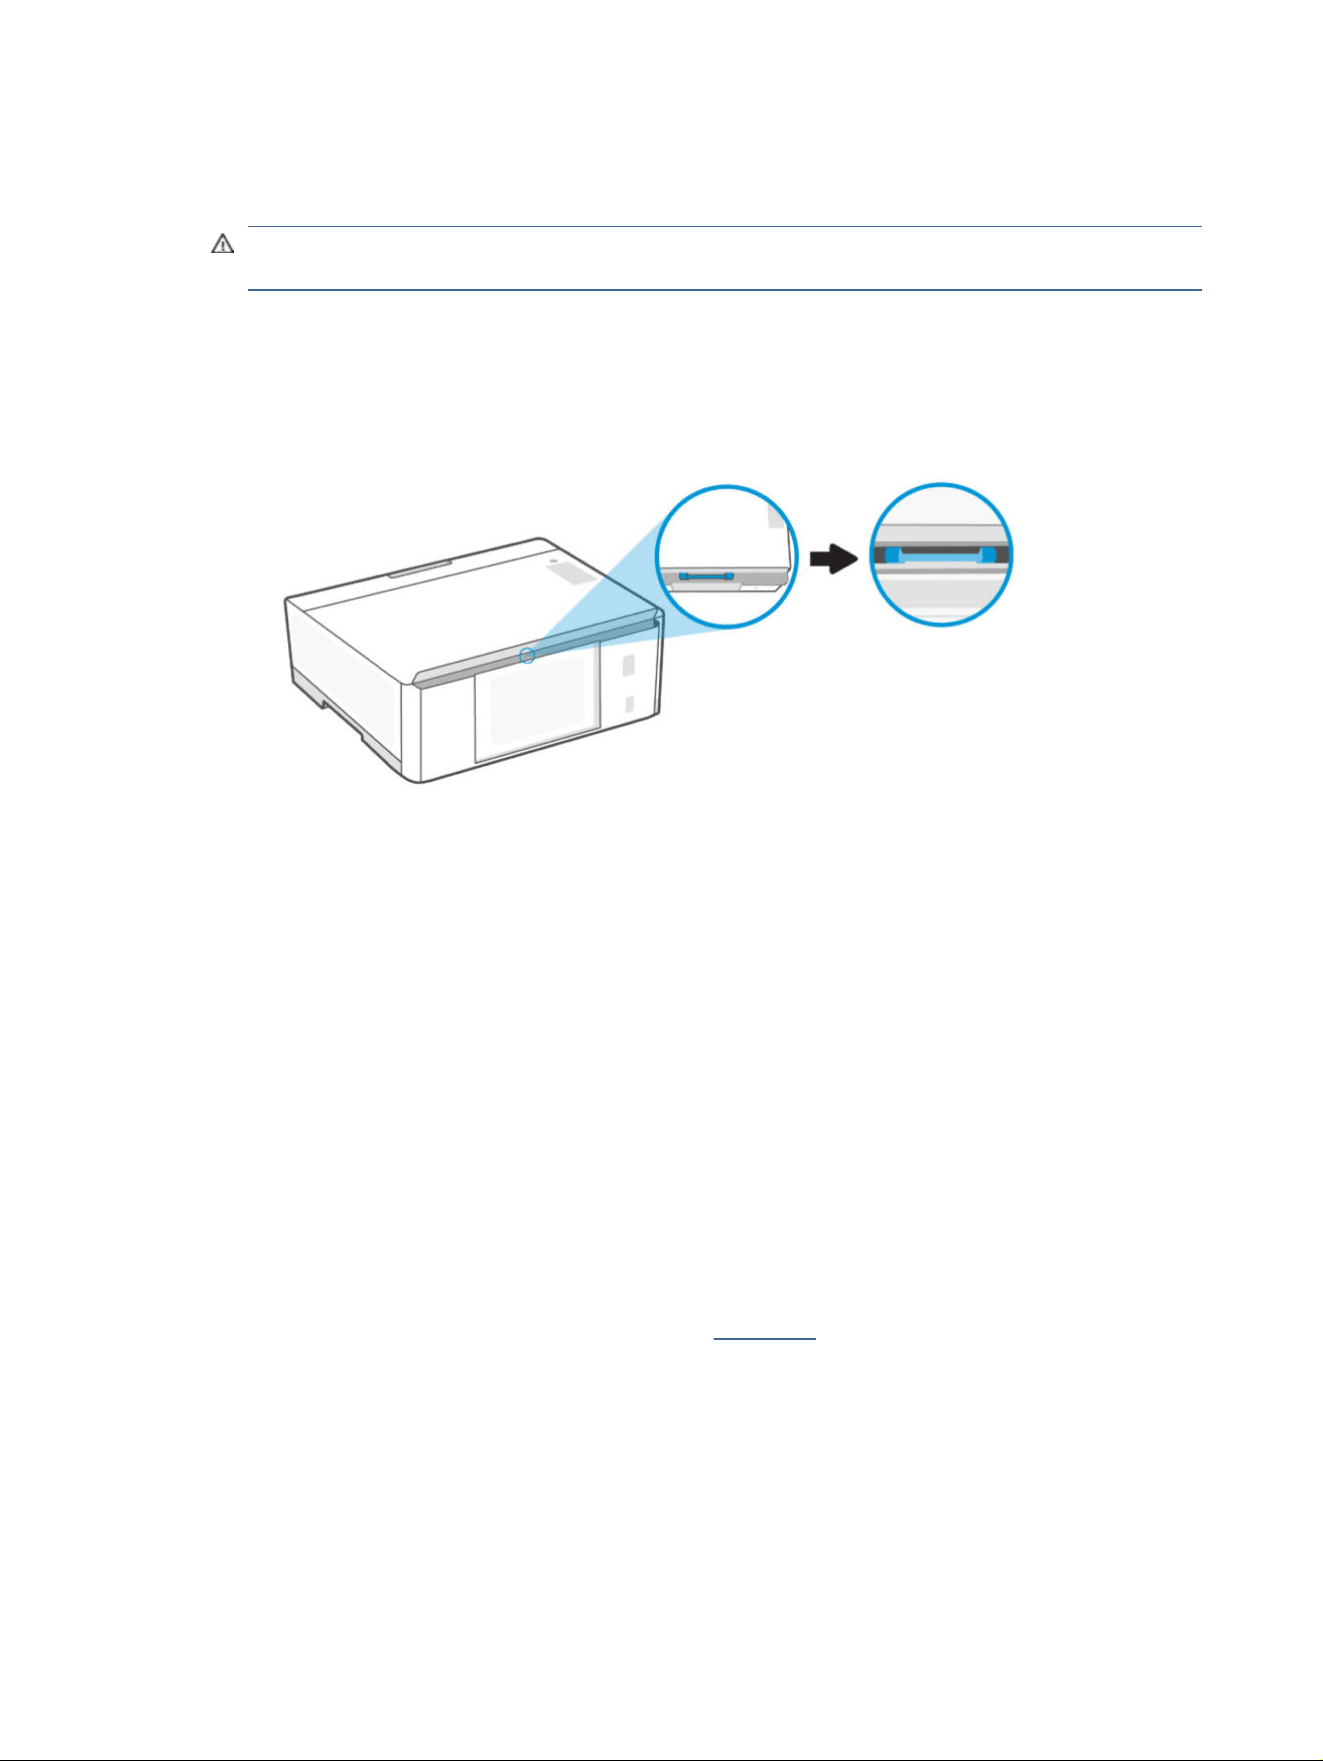
4. If necessary, pull up the input tray, or remove any paper from the input tray.
5. Lift and hold the input tray shield.
CAUTION: Do not remove the input tray shield. It can prevent debris from falling into the paper path
and causing jams or other problems.
6. Look down through the open input tray and nd the gray paper pick rollers. You might need a ashlight
to illuminate the area.
7. Dampen a long cotton swab with bottled or distilled water, and then squeeze any excess water from the
cloth.
8. Press the swab against the rollers, and then rotate them upwards to clean the rollers. Apply a moderate
amount of pressure to remove dust or dirt buildup.
9. Allow the rollers to dry for 10 or 15 minutes.
10. Plug in the power cord and any other cable to the rear of the printer.
11. Turn on the printer.
Solve paper-feed problems
Adjust the paper-width guide in the input tray to t snugly against all paper. Make sure the paper-width guide
does not bend the paper in the input tray.
● Paper-pick problems
– Make sure paper is loaded in the input tray. See Load paper.
– Make sure paper in the input tray is not curled. Uncurl paper by bending it in the opposite direction of
the curl.
– Prevent curled or wrinkled paper by storing all unused paper at in a resealable bag.
– After printing is nished, remove unused photo paper from the input tray. Store the photo paper so it
does not start to curl, which could reduce the quality of your printout.
64
Chapter 8Solve a problem

– Clean the paper rollers.
● Pages are skewing
– Load paper into the printer only when it is not printing.
– Make sure the cover at the bottom of the printer is properly closed after clearing paper jams.
● Multiple pages are being picked up
– Make sure the input tray is not overloaded with paper.
– Make sure the pieces of the loaded paper are not sticking together.
– Use HP paper for optimum performance and eiciency.
– Clean the paper rollers.
Learn how to avoid jams and paper-feed issues
Follow these tips to help prevent paper jams, misfeeds, and no feeds.
● Ensure that paper loaded in the input tray lays at, and the edges are not bent or torn.
● When adding paper to the input tray, adjust the paper guide to rest against the edge of the paper stack.
● Do not overll the input tray, but make sure that you have at least 5 pages loaded, for best results.
● Only use paper that is compatible with your printer. Do not use paper that is too thick or too thin.
Use HP paper for optimum performance.
● Whenever you change the paper size or type in the tray, be sure to change the paper setting on the print
menu of the software application you are printing from.
● Do not combine dierent paper types and paper sizes in the input tray; the entire stack of paper in the
input tray must be the same size and type.
● Avoid using the printer in dusty or dirty environments.
Do not remove the input tray shield. It can prevent debris from falling into the paper path and causing
jams or other problems.
If needed, remove paper and close the input tray when not in use.
● Remove printed papers from the output tray frequently.
● Do not force paper too far down in the input tray.
● Do not add paper while the printer is printing. Wait for the printer to prompt before loading paper.
Printhead issues
Troubleshoot printhead issues, such as missing printheads or printheads cannot be detected.
1. Verify that the indicated printhead is correctly installed.
2. Clean the printhead contacts.
Learn how to avoid jams and paper-feed issues
65
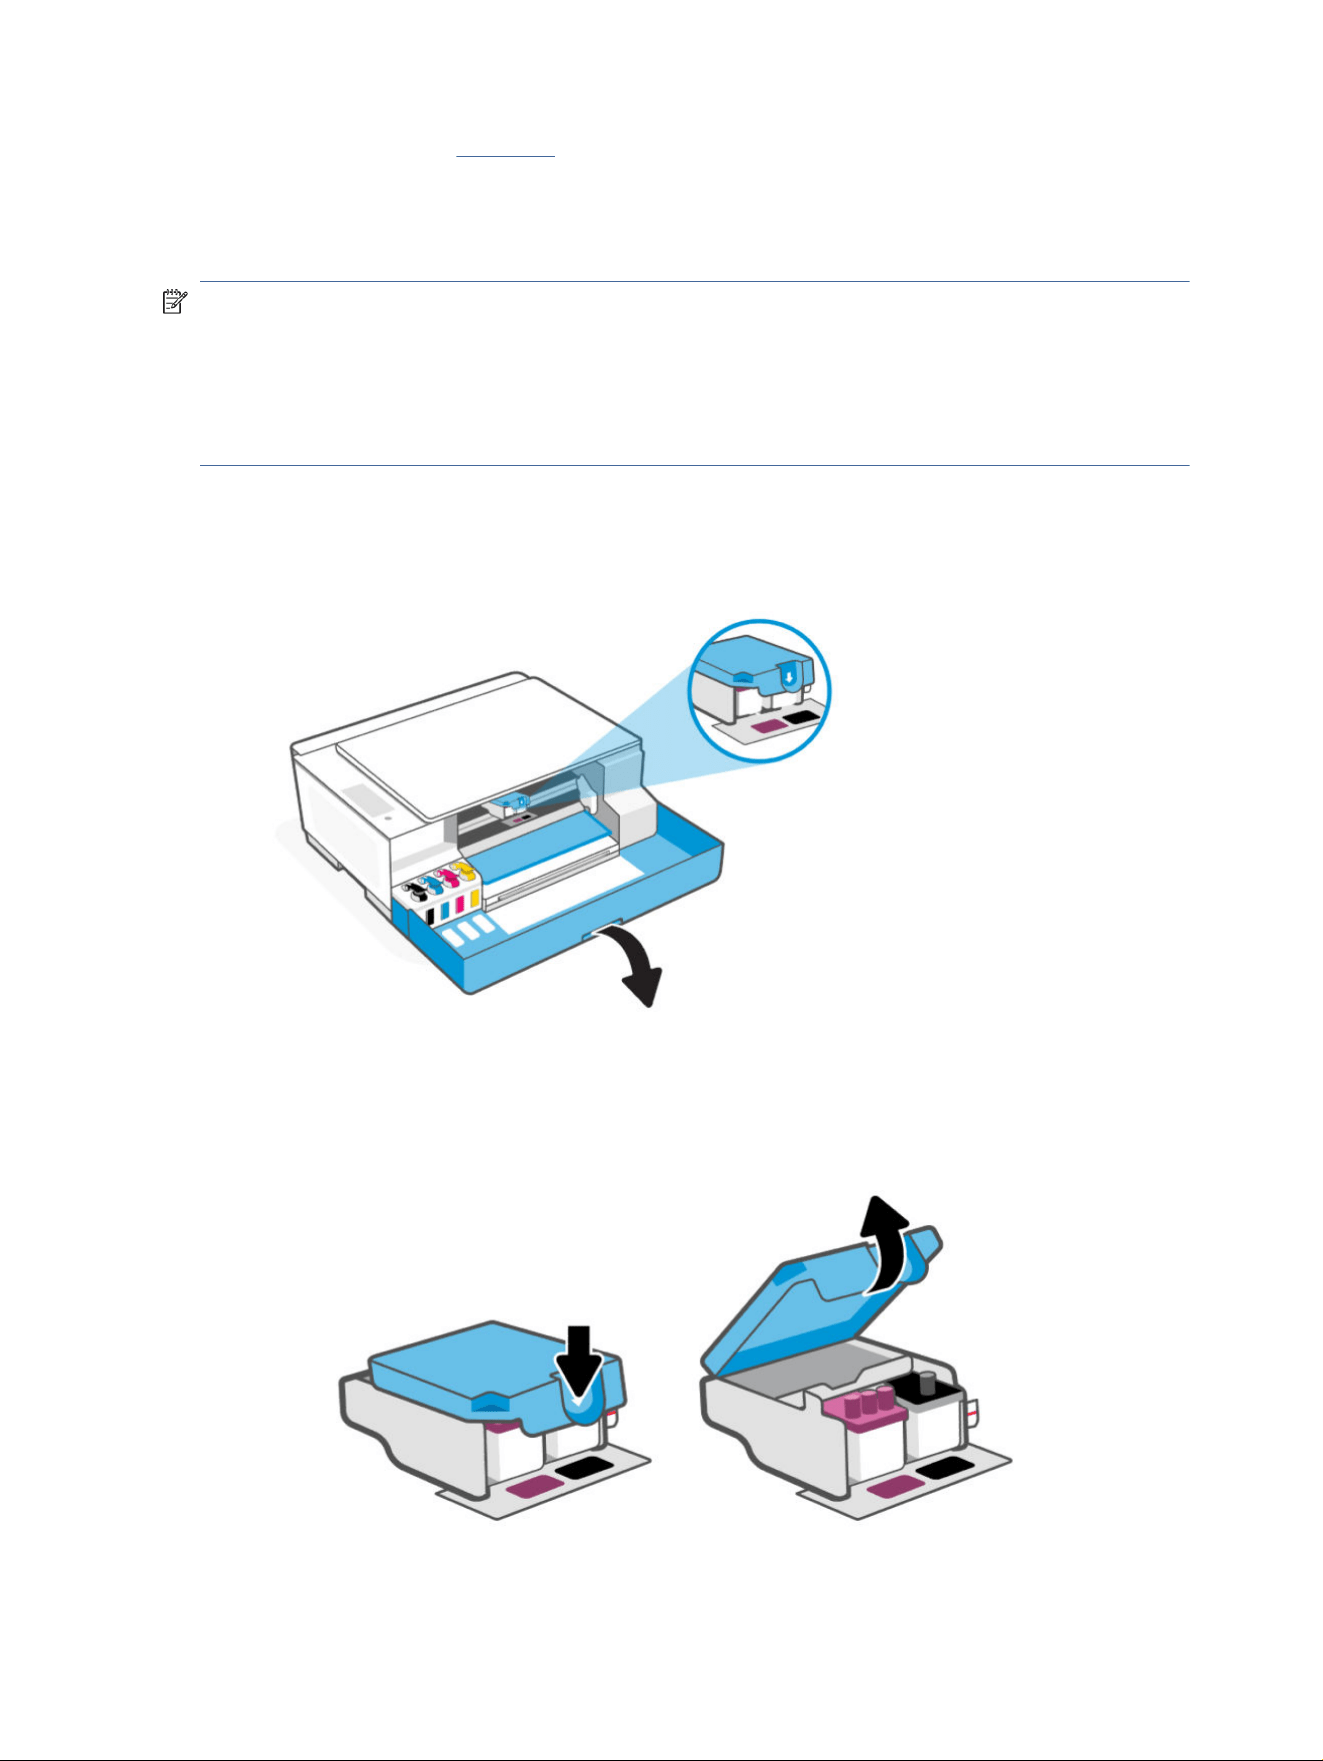
3. If the problem persists, contact HP.
Verify that the printheads are installed properly
Take note of the following before you begin.
NOTE:
● The instructions here are only applicable in this section. After you have set up the printer, do not open
the printhead cover unless instructed.
●
Handle printheads with care. Do not drop the printheads, and do not touch the electric contacts or print
nozzles on any surface.
1. Make sure the printer is turned on.
2. Open the front door. Wait for the print carriage to move to the center and stop.
3. Remove and reinsert the printhead.
a. Press and release the blue latch to open the printhead cover.
66 Chapter 8Solve a problem
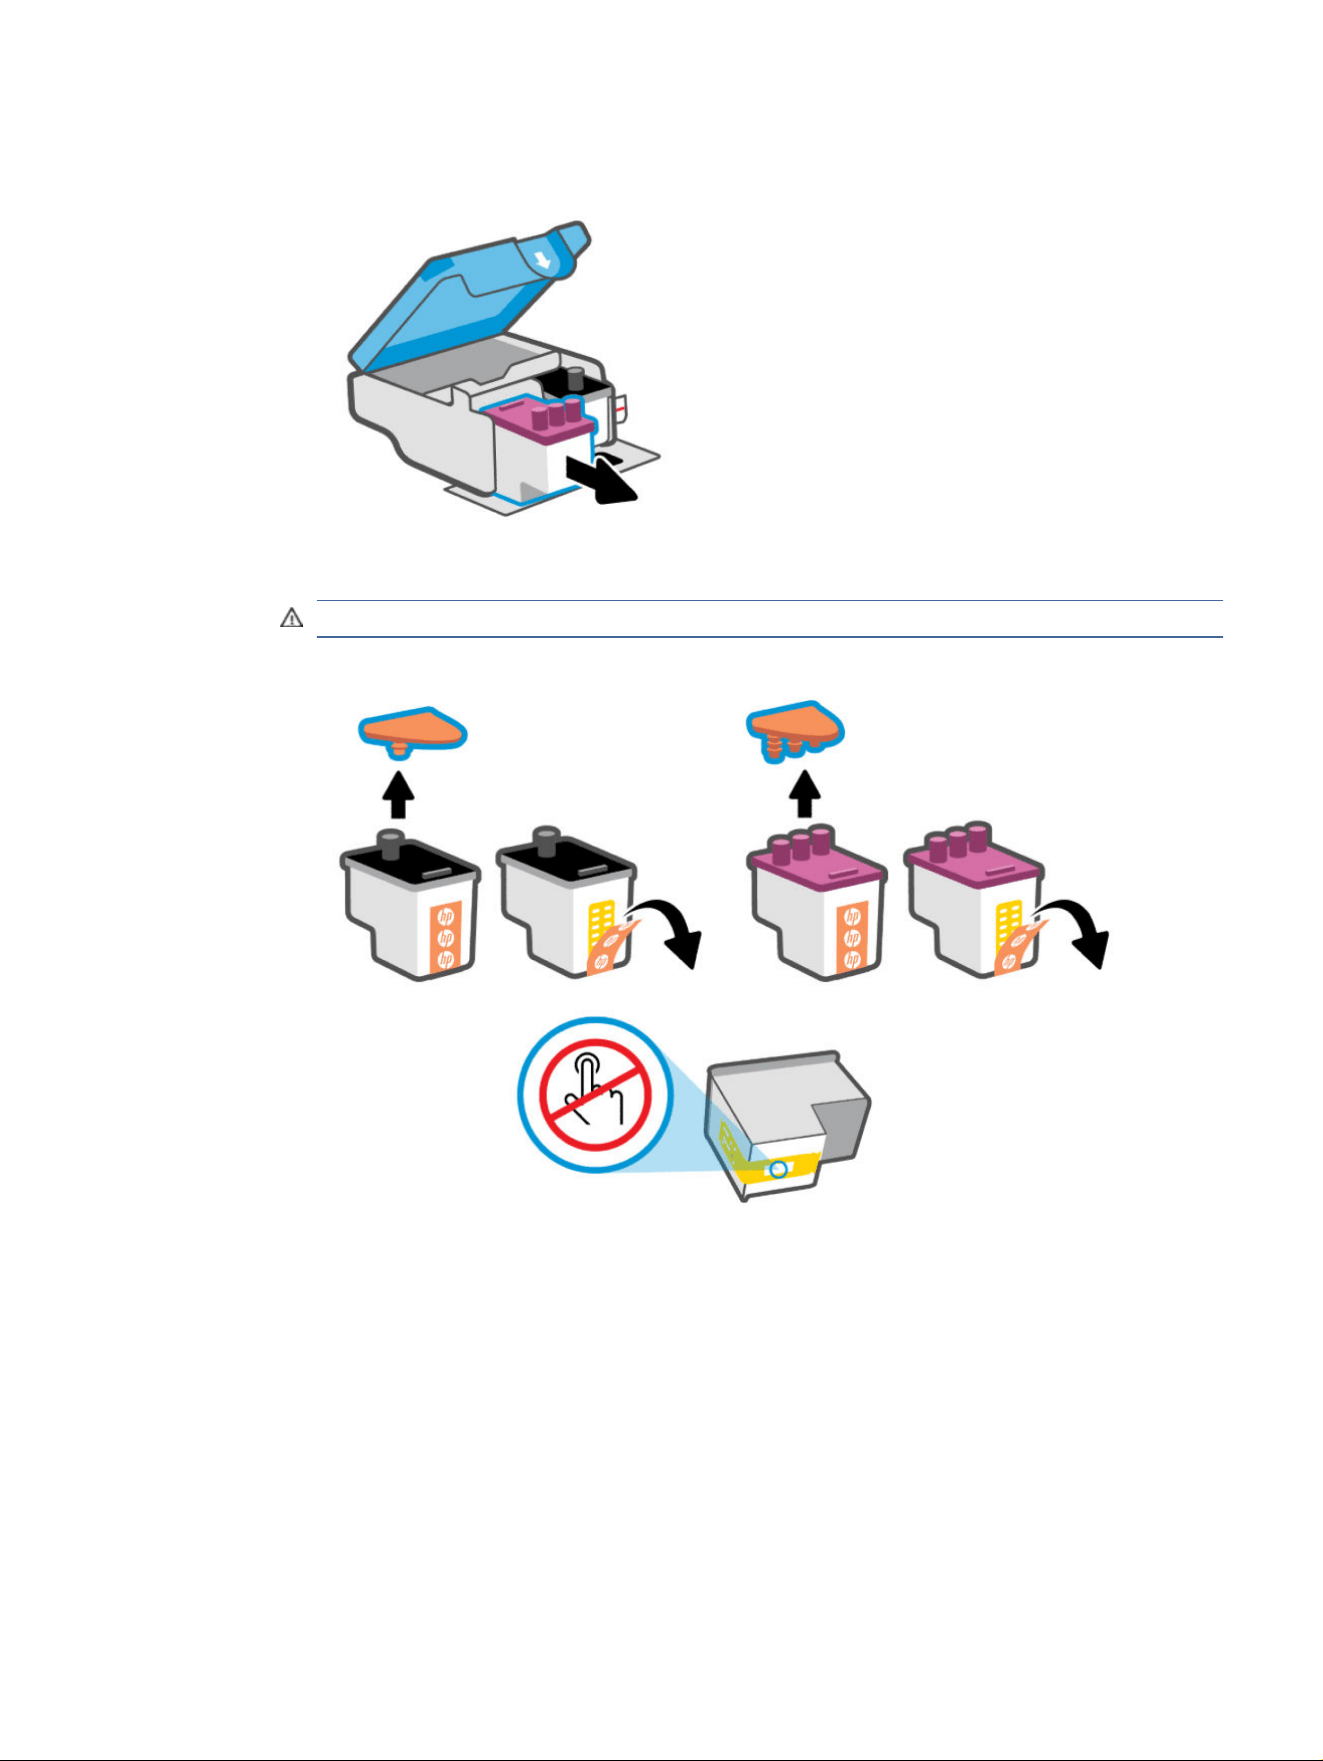
b. Remove the printhead from the carriage.
c. If you nd any orange cap or tape on the printhead, remove it.
CAUTION: Do not touch the electric contacts or print nozzles.
Verify that the printheads are installed properly 67

d. Insert the printhead into the slot until it clicks into place.
e. Close the printhead cover.
Make sure it is properly closed to avoid problems such as carriage jams.
4. Close the front door.
Clean printhead contacts
Take note of the following before you begin.
NOTE:
● Open the printhead cover and clean printhead contacts only when necessary; for example, if a printhead
cannot be detected.
The instructions here are only applicable in this section. After you have set up the printer, do not open
the printhead cover unless instructed.
68
Chapter 8Solve a problem
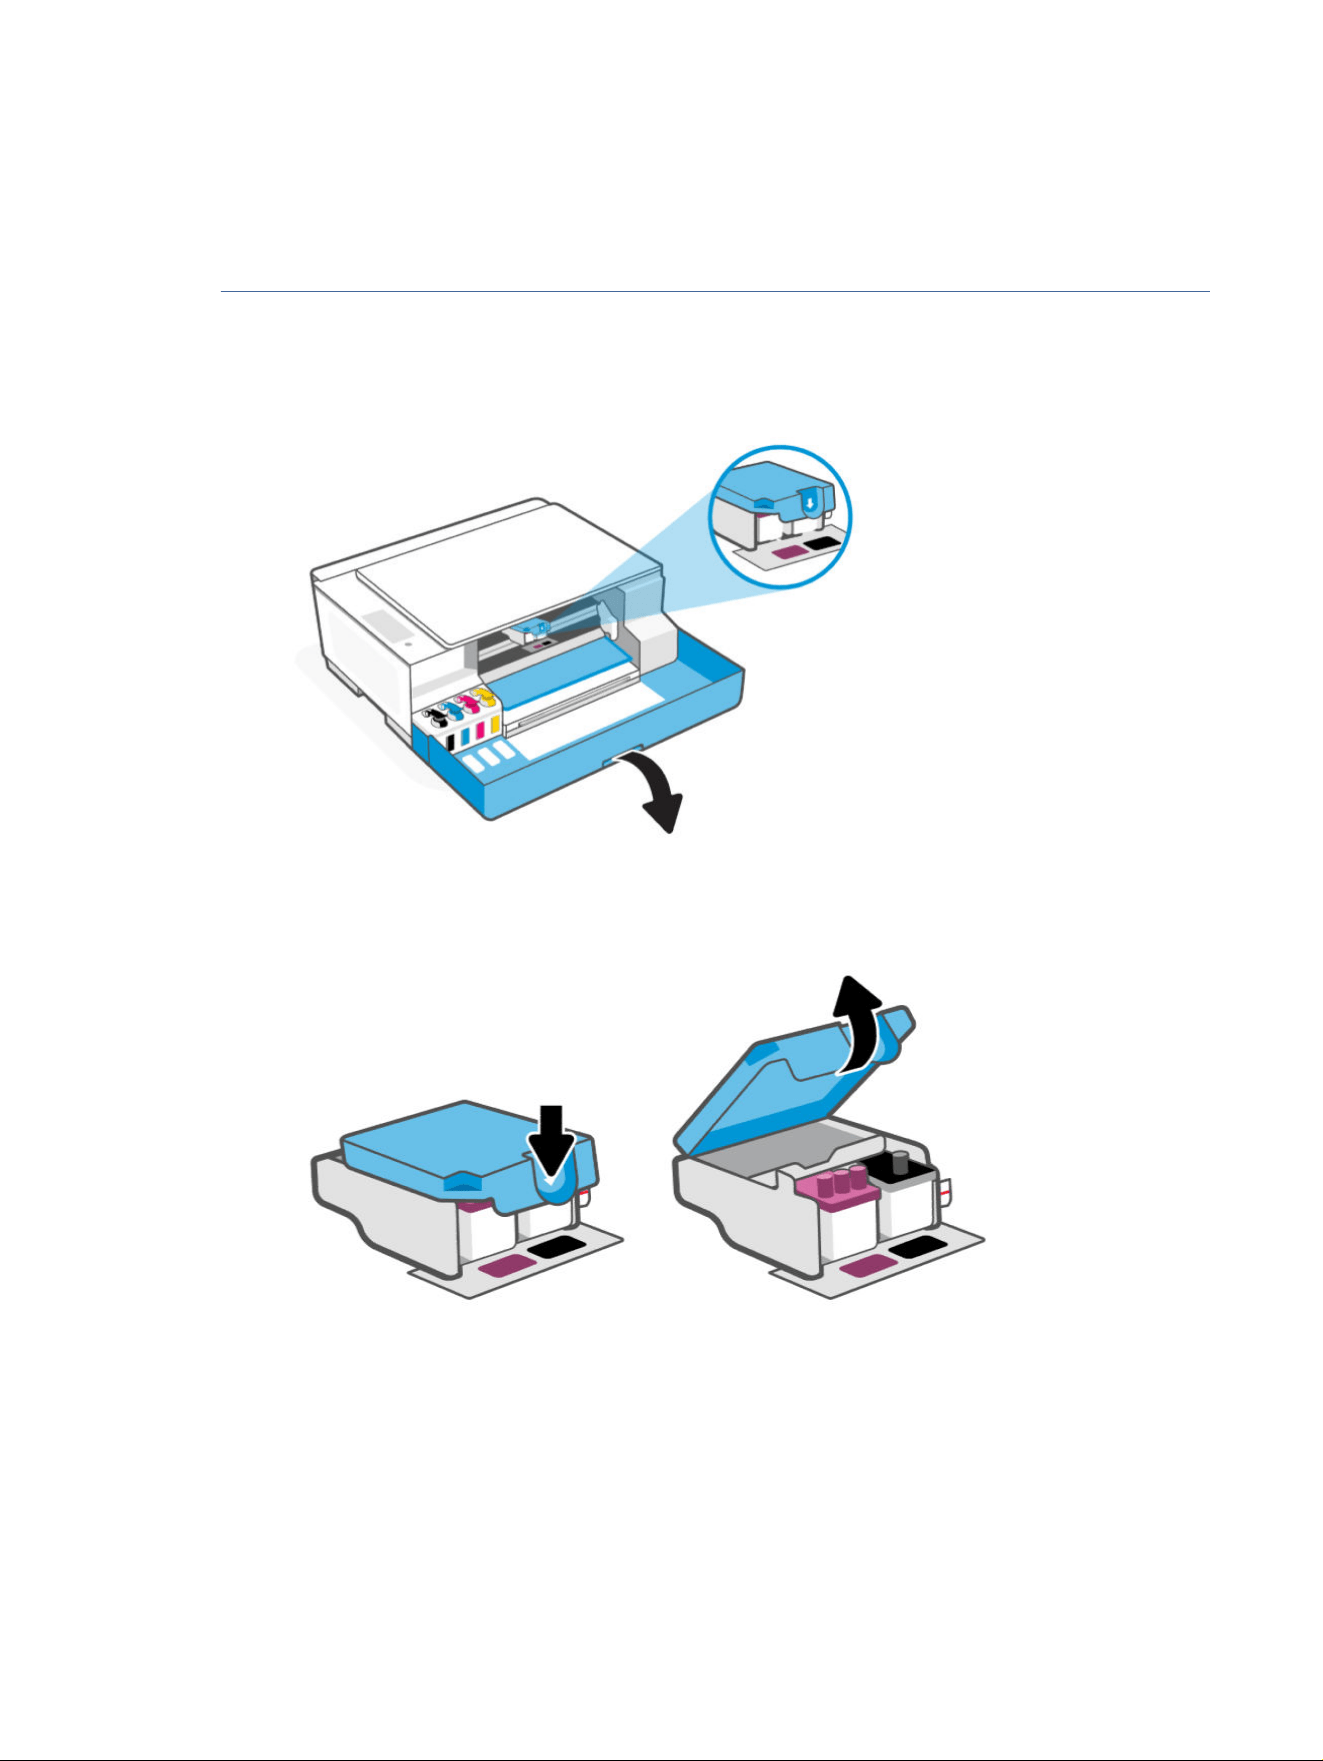
● The cleaning procedure should take only a few minutes. Make sure that the printheads are reinstalled
in the printer as soon as possible. It is not recommended to leave the printheads outside of the printer
longer than 30 minutes. This could result in damage to the printheads.
● Handle printheads with care. Do not drop the printheads, and do not touch the electric contacts or print
nozzles on any surface.
1. Make sure the printer is turned on.
2. Open the front door. Make sure the print carriage is in the center; if not, manually move it to the center.
3. Press and release the blue latch to open the printhead cover.
Clean printhead contacts 69
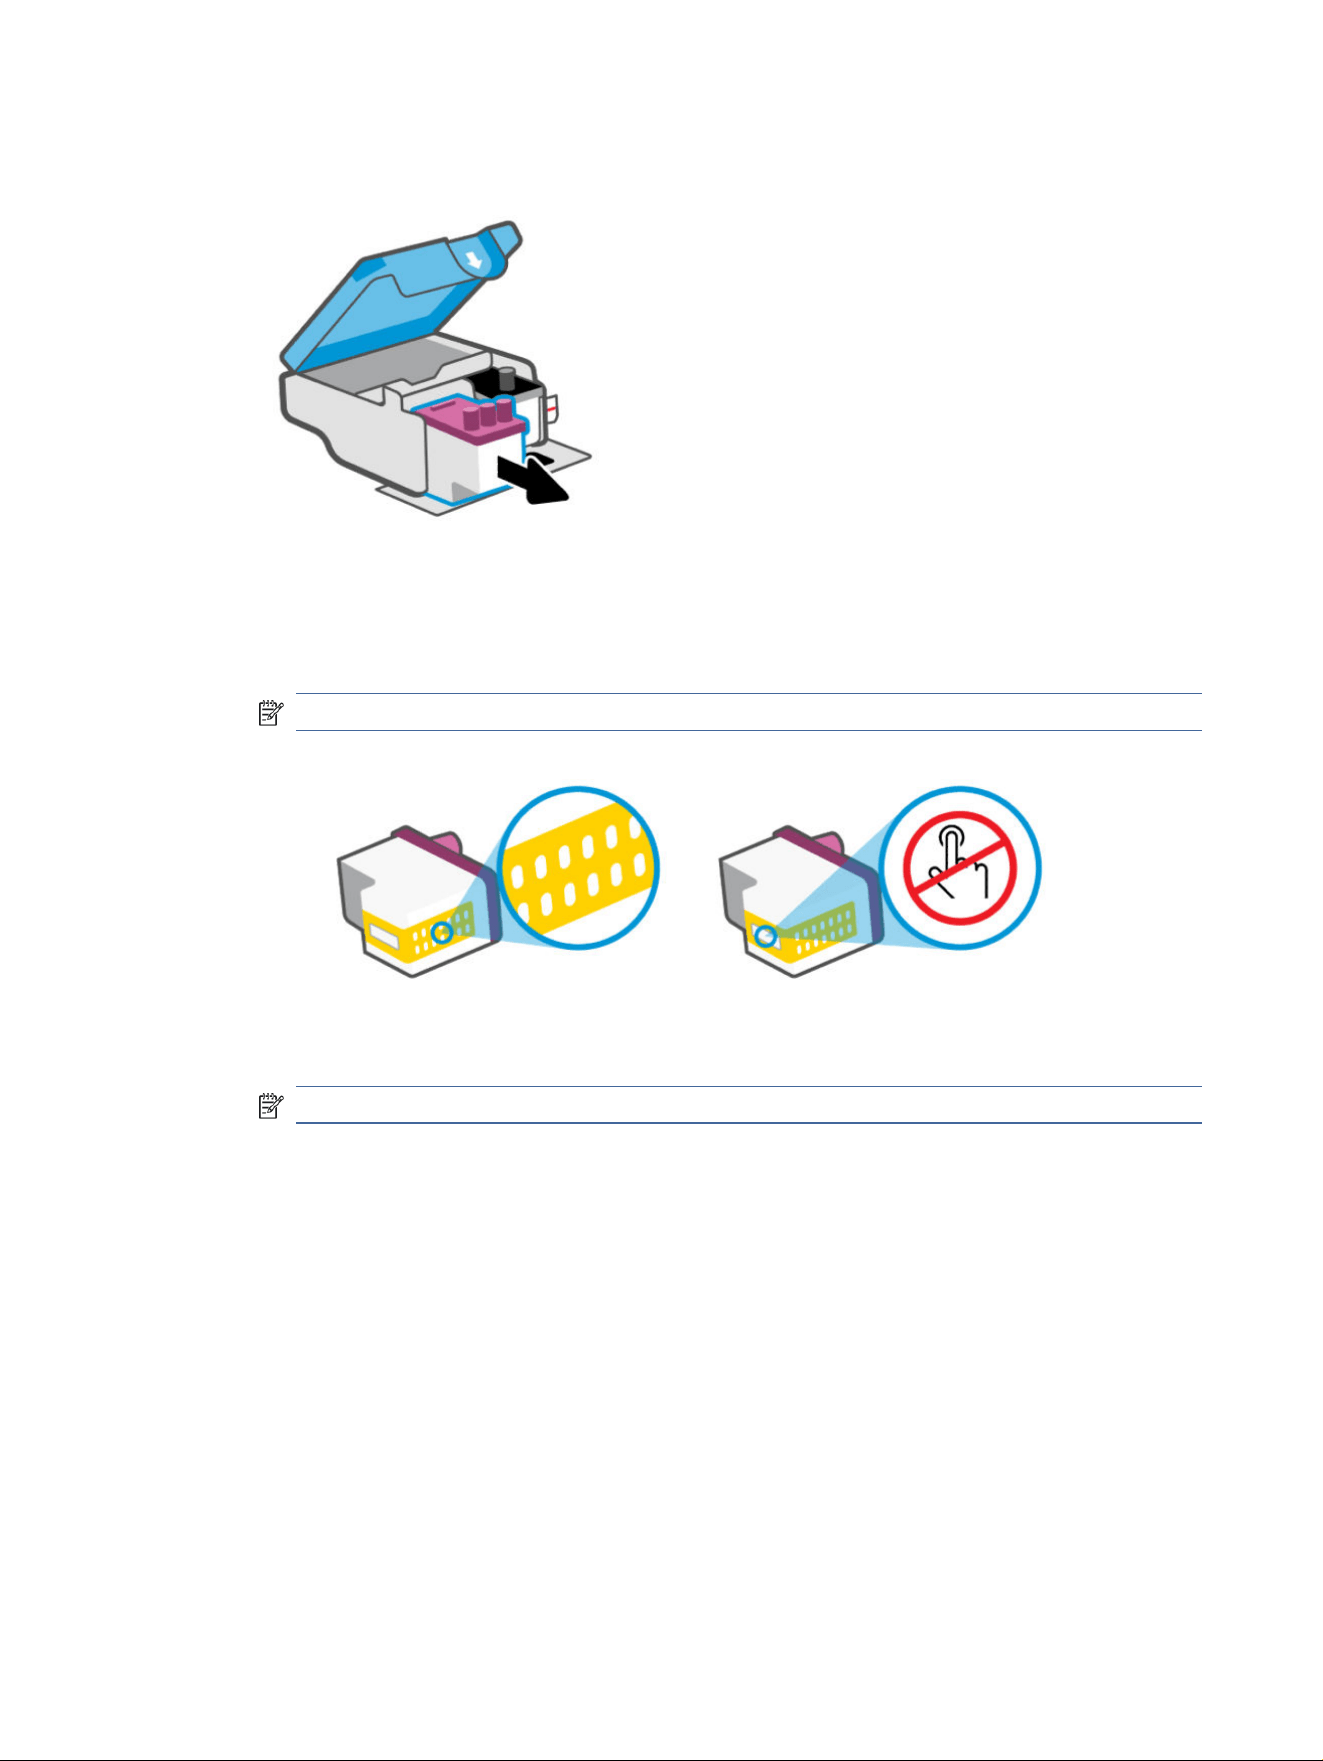
4. Remove the printhead indicated in the error message.
5. Clean the printhead contacts and printer contacts.
a. Hold the printhead by its sides and locate the electrical contacts on the printhead.
The electrical contacts are the small gold-colored dots on the printhead.
NOTE: Do not touch the electric contacts or print nozzles.
b. Wipe only the contacts with a dry swab or lint-free cloth.
NOTE: Be careful to wipe only the contacts, do not smear any ink or other debris on the contacts.
c. On the inside of the printer, locate the contacts for the printhead.
The printer contacts are the set of gold-colored bumps positioned to meet the contacts on the
printhead.
70 Chapter 8Solve a problem
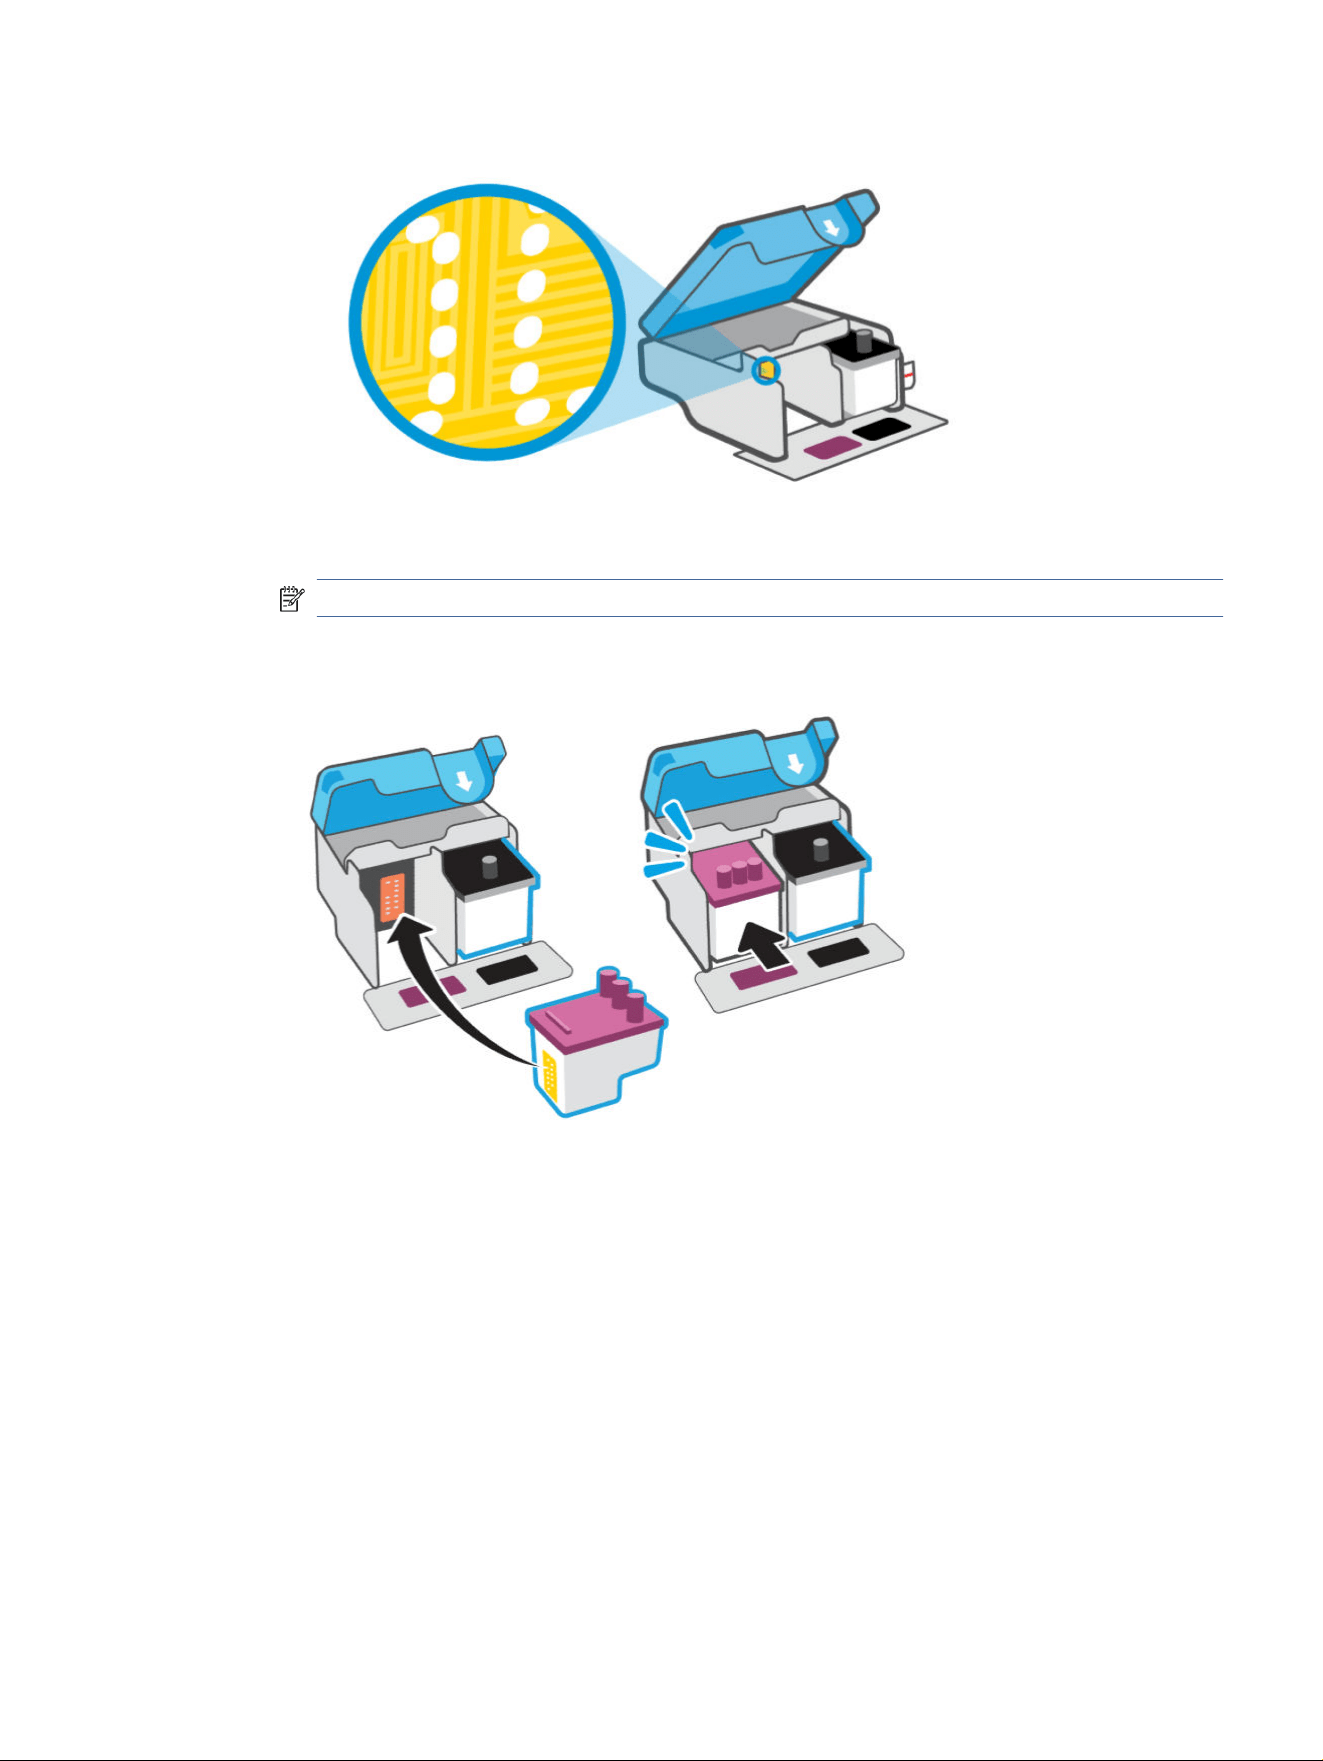
d. Use a dry swab or lint-free cloth to wipe the contacts.
NOTE: Be careful to wipe only the contacts, do not smear any ink or other debris on the contacts.
6. Insert the printhead into the slot until it clicks into place.
7. Close the printhead cover.
Make sure it is properly closed to avoid problems such as carriage jams.
Clean printhead contacts 71

8. Close the front door.
9. If the error message persists, turn the printer o, and then on.
Printing issues
Troubleshoot printing issues.
● Use the HP Print and Scan Doctor to help diagnose and x issues automatically.
NOTE: This tool is for the Windows operating system, and is only available in some languages.
● To avoid print quality problems, always turn the printer o using the Power button, and wait until the
Power button light goes out before you pull the plug or turn o a power strip. This allows the printer to
move the printheads to a capped position, where they are protected from drying out.
To improve print quality, see Fix print quality issues.
Resolve print issues (Windows)
Make sure that the printer is turned on and that there is paper in the input tray. If you are still unable to print,
try the following in order:
1. Check for error messages from the printer software and resolve them by following the on-screen
instructions.
2. If a USB cable is connected, disconnect and reconnect the USB cable.
If your computer is connected to the printer with a wireless connection, conrm that the connection is
working.
3. Verify that the printer is not paused or oine.
a. Depending on your operating system, do one of the following:
● Windows 10: From the Windows Start menu, select Windows System from the app list, select
Control Panel, and then click View devices and printers under Hardware and Sound.
● Windows 7: From the Windows Start menu, click Devices and Printers.
b. Either double-click or right-click the icon for your printer and select See what's printing to open the
print queue.
72
Chapter 8Solve a problem

c. On the Printer menu, make sure there are no check marks next to Pause Printing or Use Printer
Oine.
d. If you made any changes, try to print again.
4. Verify that the printer is set as the default printer.
a. Depending on your operating system, do one of the following:
● Windows 10: From the Windows Start menu, select Windows System from the app list, select
Control Panel, and then click View devices and printers under Hardware and Sound.
● Windows 7: From the Windows Start menu, click Devices and Printers.
b. Make sure the correct printer is set as the default printer.
The default printer has a check mark in a black or green circle next to it.
c. If the wrong printer is set as the default printer, right-click the correct printer and select Set as
Default Printer.
d. Try using your printer again.
5. Restart the print spooler.
a. Depending on your operating system, do one of the following:
● Windows 10: From the Windows Start menu, click Windows System, and then click Control
Panel.
● Windows 7: From the Windows Start menu, click Control Panel.
b. Click System and Security, and then click Administrative Tools.
c. Double-click Services.
d. Right-click the Print Spooler, and then click Properties.
e. On the General tab, make sure Automatic is selected from the Startup type drop-down list.
f. Under Service status, check the status.
● If the service is not running, click Start.
● If the service is running, click Stop, and then click Start to restart the service.
Then click OK.
6. Restart the computer.
7. Clear the print queue.
a. Depending on your operating system, do one of the following:
● Windows 10: From the Windows Start menu, click Windows System, and then click Control
Panel. Under Hardware and Sound, click View devices and printers.
● Windows 7: From the Windows Start menu, click Devices and Printers.
b. Right-click the printer, and then select the option to see what is printing.
Resolve print issues (Windows)
73

c. On the Printer menu, click Cancel all documents or Purge Print Document, and then click Yes to
conrm.
d. If there are still documents in the queue, restart the computer and try printing again after the
computer has restarted.
e. Check the print queue again to make sure it is clear, and then try to print again.
Resolve print issues (macOS) (Wi-Fi models)
1. Check for error messages and resolve.
2. Disconnect and reconnect the USB cable.
3. Verify that the product is not paused or oine.
a. In System Preferences, click Printers & Scanners.
b. Click the Open Print Queue button.
c. Click a print job to select it.
Use the following buttons to manage the print job:
● Delete: Cancel the selected print job.
● Hold: Pause the selected print job.
● Resume: Continue a paused print job.
● Pause Printer: Pause all print jobs in the print queue.
d. If you made any changes, try to print again.
4. Restart the computer.
Fix print quality issues
You can use the HP Smart app to improve the print quality. For information about this app, see Use the HP
Smart app to print, scan, and manage.
You can also print a diagnostics page to determine if cleaning or aligning the printheads is recommended to
improve print quality. See Print reports from the printer control panel.
Print a print quality diagnostics page (Windows)
1. Load Letter or A4 unused plain white paper into the input tray.
2. In the HP printer software (available from the Start menu), click Print & Scan at the top of the window.
3. In the Print section, click Maintain Your Printer to access the Toolbox.
4. In the Toolbox, click the Device Services tab, and then click the option to print the page.
74
Chapter 8Solve a problem

Understand the print quality diagnostics page
1. Review the black, cyan, magenta, and yellow boxes along with the other content on the diagnostics
page.
2. If the diagnostic page shows steaks or missing portions of the color and black boxes, then automatically
clean the printheads.
See Align and clean printheads.
3. If straight lines appear jagged on printouts, or the diagnostic page indicates to align the printheads, then
automatically align the printheads.
4. If print quality problems persist after cleaning and aligning printheads, contact HP.
Align and clean printheads
The printer has a feature to automatically align or clean the printheads.
You can check the print quality diagnostics page to determine if aligning or cleaning is recommended. See
Understand the print quality diagnostics page.
Understand the print quality diagnostics page
75

● Align printheads: Aligning the printheads can improve print quality. If you notice misaligned colors or
lines in your printouts or on the print quality diagnostics page, you should perform an alignment.
● Clean printheads: If your prints are streaked or have incorrect or missing colors, the printheads might
need to be cleaned.
NOTE:
● The cleaning process prints one page to attempt to clean the printheads.
● Clean the printheads only when necessary. Unnecessary cleaning wastes ink and shortens the life of
the printheads.
● If print quality problems persist after cleaning and aligning printheads, contact HP.
The embedded web server (EWS) (Wi-Fi models)
1. Open EWS. See Access and use EWS.
2. Click the Tools tab.
3. From the left menu, click Utilities, and select Print Quality Toolbox.
4. Click the button next to the option to align or clean printheads.
HP printer software (Windows)
1. Load Letter or A4 unused plain white paper into the input tray.
2. In the HP printer software (available from the Start menu), click Print & Scan at the top of the window.
3. In the Print section, click Maintain Your Printer to access the Toolbox.
4. In the Toolbox, click the Device Services tab, click the desired option, and then follow the on-screen
instructions.
Clean printer from the printer software (Windows)
You can run a cleaning routine from the printer software to prevent smearing on the back of printed pages.
1. Load Letter or A4 unused plain white paper into the input tray.
2. In the HP printer software (available from the Start menu), click Print & Scan at the top of the window.
3. In the Print section, click Maintain Your Printer to access the Toolbox.
4. In the Toolbox, click the Device Services tab, click the desired option, and then follow the on-screen
instructions.
Tips for working with ink and printheads
Printhead tips
● Use original HP printheads.
● Handle printheads with care. Do not drop the printheads, and do not touch the electric contacts or print
nozzles on any surface.
76
Chapter 8Solve a problem

● To protect the printheads from drying out, always turn the printer o using the Power button, and wait
until the Power button light goes out.
● Do not open or untape printheads until you are ready to install them, as this can lead to print quality
issues. Leaving tape on the printheads reduces ink evaporation.
● Install both the black and color printheads correctly. See Verify that the printheads are installed properly.
● After you have set up the printer, do not open the printhead cover unless instructed.
● You can align the printheads to improve the print quality. See Fix print quality issues for more
information.
● If you remove a printhead from the printer for any reason, try to replace it again as soon as possible. If
left unprotected outside the printer, the printhead may begin to dry out.
Ink tips
● Make sure the ink tanks are not low on ink before printing. See Check ink levels.
● Rell the ink tanks when they are low on ink. Printing with the ink tanks low on ink may cause damage to
your printer.
● Do not tilt the printer.
NOTE: Original HP printheads and ink are designed and tested with HP printers and papers to help you
easily produce great results, time after time.
HP cannot guarantee the quality or reliability of non-HP supplies. Product service or repairs required as a
result of using a non-HP supply will not be covered under warranty.
Copy and scan issues
Troubleshoot copy and scan issues.
● See Tips for successful scanning and copying.
● Use the HP Print and Scan Doctor to help diagnose and x issues automatically.
NOTE: This tool is for the Windows operating system, and is only available in some languages.
● If one or more Copy buttons do not light up or appear not to be responding or working, try one or more of
the following. Contact HP if the problem persists.
– Try lifting and closing the scanner lid.
– Clean the scanner lid sensor, it could be covered by dust or debris. See Clean the scanner lid sensor.
Network and connection issues (Wi-Fi models)
Troubleshoot network and connection issues.
Fix network connection issues
Choose one of the following troubleshooting options:
Copy and scan issues
77

● Restore network settings and reconnect the printer. See Restore original factory defaults and settings.
● Print and check the wireless network test report and network conguration page to assist in diagnosing
network connection issues. See Print reports from the printer control panel.
● Ensure that rewalls and security software (including anti-virus, anti-spyware programs) are not
aecting the printer connection to your network.
For more information, visit www.hpsmart.com/wireless-printing.
● Use the HP Print and Scan Doctor (Windows only) to help diagnose and automatically x network
connection issues.
You can also use this tool to nd network settings, such as the network name (SSID) and password
(network key).
Fix Wi-Fi Direct connection issues
1. See Print without connecting to same Wi-Fi network (Wi-Fi Direct).
2. Make sure that the Wi-Fi Direct icon on the printer display is on.
3. From your wireless computer or mobile device, turn on the wireless (Wi-Fi) connection, and then search
for and connect to the Wi-Fi Direct name of your printer.
4. Enter the Wi-Fi Direct password when prompted.
5. If you are using a mobile device, make sure you have installed a compatible printing app. Visit
123.hp.com.
Restore original factory defaults and settings
Learn how to restore printer factory defaults and network settings.
● If you have made changes to the printer or network settings, you can restore the printer to the original
factory settings or network settings.
● If you restore the printer network settings, you must reconnect the printer to the network using the HP
Smart app. See Connect your printer to a Wi-Fi network using HP Smart (Wi-Fi models).
● If you need to restart the Wi-Fi setup mode, retore the printer network settings.
● You can also troubleshoot network connection issues by restoring the printer network settings.
To restore printer factory defaults from the control panel (network models)
1.
Press and hold the Information button for 5 seconds until the control panel buttons light up.
2. Open the front door.
3. Press the Information button and the Cancel button at the same time for at least 3 seconds.
78
Chapter 8Solve a problem

Restore printer network settings from the control panel (Wi-Fi models)
1. Press and hold the Information button for 5 seconds until the control panel buttons light up.
2.
Press the Wi-Fi button and the Cancel button at the same time for 5 seconds until the Wi-Fi
light blinks blue.
Restoring printer network settings places the printer in Wi-Fi setup mode. In Wi-Fi setup mode, the Wi-Fi
light blinks blue, the Wi-Fi signal bars cycle, and the Wi-Fi alert icon is o. See Wi-Fi status, light, and
icons (Wi-Fi models).
Restore printer factory defaults or network settings from EWS (Wi-Fi models)
1. Open EWS. See Access and use EWS.
2. Click the Settings tab.
3. Click Restore Defaults, and select the option to restore the factory default settings or network settings.
4. Click the button on the selected page to continue.
Web Services issues (Wi-Fi models)
If you are having problems using Web Services, check the following:
● Make sure the printer is connected to the Internet using a supported network connection.
● Make sure the latest product updates have been installed on the printer.
● Make sure Web Services is enabled on the printer. See Use Web Services (Wi-Fi models).
● Make sure the network hub, switch, or router is turned on and working correctly.
● If you are connecting the printer using a wireless connection, make sure the Wi-Fi network is functioning
properly. For more information, see Network and connection issues (Wi-Fi models).
● If your network uses proxy settings when connecting to the Internet, make sure the proxy settings you
are entering are valid:
– Check the settings being used by the web browser you are using (such as Internet Explorer, Firefox, or
Safari).
– Check with the IT administrator or person who set up your rewall.
If the proxy settings used by your rewall have changed, you must update these settings in either the
printer control panel or the embedded web server (EWS). If these settings are not updated, you will
not be able to use Web Services.
For more information, see Use Web Services (Wi-Fi models).
Printer hardware issues
Troubleshoot printer hardware issues.
Restore printer network settings from the control panel (Wi-Fi models)
79
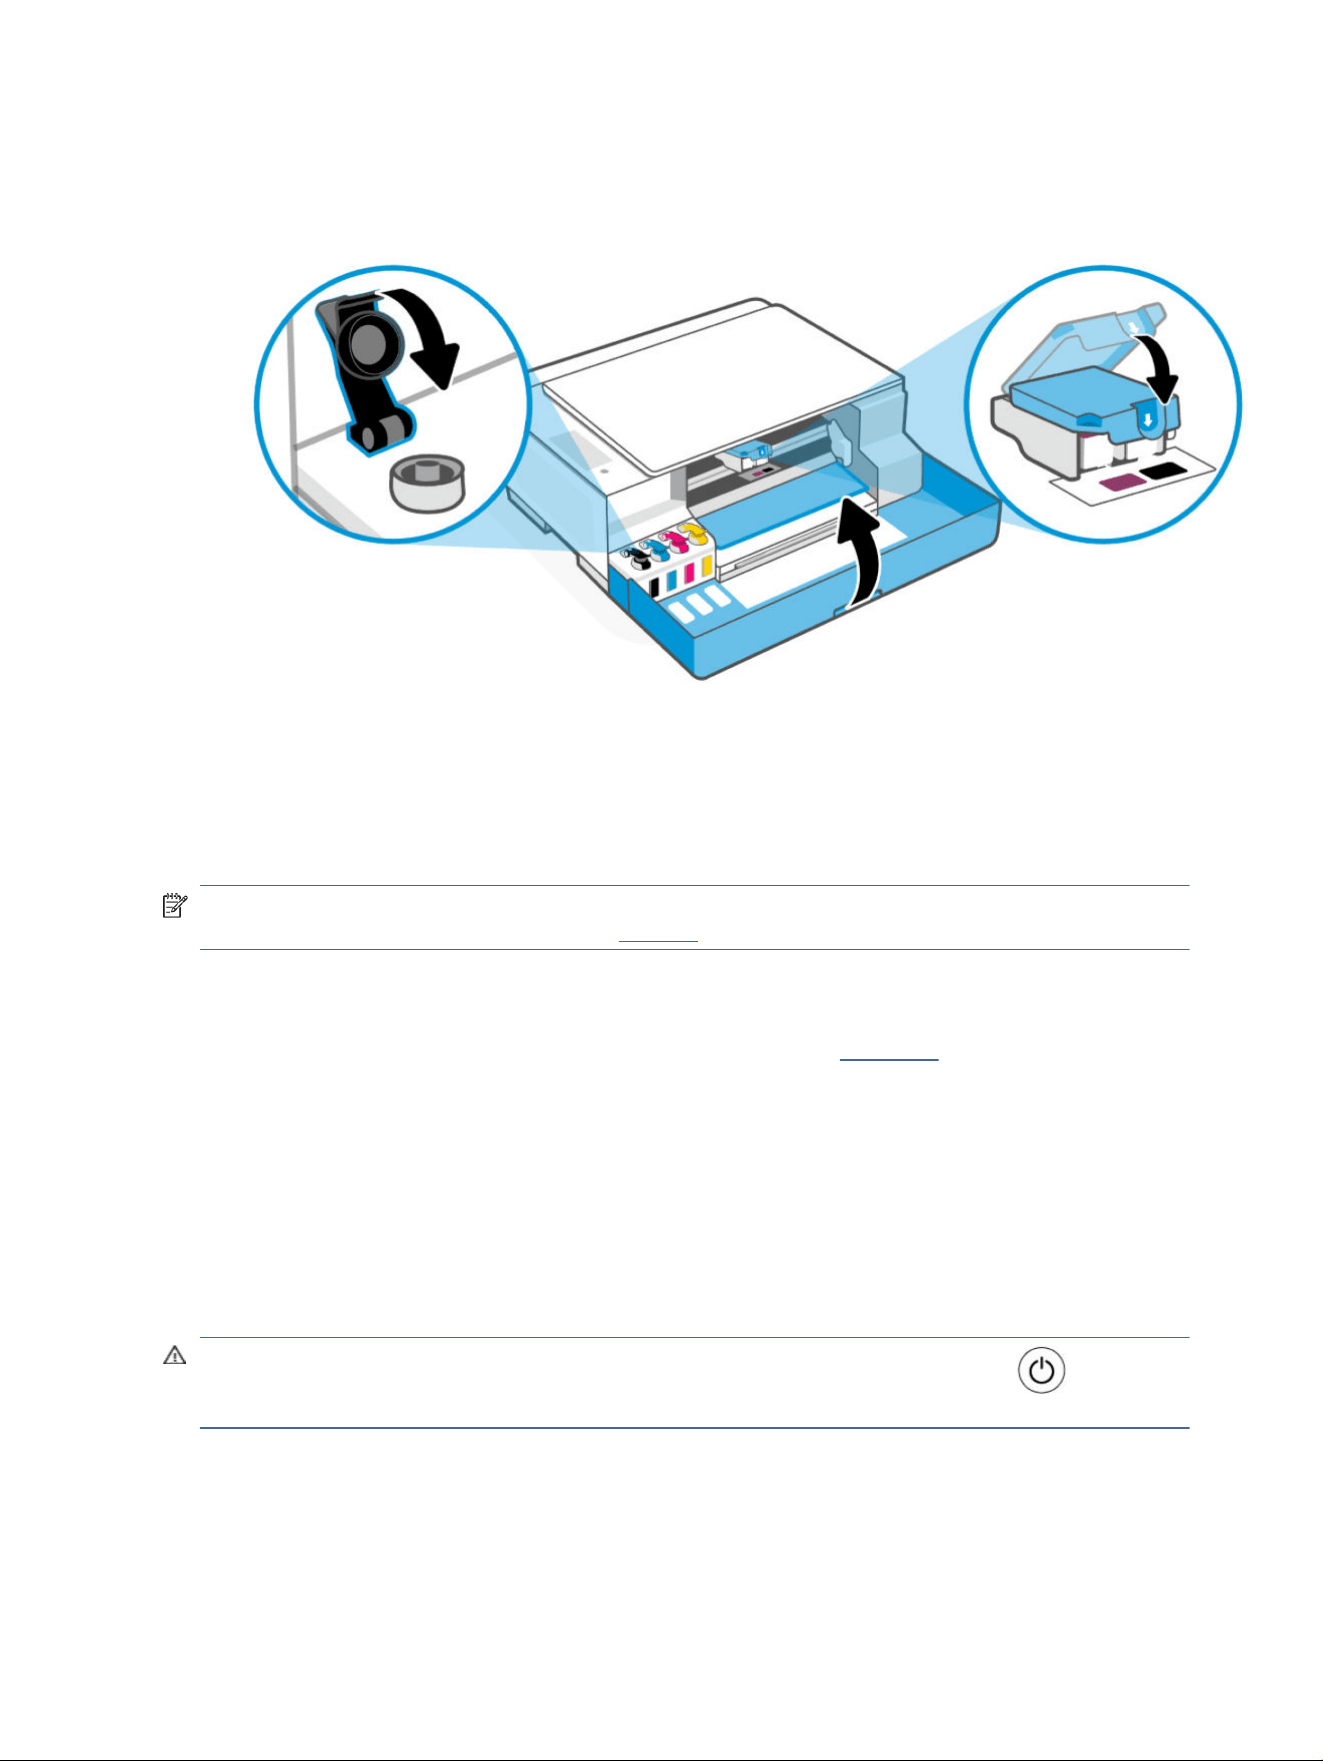
Close all covers and doors
● Make sure the tank caps, printhead cover, and front door are properly closed.
The printer shuts down unexpectedly
● Check the power and power connections.
● Make sure the printer's power cord is connected rmly to afunctioning power outlet.
NOTE: When Auto-O is enabled, the printer automatically turns o after a period of inactivity to help
reduce energy use. For more information, see Auto-O.
Resolve printer failure
● Turn the printer o, then on. If that does not resolve the problem, contact HP.
Printer maintenance
Clean dierent printer parts.
Clean the scanner glass
Dust or dirt on the scanner glass, scanner lid backing, or scanner frame can slow down performance, degrade
the quality of scans, and aect the accuracy of special features such as tting copies to a certain page size.
WARNING! Before cleaning the printer, turn the printer o by pressing the Power button , and
unplugging the power cord from the electrical socket.
80
Chapter 8Solve a problem
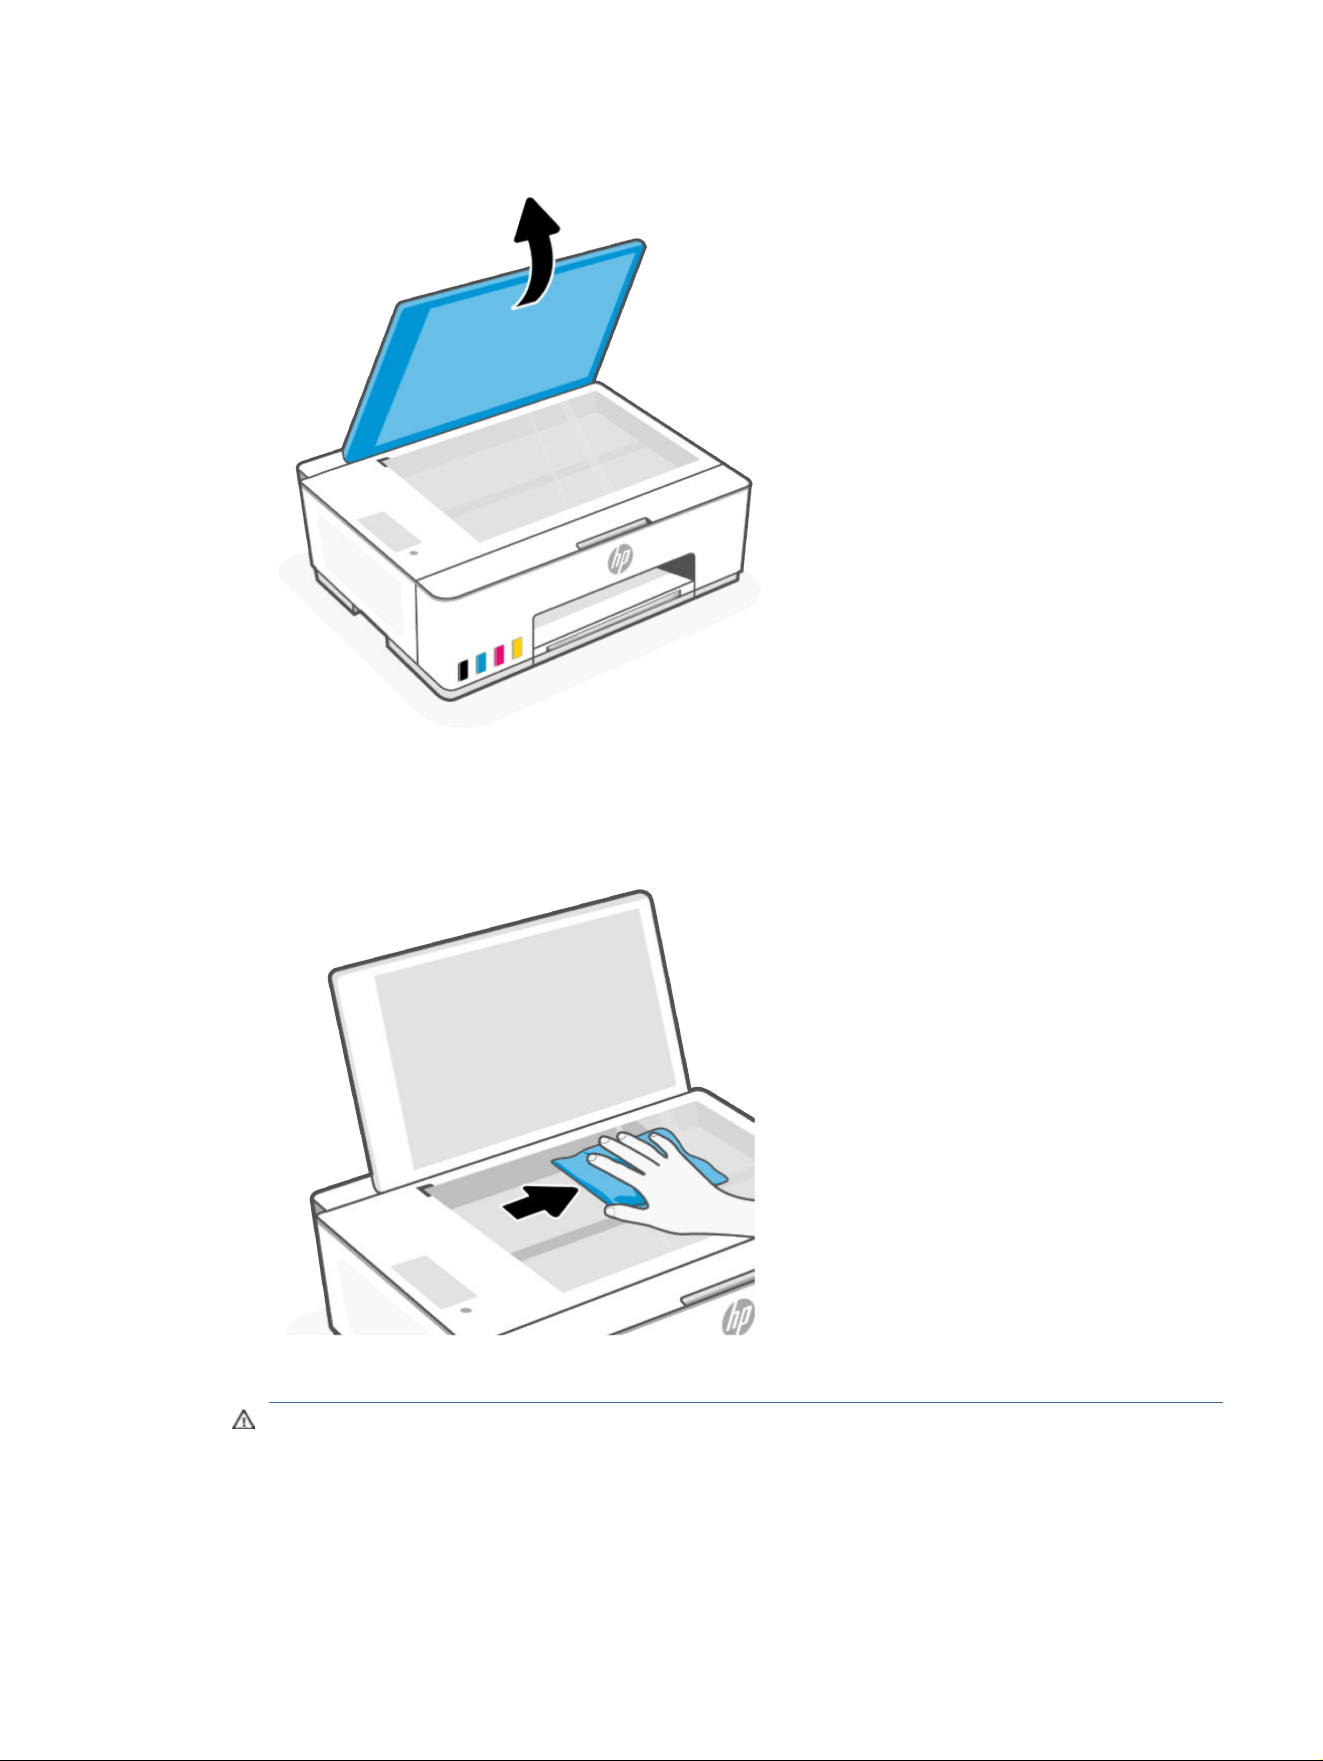
1. Lift the scanner lid.
2. Clean the scanner glass and lid backing by using a dry and soft, lint-free cloth.
Spray the cloth with a mild glass cleaner and clean only the glass.
CAUTION:
● Do not clean the scanner lid backing with anything wet to avoid damaging the protection layer.
● Use only glass cleaner to clean the scanner glass. Avoid cleaners that contain abrasives, acetone,
benzene, and carbon tetrachloride, all of which can damage the scanner glass. Avoid isopropyl
alcohol because it can leave streaks on the scanner glass.
Clean the scanner glass
81
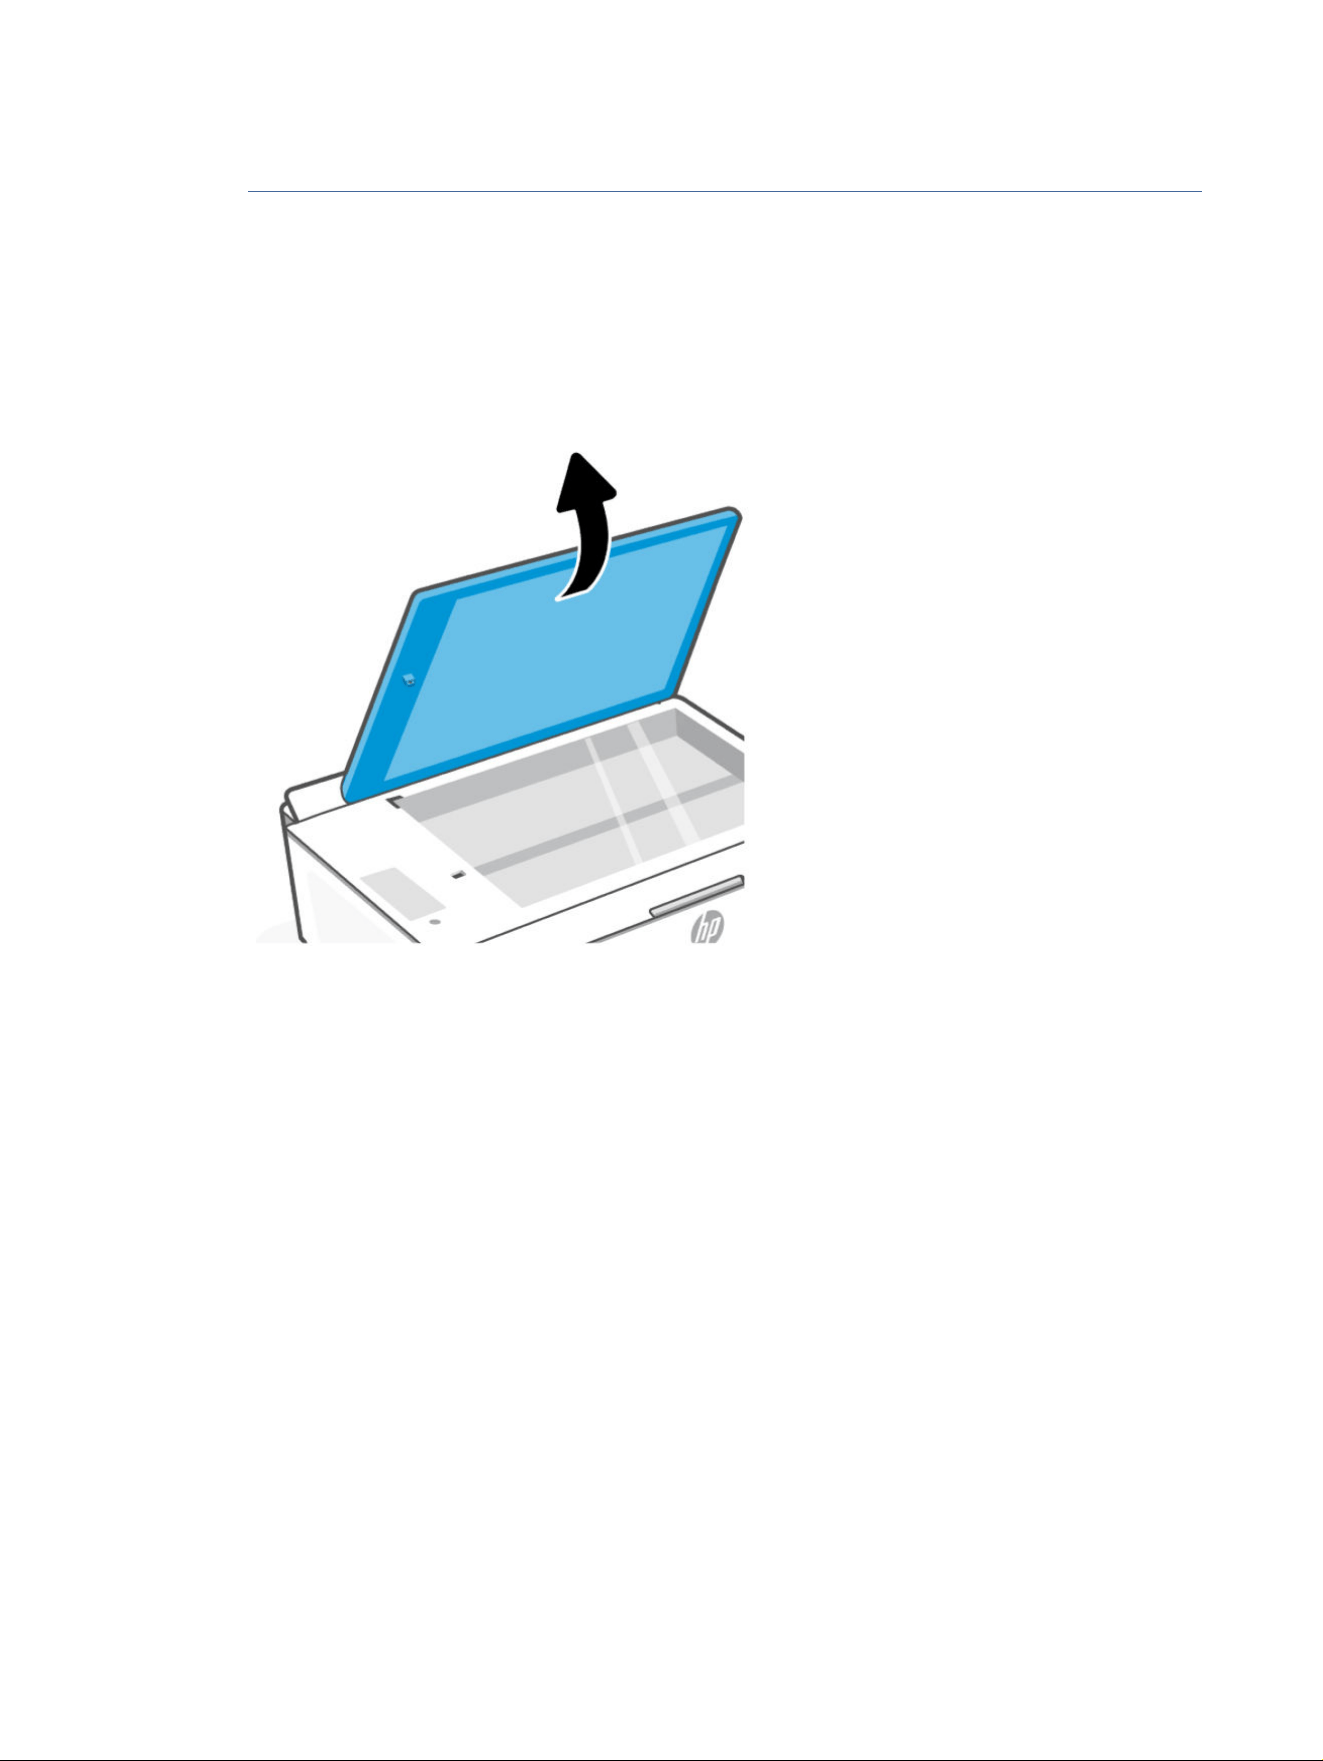
● Do not spray the glass cleaner directly on the scanner glass. If too much glass cleaner is applied, the
cleaner could leak under the scanner glass and damage the scanner.
3. Close the scanner lid, and turn on the printer.
Clean the scanner lid sensor
If you encounter problem with copying or scanning, you might need to clean the scanner lid sensor.
1. Open the scanner lid.
2. Clean the areas indicated with a dry and soft, lint-free cloth.
● The glass in the hole.
● The connector on the scanner lid.
Be careful when cleaning, do not remove or break the white piece attached.
82 Chapter 8Solve a problem
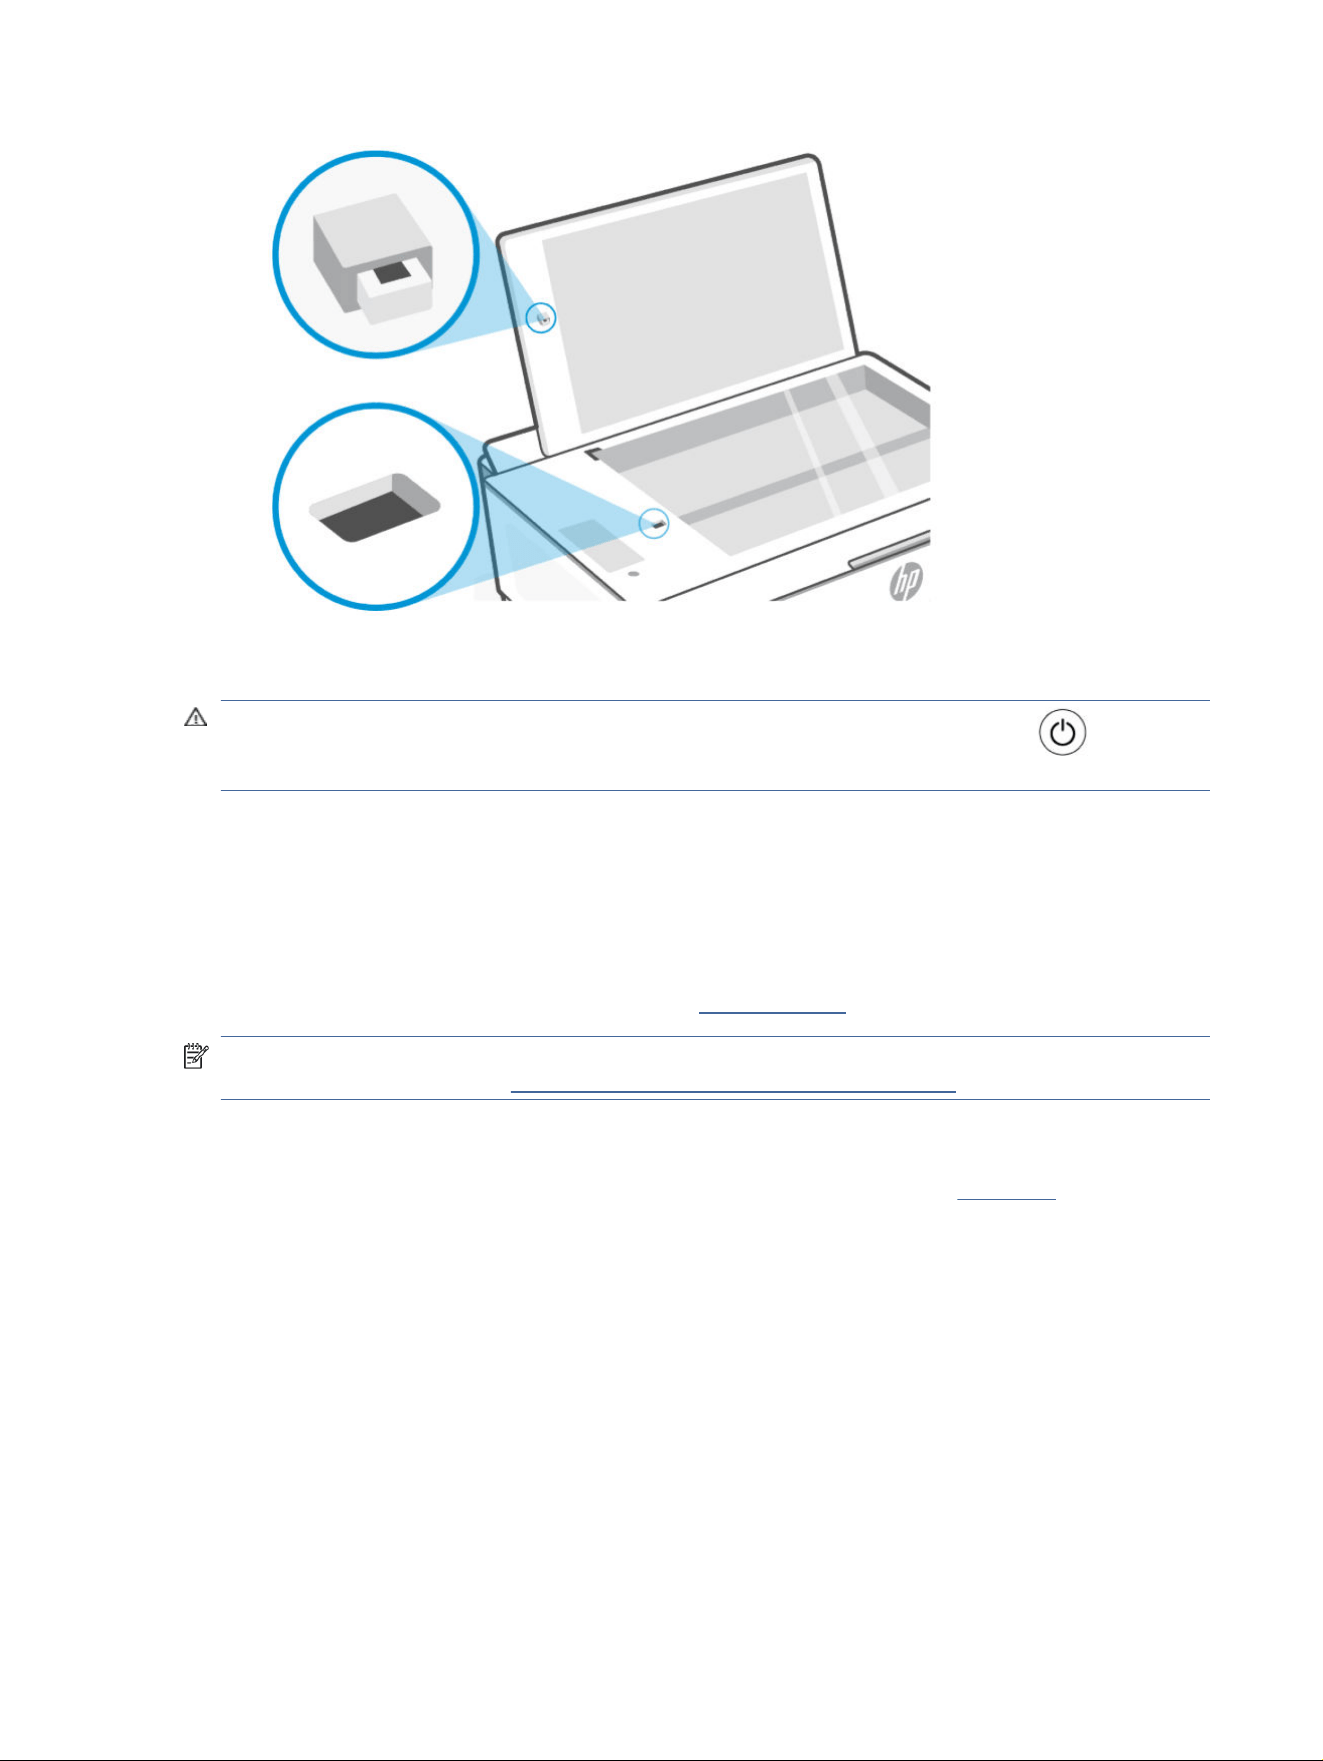
Clean the exterior
WARNING! Before cleaning the printer, turn the printer o by pressing the Power button , and
unplugging the power cord from the electrical socket.
Use asoft, damp, lint-free cloth to wipe dust, smudges, and stains o of the case. Keep uids away from the
interior of the printer, as well as from the printer control panel.
HP support
HP online support provides a variety of options for help with your printer. For the latest product updates and
support information, visit the HP support website at hp.com/support.
NOTE: You can also use the HP Smart app to check printer errors and get troubleshooting assistance. For
information about this app, see Use the HP Smart app to print, scan, and manage.
Contact HP
If you need help from an HP technical support representative to solve a problem, contact HP. The following
contact options are available at no cost for in-warranty customers (HP agent-assisted support for out-of
warranty customers may require a fee):
● Chat with the online HP Virtual Agent.
● Call an HP support agent.
When contacting HP support, be prepared to provide the following information:
● Product name (located on the printer)
● Product number and serial number (on a label on the printer)
Clean the exterior
83
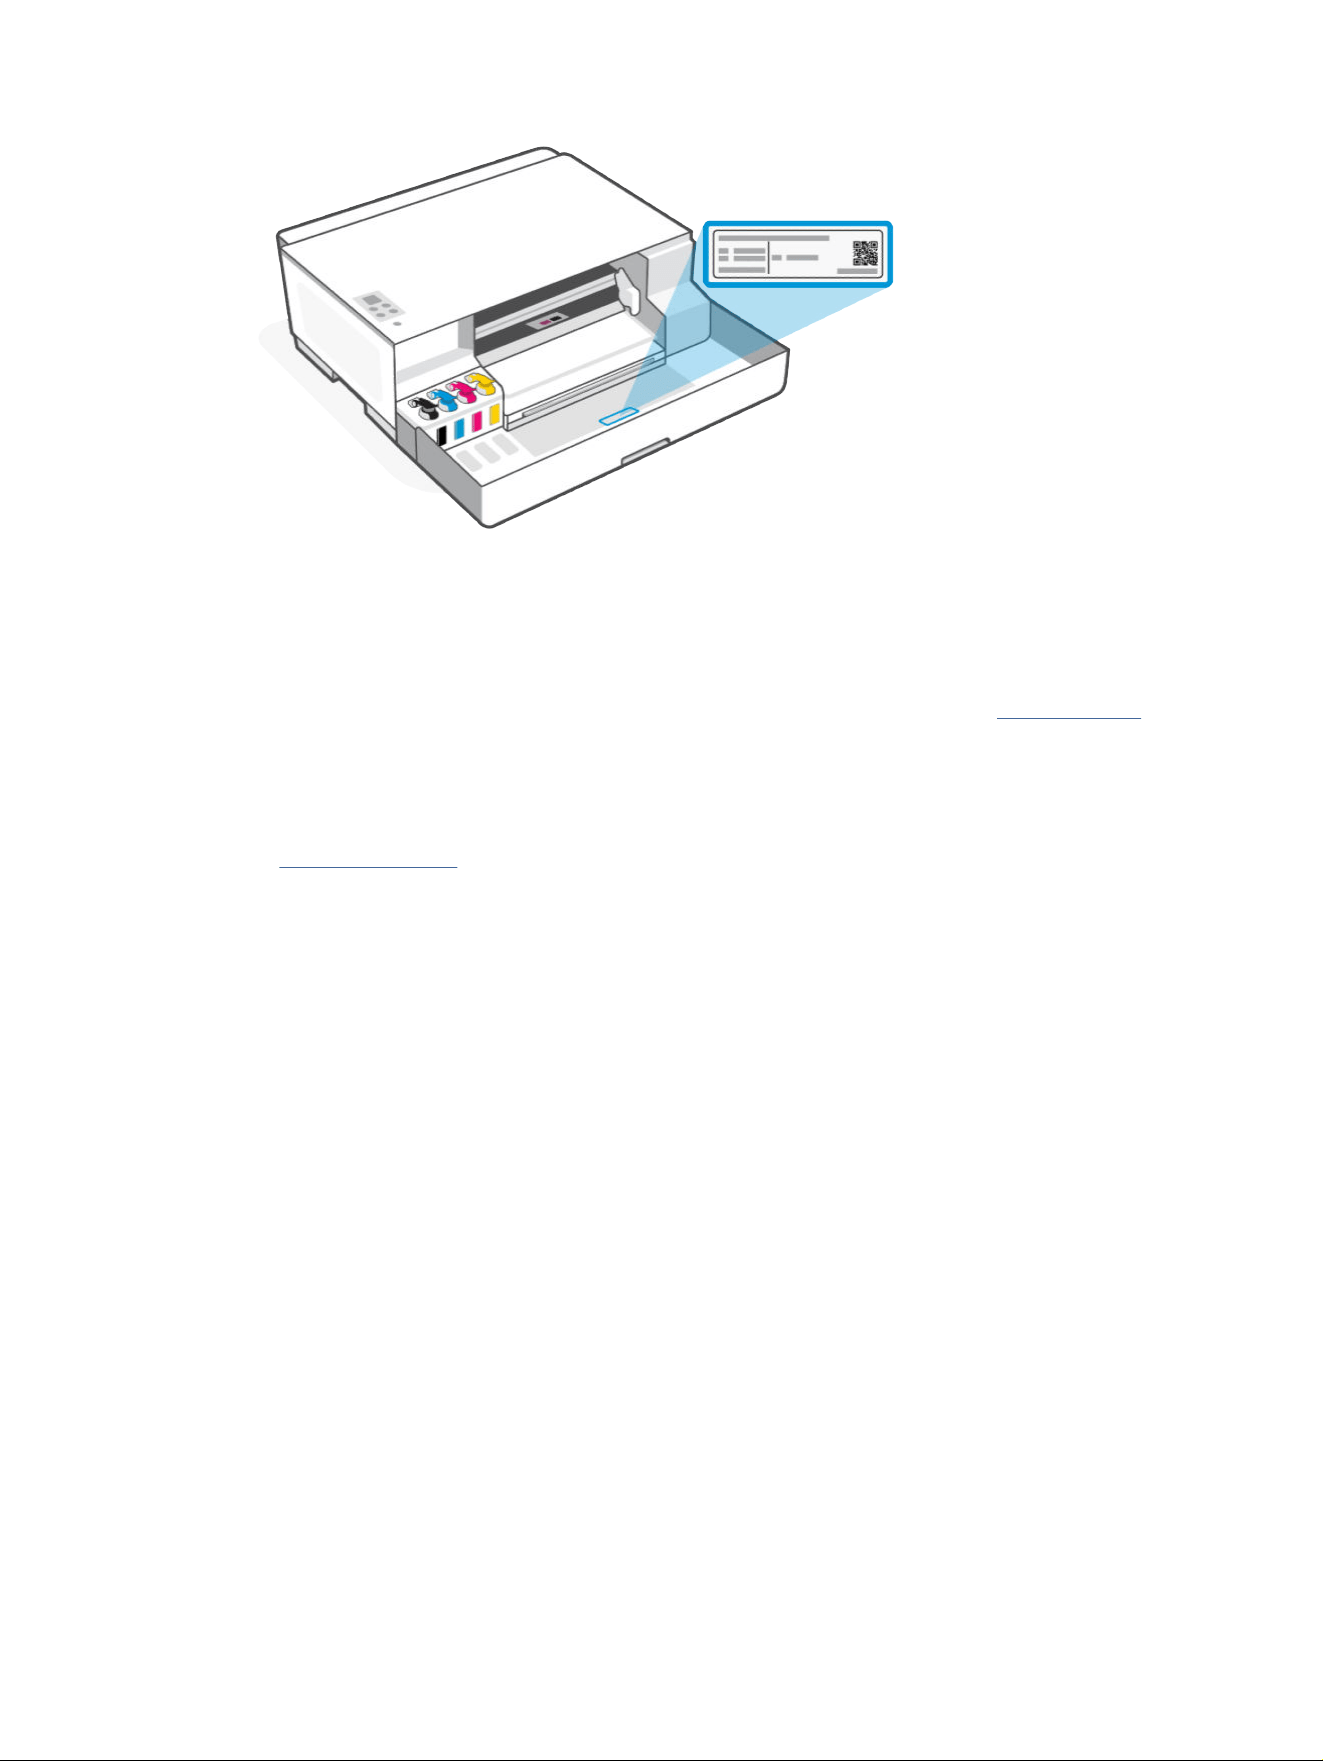
Register printer
By taking just a few quick minutes to register, you can enjoy quicker service, more eicient support, and
product support alerts.
If you did not register your printer while installing the software, you can register now at register.hp.com.
Additional warranty options
Extended service plans are available for the printer at additional costs.
Visit the HP support website, select your country/region and language, then explore the extended warranty
options available for your printer.
84 Chapter 8Solve a problem

HP EcoSolutions (HP and the Environment)
For more detailed information about environmental guidelines that HP follows during the manufacturing
process, see Environmental product stewardship program. For more information about HP's environmental
initiatives, visit HP EcoSolutions.
Power Management
Learn how to reduce the power or energy use of the printer.
NOTE: Conguring longer times for these settings or turning o these features will increase energy
consumption.
Auto-O
This feature turns the printer o after a period of inactivity to help reduce energy use. Auto-O turns the
printer
o completely, so you must use the Power button to turn the printer back on.
If your printer supports this energy saving feature, Auto-O is automatically enabled or disabled depending
on printer capabilities and connection options. Even when Auto-O is disabled, the printer enters Sleep mode
after 5 minutes of inactivity to help reduce energy use.
● Auto-O is enabled when the printer is turned on, if the printer does not have network, fax or Wi-Fi Direct
capability, or is not using these capabilities.
● Auto-O is disabled when a printer’s Wi-Fi or Wi-Fi Direct capability is turned on or when a printer with
fax, USB, or Ethernet network capability establishes a fax, USB, or Ethernet network connection.
Energy Save Mode or Sleep mode
● Power usage is reduced in this mode.
● After initial printer setup, the printer goes to sleep mode after 5 minutes of inactivity.
● You can change the time the printer goes to sleep after a period of inactivity.
● The Power button light is dimmed and the printer control panel display is o in Sleep mode.
● To wake the printer from sleep, press any button on the printer control panel.
Change the time for Sleep mode from EWS (Wi-Fi models)
1. Open EWS. See Access and use EWS.
2. Click the Settings tab.
3. From the left menu, click Power Management.
4. Click Energy Save Mode.
5. Select the desired time, and then click Apply.
HP EcoSolutions (HP and the Environment)
85

Quiet Mode
Quiet Mode slows down printing to reduce overall noise without aecting print quality. The feature only works
when printing on plain paper with normal print quality.
● To reduce printing noise, turn on Quiet Mode. To print at normal speed, turn o the feature.
● The feature is o by default.
● To change the settings from the HP Smart app, open HP Smart on your device, select your printer, and
then click Printer Settings.
Change Quiet Mode settings from EWS (Wi-Fi models)
1. Open EWS. See Access and use EWS.
2. Click the Settings tab.
3. From the left menu, click Preferences.
4. Click Quiet Mode and make the necessary changes.
5. Click Apply.
86 Chapter 9HP EcoSolutions (HP and the Environment)

Technical information
The information contained herein is subject to change without notice. Some statements might not be
applicable for your printer or all countries/regions.
Specications
For more information about the product specications (including acoustic information, print resolutions,
system requirements), visit hp.com/support.
Environmental specications
● Recommended operating temperature range: 15°C to 30°C (59°F to 86°F).
● Recommended and operating humidity range: 20% to 80% relative humidity (RH), non-condensing.
● Operating temperature range: 5°C to 40°C (41°F to 104°F).
● Non-operating (Storage) temperature range: -40°C to 60°C (-40°F to 140°F).
● In the presence of high electromagnetic elds, it is possible the output from the printer may be slightly
distorted.
● HP recommends using a USB cable less than or equal to 3m (10feet) in length to minimize injected noise
due to potential high electromagnetic elds.
Input tray capacity
● Plain paper sheets (75 grams per square meter [20lb]): Up to 100
● Envelopes: Up to 10
● Index cards: Up to 30
● Photo paper sheets: Up to 30
Output tray capacity
● Plain paper sheets (75 grams per square meter [20lb]): Up to 30
● Envelopes: Up to 10
● Index cards: Up to 30
● Photo paper sheets: Up to 30
Paper type and size
● For a complete list of supported media, refer to the printer software. For network printers, you can also
check the embedded web server (EWS). To open EWS, see Access and use EWS.
Technical information
87

Paper weights
● Plain Paper: 60 to 90 grams per square meter (16 to 24 lb).
● Envelopes: 75 to 90 grams per square meter (20 to 24 lb).
● Cards: Up to 200 grams per square meter (110-lb index maximum).
● Photo Paper: Up to 300 grams per square meter (80 lb).
Print specications
● Print speeds vary according to the complexity of the document.
● Method: drop-on-demand thermal inkjet.
● Language: PCL3 GUI
Copy specications
● Resolution: up to 600 dpi
● Digital image processing
● Copy speeds vary according to the complexity of the document and model.
Scan specications
● Resolution: up to 1200 x 1200 ppi optical
For more information about ppi resolution, see the scanner software.
● Color: 24-bit color, 8-bit grayscale (256 levels of gray).
● Maximum scan size from glass: 21.6 x 29.7 cm (8.5 x 11.7 inches)
Power specications
● Input voltage: 100-240 Vac (+/- 10%) or 200-240 Vac (+/- 10%)
● Input frequency: 50/60 Hz (+/- 3 Hz)
Regulatory notices
The printer meets product requirements from regulatory agencies in your country/region that the product is
shipping to.
Regulatory Model Number
For regulatory identication purposes, your product is assigned with a Regulatory Model Number. The
regulatory model number should not be confused with the marketing names or product numbers.
88
Appendix ATechnical information
FCC statement
The United States Federal Communications Commission (in 47 CFR 15.105) has specied that the following
notice be brought to the attention of users of this product.
This equipment has been tested and found to comply with the limits for a Class B digital device, pursuant
to Part 15 of the FCC Rules. These limits are designed to provide reasonable protection against harmful
interference in a residential installation. This equipment generates, uses and can radiate radio frequency
energy and, if not installed and used in accordance with the instructions, may cause harmful interference
to radio communications. However, there is no guarantee that interference will not occur in a particular
installation. If this equipment does cause harmful interference to radio or television reception, which can be
determined by turning the equipment o and on, the user is encouraged to try to correct the interference by
one or more of the following measures:
● Reorient or relocate the receiving antenna.
● Increase the separation between the equipment and the receiver.
● Connect the equipment into an outlet on a circuit dierent from that to which the receiver is connected.
● Consult the dealer or an experienced radio/TV technician for help.
NOTE: If the product has an Ethernet / LAN port with metallic casing then use of a shielded interface cable
is required to comply with the Class B limits of Part 15 of FCC rules.
Modications (part 15.21)
Any changes or modications made to this device that are not expressly approved by HP may void the user’s
authority to operate the equipment.
For further information, contact: Manager of Corporate Product Regulations, HP Inc. 1501 Page Mill Road, Palo
Alto, CA 94304, U.S.A.
This device complies with Part 15 of the FCC Rules. Operation is subject to the following two conditions: (1)
this device may not cause harmful interference, and (2) this device must accept any interference received,
including interference that may cause undesired operation.
Power cord instructions
Make sure your power source is adequate for the product voltage rating. The voltage rating is on the product.
The product uses either 100-240 Vac (+/- 10%) or 200-240 Vac and 50/60 Hz (+/- 3 Hz).
CAUTION: To prevent damage to the product, use only the power cord that is provided with the product.
VCCI (Class B) compliance statement for users in Japan
Notice to users in Japan about the power cord
製品には、同梱された電源コードをお使い下さい。
FCC statement
89

同梱された電源コードは、他の製品では使用出来ません。
Visual display workplaces statement for Germany
GS-Erklärung (Deutschland)
Das Gerät ist nicht für die Benutzung im unmittelbaren Gesichtsfeld am Bildschirmarbeitsplatz vorgesehen.
Um störende Reexionen am Bildschirmarbeitsplatz zu vermeiden, darf dieses Produkt nicht im
unmittelbaren Gesichtsfeld platziert werden.
Noise emission statement for Germany
Geräuschemission
LpA < 70 dB am Arbeitsplatz im Normalbetrieb nach DIN 45635 T. 19
European Union and United Kingdom Regulatory Notice
Products bearing the CE marking and UK marking comply to applicable EU Directives and the equivalent UK
Statutory Instruments and can operate in at least one EU Member State and in United Kingdom. The full EU
and UK Declaration of Conformity can be found at the following website: hp.eu/certicates (Search with the
product model name or its Regulatory Model Number (RMN), which may be found on the regulatory label.)
The point of contact for regulatory matters:
For EU: HP REG 23010, 08028 Barcelona, Spain
For UK: HP Inc UK Ltd, Regulatory Enquiries, Earley West, 300 Thames Valley Park Drive, Reading, RG6 1PT
Email: techr[email protected]
Declaration of conformity
Declaration of conformity can be found at www.hp.eu/certicates.
Regulatory wireless statements
This section contains regulatory information pertaining to wireless products.
Products with wireless functionality
EMF
This product meets international guidelines (ICNIRP) for exposure to radio frequency radiation.
If it incorporates a radio transmitting and receiving device that in normal use, a separation distance of 20 cm
ensures that radio frequency exposure levels comply with EU requirements.
90
Appendix ATechnical information

Wireless functionality in Europe
For products with 802.11 b/g/n or Bluetooth radio:
● Radio frequency band: 2400-2483.5 MHz, with transmit power of 20 dBm (100 mW) or less.
Exposure to radio frequency radiation
CAUTION: The radiated output power of this device is far below the FCC radio frequency exposure limits.
Nevertheless, the device shall be used in such a manner that the potential for human contact during normal
operation is minimized. This product and any attached external antenna, if supported, shall be placed in
such a manner to minimize the potential for human contact during normal operation. In order to avoid the
possibility of exceeding the FCC radio frequency exposure limits, human proximity to the antenna shall not be
less than 20 cm (8 inches) during normal operation.
Notice to users in Canada
Under Innovation, Science and Economic Development Canada regulations, this radio transmitter may only
operate using an antenna of a type and maximum (or lesser) gain approved for the transmitter by Innovation,
Science and Economic Development Canada. To reduce potential radio interference to other users, the
antenna type and its gain should be so chosen that the equivalent isotropically radiated power (e.i.r.p.) is not
more than that necessary for successful communication.
This device complies with Innovation, Science and Economic Development Canada licence-exempt RSS
standard(s). Operation is subject to the following two conditions: (1) this device may not cause interference,
and (2) this device must accept any interference, including interference that may cause undesired operation of
the device.
WARNING! Exposure to Radio Frequency Radiation. The radiated output power of this device is below the
Innovation, Science and Economic Development Canada radio frequency exposure limits. Nevertheless, the
device should be used in such a manner that the potential for human contact is minimized during normal
operation.
To avoid the possibility of exceeding the Innovation, Science and Economic Development Canada radio
frequency exposure limits, human proximity to the antennas should not be less than 20 cm (8 inches).
Conformément au Règlement d'Innovation, Science et Développement Economique Canada, cet émetteur
radioélectrique ne peut fonctionner qu'avec une antenne d'un type et d'un gain maximum (ou moindre)
approuvé par Innovation, Science et Développement Economique Canada. An de réduire le brouillage
radioélectrique potentiel pour d'autres utilisateurs, le type d'antenne et son gain doivent être choisis de
manière à ce que la puissance isotrope rayonnée équivalente (p.i.r.e.) ne dépasse pas celle nécessaire à une
communication réussie.
Cet appareil est conforme aux normes RSS exemptes de licence d'Innovation, Science et Développement
Economique Canada. Son fonctionnement dépend des deux conditions suivantes : (1) cet appareil ne doit
pas provoquer d'interférences nuisibles et (2) doit accepter toutes les interférences reçues, y compris des
interférences pouvant provoquer un fonctionnement non souhaité de l'appareil.
AVERTISSEMENT relatif à l'exposition aux radiofréquences. La puissance de rayonnement de cet appareil se
trouve sous les limites d'exposition de radiofréquences d'Innovation, Science et Développement Economique
Canada. Néanmoins, cet appareil doit être utilisé de telle sorte qu'il doive être mis en contact le moins
possible avec le corps humain.
An d'éviter le dépassement éventuel des limites d'exposition aux radiofréquences d'Innovation, Science et
Développement Economique Canada, il est recommandé de maintenir une distance de plus de 20 cm entre les
antennes et l'utilisateur.
Wireless functionality in Europe
91

Notice to users in Japan
この機器は技術基準適合証明又は工事設計認証を受けた無線設備を搭載しています。
Notice to users in Taiwan Region
取得審驗證明之低功率射頻器材,非經核准,公司、商號或使用者均不得擅自變 更頻率、加大功率或變更
原設計之特性及功能。低功率射頻器材之使用不得影響 飛航安全及干擾合法通信;經發現有干擾現象時,
應立即停用,並改善至無干擾 時方得繼續使用。前述合法通信,指依電信管理法規定作業之無線電通信。
低功 率射頻器材須忍受合法通信或工業、科學及醫療用電波輻射性電機設備之干擾。
Notice to users in Thailand
Notice to users in Brazil
Este equipamento não tem direito à proteção contra interferência prejudicial e não pode causar interferência
em sistemas devidamente autorizados.
Para maiores informações consulte o site da ANATEL www.anatel.gov.br.
Notice to users in Mexico
La operación de este equipo está sujeta a las siguientes dos condiciones: (1) es posible que este equipo
o dispositivo no cause interferencia perjudicial y (2) este equipo o dispositivo debe aceptar cualquier
interferencia, incluyendo la que pueda causar su operación no deseada.
Para saber el modelo de la tarjeta inalámbrica utilizada, revise la etiqueta regulatoria de la impresora.
92
Appendix ATechnical information

Notice to users in Ukraine
Повідомлення для користувачів в Україні
Використовуйте лише шнур та адаптер живлення (за наявності), надані компанією HP.
Table A-1 Notice to users in Ukraine
Використана технологія Діапазони частот радіосигналів Максимальна потужність передавання
WLAN Wi-Fi 802.11x (2,4 ГГц) 2400–2483,5 МГц < 100 мВт (20 дБм) ЕІВП
Bluetooth (2,4 ГГц) 2400–2483,5 МГц < 100 мВт (20 дБм) ЕІВП
Bluetooth iз низьким енергоспоживанням
(2,4 ГГц)
2400–2483,5 МГц < 100 мВт (20 дБм) ЕІВП
WLAN Wi-Fi 802.11x (5 ГГц)
(тільки для використання в приміщенні)
5170–5330 МГц
5490–5730 МГц
5735–5835 МГц
< 100 мВт (20 дБм) ЕІВП
< 100 мВт (20 дБм) ЕІВП
< 100 мВт (20 дБм) ЕІВП
NOTE: Відповідні частотні діапазони та максимальна потужність передавання застосовуються, лише
якщо в пристрої використовується зазначена технологія підключення.
Повний текст декларації про відповідність доступний на веб-сайті за такою адресою: cloud.mt-tech.co.
Accessibility
Learn more about our eorts to create accessible products, share your story, or connect with customer
support for accessibility help all at:
hp.com/accessibility
For more information about the accessibility of your printer, please visit hp.com/support/inkjet/accessibility
Environmental product stewardship program
HP is committed to providing quality products in an environmentally sound manner. Design for recycling has
been incorporated into this product. The number of materials has been kept to a minimum while ensuring
proper functionality and reliability. Dissimilar materials have been designed to separate easily. Fasteners and
other connections are easy to locate, access, and remove using common tools. High priority parts have been
designed to access quickly for eicient disassembly and repair. For more information, visit HP'sCommitment
to the Environment website at:
hp.com/sustainableimpact
HP tips for reducing environmental impact
● Choose from a wide variety of HP papers with FSC
®
or PEFC
TM
certication, which indicates that the paper
pulp came from a reputable and well-managed source.
1
● Conserve resources-look for paper made with recycled content.
Notice to users in Ukraine
93

● Recycle your Original HP cartridges-it's easy and free with the HP Planet Partners program, available in 47
countries and territories worldwide.
2
● Save paper by printing on both sides of the page.
● Conserve energy by choosing ENERGY STAR
®
certied HP products.
● Lower your carbon footprint-all HP printers include power management settings that help you control
energy use.
● Discover more ways HP and our customers are reducing environmental impact at HP EcoSolutions.
1
HP papers certied under FSC®C017543 or PEFC™TMPEFC/29-13-198.
2
Program availability varies. Original HP cartridge return and recycling is currently available in more than
50 countries, territories, and regions in Asia, Europe, and North and South America through the HP Planet
Partners program. For more information, visit:
hp.com/recycle.
Eco-Tips
HP is committed to helping customers reduce their environmental footprint. Please visit the HP Eco Solutions
website for more information on HP’s environmental initiatives.
hp.com/sustainableimpact
European Union Commission Regulation 1275/2008
For product power data, including the power consumption of the product in networked standby if all
wired network ports are connected and all wireless network ports are activated, please refer to section
P15 ‘Additional Information’ of the product IT ECO Declaration at hp.com/us-en/hp-information/sustainable-
impact/document-reports.html.
Paper
This product is suited for the use of recycled paper according to DIN 19309 and EN 12281:2002.
Plastics
Plastic parts over 25 grams are marked according to international standards that enhance the ability to
identify plastics for recycling purposes at the end of product life.
Safety data sheets
Safety Data Sheets, product safety and environmental information are available at hp.com/go/ecodata or on
request.
Recycling program
HP
oers an increasing number of product return and recycling programs in many countries/regions, and
partners with some of the largest electronic recycling centers throughout the world. HP conserves resources
by reselling some of its most popular products. For more information regarding recycling of HP products,
please visit: hp.com/recycle.
94
Appendix ATechnical information

HPinkjet supplies recycling program
HP is committed to protecting the environment. The HPInkjet Supplies Recycling Program is available in
many countries/regions, and lets you recycle used print cartridges and ink cartridges free of charge. For more
information, go to the following website: hp.com/recycle
Power consumption
HP printing and imaging equipment marked with the ENERGY STAR® logo is certied by the U.S. Environmental
Protection Agency. The following mark will appear on ENERGY STAR certied imaging products:
Additional ENERGY STAR certied imaging product model information is listed at: www.hp.com/go/energystar
Disposal of waste equipment by users
This symbol means do not dispose of your product with your other household waste. Instead, you should
protect human health and the environment by handing over your waste equipment to a designated collection
point for the recycling of waste electrical and electronic equipment. For more information, please contact your
household waste disposal service, or go to hp.com/recycle.
Waste disposal for Brazil
Este produto eletrônico e seus componentes não devem ser descartados no lixo comum, pois embora estejam
em conformidade com padrões mundiais de restrição a substâncias nocivas, podem conter, ainda que em
quantidades mínimas, substâncias impactantes ao meio ambiente. Ao nal da vida útil deste produto, o
usuário deverá entregá-lo à HP. A não observância dessa orientação sujeitará o infrator às sanções previstas
em lei.
Após o uso, as pilhas e/ou baterias dos produtos HP deverão ser entregues ao estabelecimento comercial ou
rede de assistência técnica autorizada pela HP.
Para maiores informações, inclusive sobre os pontos de recebimento, acesse: hp.com.br/reciclar
HPinkjet supplies recycling program
95

Chemical substances
HP is committed to providing our customers with information about the chemical substances in our products
as needed to comply with legal requirements such as REACH (Regulation EC No 1907/2006 of the European
Parliament and the Council). A chemical information report for this product can be found at: hp.com/go/reach.
96 Appendix ATechnical information
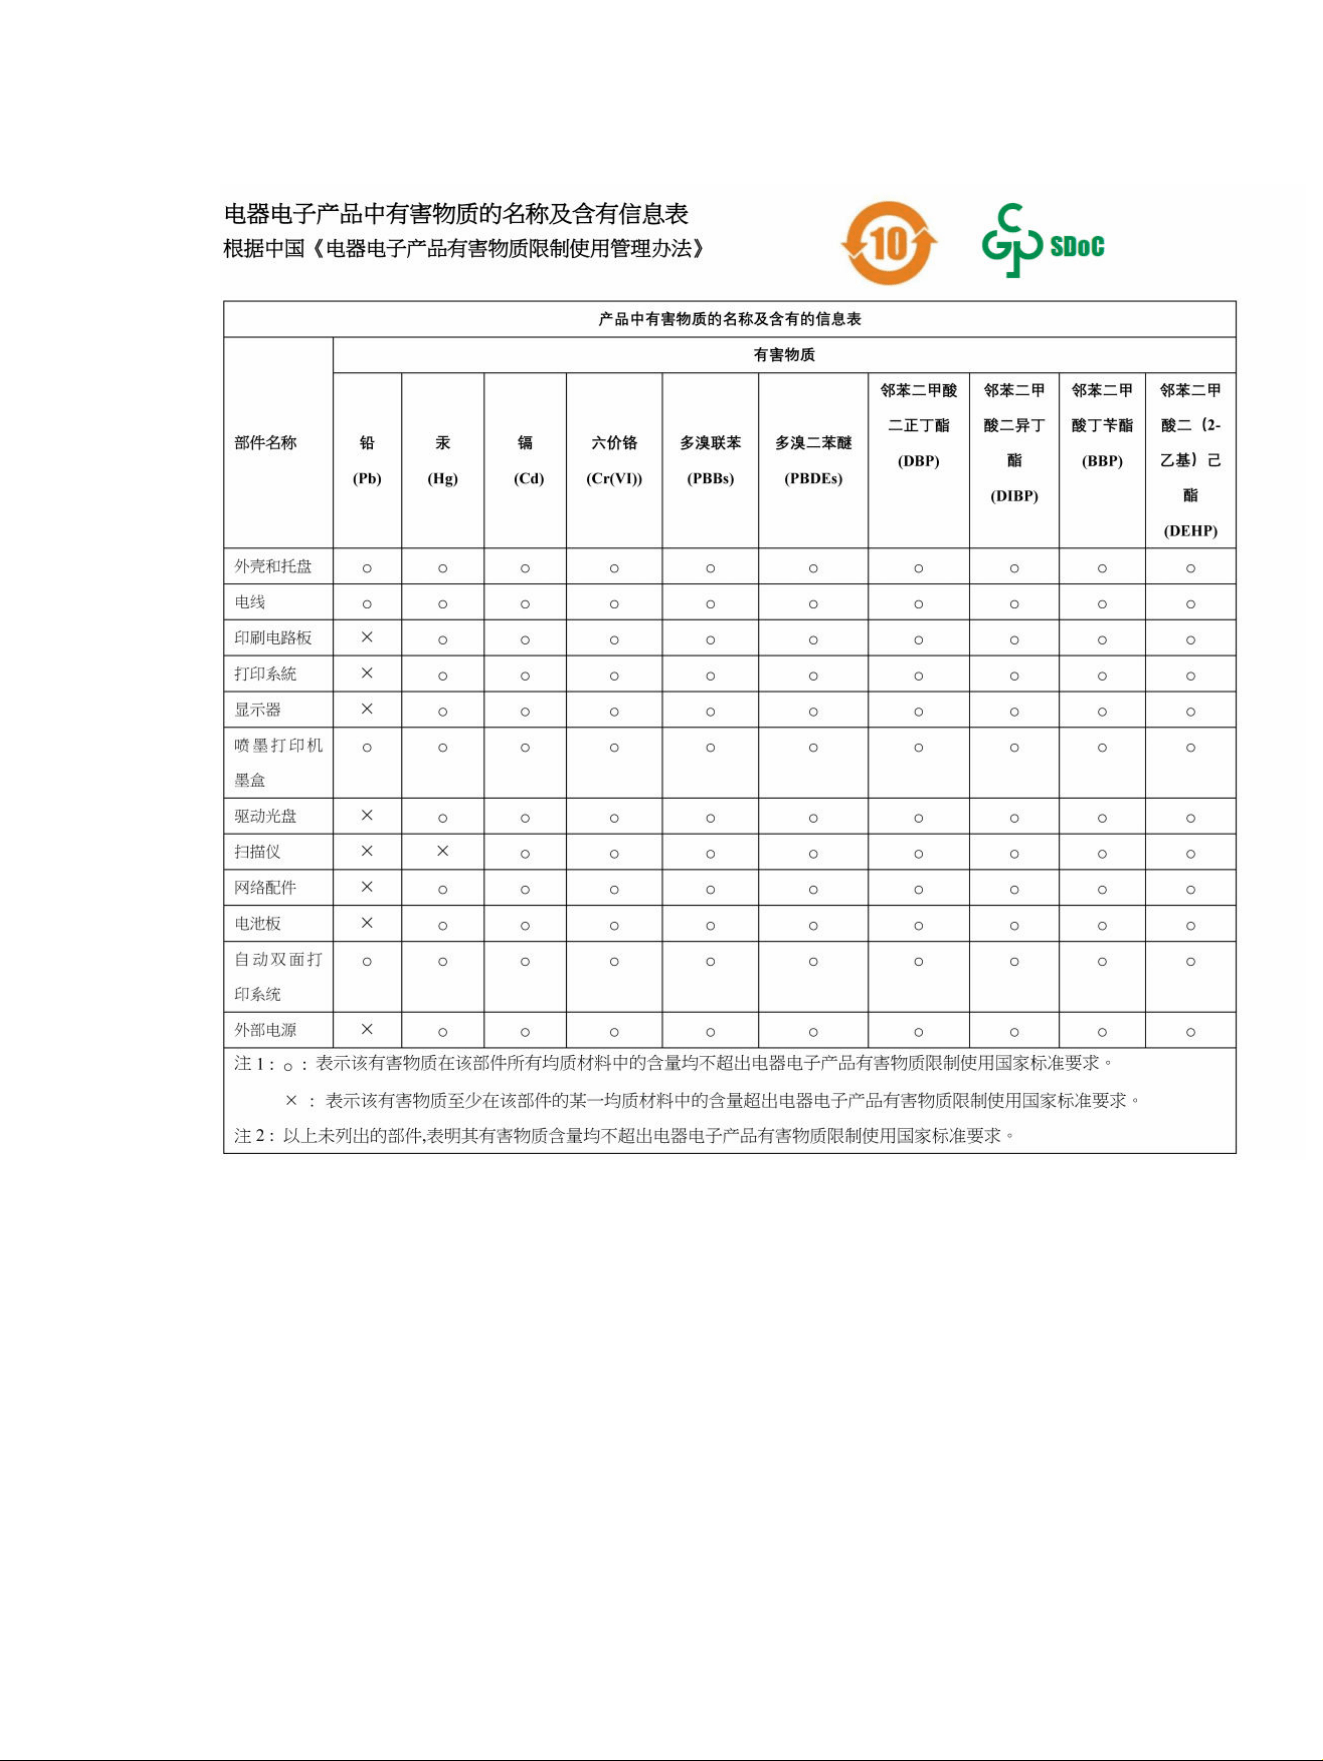
The Table of Hazardous Substances/Elements and their Content (China)
The Table of Hazardous Substances/Elements and their Content (China) 97

Declaration of the Presence Condition of the Restricted Substances Marking
(Taiwan Region)
限用物質含有情況標示聲明書
Taiwan Declaration of the Presence Condition of the Restricted Substances Marking
若要存取產品的最新使用指南或手冊,請前往 hp.com/support。選取搜尋您的產品,然後依照 畫 面上的
指示繼續執行。
To access the latest user guides or manuals for your product, go to hp.com/support. Select Find your product,
and then follow the on-screen instructions.
Restriction of hazardous substance (India)
This product, as well as its related consumables and spares, complies with the reduction in hazardous
substances provisions of the "India E-waste (Management and Handling) Rule 2016." It does not contain
lead, mercury, hexavalent chromium, polybrominated biphenyls or polybrominated diphenyl ethers in
concentrations exceeding 0.1 weight % and 0.01 weight % for cadmium, except for where allowed pursuant to
the exemptions set in Schedule 2 of the Rule.
98
Appendix ATechnical information

Restriction on hazardous substances statement (Turkey)
Türkiye Cumhuriyeti: AEEE Yönetmeliğine Uygundur
EPEAT
Most HP products are designed to meet EPEAT. EPEAT is a comprehensive environmental rating that helps
identify greener electronics equipment. For more information on EPEAT go to epeat.net.
Click here for information on HP's EPEAT registered products.
SEPA Ecolabel User Information (China)
中国环境标识认证产品用户说明
噪声大于 63.0 dB(A) 的办公设备不宜放置于办公室内,请在独立的隔离区域使用。
如需长时间使用本产品或打印大量文件,请确保在通风良好的房间内使用。
如您需要确认本产品处于零能耗状态,请按下电源关闭按钮,并将插头从电源插座断开。
您可以使用再生纸,以减少资源耗费。
China Energy Label for Printer, Fax and Copier
复印机、打印机和
传真机能源效率标识实施规则
依据“复印机、打印机和传真机能源效率标识实施规则”,该打印机具有中国能效标识。标识上显示的能效
等级和操作模式值根据“复印机、打印机和传真机能效限定值及能效等级”标准(“GB 21521”)来确定和计
算。
1. 能效等级
产品能效等级分 3 级,其中 1 级能效最高。能效限定值根据产品类型和打印速度由标准确定。能效等
级则根据基本功耗水平以及网络接口和内存等附加组件和功能的功率因子之和来计算。
2. 能效信息
喷墨打印机
● 操作模式功率
睡眠状态的能耗按照 GB 21521 的标准来衡量和计算。该数据以瓦特 (W) 表示。
● 待机功率
待机状态是产品连接到电网电源上功率最低的状态。该状态可以延续无限长时间,且使用者无法
改变此状态下产品的功率。对于“成像设备”产品,“待机”状态通常相当于“关闭”状态,但也可能相
当于“准备”状态或者“睡眠”状态。该数据以瓦特 (W) 表示。
● 睡眠状态预设延迟时间
出厂前由制造商设置的时间决定了该产品在完成主功能后进入低耗模式(例如睡眠、自动关机)
的时间。该数据以分钟表示。
● 附加功能功率因子之和
网络接口和内存等附加功能的功率因子之和。该数据以瓦特 (W) 表示。
Restriction on hazardous substances statement (Turkey)
99

标识上显示的能耗数据是根据典型配置测量得出的数据,此类配置包含登记备案的打印机依据复印机、
打印机和传真机能源效率标识实施规则所选的所有配置。因此,该特定产品型号的实际能耗可能与标识
上显示的数据有所不同。
要了解规范的更多详情,请参考最新版的 GB 21521 标准。
100 Appendix ATechnical information