1
SG24377
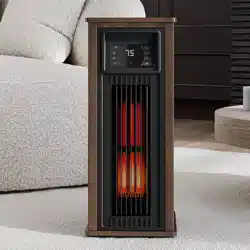
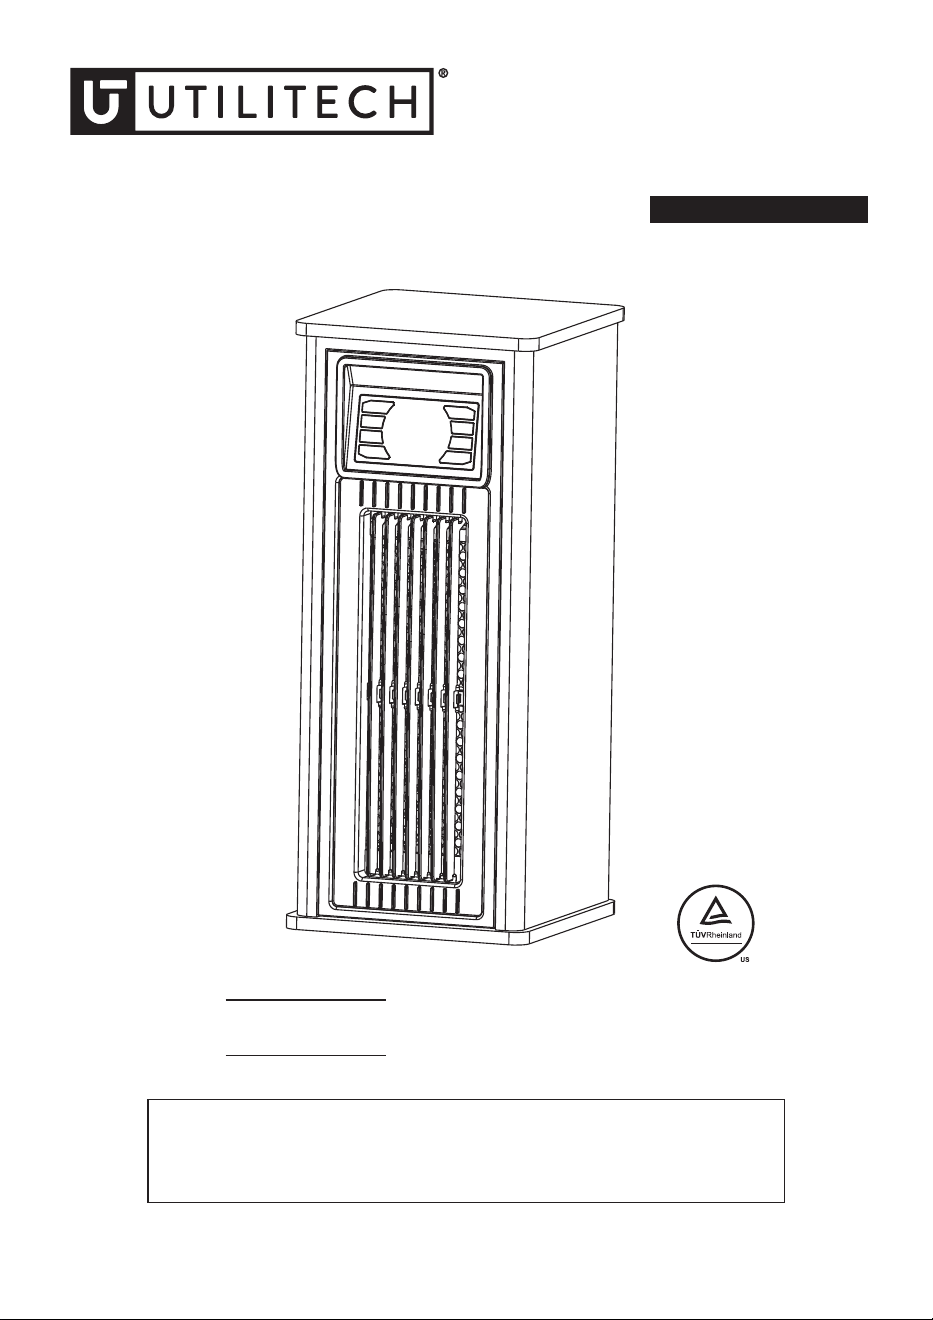
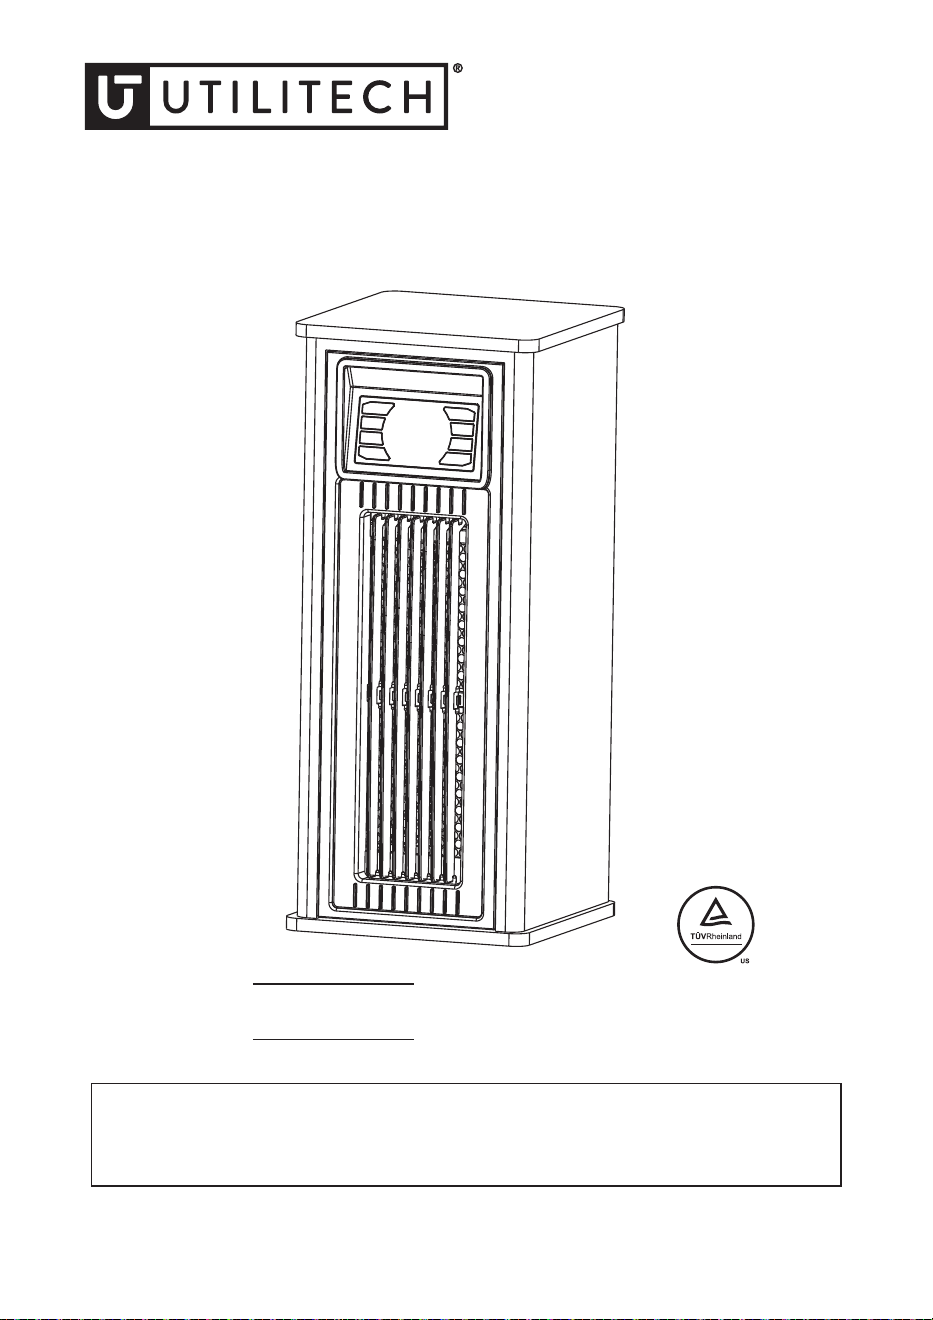
INFRARED WOOD
TOWER HEATER
ITEM #4969026
MODEL #HT1218N
Serial Number
Purchase Date
Thank you for purchasing this UTILITECH product.
Questions, problems or missing parts?
Before returning, contact us on:
866-994-4148, 8 a.m. - 8 p.m., EST, Monday - Sunday or [email protected].
Español p.13
UTILITECH and logo design are
trademarks or registered trademarks
of LF, LLC. All rights reserved.

2
T
ABLE OF CONTENTS
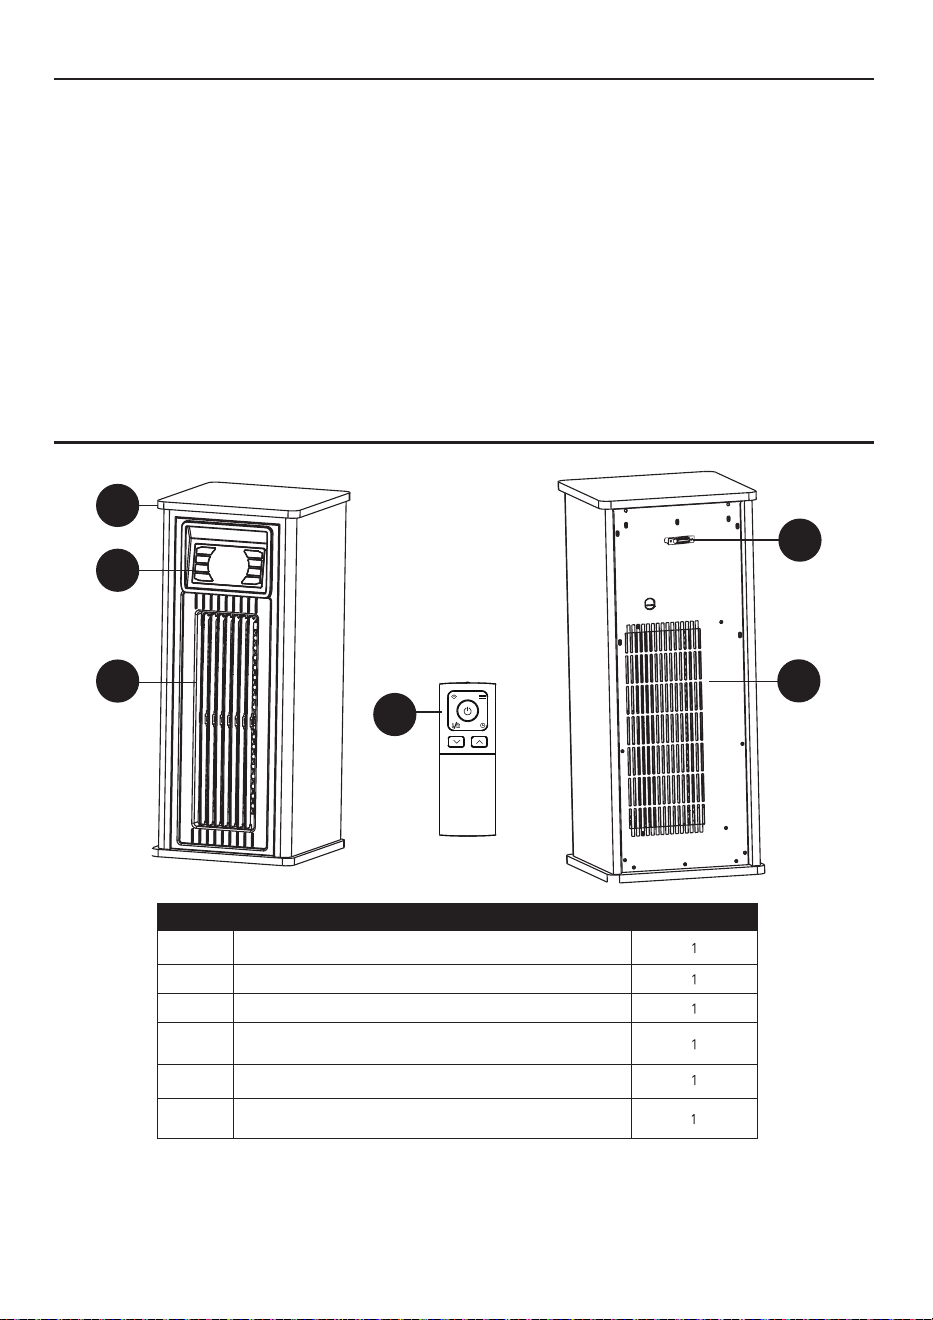
P
ACKAGE CONTENTS
P
ART
DESCRIPTION QUANTITY
A Inf
rared Heater
1
B Remo
te Control
1
C Cont
rol Panel (preassembled to Infrared Heater (A))
1
D Broadrange Oscillation Vent
(preassembled to Infrared Heater (A))
1
E T
emperature Sensor (preassembled to Infrared Heater (A))
1
F 1Air Intake Vent
(preassembled to Infrared Heater (A))
A
C
D
B
E
F
P
ackage Contents..................................................................................................................................... 2
Safety Information..................................................................................................................................... 3
Frequently Asked Questions..................................................................................................................... 5
Preparation................................................................................................................................................ 6
Control Panel............................................................................................................................................. 7
Remote Control......................................................................................................................................... 8
Operating Instructions............................................................................................................................... 8
Care and Maintenance............................................................................................................................. 10
Troubleshooting........................................................................................................................................ 11
One-Year Limited Warranty..................................................................................................................... 12
Replacement Parts List............................................................................................................................ 12
3
SAFETY IN
FORMATION
IMPOR
TANT SAFETY INSTRUCTIONS
•
•
•
•
•
•
•
•
•
•
•
•
•
•
•
•
•
•
•
•
•
P
lease read and understand this entire manual before attempting to assemble, operate, or install the product.
WARNING: POTENTIAL ELECTRICAL HAZARD IF NOT ADHERED TO. When using electrical appliances,
basic precautions should always be followed to reduce the risk of fire, electric shock, and injury to persons,
including the following:
This heater must be plugged into a 120V,15 amp (or more) circuit of its own. Do not plug anything else into
the same circuit. If unsure if your home meets this specification, consult a certified electrician prior to use.
Risk of fire, overheating, malfunction, property damage, injury, or even death may result if not
adhered to!
Connect to a proper outlet only . Do not connect the heater to extension cords, surge protectors, timers,
direct breakers, or an outlet with other appliances connected to the same outlet. Risk of fire, overheating,
malfunction, property damage, injury, or even death may result if not adhered to!
This heater is hot when in use. To avoid burns, do not let bare skin touch hot surfaces. Use handles
(certain models) or wheels to move this heater.
Keep combustible materials, such as furniture, pillows, bedding, papers, clothes, and curtains at least 3 ft.
(0.9 m) from the front of the heater and keep them away from the sides and rear of the heater.
Extreme caution is necessary when any heater is used by or near children, invalids, pets, or when the
heater is left operating unattended.
Always unplug the heater when not in use.
Do not operate any heater with a damaged cord or plug or after the heater malfunctions, has been
dropped, or damaged in any manner. Contact the manufacturer for resolution options.
Do not use outdoors. Exposure to outdoor elements such as rain, snow, sun, wind, or extreme tempera-
tures may cause the heater to become a safety hazard.
This heater is not intended for use in bathrooms, laundry areas, and similar indoor locations, nor any
locations that use GFCI outlets.
Never place the heater where it may fall into a bathtub or other water receptacles.
Do not run the cord under carpet. Do not cover the cord with throw rugs, runners, or similar coverings.
Arrange the cord away from traffic areas and where it will not be tripped over.
The heater must be plugged into a wall outlet that is a dedicated circuit with a minimum 15 amp rating on
that individual circuit.
To disconnect the heater, first turn the power button to the OFF position and then remove the plug from
the wall outlet.
Do not allow foreign objects to enter or block any ventilation or exhaust opening as this may cause electric
shock, fire, or damage the heater.
Allow at least 3 ft. of unobstructed space to the front and rear of the heater to allow for maximum heat, air,
and ventilation flow.
A heater has hot and arcing or sparking parts inside. Do not use it in areas where gasoline, paint, or
flammable liquids are used or stored, nor use flammable solvents to clean the heater. Keep the heater
dry at all times .
Use this heater only as described in this manual. Any other use not recommended by the manufacturer
may cause fire, electric shock, or injury to persons.
Do not use abrasive solvents to clean the heater as it may cause damage to the finish or casing.
To prevent a possible fire, do not block air intakes or exhaust in any manner. Do not use on soft surfaces,
like a bed, where opening may become blocked.
Always plug heaters directly into a wall outlet/receptacle. Never use with an extension cord or relocatable
power tap (outlet/power strip).
Hyperthermia can result in death. Symptoms of hyperthermia include high body temperature, headache,
nausea, vomiting, tiredness, dizziness, fainting, and rapid pulse. If you begin to experience symptoms
related to hyperthermia, turn off the heater and seek medical attention.

4
S
AVE THESE INSTRUCTIONS
SAFETY IN
FORMATION
Child Lock Sa
fety Feature
Tip-O
ver Safety Feature
O
verheat Safety Feature
Specifi
cations
V
oltage Rating
120 V (60 Hz)
P
ower Consumption
1000 W/1,500 W
Unit Size
9.6
in. (W) x 9.9 in. (D) x 23.1 in. (H)
•
To avoid excessive room temperatures which can cause hyperthermia: DO NOT leave product running
unattended in a confined space around infants, or individuals with reduced physical, sensory, or mental
capabilities.
Press and hold the child lock button located on the control panel for 5 seconds or
remote control for 3 seconds. Locking is confirmed when a buzzer rings and the
control panel displays “CL”. When locked, the control panel and remote control (if
provided) will not function.
This heater is equipped with a tip- over safety feature. Once the heater is tipped over,
an internal switch will automatically shut the heater off. Once the heater is restored to
an upright position, the heater will reset. To continue operation, turn on the heater
using the control panel or supplied remote control (if provided) on the heater.
This heater is equipped with an overheat safety feature. When the internal components of the heater reach a
certain temperature that could cause overheating or possible fire, the heater will automatically shut off.
WARNING: It is normal for the power cord to feel warm to the touch. However, a loose fit between the
outlet and the plug may cause overheating of the plug. If this occurs, try inserting the plug into a different
outlet. Contact a qualified electrician to inspect the original outlet for damage.
To unlock the control panel or remote (if provided), repeat this procedure. Unlocking
is confirmed when a buzzer rings and the lock indication disappears.
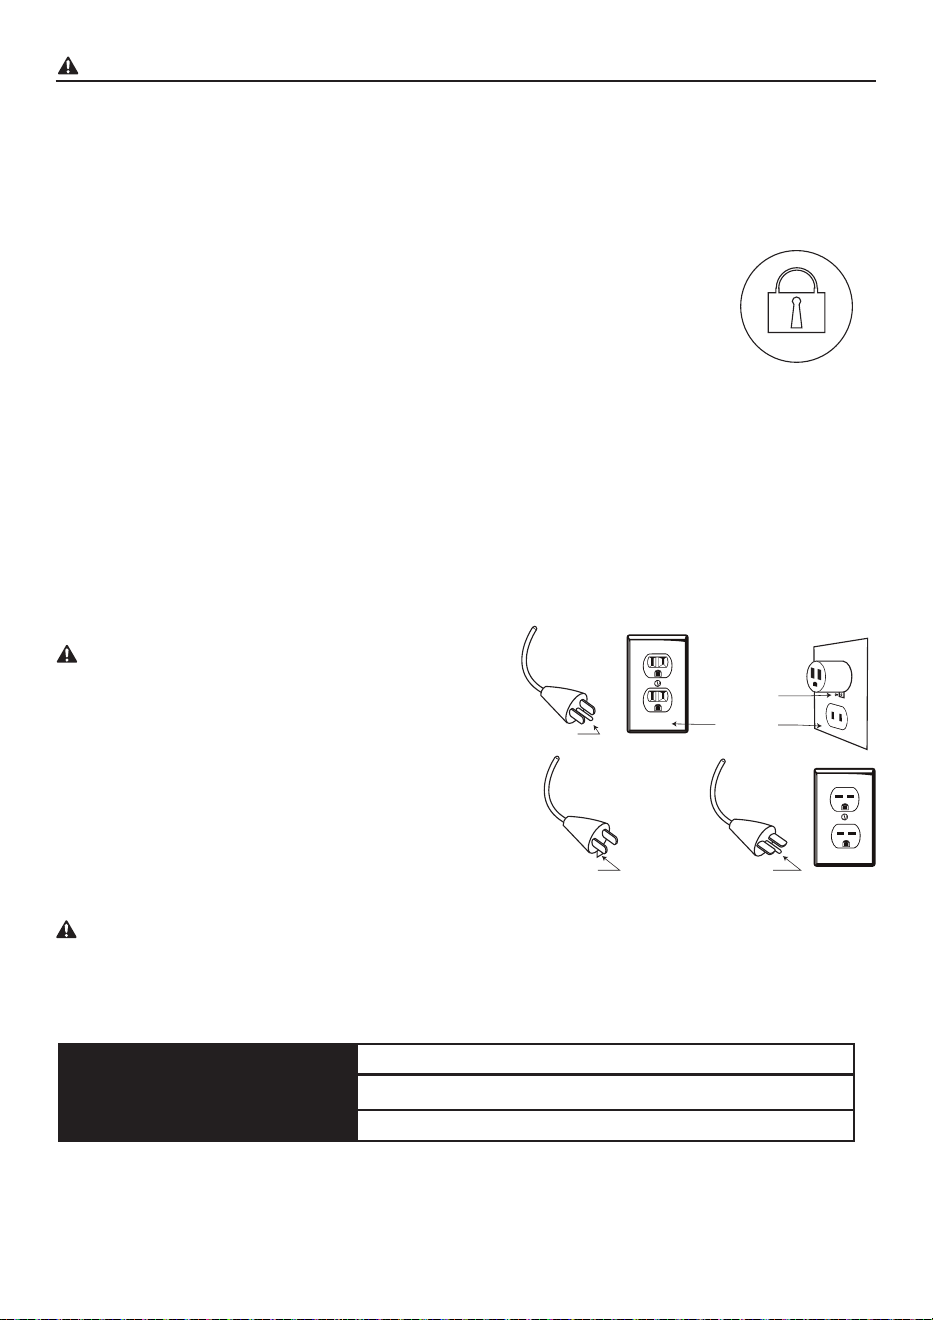
WARNING: This heater has a voltage rating of
120 volts. The cord has a three-blade, ground-
ing-type plug. An adapter is available for connecting
three-blade grounding-type plugs to two-slot
receptacles. The grounding plug extending from the
adapter must be connected to a permanent ground
such as a properly grounded outlet box. The adapter
should not be used if a three-slot grounded
receptacle is available.
DO NOT DEFEAT THE SAFETY PURPOSE OF THE
GROUNDED PLUG.
Metal Screw
Cover of Grounded
Outlet Box
Grounding Pin
Grounding PinGrounding Means
5
FREQUENT
LY ASKED QUESTIONS
W
ATTAGE
BTUS
1,500 5,118
1,000 3,412
750 2,559
500 1,706
Q. Can the heating e
lements be replaced?
Q. On
ce I plug the unit in and turn it on, how long will it take to heat my room?
Q. I do not ha
ve a grounded outlet. Can I use adapters, a 2-prong power strip?
Q. My Hea
ter has an ECO setting? How does this setting work?
Please review these frequently asked questions on the next few pages prior to using your heater.
Q. My heater emits a strange odor when I first open the box and when I turn the heater on for the first
time. Why is this happening?
Q. The temperature on my heater does not match the temperature display on my wall, or external
thermostat. Why?
Q. If my heater runs on its max wattage setting, how many BTUs is that?
A. This is normal. This heater is treated with a special heat safe/resistant coating. This odor will sometimes be
present when the box is opened. When the coating is exposed to heat, it produces this particular odor during the
first few hours of operation. This will dissipate after the break-in period. If you are sensitive to odors, you may
want to pre-burn the unit in a garage with the door open until the initial odor dissipates.
A. This heater is intended to be used as supplemental heat in areas most needed. It may take several minutes
to several hours to heat your area, depending on various factors. The below chart provides BTU translations for
different wattages.
A. Replacement heating elements can be obtained from the manufacturer. All parts may be purchased through
the manufacturer if your product is out of warranty. If you feel that the elements are definitely faulty right out of
the box, contact Customer Support. A representative can then direct you to the next step.
A. The heating process in the heater begins immediately upon powering on and setting the desired temperature
above the ambient temperature. A noticeable change in the ambient temperature of the room will vary due to
variables such as the location of the heater (in the home), floor plan and size of the room, how well the room is
insulated, how many doors/windows, how much bare concrete (acts as a heat sink with any type of heating), the
opening and closing of an exterior door, long hallways, high ceilings, etc. Customers with smaller rooms
experience quick heat changes. Rooms with larger and open floor plans can expect up to 24 hours to completely
heat up.
A. This is completely normal . The temperature display on your heater may vary from the temperature display on
another thermostat (like the one mounted to your wall or a purchased external thermostat). This is because the
temperature sensor on the heater reads the temperature directly around the heater. With the heater near the
cold floor (and heat rising), any readings on elevated or external thermostats will differ in readings on the heater.
The best way to operate your heater is to set the unit on High and dial up to a temperature that feels comfortable
to you. Then, leave it at that temperature, regardless of the mismatch. The heater will cycle off when the set
temperature is met or exceeded slightly.
A. NO! If you do not have a grounded outlet, contact a certified electrician for advice. Removing or altering any
part of the heater’s original design or intent (including the power cord) will void the warranty and make you liable
for any unexpected or hazardous results.
A. The ECO mode on your heater is a program that attempts to keep the temperature strictly at a “warm” 68° F
(20°C). This also helps with efficiency, as it is programmed to 1) Increase the power to the unit’s maximum
wattage if the temperature drops below 64.4°F (18°C) 2) Gradually reduce the wattage used as it approaches
66.2°F (19°C) and 3) Stop heating when 68° F (20°C)is achieved. This is considered an economical function,
since in the ECO setting, the heater is almost never running at the maximum watts.
6
FREQUENT
LY ASKED QUESTIONS
W
ARNING:
Risk of fi
re, damage to property, or injury may result if requirements are not met.
A. Yes, but make sure they are not plugged into the same circuit. Each heater requires its own minimum
15-amp circuit with no other items plugged into that circuit or outlet. This is because heaters are
considered appliances and draw out high amperage. If you are unsure your circuit meets these require-
ments, verify with a certified electrician.
A. This is normal . The heater’s fan will continue to run even after the heater automatically cycles down.
The fan continues to run so that every last bit of heat is blown out of the heat chamber while allowing the
unit to continue filtering your air. Once the internal box/components cool completely, the fan should then
shut off on its own. In this case, allow a few minutes after the heat cycles off (with power on). The fan will
shut off faster when the power is turned off.
A. The heater’s display is defaulted to read the temperature as Fahrenheit. If your heater is definitely
heating but shows it is in the 20s you probably have the setting to read your temperature in Celsius
rather than Fahrenheit.
A. A warm power cord is normal. These power cords are rated safe for up to 105°C/ 221°F by the UL,
CSA, or TUV. The exception is, if you detect heat, smoke, or signs of melting at the contact point of the
wall outlet, it may be due to loose or worn wall contacts (or arcing). Please stop using the heater
immediately, contact warranty support for a replacement power cord, and have a certified electrician
replace the wall outlet as soon as possible.
PRE
PARATION
Place the heater on a firm, level surface and plug into a grounded 120 V, 60 Hz power outlet. Only
operate heater in upright position.
Insert two AAA batteries into the remote control before using (batteries not included). *(Not all products
will include a remote control.)
Please note that infrared heaters do not heat like a traditional space heater. You should not expect
infrared heaters to blow hot air like a traditional space heater. Infrared heaters heat objects not air.
Infrared heaters are intended to supplement an already heated, insulated room. Square footage
specifications assume a single enclosed room not an entire home. Infrared heaters do not heat through
walls, floors, and are not intended to replace a main heat source. Infrared heat can take at least 24
hours to warm a room but operate much more efficiently to maintain the desired temperature. Infrared
heaters will not work well in uninsulated unheated spaces like screened in porches, RV’s, garages,
unheated basements, etc.
Q. Can I use more than one heater at a time? Can I use the heater and another appliance at the same
time?
Q. Why does my heater’s fan continue to run after the set temperature is reached or the power is
turned off?
Q. My heater’s display shows my ambient temperature to be in the 20s when I know it is warmer than
that. Why?
Q. My heater’s power cord gets warm. My cord is showing signs of heat or melting at the outlet.
Is this normal?
7
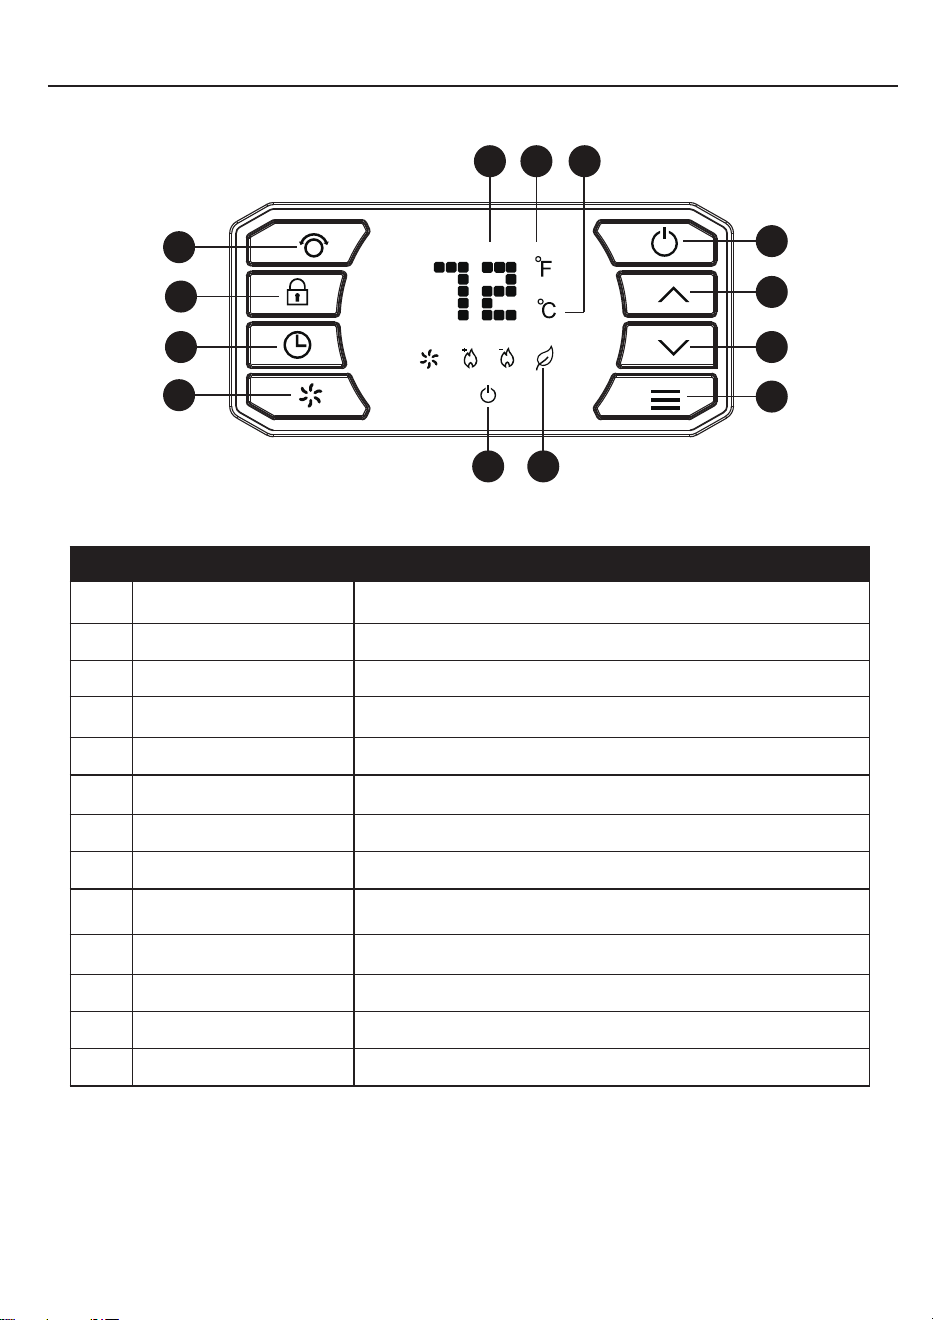
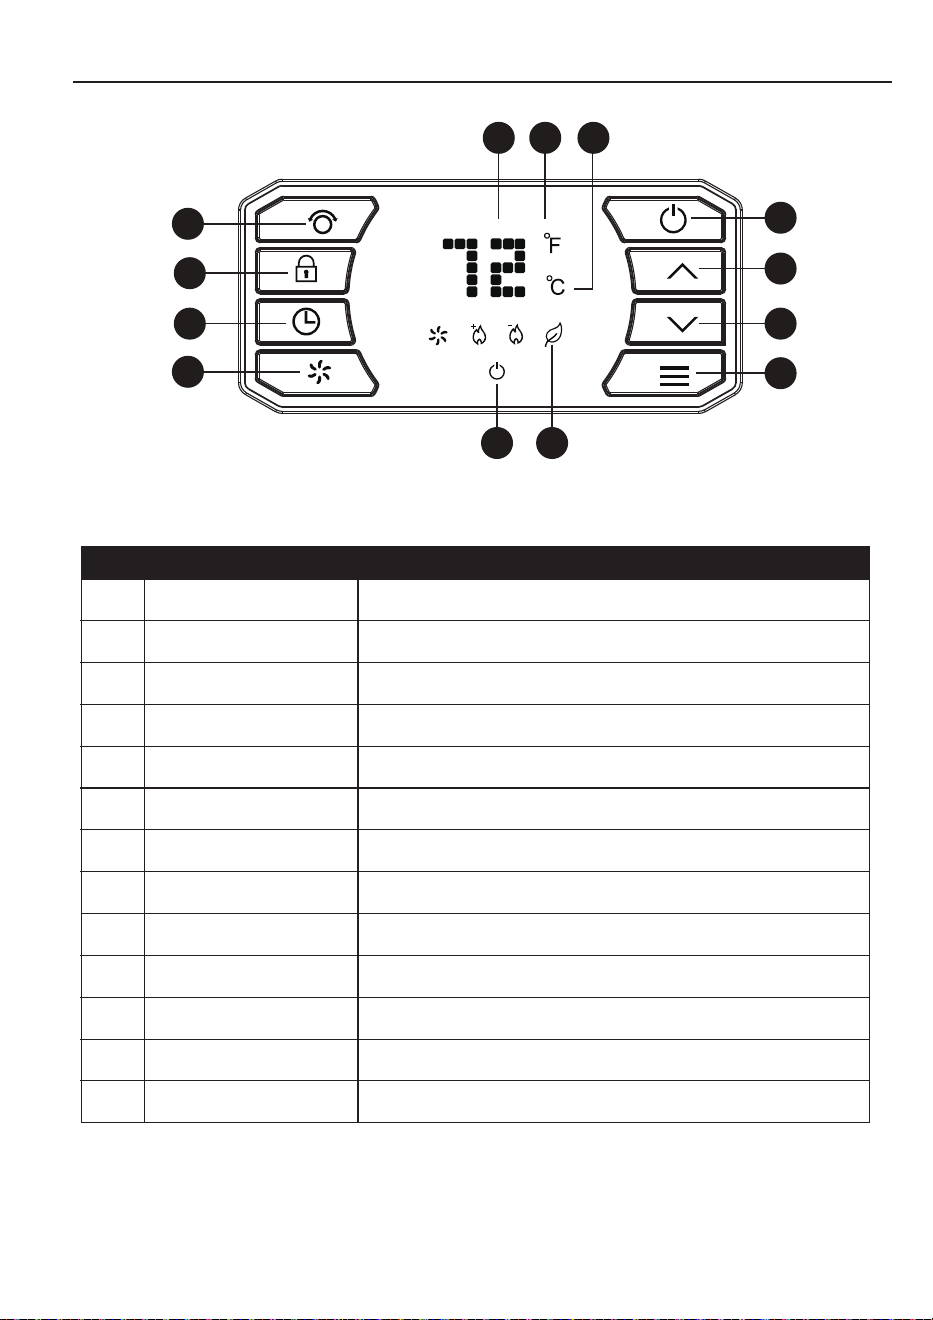
Toggles the oscillation vent ON/OFF. Hold to toggle between °C/°F
CONTROL
PANEL
PART NAME DESCRIPTION
1
2
3
Digi
tal Display
Readout of the set
room temperature or timer value
4
Celsius Indi
cator Light
Indi
cates that the temperature is being displayed in Celsius
5
F
ahrenheit Indicator Light
Indi
cates that the temperature is being displayed in Fahrenheit
6 Temp-Down Button Decreases the set temperature
7
P
ower Switch Button
P
owers the heater ON or OFF
8
Oscillation Button
9
10
T
emp-Up Button
Inc
reases the set temperature
11 Timer But
ton
Engages the on / off timer function
12
Mode But
ton
T
oggles between High / Low/ Eco
13
Sa
fety Lock Button
Hold
to Lock / Unlock heater’s control panel
Indi
cates when Heat mode is on High / Low/ Eco Mode or Fan
Only Mode
F
an Switch Button
PART NAME DESCRIPTION
Toggles between Fan Only Mode and Heat Mode
P
ower Indicator Light
Indi
cates when the unit is receiving power from the wall outlet
1
3
5
6
11
10
2
4
7
8
9
12
13
Heater modes indicator
Lights
8
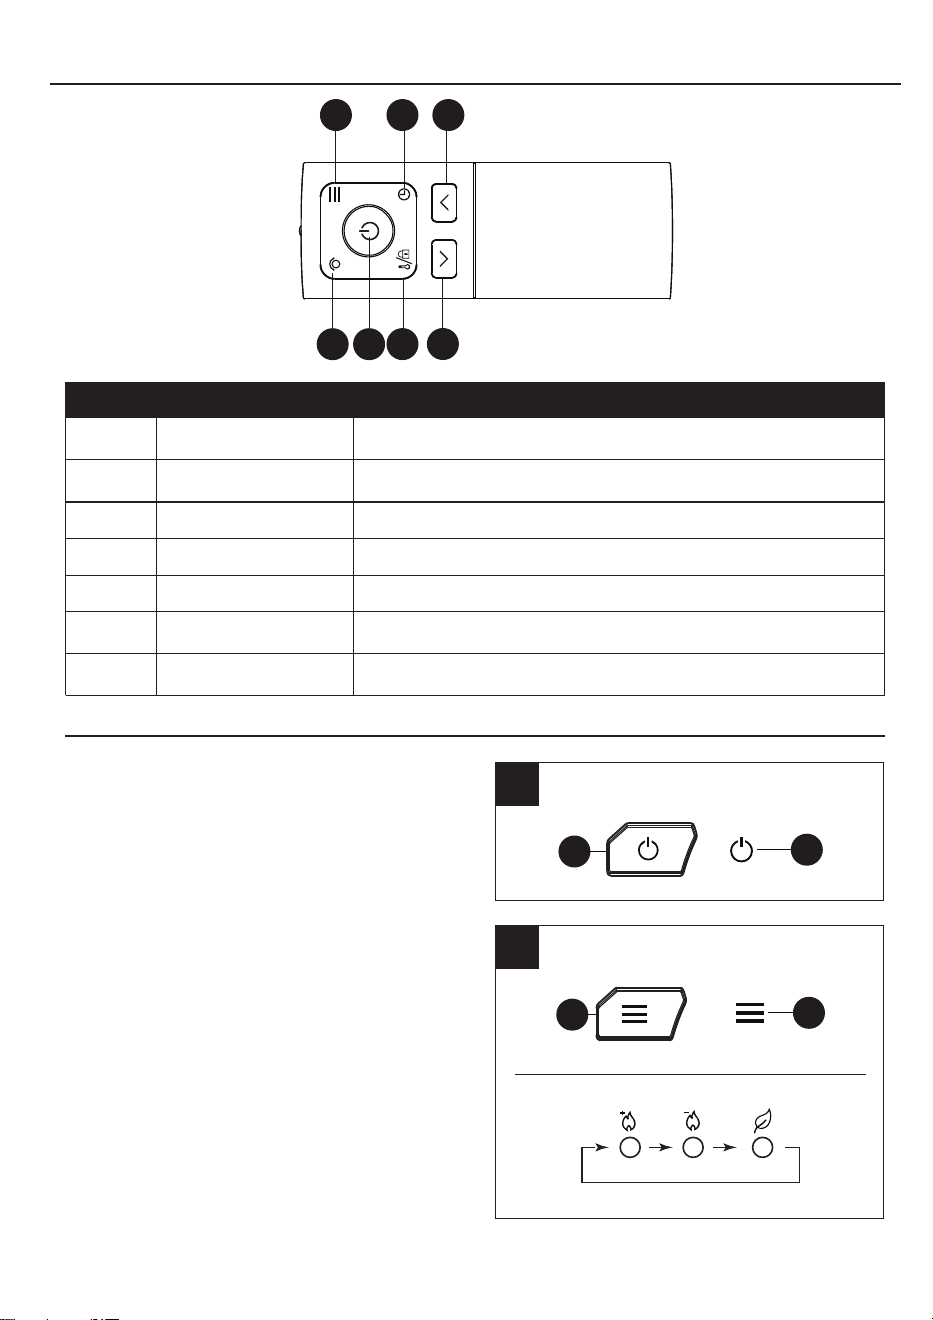
P
ART
NAME DESCRIPTION
4
Timer Button Engages the on/off timer5
Oscillation button
Engages oscillation function
3 Power Button Powers the heater on or off
1
Mode Button Toggles between High/Low/Eco Modes2
Ambient/Lock Button Shows ambient temp/hold to engage or disengage safety lock function
6
Temp Up Button Increases the set temperature value7
Temp Down Button Decreases the set temperature value
2
43
1
7
5
6
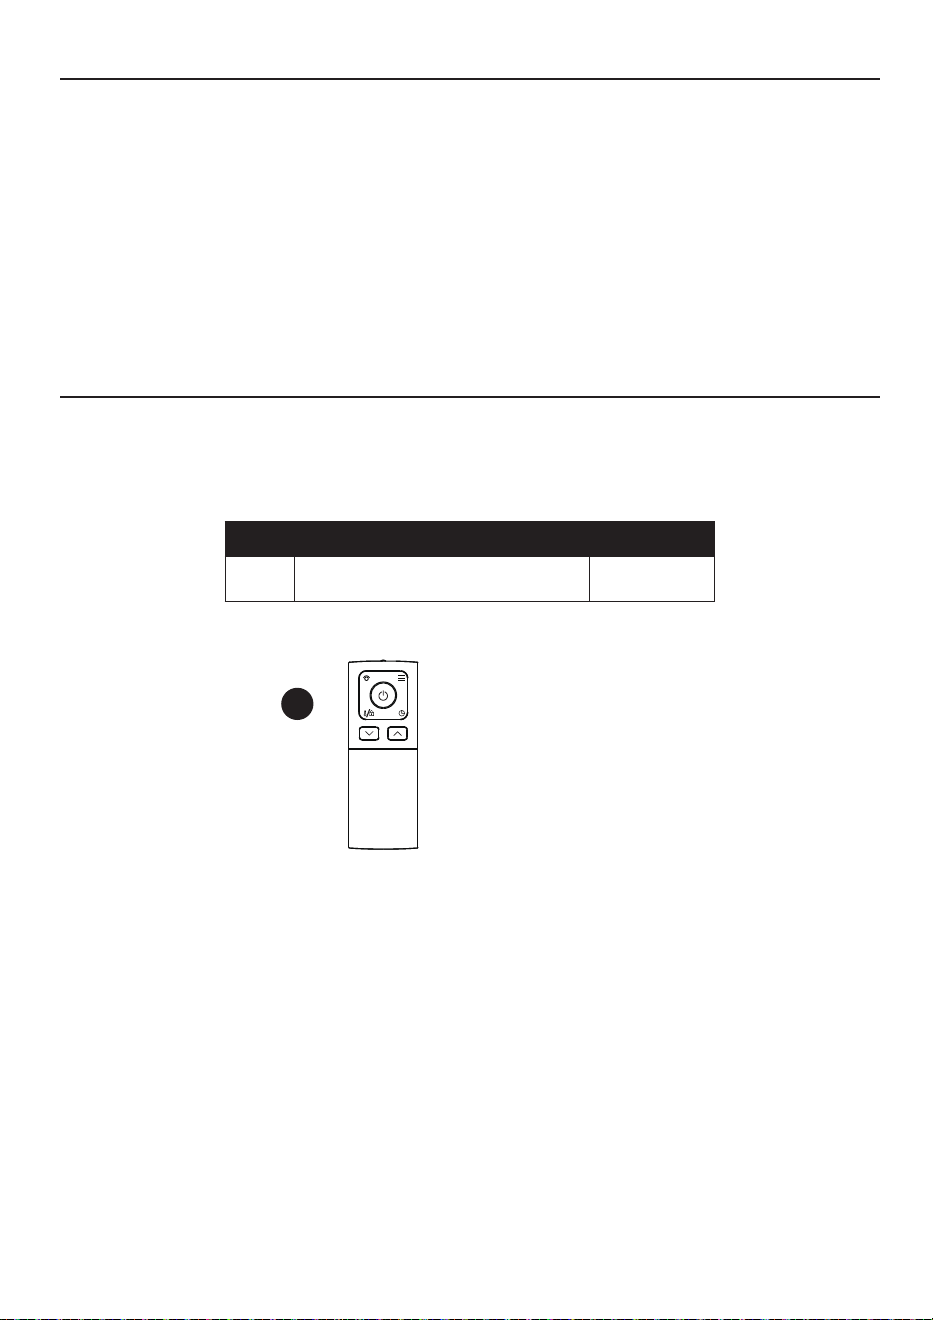
REMOTE CONTROL
OPER
ATING INSTRUCTIONS
1
.
1
C
B
2
.
No
te:
2
C
B
Power for High is 1,500 W; Low is 1,000W. ECO
mode is an economic energy saving function.
When ECO mode is chosen, the heater will
operate to maintain a constant warm 68°F.
The ECO LED light will only illuminate when
the ECOfunction is active and the ambient
room temperature falls below 68ºF / 20ºC.
Turn the heater on or off by pressing the Power
button on the control panel (C) or by pressing the
Power button on the remote control (B).
Select a heat setting by pressing the MODE
button on either the control panel (C) or the
remote control (B) to toggle between the three
heat settings.
Once the power is off, heating elements will stop
working first. Thefan will continue working for up to
90 seconds to dispense residual heat inside the
heater. This is a normal function.
9
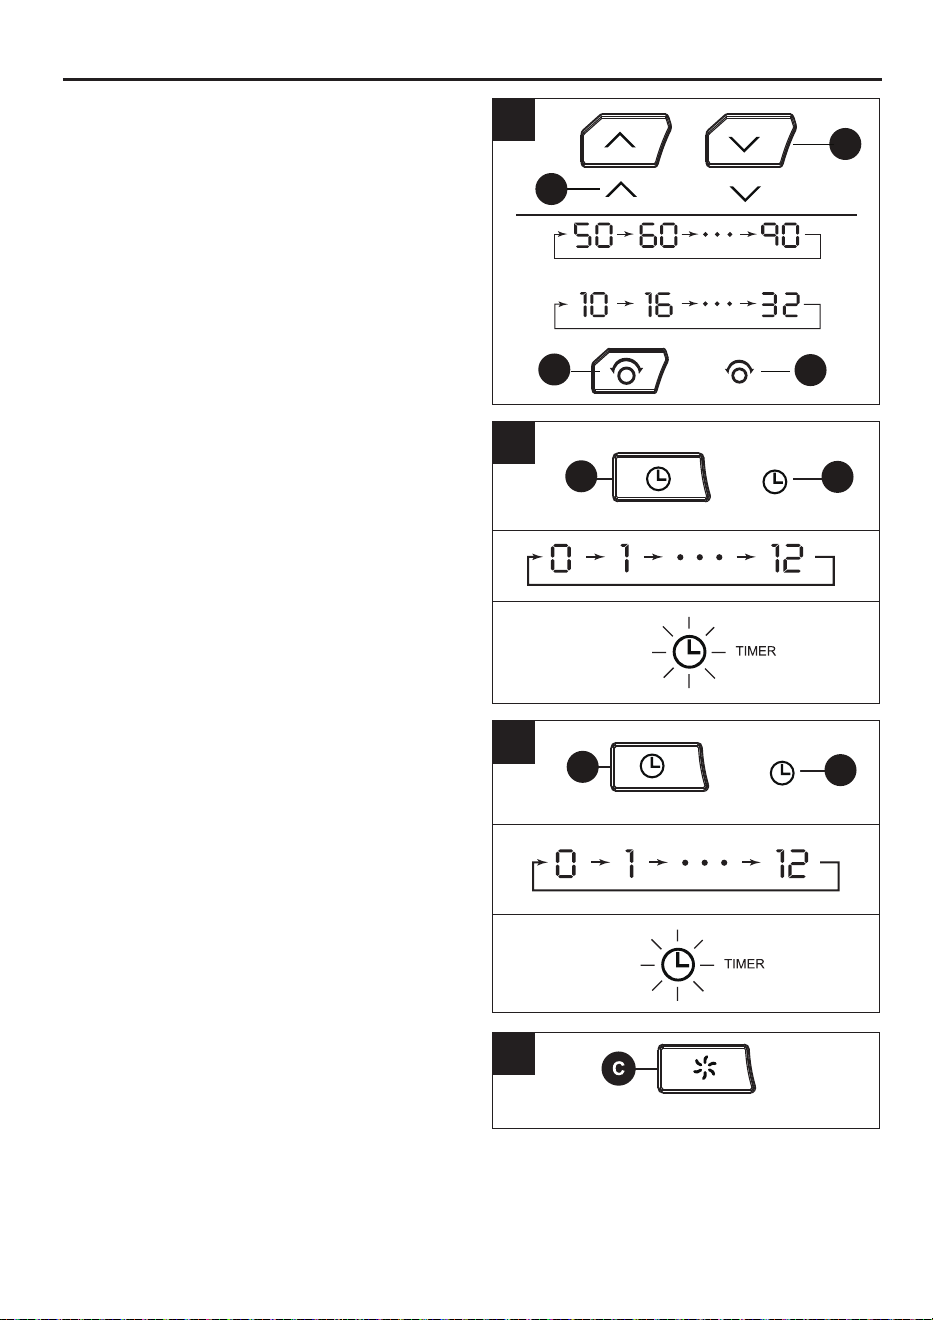
OPER
ATING INSTRUCTIONS
3
.
4
.
5
.
N
ote:
N
ote:
N
ote:
6.
3
C
C
B
B
C
B
C
B
OR
4
5
6
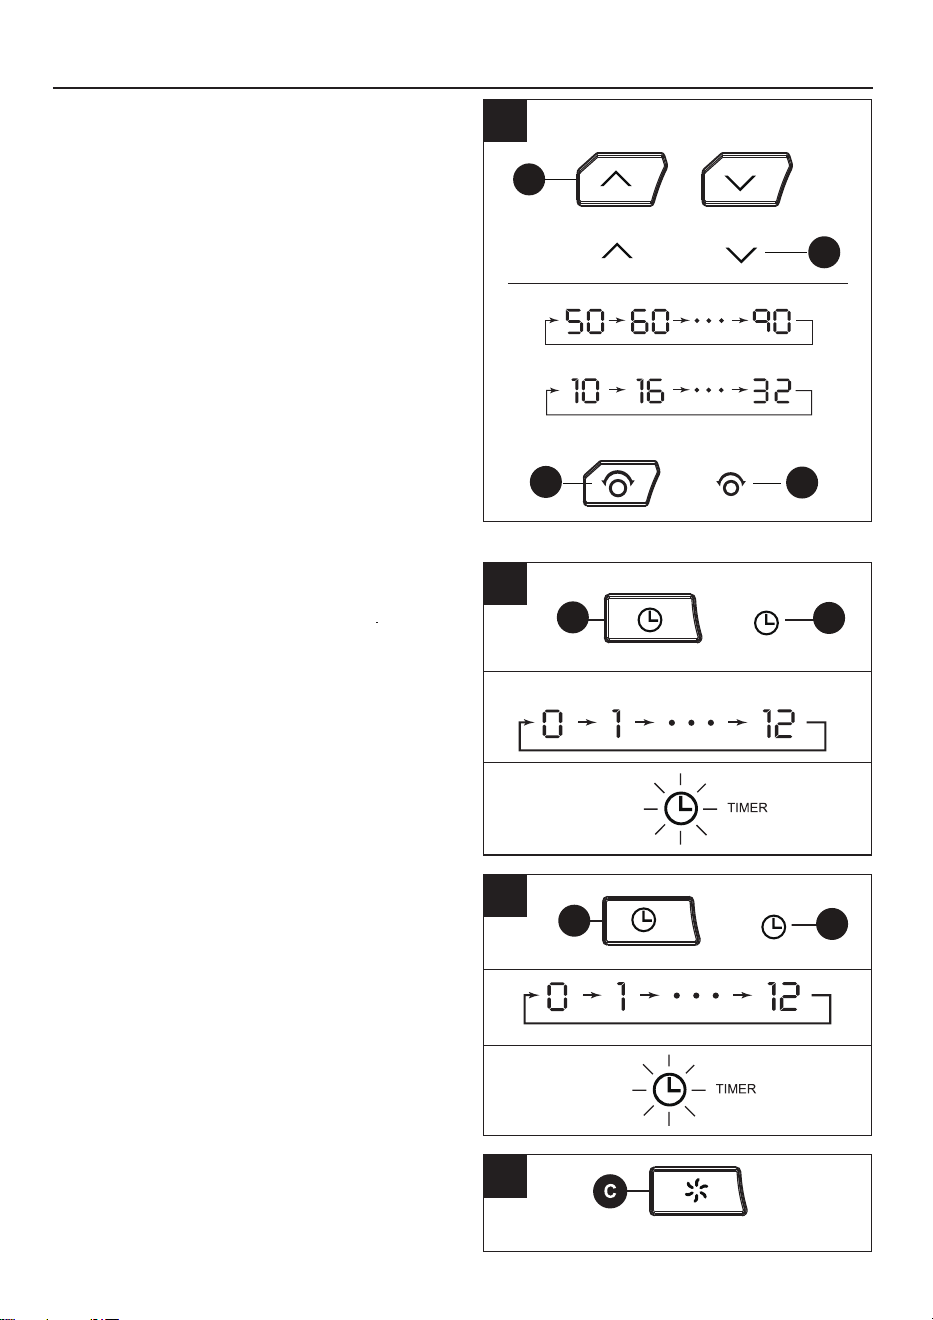
The timer-power-off function can only be
set when the heater is in power-on mode.
The timer-power-on function can only be
set when the heater is in power-off mode.
The Timer light turns on when the timer is set.
The Timer light turns on when the timer is set.
To set the timer to power off the heater, start
the unit and press the Timer button on the
control panel(C) or remote control (B).
To set the timer to power on the heater, first ensure
the unit is powered off, then press the button on the
control panel(C) or remote control (B).
To toggle between Fan Only Mode and Heat Mode
press the Fan button on the control panel (C).
Press and hold the oscillation button on the
control panel (C)for 5 seconds to switch the
digital display indicator on the heater
between Fahrenheit and Celsius. On the
remote, short press the oscillation button to
engage oscillation function.
Note: Press and hold the Fan button on the control
panel (C) for 5 seconds to engage Ambient
Temperature.
Set the temperature by pressing the arrows on
the control panel (C) or the remote control (B).
You can set the temperature on the heater
anywhere between 50°F and 90°F or between
10°C and 32°C. Once you have chosen the
desired temperature, the heater will remain on until
the room temperature increases to the temperature
on the digital display. The heater will cycle on and
off to maintain the desired room temperature.
The digital display on the control panel (C) or
remote control changes from the set temperature
readout to a time value for the timer. Press the
Timer button repeatedly to change the number
value between a range of 0 to 12 hours (in 1-hour
intervals).
The digital display on the control panel (C) or
remote control (B) will indicate time value for the
timer. Press the Timer button repeatedly to change
the number value between a range of 0 to 12
hours (in1-hour intervals).
10
OPER
ATING INSTRUCTIONS
C
ARE AND MAINTENANCE
1
.
C
AUTION: DO NOT let liquid enter the heater.
2
.
3
.
DO N
OT immerse the heater in water.
4
.
W
ait until the unit is completely dry before use.
5
.
6
.
7
.
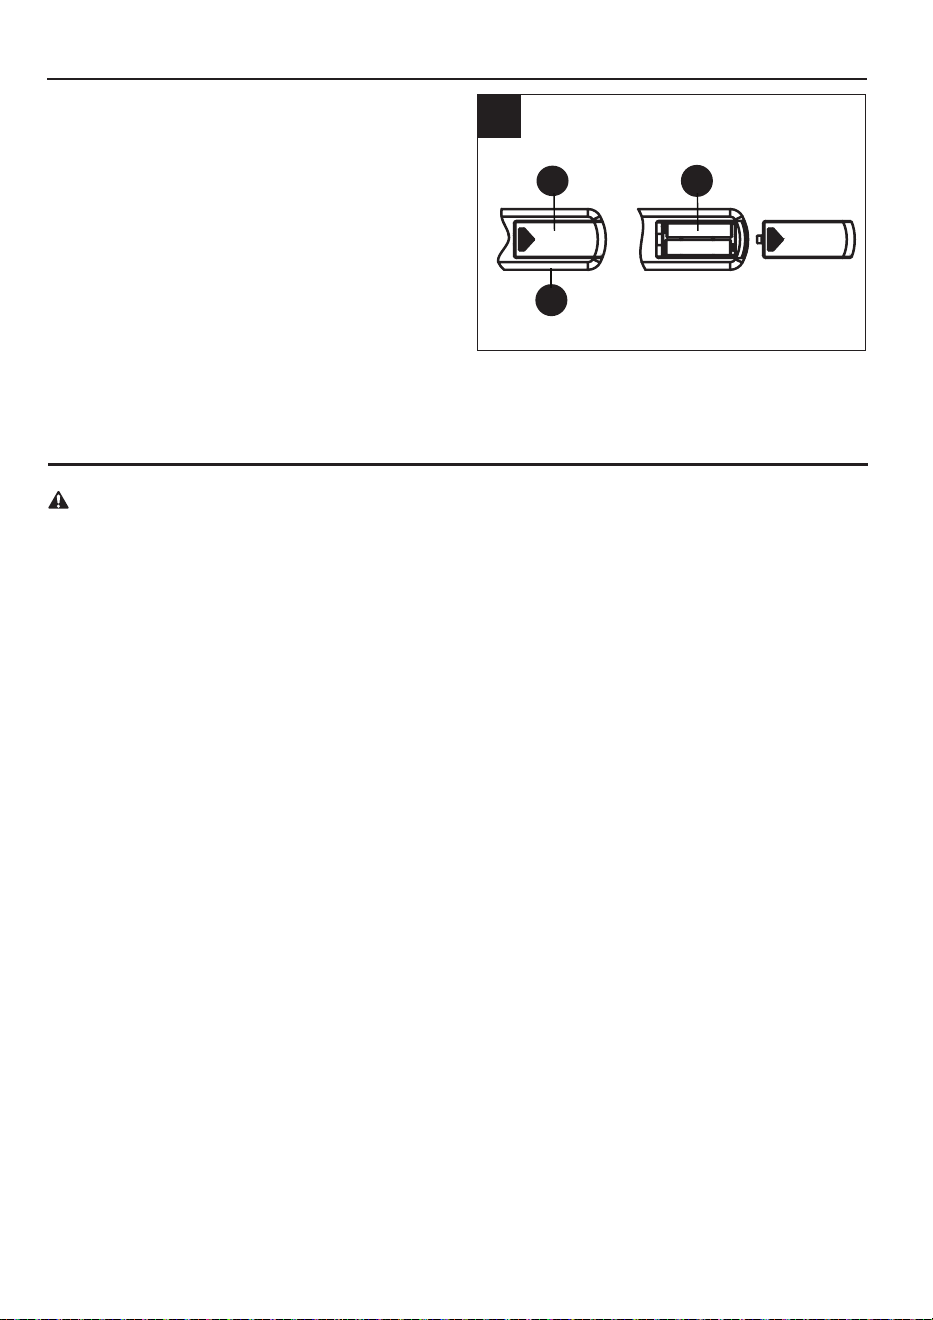
7.
7
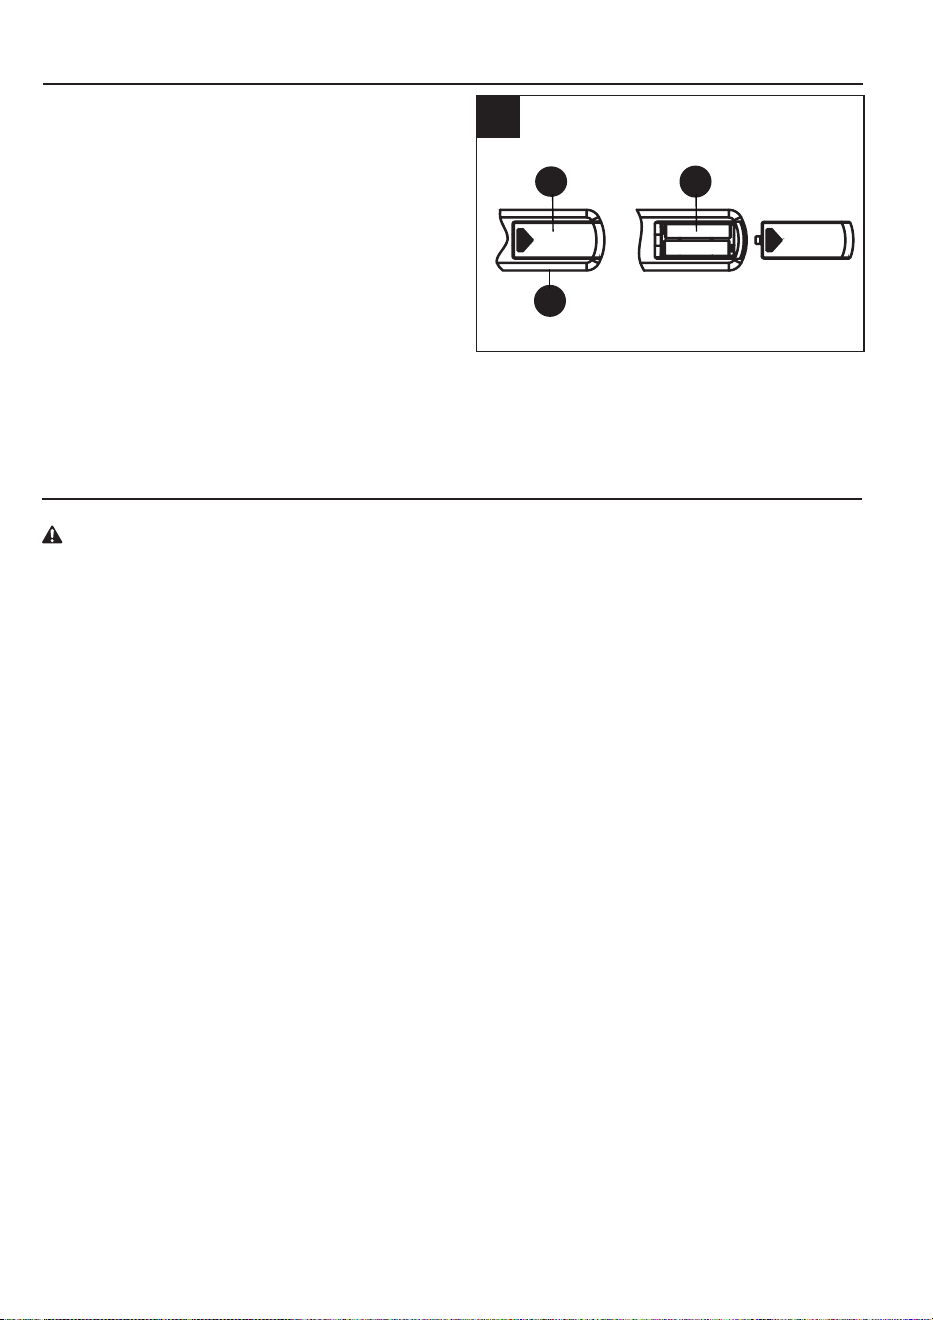
To replace the batteries, remove the battery
cover (1) from the remote (B) by applying
pressure to the battery cover (1) and sliding it
away from the remote (B). Insert two AAA
batteries (not included) (2) and close the remote
by placing the battery cover (1) back on the
remote (B):
N
ote:
Do not mix old and new batteries. Do not
mix alkaline, standard (carbon-zinc), or
rechargeable (NiCad, Ni-Nh, etc.) batteries.
Non-rechargeable batteries are not to be
recharged. Batteries are to be inserted with
the correct polarity.
Exhausted batteries are to be removed from
the product.
Remote control range: 12.2 meters.
Clean the air intake or inside the unit after three months or if it appears to be blocking airflow. With
the heater unplugged, use a vacuum hose attachment or compressed air to blow out or clean
out any dirt, hair, or debris that may have built up around and inside the unit as this will obstruct
airflow.
To keep the heater clean, clean the outer shell with a soft, damp cloth. Use a mild detergent if
necessary. After cleaning, dry the unit with a soft cloth.
DO NOT use alcohol, gasoline, abrasive powders, furniture polish, or rough brushes to clean the
heater. This may cause damage or deterioration to the surface of the heater.
If you will not be using the heater for a while, take the batteries out of the remote control and store
for future use.
Store the heater in a cool, dry location when not in use. To prevent dust and dirt build-up, use the
original packaging to repack the unit.
1 2
B
WARNING: Before performing any maintenance task, turn off the unit, unplug the unit, and allow it to cool
completely.
11
TROUBLESHO
OTING
PROBLEM PO
SSIBLE CAUSE
CORRE
CTIVE ACTION
1
.
T
he power cord is not plugged in.
2
.
3
.
4
.
1
.
2
.
3
.
4
.
1
.
The hea
ter has overheated.
2
.
Insufficient p
ower to the unit.
3
.
The air
vent is clogged.
4
.
1
.
2
.
3
.
4
.
1
.
1
.
P
lease contact technical support.
The heater does
not turn on.
The heater shut
off unexpectedly.
The heater displays
an error code “E2”.
The e
lectricity at the main fuse
box is not working.
The bat
tery in the remote control
is dead.
The thermo
stat on the heater is
set lower than the room
temperature.
Plug the p
ower cord into an
electrical outlet.
Check the e
lectricity at the main fuse
box.
Repla
ce the batteries in the remote
control.
Inc
rease the thermostat temperature
on the heater for a higher heat
setting.
Insufficient air fl
ow to the heater.
Unplug the hea
ter from the wall,
wait a few seconds then plug the
power cord back in.
Make sure the unit is plugged into a
dedicated outlet, without extension
cords or surge protectors.
C
lean the air intake located on the
bottom of the unit.
M
ove the unit at least 3ft from the
wall.
T
emperature sensor not
functioning properly.
12
ONE-YEAR LIMITED
WARRANTY
REPL
ACEMENT PARTS LIST
P
ART
DESCRIPTION P
ART #
A
Remo
te Control
1102006035
A
Prin
ted in China
For replacement parts, call our customer service department at 866-994-4148, 8 a.m.- 8 p.m., EST,
Monday - Sunday. You could also contact us at [email protected].
You should first read all instructions before attempting to use this product.
This unit is guaranteed to the original retail purchaser against defects in quality or workmanship for a
period of one year from the date of original purchase. If this unit fails because of a manufacturing defect,
contact the customers service for technical support, or return it to the place of purchase for repair or
replacement. This warranty does not cover damage caused by misuse, abuse alteration. Repairs made
by anyone other than manufacturer are not covered in this warranty. Stores will not be held liable for any
losses due to neglectful operation.
Please retain your proof of purchase as well as the BOX to validate the guarantee.
You will need to provide the unit’s model number, serial number (located on the heater), date of
purchase, a daytime phone number or email, and a copy of your receipt.
13
ARTÍCULO #4969026
MODELO #HT1218N
Número de serie
Fecha de compra
Gracias por comprar este producto UTILITECH.
¿Preguntas, problemas o piezas faltantes?
Antes de regresar, contáctenos en:
UTILITECH y el diseño del logotipo son
marcas comerciales o marcas registradas
de LF, LLC. Todos los derechos reservados.
CALENTADOR DE TORRE
DE MADERA INFRARROJO
14
ÍNDICE
Calentador infrarrojo
CANTIDAD
PIEZA
DESCRIPCIÓN
CONTENIDO DEL PAQUETE
Control remoto
Panel de control (preensamblado al calentador infrarrojo (A))
A
B
C
D
E
F
A
C
D
B
E
F
Contenido del paquete........................................................................................................................... 14
Información de seguridad....................................................................................................................... 15
Preguntas frecuentes............................................................................................................................. 17
Preparación............................................................................................................................................ 18
Panel de control...................................................................................................................................... 19
Control remoto........................................................................................................................................ 20
Instrucciones de funcionamiento............................................................................................................ 20
Cuidado y mantenimiento....................................................................................................................... 22
Solución de problemas........................................................................................................................... 23
Un año de garantía limitada.................................................................................................................... 24
Lista de piezas de repuesto.................................................................................................................... 24
Ventila de oscilación de amplio alcance (preensamblada al
calentador infrarrojo (A))
Sensor de temperatura (preensamblado al calentador
infrarrojo (A))
Interruptor de encendido de la ventila de entrada de aire
(preensamblado al calentador infrarrojo (A))
15
INFORMACIÓN DE SEGURIDAD
INSTRUCCIONES IMPORTANTES DE SEGURIDAD
•
•
•
•
•
•
•
•
•
•
•
•
•
•
•
•
•
•
•
•
Lea y comprenda completamente este manual antes de intentar ensamblar, usar o instalar el producto.
•
ADVERTENCIA: POSIBILIDAD DE RIESGO ELÉCTRICO SI NO SE CUMPLEN LAS ADVERTENCIAS.
Cuando utilice electrodomésticos, siempre tome medidas de precaución básicas para reducir el riesgo de
incendios, descargas eléctricas y lesiones personales, incluidas las siguientes:
Este calentador debe enchufarse a un circuito propio de 120 voltios y 15 amperios (o más). No enchufe
ningún otro artefacto en el mismo circuito. Si tiene dudas sobre si su hogar cumple con esta especificación,
consulte a un electricista certificado antes de usar el producto. Si esto no se cumple, podrían producirse
riesgos de incendio, sobrecalentamiento, daños materiales, lesiones o incluso la muerte.
Conéctelo solo a un tomacorriente con la debida puesta a tierra. No conecte el calentador a extensiones
eléctricas, protectores contra sobrecarga, temporizadores, interruptores de circuito o en un tomacorriente
donde haya también otros electrodomésticos conectados. Si esto no se cumple, podrían p roducirse
riesgos de incendio, sobrecalentamiento, daños materiales, lesiones o incluso la muerte.
Este calentador se calienta cuando está en funcionamiento. Para evitar quemaduras, no toque superficies
calientes con la piel desnuda. Utilice las manijas (algunos modelos) o las ruedas para mover el calentador.
Mantenga los materiales inflamables, como muebles, almohadas, ropa de cama, papeles, ropa y cortinas,
a 0,9 m (3 pies) como mínimo de la parte frontal del calentador y manténgalos alejados de los costados y
de la parte posterior del mismo.
Se debe tener extrema precaución cuando niños, personas discapacitadas y mascotas usen un calenta-
dor, cuando este se use cerca de ellos o cuando se deje funcionando sin supervisión.
Siempre desenchufe el calentador cuando no lo use.
No opere ningún calentador que tenga el cable o el enchufe dañados o después de que el calentador haya
fallado, se haya caído o dañado de cualquier manera. Póngase en contacto con el fabricante para conocer
las opciones de resolución.
No lo use en exteriores. La exposición a las condiciones climáticas exteriores, como la lluvia, la nieve, el
sol, el viento o las temperaturas extremas, podría causar que el calentador se convierta en un riesgo de
seguridad.
Este calentador no está diseñado para usarse en baños, cuartos de lavado ni en espacios interiores
similares, ni en ningún área donde se utilicen tomacorrientes con interruptor de circuito de falla de puesta a
tierra (GFCI, por sus siglas en inglés).
Nunca coloque el calentador donde se pueda caer dentro de una bañera u otros contenedores de agua.
No pase el cable por debajo de alfombras. No cubra el cable con alfombras, tapetes o cubiertas similares.
Coloque el cable lejos de zonas de tránsito en donde nadie pueda tropezarse y caer.
El calentador debe enchufarse en un tomacorriente de pared con un circuito exclusivo con una clasificación
mínima de 15 amperios en dicho circuito individual.
Para desconectar el calentador, primero gire el botón de encendido a la posición "OFF" (Apagado) y luego
retire el enchufe del tomacorriente de pared.
No permita que objetos extraños ingresen o bloqueen las aberturas de ventilación o escape, ya que esto
podría provocar descargas eléctricas, incendios o daños en el calentador.
Deje un espacio sin obstrucciones de al menos 0,91m desde las partes frontal y posterior del calentador
para permitir el máximo flujo de calor, aire y ventilación.
Un calentador contiene piezas calientes y piezas que forman arcos eléctricos o que echan chispas. No lo
utilice en áreas donde se almacene o utilice gasolina, pintura o líquidos inflamables, ni utilice solventes
inflamables para limpiar el calentador. Mantenga el calentador seco en todo momento.
Utilice este calentador solo como se describe en este manual. Cualquier otro uso no recomendado por el
fabricante puede causar incendios, descargas eléctricas o lesiones personales.
No use solventes abrasivos para limpiar el calentador, ya que podría dañar el acabado o la carcasa.
Para evitar incendios, no bloquee las entradas ni salidas de aire de ninguna manera. No use el producto
sobre superficies blandas, como una cama, donde las aberturas se puedan bloquear.
Siempre enchufe el calentador directamente en un tomacorriente de pared. Nunca lo use con extensiones
eléctricas ni tomacorrientes de alimentación reubicables (tomacorrientes múltiples o regletas).
La hipertermia puede provocar la muerte. Los síntomas de la hipertermia incluyen temperatura corporal
alta, dolor de cabeza, náuseas, vómitos, cansancio, mareos, desmayos y pulso acelerado. Si comienza a
experimentar síntomas relacionados con la hipertermia, apague el calentador y busque atención médica.
Especificaciones
Clasificación de voltaje
Consumo de energía
Tamaño de la unidad
120 V (60 Hz)
1000 VATIOS/1500 VATIOS
24.53 cm (ancho) x 25.33 cm (profundidad) x 58.90 cm (alto)
16
INFORMACIÓN DE SEGURIDAD
Característica de bloqueo de seguridad infantil
Característica de seguridad antivuelco
Característica de seguridad de sobrecalentamiento
GUARDE ESTAS INSTRUCCIONES
•
Para evitar temperaturas ambiente excesivas que pueden causar hipertermia: NO deje el producto
funcionando sin supervisión en un espacio confinado alrededor de bebés o personas con capacdades
físicas, sensoriales o mentales reducidas.
Mantenga presionado durante 5 segundos el botón del dispositivo de bloqueo para
niños, ubicado en el panel de control, o el control remoto durante 3 segundos. El bloqueo
se confirma cuando se produce un zumbido y el panel de control muestra "CL". Una vez
bloqueado, el panel de control y el control remoto (si se incluye) no funcionarán.
Repita este procedimiento para desbloquear el panel de control o el control remoto (si se
incluye). El desbloqueo se confirma cuando se produce un zumbido y desaparece el
indicador de bloqueo.
Este calentador está equipado con una característica de seguridad antivuelco. Si el calentador se vuelca, un
interruptor interno lo apaga automáticamente. Una vez que el calentador vuelva a colocarse en posición
vertical, se reiniciará. Para continuar con el funcionamiento, encienda el calentador con el panel de control o el
control remoto provisto (si se incluye) con el calentador.
Este calentador está equipado con una característica de seguridad de sobrecalentamiento. Cuando los
componentes internos del calentador alcanzan una temperatura que pueda causar el sobrecalentmiento o
un posible incendio, el calentador se apaga automáticamente.
ADVERTENCIA: es normal que el cable de alimentación se sienta caliente al tacto. Sin embargo,si el
enchufe está flojo en el tomacorriente, es posible que el enchufe se sobrecaliente. Si esto ocurre, intente
insertar el enchufe en un tomacorriente diferente. Póngase en contacto con un electricista calificado
para que revise si el tomacorriente original presenta daños.
ADVERTENCIA: este calentador tiene una
clasificación de voltaje de 120 voltios. El cable tiene
un enchufe de tres clavijas con puesta a tierra. Hay
disponible un adaptador para conectar enchufes
con puesta a tierra de tres clavijas en receptáculos
de dos ranuras. La orejeta de puesta a tierra que
sale del adaptador se debe conectar permanente-
mente a tierra, como por ejemplo, a tra- vés de una
caja de salida con la debida puesta a tierra. El
adaptador no se debe usar si hay disponible un
receptáculo de tres ranuras de puesta a tierra.
Cubierta de tornillos
de metal de la caja
Clavija con
puesta a tierra
Clavija con
puesta a tierra
Medios de
puesta a tierra
17
PREGUNTAS FRECUENTES
Consulte las preguntas frecuentes en las próximas páginas antes de usar el calentador.
P. Si el calentador funciona con la configuración de vataje máximo, ¿a cuántas BTU equivale?
VATAJE BTU
1,500 5,118
1,000 3,412
750 2,559
500 1,706
P. ¿Se pueden reemplazar los elementos de calefacción?
P. Desde que enchufo y enciendo la unidad, ¿cuánto tardará en calentar la habitación?
P. No tengo un tomacorriente con puesta a tierra. ¿Puedo usar adaptadores, una regleta de 2 clavijas?
P. ¿El calentador tiene un ajuste ECO? ¿Cómo funciona este ajuste?
P. El calentador emite un olor extraño al abrir la caja y al encenderlo por primera vez. ¿Por qué
ocurre esto?
R. Esto es normal. Este calentador está tratado con un recubrimiento especial resistente al calor. Este olor a
veces puede sentirse al abrir la caja. Cuando el recubrimiento se expone al calor, produce este olor
particular durante las primeras horas de funcionamiento. Este se disipará pasado el período de asentamien-
to. Si usted es sensible a los olores, debería encender la unidad en un garaje con la puerta abierta hasta
que el olor inicial se disipe.
R. Este calentador está diseñado para usarse como calefacción suplementaria en las áreas más necesar-
ias. Podría tardar de varios minutos a varias horas calentar el área, dependiendo de varios factores. En la
siguiente tabla, se proporcionan traducciones de unidades térmicas británicas (BTU, por sus siglas en
inglés) para diferentes vatajes.
R. Los elementos de calefacción de repuesto pueden obtenerse del fabricante. Todas las piezas deben
comprarse a través del fabricante si la garantía del producto ha caducado. Si siente que los elementos
presentan fallas desde recién sacados de la caja, póngase en contacto con Servicio al Cliente. Un
representante lo guiará en los pasos a seguir.
R. El proceso de calefacción del calentador comienza inmediatamente después de encenderlo y configurar
una temperatura deseada por sobre la temperatura de la habitación. El cambio notorio en la temperatura
ambiente de la habitación fluctúa debido a variables como la ubicación del calentador (en el hogar), la
distribución y el tamaño de la habitación, la calidad del aislamiento de la habitación, la cantidad de
puertas/ventanas, la cantidad de concreto desnudo (actúa como disipador térmico con cualquier tipo de
calefacción), la apertura y el cierre de la puerta para exteriores, los pasillos largos, los techos altos, etc. Los
clientes con habitaciones más pequeñas experimentan cambios de temperatura rápidos. Las habitaciones
con una distribución más grande y abierta pueden tardar hasta 24 horas en calentarse por completo.
R. NO. Si no tiene un tomacorriente con puesta a tierra, póngase en contacto con un electricista certificado
para obtener ayuda. Retirar o alterar cualquier pieza del diseño original del calentador (incluido el cable de
alimentación) o intentar hacerlo anulará la garantía y lo hará responsable por resultados inesperados o
peligrosos.
R. El modo ECO del calentador es un programa que intenta mantener la temperatura estrictamente "cálida”
en 20°C (68°F). Esto también ayuda con la eficiencia, ya que está programado para 1) aumentar la
potencia del vataje máximo de la unidad si la temperatura disminuye por debajo de los 18°C(64°F), 2)
reducir gradualmente el vataje utilizado a medida que se acerca a los 19°C(66°F) y 3) dejar de calentar
cuando alcanza los 20°C (68°F). Esto se condidera una función económica, ya que en el ajuste ECO, el
calentador casi nunca funciona a los vatios máximos.
R. Esto es completamente normal. La temperatura que se muestra en su calentador puede ser distinta de
aquella que aparece en otro termostato (por ejemplo, uno montado en la pared o uno externo). Esto sucede
porque el sensor de temperatura en el calentador lee la temperatura de su entorno directo. Si el calentador
está cerca del piso frío (y el calor está ascendiendo), cualquier lectura en termostatos elevados o externos
será distinta de la lectura del calentador. La mejor manera de operar el calentador es configurar la unidad
en High (Alto) y establecer una temperatura con la que usted se sienta cómodo. Luego, déjelo a esa
temperatura, sin importar que las lecturas no coincidan. El calentador terminará el ciclo cuando se alcance
o se supere la temperatura configurada.
P. La temperatura en el calentador no coincide con la temperatura que se muestra en el termostato
de pared o externo. ¿Por qué?
18
PREGUNTAS FRECUENTES
PREPARACIÓN
R. Sí, pero asegúrese de que no estén enchufados en el mismo circuito. Cada calentador requiere su
propio circuito de 15 amperios como mínimo, sin otros artículos enchufados en ese mismo circuito o
tomacorriente. Esto se debe a que los calentadores se consideran electrodomésticos y generan alto
amperaje. Si tiene dudas sobre si su circuito cumple con estos requisitos, verifique con un electricista
certificado.
R. Esto es normal. El ventilador del calentador continuará funcionando incluso después de que el calenta-
dor termine el ciclo automáticamente. El ventilador continúa funcionando a fin de expulsar todo el calor de la
cámara de calor, al mismo tiempo que permite que la unidad siga filtrando el aire. Una vez que la caja o los
componentes internos se enfríen por completo, el ventilador debería apagarse automáticamente. En este
caso, espere unos minutos después de que finalice el ciclo del calentador (con el calentador encendido). El
ventilador se apagará más rápido cuando se apague la alimentación.
R. La pantalla del calentador está predeterminada para leer la temperatura en Fahrenheit. Si el calentador
está calentando, pero muestra que hay alrededor de 20 grados, probablemente lo configuró para que lea la
temperatura en Celsius en vez de Fahrenheit.
R. Un cable de alimentación tibio es normal. Estos cables de alimentación están clasificados como seguros
para usarse con hasta 105°C(221°F) por UL, CSA o TUV. La excepción es, si detecta calor, humo o signos
de derretimiento en el punto de contacto del tomacorriente de pared, podría deberse a contactos sueltos o
desgastados (o arqueados). Deje de usar el calentador inmediatamente, póngase en contacto con el
servicio de garantía para obtener un cable de alimentación de repuesto y pida a un electricista calificado
que reemplace el tomacorriente lo más pronto posible.
P. ¿Puedo usar más de un calentador a la vez? ¿Puedo usar el calentador y otro electrodoméstico al
mismo tiempo?
ADVERTENCIA: no cumplir con los requisitos podría resultar en riesgo de incendio, daños materiales o
lesiones.
P. ¿Por qué el ventilador de mi calentador continúa funcionando después de que se alcanza la
temperatura configurada o se apaga la alimentación?
P. La pantalla de mi calentador muestra que la temperatura ambiente está alrededor de los 20
grados, pero sé que está más caluroso que eso. ¿Por qué?
P. El cable de alimentación de mi calentador se calienta. El cable muestra signos de calentamiento
o se está derritiendo en el tomacorriente. ¿Es normal?
Coloque el calefactor en una superficie firme y nivelada y conéctelo a un tomacorriente de 120V, 60Hz con
conexión a tierra. Utilice el calentador únicamente en posición vertical.
Tenga en cuenta que los calentadores infrarrojos no calientan como un calentador de espacio tradicional.
No debe esperar que los calentadores infrarrojos soplen aire caliente como un calentador de espacio
tradicional. Los calentadores infrarrojos calientan los objetos, no el aire. Los calentadores infrarrojos deben
usarse para complementar una habitación aislada que ya tiene calefacción. Las especificaciones de
metros cuadrados dan por sentado una sola habitación cerrada, no una casa completa. Los calentadores
infrarrojos no calientan a través de las paredes o los pisos y no están diseñados para reemplazar una
fuente de calor principal. El calor infrarrojo puede tardar al menos 24 horas en calentar una habitación,
pero funciona de manera mucho más eficiente para mantener la temperatura deseada. Los calentadores
infrarrojos no funcionarán bien en espacios no aislados sin calefacción, como porches con mosquiteros,
casas rodantes, garajes, sótanos sin calefacción, etc.
Inserte dos baterías AAA en el control remoto antes de usarlo (no se incluyen las baterías). *(No todos los
productos incluirán un control remoto).
PANEL DE CONTROL
PIEZA
NOMBRE DESCRIPCIÓN
Luz indicadora de grados
Celsius
Luz indicadora de grados
Fahrenheit
Botón de modo
Botón del temporizador
Botón de oscilación
Pantalla digital
Indica que la temperatura se muestra en Celsius
Indica que la temperatura se muestra en Fahrenheit
Enciende o apaga el calentador
Aumenta la temperatura configurada
Disminuye la temperatura configurada
Alterna entre Alto/Bajo/Eco (Alto, Bajo, Eco y Ventilador)
Enciende o apaga la función de temporizador
1 3
5
6
11
10
2
4
7
8
9
12
13
19
1
2
3
4
5
6
7
8
9
10
11
12
13
Lecturas de la temperatura configurada de la habitación o del
valor del temporizador
Botón del interruptor de
encendido
Botón Temp Up (Subir
temperatura)
Botón Temp Down (Bajar
temperatura)
Luz indicadora de
encendido
Indica cuando la unidad está recibiendo alimentación desde el
tomacorriente de pared
Luces indicadoras de
modos de calefacción
Indica cuando el modo Heat (Calor) está con las luces en HIGH,
Low o Eco (Alto, Bajo y Eco)
Luz indicadora del
ventilador
Indica cuando el ventilador está encendido. Mantenga presionado
para indicar la temperatura ambiente
Botón de bloqueo de
seguridad
Mantenga presionado para bloquear o desbloquear el panel de
control del calentador
Activa o desactiva la ventila de oscilación. Mantenga pulsado
para alternar entre °C/°F.
20
CONTROL REMOTO
2
43
1
7
5
6
1
C
B
2
C
B
INSTRUCCIONES DE FUNCIONAMIENTO
1
.
2
.
La potencia para el modo de calor ascendente es
de 1500 vatios, para el modo de calor descenden-
te es de 1000 vatios. El modo ECO (Economico)
es una funcion de ahorro de energia economica.
Cuando se elige el modo ECO, el calentador
funcionapara mantener una temperatura constante
de 20°C (68°F).
Nota: Configure la temperatura al presionar las
flechas en el panel de control (C) o en el control
remoto (B).
PIEZA NOMBRE
Botón de oscilación
Botón de modo
Botón de encendido
Botón de ambiente/
bloqueo
Botón del
temporizador
Botón Temp Up
(Subir temperatura)
DESCRIPCIÓN
Activa la función de oscilación
Alterna entre los modos Hi/Low/Eco (Alto,Bajo, Eco)
Enciende o apaga el calentador
Muestra la temperatura ambiente/mantenga presionado para
activar o desactivar la función de bloqueo de seguridad
Enciende o apaga el temporizador
Aumenta el valor de la temperatura configurada
Botón Temp Down
(Bajar temperatura)
Disminuye el valor de la temperatura configurada
1
2
3
4
5
6
7
Encienda o apague el calentador presionando el
botón de encendido en el panel de control (C) o
presionando el botón de encendido en el control
remoto (B).
Seleccione una configuración de calor al
presionar el botón de modo en el panel de control
(C) o en el control remoto (B) para alternar entre
las tres configuraciones de calor.
Una vez apagado, los elementos de calefacción
dejarán de funcionar primero. El ventilador
continuará funcionando por hasta 90 segundos
para dispensar el calor residual dentro del
calentador. Esta es una función normal.
21
INSTRUCCIONES DE FUNCIONAMIENTO
3
C
B
B
C
B
C
B
OR
4
5
6
3
.
Nota:
Mantenga presionado el botón de oscilación
en el panel de control (C) durante 5 segundos
para cambiar el indicador de pantalla digital en
el calentador entre Fahrenheit y Celsius. En el
control remoto, presione brevemente el botón
de oscilación para activar la función de
oscilación
la función de apagado con temporizador solo
puede configurarse cuando el calentador está
encendido.
la función de encendido con temporizador solo
puede configurarse cuando el calentador está
apagado.
4.
5.
La luz "Timer" (Temporizador) se enciende
cuando se configura el temporizador.
6.
Nota:
Nota:
Para establecer que el temporizador encienda el
calentador, primero, asegúrese de que la unidad
esté apagada y luego presione el botón
de temporizador en el panel de control (C).
Para alternar entre el Modo solo ventilador y el
Modo calor, presione el botón Ventilador en el
panel de control (C).
La pantalla digital en el panel de control (C)
indicará el valor de hora del temporizador.
Presione el botón Timer repetidamente para
cambiar el valor del número entre un rango de 0 a
12 horas (en intervalos de 1 hora).
La luz "Timer" (Temporizador) se enciende cuando
se configura el temporizador.
Nota: Mantenga presionado el botón
Ventilador en el panel de control (C) durante
5 segundos para activar la temperatura
ambiente.
Puede configurar la temperatura en el calentador
en cualquier lugar entre 10°C y 32°C(entre 50°F y
90°F). Una vez que haya elegido la temperatura
deseada, el calentador permanecerá encendido
hasta que la temperatura de la habitación aumente
a la temperatura en la pantalla digital. El calentador
alternará entre encendido y apagado para
mantener la temperatura de la habitación deseada.
Para establecer que el temporizador apague el
calentador, presione el botón "Timer" en el panel de
control (C) o en el control remoto (B).
La pantalla digital en el panel de control (C) cambia
de la lectura de la temperatura configurada al valor
de hora del temporizador. Presione el botón Timer
repetidamente para cambiar el valor del número
entre un rango de 0 a 12 horas (en intervalos de 1
hora).
C
22
INSTRUCCIONES DE FUNCIONAMIENTO
CUIDADO Y MANTENIMIENTO
1
.
PRECAUCIÓN:
NO permita que ingrese líquido al calentador.
2
.
3
.
NO sumerja el calentador en agua.
4
.
Espere a que la unidad esté completamente seca antes de usarla.
6
.
7
.
7.
Nota:
Para reemplazar las baterías, retire la cubierta para
baterías (1) del control remoto (B), aplicando
presión en la cubierta para baterías (1) y deslizán-
dola del control remoto (B). Inserte dos baterías
AAA (no se incluyen) (2) y vuelva a colocar la
cubierta para baterías (1) en el control remoto (B).
No mezcle baterías alcalinas con baterías
estándar (carbono-cinc) o recargables (níquel
cadmio, níquel-hidruro metálico, etc.).
Las baterías que no son recargables no
deben recargarse. Las baterías se deben
introducir en la polaridad correcta. Las
baterías agotadas se deben retirar del
producto.
Alcance del control remoto: 12.2 metros
7
1 2
B
ADVERTENCIA: antes de realizar cualquier tarea de mantenimiento, apague la unidad, desenchufe la
unidad y permita que se enfríe por completo.
5
.
Para mantener limpio el calentador, limpie la cubierta exterior con un paño suave humedecido. Utilice
un detergente suave si es necesario. Después de limpiar la unidad, séquela con un paño suave.
NO use alcohol, gasolina, polvos abrasivos, pulidor de muebles ni cepillos duros para limpiar el
calentador. Esto podría dañar o deteriorar la superficie del calentador.
Si no va a utilizar el calentador por un período prolongado, retire las baterías del control remoto y
almacénelas para su uso futuro.
Cuando no lo utilice, almacene el calentador en un lugar fresco y seco. Para evitar las acumula-
ci
ones de polvo y suciedad, use el empaque original para embalar la unidad.
Limpie la entrada de aire o el interior de la unidad después de tres meses o si parece estar
bloqueando el flujo de aire. Con el calentador desenchufado, use un accesorio de manguera de
aspiradora o aire comprimido para soplar o limpiar cualquier suciedad, cabello o residuos que
puedan haberse acumulado alrededor o dentro de la unidad, ya que esto obstruirá el flujo de aire.
23
SOLUCIÓN DE PROBLEMAS
PROBLEMA CAUSA POSIBLE ACCIÓN CORRECTIVA
1
.
2
.
3
.
4
.
1
.
2
.
3
.
4
.
1
.
2
.
3
.
4
.
1
.
2
.
3
.
4
.
1
.
1
.
El calentador no
enciende.
El calentador se
apaga
inesperadamente.
El calentador
muestra un código
de error "E2".
El cable de alimentación no esta
enchufado.
No hay electricidad en la caja de
fusibles principal.
Se agotó la batería del control
remoto.
El termostato del calentador está
configurado a una temperatura
más baja que la de la habitación.
Enchufe el cable de alimentación en un
tomacorriente.
Verifique que haya electricidad en la
caja de fusibles principal.
Reemplace las baterías del control
remoto.
Aumente la temperatura del
termostato en el calentador para que
produzca más calor.
El calentador se sobrecalentó.
No hay suficiente flujo de aire enel
calentador.
La ventila de aire está obstruida.
No hay suficiente flujo de aire en
el calentador.
Desenchufe el calentador de la pared,
espere unos segundos y, luego, vuelva
a enchufar el cable de alimentación.
Asegúrese de que la unidad esté
enchufada a un tomacorriente
exclusivo, sin extensiones eléctricas ni
protectores contra sobrecargas.
Limpie la entrada de aire ubicada en el
frente de la unidad.
Mueva la unidad a una distancia de
0.91 m como mínimo de la pared.
El sensor de temperatura no
funciona correctamente.
Póngase en contacto con el servicio
técnico.
24
UN AÑO DE GARANTÍA LIMITADA
E
Impreso en China
A
LISTA DE PIEZAS DE REPUESTO
PIEZA DESCRIPCIÓN PIEZA
#
A
Control remoto 1102006035
Para piezas de repuesto, llame a nuestro departamento de servicio al cliente al 866-994-4148, de 8 a.
m. a 8 p. m., hora estándar del este, de lunes a domingo. También puede contactarnos en
Antes de intentar usar este producto, debe leer todas las instrucciones.
Dentro de un año a partir de la fecha de compra inicial, el dispositivo garantiza que no habrá defectos de
calidad o proceso. Si el dispositivo falla debido a un defecto de fabricación, Póngase en contacto con el
servicio al cliente para obtener soporte técnico o devolverlo al lugar de compra para su reparación o
reemplazo. Esta garantía no incluye daños causados por uso indebido, abuso o cambio. Las repara-
ciones realizadas por cualquier persona que no sea el fabricante no están cubiertas por esta garantía.
La tienda no es responsable de ninguna pérdida causada por la operación negligente.
Por favor, mantenga su certificado de compra y la Caja para verificar la garantía.
Debe proporcionar el modelo del dispositivo, el número de serie (ubicado en el calentador), la fecha de
compra, el número de teléfono diurno o el correo electrónico, así como una copia del recibo.