
Technical Support and E-Warranty Certificate www.vevor.com/support
WINTER MAGNETIC
THERMAL-GARAGE DOOR SCREEN
USER MANUAL
We continue to be committed to provide you tools with competitive price.
"Save Half", "Half Price" or any other similar expressions used by us only represents an
estimate of savings you might benefit from buying certain tools with us compared to the major
top brands and does not necessarily mean to cover all categories of tools offered by us. You
are kindly reminded to verify carefully when you are placing an order with us if you are
actually saving half in comparison with the top major brands.

1
MODEL: 8.3X7.15 FT, 9.3X7.15 FT, 16.3X7.15 FT, 18.3X7.15 FT,
10.3X8.15 FT
Have product questions? Need technical support? Please feel free to
contact us:
Technical Support and E-Warranty Certificate
www.vevor.com/support
NEED HELP? CONTACT US!
This is the original instruction, please read all manual instructions
carefully before operating. VEVOR reserves a clear interpretation of our
user manual. The appearance of the product shall be subject to the
product you received. Please forgive us that we won't inform you again if
there are any technology or software updates on our product.
WINTER MAGNETIC
THERMAL-GARAGE
DOOR SCREEN

2
WARNING:
1. Do not allow children to climb on the unit.
2. Keep children and pets away during assembly.
ASSEMBLY PRECAUTIONS
1. Please assemble the product in strict accordance with the instructions. Incorrect
assembly could be hazardous.
2. Please wear safety goggles and work gloves properly during assembly.
3. Do not try to assemble the product when feeling tired or when under the
influence of alcohol, drugs or medication.
4. Separate and count all parts and hardware.
5. If you want to use pushpin for assembly, remove and install them carefully to
avoid injury.
6. If using power tools, please be careful to slow down and stop when needed.
7. Two people are required for assembly.
8. Follow the intended uses only. Do not sit or stand on the above.
9. When cars or large-size tools enter or exit the garage, please open the screen
first to avoid damage to the product caused by dragging.
SAVE THESE INSTRUCTIONS.
TECHNICAL PARAMETERS
Model
Material
Color
Size (ft*ft)
8.3X7.15 FT
Anti-Splashin
g 300D
Oxford
Quilted fabric
Black
8.3*7.15
9.3X7.15 FT
9.3*7.15
16.3X7.15 FT
16.3*7.15
18.3X7.15 FT
18.3*7.15
10.3X8.15 FT
10.3*8.15
3
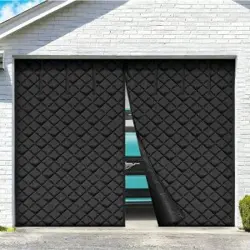
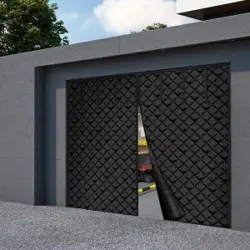
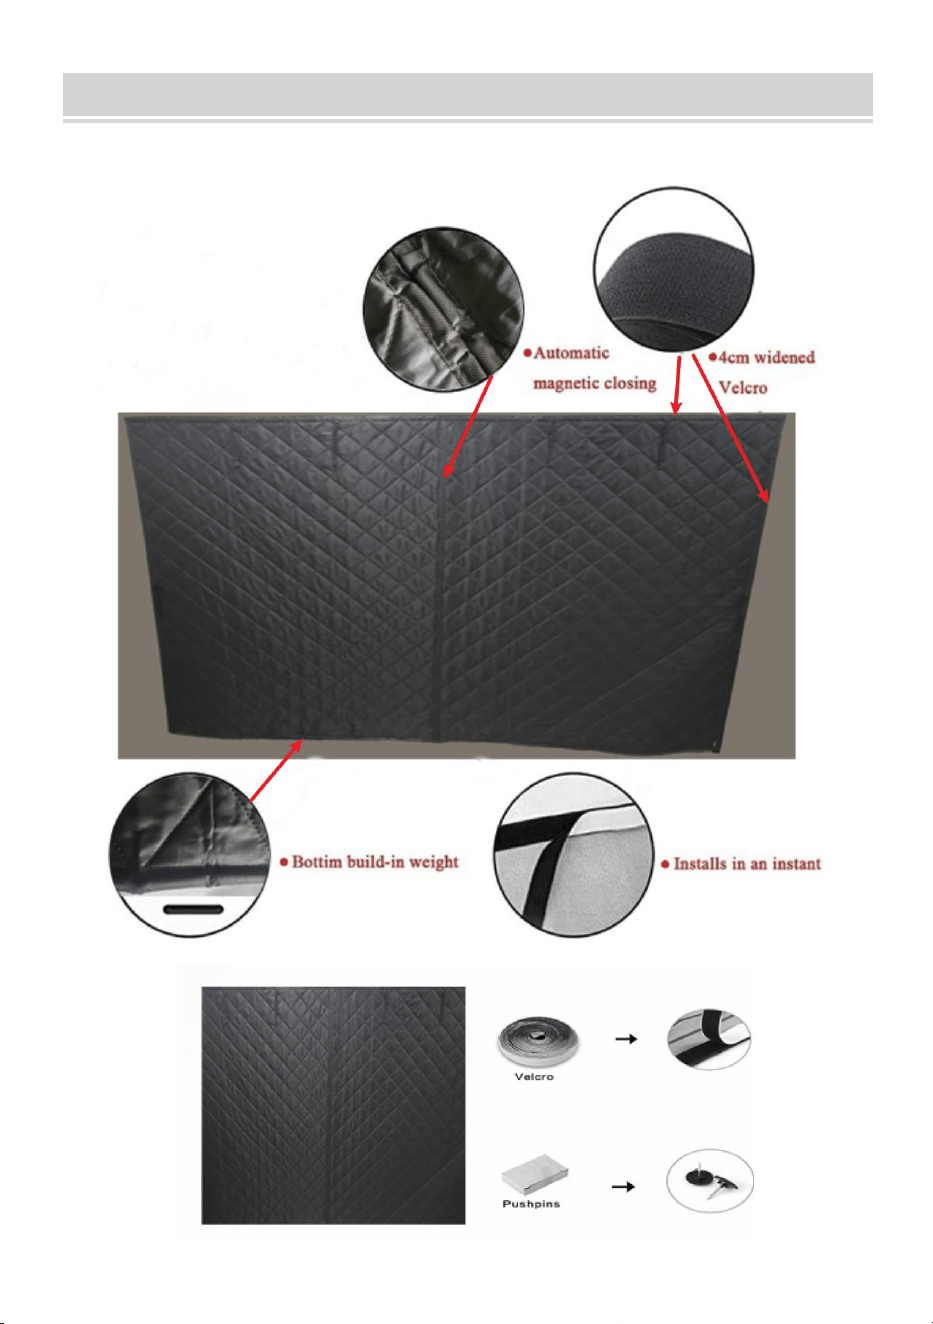
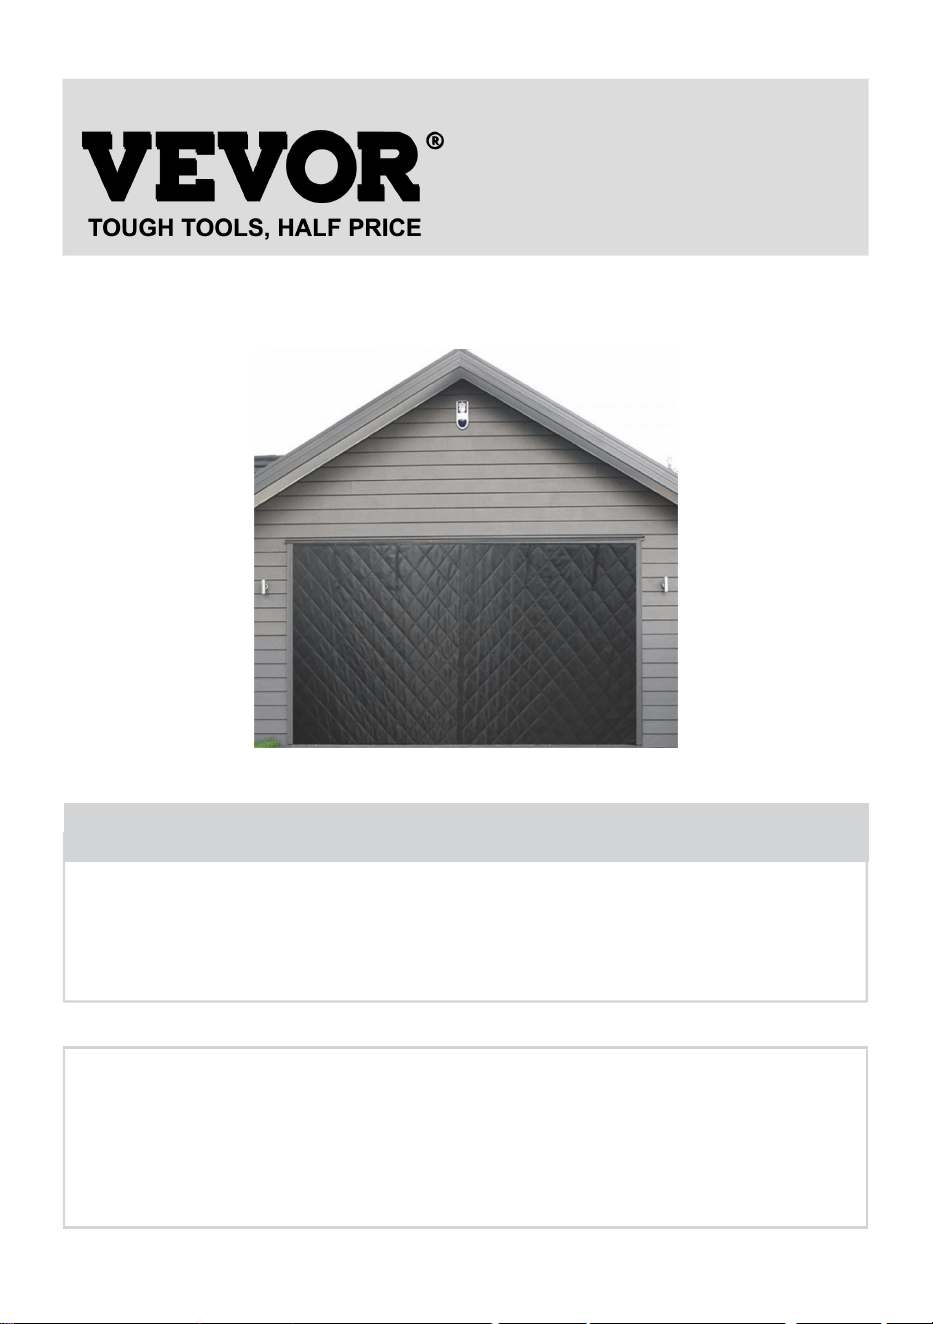
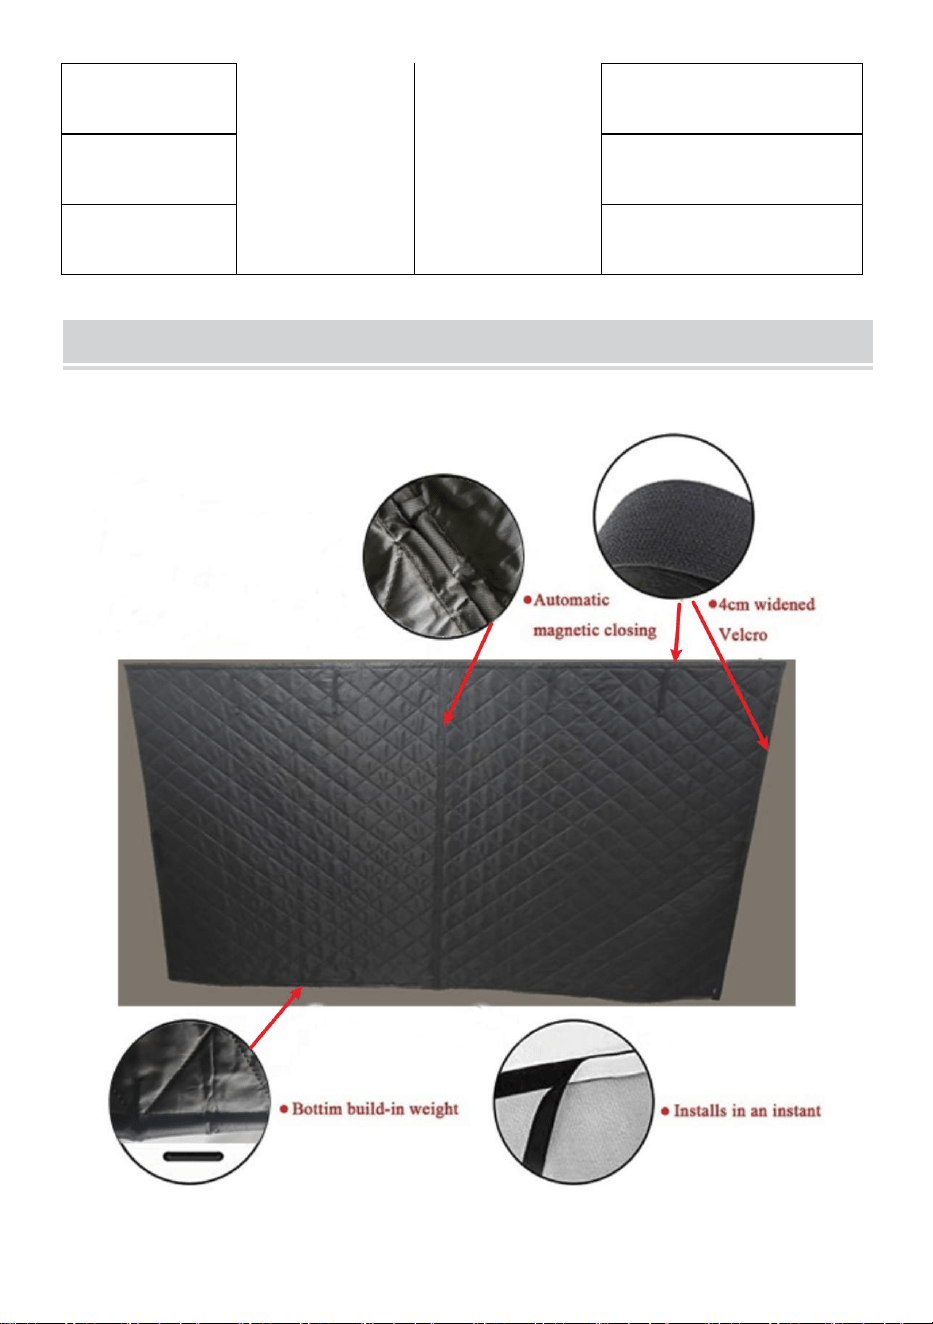
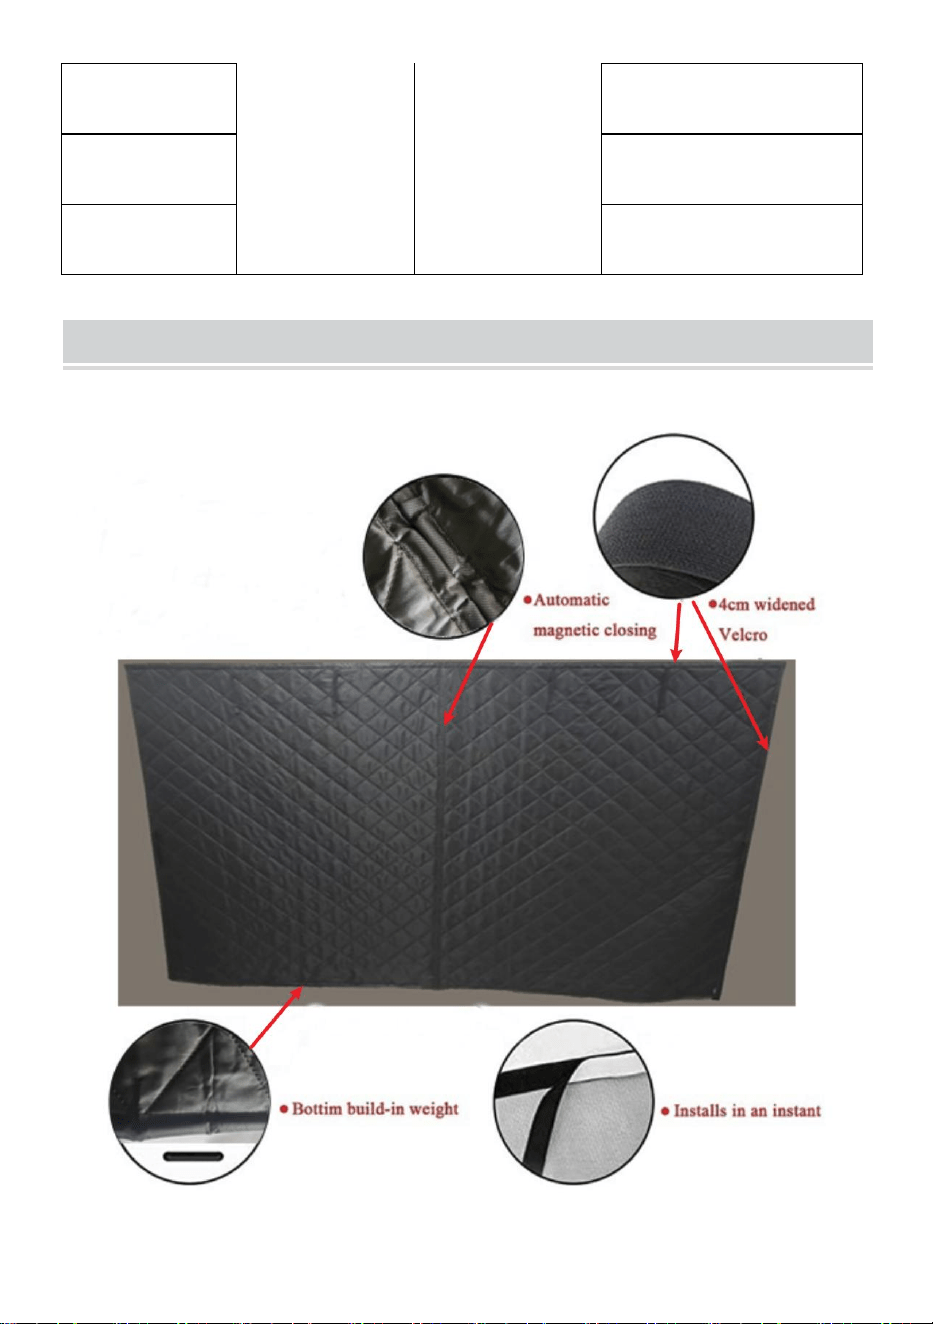
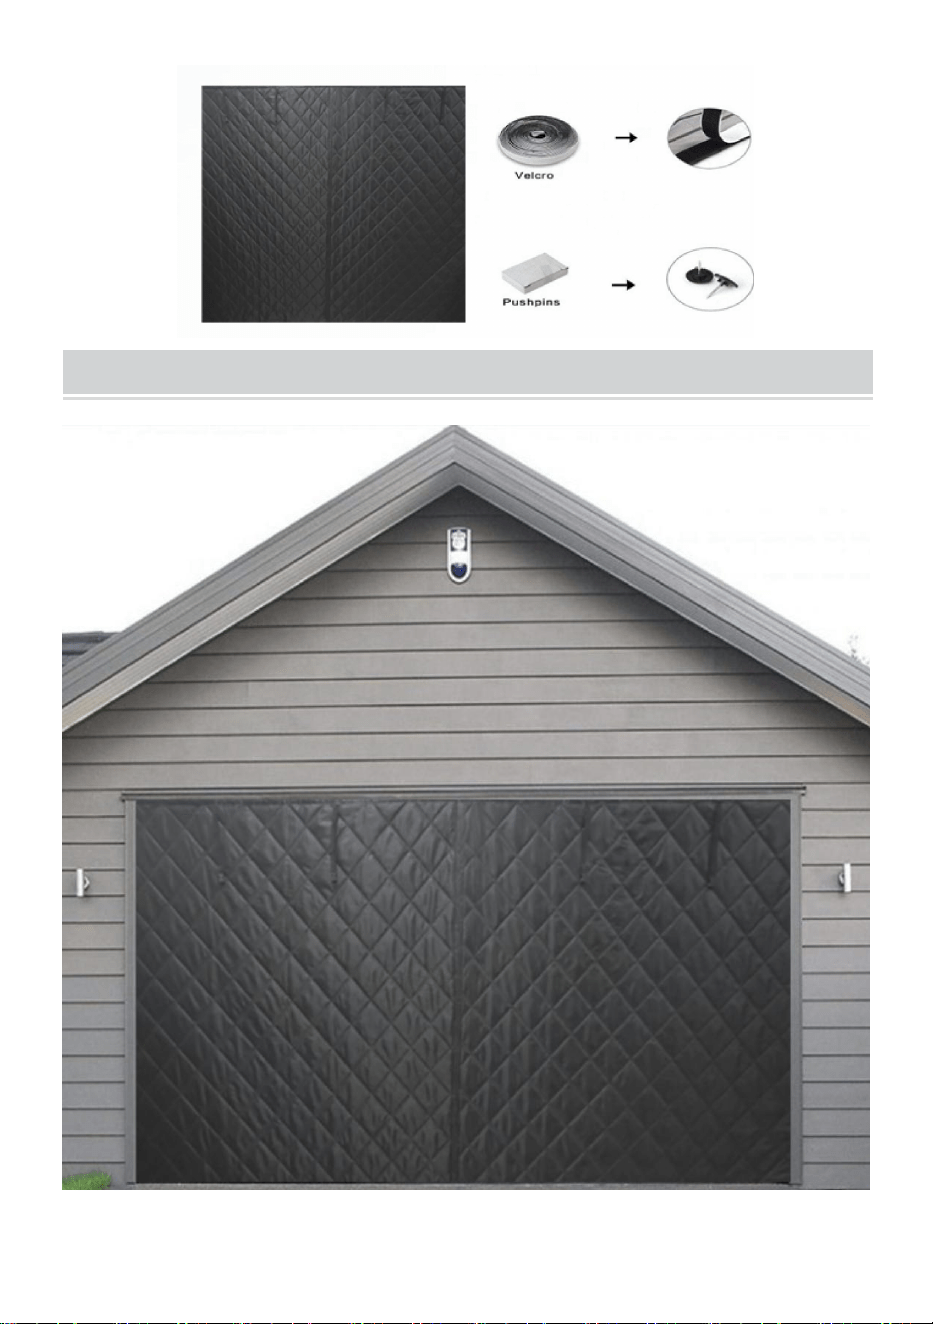
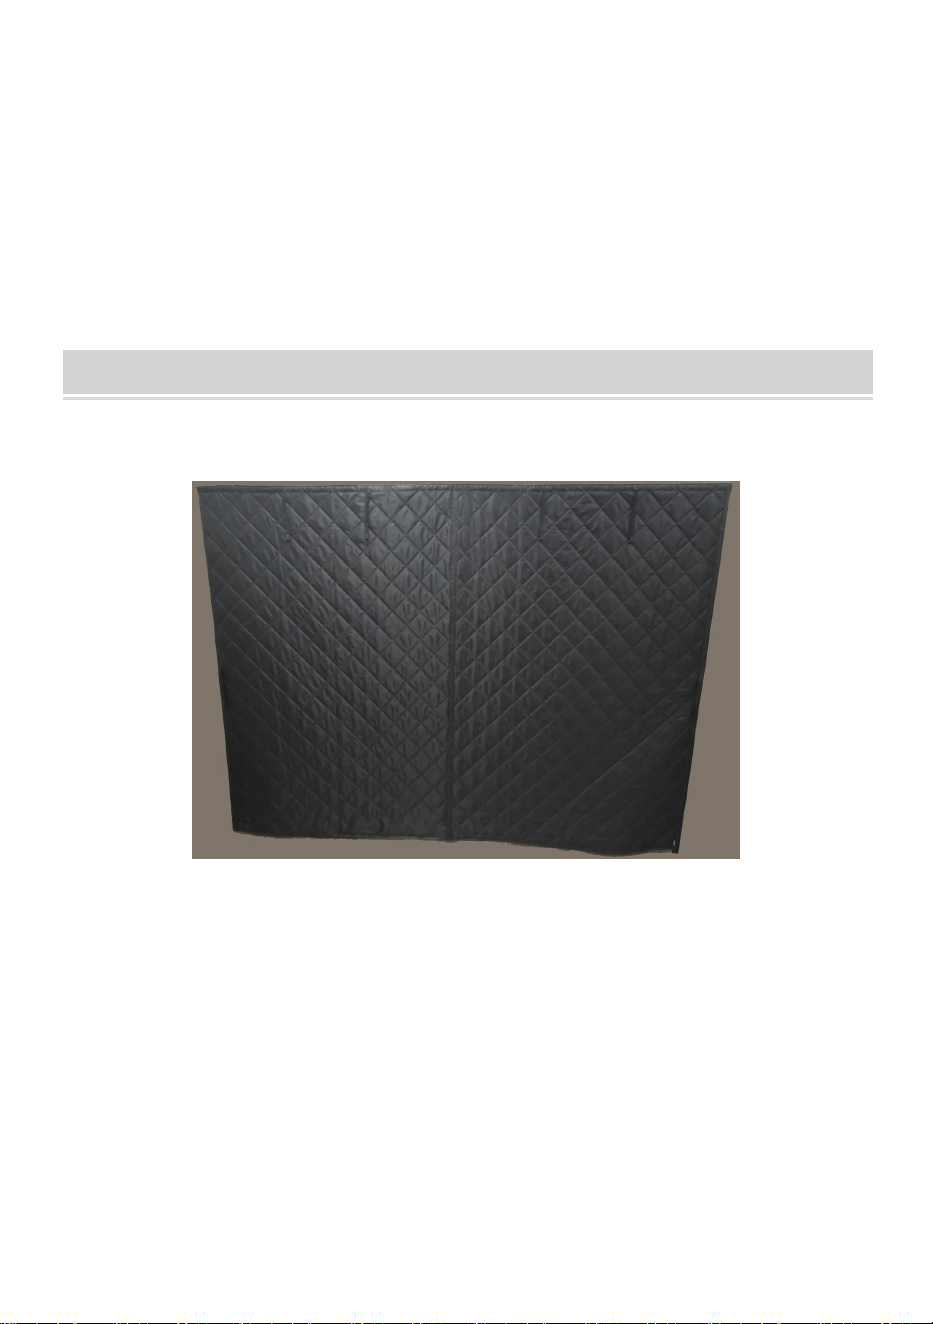
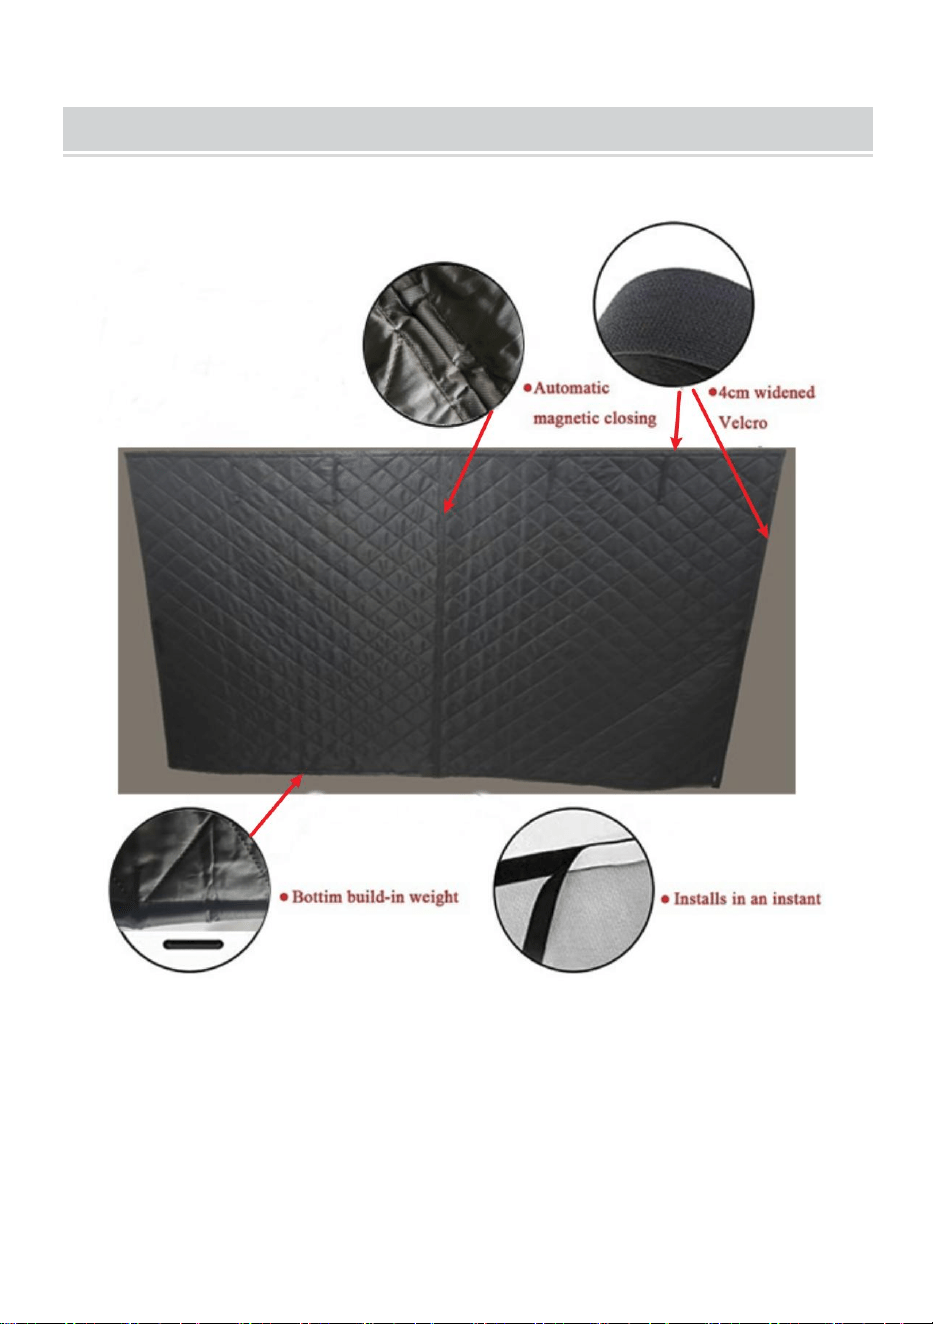
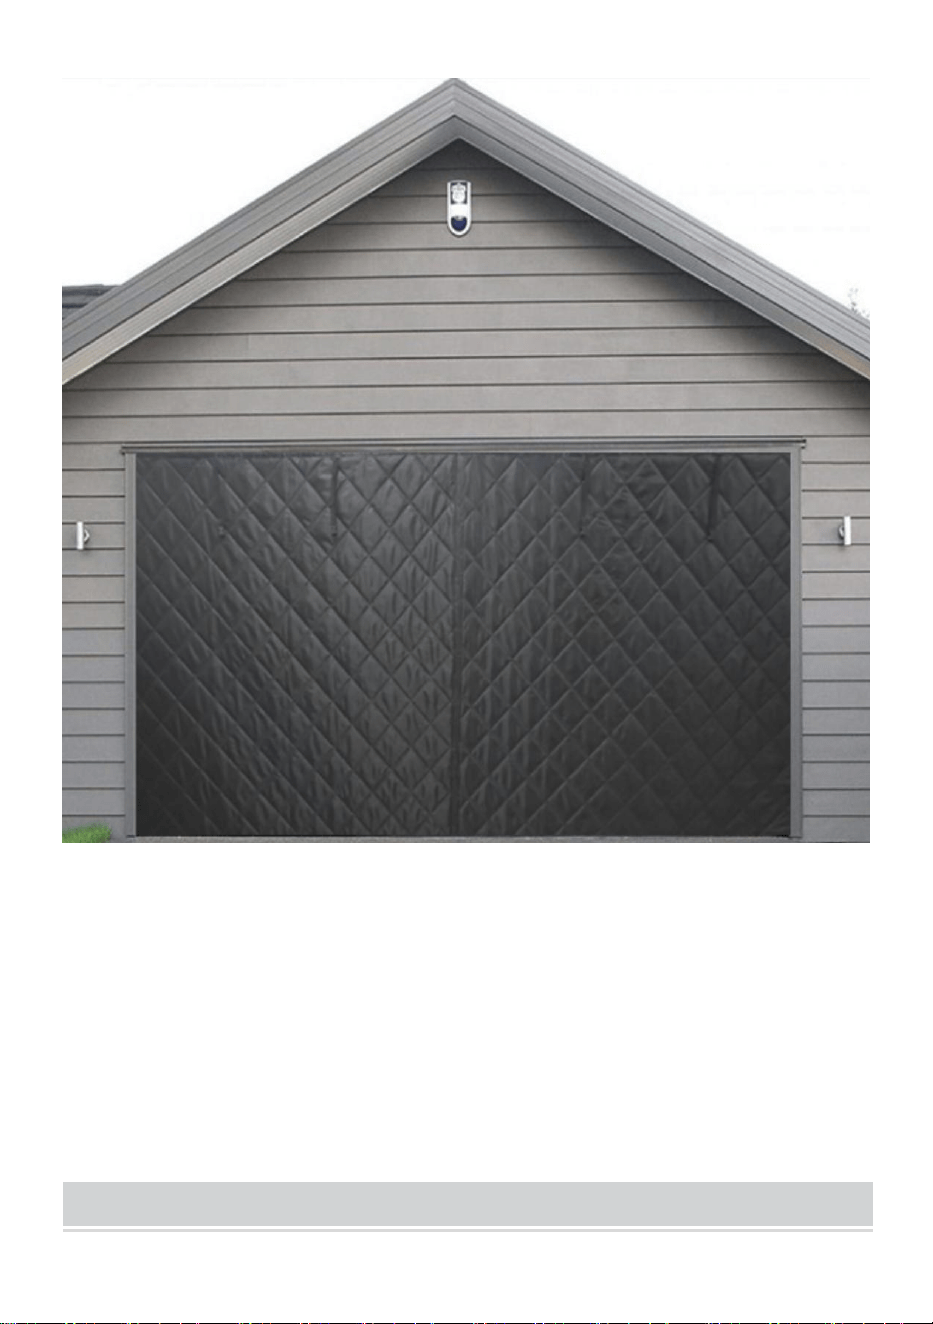
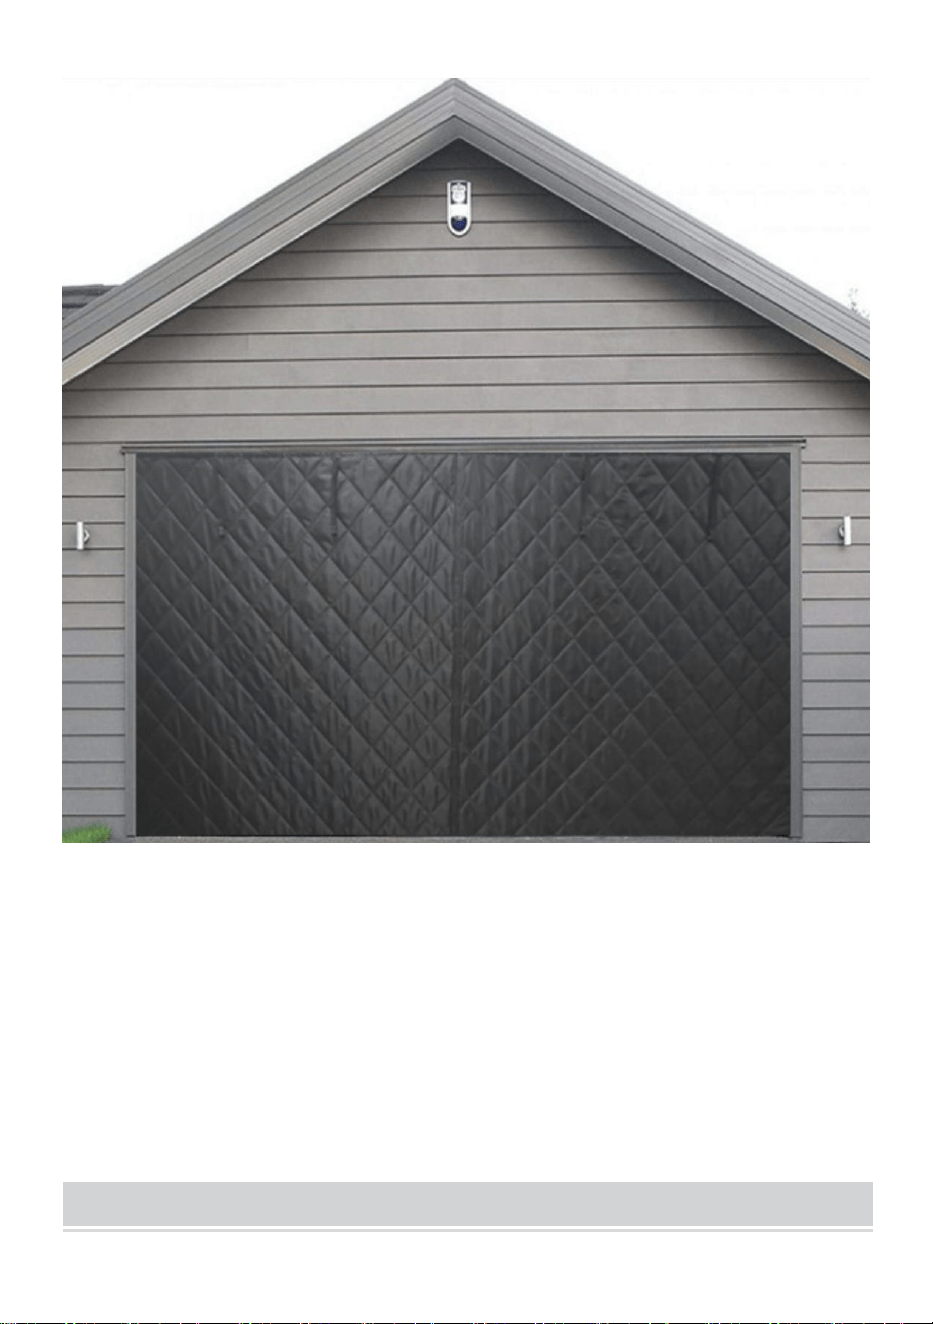
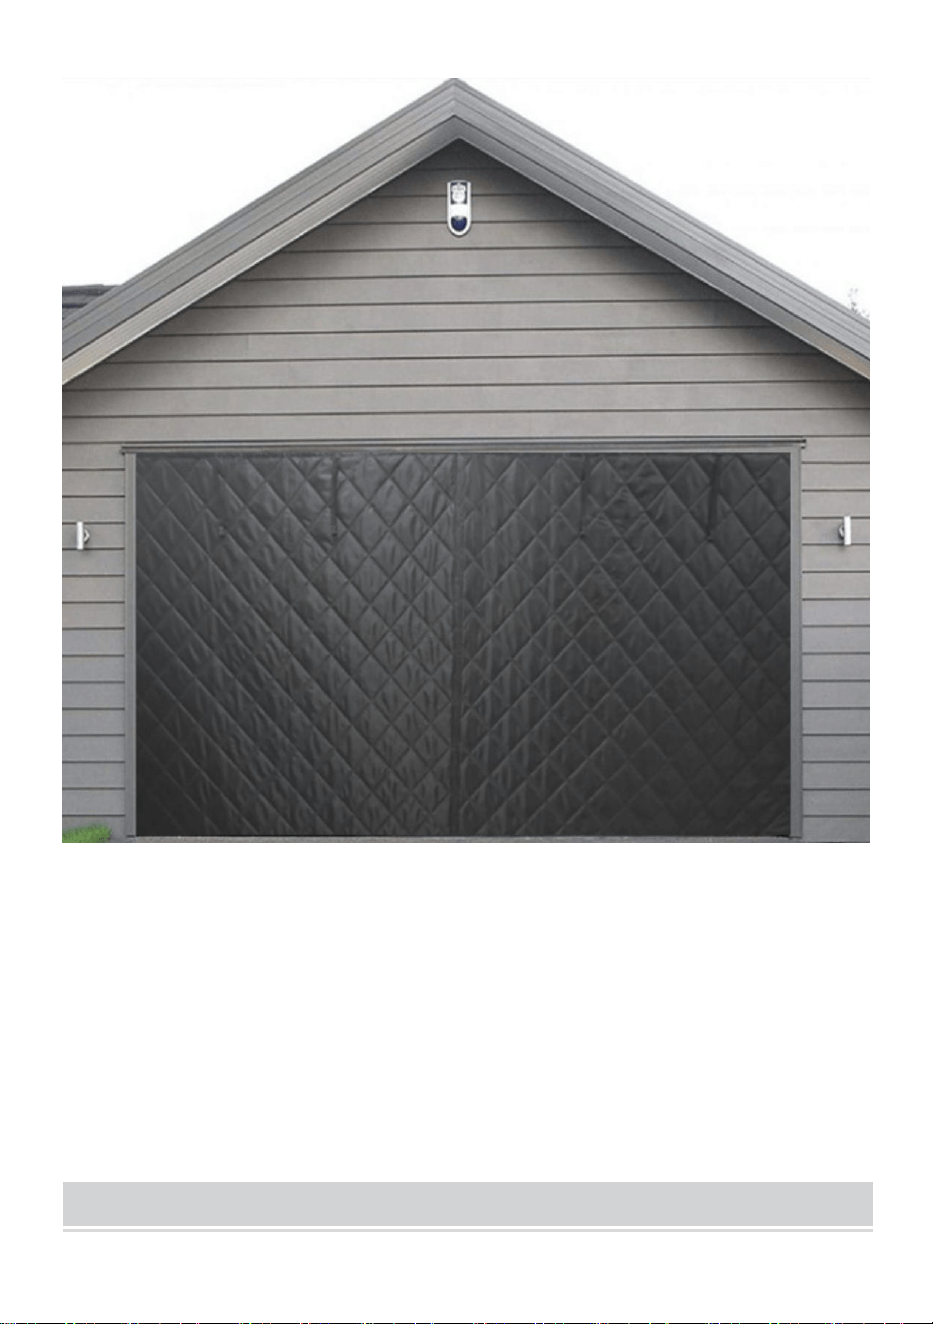
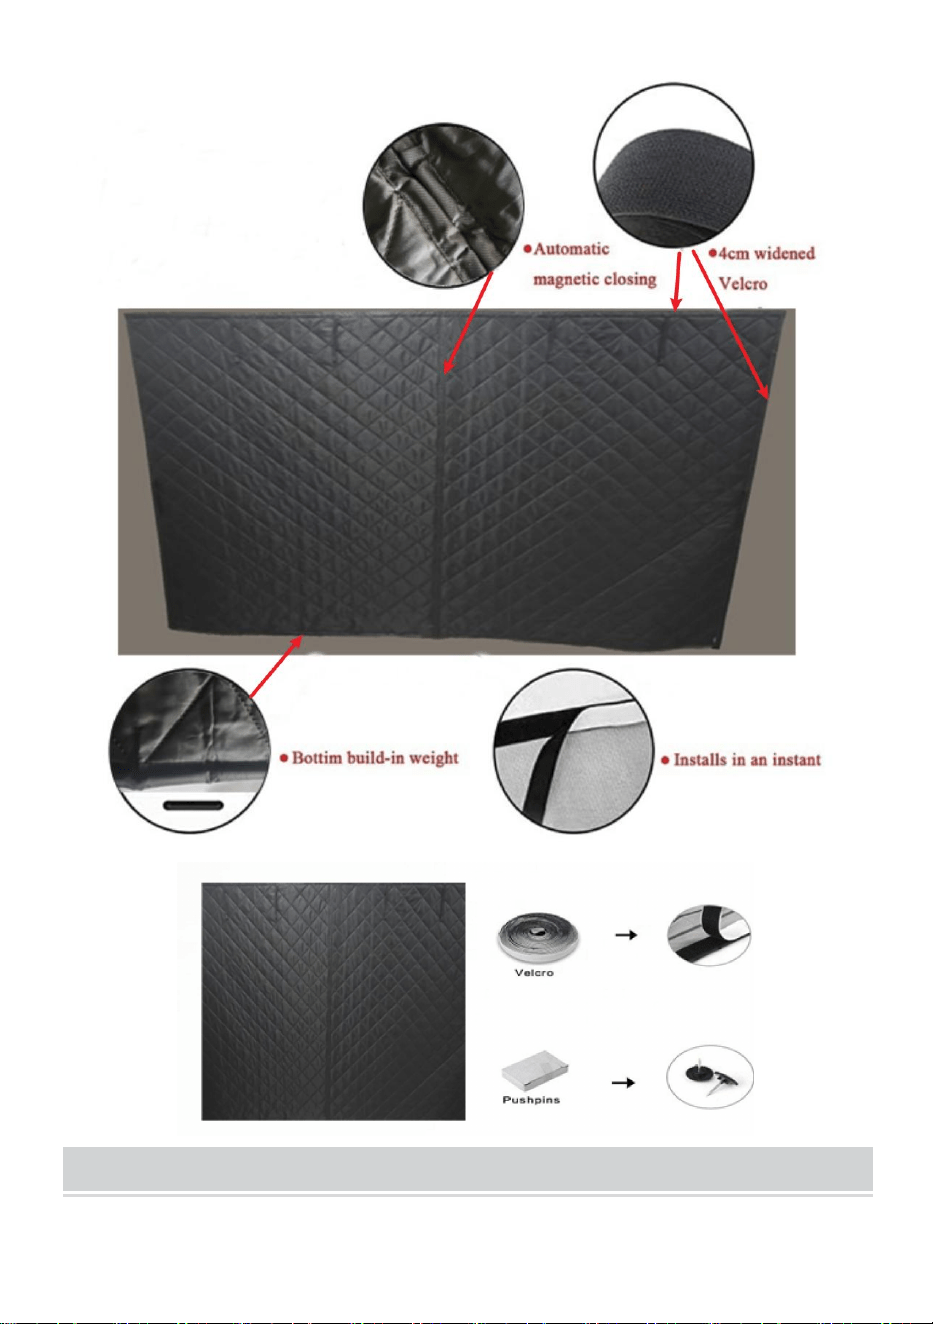
PRODUCT INTRODUCE
4
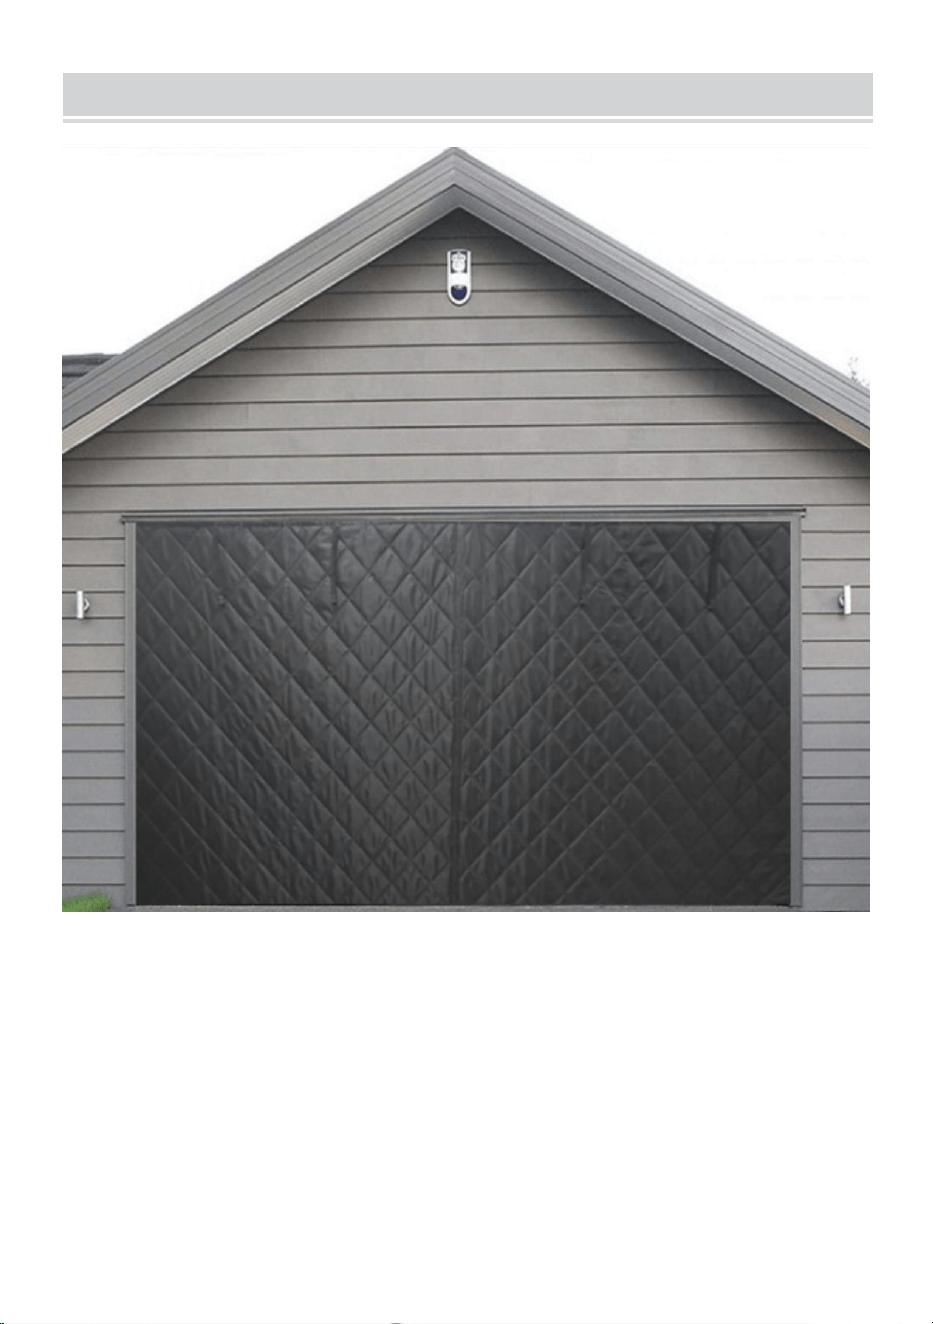
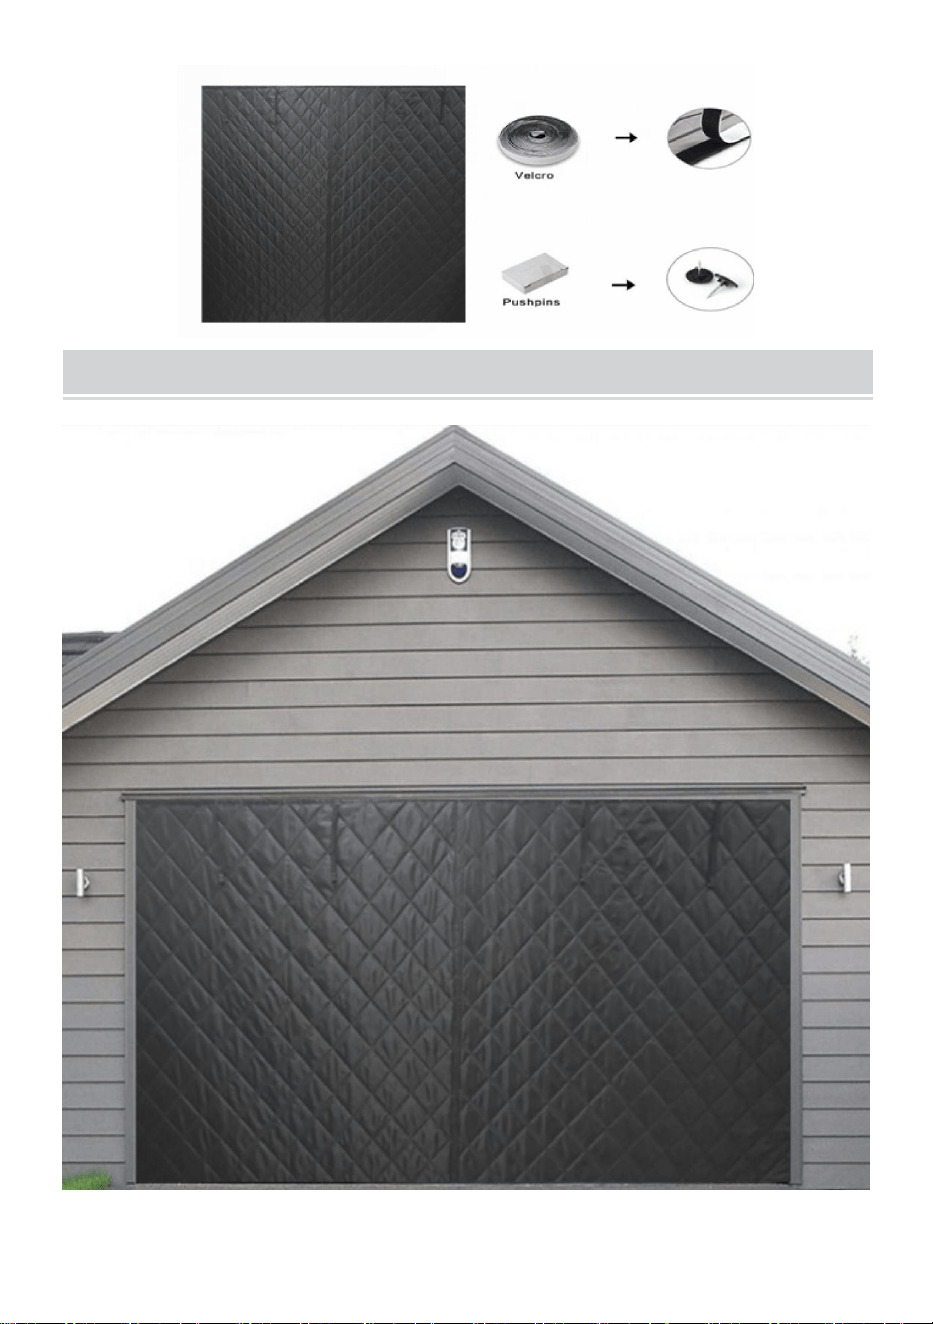
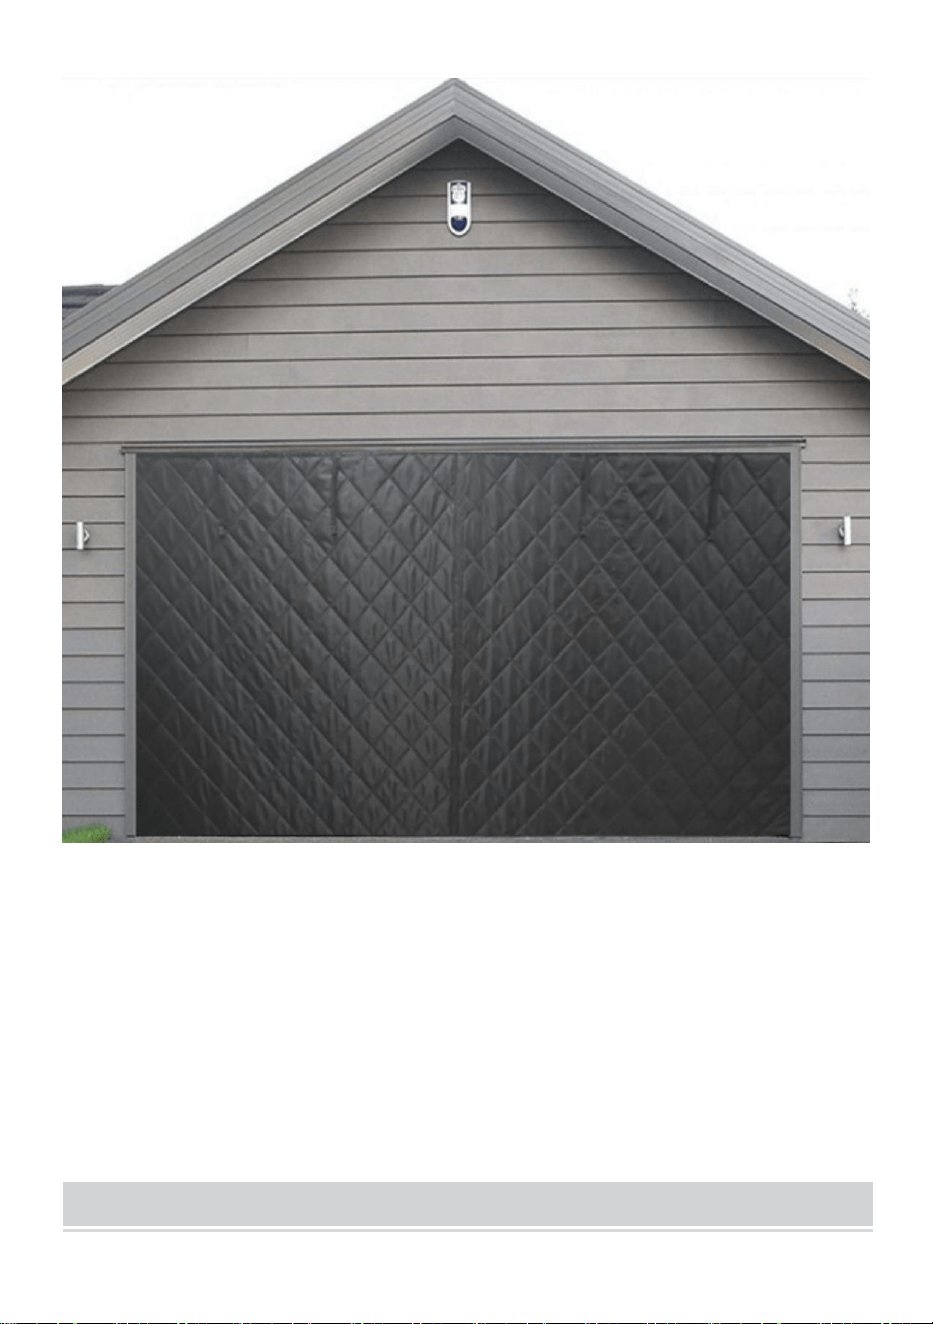
APPLICATIONS
5
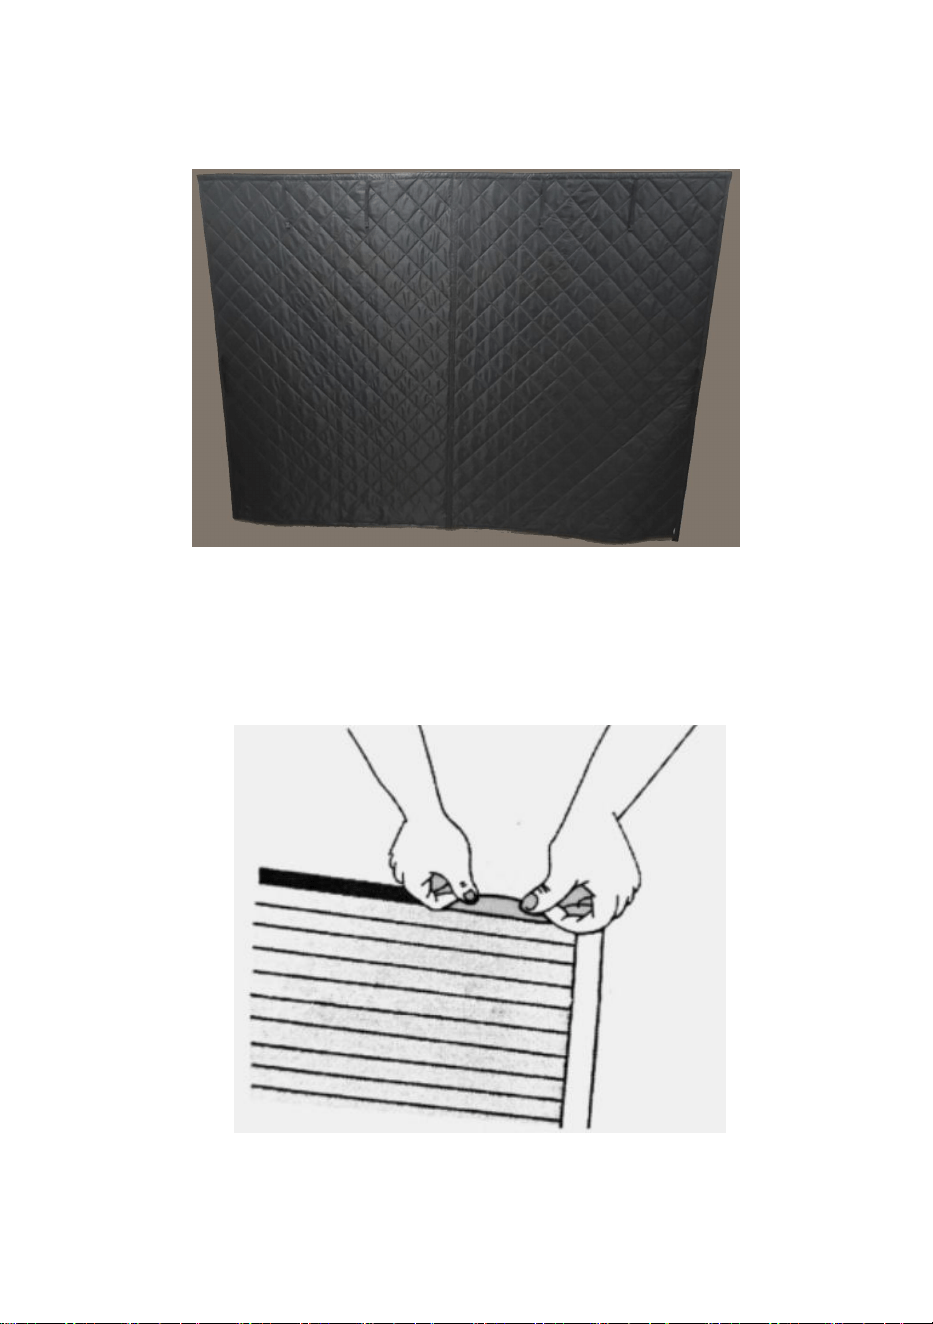
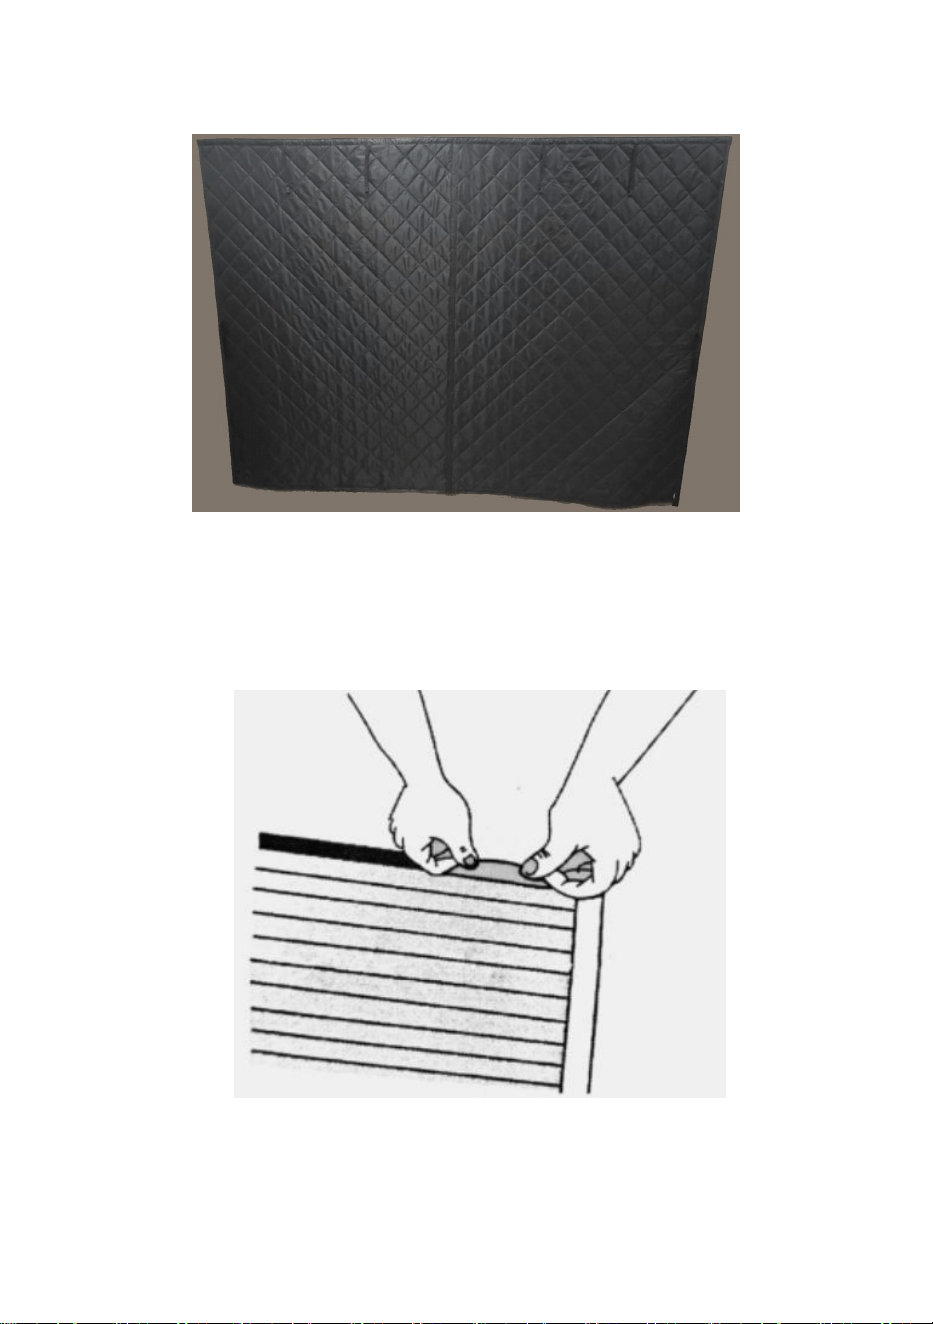
ASSEMBLY
Step 1.
Place it flat:: Lay the door curtain flat on a level ground.
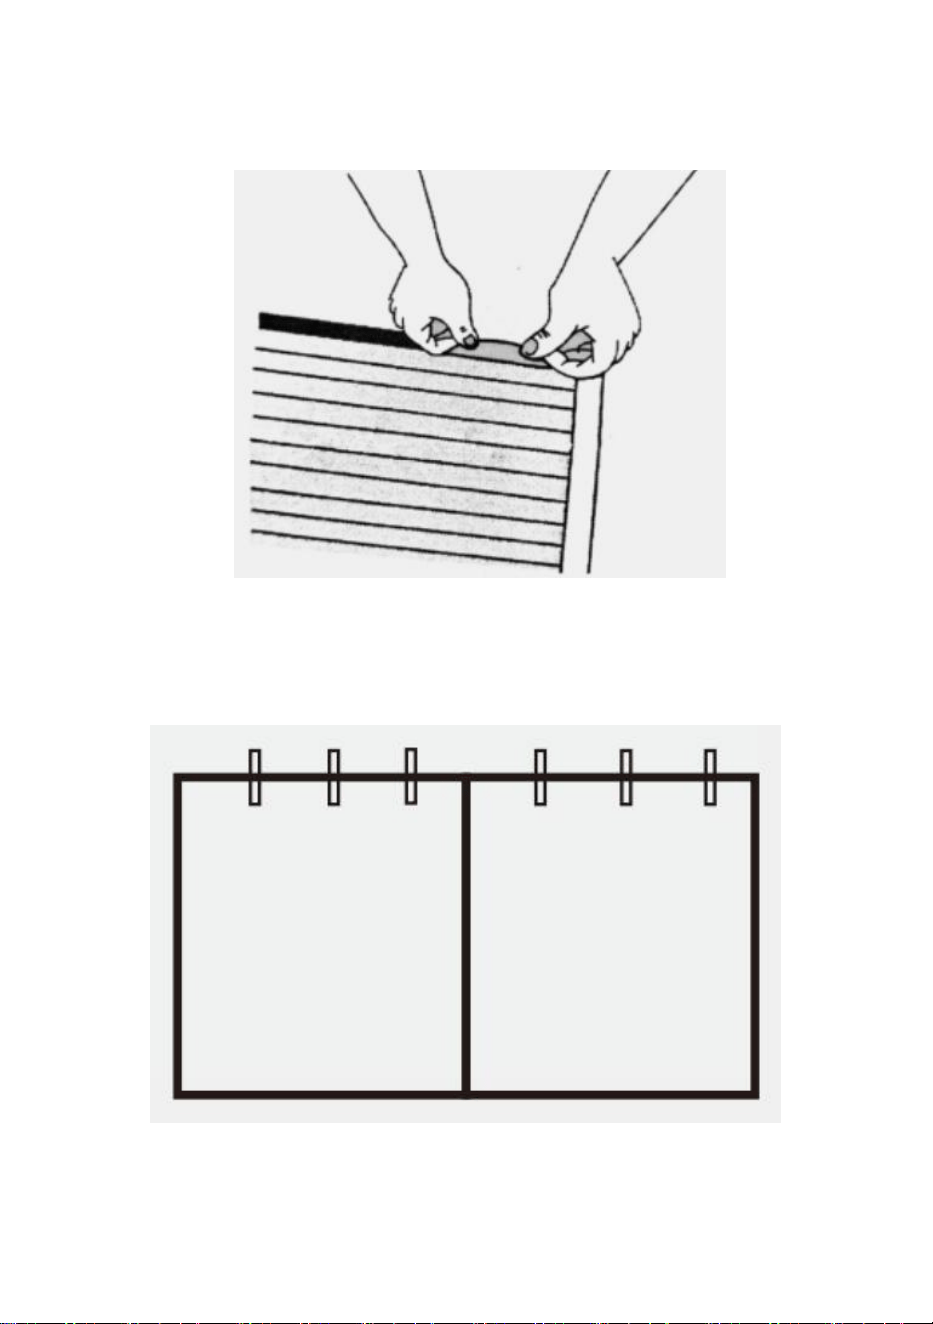
Step 2.
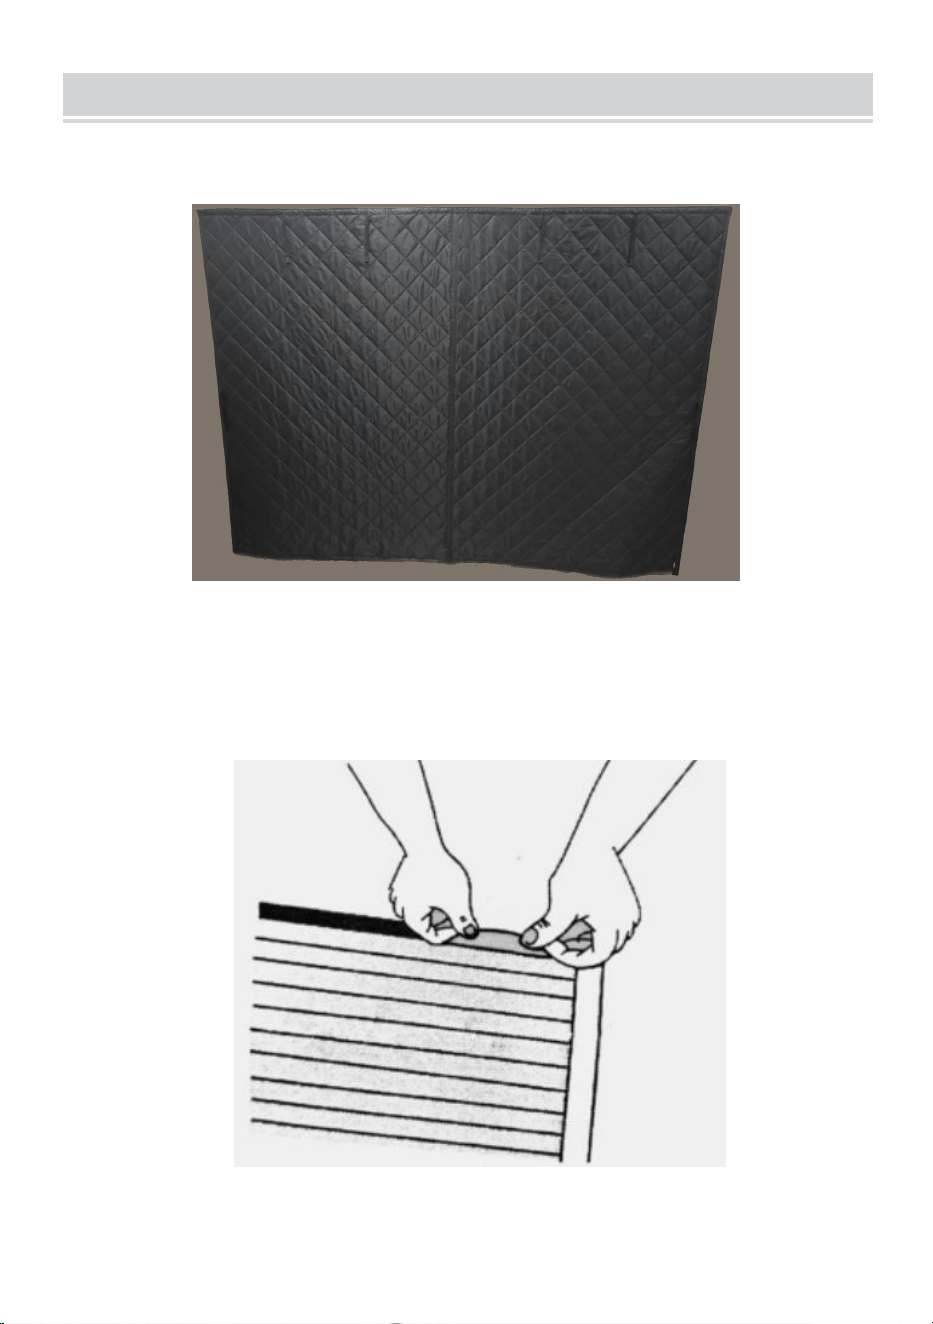
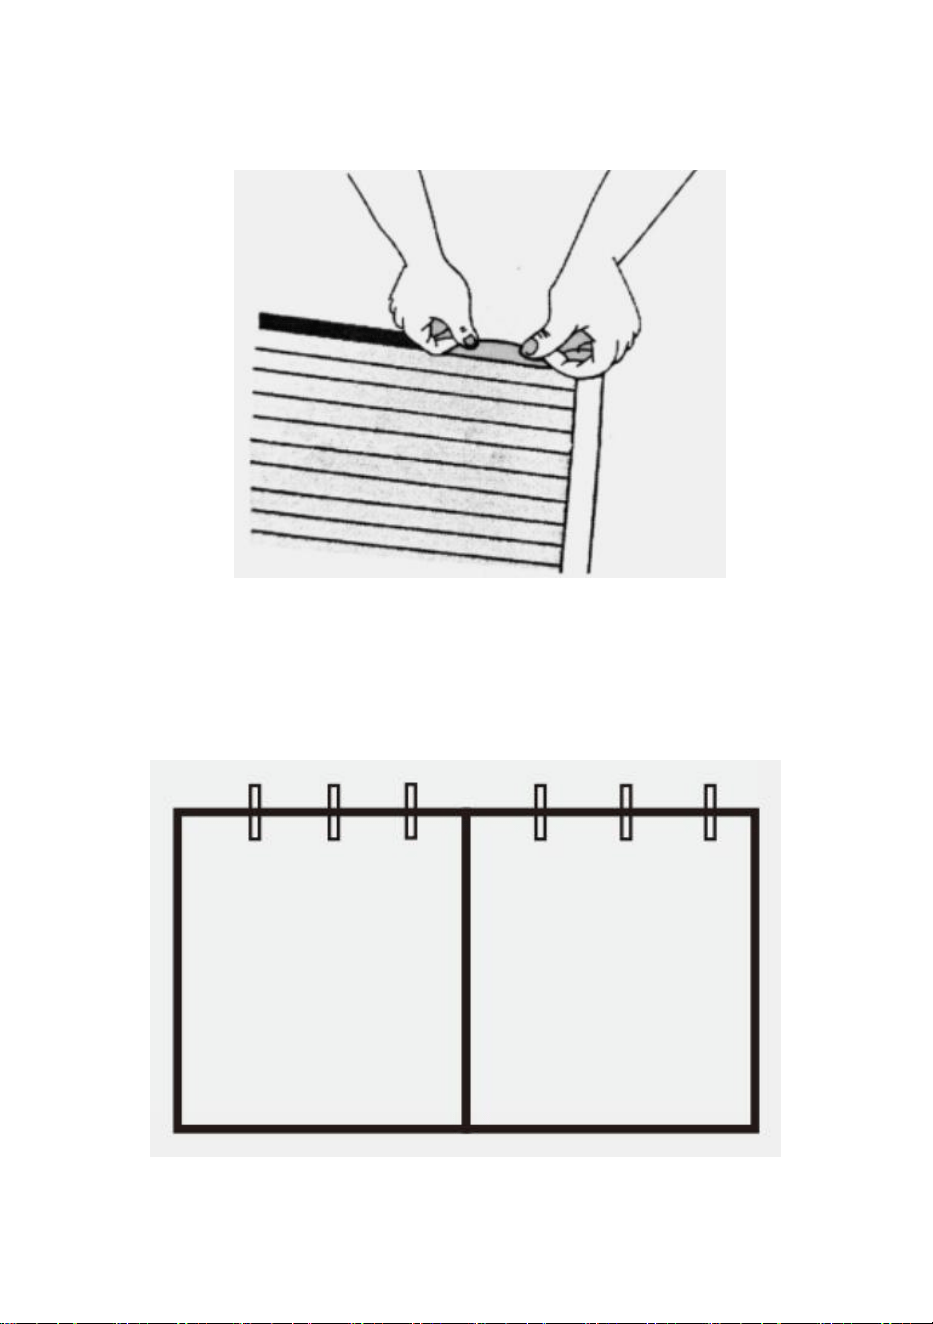
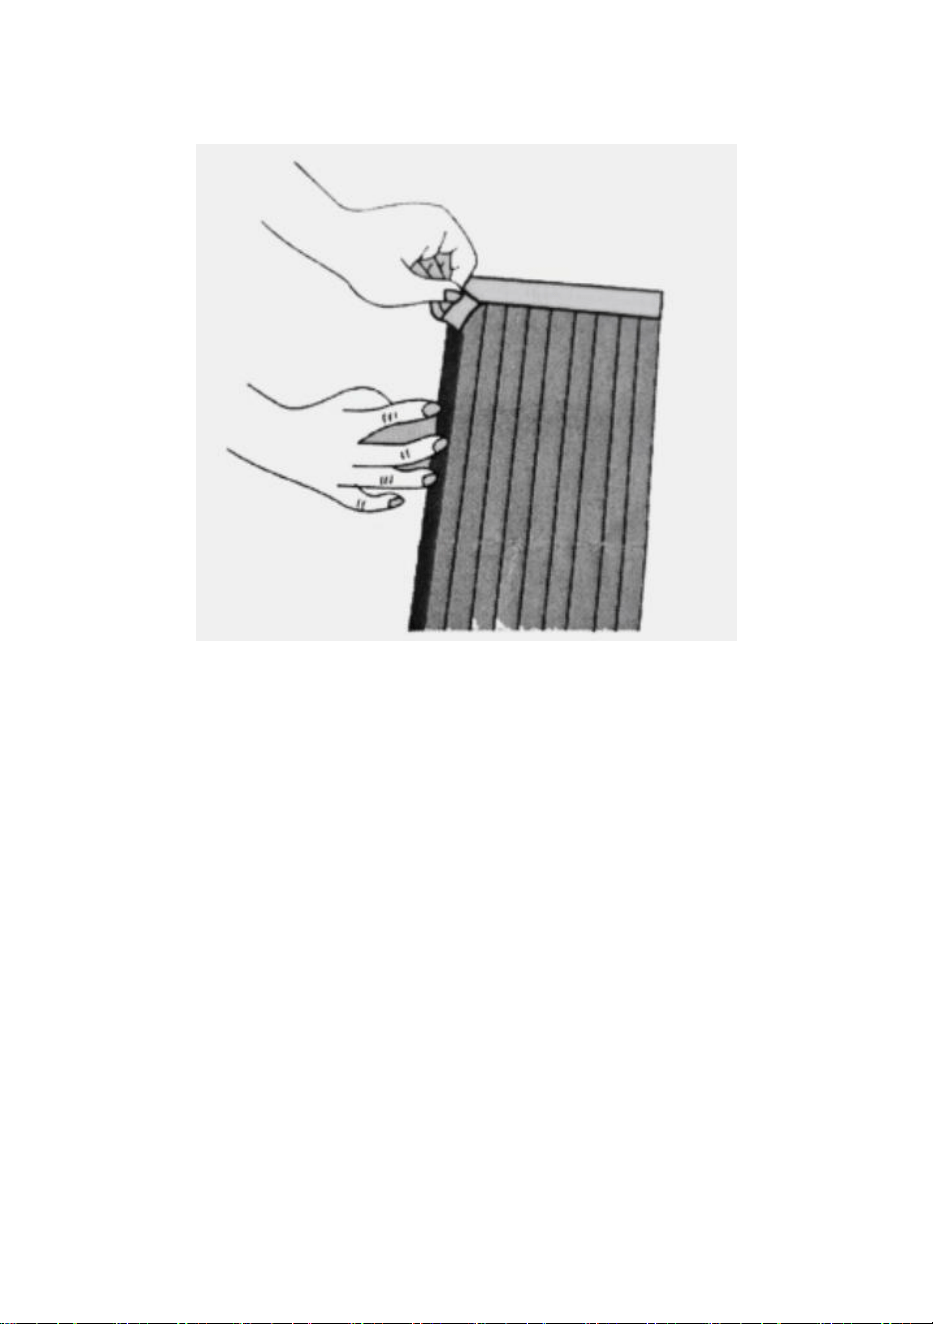
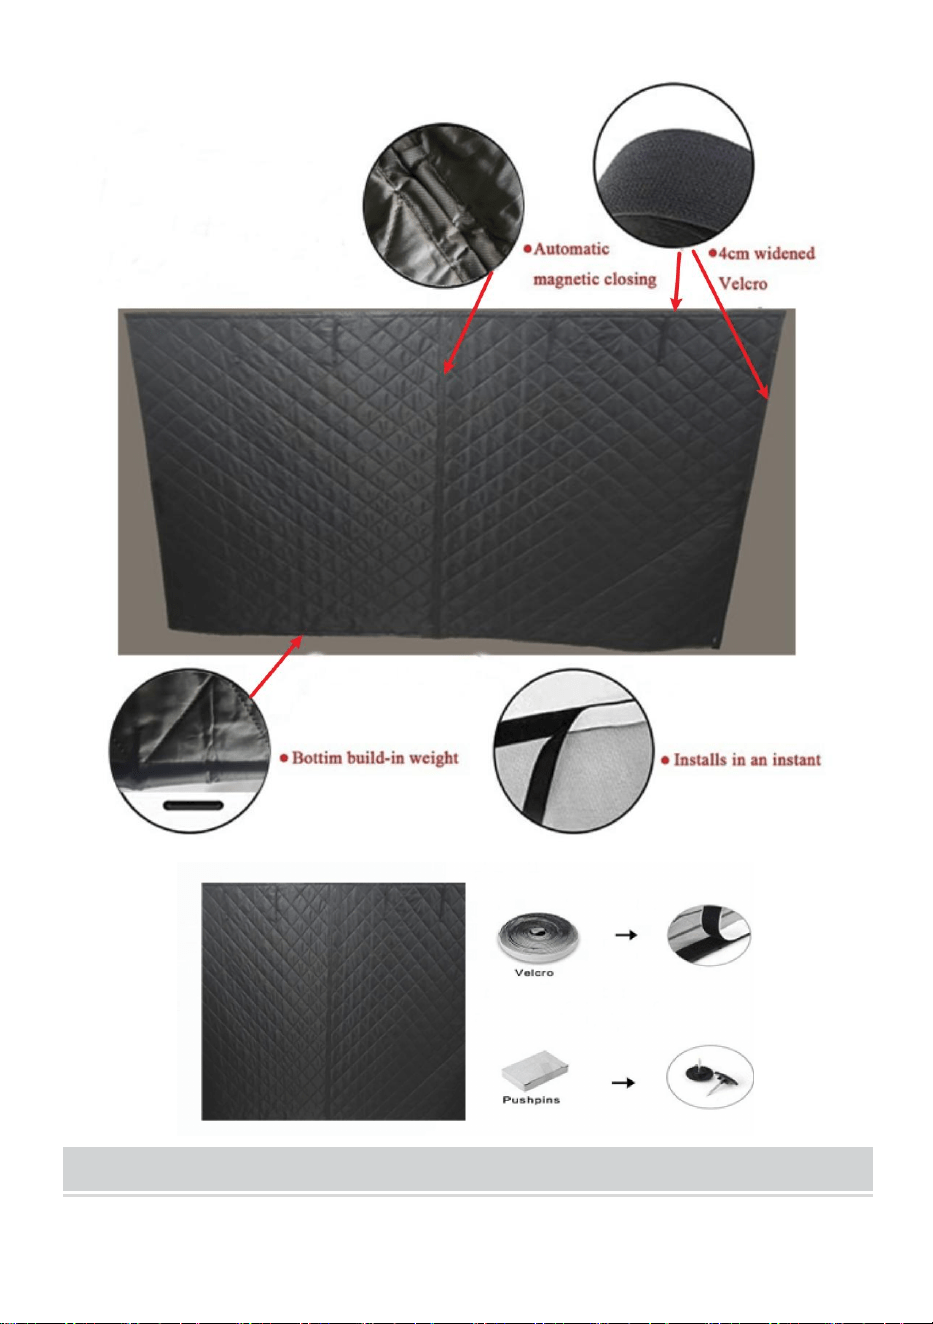
Velcro bonding:First glue the hook side of the 4 cm width Velcro with the 4 cm loop
side on the top of the screen, and then glue the hook side of the 4 cm width Velcro
with the 4cm loop side on both sides of the screen.
6
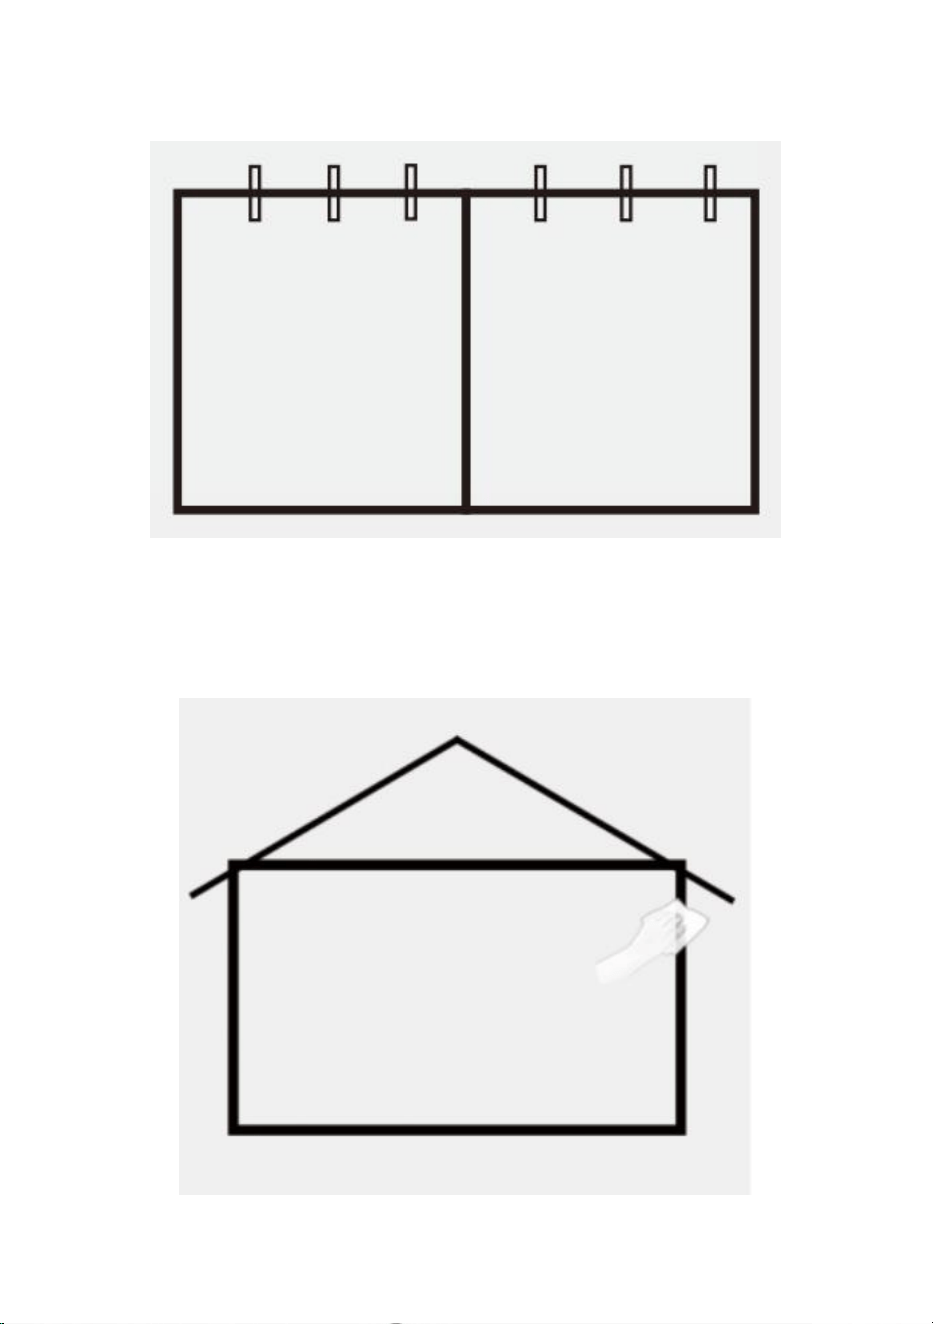
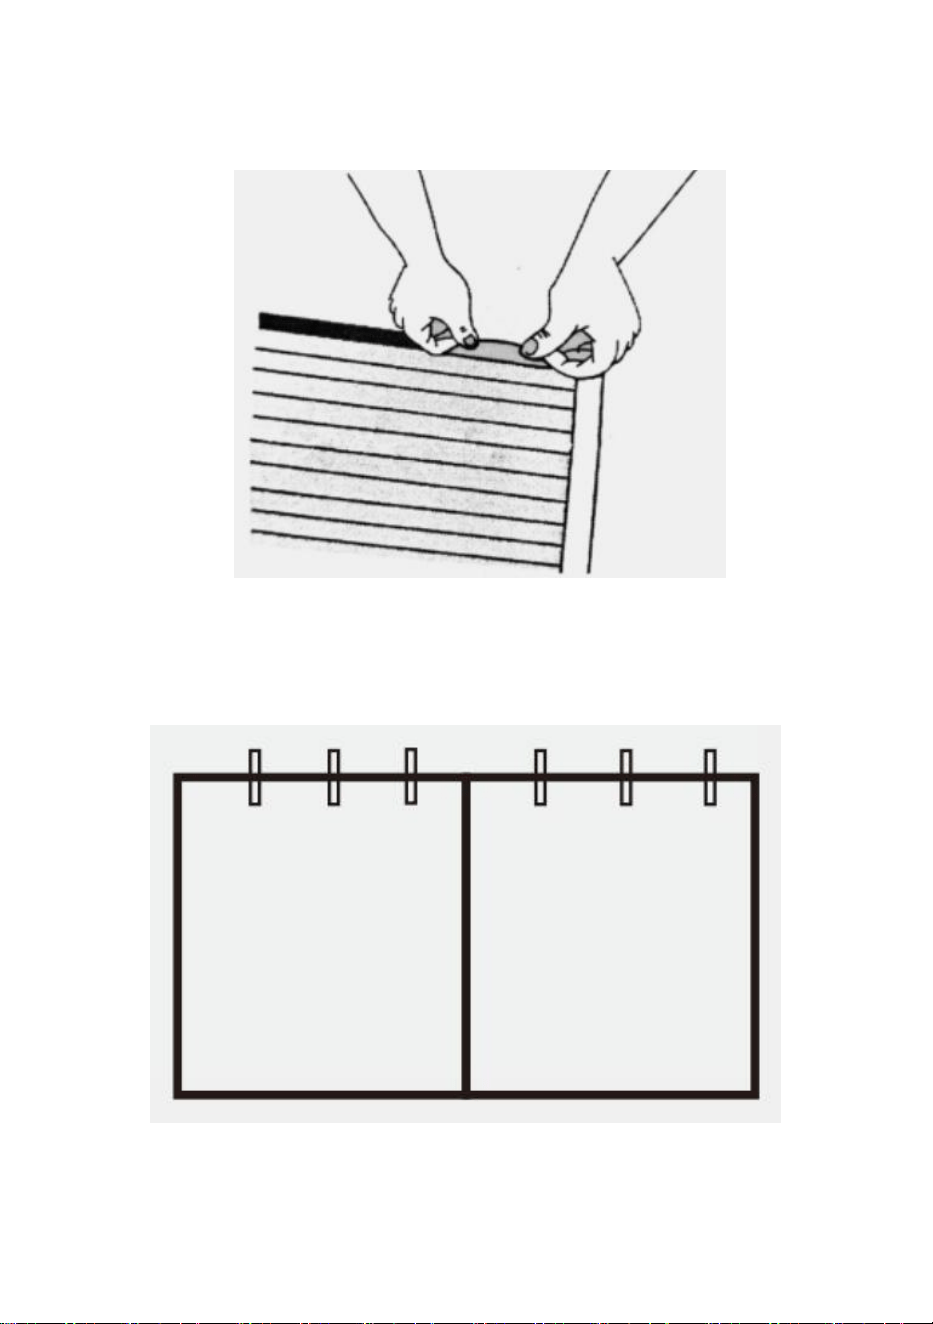
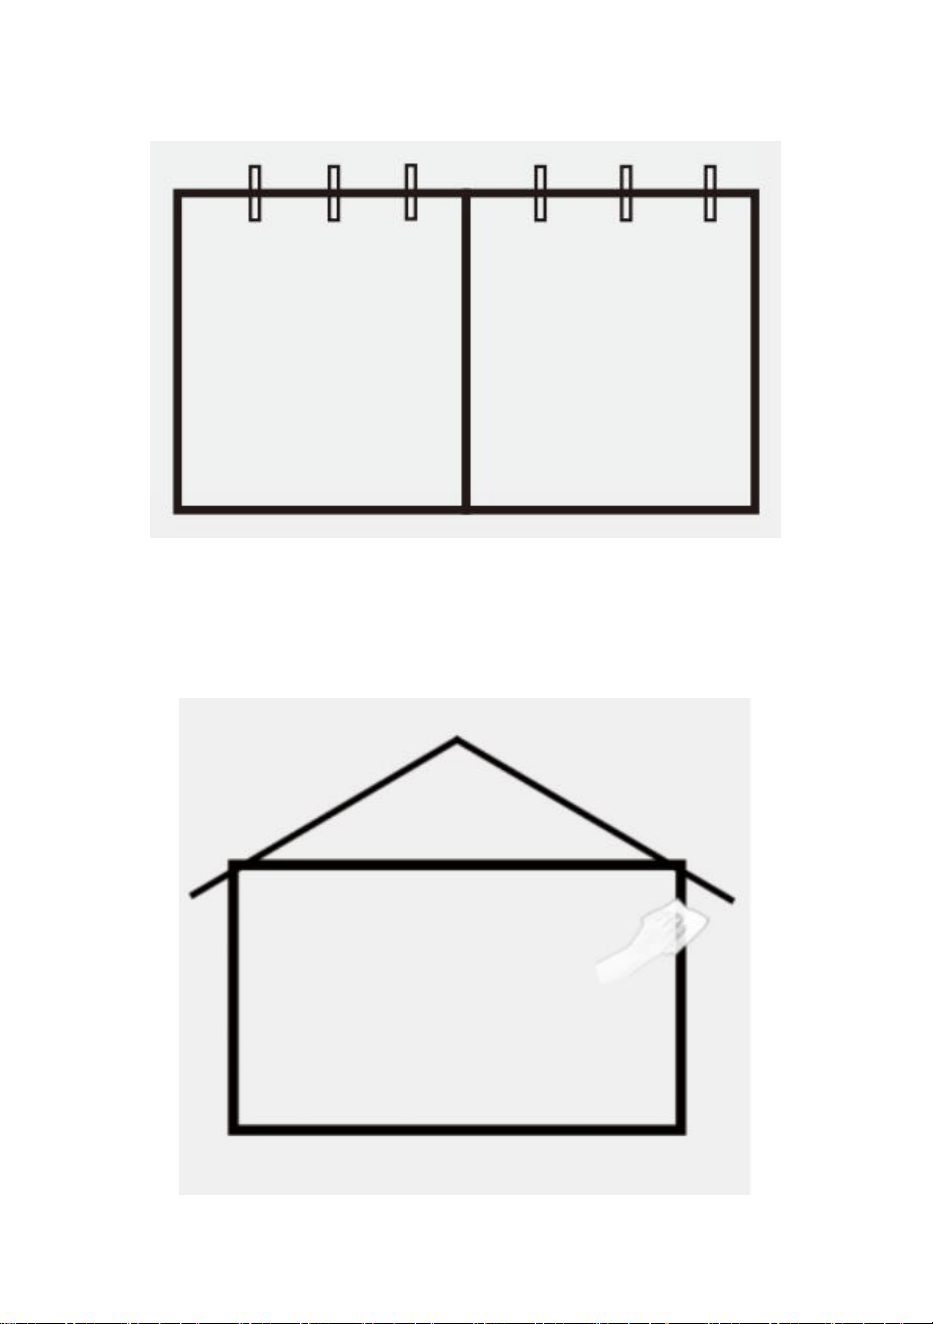
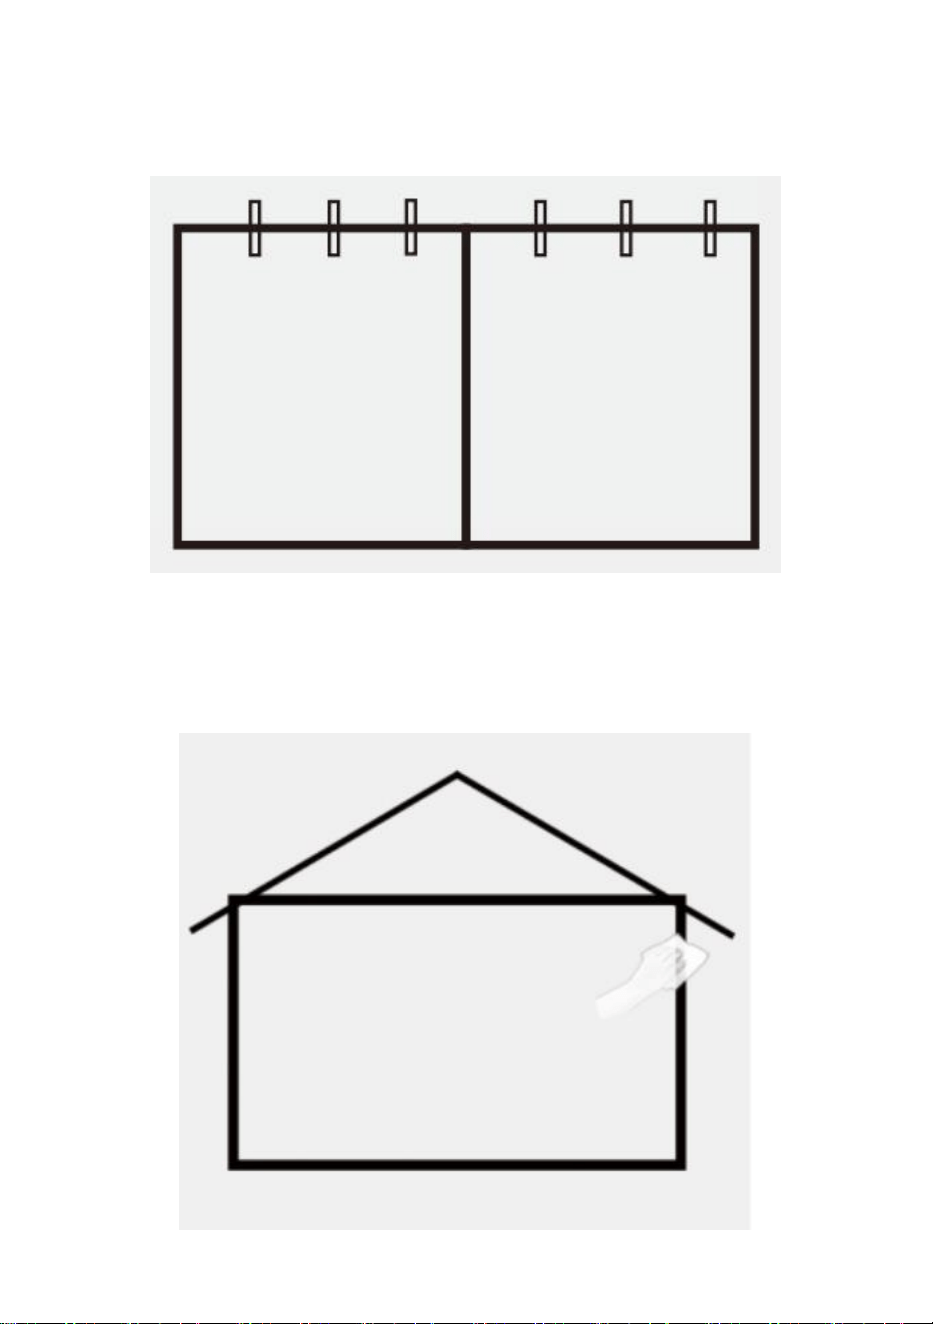
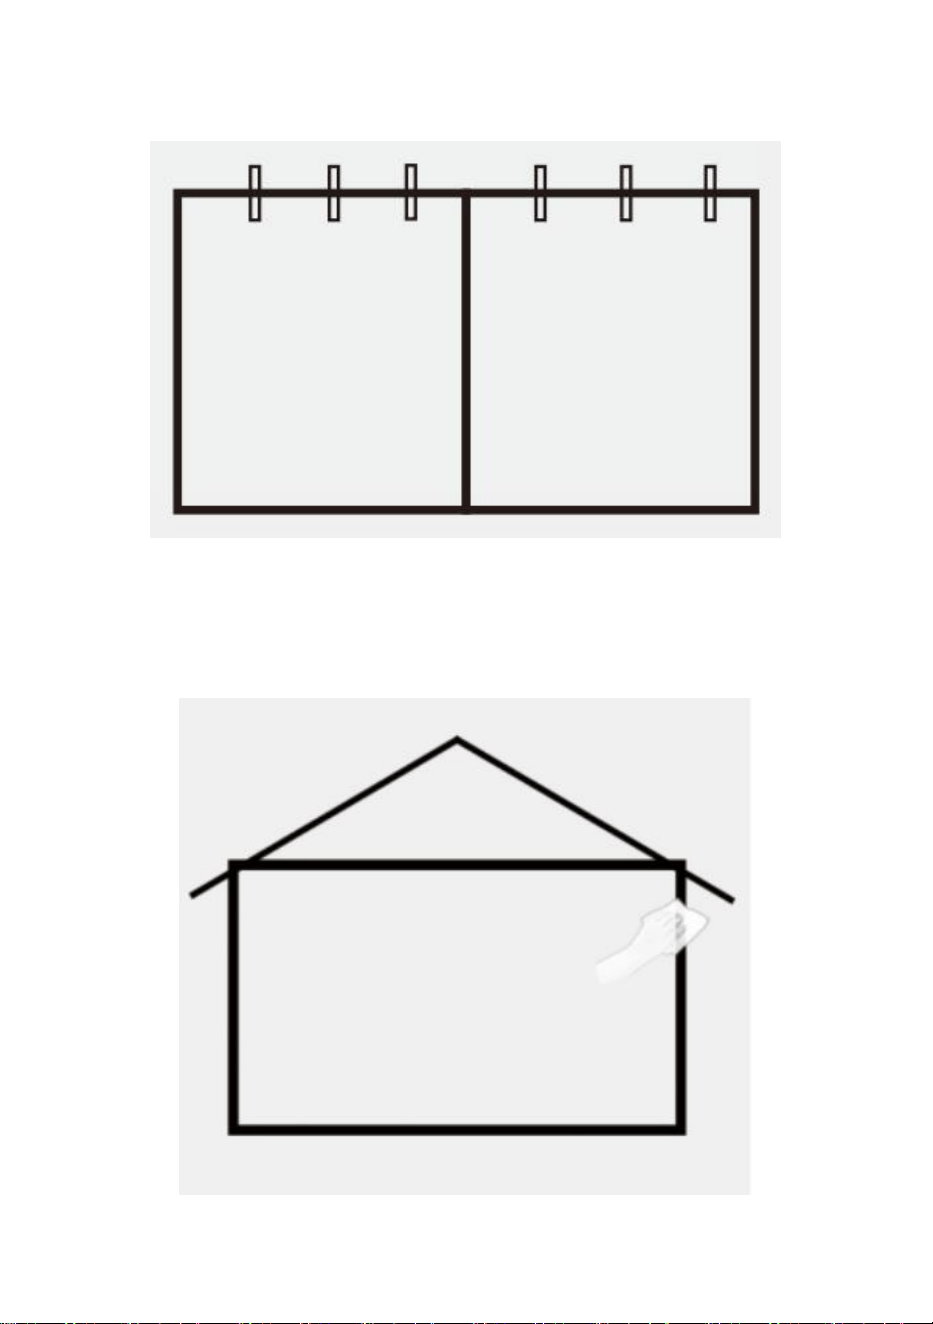
Step 3.When installing the VelcroPls do not forget to attach the straps on the left
and right top each 3 pcs to make the screen organized.
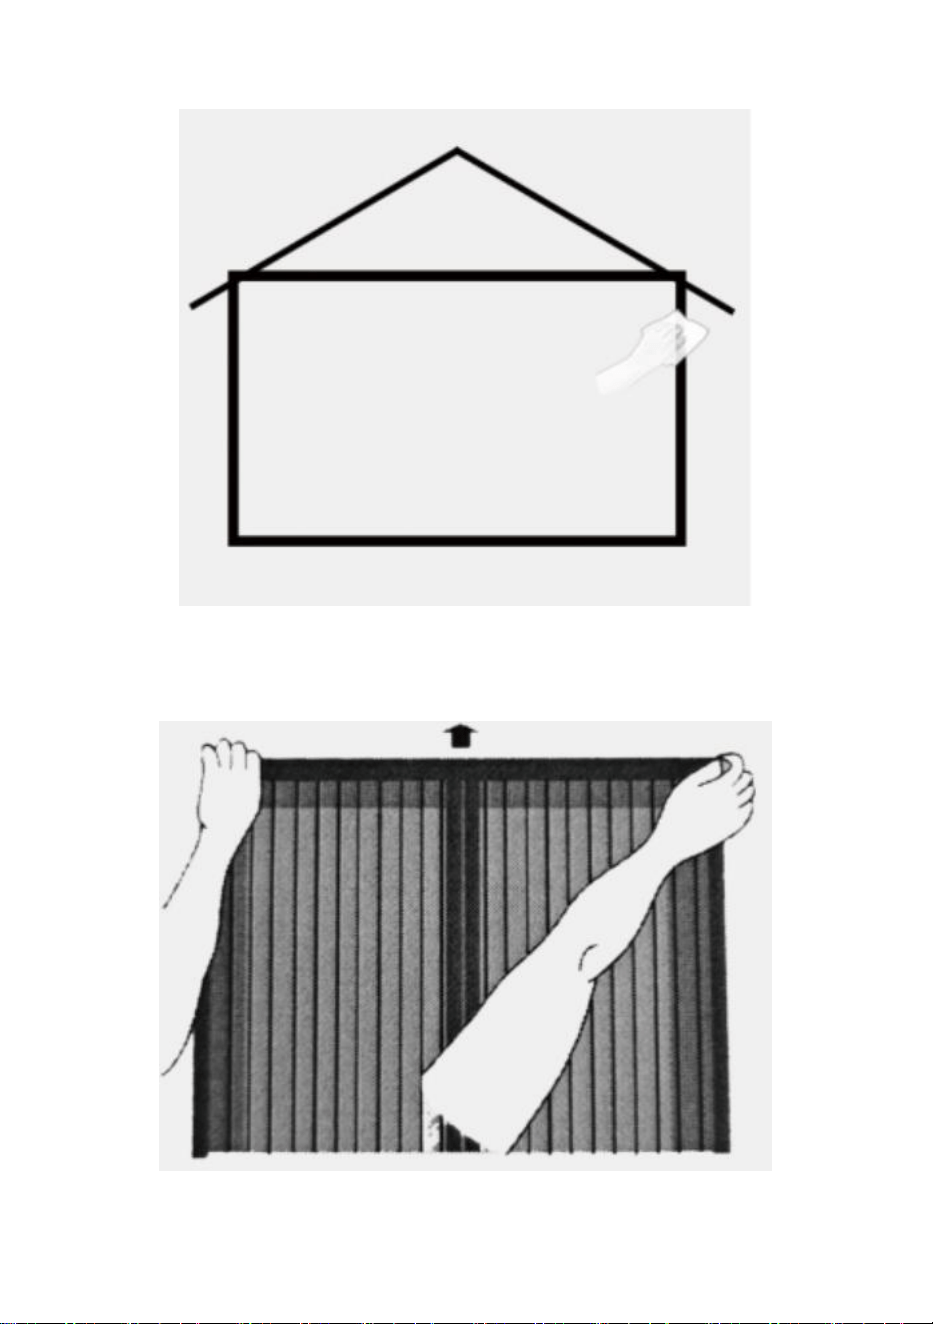
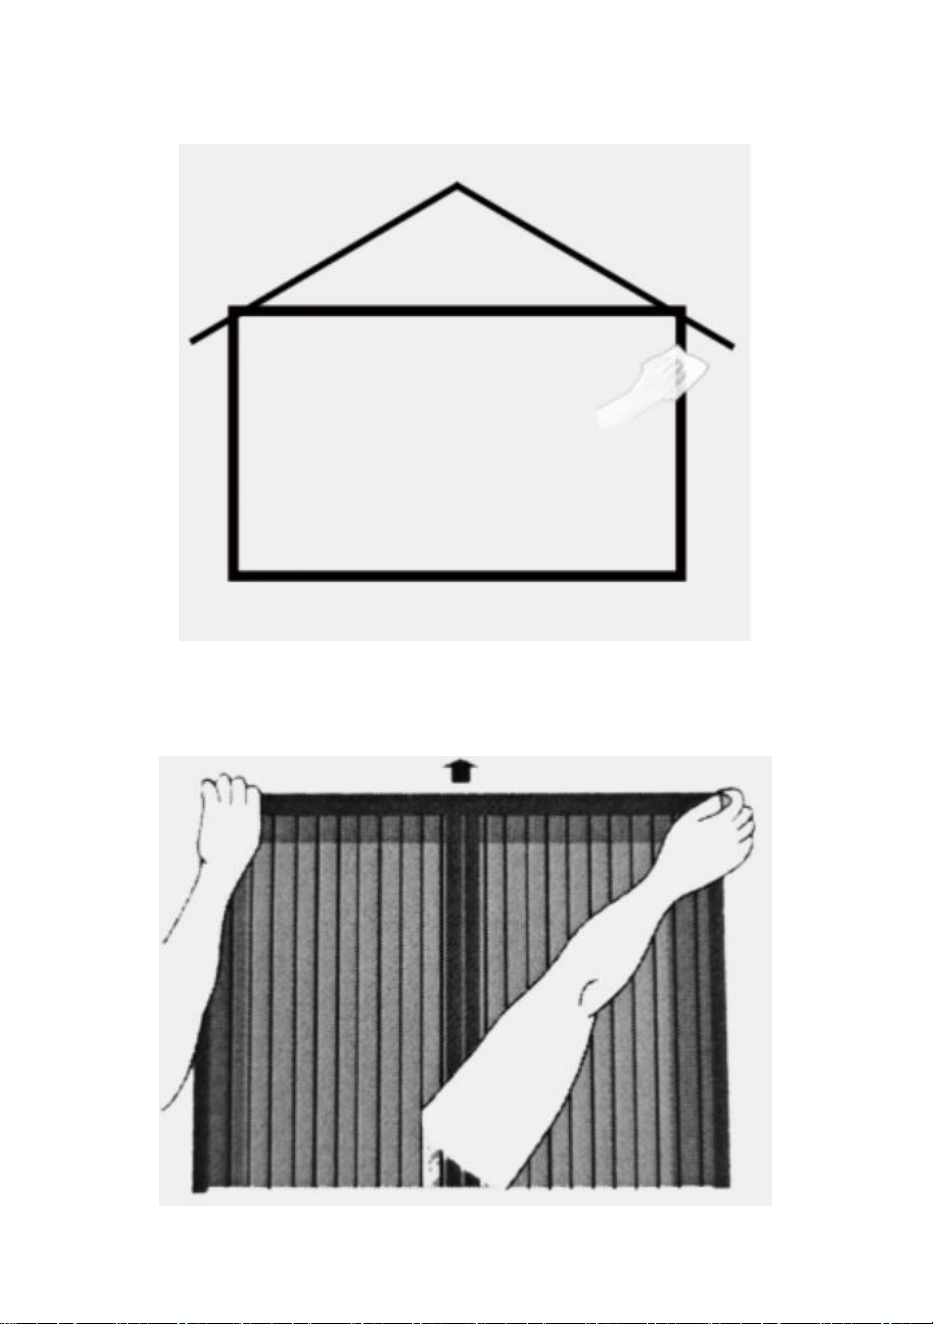
Step 4.Clean the door frame Clean the top and sides of the garage
door frame with a cloth.

7
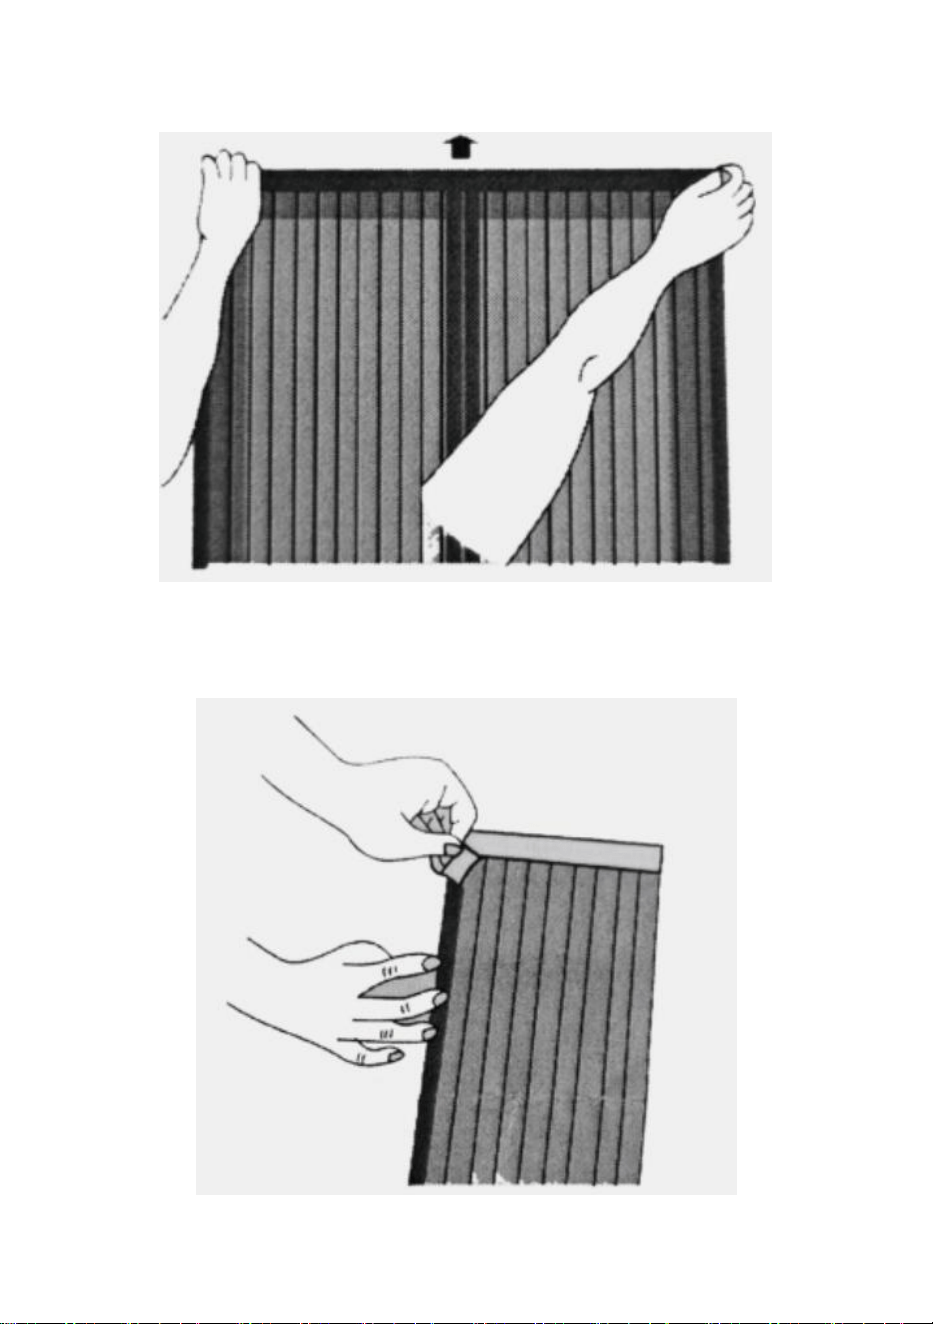
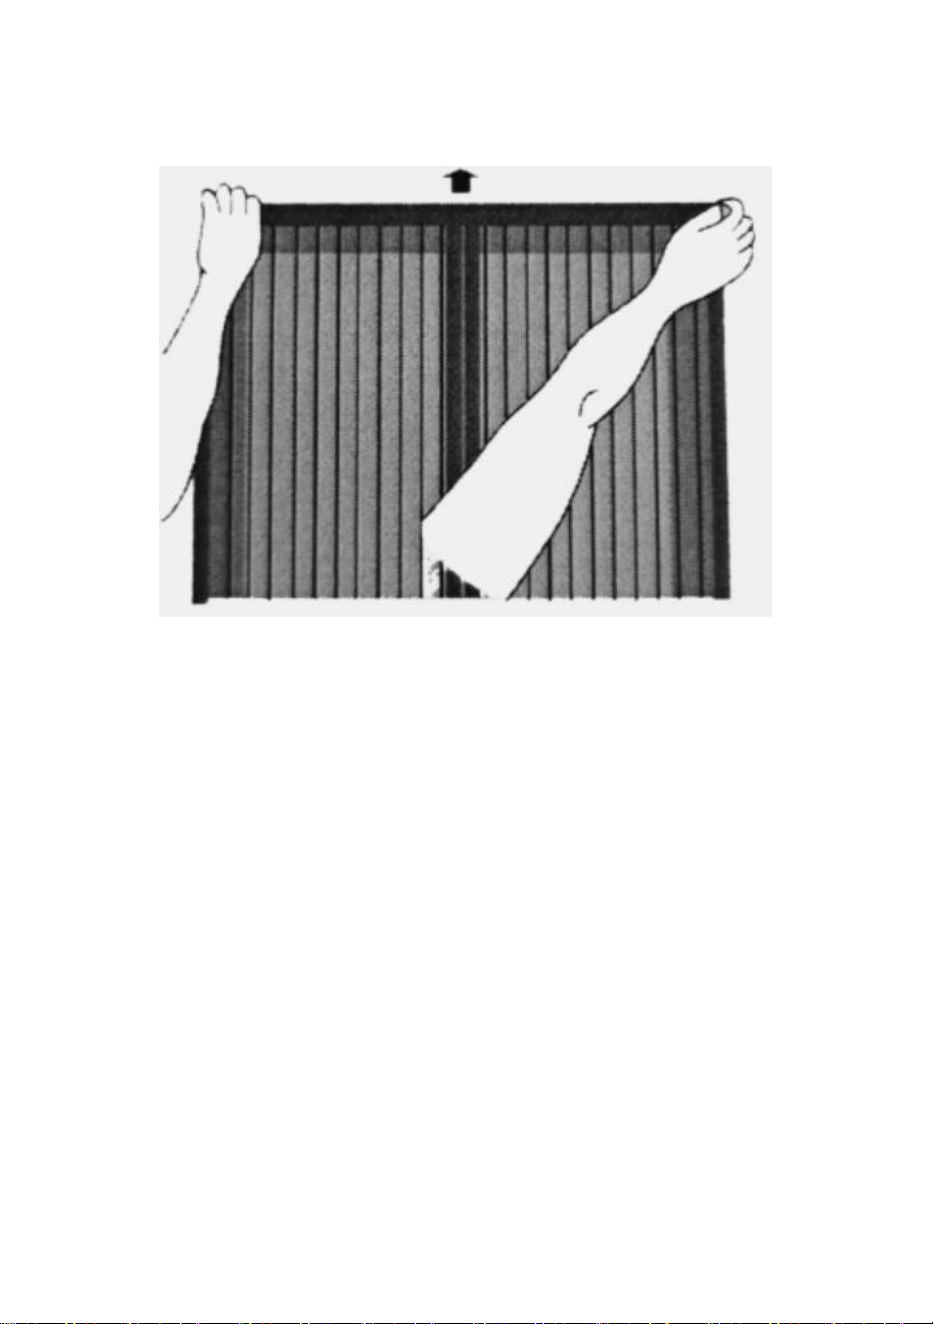
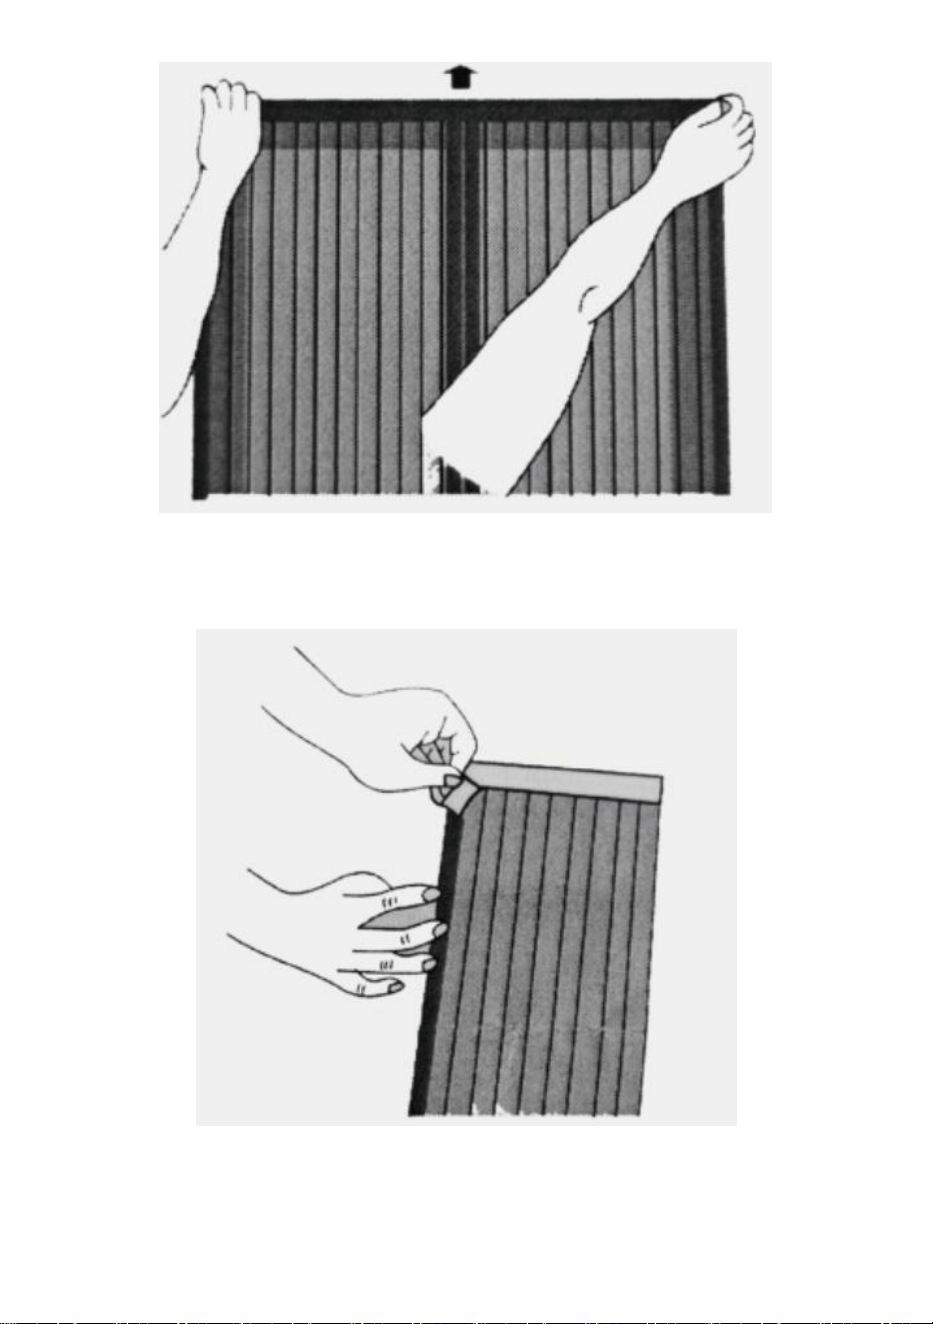
Step 5 Locate the curtain Find and mark the best position matching
your door frame.
Step 6.Tear off the sticker Remove the white realse paper of
adhesive and attach the screen on the door frame side by side.
Step 7.Finish and enjoy a mosquito-free life.

8
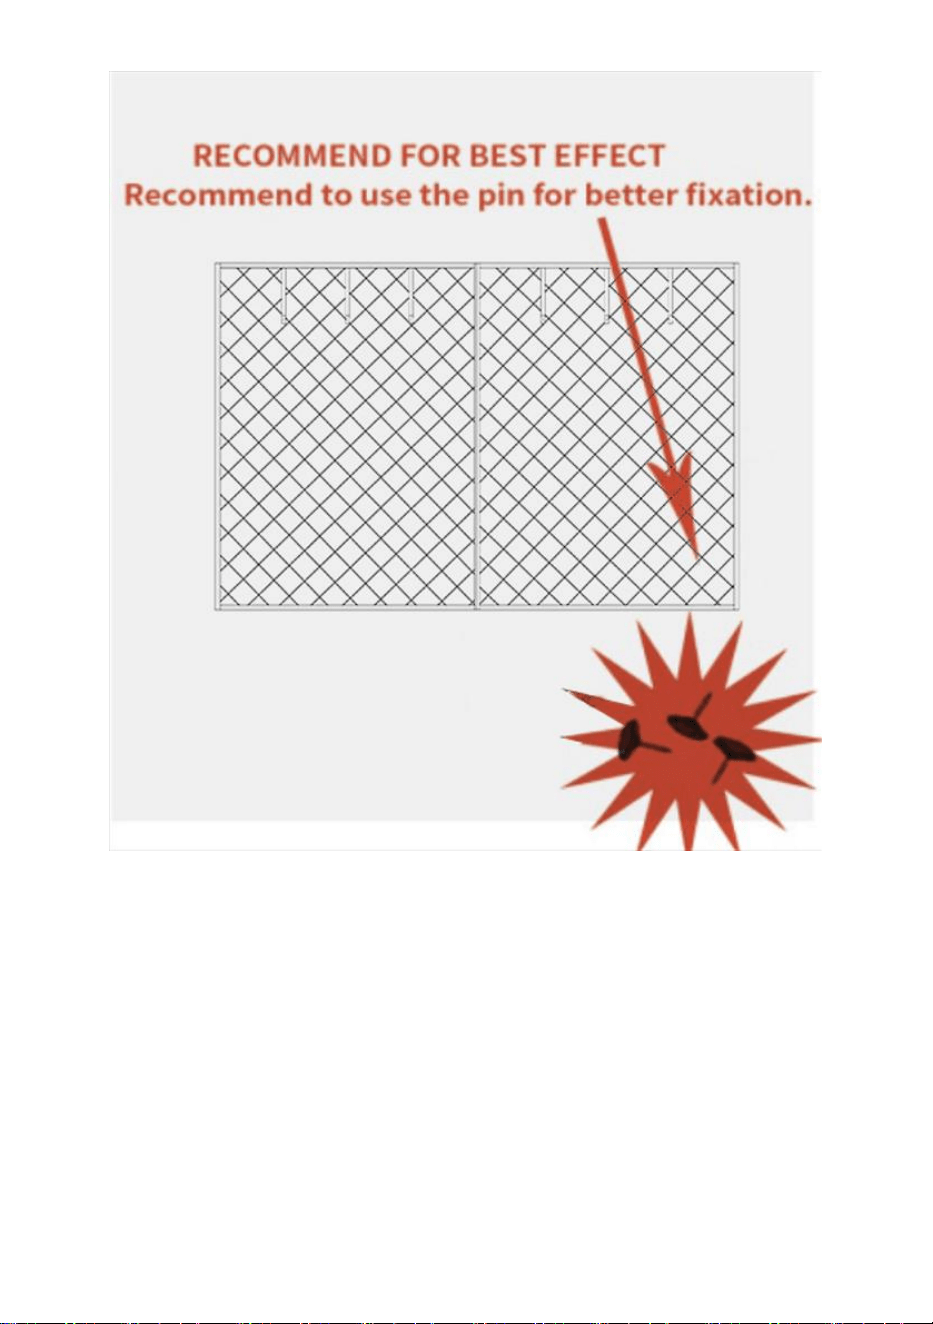
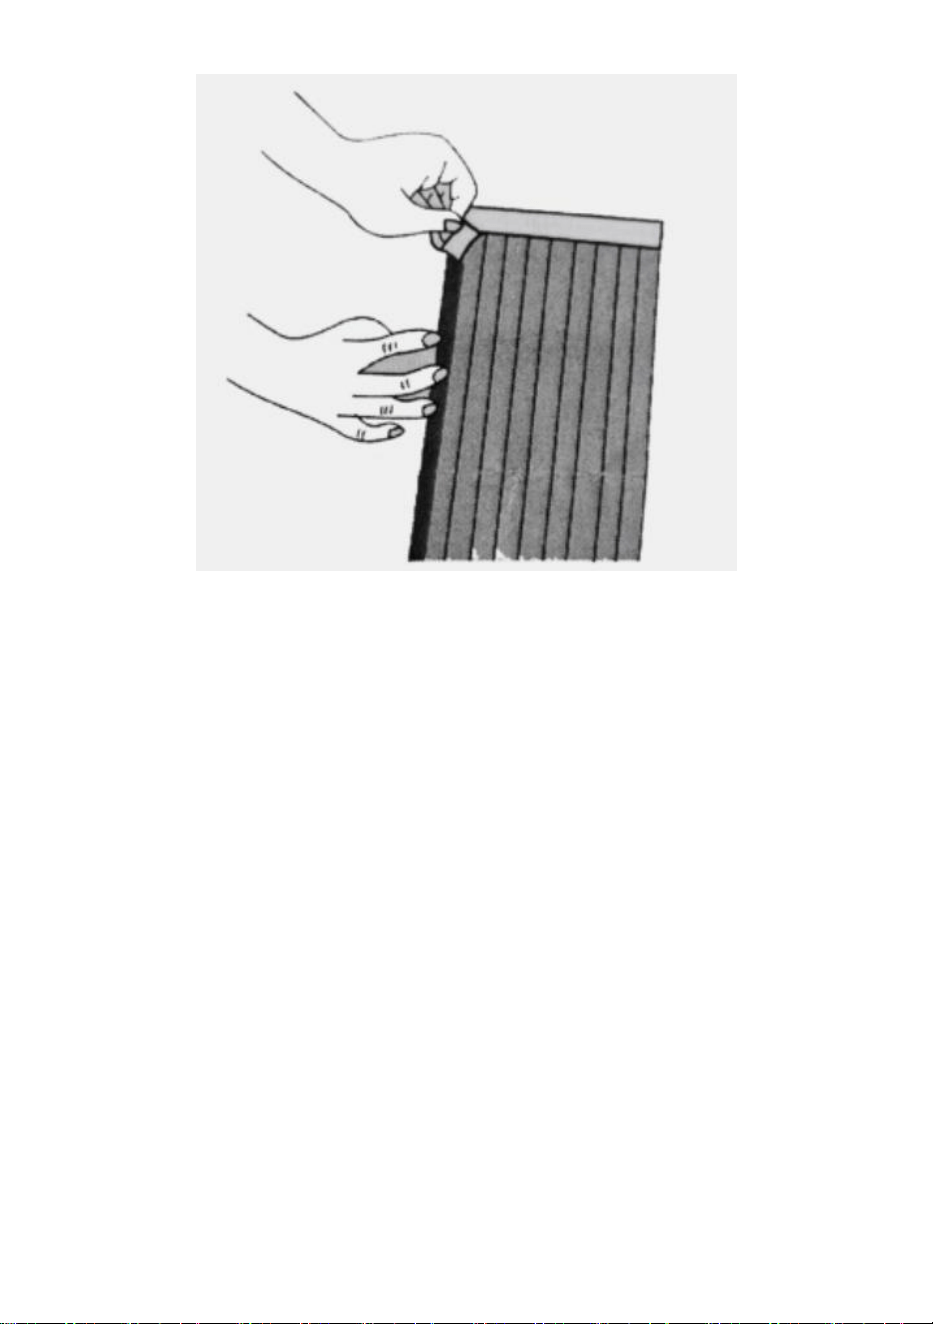
Note: lf the garage door frame is made of wood, pushpins can be used to reinforce
the periphery of the door curtain
When you want to roll up your garage screen door you can use strapping tapes.

9
Manufacturer: Shanghaimuxinmuyeyouxiangongsi
Address: Shuangchenglu 803nong11hao1602A-1609shi, baoshanqu,
shanghai 200000 CN.
Imported to AUS: SIHAO PTY LTD. 1 ROKEVA STREETEASTWOOD
NSW 2122 Australia
Imported to USA: Sanven Technology Ltd. Suite 250, 9166 Anaheim
Place, Rancho Cucamonga, CA 91730
REP
EC
E-CrossStu GmbH
Mainzer Landstr.69, 60329 Frankfurt am Main.
REP
UK
YH CONSULTING LIMITED.
C/O YH Consulting Limited Office 147, Centurion
House, London Road, Staines-upon-Thames, Surrey,
TW18 4AX


We continue to be committed to provide you tools with competitive price.
"Save Half", "Half Price" or any other similar expressions used by us only represents an
estimate of savings you might benefit from buying certain tools with us compared to the major
top brands and does not necessarily mean to cover all categories of tools offered by us. You
are kindly reminded to verify carefully when you are placing an order with us if you are
actually saving half in comparison with the top major brands.
1
MODEL: 8,3 X 7,15 STÓP , 9,3 X 7,15 STÓP , 16,3 X 7,15 STÓP , 18,3
X 7,15 STÓP , 10,3 X 8,15 STÓP
Have product questions? Need technical support? Please feel free to
contact us:
Technical Support and E-Warranty Certificate
www.vevor.com/support
NEED HELP? CONTACT US!
This is the original instruction, please read all manual instructions
carefully before operating. VEVOR reserves a clear interpretation of our
user manual. The appearance of the product shall be subject to the
product you received. Please forgive us that we won't inform you again if
there are any technology or software updates on our product.
WINTER MAGNETIC
THERMAL-GARAGE
DOOR SCREEN

2
OSTRZEŻENIE:
1. Nie pozwalaj dzieciom wspinać się na urządzenie.
2. Podczas montażu trzymaj dzieci i zwierzęta z daleka.
ŚRODKI OSTROŻNOŚCI PRZY MONTAŻU
1. Prosimy o złożenie produktu ściśle według instrukcji. Błędny
montaż może być niebezpieczny.
2. Podczas montażu należy nosić okulary ochronne i rękawice robocze.
3. Nie przystępuj do składania produktu będąc zmęczonym, pod wpływem
alkoholu, narkotyków lub leków.
4. Oddziel i policz wszystkie części i osprzęt.
5. Jeżeli do montażu chcesz wykorzystać pinezki , wyjmij je i ostrożnie zamontuj
unikać zranień .
6. Jeśli korzystasz z elektronarzędzi, pamiętaj, aby zwolnić i zatrzymać się, jeśli
zajdzie taka potrzeba.
7. Do montażu potrzebne są dwie osoby.
8. Postępuj zgodnie z przeznaczeniem. Nie siadaj ani nie stawaj na powyższym.
9. Kiedy samochody lub duże narzędzia wjeżdżają do garażu lub z niego
wychodzą, najpierw otwórz ekran, aby uniknąć uszkodzenia produktu
spowodowanego przeciąganiem .
ZACHOWAJ TE INSTRUKCJE.
TECHNICAL PARAMETERS
Model
Materiał
Kolor
Rozmiar (stopy*
stopy)
8,3 X 7,15
STÓP
Oxford 300D
zapobiegając
y rozpryskom
Czarny
8,3 * 7,15
9,3 X 7,15
STÓP
9,3 * 7,15
3
Q ulizowana
tkanina
16,3 X 7,15
STÓP
16,3 * 7,15
18,3 X 7,15
STÓP
18,3 * 7,15
10,3 X 8,15
STÓP
10,3 * 8,15
PRODUCT INTRODUCE

4
APPLICATIONS

5
ASSEMBLY
Krok 1.
Połóż płasko:: Połóż kurtynę bramy płasko na równym podłożu.
Krok 2.
6
na rzepy : Najpierw przyklej haczyk rzepu o szerokości 4 cm do strony z pętelką 4
cm na górze ekranu, a następnie przyklej haczyk rzepu o szerokości 4 cm do
strony z pętelką 4 cm po obu stronach ekranu .
Krok 3. Instalując rzepy, nie zapomnij przymocować pasków po lewej i prawej
stronie u góry, po 3 sztuki, aby uporządkować ekran.
Krok 4. Oczyść ościeżnicę Wyczyść górną i boki ościeżnicy bramy
7
garażowej szmatką.
Krok 5 Znajdź zasłonę Znajdź i zaznacz najlepszą pozycję pasującą
do Twojej Framuga.

8
Krok 6. Oderwij naklejkę Usuń biały papier z klejem i przymocuj
ekran na framudze drzwi obok siebie.
Krok 7. Zakończ i ciesz się życiem wolnym od komarów .
9
Uwaga: Jeżeli ościeżnica bramy garażowej wykonana jest z drewna, do wzmocnienia
można użyć pinezek obwód połaci drzwi
Gdy chcesz zwinąć bramę garażową możesz użyć taśm mocujących.

10
Producent: Shanghaimuxinmuyeyouxiangongsi
Adres: Shuangchenglu 803nong11hao1602A-1609shi, baoshanqu ,
szanghaj 200000 CN.
Import do AUS: SIHAO PTY LTD. 1 ROKEVA STREETEASTWOOD NSW
2122 Australia
Import do USA: Sanven Technology Ltd. Suite 250, 9166 Anaheim Place,
Rancho Cucamonga, CA 91730
REP
EC
E-CrossStu GmbH
Mainzer Landstr.69, 60329 Frankfurt am Main.
REP
UK
YH CONSULTING LIMITED.
C/O YH Consulting Limited Office 147, Centurion
House, London Road, Staines-upon-Thames, Surrey,
TW18 4AX


Technisch Ondersteuning en e-garantiecertificaat www.vevor.com/support
WINTERMAGNETISCH
THERMISCH GARAGEDEURSCHERM
Handleiding
We continue to be committed to provide you tools with competitive price.
"Save Half", "Half Price" or any other similar expressions used by us only represents an
estimate of savings you might benefit from buying certain tools with us compared to the major
top brands and does not necessarily mean to cover all categories of tools offered by us. You
are kindly reminded to verify carefully when you are placing an order with us if you are
actually saving half in comparison with the top major brands.


1
MODEL: 8,3X7,15 VOET , 9,3X7,15 VOET , 16,3X7,15 VOET ,
18,3X7,15 VOET , 10,3X8,15 VOET
Have product questions? Need technical support? Please feel free to
contact us:
Technical Support and E-Warranty Certificate
www.vevor.com/support
NEED HELP? CONTACT US!
This is the original instruction, please read all manual instructions
carefully before operating. VEVOR reserves a clear interpretation of our
user manual. The appearance of the product shall be subject to the
product you received. Please forgive us that we won't inform you again if
there are any technology or software updates on our product.
WINTER MAGNETIC
THERMAL-GARAGE
DOOR SCREEN

2
WAARSCHUWING:
1. Laat kinderen niet op het apparaat klimmen.
2. Houd kinderen en huisdieren tijdens de montage uit de buurt.
MONTAGEVOORZORGSMAATREGELEN
1. Monteer het product strikt volgens de instructies. Niet correct
montage kan gevaarlijk zijn.
2. Draag tijdens de montage een veiligheidsbril en werkhandschoenen.
3. Probeer het product niet in elkaar te zetten als u zich moe voelt of onder invloed
bent van alcohol, drugs of medicijnen.
4. Scheid en tel alle onderdelen en hardware.
een punaise wilt gebruiken voor de montage, verwijdert u deze en installeert u
deze voorzichtig
Vermijd letsel .
6. Als u elektrisch gereedschap gebruikt, zorg er dan voor dat u langzamer gaat
rijden en stopt wanneer dat nodig is.
7. Voor de montage zijn twee personen nodig.
8. Volg uitsluitend het beoogde gebruik. Ga niet op het bovenstaande zitten of
staan.
9. Wanneer auto's of groot gereedschap de garage binnenkomen of verlaten, open
dan eerst het scherm om schade aan het product door slepen te voorkomen .
BEWAAR DEZE INSTRUCTIES.
TECHNICAL PARAMETERS
Model
Materiaal
Kleur
Grootte (ft*ft)
8,3X7,15
VOET
Anti-spattend
300D Oxford
Gewatteerde
Zwart
8,3 * 7,15
9,3X7,15
VOET
9,3 * 7,15
3
stof
16,3X7,15
VOET
16,3 * 7,15
18,3X7,15
VOET
18,3 * 7,15
10,3X8,15
VOET
10,3 * 8,15
PRODUCT INTRODUCE
4
APPLICATIONS
5
ASSEMBLY
Stap 1.
Plaats het plat:: Leg het deurblad plat op een vlakke ondergrond.
Stap 2.
6
Klittenband : lijm eerst de haakzijde van het 4 cm brede klittenband met de 4 cm
luszijde aan de bovenkant van het scherm en lijm vervolgens de haakzijde van het
4 cm brede klittenband met de 4 cm luszijde aan beide zijden van het scherm .
Stap 3. Vergeet bij het installeren van de klittenbanden niet om de riemen links en
rechts bovenaan elke 3 stuks te bevestigen om het scherm georganiseerd te
maken.
7
Stap 4.Het deurkozijn reinigen Maak de boven- en zijkanten van het
garagedeurkozijn schoon met een doek.
Stap 5 Zoek het gordijn Vind en markeer de beste positie die bij uw
past deurkozijn.
8
Stap 6. Scheur de sticker af Verwijder het witte echte papier met lijm
en bevestig het scherm naast elkaar op het deurkozijn.
Stap 7. Maak het leven af en geniet van een muggenvrij leven .

9
Let op: Als het frame van de garagedeur is gemaakt van hout, punaises kunnen
worden gebruikt om het te versterken omtrek van het deurblad
Wanneer u uw garagehordeur wilt oprollen je kunt omsnoeringsbanden gebruiken.

10
Fabrikant: Shanghaimuxinmuyeyouxiangongsi
Adres: Shuangchenglu 803nong11hao1602A-1609shi, baoshanqu ,
shanghai 200000 CN.
Geïmporteerd naar AUS: SIHAO PTY LTD. 1 ROKEVA
STREETEASTWOOD NSW 2122 Australië
Geïmporteerd naar de VS: Sanven Technology Ltd. Suite 250, 9166
Anaheim Place, Rancho Cucamonga, CA 91730
REP
EC
E-CrossStu GmbH
Mainzer Landstr.69, 60329 Frankfurt am Main.
REP
UK
YH CONSULTING LIMITED.
C/O YH Consulting Limited Office 147, Centurion
House, London Road, Staines-upon-Thames, Surrey,
TW18 4AX


Teknisk Support och e-garanticertifikat www.vevor.com/support
VINTERMAGNET
TERMISK GARAGEDÖRRSKÄRM
Användarmanual
We continue to be committed to provide you tools with competitive price.
"Save Half", "Half Price" or any other similar expressions used by us only represents an
estimate of savings you might benefit from buying certain tools with us compared to the major
top brands and does not necessarily mean to cover all categories of tools offered by us. You
are kindly reminded to verify carefully when you are placing an order with us if you are
actually saving half in comparison with the top major brands.


1
MODELL: 8.3X7.15 FT , 9,3X7,15 FT , 16,3X7,15 FT , 18,3X7,15 FT ,
10,3X8,15 FT
Have product questions? Need technical support? Please feel free to
contact us:
Technical Support and E-Warranty Certificate
www.vevor.com/support
NEED HELP? CONTACT US!
This is the original instruction, please read all manual instructions
carefully before operating. VEVOR reserves a clear interpretation of our
user manual. The appearance of the product shall be subject to the
product you received. Please forgive us that we won't inform you again if
there are any technology or software updates on our product.
WINTER MAGNETIC
THERMAL-GARAGE
DOOR SCREEN

2
VARNING:
1. Låt inte barn klättra på enheten.
2. Håll barn och husdjur borta under monteringen.
FÖRSIKTIGHETSÅTGÄRDER FÖR MONTERING
1. Vänligen montera produkten i strikt enlighet med instruktionerna. Felaktig
montering kan vara farligt.
2. Använd skyddsglasögon och arbetshandskar ordentligt under monteringen.
3. Försök inte att sätta ihop produkten när du känner dig trött eller är påverkad av
alkohol, droger eller medicin.
4. Separera och räkna alla delar och hårdvara.
5. Om du vill använda stift för montering, ta bort och installera dem försiktigt
undvika skador .
6. Om du använder elverktyg, var noga med att sakta ner och stanna vid behov.
7. Två personer krävs för montering.
8. Följ endast avsedd användning. Sitt eller stå inte på ovanstående.
9. När bilar eller stora verktyg går in i eller ut ur garaget, öppna skärmen först för
att undvika skador på produkten som orsakas av att dra .
SPARA DESSA INSTRUKTIONER.
TECHNICAL PARAMETERS
Modell
Material
Färg
Storlek (ft*ft)
8,3X7,15 FT
Anti-stänk
300D Oxford
Quiltat tyg
Svart
8,3 * 7,15
9,3X7,15 FT
9 ,3* 7 ,15
16,3X7,15 FT
16 ,3* 7 ,15
18,3X7,15 FT
18 ,3* 7 ,15
10,3X8,15 FT
10 ,3* 8 ,15
3
PRODUCT INTRODUCE
4
APPLICATIONS

5
ASSEMBLY
Steg 1.
Placera den plant:: Lägg dörrgardinen plant på ett plant underlag.
Steg 2.
6
Kardborrbindning : Limma först kroksidan av den 4 cm breda kardborrbandet med
4 cm öglesidan på skärmens ovansida, och limma sedan kroksidan på den 4 cm
breda kardborren med 4 cm öglesidan på båda sidor av skärmen .
Steg 3.När du installerar kardborrebanden, glöm inte att fästa remmarna på
vänster och höger topp var 3 st för att göra skärmen organiserad.
Steg 4. Rengör dörrkarmen Rengör toppen och sidorna av

7
garageportens ram med en trasa.
Steg 5 Leta reda på gardinen Hitta och markera den bästa
positionen som matchar din dörrkarm.

8
Steg 6.Riv av klistermärket Ta bort det vita äkta papperet med lim
och fäst skärm på dörrkarmen sida vid sida.
Steg 7. Avsluta och njut av ett myggfritt liv .

9
Obs: om garageportens karm är gjord av trä, kan kartnålar användas för att förstärka
dörrgardinens periferi
När du vill rulla ihop din garageport du kan använda bandband.

10
Tillverkare: Shanghaimuxinmuyeyouxiangongsi
Adress: Shuangchenglu 803nong11hao1602A-1609shi, baoshanqu ,
shanghai 200000 CN.
Importerad till AUS: SIHAO PTY LTD. 1 ROKEVA STREETEASTWOOD
NSW 2122 Australien
Importerad till USA: Sanven Technology Ltd. Suite 250, 9166 Anaheim
Place, Rancho Cucamonga, CA 91730
REP
EC
E-CrossStu GmbH
Mainzer Landstr.69, 60329 Frankfurt am Main.
REP
UK
YH CONSULTING LIMITED.
C/O YH Consulting Limited Office 147, Centurion
House, London Road, Staines-upon-Thames, Surrey,
TW18 4AX


We continue to be committed to provide you tools with competitive price.
"Save Half", "Half Price" or any other similar expressions used by us only represents an
estimate of savings you might benefit from buying certain tools with us compared to the major
top brands and does not necessarily mean to cover all categories of tools offered by us. You
are kindly reminded to verify carefully when you are placing an order with us if you are
actually saving half in comparison with the top major brands.

1
MODELLO: 8,3X7,15 PIEDI , 9,3X7,15 PIEDI , 16,3X7,15 PIEDI ,
18,3X7,15 PIEDI , 10,3X8,15 PIEDI
Have product questions? Need technical support? Please feel free to
contact us:
Technical Support and E-Warranty Certificate
www.vevor.com/support
NEED HELP? CONTACT US!
This is the original instruction, please read all manual instructions
carefully before operating. VEVOR reserves a clear interpretation of our
user manual. The appearance of the product shall be subject to the
product you received. Please forgive us that we won't inform you again if
there are any technology or software updates on our product.
WINTER MAGNETIC
THERMAL-GARAGE
DOOR SCREEN

2
AVVERTIMENTO:
1. Non permettere ai bambini di salire sull'unità.
2. Tenere lontani i bambini e gli animali domestici durante il montaggio.
PRECAUZIONI DI MONTAGGIO
1. Si prega di assemblare il prodotto attenendosi rigorosamente alle istruzioni.
Errato
il montaggio potrebbe essere pericoloso.
2. Indossare correttamente occhiali protettivi e guanti da lavoro durante il
montaggio.
3. Non tentare di montare il prodotto quando ci si sente stanchi o sotto l'effetto di
alcol, droghe o farmaci.
4. Separare e contare tutte le parti e l'hardware.
5. Se si desidera utilizzare puntine da disegno per il montaggio, rimuoverle e
installarle con attenzione
evitare lesioni .
6. Se si utilizzano utensili elettrici, fare attenzione a rallentare e fermarsi quando
necessario.
7. Per il montaggio sono necessarie due persone.
8. Seguire solo gli usi previsti. Non sedersi o stare in piedi su quanto sopra.
9. Quando automobili o strumenti di grandi dimensioni entrano o escono dal
garage, aprire prima lo schermo per evitare danni al prodotto causati dal
trascinamento .
CONSERVA QUESTE ISTRUZIONI.
TECHNICAL PARAMETERS
Modello
Materiale
Colore
Dimensioni
(piedi*piedi)
8,3X7,15
PIEDI
Oxford 300D
antispruzzo
Nero
8,3 * 7,15

3
Tessuto
trapuntato
9,3X7,15
PIEDI
9,3 * 7,15
16,3X7,15
PIEDI
16,3 * 7,15
18,3X7,15
PIEDI
18,3 * 7,15
10,3X8,15
PIEDI
10.3 * 8.15
PRODUCT INTRODUCE

4
APPLICATIONS
5
ASSEMBLY

6
Passo 1.
Posizionarlo in piano: Appoggiare il telo della porta in piano su una superficie
piana.
Passo 2.
velcro : incollare prima il lato con il gancio del velcro di larghezza 4 cm con il lato
con l'anello di 4 cm sulla parte superiore dello schermo, quindi incollare il lato con
il gancio del velcro di larghezza 4 cm con il lato con l'anello di 4 cm su entrambi i
lati dello schermo .
7
Passaggio 3.Quando si installa il VelcroPls, non dimenticare di attaccare le cinghie
in alto a sinistra e a destra ogni 3 pezzi per organizzare lo schermo.
Passaggio 4. Pulisci il telaio della porta Pulisci la parte superiore e i
lati del telaio della porta del garage con un panno.
8
Passaggio 5 Individuare la tenda Trova e contrassegna la posizione
migliore corrispondente alla tua telaio della porta.
Passaggio 6. Strappare l'adesivo Rimuovere la carta bianca
dell'adesivo e attaccare il schermo sul telaio della porta affiancato.
Passaggio 7.Termina e goditi una vita senza zanzare .

9
Nota: se il telaio della porta del garage è in legno, le puntine da disegno possono
essere utilizzate per rinforzare il perimetro del manto della porta
Quando vuoi arrotolare la zanzariera del tuo garage puoi usare i nastri per reggiatura.

10
Produttore: Shanghaimuxinmuyeyouxiangongsi
Indirizzo: Shuangchenglu 803nong11hao1602A-1609shi, baoshanqu ,
shanghai 200000 CN.
Importato in AUS: SIHAO PTY LTD. 1 ROKEVA STREETEASTWOOD
NSW 2122 Australia
Importato negli Stati Uniti: Sanven Technology Ltd. Suite 250, 9166
Anaheim Place, Rancho Cucamonga, CA 91730
REP
EC
E-CrossStu GmbH
Mainzer Landstr.69, 60329 Frankfurt am Main.
REP
UK
YH CONSULTING LIMITED.
C/O YH Consulting Limited Office 147, Centurion
House, London Road, Staines-upon-Thames, Surrey,
TW18 4AX


Technisch Support und E-Garantie-Zertifikat www.vevor.com/support
WINTER MAGNETIC
THERMO-GARAGENTORGITTER
Benutzerhandbuch
We continue to be committed to provide you tools with competitive price.
"Save Half", "Half Price" or any other similar expressions used by us only represents an
estimate of savings you might benefit from buying certain tools with us compared to the major
top brands and does not necessarily mean to cover all categories of tools offered by us. You
are kindly reminded to verify carefully when you are placing an order with us if you are
actually saving half in comparison with the top major brands.


1
MODELL: 8,3 X 7,15 FUß , 9,3 X 7,15 FUß , 16,3 X 7,15 FUß , 18,3 X
7,15 FUß , 10,3 X 8,15 FUß
Have product questions? Need technical support? Please feel free to
contact us:
Technical Support and E-Warranty Certificate
www.vevor.com/support
NEED HELP? CONTACT US!
This is the original instruction, please read all manual instructions
carefully before operating. VEVOR reserves a clear interpretation of our
user manual. The appearance of the product shall be subject to the
product you received. Please forgive us that we won't inform you again if
there are any technology or software updates on our product.
WINTER MAGNETIC
THERMAL-GARAGE
DOOR SCREEN

2
WARNUNG:
1. Erlauben Sie Kindern nicht, auf das Gerät zu klettern.
2. Halten Sie Kinder und Haustiere während der Montage fern.
VORSICHTSMASSNAHMEN BEI DER MONTAGE
1. Bitte montieren Sie das Produkt streng nach den Anweisungen. Falsch
Die Montage könnte gefährlich sein.
2. Bitte tragen Sie während der Montage eine Schutzbrille und
Arbeitshandschuhe.
3. Versuchen Sie nicht, das Produkt zusammenzubauen, wenn Sie sich müde
fühlen oder unter dem Einfluss von Alkohol, Drogen oder Medikamenten stehen.
4. Trennen und zählen Sie alle Teile und die Hardware.
Druckstifte für die Montage verwenden möchten , entfernen und installieren Sie
diese vorsichtig, um
Verletzungen vermeiden .
6. Achten Sie bei der Verwendung von Elektrowerkzeugen darauf, die
Geschwindigkeit zu verringern und bei Bedarf anzuhalten.
7. Für die Montage sind zwei Personen erforderlich.
8. Befolgen Sie nur die vorgesehenen Verwendungszwecke. Setzen oder stellen
Sie sich nicht auf die oben genannten Gegenstände.
9. Wenn Autos oder große Werkzeuge in die Garage ein- oder ausfahren, öffnen
Sie bitte zuerst den Bildschirm, um eine Beschädigung des Produkts durch
Mitschleifen zu vermeiden .
ANLEITUNG AUFBEWAHREN.
TECHNICAL PARAMETERS
Modell
Material
Farbe
Größe (ft*ft)
8,3 X 7,15
FUß
Spritzwasserg
eschütztes
Schwarz
8,3 * 7,15

3
300D Oxford
Gesteppter
Stoff
9,3 X 7,15
FUß
9,3 * 7,15
16,3 X 7,15
FUß
16,3 * 7,15
18,3 X 7,15
FUß
18,3 * 7,15
10,3 X 8,15
FUß
10,3 * 8,15
PRODUCT INTRODUCE
4
APPLICATIONS
5
ASSEMBLY

6
Schritt 1.
legen : Legen Sie den Türvorhang flach auf einen ebenen Boden.
Schritt 2.
Klettverschluss -Verklebung: Zuerst die Hakenseite des 4 cm breiten
Klettverschlusses mit der 4 cm breiten Schlaufenseite auf die Oberseite des
Bildschirms kleben, und anschließend die Hakenseite des 4 cm breiten
Klettverschlusses mit der 4 cm breiten Schlaufenseite auf beide Seiten des
Bildschirms kleben.
7
Schritt 3. Vergessen Sie beim Anbringen des Klettverschlusses nicht, die Riemen
jeweils drei oben links und rechts anzubringen, um den Bildschirm zu
organisieren.
Schritt 4. Reinigen Sie den Türrahmen. Reinigen Sie die Oberseite
und die Seiten des Garagentorrahmens mit einem Tuch.
8
Schritt 5 Suchen Sie den Vorhang Finden und markieren Sie die
Position, die am besten zu Ihrem Türrahmen.
Schritt 6. Den Aufkleber abziehen Entfernen Sie das weiße
Klebeband und befestigen Sie die Bildschirm am Türrahmen
nebeneinander.
9
Schritt 7: Beenden Sie den Vorgang und genießen Sie ein Leben
ohne Mücken .

10
Hinweis: Wenn der Garagentorrahmen aus Holz, Reißzwecken können verwendet
werden, um die Peripherie des Torblattes
Wenn Sie Ihr Garagentor hochrollen möchten Sie können Umreifungsbänder
verwenden.

11
Hersteller: Shanghaimuxinmuyeyouxiangongsi
Adresse: Shuangchenglu 803nong11hao1602A-1609shi, Baoshanqu ,
Shanghai 200000 CN.
Nach AUS importiert: SIHAO PTY LTD. 1 ROKEVA
STREETEASTWOOD NSW 2122 Australien
Importiert in die USA: Sanven Technology Ltd. Suite 250, 9166 Anaheim
Place, Rancho Cucamonga, CA 91730
REP
EC
E-CrossStu GmbH
Mainzer Landstr.69, 60329 Frankfurt am Main.
REP
UK
YH CONSULTING LIMITED.
C/O YH Consulting Limited Office 147, Centurion
House, London Road, Staines-upon-Thames, Surrey,
TW18 4AX

12


We continue to be committed to provide you tools with competitive price.
"Save Half", "Half Price" or any other similar expressions used by us only represents an
estimate of savings you might benefit from buying certain tools with us compared to the major
top brands and does not necessarily mean to cover all categories of tools offered by us. You
are kindly reminded to verify carefully when you are placing an order with us if you are
actually saving half in comparison with the top major brands.

1
MODELO: 8.3X7.15 PIES , 9.3X7.15 PIES , 16.3X7.15 PIES , 18.3X7.15
PIES , 10.3X8.15 PIES
Have product questions? Need technical support? Please feel free to
contact us:
Technical Support and E-Warranty Certificate
www.vevor.com/support
NEED HELP? CONTACT US!
This is the original instruction, please read all manual instructions
carefully before operating. VEVOR reserves a clear interpretation of our
user manual. The appearance of the product shall be subject to the
product you received. Please forgive us that we won't inform you again if
there are any technology or software updates on our product.
WINTER MAGNETIC
THERMAL-GARAGE
DOOR SCREEN

2
ADVERTENCIA:
1. No permita que los niños se suban a la unidad.
2. Mantenga alejados a los niños y las mascotas durante el montaje.
PRECAUCIONES DE MONTAJE
1. Ensamble el producto estrictamente de acuerdo con las instrucciones.
Incorrecto
El montaje podría ser peligroso.
2. Utilice gafas de seguridad y guantes de trabajo correctamente durante el
montaje.
3. No intente montar el producto cuando se sienta cansado o bajo la influencia del
alcohol, drogas o medicamentos.
4. Separe y cuente todas las piezas y herrajes.
5. Si desea utilizar pasadores para el ensamblaje, retírelos e instálelos con
cuidado para
evitar lesiones .
6. Si utiliza herramientas eléctricas, tenga cuidado de reducir la velocidad y
detenerse cuando sea necesario.
7. Para el montaje se necesitan dos personas.
8. Siga únicamente los usos previstos. No se siente ni se pare sobre lo anterior.
9. Cuando los automóviles o herramientas de gran tamaño entren o salgan del
garaje, abra primero la pantalla para evitar daños al producto causados por el
arrastre .
GUARDA ESTAS INSTRUCCIONES.
TECHNICAL PARAMETERS
Modelo
Material
Color
Tamaño (pies*pies)
8.3X7.15
PIES
Oxford 300D
antisalpicadur
Negro
8,3 * 7,15

3
as
Tejido
acolchado
9.3X7.15
PIES
9,3 * 7,15
16.3X7.15
PIES
16,3 * 7,15
18.3X7.15
PIES
18,3 * 7,15
10.3X8.15
PIES
10,3 * 8,15
PRODUCT INTRODUCE

4
APPLICATIONS
5
ASSEMBLY
6
Paso 1.
Colóquelo en posición horizontal:: Coloque la cortina de la puerta en posición
horizontal sobre un terreno nivelado.
Paso 2.
velcro : primero pegue el lado del gancho del velcro de 4 cm de ancho con el lado
del bucle de 4 cm en la parte superior de la pantalla, y luego pegue el lado del
gancho del velcro de 4 cm de ancho con el lado del bucle de 4 cm en ambos lados
de la pantalla. .
7
Paso 3. Al instalar los VelcroPls, no olvide colocar las correas en la parte superior
izquierda y derecha, cada 3 unidades, para organizar la pantalla.
Paso 4. Limpiar el marco de la puerta Limpie la parte superior y los
lados del marco de la puerta del garaje con un paño.

8
Paso 5 Ubica la cortina Encuentre y marque la mejor posición que
coincida con su marco de la puerta.
Paso 6. Retira la pegatina. Retire el papel real blanco del adhesivo y
coloque el pantalla en el marco de la puerta, una al lado de la otra.
Paso 7. Termina y disfruta de una vida libre de mosquitos .

9
Nota: Si el marco de la puerta del garaje está hecho de madera, se pueden utilizar
chinchetas para reforzar la periferia de la cortina de la puerta
Cuando quieras enrollar la puerta mosquitera de tu garaje puedes usar cintas para
flejar.

10
Fabricante: Shanghaimuxinmuyeyouxiangongsi
Dirección: Shuangchenglu 803nong11hao1602A-1609shi, baoshanqu ,
shanghai 200000 CN.
Importado a AUS: SIHAO PTY LTD. 1 ROKEVA STREET ASTWOOD
NSW 2122 Australia
Importado a EE. UU.: Sanven Technology Ltd. Suite 250, 9166 Anaheim
Place, Rancho Cucamonga, CA 91730
REP
EC
E-CrossStu GmbH
Mainzer Landstr.69, 60329 Frankfurt am Main.
REP
UK
YH CONSULTING LIMITED.
C/O YH Consulting Limited Office 147, Centurion
House, London Road, Staines-upon-Thames, Surrey,
TW18 4AX

11


We continue to be committed to provide you tools with competitive price.
"Save Half", "Half Price" or any other similar expressions used by us only represents an
estimate of savings you might benefit from buying certain tools with us compared to the major
top brands and does not necessarily mean to cover all categories of tools offered by us. You
are kindly reminded to verify carefully when you are placing an order with us if you are
actually saving half in comparison with the top major brands.
1
MODÈLE: 8,3X7,15 PI , 9,3X7,15 PI , 16,3X7,15 PI , 18,3X7,15 PI ,
10,3X8,15 PI
Have product questions? Need technical support? Please feel free to
contact us:
Technical Support and E-Warranty Certificate
www.vevor.com/support
NEED HELP? CONTACT US!
This is the original instruction, please read all manual instructions
carefully before operating. VEVOR reserves a clear interpretation of our
user manual. The appearance of the product shall be subject to the
product you received. Please forgive us that we won't inform you again if
there are any technology or software updates on our product.
WINTER MAGNETIC
THERMAL-GARAGE
DOOR SCREEN

2
AVERTISSEMENT:
1. Ne laissez pas les enfants grimper sur l'appareil.
2. Éloignez les enfants et les animaux domestiques pendant l'assemblage.
PRÉCAUTIONS DE MONTAGE
1. Veuillez assembler le produit en stricte conformité avec les instructions.
Incorrect
le montage pourrait être dangereux.
2. Veuillez porter correctement des lunettes de sécurité et des gants de travail
pendant l'assemblage.
3. N'essayez pas d'assembler le produit lorsque vous vous sentez fatigué ou sous
l'influence de l'alcool, de drogues ou de médicaments.
4. Séparez et comptez toutes les pièces et le matériel.
5. Si vous souhaitez utiliser des punaises pour l'assemblage, retirez-les et
installez-les soigneusement pour
éviter les blessures .
6. Si vous utilisez des outils électriques, veillez à ralentir et à vous arrêter si
nécessaire.
7. Deux personnes sont nécessaires pour le montage.
8. Suivez uniquement les utilisations prévues. Ne vous asseyez pas et ne vous
tenez pas debout sur ce qui précède.
9. Lorsque des voitures ou des outils de grande taille entrent ou sortent du garage,
veuillez d'abord ouvrir l'écran pour éviter d'endommager le produit en le faisant
glisser .
CONSERVEZ CES INSTRUCTIONS.
TECHNICAL PARAMETERS
Modèle
Matériel
Couleur
Taille (pi*pi)
8,3X7,15 PI
Oxford 300D
anti-éclabous
Noir
8,3 * 7,15

3
sures
Tissu
matelassé
9,3X7,15 PI
9,3 * 7,15
16,3X7,15 PI
16,3 * 7,15
18,3X7,15 PI
18,3 * 7,15
10,3X8,15 PI
10,3 * 8,15
PRODUCT INTRODUCE
4
APPLICATIONS
5
ASSEMBLY
6
Étape 1.
Placez-le à plat : Posez le rideau de porte à plat sur un sol plat.
Étape 2.
Collage Velcro : collez d'abord le côté crochet du Velcro de 4 cm de largeur avec
le côté boucle de 4 cm sur le dessus de l'écran, puis collez le côté crochet du
Velcro de 4 cm de largeur avec le côté boucle de 4 cm des deux côtés de l'écran. .
Étape 3. Lors de l'installation du Velcro, n'oubliez pas d'attacher les sangles en
haut à gauche et à droite chacune 3 pièces pour organiser l'écran.

7
Étape 4.Nettoyez le cadre de la porte Nettoyez le dessus et les
côtés du cadre de la porte de garage avec un chiffon.
Étape 5 Localisez le rideau Trouvez et marquez la meilleure position
correspondant à votre cadre de porte.
8
Étape 6. Retirez l'autocollant Retirez le vrai papier blanc d'adhésif et
fixez le moustiquaire sur le cadre de la porte côte à côte.
Étape 7. Terminez et profitez d'une vie sans moustiques .

9
Remarque : si le cadre de la porte de garage est en bois, des punaises peuvent être
utilisées pour renforcer le périphérie du rideau de porte
Quand vous souhaitez enrouler votre porte moustiquaire de garage vous pouvez
utiliser des rubans de cerclage.

10
Fabricant : Shanghaimuxinmuyeyouxiangongsi
Adresse : Shuangchenglu 803nong11hao1602A-1609shi, baoshanqu ,
Shanghai 200000 CN.
Importé en Australie : SIHAO PTY LTD. 1 ROKEVA STREETASTWOOD
NSW 2122 Australie
Importé aux États-Unis : Sanven Technology Ltd. Suite 250, 9166
Anaheim Place, Rancho Cucamonga, CA 91730
REP
EC
E-CrossStu GmbH
Mainzer Landstr.69, 60329 Frankfurt am Main.
REP
UK
YH CONSULTING LIMITED.
C/O YH Consulting Limited Office 147, Centurion
House, London Road, Staines-upon-Thames, Surrey,
TW18 4AX

11