

2
ENGLISH
TABLE OF CONTENTS
BASIC............................................. 3
- Checking the Accessories ................................3
- Parts and Buttons ...............................................4
GETTING.READY......................... 5
- Connecting the IR Sensors ..............................5
CHECKING.BEFORE.
INSTALLATION............................. 6
- Installation Orientation .....................................6
- Installation Location ...........................................7
- Wall Mount Holder ..............................................8
- Safety and Precaution Guide for
Installation ..............................................................9
PRECAUTIONS.FOR.USE......... 10
- Dust ......................................................................... 10
- Afterimage ........................................................... 10
PRODUCT..
SPECIFICATIONS....................... 12
LICENCE....................................... 16
3
ENGLISH
WARNING - This equipment is compliant with Class A of CISPR 32. In a residential environment this
equipment may cause radio interference.
BASIC
.NOTE
• The accessories provided with your product may vary depending on the model or region.
• Product specifications or contents in this manual may be changed without prior notice due to upgrade of
product functions.
• SuperSign Software & Manual
- Visit
https://partner.lge.com
to download the latest SuperSign software and manual.
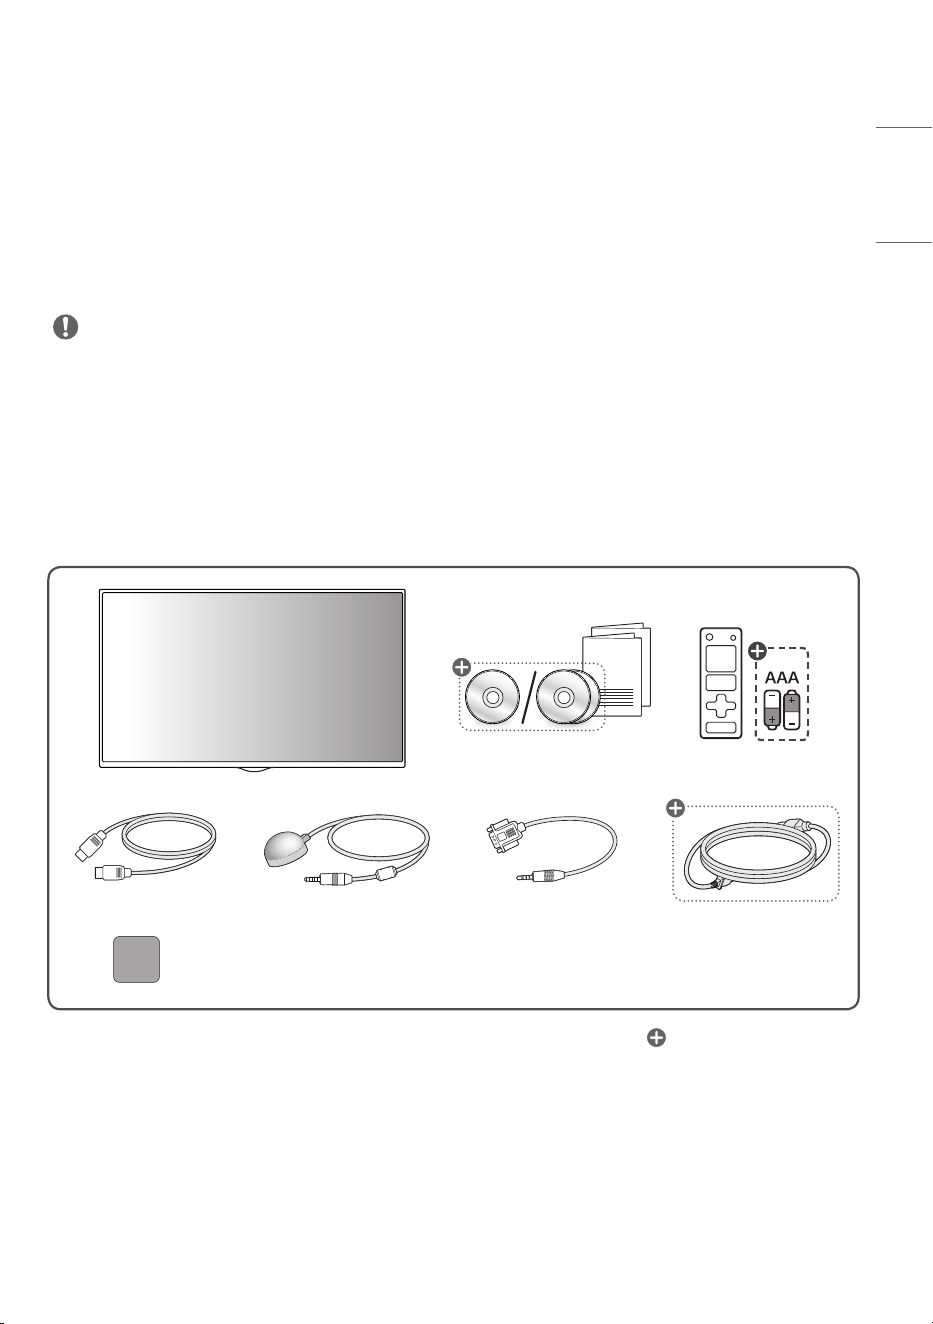
Checking.the.Accessories
.x.3
Depending upon country
4
ENGLISH
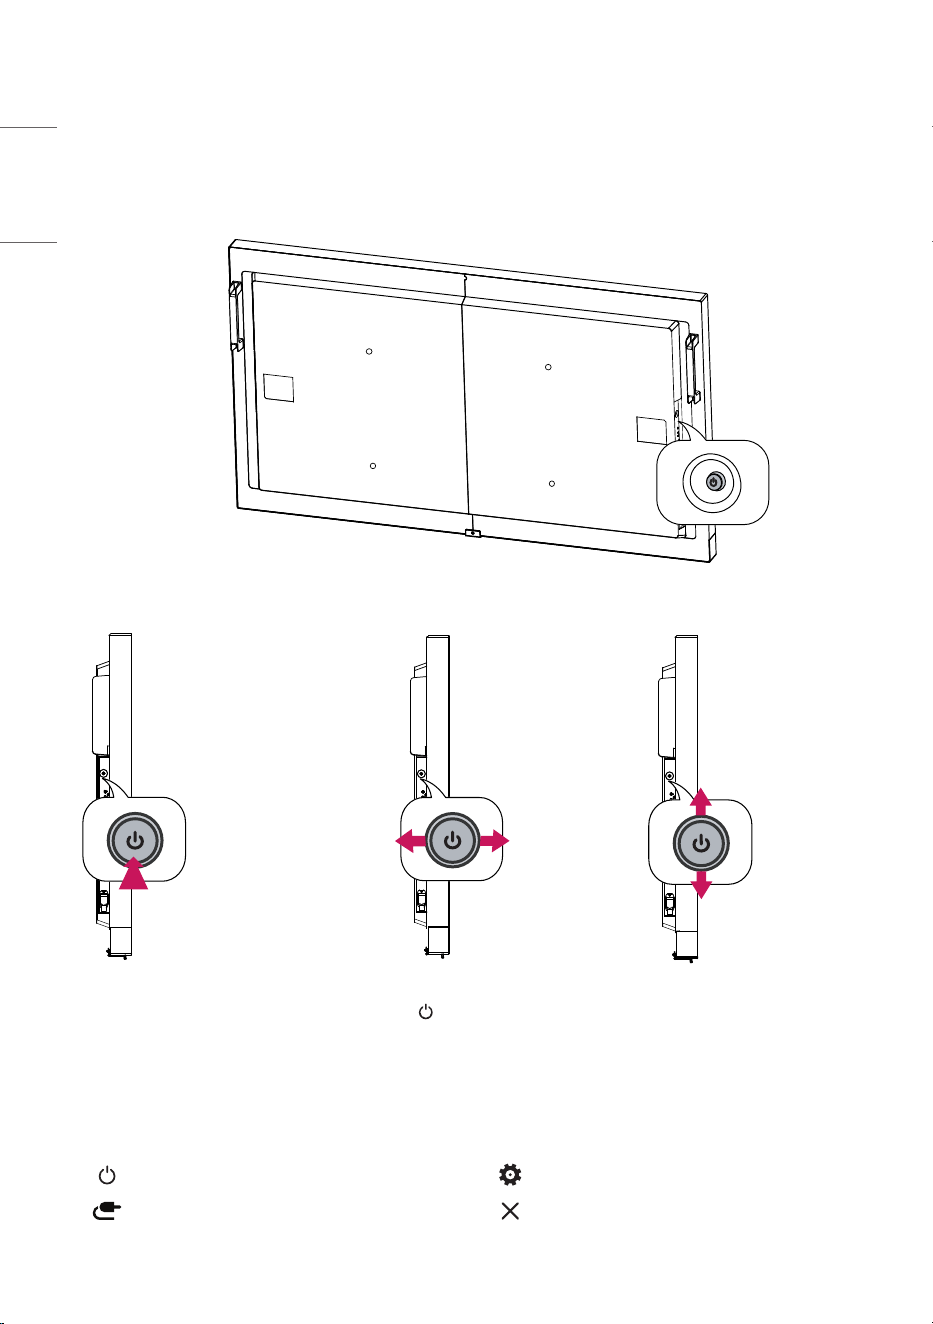
Parts.and.Buttons
The image may be different according to the model.
Power On (Press)
Quick Menu (Press
1
)
Menu Selection (Press
2
)
Power Off
3
(Press and
Hold)
Volume Control
Menu Control
2
Menu Control
2
1 When the monitor is turned on, press the button one time.
2 You can use the function when you control menu.
3 All running apps will close.
Quick.Menu
Turns the power off. Accesses the main menu.
Changes the input source. Close the quick menu.
5
ENGLISH
GETTING READY
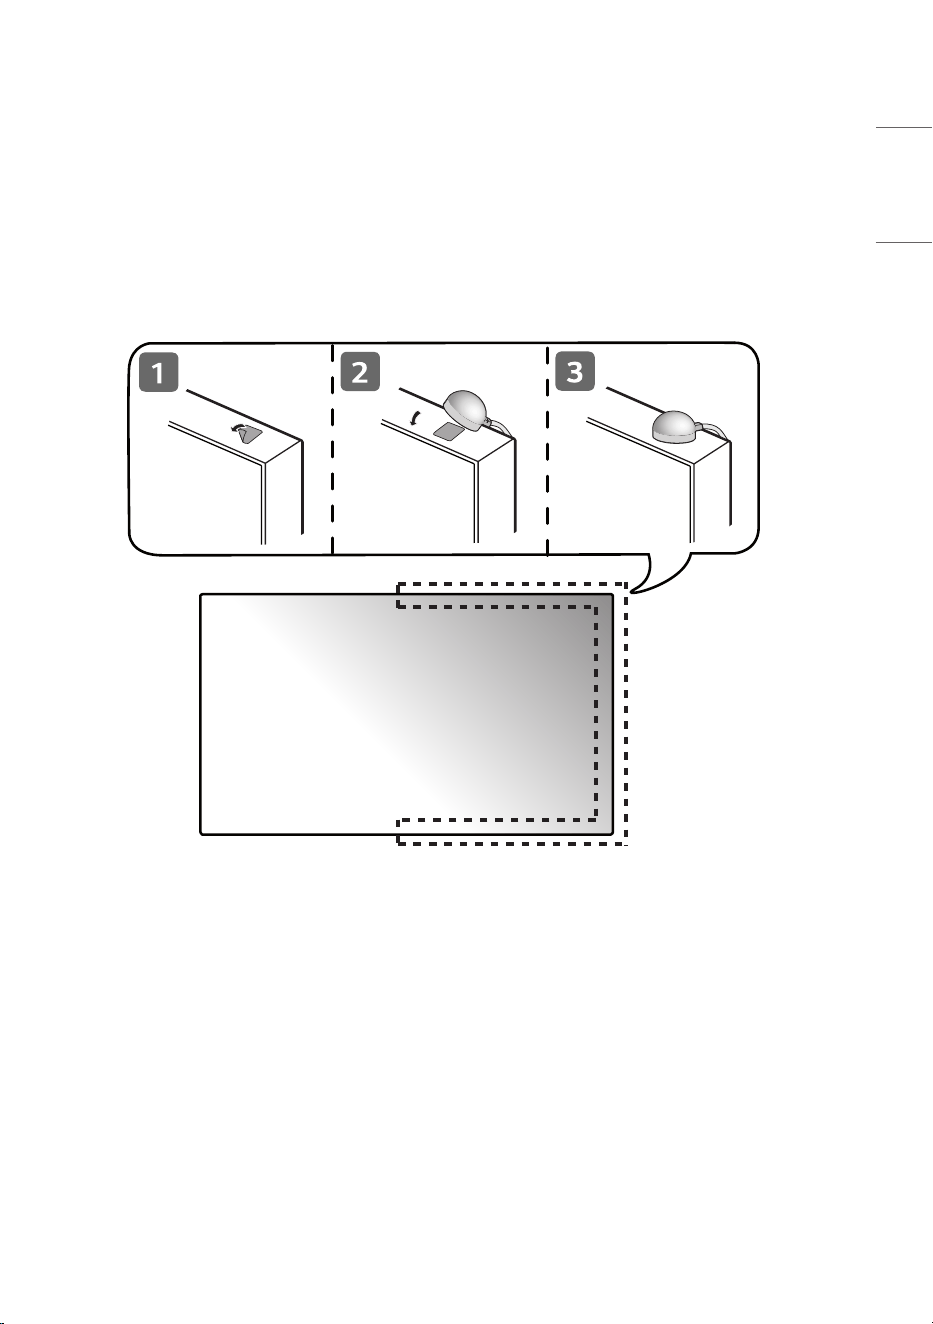
Connecting.the.IR.Sensors
When an IR receiver is connected to the product, it enables a feature to receive signals from the remote
control.
6
ENGLISH
CHECKING BEFORE INSTALLATION
We are not responsible for product damage caused by failure to follow the guide.
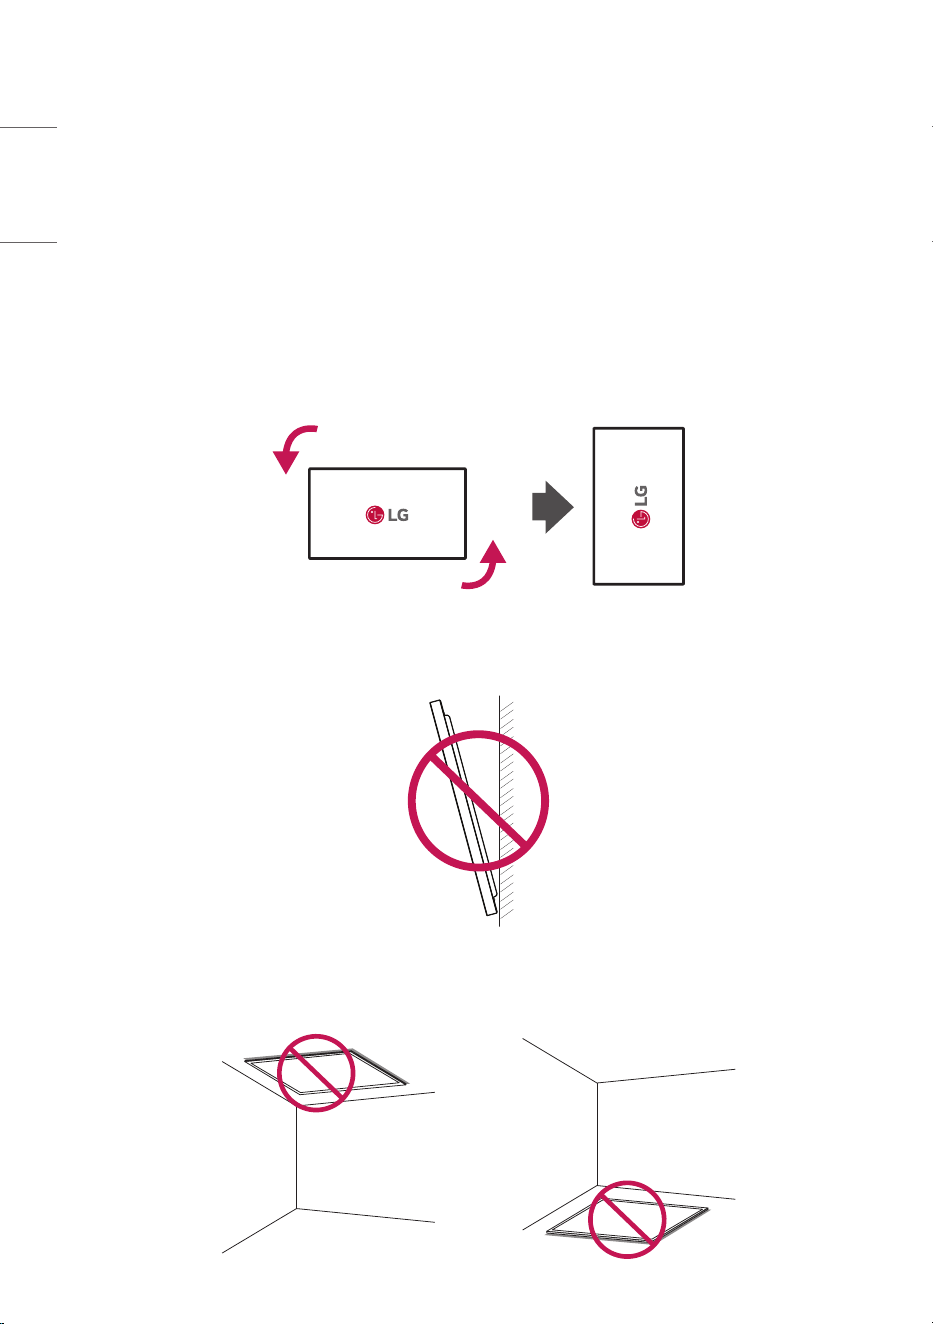
Installation.Orientation
Using.Vertically
When installing vertically, rotate the monitor 90 degrees anti-clockwise while facing the front of the
screen.
Tilt.Angle
40 mm
15˚
Ceiling,.Floor.Orientation
7
ENGLISH
Installation.Location
We are not responsible for product damage caused by failure to follow the guide.
Indoor
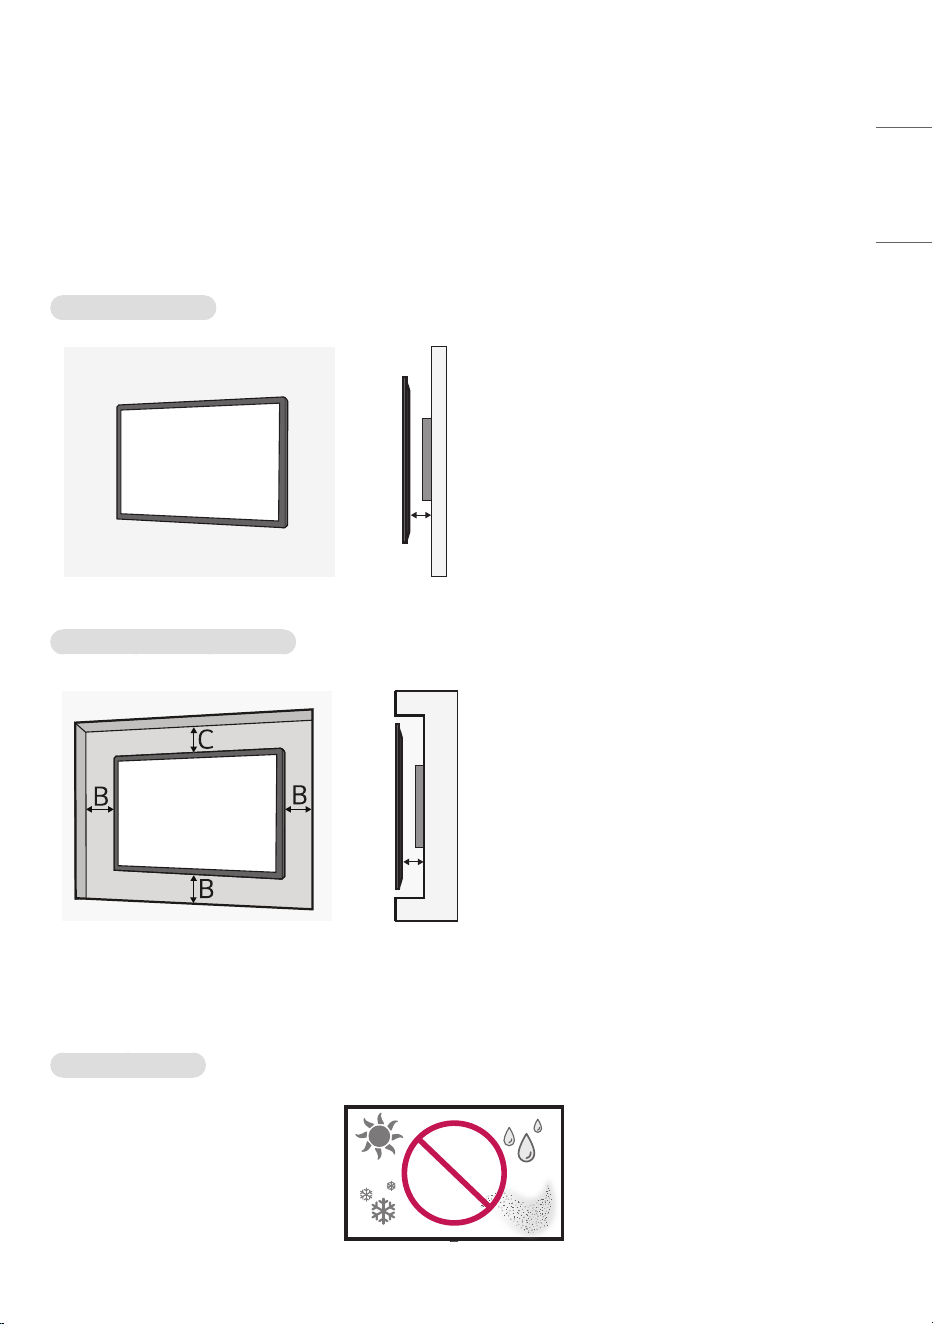
Installing.on.a.Wall
A
A
A : 100 mm (3.9 inches) or more
• The product warranty will be void if it
is used with the front panel exposed to
direct sunlight.
Installing.on.a.Recessed.Wall
A
A
A : 100 mm (3.9 inches) or more
B : 100 mm (3.9 inches) or more
C : 100 mm (3.9 inches) or more
• The product warranty will be void if it
is used with the front panel exposed to
direct sunlight.
Outdoor
Outdoor.Enclosed
8
ENGLISH
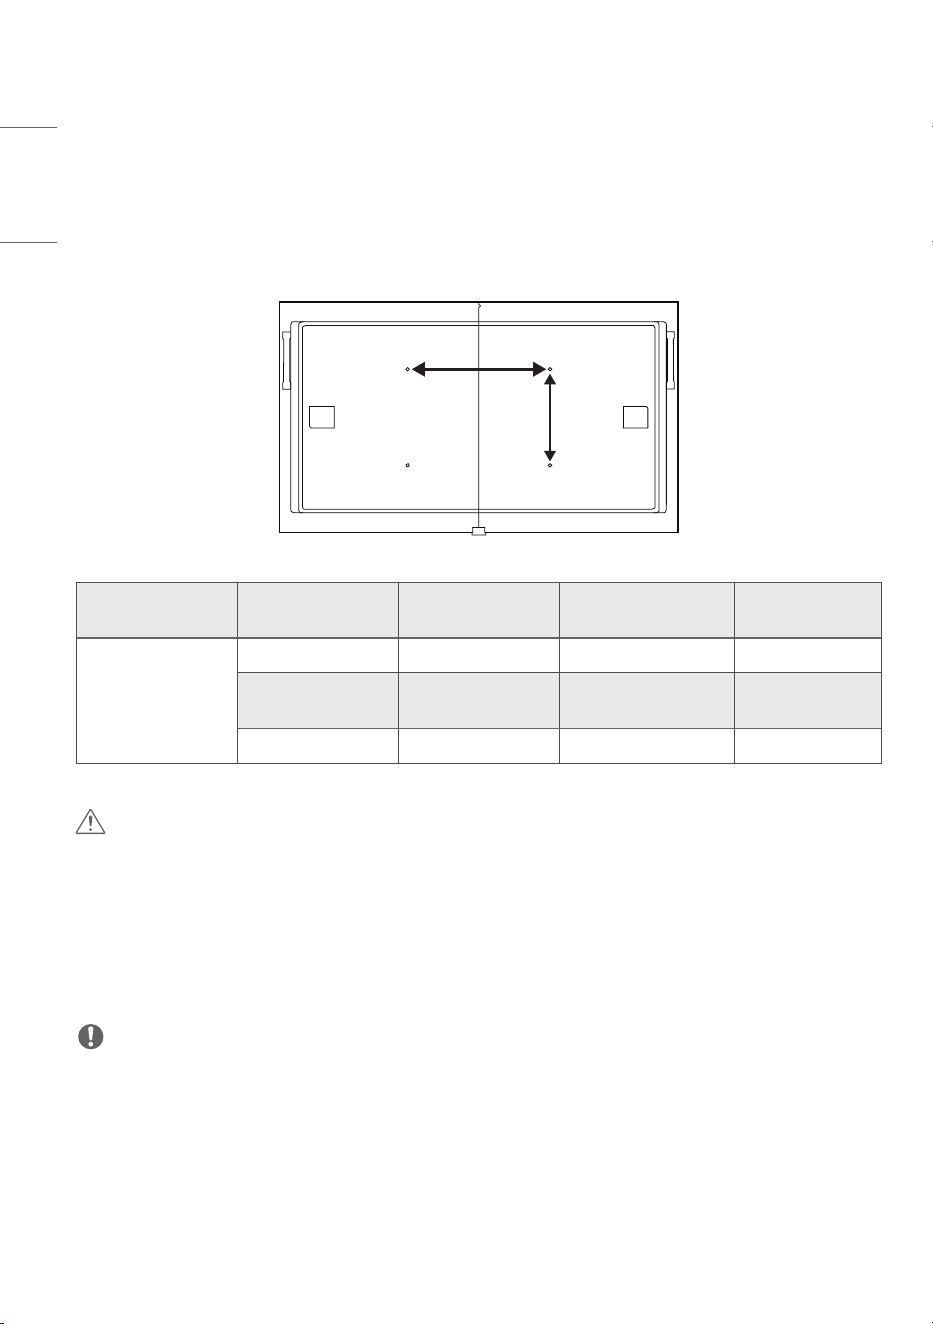
Wall.Mount.Holder
To install the monitor on a wall, attach a wall mount holder (optional) to the back of the monitor.
Take caution, and ensure that the wall mount holder (optional) is securely fixed to the monitor and to the
wall.
The VESA dimensions of the wall mount by model are as follows.
A
B
Model
VESA.Dimensions.
(A.x.B).(mm)
Standard.
Dimensions
Length.(Maximum).
(mm)
Quantity
75XS4P
600 x 400 M8 14 4
VESA.Dimensions.
(A.x.B).(inches)
Standard.
Dimensions
Length.(Maximum).
(inches)
Quantity
23.6 x 15.7 M8 0.5 4
.CAUTION
• Disconnect the power cord first, and then move or install the monitor. Otherwise, it may result in electric
shock.
• If the monitor is installed on a ceiling or inclined wall, it may fall and result in injury.
• Damage to the monitor by tightening the screws too tightly may void your warranty.
• Use screws and wall mount plates conforming to VESA standards. Breakage or personal injury due to use
or misuse of inappropriate components is not covered by the warranty of this product.
.NOTE
• Using screws longer than the indicated depth may damage the inside of the product. Be sure to use the
proper length.
• For more information on installation, please refer to the user manual for the wall mount.
9
ENGLISH
Safety.and.Precaution.Guide.for.Installation
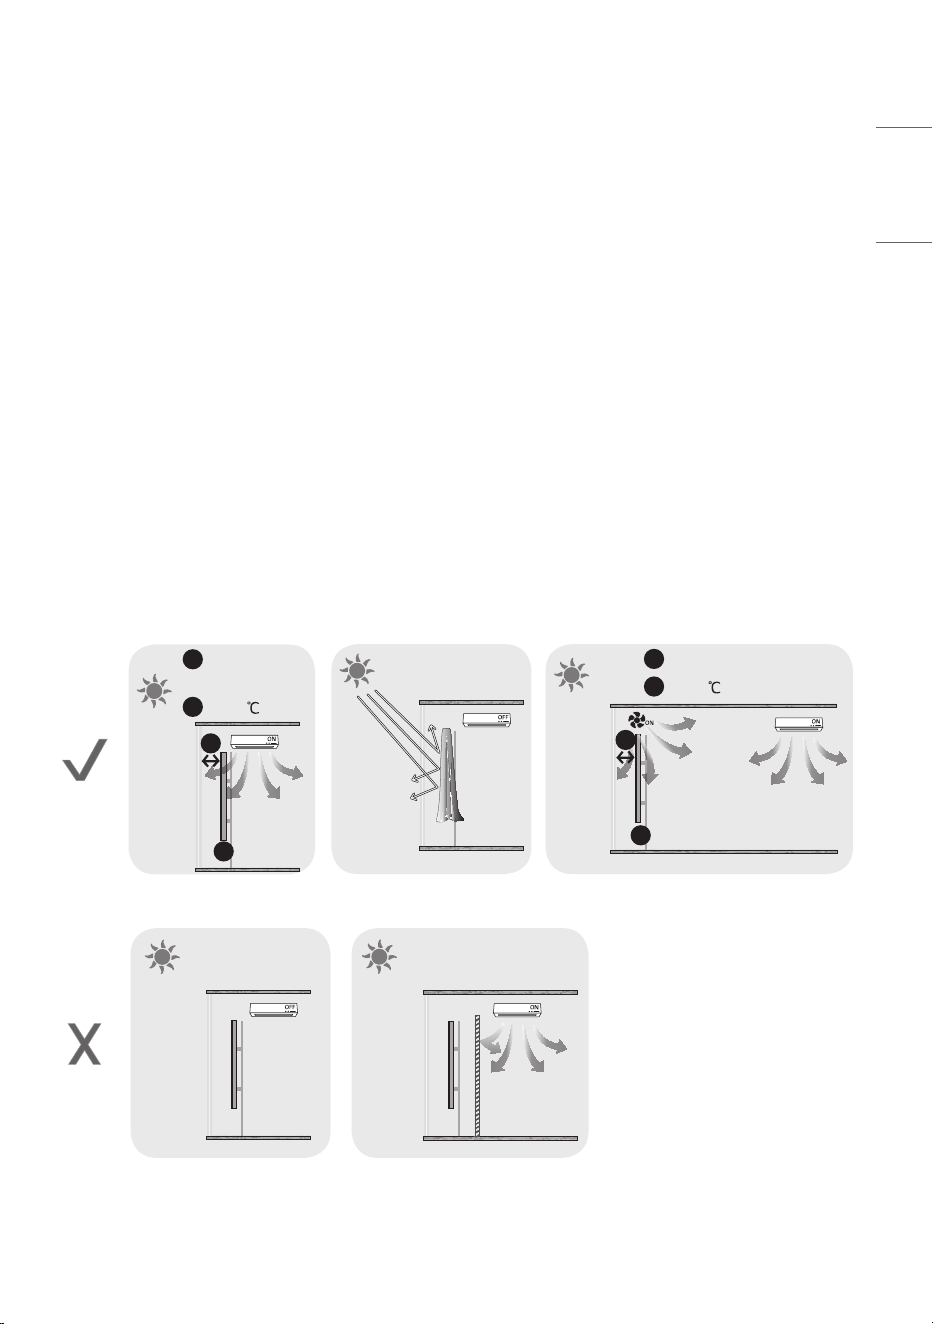
Direct.Sunlight
• Make sure to keep sufficient space between the product and the window glass. (100 mm (3.9 inches) or
more)
• Proper ventilation is recommended.
• Attach a film with UV-blocking properties to the window glass.
- Protect the display with cloth or a box when storing the device after it has been powered off.
- This can prevent faults such as black spots, creases, and yellowing.
Temperature
• Make a cooling system for the enclosure so that the operating temperature of the product can be
maintained.
- 0 °C ~ 40 °C (32 °F to 104 °F) (without Direct Sunlight)
- 0 °C ~ 30 °C (32 °F to 86 °F) (Direct Sunlight)
*
A
> 100 mm
(3.9 inches)
*
B
≤ 30
(86 °F)
B
A
*
A
>100 mm (3.9 inches)
*
B
≤ 30
(86 °F)
B
A

10
ENGLISH
PRECAUTIONS FOR USE
Dust
The warranty will not cover any damage caused by using the product in an excessively dusty environment.
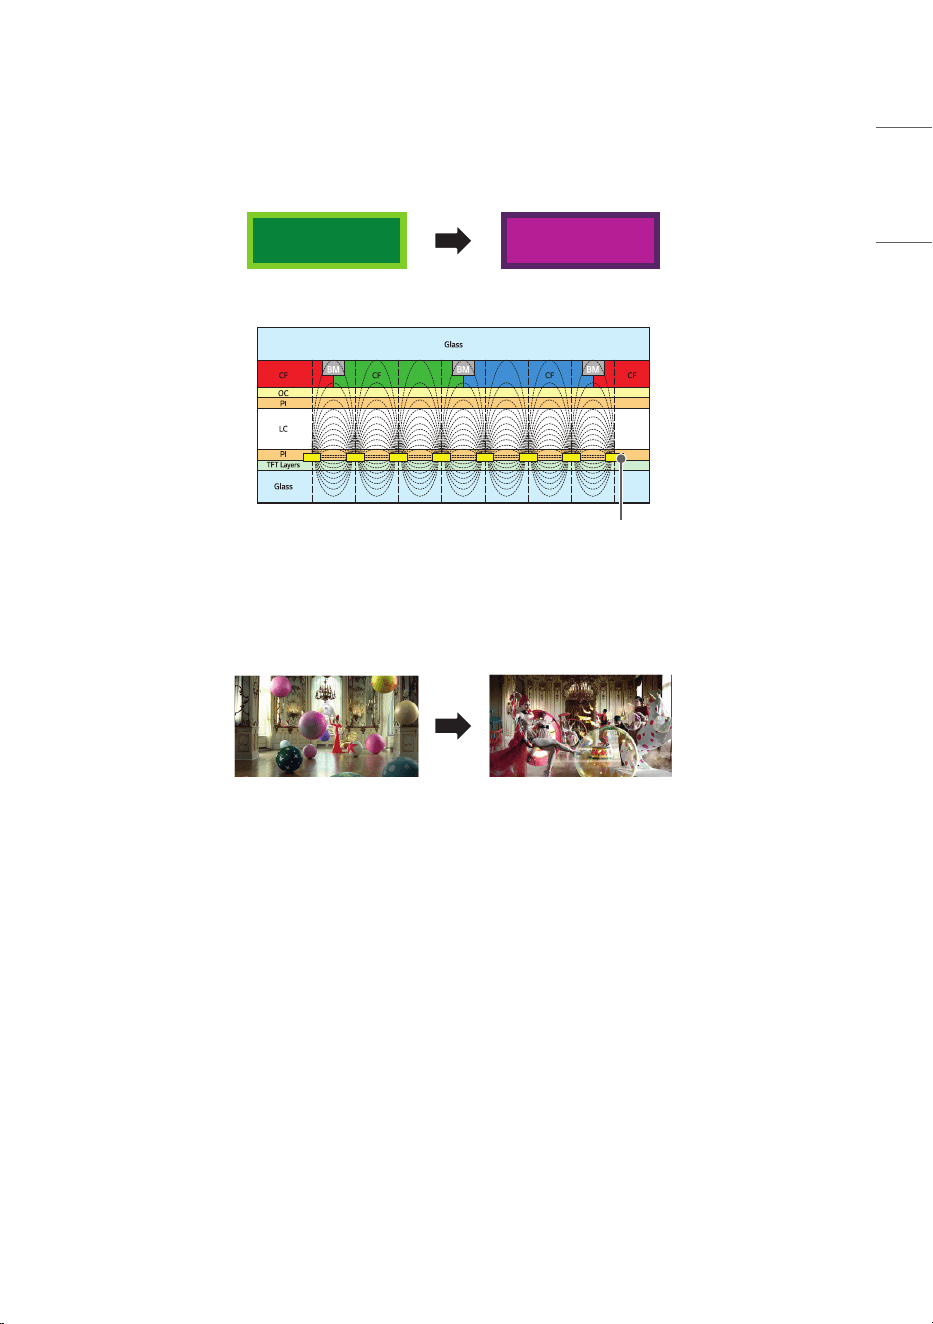
Afterimage
• After-image appears when the product is turned off.
- Pixels may be damaged rapidly if a still image is displayed on the screen for a long period of time. Use
the screen-saver function.
- Switching from a screen with high differences in luminance (black and white or grey) to a darker screen
may cause an afterimage. This is normal due to the display characteristics of this product.
• When the LCD screen is in a still pattern for extended periods of use, a slight voltage difference may
occur between the electrodes that operate the liquid crystal (LC). The voltage difference between the
electrodes increases over time and tends to keep the liquid crystal aligned in one direction. At this time,
the previous image remains, which is called an afterimage.
• Afterimages do not occur when continuously changing images are used but take place when a certain
screen is fixed for a long time. The following are operational recommendations for reducing the
occurrence of afterimages when using a fixed screen. The maximum recommended time for switching
the screen is 12 hours. Shorter cycles are better for preventing afterimages.
11
ENGLISH
• Recommended Usage Condition
1 Change the background color and text color at equal intervals.
- Afterimages occur less when the colors to be changed are complementary to one another.
A A
ITO or MoTi Pixel Layer
2 Switch the screen at equal time intervals.
- Take caution, and ensure that text or images from before the screen change are not left in the same
location after the screen change.
12
ENGLISH
PRODUCT SPECIFICATIONS
Without prior notice, all product information and specifications contained in this manual are subject to
change to improve the performance of the product.
Input / Output ports
RS-232C IN, RS-232C OUT, SPEAKER, HDMI™ IN 1, HDMI™ IN 2, DP IN, DP OUT,
USB 2.0 IN, LAN IN, LAN OUT, IR&LIGHT SENSOR, AC
Embedded battery Applied
Resolution
Recommended
resolution
HDMI 1 / HDMI 2 / DisplayPort: 3840 × 2160 @ 60 Hz
- This may not be supported on some OS or graphics
card types.
Maximum resolution
Power Voltage 100-240 V~ 50/60 Hz 9.3 A
Environmental
Conditions
Operating Temperature
0 °C to 40 °C (32 °F to 104 °F) (without Direct Sunlight)
0 °C to 30 °C (32 °F to 86 °F) (Direct Sunlight)
Operating Humidity 10 % to 80 %
Storage Temperature -20 °C to 60 °C (-4 °F to 140 °F)
Storage Humidity 5 % to 85 %
75XS4P-B
Dimensions (Width x Height x Depth)
/ Weight
1679.2 mm x 957.6 mm x 104 mm / 39.6 kg
(66.1 inches x 37.7 inches x 4 inches / 87.3 lbs)
13
ENGLISH
HDMI.1./.HDMI.2./.DisplayPort.(PC).Support.Mode
Resolution Horizontal frequency (kHz) Vertical frequency (Hz)
640 x 480 31.469 59.94
800 x 600 37.879 60.317
1024 x 768 48.363 60
1280 x 720 44.772 59.855
1366 x 768 47.712 60
1280 x 1024 63.981 60.02
1680 x 1050 65.29 59.954
1920 x 1080 67.5 60
3840 x 2160 67.5 30
3840 x 2160 135 60
HDMI.1./.HDMI.2./.DisplayPort.(DTV).Support.mode
Resolution Horizontal frequency (kHz) Vertical frequency (Hz)
480/60p 31.5 60
576/50p 31.25 50
720/50p 37.5 50
720/60p 45 60
1080/50i 28.1 50
1080/60i 33.75 60
1080/50p 56.25 50
1080/60p 67.5 60
2160/30p 67.5 30
2160/50p 112.5 50
2160/60p 135 60

14
ENGLISH
.NOTE
• Resolutions available for the Input Label option in HDMI 1/ HDMI 2/ DisplayPort input modes.
- PC resolutions: 1280 x 720 / 60 Hz, 1920 x 1080 / 60 Hz, 3840 x 2160 / 60 Hz
- DTV resolutions: 480p, 720p, 1080p and 2160p
• Vertical frequency: The product display functions by the screen image changing dozens of times every
second like a fluorescent lamp. The vertical frequency or refresh rate is the number of image displays
per second. The unit is Hz.
• Horizontal frequency: The horizontal interval is the time taken to display one horizontal line. When
1 is divided by the horizontal interval, the number of horizontal lines displayed every second can be
tabulated as the horizontal frequency. The unit is kHz.
15
ENGLISH
Wireless.module.(LGSBWAC92).Specifications
Wireless.LAN.(IEEE.802.11a/b/g/n/ac)
Frequency.range.(MHz) Output.power.(Max.).(dBm)
2400 to 2483.5
5150 to 5725
5725 to 5850
18
18
18
Bluetooth
Frequency.range.(MHz) Output.power.(Max.).(dBm)
2400 to 2483.5 8
• As band channels can vary per country, the user cannot change or adjust the operating frequency. This
product is configured for the regional frequency table.
• For consideration of the user, this device should be installed and operated with a minimum distance of
20 cm (7.8 inches) between the device and the body.
• FCC ID: BEJLGSBWAC92 / IC: 2703H-LGSBWAC92

16
ENGLISH
LICENCE
Supported licenses may differ by model. Visit
www.lg.com
for more information on licenses.
The terms HDMI, HDMI High-Definition Multimedia Interface, HDMI trade dress and the HDMI Logos are
trademarks or registered trademarks of HDMI Licensing Administrator, Inc.
Manufactured under license from Dolby Laboratories. Dolby, Dolby Vision, Dolby Vision IQ, Dolby Audio,
Dolby Atmos, and the double-D symbol are trademarks of Dolby Laboratories Licensing Corporation.
The Bluetooth
®
word mark and logos are registered trademarks owned by Bluetooth SIG, Inc. and any use
of such marks by LG Electronics Inc. is under license. Other trademarks and trade names are those of their
respective owners.
Temporary noise is normal when powering ON
or OFF this device.
The model and serial number of the product
are located on the back and on one side of the
product. Record them below in case you ever
need service.
MODEL
SERIAL NO.
Supplier’s.Declaration.of.Conformity
Trade Name LG
Responsible Party LG Electronics USA, Inc.
Address 111 Sylvan Avenue, North
Building, Englewood Cliffs,
NJ 07632
E-mail [email protected]om