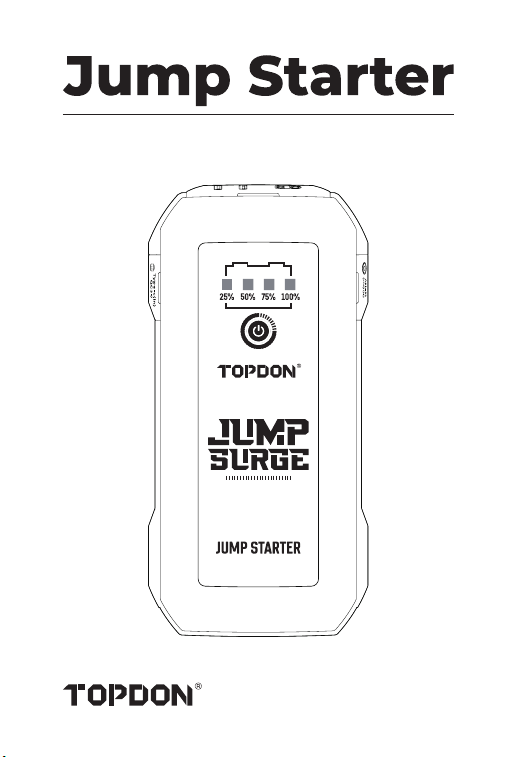
User Manual


Safety Is Always the First
Priority!
6 36 64 9222 50 78
5
EN
35
FR
63
PT
91
JP
21
DE
49
IT
77
ES
6 36 64 9222 50 78
7 37 65 9323 51 79
10 40 68 9626 54 82
11 41 69 9727 55 83
14 44 72 10030 58 86
15 45 73 10131 59 87
16 46 74 10232 60 88
17 47 75 10333 61 89
Section 1 About the Jump Starter
Section 2 What's in the
Box?
Section 7 Specications
Section 8 FAQ
Section 9 Warranty
Section 3 Product Overview
Section 4 Recharge the
Jump Starter
Section 5 How to Jump-
Start a 12V Battery Vehicle?
Section 6 Using the the Jump
Starter as a Power Bank
CONTENTS

4
ENGLISH

5
SAFETY IS ALWAYS THE FIRST
PRIORITY!
For your safety, the safety of others, and to avoid any
damage to the product and your vehicle, carefully
READ and make sure you FULLY UNDERSTAND all
the safety instructions and messages on this manual
before operating.
ONLY use the battery clamps that come with this
product.
DO NOT use this product if the cable or the jump
starter shows any signs of damage.
DO NOT put the product under direct sunlight or in
high temperature areas.
The product contains a Lithium-Ion Battery. Please
DISPOSE OF it under local regulations at the end of its
life.
Regularly check the battery level of the product and
ENSURE that it is above 50%.

6
SECTION 1
ABOUT THE JUMP STARTER
SECTION 2
WHAT'S IN THE BOX?
TOPDON's portable jump starter supports quick and
safe starts for 12V cars, boats, motorcycles, trucks, etc.
It also functions as a power bank to charge electronic
devices like phones and tablets, or supply power to 12V
DC devices.
Jump Starter
Battery Clamps
USB Cable
User Manual
Carrying Bag

7
SECTION 3
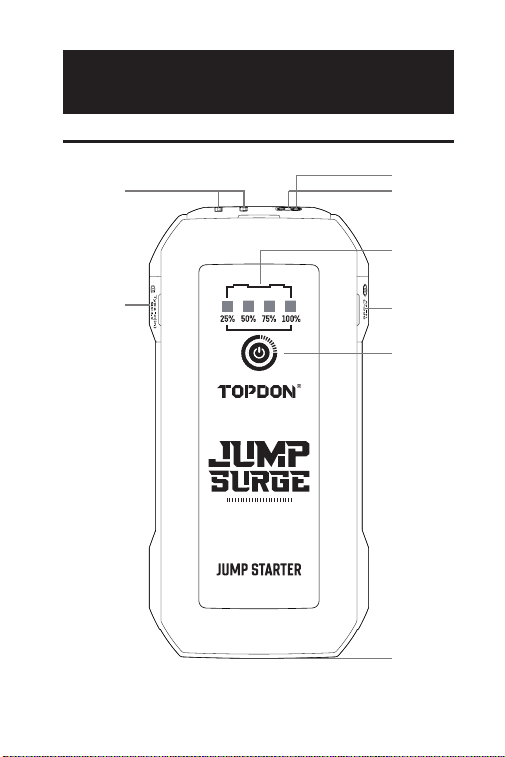
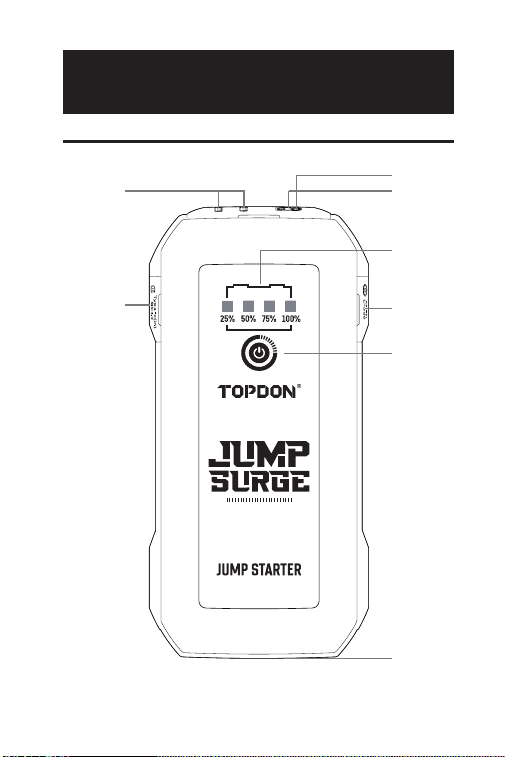
PRODUCT OVERVIEW
Jump Starter
2
7
45
6
3
1
8

8
Power Button
Press the power button to power ON.
Press and hold the power button to turn on the
LED light, and then press the button again to
toggle the light between Flashlight, SOS, Strobe,
and OFF.
Battery Level Indicators
Indicate the charge level of the internal battery of
the jump starter. (The four indicators will ash for
around 10 seconds when an over-temperature is
detected.)
Note: Only jump start vehicles when the battery
level of the jump starter is above 50%.
Jump-Start Socket
Temperature Detector
Temperature detection is used to detect over-
temperatures in the jump starter.
USB1 Output / USB2 Output (5V 3A)
USB Type-C Input/Output (PD18W)
DC Output (Max 16.8V/10A)
LED Light
1
2
3
4
5
6
7
8

9
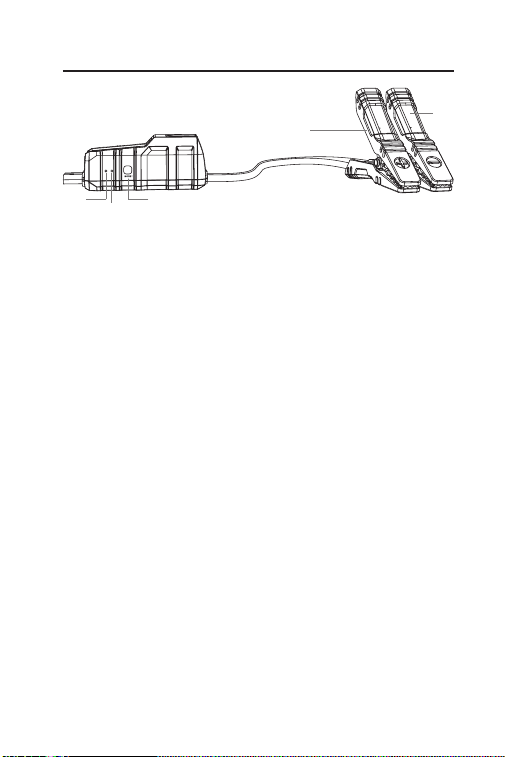
Tool Ready Indicator
Lights up solid green when the jump starter is
ready for use.
Error Indicator
Lights up solid red when a reverse polarity, short
circuit, over temperature, or improper connection
is detected. (The internal buzzer will beep in the
meantime).
Note:
-If the jump starter is properly connected, but
neither the Tool Ready nor the Error indicator is
illuminated, it may be because the vehicle's battery
voltage is less than 3V. Try jump-starting your
vehicle with the BOOST mode.
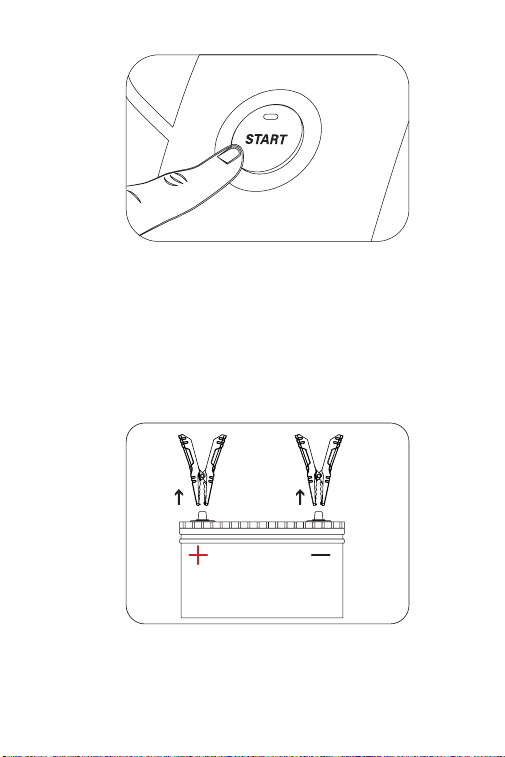
BOOST Button
Press to enable the BOOST mode (forced output
mode). The Tool Ready indicator will light up green.
Start your vehicle within 30 seconds. The BOOST
mode automatically turns off, and the green
Tool Ready indicator goes out if the vehicle is not
started within 30 seconds or successfully cranked.
Note: Under the BOOST mode, all safety
protections will be temporarily disabled. Use this
mode with caution and only when the traditional
battery jump option has been tried already.
1
2
3
Battery Clamps
1 3
4
5
2
10
Positive Clamp (Red)
Negative Clamp (Black)
4
5
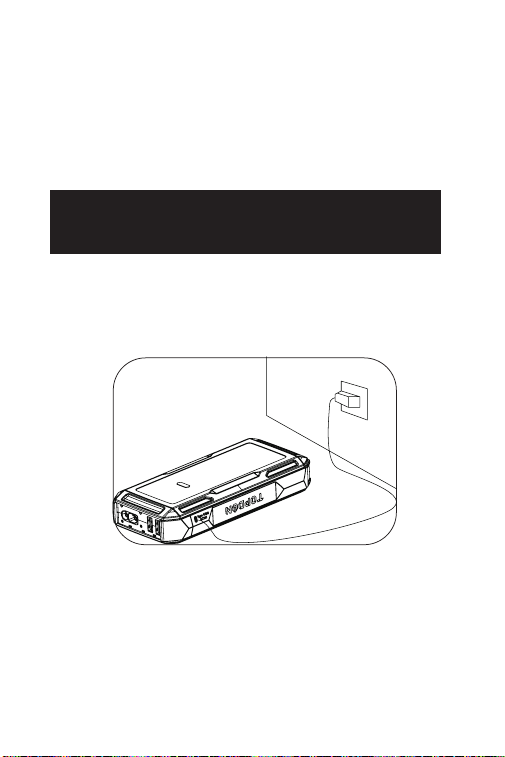
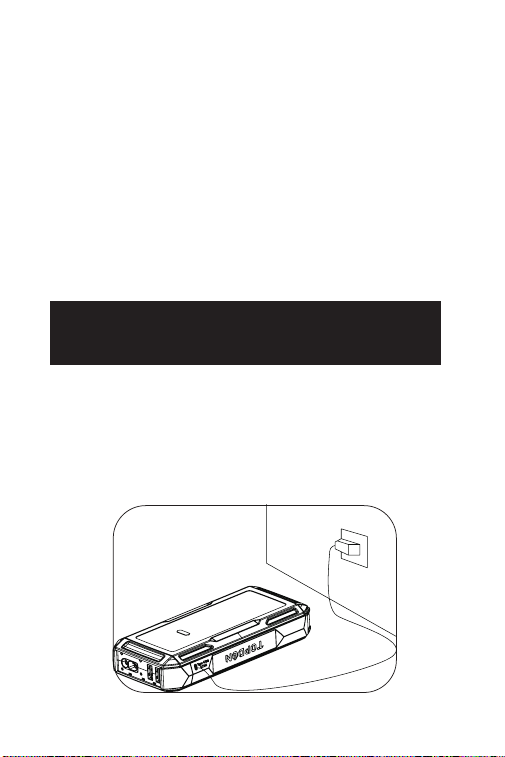
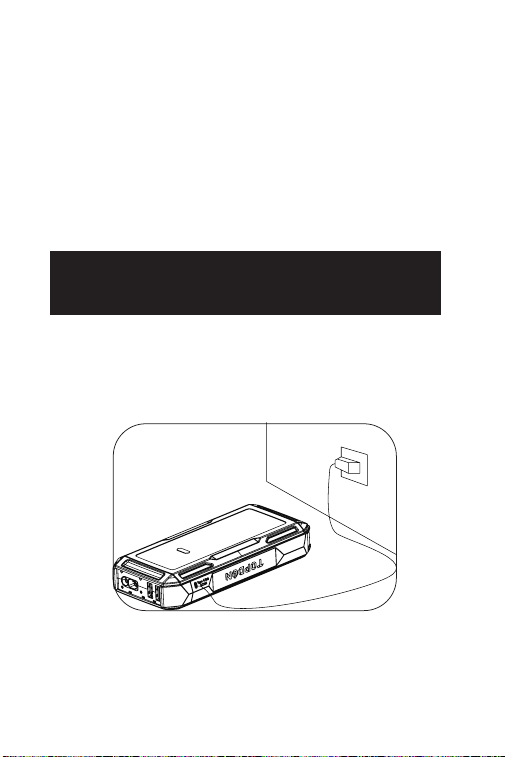
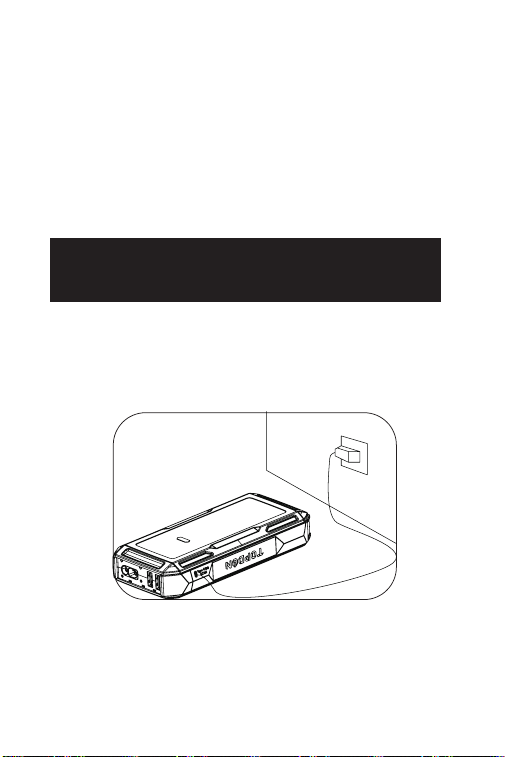
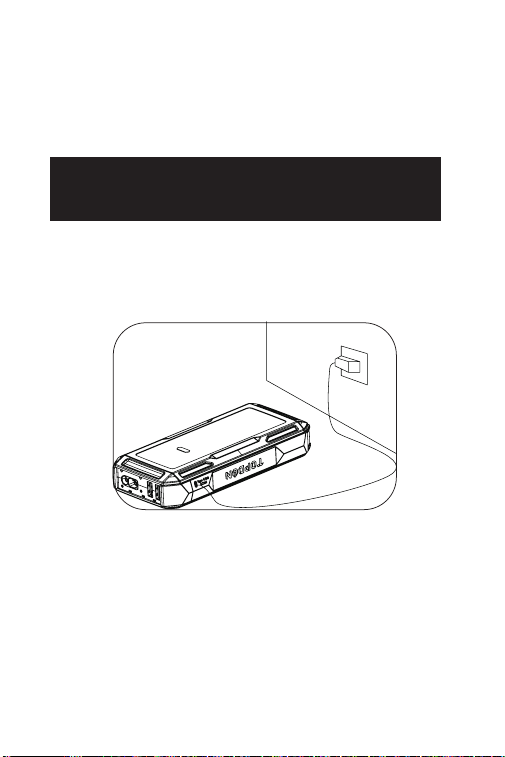
SECTION 4 RECHARGE THE
JUMP STARTER
The jump starter comes partially charged and needs to
be fully charged prior to use. Please charge the jump
starter through the USB Type-C Input/Output port once
you receive it.
11
SECTION 5 HOW TO JUMP-
START A 12V BATTERY
VEHICLE?
IMPORTANT: Make sure you have turned off all of the
power loads of the vehicle, including headlights, radio,
air conditioners, etc., before attempting to jump-start
the vehicle.
Note: The jump-starting function is only applicable to
12V lead-acid battery vehicles.
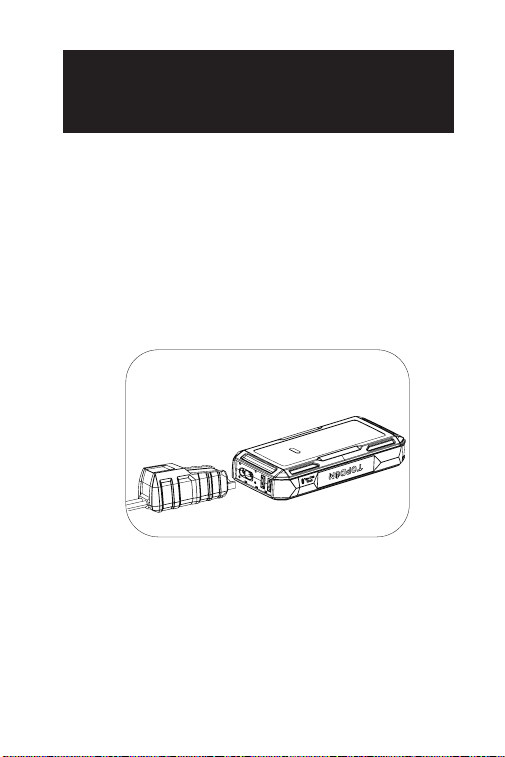
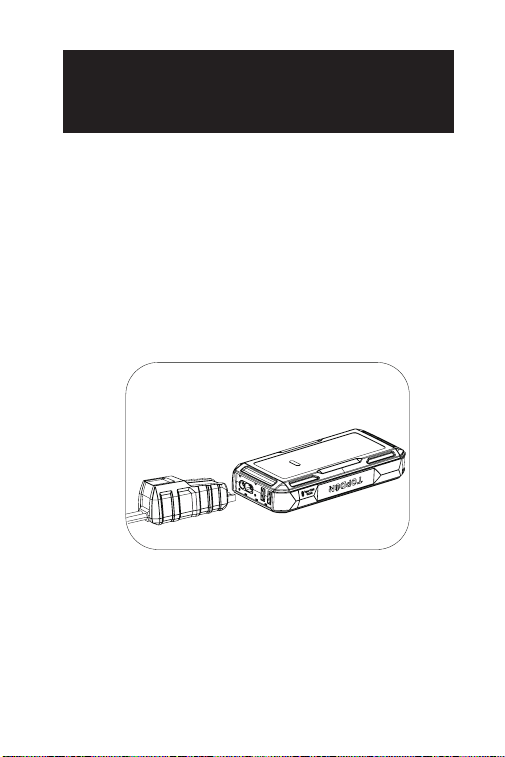
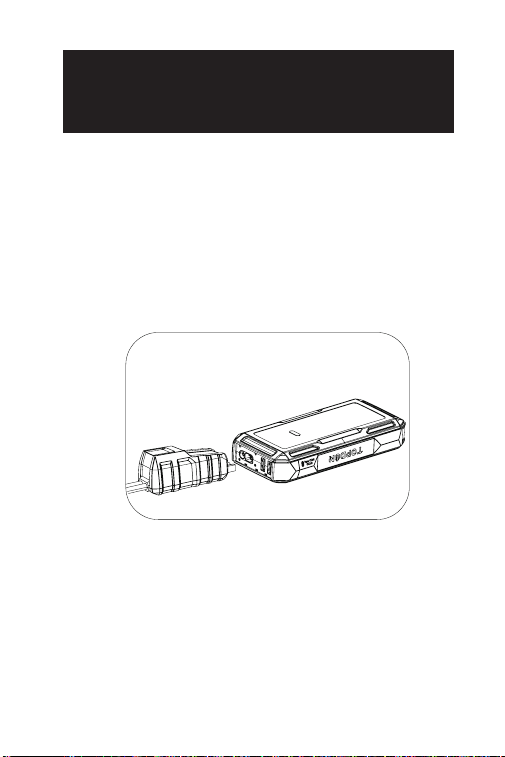
Step 1:
Plug the blue end of the battery clamps into the Jump
Start Socket.
12
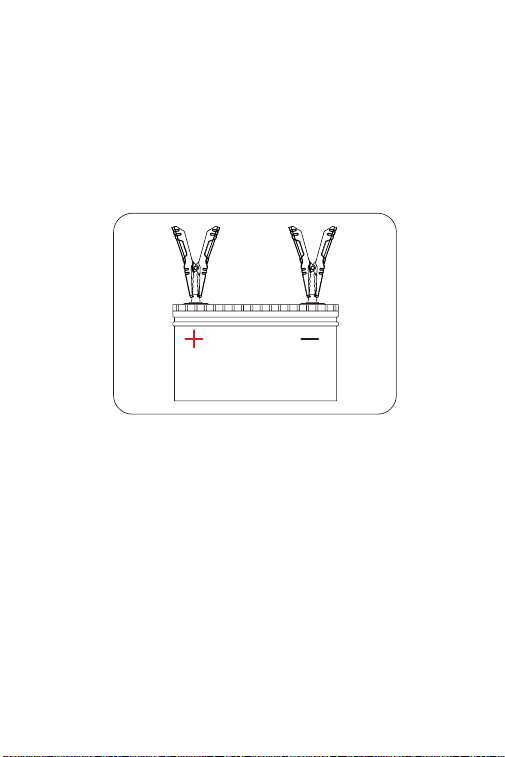
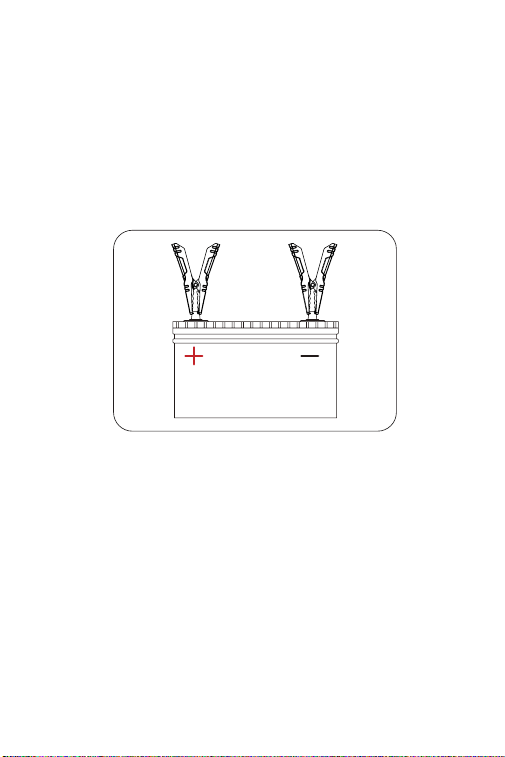
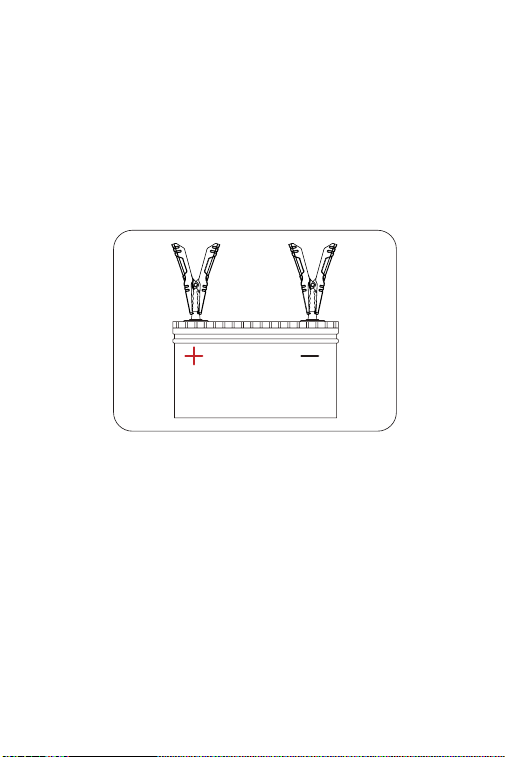
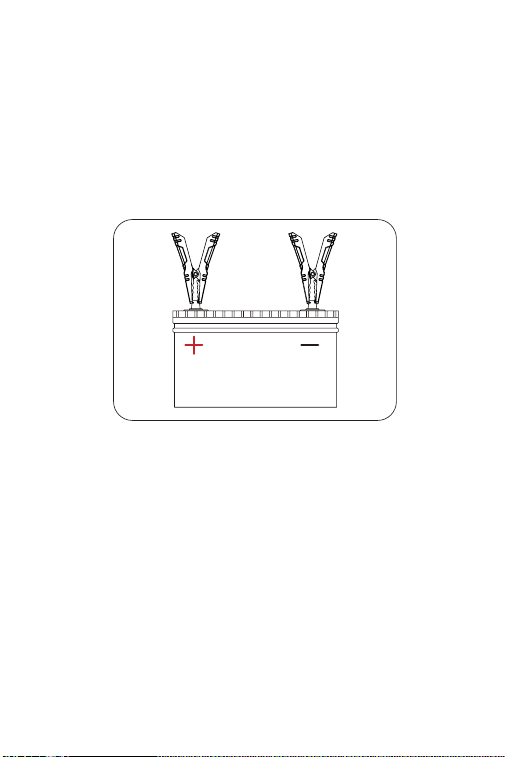
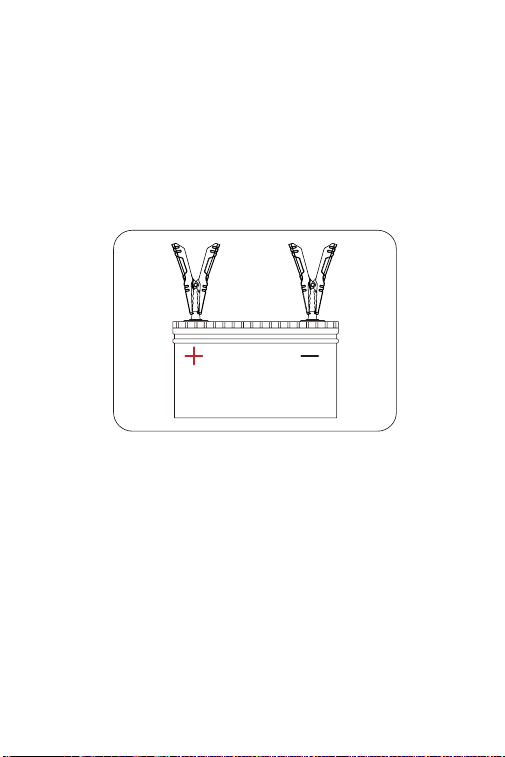
Step 2:
Connect the battery clamps to the vehicle battery.
Red clamp to the Positive Polarity (+), Black clamp to
Negative Polarity (-). The green illumination of the Tool
Ready indicator shows that the jump starter is ready for
jump-starting.
Just by connecting the clamps to the terminals
correctly, the jump starter delivers a jump to the vehicle
battery.
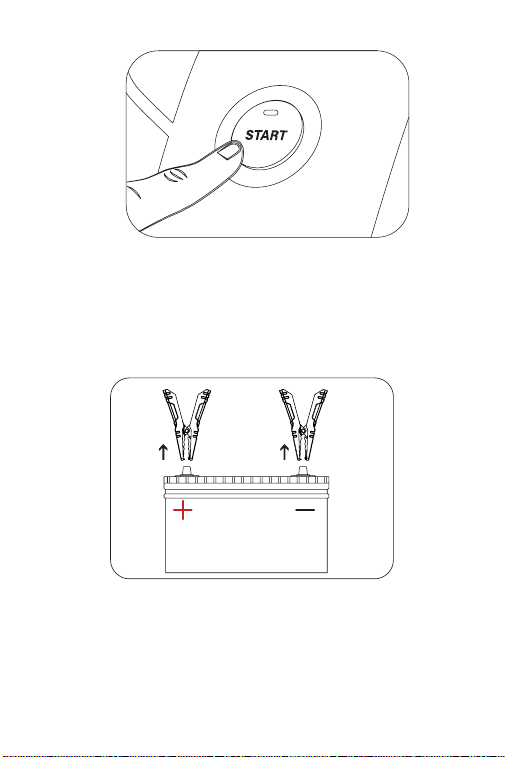
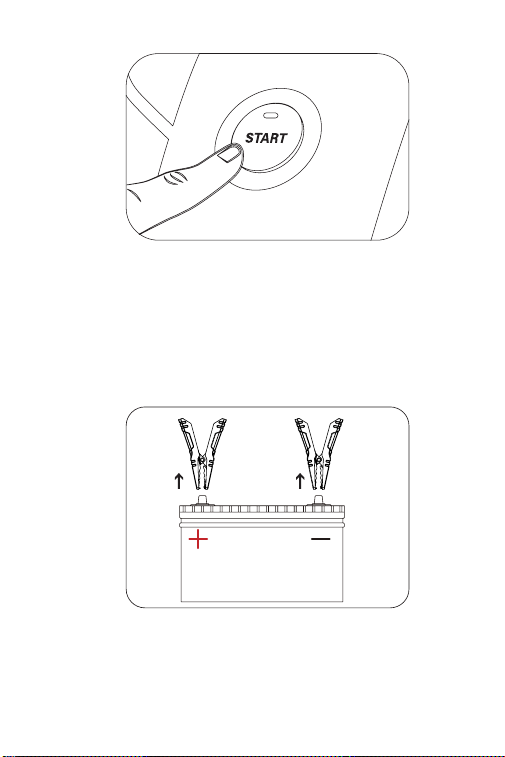
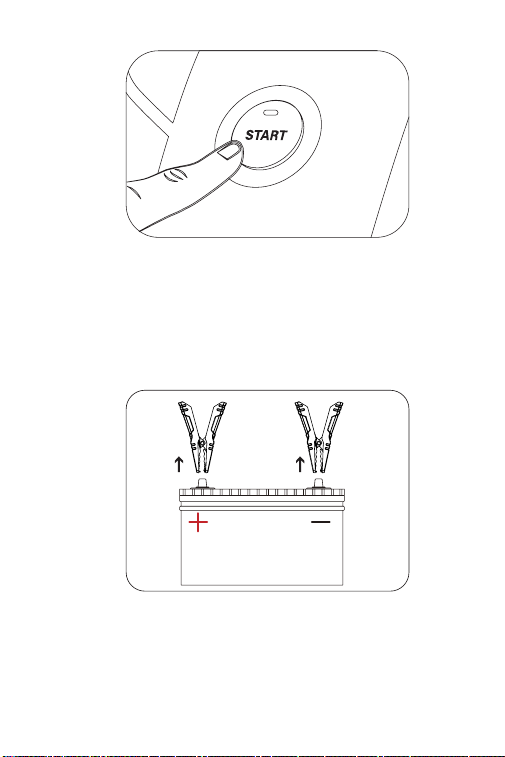
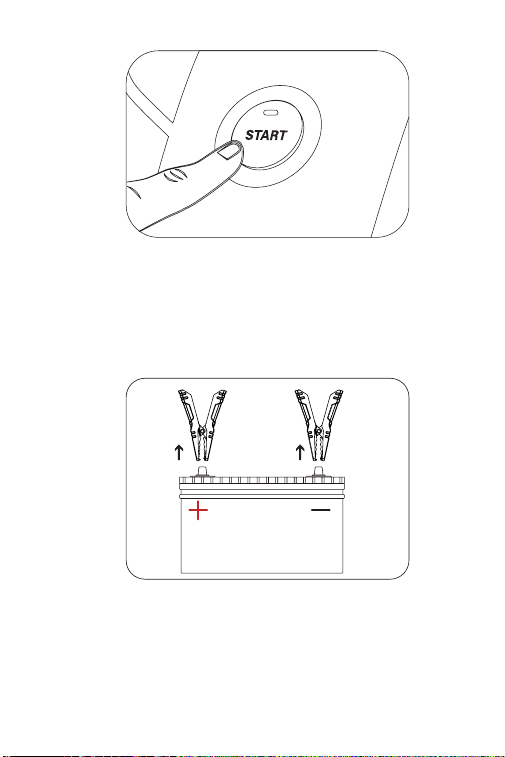
Step 3:
Try starting the vehicle. If it fails, disconnect the
battery clamps from the vehicle's battery and wait
for 20 seconds, then reconnect and try again. It's
recommended not to attempt more than 3 consecutive
jump starts within 2 minutes.
13
Step 4:
After successfully jumping the vehicle, remove the
clamps from the vehicle battery and separate the
battery clamps from the jump pack. Then your jump
starter will automatically power off in around 10
seconds.
14
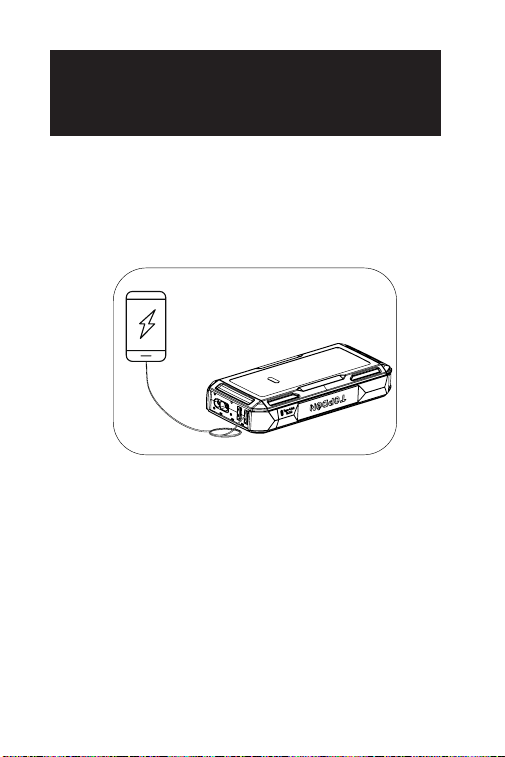
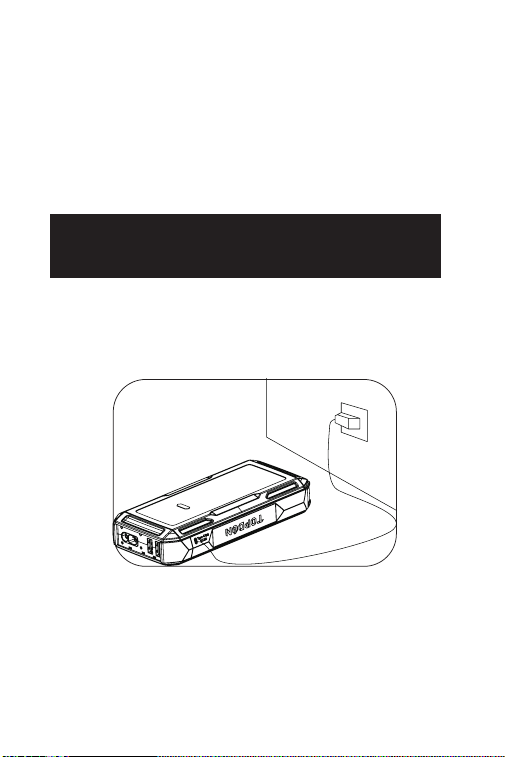
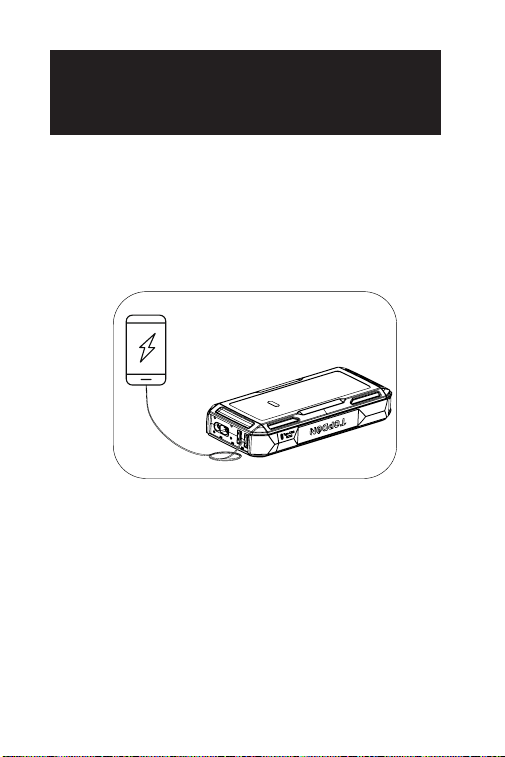
SECTION 6 USING THE
JUMP STARTER AS A POWER
BANK
To convert the jump starter into a power bank, press
the Power Button to turn on the jump starter. Then you
can use it to charge electronic devices like phones and
tablets through the USB1 Output or USB2 Output port
or supply power to 12V electronic devices via the DC
Output port (Max 16.8V/10A).

15
SECTION 7
SPECIFICATIONS
BatteryCapacity
USB1 Output / USB2
Output
DC Output
(5.5mm*2.1mm)
USB Type-C Input/
Output
Peak Current
WorkingTemperature
StorageTemperature
3.7V, 10,000mAh, 37Wh (JS1200Pro)
3.7V, 16,000mAh, 59.2Wh (JS2000Pro)
5V 3A
Max 16.8V 10A
PD18W, 5V 3A, 9V 2A
1800A (JS1200Pro)
2500A (JS2000Pro)
-10°C to 40°C (14°F to 104°F)
-20°C to 75°C (-4°F to 167°F)

16
Why is the red Error indicator lit up with the
buzzer beeping and the four battery level
indicators ashing after I performed several jump
starts?
It's possible that the jump starter is overheating
as you have jump-started too frequently in a short
period of time. Please try again in 20 minutes.
What is the reason for the DC output going as
high as 16.8V, and is there a risk of damaging my
12V electronic device during charging?
The DC output voltage can reach up to 16.8V as it
is consistent with that of the jump starter (ranges
from 13.2 to 16.8V, and increases as the battery level
rises). However, most 12V devices can withstand up
to 18V, so no damage should occur.
Q
A
Q
A
SECTION 8
FAQ

17
SECTION 9
WARRANTY
TOPDON One Year Limited Warranty
TOPDON warrants to its original purchaser that the
company's products will be free from defects in
material and workmanship for 12 months from the date
of purchase (Warranty Period).
For the defects reported during the Warranty Period,
TOPDON will either repair or replace the defective part
or product according to its technical support analysis
and conrmation.
TOPDON shall not be liable for any incidental or
consequential damages arising from the device's use,
misuse, or mounting.
If there is any conict between the TOPDON warranty
policy and local laws, the local laws shall prevail.
This limited warranty is void under the following
conditions:
• Misused, disassembled, altered or repaired by
unauthorized stores or technicians.
• Careless handling and/or improper operation.
Notice: All information in this manual is based on the
latest information available at the time of publication
and no warranty can be made for its accuracy or
completeness. TOPDON reserves the right to make
changes at any time without notice.

18
SECTION 10
FCC WARNING
This device complies with Part 15 of the FCC Rules.
Operation is subject to the following two conditions:
(1) this device may not cause harmful interference, and
(2) this device must accept any interference received,
including interference that may cause undesired
operation.

19

20
DEUTSCH

21
DIE SICHERHEIT STEHT IMMER
AN ERSTER STELLE!
Zum Gewährleisten Ihrer Sicherheit und der
Sicherheit anderer und zum Vermeiden der Schäden
am Ihren Fahrzeug LESEN SIE bitte sorgfältig und
stellen sie sicher, dass sie alle Sicherheitshinweise
und Meldungen in diesem Handbuch vor Gebrauch
VOLLSTÄNDIG VERSTANDEN haben.
Benutzen Sie NUR die Batterieklemmen, die zu diesem
Produkt gehören.
Betreiben Sie das Gerät NICHT, wenn das Kabel oder
die Starthilfe Beschädigungen aufweist.
Das Produkt MUSS NICHT direkt dem Sonnenlicht oder
hohen Temperaturen ausgesetzt werden.
Dieses Produkt verwendet einen Lithiumionenakku.
Bitte ENTSORGEN Sie sie gemäß den örtlichen
Vorschriften, wenn die Lebensdauer der Batterie
abgelaufen ist.
Überprüfen Sie regelmäßig den Ladezustand der
Batterie des Produkts und stellen Sie sicher, dass der
Ladezustand stets über 50 % liegt.

22
ABSCHNITT 1
ÜBER DEN STARTHILFEGERÄT
ABSCHNITT 2
INHALT DES PRODUKTS
Die tragbare Starthilfe von TOPDON unterstützt
schnelle und sichere Starts für 12-V-Autos, Boote,
Motorräder, LKWs usw.
Es kann auch als Stromversorgung zum Auaden
anderer elektronischer Geräte wie Handys, Tablets oder
von 12V-Gleichstromgeräten dienen.
Starthilfegerät
Batterieklemmen
USB-Kabel
Benutzerhandbuch
Tragetasche
23
ABSCHNITT 3
PRODUKTÜBERSICHT
Starthilfegerät
2
7
45
6
3
1
8

24
Stromtaste
Drücken Sie kurz auf die Stromtaste zum
Einschalten des Geräts; drücken Sie lange auf die
Stromtaste zum Einschalten des LED-Lichts, und
drücken Sie erneut kurz auf die Stromtaste zum
Wechel des LED-Lichts zwischen den folgenden
Modi: Taschenlampe, SOS, Stroboskop und AUS.
Batteriestand-Anzeigen
Diese Anzeige zeigt den Ladezustand der internen
Batterie des Starthilfegeräts an. (Die vier Anzeigen
blinken etwa 10 Sekunden lang, wenn das Gerät
überhitzt ist).
Hinweis: Versuchen Sie nur dann, einem Fahrzeug
Starthilfe zu geben, wenn der Batteriestand des
Geräts über 50% liegt.
Starthilfe-Buchse
Temperatur-Detektor
Der Temperatur-Detektor wird verwendet, um eine
Überhitzung des Starthilfegeräts zu erkennen.
USB1-Ausgang / USB2-Ausgang (5V 3A)
USB-Typ-C-Eingang/Ausgang (PD18W)
DC-Ausgang (Max. 16,8V/10A)
LEDs
1
2
3
4
5
6
7
8

25
Gerätebereitschaftsanzeige
Wenn das Starthilfegerät einsatzbereit ist, leuchtet
er durchgehend grün.
Fehleranzeige
Wenn eine Verpolung, ein Kurzschluss, eine
Übertemperatur oder ein falscher Anschluss
erkannt wird, leuchtet diese Anzeige durchgehend
rot (der interne Summer beginnt ebenfalls zu
piepen).
Hinweis:
-Wenn die Starthilfe richtig angeschlossen ist,
aber weder die Gerätebereitschafts- noch die
Fehleranzeige leuchtet, kann dies daran liegen,
dass die Batteriespannung des Fahrzeugs niedriger
als 3V ist. Versuchen Sie, das Fahrzeug im BOOST-
Modus zu starten.
BOOST-Taste
Drücken Sie diese Taste, um den BOOST-Modus
(erzwungener Ausgangsmodus) zu starten. Die
Gerätebereitschaftsanzeige erleuchtet grün.
Sie sollten Ihrem Fahrzeug innerhalb von 30
Sekunden Starthilfe geben. Wenn das Fahrzeug
nicht innerhalb von 30 Sekunden gestartet oder
erfolgreich angekurbelt wurde, wird der BOOST-
Modus automatisch deaktiviert, und die grüne
Werkzeugbereitschaftsanzeige erlöscht.
1
2
3
Batterieklemmen
1 3
4
5
2
26
Hinweis: Im BOOST-Modus werden alle
Sicherheitsvorkehrungen vorübergehend
deaktiviert. Bitte verwenden Sie diesen Modus
nur mit äußerster Vorsicht und erst, nachdem Sie
die normale Starthilfe für die Batterie ausprobiert
haben.
Positive Klemme (Rot)
Negative Klemme (Schwarz)
4
5
ABSCHNITT 4 AUFLADEN DER
STARTHILFE
Bei der Entnahme aus der Verpackung ist das
Starthilfegerät bereits teilweise aufgeladen und muss
vor der Verwendung wieder vollständig aufgeladen
werden. Bitte laden Sie das Starthilfegerät über den
USB-Typ-C-Eingangs-/Ausgangsanschluss auf.

27
ABSCHNITT 5 WIE KANN MAN
EINER 12V-BATTERIE
STARTHILFE GEBEN?
WICHTIG: Stellen Sie sicher, dass Sie alle
Stromverbraucher des Fahrzeugs, einschließlich
Scheinwerfer, Radio, Klimaanlage usw., ausgeschaltet
haben, bevor Sie versuchen, dem Fahrzeug Starthilfe zu
geben.
Hinweis: Die Starthilfefunktion ist nur für Fahrzeuge
mit 12V-Bleiakkumulator geeignet.
Schritt 1:
Verbinden Sie das blaue Ende der Batterieklemmen
mit der Starthilfe-Buchse.
28
Schritt 2:
Verbinden Sie die Batterieklemmen mit der
Fahrzeugbatterie. Rote Klemme für den positiven Pol (+),
schwarze Klemme für den negativen Pol (-). Das grüne
Licht der Gerätebereitschaftsanzeige zeigt an, dass das
Gerät bereit für die Starthilfe ist.
Wenn die Klemmen richtig angeschlossen sind, gibt das
starthilfegerät eine Starthilfe an die Fahrzeugbatterie.
Schritt 3:
Versuchen Sie zum Starten des Fahrzeugs. Lösen Sie die
Batterieklemmen von der Fahrzeugbatterie und warten
Sie 20 Sekunden, wenn das Fahrzeug nicht anspringt,
schließen Sie es dann wieder an und versuchen Sie es
erneut. Mehr als 3 aufeinander folgende Startversuche
innerhalb von 2 Minuten werden nicht empfohlen.
29
Schritt 4:
Nach erfolgreichem Ankurbeln löschen Sie bitte die
Klemmen von der Batterie aus und trennen Sie die
Batterieklemmen und die Starthilfe ab. Die Starthilfe
schaltet sich dann innerhalb von 10 Sekunden
automatisch ab.

30
ABSCHNITT 6 STARTHILFEGERÄT
ALS STROMVERSORGUNG
VERWENDEN
Um das starthilfegerät als Stromversorgung zu
verwenden, drücken Sie die Stromtaste, um das
Starthilfegerät einzuschalten. Dann können Sie damit
elektronische Geräte wie Handys und Tablets über
den USB1-Ausgang / USB2-Ausgang auaden oder
elektronische Geräte mit 12V über den DC-Ausgang
(max. 16,8V/10A) mit Strom versorgen.

31
ABSCHNITT 7
SPEZIFIKATIONEN
Batteriekapazität
USB1 Ausgang / USB2
Ausgang
DC-Ausgang
(5,5mm*2,1mm)
USB-Typ-C Eingang/
Ausgang
Spitzenstrom
Arbeitstemperatur
Lagertemperatur
3.7V, 10,000mAh, 37Wh
(JS1200Pro)
3.7V, 16,000mAh, 59.2Wh
(JS2000Pro)
5V 3A
Max 16.8V 10A
PD18W, 5V 3A, 9V 2A
1800A (JS1200Pro)
2500A (JS2000Pro)
-10°C to 40°C (14°F to 104°F)
-20°C to 75°C (-4°F to 167°F)

32
Warum leuchtet die rote Anzeige (FEHLER),
während der Buzzer piept und die vier
Batteriestandsanzeigen blinken, nachdem ich
mehrere Starthilfen gegeben habe?
Es ist möglich, dass sich die Starthilfe überhitzt,
da Sie innerhalb kurzer Zeit zu häug Starthilfe
gegeben haben. Bitte warten Sie 20 Minuten, bevor
Sie es erneut versuchen.
Warum kann der DC-Ausgang bis zu 16,8V
betragen, und besteht die Gefahr, dass mein
elektronisches 12V-Gerät während des Auadens
beschädigt wird?
Die DC-Ausgangsspannung kann bis zu 16,8V
betragen, da sie mit der des Starthilfegeräts
übereinstimmt (zwischen 13,2 und 16,8V,
mit steigendem Batteriestand). Die meisten
12-V-Geräte können jedoch bis zu 18V vertragen, so
dass eine Beschädigung während des Auadens
nicht zu erwarten ist.
Q
A
Q
A
ABSCHNITT 8
FAQ

33
ABSCHNITT 9
GARANTIE
TOPDONs Einjährige Eingeschränkte Garantie
TOPDON garantiert seinem ursprünglichen Käufer,
dass die Produkte des Unternehmens für 12 Monate ab
Kaufdatum frei von Material- und Verarbeitungsfehlern
sind (Garantiezeitraum).
Für die während der Garantiezeit gemeldeten Mängel
wird TOPDON das defekte Teil oder Gerät gemäß seiner
Analyse und Bestätigung des technischen Supports
entweder reparieren oder ersetzen.
TOPDON haftet nicht für Neben- oder Folgeschäden,
die durch den Gebrauch, den Missbrauch oder die
Montage des Geräts entstehen.
Bei Widersprüchen zwischen der TOPDON-
Gewährleistungsrichtlinie und den örtlichen
Regelungen haben die örtlichen Regelungen
bevorzugte Stellung.
Diese eingeschränkte Garantie erlischt unter den
folgenden Bedingungen:
• Missbrauch, Demontage, Änderung oder Reparatur
durch nicht autorisierte Geschäfte oder Techniker.
• Unachtsame Handhabung und Verletzung des
Betriebs.
Notiz: Alle Informationen in dieser Anleitung basieren
auf den neuesten Informationen, die zum Zeitpunkt
der Veröffentlichung verfügbar waren, und es kann
keine Garantie für ihre Genauigkeit oder Vollständigkeit
übernommen werden. TOPDON behält sich das Recht
vor, jederzeit ohne Vorankündigung Änderungen
vorzunehmen.

34
FRANÇAIS

35
LA SÉCURITÉ EST TOUJOURS
LA PLUS IMPORTANTE!
Pour votre sécurité et celle des autres, et pour
éviter tout dommage au produit et à votre véhicule,
veuillez LIRE attentivement et COMPRENDRE
COMPLÈTEMENT toutes les instructions et tous les
messages de sécurité de ce manuel avant de l'utiliser.
Utilisez UNIQUEMENT les pinces à batterie associées à
ce produit.
N'UTILISEZ PAS ce produit si vous avez constaté que le
câble ou le démarreur était endommagé.
Le produit NE DOIT PAS être exposé directement à
la lumière du soleil ou placé dans des zones à haute
température.
Le produit utilise une batterie au lithium-ion.
Veuillez vous en débarrasser conformément aux
réglementations locales si la durée de vie de la batterie
est terminée.
Vériez régulièrement le niveau de charge de la batterie
du produit et assurez-vous qu'il est toujours supérieur à
50 %.

36
SECTION 1 A PROPOS DU
DÉMARREUR
SECTION 2
CONTENU DU PRODUIT
Le démarreur portable TOPDON permet des
démarrages rapides et sûrs pour les voitures, bateaux,
motos, camions 12 V, etc. Il peut également être utilisé
comme banque d'alimentation pour recharger d'autres
appareils électroniques tels que les appareils mobiles,
ou pour alimenter des appareils 12 V CC.
Démarreur
Pinces à batterie
Câble USB
Manuel d'Utilisation
Sac de Transport

37
SECTION 3 PRÉSENTATION DU
PRODUIT
Démarreur de secours
2
7
45
6
3
1
8

38
Bouton d'Alimentation
Appuyez brièvement sur le bouton d'alimentation
pour allumer le dispositif ; appuyez longuement
sur le bouton d'alimentation pour allumer la
lumière LED, et vous pouvez appuyer brièvement
à nouveau pour faire basculer la lumière LED
entre les modes suivants: Lampe de poche, SOS,
Stroboscope, et ARRÊT.
Indicateurs de Niveau de la Batterie
Ce voyant indique le niveau de charge de la batterie
interne du démarreur de secours. (Les quatre
voyants clignotent pendant environ 10 secondes
lorsque l'appareil surchauffe).
Remarque : N'essayez de démarrer un véhicule
que lorsque le niveau de la batterie de l'appareil est
supérieur à 50 %.
Prise de Démarrage
Détecteur de température
Le détecteur de température est utilisé pour
détecter une surchauffe du démarreur de secours.
Sortie USB de USB1 / USB2 (5V3A)
Entrée/Sortie USB Type-C (PD18W)
Sortie CC (Max 16,8 V/10 A)
Lumière LED
1
2
3
4
5
6
7
8

39
Voyant d'outil prêt
Lorsque le démarreur de secours est prêt à l'emploi,
il s'allume en vert xe.
Indicateur d'erreur
Lorsqu'une inversion de polarité, un court-circuit,
une surchauffe ou une mauvaise connexion est
détectée, cet indicateur s'allume en rouge xe
(l'avertisseur interne commence également à
émettre un signal sonore).
Remarque :
-Si le démarreur de secours est correctement
connecté, mais que ni l'indicateur d'outil prêt ni
l'indicateur d'erreur ne sont allumés, cela peut être
dû au fait que la tension de la batterie du véhicule
est inférieure à 3 V. Essayez d'utiliser le mode
BOOST pour démarrer le véhicule.
Bouton BOOST
Appuyez sur ce bouton pour lancer le mode
BOOST (mode de sortie forcée). L'indicateur d'outil
prêt s'allume en vert. Vous devez faire redémarrer
votre véhicule dans les 30 secondes. Si le véhicule
n'a pas démarré dans les 30 secondes ou s'il n'a
pas été démarré avec succès, le mode BOOST sera
automatiquement désactivé et l'indicateur d'outil
prêt s'éteindra.
Remarque : Toutes les protections de sécurité
1
2
3
Pinces à batterie
1 3
4
5
2
40
sont temporairement désactivées en mode
BOOST. Veuillez utiliser ce mode avec une extrême
prudence et seulement après avoir essayé l'option
normale de démarrage à l'aide de la batterie.
Pince Positive (Rouge)
Pince Négative (Noire)
4
5
SECTION 4 RECHARGE DU
DÉMARREUR DE SECOURS
Lorsqu'il est sorti de la boîte, le démarreur de secours
est déjà partiellement chargé et doit être entièrement
rechargé avant d'être utilisé. Veuillez recharger le
démarreur à l'aide du port d'entrée/sortie USB de
type-C.

41
SECTION 5 COMMENT FAIRE
DÉMARRER UN VÉHICULE À
BATTERIE 12 V ?
IMPORTANT : Assurez-vous d'avoir éteint toutes les
sources d'alimentation du véhicule, y compris les
phares, la radio, les climatiseurs, etc. avant d'essayer de
démarrer le véhicule.
Remarque : La fonction de démarrage ne s'applique
qu'aux véhicules équipés d'une batterie au plomb de 12
V.
Étape 1 :
Branchez l'extrémité bleue des pinces à batterie dans la
prise de démarrage.

42
Étape 2 :
Connectez les pinces à batterie à la batterie du véhicule.
La pince rouge est reliée à la polarité positive (+), la
pince noire à la polarité négative (-). La lumière verte
de l'indicateur d'outil prêt indique que le démarreur de
secours est prêt à démarrer.
Lorsque les bornes sont correctement connectées, le
démarreur fournit un saut à la batterie du véhicule.
Étape 3 :
Essayez de démarrer le véhicule. Déconnectez les
pinces à batterie du véhicule et attendez 20 secondes
si le véhicule ne démarre pas, puis reconnectez-les
et réessayez. Il n'est pas recommandé d'essayer plus
de trois démarrages consécutifs en l'espace de deux
minutes.
43
Étape 4 :
Après avoir réussi à faire démarrer le véhicule,
déconnectez les pinces de la batterie du véhicule et
déconnectez les pinces à batterie et le démarreur
de secours. Ensuite, votre démarreur s'éteindra
automatiquement au bout d'environ 10 secondes.

44
SECTION 6 UTILISATION DU
DÉMARREUR COMME BANQUE
D'ALIMENTATION
Pour utiliser le démarreur comme banque
d'alimentation, appuyez sur le bouton d'alimentation
pour allumer le démarreur de secours. Vous
pouvez ensuite l'utiliser pour charger des appareils
électroniques tels que des téléphones et des tablettes
via le port de sortie USB1 / USB2 ou alimenter des
appareils électroniques 12 V via le port de sortie CC (Max
16,8 V/10 A).

45
SECTION 7
SPÉCIFICATIONS
Capacité de la batterie
Sortie USB1 / USB2
Sortie CC (5,5 mm*2,1 mm)
Entrée/Sortie USB de
type-C
Courant de Pointe
Température de
Fonctionnement
Température de Stockage
3.7V, 10,000mAh, 37Wh
(JS1200Pro)
3.7V, 16,000mAh, 59.2Wh
(JS2000Pro)
5V 3A
Max 16.8V 10A
PD18W, 5V 3A, 9V 2A
1800A (JS1200Pro)
2500A (JS2000Pro)
-10°C to 40°C (14°F to 104°F)
-20°C to 75°C (-4°F to 167°F)

46
Pourquoi l'indicateur rouge (ERREUR) est-il
allumé avec l'avertisseur sonore et les quatre
indicateurs de niveau de batterie qui clignotent
après avoir effectué plusieurs démarrages de
secours ?
Il est possible que le démarreur de secours
surchauffe car vous avez effectué des démarrages
de secours trop fréquents dans un court laps de
temps. Attendez 20 minutes avant de réessayer.
Pourquoi la sortie CC peut-elle atteindre 16,8 V
et y a-t-il un risque d'endommager mon appareil
électronique de 12 V pendant la recharge ?
La tension de sortie CC peut atteindre 16,8 V, car
elle correspond à celle du démarreur de secours
(elle varie de 13,2 à 16,8 V et augmente à mesure
que le niveau de la batterie s'élève). Cependant,
la plupart des appareils 12 V peuvent supporter
jusqu'à 18 V, de sorte qu'il ne devrait pas y avoir de
dommages pendant la recharge.
Q
R
Q
R
SECTION 8
FAQ

47
SECTION 9
GARANTIE
Garantie limitée d'un an de TOPDON
TOPDON garantit à l'acheteur initial que les produits
de la société sont exempts de tout défaut matériel et
de fabrication pendant 12 mois à compter de la date
d'achat (période de garantie).
Pour les défauts signalés pendant la période de
garantie, TOPDON réparera ou remplacera la pièce ou
le produit défectueux selon l'analyse et la conrmation
de son support technique.
TOPDON ne sera pas responsable des dommages
accessoires ou indirects résultant de l'utilisation, de la
mauvaise utilisation ou du montage de l'appareil.
S'il y a un conit entre la politique de garantie de
TOPDON et les lois locales, les lois locales prévaudront.
Cette garantie limitée est nulle dans les conditions
suivantes :
• Mauvaise utilisation, démontage, modication ou
réparation par des magasins ou des techniciens non
autorisés.
• Manipulation négligente et violation des règles de
fonctionnement.
Avis : Toutes les informations contenues dans ce manuel
sont basées sur les dernières informations disponibles
au moment de la publication et aucune garantie ne
peut être donnée quant à leur exactitude ou leur
exhaustivité. TOPDON se réserve le droit d'apporter des
modications à tout moment sans préavis.

48
ITALIANO

49
LA SICUREZZA È SEMPRE LA
PRIMA PRIORITÀ!
Per la sicurezza propria e degli altri, ed evitando
danni al prodotto e al veicolo, si prega di LEGGERE
attentamente e COMPRENDERE PIENAMENTE tutte le
istruzioni di sicurezza e i messaggi su questo manuale
prima di operare.
Utilizzare SOLO i morsetti della batteria associati a
questo prodotto.
NON utilizzare questo prodotto se il cavo o il jump
starter sono stati danneggiati
Il prodotto NON deve essere esposto direttamente alla
luce solare o collocato in aree ad alta temperatura.
La batteria agli ioni di litio viene utilizzata per il
prodotto. Si prega di SMALTIRLO in conformità con le
normative locali se la durata della batteria è terminata.
Esaminare regolarmente il livello di carica della batteria
del prodotto e ASSICURARSI che sia sempre superiore
al 50%.

50
SEZIONE 1 INFORMAZIONI SU
AVVIATORI DI SALTO
SEZIONE 2 CONTENUTO DEL
PRODOTTO
L'avviatore di emergenza portatile TOPDON supporta
avviamenti rapidi e sicuri per auto, barche, motociclette,
camion a 12 V, ecc.
Può anche essere utilizzato come power bank per
ricaricare altri dispositivi elettronici come dispositivi
mobili o fornire alimentazione a dispositivi 12 V DC.
Avviatori di Salto
Morsetti per batterie
Cavo USB
Manuale
Borsa da trasporto

51
SEZIONE 3 PANORAMICA DEL
PRODOTTO
Avviatori di Salto
2
7
45
6
3
1
8

52
Pulsante di accensione
Premendo brevemente il pulsante di accensione si
accende il dispositivo; premendo a lungo il
pulsante di accensione si accende la luce LED,
mentre premendolo di nuovo brevemente si attiva
la rotazione della luce LED trale seguenti modalità:
Torcia, SOS, Strobo e OFF.
Indicatori di livello della batteria
Questo indicatore mostra il livello di potenza
della batteria interna del jump starter. (I quattro
indicatori lampeggeranno per circa 10 secondi
quando il dispositivo si surriscalda.)
Nota: Tentare di avviare un veicolo solo quando il
livello della batteria del dispositivo è superiore al
50%.
Presa di avvio rapido
Rilevatore di temperatura
Il rilevamento della temperatura viene utilizzato
per rilevare il surriscaldamento nel jump starter.
Uscita USB1 / USB2 (5V3A)
Ingresso/Uscita USB Type-C (PD18W)
Uscita DC (Max 16.8 V/10 A)
Luce LED
1
2
3
4
5
6
7
8

53
Indicatore di Utensile Pronto
Quando il ponticello di avviamento è pronto per
l'uso, viene illuminato come un verde sso.
Indicatore di Errore
Quando viene rilevata un'inversione di polarità, un
cortocircuito, una temperatura eccessiva o una
connessione errata, questo indicatore si illuminerà
in rosso sso (anche il cicalino interno inizierà a
emettere un segnale acustico).
Nota:
-Se il jump starter è collegato correttamente, ma
né l'Tool Ready né l'indicatore di errore sono accesi,
la tensione della batteria del veicolo è inferiore a 3
V. Prova a utilizzare la modalità BOOST per avviare
rapidamente il veicolo.
Pulsante BOOST
Premere per avviare la modalità BOOST (modalità
di uscita forzata). L'indicatore Tool Ready si
illuminerà in verde. Dovresti avviare il tuo veicolo
entro 30 secondi. Se il veicolo non si è avviato entro
30 secondi o non è stato avviato correttamente, la
modalità BOOST verrà disattivata automaticamente
e l'indicatore verde Tool Ready si spegnerà
Nota: Tutte le protezioni di sicurezza saranno
temporaneamente disattivate in modalità BOOST.
Utilizzare questa modalità con estrema cautela e
1
2
3
Morsetti per batterie
1 3
4
5
2
54
solo dopo che la normale opzione di avvio rapido
della batteria è già stata provata.
Morsetto positivo (rosso)
Morsetto negativo (nero)
4
5
SEZIONE 4 RICARICARE IL
JUMP STARTER
Quando viene estratto dalla scatola, il jump starter è
già parzialmente carico e deve essere completamente
ricaricato prima di essere utilizzato. Caricare il jump
starter tramite la porta di ingresso/Uscita USB Type-C.

55
SEZIONE 5
COME AVVIARE UN VEICOLO A
BATTERIA DA 12 V?
IMPORTANTE: Assicurati di aver spento tutti i carichi
di potenza del veicolo, inclusi fari, radio, condizionatori
d'aria, ecc., Prima di tentare di avviare il veicolo.
Nota: La funzione di avviamento è applicabile solo ai
veicoli con batterie al piombo acido da 12 V.
Passo 1:
Inserire l'estremità blu dei morsetti della batteria nella
presa di avviamento rapido.
56
Passo 2:
Collegare i morsetti della batteria alla batteria del
veicolo. Morsetto rosso alla polarità positiva (+),
morsetto nero alla polarità negativa (-). La luce verde
dell'indicatore Tool Ready indica che il jump starter è
pronto per il jump-start.
Quando i terminali sono collegati correttamente,
Avviatori di Salto fornirà un salto alla batteria del veicolo.
Passo 3:
Prova ad avviare il veicolo. Scollegare i morsetti della
batteria dalla batteria del veicolo e attendere 20
secondi se il veicolo non si avvia, quindi ricollegarlo e
riprovare. Non è consigliabile provare più di 3 jump-
start consecutivi entro 2 minuti.

57
Passo 4:
Dopo aver avviato correttamente il veicolo, scollegare i
morsetti dalla batteria del veicolo e scollegare i morsetti
della batteria e il jump starter. L'avviatore si spegnerà
automaticamente dopo circa 10 secondi.

58
SEZIONE 6
UTILIZZO DI AVVIATORI DI
SALTO COME POWER BANK
Per utilizzare il Avviatori di Salto come power bank,
premere il pulsante di accensione per accendere il
ponticello di avviamento. Quindi è possibile utilizzarlo
per caricare dispositivi elettronici come telefoni e
tablet tramite la porta di uscita USB1 / USB2 o fornire
alimentazione a dispositivi elettronici 12 V tramite la
porta di uscita CC (Max 16.8 V / 10 A).

59
SEZIONE 7
SPECIFICHE
Capacità della batteria
Uscita USB1 / USB2
Uscita DC (5,5 mm * 2,1
mm)
Ingresso/uscita USB
Type-C
Corrente di picco
Temperatura di esercizio
Temperatura di
stoccaggio
3.7V, 10,000mAh, 37Wh
(JS1200Pro)
3.7V, 16,000mAh, 59.2Wh
(JS2000Pro)
5V 3A
Max 16.8V 10A
PD18W, 5V 3A, 9V 2A
1800A (JS1200Pro)
2500A (JS2000Pro)
-10°C to 40°C (14°F to 104°F)
-20°C to 75°C (-4°F to 167°F)

60
Perché l'indicatore rosso (ERROR) si accende
con il segnale acustico del cicalino e i quattro
indicatori del livello della batteria lampeggiano
dopo aver eseguito diversi jump start?
È possibile che il jump starter si stia surriscaldando
poiché hai iniziato troppo frequentemente in un
breve lasso di tempo. Attendi 20 minuti prima di
riprovare.
Perché l'uscita DC può arrivare no a 16,8 V e
c'è il rischio di danneggiare il mio dispositivo
elettronico a 12 V durante la ricarica?
La tensione di uscita DC può raggiungere no
a 16,8 V in quanto è coerente con quella del
jump starter (varia da 13,2 a 16,8 V e aumenta
all'aumentare del livello della batteria). Tuttavia, la
maggior parte dei dispositivi a 12 V può sopportare
no a 18 V, quindi non dovrebbe vericarsi un
danno durante la ricarica.
D
R
D
R
SEZIONE 8
FAQ

61
SEZIONE 9
GARANZIA
Garanzia limitata di un anno di TOPDON
TOPDON garantisce al suo acquirente originale
che i prodotti dell'azienda saranno esenti da difetti
di materiale e lavorazione per 12 mesi dalla data di
acquisto (Periodo di garanzia).
Per i difetti segnalati durante il periodo di garanzia,
TOPDON riparerà o sostituirà la parte o il prodotto
difettoso in base all'analisi e alla conferma del supporto
tecnico.
TOPDON non sarà responsabile per eventuali danni
incidentali o consequenziali derivanti dall'uso, uso
improprio o montaggio del dispositivo.
In caso di conitto tra la politica di garanzia TOPDON e
le leggi locali, prevarranno le leggi locali.
Questa garanzia limitata è nulla nelle seguenti
condizioni:
• Usato in modo improprio, smontato, alterato o riparato
da negozi o tecnici non autorizzati.
• Manipolazione negligente e violazione dell'operazione.
Avviso: tutte le informazioni contenute in questo
manuale si basano sulle ultime informazioni disponibili
al momento della pubblicazione e non può essere
fornita alcuna garanzia per la sua accuratezza o
completezza. TOPDON si riserva il diritto di apportare
modiche in qualsiasi momento senza preavviso.

62
PORTUGUÊS

63
SEGURANÇA SEMPRE EM
PRIMEIRO LUGAR!
Pela sua segurança e dos demais, e para evitar danos
ao produto e ao seu veículo, por favor LEIA com
cuidado e ENTENDA COMPLETAMENTE todas as
instruções e mensagens de segurança neste manual
antes de operar.
APENAS use as pinças de bateria associadas a este
produto.
NÃO use este produto se o cabo ou o dispositivo de
arranque aparentarem ter sofrido qualquer tipo de
dano.
O produto NÃO DEVE ser exposto diretamente à luz
solar ou colocado em áreas de alta temperatura.
Bateria de Lítio-Ion usada no produto. Por favor
DESCARTE o produto de acordo com as regulações
locais se a vida útil da bateria tiver acabado.
Examine regularmente o nível da bateria do produto e
GARANTA que ela esteja acima de 50% todo o tempo.

64
SEÇÃO 1 SOBRE O
DISPOSITIVO DE ARRANQUE
SEÇÃO 2
CONTEÚDO DO PRODUTO
O acionador de partida portátil TOPDON suporta
partidas rápidas e seguras para carros, barcos,
motocicletas, caminhões de 12V, etc.
Também pode ser usado como um power bank para
recarregar outros dispositivos eletrônicos tais como
dispositivos móveis, ou fornecer força a dispositivos de
12V CC.
Dispositivo de Arranque
Pinças de Bateria
Cabo USB
Manual do Usuário
Mochila

65
SEÇÃO 3
VISÃO GERAL DO PRODUTO
Dispositivo de Arranque
2
7
45
6
3
1
8

66
Botão de Energia
Aperte uma vez o botão iniciar para ligar o
dispositivo; Mantenha pressionado para ligar a luz
LED, e você pode apertar mais uma vez para fazer
que a luz LED alterne entre os seguintes modos:
Lanterna, SOS, Estroboscópio, e DESLIGADO.
Indicadores de Nível da Bateria
Este indicador mostra o nível da bateria interna do
dispositivo de arranque. (Os quatro indicadores irão
piscar por mais ou menos 10 segundos quando o
dispositivo estiver sobreaquecendo.)
Nota: Tente arrancar o veículo apenas quando o
nível de bateria do dispositivo estiver acima de
50%.
Soquete de Arranque
Detector de Temperatura
Detecção de temperatura é usada para detectar
sobreaquecimento no dispositivo de arranque.
Saída USB1 / USB2 (5V3A)
Entrada/Saída USB Tipo C (PD18W)
Saída DC (Máximo 16.8V/10A)
Luz LED
1
2
3
4
5
6
7
8

67
Indicador de Prontidão da Ferramenta
Quando o dispositivo de arranque estiver pronto
para o uso, a luz verde acenderá.
Indicador de Erro
Quando houver polaridade invertida, curto-circuito,
alta temperatura, ou uma conexão incorreta
detectada, este indicador vermelho acenderá (O
alarme interno também começará a tocar).
Nota:
-Se o dispositivo de arranque estiver conectado
corretamente, mas nem o Indicador de Prontidão
nem o Indicador de Erro acenderem, isso pode ser
causado pela voltagem da bateria do veículo estar
menor que 3V. Tente usar o modo IMPULSO para
dar arrancada no veículo.
Botão IMPULSO
Pressione para iniciar o modo IMPULSO (modo
forçado). O Indicador de Prontidão da Ferramenta
verde irá acender. Você deve dar a partida em
seu veículo dentro de 30 segundos. Se o veículo
não houver ligado dentro de 30 segundos ou não
for arrancado, o modo IMPULSO irá se desativar
automaticamente, e o Indicador de Prontidão da
Ferramenta verde irá se apagar.
Nota: Todas as proteções de segurança serão
temporariamente desativadas durante o modo
1
2
3
Pinças de Bateria
1 3
4
5
2

68
IMPULSO. Por favor use este modo com extrema
cautela e apenas após tentar a opção de arrancada
de bateria normal.
Pinça Positiva (Vermelha)
Pinça Negativa (Preta)
4
5
SEÇÃO 4 RECARREGAR O
DISPOSITIVO DE ARRANQUE
Ao ser retirado da caixa, o dispositivo de arranque
já estará parcialmente carregado e deverá ser
completamente carregado antes do uso. Por favor
recarregue o dispositivo de arranque através da
Entrada/Saída USB Tipo C.

69
SEÇÃO 5 COMO DAR A
PARTIDA EM UMA BATERIA DE
VEÍCULO DE 12V?
IMPORTANTE: Assegure-se de que você desligou todas
as cargas elétricas do veículo, incluindo faróis, rádio,
ar-condicionado, etc., antes de tentar dar a partida no
veículo.
Nota: A função de arrancada só é aplicável a veículos
com baterias de chumbo-ácido de 12V.
Passo 1:
Ligue a parte azul das pinças de bateria no Soquete de
Arranque.
70
Passo 2:
Conecte as pinças de bateria à bateria do veículo. A
Pinça vermelha no Polo Positivo (+), a Pinça preta no
Polo Negativo (-). A luz verde do Indicador de Prontidão
da Ferramenta indica que o dispositivo de arranque
está pronto para dar a partida.
Quando os terminais forem conectados corretamente,
o dispositivo de arranque irá dar uma arrancada na
bateria do veículo.
Passo 3:
Tente dar a partida no veículo. Desconecte as pinças de
bateria da bateria do veículo e espere por 20 segundos
caso o veículo não possa ligar, então reconecte-as e
tente novamente. Tentar mais de 3 arrancadas dentro
de 2 minutos não é recomendado.

71
Passo 4:
Após dar a partida no veículo com sucesso, desconecte
as pinças da bateria do veículo e desconecte-as do
dispositivo de arranque. Seu dispositivo de arranque irá
desligar automaticamente em cerca de 10 segundos.

72
SEÇÃO 6 USANDO O
DISPOSITIVO DE ARRANQUE
COMO UM POWER BANK
Para usar o dispositivo de arranque como um power
bank, pressione o Botão de Ligar para ligar o dispositivo
de arranque. Então você poderá usá-lo para carregar
dispositivos como telefones e tablets através da
Saída USB1 / USB2 ou fornecer energia a dispositivos
eletrônicos de 12V via Saída CC (Max 16.8V/10A).

73
SEÇÃO 7
ESPECIFICAÇÕES
Capacidade da Bateria
Saída USB1 / USB2
Saída CC (5.5mm*2.1mm)
Entrada/Saída USB Tipo C
Corrente Máxima
Temperatura de Trabalho
Temperatura de
Armazenagem
3.7V, 10,000mAh, 37Wh
(JS1200Pro)
3.7V, 16,000mAh, 59.2Wh
(JS2000Pro)
5V 3A
Max 16.8V 10A
PD18W, 5V 3A, 9V 2A
1800A (JS1200Pro)
2500A (JS2000Pro)
-10°C to 40°C (14°F to 104°F)
-20°C to 75°C (-4°F to 167°F)

74
Por que o indicador vermelho (ERRO) acendeu
com o alarme tocando e os quatro indicadores
de bateria estão piscando após eu executar
diversos arranques?
É possível que o dispositivo de arranque tenha
sobreaquecido e você tenha executado arranques
muito frequentemente dentro de um curto espaço
de tempo. Por favor espere 20 minutos antes de
tentar novamente.
Por que a saída CC pode chegar a até 16.8V,
e há um risco de danicar o meu dispositivo
eletrônico de 12V durante a recarga?
A voltagem da saída CC pode alcançar até
16.8V porque é consistente com a voltagem do
dispositivo de arranque (que varia entre 13.2 e 16.8V,
e aumenta de acordo com o nível da bateria). No
entanto, a maioria dos dispositivos de 12V pode
aguentar uma voltagem de até 18V, portanto não
devem ocorrer danos durante a recarga.
P
R
P
R
SEÇÃO 8
PERGUNTAS FREQUENTES

75
SEÇÃO 9
GARANTIA
Garantia Limitada de Um Ano TOPDON
A TOPDON garante a seu comprador original que os
produtos da empresa serão livres de defeitos materiais
e de confecção por 12 meses a partir da data de compra
(Período de Garantia).
Para defeitos reportados durante o Período de Garantia,
a TOPDON irá ou consertar ou substituir o componente
ou produto defeituoso de acordo com a análise e
conrmação de seu suporte técnico.
A TOPDON não se responsabiliza por quaisquer danos
incidentais ou consequentes decorrentes do uso, uso
indevido ou montagem do dispositivo.
Se houver qualquer conito entre a política de garantia
TOPDON e as leis locais, as leis locais devem prevalecer.
Esta garantia limitada é anulada sob as seguintes
condições:
• Uso indevido, desmontagem, alteração ou consertos
por lojas ou técnicos não autorizados.
• Manejo descuidado e/ou operação indevida.
Aviso: Todas as informações neste manual são baseadas
nas informações disponíveis mais recentes durante o
momento de sua publicação e nenhuma garantia pode
ser feita sobre sua exatidão ou integridade. A TOPDON
se reserva o direito de fazer alterações a qualquer
momento sem aviso.

76
ESPAÑOL

77
¡LA SEGURIDAD ES SIEMPRE
LA MAYOR PRIORIDAD!
Para la seguridad de todos, y para evitar cualquier
daño al producto y a su vehículo, por favor LEA
detenidamente y COMPRENDA TOTALMENTE todas
las instrucciones y mensajes de seguridad de este
manual antes de utilizarlo.
Utilice ÚNICAMENTE las abrazaderas de batería
asociadas con este producto.
NO use este producto si se ha observado que el cable o
el arrancador están dañados.
El producto NO DEBE exponerse directamente a la luz
solar ni colocarse en áreas de alta temperatura.
La batería de iones de litio fue utilizada para este
producto. Por favor DESECHARLO de acuerdo con las
normas locales si la vida útil de la batería ha terminado.
Examine regularmente el nivel de carga de la batería
del producto y ASEGÚRESE de que debería estar por
encima del 50 % en todo momento.

78
SECCIÓN 1 ACERCA DE
ARRANCADOR DE SALTO
SECCIÓN 2
CONTENIDO DEL PRODUCTO
El arrancador portátil de TOPDON admite arranques
rápidos y seguros para automóviles, embarcaciones,
motocicletas, camiones, etc. de 12 V.
También se puede utilizar como banco de energía
para recargar otros dispositivos electrónicos, así
como dispositivos móviles, o proporcionar energía a
dispositivos de 12V CC.
Arrancador de Salto
Abrazaderas de Batería
Cable USB
Manual de Usuario
Mochila
79
SECCIÓN 3 DESCRIPCIÓN
GENERAL DEL PRODUCTO
Arrancador de Salto
2
7
45
6
3
1
8

80
Botón de Encendido
Presione una vez el botón de prender para prender
el dispositivo; Presione el botón de poder para
prender la luz LED, y usted puede presionarlo
otra vez para hacer que la luz LED alterne
entre los siguientes modos: Linterna, SOS, Luz
Estroboscópica, y APAGAR.
Indicadores de Nivel de Batería
Este indicador muestra el nivel de energía de la
batería interna del arrancador de salto. (Los cuatro
indicadores parpadearán alrededor de unos 10
segundos cuando el dispositivo se sobrecaliente).
Nota: Solo intente arrancar un vehículo cuando el
nivel de la batería del dispositivo esté por encima
del 50 %.
Zócalo de Arrancador
Detector de Temperatura
La detección de temperatura es utilizada para
detectar el sobrecalentamiento en el arrancador de
salto.
Salida USB1 / USB2 (5V 3A)
Entrada/Salida USB tipo C (PD18W)
Salida de CC (Máx. 16,8V/10A)
Luz LED
1
2
3
4
5
6
7
8
81
Indicador de Herramienta Lista
Cuando el arrancador de salto está listo para usar,
se ilumina en el color verde jo.
Indicador de Error
Cuando se detecta una polaridad inversa, un
cortocircuito, un exceso de temperatura o una
conexión incorrecta, este indicador se iluminará
en el color rojo jo (el zumbador interno también
comenzará a sonar).
Nota:
-Si el arrancador de salto está conectado
correctamente, pero ni el Indicador de Herramienta
Lista ni el de Error están encendidos, puede
deberse a que el voltaje de la batería del vehículo
es inferior a 3V. Intente usar el modo IMPULSO para
arrancar el vehículo.
Botón IMPULSO
Presione para iniciar el modo IMPULSO (modo
de salida forzada). El Indicador de Herramienta
Lista se iluminará en verde. Deberá arrancar su
vehículo dentro de 30 segundos. Si el vehículo
no ha arrancado dentro de 30 segundos o no
ha arrancado con éxito, el modo IMPULSO se
desactivará automáticamente y el indicador verde
de Herramienta Lista se apagará.
Nota: Todas las protecciones de seguridad se
1
2
3
Abrazaderas de Batería
1 3
4
5
2
82
desactivarán temporalmente cuando esté en modo
IMPULSO. Por favor utilice este modo con extrema
precaución y solo después de haber probado la
opción normal de arranque de batería.
Abrazadera Positiva (Roja)
Abrazadera Negativa (Negra)
4
5
SECCIÓN 4 RECARGAR EL
ARRANCADOR DE SALTO
Cuando ya se saca de la caja, el arrancador de
salto está parcialmente cargado y debe recargarse
completamente antes de usarse. Por favor cargue el
arrancador de salto a través del puerto de entrada/
Salida USB tipo C.
83
SECCIÓN 5 ¿CÓMO ARRANCAR
UN VEHÍCULO CON BATERÍA
DE 12V?
IMPORTANTE: Antes de intentar arrancar el vehículo,
por favor asegúrese de haber apagado todas las cargas
de energía del vehículo, incluidos los faros, la radio, los
acondicionadores de aire, etc.
Nota: La función de arranque rápido solo es aplicable a
vehículos con batería de plomo-ácido de 12V.
Paso 1:
Enchufe el extremo azul de las abrazaderas de la batería
en el enchufe del Zócalo de Arrancador.

84
Paso 2:
Conecte las abrazaderas de batería a la batería del
vehículo. Pinza roja a la Polaridad Positiva (+), Pinza
Negra a la Polaridad Negativa (-). La luz verde del
Indicador Herramienta Lista muestra que el arrancador
de salto está listo para arrancar.
Cuando los terminales estén correctamente
conectados, el arrancador de salto se proporcionará un
salto para la batería del vehículo.
Paso 3:
Intente arrancar el vehículo. Desconecte las abrazaderas
de batería de la batería del vehículo y espere 20
segundos si el vehículo falla en arrancar, luego vuelva
a conectarlo e intentarlo de nuevo. No se recomienda
intentar más de 3 arranques rápidos consecutivos
dentro de 2 minutos.
85
Paso 4:
Después de arrancar con éxito el vehículo, desconecte
las abrazaderas de batería del vehículo y desconecte
las abrazaderas de batería del arrancador de salto. Tu
arrancador de salto se apagará automáticamente en
unos 10s.
86
SECCIÓN 6 USANDO EL
ARRANCADOR DE SALTO
COMO BANCO DE ENERGÍA
Para usar el arrancador de salto como un banco de
energía, presione el Botón de Encendido para encender
el puente de arranque. Luego, puede usarlo para cargar
dispositivos electrónicos como teléfonos y tabletas a
través del puerto de salida USB1 / USB2 o proporcionar
energía a dispositivos electrónicos de 12V a través del
puerto de salida de CC (Máx. 16,8V/10A).

87
SECCIÓN 7
ESPECIFICACIONES
Capacidad de la Batería
Salida USB1 / USB2
Salida de CC (5,5 mm * 2,1
mm)
Entrada/Salida USB Tipo C
Corriente Pico
Temperatura de Trabajo
Temperatura de
Almacenamiento
3.7V, 10,000mAh, 37Wh
(JS1200Pro)
3.7V, 16,000mAh, 59.2Wh
(JS2000Pro)
5V 3A
Max 16.8V 10A
PD18W, 5V 3A, 9V 2A
1800A (JS1200Pro)
2500A (JS2000Pro)
-10°C to 40°C (14°F to 104°F)
-20°C to 75°C (-4°F to 167°F)

88
¿Por qué se enciende el indicador rojo (ERROR)
con el zumbador emitiendo un pitido y los cuatro
indicadores de nivel de batería parpadeando
después de realizar varios arranques rápidos?
Es posible que el arrancador se sobrecaliente, ya
que lo ha arrancado con demasiada frecuencia
dentro de un período de tiempo corto. Por favor
espere 20 minutos antes de volver a intentarlo.
¿Por qué la salida de CC puede llegar a 16,8V
y existe el riesgo de dañar mi dispositivo
electrónico de 12V durante la recarga?
El voltaje de salida de CC puede alcanzar hasta
16,8V, ya que es consistente con el del arrancador
de salto (varía de 13,2 a 16,8V y aumenta a medida
que incrementa el nivel de la batería). Sin embargo,
la mayoría de los dispositivos de 12V pueden
soportar hasta 18V, por lo que no debería haber
daños durante la recarga.
P
R
P
R
SECCIÓN 8
PREGUNTAS FRECUENTES

89
SECCIÓN 9
GARANTÍA
Garantía limitada de un a ño para TOPDON
TOPDON asegura a sus compradores originales que
los productos de la empresa estarán libres de defectos
de materiales y mano de obra durante un período de
12 meses a partir de la fecha de compra (Período de
Garantía).
Para los defectos reportados durante el período de
garantía, TOPDON analizará y conrmará, reparará o
reemplazará las piezas o productos defectuosos de
acuerdo con su soporte técnico.
TOPDON no será responsable de ningún daño
accidental o consecuente causado por el uso, mal uso o
instalación del dispositivo.
Si hay conictos entre la política de garantía de
TOPDON y las leyes locales, prevalecerán las leyes
locales.
Esta garantía limitada no es válida en los siguientes
casos:
• Uso indebido, desmontaje, modicación o reparación
de tiendas o técnicos no autorizados.
• Manejo de errores e irregularidades operativas.
Nota: Toda la información contenida en este manual se
basa en la información más reciente disponible en el
momento de su publicación y no garantiza su exactitud
o exhaustividad. TOPDON se reserva el derecho de
cambiarla en cualquier momento sin previo aviso.

90
日本语

91
安全は常に最優先事項です!
あなた自身と他の人々の安全、および製品と車両への損傷を
回避するために、操作する前に、このマニュアルに記載され
ているすべての安全指示とメッセージを注意深く熟読し、十
分に理解してください。
この製品に付属のバッテリークランプのみを使用してくださ
い。
ケーブルやジャンプスターターが損傷していると観察された
場合、この製品を使用しないでください。
製品は直射日光にさらされず、高温の場所に置かないでくだ
さい。
リチウムイオンバッテリーが製品に使用されています。バッ
テリーの寿命が終了した場合は、地域の規制に従って処分し
てください。
製品のバッテリー電力レベルを定期的に確認し、常時 50%以
上であることを確認してください。

92
セクション1
ジャンプスターターについて
セクション2
製品の内容
TOPDON のポータブル ジャンプ スターターは、12V 車、ボー
ト、オートバイ、トラックなどの迅速かつ安全な始動をサポ
ートします。
また、モバイルデバイスなどの他の電子機器の充電や、12V
DC デバイスへの電源供給としても使用できます。
ジャンプスターター
バッテリークランプ
USB ケーブル
取扱説明書
手荷物

93
セクション3
製品の概要
ジャンプスターター
2
7
45
6
3
1
8

94
電源ボタ
電源ボタンを押してデバイスをオンにします。電源ボタ
ンを長押しして LED ライトを点灯し、ボタンをもう一度
押してライトを懐中電灯、SOS、ストロボ、OFF の間で
切り替えます。
バッテリーレベルインジケーター
このインジケーターは、ジャンプスターターの内部バッ
テリーの電力レベルを表示します。(デバイスが過熱し
ているとき、4 つのインジケーターは約 10 秒間点滅しま
す。)
注:デバイスのバッテリーレベルが 50%以上の場合にの
み、車両のジャンプスタートを試みてください。
ジャンプスタートソケット
温度検出器
温度検出は、ジャンプスターターの過熱を検出するため
に使用されます。
USB1 / USB2 出力(5V3A)
USB Type-C 入力 / 出力(PD18W)
DC 出力(最大 16.8V/10A)
LED ライト
1
2
3
4
5
6
7
8

95
ツール準備インジケーター
ジャンプスターターが使用準備ができているとき、緑色
で点灯します。
エラーインジケーター
逆極性、ショートサーキット、過熱、または不適切な接
続が検出された場合、このインジケーターは赤色で点灯
します(内部ブザーも鳴り始めます)。
注:
- ジャンプスターターが正しく接続されている場合でも、
ツール準備インジケーターやエラーインジケーターが点
灯していない場合は、車両のバッテリー電圧が 3V 未満で
あることが原因かもしれません。BOOST モードを使って
車両をジャンプスタートしてみてください。
BOOST ボタン
BOOST モード(強制出力モード)を開始するために押し
てください。ツール準備インジケーターが緑色で点灯し
ます。ジャンプスタートは 30 秒以内に行ってください。
30 秒以内に車両が始動しない、または正常にクランクさ
れない場合、BOOST モードは自動的に無効になり、緑色
のツール準備インジケーターが消灯します。
注:BOOST モードでは、すべての安全保護が一時的に無
効になります。通常のバッテリージャンプスタートオプ
ションが既に試みられた後にのみ、このモードを極度の
注意を払って使用してください。
プラスクランプ(赤)
1
2
3
4
バッテリークランプ
1 3
4
5
2
96
マイナスクランプ(黒)
5
セクション4
ジャンプスターターの充電
箱から取り出したとき、ジャンプスターターはすでに部分的
に充電されており、使用前に完全に充電されている必要があ
ります。USB Type-C 入力 / 出力ポートを使用して、ジャンプ
スターターを充電してください。
97
セクション5
12Vバッテリー車両のジャンプスタ
ート方法は?
重要:ジャンプスタートを試みる前に、車両のすべての電力
負荷(ヘッドライト、ラジオ、エアコンなど)をオフにして
ください。
注:ジャンプスタート機能は、12V 鉛酸バッテリー車両にのみ
適用されます。
ステップ 1:
バッテリークランプの青い端子をジャンプスタートソケット
に差し込みます。
98
ステップ 2:
バッテリークランプを車両のバッテリーに接続します。赤い
クランプを正極(+)に、黒いクランプを負極(-)に接続します。
ツール準備インジケーターの緑色の光が、ジャンプスタータ
ーがジャンプスタートの準備ができていることを示します。
端子が正しく接続されている場合、ジャンプスターターは車
両のバッテリーにジャンプを送ります。
ステップ 3:
車両の始動を試みます。車両が始動しない場合は、バッテリ
ークランプを車両のバッテリーから外し、20 秒待ってから再
接続し、もう一度試してください。2 分以内に 3 回以上の連続
ジャンプスタートを試みることはお勧めしません。
99
ステップ 4:
車両を正常に始動させた後、クランプを車両のバッテリーか
ら外し、バッテリークランプとジャンプスターターを切断し
ます。それから、ジャンプスターターは約 10 秒後に自動的に
電源が切れます。

100
セクション6
ジャンプスターターをパワーバンク
として使用する
ジャンプスターターをパワーバンクとして使用するには、電源
ボタンを押してジャンプスターターをオンにします。その後、
USB1 / USB2 出力ポートを介して携帯電話やタブレットなど
の電子機器を充電したり、DC 出力ポート(最大 16.8V/10A)
を経由して 12V 電子機器に電源を供給することができます。

101
セクション7
仕様
バッテリー容量
USB1 / USB2 出力
DC 出力(5.5mm*2.1mm)
USB Type-C 入力 / 出力
ピーク電流
動作温度
保存温度
3.7V, 10,000mAh, 37Wh
(JS1200Pro)
3.7V, 16,000mAh, 59.2Wh
(JS2000Pro)
5V 3A
Max 16.8V 10A
PD18W, 5V 3A, 9V 2A
1800A (JS1200Pro)
2500A (JS2000Pro)
-10°C to 40°C (14°F to 104°F)
-20°C to 75°C (-4°F to 167°F)

102
ジャンプスタートを何度か行った後、赤いインジケータ
ー(エラー)が点灯し、ブザーが鳴り、4 つのバッテリ
ーレベルインジケーターが点滅していますが、どうして
ですか?
短い時間内に何度もジャンプスタートを行ったことで、
ジャンプスターターが過熱している可能性があります。
20 分待ってから再度試してください。
DC 出力が最大 16.8V になる理由は何ですか?また、充
電中に 12V の電子機器を壊すリスクはありますか?
DC 出力電圧が最大 16.8V に達するのは、ジャンプスター
ターのそれに一致しているためです(13.2 〜 16.8V の範
囲で、バッテリーレベルが上がるにつれて増加します)。
ただし、ほとんどの 12V デバイスは最大 18V まで耐えら
れるため、充電中に損傷が発生することはありません。
Q
A
Q
A
セクション8
よくある質問

103
セクション9
保証
TOPDON の 1 年間の限定保証
TOPDON は、購入日から 12 ヶ月以内(保証期間)に材料とプ
ロセスが欠陥がないことを元の購入者に保証します。
保証期間内に報告された欠陥について、TOPDON は技術サポ
ートに基づいて欠陥部品や製品の修理または交換を分析およ
び確認します。
TOPDON は、デバイスの使用、誤用、や取り付けによる付随
的または結果的な損害に対して責任を持っていません。
TOPDON 保証ポリシーと現地の法律は何かの競合がある場合
は、現地の法律に準拠してください。
次の場合は、この限定保証は無効です。
• 無許可店舗や技術者による誤用、取り外し、変更、修理
• 不注意な処理や不適切な操作
知らせこのマニュアルのすべての情報は、出版時に利用可能
な最新の情報に基づいて、正確性や完全性は保証されていま
せん。TOPDON は予告ないで変更する権利を保持しています。