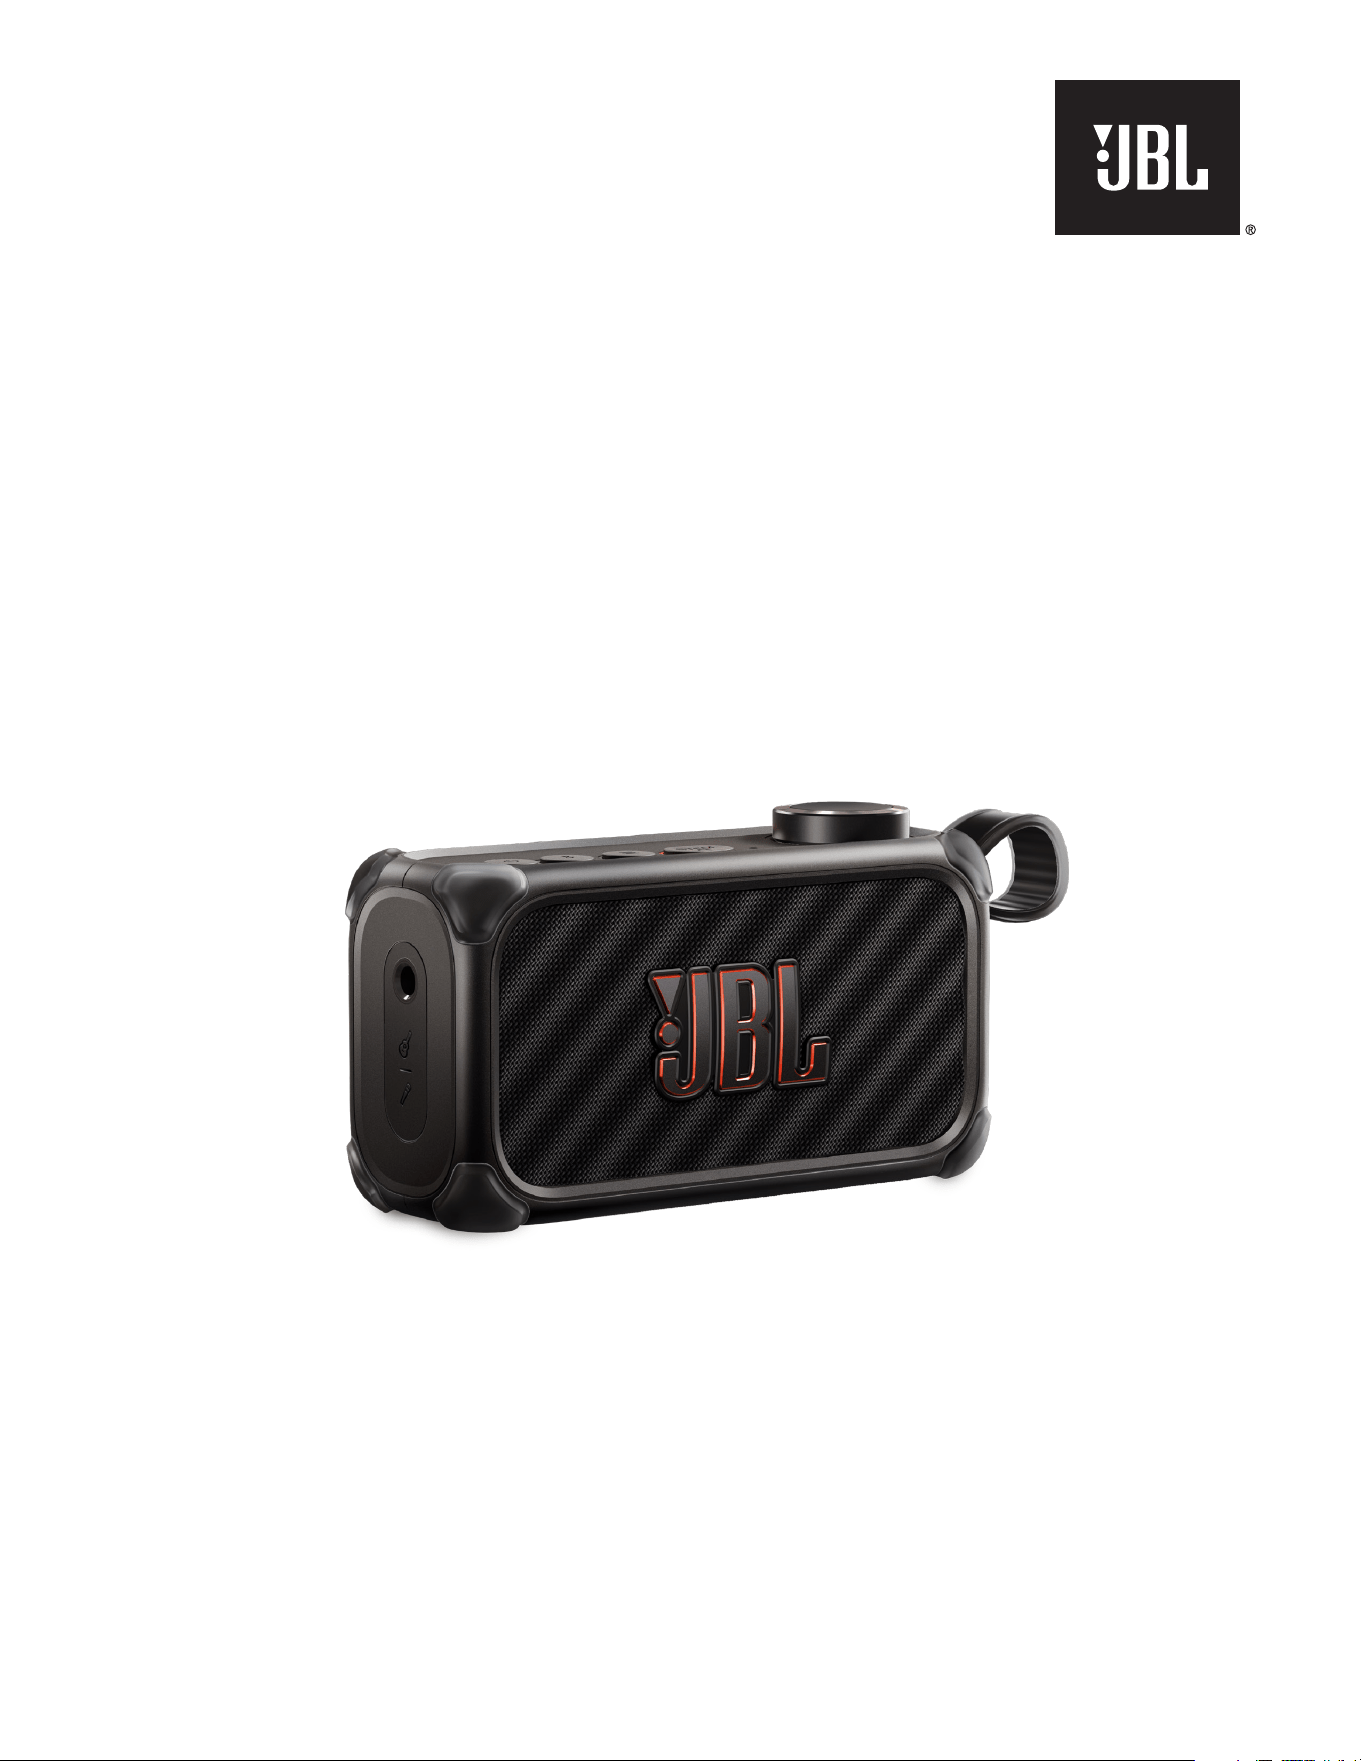
JBL BandBox Solo
OWNER’S MANUAL
22
IMPORTANT SAFETY INSTRUCTIONS
For all products:
1. Clean only with a dry cloth.
2. Do not block any ventilation openings. Install this apparatus
in accordance with the manufacturer’s instructions.
3. Do not install this apparatus near any heat sources such as
radiators, heat registers, stoves or other apparatus (including
ampliers) that produce heat.
4. Do not defeat the safety purpose of the polarized or grounding-
type plug. A polarized plug has two blades with one wider
than the other. A grounding-type plug has two blades and
a third grounding prong. The wide blade or the third prong
is provided for your safety. If the provided plug does not t
into your outlet, consult an electrician for replacement of the
obsolete outlet.
5. Protect the power cord from being walked on or pinched,
particularly at plugs, convenience receptacles and the point
where they exit from the apparatus.
6. Use only attachments/accessories specied by the manufacturer.
7. Use only with the cart, stand, tripod, bracket or
table specied by the manufacturer or sold with
the apparatus. When a cart is used, use caution
when moving the cart/apparatus combination to
avoid injury from tip-over.
8. Unplug this apparatus during lightning storms or when unused
for long periods of time.
9. Refer all servicing to qualied service personnel. Servicing is
required when the apparatus has been damaged in any way,
such as when the power-supply cord or plug is damaged, liquid
has been spilled or objects have fallen into the apparatus, or
the apparatus has been exposed to rain or moisture, does not
operate normally or has been dropped.
10. To disconnect this apparatus from the AC mains completely,
disconnect the power- supply cord plug from the AC receptacle.
11. The mains plug of the power-supply cord shall remain readily
operable.
12. This apparatus is intended to be used only with the power
supply and/or charging cable provided by the manufacturer.
The following instructions may not apply to waterproof
devices. Refer to your device user manual or quick start
guide for more waterproof instruction if any.
• Do not use this apparatus near water.
• Do not expose this apparatus to dripping or splashing, and
ensure that no objects lled with liquids, such as vases, are
placed on the apparatus.
WARNING:
– TO REDUCE THE RISK OF FIRE OR ELECTRIC SHOCK, DO NOT
EXPOSE THIS APPARATUS TO RAIN OR MOISTURE.
CAUTION
RISK OF ELECTRIC SHOCK. DO NOT OPEN.
THIS SYMBOL ON THE PRODUCT MEANS THERE IS UNINSULATED,
DANGEROUS VOLTAGE WITHIN THE PRODUCT ENCLOSURE THAT
MAY PRESENT A RISK OF ELECTRICAL SHOCK.
THIS SYMBOL ON THE PRODUCT MEANS THERE ARE IMPORTANT
OPERATING AND MAINTENANCE INSTRUCTIONS IN THIS GUIDE.
CAUTION FCC AND IC STATEMENT FOR USERS
This device complies with part 15 of the FCC Rules. Operation
is subject to the following two conditions: (1) This device may
not cause harmful interference, and (2) this device must accept
any interference received, including interference that may cause
undesired operation.
CAN ICES(B)/NMB(B)
FCC SDOC SUPPLIER’S DECLARATION OF
CONFORMITY
HARMAN International hereby declares that this equipment is in
compliance with the FCC Part 15 Subpart B.
Federal Communication Commission
Interference Statement
This equipment has been tested and found to comply with the limits
for a Class B digital device, pursuant to Part 15 of the FCC Rules.
These limits are designed to provide reasonable protection against
harmful interference in a residential installation. This equipment
generates, uses and can radiate radio frequency energy and, if
not installed and used in accordance with the instructions, may
cause harmful interference to radio communications. However,
there is no guarantee that interference will not occur in a particular
installation. If this equipment does cause harmful interference to
radio or television reception, which can be determined by turning
the equipment off and on, the user is encouraged to try to correct
the interference by one or more of the following measures:
• Reorient or relocate the receiving antenna.
• Increase the separation between the equipment and receiver.
• Connect the equipment into an outlet on a circuit different
from that to which the receiver is connected.
• Consult the dealer or an experienced radio/TV technician
for help.
Caution:
– Changes or modications not expressly approved by HARMAN
could void the user’s authority to operate the equipment.
For Products That Transmit RF Energy:
(i) This device contains licence-exempt transmitter(s)/
receiver(s) that comply with Innovation, Science and
Economic Development Canada’s licence-exempt RSS(s).
Operation is subject to the following two conditions:
1. This device may not cause interference.
2. This device must accept any interference, including
interference that may cause undesired operation of the device.
33
www.jbl.com
English
(ii) Radiation Exposure statement
This equipment complies with FCC and IC RSS-102 radiation
exposure limits set forth for an uncontrolled environment.
For radio equipment operates in 5150-5850MHz
FCC and IC Caution:
High power radars are allocated as primary users of the 5.25 to
5.35 GHz and 5.65 to 5.85 GHz bands. These radar stations
can cause interference with and/or damage to LE LAN (Licence-
Exempt Local Area Network) devices. No conguration controls
are provided for this wireless equipment allowing any change in
the frequency of operations outside the FCC grant of authorization
for US operation according to Part 15.407 of the FCC rules.
IC Caution:
User should also be advised that:
1. The device for operation in the band 5150 - 5250 MHz is only
for indoor use to reduce the potential for harmful interference
to co-channel mobile satellite systems;
2. The maximum antenna gain permitted for devices in the bands
5250 - 5350 MHz and 5470 - 5725 MHz shall comply with the
e.i.r.p. limit: and
3. The maximum antenna gain permitted for devices in the
band 5725 - 5825 MHz shall comply with the e.i.r.p. limits
specied for point-to-point and non point-to-point operation
as appropriate.
Use Restriction Attention in European Union, operation is limited
to indoor use within the band 5150-5350 MHz.
Correct disposal of this product (Waste Electrical &
Electronic Equipment)
This symbol means the product must not be discarded as
household waste, and should be delivered to an appropriate
collection facility for recycling. Proper disposal and recycling helps
protect natural resources, human health and the environment.
For more information on disposal and recycling of this product,
contact your local municipality, disposal service, or the shop
where you bought this product.
This product is RoHS compliant.
This product is in compliance with Directive 2011/65/EU and UK
The Restriction of the Use of Certain Hazardous Substances in
Electrical and Electronic Equipment Regulations 2012, and its
amendments, on the restriction of the use of certain hazardous
substances in electrical and electronic equipment.
REACH
REACH (Regulation No 1907/2006) addresses the production
and use of chemical substances and their potential impacts
on human health and the environment. Article 33(1) of REACH
Regulation requires suppliers to inform the recipients if an
article contains more than 0.1 % (per weight per article) of any
substance(s) on the Substances of Very High Concern (SVHC)
Candidate List (‘REACH candidate list’). This product may contain
the substance “lead” (CAS-No. 7439-92-1) in a concentration of
more than 0.1% per weight.
At the time of release of this product, except for the lead
substance, no other substances of REACH candidate list are
contained in a concentration of more than 0.1% per weight in
this product.
Note:
– On June 27, 2018, lead was added to the REACH candidate list.
The inclusion of lead in the REACH candidate list does not mean
that lead-containing materials pose an immediate risk or results in a
restriction of permissibility of its use.
For devices with headphone jacks
WARNINGS/CAUTIONS
Do NOT use the headphones at a high volume for
any extended period.
- To avoid hearing damage, use your headphones at
a comfortable, moderate volume level.
- Turn the volume down on your device before placing
the headphones on your ears, then turn the volume
up gradually until you reach a comfortable listening
level.
For Products That Include Batteries
Instructions for Users on Removal, Recycling and Disposal
of Used Batteries
To remove the batteries from your equipment or remote control,
reverse the procedure described in the owner’s manual for
inserting batteries. For products with a built-in battery that lasts
for the lifetime of the product, removal may not be possible for
the user. In this case, recycling or recovery centers handle the
dismantling of the product and the removal of the battery. If, for
any reason, it becomes necessary to replace such a battery, this
procedure must be performed by authorized service centers. In
the European Union and other locations, it is illegal to dispose
of any battery with household trash. All batteries must be
disposed of in an environmentally sound manner. Contact your
local waste-management ofcials for information regarding the
environmentally sound collection, recycling and disposal of used
batteries.
WARNING:
– Danger of explosion if battery is incorrectly replaced. To reduce risk of
re, explosion or leakage of ammable liquid/gas, don’t disassemble,
crush, puncture, short external contacts, expose to temperature
above 60°C (140°F), sunshine or like, expose to extremely low air
pressure or dispose of in re or water. Replace only with specied
batteries. The symbol indicating ‘separate collection’ for all batteries
and accumulators shall be the crossed-out wheeled bin shown
below:

44
WARNING - For Products Contain Coin/Button
Cell Batteries
DO NOT INGEST BATTERY, CHEMICAL BURN HAZARD. This
product contains a coin/button cell battery. If the coin/button cell
battery is swallowed, it can cause severe internal burns in just
2 hours and can lead to death. Keep new and used batteries
away from children. If the battery compartment does not close
securely, stop using the product and keep it away from children.
If you think batteries might have been swallowed or placed inside
any part of the body, seek immediate medical attention.
For All Products with Wireless Operation:
HARMAN International hereby declares that this equipment
is in compliance with the essential requirements and other
relevant provisions of Directive 2014/53/EU and UK Radio
Equipment Regulations 2017. The declaration of conformity may
be consulted in the specs section of the product detail page,
accessible from www.jbl.com or in www.jbl.com/doc.

55
www.jbl.com
English
8. SPECIFICATIONS 14
9. TROUBLESHOOTING 15
10. COMPLIANCE 16
11. TRADEMARK 16
TABLE OF CONTENTS
IMPORTANT SAFETY INSTRUCTIONS 2
1. INTRODUCTION 6
2. WHAT’S IN THE BOX 6
3. PRODUCT OVERVIEW 7
3.1 Controls and user interfaces 7
3.2 Inputs and outputs 7
4. POWER ON 8
5. CONNECTIONS AND USE CASES 8
5.1 Music source connection 8
5.2 Connection based on your musician type 9
6. USING YOUR BANDBOX SOLO 10
6.1 Guitar presets 10
6.2 STEM AI 10
6.3 Menu operation 10
6.4 Connecting to a louder speaker 12
6.5 Recording via USB-C 12
7. ADVANCED USAGE 13
7.1 JBL ONE app 13
7.2 Features available in app 13
7.3 Software update 14

66
2. WHAT’S IN THE BOX
1 2
1) Main unit
2) Quick Start Guide, Safety Sheet, Warranty Card
1. INTRODUCTION
Congratulations on your purchase! This manual includes
information about the JBL BandBox Solo compact AI-powered
practice amp and speaker. We encourage you to take a few
minutes to read this manual, which describes the product and
includes step-by-step instructions to help you to set up and get
started. Read and understand all the safety instructions before
using your product.
If you have any questions about this product, its installation or
operation, please contact your retailer or customer service, or
visit us at www.jbl.com.
77
www.jbl.com
English
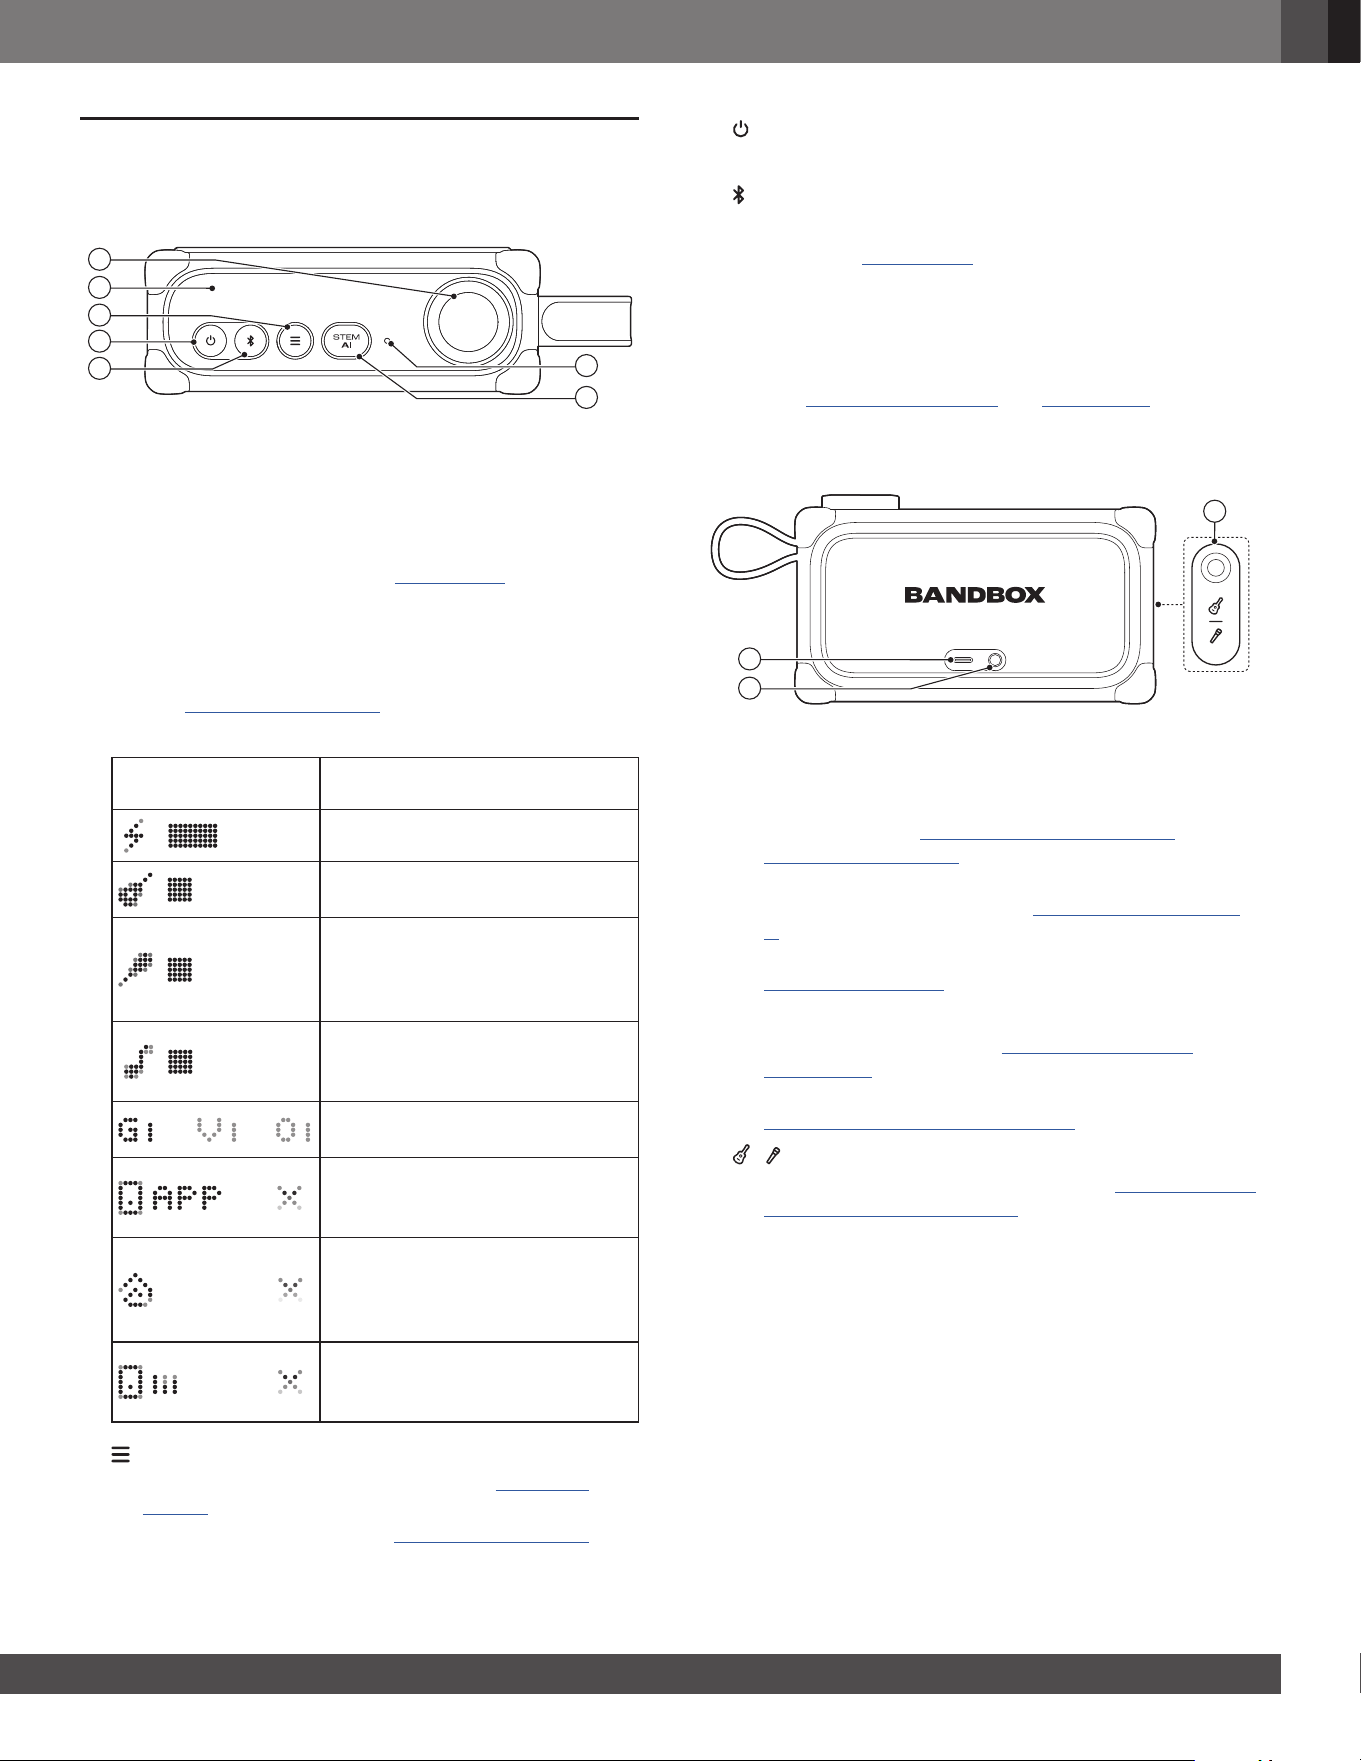
3. PRODUCT OVERVIEW
3.1 Controls and user interfaces
7
6
4
2
1
3
5
1) Control knob
• Hold to access volume control from any screen.
• On volume control screen, press to switch between
music/guitar/microphone volume controls, and rotate to
adjust volume.
• During stem separation (see 6.2 STEM AI):
• Press the knob to mute/unmute a stem.
• Hold and rotate to adjust the stem volume.
• In menu navigation, rotate to switch between menu
options; press to enter a sub-menu or conrm an option
(see 6.3.1 Menu navigation).
2) Display panel
Examples Explanation
Battery status
Guitar volume control (guitar
connected as input source)
Microphone volume control
(built-in microphone or external
microphone connected as input
source)
Music (Bluetooth or USB-C music
as input source), metronome, or
looper volume control
Stem volume controls (G: Guitar;
V: Vocal; O: Others)
App control is active. Press the
control knob to resume device
control.
You are in an Auracast party.
Press the control knob to quit
Auracast and resume device
control.
Stem settings changed in app.
Press the control knob to resume
device control.
3)
• Press to access/quit guitar presets (see 6.1 Guitar
presets).
• Hold to access a menu (see 6.3.1 Menu navigation).
4)
• Turn the power on or off.
5)
• Press to enter Bluetooth pairing mode.
6) STEM AI (see 6.2 STEM AI)
• Press to access/quit stem separation.
• Hold to invert STEM AI settings.
7) Built-in microphone
• Works with headphones connected to the 3.5 mm port
(see 5.2.1 Singing guitarist and 5.2.3 Singer).
3.2 Inputs and outputs
8
10
9
8) USB-C port (cable not included)
• Charge in: Charge your BandBox Solo.
• Audio in: Play music from your mobile phone, tablet,
or computer (see 5.1 Music source connection -
5.1.2 USB connection).
• Audio out: Record audio to your UAC (Universal Audio
Class)-compatible device (see 6.5 Recording via USB-
C).
• Software update (available in the JBL ONE app) (see
7.3 Software update)
9) Headphones port (1/8" or 3.5 mm TRS output)
• Connect headphones (see 5.2.1 Singing guitarist and
5.2.3 Singer).
• Connect to a mixer or PA system for louder sound (see
6.4 Connecting to a louder speaker).
10)
|
(1/4" or 6.35 mm TRS input)
• Connect to a microphone or guitar (see 5.2 Connection
based on your musician type).
88
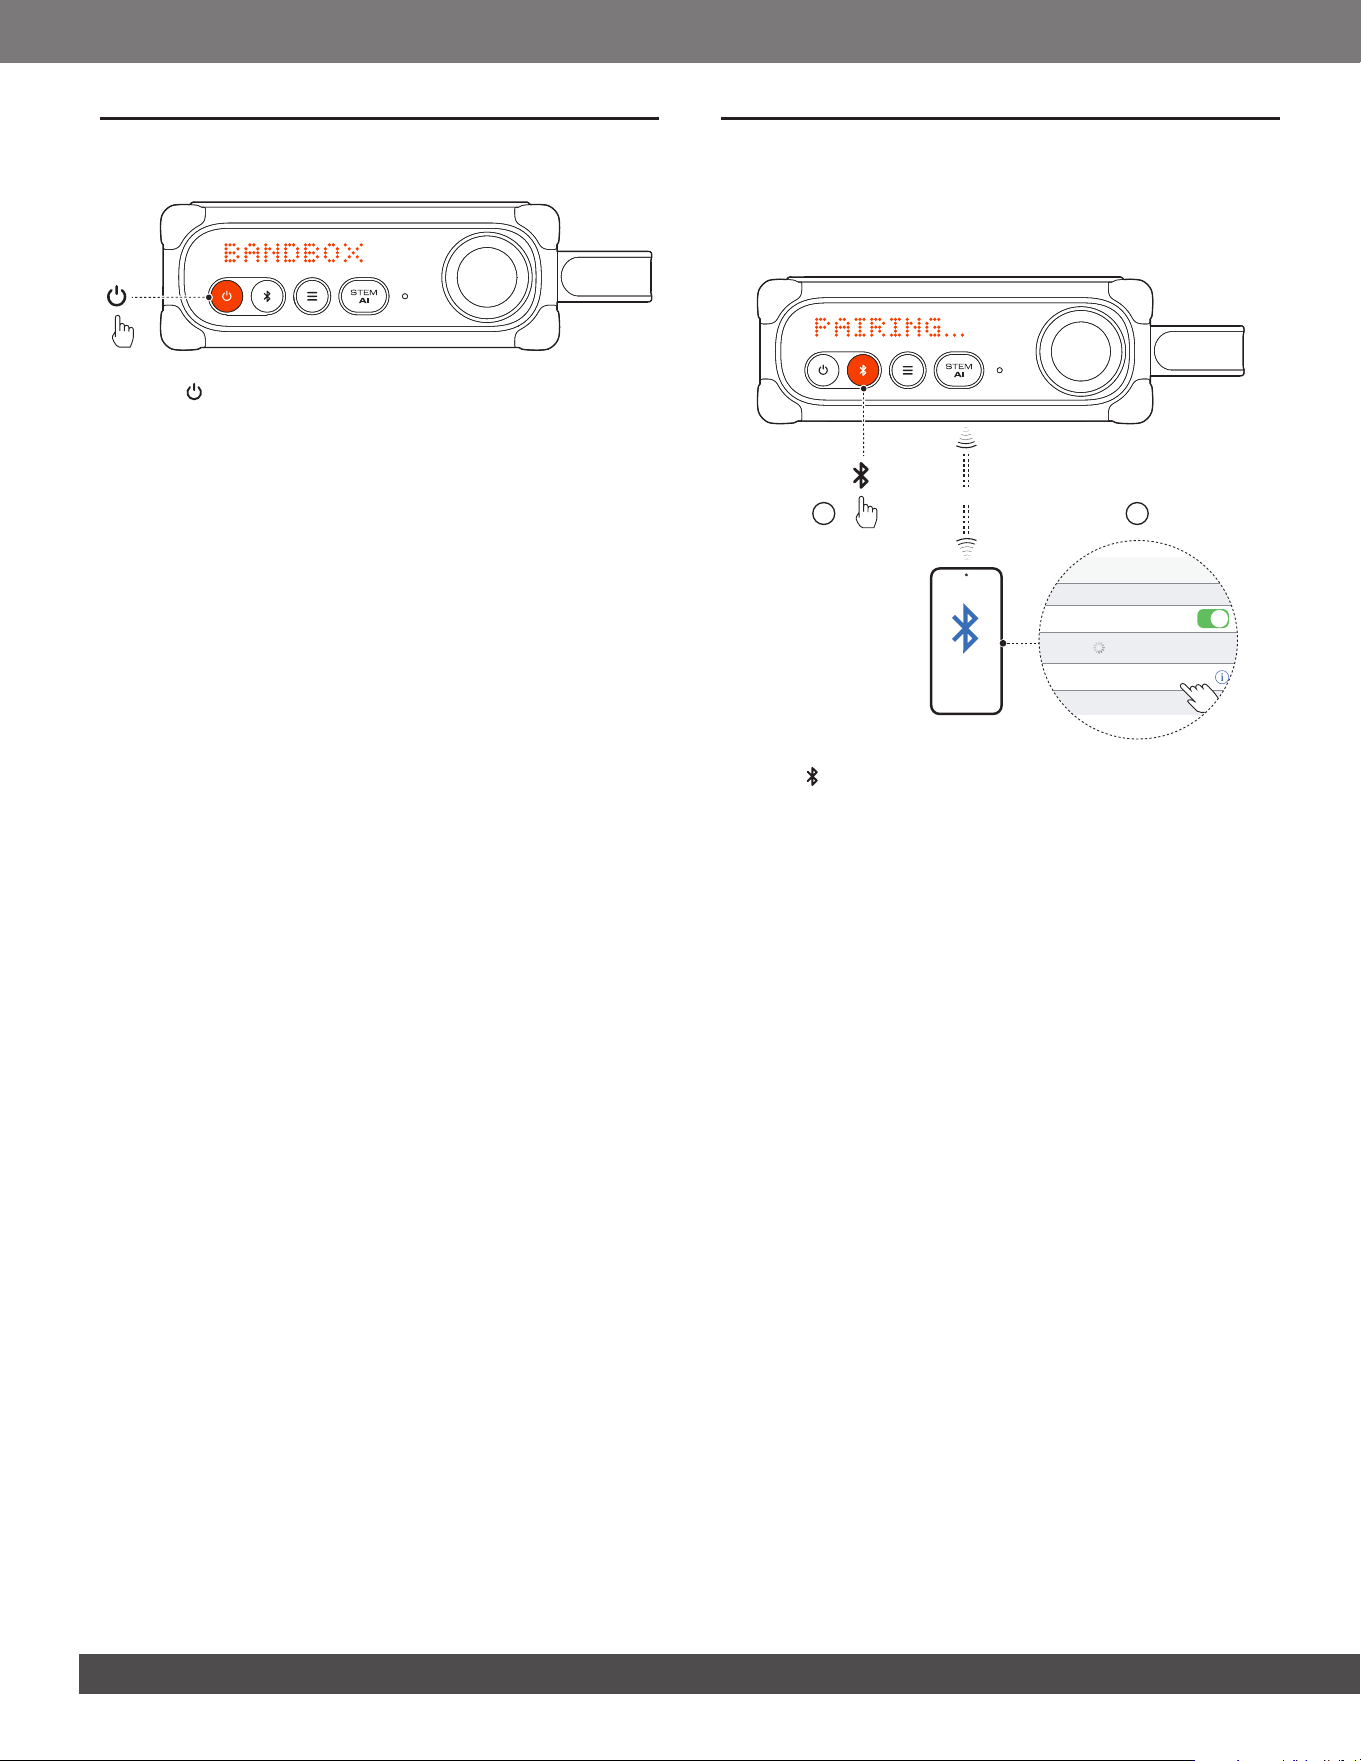
4. POWER ON
• Press to power on.
→ “BANDBOX” appears after 2 to 3 seconds.
Tips:
– Fully charge BandBox Solo before rst-time use to prolong the
lifespan of the built-in battery. Use a USB-C charging cable (not
included).
– BandBox Solo switches off automatically after 20 minutes of
inactivity (when no guitar or microphone is plugged in).
5. CONNECTIONS AND USE CASES
5.1 Music source connection
5.1.1 Bluetooth connection
ON
21
<10 m (33 ft)
Settings Bluetooth
Bluetooth
DEVICES
JBL BandBox Solo
Now Discoverable
Connected
1. Press on BandBox Solo to enter Bluetooth pairing mode.
• For rst time use, BandBox Solo enters Bluetooth pairing
mode directly.
• Choose JBL BandBox Solo on your Bluetooth device,
such as a mobile phone or tablet, to connect.
2. Once successfully connected, you can stream audio from
your Bluetooth device to BandBox Solo.
Notes:
– BandBox Solo supports multi-point connection. You can pair a
second Bluetooth device without disconnecting the rst one.
– Enter “0000” if a PIN code is requested for connection to a
Bluetooth device.
– Bluetooth performance can be affected by the distance between
BandBox Solo and your Bluetooth device and the environment of
operation.
To terminate the Bluetooth-enabled device:
• Turn off BandBox Solo, or
• Disable Bluetooth on your device.
To reconnect the Bluetooth enabled device:
• When you turn on BandBox Solo next time, it tries to
reconnect the last connected device automatically.
• If not, manually select JBL BandBox Solo on your
Bluetooth device to connect.
99
www.jbl.com
English
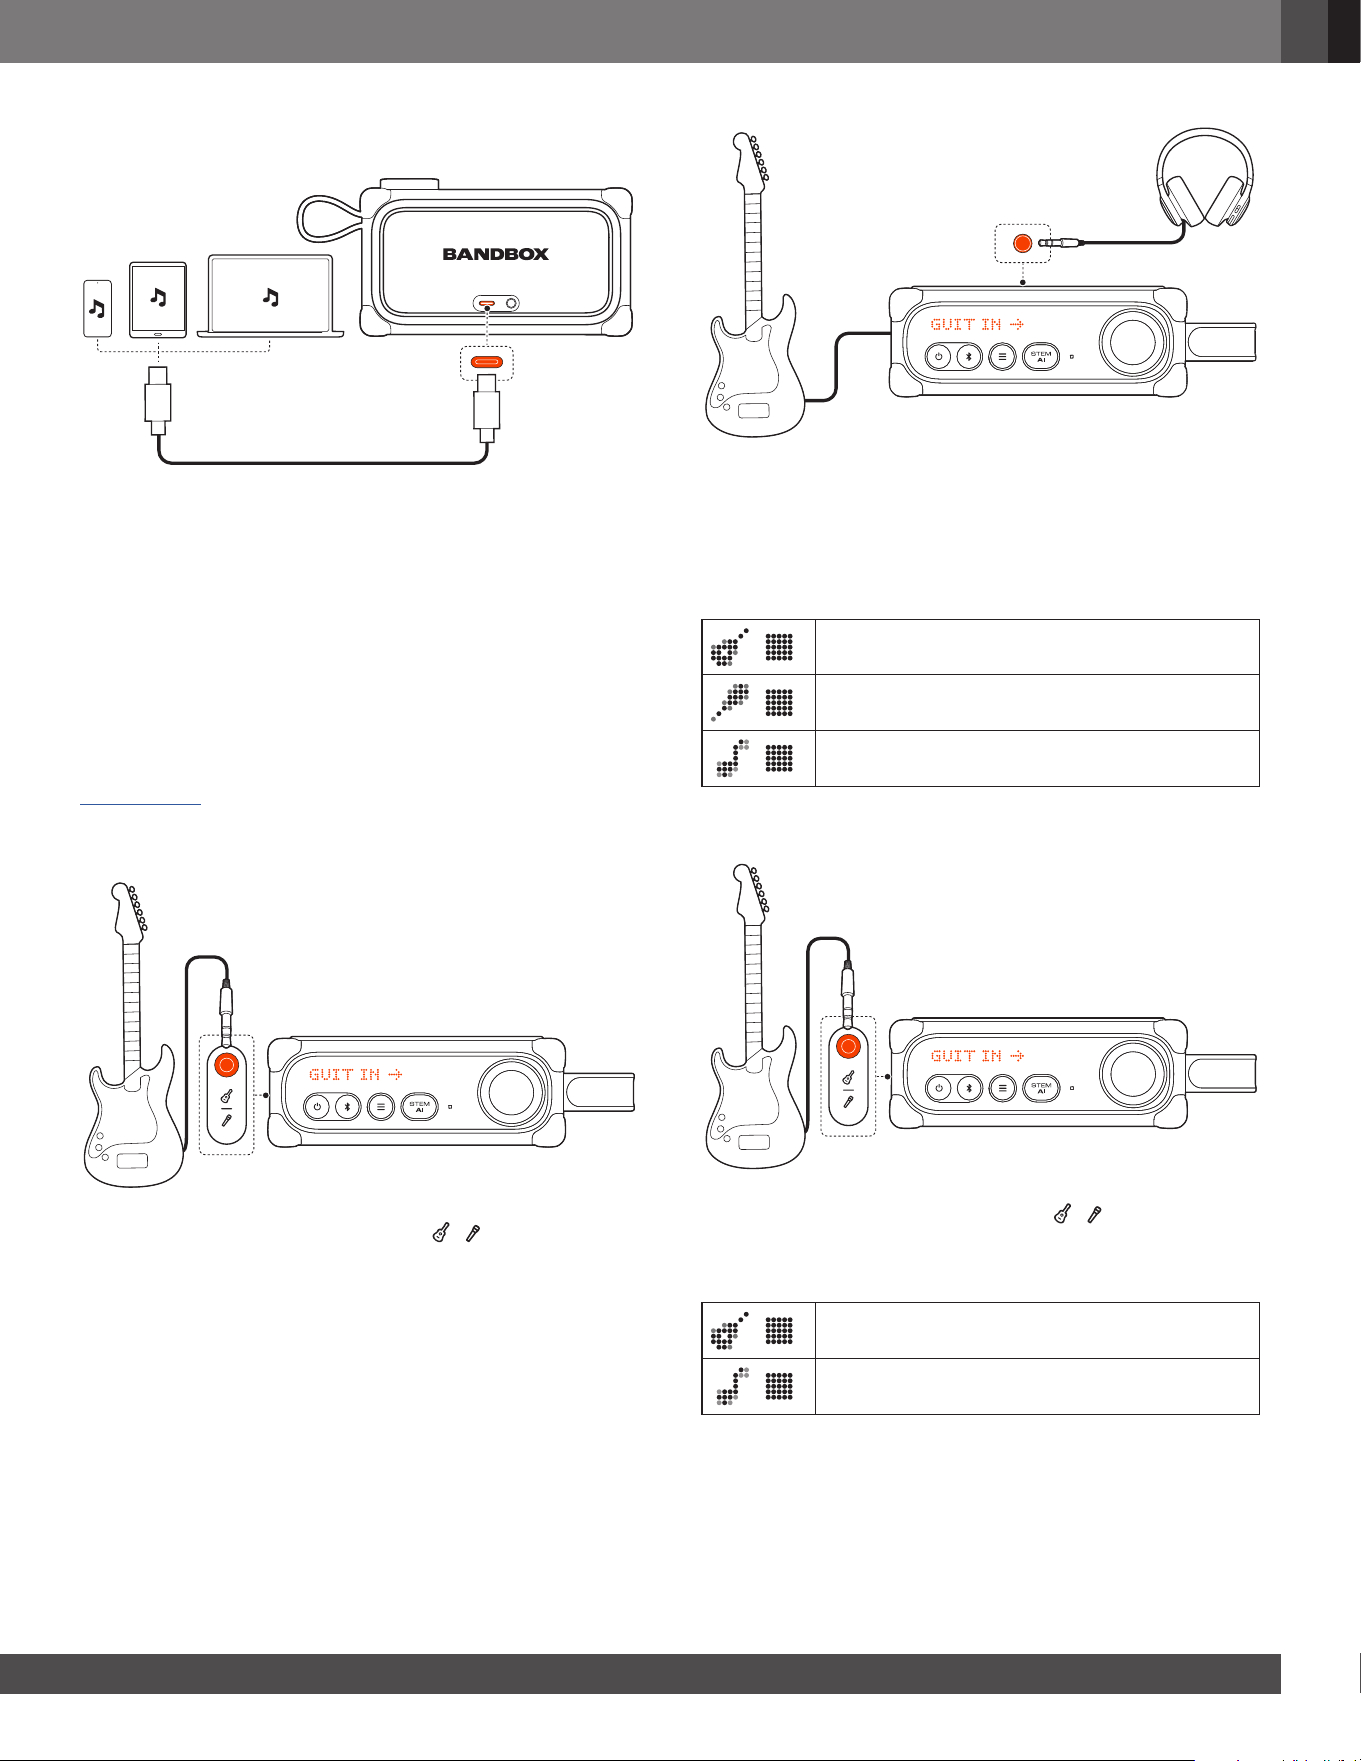
5.1.2 USB connection
1. Use a USB-C cable that supports data transfer (not included)
to connect your mobile phone, tablet, or computer to
BandBox Solo.
2. Stream audio to BandBox Solo.
5.2 Connection based on your musician type
Connect your guitar or microphone to BandBox Solo according
to the type of musician you are.
By default, all controls congured for a singing guitarist are
available for rst time use. To customize your settings for more
convenient and precise control, select your musician type (see
Musician type).
5.2.1 Singing guitarist
• Connect your guitar to the 6.35 mm
|
input port.
• To activate the built-in microphone, connect your
headphones to the 3.5 mm headphones port.
→ Now you can sing and play the guitar for silent practice
or live webcast.
Volume controls available:
Guitar volume
Microphone volume (built-in microphone)
Music volume (Bluetooth or USB-C music)
5.2.2 Guitarist
• Connect your guitar to the 6.35 mm
|
input port.
→ Now you can practice with your guitar.
Volume controls available:
Guitar volume
Music volume (Bluetooth or USB-C music)
1010
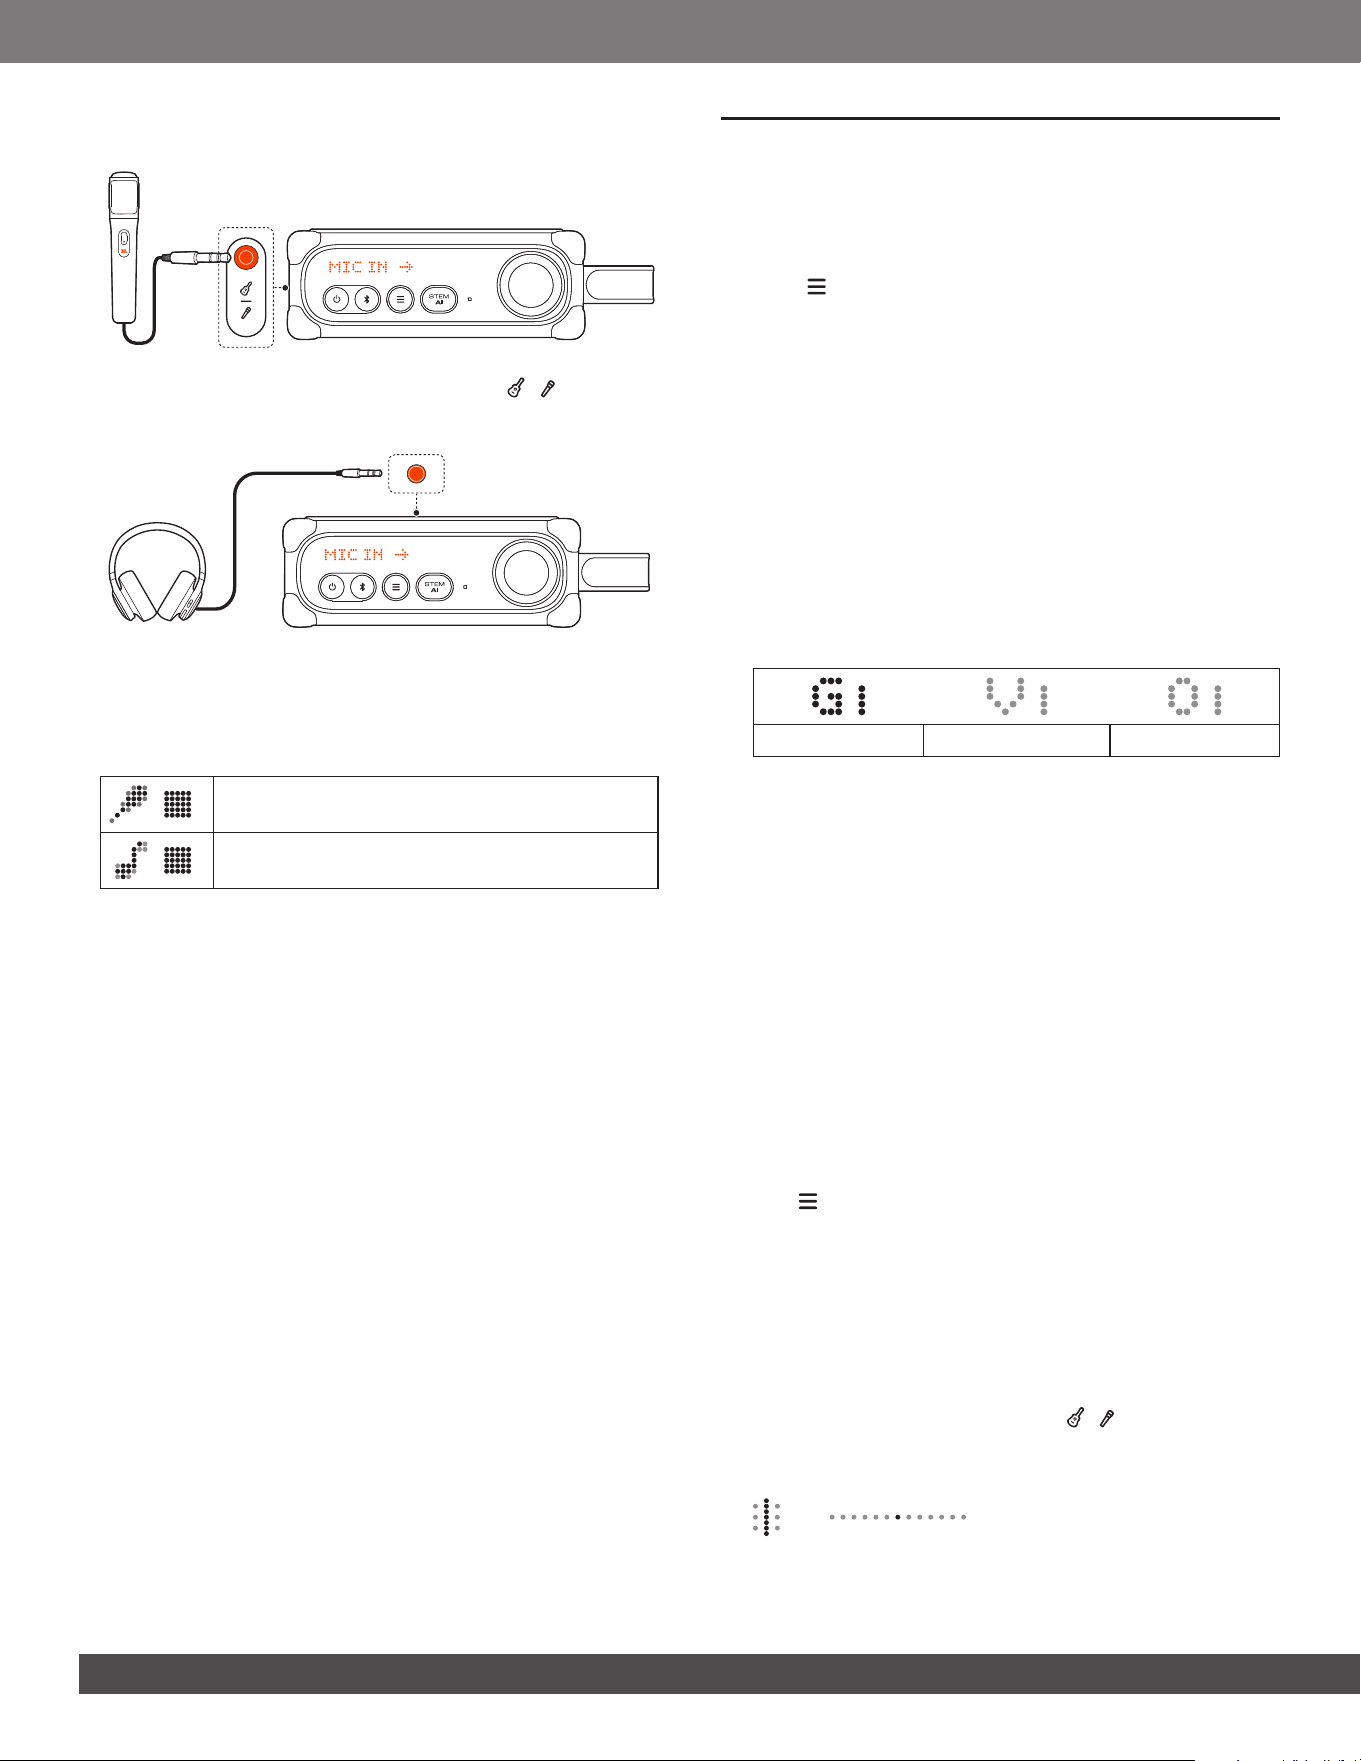
5.2.3 Singer
• Connect your microphone to the 6.35 mm
|
input port.
→ Now you can sing through BandBox Solo.
• To use the built-in microphone instead, disconnect your
microphone, then connect your headphones to the 3.5 mm
headphones port.
Volume controls available:
Microphone volume (external or built-in
microphone)
Music volume (Bluetooth or USB-C music)
6. USING YOUR BandBox Solo
6.1 Guitar presets
BandBox Solo offers a wide range of built-in guitar preset
effects to enhance your practice.
1. Press to access on-product guitar preset effects.
2. Rotate the control knob to switch between the effects.
Tip:
– Explore the JBL ONE app for more guitar preset effects and
effect chain settings.
6.2 STEM AI
BandBox Solo supports real-time separation of streamed audio
into individual stems. With this feature, you can separate or
mute stems you want to play over while practicing.
1. Stream audio from the music source connected via Bluetooth
or USB-C.
2. Press STEM AI to access stem separation.
Guitar stem Vocal stem Others stem
3. Rotate the control knob to select a stem.
4. Press the control knob to mute or unmute a stem.
• To invert STEM AI settings:
While practicing, you can mute every stem except guitar to
learn the part.
Once you are ready to play over, hold STEM AI to instantly
mute only the guitar and play along with the rest of the
track.
Tip:
– You can hold and rotate the control knob to adjust stem volume.
– Discover more stem separation options in the JBL ONE app,
including drum separation and karaoke mode.
6.3 Menu operation
6.3.1 Menu navigation
1. Hold to access a menu.
2. Rotate the control knob to select a function.
3. Press the control knob to access features or enter a
submenu.
6.3.2 Tuner
You can tune your guitar through the built-in tuner of
BandBox Solo directly.
1. Connect your guitar to the 6.35 mm | input port.
2. Navigate to “TUNER”, then press the control knob to enter
guitar tuning.
1111
www.jbl.com
English
3. Pluck the string you want to tune.
• For manual tuning (optional), rotate the control knob to select
the string you want to tune.
→ When the string is in tune:
→ The center dot lights up.
→ The tuning completion screen appears.
→ When the string is sharp:
→ A dot to the left of center lights up. Loosen the string
to lower the pitch.
→ When the string is at:
→ A dot to the right of center lights up. Tighten the
string to raise the pitch.
4. Repeat the steps to tune the other strings.
Tip:
– Explore the JBL ONE app for more tuning options, such as
instrument type, tuning customization, and chromatic tuner.
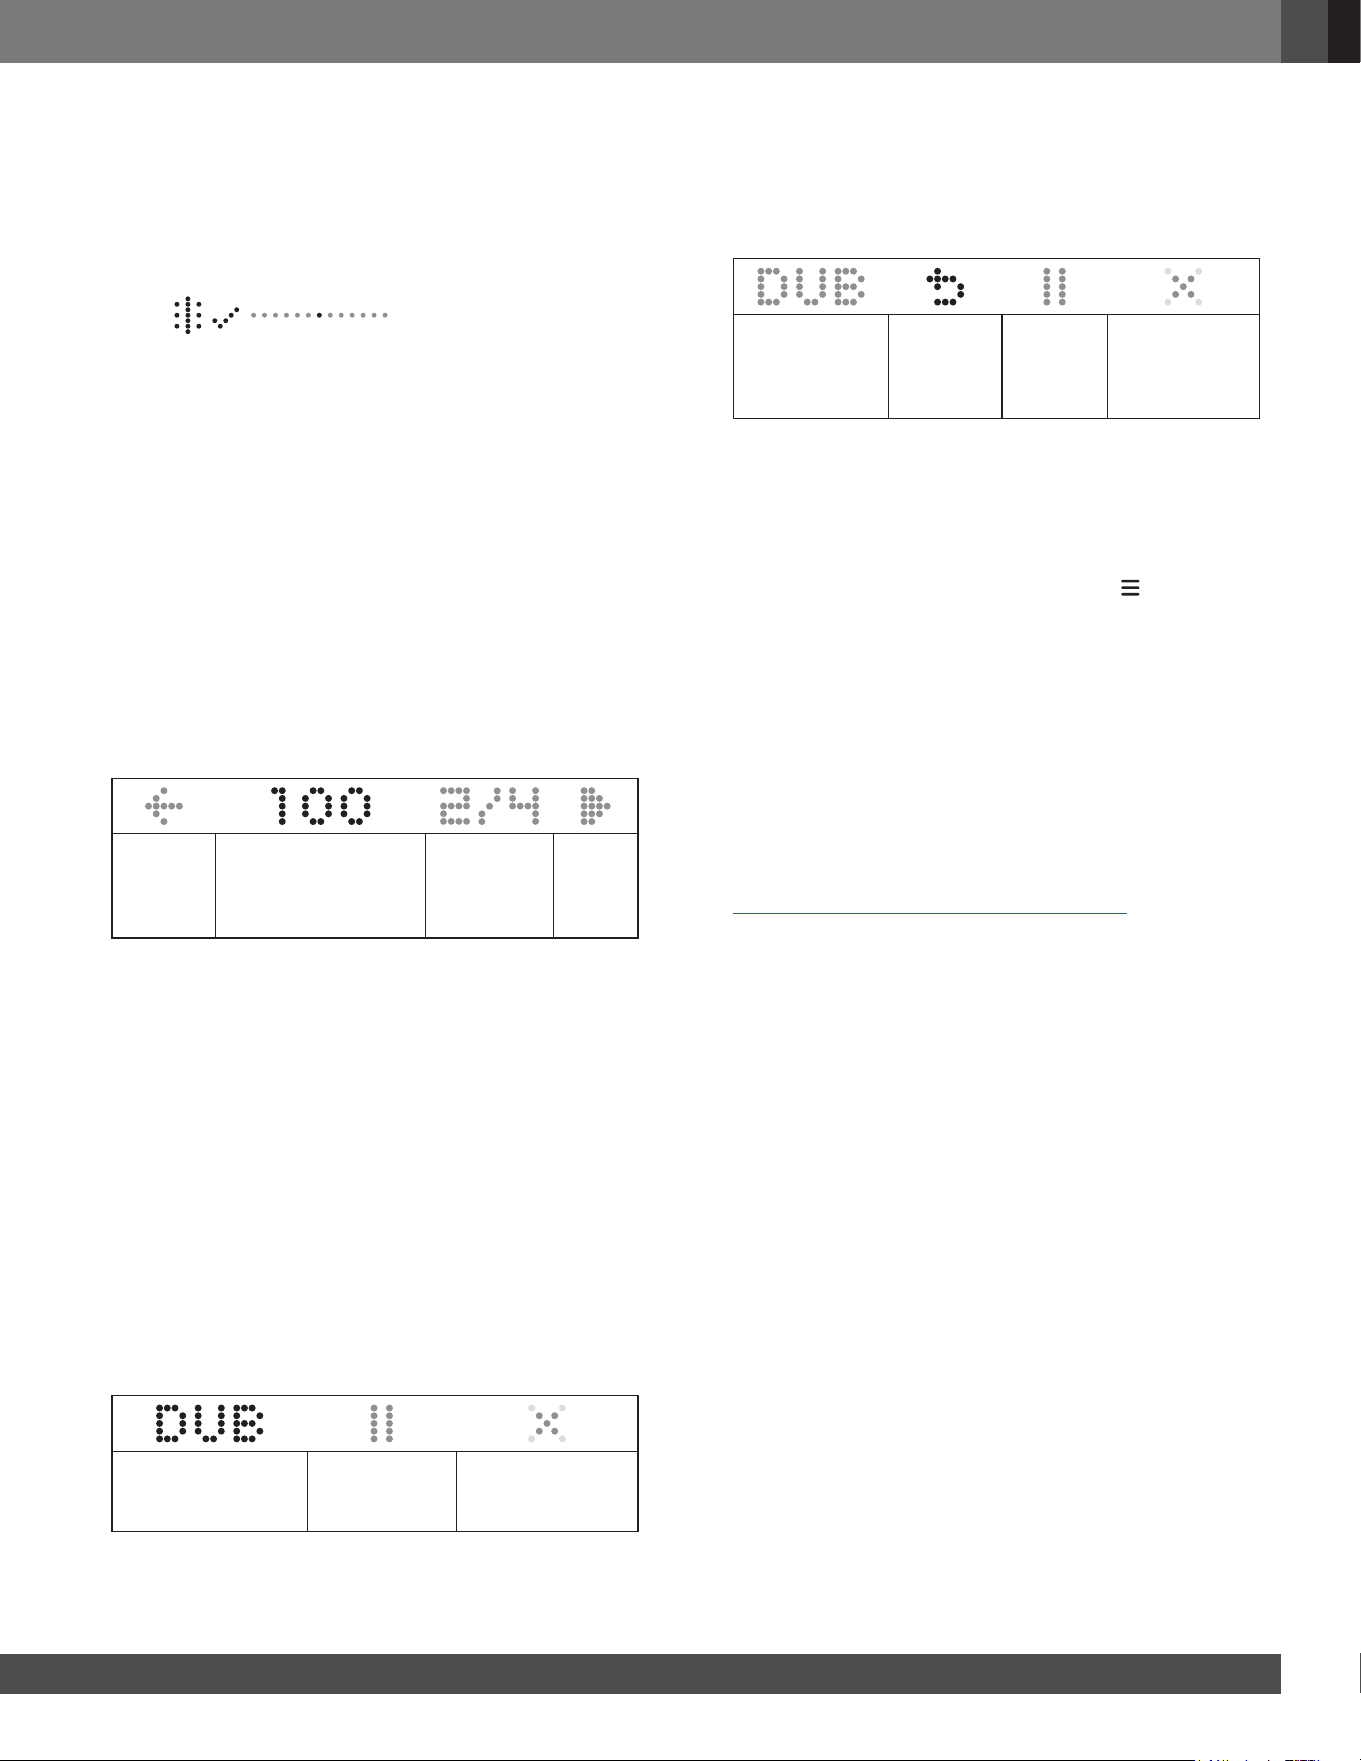
6.3.3 Metronome
BandBox Solo includes a built-in metronome to help you
maintain an established tempo while practicing.
1. Navigate to “METRONOME” to enter metronome setup.
Return to
the upper
level.
Tempo, ranging
between 30 and
240 BPM (Beats Per
Minute)
Time
signature
Play
button
2. Set your preferred tempo and time signature.
3. Navigate to the play button to play the metronome.
4. Press the control knob to stop playback.
• To control the metronome volume, hold the control knob to
access volume controls.
6.3.4 Looper
The built-in 60-second digital looper of BandBox Solo allows
you to record and overdub guitar phrases in real time.
1. Navigate to “LOOPER” to access the feature.
2. With your guitar or microphone ready, press the control knob
to start recording the rst layer of a loop.
3. Depending on the loop length you want to record (up to
60 seconds), press the control knob again to stop recording
and the recorded loop will play repeatedly.
→ The overdub screen appears.
Record another
layer (overdub) onto
the recorded loop.
Pause or
resume loop
playback.
Clear the recorded
loop and reset the
looper.
4. Navigate to “DUB” to record your overdub layer.
→ The overdub process starts after a countdown.
→ When the overdub ends, the recorded loop starts to
play repeatedly, and the overdub screen with an undo
button appears.
Continue
overdubbing
onto the
recorded loop.
Discard
the latest
overdub
layer.
Pause or
resume
loop
playback.
Clear the
recorded loop
and reset the
looper.
• If necessary, repeat step 4 to overdub more layers onto the
loop.
5. Start playing with your creation.
Tips:
– Explore the JBL ONE app for more looper options.
– As long as there is a recorded loop, you can hold to return to
the overdub screen.
6.3.5 Settings
Brightness
Navigate to “BRIGHTNESS” to adjust the brightness level.
Musician type
Navigate to “MUSICIAN TYPE” to select “SINGING
GUITARIST” (default), “GUITARIST”, or “SINGER”.
→ The available volume controls and default inputs adjust
automatically based on the selected musician type (see
5.2 Connection based on your musician type).
Version
Navigate to “VERSION” to check the current software version
of your BandBox.
Factory reset
Navigate to “FACTORY RESET” to restore the factory settings.
Back
Navigate to “BACK” to return to the upper-level menu.
1212
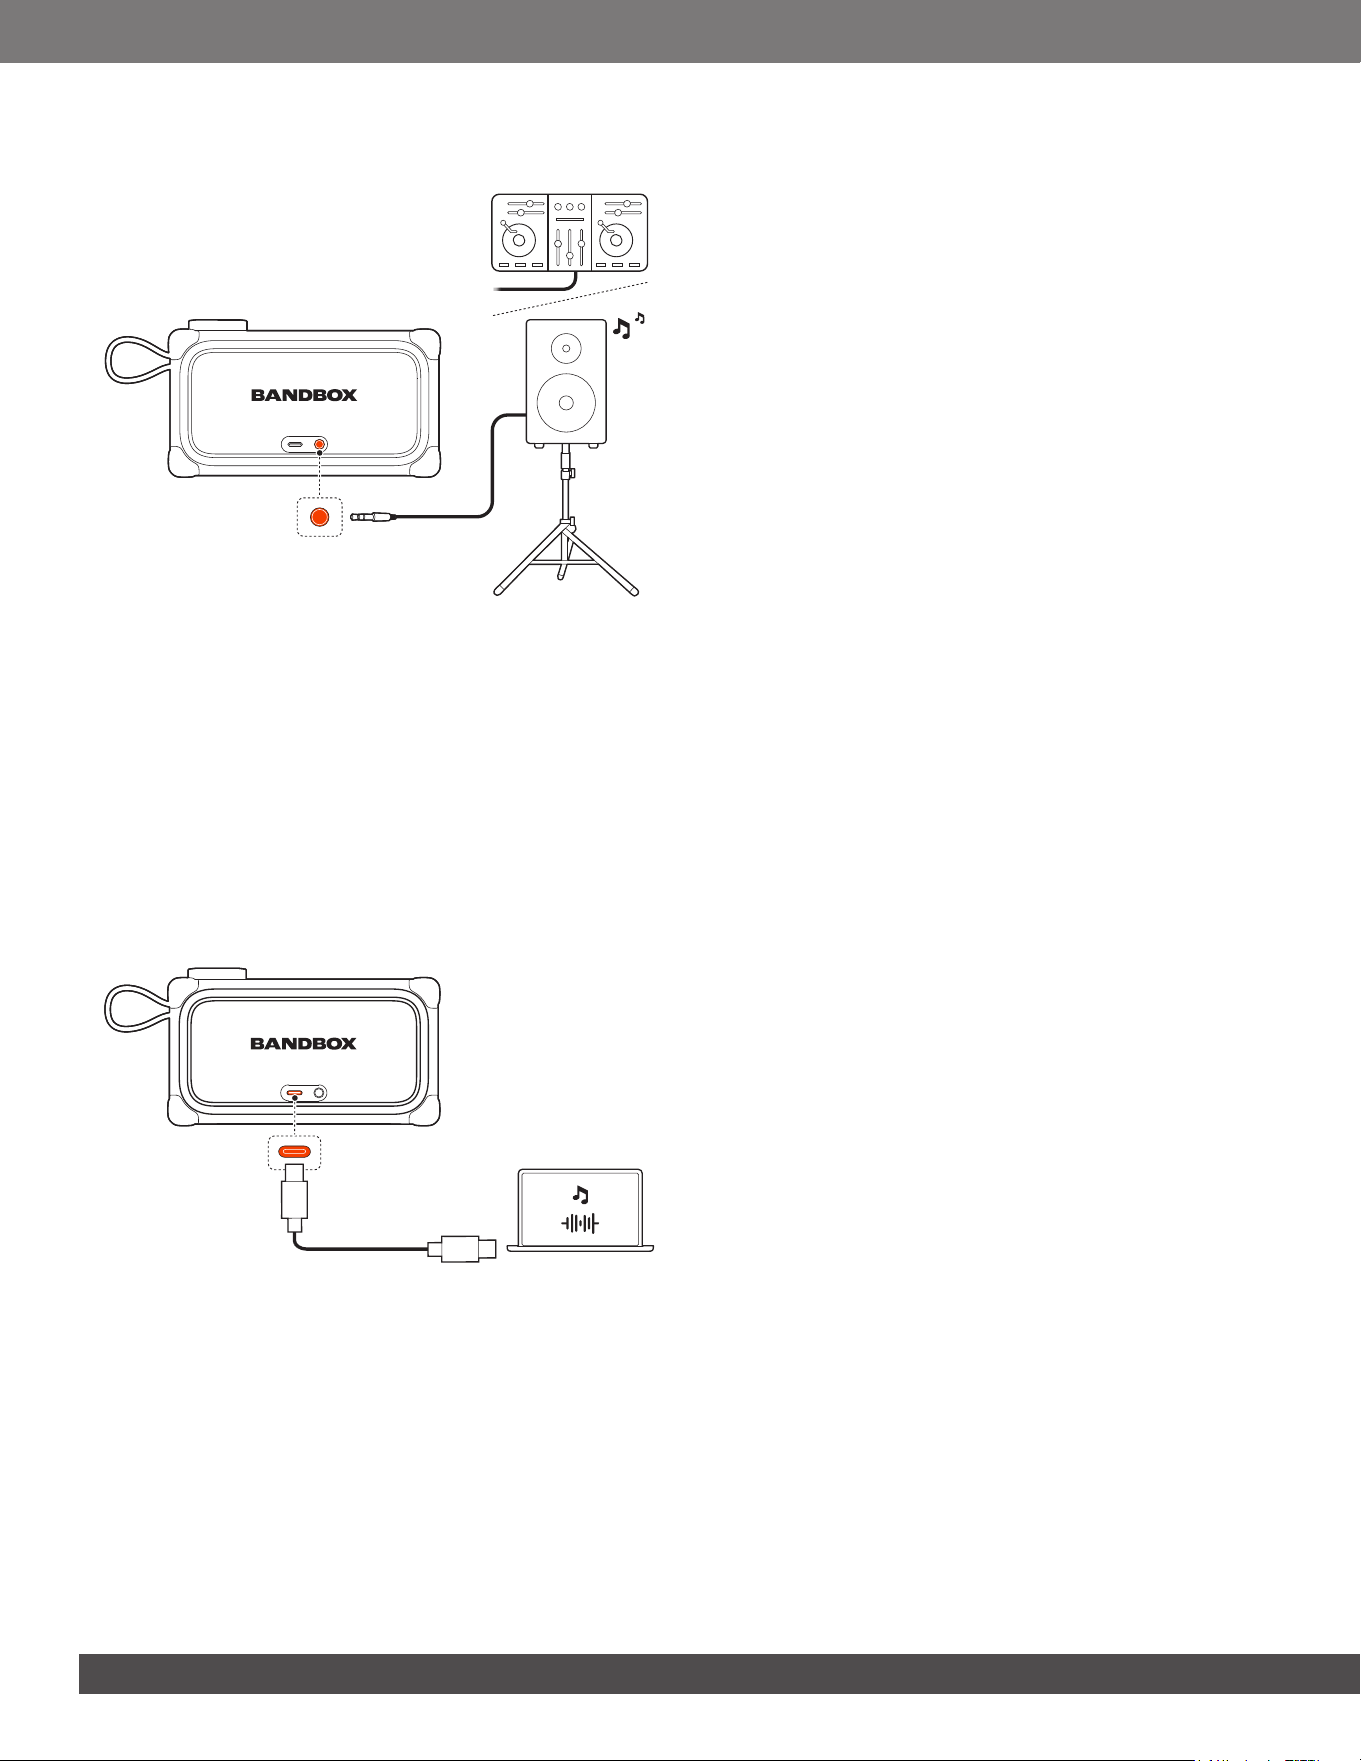
6.4 Connecting to a louder speaker
For louder sound, you can route audio from the headphones
port on your BandBox Solo to a mixer or PA system (cable not
included).
• To connect to a pair of mono, unbalanced line-level inputs,
use a 3.5 mm (1/8") TRS (stereo) to dual 6.35 mm (1/4") TS
(mono) Y-splitter cable.
• To connect to a single stereo TRS input, use a standard
3.5 mm (1/8") TRS-to-TRS cable.
• To connect to balanced XLR inputs, insert a DI (Direct Input)
box between BandBox Solo and the mixer/PA system.
6.5 Recording via USB-C
1. Use a USB-C cable that supports data transfer (not included)
to connect your UAC-compatible device to BandBox Solo.
→ BandBox Solo can work as an audio interface.
2. Once you have a DAW (Digital Audio Workstation) app
installed on your device, you can record your sound directly
from BandBox Solo to your DAW app.
1313
www.jbl.com
English
7. ADVANCED USAGE
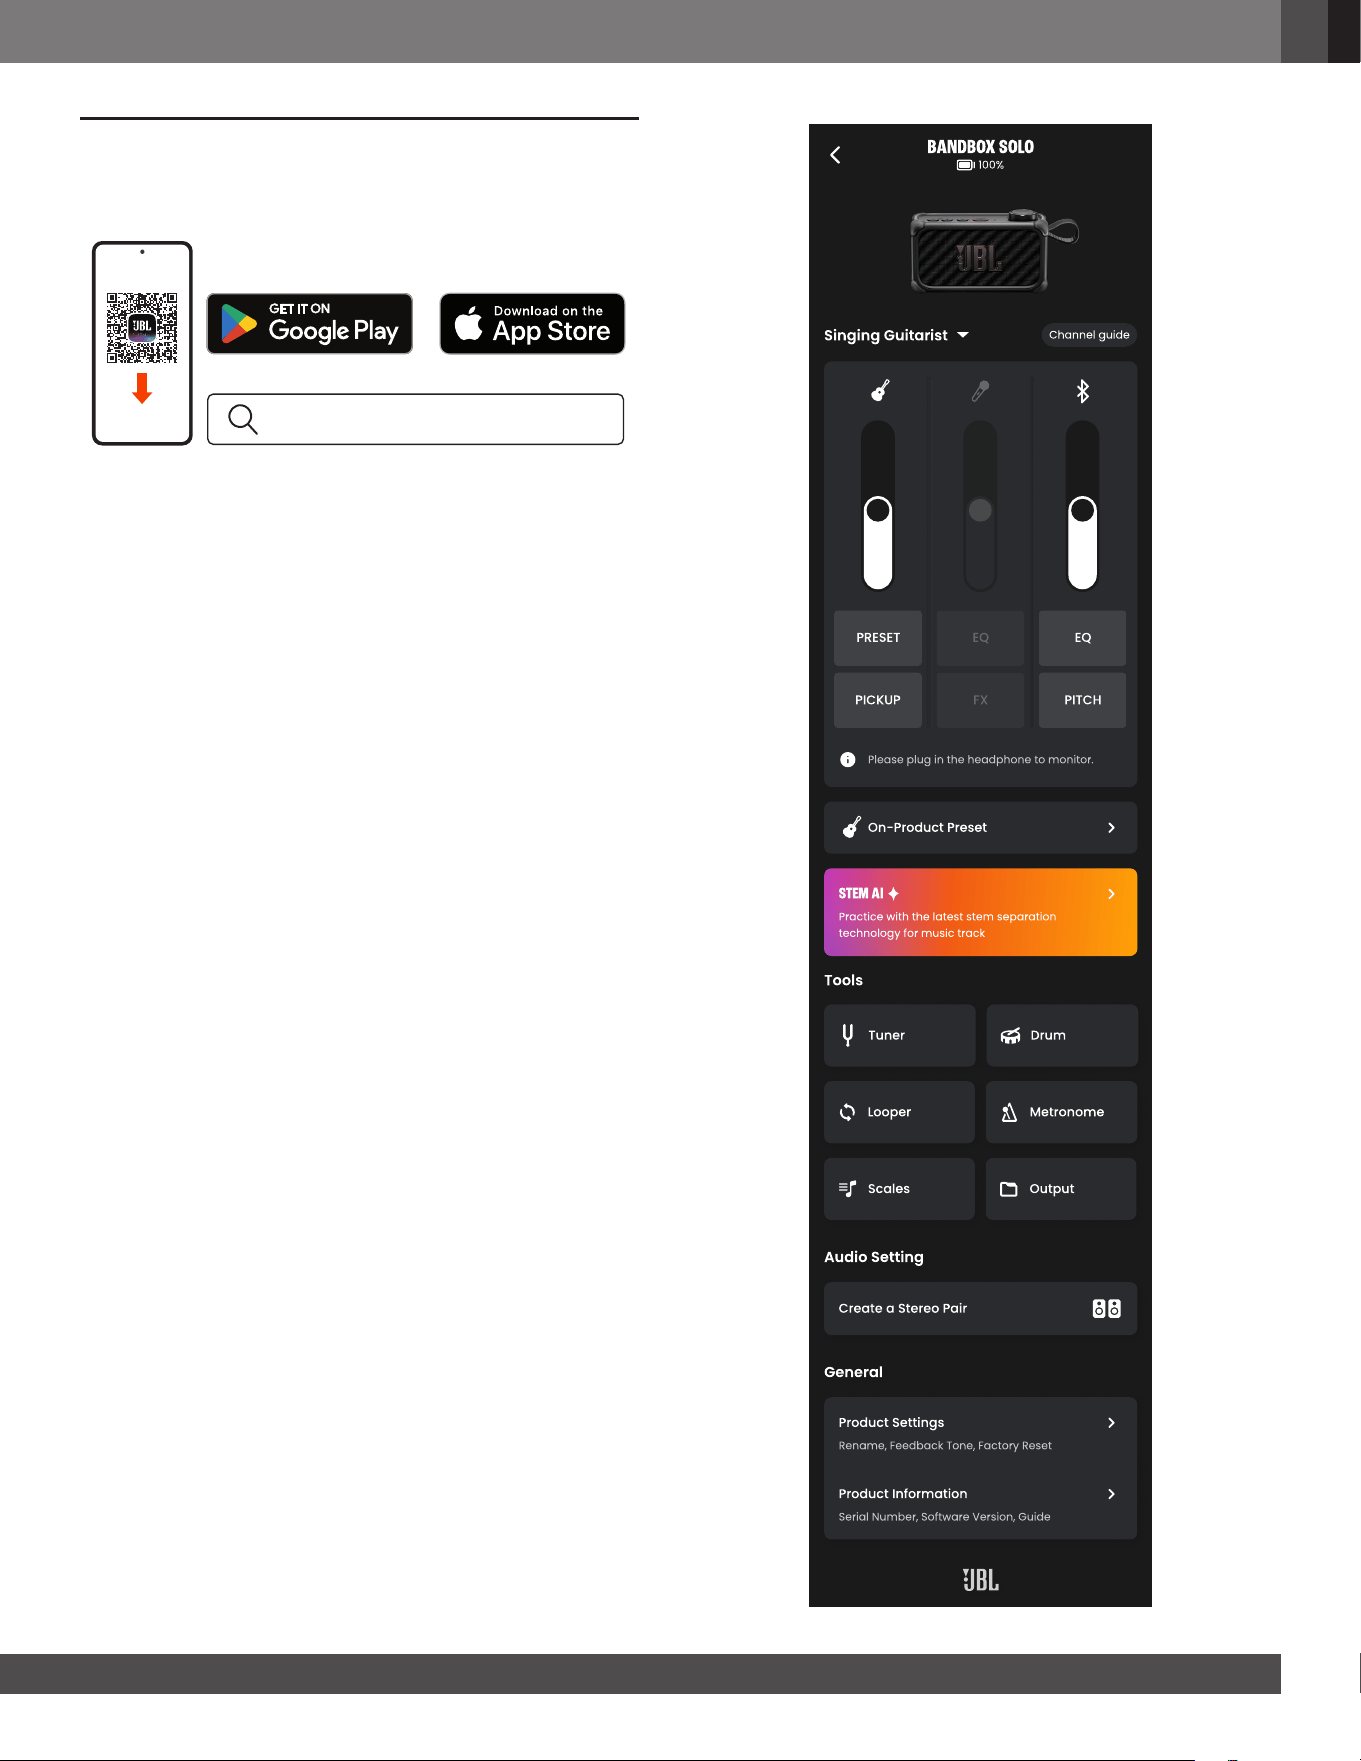
7.1 JBL ONE app
JBL ONE
Download and install the JBL ONE app to get more from the
product.
7.2 Features available in app
In addition to the features on BandBox Solo, the JBL ONE app
provides more additional features, such as:
• Renaming your BandBox
• Customizing on-product presets
• More guitar presets and effect chain settings
• EQ settings
• More precise stem separation (including drum separation)
• Tuner with various tuning modes plus chromatic tuner
• More precise looper
• Exporting your sound to your mobile device or ash drive
• Auracast party
• Updating product software
Explore the app for more detailed information and operations.
Note:
– App screens are subject to change without notice.
Bandbox solo
100%
Singing Guitarist
Channel guide
PRESET
PICKUP
EQ
FX
EQ
PITCH
Please plug in the headphone to monitor.
On-Product Preset
stem AI
Practice bith the latest stem separation
technology for music track
Tools
Tuner Drum
Looper Metronome
Scales Output
Audio Setting
Create a Stereo Pair
General
Product Settings
Rename, Feedback Tone, Factory Reset
Product +nÅorution
Serial Number, Software Version, Guide
1414
8. SPECIFICATIONS
• Transducers: 1 x 2.25 inch full range
• Output power: 18 W RMS (IEC60268, < 1% THD+N)
• Headphone output: Max 1 Vrms, supporting 16 ohm and
32 ohm impedance headphones
• Power input: 5 V / 3 A (max)
• Frequency response: 73 Hz – 20 kHz (-6 dB)
• Signal-to-noise ratio: > 80 dB
• Battery type: Li-ion 17 Wh (equivalent to 3.6 V/ 4722 mAh)
• Battery charge time: 3.5 hours (speaker off mode)
• Music play time: Up to 6 hours (varies by volume level and
audio content)
• UAC: UAC audio format supporting PCM, 48 K, 24 bit with
2 channels
• Bluetooth
®
version: 5.4
• Bluetooth
®
prole: A2DP V1.4, AVRCP V1.6
• Bluetooth
®
transmitter frequency range:
2.4 GHz – 2.4835 GHz
• Bluetooth
®
transmitter power: ≤ 13 dBm (EIRP)
• Bluetooth
®
transmitter modulation:
GFSK, π/4 DQPSK, 8DPSK
• Input sensitivity:
• Mic-In: 20 mV rms
• Guitar-In: 100 mV rms
• Bluetooth/USB input: -9 dBFS
• Product dimensions (W x H x D):
150 x 87 x 55 mm / 5.91" x 3.43" x 2.17"
• Net weight: 0.53 kg / 1.17 lbs
• Packaging dimensions (W x H x D):
211 x 108 x 78 mm / 8.31" x 4.25" x 3.07"
• Gross weight: 0.78 kg / 1.72 lbs
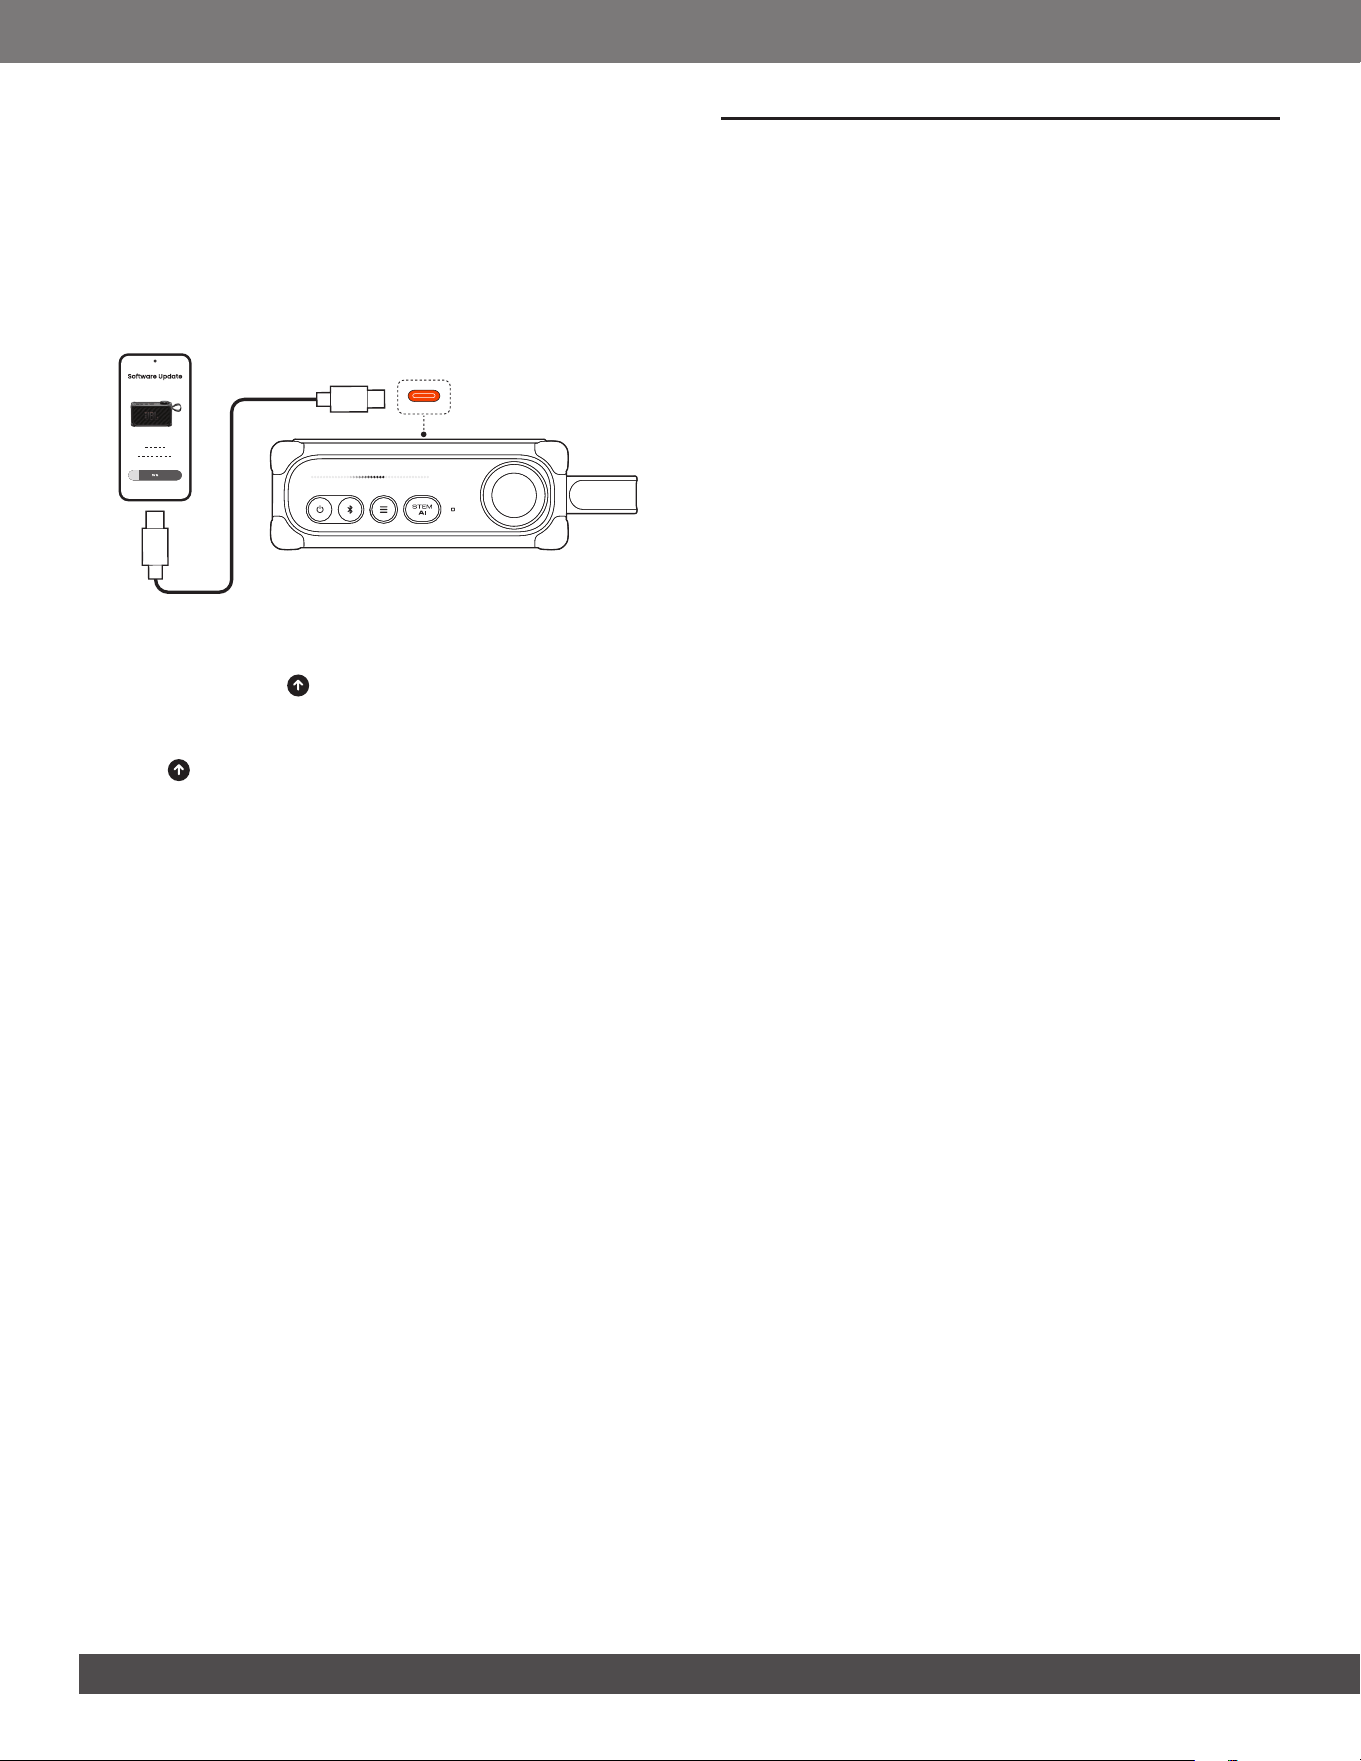
7.3 Software update
Notes:
– Ensure that your mobile phone to be used for software update has
a USB-C port.
– Ensure to use a USB-C to USB-C cable that supports a data
transfer rate of at least 480 Mbps. Note that Lightning cables are
not compatible.
1. In the JBL ONE app, navigate to “Product Information” ->
“Product Software” to check for any available new software.
→ You will see a if there is a new software version
available.
2. Ensure that your BandBox Solo has at least 50% battery.
3. Tap in the JBL ONE app, then tap “UPDATE”.
→ You will see a reminder asking you to connect your
mobile phone to BandBox Solo.
→ Connect your mobile phone to BandBox Solo using a
USB-C to USB-C cable (not included).
4. Tap “CONTINUE” in the JBL ONE app to start the updating
process.
→ BandBox Solo will reboot during new software
installation.

1515
www.jbl.com
English
• Note that Lightning cables are not compatible. If you try,
JBL ONE app will display a prompt with a web link. In this
case, follow these steps:
1) Option A: Email or message (e.g., via WhatsApp) the link
to your computer, then download the le.
Option B: Download the le to your iPhone, then
transfer it to your computer using AirDrop or a cloud
drive, etc.
2) Save the le with its original name (.hui) in the root
directory of a USB storage device (connector type:
USB-C drive or USB-A with an adaptor; format: FAT32).
3) Hold both and STEM AI on BandBox Solo for more
than 10 seconds.
→ BandBox Solo will reboot during new software
installation.
• During the software download, data transfer, and update
processes, do not turn off your BandBox Solo, or exit the
JBL ONE app.
Sound
No sound or distorted sound from BandBox Solo.
• Ensure that BandBox Solo is powered on.
• Check both the input source and stem volume controls (see
2) Display panel).
• Check cable connection.
• Ensure that a sound source is active and not muted.
• Ensure that no headphones are connected.
• Try a different guitar preset, adjust volume or restart your
BandBox Solo. If the issue remains, perform factory reset
(see Factory reset).
Why can't I hear the recorded audio playback via
BandBox?
• If you're unable to hear recorded audio playback on
BandBox, ensure that the Stem AI feature is deactivated.
Activating Stem AI might mute the guitar or vocal from your
recorded audio.
Bluetooth
A device cannot connect with BandBox Solo.
• Ensure that the Bluetooth function of the device is enabled.
• BandBox Solo is already connected with another Bluetooth
device. Hold on BandBox Solo for more than 10 seconds
to disconnect and pair with a new device.
Poor audio quality from a connected Bluetooth device
• The Bluetooth reception is poor. Move the device closer to
BandBox Solo, or remove any obstacle between the device
and BandBox Solo.
9. TROUBLESHOOTING
Caution:
– Never try to repair the product by yourself. If you have any
problems while using this product, check the following points
before you request service.
System
My BandBox Solo will not turn on.
• Ensure that the BandBox Solo battery is not drained. Fully
charge the battery.
• If the issue remains, try hardware reset by holding for
10 seconds.
An “X” symbol appears when I try certain operations.
• You will see this symbol in the following cases:
• App control is active, for example, when you are tuning
your guitar in app.
• You are in an Auracast party.
• You have changed a stem setting in app.
Press the control knob to resume device control (see 2)
Display panel).
The built-in microphone does not work.
• The built-in microphone is disabled in guitarist mode. It
works with headphones connected in singing guitarist and
singer modes (see 5.2 Connection based on your musician
type).
You may experience environmental sound pickup when
using the 3.5 mm output port with headphones or a PA
system.
• The built-in microphone may have been activated.
• Reduce the microphone volume.
• Alternatively, switch to guitarist mode (see 6.3.5 Settings
- Musician type).
My guitar/microphone does not work properly.
• Check cable connection.
• Ensure that the correct input is selected: “GUIT IN” for
guitar and “MIC IN” for microphone. If not, rotate the
control knob to select the correct input.
Product software update fails.
• Ensure that the mobile phone you are using for software
update has a USB-C port.
• Check cable connection. Ensure that you are using a
USB-C to USB C cable that supports a data transfer rate of
at least 480 Mbps.

1616
11. TRADEMARK
The Bluetooth
®
word mark and logos are registered trademarks
owned by Bluetooth SIG, Inc. and any use of such marks
by HARMAN International Industries, Incorporated is under
license. Other trademarks and trade names are those of their
respective owners.
10. COMPLIANCE
The product complies with Commission Regulation (EU)
2023/826 ecodesign requirements for off mode, standby mode,
and networked standby energy consumption of electrical and
electronic household and ofce equipment.
1. Information on power consumption
• Off mode: N/A
• Standby mode: ≤ 0.5 W
• Networked standby mode: ≤ 2.0 W
• Networked standby mode if all wired ports are
connected and all wireless ports are activated: ≤ 2.0 W
2. The period after which the power management function
switches the equipment automatically into:
Off/
Standby
mode
When the system
is in normal
operation
Switched to Off/
Standby mode after
20 minutes of inactivity
Networked
Standby
mode
When wireless
network
connection is
activated
Switched to networked
Standby mode after
20 minutes of inactivity
3. Recommended external Adaptor information:
• Power adaptor with rating output:
5.0 V DC, 7.5 W – 15.0 W.
• Energy efciency rating: level VI or complies with
corresponding regional or national laws and regulation.
The maximum operation temperature is 45 °C.
No naked ame sources, such as lighted candles, should be
placed on the apparatus.

HARMAN International Industries,
Incorporated 8500 Balboa Boulevard,
Northridge, CA 91329 USA
www.jbl.com
© 2026 HARMAN International Industries, Incorporated.
All rights reserved.
JBL is a trademark of HARMAN International Industries, Incorporated, registered in
the United States and/or other countries. Features, specications and appearance are
subject to change without notice.
For non-commercial use only. It is your responsibility to know and abide by copyright
laws in your country, and your use may require permission from the copyright holder(s).
Review terms associated with use of prerecorded or licensed music, and streaming
services, before using BandBox.
JBL BandBox Solo_OM_Global_SOP_EN_V8
