

I worked really hard
on this manual -
so please read it...
XOG36PANTRY
36” Sealed Pantry
IMPORTANT SAFETY INSTRUCTIONS
Doing so may void warranty.
To the consumer, please make this information available to the people installing the
product. Doing so can assist in speeding installation and reducing costs.
To the installer(s), leave these instructions with the customer for future reference and
for use by local inspectors.
Improper installation may invalidate warranty or liability claims and prevent proper
operation of the pantry.
Any service to the appliance should be performed by qualified personnel using only
factory original replacement parts.
The cavity where the appliance is to be installed must be square, level and plumb and
free of any obstructions such as support members, wiring or plumbing.
Never store or use gasoline or other flammable vapors or liquids either inside or in the
vicinity of this or any other appliance.
Do not store LP cylinders either inside or in the vicinity of this appliance.
PANEL EDGES MAY BE SHARP - FAILURE TO USE CAUTION MAY RESULT IN INJURY
OR CUTS.
USE TWO OR MORE PEOPLE TO LIFT, MOVE OR POSITION THE UNIT TO HELP AVOID
INJURY.
WARNING - CUT HAZARD!
WARNING - HEAVY TEAM LIFT!
these are the models
covered in this
book
XOG36PANTRY
You will need these
Drill + Bits
Phillips head screwdriver (#1 or 2)
Work gloves
Safety glasses
Pencil
Saw
Tape measure
Carpenters level
Framing square
Hammer
Fasteners (for framing)
tools:
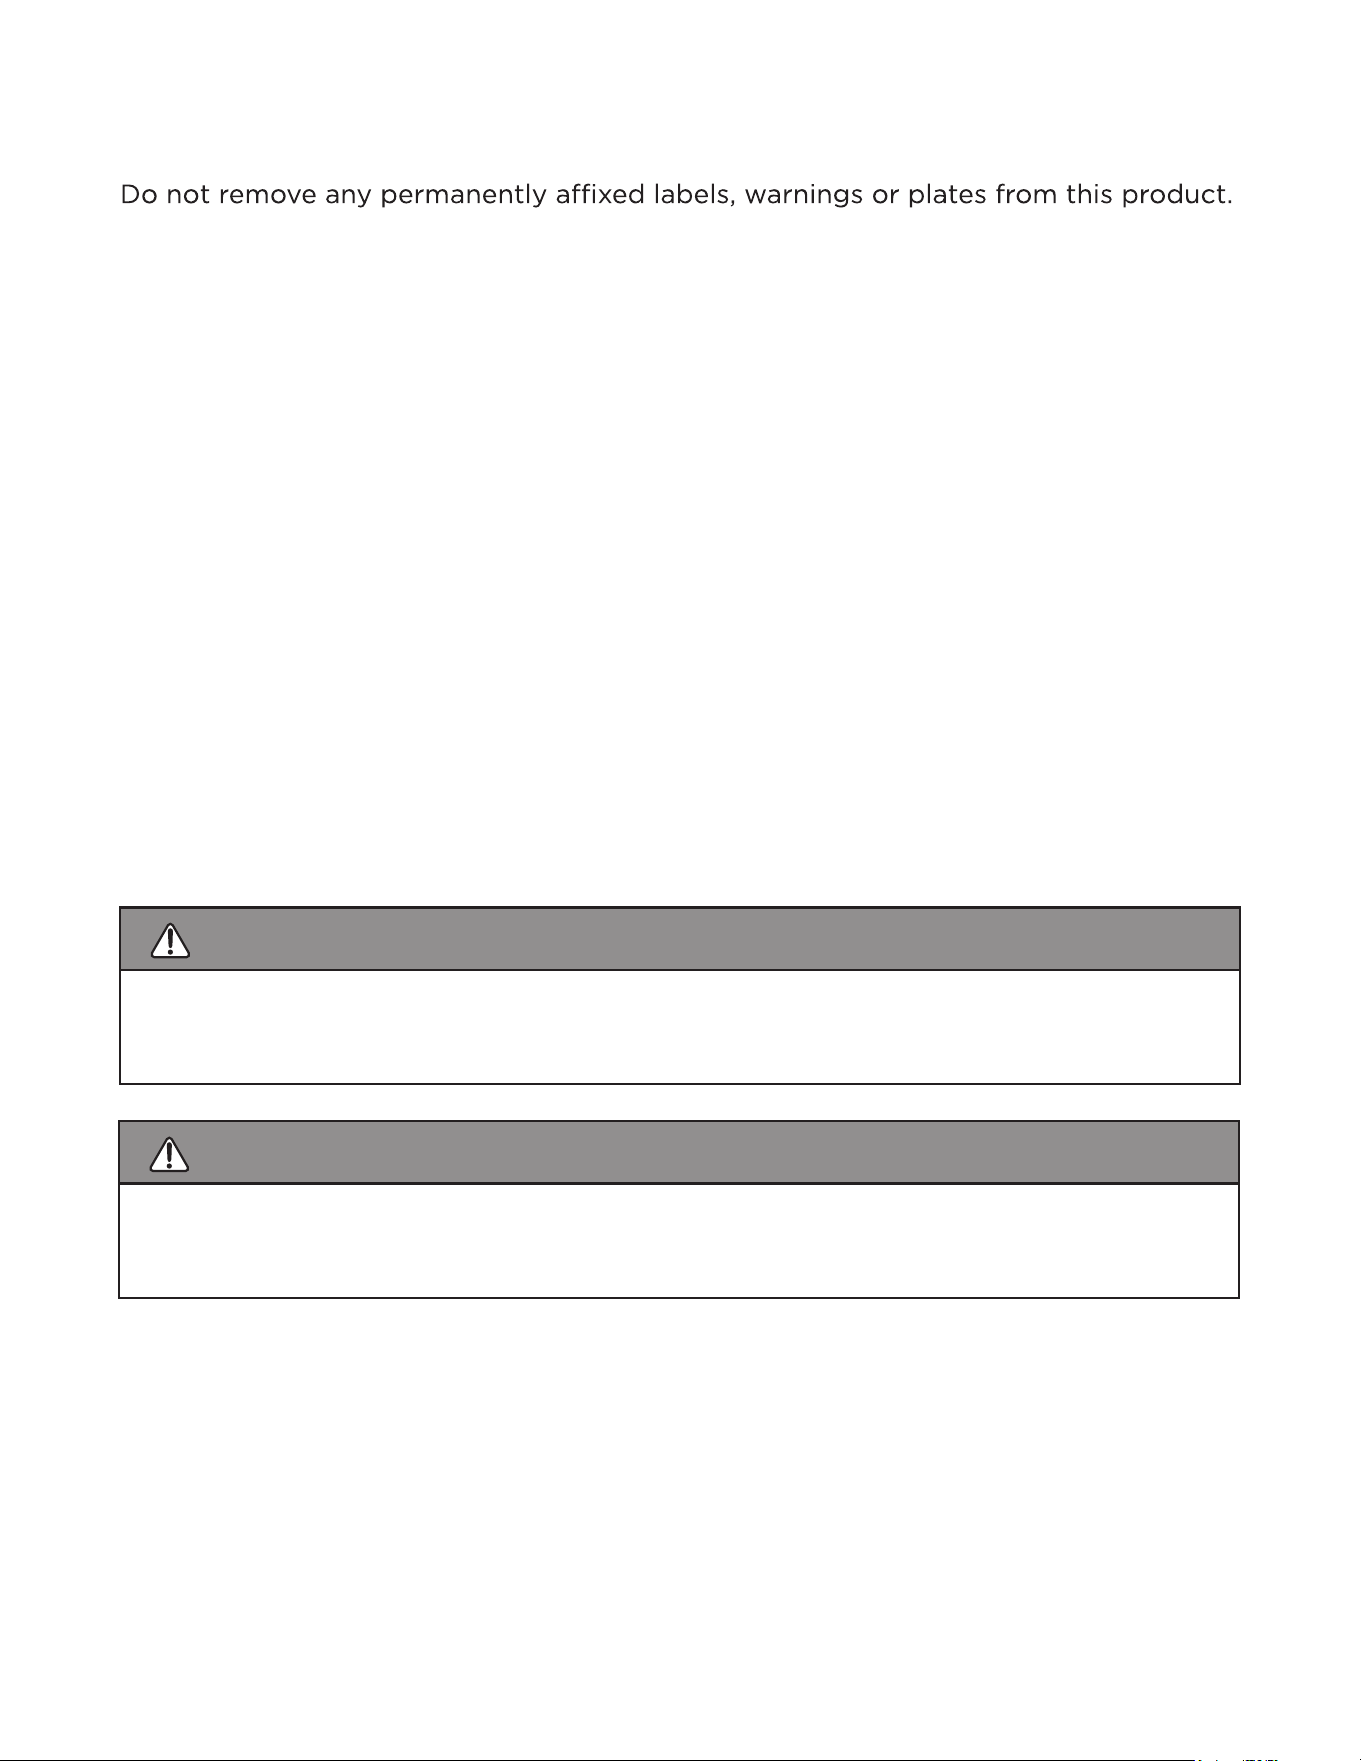
UNPACKING | DOOR HANDLE ASSEMBLY
AFTER YOUR UNIT ARRIVES, CAREFULLY UNPACK THE UNIT AND INSPECT
FOR ANY DAMAGE THAT MAY HAVE RESULTED IN TRANSIT.
REMEMBER TEAM LIFT
PLEASE DISPOSE OF ALL PACKING MATERIALS RESPONSIBLY.
USING THE SCREWS PROVIDED,
ATTACH THE DOOR HANDLES TO
THE TWO PANTRY DOORS.
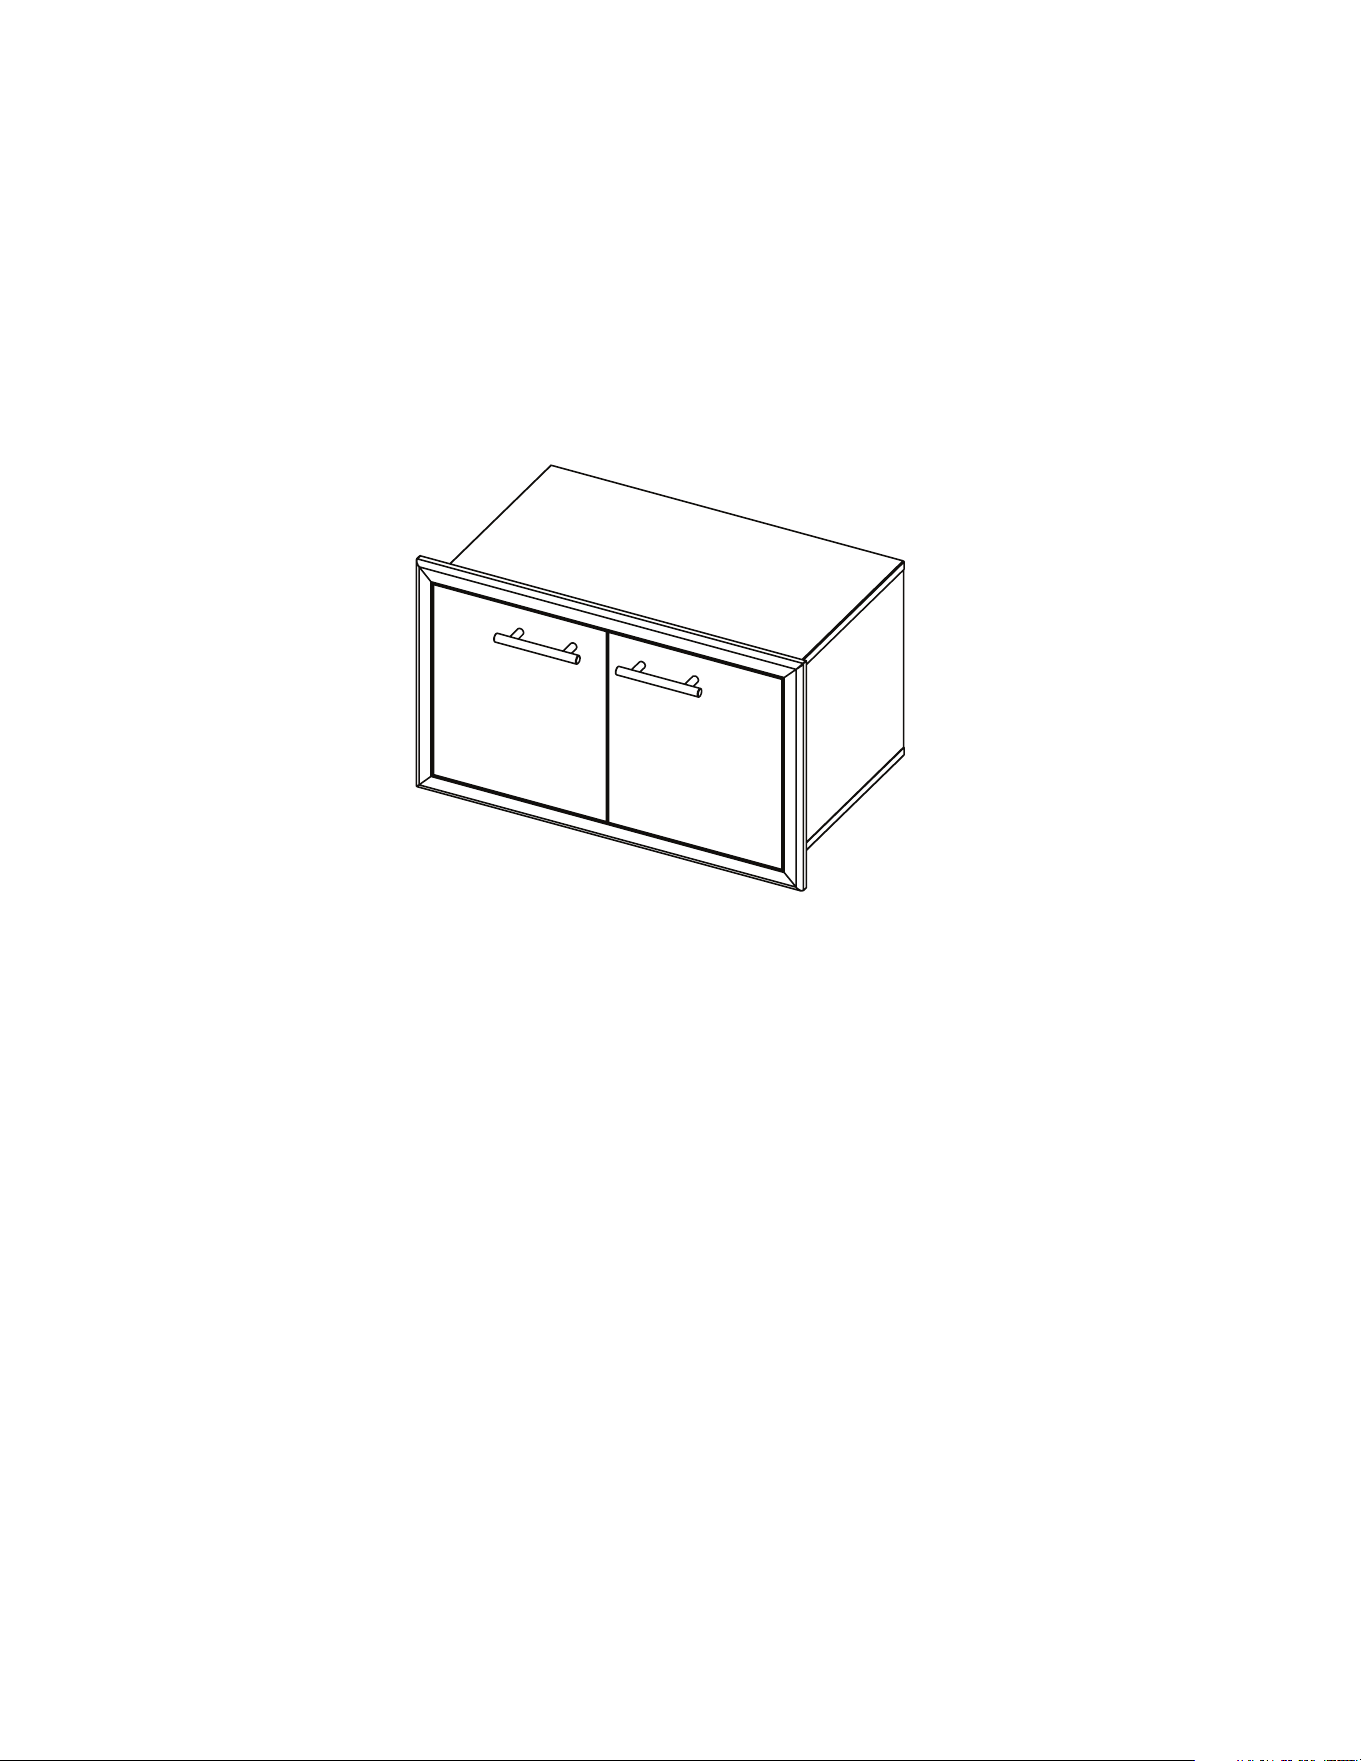
SHOWN WITH DOORS REMOVED
TO REVEAL ADJUSTABLE SHELVES
& THREE SOFT CLOSE DRAWERS
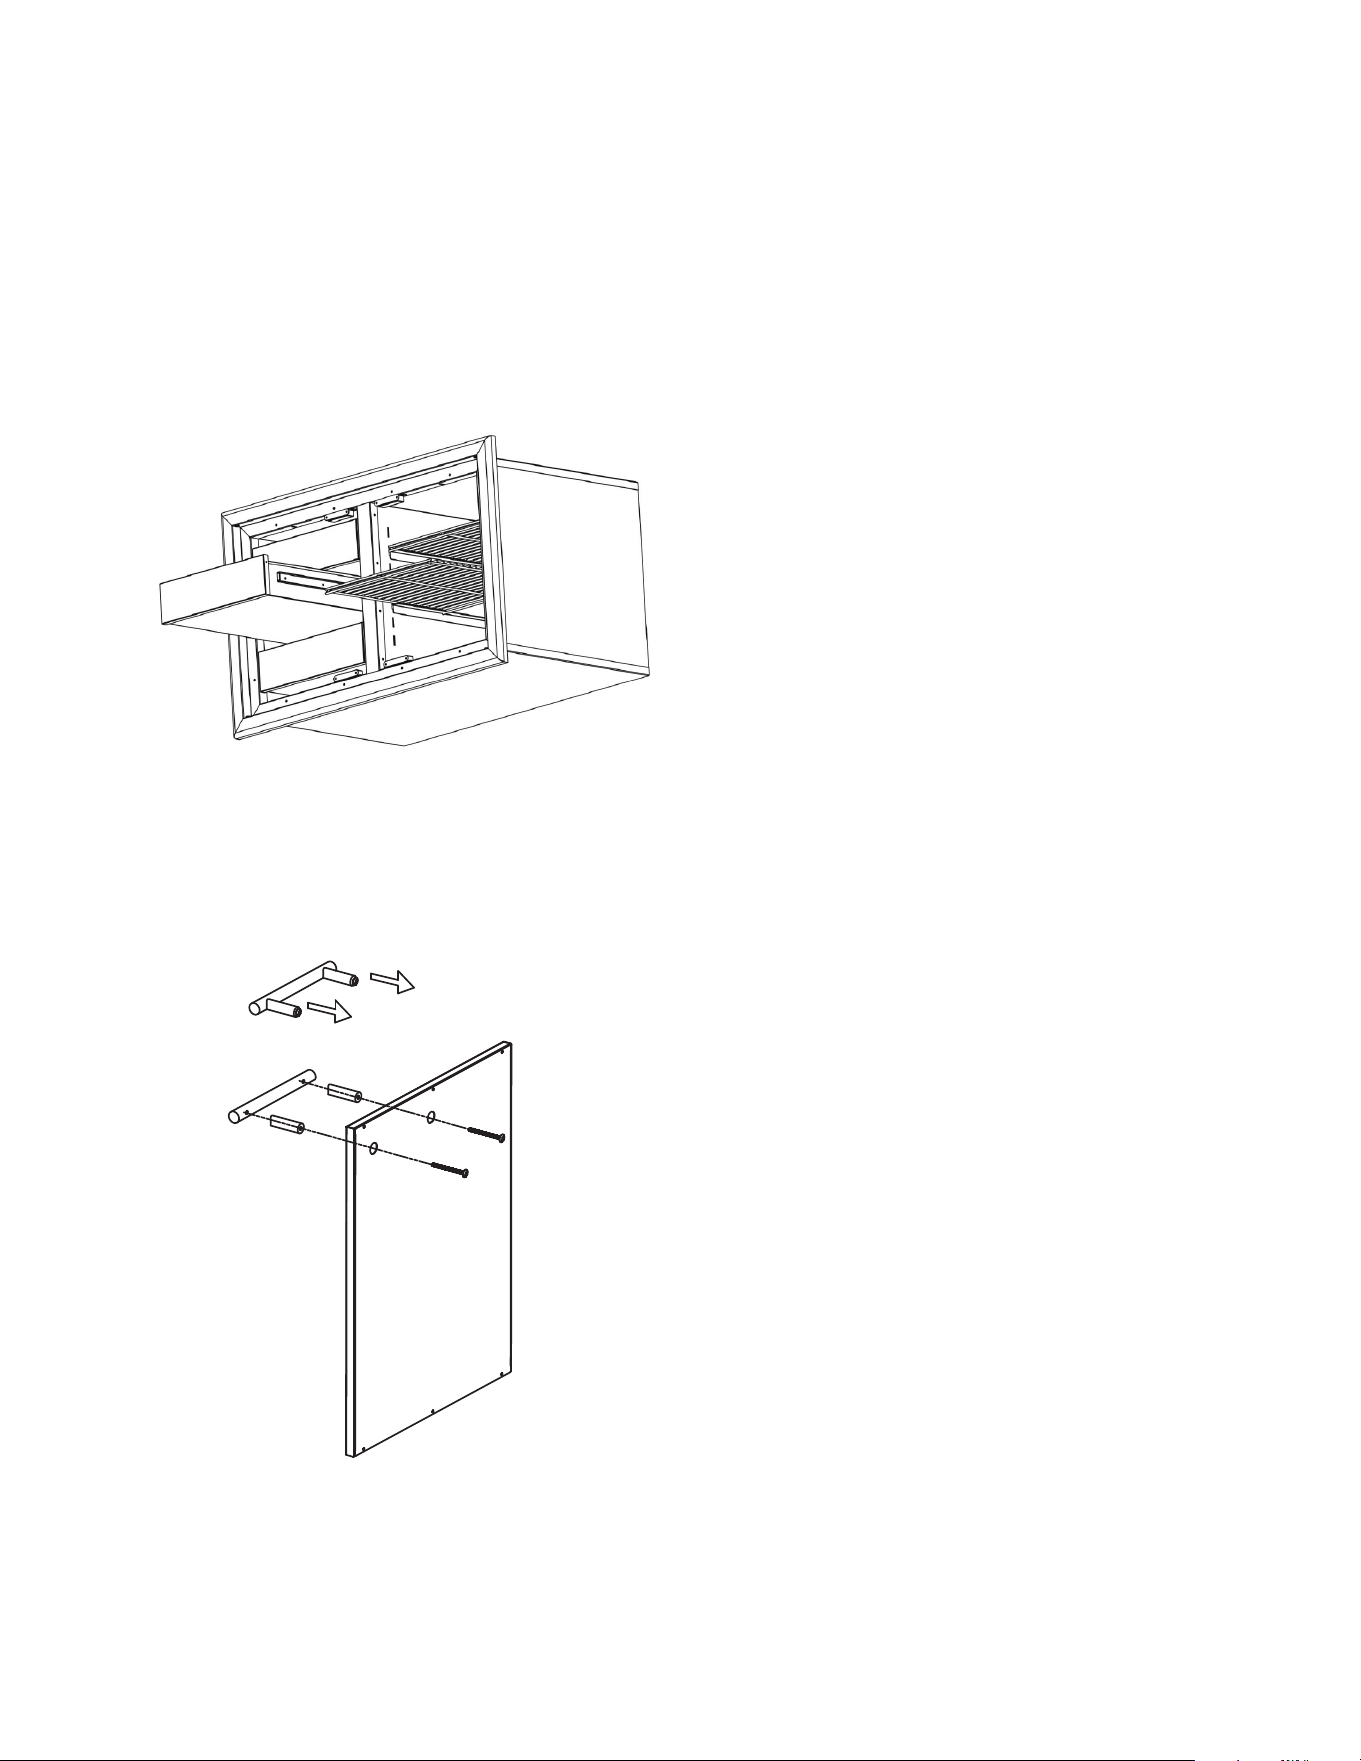
33-7/16”
20-1/2”
36-11/16”
22-3/16
20-1/2”
1”
19-1/8”
PRODUCT DIMENSIONS
CUT OUT DIMENSIONS
If installing in a corner- leave 6-1/2”
to the turn to avoid interference
with other appliances.
33-3/4”
3-1/8”
19-1/4”
REQUIRES
20-5/8” MINIMUM
DEPTH CLEAR
D
D
6-1/2”

PARTS
XOG36PANTRY
Item # Description Part # Qty
1 Cabinet Body XOPG241 1
2 Handle XOPG009 2
3 Left Door XOPG242 1
4 Drawer XOPG243 3
5 Slide Rail XOPG244 3 Pairs
6 Door Magnet XOPG152 4
7 Rack XOPG245 2
8 Left Bracket XOPG246 2
9 Right Bracket XOPG247 2
10 Right Door XOPG248 1
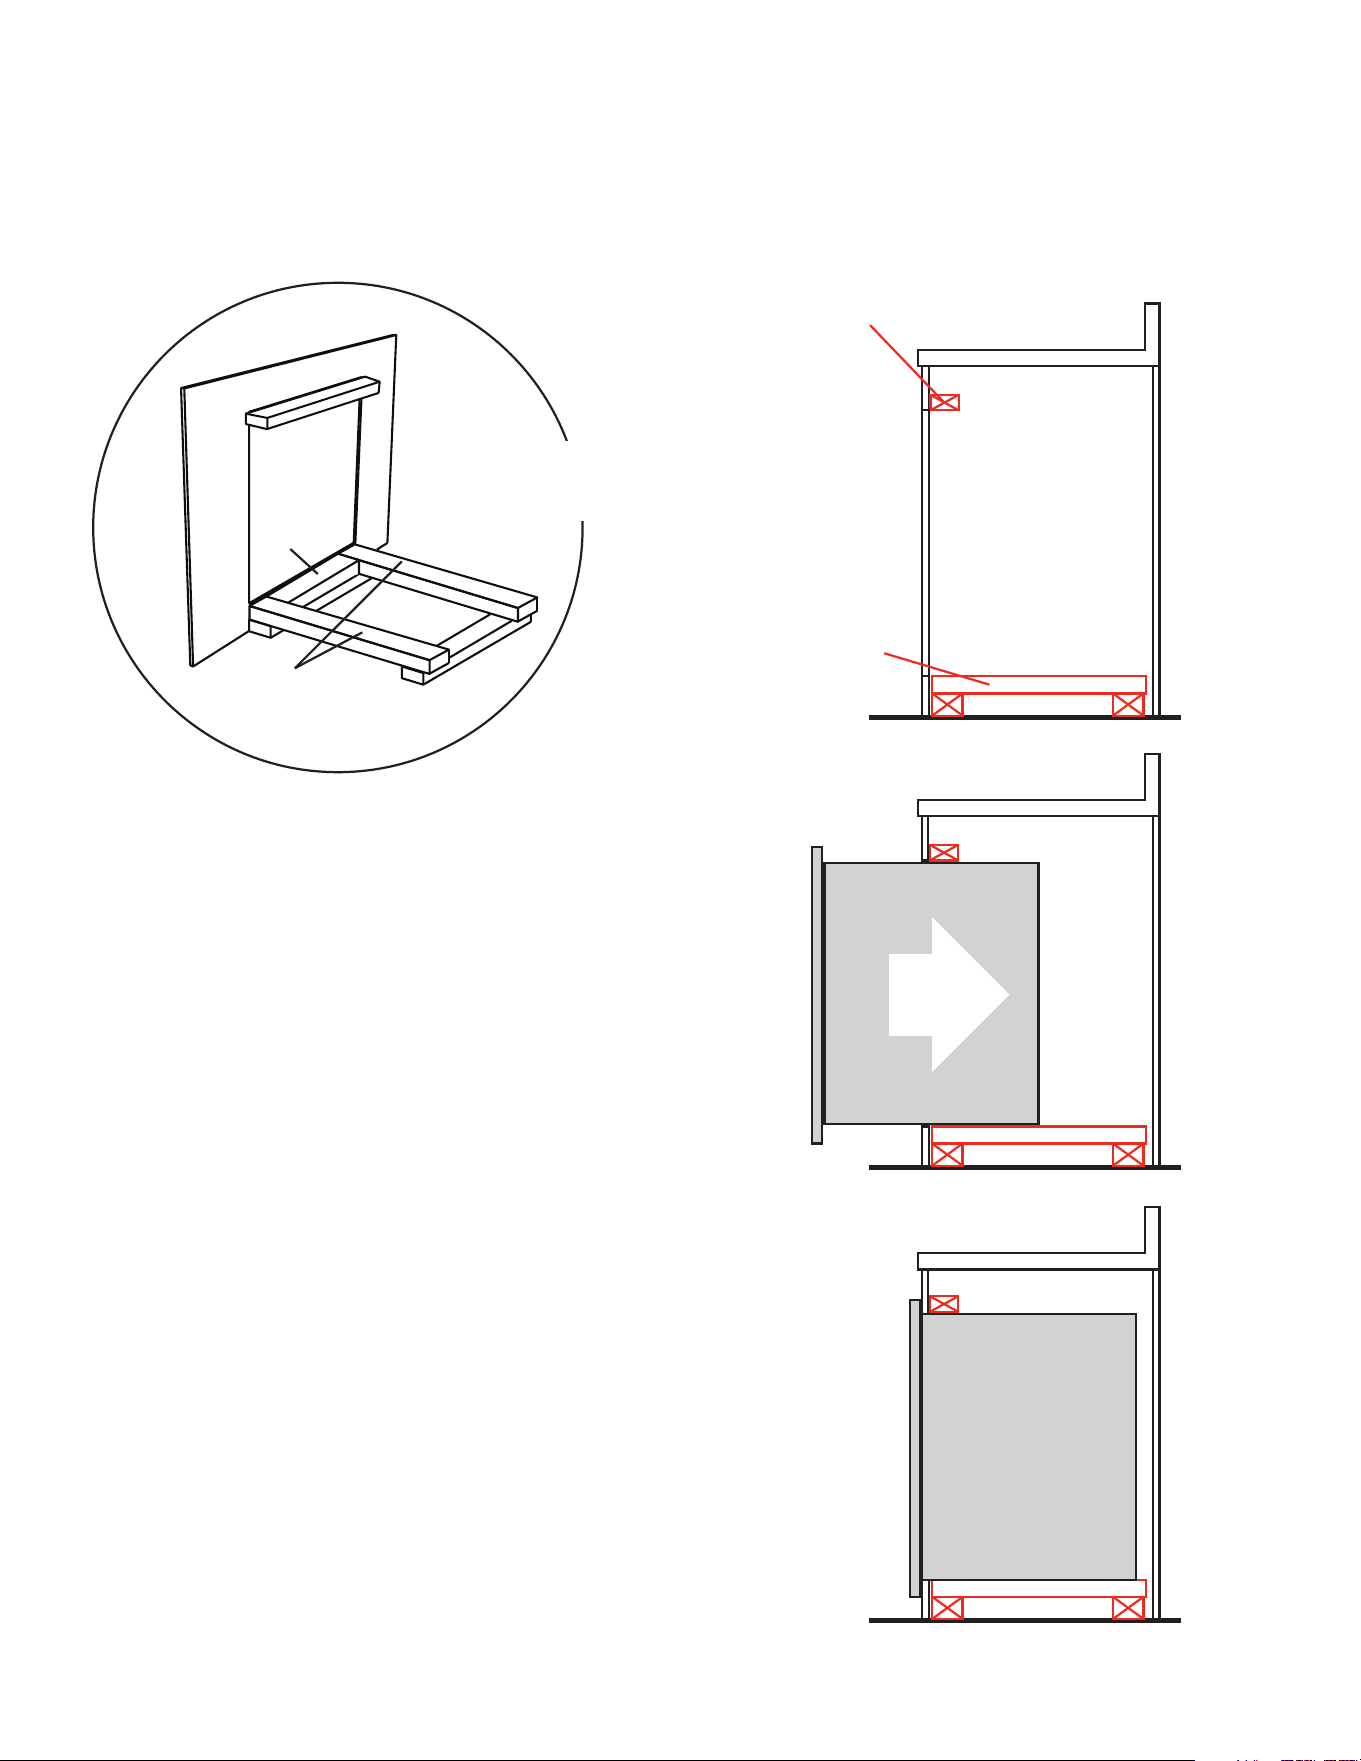
SITE PREPARATION | INSTALLATION
The cabinet must be plumb, level and square. Sleepers must support pantry weight
fully loaded.
VIEWED FROM
INSIDE CABINET
ATTACH SLEEPER
ABOVE CUTOUT
SET & LEVEL
TWO SLEEPERS
& FRONT SILL
EVEN WITH
THE CUT OUT
WITH TWO PEOPLE ALIGN THE PANTRY
WITH THE OPENING AND SLIDE INTO
PLACE.
ONCE FIT IS ASSURED
PUSH ALL THE WAY INTO THE OPENING
UNTIL FLANGE IS SEATED.
DO NOT USE SILCON OR OTHER SEALANT
IN CASE UNIT MUST BE REMOVED LATER.
SILL
SLEEPERS
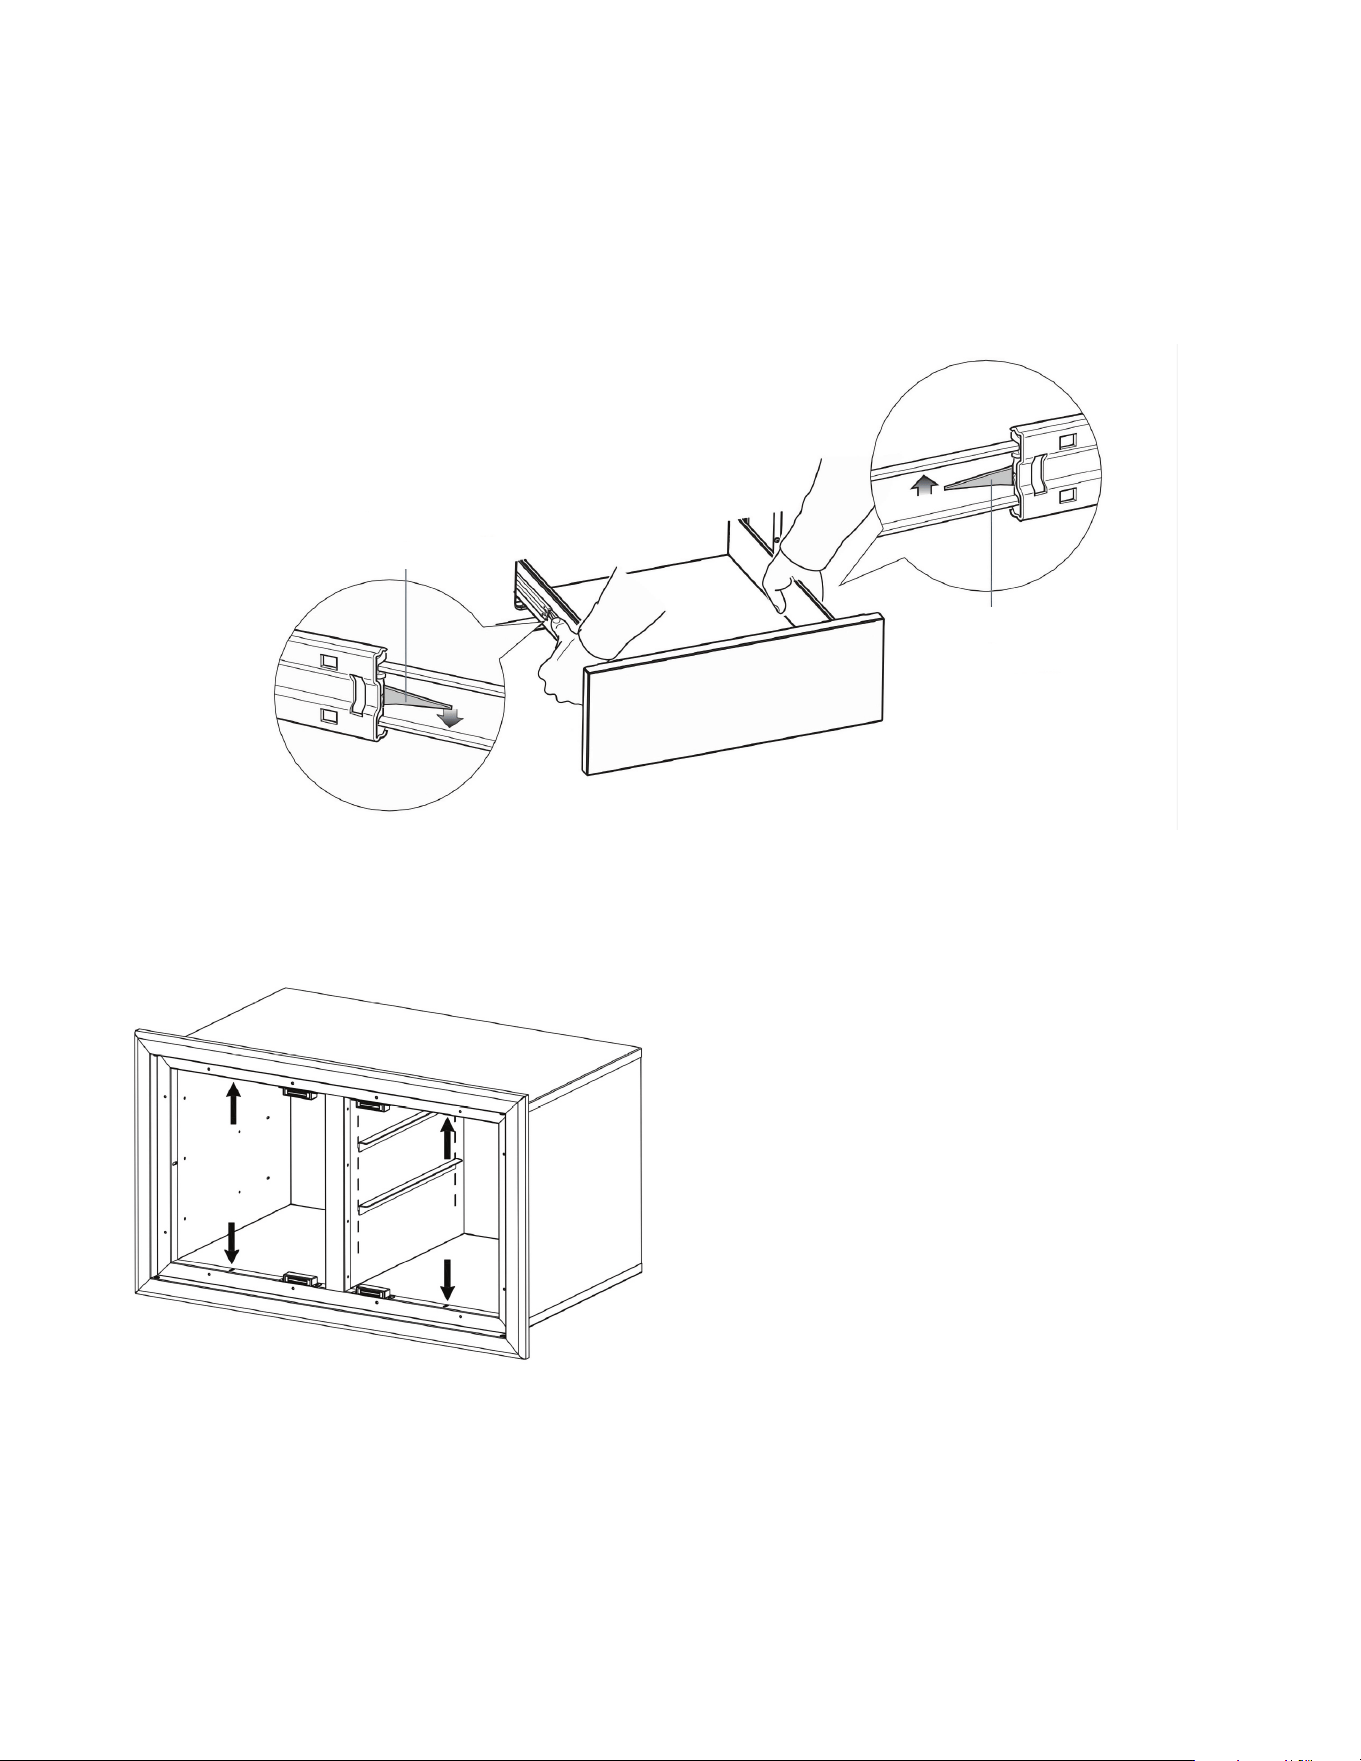
SECURING THE PANTRY
Remove the shelves and drawers to provide access to the attachment screw holes.
To remove a drawer, extend it fully.
On either side of the slides are plastic triangular levers.
At the same time:
While holding the right side lever up and the
left side lever down - Pull the drawer out.
After the pantry is secured in place reinstall the drawers and you are done.
PUSH DOWN
PUSH UP
With the drawers and shelves removed,
after the pantry has been inserted into
the cut out, attach to the upper and lower
sleepers using 4 screws in the locations
shown.
XO Appliance
www.xoappliance.com
