WONDERWALL
SMART 600
Infrarot-Heizung
Infrared Heater
Radiador infrarrojo
Radiateur Infrarouge
Radiatore a infrarossi
Hinweis: Dieses Produkt ist nur für gut isolierte Räume
oder für den gelegentlichen Gebrauch geeignet.
Note: This product is only suitable for well insulated
spaces or occasional use.
Nota: Este producto está indicado únicamente en
lugares abrigados o para una utilización punctual.
Remarque : Ce produit ne peut être utilisé que dans
des locaux bien isolés ou de manière occasionnelle.
Advertencia: Questo prodotto è adatto solo per spazi
ben isolati o uso occasionale.
www.klarstein.com
10032782

3
DE
Sehr geehrter Kunde,
wir gratulieren Ihnen zum Erwerb Ihres Gerätes. Lesen Sie
die folgenden Hinweise sorgfältig durch und befolgen Sie
diese, um möglichen Schäden vorzubeugen. Für Schäden,
die durch Missachtung der Hinweise und unsachgemäßen
Gebrauch entstehen, übernehmen wir keine Haftung. Scannen
Sie den folgenden QR-Code, um Zugriff auf die aktuellste
Bedienungsanleitung und weitere Informationen rund um das
Produkt zu erhalten:
INHALTSVERZEICHNIS
Produktdatenblatt4
Sicherheitshinweise5
Wandinstallation6
Geräteübersicht7
Bedienfeld7
Bedienung8
Gerätesteuerung per Smartphone9
Reinigung und Pege11
Fehlersuche und Fehlerbehebung11
Spezielle Entsorgungshinweise für Verbraucher in Deutschland12
Hinweise zur Entsorgung14
Konformitätserklärung14
TECHNISCHE DATEN
Artikelnummer 10032782
Stromversorgung 220-240 V ~ 50 Hz
Leistung 600 W
WiFi-Standard
802.11 b/g/n
WiFi-Frequenz
2,4 GHz
WiFi-Sendeleistung (max.)
20 dBm
Hinweis: Zu diesem Artikel ist unter der Artikelnummer 10032802 ein Zubehörpaket
für die Wandbefestigung erhältlich.
English 15
Español 25
Français 35
Italiano 45
4
DE
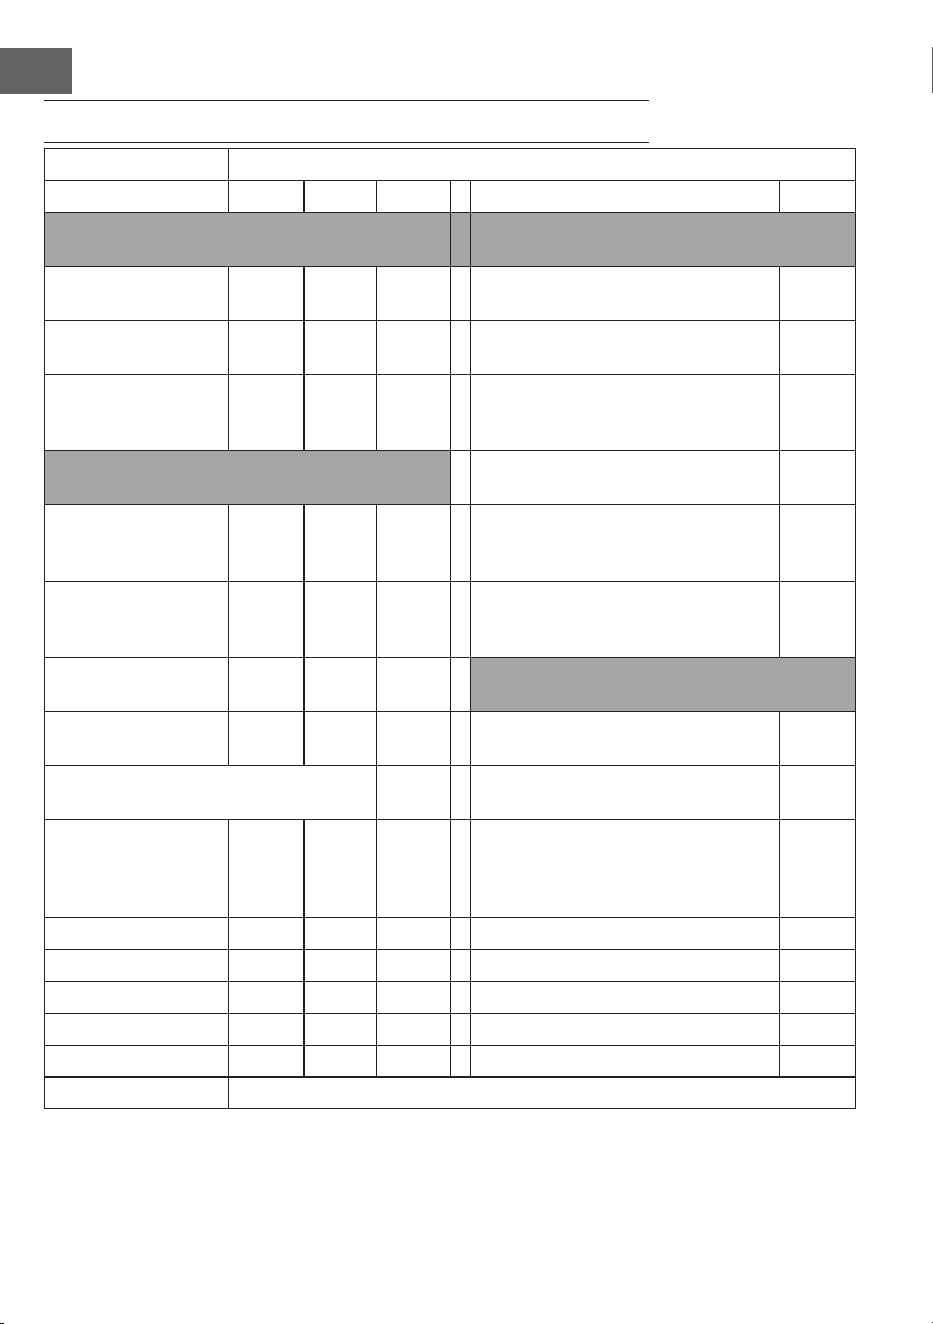
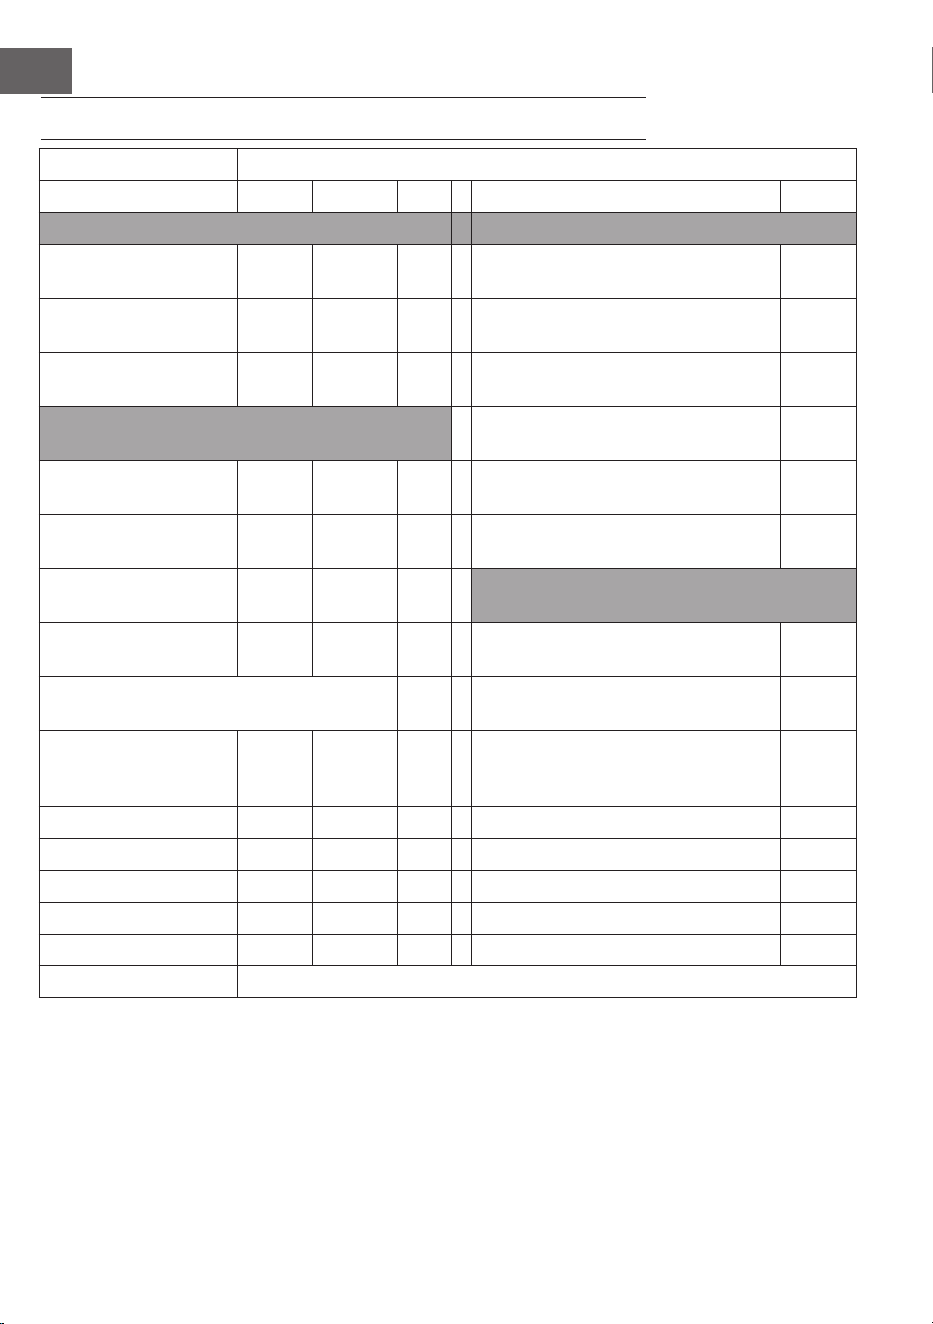
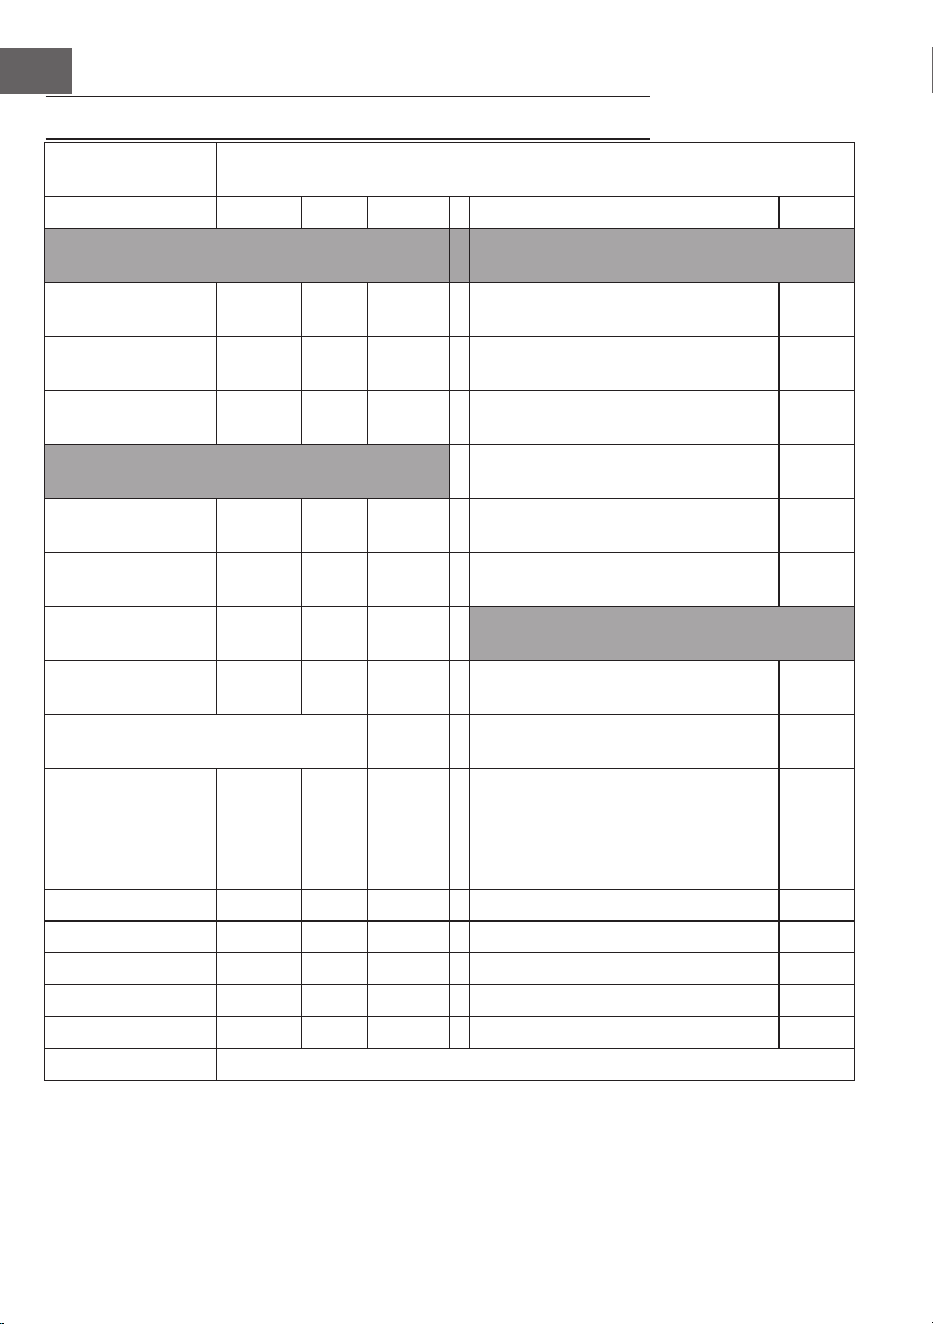
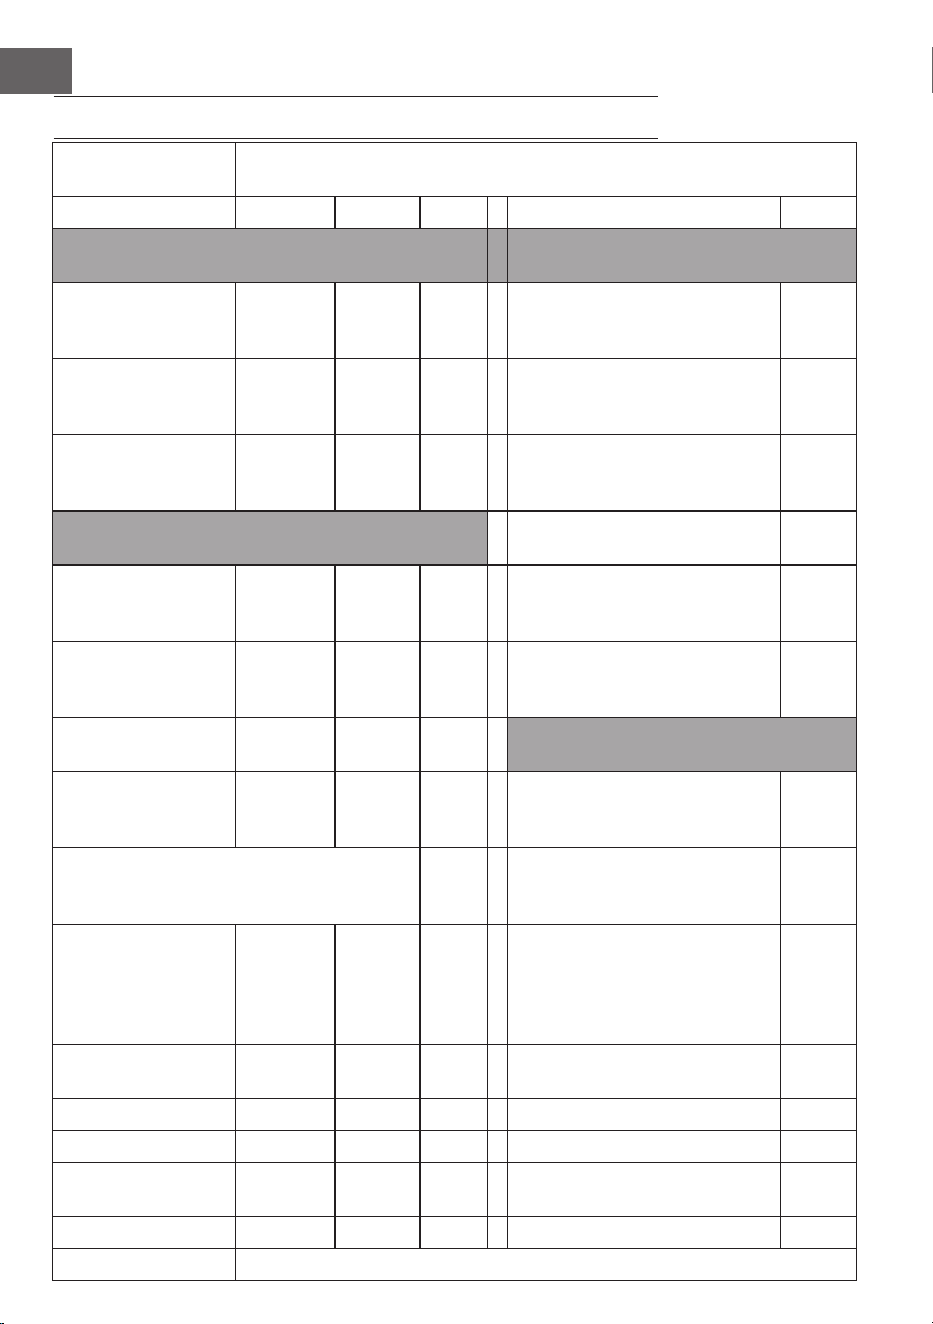
PRODUKTDATENBLATT
Modellkennung(en): 10032782
Artikel Symbol Wert Einheit Artikel Einheit
Wärmeleistung Art der Wärmeleistung/
Raumtemperaturkontrolle
Nennwärmeleistung P
nom
0,6
kW Einstuge Wärmeleistung und keine
Raumtemperaturkontrolle
nein
Minimale Heizleistung
(indikativ)
P
min
0,6
kW Zwei oder mehr manuelle Stufen, keine
Raumtemperaturkontrolle
nein
Maximale
kontinuierliche
Wärmeleistung
P
max,c
0,6
kW Raumtemperaturkontrolle mit
mechanischem Thermostat
nein
Stromverbrauch Mit elektronischer
Raumtemperaturkontrolle
nein
In ausgeschaltetem
Modus
Po 0,00 W Mit elektronischer
Raumtemperaturkontrolle und Tages-
Zeitschaltuhr
nein
Im Standby-Modus Psm 0,35 W Mit elektronischer
Raumtemperaturkontrolle und
Wochen-Zeitschaltuhr
ja
Im Ruhezustand Pidle 0,83 W Weitere Kontrollmöglichkeiten
(Mehrfachauswahl möglich)
Im Netzwerk-Standby-
Modus
Pnsm 0,79 W Raumtemperaturkontrolle mit
Präsenzerkennung
nein
Standby-Modus mit Anzeige von
Informationen oder Status
ja Raumtemperaturkontrolle mit
Erkennung offener Fenster
ja
Saisonale
Raumheizungsenergie
Wirkungsgrad im
aktiven Modus
n
S, on
94 % Mit Fernbedienungsoption ja
Adaptive Startsteuerung nein
Arbeitszeitbegrenzung ja
Schwarzkugelsensor nein
Selbstlernende Funktionalität nein
Steuerungsgenauigkeit nein
Kontaktangaben Chal-Tec GmbH, Mühlenstraße 25, 10243, Berlin, Deutschland

5
DE
SICHERHEITSHINWEISE
• Prüfen Sie vor der Benutzung die Spannung auf der Geräteplakette und schließen
Sie das Gerät nur an Steckdosen an, die der Spannung des Geräts entsprechen.
• Falls das Netzkabel beschädigt ist, lassen Sie es von einer ausgebildeten Fachkraft ersetzen.
• Stellen Sie den Kamin nicht direkt unter der Steckdose auf.
• Halten Sie einen Meter Abstand zu brennbaren Materialien wie Möbeln,
Vorhängen oder Ähnlichem.
• Lassen Sie das Gerät während der Benutzung nicht unbeaufsichtigt.
• Lassen Sie das Gerät nicht unbeaufsichtigt, während es an die Steckdose
angeschlossen ist.
• Benutzen Sie das Gerät außerhalb der Reichweite von Kindern. Kinder dürfen das
Gerät nur unter Aufsicht bedienen.
• Das Gerät ist nicht für den kommerziellen Gebrauch, sondern nur für Gebrauch im
Haushalt und in ähnlichen Umgebungen vorgesehen.
• Benutzen Sie das Gerät nicht wenn es Fehlfunktionen aufweist oder in irgendeiner
Form beschädigt wurde.
• Reparaturen dürfen nur von ausgebildeten Fachkräften durchgeführt werden.
• Falsch oder eigenständig ausgeführte Reparaturen stellen ein Verletzungsrisiko dar.
• Verlegen Sie das Netzkabel nicht unter Teppichen oder Läufern.
• Achten Sie darauf, dass das Netzkabel nicht über scharfe Kanten oder heiße
Oberächen verläuft.
• Decken Sie den Kamin nicht ab, um Überhitzen zu vermieden.
• Benutzen Sie das Gerät nicht mit einem externen Timer, einer ferngesteuerten Steckdose
oder einem anderen Gerät, das den Kamin automatisch ein- und ausschaltet.
• Tauchen Sie das Gerät nicht in Wasser oder andere Flüssigkeiten.
• Benutzen Sie das Gerät nicht in der Nähe von Badewannen, Duschen oder
Swimmingpools.
• Benutzen Sie das Gerät nicht im Freien.
• Benutzen Sie das Gerät nicht mit nassen Händen.
• Benutzen Sie das Gerät nicht auf oder in der Nähe heißer Oberächen.
• Benutzen Sie das Gerät nicht mit beschädigtem Netzkabel.
• Ziehen Sie vor der Reinigung den Stecker aus der Steckdose und lassen Sie das
Gerät vollständig abkühlen.
• Benutzen Sie zur Reinigung keine Scheuermittel.
• Verwenden Sie nur Zubehör, das vom Hersteller ausdrücklich dafür zugelassen ist.
• Kinder, physisch und körperlich eingeschränkte Menschen sollten das Gerät nur
benutzen, wenn sie vorher von einer Aufsichtsperson ausführlich mit den Funktionen
und den Sicherheitsvorkehrungen vertraut gemacht wurden.
• Achten Sie darauf, dass Kinder nicht mit dem Gerät spielen.
VORSICHT
Verbrennungsgefahr! Einige Geräteteile können sehr heiß werden.
Achten Sie darauf, dass Sie oder Ihre Kinder sich nicht daran
verbrennen.

6
DE
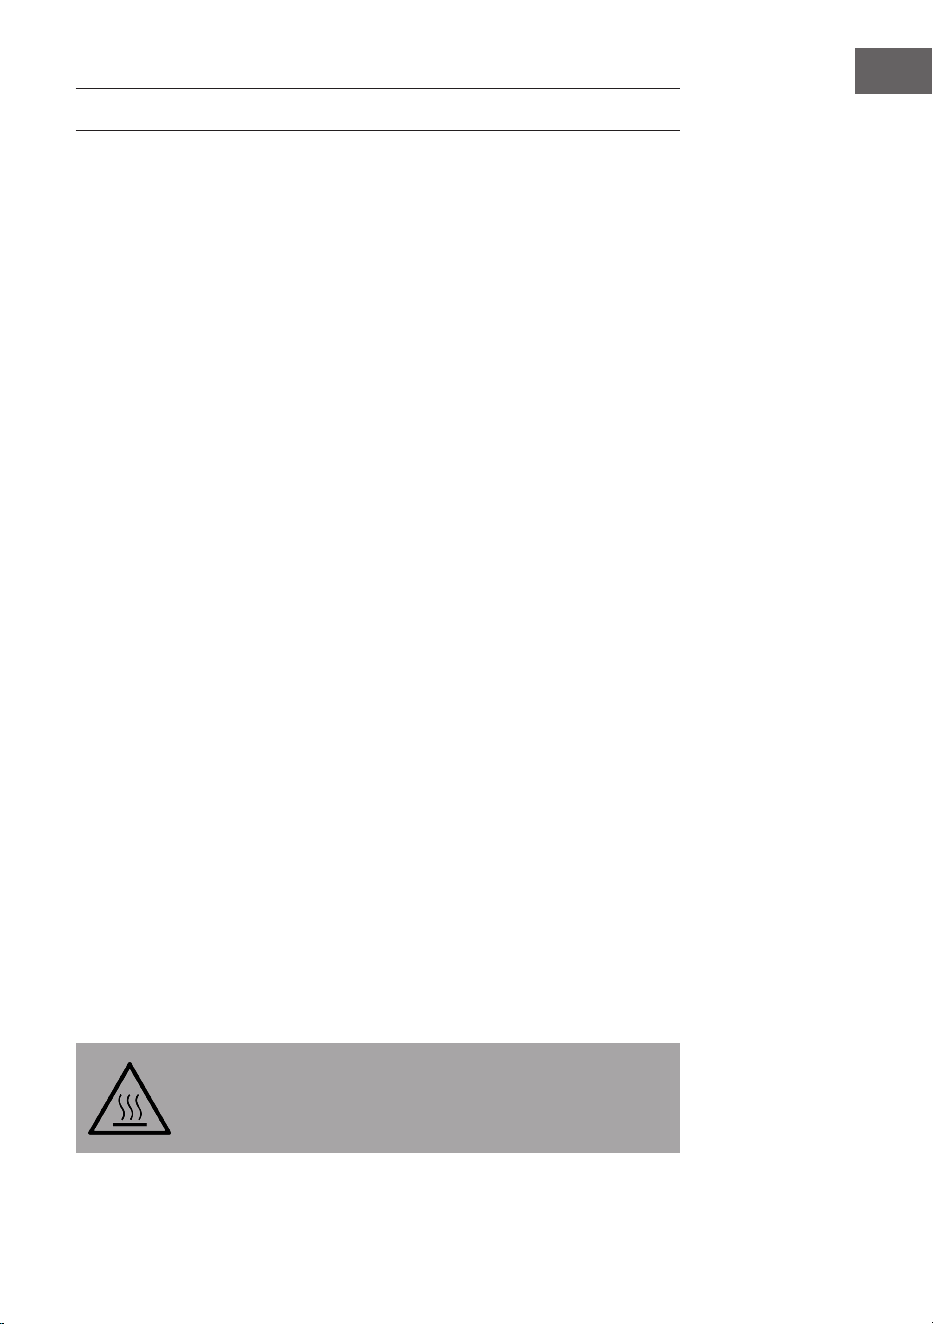
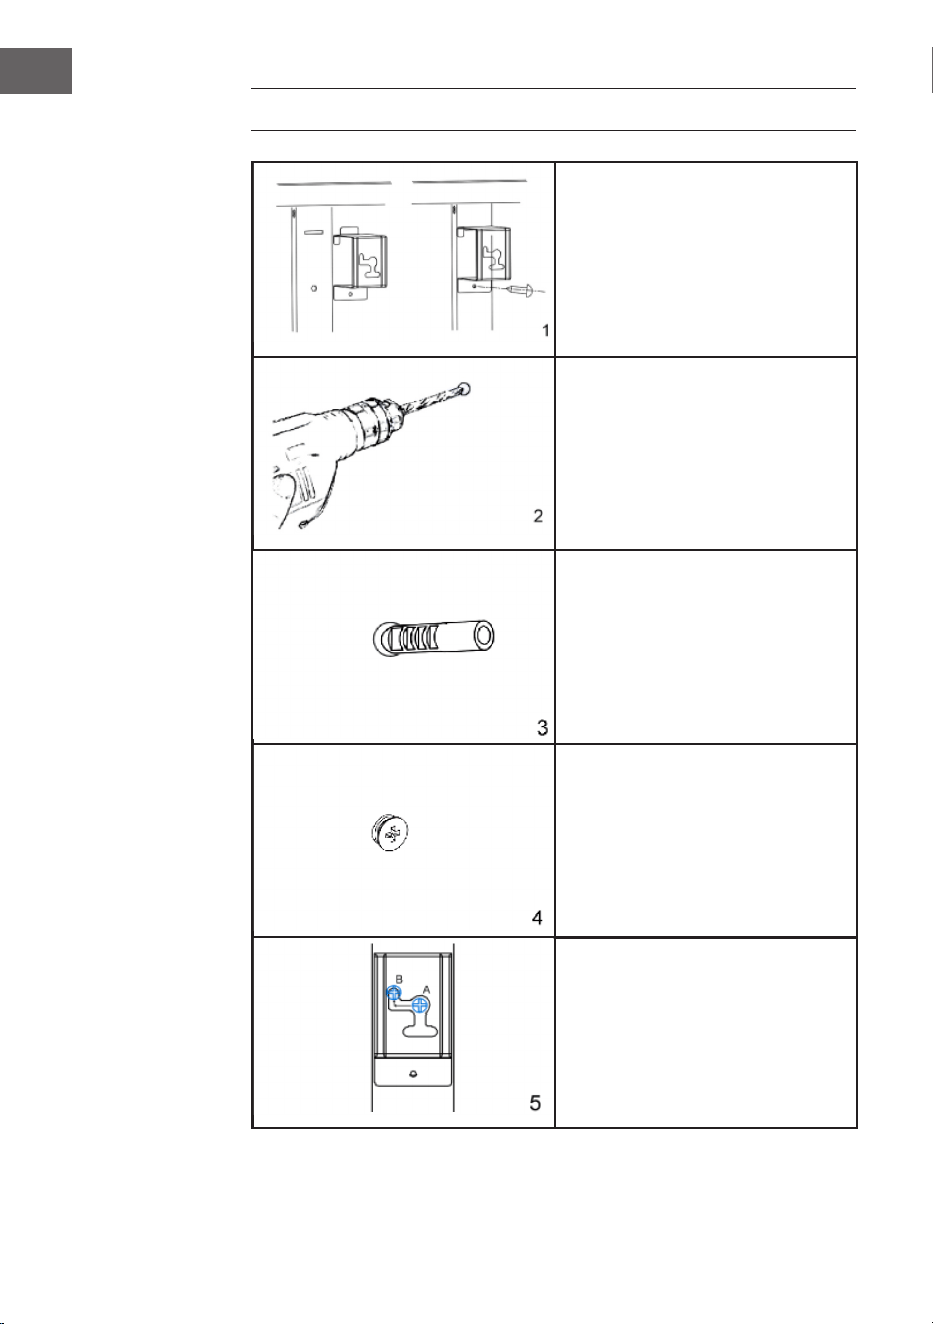
WANDINSTALLATION
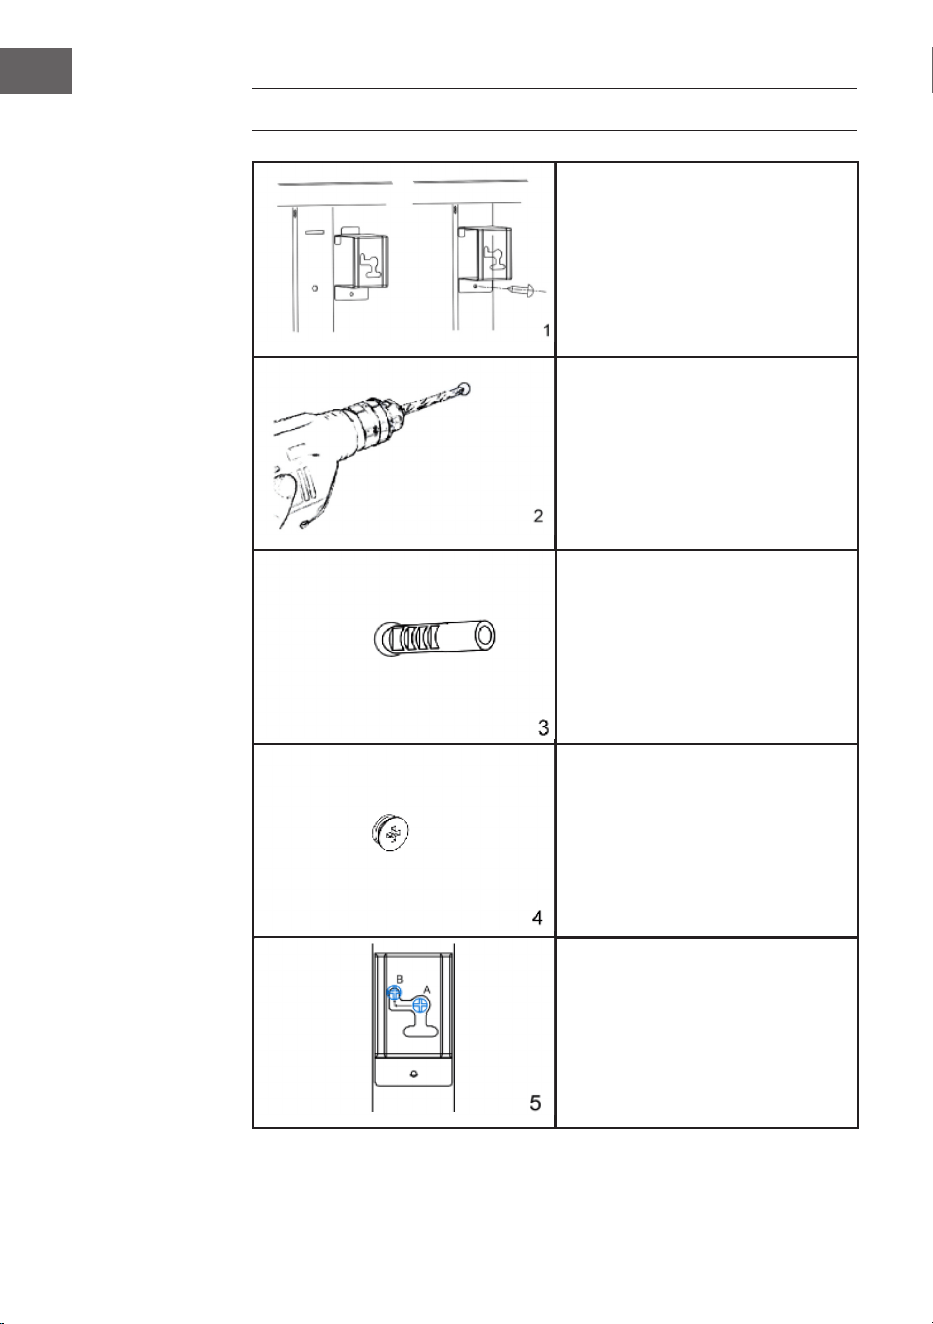
Nehmen Sie die 4 Metall-
Wandhalterungen und die
4 Metallschrauben für die
Wandhalterungen aus der Halterung und
befestigen Sie diese Halterungen an der
Rückseite des Geräts.
Markieren Sie die Positionen der vier
zu bohrenden Löcher an der Wand und
bohren Sie die Löcher mit dem Bohrer.
Vergewissern Sie sich, dass der Abstand
zwischen den einzelnen Löchern mit den
runden Löchern an den Halterungen
auf der Rückseite des Heizgerätes
übereinstimmt.
Setzen Sie die Kunststoffdübel in die
Löcher ein.
Setzen Sie die Metallschrauben in die
Dübel ein.
Heben Sie das Heizgerät an, richten
Sie die vier runden Löcher an den
Halterungen auf der Rückseite des
Heizgeräts an den vier Schrauben an
der Wand aus, und schieben Sie die
Schraube von Position A nach Position
B, indem Sie das Heizgerät leicht
bewegen.
7
DE
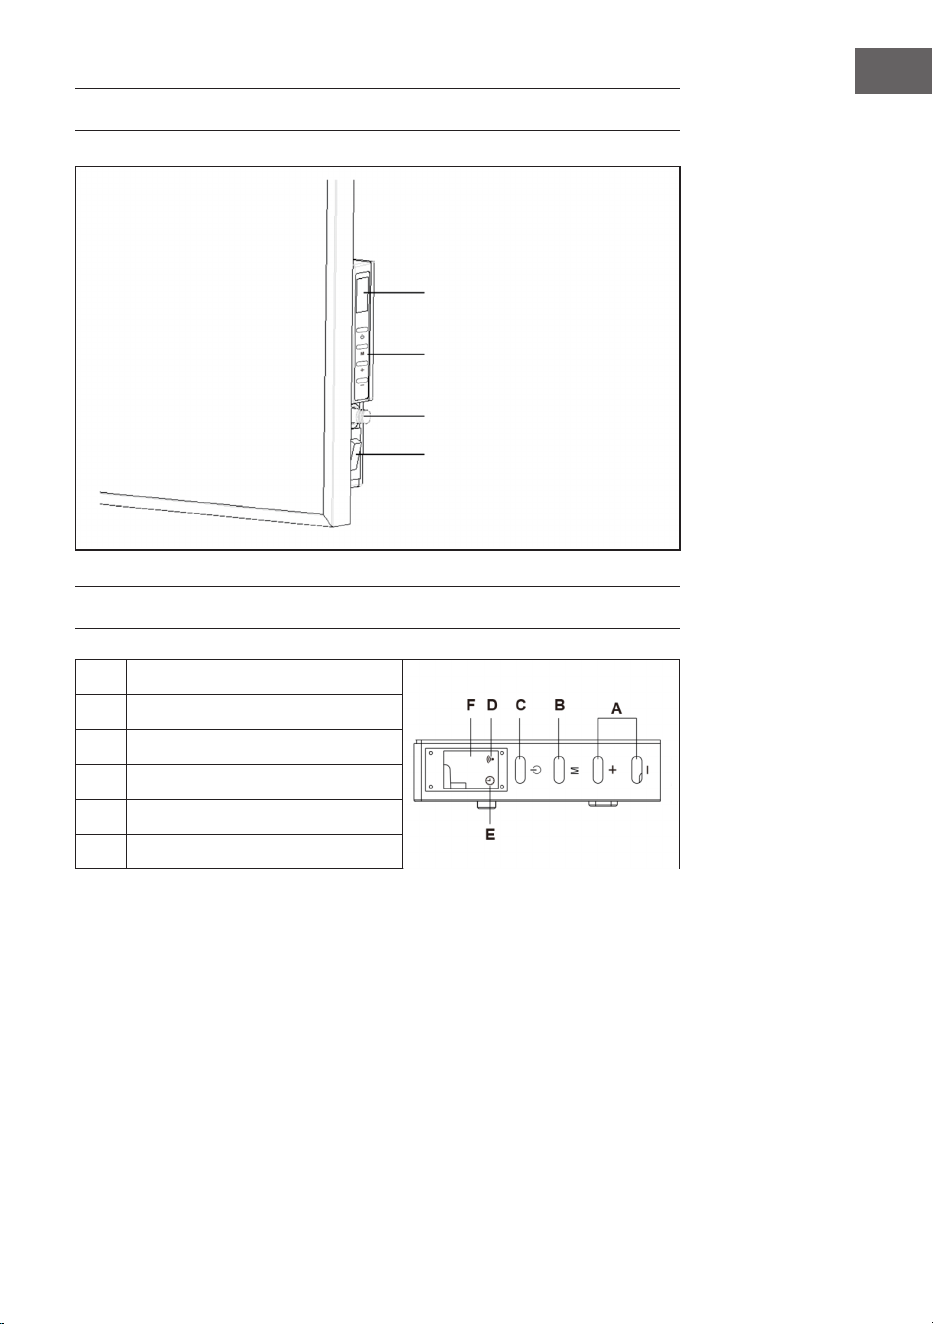
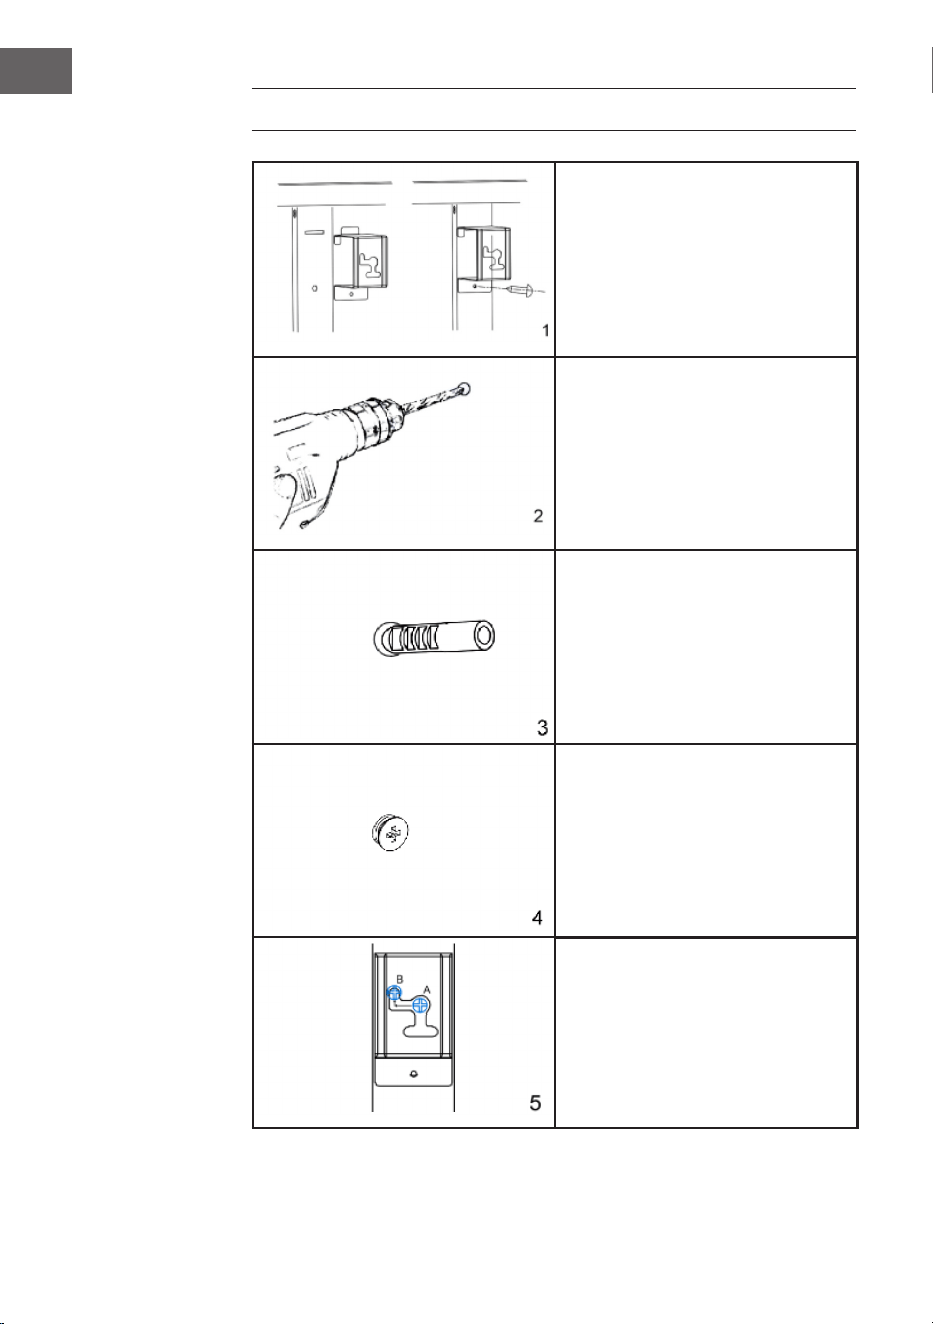
GERÄTEÜBERSICHT
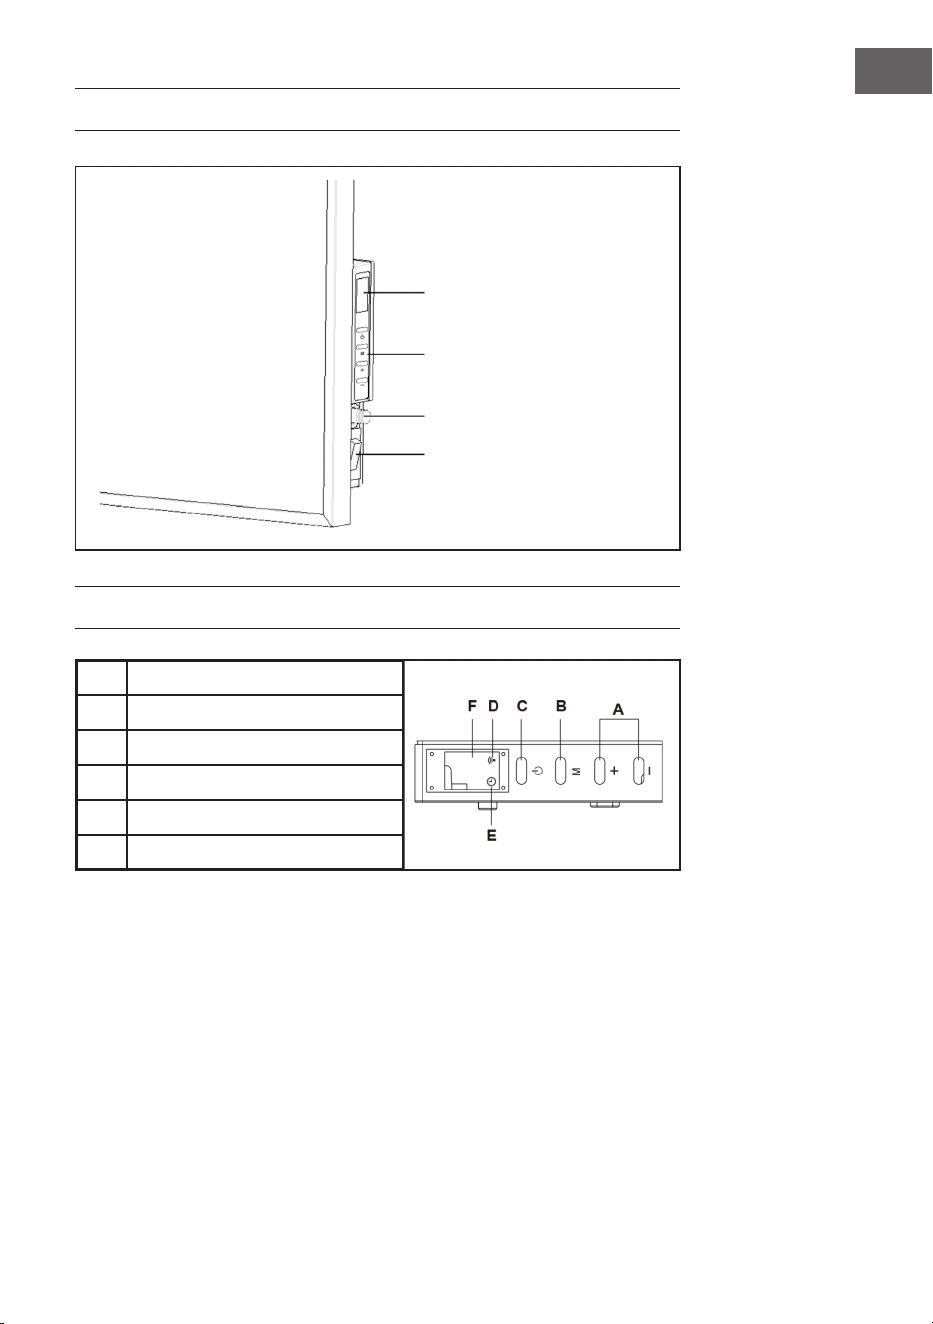
BEDIENFELD
A
Hoch-/Runter-Taste
B
Timer und WiFi-Taste
C
Start-/Stop-Taste
D
WiFi-Licht
E
Timer-Licht
F
Display
LED Display
Tasten
Raumtemperatursensor
Beleuchteter Ein-/
Aus-Schalter

8
DE
BEDIENUNG
Inbetriebnahme
1. Überprüfen Sie die Heizung, um sicherzugehen, dass sie nicht beschädigt ist.
2. Stecken Sie den Stecker in die Steckdose.
3. Schalten Sie das Gerät am Ein-Schalter ein. Die Betriebslampe geht an und die
Heizung bendet sich im Standby-Modus.
4. Drücken Sie nun die Start-Taste. Die Heizung beginnt zu arbeiten. Das Display zeigt
die Raumtemperatur an.
5. Wenn sie das Gerät ausschalten möchten, drücken Sie zuerst die Stop-Taste,
um das Gerät auszuschalten. Die Heizung bendet sich nun im Standby-Modus.
Stellen Sie dann den Aus-Schalter auf (O). Die Betriebslampe erlischt. ZIehen Sie
zum Schluss den Stecker aus der Steckdose.
Thermostat einstellen
1. Wenn Sie die [+] oder [-] Taste drücken, blinkt die aktuelle Temperatureinstellung
5-mal im Display.
2. Stellen Sie die gewünschte Temperatur ein, indem Sie die [+] oder [-] Taste drücken,
während sie blinkt. Mit jedem Tastendruck wird die Temperatur um 1 °C erhöht
oder verringert.
3. Das Gerät behält die eingestellte Temperatur bei, indem ie Heizung während dem
Betrieb mehrmals automatisch an- und ausgeht.
Timer einstellen
• Ein kurzer Druck auf die Taste M schaltet den Timer ein. Die Timerlampe leuchtet
und die Anzeige blinkt.
• Sie können nun die Zeit einstellen, zu der die Heizung automatisch ausgehen soll,
indem Sie die Tasten [+] oder [-] drücken.
• Bei jedem Tastendruck geht die Zeit eine Stunde hoch oder runter. Warten Sie bis
die Timerzeit 5x blinkt und übernommen wurde.
• Das Display zeigt nun abwechselnd die Raumtemperatur und die eingestellte
Stundenzahl an.
• Sobals die eingestellte Zeit abgelaufen ist erlischt das Display und die Heizung
schaltet sich utomatisch aus.

9
DE
WLAN-Einstellung
Wenn das Heizgerät eingeschaltet ist, blinkt das WiFi-Symbol nicht automatisch. Um
in den Kopplungsmodus zu gelangen, halten Sie die Taste „M“ etwa 3 Sekunden lang
gedrückt, bis Sie einen Piepton hören. Das blaue WiFi-Symbol blinkt dann schnell
(zweimal pro Sekunde) und zeigt damit an, dass sich das Heizgerät im Pairing-Modus
bendet. Sie können nun das Heizgerät über WiFi mit Ihrem Smartphone verbinden.
Wenn Sie das Gerät einschalten, blinkt das WLAN-Symbol nicht automatisch. Halten
Sie die M-Taste ca. drei Sekunden lang gedrückt, bis ein Signalton ertönt. Dadurch
werden die WLAN-Einstellungen zurückgesetzt und das blaue Licht blinkt schnell
(zweimal pro Sekunde). Die maximale Zeit für die Netzwerkkonguration beträgt 180
Sekunden. Danach muss der Koppelungsmodus wieder aktiviert werden. Halten Sie die
WLAN-Taste drei Sekunden lang gedrückt.
GERÄTESTEUERUNG PER SMARTPHONE
Wenn Sie Ihr Klarstein-Gerät in Ihr heimisches WLAN einbinden, können Sie es ganz
bequem über die dazugehörige Klarstein-App bedienen. Die App ermöglicht es Ihnen
nicht nur das Gerät über Ihr Smartphone fernzusteuern, sondern bietet Ihnen zudem
Zugang zu Rezepten und weiterführenden Informationen.
Gehen Sie folgendermaßen vor, um Ihr Smartphone mit Ihrem Klarstein-Gerät zu
verbinden:
1 Laden Sie zuerst die Klarstein-App herunter, indem Sie mit Ihrem Smartphone den
QR-Code sannen (siehe unten) oder laden Sie diese direkt aus dem App Store oder
bei Google Play herunter.
2 Versichern Sie sich, dass Ihr Smartphone mit dem selben WiFi-Netzwerk verbunden
ist, mit dem Ihr Klarstein-Gerät verbunden werden soll.
3 Öffnen Sie die Klarstein-App.
4 Melden Sie sich mit Ihrem Konto an. Wenn Sie noch keinen Account haben,
registrieren Sie sich in der Klarstein-App.
5 Folgen Sie den Anweisungen der App.
10
DE
App-Download
Verwenden Sie die Scan-Funktion Ihres Handys, um den QR-Code zu scannen und
speichern Sie die App auf Ihrem Smartphone.
Hinweis: Weitere Hinweise zur Bedienung der App und Hilfestellungen zur
Herstellung der Verbindung mit Ihrem Gerät liefert Ihnen die App, sobald Sie sie das
erste Mal öffnen.
iOS Android
Fehlerbebung bei Verbindungsproblemen
Wenn Ihr Klarstein-Gerät im WLAN nicht gefunden werden kann, überprüfen Sie
folgendes:
• Ist das Gerät eingesteckt?
• Ist die WiFi-Funktion des Smartphones aktiviert?
• Ist die WiFi-Funktion des Klarstein-Gerätes aktiviert? (Befolgen Sie die
Anweisungen in der App)
• Ist das WLAN-Passwort korrekt eingegeben worden?
• Benden sich Router, Klarstein-Gerät und Smartphone während des
Kopplungsversuches in unmittelbarer Nähe? (Idealerweise nicht mehr als 5 m
voneinander entfernt)
• Falls sie in den Einstellungen ihres W-Lan-Routers das 2,4 GHz Band deaktiviert
haben, aktivieren Sie dieses in Ihren Routereinstellungen.
Hinweis: Für weitere Hilfestellungen folgen Sie den Anweisungen der App beim
Verbindungsaufbau.

11
DE
REINIGUNG UND PFLEGE
Schalten Sie das Heizgerät vor der Reinigung aus und lassen Sie es abkühlen. Trennen
Sie die Stromzufuhr zum Gerät. Die Außenseite kann mit einem weichen, feuchten Tuch
abgewischt und anschließend getrocknet werden. Verwenden Sie keine scheuernden
Reinigungspulver oder Möbelpolitur, da dies die Oberäche beschädigen kann.
Um das Heizgerät von der Wand zu lösen, öffnen Sie einfach die Schraubkappe und
schrauben Sie die Schrauben ab. Wenn Sie die Heizung für einen kurzen Zeitraum nicht
benutzen, ziehen Sie den Stecker. Wenn Sie das Gerät länger nicht benutzen, können
Sie ihn von der Wand entfernen oder abdecken.
FEHLERSUCHE UND FEHLERBEHEBUNG
Wenn Ihr Heizgerät nicht funktioniert, befolgen Sie bitte diese Anweisungen:
• Vergewissern Sie sich, dass er Hauptschalter oder Ihre Sicherung ordnungsgemäß
funktioniert.
• Vergewissern Sie sich, dass die Heizung angeschlossen ist und die Steckdose
ordnungsgemäß funktioniert.
• Wenn der ON/OFF-Schalter in der Stellung ON nicht leuchtet, enden Sie sich an
einen Fachbetrieb in Ihrer Nähe.
Hinweis: Wenn Sie weiterhin ein Problem mit Ihrem Heizgerät haben, versuchen
Sie nicht das Gerät zu öffnen oder selbst zu reparieren. Dies kann zum Verlust der
Garantie, zu Schäden oder Verletzungen führen. Wenden Sie Sich an den Händler.
12
DE
SPEZIELLE ENTSORGUNGSHINWEISE FÜR
VERBRAUCHER IN DEUTSCHLAND
Entsorgen Sie Ihre Altgeräte fachgerecht. Dadurch wird gewährleistet, dass die
Altgeräte umweltgerecht verwertet und negative Auswirkungen auf die Umwelt und
menschliche Gesundheit vermieden werden. Bei der Entsorgung sind folgende Regeln
zu beachten:
• Jeder Verbraucher ist gesetzlich verpichtet, Elektro- und Elektro-
nikaltgeräte (Altgeräte) sowie Batterien und Akkus getrennt vom
Hausmüll zu entsorgen. Sie erkennen die entsprechenden Altgeräte
durch folgendes Symbol der durchgestrichene Mülltonne (WEEE
Symbol).
• Sie haben Altbatterien und Altakkumulatoren, die nicht vom Altgerät umschlossen
sind, sowie Lampen, die zerstörungsfrei aus dem Altgerät entnommen werden
können, vor der Abgabe an einer Entsorgungsstelle vom Altgerät zerstörungsfrei zu
trennen.
• Bestimmte Lampen und Leuchtmittel fallen ebenso unter das Elektro- und
Elektronikgesetz und sind dementsprechend wie Altgeräte zu behandeln.
Ausgenommen sind Glühbirnen und Halogenlampen. Entsorgen Sie Glühbirnen
und Halogenlampen bitte über den Hausmüll, sofern Sie nicht das WEEE Symbol
tragen.
• Jeder Verbraucher ist für das Löschen von personenbezogenen Daten auf dem
Elektro- bzw. Elektronikgerät selbst verantwortlich.
Rücknahmepicht der Vertreiber
Vertreiber mit einer Verkaufsäche für Elektro- und Elektronikgeräte von mindestens 400
Quadratmetern sowie Vertreiber von Lebensmitteln mit einer Gesamtverkaufäche von
mindestens 800 Quadratmetern, die mehrmals im Kalenderjahr oder dauerhaft Elektro-
und Elektronikgeräte anbieten und auf dem Markt bereitstellen, sind verpichtet,
1 bei der Abgabe eines neuen Elektro- oder Elektronikgerätes an einen Endnutzer ein
Altgerät des Endnutzers der gleichen Geräteart, das im Wesentlichen die gleichen
Funktionen wie das neue Gerät erfüllt, am Ort der Abgabe oder in unmittelbarer
Nähe hierzu unentgeltlich zurückzunehmen und
2 auf Verlangen des Endnutzers Altgeräte, die in keiner äußeren Abmessung größer
als 25 Zentimeter sind, im Einzelhandelsgeschäft oder in unmittelbarer Nähe hierzu
unentgeltlich zurückzunehmen; die Rücknahme darf nicht an den Kauf eines Elektro-
oder Elektronikgerätes geknüpft werden und ist auf drei Altgeräte pro Geräteart
beschränkt.

13
DE
• Bei einem Vertrieb unter Verwendung von Fernkommunikationsmitteln ist die
unentgeltliche Abholung am Ort der Abgabe auf Elektro- und Elektronikgeräte der
Kategorien 1, 2 und 4 gemäß § 2 Abs. 1 ElektroG, nämlich „Wärmeüberträger“,
„Bildschirmgeräte“ (Oberäche von mehr als 100 cm²) oder „Großgeräte“
(letztere mit mindestens einer äußeren Abmessung über 50Zentimeter)
beschränkt. Für andere Elektro- und Elektronikgeräte (Kategorien 3, 5, 6) ist eine
Rückgabemöglichkeit in zumutbarer Entfernung zum jeweiligen Endnutzer zu
gewährleisten.
• Altgeräte dürfen kostenlos auf dem lokalen Wertstoffhof oder in folgenden
Sammelstellen in Ihrer Nähe abgegeben werden:
www.take-e-back.de
• Für Elektro- und Elektronikgeräte der Kategorien 1, 2 und 4 an bieten wir auch die
Möglichkeit einer unentgeltlichen Abholung am Ort der Abgabe. Beim Kauf eines
Neugeräts haben sie die Möglichkeit eine Altgerätabholung über die Webseite
auszuwählen.
• Batterien können überall dort kostenfrei zurückgegeben werden, wo sie verkauft
werden (z. B. Super-, Bau-, Drogeriemarkt). Auch Wertstoff- und Recyclinghöfe
nehmen Batterien zurück. Sie können Batterien auch per Post an uns zurücksenden.
Altbatterien in haushaltsüblichen Mengen können Sie direkt bei uns von Montag bis
Freitag zwischen 08:00 und 16:00 Uhr unter der folgenden Adresse unentgeltlich
zurückgeben:
Chal-Tec Fulllment GmbH
Norddeutschlandstr. 3
47475 Kamp-Lintfort
• Wichtig zu beachten ist, dass Lithiumbatterien aus Sicherheitsgründen vor der
Rückgabe gegen Kurzschluss gesichert werden müssen (z. B. durch Abkleben der
Pole).
• Finden sich unter der durchgestrichenen Mülltonne auf der Batterie zusätzlich die
Zeichen Cd, Hg oder Pb ist das ein Hinweis darauf, dass die Batterie gefährliche
Schadstoffe enthält. (»Cd« steht für Cadmium, »Pb« für Blei und »Hg« für
Quecksilber).
Hinweis zur Abfallvermeidung
Indem Sie die Lebensdauer Ihrer Altgeräte verlängern, tragen Sie dazu bei, Ressourcen
efzient zu nutzen und zusätzlichen Müll zu vermeiden. Die Lebensdauer Ihrer Altgeräte
können Sie verlängern indem Sie defekte Altgeräte reparieren lassen. Wenn sich
Ihr Altgerät in gutem Zustand bendet, könnten Sie es spenden, verschenken oder
verkaufen.
14
DE
HINWEISE ZUR ENTSORGUNG
Wenn es in Ihrem Land eine gesetzliche Regelung zur
Entsorgung von elektrischen und elektronischen Geräten
gibt, weist dieses Symbol auf dem Produkt oder auf der
Verpackung darauf hin, dass dieses Produkt nicht im
Hausmüll entsorgt werden darf. Stattdessen muss es zu
einer Sammelstelle für das Recycling von elektrischen
und elektronischen Geräten gebracht werden. Durch
regelkonforme Entsorgung schützen Sie die Umwelt und die
Gesundheit Ihrer Mitmenschen vor negativen Konsequenzen.
Informationen zum Recycling und zur Entsorgung dieses
Produkts, erhalten Sie von Ihrer örtlichen Verwaltung oder
Ihrem Hausmüllentsorgungsdienst.
KONFORMITÄTSERKLÄRUNG
Hersteller:
Chal-Tec GmbH, Mühlenstraße 25, 10243 Berlin
Kontakt: info@electronic-star.de
Hiermit erklärt Chal-Tec GmbH, dass der Funkanlagentyp
Wonderwall Smart 600 der Richtlinie 2014/53/EU
entspricht. Der vollständige Text der EU-Konformitätserklärung
ist unter der folgenden Internetadresse verfügbar: use.
berlin/10032782
15
EN
Dear Customer,
Congratulations on purchasing this device. Please read the
following instructions carefully and follow them to prevent
possible damages. We assume no liability for damage caused
by disregard of the instructions and improper use. Scan the QR
code to get access to the latest user manual and more product
information.
CONTENT
Product Data Sheet16
Safety Instructions17
Wall Mounting INstructions18
Product Overview19
Control Panel19
OPeration20
Device Control by Smartphone21
Cleaning and Care23
Troubleshooting23
Disposal Considerations24
Declaration of Conformity24
TECHNICAL DATA
Item number 10032782
Power supply 220-240 V ~ 50 Hz
Power 600 W
WiFi standard
802.11 b/g/n
WiFi frequency
2,4 GHz
WiFi radio-frequency power (max.)
20 dBm
Note: An accessory kit for wall mounting is available for this article number
10032802.
16
EN
PRODUCT DATA SHEET
Model identier(s): 10032782
Item Symbol Value Unit Item Unit
Heat output Type of heat output/room temperature control
Nominal heat output P
nom
0.6
kW single stage heat output and no room
temperature control
no
Minimum heat output
(indicative)
P
min
0.6
kW Two or more manual stages, no room
temperature control
no
Maximum continuous
heat output
P
max,c
0.6
kW With mechanic thermostat room
temperature control
no
Power consumption With electronic room temperature
control
no
In off mode Po 0.00
W
Electronic room temperature control
plus day timer
no
In standby mode Psm 0.35
W
electronic room temperature control
plus week timer
yes
In idle mode Pidle 0.83
W
Other control options (multiple selections
possible)
In network standby Pnsm 0.79
W
room temperature control, with
presence detection
no
Standby mode with display of information or
status
yes Room temperature control, with open
window detection
yes
Seasonal space heating
energy
Eciency in active mode
n
S, on
94 % Distance control option yes
Adaptive start control no
Working time limitation yes
Black bulb sensor no
Self-learning functionality no
Control accuracy no
Contact details Chal-Tec GmbH, Mühlenstraße 25, 10243, Berlin, Germany
17
EN
SAFETY INSTRUCTIONS
• Do not use the appliance until it is securely xed as described in this manual.
• Check that the voltage indicates on the data plate corresponds with that of the local
network before connecting the appliance to the mains power supply.
• If the supply cord is damaged, it must be replaced by a qualied engineer in order
to avoid a hazard.
• The replace heater must not be positioned directly under the power socket.
• Keep furniture, curtains and other ammable material at least 1 meter away from
the appliance.
• Do not leave the appliance unattended during use.
• Do not leave the appliance unattended whilst connected to the mains supply.
• Keep out of reach of children and do not allow them to operate this appliance.
• This appliance is intended for household use only and should not be used for
industrial purposes.
• Do not operate this appliance after a malfunction or after being damaged in any way.
• Repairs to electrical appliances should only be performed by a qualied electrician.
• Improper repairs may place user at serious risk.
• Do not run the mains cable under carpets, rugs, etc.
• Do not allow the mains cable to hang over sharp edges or come in contact with hot surfaces.
• In order to avoid overheating, do not cover the heater.
• Do not use this heater with a programmer, timer, separate remote control system or
any other device that switches the heater on automatically, since a re risk exists if
the heater is covered or positioned incorrectly.
• Never immerse the product in water or any other liquid for any reasons.
• Do not use this heater in the immediate surroundings of a bath, a shower or a
swimming pool.
• Do not use the appliance outdoors.
• Do not use if you have wet hands.
• Never use the appliance on or near hot surfaces.
• Do not operate with a damaged cord.
• Before cleaning the appliance, make sure it is unplugged from the power and that it is
completely cooled.
• Do not clean the appliance with abrasive chemicals.
• Never use accessories that are not recommended or supplied by the manufacturer.
It could cause danger to the user or damage to the appliance.
• This appliance is not intended for use by persons (including children) with reduced
Physical, sensory or mental capabilities, or lack of experience and knowledge
unless they have been given supervision or instruction concerning use of the
appliance by a person responsible for their safety.
• Children should be supervised to ensure that they do not play with the appliance.
CAUTION
Risk of burns! Some parts of this product can become very hot and
cause burns. Particular attention has to be given where children and
vulnerable people are present.
18
EN
WALL MOUNTING INSTRUCTIONS
Remove the 4 metal wall brackets and
the 4 metal screws for the wall brackets
from the bracket and attach these
brackets to the back of the unit.
Mark the positions of the four holes to
be drilled on the wall, and Drill the holes
with the drill bit. Make sure the distance
between each holes is same as the round
holes on the brackets at back of the
heater.
Insert the plastic rails tting into the
holes.
Insert the metal screws into the plastic
rails.
Lift the heater, align the four round
holes on the brackets on the back of the
heater with the four screws on the wall,
and slide the screw from position A to
position B by moving the heater slightly.
19
EN
PRODUCT OVERVIEW
CONTROL PANEL
A
Up/down key
B
Timer and wi button
C
ON/OFF switch
D
Wi light
E
Timer light
F
Display
LED display
Control buttons
Room temperature sensor
Illuminated ON/OFF switch

20
EN
OPERATION
Getting Started
1. Check the heater to be sure it is not damaged.
2. Insert the plug in the socket
3. Turn the main switch on: the light will turn on and the heater is in standby mode
4. Now press the ON/OFF switch: the heater will start working. The display will show
the room temperature.
5. Press the ON/OFF button rst in order to switch the device off. The heater is now
in standby mode. Now switch the main switch off (O); the lamp will go out. Finally
remove the plug from the socket.
Thermostat
1. If you press the + or - key, the temperature setting will ash 5x on the display.
2. You can adjust the temperature setting by pressing the + or - key while it is ashing.
With each key press, the temperature will be increased (+) or decreased (-) by one
degree.
3. The device will retain the temperature setting by switching itself on and off
automatically.
Timer
• Briey pressing once on the M button will switch the timer on. The timer lamp will
burn and the display will blink.
• You can set the time when the heater is to switch itself off by pressing the [+] or [-]
buttons: with each press it will go an hour forwards or backwards. The timer time is
set after 5x unchanged blinking.
• The display will now alternately show the room temperature and the set number of
hours. The display will then go off.
• The heater will switch itself off after the set number of hours.

21
EN
WiFi Setting
When the heater is powered on, the WiFi symbol will not ash automatically. To enter
pairing mode, press and hold the „M“ button for approximately 3 seconds until you
hear a beep. The blue WiFi symbol will then ash rapidly (twice per second), indicating
that the heater is in pairing mode. You can now connect the heater to your smartphone
via WiFi.
When you power on the machine, the WiFi symbol will not ash automatically. You
need to press and hold the M button for around three seconds until you hear a beep.
This will reset the WiFi settings and the blue light will ash rapidly (twice per second).
The maximum time for network conguration is 180 seconds. After this, pairing mode
will need to be reactivated. Hold the WiFi button for three seconds.
DEVICE CONTROL BY SMARTPHONE
If you integrate the device into your home WiFi, you can conveniently operate it via the
associated Klarstein app. The app not only allows you to remotely control the device via
your smartphone, but also gives you access to recipes and additional information.
Follow these steps to connect your smartphone to your Klarstein device:
1 Download the Klarstein app rst by scanning the QR code with your smartphone
(see below), or download it directly from App Store or Google Play.
2 Make sure your smartphone is connected to the same WiFi network that your
Klarstein device is to be connected to.
3 Open the Klarstein app.
4 Sign in to your account. If you do not have an account, sign up in the Klarstein app.
5 Follow the instructions from the app.
22
EN
App Download
Use the scan function of your smartphone to scan the QR code and save the app on
your smartphone.
Note: The app provides further information on how to use the app and help on how
to connect to your device as soon as you open it for the rst time.
iOS Android
Troubleshooting connection problems
If your Klarstein device cannot be found in the WiFi, check the following:
• Is the device plugged in?
• Is the WiFi feature of my phone enabled?
• Is the WiFi function of the Klarstein device activated? (Follow the instructions in the
app)
• Has the WiFi password been entered correctly?
• Are the router, Klarstein device and smartphone in the immediate vicinity during the
connection attempt? (Ideally no more than 5 m apart)
• If you have deactivated the 2.4 GHz band in the settings of your wireless router,
activate it in your router settings.
Note: For further help, follow the instructions in the app when setting up the
connection.

23
EN
CLEANING AND CARE
Before cleaning your heater, switch off the heater and allow it to cool. Disconnect the
electricity supply to the appliance. The outside can be cleaned by wiping it over with
a soft damp cloth and then dried. Do not use abrasive cleaning powders or furniture
polish, as this can damage the surface nish. To release the heater from the wall, for
cleaning or redecoration, just open the screw bolt cap and unscrew the bolts to take off
from the wall.
For short term storage, just plug off the heater and leave it away; for long term storage,
you can dismantle from the wall or cover it with some material.
TROUBLESHOOTING
If your heater fails to operate, please follow these instructions:
• Ensure that your circuit breaker or fuse is working properly.
• Be sure the heater is plugged in and that the electrical outlet is working properly.
• If the ON/OFF switch is not illuminated at ON position, send it to service center for
reparation directly.
Note: If you experience a problem with your heater, please see the warranty
information for instructions. Please do not attempt to open or repair the heater
yourself. Doing so may void the warranty and could cause damage or personal
injury. If the problem still persists, please contact the distributor.
24
EN
DISPOSAL CONSIDERATIONS
If there is a legal regulation for the disposal of electrical and
electronic devices in your country, this symbol on the product
or on the packaging indicates that this product must not be
disposed of with household waste. Instead, it must be taken to
a collection point for the recycling of electrical and electronic
equipment. By disposing of it in accordance with the rules, you
are protecting the environment and the health of your fellow
human beings from negative consequences. For information
about the recycling and disposal of this product, please contact
your local authority or your household waste disposal service.
DECLARATION OF CONFORMITY
Manufacturer & Importer for Great Britain:
Chal-Tec GmbH, Mühlenstrasse 25, 10243 Berlin, Germany.
Contact: info@electronic-star.de
Hereby, Chal-Tec GmbH declares that the radio equipment type
Wonderwall Smart 600 is in compliance with Directive 2014/53/
EU. The full text of the EU declaration of conformity is available at
the following internet address: use.berlin/10032782
For Great Britain: Hereby, Chal-Tec GmbH declares that the
radio equipment type Wonderwall Smart 600 is in compliance with
the relevant statutory requirements. The full text of the declaration
of conformity is available at the following internet address: use.
berlin/10032782

25
ES
Estimado cliente,
Le felicitamos por la adquisición de este producto. Lea
atentamente el siguiente manual y siga cuidadosamente las
instrucciones de uso con el n de evitar posibles daños. La
empresa no se responsabiliza de los daños ocasionados por
un uso indebido del producto o por haber desatendido las
indicaciones de seguridad. Escanee el siguiente código QR
para acceder al manual de usuario más reciente y a otra
información sobre el producto:
ÍNDICE
Hoja de datos del producto26
Instrucciones de seguridad27
Montaje sobre pared28
Vista general del aparato29
Panel de control29
Funcionamiento30
Control del dispositivo
por smartphone31
Limpieza y mantenimiento33
Búsqueda de errores y reparación de anomalías33
Retirada del aparato34
Declaración de conformidad34
DATOS TÉCNICOS
Número de artículo 10032782
Alimentación 220-240 V ~ 50 Hz
Potencia 600 W
WiFi estándar
802.11 b/g/n
WiFi frecuencia
2,4 GHz
WiFi potencia de radiofrecuencia (max.)
20 dBm
Nota: Para este artículo hay disponible un paquete de accesorios para el montaje
sobre pared con el número de artículo 10032802.
26
ES
HOJA DE DATOS DEL PRODUCTO
Identicador(es)
del modelo
10032782
Artículo Símbolo Valor Unidad Artículo Unidad
Potencia caloríca Tipo de control de la potencia caloríca/
temperatura ambiente
Potencia caloríca
nominal
P
nom
0,6
kW potencia caloríca de una etapa y sin
control de la temperatura ambiente
no
Potencia caloríca
mínima (indicativa)
P
mín.
0,6
kW Dos o más etapas manuales, sin control
de temperatura ambiente
no
Máxima potencia
caloríca continua
P
max, c
0,6
kW Con termostato mecánico de control de
la temperatura ambiente
no
Consumo de energía Con control electrónico de la
temperatura ambiente
no
En modo apagado Po 0,00 W Control electrónico de la temperatura
ambiente y programador diario
no
En modo de espera Psm 0,35 W control electrónico de la temperatura
ambiente y programador semanal
sí
En modo de reposo Pidle 0,83 W Otras opciones de control (posibilidad de
selección múltiple)
En modo de espera
de red
Pnsm 0,79 W control de la temperatura ambiente,
con detección de presencia
no
Modo de espera con visualización de
información o estado
sí Control de temperatura ambiente, con
detección de ventana abierta
sí
Energía para
calefacción por
temporada
Eciencia en modo
activo
nS
, el
94 % Opción de control de distancia sí
Control de arranque adaptativo no
Limitación del tiempo de trabajo sí
Sensor de bombilla negra no
Función de autoaprendizaje no
Control de la precisión no
Datos de contacto Chal-Tec GmbH, Mühlenstraße 25, 10243, Berlin, Germany

27
ES
INSTRUCCIONES DE SEGURIDAD
• Antes del uso, compruebe la tensión en la placa del aparato y conecte el aparato
sólo a enchufes que correspondan a la tensión del aparato.
• Si el cable de alimentación está dañado, pídale a un electricista cualicado que
lo sustituya.
• No coloque la chimenea directamente debajo de la toma de corriente.
• Manténgalo a un metro de distancia de materiales inamables como muebles,
cortinas o similares.
• No deje el aparato desatendido durante su uso.
• No deje el aparato desatendido mientras esté conectado a una toma de corriente.
• Utilice el aparato fuera del alcance de los niños. Los niños sólo pueden utilizar el
aparato bajo supervisión.
• El dispositivo no está diseñado para el uso comercial, sino sólo para el hogar y
entornos similares.
• No utilice el aparato si éste no funciona correctamente o si está dañado de alguna
manera.
• Las reparaciones sólo pueden ser realizadas por especialistas capacitados.
• Las reparaciones realizadas de forma incorrecta o independiente son un riesgo de
lesiones.
• No pase el cable de alimentación por debajo de alfombras o pasillos.
• Asegúrese de que el cable de alimentación no pase sobre bordes alados o
supercies calientes.
• No cubra el radiador para evitar el sobrecalentamiento.
• No utilice la unidad con un temporizador externo, una toma de corriente remota o
cualquier otro dispositivo que encienda y apague automáticamente la chimenea.
• No sumerja el aparato en agua u otros líquidos.
• No utilice el dispositivo cerca de bañeras, duchas o piscinas.
• No utilice el aparato al aire libre.
• No use el aparato con las manos mojadas.
• No utilice la unidad sobre o cerca de supercies calientes.
• No utilice la unidad con un cable de alimentación dañado.
• Antes de la limpieza, desconecte el enchufe de la toma de corriente y deje que la
unidad se enfríe completamente.
• No utilice productos abrasivos para la limpieza.
• Utilice únicamente accesorios explícitamente autorizados por el fabricante.
• Niños y personas con discapacidades físicas o mentales sólo deben utilizar el
aparato si han sido familiarizados con sus funciones y precauciones de seguridad
por un supervisor.
• No permita que los niños jueguen con el dispositivo.
ATENCIÓN
Peligro de quemaduras! Algunas partes de la unidad pueden
calentarse mucho. Tenga mucho cuidado de que ni usted ni sus hijos
se quemen.

28
ES
MONTAJE SOBRE PARED
Retire los 4 soportes de pared metálicos
y los 4 tornillos metálicos para los
soportes de pared del soporte y je
estos soportes a la parte posterior de la
unidad.
Marque las posiciones de los cuatro
agujeros a taladrar en la pared y taladre
los agujeros con el taladro. Asegúrese
de que la distancia entre los oricios
individuales coincida con los oricios
redondos de los soportes de la parte
posterior del radiador.
Inserte los tacos de plástico en los
oricios.
Inserte los tornillos metálicos en los tacos.
Levante la estufa, alinee los cuatro
oricios redondos de los soportes de
la parte posterior de la estufa con los
cuatro tornillos de la pared y deslice el
tornillo de la posición A a la posición B
moviendo ligeramente la estufa.

29
ES
VISTA GENERAL DEL APARATO
PANEL DE CONTROL
A
Botón Arriba/Abajo
B
Botón de temporizador y WiFi
C
Botón de iniciar/parar
D
Luz para WiFi
E
Luz para el temporizador
F
Pantalla
Pantalla LED
Botones
Sensor de temperatura
ambiente
Interruptor de encendido/
apagado iluminado

30
ES
FUNCIONAMIENTO
Puesta en marcha
1 Revise el radiador para asegurarse de que no esté dañado.
2 Enchufe el conector en la tomacorriente.
3 Encienda la unidad con el interruptor de encendido. La luz de funcionamiento se
enciende y la calefacción está en modo de espera.
4 Ahora presione el botón de inicio. La calefacción empieza a funcionar. La pantalla
muestra la temperatura ambiente.
5 Si desea apagar el dispositivo, primero pulse el botón de parada para apagar el
dispositivo. El calentador está ahora en modo de espera. A continuación, coloque
el interruptor de apagado en (O). El indicador de funcionamiento se apaga. Por
último, desenchufe el cable de alimentación de la toma de corriente.
Ajustar el termostato
1. Al pulsar el botón [+] o [-], el ajuste de temperatura actual parpadea 5 veces en la
pantalla.
2. Ajuste la temperatura deseada pulsando el botón [+] o [-] mientras esté
parpadeando. La temperatura se aumenta o se reduce por 1 °C cada vez que el
botón es presionado.
3. La unidad mantiene la temperatura ajustada encendiéndose y apagándose
automáticamente varias veces durante el funcionamiento.
Ajustar el temporizador
• Pulsando brevemente la tecla M activa el temporizador. La luz del temporizador se
enciende y la pantalla parpadea.
• Ahora puede ajustar la hora a la que la calefacción se apagará automáticamente
pulsando las teclas [+] o [-].
• El tiempo se aumenta o se reduce por una hora cada vez que es presionado el
botón. Espere hasta que el tiempo del temporizador parpadee 5 veces y la función
haya sido aceptada.
• La pantalla muestra alternativamente la temperatura ambiente y el número de horas
ajustado.
• Una vez que el tiempo ajustado ha transcurrido, la pantalla se apaga y la
calefacción se apaga automáticamente.

31
ES
Conguración WiFi
Cuando la estufa esté encendida, el símbolo WiFi no parpadeará automáticamente.
Para entrar en el modo de emparejamiento, mantenga pulsado el botón «M» durante
aproximadamente 3 segundos hasta que oiga un pitido. El símbolo azul de WiFi
parpadeará rápidamente (dos veces por segundo), indicando que la estufa está en
modo de emparejamiento. Ahora puede conectar la estufa a su smartphone a través de
WiFi.
Al encender el dispositivo, el símbolo WiFi no parpadeará automáticamente. Debe
mantener pulsado el botón M durante unos tres segundos hasta que oiga un Esto
restablecerá la conguración WiFi y la luz azul parpadeará rápidamente (dos veces
por segundo). El tiempo máximo para la conguración de la red es de 180 segundos.
Después, será necesario reactivar el modo de emparejamiento. Mantenga pulsado el
botón WiFi durante tres segundos.
CONTROL DEL DISPOSITIVO
POR SMARTPHONE
Si conecta el aparato a su red WiFi doméstica, podrá controlarlo cómodamente
mediante la App correspondiente de Klarstein. La App le permite no solo controlar el
aparato mediante su smartphone, sino que también le ofrece acceso a recetas y otra
información adicional.
Proceda del siguiente modo para conectar su smartphone al dispositivo Klarstein.
1 Descargue primero la App de Klarstein escaneando el código QR con su
smartphone (véase más abajo) o descárguelo directamente de la App Store o de
Google Play.
2 Asegúrese de que su smartphone esté conectado a la misma red WiFi a la que
debe conectarse su dispositivo Klarstein.
3 Abra la App de Klarstein.
4 Inicie sesión con su cuenta. Si aún no tiene una cuenta, regístrese en la aplicación
Klarstein.
5 Siga las instrucciones que aparecerán en la app.
32
ES
Descarga de la app
Utilice la función de escaneado de su teléfono para escanear el código QR y guarde
la app en su smartphone.
Nota: La aplicación proporciona más información sobre cómo usar la aplicación y
ayuda sobre cómo conectarse al dispositivo tan pronto como se abre por primera
vez.
iOS Android
Solución de problemas de conexión
Si su dispositivo Klarstein no se encuentra en la WiFi, compruebe lo siguiente:
• ¿Está enchufado el dispositivo?
• ¿Está activada la función WiFi de mi teléfono?
• ¿Está activada la función WiFi del dispositivo Klarstein? (Sigue las instrucciones de
la aplicación)
• ¿Se ha introducido correctamente la contraseña WiFi?
• ¿Están el router, el dispositivo Klarstein y el smartphone en las inmediaciones
durante el intento de conexión? (Idealmente no más de 5 m de separación)
• Si ha desactivado la banda de 2,4 GHz en la conguración de su encaminador
inalámbrico, actívela en la conguración de su encaminador.
Nota: Para obtener más ayuda, sigue las instrucciones de la aplicación al congurar
la conexión.

33
ES
LIMPIEZA Y MANTENIMIENTO
Apague el radiador antes de limpiarlo y deje que se enfríe. Desconecte la fuente de
alimentación de la unidad. La parte exterior puede ser limpiada con un paño suave y
húmedo y luego secada. No utilice polvo de limpieza abrasivo ni abrillantador para
muebles, ya que esto puede dañar la supercie.
Para retirar el radiador de la pared, simplemente abra el tapón de rosca y desatornille
los tornillos. Si no utiliza el calentador durante un corto período de tiempo, desconecte
el enchufe. Si no va a utilizar la unidad durante mucho tiempo, puede retirarla de la
pared o cubrirla.
BÚSQUEDA DE ERRORES Y REPARACIÓN DE
ANOMALÍAS
Si su radiador no funciona, siga estas instrucciones:
• Asegúrese de que el interruptor principal o el fusible funcionan correctamente.
• Asegúrese de que el calentador esté enchufado y de que la toma de corriente
funcione correctamente.
• Si el interruptor de encendido/apagado no está iluminado en la posición ON,
póngase en contacto con un especialista cerca de donde vive usted.
Nota: Si sigue teniendo problemas con su radiador, no intente abrirlo ni repararlo
usted mismo. Esto puede resultar en la pérdida de la garantía, daños o lesiones.
Póngase en contacto con el distribuidor.
34
ES
RETIRADA DEL APARATO
Si en su país existe una disposición legal relativa a la
eliminación de aparatos eléctricos y electrónicos, este
símbolo estampado en el producto o en el embalaje
advierte que no debe eliminarse como residuo doméstico.
En lugar de ello, debe depositarse en un punto de recogida
de reciclaje de aparatos eléctricos y electrónicos. Una
gestión adecuada de estos residuos previene consecuencias
potencialmente negativas para el medio ambiente y la salud
de las personas. Puede consultar más información sobre el
reciclaje y la eliminación de este producto contactando con
su administración local o con su servicio de recogida de
residuos.
DECLARACIÓN DE CONFORMIDAD
Fabricante:
Chal-Tec GmbH, Mühlenstraße 25, 10243 Berlín, Alemania.
Contacto: info@electronic-star.de
Por la presente, Chal-Tec GmbH declara que el tipo de
equipo radioeléctrico Wonderwall Smart 600 es conforme
con la Directiva 2014/53/UE. El texto completo de la
declaración UE de conformidad está disponible en la
dirección Internet siguiente: use.berlin/10032782
35
FR
Chère cliente, cher client,
Toutes nos félicitations pour l’acquisition de ce nouvel appareil.
Veuillez lire attentivement et respecter les instructions de ce mode
d’emploi an d’éviter d’éventuels dommages. Nous ne saurions
être tenus pour responsables des dommages dus au non-respect
des consignes et à la mauvaise utilisation de l’appareil. Scannez
le QR-Code pour obtenir la dernière version du mode d‘emploi
et à d‘autres informations concernant le produit :
SOMMAIRE
Fiche de données produit36
Consignes de sécurité37
Installation murale38
Aperçu de l‘appareil39
Panneau de commande39
Utilisation40
Contrôle de l‘appareil
par smartphone41
Nettoyage et entretien43
Identication et résolution des problèmes43
Conseils pour le recyclage44
Déclaration de conformité44
FICHE TECHNIQUE
Numéro d'article 10032782
Alimentation 220-240 V ~ 50 Hz
Puissance 600 W
WiFi standard
802.11 b/g/n
WiFi fréquence
2,4 GHz
WiFi puissance de radiofréquence (max.)
20 dBm
Remarque : Pour cet article, un pack d‘accessoires est disponible sous le numéro
d‘article 10032802 pour le montage mural.
36
FR
FICHE DE DONNÉES PRODUIT
Identiant(s) du
modèle :
10032782
Article Symbole Valeur Appareil Article Appareil
Puissance calorique Type de chauffage/régulation de la
température ambiante
Puissance calorique
nominale
P
nom
0,6
kW production de chaleur en une
seule étape et pas de contrôle de la
température ambiante
non
Puissance calorique
minimale (indicative)
P
min
0,6
kW Deux étapes manuelles ou plus,
pas de contrôle de la température
ambiante
non
Puissance calorique
maximale continue
P
max,c
0,6
kW Avec thermostat mécanique de
régulation de la température
ambiante
non
Consommation électrique Avec contrôle électronique de la
température ambiante
non
En mode arrêt Po 0,00 W Avec contrôle électronique de la
température ambiante et minuterie
quotidienne
non
En mode veille Psm 0,35 W Avec contrôle électronique de la
température ambiante et minuterie
hebdomadaire
oui
En mode veille P en
veille
0,83 W Autres options de contrôle (plusieurs
sélections possibles)
En attente de réseau Pnsm 0,79 W contrôle de la température ambiante,
avec détection de présence
non
Mode veille avec achage d'informations
ou d'état
oui Contrôle de la température
ambiante, avec détection de fenêtre
ouverte
oui
Énergie saisonnière
pour le chauffage
des locaux.
Ecacité en mode
actif.
n
S, on
94 % option contrôle à distance oui
contrôle adaptatif du démarrage non
limitation du temps de
fonctionnement
oui
capteur à ampoule noire non
Fonction d'auto-apprentissage non
Précision du contrôle non
Coordonnées de
contact
Chal-Tec GmbH, Mühlenstrasse 25, 10243 Berlin, Allemagne.

37
FR
CONSIGNES DE SÉCURITÉ
• Avant d‘utiliser l‘appareil, vériez la tension sur la plaque signalétique et branchez
l‘appareil uniquement aux prises correspondant à la tension indiquée.
• Si le câble d‘alimentation est endommagé, faites-le remplacer par un professionnel
qualié.
• Ne placez pas la cheminée directement sous la prise de courant.
• Gardez un mètre d‘écart par rapport aux matériaux combustibles tels que les
meubles, rideaux ou similaires.
• Ne laissez pas l‘appareil sans surveillance pendant l‘utilisation.
• Ne laissez pas l‘appareil sans surveillance lorsqu‘il est branché.
• Utilisez l‘appareil hors de portée des enfants. Les enfants ne sont autorisés à utiliser
l‘appareil que sous surveillance.
• L‘appareil n‘est pas destiné à un usage commercial, mais seulement pour une
utilisation dans le cadre domestique et dans des conditions similaires.
• N‘utilisez pas l‘appareil s‘il présente un dysfonctionnement ou s‘il a été
endommagé de quelque façon que ce soit.
• Les réparations ne peuvent être effectuées que par des spécialistes qualiés.
• Les réparations effectuées incorrectement ou par l‘utilisateur présentent un risque de
blessure.
• Ne faites pas passer le câble d‘alimentation sous une moquette ou un tapis.
• Assurez-vous que le câble d‘alimentation ne passe pas sur des rebords tranchants
ou des surfaces chaudes.
• Ne couvrez pas la cheminée pour éviter la surchauffe.
• N‘utilisez pas l‘appareil avec une minuterie externe, une prise de courant à
distance ou un autre appareil qui allume et éteint automatiquement le foyer.
• Ne plongez pas l‘appareil dans l‘eau ou dans d‘autres liquides.
• N‘utilisez pas l‘appareil près d‘une baignoire, d‘une douche ou d‘une piscine.
• N‘utilisez pas l‘appareil à l‘extérieur.
• N‘utilisez pas l‘appareil avec les mains mouillées.
• N‘utilisez pas l‘appareil sur ou à proximité de surfaces chaudes.
• N‘utilisez pas l‘appareil avec un câble d‘alimentation endommagé.
• Avant le nettoyage, débranchez la che de la prise et laissez l‘appareil refroidir
complètement.
• N‘utilisez pas d‘abrasifs pour le nettoyage.
• N‘utilisez que des accessoires expressément approuvés par le fabricant.
• Les enfants, les personnes physiquement et psychiquement handicapées ne doivent
utiliser l‘appareil que si une personne responsable de leur sécurité leur a bien
expliqué les fonctions de l‘appareil et les précautions de sécurité.
• Assurez-vous que les enfants ne jouent pas avec l‘appareil
ATTENTION
Risque de brûlure ! Certaines parties de l‘appareil peuvent devenir
très chaudes. Veillez à ne pas vous y brûler, vous-même ou vos
enfants.
38
FR
INSTALLATION MURALE
Retirez les 4 supports muraux métalliques
et les 4 vis métalliques pour les supports
muraux du support et xez ces supports
à l‘arrière de l‘appareil.
Marquez les positions des quatre trous à
percer sur le mur et percez les trous avec
la perceuse.
Assurez-vous que la distance entre
chaque trou correspond aux trous ronds
sur les supports à l‘arrière du radiateur.
Insérez les chevilles en plastique dans
les trous.
Placez les vis métalliques dans les
chevilles.
Soulevez le poêle, alignez les quatre
trous ronds des supports à l‘arrière du
poêle avec les quatre vis sur le mur, et
faites glisser la vis de la position A à la
position B en déplaçant légèrement le
poêle.

39
FR
APERÇU DE L‘APPAREIL
PANNEAU DE COMMANDE
A
Touche haut/bas
B
Touche minuterie et WiFi
C
Touche Start/Stop
D
Témoin du WiFi
E
Témoin de la minuterie
F
Écran
Ecran LED
Touches
Capteur de température
ambiante
Bouton de marche/arrêt
éclairé

40
FR
UTILISATION
Mise en marche
1 Vériez le chauffage pour vous assurer qu‘il n‘est pas endommagé.
2 Insérez la che dans la prise.
3 Allumez l‘appareil avec l‘interrupteur. Le témoin de fonctionnement s‘allume et le
radiateur se trouve en mode veille.
4 Maintenant, appuyez sur le bouton Démarrer. Le radiateur se met à fonctionner.
L‘afchage indique la température de la pièce.
5 Si vous souhaitez mettre l‘appareil hors tension, appuyez d‘abord sur le bouton
Stop pour éteindre l‘appareil. Le radiateur est maintenant en mode veille. Mettez
ensuite l‘interrupteur d‘arrêt sur (O). Le témoin de fonctionnement s‘éteint. Enn,
retirez la che de la prise.
Réglage du thermostat
1. Si vous appuyez sur la touche [+] ou [-], le réglage de la température actuelle
clignote 5 fois sur l‘écran.
2. Réglez la température désirée en appuyant sur la touche [+] ou [-] pendant qu‘il
clignote. Chaque pression sur la touche élève ou abaisse la température de 1 ° C.
3. L‘appareil maintient la température réglée en allumant et en éteignant
automatiquement plusieurs fois le radiateur pendant le fonctionnement.
Réglage de la minuterie
• Un appui court sur la touche M active la minuterie. Le témoin de minuterie s‘allume
et l‘indicateur clignote.
• Vous pouvez maintenant régler l‘heure à laquelle le chauffage doit s‘éteindre
automatiquement en appuyant sur les touches [+] ou [-].
• Chaque fois que vous appuyez sur la touche, la durée augmente ou diminue
d‘une heure. Attendez que l‘heure de la minuterie clignote 5 fois et ait été prise en
compte.
• L‘afchage indique alternativement la température de la pièce et le nombre
d‘heures réglé.
• Une fois la durée écoulée, l‘afchage s‘éteint et le chauffage s‘éteint
automatiquement.

41
FR
Réglage du WiFi
Lorsque l’appareil est sous tension, le symbole WiFi ne clignote pas automatiquement.
Pour entrer en mode d’appairage, appuyez sur le bouton « M » pendant environ 3
secondes jusqu’à ce que vous entendiez un bip. Le symbole WiFi bleu clignote alors
rapidement (deux fois par seconde), indiquant que le poêle est en mode d’appairage.
Vous pouvez maintenant connecter le poêle à votre smartphone par WiFi.
Lors de la mise sous tension de l’appareil, l’icône WiFi ne clignote pas
automatiquement. Appuyez sur la touche M et maintenez-la pendant environ 3
secondes jusqu’à entendre un bip. Cette opération réinitialise les paramètres WiFi et le
voyant bleu clignote rapidement (deux fois par seconde). Le temps maximum pour la
conguration du réseau est de 180 secondes. Ensuite, le mode d’appairage devra être
réactivé. Maintenez la touche WiFi pendant trois secondes.
CONTRÔLE DE L‘APPAREIL
PAR SMARTPHONE
Si vous connectez l‘appareil à votre réseau WiFi domestique, vous pouvez l‘utiliser
facilement via l‘application Klarstein associée. L‘application vous permet non seulement
de contrôler à distance l‘appareil via votre smartphone, mais vous donne également
accès à des recettes et à des informations supplémentaires.
Procédez comme suit pour connecter votre smartphone avec votre appareil Klarstein :
1 Téléchargez d‘abord l‘application Klarstein en scannant le code QR avec votre
smartphone (voir ci-dessous) ou téléchargez-le directement depuis l‘App Store ou
Google Play.
2 Assurez-vous que votre smartphone est connecté au même réseau WiFi que votre
appareil Klarstein.
3 Ouvrez l‘application Klarstein.
4 Connectez-vous avec votre compte. Si vous n‘avez pas encore de compte,
inscrivez-vous dans l‘application Klarstein.
5 Suivez les indications de l‘application.
42
FR
Téléchargement de l‘application
Utilisez la fonction de scan de votre téléphone portable pour scanner le QR Code et
télécharger l‘application sur votre smartphone.
Remarque : L‘application fournit des informations supplémentaires sur la façon
d‘utiliser l‘application et de l‘aide sur la façon de se connecter à votre appareil dès
que vous l‘ouvrez pour la première fois.
iOS Android
Dépannage des problèmes de connexion
Si votre appareil Klarstein ne se trouve pas dans le WiFi, vériez les points suivants :
• L‘appareil est-il branché ?
• La fonction WiFi de mon téléphone est-elle activée ?
• La fonction WiFi de l‘appareil Klarstein est-elle activée ? (Suivez les instructions
dans l‘application)
• Le mot de passe WiFi a-t-il été saisi correctement ?
• Le routeur, l‘appareil Klarstein et le smartphone se trouvent-ils à proximité
immédiate pendant la tentative de connexion ? (Idéalement, pas plus de 5 m de
distance)
• Si vous avez désactivé la bande des 2,4 GHz dans les paramètres de votre routeur
sans l, activez-la dans les paramètres de votre routeur.
Remarque : Pour plus d‘aide, suivez les instructions de l‘application lors de la
conguration de la connexion.

43
FR
NETTOYAGE ET ENTRETIEN
Éteignez l‘appareil de chauffage avant de le nettoyer et laissez-le refroidir. Débranchez
l‘alimentation de l‘appareil. L‘extérieur peut être essuyé avec un chiffon doux et humide,
puis séché. N‘utilisez pas de poudre nettoyante abrasive ou de cire pour meubles car
cela pourrait endommager la surface.
Pour retirer le radiateur du mur, ouvrez simplement le capuchon des vis et dévissez. Si
vous n‘utilisez pas le radiateur pendant une courte période, débranchez-le. Si vous
n‘utilisez pas l‘appareil pendant une longue période, vous pouvez le retirer du mur ou
le couvrir.
IDENTIFICATION ET RÉSOLUTION DES
PROBLÈMES
Si votre appareil de chauffage ne fonctionne pas, suivez ces instructions :
• Assurez-vous que l‘interrupteur principal ou votre fusible fonctionne correctement.
• Assurez-vous que le radiateur est branché et que la prise de courant fonctionne
correctement.
• Si l‘interrupteur ON / OFF ne s‘allume pas en position ON, adressez-vous à une
entreprise spécialisée dans votre région.
Remarque : Si vous avez toujours un problème avec votre radiateur, n‘essayez pas
d‘ouvrir l‘appareil ou de le réparer vous-même. Cela peut entraîner une perte de
garantie, des dommages ou des blessures. Contactez votre revendeur.
44
FR
CONSEILS POUR LE RECYCLAGE
S‘il existe une réglementation pour l‘élimination ou le
recyclage des appareils électriques et électroniques dans
votre pays, ce symbole sur le produit ou sur l‘emballage
indique que cet appareil ne doit pas être jeté avec les
ordures ménagères. Vous devez le déposer dans un point
de collecte pour le recyclage des équipements électriques
et électroniques. La mise au rebut conforme aux règles
protège l‘environnement et la santé de vos semblables des
conséquences négatives. Pour plus d‘informations sur le
recyclage et l‘élimination de ce produit, veuillez contacter
votre autorité locale ou votre service de recyclage des
déchets ménagers.
Ce produit contient des piles. S‘il existe une réglementation
pour l‘élimination ou le recyclage des piles dans votre pays,
vous ne devez pas les jeter avec les ordures ménagères.
Renseignez-vous sur les dispositions locales relatives à la
collecte des piles usagées. La mise au rebut conforme aux
règles protège l‘environnement et la santé de vos semblables
des conséquences négatives.
DÉCLARATION DE CONFORMITÉ
Fabricant :
Chal-Tec GmbH, Mühlenstraße 25, 10243 Berlin, Allemagne.
Contact: info@electronic-star.de
Le soussigné, Chal-Tec GmbH, déclare que l’équipement
radioélectrique du type Wonderwall Smart 600 est conforme à
la directive 2014/53/UE. Le texte complet de la déclaration UE
de conformité est disponible à l’adresse internet suivante : use.
berlin/10032782

45
IT
Gentile Cliente,
La ringraziamo per aver acquistato il dispositivo. La preghiamo
di leggere attentamente le seguenti istruzioni per l’uso e di
seguirle per evitare possibili danni tecnici. Non ci assumiamo
alcuna responsabilità per danni scaturiti da una mancata
osservazione delle avvertenze di sicurezza e da un uso
improprio del dispositivo. Scansionare il codice QR seguente,
per accedere al manuale d’uso più attuale e per ricevere
informazioni sul prodotto.
INDICE
Scheda informativa del prodotto46
Avvertenze di sicurezza47
Installazione alla parete48
Descrizione del dispositivo49
Pannello di controllo49
Utilizzo50
Gestione tramite smartphone51
Pulizia e manutenzione53
Ricerca e correzione degli errori53
Smaltimento54
Dichiarazione di conformità54
DATI TECNICI
Numero articolo 10032782
Alimentazione 220-240 V ~ 50 Hz
Potenza 600 W
WiFi standard
802.11 b/g/n
WiFi frequenza
2,4 GHz
WiFi potenza a radiofrequenza (max.)
20 dBm
Nota: Il pacchetto di accessori per il ssaggio a parete di questo dispositivo è
disponibile al numero articolo 10032802.
46
IT
SCHEDA INFORMATIVA DEL PRODOTTO
Identicatore/-i del
modello:
10032782
Articolo Simbolo Valore Unità Articolo Unità
Potenza termica Tipo di potenza termica/controllo della
temperatura ambiente
Potenza termica
nominale
P
nom
0,6
kW Potenza termica a singolo
stadio e nessun controllo della
temperatura ambiente
no
Potenza termica
minima (indicativa)
P
min
0,6
kW Due o più fasi manuali, senza
controllo della temperatura
ambiente
no
Potenza termica
massima continua
P
max,c
0,6
kW Con termostato meccanico per
il controllo della temperatura
ambiente
no
Consumo di energia Con controllo elettronico della
temperatura ambiente
no
A dispositivo spento Po 0,00 W Controllo elettronico della
temperatura ambiente con timer
giornaliero
no
In modalità standby Psm 0,35 W Controllo elettronico della
temperatura ambiente con timer
settimanale
sì
In modalità inattiva Pidle 0,83 W Altre opzioni di controllo (è possibile
effettuare più selezioni)
In standby di rete Pnsm 0,79 W Controllo della temperatura
ambiente, con rilevamento di
presenza
no
Modalità standby con indicazione delle
informazioni o dello stato
sì Controllo della temperatura
ambiente, con rilevamento di
nestre aperte
sì
Energia stagionale per
il riscaldamento degli
ambienti.
Ecienza in modalità
attiva
n
S, on
94 % Opzione di controllo a distanza sì
Controllo adattativo
dell'avviamento
no
Limitazione della durata operativa sì
Sensore a bulbo nero no
Funzionalità di
autoapprendimento
no
Accuratezza del controllo no
Dettagli di contatto Chal-Tec GmbH, Mühlenstrasse 25, 10243 Berlino, Germania.

47
IT
AVVERTENZE DI SICUREZZA
• Prima dell’utilizzo, controllare la tensione indicata sulla targhetta del dispositivo e
collegarlo solo a prese elettriche con tensione corrispondente.
• Se il cavo di alimentazione è danneggiato, farlo sostituire da un tecnico.
• Non posizionare il camino direttamente sotto a una presa elettrica.
• Tenere almeno un metro di distanza da materiali inammabili come mobili, tende o
similari.
• Non lasciare il dispositivo privo di controllo durante il funzionamento.
• Utilizzare il dispositivo fuori dalla portata dei bambini. I bambini possono utilizzare
il dispositivo solo se sono controllati.
• Il dispositivo non è adatto a usi commerciali, ma solo per uso casalingo e in
ambienti simili.
• Non utilizzare il dispositivo se presenta malfunzionamenti o se è stato in qualche
modo danneggiato.
• Eventuali riparazioni devono essere effettuate solo da tecnici specializzati.
• Riparazioni errate o realizzate autonomamente possono rappresentare un rischio
di lesione.
• Non far passare il cavo di alimentazione sotto a tappeti o passatoie.
• Assicurarsi che il cavo di alimentazione non passi su bordi taglienti o superci
bollenti.
• Per evitare il surriscaldamento, non coprire il camino.
• Non utilizzare il dispositivo con un timer esterno, una presa di corrente con
comando a distanza o un altro dispositivo che accende e spegne il camino
automaticamente.
• Non immergere il dispositivo in acqua o altri liquidi.
• Non utilizzare il dispositivo vicino a vasche, docce o piscine.
• Non utilizzare il dispositivo all’aperto.
• Non utilizzare il dispositivo con le mani bagnate.
• Non utilizzare il dispositivo vicino o sopra a una supercie bollente.
• Non utilizzare il dispositivo se il cavo di alimentazione è danneggiato.
• Prima della pulizia, scollegare la spina e lasciare raffreddare completamente il
dispositivo.
• Non utilizzare prodotti abrasivi per la pulizia.
• Utilizzare solo accessori espressamente autorizzati dal produttore.
• Bambini e persone con limitate capacità siche e psichiche possono utilizzare
il dispositivo solo se sono stati precedentemente istruiti in modo esaustivo sulle
funzioni e sulle procedure di sicurezza da una persona responsabile del loro
controllo.
• Assicurarsi che i bambini non giochino con il dispositivo
ATTENZIONE
Pericolo di ustione! Alcuni componenti possono diventare
estremamente caldi. Fare attenzione a non ustionarsi.
48
IT
INSTALLAZIONE ALLA PARETE
Rimuovere le 4 staffe metalliche da
parete e le 4 viti metalliche per le staffe
da parete e ssare queste staffe al retro
dell‘unità.
Segnare la posizione dei quattro fori da
realizzare col trapano. Assicurarsi che
la distanza tra i singoli fori corrisponda
ai fori tondi sul supporto sul retro del
dispositivo.
Inserire i tasselli di plastica nei fori.
Inserire le viti nei tasselli.
Sollevare il riscaldatore, allineare
i quattro fori rotondi delle staffe sul
retro del riscaldatore con le quattro viti
sulla parete e far scorrere la vite dalla
posizione A alla posizione B spostando
leggermente il riscaldatore.

49
IT
DESCRIZIONE DEL DISPOSITIVO
PANNELLO DI CONTROLLO
A
Tasto Aumentare/Diminuire
B
Tasto Timer e WiFi
C
Tasto Start/Stop
D
Luce WiFi
E
Luce Timer
F
Display
Pantalla LED
Botones
Sensor de temperatura
ambiente
Interruptor de encendido/
apagado iluminado
50
IT
UTILIZZO
Messa in funzione
1 Controllare che il radiatore non sia danneggiato.
2 Inserire la spina nella presa.
3 Accendere il radiatore con l´interruttore di accensione. La spia di funzionamento si
accende e il riscaldamento è in modalità standby.
4 Ora premere il pulsante Start. Il radiatore si mette in funzione. Il display mostra la
temperatura ambiente.
5 Se si desidera spegnere il radiatore, premere prima il pulsante Stop. Il radiatore
è ora in modalità standby. Quindi posizionare l‘interruttore su (O). La spia di
funzionamento si spegne. Inne, rimuovere la spina dalla presa.
Impostare il termostato
1. Premendo (+) o (-), viene mostrata 5 volte sul display la temperatura impostata
attuale.
2. Impostare la temperatura desiderata premendo (+) o (-) mentre l’indicazione
lampeggia. Ad ogni pressione del tasto la temperatura si alza o si abbassa di 1
°C.
3. Il dispositivo mantiene la temperatura impostata accedendosi e spegnendosi
diverse volte automaticamente.
Impostare il timer
• Premendo brevemente il tasto M si accende il timer. La spia del timer si accende e
lo schermo lampeggia.
• Ora è possibile impostare il tempo per lo spegnimento automatico del radiatore
con (+) o (-).
• Ogni pressione aggiunge o toglie un’ora. Attendere no a quando il timer
lampeggia 5 volte, per segnalare che è stato salvato il valore inserito.
• Lo schermo mostra ora alternativamente la temperatura ambiente e le ore
impostate.
• Una volta scaduto il tempo impostato, il display si spegne e il radiatore si disattiva
automaticamente.

51
IT
Impostazione WiFi
Quando il riscaldatore è acceso, il simbolo WiFi non lampeggia automaticamente. Per
accedere alla modalità di accoppiamento, tenere premuto il pulsante “M” per circa 3
secondi no a quando non si sente un segnale acustico. Il simbolo WiFi blu lampeggerà
rapidamente (due volte al secondo), indicando che il riscaldatore è in modalità di
accoppiamento. A questo punto è possibile collegare il riscaldatore allo smartphone
tramite WiFi.
Quando si accende il dispositivo, il simbolo del WiFi non lampeggia automaticamente.
Tenere premuto il tasto M per circa tre secondi nché non si sente un segnale acustico.
In questo modo si ripristinano le impostazioni del WiFi e la luce blu lampeggia
rapidamente (due volte al secondo). Il tempo massimo per la congurazione della
rete è di 180 secondi. Successivamente, sarà necessario riattivare la modalità di
accoppiamento. Tenere premuto il tasto del WiFi per tre secondi.
GESTIONE TRAMITE SMARTPHONE
Se si collega l‘apparecchio al WiFi, è possibile gestirlo comodamente con la relativa
applicazione Klarstein. L‘app non solo consente di controllare l´apparecchio da
remoto dal proprio smartphone, ma consente anche di accedere a ricette e ad altre
informazioni.
Per collegare il telefono al dispositivo Klarstein, procedere come segue:
1 Per prima cosa scaricare l‘app Klarstein scansionando il codice QR con lo
smartphone (vedere sotto) o scaricarla direttamente dall‘App Store o da Google
Play.
2 Accertarsi che lo smartphone sia connesso alla stessa rete WiFi a cui deve
collegarsi il dispositivo Klarstein.
3 Aprire l‘applicazione Klarstein.
4 Accedere con il proprio account. Se non si possiede ancora un account, registrarsi
nell‘app Klarstein.
5 Seguire le istruzioni contenute nell‘App.

52
IT
App-Download
Utilizzare la funzione di scansione del telefono per eseguire la scansione del codice
QR e salvare l‘applicazione sullo smartphone.
Nota: L‘applicazione fornisce ulteriori informazioni su come utilizzarla e su come
connettersi al dispositivo non appena viene aperta per la prima volta.
iOS Android
Risoluzione dei problemi di connessione
Se il dispositivo Klarstein non si trova nella WiFi, controllare quanto segue:
• Il dispositivo è collegato?
• La funzione WiFi del telefono è abilitata?
• La funzione WiFi del dispositivo Klarstein è attivata? (Seguire le istruzioni nell‘app)
• La password WiFi è stata immessa correttamente?
• Il router, il dispositivo Klarstein e lo smartphone sono nelle immediate vicinanze
durante il tentativo di connessione? (Idealmente a non più di 5 m di distanza)
• Se la banda da 2,4 GHz è stata disattivata nelle impostazioni del router wireless,
attivarla nelle impostazioni del router.
Nota: Per ulteriori informazioni, seguire le istruzioni nell‘app quando si congura la
connessione.
53
IT
PULIZIA E MANUTENZIONE
Spegnere il dispositivo e lasciarlo raffreddare prima di pulirlo. Staccare la spina del
dispositivo dalla presa elettrica. L’esterno può essere pulito con un panno morbido e
umido e deve poi essere asciugato. Non utilizzare detergente in polvere abrasivo o
cera per mobili, in modo da non rovinare la supercie.
Per staccare il radiatore dalla parete, aprire la copertura delle viti e svitarle. Se
il radiatore non viene utilizzato per brevi periodi, staccare la spina. Se non viene
utilizzato per periodi prolungati, staccarlo dalla parete oppure coprirlo.
RICERCA E CORREZIONE DEGLI ERRORI
Se il radiatore non funziona, seguire queste indicazioni:
• Assicurarsi che l’interruttore principale o il fusibile funzionino correttamente.
• Assicurarsi che il dispositivo sia collegato alla presa e che questa funzioni
correttamente.
• Se l’interruttore ON/OFF non si accende in posizione ON, rivolgersi a un tecnico
specializzato.
Nota: Se i problemi persistono, non cercare di aprire il dispositivo e di ripararlo
autonomamente. Questo può portare alla perdita della garanzia o causare lesioni.
Rivolgersi al rivenditore.

54
IT
SMALTIMENTO
Se nel proprio paese si applicano le regolamentazioni
inerenti lo smaltimento di dispositivi elettrici ed elettronici,
questo simbolo sul prodotto o sulla confezione segnala che
questi prodotti non possono essere smaltiti con i riuti normali
e devono essere portati a un punto di raccolta di dispositivi
elettrici ed elettronici. Grazie al corretto smaltimento dei
vecchi dispositivi si tutela il pianeta e la salute delle persone
da possibili conseguenze negative. Informazioni riguardanti il
riciclo e lo smaltimento di questi prodotti si ottengono presso
l’amministrazione locale oppure il servizio di gestione dei
riuti domestici.
DICHIARAZIONE DI CONFORMITÀ
Produttore:
Chal-Tec GmbH, Mühlenstraße 25, 10243 Berlino,
Germania.
Contattateci: info@electronic-star.de
Il fabbricante, Chal-Tec GmbH, dichiara che il tipo di
apparecchiatura radio Wonderwall Smart 600 è conforme
alla direttiva 2014/53/UE. Il testo completo della
dichiarazione di conformità UE è disponibile al seguente
indirizzo Internet: use.berlin/10032782