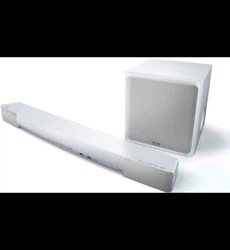

SR-X90A
Sound Bar
User Guide
EN

CONTENTS
ABOUT THIS PRODUCT AND THE USER GUIDE 8
Features..................................................................................................8
About items included with this product........................................................9
About the User Guide and provided manuals.. ............................................. 11
Notes about the safety instructions in the User Guide.. ........................................................................................................11
PART NAMES AND FUNCTIONS 12
Part names of the sound bar (front/top).. ................................................... 12
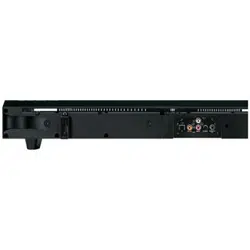
Part names of the sound bar (rear).............................................................14
Part names of the sound bar (front display).. .............................................. 15
Names of parts and functions on the front display................................................................................................................15
Switching the information screen on the front display.. .......................................................................................................18
Part names of the subwoofer.. .................................................................. 23
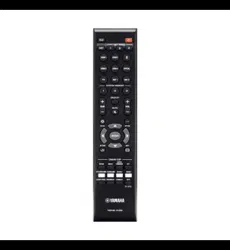
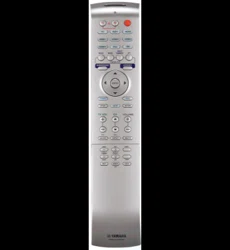
Part names of the remote control..............................................................26
PREPARATION FOR USE 29
Preparation............................................................................................29
Precautions for preparation......................................................................31
Preparing the remote control....................................................................34
Installing.. ............................................................................................. 35
Connecting to a TV...................................................................................37
HDMI Connection to a TV......................................................................................................................................................... 37
Connecting an AV device...........................................................................39
Connecting an AV device to the sound bar.............................................................................................................................39
Connecting an AV device to the TV’s HDMI input jack............................................................................................................40
Preparing to connect to a network.............................................................42
Connecting to a network.. .......................................................................................................................................................42
Connecting to a network using a LAN cable (wired connection)...........................................................................................43
Connecting to power................................................................................44
Turning on the sound bar..........................................................................45
Confirming subwoofer connection.............................................................47
2
CONTENTS

Enabling the HDMI Control function........................................................... 48
Checking that the sound bar outputs audio.................................................51
Connecting wireless speakers (TRUE X SURROUND).. ................................... 53
Setting MusicCast....................................................................................54
MusicCast.. ............................................................................................................................................................................... 54
MusicCast Controller................................................................................................................................................................55
Registering to a MusicCast network........................................................................................................................................56
TRUE X SURROUND 57
What is TRUE X SURROUND?......................................................................57
TRUE X SURROUND instructions list........................................................... 59
Preparations to use TRUE X SURROUND for the first time..............................60
Registering wireless speakers to the sound bar.....................................................................................................................60
Installing wireless speakers.....................................................................................................................................................69
Checking whether audio is output from the wireless speakers.. ..........................................................................................71
Playback operations................................................................................74
Surround playback.. ................................................................................................................................................................74
Adjusting the volume balance.................................................................................................................................................77
Playing the same audio from all speakers (ALL mode).. ........................................................................................................78
Switching between the modes (SOLO/SURROUND) of the wireless speakers.. ...................................................................80
Removing the registration of wireless speakers to the sound bar...................81
Checking the connection status.................................................................82
Checking the connection status of the wireless speakers on the sound bar........................................................................ 82
PLAYBACK 83
Basic control...........................................................................................83
Basic control during playback.................................................................................................................................................83
Playback Screen....................................................................................................................................................................... 85
Listening to TV audio.. ............................................................................. 86
Listening to TV audio using eARC/ARC.................................................................................................................................... 86
Using a digital optical audio cable to listen to TV audio on the sound bar...........................................................................87
Starting playback on a Bluetooth® device................................................... 88
Playing back audio from a Bluetooth® device........................................................................................................................88
Playback is possible using Bluetooth® wireless speakers to listen to audio on the sound bar.. ......................................... 90
3
CONTENTS

Play back using MusicCast Controller (app).................................................92
Playing streaming services......................................................................................................................................................92
Playing back audio files.. .........................................................................................................................................................93
Internet Radio Playback.. ........................................................................................................................................................94
Using AirPlay to playback music................................................................95
ADJUSTING THE SOUND TO YOUR PREFERENCE 96
Selecting music of your choice (Sound mode)..............................................96
Playback with surround sound effects matching the scene (SURROUND:AI)..
.............................................................................................................97
Selecting your favorite decoder for surround playback (3D MUSIC).. .............. 98
Playback the original audio (STRAIGHT).. ................................................... 99
Stereo playback (STEREO).. .................................................................... 100
Emphasizing a specific range of sound (sound settings)...............................101
CONFIGURATION 102
Menus..................................................................................................102
Menu types.. ...........................................................................................................................................................................102
Checking playback settings and signal information (Option menu)...............103
Basic operations in the Option menu.. .................................................................................................................................103
Option menu list.. .................................................................................................................................................................. 104
Automatic adjustment of high and low frequency range balance (Adaptive Volume).. .................................................... 105
Confirming audio signal information....................................................................................................................................106
Confirming video signal information.. ..................................................................................................................................108
Setting auto playback............................................................................................................................................................ 109
Set the volume linking the AirPlay playback device and the sound bar.. ...........................................................................110
Setting functions (Setup menu)............................................................... 111
Basic operations of the Setup menu..................................................................................................................................... 111
Setup menu list.. ....................................................................................................................................................................112
Configuring the speakers....................................................................................................................................................... 115
Making audio settings............................................................................................................................................................ 118
Making HDMI settings.. ..........................................................................................................................................................122
Setting up detailed function settings (Function).. ...............................................................................................................125
Setting up a network.. ...........................................................................................................................................................128
Configuring the Bluetooth function......................................................................................................................................132
Language settings..................................................................................................................................................................134
4
CONTENTS

Making settings from the sound bar (front display menu)............................135
Basic operations in the front display menu..........................................................................................................................135
Front display menu list.. ........................................................................................................................................................ 136
Adjusting the brightness of front display and the power indicator (Dimmer).................................................................... 137
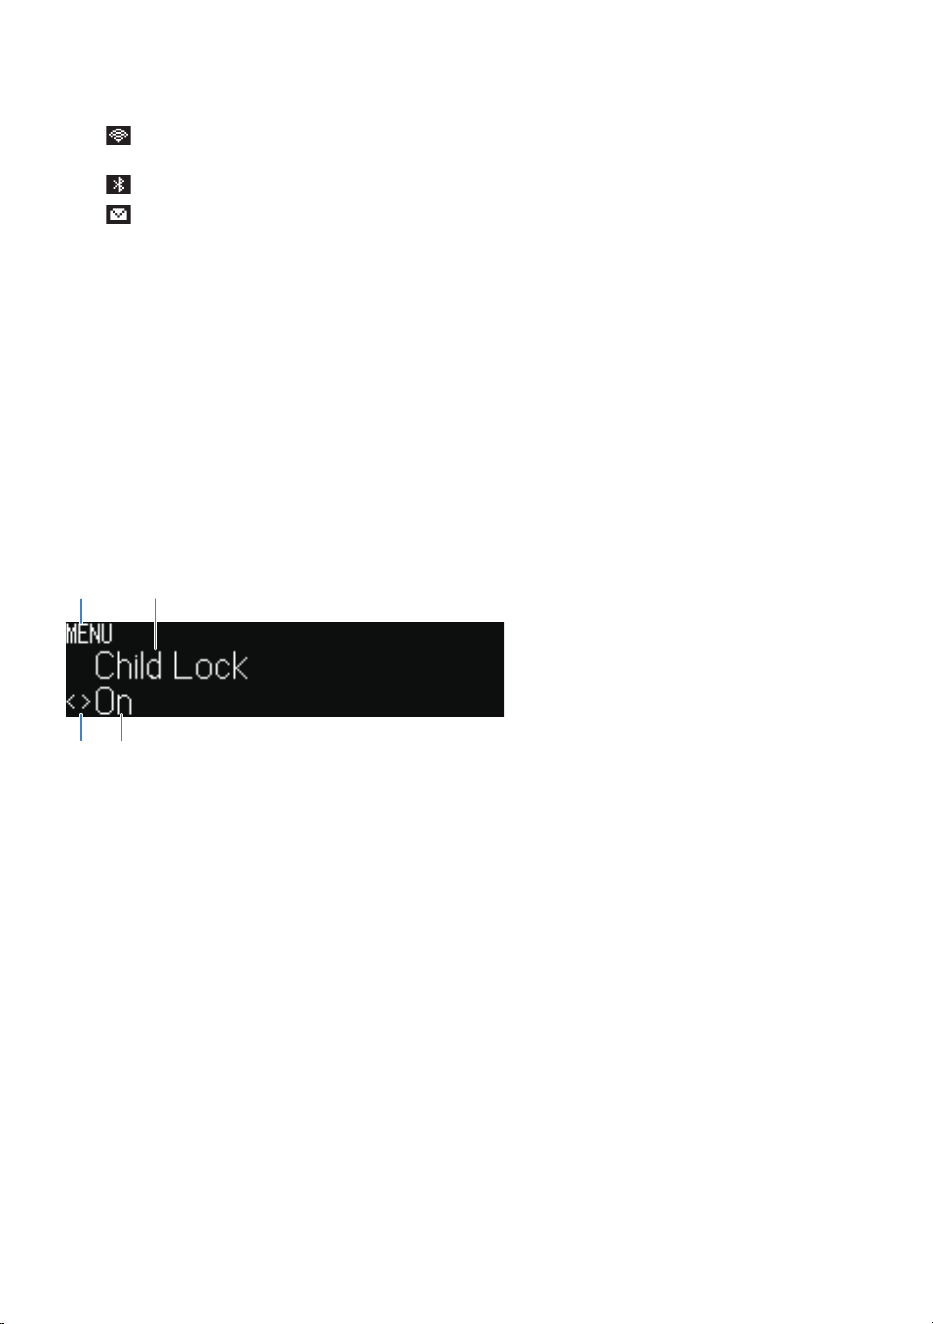
Enabling/disabling the Child Lock function.. .......................................................................................................................138
Initializing the sound bar....................................................................................................................................................... 139
Updating the firmware.. ........................................................................................................................................................ 140
UPDATING THE FIRMWARE 141
Firmware Update...................................................................................141
Updating the firmware...........................................................................142
Updating the firmware via a network.. .................................................................................................................................142
Updating the firmware with a USB flash drive.. ...................................................................................................................144
Front display error messages.. ................................................................ 146
TROUBLESHOOTING 147
Check the following first.........................................................................147
Power and overall functionality...............................................................148
The power turns off suddenly.. ............................................................................................................................................. 148
The power cannot be turned on............................................................................................................................................ 149
No operations can be performed from the sound bar controls.. ........................................................................................ 150
Front display is off when power is on (the power appears to be off).. ................................................................................151
The sound bar does not function correctly.. ........................................................................................................................152
The sound bar turns on even though no operation was performed.. .................................................................................153
The sound bar cannot be controlled with the remote control............................................................................................154
The sound bar cannot be controlled using the TV’s remote control................................................................................... 155
Sound bar input source not displayed on a TV.....................................................................................................................156
Audio playback......................................................................................157
No sound.. ..............................................................................................................................................................................157
No sound is coming from the subwoofer.............................................................................................................................. 158
The volume decreases or increases when the sound bar is turned back on.. ....................................................................159
No surround effect.. ...............................................................................................................................................................160
Noise is heard.........................................................................................................................................................................161
Bluetooth® connection.. ......................................................................... 162
The sound bar cannot be connected to a Bluetooth® device..............................................................................................162
No sound can be heard or the sound cuts off intermittently from a Bluetooth® device....................................................163
5
CONTENTS

Network...............................................................................................164
Network functions cannot be used....................................................................................................................................... 164
The sound bar cannot be connected to the Internet via a wireless LAN router (access point).. .......................................165
A wireless network cannot be not found.. ............................................................................................................................ 166
Audio cannot be played with AirPlay.. .................................................................................................................................. 167
The sound bar is not detected on an AirPlay-compatible device........................................................................................168
Streaming services cannot be played................................................................................................................................... 169
An audio file on the media server (NAS, etc.) cannot be played..........................................................................................170
Notification of a firmware update is not displayed..............................................................................................................171
Use of the app.. ..................................................................................... 172
The app cannot detect the sound bar...................................................................................................................................172
A media server (NAS, etc.) is not detected with the app...................................................................................................... 173
TRUE X SURROUND.. .............................................................................. 174
No sound is coming from both of the wireless speakers.. ...................................................................................................174
No sound is coming from one of the wireless speakers.......................................................................................................175
The volume of the connected wireless speakers is too low.. ..............................................................................................176
The wireless speakers do not turn on when the sound bar is turned on.. .......................................................................... 177
The registration of the wireless speakers does not complete.............................................................................................178
L/R cannot be selected while the wireless speakers are being registered.. .......................................................................179
Audio content from a Bluetooth device cannot be played on the wireless speakers.. ......................................................180
Broken, distorted, or unusual sounds are heard.................................................................................................................. 181
The sound bar and subwoofer are not connected automatically.. ................. 182
How to initialize (reset)/restart the sound bar...........................................183
To initialize (reset) the sound bar.. .......................................................................................................................................183
Force the sound bar to restart............................................................................................................................................... 184
“Internal Error” appears on the front display............................................185
SPECIFICATIONS 186
Specifications.. ..................................................................................... 186
Supported HDMI video signal formats.......................................................190
Supported digital audio signal formats.....................................................191
6
CONTENTS

APPENDIX 193
Making a wireless connection to a network.. ............................................. 193
Selecting a wireless connection method to a network........................................................................................................ 193
Using the WPS button to make wireless connections..........................................................................................................194
Using iPhone to make wireless connections........................................................................................................................195
Connecting wirelessly from a list of access points...............................................................................................................196
Making a wireless connection manually...............................................................................................................................197
Wireless connection with PIN-code type WPS......................................................................................................................198
Connecting a subwoofer manually.. ......................................................... 199
Trademarks..........................................................................................200
List of support centers............................................................................202
7
CONTENTS

ABOUT THIS PRODUCT AND THE USER GUIDE
Features
This subwoofer-equipped bar-shaped speaker is designed to be connected to TV sets or other AV devices.
It allows you to enjoy a highly realistic sound experience and the wide variety of content that networking
functions can provide.
In addition, the product supports “TRUE X SURROUND” using wireless speakers to provide real surround
sound.
8
ABOUT THIS PRODUCT AND THE USER GUIDE > Features
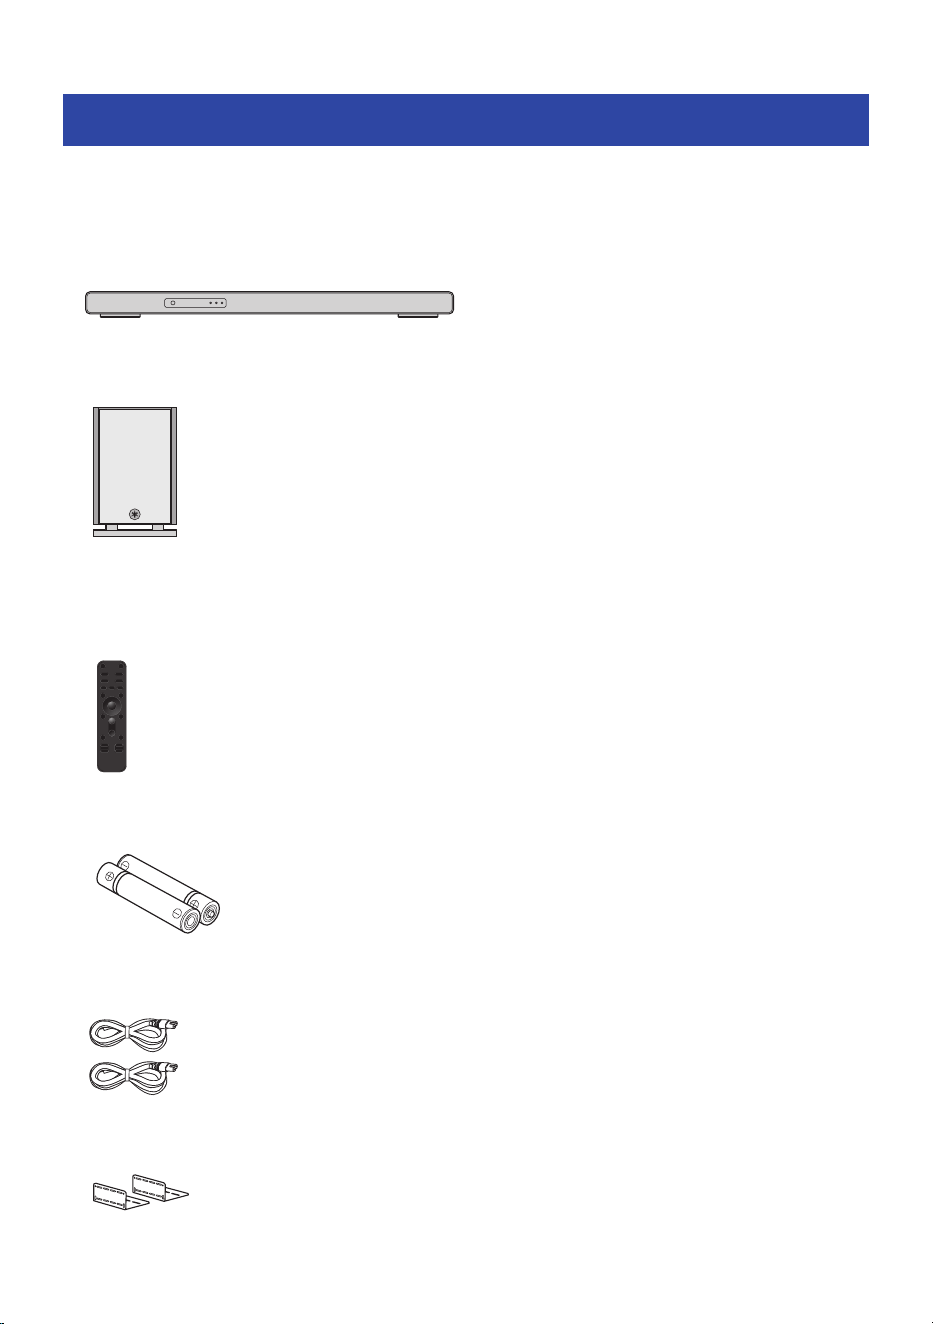
About items included with this product
The following items are included with this product. Make sure that all of the included items are present.
n
Main devices
(
Sound bar (SR-CUX90A)
(
Subwoofer (SR-WSWX90A)
n
Accessories
(
Remote control (×1)
(
Batteries (AAA, LR03, UM-4) (×2)
(
Power cords (×2)
(
Mounting brackets (×2)
9
ABOUT THIS PRODUCT AND THE USER GUIDE > About items included with this product

(
Washers (×2)
(
Quick Guide (×1)
(
Safety Guide (×1)
NOTE
An HDMI cable is not included. If you intend to use an HDMI cable to connect this product, get one that is commercially available.
Choose an HDMI cable according to the functions of the device to be connected.
10
ABOUT THIS PRODUCT AND THE USER GUIDE > About items included with this product

About the User Guide and provided manuals
Notes about the safety instructions in the User Guide
(
The User Guide (this guide) uses the following signal words for important safety information.
(
WARNING
indicates “risk of serious injury or death”.
(
CAUTION
indicates “risk of injury”.
(
NOTICE
indicates measures you must take to prevent product failure, damage or malfunction and data loss, as
well as to protect the environment.
(
NOTE
indicates notes on instructions, restrictions on functions, and additional information that may be
helpful.
(
The illustrations and screens in the descriptions are for instructional purposes only.
(
The company names and product names in this guide are the trademarks or registered trademarks of their
respective companies.
(
Various smartphones and tablet devices are collectively referred to as “smartphones”. When necessary,
the type of device is specified in the explanations.
(
This guide refers to the iPhone, iPad and iPod touch collectively as “iPhone”. Unless specified, “iPhone”
refers to iPhone, iPad and iPod touch.
(
This guide mainly explains control operations using the remote control. If operation using the controls on
the sound bar itself is required, it will be explained in each case.
n
About the manuals of this product
The following guides are included with this product or are available on the Yamaha website.
Safety Guide
This document provides information necessary for the safe use of this product. Be sure to read it before use.
Quick Guide
This document describes how to install this product after purchase from opening the box and until you can
enjoy the sound from a TV or other device.
User Guide (this guide)
This guide explains all functions and procedures for use, including those not covered in the Quick Guide.
11
ABOUT THIS PRODUCT AND THE USER GUIDE > About the User Guide and provided manuals
PART NAMES AND FUNCTIONS
Part names of the sound bar (front/top)
This section describes the part names and functions of the front and top of the sound bar.
b
a
f
h
g
g
i c d
e
a
Power button
Turn the sound bar on and off (standby).
b
Power indicator
The power status of the sound bar is displayed as follows.
Off: When the power is on, the light is off.
On: Glows in either of the following states when power is off.
(
When HDMI Control is enabled (p.122)
(
When HDMI Pass Through is enabled (p.122)
(
When Network Standby is enabled (p.128)
(
When True X Ready is enabled (p.125)
c
Front display
Displays information and menus.
d
INPUT/CONNECT button
Select the input source or register MusicCast network (p.83, p.56).
e
VOL +/- buttons
Adjust the volume.
12
PART NAMES AND FUNCTIONS > Part names of the sound bar (front/top)

f
Height speakers
g
Front speakers
h
Center speaker
i
Remote control sensor
NOTE
(
Text may become difficult to read when the temperature of the LCD display is very high or low, this is a characteristic of LCD
displays and not indicative of a malfunction.
(
Enabling the Child Lock prevents accidental operation.
(
Use the Dimmer to adjust the brightness of the power indicator and the front display.
Related links
(
“Enabling/disabling the Child Lock function”(p.138)
(
“Adjusting the brightness of front display and the power indicator (Dimmer)”(p.137)
(
“Part names of the sound bar (rear)”(p.14)
(
“Names of parts and functions on the front display”(p.15)
(
“Part names of the remote control”(p.26)
13
PART NAMES AND FUNCTIONS > Part names of the sound bar (front/top)
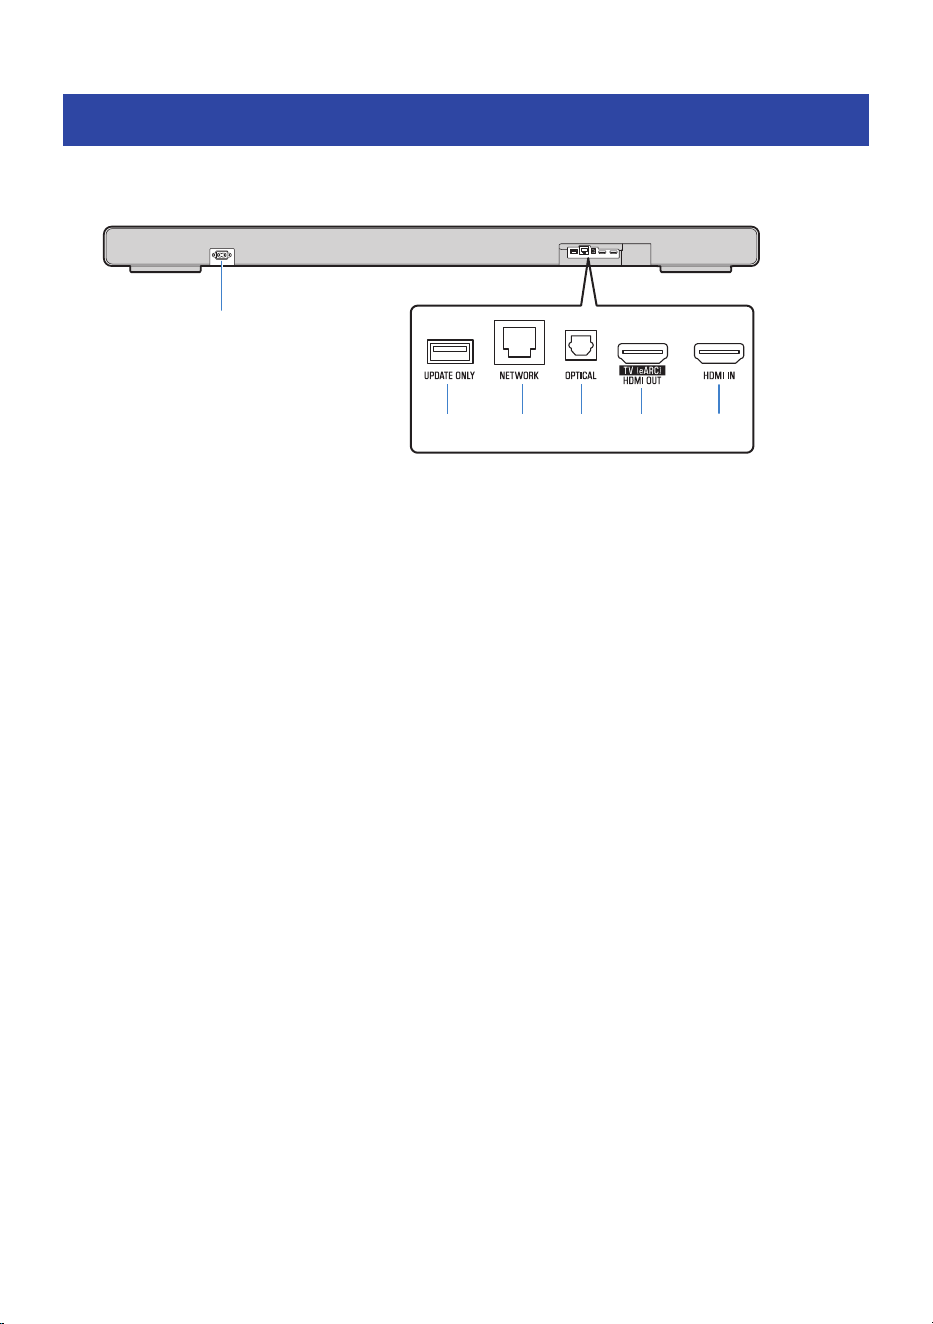
Part names of the sound bar (rear)
This section describes the part names and functions on the rear of the sound bar.
b c d e f
a
a
AC power input jack
Use to connect the power cord of the sound bar.
b
UPDATE ONLY jack
Use this jack only to update the sound bar’s firmware using a USB flash drive.
See “Firmware Update”(p.141) for details on how to download and update the firmware.
c
NETWORK jack
Connect a cable to this jack and to connect the sound bar to a network (p.43).
d
OPTICAL jack
If not using the ARC or eARC functions, use an HDMI cable (commercially available) and a digital optical audio cable
(commercially available) to connect to the TV (p.37).
The digital optical audio cable transmits the TV’s audio signal to the sound bar.
e
HDMI OUT/TV (eARC) jack
Connect a TV with an HDMI input. Video and audio are output. When using eARC/ARC, audio from the TV is input
(p.37).
f
HDMI IN jack
Connect an AV device with an HDMI output. Video and audio are Input (p.39).
Related links
(
“Part names of the sound bar (front/top)”(p.12)
(
“Part names of the sound bar (front display)”(p.15)
(
“Part names of the remote control”(p.26)
(
“Firmware Update”(p.141)
14
PART NAMES AND FUNCTIONS > Part names of the sound bar (rear)
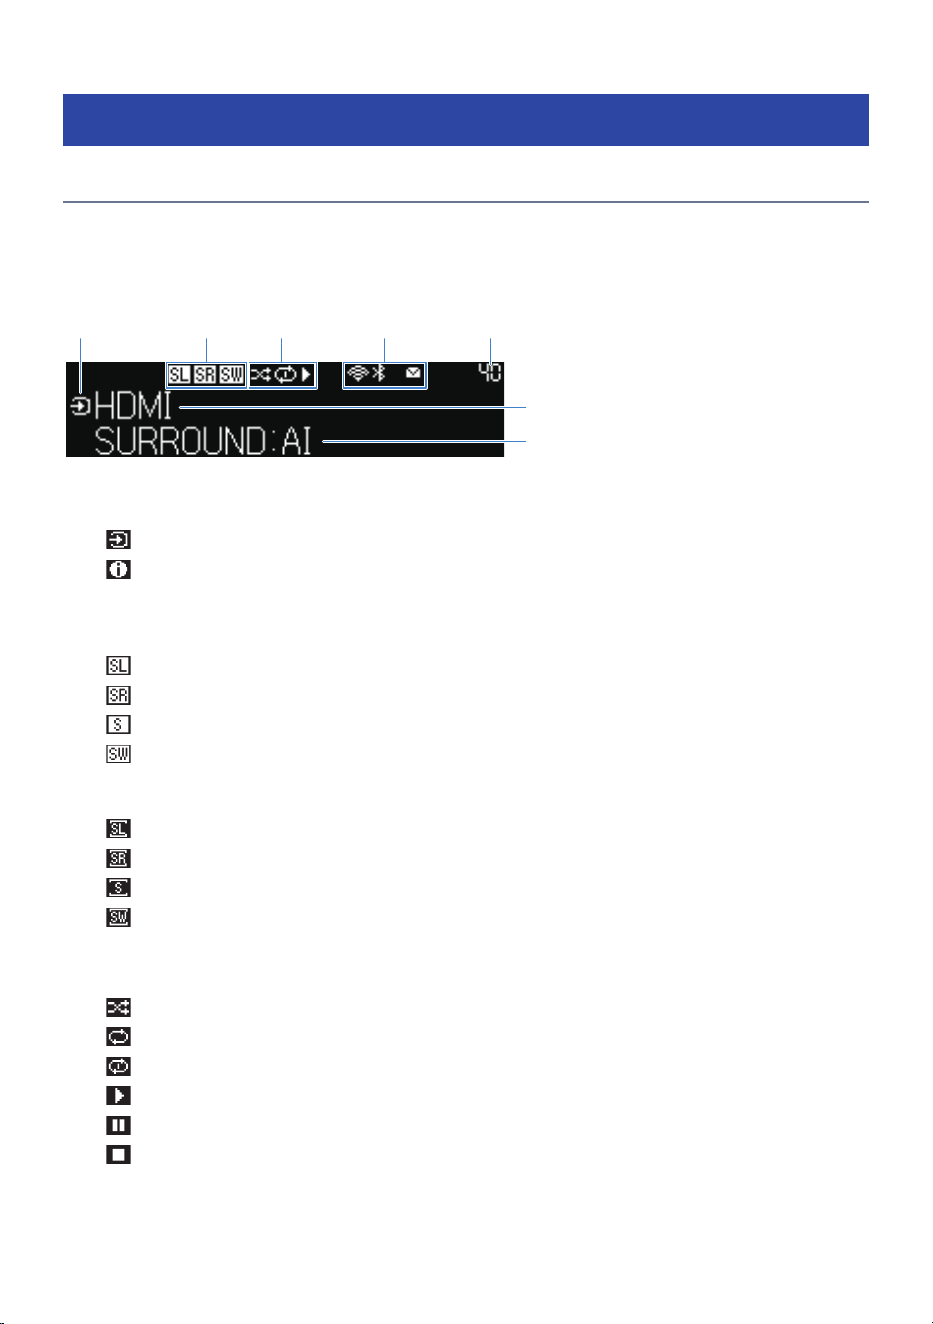
Part names of the sound bar (front display)
Names of parts and functions on the front display
This section describes the names and functions of the parts of the front display.
n
Normal display
a e
f
g
cb d
a
Mode icon
Displays the modes (input display, information screen selection) of the front display.
: Glows when in input display mode.
: Glows when in information screen selection mode.
b
Icons indicating connected speaker
The following icons glow when surround speakers or a subwoofer is connected.
: Glows when the left surround speaker is connected.
: Glows when the right surround speaker is connected.
: Glows when only one surround speaker is connected.
: Glows when a subwoofer is connected.
The following icons glow when the surround speakers and subwoofer connected to the sound bar are turned off.
Glows only when the surround speakers or subwoofer are connected to power.
: Glows when the left of the connected surround speakers is turned off.
: Glows when the right of the connected surround speakers is turned off.
: Glows when only one of the connected surround speakers is turned off.
: Glows when a connect subwoofer for some reason is turned off. When this icon glows, disconnect the power
plug of the subwoofer momentarily before reconnecting it to check that it is connected to the sound bar.
c
Playback status icons
: Glows when Shuffle playback is selected.
: Glows when Repeat (All Tracks) playback is selected.
: Glows when Repeat (1 Track) playback is selected.
: Glows during playback.
: Glows when playback is paused.
: Glows when playback is stopped.
15
PART NAMES AND FUNCTIONS > Part names of the sound bar (front display)
d
Status icons
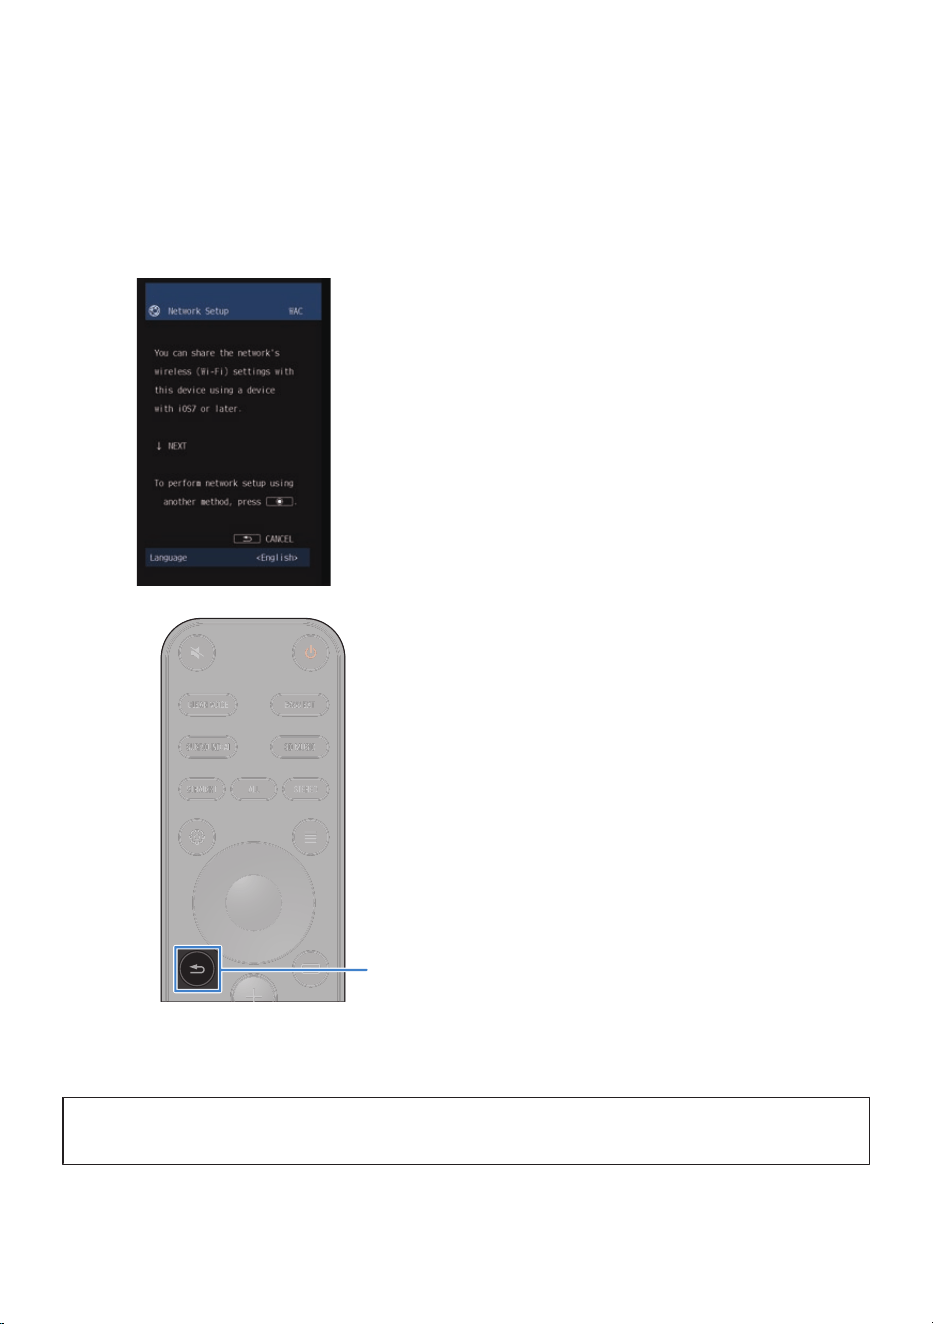
(Wireless LAN): Glows when connected to a wireless network. Flashing starts while WAC* and MusicCast network
are in registration mode.
(Bluetooth): Glows when a Bluetooth device is connected.
: Glows when a firmware update has become available.
* WAC (Wireless Accessory Configuration) is a feature that applies the wireless settings of an iOS device to another
device and wirelessly connects it to the network.
e
Volume
Displays the volume.
f
Main information display area
Displays the name of the current input, the name of the display item of input information, etc. depending on the
display mode of the front display.
g
Additional information display area
Displays additional input information (sound mode name, output channel information, etc.).
n
Menu display
a
d c
b
a
Menu mode
Glows when the front display menu is opened.
b
Menu level
Displays the name of the current level of the hierarchical front display menu.
c
Menu item
Displays front display menu item or set value.
d
Cursor indicator
Displays cursor operations of right menu items or set values.
NOTE
The front display example shown here is an English screen.
16
PART NAMES AND FUNCTIONS > Part names of the sound bar (front display)

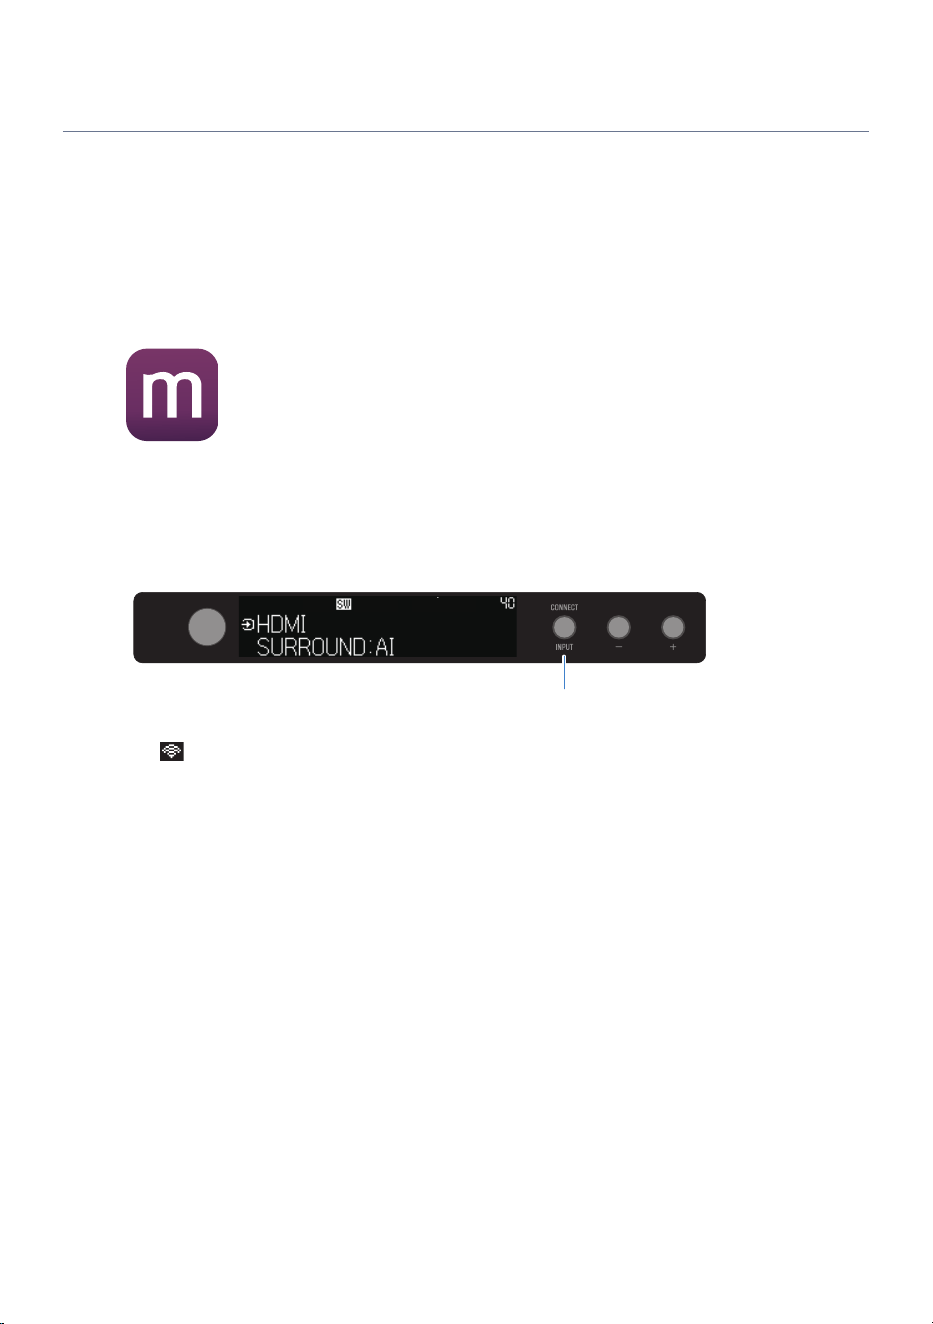
Switching the information screen on the front display
The information screen on the front display shows additional information on selected inputs.
Name of displayed screen
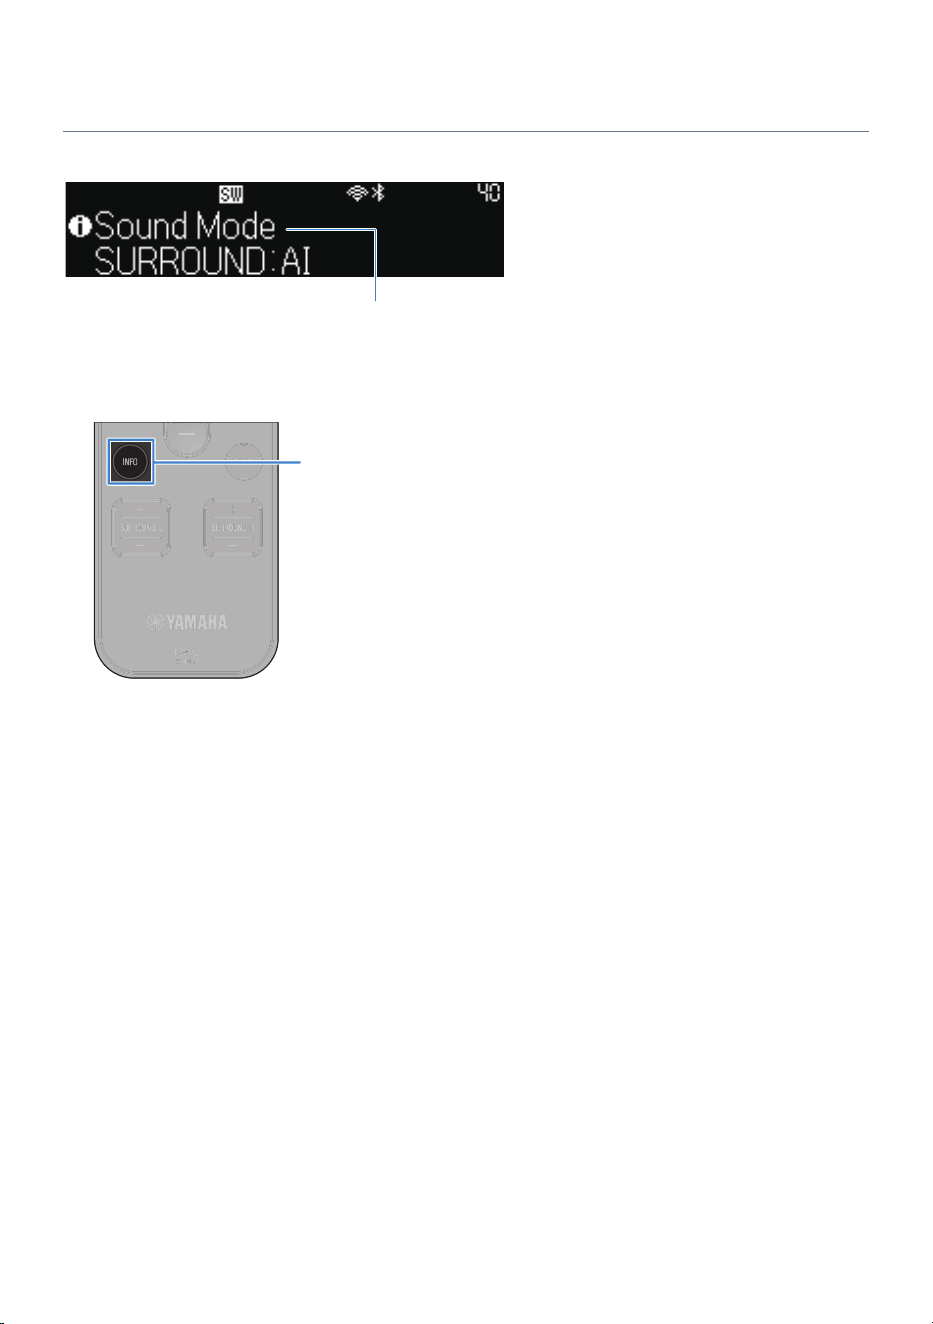
Press the INFO key on the remote control to open the information selection screen on the front display. Use
the INFO key to switch between display screens. The bottom of displayed screens show information on
displayed items.
INFO
Displayed screens vary with input.
18
PART NAMES AND FUNCTIONS > Part names of the sound bar (front display)
Input Displayed screen
HDMI
TV
OPTICAL
Sound mode, audio decoder, output channel, HDMI status, system status
NET (network)
type input
SERVER
Amazon Music
AirPlay
Played back track, played back artist, played back album, IP address,
MAC address (Ethernet), MAC address (Wi-Fi), sound mode, audio
decoder, output channel, HDMI status, system status
NET RADIO
Broadcasting station, IP address, MAC address (Ethernet), MAC address
(Wi-Fi), sound mode, audio decoder, output channel, HDMI status, system
status, played back track, played back album
Spotify
Information, played back track, played back artist, played back album, IP
address, MAC address (Ethernet), MAC address (Wi-Fi), sound mode,
audio decoder, output channel, HDMI status, system status
Deezer
Qobuz
TIDAL Connect
Played back track, played back artist, played back album, IP address,
MAC address (Ethernet), MAC address (Wi-Fi), sound mode, audio
decoder, output channel, HDMI status, system status
MusicCast Link
Sound mode, audio decoder, output channel, HDMI status, system status,
IP address, MAC address (Ethernet), MAC address (Wi-Fi)
SiriusXM*
Played back track, played back artist, played back channel, IP address,
MAC address (Ethernet), MAC address (Wi-Fi), sound mode, audio
decoder, output channel, HDMI status, system status
Pandora*
Played back track, played back album, broadcasting station, IP address,
MAC address (Ethernet), MAC address (Wi-Fi), sound mode, audio
decoder, output channel, HDMI status, system status
Bluetooth
Played back track, played back artist, played back album, sound mode,
audio decoder, output channel, HDMI status, system status
* U.S.A. and Canada models only.
NOTE
(
These services may not be available in some regions.
(
The front display returns to normal display after 5 seconds of inaction.
(
The front display example shown here is an English screen.
n
Sound mode
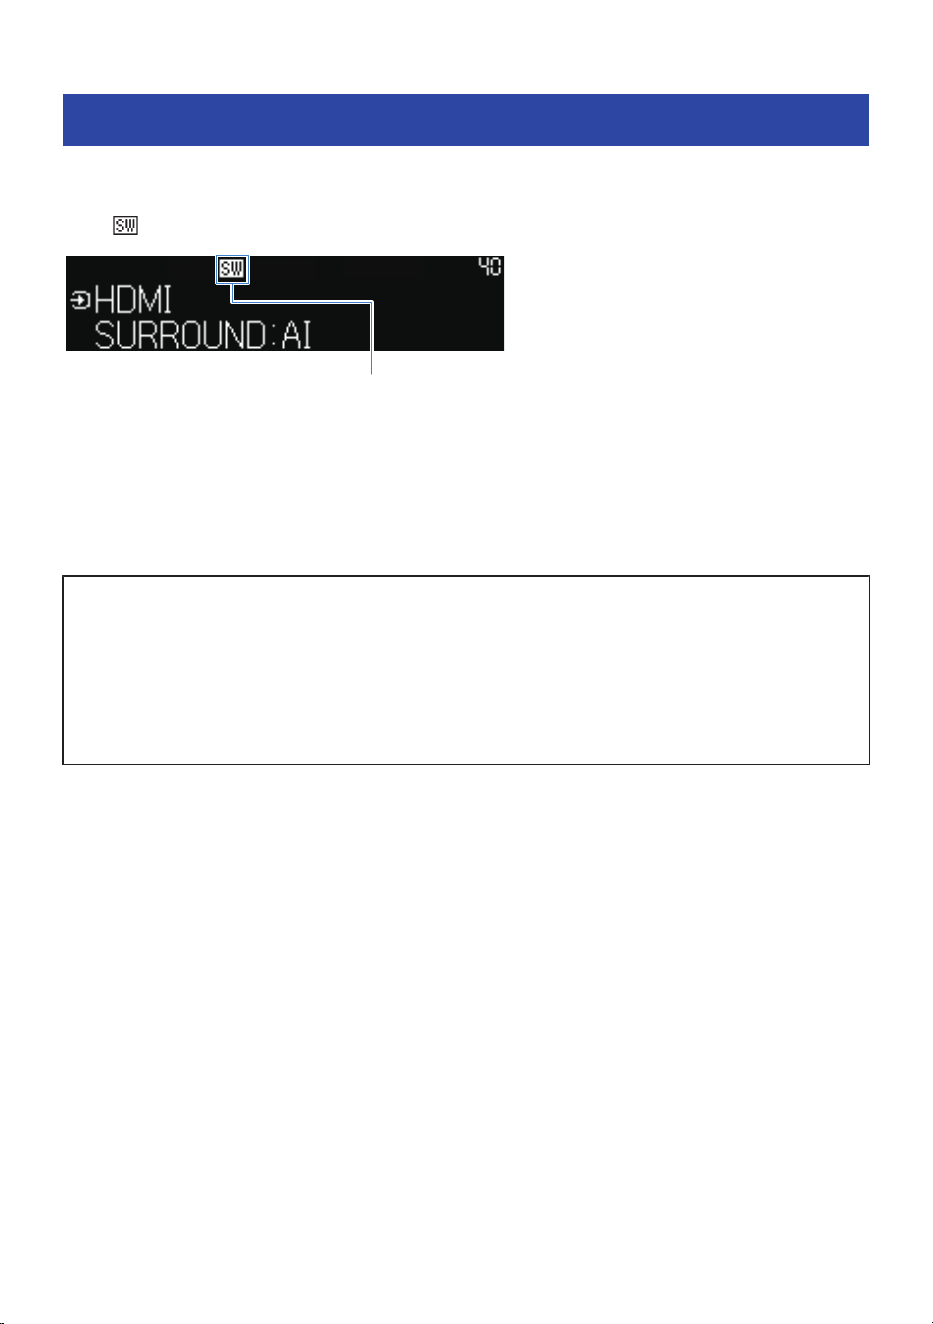
The selected sound mode (SURROUND:AI/3D MUSIC/STEREO/STRAIGHT/ALL) is displayed.
n
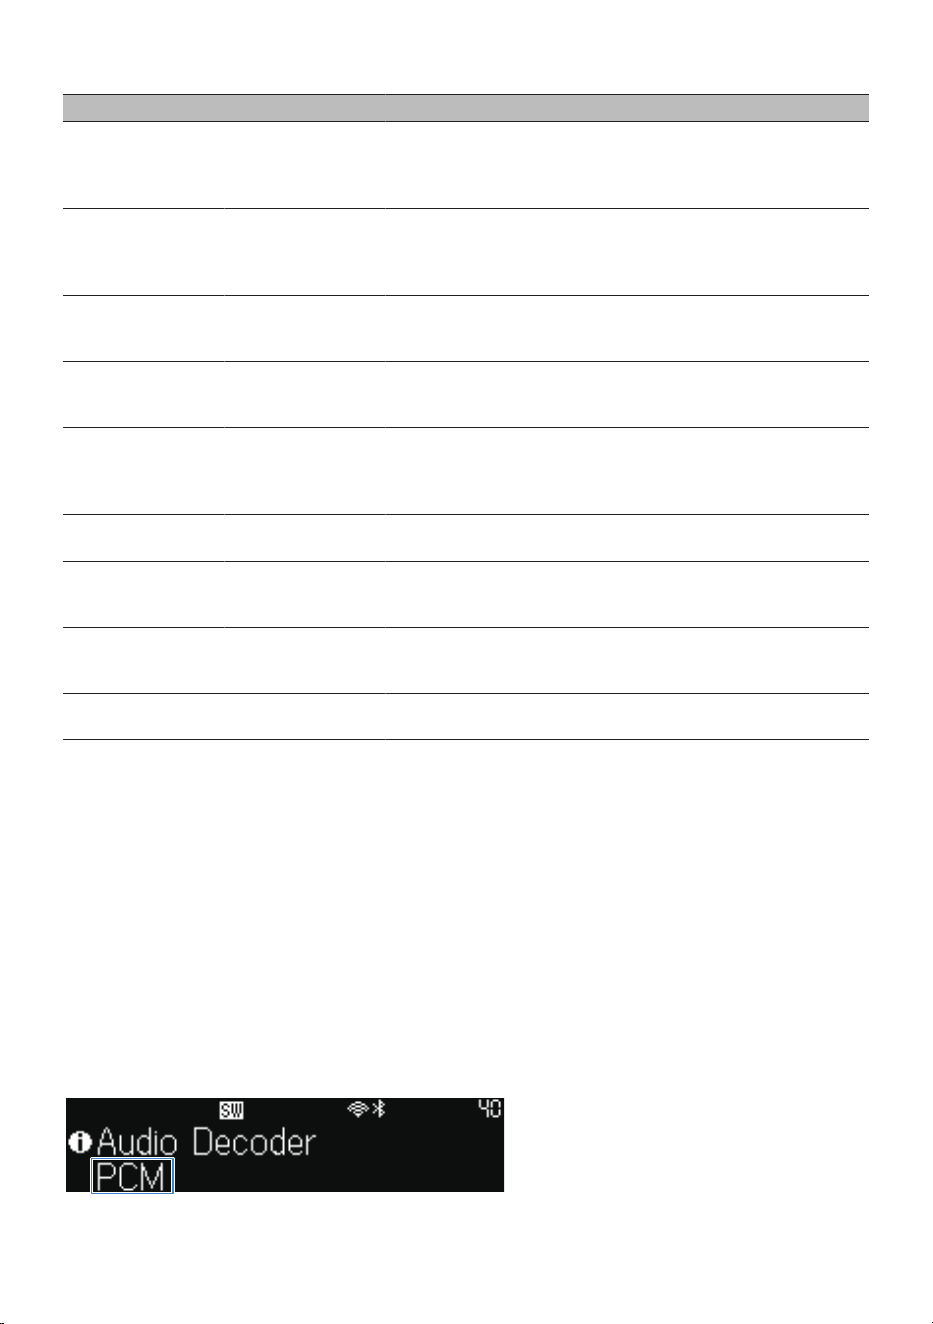
Audio decoder
Name of CODEC and decoder is displayed.
19
PART NAMES AND FUNCTIONS > Part names of the sound bar (front display)
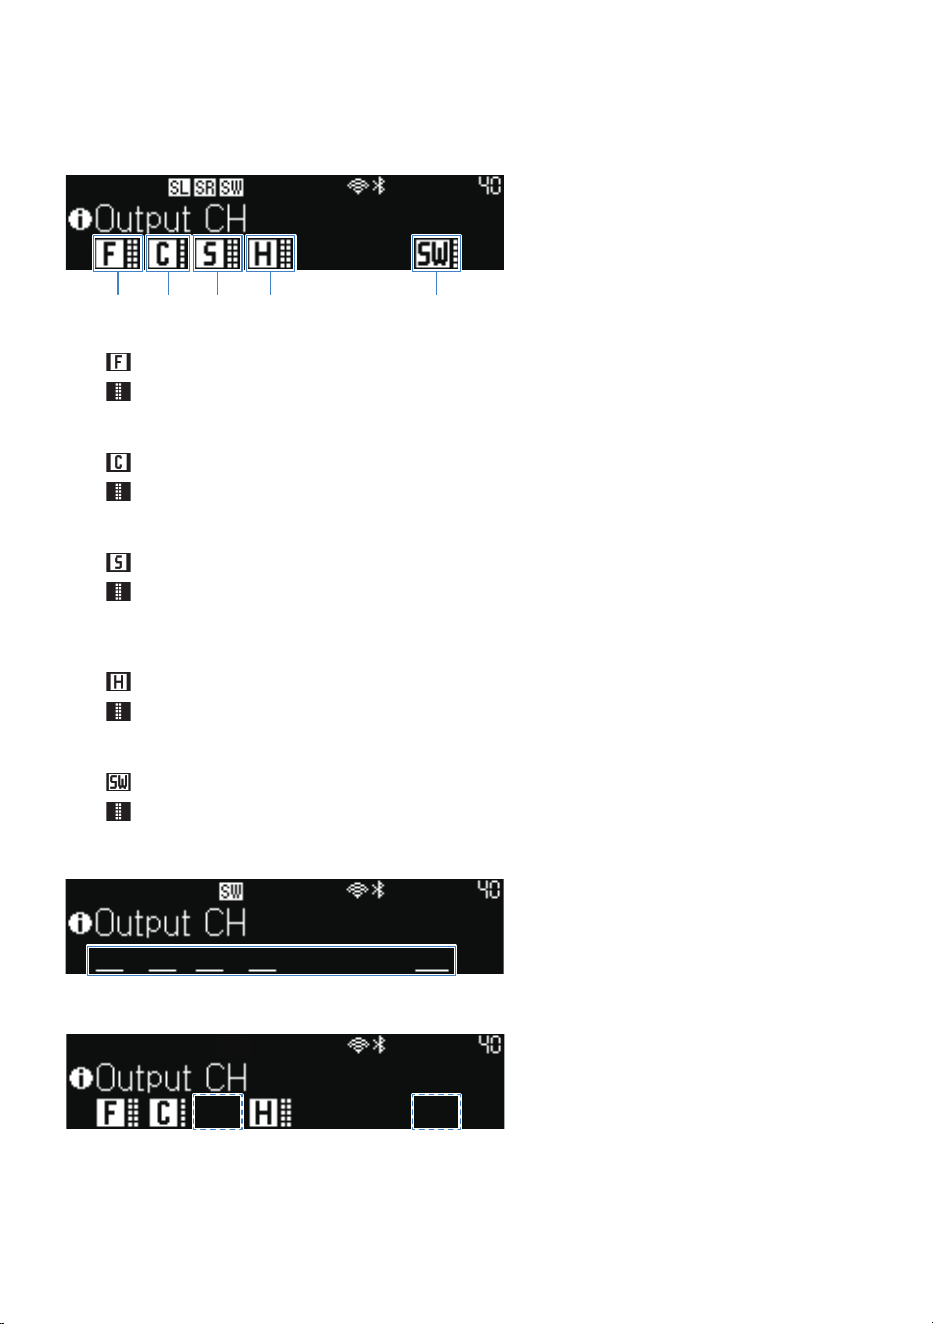
n
Output channels
The channel of output sound and level meter are displayed.
a c db e
a
Front speaker, front left and right level meters
glows when sound is output from the front speakers.
shows audio levels for the right and left speakers.
b
Center speaker, center level meter
glows when sound is output from the center speaker.
shows the audio level for the center speaker.
c
Surround speakers, surround L/R level meters
glows when sound is output from the surround speakers.
shows audio levels for the right and left surround speakers. If there is only one surround speaker, only one level
meter is displayed.
d
Height speakers, height left and right level meters
glows when sound is output from the height speakers.
shows audio levels for the right and left height speakers.
e
Subwoofer, subwoofer level meter
glows when sound is output from the subwoofer.
displays the audio level of the subwoofer.
An underline is displayed if no sound is output.
If the surround speakers and the subwoofer are not registered, no underline is displayed.
20
PART NAMES AND FUNCTIONS > Part names of the sound bar (front display)
n
HDMI status
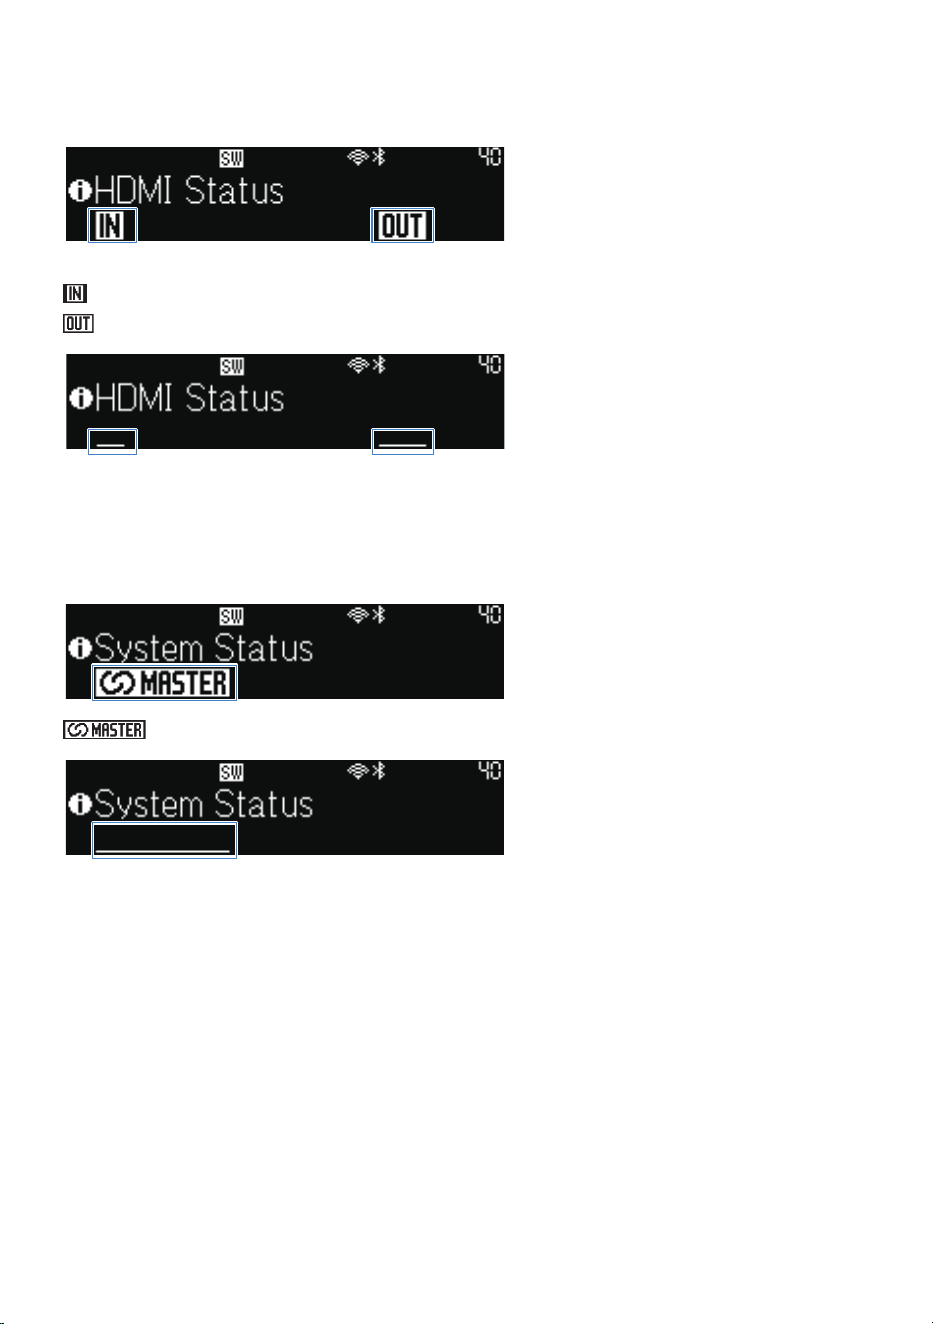
Indicates whether an input or output signal has been made to the HDMI IN, HDMI OUT/TV (eARC) jack.
: HDMI input
: HDMI output
An underline is displayed if no sound is output.
n
System status
Indicates the functional status of the overall system.
: Glows when operating as the parent unit of the MusicCast network (and is the link master).
An underline is displayed if it is not the link master.
n
Short messages
Short messages are displayed during sound bar operations, for example, when selecting inputs or adjusting
the volume.
When the operation is completed, the message disappears after a few seconds.
The following figure is an example of a message made during volume adjustment.
21
PART NAMES AND FUNCTIONS > Part names of the sound bar (front display)

Message title/icon
Message
Pressing keys or buttons that are not available causes the message “Not Available” to appear.
Related links
(
“Names of parts and functions on the front display”(p.15)
(
“Part names of the remote control”(p.26)
22
PART NAMES AND FUNCTIONS > Part names of the sound bar (front display)
Part names of the subwoofer
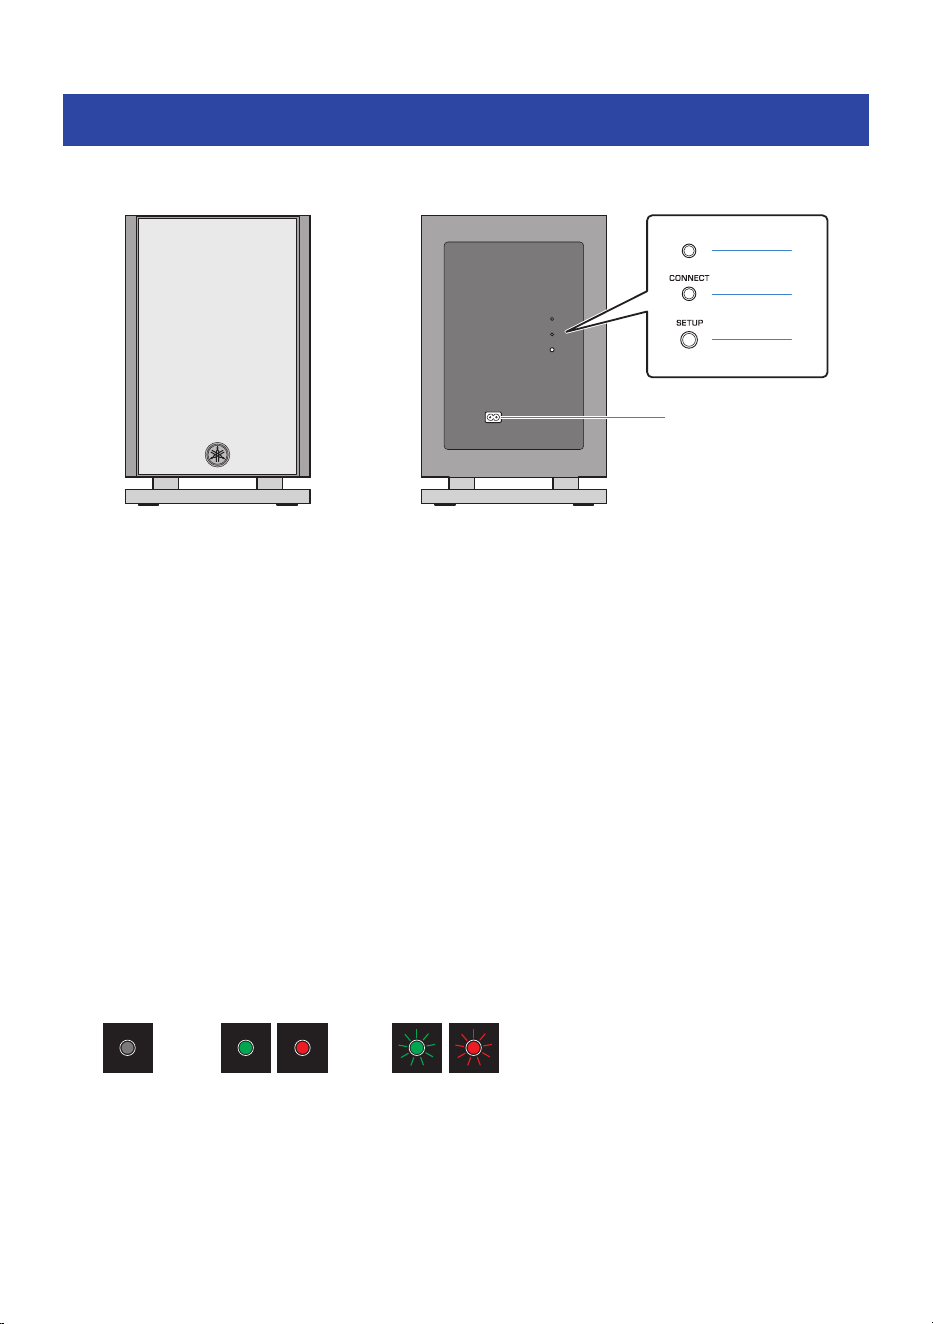
This section describes the part names and functions of the subwoofer.
d
a
b
c
Front Rear
a
Power indicator
Indicates the status of the subwoofer.
For details, refer to “Information displayed by the indicators of the subwoofer” below.
b
CONNECT indicator
Indicates the connection status of the sound bar and the subwoofer.
For details, refer to “Information displayed by the indicators of the subwoofer” below.
c
SETUP button
Use to manually connect the subwoofer to the sound bar (p.199).
d
AC power input jack
Use to connect the power cord of the subwoofer.
n
Information displayed by the indicators of the subwoofer
NOTE
This guide shows indicator glowing status as follows:
Off Glows Flashes
23
PART NAMES AND FUNCTIONS > Part names of the subwoofer
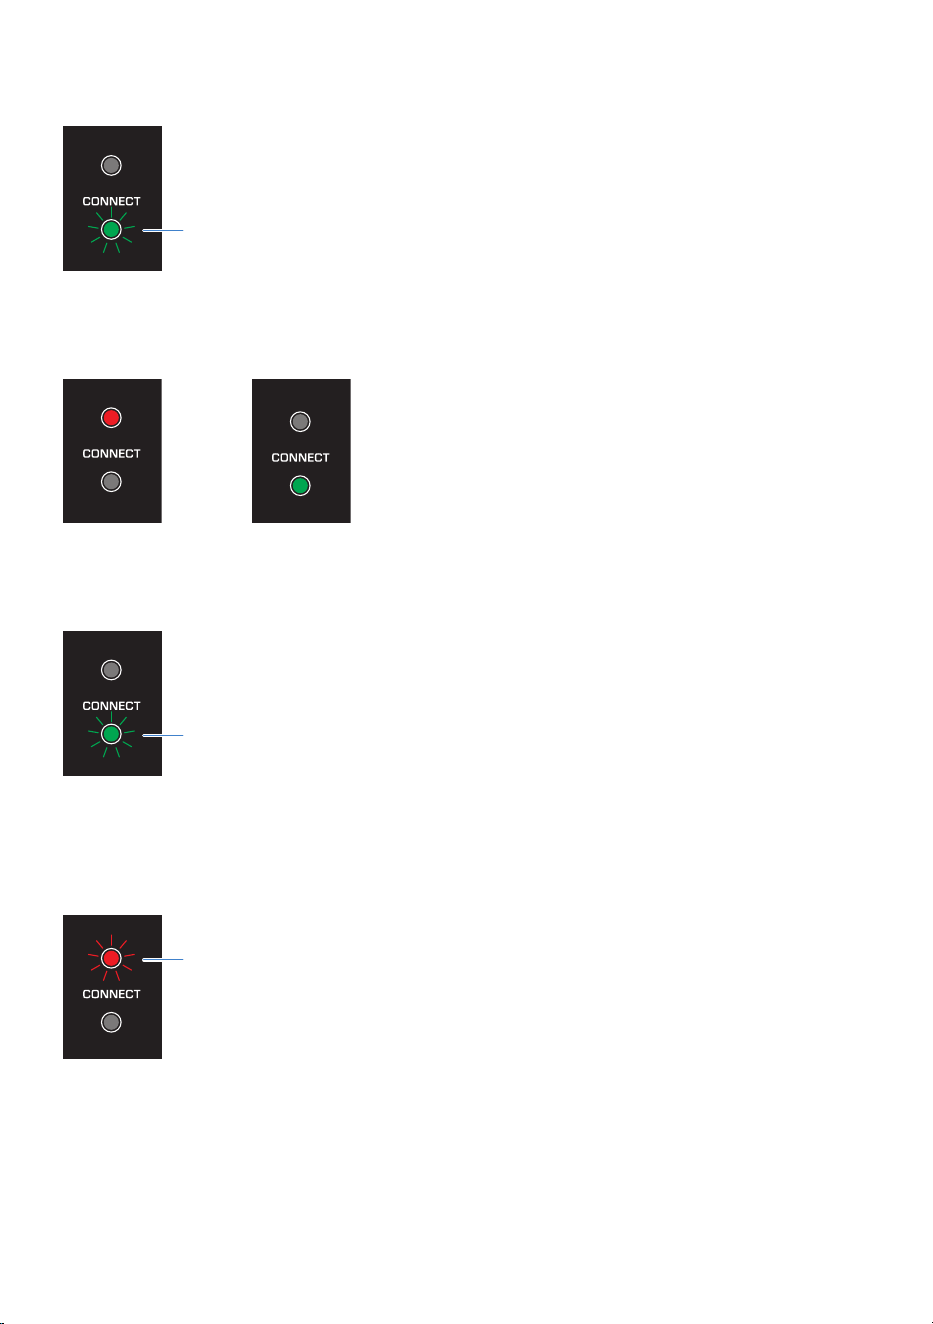
Connecting to the sound bar
Flashes slowly (searching)
Flashes rapidly (ready to accept registration to the sound
bar)
Power off state (standby)
Connection to the sound bar is established
When in power off
state
When in power on state
Connection to the sound bar has been terminated
Flashes slowly (searching)
Power on state
Flashes slowly for 30 seconds, the power is being turned off.
The time period set for registration has timed out
Flashes rapidly (2.5 times/sec)
24
PART NAMES AND FUNCTIONS > Part names of the subwoofer

Protection circuitry has been activated
Flashes very rapidly (5 times/sec)
Related links
(
“Names of parts and functions on the front display”(p.15)
(
“Connecting a subwoofer manually”(p.199)
(
“Connecting to power”(p.44)
(
“Turning on the sound bar”(p.45)
25
PART NAMES AND FUNCTIONS > Part names of the subwoofer

c
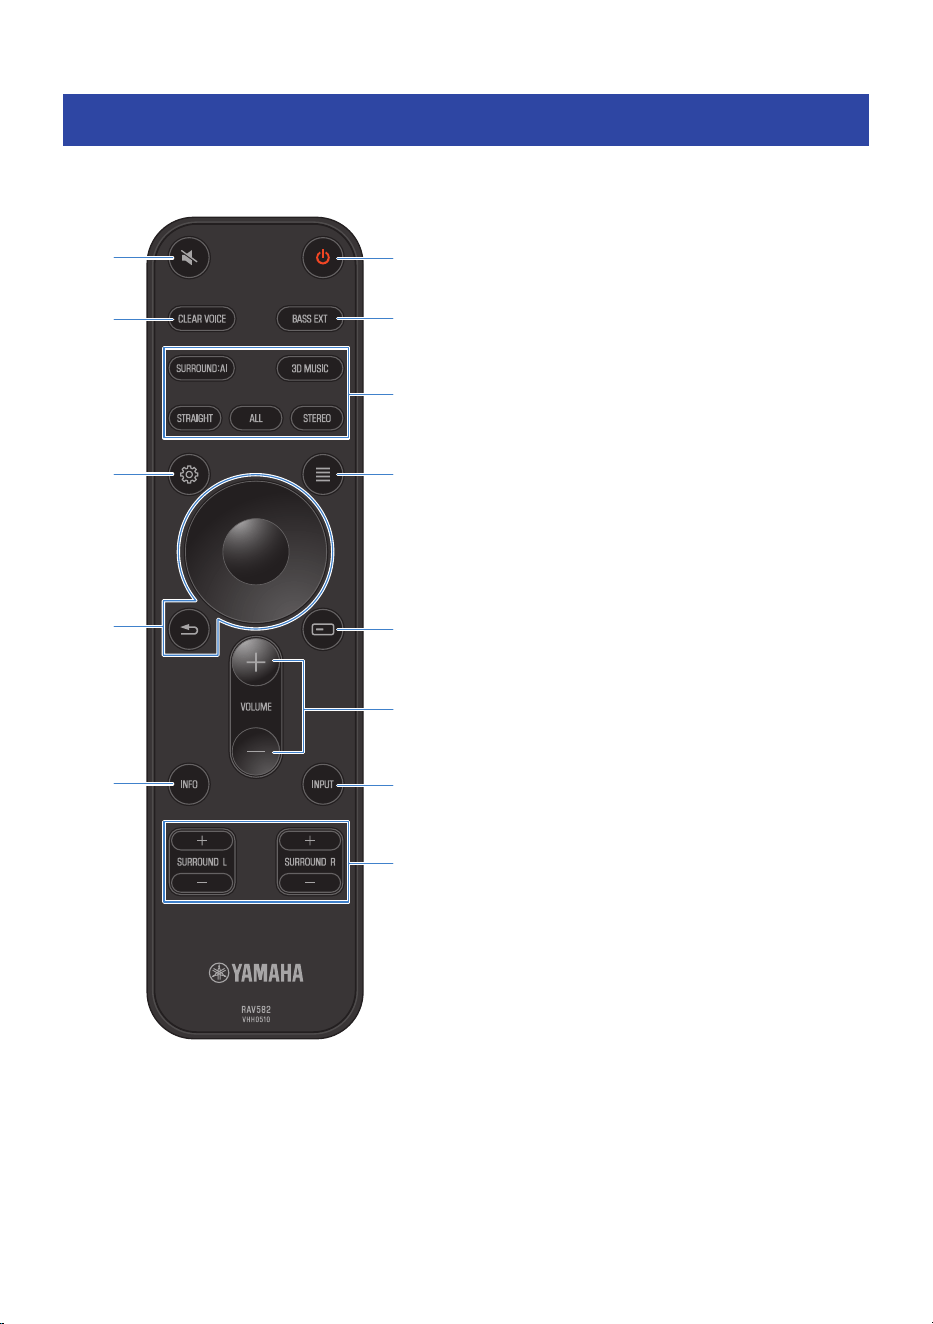
CLEAR VOICE key
Enables or disables the Clear Voice function (p.101).
d
BASS EXT key
Enables or disables the Bass Extension function (p.101).
e
Sound mode keys
Switches sound modes (p.96).
f
~ (Setup) key
Opens the Setup menu used on the TV screen (p.111).
g
u (Option) key
Opens the Option menu used on the TV screen (p.103).
h
ENTER/Cursor, - (Return) key
Displays menu operations at the top of the TV screen or on the front display.
The TV screen refers to the ENTER key as the “ENTER
key”.
i
(Front Display Menu) key
Displays the front display menu (p.135).
j
VOLUME +/- keys
Adjusts the volume (p.83).
k
INPUT key
Selects the input source you want to play back (p.83).
l
INFO key
Switches the front display between showing the type of audio signal being played back and other sound bar
information (p.18).
m
SURROUND L/R +/- keys
Adjusts the volume of the surround speakers (p.77).
When only one surround speaker is used, you can use either the L or R keys of SURROUND L/R to adjust the volume of
the surround speaker.
n
Remote control operating range
The operating range of the remote control is shown in the following illustration.
Use remote control by pointing it at the remote control sensor.
27
PART NAMES AND FUNCTIONS > Part names of the remote control


PREPARATION FOR USE
Preparation
1 Prepare the remote control.
“Preparing the remote control”(p.34)
2 Install the sound bar and subwoofer.
“Installing”(p.35)
3 Connect the sound bar to a TV.
Connect the sound bar to the TV using a method suitable for the type of jacks on the TV and
the functions to be used.
“HDMI Connection to a TV”(p.37)
4 Connect an AV device. (if needed)
“Connecting an AV device to the sound bar”(p.39)
“Connecting an AV device to the TV’s HDMI input jack”(p.40)
5 Preparing for network connection. (Cable connection to a network)
“Connecting to a network using a LAN cable (wired connection)”(p.43)
6 Connect to power.
“Connecting to power”(p.44)
7 Turn on the sound bar.
When the sound bar is turned on, the subwoofer is registered at the same time.
“Turning on the sound bar”(p.45)
8 Check a subwoofer connection.
“Confirming subwoofer connection”(p.47)
9 Enables the HDMI Control function. (if needed)
“Enabling the HDMI Control function”(p.48)
10 Check that the sound bar outputs audio.
“Checking that the sound bar outputs audio”(p.51)
11 Connect TRUE X SURROUND wireless speakers. (if needed)
“Registering wireless speakers to the sound bar”(p.60)
29
PREPARATION FOR USE > Preparation

Precautions for preparation
Before installing the sound bar and connecting other devices, be sure to read the following precautions.
Be sure to follow the precautions.
n
Precautions for remote control batteries
Before inserting batteries in the remote control, be sure to read the following precautions. Be sure to follow
the precautions.
WARNING
(
Do not dispose of a battery in fire. Do not expose a battery to high temperatures, such as direct sunlight or a fire. Do not attempt
to charge the battery installed in the remote control. The battery could burst or leak, causing a fire or injury.
(
Do not disassemble a battery. If the battery leaks, avoid contact with the leaked fluid. If the contents of the battery get on your
hands or in your eyes, it can cause blindness or chemical burns. If the battery fluid should come in contact with your eyes,
mouth, or skin, wash immediately with water and consult a doctor.
CAUTION
(
Do not use a battery other than the specified one. Doing so may cause fire or burns, or result in fluid leakage that may cause
skin inflammation.
(
Always make sure the battery is inserted in conformity with the +/- polarity markings. Failure to do so might result in a fire,
burns, or inflammation due to fluid leaks.
(
When the battery runs out, or if the sound bar is not to be used for a long time, remove the battery from the remote control to
prevent possible leakage of the battery fluid.
(
Do not put in a pocket or bag, carry, or store batteries together with pieces of metal. The battery could short, burst, or leak,
causing a fire or injury.
(
When storing or discarding batteries, insulate the terminal area by applying tape, or some other protection. Mixing them with
other batteries or metal objects can cause a fire, burns, or inflammation due to fluid.
NOTICE
(
Batteries have been provided to enable the user to confirm that the device works. Since those batteries may have lost power in
storage, replace them as soon as you have confirmed that the device is operational.
31
PREPARATION FOR USE > Precautions for preparation
n
Precautions for installation
WARNING
(
Install as instructed in the User Guide. Failure to observe this may cause devices to fall and result in injury.
(
Confirm that the finished installation is safe and secure. Also, carry out safety inspections periodically. Failure to observe this
may cause devices to fall and result in injury.
(
Do not expose the product to rain, use it near water or in damp or wet conditions, or place on the product any containers (such
as vases, bottles or glasses) containing liquids which might spill into any openings or places where water may drop. A liquid
such as water getting into the product may cause a fire, electric shocks, or malfunctions.
(
Do not place any burning items or open flames near the product, since they may cause a fire.
(
Do not use this product near medical devices or inside medical facilities. Radio waves from this product may affect electro-
medical devices.
CAUTION
(
Do not place the product in an unstable position where it might accidentally drop. or fall over and cause injuries.
(
When installing this product, do not obstruct heat dissipation. Failure to observe this may trap heat inside the product, causing
a fire or malfunctions.
(
Avoid being near the product during a disaster, such as an earthquake. Since the product may turn over or fall and cause injury,
quickly move away from the product and go to a safe place.
NOTICE
(
Do not install the product in places where it may come into contact with corrosive gases or salt air, or places that have
excessive smoke or steam. Doing so may result in malfunction.
(
Do not press hard on the speaker units or fabric-covered portion of this product.
(
Do not place any objects susceptible to magnetism (such as a hard disk drive or magnetic card) near the product. The magnetic
effect of the sound bar may cause damage to the object or its recorded data.
(
Do not use this product in a location that becomes extremely hot, such as in direct sunlight or near a heater, or that becomes
extremely cold, or that is subject to excessive dust or vibration. Failure to observe this may cause this product’s panel to
become deformed, the internal components to malfunction, or for operation to become unstable.
(
If using a wireless function, avoid installing this product near metal walls or desks, microwave ovens, or other wireless network
devices. Obstructions could shorten the transmission distance.
(
Do not stack the sound bar and subwoofer directly on top of one another. Also, do not stack other AV devices directly on or
under this product. These devices may malfunction due to vibrations.
(
Do not place the subwoofer in the following ways. Doing so may cause a loss in bass sound volume.
(
With the speaker units (fabric-covered portion) placed tightly against the wall
(
With the bass reflex port blocked
(
The subwoofer is designed to be placed upright. Do not lay it on its side.
(
Do not place furniture or other objects made of metal between the sound bar and subwoofer. Doing so may interfere with the
wireless connection.
32
PREPARATION FOR USE > Precautions for preparation
n
Precautions for connections
WARNING
(
Use this product with the power supply voltage printed on it. Failure to observe this may cause a fire, electric shocks, or
malfunctions.
(
Be sure to use the supplied power cord. Do not use the supplied power cord for other devices. Failure to observe this may cause
a fire, electric shocks, or malfunctions.
(
Never insert or remove an electric plug with wet hands. Do not handle this product with wet hands. Failure to observe this may
cause electric shocks or malfunctions.
(
Do not touch the power plug or cord if there is a chance of lightning. Failure to observe this may cause electric shocks.
(
When setting up the product, make sure that the AC outlet you are using is easily accessible. If some trouble or malfunction
occurs, immediately turn off the power switch and disconnect the plug from the AC outlet. Even when the power switch is
turned off, as long as the power cord is not unplugged from the wall AC outlet, the product will not be disconnected from the
power source.
(
If not using the product for long periods of time, be sure to pull the power plug from the AC outlet. Failure to observe this may
cause a fire or malfunctions.
(
Check the electric plug periodically and remove any dirt or dust which may have accumulated on it. Failure to observe this may
cause a fire or electric shocks.
CAUTION
(
Do not use an AC outlet where the power plug fits loosely when inserted. Failure to observe this may cause a fire, electric
shocks, or burns.
(
When disconnecting the power plug, always hold the plug itself and not the cord. Pulling by the cord can damage it and cause
electric shocks or a fire.
(
Insert the power plug firmly all the way into the AC outlet. Using the product when it is not plugged in sufficiently can cause
dust to accumulate on the plug, causing a fire or burns.
NOTICE
(
If connecting external devices, be sure to thoroughly read the User Guide for each device and connect them in accordance with
the instructions. Failure to properly handle a device in accordance with the instructions could cause malfunctions.
(
Do not connect this product to industrial devices. This product has been designed to connect to consumer-use devices.
Connection to an industrial-use device could cause this product to malfunction.
33
PREPARATION FOR USE > Precautions for preparation
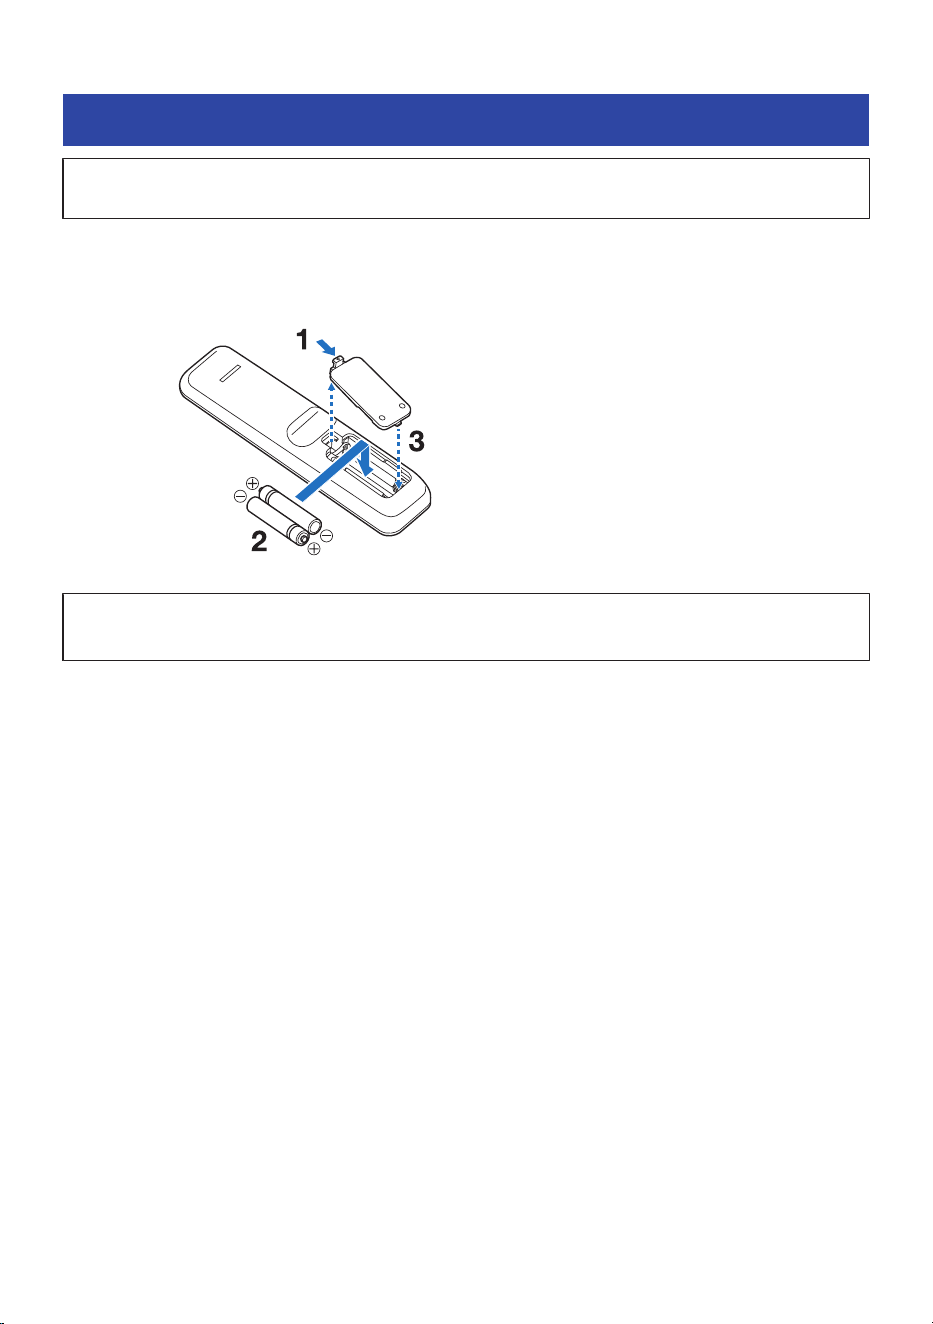
Preparing the remote control
(
Before inserting batteries in the remote control, be sure to read the following precautions.
(
“Precautions for preparation”(p.31)
Install the provided batteries in the remote control, taking care to orient the (+) plus and (-) minus poles
correctly.
Press the tab with the △ mark in the direction
of the arrow to open the lid
Fit the tab in the indentation
to close the lid
Two included batteries
(AAA, LR03, UM-4)
Next steps
(
“Installing”(p.35)
34
PREPARATION FOR USE > Preparing the remote control
Installing
(
Before installing the sound bar, be sure to read the following precautions.
(
“Precautions for preparation”(p.31)
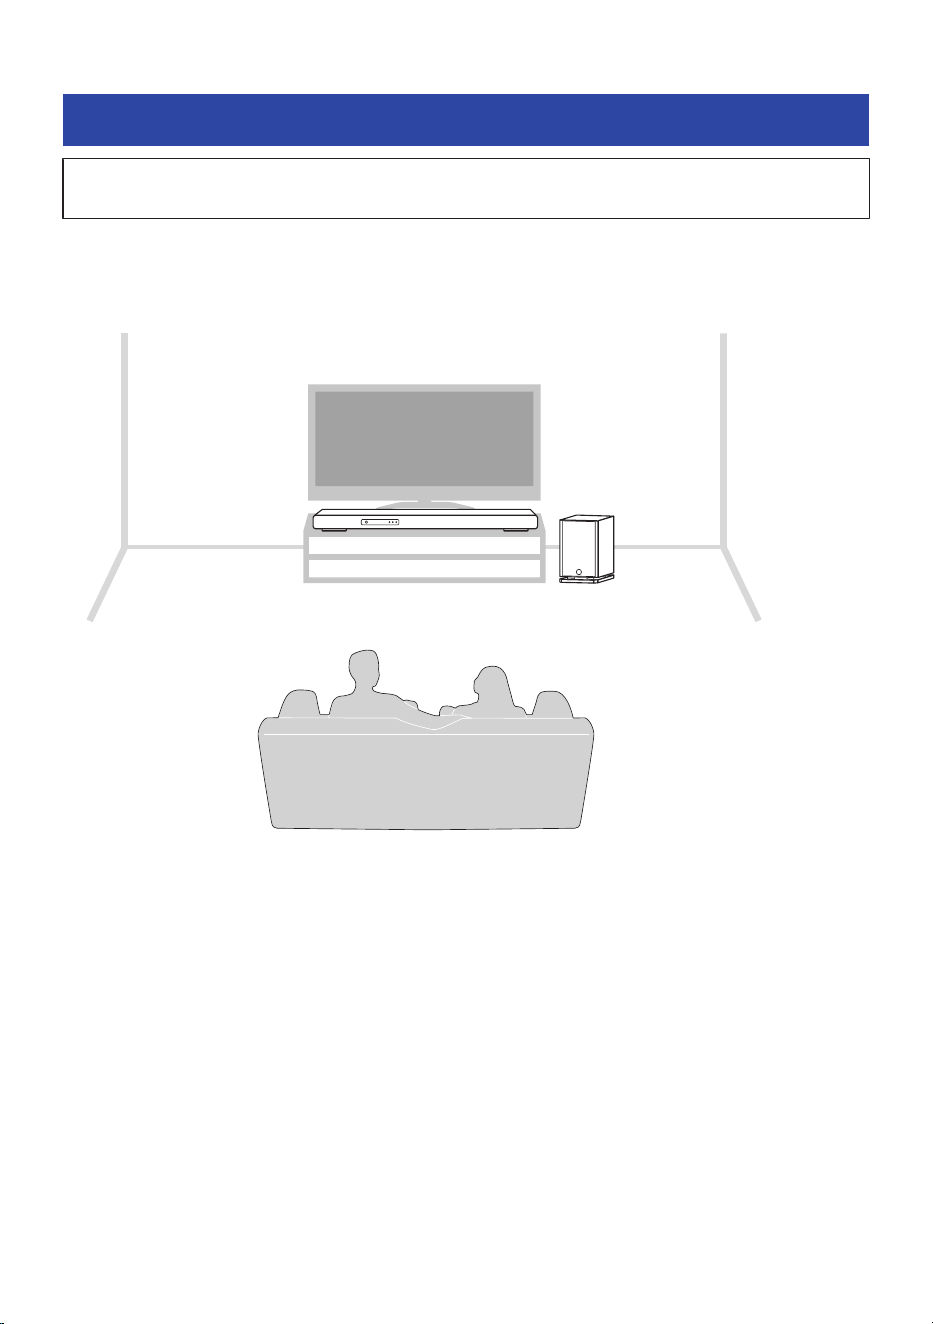
The following diagram is an example of how to install the sound bar and subwoofer. Place the subwoofer to
the side of the sound bar. If you notice that sound bouncing off walls has a negative effect on the sound due
to subwoofer orientation, turning the front of the subwoofer slightly inwards may improve the sound.
35
PREPARATION FOR USE > Installing
NOTICE
(
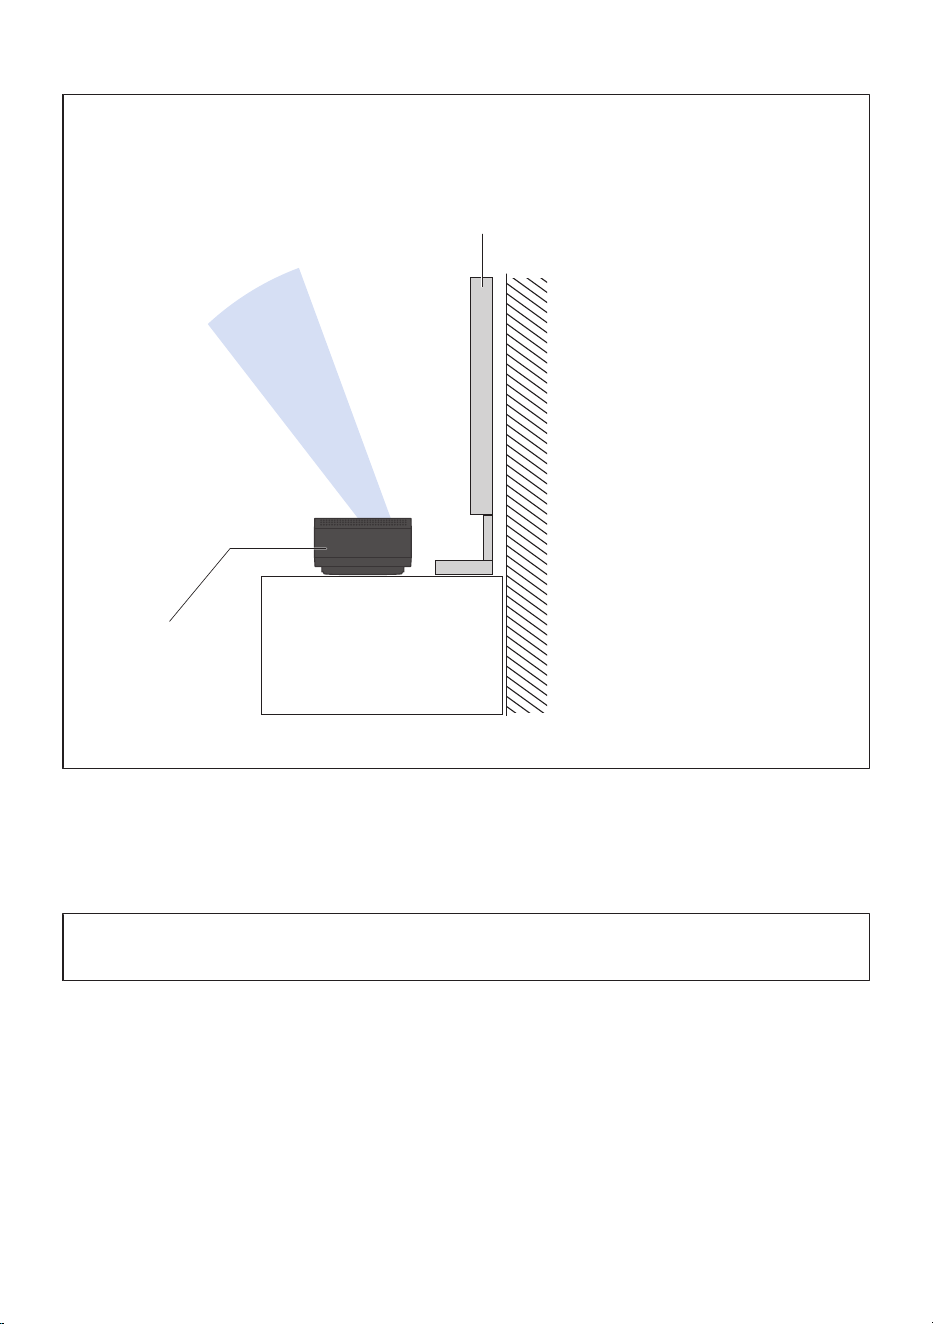
The top of the sound bar is equipped with built-in height speakers that output the sound of the height channels.
Provide some space above the top of the sound bar to ensure unobstructed output of the height channels. This will provide you
the best possible surround sound field.
TV
Audio output area of
height channels
Sound bar
NOTE
The sound bar can also be mounted on a wall. For proper installation of the sound bar on a wall, make sure to have the work done by
the dealer from where you purchased the unit or by a contractor with qualified service personnel. For more information, visit the
following website.
https://manual.yamaha.com/audio/sound_bar/wallmount/sr-x90a/
Next steps
(
“HDMI Connection to a TV”(p.37)
36
PREPARATION FOR USE > Installing
Connecting to a TV
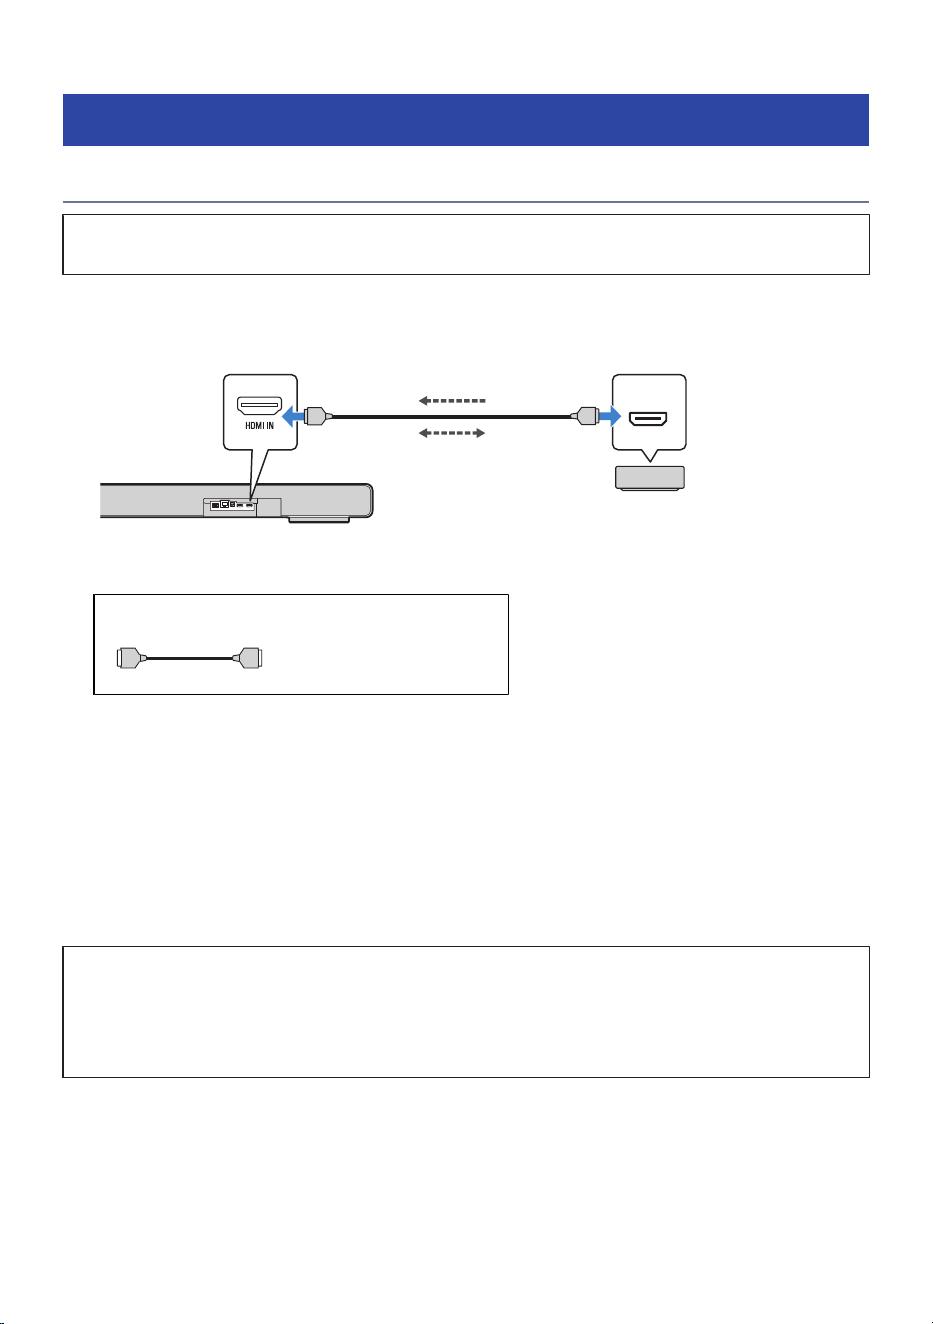
HDMI Connection to a TV
(
Before connecting devices, be sure to read the following precautions.
(
“Precautions for preparation”(p.31)
NOTE
(
Use a 19-pin HDMI cable with an HDMI logo.
(
Use an HDMI cable that is as short as possible to prevent any degradation in signal quality.
(
When using the eARC/ARC function, use an HDMI cable that supports eARC/ARC, such as a high-speed HDMI cable that is
compatible with Ethernet.
(
For playback of 3D and 4K Ultra HD video, use a Premium High Speed HDMI cable or a Premium High-Speed HDMI cable with
Ethernet.
(
These connections may require additional settings on the TV. For details, see the instruction manual supplied with your TV.
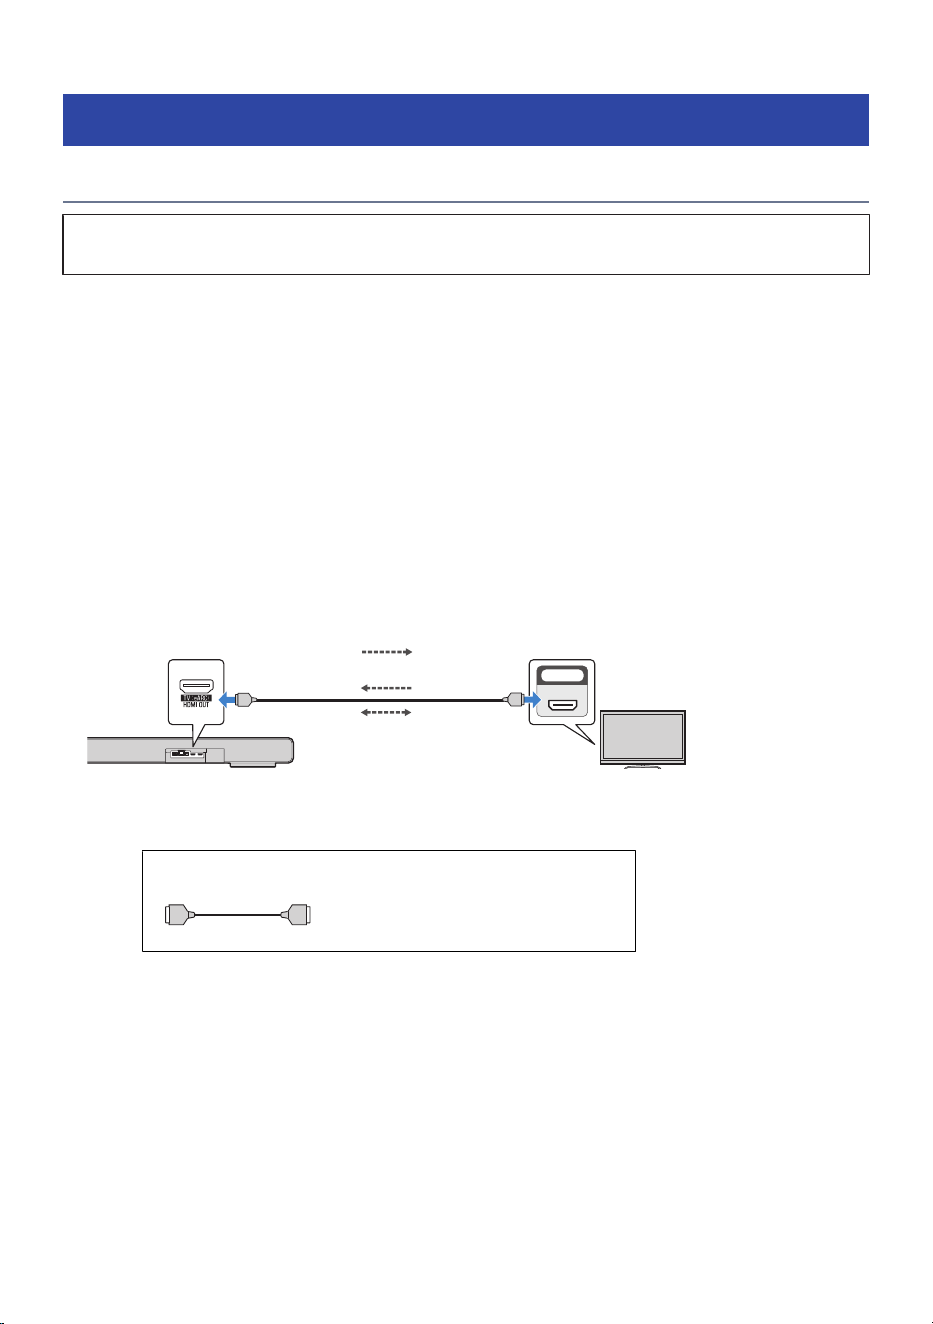
n
Using the eARC/ARC function
If your TV supports the eARC or ARC function, you only need one HDMI cable to output TV audio to the sound
bar. To use the ARC function, you have to turn On the HDMI Control function.
HDMI IN
eARC/ARC
HDMI
HDMIHDMI
HDMI OUT/TV (eARC) jack
Sound bar (rear)
HDMI input jack
(compatible with eARC/
ARC)
TV
TV’s audio signal
Control signal
Cable to use
HDMI HDMI
HDMI cable (commercially available)
Video device’s video signal
NOTE
(
ARC is an abbreviation for Audio Return Channel. By connecting the ARC-compatible HDMI input jack on the TV to the ARC-
compatible HDMI output jack on an AV device (such as the sound bar or an AV receiver) via an HDMI cable, audio from the TV can be
played back on the AV device without using an optical cable.
(
eARC is an abbreviation for Enhanced Audio Return Channel. It is an extension of ARC functionality and is capable of transmitting
object-based audio signals such as uncompressed 5.1ch, 7.1ch via a TV.
37
PREPARATION FOR USE > Connecting to a TV
n
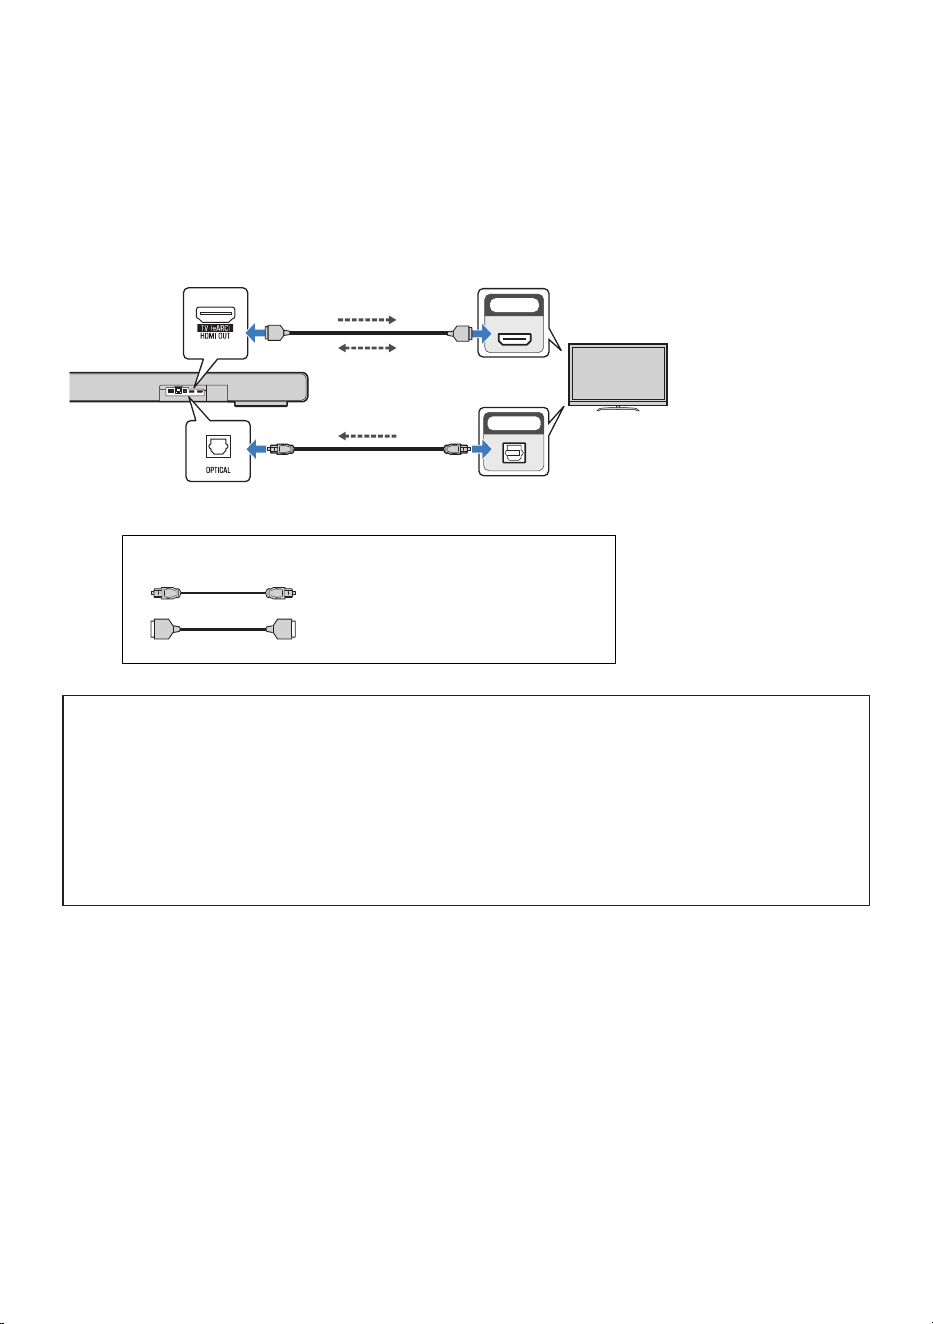
Connecting a digital optical audio cable
Use a digital optical cable (commercially available) to connect to a TV not supporting eARC or ARC.
The HDMI cable transmits the control signal for controlling the sound bar using the TV remote control (HDMI
Control function). When an AV device is connected to the HDMI IN jack on the sound bar, the video signal is
transmitted to the TV. To use the HDMI Control function, set the sound bar HDMI Control function to On.
OPTICAL
HDMI IN
HDMIHDMI
HDMI
HDMI OUT/TV (eARC) jack
Sound bar
(rear)
TV jack
Audio output (digital optical)
jack
HDMI input jack
TV
Video device’s video
signal
Control signal
TV’s audio signal
Cable to use
HDMI HDMI
HDMI cable (commercially available)
Digital optical audio cable (commercially
available)
Next steps
(
If connecting an AV device:
(
“Connecting an AV device to the sound bar”(p.39)
(
“Connecting an AV device to the TV’s HDMI input jack”(p.40)
(
If not connecting an AV device:
(
Connect cable to a network:
“Connecting to a network”(p.42)
(
Making a wireless connection to a network:
“Connecting to power”(p.44)
38
PREPARATION FOR USE > Connecting to a TV
Connecting an AV device
Connecting an AV device to the sound bar
(
Before connecting devices, be sure to read the following precautions.
(
“Precautions for preparation”(p.31)
Connect an AV device (such as a Blu-ray Disc player or a set top box) to the sound bar using an HDMI cable
(commercially available).
HDMI
HDMI
HDMIHDMI
HDMI IN jack
Sound bar
(rear)
AV devices
Audio and video signals
Control signal
Cable to use
HDMI HDMI
HDMI cable (commercially
available)
NOTE
(
To play audio from an AV device via the sound bar, set the input sources as follows:
(
Sound bar’s input source: HDMI
(
In the sound bar’s Setup menu, under “HDMI”, set “Pass Through” to “On” or “Auto” to play back video and audio from an AV
device on a TV even when the sound bar is turned off (HDMI signal pass-through). The default setting is “Auto”.
(
Use a 19-pin HDMI cable with an HDMI logo.
(
Use an HDMI cable that is as short as possible to prevent any degradation in signal quality.
(
For playback of 3D and 4K Ultra HD video, use a Premium High Speed HDMI cable or a Premium High-Speed HDMI cable with
Ethernet.
Next steps
(
Cable connection to a network:
(
“Connecting to a network”(p.42)
(
Wireless connection to a network:
(
“Connecting to power”(p.44)
Related links
“Connecting an AV device to the TV’s HDMI input jack”(p.40)
39
PREPARATION FOR USE > Connecting an AV device

Connecting an AV device to the TV’s HDMI input jack
(
Before connecting devices, be sure to read the following precautions.
(
“Precautions for preparation”(p.31)
Connect AV devices (such as Blu-ray Disc players or set top boxes) to the TV using an HDMI cable
(commercially available) to play music from the sound bar. Use this method to connect multiple AV devices
for playback.
Depending on your TV, the high-definition audio signals input from the AV device may be converted to other
audio signals before transmission. In order to reproduce sound that makes the most of the characteristics of
the audio signals output from the AV device, connect it to the HDMI IN jack on the sound bar.
HDMI
HDMI
HDMI IN 1 HDMI IN 2
HDMI IN
eARC/ARC
HDMI
HDMI
HDMI
HDMI
HDMI
HDMIHDMI
HDMI output jack
AV devices
HDMI input jack
(compatible with eARC/
ARC)
TV
AV devices
HDMI input jackHDMI input jack
HDMI OUT/TV (eARC) jack
Sound bar (rear)
HDMI output jack
Audio signal
Control signal
Control signal
Control signal
Audio and video signals
Audio and video signals
Cable to use
HDMI HDMI
HDMI cable (commercially available)
40
PREPARATION FOR USE > Connecting an AV device

NOTE
(
To play audio from an AV device via the sound bar, set the input sources as follows:
(
Sound bar input source: TV (HDMI OUT/TV (eARC))
(
TV’s input source: AV device playing the content
(
ARC is an abbreviation for Audio Return Channel. By connecting the ARC-compatible HDMI input jack on the TV to the ARC-
compatible HDMI output jack on the sound bar or an AV receiver via an HDMI cable, audio from the TV can be played on the sound
bar or AV receiver without using an optical cable.
(
eARC is an abbreviation for Enhanced Audio Return Channel. It is an extension of the ARC functionality and is capable of
transmitting audio signals via a TV that ARC cannot transmit.
(
When the sound bar is connected to an ARC-compatible HDMI input jack on the TV, turn On the HDMI Control function on the sound
bar.
(
Use a 19-pin HDMI cable with an HDMI logo.
(
Use an HDMI cable that is as short as possible to prevent any degradation in signal quality.
(
To use the eARC or ARC function, use an eARC/ARC-compatible HDMI cable such as an Ethernet-supporting High Speed HDMI cable.
(
For playback of 3D and 4K Ultra HD video, use a Premium High Speed HDMI cable or a Premium High-Speed HDMI cable with
Ethernet.
Next steps
(
Cable connection to a network:
(
“Connecting to a network”(p.42)
(
Wireless connection to a network:
(
“Connecting to power”(p.44)
Related links
“Connecting an AV device to the sound bar”(p.39)
41
PREPARATION FOR USE > Connecting an AV device

Preparing to connect to a network
Connecting to a network
The sound bar supports wired and wireless connections.
When connected to a network, you can use network functions and update firmware over the network.
Use of network functions requires a registration with the “MusicCast Network” and use the “MusicCast
Controller” smartphone application.
On the sound bar you can play back music files stored on various streaming services and media servers such
as network attached storage (NAS) from MusicCast Controller.
Register with a MusicCast network after turning on the sound bar. While you make a registration, you can
also make a wireless connection. For details, refer to the following link.
If you wish to use the network via a wired connection, connect a LAN cable to the sound bar before turning
on the sound bar. For details, refer to the following link.
NOTICE
(
Do not connect this product to a public Wi-Fi and/or Internet service directly. Set up an appropriate password for the router
that it goes through. Do not connect directly to communication lines (including public LANs) of telecommunications carriers
(mobile communication companies, fixed-line providers, Internet providers, etc.).
NOTE
(
To make a wired connection, connect the LAN cable to the sound bar before turning on the sound bar. For details, refer to the
following link.
(
Streaming services vary with country and region where the product is used.
Related links
(
“Connecting to a network using a LAN cable (wired connection)”(p.43)
(
“Registering to a MusicCast network”(p.56)
42
PREPARATION FOR USE > Preparing to connect to a network
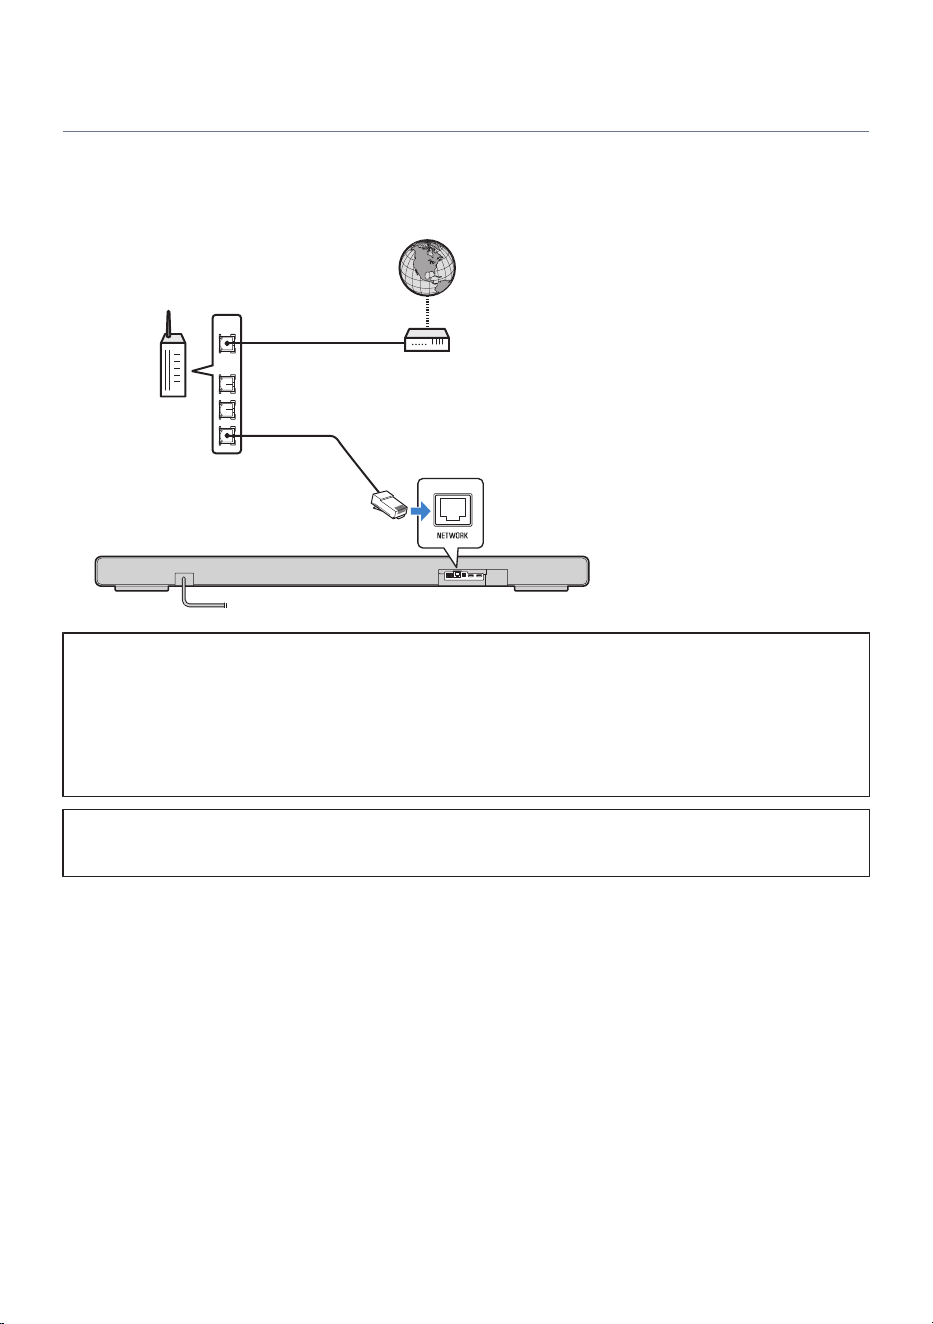
Connecting to a network using a LAN cable (wired connection)
Connect the sound bar to a router using a commercially available LAN cable (a CAT-5 or higher STP straight
cable). The wired connection is now complete.
LAN
WAN
Internet
LAN cable
Router
NETWORK jack
NOTICE
(
To safely connect the sound bar to the Internet, be sure to connect it via a router or similar device. Set up an appropriate
password for the router that it goes through. Do not connect directly to communication lines (including public LANs) of
telecommunications carriers (mobile communication companies, fixed-line providers, Internet providers, etc.).
(
Use STP (Shielded Twisted Pair) cable to prevent electromagnetic interference.
(
If your router does not support a DHCP server or network information is manually allocated, you may have to set up the
network.
Next steps
(
“Connecting to power”(p.44)
Related links
(
“Connecting to a network”(p.42)
(
“Registering to a MusicCast network”(p.56)
(
“Setting up a network”(p.128)
43
PREPARATION FOR USE > Preparing to connect to a network
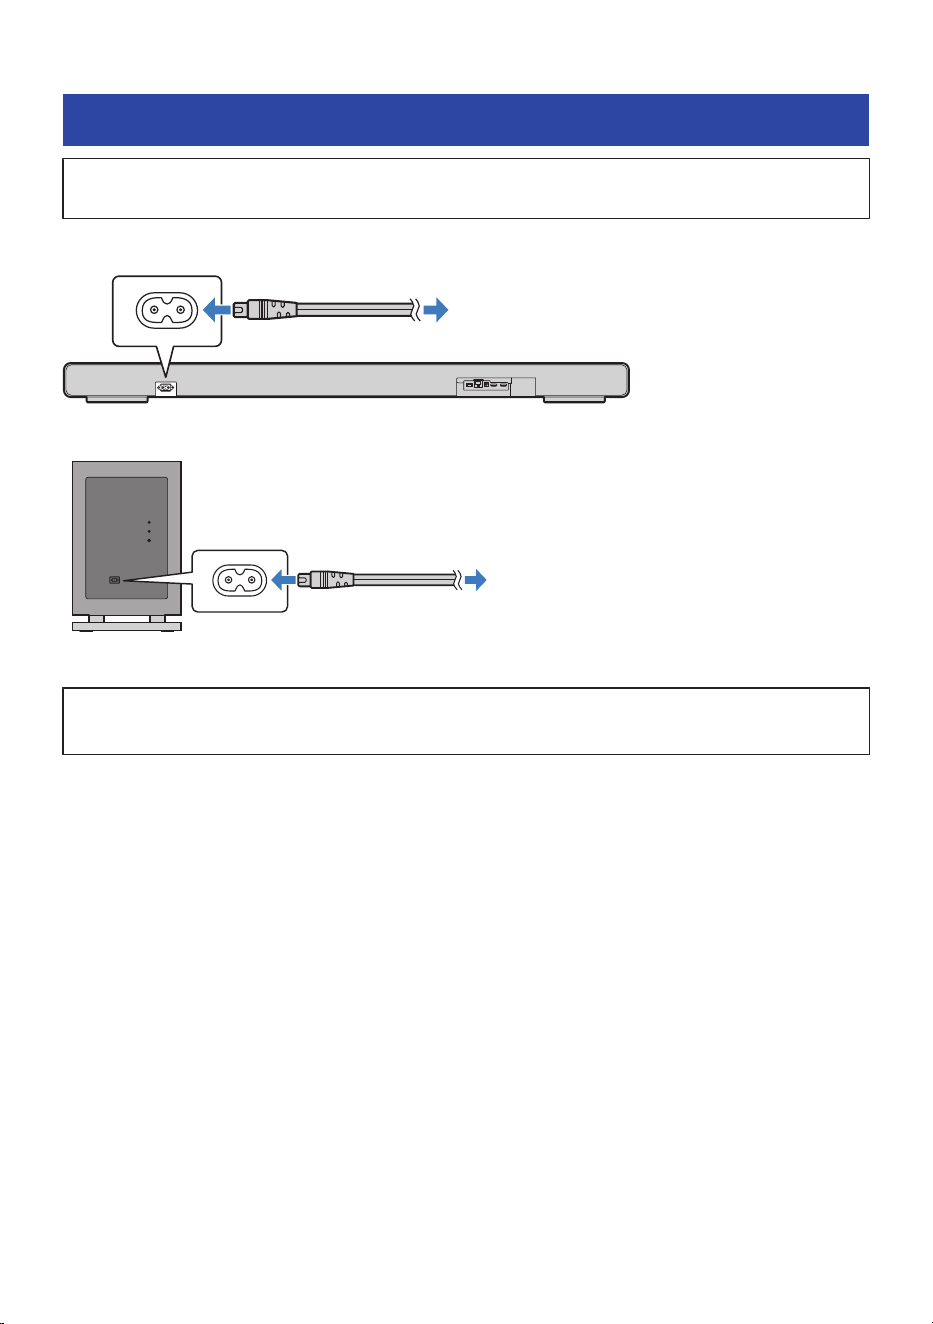
Connecting to power
(
Before connecting devices, be sure to read the following precautions.
(
“Precautions for preparation”(p.31)
After connecting to the TV and AV devices, connect the sound bar and subwoofer to power.
To an AC wall outlet
Power cord (included)
Sound bar (rear)
To an AC wall outlet
Power cord (included)
Subwoofer (rear)
Next steps
(
“Turning on the sound bar”(p.45)
44
PREPARATION FOR USE > Connecting to power
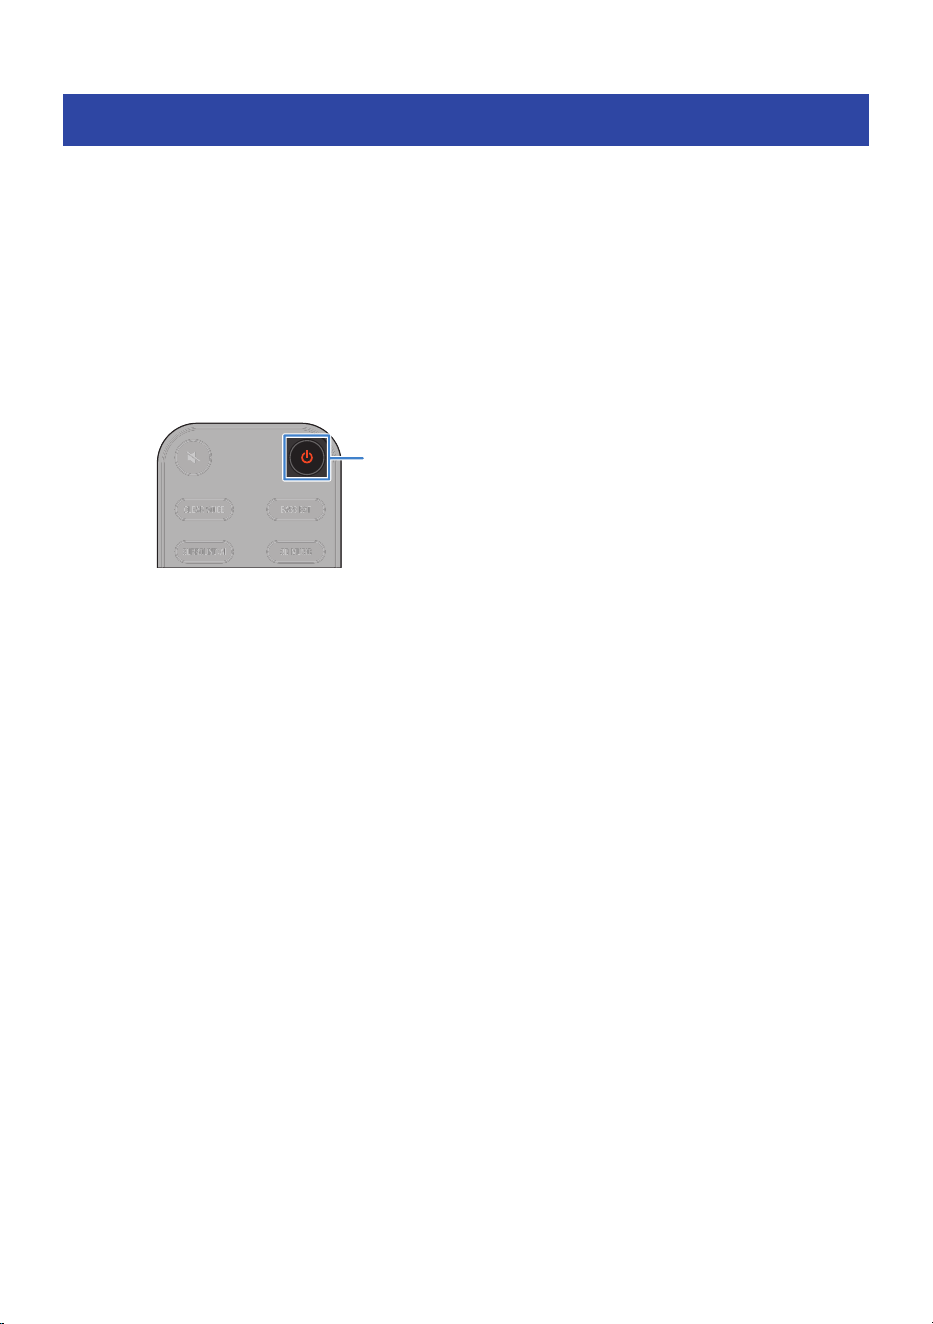
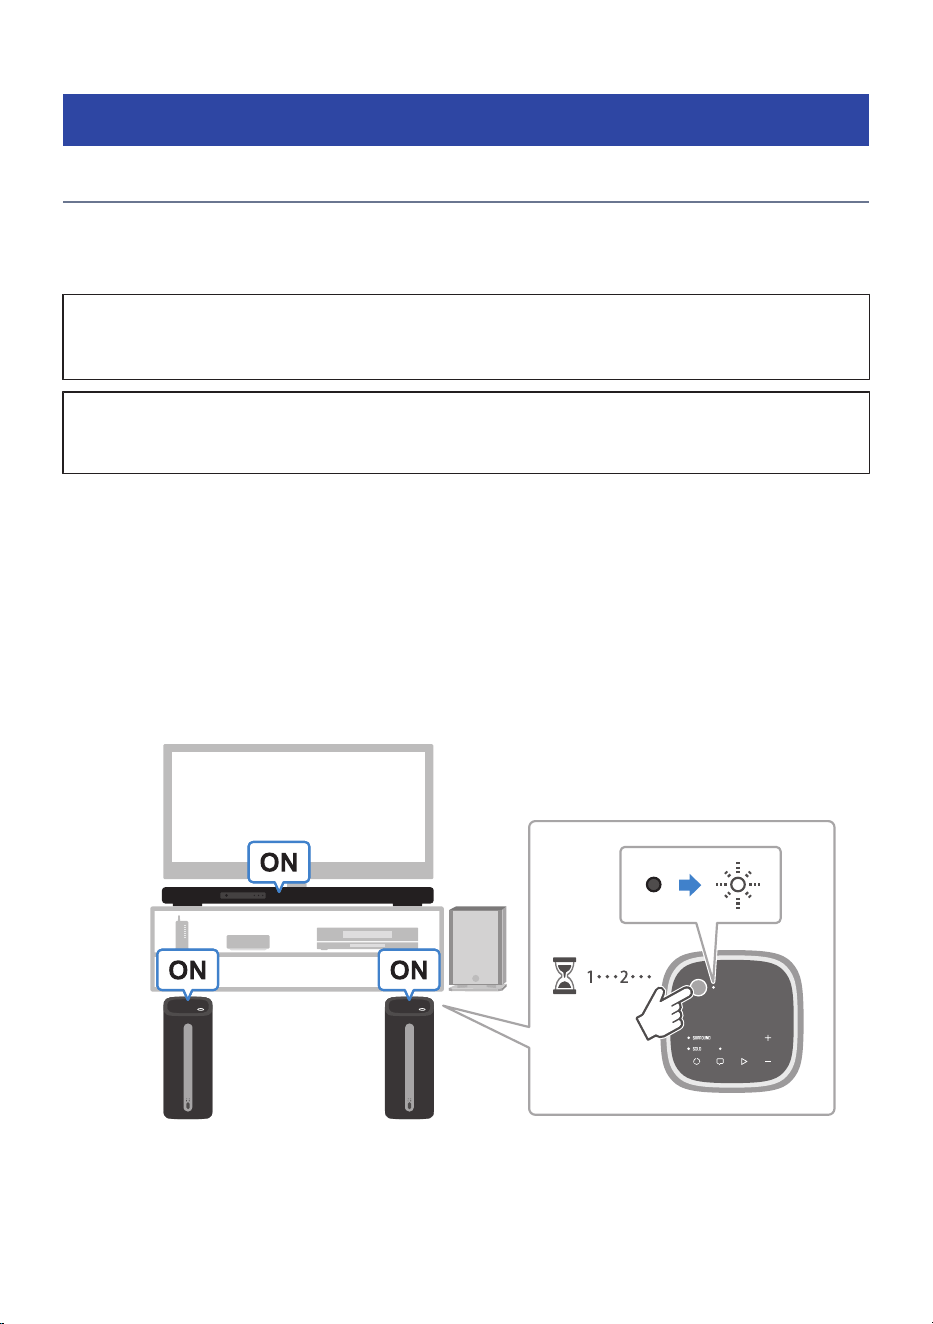
Turning on the sound bar
Turn the product on.
Check that the indicators on the front display of the sound bar are off and the power lamp on the rear of the
subwoofer flashes green or red before turning on the sound bar.
1 Turn on the TV.
2 Press the z (Power) key on the remote control.
When the sound bar is turned on, it is automatically connected to the subwoofer wirelessly
and the front display shows current settings.
z
(Power)
45
PREPARATION FOR USE > Turning on the sound bar
3 Select the input on the TV to sound bar.
Select sound bar on the TV input. For details, refer to the instruction manual for your TV.
If a LAN cable is not connected, a message regarding network settings will appear on the TV
screen.
If this is the case, press the - (Return) key to close the message.
(Return)
-
NOTE
Pressing the z (Power) key when the power is on will turn the sound bar off. When the sound bar is turned off, the indicators go off.
Next steps
(
“Confirming subwoofer connection”(p.47)
46
PREPARATION FOR USE > Turning on the sound bar
Confirming subwoofer connection
Confirm that the subwoofer is connected to the sound bar.
If the following applies, the subwoofer is connected to the sound bar.
(
The
icon is shown on the front display of the sound bar
Glowing: Connected
Off: Not registered or not connected
(
The CONNECT indicator on the subwoofer glows green
NOTE
If the status indicator is rapidly flashing red, a malfunction may have occurred in the subwoofer. Refer to “TROUBLESHOOTING”
(p.158).
Next steps
(
To turn the HDMI Control function On:
(
“Enabling the HDMI Control function”(p.48)
(
To use the HDMI Control function when Off:
(
If TRUE X SURROUND will not be used or set up later:
“Registering to a MusicCast network”(p.56)
(
To use TRUE X SURROUND:
“Registering wireless speakers to the sound bar”(p.60)
47
PREPARATION FOR USE > Confirming subwoofer connection

Enabling the HDMI Control function
By turning On the HDMI Control function, you can use convenient functions such as linking to TV operations.
To listen to audio from a TV that only supports ARC, you have to turn On the HDMI Control function. If
necessary, turn the HDMI Control function On.
NOTE
The following default settings are provided.
(
Models for U.K. and Europe: Off
(
Models for other areas: On
HDMI Control function
Use an HDMI cable to connect the sound bar to a TV, then turn the HDMI Control function On to allow you to do the following.
(
Link turning the TV on and off
(
Using the TV remote control to adjust the volume of the sound bar
(
Automatically switch the input to “TV”
(
Use the ARC function to output TV audio from the sound bar
n
When the HDMI Control function is needed to listen to audio from a TV
To connect a TV that only supports ARC using an HDMI cable, you have to turn the HDMI Control function and
ARC function to On.
When the “HDMI Control” is “On”, the “ARC” setting can be used. The default setting of “HDMI Control” is
“Off” and the default setting of “ARC” is “On”.
HDMI Jack(s) of the TV you want to connect
to
You can listen to TV audio also when the HDMI Control function is set
to Off
eARC/ARC supported HDMI IN jack ,
HDMI IN jack and OPTICAL jack ,
ARC supported HDMI IN jack -
NOTE
If you cannot output audio from the TV sound using the sound bar, refer to the TV instruction manual as well.
n
Enabling the HDMI Control function
Set “HDMI Control” to “On” from the TV Setup menu.
48
PREPARATION FOR USE > Enabling the HDMI Control function

1 Press the ~ (Setup) key.
The Setup menu appears on the TV.
2 In “HDMI” Select “HDMI Control”.
49
PREPARATION FOR USE > Enabling the HDMI Control function
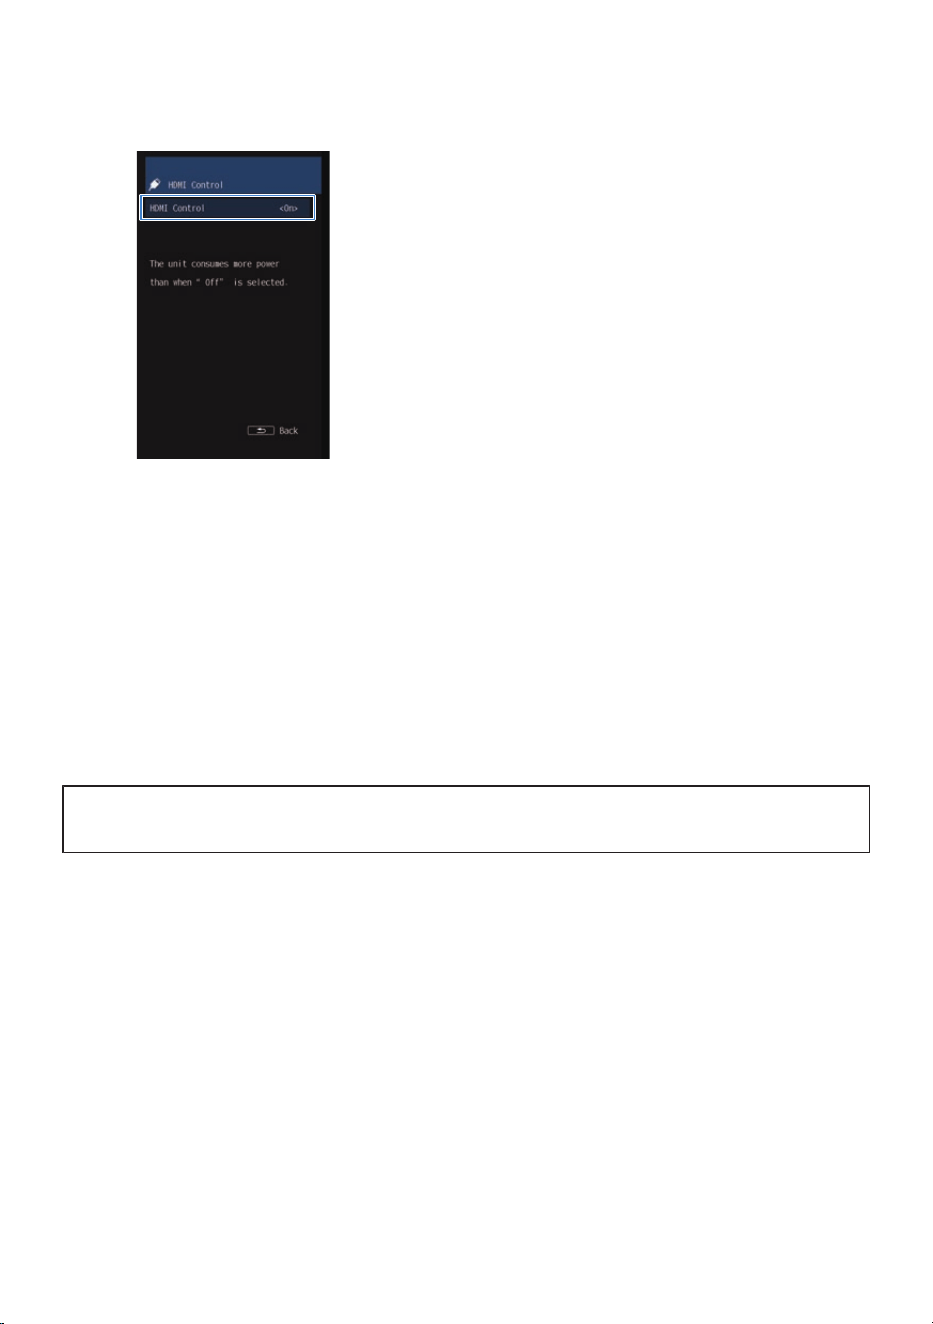
3 In the HDMI Control screen, select “On”.
4 Press the ~ (Setup) key.
The Setup menu closes.
This completes the setting.
NOTE
(
Setting the HDMI Control function to On consumes more power than when it is set to Off.
(
When connecting an HDMI jack that supports only ARC on the TV to the HDMI OUT/TV (eARC) jack on the sound bar, set also “ARC”
to “On”. The default setting is “On”.
Related links
“Making HDMI settings”(p.122)
Next steps
(
“Checking that the sound bar outputs audio”(p.51)
50
PREPARATION FOR USE > Enabling the HDMI Control function
Checking that the sound bar outputs audio
Play back content to check that audio is actually output.
n
Checking TV audio
Watch the TV connected to the sound bar to confirm that TV audio is being output from the sound bar. If TV
audio is not output, press the INPUT key on the remote control to switch the input source to “TV”.
INPUT
NOTE
(
If audio is being output from both the TV speakers and the sound bar, mute the TV speakers.
(
If you have AV devices connected to the TV, switch the input source to “TV” in the same way and check if audio is output from the
sound bar.
n
Checking audio from AV devices
Play an AV device connected to the sound bar's HDMI IN jack and press the INPUT key on the remote control
to switch the input source to “HDMI”.
Check that the sound bar outputs audio from the AV device.
INPUT
NOTE
When an AV device is connected to the HDMI IN jack of the sound bar, the HDMI cable connecting the sound bar to the TV transmits the
video signal from the AV device to the TV.
51
PREPARATION FOR USE > Checking that the sound bar outputs audio


Connecting wireless speakers (TRUE X SURROUND)
If you wish to connect and use TRUE X SURROUND wireless speakers such as WS-X3A with the sound bar,
refer to the related link.
Refer to the “TRUE X SURROUND” section in this guide for details on how to use TRUE X SURROUND.
Related links
“Registering wireless speakers to the sound bar”(p.60)
Next steps
(
“Registering to a MusicCast network”(p.56)
53
PREPARATION FOR USE > Connecting wireless speakers (TRUE X SURROUND)

Setting MusicCast
MusicCast
With MusicCast, you can share music with MusicCast devices installed in multiple rooms. The MusicCast
Controller smartphone application allows you to easily enjoy music from your smartphone, media server
(computer/NAS), Internet radio or streaming services anywhere in your home.
Refer to the Yamaha website for more information on MusicCast and compatible devices.
Related links
(
“MusicCast Controller”(p.55)
(
“Registering to a MusicCast network”(p.56)
54
PREPARATION FOR USE > Setting MusicCast

MusicCast Controller
Use of network functions on a MusicCast compatible device requires the use of the “MusicCast Controller”
smartphone application. Search for “MusicCast Controller” (free) on the App Store or Google Play and install
it.
55
PREPARATION FOR USE > Setting MusicCast
Registering to a MusicCast network
Connect the sound bar to the MusicCast network. At the same time, connect the sound bar to a wireless
network.
To become a registered user of the MusicCast network requires the “MusicCast Controller” smartphone
application. Search for “MusicCast Controller” (free) on the App Store or Google Play and install it.
Confirm that your smartphone is connected to your home router before operation.
1 Start up the “MusicCast Controller” on your smartphone and tap “Setup”.
If you have another already registered MusicCast device, tap the “Settings” tab and tap “Add
New Device”.
2 Follow the instructions in the “MusicCast Controller” and hold down the INPUT/
CONNECT button on the sound bar for 5 seconds or longer.
INPUT (CONNECT)
The (wireless LAN) icon starts to flash when entering the registration mode.
3 Connect and set up the MusicCast network according to the “MusicCast Controller”
instructions.
This completes your MusicCast network registration.
NOTE
(
The sound bar cannot be connected to a wireless LAN router (an access point) if they are far apart. In such a case, install the sound
bar and wireless LAN router (access point) close to each other.
(
To make a wireless connection to the network, get a wireless LAN router SSID (access point) and set a security key.
(
MusicCast Controller screens and menu names are subject to change without notice.
Related links
“MusicCast Controller”(p.55)
56
PREPARATION FOR USE > Setting MusicCast
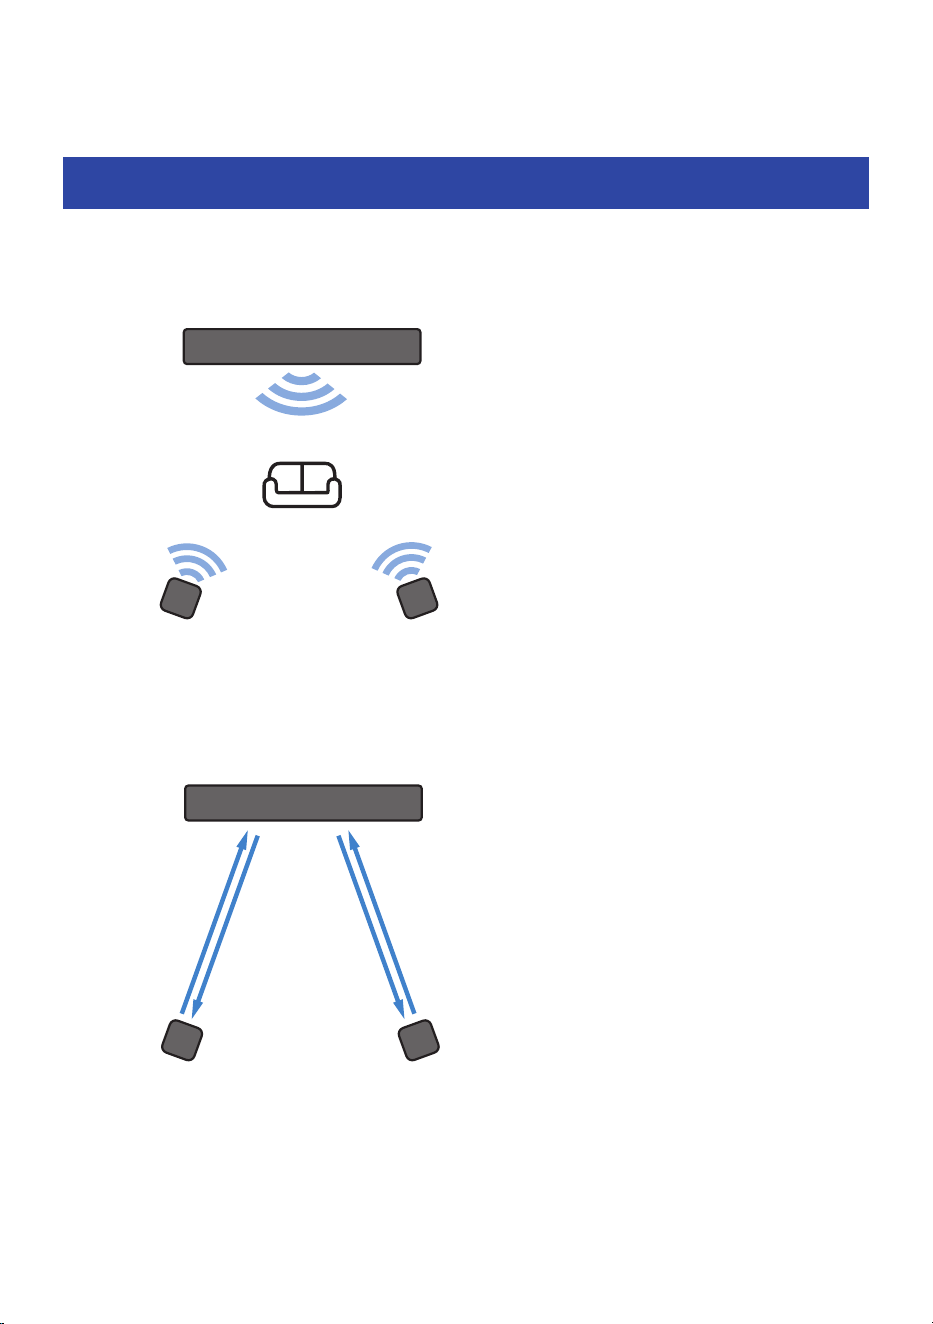
TRUE X SURROUND
What is TRUE X SURROUND?
TRUE X SURROUND is a function to easily obtain real surround sound through use of TRUE X SURROUND
compatible wireless speakers such as TRUE X SPEAKER 3A (WS-X3A) as surround speakers for the sound bar.
Surround (right)Surround (left)
Wireless speaker
Sound bar
The sound bar and wireless speakers are connected wirelessly for communication between them. For that
reason, when using these products for the first time, the respective device information of the sound bar and
wireless speakers needs to be registered to one another.
Sound bar
Register as
Surround (Right)
channel speaker
Register as
Surround (Left)
channel speaker
Register as the
sound bar to which
the speakers are
connected
Wireless speaker
In addition to the real surround sound, you can use the “ALL mode” to output music from both the sound bar
and the wireless speakers to enjoy music and video in a wider setting.
There is also a “SOLO mode” that allows you to use the wireless speakers independently of the sound bar as
Bluetooth speakers in a different room.
57
TRUE X SURROUND > What is TRUE X SURROUND?

Video overview of TRUE X SURROUND (YouTube)
Overview of TRUE X SURROUND (YouTube)
NOTE
It is also possible to use only one wireless speaker. If only one wireless speaker is registered, the connected wireless speaker outputs
Surround (Left) sound and Surround (Right) sound.
Related links
(
“Registering wireless speakers to the sound bar”(p.60)
(
“Surround playback”(p.74)
(
“Switching between the modes (SOLO/SURROUND) of the wireless speakers”(p.80)
58
TRUE X SURROUND > What is TRUE X SURROUND?

TRUE X SURROUND instructions list
A list of instructions for TRUE X SURROUND.
n
What is TRUE X SURROUND? (p.57)
This section explains TRUE X SURROUND.
n
Preparations to use TRUE X SURROUND for the first time
Information on TRUE X SURROUND for first time users.
(
Registering wireless speakers to the sound bar (p.60)
(
Installing wireless speakers (p.69)
(
Checking whether the wireless speakers output sound (p.71)
n
Playback operations
Instructions for how to play back audio using TRUE X SURROUND speakers.
(
Using surround speakers for playback (p.74)
(
Adjusting volume balance (p.77)
(
Playing the same audio from all speakers (ALL mode) (p.78)
(
Switching between wireless speaker modes (SOLO/SURROUND) (p.80)
n
Changing the connection settings
The following information describes how to modify the wireless speakers and how to deregister them.
(
Deregistering wireless speakers from the sound bar (p.81)
n
Checking the connection status (p.82)
Instructions for how to check the connection status of the wireless speakers and the sound bar.
n
Frequently asked questions (p.174)
Frequently asked questions about TRUE X SURROUND.
59
TRUE X SURROUND > TRUE X SURROUND instructions list
Preparations to use TRUE X SURROUND for the first time
Registering wireless speakers to the sound bar
To connect TRUE X SURROUND wireless speakers to the sound bar for the first time, follow the order of the
procedure described below to register the wireless speakers you connect to the sound bar. Registration is
required for initial connection only.
If registering only one wireless speaker
(
It is also possible to register and use only one wireless speaker. In this case, you do not need to register the second wireless
speaker. When the registration of one wireless speaker is complete, proceed to set it up.
How-to video
You can also watch a video about the registration procedure.
Initial setup for TRUE X SURROUND (YouTube)
n
Preparation for registration
1 Turn on the wireless speakers and sound bar.
Place the wireless speakers near the sound bar during registration to avoid interference from
other nearby wireless devices and help the registration complete successfully.
To turn on the wireless speakers, hold down the power button of the wireless speakers for 2
seconds.
Wireless speaker
L R
60
TRUE X SURROUND > Preparations to use TRUE X SURROUND for the first time
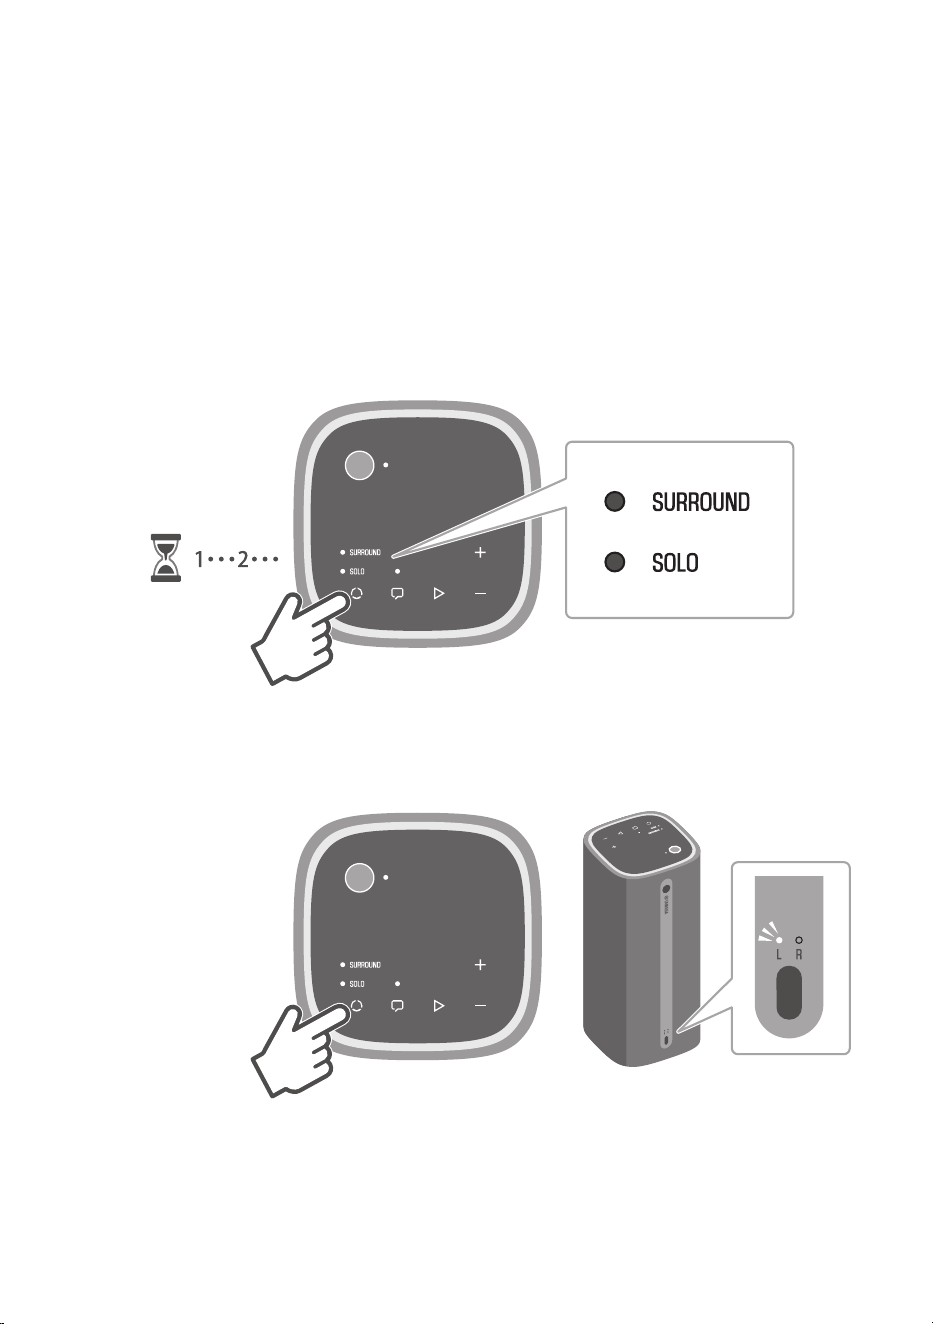
n
Registering the first wireless speaker
Register the wireless speaker (L) as Surround Speaker (Left).
If you want to register only one wireless speaker, perform the following procedure.
NOTE
The wireless speakers do not have a right or left side. It does not matter which of the two speakers you register first.
1 Hold down P (mode) for at least three seconds on the wireless speaker.
A notification tone will be heard making it possible to select the Left (L) or Right (R) speaker.
SURROUND: Off
SOLO: Off
2 Press P (mode) to turn on the L indicator.
Each press of the button switches between L and R. The default setting is “L” (Surround (Left)).
L: Glows
61
TRUE X SURROUND > Preparations to use TRUE X SURROUND for the first time

3 Hold down P (mode) for at least three seconds on the wireless speaker.
The notification tone indicates that the wireless speakers have entered the registration wait
status, and the SURROUND indicator on the wireless speaker will start to flash.
SURROUND: Flashes
In the next step, operate the controls of the sound bar. Operate the controls of the sound bar
within two minutes after the wireless speaker has entered the registration wait status.
The wait status is canceled after two minutes have elapsed. If this happens, start over from
step 1.
4 Press the ~ (Setup) key on the remote control of the sound bar to open the Setup
menu.
62
TRUE X SURROUND > Preparations to use TRUE X SURROUND for the first time
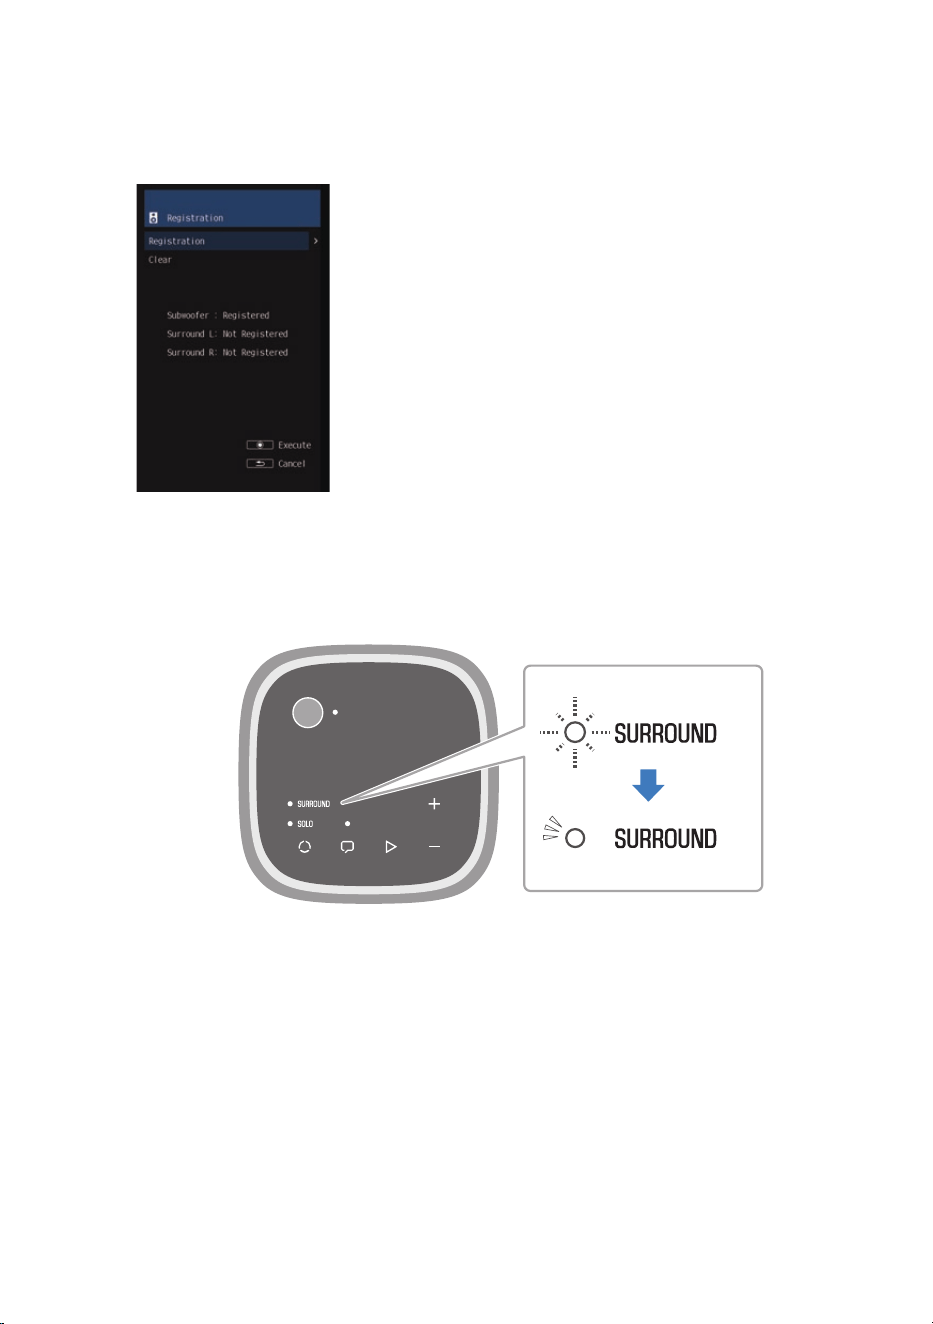
5 In the Setup menu, under “Speaker” > “Registration”, select “Registration”.
The “Registration” screen appears.
Follow the instructions on the screen to register wireless speakers to the sound bar.
When the SURROUND indicator on the control panel of the wireless speaker changes from flashing tos
glowing and “Registered” appears in the “Registration” screen, the registration is complete. The wireless
speaker is registered as Surround Speaker (Left).
If you only want to connect one wireless speaker, the registration procedure is complete. Proceed to install
the wireless speaker.
If you want to connect two surround speakers, use the procedure below to register the second surround
speaker.
63
TRUE X SURROUND > Preparations to use TRUE X SURROUND for the first time

NOTE
(
If only one wireless speaker is registered, both the L and R indicators on the rear of the wireless speaker are glowing.
L: Glowing
R: Glowing
(
If the registration is not complete within two minutes after the wireless speaker has entered the registration wait status, the
registration wait status will be canceled.
(
To interrupt the registration procedure, hold down the power button for at least three seconds to turn off the wireless speaker.
(
If there is a firmware update after completing the registration, the update will start automatically.
(
If you update sound bar firmware manually after registration, you may also have to update the firmware of the wireless speakers.
The wireless speaker firmware will be updated automatically and “Wireless SP : FW Updating..” will appear on the front display.
When “Update success” appears on the front display, turn off the sound bar and then turn it back on.
Depending on the number of connected wireless speakers, you may have to repeat the firmware update process several times.
(
If the Wireless Speakers are connected to a power source, turning on the sound bar will automatically turn on the Wireless
Speakers.
(
When the True X Ready function is set to “On”, the wireless speakers turn on with the sound bar earlier than when the function is
set to “Off”.
n
Registering the second wireless speaker
Perform the same operation as the first wireless speaker (L) to register the second wireless speaker (R) as
Surround Speaker (Right).
64
TRUE X SURROUND > Preparations to use TRUE X SURROUND for the first time
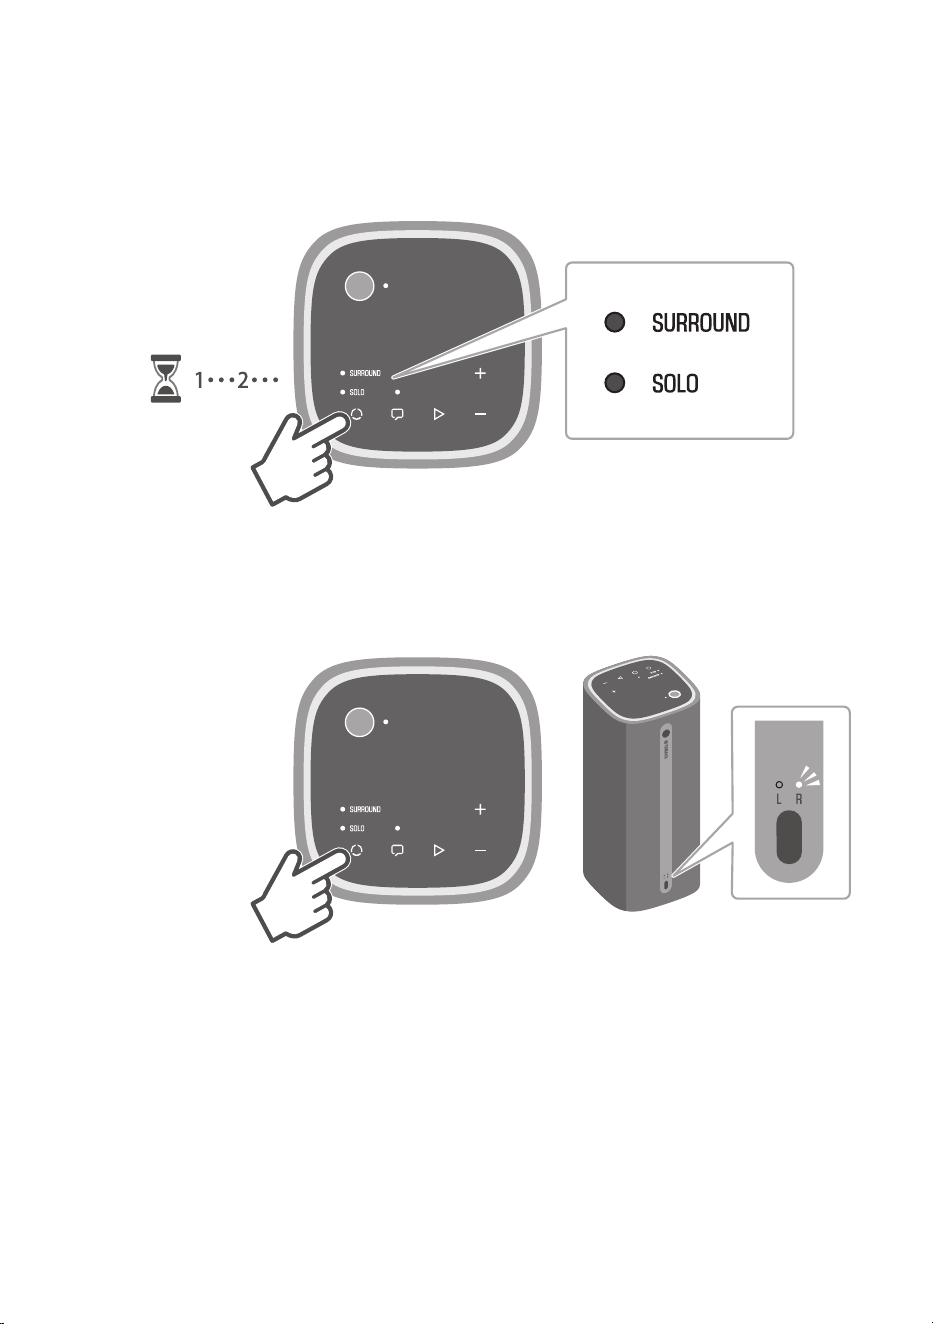
1 Hold down P (mode) for at least three seconds on the wireless speaker.
A notification tone will be heard making it possible to distinguish Left (L) and Right (R)
speakers.
SURROUND: Off
SOLO: Off
2 Press P (mode) to turn on the R indicator.
Each press of the button switches the indication between L and R and the notification tone is
heard. The default setting is “L” (Surround (Left)).
R: Glows
65
TRUE X SURROUND > Preparations to use TRUE X SURROUND for the first time
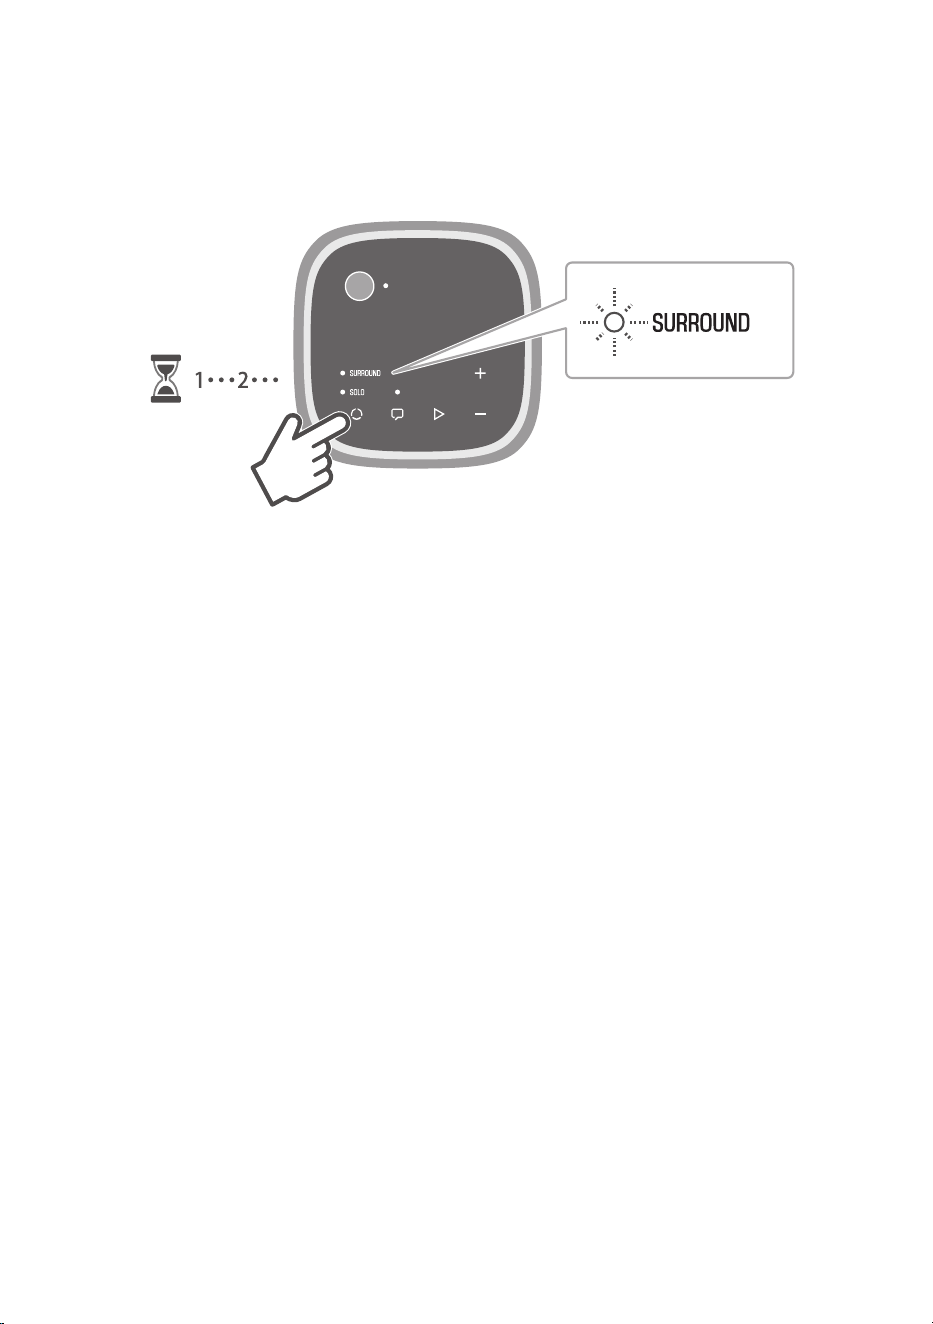
3 Hold down P (mode) for at least three seconds on the wireless speaker.
The notification tone indicates that the wireless speakers have entered the registration wait
status, and the SURROUND indicator on the wireless speaker will start to flash.
SURROUND: Flashes
In the next step, operate the controls of the sound bar. Operate the controls of the sound bar
within two minutes after the wireless speaker has entered the registration wait status.
The wait status is canceled after two minutes have elapsed. If this happens, start over from
step 1.
4 Press the ~ (Setup) key on the remote control of the sound bar to open the Setup
menu.
66
TRUE X SURROUND > Preparations to use TRUE X SURROUND for the first time

5 In the Setup menu, under “Speaker” > “Registration”, select “Registration”.
The “Registration” screen appears.
Follow the instructions on the screen to register wireless speakers to the sound bar.
When the SURROUND indicator on the control panel of the wireless speaker changes from
flashing tos glowing and “Registered” appears in the “Registration” screen, the registration is
complete. The wireless speaker is registered as Surround Speaker (Right).
The L or R indicator on the rear of each wireless speaker glows according to the channel it is
registered as.
Check the following if the registration status of a speaker shows “Not registered” on the
“Registration” screen.
67
TRUE X SURROUND > Preparations to use TRUE X SURROUND for the first time
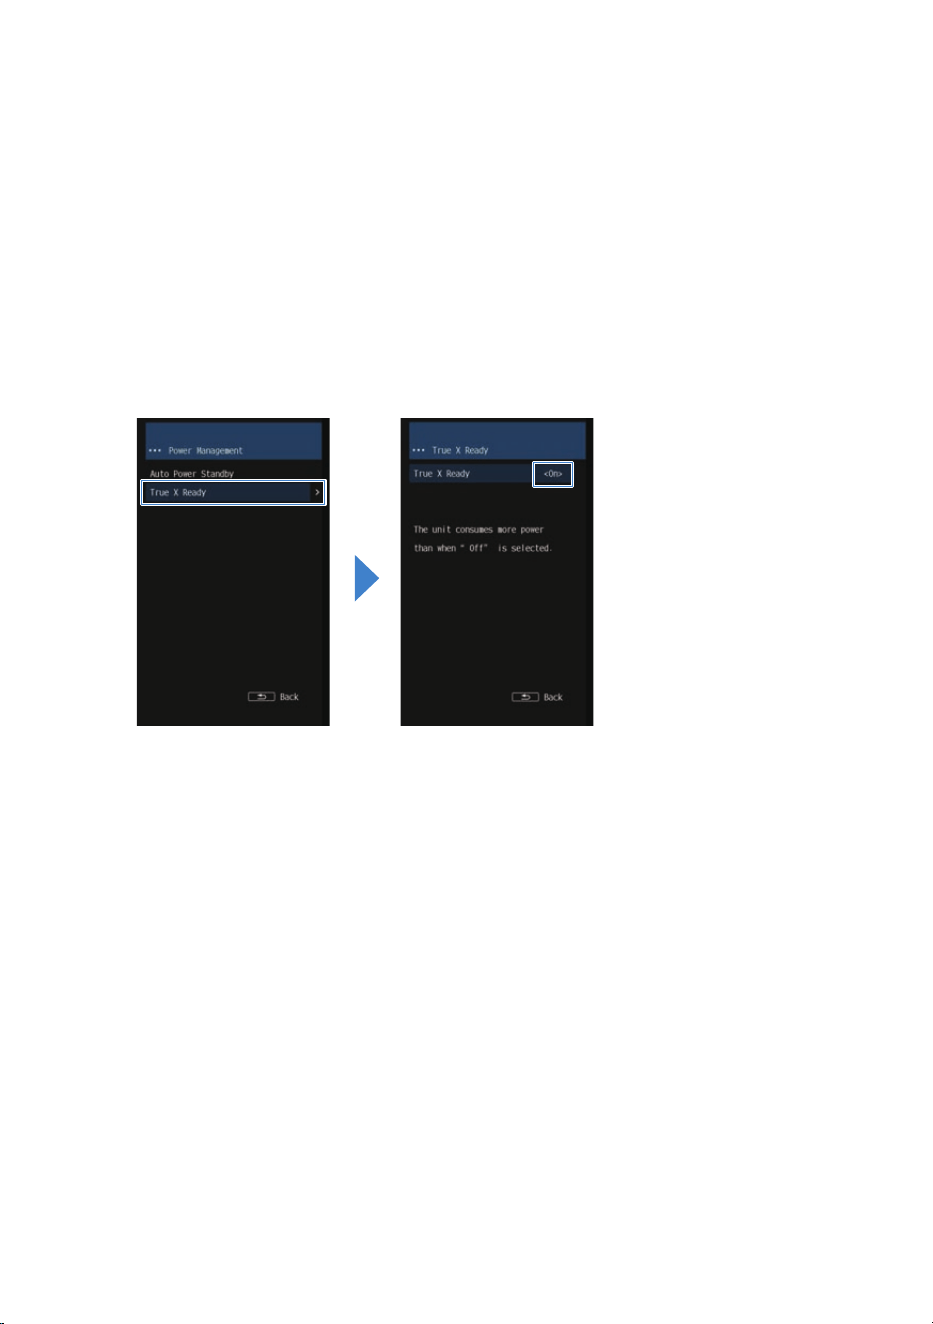
(
The same channel (L/R) registered for the first wireless speaker is also selected for the
second wireless speaker.
(
Hold down P (mode) for at least three seconds to select a different channel, and then
hold down P (mode) for at least three seconds again.
(
The wireless speaker’s registration wait status is expired.
(
The registration wait status will be canceled after more than two minutes have elapsed.
Start over the registration procedure again.
6 Press the ~ (Setup) key on the remote control of the sound bar to open the Setup
menu.
7 In the Setup menu, under “Power Management” > “True X Ready”, select “On”.
Proceed to install the wireless speakers in their respective positions.
NOTE
(
If the registration is not complete within two minutes after the wireless speaker has entered the registration wait status, the
registration wait status will be canceled.
(
To interrupt the registration procedure, hold down the power button for at least three seconds to turn off the wireless speaker.
(
If there is a firmware update after completing the registration, the update will start automatically.
(
If you update sound bar firmware manually after registration, you may also have to update the firmware of the wireless speakers.
The wireless speaker firmware will be updated automatically and “Wireless SP : FW Updating..” will appear on the front display.
When “Update success” appears on the front display, turn off the sound bar and then turn it back on.
Depending on the number of connected wireless speakers, you may have to repeat the firmware update process several times.
(
If the Wireless Speakers are connected to a power source, turning on the sound bar will automatically turn on the Wireless
Speakers.
(
When the True X Ready function is set to “On”, the wireless speakers turn on with the sound bar earlier than when the function is
set to “Off”.
(
Setting the “True X Ready” to “On” consumes more power than when it is set to “Off”.
Related links
(
“Installing wireless speakers”(p.69)
(
“Checking whether audio is output from the wireless speakers”(p.71)
(
“Checking the connection status of the wireless speakers on the sound bar”(p.82)
(
“Setting up detailed function settings (Function)”(p.125)
68
TRUE X SURROUND > Preparations to use TRUE X SURROUND for the first time
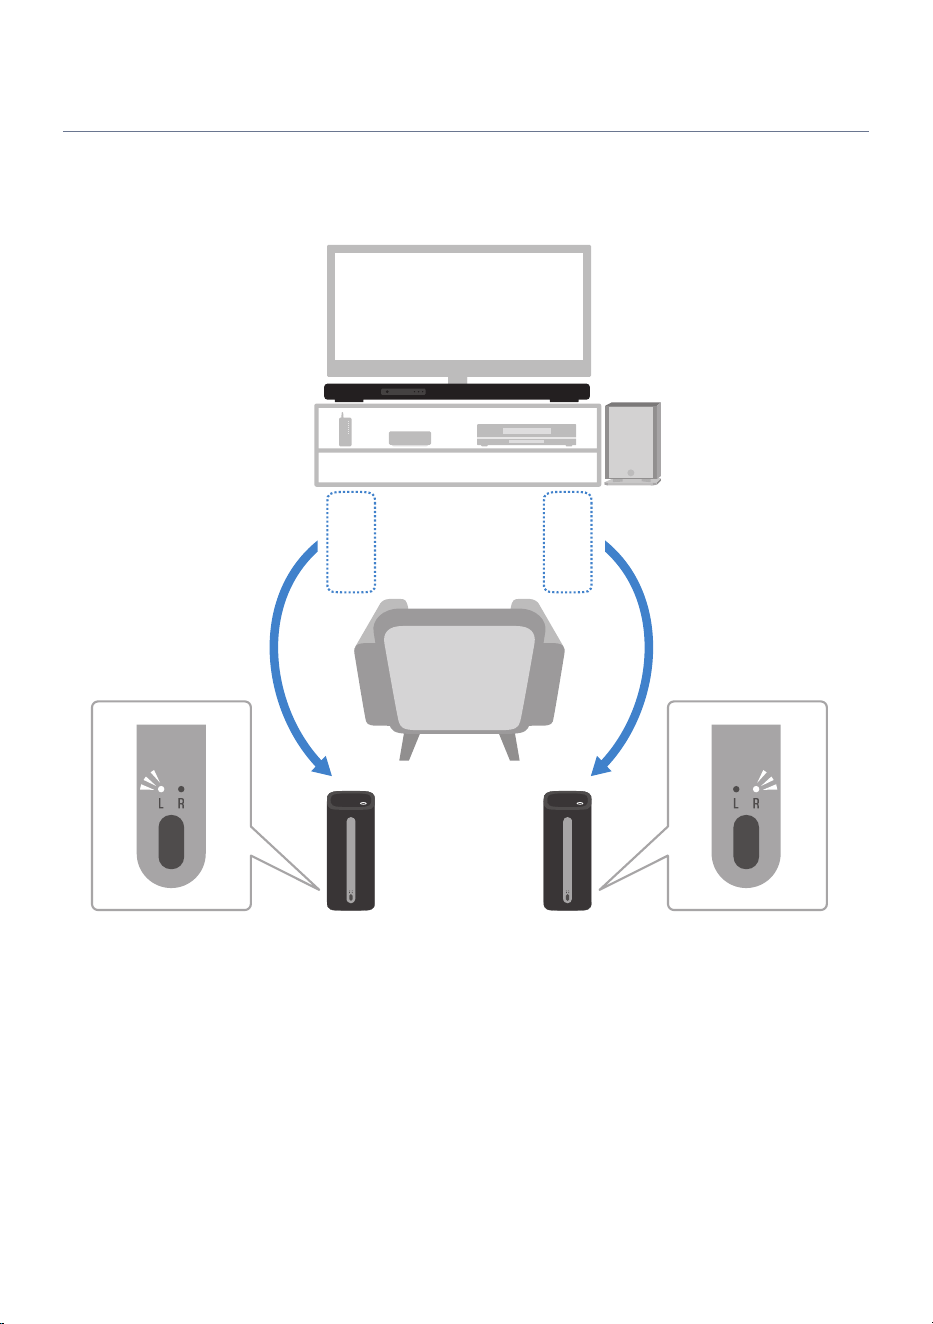
Installing wireless speakers
When the registration is complete, proceed to install the wireless speakers in their respective positions.
Check the status of the L/R indicators on the rear of the wireless speakers, and install the wireless speakers
accordingly.
If only one wireless speaker is registered, perform the following procedure to install it.
69
TRUE X SURROUND > Preparations to use TRUE X SURROUND for the first time
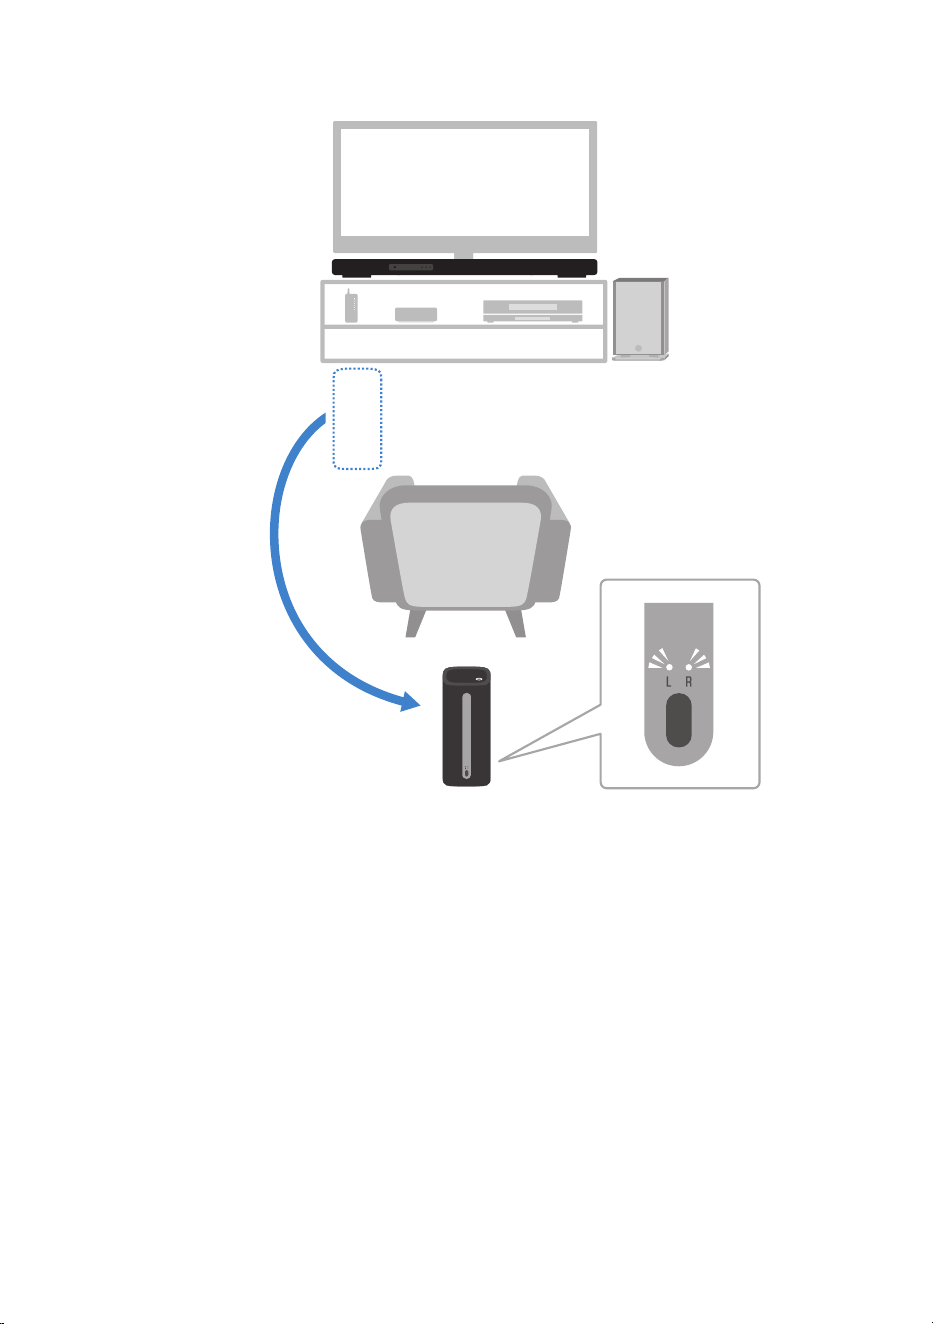
The connection and installation procedures are completed. The product is now ready for playback.
Next, check the connection status of the wireless speakers.
Related links
(
“Checking whether audio is output from the wireless speakers”(p.71)
(
“Registering wireless speakers to the sound bar”(p.60)
70
TRUE X SURROUND > Preparations to use TRUE X SURROUND for the first time

Checking whether audio is output from the wireless speakers
When the connection is established, play content to check that audio is actually output from the connected
wireless speakers.
1 Play content on the sound bar.
Check that audio is being output from the sound bar.
71
TRUE X SURROUND > Preparations to use TRUE X SURROUND for the first time
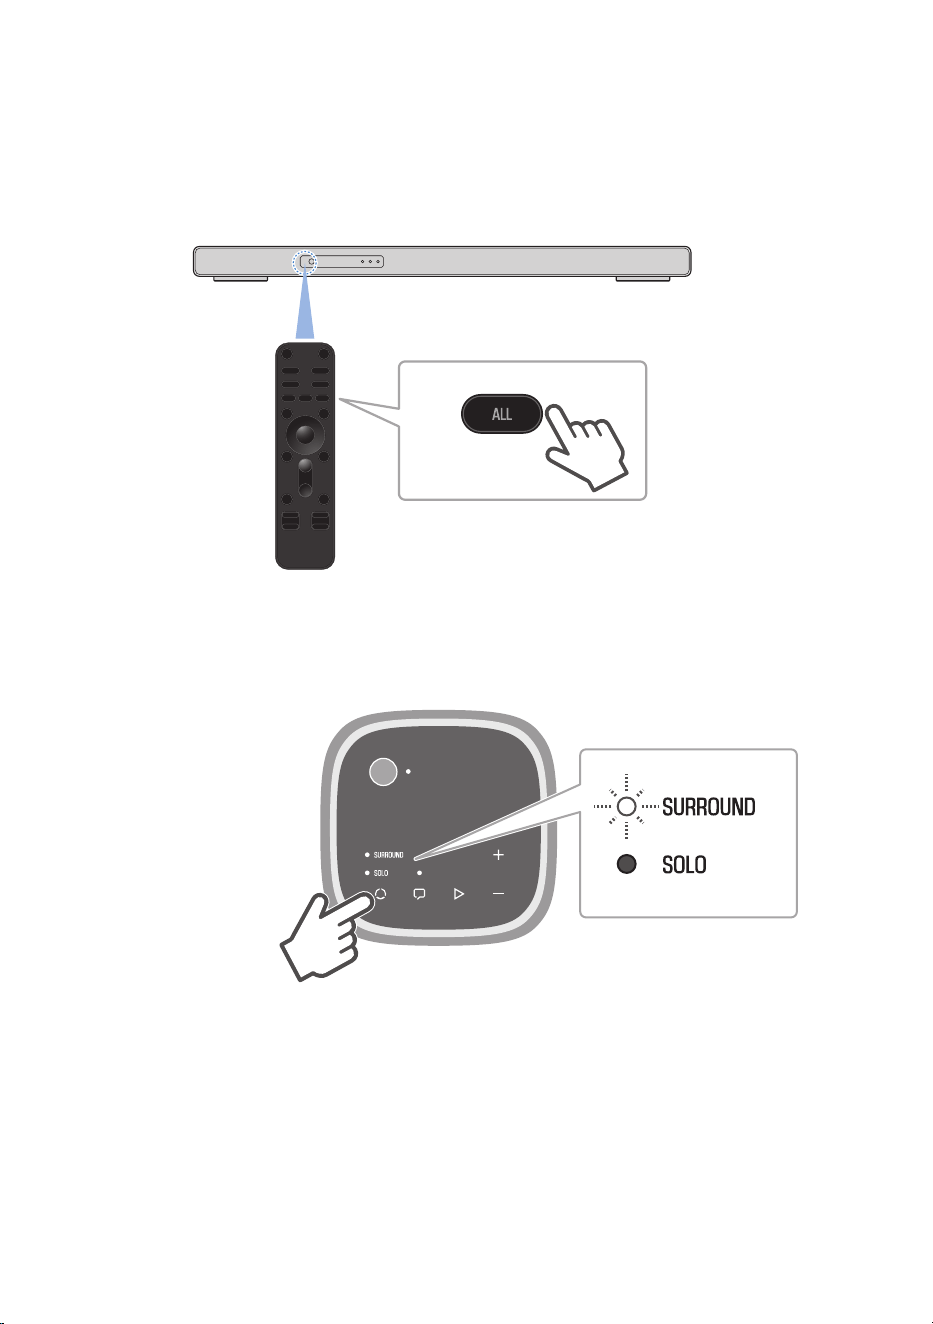
2 Point the sound bar remote control at the sound bar and press the ALL key to
switch to ALL mode.
ALL mode is a mode that outputs the same music from the sound bar and the wireless
speakers. In this state, check that audio is being output from the wireless speakers.
If no audio is being output from the wireless speakers, check for the following.
(
The SOLO indicators of the wireless speakers are glowing or flashing.
(
Press P (mode) to switch to SURROUND.
(
The SURROUND indicators on the wireless speakers are flashing rapidly.
(
The wireless speakers are waiting to be registered to the sound bar. Reregister the
wireless speakers.
72
TRUE X SURROUND > Preparations to use TRUE X SURROUND for the first time
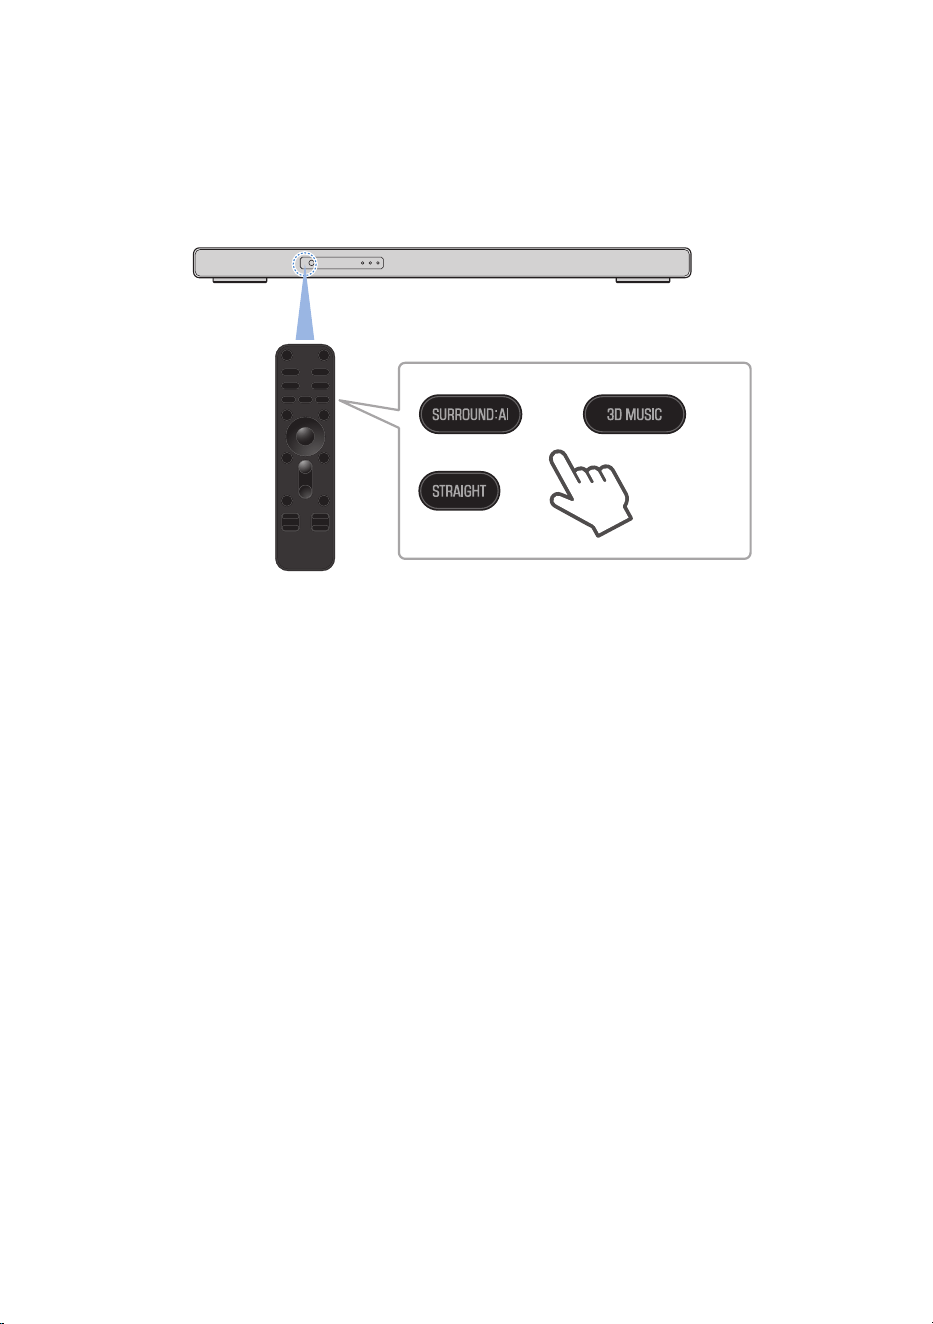
3 Once you have checked that audio is output from the wireless speakers, point the
sound bar remote control at the sound bar and press the SURROUND:AI, 3D MUSIC,
or STRAIGHT key to switch to surround playback.
Enjoy surround sound playback.
NOTE
(
You can check the connection status of the wireless speakers on the front display. For details, refer to the following link.
(
To check the connection status by outputting audio from each speaker in turn, select “Test Tone” under “Speaker” > “Level” in the
Setup menu. For details, refer to the following link.
Related links
(
“Registering wireless speakers to the sound bar”(p.60)
(
“Checking the connection status of the wireless speakers on the sound bar”(p.82)
(
“Configuring the speakers”(p.115)
73
TRUE X SURROUND > Preparations to use TRUE X SURROUND for the first time

Playback operations
Surround playback
This section describes the basic control operations for surround playback on the sound bar and wireless
speakers.
1 Turn on the sound bar.
If the wireless speakers connected to the sound bar are connected to power, they will be
turned on. In this case, proceed to step 3.
2 If the wireless speakers are not turned on, hold down their power buttons to turn
them on.
Note
(
If “Wireless SP : FW Updating..” appears on the front display of the sound bar after the registration is complete, the firmware is
being updated. Turning off the wireless speakers while the firmware is being updated may cause malfunction. Wait until the
power indicator stops flashing.
74
TRUE X SURROUND > Playback operations
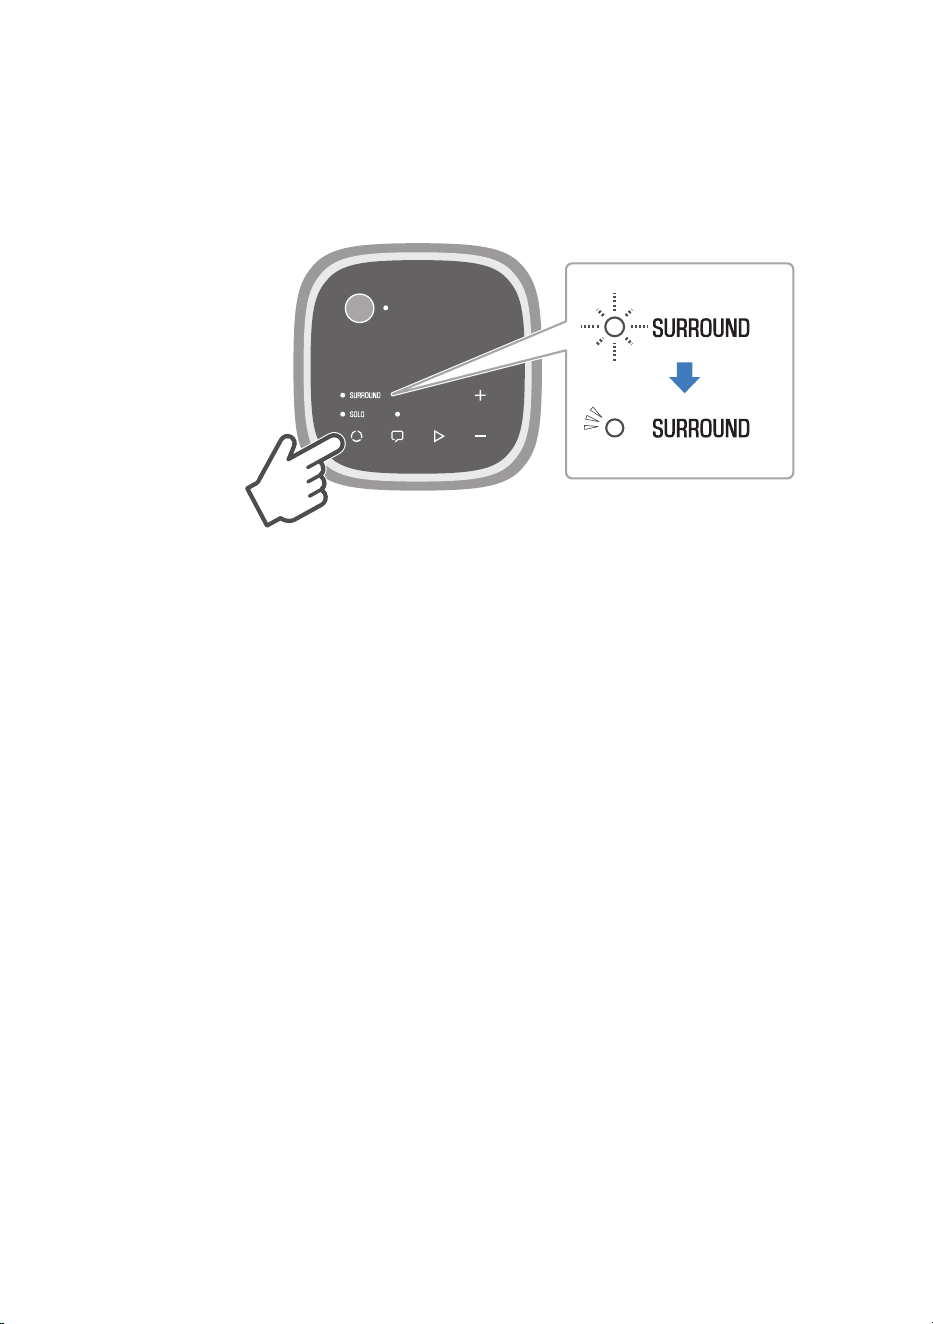
3 If the SOLO indicators of the wireless speakers are flashing or glowing, press P
(mode) to select SURROUND.
The SURROUND indicator starts flashing. When the connection with the sound bar is
established, the SURROUND indicator stops flashing and starts glowing.
75
TRUE X SURROUND > Playback operations
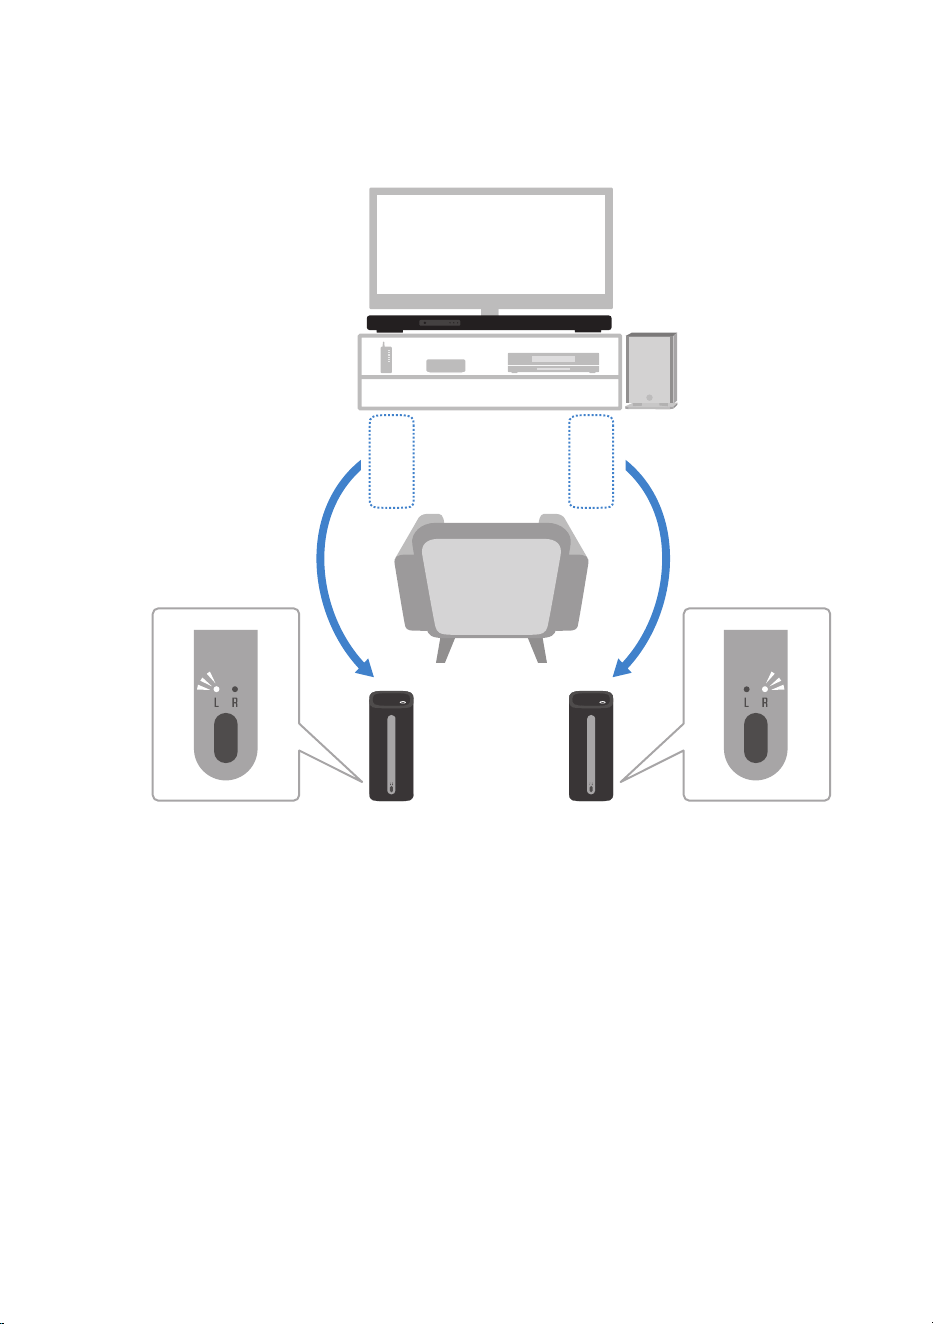
4 Check whether the L or R indicator on the rear of each wireless speaker is glowing,
and install the wireless speakers in their respective positions.
5 Start surround playback on the sound bar.
6 To stop using the sound bar, turn it off.
This will turn off the wireless speakers connected to the sound bar at the same time.
76
TRUE X SURROUND > Playback operations
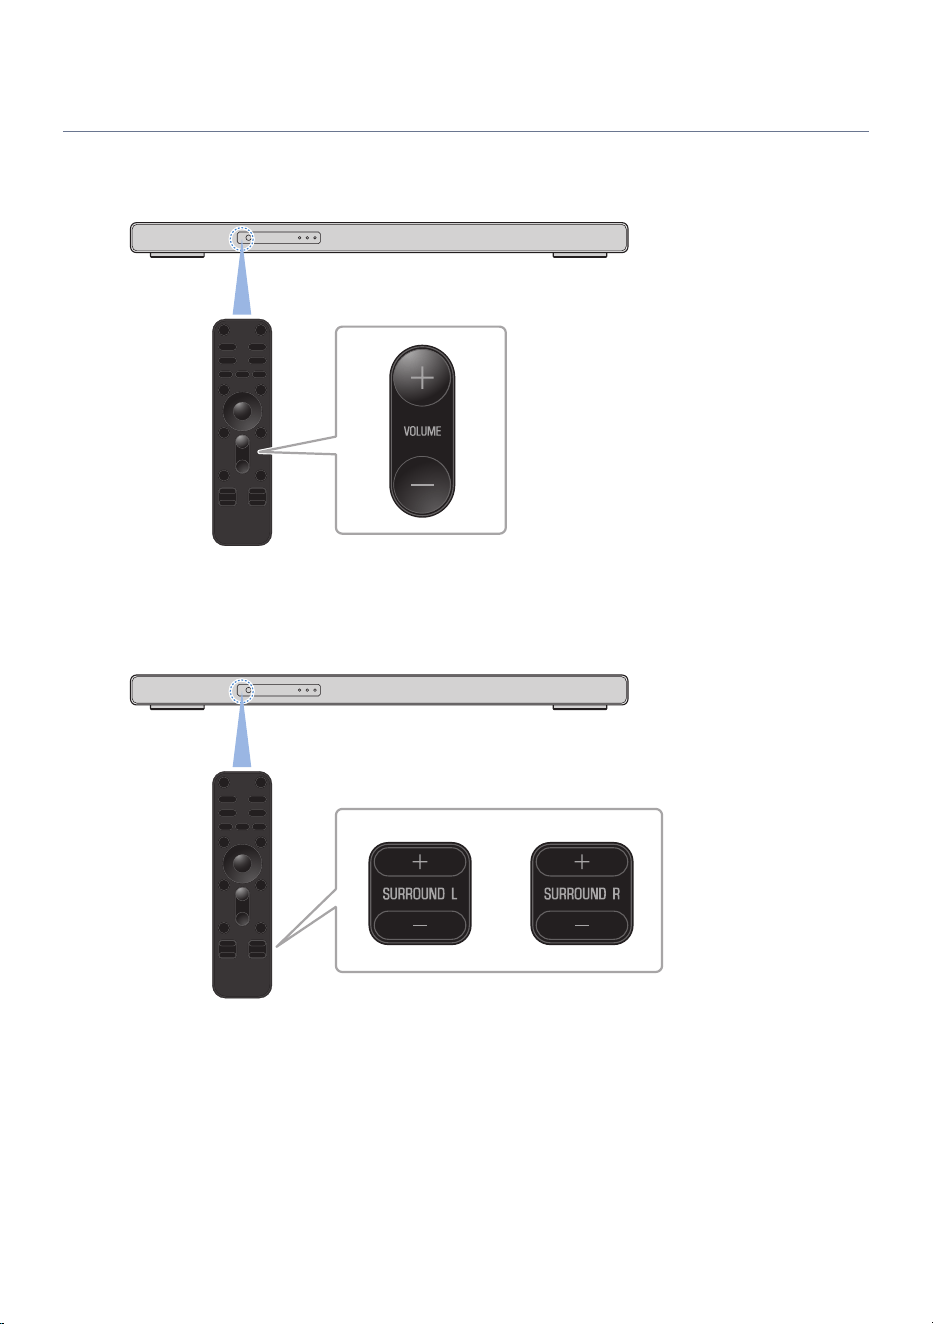
Adjusting the volume balance
Adjusting the volume of the sound bar during playback using TRUE X SURROUND will adjust the volume of
the sound bar and the wireless speakers.
The volumes of the wireless speakers (surround channels) can also be adjusted individuality.
After the overall volume of the sound bar and wireless speakers has been adjusted, the volumes of the
wireless speakers can be adjusted to achieve the optimal balance.
77
TRUE X SURROUND > Playback operations
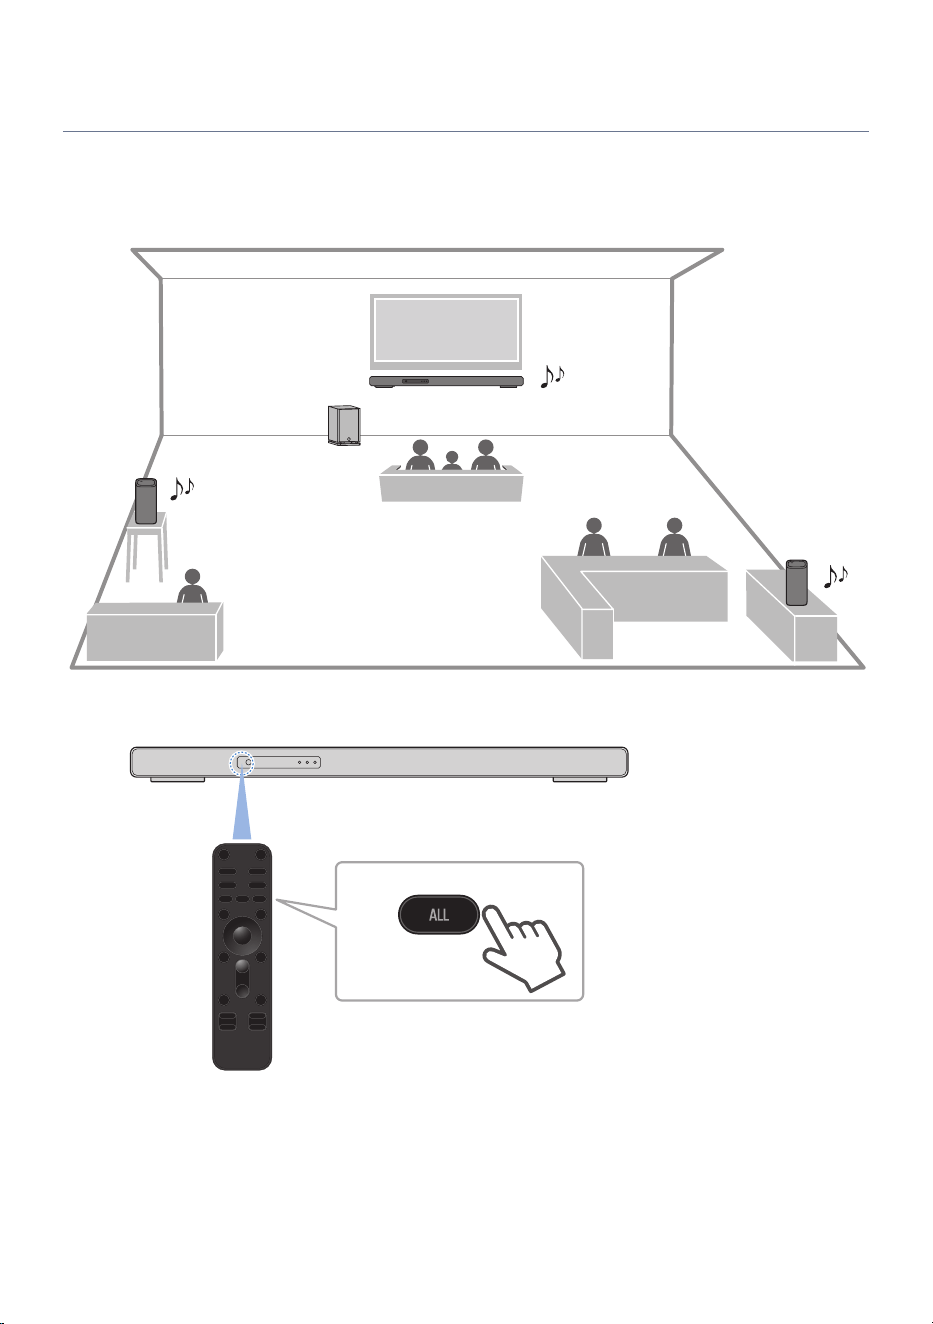
Playing the same audio from all speakers (ALL mode)
When the mode is switched to the ALL mode, the wireless speakers (surround speakers) connected to the
sound bar will output same audio as the sound bar in monaural mode. This mode is useful for making audio
easy to hear from anywhere in a large room.
Point the sound bar remote control at the sound bar and press the ALL key to switch to ALL mode.
A short message displays “ALL” when you switch to ALL mode.
When the INFO key is pressed to open the sound mode during playback in ALL mode, “ALL” is displayed on
the front display.
To cancel ALL mode, press one of the following keys on the remote control to switch to surround playback or
stereo playback: SURROUND:AI, 3D MUSIC, STRAIGHT, or STEREO.
78
TRUE X SURROUND > Playback operations
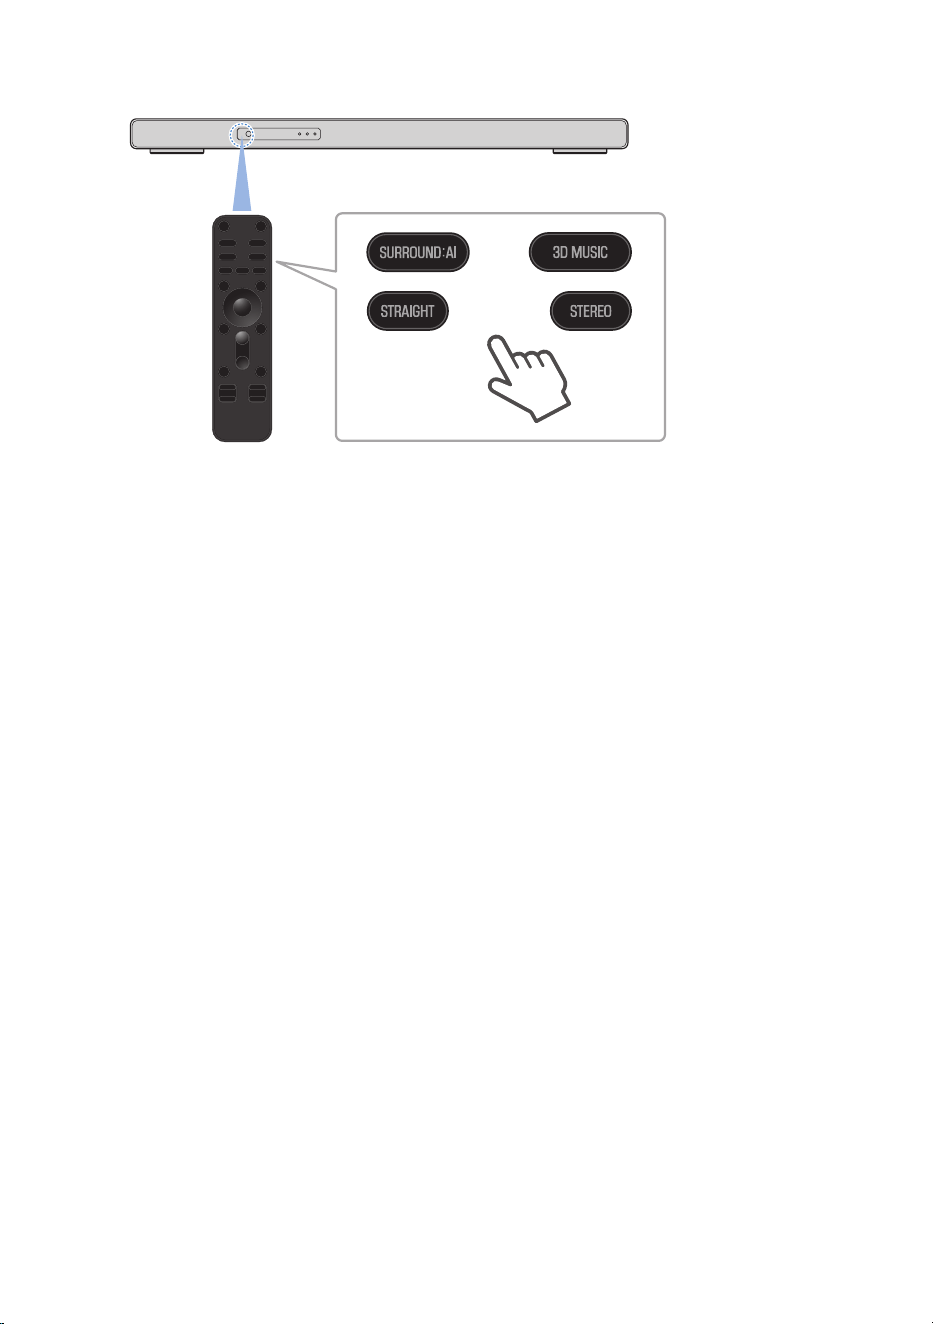
NOTE
(
In ALL mode, multi-channel playback is off, and the sound bar provides stereo playback while the wireless speakers provide
monoaural playback.
(
Install wireless speakers within 10 m (33 ft) of the sound bar.
(
If there is a wall or other obstacle between the sound bar and wireless speakers, the audio may cut out.
79
TRUE X SURROUND > Playback operations
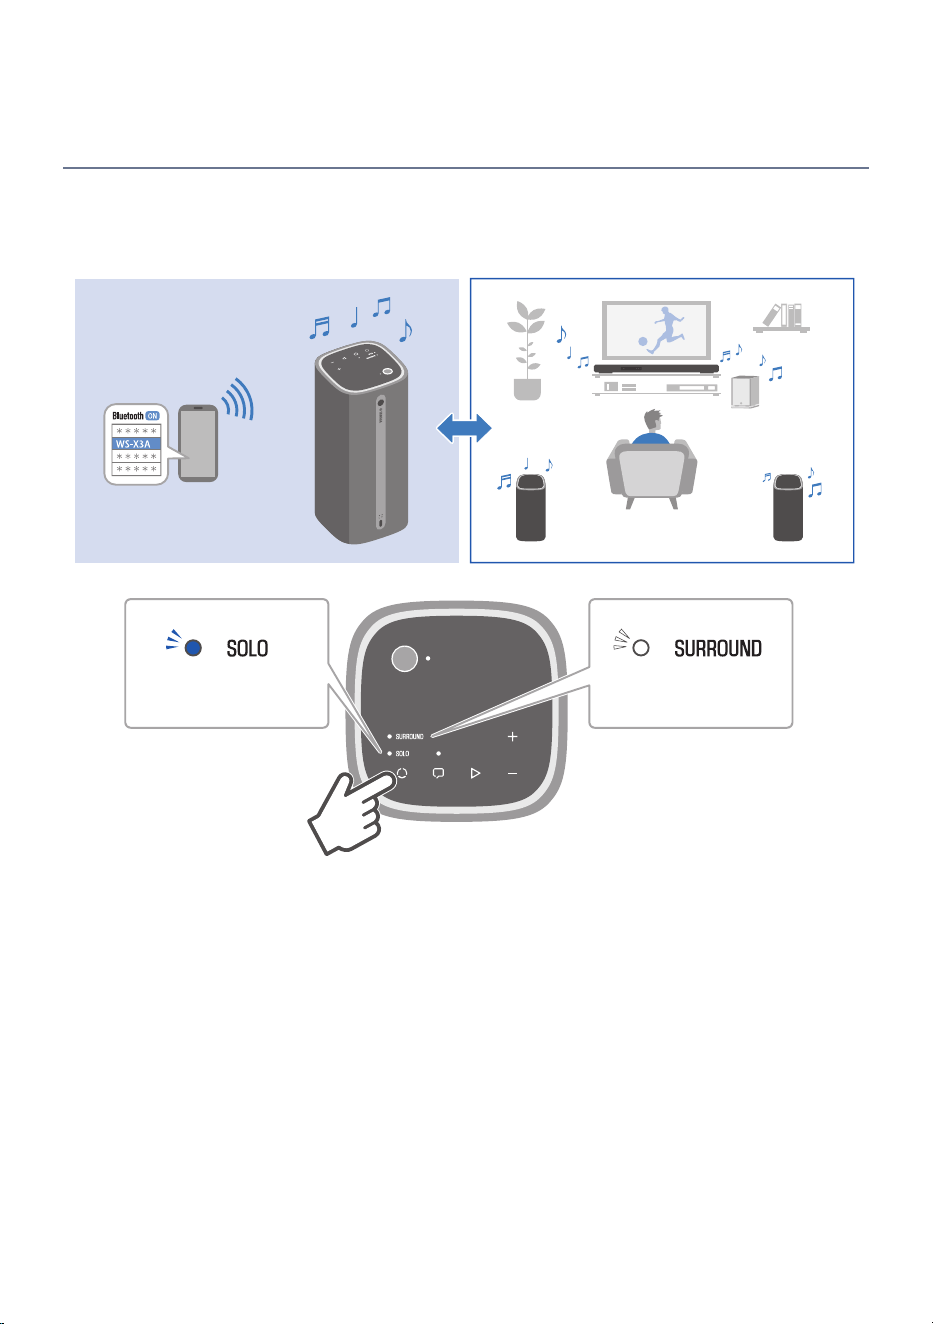
Switching between the modes (SOLO/SURROUND) of the
wireless speakers
Pressing P (mode) on the wireless speakers switches modes between “SURROUND mode” for using the
wireless speakers as surround speakers for the sound bar and “SOLO mode” for using the wireless speakers
as Bluetooth speakers.
SOLO mode SURROUND mode
For details on operating in SOLO mode, refer to the wireless speaker User Guide.
80
TRUE X SURROUND > Playback operations

Removing the registration of wireless speakers to the
sound bar
Delete the registration information stored in the sound bar and disconnect the TRUE X SURROUND wireless
speakers completely.
1 Press the ~ (Setup) key on the remote control of the sound bar to open the Setup
menu.
2 In the Setup menu, under “Speaker” > “Registration”, select “Clear”.
This removes the registration of the wireless speakers and the subwoofer.
NOTE
(
This procedure removes all speaker registrations from the sound bar. Since the subwoofer registration is also removed, follow the
instructions for manually registering a subwoofer if you need to register a subwoofer again. For details, refer to the following link.
(
To connect deregistered wireless speakers to the sound bar again, follow the procedure for connecting a new wireless speakers to
the sound bar. For details, refer to the following link.
(
If you want to change the number of connected wireless speakers from two to one, you need to delete the registration information
stored in the sound bar. Then register the wireless speaker that you want to connect to the sound bar again.
(
If you want to change the number of connected wireless speakers, you need to delete the registration information stored in the
sound bar. Then register the new wireless speaker that you want to connect to the sound bar again.
Related links
(
“Configuring the speakers”(p.115)
(
“Registering wireless speakers to the sound bar”(p.60)
(
“Connecting a subwoofer manually”(p.199)
81
TRUE X SURROUND > Removing the registration of wireless speakers to the sound bar
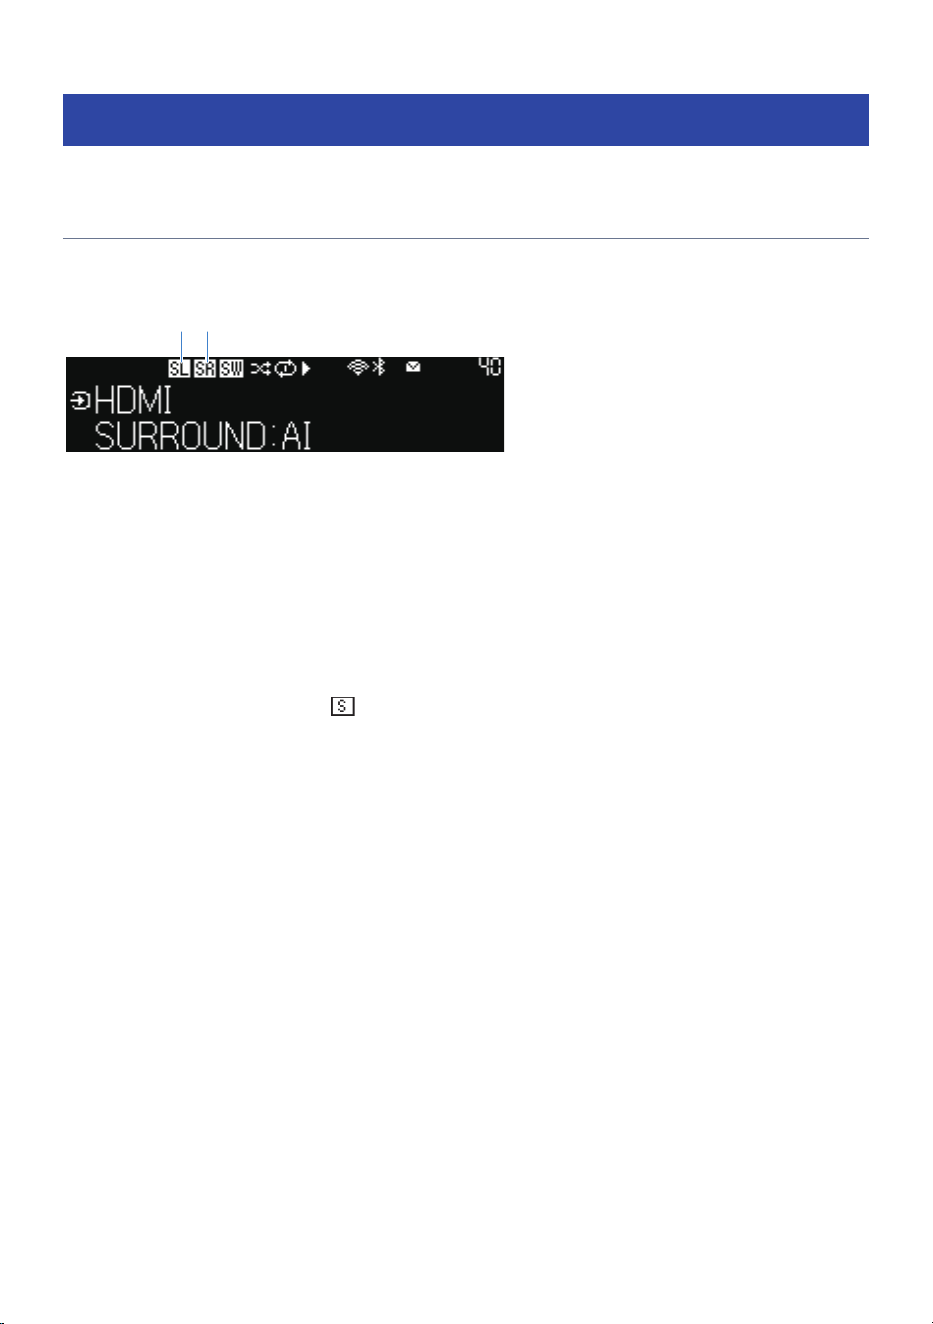
Checking the connection status
Checking the connection status of the wireless speakers on
the sound bar
The front display of the sound bar allows you to check wireless speaker connection status of the wireless
speakers.
a b
a
Connection of Surround Speaker (Left)
Glowing: Connected
Off: Not registered or not connected
b
Connection of Surround Speaker (Right)
Glowing: Connected
Off: Not registered or not connected
NOTE
(
If only one wireless speaker is registered,
(Surround) on the front display glows when it is connected. It does not glow when
not registered.
(
For details on other icons, refer to the following link.
Related links
“Names of parts and functions on the front display”(p.15)
82
TRUE X SURROUND > Checking the connection status
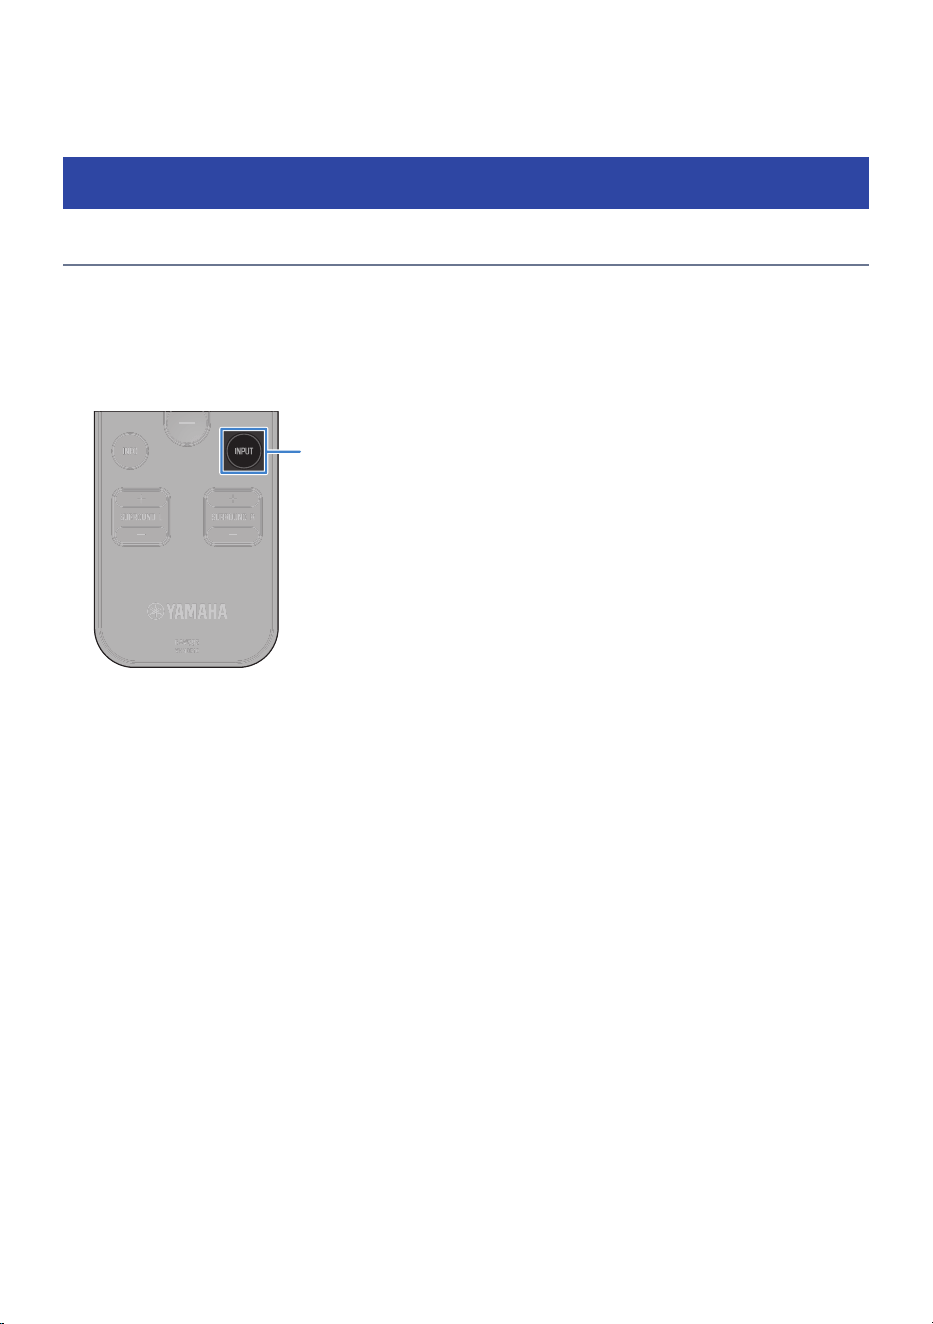
PLAYBACK
Basic control
Basic control during playback
This section describes the basic control operations available during playback.
n
Selecting an input
Press the INPUT key to change the input source.
INPUT
Displays the names of input sources on the front display as shown below. The TV screen also displays a short
message.
(
HDMI: Audio from a device connected to the HDMI IN jack
(
OPTICAL: Audio from a device connected to the OPTICAL jack
(
TV: Audio from TV connected to HDMI OUT/TV (eARC) jack or OPTICAL jack
(
Network Input name (example: SERVER/NET RADIO, etc.): Audio from streaming services, etc.
(
Bluetooth: Audio from a Bluetooth device
NOTE
(
“TV” operates as follows.
(
When using the eARC function, audio is played back via eARC.
(
When the ARC function is used, audio is played back via ARC. In this situation, set “HDMI Control” to “On”, and “ARC” to “On” in
the Setup menu.
(
If eARC/ARC are not used, audio from devices (TV) connected to the OPTICAL jack is output.
(
You can use the smartphone application MusicCast Controller to select network input (SERVER/NET RADIO, etc.).
(
If you press the INPUT key to switch to network input, the last selected input is selected. Use the MusicCast Controller to make any
changes to network input.
n
Adjusting volume
Use the VOLUME +/- keys to adjust the volume.
83
PLAYBACK > Basic control
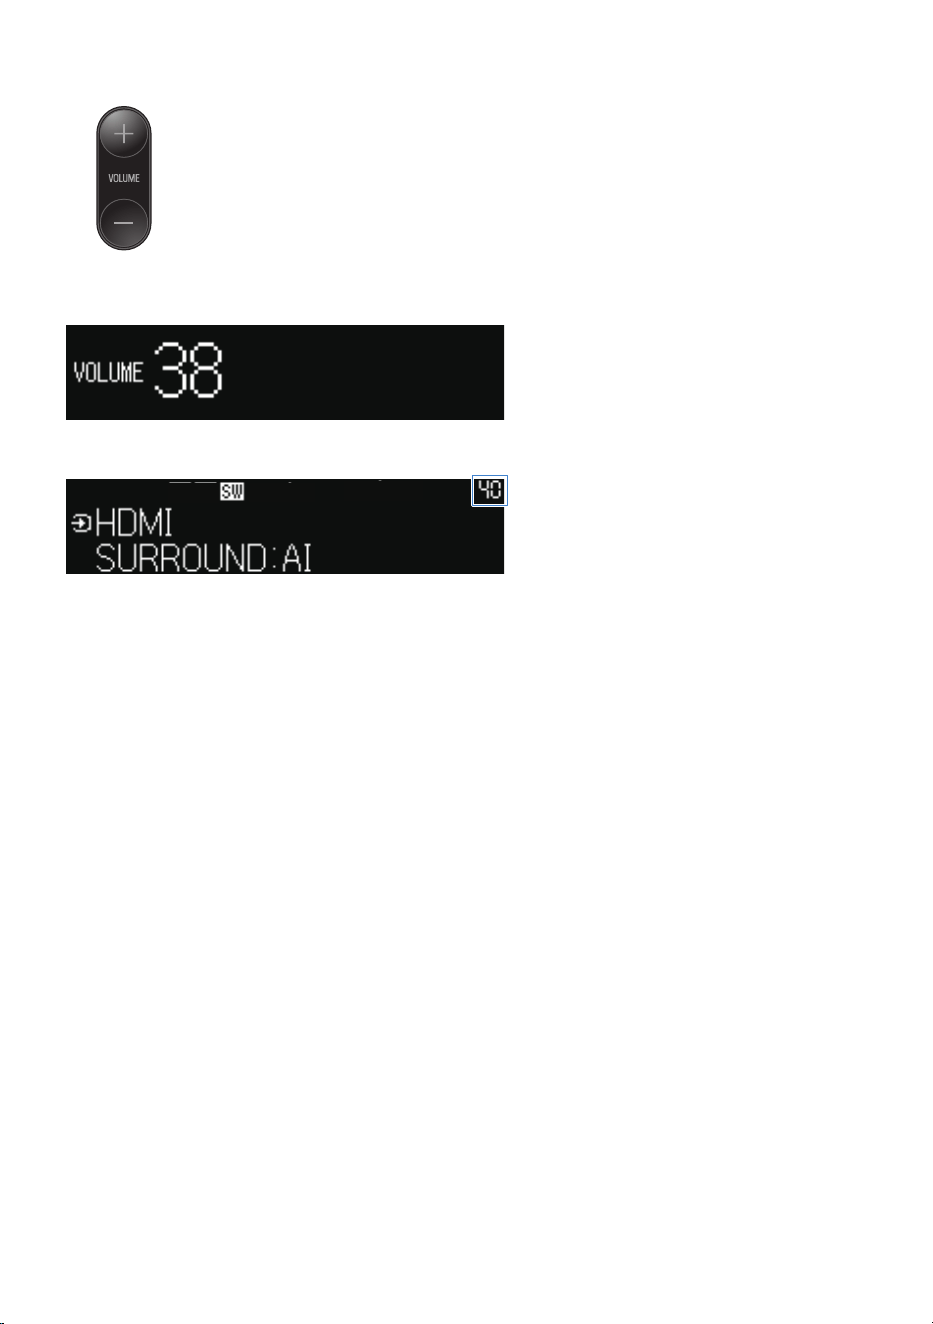
While muted, the front display will show the following when the volume is adjusted. The volume is also
displayed on the TV screen.
The sound volume is usually displayed at top right corner of the front display.
If audio is being output from both the TV speakers and the sound bar, mute the TV.
To temporarily mute the sound bar, press | (Mute) key on the remote control. To unmute, press | the
(Mute) key again or press the VOLUME +/- keys.
Related links
“Enabling the HDMI Control function”(p.48)
84
PLAYBACK > Basic control
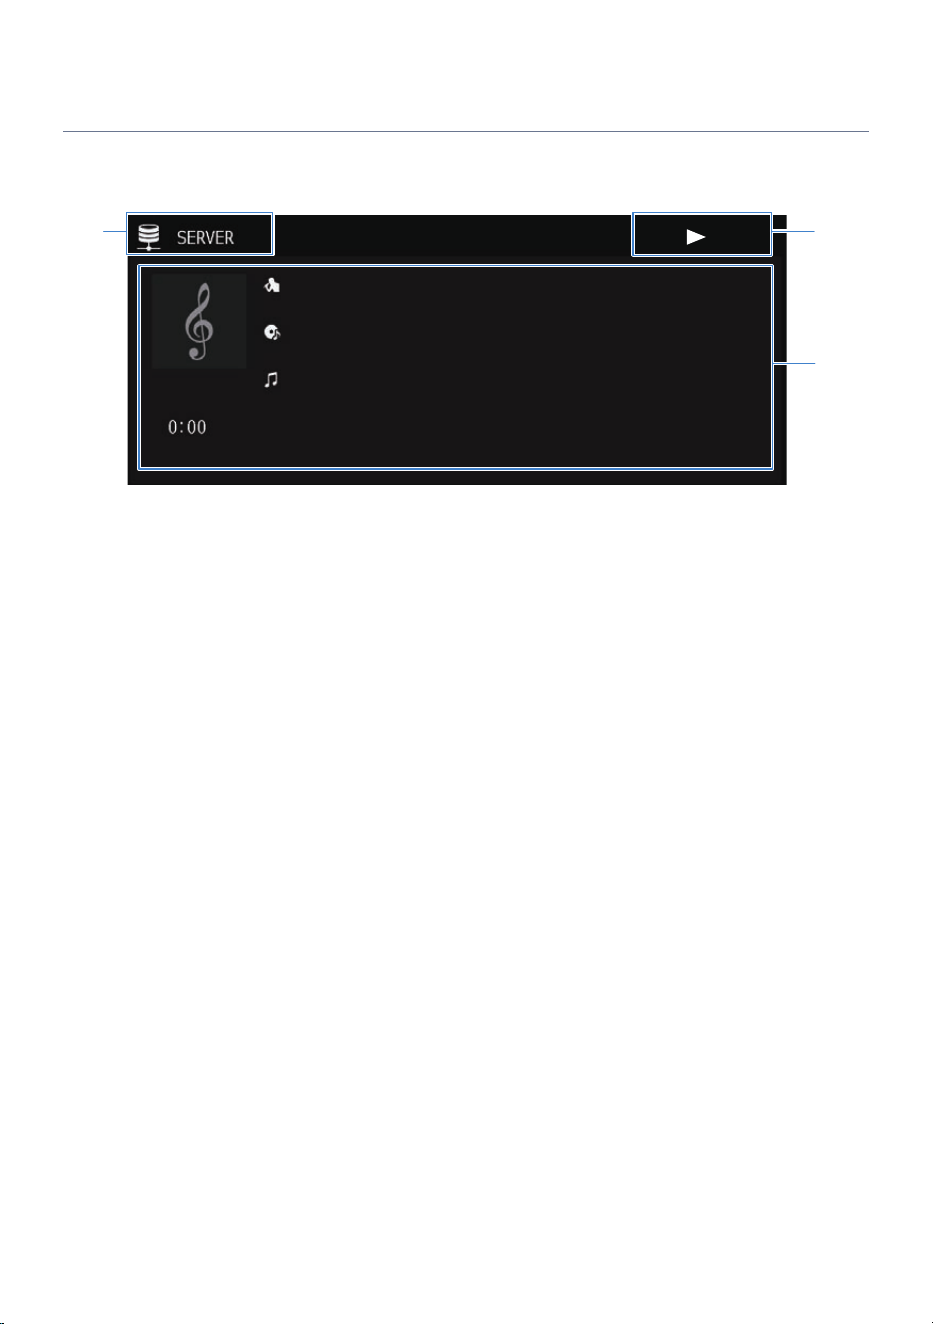
Playback Screen
The Playback screen appears on the TV when playback starts.
a
c
b
a
Input information
Information on the input source appears.
b
Playback status display
Shows Shuffle playback, repeat playback, playback status (playback/pause, etc.).
c
Playback information
Displays artist name, name of track, album name, playback track, playback time, broadcasting station, etc.
NOTE
(
The above image shows playback from a media server (computer or NAS). Displayed information varies with input.
(
An AirPlay, Spotify and MusicCast Link does not show playback status.
85
PLAYBACK > Basic control

Listening to TV audio
Listening to TV audio using eARC/ARC
Connect an eARC/ARC TV to the sound bar using an HDMI cable (commercially available) to listen to TV audio
on the sound bar.
When the HDMI Control function is On, the soundbar will automatically start up when the TV is turned on.
NOTE
(
When using eARC when the HDMI Control function is Off, the sound bar input will not automatically switch even if you use the TV
remote control to select a program. Manually switch the input to “TV”.
(
When using ARC, the HDMI Control function and the ARC function must be turned On.
(
These connections may require additional settings on the TV. For details, see the instruction manual supplied with your TV.
(
If your TV is not an eARC/ARC TV or if you experience audio interruption when using eARC/ARC, use an optical digital cable to
connect the sound bar to the TV.
Related links
(
“HDMI Connection to a TV”(p.37)
(
“Making HDMI settings”(p.122)
86
PLAYBACK > Listening to TV audio

Using a digital optical audio cable to listen to TV audio on the
sound bar
To listen to TV audio on the sound bar, connect the TV to the sound bar using a digital optical audio cable
(commercially available).
(
A TV not supporting eARC/ARC
(
Not using eARC/ARC
1 In the Setup menu > “HDMI”, set “ARC” to “Off”.
2 Use the remote control to select the content (the program) you want to watch on
TV.
Sound bar input will automatically switch to “TV” and the TV sound will be output from the
sound bar.
NOTE
(
Even if the HDMI input jack on the TV does not support eARC/ARC, the HDMI Control function can be used by connecting the sound
bar to the TV with an HDMI cable.
(
Even if the HDMI Control function is Off, you can press the INPUT key to switch to “OPTICAL” before using the TV remote control.
Related links
“Making HDMI settings”(p.122)
87
PLAYBACK > Listening to TV audio

Starting playback on a Bluetooth® device
Playing back audio from a Bluetooth® device
Audio content from a Bluetooth device (smartphone, etc.) can be played back on the sound bar.
CAUTION
(
If the volume is adjusted on a Bluetooth device, the volume may become unexpectedly loud, causing hearing impairment or
damage to the device. If the volume becomes too loud during playback, stop playback immediately.
Sound bar
Bluetooth device (smartphone, etc.)
1 Press the INPUT key to switch to “Bluetooth”.
2 Select sound bar (name of sound bar network) on the Bluetooth device to pair the
devices.
If a passkey is required, enter the number “0000”.
3 Play a track from a Bluetooth device.
The playback screen appears on the TV.
88
PLAYBACK > Starting playback on a Bluetooth® device

NOTE
(
Use a Bluetooth device that supports the A2DP profile. Note that not all Bluetooth devices are supported.
(
Please note that Bluetooth connectivity and the functions and performance described in this guide are not guaranteed for all
Bluetooth devices.
(
If a paired Bluetooth device is detected, switching the input to “Bluetooth” will automatically connect to that device.
To pair with a new Bluetooth device, disconnect the currently paired device and start anew.
(
During playback, the volume of the sound bar can be adjusted from the Bluetooth device.
(
Perform any of the following operations to terminate the connection with the Bluetooth device.
(
Terminate the connection on the Bluetooth device.
(
Set the input source on the sound bar to something other than “Bluetooth”.
(
In the Setup menu, under “Bluetooth” > “Audio Receive”, select “Disconnect” and press the ENTER key.
(
When Bluetooth devices are connected, the
(Bluetooth) icon on the front display glows.
Bluetooth icon
89
PLAYBACK > Starting playback on a Bluetooth® device
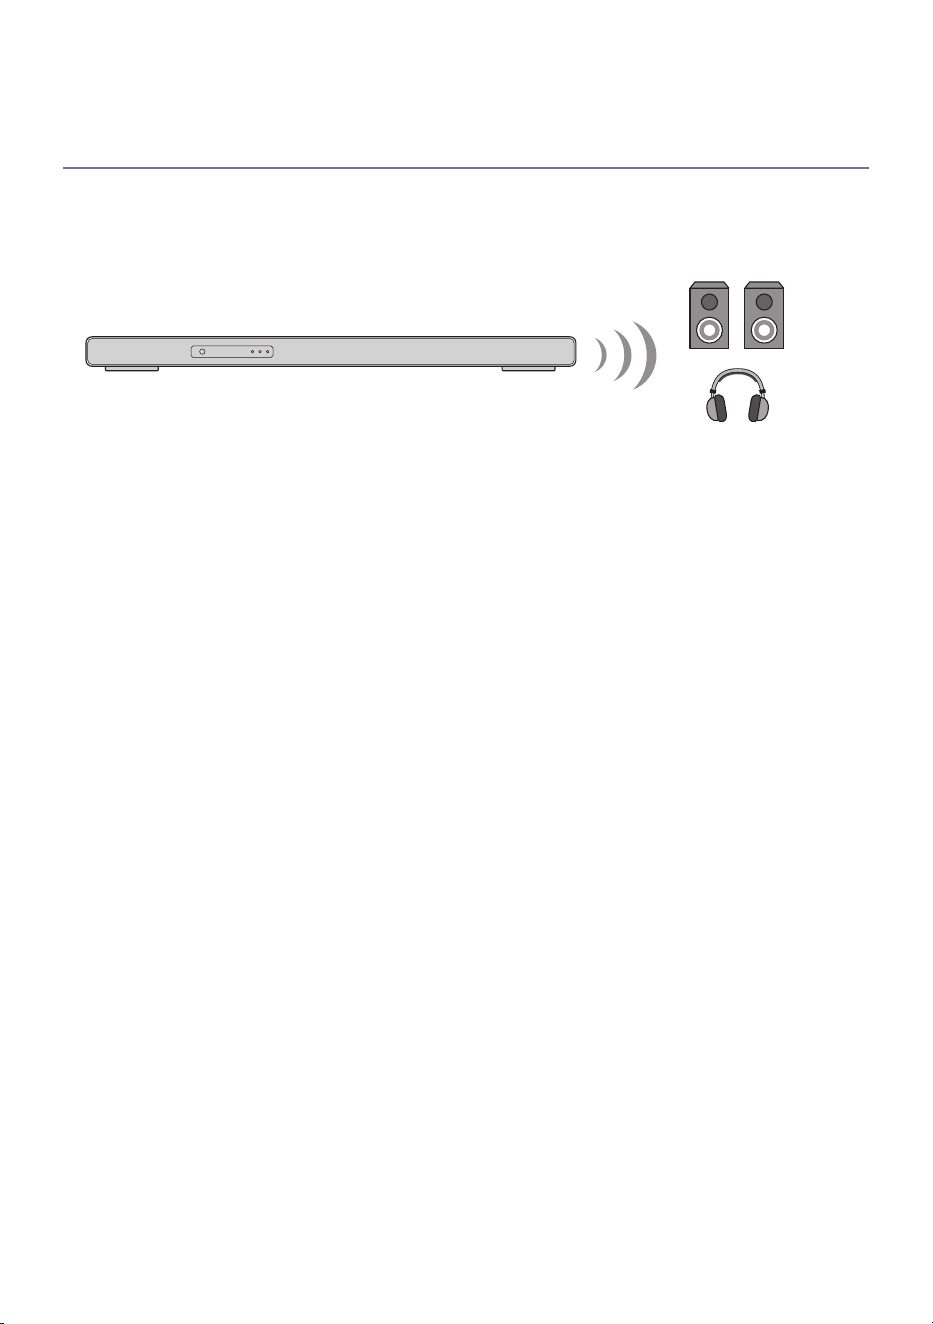
Playback is possible using Bluetooth® wireless speakers to
listen to audio on the sound bar
Bluetooth-compatible speakers/wireless headphones can be used to listen to audio played on the sound bar.
Be sure to connect Bluetooth speakers/headphones device that allow you to adjust the volume. The volume
cannot be adjusted on the sound bar.
Bluetooth speakers/
headphones
Sound bar
1 Press the INPUT key to select an input source other than “Bluetooth”.
2 Press the ~ (Setup) key.
3 In the Setup menu, under “Bluetooth” > “Audio Send”, set “Transmitter” to “On”.
4 In the Setup menu, under “Bluetooth” > “Audio Send” > “Device Search”, select
the Bluetooth speakers or headphones.
When the connection is completed, “Completed” will be displayed and audio will be output
from the Bluetooth speaker/headphone.
90
PLAYBACK > Starting playback on a Bluetooth® device
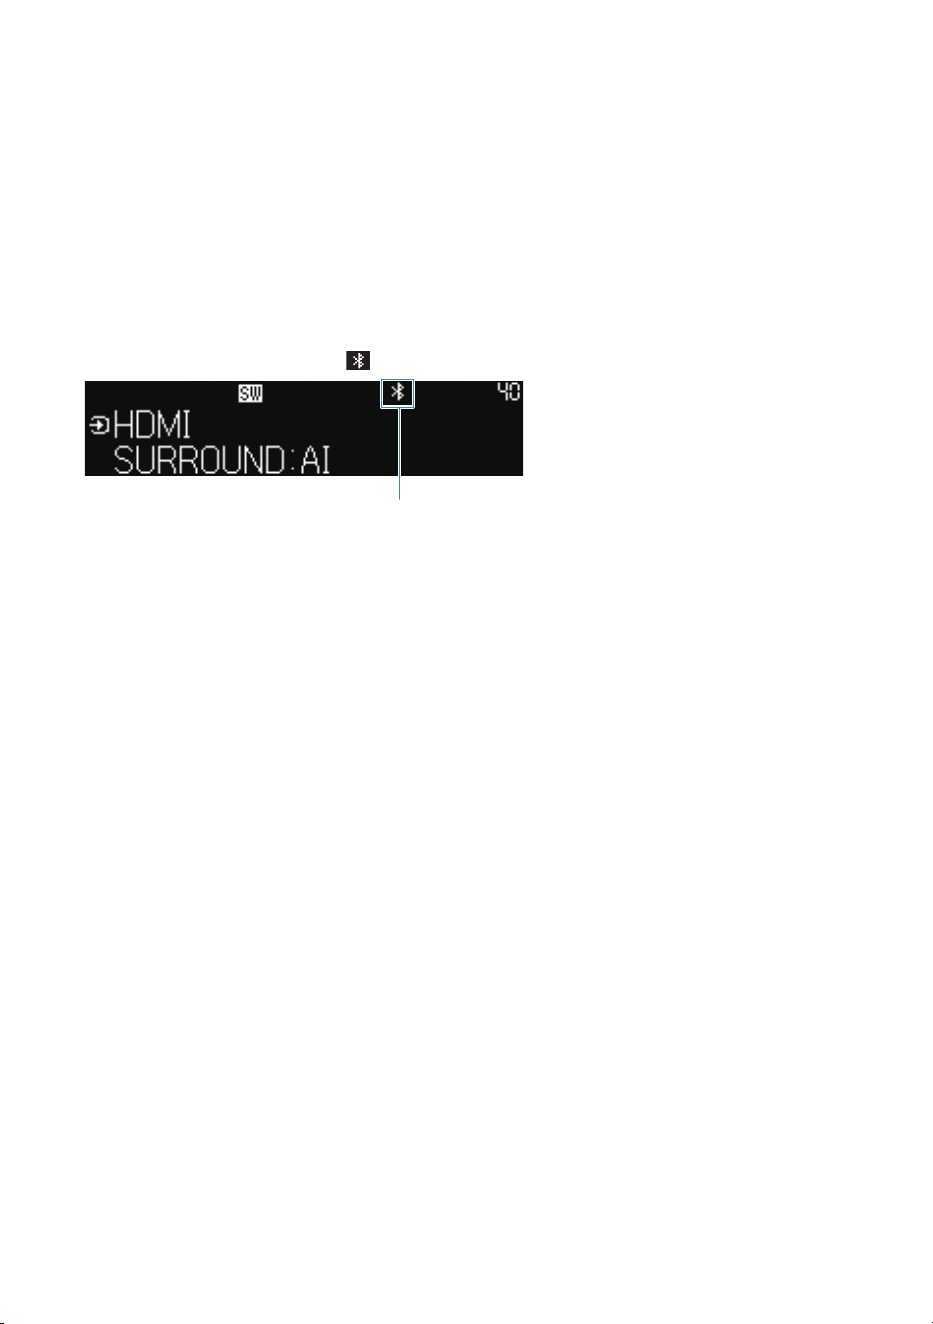
NOTE
(
Use a Bluetooth device that supports the A2DP profile. Note that not all Bluetooth devices are supported.
(
Please note that Bluetooth connectivity and the functions and performance described in this guide are not guaranteed for all
Bluetooth devices.
(
Adjust the volume on the connected Bluetooth device.
(
Audio being played with AirPlay cannot be transmitted.
(
The “Audio Send” and “Audio Receive” Bluetooth functions cannot be used simultaneously.
(
If the Bluetooth device you wish to connect does not appear in the list, pair the Bluetooth device and then perform the “Device
Search” again.
(
Perform any of the following operations to terminate the connection with the Bluetooth device.
(
Terminate the connection on the Bluetooth device.
(
In the Setup menu, under “Bluetooth” > “Audio Send”, set “Transmitter” to “Off”.
(
When Bluetooth devices are connected, the
(Bluetooth) icon on the front display glows.
Bluetooth icon
91
PLAYBACK > Starting playback on a Bluetooth® device

Play back using MusicCast Controller (app)
Playing streaming services
You can listen to content distributed by various streaming services on the Internet on the sound bar.
Use the applications provided by the streaming service or use the MusicCast Controller to select streaming
service and content.
See the product information page on the Yamaha website regarding which streaming services the product
currently supports or information provided by MusicCast Controller.
Additional information about each streaming service is also provided on the following website:
https://manual.yamaha.com/av/mc/ss/
NOTE
(
Some streaming services may require you to purchase a paid subscription to listen to their content on the sound bar. For more
information, visit their websites to check.
(
Streaming services may change or be discontinued without notice. Please note that Yamaha Corporation does not accept any
responsibility and will not be liable for any streaming service.
92
PLAYBACK > Play back using MusicCast Controller (app)
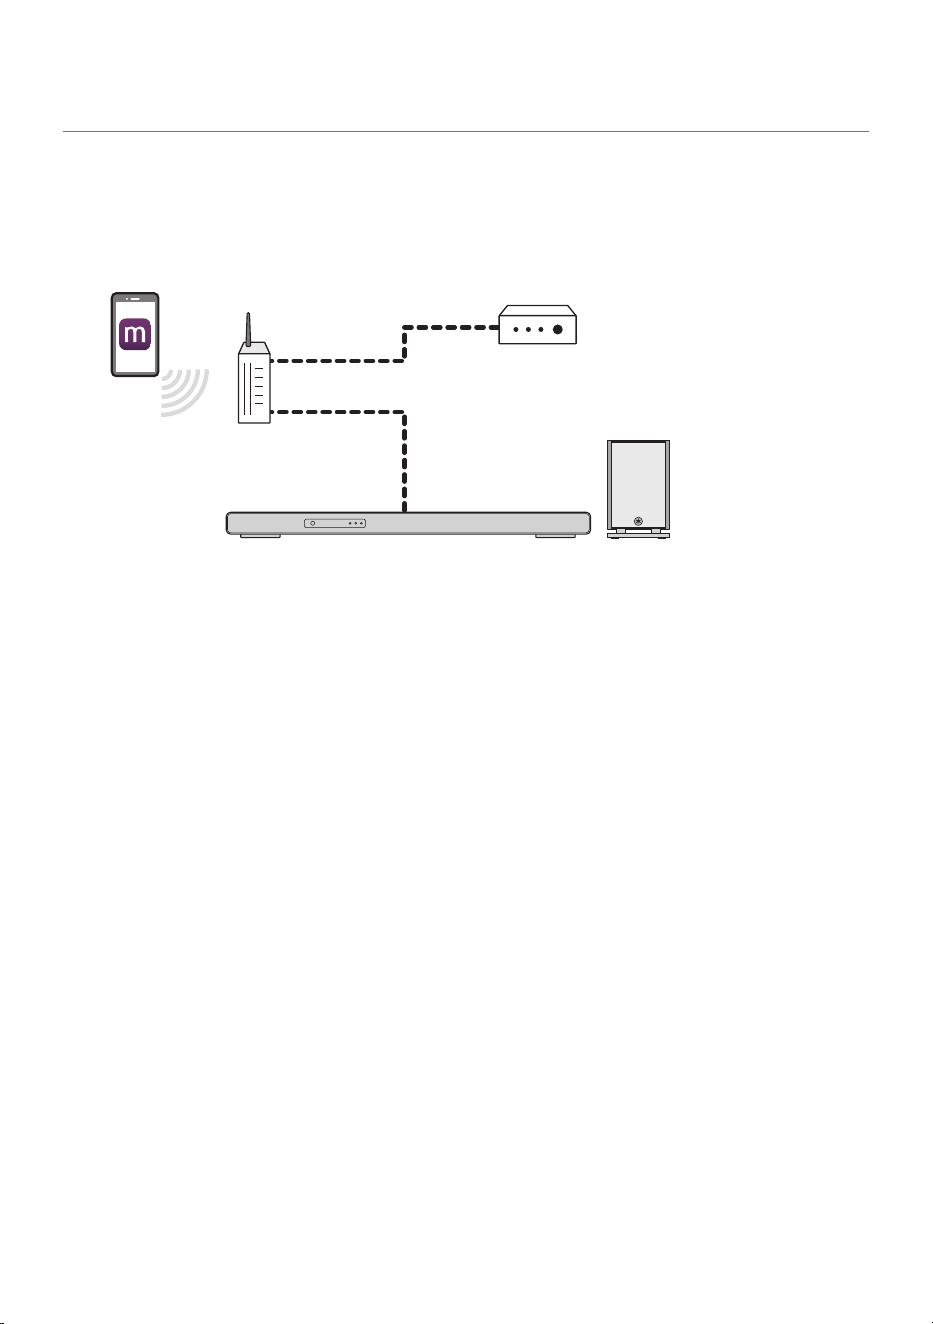
Playing back audio files
You can use the MusicCast Controller installed on a smartphone to play back music on a smartphone or
media server (computer or NAS) via the network. Follow the instructions on the screen of the MusicCast
Controller smartphone app.
Smartphone
Router
Wired or wireless
Media server (NAS,
etc.)
NOTE
(
The media sharing setting on each device or media server software must be enabled. See the documentation supplied with each
device or software for more information.
(
DRM (copyright-protected content) cannot be played.
(
The smartphone, media server and sound bar must be connected to the same network.
(
The playable formats differ depending on the server software installed on the media server (computer or NAS). See the
documentation supplied with the server software for more information.
93
PLAYBACK > Play back using MusicCast Controller (app)

Internet Radio Playback
Use the MusicCast Controller application installed on a smartphone to playback Internet radio. Follow the
instructions on the screen of the MusicCast Controller smartphone app.
NOTE
(
This function uses the airable.Radio service. airable is a service provided by airable GmbH.
(
This service may be changed, stopped, or terminated without notice. Please note that Yamaha Corporation does not accept any
responsibility and will not be liable for any streaming service.
(
Reception may not be possible for some Internet radio stations or at certain times of the day.
94
PLAYBACK > Play back using MusicCast Controller (app)
Using AirPlay to playback music
You can use AirPlay to play back audio content on the sound bar. Tap (or click) the AirPlay icon on your
iPhone or iTunes/Apple Music app and select the sound bar as the output destination.
CAUTION
(
If the volume is adjusted on an AirPlay device, the volume may become unexpectedly loud, causing hearing impairment or
damage to the device. If the volume becomes too loud during playback, stop playback immediately.
NOTE
(
Starting playback on an AirPlay device will automatically turn on the sound bar.
(
The names of networks displayed on an AirPlay device can be changed.
(
During playback, the volume of the sound bar can be adjusted from the AirPlay device.
(
The sound bar supports AirPlay 2.
(
For details about AirPlay, visit the Apple website.
Related links
(
“Set the volume linking the AirPlay playback device and the sound bar”(p.110)
(
“Setting up detailed function settings (Function)”(p.125)
(
“Setting up a network”(p.128)
95
PLAYBACK > Using AirPlay to playback music
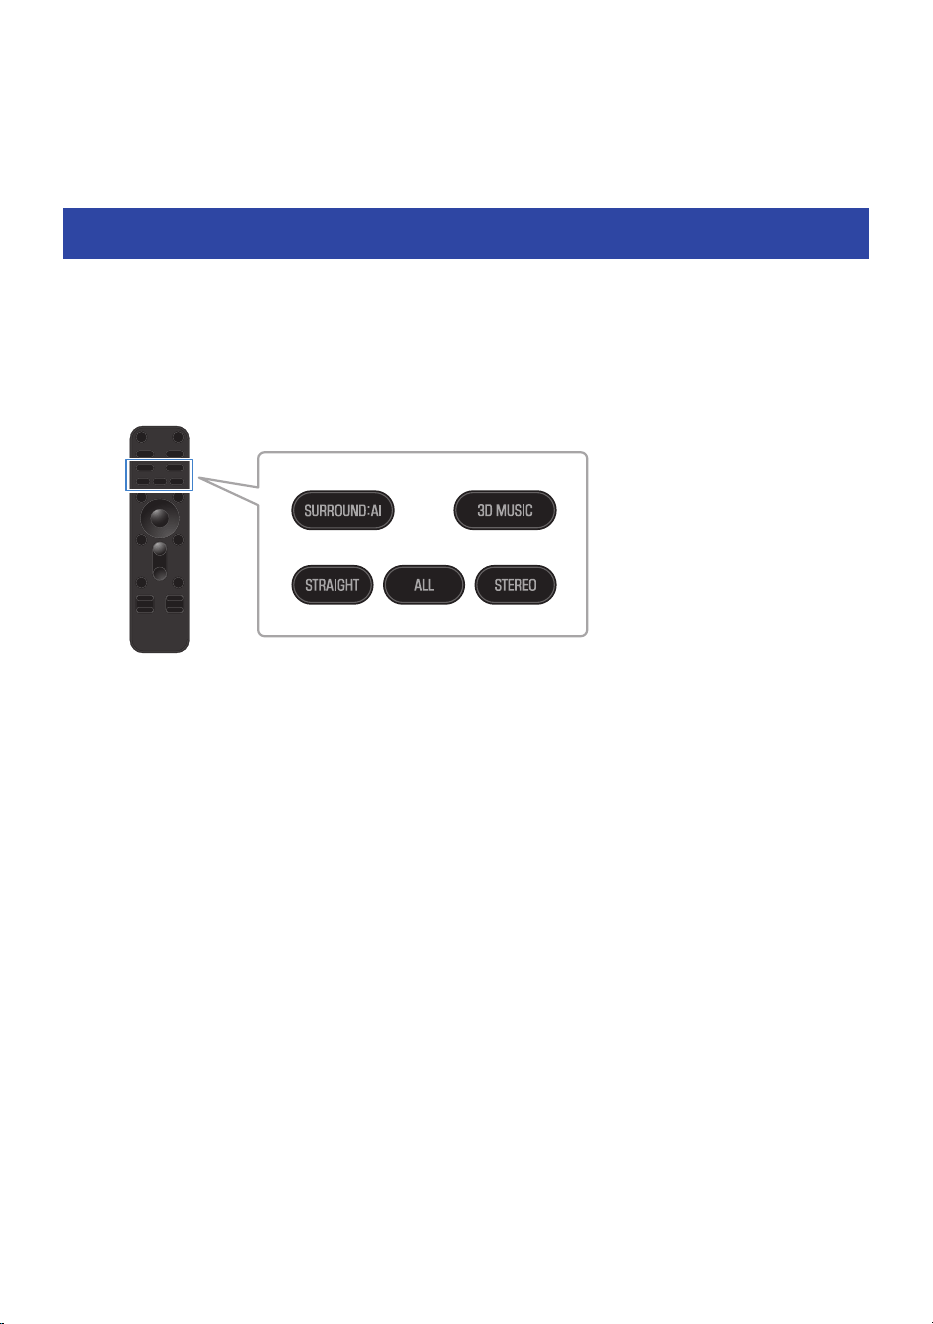
ADJUSTING THE SOUND TO YOUR
PREFERENCE
Selecting music of your choice (Sound mode)
The sound bar is equipped with sound modes for surround playback and for stereo playback. There are also
various sound settings for adjusting the sound to better suit your preferences.
NOTE
The default is “SURROUND:AI”.
n
SURROUND:AI (p.97)
SURROUND:AI creates the optimum surround effect to suit the playback content.
n
3D MUSIC (p.98)
You can select your preferred Surround Decoder from AURO-3D, Dolby Surround and Neural:X.
n
STRAIGHT (p.99)
Playback without sound field effects is possible.
n
STEREO (p.100)
Stereo playback without sound field effects is possible.
n
ALL (p.78)
TRUE X SURROUND is available only when wireless speakers are connected. Audio output from the sound bar
is played in stereo, and audio output from the wireless speakers is monaural.
96
ADJUSTING THE SOUND TO YOUR PREFERENCE > Selecting music of your choice (Sound mode)

Playback with surround sound effects matching the
scene (SURROUND:AI)
SURROUND:AI creates the optimum surround effect to suit the playback content. It instantly analyzes and
optimizes the scene in real time based on sound elements such as “dialog”, “background music”, “ambient
sounds”, and “sound effects” to provide a realistic experience that will blow you away.
Press the SURROUND:AI key to set sound mode to “SURROUND:AI”.
NOTE
The default setting “SURROUND:AI” is set.
97
ADJUSTING THE SOUND TO YOUR PREFERENCE > Playback with surround sound effects matching the scene
(SURROUND:AI)

Selecting your favorite decoder for surround playback
(3D MUSIC)
Select your favorite Surround Decoder for surround playback.
Press the 3D MUSIC key to set sound mode to “3D MUSIC”.
To select the Surround Decoder, press the ~ (Setup) key to display “Sound” > “Surround Decoder”. When
the Surround Decoder screen appears, if a sound mode other than 3D MUSIC is selected, it will automatically
switch to 3D MUSIC. The effect of the Surround Decoder expands even a stereo input signal into a 3D
surround multi-channel sound with great height. You can select the following Surround Decoder.
(
AURO-3D
An AURO-3D decoder.
It enables optimal expansion for the placement of the installed speaker. Be sure to use this setting for
decoding and viewing AURO-3D content in AURO-3D.
(
DSurr
A Dolby Surround decoder.
It enables optimal expansion for the placement of the installed speaker. This results in realistic sound
from all directions, including overhead.
(
Neural:X
A DTS Neural:X decoder.
It enables optimal expansion for the placement of the installed speaker. This results in realistic sound
from all directions, including overhead.
NOTE
(
The default setting is “AURO-3D”.
(
Regardless of which Surround Decoder you select, the resulting sound is also virtually processed.
(
When using TRUE X SURROUND, virtual effects are applied as needed depending on the presence of wireless speakers.
(
3D MUSIC is not intended only for listening to music, but also to make the experience of watching films more immersive. Please use
it according to your preference.
Related links
“Making audio settings”(p.118)
98
ADJUSTING THE SOUND TO YOUR PREFERENCE > Selecting your favorite decoder for surround playback (3D
MUSIC)

Playback the original audio (STRAIGHT)
Enables playback without applying surround sound effects. 2-channel sources are played back in stereo
through the sound bar front speakers, and multi-channel sources are played back in multi-channel audio.
Press the STRAIGHT key to set sound mode to “STRAIGHT”.
NOTE
If the content being played does not contain height channel audio, the height speakers will not output any sound.
99
ADJUSTING THE SOUND TO YOUR PREFERENCE > Playback the original audio (STRAIGHT)

Stereo playback (STEREO)
This mode plays back stereo audio from the sound bar front speakers without applying surround sound
effects.
Press the STEREO key to set sound mode to “STEREO”.
100
ADJUSTING THE SOUND TO YOUR PREFERENCE > Stereo playback (STEREO)

Emphasizing a specific range of sound (sound settings)
Enjoying rich bass sound (BASS EXT)
The acoustic image of bass sound is enhanced when the Bass Extension function is enabled. The subwoofer
volume remains the same, but the overall acoustic image of bass sound is adjusted to be more clear.
Therefore, the presence of the acoustic image of the bass sound can be emphasized without disturbing the
balance of the overall sound. This function is recommended when you want to increase the bass while
suppressing the volume of the subwoofer, or when you want to emphasize the sounds of low-pitched
instruments.
Press BASS EXT key to enable or disable the function.
Playing back human voices clearly (CLEAR VOICE)
The human voices within the audio can be heard more easily without turning up volume when the Clear
Voice function is enabled. The function is recommended for enjoying movies or dramas at a low volume, and
for movies or dramas that use a lot of background music and sound effects.
Press CLEAR VOICE key to enable or disable the function.
NOTE
Clear Voice is a function focusing on emphasizing the sound quality of the human voice in narration and dialog during playback. Only
the human voices are emphasized without changing the overall volume and frequency characteristics, and it gives a clear sense of
localization to the human voices.
101
ADJUSTING THE SOUND TO YOUR PREFERENCE > Emphasizing a specific range of sound (sound settings)

CONFIGURATION
Menus
Menu types
The sound bar provides the following menus.
n
Option menu
Shows sound bar playback settings and confirms audio and video signal information. Look at the TV screen
while operating this menu.
n
Setup menu
Use to set detailed functions. Look at the TV screen while operating this menu.
n
Front display menu
Use to make system settings. Look at the front display while operating this menu.
NOTE
(
The above menus cannot be used simultaneously. For example, the Setup menu cannot be used simultaneously with the front
display menu.
(
Later set menus take precedence.
Related links
(
“Basic operations in the Option menu”(p.103)
(
“Basic operations of the Setup menu”(p.111)
(
“Basic operations in the front display menu”(p.135)
102
CONFIGURATION > Menus
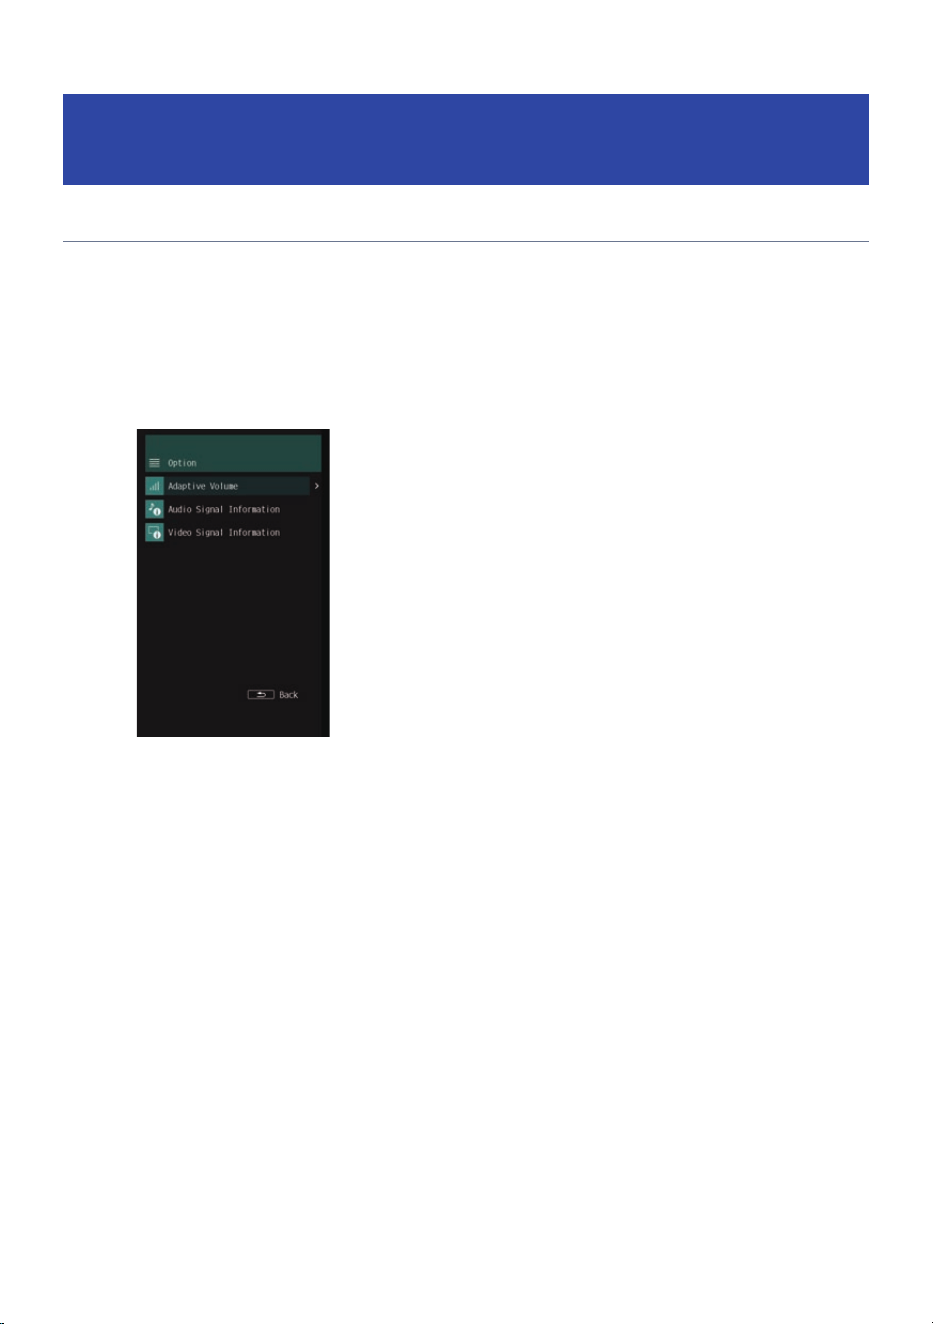
Checking playback settings and signal information
(Option menu)
Basic operations in the Option menu
This section describes basic Option menu control operations.
Use the remote control while looking at the TV screen to operate this menu.
1 Press the u (Option) key.
The Option menu screen appears.
2 Select a menu item.
3 Change the setting.
4 Press the u (Option) key.
This completes the setting.
Related links
“Option menu list”(p.104)
103
CONFIGURATION > Checking playback settings and signal information (Option menu)

Option menu list
This is the Option menu list. For more information on menu items, refer to the links in the page column.
Item Page
Adaptive Volume Adaptive Volume
105
Audio Signal Information
Format
106
Channel In
Channel Out
Sampling
Dialogue
Video Signal Information
Video In
108
Video Out
Color Format
HDR
Auto Play Auto Play
109
Volume Interlock Volume Interlock
110
NOTE
Applicable items depend on input.
104
CONFIGURATION > Checking playback settings and signal information (Option menu)

Automatic adjustment of high and low frequency range
balance (Adaptive Volume)
Determines whether the balance of high and low frequencies should be automatically adjusted depending
on sound volume.
When “On”, you can enjoy a natural balanced sound even at low volumes. A convenient function during low-
volume night-time listening.
Option menu
“Adaptive Volume” > “Adaptive Volume”
Settings
Off Disables Adaptive Volume.
On Enables Adaptive Volume.
105
CONFIGURATION > Checking playback settings and signal information (Option menu)

Confirming audio signal information
Allows you to confirm audio signal information.
Allows you to confirm audio format of the played back source, the number of input channels, etc.
n
Confirming audio signal format
Option menu
“Audio Signal Information” > “Format”
Displayed information
Indicates the audio format of input audio signals.
n
Allows you to confirm the number of channels of input audio signals
Option menu
“Audio Signal Information” > “Channel In”
Displayed information
The number of input audio signal channels are displayed in the following order: “Front/surround/
subwoofer”.
For example, “3/2/0.1” means front 3 ch, surround 2 ch, LFE 0.1 ch.
n
Allows you to confirm the number of channels of the played back source being
outputted
Option menu
“Audio Signal Information” > “Channel Out”
Displayed information
Number of output audio signal channels are displayed in the order “Front and surround. subwoofer. height”.
For example, if “5.1.2” is displayed, it means the 5.1 channels of the front and surround and of the
subwoofer, and the 2 channels of the height (upper) speakers.
n
Confirming the sampling frequency range
Option menu
“Audio Signal Information” > “Sampling”
106
CONFIGURATION > Checking playback settings and signal information (Option menu)

Displayed information
Indicates the sampling frequency range of input audio signals.
n
Confirming dialog volume
Option menu
“Audio Signal Information” > “Dialogue”
Displayed information
Indicates the dialog volume level of input audio signals. The higher the level, the more the dialog is
emphasized.
107
CONFIGURATION > Checking playback settings and signal information (Option menu)

Confirming video signal information
Allows you to confirm video signal information.
Check the type of video signal being input, the number of frame rates, etc.
n
Confirming type of video signal being input
Option menu
“Video Signal Information” > “Video In”
Displayed information
Indicates the type, resolution and frame rate of input video signals.
n
Confirming the type of video signals being output
Option menu
“Video Signal Information” > “Video Out”
Displayed information
Indicates the type, resolution and frame rate of output video signals.
n
Confirming video signal format
Option menu
“Video Signal Information” > “Color Format”
Displayed information
Indicates the color format of input video signals.
n
Confirming high dynamic range format
Option menu
“Video Signal Information” > “HDR”
Displayed information
Displays the high dynamic range method of the input video signal.
108
CONFIGURATION > Checking playback settings and signal information (Option menu)

Setting auto playback
Set whether content from streaming services and other content should be played back automatically when
network input is selected.
Option menu
“Auto Play” > “Auto Play”
Settings
Off Disable auto playback.
On Always enable automatic playback of the most recently played content.
Auto
Enable automatic playback only of content whose playback was interrupted by a power
off (standby).
NOTE
(
“Auto” cannot be selected for a “Bluetooth” input source.
(
Some input sources and content may not be played back automatically.
109
CONFIGURATION > Checking playback settings and signal information (Option menu)

Set the volume linking the AirPlay playback device and the
sound bar
When AirPlay is selected for input, set whether the volume of the sound bar and AirPlay device should be
linked. If something other than “Off” is set, the volume of the sound bar can be adjusted from the AirPlay
device.
Option menu
“Volume Interlock” > “Volume Interlock”
Settings
Off Disable volume control from AirPlay device.
Limited Enable mute and volume control in the range 0 to 60.
Full Enable mute and volume control in the range 0 to 100.
110
CONFIGURATION > Checking playback settings and signal information (Option menu)
Setting functions (Setup menu)
Basic operations of the Setup menu
This section describes basic Setup menu control operations.
Use the remote control while looking at the TV screen to operate this menu.
1 Press the ~ (Setup) key.
2 Select menu.
3 Select a menu item.
4 Change the setting.
5 Press the ~ (Setup) key.
This completes the setting.
NOTE
(
A message will inform you when new firmware becomes available.
(
If there is new firmware on the network, an
icon will appear in the lower left corner of the screen in the Setup menu.
Related links
“Setup menu list”(p.112)
111
CONFIGURATION > Setting functions (Setup menu)
Setup menu list
This is the Setup menu list. For more information on menu items, refer to the links in the page column.
n
Speaker
Item Page
Beam
Angle
Height L
115
Height R
Focal Length
Height L
Height R
Ceiling Height
Level
Test Tone
115
Front L
Front R
Center
Height L
Height R
Subwoofer
Surround L
Surround R
Surround
Registration
115
n
Sound
Item Page
Tone Control
Treble
118
Bass
Surround Decoder
118
AURO-3D
Auro-Matic Preset
118
Auro-Matic Strength
Auto Lipsync
118
DTS Dialogue Control
118
Volume
Dynamic Range
118
Max Volume
Initial Volume
112
CONFIGURATION > Setting functions (Setup menu)

n
HDMI
Item Page
HDMI Control
122
Audio Output
122
Pass Through
122
HDCP Version
122
ARC
122
n
Function
Item Page
Display Settings
Dimmer
125
Short Message
Power Management
Auto Power Standby
125
True X Ready
Initialization
125
Firmware Update
125
n
Network
Item Page
Information
128
Network Connection
128
IP Address
128
DMC Control
128
Network Standby
128
Network Name
128
MusicCast Link Power Interlock
128
n
Bluetooth
Item Page
Bluetooth
132
Audio Receive Disconnect
132
Audio Send
Transmitter
132
Device Search
113
CONFIGURATION > Setting functions (Setup menu)

Configuring the speakers
n
Beam
The viewing environment may not make it possible for the default settings to provide an adequate surround
sound effect. In such cases, the surround sound effect can be improved by adjusting the beam angle, focal
length, and ceiling height.
About Beam (Sound Beam)
(
This sound bar uses sound beam technology for height channel playback. Sound beam technology is a technology that uses a
digital signal processor (DSP) to individually control the audio output from the array speakers (multiple small speaker units
arranged in a row) located toward the ceiling at the left and right ends of the sound bar to create a beam-like high directivity
characteristic in a specific direction. This technology generates a beam-like high directivity characteristic in a specific direction.
The height channels use sound beams to reflect sound off the ceiling creating an effect that make it seem the sound comes
from speakers embedded in the ceiling.
Angle
Adjusts the height beam output angle (vertical) for left and right respectively.
(
Setup menu
“Speaker” > “Beam” > “Angle” > “Height L”/“Height R”
(
Settings
30° to 90°
(
90° is straight up.
(
Default setting
72°
115
CONFIGURATION > Setting functions (Setup menu)

Focal Length
Adjusts the height beam width (sweet spot) for left and right respectively.
Refer to the following illustration for the focal length.
Focal Length
Focal Point
Sweet Spot
Focal Point
Focal Length Sweet Spot
(
Setup menu
“Speaker” > “Beam” > “Focal Length” > “Height L”/“Height R”
(
Settings
1.0 m to 3.0 m
(
Default setting
1.8 m
Ceiling Height
Adjusts to suit the ceiling height of the used room.
(
Setup menu
“Speaker” > “Beam” > “Ceiling Height”
(
Settings
1.0 m to 4.0 m
(
Default setting
2.5 m
NOTE
(
When “Angle”, “Focal Length” are selected, a test tone is automatically played.
(
In “Focal Length” and “Ceiling Height”, under “Unit”, you can switch between “Meter” and “Feet”.
If the “Unit” setting is switched, the “Focal Length” setting will return to its default value. Then change the setting again.
(
The beam can be used in the following sound modes.
(
SURROUND:AI
(
3D MUSIC (Surround Decoder is AURO-3D/DSurr (Dolby Surround)/Neural:X)
(
STRAIGHT
(
In AURO-3D or Dolby Surround playback, “Ceiling Height” cannot be adjusted.
n
Level
Adjusts the volume for each channel.
116
CONFIGURATION > Setting functions (Setup menu)

Test Tone
(
Setup menu
“Speaker” > “Level” > “Test Tone”
(
Settings
Off Test tone is not played.
On Test tone is played.
NOTE
(
After turning “Test Tone” to “On”, press the - (Return) key to select the channel whose volume you want to adjust when returning
to the “Level” screen and you can adjust the volume while playing a test tone from the selected channel.
(
Closing the Setup menu while the “Test Tone” is still set to “On” will stop the test tone.
(
When test tone is used, it is possible to check whether the wireless speakers are connected or whether sound is coming from the
wireless speakers when TRUE X SURROUND is used.
Channel selection
(
Setup menu
Under “Speaker” > “Level”, select the channel for which to adjust the level.
(
Settings
-20 to +20
NOTE
(
The “Front L”, “Front R”, and “Center” channels cannot be used to make level adjustments. You can listen to the test tone from
each channel by playing the test tone and applying the cursor to it. Adjust the volume by comparing the sound from the front and
center with the sound from the subwoofer or wireless speakers.
(
“Surround L”, “Surround R”, and “Surround” can also be adjusted with the SURROUND L/R keys on the remote control.
n
Registration
Turn on the subwoofer and the wireless speakers.
Setup menu
“Speaker” > “Registration”
Settings
Registration Start registration.
Clear Clear registrations.
NOTE
(
“Registered” is displayed on beside the name of a registered speaker.
(
Selecting “Clear” removes all speaker registrations from the sound bar.
(
If a wireless speaker firmware update fails three times, “ERROR XXXXXX” (”XXXXXX” is the error number) is displayed beside the
name of the speaker.
Contact your dealer or service center if an error occurs.
117
CONFIGURATION > Setting functions (Setup menu)

Making audio settings
n
Tone Control
This function separately adjusts the volumes of the high and low frequency ranges.
Setup menu
“Sound” > “Tone Control” > “Treble”/“Bass”
Settings
-12 to +12
Default setting
0
n
Surround Decoder
When the sound bar is set to “3D MUSIC”, you can select your favorite Surround Decoder to change the
effect.
When the Surround Decoder screen appears, if a sound mode other than 3D MUSIC is selected, it will
automatically switch to 3D MUSIC.
Setup menu
“Sound” > “Surround Decoder”
Settings
AURO-3D
An AURO-3D decoder.
It enables optimal expansion for the placement of the installed speaker. Be sure to use
this setting for decoding and viewing AURO-3D content in AURO-3D.
DSurr (Dolby Surround)
A Dolby Surround decoder.
It enables optimal expansion for the placement of the installed speaker. This results in
realistic sound from all directions, including overhead.
Neural:X
A DTS Neural:X decoder.
It enables optimal expansion for the placement of the installed speaker. This results in
realistic sound from all directions, including overhead.
Default setting
AURO-3D
n
AURO-3D
Set to AURO-3D when “AURO-3D” is selected on the “Surround Decoder”.
118
CONFIGURATION > Setting functions (Setup menu)

Setup menu
“Sound” > “AURO-3D” > “Auro-Matic Preset”/“Auro-Matic Strength”
Settings
(
Auro-Matic Preset
An Auro-Matic Upmixer Preset used to effectively play back AURO-3D according to content. Select one of
following presets as required by playback content.
Small Preset for pop music and chamber music.
Medium Preset for jazz music, general movies, and TV programs.
Large Preset for content recorded in a large space, such as an orchestra.
Movie Preset for movie content, such as action movies with loud explosion scenes.
Speech
This preset is best suited for news broadcasts and other content that does not have
spatial information, such as commentary and conversation.
(
Auro-Matic Strength
Sets the level of upmixing for the original input signal.
0 to 15
Default setting
(
Auro-Matic Preset: Medium
(
Auro-Matic Strength: 12
n
Auto Lipsync
Automatically compensates for the delay between the timing of the output of the video and the audio.
Setup menu
“Sound” > “Auto Lipsync”
Settings
Off Disables compensation using Auto Lipsync.
On
Enables compensation using Auto Lipsync.
Enabled only on a TV with automatic compensation connected using HDMI.
Default setting
On
n
DTS Dialogue Control
Adjusts the volume of dialog that is difficult to hear during playback of DTS:X content.
119
CONFIGURATION > Setting functions (Setup menu)

Setup menu
“Sound” > “DTS Dialogue Control”
Settings
0 to 6
Default setting
0
NOTE
Can be set only with DTS:X content supporting DTS Dialogue Control.
n
Volume
Setup menu
“Sound” > “Volume” > “Dynamic Range”/“Max Volume”/“Initial Volume”
Settings
(
Dynamic Range
Sets how the dynamic range (difference between maximum and minimum volume) is adjusted during
playback of Dolby Digital and DTS signals.
Maximum Playback the input signal without correction.
Standard Playback with a dynamic range suitable for home use.
Min/Auto
Playback with a dynamic range suitable for nighttime or low volume listening.
Dolby TrueHD playback is based on input signal information.
(
Max Volume
Sets the upper limit value to which the volume can be adjusted using the VOLUME +/- keys on the remote
control or other keys.
40 to 100
(
Initial Volume
Sets the sound volume when the power is turned on.
Off Set the volume to the level it had when the power was most recently put on standby.
On
Mute Mute the sound.
1 to 100
Use the set volume.
Enabled only when set to a value lower than “Max
Volume”.
120
CONFIGURATION > Setting functions (Setup menu)

Default setting
(
Dynamic Range: Maximum
(
Max Volume: 100
(
Initial Volume: Off
121
CONFIGURATION > Setting functions (Setup menu)

Making HDMI settings
n
HDMI Control
Set operation of HDMI Control TV and AV devices to link with sound bar operations.
Setup menu
“HDMI” > “HDMI Control” > “HDMI Control”
Settings
Off Disables HDMI Control.
On
Enables HDMI Control.
The “ARC” setting is applied.
Default setting
Models for U.K. and Europe: Off
Models for other areas: On
NOTE
Setting the “HDMI Control” to “On” consumes more power than when it is set to “Off”.
n
Audio Output
Sets whether audio is output from the speakers of an HDMI-connected TV.
Setup menu
“HDMI” > “Audio Output”
Settings
Off The TV does not output audio.
On The TV will output audio.
Default setting
Off
NOTE
Can be set only when “HDMI Control” is “Off” in the Setup menu.
n
Pass Through
Sets whether the audio/video input to the HDMI IN jack is output to a TV connected to the HDMI OUT jack
when the soundbar is turned off (standby).
122
CONFIGURATION > Setting functions (Setup menu)

Setup menu
“HDMI” > “Pass Through” > “Pass Through”
Settings
Off Audio/video is not output to TV.
On Audio/video is output to TV. Consumes more power than when set to “Off”, “Auto”.
Auto
Automatically determines whether to output audio/video to the TV depending on the
status of the connected devices.
Default setting
Auto
NOTE
(
When “Pass Through” is set to “On” or “Auto”, it consumes more power than when set to “Off”.
(
When “HDMI Control” is set to “On” in the Setup menu, only “On” and “Auto” can be selected.
n
HDCP Version
Sets the HDCP version of the HDMI IN jack. Set as required during 4K viewing.
Setup menu
“HDMI” > “HDCP Version”
Settings
Auto The HDCP version is automatically determined by the content.
1.4 The HDCP version is fixed at 1.4.
Default setting
Auto
n
ARC
When “HDMI Control” in the Setup menu is set to “On”, this setting determines whether TV audio is output
from the sound bar.
Setup menu
“HDMI” > “ARC”
Settings
Off Disables ARC.
On Enables ARC.
123
CONFIGURATION > Setting functions (Setup menu)

Default setting
On
NOTE
Normally, there is no need to change the setting from “On” (the default value). Set to “Off” only when noise is generated by an audio
signal not supported by the sound bar is input from a TV. Use the TV speakers if this happens.
124
CONFIGURATION > Setting functions (Setup menu)

Setting up detailed function settings (Function)
n
Display Settings
Set the display settings for TV screen on the front display.
Setup menu
“Function” > “Display Settings” > “Dimmer”/“Short Message”
Settings
(
Dimmer
Adjust the brightness of the power indicator and the front display. A higher value means brighter light.
-5 to 0
(
Short Message
Sets the location where short messages are displayed during soundbar operation.
Off The short message is not displayed.
On Displays the short message.
Position Bottom Displayed at the bottom of the screen.
Top Displayed at the top of the screen.
Default setting
(
Dimmer: -2
(
Short Message: On (Position: Bottom)
NOTE
(
Even if set to “-5” (off), short messages and menus on the front display menu will still be displayed at a brightness of “-4”.
(
When set to “-5” (off), it will be more difficult to see whether or not the sound bar is on. Take care not to leave the sound bar with
the power on. You are recommended to set “Auto Power Standby” in the Setup menu to something other than “Off”.
(
The “Dimmer” setting in the Setup menu and the “Dimmer” setting on the front display menu are interlocked.
n
Power Management
Auto Power Standby
Sets the time it takes for the sound bar to turn off (standby) automatically.
(
Setup menu
“Function” > “Power Management” > “Auto Power Standby”
(
Settings
Off
Do not automatically put on standby.
Setting to “Off” consumes more power than setting to the selections other than “Off”.
125
CONFIGURATION > Setting functions (Setup menu)

5 minutes, 20 minutes
Standby when the sound bar has not been operated for a specified period of time and no
input signal has been detected for a specified period of time.
2 hours, 4 hours, 8 hours, 12
hours
Put the sound bar in standby mode when it has not been operated for a specified period
of time.
(
Default setting
20 minutes
True X Ready
Select whether to maintain the connection to the wireless speakers when the sound bar is off.
(
Setup menu
“Function” > “Power Management” > “True X Ready”
(
Settings
Off
Minimizes the power consumption of the sound bar, but it takes longer for the wireless
speakers to connect.
On
Increases the power consumption of the sound bar, but shortens the time it takes for the
wireless speakers to connect.
(
Default setting
Models for U.K. and Europe: Off
Models for other regions: On
NOTE
(
Setting the “True X Ready” to “On” consumes more power than when it is set to “Off”.
(
It is recommended that “True X Ready” be set to “On” for smooth power interlocking with the wireless speakers.
n
Initialization
Reset (initialize) the settings of the sound bar.
Setup menu
“Function” > “Initialization”
Settings
All Initializes all settings.
Network Initializes the network settings.
Operation method
Refer to “To initialize (reset) the sound bar”(p.183) for information on the operation method.
NOTE
You can also use “Initialization” in the front display menu to initialize a setting.
126
CONFIGURATION > Setting functions (Setup menu)

n
Firmware Update
Update the sound bar’s firmware. You can also confirm the version of current firmware and the system ID.
Setup menu
“Function” > “Firmware Update”
Settings
Network Update Update performed via a network.
USB Update Update using a USB flash drive.
Operation method
Refer to “Firmware Update”(p.141) for information on the operation method.
NOTE
(
You cannot select “Network Update” until you are ready to update the firmware.
(
Use this menu only for updating firmware. Before updating, be sure to check for important information on our web site.
(
A firmware update via a network takes about 20 minutes.
(
If your Internet connection is not fast enough or you are using a wireless network, you may not receive notice of a firmware update.
In such a case, it may be better to use a USB flash drive to update the firmware.
(
You can also use “Firmware Update” in the front display menu to update firmware.
(
After the firmware of the sound bar has been updated, the firmware of the wireless speakers may be updated automatically.
127
CONFIGURATION > Setting functions (Setup menu)

Setting up a network
n
Information
Displays information for connecting the sound bar to a network.
Setup menu
“Network” > “Information”
Displayed information
Status The status of the network jack
Connection Method for making a network connection
SSID
The access point to which the sound bar is connected to when using a wireless
connection (Wi-Fi)
MusicCast Network Status of MusicCast network registration
MAC Address (Ethernet) Sound bar MAC address
MAC Address (Wi-Fi) Sound bar MAC address
IP Address Sound bar IP address
Subnet Mask Subnet mask
Default Gateway IP address for default gateway
DNS Server (P) Primary DNS server IP address
DNS Server (S) Secondary DNS server IP address
n
Network Connection
Use to configure settings to connect the sound bar to a network.
Setup menu
“Network” > “Network Connection”
Settings
Wired Connecting to a network using a network cable.
Wireless(Wi-Fi) Connecting to a wireless network.
Default setting
Wired
NOTE
(
To make a cable connection, refer to “Connecting to a network using a LAN cable (wired connection)”(p.43).
(
To make a wireless connection, refer to “Selecting a wireless connection method to a network”(p.193).
128
CONFIGURATION > Setting functions (Setup menu)

n
IP Address (DHCP function)
Use the DHCP server to automatically set the network information (IP address, subnet mask, default
gateway, etc.) of the sound bar for the sound bar using a DHCP server.
Setup menu
“Network” > “IP Address” > “DHCP”
Settings
Off
Set the network information manually without using a DHCP server.
To set network information, refer to “Manually setting network information”.
On Use a DHCP server to set network information automatically.
Default setting
On
Manually setting network information
a For “DHCP”, select “Off”.
b Select the item you want to set.
c Set network information.
d Press the ENTER key.
e To set other items, repeat steps b to d.
f Press the ~ (Setup) key.
This completes the setting.
n
DMC Control
Sets whether the sound bar is operated from a digital media controller (DMC). When enabled, sound bar
playback can be controlled from a DMC on the same network as the sound bar.
Setup menu
“Network” > “DMC Control”
Settings
Disable Disables operations from DMC.
Enable Enables operations from DMC.
Default setting
Enable
129
CONFIGURATION > Setting functions (Setup menu)

n
Network Standby
Sets whether the sound bar will be turned on from a network device.
Setup menu
“Network” > “Network Standby”
Settings
Off Disables Network Standby.
On
Enables Network Standby.
Consumes more power than when set to “Off”.
Auto
Enables Network Standby.
When “Network Connection” is set to “Wired”, and the network cable is disconnected, the
sound bar enters the power save mode to save power.
Default setting
Auto
NOTE
(
In power save mode, the sound bar cannot be turned on from network devices even when a power cable is connected. Turn on the
sound bar manually.
(
If “Network Standby” is set to “Off”, the sound bar cannot be turned on from a device, not even a Bluetooth device that has already
been paired with the sound bar. Turn on the sound bar manually.
n
Network Name
This sets the name of the sound bar that is displayed to the network (its network name).
Setup menu
“Network” > “Network Name”
Setup procedure
a Press the ENTER key.
b Edit the name.
c Select “OK”.
d Press the ~ (Setup) key.
This completes the setting.
NOTE
(
Select “CLEAR” to delete all entered data.
(
If “RESET” is selected, the default for the name of the sound bar (its network name) is displayed.
130
CONFIGURATION > Setting functions (Setup menu)

n
MusicCast Link Power Interlock
When the sound bar (master) is turned on, set whether the MusicCast devices (secondary devices) are also
turned on.
Setup menu
“Network” > “MusicCast Link Power Interlock”
Settings
Off The power function of the sound bar and MusicCast devices are not linked.
On The power function of the sound bar and MusicCast devices are linked.
Default setting
Off
131
CONFIGURATION > Setting functions (Setup menu)

Configuring the Bluetooth function
n
Bluetooth
Set whether the Bluetooth function will be used.
Setup menu
“Bluetooth” > “Bluetooth”
Settings
Off Disables the Bluetooth function.
On Enables the Bluetooth function.
Default setting
On
n
Disconnect
Disconnects the Bluetooth device from the sound bar.
Setup menu
“Bluetooth” > “Audio Receive” > “Disconnect”
Setup procedure
Select “Disconnect” and press the ENTER key to cancel the Bluetooth connection.
NOTE
Unconnected Bluetooth devices cannot use this function.
n
Audio Send
Use Bluetooth devices (speakers/headphones, etc.) to listen to audio played on the sound bar.
Setup menu
“Bluetooth” > “Audio Send” > “Transmitter”
Settings
Off Disables the Bluetooth audio transmission function.
On Enables the Bluetooth audio transmission function.
132
CONFIGURATION > Setting functions (Setup menu)

Default setting
Off
n
Device Search
When the “Transmitter” is set to “On” in the Setup menu, connect the Bluetooth device (speaker/
headphones, etc.) to be used for audio transmission.
Set the Input of the sound bar to something other than Bluetooth.
Setup menu
“Bluetooth” > “Audio Send” > “Device Search”
Setup procedure
a Check the message and press the ENTER key.
A Bluetooth device that can be connected to the sound bar appears.
b Select the Bluetooth device for sending audio.
c Press the ENTER key.
When the connection is completed, “Completed” will be displayed.
d Press the ENTER key.
This completes the setting.
NOTE
(
If the Bluetooth device you wish to connect does not appear in the list, pair the Bluetooth device and then perform the “Device
Search” again.
(
To terminate the connection, turn off the Bluetooth speakers/headphones.
133
CONFIGURATION > Setting functions (Setup menu)

Language settings
n
Language
Set the interface language for the Setup menu and other menus.
Setup menu
“Language”
Settings
English English
日本語 Japanese
Français French
Deutsch German
Español Spanish
Русский Russian
Italiano Italian
中文 Chinese
134
CONFIGURATION > Setting functions (Setup menu)
Making settings from the sound bar (front display menu)
Basic operations in the front display menu
Describes how to use the basic front display menu functions. Use the remote control while looking at the
front display to operate this menu.
1 Press the
(Front Display Menu) key on the remote control.
The menu list screen appears.
2 Select a menu item.
3 Change the setting.
4 Press the
(Front Display Menu) key.
This completes the setting.
NOTE
To cancel operation in the front display menu, or to return to a previous display, press the - (Return) key on the remote control.
Related links
“Front display menu list”(p.136)
135
CONFIGURATION > Making settings from the sound bar (front display menu)

Front display menu list
This is the front display menu list. For more information on menu items, refer to the links in the page column.
Item Page
Dimmer
137
Child Lock
138
Initialization
All Initialization
139
Network Initialization
Firmware Update
Network Update
140
USB Update
136
CONFIGURATION > Making settings from the sound bar (front display menu)

Adjusting the brightness of front display and the power
indicator (Dimmer)
Adjust the brightness of the front display and the power indicator. A higher value means brighter light.
Front display menu
“Dimmer”
Settings
-5 to 0
Default setting
-2
NOTE
(
“-5” indicates off.
(
Even if set to “-5” (off), short messages and menus on the front display menu will still be displayed at a brightness of “-4”.
(
When set to “-5” (off), it will be more difficult to see whether or not the sound bar is on. Take care not to leave the sound bar with
the power on. You are recommended to set “Auto Power Standby” in the Setup menu to something other than “Off”.
(
The “Dimmer” setting in the Setup menu and the “Dimmer” setting on the front display menu are interlocked.
137
CONFIGURATION > Making settings from the sound bar (front display menu)

Enabling/disabling the Child Lock function
Enabling the Child Lock function locks the controls of the sound bar to prevent accidental operation.
Front display menu
“Child Lock”
Settings
Off Disables the Child Lock function.
On Enables the Child Lock function.
Default setting
Off
NOTE
The power button cannot be locked.
138
CONFIGURATION > Making settings from the sound bar (front display menu)

Initializing the sound bar
Reset (initialize) the settings of the sound bar.
Front display menu
“Initialization”
Item
All Initialization Initializes all settings.
Network Initialization Initializes the network settings.
Operation method
Refer to “To initialize (reset) the sound bar”(p.183) for information on the operation method.
NOTE
You can also use “Initialization” in the Setup menu to initialize settings.
139
CONFIGURATION > Making settings from the sound bar (front display menu)

Updating the firmware
Update the sound bar’s firmware. You can also confirm the version of current firmware.
Front display menu
“Firmware Update”
Settings
Network Update Update performed via a network.
USB Update Update using a USB flash drive.
Operation method
Refer to “Firmware Update”(p.141) for information on the operation method.
NOTE
(
You cannot select “Network Update” until you are ready to update the firmware.
(
Use this menu only for updating firmware. Before updating, be sure to check for important information on our web site.
(
A firmware update via a network takes about 20 minutes.
(
If your Internet connection is not fast enough or you are using a wireless network, you may not receive notice of a firmware update.
In such a case, it may be better to use a USB flash drive to update the firmware.
(
You can also use “Firmware Update” in the Setup menu to update firmware.
140
CONFIGURATION > Making settings from the sound bar (front display menu)
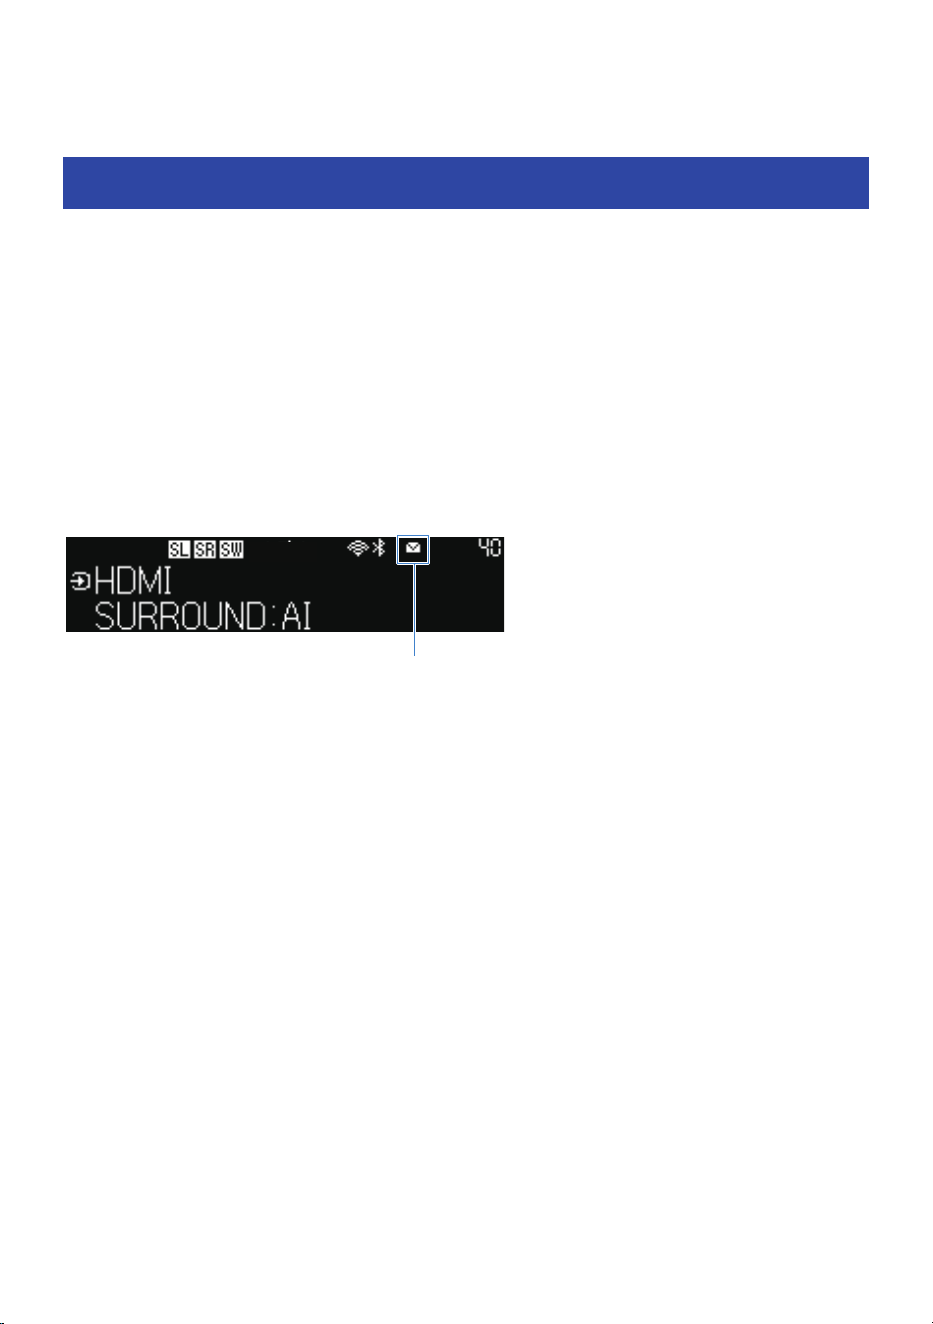
UPDATING THE FIRMWARE
Firmware Update
New firmware is provided to add features or fix bugs. For more information about firmware, visit the Yamaha
website. Firmware can be updated via the Internet or using a USB flash drive.
n
Notification of a firmware update
App notification
If you are using the MusicCast Controller smartphone application, it will notify you when a firmware update
becomes available.
Front display notification
When the sound bar is ready to accept new firmware, the firmware update icon on the front display will glow.
Firmware Update icon
NOTE
(
If a more recent version of firmware becomes available before an update is performed, the firmware update indicator may
temporarily turn off.
(
If your Internet connection is not fast enough or you are using a wireless network, you may not receive notice of a firmware update.
In such a case, it may be better to use a USB flash drive to update the firmware.
(
The front display example shown here is an English screen.
Related links
(
“Updating the firmware via a network”(p.142)
(
“Updating the firmware with a USB flash drive”(p.144)
141
UPDATING THE FIRMWARE > Firmware Update
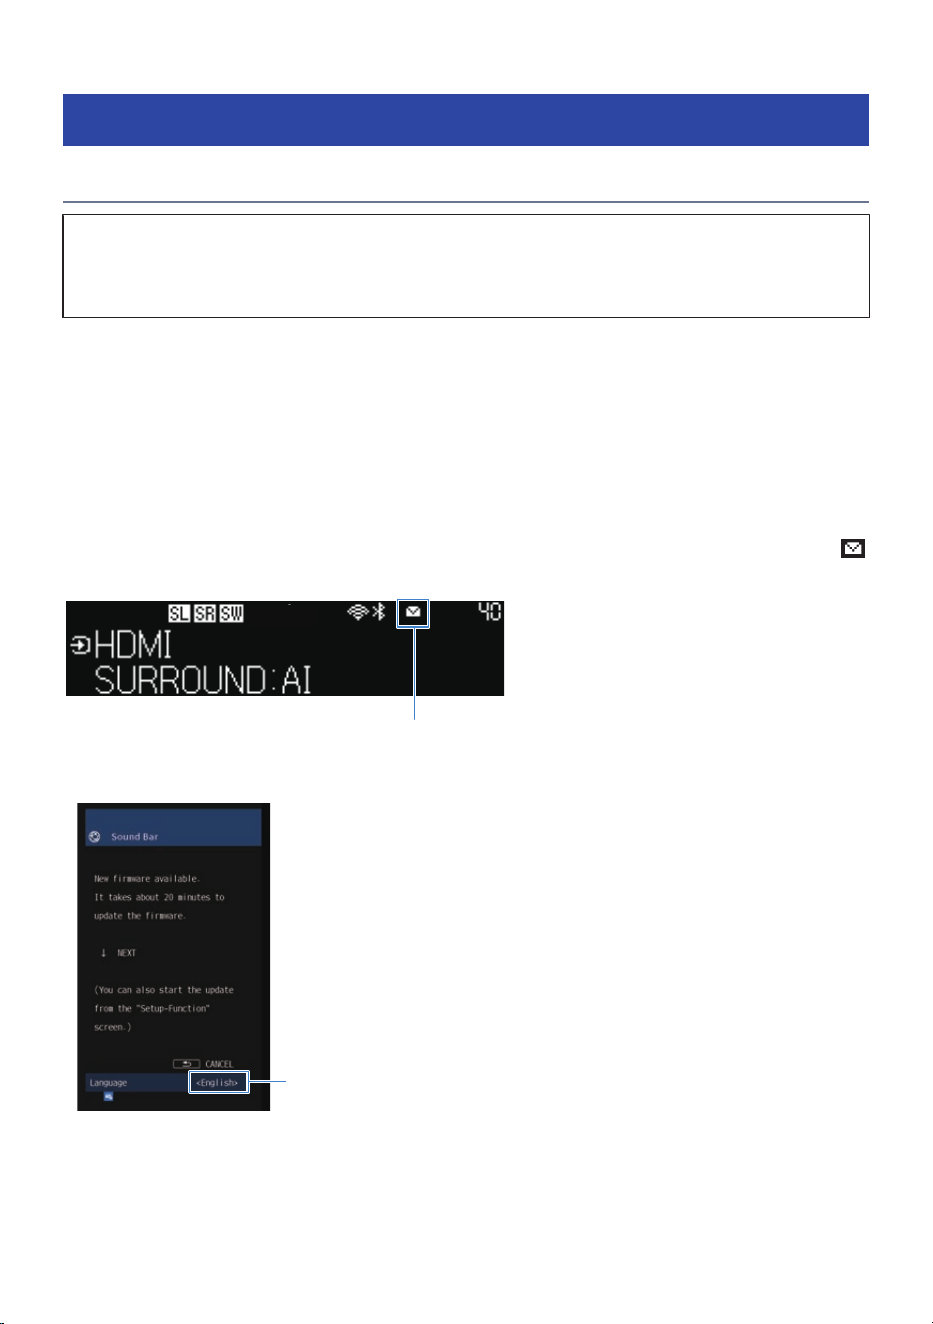
Updating the firmware
Updating the firmware via a network
NOTICE
(
Do not operate the sound bar or unplug the power cord or network cable while updating the firmware. In the unlikely event that
this process is interrupted, it may not be possible to use the sound bar. In that case, you may have to take it in to have it
repaired.
n
Update using the application
If you are using the MusicCast Controller smartphone application, it will notify you when a firmware update
becomes available.
Follow the app screen instructions to update the firmware.
n
Updating from the Setup menu
If the sound bar is connected to the Internet, when the sound bar is ready to update to new firmware, the
(Firmware Update) icon on the front display will glow.
Firmware Update icon
In the situation described above, press the ~ (Setup) key and the following message will appear.
You can use the right and left
cursor keys to switch
languages.
In that screen, follow the following instructions to update the firmware.
142
UPDATING THE FIRMWARE > Updating the firmware

1 Read the instructions on the screen and press the bottom cursor key.
The following screen appears.
2 Check the information on the screen and press the ENTER key.
The TV screen clears and the firmware update starts.
3 When the message “UPDATE SUCCESS PLEASE POWER OFF!” appears, press the
power button on the sound bar.
This completes the firmware update.
NOTE
(
A firmware update takes about 20 minutes.
(
If your Internet connection is not fast enough or you are using a wireless network, you may not receive notice of a firmware update.
In such a case, it may be better to use a USB flash drive to update the firmware.
(
After the firmware of the sound bar has been updated, the firmware of the wireless speakers may be updated automatically.
n
The firmware is updated when the power is turned off
If you are currently unable to update firmware, make a reservation and the update will be performed the
next time the sound bar is powered off.
Proceed as follows.
1 Press the cursor down key instead of the ENTER key in step 2 of “Updating the
firmware via a network”.
2 Press the ENTER key in the next screen.
A firmware update is reserved.
If you schedule a firmware update, a message asking you to confirm whether you want to perform the
update will appear on the front display when you turn off the power.
Press the ENTER key to start the update. The power is automatically turned off when the update is
complete.
NOTE
(
After 2 minutes have elapsed since the update confirmation screen is displayed, the power will turn off without updating.
(
Press the - (Return) key to cancel the update and the power is turned off.
(
When the sound bar is turned off by the MusicCast Controller, the power is turned off without updating the firmware.
(
After the firmware of the sound bar has been updated, the firmware of the wireless speakers may be updated automatically.
143
UPDATING THE FIRMWARE > Updating the firmware
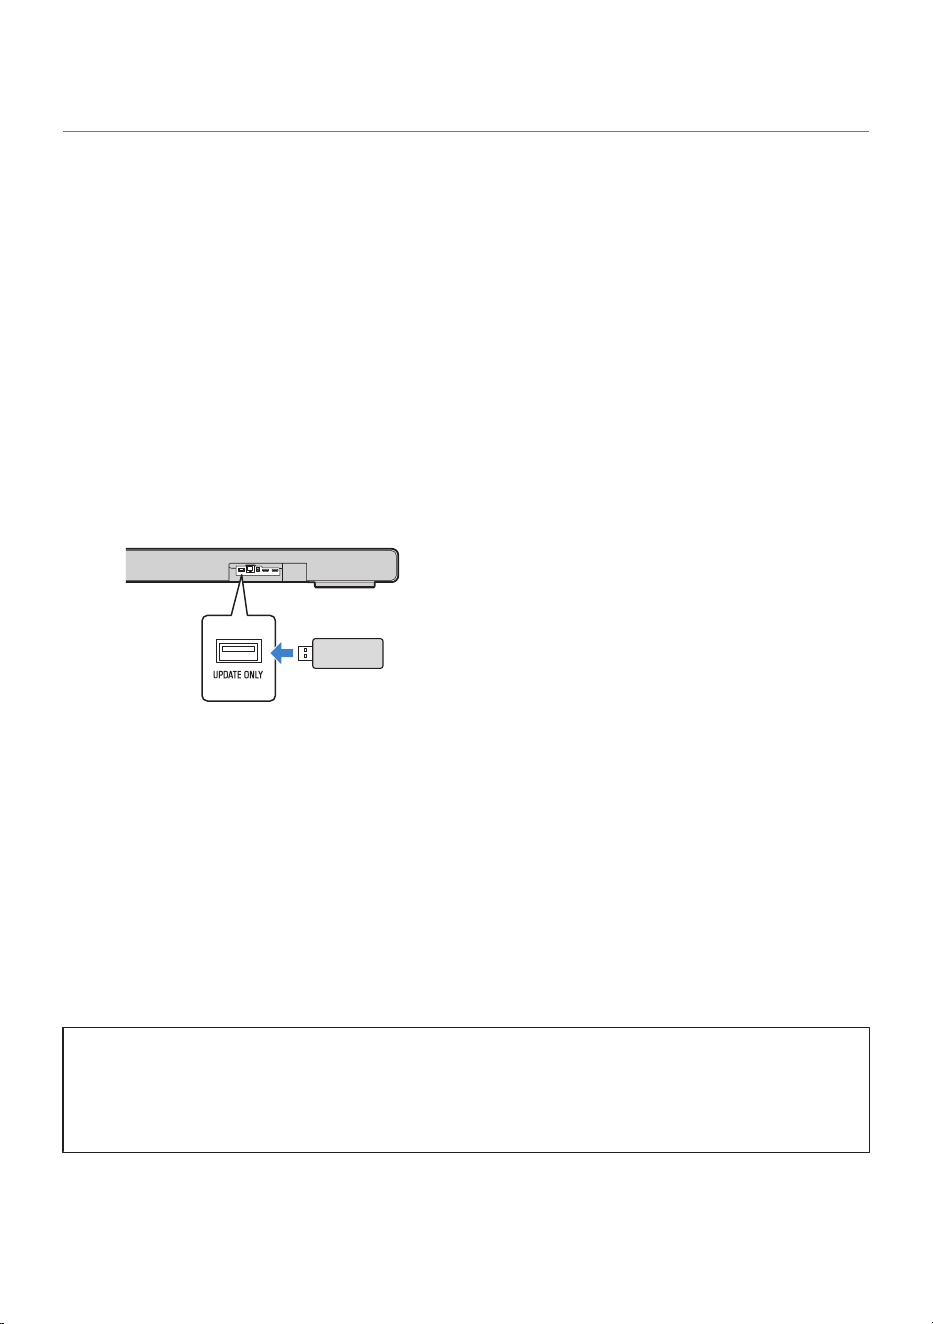
Updating the firmware with a USB flash drive
Use a USB flash drive to update the firmware when the sound bar is not connected to the Internet or when
the speed of your Internet connection is not fast enough.
Please visit the Yamaha website for details on how to download the firmware.
1 Download the latest version of the firmware for the soundbar to your computer
from the Yamaha website.
For more information, visit the product information page on the Yamaha website.
2 Extract the downloaded compressed file, and save the firmware data file to the
USB flash drive.
Be sure to save only the firmware data file to the top folder (root folder) of the USB flash drive.
Do not change the name of the data file.
3 Connect the USB flash drive to the UPDATE ONLY jack on the rear of the sound bar.
USB flash drive containing
the firmware data file
4 Press the ~ (Setup) key on the remote control.
5 Select “Function” > “Firmware Update” > “USB Update” from the Setup menu on
the TV screen.
The firmware update will start. Never turn off the power while updating the firmware.
6 When the message “UPDATE SUCCESS PLEASE POWER OFF!” appears on the front
display, turn off the sound bar.
7 Make sure that the sound bar is turned off, and then remove the USB flash drive.
This completes the firmware update.
NOTICE
(
Do not operate the sound bar or unplug the power cord or network cable while updating the firmware. In the unlikely event that
this process is interrupted, it may not be possible to use the sound bar. In that case, you may have to take it in to have it
repaired.
(
If you are using TRUE X SURROUND, be sure to update the firmware while the wireless speakers are connected.
144
UPDATING THE FIRMWARE > Updating the firmware

NOTE
You can also update the firmware by selecting “Firmware Update” > “USB Update” in the menu on the front display.
145
UPDATING THE FIRMWARE > Updating the firmware

Front display error messages
During the firmware update, an error message such as those below may appear on the front display. Try the
corresponding solution.
Message Solution
NOT FOUND
The update file is not on the USB flash drive. Check if the update file is on the USB
flash drive.
DEVICE ERROR
Access to the USB flash drive failed. The USB flash drive may not have been properly
inserted or may be damaged. Check the USB flash drive.
INVALID FILE
The update file stored on the USB flash drive may be corrupted. Save the latest
update file.
Version Error
Updating the firmware failed. Perform the update again.
ERROR! XXXXXX (“XXXXXX”
is the error number)
The sound bar firmware update failed. Perform the update again.
Update failed XXXXXX
(“XXXXXX” is the error
number)
The firmware update of the wireless speakers ended in error. Turn the wireless
speaker off, then turn it back on again. Then, unplug the power cord of the subwoofer
from the AC wall outlet, and when the power indicator goes off, plug the power cord
back in again.
NOTE
If the wireless speaker firmware update fails three times, no further update will be performed. In that case, the error message “ERROR
XXXXXX” will appear in the Setup menu on the “Speaker” > “Registration” screen. Contact the nearest authorized Yamaha dealer or
service center.
146
UPDATING THE FIRMWARE > Front display error messages

TROUBLESHOOTING
Check the following first
Make sure of the following when the sound bar does not function properly.
(
The power plugs of the soundbar, TV, and AV equipment (Blu-ray Disc players, etc.) are securely connected
to a power outlet.
(
The sound bar, subwoofer, TV and AV devices (Blu-ray Disc players, etc.) are turned on.
(
The connectors of each cable are securely inserted into the jacks on each device.
147
TROUBLESHOOTING > Check the following first

Power and overall functionality
The power turns off suddenly
(
The Auto Power Standby function turned off the power.
When the Auto Power Standby function is on, it will turn off the sound bar automatically according to the
conditions you set.
Turn on the sound bar again. The Auto Power Standby function can be disabled.
(
“Setting up detailed function settings (Function)”(p.125)
(
The protection circuitry has been activated (The power indicator on the sound bar flashes red).
Make sure that the power indicator is correctly connected before turning on the power again. If the
power still turns off frequently, unplug the power cord from the AC wall outlet and contact the nearest
authorized Yamaha dealer or service center.
148
TROUBLESHOOTING > Power and overall functionality

The power cannot be turned on
(
The protection circuitry has been activated three times consecutively (The power indicator on the
sound bar flashes red).
To protect the product, the power cannot be turned on. Unplug the power cord from the AC wall outlet
and contact the nearest authorized Yamaha dealer or service center.
149
TROUBLESHOOTING > Power and overall functionality


Front display is off when power is on (the power appears to be
off)
(
Brightness for the front display is set to “Off”.
Make sure that the Dimmer is set to “-4” or more.
(
“Adjusting the brightness of front display and the power indicator (Dimmer)”(p.137)
151
TROUBLESHOOTING > Power and overall functionality

The sound bar does not function correctly
(
The internal microcomputer is frozen due to an external electric shock (such as lightning or
excessive static electricity) or to a drop in the power supply voltage.
Press the power button on the sound bar for at least 10 seconds to force the sound bar to turn off. Then
disconnect the power cord of the subwoofer from the AC wall outlet. Make sure the power indicator is off
before plugging the power cord of the subwoofer back in and turn on the sound bar again.
152
TROUBLESHOOTING > Power and overall functionality

The sound bar turns on even though no operation was
performed
(
Another Bluetooth device is being operated nearby.
Terminate the Bluetooth connection with the sound bar.
(
Another device is playing AirPlay, Spotify, etc. nearby.
Disconnect the sound bar from the playback device.
(
The soundbar is selected as the playback device in MusicCast Controller.
Set the playback device to a desired device other than the soundbar.
153
TROUBLESHOOTING > Power and overall functionality

The sound bar cannot be controlled with the remote control
(
The sound bar is out of the operating range.
Use the remote control within the operating range.
(
The battery in the remote control has run out.
Replace the battery with a new one.
(
The remote control sensor of the sound bar is exposed to direct sunlight or strong lighting.
Adjust the lighting angle or reposition the sound bar.
154
TROUBLESHOOTING > Power and overall functionality

The sound bar cannot be controlled using the TV’s remote
control
(
The HDMI Control function is not properly configured.
Confirm that the settings are properly configured as follows:
(
The HDMI Control function of the sound bar is On
“Making HDMI settings”(p.122)
(
The HDMI Control function of the TV is On
(
In the TV’s HDMI settings, the audio output destination is set to an option other than the TV’s built-in
speakers
If the sound bar still cannot be controlled with the TV’s remote control, perform the following:
(
Turn off the sound bar and the TV, and then turn them back on again
(
Unplug the power cord of the sound bar, as well as the power cords of external devices connected to
the sound bar via an HDMI cable, from the AC wall outlet. Wait for 30 seconds before plugging them in
again
(
The TV does not support the sound bar’s control functions.
Even if your TV supports the HDMI Control function, some functions may not be available. For details, see
the documentation supplied with your TV.
(
Devices no longer start up simultaneously due to a power failure or for some other reason.
Disconnect the HDMI cable and the power cable, leave the system to discharge for five minutes. Then,
reconnect the cables in the following order: AV devices (if connected), the sound bar and TV.
155
TROUBLESHOOTING > Power and overall functionality
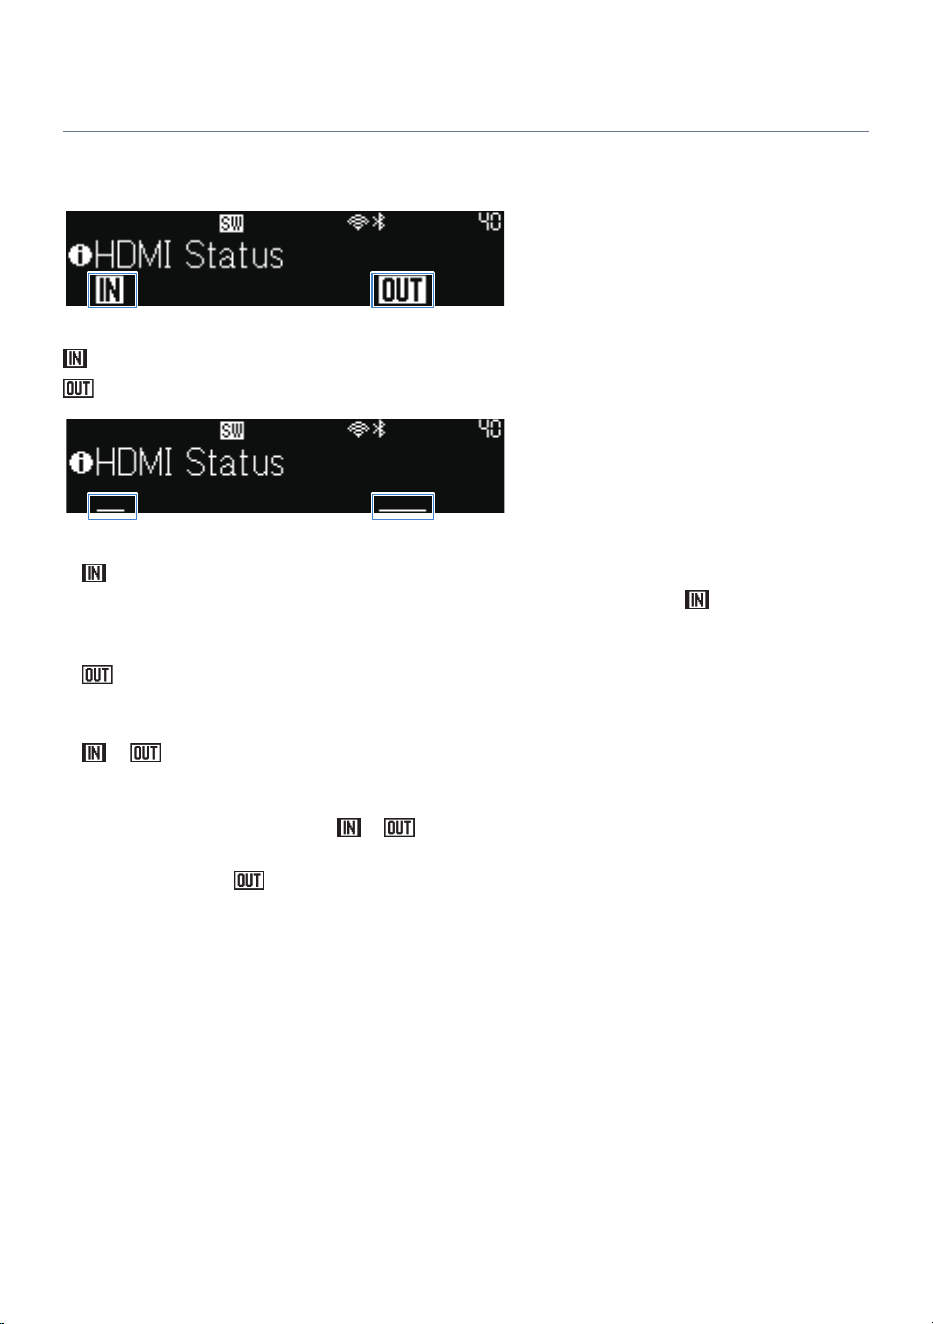
Sound bar input source not displayed on a TV
Check that all connections to the TV are properly made.
To check connection status, press the INFO button repeatedly until the front display shows HDMI status.
Indicates whether an input or output signal has been made to the HDMI IN, HDMI OUT/TV (eARC) jack.
: HDMI input
: HDMI output
An underline is displayed if no sound is output.
(
is not displayed, and an underline is displayed.
The input signal is not recognized. If the power of the AV device is turned on but
does not light up,
make sure the HDMI cable is securely connected at both ends between the sound bar and the AV device
that is connected to the HDMI IN jack of the sound bar.
(
is not displayed, and an underline is displayed.
The signal is not being output. Make sure that the HDMI cable connecting the TV and sound bar is
securely connected to both ends.
(
or flashes repeatedly.
(
The HDMI cable may not be securely connected. Make sure that the HDMI cable connecting the TV and
sound bar is securely connected to both ends.
(
If the connection is stable, but
or is flashing repeatedly, there may be a problem with the
HDMI cable. Replace the HDMI cable.
(
The flashing of the
does not affect TV reception.
(
Select sound bar on the TV input. For information on how to switch, refer to the instruction manual for
your TV.
(
If you switch the TV input to the sound bar and still cannot see the image, there may be a problem with
the HDMI cable. Replace the HDMI cable.
156
TROUBLESHOOTING > Power and overall functionality

Audio playback
No sound
(
The input source you are attempting to play back from is not selected.
Select the correct input source.
(
“Basic control during playback”(p.83)
(
The mute function is active.
Cancel the mute function.
(
“Basic control during playback”(p.83)
(
The volume is too low.
Turn up the volume.
(
“Basic control during playback”(p.83)
(
The power cord of the sound bar is not connected securely.
Make sure that the power cord of the sound bar is properly connected to an AC wall outlet.
(
The sound bar has just been started up.
The sound bar does not produce a sound for the first 30 seconds. In the meantime, the front display will
show a “Please wait” message. Wait awhile before proceeding.
(
An input jack is connected to another input jack.
Connect the input jack on the sound bar to the output jack on the AV device. When connecting the AV
device to the TV, connect the output jack on the AV device to the input jack on the TV.
(
“Connecting an AV device to the sound bar”(p.39)
(
“Connecting an AV device to the TV’s HDMI input jack”(p.40)
(
A signal that the sound bar cannot play is being input.
Change the digital audio output setting on the TV or AV device to a type of audio signal supported by the
sound bar.
(
“Supported digital audio signal formats”(p.191)
(
The HDMI Control function is set to Off.
When connecting a TV supporting the Audio Return Channel (ARC) to the sound bar using only an HDMI
cable, turn On the HDMI Control function.
To output audio from the sound bar when the HDMI Control function is turned Off, connect the TV’s
audio output jack to the OPTICAL jack (digital optical) on the sound bar using a digital optical audio
cable.
(
“Making HDMI settings”(p.122)
(
The audio output destination of a TV using HDMI Control function is the built-in speakers of the TV.
In the TV’s HDMI settings, set the audio output destination to an option other than the TV’s built-in
speakers.
(
A DVD-Audio or an SACD is being played back.
Playback of DVD-Audio and SACD is not supported.
157
TROUBLESHOOTING > Audio playback

No sound is coming from the subwoofer
(
The playback source does not contain subwoofer channel signals or low-frequency signals.
Try to play content containing subwoofer channel signals or low-frequency signals, to check if any sound
can be heard from the subwoofer.
(
The volume of the subwoofer is too low.
Turn up the volume of the subwoofer.
(
The power cord of the subwoofer is not connected to an AC wall outlet.
Connect the power cord of the subwoofer to an AC wall outlet.
(
The protection circuit has been activated (the power light on the back of the subwoofer flashes
red rapidly).
To protect the product, the power of the subwoofer cannot be turned on. The protection circuit may also
be activated by continuous loud playback, unplugging the unit during playback, or after a brief power
failure. Make sure the power indicator is off before plugging the subwoofer power cord back in to turn on
the sound bar again. If the power indicator still flashes rapidly, unplug the power cord from the AC wall
outlet and contact the nearest authorized Yamaha dealer or service center.
(
Weak wireless signal (The CONNECT indicator on the rear of the subwoofer is flashing slowly).
The condition of the wireless connection is bad, and the subwoofer cannot be connected to the sound
bar. Try the following.
(
Place the subwoofer closer to the sound bar.
(
If metal furniture is placed between the sound bar and subwoofer, change the layout or relocate the
subwoofer.
(
If a device emitting electromagnetic waves (such as a microwave oven or a wireless LAN device) is
located nearby, place the subwoofer and sound bar farther away from it.
(
The subwoofer and the sound bar are not connected (The CONNECT indicator on the rear of the
subwoofer is flashing slowly. Or the CONNECT indicator is slowly flashing red).
Manually connect the subwoofer to the sound bar.
(
“Connecting a subwoofer manually”(p.199)
(
The subwoofer is not turned on.
If the
icon appears on the soundbar front display and the subwoofer power indicator is solid red, the
subwoofer has been turned off for some reason.
Unplug the power cord of the subwoofer from the AC wall outlet. Then wait until the power indicator
goes off before plugging it in again.
158
TROUBLESHOOTING > Audio playback

The volume decreases or increases when the sound bar is
turned back on
(
The default volume is set.
In the Setup menu, it is possible that “Initial Volume” is “On”, and it is set to “Mute” or a low volume or to
a high volume. Set it to “Off” or adjust the volume.
(
“Making audio settings”(p.118)
159
TROUBLESHOOTING > Audio playback

No surround effect
(
Stereo playback is selected.
Press SURROUND:AI, 3D MUSIC or STRAIGHT keys on the sound bar remote control to switch to surround
playback.
(
The volume is too low.
Turn up the volume.
(
The TV or AV device is set to output 2-channel audio (such as PCM) only.
Change the audio output setting on the TV or AV device to output Bitstream audio signals.
(
Sound is also heard from the TV’s built-in speakers.
Turn the TV’s volume all the way down.
(
You are listening from a position that’s extremely close to the sound bar.
You should listen at some distance from the sound bar.
(
TRUE X SURROUND is set but no wireless speakers are connected.
Check that wireless speakers are connected.
(
“Checking the connection status of the wireless speakers on the sound bar”(p.82)
160
TROUBLESHOOTING > Audio playback

Noise is heard
(
The sound bar is too close to another digital or high-frequency device.
Move those devices away from the sound bar.
161
TROUBLESHOOTING > Audio playback

Bluetooth® connection
The sound bar cannot be connected to a Bluetooth® device
(
Something other than Bluetooth is selected during input from a Bluetooth device.
Set input to “Bluetooth” to playback content from a Bluetooth device on the sound bar.
(
When playing audio from the sound bar with a Bluetooth device, the sound bar input is set to
Bluetooth.
Set sound bar input to something other than “Bluetooth” to play back sound bar audio on a Bluetooth
device.
(
The sound bar is too far away from the Bluetooth device.
Move the Bluetooth device closer to the sound bar.
(
A device emitting electromagnetic waves (such as a microwave oven or a wireless device) is
located nearby.
Do not use the sound bar near devices that emit electromagnetic waves.
(
The Bluetooth device you are using does not support the A2DP profile.
Use a Bluetooth device that supports the A2DP profile.
(
The connection profile registered in the Bluetooth device is not functioning correctly.
Delete the connection profile in the Bluetooth device, and then connect the Bluetooth device to the
sound bar.
(
The passkey for devices such as a Bluetooth adapter is not “0000”.
Use a Bluetooth device with a passkey of “0000”.
(
The sound bar is connected to another Bluetooth device.
Terminate the current Bluetooth connection, and then connect to the new device.
(
The Bluetooth function of the sound bar is disabled.
Enable the Bluetooth function.
162
TROUBLESHOOTING > Bluetooth® connection

No sound can be heard or the sound cuts off intermittently
from a Bluetooth® device
(
The volume on the Bluetooth device is too low.
Raise the volume on the Bluetooth device.
(
Playback is not being performed on the Bluetooth device.
Perform playback on the Bluetooth device.
(
The audio output destination on the Bluetooth device is not set to the sound bar.
Select the sound bar as the audio output destination on the Bluetooth device.
(
The connection to the Bluetooth device was terminated.
Connect to the Bluetooth device again.
(
The sound bar is too far away from the Bluetooth device.
Move the Bluetooth device near the sound bar.
(
A device emitting electromagnetic waves (such as a microwave oven or a wireless device) is
located nearby.
Do not use the sound bar near devices that emit electromagnetic waves.
163
TROUBLESHOOTING > Bluetooth® connection

Network
Network functions cannot be used
(
The network information (IP address) is not being properly acquired.
Enable the DHCP server function on the router.
(
You are trying to connect to an IPv6-type router.
The sound bar does not support IPv6 networks. Connect the sound bar to an IPv4 network.
164
TROUBLESHOOTING > Network

The sound bar cannot be connected to the Internet via a
wireless LAN router (access point)
(
The wireless LAN router (access point) is off.
Turn on the wireless LAN router (access point).
(
The sound bar is too far away from the wireless LAN router (access point).
Install the sound bar and wireless LAN router (access point) closer to each other.
(
Obstacles are between the sound bar and wireless LAN router (access point).
Install the sound bar and wireless LAN router (access point) in a place where there are no obstacles are
between them.
(
The wireless LAN router (access point) is set to use a specific wireless channel.
Change the settings of the wireless LAN router so that it automatically selects a channel. If you want to
specify the channel to use, specify channel 1 or 11.
165
TROUBLESHOOTING > Network

A wireless network cannot be not found
(
Electromagnetic waves being emitted from devices such as microwave ovens or from other
wireless devices are obstructing the wireless communication.
Turn off these devices or keep the sound bar and wireless LAN router (access point) away from these
devices. Or, connect the sound bar to a 5 GHz-compatible wireless LAN router (access point).
(
Access to the network is limited by the way the firewall is configured on the wireless LAN router
(access point).
Check to see how the firewall is configured on the wireless LAN router (access point).
166
TROUBLESHOOTING > Network

Audio cannot be played with AirPlay
(
An audio file not supported by the sound bar is being played.
Play the file on an AirPlay-compatible device, to see if it can be played back. If it cannot be played, the
file format may not be not supported, or the file may be corrupted.
167
TROUBLESHOOTING > Network

The sound bar is not detected on an AirPlay-compatible
device
(
The sound bar and an AirPlay-compatible device are each connected to different SSIDs.
Connect the sound bar and AirPlay-compatible devices to the same SSID (try connecting them to the
primary SSID).
168
TROUBLESHOOTING > Network

Streaming services cannot be played
(
The selected streaming service is currently stopped.
Try playing the streaming service again later.
(
Access to the network is limited by the way the firewall is configured on the router or other
network device.
Check to see how the firewall is configured on the network device. Also, streaming services can only be
played via the port specified by each service. The port number varies depending on the streaming
service.
(
This product is being used in an area where streaming services are not provided.
Streaming services are only provided in certain areas. Streaming services may not be available in some
countries or regions where the product is used.
169
TROUBLESHOOTING > Network


Notification of a firmware update is not displayed
(
Notification of a firmware update is not displayed in the TV screen menu, front display, or
MusicCast Controller.
If there is firmware update information for this product on the Yamaha website, but nothing appears in
the TV screen menu, front display, or MusicCast Controller notification, please update the firmware via
the USB port.
(
“Updating the firmware with a USB flash drive”(p.144)
171
TROUBLESHOOTING > Network

Use of the app
The app cannot detect the sound bar
(
An app not supported by the sound bar is being used.
This product supports only the MusicCast Controller. Sound Bar Remote, HomeTheater Controller and
Sound Bar Controller cannot be used.
(
The sound bar and smartphone are not connected to the same network.
Check the network connection and the router’s settings, and connect the sound bar and smartphone to
the same network.
(
The smartphone is not connected wirelessly (via Wi-Fi) to the wireless LAN router.
Connect the smartphone wirelessly (via Wi-Fi) to the wireless LAN router.
(
A router that supports multiple SSIDs is being used.
The network splitting function of a wireless LAN router may prevent access to the sound bar. Connect
the sound bar and smartphone to a network with the same SSID. Try connecting to the primary SSID
first.
(
The wireless (Wi-Fi) function of the sound bar is disabled.
If you are connected wirelessly (Wi-Fi) to a network, turn on the wireless (WiFi) function.
(
“Setting up a network”(p.128)
(
The LAN cable is not connected
If you have a wired connection to the network, make sure the LAN cable is securely connected.
(
“Connecting to a network using a LAN cable (wired connection)”(p.43)
172
TROUBLESHOOTING > Use of the app

A media server (NAS, etc.) is not detected with the app
(
The media sharing setting on the media server is not enabled.
The media sharing setting on each media server (NAS, etc.) or media server software must be enabled.
See the documentation supplied with each device or software for more information.
(
Access to the media server is restricted due to settings such as security software.
Check the security software settings of the media server or router.
173
TROUBLESHOOTING > Use of the app

TRUE X SURROUND
No sound is coming from both of the wireless speakers
(
The wireless speaker is not turned on.
Check that the power indicator on the top of the wireless speaker is glowing. If the indicator is not
glowing, hold down the power button on the wireless speaker to turn it on.
(
The mode is not set to SURROUND on the wireless speaker.
Check that the SURROUND indicator on the top of the wireless speaker is glowing. If the SOLO indicator
is glowing or flashing, press the P (mode) button to switch the mode to SURROUND.
If SURROUND cannot be selected by pressing P (mode) on the wireless speakers, it is possible that the
registration of the wireless speakers to the sound bar has not been completed. In this case, complete the
registration.
(
“Registering wireless speakers to the sound bar”(p.60)
(
Audio output from the sound bar is not played in surround.
Press the SURROUND:AI, 3D MUSIC or STRAIGHT keys on the sound bar remote control to switch to
surround playback.
(
The volumes of the wireless speakers are set too low.
Press the SURROUND L (+/-) or SURROUND R (+/-) keys on the sound bar remote control to adjust the
volume of each wireless speaker. Point the remote control at the sound bar to operate it.
(
The content being played does not contain surround channel audio.
Change the playback content to something that definitely contains surround channel audio, such as a
movie that contains multi-channel audio, and check that audio is output from the wireless speakers.
(
The firmware of the wireless speakers is being updated.
If the L and R indicators on the rears of the wireless speakers are glowing alternately, their firmware is
being updated. Wait while the update is processing, and do not operate the buttons of the wireless
speaker until the update is completed.
(
The condition of the connection between the sound bar and wireless speakers is bad.
Check that there is no device emitting strong radio waves or interrupting radio waves placed between
the sound bar and wireless speakers.
(
The registration of the wireless speakers was removed from the sound bar.
If the SURROUND indicators on the tops of the wireless speakers keep flashing slowly, the registration of
the wireless speakers to the sound bar may have been removed. Register the wireless speakers to the
sound bar again.
(
“Registering wireless speakers to the sound bar”(p.60)
(
One wireless speaker is turned off when not in ALL mode.
When two wireless speakers are connected, if one of the wireless speakers is turned off or placed at a
distance where it cannot be connected, no sound will come out of the wireless speakers except in ALL
mode. Turn on both wireless speakers or move the wireless speakers closer to each other until they can
be connected.
174
TROUBLESHOOTING > TRUE X SURROUND

No sound is coming from one of the wireless speakers
If sound is coming from one of the wireless speakers and no sound is coming from the other wireless
speaker, the following could be the cause.
(
In ALL mode, the wireless speaker may not be turned on.
Check that the power indicator on the top of the wireless speaker is glowing. If the indicator is not
glowing, hold down the power button to turn on the wireless speaker.
(
In ALL mode, the wireless speaker may not be set SURROUND mode.
Check that the SURROUND indicator on the top of the wireless speaker is glowing. If the SOLO indicator
is glowing or flashing, press P (mode) to switch the mode to SURROUND.
If SURROUND cannot be selected by pressing P (mode) on the wireless speakers, it is possible that the
registration of the wireless speakers to the sound bar is not completed. In this case, complete the
registration.
(
“Registering wireless speakers to the sound bar”(p.60)
(
The volumes of the wireless speakers are set too low.
Press the volume (+) buttons on the wireless speakers to turn up their volume.
Press the SURROUND L (+/-) or SURROUND R (+/-) keys on the sound bar’s remote control to adjust the
respective volumes of the wireless speakers.
(
The firmware of the wireless speakers is being updated.
If the L and R indicators on the rears of the wireless speakers are glowing alternately, their firmware is
being updated. Wait while the update is processing, and do not operate the buttons of the wireless
speaker until the update is completed.
(
The condition of the connection between the sound bar and wireless speakers is bad.
Check that there is no device emitting strong radio waves or interrupting radio waves placed between
the sound bar and wireless speakers.
(
The registration of the wireless speakers was removed.
If SURROUND cannot be selected by pressing P (mode) on the wireless speakers, the registration of the
wireless speakers to the sound bar may have been removed. In this case, complete the registration.
(
“Registering wireless speakers to the sound bar”(p.60)
175
TROUBLESHOOTING > TRUE X SURROUND

The volume of the connected wireless speakers is too low
If the volume of the wireless speakers is too low, the following could be the cause.
(
The volumes of the wireless speakers are set too low.
Press the SURROUND L (+/-) or SURROUND R (+/-) keys on the sound bar remote control to adjust the
volume of each of the wireless speakers. Point the remote control at the sound bar to operate it.
176
TROUBLESHOOTING > TRUE X SURROUND

The wireless speakers do not turn on when the sound bar is
turned on
If the wireless speakers do not turn on, the following could be the cause.
(
The wireless speakers are not connected to power.
If the wireless speakers are not connected to power, the wireless speakers do not turn on automatically
even when the sound bar is turned on. In this case, press the power buttons on both of the wireless
speakers to turn them on.
(
The wireless speakers were turned off in SOLO mode.
If the mode was set to SOLO when the wireless speakers were turned off, the wireless speakers do not
turn on automatically even if the wireless speakers are connected to power. Choose SURROUND mode,
and then turn off the wireless speakers.
(
The remaining battery level of the wireless speakers is low.
Connect the wireless speakers to power to charge them before use. For details, refer to the User Guide of
the wireless speakers.
(
Connecting the wireless speakers is time-consuming.
If “True X Ready” is set to “Off”, it may take some time for the wireless speakers to turn on after the
sound bar is turned on. To shorten the time, set “True X Ready” to “On”. The “On” setting consumes
more power than the “Off” setting.
(
“Setting up detailed function settings (Function)”(p.125)
177
TROUBLESHOOTING > TRUE X SURROUND

The registration of the wireless speakers does not complete
If the registration of the wireless speakers will not complete and the wireless speakers cannot be connected
to the sound bar, perform the following procedure to check the status.
(
You are trying to register a wireless speaker to the same channel as a wireless speaker that is
already connected.
Turn off the sound bar and wireless speakers and turn them back on. Then, start over the registration
procedure again.
(
“Registering wireless speakers to the sound bar”(p.60)
(
The wireless speaker’s registration wait status is canceled, and the mode is set to SOLO.
If more than two minutes pass after the wireless speakers enter the registration wait status, the
registration wait status is canceled, and the mode switches back to SOLO. Start over the registration
procedure again.
(
“Registering wireless speakers to the sound bar”(p.60)
(
The wireless speakers or sound bar have not entered the registration wait status.
In the sound bar’s Setup menu, under “Speaker” > “Registration”, select “Registration”. When the
“Registration” screen appears, follow the instructions on the screen to register the wireless speakers to
the sound bar.
If the SURROUND indicators of the wireless speakers are not flashing, press P (mode) for at least three
seconds.
If the registration still does not complete with the above operation, wait until the indicators on the front
of the sound bar return to their normal display and the SOLO indicators on the wireless speakers either
flash or glow, and then start over the registration procedure again.
(
“Registering wireless speakers to the sound bar”(p.60)
178
TROUBLESHOOTING > TRUE X SURROUND

L/R cannot be selected while the wireless speakers are being
registered
If you cannot select L/R while registering the wireless speakers, it could be because of the following.
(
The wireless speakers are waiting to be registered to the sound bar.
Since P (mode) on the wireless speaker was held down two times consecutively, the wireless speaker is
waiting to be registered to the sound bar. Hold down P (mode) until the SURROUND indicator turns off,
and then select L/R again.
(
The mode is set to SOLO on the wireless speakers.
Start over the registration procedure again.
(
The wireless speakers are off.
Turn on the wireless speakers and register them. If the remaining battery level of the wireless speakers is
low, charge the wireless speakers, and then turn them on. For details on charging, refer to the User
Guide of the wireless speakers.
Related links
“Registering wireless speakers to the sound bar”(p.60)
179
TROUBLESHOOTING > TRUE X SURROUND

Audio content from a Bluetooth device cannot be played on
the wireless speakers
If audio content from a Bluetooth device cannot be played on the wireless speaker after the wireless speaker
have been registered to the sound bar, the following could be the cause.
(
The mode is not set to SOLO on the wireless speaker.
Check that the SOLO indicator on the top of the wireless speaker is glowing. If the SURROUND indicator
is glowing or flashing, press P (mode) to switch the mode to SOLO.
NOTE
For causes other than the above, refer to the User Guide of the wireless speakers.
180
TROUBLESHOOTING > TRUE X SURROUND

Broken, distorted, or unusual sounds are heard
If the sound quality of the wireless speakers is deteriorated significantly, the following could be the cause.
(
The volume is too high.
Point the sound bar remote control at the sound bar and press the SURROUND L (+/-) or SURROUND R
(+/-) keys on the sound bar remote control to adjust the volume of each of the wireless speakers.
(
The condition of the connection between the sound bar and wireless speakers is bad.
Check that there is no device emitting strong radio waves or interrupting radio waves placed between
the sound bar and wireless speakers. Install the wireless speakers within 10 m (33 ft) of the sound bar.
181
TROUBLESHOOTING > TRUE X SURROUND

The sound bar and subwoofer are not connected
automatically
(
A temporary communications failure may have occurred.
Normally, the sound bar and subwoofer are paired and connected automatically, but if they are not
properly paired due to a temporary communications failure, connect them manually.
(
The soundbar was initialized or the subwoofer registration was canceled.
Once the subwoofer is registered, the subwoofer will not automatically connect if the soundbar is
initialized or speaker registration is canceled. Connect the devices manually.
Related links
“Connecting a subwoofer manually”(p.199)
182
TROUBLESHOOTING > The sound bar and subwoofer are not connected automatically

How to initialize (reset)/restart the sound bar
To initialize (reset) the sound bar
Refer to the following instructions to reset the settings.
n
To operate the Setup menu (tv screen)
1 Press the ~ (Setup) key.
2 Select “Function” > “Initialization” > “All” from the “Setup” menu.
To reset the network settings only, select “Network”.
3 Follow the instructions on the screen.
When initialized, the sound bar restarts automatically.
When “Network” is selected, a message indicating that initialization has been completed
appears, but the sound bar is not restarted.
This completes the settings.
n
Using the front display menu
1 Press the
(Front Display Menu) key.
2 Select “Initialization” > “All Initialization” from the front display menu.
When initialized, the sound bar restarts automatically.
When “Network Initialization” is selected, a message indicating that initialization has been
completed appears, but the sound bar is not restarted.
This completes the settings.
183
TROUBLESHOOTING > How to initialize (reset)/restart the sound bar

Force the sound bar to restart
Press the power button on the sound bar for at least 10 seconds. Restart the sound bar.
184
TROUBLESHOOTING > How to initialize (reset)/restart the sound bar

“Internal Error” appears on the front display
(
A malfunction has occurred in the sound bar
Press the power button on the sound bar for at least 10 seconds to force the sound bar to turn off.
Disconnect the power cord of the subwoofer from the AC wall outlet. Make sure the power indicator is off
before plugging the power cord of the subwoofer back in and turn on the sound bar again.
If these procedures do not help, contact the nearest authorized Yamaha dealer or service center.
185
TROUBLESHOOTING > “Internal Error” appears on the front display

SPECIFICATIONS
Specifications
The specifications of this product are as follows.
n
Sound bar
Amplifier section (Maximum rated output power)
Front L/R 100 W × 2
Center 100 W
Height L/R 2.5 W × 12
Speaker section
Front L/R
(
Type Enclosed type (non-magnetic shielding)
(
Driver 11 × 5.3 cm (4 3/8″ × 2 1/8″) cone × 2
(
Frequency response 120 Hz to 3.2 kHz
(
Impedance 6 Ω
(
Type Enclosed type (magnetic shielding)
(
Driver 2.5 cm (1″) dome × 2
(
Frequency response 3.2 kHz to 20 kHz
(
Impedance 6 Ω
Center
(
Type Enclosed type (non-magnetic shielding)
(
Driver 11 × 5.3 cm (4 3/8″ × 2 1/8″) cone × 2
(
Frequency response 120 Hz to 3.2 kHz
(
Impedance 12 Ω (parallel 6 Ω)
(
Type Enclosed type (magnetic shielding)
(
Driver 2.5 cm (1") dome × 1
(
Frequency response 3.2 kHz to 20 kHz
(
Impedance 6 Ω
186
SPECIFICATIONS > Specifications

Height
(
Type Enclosed type (magnetic shielding)
(
Driver 2.8 cm (1 1/8″) cone × 12
(
Frequency response 500 Hz to 20 kHz
(
Impedance 4 Ω
Input jacks
Digital optical 1 (OPTICAL)
HDMI 1 (HDMI IN)
Output jacks
HDMI 1 (HDMI OUT/TV (eARC))
Other jacks
USB 1 (UPDATE ONLY)
Network (100BASE-TX/10BASE-T) 1 (NETWORK)
Bluetooth
Sink Function Receiving signals from a Bluetooth device (such as a smartphone or tablet)
Source Function Transmitting signals to a Bluetooth device (such as Bluetooth headphones)
Bluetooth version Ver. 4.2
Supported profiles
Sink function: A2DP, AVRCP
Source function: A2DP, AVRCP
Supported codecs
Sink function: SBC, AAC
Source function: SBC
Bluetooth class Bluetooth Class 1
Range (with line-of-sight) Approx. 10 m (33 ft) (without obstructions)
Supported content protection methods SCMS-T method (when receiving)
187
SPECIFICATIONS > Specifications

Wireless network
(
Wireless LAN standards
IEEE802.11 a/b/g/n/ac*
*20 MHz channel bandwidth only
(
Radio frequency bands 2.4 GHz/5 GHz
(
Maximum communication distance Approx. 10m (33 ft) (without obstructions)
(
Available security methods WPA, WPA2
Network audio function
Supported codecs WAV (PCM format only)/FLAC/AIFF/Ogg Vorbis: up to 384 kHz
ALAC: up to 96 kHz
MP3/WMA/Ogg Opus: up to 48 kHz
General
Power supply AC 100 V to 240 V, 50/60 Hz
Power consumption 54 W
Standby power consumption
(
HDMI Control, Pass Through, Network Standby (wired, wireless), Bluetooth: Off 0.5 W
(
HDMI Control, Pass Through: On
Network Standby (wired, wireless), Bluetooth: Off
2.0 W
(
HDMI Control, Pass Through, Network Standby (wireless), Bluetooth: Off
Network Standby (wired): On
2.0 W
(
HDMI Control, Pass Through, Network Standby (wired), Bluetooth: Off
Network Standby (wireless): On
2.0 W
(
HDMI Control, Pass Through, Network Standby (wired, wireless): Off
Bluetooth: On
2.0 W
Dimensions (W × H × D)
(
Installed in front of a TV, etc. 1180 × 85 × 143 mm (46 1/2″ × 3 3/8″ × 5 5/8″)
(
Mounted on a wall, including the mounting brackets 1180 × 76 × 155 mm (46 1/2″ × 3″ × 6 1/8″)
Weight 11 kg (24.3 lbs)
n
Subwoofer
Amplifier section
Maximum rated output power 100 W
188
SPECIFICATIONS > Specifications

Speaker section
(
Type Bass reflex type (non-magnetic shielding)
(
Driver 17 cm (6 3/4″) cone × 1
(
Frequency response 33 Hz to 120 Hz
(
Impedance 3 Ω
Communication between the sound bar and subwoofer
(
Radio frequency band 5 GHz
(
Maximum communication distance Approx. 10 m (33 ft) ( without obstructions)
General
Power supply AC 100 V to 240 V, 50/60 Hz
Power consumption 24 W
Standby power consumption 2.0 W
Dimensions (W × H × D) 241 × 378 × 414 mm (9 1/2″ × 14 7/8″ × 16 1/4″)
Weight 12.7 kg (28.0 lbs)
NOTE
The contents of this User Guide apply to the latest specifications as of the publishing date. The latest version of the User Guide is
available to download from the Yamaha website.
189
SPECIFICATIONS > Specifications

Supported HDMI video signal formats
The following HDMI video signals are supported by this product.
The following video signals are supported.
(
Deep Color
(
x.v.Color
(
3D video signals
(
High Dynamic Range (HDR) video signals
(
HDR10
(
HLG
(
Dolby Vision
(
HDR10+
The following resolutions are supported.
(
VGA
(
480i / 60 Hz
(
480p / 60 Hz
(
576i / 50 Hz
(
576p / 50 Hz
(
720p / 60 Hz, 50 Hz
(
1080i / 60 Hz, 50 Hz
(
1080p / 120 Hz, 100 Hz, 60 Hz, 50 Hz, 24 Hz
(
4K / 60 Hz, 50 Hz, 30 Hz, 25 Hz, 24 Hz
The following feature is supported.
(
ALLM (Auto Low Latency Mode)
n
Copyright protection standards
HDCP 2.3, HDCP1.4
NOTE
(
See also the instruction manual supplied with the AV device for details on how to connect it to the sound bar.
(
Some DVD players may not play back audio or video signals when playing a copy-protected DVD.
(
The sound bar does not support TVs or projectors equipped with HDMI or DVI jacks that are not HDCP compatible. See the
instruction manual supplied with the HDMI or DVI device to check whether it is HDCP-compatible.
(
The resolution at which video signals are transmitted varies depending on the specifications of the connected TV.
(
The contents of this User Guide apply to the latest specifications as of the publishing date. The latest version of the User Guide is
available to download from the Yamaha website.
190
SPECIFICATIONS > Supported HDMI video signal formats

Supported digital audio signal formats
The following digital audio signals are supported by this product.
n
Audio input signals of the HDMI IN jack
The following audio signals can be played on this product when they are input from the HDMI output jack on
an AV device to the HDMI IN jack on the sound bar:
Audio formats Details
2-channel Linear PCM 2ch, 32 / 44.1 / 88.2 / 96 / 176.4 / 192 kHz, 16 / 20 / 24 bit
Multi-channel PCM 8ch, 32 / 44.1 / 88.2 / 96 / 176.4 / 192 kHz, 16 / 20 / 24 bit
Bitstream
Dolby Digital / Dolby Digital Plus / Dolby TrueHD / Dolby Atmos - Dolby Digital Plus / Dolby Atmos -
Dolby TrueHD / DTS 96/24 / DTS-ES Discrete 6.1 / DTS-ES Matrix 6.1 / DTS / DTS Express / DTS-HD
High Resolution / DTS-HD Master Audio / DTS:X / AURO-3D
n
Audio input signals of the HDMI OUT/TV (eARC) jack
The following digital audio signals can be played on this product when they are input from the ARC-
compatible HDMI input jack on the TV to the HDMI OUT/TV (eARC) jack on the sound bar:
Signals from a TV’s eARC-compatible HDMI input jack
Audio formats Details
2-channel Linear PCM 2ch, 32 / 44.1 / 88.2 / 96 / 176.4 / 192 kHz, 16 / 20 / 24 bit
Multi-channel PCM 8ch, 32 / 44.1 / 88.2 / 96 / 176.4 / 192 kHz, 16 / 20 / 24 bit
Bitstream
Dolby Digital / Dolby Digital Plus / Dolby TrueHD / Dolby Atmos - Dolby Digital Plus / Dolby Atmos -
Dolby TrueHD / DTS 96/24 / DTS-ES Discrete 6.1 / DTS-ES Matrix 6.1 / DTS / DTS Express / DTS-HD
High Resolution / DTS-HD Master Audio / DTS:X / AURO-3D
Signals from a TV’s ARC-compatible HDMI input jack
Audio formats Details
2-channel Linear PCM 2ch, 32 / 44.1 / 88.2 / 96 / 176.4 / 192 kHz, 16 / 20 / 24 bit
Bitstream
Dolby Digital / Dolby Digital Plus / Dolby Atmos - Dolby Digital Plus / DTS 96/24 / DTS-ES Discrete
6.1 / DTS-ES Matrix 6.1 / DTS
n
Audio input signals of the OPTICAL jack
The following digital audio signals can be played on this product when they are input from the digital optical
output jack on the TV to the OPTICAL jack on the sound bar:
Audio formats Details
2-channel Linear PCM 2ch, 32 / 44.1 / 88.2 / 96 kHz, 16 / 20 / 24 bit
Bitstream Dolby Digital / DTS / DTS 96/24 / DTS-ES Discrete 6.1 / DTS-ES Matrix 6.1
191
SPECIFICATIONS > Supported digital audio signal formats

NOTE
(
The contents of this User Guide apply to the latest specifications as of the publishing date. The latest version of the User Guide is
available to download from the Yamaha website.
(
See also the instruction manual supplied with the AV device for details on how to connect it to the sound bar.
(
Some DVD players may not play back audio or video signals when playing a copy-protected DVD.
(
The sound bar does not support TVs or projectors equipped with HDMI or DVI jacks that are not HDCP compatible. See the
instruction manual supplied with the HDMI or DVI device to check whether it is HDCP-compatible.
(
To decode Bitstream audio signals, change the settings on the AV device so that the AV device directly outputs Bitstream signals.
See the instruction manual supplied with the AV device for more information.
(
Playback of DVD-Audio and SACD is not supported.
192
SPECIFICATIONS > Supported digital audio signal formats

APPENDIX
Making a wireless connection to a network
Selecting a wireless connection method to a network
Once the soundbar is registered to the MusicCast network, the wireless (Wi-Fi) settings can be made at the
same time using MusicCast Controller.
If you are not using a MusicCast Controller, select the connection method that suits your network
environment.
1 Press the ~ (Setup) key on the remote control.
2 Select “Network”.
3 Select “Network Connection”.
4 Select “Wireless(Wi-Fi)”.
Use the link below to select a wireless connection method.
NOTE
It may not be possible to connect the sound bar to a wireless LAN router (an access point) if they are far apart. In such a case, install
the sound bar and wireless LAN router (access point) close to each other.
Related links
(
“Registering to a MusicCast network”(p.56)
(
“Using the WPS button to make wireless connections”(p.194)
(
“Using iPhone to make wireless connections”(p.195)
(
“Connecting wirelessly from a list of access points”(p.196)
(
“Making a wireless connection manually”(p.197)
(
“Wireless connection with PIN-code type WPS”(p.198)
193
APPENDIX > Making a wireless connection to a network

Using the WPS button to make wireless connections
Press the WPS button on a wireless LAN router to easily make a wireless connection.
Setup menu
“Network” > “Network Connection” > “Wireless(Wi-Fi)”
1 Select the “WPS Button”.
2 Follow the instructions on the TV screen to make a wireless connection.
When the connection is completed, “Completed” will be displayed.
If the message “Not connected” is displayed, start over from step 1 or try a different
connection method.
This completes the wireless connection.
NOTE
Cannot connect to wireless LAN routers that use WEP as the encryption method. If so, try another connection method.
n
What is WPS?
WPS (Wi-Fi protected setup) is a Wi-Fi Alliance standard. WPS makes it easy to configure a wireless network.
194
APPENDIX > Making a wireless connection to a network

Using iPhone to make wireless connections
Use your iPhone network setting for your sound bar to make a wireless setting.
Before starting the settings, confirm that your iPhone is connected to your wireless LAN router.
NOTE
You need an iPhone using iOS7 or later.
Setup menu
“Network” > “Network Connection” > “Wireless(Wi-Fi)”
1 Select “WAC(iOS)”.
2 Follow the instructions on the TV screen to make a wireless connection.
Once the sharing operation is complete, the sound bar will automatically connect to the
selected wireless LAN router.
This completes the wireless connection.
NOTE
(
The settings of the sound bar are initialized.
(
Network
(
Bluetooth
(
Content registered to Favorites in MusicCast Controller
(
NET RADIO radio stations you have added to your Favorites
(
Account information for each music service
(
Cannot connect to wireless LAN routers that use WEP as the encryption method. If so, try another connection method.
(
If a network cable is connected to the sound bar, a warning message will appear. Disconnect the network cable before operating.
195
APPENDIX > Making a wireless connection to a network

Connecting wirelessly from a list of access points
Select a connection point from the list of wireless LAN routers searched by the soundbar and set up a
wireless connection.
A security key must be set manually.
Setup menu
“Network” > “Network Connection” > “Wireless(Wi-Fi)”
1 Select “Access Point Scan”.
2 Follow the instructions on the TV screen to make a wireless connection.
When the connection is completed, “Completed” will be displayed.
If the message “Not connected” is displayed, start over from step 1 or try a different
connection method.
This completes the wireless connection.
196
APPENDIX > Making a wireless connection to a network

Making a wireless connection manually
Enter the required information to make a wireless connection. You may have to manually enter SSID
(network name), encryption method and security key.
Setup menu
“Network” > “Network Connection” > “Wireless(Wi-Fi)”
1 Select “Manual Setting”.
2 Follow the instructions on the TV screen to make a wireless connection.
When the connection is completed, “Completed” will be displayed.
If you receive a “Not connected” message, please try again or try a different connection
method.
This completes the wireless connection.
197
APPENDIX > Making a wireless connection to a network

Wireless connection with PIN-code type WPS
Enter the PIN code on a wireless LAN router to make a wireless connection. This service is available when the
wireless LAN router supports PIN code type WPS.
Setup menu
“Network” > “Network Connection” > “Wireless(Wi-Fi)”
1 Select “PIN Code”.
2 Follow the instructions on the TV screen to make a wireless connection.
When the connection is completed, “Completed” will be displayed.
If the message “Not connected” is displayed, start over from step 1 or try a different
connection method.
This completes the wireless connection.
198
APPENDIX > Making a wireless connection to a network
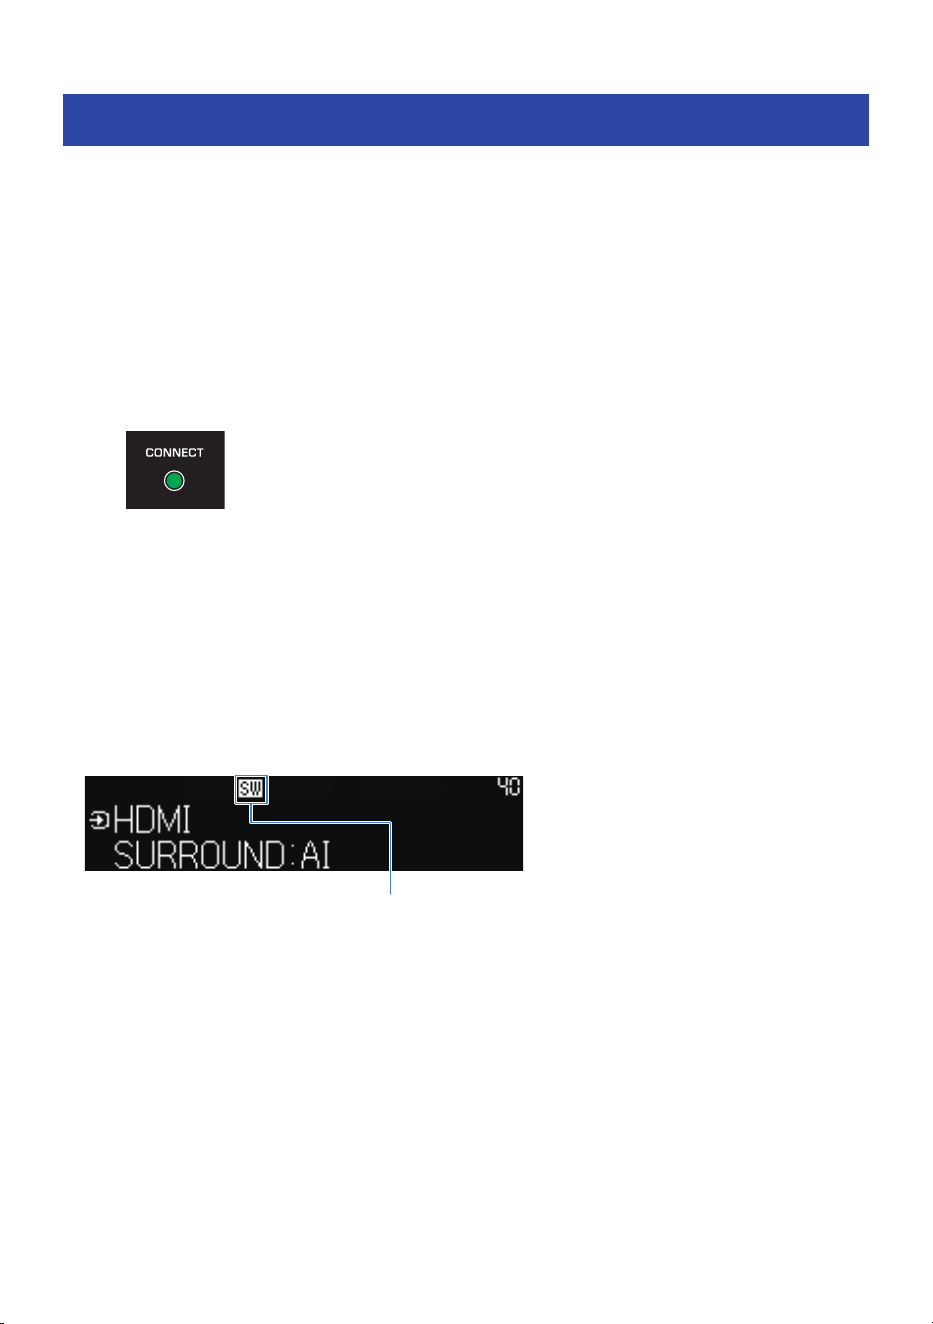
Connecting a subwoofer manually
Manually connect the subwoofer to the sound bar as described below.
1 Hold down SETUP button on the rear of the subwoofer for at least five seconds.
2 Turn on the sound bar.
3 Press the ~ (Setup) key and select “Speaker” to select “Registration” in the
“Registration” screen.
When the connection is established, the CONNECT indicator on the rear of the subwoofer
glows.
If the CONNECT indicator on the subwoofer does not glow after following the procedure above, do the
following and then connect the subwoofer manually again.
(
Move the subwoofer and/or the sound bar so that they are closer to each other.
(
Install the sound bar and subwoofer in positions where they are not obstructed from each other by metal
furniture.
(
If a device emitting electromagnetic waves (such as a microwave oven or a wireless LAN device) is located
nearby, place the subwoofer and sound bar farther away from such a device.
NOTE
(
Check the connection status of the subwoofer with the indicators on the front display of the sound bar.
Glowing: Connected
Off: Not registered or not
connected
(
To disconnect the sound bar from the subwoofer, select “Clear” in the “Speaker” > “Registration” screen from the Setup menu.
Selecting “Clear” will delete all speaker registrations made to the sound bar.
Related links
“Configuring the speakers”(p.115)
199
APPENDIX > Connecting a subwoofer manually

Trademarks
The following trademarks are used in this guide.
Dolby, Dolby Vision, Dolby Atmos, and the double-D symbol are trademarks of Dolby Laboratories Licensing Corporation.
Manufactured under license from Dolby Laboratories.
Confidential unpublished works. Copyright © 2012–2024 Dolby Laboratories. All rights reserved.
FOR DTS PATENTS, SEE HTTP://XPERI.COM/DTS-PATENTS/.
MANUFACTURED UNDER LICENSE FROM DTS, INC. AND ITS AFFILIATES.
DTS, DTS:X, AND THE DTS:X LOGO ARE REGISTERED TRADEMARKS OR TRADEMARKS OF DTS, INC. AND ITS AFFILIATES IN
THE UNITED STATES AND/OR OTHER COUNTRIES.
© DTS, INC. AND ITS AFFILIATES. ALL RIGHTS RESERVED.
AURO-3D® is a registered trademark of GOER DYNAMICS, BV. AURO, AURO-3D, Auro-Codec and Auro-Matic are trademarks of
GOER DYNAMICS, BV.
To use AirPlay with Front Surround System, the latest version of iOS, iPadOS, or macOS is recommended.
Use of the Works with Apple AirPlay badge means that an accessory has been designed to work specifically with the
technology identified in the badge and has been certified by the developer to meet Apple performance standards.
Apple, AirPlay, Apple TV, Apple Watch, iPad, iPad Air, iPad Pro, iPhone, Lightning, and iTunes are trademarks of Apple Inc.,
registered in the U.S. and other countries and regions.
The terms HDMI, HDMI High-Definition Multimedia Interface, HDMI Trade Dress and the HDMI Logos are trademarks or
registered trademarks of HDMI Licensing Administrator, Inc.
200
APPENDIX > Trademarks

The Bluetooth® word mark and logos are registered trademarks owned by Bluetooth SIG, Inc. and any use of such marks by
Yamaha Corporation is under license. Other trademarks and trade names are those of their respective owners.
The Wi-Fi CERTIFIED™ Logo and Wi-Fi Protected Setup Logo are registered trademark of Wi-Fi Alliance®.
Wi-Fi, Wi-Fi CERTIFIED, Wi-Fi Protected Setup and WPA2 are trademarks or registered trademarks of Wi-Fi Alliance®.
x.v.Color™
“x.v.Color” is a trademark of Sony Corporation.
App Store
App Store is a service mark of Apple Inc., registered in the U.S. and other countries.
Android Google Play
Android and Google Play are trademarks of Google LLC.
MusicCast is a trademark or registered trademark of Yamaha Corporation.
Google Noto Fonts
This product uses the following fonts.
Copyright © June 2015, Google (https://www.google.com/get/noto/#sans-lgc), with Reserved Font Name Noto Sans.
Copyright © June 2015, Google (https://www.google.com/get/noto/help/cjk/), with Reserved Font Name Noto Sans CJK.
This Font Software is licensed under the SIL Open Font License, Version1.1. This license is available with a FAQ at:
http://scripts.sil.org/OFL
GPL/LGPL
This product utilizes GPL/LGPL open-source software in some sections. You have the right to obtain, duplicate, modify, and
redistribute this open-source code only. For information on GPL/LGPL open source software, how to obtain it, and the GPL/
LGPL license, refer to the Yamaha Corporation website
(https://download.yamaha.com/sourcecodes/musiccast/).
Licenses
For information on the licenses of the third-party software in this product, refer to the following.
http://(IP address of this product*)/licenses.html
* IP address of this product is checked with MusicCast Controller, the Setup menu or front display menu.
201
APPENDIX > Trademarks

List of support centers
If the trouble still cannot be solved, please contact us for product support as explained below:
For customers within Japan
Please contact the store where you purchased this product, or the Product Support Center as listed in the
“Quick Guide” included with this product.
For customers outside of Japan
Please contact your nearest authorized Yamaha dealer or service center.
https://manual.yamaha.com/audio/address_list/
202
APPENDIX > List of support centers

Yamaha Global Site
https://www.yamaha.com/
Yamaha Downloads
https://download.yamaha.com/
© 2025 Yamaha Corporation
Published 09/2025 NV-B0
AV24-0002
Layout Folder: YMH_PDF_Manual_A5_AV
Stylesheet Name: 01_YMH_PDF_Manual_A5_AV_En-Multi
Stylesheet Version: 2025.3.19