

ML Touch
User’s Guide
Music Laboratory System
Application for Instructors
EN

2 ML Touch User’s Guide
Introduction
In a classroom equipped with the Music Laboratory System, the iPad application “ML Touch” is
software for instructors to operate the entire system while teaching the class.
Notice
• This software and User’s Guide are the exclusive copyrights of Yamaha Corporation (“Yamaha”).
• Copying of the software or reproduction of this User’s Guide in whole or in part by any means is
expressly forbidden without the written consent of the manufacturer.
• Yamaha Corporation make no representations or warranties with regard to the use of the software
and User’s Guide and cannot be held responsible for the results of the use of this User’s Guide and
the software.
• The illustrations and screens shown in this User’s Guide are for instructional purposes only. They
may differ from the actual screens.
• Copying or transferring music/sound data sold or provided by Yamaha Corporation or third parties is
prohibited without consent of the copyright holder, except when allowed under copyright law such as
for personal use. Consult with an expert on copyrights when using said music or sound data.
• Apple, the Apple logo, Mac, iPad, and iTunes are trademarks of Apple Inc., registered in the U.S.
and other countries.
• IOS is a trademark or registered trademark of Cisco in the U.S. and other countries and is used
under license.
• The company names and product names in this manual are trademarks or registered trademarks of
their respective companies.
• Software may be revised and updated without prior notice.
ML Touch User’s Guide 3
Contents
Introduction .........................................................................................2
Notice ......................................................................................................................... 2
Operating Environment ......................................................................3
Preparations ........................................................................................4
Setting up Wi-Fi.......................................................................................................... 4
Setting up Wi-Fi on the iPad ...................................................................................... 4
Setting up ML Touch .................................................................................................. 4
Part names and functions ..................................................................6
HOME window ........................................................................................................... 6
CALL window ............................................................................................................. 9
LISTENING window ................................................................................................. 10
TRAINING window ................................................................................................... 11
BROADCAST window.............................................................................................. 14
GROUPING window................................................................................................. 16
ATTENDANCE window............................................................................................ 17
LAYOUT window...................................................................................................... 20
SETTINGS window .................................................................................................. 22
Operating Environment
Compatible operating systems iOS12 or later
Compatible device iPad supporting a compatible OS
Compatible instruments
MLA-200, MRX7-D & electronic musical instruments connected
to MLA-200
Network connection Wireless access point
4 ML Touch User’s Guide
Preparations
Setting up Wi-Fi
Set up the wireless access point ac
cording to the operation manuals for each device as well as the
MLA-200 Installation Guide. We recommend using a security setting such as WPA in order to prevent
external intrusions into the network.
Setting up Wi-Fi on the iPad
Use DHCP to set up the iPad.
1. Open the Settings app on the iPad.
2. Select [Wi-Fi], and then select the wireless access point.
3. Tap the blue mark to the right of the currently selected wireless
access point to display a screen for editing the IP address section
labelled “IPV4”
.
4. in the setting called “Configure IP” select Automatic, and then
check that the iPad has received the settings for “IP Address”,
“Subnet Mask”, “Router” and “DNS”.
5. If the settings have not been applied, tap [Renew Lease].
6. After the setup is finished, return to the Home window.
Setting up ML
Touch
Perform the initial setup according to the MLA-200 Installation Guide.
1
. Install ML Touch from the App Store.
2. Tap the ML Touch icon to start the application.
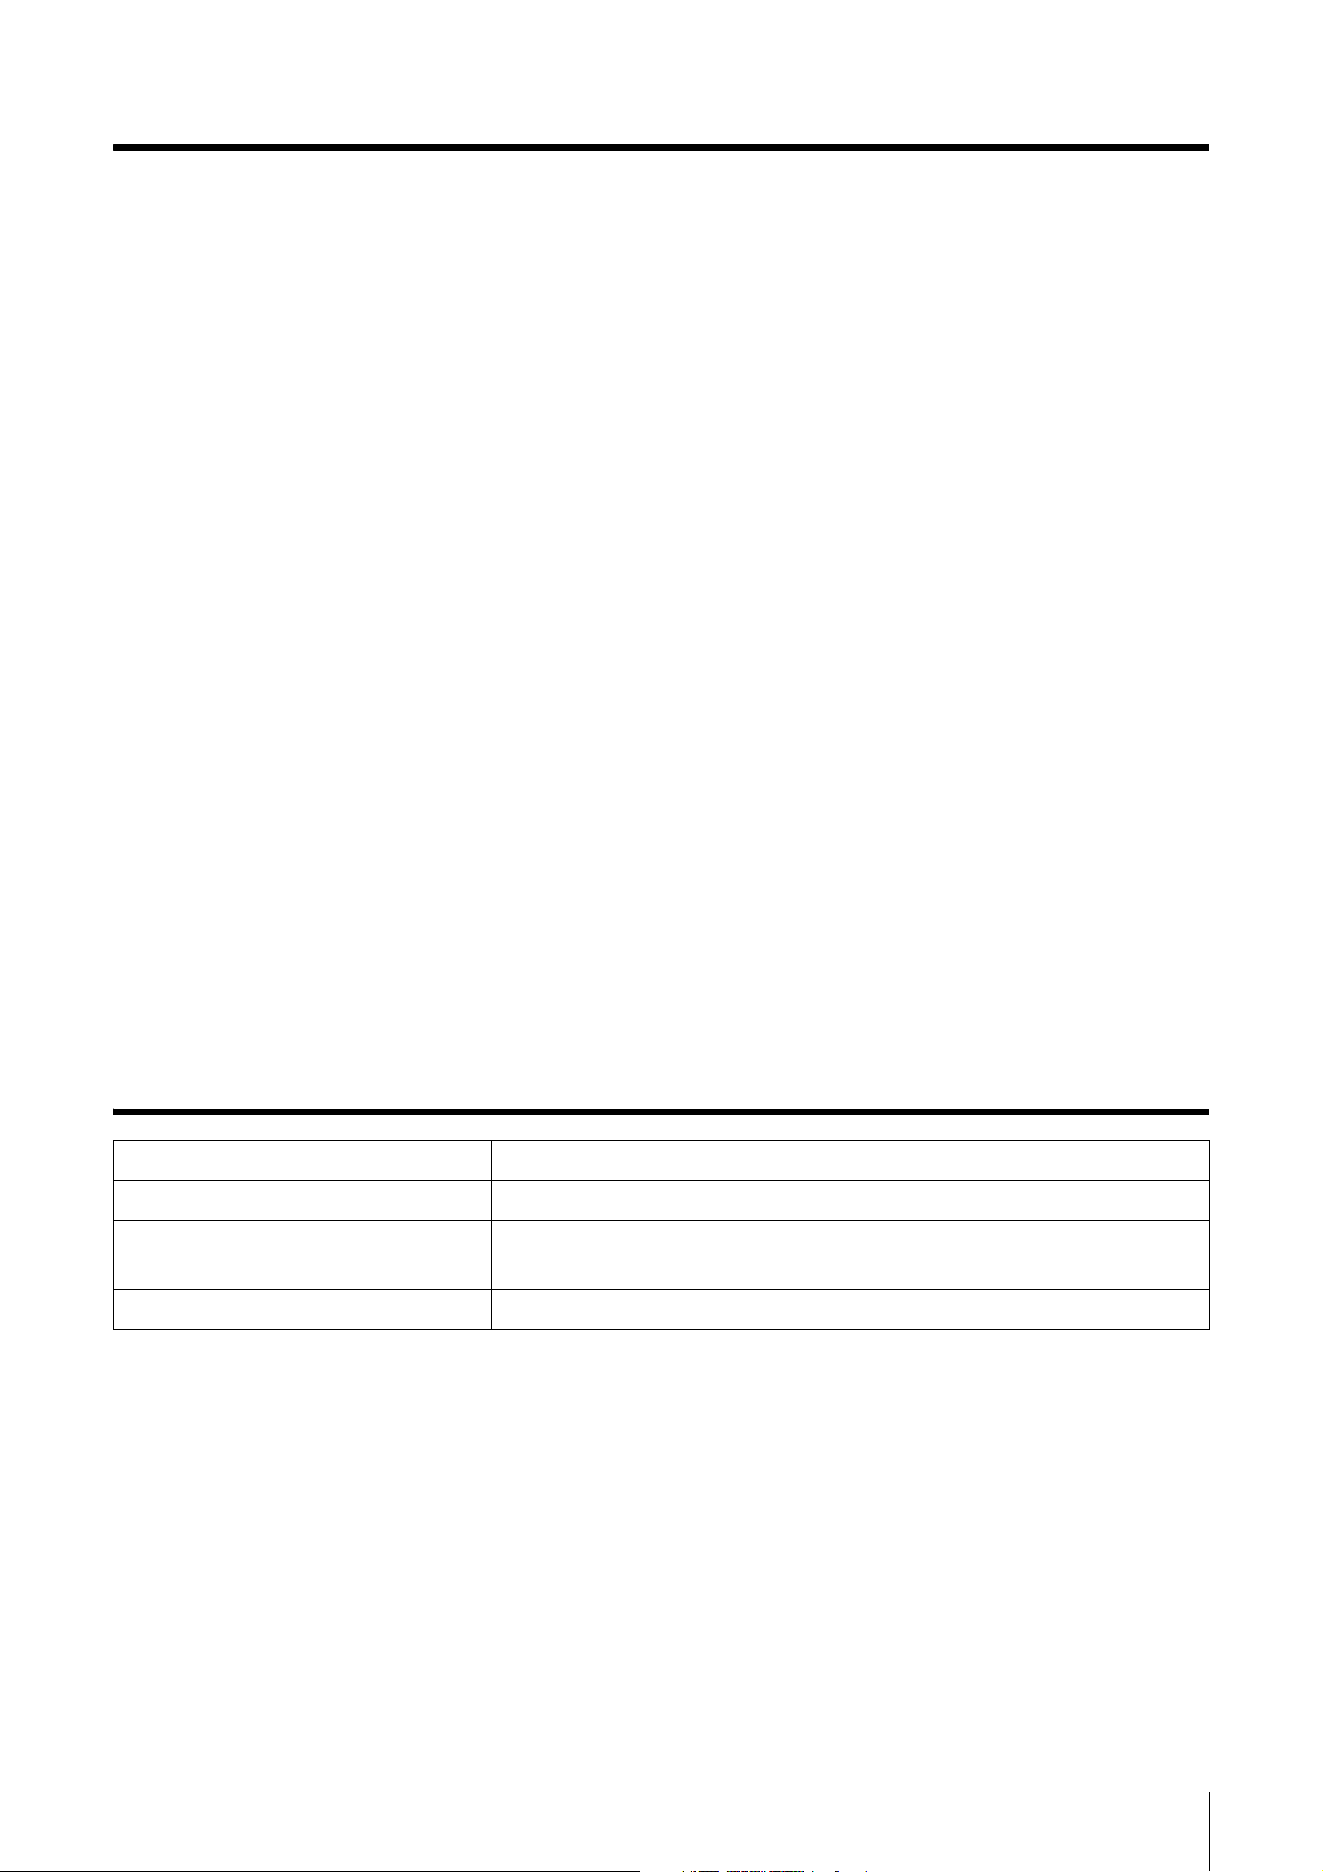
The initial setup window appears.
q OFFLINE MODE button
Open the HOME window in offline mode (limited functionality).
In offline mode, MIDI transmissions and audio connection switching cannot be performed,
but the number of MLA-200s and the number of MRX7-Ds can be specified.
q

ML Touch User’s Guide 5
Preparations
Then, if there are no problems, the HOME window appears.
If the following cases, an error occurs, and the HOME window does not appear.
• Not even one connected MRX7-D can be detected.
• No MLA-200 is connected.
In this case, resolve the problem, and then restart ML Touch.
6 ML Touch User’s Guide
Part names and functions
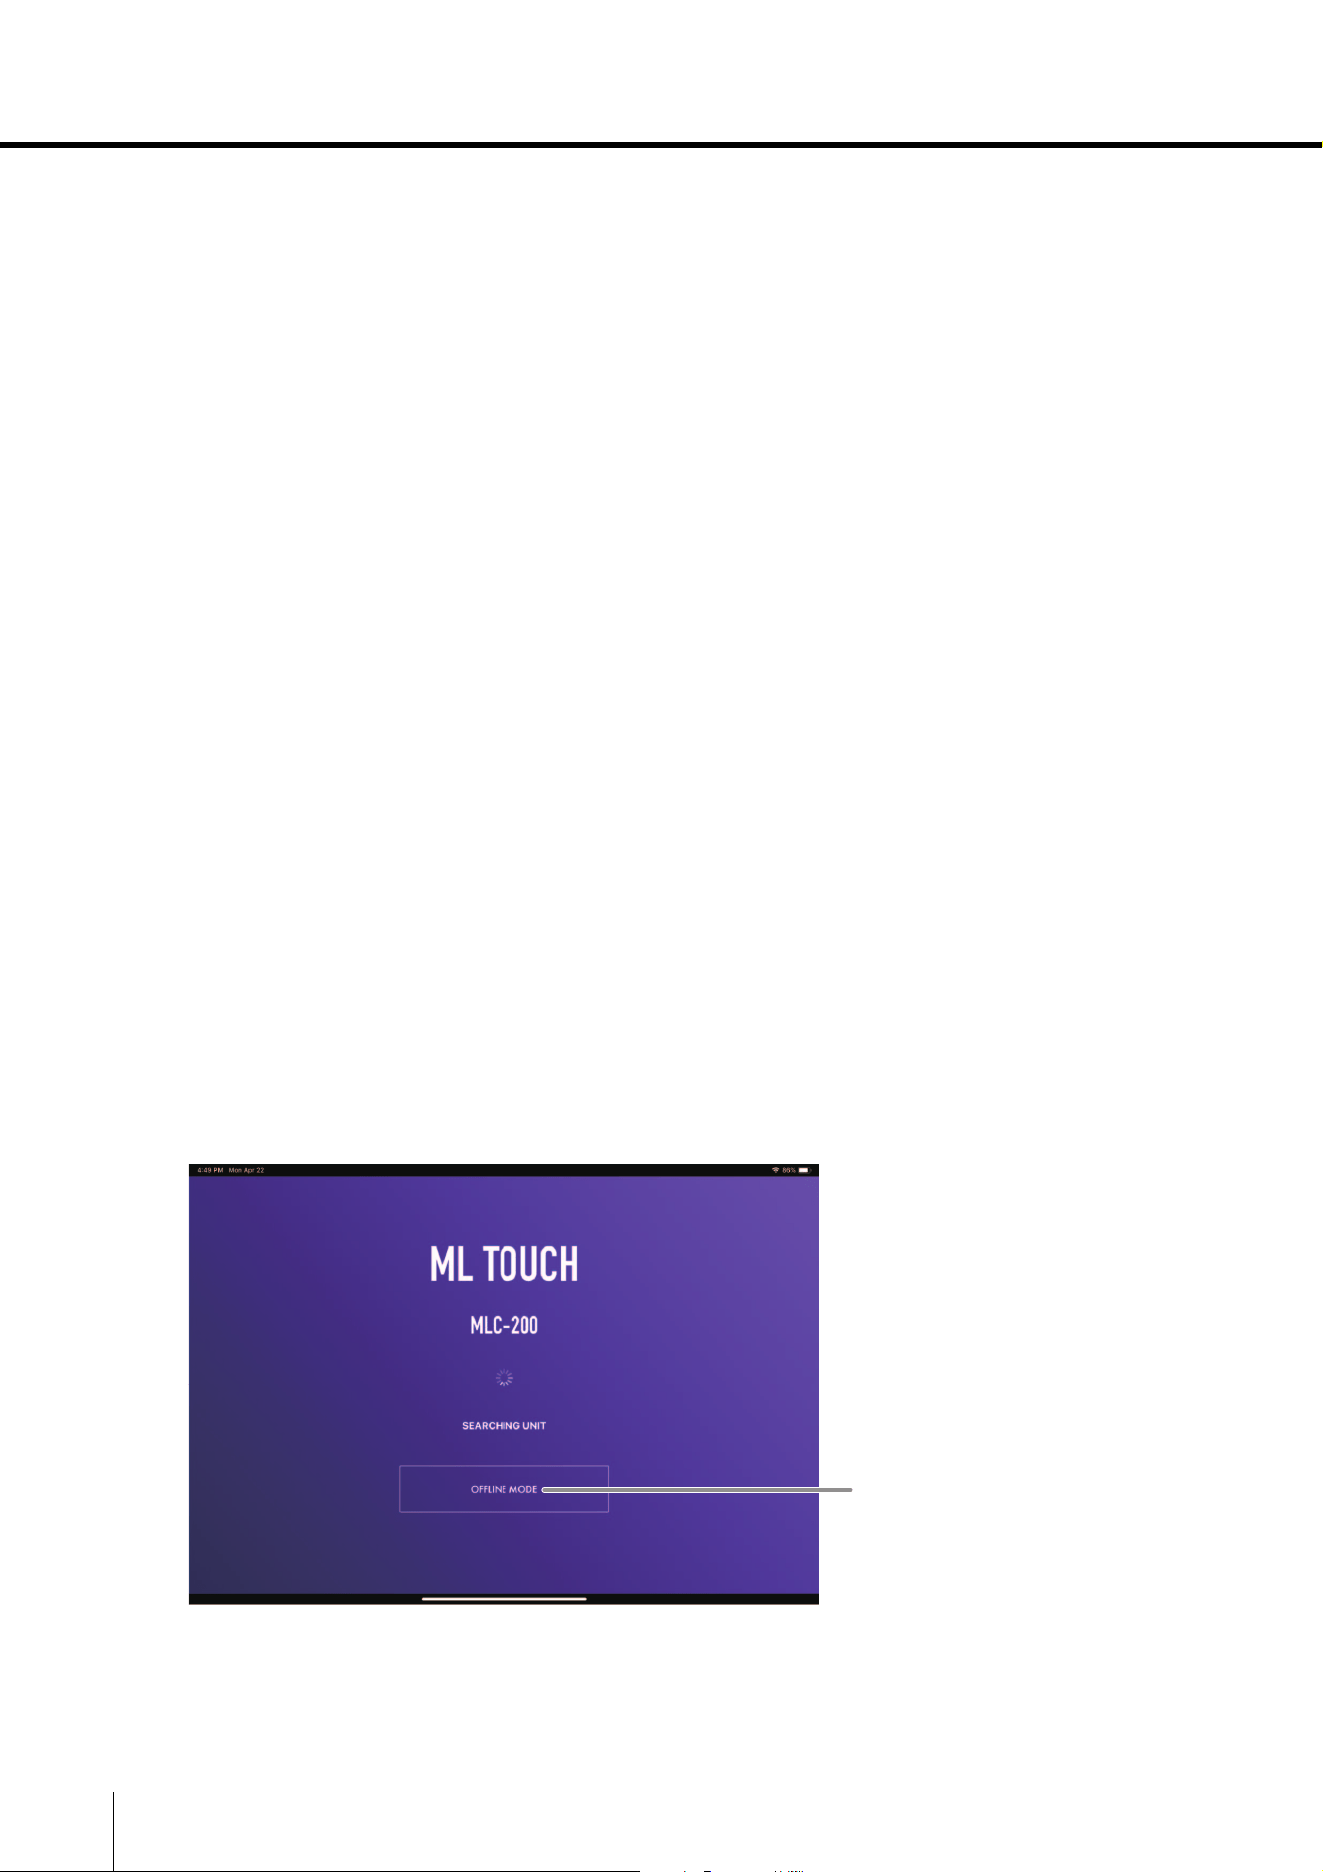
HOME window
This is the main window for ML Touch. This window appears when the application is started.
q Settings button
Displays the SETTINGS window to specify various settings related to ML Touch. (
page 22)
w LISTENING button
Displays the LISTENING window to listen to the performance of the selected student.
( page 10)
e TRAINING button
Displays the TRAINING window used in lessons. ( page 11)
r ATTENDANCE button
Displays the ATTENDANCE window to take attendance. ( page 17)
t GROUPING button
Displays the GROUPING window to specify groups of students. ( page 16)
y BROADCAST button
Displays the BROADCAST window to allow specific students and the instructor or the entire
classroom to listen to a played-back song or the instructor’s/student’s performance.
( page 14)
q ew r t y u
i !2!1 !3!0o
ML Touch User’s Guide 7
Part names and functions
u LAYOUT button
Displays the LAYOUT window to specify the arrangement of students displayed in the
HOME window and the student icon display area. ( page 20)
i CLASS NAME indicator / Class number indicator / STUDENTS indicator
Display the class name, class number and number of students specified in the SETTINGS
window. Tap to display the SETTINGS window. ( page 22)
o CONNECT ALL button
Connects the audio with all students.
!0 DISCONNECT ALL button
Disconnects the audio with all students.
!1 MUTE STUDENTS button
Mutes the audio of all students when the audio with all students is connected.
Students can hear audio only from the instructor.
Tap the cancel button to undo.
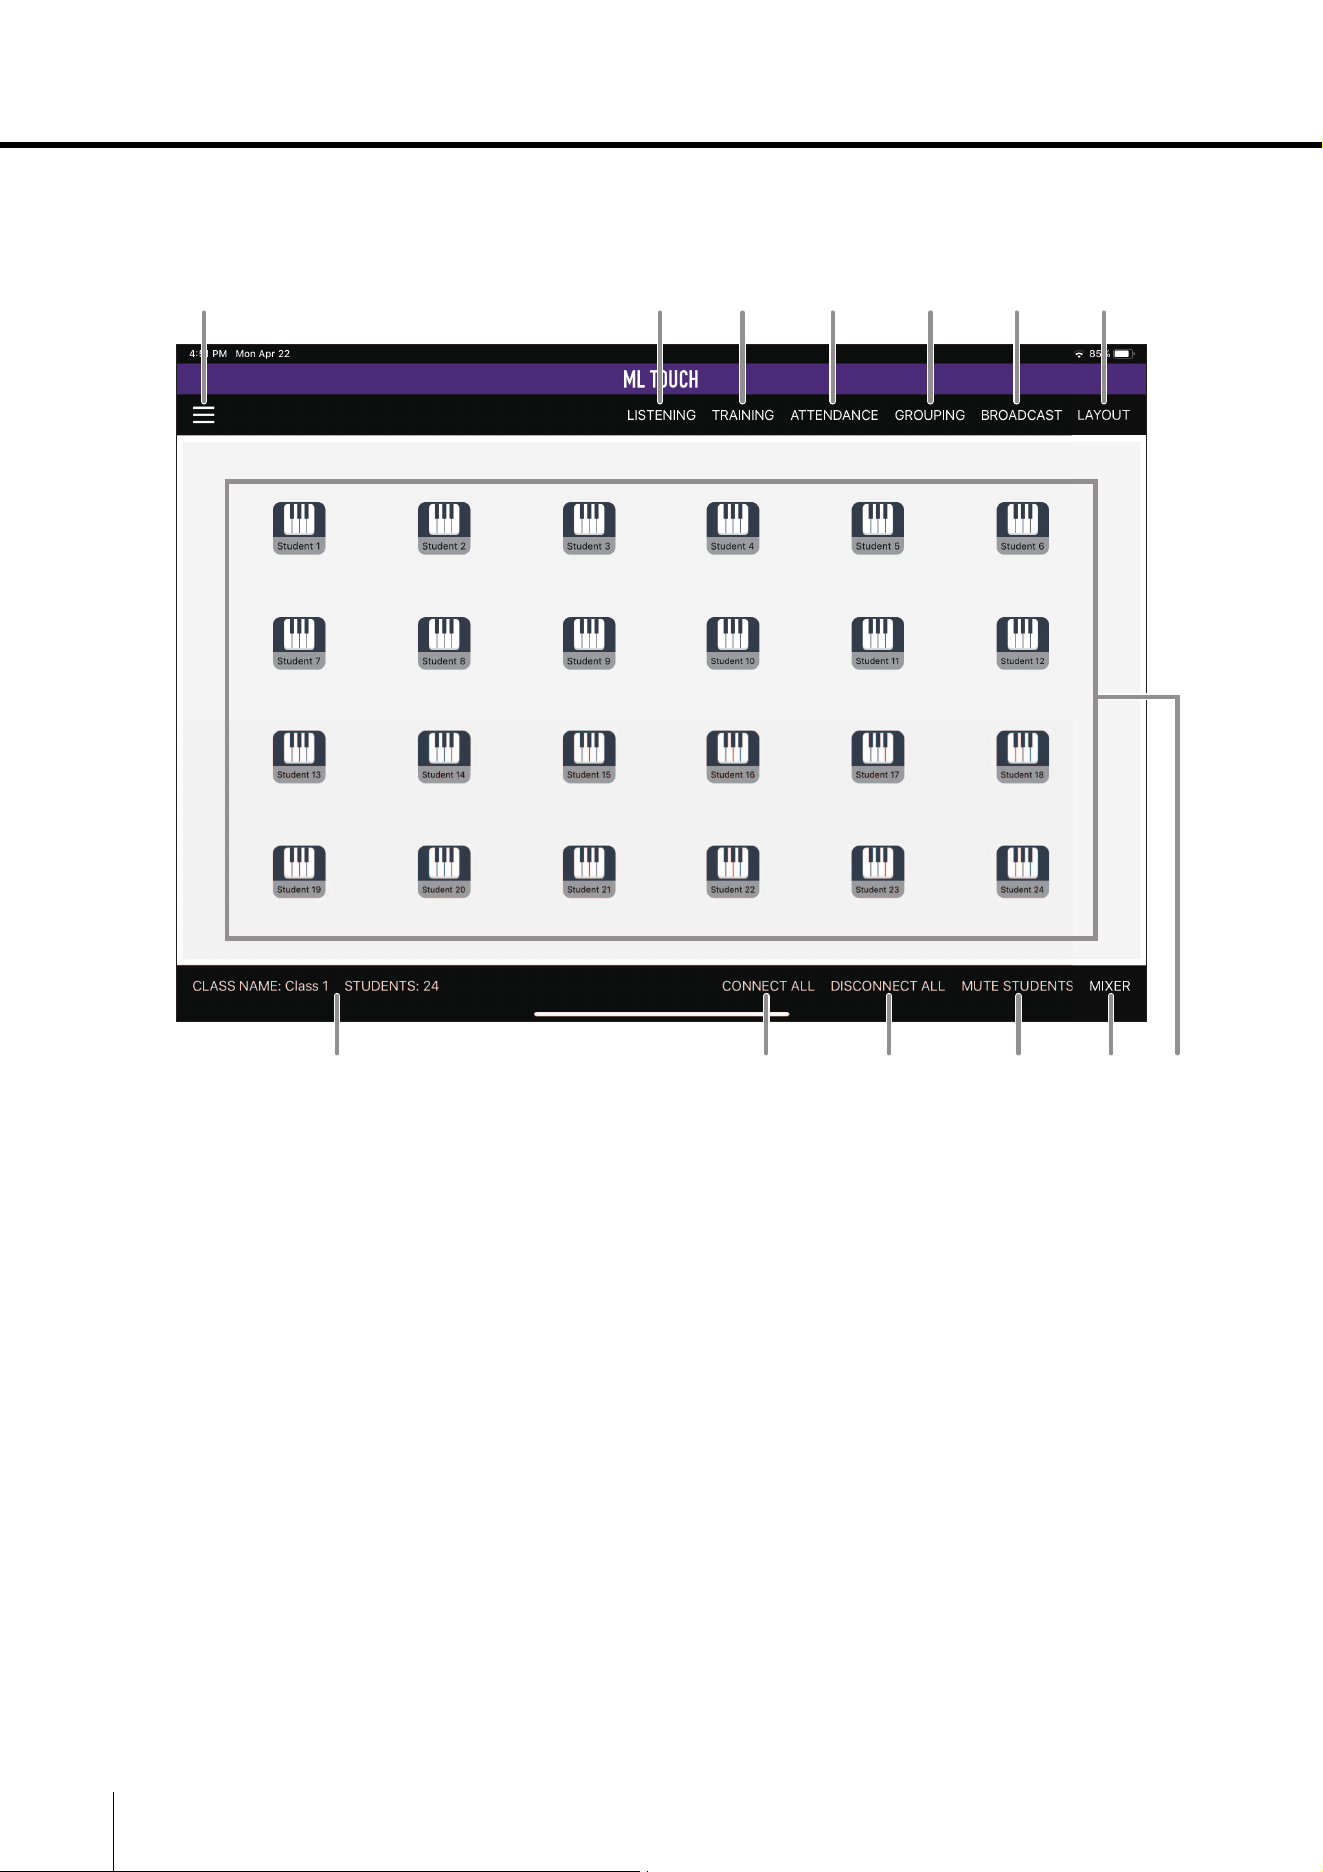
!2 MIXER button
Displays a window for adjusting the volumes of the instructor’s headphones, speakers and
AUX input as well as for turning on/off the speakers.
These are the same settings as those available from the Mixing Console menu in the
SETTINGS window. ( page 24)
!3 Student icons
Tap an icon to connect the audio of that student and the instructor. Tap the icon again to
disconnect.
Student icon indications and statuses ( page 8)
Operations related to student icons ( page 8)
!4 Display lock button
When the HOME window is pinched to zoom in, this button appears at the right side of the
screen. Tap to lock the student icons at their current display positions. Tap again to unlock.
!4

8 ML Touch User’s Guide
Part names and functions
Student icon indications and statuses
The student icon changes depending on the status. If there are multiple statuses, their indications
overlap.
The device ID of the MLA-200 appears on icons with no student assigned.
For example: A student icon with statuses w, e, y and u appears as shown below.
Operations related to student icons
During the lesson, tap a student icon to perform an operation.
• Tapping the icon of a student whose audio is not connected allows the instructor and student to hear
each other’s performances and voices.
Tap the icon again to disconnect.
• Tapping the icon of a group-assigned student whose audio is not connected allows the instructor
and all students in the group to hear each other’s performances and voices.
Tap the icon again to disconnect the group. However, the student’s mic will remain on.
• Tapping the icon of a student who is calling (student pressed the [CALL] button on the MLA-200)
turns on that student’s mic so that their voice can be heard. At that time, the performances of
students other than the one who called cannot be heard. Tap the icon again to end the call. When
the student’s mic is on, the [MIC] button on the student’s MLA-200 flashes.
• If a group-assigned student called, all students in the same group can hear the audio.
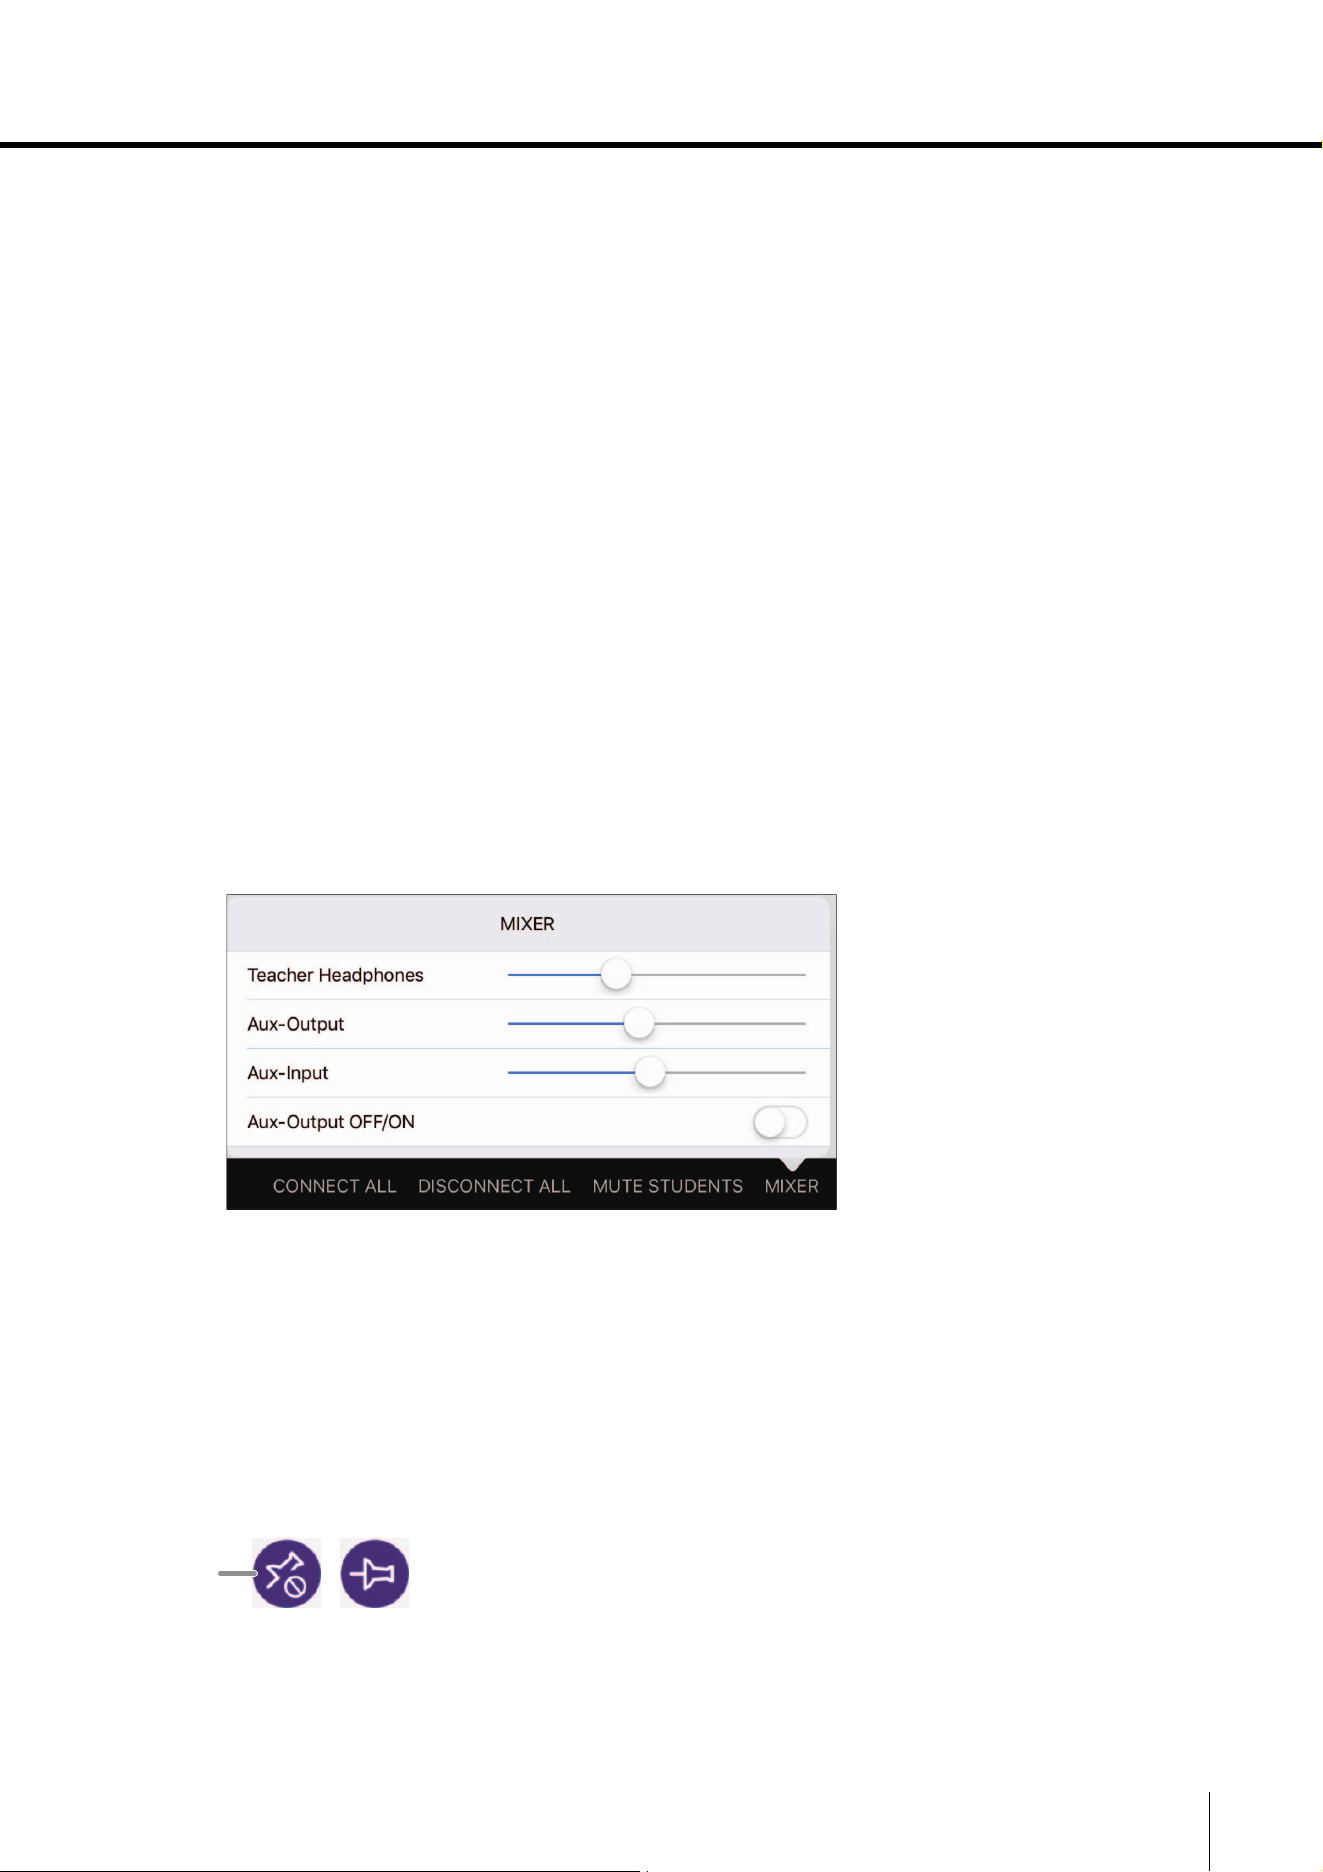
• During calls from students, appears at the right side of the HOME window. Tap this icon to end
calls with all students.
• If an error indication appears on a student icon, check the connection status, etc.
q Student not assigned w Student assigned e Group assigned
r
Multiple students assigned
t Connection error y Muted
u Student mic on while
connected with student
i Student mic off while
connected with student
o Call from student
(flashing frame)

ML Touch User’s Guide 9
Part names and functions
CALL window
This window appears when a call is received from a student while any window other than the HOME
window is displayed.
Various operations can be performed in the displayed window, even during a call.
q Student indication
Indicates the student who is calling.
w CATCH button
Tap to accept a student’s call and connect. If calls from multiple students are received at the
same time, select the student whose call to accept. After accepting a call, tap this button to
end the call.
e CANCEL button
Tap to decline the student’s call and not connect.
r KEEP BLOCKING button
Tap to block a student’s calls while the current window is displayed.
This setting is canceled after a different window is displayed.
wq e r
10 ML Touch User’s Guide
Part names and functions
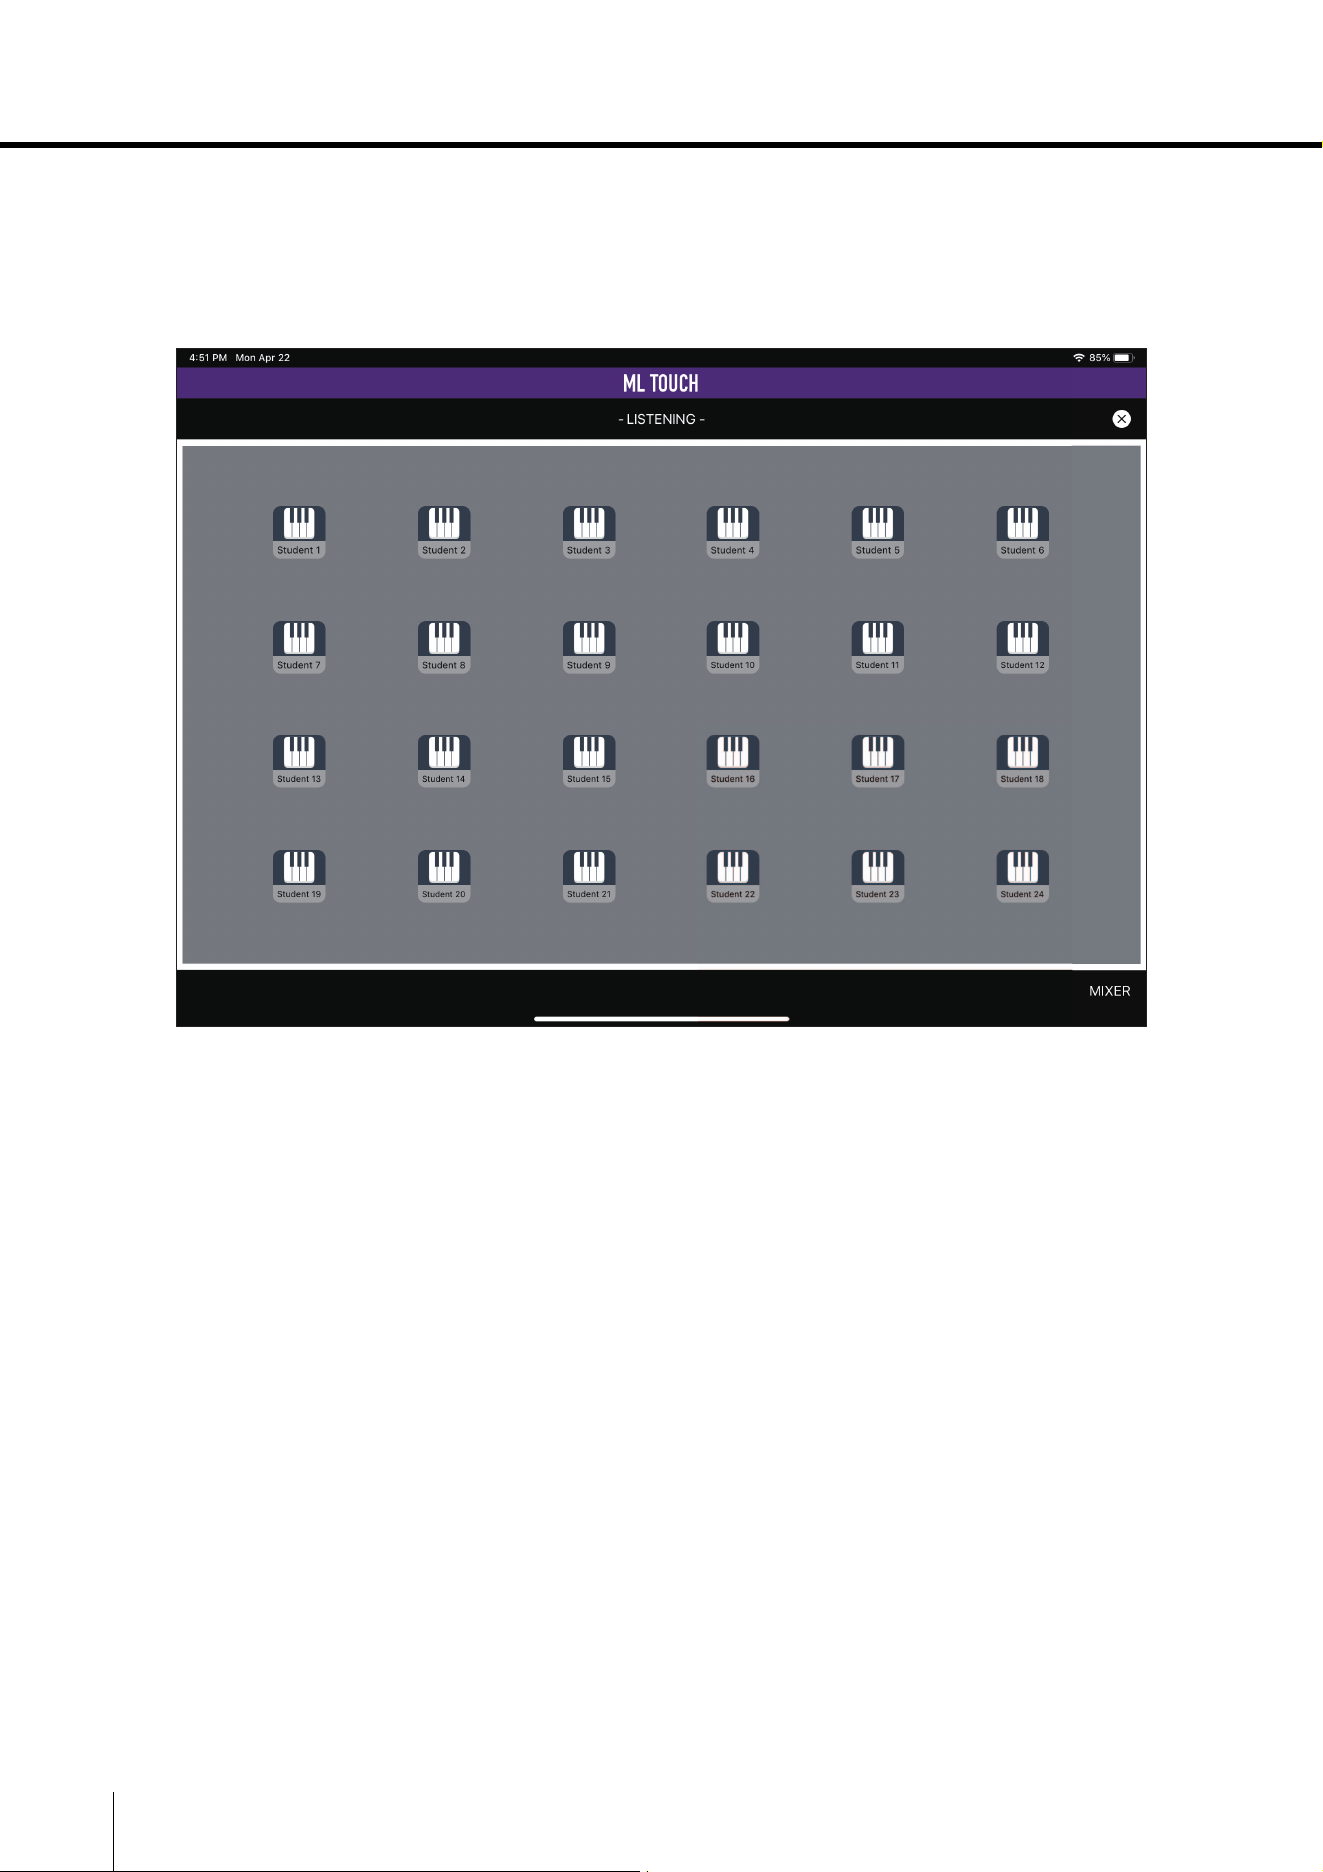
LISTENING window
This window appears when listening to the performance of a selected student. The instructor can
listen to only a selected student by tapping the icon. Even if the student is in a group, only the selected
student can be heard.
ML Touch User’s Guide 11
Part names and functions
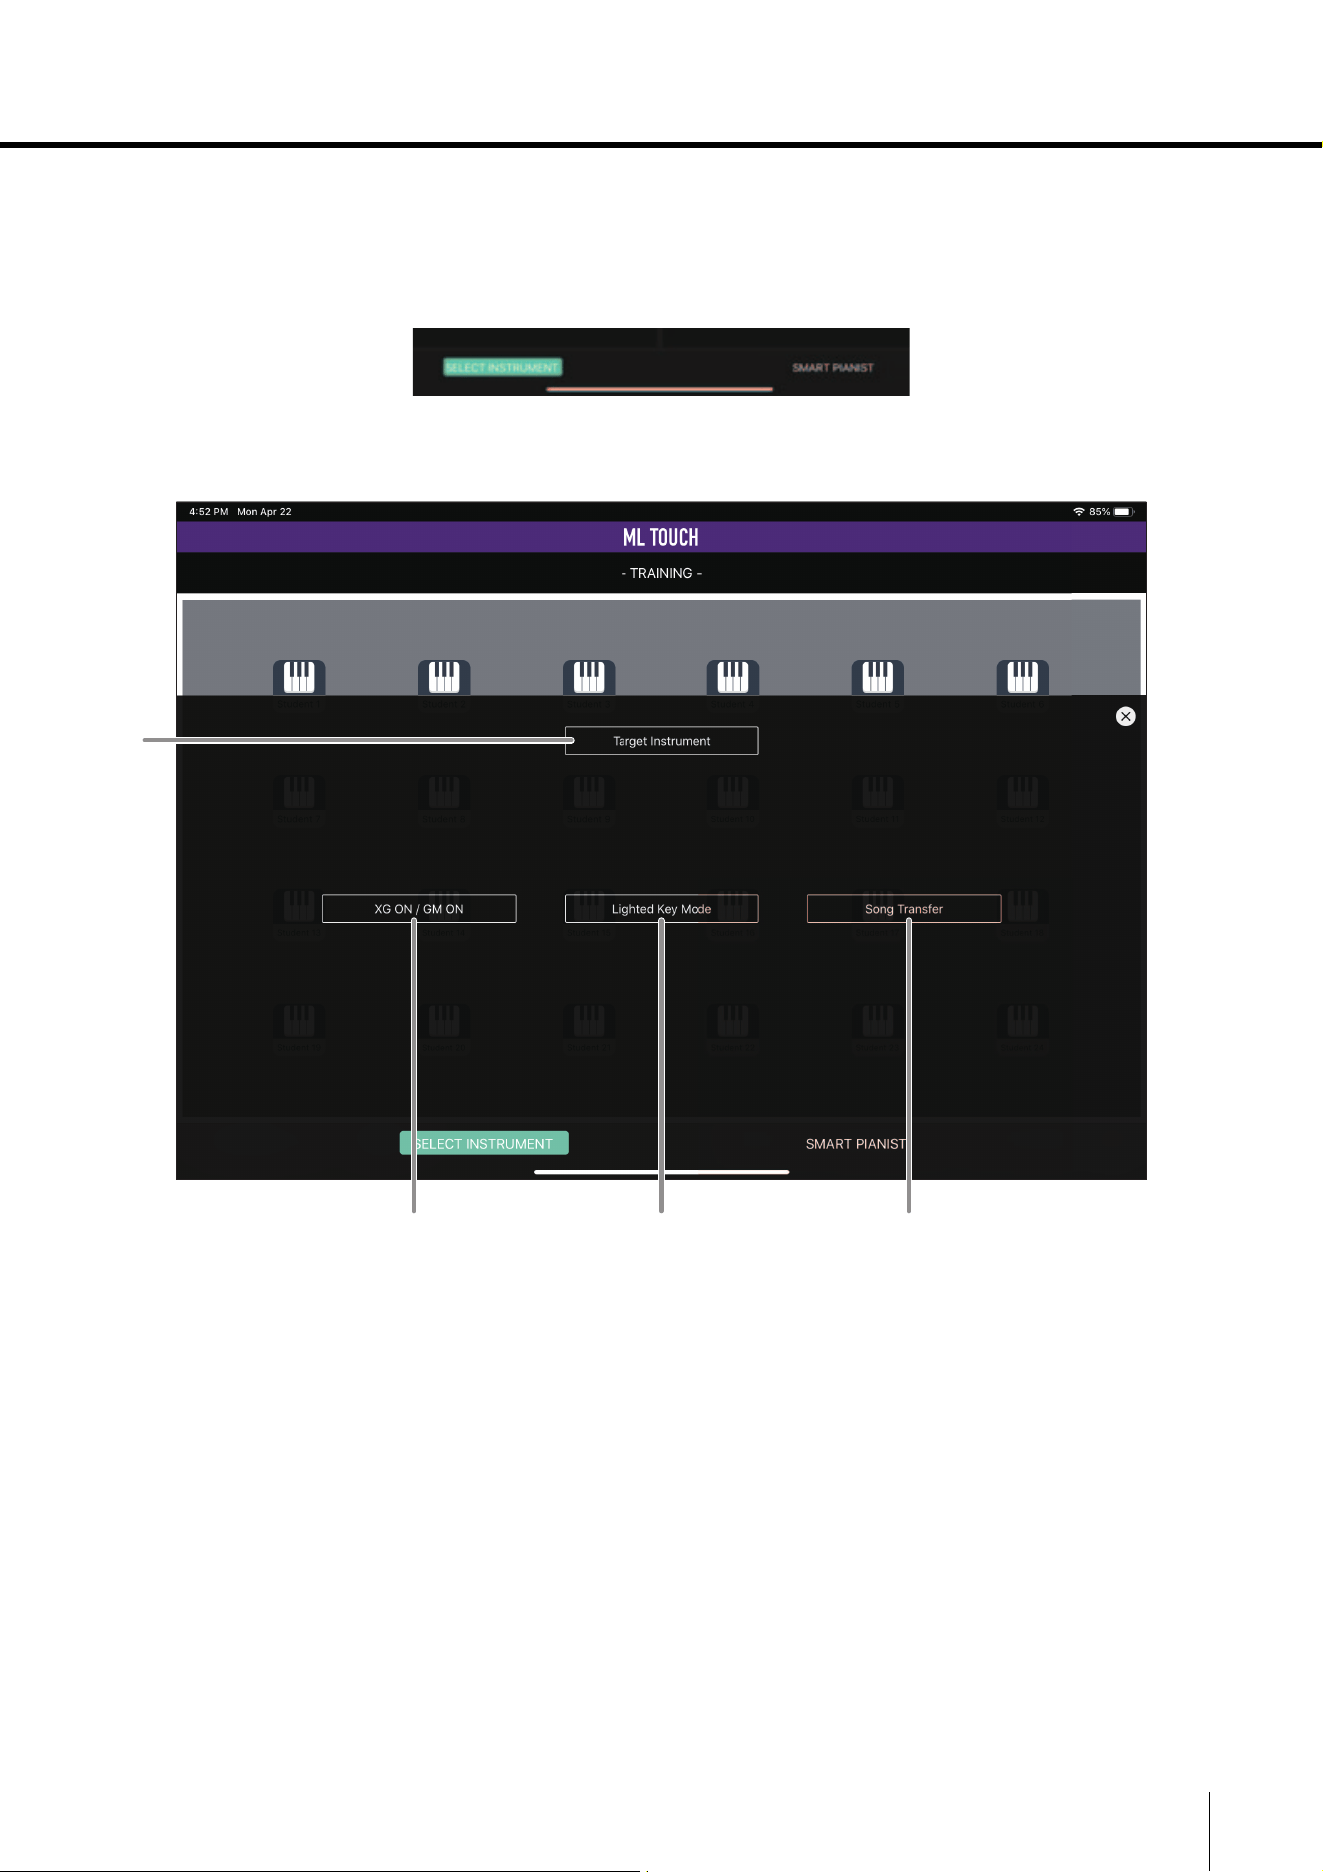
TRAINING window
This window is used to perform various useful functions during a lesson.
Switch the mode with the buttons at the bottom of the window.
SELECT INSTRUMENT mode
q Target Instrument button
Displays the TARGET INSTRUMENT window to select a target student or group. (
page 13)
w XG ON/GM ON button
Sends XG ON/GM ON to reset the sound source on the instrument.
e Lighted Key Mode button
Turns on/off the function for lighting the guide lamps on the student’s instrument during the
instructor’s keyboard performance.
This can be used with instruments that support the guide lamp function. With other
instruments, be sure to turn this off in order to prevent unnecessary communication.
r Song Transfer button
Sends a standard MIDI file imported with iTunes file sharing to the instrument of the student
selected with the TARGET button. Tap this button to display the transmission status in a
progress bar. If an error occurred, error details will appear. In addition, this function cannot
be used with some instruments.
w re
q
12 ML Touch User’s Guide
Part names and functions
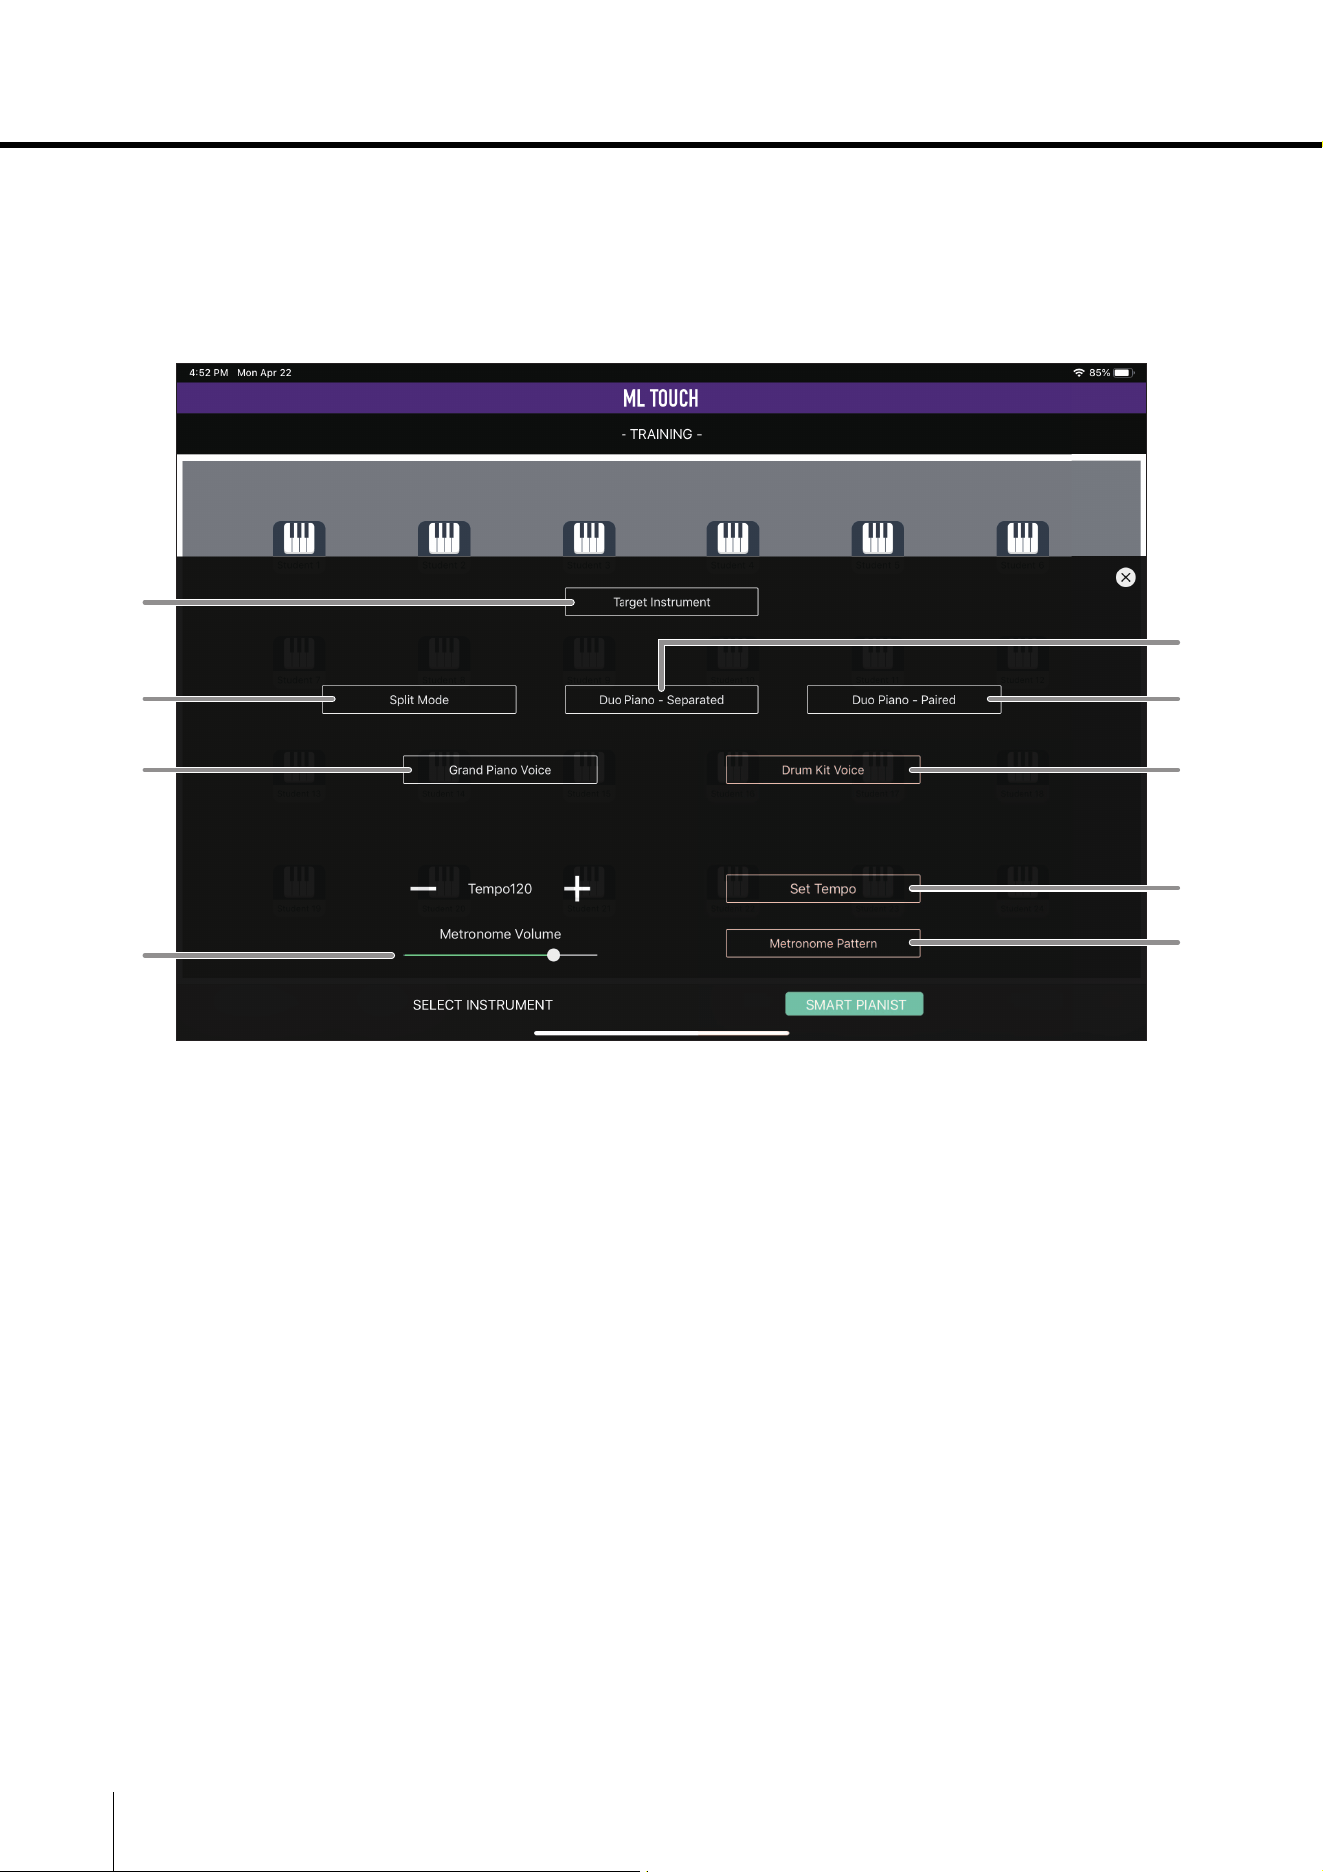
SMART PIANIST mode
This is a mode for specifying the status of a student’s instrument. This function is available with some
instruments that support Smart Pianist.
This mode is available when a USB cable is used to connect the MLA-200’s [I/O] port and a Smart
Pianist-compatible instrument.
q Target Instrument button
Displays the TARGET INSTRUMENT window to select a target student or group. (
page 13)
w Split Mode button
Switches the instrument to Split mode.
e Duo Piano – Separated button
Sets the instrument to duo piano, and turns on the DUO mode on the MLA-200.
r Duo Piano – Paired button
Sets the instrument to duo piano, and turns off the DUO mode on the MLA-200.
t Grand Piano Voice button
Sets the tone of the instrument to the first “Piano”.
y Drum Kit Voice button
Sets the tone of the instrument to “Drums/Percussion”.
u Set Tempo button / + (INC)/– (DEC) buttons
Specifies the metronome tempo. This can be set within the range of 5 and 500.
i Metronome Volume slider
Adjusts the metronome volume. The more the slider is moved to the right, the louder the
volume will be.
o Metronome Pattern button
Selects the metronome pattern.
r
e
y
u
o
q
w
t
i
ML Touch User’s Guide 13
Part names and functions
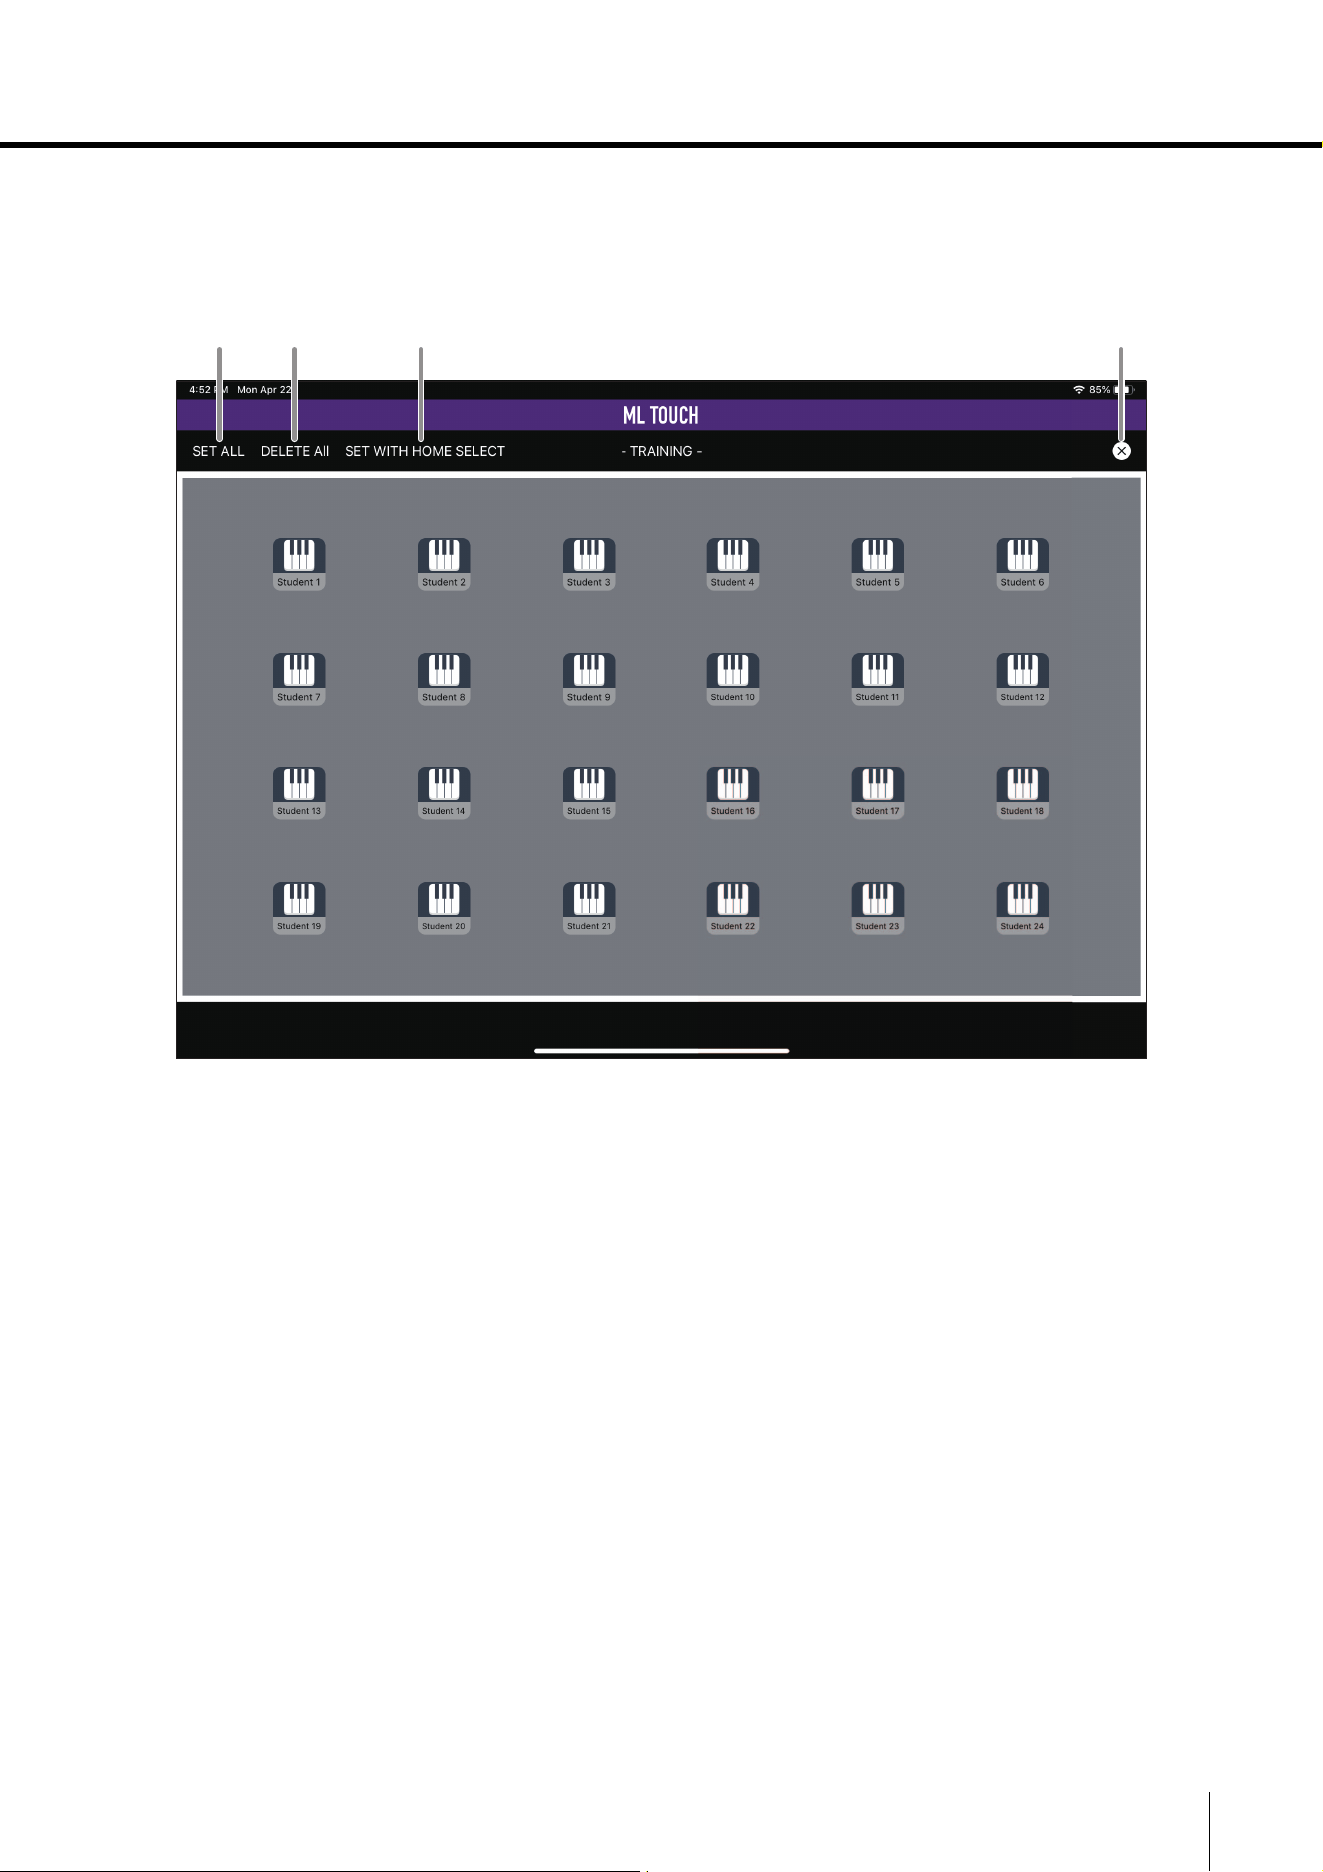
TARGET INSTRUMENT window
This window appears when the Target Instrument button in the TRAINING window is tapped.
Tap a student icon in any area to select a target.
q SET ALL button
Selects all students.
w DELETE ALL button
Cancels all selections.
e SET WITH HOME SELECT button
Selects the students selected in the HOME window.
r Close button
Completes selecting targets and returns to the previous window.
q w e r
14 ML Touch User’s Guide
Part names and functions
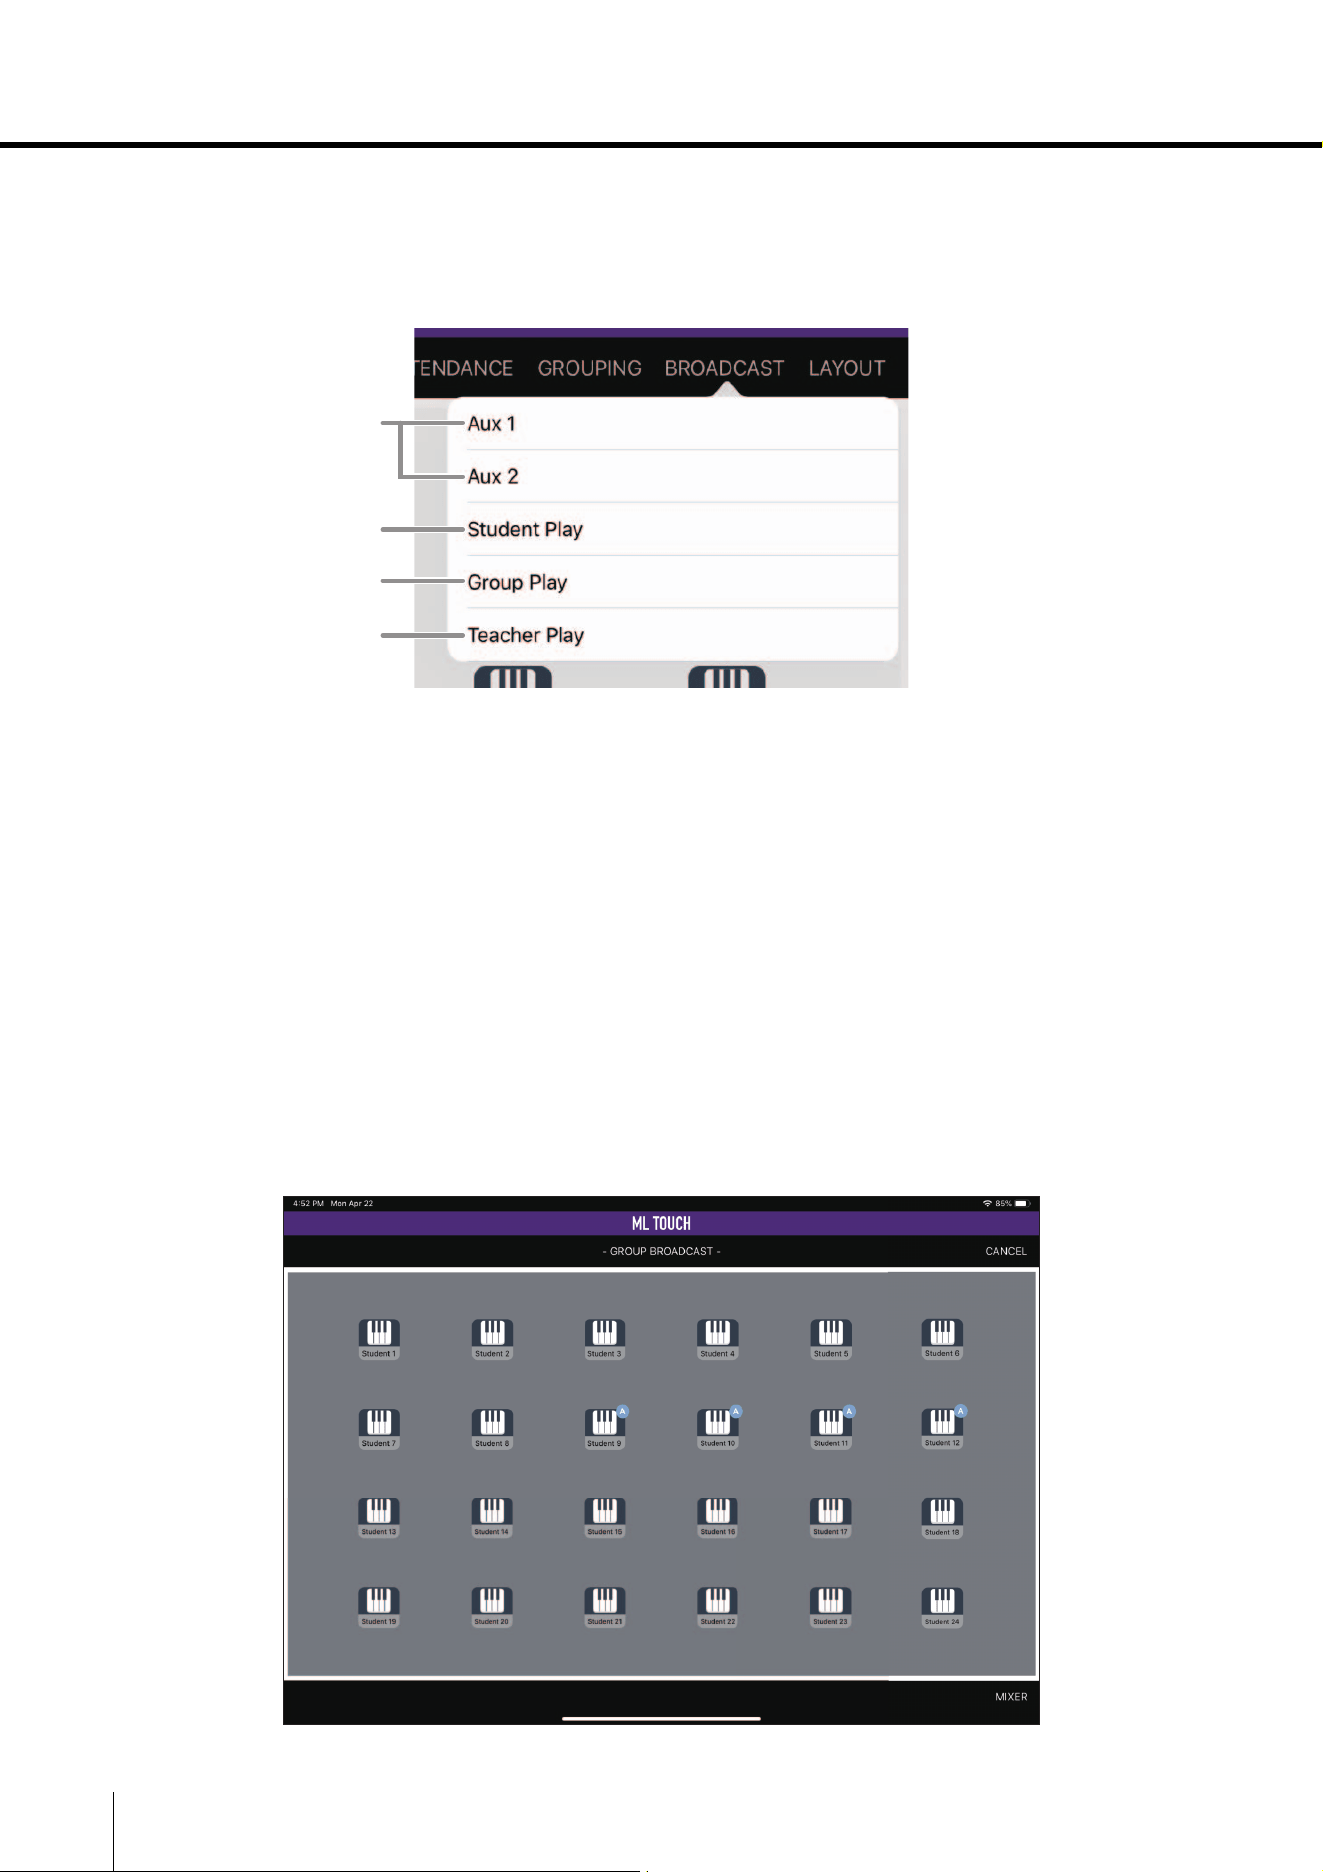
BROADCAST window
The BROADCAST window is used to broadcast the selected input sound to everyone.
Tap the BROADCAST button in the HOME window to display a list of input sounds to be broadcast.
q Aux 1/Aux 2
Broadcasts the audio inputted to AUX IN1/AUX IN2 of the MRX7-D.
w Student Play
Broadcasts the performance of the selected student.
e Group Play
Broadcasts the performance of the selected group.
r Teacher Play
Broadcasts the performance of the instructor.
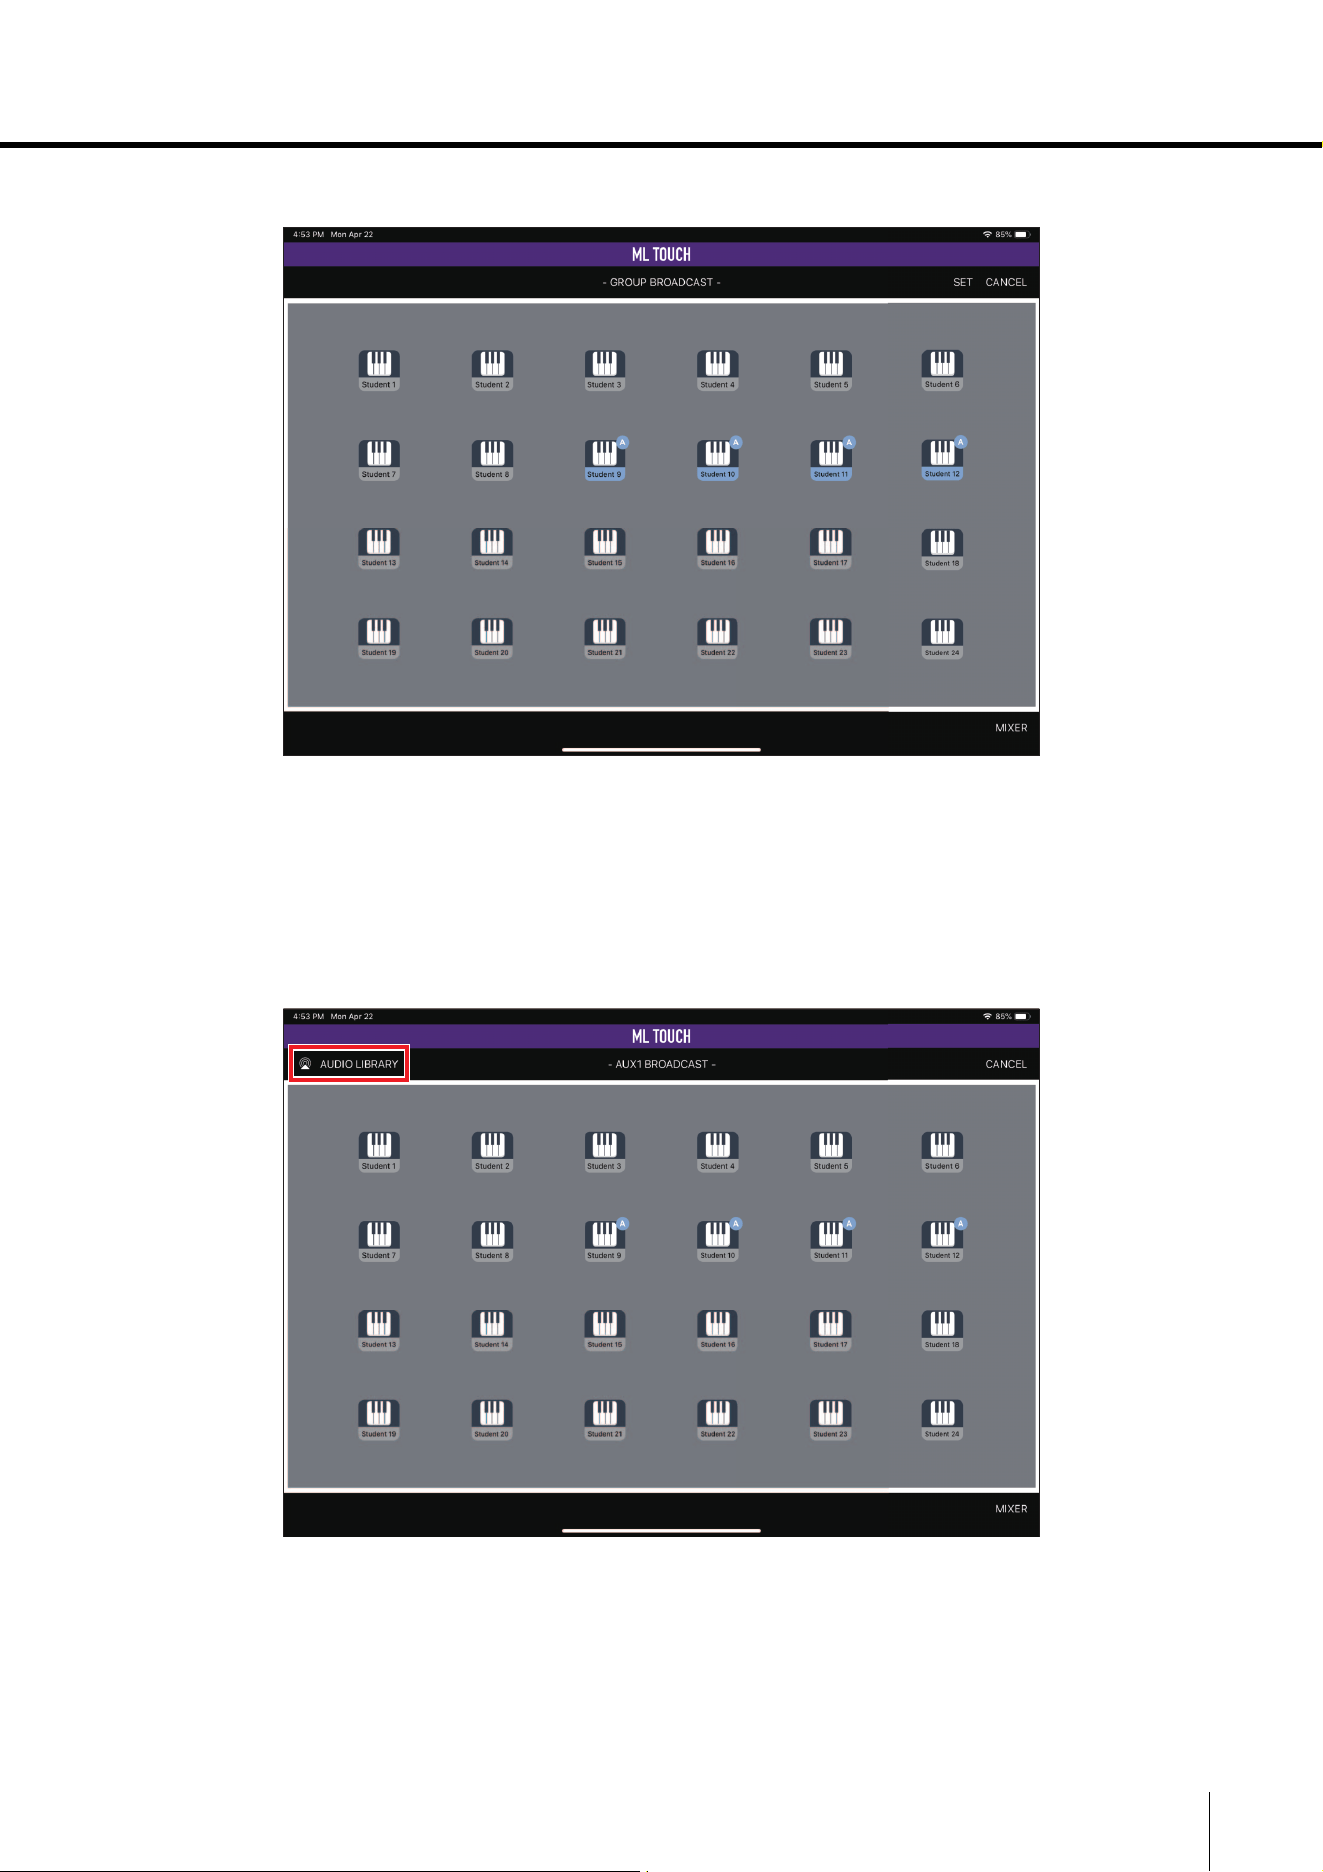
Window after selecting Student Play/Group Play
The following window appears when Student Play or Group Play has been selected.
q
w
e
r
ML Touch User’s Guide 15
Part names and functions
Tap a student icon to select the student or group to be broadcast.
Tap the SET button in the upper-right corner of the window to apply the setting. To cancel the setting,
tap the CANCEL button.
AUX window
When Aux 1 or Aux 2 is selected, the AUDIO LIBRARY button appears in the upper-left corner of the
window.
Tap this button to display the iOS AirPlay screen to broadcast audio data saved on the iPad.
16 ML Touch User’s Guide
Part names and functions
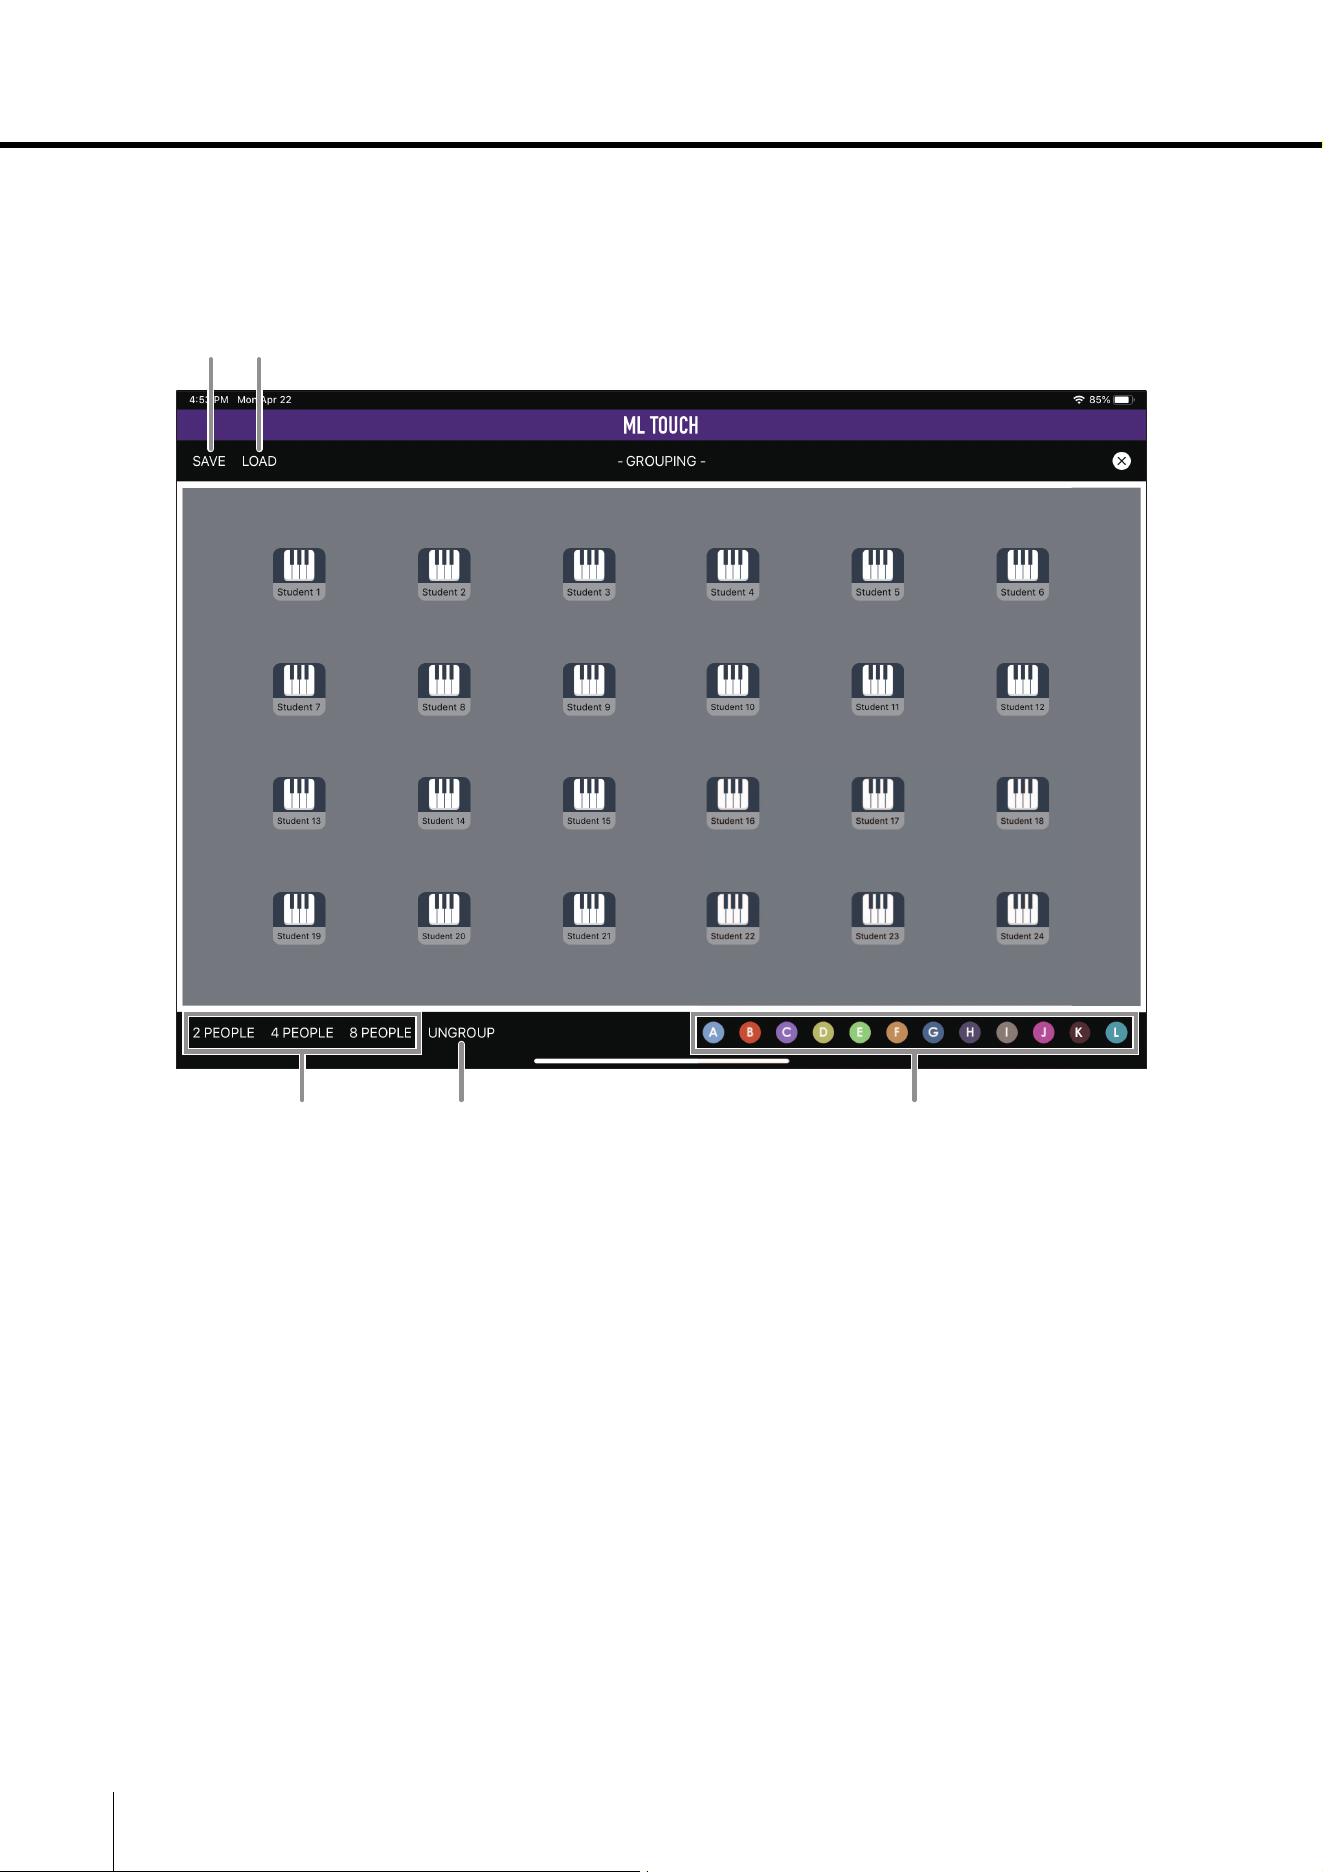
GROUPING window
This window is used to specify student groups.
Twelve groups (A to L) can be specified.
q SAVE button
Saves the current group settings. A maximum of 8 sets can be saved.
w LOAD button
Loads saved group settings.
e 2 PEOPLE button / 4 PEOPLE button / 8 PEOPLE button
These buttons form groups in the order of the IP addresses, starting from the top. 2-person,
4-person and 8-person groups are automatically assigned. Since groups are arranged in the
order of the IP addresses, it is not always possible to group students sitting beside each other.
r UNGROUP button
Cancels the group settings.
t Group selection buttons
Select a group to be specified. Tap a group name to select it, and then tap a student icon to
add the student to the selected group. Tap a student icon again to remove the student from
the group. Tapping a new group, then tapping a student icon already in another group
assigns that student to the new group.
q w
er t
ML Touch User’s Guide 17
Part names and functions
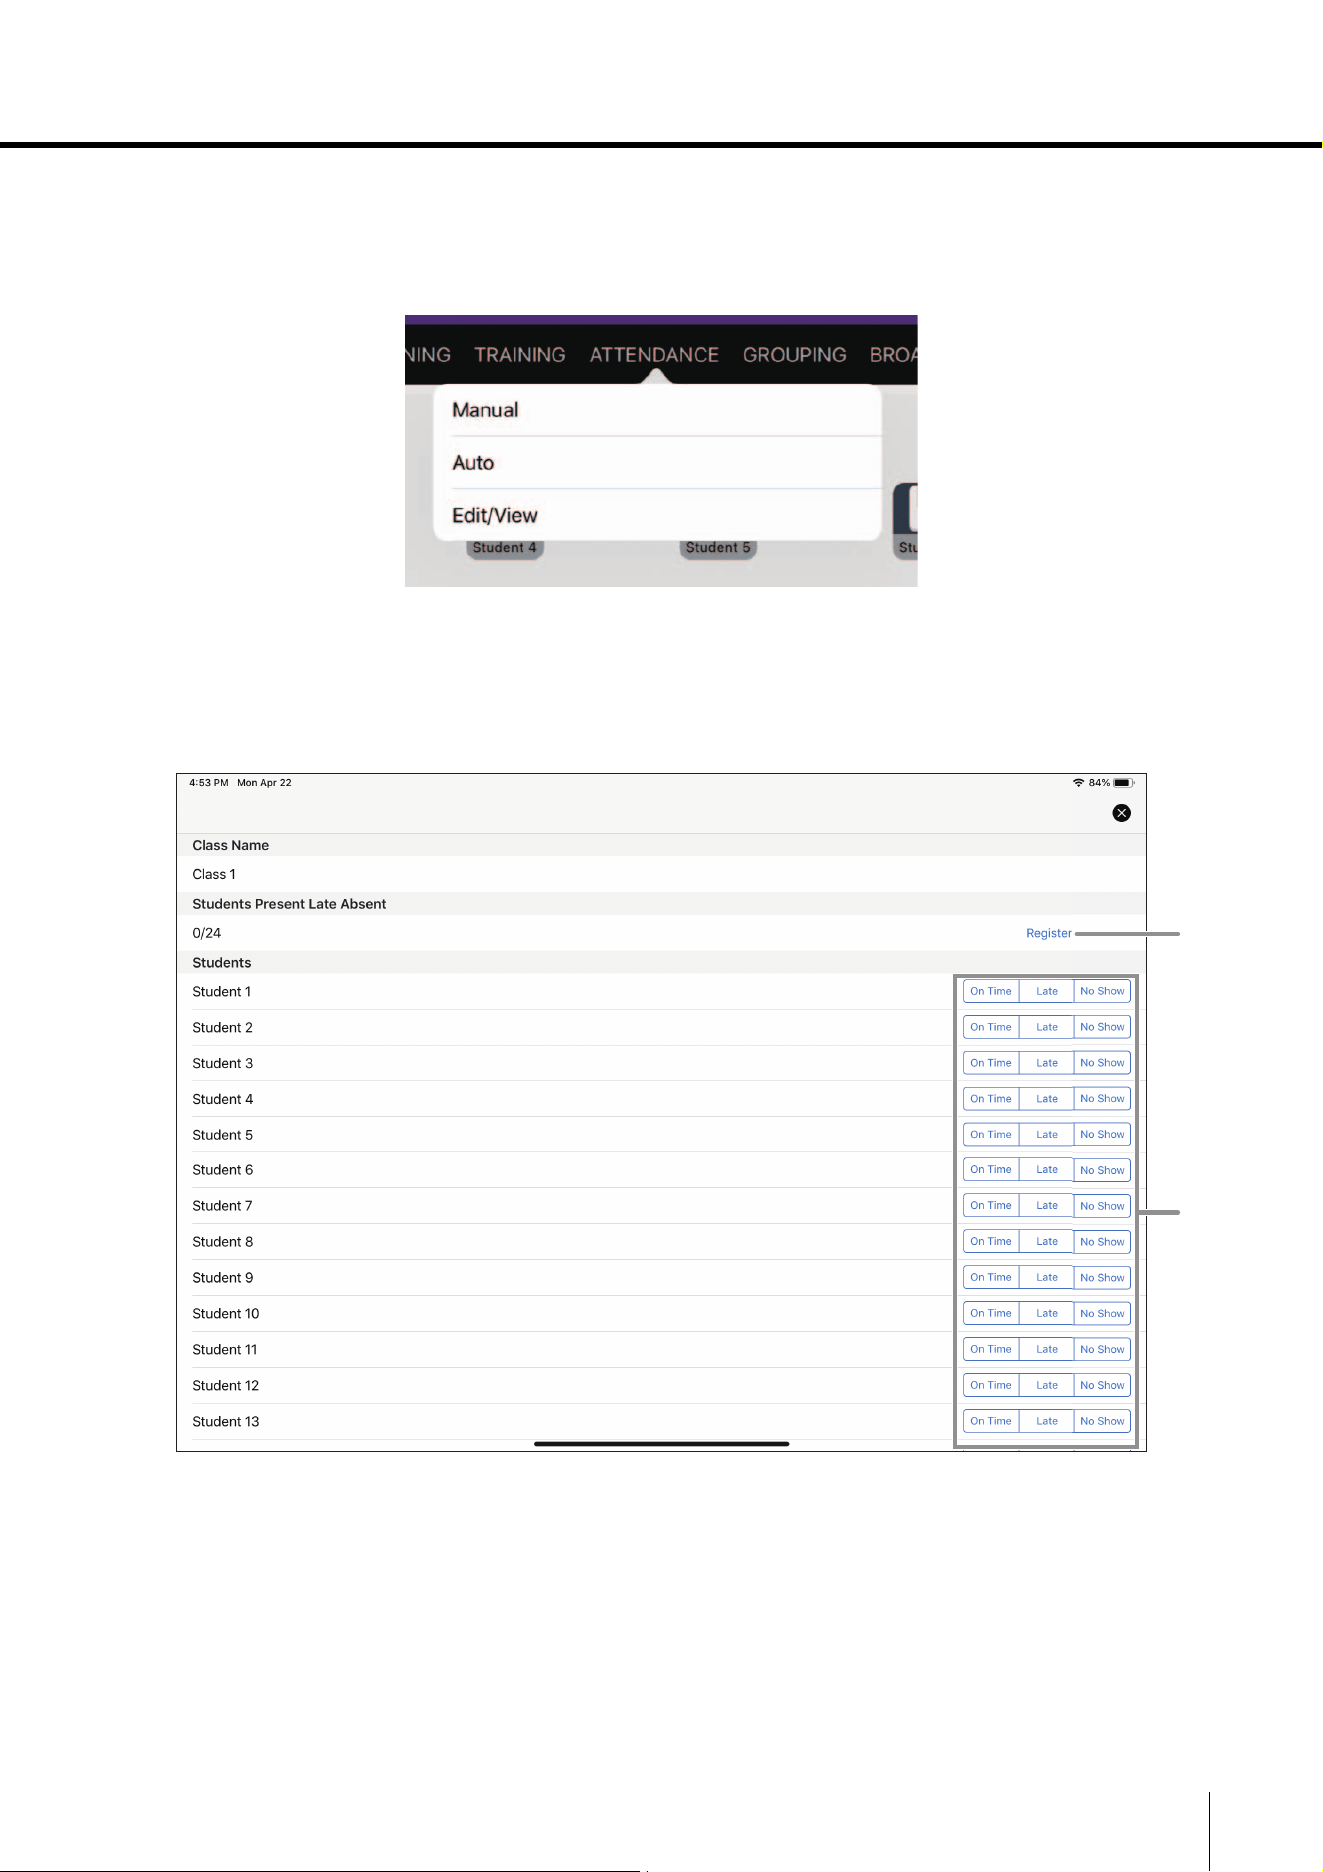
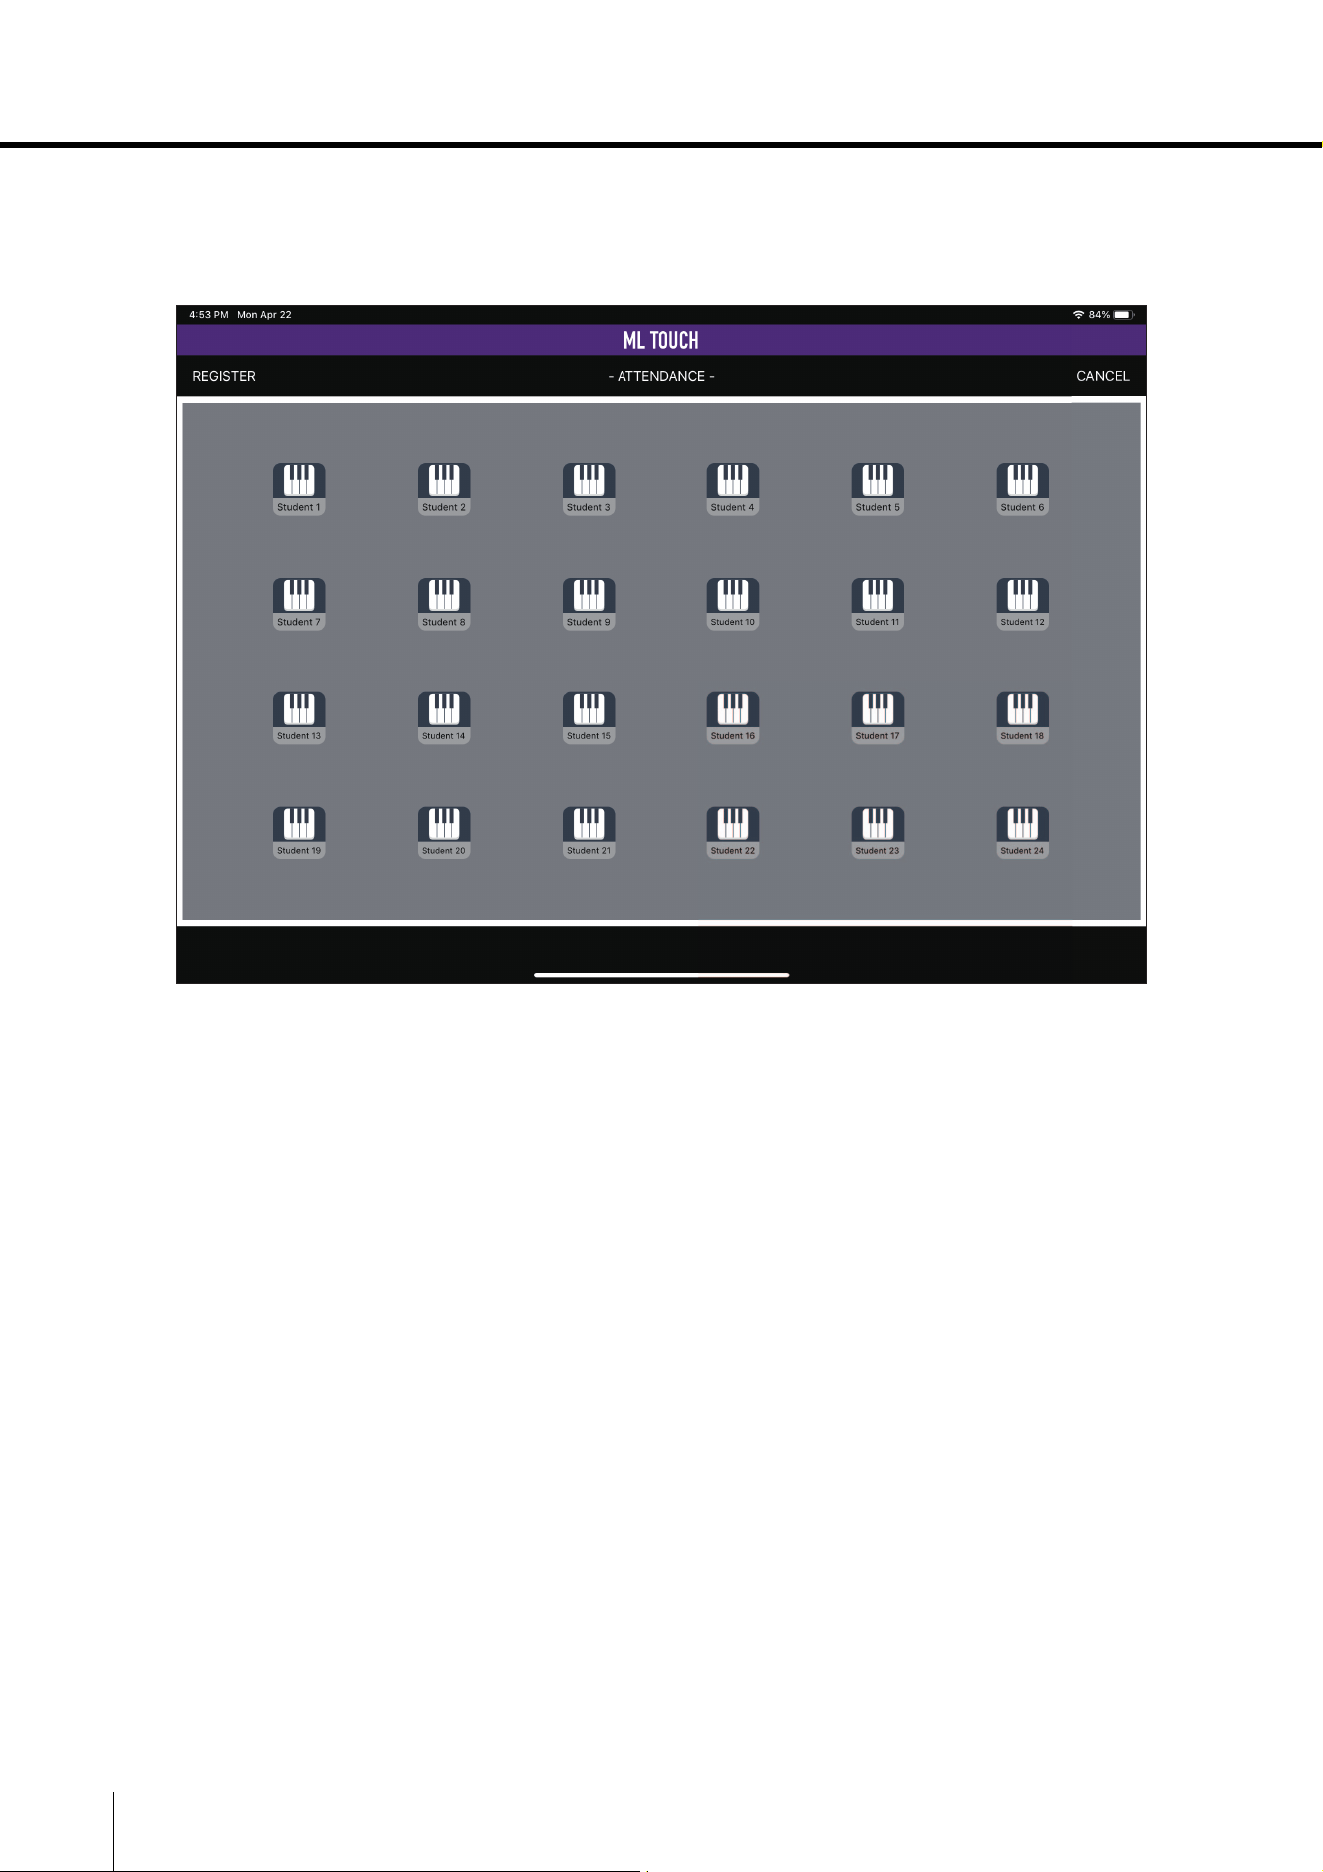
ATTENDANCE window
Tap the ATTENDANCE button in the HOME window to display the ATTENDANCE window for
recording student attendance.
The ATTENDANCE window has three modes.
Manual mode
This mode is for manually entering student attendance.
q Attendance status buttons
Enter the attendance status for each student. Select from On Time, Late and No Show.
w Register button
Saves the entered attendance statuses. The attendance statuses are saved in a CSV file.
The saved attendance record can be exported to an external file using “Export Attendance
CSV File” in the System menu in the SETTINGS window. The exported CSV file can be
saved/edited on the computer via iTunes.
w
q
18 ML Touch User’s Guide
Part names and functions
Auto mode
This mode is for automatically acquiring student attendance when the [CALL] button on the MLA-200
is pressed.
Once the Auto mode has been entered, it will wait for the appropriate student operation.
When a student presses the [CALL] button on their MLA-200, the corresponding student icon changes
to green. In addition, the [CALL] button lights up.
When you have finished taking attendance, tap the REGISTER button in the upper-left corner of the
window to save the attendance record.
When Auto mode is exited, the [CALL] buttons on the students’ MLA-200s go off.
NOTE
In Auto mode, late attendance cannot be recorded. After pressing the REGISTER button, edit the record in Edit/
View mode.
ML Touch User’s Guide 19
Part names and functions
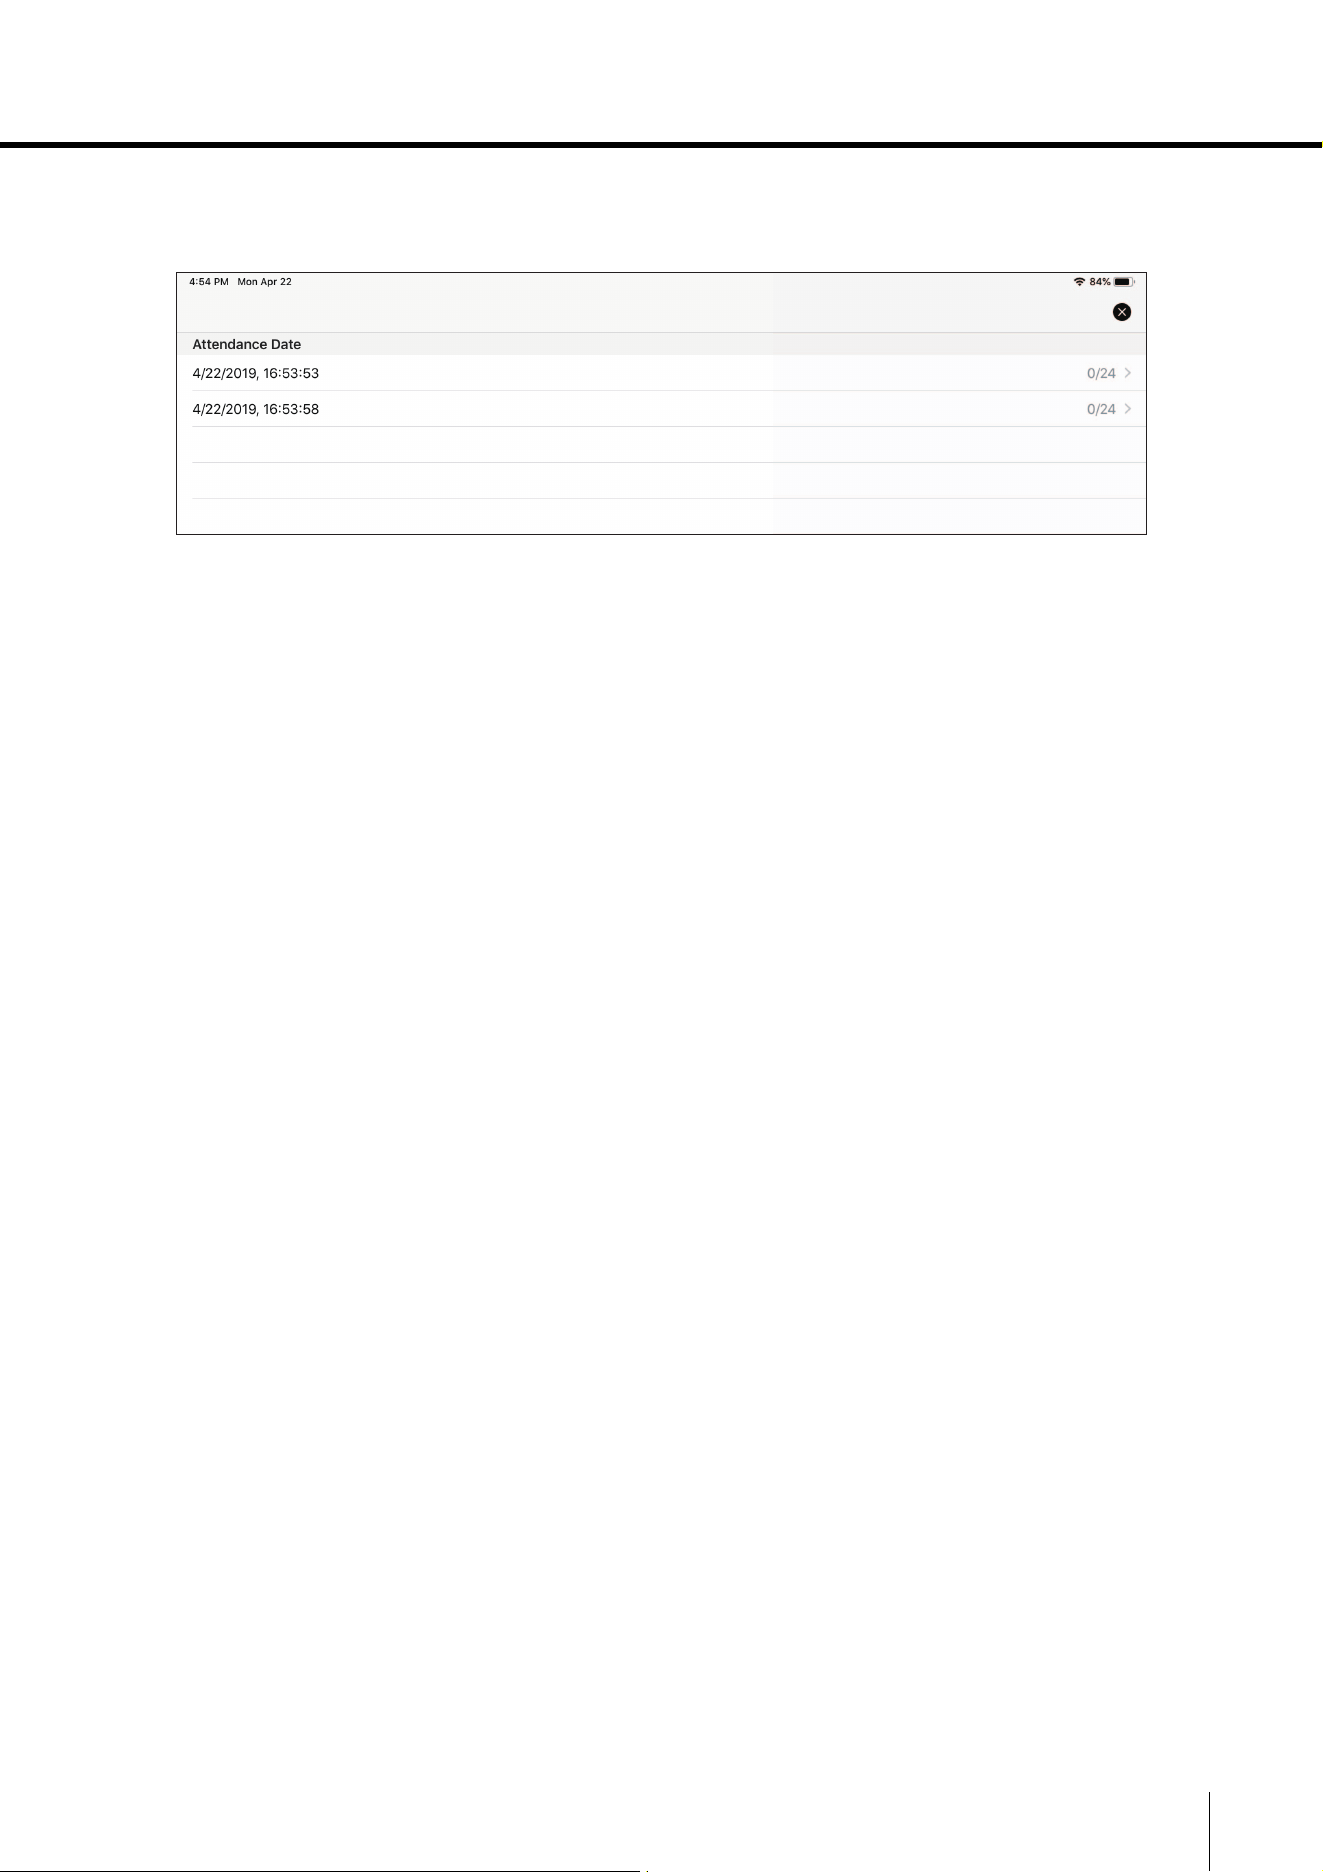
Edit/View mode
This mode is for checking and editing saved attendance records.
The date and time that attendance was recorded as well as the number of students who attended
appear in a list.
Tap the record to be edited to display the window for Manual mode. Saving information that has been
entered or changed overwrites the previous information. However, it will be saved with the date and
time when it was initially saved.
To delete a record, swipe it to the left in the list.
20 ML Touch User’s Guide
Part names and functions
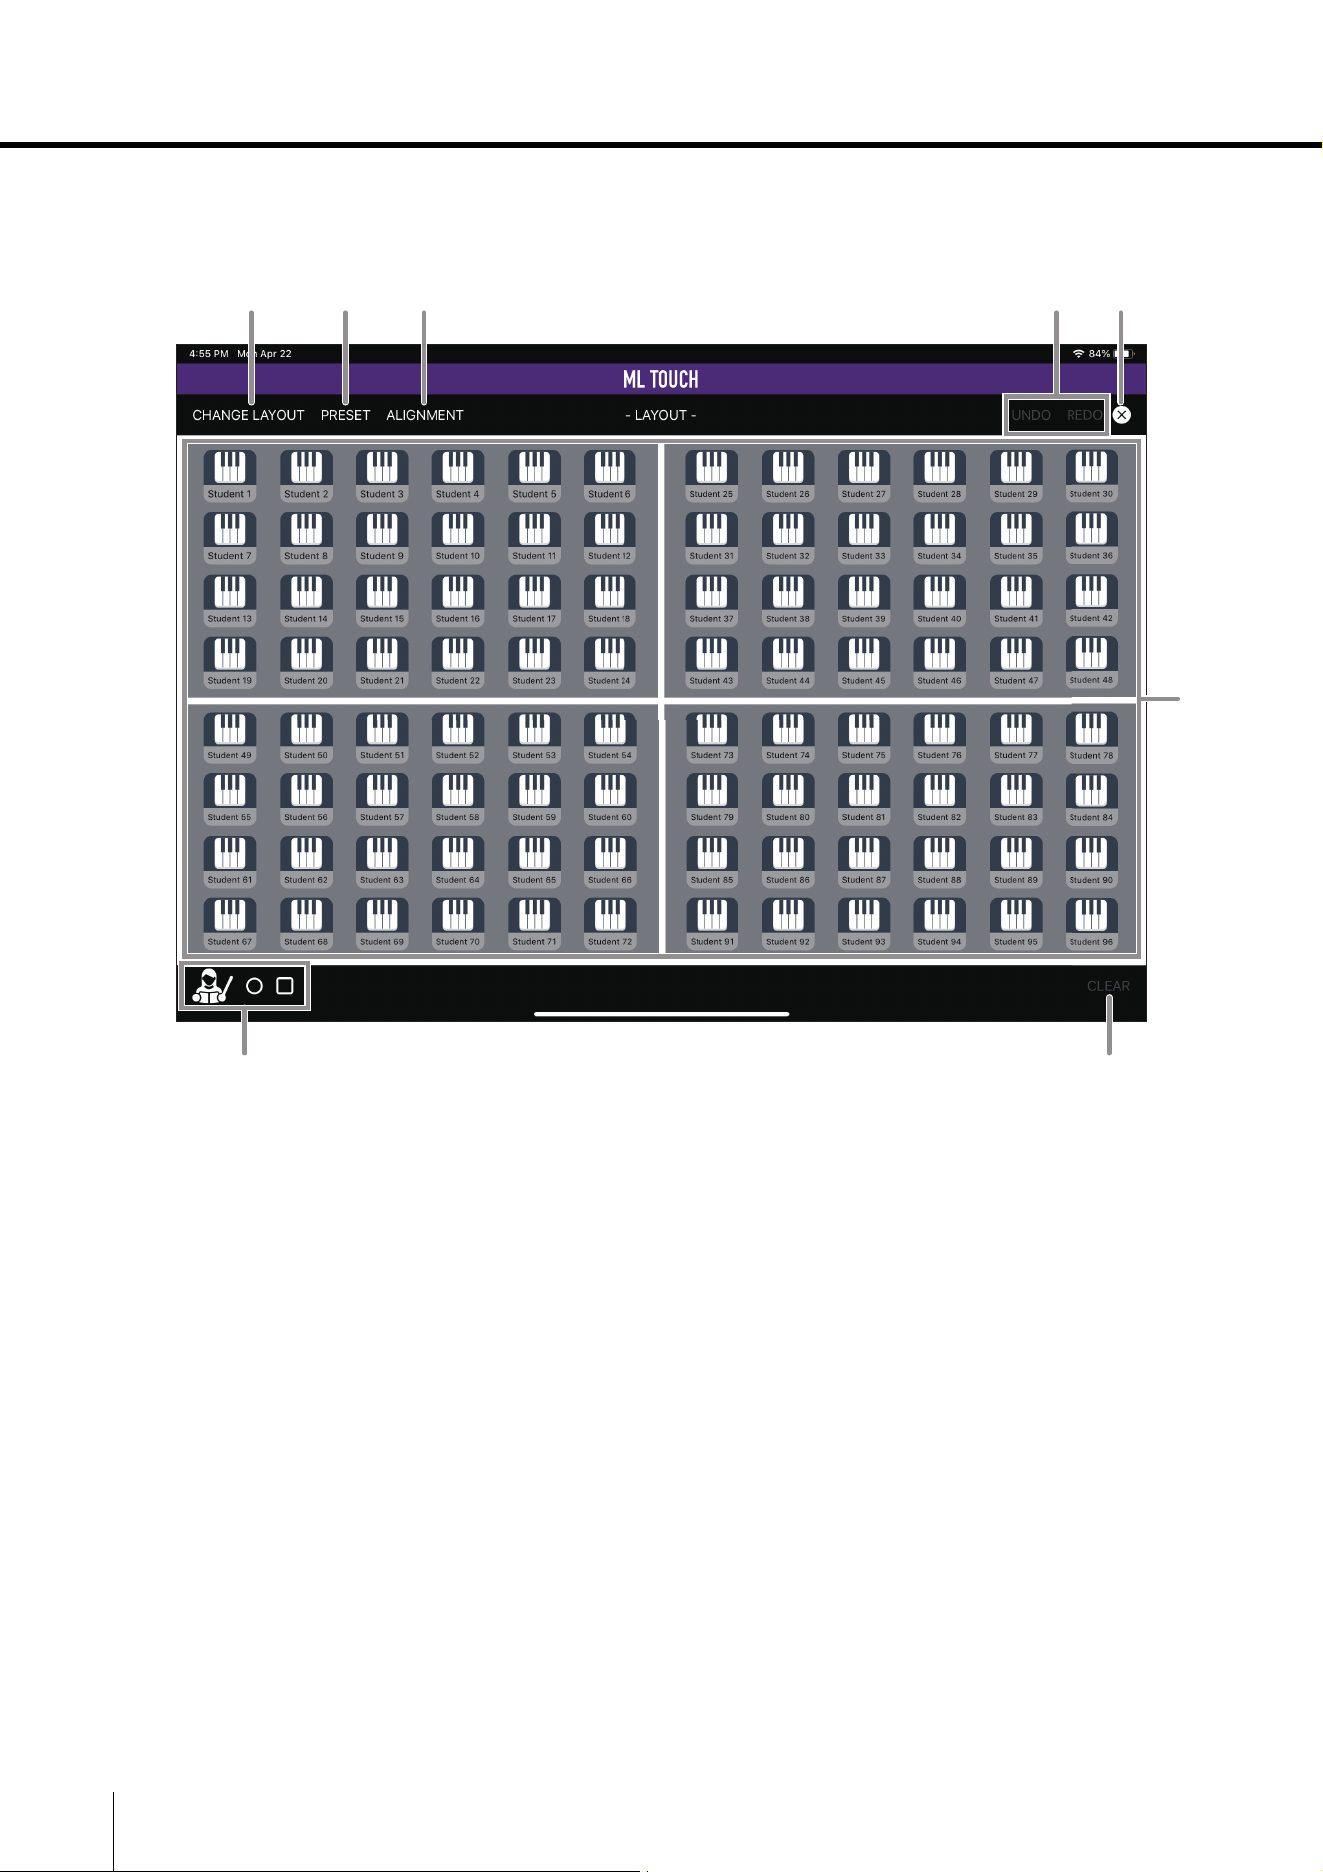
LAYOUT window
This window is used to edit the layout on the iPad.
q CHANGE LAYOUT button
Changes the shapes of the areas. This cannot be used when there is only one MRX7-D.
Area layouts ( page 21)
w PRESET button
Select a student icon arrangement from the presets. Two to six rows can be selected. In
addition, selecting the optimizing setting will position the student icons in a well-balanced
arrangement within the current layout.
e ALIGNMENT button
Arranges manually dragged and dropped icons.
r UNDO button / REDO button
Undoes or redoes layout change operations. Only one previous or later operation is saved.
t Close button
Completes editing and returns to the HOME window.
q w e tr
u
i
y
ML Touch User’s Guide 21
Part names and functions
y Areas
Drag and drop student icons to move them.
Student icons can be freely moved within the same area.
u Object components
These can be positioned anywhere. Only one teacher object can be added.
Added objects can be deleted by dragging them to their original positions.
i CLEAR button
Removes all arranged objects.
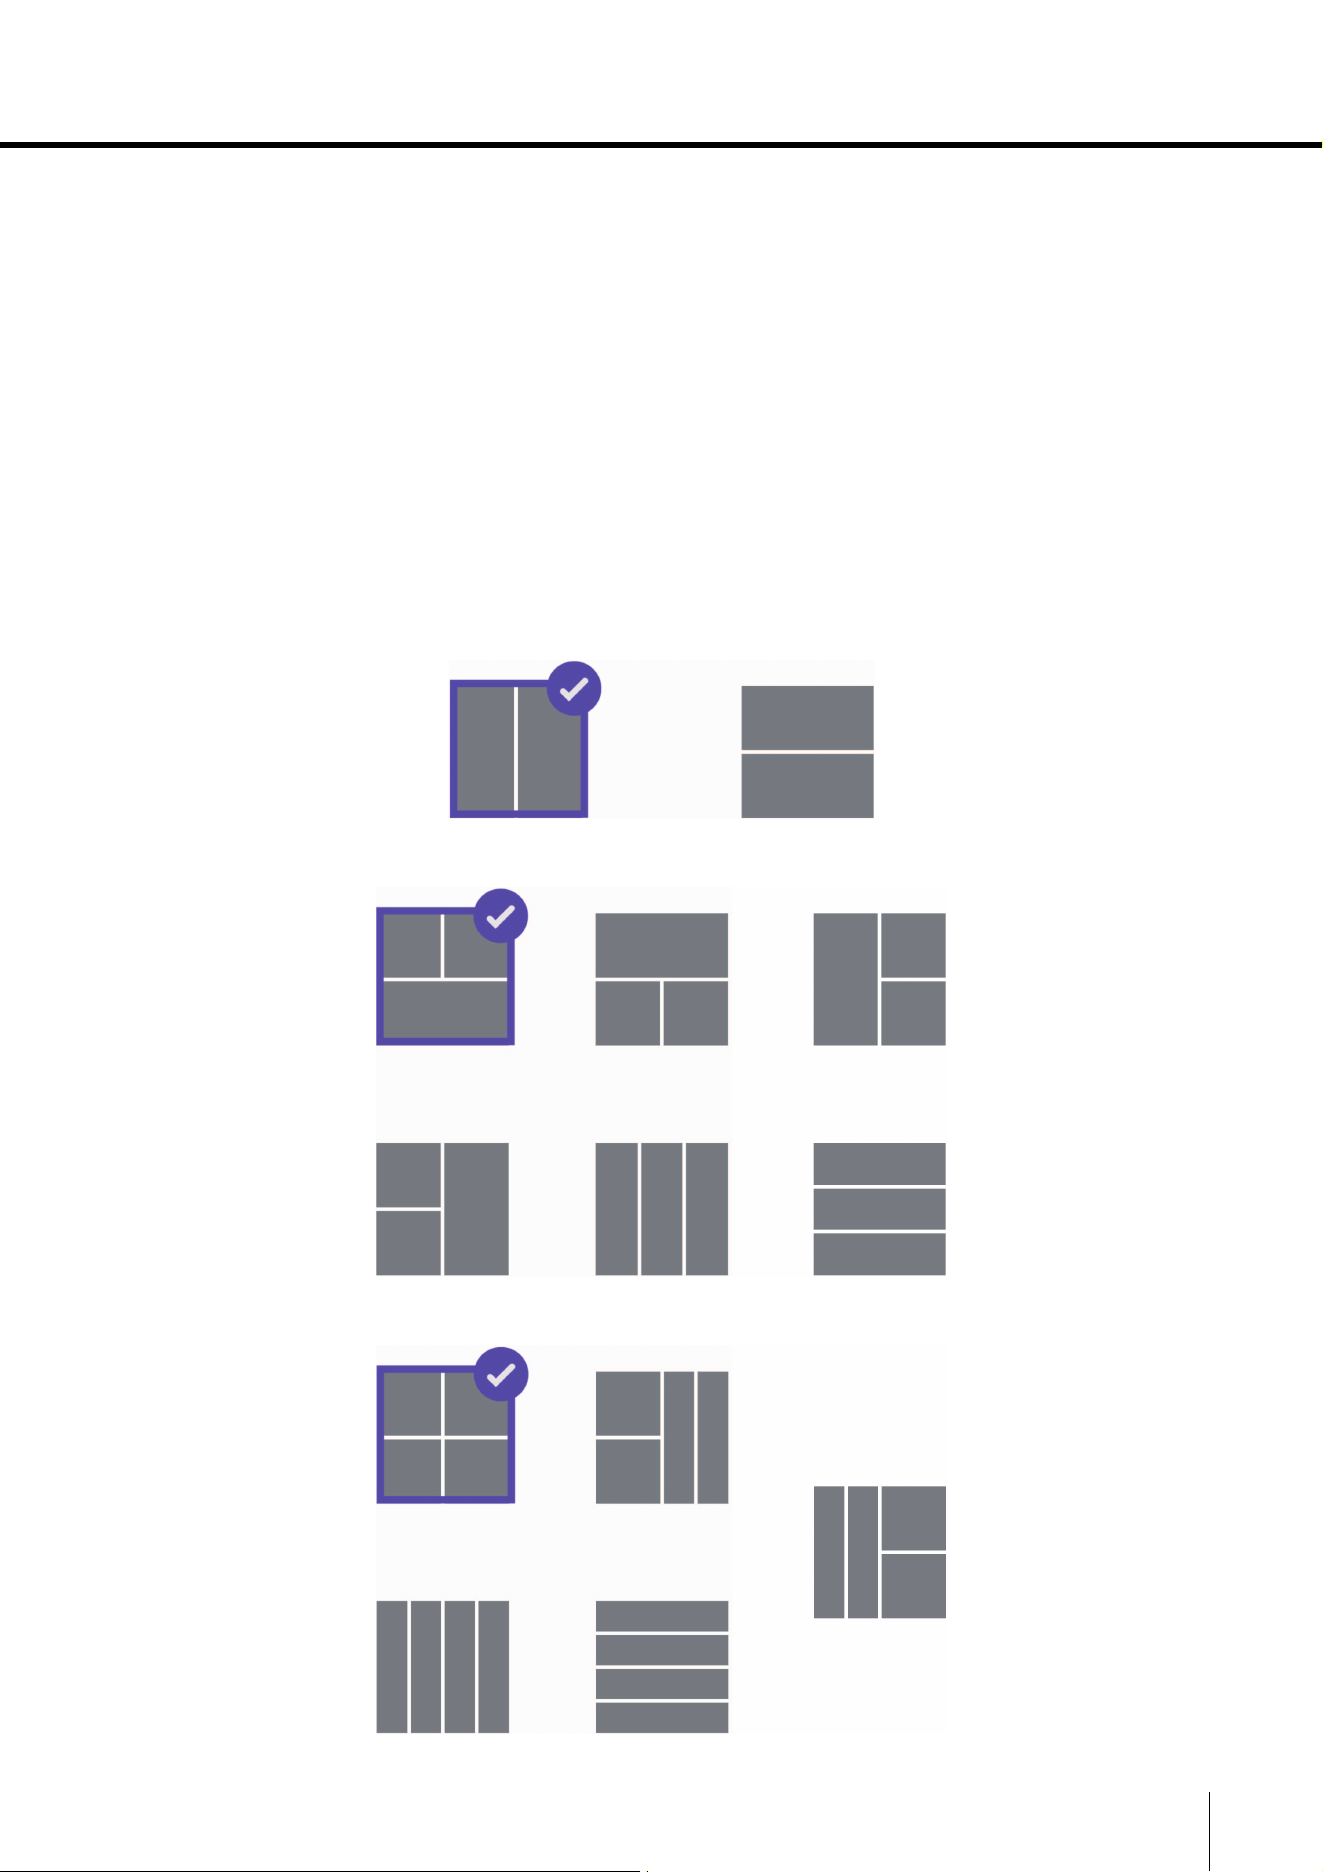
Area layouts
Tap the CHANGE LAYOUT button to select one of the following area layouts.
MRX7-D × 2
MRX7-D × 3
MRX7-D × 4
22 ML Touch User’s Guide
Part names and functions
SETTINGS window
This window is used to specify various settings.
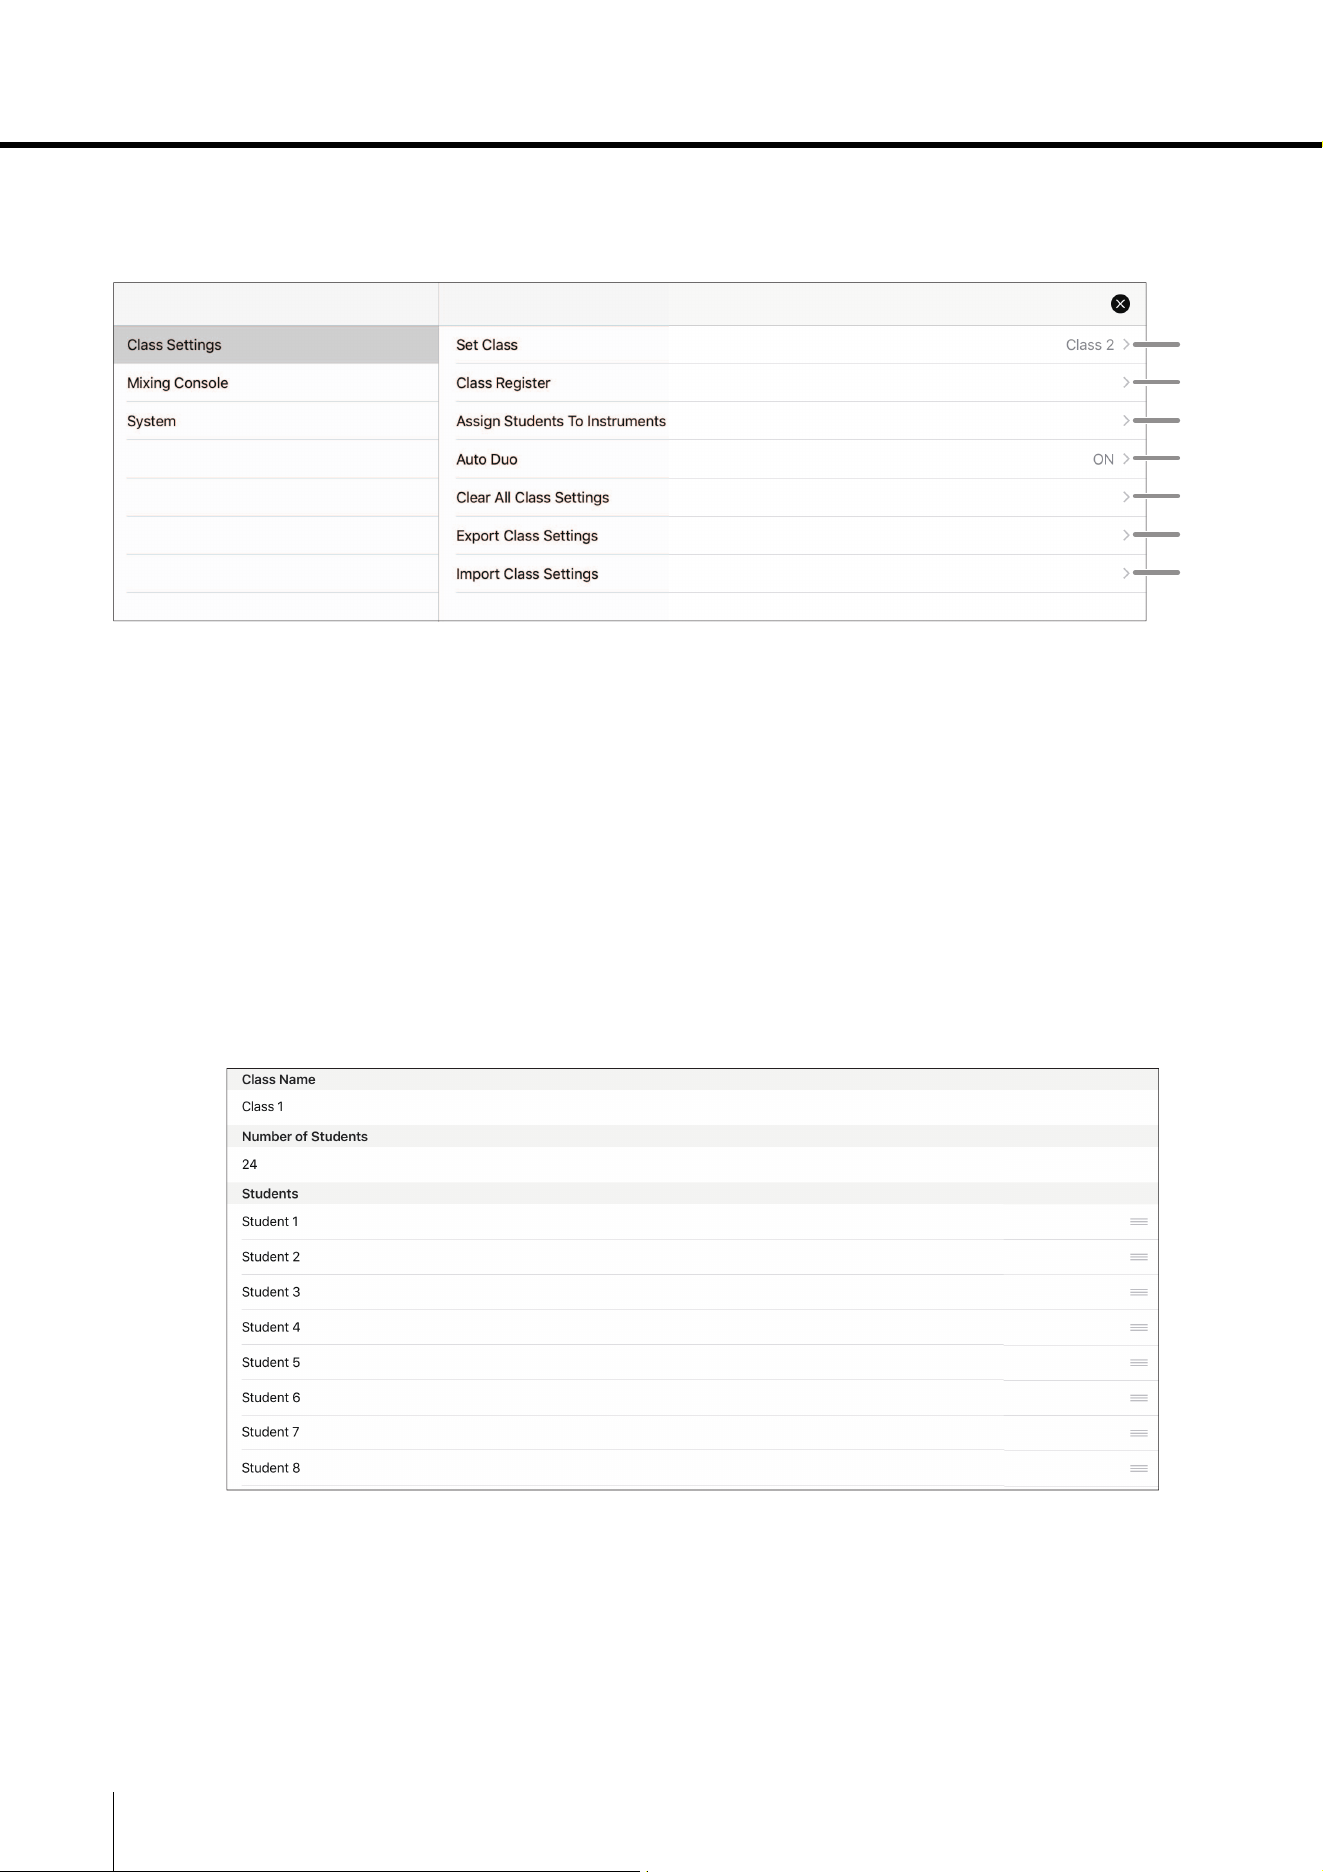
Class Settings menu
Used to specify class settings.
q Set Class
Selects the class to be taught.
Tap to display a list of classes. Tapping the class to be taught returns to the previous window.
w Class Register
Registers class and student information.
Tap to display a list of classes. Tapping the class whose information is to be registered
displays the editing window.
Class Name: Specify the name of the class. Tap to display a keyboard.
A maximum of 24 classes can be registered.
Number of Students
: Specify the number of students in the class. A maximum of 100
students can be registered in one class.
Students:
Specify the student information. A name, ID and photo can be registered.
Enter the necessary information, and then tap the save button to save
the information.
q
w
e
r
t
y
u
ML Touch User’s Guide 23
Part names and functions
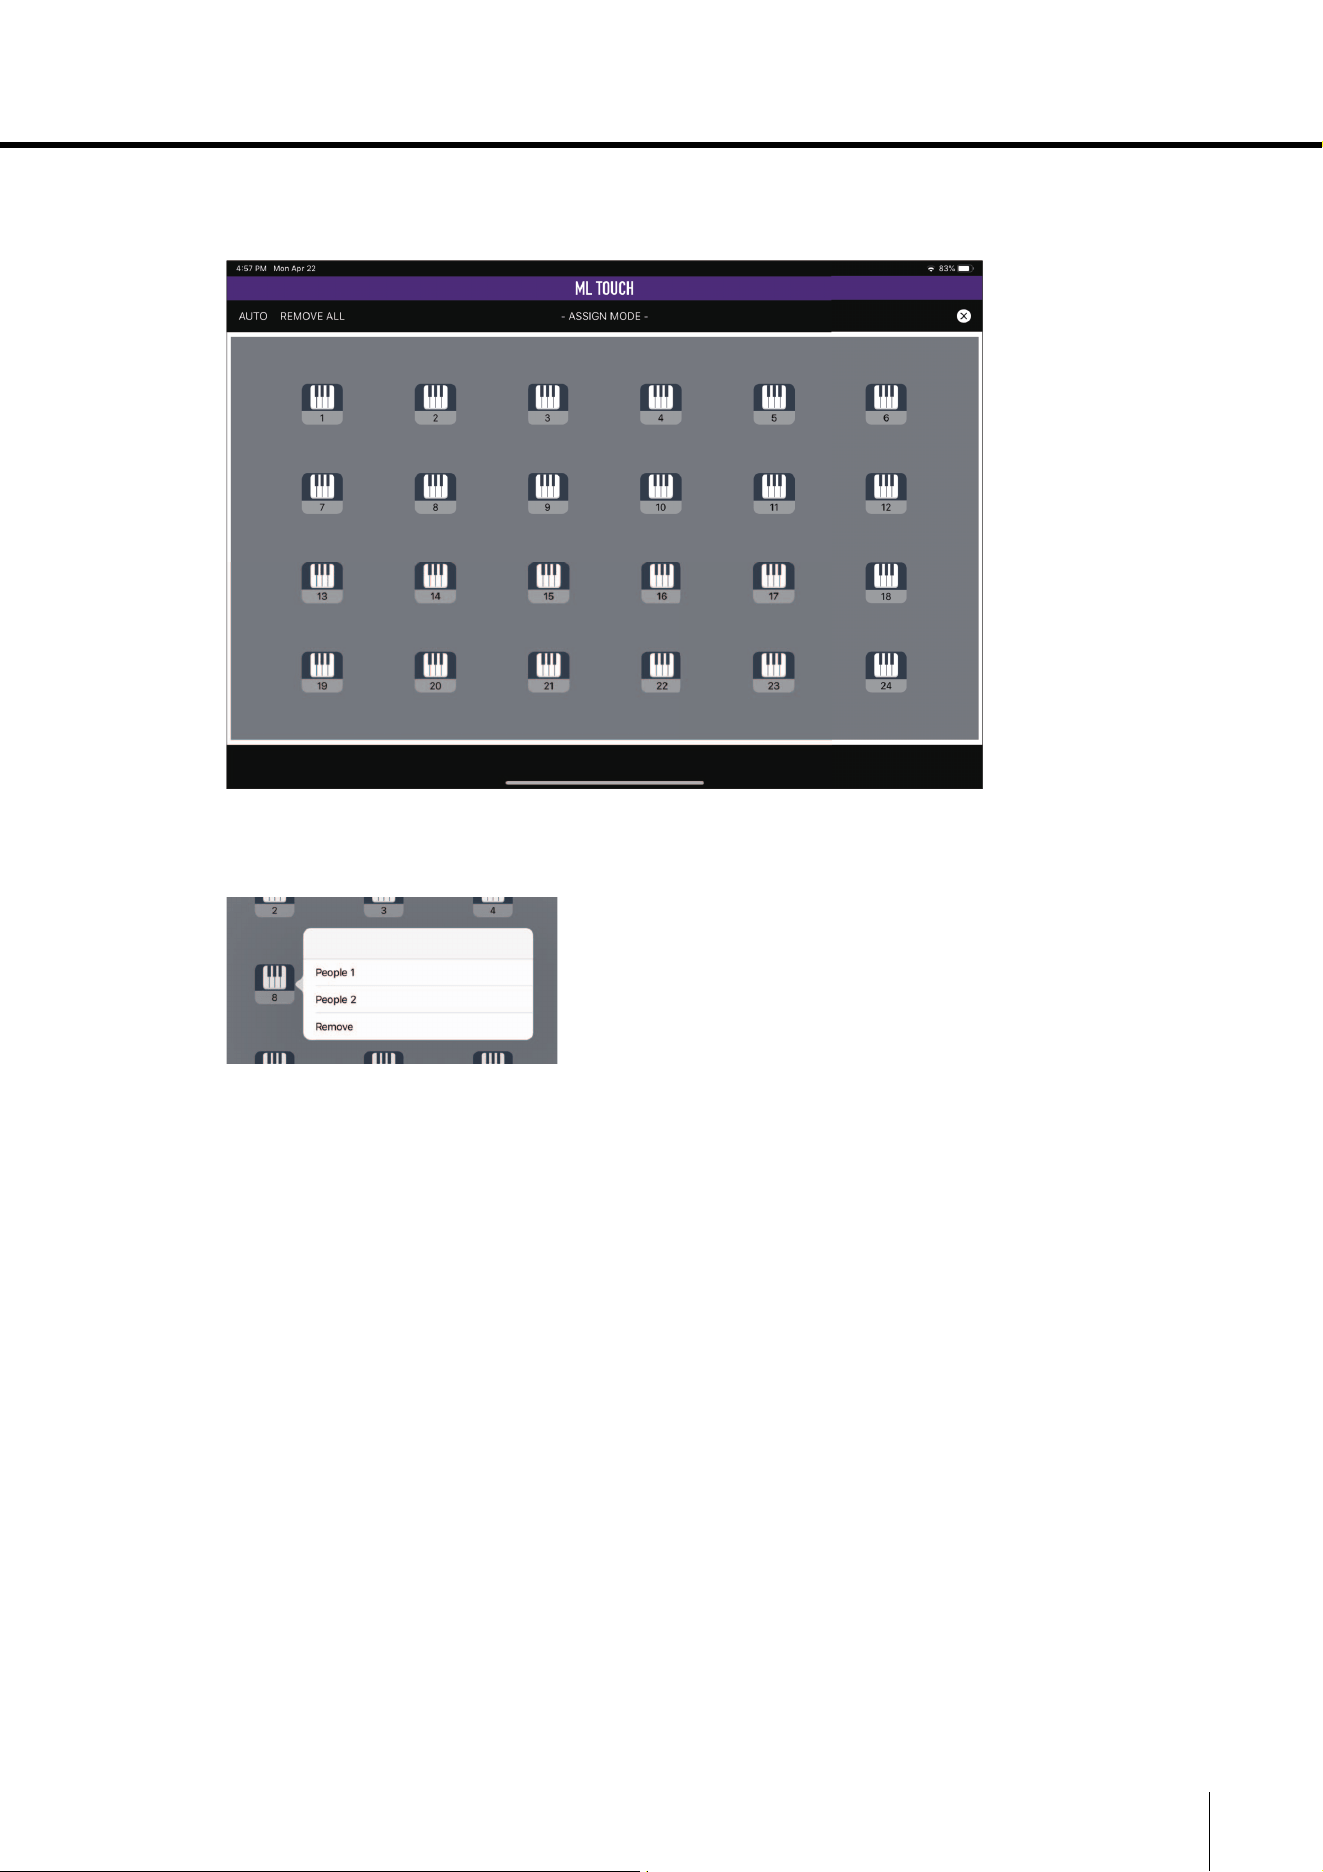
e Assign Students To Instruments
Assigns the registered class and student information to areas and student icons.
Two people can be registered to a single student icon. Tap a student icon, tap People 1 or
People 2, and then select a student name.
AUTO: Automatically assigns student information, starting with student icon 1.
REMOVE ALL: Cancels all assignments to student icons.
Close (× mark): Closes the window.
r Auto Duo
Sets whether to automatically switch to DUO mode when headsets are connected to both
the [MAIN] and [DUO] jacks of an MLA-200. Switches automatically when set to ON.
t Clear All Class Settings
Initializes all specified information.
y Export Class Settings
Export the class information to an external file (classes.bup).
This file can be backed up to a different location by using iTunes file sharing, etc.
u Import Class Settings
Imports a saved file of class information.
24 ML Touch User’s Guide
Part names and functions
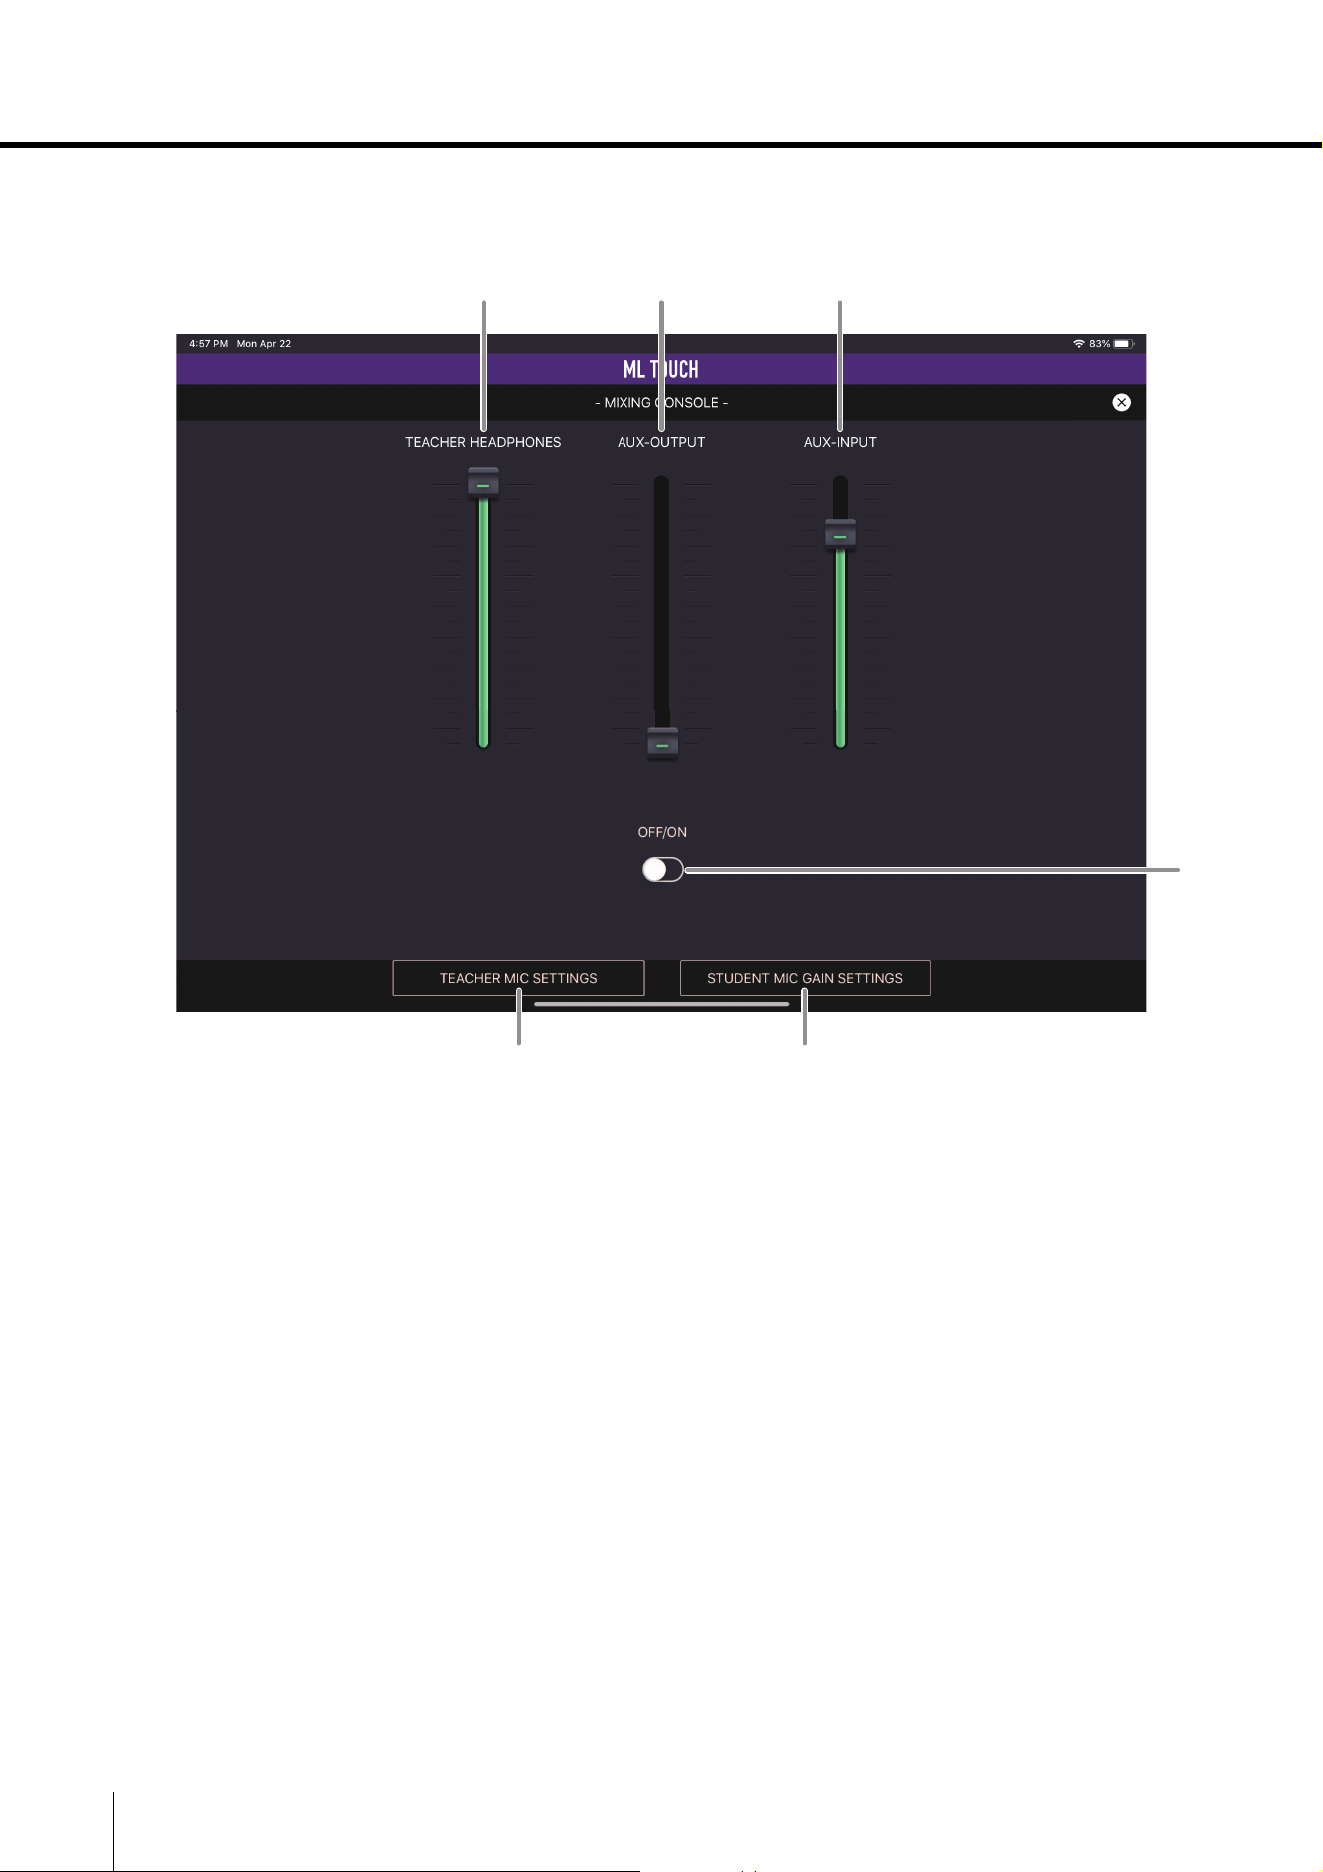
Mixing Console menu
Used to specify audio settings.
q TEACHER HEADPHONES slider
Adjusts the volume of the instructor’s headphones.
w AUX-OUTPUT slider
Adjusts the volume of the classroom speakers.
e AUX-INPUT slider
Adjusts the AUX volume on the MRX7-D.
r Speaker OFF/ON switch
Turns on/off the classroom speak
ers. When turned on, all audio heard from the
instructor’s headphones is also output from the classroom speakers.
t TEACHER MIC SETTINGS button
Displays a window for specifying settings for the instructor’s mic.
Teacher Mic Settings pop-up window ( page 25)
y STUDENT MIC GAIN SETTINGS button
Displays a window for specifying gain settings for each student’s headset mic.
Student HeadSet Mic Gain Settings pop-up window ( page 26)
q w e
t
r
y

ML Touch User’s Guide 25
Part names and functions
Teacher Mic Settings pop-up window
Used to specify the settings for the mic used by the instructor.
q HeadSet Mic Gain switch
Sets the mic gain when a wired mic is being used by the instructor. The default setting is off
(Low). If the volume is insufficient, turn on (High).
w Wireless Mic Volume slider
Adjusts the volume of a wireless mic.
e Wireless Mic Noise Gate Sensitivity slider
Sets the level at which a noise gate starts to be applied to a wireless mic. The more the
slider is moved to the right, the stronger the noise gate will be. However, the sound may
become unnatural.
r Wireless Mic Noise Gate ON/OFF switch
Turns on/off the noise gate. Turn on when worried about noise while not talking.
w
q
e
r
26 ML Touch User’s Guide
Part names and functions
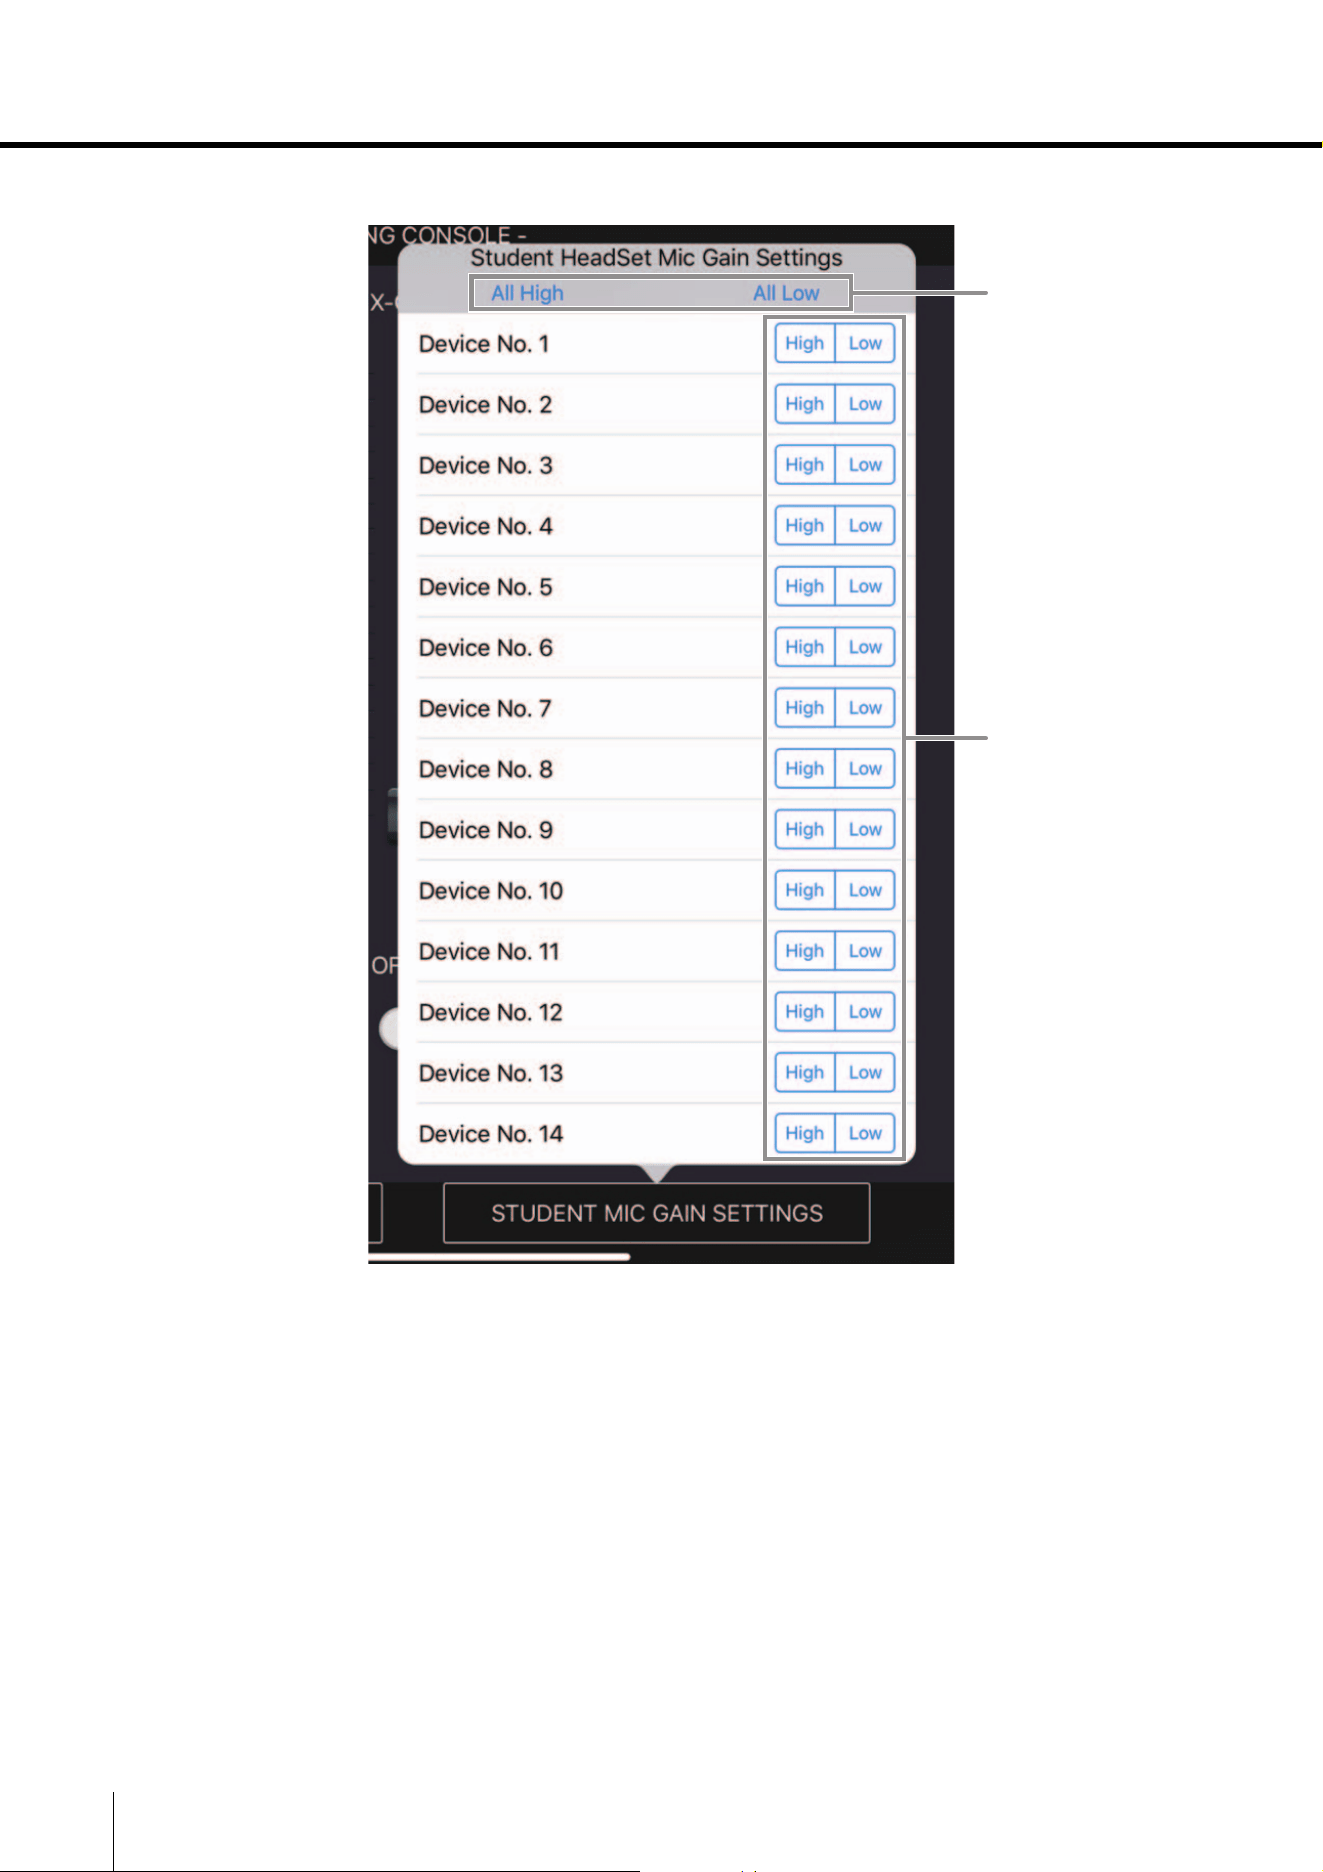
Student HeadSet Mic Gain Settings pop-up window
q All High button / All Low button
Sets the headset mic gain of each student to High or Low.
w High button / Low button
Sets the headset mic gain for a student to High or Low.
w
q
ML Touch User’s Guide 27
Part names and functions
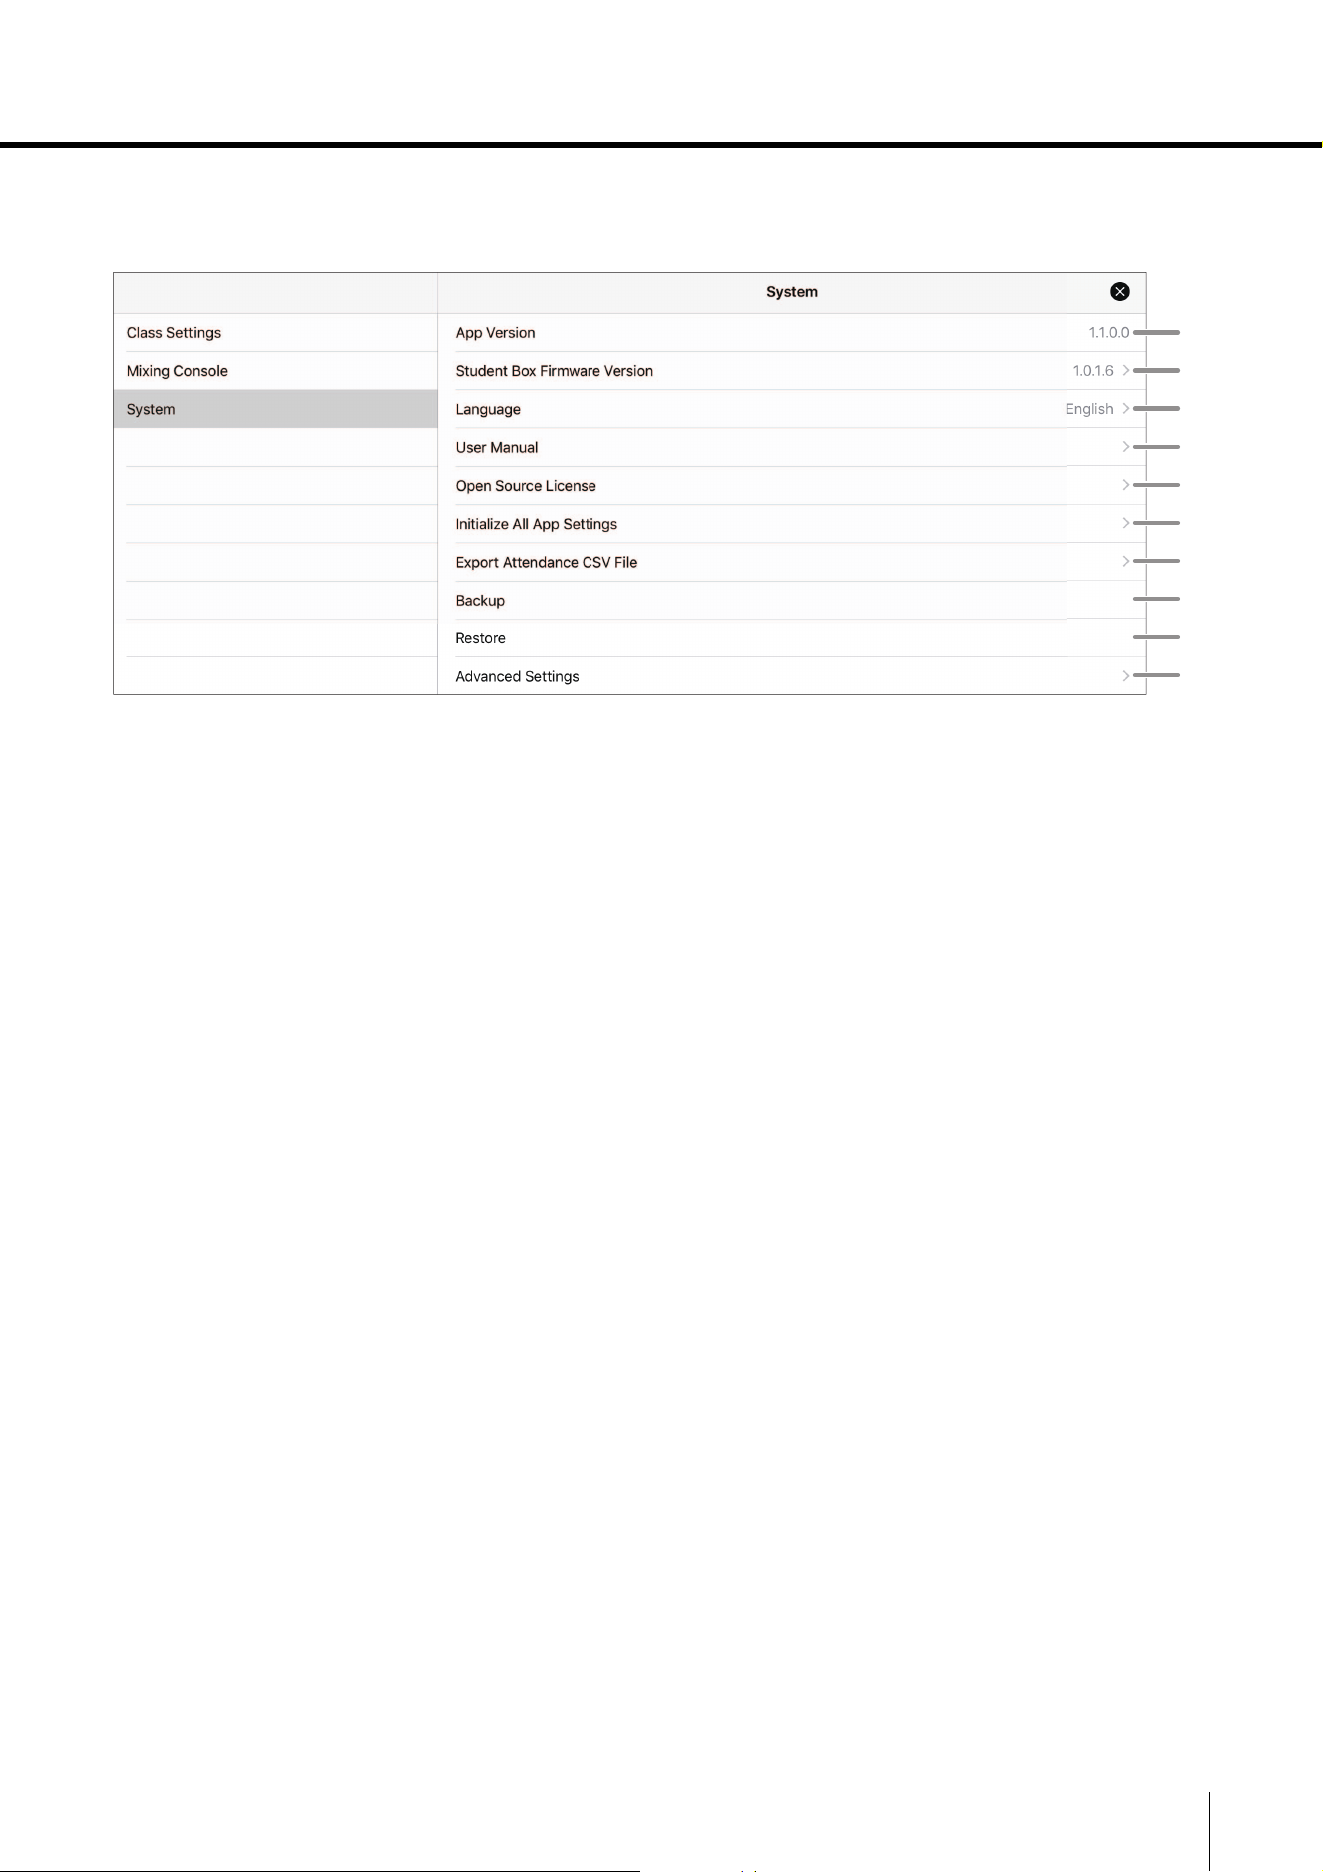
System menu
Used to specify ML Touch and system settings.
q App Version
Displays the ML Touch version.
w Student Box Firmware Version
Displays the version of a connected MLA-200. The version that is displayed is for the first IP
address. Tap to display a list of versions for all connected MLA-200s.
e Language
Sets the display language for ML Touch. English, Japanese, or Chinese can be selected.
r User Manual
Opens the ML Touch User’s Guide (this manual).
t Open Source License
Displays the open-source license used in the Music Laboratory System.
y Initialize All App Settings
Reverts ML Touch to its initial condition. After tapping displays a confirmation message, tap
the Yes button. To cancel initializing, tap the No button.
u Export Attendance CSV File
Exports the saved attendance record to a CSV file. The exported CSV file can be used as
an external file via iTunes.
i Backup
Backs up all ML Touch settings. The backed-up data is saved on the iPad in a file with the
name “System.bup”.
o Restore
Restores the system from the backup file “System.bup”.
!0 Advanced Settings
Used when building the system. This menu is normally not used.
q
w
e
r
t
y
u
i
o
!0
Part names and functions
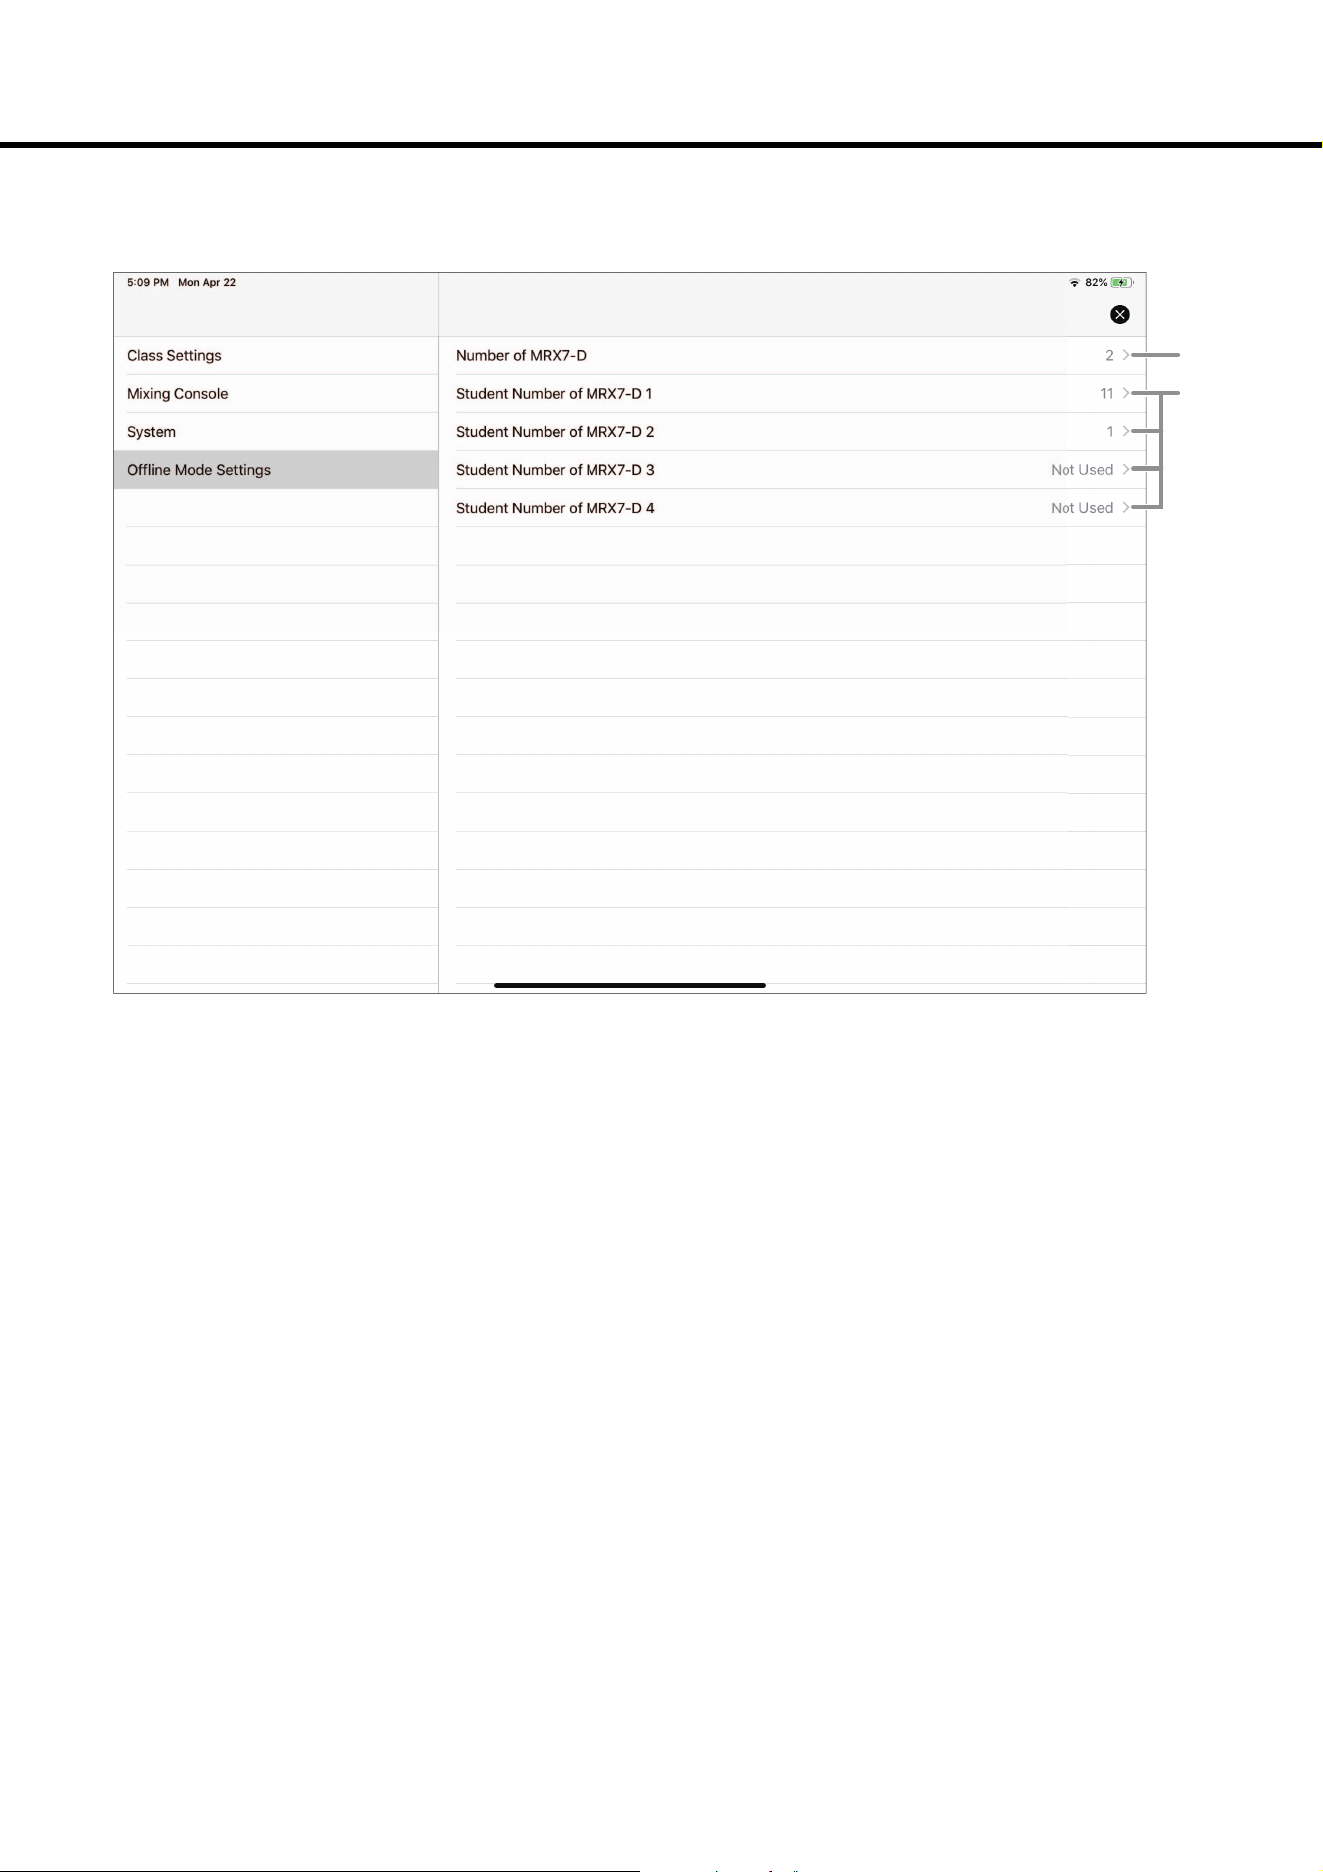
Offline Mode Settings menu
Used to specify environment settings when ML Touch is used offline.
q Number of MRX7-D
Specify the number of MRX7-Ds.
w Student Number of MRX7-D 1 through 4
Specify the number of MLA-200s for each MRX7-D.
q
w
Published 06/2019 CR-B0
© 2019 Yamaha Corporation
Manual Development Group
