Page | 1
SERVICE, INSTALLATION, AND INSTRUCTION MANUAL
For AUTHORIZED PARTS or TECHNICAL SERVICE, please contact:
1-877-368-2797 or Service@MaxxHelp.com
FOR SOME MODELS the POWER SUPPLY CORD is NOT INCLUDED.
MUST HAVE A 3-PRONG GROUNDING PLUG.
3355 Enterprise Avenue, Suite 160, Fort Lauderdale, FL 33331 USA
Phone: (954) 202-7419 • Website: MaxximumFoodService.com
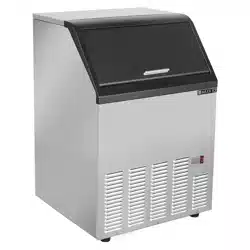
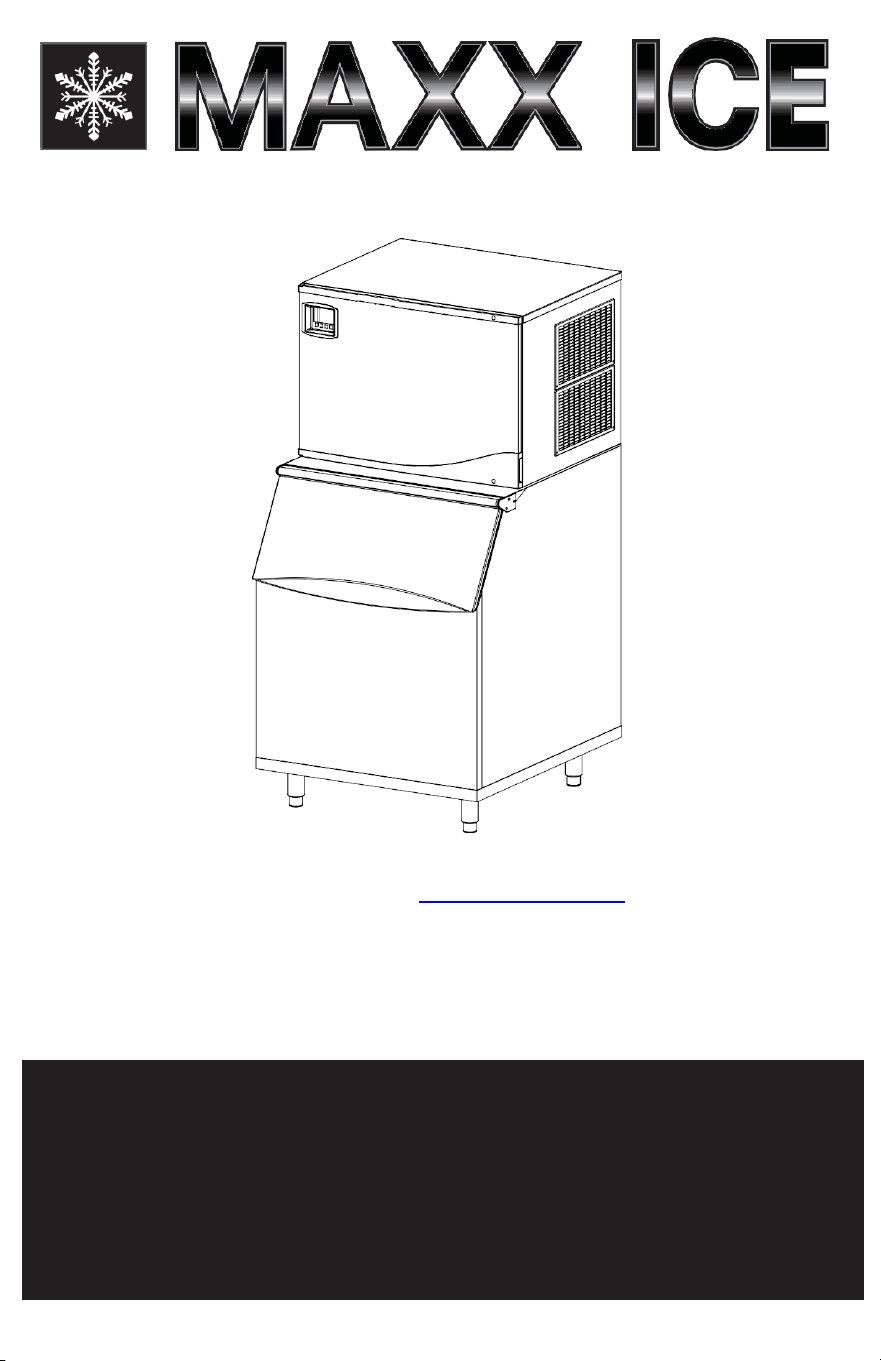
MIM360N-MIM360NH
MIM370N-MIM370NH
MIM500N-MIM500NH
MIM650N-MIM650NH
MIM1000N-MIM1000NH
COMMERCIAL ICE MACHINE
PLEASE READ CAREFULLY
V1_051517

Page | 2
Contents
ICE MAKER SAFETY 3
IMPORTANT SAFEGUARDS 4-5
MAJOR FEATURES 5
TECHNICAL INFORMATION 6
INTRODUCTION 6
COMPONENT INFORMATION 6
ICE MAKER INSTALLATION
Unpacking 7
Remove Packaging Material 7
Location Requirements 8-9
Typical Installation of Ice Storage Bin 9
Electrical Requirements 9
Connecting the power supply line 10
Water Supply 10
Installation Types 11
OPERATION
Final Checklist before Operation 11
Control Panel Operation 11-12
How the Machine Makes Ice 13
Normal Sounds 13
Preparing the Ice Maker for Long Storage 13
CLEANING AND MAINTENANCE
Exterior Cleaning 14
Interior Cleaning 14
Water Distribution Tube Cleaning 15
Ice-Making System Cleaning 15
Condenser Cleaning 16
TROUBLESHOOTING GUIDE 17
TROUBLESHOOTING 18
FRENCH 19-36
Maxx Ice reserves the right to make specifications and design changes without prior notice.
NOTICE:
This instruction manual is for the models noted on the front over.
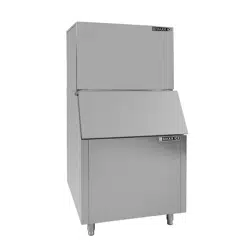
Ice storage bins are NOT INCLUDED.
Page | 3
ICE MAKER SAFETY
Always read and obey all safety messages.
This is the Safety Alert Symbol This symbol alerts you to potential hazards that
can injure or kill you and others All safety messages will follow the Safety
Alert Symbol and either the words “DANGER”, “WARNING” OR “CAUTION”
DANGER
DANGER means that failure to heed this safety statement may result in death or severe
personal injury.
WARNING
WARNING means that failure to heed this safety statement may result in extensive product
damage, serious personal injury, or death.
CAUTION
CAUTION means that failure to heed this safety statement may result in minor or moderate
personal injury, or property or equipment damage.
All safety messages will alert you to what the potential hazard is, tell you how to reduce the
chance of injury, and let you know what can happen if the instructions are not followed.
NOTE: IMPORTANT SAFETY INSTRUCTIONS
WARNING: To reduce the risk of fire, electric shock or injury, when using your ice maker, follow these
basic precautions:
•
Plug into grounded 3-prong outlet
•
Do not remove grounding prong
•
Do not use an adapter
•
Do not use an extension cord
•
Disconnect power before cleaning
•
Disconnect power before servicing
•
Replace all panels before operating
•
Use 2 or more people to move and install ice maker
SAVE THESE INSTRUCTIONS

Page | 4
IMPORTANT SAFEGUARDS
Before the ice maker is used, it must be properly positioned and installed as
described in this manual, so read the manual carefully We strongly
recommend that you have a professional install your new machine The
warranty may be affected or voided by an incorrect installation. To reduce
the risk of fire, electrical shock or injury when using the ice maker, follow basic
precautions, including the following:
DANGER
•
It is recommended that a separate circuit, serving only your ice maker, be provided Use
receptacles that cannot be turned off by a switch or pull chain
•
Do not connect or disconnect the electric plug when your hands are wet
•
Never unplug the ice maker by pulling on the power cord. Always grip the plug firmly
and pull straight out from the outlet
•
Never clean ice maker parts with flammable fluids. Do not store or use gasoline or
other flammable vapors and liquids in the vicinity of this or any other appliance. The fumes
can create a fire hazard or explosion.
•
Before proceeding with cleaning and maintenance operations, make sure the power line
of the unit is disconnected and the water line is shut off (EXCEPTION: When cleaning the
machine’s ice making and water systems)
•
Before operating, put all the enclosure panels back into their original places
•
Do not touch the evaporator with your hand when the machine is operating
•
Unplug the ice maker or disconnect power before cleaning or servicing Failure to do
so can result in electrical shock or death
•
Do not attempt to repair or replace any part of your ice maker unless it is specifically
recommended in this manual. A qualified technician should do all other servicing.
WARNING
•
Use two or more people to move and install ice maker Failure to do so can result in
back or other injury
•
To ensure proper ventilation for your ice maker, the front of the unit must be completely
unobstructed Choose a well-ventilated area with temperatures above 50ºF (10ºC) and
below 100ºF (38ºC) This unit MUST be installed in an area protected from the elements,
such as wind, rain, water spray or drips
•
The ice maker should not be located next to ovens, grills or other sources of high heat
•
The ice maker must be installed with all electrical and water connections in
accordance with state and local codes A standard electrical supply against the
nameplate rating, properly grounded in accordance with the National Electrical Code
and local codes and ordinances is required
•
The fuse (or circuit breaker) size should be 20 amperes for the ice makers
•
It is important for the ice maker to be well leveled for proper operation You may need to
make several adjustments to level it
•
All installations must be in accordance with local plumbing code requirements
•
Make certain that the hoses are not pinched or kinked or damaged during installation
•
Check for leaks after connection
•
Although the unit has been tested at the factory, due to long-term transit and storage,
the first batch of cubes must be discarded
•
Remove the packing materials and clean the ice maker before using
•
Turn on the water supply tap before switching on the ice maker Never turn off the water
supply tap when the ice maker is working
•
Except to take ice from the storage bin, keep the bin door closed in order to reduce ice
melting and to promote proper ice formation
•
If the ice maker will not be used for a long time, before the next use it must be
thoroughly cleaned Follow carefully any instructions provided for cleaning or use of
sanitizing solution Do not leave any solution inside the ice maker after cleaning
•
DO NOT touch the condenser fins. The condenser fins are sharp and can be easily damaged.
Page | 5
•
DO NOT use solvent-based cleaning agents or abrasives on the interior These cleaners may
transmit taste to the ice cubes, or damage or discolor the interior
•
The ice machine cleaner contains acids DO NOT use or mix with any other solvent-based cleaner
products Use rubber gloves to protect hands Carefully read the material safety instructions on
the container of the ice machine cleaner
•
Do not use this apparatus for other than its intended purpose
Electrical Connection
Do not, under any circumstances, cut or remove the third (ground) prong from the power cord
For personal safety, this appliance must be properly grounded The power cord of this appliance
is equipped with a 3-prong grounding plug that mates with a standard 3-prong grounding wall
outlet to minimize the possibility of electric shock hazard from the appliance Have the wall outlet
and circuit checked by a qualified electrician to make sure the outlet is properly grounded. When
a standard 2-prong wall outlet is encountered, it is your responsibility and obligation to have it
replaced with a properly grounded 3-prong wall outlet The ice maker should always be plugged
into its own individual electrical outlet which has a voltage rating that matches the rating label on
the appliance This provides the best performance and also prevents overloading house wiring
circuits which could cause a fire hazard from overheated wires. Never unplug your ice maker by
pulling on the power cord. Always grip the plug firmly and pull straight out from the outlet. Repair
or replace immediately all power cords that have become frayed or otherwise damaged Do not
use a cord that shows cracks or abrasion damage along its length or at either end When moving
the ice maker, be careful not to damage the power cord
Extension Cord
Because of potential safety hazards under certain conditions, it is strongly recommended that you
do not use an extension cord with this ice maker
Major Features
1
Completely automatic operation
2
Easy read screen Displays operational status, reminders and alerts
3
The fan motor responds to the ambient temperature If room temperature is low, the motor
will stop working to keep the cooling system in good working condition
4
Ice cube size is adjustable
5
Periodically draining water allows more pure ice and keep minimum mineral buildup
6
A sensitive probe and accurate timer enhance the performance of the ice maker
Technical Information
MODEL
MIM360N/360NH
MIM370N/370NH
MIM500N/500NH
MIM650N/650NH
MIM1000N/1000NH
Electrical input
115VAC / 60Hz
115VAC / 60Hz
115VAC / 60Hz
230VAC / 60Hz
230VAC / 60Hz
Power consumption
(kW·h /100 lbs of ice)
6 1
6 1
4 9
5 65
5 0
Ice-making/Ice-harvest
rated current
7.5A/10.5A
7.5A/10.5A
7A/9.3A
7.1A/8.0A
10A/11.1A
Refrigerant
R404A, 24.5oz
R404A, 24.5oz
R404A, 24.5oz
R404A, 43 oz
R404A, 57.1oz
High/Low side pressure
380psig/240psig
380psig/240psig
380psig/240psig
380psig/190psig
400psig/190psig
Unit width x depth x height
22"x 24.6"x 21"
30"x 24.6"x 21"
30"x 24.6"x 21"
30"x 24.6"x 21"
30"x 24.6"x 26.7"
Unit weight
98 lbs
98 lbs
125 lbs
134 5 lbs
178 5 lbs
Ice-making capability
+280 lbs/day*
+280 lbs/day*
+360 lbs/day*
+540 lbs/day*
+800 lbs/day*
Ice shape
Cube
Cube
Cube
Cube
Cube
Ice cube dimensions
Dice: 3/4”x 1”x 3/4”
Dice: 3/4”x 1”x 3/4”
Dice: 3/4”x 1”x 3/4”
Dice: 3/4”x 1”x 3/4”
Dice: 3/4”x 1”x 3/4”
Half dice: 1/2”x 1”x 3/4”
Half dice: 1/2”x 1”x 3/4”
Half dice: 1/2”x 1”x 3/4”
Half dice: 1/2”x 1”x 3/4”
Half dice: 1/2”x 1”x 3/4”
*The actual quantity of ice produced per day can vary with room and water conditions The technical data and
performance indices listed above should be used for reference only They are subject to change.
Page | 6
Introduction
This user’s manual is intended for installing, using and servicing your Maxx Ice Machine. It is
recommended that this manual be kept in an accessible place. Every Maxx Ice machine is
designed and manufactured according to the highest standards of safety and performance It
meets or exceeds the safety standard of UL563 and sanitation standard NSF12
The Legacy Companies assumes no liability or responsibility of any kind for products manufactured by
Maxx Ice, that have been altered in any way, including the use of any parts and/or other
components not specifically approved by The Legacy Companies. Maxx Ice reserves the right to
make design changes and/or improvements at any time. Specifications and designs are subject to
change without notice.
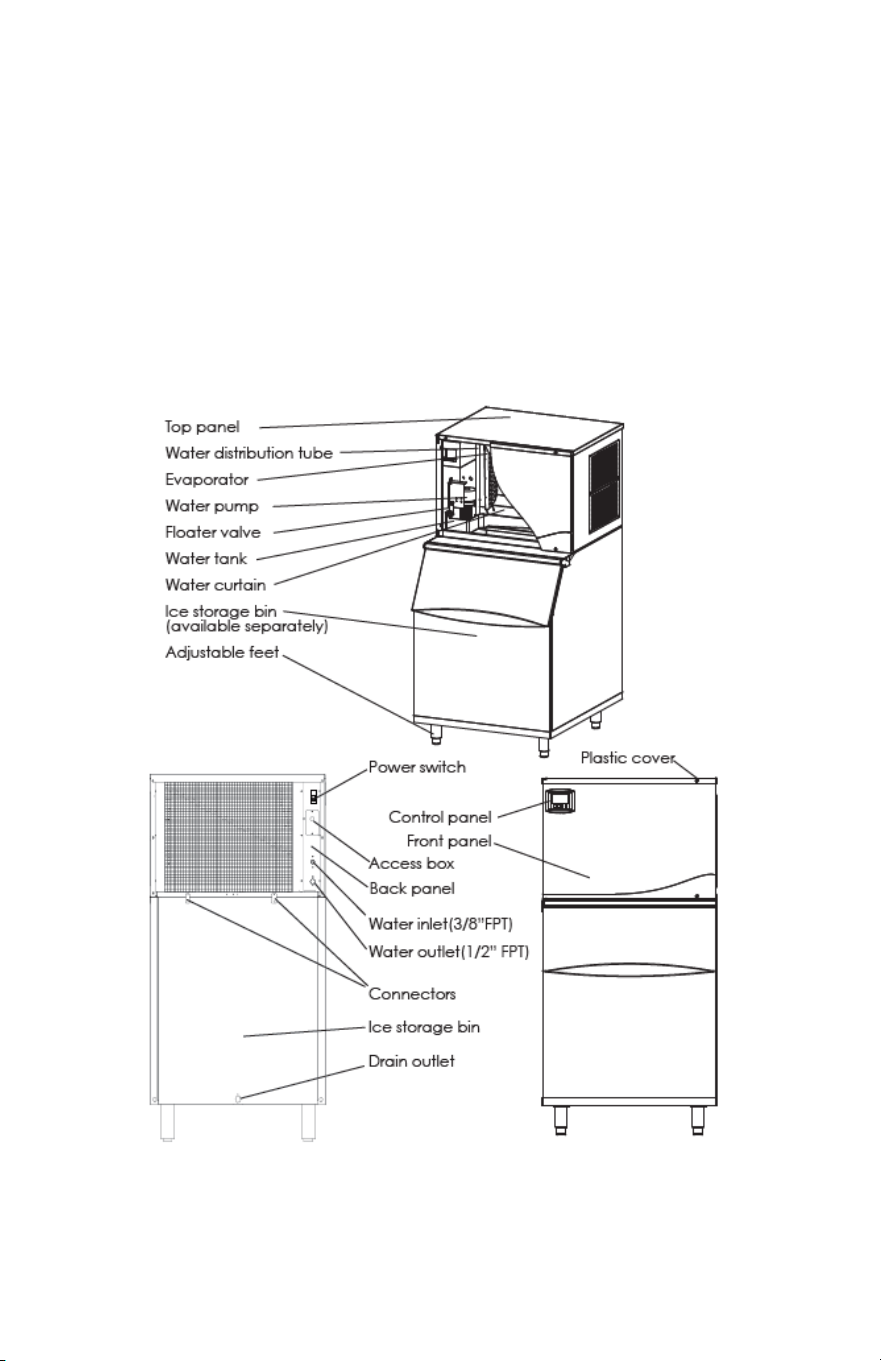
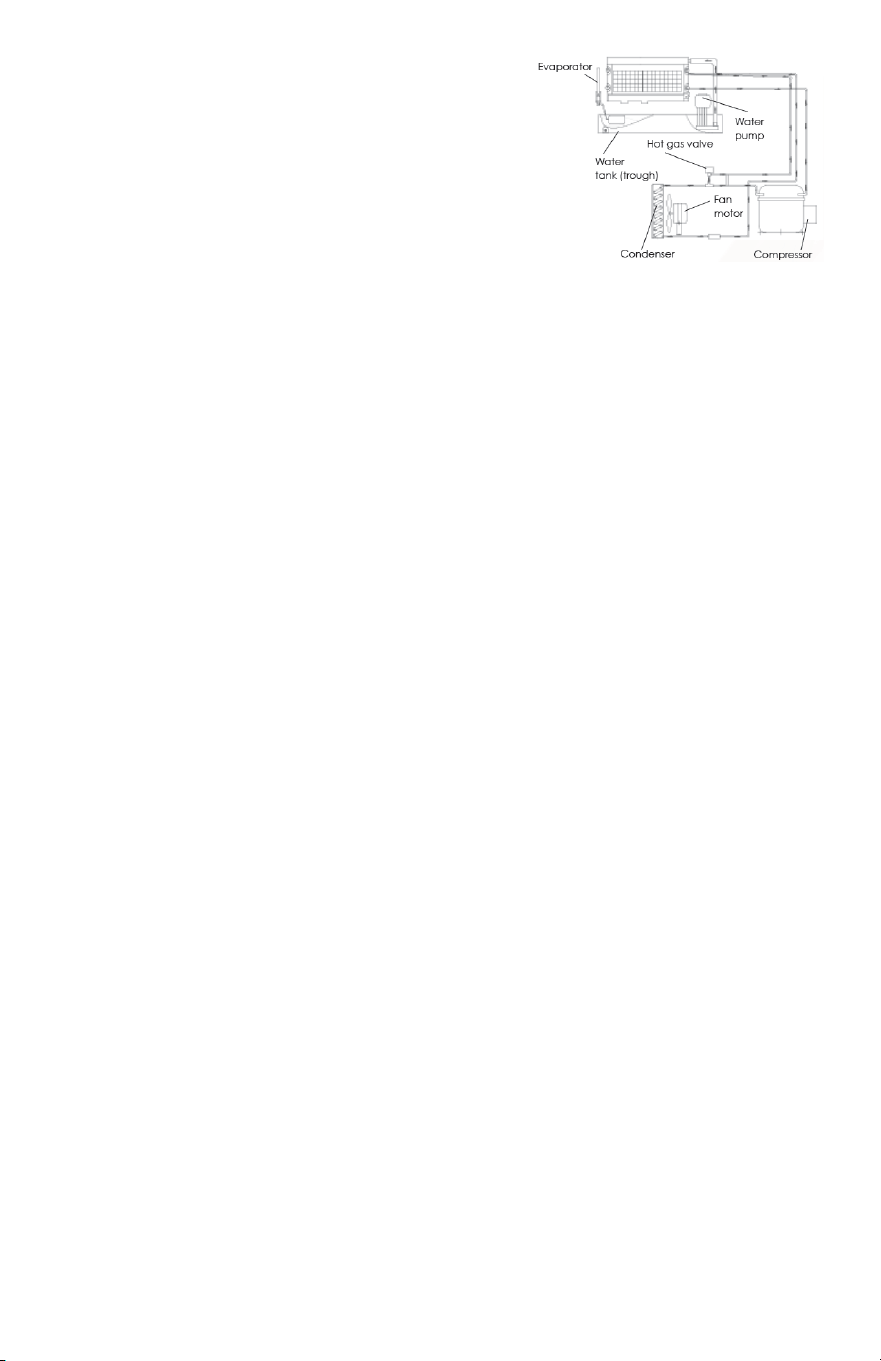
Component Information
Page | 7
Ice Maker Installation
POWER SUPPLY CORD - NOT INCLUDED.
MUST HAVE A 3-PRONG GROUNDING PLUG.
UNPACKING
This unit is an ice maker only. It requires a separate ice storage bin.
REMOVE PACKAGING MATERIALS
IMPORTANT:
Do not remove any permanent instruction labels or the data label on your ice maker.
Remove tape and glue from your ice maker before using,
• To remove any remaining tape or glue, rub the area briskly with your thumb. Tape or glue residue can
also be easily removed by rubbing a small amount of liquid dish soap over the adhesive with your
fingers. Wipe with warm water and dry with a soft cloth.
• Do not use sharp instruments, rubbing alcohol, flammable fluids, or abrasive cleaners to remove tape
or glue These products can damage the surface of your ice maker
LOCATION REQUIREMENTS
• This ice maker should be installed by qualified personnel.
• The ice maker must be installed with all electrical and water connections in accordance with state
and local codes.
• Installation of the ice maker requires a cold water supply inlet of 3/8”(9 5 mm) soft copper tubing with
a shut-off valve.
• The ice maker requires a continuous water supply with a minimum pressure of 15 psig and a static
pressure not to exceed 80 psig.
• To ensure proper ventilation for your ice maker, you need keep the front of the unit completely
unobstructed. This unit MUST be installed in an area protected from the elements, such as wind, rain,
water spray or drips. The unit should not be located next to ovens, grills or other sources of high heat.
• It is recommended to use filtered water. A water filter can remove taste, odors and particles.
WARNING
Excessive Weight Hazard
Use two or more persons to move and install ice maker.
Failure to do so may result in back or other injury.
WARNING
Normal operating ambient temperature should be between
50˚F (10˚C) and 100˚F (38˚C). Normal operating water temperature should be between
41˚F (5˚C) and 90˚F (32˚C). Operation of the ice maker for extended periods outside of
these normal temperature ranges may affect production capacity

Page | 8
INSTALLATION CLEARANCE
TOP VIEW of ICE MACHINE
REAR VIEW of ICE MACHINE

Page | 9
REAR VIEW if ATTACHING to an ICE BIN
The (2) security latch holes are used when securing to an ice bin.
TO INSTALL ICE MACHINE to a ICE STORAGE BIN
Two connecting brackets are attached to the upper rear edge of the ice storage bin.
Turn the brackets up (180°) and use two screws to connect the main machine and ice storage bin.
The feet of most bins can be rotated to adjust the height if necessary Follow instructions
accompanying the bin you purchase.
The feet of most bins can be rotated to adjust the height if necessary.
The ice maker and bin should be located on a firm and level surface. It is important for the ice
maker to be perfectly level for proper operation; otherwise water may not flow properly through the
evaporator (ice mold) Ice production will be less than expected and operation will be noisy.
ELECTRICAL REQUIREMENTS
Before you move your ice maker into its final location:
Be sure you have the proper electrical connection.
Refer to the nameplate rating at the left of the ice machine to make sure proper voltage,
properly grounded in accordance with National Electrical Code and local codes and
ordinances, is required.
The ice maker should always be plugged into its own individual electrical outlet It is
recommended that a separate circuit, serving only your ice maker, be provided.
Use receptacles that cannot be turned off by a switch or pull chain The fuse (or circuit breaker)
size should be 20 amperes
DANGER
Plug into a grounded 3-prong outlet.
Never remove the grounding prong from the plug.
Never use an adapter. Never use an extension cord.
Failure to follow these instructions can result in fire, electrical shock or
death.
Page | 10
RECOMMENDED GROUNDING METHOD
POWER SUPPLY CORD - NOT INCLUDED.
MUST HAVE A 3-PRONG GROUNDING PLUG.
For your personal safety, this appliance must be grounded. To minimize possible shock hazard, the
cord must be plugged into a mating 3-pronged and grounding-type wall receptacle, grounded in
accordance with the National Electrical Code and local codes and ordinances. If a mating wall
receptacle is not available, it is the personal responsibility of the customer to have a properly
grounded, 3-prong wall receptacle installed by a qualified electrician.
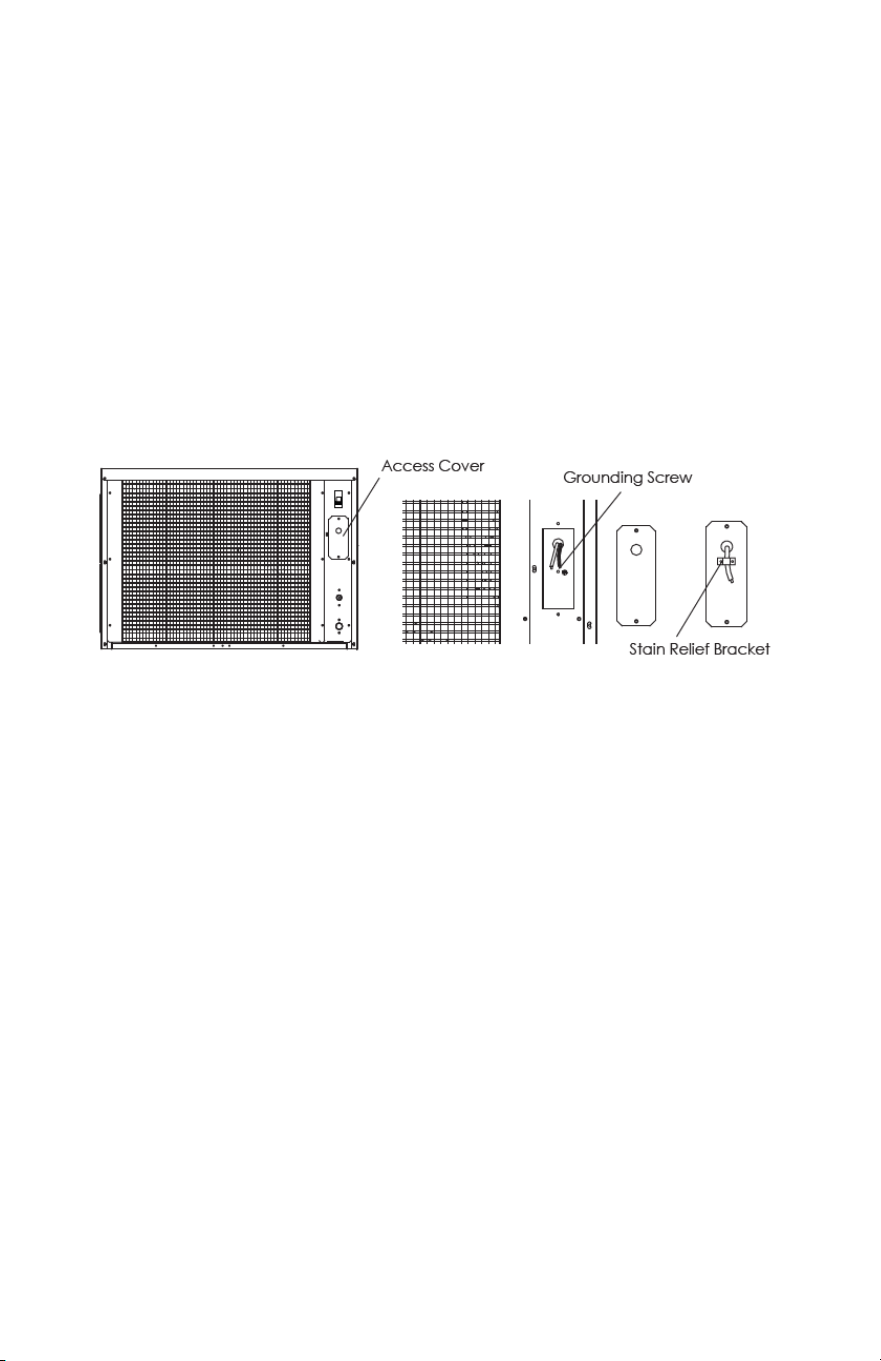
CONNECTING THE POWER SUPPLY LINE
1. Unscrew the two screws holding the access cover and remove the cover. You will find two leads
(black and white.) See drawing below.
2. Feed a power supply cord (not included) through the access cover and connect it with the two
leads. The ground line should be connected to the grounding screw. The two connectors must be
insulated Put the access cover back in place.
3. You will find a strain relief bracket in the accessory package. Fix the power supply cord below the
bracket, as shown in the previous illustration.
4. The other end of the power supply cord should be connected to an outlet that is in accordance
with the local electrical code.
Note: This machine is stackable on any of the machines in this manual. If the machine is to be stacked
on top of another machine, a stacking kit will need to be installed. Refer to the installation instructions
included with the stacking kit.
WATER SUPPLY
The water supply should be ready at the point of installation. The water supply pressure should be a
minimum of 15 psig with a static pressure not more than 80 psig. (A wall outlet directly behind the ice
maker will make installation easier. )
Tools required: 3/8” open-end wrench and Phillips screwdriver
IMPORTANT:
1
All installations must be in accordance with local plumbing code requirements.
Professional installation is recommended.
2
Water inlet fitting: 3/8” FPT (Female Pipe Thread); drain line connection: 1/2” FPT.
3
Make certain you have a suitable water supply hose and two suitable drain hoses, and that the
hoses are not pinched, kinked or damaged during installation
4
Check for leaks after connection.
Connecting the water line:
1
Turn off main water supply.
2
Find a water supply line near the installation location. The distance should be less than the length
of the water supply hose.
3
A shut-off valve must be installed to the main water supply.
4
Connect the water supply hose to tap and water inlet valve. Tighten firmly by hand, then one-half
turn with wrench
5
Connect the water drain hose to drain line connection. Tighten firmly by hand, then one-half turn
with wrench.
6
Turn on main water supply and tap. Check for water supply connection leaks. Tighten every
connection (including connections at the water inlet.)

Page | 11
INSTALLATION TYPES
This ice maker has only been designed for mobile (free-standing) installation
Mobile installation:
An enclosed installation will allow you to install the ice cube machine under a counter or in a kitchen
cabinet provided the required clearance space around the ice maker is respected.. You must follow
the stated instructions for:
a Electrical requirements
b Water supply
Cleaning before use
After you remove all tape from the machine, clean the inside of your ice maker and ice storage bin
before using them. See “Interior Cleaning” in the Cleaning and Maintenance section.
Operation
FINAL CHECK LIST BEFORE OPERATION
1. Have all packing materials and tape been removed from the interior and exterior of the ice maker?
2. Did you clean the ice storage bin?
3. Have the installation instructions been followed, including connecting the machine to water
and electricity?
4. Has the machine been leveled?
5. Is the ice cube machine in a site where the ambient temperature is between 50º F (10º C) and 100º
F (38º C) and the water temperature between 41º F (5º C) and 90º F (32º C) all year round?
6. Has the water supply pressure been checked to ensure a minimum of 15 psig with a static
pressure not to exceed 80 psig?
7. Is there a clearance of at least 6” (150 mm) at the rear and sides, 1” (25 mm) at the top for
proper air circulation?
8. Has the power supply voltage been checked or tested against the nameplate rating? And has
proper grounding been installed for the ice cube machine?
9. Is the ice cube machine plugged in?
10. Have you turned on the main water supply and the tap?
11. Have you checked for leaks at all water supply connections?
Control Panel (in the front panel of the machine)
You will find the control panel in the front panel
of the machine This control panel offers four pressure
sensitive
buttons and a LCD display screen
1 ON/ OFF Button. Powers the ice machine.
2 Bin Full Process: When the words of "Bin Full" display, the ice storage bin is full of ice or
something is holding the water curtain open The unit will stop working When ice cubes are
taken out of the ice storage bin, releasing the water curtain, the words of "Bin Full" will fash for
3 minutes. The unit will then restart and returns to the ice making mode.
3 Making Ice Process: When the words of "Making Ice" display, the unit is working in the Ice
Making mode controlled by a temperature probe on the evaporator and a fixed timer.
4 Harvesting Ice Process: When the words of "Harvesting Ice" di splay, the unit is working in the Ice
Harvest mode controlled by a temperature probe on the evaporator and a fixed timer.
5 Clean Button: When this button is pressed, the unit enters the Cleaning mode. the screen will
display "Cleaning" To stop the Cleaning mode, just press the button again.
6 Mode Button: Recommended for service technician only. When this button is pressed, unit
can change from Ice Making mode to Ice Harvest mode or from Ice Harvest mode to Ice
Making mode. You can judge the mode from the displaying contents on the screen.
7 Water Fill Process: When the words of "Water Fill" display, there are three minutes for water inlet
and self-checking After
three minutes the ice maker will start to make ice automatically.
Page | 12
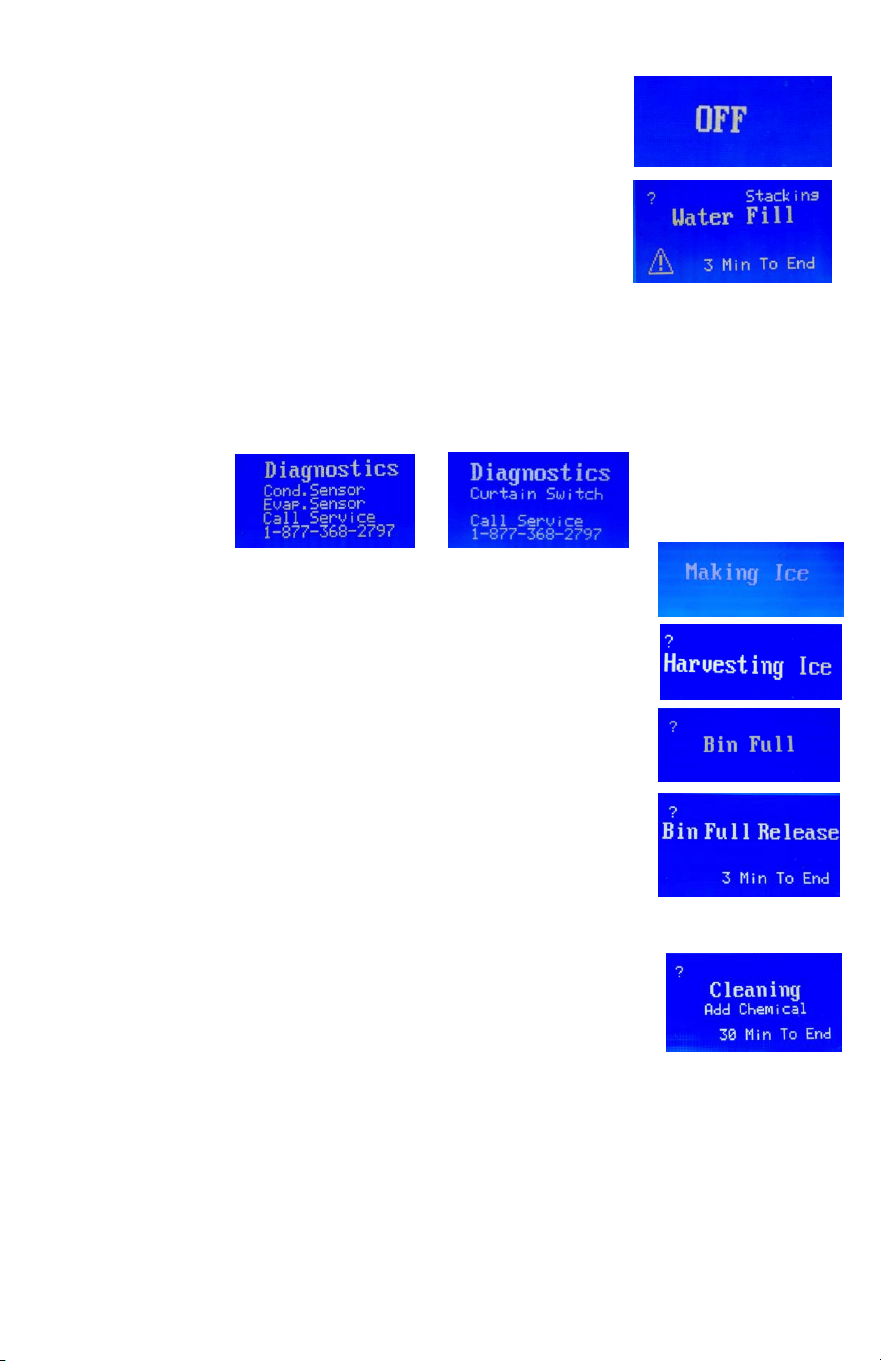
OPERATION OF THE CONTROL PANEL:
1. When the unit is plugged in and turn on the power switch. Only
“OFF” displays on the LCD screen.
2. Press the ON/OFF button, the LCD screen lights. If normal, only the
words of “Water Fill” and “3 Min To End” displays on the LCD screen.
The ice maker will start to make ice automatically when the words
of “3 Min To End” changes to “0 Min To End".
Note:
Only when the double ice machine heads stacked, the words of “Stacking” may be
displayed on the LCD screen.
When the ice machine runs in “Water Fill” process, the control board will check the
condenser probe, evaporator probe and water curtain function, if one of them defaults, the
exclamation mark will appear and blink on the left bottom corner of the LCD screen. At this
time press “ADJUST” button, the Diagnostics for Curtain switch, condenser sensor and
evaporator sensor will appear on the LCD screen.
or
3. After three minutes, the ice maker will start to make ice automatically.
The words of “Making Ice” displays on the LCD screen.
4. When the ice machine runs in harvest process, the words of
“Harvesting Ice” displays on the LCD screen.
5. When the ice storage bin is full, the words of “Bin Full” displays on the
LCD screen. The unit stops working.
6. When ice cubes are taken out from the ice storage bin, releasing the
water curtain, the machine will judge the status for three minutes.
During this period, the LCD screen will display the words of “Bin Full
Release” and “3 Min To End”. "Bin Full Release” flashes until the words
“3 Min To End” changes to“0 Min To End”. At this time, the ice maker
will start to make ice automatically.
7. TO CLEAN THE MACHINE, press the ON/OFF button first, then press it on again.
During “Water Fill” process, press the “CLEAN” button, the ice maker
will start the cleaning process, the words of “Cleaning”, “Add
chemical” and “30 Min To End” display on the LCD screen.
At the first one minute, the words of “Add chemical” flash to remind
pouring the Ice Maker Cleaner Solution into the water tank until the
words of “30 Min To End” changed into “29 Min To End”, the words of “Add chemical”
disappear and the water pump runs, the ice maker goes into cleaning process.
The ice-making system cleaning cycle will continue until the words of “30 Min To End” changed
into “0 Min To End”, the cleaning process stops and the ice machine is in suspend mode.
You can press the ON/OFF button to stop the cleaning cycle any time during the cleaning
mode.
If you want to make ice cubes after cleaning, press the ON/OFF twice, the next ice-making
cycle will begin. See photo below.
NOTE:
Pressing the CLEAN BUTTON has no effect when the ice maker runs in ice-making, harvest and bin
full process.

Page | 13
Additional Functions:
1. Draining Function: press the “Clean” button and hold for 6
seconds, the machine will go into the draining water mode
automatically. The words of “Purging Water” appear on the
LCD screen. The words disappear after 3 minutes and the
draining process stops. NOTE: Draining function only effect in
“Water Fill” process and “Cleaning” process.
2. Self-checking Function: when the ice maker runs, the control board will check the
condenser probe, evaporator probe, high condenser temperature, water shortage, long
freeze, long harvest and water curtain function, if one of them defaults, the
exclamation mark will appear and blink on the left bottom corner of the LCD screen. At this
time press “ADJUST” button, the cause of default will appear on the LCD screen. See photo
below.
3. Purging cycle interval Optional Function: during “Water Fill”
process, press and hold the “CLEAN” button and “ADJUST”
button together for at least 3 seconds. The unit will enter the
“Purging Optional” process, the words of “Purging Optional”
and “20 Cycle” (Note: The cycle number may display other
number) appear on the LCD screen. During this period, you
can press the “MODE” or “CLEAN” button for the desired purging cycle interval. You can
choose any purging cycle interval from 0 to 20.
4. After 10 seconds without any operation, the unit will automatically memorize the current
status and return to the previous process.
NOTE: The machine is only in “Water Fill” process, the purging cycle interval Optional Function can be
accessed. IMPORTANT: The purging cycle interval 20 has been set at the factory for optimum
performance. You can change it according to the quality of water.
ICE BRIDGE SIZE ADJUSTMENT GUIDE:
1
Press
and
hold
the
“ADJUST"
button
for
at
least
3
seconds
The
unit
will
enter
the
Ice
Size
Adjustment mode and the words "Ice Adjust" display on the LCD Screen.
2
While in the Ice Size Adjustment mode, press the “Clean” button or the “Mode” button for the
desired ice size.
SMALLER ICE SETTING:
By pressing the “Clean” button, you can decrease the size of the ice bridge The words of "-6
Minutes" indicate the smallest ice size
LARGER ICE SETTING:
By pressing the “Mode” button, you can increase the size of the ice bridge The words of "+10 Minutes"
indicate the largest ice size. After 10 seconds without any operation, the unit will automatically
memorize the current state and return to the previous mode.
NOTE:
•
If during the ice size adjustment mode the words of “Ice Adjust” and “0 Minute” display on the LCD
screen, this indicates that the unit is in the regular (middle) setting of the ice size.
•
When the machine is in the cleaning stage or ice full stage, the ice size adjustment mode cannot be
accessed
IMPORTANT:
•
The ice bridge adjustment has been set at the factory for optimum performance and it is not
recommended for a user to make this adjustment This ice adjustment procedure should therefore be
made only by an authorized service technician
IMPORTANT:
•
Although the unit has been tested and cleaned at the factory, due to long-term transit and storage,
the first batch of cubes must be discarded.
•
Never turn the water supply tap off when the ice maker is working.
•
Never touch the evaporator when the machine is running.
•
Keep the door closed as much as possible to reduce melting and insure proper ice formation.
Page | 14
HOW THE ICE MACHINES MAKES ICE
Turn the power switch to the ON position.
Then press ON/OFF button in front panel.
The LCD screen lights.
After about 3 minutes the machine will
automatically go into the ice-making stage.
There are two distinct cycles: freeze and harvest.
In the freeze cycle, water flows to the evaporator
surface. In the harvest cycle, the ice is released
and water enters the machine.
A complete cycle (freeze cycle and harvest cycle) takes 15 to 40 minutes,
depending on temperature and operating conditions.
Freeze: During the freeze cycle the compressor is pumping refrigerant, the fan motor is blowing air, and
the water pump is pumping water. When the batch of ice has been fully formed, the ice maker stops
the
freeze cycle and the harvest cycle start.
Harvest: During the harvest cycle, the compressor is still operating and power is supplied to the hot gas
valve. Every 20 cycles, the water purge valve opens and allows the water pump to purge the water
from
the water tank, removing all impurities and sediment. This allows the machine to make clear ice
cubes and keep mineral build-up at a minimum. The water pump will then stop. When the hot gas valve
opens, it allows
hot gas to go directly to the evaporator. The gas warms the evaporator, causing the
cubes to slide off the
evaporator and into the storage bin. The freeze cycle will restart when all the cubes
drop into the bin.
HOW THE MACHINE USES WATER
The ice maker begins with a fixed charge of water that is contained in the water tank. As the water flows
to
the freezing evaporator surface, the water freezes and sticks to the ice cube molds. During the ice-
making process, fresh water enters the water tank continuously as the water from the tank freezes
continuously on the evaporator.
NORMAL SOUNDS
Your new ice cube machine may make sounds that are unfamiliar to you. Most of the new sounds
are normal Hard surfaces like the floor and walls can amplify the sounds. The following describes the
kinds of sounds that might be new to you and what may be causing them.
Rattling noises may come from the flow of the refrigerant or the water line. Items stored on top of
the ice
cube machine can also make noises.
The high-efficiency compressor may make a pulsating or high-pitched sound.
Running water may make a splashing sound.
You may hear air being forced over the condenser by the condenser fan.
During the Harvest cycle, you may hear the sound of ice cubes falling into the ice storage bin.
PREPARING THE ICE CUBE MACHINE FOR LONG STORAGE or WHEN MOVING THE ICE MACHINE
1
Shut off the water supply at the main water source.
2
Disconnect the water supply pipe from the water inlet.
3
Depress the clean button and hold for six seconds. Draining mode starts automatically. When
the words "Water Fill" display, the drain process is complete.
4
Shut off the power supply at the main electrical power source.
5
Dry the water tank.
6
Remove all ice cubes from the ice storage bin and dry it.
7
Keep the food open to allow for ventilation and to prevent mold and mildew.
8
Leave the water supply pipe and power cord disconnected until needed for use.
IMPORTANT: Do not touch the power plug when your hands are wet. Never unplug the unit by pulling on
the cord.

Page | 15
Cleaning and Maintenance
Periodic cleaning and proper maintenance will ensure efficiency, top performance, and long life. The
maintenance intervals listed are based on normal conditions You may want to shorten the intervals if
you have pets or there are other special considerations
WHAT SHOULDN’T BE DONE
Never keep anything in the ice storage bin other than ice: objects like wine and beer bottles are not
only unsanitary, but the labels may slip off and plug up the drain
WHAT SHOULD BE KEPT CLEAN
1 The exterior
2 The interior
3 Water distribution tube
4 The ice-making system cleaning
EXTERIOR CLEANING
The exterior of the ice maker and bin may be cleaned with a soft cloth or sponge dampened with a
mild detergent and warm water solution such as 1 oz of dishwashing liquid mixed with 2 gallons of warm
water. Never use solvent-based or abrasive cleaning agents. Rinse with clean water. Wipe with a
soft clean towel to prevent water spotting.
INTERIOR CLEANING
Clean the water tank before the ice maker is used for the first time and reused after stopping for an
extended period of time. It is usually convenient to sanitize the tank after the ice-making system
has been cleaned and the ice storage bin is empty. The ice storage bin should be sanitized
occasionally.
Follow these steps to clean the tank and the bin:
1. Disconnect power to the unit
2. Using a knifepoint or similar tool t o remove the plastic covers on the top and bottom front
panel
3. Using a Phillips screwdriver, remove the screws, then swing the front panel open
4. Using a sanitizing solution made o f 1 ounce of household bleach and 2 gallons of hot water
(95º to 115ºF), wipe down the water tank and the inside of the ice storage bin with a clean
cloth To clean hard-to-reach corners, apply the sanitizing solution with a spray bottle.
5. Rinse thoroughly with clear water.
6. This completes the interior cleaning of the ice maker and storage bin.
7. Reconnect power to the unit.
CAUTION
If the ice maker is left unused for a long time, before the next use it must be thoroughly
cleaned Follow carefully any instructions provided for cleaning or use of sanitizing solution
Do not leave any solution inside the ice maker after cleaning.
WARNING
Before proceeding with cleaning and maintenance operations, make sure the power
line of the unit is disconnected and the water line is shot off. (EXCEPTION: Cleaning of ice-
making system)

Page | 16
Cleaning and Maintenance
WATER DISTRIBUTION TUBE CLEANING
When you find that the ice cubes are incompletely formed or the output of ice cubes is low, the water
distribution tube may be blocked Set the power switch to OFF Unscrew the six screws holding the top
panel and remove the panel You will see the water distribution tube Rotate the water distribution tube
so that the holes in it are facing up Using a toothpick or similar tool, dredge the holes, then rotate the
water distribution tube back to its original position If the tube is badly blocked, clean it as follows:
1. Shut off the water and power supplies
2. Disconnect the water hose from the distribution tube
3. Lift one side, remove the distribution tube
4. With a brush, clean the tube with a dilute solution of warm water and a mild detergent
such as dishwashing liquid After removing the dirt and lint from the surface, rinse the tube
with clean water
5. Replace the distribution tube
6. Reconnect the water supply and power supply lines
7. Re-attach the top and front panels
ICE-MAKING SYSTEM CLEANING
Minerals that are removed from water during the freezing cycle will eventually form a hard, scaly
deposit in the water system. Cleaning the system regularly helps remove the mineral scale buildup
How often you need to clean the system depends on how hard your water is or how effective your
filtration may be. With hard water of 15 to 20 grains/ gallon (4 to 5 grains/liter), you may need to clean
the system as often as every 3 months.
1. Using tools to remove the plastic c over and screws fixed in front panel, swing the front panel
open.
2. Make sure all ice is off evaporator If ice is being made, initiate harvest or wait for cycle
completion, then turn machine off at the power switch.
3. Remove all ice cubes from the storage bin.
4. Keep the ice maker connected to the water supply Pour 8 oz of Nickel-Safe Ice Maker
Cleaner Solution into the water tank.
5. Press ON/OFF button to light the LCD screen. Within 3 minutes, press the CLEAN button.
The machine will automatically shift into cleaning mode.
6. The ice-making system cleaning cycle will continue for 30 minutes unless you press ON/OFF
button (you can press the power switch to stop the cleaning cycle any time during the 30
minutes) After cleaning, the LCD screen will display the words of "OFF"
The cleaning
process stops.
7.
Repeat steps 4 and 5 above, three times, to rinse the ice machine thoroughly.
(NOTE: Do not add Ice Maker Cleaner Solution to the water tank during the rinses.)
8. Perform steps 3 and 4 in the Interior Cleaning section.
9. If you want to make ice cubes after cleaning, turn off the power switch, then turn on the
power switch The next ice-making cycle will begin.
10. Discard the first batch of ice.
WARNING
DO NOT use solvent-based cleaning agents or abrasives on the interior These cleaners
may transmit taste to the ice cubes, or damage or discolor the interior
Page | 17
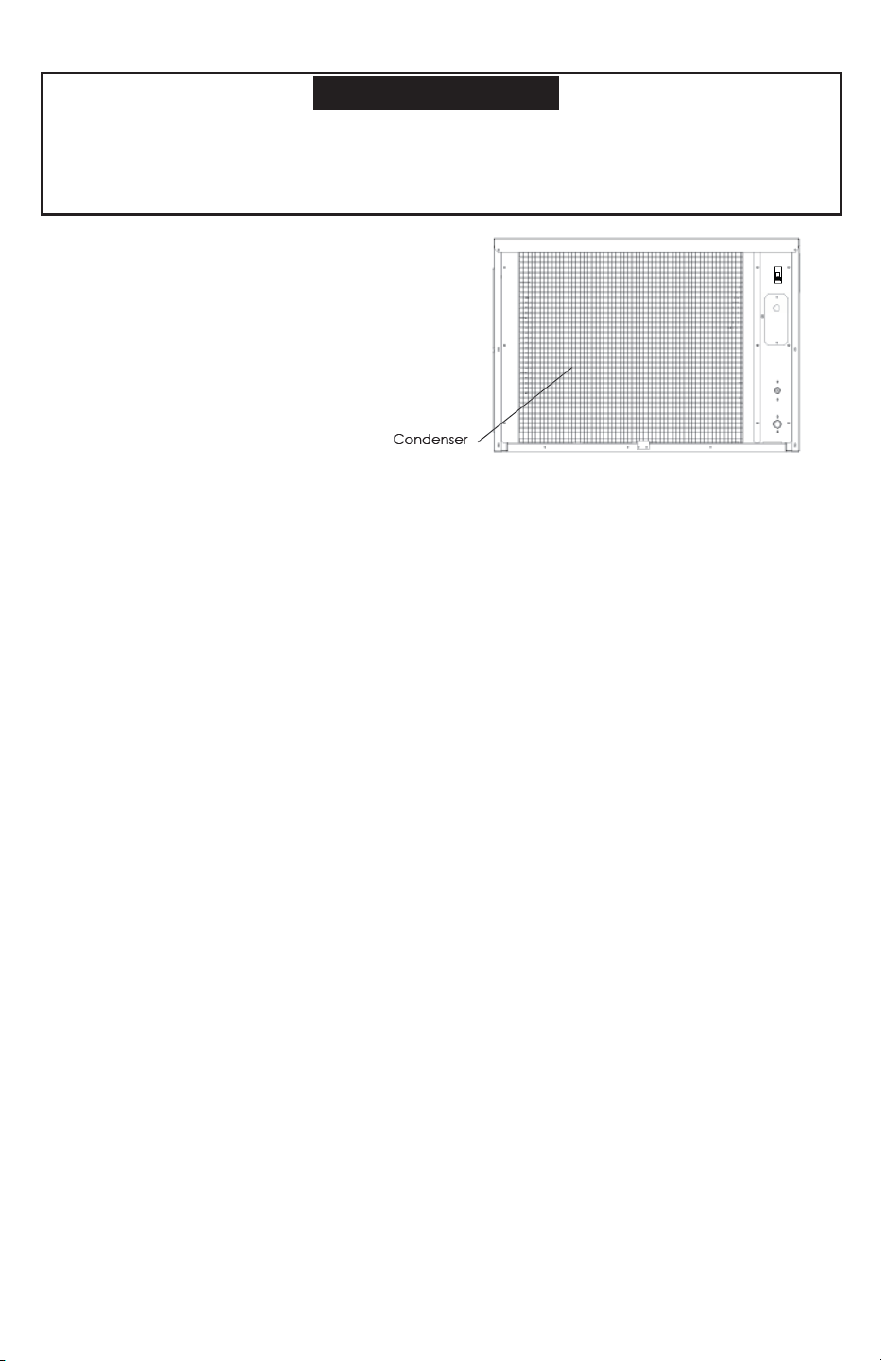
CONDENSER CLEANING
1 See drawing
2 The air cooled condenser should be
vacuumed once or twice per year to
remove any lint that may have been
drawn into it Using a tool that seems
like a probe to remove any lint from
the condenser fins.
NOTE: Do not touch condenser fins. They are
sharp and can be damaged easily.
Troubleshooting
BEFORE CALLING FOR SERVICE
If the unit appears to be malfunctioning, read through the OPERATION section of this manual first.
If the problem persists, check the Troubleshooting Guide on the following page. The problem may
be something very simple that can be solved without a service call.
WARNING
The ice machine cleaner contains acids. DO NOT use or mix with any other solvent-based
cleaner products. Use rubber gloves to protect hands. Carefully read the material safety
instructions on the container of the ice machine cleaner. DISCARD the first batch of ice
produced after cleaning.
Page | 18
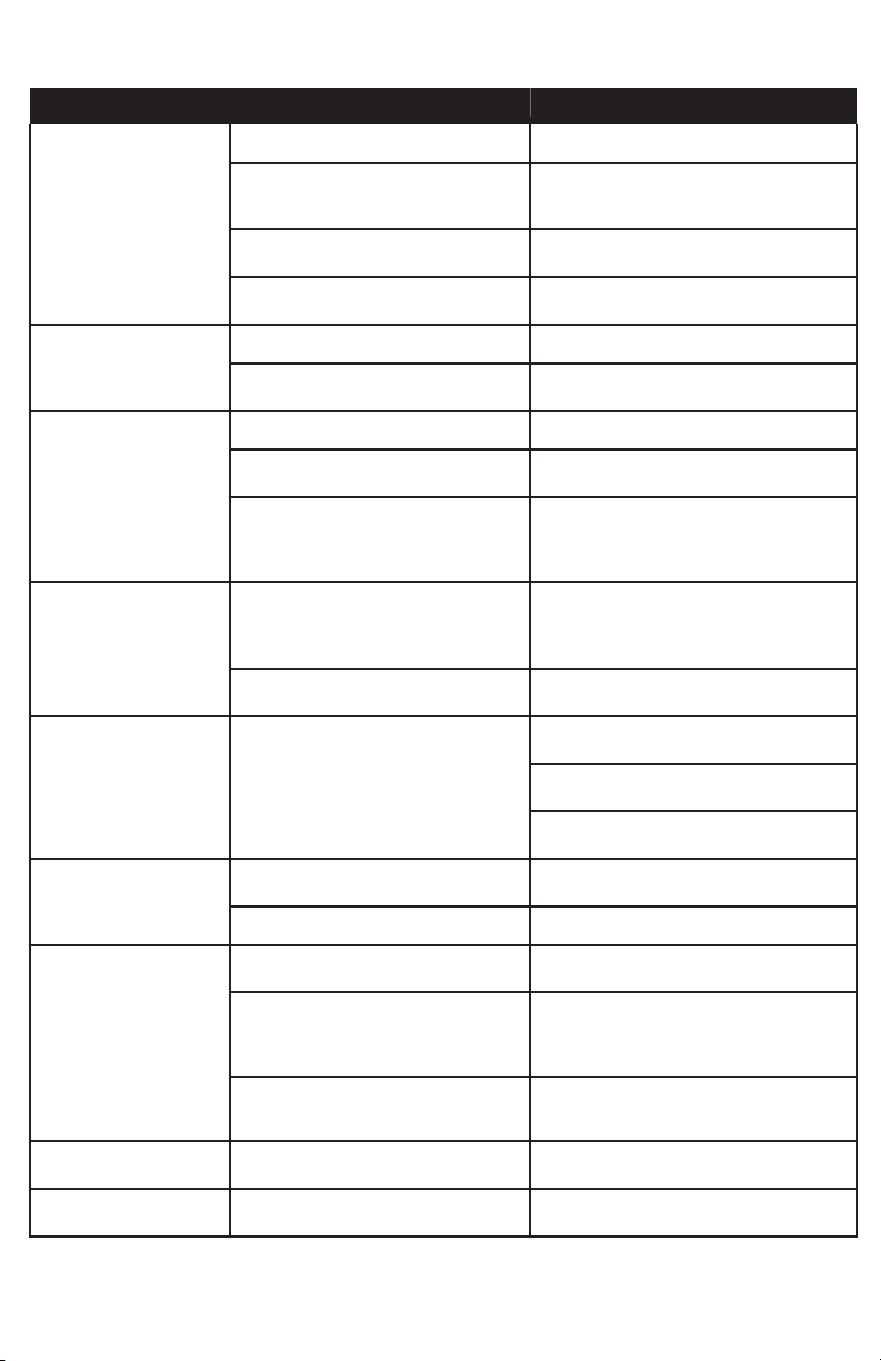
Troubleshooting Guide
PROBLEM
POSSIBLE CAUSE
PROBABLE CORRECTION
The machine
doesn't
operate
The ice maker is unplugged
Plug the ice maker in
The fuse is blown
Replace fuse If it happens again,
call for service to check for a short
circuit in the ice maker
The ice maker power switch is
OFF
Turn the ice maker power switch ON
The ice storage bin is full of ice
Remove some ice Make sure water
curtain and micro-switch are closed
The water doesn't
feed in after the ice
maker starts
The water supply tap is turn off
Turn on the water supply line
The water supply pipe is not
proper connected
Reconnect the water supply pipe
Machine makes ice,
but bin does not fill
up with ice
The condenser may be dirty
Clean the condenser air filter.
The air flow to the ice maker
may be obstructed
Check the installation
The ambient and water
temperatures are high, or the
machine is near some heat
source
Check the installation
Water is leaking from
the unit
A few water drops fall to the
floor when you open the door
to take out ice from ice storage
bin
Normal condensation on the door or
some water together with ice Take
care when you take out ice
Water supply connection leaks
Tighten fitting. See “Connecting the
water line”
Cubes are partially
formed or white at
the bottom
Not enough water in the
water trough
Check if the water supply
pressure is below 15 psig
Check water supply--filter may be
restricted
Check for a water leak at the water
trough
Noise during operation
The feet are not leveled
and locked
Level and lock the feet
See “Leveling the Ice Maker”
Certain sounds are normal
See Normal Sounds
The ice maker stops
suddenly while
making ice
The electricity is off
Reconnected the power
supply line
The room temperature is out
the stated range
Cut off the electricity, let the ice
maker stop working until the
temperature returns within the
stated range
The ice storage bin is full of ice
Remove some ice cubes; Make sure
the water curtain and micro-switch
are close
The body of the ice
maker is electrified.
The grounding line isn’t in the
socket
Use a socket meeting the required
electrical standard
Scaling occur
frequently inside
the machine
The hardness of the water is
too high
Use a water-softening device in- stalled
in front of the water inlet