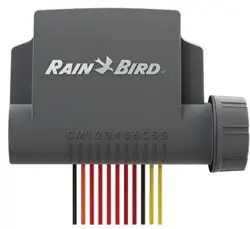
1
BAT-BT
ESPBAT-BT1, ESPBAT-BT2,
ESPBAT-BT4, ESPBAT-BT6
Quick Start Guide
Install and setup BAT-BT baery powered
Bluetooth Irrigation controllers.
Guía de arranque rápido
Instalación y configuración de los
programadores de riego BAT-BT con
Bluetooth a pilas
Guide de démarrage rapide
Installez et paramétrez les programmateurs
d’arrosage Bluetooth à pile BAT-BT.
EN
ES
FR
Schnellstart-Anleitung
Installieren und Einrichten des
baeriebetriebenen Bluetooth-
Bewässerungssteuergeräts BAT-BT
Guida rapida
Installazione e configurazione dei
programmatori di irrigazione Bluetooth a
baeria BAT-BT.
Guia Rápido de Utilização
Instalar e configurar os programadores
de rega Bluetooth alimentados por pilhas
BAT-BT
Hızlı Başlangıç Kılavuzu
BAT-BT pilli Bluetooth Sulama kontrol
ünitelerinin kurulumu ve ayarlanması
Skrócona instrukcja obsługi
Montaż i ustawienie sterowników
nawadniania Bluetooth BAT-BT zasilanych
bateriami
عيرسلا ليغشتلا ليلد
ةفيظوب ةدوزملا يرلا يف مكحتلا تادحو بيكرت
.اهدادعإو BAT-BT ةيراطبلاب لمعت يتلا Bluetooth
DE
IT
PT
TR
PO
AR
READ AND SAVE THESE INSTRUCTIONS
640391-01 Rev. 05/24
2
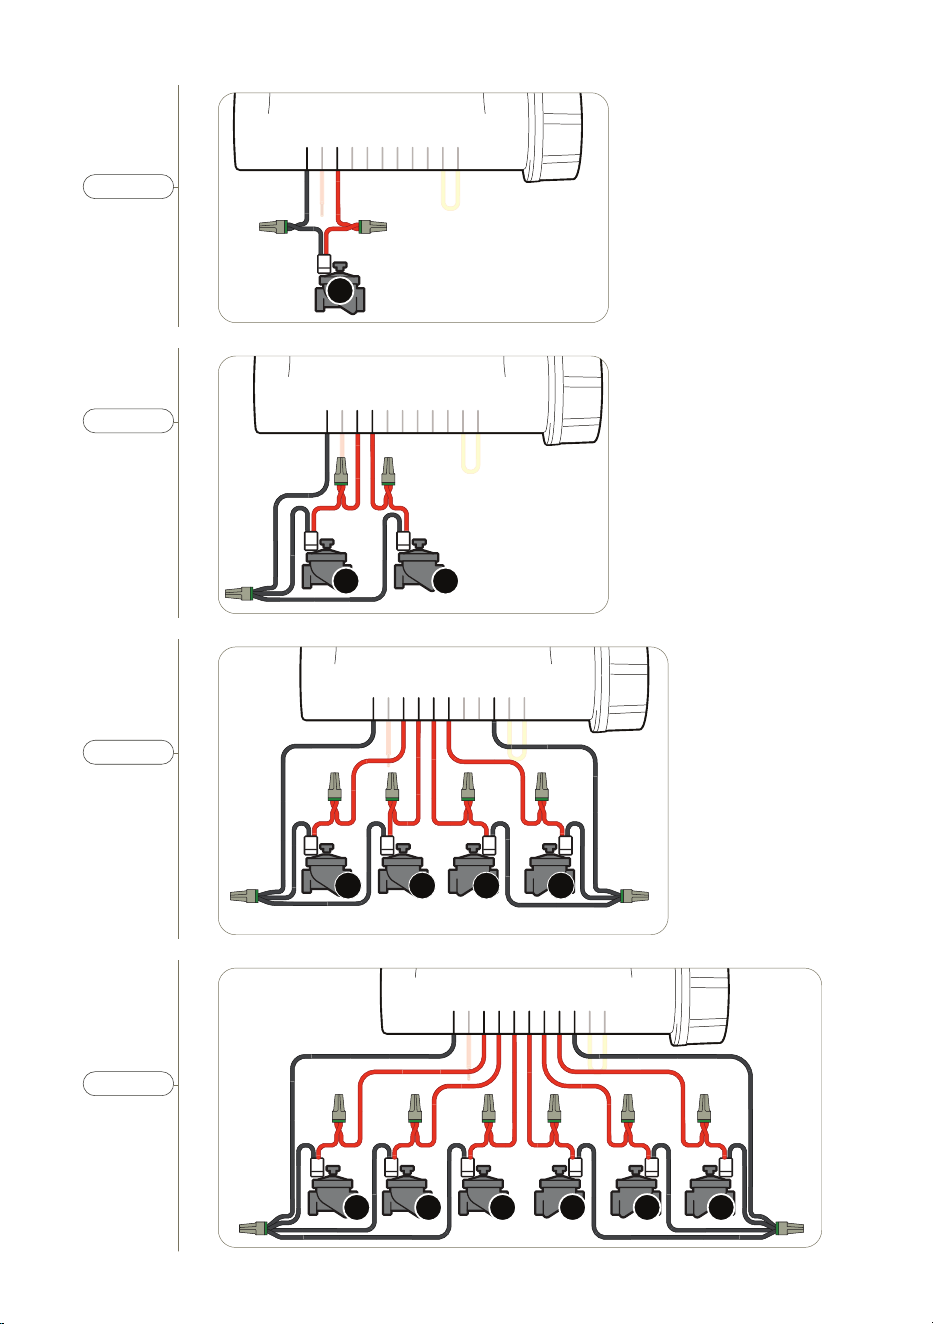
Connect to Valves
Connect the station wires to DC
latching solenoids (e.g. TBOSPSOL)
as shown. Doing this first will give you
the opportunity to hear the solenoid
“chaer” aer the baeries are
installed. This way you can confirm
the baeries are in good health, and
installed correctly.
Conexión a las válvulas
Conecte los cables de la estación
a los solenoides de enclavamiento
de corriente continua (por ejemplo,
TBOSPSOL) como se muestra. Hacer
esto primero le dará la oportunidad de
escuchar el “parloteo” del solenoide
después de colocar las pilas. De
esta manera podrá confirmar que las
pilas están en buen estado y se han
instalado correctamente.
Connectez aux stations
Raccordez les fils de station aux
solénoïdes à verrouillage CC (par
exemple TBOSPSOL) comme indiqué.
En procédant d’abord à cee opération,
vous pourrez entendre le solénoïde
s’activer après l’installation des piles.
Vous vous assurerez ainsi que les
piles sont bonnes et qu’elles ont été
installées correctement.
Anschluss an Ventile
Verbinden Sie die Stationskabel mit
Gleichstrom-Magnetspulen (z.B.
TBOSPSOL) wie gezeigt. Wenn Sie dies
zuerst tun, haben Sie die Möglichkeit,
das „Klicken“ der Magnetspule zu
hören, nachdem die Baerien eingelegt
sind. So können Sie sich vergewissern,
dass die Baerien in gutem Zustand
sind und richtig eingelegt sind.
Collegare alle valvole
Collegare i fili della stazione ai solenoidi
bistabili CC (ad es. TBOSPSOL) come
indicato. Eeuando questa operazione
per prima cosa avrai la possibilità di
sentire il “rumore” del solenoide dopo
l’installazione delle baerie. In questo
modo è possibile confermare che le
baerie sono in buone condizioni e che
sono state installate correamente.
EN
ES
FR
DE
IT
Ligação às eletroválvulas
Ligue os fios da estação aos solenoides
de impulsos CC (por exemplo, TBOSPSOL)
conforme ilustrado. SAo colocar as
pilhas após a ligação do solenoide ao
programador, ouvirá o click do êmbolo.
Desta forma, pode confirmar que as
pilhas estão em bom estado e foram
corretamente instaladas.
Vanalara Bağlayın
İstasyon kablolarını, gösterildiği gibi DC kilit
solenoidlerine (örn. TBOSPSOL) bağlayın.
Önce bunu yapmanız, piller takıldıktan
sonra solenoidin “cızırtsını” duymanıza
olanak tanıyacaktır. Bu şekilde, pillerin iyi
durumda olduğunu ve doğru takıldığını teyit
edebilirsiniz.
Podłączenie do zaworów
Należy podłączyć okablowanie sekcji do
elektrozaworów 9V (np. TBOSPSOL) tak,
jak przedstawiono na ilustracji. Wykonanie
tej czynności pozwala usłyszeć „szum”
elektrozaworów po zainstalowaniu baterii.
W ten sposób można też potwierdzić
prawidłowość stanu oraz montażu baterii.
سباحملاب ليصوتلا
،لاثملا ليبس ىلع( رشابملا رايتلاب لمعت يتلا
مايقلا كل حيتي .حضوم وه امك )TBOSPSOL
»كاكطصا« توص عامس ةصرف
ا
�لوأ ةوطخلا هذهب
كنكمي كلذب .تايراطبلا بيكرت دعب يبلوللا فلملا
.ةحيحص ةروصب اهبيكرتو تايراطبلا ةم�لس نم دكأتلا
PT
TR
PO
AR
1 - 2 - 3 - 4 - 5 - 6 - 7
3
1
C
2
3
1
M
C
S
S
4
5
6
2
1
C2
3
1
M
C
S
S
4
5
6
1
3 42
C231
M
C
S
S
4
5
6
2 31 4 5 6
C231
M
C
S
S
456
BAT-BT1
BAT-BT2
BAT-BT4
BAT-BT6

4
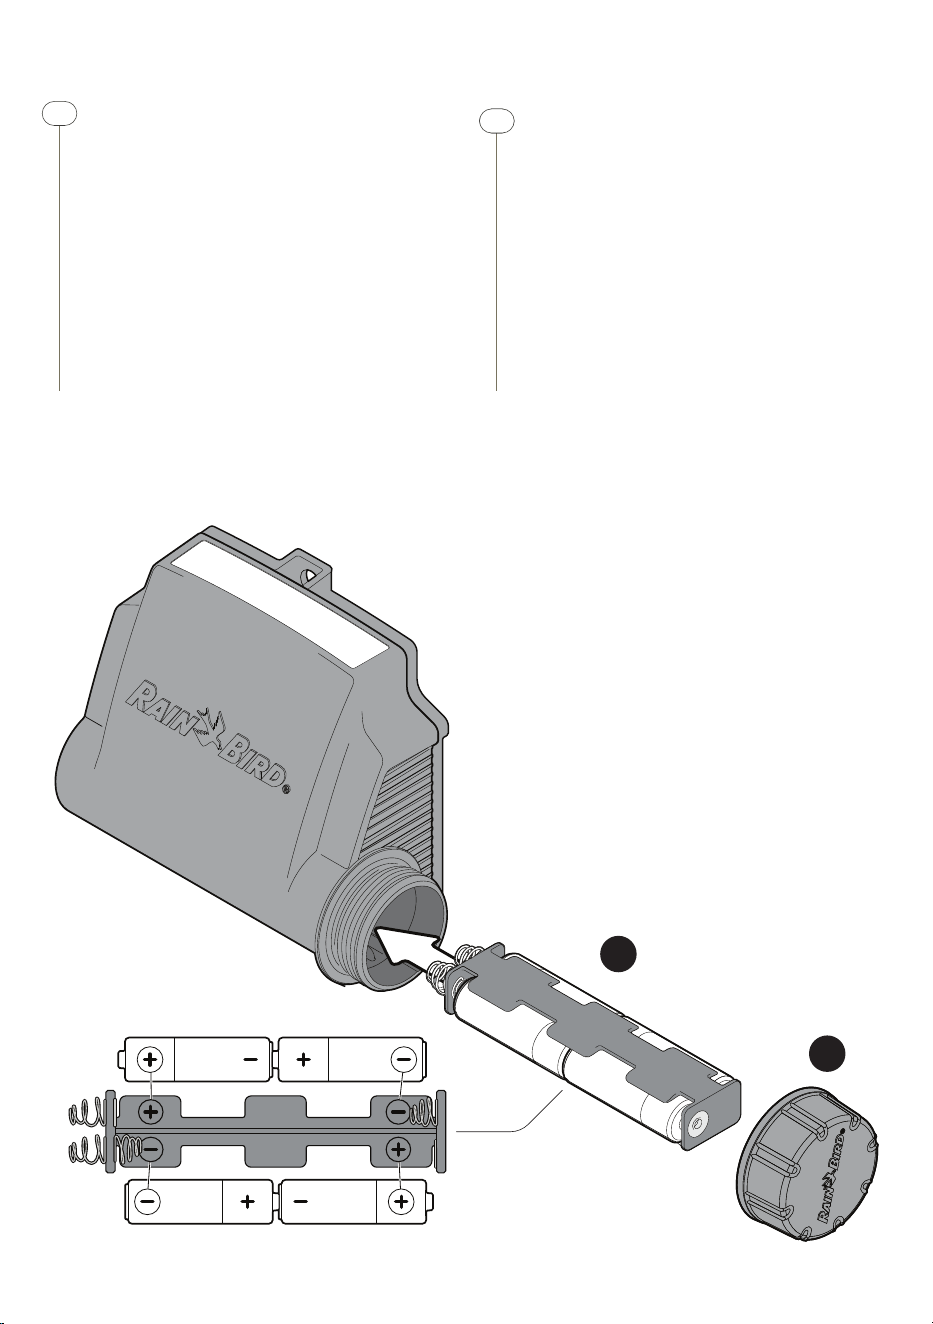
Insert Baeries
The BAT-BT is powered by 4 x LR6 (“AA”)
Non-rechargeable, alkaline baeries. To
insert the baeries:
1. Remove the baery cap (a)
2. Remove the baery holder (b)
3. Place the baeries in the holder being
careful to install them with the correct
polarity (+ / -)
4. Re-insert the baery holder into the
device spring side first
5. Replace the baery cap
Insertar pilas
El BAT-BT funciona con 4 pilas LR6 (“AA”)
Pilas alcalinas no recargables. Para insertar
las pilas:
1. Retire la tapa de las pilas (a)
2. Retire el portapilas (b)
3. Place the baeries in the holder
being Coloque las pilas en el soporte
teniendo cuidado de introducirlas con
la correcta polaridad (+/-)
4. Vuelva a insertar el portapilas en el
dispositivo primero por el lado del
muelle
5. Vuelva a colocar la tapa de las pilas
Insérez les piles
Le BAT-BT est alimenté par 4 piles LR6
(“AA”) alcalines non rechargeables. Pour
insérer les piles:
1. Retirez le couvercle des piles (a)
2. Retirez le porte-pile (b)
3. Insérez les piles dans le porte-pile en
veillant à respecter la bonne polarité
(+ / -)
4. Remeez le support de pile dans
l’appareil, côté ressort en premier
5. Refermez le couvercle des piles
Baerien einlegen
Der BAT-BT wird mit 4 x LR6 (“AA”)
nicht wiederaufladbaren Alkalibaerien
betrieben. Einlegen der Baerien:
1. Entfernen Sie den Baeriefachdeckel
(a)
2. Entfernen Sie den Baeriehalter (b)
3. Legen Sie die Baerien in den Halter
ein und achten Sie dabei auf die
richtige Polarität (+ / -)
EN
ES
FR
DE
4. Setzen Sie den Baeriehalter mit der
Federseite voran wieder in das Gerät
ein
5. Setzen Sie den Baeriefachdeckel
wieder auf
Inserire le baerie
I BAT-BT sono alimentati da 4 x LR6 (“AA”)
Baerie alcaline non ricaricabili. Per inserire
le baerie:
1. Rimuovere il tappo del vano
portabaerie (a)
2. Rimuovere il supporto portabaerie (b)
3. Posizionare le baerie nel supporto
facendo aenzione a installarle con la
correa polarità (+ / -)
4. Reinserire il supporto per baerie nel
dispositivo prima dal lato con la molla
5. Rimeere il tappo del vano
portabaerie
Inserir as pilhas
O BAT-BT é alimentado por 4 x LR6 (“AA”)
Pilhas alcalinas não recarregáveis. Para
inserir as pilhas:
1. Retire a tampa da bateria (a)
2. Retire o suporte para pilhas (b)
3. Coloque as pilhas no suporte, tendo
o cuidado de as instalar com a
polaridade correta (+/-)
4. Volte a inserir o suporte para pilhas
no dispositivo, com o lado das molas
virado para o interior
5. Coloque a tampa da bateria
Pilleri Takın
BAT-BT, 4 adet LR6 (“AA”) şarj edilemeyen
alkalin pillerle çalışır. Pilleri takmak için:
1. Pil kapağını (a) açın
2. Pil tutucuyu (b) çıkarın
3. Pilleri doğru polarite (+ / -) ile takmaya
dikkat ederek tutucuya yerleştirin
4. Pil tutucuyu, önce yaylı taraf olmak
üzere cihaza yeniden yerleştirin
5. Pil kapağını yerine takın
IT
PT
TR
1 - 2 - 3 - 4 - 5 - 6 - 7
5
a
b
Montaż baterii
Sterownik BAT-BT zasilany jest alkalicznymi
bateriami: 4 × LR6 („AA”).
Aby wprowadzić baterie:
1. Należy odkręcić osłonę baterii (a)
2. Należy wyjąć uchwyt baterii (b)
3. Należy umieścić baterie w uchwycie
mając na uwadze zachowanie
odpowiedniej polaryzacji (±)
4. Należy ponownie wprowadzić uchwyt
baterii – stroną ze sprężynami – do
urządzenia
5. Należy ponownie zamknąć osłonę baterii
PO
تايراطبلا بيكرت
تايراطب 4 مادختساب BAT-BT مكحتلا ةدحو لمعت
.)»AA«( LR6 عونلا نم نحشلا ةداع�ل ةلباق ريغ ةيولق
:تايراطبلا بيكرتل
)a( تايراطبلا ءاطغ كفب مق .1
)b( تايراطبلا لماح جرخأ .2
ىلع صرحاو لماحلا يف تايراطبلا عض .3
)+/-( ةحيحصلا ةيبطقلاب اهبيكرت
زاهجلا يف تايراطبلا لماح بيكرت دعأ .4
لوأ ضبانلا لمحي يذلا بناجلا لاخدإ عم
تايراطبلا ءاطغ ب
ّّ
كر .5
ARAR

6
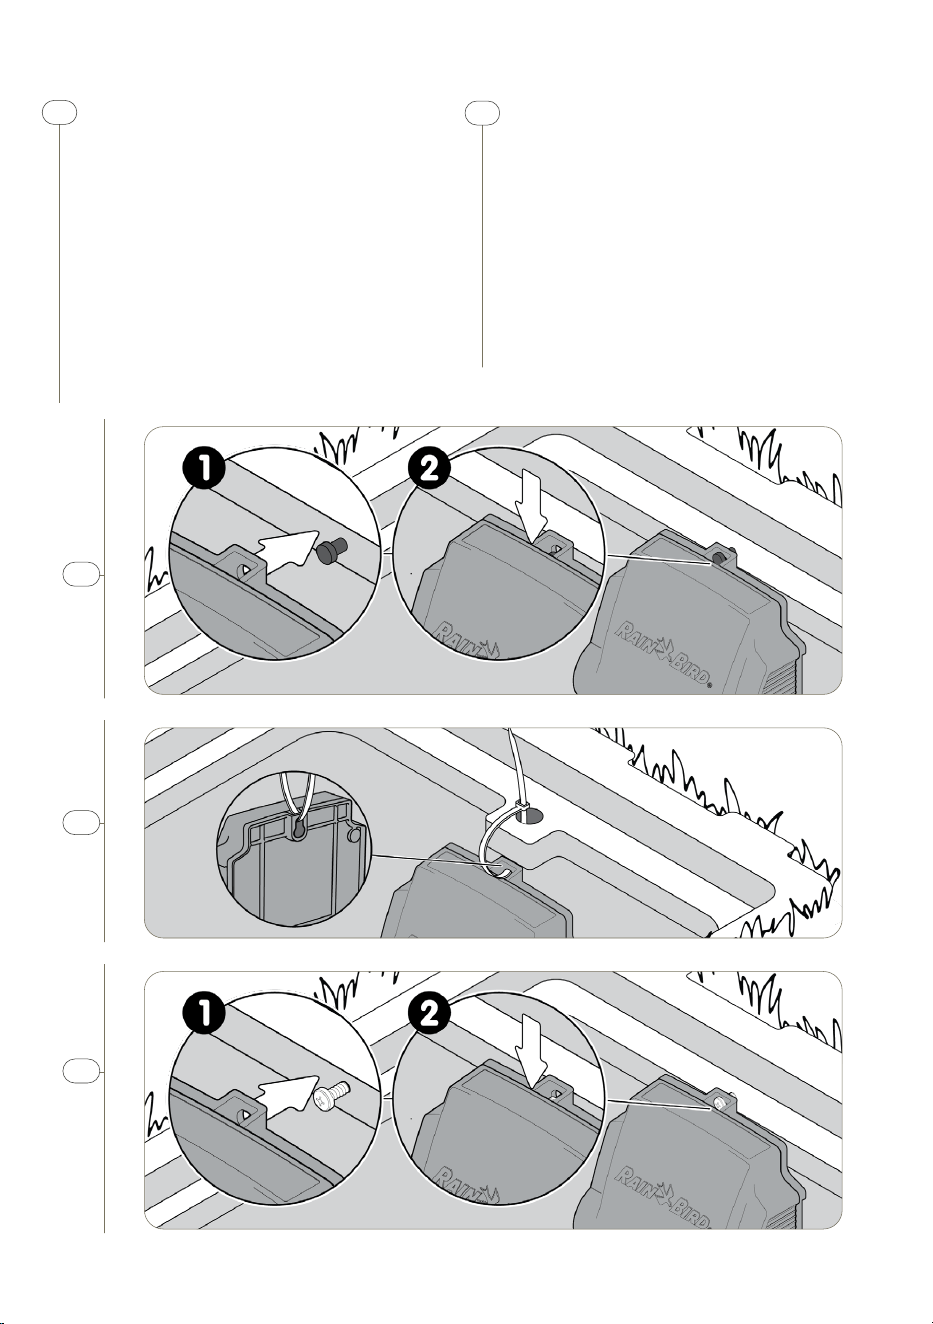
Mount in Valve Box
The BAT-BT should be installed in a valve
box using one of these 3 methods:
A. Mounting Peg: The BAT can be hung
using the mounting hole.
B. Cable Tie: Use the provided cable tie
to strap the BAT mounting hole to the
valve box locking ring or a drilled hole.
C. Screw Mount: The BAT can also be
hung from a screw using the mounting
hole.
Montaje en caja de válvulas
El BAT-BT debe instalarse en una caja de
válvulas utilizando uno de estos 3 métodos:
A. Clavija de montaje: El BAT se puede
colgar utilizando el orificio de montaje.
B. Brida para cables: Utilice la brida de
cable suministrada para atar el orificio
de montaje del BAT al anillo de bloqueo
de la caja de válvulas o a un orificio
taladrado.
C. Fijación por tornillo: El BAT también se
puede colgar de un tornillo utilizando el
orificio de montaje
Installez dans un regard de vanne
Le BAT-BT doit être installé dans un regard
de vanne en utilisant l’une des 3 méthodes
suivantes:
A. Cheville de xation: le BAT peut être
suspendu par l’orifice de fixation.
B. Attache autobloquante : utilisez
l’aache autobloquante fournie pour
relier l’orifice de fixation du BAT à
l’anneau de verrouillage du regard de
vanne ou à un trou pratiqué à l’aide
d’une perceuse.
C. Fixation au moyen d’une vis : le BAT
peut également être suspendu à une
vis par l’orifice de fixation.
Montage im Ventilkasten
Das BAT-BT sollte in einem Ventilkasten mit
einer der 3 folgenden Methoden installiert
werden:
A. Befestigungsstift: Das BAT kann über
das Befestigungsloch aufgehängt
werden.
B. Kabelbinder: Verwenden Sie den
mitgelieferten Kabelbinder um
das Befestigungsloch des BAT am
EN
ES
FR
DE
Verriegelungsloch des Ventilkastens
oder einem gebohrten Loch zu
befestigen.
C. Schraubmontage: Aufhängung des
BAT mit Hilfe des Befestigungslochs an
einer Schraube.
Montaggio nel pozzeo per val-
vole
Il BAT-BT deve essere installato in un
pozzeo per valvole utilizzando uno dei 3
metodi seguenti:
A. Piedino di montaggio: il BAT può
essere appeso utilizzando il foro di
montaggio.
B. Fascetta: utilizzare la fascea in
dotazione per fissare il foro di
montaggio del BAT all’anello di
bloccaggio del pozzeo per valvole o a
un foro perforato.
C. Montaggio a vite:Il BAT può anche
essere appeso a una vite utilizzando il
foro di montaggio
Montagem na caixa de válvulas
O BAT-BT deve ser instalado numa caixa
de válvulas utilizando um dos 3 métodos
seguintes:
A. Cavilha de montagem: O BAT pode
ser pendurado utilizando o orifício de
montagem.
B. Braçadeira de cabos: Utilize a
braçadeira de cabos fornecida para
prender o orifício de montagem do BAT
à anilha-freio da caixa de válvulas ou a
um orifício perfurado.
C. Montagem aparafusada: O BAT
também pode ser pendurado num
parafuso utilizando o orifício de
montagem.
Vana Kutusuna Montaj
BAT-BT, şu 3 yöntemden biri kullanılarak
vana kutusuna monte edilmelidir:
A. Montaj Askısı: BAT, montaj deliği
kullanılarak asılabilir.
B. Kablo Bağı: BAT montaj deliğini vana
kutusunun kilit halkasına veya açılmış
deliğe bağlamak için verilen kablo
bağını kullanın.
C. Vidalı Montaj: BAT aynı zamanda
montaj deliği kullanılarak bir vidaya da
asılabilir
IT
PT
TR
1 - 2 - 3 - 4 - 5 - 6 - 7
7
Montaż w skrzynce zaworowej
Sterownik BAT-BT należy zainstalować
w skrzynce zaworowej, wykorzystując jedną
z poniższych metod:
A. Kołki montażowe: Sterownik BAT
można powiesić, wykorzystując otwór
montażowy.
B. Opaska zaciskowa: Należy użyć
dostarczonej opaski zaciskowej, aby
przypiąć otwór montażowy sterownika
BAT do pierścienia blokującego skrzynki
zaworowej lub wywierconego otworu.
C. Montaż śrubowy: Istnieje możliwość
zawieszenia sterownika na śrubie
PO
سبحم قودنص يف بيكرتلا
قودنص يف BAT-BT مكحتلا ةدحو بيكرت بجي
:ةيلاتلا ةث�لثلا قرطلا ىدحإ مادختساب سبحم
BAT مكحتلا ةدحو قيلعت نكمي :بيكرتلا دتو .A
.بيكرتلا ةحتف مادختساب
د
ّ
وز
ُ
ملا ت�لبكلا طابر مدختسا :ت�لبكلا طابر .B
ةقلحب BAT مكحتلا ةدحو بيكرت ةحتف طبرل
.ةبوقثم ةحتفب وأ سبحملا قودنص تيبثت
ةدحو قيلعت ا
ا
يأ نكمي :يغرب ىلع بيكرتلا .C
.بيكرتلا ةحتف مادختساب يغرب نم BAT مكحتلا
AR
A
B
C
8
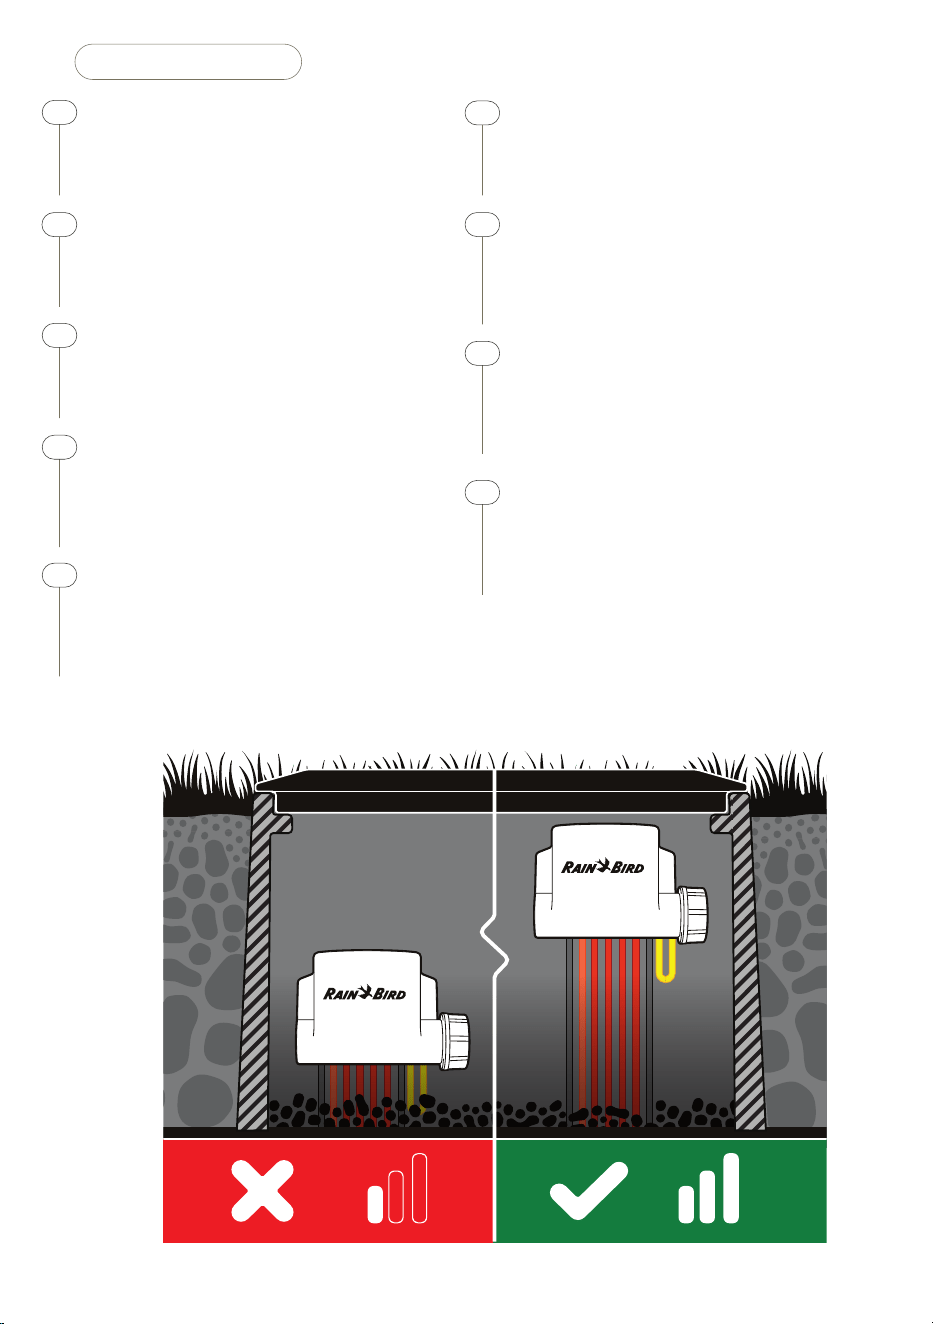
Connection Strength
Install the BAT-BT as close to surface level
as possible to optimize Bluetooth® signal
strength and range.
Fuerza de conexión
Instale el BAT-BT lo más cerca posible
del nivel de la superficie para optimizar la
fuerza y el alcance de la señal Bluetooth® .
Puissance de la connexion
Installez le BAT-BT le plus près possible de
la surface pour optimiser la puissance et la
portée du signal Bluetooth®.
Verbindungsstärke
Installieren Sie das BAT-BT so nah wie
möglich an der Oberfläche, um die
Bluetooth®-Signalstärke und -Reichweite
zu optimieren.
Potenza del segnale
Installare il BAT-BT il più vicino possibile
al livello della superficie per oimizzare
la potenza e la portata del segnale
Bluetooth®.
EN
ES
FR
DE
IT
Força da ligação
Instale o BAT-BT o mais próximo possível
do nível da superfície para otimizar a força
e o alcance do sinal Bluetooth®.
Bağlantı Gücü
Bluetooth® sinyal gücünü ve etki alanını
optimize etmek için BAT-BT’yi mümkün
olduğunca yüzey seviyesine yakın monte
edin.
Siła połączenia
Należy zamocować BAT-BT jak najbliżej
powierzchni, aby zoptymalizować zasięg
oraz siłę sygnału Bluetooth®.
لاصت�لا ةوق
نكمم عضوم برقأ يف BAT-BT مكحتلا ةدحو ب
ّ
كر
ةراشإ ىدمو ةوق نيسحتل ضرألا حطس ىوتسم نم
.Bluetooth®
PT
TR
PO
AR
1 - 2 - 3 - 4 - 5 - 6 - 7

9
Pair with Smart Phone
1. Download the Rain Bird app from the
App Store or Google Play.
2. Scan the QR code on the top surface
of the BAT-BT to begin pairing.
3. Follow the on screen prompts to
connect to the controller via Bluetooth®
and set it up.
Emparejar con teléfono inteli-
gente
1. Descargue la aplicación de Rain Bird de
la App Store o Google Play.
2. Escanee el código QR de la superficie
superior del BAT-BT para iniciar el
emparejamiento.
3. Siga las indicaciones en pantalla para
conectar el programador mediante
Bluetooth® y configurarlo.
Associez avec un smartphone
1. Téléchargez l’application Rain Bird à
partir de l’App Store ou de Google Play.
2. Scannez le code QR situé sur la face
supérieure du BAT-BT pour lancer
l’association.
3. Suivez les instructions à l’écran pour
vous connecter au programmateur en
Bluetooth® et le paramétrer.
Mit Smartphone koppeln
1. Laden Sie die Rain Bird App aus dem
App Store oder von Google Play
herunter.
2. Scannen Sie den QR-Code auf
der Oberseite des BAT-BT, um die
Kopplung zu starten.
3. Folgen Sie den Anweisungen auf dem
Bildschirm, um eine Verbindung mit
dem Steuergerät über Bluetooth®
herzustellen und es einzurichten.
Accoppiamento con lo smart-
phone
1. Scaricare l’app Rain Bird da App Store
o Google Play.
2. Scansionare il codice QR sulla
superficie superiore del BAT-BT per
avviare l’accoppiamento.
3. Seguire le istruzioni sullo schermo
per collegarti al programmatore via
Bluetooth® e configurarlo.
EN
ES
FR
DE
IT
Emparelhar com o smartphone
1. Transfira a aplicação Rain Bird a partir
da App Store ou Google Play.
2. Efetue a leitura do código QR na
superfície superior do BAT-BT para
iniciar o emparelhamento.
3. Siga as indicações no ecrã para
estabelecer ligação ao programador
através de Bluetooth® e configurá-lo.
Akıllı Telefon ile Eşleştirin
1. App Store veya Google Play’den Rain
Bird uygulamasını indirin.
2. Eşleştirmeye başlamak için BAT-BT’nin
üst yüzeyindeki QR kodunu tarayın.
3. Bluetooth® üzerinden kontrol ünitesine
bağlanmak ve kurulumu yapmak için
ekrandaki talimatları izleyin.
Parowanie ze smartfonem
1. Należy pobrać aplikację Rain Bird ze
sklepu App Store zaplikacjami na
urządzenia zsystemem Apple iOS lub
sklepu Google Play.
2. Aby rozpocząć parowanie, należy
zeskanować kod QR widoczny na
górnej powierzchni sterownika BAT-BT.
3. Należy postępować zgodnie z
pojawiającymi się na ekranie
powiadomieniami, aby podłączyć
sterownik za pośrednictwem
Bluetooth® i wprowadzić ustawienia.
يكذلا فتاهلاب نارق�لا
وأ App Store نم Rain Bird قيبطت ليزنتب م
ُ
ق .1
.Google Play
ةعيرسلا ةباجتس�لا زمرل يئوض حسم ءارجإب م
ُ
ق .2
مكحتلا ةدحول يولعلا حطسلا ىلع دوجوملا
.نارق�لا ءدبل BAT-BT
لاصت�لل ةشاشلا ىلع رهظت يتلا تابلاطملا عبتا .3
.اهدادعإو Bluetooth® ةفيظو ربع مكحتلا ةدحوب
PT
TR
PO
ARAR
1 - 2 - 3 - 4 - 5 - 6 - 7
10
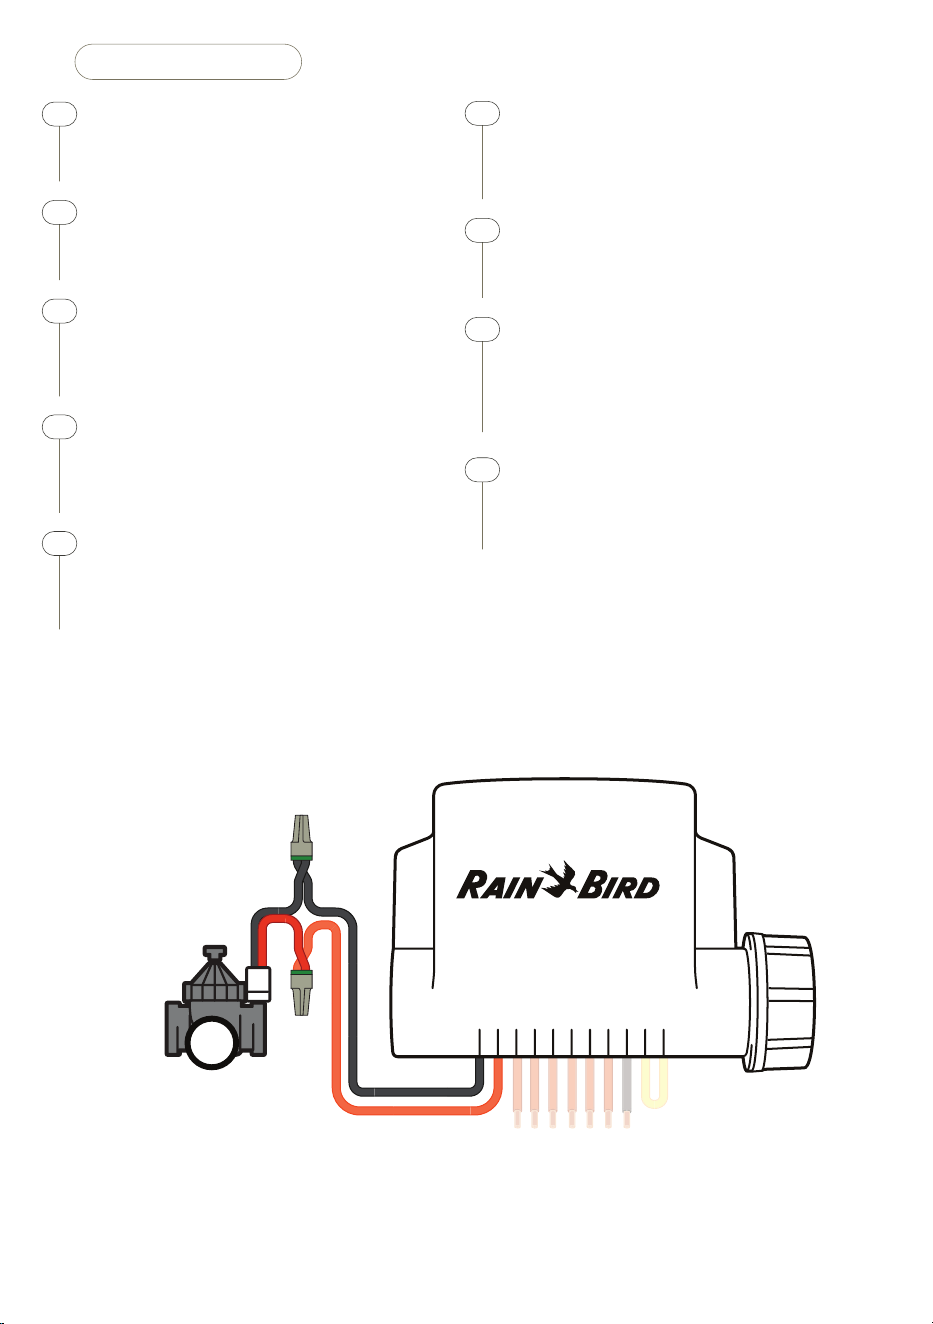
Master Valve (Optional)
Connect the orange master valve ‘M’ and
black common ‘C’ wire as shown.
Válvula maestra (opcional)
Conecte la válvula maestra naranja “M” y el
cable común negro “C” como se muestra.
Vanne maîtresse (facultatif)
Raccordez le fil orange de la vanne
maîtresse “M” et le fil noir neutre “C”
comme indiqué.
Hauptventil (optional)
Schließen Sie das orangefarbene
Hauptventil ‘M’ und das schwarze
gemeinsame Kabel ‘C’ wie abgebildet an.
Valvola master (opzionale)
Collegare il filo arancione della valvola
master “M” e il cavo nero comune “C”
come mostrato.
EN
ES
FR
DE
IT
Válvula mestra (opcional)
Ligue o fio cor de laranja da válvula mestra
‘M’ e o fio preto comum ‘C’, conforme
ilustrado.
Ana Vana (İsteğe Bağlı)
Turuncu ana vanayı ‘M’ ve siyah ortak ‘C’
kablosunu gösterildiği gibi bağlayın.
Zawór główny (opcjonalnie)
Należy połączyć pomarańczowy przewód
zaworu głównego “M” oraz czarny dla
przewodu wspólnego “C” tak, jak na
ilustracji.
يرايتخا( يسيئرلا سبحملا(
»M«يلاقتربلا يسيئرلا سبحملا ليصوتب م
ُ
ق
.حضوم وه امك »C« دوسألا كرتشملا كلسلاو
PT
TR
PO
AR
M
C
2
3
1
M
C
S
S
4
5
6
1 - 2 - 3 - 4 - 5 - 6 - 7

11
2
3
1
M
C
SS
4
5
6
C
2
3
1
M
C
SS
4
5
6
Rain Sensor (Optional)
Connect the sensor wires ‘S’ to a
compatible sensor
Sensor de lluvia (opcional)
Conecte los cables del sensor “S” a un
sensor compatible
Sonde de pluie (facultatif)
Raccordez les fils de sonde “S” à une
sonde compatible
Regensensor (optional)
Schließen Sie die Sensorkabel ‘S’ an einen
kompatiblen Sensor an
Sensore pioggia (opzionale)
Collegare i cavi del sensore “S” a un
sensore compatibile
EN
ES
FR
DE
IT
Sensor de chuva (opcional)
Ligue os fios do sensor ‘S’ a um sensor
compatível
Yağmur Sensörü (İsteğe
Bağlı)
Sensör kablolarını ‘S’ uyumlu bir sensöre
bağlayın
Czujnik deszczu (opcjonal-
nie)
Należy podłączyć przewody czujnika „S” do
kompatybilnego czujnika
يرايتخا( رطملا ساسح(
.قفاوتم ساسحب »S« ساسحلا يكلس ليصوتب م
ُ
ق
PT
TR
PO
ARAR
1 - 2 - 3 - 4 - 5 - 6 - 7
12
EN
CAUTION
Only use four non-rechargeable alkaline baeries type LR6 (“AA”). These baeries provide the voltage required by the
controller.
This device must be installed to provide a separation distance of at least 20 cm from all persons and must not be co-
located or operating in conjunction with any other antenna or transmier.
RISK OF EXPLOSION IF BATTERY IS REPLACED WITH AN INCORRECT TYPE
DISPOSE OF USED BATTERIES ACCORDING TO THE INSTRUCTIONS
WARNING
This appliance is not intended for use by persons (including children) with reduced physical, sensory or mental capacity,
or lack of experience and knowledge unless they have been given supervision or instruction concerning use of the
appliance by a person responsible for their safety. Children should be supervised to ensure that they do not play with the
appliance.
Special precautions must be taken when valve wires are located adjacent to, or share a conduit with other wires, such as
those used for landscape lighting or other electrical systems.
Separate and insulate all conductors carefully, taking care not to damage wire insulation during installation. An electrical
“short” (contact) between the valve wires and another power source can damage the controller and create a fire hazard.
NOTICE
Changes or modifications not expressly approved by Rain Bird could void the user’s authority to operate the equipment.
Use only Rain Bird approved accessory devices. Unapproved devices may damage the controller and void warranty.
All electrical connections and wiring runs must comply with local building codes. Some local codes require that only a
licensed or certified electrician can install power. Only professional personnel should install the controller. Check your
local building codes for guidance.
The baery must be removed from the controller before disposal.
The leaking baeries should be removed from the device and disposed safely in accordance with local laws.
ISED NOTICE
This device contains license-exempt transmier(s)/receiver(s) that comply with Innovation, Science and Economic
Development Canada’s license-exempt RSS(s). Operation is subject to the following two conditions:
1. This device may not cause interference.
2. This device must accept any interference, including interference that may cause undesired operation of the device.
SPECIFICATION
Electronic disconnection on operation
Maximum radio-frequency power (for EU and UK): 9.95 dBm
Operating frequency band: 2 402 - 2 480 MHz
EU DECLARATION OF CONFORMITY
Hereby, Rain Bird Corporation declares that the radio equipment type ESPBAT-BT1, ESPBAT-BT2, ESPBAT-BT4, ESPBAT-
BT6 are in compliance with Directive 2014/53/EU
The full text of the EU declaration of conformity is available at the following internet address: www.rainbird.com/
RegulatoryCompliance
13
UK DECLARATION OF CONFORMITY
Hereby, Rain Bird Corporation declares that the radio equipment type ESPBAT-BT1, ESPBAT-BT2, ESPBAT-BT4, ESPBAT-
BT6 are in compliance with Statutory Instrument 2017 No. 1206.
The full text of the UK declaration of conformity is available at the following internet address: www.rainbird.com/
RegulatoryCompliance
DISPOSAL OF ELECTRONIC WASTE – FOR EUROPEAN COUNTRIES ONLY
This symbol on the product and/or accompanying documents means that used electrical and electronic
equipment (WEEE) should not be mixed with general household waste. For proper treatment, recovery,
and recycling, please take this product to designated collection points. Disposing of this product correctly
will help save resources and prevent any potential negative eects on human health and the environment,
which could otherwise arise from inappropriate waste handling.
SUPPLIER’S DECLARATION OF CONFORMITY
47 CFR § 2.1077 Compliance Information
Unique identifier: ESPBAT-BT1, ESPBAT-BT2, ESPBAT-BT4, ESPBAT-BT6
Responsible Party – Rain Bird Corporation, 9491 Ridgehaven Court, Suite C, San Diego, CA 92123, USA, www.rainbird.com
Note: This equipment has been tested and found to comply with the limits for a Class B digital device, pursuant to
part 15 of the FCC Rules. These limits are designed to provide reasonable protection against harmful interference in a
residential installation. This equipment generates, uses, and can radiate radio frequency energy and, if not installed and
used in accordance with the instructions, may cause harmful interference to radio communications. However, there is no
guarantee that interference will not occur in a particular installation. If this equipment does cause harmful interference to
radio or television reception, which can be determined by turning the equipment o and on, the user is encouraged to try
to correct the interference by one or more of the following measures:
- Reorient or relocate the receiving antenna.
- Increase the separation between the equipment and receiver.
- Connect the equipment into an outlet on a circuit dierent from that to which the receiver is connected.
- Consult the dealer or an experienced radio/TV technician for help.
Rain Bird Corporation
6991 East Southpoint Road
Tucson, AZ 85756, USA
www.rainbird.com
® Registered trademark of the Rain Bird Corporation
© 2023 Rain Bird Corporation
BATTERY MAINTENANCE
Replace by using four Non-rechargeable, alkaline baeries type LR6 (“AA”).
1. Remove cover
2. Remove baeries
3. Replace with new baeries being careful to install with the correct polarity (+ / -)
4. Replace the cover
5. The baeries removed should be disposed safely in accordance with local laws.
Apple is a trademark of Apple Inc, registered in the U.S. and other countries. iOS is a trademark of Cisco Systems Inc. Android
is a trademark of Google LLC
14
ES - LEA Y GUARDE ESTAS INSTRUCCIONES
ATENCIÓN
Utilice solo cuatro pilas alcalinas no recargables del tipo LR6 (“AA”). Estas pilas proporcionan el voltaje que requiere el
programador.
Este dispositivo debe instalarse de manera que guarde una distancia de separación de al menos 20 cm de todas las
personas y no debe colocarse cerca ni utilizarse junto con otra antena o transmisor.
HAY RIESGO DE EXPLOSIÓN SI SE SUSTITUYE LA PILA POR UN TIPO INCORRECTO
DESECHE LAS PILAS USADAS SEGÚN LAS INSTRUCCIONES
ADVERTENCIA
Este dispositivo no está diseñado para ser utilizado por personas (incluyendo niños) con una capacidad física, sensorial
o mental reducida, o bien sin los conocimientos o experiencia necesarios, a menos que sean supervisados o hayan
recibido instrucciones acerca del uso del dispositivo de manos de una persona responsable de su seguridad. No deje a
los niños desatendidos para asegurarse de que no juegan con el aparato.
Se deben tomar precauciones especiales cuando los cables de la válvula estén situados junto a, o compartan un
conducto con otros cables, como los utilizados para la iluminación paisajística u otros sistemas eléctricos.
Separe y aísle todos los conductores con especial cuidado para no dañar el aislamiento del cable durante la instalación.
Un cortocircuito (contacto) entre los cables de la válvula y otra fuente de corriente eléctrica podría dañar el programador
y producir un riesgo de incendio.
AVISO
Los cambios o modificaciones no aprobados expresamente por Rain Bird podrían anular el derecho del usuario a operar
el equipo.
Utilice únicamente aquellos dispositivos accesorios aprobados por Rain Bird. Los dispositivos no aprobados podrían
dañar el control invalidar la garantía.
Todas las conexiones eléctricas y el cableado deben cumplir las normas de construcción locales. Algunas normas
locales dictan que solamente un electricista certificado puede instalar la corriente. El control debe ser instalado
únicamente por profesionales. Consulte las normas de construcción locales para obtener más directrices.
La batería debe extraerse del control antes de desecharla.
Las pilas con fugas deben retirarse del aparato y desecharse de forma segura de acuerdo con la legislación local.
ESPECIFICACIONES ELÉCTRICAS
Desconexión electrónica en funcionamiento
Potencia máxima de radiofrecuencia (para la UE y el Reino Unido): 9,95 dBm
Banda de frecuencia de funcionamiento: 2 402 - 2 480 MHz
AVISO IFT
La operación de este equipo está sujeta a las siguientes dos condiciones: (1) es posible que este equipo o dispositivo
no cause interferencia perjudicial y (2) este equipo o dispositivo debe aceptar cualquier interferencia, incluyendo la que
pueda causar su operación no deseada.
15
AVISO
Importado en México por: RAIN BIRD MEXICO S DE RL DE CV
Lázaro Cárdenas 3141, Col. Chapalita, Guadalajara, Jal. C.P 44500, México.
R.F.C. RBM021213590
CONTROL PARA IRRIGACIÓN
Marca: Rain Bird Modelos: ESPBAT-BT1, ESPBAT-BT2, ESPBAT-BT4, ESPBAT-BT6
ESPECIFICACIONES ELÉCTRICAS:
Entrada: 6 Vcc 150mA (Opera con cuatro baterías alcalinas “AA” de 1.5 Vcc)
Hecho en México
DECLARACIÓN DE CONFORMIDAD DE LA UE
Por la presente, Rain Bird Corporation declara que los equipos de radio tipo ESPBAT-BT1, ESPBAT-BT2, ESPBAT-BT4,
ESPBAT-BT6 cumplen la Directiva 2014/53/UE.
El texto completo de la declaración de conformidad de la UE está disponible en la siguiente dirección de Internet: www.
rainbird.com/RegulatoryCompliance
ELIMINACIÓN DE RESIDUOS ELECTRÓNICOS (SOLO PARA PAÍSES EUROPEOS)
Este símbolo en el producto y/o en los documentos que lo acompañan significa que los equipos eléctricos
y electrónicos usados (WEEE) no deben mezclarse con la basura doméstica general. Para un tratamiento,
recuperación, y reciclaje adecuados, lleve este producto a los puntos de recogida designados. Desechar
este producto correctamente ayudará a ahorrar recursos y a prevenir cualquier posible efecto negativo
sobre la salud humana y el medio ambiente que, de lo contrario, podría derivarse de una manipulación
inadecuada de los residuos.
MANTENIMIENTO DE LAS PILAS
Sustitúyalas por cuatro pilas alcalinas no recargables de tipo LR6 (“AA”).
1. Quite la tapa
2. Quite las pilas
3. Reemplácelas con pilas nuevas teniendo cuidado de introducirlas con la polaridad correcta (+ / -)
4. Vuelva a colocar la cubierta
5. Las pilas extraídas deben desecharse de forma segura de acuerdo con las leyes locales.
FR
ATTENTION
N’utilisez que quatre piles alcalines non rechargeables de type LR6 (“AA”). Ces piles fournissent la tension nécessaire au
programmateur.
Cet appareil doit être installé de sorte à être séparé de toute personne d’une distance d’au moins 20cm et ne doit pas
se situer à proximité de, ou fonctionner conjointement à, toute autre antenne ou console.
RISQUE D’EXPLOSION SI LA PILE EST REMPLACÉE PAR UN TYPE INCORRECT
METTEZ LES PILES USAGÉES AU REBUT CONFORMÉMENT AUX INSTRUCTIONS
AVERTISSEMENT
Cet appareil n’est pas conçu pour être utilisé par des personnes (notamment des enfants) aux capacités physiques,
sensorielles ou mentales réduites, ou qui manquent d’expérience et de connaissances, sauf si une personne responsable
de leur sécurité les supervise ou leur donne des instructions concernant l’utilisation de l’appareil. Les enfants doivent être
surveillés de façon à éviter qu’ils ne jouent avec le dispositif.
Il convient de prendre des précautions particulières lorsque des fils de vanne se trouvent à proximité d’autres fils, ou
partagent une conduite avec eux, par exemple dans le cas des fils servant à l’éclairage d’espaces verts ou à d’autres
systèmes électriques.
16
Séparez et isolez soigneusement tous les conducteurs, en prenant soin de ne pas endommager l’isolation des fils lors
de l’installation. Un “court-circuit” (contact) électrique entre les fils de vanne et une autre source d’alimentation peut
endommager le programmateur et provoquer un incendie.
AVIS
Changements ou modifications qui n’ont pas été préalablement et expressément approuvés peuvent entraîner
l’annulation de l’autorisation à utiliser cet appareil.
Utilisez uniquement des accessoires approuvés par Rain Bird. Les appareils non approuvés peuvent endommager le
programmateur et annuler la garantie.
Toutes les connexions électriques et le câblage doivent être conformes aux normes locales de construction. Certaines
normes locales exigent que seul un électricien agréé ou certifié puisse installer l’alimentation. Le programmateur ne doit
être installé que par un professionnel. Consultez vos normes de construction locales pour plus d’instructions.
La pile doit être retirée du programmateur avant d’être mise au rebut.
Les piles qui fuient doivent être retirées de l’appareil et mises au rebut en toute sécurité, conformément à la législation
locale.
ISED AVIS
L’émeeur/récepteur exempt de licence contenu dans le présent appareil est conforme aux CNR d’Innovation, Sciences
et Développement économique Canada applicables aux appareils radio exempts de licence. L’exploitation est autorisée
aux deux conditions suivantes:
1. L’appareil ne doit pas produire de brouillage;
2. L’appareil doit accepter tout brouillage radioélectrique subi, même si le brouillage est susceptible d’en compromere le
fonctionnement.
PRÉCISION
Déconnexion électronique en cours de fonctionnement
Puissance maximale des radiofréquences (pour l’UE et le Royaume-Uni): 9,95 dBm
Bande de fréquence de fonctionnement: 2402 - 2480MHz
DÉCLARATION DE CONFORMITÉ POUR L’UE
Par la présente, Rain Bird Corporation déclare que les équipements radio de type ESPBAT-BT1, ESPBAT-BT2, ESPBAT-BT4,
ESPBAT-BT6 sont conformes à la directive 2014/53/UE
Le texte intégral de la déclaration de conformité pour l’UE est disponible à l’adresse Internet suivante: www.rainbird.com/
RegulatoryCompliance
MISE AU REBUT DES DÉCHETS ÉLECTRONIQUES - POUR LES PAYS EUROPÉENS UNIQUEMENT
Ce symbole figurant sur le produit et/ou dans les documents qui l’accompagnent signifie que les
équipements électriques et électroniques usagés (DEEE) ne doivent pas être mélangés avec les déchets
ménagers ordinaires. Pour un traitement, une récupération et un recyclage adéquats, veuillez rapporter
ce produit aux points de collecte prévus à cet eet. La mise au rebut correcte de ce produit contribuera à
économiser les ressources et à prévenir tout eet négatif potentiel sur la santé humaine et l’environnement,
qui pourrait résulter d’une manipulation inappropriée des déchets.
MAINTENANCE DES PILES
Remplacez-les par quatre piles alcalines non rechargeables de type LR6 (“AA”).
1. Retirez le couvercle
2. Retirez les piles
3. Remplacez les piles par des piles neuves en veillant à respecter la polarité (+ / -)
4. Remeez le couvercle en place
5. Les piles retirées doivent être mises au rebut en toute sécurité, conformément à la législation locale.
17
DE
ACHTUNG
Verwenden Sie nur vier nicht wiederaufladbare Alkalibaerien vom Typ LR6 („AA“). Diese Baerien liefern die vom
Steuergerät benötigte Spannung.
Dieses Gerät muss so installiert sein, dass ein Abstand von mindestens 20 cm zu allen Personen eingehalten wird und
darf nicht in Verbindung mit anderen Antennen oder Sendern betrieben werden.
EXPLOSIONSGEFAHR, WENN DIE BATTERIE DURCH EINEN FALSCHEN TYP ERSETZT WIRD
ENTSORGEN SIE GEBRAUCHTE BATTERIEN GEMÄSS DEN ANWEISUNGEN
WARNUNG
Dieses Gerät darf nicht von Personen (einschließlich Kinder) mit körperlichen, sensorischen oder geistigen
Einschränkungen oder mangelnder Erfahrung und mangelnden Kenntnissen verwendet werden, außer sie werden von
einer Person, die für ihre Sicherheit verantwortlich ist, beaufsichtigt oder haben von dieser eine Anleitung in Bezug auf die
Anwendung des Geräts erhalten. Kinder müssen beaufsichtigt werden, um sicherzustellen, dass sie nicht mit dem Gerät
spielen.
Besondere Vorsichtsmaßnahmen sind zu treen, wenn sich Ventilkabel neben anderen Kabeln befinden oder mit anderen
Kabeln, z. B. solchen, die für die Landschasbeleuchtung oder andere elektrische Systeme verwendet werden, einen
Kabelkanal teilen.
Alle Leiter müssen sorgfältig voneinander getrennt und isoliert werden und die Isolierung der Kabel darf während der
Installation nicht beschädigt werden. Ein elektrischer „Kurzschluss“ (Kontakt) zwischen den Ventilkabeln und einer
anderen Stromquelle kann das Steuergerät beschädigen und stellt eine Brandgefahr dar.
HINWEIS
Nicht ausdrücklich von Rain Bird genehmigte Änderungen oder Modifizierungen können zur Folge haben, dass der
Benutzer das Gerät nicht mehr bedienen darf.
Nur von Rain Bird genehmigte Zubehörgeräte verwenden. Nicht genehmigte Geräte können das Steuergerät beschädigen
und zu einem Erlöschen der Garantie führen.
Alle elektrischen Anschlüsse und Leitungsverläufe müssen den vor Ort geltenden Bauvorschrien entsprechen. Einige
lokale Vorschrien sehen vor, dass die Stromanschlüsse nur von einem zugelassenen Elektroinstallateur vorgenommen
werden dürfen. Das Steuergerät darf nur von Fachpersonal installiert werden. Im Leitfaden für Ihr Gebäude finden Sie
weiterführende Informationen.
Die Baerie muss vor der Entsorgung aus dem Steuergerät entfernt werden.
Die ausgelaufenen Baerien sollten aus dem Gerät entfernt und gemäß den örtlichen Gesetzen sicher entsorgt werden.
TECHNISCHE DATEN
Elektronische Abschaltung bei Betrieb
Maximale Funkfrequenzleistung (für EU und UK): 9,95 dBm
Betriebsfrequenzband: 2 402 - 2 480 MHz
EU-KONFORMITÄTSERKLÄRUNG
Hiermit erklärt die Rain Bird Corporation, dass die Funkgeräte vom Typ ESPBAT-BT1, ESPBAT-BT2, ESPBAT-BT4, ESPBAT-
BT6 der Richtlinie 2014/53/EU entsprechen
Der vollständige Text der EU-Konformitätserklärung ist unter der folgenden Internetadresse abrufbar: www.rainbird.com/
RegulatoryCompliance
18
ENTSORGUNG VON ELEKTRONIKSCHROTT - NUR FÜR EUROPÄISCHE LÄNDER
Dieses Symbol auf dem Produkt und/oder den Begleitdokumenten bedeutet, dass gebrauchte elektrische
und elektronische Geräte (WEEE) nicht mit dem allgemeinen Hausmüll vermischt werden dürfen. Für eine
ordnungsgemäße Behandlung, Rückgewinnung und Wiederverwertung bringen Sie dieses Produkt bie
zu den dafür vorgesehenen Sammelstellen. Die ordnungsgemäße Entsorgung dieses Produkts trägt dazu
bei, Ressourcen zu sparen und mögliche negative Auswirkungen auf die menschliche Gesundheit und die
Umwelt zu vermeiden, die durch unsachgemäße Abfallbehandlung entstehen könnten.
BATTERIEWARTUNG
Durch vier nicht wiederaufladbare Alkali-Baerien vom Typ LR6 („AA“) ersetzen.
1. Abdeckung entfernen
2. Baerien entfernen
3. Ersetzen Sie die Baerien durch neue und achten Sie dabei auf die richtige Polarität (+ / -)
4. Die Abdeckung wieder anbringen
5. Die entnommenen Baerien sollten gemäß den örtlichen Gesetzen sicher entsorgt werden.
IT
ATTENZIONE
Utilizzare solo quaro baerie alcaline non ricaricabili di tipo LR6 (“AA”). Queste baerie forniscono la tensione necessaria
al programmatore.
Questo dispositivo deve essere installato ad una distanza minima di 20 cm dal corpo e non deve essere collocato né
fao funzionare assieme ad altre antenne o trasmeitori.
RISCHIO DI ESPLOSIONE SE LA BATTERIA VIENE SOSTITUITA CON UNA DI TIPO NON CORRETTO
SMALTIRE LE BATTERIE USATE SECONDO LE ISTRUZIONI
AVVERTENZA
L’utilizzo del presente apparecchio non è destinato a persone (inclusi bambini) con capacità fisiche, sensoriali o mentali
ridoe o prive della giusta esperienza e conoscenza a meno che non abbiano ricevuto supervisione o istruzioni circa
l’utilizzo dell’apparecchio da parte di una persona responsabile della sicurezza. I bambini devono essere supervisionati
anché non giochino con l’apparecchiatura.
È necessario adoare precauzioni speciali quando i cavi delle valvole sono ubicati in prossimità di (o condividono) una
canalina con altri cavi, tra cui quelli utilizzati per l’illuminazione di paesaggi o altri impianti elerici.
Separare e isolare tui i conduori con cautela, prestando aenzione a non danneggiare l’isolamento dei cavi
durante l’installazione. Un cortocircuito tra i cavi della valvola e un’altra fonte di alimentazione potrebbe danneggiare il
programmatore e causare rischi di incendio.
AVVISO
I cambiamenti o le modifiche non espressamente approvati da Rain Bird potrebbero invalidare il dirio dell’utente ad
utilizzare l’apparecchiatura.
Utilizzare esclusivamente accessori Rain Bird. Dispositivi non approvati potrebbero danneggiare il programmatore e
invalidare la garanzia.
Tui i cavi e collegamenti elerici devono essere conformi alle normative locali. Alcune normative richiedono che tali
collegamenti possano essere eeuati esclusivamente da elericisti qualificati. Solo personale qualificato deve installare il
programmatore. Per ulteriori deagli, consultare le normative locali.
La baeria deve essere rimossa dal programmatore prima di essere smaltita.
Le baerie con perdite devono essere rimosse dal dispositivo e smaltite in modo sicuro in conformità alle leggi locali.
19
SPECIFICHE
Interruzione eleronica della connessione durante il funzionamento
Potenza massima in radiofrequenza (per UE e Regno Unito): 9,95 dBm
Banda di frequenza operativa: 2 402 - 2 480 MHz
DICHIARAZIONE DI CONFORMITÀ DELL’UE
Rain Bird Corporation dichiara che le apparecchiature radio ESPBAT-BT1, ESPBAT-BT2, ESPBAT-BT4, ESPBAT-BT6 sono
conformi alla direiva 2014/53/UE.
Il testo completo della dichiarazione di conformità dell’UE è disponibile al seguente indirizzo: www.rainbird.com/
RegulatoryCompliance
SMALTIMENTO DI RIFIUTI ELETTRONICI (SOLO PER I PAESI EUROPEI)
Questo simbolo sul prodoo e/o sui documenti di accompagnamento indica che le apparecchiature
eleriche ed eleroniche usate (RAEE) non devono essere mescolate con i rifiuti domestici generici. Per
un correo traamento, recupero e riciclaggio, si prega di portare questo prodoo nei punti di raccolta
designati. Smaltire correamente questo prodoo contribuirà a risparmiare risorse e a prevenire potenziali
eei negativi sulla salute dell’uomo e sull’ambiente, che potrebbero altrimenti derivare da una gestione
inappropriata dei rifiuti.
MANUTENZIONE DELLA BATTERIA
Sostituire le baerie utilizzandone quaro alcaline non ricaricabili di tipo LR6 (“AA”).
1. Rimuovere il tappo
2. Rimuovere le baerie
3. Sostituire le baerie con altre nuove facendo aenzione a installarle con la polarità correa (+ / -)
4. Sostituire il tappo
5. Le baerie rimosse devono essere smaltite in modo sicuro in conformità alle leggi locali.
PT
CUIDADO
Utilize apenas quatro pilhas alcalinas não recarregáveis do tipo LR6 (“AA”). Estas pilhas fornecem a tensão necessária ao
programador.
Este dispositivo deve ser instalado para oferecer uma distância de separação de pelo menos 20 cm de todas as pessoas
e não deve coincidir ou funcionar em conjunto com qualquer outra antena ou transmissor.
RISCO DE EXPLOSÃO SE A PILHA FOR SUBSTITUÍDA POR UMA QUE NÃO A INDICADA
INCORRETO ELIMINE AS PILHAS USADAS DE ACORDO COM AS INSTRUÇÕES
AVISO
Este dispositivo não se destina a ser utilizado por pessoas (incluindo crianças) com capacidade física, sensorial
ou mental reduzidas ou sem experiência e conhecimento, exceto se tiverem recebido supervisão ou instruções
relativamente à utilização do dispositivo por uma pessoa responsável pela sua segurança. As crianças devem ser
vigiadas para garantir que não brincam com o aparelho.
Devem ser tomadas precauções especiais quando os fios elétricos da válvula estão localizados junto ou partilham um
condutor com outros fios, como os utilizados para iluminação da paisagem ou outros sistemas elétricos.
Separe e isole todos os condutores com cuidado, para que não danifiquem o isolamento do fio durante a instalação.
Um curto-circuito (contacto) elétrico entre os fios elétricos da válvula e outra fonte de alimentação pode danificar o
controlador e criar um risco de incêndio.
AVISO
As alterações ou modificações não expressamente aprovadas pela Rain Bird podem anular a autorização do utilizador de
operar o equipamento.
20
Utilize apenas dispositivos auxiliares aprovados pela Rain Bird. Dispositivos não aprovados podem danificar o
programador e anular a garantia.
Todas as ligações elétricas e cablagem devem estar em conformidade com os códigos de construção locais. Alguns
códigos locais requerem que apenas um eletricista licenciado ou certificado possa proceder à instalação. Apenas
profissionais podem instalar o programador. Consulte os seus códigos de construção locais para orientação.
A pilha deve ser retirada do programador antes de ser eliminada.
As pilhas com fugas devem ser retiradas do dispositivo e eliminadas de forma segura, de acordo com a legislação local.
ESPECIFICAÇÕES
Desativação eletrónica durante o funcionamento
Potência máxima de radiofrequência (para a UE e o Reino Unido): 9,95 dBm
Banda de frequência de funcionamento: 2 402 - 2 480 MHz
AVISO ANATEL
BRASIL: Este equipmento não tem direlto à proteção contra interferêncla prejudicial e não pode causar interferência em
sistemas devidamente autorizados. Para maiores informações, consulte o site da ANATEL www.gov.br/anatel/pt-br.
DECLARAÇÃO DE CONFORMIDADE DA UE
Pelo presente, a Rain Bird Corporation declara que o equipamento de rádio de tipo ESPBAT-BT1, ESPBAT-BT2, ESPBAT-
BT4 , ESPBAT-BT6
está em conformidade com a Diretiva 2014/53/UE
O texto integral da declaração de conformidade da UE está disponível no seguinte endereço da Internet: www.rainbird.
com/RegulatoryCompliance
DISPOSAL OF ELECTRONIC WASTE – FOR EUROPEAN COUNTRIES ONLY
Este símbolo no produto e/ou nos documentos que o acompanham significa que os equipamentos
elétricos e eletrónicos usados (REEE) não devem ser misturados com o lixo doméstico geral. Para
um tratamento, recuperação e reciclagem adequados, entregue este produto nos pontos de recolha
designados. A eliminação correta deste produto permitirá poupar recursos e evitar quaisquer potenciais
efeitos negativos para a saúde humana e para o ambiente que, de outro modo, poderiam resultar de um
manuseamento inadequado dos resíduos.
MANUTENÇÃO DAS PILHAS
Substitua por quatro pilhas alcalinas não recarregáveis do tipo LR6 (“AA”).
1. Retire a tampa
2. Retire as pilhas
3. Substitua por pilhas novas, tendo o cuidado de as instalar com a polaridade correta (+/-)
4. Recoloque a tampa
5. As pilhas retiradas devem ser eliminadas de forma segura, de acordo com a legislação local.
21
TR
DİKKAT
Sadece LR6 (“AA”) tipi dört adet şarj edilemeyen alkalin pil kullanın. Bu piller, kontrol ünitesinin ihtiyaç duyduğu voltajı
sağlar.
Bu cihaz, tüm kişilerden en az 20 cm’lik bir ayrım mesafesiyle kurulmalı, başka bir anten veya verici ile aynı yerde ya da
birlikte çalıştırılmamalıdır.
YANLIŞ TİPTE BİR PİL TAKILIRSA PATLAMA RİSKİ VARDIR
KULLANILMIŞ PİLLERİ TALİMATLARA UYGUN OLARAK BERTARAF EDİN
UYARI
Bu cihaz, kendi güvenliğinden sorumlu olan bir kişi tarafından denetlenmediği veya cihaz kullanımına ilişkin
yönlendirilmediği takdirde, düşük fiziksel, duyusal veya zihinsel becerilere sahip veya yeterli deneyim ya da bilgisi olmayan
kişiler (çocuklar dahil) tarafından kullanılmamalıdır. Çocuklar, cihazla oynamadıklarından emin olmak içingözetim altında
tutulmalıdır.
Vana kabloları başka kablolarla (örn. peyzaj aydınlatması veya diğer elektrik sistemleri için kullanılanlar) yanyana
yerleştirildiğinde veya aynı kablo kanalını paylaştığında özel önlemler alınmalıdır.
Kurulum sırasında kablo yalıtımının zarar görmemesine dikkat ederek iletkenlerin birbirine temas etmediğinden ve
yalıtıldıklarından emin olun. Vana kabloları ve diğer güç kaynakları arasındaki kısa devreler (kontak) kontrol ünitesine zarar
verebilir ve yangın riski oluşturabilir.
BİLDİRİM
Rain Bird tarafından açıkça onaylanmamış değişiklikler veya modifikasyonlar, kullanıcının ekipmanı çalıştırma yetkisini
geçersiz kılabilir.
Yalnızca Rain Bird onaylı yardımcı cihazları kullanın. Onaysız cihazlar kontrol ünitesine zarar verebilir ve garantiyi bozabilir.
Tüm elektrik bağlantıları ve kablolar, yerel inşaat yönetmeliklerine uygun olmalıdır. Bazı yerel yönetmeliklerde güç
kurulumunun lisanslı veya sertifikalı elektrikçiler tarafından yapılması zorunlu tutulmuştur. Yalnızca profesyonel personeller
kontrol ünitesini monte edebilir. Bilgi için yerel inşaat yönetmeliklerinizi kontrol edin.
Pil bertaraf edilmeden önce kontrol ünitesinden çıkarılmalıdır.
Akan piller cihazdan çıkarılmalı ve yerel yasalara uygun olarak güvenli bir şekilde imha edilmelidir.
TEKNİK ÖZELLİKLER
Çalışma sırasında elektronik bağlantı kesilmesi
Maksimum radyo frekansı gücü (AB ve BK için): 9,95 dBm
Çalışma frekansı bandı: 2 402 - 2 480 MHz
BİRLEŞİK KRALLIK UYGUNLUK BEYANI
Rain Bird Corporation, ESPBAT-BT1, ESPBAT-BT2, ESPBAT-BT4, ESPBAT-BT6 tipi telsiz ekipmanlarının 1206 sayılı Yasal
Düzenleme 2017 ile uyumlu olduğunu beyan eder.
BK uygunluk beyanının tam metnine internet adresinden ulaşılabilir: www.rainbird.com/RegulatoryCompliance
ELEKTRONİK ATIKLARIN BERTARAFI - SADECE AVRUPA ÜLKELERİ İÇİN
Ürün ve/veya beraberindeki belgeler üzerindeki bu sembol, kullanılmış elektrikli ve elektronik ekipmanın
(WEEE) genel evsel atıklarla karıştırılmaması gerektiği anlamına gelir. Uygun arıtma, geri kazanım ve geri
dönüşüm için lütfen bu ürünü belirlenen toplama noktalarına götürün. Bu ürünün doğru şekilde bertaraf
edilmesi, kaynakların korunmasına yardımcı olacak ve insan sağlığı ve çevre üzerinde uygunsuz atık
kullanımından kaynaklanabilecek olası olumsuz etkileri önleyecektir.
22
PİL BAKIMI
Dört adet LR6 (“AA”) tipi şarj edilemeyen alkalin pil ile değiştirin.
1. Kapağı kaldırın
2. Pilleri çıkarın
3. Doğru polarite (+ / -) ile takmaya dikkat ederek yeni pillerle değiştirin
4. Kapağı yerine takın
5. Çıkarılan piller yerel yasalara uygun olarak güvenli bir şekilde imha edilmelidir.
PO
UWAGA
Należy stosować tylko alkaliczne baterie LR6 („AA”). Ten rodzaj baterii zapewnia odpowiednie napięcie wymagane przez
sterownik.
To urządzenie należy zamontować w odległości co najmniej 20 cm od stanowisk personelu i nie może działać, w pobliżu
dodatkowych anten lub przekaźników lub razem z nimi.
WYKORZYSTANIE NIEWŁAŚCIWEGO RODZAJU BATERII GROZI WYBUCHEM
UTYLIZACJĘ BATERII NALEŻY PRZEPROWADZIĆ ZGODNIE Z INSTRUKCJAMI
OSTRZEŻENIE
Urządzenie nie powinno być obsługiwane przez osoby (włączając w to dzieci) o ograniczonej sprawności fizycznej,
sensorycznej i umysłowej, nieposiadające odpowiedniego doświadczenia lub wiedzy, chyba że zostaną one przeszkolone
w zakresie obsługi urządzenia lub korzystają z niego pod opieką osoby odpowiedzialnej za ich bezpieczeństwo. Należy
pilnować, aby dzieci nie bawiły się urządzeniem.
Należy zastosować szczególne środki ostrożności, jeśli przewody zaworu znajdują się obok innych przewodów, takich jak
przewody stosowane do oświetlania terenu lub innych systemów elektrycznych.
Należy ostrożnie oddzielić iodizolować wszystkie przewody, uważając, by podczas montażu nie uszkodzić izolacji
przewodów. „Zwarcie” elektryczne (kontakt) pomiędzy przewodami zaworu ainnym źródłem zasilania może uszkodzić
sterownik istworzyć ryzyko pożaru.
UWAGA
Zmiany lub modyfikacje, które nie zostały wyraźnie zatwierdzone przez firmę Rain Bird, mogą spowodować unieważnienie
pozwolenia na eksploatację tego urządzenia.
Należy stosować wyłącznie akcesoria zatwierdzone przez Rain Bird. Niezatwierdzone urządzenia mogą uszkodzić
sterownik ispowodować unieważnienie gwarancji.
Wszystkie złącza elektryczne ikanały na okablowanie muszą być zgodne zmiejscowym prawem budowlanym. Niektóre
miejscowe przepisy stanowią, że zasilanie podłączać może tylko licencjonowany lub certyfikowany elektryk. Sterownik
powinien montować wyłącznie wykwalifikowany instalator. Należy stosować się do przepisów miejscowego prawa
budowlanego.
Przed utylizacją sterownika należy usunąć baterie.
Nieszczelne baterie należy wyjąć z urządzenia i zutylizować zgodnie z lokalnymi przepisami.
SPECYFIKACJA
Elektroniczne rozłączenie w trakcie działania
Maksymalna moc częstotliwości radiowej (dla UE i UK): 9,95 dBm
Zakres częstotliwości operacyjnej: 2 402–2 480 MHz
23
DEKLARACJA ZGODNOŚCI Z REGULACJAMI UE
Rain Bird Corporation niniejszym deklaruje, że wyposażenie radiowe ESPBAT-BT1, ESPBAT-BT2, ESPBAT-BT4, ESPBAT-BT6
jest zgodne z Dyrektywą 2014/53/EU
Pełny tekst deklaracji zgodności z regulacjami UE można znaleźć pod adresem: www.rainbird.com/RegulatoryCompliance
UTYLIZACJA ODPADÓW ELEKTRONICZNYCH DLA OBSZARU EUROPY
Symbol znajdujący się na produkcie lub dokumentacji oznacza, że wykorzystane wyposażenie elektryczne/
elektroniczne (WEEE) nie może być utylizowane razem z ogólnymi odpadami. W celu odpowiedniej utylizacji,
odbioru i recyklingu prosimy przekazać odpady do wyznaczonego punktu zbiorczego. Odpowiednia
utylizacja tego produktu zapobiega marnowaniu surowców oraz obniża ryzyko potencjalnych negatywnych
efektów na zdrowie ludzi i środowiska – co miałoby miejsce w przypadku nieodpowiedniej utylizacji.
WYMIANA BATERII
Wymiany należy dokonać tylko na baterie alkaliczne LR6 („AA”).
1. Należy odkręcić osłonę baterii
2. Należy wyjąć uchwyt baterii
3. Należy umieścić baterie w uchwycie mając na uwadze zachowanie odpowiedniej polaryzacji (±)
4. Należy ponownie wprowadzić uchwyt baterii – stroną ze sprężynami – do urządzenia
5. Należy ponownie zamknąć osłonę baterii
6. Usunięte baterie należy bezpiecznie zutylizować zgodnie z lokalnymi regulacjami.
24
AR
هيبنت
.مكحتلا ةدحو ةطساوب ةبولطملا ةيتلوفلا تايراطبلا هذه رفوت .)"AA"( LR6 عونلا نم نحشلا ةداع�ل ةلباق ريغ ةيولق تايراطب 4 �لإ مدختست �ل
وأ يئاوه يأ عم هليغشت وأ هعضو مدع بجيو صاخشألا لك نع لقألا ىلع مس 20 غلبت ةلصاف ةفاسم كانه نوكت ثيحب زاهجلا اذه بيكرت بجي
.رخآ لاسرإ زاهج
حيحص ريغ عونب ةيراطبلا لادبتسا ةلاح يف راجفن�لا رطخ
تاداشر�لل ا
ا
قفو ةلمعتسملا تايراطبلا نم صلخت
ريذحت
يف صقن مهيدل وأ ةفخنم ةيلقع وأ ةيسح وأ ةيدسج تاردق يوذ )لافطألا كلذ يف امب( صاخشأ لب
ِ
ق نم مادختس�لا زاهجلا اذه نم ضرغلا سيل
نامل لافطألا ىلع فارش�لا بجي .مهتم�لس ةيلوؤسم لمحتي صخش دي ىلع زاهجلا مادختساب قلعتي ا
ا
هيجوت وأ ا
ا
فارشإ اوقلت اذإ �لإ ،ةفرعملاو ةربخلا
.زاهجلاب مهثبع مدع
ك�لسألاك ىرخألا ك�لسألا عم ليصوت ةانقل اهتكراشم ةلاح يف وأ ىرخأ ك�لسأ راوجب سبحملا ك�لسأ دوجو ةلاح يف ةصاخ ةيئاقو ريبادت عابتا بجي
.ىرخألا ةيئابرهكلا ةمظنألا وأ ءارخلا تاحطسملا ةءاضإ يف ةمدختسملا
نيب ةيئابرهك )سم�لت( "رصق" ةرئاد ثودح ببستي دقف .بيكرتلا ءانثأ ك�لسألا ت�لزاع ف�لتإ رذحاو رذحب اهلزعو ت�لصوملا عيمج لصف نم دكأت
.قيرح بوشن رطخ ثادحإو مكحتلا ةدحو ف�لتإ يف رخآ ةقاط ردصمو سبحملا ك�لسأ
ةظح�لم
.زاهجلا ليغشتل مدختسملل ةحونمملا ةيح�لصلا ءاغلإ ىلإ Rain Bird ةكرش نم ةحيرص ةقفاوم ىلع لوصحلا نود ت�ليدعت وأ تارييغت ءارجإ يدؤي دق
.ناملا لاطبإو مكحتلا ةدحو ف�لتإ يف ةدمتعملا ريغ ةزهجألا ببستت دقف .Rain Bird لب
ِ
ق نم ةدمتعملا ةيفاض�لا ةزهجألا ىوس مدختست �ل
يئابرهك ىوس ةقاطلا ت�لصو لمعب موقي �لأ ةيلحملا نيناوقلا ضعب طرتشت .ةيلحملا ءانبلا داوكأ عم ك�لسألاو ةيئابرهكلا ت�لصولا عيمج قفاوتت نأ بجي
.اهب داشرتس�لل كيدل ةيلحملا ءانبلا نيناوق عجار .نيصتخم نيينف لبق نم �لإ مكحتلا ةدحو بيكرتب حمس
ُ
ي �ل .دمتعم وأ صخرم
.اهنم صلختلا لبق مكحتلا ةدحو نم ةيراطبلا جارخإ بجي
.ةيلحملا نيناوقلل ا
ا
قفو ةنمآ ةروصب اهنم صلختلاو زاهجلا نم بيرست اهب يتلا تايراطبلا جارخإ بجي
تافصاوملا
ليغشتلا دنع ينورتكلإ لصف
طاو يلليم لبيسيد 9,95 :)ةدحتملا ةكلمملاو يبوروألا داحت�لل( يكلس�للا ددرتلل ىوصقلا ةردقلا
زترهاجيم 2480 - 2402 :ليغشتلا ددرت قاطن
تايراطبلا ةنايص
.)"AA"( LR6 عونلا نم نحشلا ةداع�ل ةلباق ريغ ةيولق تايراطب عبرأ مادختساب تايراطبلا لدبتسا
1 .ءاطغلا ةلازإب م
ُ
ق
2 .تايراطبلا جرخأ
3 .)+/-( ةحيحصلا ةيبطقلا مادختساب اهبيكرت ىلع صرحلا عم ةديدج تايراطب مادختساب تايراطبلا لدبتسا
4 .ءاطغلا عضو دعأ
5 ..ةيلحملا نيناوقلل ا
ا
قفو ةنمآ ةروصب اهجارخإ مت يتلا تايراطبلا نم صلختلا بجي