The Perlick Corporation veries this product does not contain a prohibited refrigerant as dened by the California Air Resource Board (CARB),
the state of New York, and any other state with HFC prohibition laws. This product does not contain HFC’s. The following disclosure statement is
provided to comply with the CARB regulation:
This equipment is prohibited from use in California with any refrigerants on the “List Of Prohibited Substances” for that specic end use, in
accordance with the California Code of Regulations, title 17, section 95374. This disclosure statement has been reviewed and approved by
the Perlick Corporation and the Perlick Corporation attests under penalty of perjury, that these statements are true and
Installation &
Operation Manual
Form No. Z3006
Rev. 07.13.26
C
US
CC24B-2
CR24B-2
CC24C-2
CR24C-2
CC24D-2
CR24D-2
CC24W-2
CR24W-2
CC30B-2
CR30B-2
CC30C-2
CR30C-2
CC30D-2
CR30D-2
CC30W-2
CR30W-2
For all second generation
column refrigeration
produced after 7/21/24
COLUMN REFRIGERATION

2
Column Refrigeration Installation & Operation Manual
TABLE OF CONTENTS
GENERAL INFORMATION
Warranty Registration
To register your product, visit our web site at
perlick.com. Or scan QR code located next to the
product identication plate located behind the toe
kick to complete a “Warranty Registration Form”.
You must complete and submit this form or the
installation date will revert back to the ship date.
Please record the purchase date and the dealer’s
name, address and telephone number below.
Model Number: ___________________________
Serial Number: ___________________________
Purchase Date: ___________________________
Dealer Name & Address
______________________________________
______________________________________
______________________________________
Phone Number ___________________________
Introduction
Congratulations on your purchase of a Perlick
column refrigerator. This manual has been
prepared to assist you in the installation of your
cabinet and to acquaint you with its operation and
maintenance.
We dedicate considerable time to ensure that our
products provide the highest level of customer
satisfaction. If service is required, your dealer can
provide you with a list of qualied service agents.
For your own protection, never return merchandise
for credit without our approval.
We thank you for selecting a Perlick product
and assure you of our continuing interest in your
satisfaction.
Product Information
Additional product information, such as installation
instructions, Use and Care Guides, Spec Sheets,
CAD Drawings, Compliance Documentation and
product warranty information can be referenced or
downloaded at perlick.com.
General Information ............................................................................................................................................................................................................2
Safety Precautions/Site Preparation ............................................................................................................................................................................3
Prior to Installation ...............................................................................................................................................................................................................4
Installation ...............................................................................................................................................................................................................................5
Anti-Tip Bracket/Application ........................................................................................................................................................................................11
Placement and Alignment of Appliance ..................................................................................................................................................................12
Installing Door Overlay Panel .......................................................................................................................................................................................15
24” Column Glass Door Template for 4”/6” Toe Kick.......................................................................................................................................17
30” Column Glass Door Template for 4”/6” Toe Kick.......................................................................................................................................19
24” Wine Shelf Front Detail ..........................................................................................................................................................................................21
30” Wine Shelf Front Detail ..........................................................................................................................................................................................22
Door Overlay Panel Adjustment ..................................................................................................................................................................................21
Door Trim Installation ......................................................................................................................................................................................................22
Wine Storage and Shelving ..........................................................................................................................................................................................26
Toe Kick Installation .........................................................................................................................................................................................................28
Toe Kick Clearance ..........................................................................................................................................................................................................28
Air Filter Installation ..........................................................................................................................................................................................................29
Hinge Operation ................................................................................................................................................................................................................29
PerliQ Digital Control Operation ..................................................................................................................................................................................30
Stainless Steel/Surface Care ........................................................................................................................................................................................33
Air Filtration Care ..............................................................................................................................................................................................................33
Troubleshooting .................................................................................................................................................................................................................34
Column Install Checklist .................................................................................................................................................................................................36
Product Identication Plate
Your product information can be found on the
product’s identication plate. The identication
plate is located on the sidewall behind the toe kick
plate. To access the identication plate, simply
remove the toe kick plate (grill). The identication
plate will be adhered to the right sidewall.
3
IMPORTANT!
Read and understand all information in this manual before attempting the installation.
All electrical work must be performed by a qualied technician and
conform to all applicable state and local codes.
SAFETY
PLEASE READ all instructions completely before
attempting to install or operate the unit. Take
particular note of the DANGER, WARNING
an CAUTION information in the manual. The
information is important for the safe and efcient
installation, operation and care of your Perlick unit.
DANGER
Indicates a hazard
that WILL result in serious
injury or death if precautions
are not followed.
W ARNING
Indicates a hazard MAY
cause serious injury or
death if precautions are not followed.
CAUTION
Indicates a hazard w
here minor injury or
product damage may occur if precautions are
not followed.
NOTICE
Indicates that property
damage may occur if
warnings or instructions are not followed.
W ARNING
Carefully inspect the cabinet
for hidden damage. If
damage is discovered, le your claim immediately
with the transportation company. Perlick is not
responsible for damage in transit.
CAUTION
When moving the unit, be
sure to protect nished
ooring with appropriate material to avoid damage
from moving the appliance.
CAUTION
If unit has been laid on its
back or sides, place unit
upright and allow minimum of 24 hours before
connecting the unit. Failure to do so can affect the
function and performance of the appliance.
This appliance should be installed in a dry,
ventilated indoor location. The ambient
temperature of the location must be between
55°F (13°C) and 100°F (43°C) for optimal
performance.
When fully stocked, Perlick wine column refrigera-
tion is very heavy. To ensure safety and prevent
home damage, the load-bearing capacity of your
oor
must be 550 lbs.capacity for 24”, and 650 lbs.
capacity for 30” column units being installed.
This product must be installed on a level oor for
safety and optimal performance. The base must
be at to ensure anti-tip brackets properly func-
tion and that the refrigeration system is level. Any
walls and surrounding furniture/xtures need to be
securely attached to the oor, wall studs or con-
crete prior to installing the column.
To ensure proper performance, the air intake (toe
kick) must not be blocked and condenser divider
installed. Perlick refrigeration is front-breathing,
and covering the intake, or failure to install the
condenser divider will cause the system to overheat
SITE PREPARATION
WARNING: California Prop 65 Notice
These products may expose you to chemicals including Chromium, which are known to the state of California to cause
cancer and birth defects or other reproductive harm. For more information on whether a product in this list contains these
Column Refrigeration Installation & Operation Manual
4
PRIOR TO INSTALLATION
Safety Precautions
W ARNING
Inspect the electrical cord
and plug for damage
prior to plugging the unit in.
WARNING
It is strongly recommended
that all service work is performed by individuals
that are trained on the specic equipment. To
avoid risk of injury or death, individuals must be
properly trained on the appropriate procedures
for handling of flammable refrigerants and
safely working with electricity. All component
parts shall be replaced with like components.
Incorrect parts or improper service may result
in injury, damage to property, or fire. It is
recommended that all warranty service work be
performed by Perlick authorized service agent
using only OEM parts.
CAUTION
If unit has been laid on its
back or sides, place unit
upright and allow minimum of 24 hours
before connecting power. Failure to follow this
procedure may damage the compressor and
void the warranty.
DANGER
Do not use or store
ammable liquids (ie;
gasoline) or vapors near the appliance.
DANGER
Perlick columns are top
heavy. It is important that it
is secured at all times with the door closed
until installed. Install as directed using anti-tip
brackets provided to prevent tipping.
DANGER
Take special care when
moving to prevent injury.
Electrical
DANGER
Serious electrocution
hazard. Electrical grounding
is required. This appliance is equipped with a
3-prong (grounding) polarized plug for your
protection against possible shock hazards.
Failure to comply with these electrical
guidelines may result in possible death or
serious injury, re or loss of property.
W ARNING
Never use an extension
cord to connect the unit
to the electrical source. Do not use a two-
prong adapter or remove the power cord
ground prong.
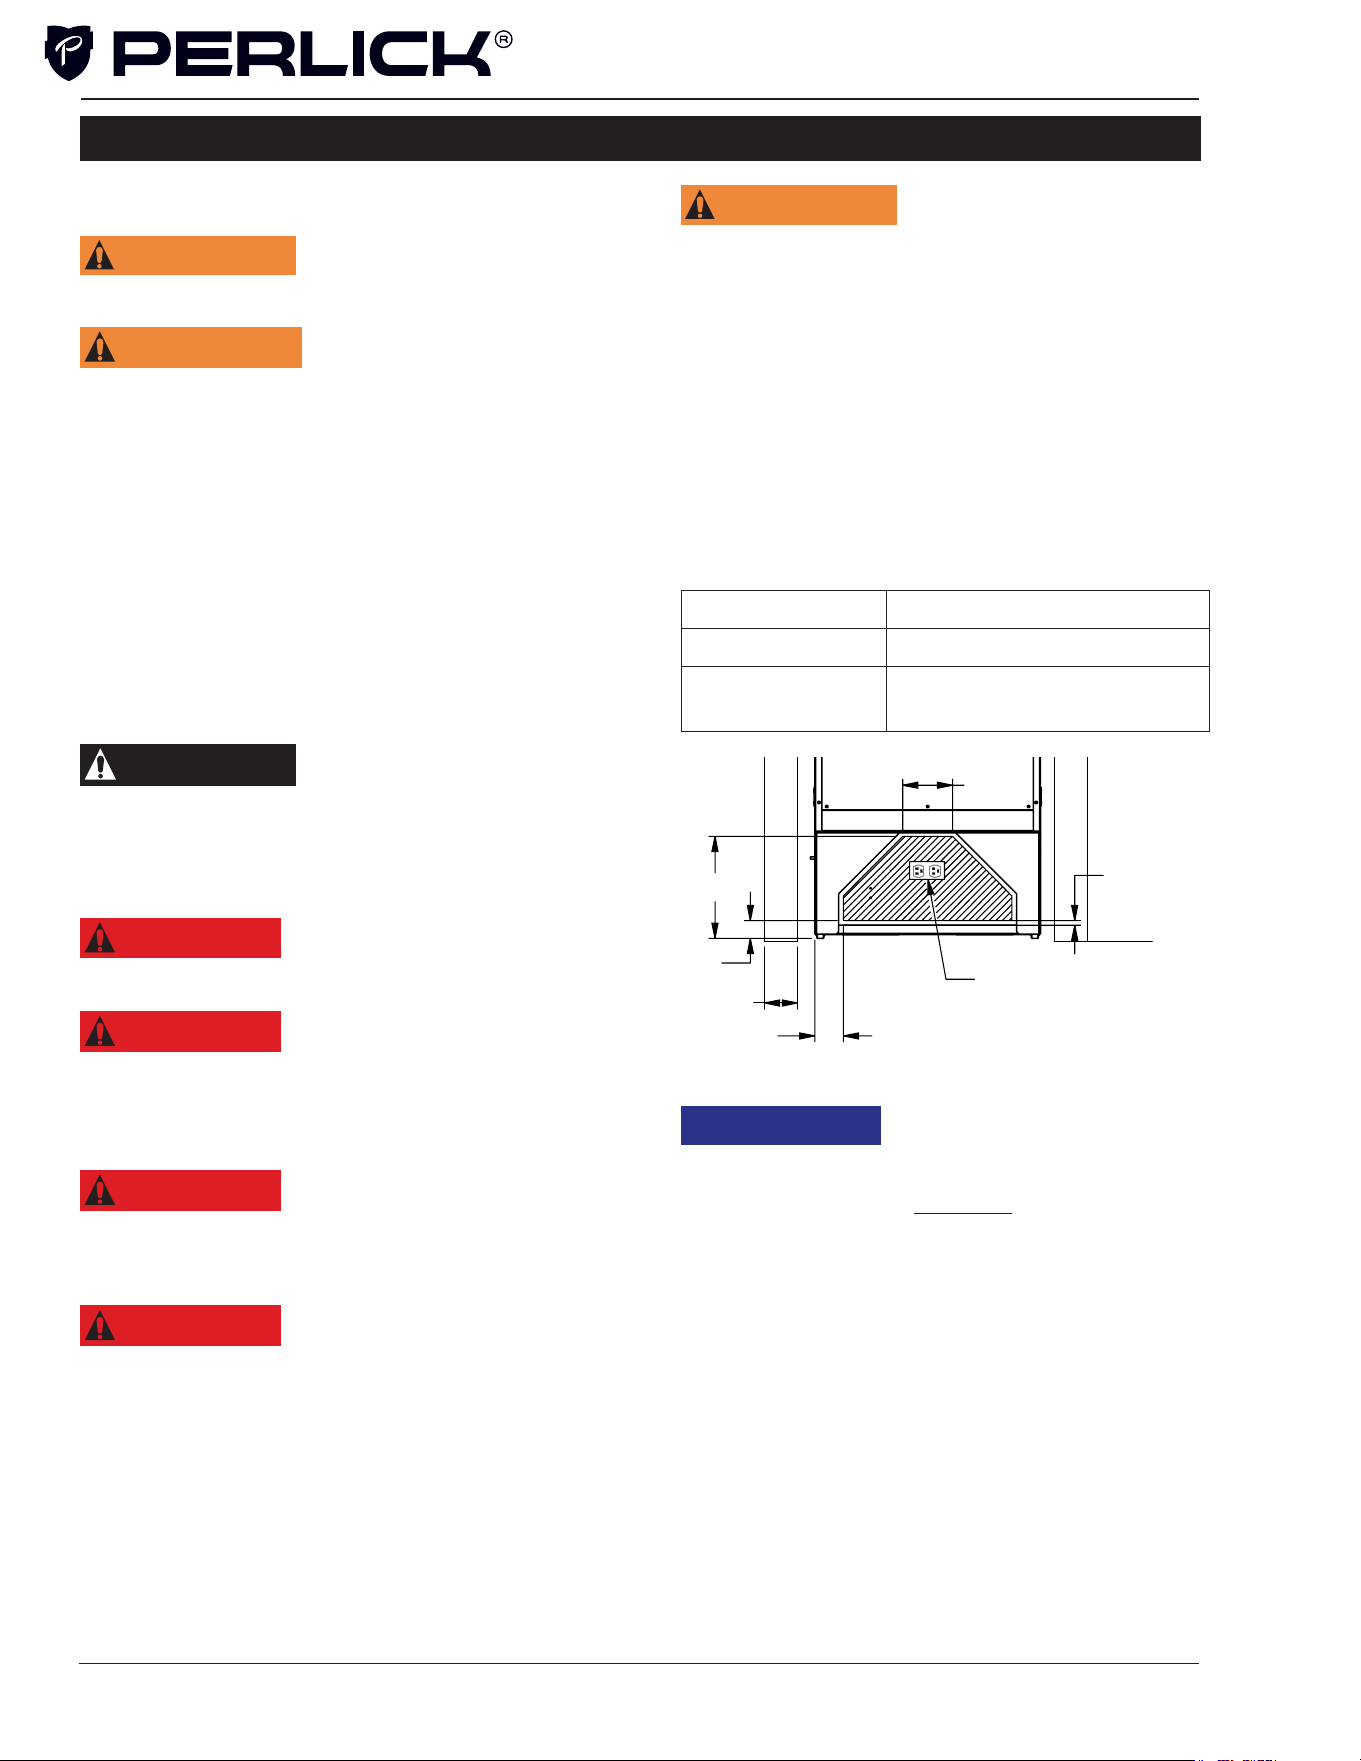
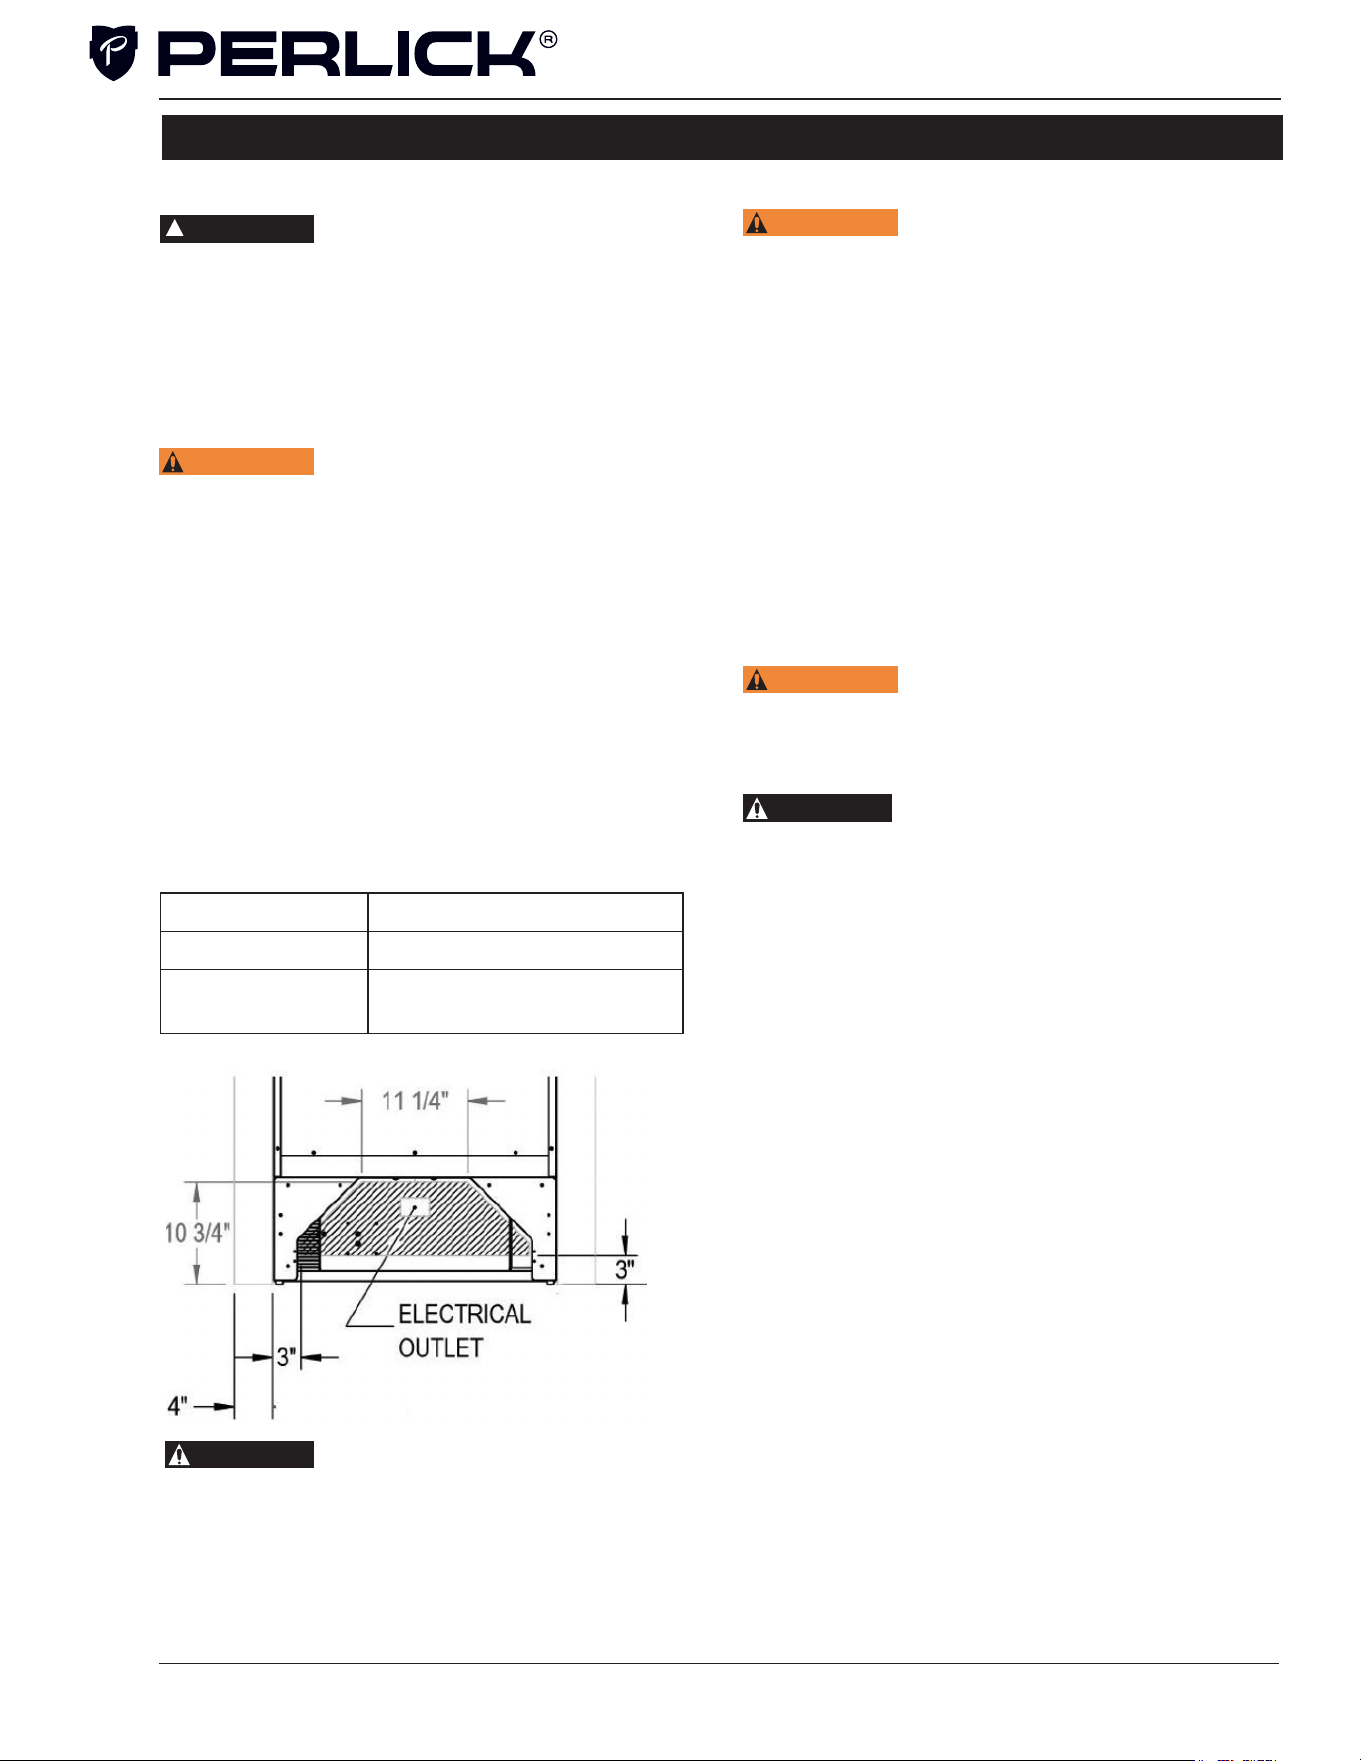
Installation must comply with all applicable
electrical codes. The electrical supply must be
located within the shaded area of the illustration
below. A separate circuit, servicing only this
appliance, is required. A ground fault circuit
interrupter (GFCI) is not recommended and may
cause interruption of operation. The outlet should
be placed in the hatched area dimensioned below.
Electrical Supply 115V, 60Hz, 1 Phase, 3.2 Amps
Service Dedicated 15 amp circuit
Power/Cord Type/
Length
NEMA 5-15 Cord Plug Type
(5’ length)
84"
4"
24"
83 11/16"
14 1/8"
66 1/2"
4"
OVERLAY TEMPLATE
DIMENSIONAL LIMIT
21.5/8"
1 4/5"
13 3/8"
22 3/16"
24 1/16"
23 3/4"
28"
90°
50 1/8"
1/2"
3"
3"
10 3/4"
5 1/4"
ELECTRICAL
OUTLET
LOCATION
CABINET
OPENING
N OTICE
This product contains
blown foam insulation using
blowing agent R-611 (Methyl Formate). The
foam in this product does not contain HFC’s,
CFC’s, or HCFC’s.
Column Refrigeration Installation & Operation Manual
5
CAUTION
CAUTION
CAUTION
CAUTION
CAUTION
CAUTION
CAUTION
Column Refrigeration Installation & Operation Manual
PRIOR TO INSTALLATION
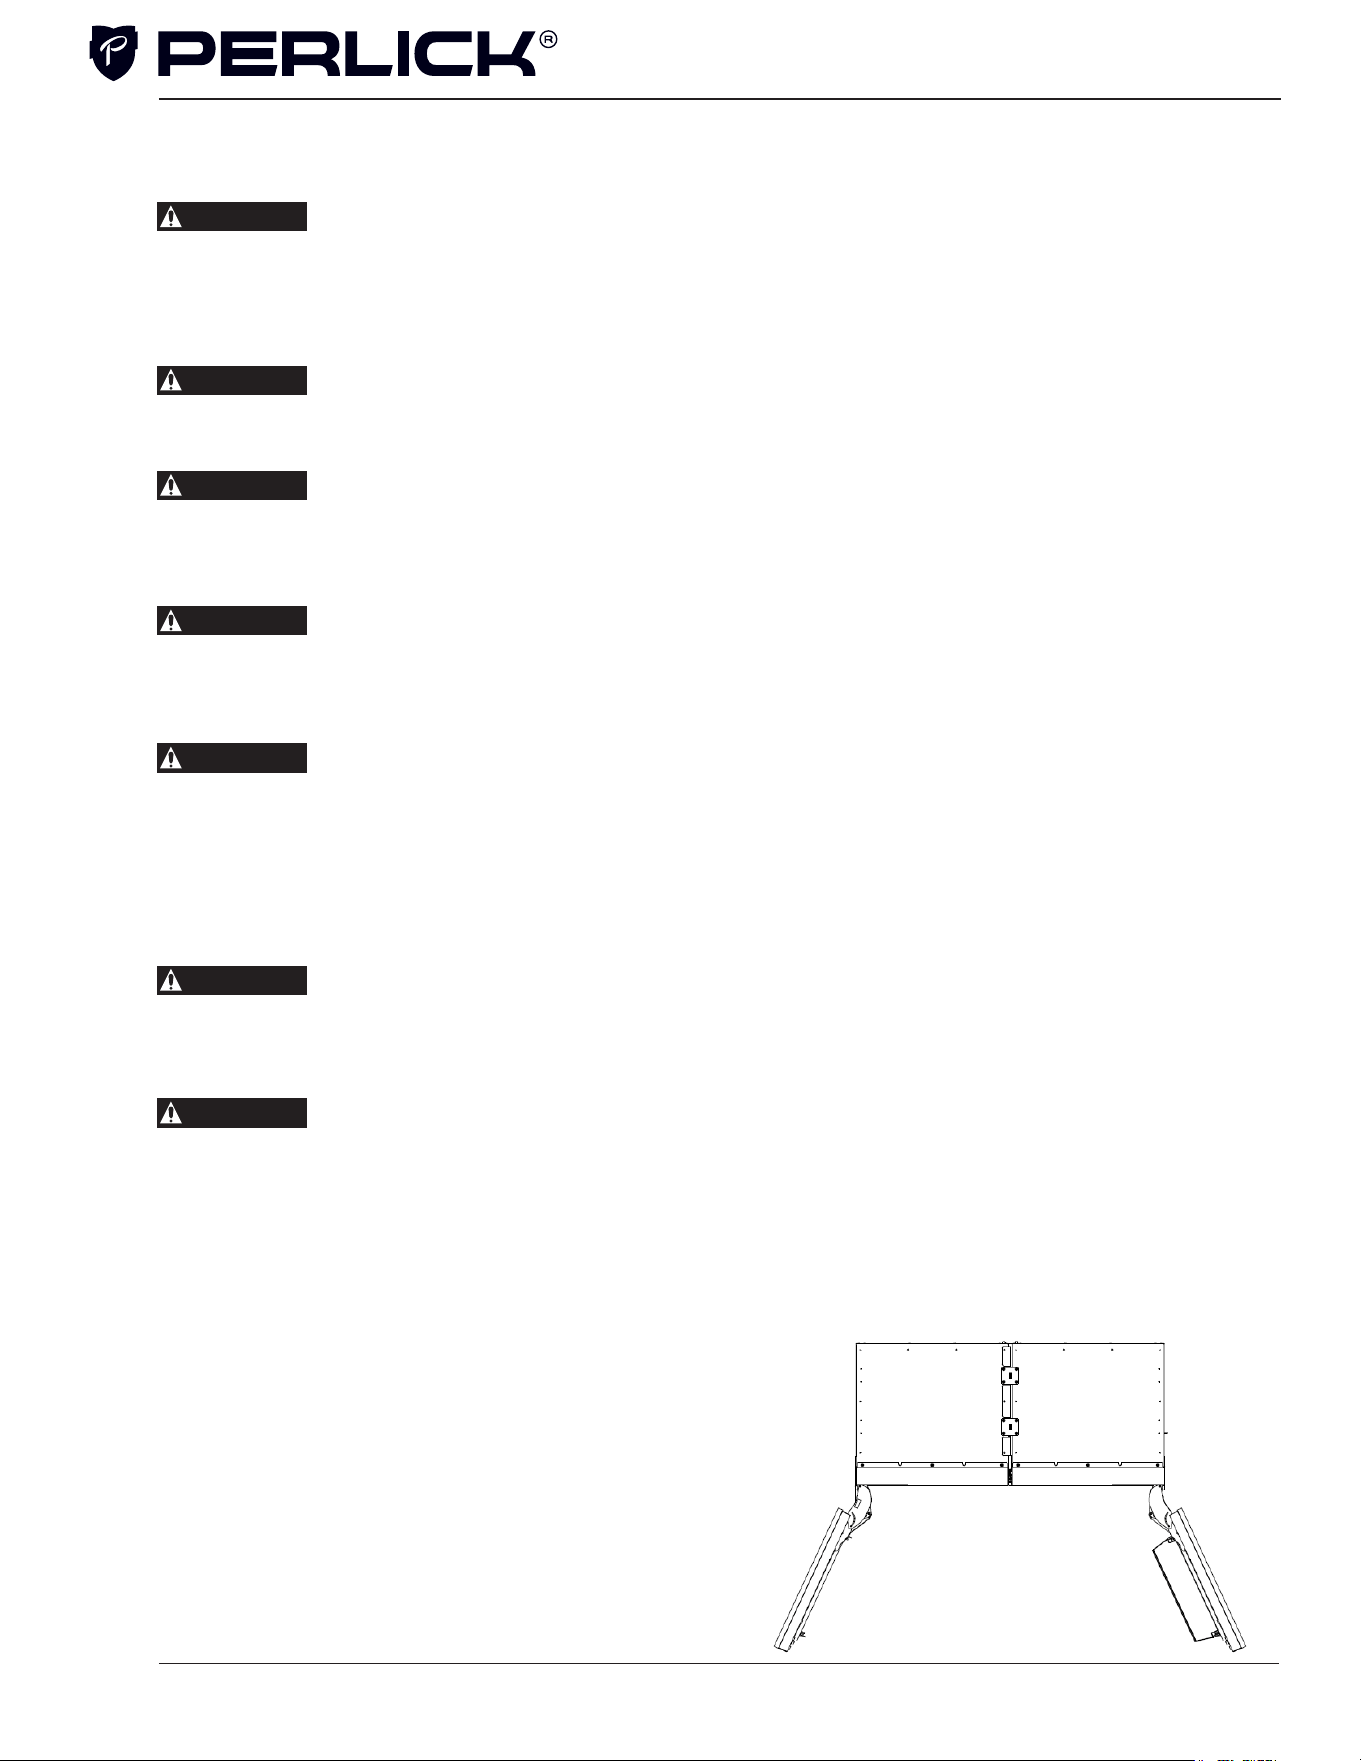
Before beginning installation,
carefully inspect the cabinet for hidden damage. If
damage is discovered, immediately le a claim with the
transportation company. Perlick is not responsible for
damage in transit.
When moving the unit, be sure to
protect nished ooring with appropriate material to
avoid damage from moving the appliance.
If the unit has been laid on its back or
sides, place unit upright and allow minimum of 24 hours
before connecting the unit. Failure to do so can affect
the function and performance of the appliance.
This appliance should be installed in
dry, ventilated indoor location. The ambient temperature
of the location must be between 55°F (13°C) and 100°F
(43°C) for optimal performance.
This product must be installed on a
level oor for safety and optimal performance. The base
must be at to ensure anti-tip brackets properly function
and that the refrigeration system is level. Any walls
and surrounding furniture/xtures need to be securely
attached to the oor, wall studs or concrete prior to
installation of the column.
To ensure proper performance,
the air intake (toe kick) must not be blocked. Perlick
refrigeration is front-breathing — covering the intake will
cause the system to overheat and fail.
Perlick column doors open to
105°. When installing a panel thicker than ¾” (19), or if
located next to adjacent wall, the 90° hinge stop pin may
be required to prevent damage to the unit and adjacent
cabinetry/walls. This hinge pin must be installed prior to
full integration.
In addition, the appliance must not be in direct exposure
of constant sunlight or excessive heat. If it must be
installed next to a heat source, such as a cooking
appliance or radiant heat, you must install an insulating
plate between the column and heat source.
When fully stocked, Perlick column refrigeration is very
heavy. To ensure the safety and prevent home damage,
the load-bearing capacity of your oor must be 846 lbs
(384 kg).
INSTALLATION TOOLS AND MATERIALS
▪ Screwdrivers (standard and #2 Phillips)
▪ Power drill
▪ Needle nose pliers
▪ Drill bits
▪ 13mm socket or wrench set
▪ 2’ and 4’ levels
▪ Material to protect ooring and
surrounding cabinetry
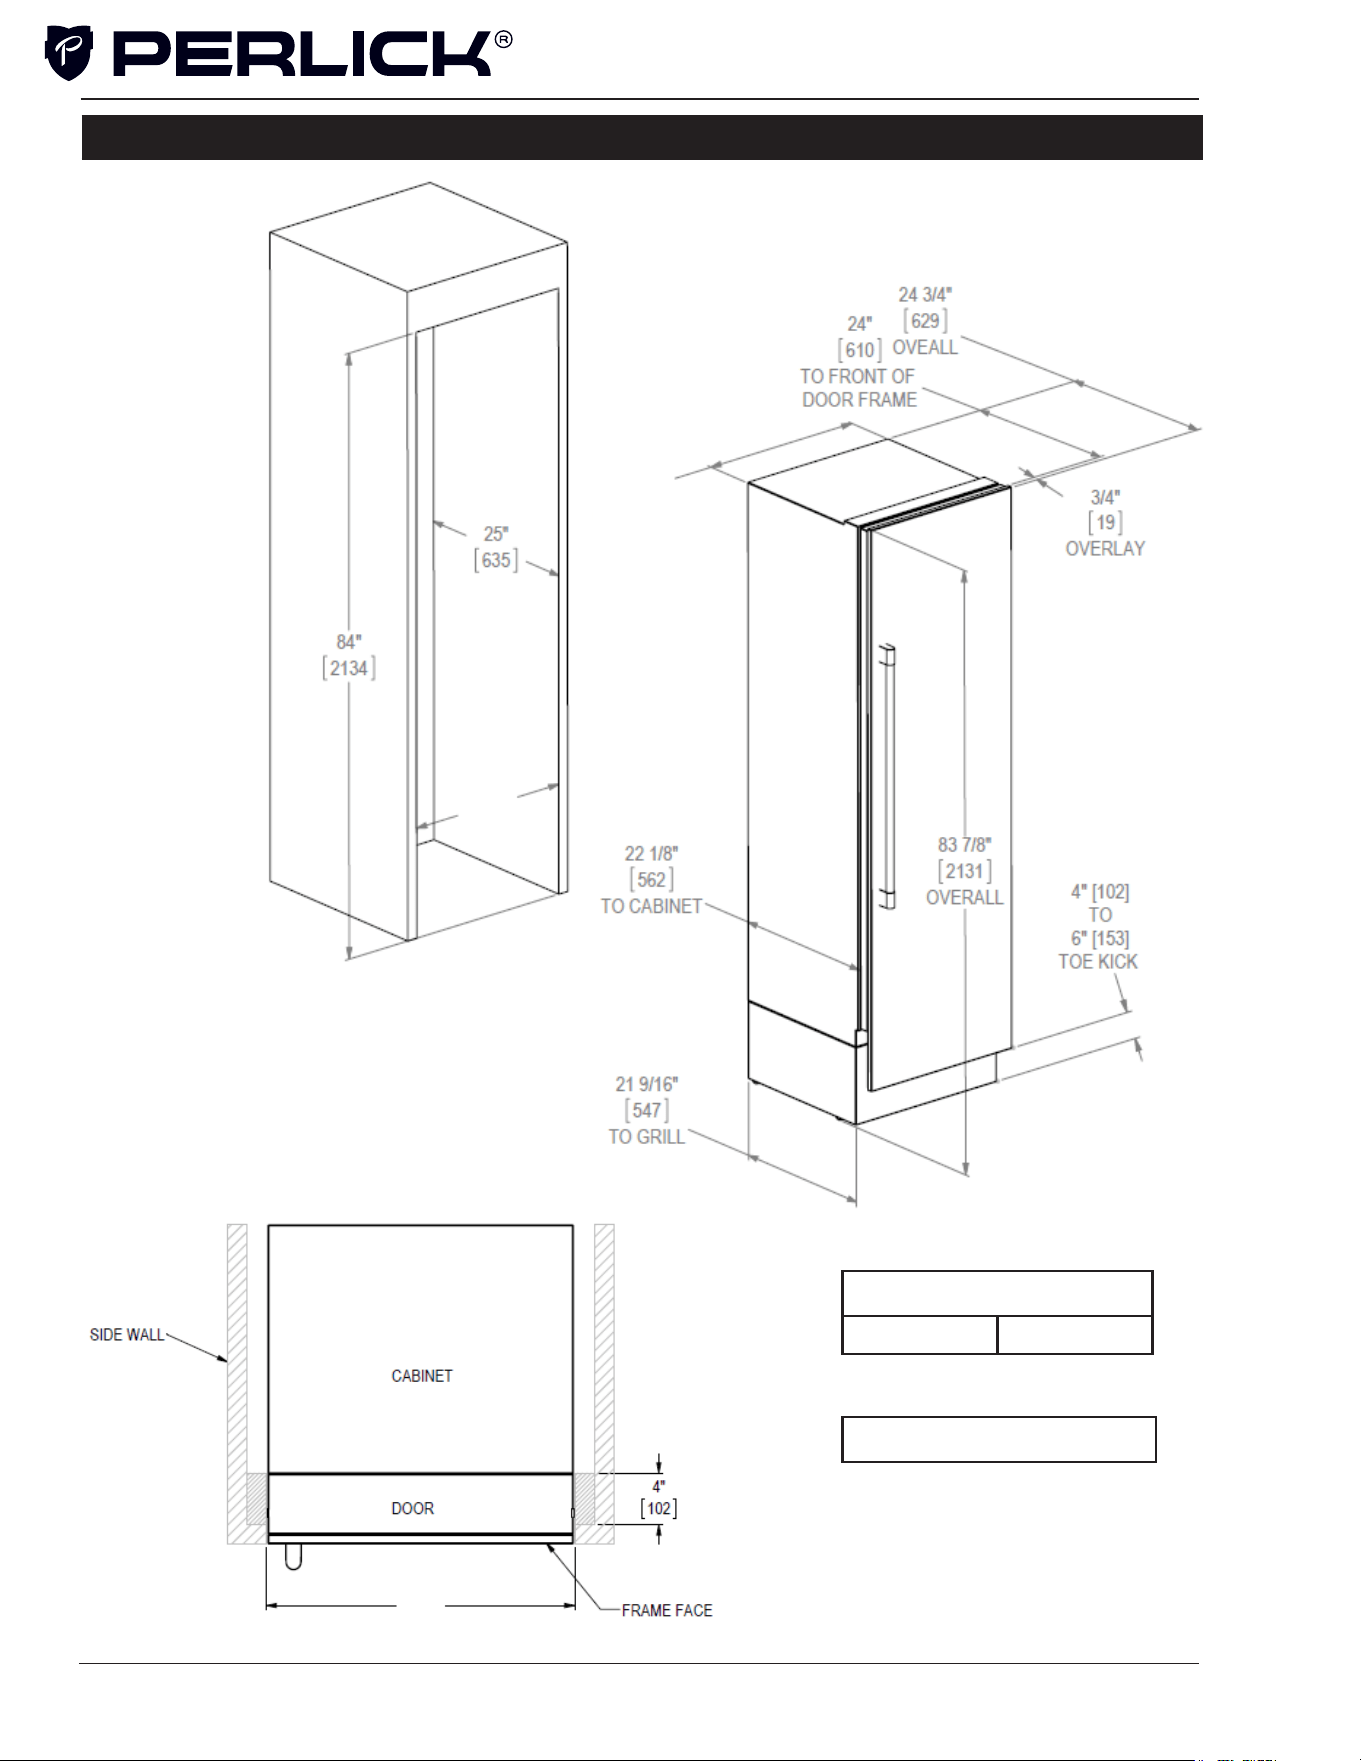
OPENING DIMENSIONS - SINGLE UNIT
The depth of each Perlick column is 24” (610).
Allow for panel thickness when planning the nished
opening depth. A minimum of a 4” (102) nished
return is required on all sides of the opening. See
page 6 for niche and product dimension drawings.
It is important that the side walls of the niche are
plumb prior to installation. The minimum thickness
of both the side walls and the top wall must be 5/8”
(16). A thickness of 3/4” (19) is recommended for
toe kick panels.
Framed cabinets will require additional nished
ller material behind the face frame for a proper
installation. Refer to the illustration on page 6.
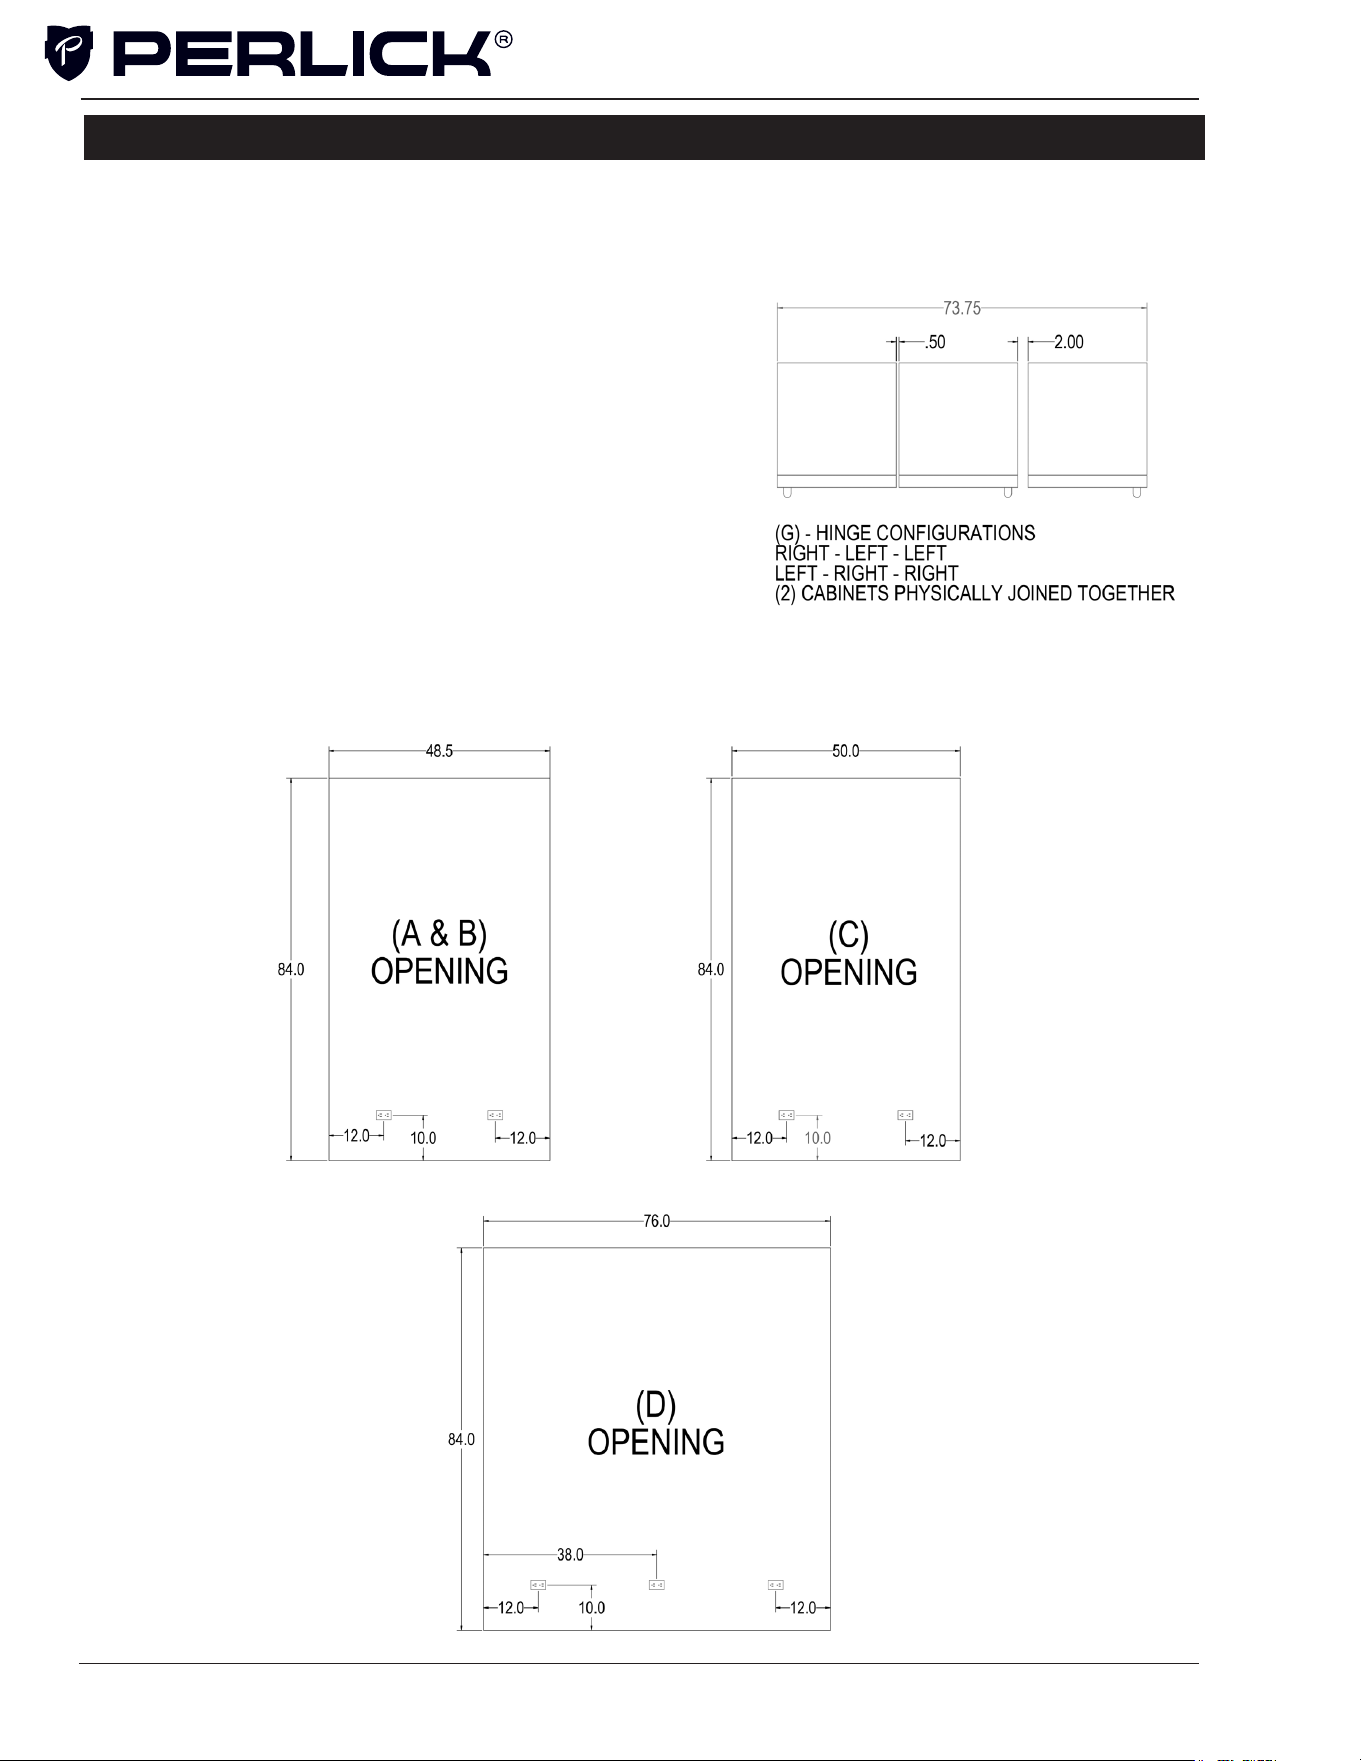
OPENING DIMENSIONS - TWO UNITS
When installing two units side-by-side, a Perlick Dual
Installation Kit (part number CR-ACC-D1) is required.
You must plan for both units plus dual installation kit
when planning the cut-out dimensions. The cutout
width for a dual CR24 installation is 48”. The cutout
width for a dual installation consisting of one CR24
and one CR30 is 54-1/2”. For more information, see
instructions that accompany the CR-ACC-D1.
6
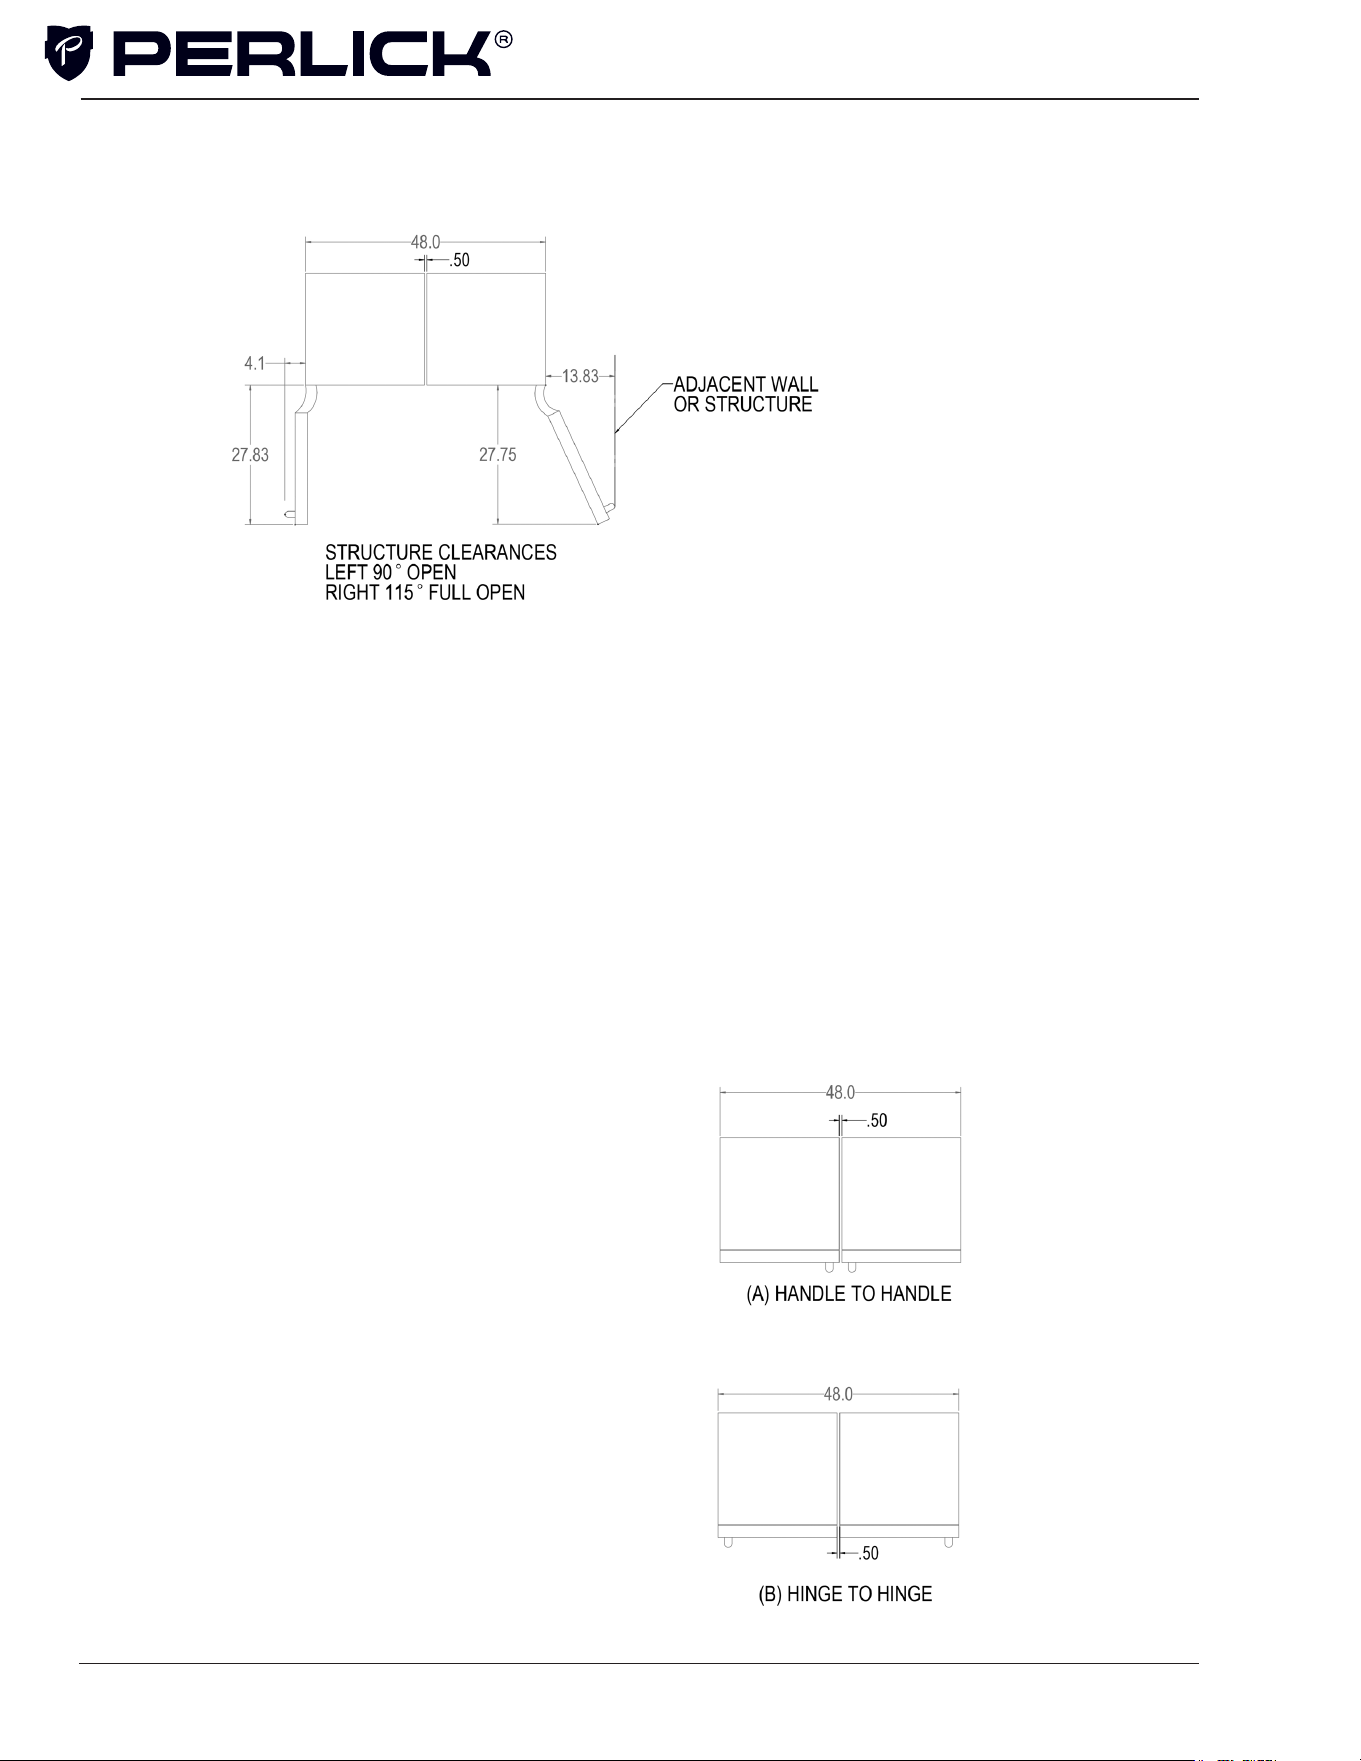
ADJACENT WALL OR STRUCTURE MINIMUM CLEARANCE REQUIREMENTS
When building into structure or next to adjacent walls reference this drawing for minimum
required clearances to avoid interference when opening the door(s).
The adjacent structure clearances indicated are based on a standard perlick handle installed on
the door overlay.
MINIMUM SPACING REQUIRED BETWEEN ADJACENT CABINETS TO AVOID DOOR SWING
INTERFERENCE.
(A) 2 Cabinets HANDLE TO HANDLE.
Refer to (A&B) Opening diagram (page 8)
for nished opening dimensions and outlet
locations.
(B) 2 Cabinets HINGE TO HINGE.
Refer to (A&B) Opening diagram (page 8)
for nished opening dimensions and outlet
locations.
Column Refrigeration Installation & Operation Manual
7
INSTALLATION CONTINUED
Opening Dimensions
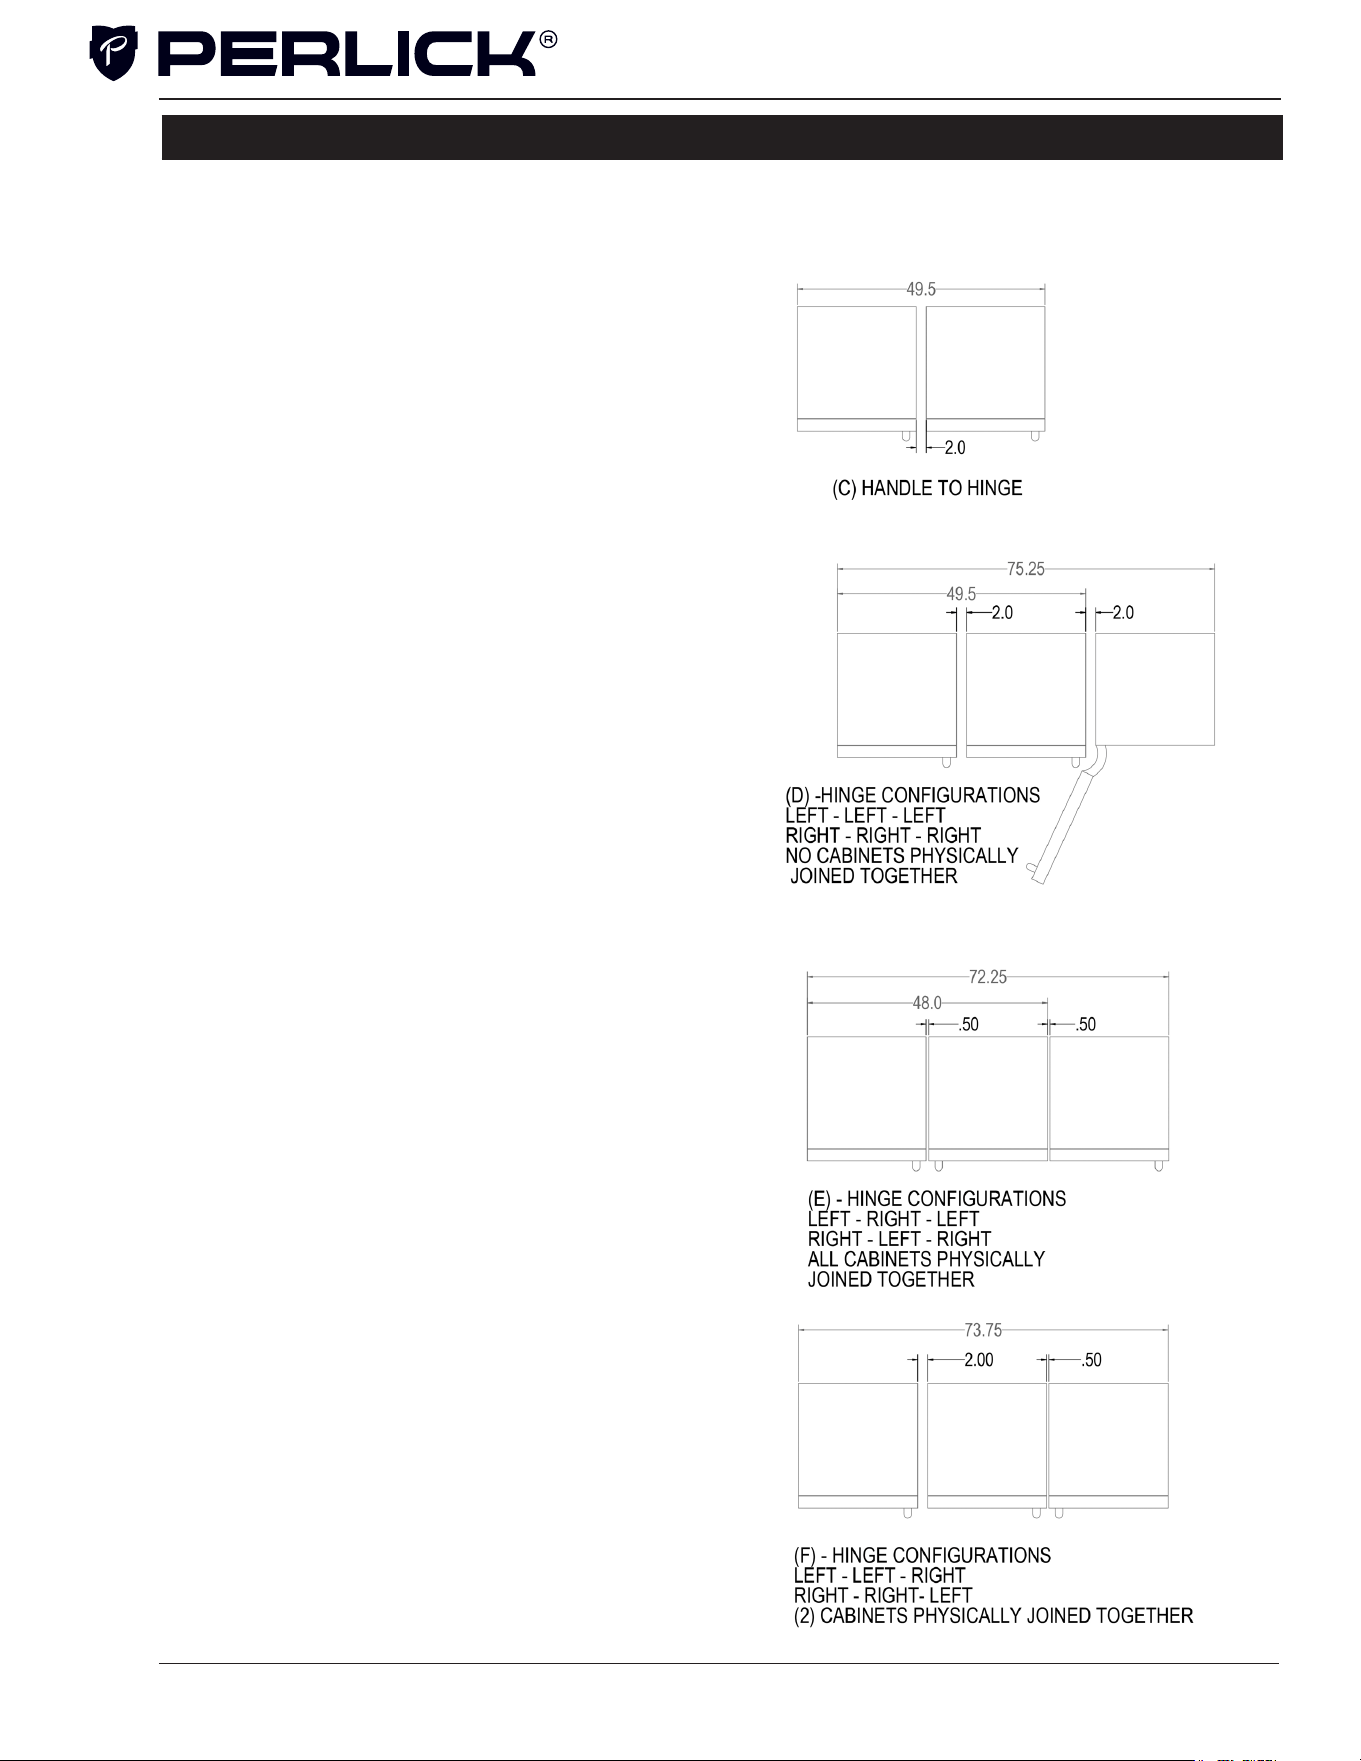
(C) 2 Cabinets HANDLE TO HINGE.
Refer to (C) Opening diagram (page 8) for nished
opening dimensions and outlet locations.
(D) 3 Cabinets with Hinges either all left
or all right.
Refer to (D) Opening diagram (page 8) for nished
opening dimensions and outlet locations.
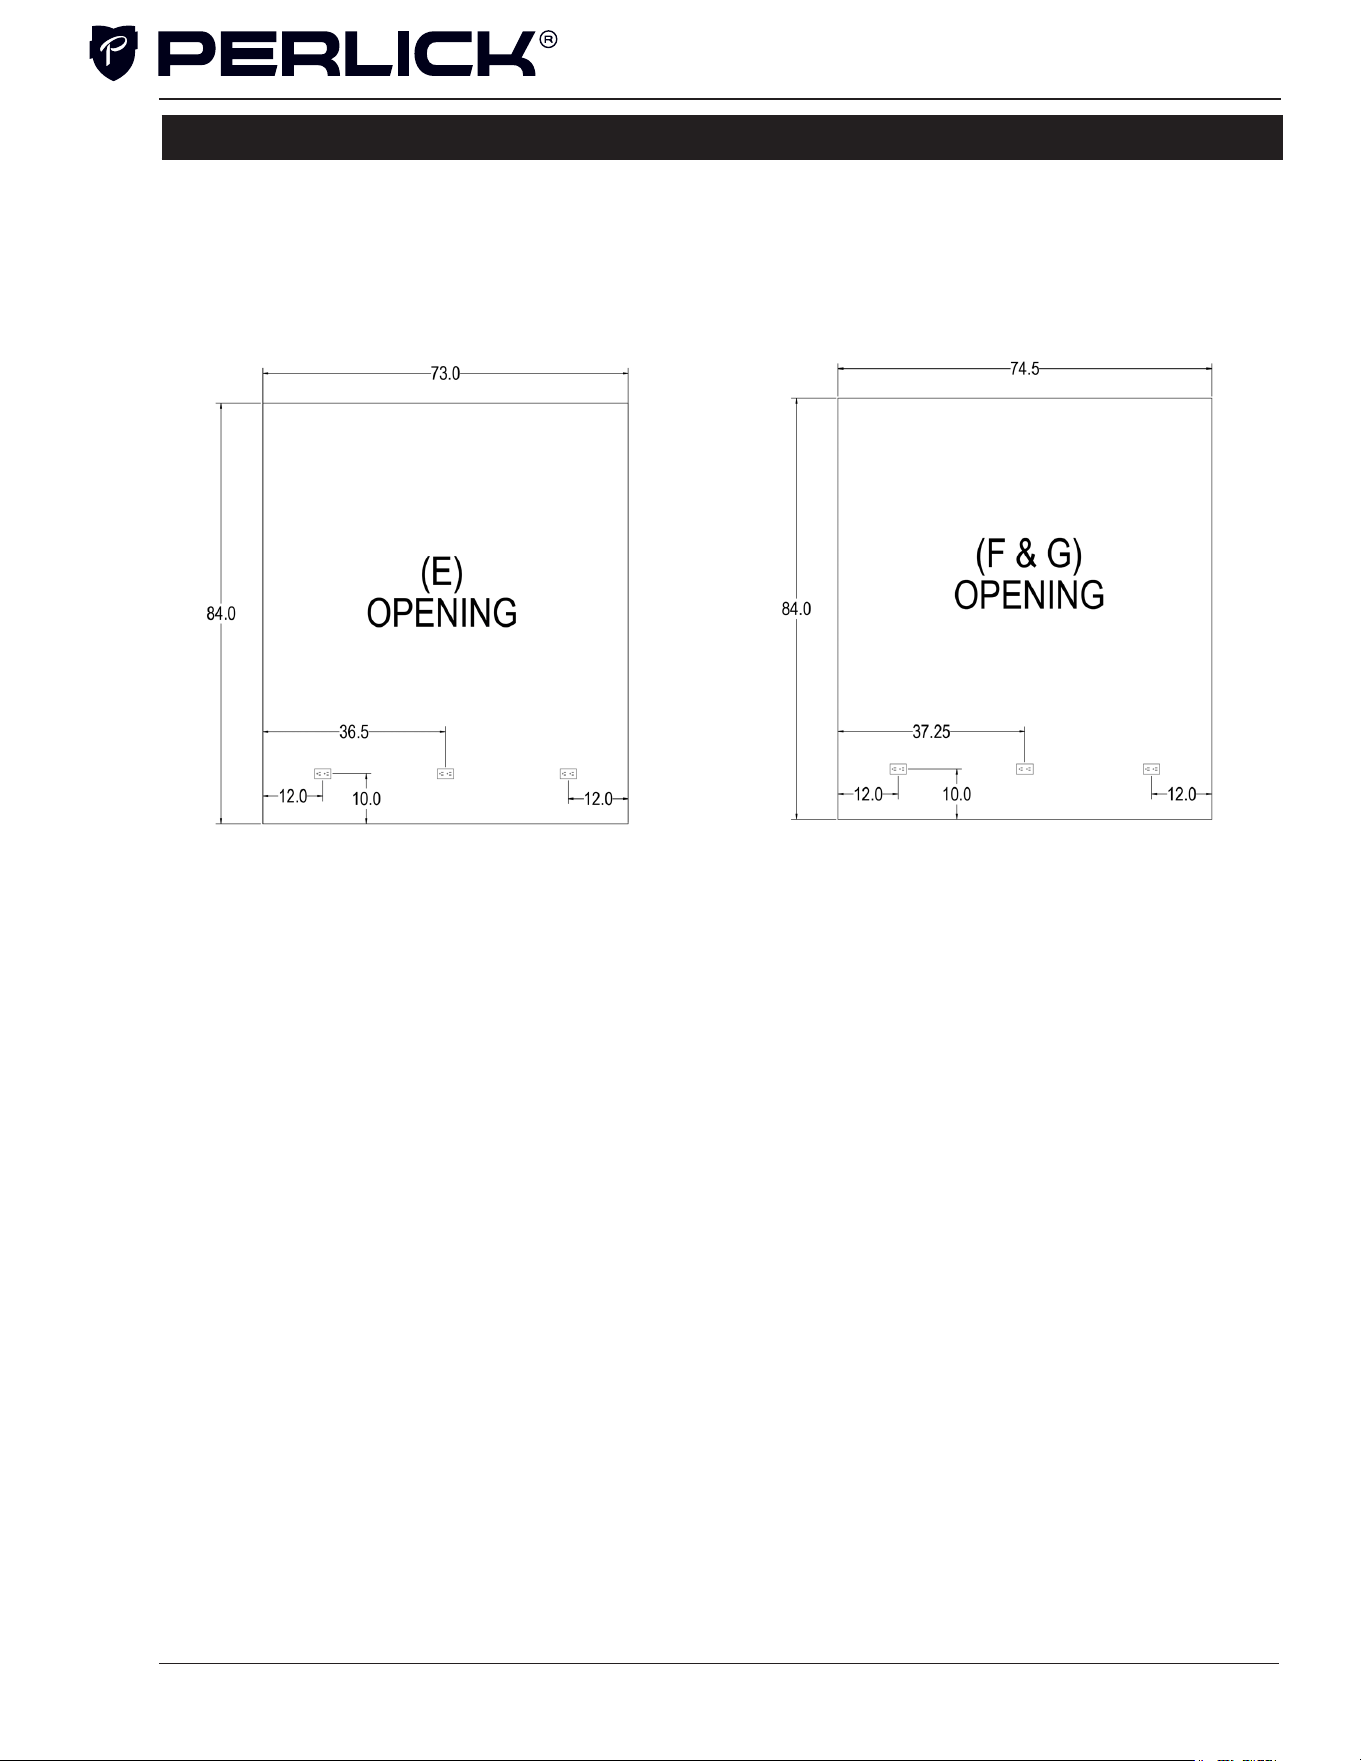
(E) 3 Cabinets with Hinges Left-Right-Left or
Right-Left-Right.
Refer to (E) Opening diagram (page 9) for nished
opening dimensions and outlet locations.
(F) 3 Cabinets with Hinges Left-Left-Right or
Right-Right-Left.
Refer to (F) Opening diagram (page 9) for nished
opening dimensions and outlet locations.
MINIMUM SPACING REQUIRED BETWEEN ADJACENT CABINETS TO AVOID DOOR SWING
INTERFERENCE CONTINUED.
Column Refrigeration Installation & Operation Manual
8
INSTALLATION CONTINUED
(G) 3 Cabinets with Hinges Right-Left-Left or
Left-Right-Right.
Refer to (G) Opening diagram (page 9) for nished
opening dimensions and outlet locations.
FINISHED OPENING DIMENSIONS FOR 2 AND 3 UNIT INSTALLATIONS.
MINIMUM SPACING REQUIRED BETWEEN ADJACENT CABINETS TO AVOID DOOR SWING
INTERFERENCE CONTINUED.
Column Refrigeration Installation & Operation Manual
9
INSTALLATION CONTINUED
FINISHED OPENING DIMENSIONS FOR 2 AND 3 UNIT INSTALLATIONS CONTINUED.
Note:
For installations involving more than 3 cabinets, combine opening dimensions for the open-
ings which correspond to the combined Hinge and Handle congurations.
Column Refrigeration Installation & Operation Manual
10
INSTALLATION CONTINUED
Column Refrigeration Installation & Operation Manual
A
A
A
CR24, CC24 24” (610)
B
PLEASE NOTE: When installing column ad-
jacent to wall, a 2” clearance is required if
door is opening towards the wall
11
INSTALLATION CONTINUED
WARNING
WARNING
WARNING
CAUTION
CAUTION
Column Refrigeration Installation & Operation Manual
ELECTRICAL
Serious electrocution hazard.
Electrical grounding is required. This appliance is
equipped with a 3-prong (grounding) polarizing
plug for your protection against possible shock
hazards. Failure to comply with these electrical
guidelines may result in possible death or serious
injury, re or loss
of property.
Never use an extension cord
to connect unit to electrical source. Do not use a
two-prong adapter or remove the power cord
grounding prong.
Installation must comply with all applicable electrical
codes. The electrical supply must be located within
the shaded area of the illustration below. A separate
circuit, servicing only this appliance, is required.
A ground fault circuit interrupter (GFCI) is not
recommended and may cause interruption of
operation. The outlet should be placed in the
hatched area dimensioned below.
Electrical Supply 115V, 60Hz, 1 Phase, 3.2 Amps
Service Dedicated 15 amp circuit
Power/Cord Type/
Length
NEMA 5-15 Cord Plug Type
(5’ length)
DANGER
ANTI-TIP BRACKET
To prevent the unit from tipping forward,
the anti-tip bracket must be installed. Use all anti-tip
bracket hardware as instructed. Level as instructed on
page 12 prior to installing anti-tip bracket(s)
The anti-tip bracket and supporting hardware is
included with your unit. Please note that four anti-tip
brackets are required for each unit or dual installation.
In the case of dual installation, each individual unit must
be outtted with the two anti-tip brackets on cabinet
sides for a total of four.
For drawings of the anti-tip bracket installation on
integrated (built-in) units, see page 13. For drawings
of the anti-tip bracket installation on freestanding units,
see page 14.
Verify there are no electrical wires or plumbing in the area
which the screws could penetrate.
Always wear safety glasses and use other
necessary protective devices or apparel when installing
or working with anchors. Anchors are not recommended
for use in lightweight masonry material such as block
or brick, or for use in new concrete which has not had
sufcient time to cure. The use of core
drills is not recommended to drill holes for anchors.
90° HINGE STOP
Perlick column doors open to 105°. When installing a
panel thicker than ¾” (19), or if located next to adjacent
wall, the 90° hinge stop pin may be required to prevent
damage to the unit and adjacent cabinetry/walls. This
hinge pin must be installed prior to full integration.
1. Remove the cabinet hinge trim cover by removing the
three Phillips head fasteners located on the
top of the cabinet. Lift the rear of trim cover to tilt
trim cover to disengage tab on right and left end
of trim cover. Slide forward to remove.
2. Open cabinet door approximately 45° to 85° to
expose hole under hinge guard. Install hinge pin
into hole. Ensure hinge pin is fully seated to top
of hinge to prevent damage to hinge guard.
3. Reattach the cabinet hinge trim piece. Slide front
bottom of hinge trim cover under reed switch.
Tilt trim cover to engage right and left end tab into
cabinet. Install the three fasteners.
PLACEMENT
Before moving unit into position, secure the door
closed and protect any nished ooring.
Use an appliance dolly to move the unit near
the opening.
12
PLACEMENT & ALIGNMENT
CAUTION
Before moving the unit
into position, secure the
door closed and protect any nished ooring.
W ARNING
If the unit has been on its
back, it must stand
upright for a minimum of 24 hours before
connecting power.
Move the unit near the opening. Plug the
power cord into the grounded outlet and roll
the unit into position. Push unit into place.
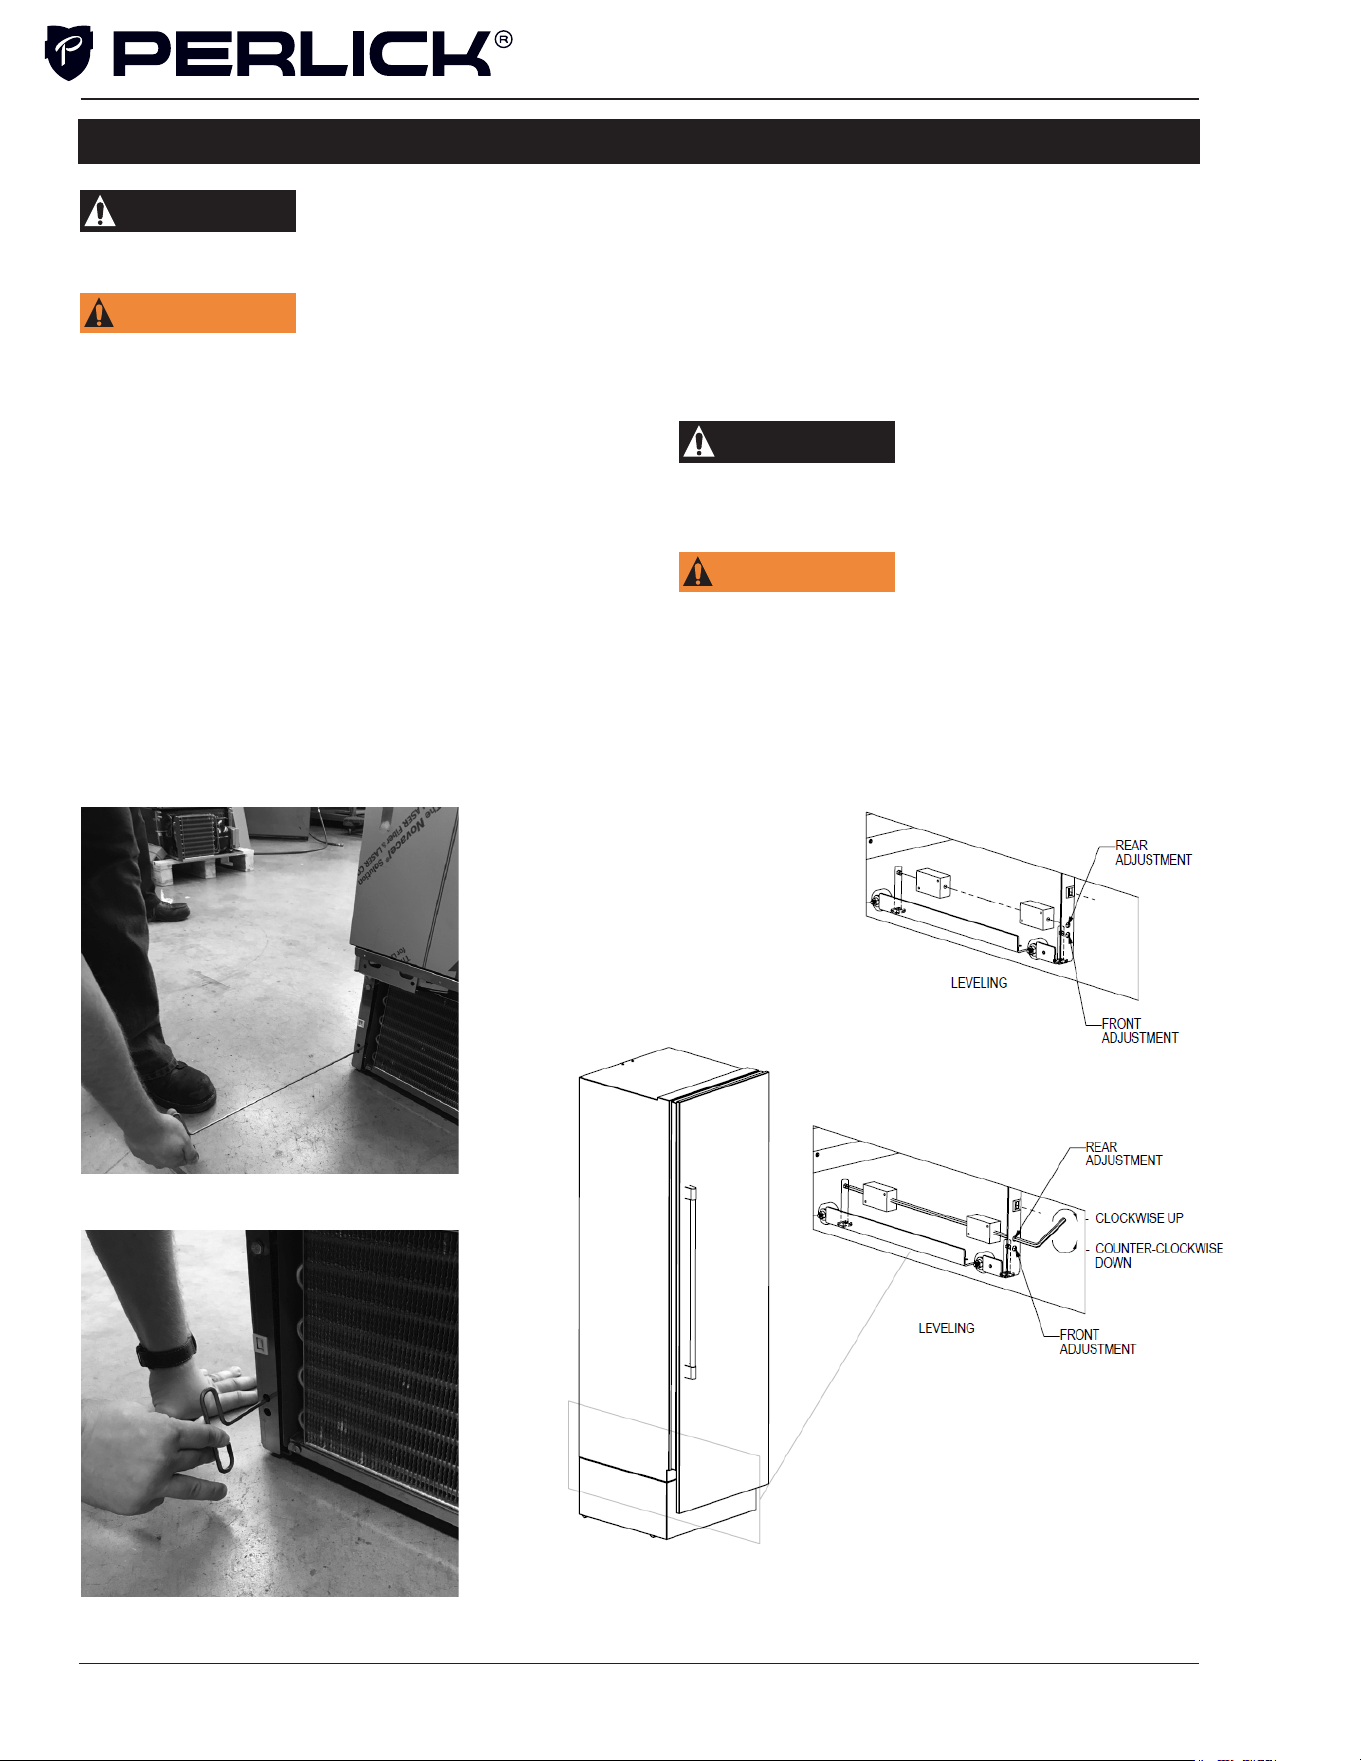
LEVELING
Front and rear leveling legs can be adjusted
from the front once the unit is positioned.
NOTE: Remove grill to access leveling
adjustment access holes.
Once the unit is in position, height adjustment
can be made from the front. Using the hex
driver leveling tool, turn clockwise to raise the
unit or counterclockwise to lower. Refer to the
illustration below.
When the unit is properly leveled, door
adjustments are less likely to be necessary.
CAUTION
Level the unit to the oor,
not surrounding cabinetry.
This could affect the operation of the unit,
such as door closing.
W ARNING
To reduce the possibility
of the unit tipping
forward, the front leveling legs must be in
contact with the oor.
LEVELING THE UNIT
Adjusting front leveling legs.
Adjusting rear leveling legs.
Column Refrigeration Installation & Operation Manual
13
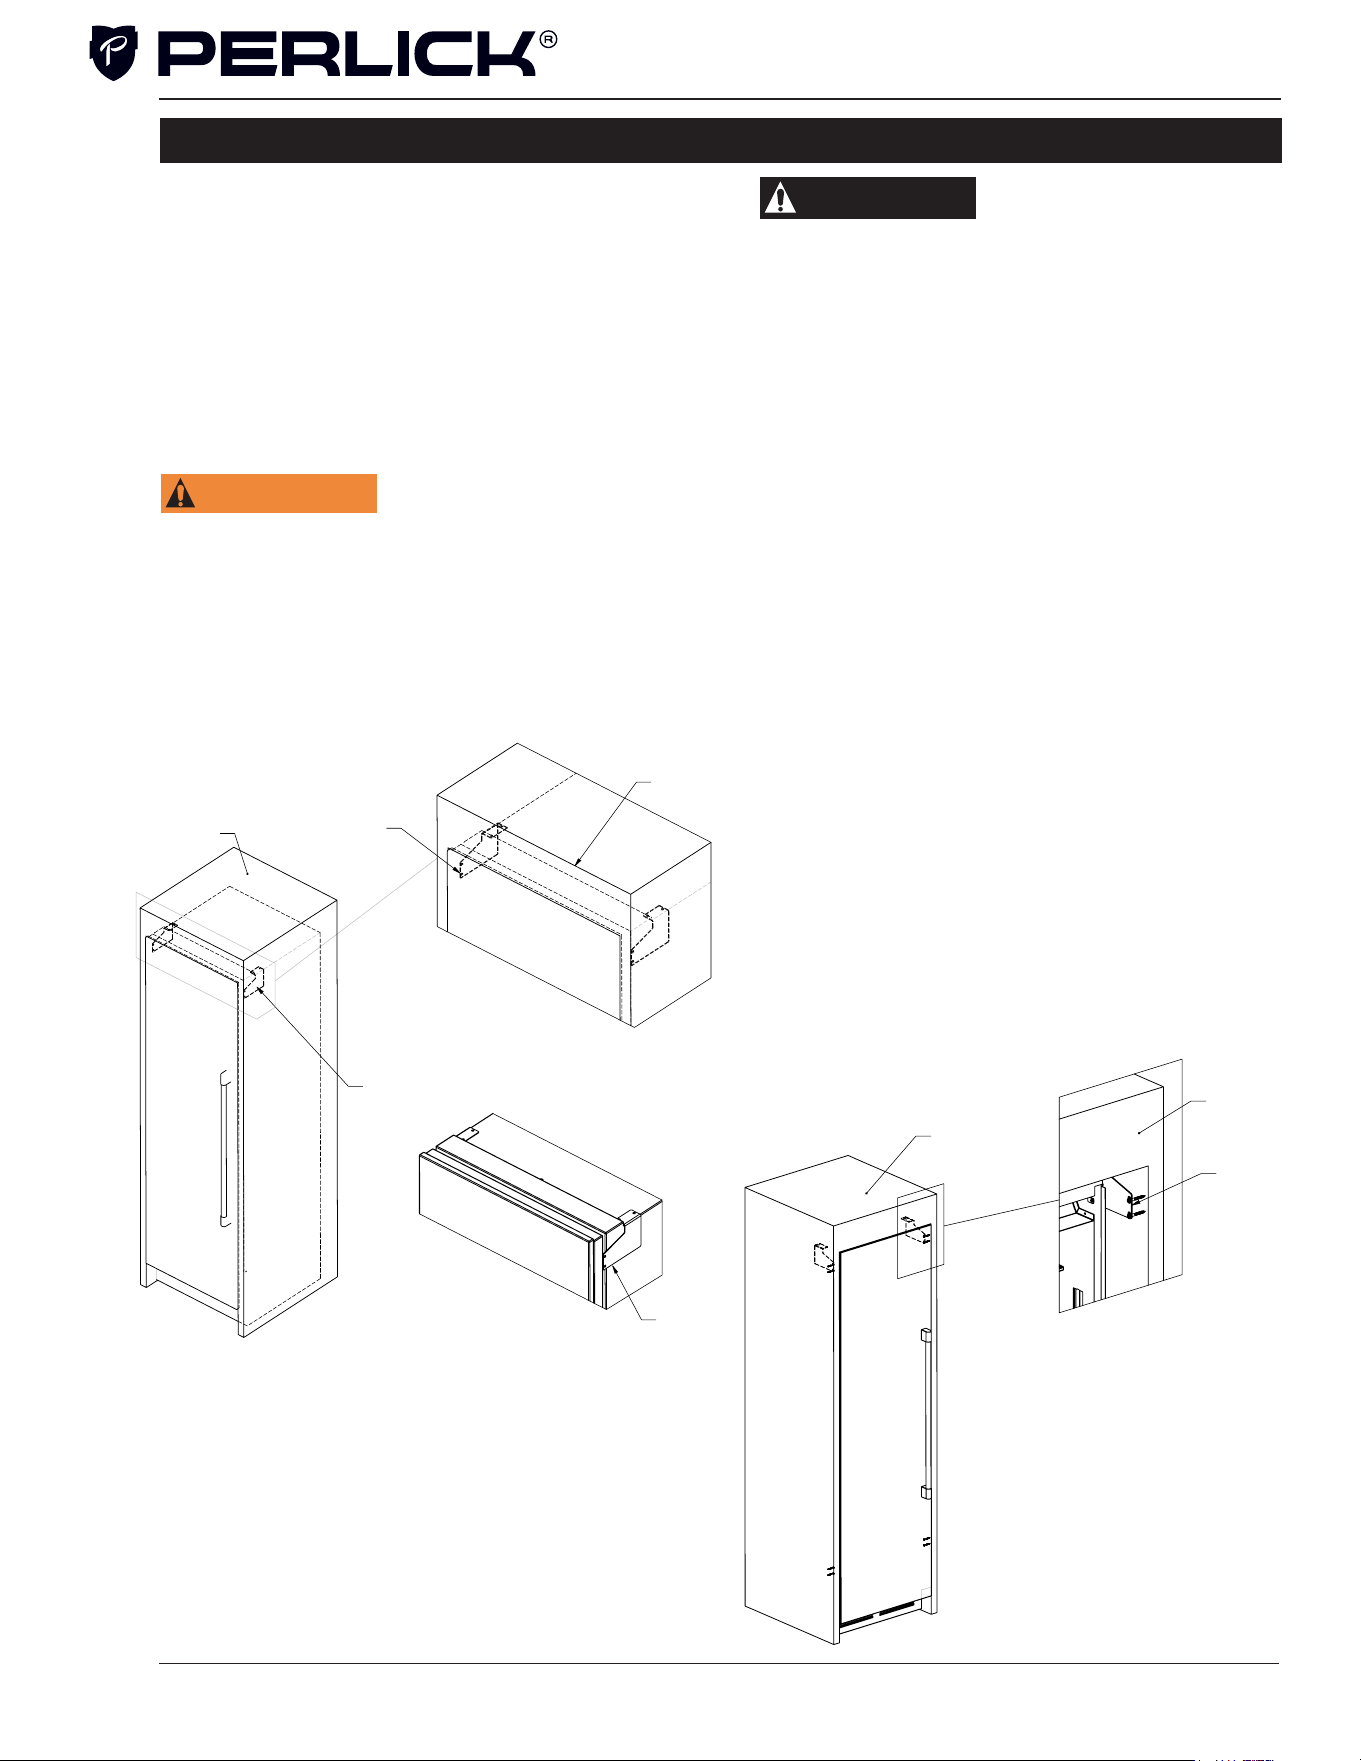
The anti-tip bracket and supporting
hardware is included with your unit. In the
case of dual installation, each individual unit
must be outtted with the included anti-tip
brackets.
For drawings of the anti-tip bracket
installation on integrated unit, see below. For
drawings of the anti-tip bracket installation
on freestanding units, see page 11.
W ARNING
Verify there are no
electrical wires or
plumbing in the area which the screws could
penetrate.
ANTI-TIP BRACKET
CAUTION
Always wear safety
glasses and use other
necessary protective devices or apparel when
installing or working with anchors. Anchors
are not recommended for use in lightweight
masonry material such as block or brick, or
for use in new concrete which has not had
sufcient time to cure. The use of core drills is
not recommended to drill holes for anchors.
NOTE: Do not fasten anti-tip brackets to adjacent cabinetry until the cabinet has been leveled.
POSITIONS FOR ANTI-TIP BRACKETS
ANTI-TIP BRACKETS
SIDE
OUTER FRAME
OUTER FRAME
ANTI-TIP
BRACKETS
ANTI-TIP BRACKETS
INSTALLATION WITH OUTER FRAME
ANTI-TIP BRACKETS
INSTALLATION WITH CABINET WALLS
ANTI-TIP
BRACKETS
Anti-Tip Bracket Installation for Built-In Applications
OUTER FRAME
DETAIL P
SCALE 1 : 6
OUTER FRAME
ANTI-TIP
BRACKETS
ANTI-TIP BRACKETS
INSTALLATION WITH OUTER FRAME
DOOR NOT SHOWN
Column Refrigeration Installation & Operation Manual
14
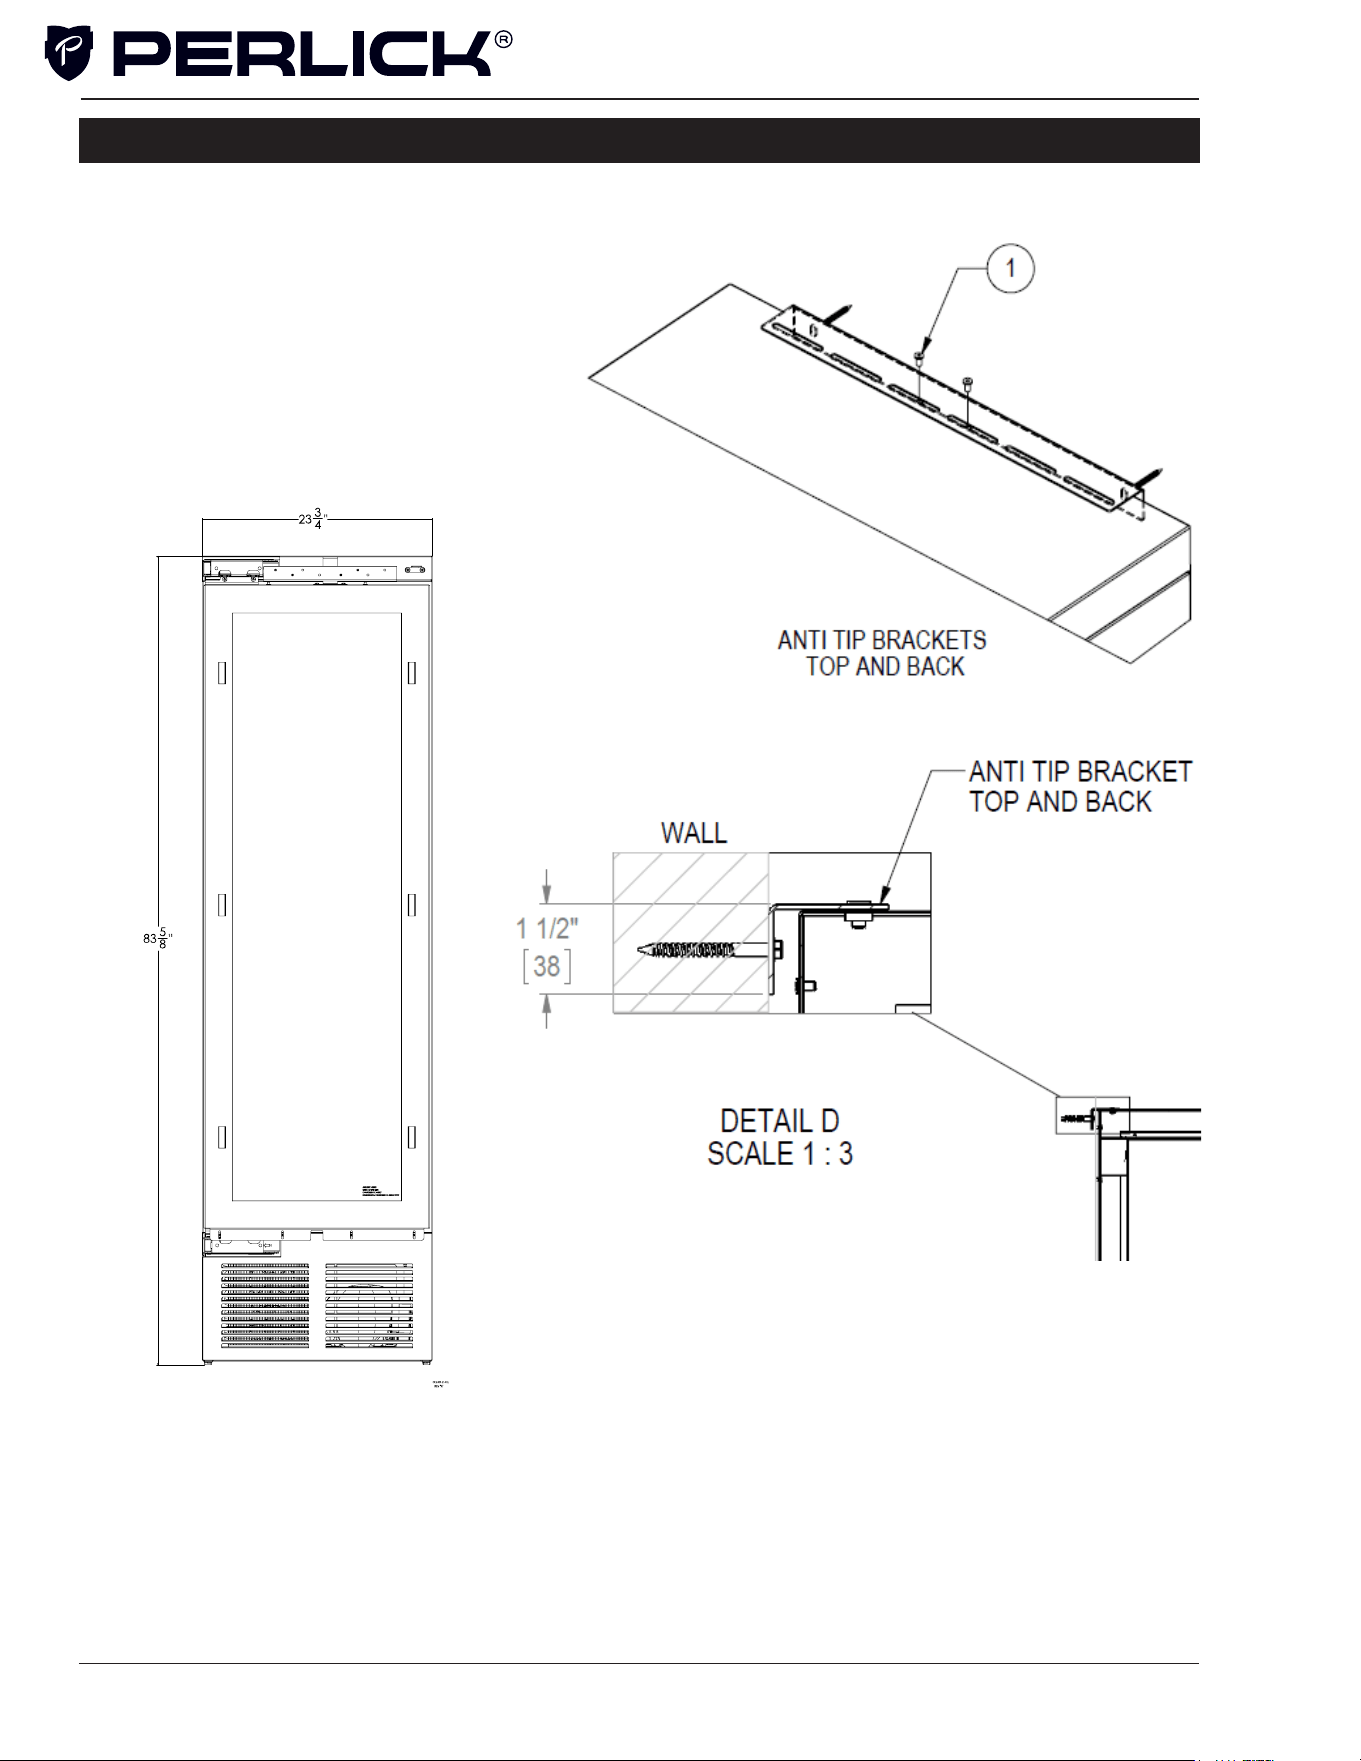
Anti-Tip Application for Freestanding Applications
NOTE: Cabinet must be leveled before
securing to wall with anti-tip bracket.
New Glass door
model image
ANTI-TIP APPLICATION
Column Refrigeration Installation & Operation Manual
15
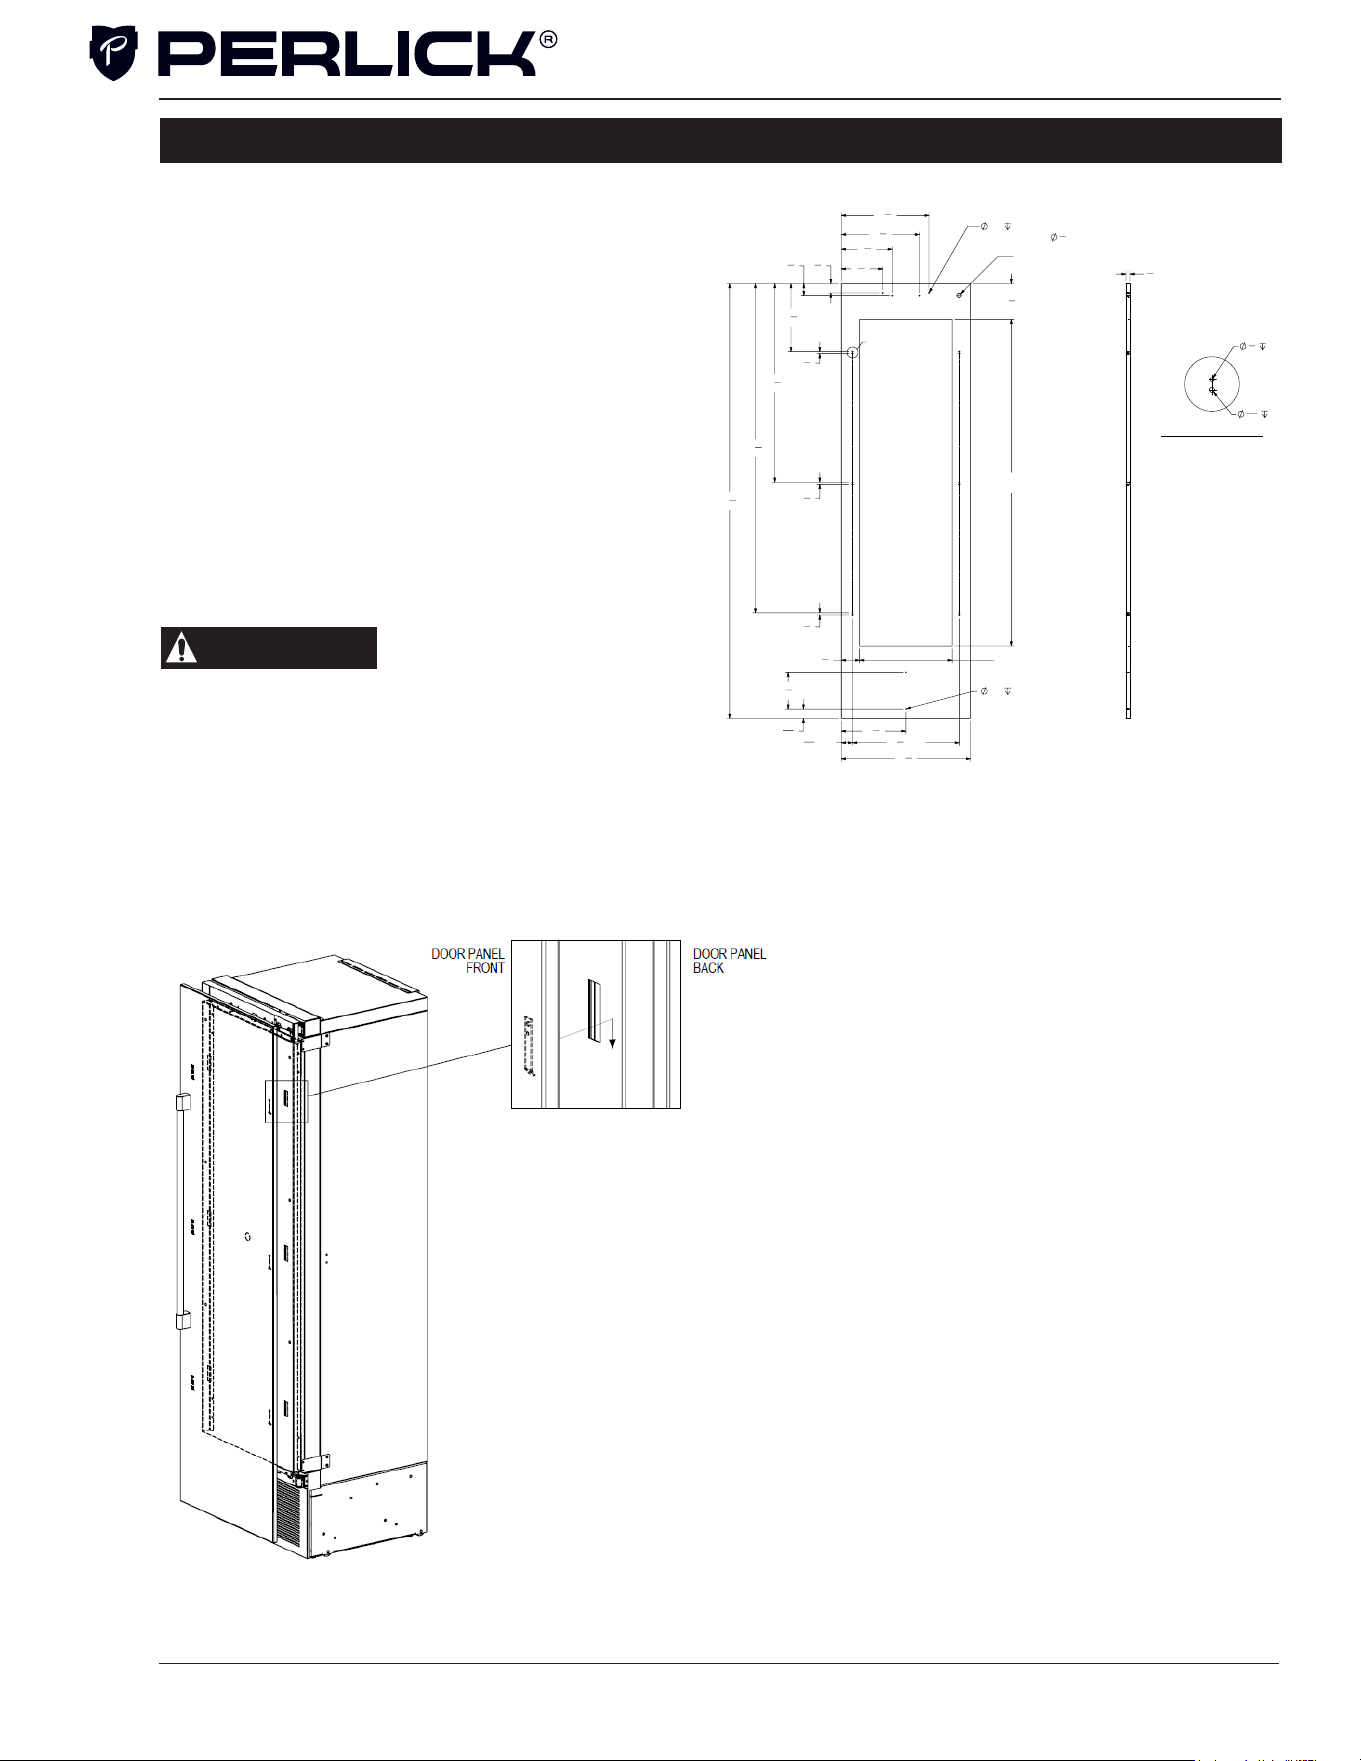
4” Toe Kick Wood Overlay Template Glass Door
INSTALLING DOOR OVERLAY PANELS
Typical panel dimensions are based on 84”
(2134) nished height with 1/8” (3) reveals.
Template must be adjusted for panels exceeding
typical dimensions.
Place the panel face down on a protected work
surface. Attach six clips to the back of overlay in
locations indicated in wood overlay drawing.
Use provided #10 x 1/2” screws to attach clips
to overlay. Overlay then slides onto door face.
Attach overlay to door adjustment brackets using
remaining #10 x 1/2” screws. Once mounted,
adjust overlay to match adjacent cabinetry.
CAUTION
As the reveal between
cabinets and the unit
decreases, the potential exists for severe
nger pinching if ngers are placed in the
opening when door is closing.
7
5
8
"
16
1
8
"
12
1
2
"
3
8
"
36
1
2
"
60
1
2
"
6
5
8
"
60"
CUTOUT
17" CUTOUT
2
1
16
" TYP
19
5
8
" TYP
1
3
4
"
3
4
"
FOR LOCK OPTIONAL
USE DRILL FIXTURE TO
LOCATE HOLE
23
3
4
"
79
7
8
"
3
3
8
"
.136
.500 (4X)
3
8
"
3
8
"
2
1
4
"
14
3
8
"
9
3
8
"
11
7
8
"
.136
.500 (2X)
1
11
16
"
6
3
4
"
A
3
4
"
1
8
"
1/2" (6X)
3
16
"
1/2" (6X)
DETAIL A
SCALE 1 : 2
OVERLAY CLIP MTG HOLES
REV.
DESCRIPTION
DATE
APPROVED
REVISIONS
F
REVISED MTG HOLE LOCATIONS AND COND. AIRFLOW
DIVIDER MTG HOLES
11/8/2017
JMP
E
UPDATED CLIP MTG HOLE LOCATIONS
10/6/2017
JMP
D
REVISED WINDOW SIZE BY INCREASE CUTOUT WIDTH AND
HEIGHT BY 1-1/4" OVERALL
10/5/2017
JMP
C
ADDED HOLES FOR CONDENSER AIR DIVIDER
10/3/2017
JMP
B
UPDATED HOLE PATTERN FOR ADJUSTMENT BRKT
8/25/2017
JMP
A
INITIAL RELEASE
11/8/2016
TEC
2
2
B
A
3
C
B
1
C
1
3
SW
C:\Perlick\Engineering\Projects\Refrigeration\1601802\CAD Files\1007917.slddrw
11/28/2016
11/08/2017
JMP
JMP
-
DIMENSIONS ARE IN INCHES TOLERANCES:
THIS DOCUMENT / PUBLICATION / SOFTWARE / DRAWING CONTAINS PROPRIETARY INFORMATION WHICH IS THE PROPERTY OF THE PERLICK CORPORATION. IT MAY NOT BE REPRODUCED OR TRANSMITTED IN ANY
FORM, ELECTRONIC OR MECHANICAL, INCLUDING PHOTOCOPYING, RECORDING, OR USED IN ANY INFORMATION STORAGE, TRANSMISSION, OR RETRIEVAL SYSTEM, WITHOUT WRITTEN PERMISSION FROM THE PERLICK
CORPORATION. COPYRIGHT 2015 PERLICK CORPORATION. ALL RIGHTS RESERVED.
DRAWN BY:
APPROVED BY:
FINISH:
QTY.:
HOLES:
.0135 THRU
.125:
.004
.1260 THRU
.250:
.005
.2510 THRU
.500:
.006
.5010 THRU
.750:
.008
.7510 THRU
1.000:
.010
1.001 & UP:
.012
BREAK SHARP EDGES - .015 X 45°
RADIUS SHARP FILLETS - .015 TO .031
UNLESS OTHERWISE SPECIFIED:
MATERIAL:
DATE
SIGNATURES
Milwaukee, Wisconsin
Perlick Corporation
DWG NO.
REFERENCE:
PART NO.
PURCHASE REC.:
TITLE:
1007917
1007917
FOR COLUMN WINE
OVERLAY, WOOD, 4'' TOE KICK
SCALE = 1:10
SHEET 1 OF 4
A
WOOD
Column Refrigeration Installation & Operation Manual

16
INSTALLING DOOR OVERLAY PANELS CONTINUED
Custom Overlay Panels
A custom door panel and handle hardware must
be installed if a customer chooses to not purchase
a Perlick stainless steel door panel. The thickness
of the custom panel can vary. A minimum 5/8”
(16) thick panel is required, but the thickness
can be increased provided it does not exceed the
maximum panel weight of 65 lbs (29). 3/4” panel
is recommended. Please note that the combined
door and overlay weight cannot exceed 120 lbs
(54). The depth of each model is 24” (610). Allow
for panel thickness when planning the nished
opening depth. Templates for glass doors with 4”
or 6” toe kicks can be found starting on page 17.
CAUTION
As reveals between
cabinetry and the unit
decrease, severe nger pinching can occur
while the door is closing.
The height of the custom door panel can extend
beyond the typical panel height provided it does
not exceed the weight limit listed above.
CAUTION
Do not install a solid
overlay panel onto the
front of a glass door model. Condensation will
form between the glass and the overlay
panel, which will cause damage to custom
cabinetry.
Column Refrigeration Installation & Operation Manual
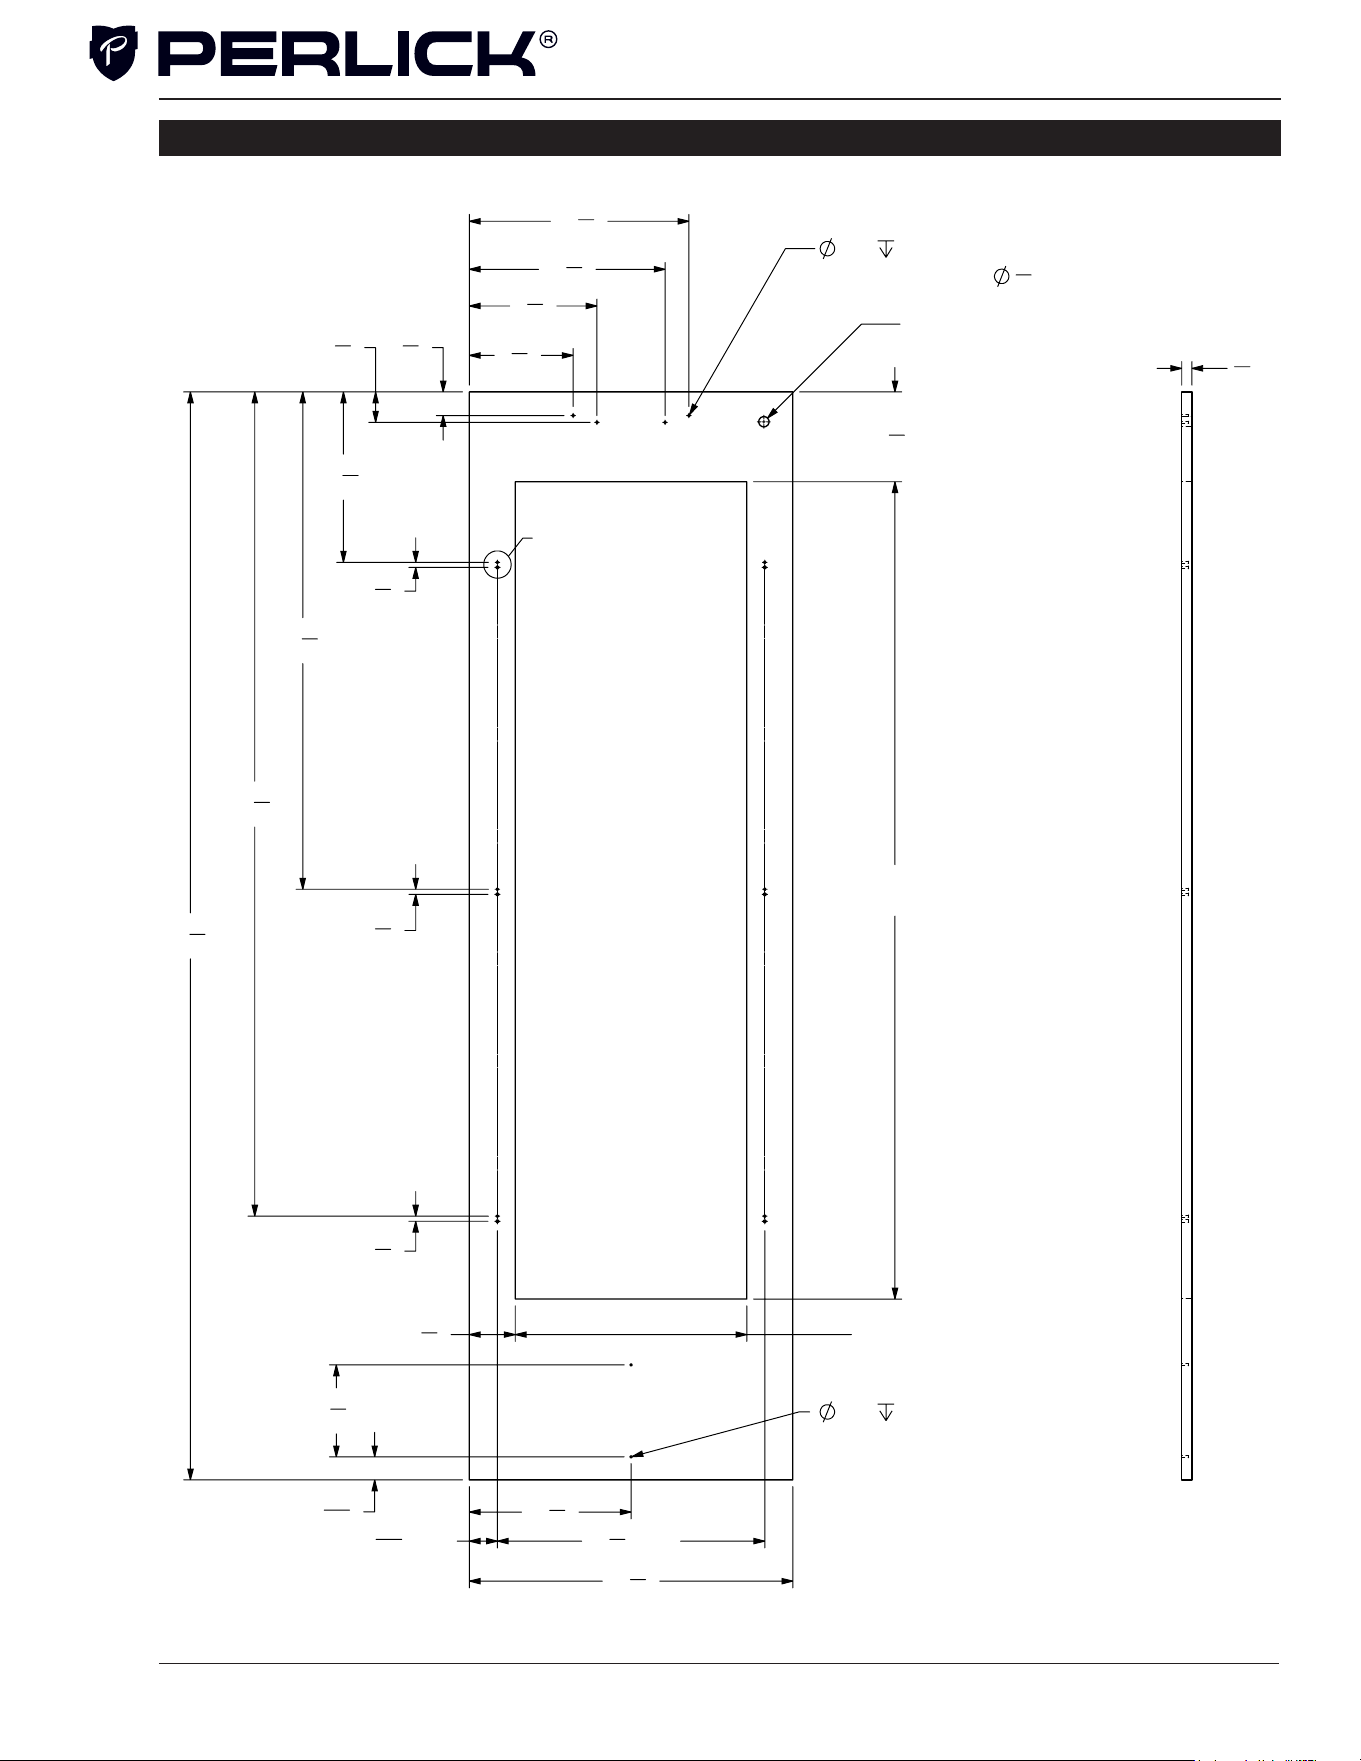
17
Column Refrigeration Installation & Operation Manual
24 INCH COLUMN GLASS DOOR TEMPLATE FOR 4” TOE KICK
7
5
8
"
16
1
8
"
12
1
2
"
3
8
"
36
1
2
"
60
1
2
"
6
5
8
"
60"
CUTOUT
17" CUTOUT
2
1
16
" TYP
19
5
8
" TYP
1
3
4
"
3
4
"
FOR LOCK OPTIONAL
USE DRILL FIXTURE TO
LOCATE HOLE
23
3
4
"
79
7
8
"
3
3
8
"
.136
.500 (4X)
3
8
"
3
8
"
2
1
4
"
14
3
8
"
9
3
8
"
11
7
8
"
.136
.500 (2X)
1
11
16
"
6
3
4
"
A
3
4
"
1
8
"
1/2" (6X)
3
16
"
1/2" (6X)
DETAIL A
SCALE 1 : 2
OVERLAY CLIP MTG HOLES
REV.
DESCRIPTION
DATE
APPROVED
REVISIONS
F
REVISED MTG HOLE LOCATIONS AND COND. AIRFLOW
DIVIDER MTG HOLES
11/8/2017
JMP
E
UPDATED CLIP MTG HOLE LOCATIONS
10/6/2017
JMP
D
REVISED WINDOW SIZE BY INCREASE CUTOUT WIDTH AND
HEIGHT BY 1-1/4" OVERALL
10/5/2017
JMP
C
ADDED HOLES FOR CONDENSER AIR DIVIDER
10/3/2017
JMP
B
UPDATED HOLE PATTERN FOR ADJUSTMENT BRKT
8/25/2017
JMP
A
INITIAL RELEASE
11/8/2016
TEC
2
2
B
A
3
C
B
1
C
1
3
SW
C:\Perlick\Engineering\Projects\Refrigeration\1601802\CAD Files\1007917.slddrw
11/28/2016
11/08/2017
JMP
JMP
-
DIMENSIONS ARE IN INCHES TOLERANCES:
THIS DOCUMENT / PUBLICATION / SOFTWARE / DRAWING CONTAINS PROPRIETARY INFORMATION WHICH IS THE PROPERTY OF THE PERLICK CORPORATION. IT MAY NOT BE REPRODUCED OR TRANSMITTED IN ANY
FORM, ELECTRONIC OR MECHANICAL, INCLUDING PHOTOCOPYING, RECORDING, OR USED IN ANY INFORMATION STORAGE, TRANSMISSION, OR RETRIEVAL SYSTEM, WITHOUT WRITTEN PERMISSION FROM THE PERLICK
CORPORATION. COPYRIGHT 2015 PERLICK CORPORATION. ALL RIGHTS RESERVED.
DRAWN BY:
APPROVED BY:
FINISH:
QTY.:
HOLES:
.0135 THRU
.125:
.004
.1260 THRU
.250:
.005
.2510 THRU
.500:
.006
.5010 THRU
.750:
.008
.7510 THRU
1.000:
.010
1.001 & UP:
.012
BREAK SHARP EDGES - .015 X 45°
RADIUS SHARP FILLETS - .015 TO .031
UNLESS OTHERWISE SPECIFIED:
MATERIAL:
DATE
SIGNATURES
Milwaukee, Wisconsin
Perlick Corporation
DWG NO.
REFERENCE:
PART NO.
PURCHASE REC.:
TITLE:
1007917
1007917
FOR COLUMN WINE
OVERLAY, WOOD, 4'' TOE KICK
SCALE = 1:10
SHEET 1 OF 4
A
WOOD
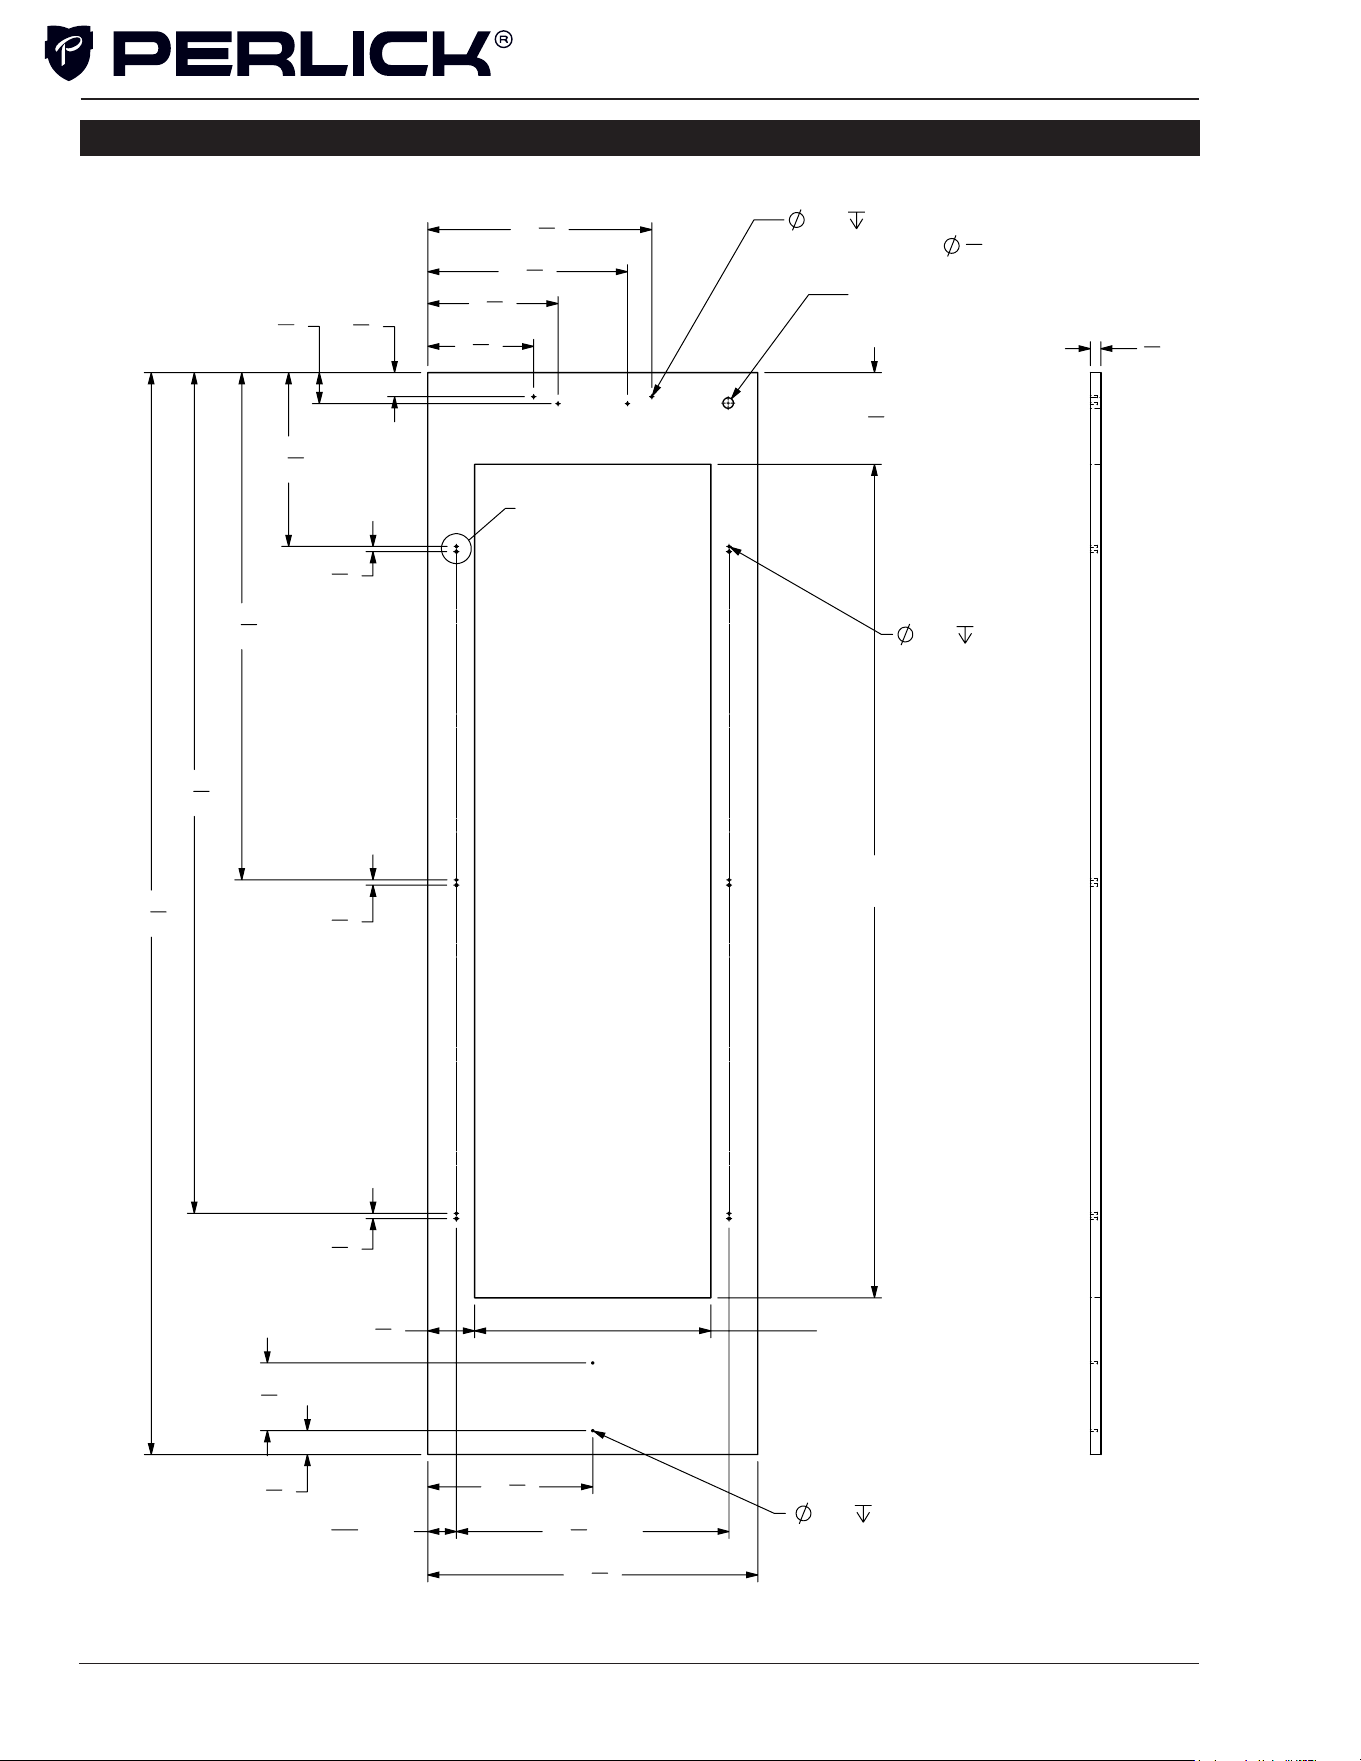
18
Column Refrigeration Installation & Operation Manual
24 INCH COLUMN GLASS DOOR TEMPLATE FOR 6” TOE KICK
7
5
8
"
16
1
8
"
12
1
2
"
3
8
"
36
1
2
"
60
1
2
"
6
5
8
"
60"
CUTOUT
17" CUTOUT
2
1
16
" TYP
19
5
8
" TYP
1
3
4
"
3
4
"
FOR LOCK OPTIONAL
USE DRILL FIXTURE TO
LOCATE HOLE
23
3
4
"
77
7
8
"
3
3
8
"
.136
.500 (12X)
.136
.500 (4X)
3
8
"
3
8
"
2
1
4
"
9
3
8
"
14
3
8
"
1
3
4
"
11
7
8
"
.136
.500 (2X)
4
7
8
"
A
3
4
"
1
8
"
1/2" (6X)
3
16
"
1/2" (6X)
DETAIL
A
SCALE
1 : 2
OVERLAY CLIP MTG HOLES
REV.
DESCRIPTION
DATE
APPROVED
REVISIONS
F
REVISED MTG HOLE LOCATIONS AND COND. AIRFLOW
DIVIDER MTG HOLES
11/8/2017
JMP
E
UPDATED CLIP MTG HOLE LOCATIONS
10/6/2017
JMP
D
REVISED WINDOW SIZE BY INCREASE CUTOUT WIDTH AND
HEIGHT BY 1-1/4" OVERALL
10/5/2017
JMP
C
ADDED HOLES FOR CONDENSER AIR DIVIDER
10/3/2017
JMP
B
UPDATED HOLE PATTERN FOR ADJUSTMENT BRKT
8/25/2017
JMP
A
INITIAL RELEASE
11/8/2016
TEC
2
2
B
A
3
C
B
1
C
1
3
SW
C:\Perlick\Engineering\Projects\Refrigeration\1601802\CAD Files\1007917.slddrw
11/28/2016
11/08/2017
JMP
JMP
-
DIMENSIONS ARE IN INCHES TOLERANCES:
Ang = ±1.0°
Frac. = ±1/16
THIS DOCUMENT / PUBLICATION / SOFTWARE / DRAWING CONTAINS PROPRIETARY INFORMATION WHICH IS THE PROPERTY OF THE PERLICK CORPORATION. IT MAY NOT BE REPRODUCED OR TRANSMITTED IN ANY
FORM, ELECTRONIC OR MECHANICAL, INCLUDING PHOTOCOPYING, RECORDING, OR USED IN ANY INFORMATION STORAGE, TRANSMISSION, OR RETRIEVAL SYSTEM, WITHOUT WRITTEN PERMISSION FROM THE PERLICK
CORPORATION. COPYRIGHT 2015 PERLICK CORPORATION. ALL RIGHTS RESERVED.
DRAWN BY:
APPROVED BY:
FINISH:
QTY.:
HOLES:
.0135 THRU
.125:
.004
.1260 THRU
.250:
.005
.2510 THRU
.500:
.006
.5010 THRU
.750:
.008
.7510 THRU
1.000:
.010
1.001 & UP:
.012
BREAK SHARP EDGES - .015 X 45°
RADIUS SHARP FILLETS - .015 TO .031
UNLESS OTHERWISE SPECIFIED:
MATERIAL:
DATE
SIGNATURES
Milwaukee, Wisconsin
Perlick Corporation
DWG NO.
REFERENCE:
PART NO.
PURCHASE REC.:
TITLE:
1007917
1007917
FOR COLUMN WINE
OVERLAY, WOOD, 6'' TOE KICK
SCALE = 1:10
SHEET 2 OF 4
A
WOOD
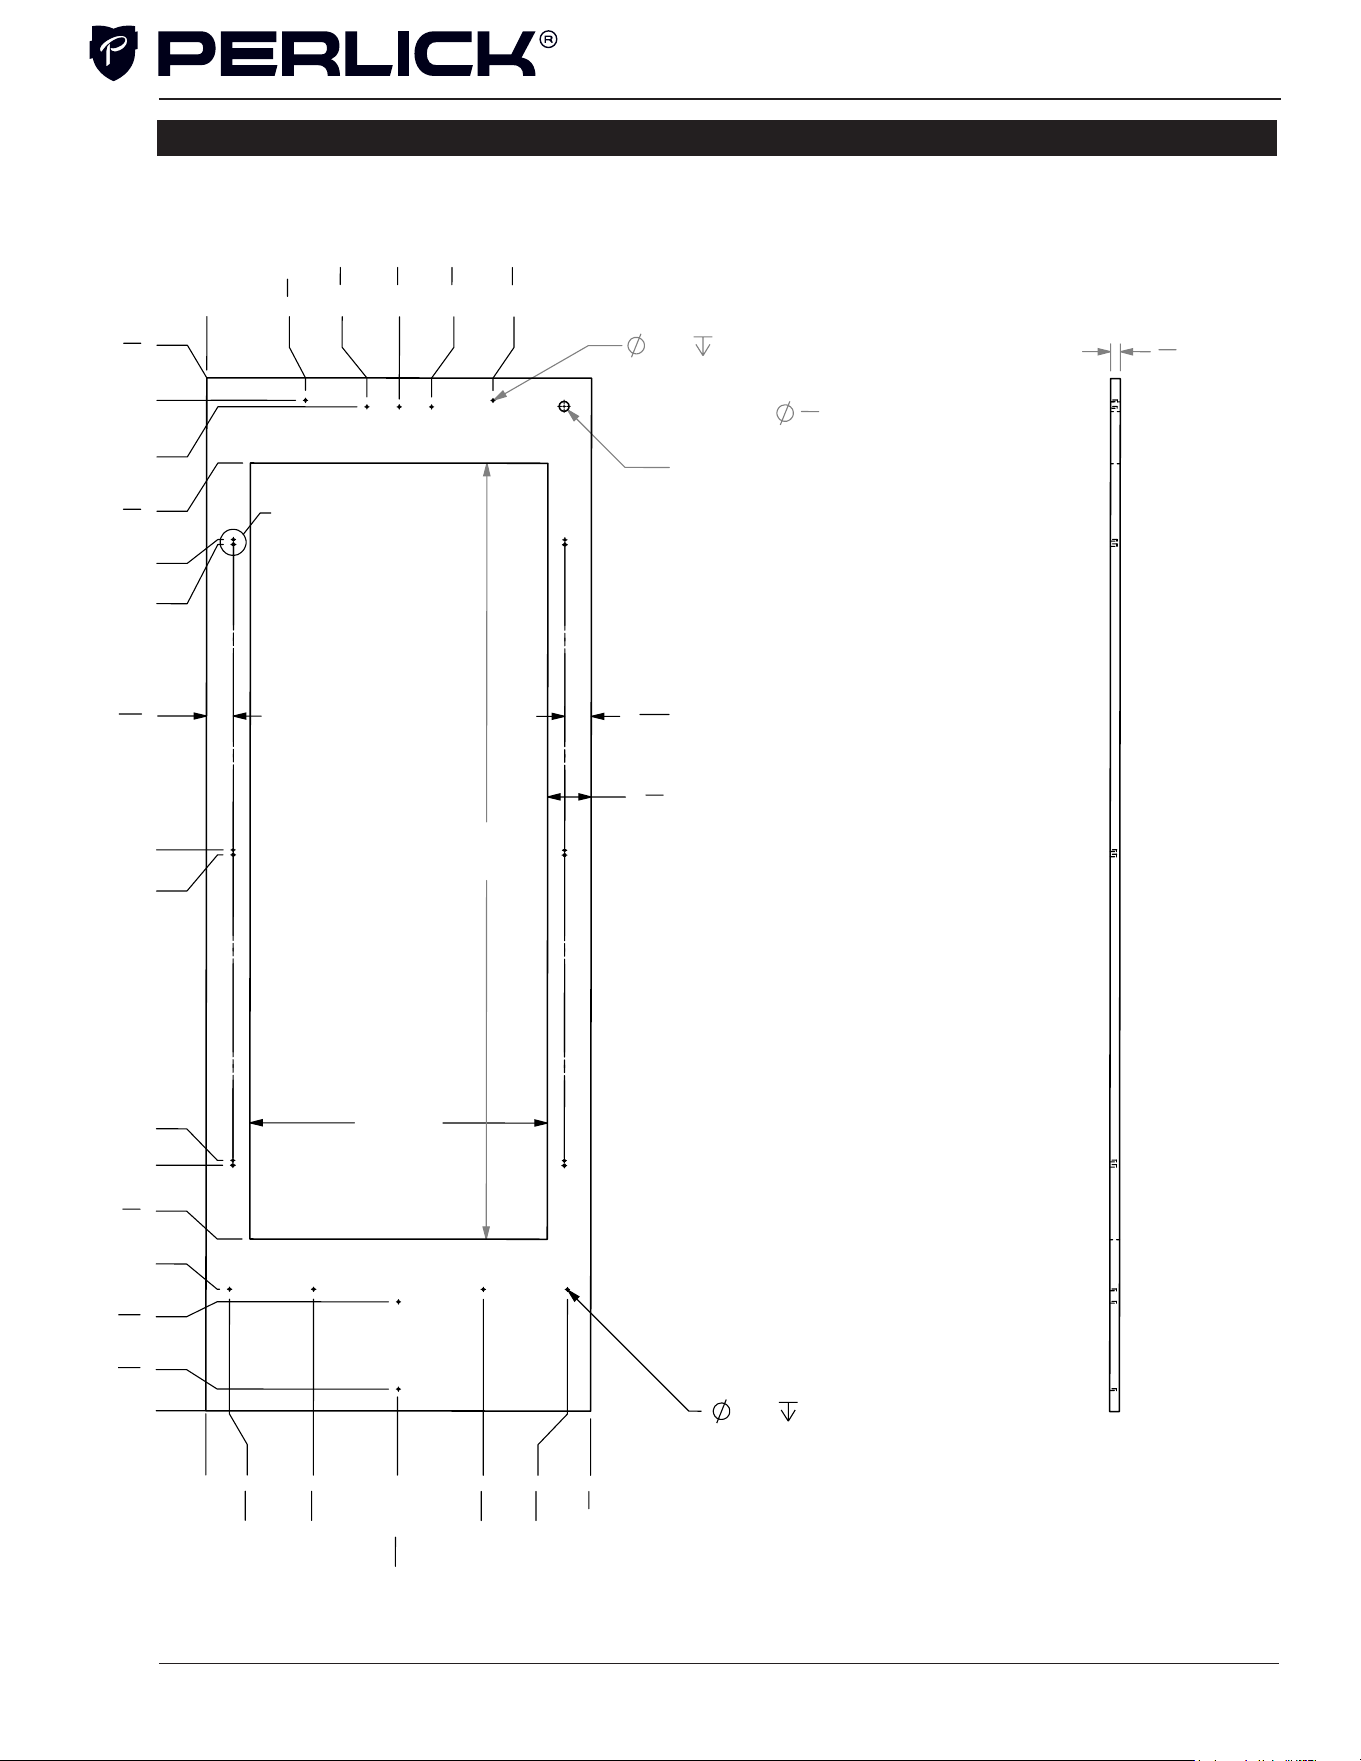
19
Column Refrigeration Installation & Operation Manual
30 INCH COLUMN GLASS DOOR TEMPLATE FOR 4” TOE KICK
60"
CUTOUT
3
4
"
FOR LOCK OPTIONAL
USE DRILL FIXTURE TO
LOCATE HOLE
.136
.500 (5X)
.136
.500 (6X)
23"
CUTOUT
2
1
16
"
2
1
16
"
3
3
8
"
0"
1
13
16
"
8
5
16
"
14
13
16
" (2X)
21
7
16
"
27
15
16
"
0"
1
11
16
"
8
7
16
"
9
3
8
" (4X)
13
1
4
"
19" (2X)
19
3
8
"(2X)
67"(2X)
67
3
8
"(2X)
73
1
4
"
77
5
8
"(3X)
78
1
8
"(2X)
79
7
8
"
43"(2X)
43
3
8
"(2X)
29
3
4
"
0"
7
5
8
"
12
3
8
"
14
7
8
"
17
3
8
"
22
1
8
"
A
3
4
"
1
8
"
1/2" (6X)
3
16
"
1/2" (6X)
DETAIL A
SCALE 1 : 2
OVERLAY CLIP MTG HOLES
REVISIONS
REV
ECO
DESCRIPTION
DESIGNER
DATE
APPROVED BY
A
2024-6396
INITIAL CREATION
DJC
06/12/2024
DJC
DESCRIPTION
PART NUMBER
DRAWING NUMBER
MATERIAL:
REFERENCE:
SCALE: 1:10
1007917-30 1007917-30
OVERLAY, WOOD, 4" TOE KICK, FOR 30" COLUMN WINE
HOLES:
.0135 THRU
.125:
.004
.1260 THRU
.250:
.005
.2510 THRU
.500:
.006
.5010 THRU
.750:
.008
.7510 THRU
1.000:
.010
1.001 & UP:
.012
BREAK SHARP EDGES - .015 X 45°
RADIUS SHARP FILLETS - .015 TO .031
DIMENSIONS ARE IN INCHES TOLERANCES:
UNLESS OTHERWISE SPECIFIED:
Ang =
Frac =
1/64
THIS DOCUMENT / PUBLICATION / SOFTWARE / DRAWING CONTAINS PROPRIETARY INFORMATION WHICH IS THE PROPERTY OF THE PERLICK CORPORATION. IT MAY NOT BE REPRODUCED OR TRANSMITTED IN ANY FORM, ELECTRONIC OR MECHANICAL,
INCLUDING PHOTOCOPYING, RECORDING, OR USED IN ANY INFORMATION STORAGE, TRANSMISSION, OR RETRIEVAL SYSTEM, WITHOUT WRITTEN PERMISSION FROM THE PERLICK CORPORATION. COPYRIGHT 2015 PERLICK CORPORATION. ALL RIGHTS RESERVED.
Milwaukee, Wisconsin
Perlick Corporation
MISC
A A
B B
C C
D D
4
4
3
3
2
2
1
1
.X =
.XX =
.XXX =
OVERALL DIMENSIONS: 0L X 0W X 0H
WEIGHT: LBS
GAUGE: -ga
REQ QUAL MFG: NO
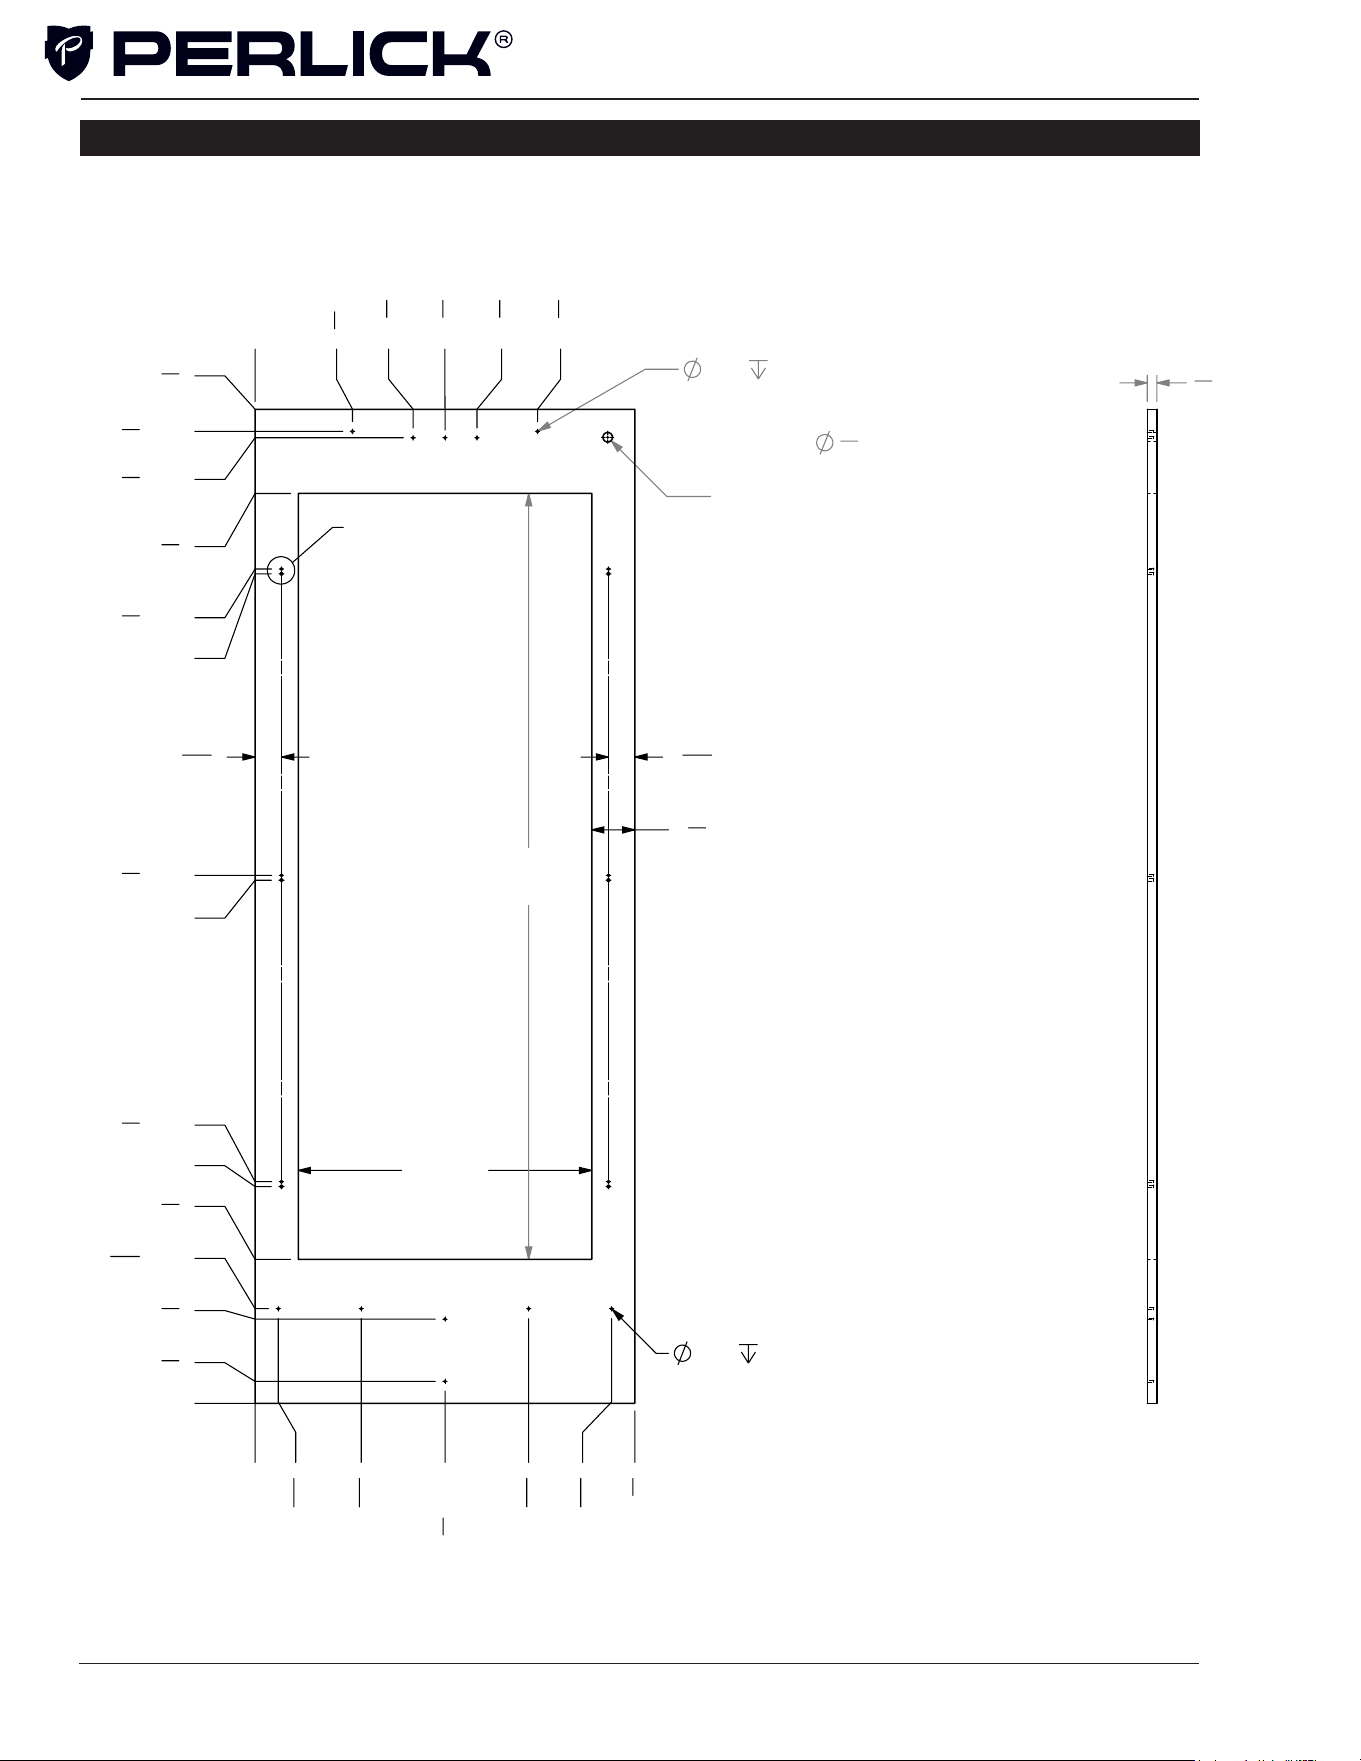
20
Column Refrigeration Installation & Operation Manual
30 INCH COLUMN GLASS DOOR TEMPLATE FOR 6” TOE KICK
3
4
"
FOR LOCK OPTIONAL
USE DRILL FIXTURE TO
LOCATE HOLE
.136
.500 (5X)
60"
CUTOUT
23"
CUTOUT
3
3
8
"
2
1
16
"
2
1
16
"
.136
.500 (6X)
0"
7
5
8
"
12
3
8
"
14
7
8
"
17
3
8
"
22
1
8
"
0"
1
13
16
"
8
5
16
"
14
7
8
"(2X)
21
7
16
"
27
15
16
"
29
3
4
"
0"
1
3
4
"
6
5
8
"
7
7
16
"(4X)
11
1
4
"
17"(2X)
17
3
8
"(2X)
41"(2X)
41
3
8
"(2X)
65"(2X)
65
3
8
"(2X)
71
1
4
"
75
5
8
"(3X)
76
1
8
"(2X)
77
7
8
"
A
3
4
"
1
8
"
1/2" (6X)
3
16
"
1/2" (6X)
DETAIL
A
SCALE
1 : 2
OVERLAY CLIP MTG HOLES
DESCRIPTION
PART NUMBER
DRAWING NUMBER
MATERIAL:
REFERENCE:
SCALE: 1:10
1007917-30 1007917-30
OVERLAY, WOOD, 6" TOE KICK, FOR 30" COLUMN WINE
HOLES:
.0135 THRU
.125:
.004
.1260 THRU
.250:
.005
.2510 THRU
.500:
.006
.5010 THRU
.750:
.008
.7510 THRU
1.000:
.010
1.001 & UP:
.012
BREAK SHARP EDGES - .015 X 45°
RADIUS SHARP FILLETS - .015 TO .031
DIMENSIONS ARE IN INCHES TOLERANCES:
UNLESS OTHERWISE SPECIFIED:
Ang =
Frac =
1/64
THIS DOCUMENT / PUBLICATION / SOFTWARE / DRAWING CONTAINS PROPRIETARY INFORMATION WHICH IS THE PROPERTY OF THE PERLICK CORPORATION. IT MAY NOT BE REPRODUCED OR TRANSMITTED IN ANY FORM, ELECTRONIC OR MECHANICAL,
INCLUDING PHOTOCOPYING, RECORDING, OR USED IN ANY INFORMATION STORAGE, TRANSMISSION, OR RETRIEVAL SYSTEM, WITHOUT WRITTEN PERMISSION FROM THE PERLICK CORPORATION. COPYRIGHT 2015 PERLICK CORPORATION. ALL RIGHTS RESERVED.
Milwaukee, Wisconsin
Perlick Corporation
MISC
A A
B B
C C
D D
4
4
3
3
2
2
1
1
.X =
.XX =
.XXX =
OVERALL DIMENSIONS: 0L X 0W X 0H
WEIGHT: LBS
GAUGE: -ga
REQ QUAL MFG: NO
21
Column Refrigeration Installation & Operation Manual
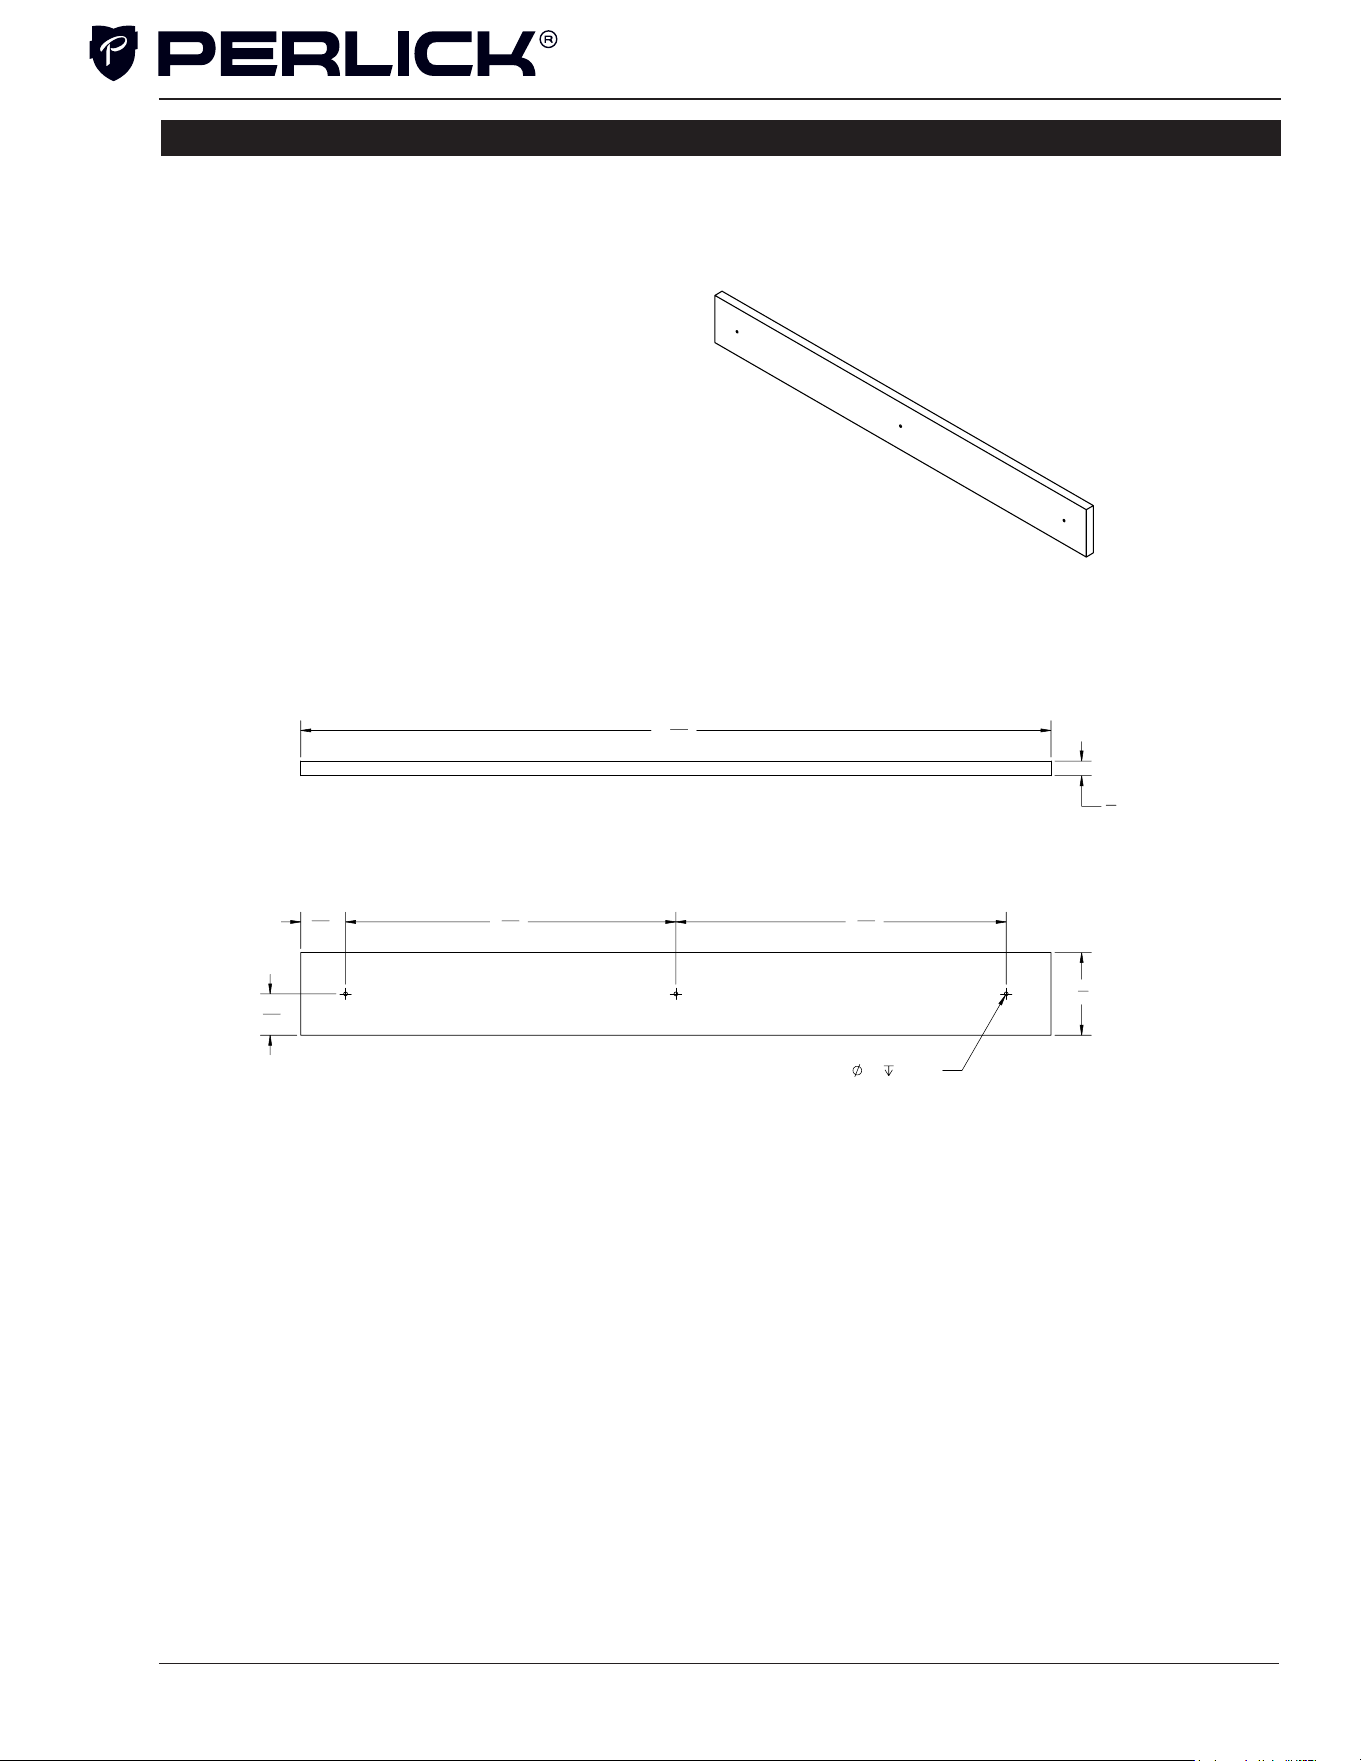
24” WINE SHELF FRONT DETAIL
2
1
8
"
1
5
32
"
8
31
64
"
8
31
64
"
1
1
16
"
.09
.25 (3X)
3
8
"
19
9
32
"
REVISIONS
REV
ECO
DESCRIPTION
DESIGNER
DATE
APPROVED BY
A
2024-6396
INITIAL RELEASE
david.charlier
06/12/2024
david.charlier
DESCRIPTION
PART NUMBER
DRAWING NUMBER
MATERIAL:
REFERENCE:
SCALE: 1:4
1053807 1053807
OVERLAY, WOOD, SHELF, COLUMN 24"
HOLES:
.0135 THRU
.125:
.004
.1260 THRU
.250:
.005
.2510 THRU
.500:
.006
.5010 THRU
.750:
.008
.7510 THRU
1.000:
.010
1.001 & UP:
.012
BREAK SHARP EDGES - .015 X 45°
RADIUS SHARP FILLETS - .015 TO .031
DIMENSIONS ARE IN INCHES TOLERANCES:
UNLESS OTHERWISE SPECIFIED:
Ang =
Frac =
1/64
THIS DOCUMENT / PUBLICATION / SOFTWARE / DRAWING CONTAINS PROPRIETARY INFORMATION WHICH IS THE PROPERTY OF THE PERLICK CORPORATION. IT MAY NOT BE REPRODUCED OR TRANSMITTED IN ANY FORM, ELECTRONIC OR MECHANICAL,
INCLUDING PHOTOCOPYING, RECORDING, OR USED IN ANY INFORMATION STORAGE, TRANSMISSION, OR RETRIEVAL SYSTEM, WITHOUT WRITTEN PERMISSION FROM THE PERLICK CORPORATION. COPYRIGHT 2015 PERLICK CORPORATION. ALL RIGHTS RESERVED.
Milwaukee, Wisconsin
Perlick Corporation
MISC
A A
B B
C C
D D
4
4
3
3
2
2
1
1
.X =
.XX =
.XXX =
OVERALL DIMENSIONS: L X W X H
WEIGHT: LBS
GAUGE: ga
REQ QUAL MFG: NO
2
1
8
"
1
5
32
"
8
31
64
"
8
31
64
"
1
1
16
"
.09
.25 (3X)
3
8
"
19
9
32
"
REVISIONS
REV
ECO
DESCRIPTION
DESIGNER
DATE
APPROVED BY
A
2024-6396
INITIAL RELEASE
david.charlier
06/12/2024
david.charlier
DESCRIPTION
PART NUMBER
DRAWING NUMBER
MATERIAL:
REFERENCE:
SCALE: 1:4
1053807 1053807
OVERLAY, WOOD, SHELF, COLUMN 24"
HOLES:
.0135 THRU
.125:
.004
.1260 THRU
.250:
.005
.2510 THRU
.500:
.006
.5010 THRU
.750:
.008
.7510 THRU
1.000:
.010
1.001 & UP:
.012
BREAK SHARP EDGES - .015 X 45°
RADIUS SHARP FILLETS - .015 TO .031
DIMENSIONS ARE IN INCHES TOLERANCES:
UNLESS OTHERWISE SPECIFIED:
Ang =
Frac =
1/64
THIS DOCUMENT / PUBLICATION / SOFTWARE / DRAWING CONTAINS PROPRIETARY INFORMATION WHICH IS THE PROPERTY OF THE PERLICK CORPORATION. IT MAY NOT BE REPRODUCED OR TRANSMITTED IN ANY FORM, ELECTRONIC OR MECHANICAL,
INCLUDING PHOTOCOPYING, RECORDING, OR USED IN ANY INFORMATION STORAGE, TRANSMISSION, OR RETRIEVAL SYSTEM, WITHOUT WRITTEN PERMISSION FROM THE PERLICK CORPORATION. COPYRIGHT 2015 PERLICK CORPORATION. ALL RIGHTS RESERVED.
Milwaukee, Wisconsin
Perlick Corporation
MISC
A A
B B
C C
D D
4
4
3
3
2
2
1
1
.X =
.XX =
.XXX =
OVERALL DIMENSIONS: L X W X H
WEIGHT: LBS
GAUGE: ga
REQ QUAL MFG: NO
22
Column Refrigeration Installation & Operation Manual
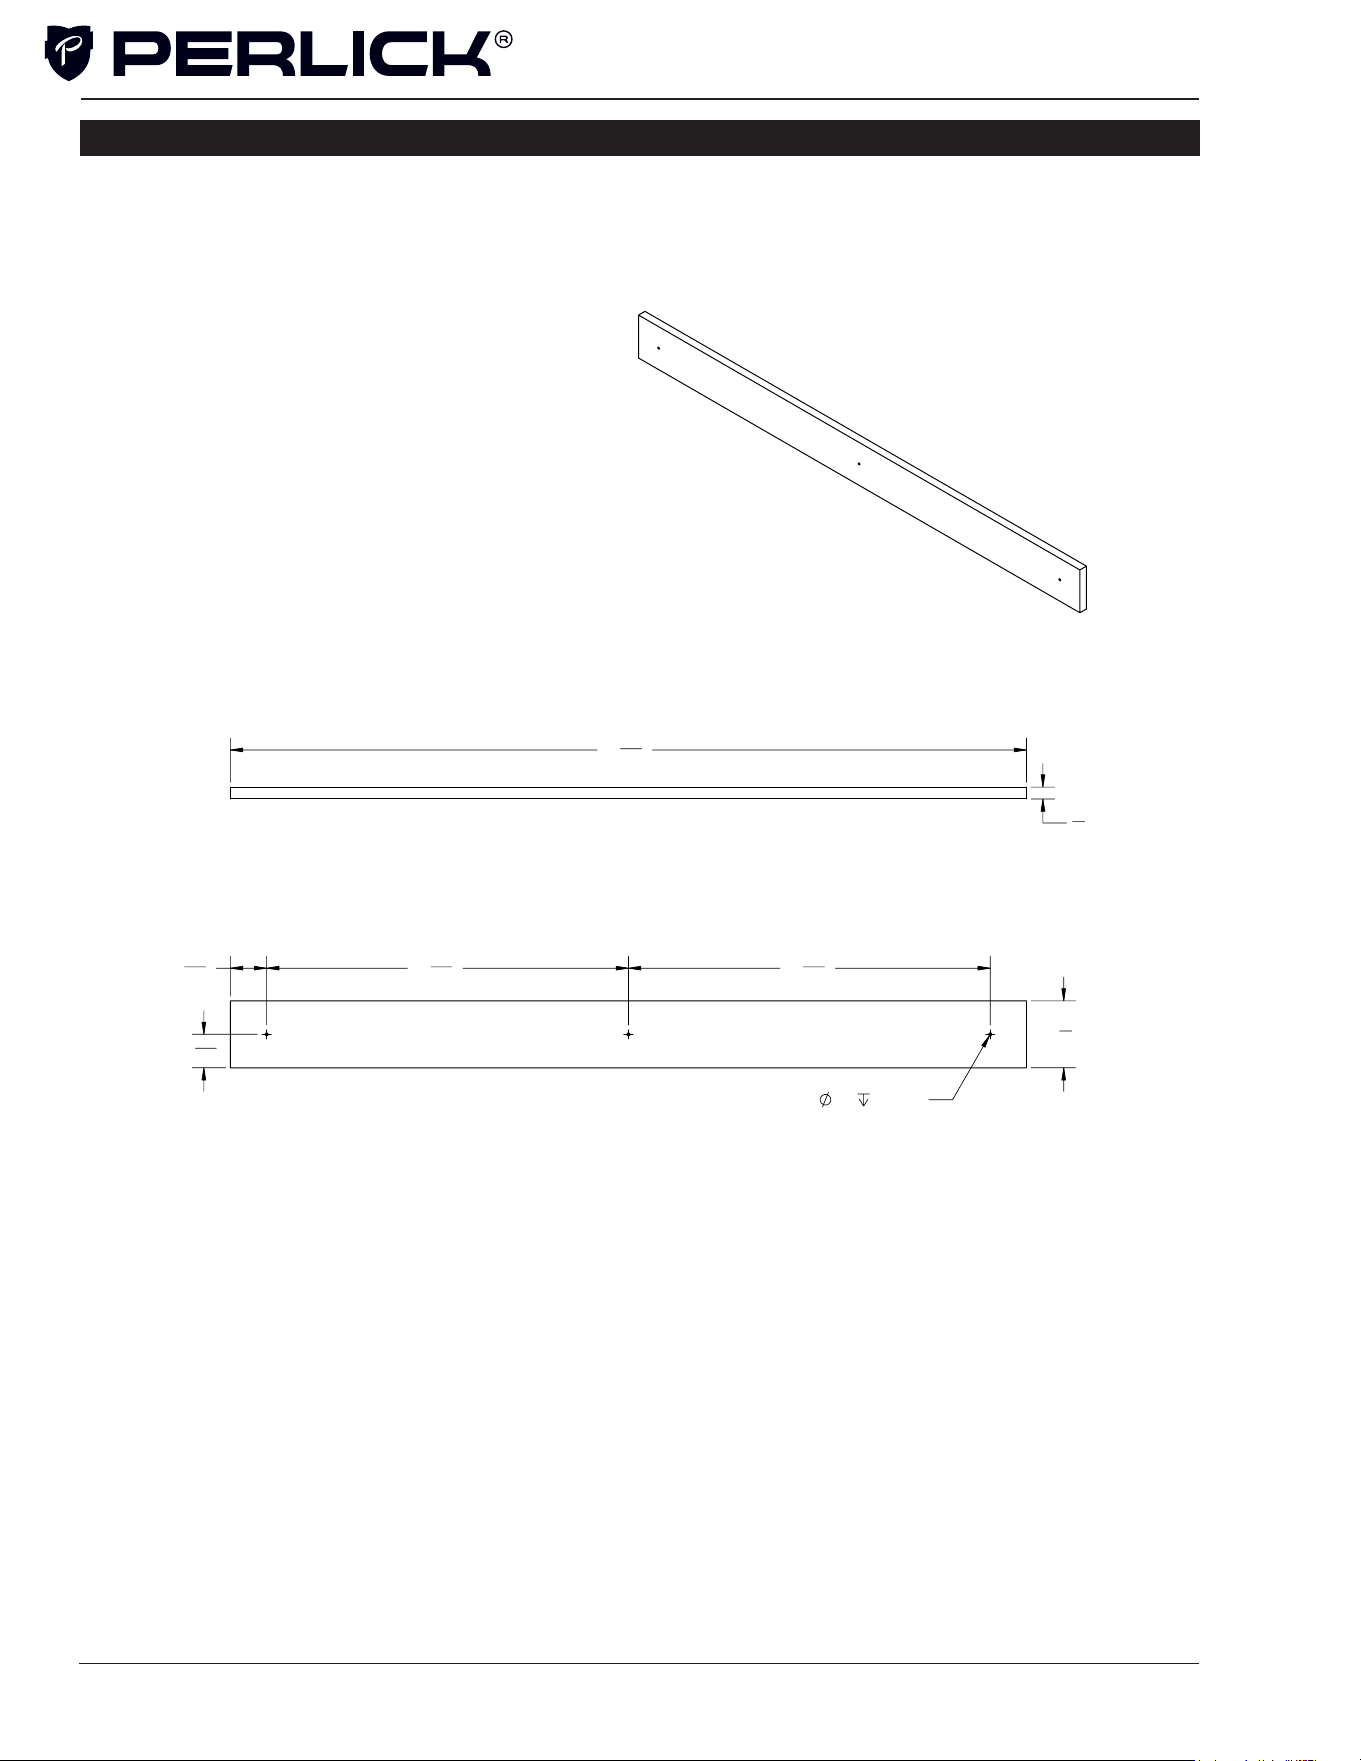
30” WINE SHELF FRONT DETAIL
2
1
8
"
1
1
16
"
1
5
32
"
11
31
64
"
11
31
64
"
.09
.25 (3X)
25
9
32
"
3
8
"
REVISIONS
REV
ECO
DESCRIPTION
DESIGNER
DATE
APPROVED BY
A
2024-6396
INITIAL RELEASE
david.charlier
06/12/2024
david.charlier
DESCRIPTION
PART NUMBER
DRAWING NUMBER
MATERIAL:
REFERENCE:
SCALE: 1:4
1053807-30 1053807-30
OVERLAY, WOOD, SHELF, COLUMN 30"
HOLES:
.0135 THRU
.125:
.004
.1260 THRU
.250:
.005
.2510 THRU
.500:
.006
.5010 THRU
.750:
.008
.7510 THRU
1.000:
.010
1.001 & UP:
.012
BREAK SHARP EDGES - .015 X 45°
RADIUS SHARP FILLETS - .015 TO .031
DIMENSIONS ARE IN INCHES TOLERANCES:
UNLESS OTHERWISE SPECIFIED:
Ang =
Frac =
1/64
THIS DOCUMENT / PUBLICATION / SOFTWARE / DRAWING CONTAINS PROPRIETARY INFORMATION WHICH IS THE PROPERTY OF THE PERLICK CORPORATION. IT MAY NOT BE REPRODUCED OR TRANSMITTED IN ANY FORM, ELECTRONIC OR MECHANICAL,
INCLUDING PHOTOCOPYING, RECORDING, OR USED IN ANY INFORMATION STORAGE, TRANSMISSION, OR RETRIEVAL SYSTEM, WITHOUT WRITTEN PERMISSION FROM THE PERLICK CORPORATION. COPYRIGHT 2015 PERLICK CORPORATION. ALL RIGHTS RESERVED.
Milwaukee, Wisconsin
Perlick Corporation
MISC
A A
B B
C C
D D
4
4
3
3
2
2
1
1
.X =
.XX =
.XXX =
OVERALL DIMENSIONS: L X W X H
WEIGHT: LBS
GAUGE: ga
REQ QUAL MFG: NO
2
1
8
"
1
1
16
"
1
5
32
"
11
31
64
"
11
31
64
"
.09
.25 (3X)
25
9
32
"
3
8
"
REVISIONS
REV
ECO
DESCRIPTION
DESIGNER
DATE
APPROVED BY
A
2024-6396
INITIAL RELEASE
david.charlier
06/12/2024
david.charlier
DESCRIPTION
PART NUMBER
DRAWING NUMBER
MATERIAL:
REFERENCE:
SCALE: 1:4
1053807-30 1053807-30
OVERLAY, WOOD, SHELF, COLUMN 30"
HOLES:
.0135 THRU
.125:
.004
.1260 THRU
.250:
.005
.2510 THRU
.500:
.006
.5010 THRU
.750:
.008
.7510 THRU
1.000:
.010
1.001 & UP:
.012
BREAK SHARP EDGES - .015 X 45°
RADIUS SHARP FILLETS - .015 TO .031
DIMENSIONS ARE IN INCHES TOLERANCES:
UNLESS OTHERWISE SPECIFIED:
Ang =
Frac =
1/64
THIS DOCUMENT / PUBLICATION / SOFTWARE / DRAWING CONTAINS PROPRIETARY INFORMATION WHICH IS THE PROPERTY OF THE PERLICK CORPORATION. IT MAY NOT BE REPRODUCED OR TRANSMITTED IN ANY FORM, ELECTRONIC OR MECHANICAL,
INCLUDING PHOTOCOPYING, RECORDING, OR USED IN ANY INFORMATION STORAGE, TRANSMISSION, OR RETRIEVAL SYSTEM, WITHOUT WRITTEN PERMISSION FROM THE PERLICK CORPORATION. COPYRIGHT 2015 PERLICK CORPORATION. ALL RIGHTS RESERVED.
Milwaukee, Wisconsin
Perlick Corporation
MISC
A A
B B
C C
D D
4
4
3
3
2
2
1
1
.X =
.XX =
.XXX =
OVERALL DIMENSIONS: L X W X H
WEIGHT: LBS
GAUGE: ga
REQ QUAL MFG: NO
23
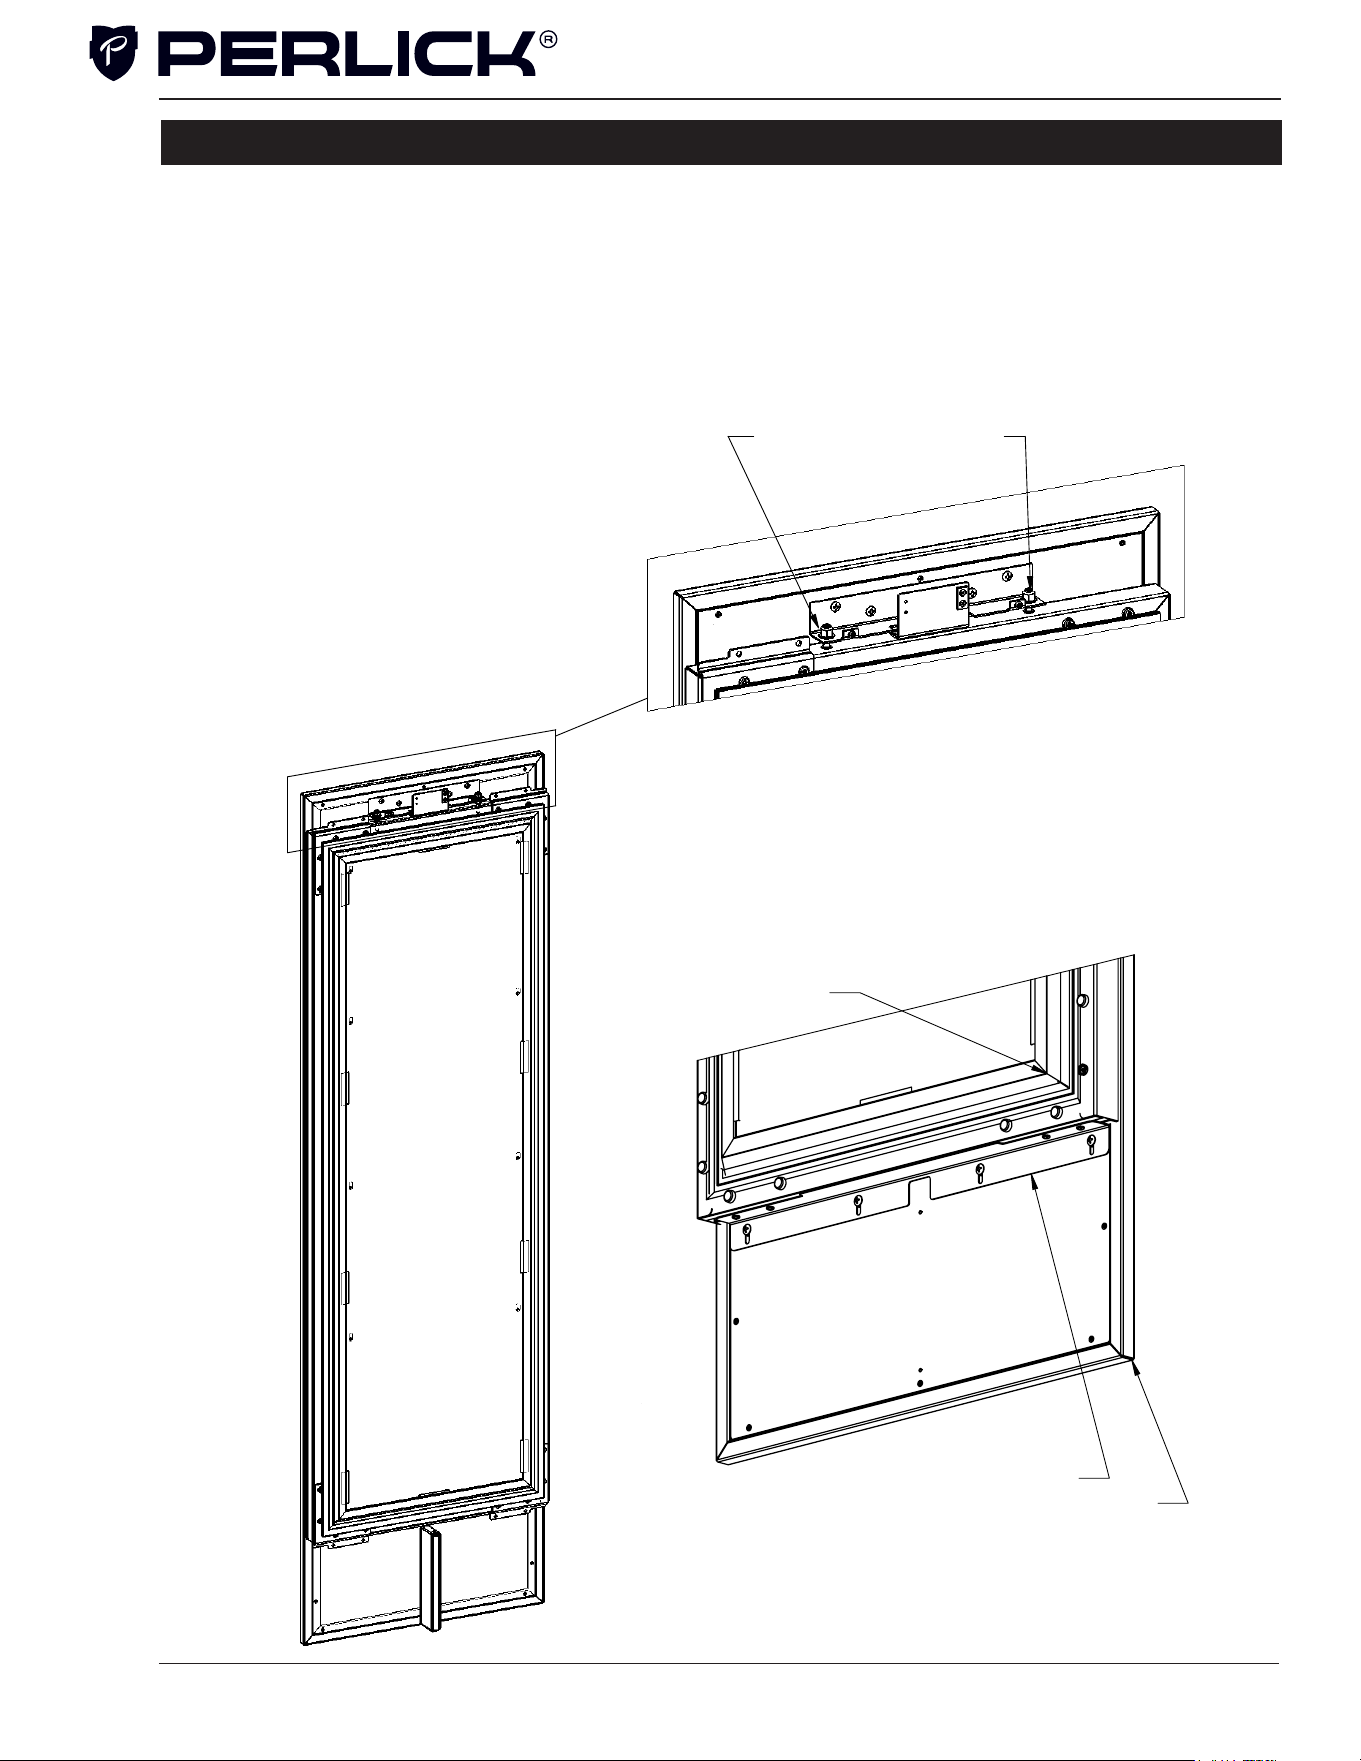
DOOR OVERLAY PANEL ADJUSTMENT
DETAIL H
SCALE 1 : 6
USE #4 ALLEN KEY
CLOCKWISE - DOWN
HEIGHT ADJUSTMENT
COUNTER CLOCKWISE - UP
TOP OF DOOR
BOTTOM OF DOOR
Close the door to make adjustments to align
panels and reveals.
For up-and-down adjustments, turn the height
adjustment screws in the top bracket in and out.
Adjust the screws as needed to achieve an even
reveal on each side of the door overlay.
Once nal adjustments are made to the position
of the door overlay, secure the overlay in place
by installing the bottom overlay bracket as
shown in BOTTOM OF DOOR illustration below.
G
*INSTALL BRACKET BOTTOM
OVERLAY TO DOOR AND
OVERLAY WITH FASTENERS
OVERLAY
DOOR
BRACKET, BOTTOM, OVERLAY
DETAIL G
SCALE 1 : 5
OVERLAY
BRACKET, BOTTOM, OVERLAY
DOOR
Column Refrigeration Installation & Operation Manual
24
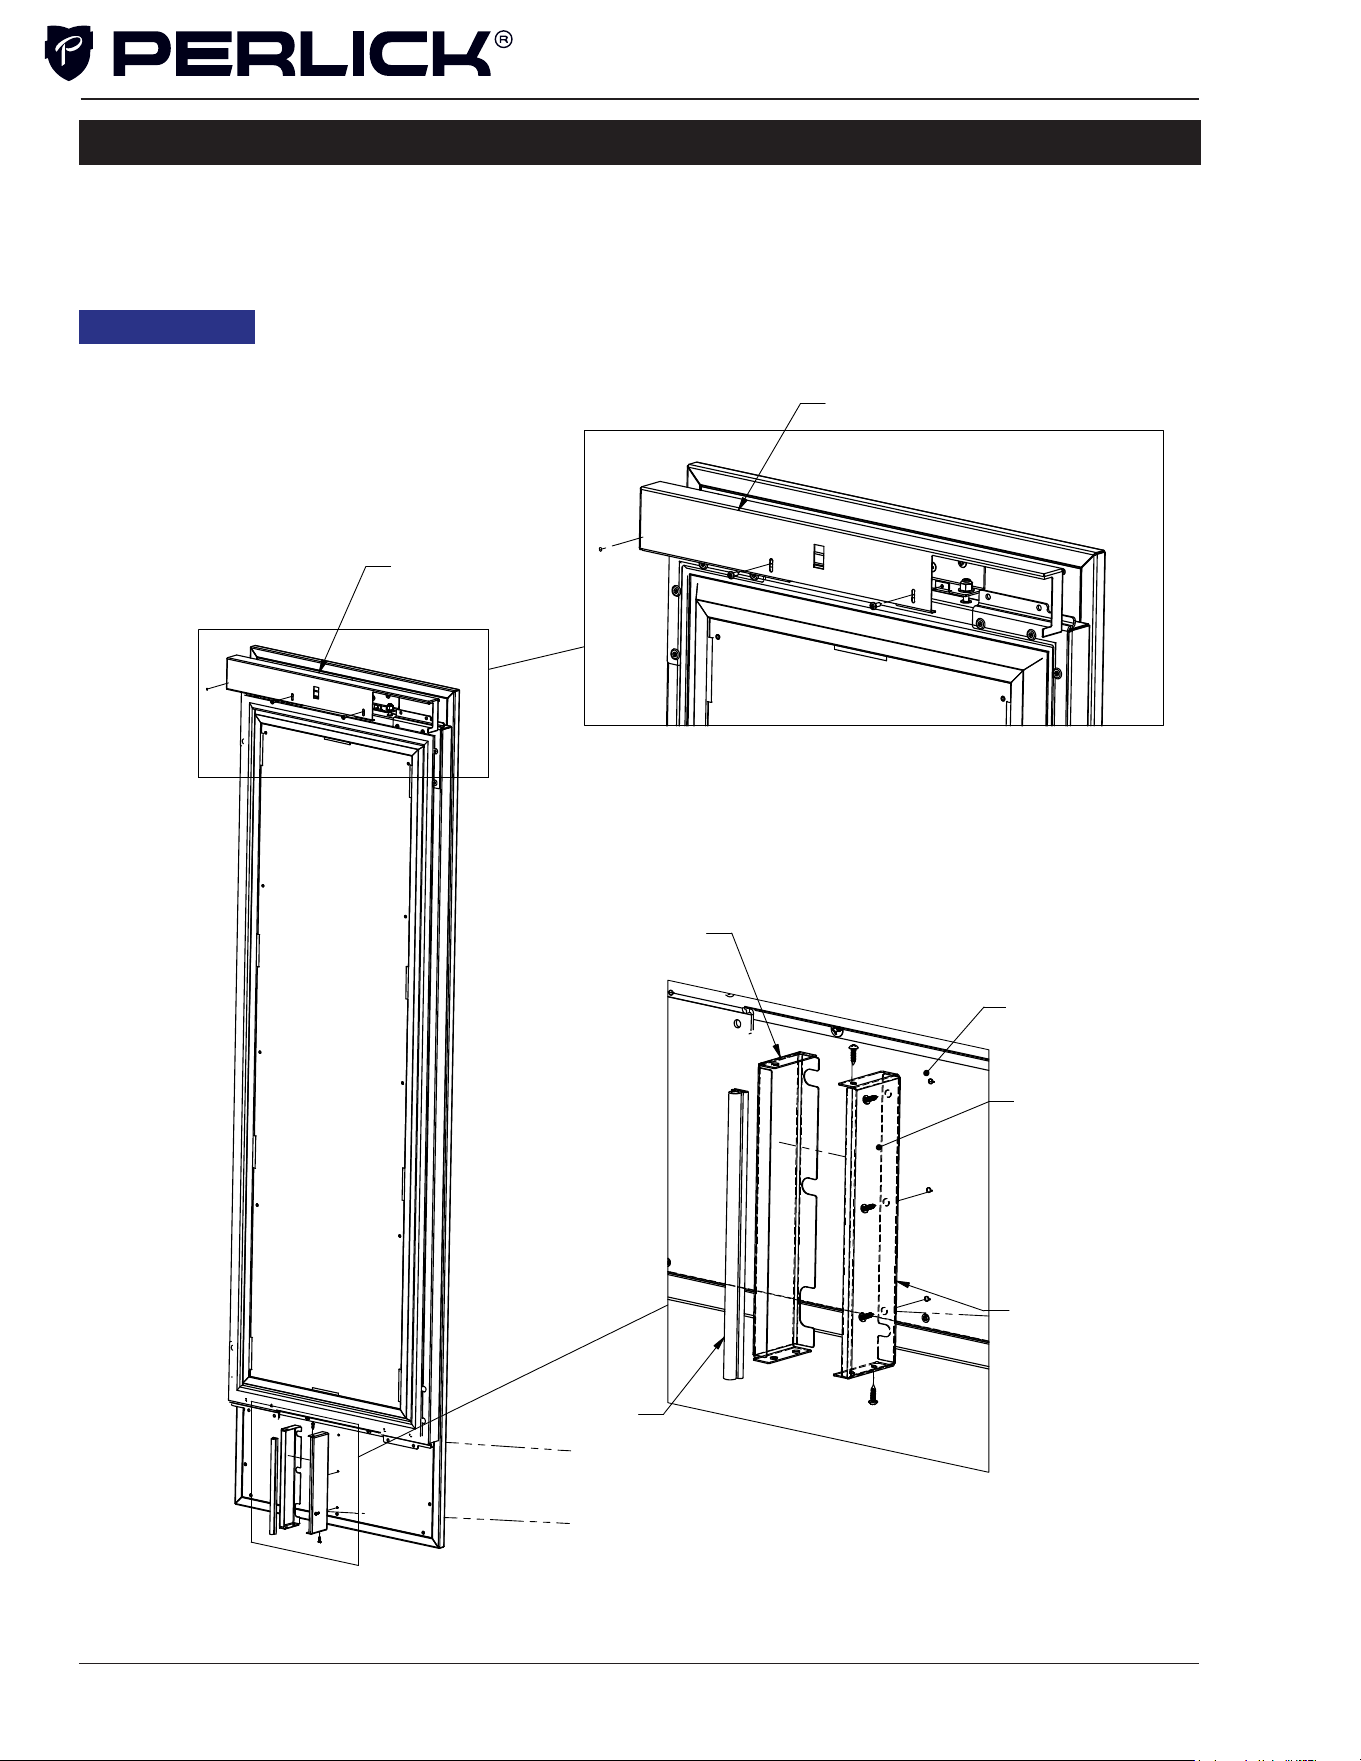
DOOR TRIM INSTALLATION
Once overlay is adjusted, mount the door trim
cover onto the door adjustment bracket using
the provided screws.
DOOR PANEL
DOOR TRIM
ON
DOOR TRIM
DOOR TRIM
CONDENSOR
FRAME 1
OVERLAY
3.
DIVIDER PANEL
GASKET
TEMPATE
DETAIL K
SCALE 1 : 4
FRAME 2
INSTALL FRAME 1 TO OVERLAY.1.
INSTALL GASKET ONTO FRAME 2.2.
MOUNT FRAME 2 ONTO FRAME 1.
INSTALLATION STEPS
DETAIL J
SCALE 1 : 6
DOOR TRIM
ON
DOOR PANEL
Installation of Condenser
Divider Panel on bottom
of door panel, is critical to performance
of the system. Failure to install will cause
premature sealed system issues and void
warranty. Condenser Divider Panel should
be installed to either stainless steel or
customer provided door panels.
NOTICE
CONDENSER
DIVIDER PANEL
CONDENSER DIVIDER PANEL INSTALLATION
OVERLAY
TEMPLATE
Column Refrigeration Installation & Operation Manual
3
1
16
"
3
1
16
"
3
1
4
"
23
3
4
"
66"
3"
69
1
2
"
1"
11
3
8
"
C
L
3
4
"
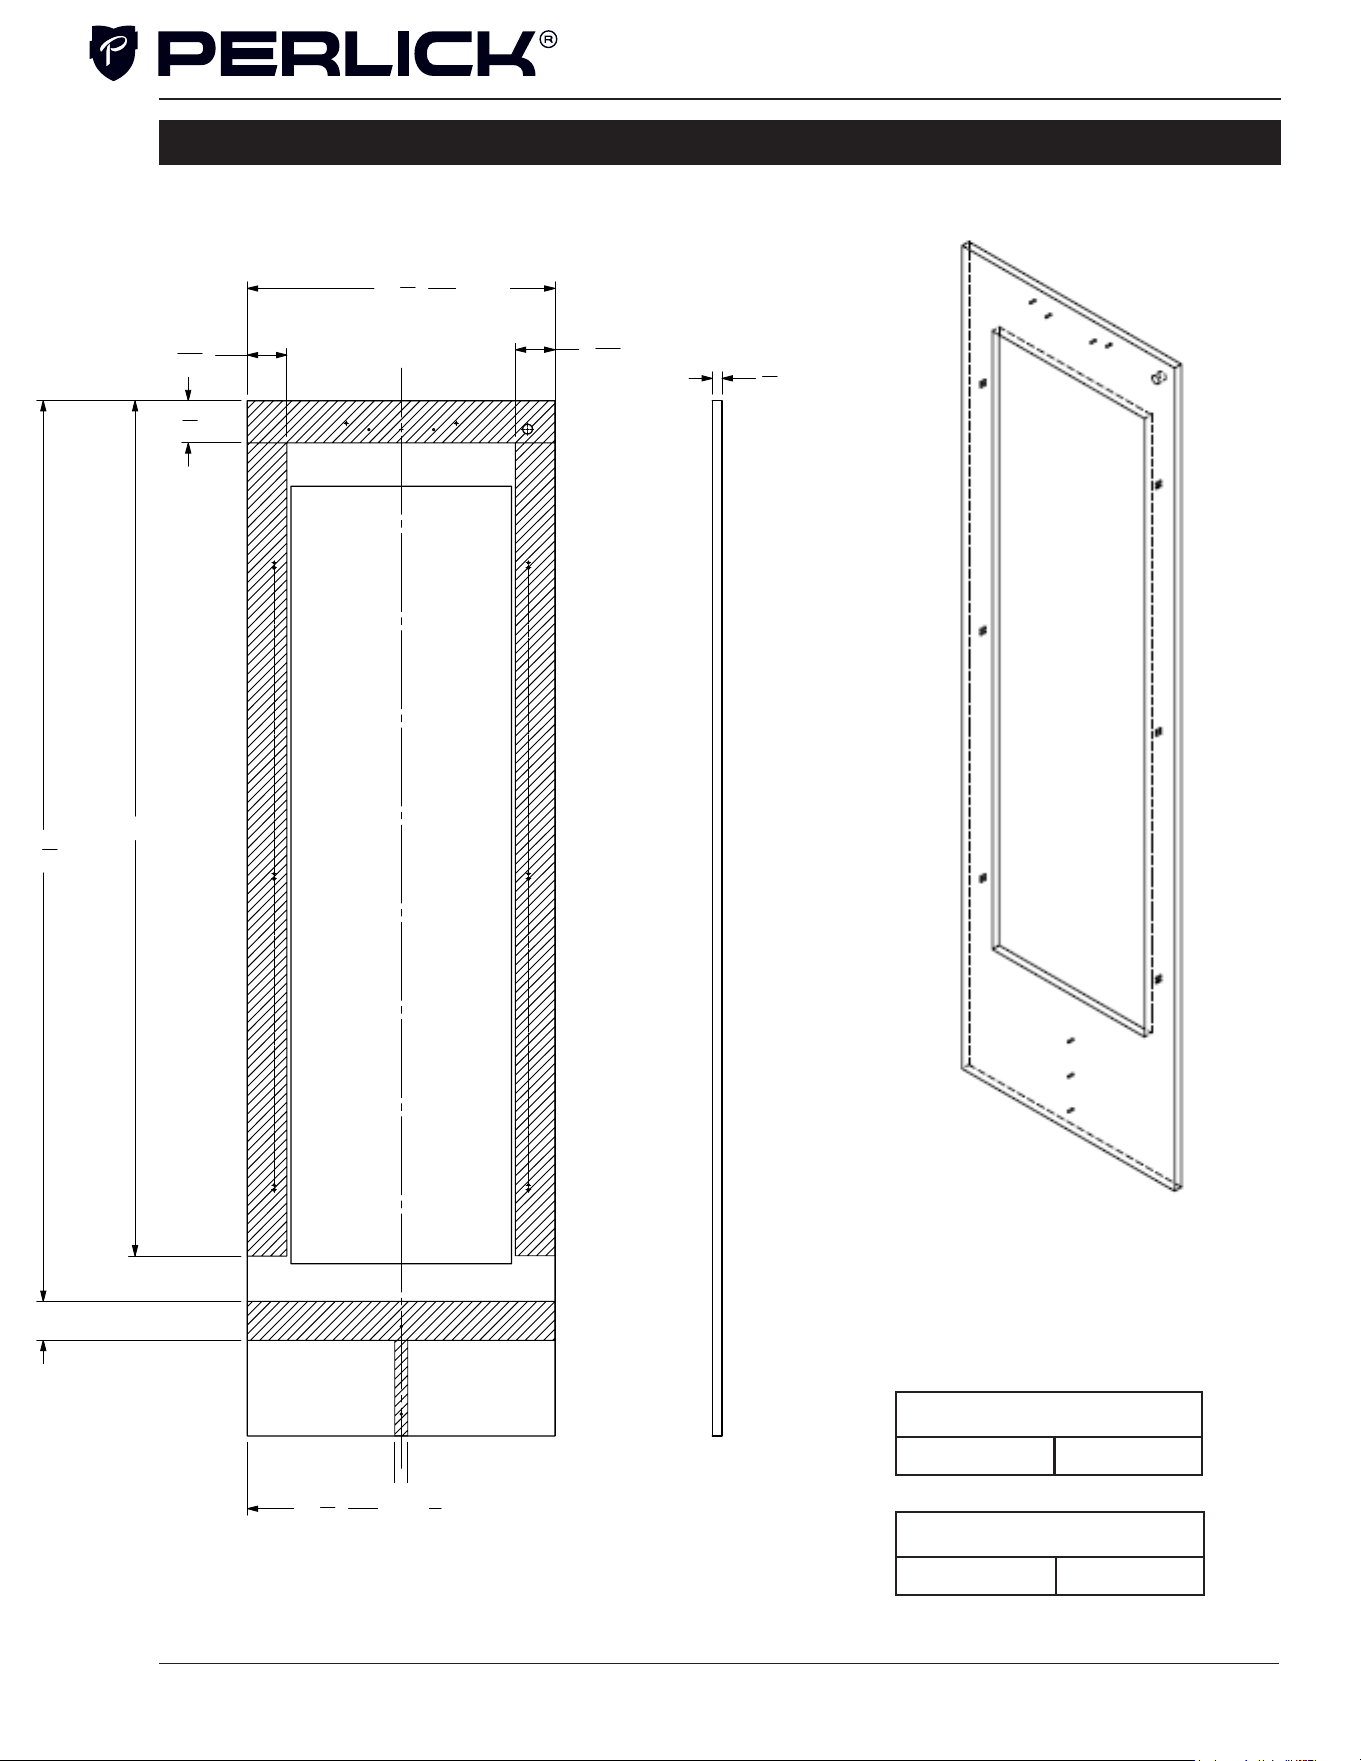
NOTE:
HATCH AREAS SHOULD PROVIDE ENOUGH
THICKNESS FOR WOOD SCREW FOR
OVERLAY ATTACHMENT BRACKETS.
REV.
DESCRIPTION
DATE
APPROVED
REVISIONS
F
REVISED MTG HOLE LOCATIONS AND COND. AIRFLOW
DIVIDER MTG HOLES
11/8/2017
JMP
E
UPDATED CLIP MTG HOLE LOCATIONS
10/6/2017
JMP
D
REVISED WINDOW SIZE BY INCREASE CUTOUT WIDTH AND
HEIGHT BY 1-1/4" OVERALL
10/5/2017
JMP
C
ADDED HOLES FOR CONDENSER AIR DIVIDER
10/3/2017
JMP
B
UPDATED HOLE PATTERN FOR ADJUSTMENT BRKT
8/25/2017
JMP
A
INITIAL RELEASE
11/8/2016
TEC
2
2
B
A
3
C
B
1
C
1
3
SW
C:\Perlick\Engineering\Projects\Refrigeration\1601802\CAD Files\1007917.slddrw
11/28/2016
11/08/2017
JMP
JMP
-
DIMENSIONS ARE IN INCHES TOLERANCES:
THIS DOCUMENT / PUBLICATION / SOFTWARE / DRAWING CONTAINS PROPRIETARY INFORMATION WHICH IS THE PROPERTY OF THE PERLICK CORPORATION. IT MAY NOT BE REPRODUCED OR TRANSMITTED IN ANY
FORM, ELECTRONIC OR MECHANICAL, INCLUDING PHOTOCOPYING, RECORDING, OR USED IN ANY INFORMATION STORAGE, TRANSMISSION, OR RETRIEVAL SYSTEM, WITHOUT WRITTEN PERMISSION FROM THE PERLICK
CORPORATION. COPYRIGHT 2015 PERLICK CORPORATION. ALL RIGHTS RESERVED.
DRAWN BY:
APPROVED BY:
FINISH:
QTY.:
HOLES:
.0135 THRU
.125:
.004
.1260 THRU
.250:
.005
.2510 THRU
.500:
.006
.5010 THRU
.750:
.008
.7510 THRU
1.000:
.010
1.001 & UP:
.012
BREAK SHARP EDGES - .015 X 45°
RADIUS SHARP FILLETS - .015 TO .031
UNLESS OTHERWISE SPECIFIED:
MATERIAL:
DATE
SIGNATURES
Milwaukee, Wisconsin
Perlick Corporation
DWG NO.
REFERENCE:
PART NO.
PURCHASE REC.:
TITLE:
1007917
1007917
FOR COLUMN WINE
OVERLAY, WOOD, 4'' TOE KICK
SCALE = 1:10
SHEET 3 OF 4
A
WOOD
25
SCREW ZONE FOR 24 AND 30 INCH OVERLAY TEMPLATES
Column Refrigeration Installation & Operation Manual
3
1
16
"
3
1
16
"
3
1
4
"
23
3
4
"
66"
3"
69
1
2
"
1"
11
3
8
"
C
L
3
4
"
NOTE:
HATCH AREAS SHOULD PROVIDE ENOUGH
THICKNESS FOR WOOD SCREW FOR
OVERLAY ATTACHMENT BRACKETS.
REV.
DESCRIPTION
DATE
APPROVED
REVISIONS
F
REVISED MTG HOLE LOCATIONS AND COND. AIRFLOW
DIVIDER MTG HOLES
11/8/2017
JMP
E
UPDATED CLIP MTG HOLE LOCATIONS
10/6/2017
JMP
D
REVISED WINDOW SIZE BY INCREASE CUTOUT WIDTH AND
HEIGHT BY 1-1/4" OVERALL
10/5/2017
JMP
C
ADDED HOLES FOR CONDENSER AIR DIVIDER
10/3/2017
JMP
B
UPDATED HOLE PATTERN FOR ADJUSTMENT BRKT
8/25/2017
JMP
A
INITIAL RELEASE
11/8/2016
TEC
2
2
B
A
3
C
B
1
C
1
3
SW
C:\Perlick\Engineering\Projects\Refrigeration\1601802\CAD Files\1007917.slddrw
11/28/2016
11/08/2017
JMP
JMP
-
DIMENSIONS ARE IN INCHES TOLERANCES:
THIS DOCUMENT / PUBLICATION / SOFTWARE / DRAWING CONTAINS PROPRIETARY INFORMATION WHICH IS THE PROPERTY OF THE PERLICK CORPORATION. IT MAY NOT BE REPRODUCED OR TRANSMITTED IN ANY
FORM, ELECTRONIC OR MECHANICAL, INCLUDING PHOTOCOPYING, RECORDING, OR USED IN ANY INFORMATION STORAGE, TRANSMISSION, OR RETRIEVAL SYSTEM, WITHOUT WRITTEN PERMISSION FROM THE PERLICK
CORPORATION. COPYRIGHT 2015 PERLICK CORPORATION. ALL RIGHTS RESERVED.
DRAWN BY:
APPROVED BY:
FINISH:
QTY.:
HOLES:
.0135 THRU
.125:
.004
.1260 THRU
.250:
.005
.2510 THRU
.500:
.006
.5010 THRU
.750:
.008
.7510 THRU
1.000:
.010
1.001 & UP:
.012
BREAK SHARP EDGES - .015 X 45°
RADIUS SHARP FILLETS - .015 TO .031
UNLESS OTHERWISE SPECIFIED:
MATERIAL:
DATE
SIGNATURES
Milwaukee, Wisconsin
Perlick Corporation
DWG NO.
REFERENCE:
PART NO.
PURCHASE REC.:
TITLE:
1007917
1007917
FOR COLUMN WINE
OVERLAY, WOOD, 4'' TOE KICK
SCALE = 1:10
SHEET 3 OF 4
A
WOOD
NOTE: HATCH AREAS SHOULD
PROVIDE ENOUGH THICKNESS FOR
WOOD SCREWS FOR OVERLAY
ATTACHMENT BRACKET.
A
CR24, CC24 23-3/4”
B
CR24, CC24 11-3/8”
A
B
26
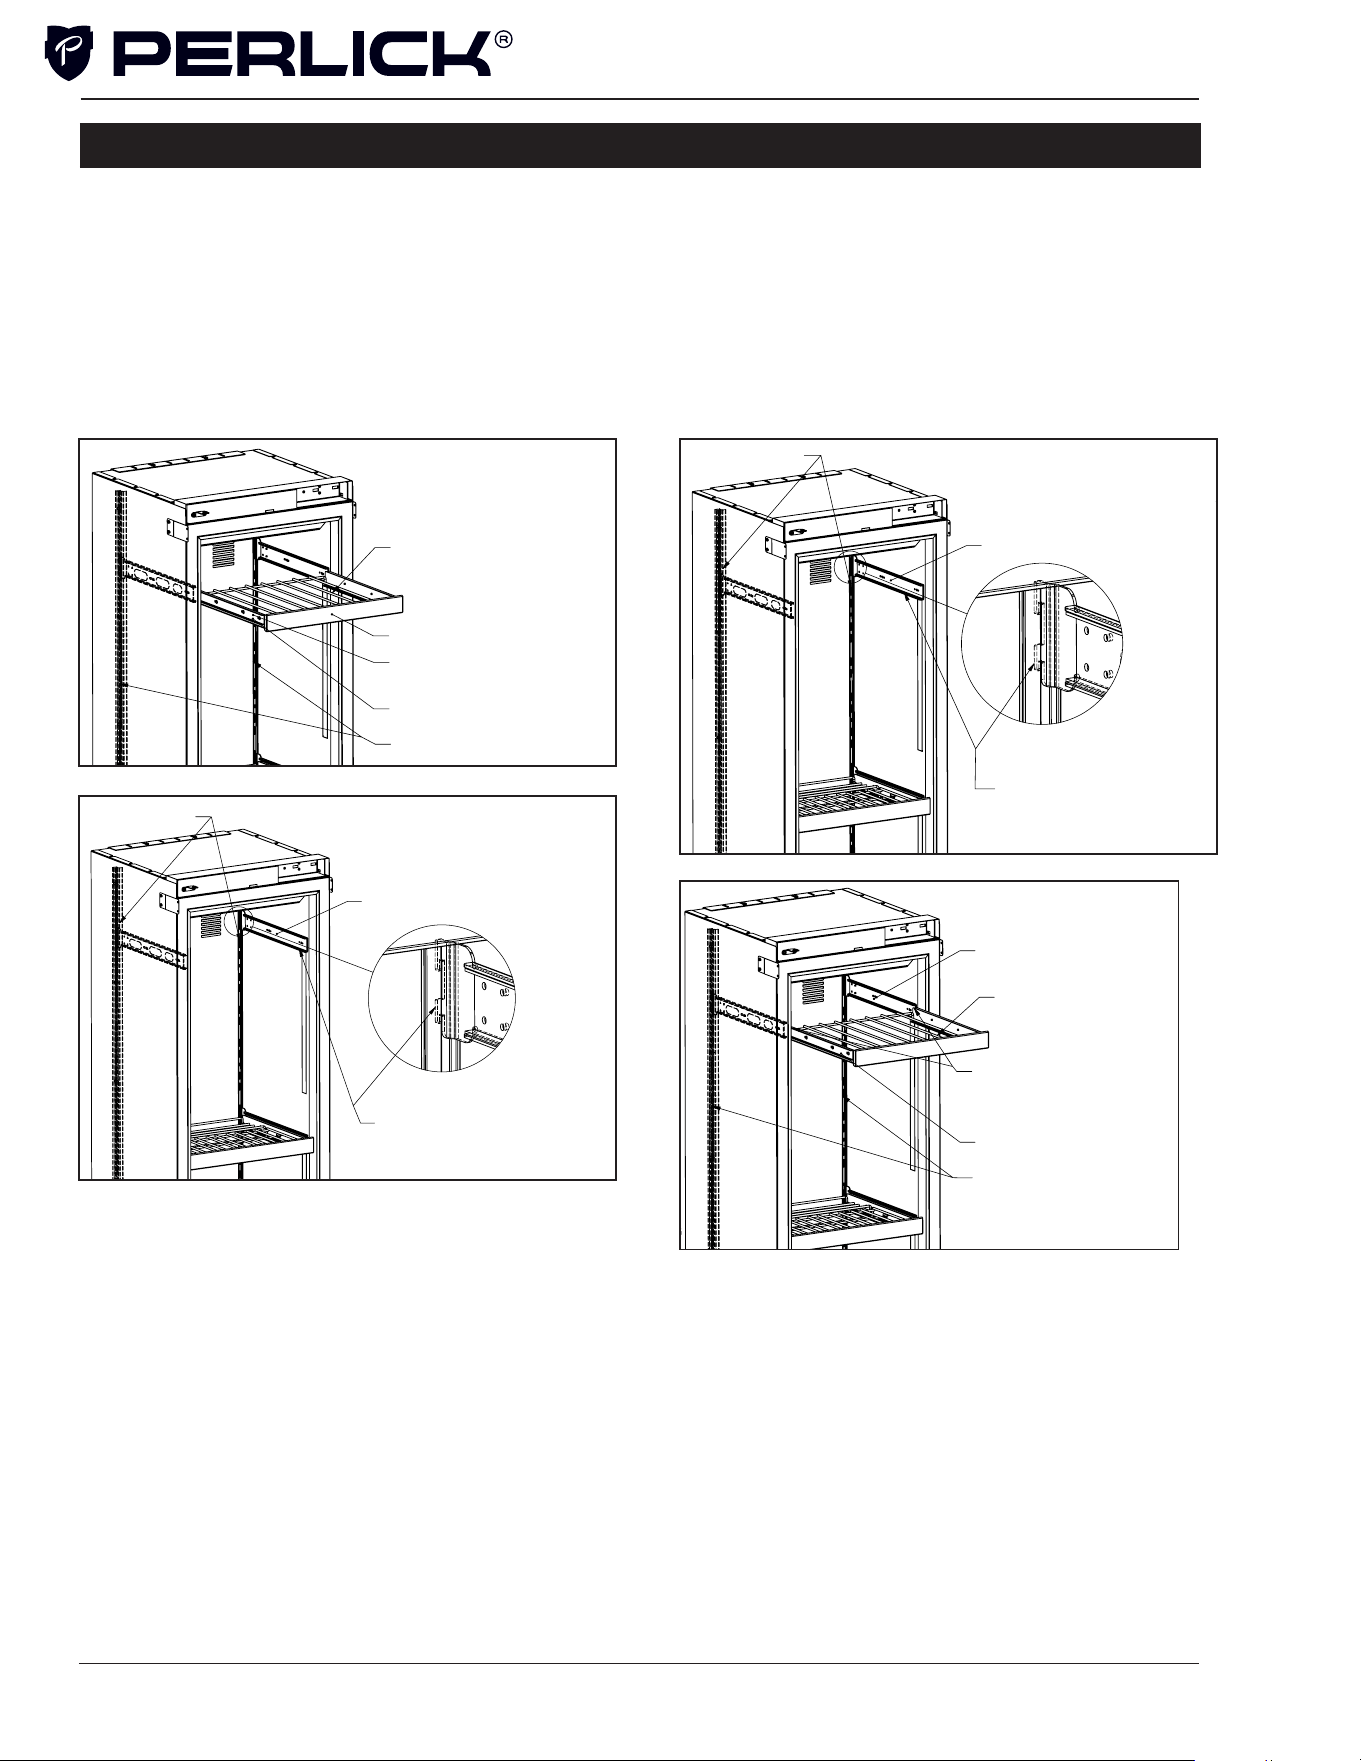
Wine Shelving
▪ Prior to making shelf adjustments, clear the
shelf of product. Shelf must be empty prior to
changing its position.
SHELF
MOVABLE SLIDER
PILASTER
1. PULL OPEN THE SHELF
2 PULL OPEN THE SLIDER LEVER
3. REMOVE THE SHELF FROM SLIDER
PILASTER
FIXED SLIDER WITH BRACKET
DETAIL N
SCALE 1 : 2
4. PULL UP THE SLIDER MOUNTING BRACKET
FROM THE PILASTER SLOTS
5.REMOVE LH AND RH SLIDER BRACKETS.
2
2
B
A
3
C
B
1
C
1
3
A
SHELF
MOVABLE SLIDER
PILASTER
1. PULL OPEN THE SHELF
2 PULL OPEN THE SLIDER LEVER
3. REMOVE THE SHELF FROM SLIDER
PILASTER
FIXED SLIDER WITH BRACKET
DETAIL N
SCALE 1 : 2
4. PULL UP THE SLIDER MOUNTING BRACKET
FROM THE PILASTER SLOTS
5.REMOVE LH AND RH SLIDER BRACKETS.
2
2
B
A
3
C
B
1
C
1
3
A
To Remove Wine Shelves
SHELF
MOVABLE SLIDER
PILASTER
3. ALIGN FIXED SLIDER WITH MOVING
SLIDER BOTH SIDES, INSERT THE
SLIDER WITH SHELF AND SLIDE IN
FIXED SLIDER WITH BRACKET
PILASTER
FIXED SLIDER WITH BRACKET
DETAIL N
SCALE 1 : 2
INSTALLED SHELFS
INSTALL SLIDING MOUNTING
1.
BRACKET INTO PILASTER SLOTS.
INSTALL BOTH LH AND RH SLIDING
2.
BRACKETS.
2
2
B
A
3
C
B
1
C
1
3
A
To Install Wine Shelves
SHELF
MOVABLE SLIDER
PILASTER
3. ALIGN FIXED SLIDER WITH MOVING
SLIDER BOTH SIDES, INSERT THE
SLIDER WITH SHELF AND SLIDE IN
FIXED SLIDER WITH BRACKET
PILASTER
FIXED SLIDER WITH BRACKET
DETAIL N
SCALE 1 : 2
INSTALLED SHELFS
INSTALL SLIDING MOUNTING
1.
BRACKET INTO PILASTER SLOTS.
INSTALL BOTH LH AND RH SLIDING
2.
BRACKETS.
2
2
B
A
3
C
B
1
C
1
3
A
WINE STORAGE
Column Refrigeration Installation & Operation Manual
27
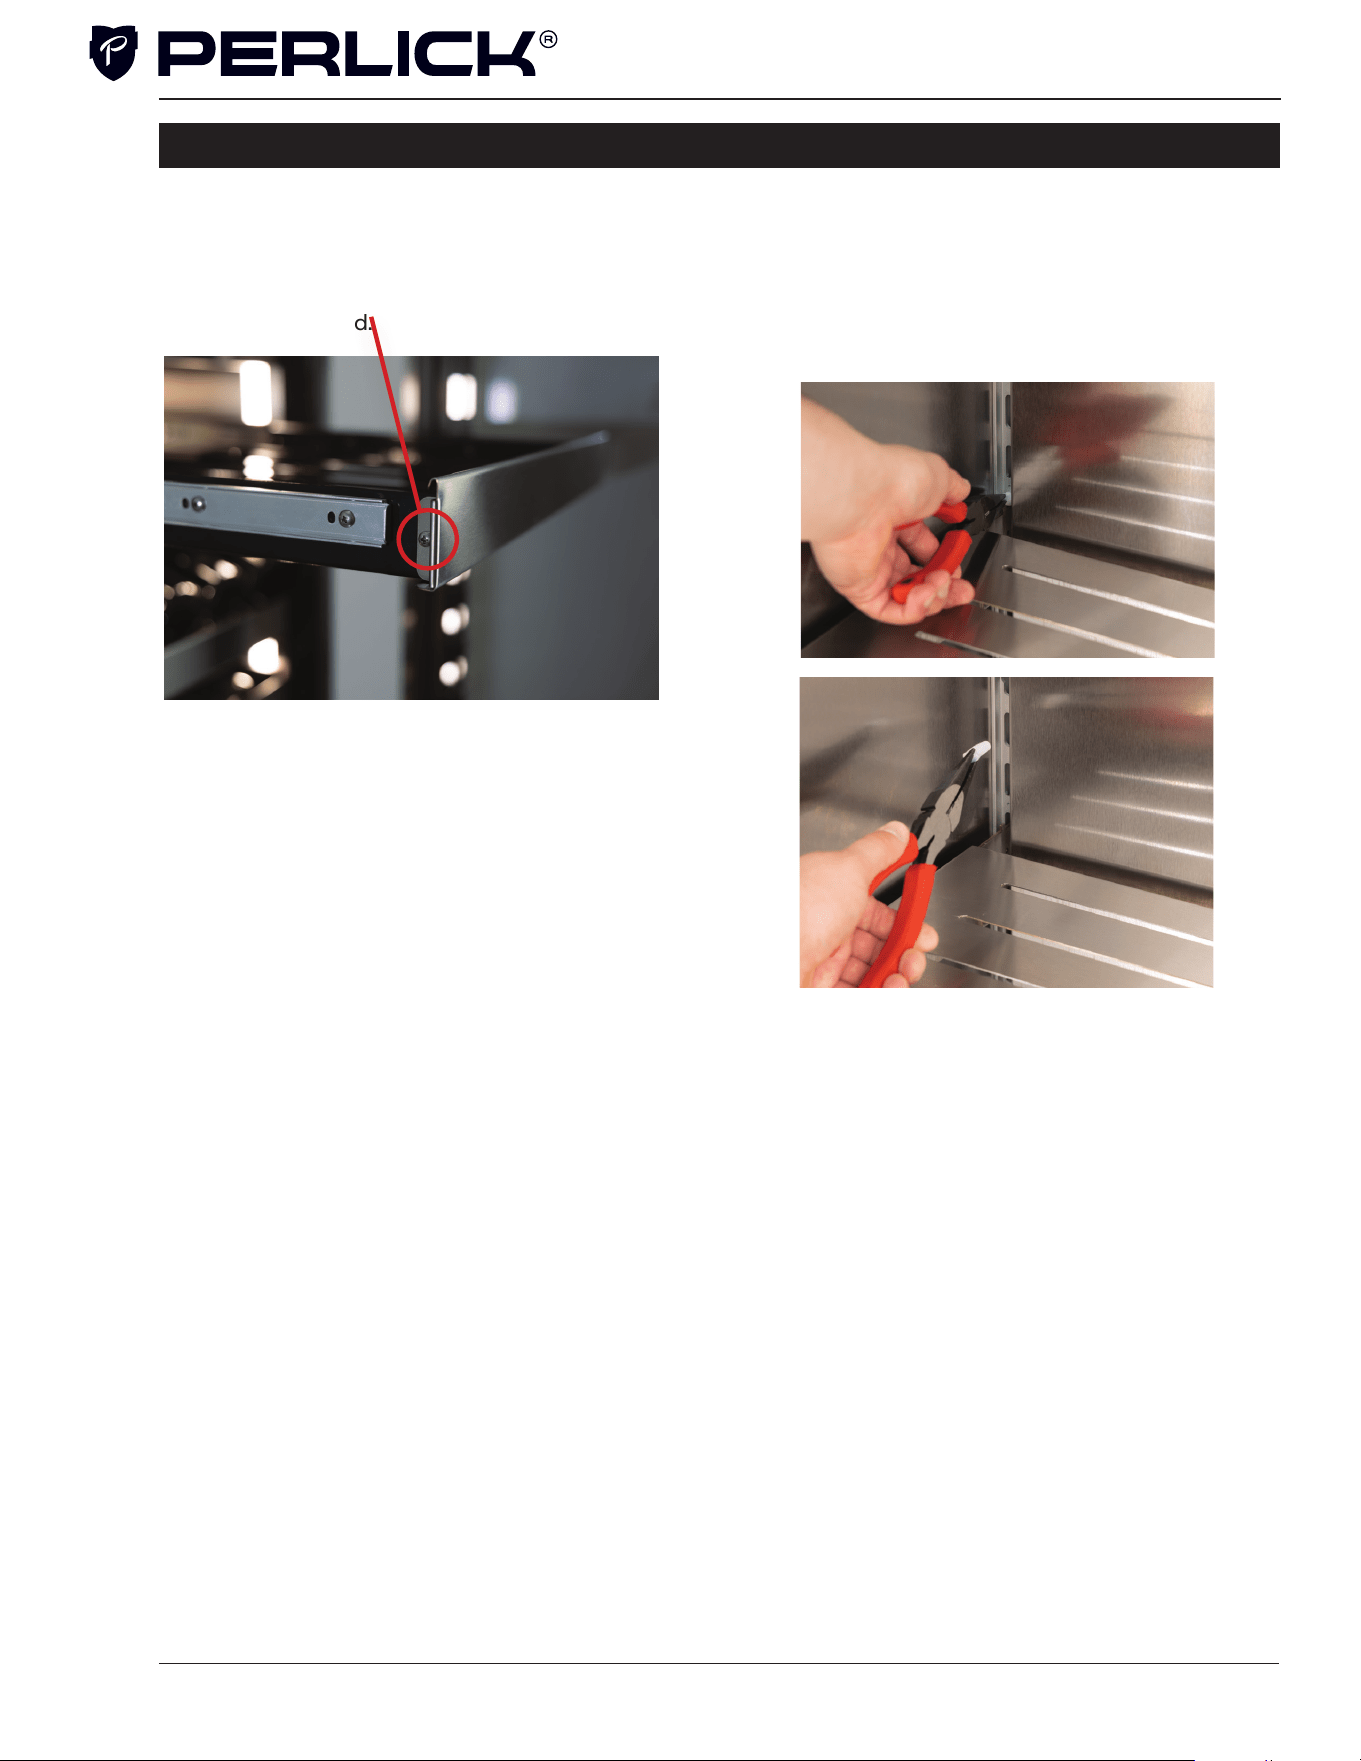
▪ Use a #2 Phillips screwdriver to remove the
two screws on either side of the wine shelf
front as pictured.
WINE STORAGE
▪ Remove shelf plugs prior to the removal
of shelving. Use a needle nose pliers to
grab onto the rubber plug and wiggle
until plug is free.
Column Refrigeration Installation & Operation Manual
28
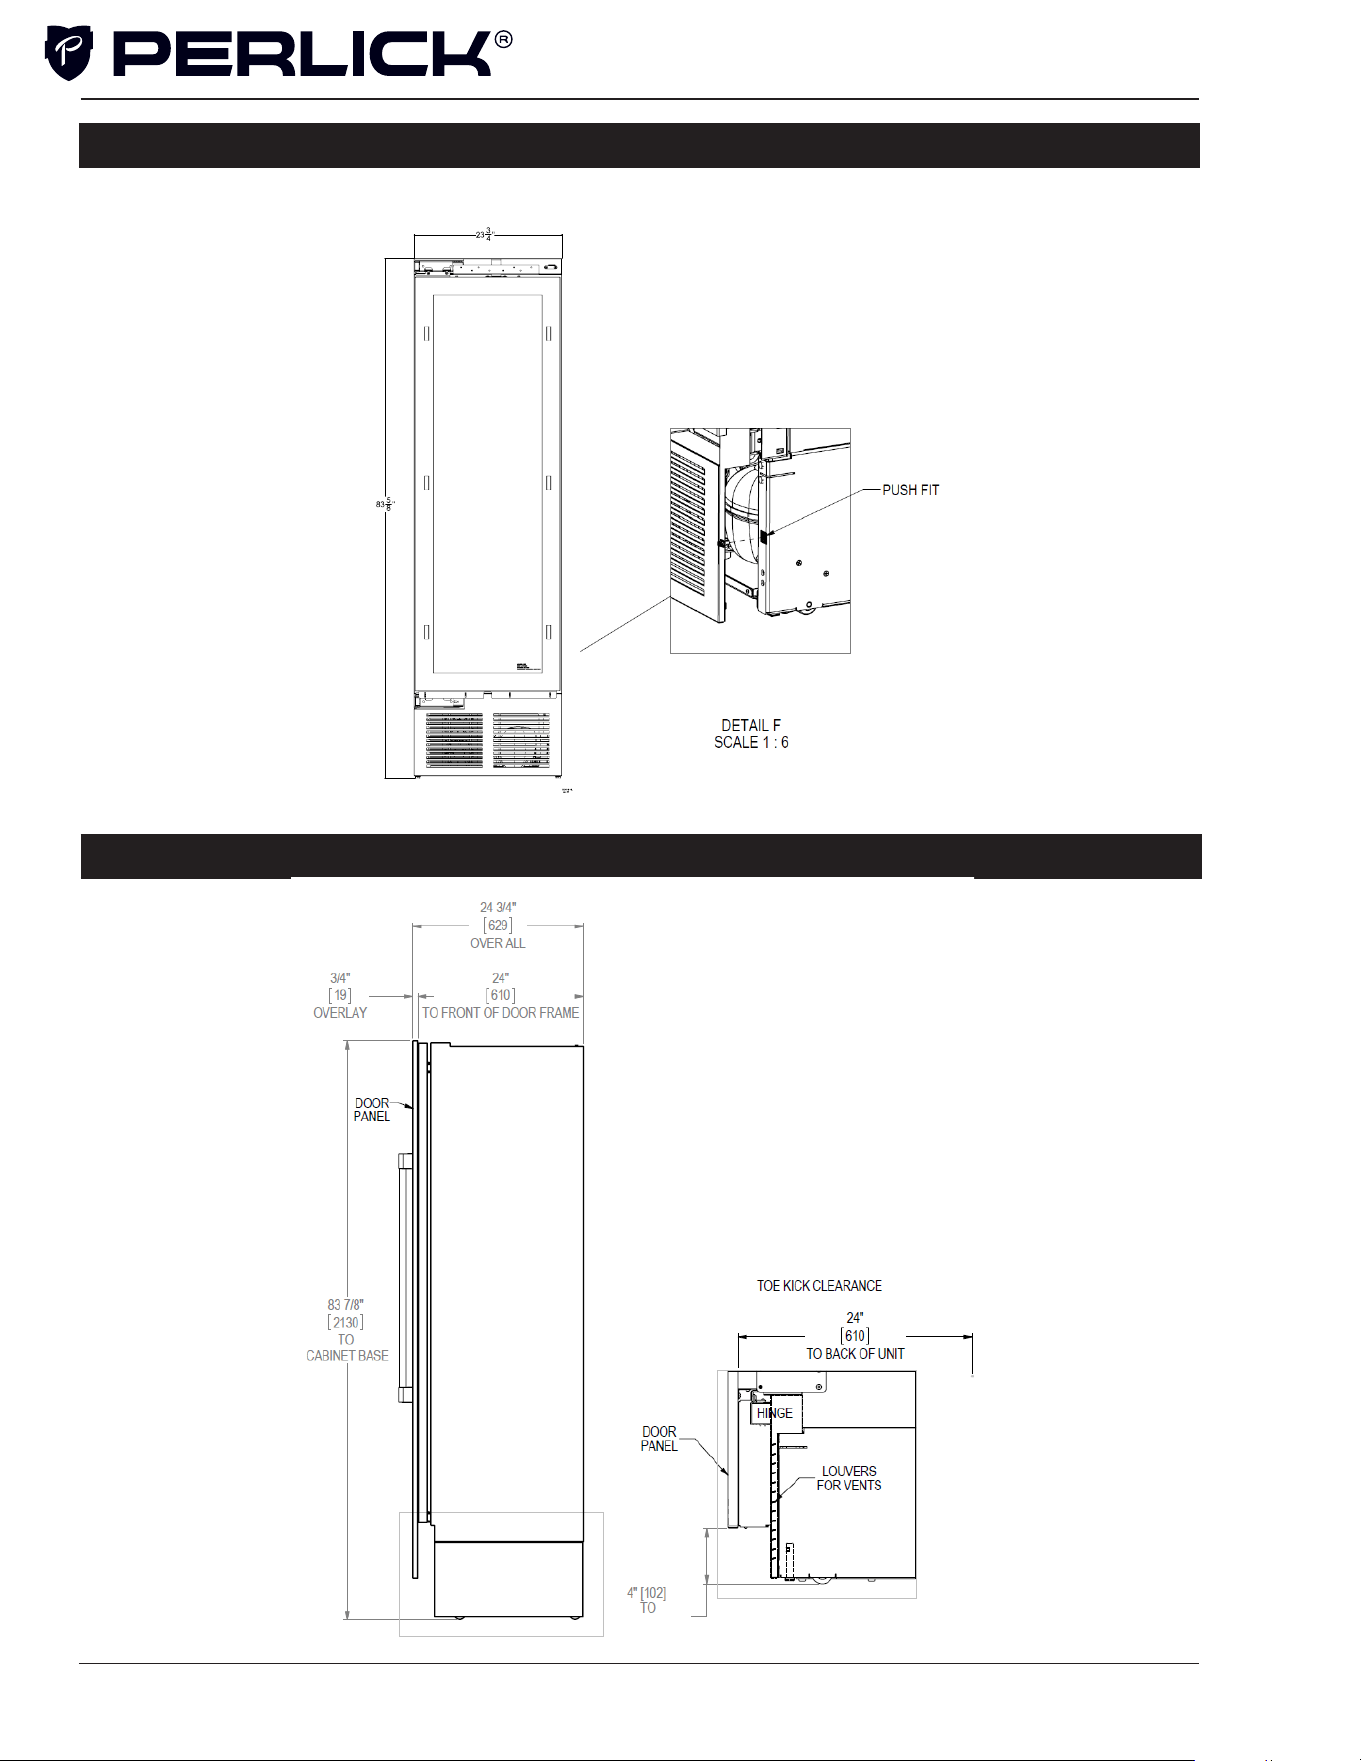
COMPLETION - TOE KICK INSTALLATION
TOE KICK CLEARANCE
Column Refrigeration Installation & Operation Manual
29
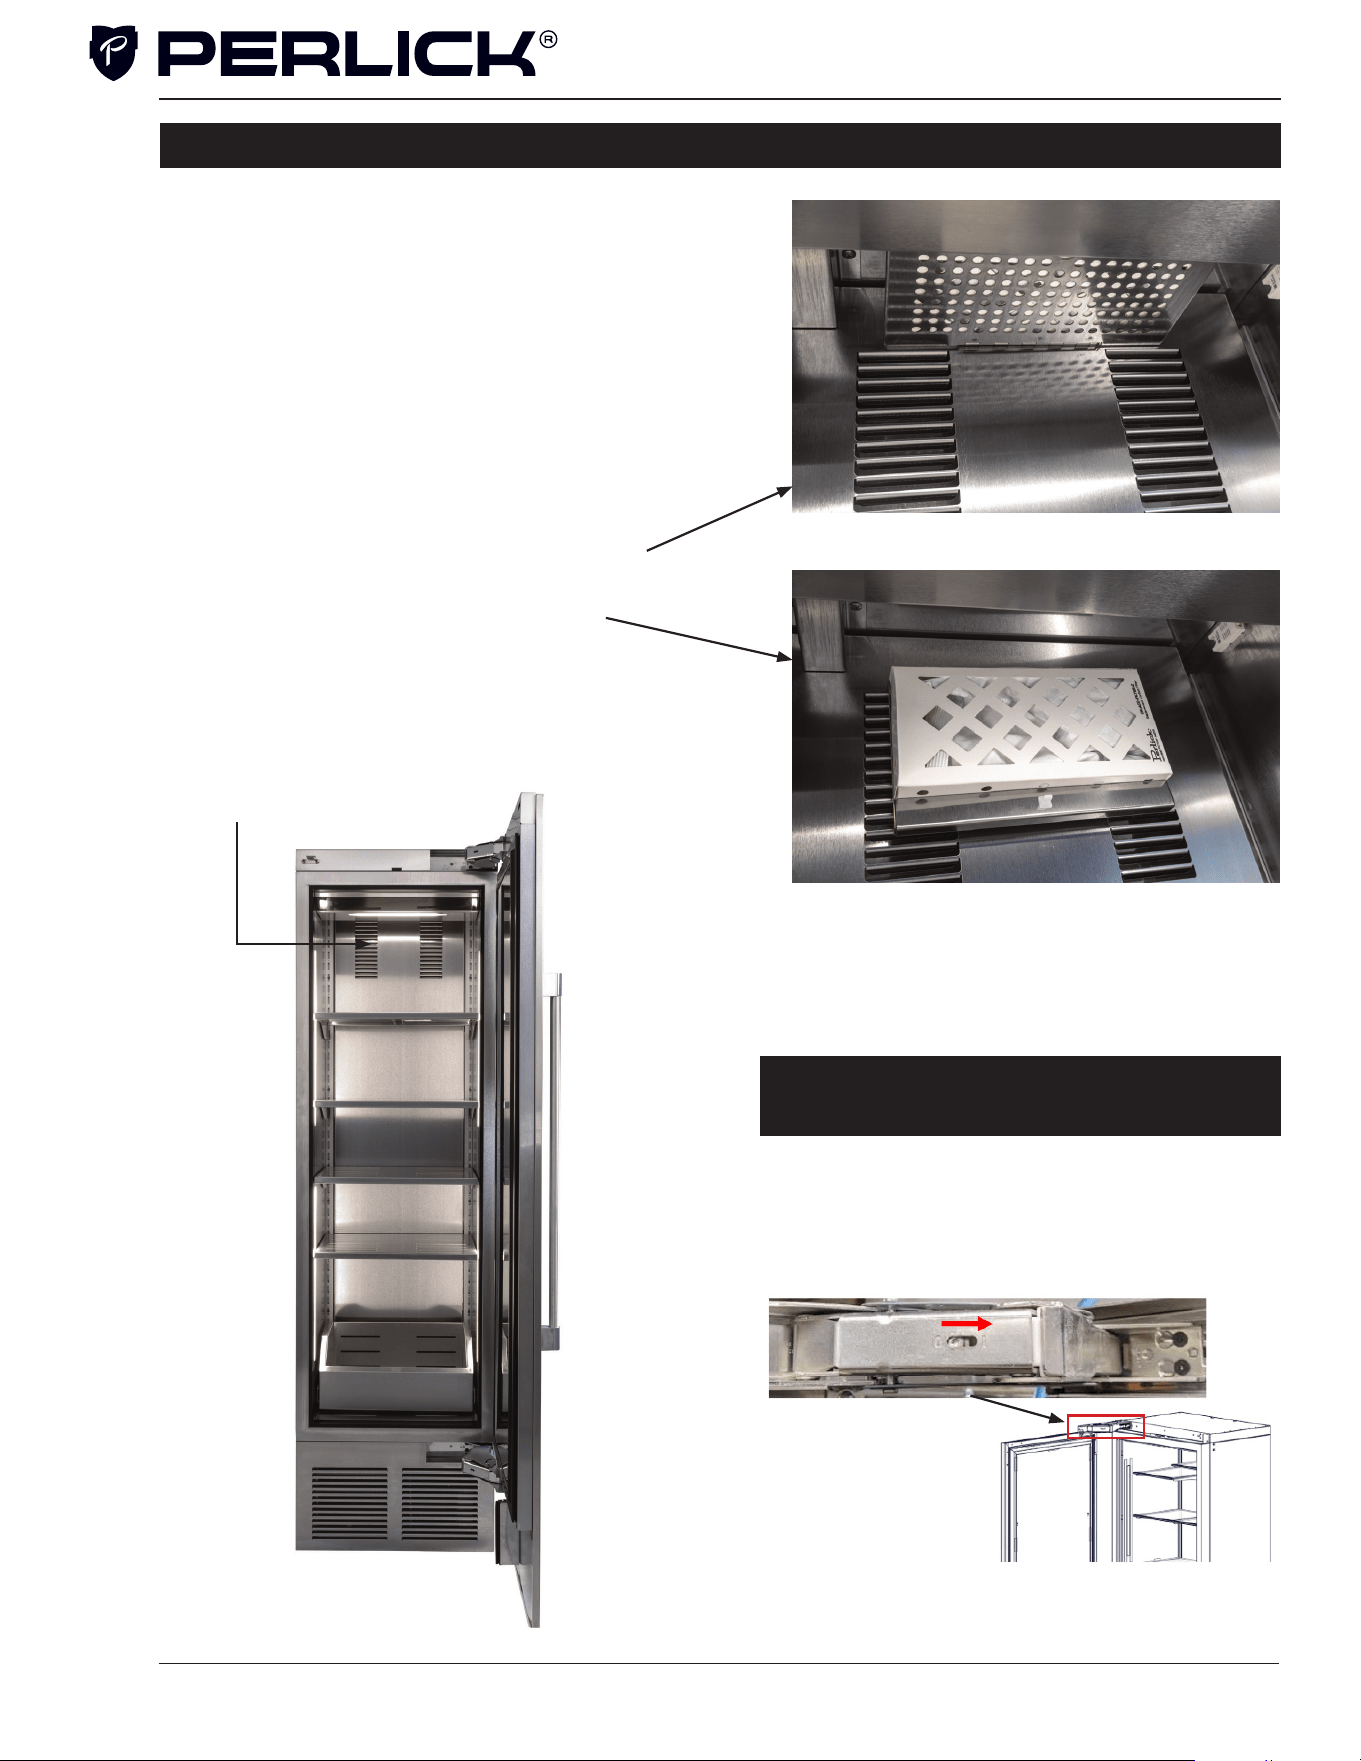
INSTALLING AIR FILTERS
Carbon Air Filter
The carbon air lters should be placed on the
perforated panel located in the top-rear of the
cabinet.
NOTE: For units with shelves the top shelf will
need to be removed for lter.
1. Remove the lter from the plastic bag
before installing into the unit. Do not open or
puncture the Tyvek
®
bag. For units with wine
shelves the top shelf will need to be removed
for lter.
2. To lower the carbon air lter panel, pull rmly.
3. Place the carbon air lter directly onto
the panel and close panel - push rmly to
engage closure clips.
4. It is recommended that the carbon lter be
replaced every 6 months.
Carbon Air Filter Panel (closed)
Carbon Air Filter with panel opened
With a 1/4-inch drive T20 Torx bit socket,
activate both hinges by turning the screw in the
center of
the hinge from “0” to “1.” This allows will allow the
door to self close once 15 degrees.
HINGE SOFT CLOSE ACTIVATION
Column Refrigeration Installation & Operation Manual
Carbon Air Filter location
30
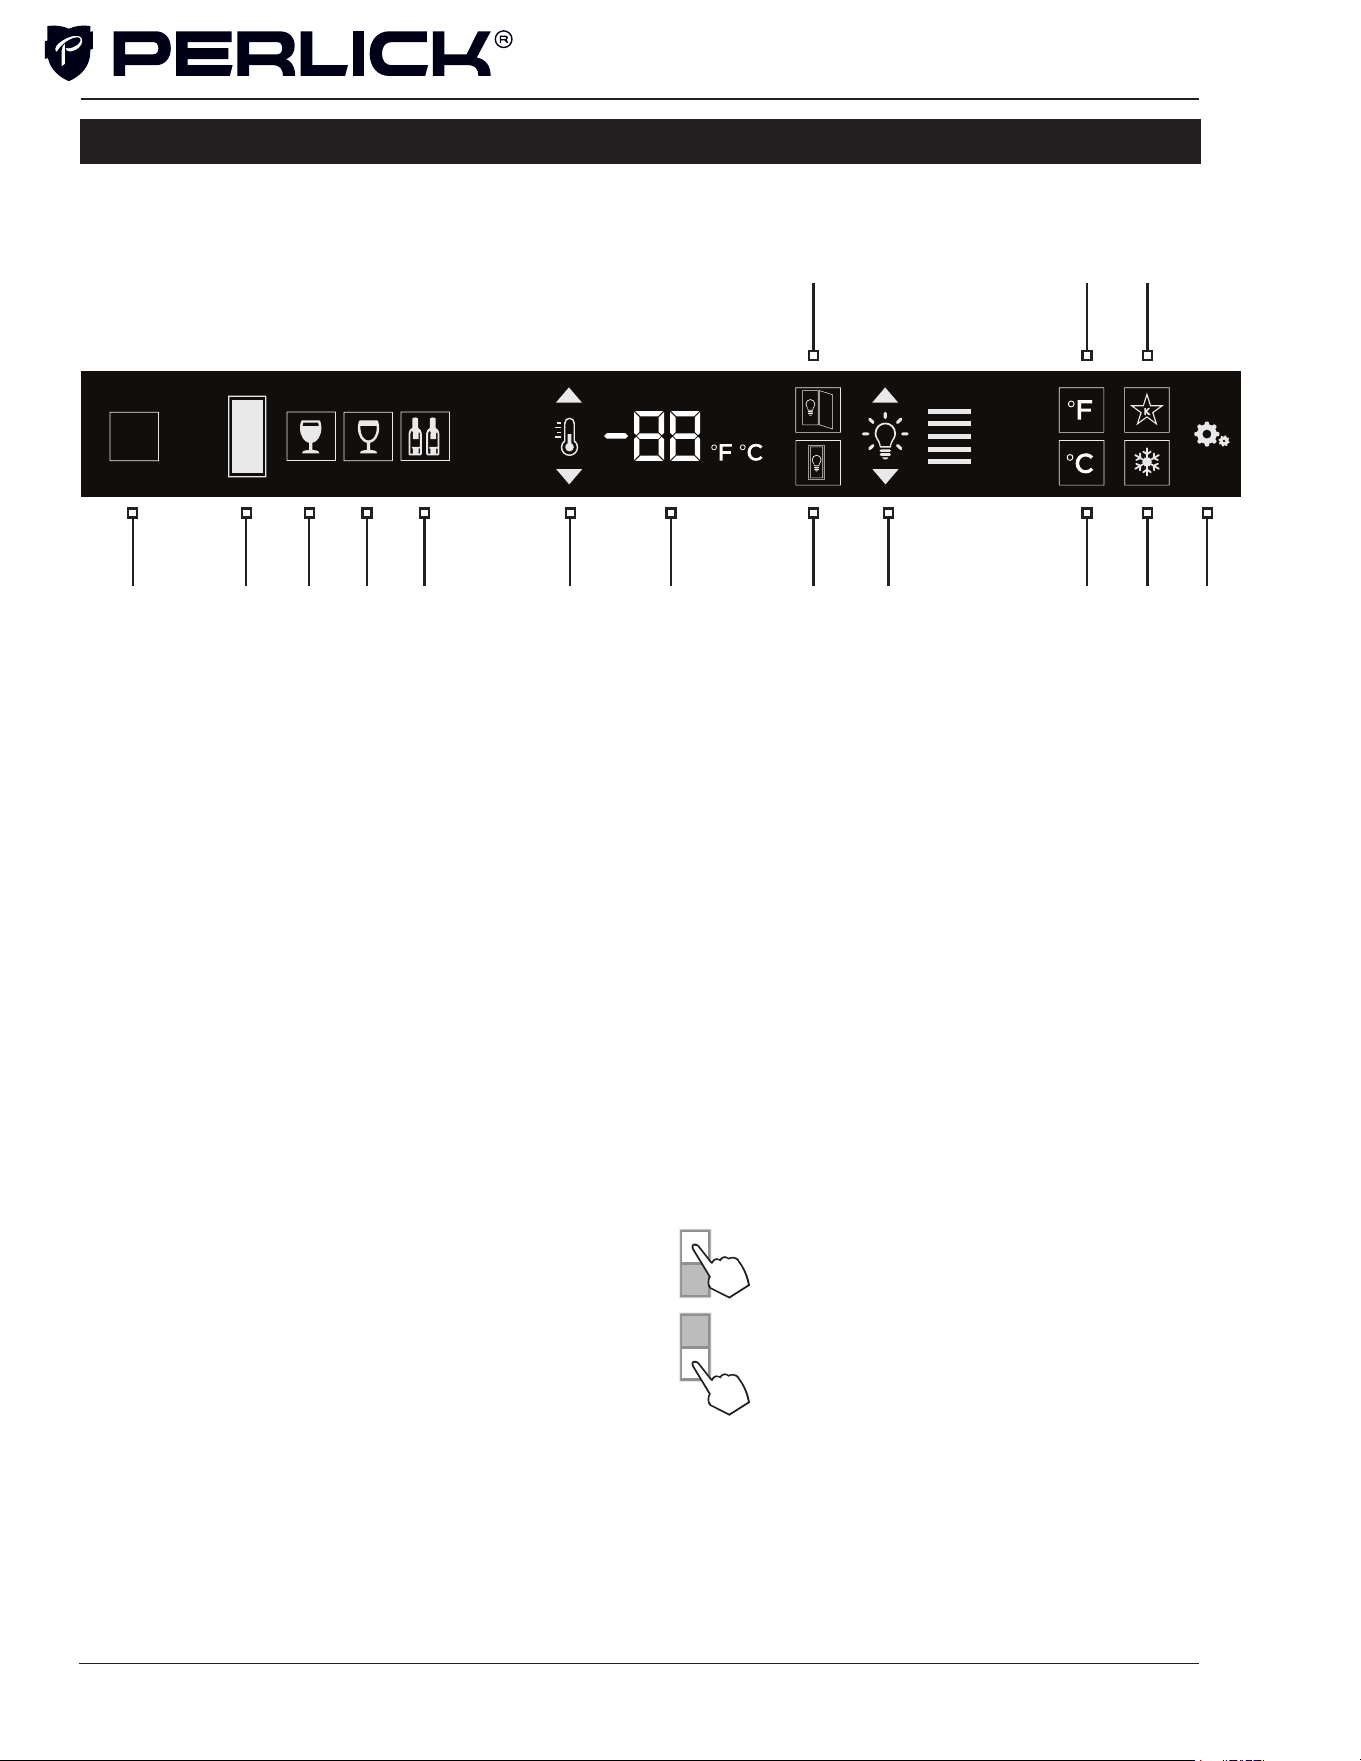
2 3 4 5 6 7 109 12 14 151
11 13
8
1 Wake Button
2 Temperature zone selection (Dual-zone models)
3 White wine temperature setting
(wine models only)
4 Red wine temperature setting
(wine models only)
5 Cellar temperature setting
6 Temperature adjustment (up and down in
1° increments)
7 Temperature readout
8 Light adjustment (door open)
9 Light adjustment (door closed)
10 Light intensity adjustment
11 Fahrenheit temperature mode
12 Celsius temperature mode
13 Sabbath mode
14 QuickCool mode
15 Settings menu
Using the Wine Column Control
Upon door opening, the Wake button (1) outline
will illuminate. Once activated, the temperature
zone selection (2), temperature adjustment (6),
temperature readout (7) and settings (15) menu
icons will illuminate.
Selecting a Temperature Zone
Perlick’s PerlIQ™ digital controller is preset with
recommended temperature settings for white
wine, red wine and cellaring. Within the presets,
you have the ability to adjust the temperature in
1° increments as you desire. Because single zone
models are one temperature throughout, there
is no zone selection. On dual zone models, press
the temperature zone selection (2) icon to toggle
through the zones until desired zone is illuminated.
COLUMN DIGITAL CONTROL OPERATION
Top Zone
Bottom Zone
NOTE: Dual Zone Wine Upper compartment
temperature set point must always be set at or
above the lower compartment set point.
Column Refrigeration Installation & Operation Manual
31
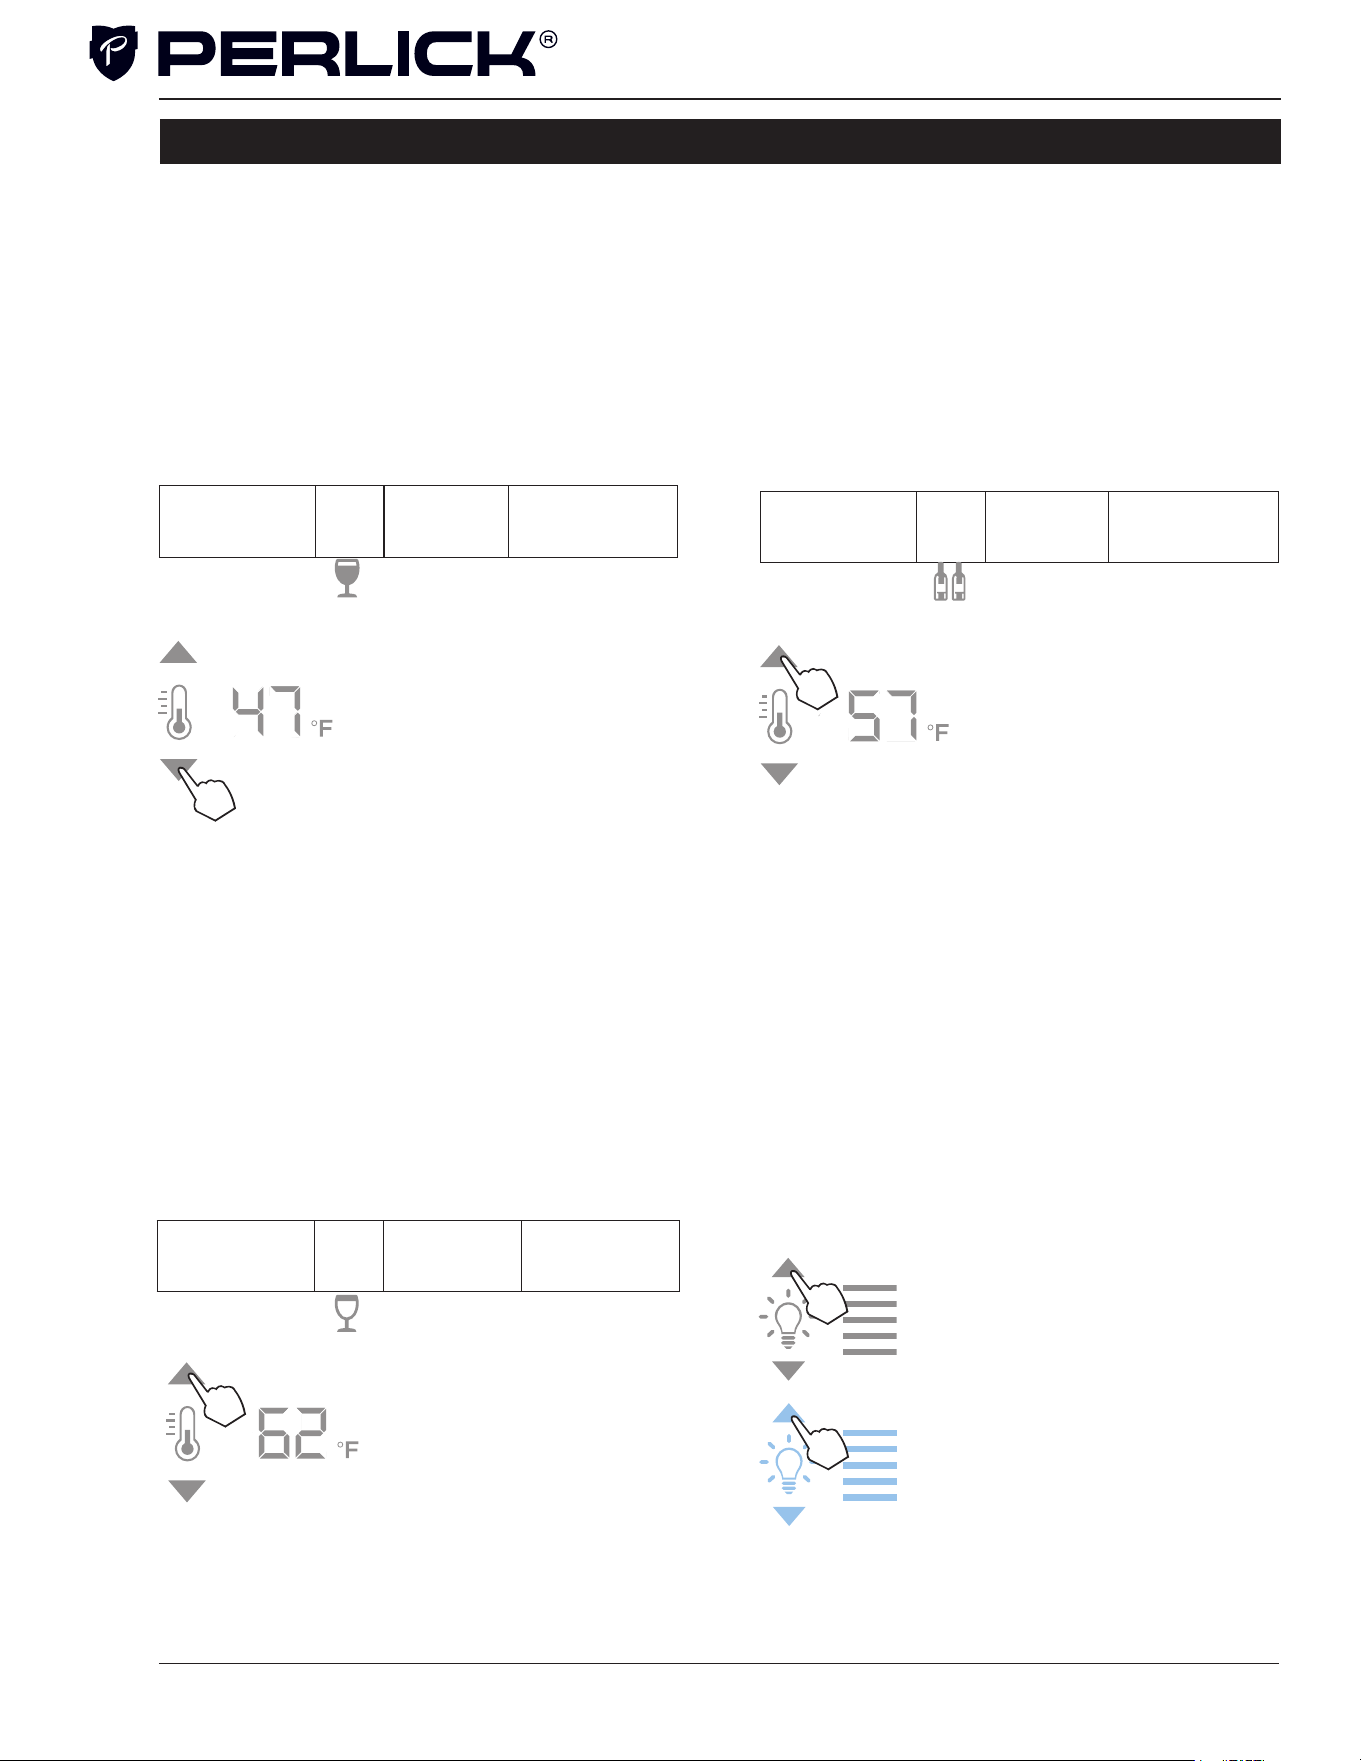
Storing White Wine
Perlick wine columns are preset with expert-
recommended temperature settings for white
wine. To set a zone in dual zone models to this
preset, touch the temperature zone selection icon
(2) to illuminate the zone you’d like to set to white
wine temperature, then choose the white wine
temperature setting icon (3) to set. For single zone
models, simply choose the white wine temperature
setting icon (3).
Sp. Factory
Setting
Temperature
Range
To adjust the temperature up
or down, press the temperature
adjustment (6) arrows until
desired temperature is reected
in the temperature readout
(7). Double beep indicates
that minimum or maximum
temperature has been reached.
Temperature will ash twice to
Storing Red Wine
Perlick wine columns are preset with expert-
recommended temperature settings for red
wine. To set a zone in dual zone models to this
preset, touch the temperature zone selection
icon (2) to illuminate the zone you’d like to set to
red wine temperature, then choose the red wine
temperature setting icon (4) to set. For single zone
models, simply choose the red wine temperature
setting icon (4).
Sp. Factory
Setting
Temperature
Range
To adjust the temperature
up or down, press the
temperature adjustment
(6) arrows until desired
temperature is reected in
the temperature readout
(7). Double beep indicates
that minimum or maximum
temperature has been
reached. Temperature will ash
Cellaring Wine
Perlick wine columns are preset with expert-
recommended temperature settings for cellaring
(long-term storage) wine. By choosing the cellar
mode, the entire cabinet will default to 55°F
for long-term storage. For dual zone models,
touch the temperature zone selection icon (2) to
illuminate, then choose the Cellar temperature
setting icon (5) to set. For single zone models,
simply choose the Cellar temperature icon (5).
Sp. Factory
Setting
Temperature
Range
To adjust the temperature up
or down, press the temperature
adjustment (6) arrows until
desired temperature is
reected in the temperature
readout (7). Double beep
indicates that minimum or
maximum temperature has
been reached. Temperature
Column Theatre Lighting
Perlick column wine reserves feature an impressive
amount of lighting for clear viewing and display of
wine bottles. Main lighting, which can be changed
from white to blue, runs vertically down the wall,
and display lighting runs horizontally across the
ceiling of the unit. Dual zone models also have
display lighting on ceiling of the lower zone.
Wine models are factory set
to white lighting. To adjust the
brightness of the lighting when
the door is opened, press the
up and down arrows in the light
intensity adjustment icon (4). To
change to blue lighting, continue
pressing the arrows until the
control turns blue in color. To
return to white lighting, continue
pressing the arrows until controls
illuminate white. Icons will ash
twice to conrm color setting.
COLUMN DIGITAL CONTROL OPERATION
Column Refrigeration Installation & Operation Manual
32
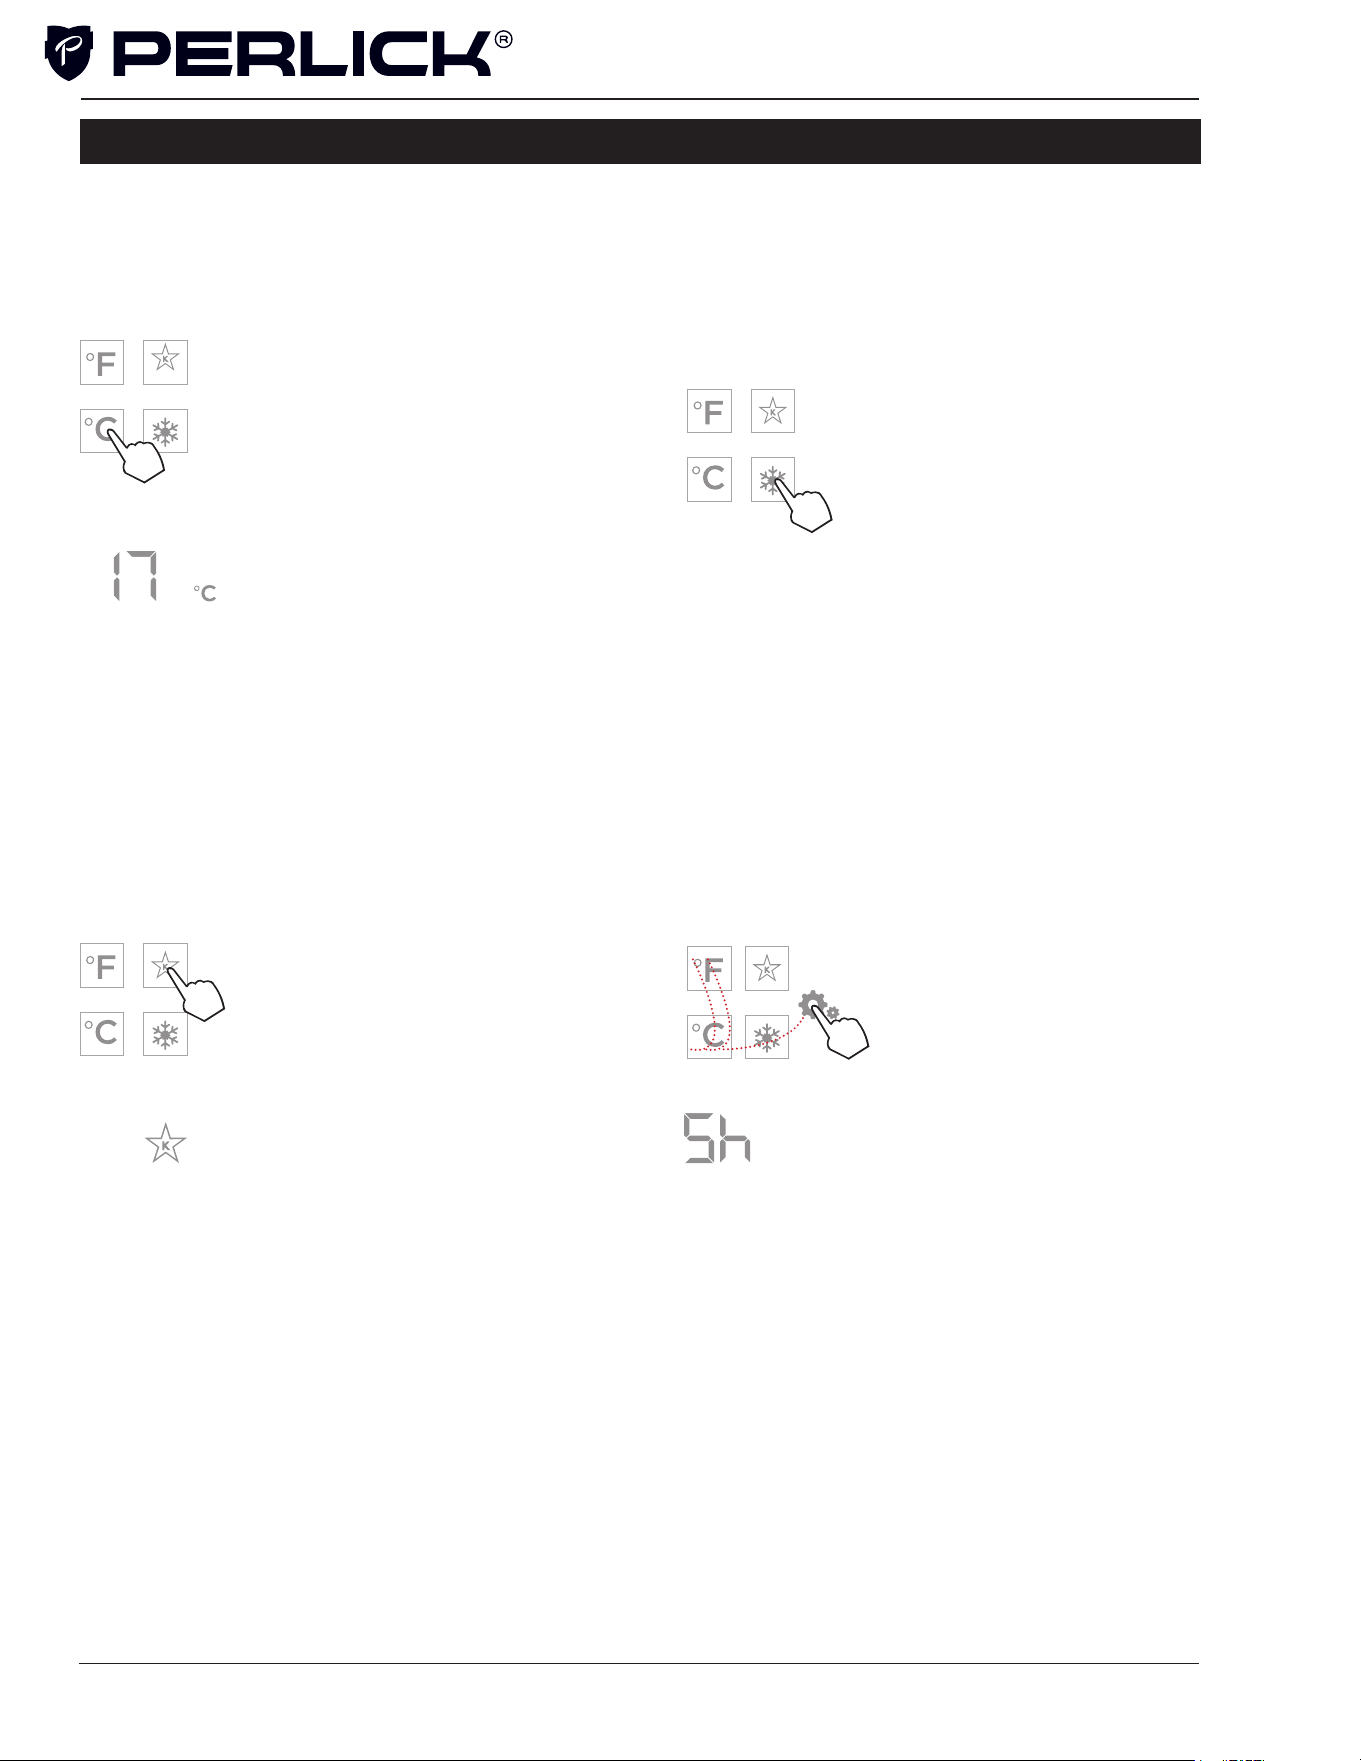
Changing from Fahrenheit to Celsius scale
The controller is factory set to Fahrenheit scale,
but can easily be changed to read Celsius in the
settings menu.
Press the settings menu (15)
icon on the far right. This
will illuminate a cluster of
four icons as shown to the
left. To display temperatures
in Celsius, press the Celsius
readout icon (12).
Change will be reected in the
temperature readout (7). The
C will be illuminated to signify
Sabbath Mode
All Perlick column refrigeration models have
Sabbath mode capabilities. This allows the user to
interact with the unit without changing the amount
of energy it is using. In this mode, the interior
lighting is turned off until user turns off Sabbath
Press the settings menu (15)
icon on the far right. This will
illuminate a cluster of four
icons as shown to the left. To
activate Sabbath mode, press
the Sabbath mode icon (13).
Please note that, when in
Sabbath mode, the Sabbath
mode (13) icon will be
the only icon that will be
illuminated (continuously) until
user presses the Sabbath
mode
Quick Cool (Shopping) Mode
The wine column can be set to Quick Cool
(shopping) mode to lower the temperature after
loading a large quantity of product to quickly bring
them to the preferred temperature.
Press the settings menu (15)
icon on the far right. This will
illuminate a cluster of four icons
as shown to the left. To activate
Quick Cool (shopping) mode,
press the Quick Cool (14) icon.
This will activate the mode and
the Quick Cool (14) will remain
illuminated until the set point is
COLUMN DIGITAL CONTROL OPERATION
Column Refrigeration Installation & Operation Manual
Showroom Mode
Select Showroom mode for units that are being
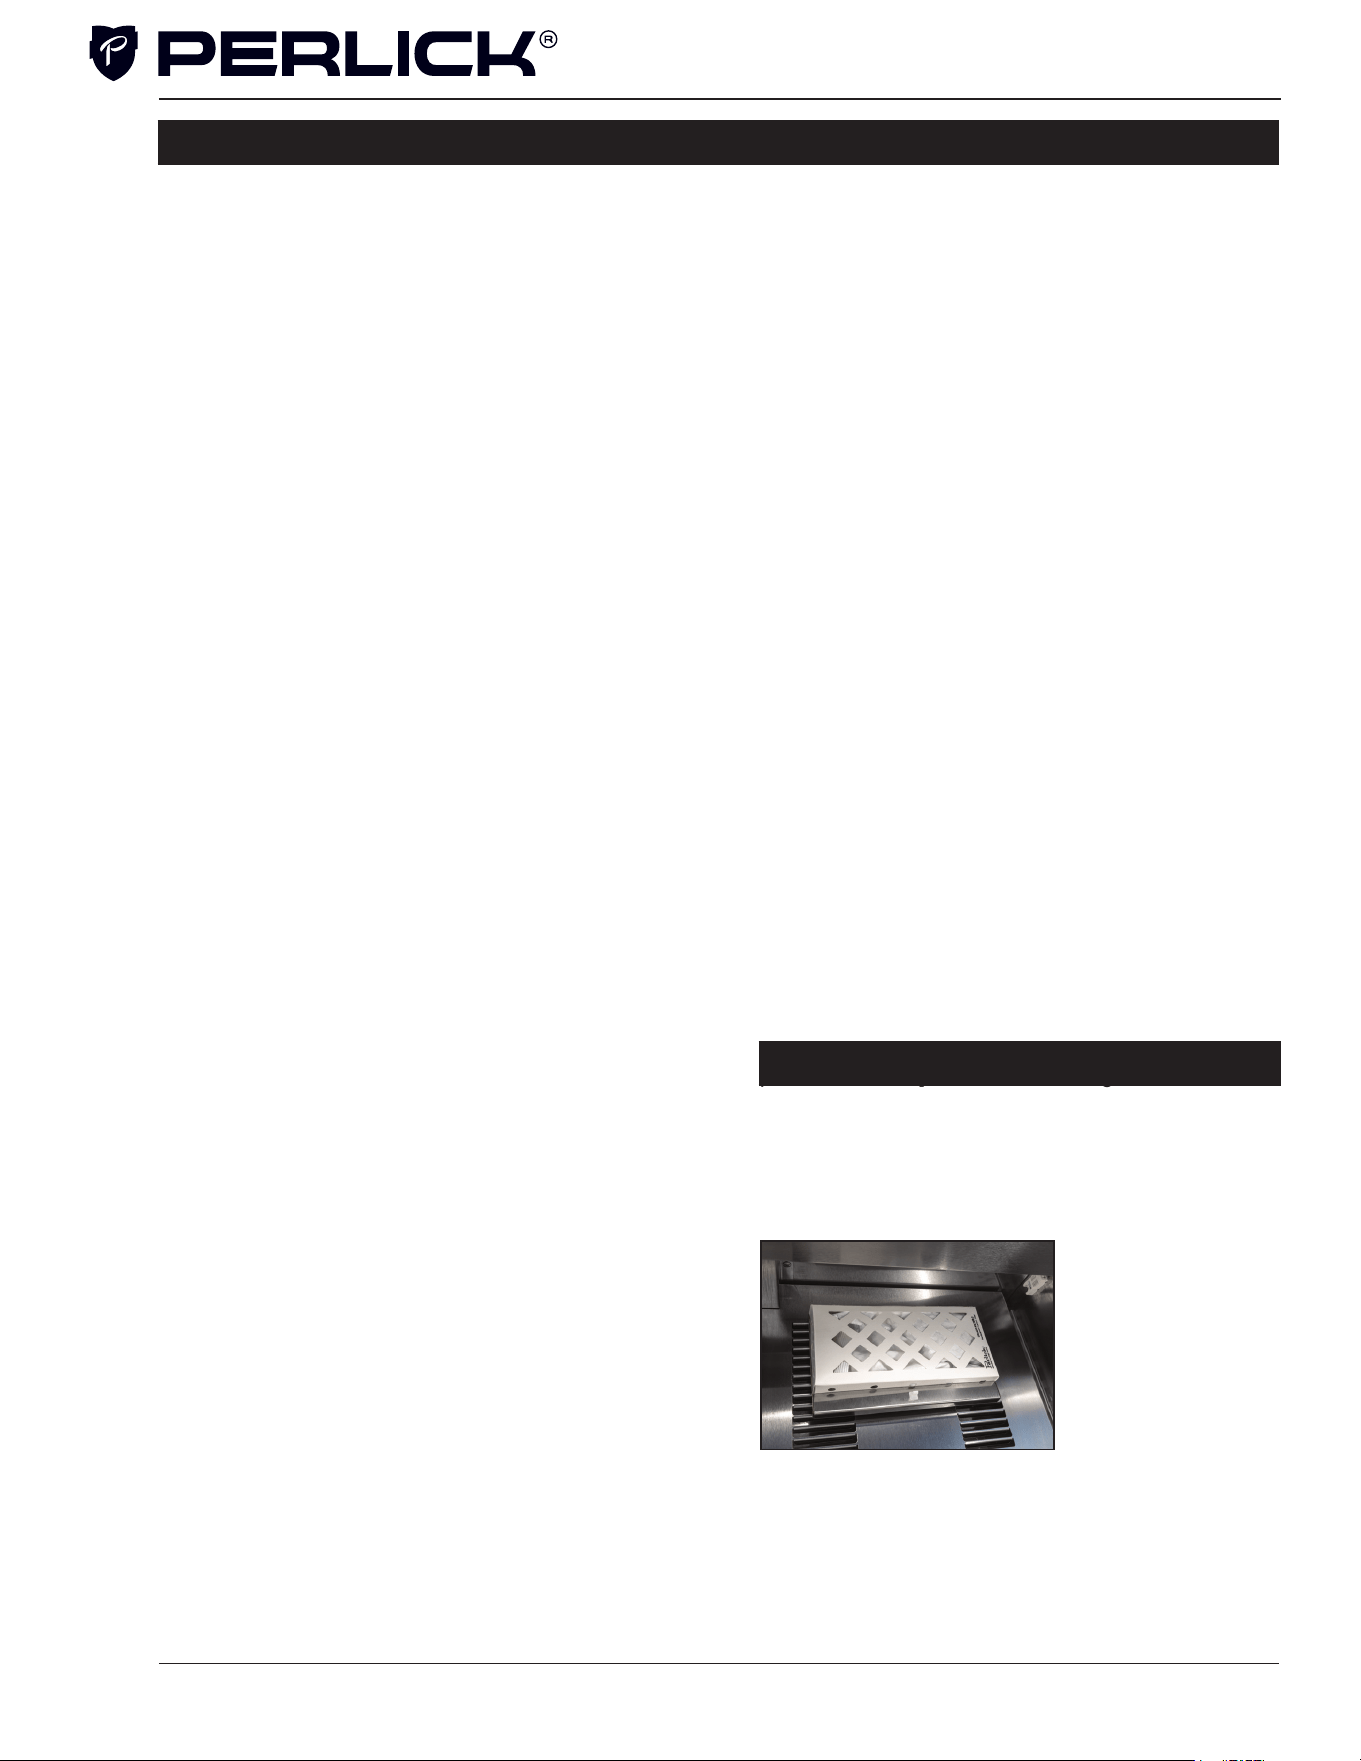
used solely for display purposes. Showroom
mode has the user interface fully functional along
with the cabinet lights, however, no compressor,
Press the settings menu (15)
icon on the far right. This will
illuminate a cluster of four
icons as shown to the left. A
5 key combination*, including
the Fahrenheit readout (11)
icon, Celsius readout (12)
icon and settings menu (15)
icon, will activate Showroom
mode: F-C-F-C-Settings. Upon
activating showroom mode,
the temperature readout (7)
with show “Sh” each time the
door is opened until showroom
mode
is turned off.
To exit showroom mode, enter
the 5 key combination.
*5 key combination must be
completed within 5 seconds to
33
Perlick’s stainless steel surfaces are food grade,
304 stainless steel. Stainless steel is a “passive”
metal because it contains other metals like
Chromium, Nickel and Manganese that stabilize
the atoms. Chromium provides an invisible lm
that covers the steel surface, acting as a shield
agent against corrosion. As long as the lm is
intact and not contaminated, the metal is passive
and stainless.
If the passive lm of stainless steel has been
broken, the surface can start to corrode or rust.
Three materials or processes can break down
stainless steel’s passive layer, allowing corrosion
to occur.
▪ Mechanical Abrasion
This refers to items that will scratch stainless
steel surfaces. Steed pads, wire brushes and
scrapers are prime examples.
▪ Water
Water that comes out of the faucet in varying
degrees of hardness. Hard water may leave
spots. When allowed to sit, these deposits will
break down the passive Chromium layer and
rust stainless steel. Other deposits from food
preparation must be promptly removed with
an appropriate cleaning agent.
▪ Chlorides
Chlorides are found everywhere. They are
in water, food and table salt. Household and
industrial cleaners are the worst offenders.
Preventing Stainless Steel Rust
Use non-abrasive tools to clean stainless steel
surfaces. Soft cloths and plastic scouring pads will
not harm the steel’s passive layer.
Clean with polish lines. Some stainless steels have
visible polishing lines or “grain”. When visible lines
are present, always scrub in a motion parallel to
the lines. When the grain cannot be seen, polish
in a consistent straight pattern - not in a circular
motion.
Use alkaline, alkaline chlorinated or non-chloride
containing cleaners. While many traditional
cleaners are loaded with chlorides, the industry
is providing an ever-increasing choice of non-
chloride cleaners. If you are not sure of chloride
content in the cleaner being used, contact your
cleaner supplier. If you present cleaner contains
chloride, ask your supplier for an alternative. Avoid
cleaners containing quaternary salt; it also can
attack stainless steel and cause pitting and/or
rusting. Clean frequently to avoid build-up of hard,
stubborn stains.
Stainless Steel Exterior Door Cleaning
Keep exterior stainless steel surface pristine by
wiping the door with a damp microber cloth,
followed by a dry polishing chamois. Always follow
the grain direction when cleaning.
Glass Cleaning
Perlick’s triple pane glass is designed to protect
cabinet contents from UV light, while displaying
the contents elegantly while the door is closed. To
ensure life long performance, always use standard
glass cleaners containing alcohol to clean the
acid-etched glass. Never use products containing
hydrouoric acid, uorine, chlorine or ammonia
derivatives because they can damage the surface
of the glass. Never use acidic and alkaline
products as they can abrade the glass surface.
STAINLESS STEEL CLEANING
We recommended changing the air lters every
6 months for optimum performance. Filters can
be purchased through your local authorized
Perlick dealer.
Carbon Air Filter
The Carbon air lter removes odor, bacteria
and mold spores from the air. To remove the
Carbon air lter in all units, refer to page 29 -
carbon air lter.
AIR FILTRATION
Column Refrigeration Installation & Operation Manual
34
TROUBLESHOOTING
Column Refrigeration Installation & Operation Manual
Problem Cause Solution
UI ashes Cabinet is in Showroom Mode
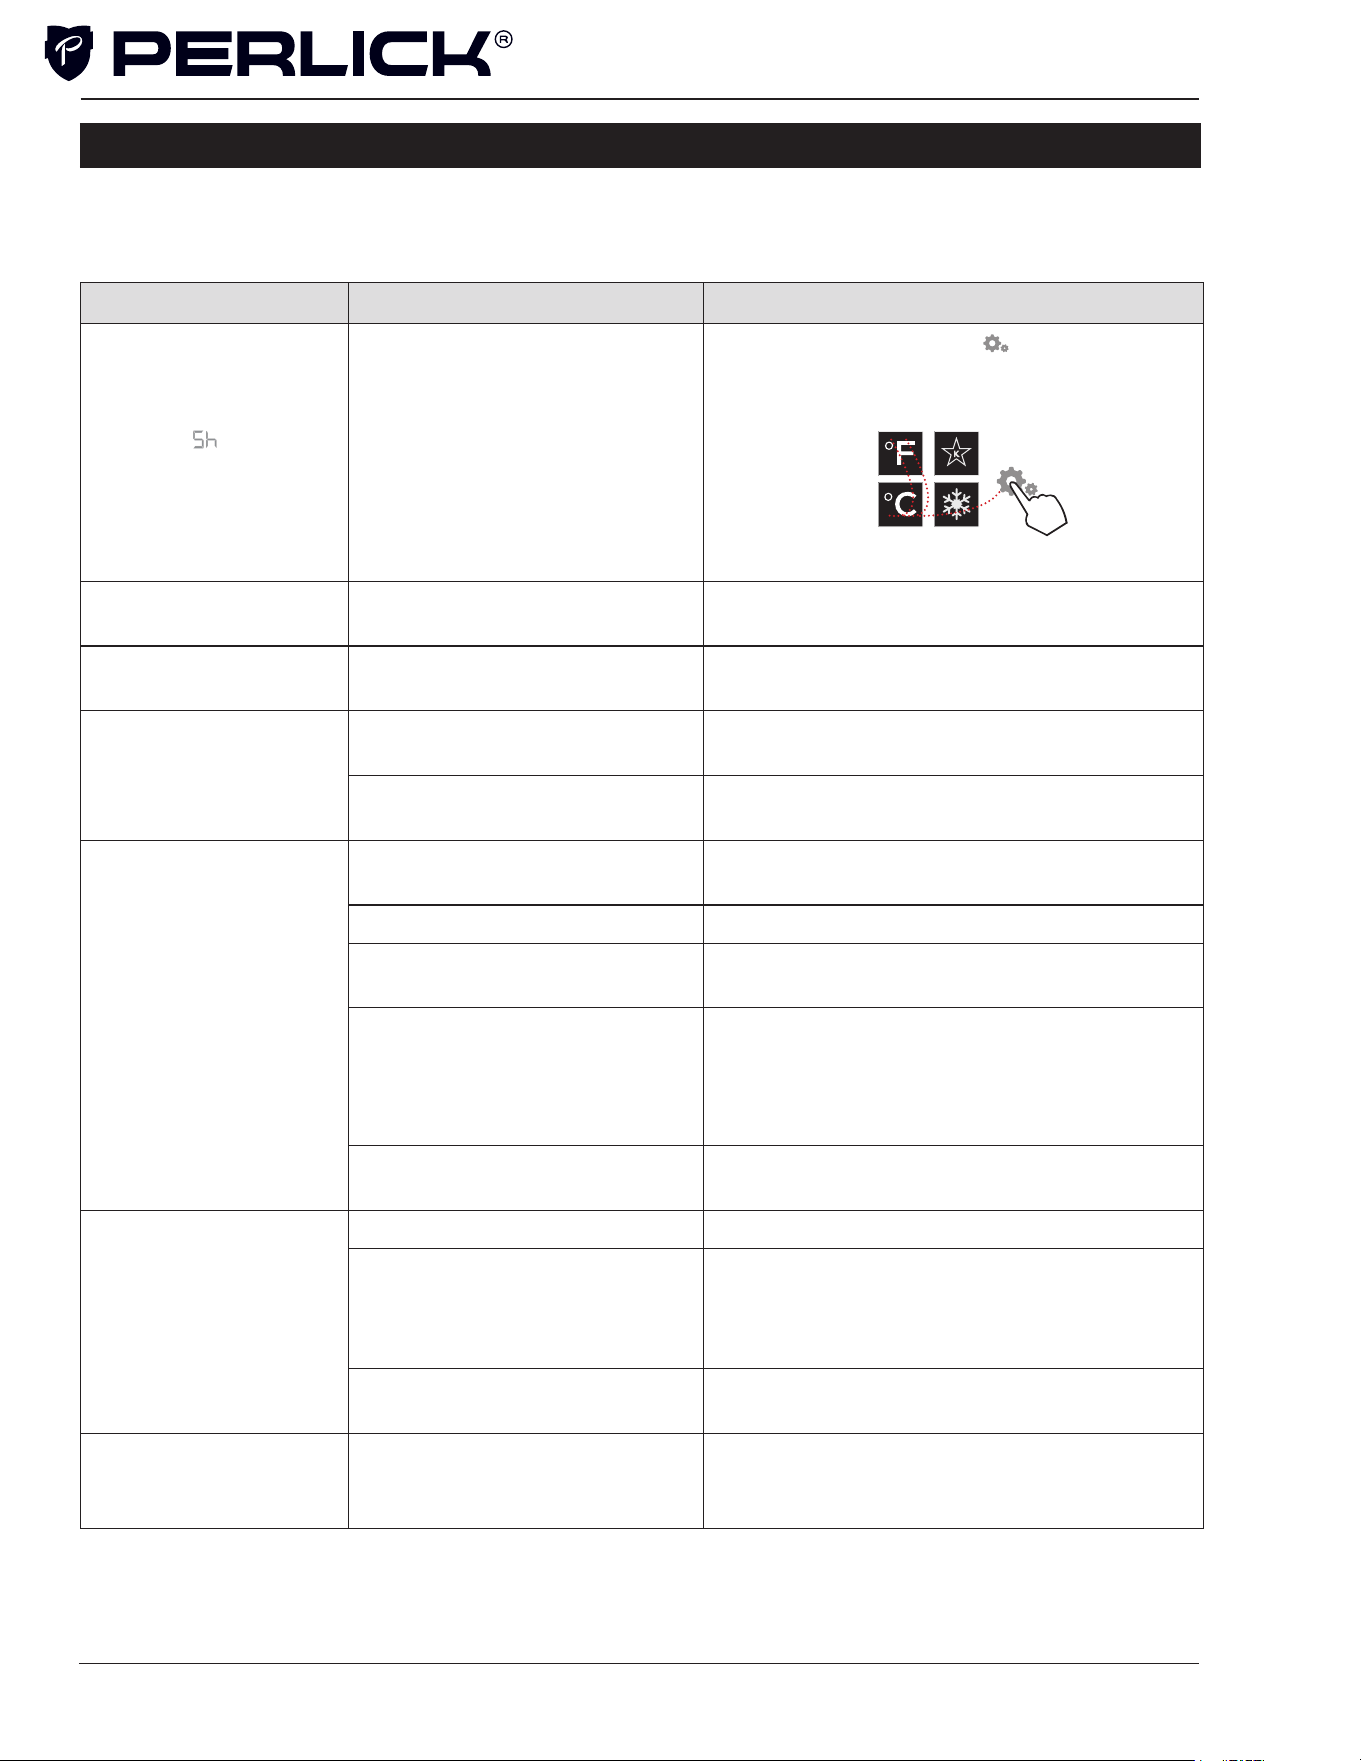
Press the settings menu icon ( ) to illuminate a
cluster of four icons. A ve key combination - F-C-
F-C-Settings - will exit showroom mode as shown
below:
Door alarm is beeping
Door has been open for more than
3 minutes
Close the door
Light stays on when door
is closed (wine units)
Door Closed with Light (Display)
Follow directions above to turn off Door Closed
with Light (Display) mode.
Light stays on when door
is closed (all units)
Door not closing correctly
Determine what may be causing the door to
not fully close
Issue with reed switch and magnet
Contact Perlick Technical Service at
(844) 411-8050
Compartments are
warmer than usual
Control is preset too warm
Lower the set point temperature. Refer to changing
the set point for the specic model in this manual
Condenser is dirty or obstructed Clear the condenser and clear obstruction
The door is open or has been
opened more frequently lately
Wait 24 hours and recheck the temperature
Internal louvers and/or damper
covers are obstructed
Reset the preset temperature if necessary -
refer to page 30 of this manual for settings
Make sure the louvers and/or the fan are not
obstructed
Warm product was recently placed
in the cabinet
Engage QuickCool mode; see pages 32 for
instructions for instructions on how
System runs for a long
period of time
Condenser is dirty or obstructed Clean the condenser and clear the obstruction
Door was kept open for a long time
or was opened more frequently, or
warm product was recently placed
in the cabinet
Wait 24 hours and recheck temperature
Hot day and warm room
temperature
Normal for the system to run more frequently
Condensation forms
outside of the unit
High humidity and/or frequent
door opening
Condensation is normal in high humidity ambient,
if installed next to another Perlick column, ensure
proper dual-installation kit has been selected
If the unit appears to be malfunctioning, check the troubleshooting guide below to see if you can identify the
35
TROUBLESHOOTING
Column Refrigeration Installation & Operation Manual
Noisy operation
Soft sounds from compressor, fan
motor and valves heard
Normal operation
“Crackling” sounds during defrost Normal operation
Unit is not running No power going to the unit
Home circuit breaker was tripped. Reset the
circuit breaker
Ensure the unit is plugged in
Ensure the unit is not in “Showroom” mode
Code Cause Solution
P1, P2, P3, P4, P5, P6 Temperature or humidity sensor failure
Call Perlick Technical Service at
(844) 411-8050
L1, L2, L3, L4, L5, L6 Low temperature alarm
High and Low temperature alarms may occur
from extended door openings or heavy loading
of warm product. If alarm persists, call Perlick
Technical Service at (844) 411-8050
H1, H2, H3, H4, H5, H6 High temperature alarm
r5, r6 Open/Disconnected humidity sensor
Call Perlick Technical Service at
(844) 411-8050
Below is a list of column troubleshoot codes. If the cause occurs, the corresponding code will ash on the

Form No. Z3006
Rev. 07.13.26
8300 West Good Hope Road, Milwaukee, WI 53223, USA
perlick.com • (800) 558-5592
COLUMN INSTALL CHECKLIST
1. Is the unit level?
2. Is the 90 degree hinge stop installed? Only needed for installations with potential
handle interference on hinge side.
3. Is anti-tip bracket installed and properly engaged?
4. Are all 6 clips engaged on door panel and bottom overlay bracket installed?
5. Is the condenser divider installed at bottom of door panel?
6. Is the top door trim installed?
7. Is the toe kick installed?
8. Is the carbon air lter installed and panel closed securely?
9. Has the hinge soft close feature been activated?
10. Has shipping material been removed from cabinet and shelf plugs removed from
pilasters?
11. Has the inside of cabinet been wiped clean of any packaging or other debris?
12. Has all of the packaging been removed from customer site?