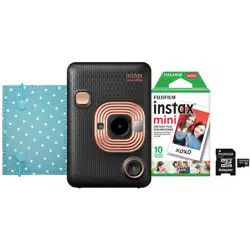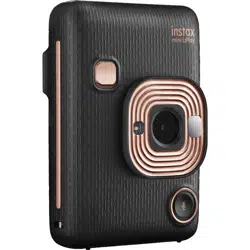
FI019-EN-NA-02
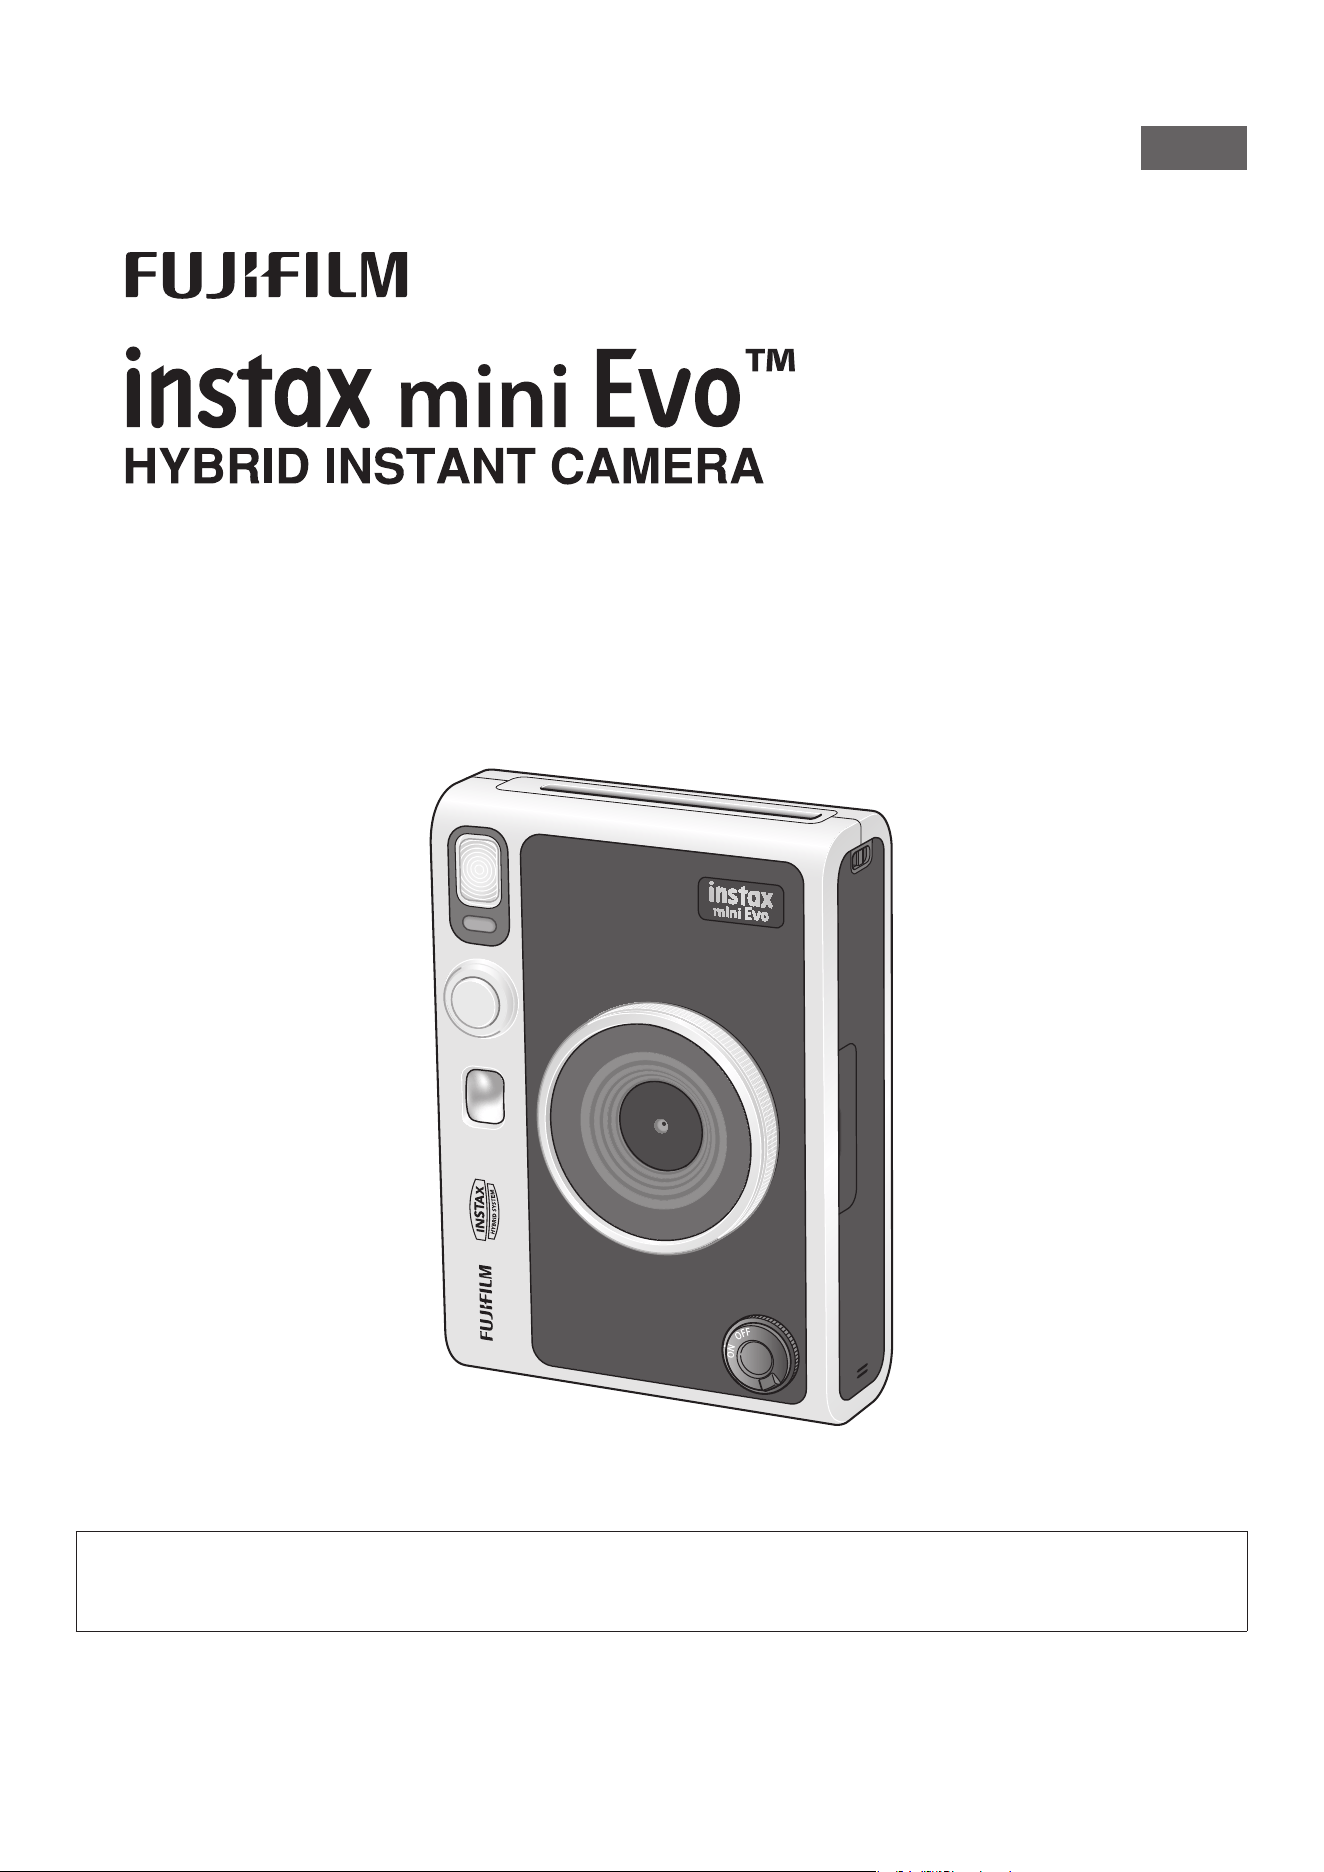
User’s Guide (Full version)
model number: FI019
NA_EN
[INSTANT PRINT
+
DIGITAL TECHNOLOGIES]
•This User's Guide (Full version) corresponds to firmware version Ver.1.01. Depending on the firmware version, the functions and screens
may differ from those described.
•There are two methods to upgrade the firmware. For details, refer to [FIRMWARE UPGRADE]. (p. 22)
I
N
S
T
A
X
L
E
N
S
2
8
m
m
F
2
.
0
F
O
C
U
S
R
A
N
G
E
0
.
1
m
~
∞

2
Table of Contents
Before Using the Camera ���������������������������������������������������������3
Notes on Disposing of the Camera ����������������������������������������3
About This Camera �������������������������������������������������������������������� 3
Main Features ������������������������������������������������������������������������������������3
Free, Downloadable INSTAX MINI EVO App ���������������������������������3
Part Names ����������������������������������������������������������������������������������4
LCD Screen ���������������������������������������������������������������������������������� 6
Using the Select Buttons ����������������������������������������������������������7
Attaching the Shoulder Strap �������������������������������������������������7
Charging the Battery ����������������������������������������������������������������8
Charging Status Indication �������������������������������������������������������������8
Power On/Off ������������������������������������������������������������������������������8
How to Check the Battery Level �����������������������������������������������������9
Configure the Initial Settings ��������������������������������������������������9
Loading/Unloading the INSTAX MINI™ Instant Film Pack
��� 11
Loading the INSTAX MINI instant film pack ������������������������������ 11
Unloading a Used INSTAX MINI instant film pack �������������������� 12
Basic Shooting and Playback ������������������������������������������������12
Taking Photos ��������������������������������������������������������������������������������� 12
Playing Back the Images You Have Taken ��������������������������������� 13
Changing the Display on the Playback Screen ������������������������ 13
Printing a Photo ����������������������������������������������������������������������� 14
About the Remaining Film Sheets Display ������������������������������� 15
Adding Effects to Your Photos ����������������������������������������������15
Selecting a Lens Effect ������������������������������������������������������������������ 15
Selecting a Film Effect ������������������������������������������������������������������� 16
Specifying a Film and Lens Effect Combination ����������������16
Setting an Effect Combination ���������������������������������������������������� 16
Using your Effect Combinations ������������������������������������������������� 16
Miscellaneous Actions ������������������������������������������������������������17
Changing the Brightness of the Image �������������������������������������� 17
Using the Self-Timer to Take Photos������������������������������������������� 17
Taking Photos with the Flash������������������������������������������������������� 18
Taking Macro Photos ��������������������������������������������������������������������� 18
Matching the Light Source when Taking Photos ��������������������� 19
Taking a Photo of Yourself (Selfie) ���������������������������������������������� 19
Using AF/AE Lock to Take Photos ����������������������������������������������� 20
Printing from Print History ����������������������������������������������������20
Using the Memory Card ���������������������������������������������������������21
Inserting a Memory Card �������������������������������������������������������������� 21
Using the Shooting Menu ������������������������������������������������������22
Using the Playback Menu ������������������������������������������������������23
Smartphone App Functions ��������������������������������������������������24
Direct Print Function ��������������������������������������������������������������������� 24
Remote Shooting Function ���������������������������������������������������������� 24
Printed Image Transfer Function ������������������������������������������������ 24
Specifications ���������������������������������������������������������������������������24
Troubleshooting ����������������������������������������������������������������������25
IMPORTANT SAFETY NOTICE �������������������������������������������������26
Camera Care ������������������������������������������������������������������������������������ 27
Bluetooth® Device Cautions �������������������������������������������������������� 28
3
NA_EN
Before Using the Camera
Before using the camera, check the following.
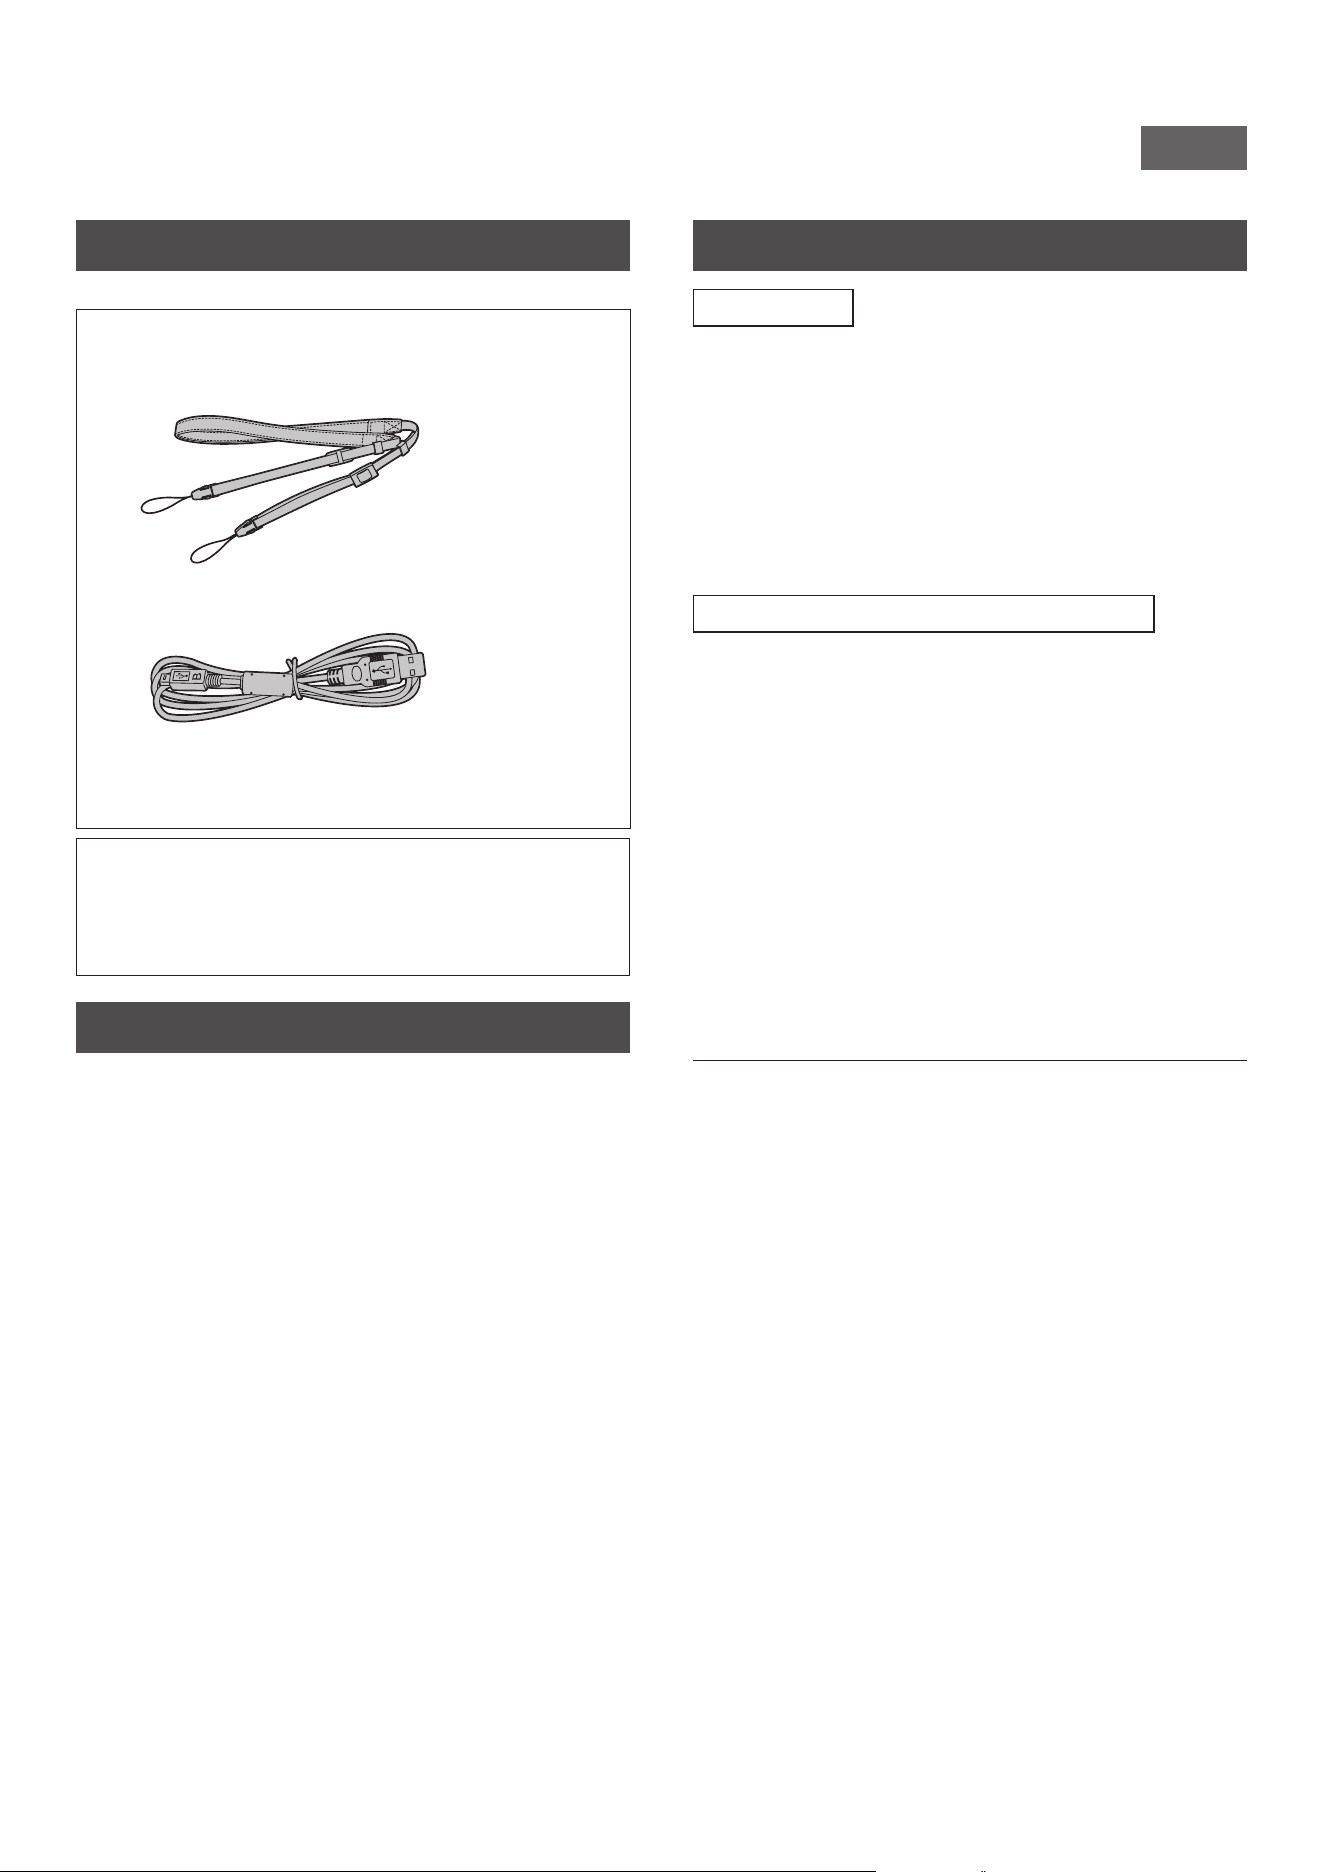
•User’s Guide (1)
•Shoulder strap (1)
•USB cable for charging (1)
Supplied Accessories
•Use the strap over your shoulder, not around your neck.
•Make sure the camera strap does not hang over the film
ejection slot.
•The battery has not been fully charged at the factory. Be sure
to fully charge the battery before using the camera.
Notes on Disposing of the Camera
A built-in lithium ion battery is used for this camera�
When you dispose of the camera, follow your local regulations and
dispose of it properly.
Do not attempt to remove the built-in battery. Injury may result.
For proper disposal in the United States at product end-of-life,
please contact 1-800-800-3854 Option #1 Help Desk.
For proper disposal in Canada at product end-of-life, please
contact 1-800-461-0416.
About This Camera
Main Features
●
Provides the best INSTAX image quality to date�*
●
Provides up to 100 different expressions with 10 lens effect
options and 10 film effect options�
●
You can take photos while looking at the LCD Screen and
save them to either the main unit or a micro SD card (sold
separately)�
●
Select stored photos to print using the INSTAX Print feature�
●
Luxurious, classic design�
●
Analog-like operability with lens dial, film dial, and print lever�
●
Features a selfie mirror for easy selfies�
Free, Downloadable INSTAX MINI EVO App
Download of the Free INSTAX MINI EVO App is required for the
below features.
For instructions on how to download the App, please see page 9.
●
Direct Print Function
Transfer a photo from your Smartphone to the camera, and print
it on INSTAX MINI instant film (sold separately) using the INSTAX
Print feature. Before transferring the photo, you can use the
INSTAX MINI EVO App to rotate it, enlarge it or reduce its size.
●
Remote Shooting Function
Control the camera with your Smartphone for remote shooting
of photos.
●
Printed Image Transfer Function
Send images that were previously printed with the camera
to the INSTAX MINI EVO App and save them as INSTAX frame
images on your Smartphone. See “Using the Playback Menu”
(p. 23).
*As of December 2021
4
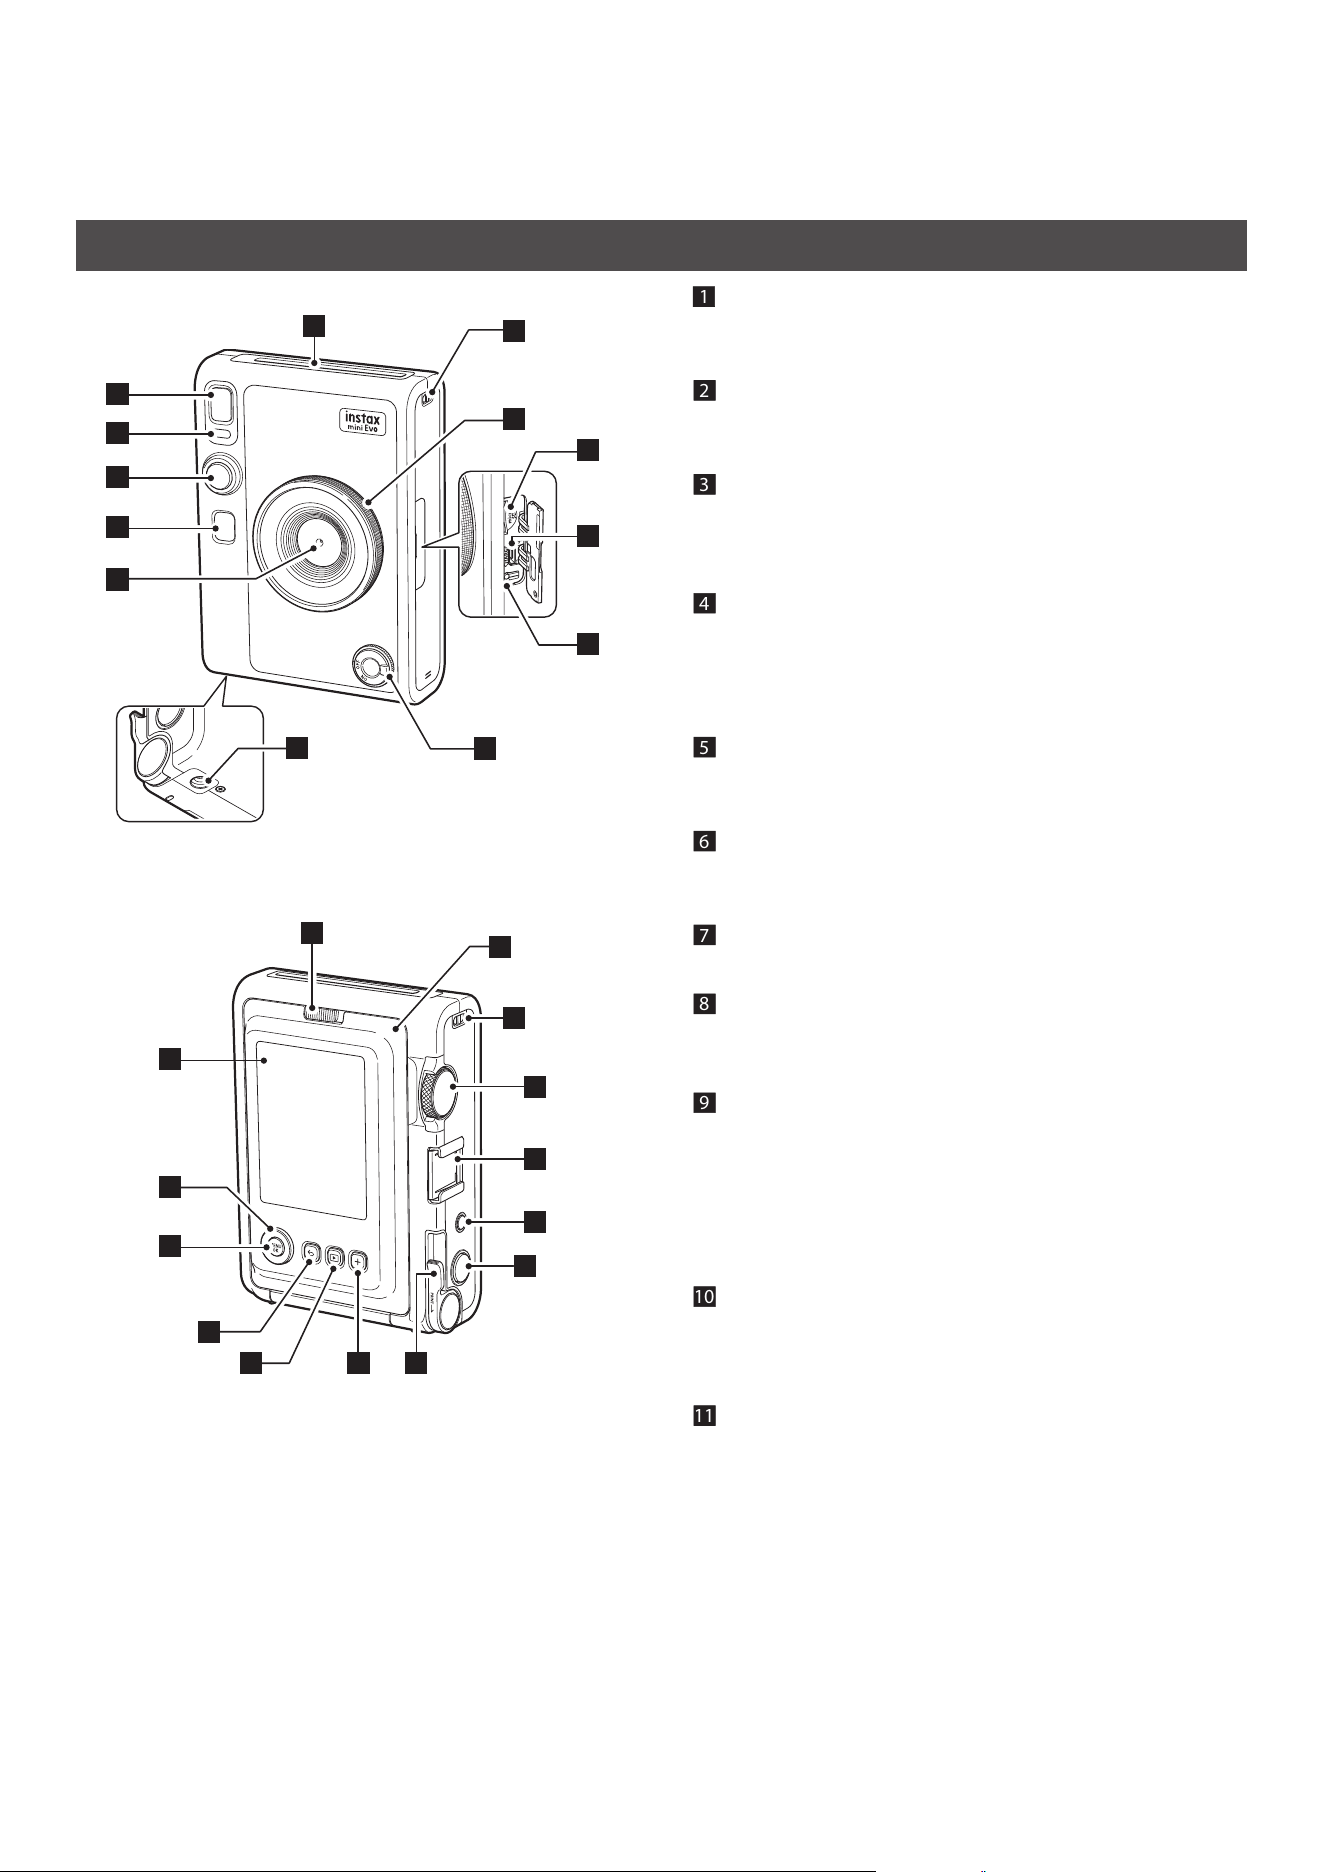
Part Names
Front
1
2
3
4
5
6
7
8
13
12
11
10
9
Rear
15
14
16
17
18
19 20 21
4
22
23
24
13
25
1 Film ejection slot
The exposed INSTAX MINI instant film will be ejected from the
film ejection slot during printing.
2 Flash
The flash operates depending on the setting. You can also set
the flash to not operate.
3 Self-timer lamp/Charging lamp
The self-timer lamp/charging lamp blinks when you take a
photo with the self-timer. Also, it lights up during charging and
turns off when charging is complete.
4 Shutter button
Press the shutter button halfway to focus on the subject.
Then press it fully to operate the camera shutter and take a
photo. Press the shutter button in Playback Mode to switch to
Shooting Mode.
5 Selfie mirror
Use the selfie mirror to check your framing before taking a
selfie.
6 Photo Lens
This is the lens used to take photos. Make sure that your
fingers do not obstruct the lens during shooting.
7 Tripod hole
You can attach a tripod (sold separately) by using this hole.
8 Power switch
Turn the power switch clockwise to turn on the power. Turn it
counter-clockwise to turn off the power.
9 Reset button
If the camera is not operating properly, press this button to
force the camera to turn off. After pressing the reset button,
turn the power switch off and then on again to start the
camera. Do not use the reset button while the camera is
operating normally. Doing so may cause the photo data to be
erased.
10 USB port (micro USB Micro-B)
This is the USB port for charging the camera using the
provided charging cord. The USB port cannot be used for data
transfer.
11 Micro SD card slot
This is the slot for a micro SD card (sold separately).
5
NA_EN
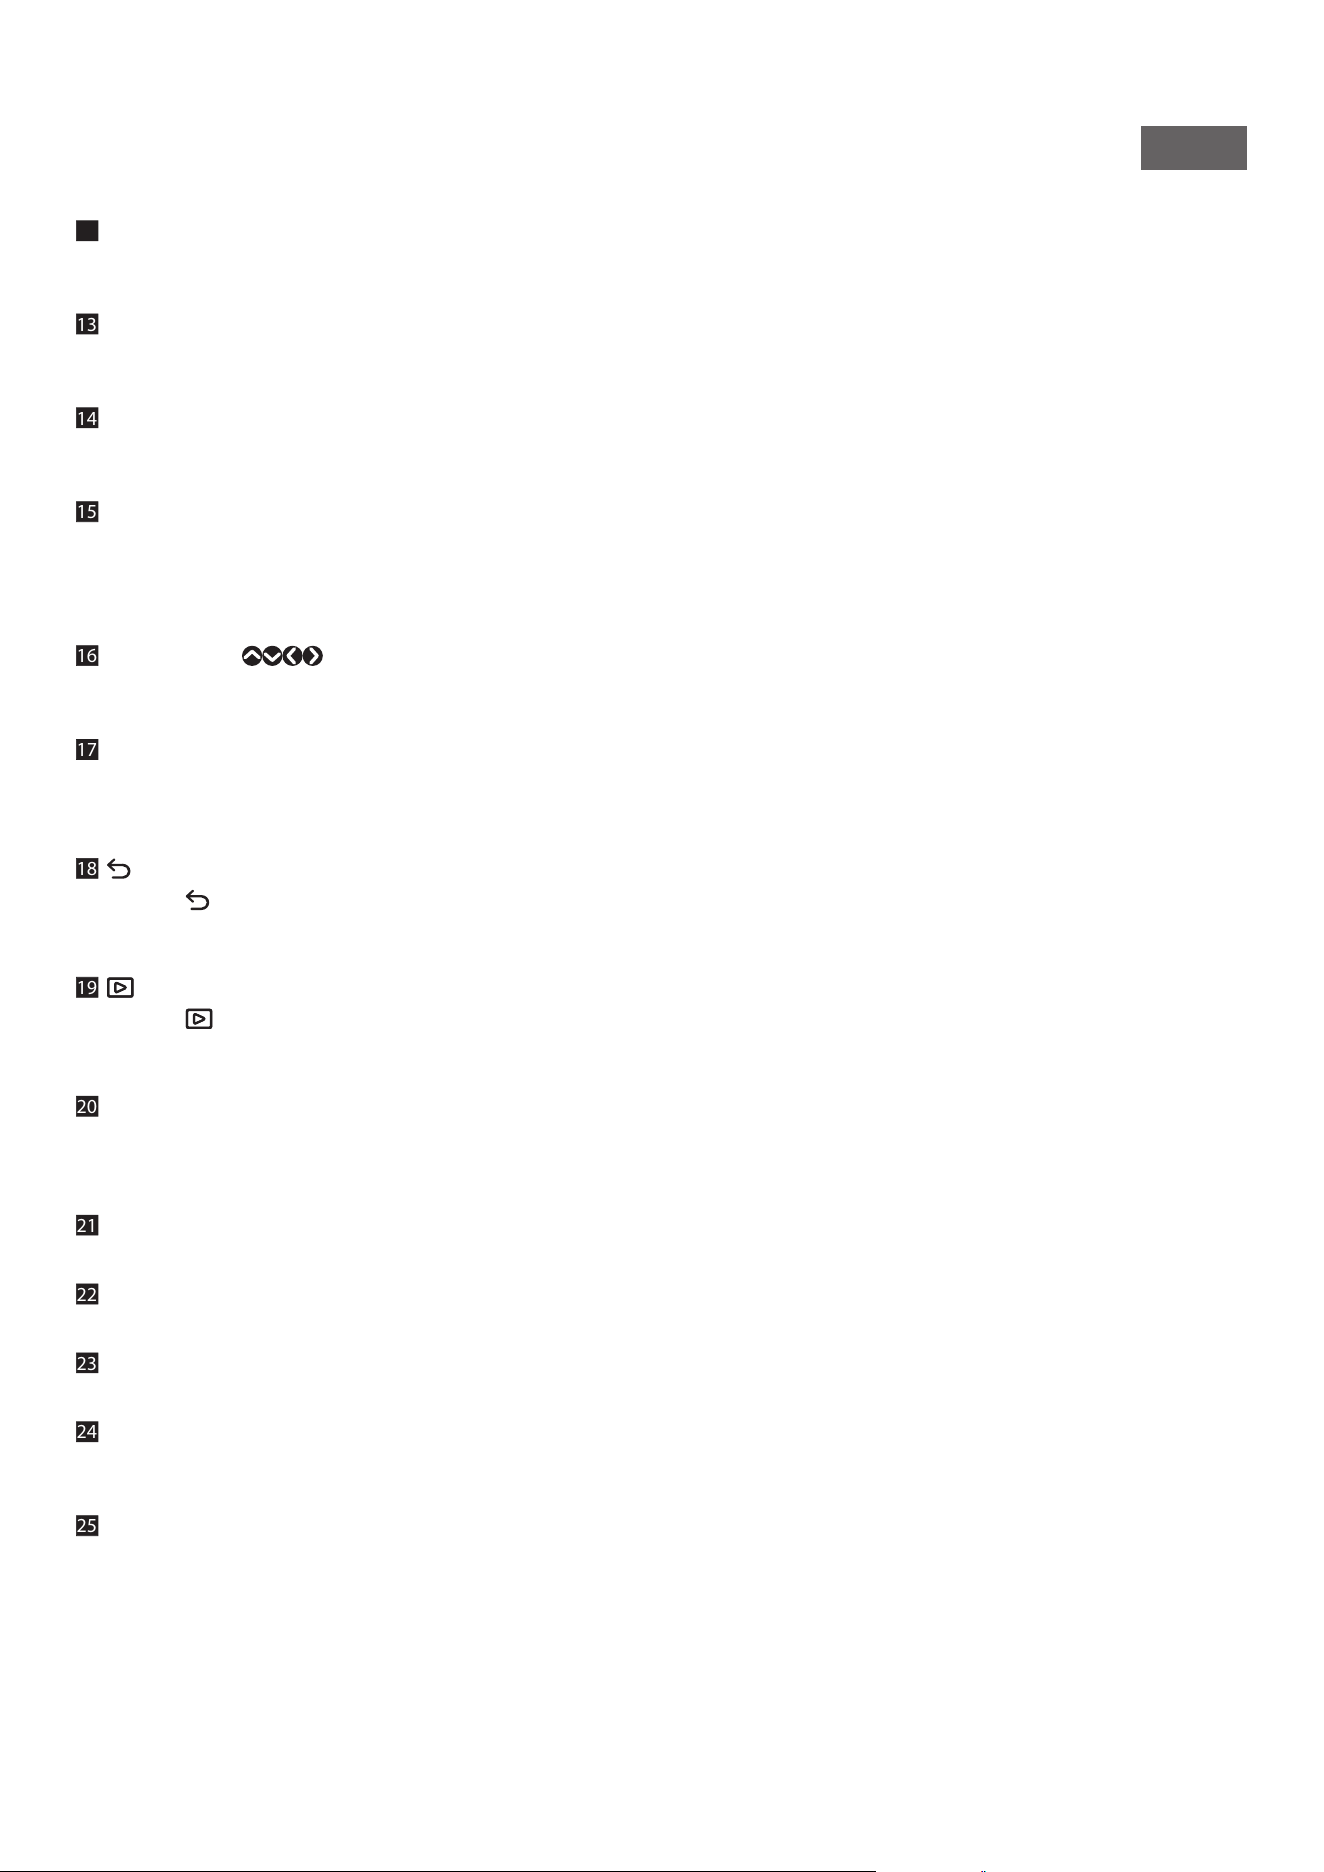
12 Lens dial
Turn the lens dial to switch between 10 different lens effect
options.
13 Strap hook
Pass the cord on the strap through the strap hook to attach the
strap.
14 Film door lock
Slide the film door lock to the right to unlock and open the
film door.
15 LCD Screen
You can preview the image before shooting or printing and
view the image after it has been captured, on the LCD Screen.
Also, menus are displayed on the LCD Screen based on the
user operation.
16 Select buttons (
)
Use the select buttons to select menu items and to use the
functions displayed on the LCD Screen.
17 MENU/OK button
During shooting or playback, press the MENU/OK button to
display the menu on the LCD Screen. This button is also used
to confirm menu items.
18
(Back) button
Press the
(Back) button to return to the previous screen
from the menu currently displayed on the LCD Screen. This
button is also used to cancel photo printing.
19
(Playback) button
Press the
(Playback) button to display the photos you have
taken on the LCD Screen. When in Shooting Mode, this button
is also used to switch to Playback Mode.
20 + (Function) button
Press the + (Function) button in Shooting Mode to check the
current effects used on the LCD Screen. You can also save and
use effects.
21 Print lever
Print the image displayed on the LCD Screen.
22 Effect reset button
Return both the lens and film effects to normal.
23 Accessory shoe
This is the mounting connector for camera accessories.
24 Film dial
Turn the film dial to switch between 10 different film effect
options.
25 Film door
When loading/unloading an INSTAX MINI instant film pack
(sold separately), slide the film door lock to unlock the film
door and lift it open. Do not open the film door until you have
used up the instant film pack.
6
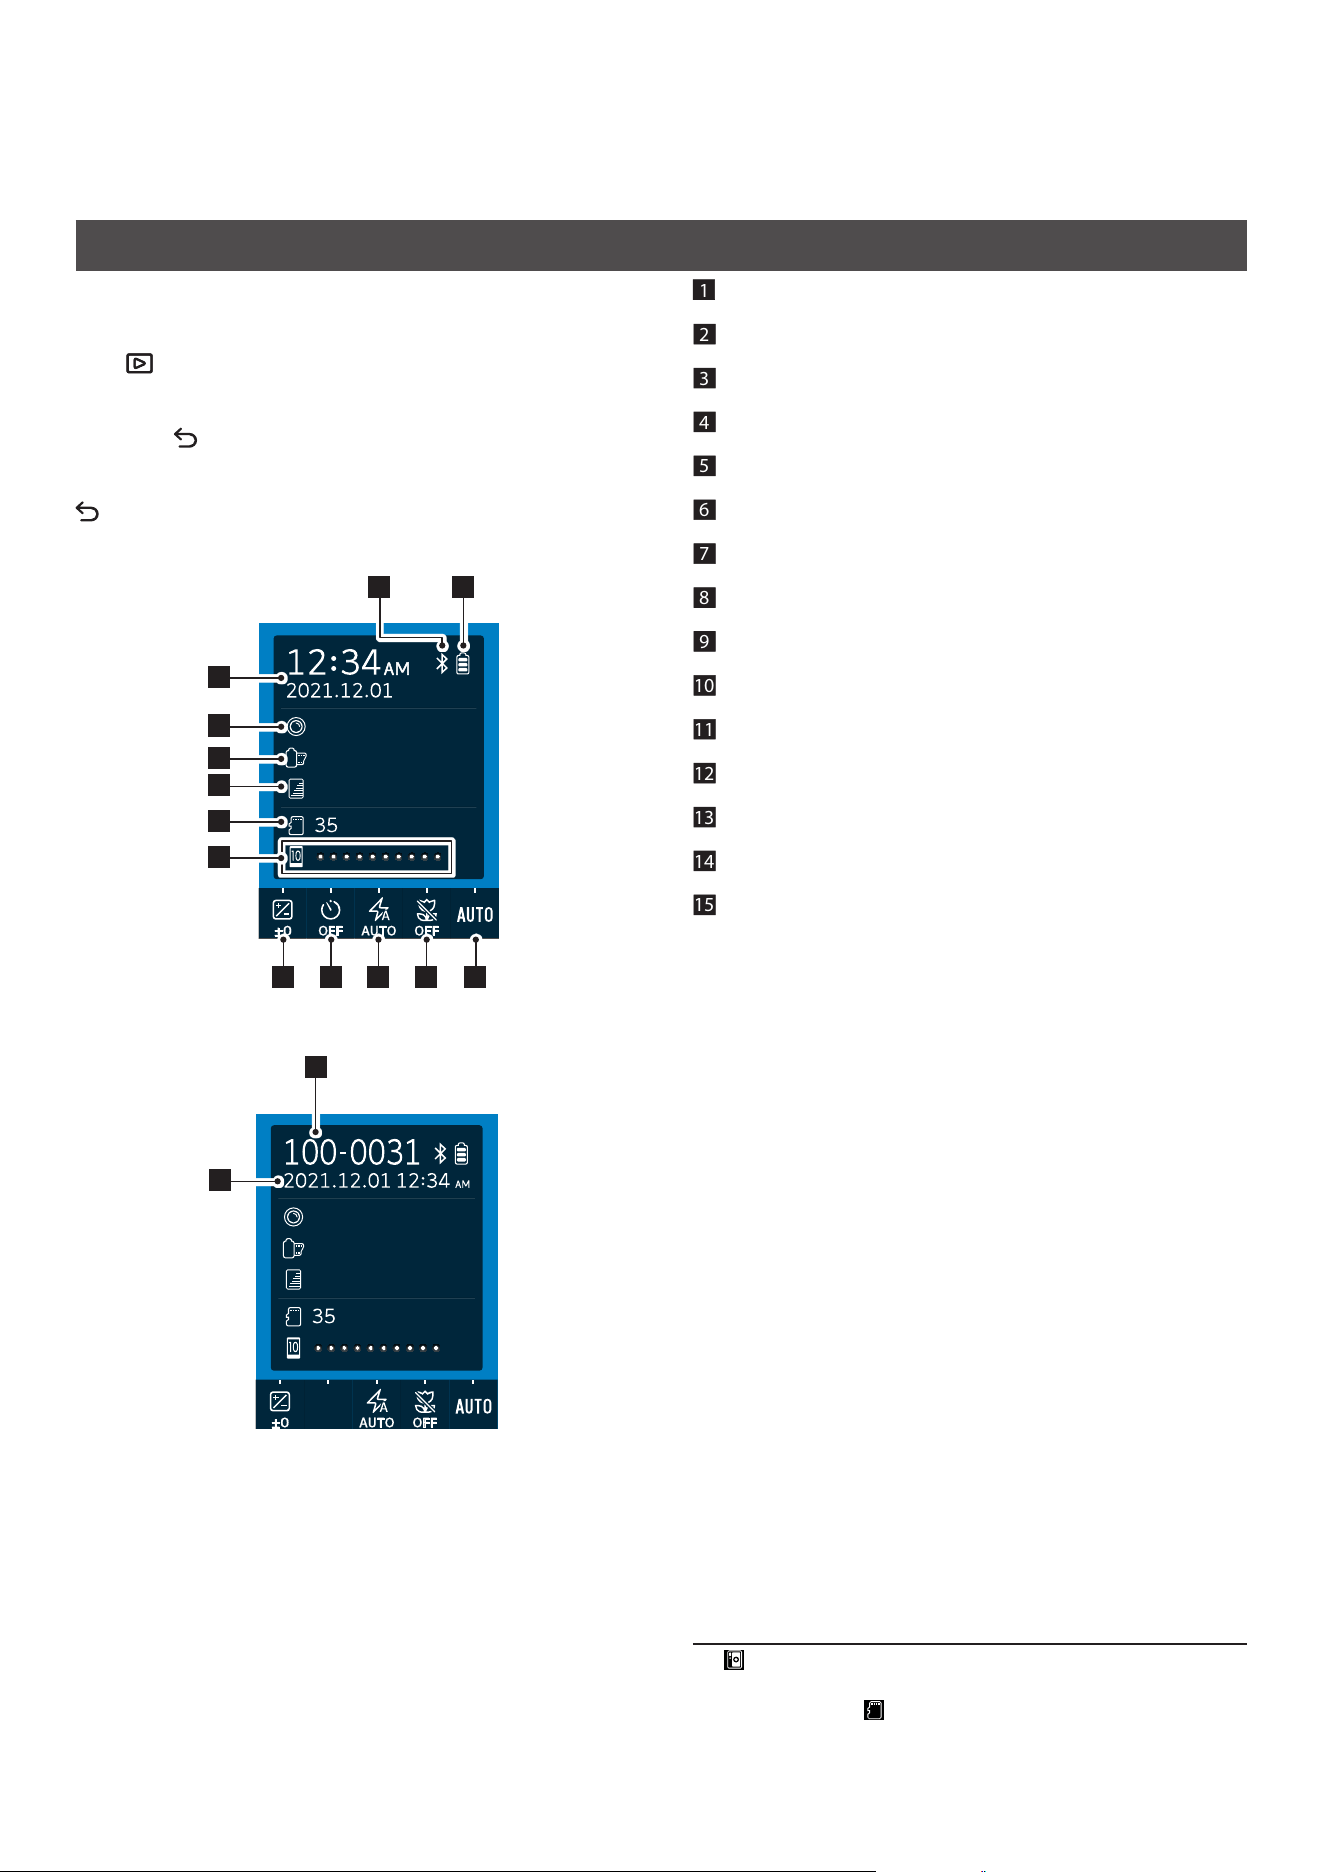
LCD Screen
When the camera is turned on, the shooting screen appears on the
LCD Screen.
•To switch from the shooting screen to the playback screen, press
the
(Playback) button.
•To switch from the playback screen to the shooting screen, press
the Shutter button fully.
If you press (Back) while the shooting screen or playback screen
is displayed, the following information will appear on the LCD
Screen. To return to the shooting screen or playback screen, press
(Back) again.
Shooting screen
1
2
3
4
5
7 8 9 10 11
1213
6
LENS #1 Normal
FILM #1 Normal
instax-Rich Mode
Playback screen
15
14
LENS #1 Normal
FILM #1 Normal
instax-Rich Mode
1 Current date and time
2 Lens effect
3 Film effect
4 Print quality mode
5 Number of shots available*
1
6 Film remaining indicator
7 EXPOSURE
8 SELF-TIMER
9 FLASH
10 MACRO
11 WHITE BALANCE
12 Battery remaining indicator
13 Bluetooth connection status indicator
14 Frame number
15 Shooting date and time
*1 (Camera) is displayed when the internal memory is used.
When the number of shots available is 10 or less, the icon is
displayed in red. (Memory card) is displayed when a
memory card is used.
7
NA_EN
Using the Select Buttons
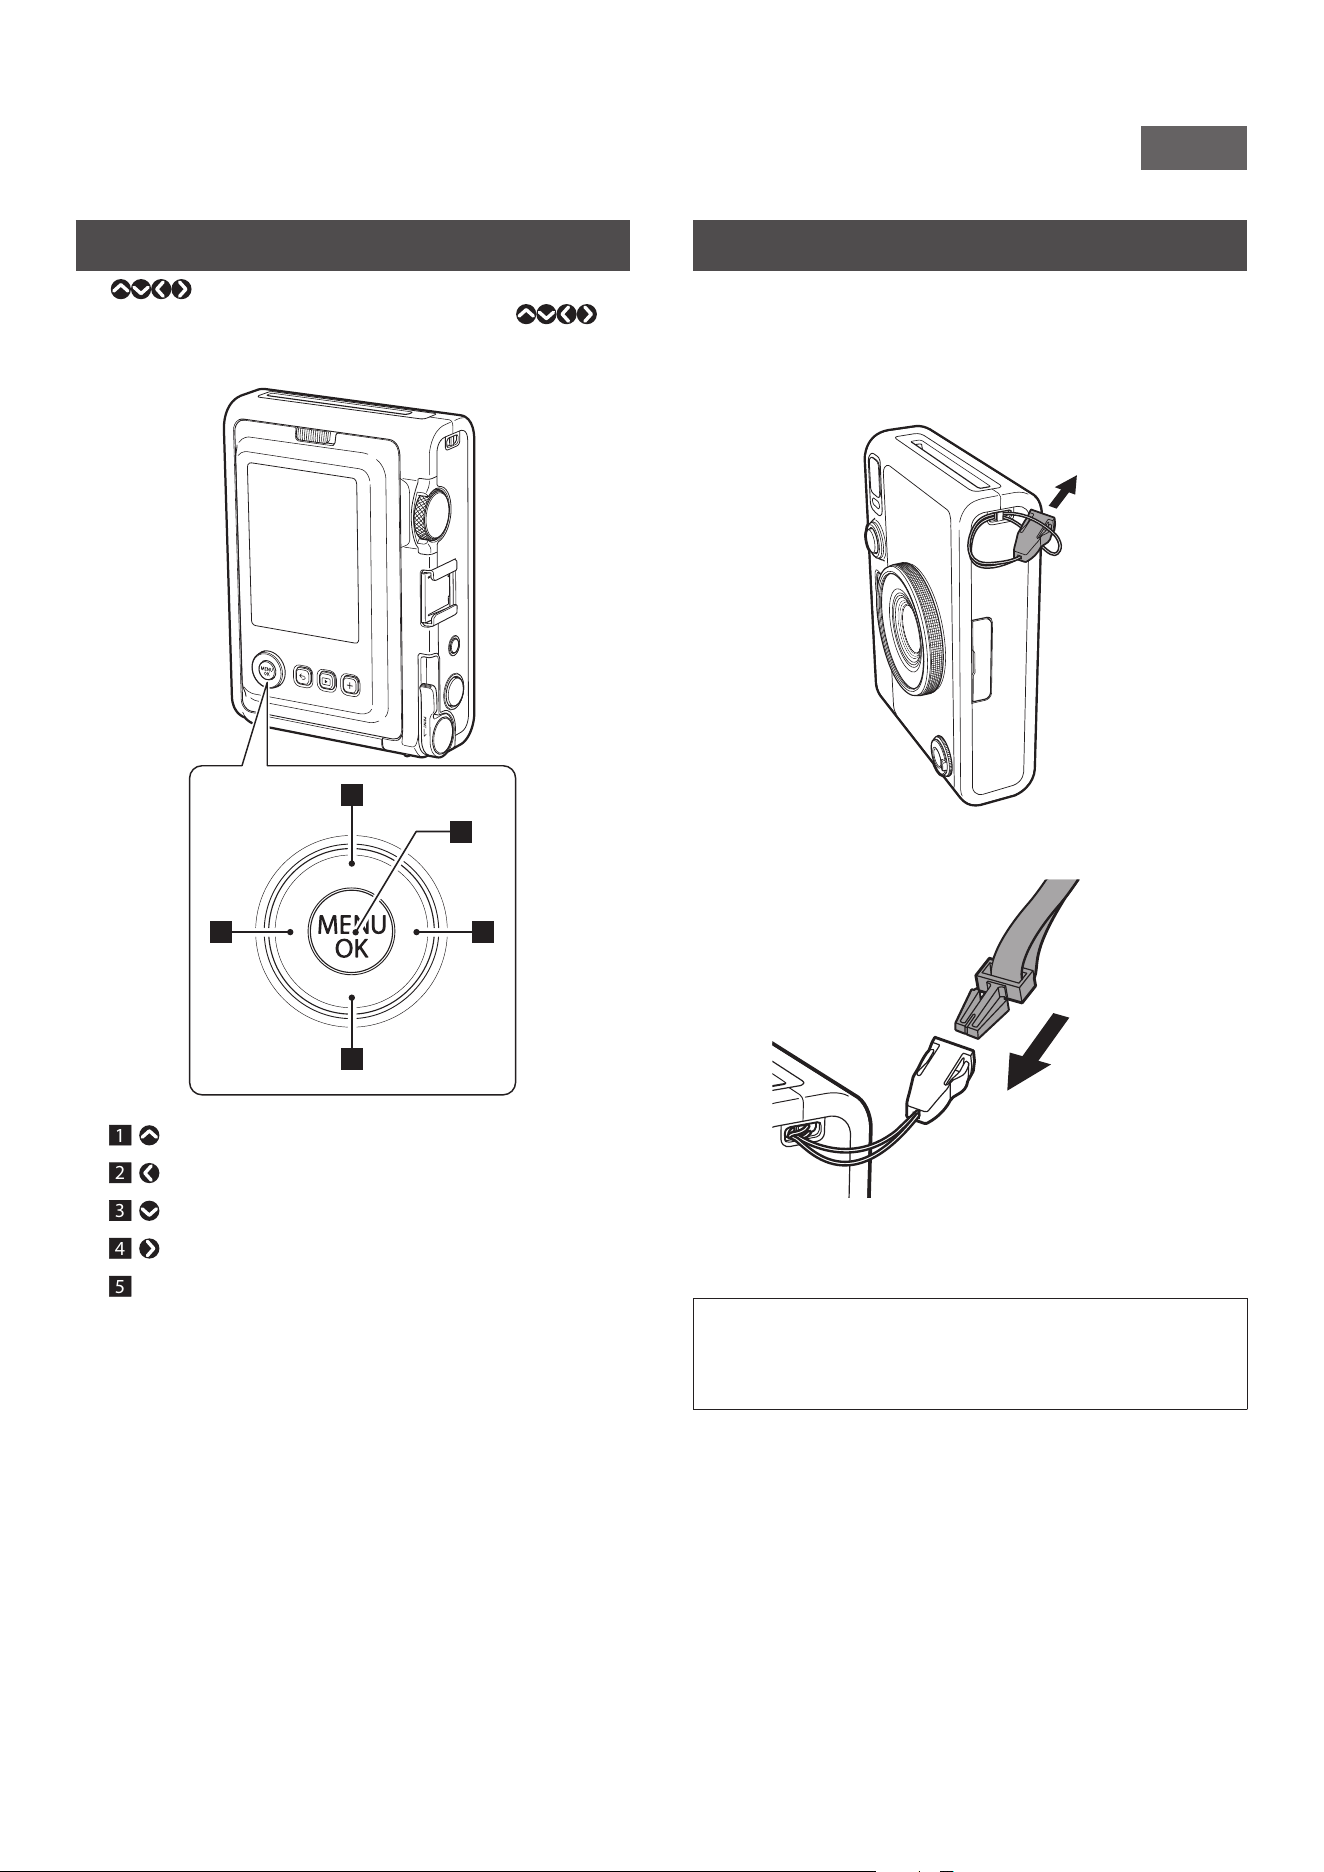
The (Up/Down/Left/Right) buttons are used to select
menu items and to use the functions assigned to the
buttons. The [MENU/OK] button is used to display menus and
make selections.
2 4
1
3
5
1 Move (up).
2
Move (left).
3
Move (down).
4
Move (right).
5 Determines which menu item is displayed or selected.
Attaching the Shoulder Strap
Follow the steps below to attach the shoulder strap to the camera
body.
1
Insert one end of the shoulder strap through the
strap hook on the camera�
2
Attach the strap body to the end of the strap�
3
Attach the other end in the same manner�
•The shoulder strap should be worn on the shoulder, not
hanging around the neck.
•Make sure the shoulder strap does not hang over the film
ejection slot or over the camera lens.
8
Charging the Battery
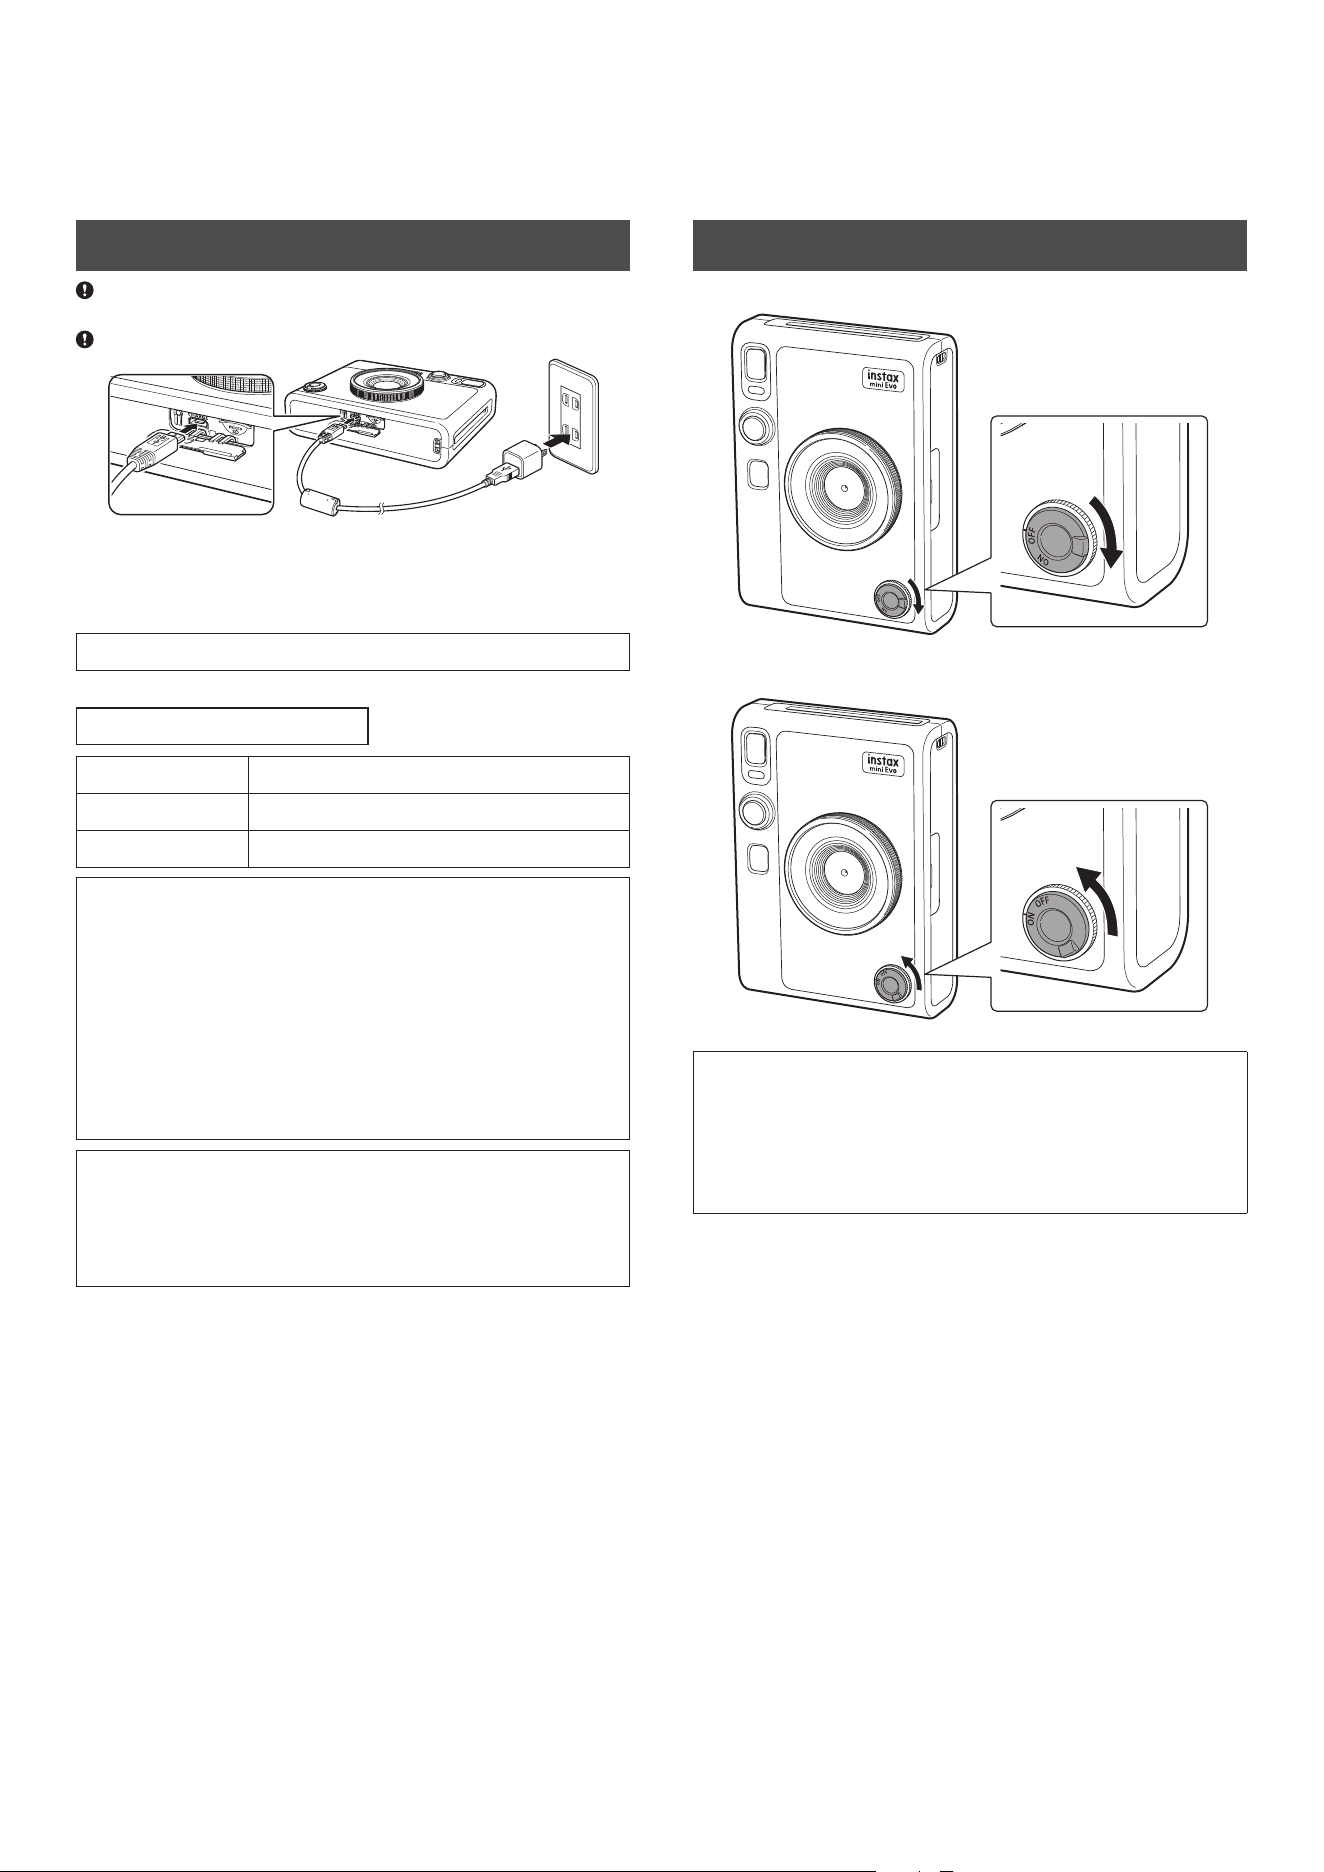
Turn off the camera before charging the battery. Battery will not
charge if the camera is powered on.
Be careful to properly attach cable as indicated.
Connect the camera and a USB AC adapter supplied with your
Smartphone using the supplied USB cable, then connect the USB
AC adapter to an indoor power outlet.
Charging time is approximately 2 to 3 hours.
Charging Status Indication
While charging Self-timer lamp lights up.
Charging finished Self-timer lamp goes off.
Charging error Self-timer lamp flashes.
When charging from a PC:
•Connect the camera directly to the PC using the supplied USB
cable, not through a USB hub or keyboard.
•If the PC goes into hibernation (sleep mode) while charging,
charging will be stopped. To continue charging, wake up the
PC from hibernation (sleep mode) and reconnect the USB
cable.
•Depending on your PC’s specifications, settings, or condition,
it may not be possible to charge the camera battery from your
PC.
•It is not possible to remove the battery.
•The battery has not been fully charged at the factory. Be sure
to charge the battery before using the camera.
•Please refer to “Camera Care” for precautions regarding the
battery. (p. 27)
Power On/Off
Turn the power switch to the right to turn on the power.
Turn the power switch to the left to turn off the power.
•If you do not operate the camera for a certain period of
time, it will automatically turn off. If the camera turns off
automatically, turn the power switch off and then on again to
turn it on.
•You can also adjust the time until the camera turns off.
(p. 22)
9
NA_EN
How to Check the Battery Level
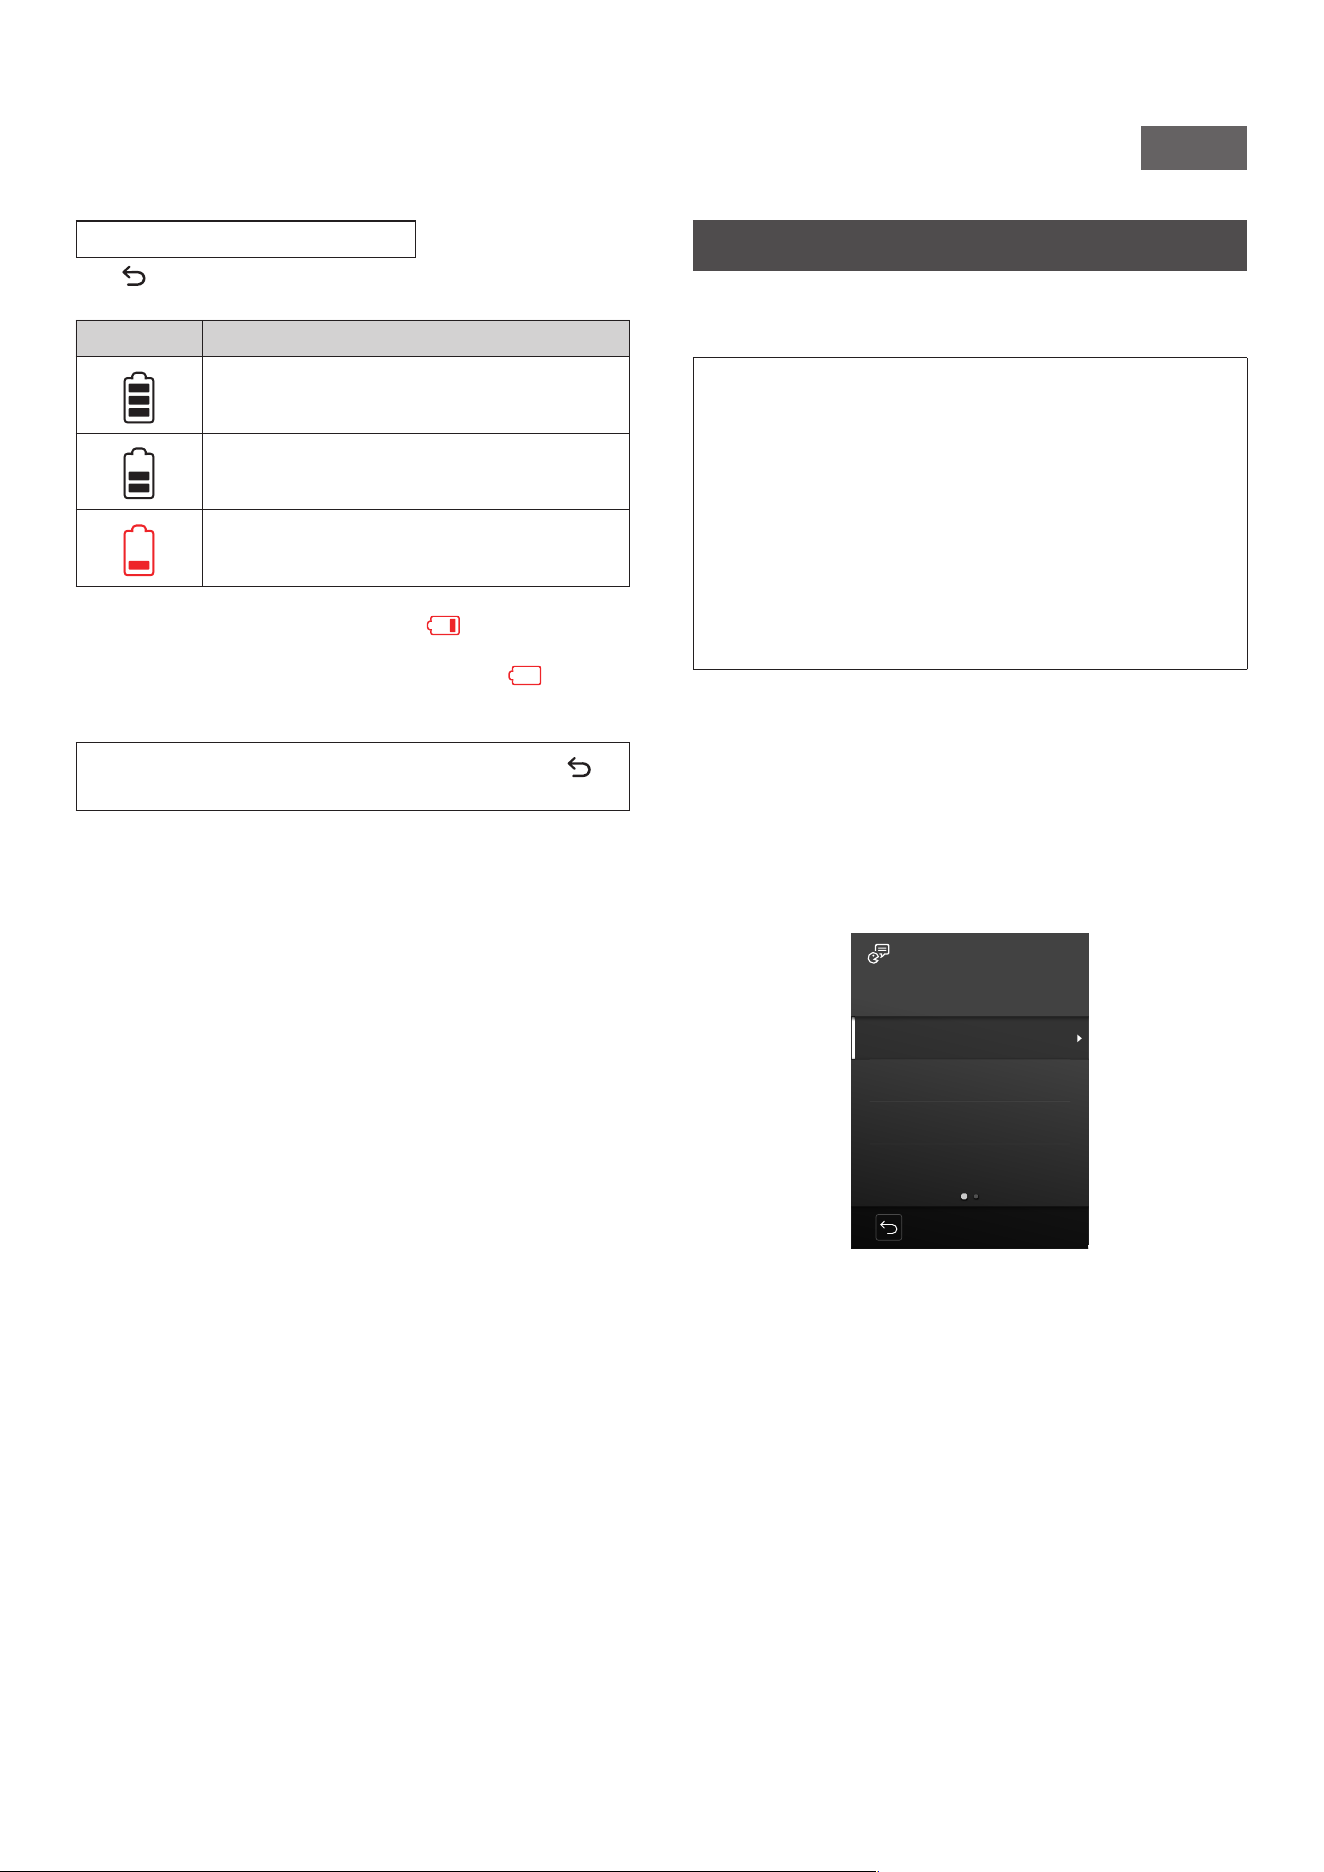
Press (Back) on the shooting or playback screen to display the
remaining battery charge on the LCD Screen.
Display Remaining battery charge
Sufficient battery charge remaining.
Less than half of battery charge remaining.
Recharging the battery is recommended.
Low battery charge. Recharge the battery as
soon as possible.
•When the battery charge is low, an icon (
) will also appear in
the lower right corner of the LCD Screen.
•When the battery is completely depleted, an icon ( ) will
appear in the middle of the LCD Screen and the power will turn
off.
To return to the shooting screen or playback screen, press
(Back) again.
Configure the Initial Settings
When you turn on the camera for the first time after purchase, you
will be automatically prompted to set the language, the date and
time, and to pair your Smartphone.
Before pairing registration, install the INSTAX MINI EVO App on
your Smartphone.
•If you are using an Android OS Smartphone, search for INSTAX
MINI EVO on Google Play and install it.
*Requirements for Android OS Smartphones: Android version
7 or later and have Google Play installed.
•If you are using an iOS Smartphone, search for INSTAX MINI
EVO in the App Store and install it.
*Requirements for iOS Smartphones: iOS version 12 or later
Depending on your Smartphone model, you may not be able to
use the Smartphone App even if you have installed it and meet
the above operation requirements.
This setting can be set at a later time� If you want to set or re-set
it later, set it from [言語/LANG�], [DATE/TIME], and [BLUETOOTH
SETTINGS] in the setup menu�
1
Turning on the power�
• When you turn on the camera for the first time after
purchase, the language setting screen will appear.
2
Select the language you want to use, and then press
[MENU/OK]�
言語/LANG.
日本語
ENGLISH
FRANCAIS
DEUTSCH
ESPAÑOL
NO
10
3
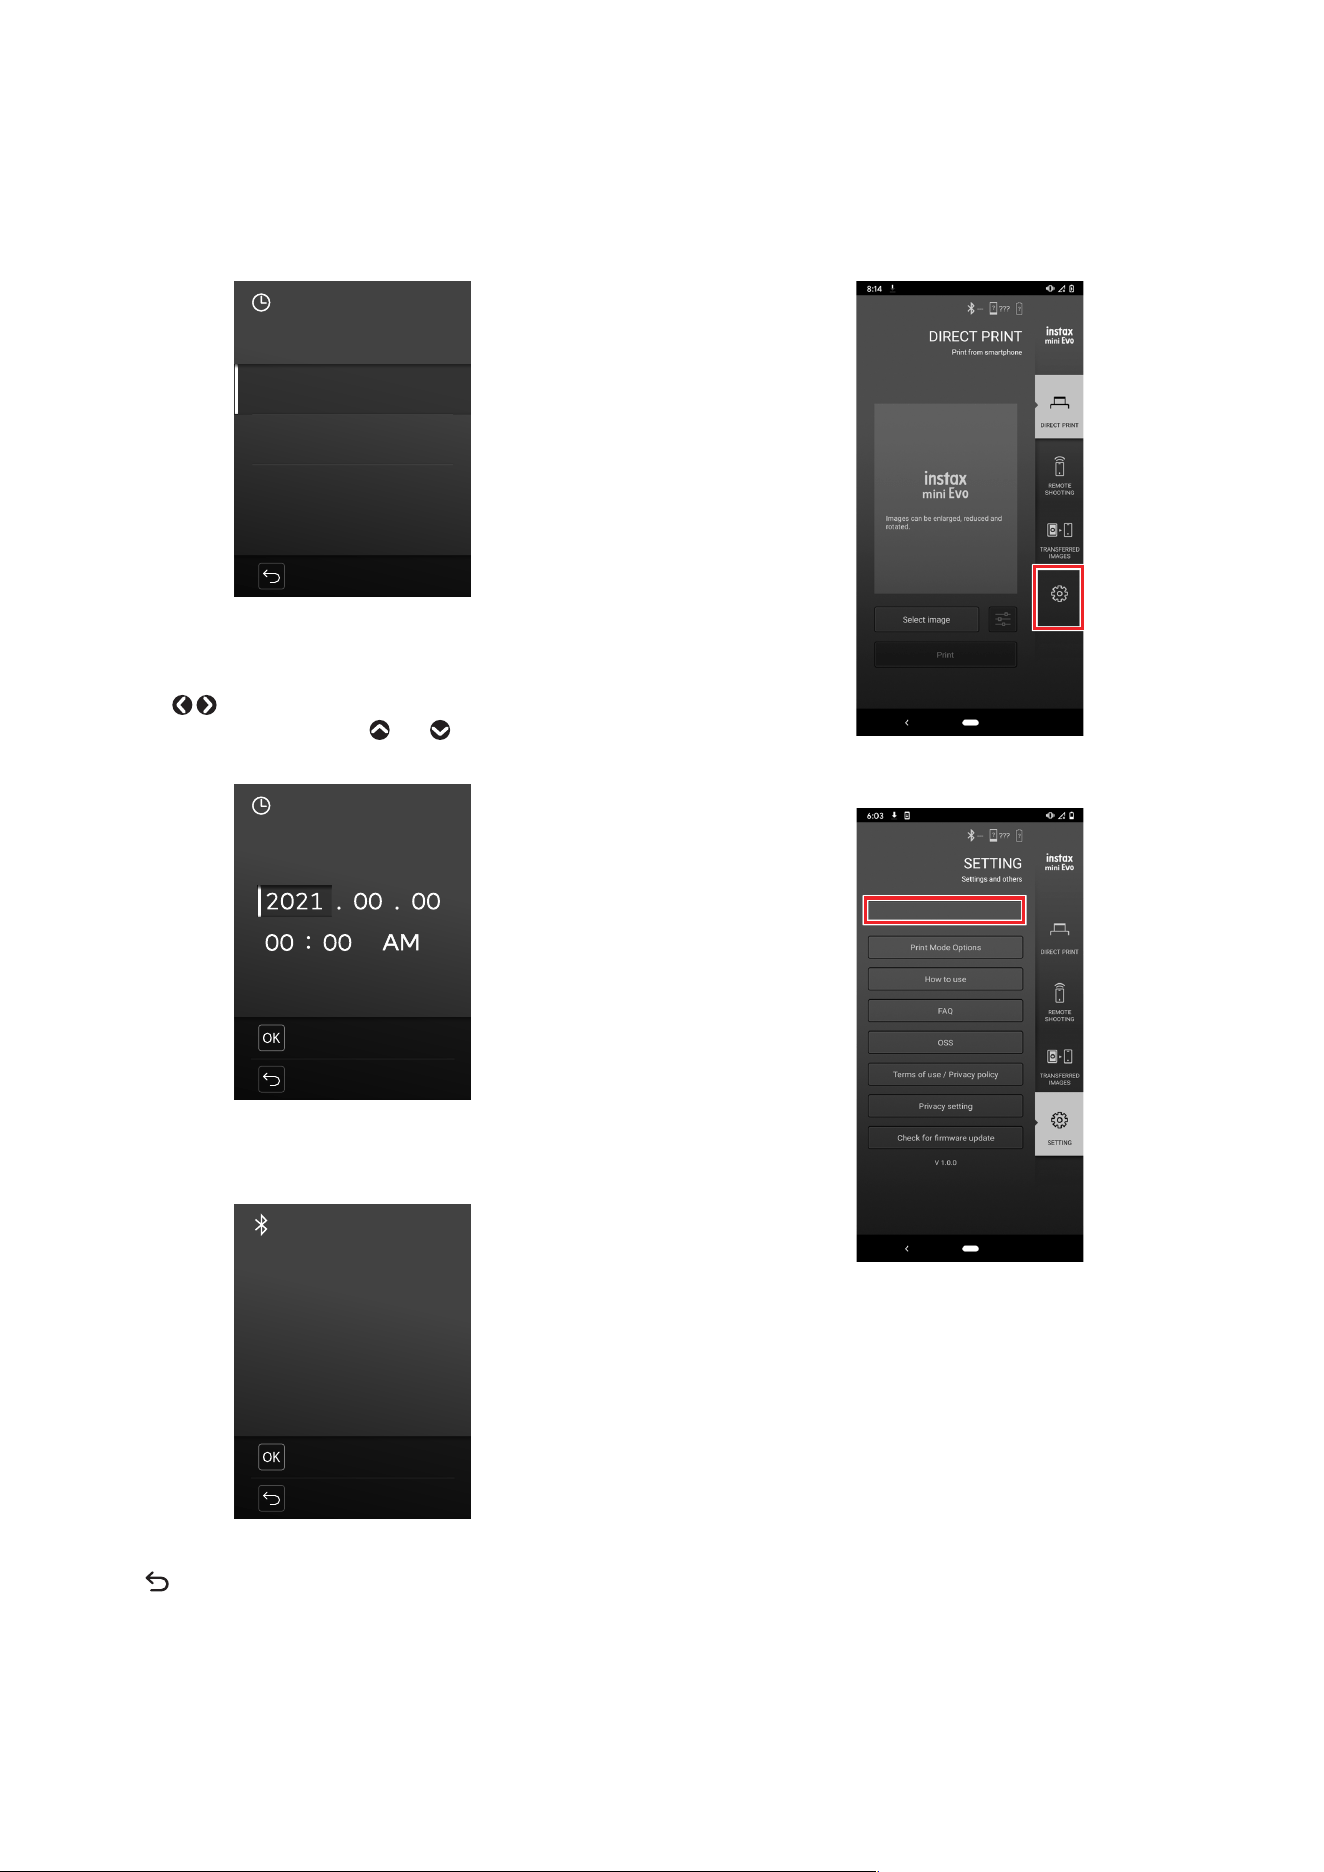
Set the year, month, and date in that order, and then
press [MENU/OK]�
DATE/TIME
NO
YY.MM.DD
DD.MM.YY
MM/DD/YY
4
Set the year, month, day, hour, and minute, and then
press [MENU/OK]�
Press to select the item to be set (year, month, day,
hour, minute) and then press and to select the number
to be set.
DATE/TIME
YY.MM.DD
NO
SET
Next, configure the pairing settings.
5
Press [MENU/OK]�
BLUETOOTH SETTINGS
Pair this product
with a smartphone
to use the functions
linked to
this product’s
smartphone app.
NO
PAIRING
• If you do not want to configure the pairing settings, press
(Back) to exit the initial settings.
6
Launch the INSTAX MINI EVO Smartphone App and
tap [SETTINGS]�
SETTINGS
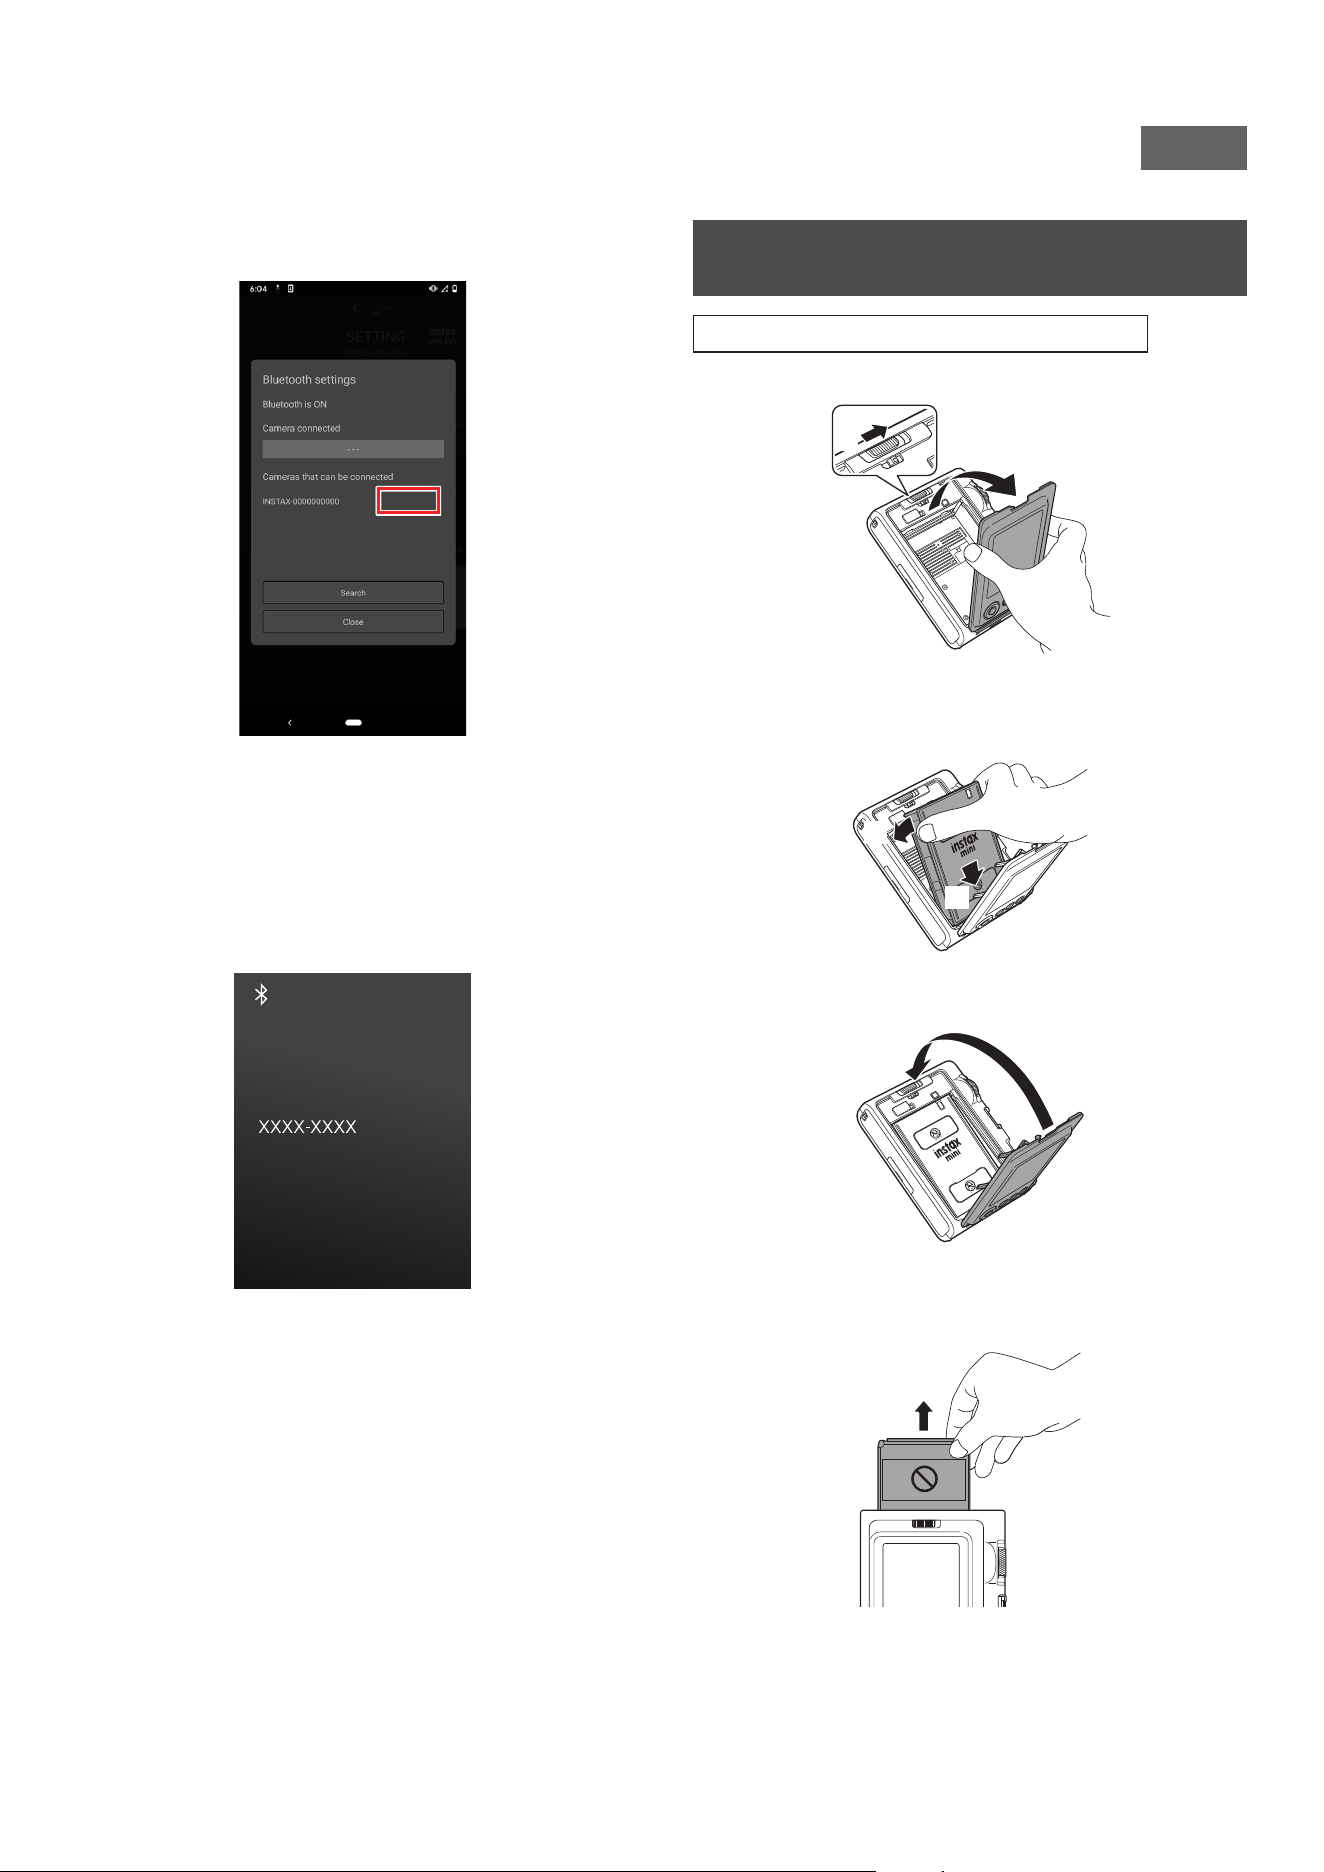
7
Tap [Bluetooth settings] on the Smartphone App�
Bluetooth settings
11
NA_EN
8
Tap [Connect] on the Smartphone App once the
camera’s OWN NAME appears�
Connect
• To check the camera’s OWN NAME, display the
shooting menu on the camera (p. 22). Then, select
[BLUETOOTH SETTINGS], [INFORMATION], and [OWN
NAME] in this order.
9
Allow pairing�
10
Confirm that pairing registration has been
completed�
PAIRING
REGISTRATION
PAIRING
COMPLETE
When pairing registration is complete, the screen switches to
the shooting screen.
Loading/Unloading the INSTAX MINI™ Instant
Film Pack
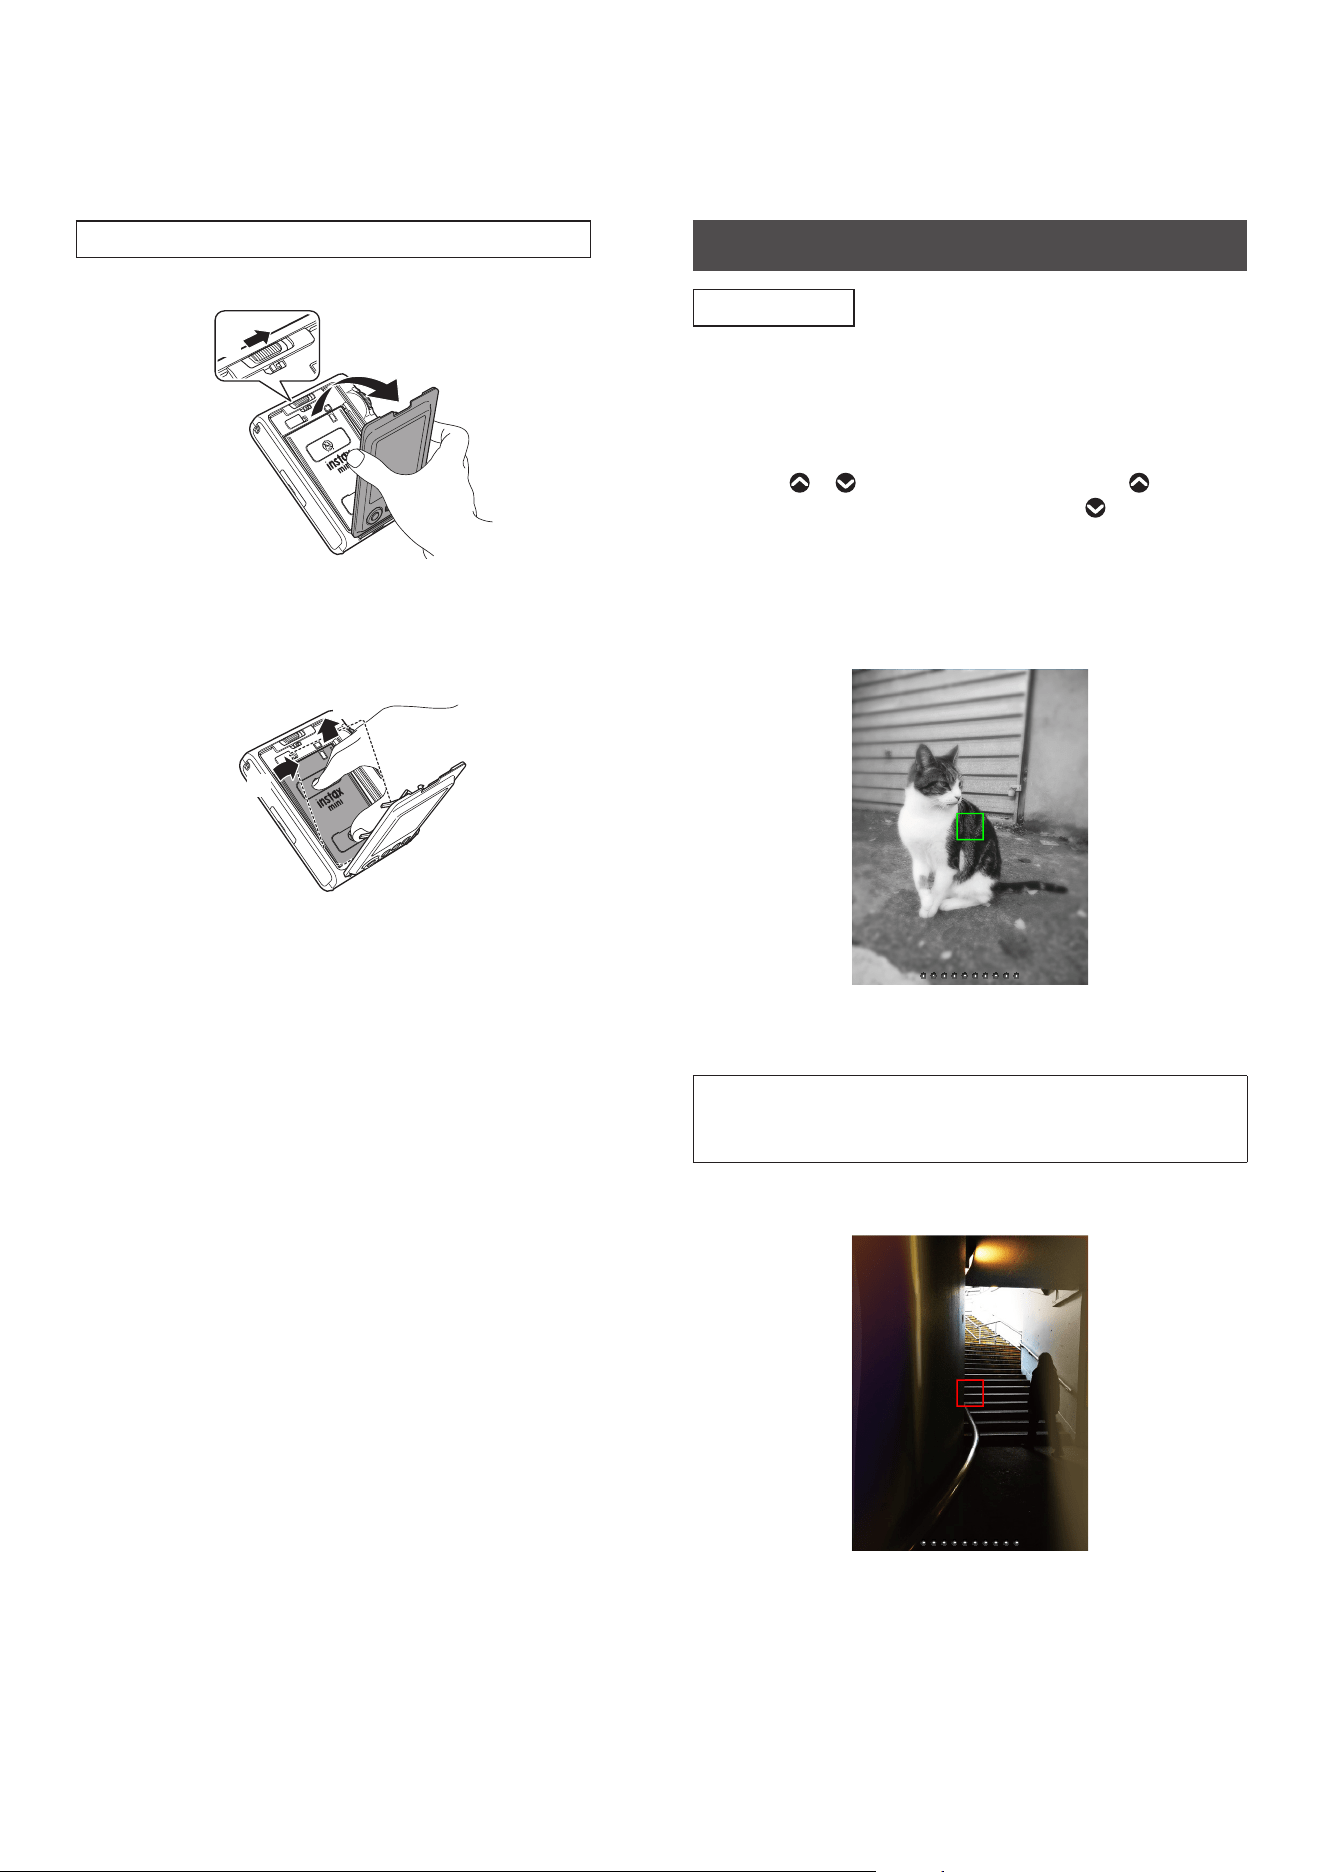
Loading the INSTAX MINI instant film pack
1
Slide the film door lock and open the film door�
1
2
2
Insert an INSTAX MINI instant film pack by aligning
the yellow marks�
2
1
3
Close the film door�
4
Remove the black film cover that is automatically
ejected from the camera�
12
Unloading a Used INSTAX MINI instant film pack
1
Slide the film door lock and open the film door�
1
2
2
Grasp the rectangular holes on the film pack, then
pull film pack out from the camera� Properly dispose
of used film pack�
1
2
Basic Shooting and Playback
Taking Photos
This section explains the basic steps to take photos.
1
Turn on the power�
2
Set effects and other settings as desired�
3
Compose the photo�
Press or to adjust the composition. Press to take a
closer image of a distant subject, or press to take an image
of a farther area.
4
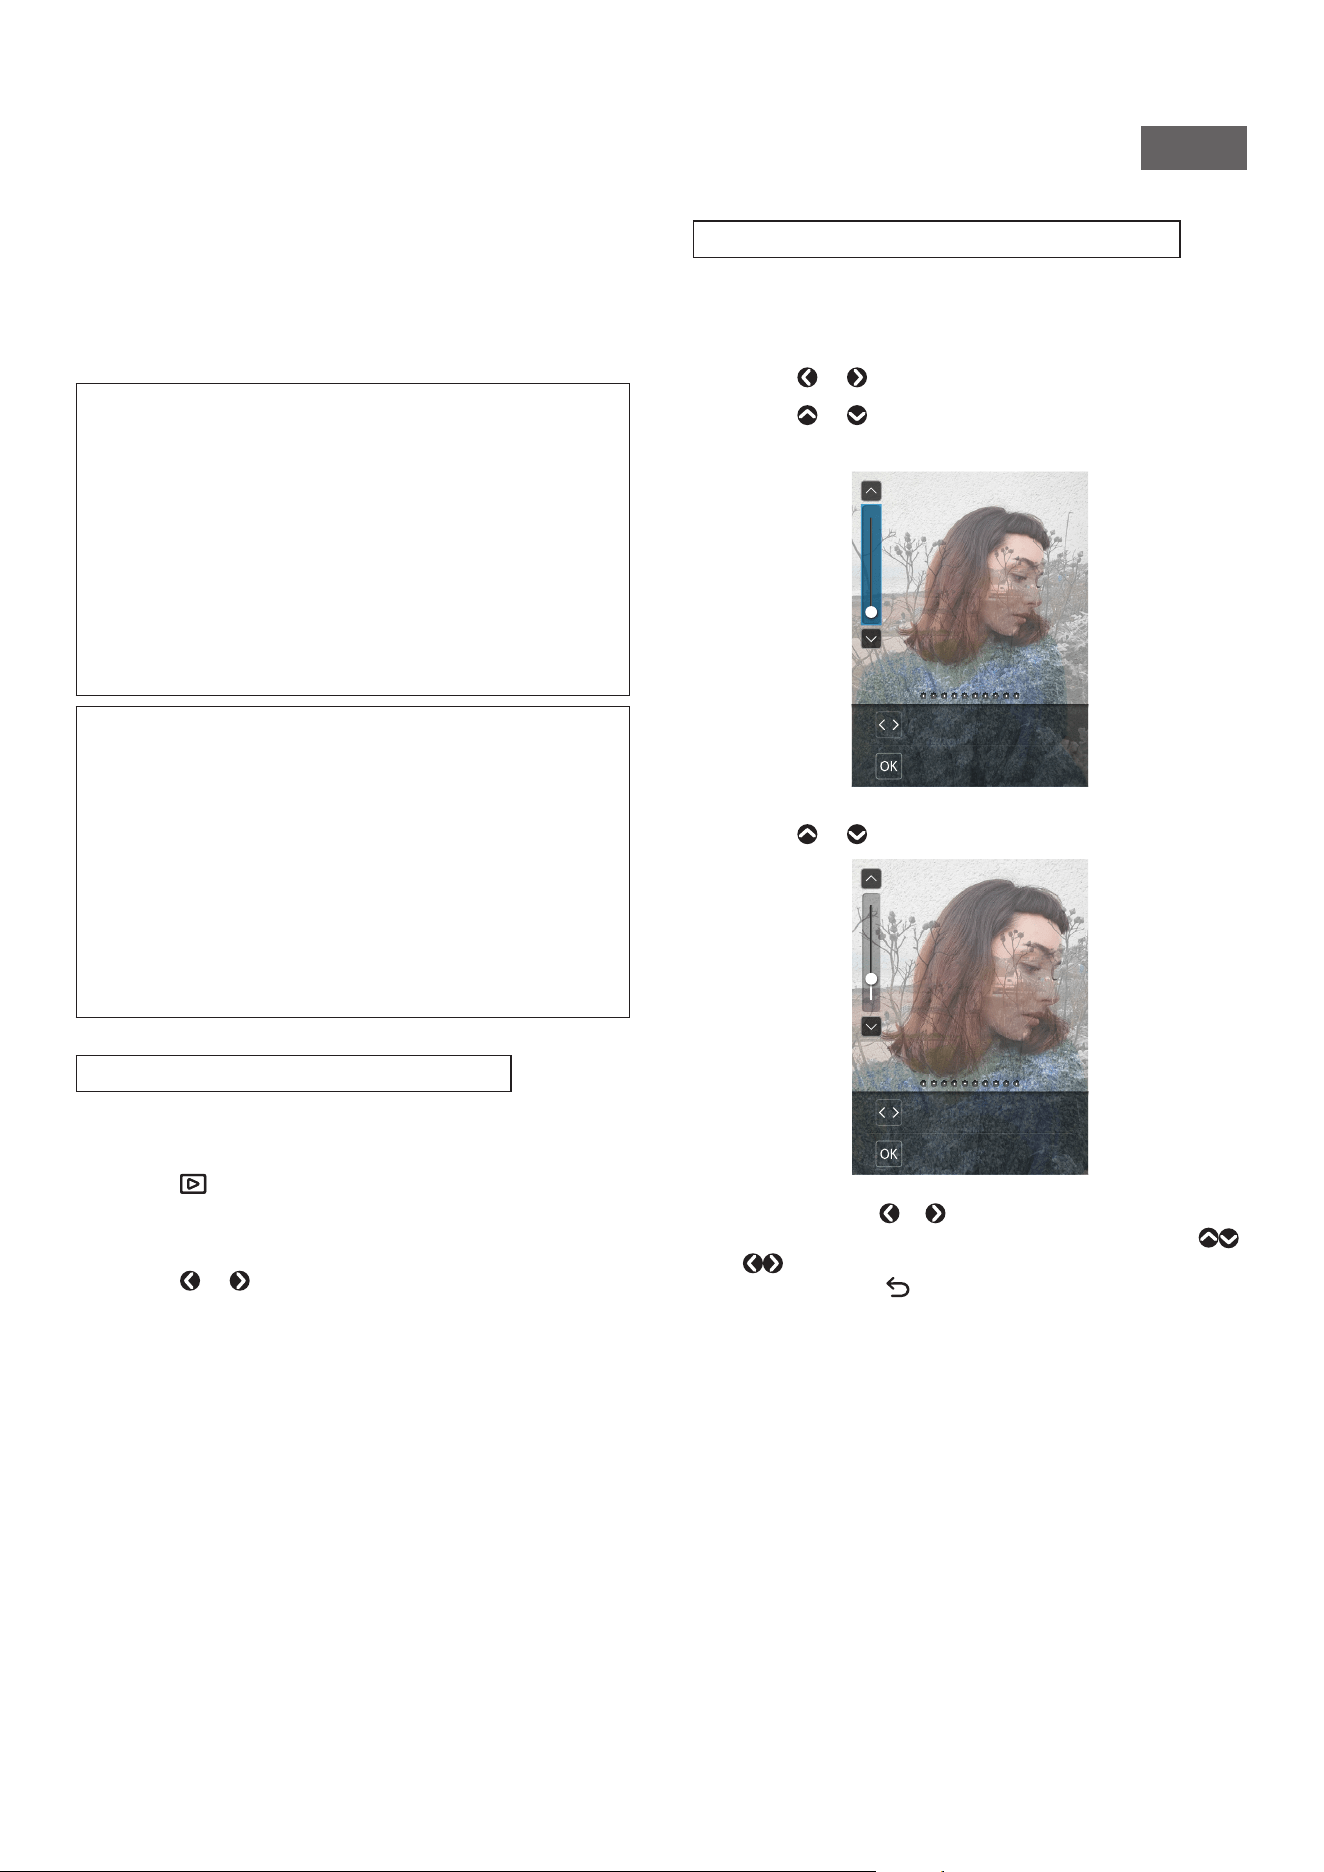
Press the Shutter button halfway to bring the
subject into focus�
When the subject is in focus:
A “beep” is heard and a green AF frame appears in the center
of the LCD screen.
When [FACE DETECTION] is enabled, a green AF frame appears
over the face of the person when the camera recognizes their
face. (p. 22)
When the subject is NOT in focus:
A red AF frame appears in the center of the LCD screen.
Change the composition or use AF/AE lock. (p. 20)
13
NA_EN
5
Hold the Shutter button halfway down and then
press it in (all the way down) to shoot the photo�
After taking a photo, the image is stored in the internal
memory or on the memory card.
• See “Printing a Photo” for the procedure to print photos
you have taken. (p. 14)
•When taking a photo, hold your arms tightly against your
body and hold the camera firmly with both hands.
•Be careful not to touch the camera lens when you press the
Shutter button.
•When fully pressing the Shutter button, press it gently to
prevent the camera from moving and causing the photo to
blur.
•Be careful not to let your fingers or the shoulder strap cover
the flash or lens.
•In dark or backlit conditions, the flash may fire when the
Shutter button is pressed fully. You can change the flash
settings to prevent the flash from firing.(p. 18)
Precautions regarding the internal memory
•If the internal memory is full, the shutter will not release and
you will not be able to take photos. Delete images or use a
memory card.
•If the camera malfunctions, images in the internal memory
may be damaged or lost.
•We recommend that you copy important images to another
media (hard disk, CD-R, CD-RW, DVD-R, etc.) for backup.
•If you send the camera in for repair, we cannot guarantee the
images will be saved in the internal memory.
•When the camera is repaired, we may need to check the
images in the internal memory.
Playing Back the Images You Have Taken
You can play back the images you have taken on the LCD Screen.
1
Turn on the power
2
Press (Playback) to display the last photo you
took�
The last photo you took is displayed.
3
Press or to select the image you want to view�
Press the Shutter button fully to return to the shooting
screen.
Changing the Display on the Playback Screen
You can zoom in on an image or change the number of frames
displayed on the LCD Screen.
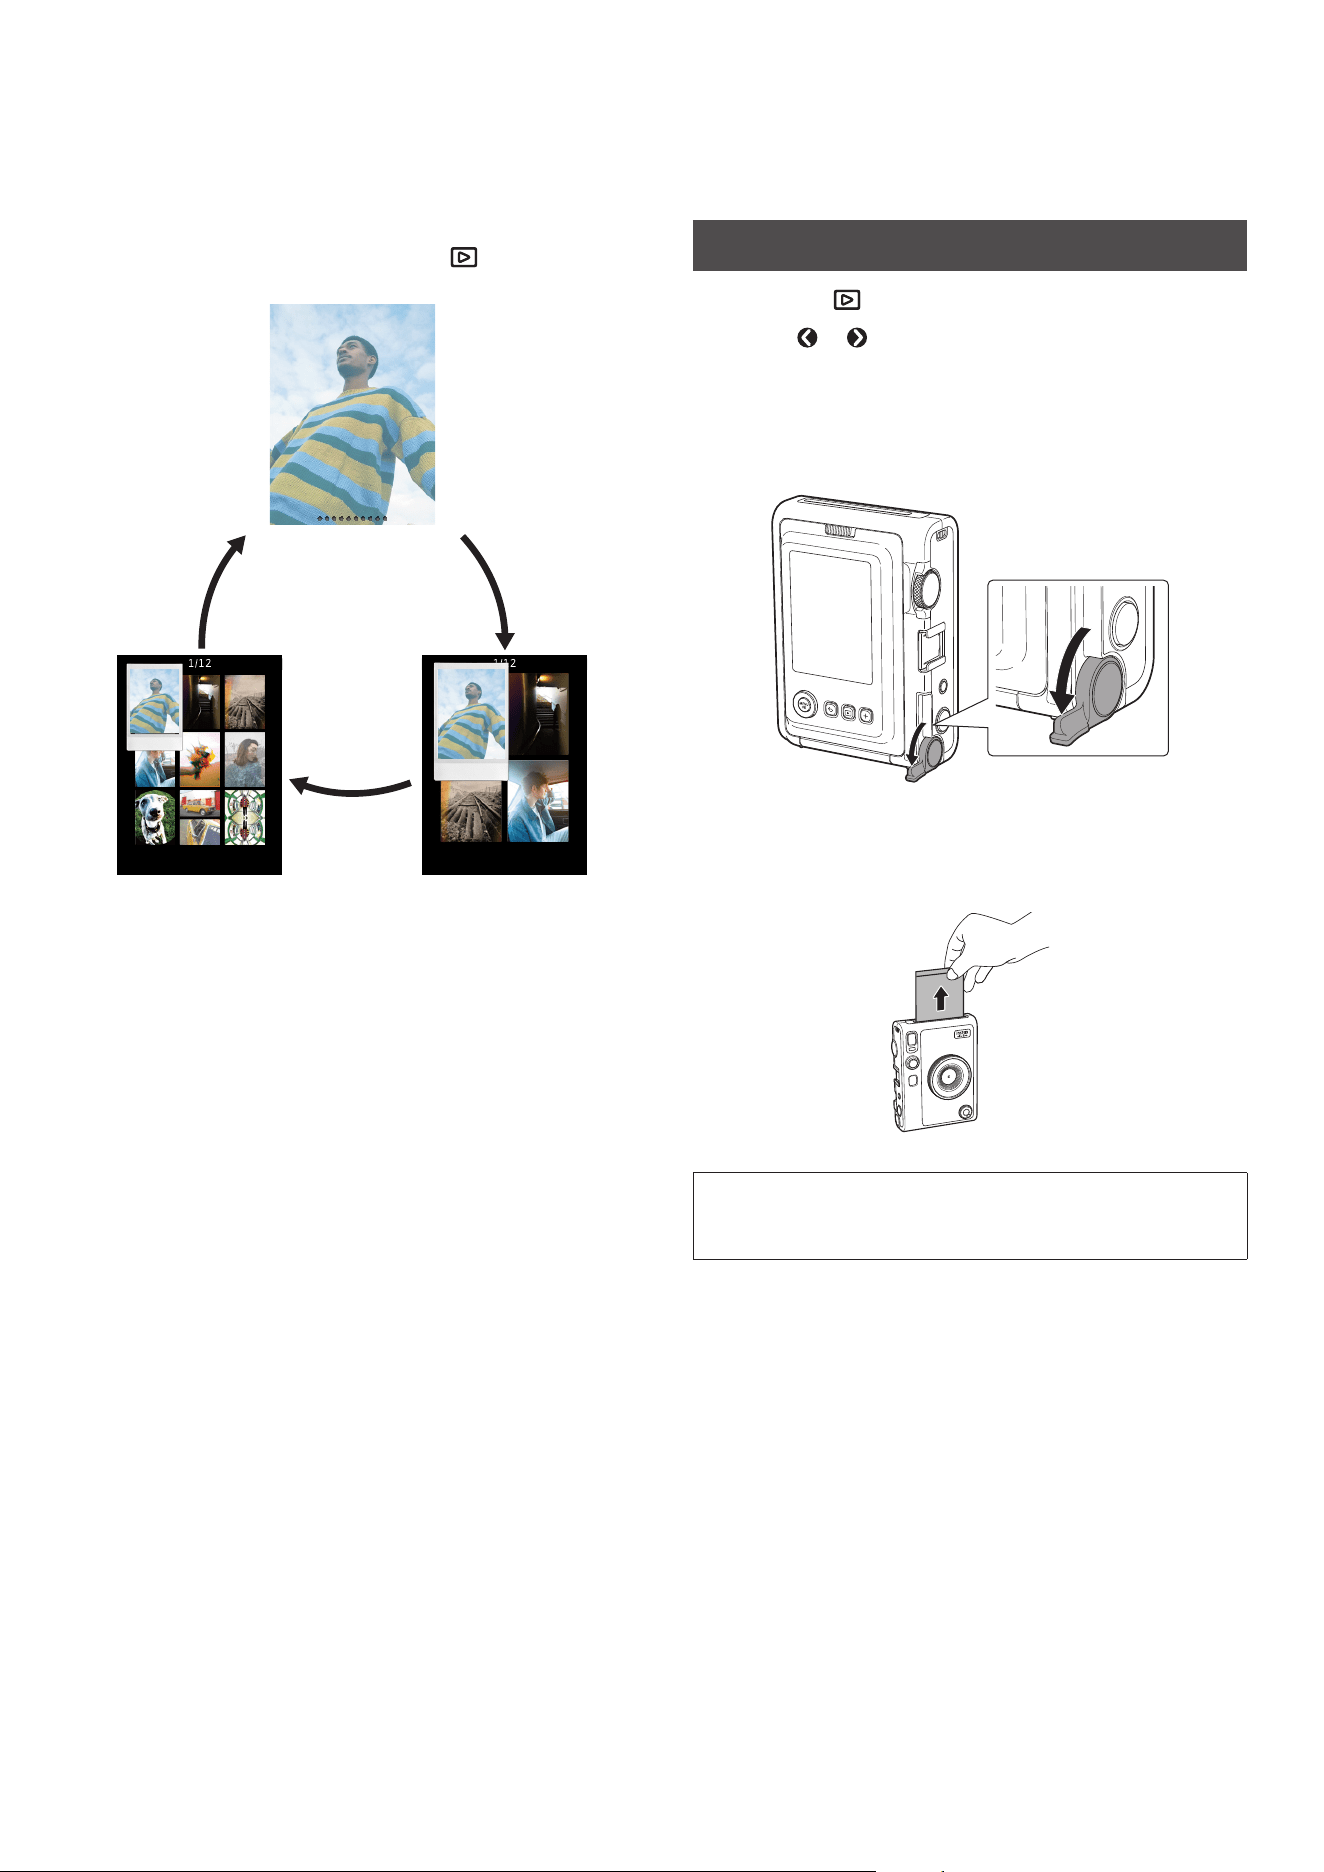
■ To Zoom In on an Image
1
Press or to select the image you want to view�
2
Press or �
The zoom in/out screen appears.
CONFIRM
Move
3
Press or to zoom in or out on the image�
CONFIRM
Move
When you press or on the zoom in/out screen, the
screen switches to the move screen, and you can press
to move the screen position. To return to the zoom in/
out screen, press (Back).
4
Press [MENU/OK] to print a zoomed-in or zoomed-
out image�
14
■ Changing the Number of Frames Displayed
When the playback screen is displayed, press (Playback) to
change the number of frames displayed.
1 frame display
4 frame display9 frame display
Printing a Photo
1
Press the (Playback) button�
2
Press or on the Select button to select the
photo you want to print�
3
You can enlarge the photo or make other edits
before printing�
4
Turn the print lever�
5
Use only INSTAX MINI instant print film� After the
sound of the film ejecting stops, remove the ejected
film from the camera by the film edge�
CAUTION
Be careful not to let your fingers or the camera strap get caught
in the film ejection slot.
15
NA_EN
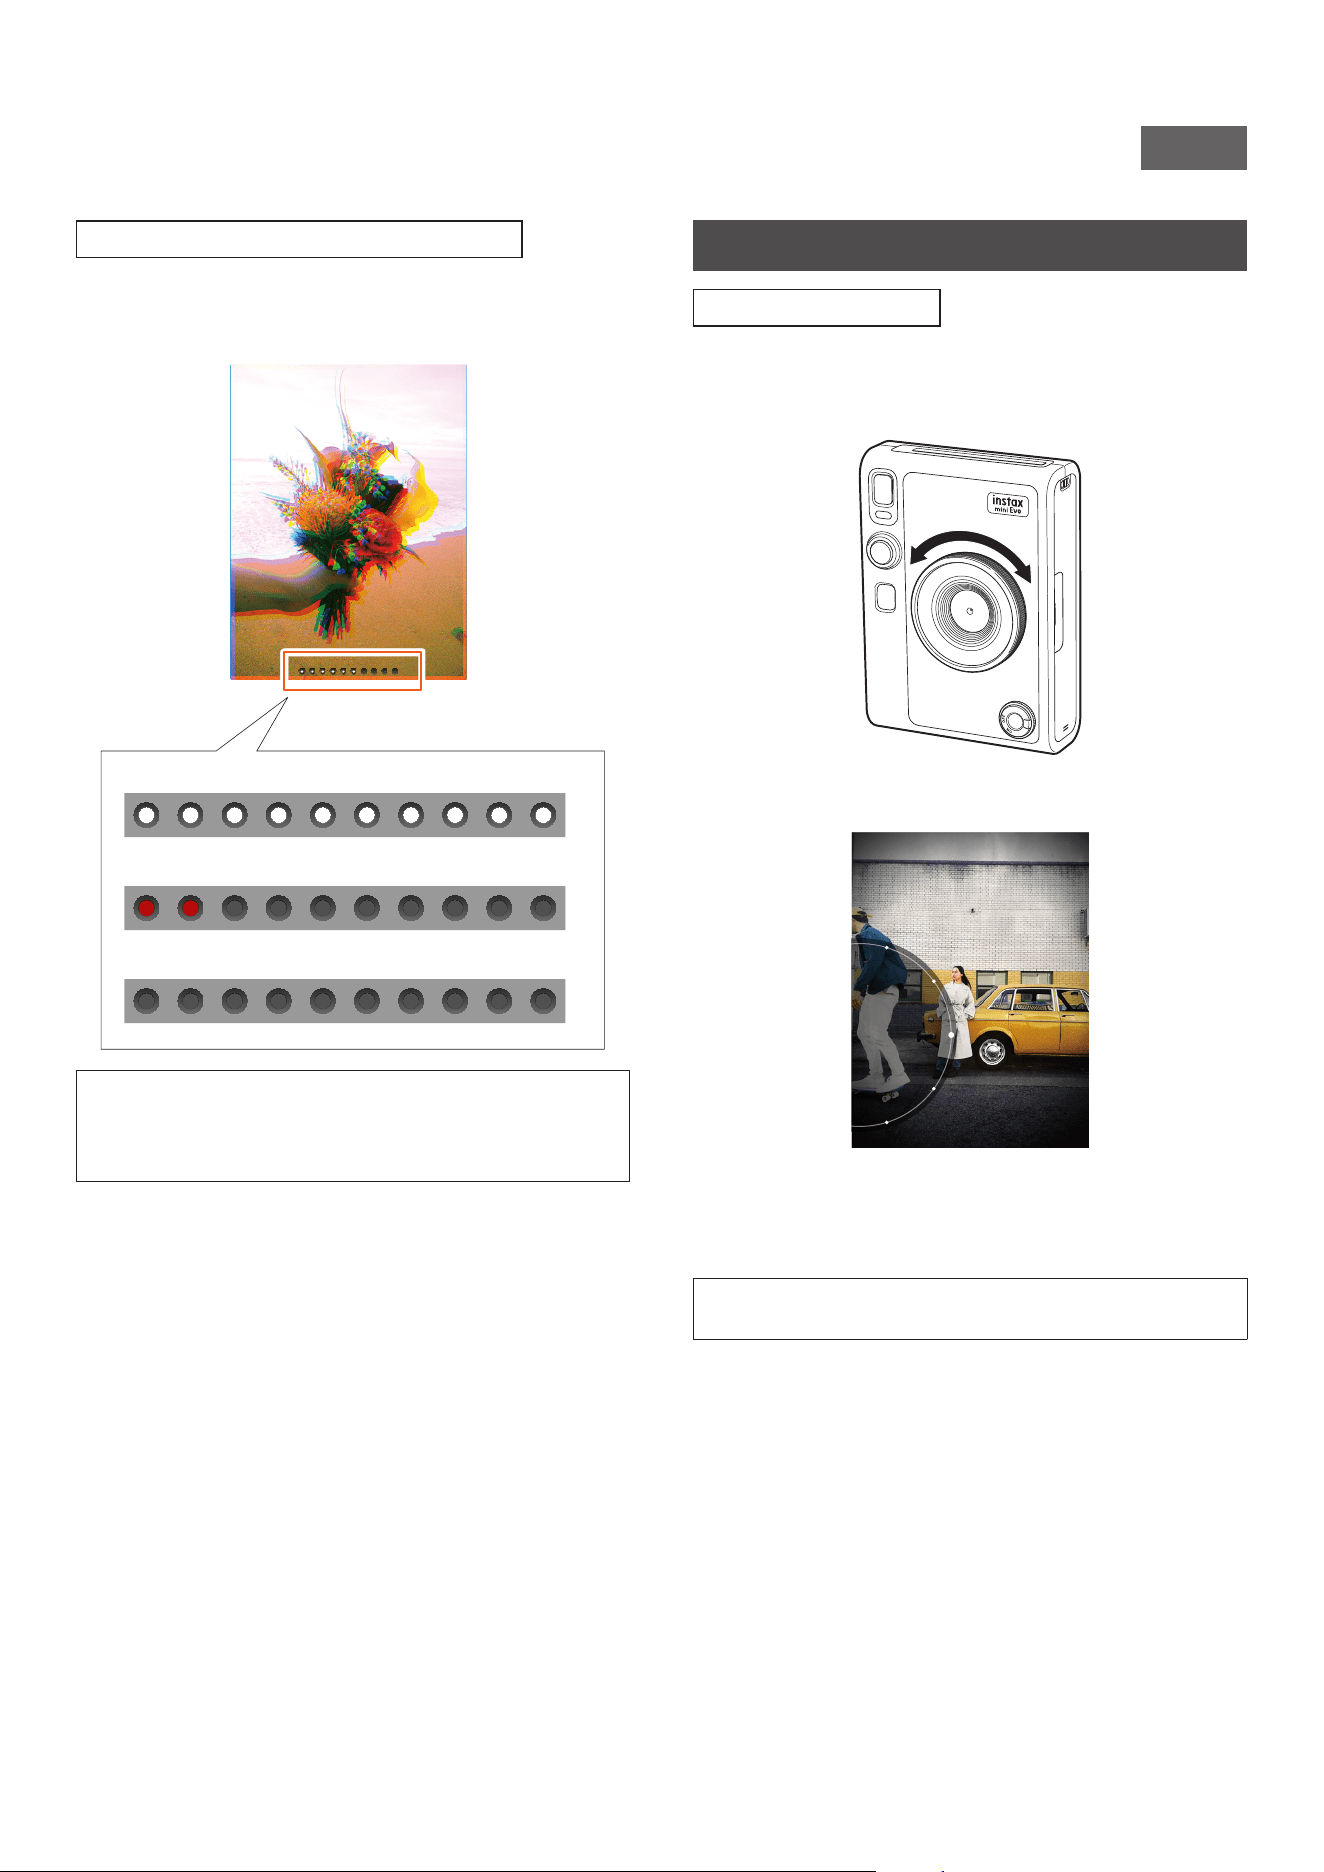
About the Remaining Film Sheets Display
The number of remaining film sheets is indicated by a white dot at
the bottom of the screen. Each time you print an image, this dot
turns gray. When there are only two film sheets remaining in your
loaded film pack, the dot turns red.
10 sheets remaining display
2 sheets remaining display
0 sheets remaining display
•For details on film handling, see the instructions provided
with the INSTAX MINI instant film pack.
•Film develops in about 90 seconds (time may vary with
temperature).
Adding Effects to Your Photos
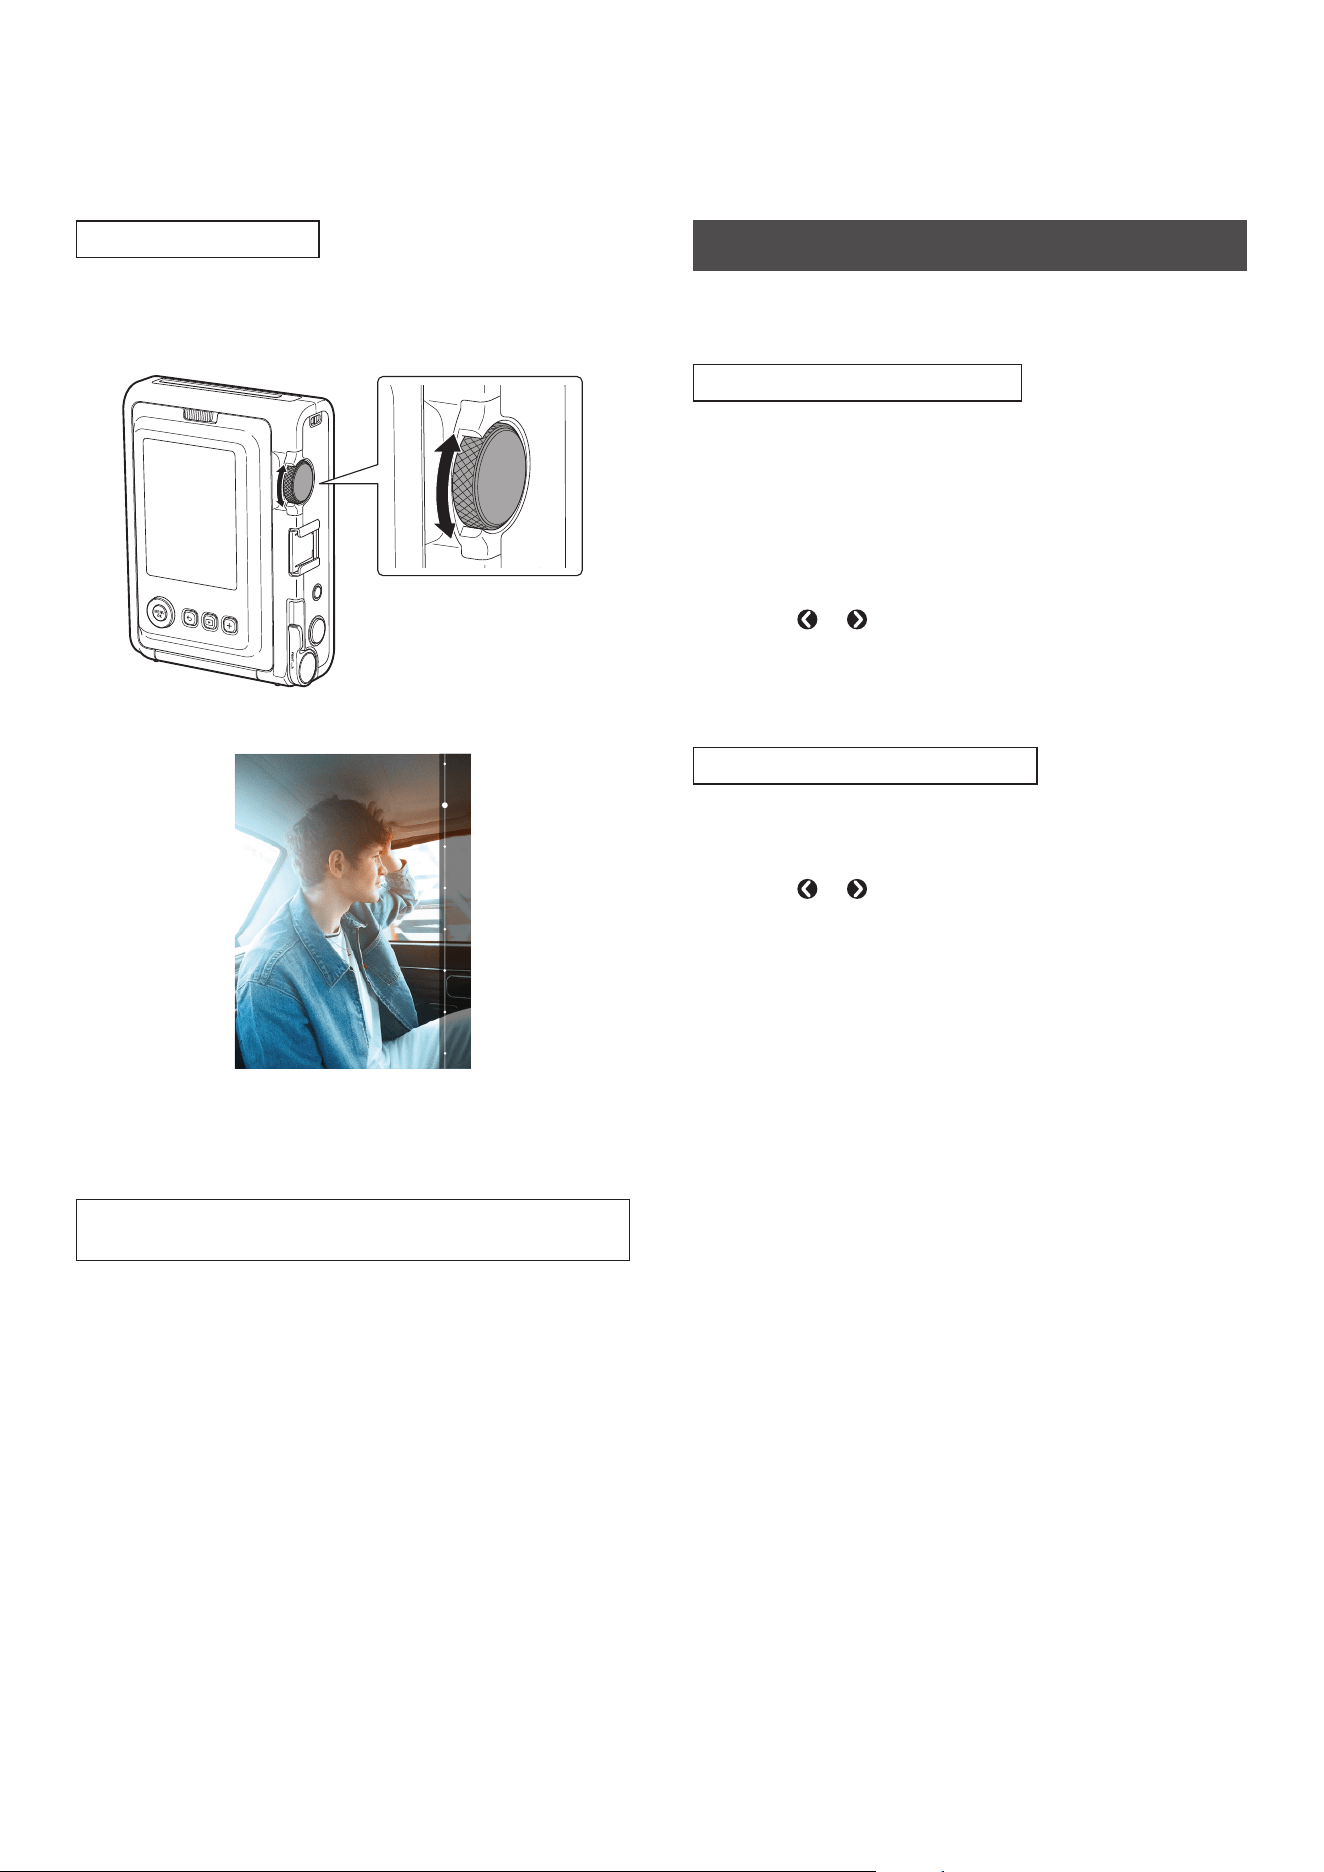
Selecting a Lens Effect
Follow the steps below to select a lens effect.
1
Display the shooting screen�
2
Rotate the Lens dial to select the lens effect�
The following screen appears.
LENS #1
Normal
• To remove the applied lens effect, select [Normal] from
the lens effect menu.
• Press the Effect reset button to cancel the applied lens
and film effects.
You can also press the + (Function) button to set your favorite
lens and film effect combinations.
16
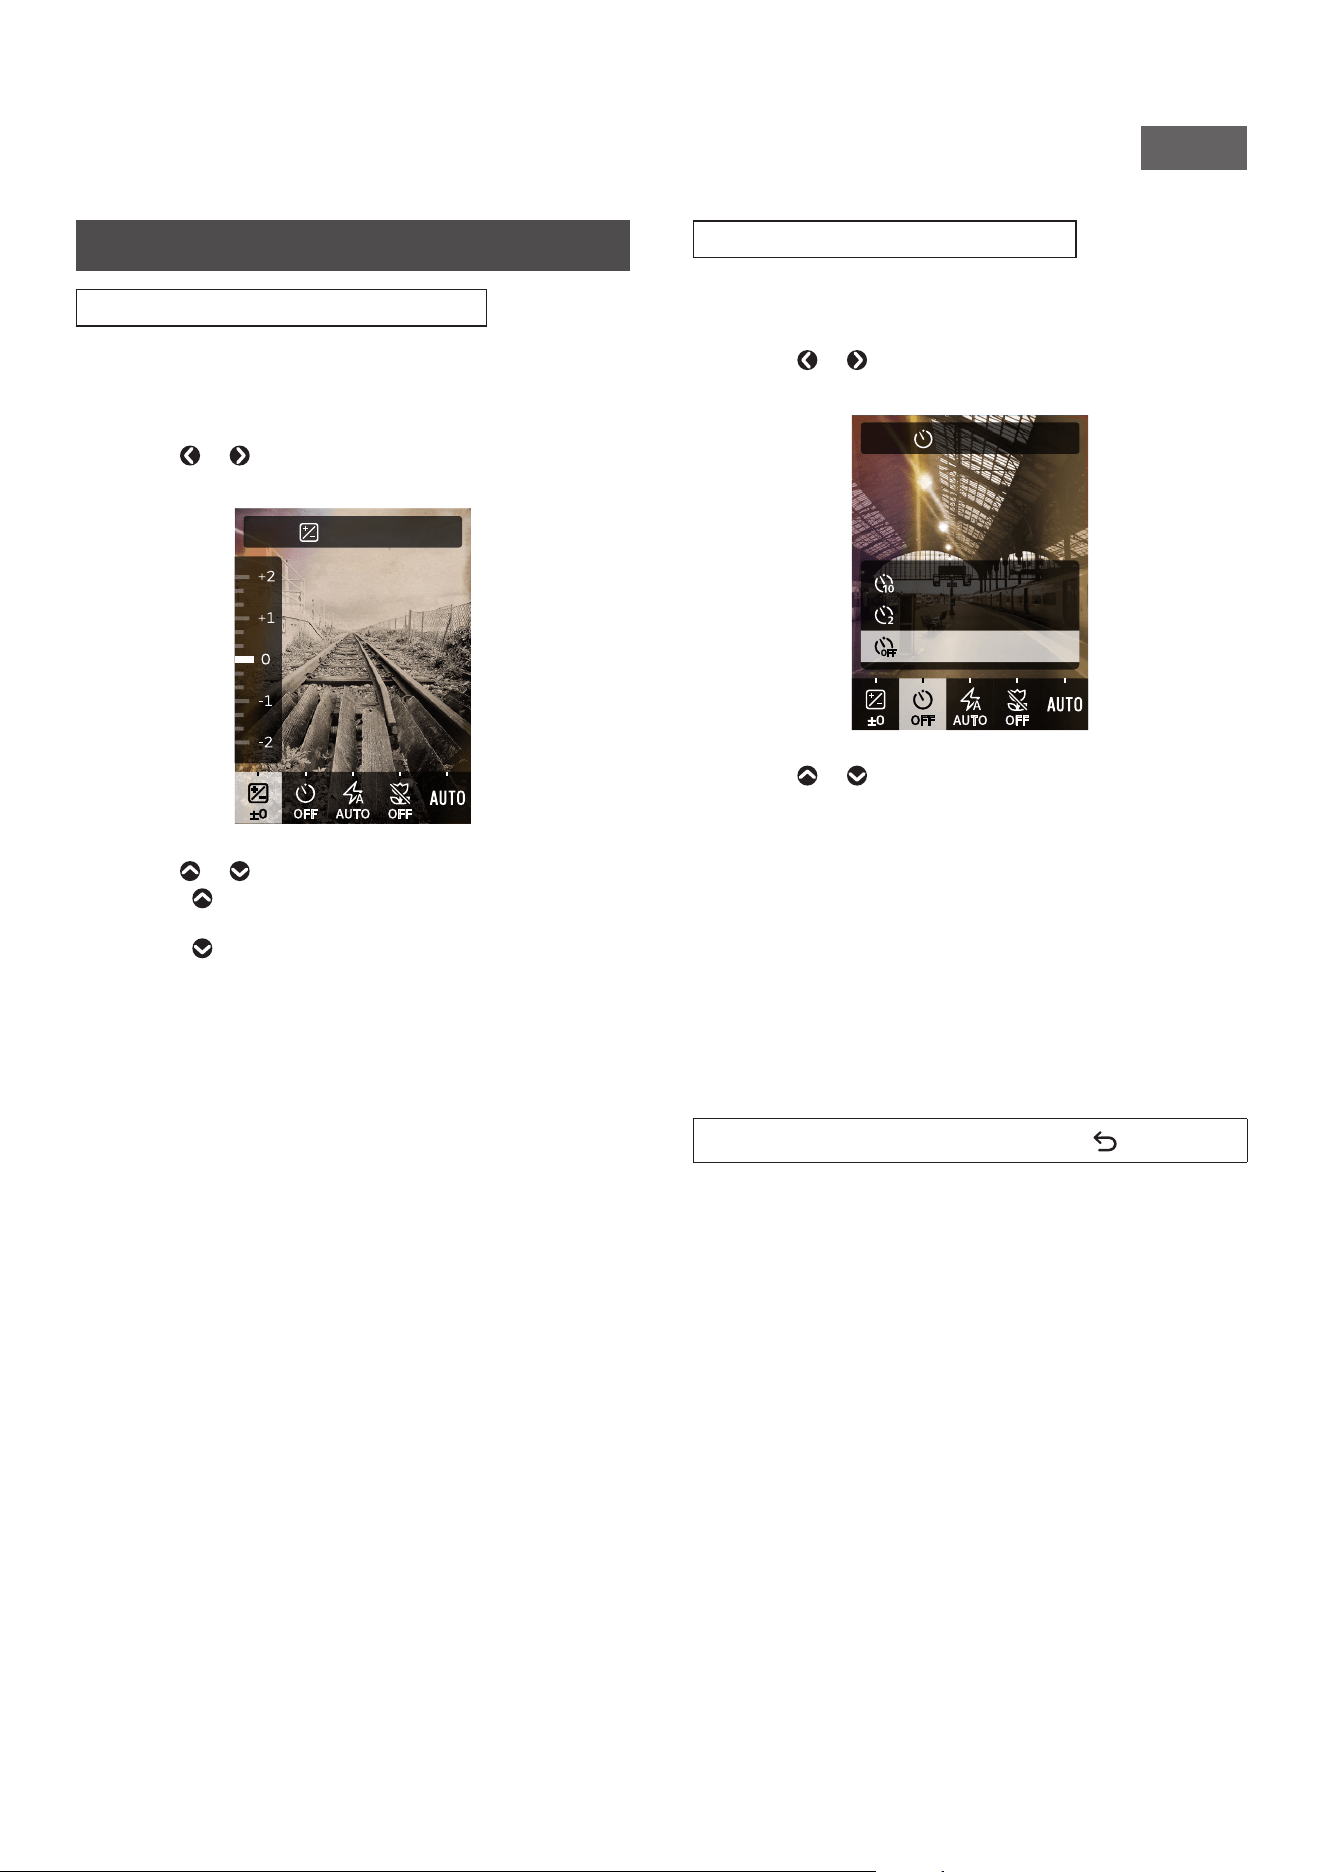
Selecting a Film Effect
Follow the steps below to select a film effect.
1
Display the shooting screen�
2
Turn the Film dial to select the desired film effect�
The following screen appears.
FILM #1 Normal
• To remove the applied film effect, select [Normal] from the
film effect menu.
• Press the Effect reset button to cancel the applied lens
and film effects.
You can also press the + (Function) button to set your favorite
lens and film effect combinations.
Specifying a Film and Lens Effect Combination
You can set a combination of your favorite lens and film effects.
You can use a saved effect combination by pressing the + (Function)
button.
Setting an Effect Combination
1
Display the shooting screen�
2
Rotate the Lens dial to select the desired lens effect�
3
Turn the Film dial to select the desired film effect�
4
Press the + (Function) button�
5
Press [MENU/OK]�
6
Press or to select [Favorite[1]] to [Favorite[3]]�
Up to three effect combinations can be set.
7
Press [MENU/OK]�
The effect combination is set.
Using your Effect Combinations
1
Display the shooting screen�
2
Press the + (Function) button twice�
3
Press or to select one of the saved 3 Favorites�
4
Press [MENU/OK]�
The effect combination is applied.
17
NA_EN
Miscellaneous Actions
Changing the Brightness of the Image
Adjust the brightness of the image. Use this function when the
subject is too bright or too dark, or when there is much contrast
(difference between light and dark) between the subject and the
background.
1
Press or until [EXPOSURE] appears on the
shooting screen�
EXPOSURE
2
Press or to correct the exposure�
• Press to correct the exposure to the + side to brighten
the entire image.
• Press to adjust the exposure to the - side to darken the
entire image.
3
Press the Shutter button all the way down�
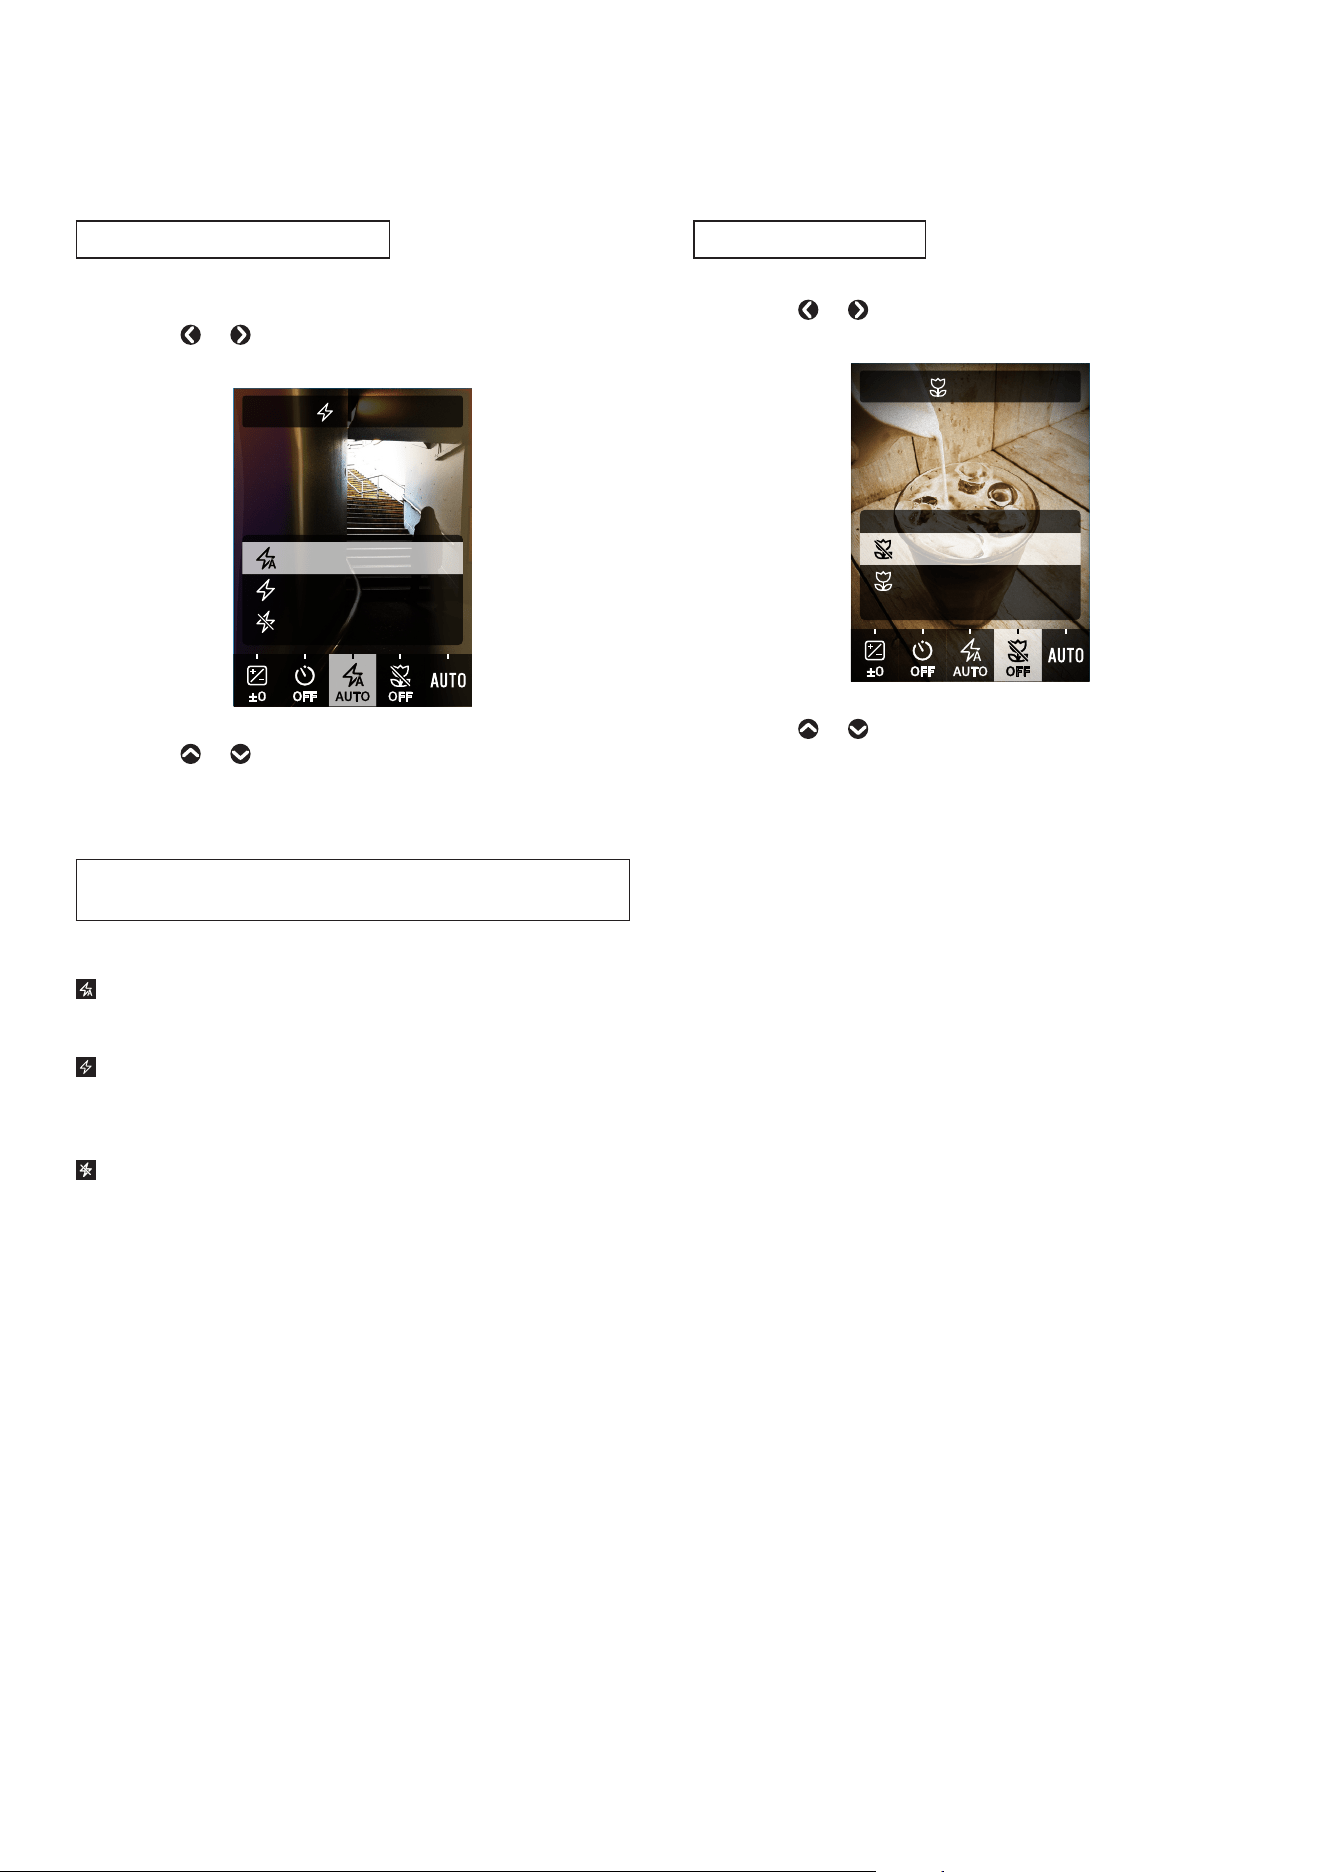
Using the Self-Timer to Take Photos
Use this function to take a group photo including the
photographer or to prevent the camera from moving while the
Shutter button is pressed.
1
Press or until [SELF-TIMER] appears on the
shooting screen�
SELF-TIMER
10 SEC
2 SEC
OFF
2
Press or to select [2 SEC] or [10 SEC]�
The icon corresponding to the set self-timer appears in the
center of the screen.
• If you do not want to set a self-timer, select [OFF].
3
Press the Shutter button all the way down�
The countdown starts.
When [2 SEC] is selected:
When you press the Shutter button, the self-timer light
flashes for 2 seconds before taking the photo.
When [10 SEC] is selected:
When you press the Shutter button, the self-timer light lights
up and starts flashing three seconds before taking the photo.
To cancel the self-timer halfway through, press (Back).
18
Taking Photos with the Flash
Use the flash when taking photos at night or in a dark room. You
can also set the camera so that the flash does not fire.
1
Press or until [FLASH] appears on the shooting
screen�
FLASH
AUTO FLASH
FORCED FLASH
SUPPRESSED FLASH
2
Press or to select the flash setting�
• For more information on flash settings, see “Types of
Flash” below.
3
Press the Shutter button all the way down�
•If you press the Shutter button while the flash is charging, the
self-timer light will flash and the shutter will not release.
■ Types of Flash
AUTO FLASH
The flash will fire automatically when the surroundings are
dark. This setting applies to most situations.
FORCED FLASH
The flash will fire regardless of the brightness of the
surroundings. Use this setting when the subject is dark due to
backlighting.
SUPPRESSED FLASH
The flash will not fire even if the surroundings are dark.
This setting is suitable for shooting in places where flash
photography is prohibited.
When shooting in dark places without using the flash, it is
recommended to steady the camera on a table or similar
surface.
Taking Macro Photos
Use macro shooting when you want to get close to the subject.
1
Press or until [MACRO] appears on the shooting
screen�
MACRO
OFF
ON
2
Press or and select [ON]�
3
Press the Shutter button all the way down�
Macro shooting is performed.
19
NA_EN
Matching the Light Source when Taking Photos
By setting the white balance to match the light source, such as
sunlight or artificial lighting, you can shoot with colors closer to
real life.
1
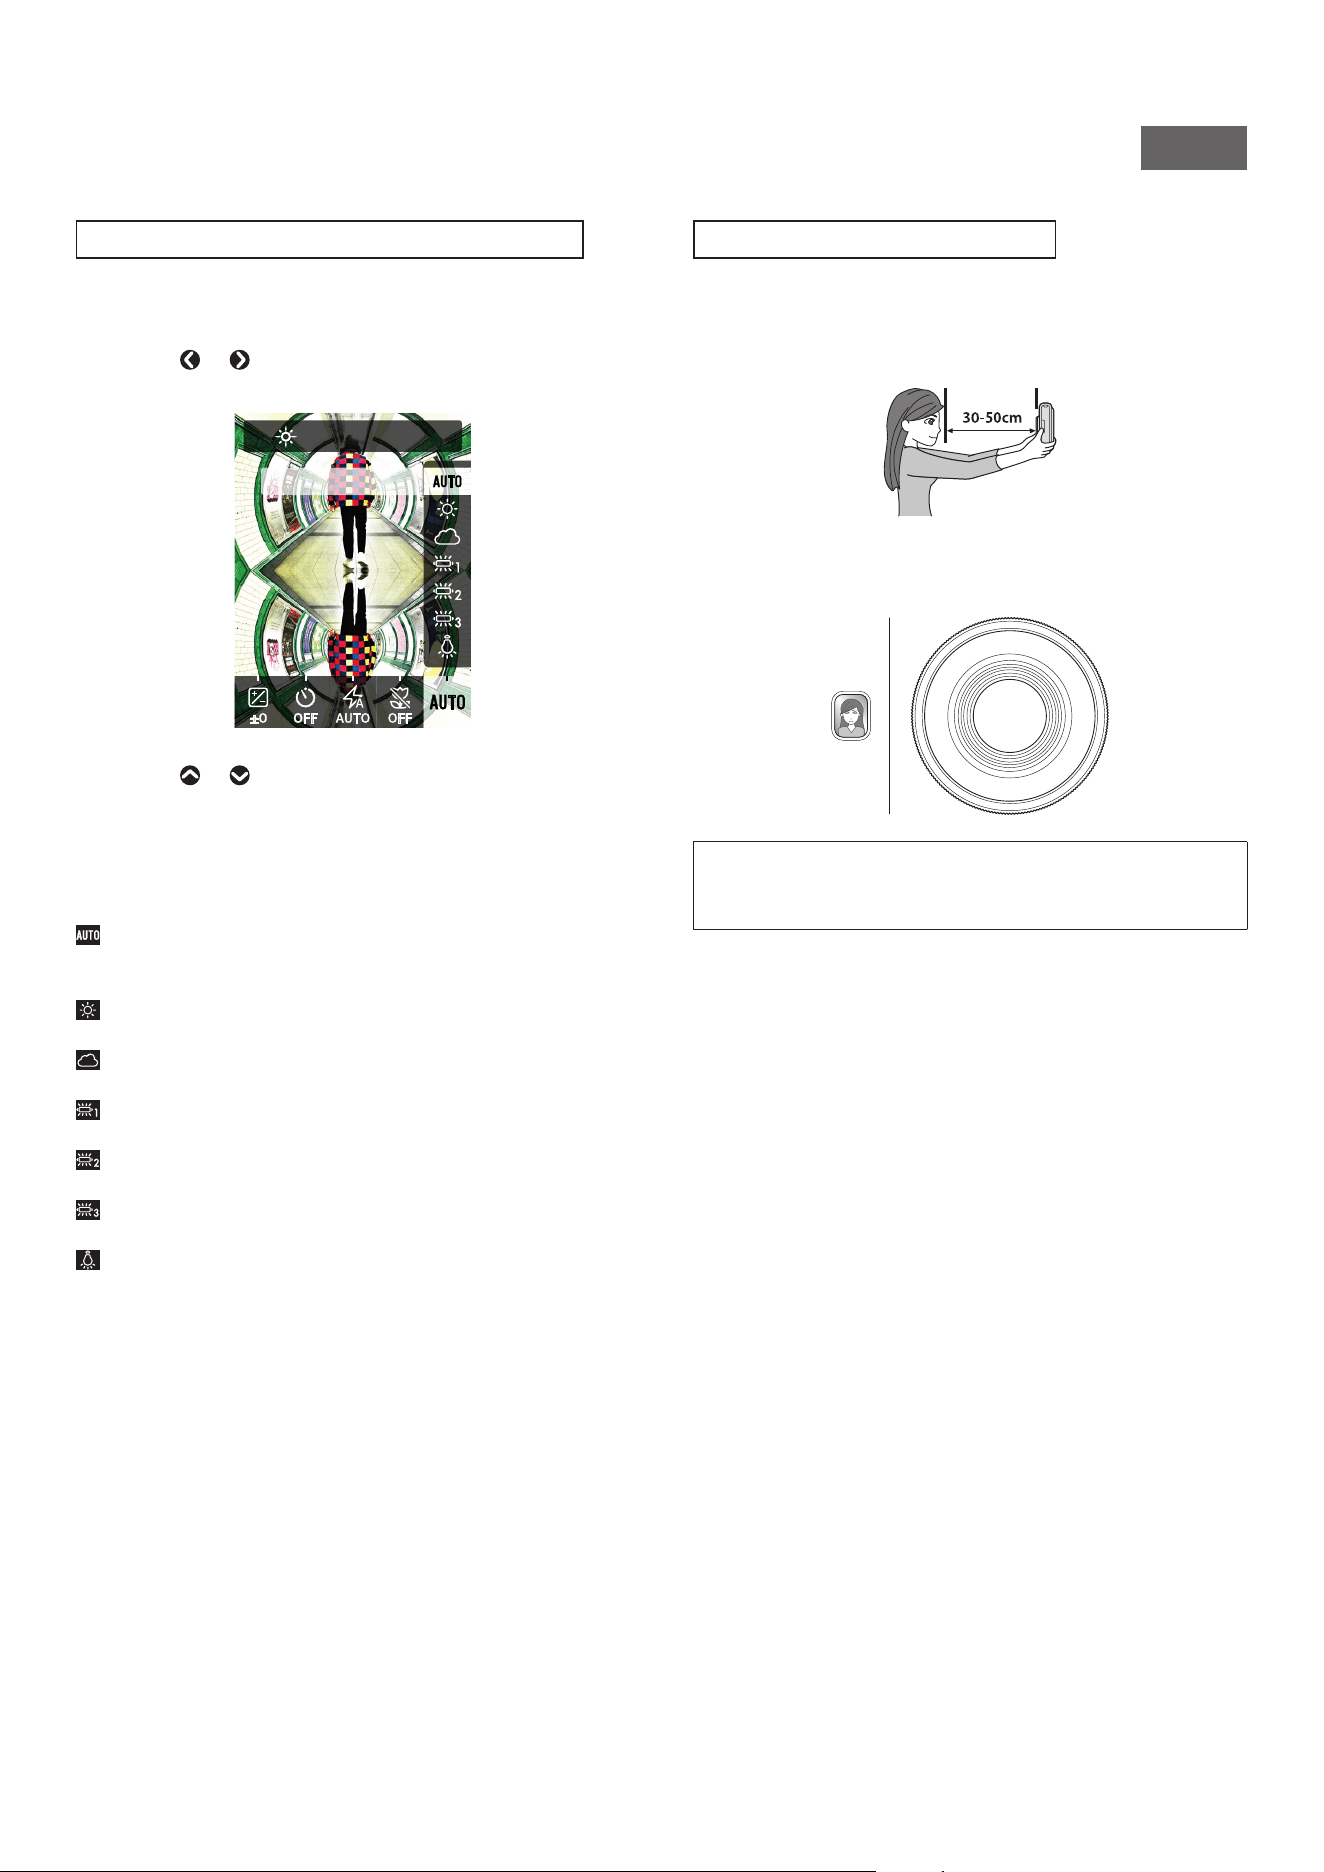
Press or until [WHITE BALANCE] appears on the
shooting screen�
WHITE BALANCE
AUTO
2
Press or to select one of the settings�
• For details on setting the white balance, see “Types of
White Balance” below.
3
Press the Shutter button all the way down�
■ Types of White Balance
AUTO
The camera sets the white balance automatically.
AUTO is recommended for normal shooting.
FINE
For outdoor shooting in sunny weather.
SHADE
For shooting on cloudy days or in the shade.
FLUORESCENT LIGHT-1
For shooting under daylight fluorescent lighting.
FLUORESCENT LIGHT-2
For shooting under daylight white fluorescent lighting.
FLUORESCENT LIGHT-3
For shooting under white fluorescent lighting.
INCANDESCENT
For shooting under light bulbs and incandescent lamps.
Taking a Photo of Yourself (Selfie)
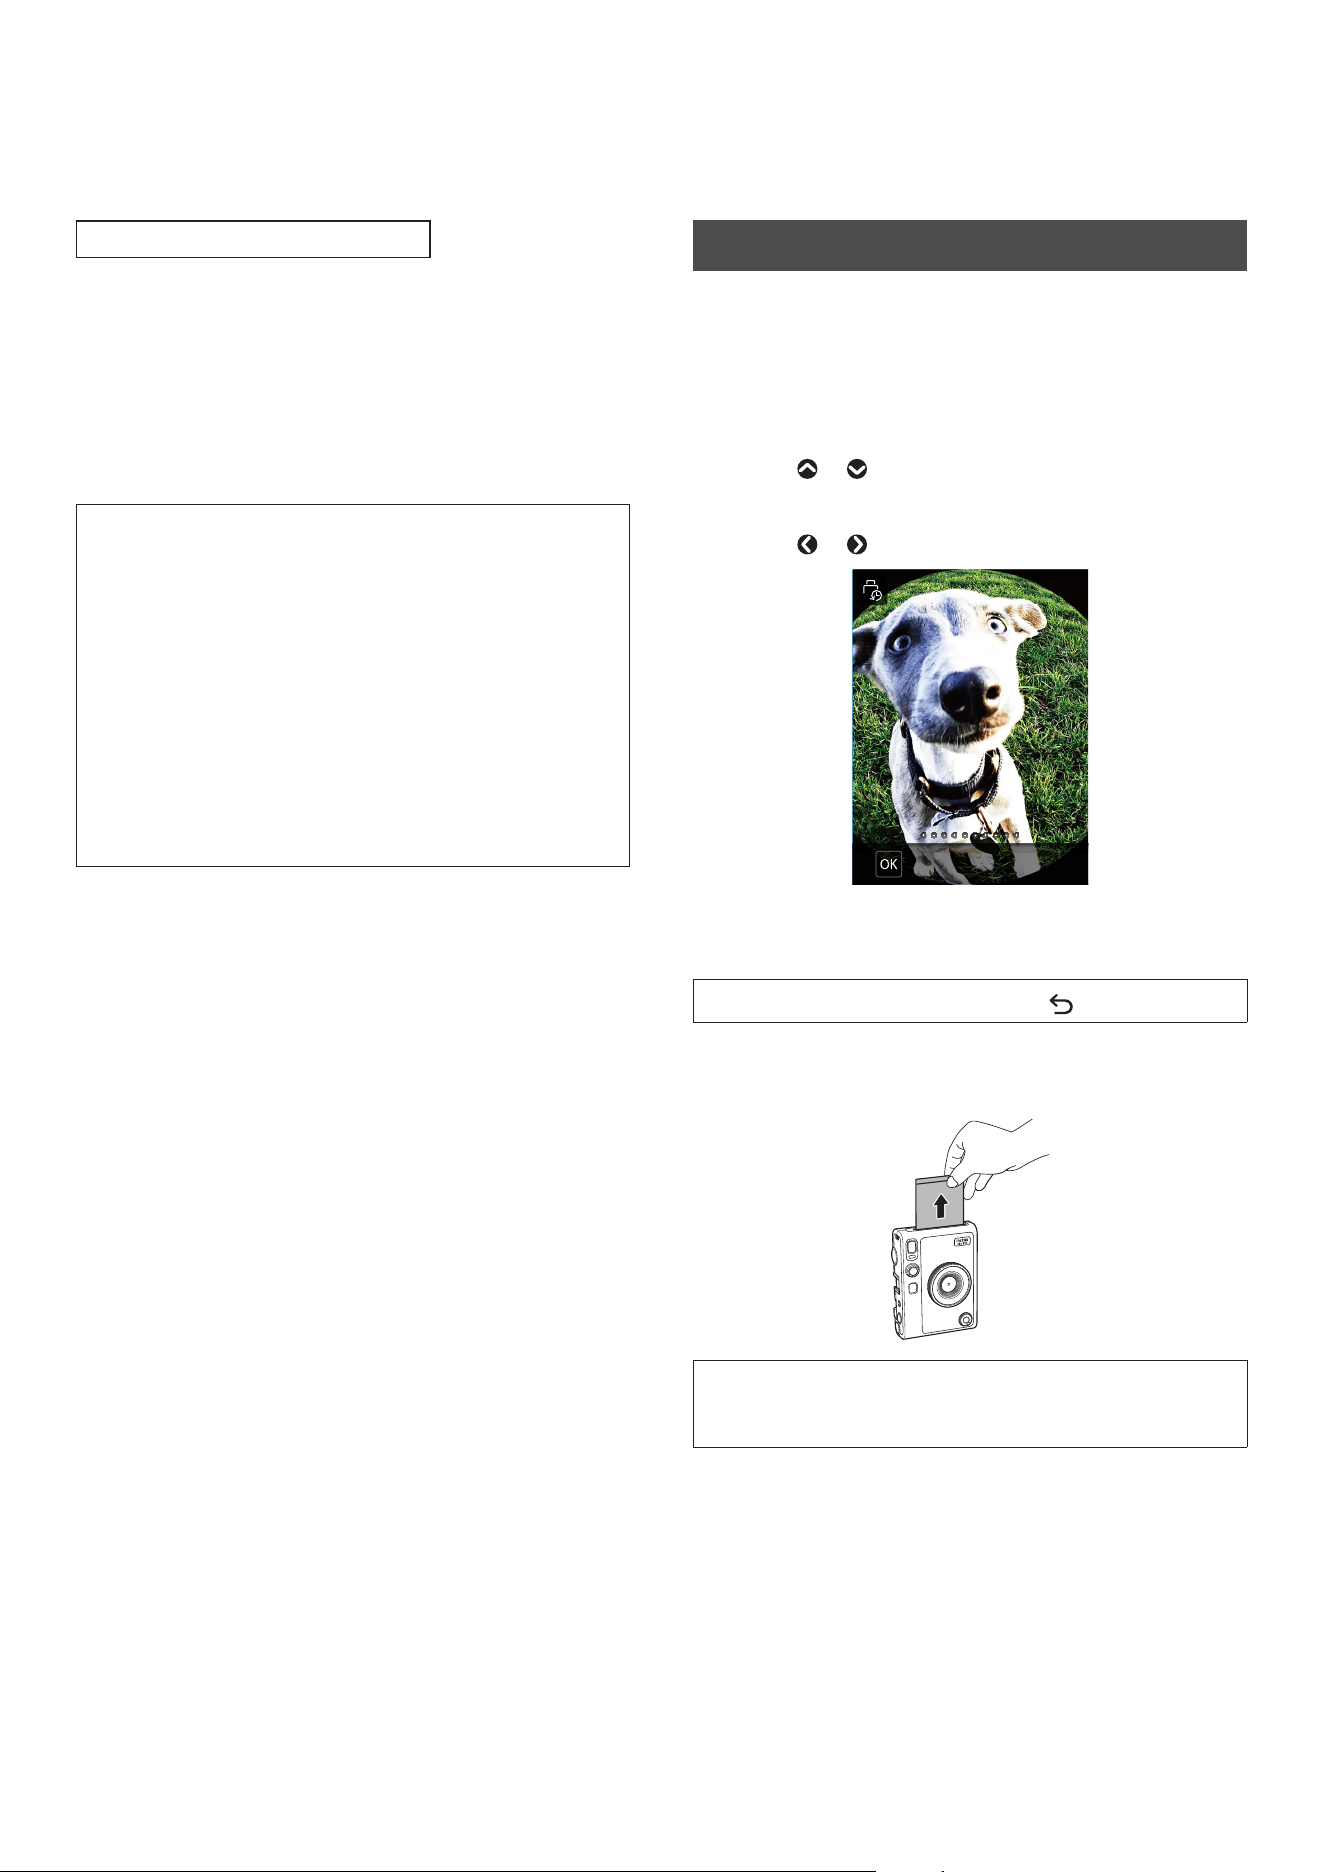
You can use the selfie mirror to take photos of yourself.
1
Hold the camera securely so that your face comes 30
to 50 cm away from the end of the lens�
• Hold the camera securely.
2
Use the selfie mirror next to the lens to confirm your
composition and then take a photo�
•Do not stare at the flash when taking photos. Looking at the
flash while taking a photo may cause temporary visual
impairment.
20
Using AF/AE Lock to Take Photos
When taking a photo, pressing and holding the Shutter button
halfway to lock the focus is called “AF Lock,” and pressing and
holding the Shutter button to lock the brightness is called “AE
Lock.” This is useful when you want to take a photo where the
subject is not in the center of the screen.
1
Press the Shutter button halfway to bring the
subject into focus or to change the composition�
2
Press the Shutter button fully to take the photo�
It is recommended that you use AE/AF lock when taking photos
of the following objects, as they may be difficult to focus on.
•Shiny objects, such as mirrors and car bodies
•Subjects that are moving at high speed
•Subjects on the other side of glass
•Dark objects, such as hair or fur, that absorb light rather than
reflect it
•Insubstantial objects such as smoke or flames
•Subjects with little difference between light and dark (for
example, a person wearing clothes the same color as the
background)
•When there is a large contrast difference in the AF frame and
the subject is in that area (for example, a subject in front of a
high-contrast background)
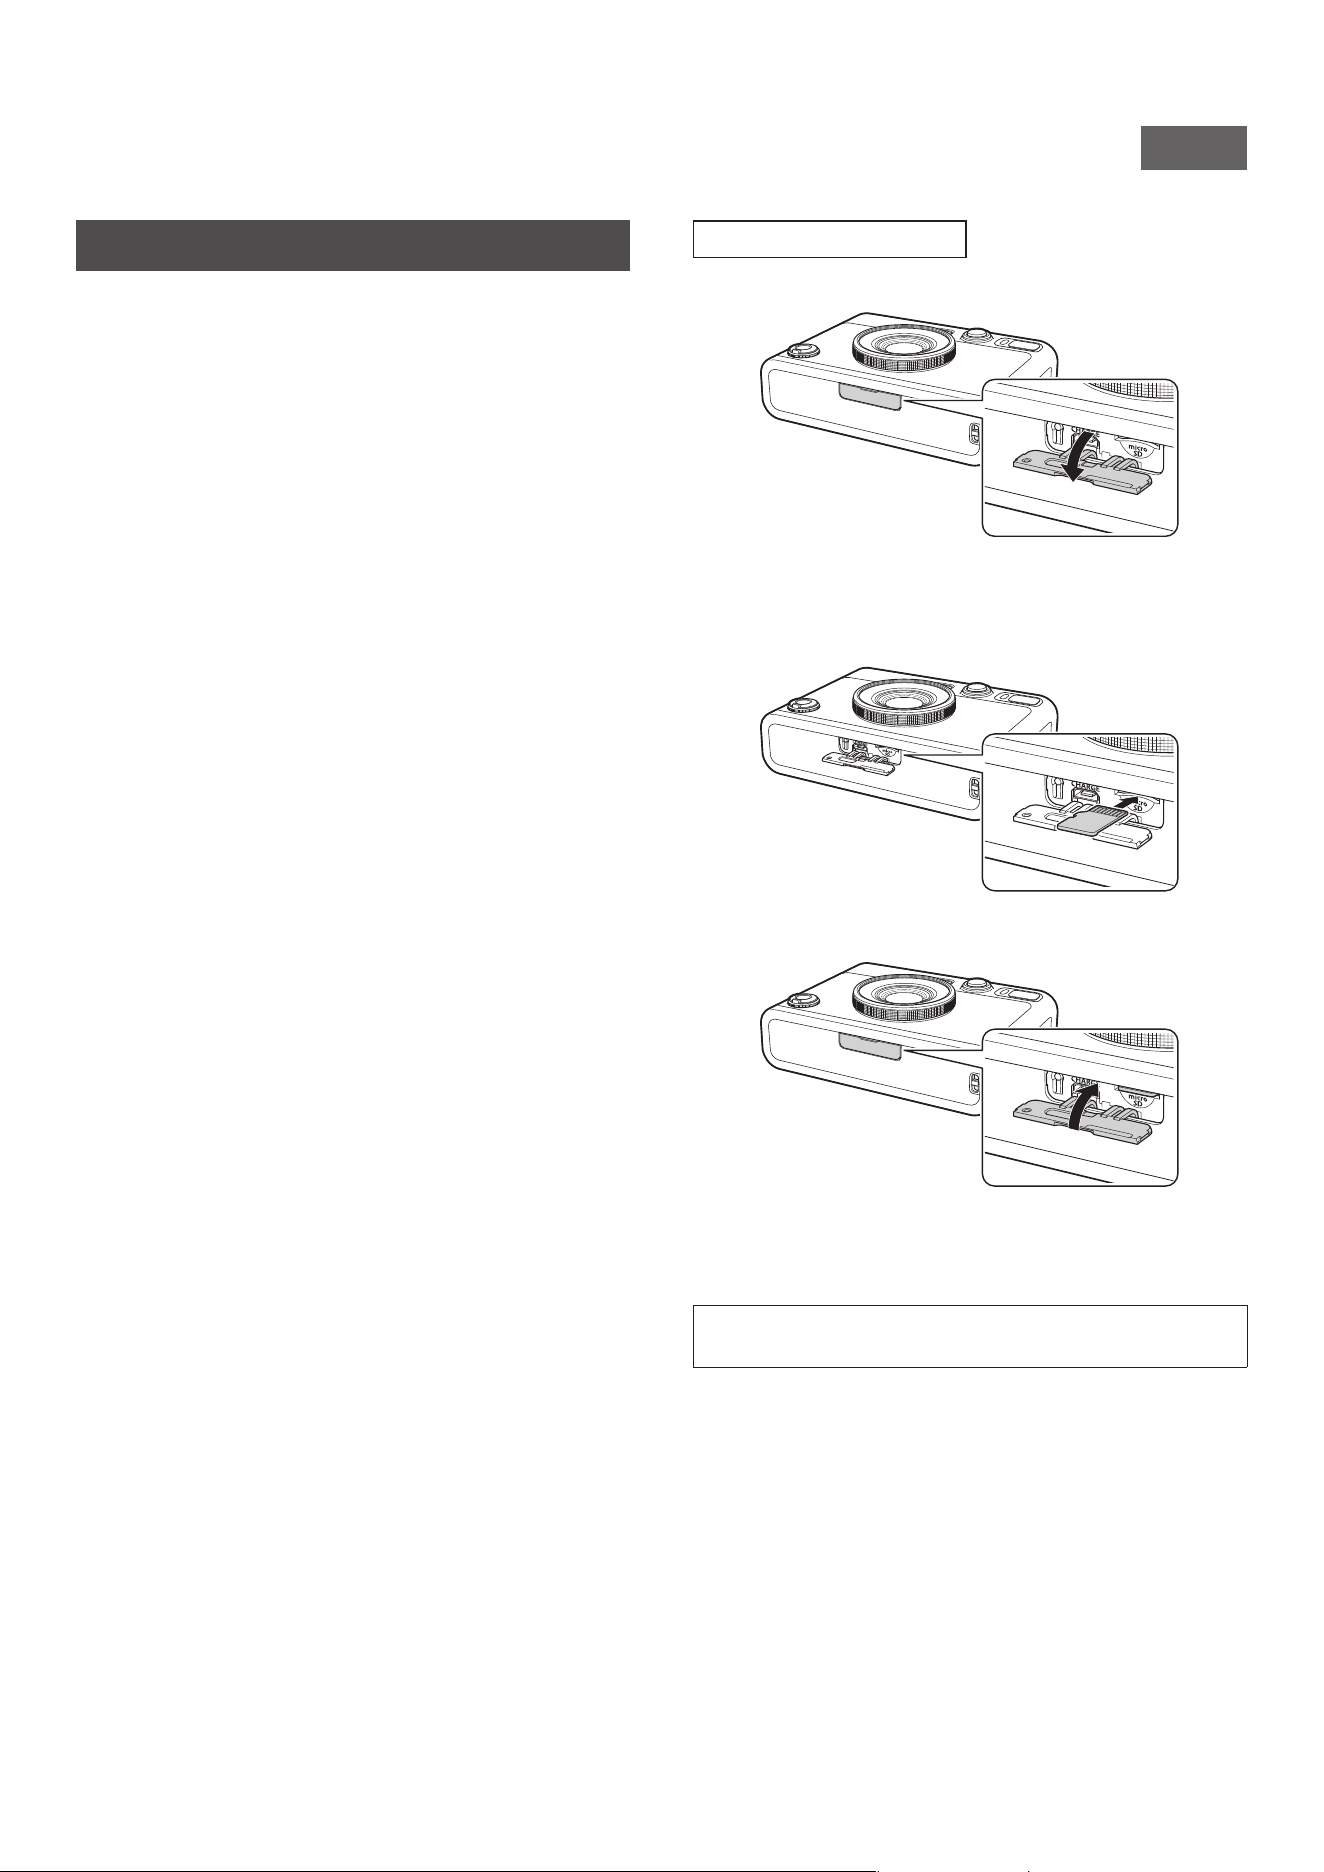
Printing from Print History
You can display images that you printed previously and view the
settings (image effects, etc.) used at that time.
You can print the images you have taken by following the steps
below.
1
On the playback screen, press [MENU/OK]�
The playback menu appears.
2
Press or to select [PRINT HISTORY]�
3
Press [MENU/OK]�
4
Press or to select the image you want to print�
ERASE
5
Turn the Print lever�
Printing starts.
To cancel printing halfway through, press (Back).
6
After the sound of the film ejecting stops, remove
the ejected film from the camera by the film edge�
CAUTION
Be careful not to let your fingers or the shoulder strap cover the
Film ejection slot.
21
NA_EN
Using the Memory Card
The camera's internal memory can store about 45 still images,
but you can store more images by using a memory card (sold
separately). You will also need a memory card to upgrade the
firmware.
Precautions Regarding Memory Cards
•This camera is compatible with micro SD cards and micro SDHC
cards. Using other types of memory cards may cause damage to
the camera.
•Memory cards are small and may be accidentally swallowed by
infants. Keep them out of the reach of infants. In the unlikely
event that an infant swallows a memory card, consult a
physician immediately.
•Do not turn off the camera or remove the memory card during
formatting or while recording/deleting data� The memory
card may be damaged�
•Do not use or store memory cards in an environment that is
prone to strong static electricity or electrical noise.
•Inserting a memory card charged with static electricity into the
camera may cause the camera to malfunction. If this happens,
turn the camera off and then on again.
•Do not carry a memory card in the pocket of your pants. A
strong force may be applied when you sit down, which may
cause the memory card to break.
•The memory card may become hot to the touch after prolonged
use, but this is normal.
•Do not put any labels on memory cards. If the label comes off, it
may cause the camera to malfunction.
Precautions Regarding Using a Memory Card on a PC
•Always format an unused memory card or a memory card that
has been used on a PC or other device before using it in the
camera.
•When a memory card is formatted in the camera and used
for shooting and recording, folders are automatically created.
Do not use your PC to rename or delete folders or files on the
memory card. Doing so may make the memory card in the
camera unusable.
•Do not use your PC to delete images on the memory card.
Always use the camera.
•If you want to edit an image file, copy or move the image file to
a hard disk or similar device, and then edit the copied or moved
image file.
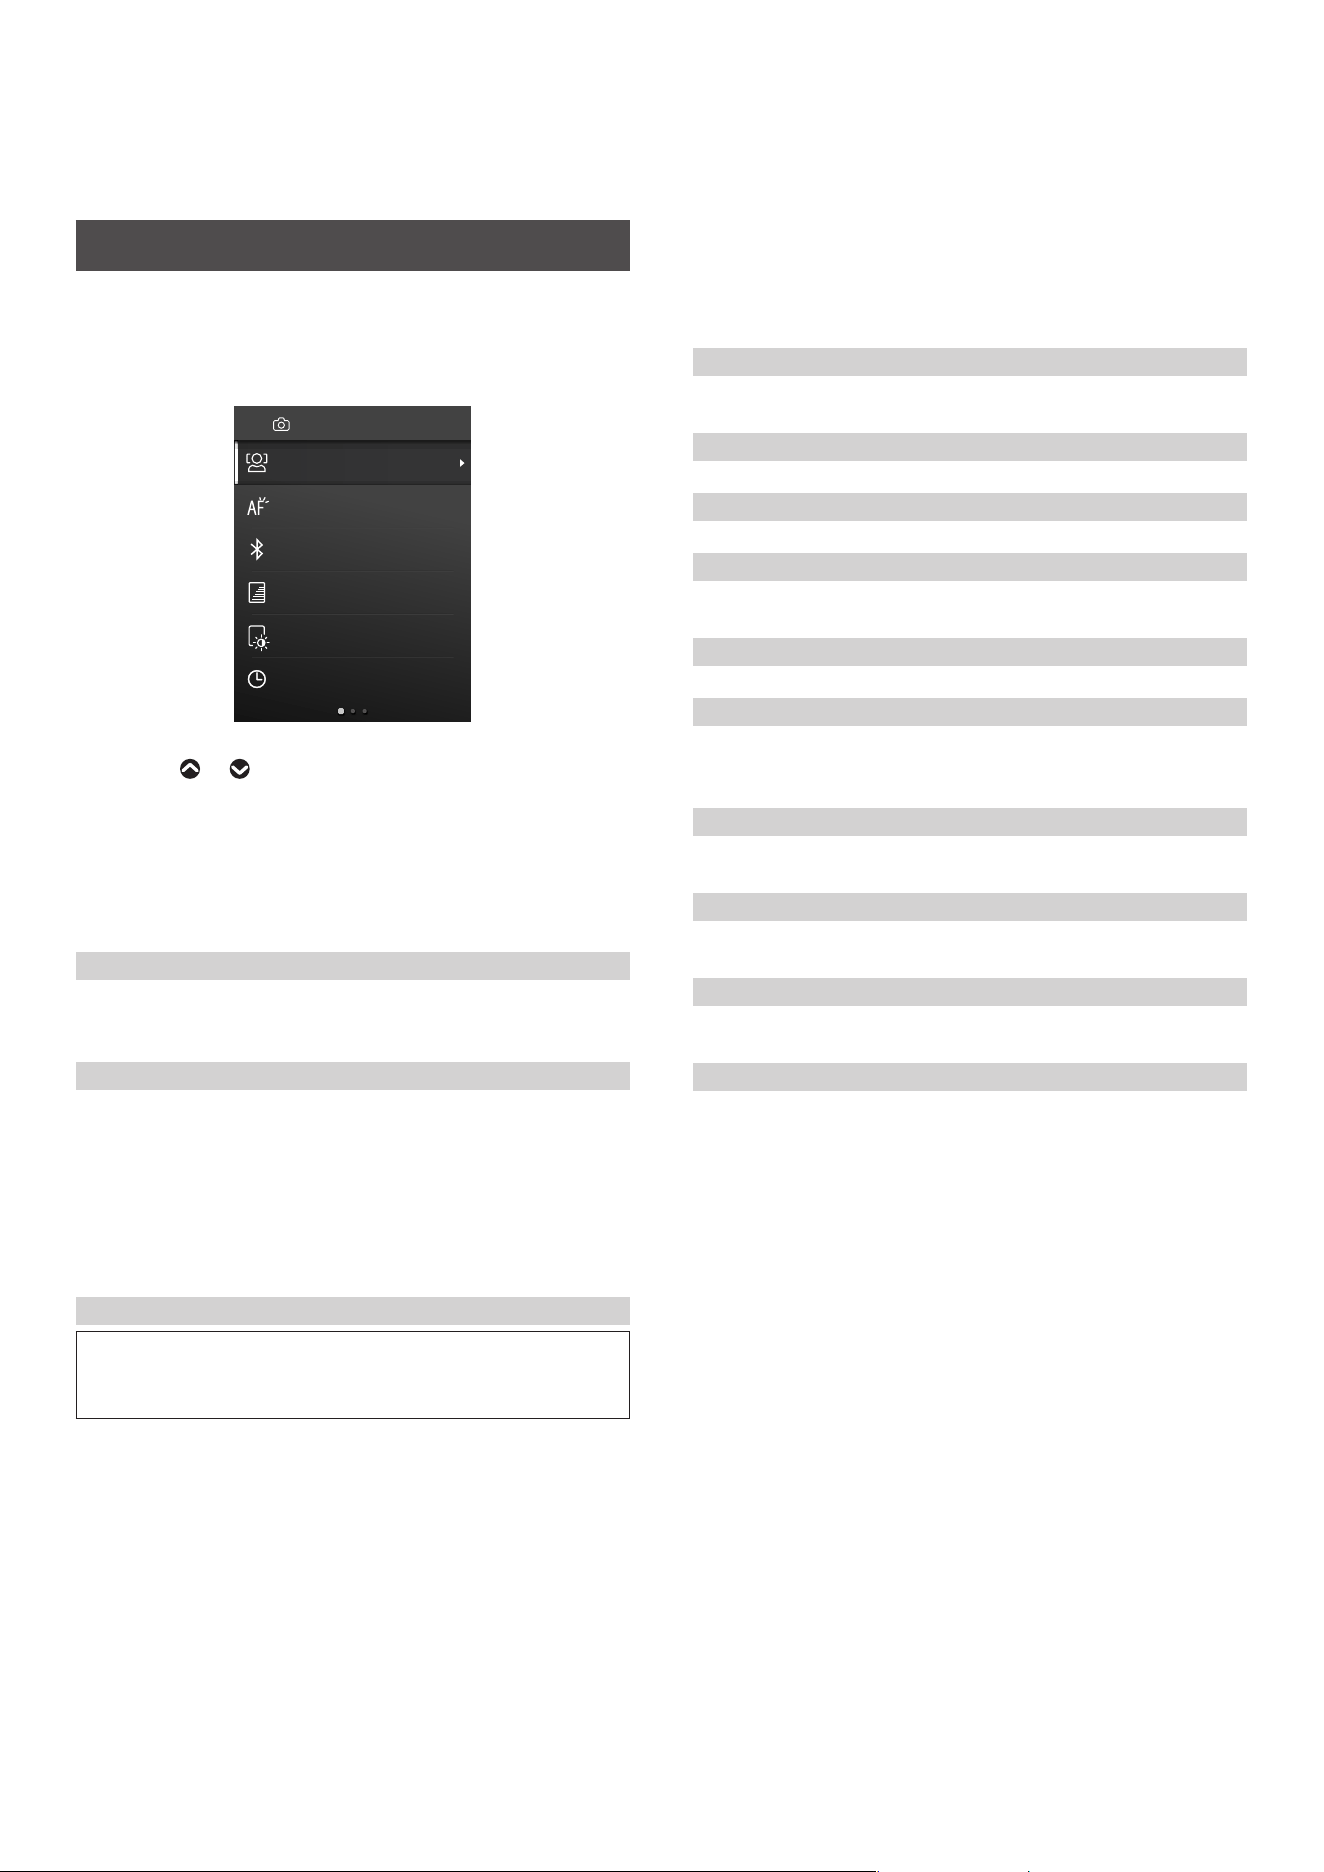
Inserting a Memory Card
1
Open the card slot cover�
2
Fully insert the memory card into the camera in the
correct orientation as shown below until you hear a
“click�”
3
Close the card slot cover�
•To remove the memory card, push the card in with your finger
and then release your finger gently. The card will be unlocked
and is ready to be removed.
If you suddenly release your finger while removing the memory
card, the card may pop out. Release your finger gently.
22
Using the Shooting Menu
You can use the shooting menu to change various settings related
to shooting.
1
On the shooting screen, press [MENU/OK]�
The shooting menu appears.
FACE DETECTION
AF ILLUMINATOR
BLUETOOTH SETTINGS
Print Brightness
PRINT QUALITY MODE
DATE/TIME
SHOOTING MENU
2
Press or to select an item�
• For details on each item, see “Shooting Menu Items” below.
3
Press [MENU/OK] to change the setting�
The setting is applied and the display returns to the shooting
screen.
■ Shooting Menu Items
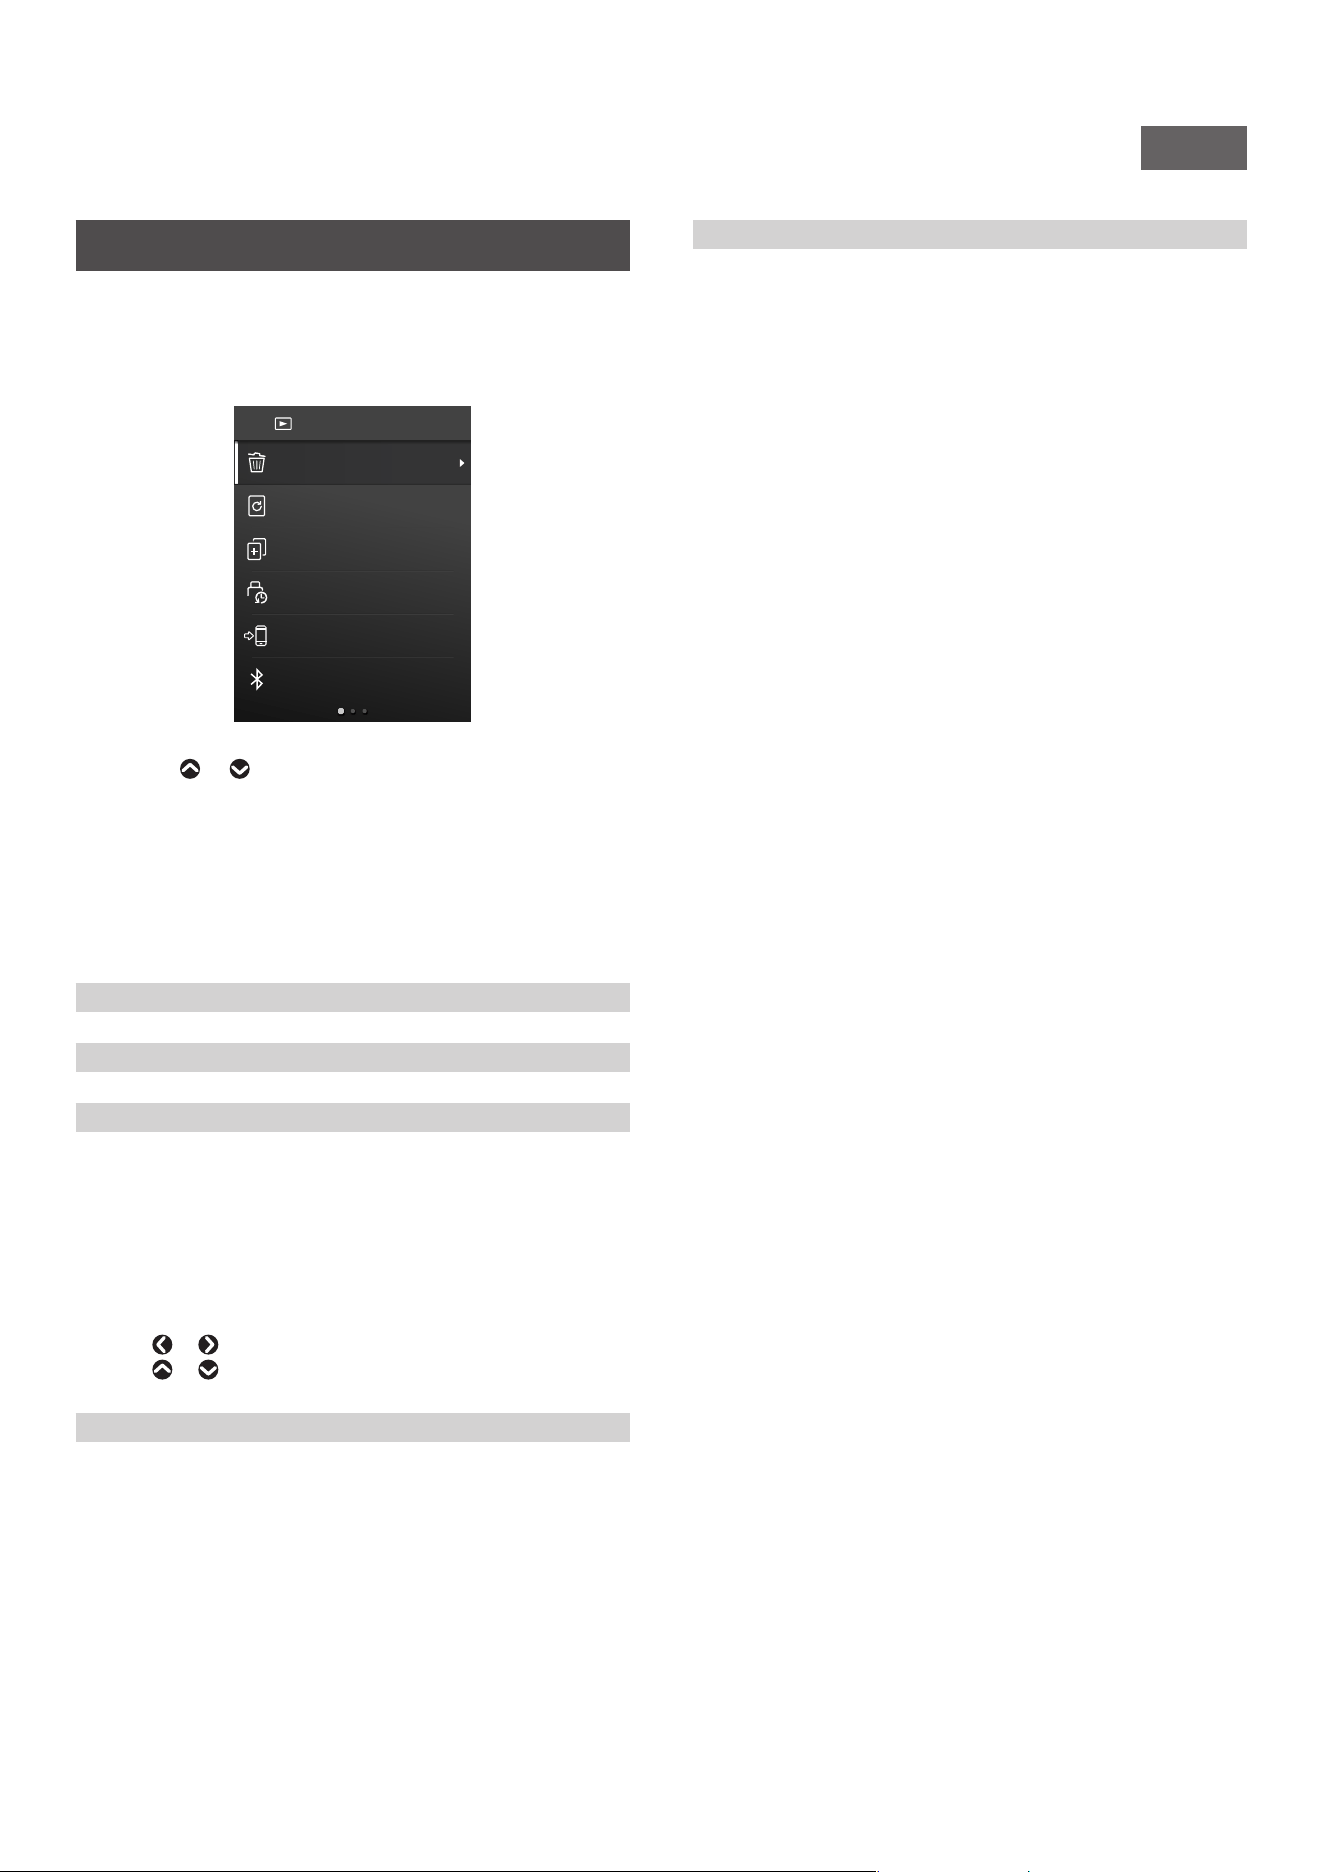
[FACE DETECTION]
When [FACE DETECTION] is turned on, the camera detects the
person's face and adjusts the focus and brightness to the face
instead of the background to make the person brightly stand out.
[AF ILLUMINATOR]
When set to ON, the AF ILLUMINATOR lights up from the time the
Shutter button is pressed halfway until the subject is in focus,
making it easier to focus on a dark subject.
•Depending on the scene, it may be difficult to get the subject in
focus even when the AF ILLUMINATOR is activated.
•The AF ILLUMINATOR may not be fully effective when shooting
close to the subject.
•Do not flash the AF ILLUMINATOR close to the human eye.
[BLUETOOTH SETTINGS]
Install the INSTAX MINI EVO Smartphone App on your
Smartphone before pairing the camera. Please see page 9 for
instructions.
[PAIRING REGISTRATION]:
When connecting the camera to your Smartphone via Bluetooth
for the first time, you will need to pair the devices together. Please
refer to the following procedure for pairing.
1.
Select [BLUETOOTH SETTINGS] from the SHOOTING MENU or
the PLAYBACK MENU.
2.
Select [PAIRING REGISTRATION] and press [MENU/OK]
3.
Press [SETTINGS] on the main screen of the INSTAX MINI EVO
Smartphone App
4.
Press [Bluetooth settings]
5.
Press [Connect]
6.
Allow pairing
DELETE PAIRING REGISTRATION:
You can delete the information of a paired Smartphone.
[INFORMATION]:
Displays the Bluetooth address, name of the paired device and
other paired device information.
[PRINT QUALITY MODE]
Set to INSTAX-Natural Mode for regular quality, or INSTAX-Rich
Mode for richer color representation (factory default).
[Print Brightness]
Set [×1 (standard)], [×1.5 (semi-bright)], or [×2.0 (bright)].
[DATE/TIME]
Sets the date and time.
[DATE STAMP]
Stamps the date on the image. If you want to erase the date
stamped on the image, set to [OFF].
[言語/LANG�]
Sets the language displayed on the LCD Screen.
[SOUND SET-UP]
Sets the volume of the operation sound, shutter volume, and start-
up sound.
If you want to turn off the sound, set this to [OFF].
[AUTO POWER OFF]
Sets the time to turn off automatically when the camera has not
been operated for a period of time.
[RESET]
Resets the settings to the factory default values.
The date and time set in DATE/TIME will not be reset.
[FORMAT]
Initializes the camera's internal memory or a memory card inserted
in the card slot. All stored images will be deleted.
[FIRMWARE UPGRADE]
Upgrades the camera firmware to the most recent release. There
are two methods to upgrade the firmware, as shown below.
A memory card is required to upgrade the firmware. Please
purchase a memory card separately and properly format it before
performing the below steps.
● Using the INSTAX MINI EVO Smartphone App
1.
Insert the memory card into the card slot of the camera
2.
Launch the INSTAX MINI EVO Smartphone App
3.
Tap [SETTINGS] on the main screen
4.
Click [Check for firmware update]
5.
Follow the on-screen instructions
● Using the Camera
1.
Download the latest firmware (FPUPDATE.DAT) from the
FUJIFILM website below using a PC or other device, and copy it
to the root directory of the memory card
https://instax.com/mini_evo/en/support/firmware/
2.
Insert the memory card with the copied firmware into the
camera card slot
3.
Select [FIRMWARE UPGRADE] from the SHOOTING MENU or
PLAYBACK MENU
4.
Follow the on-screen instructions
23
NA_EN
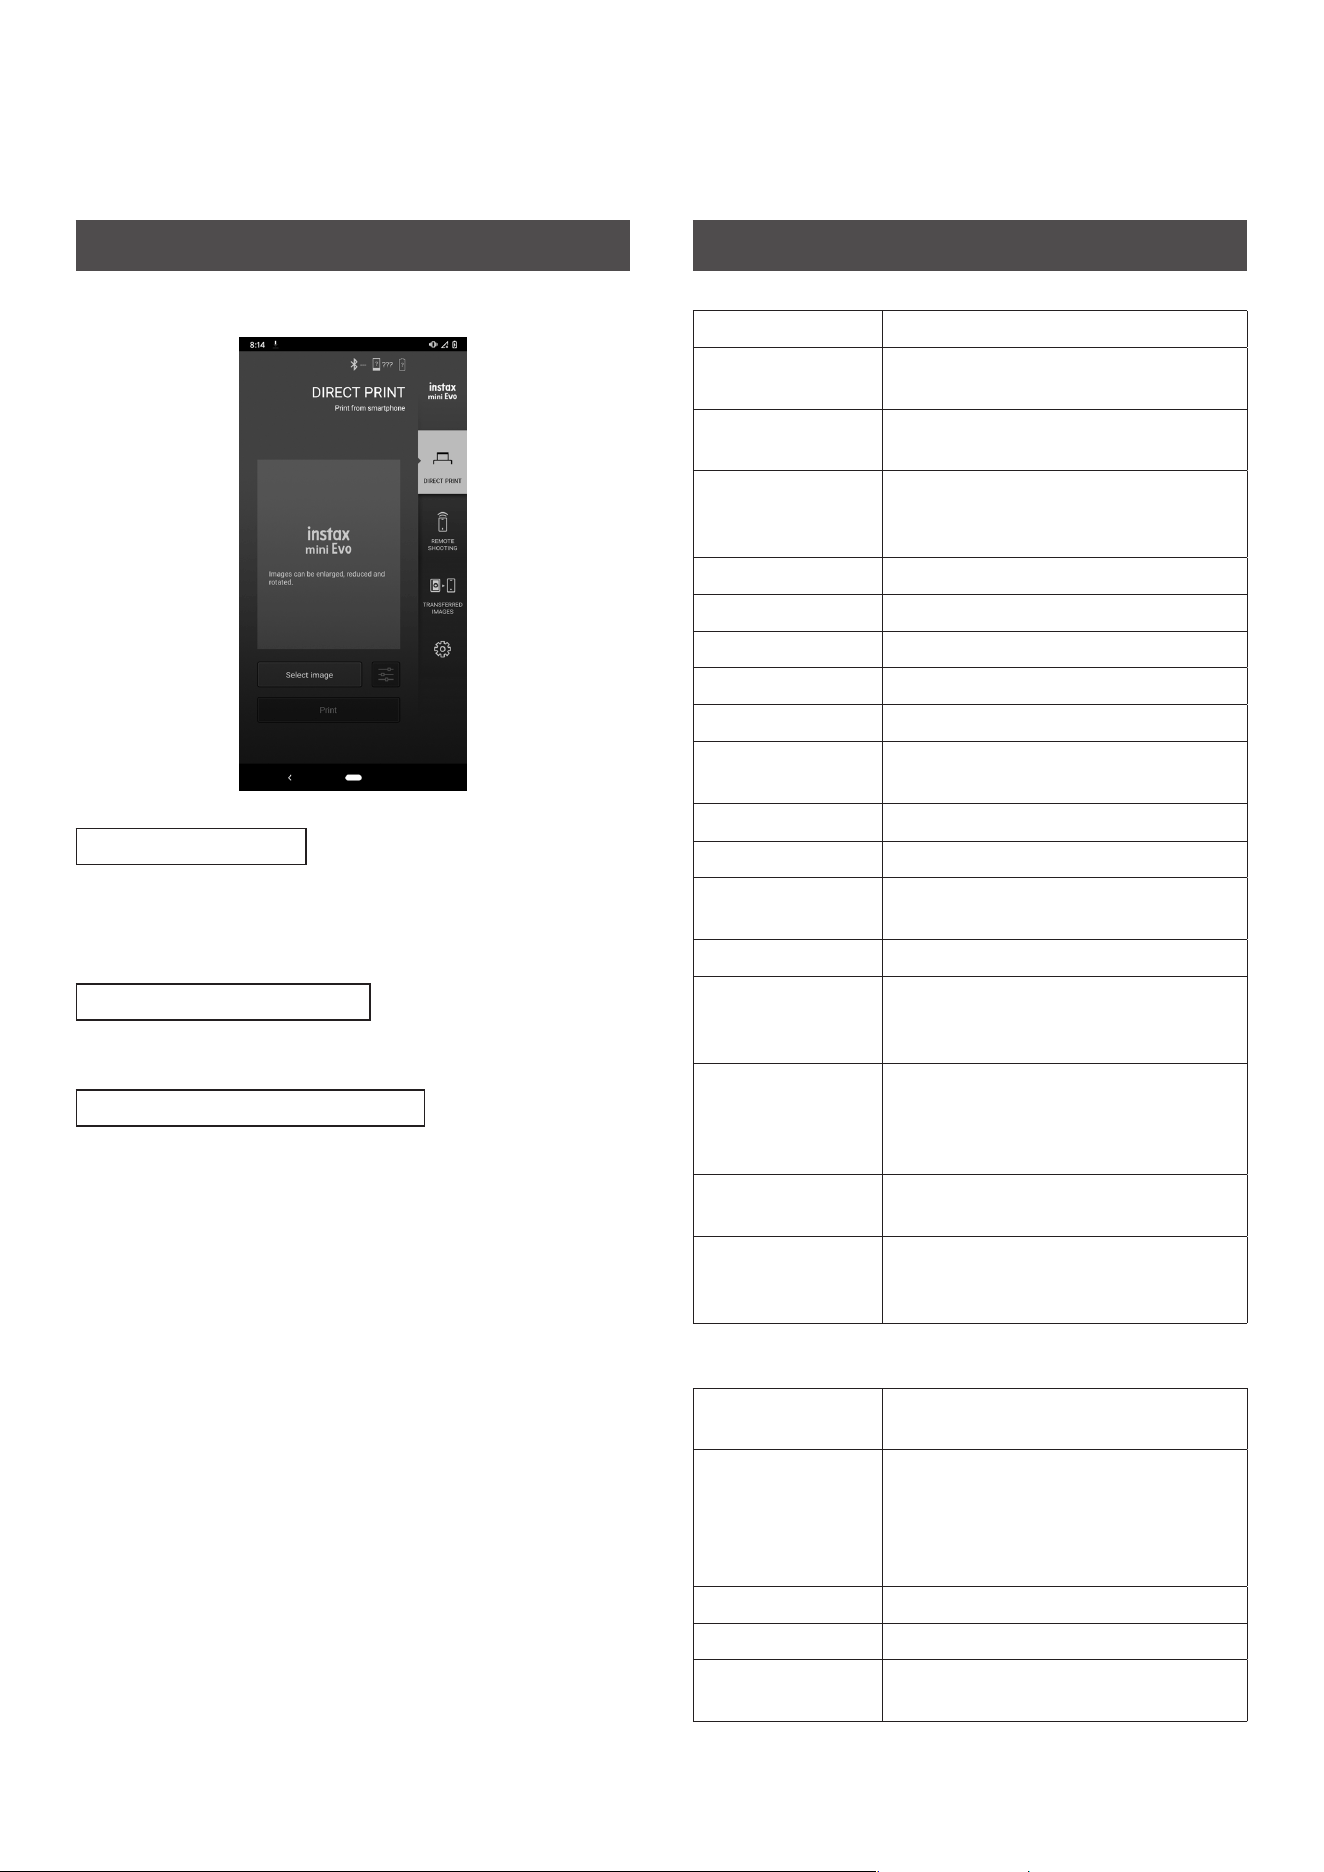
Using the Playback Menu
You can use the Playback Menu to change various playback-
related settings.
1
On the playback screen, press [MENU/OK]�
The playback menu appears.
ERASE
IMAGE ROTATE
COPY
PRINTED IMAGE
TRANSFER
PRINT HISTORY
BLUETOOTH SETTINGS
PLAYBACK MENU
2
Press or to select an item�
For details on each item, see ”Items in the Playback Menu”
below.
3
Press [MENU/OK] to change the setting�
The settings are applied and the display returns to the
previous screen.
■ Items in the Playback Menu
[ERASE]
Erases images one frame at a time or all frames at once.
[IMAGE ROTATE]
Rotates the image in 90-degree increments.
[COPY]
Copy images from the internal memory to the memory card or
from the memory card to the internal memory.
Follow the steps below.
1.
Select [COPY] from the Playback Menu
2.
Select the copy destination and press [MENU/OK]
3.
Select [FRAME] or [ALL FRAMES] and press [MENU/OK]
If you selected [ALL FRAMES], copying starts. If you selected
[FRAME], go to step 4.
4.
Press
or to select the image you want to copy.
5.
Press or and select [COPY]
6.
Press [MENU/OK]
[PRINT HISTORY]
•Displays up to 50 images that have been printed previously.
•Select an image and turn the Print lever to start printing.
•Press [MENU/OK] to clear the print history frame by frame.
[PRINTED IMAGE TRANSFER]
You can send images that were previously printed with the camera
to the INSTAX MINI EVO App and save them as INSTAX frame
images on your Smartphone.
For more information on the following items, please refer to the
same items in “Using the Shooting Menu”. (p. 22)
• BLUETOOTH SETTINGS
• PRINT QUALITY MODE
• Print Brightness
• DATE/TIME
• DATE STAMP
• 言語/LANG.
• SOUND SET-UP
• AUTO POWER OFF
• RESET
• FORMAT
• FIRMWARE UPGRADE
24
Smartphone App Functions
The following functions are available when connected with the
INSTAX MINI EVO Smartphone App.
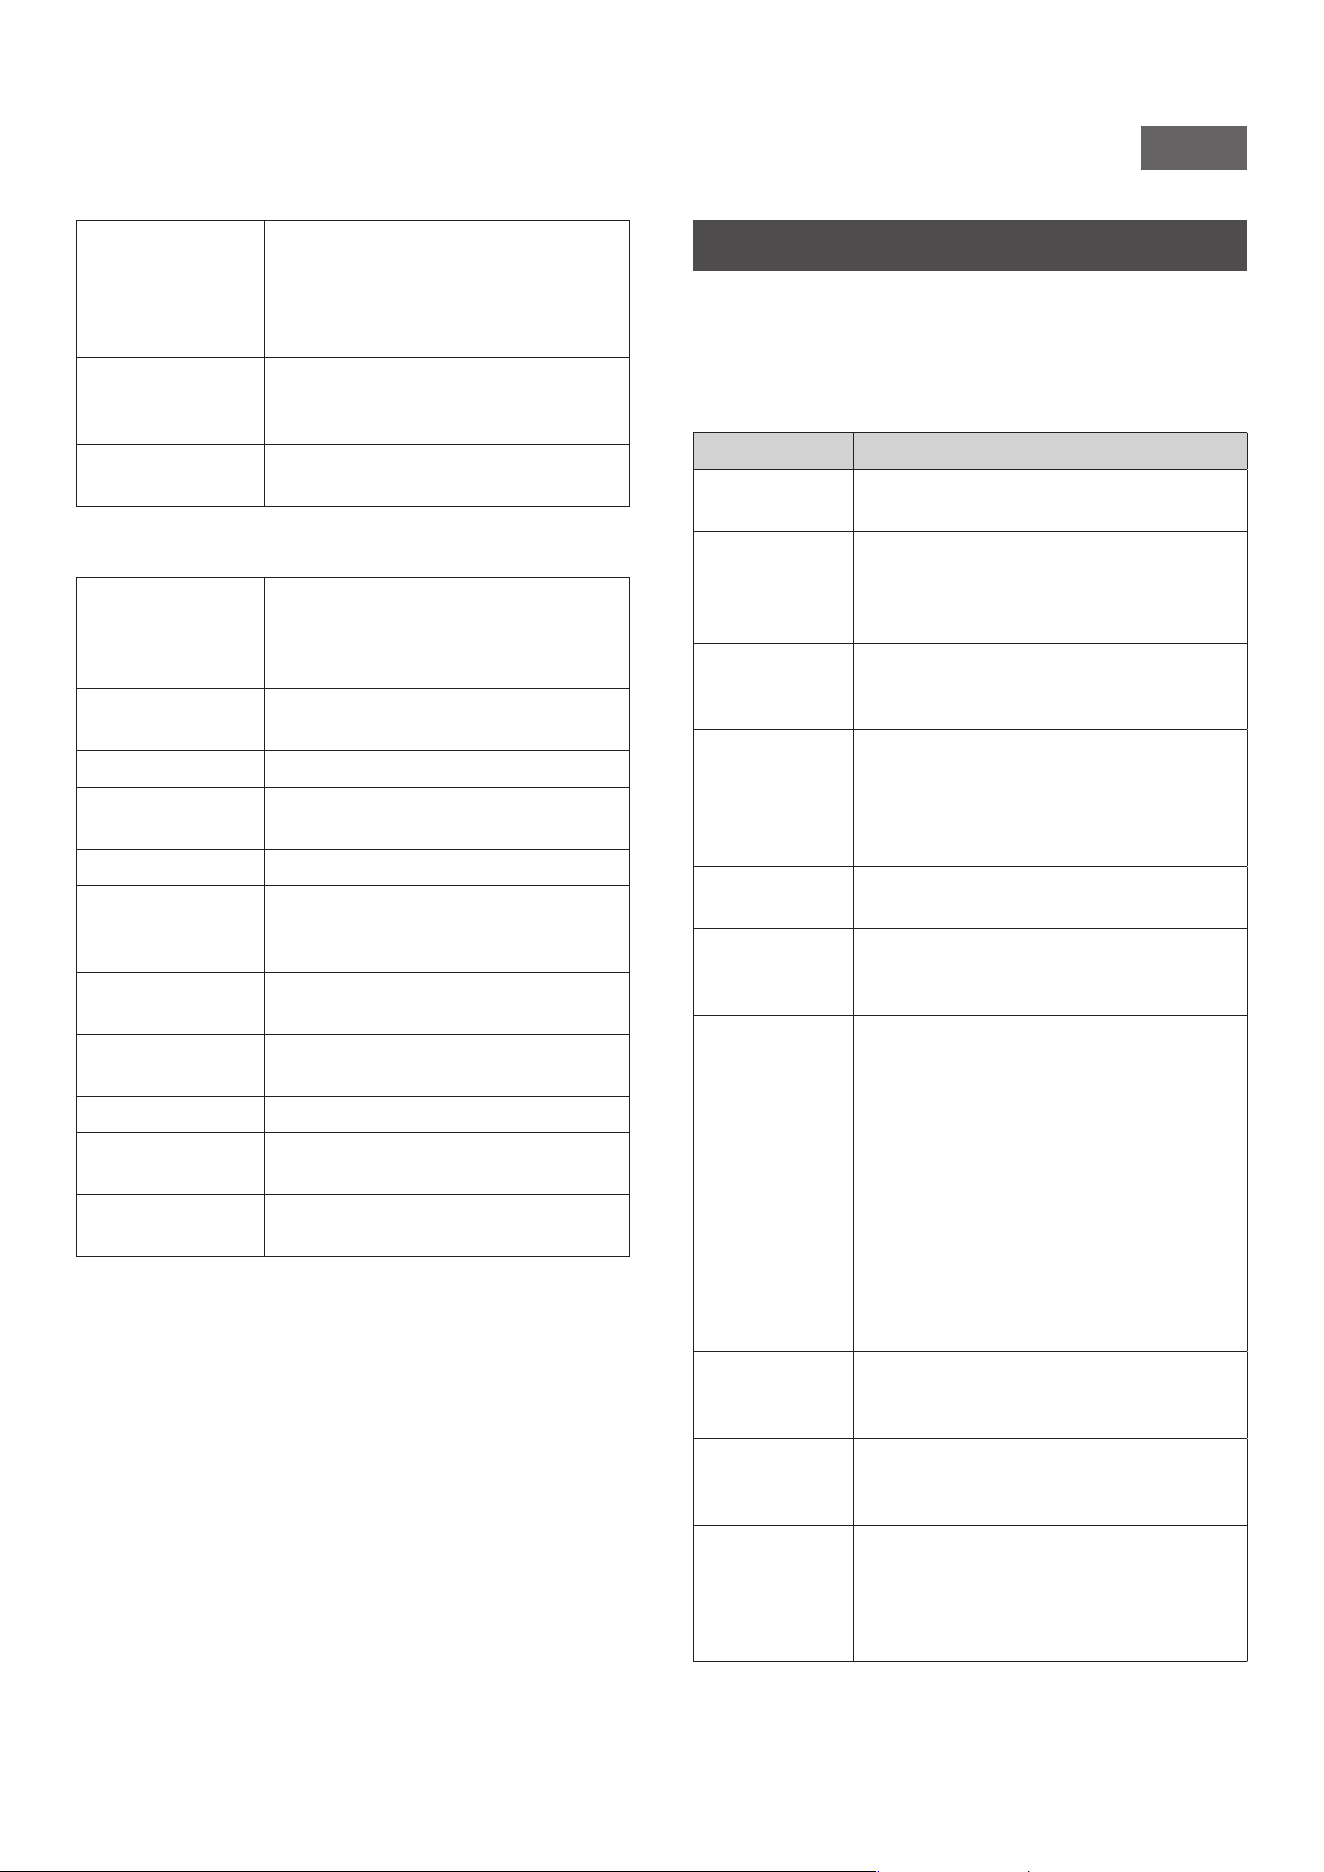
Direct Print Function
This function allows you to send images from your Smartphone to
the camera for INSTAX printing onto INSTAX MINI instant print film.
You can use the INSTAX MINI EVO App to move, rotate, and zoom
into the image before sending it.
Remote Shooting Function
You can set the flash and self-timer of the camera with the INSTAX
MINI EVO App and take photos remotely.
Printed Image Transfer Function
You can send images that were previously printed with the camera
to the INSTAX MINI EVO App and save them as INSTAX frame
images on your Smartphone. The transferred images from the
camera appear in Transferred Images. See “Using the Playback
Menu” (p. 23).
Specifications
■ Camera Function
Image sensor 1/5-inch CMOS with primary color filter
Number of recorded
pixels
2560 × 1920
Storage media Internal memory, microSD/microSDHC
memory card (sold separately)
Storage capacity
Approximately 45 images in internal
memory, approximately 850 images per
1 GB in microSD/microSDHC memory card
Recording method DCF compliant Exif Ver 2.3
Focus distance f = 28 mm (35 mm film equivalent)
Aperture F2.0
Auto focus Single AF (with AF Illuminator)
Shooting distance 3.9 in (10 cm) and beyond
Shutter speed 1/4 second to 1/8000 second (automatic
switching)
Shooting sensitivity ISO100 to 1600 (automatic switching)
Exposure control Program AE
Exposure
compensation
−2.0 EV to +2.0 EV (1/3 EV step)
Metering method TTL 256 split metering, multi metering
White balance Auto, Fine, Shade, Fluorescent 1,
Fluorescent 2, Fluorescent 3,
Incandescent
Flash Auto flash / Forced flash / Suppressed
flash
Shooting range with flash: Approximately
19.7 in (50 cm) to 59 in (1.5 m)
Self-timer 2 settings: Approximately 2 seconds /
Approximately 10 seconds
Image Effect
Options
10 lens effects, 10 film effects
Total of 100 lens/film effect combination
options
■ Print function
Exposure pixel
count
1600 × 600 dots (800 × 600 dots when
printed from Smartphone App)
Exposure resolution 25 dots / mm × 12.5 dots/ mm
(635 × 318 dpi, 40 × 80 μm dot pitch)
12.5 dots / mm when printed from
Smartphone App
(318 dpi, 80 μm dot pitch)
Exposure gradation RGB gradation of 256 colors
Interface Bluetooth Ver. 4.2 (BLE)
Printable image
format
JPEG images taken with this unit
25
NA_EN
Print transmission
time
Approximately 16 seconds for
transmission and to start printing
* Plus 7 seconds when printed using
INSTAX-Rich Mode immediately after
startup.
Print function Images in the internal memory or on a
memory card (sold separately) can be
printed
Reprint Reprint is possible for images stored in
print history (up to 50)
■ Other
Smartphone App
Functions
Smartphone image print function,
remote shooting function, printed image
transfer function, firmware upgrade
function
LCD Screen 3.0-inch TFT color LCD screen
Pixel count: Approximately 460,000 dots
External interface Micro USB Micro-B (for charging only)
Power supply Lithium ion battery (internal type: not
removable)
Charging function Built-in
Possible number of
printed images
Approximately 100 (from full charge;
number of prints depends on usage
conditions)
Charging time 2-3 hours (depending upon environment
temperature at time of charging)
Main unit
dimensions
3.4 in x 4.8 in x 1.4 in / 87 mm x 122.9 mm
x 36 mm (excluding projecting parts)
Main unit weight Approximately 0.63 lbs (285 g)
Operating
environment
Temperature: 41 ºF to 104 ºF (5 ºC to 40 ºC)
Humidity: 20% to 80% (no condensation)
Film used FUJIFILM INSTAX MINI instant print film
(sold separately)
* The above specifications are subject to change for performance
improvement.
Troubleshooting
Please check the following items before considering a problem
to be a malfunction. If the problem persists even after taking
action, please contact the FUJIFILM service center for repair in your
country or visit the website below.
FUJIFILM website: https://www.fujifilm.com/
If the following problem occurs���
Problem Possible causes and solutions
I cannot turn on
the camera.
The battery may not be charged. Please
charge the camera.
The battery
loses its charge
quickly.
If you use the camera in a very cold
environment, the battery will drain quickly.
Please keep the camera warm before
shooting.
The camera
turned off
during use.
The battery level may be low. Please charge
the camera.
Charging does
not start.
•Make sure that the USB power adapter
plug is properly connected to the power
outlet.
•Turn off the camera when charging. If
power is on camera will not charge.
It takes too long
to charge.
At low temperatures, charging may take
some time.
The self-timer
lamp flashes
while charging.
Charge the battery in a temperature range of
41 ºF to 104 ºF (5 °C to 40 °C).
I am unable to
shoot when I
press the shutter
button.
•Make sure that the power is on.
•If the battery level is low, please charge
the camera.
•If the internal memory or memory card is
full, insert a new memory card or delete
unnecessary images.
•Use a memory card formatted with this
unit.
•If the contact surface of the memory card
(gold part) is dirty, wipe it with a soft, dry
cloth.
•The memory card may be broken. Please
insert a new memory card.
I am unable
to focus the
camera.
Use the AF/AE Lock to shoot subjects that
are difficult to focus on.
The flash does
not fire.
Check to see if Suppressed Flash is selected
in the Flash settings. If so, select a setting
other than Suppressed Flash.
Even though the
flash fired, the
image is dark.
•Check to see if you are far from the
subject. Shoot within the range where
flash photography is possible.
•Hold the camera correctly so that you do
not obstruct the flash with your fingers.
26
Problem Possible causes and solutions
The image is
blurry.
•Check to see if the lens has any fingerprints.
If so, clean the lens.
•Make sure that the AF frame is green
before taking a photo.
•Make sure to hold the camera steady,
particularly in dark environments.
The camera
does not work
properly.
•There may be a temporary malfunction.
Please press the reset button. If it still does
not work properly, please contact the
applicable Fujifilm repair center for repair.
•The battery may not be charged. Charge
the camera.
The film pack
does not load or
does not load
smoothly.
•Please use only FUJIFILM INSTAX MINI
instant print film (INSTAX SQUARE™ or
INSTAX WIDE™ instant print film can not
be used).
•Align the yellow mark on the film pack
with the yellow camera alignment mark
and load it.
The film does
not unload.
•The film may be misaligned due to shock
such as vibration or dropping. Load a new
film pack.
•If the film is jammed, turn off the camera
and turn it on again. If the problem
persists, remove the jammed film and
then load a new film pack.
Some or all of
the finished
prints are white.
Do not open the film door until the film
is used up. If the film door is opened with
film remaining, the film is exposed and the
exposed area becomes white.
The print is
uneven.
•Do not shake, bend, fold or hold the print
immediately after it is printed.
•Do not obstruct the film ejection slot.
IMPORTANT SAFETY NOTICE
This product has been designed with safety in mind, and
to provide safe operation when handled correctly and in
accordance with the instructions in this User’s Guide� It is
important that both the product and the INSTAX MINI instant
film pack are handled properly and used only to print photos
as instructed in this User’s Guide and in the INSTAX MINI instant
film pack instructions� For your ease and safety, strictly follow
the instructions in this User’s Guide� Keep this User’s Guide in a
safe, convenient place for easy future reference as needed�
WARNING
This symbol indicates danger, which could result in product
damage, injury or death. Follow the instructions indicated to avoid
damage to the camera or injury.
WARNING
If one of the following cases occur, immediately unplug the
Micro USB cable, turn the camera off and refrain from any
further use of the camera:
•The camera becomes hot, emits smoke, has a burnt smell, or
otherwise seems abnormal�
•The camera is dropped into water, or foreign objects like
water, sand, dirt or metal get inside the camera�
The camera has a built-in lithium battery� Do not subject
it to heat, expose it to an open flame, drop it, or otherwise
apply force or impact to it� Doing so may cause the camera to
explode, resulting in injury�
WARNING
Never attempt to take this product apart. You may be injured.
All repairs should be handled solely by Fujifilm. Injury may result
from attempts to self-assess or repair this camera.
If this product is dropped or damaged so that the outer case
becomes cracked or open, do not touch it. Contact Fujifilm.
Do not touch any parts which are inside the film door. You may
be injured.
Never get this product wet or handle it with wet hands. Doing
so may result in electric shock and injury.
Promptly unplug the Micro USB cable once battery is fully
charged.
Keep out of the reach of small children. This product could
cause injury in the hands of a child.
Do not cover or wrap the camera or the AC power adapter in a
cloth or blanket, or otherwise place the camera in the sun or an
environment where heat may build up. This could distort the
casing or cause a fire.
The “CE” mark certifies that this product satisfies the
requirements of the EU (European Union) regarding
safety, public health, environment and consumer
protection. (“CE” is the abbreviation of Conformité
Européenne.)
27
NA_EN
Camera Care
■
Handling the Camera
•
CAUTION - Do not expose to excessive heat such as
sunshine, fire or the like during use, storage, or transportation.
An explosion or leakage of flammable liquid or gas could result.
Also, ensure proper disposal in accordance with the instructions
below.
• CAUTION - Do not remove or attempt to remove the lithium
battery. Without limitation, do not expose or attempt to expose
the camera or the lithium battery to fire or a hot oven. Do not
attempt to damage, mechanically crush or cut the lithium
battery, as an explosion could result.
• CAUTION - Do not subject to extremely low air pressure at
high altitude. An explosion or the leakage of flammable liquid or
gas could result.
■
Camera Care
1.
Do not open the film door until you have used up the loaded
instant film pack� Doing so will expose the remaining film,
causing the remainder of the film pack to become unusable�
2.
Your camera is a precision instrument. Do not get it wet or
drop it. Also, do not expose it to sand, dust or dirt.
3.
Do not use a strap made for cellular phones or other similar
electronic products with your camera. These straps are usually
too weak to hold your camera securely. For safety, use only
straps designed for and provided with your camera, and use
only as specifically intended and instructed.
4.
Do not use cleaning products or solvents such as those with
bleach or alcohol to remove dirt. Wipe with a damp cloth if and
as necessary.
5.
In hot weather, do not leave your camera in hot places such
as in a car or on the beach. Do not leave it in damp places or
places where weather exposure could result.
6.
Moth repellent gas such as naphthalene may affect your
camera and prints. Store your camera and photo prints in a
place where exposure to harmful cleaning or other household
elements will be avoided.
7.
Note that the temperature range within which your camera
should be used is 41°F to 104°F (5°C to 40°C).
8.
Take great care to ensure that your prints do not violate
copyright, image rights, privacy or other personal rights and
do not offend public decency. Actions that violate the rights of
others, that are contrary to public decency, or that constitute
a nuisance may be punishable by law or otherwise legally
actionable.
■
Handling the LCD Screen
As the LCD Screen can be easily damaged, ensure the surface
is not scratched with solid materials. To avoid the LCD Screen
getting damaged, we recommend you attach a protective, clear
plastic sheet (sold separately and widely available) on the LCD
Screen.
■
Charging the Battery
The battery is not charged at shipment� Charge the battery
completely before use�
Charge the battery using the supplied Micro USB cable and
the USB Adapter from your Smartphone. Charging times
will increase at ambient temperatures below 50°F (10°C)
or above 95°F (35°C). Do not attempt to charge the battery
in environments with temperatures above 104°F (40°C); at
temperatures below 41°F (5°C), the battery will not charge.
■
Battery Life
At normal temperatures, the battery can be recharged about
300 times. A noticeable decrease in the length of time the
battery will hold a charge indicates that it has reached the end
of its service life.
■
Caution: Handling the Battery
The battery and camera body may become slightly warm to the
touch after extended use. This is normal.
■
Required certification markings are located inside the film
chamber�
■
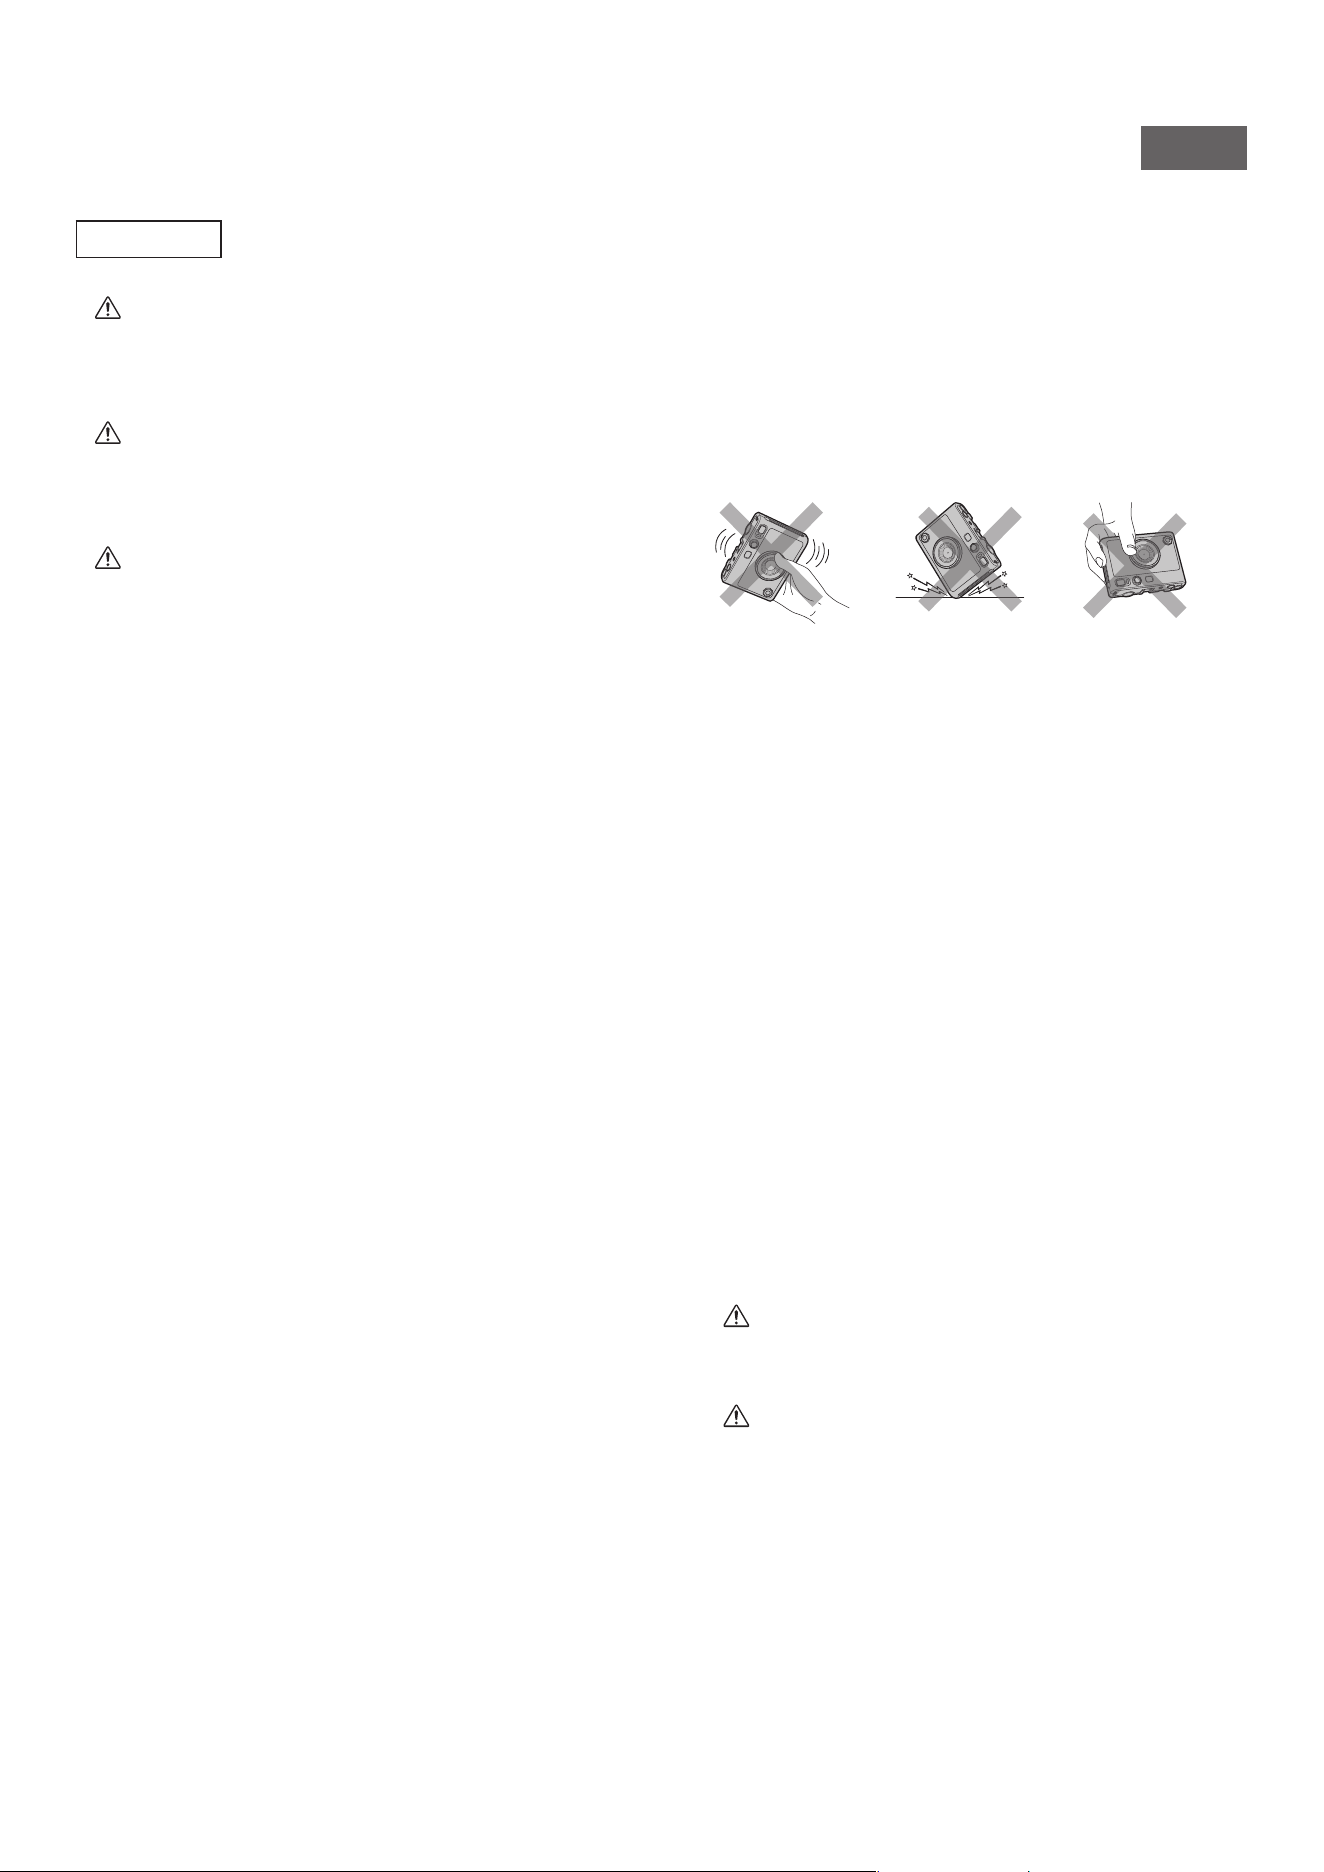
Cautions During Printing
Do not shake the
camera while
printing.
Do not drop the
camera while
printing.
Do not cover or
permit interference
with the film
ejection slot while
printing.
■
INSTAX MINI Instant Film and Print Care
This camera uses INSTAX MINI instant print film, sold separately.
See FUJIFILM INSTAX MINI instant film pack use instructions.
Follow all instructions for safe and proper use, including:
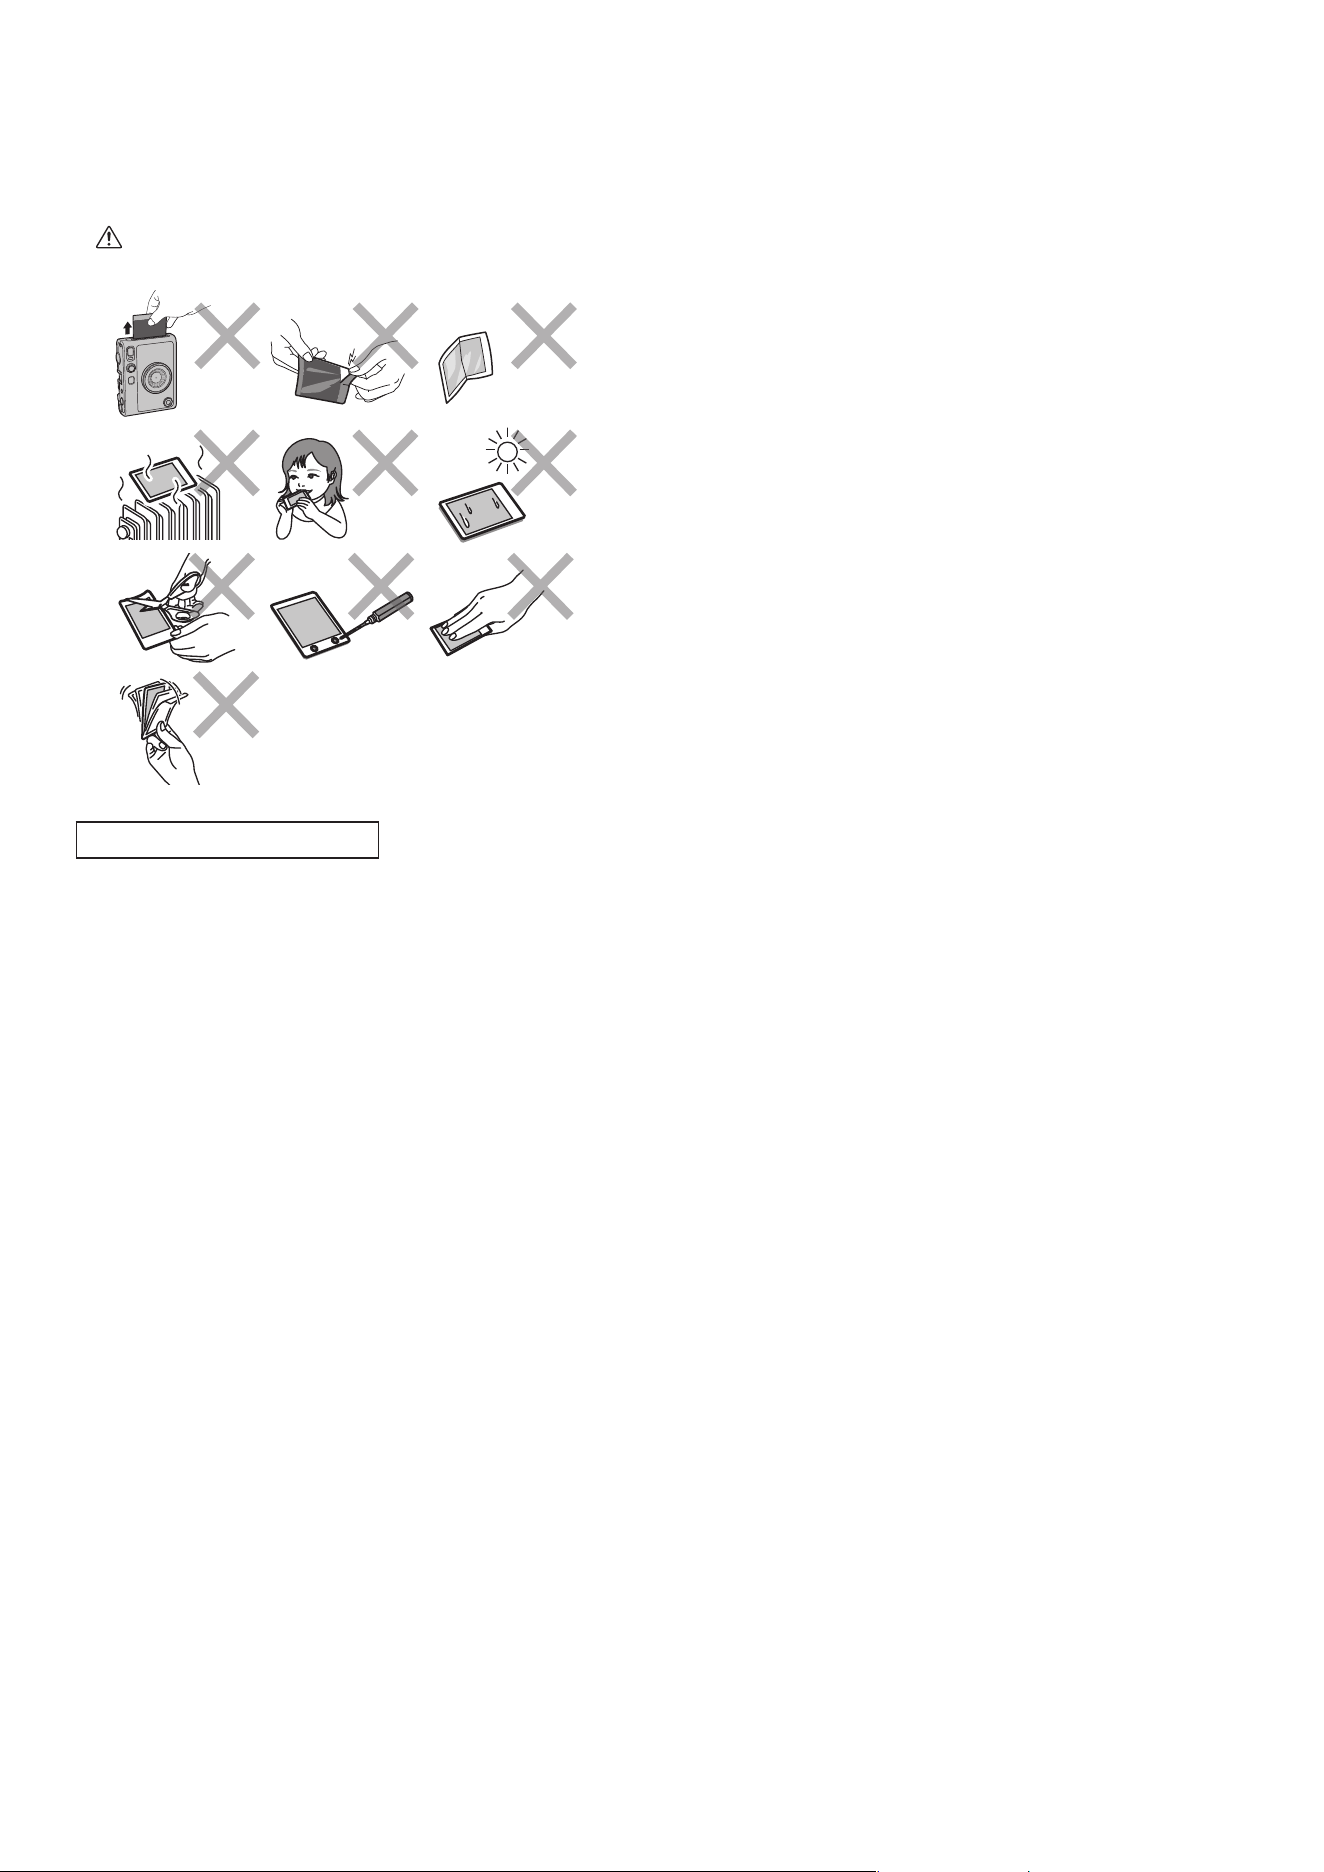
1.
Keep the film in a cool place. Do not leave the film in a place
where the temperature is extremely high (e.g., in a closed car)
for many hours.
2.
Do not puncture, tear, or cut INSTAX MINI instant film. If film
becomes damaged, do not use.
3.
When you load a film pack, use the film as soon as possible.
4.
If the film has been kept in a place where the temperature is
extremely high or low, bring it to room temperature before
loading or starting to print photos.
5.
Be sure to use the film before the expiration or “Use Before”
date.
6.
Avoid airport checked luggage inspection and other strong
X-ray illumination. Such exposure may cause fogging and
otherwise affect your unused film. Carrying your camera and
film onto an aircraft in your carry-on luggage is recommended.
(Check with each airport for more information.)
7.
Avoid exposing the developed prints to strong light, and keep
them in a cool, dry place.
8.
Do not puncture or cut the film as it contains a small
amount of caustic paste (high alkaline). Never let children or
animals put the film into their mouth. Also pay attention so
that the paste does not come into contact with skin or clothes.
9.
If the paste inside the film comes into contact with skin or
clothes, immediately wash off with plenty of water. If the paste
comes into contact with the eyes or mouth, immediately wash
the area with plenty of water and contact a doctor. Note that
the alkaline inside the film remains active for about 10 minutes
after the photo has been printed.
28
■
CAUTIONS on Handling INSTAX MINI Instant Film and Prints
See below for film activities to be avoided.
Bluetooth® Device Cautions
IMPORTANT: Read the following notices before using this
camera’s built-in Bluetooth transmitter�
■
Use only as part of a Bluetooth network�
Do not use in applications requiring a high degree of reliability,
for example in medical devices or other systems that may
directly or indirectly impact human life. When using the device
in computer and other systems that demand a greater degree of
reliability than Bluetooth networks, be sure to take all necessary
precautions to ensure safety and prevent malfunction. FUJIFILM
Corporation and its affiliates do not accept liability for damages
resulting from unauthorized use or misuse.
■
Use only in the country in which the device was purchased�
This device conforms to regulations governing Bluetooth
devices in the country in which it was purchased. Observe
all location regulations when using the device. FUJIFILM
Corporation and its affiliates do not accept liability for problems
arising from use in other jurisdictions.
■
Wireless data (images) may be intercepted by third parties�
FUJIFILM Corporation and its affiliates are not responsible for
intercepted transmissions, or for unintended image uses.
■
Do not use the device in locations subject to magnetic fields,
static electricity, or radio interference�
Do not use the transmitter in the vicinity of microwave ovens or
in other locations subject to magnetic fields, static electricity,
or radio interference that may prevent reception of wireless
signals. Mutual interference may occur when the transmitter is
used in the vicinity of other wireless devices operating in the
2.4GHz band.
■
The Bluetooth transmitter operates in the 2�4 GHz band� The
standard output is approximately 3�16 mW�
■
This device operates on the same frequency as commercial,
educational, and medical devices and wireless transmitters�
It also operates on the same frequency as licensed transmitters
and special unlicensed low-voltage transmitters used in radio-
frequency identification tracking systems for assembly lines and
in other similar applications.
■
To prevent interference with other devices operating on the
same frequency, observe the following precautions�
Confirm that the radio-frequency identification transmitter
is not in operation before using this device. If you notice
that this device causes interference in low-voltage radio-
frequency identification tracing systems, contact a FUJIFILM
representative.
■
The following may be punishable by law:
– Disassembly or modification of this device.
– Removal of device certification labels.
For customers in the USA:
FCC Statement
This device complies with part 15 of the FCC Rules. Operation
is subject to the following two conditions: (1) This device may
not cause harmful interference, and (2) this device must accept
any interference received, including interference that may cause
undesired operation.
For more information, access the website below.
https://instax.com/mini_evo/en/spec.html
CAUTION
This equipment has been tested and found to comply with the
limits for a Class B digital device, pursuant to Part 15 of the FCC
Rules. These limits are designed to provide reasonable protection
against harmful interference in a residential installation. This
equipment generates, uses, and can radiate radio frequency
energy and, if not installed and used in accordance with
the instructions, may cause harmful interference to radio
communications. However, there is no guarantee that interference
will not occur in a particular installation. If this equipment does
cause harmful interference to radio or television, which can be
determined by turning the equipment off and on, the user is
encouraged to try to correct the interference by one or more of
the following measures:
•Reorient or relocate the receiving antenna.
•Increase the separation between the equipment and receiver.
•Connect the equipment into an outlet on a circuit different from
that to which the receiver is connected.
•Consult the dealer or an experienced radio/TV technician for
help.
Changes or modifications not expressly approved by Fujifilm
responsible for compliance could void the user’s authority to
operate the equipment.
This transmitter must not be co-located or operated in conjunction
with any other antenna or transmitter.
The available scientific evidence does not show that any health
problems are associated with using low power wireless devices.
There is no proof, however, that these low power wireless devices
are absolutely safe. Low power wireless devices emit low levels of
radio frequency energy (RF) in the microwave range while being
used. Whereas high levels of RF can produce health effects (by
heating tissue), exposure of low-level RF that does not produce
heating effects causes no known adverse health effects. Many
studies of low-level RF exposures have not found any biological
effects. Some studies have suggested that some biological
effects might occur, but such findings have not been confirmed
by additional research. This device has been tested and found
to comply with FCC radiation exposure limits set forth for an
uncontrolled environment and meets the FCC radio frequency (RF)
Exposure Guidelines.
29
NA_EN
Notes on the Grant
To comply with Part 15 of the FCC Rules, this product must be used
with a Fujifilm-specified Micro USB cable.
For customers in Canada:
CAN ICES-003(B) / NMB-003 (B)
This device contains licence-exempt transmitter(s)/receiver(s) that
comply with Innovation, Science and Economic Development
Canada’s license-exempt RSS(s). Operation is subject to the
following two conditions:
1.
This device may not cause interference.
2.
This device must accept any interference, including
interference that may cause undesired operation of the device.
The available scientific evidence does not show that any health
problems are associated with using low power wireless devices.
There is no proof, however, that these low power wireless devices
are absolutely safe. Low power wireless devices emit low levels of
radio frequency energy (RF) in the microwave range while being
used. Whereas high levels of RF can produce health effects (by
heating tissue), exposure of low-level RF that does not produce
heating effects causes no known adverse health effects. Many
studies of low-level RF exposures have not found any biological
effects. Some studies have suggested that some biological
effects might occur, but such findings have not been confirmed
by additional research. This device has been tested and found
to comply with ISED radiation exposure limits set forth for an
uncontrolled environment and meets RSS-102 of the ISED radio
frequency (RF) exposure rules.
Proper Disposal - US and Canada
Disposal of Electric and Electronic Equipment in
Private Households
Disposal of used Electrical & Electronic Equipment
(Applicable in the European Union and other
European countries with separate collection systems)
This symbol on the product, or in the manual and in the limited
product warranty, and/or on its packaging indicates that this
product shall not be treated as household waste.
Instead it should be taken to an applicable collection point for the
recycling of electrical and electronic equipment.
By ensuring this product is disposed of correctly, you will help
prevent potential negative consequences to the environment and
human health, which could otherwise be caused by inappropriate
waste handling of this product.
The recycling of materials may help to conserve natural resources.
For more detailed information about recycling of this product,
please contact your local city recycling office, your household waste
disposal service or the authorized FUJIFILM dealer from which you
purchased the product or contact Fujifilm at the address below.
For proper disposal in the United States at product end-of-life,
please contact 1-800-800-3854 Option #1 Help Desk.
For proper disposal in Canada at product-end-of-life, please
contact 1-800-461-0416.
Information for Fujifilm in the United States
FUJIFILM North America Corp.
200 Summit Lake Drive
Valhalla, New York 10595, USA
Information for Fujifilm in Canada
FUJIFILM Canada Inc.
600 Suffolk Court,
Mississauga, Ontario L5R 4G4, Canada
If you have any inquiries about this product, please contact a
FUJIFILM authorized Dealer, or access the website below.
https://www.fujifilm.com/
■
Trademark Information
The Bluetooth® word mark and logos are registered trademarks
owned by the Bluetooth SIG, Inc., and any use of such marks by
FUJIFILM is under license.
FUJIFILM, INSTAX, INSTAX MINI, INSTAX SQUARE, INSTAX WIDE
and INSTAX MINI EVO are trademarks of FUJIFILM Corporation
and its affiliates.
© 2021 FUJIFILM Corporation. All rights reserved.