SKU: PN SM2x4-50W-0K
User Manual
2x4 LED
Selectable
Ceiling Panel
support@sunco.com
(844) 334-9938
Lighting made better.
1
Let there be light!
(literally)
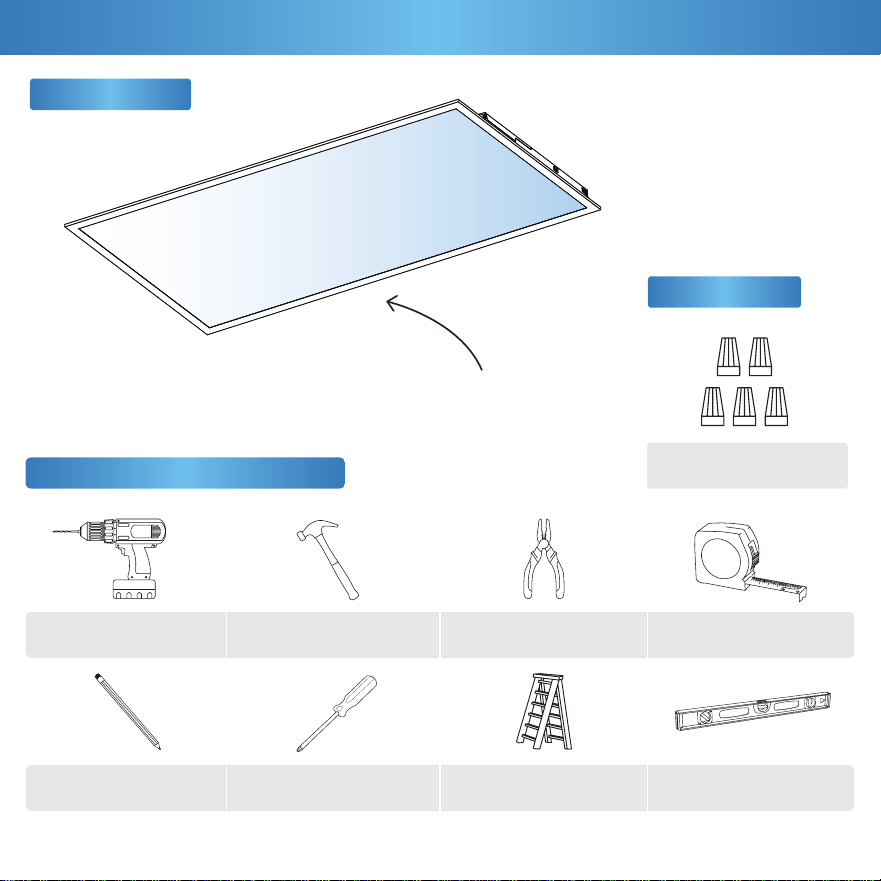
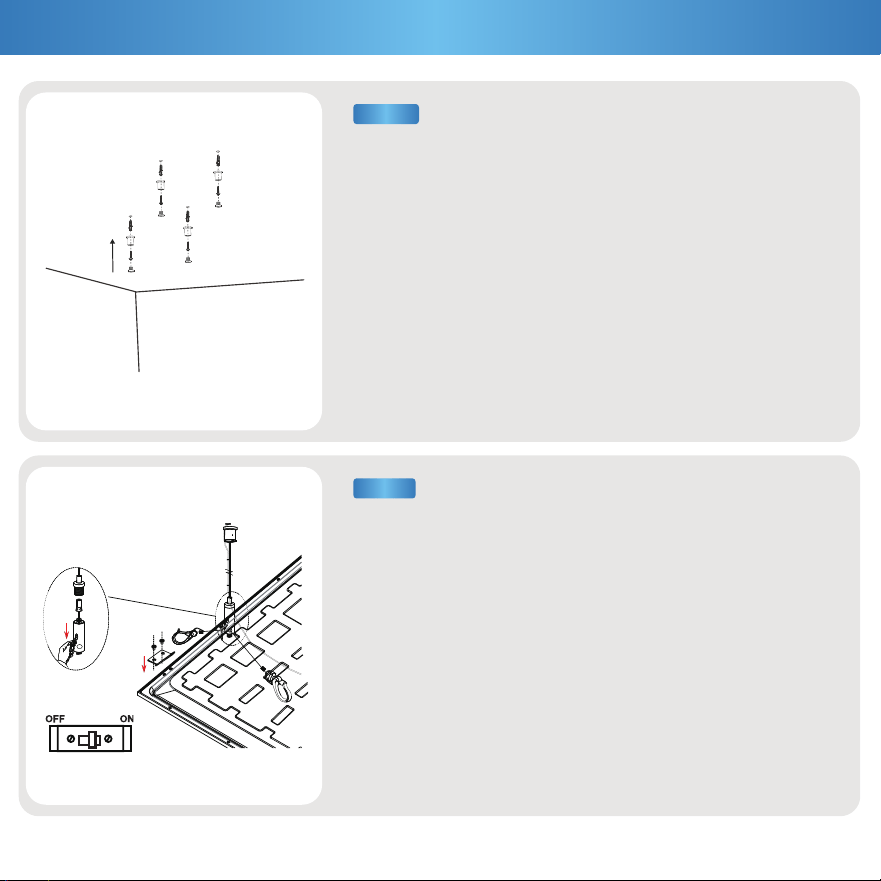
What’s in the Box?
Ceiling Panel
Accessories
Ladder
Philips ScrewdriverPencil
Pliers
Leveler
Drill Hammer
Get Your Gear (Not Included)
Tape Measure
Wire Nuts
x5
(A)
To reduce the risk of fire, electric shock, or physical injury:
2
2
Safety Information
Before You Start
Wiring Diagram
This device complies with Part 15 of the FCC rules.
Operation is subject to the following two conditions:
1) This device may not cause harmful interference.
2) This device must accept any interference that may cause
undesired operation. Please review all instructions carefully
prior to installation.
• Turn o circuit breaker before installing this xture.
• Suitable for use in wet environments at temperatures
ranging from -4° to 113°F.
• Not for use where directly exposed to water.
• Not intended for use with emergency xtures.
• Not compatible with photo controls.
• Not compatible with occupancy sensors.
• Not compatible with third party sensors.
• Not compatible with all dimmers. For more dimming
information, please visit www.sunco.com.
• Not compatible with timing devices.
• All electrical connections must be in accordance with local
and National Electric Code (N.E.C.) standards.
• Please review installation manual carefully before
proceeding. Consult a qualied electrician if you are unfamiliar
with proper electrical wiring connections.
WARNING:
Cancer & Reproductive Harm- www.P65Warnings.ca.gov
3
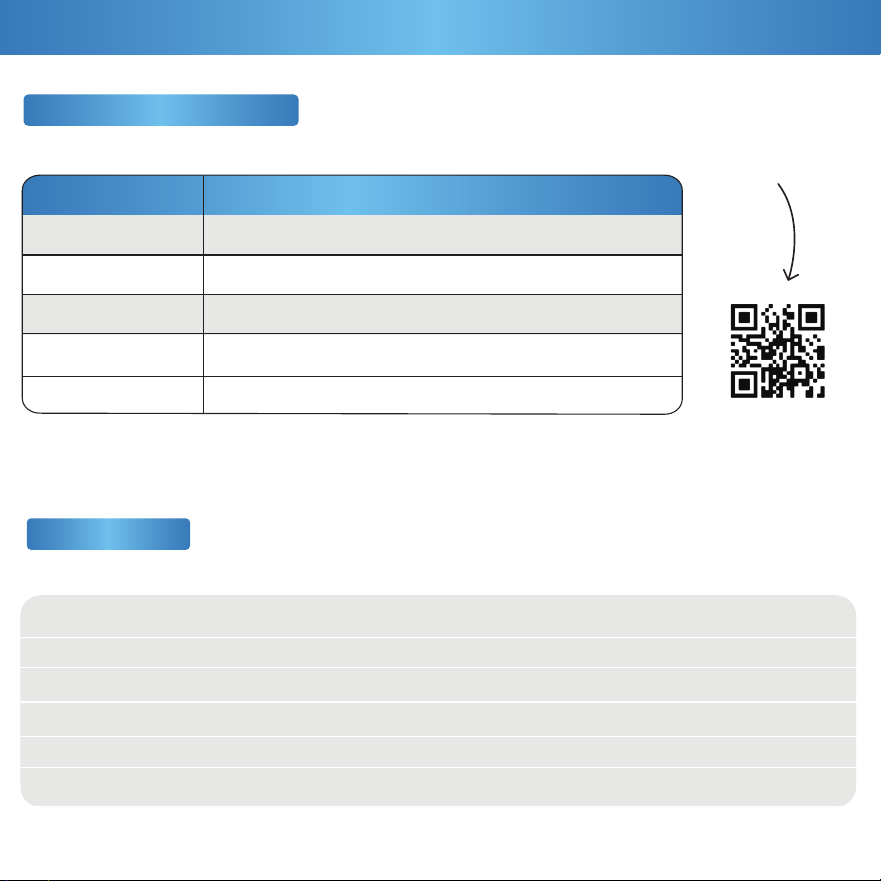
Installation Guide (Recessed Mount)
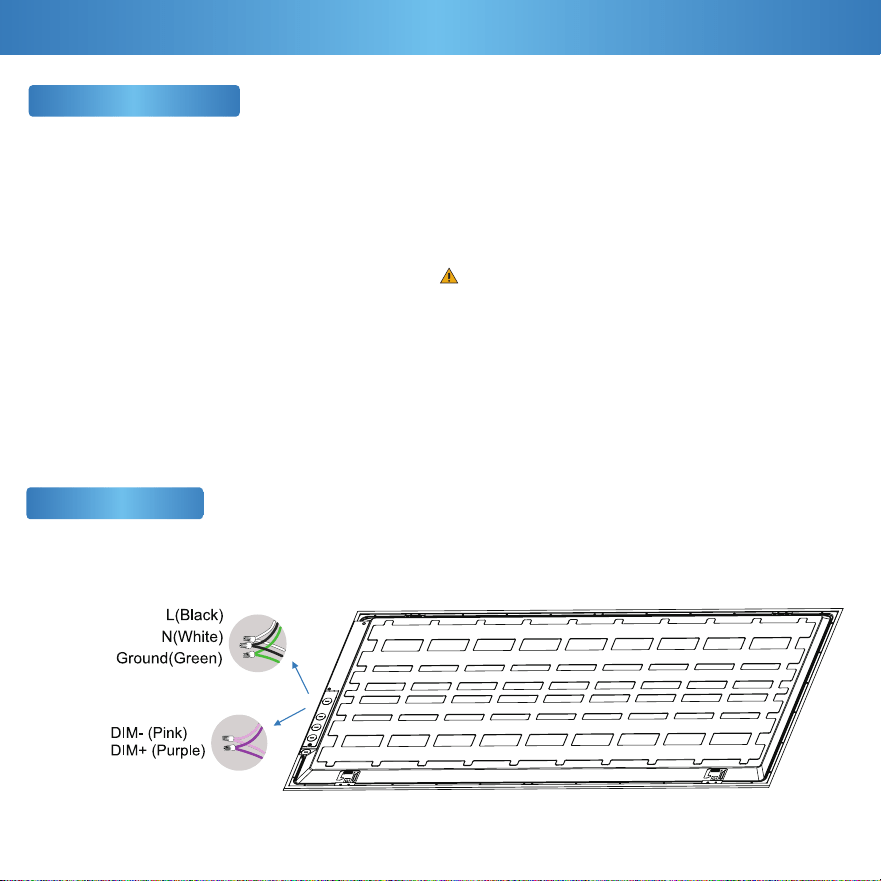
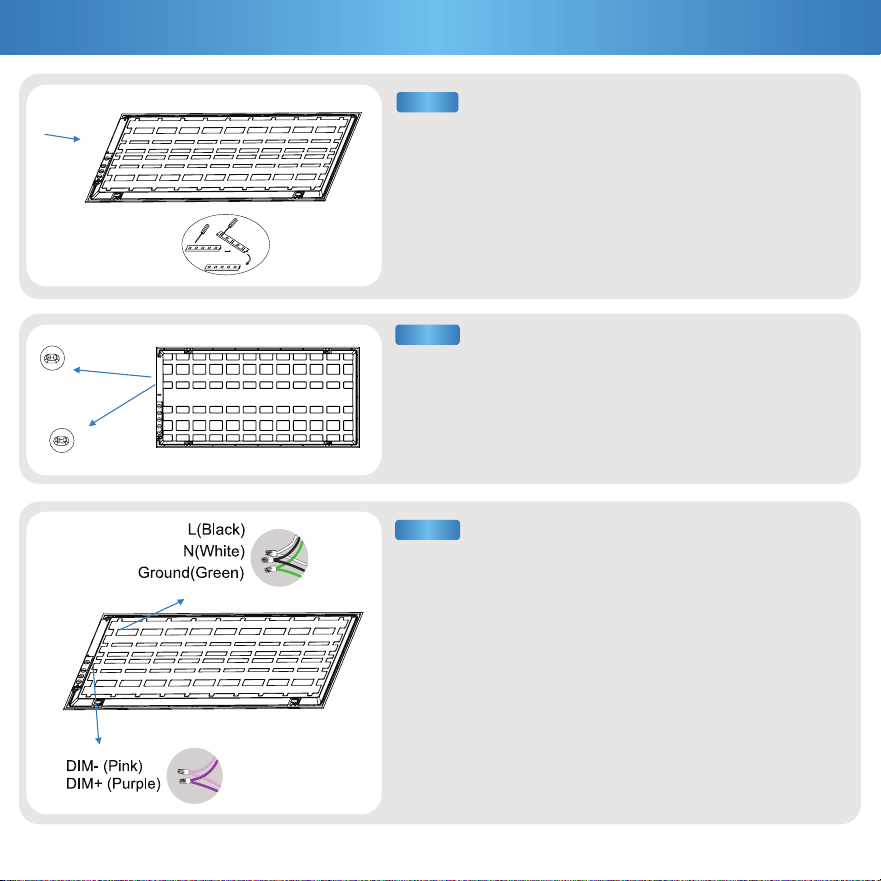
a. Connect supply wires with wire nuts:
• Black to Black (Live) • White to White (Neutral) • Green to Bare
Copper (Ground)
b. For wire connections with multiple hot wires (240/277V):
• Black to Red (HOT1) • White to Red (HOT2) • Green to Bare
Copper (Ground)
c. Optional: Connect compatible device for dimming features.
Otherwise, cap wires if dimmer is not being used.
• Pink to Pink (DIM-) • Purple to Purple (DIM+)
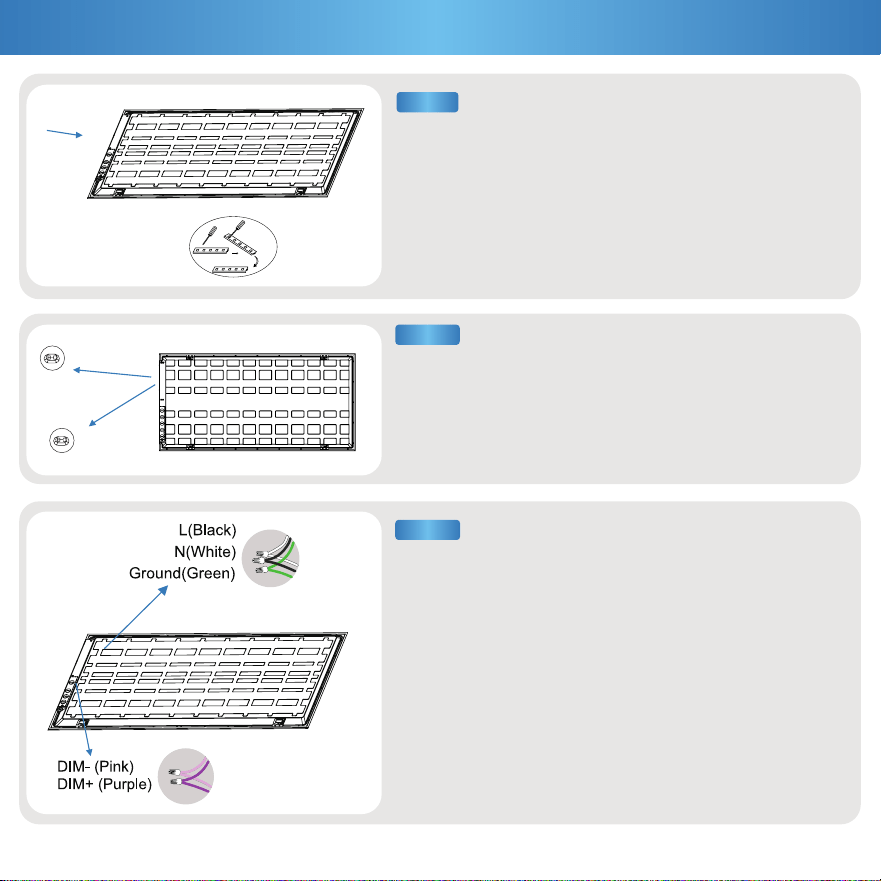
a. Turn off circuit breaker before installation.
b. Place ceiling panel face down on a flat surface. Unscrew the
driver cover and set screws aside. Pop out knockouts
(choice of 4).
c. Optional: If using dimming wires, pop out an additional
knockout of the four available knockouts.
STEP 3
STEP 1
a. Use the switches to select the wattage / CCT on the back
of the ceiling panel.
b. Connect the conduit to each knockout, then feed the
wires through.
CCT Switch
(4000K,5000K,6000K)
Power Switch
(30W,40W,50W)
STEP 2
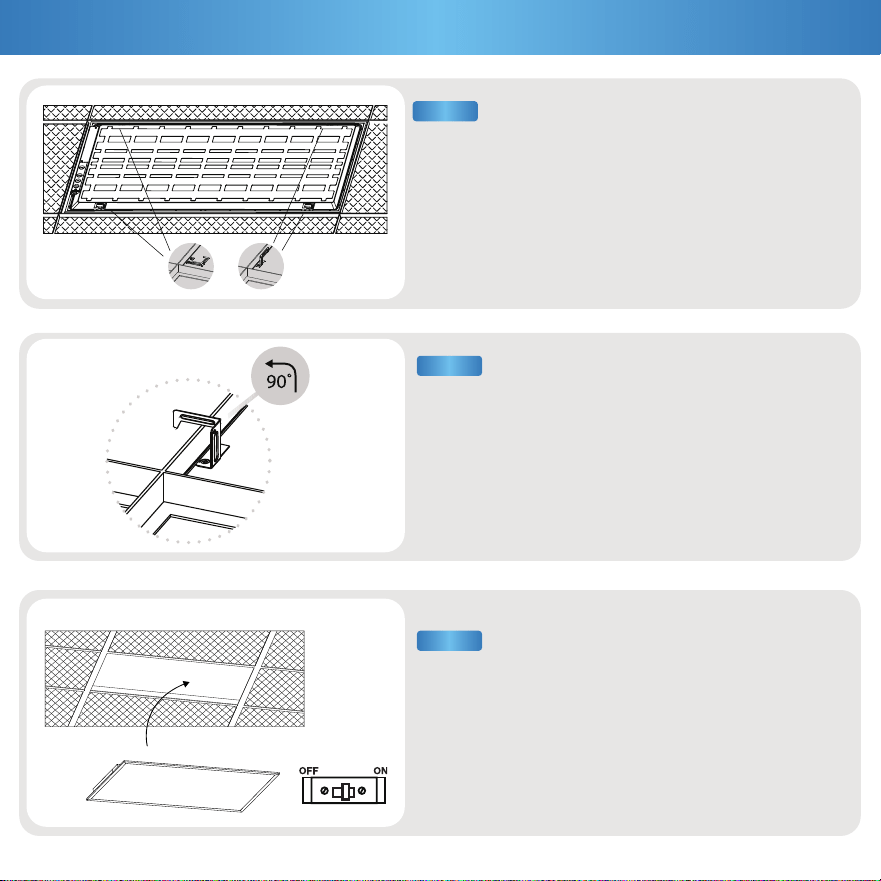
a. Bend 4 protective brackets located on back
of Ceiling Panel up 90°.
a. Turn brackets 90°. Hook should face outside edge of
Ceiling Panel.
a. Install ceiling panel, then turn on circuit
breaker to test light.
4
STEP 5
STEP 4
Installation Guide (Cont.)
STEP 6
a. Connect supply wires with wire nuts(A):
• Black to Black (Live) • White to White (Neutral) • Green to Bare
Copper (Ground)
b. For wire connections with multiple hot wires (240/277V):
• Black to Red (HOT1) • White to Red (HOT2) • Green to Bare
Copper (Ground)
c. Optional: Connect compatible device for dimming features.
Otherwise, cap wires if dimmer is not being used.
• Pink to Pink (DIM-) • Purple to Purple (DIM+)
a. Turn off circuit breaker before installation.
b. Place ceiling panel face down on a flat surface. Unscrew the
driver cover and set screws aside. Pop out knockouts
(choice of 5).
c. Optional: If using dimming wires, pop out an additional
knockout of the four available knockouts.
5
STEP 3
STEP 1
Installation Guide(Suspension Mount)
a. Use the switches to select the wattage / CCT on the back
of the ceiling panel.
b. Connect the conduit to each knockout, then feed the
wires through.
CCT Switch
(4000K,5000K,6000K)
Power Switch
(30W,40W,50W)
STEP 2
6
Installation Guide (Cont.)
a. Drill 4 holes into desired area of the ceiling.
b. Insert plastic anchors (not included) into screw holes, insert
wire rope (not included) and mounting screws (not included)
Note: Refer to suspension kit install manual (not included) for
complete details.
a. Adjust support rope / wire to ensure ceiling panel hangs
horizontally and evenly.
b. Adjust the light into the ceiling,thensecure using protective
brackets.
c. Once the ceiling panel is installed, turn on the circuit breaker to
test the light.
STEP 4
STEP 5
7
Product Details
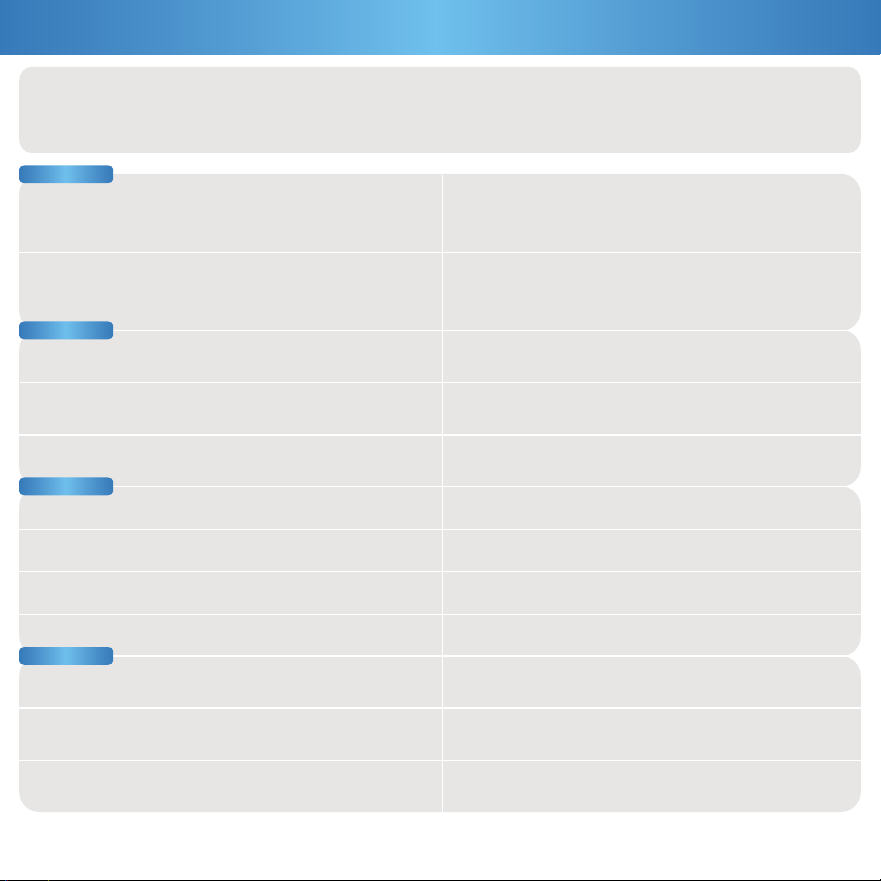
Specifications
Voltage
Wattage
Power Factor
Beam Angle
CRI
Dimmable
120-277V
30W/40W/50W
>0.9
120°
80+
0-10V
50,000 hrs
4500/5500/6500 lm
IP20
PC+SPCC
130 lm/W
7 Years
Average Lifetime
Lumens
IP Rating
Housing Material
Efficacy
Warranty
Recommended Dimmers
Scan for the full
compatible dimmer list!
Brand
Model
DVSTV-WH
DVTV-WH
DS710-10Z
RH4FBL3PTC
LEGRAND
NTSTV-DV
LEVITON
LUTRON
LUTRON
LUTRON
8
Feeling in the dark about an issue with your product? No
worries! Our troubleshooting section is here to shed some light
and provide you with easy-to-follow solutions for any problem.
Light unexpectedly fails.
Light not dimming to lowest setting.
Fixture buzzing with appliances or electronic devices.
Fixture buzzing when dimmed.
Look for nearby interferences that can cause buzzing.
Such as televisions, radios, computers, etc.
Light not dimming smoothly.
Light ickering with other lights on the same circuit.
Check that the lights on the same circuit are not
overloading the circuit.
Light ickering when turned on.
Light ickering when dimmed.
Dimming only accessible via the app.
Double check if xture is properly connected
and circuit breaker hasn’t been tripped.
Check light-dimmer compatibility. Consider purchasing
compatible switch if necessary.
Dimming only accessible via the app.
Light isn’t turning on.
Light not compatible with dimmer switch.
Fixture buzzing with power outages. Verify light is connected to surge protector securely.
Dimming only accessible via the app.
Verify xture compatibility.
Light is ickering when turning on.
Check that xture wiring connections are secure.
For further assistance, contact our customer support.
Ensure minimum dimmer load requirement is met.
If you still need some assistance, please feel free to
contact us with any questions. Our team of lighting experts
are happy to help brighten your day.
Installation
Dimming
Flickering
Buzzing
Common Troubleshooting

support@sunco.com
(844) 334-9938
Lighting made better.
REV1.0