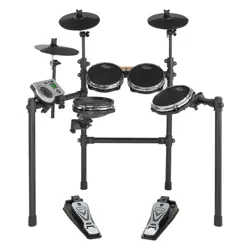
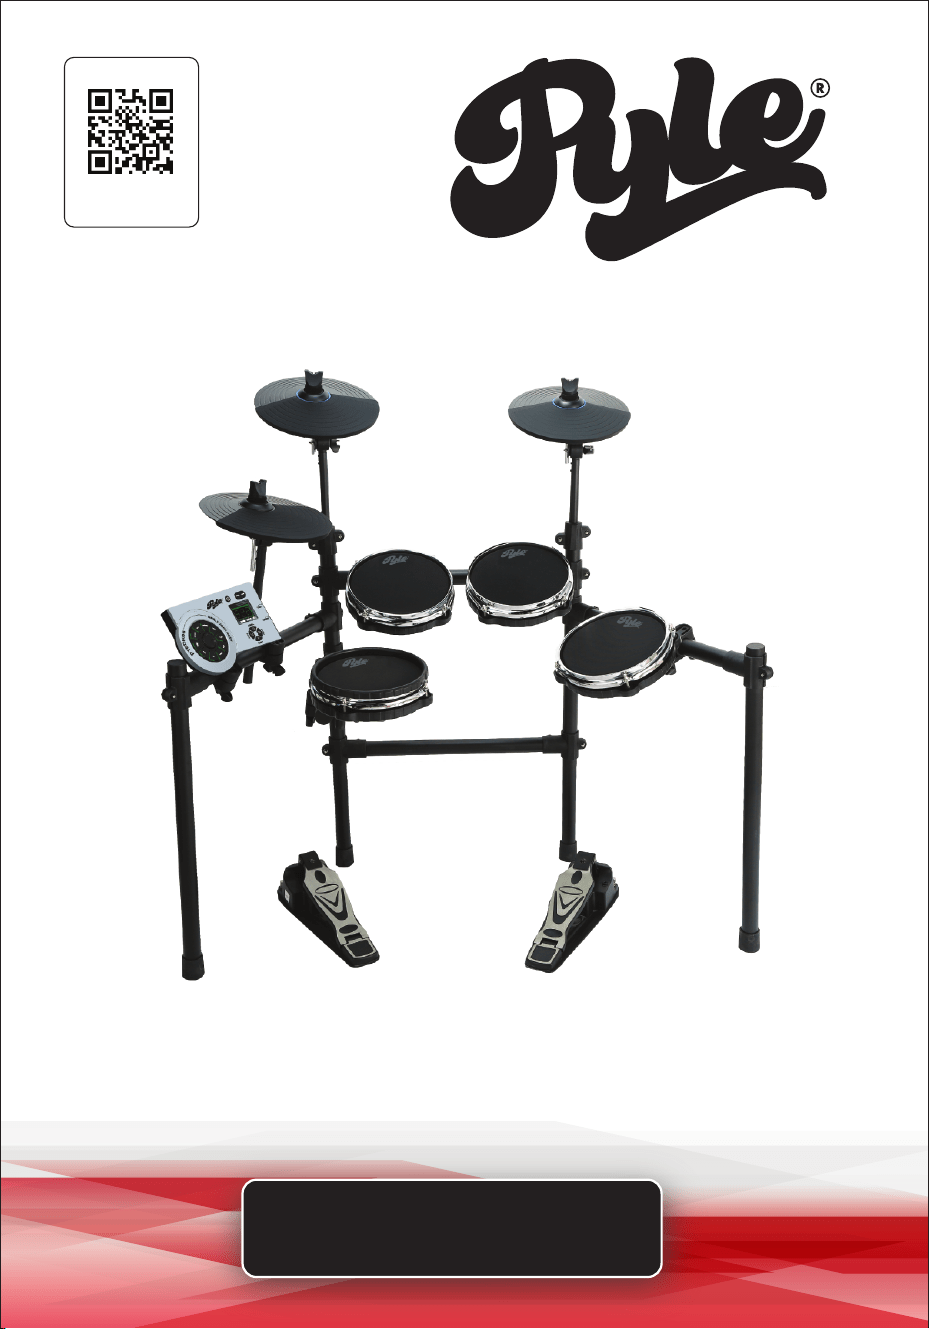
USER GUIDE
Electronic Drum Kit
Visit Our Website
SCAN ME
PyleUSA.com
PTEDK86

ww w.PyleUSA.com
2
READ ALL INSTRUCTIONS CAREFULLY BEFORE USING THIS PRODUCT.
RETAIN THIS OWNER’S MANUAL FOR FUTURE REFERENCE.
Features:
• Hassle-Free Tabletop Drum Kit
• Compact, Portable & Ultra-Thin
• Unique Roll-Up Design for Instant Drumming
• Pre-Loaded with Selectable Drum Kits & Songs
• MIDI Support: Connect to Computer & Unlock More
• Record Mode: Playback Your Drum Sessions
• Hand Percussion Mode: Drop the Drumsticks & Use Your Hands
• Eectively Reproduces Complete 'Drum Set' Sounds
• (8) Drum Pads with Touch Sensitivity
• Tom-Toms, Hi-Hat, Snare & Bass Drums, Crash & Ride Cymbals
• Super Easy & Simple USB Plug-in Operation
• Includes (2) Digital Foot Pedal Controllers
• Front Panel Button Control Center
• Aux (3.5mm) Input Jack
• Drum-Along to Music via Connected Device
• Headphone Jack
• Tempo & Volume Adjustable
• Compatible with Mac & PC
What's in the Box:
• (3) Drum Foot Pedals
• Wall Power Adapter
• Audio Connection Cable
• Drum Sticks
Technical Specs:
• Drum Kits: (12) Sound Styles
• Power Connection: DC 12V
• Drum Sticks Dimensions: 0.6’’ x 16’’ -inches
• Electronic Drum Pad Dimensions: 8” -inches

FCC INFORMATION
WARNING: Changes or modications not expressly approved by the party
responsible for compliance could void the user’s authority to operate the
equipment.
NOTE: This equipment has been tested and found to comply with the limits for
a Class B digital device, pursuant to Part 15 of the FCC Rules.
These limits are designed to provide reasonable protection against harmful
interference in a residential installation. This unit generates, uses, and can radiate
radio frequency energy, and if not installed and used in accordance with the
instructions, may cause harmful interference to radio communications.
However, there is no guarantee that interference will not occur in a particular
installation. If this equipment does cause harmful interference to radio or
television reception, which can be determined by turning the equipment o
and on, the user is encouraged to try and correct the interference by one or
more of the following measures:
• Reorient or relocate the receiving antenna.
• Increase the separation between the equipment and receiver.
• Connect the equipment to an outlet on a circuit dierent from that to which
the receiver is connected.
• Consult the dealer or an experienced radio/TV technician for help.
This device complies with Part 15 of the FCC Rules. Operation is subject to the
following two conditions:
1. This device may not cause harmful interference.
2. This device must accept any interference received, including interference that
may cause undesired operation.
ww w.PyleUSA.com
3

ww w.PyleUSA.com
4
CONGRATULATIONS!
Thank you for purchasing this digital drum set. The drum set has been
developed to act and play like a drum set but with greater ease.
Before you use the instrument, we recommend you to read through
this manual.
Location
• To avoid deformation, discoloration,
or more serious damage, do not expose
the unit to direct sunlight, high
temperature sources, or excessive
humidity.
• Direct sunlight.
• High temperature (near a heat source,
or in car during the day time).
• Disconnect all cables before moving
Power Supply
• Use the specied adapter only. Using
the wrong adapter can result in damage
to the instrument or overheating.
• Turn the power switch OFF when the
instrument is not in use.
• Remove the electric plug from the
outlet when the instrument is not to
be used for extended periods of time,
or during electrical storms.
• Avoid plugging the AC adaptor into
an AC outlet that is also powering
high-consumption appliances such as
electric heaters or televisions.
Also avoid usingmulti plug adaptors
since these can reduce sound quality,
cause operation errors and result in
possible damage.
Turn Power OFF When Making
Connections
• To avoid damage, turn OFF the power
switch and all related devices prior to
connecting or disconnecting cables.
Handling and Transport
• Never apply excessive force to controls,
connectors, and other part
• Unplug cables by gripping the plug
rmly. Do not pull on the cable.
• Disconnect all cables before moving
the instrument.
• Physical shocks caused by dropping,
bumping, or placing heavy objects on
the instrument can result in scratches
and more serious damage.
Cleaning
• Clean the module with a dry, soft cloth.
• A slightly damp cloth may be used to
remove stubborn grime and dirt.
• Never use cleaners such as alcohol or
thinner.
• To avoid discoloration, do not place
vinyl objects on top of the instrument.
Electrical Interference
• This instrument contains digital
circuitry and may cause interference
if placed too close to radio or television
receivers. If this occurs, move the
instrument further away from the
aected equipment.

ww w.PyleUSA.com
5
TABLE OF CONTENTS
FEATURES AND TECHNICAL SPECS
ASSEMBLY GUIDE
CONNECTION
FUNCTION BUTTON DESCRIPTION
Front panel
Rear panel
Side panel
CONNECT WITH EXTERNAL DEVICES
Connect to audio system or amplier
Connect to headphones
Connect to MP3 or CD player
Connect with computer
Connect to computer via MIDI
Connect the MIDI keyboard via the MIDI port
Connect with power supply
BASIC OPERATION
Selecting a drum kit
Playing the pads
HI-HAT demonstration
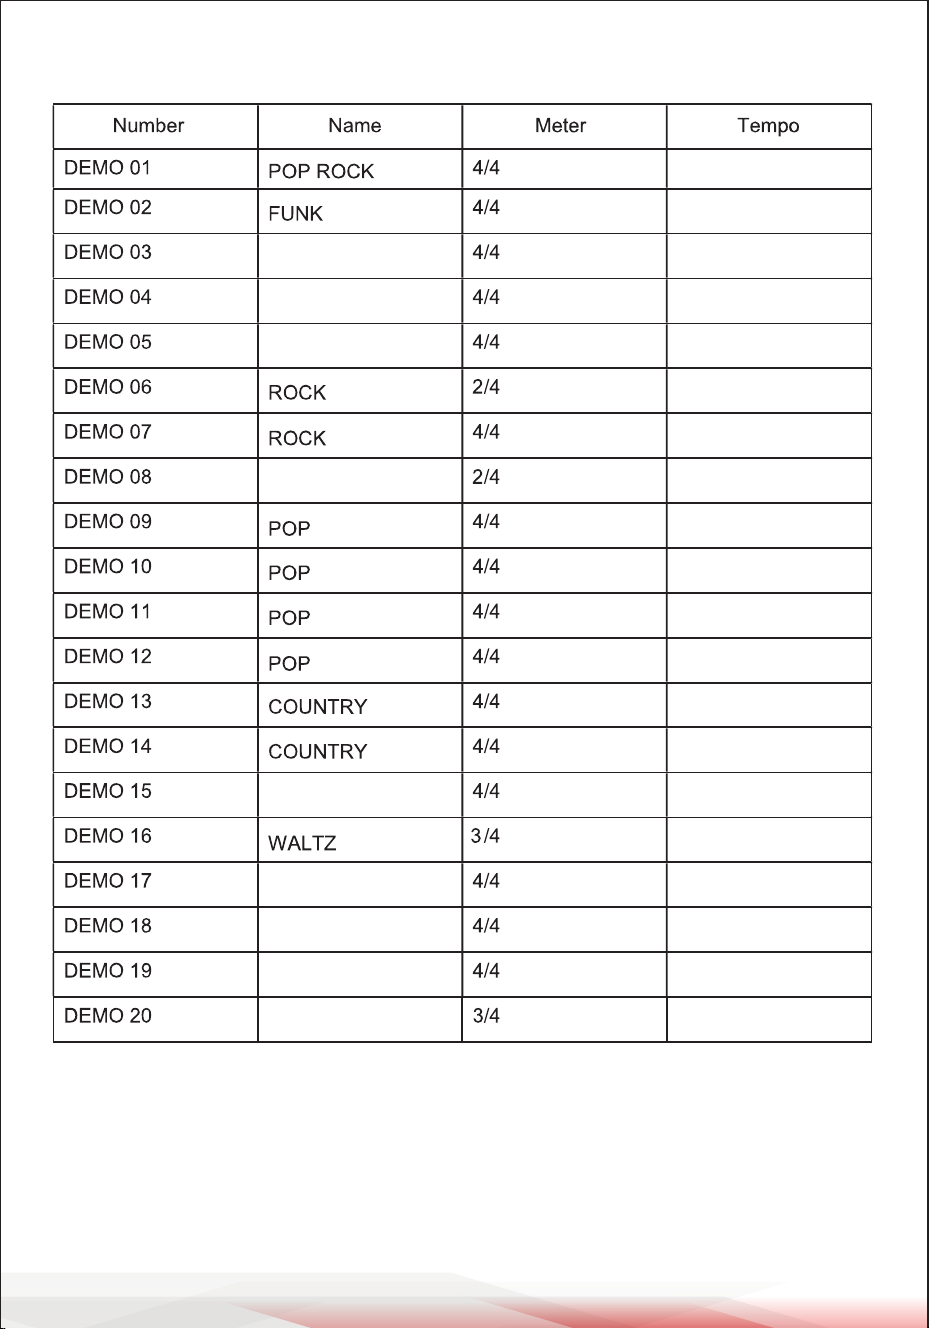
DEMO SONG
Play and switch the DEMO SONG
Adjusting DEMO SONG accompaniment
and drum volume
Mute the drums of DEMO SONG
Adjusting DEMO SONG tempo
RECORD YOUR PERFORMANCE
Recording quickly
Play back recording
METRONOME
Adjusting the click
EDIT AND SAVE DRUM KIT VOICE
Edit the voice
Voice volume adjustment
Voice sound eld adjustment
MIDI channel setting
Save the voice of drum set
ADJUST PAD TRIGGER
Adjust trigger sensitivity
Adjust trigger crosstalk eliminate
Adjusting pad curve
Local control
Adjust Hi-hat sensitivity
SELECT TRIGGER
HI-HAT trigger setting
Kick sensor type
RELOAD DEFAULT SETTING
Single user drum kit is restored to
factory settings
All parameters restore factory settings
SYSTEM SOFTWARE UPDATE
MIDI SETTING
MIDI connection
Connect with external audio device
Used as an audio source device
MIDI list
TROUBLESHOOTING
AUDIO SOURCE SPECIFICATIONS
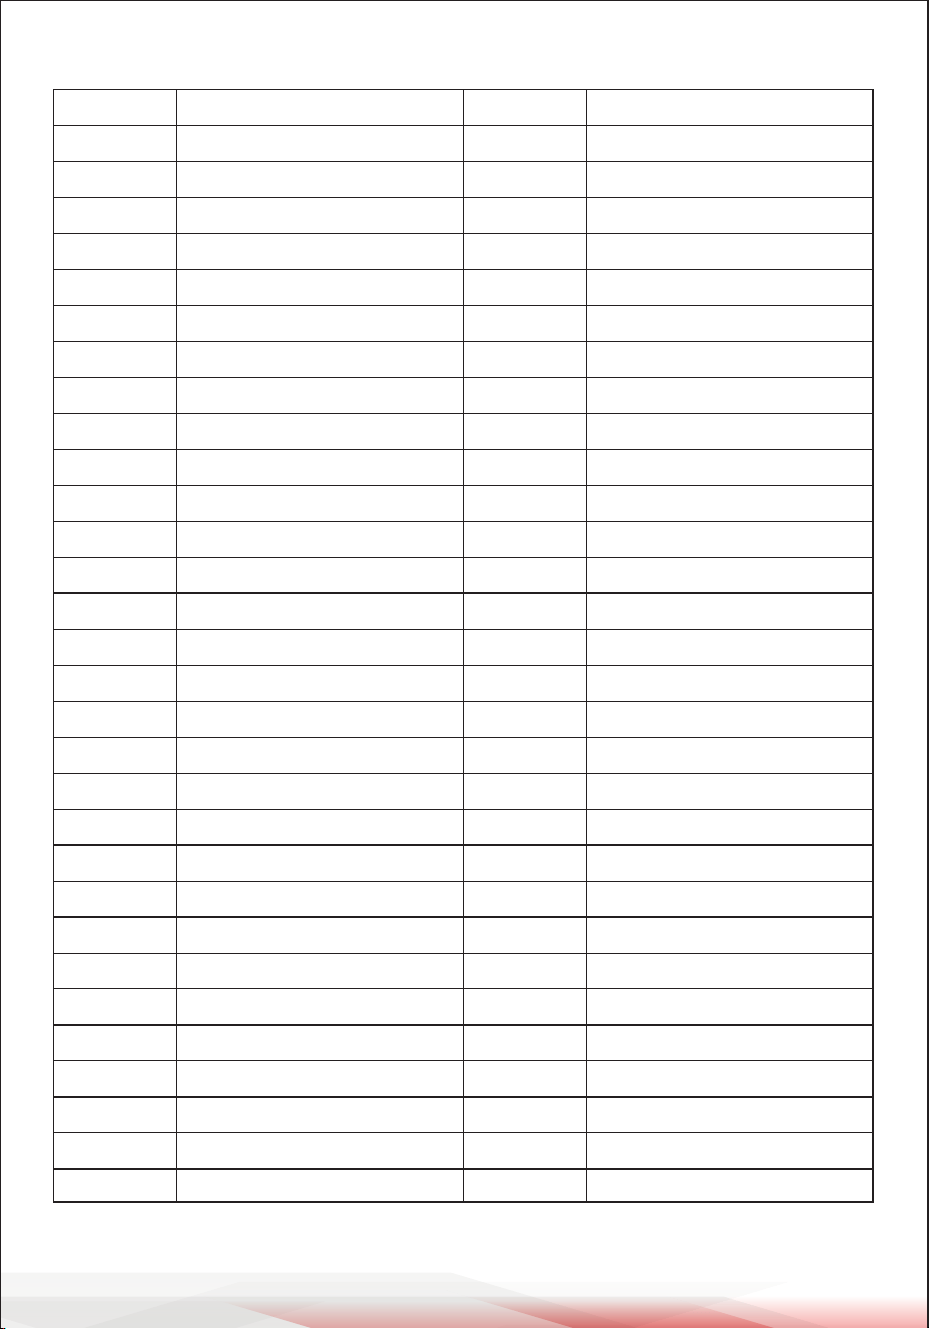
DRUM KIT LIST
VOICE LIST
GM DRUM KIT LIST
DEMO SONG LIST
REGISTER PRODUCT
2
6
7
8
8
8
9
10
10
11
12
12
13
13
14
15
15
15
17
17
17
18
18
19
19
19
20
20
20
21
21
21
22
23
23
24
24
25
25
27
27
28
28
28
29
29
29
30
30
30
31
31
32
33
34
35
36
38
40
41
ww w.PyleUSA.com
6
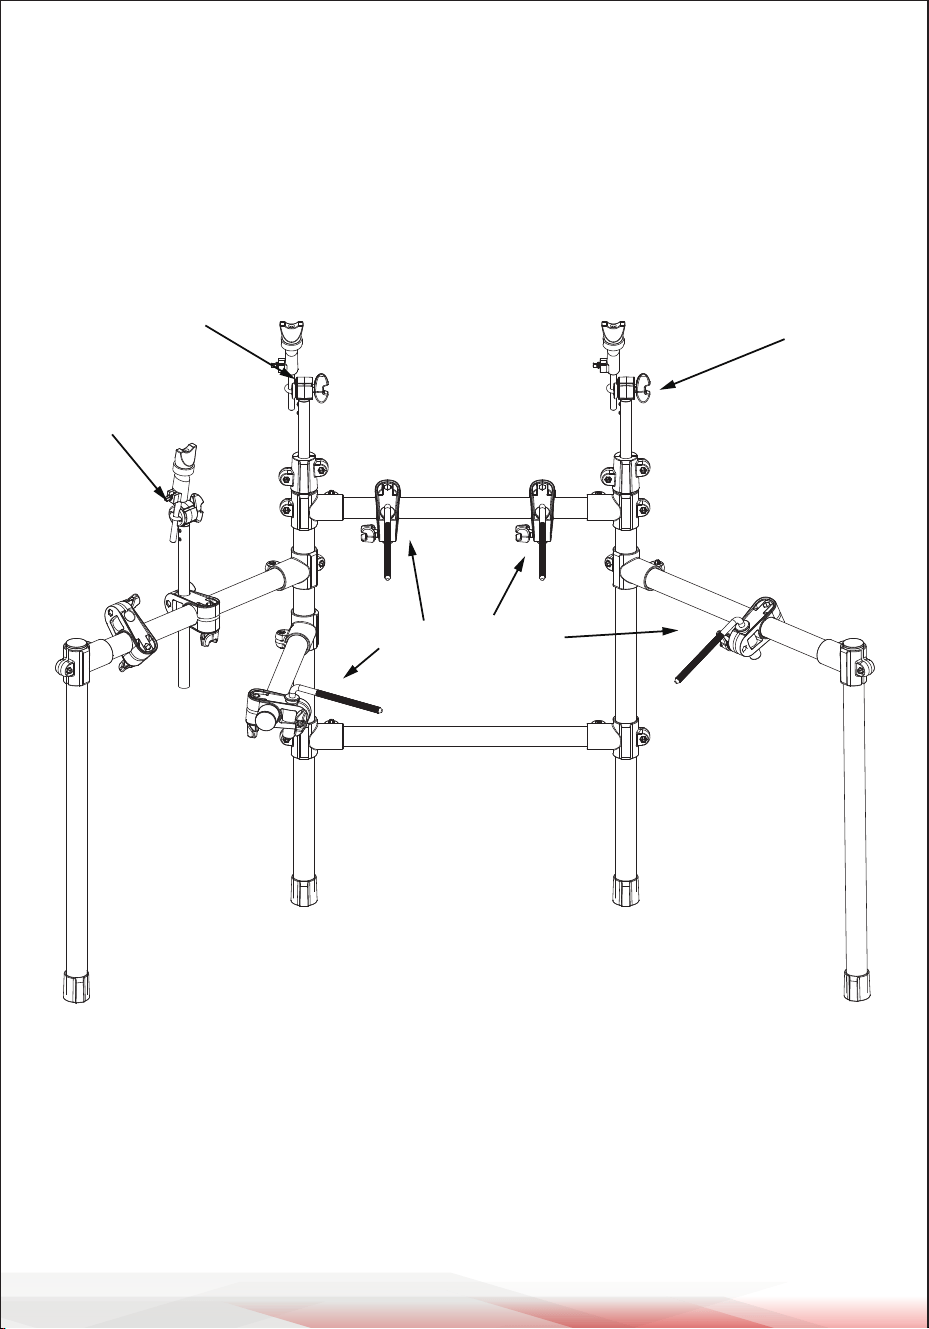
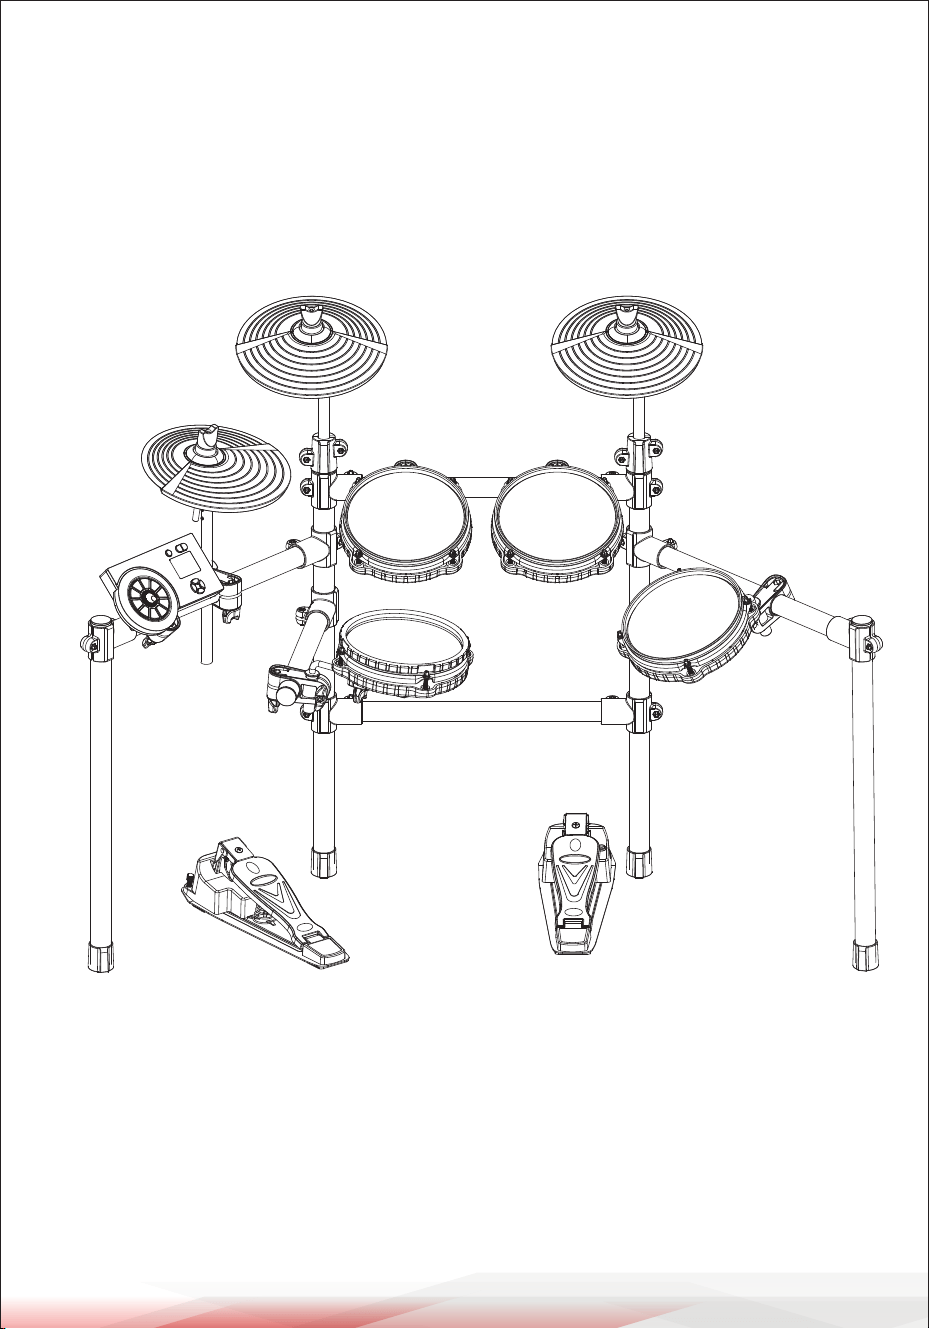
ASSEMBLY GUIDE
1. Set up the drum stand.
2. Put the long cymbal tube/short cymbal tube/L shape pad rod into the drum
stand.
3. Put the pads/cymbal/module to the relative position.
Short cymbal tube
Long cymbal tube
L shape pad rod
Long cymbal tube
ww w.PyleUSA.com
7
CONNECTION
Caution!
To prevent electric shock and damage to the device, make sure the power is
switched OFF on the drum and all related device before making any connection.
CRASH
RIDE
HI-HAT
MODULE
HH CONTROL
KICK PEDAL
SNARE
TOM1 TOM2
TOM3
ww w.PyleUSA.com
8
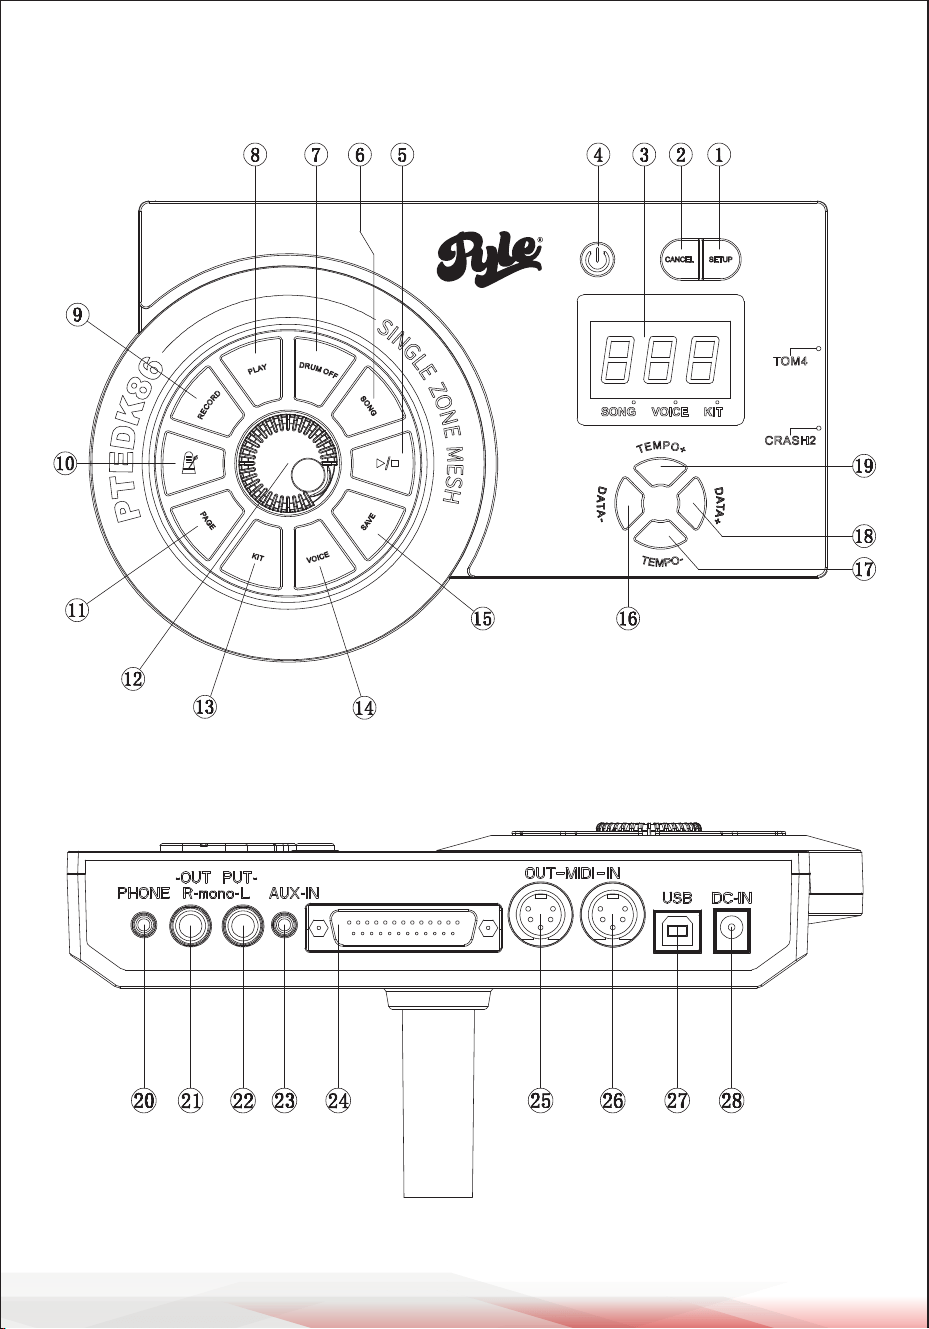
FUNCTION BUTTON DESCRIPTION
FRONT PANEL
REAR PANEL
ww w.PyleUSA.com
9
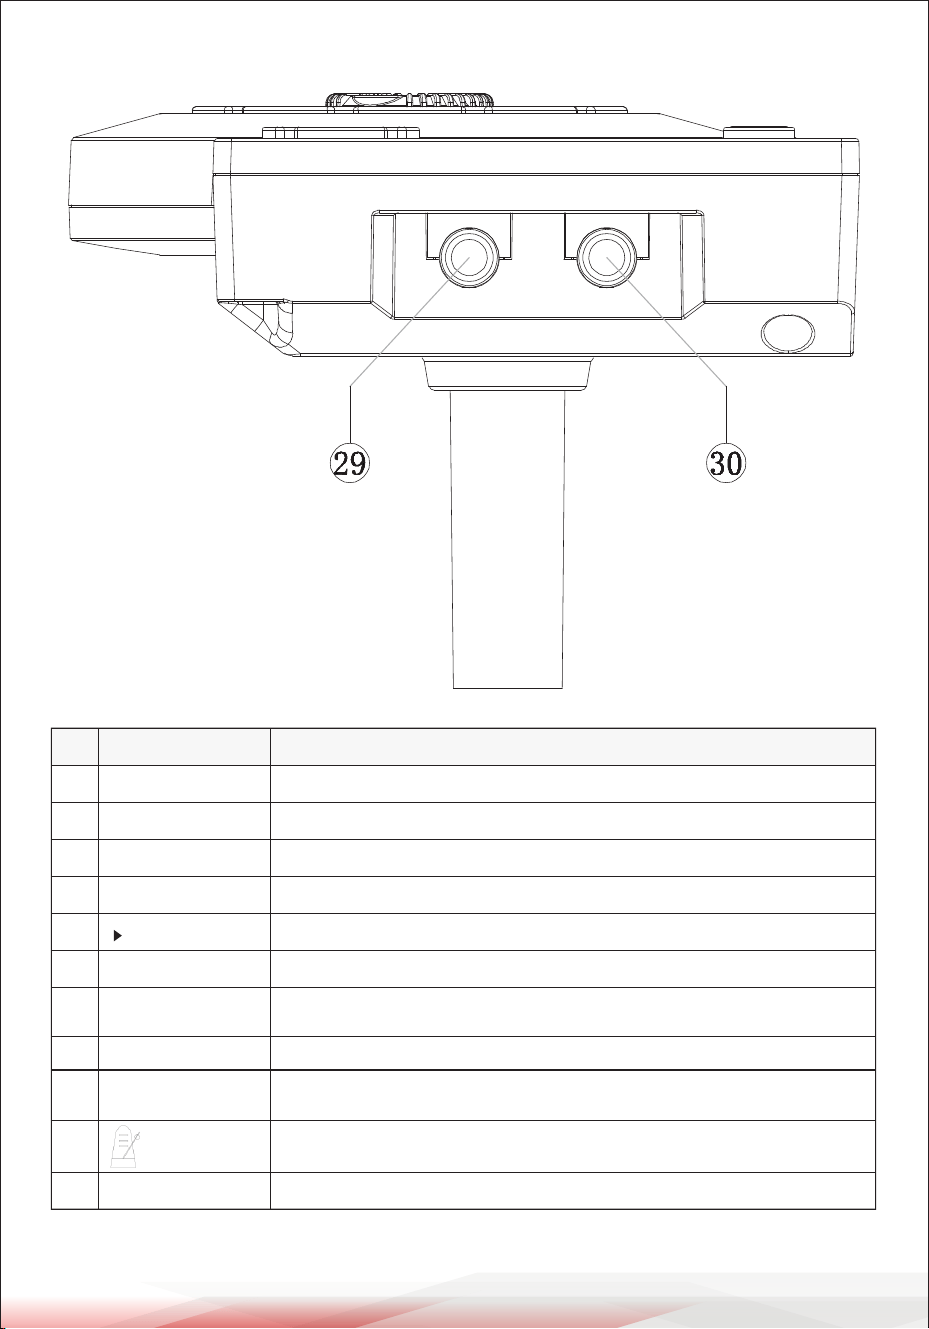
SIDE PANEL
NO.
1
SETUP Enter the menu setting interface
Exit the current operation and return to the previous interface
3-segment numeric LED: content of menu
Power switch (press and hold to turn off)
Start/stop DEMO SONG playing
Enter the DEMO SONG setting interface
Drum track playback control, LED lights up means off and goes off
means on
Press once to play the recording sound/press the second time to stop
Metronome play switch
Page turning
CANCEL
Numeric LED
POWER
┃■
SONG
DRUM OFF
PLAY
PAGE
2
3
4
5
6
7
8
Enter the recording waiting state, hit any pad to start the recording,
button light flashing
RECORD
9
10
11
NAME DESCRIPTION
ww w.PyleUSA.com
10
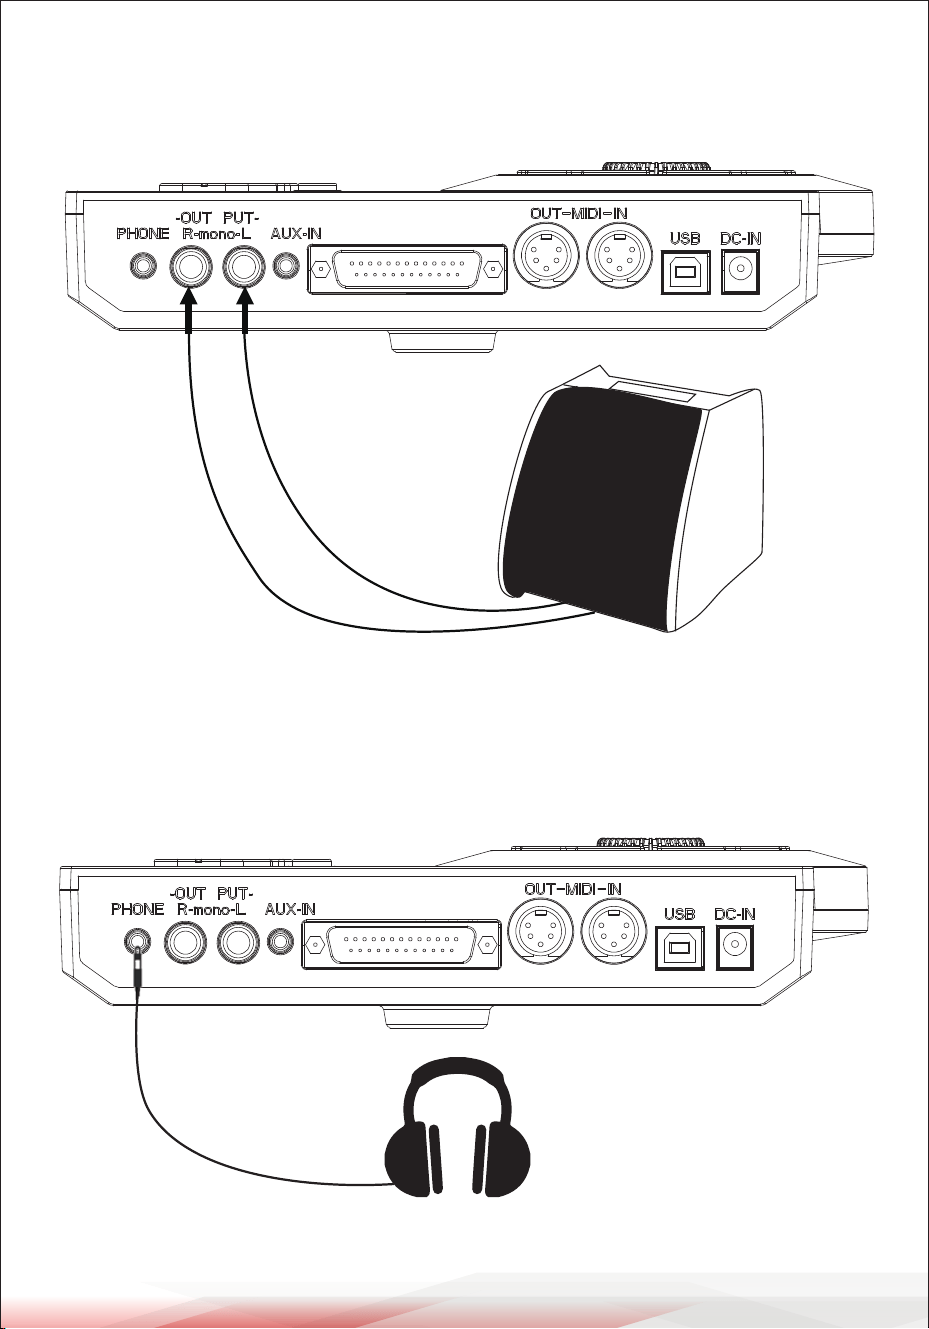
CONNECT WITH EXTERNAL DEVICES
Connect to audio system or amplier
When connecting with audio system or drum amplier, connect one end of the
audio cable with the module OUTPUT: R L/mono, and the other end with the
audio system or drum amplier.
Note:
1. Plug into L/mono connector when connecting with mono audio device.
2. Plug into L/mono and R connectors when connecting with stereo device.
Adjust the master volume
Quick access to the KIT home page
Enter the voice page
Save current settings
Editor the parameters
Quick access to speed adjustment
Editor the parameters
Quick access to speed adjustment
Stereo headphone output connector
Audio output of right channel and L OUTPUT constitute stereo output
Left channel output, can be separately connected to the drum amplifier
via mono - channel cable
Connect to a digital audio player or as listening input for live performance
Drum signal input port
Connect to other MIDI output interfaces with MIDI devices
Connect to other MIDI input interfaces with MIDI devices
Connect with PC connector (MIDI input/output or software update via USB)
Power adapter port: 12V 1A
Connect with CRASH2
Connect with TOM4
MASTER LEVEL
KIT
VOICE
SAVE
DATE-
TEMPO-
DATE+
TEMPO+
PHONE
R OUTPUT
L (MONO) OUTPUT
AUX IN
TRIGGERS IN
MIDI IN
MIDI OUT
USB
DC IN
CRASH2
TOM4
12
13
14
15
16
17
18
19
20
21
22
23
24
25
26
27
28
29
30
ww w.PyleUSA.com
11
The output volume can be adjusted via the master volume knob on the instrument
or that on the audio device.
Connect to headphones
The instrument has 1/8" stereo headphone connector, the volume is controlled
by the master volume knob on the Drum Kit.
ww w.PyleUSA.com
12
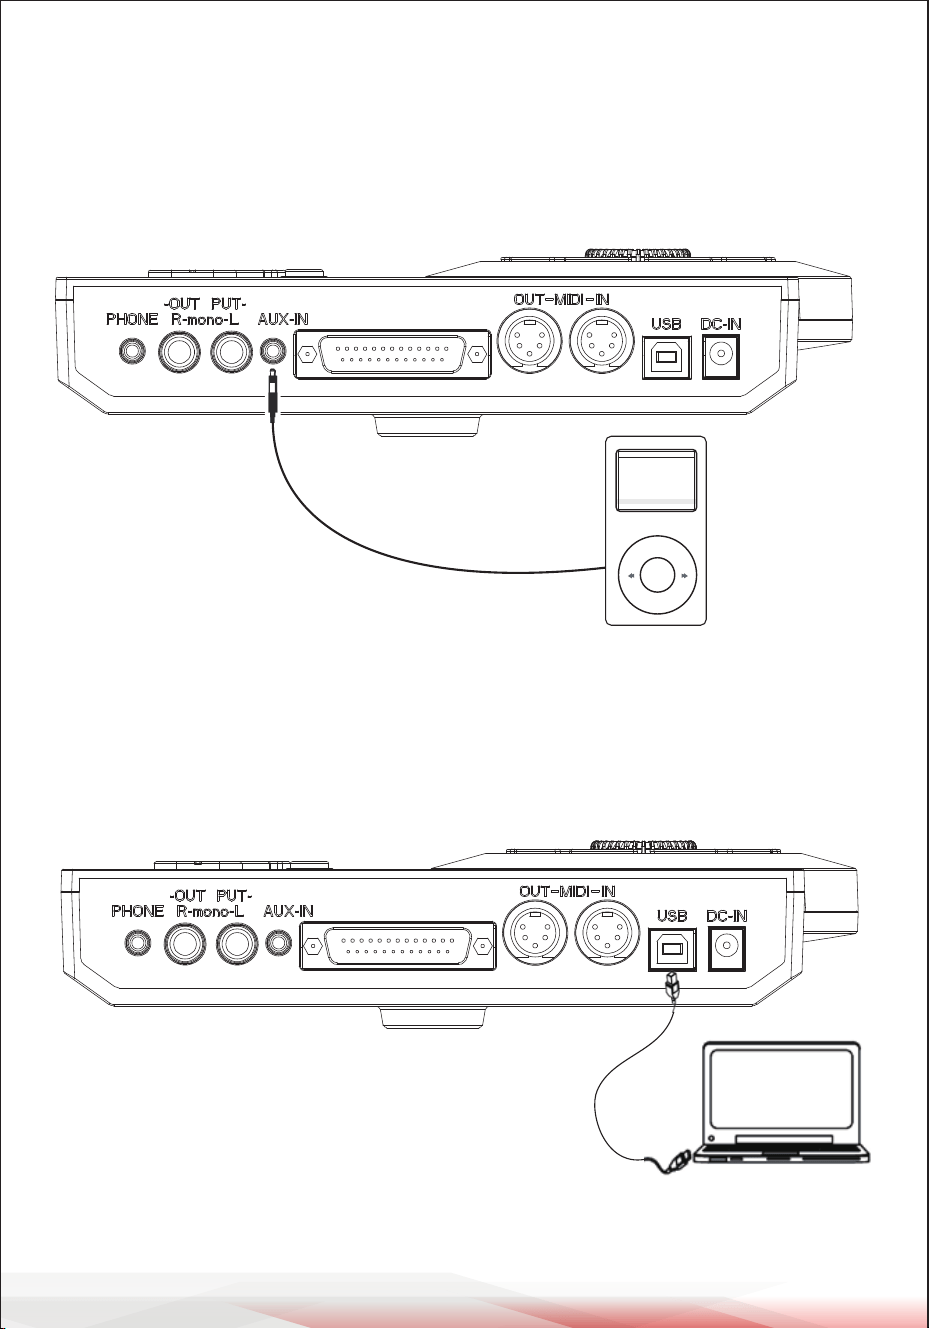
Connect to MP3 or CD player
Connect the output of MP3 or CD player or other audio sources with AUX. IN
connector. The volume can be adjusted by the master volume control knob on
the panel. The input signal can be mixed with the drum signal, strike the pads
according to the rhythm of the input signal.
Connect with computer
1. Connect the computer via USB cable when it’s powered o.
2. Turn ON the computer and then turn ON the device, when the connection is
successful, you can receive and send MIDI information.
ww w.PyleUSA.com
13
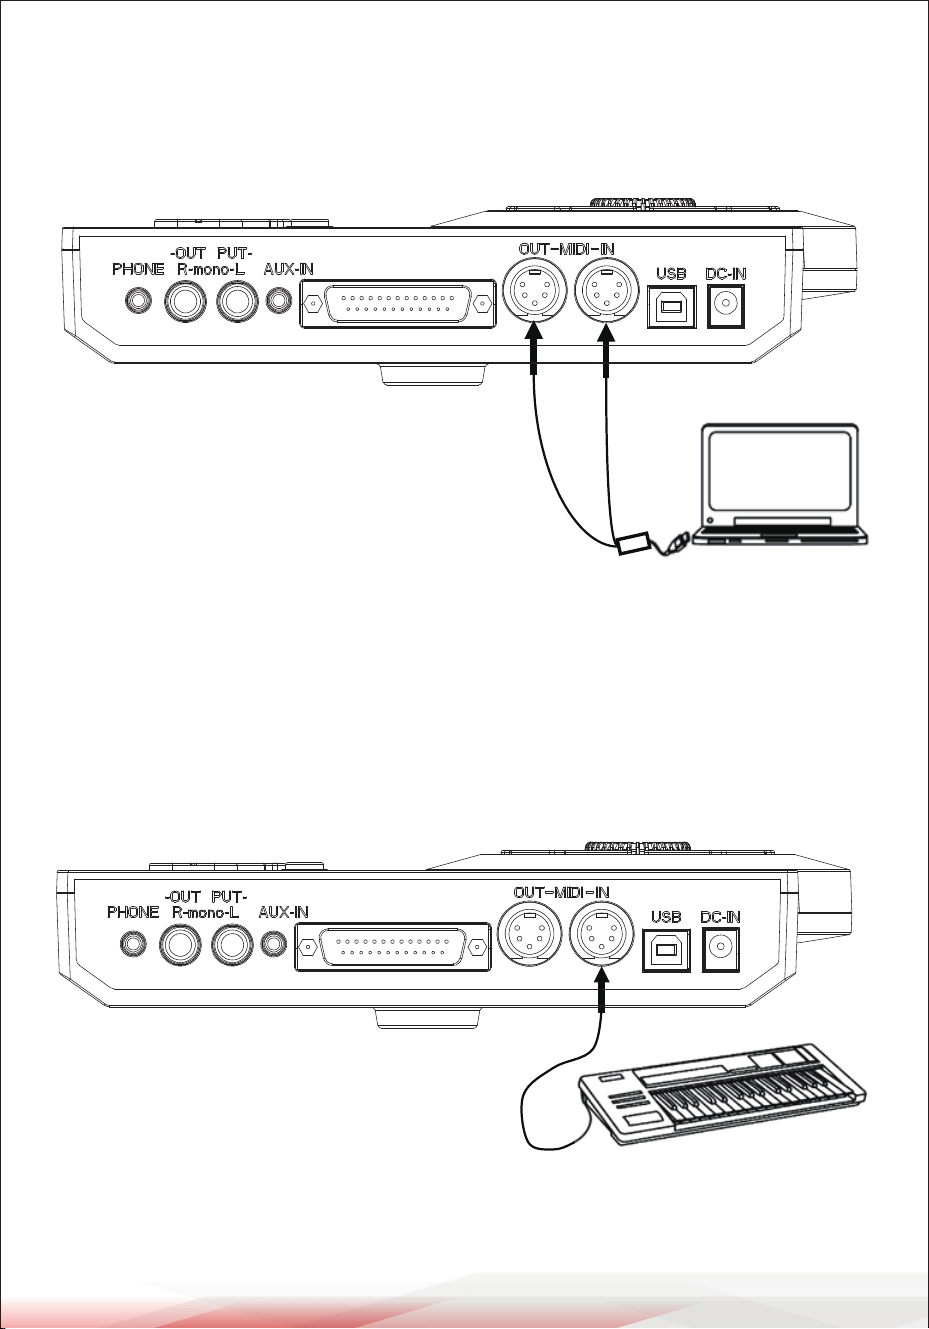
Connect to computer via MIDI
MIDI IN: Receive MIDI signals from external MIDI devices or computers
MIDI OUT: Sends pads signal to external MIDI device or computer
Connect the MIDI keyboard via the MIDI port
MIDI-IN/OUT:If external keyboard or MIDI device are used to control the drum,
it needs MIDI cable one end connecting with MIDI IN of the Drum Kit, and other
end with MIDI OUT of the MIDI keyboard. This drum is used as audio source.
The connection is as follows:
ww w.PyleUSA.com
14
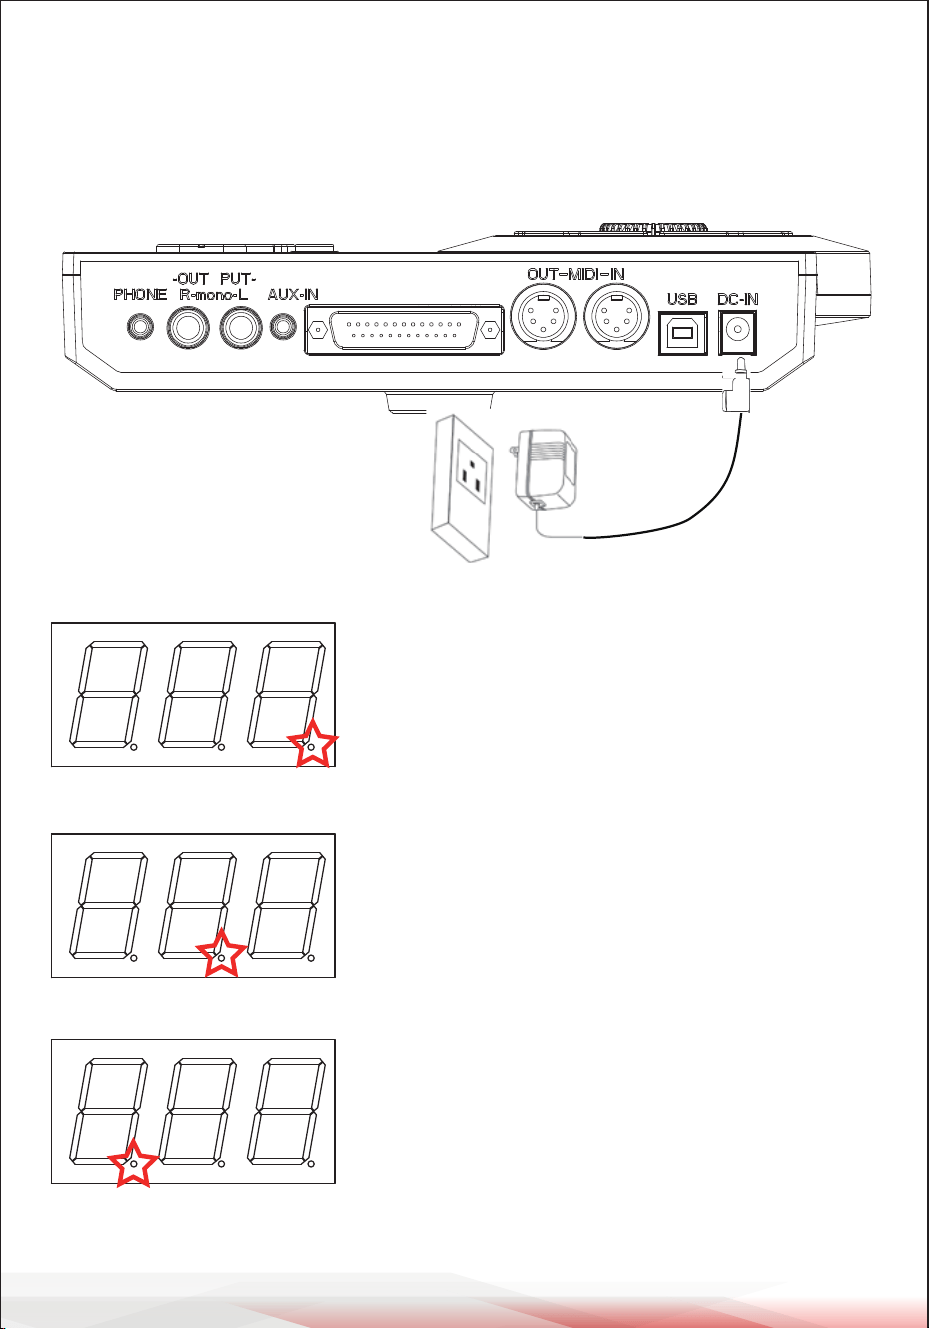
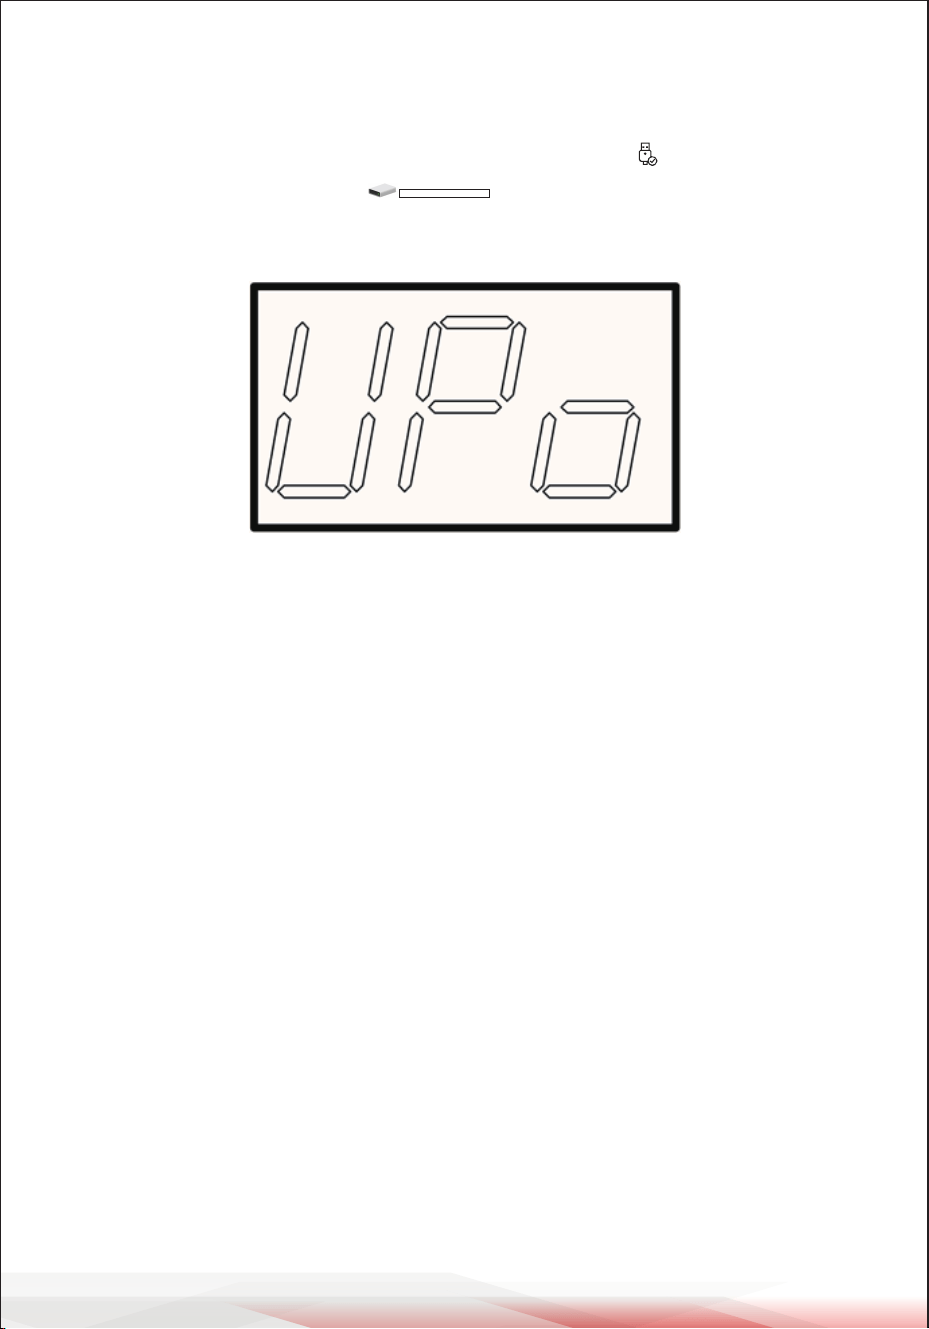
Connect with power supply
1. Plug the power adapter into DC IN connector
2. Make sure all drum pads are connected, turn the master volume on the Drum
Kit to the minimum, and then press the power button down. At which point the
display will light up and enter the drum set menu.
NUMERIC LED INTERFACE
Drum kit LED lights up: the number means
the drum kit number
Voice LED lights up: the number means the
voice number
The preset song led lights up: the number
means the preset song number.
SONG VOICE KIT
SONG VOICE KIT
SONG VOICE KIT

ww w.PyleUSA.com
15
BASIC OPERATION
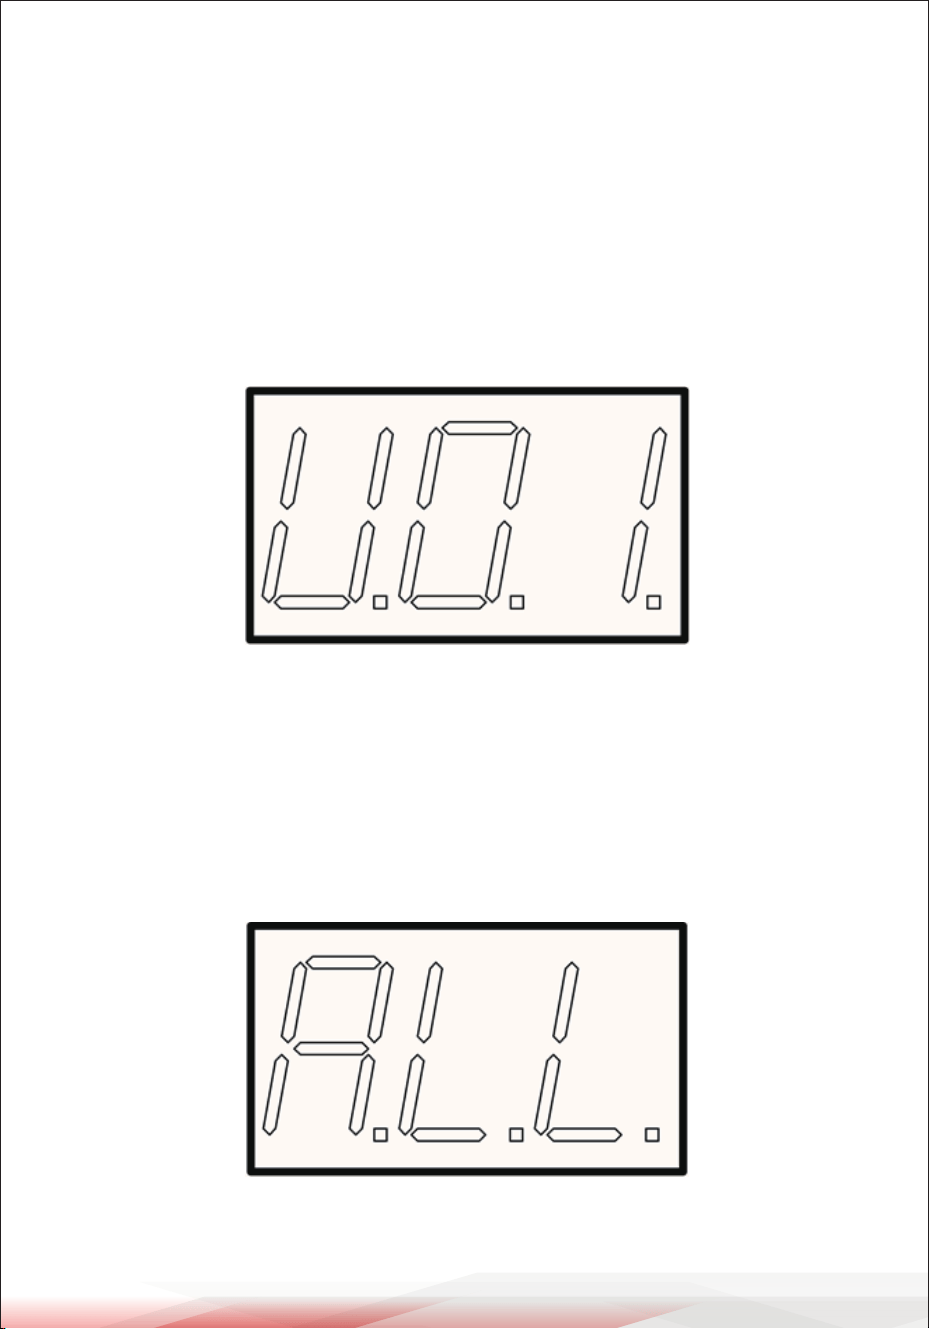
Selecting a drum kit
Power ON, numeric LED as shown in the gure 001. The Kit button light is always
ON to indicate that the drum kit is currently in the operation interface.
Drum sets can be switched between 【DATA+】and 【DATA-】.
37 sets of drum kits in all.
22 set of preset drum kits: 001---022
10 set of user drum kits: (display as U**) U01---U10
Playing the pads
Similar to an acoustic drum kit, the digital drum responds dierently to various
playing techniques and dynamics. All the pads senses the striking force.
Some voices change tone depending on the striking force.
The digital drum pad detects head and rim shorts (rim shorts are dierent from
the pad shorts)
Note:
1. SNARE is dual zone.
2. TOM1-TOM3 are standard with single zone.
3. All pads are single zone,CRASH and RIDE have the choke, e.g. hit the cymbal
then hold the rim to choke (stop) the sound.
4. SNARE delivers one sound when hit the pad rim strongly.
ww w.PyleUSA.com
16
ww w.PyleUSA.com
17
HI-HAT demonstration
The Hi-Hat: Sound varies depending on the position of the Hi-Hat pedal
Open Hi-Hat: Strike the Hi-Hat pad without pressing the pedal.
Half-open Hi-Hat: Strike the Hi-Hat pad with the pedal pressed but not
completely down.
Close Hi-Hat: Strike the Hi-Hat pad with the pedal pressed completely down.
Hi-Hat pedal close: Press the pedal completely down without striking the pad.
DEMO SONG
Play and switch the DEMO SONG
Press the 【 ┃ 】to play DEMO SONG, press again to stop. Use 【DOWN】 to select
the SONG, then press 【DATE+】 or 【DATE-】to switch (refer to DEMO SONG LIST for
DEMO SONG)
ww w.PyleUSA.com
18
Adjusting DEMO SONG accompaniment and drum volume
Press 【SONG】 to enter SONG setting menu, after entering, press 【PAGE】to enter
accompaniment adjustment menu. And use 【DATE+】 or 【DATE-】 to adjust DEMO
SONG accompaniment volume.
Press 【PAGE】 again to enter volume adjustment interface, and use 【DATE+】 or
【DATE-】to adjust the drum volume.
Mute the drums of DEMO SONG
Press 【DRUM OFF】 to quickly ON or OFF the drum volume of DEMO SONG
(The DRUM OFF button light is on, indicating that the DRUM sound of DEMO
SONG is muted, whereas the DRUM sound is output)
ww w.PyleUSA.com
19
Adjusting DEMO SONG tempo
Press 【TEMPO+】 or 【TEMPO-】, use 【DATE+】 or 【DATE-】 to adjust DEMO SONG
tempo.
Note:
When no operation returns to the previous interface within 3 seconds after
adjusting the speed, pressing other keys will also exit the speed adjustment
menu directly.
RECORD YOUR PERFORMANCE
Recording quickly
Press 【RECORD】 then 【RECORD】 LED lights up, strike any pad to start recording
and the LED start ashing. Press 【RECORD】again to stop recording and the LED
lights o.
ww w.PyleUSA.com
20
Play back recording
Press 【PLAY】 then 【PLAY】 LED lights up, and it plays the recorded performance,
press 【PLAY】 again to stop playing. If you are unsatised with the recorded
performance, press 【RECORD】 to record once again.
Note:
You can record the performance but can not save. This means the recorded
performance will replace the former recorded performance.
METRONOME
User can use the 【 】 button to turn ON/OFF metronome,When the metro-
nome is turned ON, the rst beat of the metronome button will light up red, the
other beats will light up green and the cycle lights up.
Adjusting the click
Press and hold to enter CLICK SETTING interface,and press 【PAGE】 to switch
options.
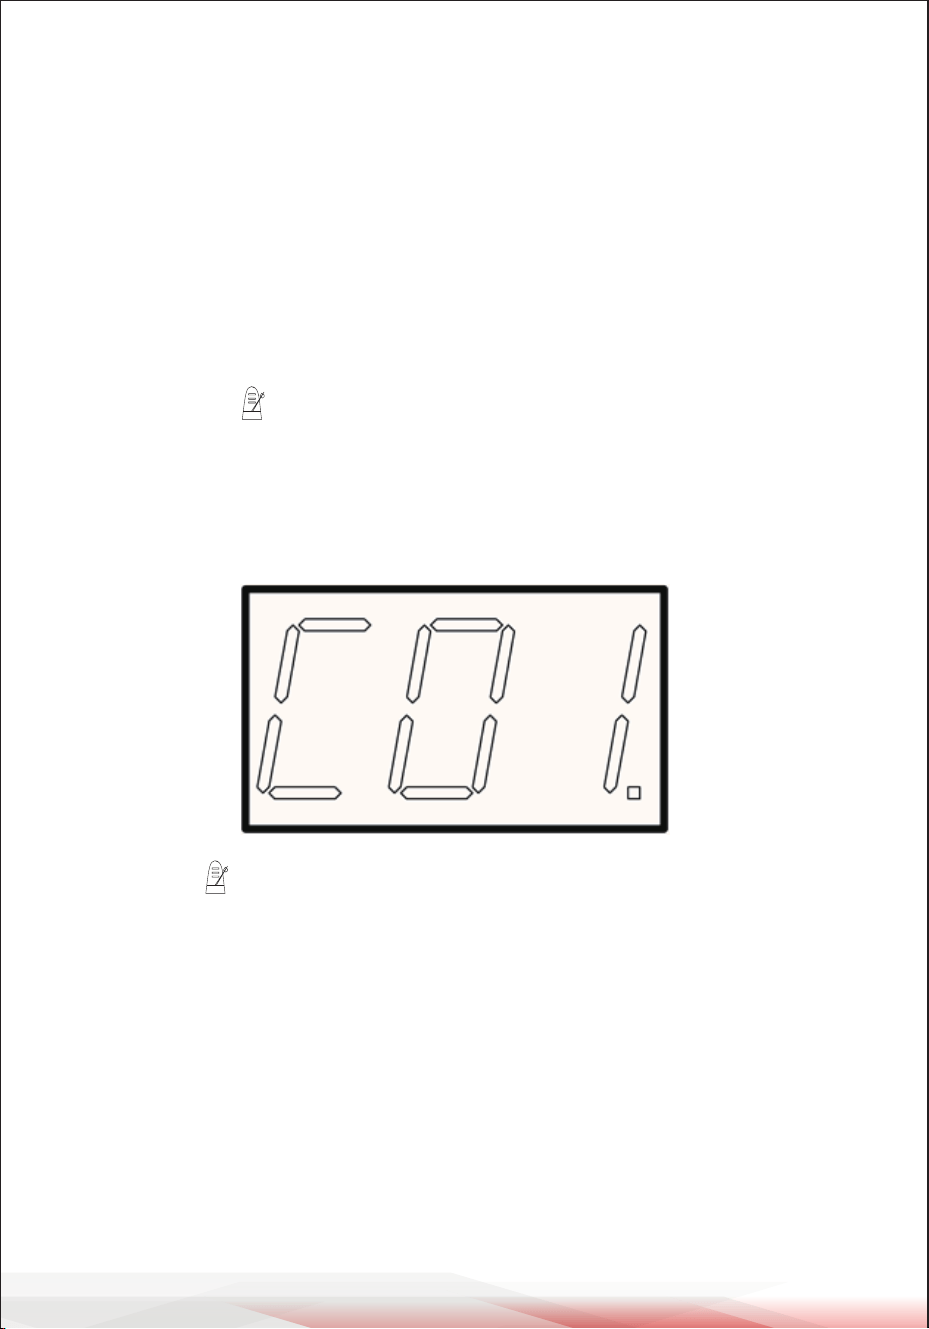
C01 interface is tone setting: C01 (human voice); C02 (traditional click);
C03 (digital click); C04 (triangle);
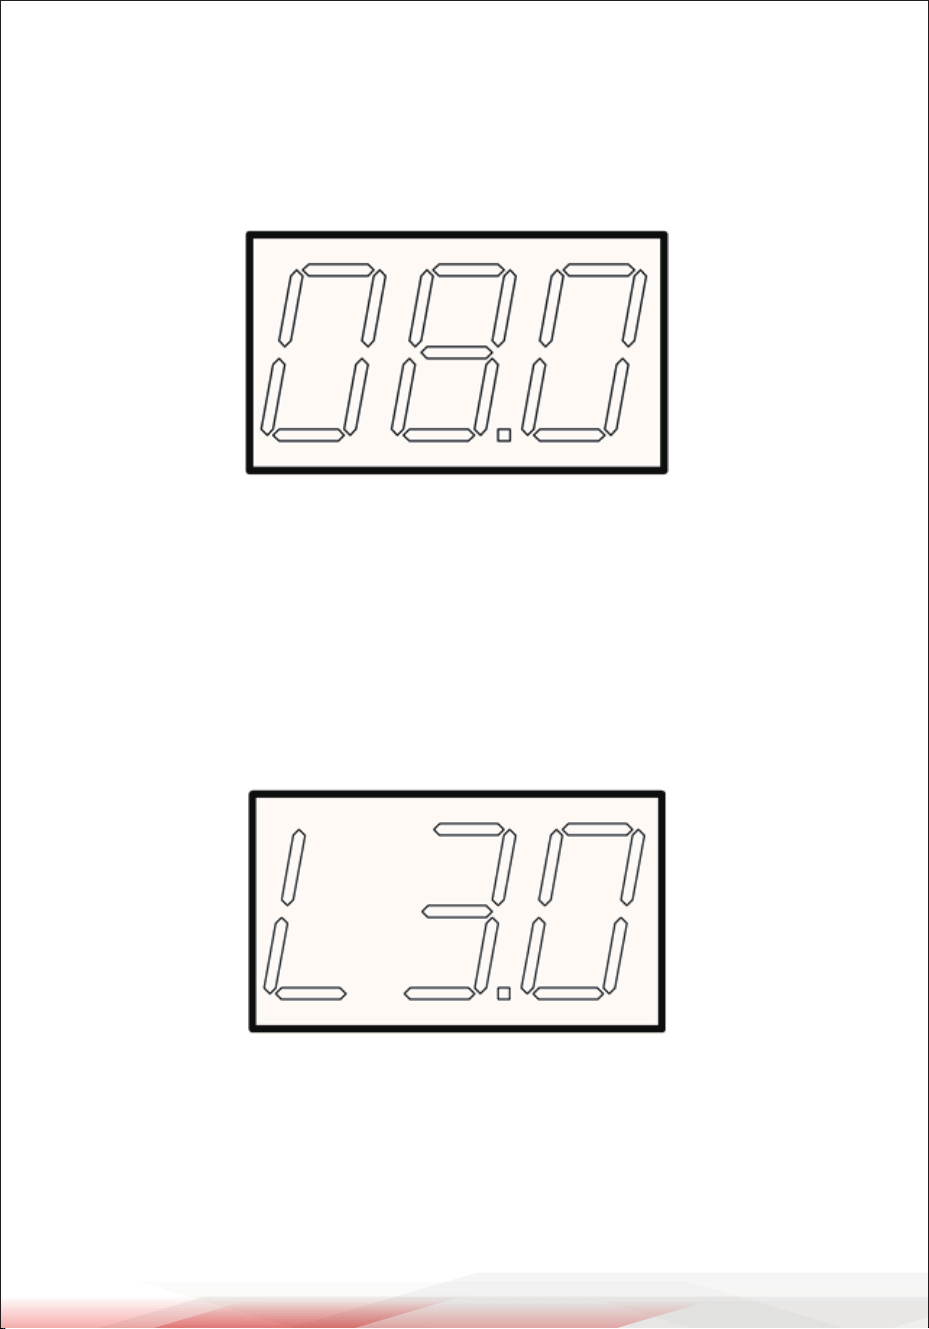
METER: 1/2, 2/2, 3/2, 4/2, 5/2, 6/2, 7/2, 8/2, 9/2, 1/4/, 2/4, 3/4, 4/4, 5/4, 6/4, 7/4,
8/4, 9/4, 1/8, 2/8, 3/8, 4/8, 5/8, 6/8, 7/8, 8/8, 9/8
VOLUME: 0-8 (0 is mute)
ww w.PyleUSA.com
21
EDIT AND SAVE DRUM KIT VOICE
Edit the voice
Press 【VOICE】 to enter VOICE adjustment interface,【 VOICE】 button light is
always on.
You can switch by hitting the pad you want to adjust. Press 【DATE+】 or 【DATE-】
to adjust the voice.
Voice volume adjustment
Press 【PAGE】 to enter the voice volume adjustment interface, then press 【DATE+】
o r【DATE-】 to adjust the volume.
Note:
The volume adjustment range is 00-32, the larger the value, the louder the sound.
ww w.PyleUSA.com
22
Voice sound eld adjustment
Press 【PAGE】 to enter voice sound eld adjustment interface, and press 【DATE+】
or 【DATE-】 to adjust the parameter.
Note:
Sound eld adjustable range: -8-8. The negative sound eld is to the left, 0 is the
center position, and the positive value is to the right.
Voice sound eld adjustment
Press 【PAGE】 to enter voice sound eld adjustment interface, and press 【DATE+】
or 【DATE-】 to adjust the parameter.
Note:
Volume adjustable range:-2-2 The greater the negative value, the lower the pitch,
the greater the positive value, the higher the pitch.
ww w.PyleUSA.com
23
MIDI channel setting
Press 【PAGE】 to enter voice MIDI channel setting interface, press 【DATE+】 or
【DATE-】 to adjust the voice MIDI channel.
Note:
The MIDI channel can be set according to the external equipment or software.
The factory setting is preset according to the standard MIDI channel.
Save the voice of drum set
Press 【SAVE】 to enter the user drum set save setting, and press 【DATE+】 or
【DATE-】 to adjust user drum set.
Note: 10 sets of user drum kits built in this machine.

ww w.PyleUSA.com
24
ADJUST PAD TRIGGER
Press 【SETUP】 to enter SETTING menu, press 【PAGE】 to switch setting menus.
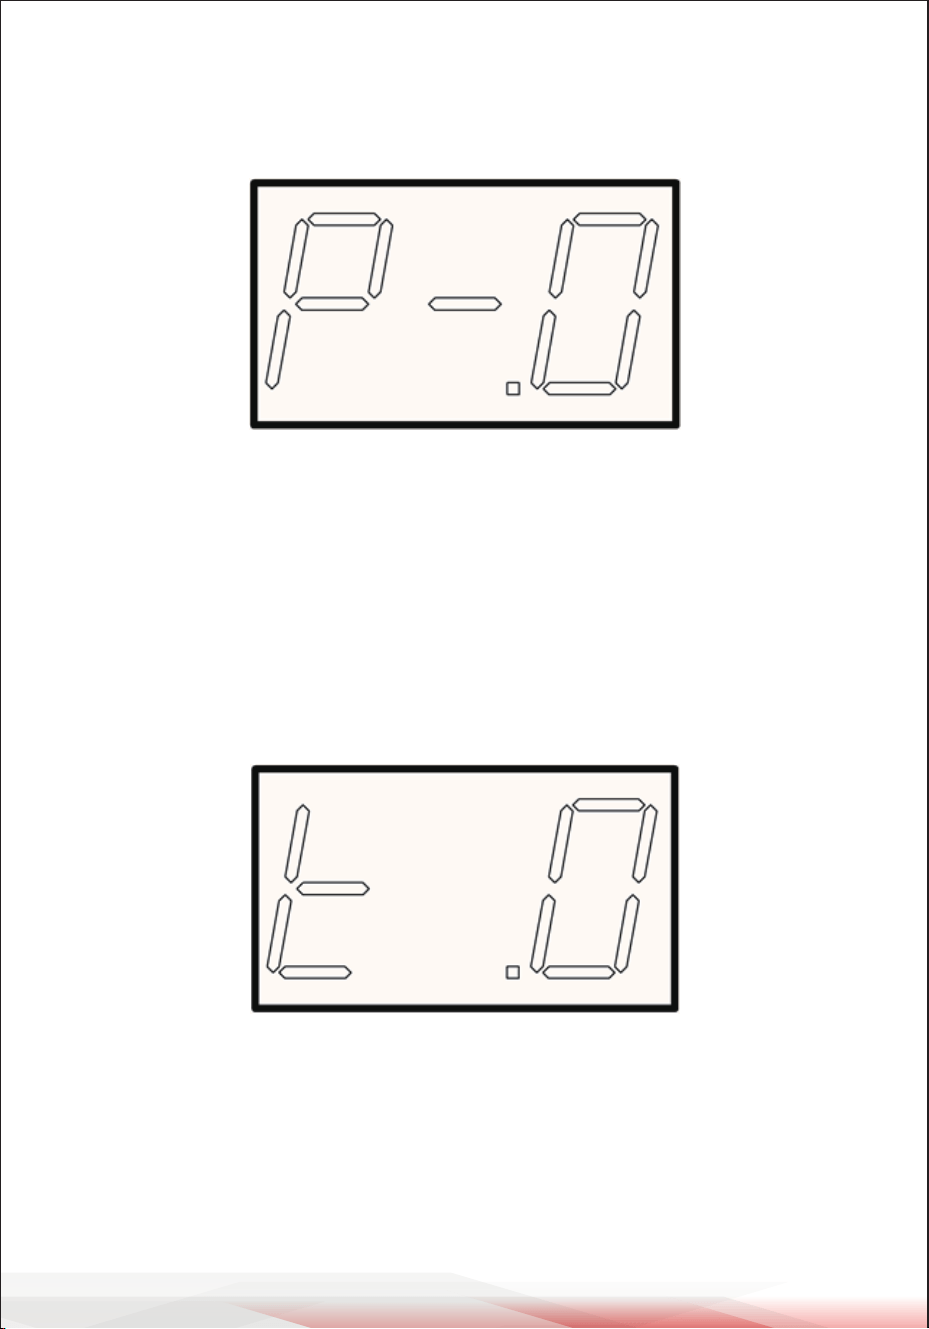
Adjust trigger sensitivity
Press 【PAGE】 to enter the rst interface which is pad sensitivity adjust interface,
use 【DATA+】 or 【DATA-】 to adjust, and the adjustable range is 01-08.
Users can adjust the sensitivity of the drum pad according to their personal
playing habits.
This setting allows users to have more control over the volume and strength
based on the user's hitting strength.
High Sensitivity: The higher the value, the louder volume will be produced even
if you tap lightly; the lower the sensitivity, the smaller the value, the volume will
be very small even if you hit harder.
Note:
Before adjustment, select the drum pad that needs to be adjusted.
You can use the drum stick to strike the pad to be adjusted to switch between
the drum pads.
ww w.PyleUSA.com
25
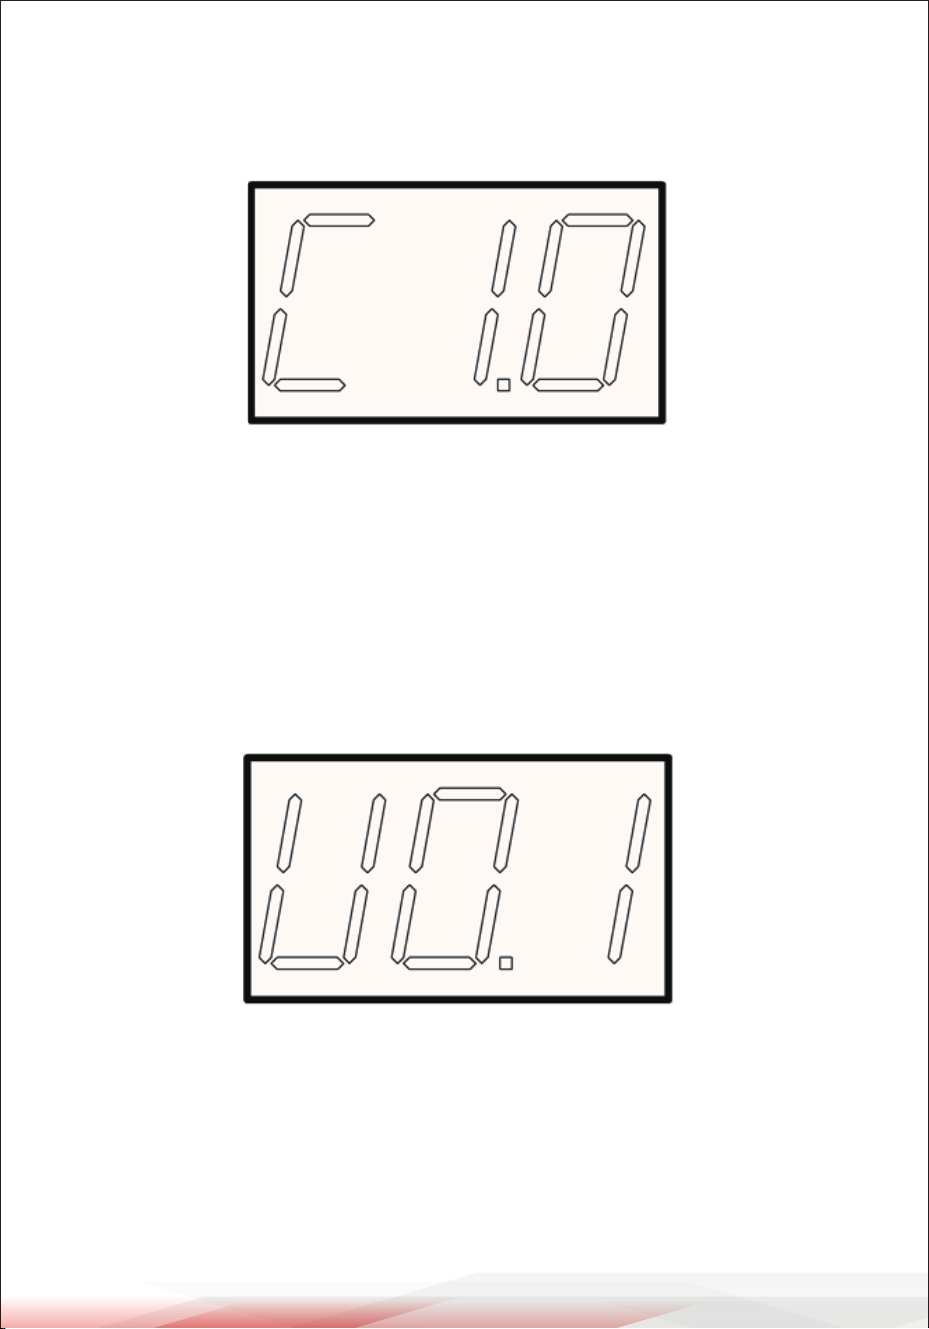
Adjust trigger crosstalk eliminate
Press 【PAGE】 to switch the second interface(pad sensitivity adjustment, you can
use 【DATA+】 or 【DATA-】 to adjust, adjustable range: 00-16.
When two pads are close, hitting one pad can cause the other pad to generate
a signal. This crosstalk can be eliminated by setting a high parameter of the
other pad.
Note:
If the crosstalk value is set too high, when two pads are played simultaneously
the one that is struck less forcefully will not sound, so be careful and set this.
parameter to the minimum value required to prevent such crosstalk. In addition,
when this parameter is set to 0, crosstalk suppression does not work.
Adjusting pad curve
Press 【PAGE】 to switch the third interface(pad force curve), and you can use
【DATA+】 or 【DATA-】 to adjust, adjustable range: CU1-CU6.
ww w.PyleUSA.com
26
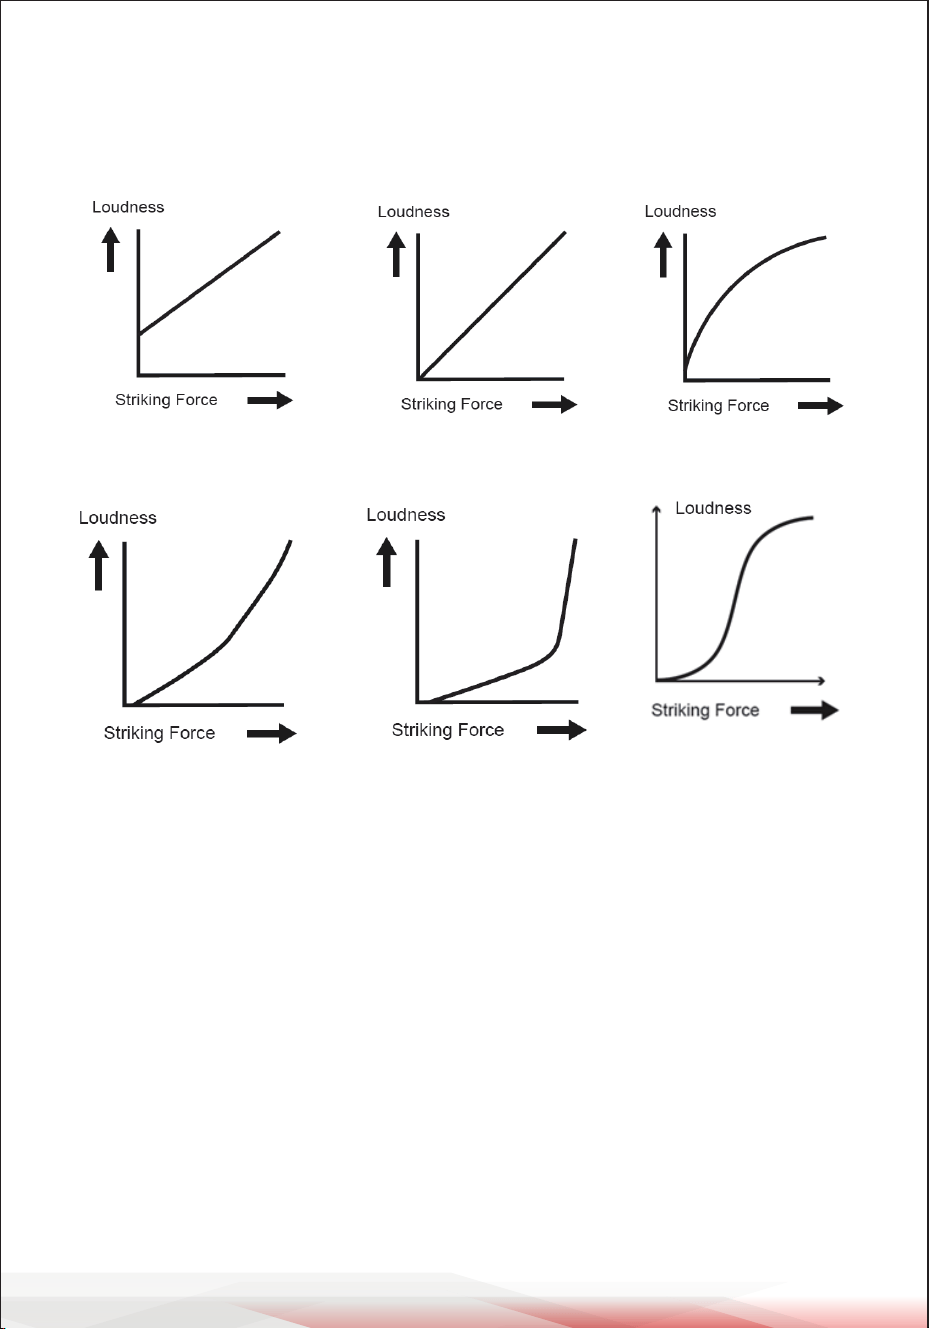
VEL CURVE
Refers to the corresponding relationship between percussion strength and volume.
By adjusting the parameters, it can make the percussion feel more comfortable
and natural. Users can set the parameters according to their percussion habits.
CURVE 1: Small dynamic response. Select this curve and it delivers high but
stable volume.
CURVE 2: The standard setting to deliver natural signal.
CURVE 3: Compared to CURVE 2, low striking force causes big volume change.
CURVE 4: Compared to CURVE 2, comparatively high striking force causes
comparatively big volume change.
CURVE 5: Compared to CURVE 2, comparatively high striking force causes very
big volume change.
CURVE 6: The striking force causes extreme volume change.
CURVE 1
CURVE 4 CURVE 5
CURVE 2
CURVE 3
CURVE 6
ww w.PyleUSA.com
27
Local Control
Press 【PAGE】 to switch to the forth interface (local control), and you can use
【DATA+】 or 【DATA-】 to open or close.
LOCAL: Local control to control the connection between the trigger and the
drum module.
ON: The drum pad is connected with the internal sound module, and the drum
pad is tapped to produce sound, which defaults to ON.
OFF: The drum pad is disconnected from the internal sound module, and the
drum pad does not sound.
Adjust Hi-hat sensitivity
Press 【PAGE】to switch the fth interface (Hi-hat sensitivity adjustment), and you
can use 【DATA+】or【DATA-】to adjust, adjustable range: H01-H16.
ww w.PyleUSA.com
28
SELECT TRIGGER
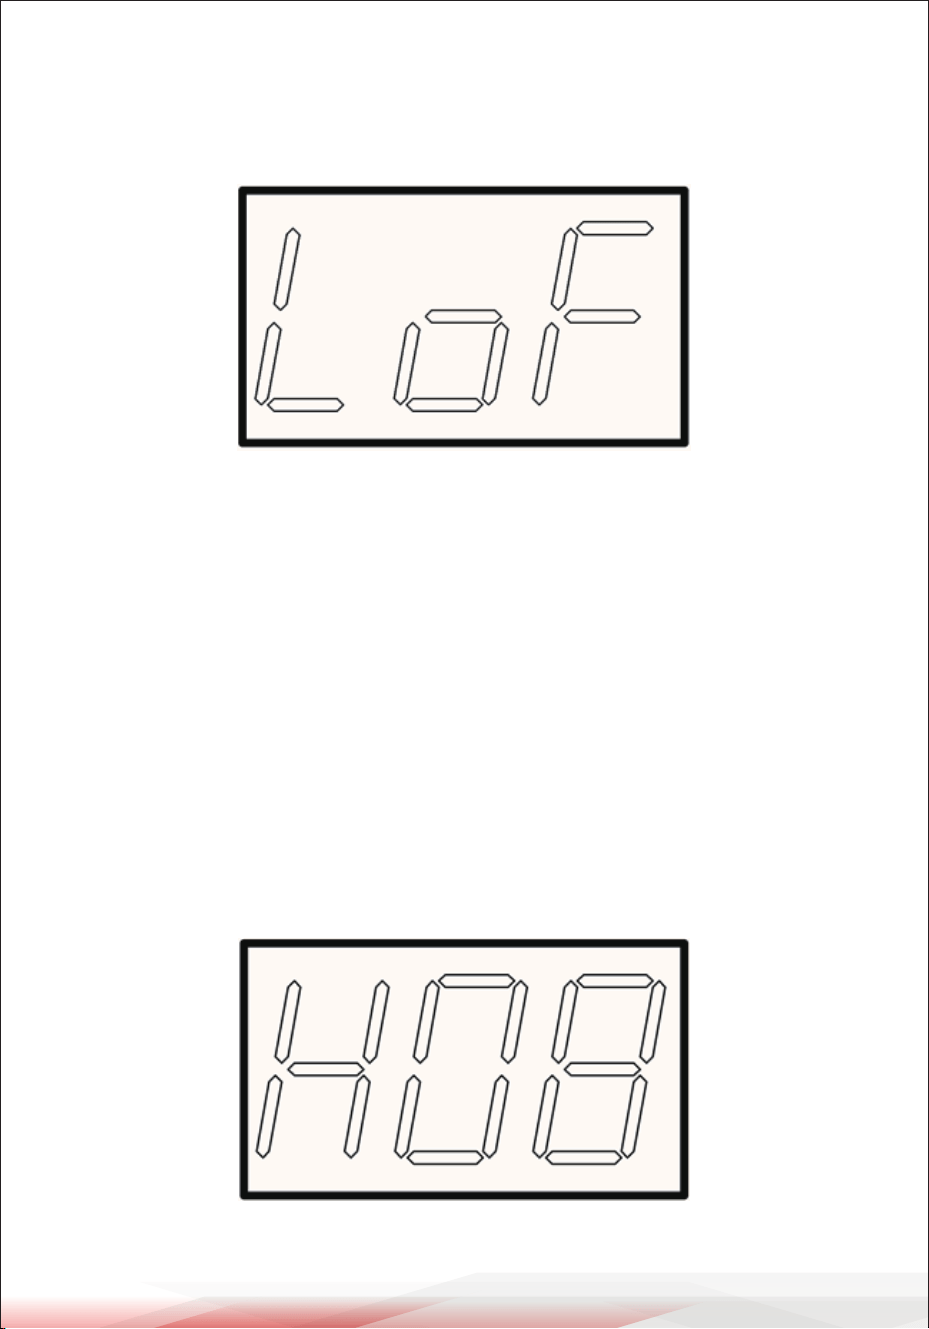
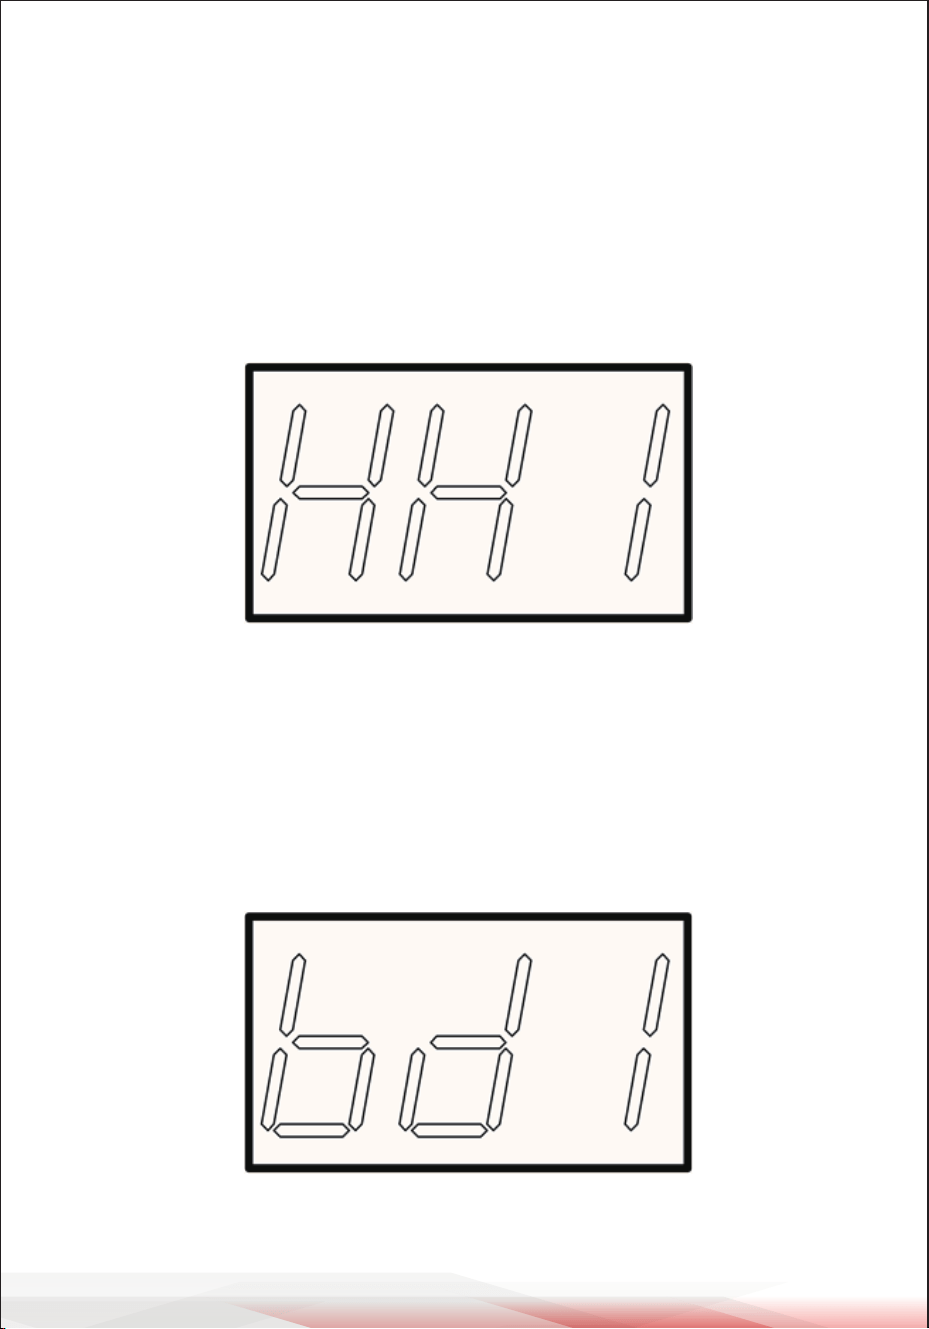
HI-HAT trigger setting
Press 【SETUP】 to enter setting menu, and press 【PAGE】 to enter HI-HAT sensor
type setting page. You can use 【DATA+】 or 【DATA-】 to set the trigger type of
HI-HAT.
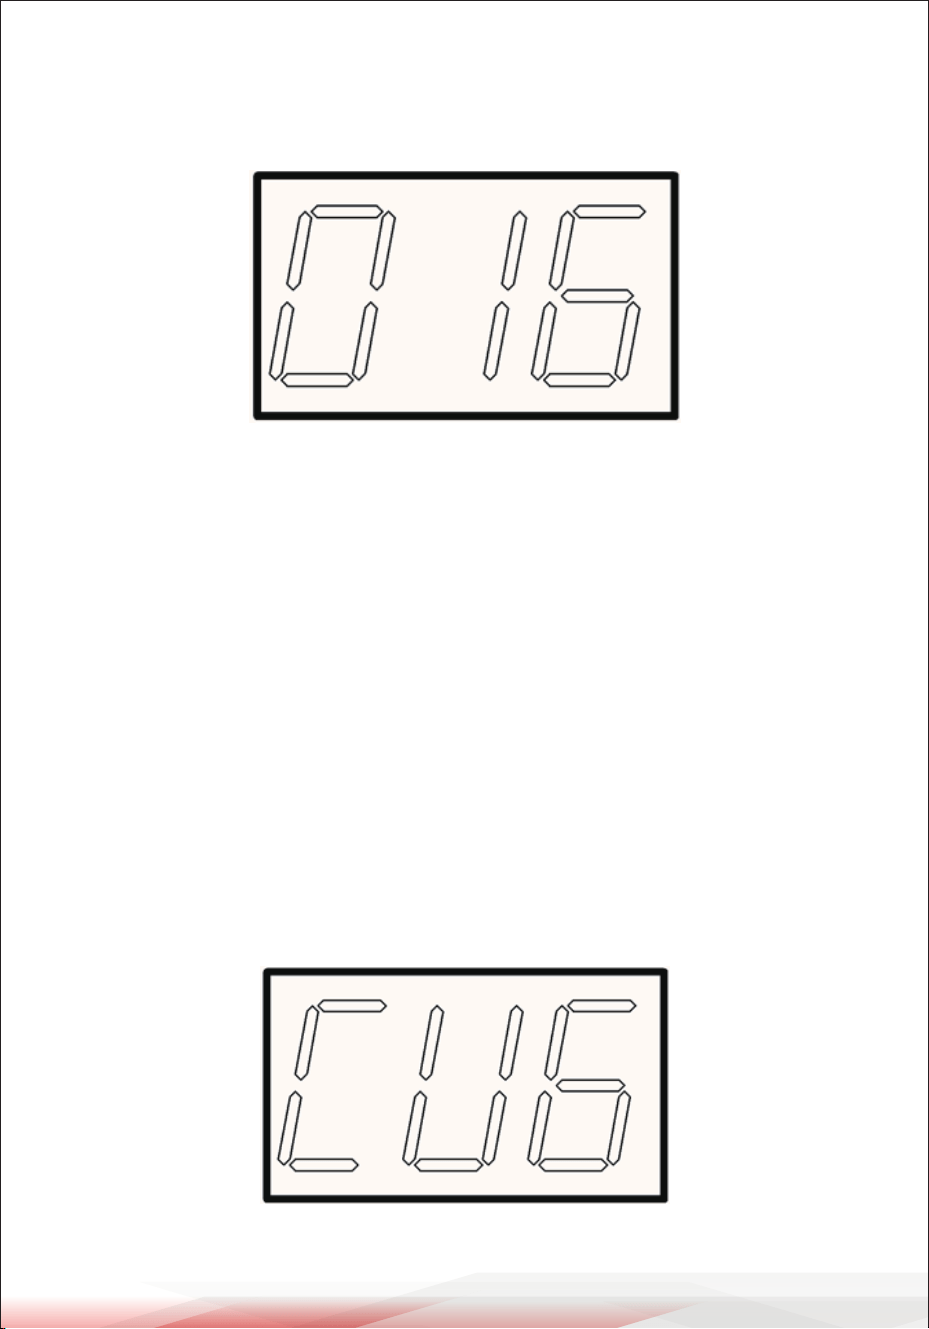
HH1: Pedal type
HH2: Simulate hi-hat
Kick sensor type
Press 【SETUP】 to enter SETTING menu, and press 【PAGE】 to enter kick sensor
type setting. You can use 【DATA+】 or 【DATA-】 to set the type of kick sensor.
bd1: Pedal type
bd2: Hammer type
ww w.PyleUSA.com
29
RELOAD DEFAULT SETTING
Single user drum kit is restored to factory settings
Press and hold 【SETUP】 to enter user drum kit default setting page, three indicators
on the numeric LED are light up from left to right.
You can use 【DATA+】 or 【DATA-】 to adjust the drum kit you want to restored,
then press 【SETUP】 to reload. The 3 indicators on the numeric LED blinks at the
same time during the recovery process. When the reload is completed, the LED
lights up again from left to right to indicate that the recovery is completed.
All parameters restore factory settings
Press and hold 【SETUP】 to enter user drum kit default setting page, then press
【PAGE】 to enter all parameters restore factory setting. Three indicators on the
numeric LED are light up from left to right. Then press 【SETUP】 to reload, it will
enter the home menu-preset drum kit 001 directly after the recovery.
ww w.PyleUSA.com
30
SYSTEM SOFTWARE UPDATE
Connect the module to the computer via the USB cable before operation, then
select Yes by pressing 【DATE+】 or 【DATE-】 in the UPDATE option and press
【SETUP】again. The system will have USB devices identiedand on My Computer
in the form of a USB ash drive . You can double click the left mouse
button to open, to update the program le (le name) copy and paste in the USB
disk, you can complete the software upgrade.
Note: The upgrade le can be downloaded from the company's ocial website,
or consult relevant sales sta. The correct le name is “A005000.bin” .
Do not turn o the mainframe power during the upgrade process.
Keep the mainframe power supply stable and have no other operation.
MIDI SETTING
This device is compatible with various MIDI devices. When it is used as trigger
device or audio source, it is compatible with GM standard, and can be used with
most sequencer software.
MIDI Connection
MIDI IN: Inputs MIDI signal when connecting with external MIDI device.
MIDI OUT: Outputs MIDI signal when connecting with external MIDI device.
USB:Standard USB2.0 interface. It can be connected to any MIDI device or PC with
a standard USB driver, and the corresponding driver is included in the general
operating system, so there is no need for repeated installation. Compatible with
common computer operating systems such as: XP, Win7, Vista, Mac OSX, etc. (USB
is only used for MIDI connection).
Note: When USB connects with PC, all MIDI data will be received and transmitted
via USB.
ww w.PyleUSA.com
31
Connect with external audio device
This device automatically connects via channel 10 transfers drum signal to other
MIDI device including notes, forces, pedal performance, etc.
Note: Song playback data and metronome notes are not transferred.
Record your performance with external sequencer
1. Connect with external sequencer or PC via MIDI OUT for playback or USB
interface.
2. Use the sequencer or the software to set channel 10 as a device to start recording.
3. Play the drum pads.
4. Stop performance and recording. Playback the recording.
Setting MIDI IN/OUT note to be transferred/received by each pad
1. Press VOICE button to enter the VOICE setting menu.
2. Strike the relative pad, press 【PAGE】 to switch to C**
3. Use 【DATE+】 or 【DATE-】 to adjust the MIDI value for a pad.
4. Press save button to save USER drum kit.
Default factory setting as below:
Used as an audio source device
When connected with external MIDI keyboard or sequencer through MIDI OUT or
USB cable, the device can receive its MIDI output signal, and then the device can
play OUT the valid signal. The output tone changes with the switch of drum kit.
This equipment has most GM drum kit tone. Users can build their own USER
drum kit if necessary. Other MIDI support and limitations are described in the
MIDI list.
TRIGGER
KICK
SNARE
SANRE RIM
TOM1
RIDE
MIDI NOTE
36
38
37
48
51
TRIGGER
TOM3
CRASH2
HI-HAT C
TOM4
HI-HAT O
MIDI NOTE
43
57
42
41
46
TRIGGER
HI-HAT CTRL
CRASH
TOM2
MIDI NOTE
44
49
45
ww w.PyleUSA.com
32
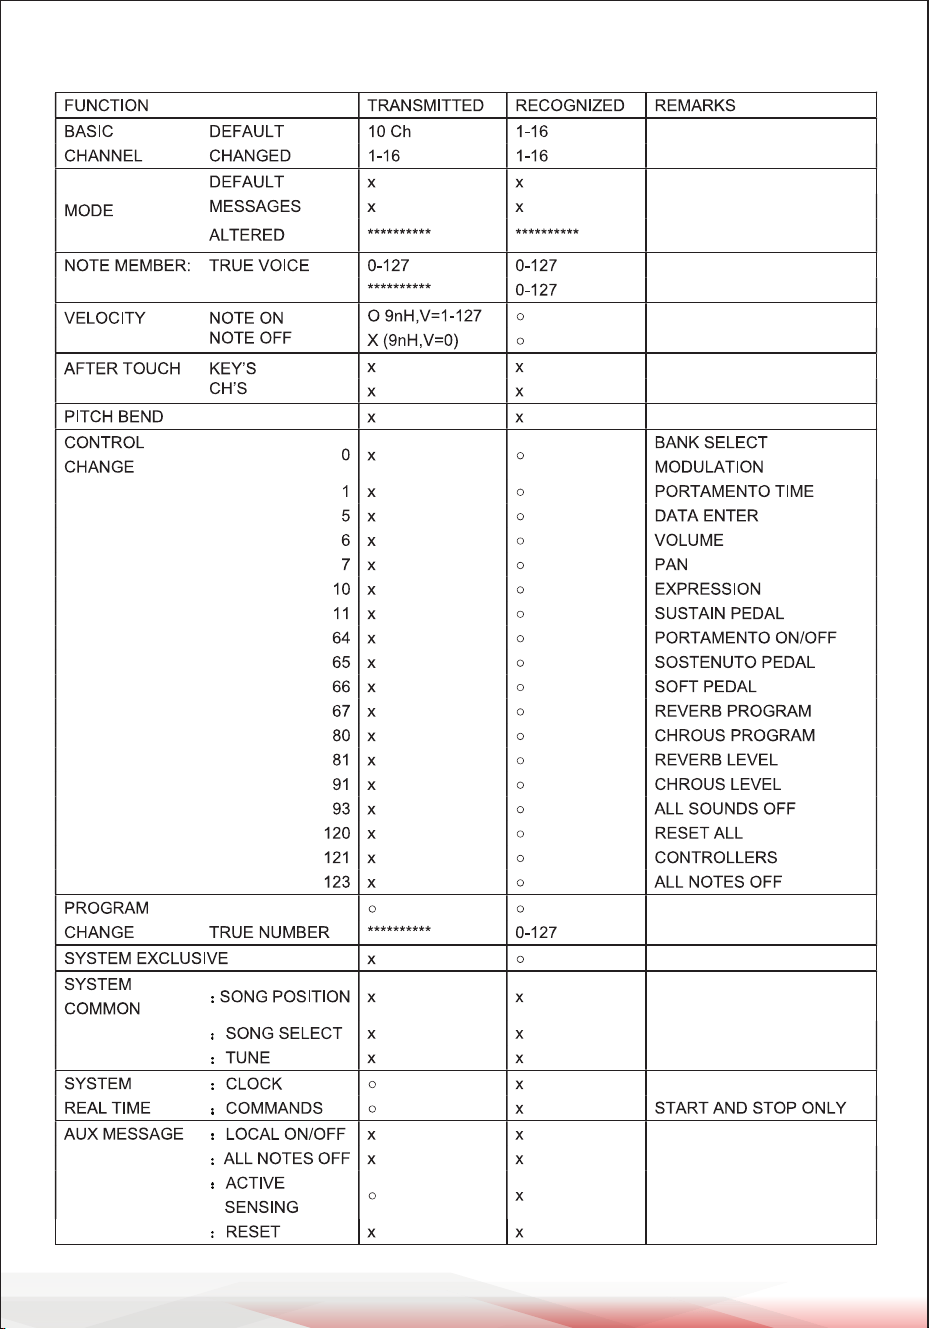
MIDI LIST
ww w.PyleUSA.com
33
TROUBLESHOOTING
No sound on the
external drum pad
No sound on the
external drum pad
No sound on
DEMO SONG
There is no sound
output connected
to MIDI
communication
devices
2. Check whether setting "LOCAL" to "OFF". If setting to
"OFF", there is no sound output on the drum pad.
3. Check whether the corresponding drum volume is set
to 0.
Make sure the volume of DEMO SONG is not 0
1. Check whether the USB cable used to connect is damaged.
2. Verify whether the communication channel is set
correctly. The communication channel set by the audio
source is 10 channels by default. If the audio source is set
to other channels, other MIDI devices should also be set
to corresponding channels.
1.Make sure the volume knob is set correctly and adjust
the volume knob.
2.Check whether the audio cable between the audio
source and the power amplier or other playback
equipment is connected correctly.
Replace the cable to test.
No sound/sound
is too low
3.If you are connecting to the audio device through the
mixer, insert a good earphone into the headphone
output jack of the audio source. If there is sound, check
whether the cable is normal, the Settings and connections
of the mixer and audio equipment normal?
1.Make sure that the connecting wire between the drum
pad and the host machine is connected correctly and
in place.
Whether the metronome volume is 0

ww w.PyleUSA.com
34
AUDIO SOURCE SPECIFICATIONS
•
POLYPHONY: 64
• DISPLAY: 3-segment numeric LED
• VOICE: 320 drum and other percussion voices + 128 kinds of GM music tone
• DRUM KITS: 22 preset drum kits+10 user drum kits
SEQUENCER:
1.Single track recording 1000 notes
2.Normal mode:20 preset songs
TEMPO FUNCTION:
1. Tempo tone: 4 kinds
2. Adjustable range: 30-250
3. Tempo: 1/2-9/8
CONNECTION:
• Headphone stereo output (1/8"),AUX INPUT stereo port (1/8")
• Audio output interface L MONO OUT (1/4"), R OUT (1/4")
• Sensor interface(D-SUB 25P)
• MIDI IN/MIDI OUT Interface (standard 5-pin port)
• USB Data interface (USB B-type interface)
• Extension: CRASH2,TOM4 (1/4")
• Battery power supply interface
*** The specication is subject to change without prior notice. ***
ww w.PyleUSA.com
35
DRUM KIT LIST
No.
KIT01
KIT02
KIT03
KIT04
KIT05
KIT06
KIT07
KIT08
KIT09
KIT10
KIT11
KIT12
KIT13
KIT14
KIT15
KIT16
ROCK
FUNK/POP
JAZZ
LATIN
DANCE
POP1
POP2
POP3
HARD RCK
METAL
FUNK1
FUNK12
HIP-HOP
FUSSION
BLUES
CUBAN
Name No.
KIT17
KIT18
KIT19
KIT20
KIT21
KIT22
KIT23
KIT24
KIT25
KIT26
KIT27
KIT28
KIT29
KIT30
KIT31
KIT32
BRUSH
ELE1
ELE2
COUNTRY
ORCH
SONGGU
USER01
USER02
USER03
USER04
USER05
USER06
USER07
USER04
USER05
USER06
Name
ww w.PyleUSA.com
36
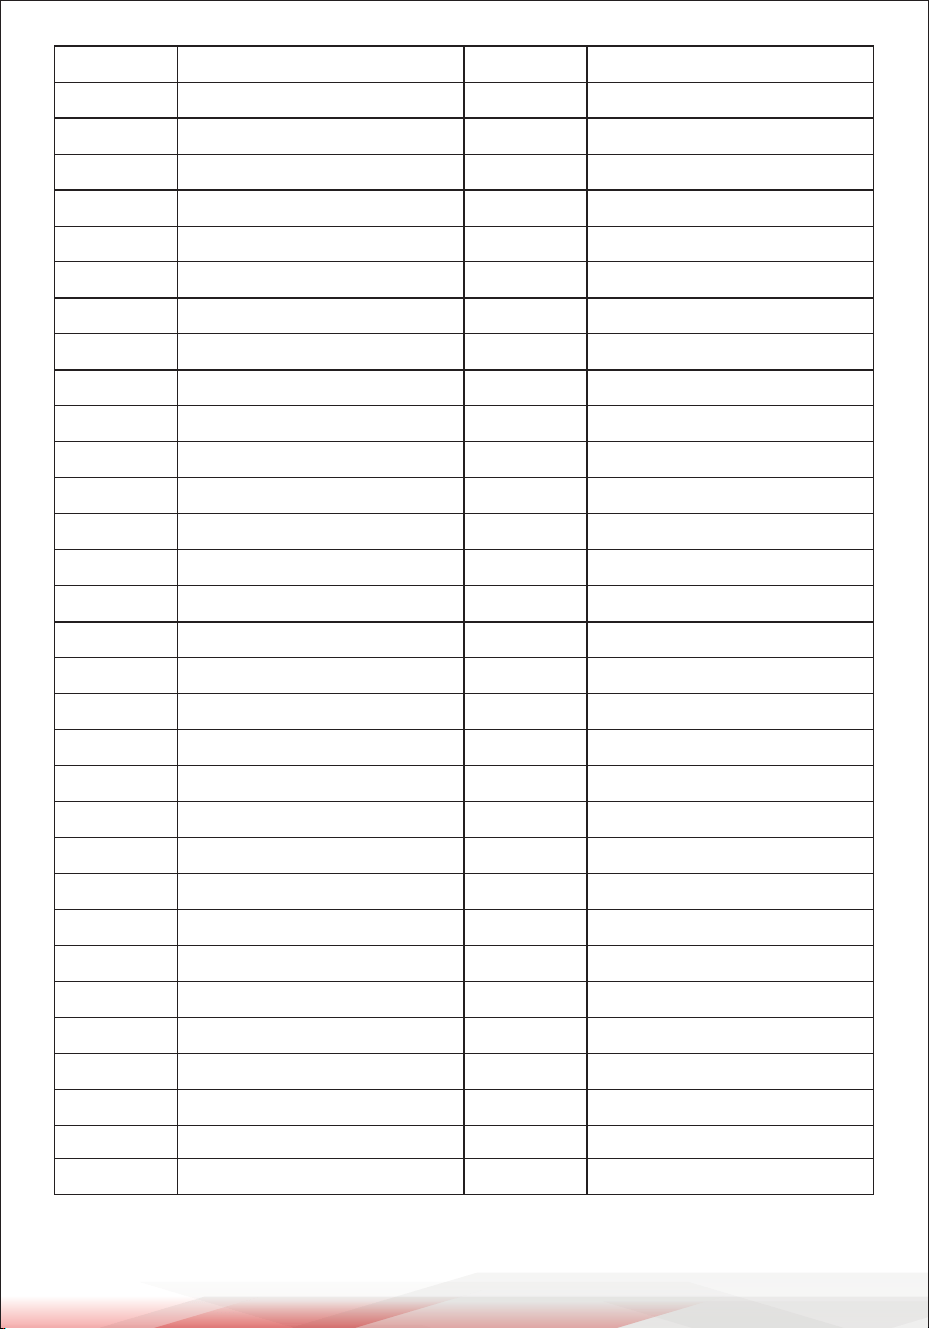
VOICE LIST
KIT01
KIT02
KIT03
KIT04
KIT05
KIT06
KIT07
KIT08
KIT09
KIT10
KIT11
KIT12
KIT13
KIT14
KIT15
KIT16
KIT17
KIT18
KIT19
KIT20
KIT21
KIT22
KIT23
KIT24
KIT25
KIT26
SNARE01
SNARE02
SNARE03
SNARE04
SNARE05
SNARE06
SNARE07
SNARE08
SNARE09
SNARE10
SNARE11
SNARE12
SNARE13
SNARE14
SNARE15
SNARE16
SNARE17
SNARE18
SNARE19
SNARE20
SNARE21
SNARE22
SNARE23
SNARE24
KICK
SNARE
1
2
3
4
5
6
7
8
9
10
11
12
13
14
15
16
17
18
19
20
21
22
23
24
25
26
27
28
29
30
31
32
33
34
35
36
37
38
39
40
41
42
43
44
45
46
47
48
49
50
CYMBAL
TOMM4
TOMM5
TOMM6
TOMM7
TOMM8
TOML1
TOML2
TOML3
TOML4
TOML5
TOML6
TOML7
TOML8
TOML9
TOME1
TOME2
TOME3
TOME4
TOME5
TOME6
TOME7
153
154
155
156
157
158
159
160
161
162
163
164
165
166
167
168
169
170
171
172
173
174
175
176
177
178
179
180
181
182
183
184
185
186
187
188
189
190
191
192
193
194
195
196
197
198
199
200
201
202
203
CRSH01
CRSH02
CRSH03
CRSH04
CRSH05
CRSH06
CRSH07
CRSH08
CRSH09
CRSH10
CRSH11
CRSH12
CRSH13
CRSH14
CRSH15
CRSH16
CRSH17
CRSH18
CRSH19
CRSH20
CRSH21
CRSH22
CRSH23
CRSH24
CRSH25
CRSH26
CRSH27
CRSH28
RIDE1
RIDE2
TOM
TOMH1
TOMH2
TOMH3
TOMH4
TOMH5
TOMH6
TOMH7
TOMM1
TOMM2
TOMM3
PDLHHT15
PDLHHT16
OPNHHT01
OPNHHT02
OPNHHT03
OPNHHT04
OPNHHT05
OPNHHT06
OPNHHT07
OPNHHT08
OPNHHT09
OPNHHT10
OPNHHT11
OPNHHT12
OPNHHT13
OPNHHT14
OPNHHT15
OPNHHT16
HOPNHHT01
HOPNHHT02
HOPNHHT03
HOPNHHT04
HOPNHHT05
HOPNHHT06
HOPNHHT07
HOPNHHT08
HOPNHHT09
LSHHT1
LSHHT2
LSHHT3
LSHHT4
LSHHT5
LSHHT6
LSHHT7
ELCHHT1
ELCHHT2
ELCHHT3
ELCHHT4
ELCHHT5
ELCHHT6
ELCHHT7
102
103
104
105
106
107
108
109
110
111
112
113
114
115
116
117
118
119
120
121
122
123
124
125
126
127
128
129
130
131
132
133
134
135
136
137
138
139
140
141
142
143
144
145
146
147
148
149
150
151
152
SNARE25
SNARE26
SNARE27
SNARE28
SNRIM1
SNRIM2
SNRIM3
SNRIM4
SNRIM5
SNRIM6
SNRIM7
SNRIM8
ESNR1
ESNR2
ESNR3
ESNR4
ESNR5
ESNR6
ESNR7
ESNR8
ESNR9
CLHIHAT01
CLHIHAT02
CLHIHAT03
CLHIHAT04
CLHIHAT05
CLHIHAT06
CLHIHAT07
CLHIHAT08
CLHIHAT09
CLHIHAT10
CLHIHAT11
CLHIHAT12
CLHIHAT13
CLHIHAT14
CLHIHAT15
CLHIHAT16
PDLHHT01
PDLHHT02
PDLHHT03
PDLHHT04
PDLHHT05
PDLHHT06
PDLHHT07
PDLHHT08
PDLHHT09
PDLHHT10
PDLHHT11
PDLHHT12
PDLHHT13
PDLHHT14
HIHAT
51
52
53
54
55
56
57
58
59
60
61
62
63
64
65
66
67
68
69
70
71
72
73
74
75
76
77
78
79
80
81
82
83
84
85
86
87
88
89
90
91
92
93
94
95
96
97
98
99
100
101
ww w.PyleUSA.com
37
PERCUSSION
RIDE3
RIDE4
RIDE5
RIDE6
RIDE7
RIDE8
RDBELL1
RDBELL2
RDBELL3
RDBELL4
RDBELL5
RDBELL6
RDBELL7
ELCRASH1
ELCRASH2
ELCRASH3
ELCRASH4
ELCRASH5
ELCRASH6
HI_Q
SLAP
SCRCH1
SCRCH2
STICK
SQCLCK
CLICK
BELL
CLAP1
CLAP2
CLAP3
TAMBRINE
COWBELL1
COWBELL2
COWBELL3
ELCRASH4
VSLAP
HIBONGO
LOBANGO
MUTECONGA1
MUTECONGA2
LOCONGA1
LOCONGA2
HTIMBL1
HTIMBL2
LTIMBL1
LTIMBL2
HIAGOGO
LOAGOGO
CABASA
MARACS
WHISTLE_S
204
205
206
207
208
209
210
211
212
213
214
215
216
217
218
219
220
221
222
223
224
225
226
227
228
229
230
231
232
233
234
235
236
237
238
239
240
241
242
243
244
245
246
247
248
249
250
251
252
253
254
PIATIM
ESCRCH
ECLK
CIRCLE
DOWN
VOCAL1
VOCAL2
VOCAL3
VOCAL4
VOCAL5
VOCAL6
VOCAL7
VOCAL8
VOCAL9
307
308
309
310
311
312
313
314
315
316
317
318
319
320
255
256
257
258
259
260
261
262
263
264
265
266
267
268
269
270
271
272
273
274
275
276
277
278
279
280
281
282
283
284
285
286
287
288
289
290
291
292
293
294
295
296
297
298
299
300
301
302
303
304
305
306
LOAGOGO
CABASA
MARACS
WHISTLE_S
WHISTLE_L
SGUIRO
GUIRO_S
GUIRO_L
CLAVES
WBLK_H
WBLK_L
CUICA_M
CUICA_O1
CUICA_O2
MTRIANGLE
OTRIANGLE
SHAKER1
SHAKER2
JNGLBL
BLTREE
CSTNTS1
CSTNTS2
SURDO_M
SURDO_O
TLKNDML
TLKNDMH
TABLA1
TABLA2
SNAP
DJMB1
DJMB2
DJMB3
CAJON1
CAJON2
CAJON3
TMPNI1
TMPNI2
GONG_L
ELCLKH
ELCLKL
TAIKO
BELL
BAN
SIGU
DONG1
DONG2
GONG1
PIATIH
HGONG1
HGONG2
GONG2
GONG3
ww w.PyleUSA.com
38
GM DRUM KIT LIST
Note No. Standard name Voice No. Voice Name
27-D#1
28 E1
29-F1
30-F#1
31-G1
32-G#1
33-A1
34-A#1
35-B1
36-C2
37-C#2
38-D2
39-D#2
40-E2
41-F2
42-F#2
43-G2
44-G#2
45-A2
46-A#2
47-B2
48-C3
49-C#3
50-D3
51-D#3
52-E3
53-F3
54-F#3
55-G3
56-G#3
High Q
Slap
Scratch Push
Scratch Pull
Sticks
Square Click
Metronome Click
Metronome Bell
Acoustic Bass Drum
Bass Drum 1
Side Stick
Acoustic Snare
Hand Clap
Electric Snare
Low Floor Tom
Closed Hi Hat
High Floor Tom
Pedal Hi-Hat
Low Tom
Open Hi-Hat
Low-Mid Tom
Hi-Mid Tom
Crash Cymbal 1
High Tom
Ride Cymbal 1
Chinese Cymbal
Ride Bell
Tambourine
Splash Cymbal
Cowbell
223
224
225
226
227
228
229
230
1
6
55
49
231
28
160
72
160
88
151
104
144
144
184
144
206
193
213
234
191
235
High Q
SLAP
SCRCH1
SCRCH2
STICK
SQCLCK
CLICK
BELL
KICK01
KICK06
SNRIM1
SNARE23
CLAP1
SNARE02
TOML3
CLHIHAT01
TOML3
PDLHHT01
TOMM2
OPNHHT01
TOMH2
TOMH2
CRSH11
TOMH2
RIDE5
CRSH20
RDBELL4
TAMBRINE
CRSH18
COWBELL1
ww w.PyleUSA.com
39
Note No. Standard name Voice No. Voice Name
57-A3
58-A#3
59-B3
60-C4
61-C#4
62-D4
63-D#4
64-E4
65-F4
66-F#4
67-G4
68-G#4
69-A4
70-A#4
71-B4
72-C5
73-C#5
74-D5
75-D#5
76-E5
77-F5
78-F#5
79-G5
80-G#5
81-A5
82-A#5
83-B5
84-C6
85-C#6
86-D6
87-D#6
Crash Cymbal 2
Vibraslap
Ride Cymbal 2
Hi Bongo
Low Bongo
Mute Hi Conga
Open Hi Conga
Low Conga
High Timbale
Low Timbale
High Agogo
Low Agogo
Cabasa
Maracas
Short Whistle
Long Whistle
Short Guiro
Long Guiro
Claves
Hi Wood Block
Low Wood Block
Mute Cuica
Open Cuica
Mute Triangle
Open Triangle
Shaker
Jingle Bell
Bell Tree
Castanets
Mute Surdo
Open Surdo
185
241
209
242
243
244
246
248
250
252
254
255
256
257
258
259
260
262
263
264
265
266
267
269
270
271
273
274
275
277
278
CRASH12
VSLP1
RIDE8
HIBONGO
LOBANGO
MUTECONGA1
HICONGA1
LOCONGA1
HTIMBL1
LTIMBL1
HIAGOGO
LOAGOGO
CABASA
MARACS
WHISTLE_S
WHISTLE_L
SGUIRO
GUIRO_L
CLAVES
WBLK_H
WBLK_L
CUICA_M
CUICA_O1
MTRIANGLE
OTRIANGLE
SHAKER1
JNGLBL
BLTREE
CSTNTS1
SURDO_M
SURDO_O
ww w.PyleUSA.com
40
DEMO SONG LIST
SHUFFLE
90
110
117
128
105
120
138
140
123
100
82
159
120
108
140
180
120
110
180
110
SHUFFLE
ROCKBLUES
DANCE
SWING
BOSSA
RAGGE
LATIN
FLAMINGO

ww w.PyleUSA.com
41
Register Product
Thank you for choosing PyleUSA. By registering your product,
you ensure that you receive the full benets of our exclusive
warranty and personalized customer support.
Complete the form to access expert support and to keep your
PyleUSA purchase in perfect condition.
Start Here
Model Number:
PTEDK86
PyleUSA.com/pages/register

Questions or Comments?
We are here to help!
Phone: 1.718.535.1800
PyleUSA.com/ContactUs