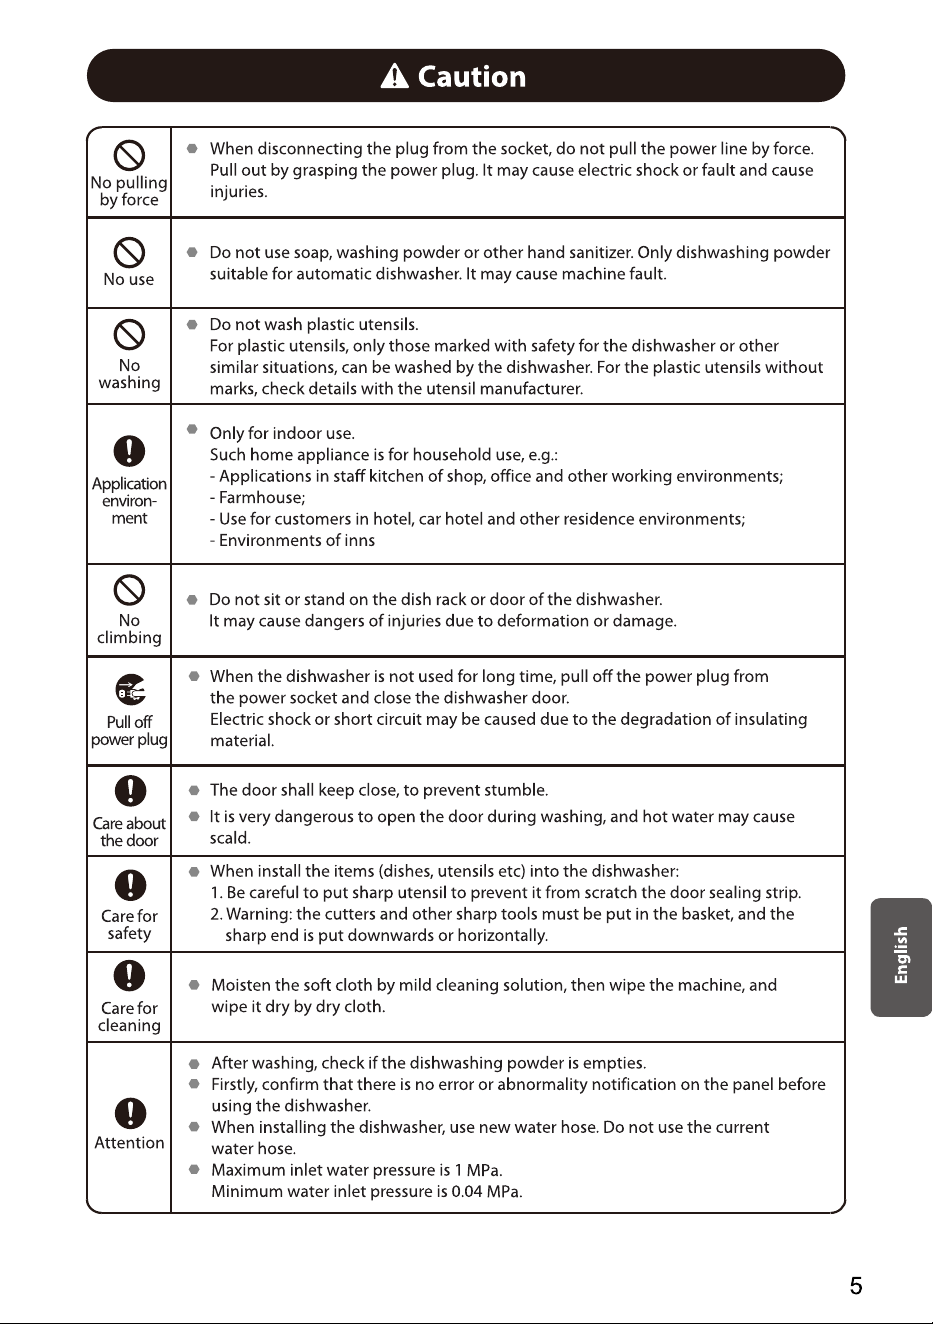
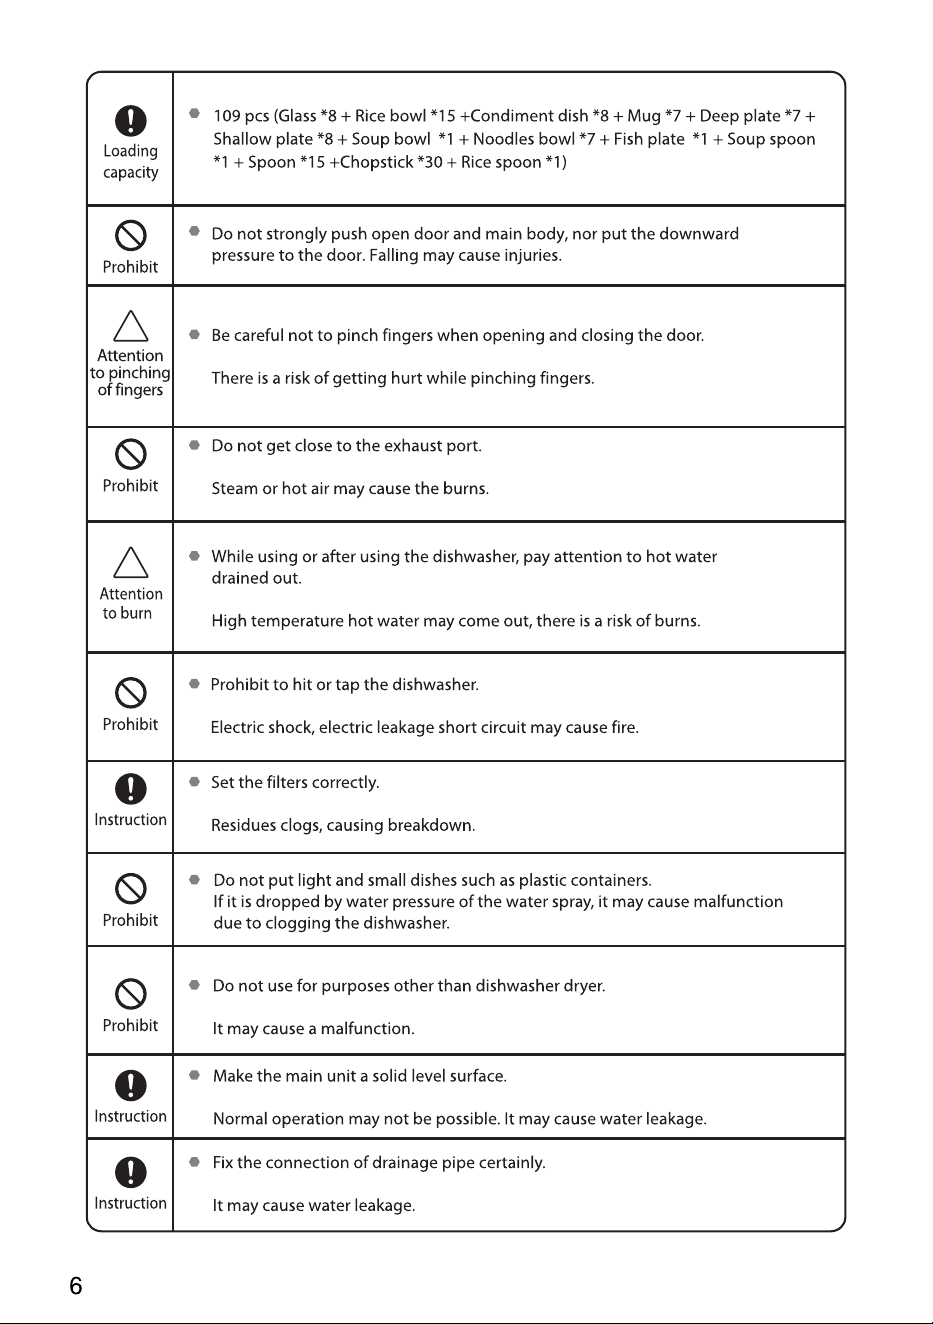
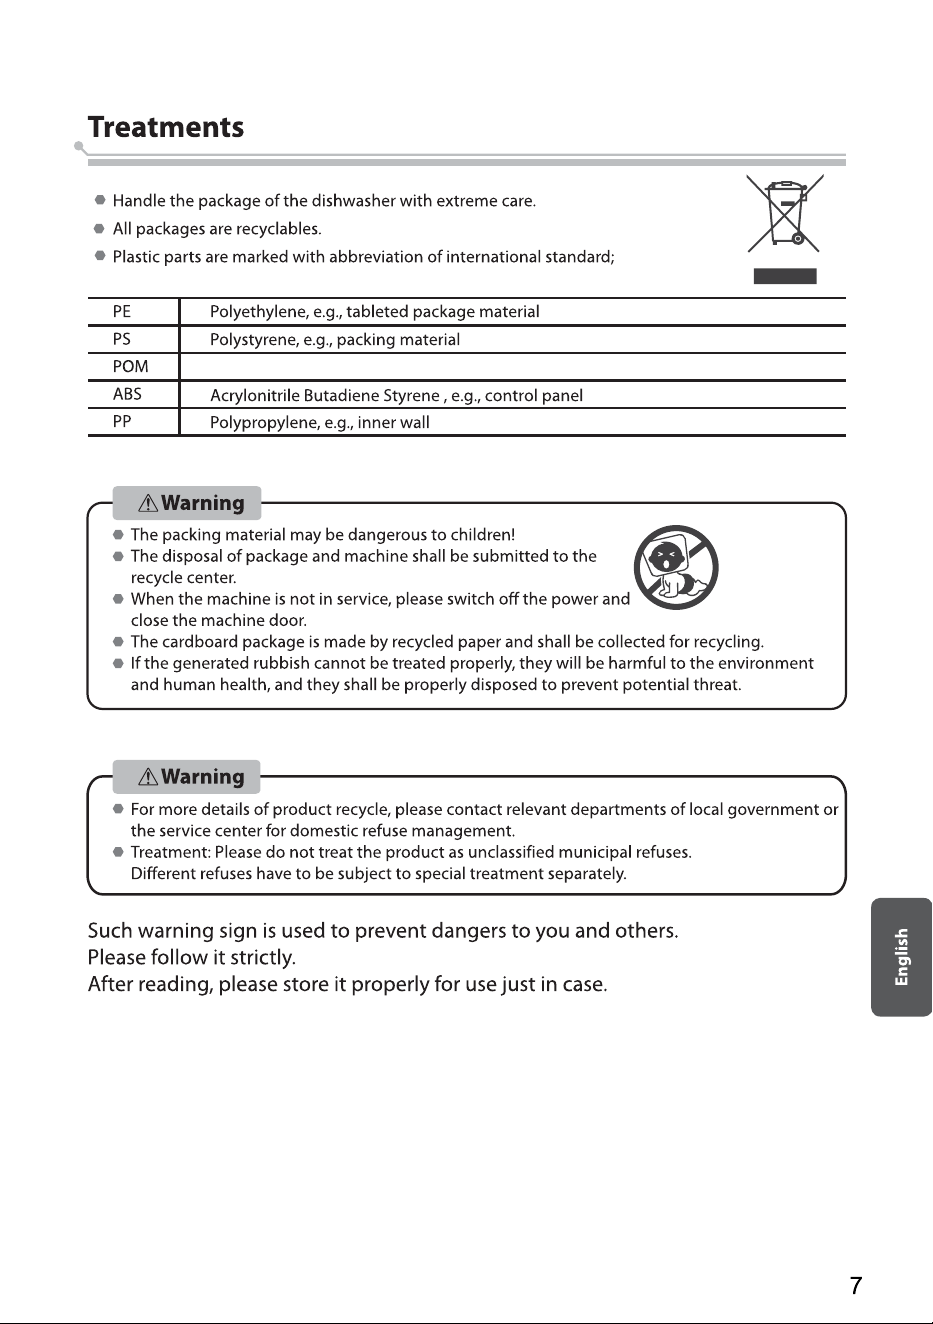
Polyacetal or polyox, e.g., plastic clip
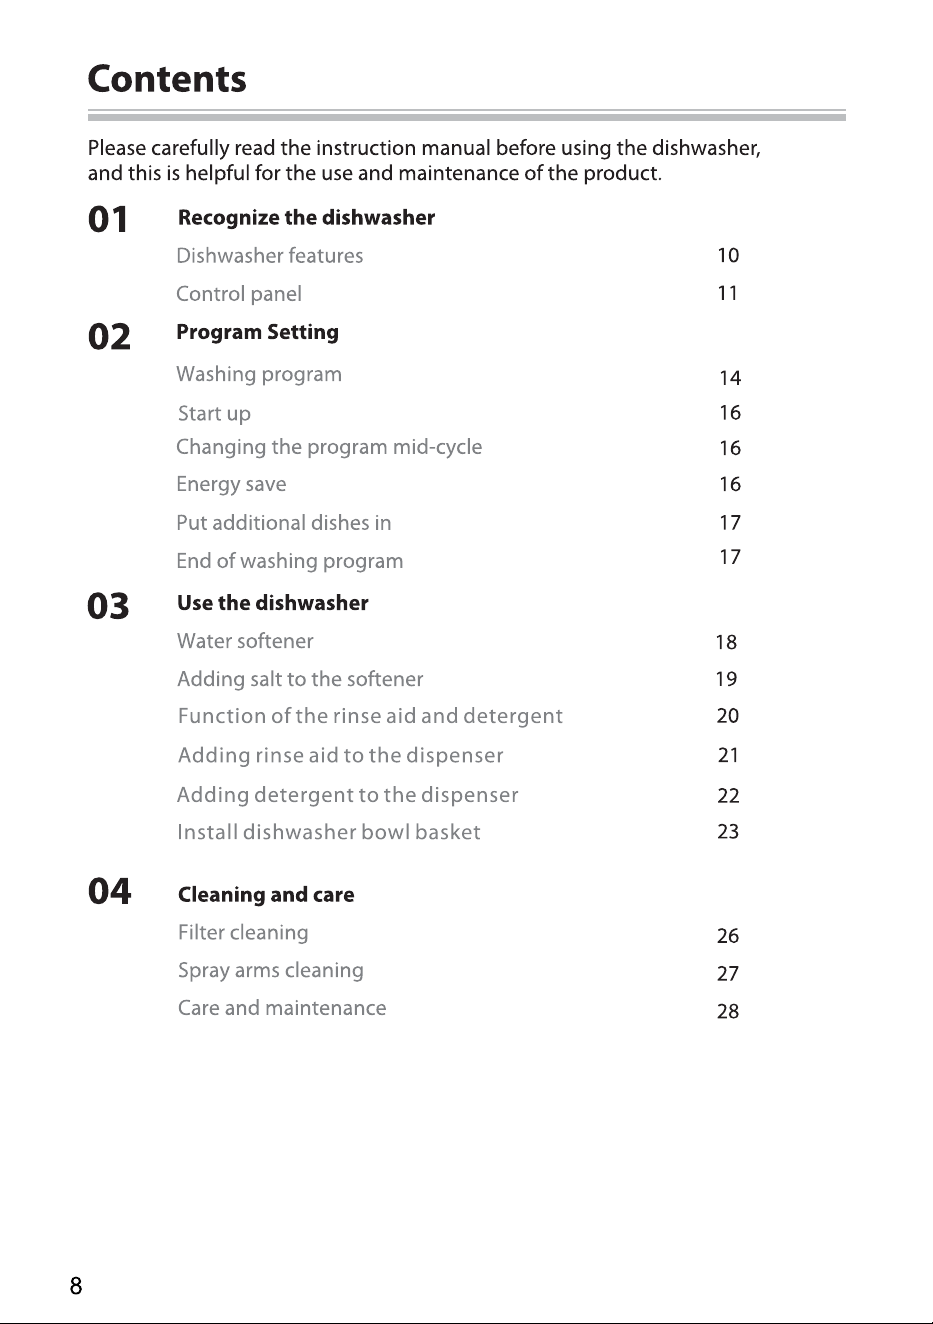
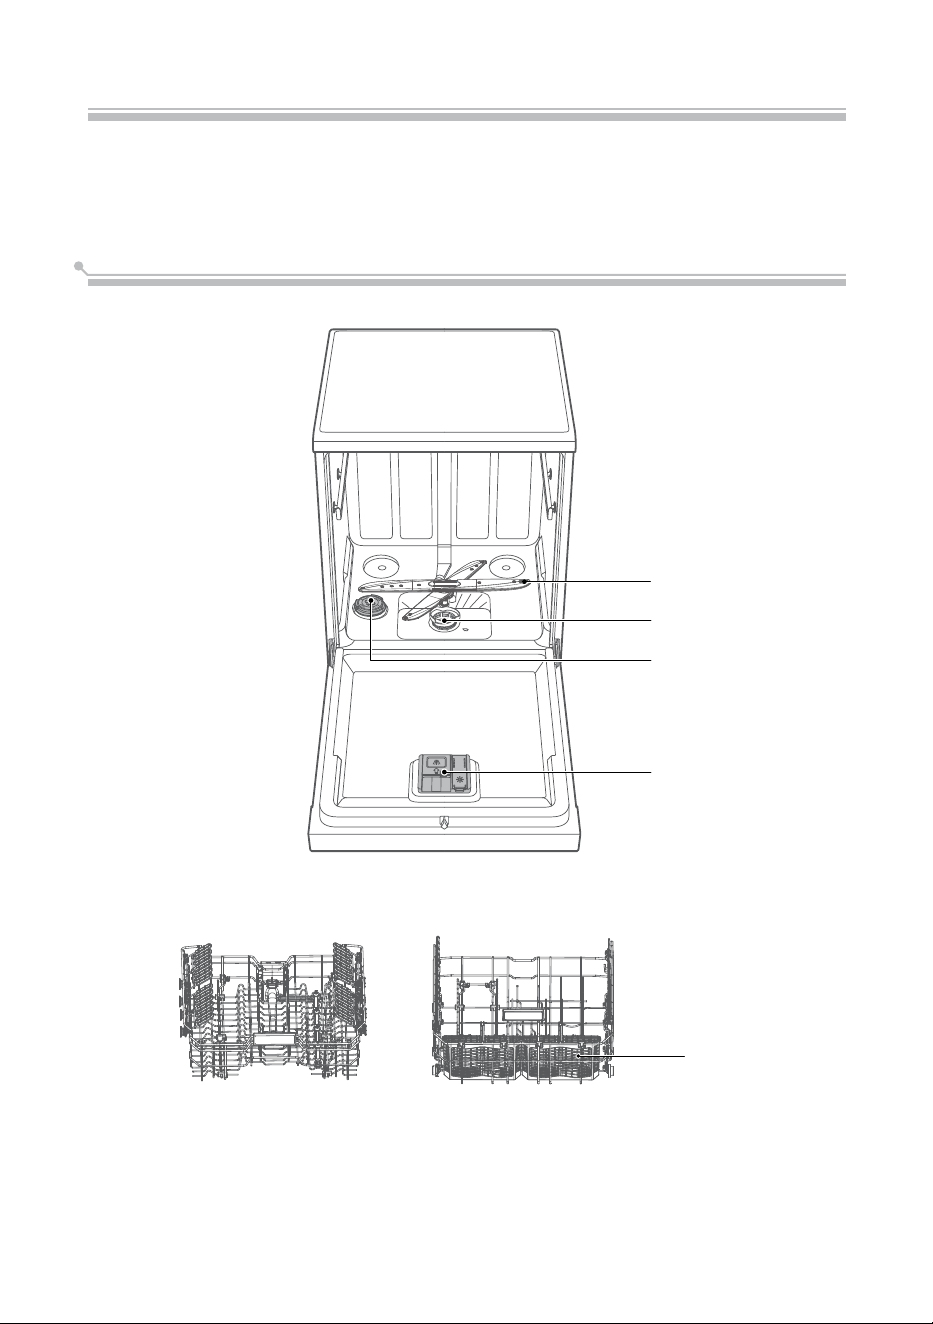
Recognize the dishwasher
Dishwasher features
Important:
Before using the dishwasher for the first time, read following instructions to ensure the
best results.
10
Spray arm
Filter assembly
Salt container
Dispenser
Cutlery basket
Upper basket
Lower basket
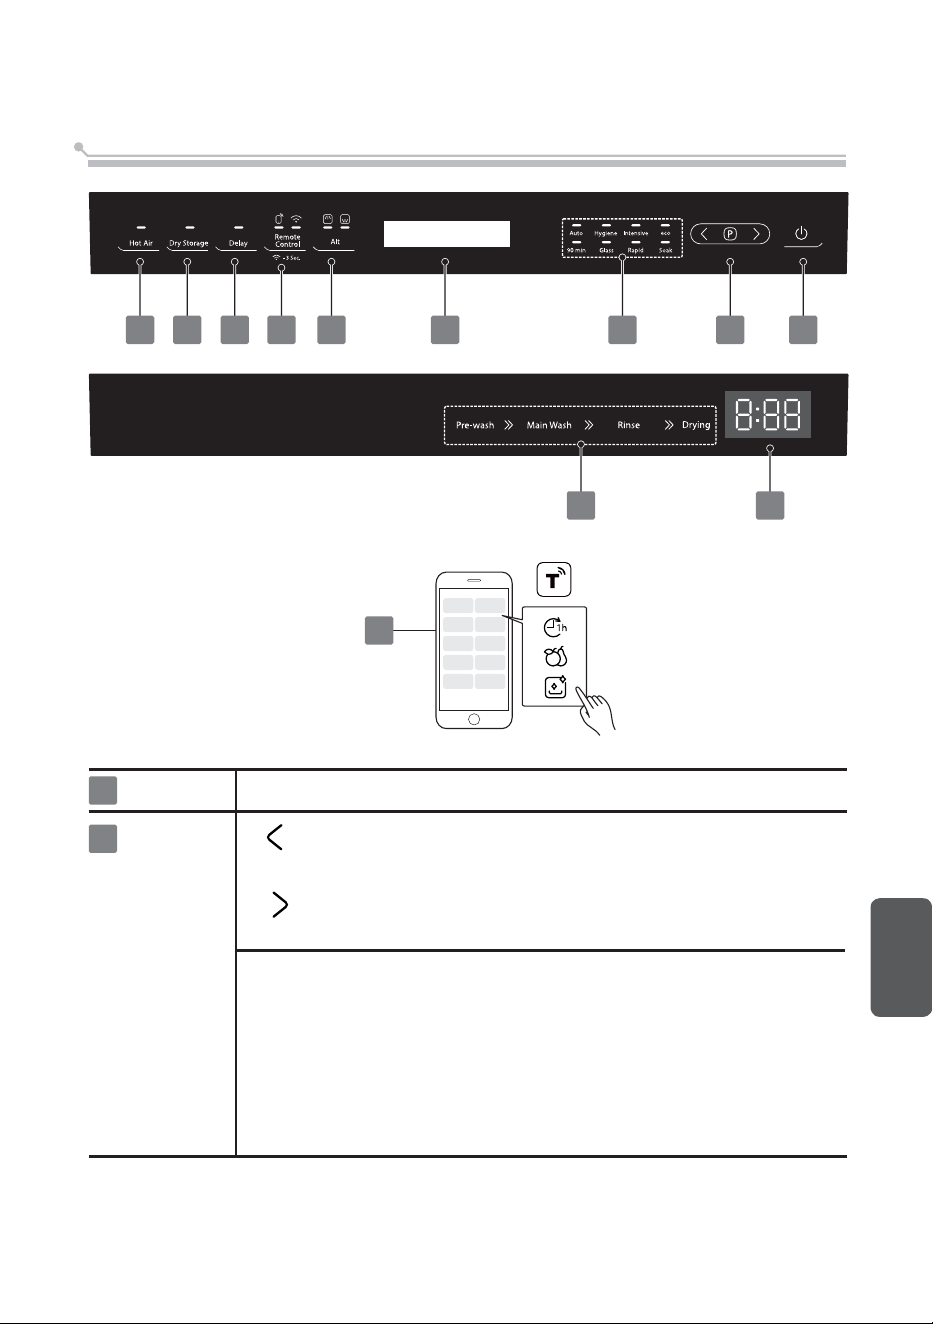
Control panel
1
Power
2
Program
Select the appropriate washing program and the corresponding
indicator will light up.
English
Hygiene
Use to remove bacteria your dishes and glassware.
Maintains the water temperature at 72˚C.
11
Press this button to turn
on the dishwasher.
For lightly, normally or heaviy soiled crockery
with or without dried-on food.
Auto
Select the corresponding washing program, press the button
tobackward.
Select the corresponding washing program, press the button
toforward.
67 5 4 3 8 2 2 1
9 8
4
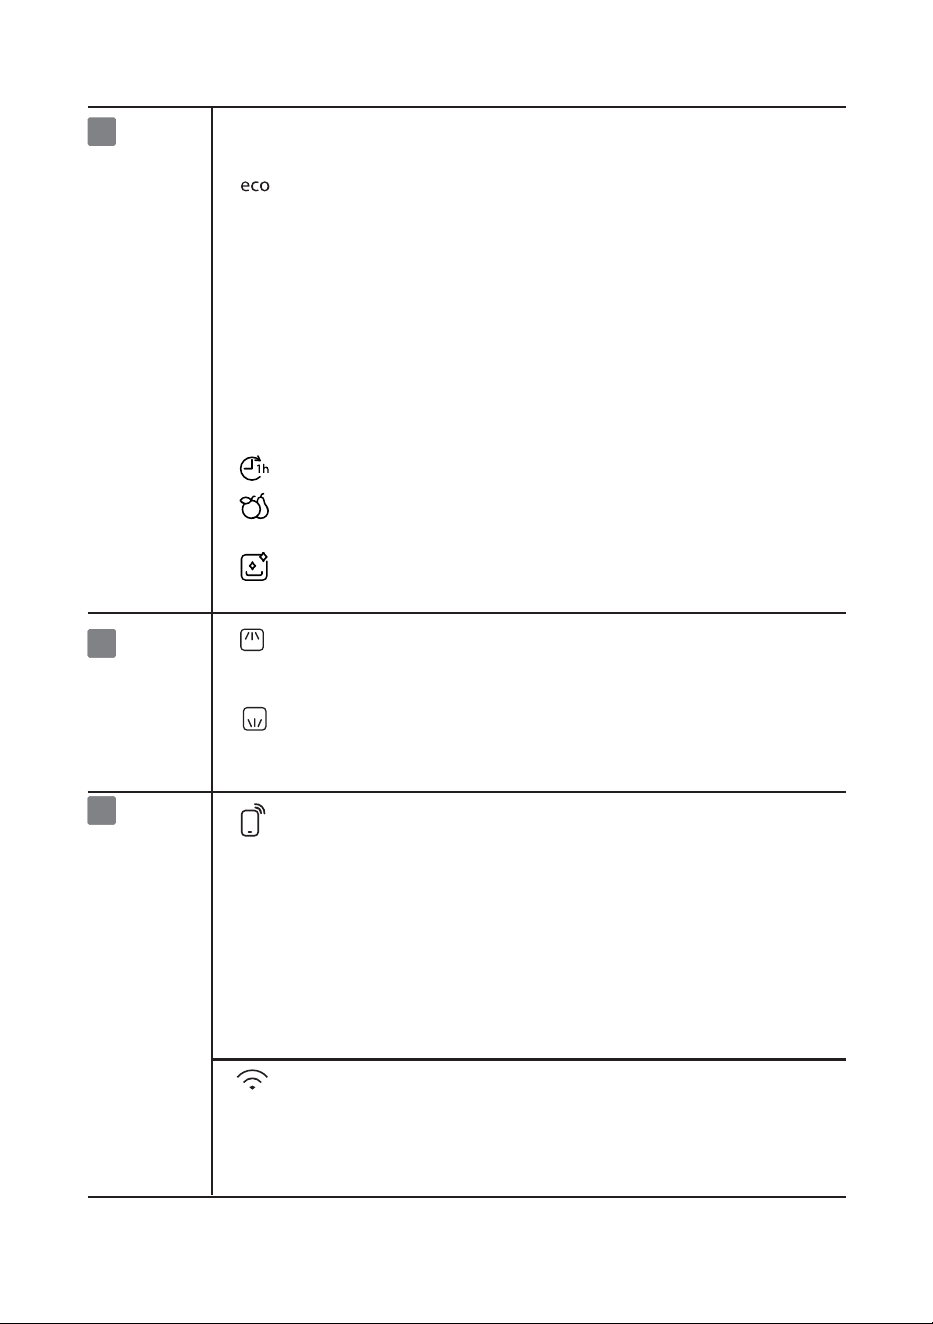
To rinse dishes that you plan to wash later that day.
When you select Upper, only the dishes in the upper
rack will be washed. The spray system of the lower
basket will not operate.
For normally soiled loads that need quick wash.
2
Program
This is standard program. For general dirty dishes and
utensils (such as pots, plates, glasses, pans).
Intensive
For heavily soiled items include pots and pans. With
dried on food.
Rapid For slight dirty dishes, the required cleaning time is
relatively short.
90 min
Soak
For lightly soiled crockery and glass.
Glass
12
When you select Lower, only the dishes in the lower
rack will be washed. The spray system of the upper
basket will not operate.
3
Alt
3
3
Remote
Control/
Connect
4
The remote control function is used with the wireless function, and
can only be used after your dishwasher is connected successfully.
When you need to use the APP to control your dishwasher, you need to
press the "Remote" button, and then close the door immediately. Tips:
*In order to use the dishwasher more safely, you need to press the
"Remote" button before each remote operation and close the door
within 3 seconds.
*When the door of the dishwasher is opened, the remote control
function will fail. You need to complete the above operations again
before you can use the APP remote operation.
These washing programs that can be selected in the APP:
Press the button for more than 3 seconds. After a shout bleeping and
the icon starts to blink slowly, it's in the network linking status to APP.
Slowly flashing shows DW is waiting for connection.
Quickly flashing shows DW is connecting.
Quickly flashing solid shows DW is connected to your wireless router.
Lower
Upper
For normally soiled loads that need 1 hour wash.
1 hour
Used to clean fruits, vegetables, shells, etc.
This program need to set the water level and strength.
Fruit wash
This program provides an eective cleaning of the
dishwasher itself.
Self clean
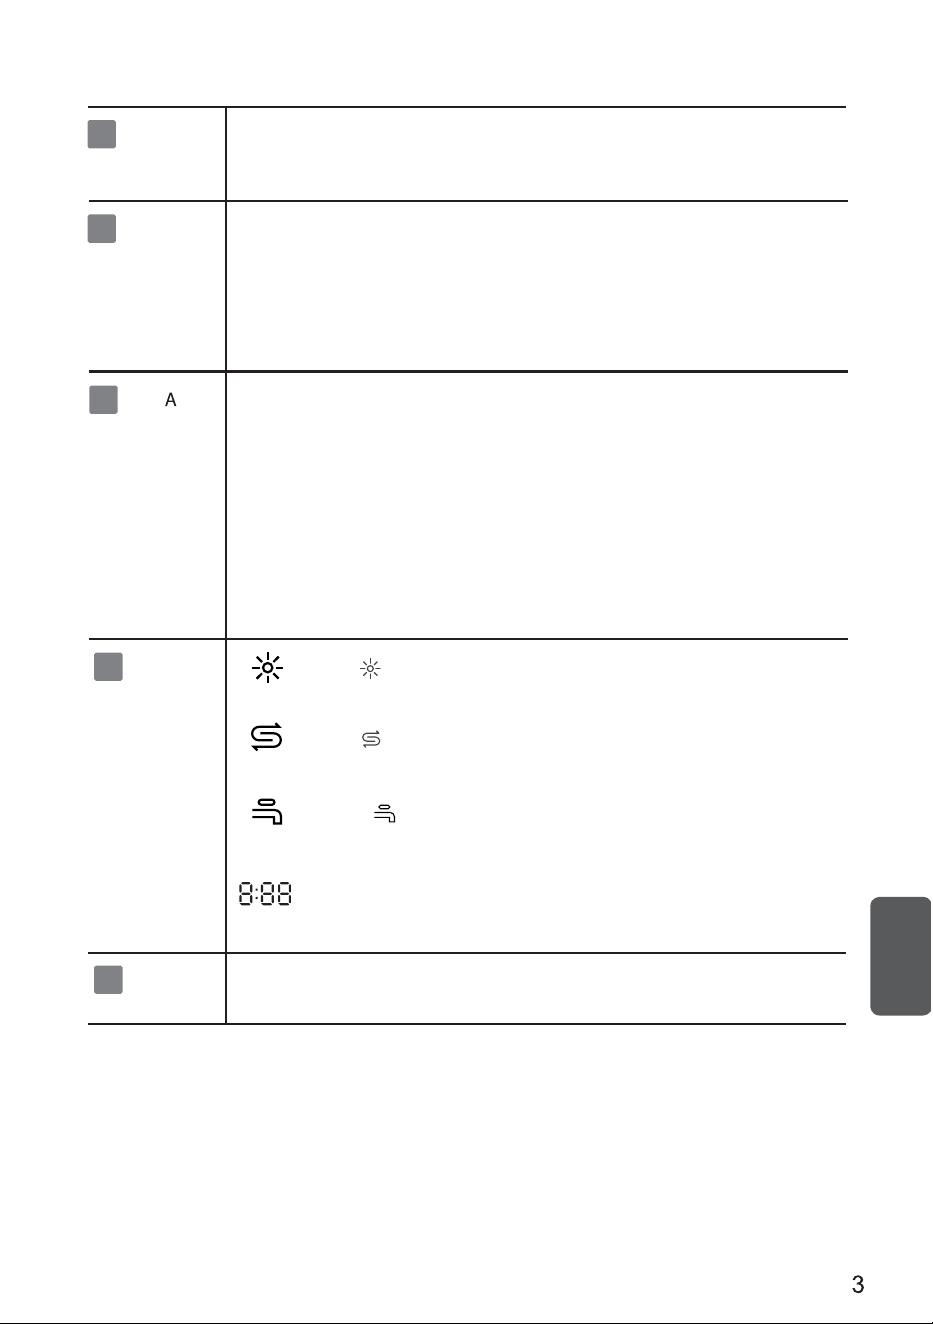
If the “ ” indicator is lit, it means the dishwasher is low on
dishwasher rinse aid and requires a refill.
If the “ ” indicator is lit, it means the dishwasher is low on
dishwasher salt and requires a refill.
8
Screen
9
Progress
indicators
If the “ ” indicator is lit, it means the water faucet
closed.
To show the remaining program time and delay time,
To show the current washing stage.
error code etc.
7 Hot ir
5
Delay
6
Dry
Storage
Press this button to set the delayed hours for washing. You can delay the
start of washing up to 24 hours. One press on this button delays the start
of washing by one hour.
The Dry Storage function can achieve better drying eect and keep the
air inside the dishwasher fresh.
The Dry Storage function is carried out after the dishwasher has finished
washing, and it can run for up to 72 hours.
When you select Rapid, Soak or Fruit Wash, you cannot use the Dry
Storage function.
An independent drying function with 3 modes, to Fresh, Warm and Dry
your kitchenware.25mins Fresh & Dry
Blow fresh air into the tub for a daily freshness of your dishwasher.
50mins Warm & Dry
This function can have your dishware properly warmed, It is suitable for
use before meals. Warm plates is more suitable for your just finished
cooking. 80mins Rinse & Dry
Recommend running it once for Long-time-no-use Dishes after Vocation
or Before Dinner Party. 80mins Rinse & Dry washes the dust particles
away and gets the dishes well heated, to let them thoroughly dry again.
1
English
Washing program
Program Setting
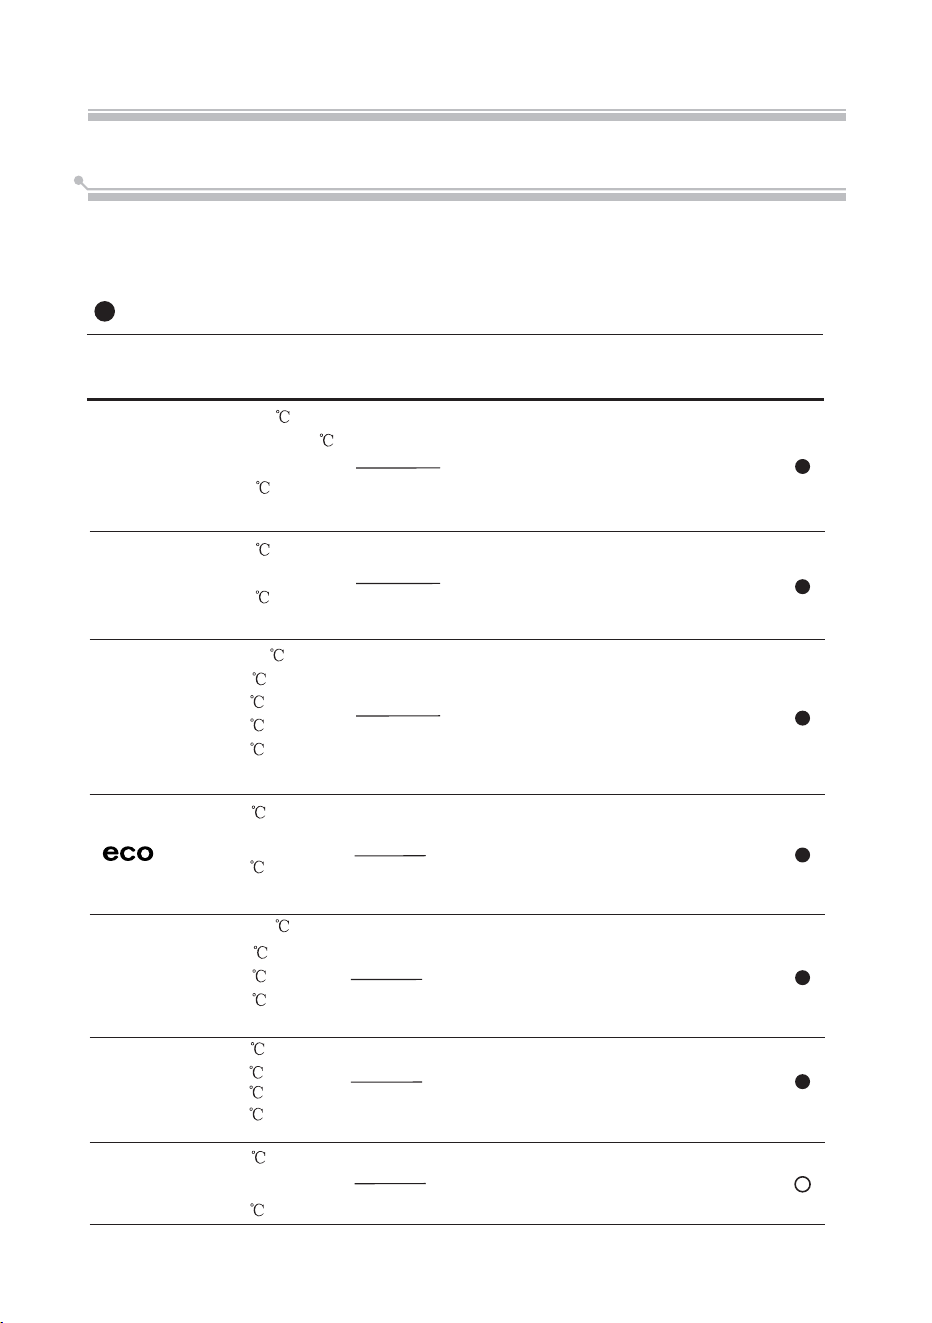
Following table shows best cleaning procedures and amount of dishwashing
powder required according to the dirty level of the dishes, as well as the
( )
indicates that the program uses rinse aid in the last rinse.
Program
Running
Time(min)
Energy
( Wk )h
Water
(L)
Description
Of Cycle
Rinse
Aid
Detergent
Pre/Main Wash
Wash(47 )
Rinse(50
Rinse
)
Drying
Rapid
Auto
Hygiene
90 min
Intensive
Prewash(45 )
Auto wash(50-55
)
Rinse
Rinse(72
)
Drying
115-195 1.150-1.550 12.1-19.4
5/28.75
1 or 2
5/28.75
1 or 2
5/28.75
1 or 2
Wash(65 )
Rinse
Rinse(72
)
Drying
150 2.965 11.9
Prewash(50 )
Wash(70
Drying
)
Rinse(72
)
Rinse(60
)
Rinse(60
)
160 1.905 20.9
235 0.835 10.5
5/28.75
1 or 2
5/28.75
1 or 2
5/28.75
1 or 2
90 1.079 14.2
Wash(45 )
Rinse
29 0.565 12
25
1 piece
Rinse(45 )
corresponding power and water consumption.
14
Glass
Wash(55 )
Rinse(45
)
Rinse(60
)
Rinse(50
)
Drying
130 1.265 15.2
Wash(50 )
(25 )
Rinse(65
Rinse(45 )
Drying
Prewash
Program
Running
Time(min)
Energy
Wk )h(
Water
(L)
Description
Of Cycle
Rinse
Aid
Detergent
Pre/Main Wash
Soak
Prewash
15 0.025 4.6
-
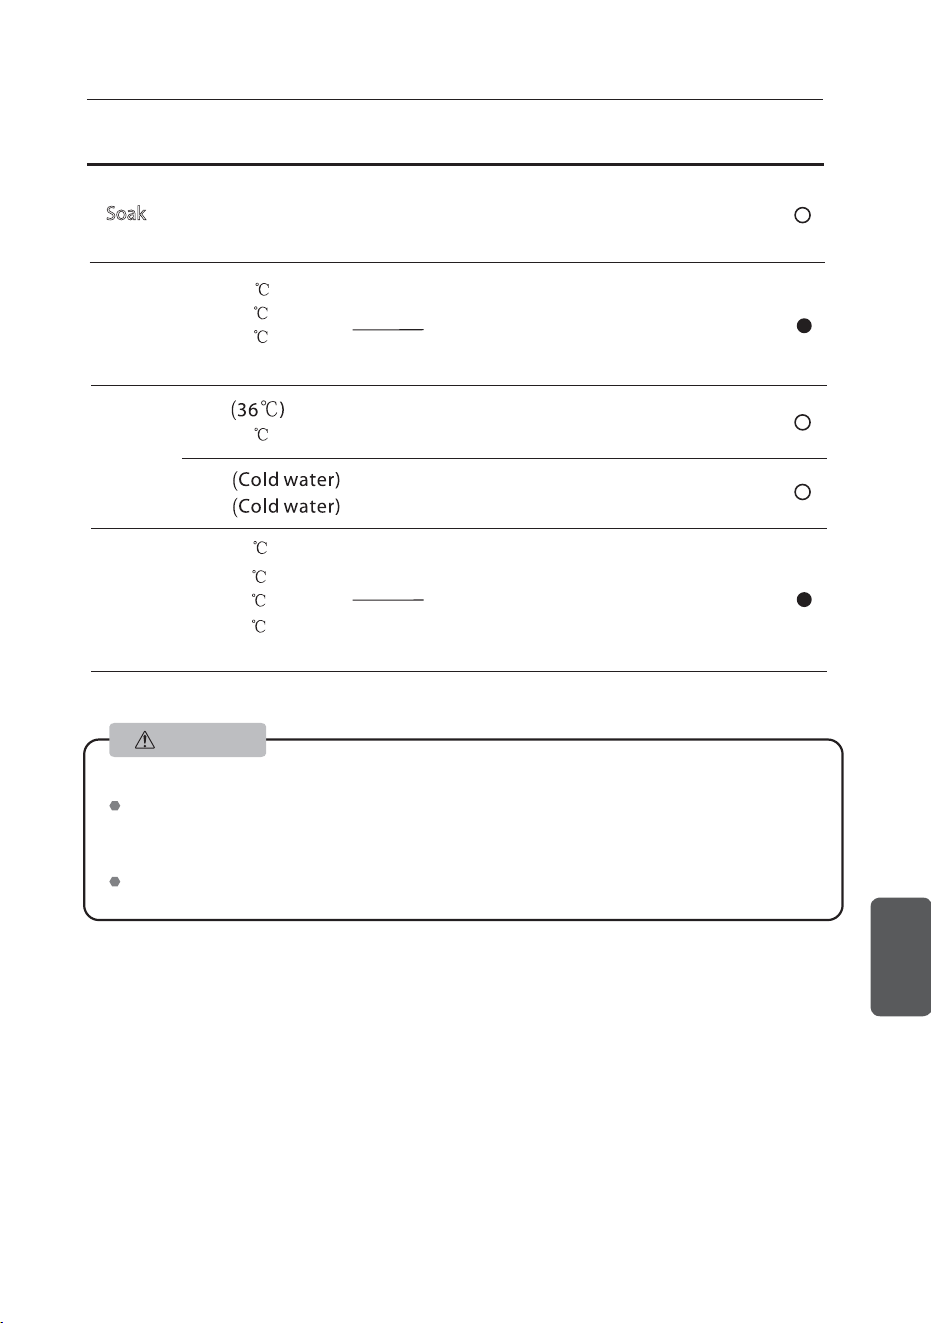
The above program data is for reference only. Test conditions are as follows:
Attention
Washing capacity: 105 pcs (Glass x8 + Rice bowl x15 + Soup spoon x1 + Rice Spoon x1 + Soup
Bowl x1 + Fish Plate x1+Condiment Dish x8 + Mug x7 + Noodles Bowl x7 + Plate x7+
Spoon x15 + Chopsticks x30)
Power consumption at shutdown state and standby state similarly are 1.00 W.
15
English
5/28.75
1 or 2
60 0.899 11.7
Wash(70 )
Rinse(50 )
Rinse(45 )
Wash(50
)
Rinse(60
Rinse(45 )
Drying
1 hour
Fruit wash
Self clean
)
/
15 0.025 6.8
Drying
R
inse( )
5/28.75
1 or 2
135 1.695
15.2
Rinse(55 )
72
ashW
ashW
10 0.025 6.8
Rinse
/
Start up
Changing the program mid-cycle
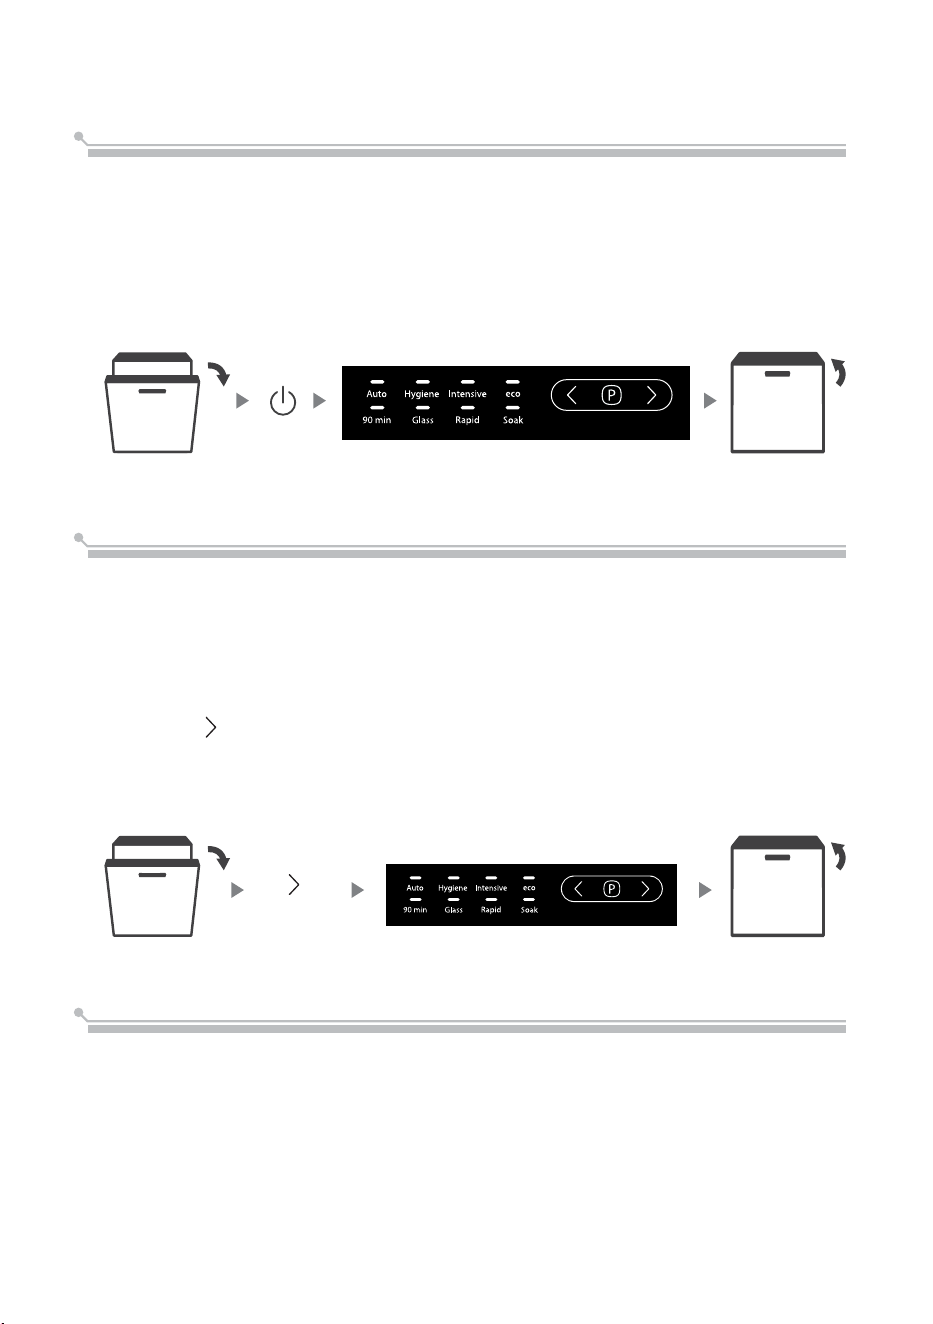
1. The plug shall be firstly plugged into the socket. Power supply shall be of
220-240V AC 50Hz type, with socket of 10 A 220-240V AC.
2. Make sure that the water supply is turned on to full pressure.
3. Open the door, switch on the appliance.
4. Press the button of desired program, the corresponding indicator will light up.
5. Close the door
to start.
A wash cycle can only be changed if it has been running for a short time otherwise, the
detergent may have already been released and the dishwasher may have already drained
the wash water. If this is the case, the dishwasher needs to be reset and the detergent
dispenser must be refilled. To reset the dishwasher, follow the instructions below:
1.
2.
3.
4.
Open the door a little to stop the dishwasher, after the spray arm stop working, you can
open the door completely.
Press the “ ” button for more than 3 seconds, the dishwasher will enter
standby mode.
Press the Program buttons to select the desired program.
Then, close the door, the dishwasher will start its cycle.
Energy save
1. Pre-rinsing of tableware items leads to increased water and energy consumption and is
not recommended.
2. Washing tableware in a household dishwasher usually consumes less energy and water in
the use phase than hand dishwashing when the household dishwasher is used according to
the instructions.
16
3 seconds
17
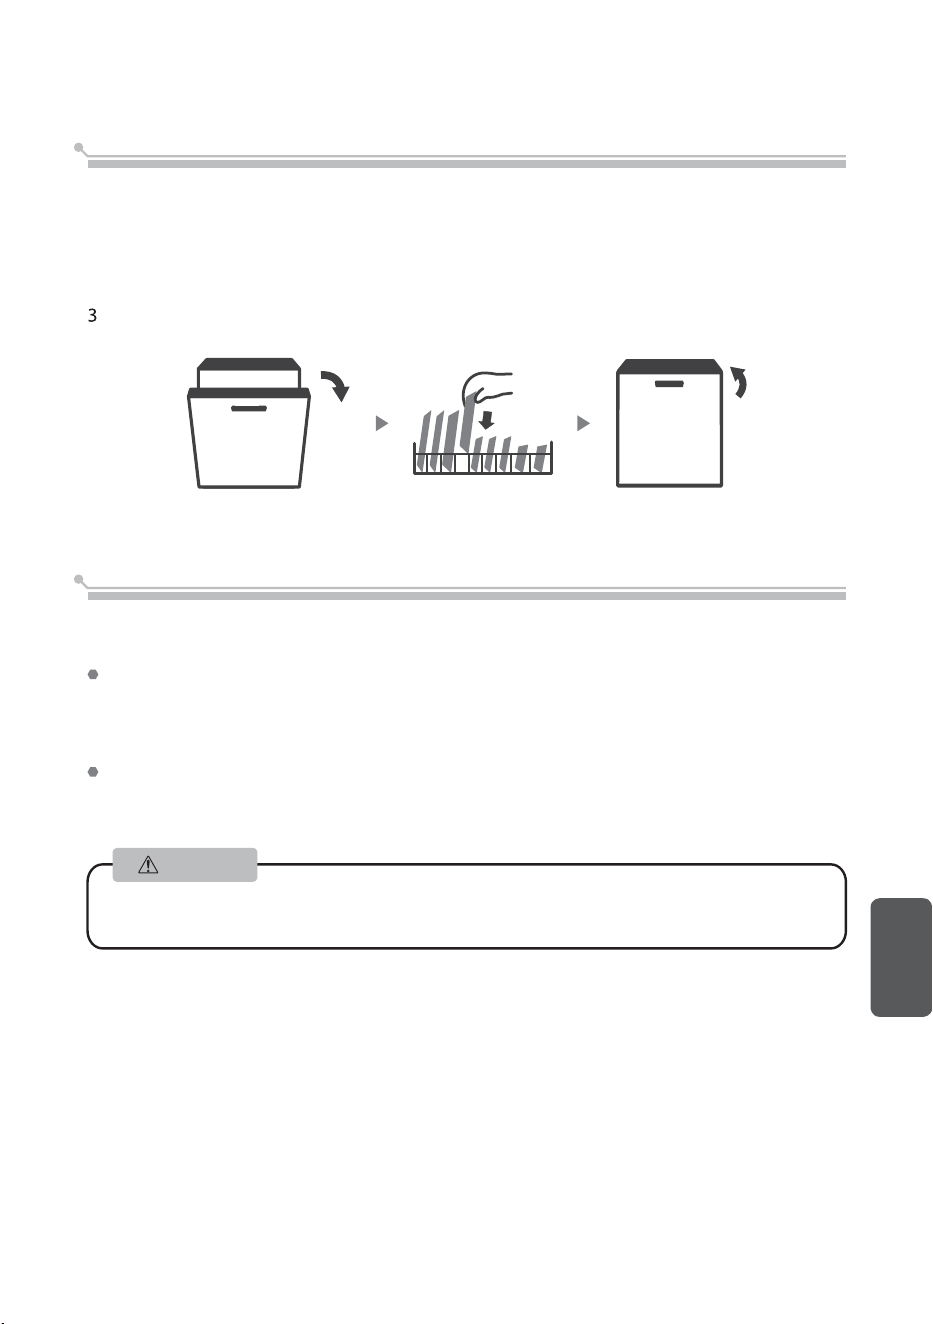
End of washing program
After the program finishes, the machine show "End" after the buzzer beeps for 8 seconds.
Warning
Hot dishes are more likely to be damaged. The dishes shall be cool for about 15 minutes
and then taken out from the dishwasher.
Open the door carefully
It is extremely emely dangerous to open the door in the process of washing as this may cause
severe burn by hot water.
Clear the dishwasher
It is normal that the dishwasher still remains wet inside.
English
Put dishes in additional
A
dditional dishes can be placed in at any time before dishwasher program start. If you
want to reload dishes in the process of washing, please follow instructions below:
1. Open the door a little to stop the dishwasher, after the spray arm stop working, you can
open the door completely.
2. Put the additional dishes in.
. Close the door, the dishwasher will start after 10 seconds.
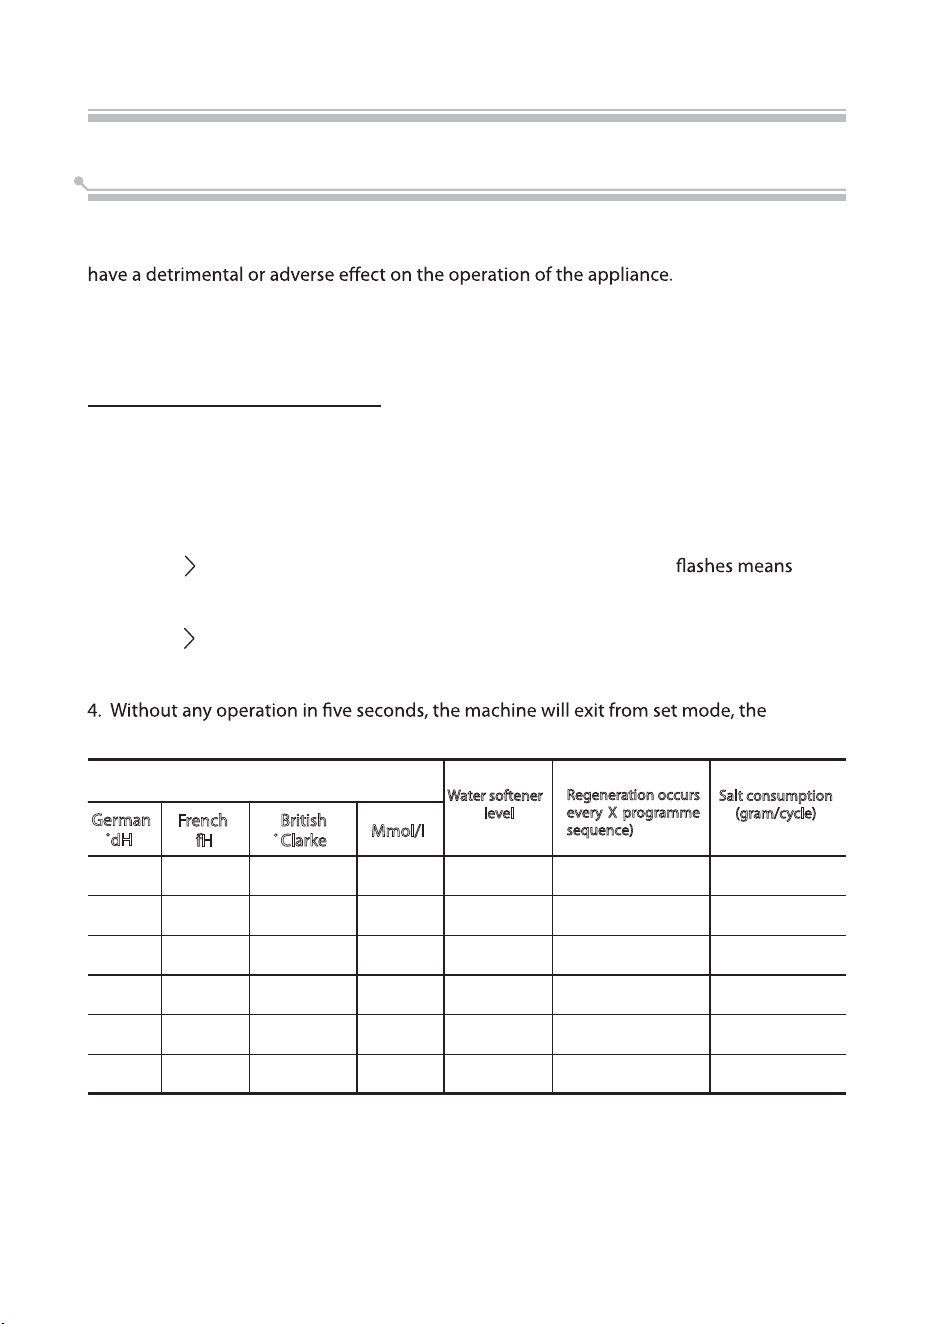
The water softener must be set manually, using the water hardness dial.
The water softener is designed to remove minerals and salts from the water, which would
The more minerals there are, the harder your water is.
The softener should be adjusted according to the hardness of the water in your area. Your
local Water Authority can advise you on the hardness of the water in your area.
Use the dishwasher
Water softener
The dishwasher is designed to allow for adjustment in the amount of salt consumed
based on the hardness of the water used. This is intended to optimise and customise the
level of salt consumption.
Please follow the steps below for adjustment in salt consumption.
1.
2.Press the button for more than 5 seconds,when the salt indicator
entering the water softener settings.
You must set model within 60 seconds after the appliance was switched on.
3.Press the button to select the proper set according to your local
the sets will change in the following sequence:
H3->H4->H5->H6->H1->H2.
machine is into standby status.
Adjusting salt consumption
0 - 5
6 - 11
12 - 17
18 - 22
23 - 34
35 - 55
German
dH
Salt consumption
)(gram/cycle
0 - 9
10 - 20
21 - 30
31 - 40
41 - 60
61 - 98
0 - 6
7 - 14
15 - 21
22 - 28
29 - 42
43 - 69
0 - 0.94
1.0 - 2.0
2.1 - 3.0
3.1 - 4.0
4.1 - 6.0
6.1 - 9.8
0
9
12
20
30
60
fH
French
Mmol/l
Water softener
level
Clarke
British
WATER HARDNESS
H1
H2
H3
H4
H5
H6
1
°
dH=1.25
°
Clarke=1.78
°
fH=0.178mmol/l
The factory setting: H3
Every cycle with a regeneration operation consumes additional 2.0 litres of water , the
energy consumption increases by 0.02kWh and the programme extents by 4 minutes
sequence)
Regeneration occurs
every X programme
No regeneration
10
5
3
2
1
18
Open the door, switch on the appliance.
environment,
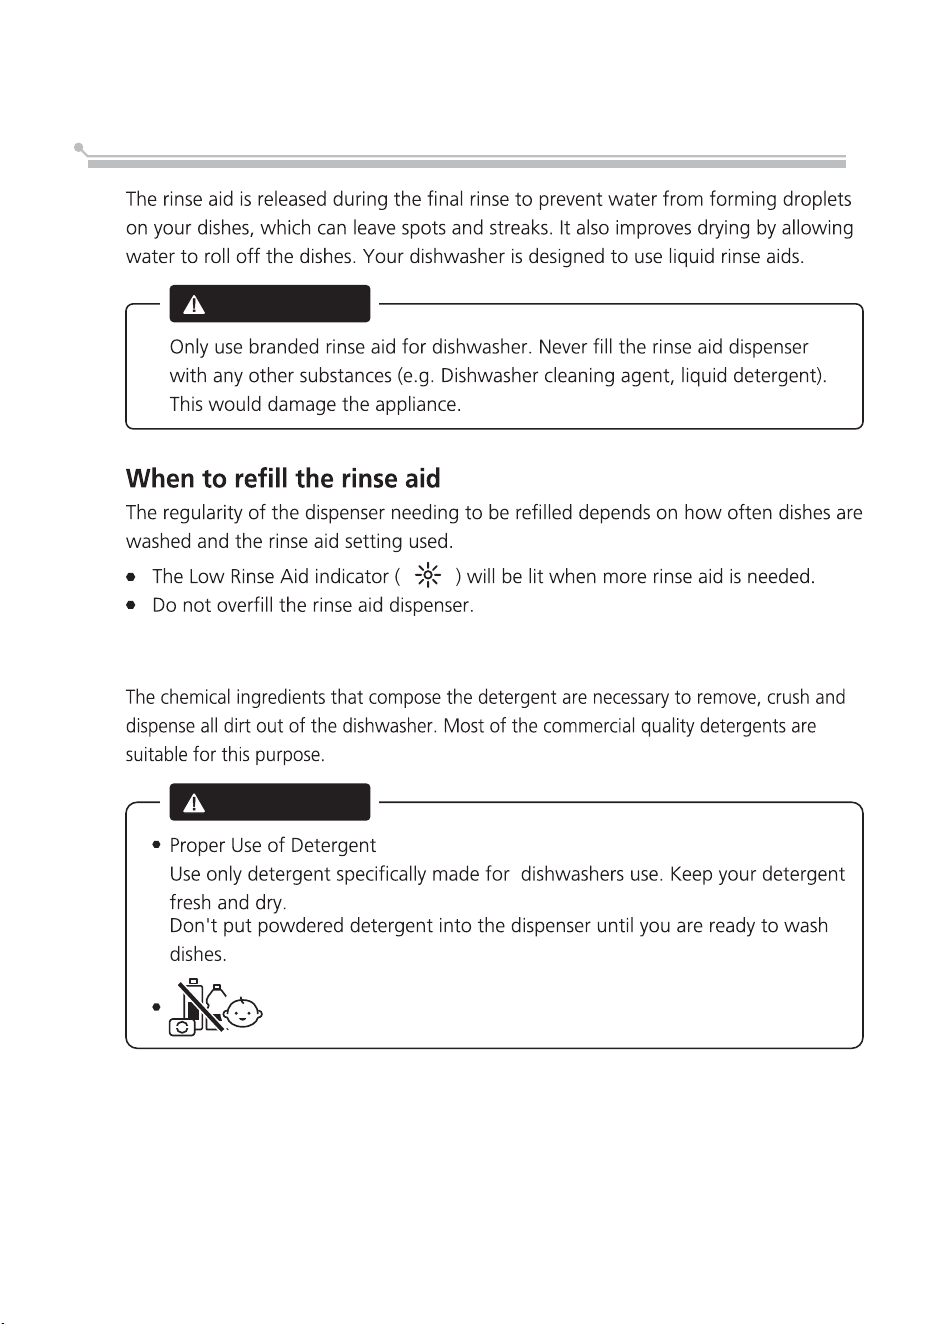
Function of the rinse aid and detergent
WARNING
Function of detergent
WARNING
Dishwasher detergent is corrosive! Keep dishwasher
detergent out of the reach of children.
20
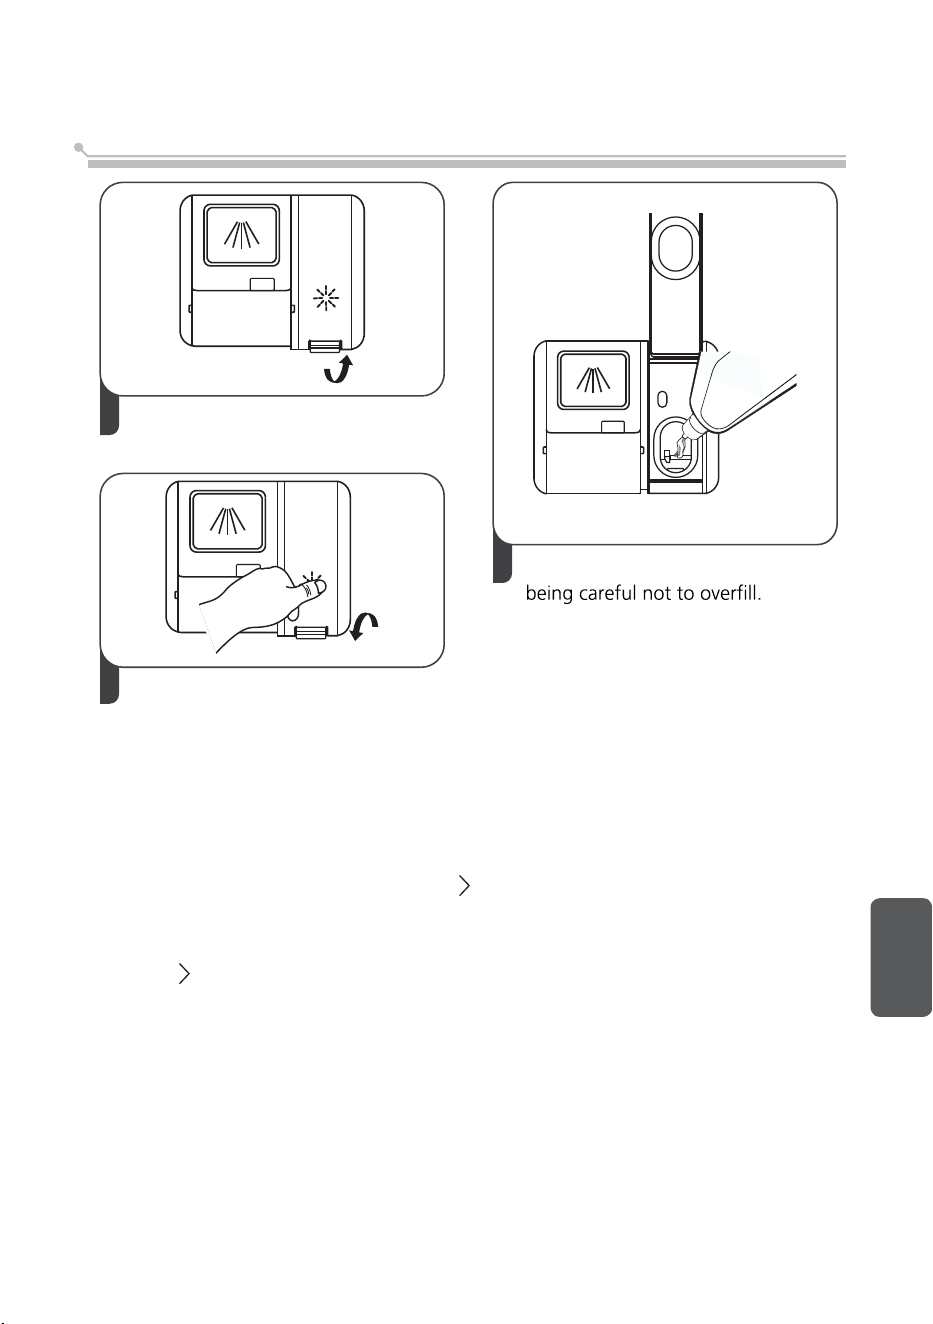
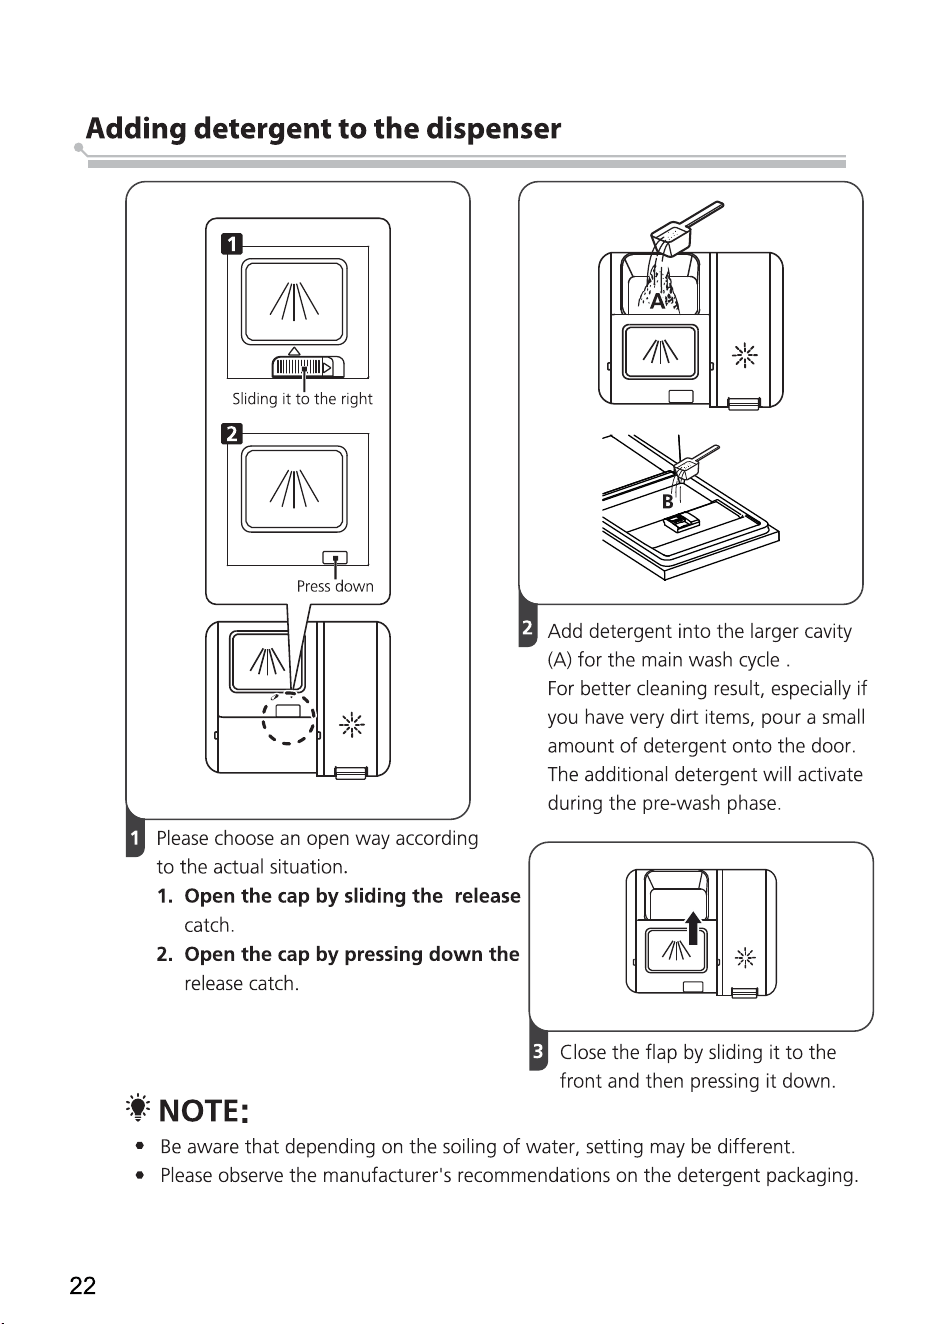
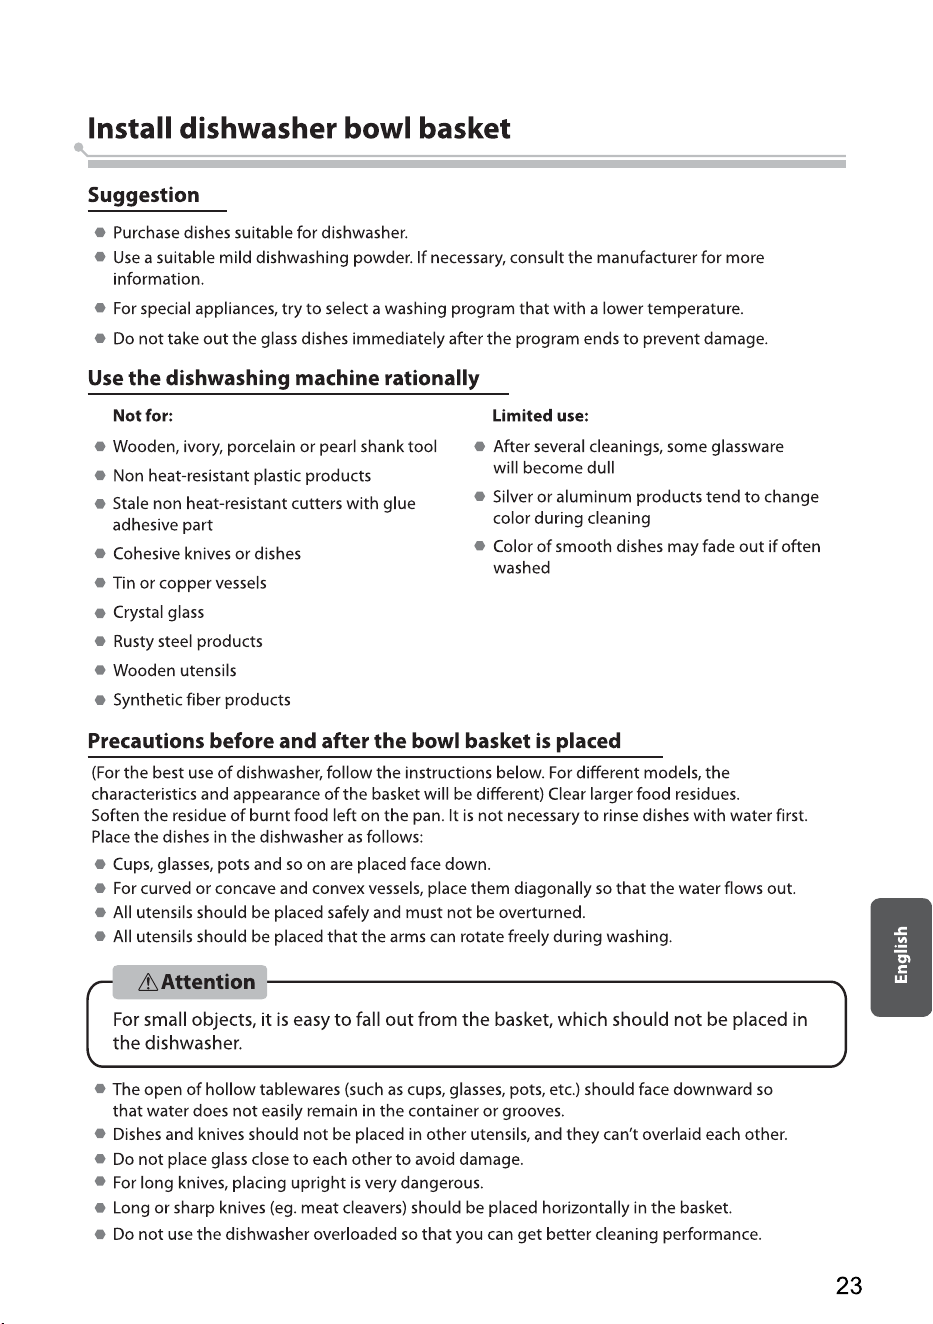
Adding rinse aid to the dispenser
Adjusting the rinse aid reservoir
To achieve a better drying performance with limited rinse aid, the dishwasher is
designed to adjust the consumption by user. Follow the below steps.
button more than 5 seconds,
press the Delay button to enter the set model, the rinse aid indication
frequency.
3.Press the button to select the proper set according to your using habits,
the sets will change in the following sequence: D1->D2->D3->D4->D5->D1.
The higher the number, the more rinse aid the dishwasher uses.
4. Without operation in 5 seconds or press the Power button to complete the setup
and exit the setup mode.
3
Close the cap after all.
1
2
Remove the rinse reservoir cap by
lifting up the handle .
Pour the rinse aid into the dispenser,
21
English
1. Open the door and switch on the appliance.
2. Within 60 seconds after step 1, press the
and then
blinks as 1Hz
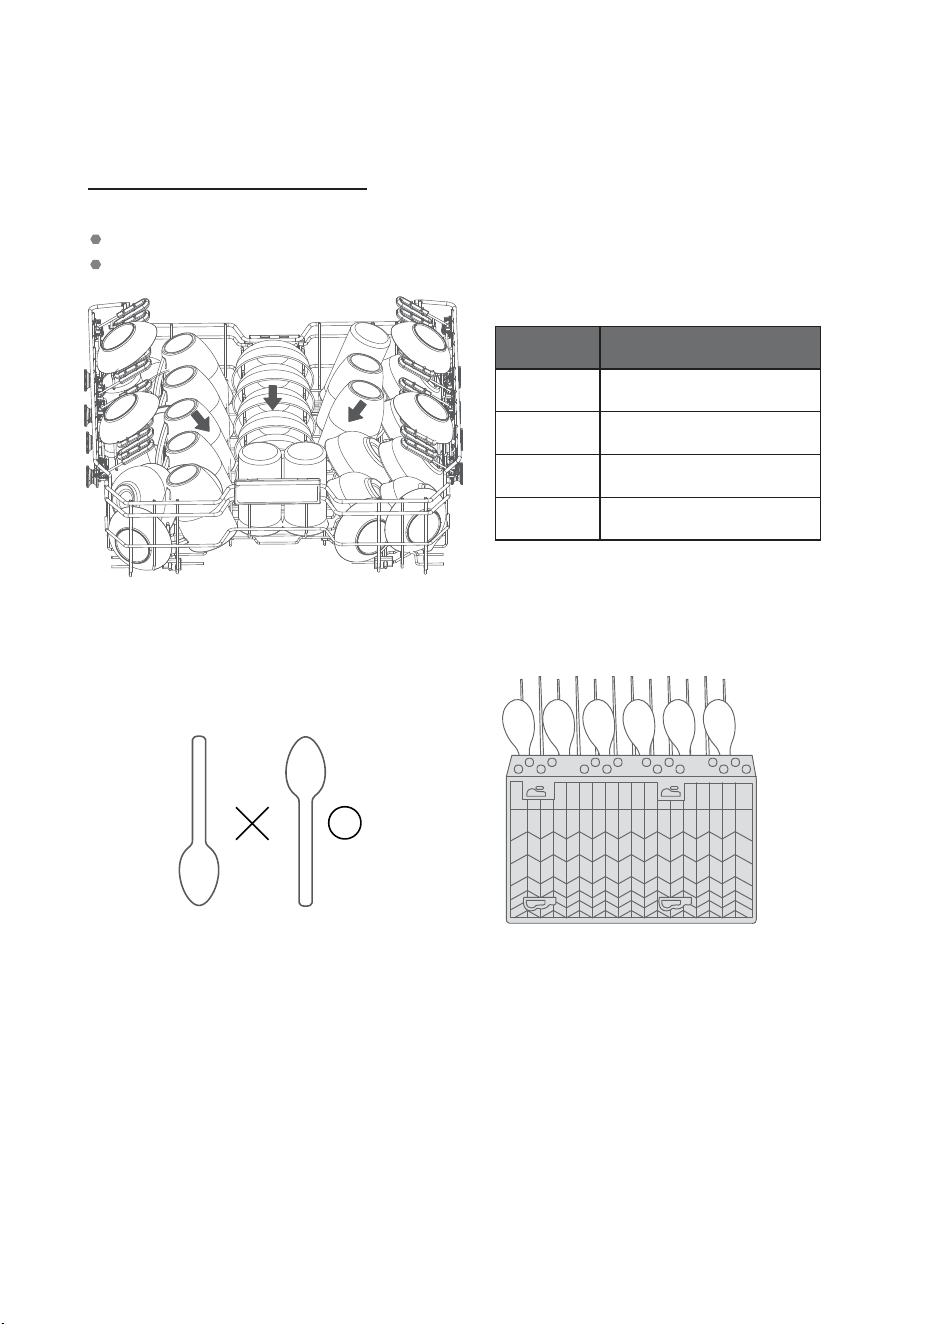
24
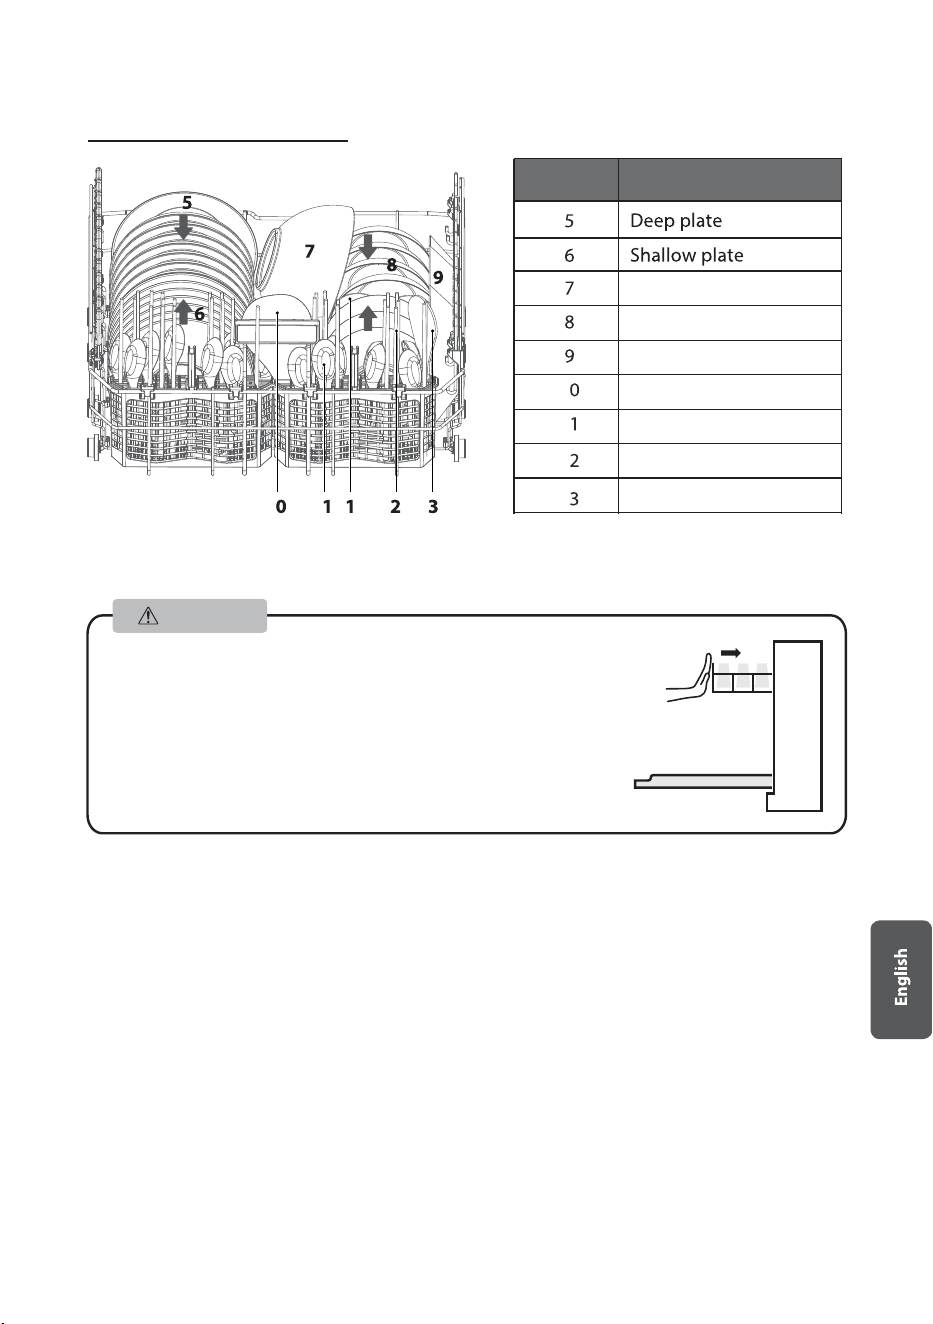
Chopsticks Spoon Basket
Place items so that the open end faces down for cleaning and drying.
Do not stack items on top of each other.
1
2
3
4
Item
Number
Glass
Rice bowl
Condiment dish
Mug
Loading the upper basket
Use the upper rack for small or delicate items such as small plates, cups, saucers, glasses.
Loading the dishwasher to its full capacity will contribute to energy and water savings.
The handle of the cutlery should be facing down.
When placing sharp cutlery, please be careful to
scratch it.
1
4
2
3
1
1
1
1
Soup bowl
Noodles bowl
Fish plate
Chopstick
Soup spoon
Rice spoon
Spoon
Item
Number
2. Lower basket placement
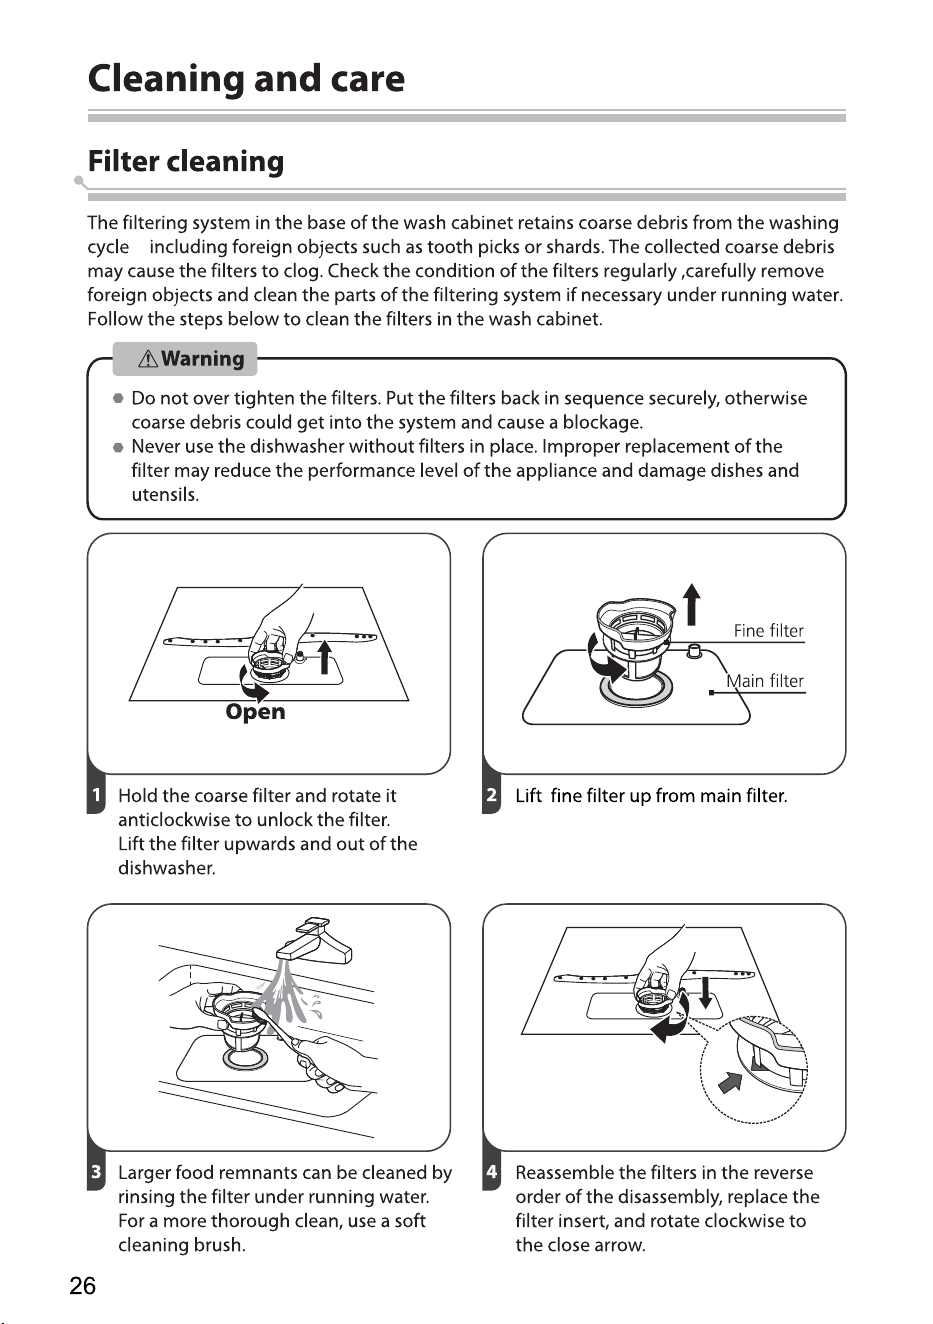
In order to prevent the connection between the upper basket
and the inner water pipe is not in place, which can cause low
water pressure of the upper spray arm. After the upper basket
is loaded with tableware, please make sure to push the upper
basket until there is obvious resistance and then stop pushing.
25
Attention
1 1 1 1
,
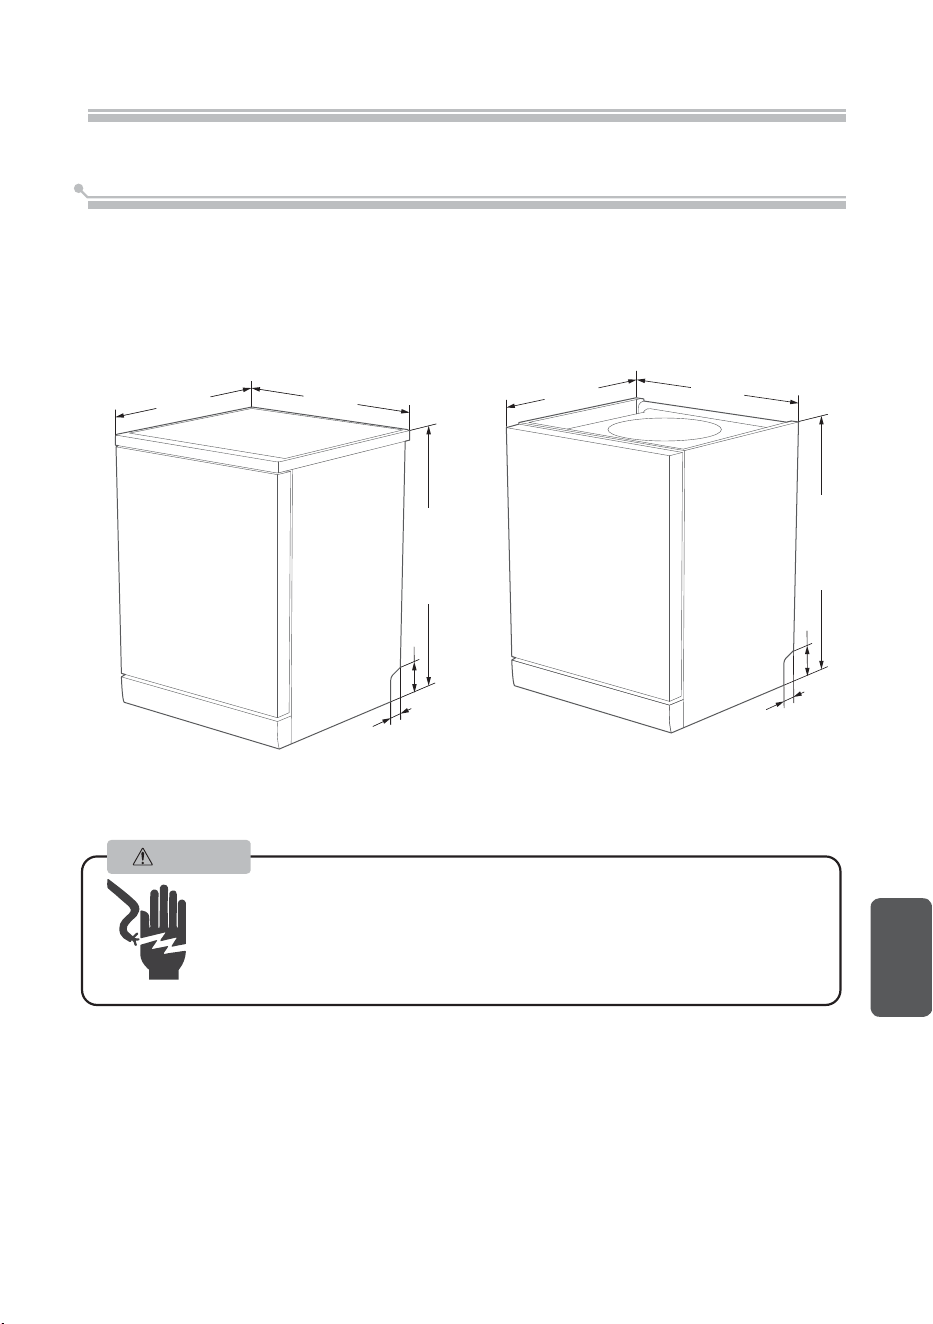
The following figure shows the dimensions of the product in millimeters.
You can adjust the height of the product through the height of the bottom adjusting rod.
You can remove the top plate to lower the height of the product to match your cabinet.
Installation
Product dimension
29
English
Warning
Electric Shock
The machine shall be installed after the power is o. If not, electric shock
or death can be caused.
Please make sure the machine is properly grounded before use.
600
600
805-825
90
45
600
570
775-795
09
45
Power connection
Warning
Electric Shock
Do not use an extension cord or power adapter on this machine.
In case, do not cut o or remove the grounding connection of power cord.
Power requirements
Please check the label of rated value of power supply system for knowing rated voltage and
connect the machine to appropriate power supply. 10A fuse is required and time-delay
fuse or circuit breaker is recommended. Only separate circuit is suitable for this machine.
Machine connection
Make sure that supplied voltage and frequency correspond to those on rating plate. Plug
can only be connected to a properly grounded socket. If the socket that the machine must
be connected to is not suitable for the plug, replace the socket, and do not use a power
adapter that may cause overheating and burning.
30
Grounding Instructions
This appliance must be earthed. In the event of a malfunction or breakdown,
earthing will reduce the risk of electric shock by providing a path of least resistance
for the electric current.
This appliance is equipped with a cord having an equipment-earthing conductor and
an earthing plug. The plug must be plugged into an appropriate outlet that is
installed and earthed in accordance with all local standards and requirements
31
English
Warning
A hose that attaches to a tap can burst if it is installed on the same water line as the
dishwasher. If your sink has one, it is recommended that the hose be disconnected
and the hole plugged.
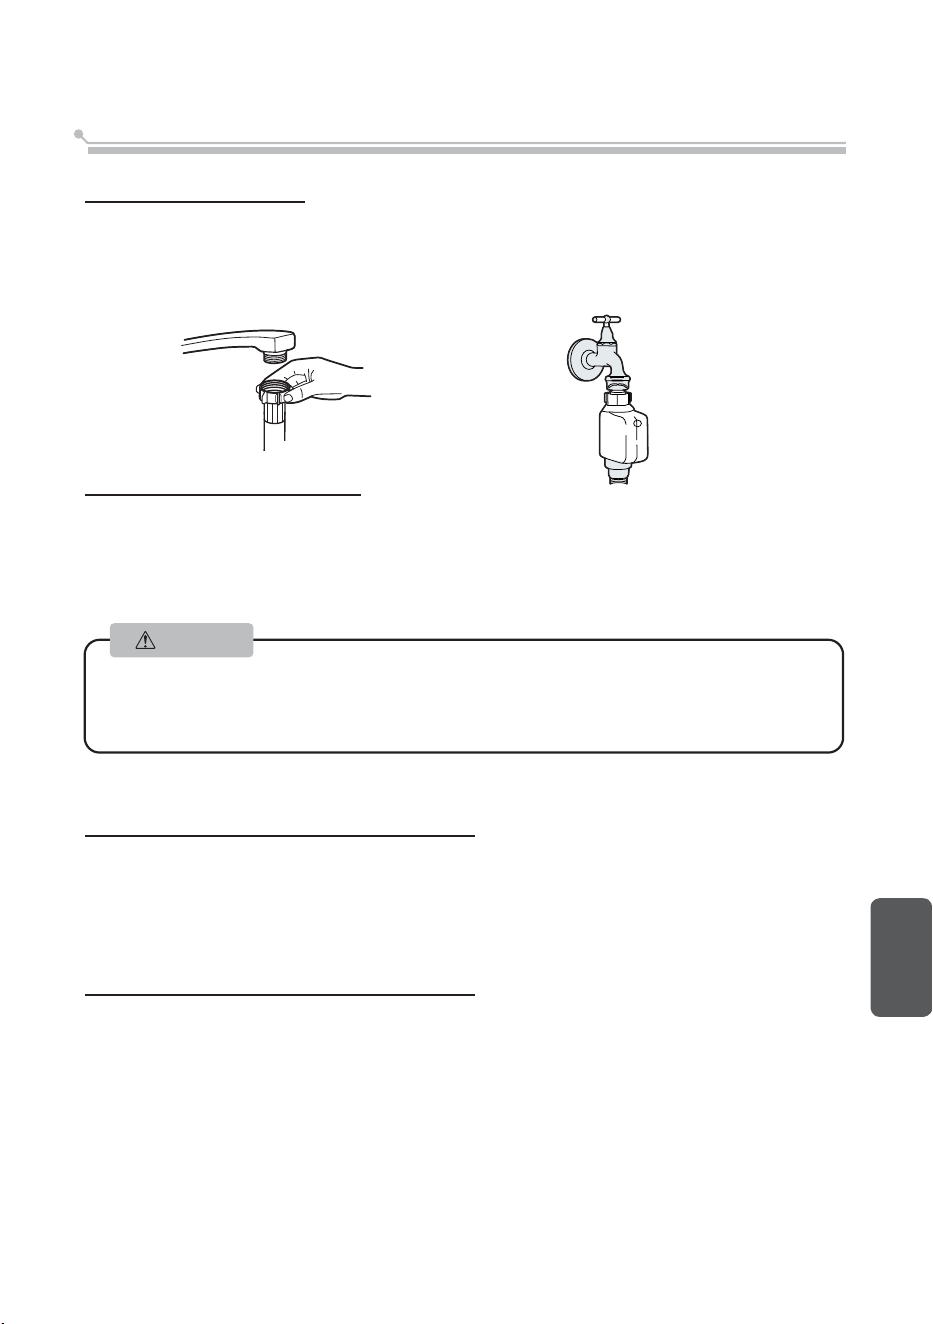
Cold water connection
Connect the cold water supply hose to a threaded 3/4(inch) connector and make sure that it
is fastened tightly in place.If the water pipes are new or have not been used for an extended
period of time, let the water run to make sure that the water is clear. This precaution is
needed to avoid the risk of the water inlet to be blocked and damage the appliance.
About the safety supply hose
The safety supply hose consists of the double walls. The system guarantees its intervention
by blocking the flow of water in case of the supply hose breaking and when the air space
between the supply hose itself and the outer corrugated hose is full of water.
ordinary supply
hose
safety supply hose
Water Supply And Drain
How to connect the safety supply hose
1. Pull the safety supply hoses out from storage compartment located at rear of dishwasher.
2. Tighten the screws of the safety supply hose to the faucet with thread 3/4inch.
3. Turn the water fully on before starting the dishwasher.
How to disconnect the safety supply hose
1. Turn o the water.
2. Unscrew the safety supply hose from the faucet.
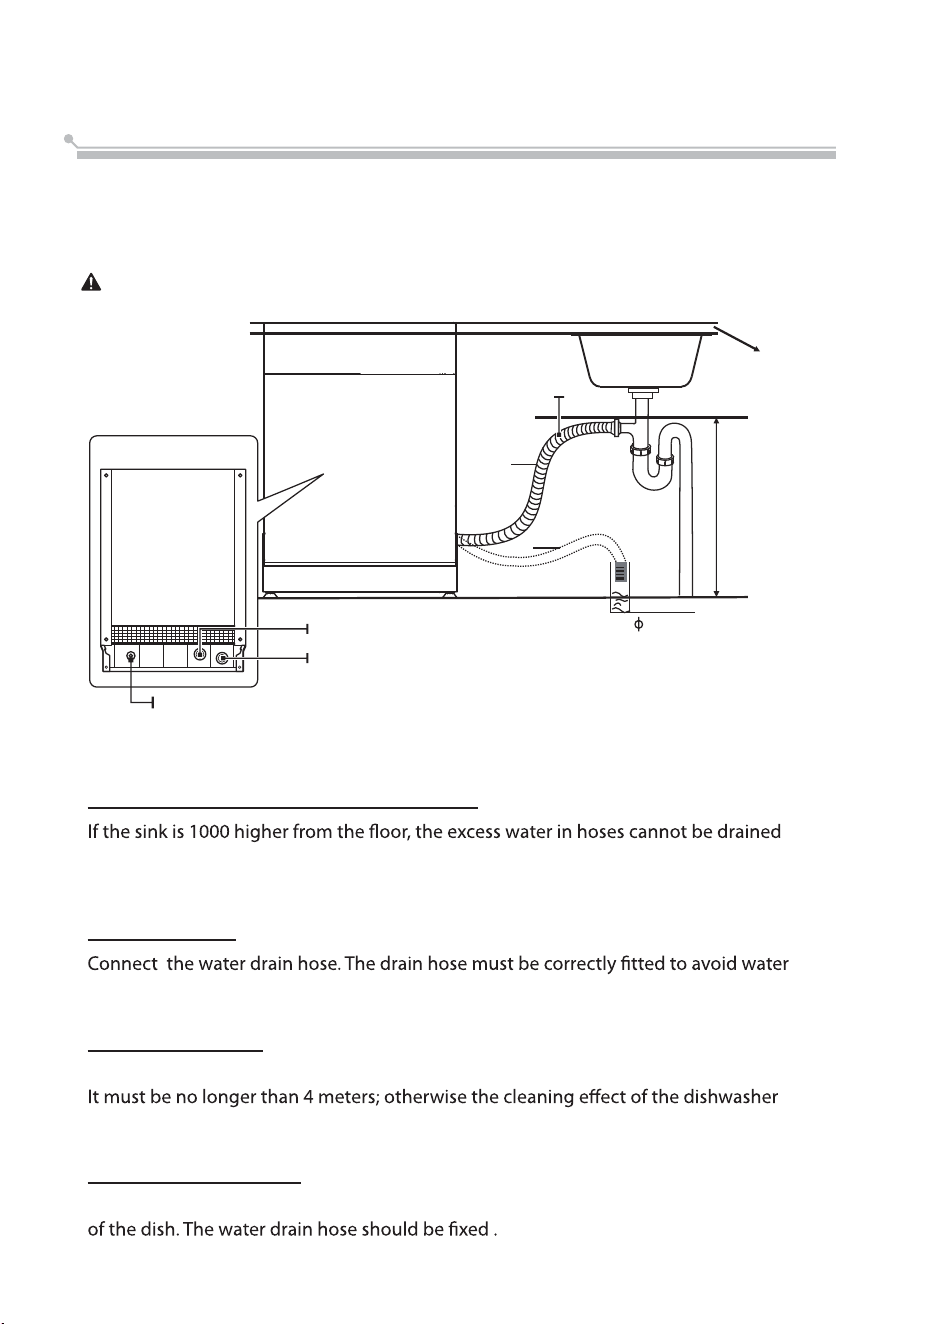
Extension hose
Water outlet
How to drain excess water from hoses
Syphon connection
directly into the sink. It will be necessary to drain excess water from hoses into a bowl or
suitable container that is held outside and lower than the sink.
leaks. Ensure that the water drain hose is not kinked or squashed.
The waste connection must be at a height less than 100 cm (maximum) from the bottom
If you need a drain hose extension, make sure to use a similar drain hose.
could be reduced.
32
Please securely fix the drain hose in either position A or position B
Insert the drain hose into a drain pipe with a minimum diameter of 4 cm, or let it run into
the sink, making sure to avoid bending or crimping it. The height of drain pipe must be less
than 750 mm. The free end of the hose must not be immersed in water to avoid the back
flow of it.
Connection of drain hoses
B
A
MAX 1000 mm
Counter
Drain hose
Back of dishwasher
Water Inlet
Drain Pipe
Mains Cable
40 mm
Drain Pipe
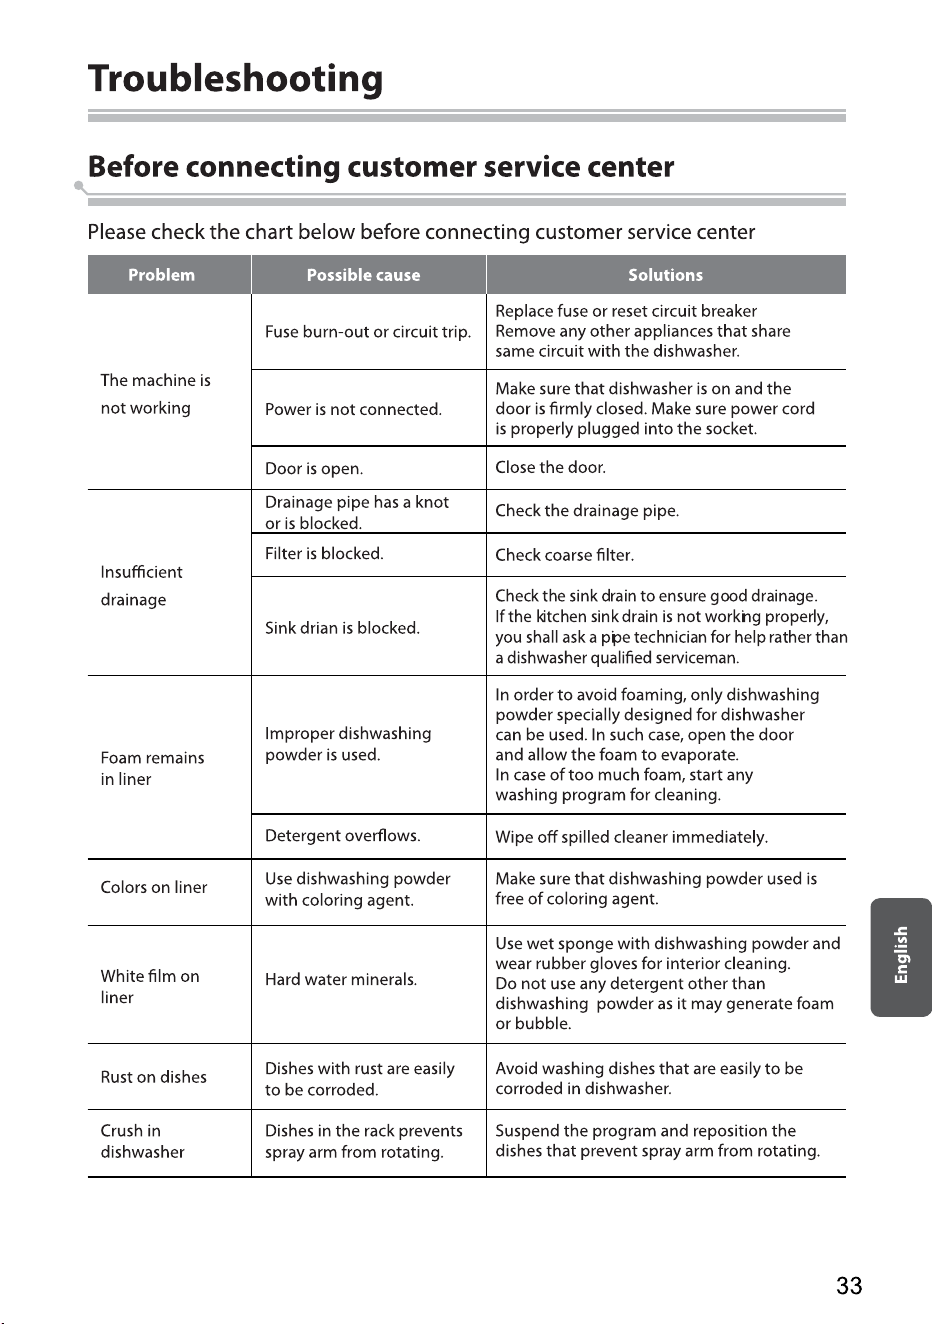
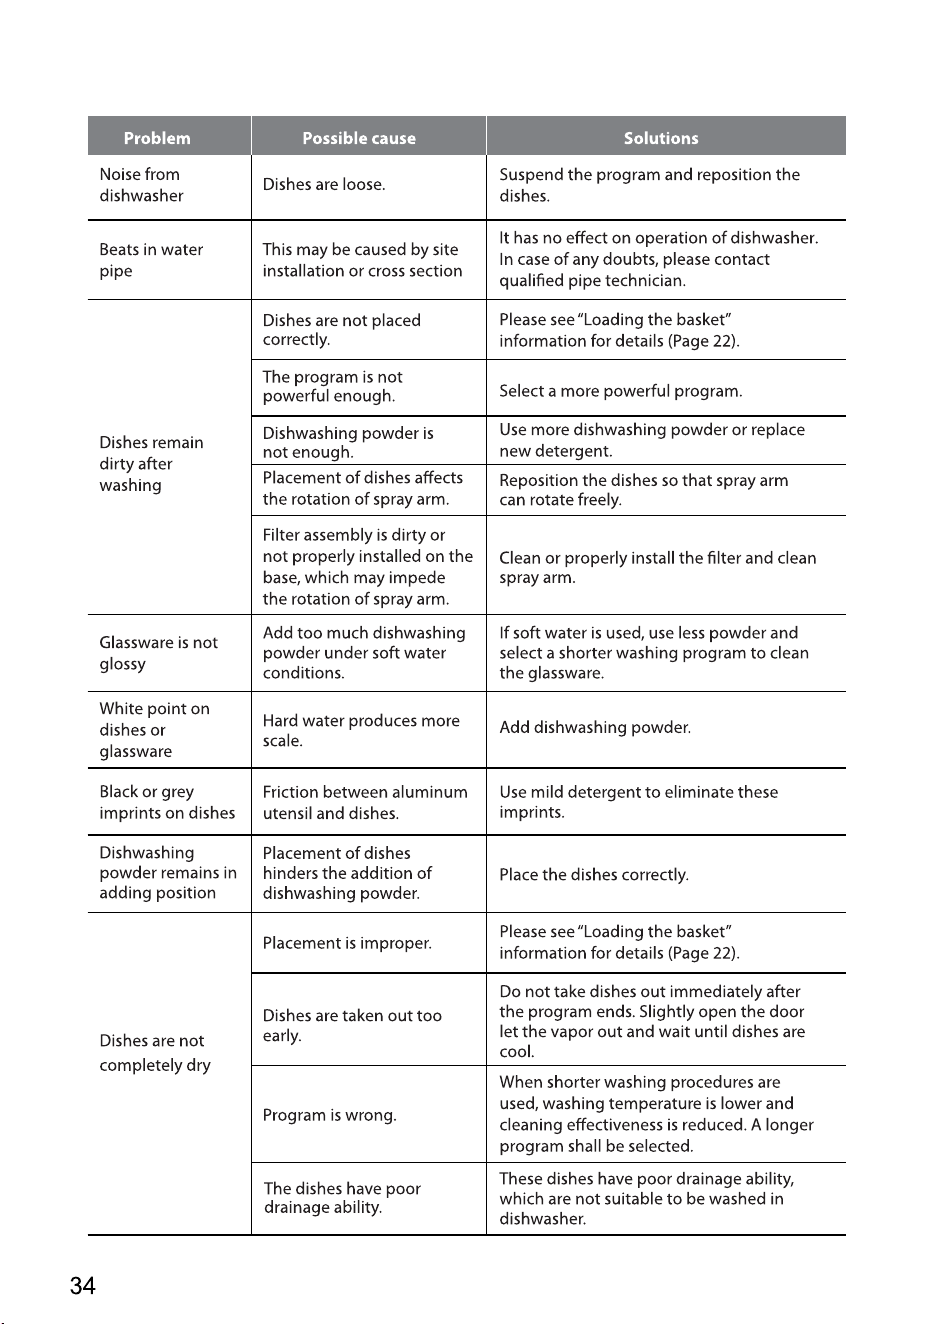
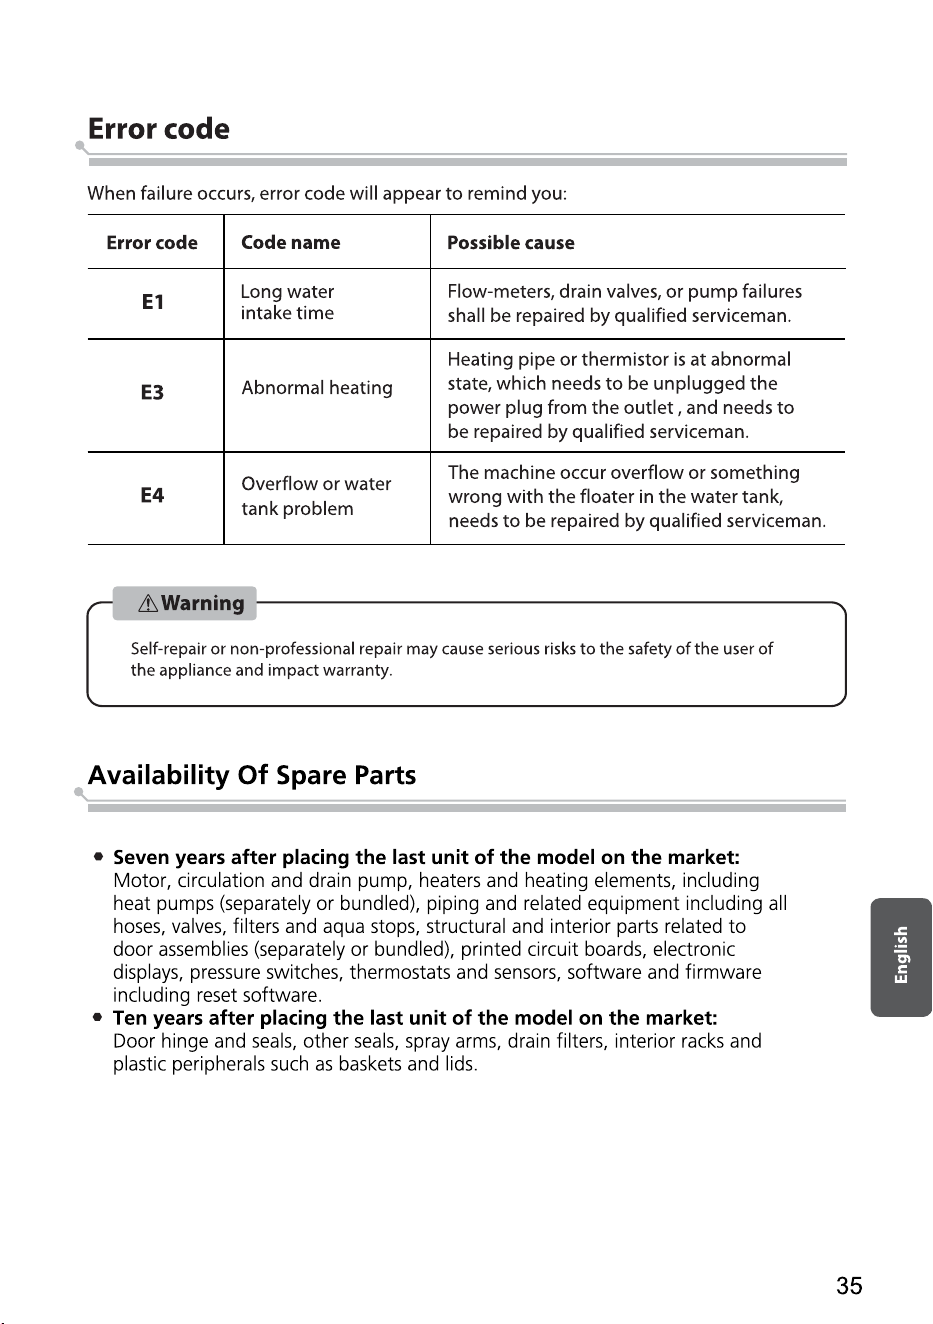
36
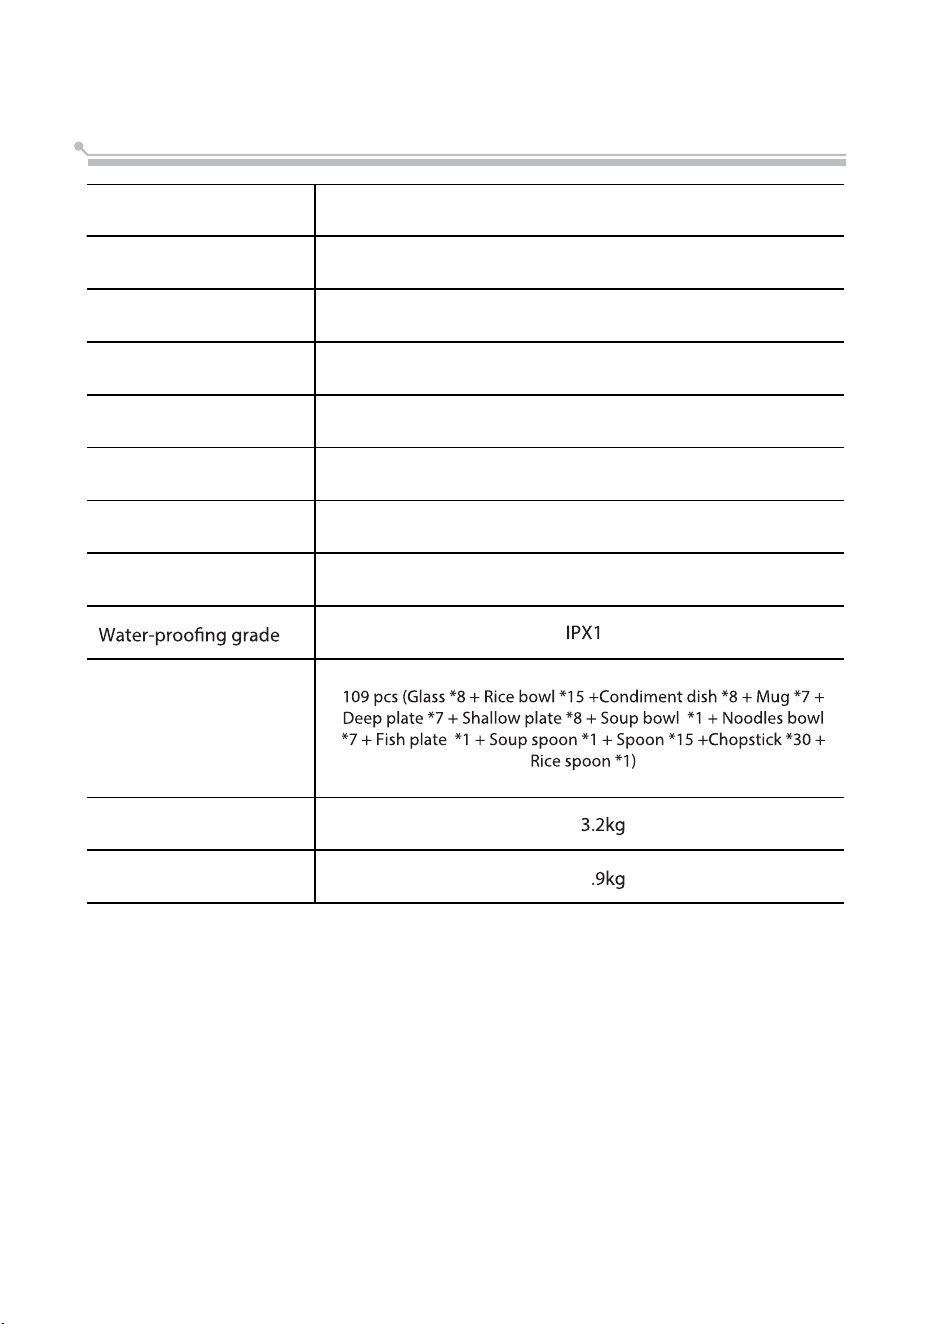
M
odel
Dimension (mm)
Rated voltage
Rated frequency
Rated power
Water consumption
Power consumption
Control mode
Washing capacity
Total weight
Net weight
DW-15F6(G)-MY
600(W) x 805(H) x 600(D)
220-240 V
50 Hz
1828-2158 W
10.5L
0.835 kWh
Electronic type
Specification
5
47
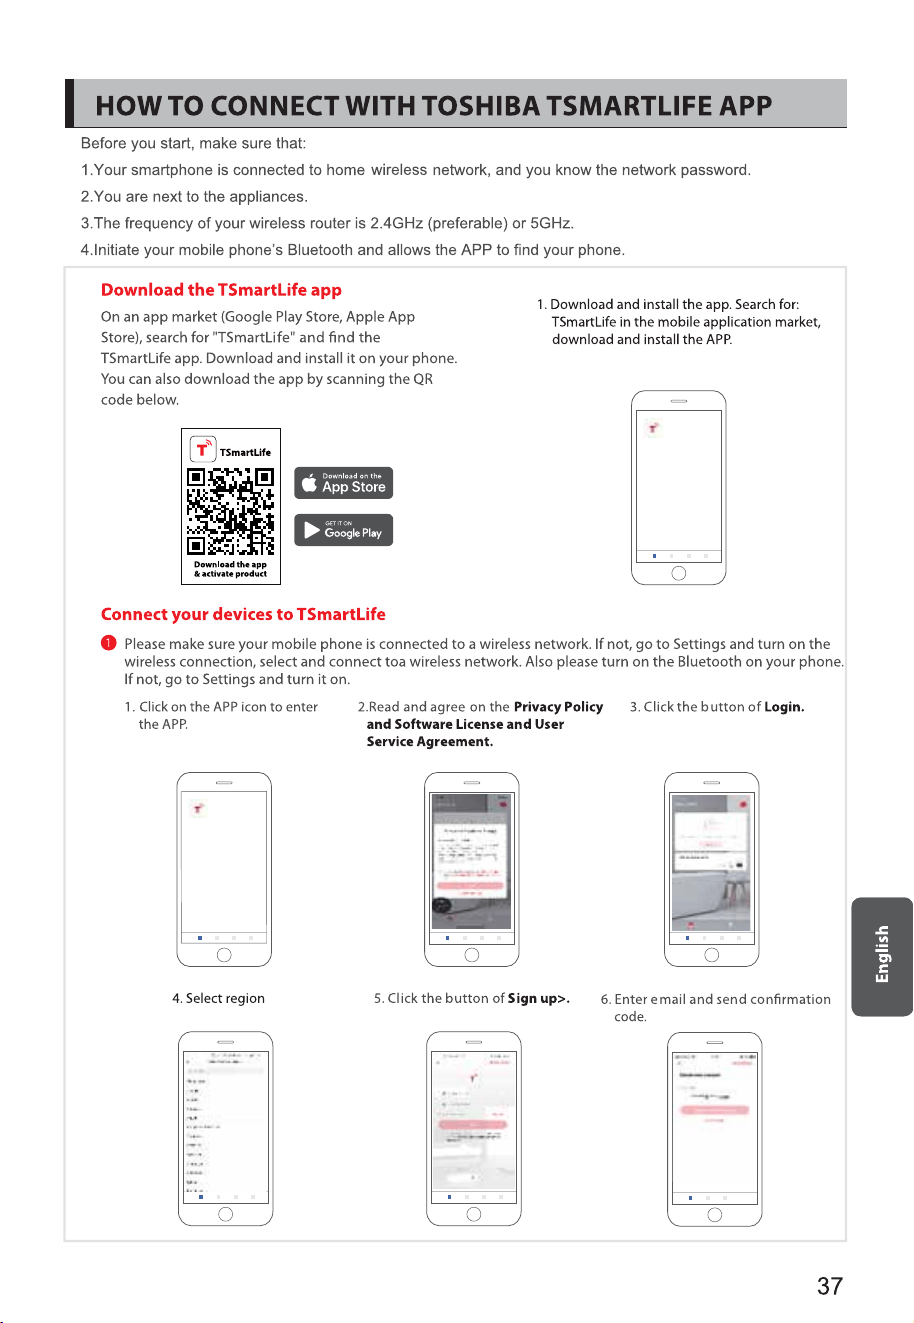
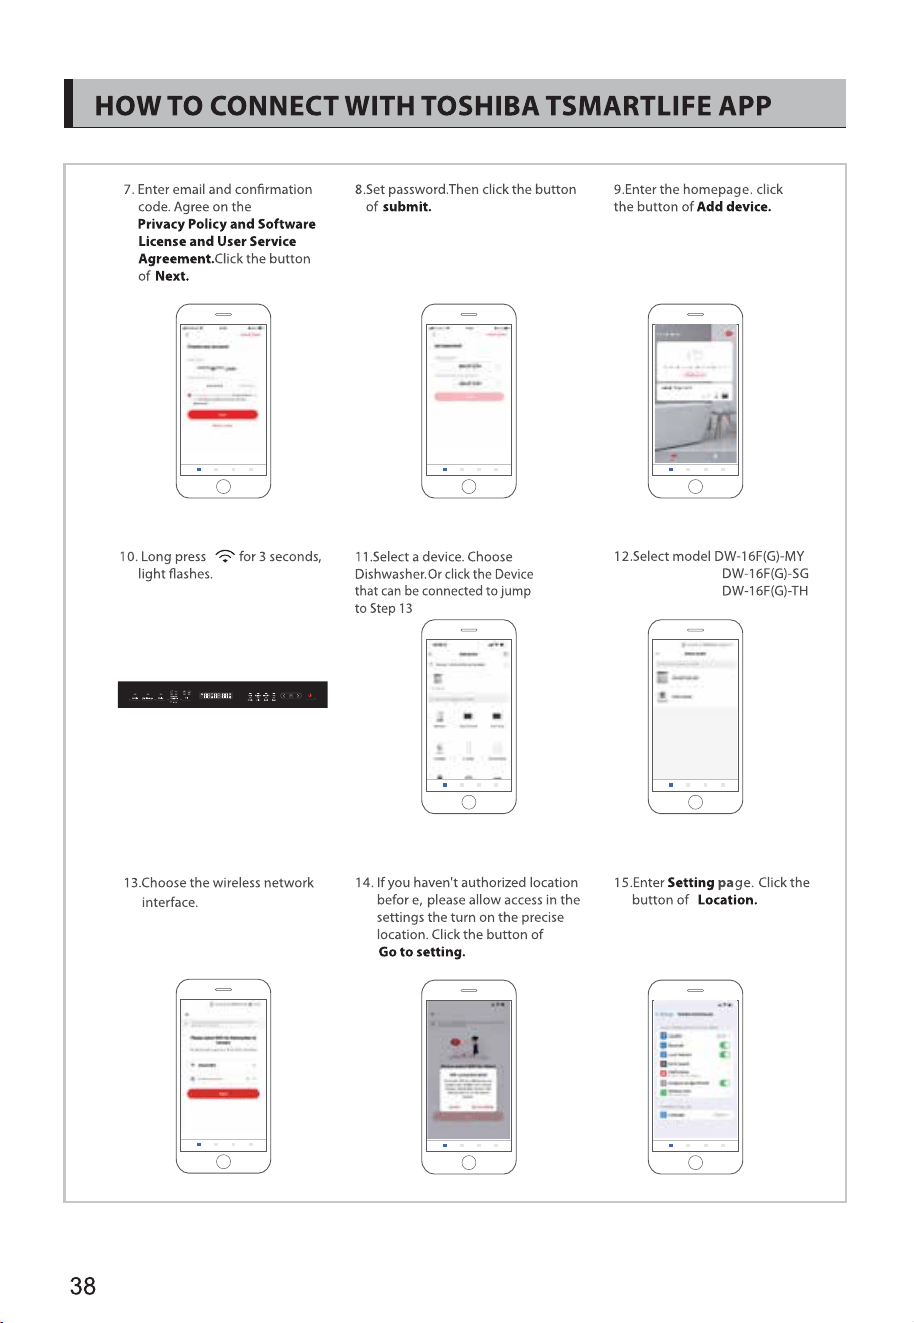
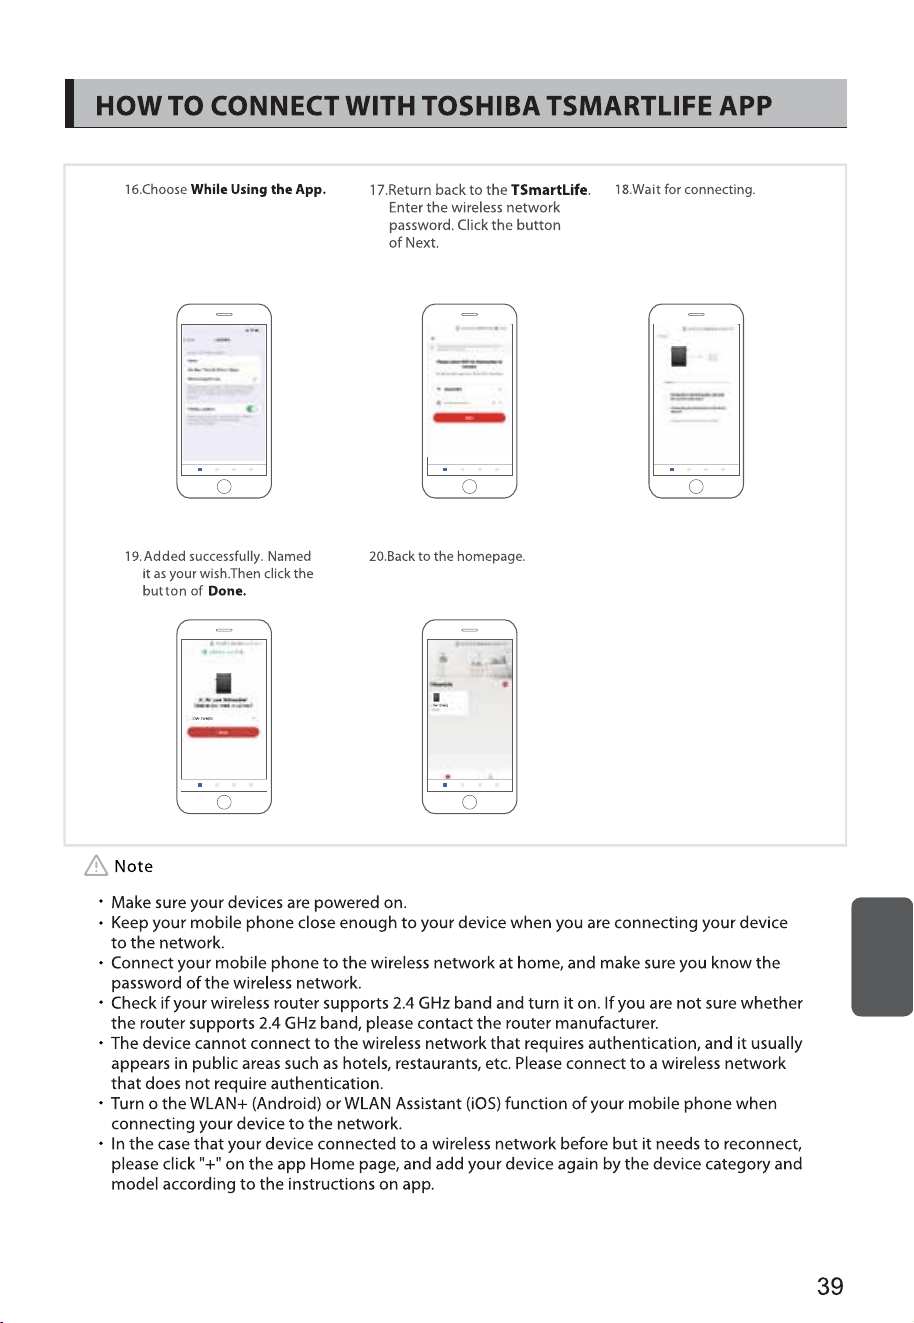
hsilgnE hsilgnE
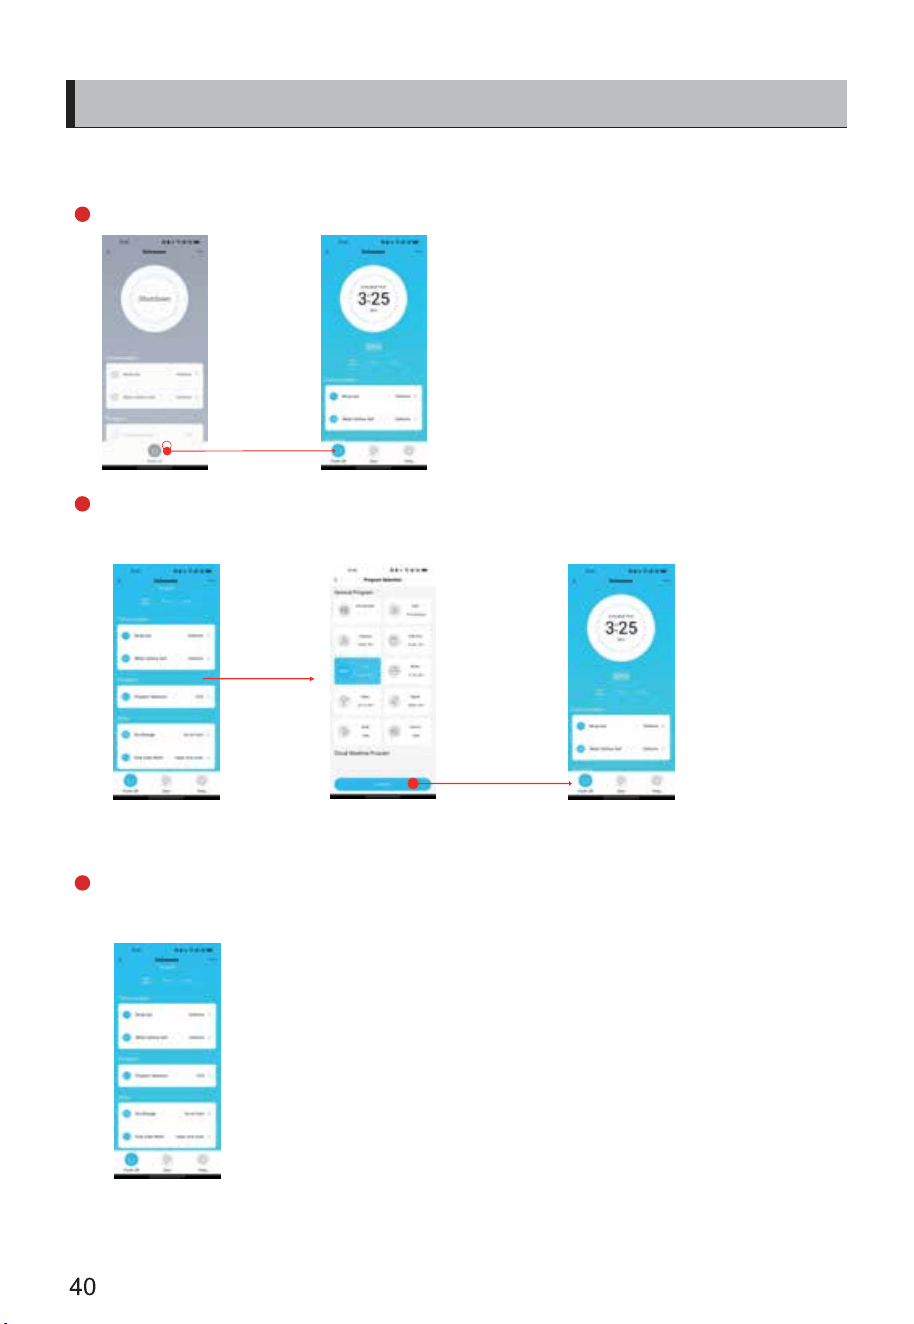
INSTRUCTIONS TO FUNCTION WITH TSMARTLIFE APP
Application software operation interface
1
3
2
Click "Program Selection" to select the program, click "Confirm" to return to the
main interface
Click power on to enter the home page of Dishwasher
Slide the screen to the bottom, select the additional functions you need in
"Additional", and click "Start" to start running after the selection is complete.
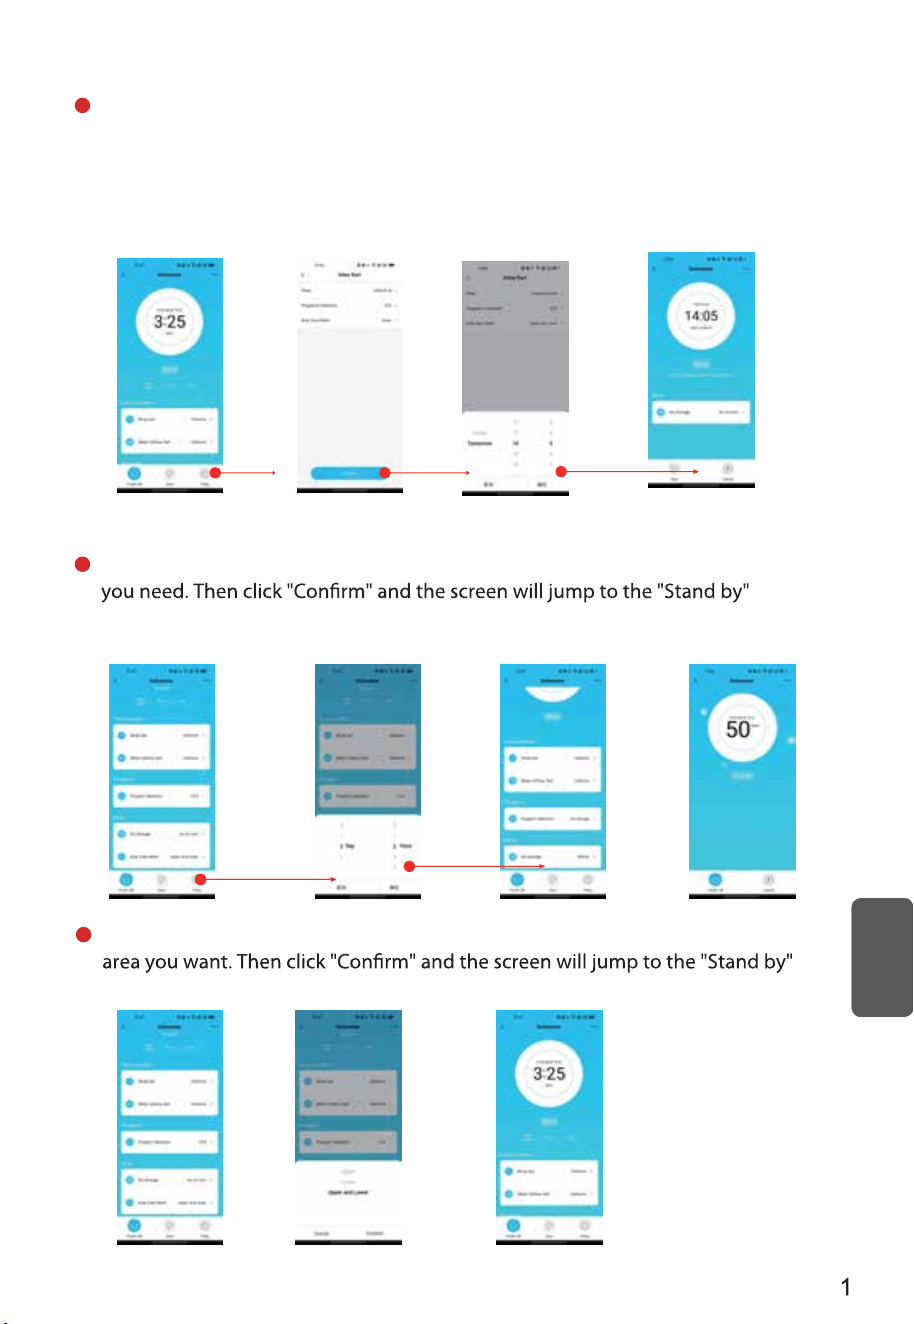
4
Click "Delay" to set delay start. After entering the next interface, click
"Delay" again to select the startup time you want, click "Program Selection"
to select the program you need, and you can also select additional
functions. After setting, click "Confirm" to jump to the appointment
interface, the device will enter the appointment countdown automatically.
If you click start, the device will start the washing process directly.
Dry Storage. Click "Dry storage". Then slide up and down to select the time
interface. Click "Start" and the dishwasher will enter the "Dty storage" stage
after washing.
5
Dual Zone Wash. Click "Dual Zone Wash". Then slide up and down to select the
interface. Click "Start" to start the dishwasher.
6
4
hsilgnE hsilgnE
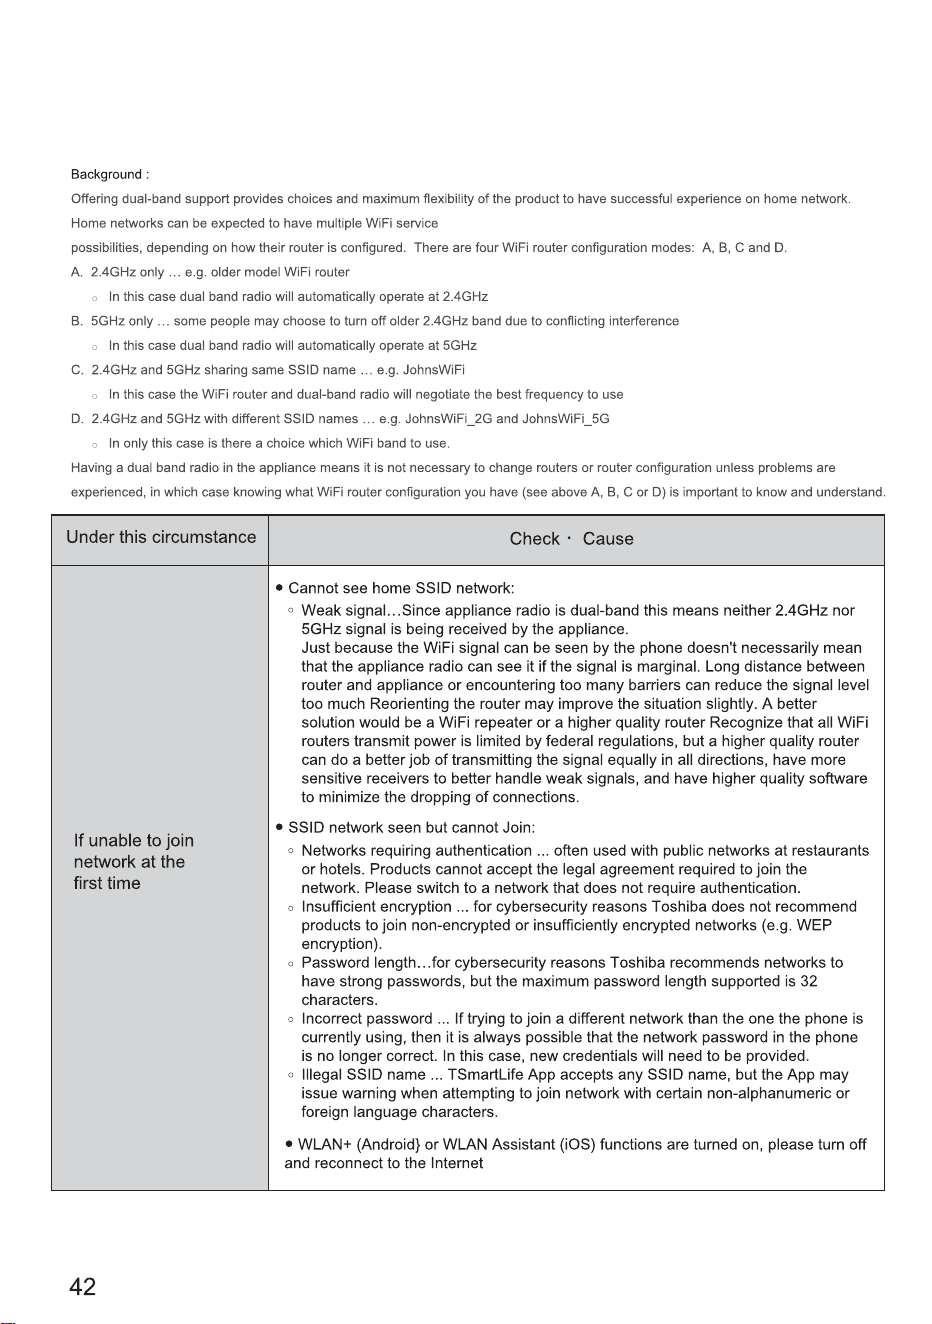
Toshiba TSmartLife Troubleshooting
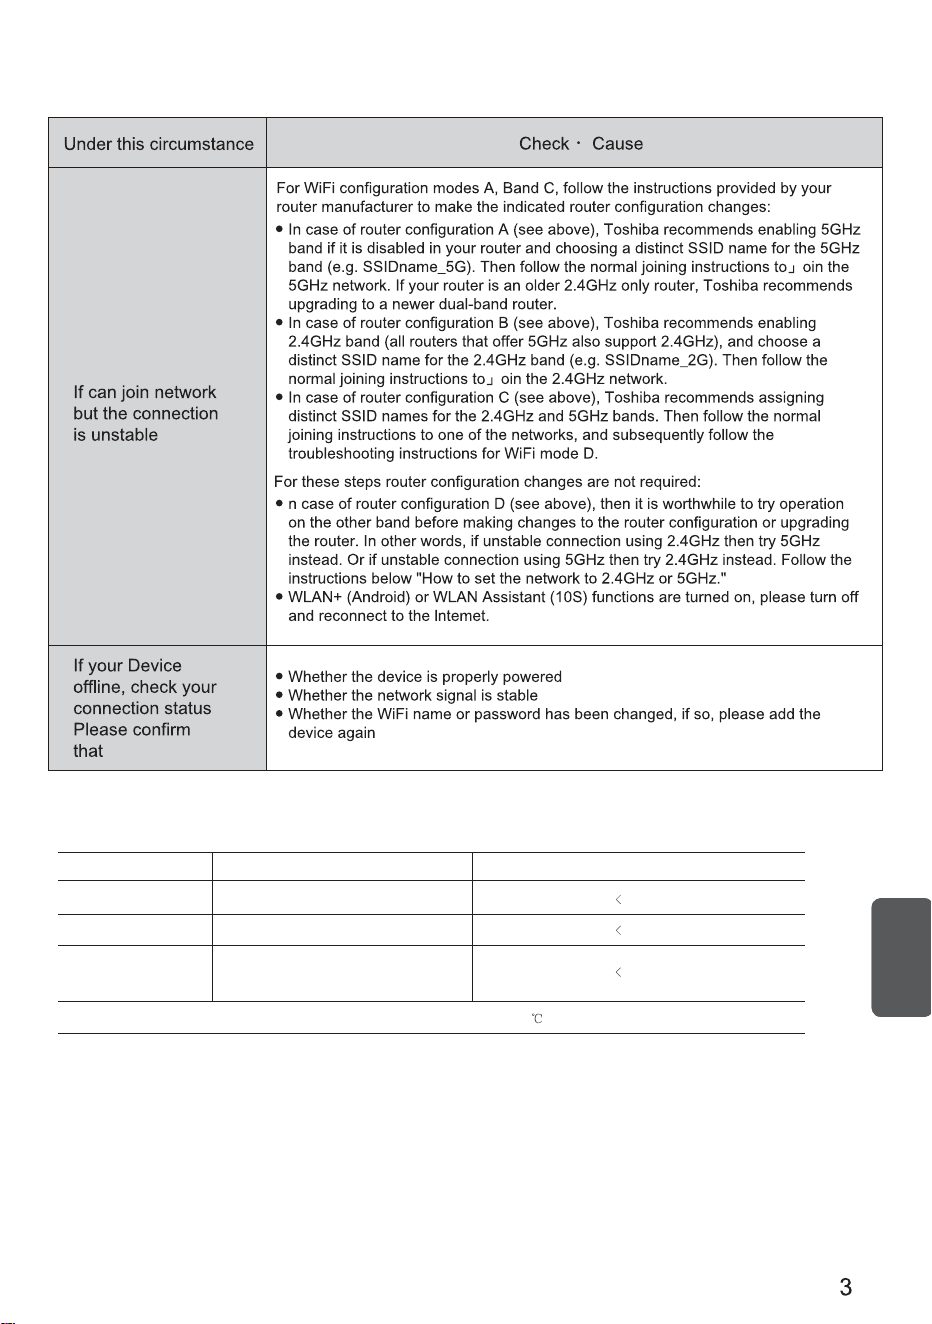
Operating frequency of product :
RF
BLE
2.4G WiFi
5G WiFi(If have)
Maximum transmit power
Transmit frequency
2402-2480MHz
2412-2472MHz
5180-5240MHz
5260-5320MHz
10dBm
20dBm
20dBm
Note: The product is suitable to operating in the environment of 4~40
4
hsilgnE hsilgnE