DAB Mode – Choosing Menu Options
1. In DAB Mode, press and hold MENU/INFO
to enter the menu list shown on fig.2. Press NEXT/
PREVIOUS to select option through the menu list. Select
your preferred option and press the SELECT button to
confirm. The menu options are: Full Scan, Station
list ,Manual Tune, Prune ,DRC and System.
2. Full Scan – In the menu list, press the Next/ Previous button
to select “Full scan”. Press SELECT
button to confirm (See fig.2).
3.
Manual T
une
– As well as the normal method of scanning, you
can also manually tune to a particular
channel/frequency. This can be useful
for adjusting your antenna to achieve
the best possible reception and scanning
a particular channel to update the station list. Under the menu
list, press the Next/ Previous button to select “Manual tune”.
Push SELECT to confirm and then press NEXT/PREVIOUS
to select a particular channel/frequency. Push SELECT to
confirm the setting (See Fig.3).The display shows a live
indication of the received signal strength on the selected
frequency. Adjustments to your antenna will be manifested in
the received signal strength displayed.
CONNECTIONS
PRODUCT OVER
VIEW
CONTROLS
Switching on
Before you switch on the first time, charge the battery for at
least 8 hours.
1. Connect the headphones into the headphone socket.
The headphones are also the aerial.
Switching to DAB/FM Mode
Changing the DAB Display Information
Locking the PR1L
You can lock the buttons, so you don't accidentally press a button.
2.
Slide the Power/Lock switch into the position and then
release the switch. PR1L switches on and starts tuning
to digital radio stations. After the auto tune is complete,
you can start listening to digital radio.
Charging the PR1L
1. Connect the Type C-USB cable to the Type C-USB port.
2. Connect the other end of the Type C-USB cable to a power
outlet, using a USB power adapter. You can also
charge the battery by connecting PR1L to a
computer's USB port.
2 3 4 5 6
1. 3.5 mm headphone socket
2. Type C-USB socket
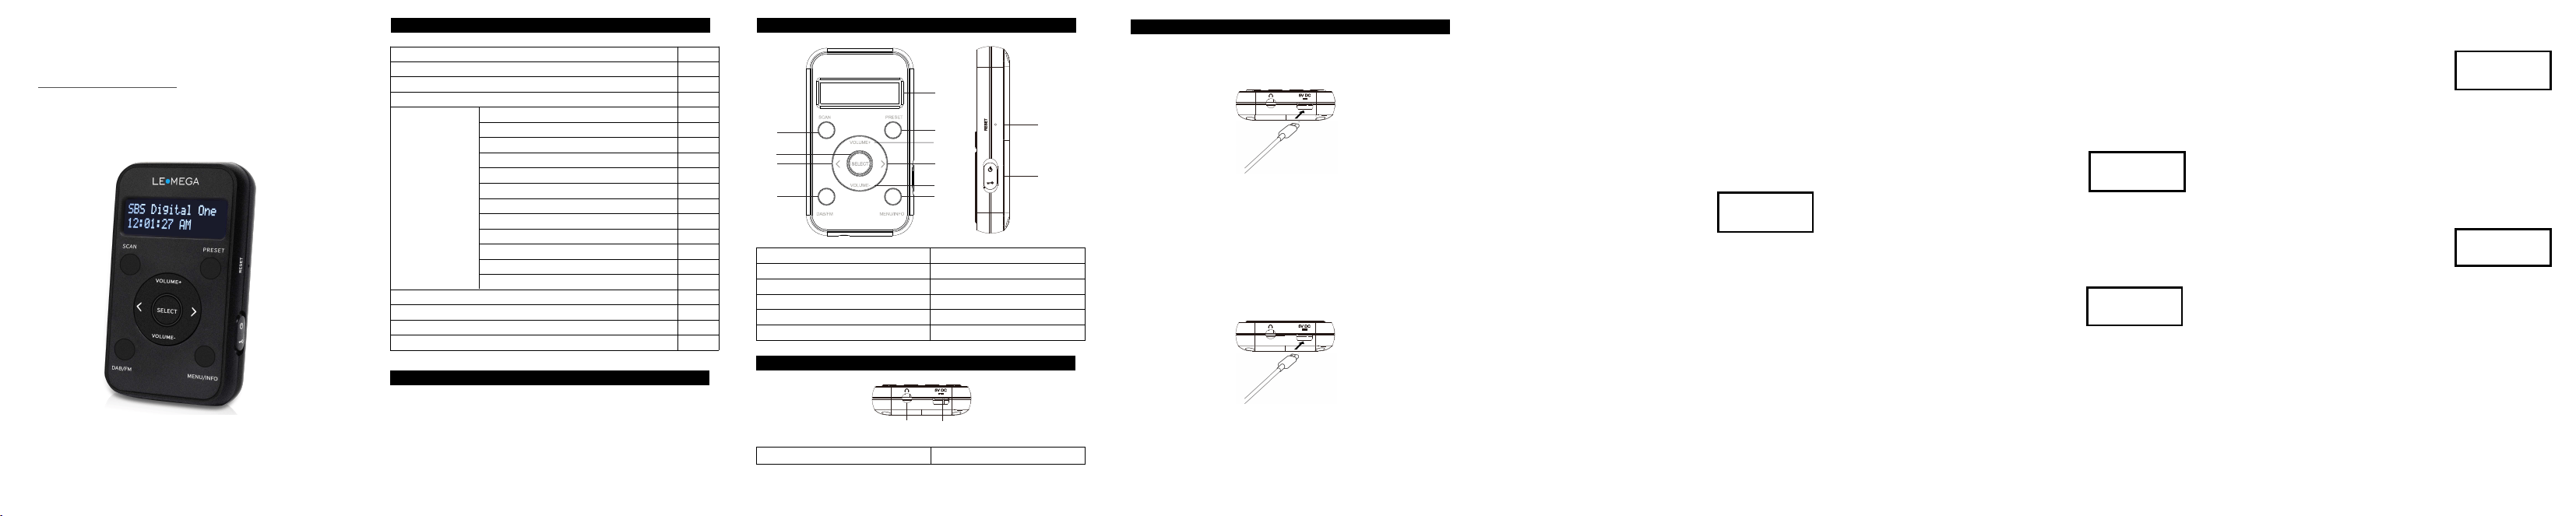
1. LCD Display
10. Scan Button
2. Preset Button
3. Volume + Button
4. Next/TUNE+ Button
5. Volume - Button
9. Select Button
8. Previous /TUNE- Button
7. DAB/FM Button
6. Menu/Info Button
11. Power/Lock Button
12. Reset Button
1 2
11
1 2
87.5MHz
[No RadioTe
xt]
Fig.1
< Full Scan >
The radio will automatically start
scanning all DAB radio stations available.
Once a full scan has been completed,
the radio will start playing the previously selected radio station or
the first one available from the list.
DAB
< Manual tune
>
Fig.3
DAB
4.
DRC (Dynamic Range Compression)
– This function
reduces the difference between the loudest
and quietest audio being broadcast.
DAB
Ef
fectively, this makes quiet sounds
>< DRC
comparatively louder and loud sounds
comparatively quieter. In the menu list,
Fig.4
press the NEXT/PREVIOUS to select “DRC”(See Fig. 4).
Push ENTER to confirm. Press NEXT/PREVIOUS to select
and Push SELECT button to confirm the
setting options: Off (default)/High/Low.
Note: DRC only works if it is enabled by the broadcaster for a
specific station.
5.
Prune
– This removes all invalid stations indicated in the station
list with a ‘?’ in front of the station name.
In the menu list, press NEXT/PREVIOUS
to select “Prune”. Push SELECT to
confirm (See Fig. 5). Press NEXT/
PREVIOUS to select <Yes>, and push SELECT to confirm.
Time – if there is any DAB+ radio signal, the machine will
automatically update the time, there is no signal, can also be
set manually(SeeFig.6).
*Set Time/Date: Set Date>Set Month > Set Year
*Set Hour > Set Minutes >Saved
*Auto Update Options: Update from any / Update from FM /
< Prune >
Fig.5
DAB
1. If the PR1L is in DAB Mode, press MENU/INFO button to
select different info to show on the display, such as DLS
(Dynamic Label Segment), Signal Strength, PTY
(Programme Type), Ensemble, Frequency, Signal Quality, Bit
Rate Codec, Battery status,Time or Date.
2. If the PR1L is in FM mode, press MENU/INFO button to select
different information to show on the display, such as Radio
Text, PTY (Programme Type), PS (Programme Service),
Stereo/Mono, Battery status,Time, or Date.
1. When powered on for the first time, it will start up DAB Mode.
2. If the PR1L is in DAB Mode, press the MODE button
repeatedly until FM is shown on the display.
3. Once in FM Mode, PR1L will start
scanning with the available FM range
(87.50MHz) or play last FM radio
station (See fig.1.).
4. To manually change the FM frequency, make sure that you
have not selected any other sub-menus. Turn the
TUNE+/TUNE- to change the frequency by 0.05MHz.
1. To lock the buttons, slide the Power/Lock switch into the position.
2. To unlock the buttons, slide the Power/Lock switch into the
middle position.
4
Thank you for purchasing the LEMEGA PR1L.
Please follow the guidance of the manual to set up your device
and enjoy its fantastic features.
CONTENTS
INTRODUCTION
Topic Page
Introduction 1
1
2
2
3
3
4
4
5
8
9
9
9
10
10
10
10
11
11
Controls
Connections
Product
Overview
Charging the PR1L
Switching on for the first time
Locking & Unlocking
Switching to DAB/FM Mode
Changing the DAB Display Information
DAB Mode
FM Mode
PRESET Button
Recall a Station from the Preset List
Next/ Previous Button
VOLUME +/- Button
Performing a Battery Reset
Support
Warranty
Specification
Safety Instructions
4
Fig.2
1
2
3
4
5
6
10
9
8
7
LE•MEGA
LIFE & ALOUD
PR1L PORTABLE DAB & FM RADIO
[
INCLUDED HEADPHONE
]
Owner's Manual
LE•MEGA
System settings
6.2
6.1
Sleep – To set the sleep timer while the radio is playing
Press Menu> System setting>Sleep. You can choose the
sleep delay time in minutes from: Sleep Off | 15 |30 | 45 | 60 |
90.
6.4 Language –The language used for display messages can
6.5 Factory Reset –This function clears all user defined
settings, replacing them with the
original default values-Time/Date,
Preferences/Settings, DAB station
6.3 Backlight –This radio display has a backlight which can
be adjustable.
You can select the On Level at
Low / Medium [default] /High
< Backlight >
System
Fig.7
< Language >
System
your preferred one. Press SELECT button to confirm your
selection.
< Factory reset >
System
list and Preset Stations are all lost.
Under the System Menu, press
NEXT/PREVIOUS to select “Factory Reset”. Push SELECT to
6.6 Software version – This is used to display the current
software version. Under the System
Menu, press NEXT/PREVIOUS to
select “Software version” See Fig. 10).
FM Mode – Choosing Menu Options
1. In FM Mode, press and hold MENU/ INFO button to enter
the menu list (SeeFig.11). Press NEXT/PREVIOUS to select
option in the menu. Press SELECT to
confirm option. The menu options
are: Scan Setting, Audio Setting.
2. Scan Setting- By default, any FM scan will stop when finding
an available radio station which may result in poor sound
quality for the radio stations found with weak radio signal
reception.
While in ‘Scan Setting’ . press NEXT/PREVIOUS to view and
choose one of these options: ‘Strong stations only’ or ‘All
Stations’. Press SELECT button to confirm the change to new
setting (See fig.11),
3. Audio Setting – By default, all stereo stations are reproduced
in stereo. For weak stations, this may result in poor quality
audio. The audio quality can be improved using mono.
In the Menu List, press NEXT/PREVIOUS
to select a particular option
8
<SW version >
System
Press SELECT to confirm the existing SW
version will be showed.
<Scan se�ng >
FM
10
VOLUME +/- Button
Adjusting Volume - Turn the Volume dial to increase or decrease
the volume.
Performing a Battery Reset
If the controls stop responding, perform a battery reset. To
perform a battery reset, use a paper clip to press the reset button
on the side.
SUPPORT
If you require further assistance with your new radio, please
contact our support team at [email protected]
www.lemegaaudio.com
12
5.
6.
7.
8.
9.
10.
Do not use your product in extremely hot or cold temperature.
Keep the device away from heat sources, such as radiators or
gas/electric fires. Do not expose your product to naked flames,
such as lighted candles.
To charge your product, only connect it to a supply source that
meets the Safety Isolation requirements of EN 60065 or EN
60950-1 for an accessible safety extra low voltage circuit. For
this connection, use either the supplied Type C-USB cable or
a suitably CE approved power adapter with the correct USB
output rating.
Power the product using an external 5V DC 1A power supply.
The maximum output current is 1A, protected by an internal
circuit.
Before charging your product, ensure that the available supply
voltage corresponds with the required operation at voltage of
the product.
Disconnect your product from the charging power supply if
you will not use your product for a long period of time
(for example, if you are going on holiday).
Always unplug your product from the charging power supply
before cleaning. When cleaning the product, do not use any
type of abrasive pad or abrasive cleaning solutions as these
may damage the product's surface.
11. To reduce the risk of electric shock, do not remove any screws.
The product does not contain any user-service able parts
inside. Product repairs should only be carried out by
authorized personnel.
9
<1: (Empty) >
Preset Store
Fig.13
<1: 87.5MHz >
Preset Store
Fig.14
Stored
Fig.15
Preset 1
Recall a Radio Station from the Preset List
To recall a Preset Station, press ‘ PRESET’ button, then using
NEXT/PREVIOUS you can view your stored preset stations.
When the display shows your desired Preset number, press
SELECT to confirm.
Next/ Previous Button
Choosing Radio Stations or Options
1. If PR1L is in DAB mode, you can press NEXT /PREVIOUS
buttons to scroll through the radio stations list while playing
a radio station.
In DAB mode,you can also use NEXT/ PREVIOUS buttons
to navigate through radio Menu list/ Options.
2. If the radio is in FM Mode, you can press NEXT/PREVIOUS
buttons to manually adjust the frequency by 0.05MHz.
Alternatively, press and hold TUNE+/TUNE- button to auto-
scan station.
While in FM mode you can also use NEXT/PREVIOUS
buttons to scroll through the Menu list/ Options.
PRESET Button
DAB radio stations presets and 20 FM radio
stations.
To store a radio station as a Preset, select
your radio station that you would like to save
on the list, then Press and hold down
PRESET button for 1-2 seconds until you
will see on radio display ‘Preset Store #:
(Empty)”’. (See Fig.13). or “#: saved radio
station”. Press NEXT/PREVIOUS to select
your desired station preset number. Press
the SELECT button to confirm your
selection. The radio display will then show
“Preset # Stored” (See Fig.15).
11
Please read this owner’s Manual completely before operating this
unit and store this instruction manual for future reference.
SAFETY
INSTRUCTIONS
Model:
Type:
Power output:
PR1L
Portable Digital Radio
1CH X1.2W
Power Supply: 5V DC (1A) Type C-USB power socket
Dimension (mm): 90 mm (H) x 51 mm (W) x 16 mm (D)
Weight: 0.1KG
SPECIFICATIONS
Specifications are subject to change without notice.
1. If you do not follow the operating instructions provided, it may
compromise the safety of your product and this may invalidate
the warranty.
2. Do not expose the product to dripping or splashing. Do not place
objects filled with liquids, such as vases on the product. If liquid
or water spills onto the product, switch it off immediately and
contact your retailer. If you are using a mains-powered adapter,
do not touch the product with wet hands.
3. The internal battery in this product is not user replaceable. Do
not expose the battery to excessive heat or naked flames.
Ensure adequate ventilation and airflow around the product,
particularly when charging. Dispose of the product in accordance
with local environmental rules.
4. Using the product in rooms or climates with high humidity and
temperatures may cause condensation to form inside the
product, which can damage the product. Use the product in
moderate climates only.
13
EU Compliance Information
Eligible to bear the CE mark; Conforms to European Union Low
Voltage Directive 2014/35/EU; European Union EMC Directive
2014/30/EU; European Union Restriction of Hazardous
Substances Recast (RoHS) Directive 2011/65/EU; European
Union WEEE Directive 2012/19/EU;European Union Eco-Design
Directive 2009/125/EC; European Union Registration,
Evaluation, Authorization and Restriction of Chemicals (REACH)
Directive 2006/121/EC.European Union Radio Equipment
Directive (RED), 2014/53/EU.
To prevent possible hearing damage, do not listen at high-
volume levels for long periods of time. Consistent exposure to
high volumes when using headphones can damage your
hearing. Always check the volume level before you insert
headphones into your ears. Use of headphones other than
those supplied by manufacture expose you to hearing damage,
as the high-level volume warning on the device may be
inaccurate. Use of headphones while operating a vehicle is not
recommended and is illegal in some areas. If you find that
listening to is distracting while operating any type of vehicle or
performing an activity that requires your full attention,stop
listening.
be English, Deutsch, Italiano etc.
In System menu, Press
NEXT/PREVIOUS buttons to find the
‘Language’ menu, Press SELECT button
to confirm (See Fig.8). Scroll through the
‘Language’ menu using NEXT/ PREVIOUS buttons to find
Fig.9
Fig.11
(Options: Stereo allowed | Forced mono)
in “Audio Setting” (See Fig.12). Press
SELECT to confirm the change to
new setting. It will automatically change to
new setting after 3 seconds.
<Audio se�ng >
FM
Fig.12
confirm (See Fig.9).Use the Next/ Previous button
to choose <Yes> and push SELECT button to start the
factory reset.
Fig.10
7
Fig.8
On PR1L radio you can save 20
by pressing SELECT, choose your option, and push
SELECT changes.
*Set 12/24 hour: 12hour/24 hours
*Set date format: DD-MM-YYYY/
MM-DD-YYYY Cycle through Time Menu
Update from DAB / No Update.
< Time >
System
Fig.6