Operation guide(BellaBot)
Contents
1.Quick Start Guide
1.1Power on
1.2 Power off
2. Task Scenarios
2.1 Product Features
2.2 Dilivery mode
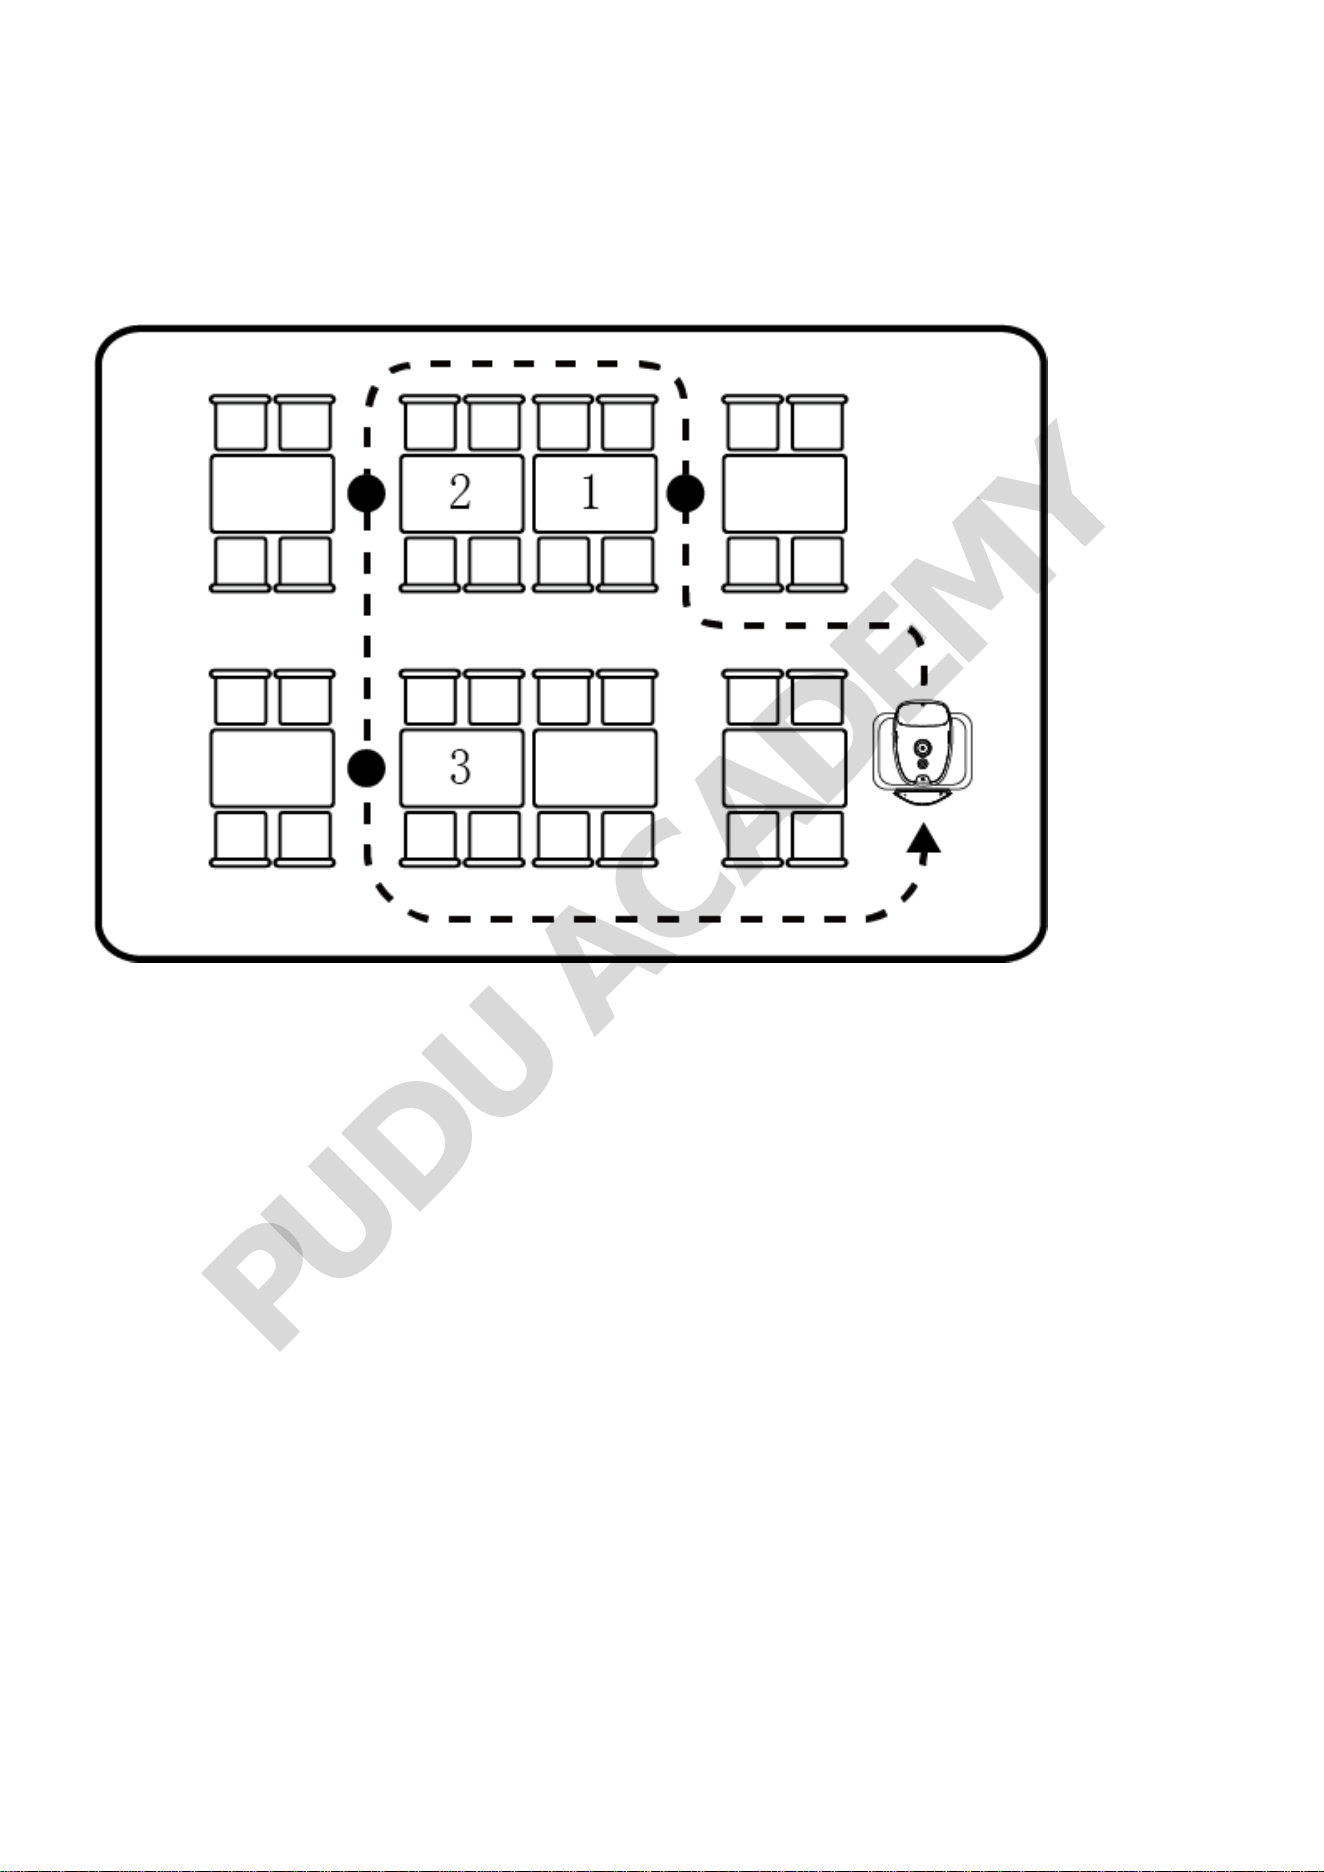
2.3 Cruise mode
2.4 Guiding Mode
2.5 Direct Delivery Mode
2.6 Birthday Mode
2.7 Special Mode
3. Settings
3.1 Map Settings
3.2 Voice Settings
3.2.1 Voice Packet Replacement
3.2.2 Voice Customization
3.3 Tray Settings
3.4 Interactive Function
3.5 Advanced Settings
4. Music Functions
5. Voice Interaction Descriptions
6. Touch Interaction Descriptions
7. Docking Instructions
1.Quick Start Guide
1.1Power on
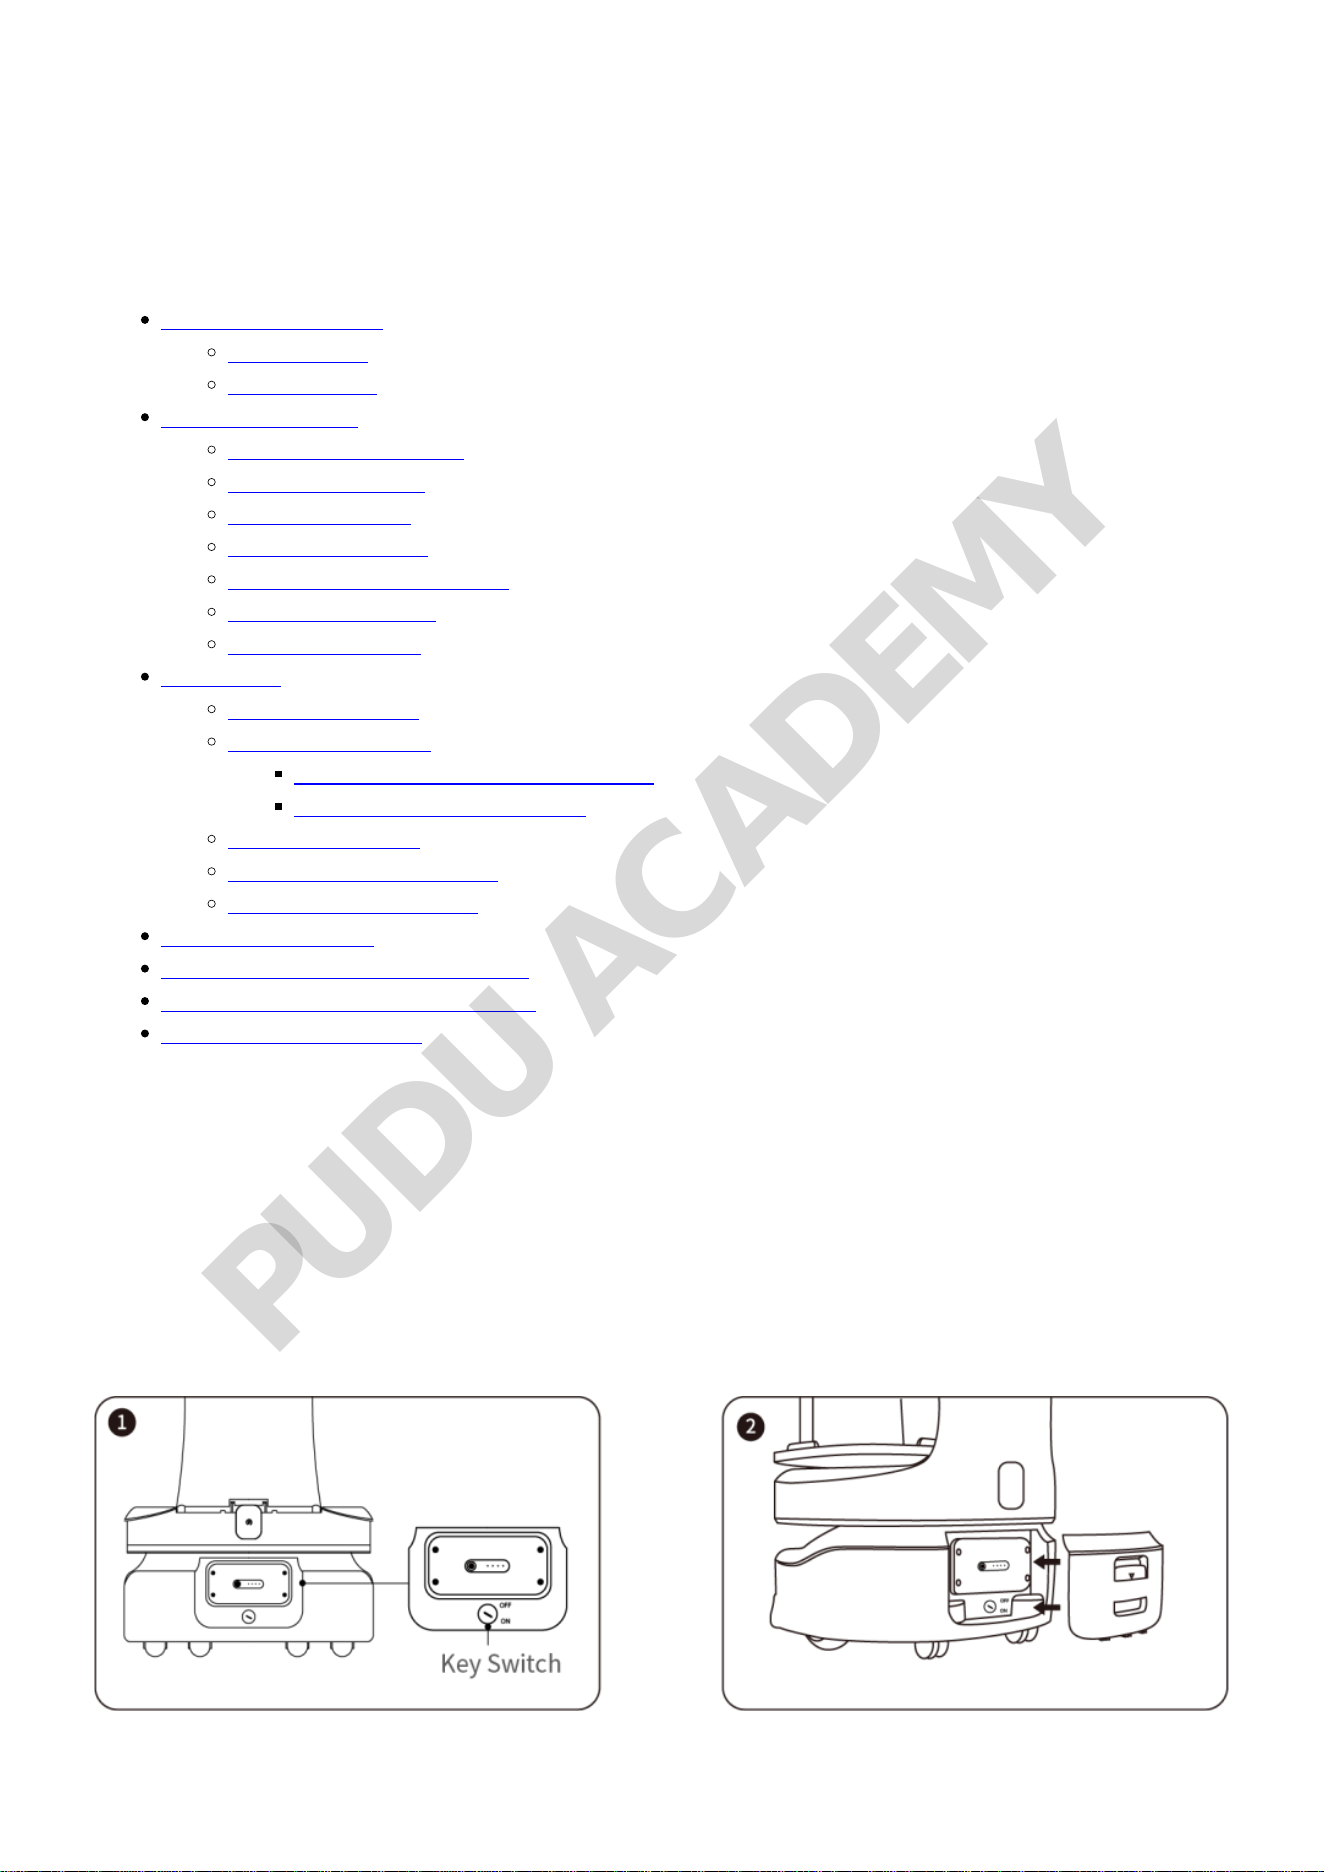
Step 1 Open the battery box and make sure the key switch is turned to ON, then close the battery
box.
PUDU ACADEMY
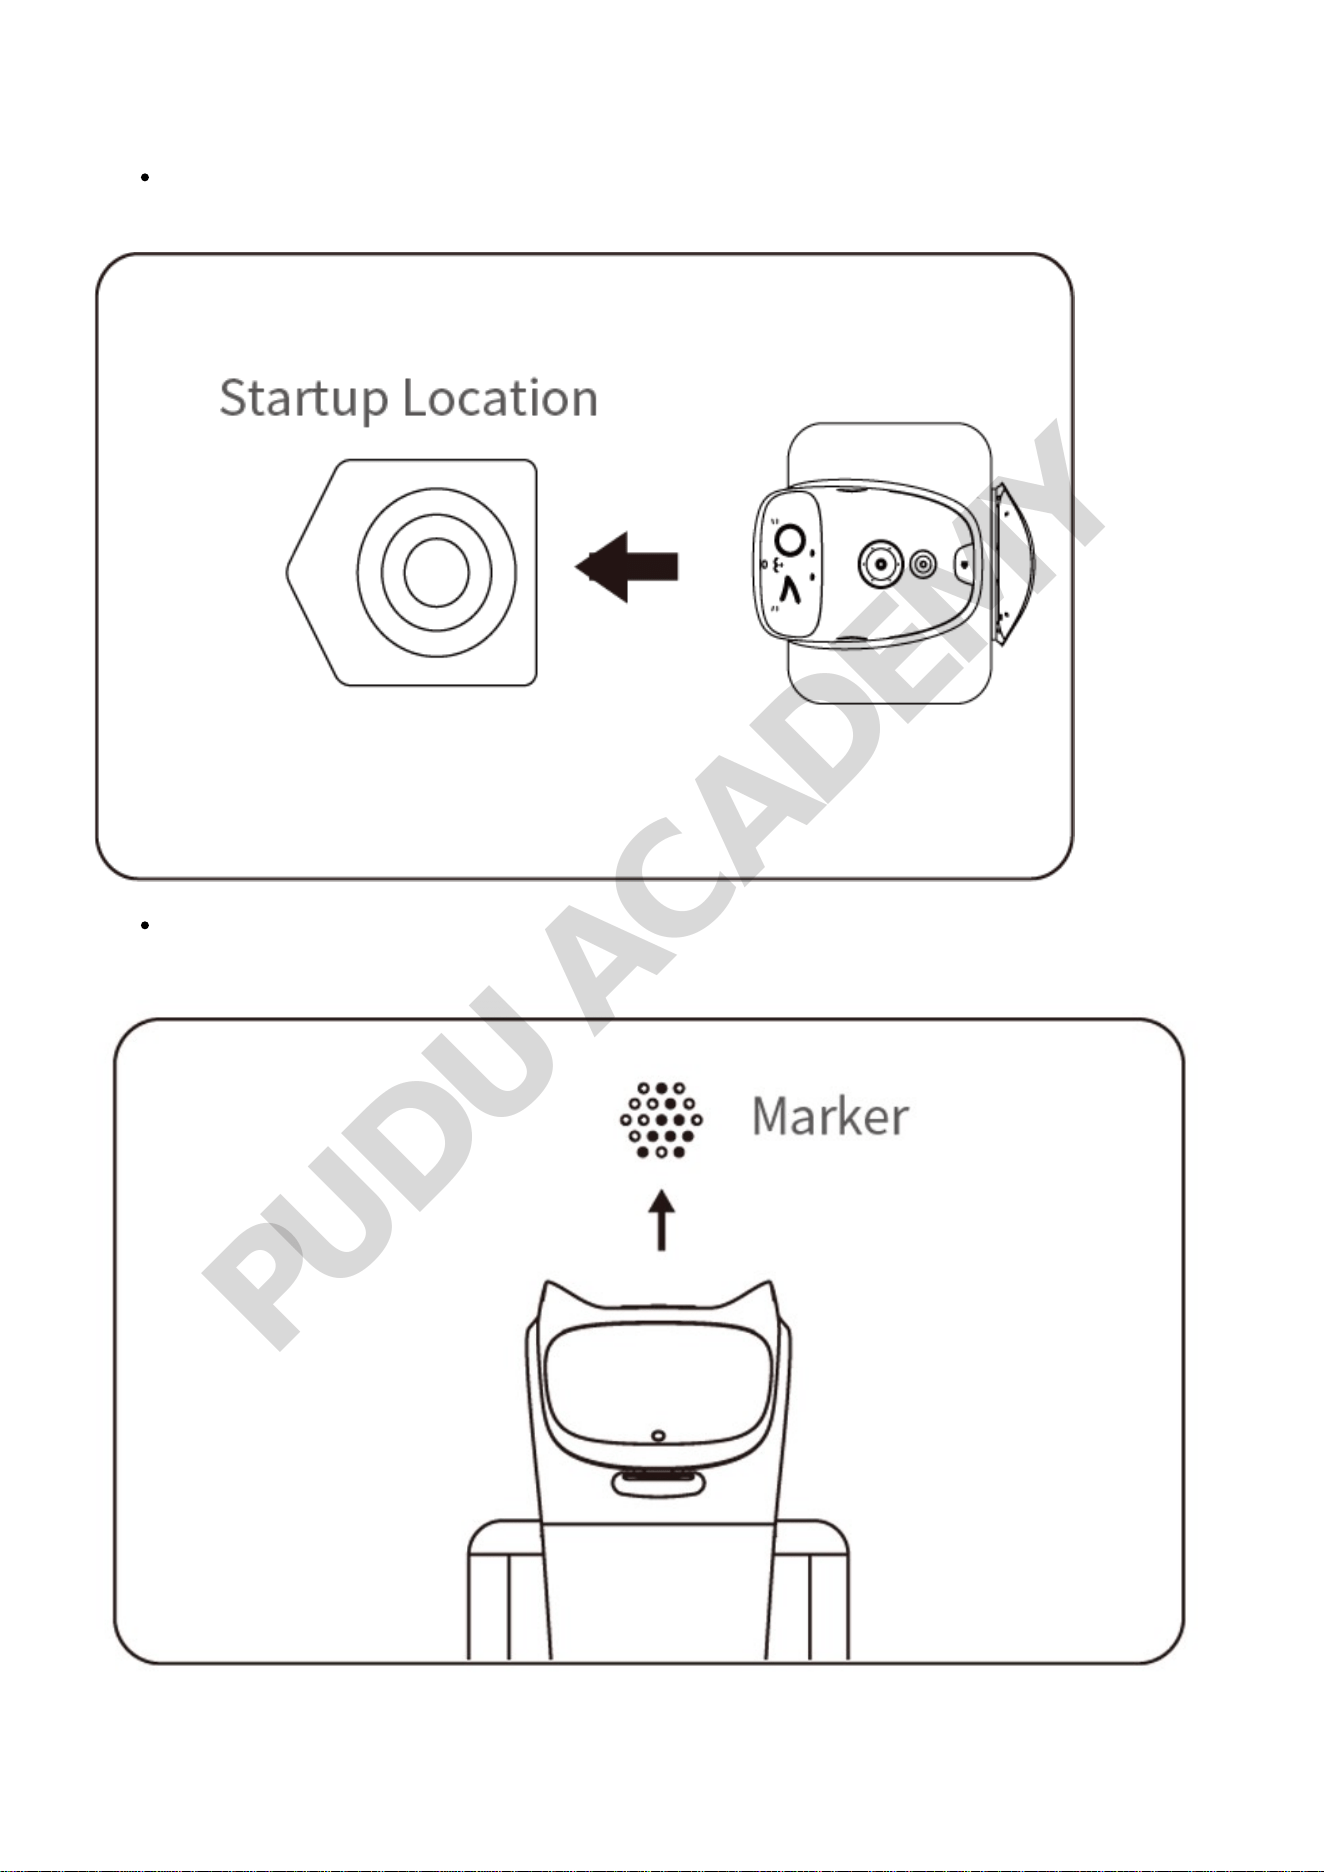
Step 2 Move the robot to the startup location
If Lidar navigation is used, move the robot to the startup location (make sure that the robot
has the correct position and direction at the startup location).
If visual navigation or Laser and visual integrated SLAM positioning navigation is used, move
the robot right below the Marker code.
Step 3 Press and hold the power switch for 1 second.
PUDU ACADEMY
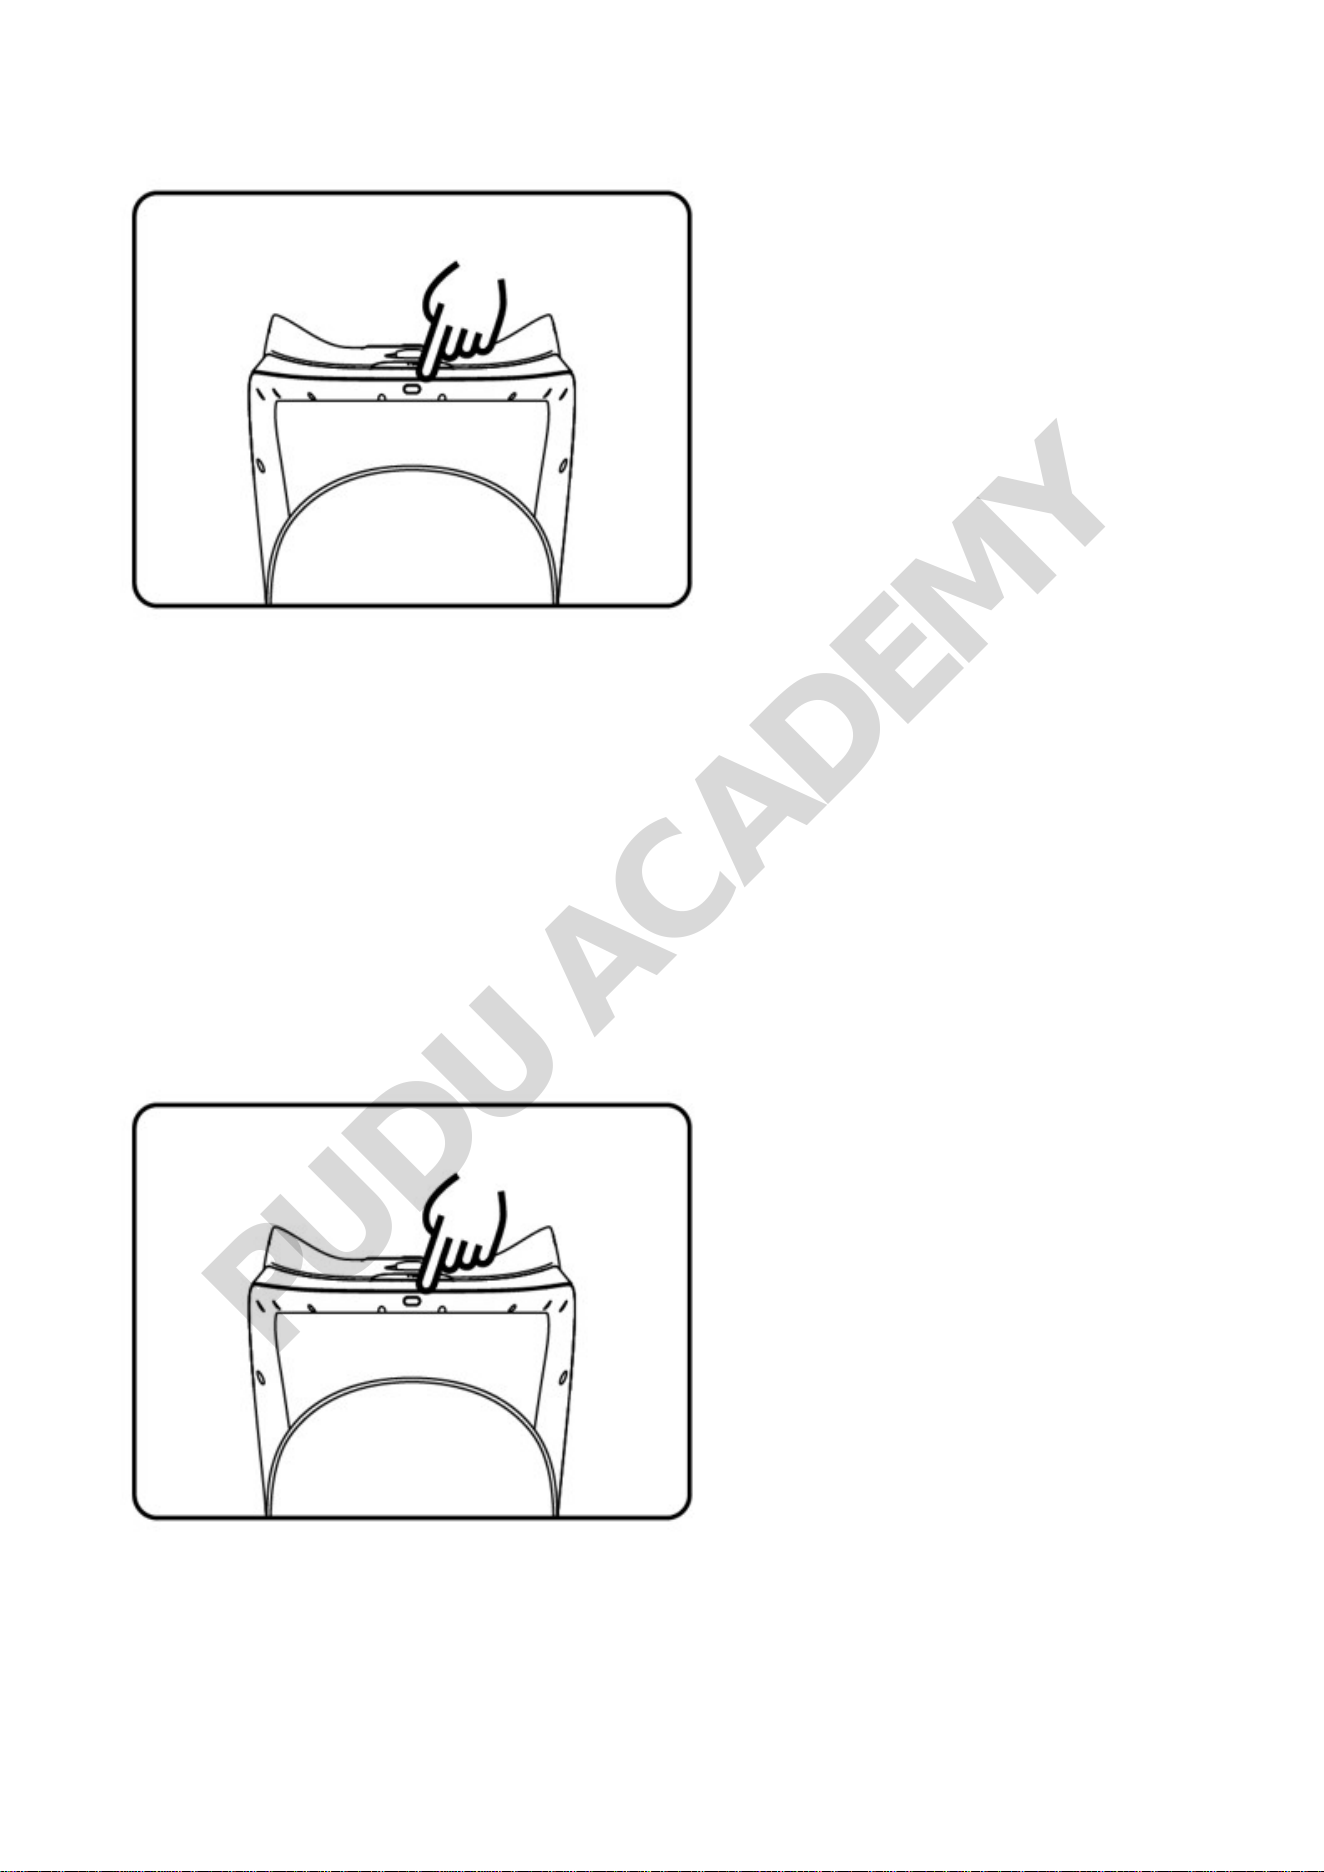
The bottom light strip flashes, and the screen displays boot logo, animation, and Android desktop in
turn, indicating that the robot is powered on.
Note
The system will automatically start Pudu App by default after powering on. If not, tap the Pudu App
icon on the system desktop to start it.
Step 4 The robot is powered on, let's try it out!
1.2 Power off
Press and hold the power switch for 3 seconds. The bottom light strip and screen will go off,
indicating that the robot is powered off.
2. Task Scenarios
PUDU ACADEMY
2.1 Product Features
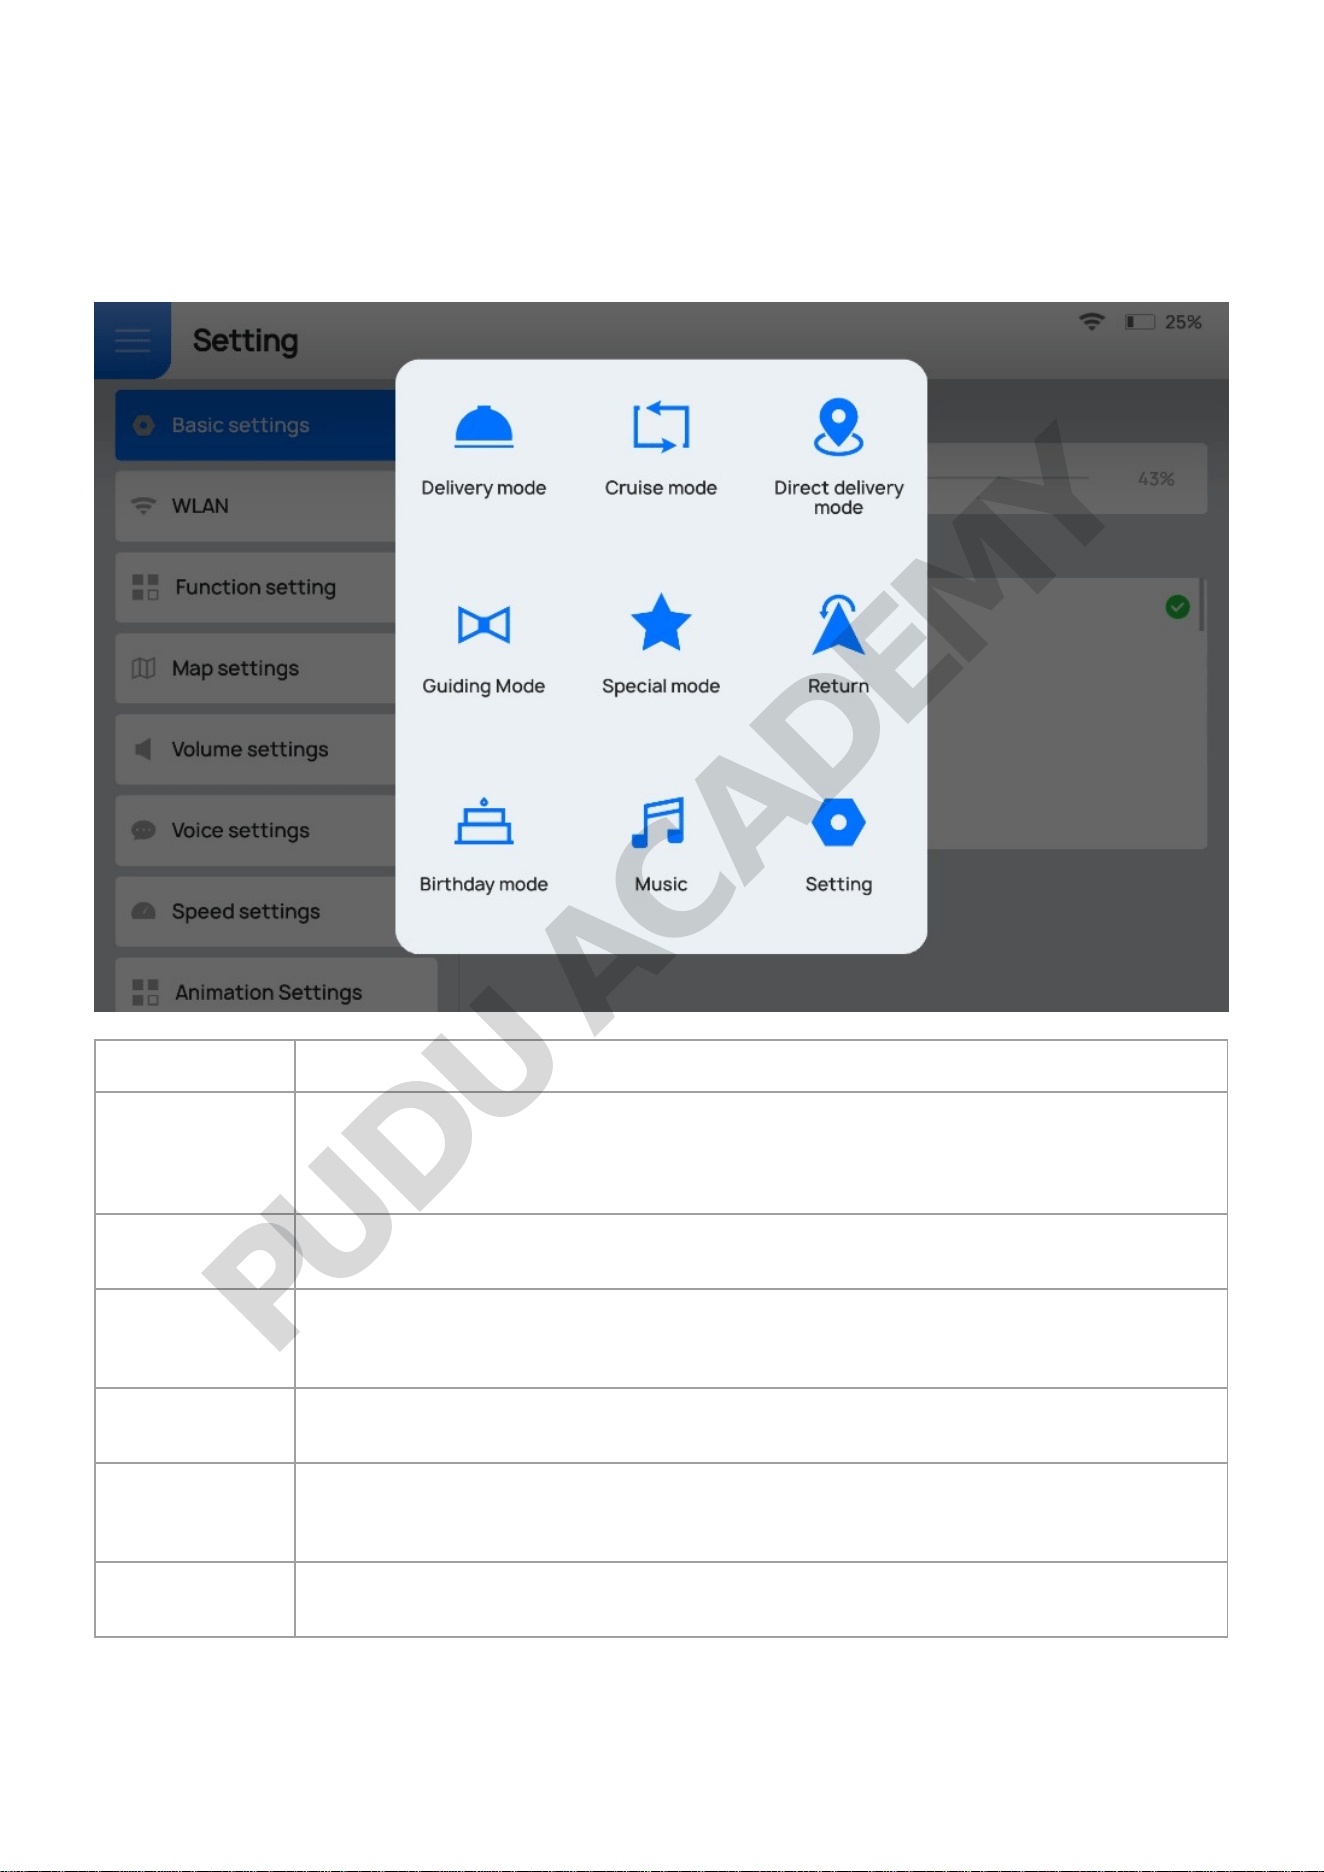
The robot comes with various modes, including Delivery mode, Cruise mode, Direct Delivery mode,
Birthday mode, and Guiding mode, to cater to the needs of different scenarios. After powering on the
robot, you can select the mode as needed in the screen.
Mode Description
Delivery mode
The robot delivers food to multiple tables at the same time. After the dishes ordered
by different customers are placed on the trays and the table numbers are entered,
the robot automatically plans the best routes for delivery. After that, the robot
automatically returns to the pick-up position.
Cruise mode
The robot circulates along a predetermined path with self-service drinks, desserts
or napkins, and recommends them to customers by voice.
Direct Delivery
mode
You can set a table with a certain number or the dish-washing room as the
destination. After performing one-way delivery, the robot exits from the current
task instead of returning to the pick-up position.
Birthday mode
The robot delivers birthday cakes or gifts to customers, accompanied by customized
background music.
Special mode
After selecting this mode, you will be prompted to select the background music.
This mode is designed for special occasions such as marriage proposal and
expression of blessings, in which the background music can be selected quickly.
Guiding mode
The robot says hello to customers coming into the store and leads them to their
tables. Then, it automatically returns to the greeting location.
Note
To ensure a stable and safe operation of the robot, it is recommended that the delivery speed be
PUDU ACADEMY
lower than 0.9m/s (2.95 ft/s), and the cruise speed at 0.2m/s (0.66 ft/s) or 0.6m/s (1.97 ft/s).
2.2 Dilivery mode
In the Delivery mode, the robot delivers meals to the designated locations.
Step 1 Tap the menu bar at the pickup location and select Delivery Mode.
The Delivery mode interface is displayed.
PUDU ACADEMY
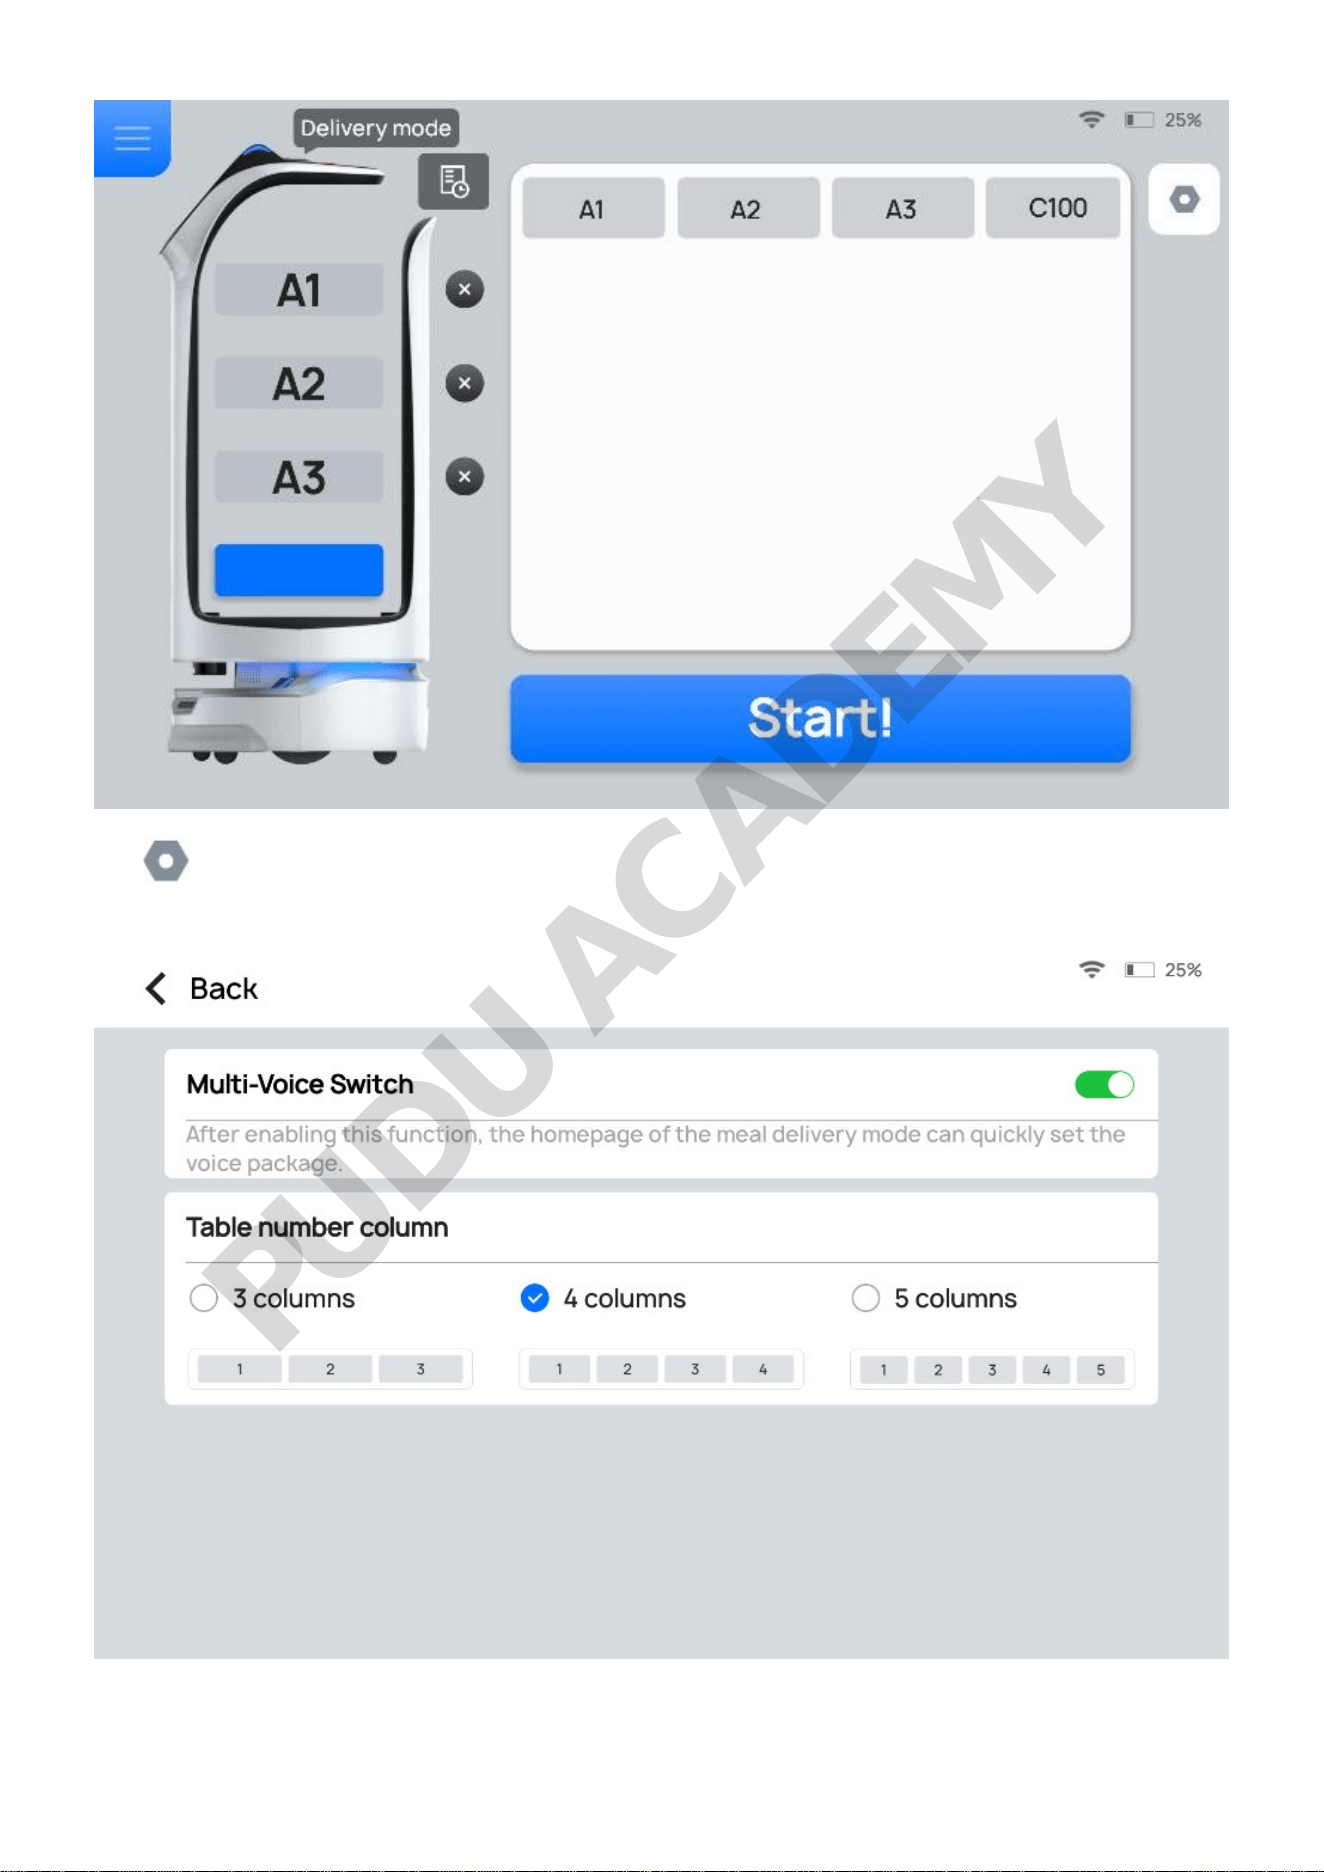
Tap to enter the Delivery Settings interface. The Delivery Settings interface and descriptions
of the settings are shown below.
PUDU ACADEMY
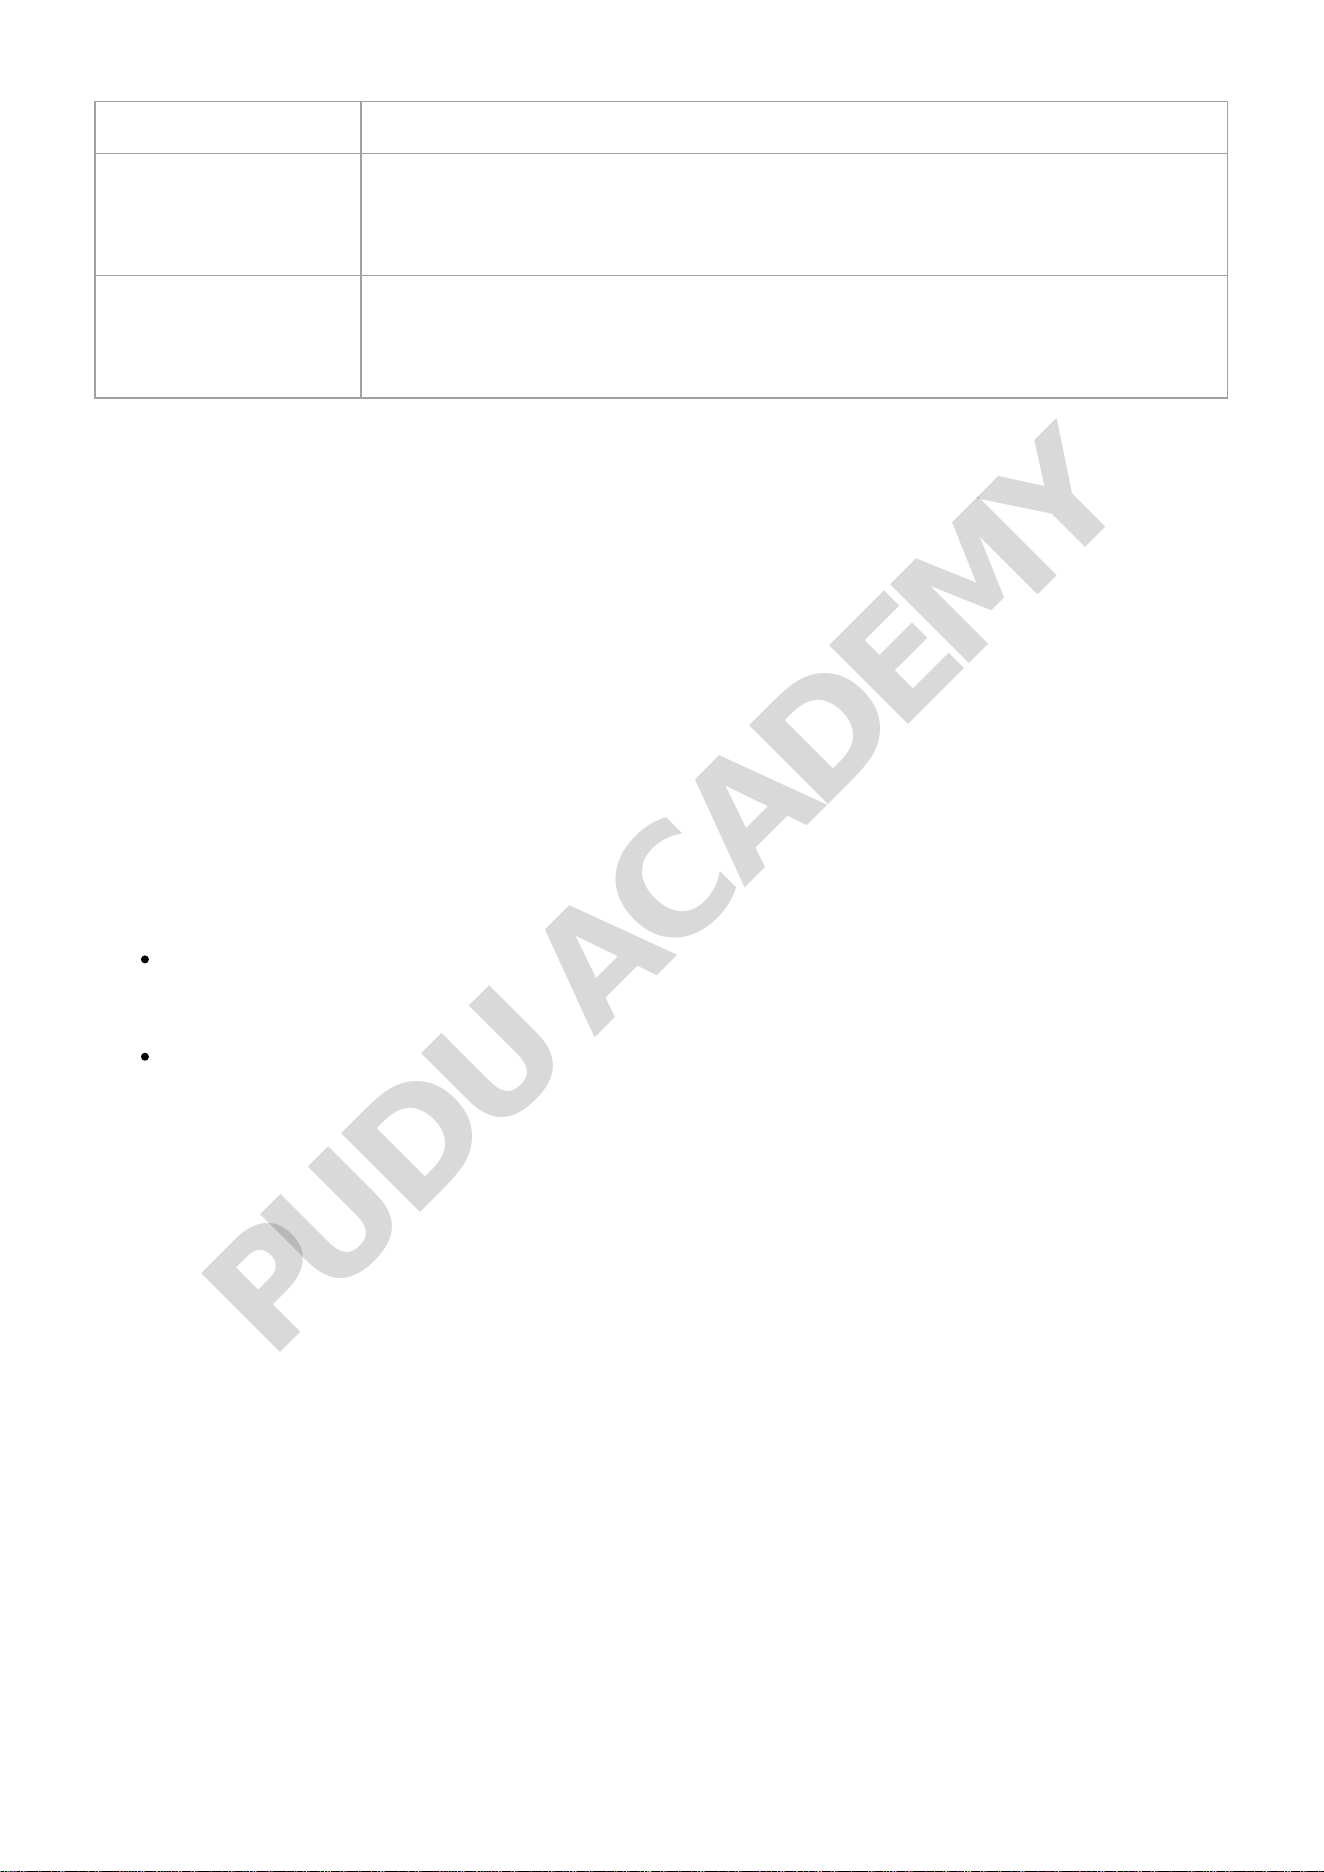
Button Description
Multi-Voice
Switch
Choose whether to enable Multi-Voice Switch.
When enabled, you can select voice packets as required. Custom voice file
needs to be uploaded to the Pudu Cloud Platform in advance. Please contact
technical engineers for details.
Table number column
Select the Table number column displayed on the Delivery Mode interface.
• 3 columns
• 4 columns
• 5 columns
Step 2 Put the dishes on the corresponding tray.
Step 3 Tap the tray on the screen and select the desired table number.
The corresponding tray then displays its table number.
Step 4 After entering the table number, tap Start!
The robot arrives at the specified table along the predetermined path.
Step 5 After arriving at the table, the robot provides a voice prompt, with the light strip of the
corresponding tray turned on. The waiter then takes the dishes following screen display and voice
prompts.
Step 6 After taking the dishes, tap Done or the lightning button, and the robot performs its next
task.
If Automatic pick up time is enabled in the Advanced settings interface when the food arrives
at the destination and Done is not tapped within the preset automatic pick up time, the robot
will automatically complete the task and return to the pickup location.
To make any modifications during delivery (e.g., modify task, pick up in advance, cancel all, or
return), tap the screen or the lightning button on the robot's head to pause the robot before
any operation. If Delivery mode protection is enabled in the Advanced settings, a password is
required for any further operations. If no operation is performed within the pause time (Non-
cruise mode auto resume time of pause), the robot will proceed with its current task. Pause
time (Non-cruise mode auto resume time of pause) can be set in the Advanced Settings
interface.
PUDU ACADEMY
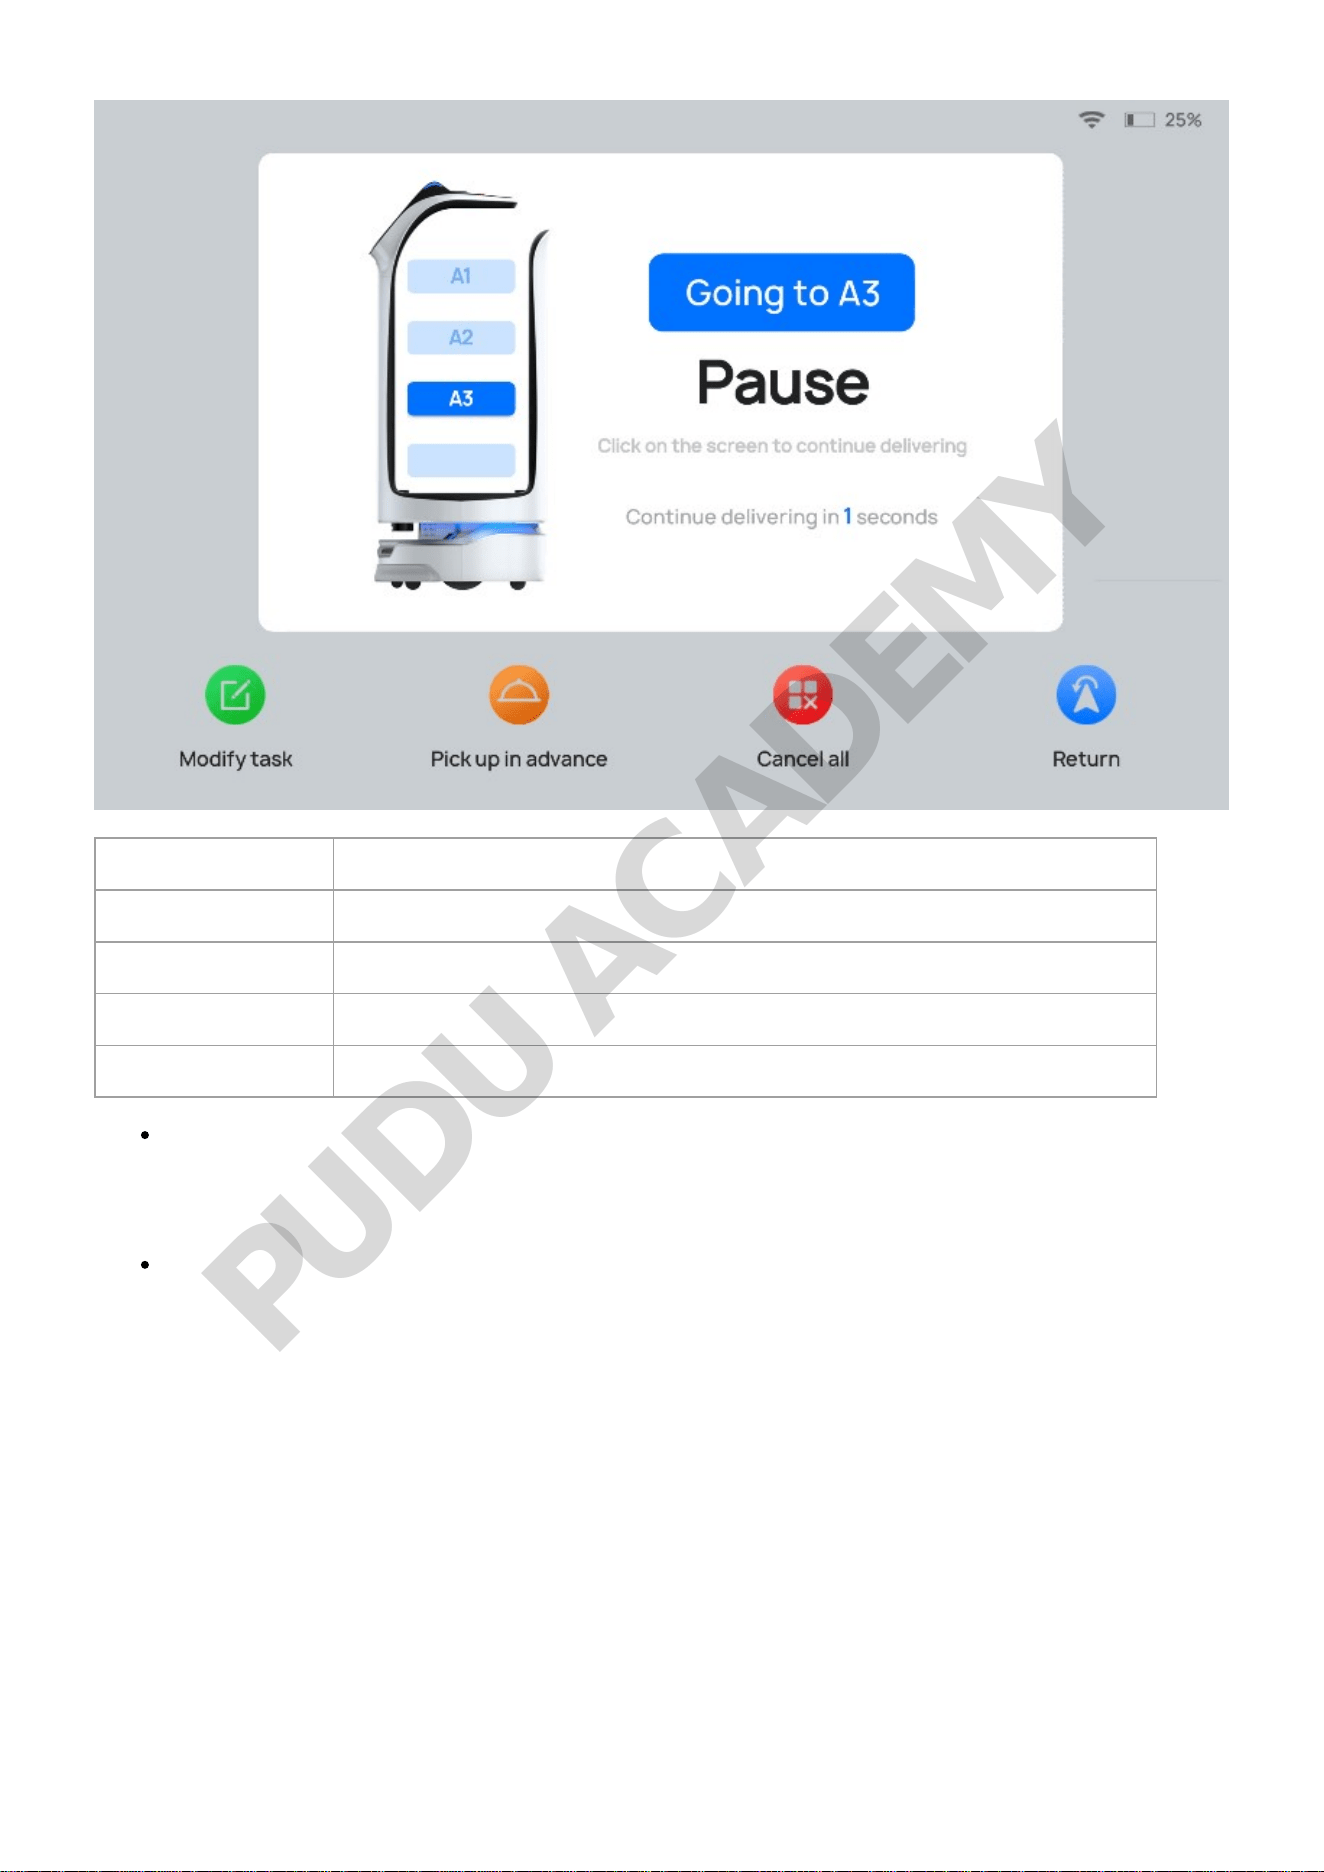
Button Description
Modify task Tap to modify the table number of delivery.
Pick up in advance Tap to pick up the dishes in advance and proceed with the next task.
Cancel all Tap to cancel all delivery tasks without returning to the pickup location.
Return Tap to return to the pickup location.
If Tray Sensor Switch is enabled on the Try Settings page, the corresponding light strip goes
out after the dishes are taken. The robot will automatically end the current task after 5
seconds and continue to perform the next one. The function is valid only when a single tray
corresponds to a single dish.
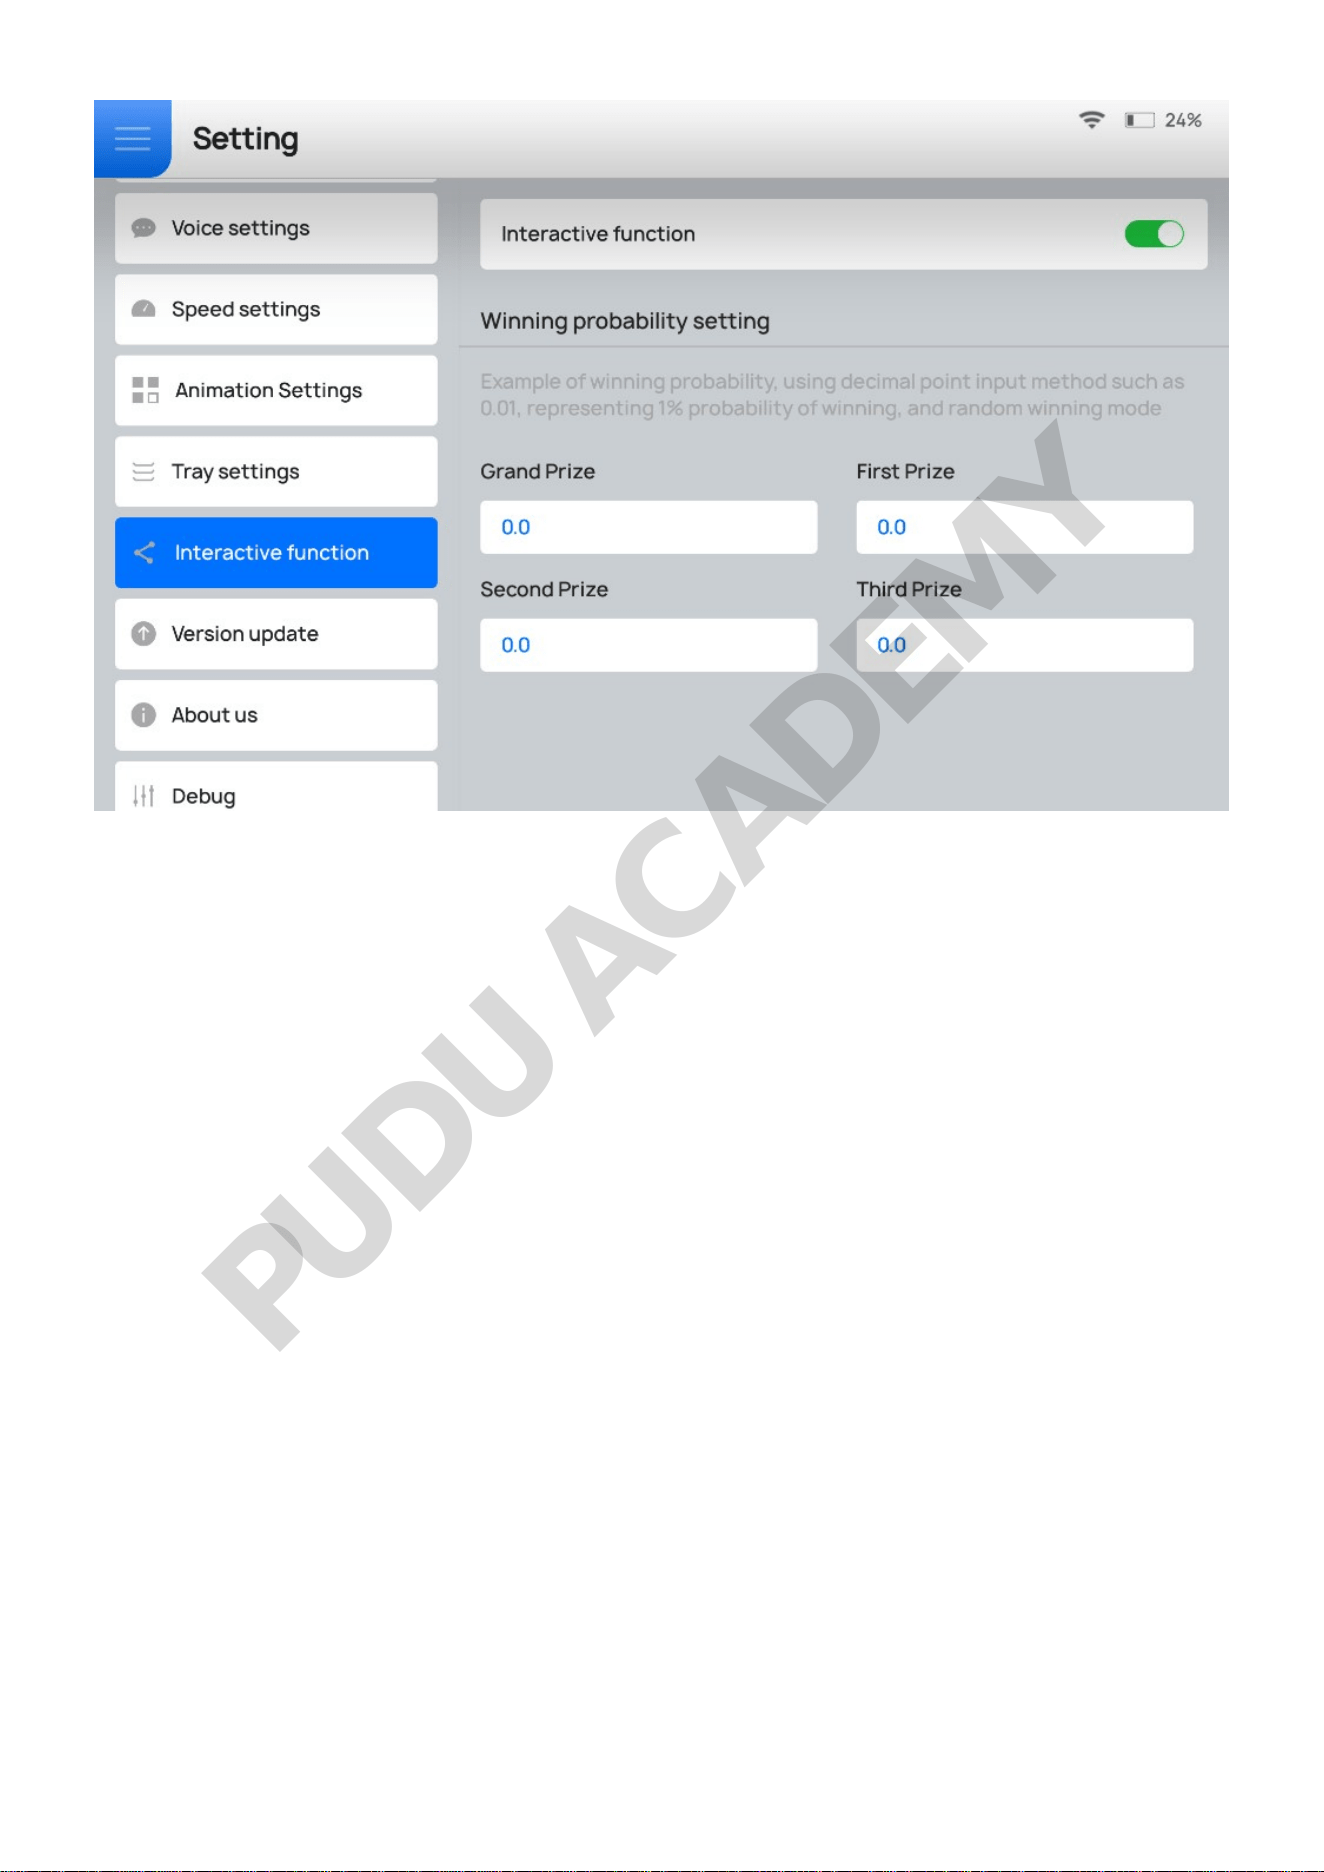
To hold a lucky draw, go to Setting > Interactive function to enable the interactive function
and set the lucky draw probabilities. The probabilities should sum up to 1.
PUDU ACADEMY
Customers can participate in the lucky draw after the dishes are delivered. The winning customers
will be reminded to contact the waiter to redeem their prizes after taking a picture. Tap Please
click this button after taking a picture for the robot to perform the next task. If the customer
doesn't win a prize, the robot will perform the next task after 3 seconds.
2.3 Cruise mode
In the Cruise mode, the robot cruises around a specific large area.
PUDU ACADEMY
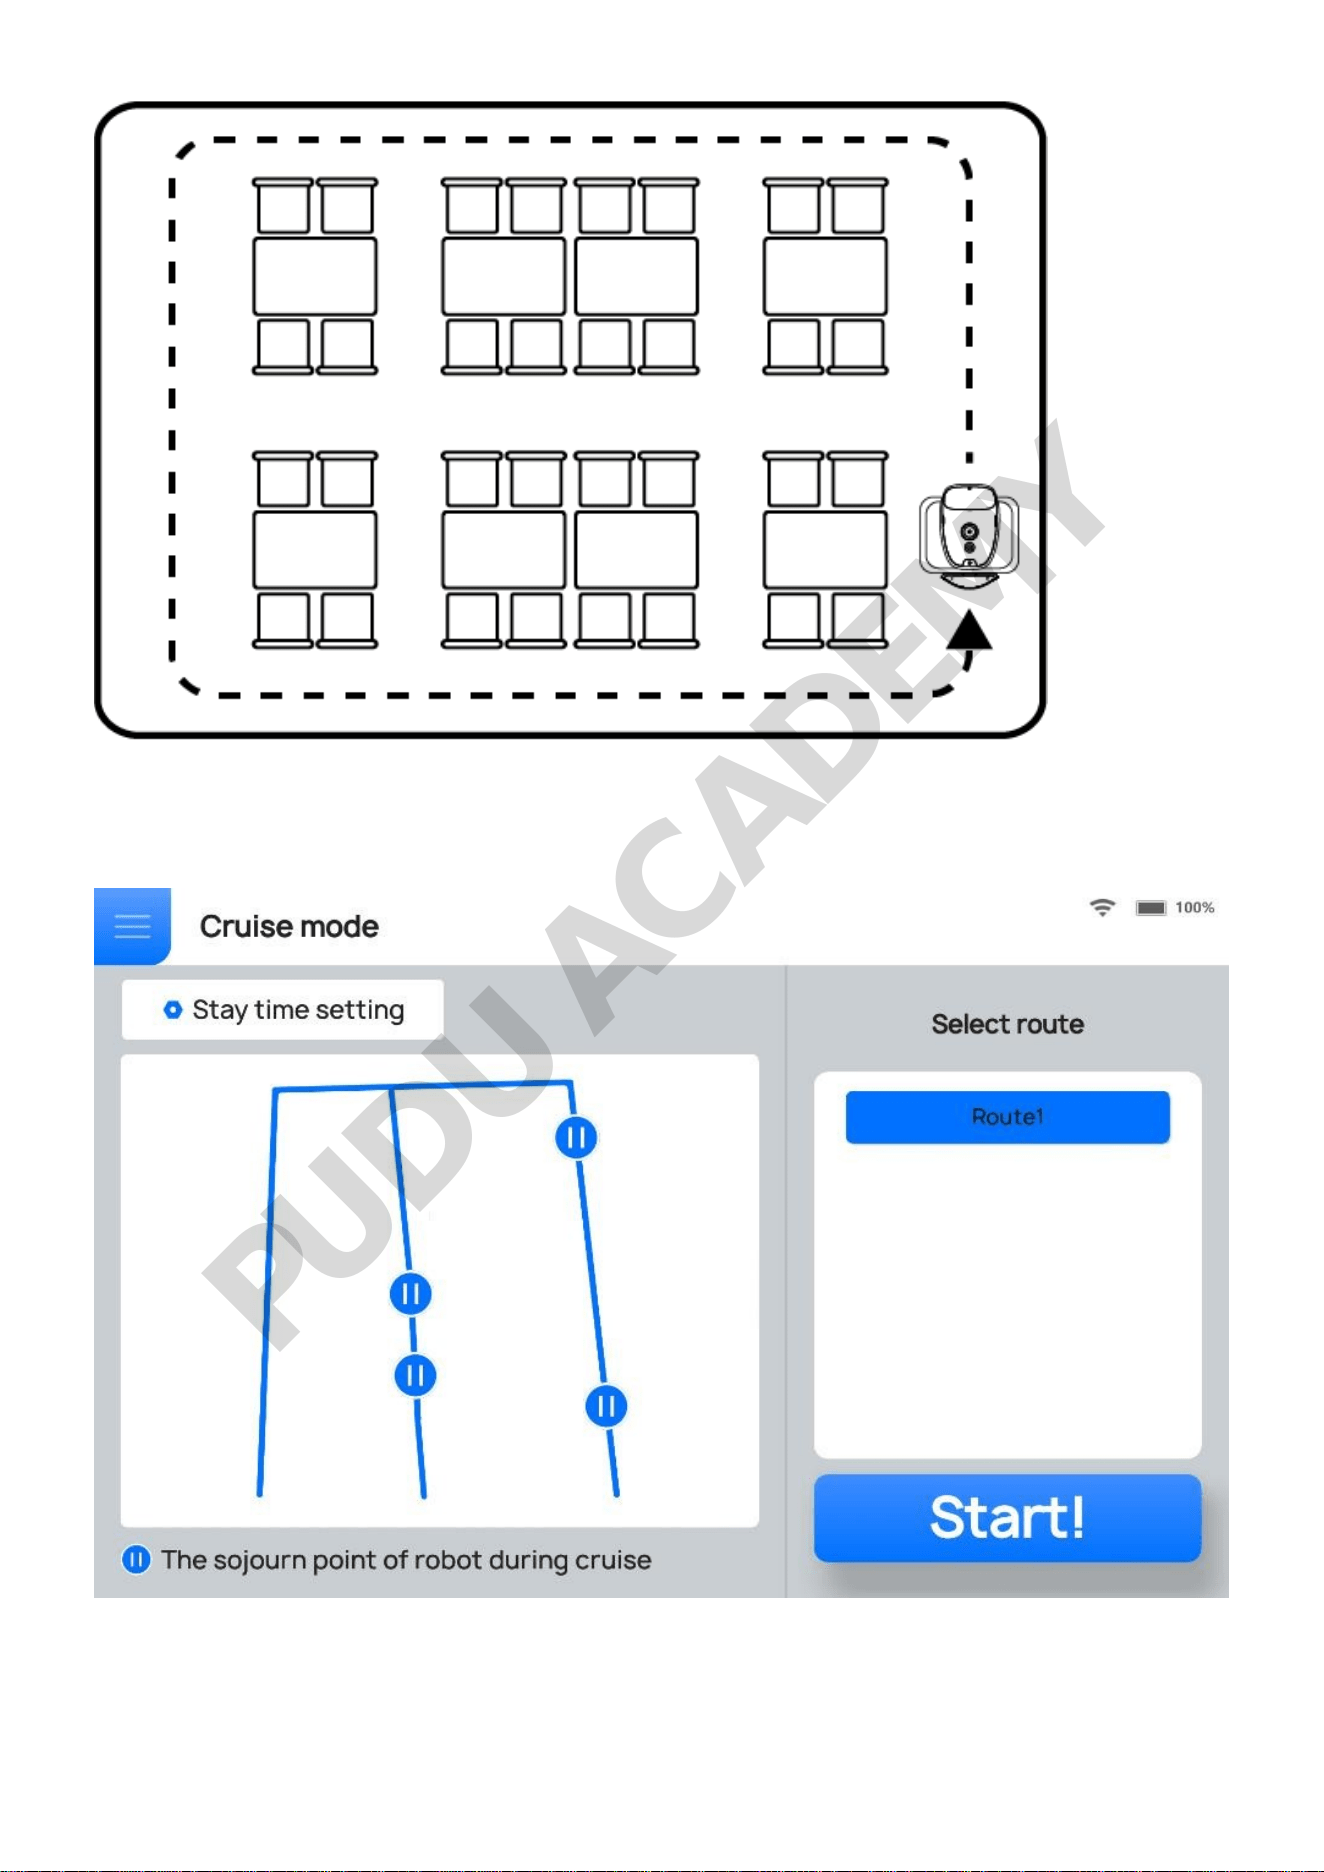
Step 1 Tap the menu bar at the pickup location and select Cruise Mode.
The Cruise Mode interface is shown below. The cruise route is shown in blue on the map.
If there are stay locations on the route, the user can also set On-screen text for stay location,
Time of stay, Voice Customization Settings, etc.
PUDU ACADEMY
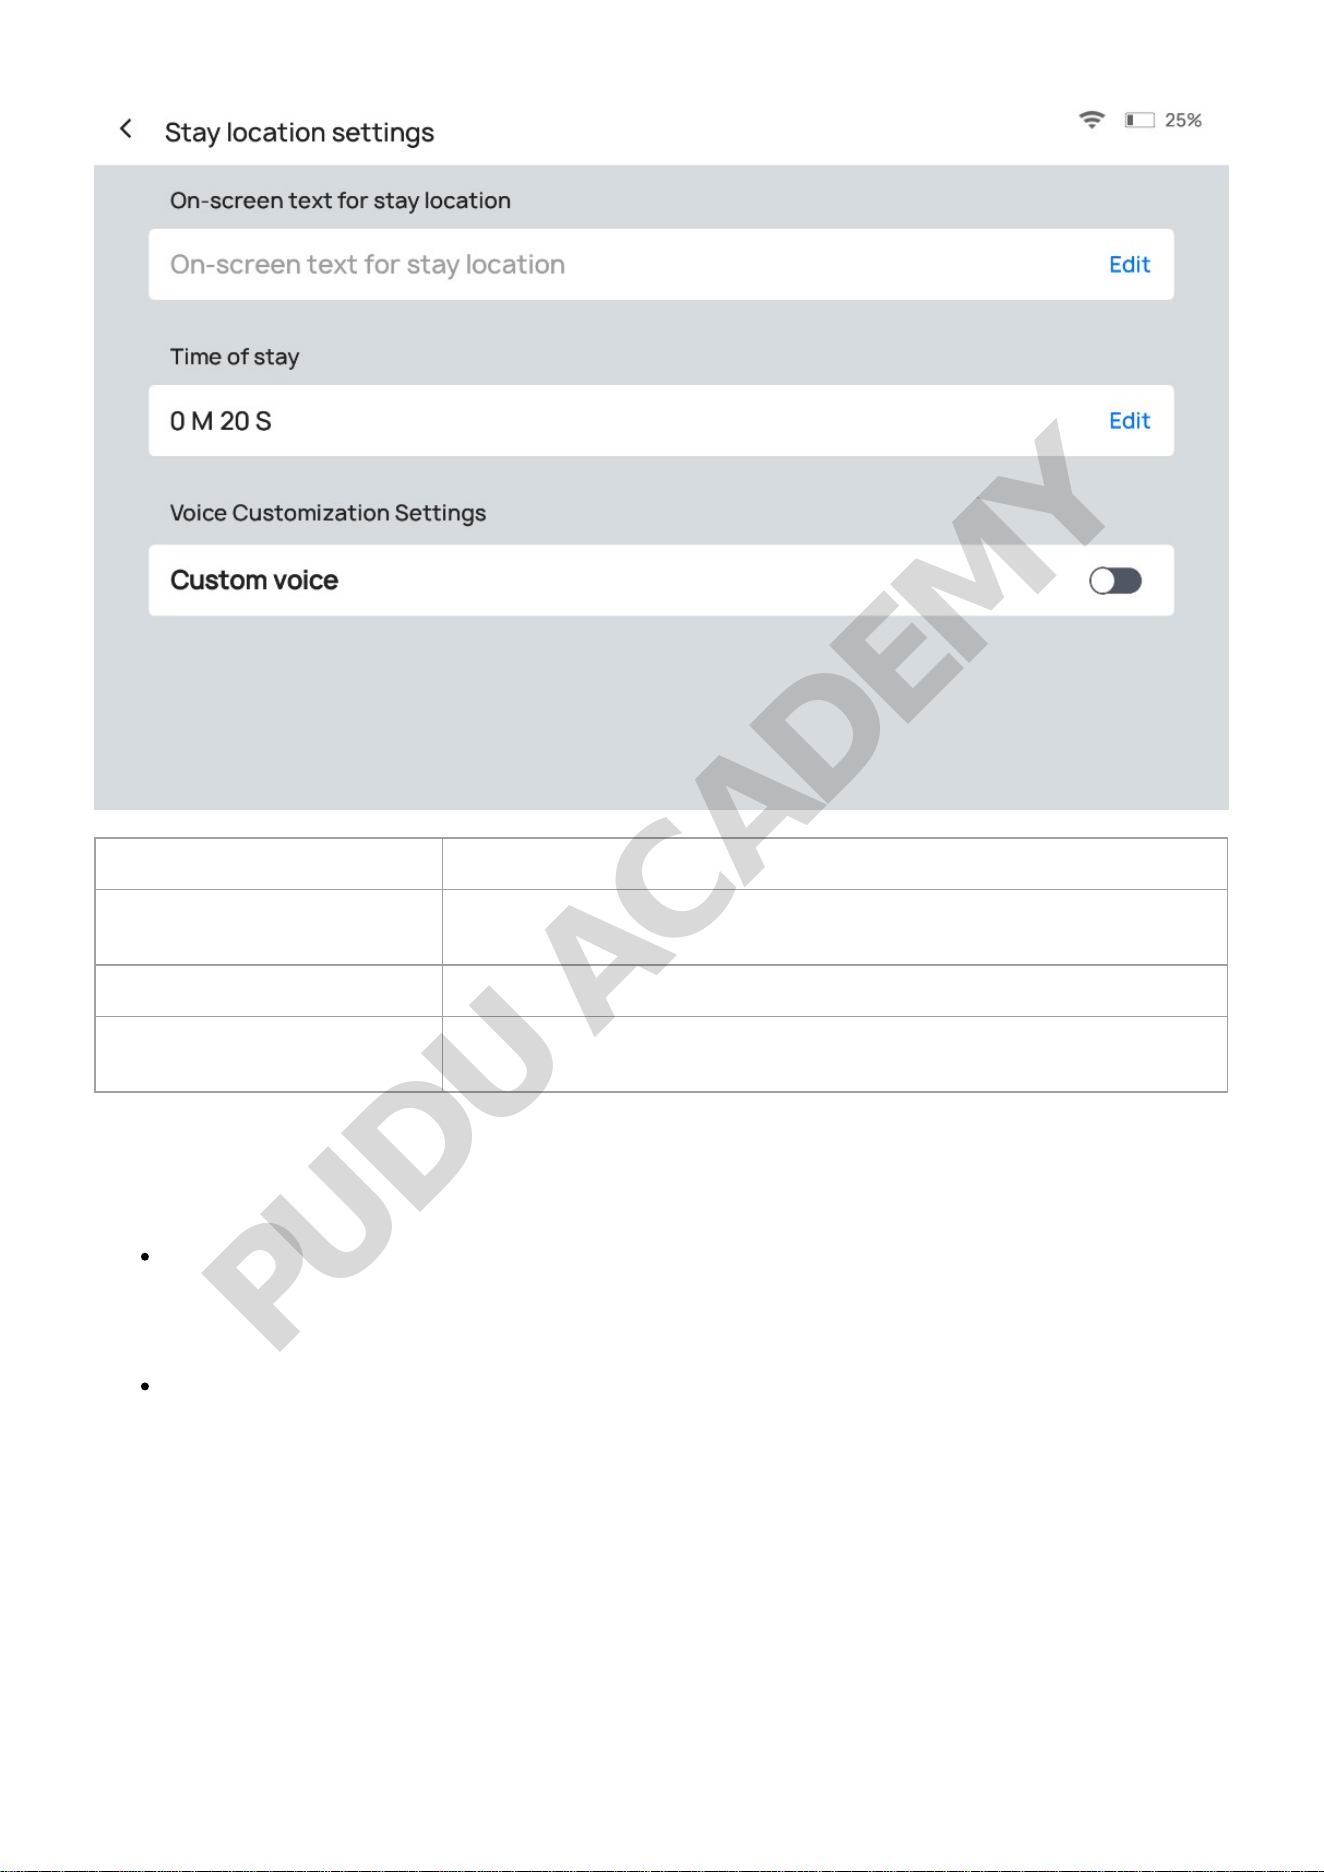
Button Description
On-screen text for stay
location
Set the scrollable text displayed on the screen at stay locations during
cruise.
Time of stay Set the Stay time at stay locations during cruise
Custom voice
Choose whether to enable Custom voice for the voice broadcast at
stay locations.
Step 2 Select the desired cruise route and tap Start!
The robot then begins to circulate along the Cruise Route.
To pick up dishes, tap the screen or the lightning button. If no operation is performed within
the pause time (Cruise mode auto resume time of pause), the robot will proceed with its
current task. Pause time (Cruise mode auto resume time of pause) can be set in the Advanced
Settings interface.
Tap the screen or the lightning button, then tap Cancel cruise and enter the password to exit
the Cruise mode. Please contact Pudu's technical support for the password.
2.4 Guiding Mode
In the Guiding mode, the robot acts as a receptionist, greeting customers at the door and guiding
them to their tables.
Step 1 Select Guiding Mode at the greeting point.
PUDU ACADEMY
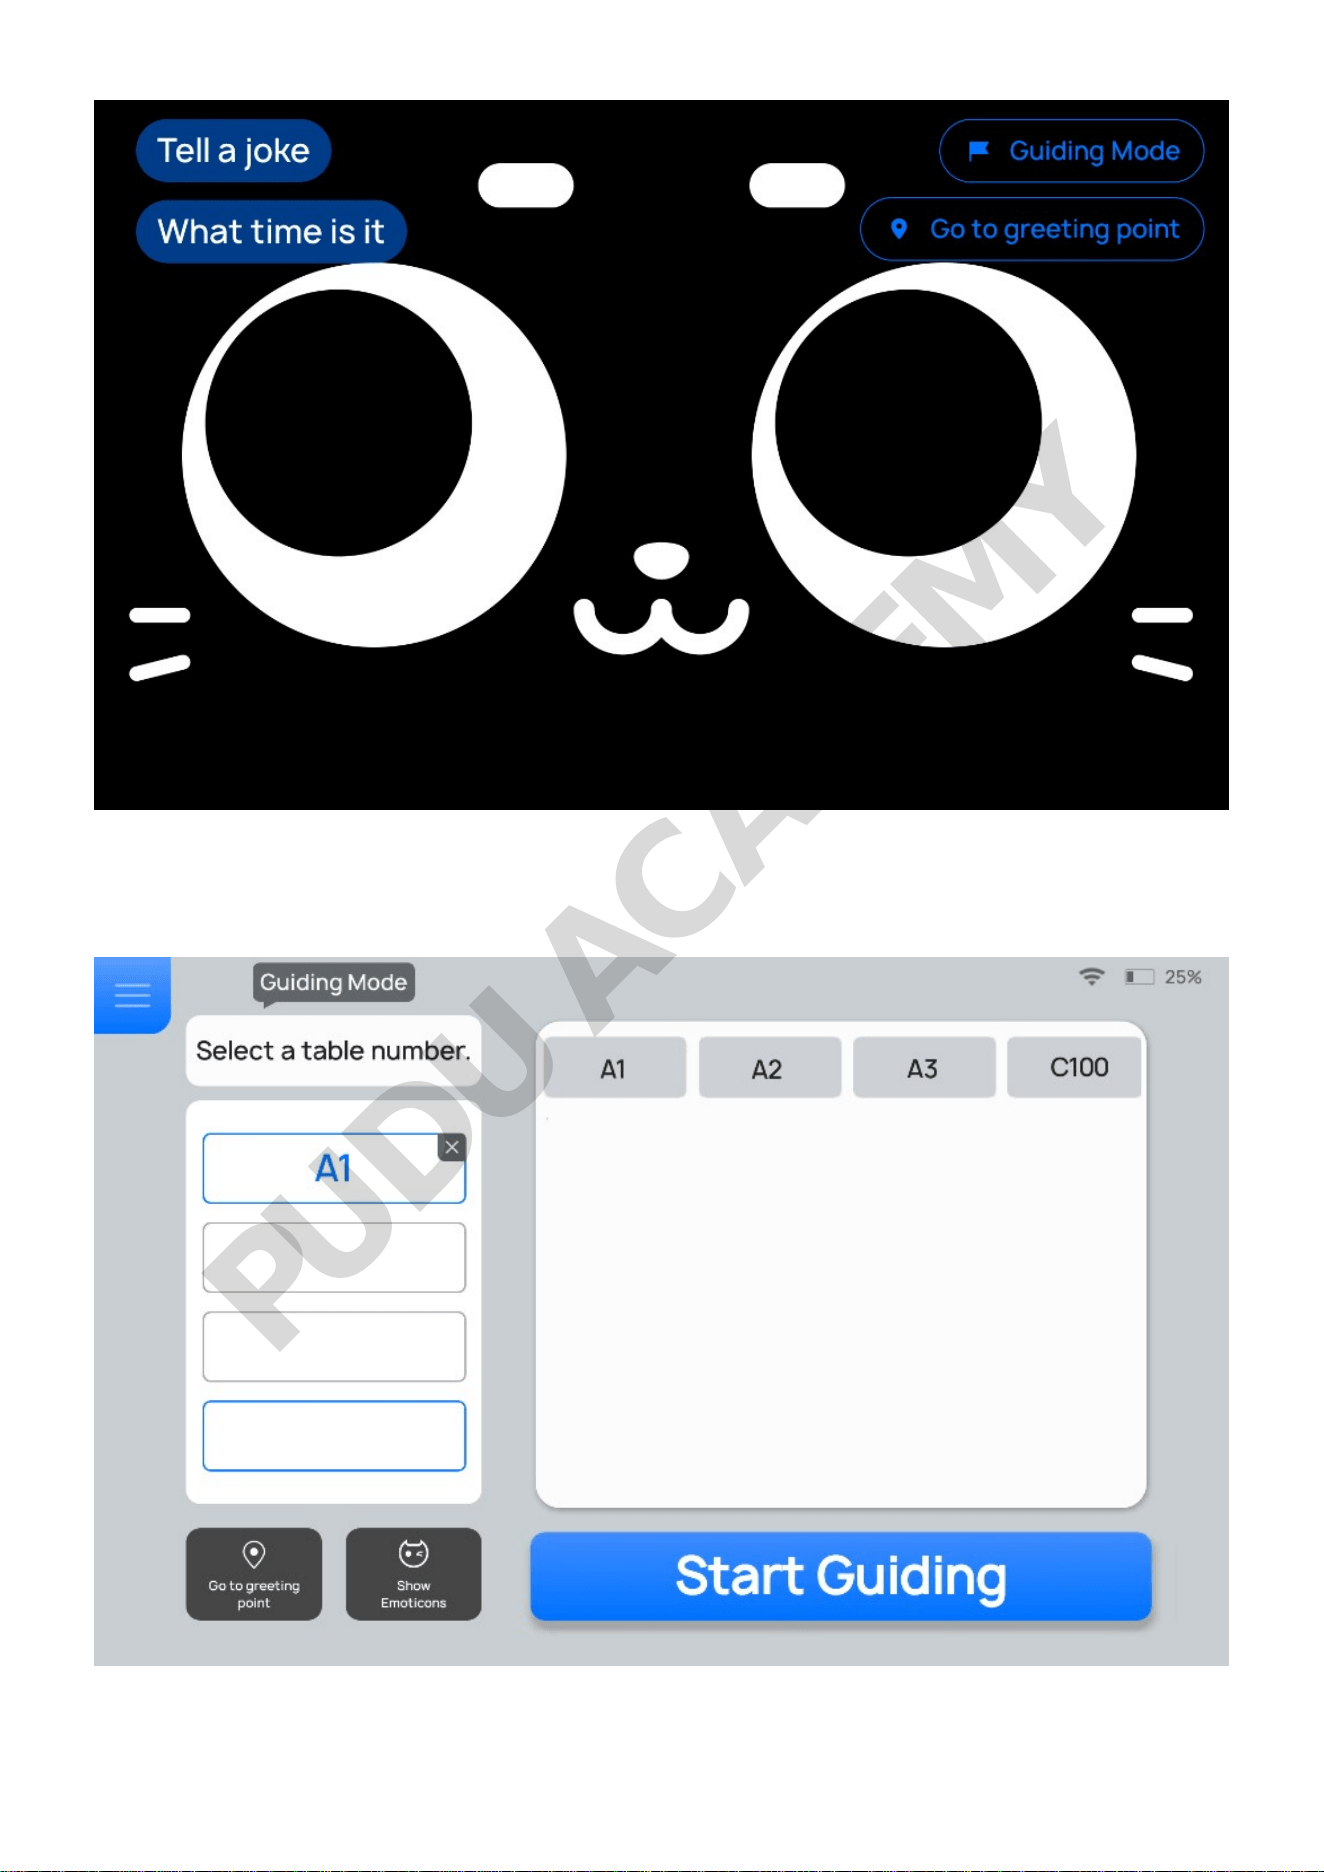
Step 2 Select the desired table number and tap Start Guiding.
The robot will then lead the customers to the desired table.
PUDU ACADEMY
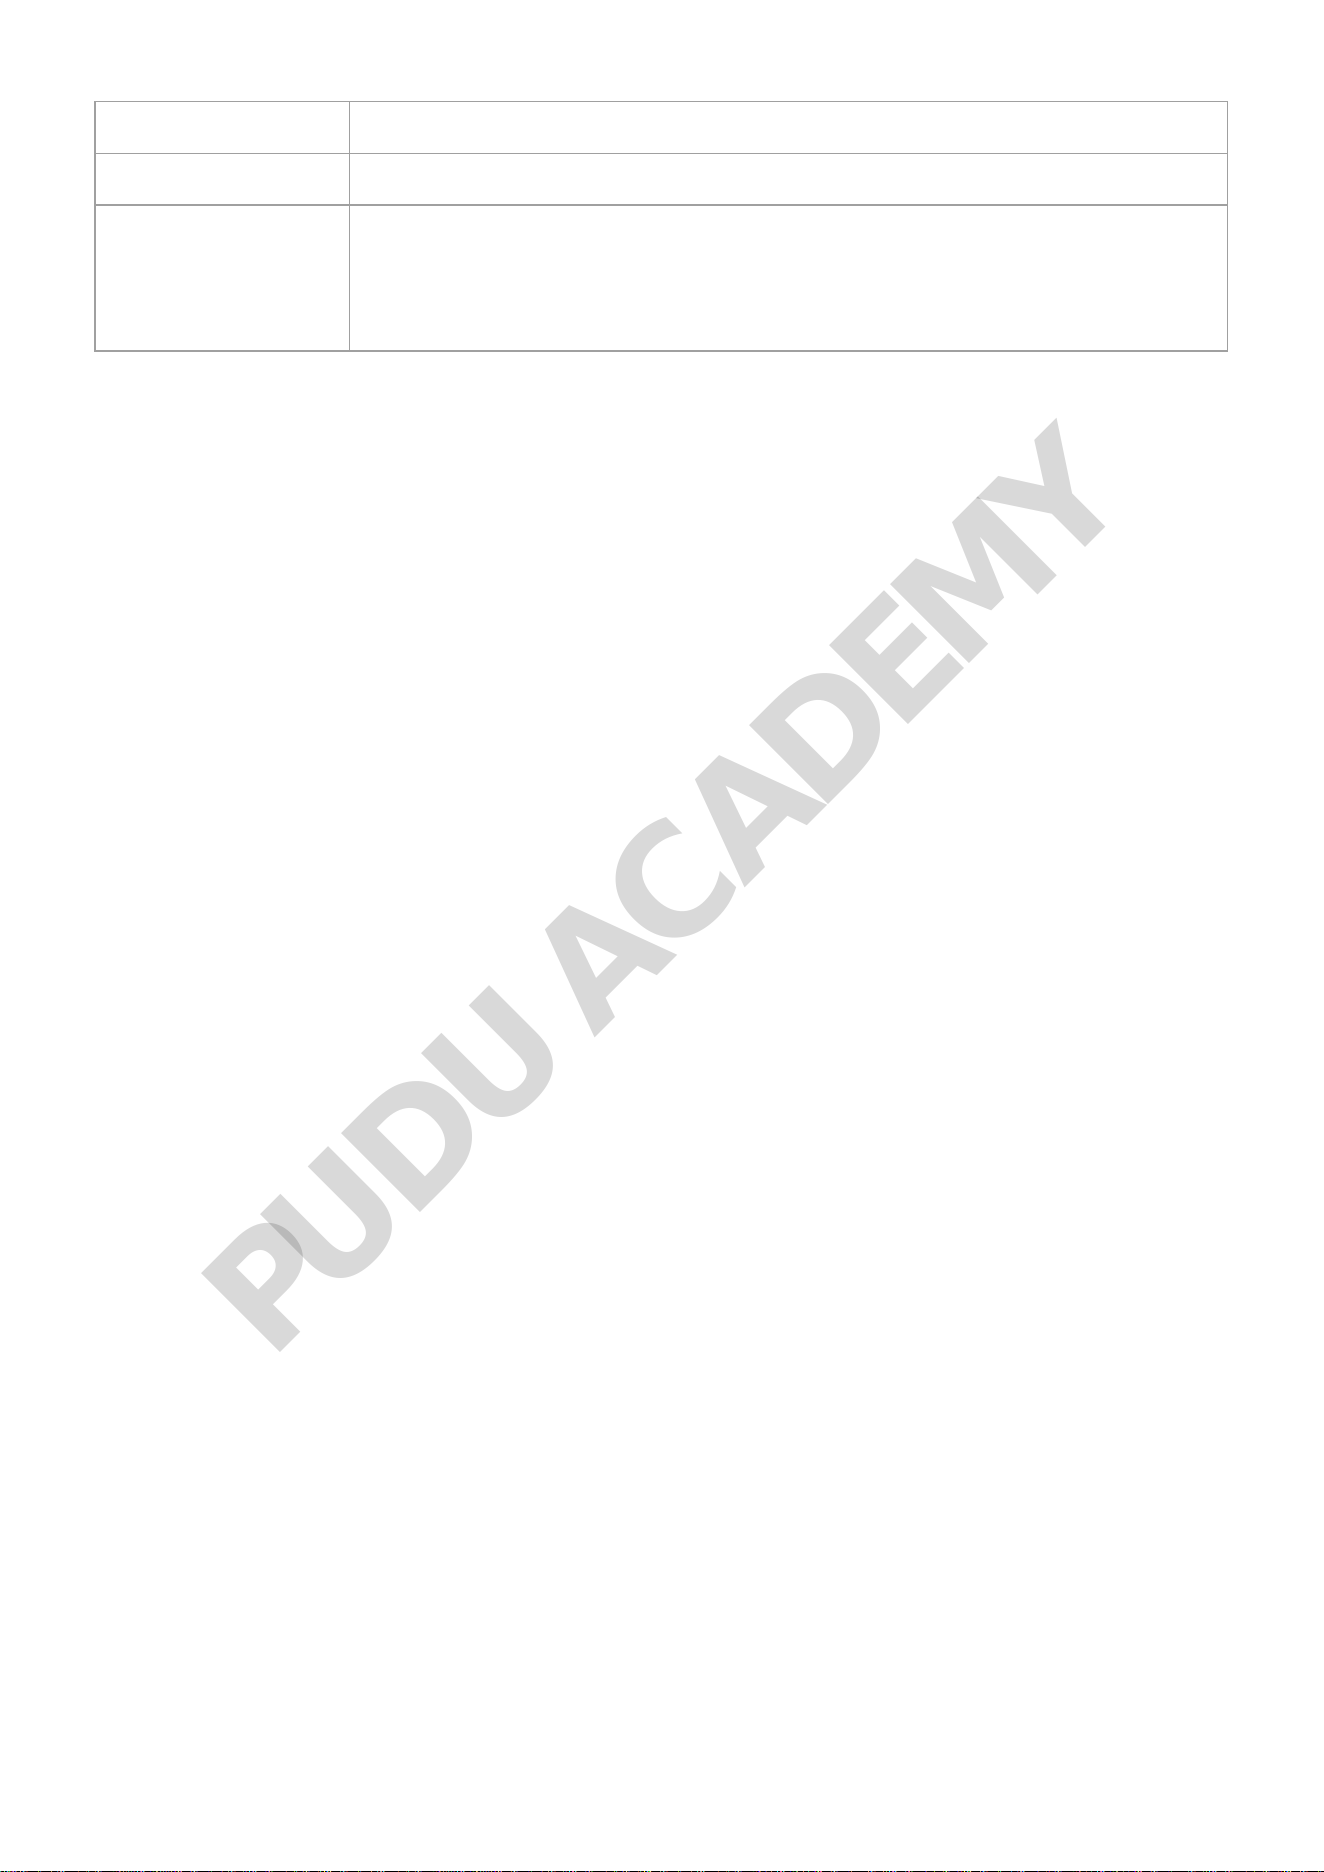
Button Description
Go to greeting point Tap the button and the robot goes directly to the greeting point.
Show Emoticons
Tap the button to enter the voice wake-up interface. There are two ways to
interact with the robot.
• Touch its head or ears, the robot will show cute emoticons and give voice
feedback.
• Say "Bella, Bella" to talk with the robot.
Note
If the robot is displaying the voice wake-up interface, its motor is locked, and the user cannot move
the robot at this time.
Step 3 Tap Done or the lightning button after the robot reaches the desired table.
The robot returns to the greeting point.
If Done is not tapped within the Auto complete time of guiding after the guiding is completed,
the robot will automatically complete the task and return to the greeting location. Auto complete
time of guiding can be set in the Advanced Settings interface.
To cancel the task or return to the greeting point during guiding, tap the screen or the lightning
button on the robot head to pause the robot before any operation. If Guiding mode protection is
enabled in the Advanced settings, a password is required for any further operations. Please contact
our technical engineers for the password. If no operation is performed within the pause time (Non
cruise mode auto resume time of pause), the robot will proceed with its current task. Pause time
(Non cruise mode auto resume time of pause) can be set in the Advanced Settings interface.
2.5 Direct Delivery Mode
In the Direct Delivery mode, the robot performs a single delivery operation and automatically exits
the task after delivery.
PUDU ACADEMY
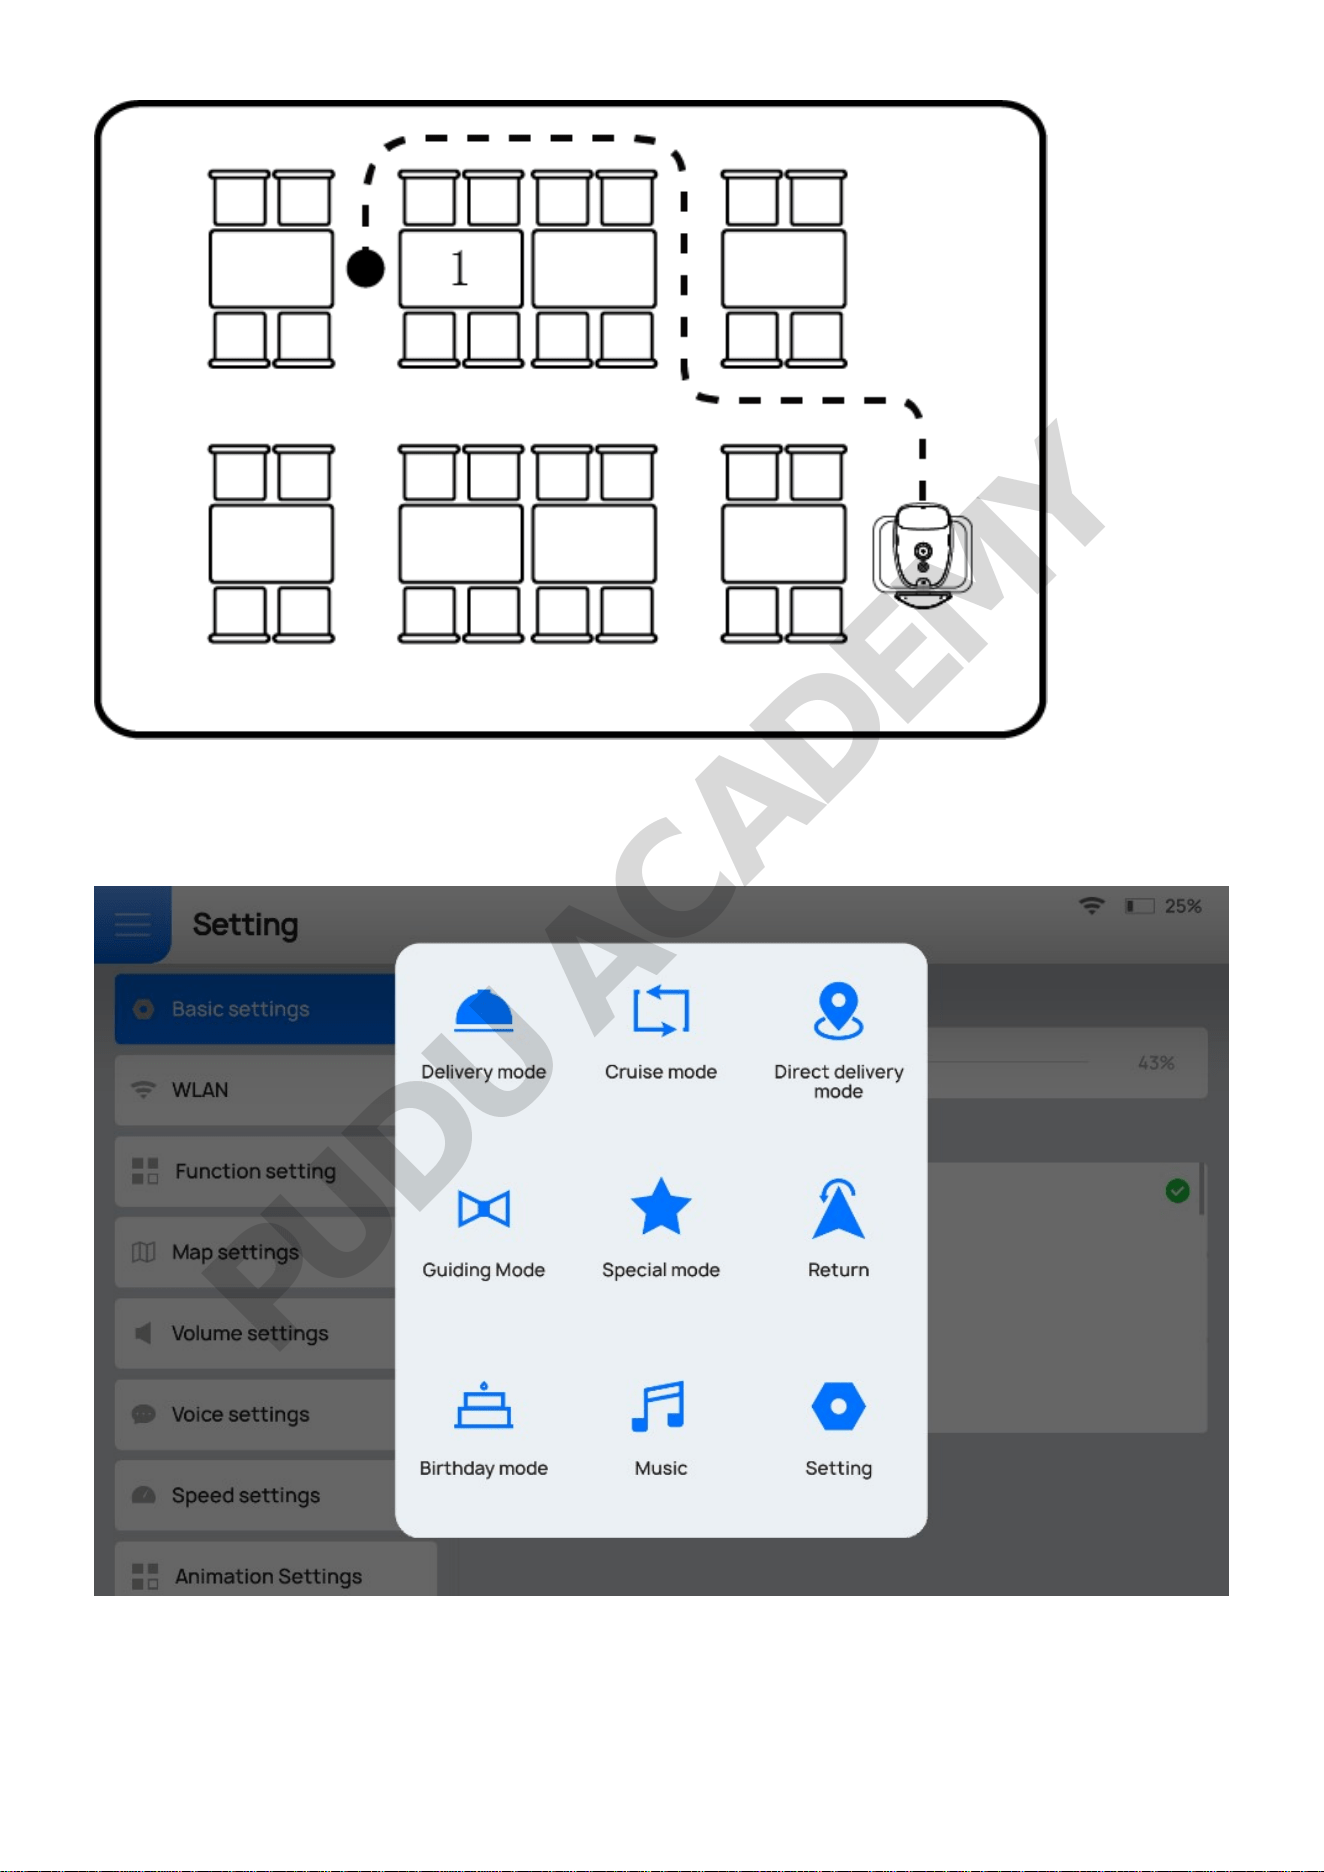
Take food delivery as an example. The operating procedures are as follows.
Step 1 Tap the menu bar at the pickup location and select Direct delivery mode.
Step 2 Place the dishes on the first tray and select the desired table number.
The tray then displays its table number.
PUDU ACADEMY
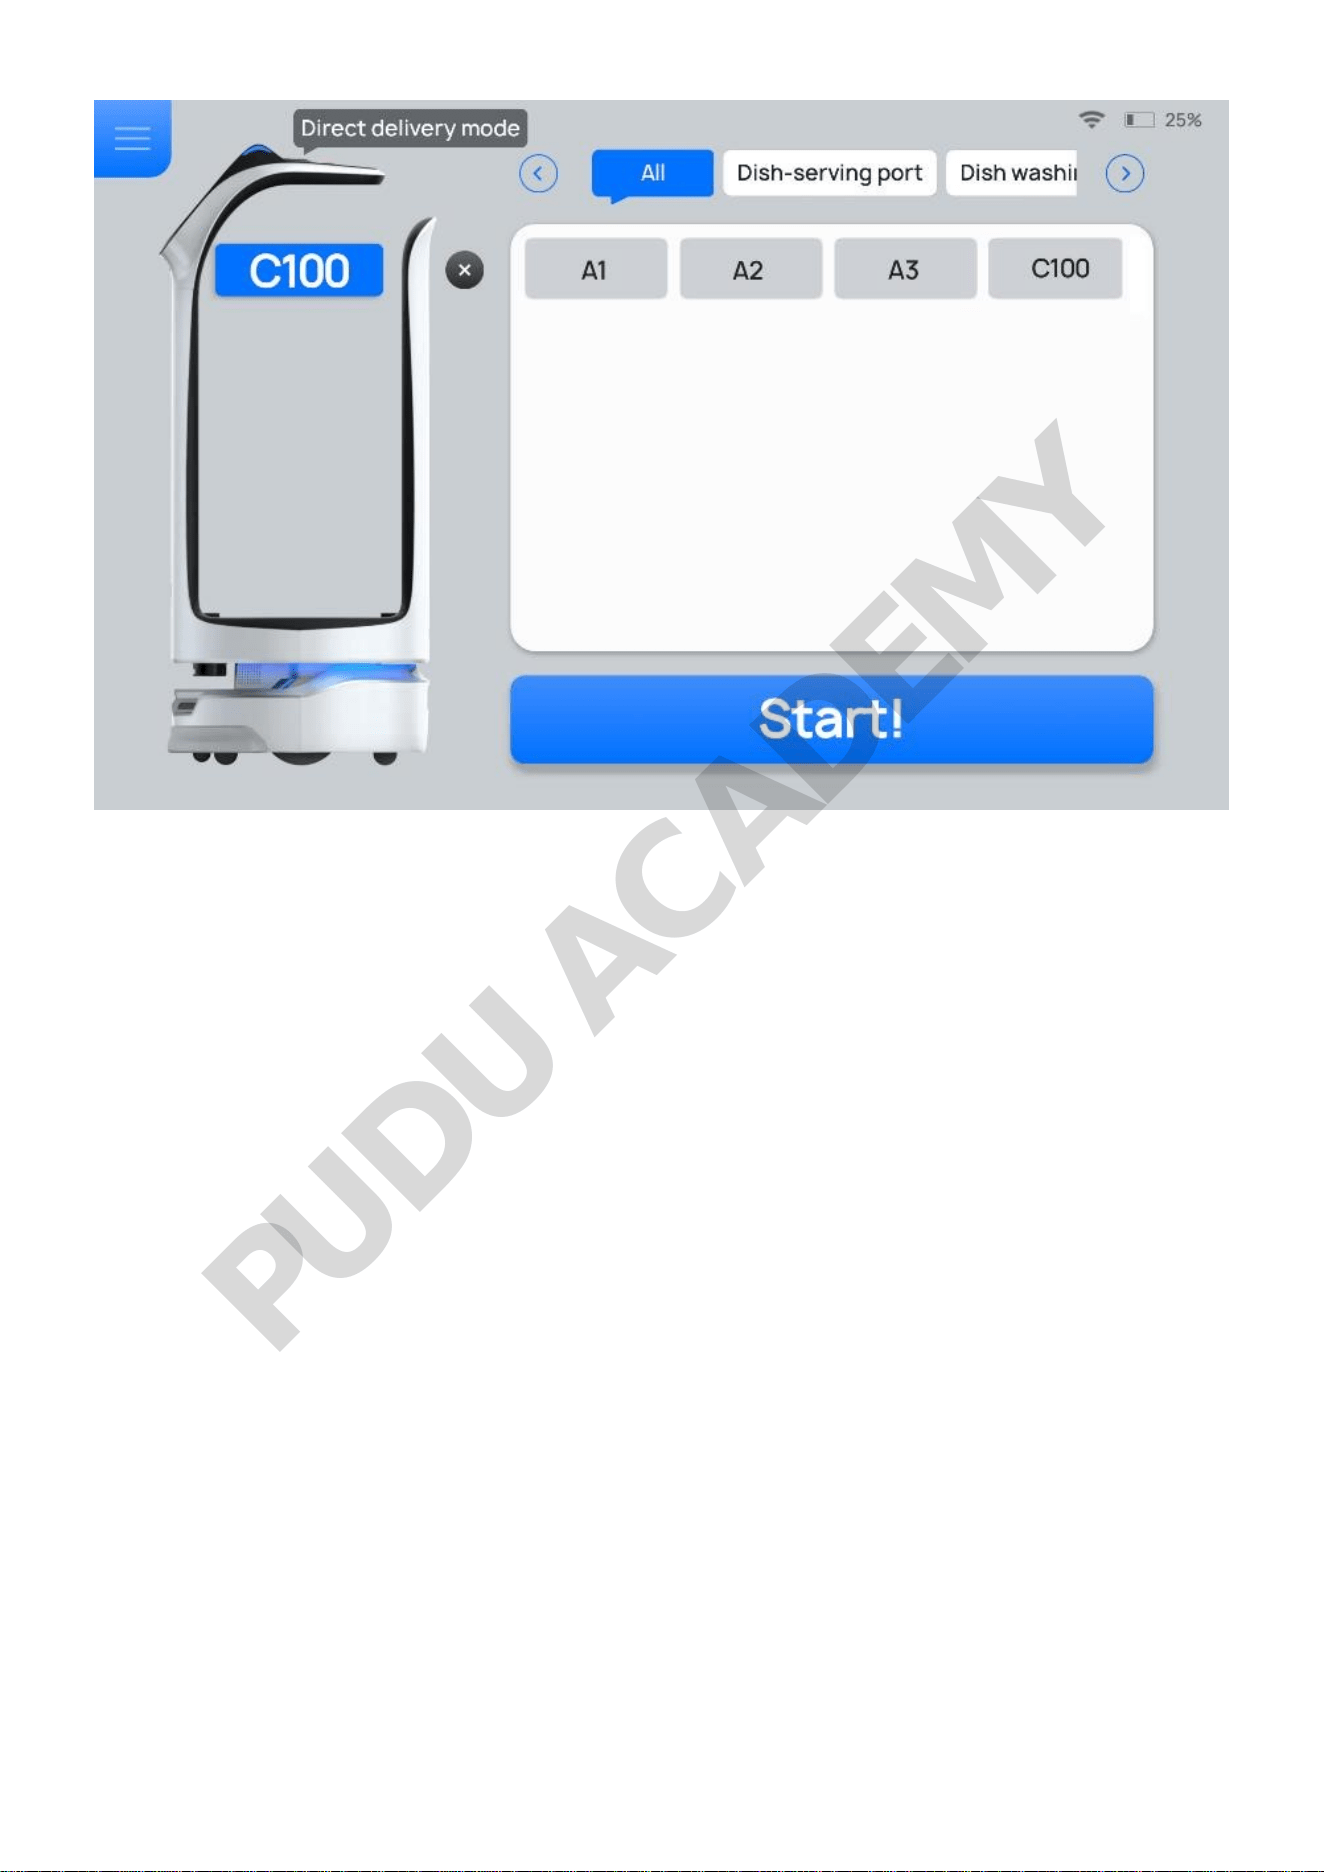
Note
Only one destination can be selected in the Direct Delivery mode.
Step 3 Tap Start!
The robot arrives at the desired table along the predetermined path.
Step 4 After the task is completed, tap the menu bar and select Return or perform the next task.
The robot performs the task along the predetermined path.
To make any modifications during direct delivery (e.g., modify task, pick up in advance, cancel all, or
return), tap the screen or the lightning button on the robot's head to pause the robot before any
operation. If no operation is performed within the pause time (Non cruise mode auto resume time of
pause), the robot will proceed with its current task. Pause time (Non cruise mode auto resume time
of pause) can be set in the Advanced Settings interface.
PUDU ACADEMY
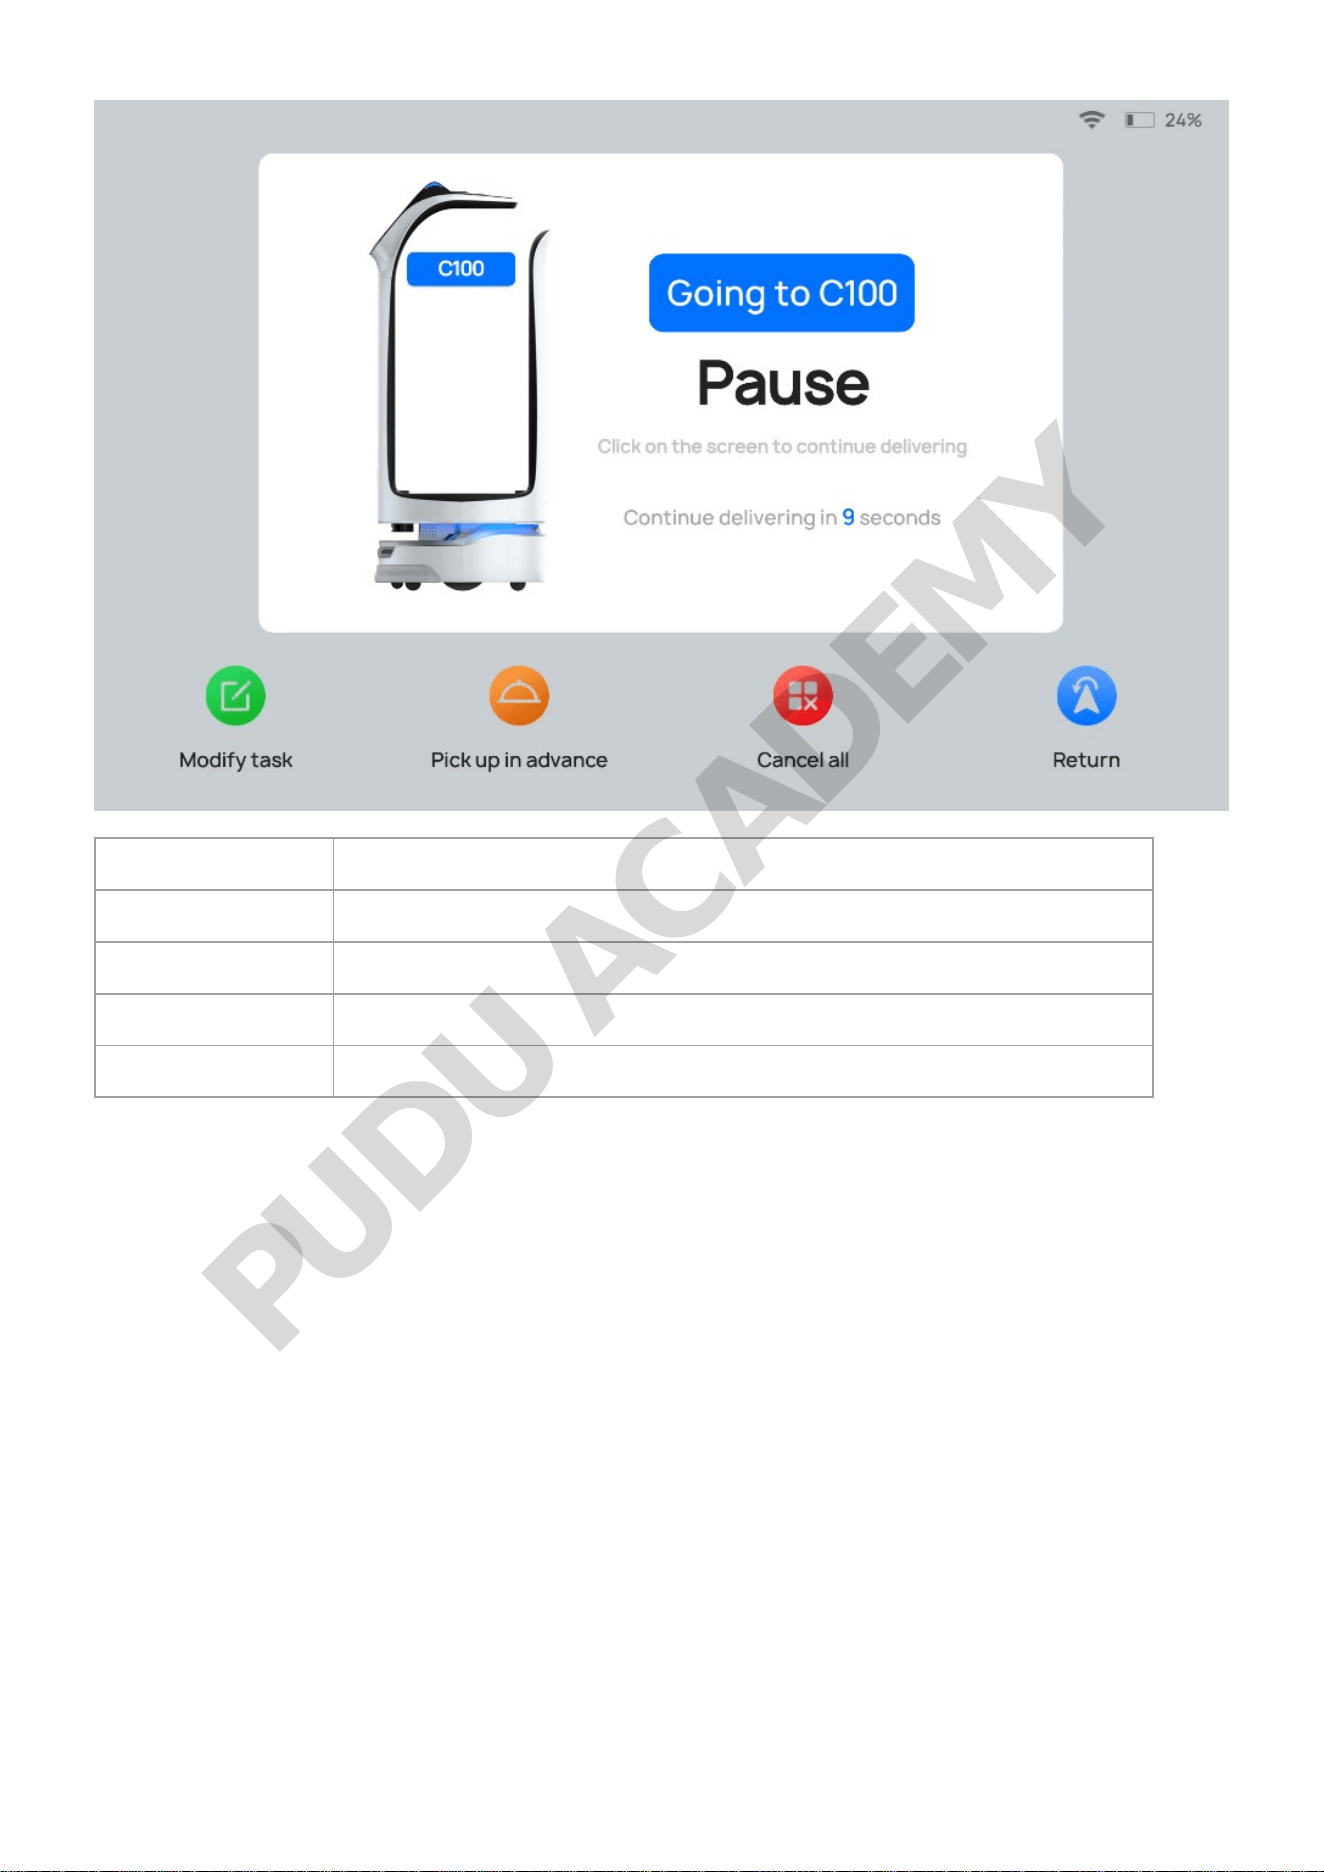
Button Description
Modify task Tap to modify the delivery destination.
Pick up in advance Tap to pick up the dishes in advance and automatically exit the task.
Cancel all Tap to cancel the delivery task without returning to the pickup location.
Return Tap to return to the pickup location.
2.6 Birthday Mode
In the Birthday mode, the robot delivers gifts and plays birthday songs for customers who celebrate
their birthdays.
Step 1 Tap the menu bar at the pickup location and select Birthday mode.
The Birthday mode interface is displayed.
PUDU ACADEMY
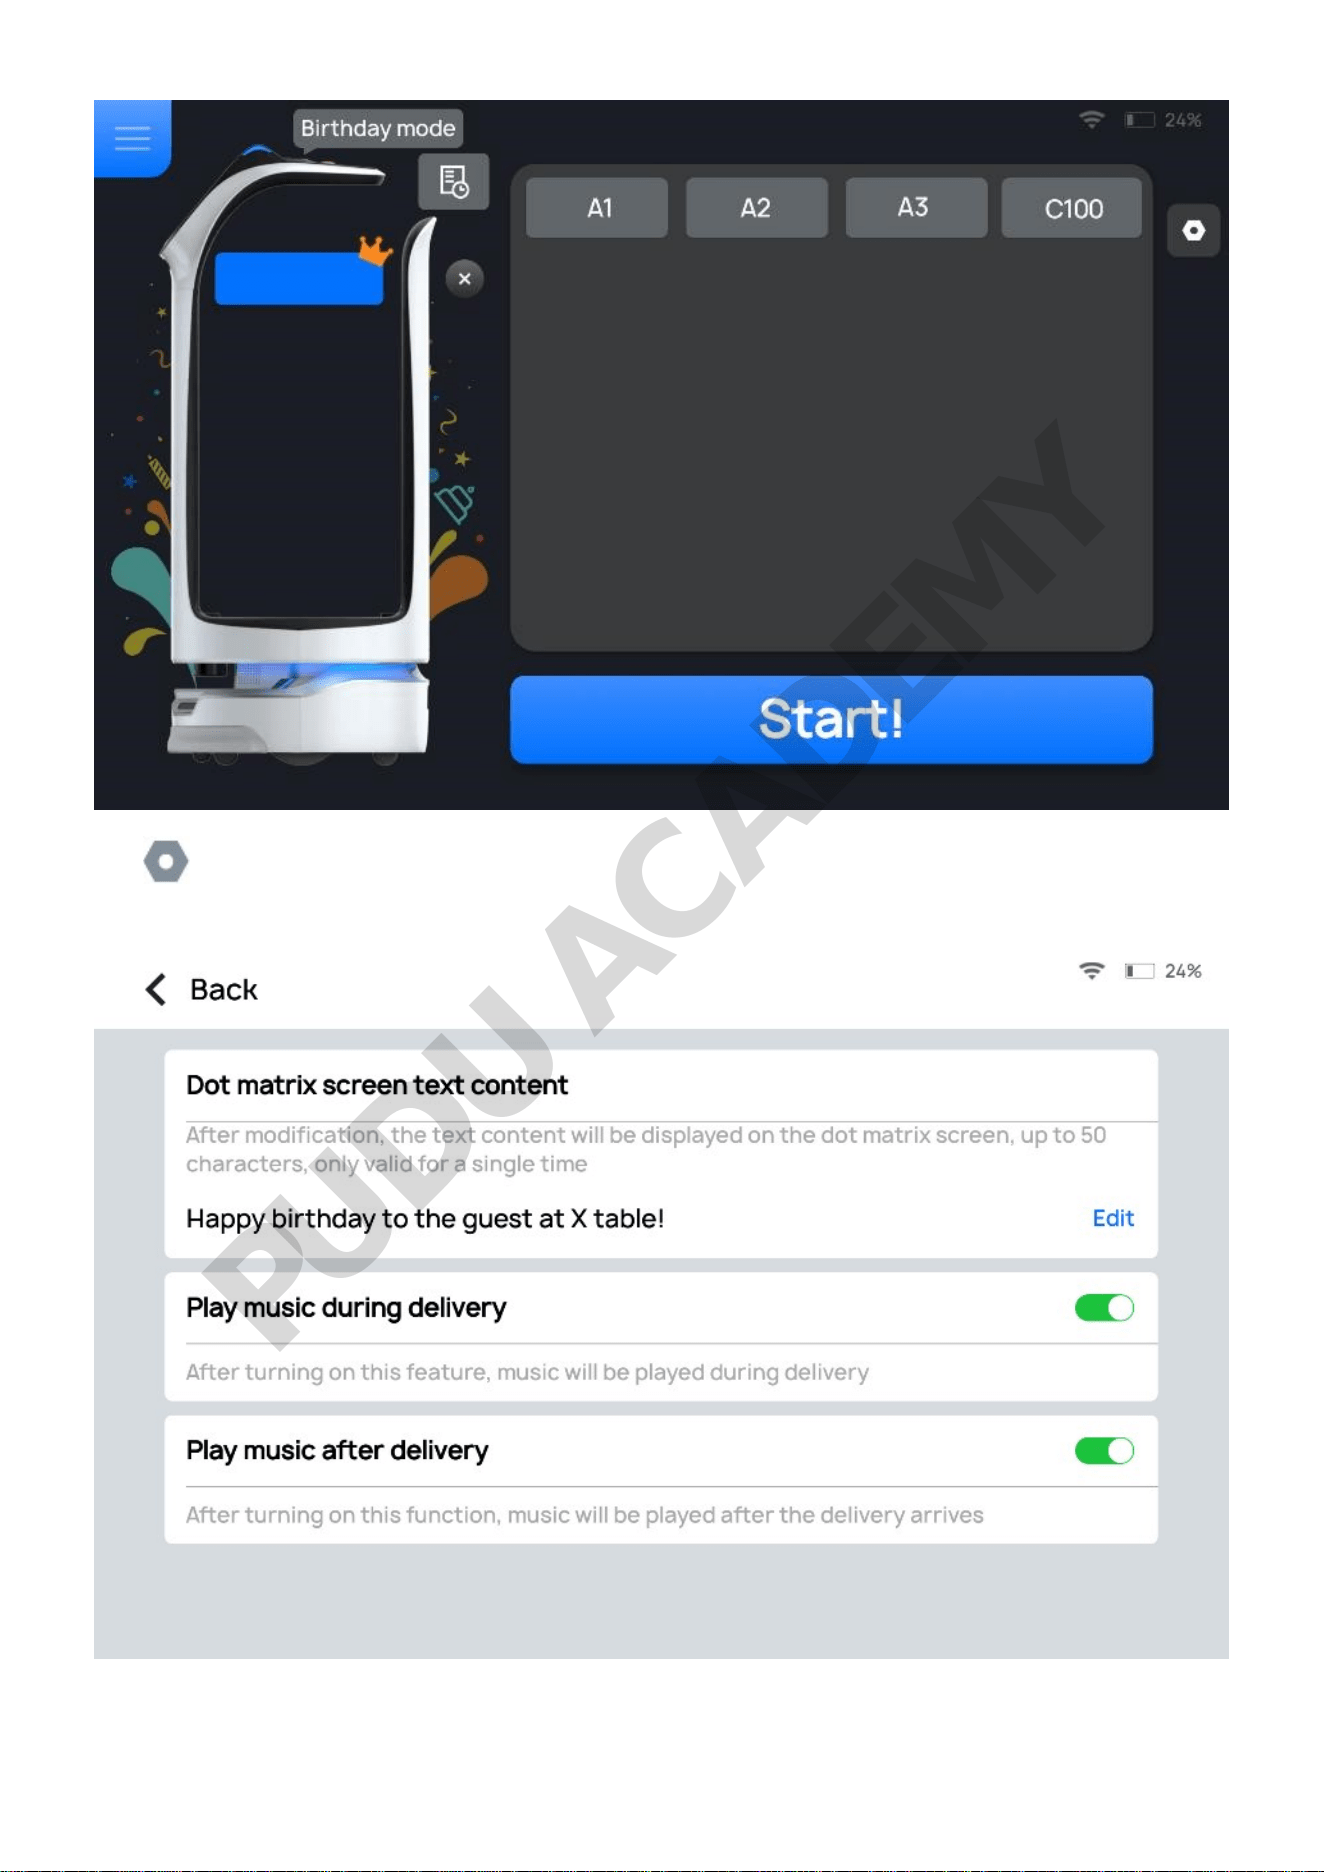
Tap to enter the Birthday Settings interface. The Birthday Settings interface and descriptions
of the settings are shown below.
PUDU ACADEMY
Button Description
Dot matrix screen text
content
Set Dot matrix screen text.
A maximum of 50 characters can be added, which is only valid in the current
task
Play music during
delivery
Choose whether to enable Play music during delivery.
When enable, the selected music will be played during delivery. If no music
is available, you may add music in the Music > List editing > Birthday
playlist interface.
Play music after
delivery
Choose whether to enable Play music after delivery.
When enable, the selected music will be played after delivery. If no music is
available, you may import music in the Music > List editing > Birthday
playlist interface.
Step 2 Place the gifts on the first tray and select the desired table number.
The tray then displays its table number.
Note
Only a single table number can be selected in the Birthday mode.
Step 3 Tap Start!
The robot arrives at the desired table along the predetermined path, and plays songs in the set
playlist for Birthday mode.
Step 4 Tap Done or the lightning button after the task is completed.
The robot returns to the pickup location.
To make any modifications during the delivery of birthday gifts (e.g., modify task, pick up in
advance, cancel all, or return), tap the screen or the lightning button on the robot's head to pause
the robot before any operation. If no operation is performed within the pause time (Non cruise mode
auto resume time of pause), the robot will proceed with its current task. Pause time (Non cruise
mode auto resume time of pause) can be set in the Advanced Settings interface.
PUDU ACADEMY
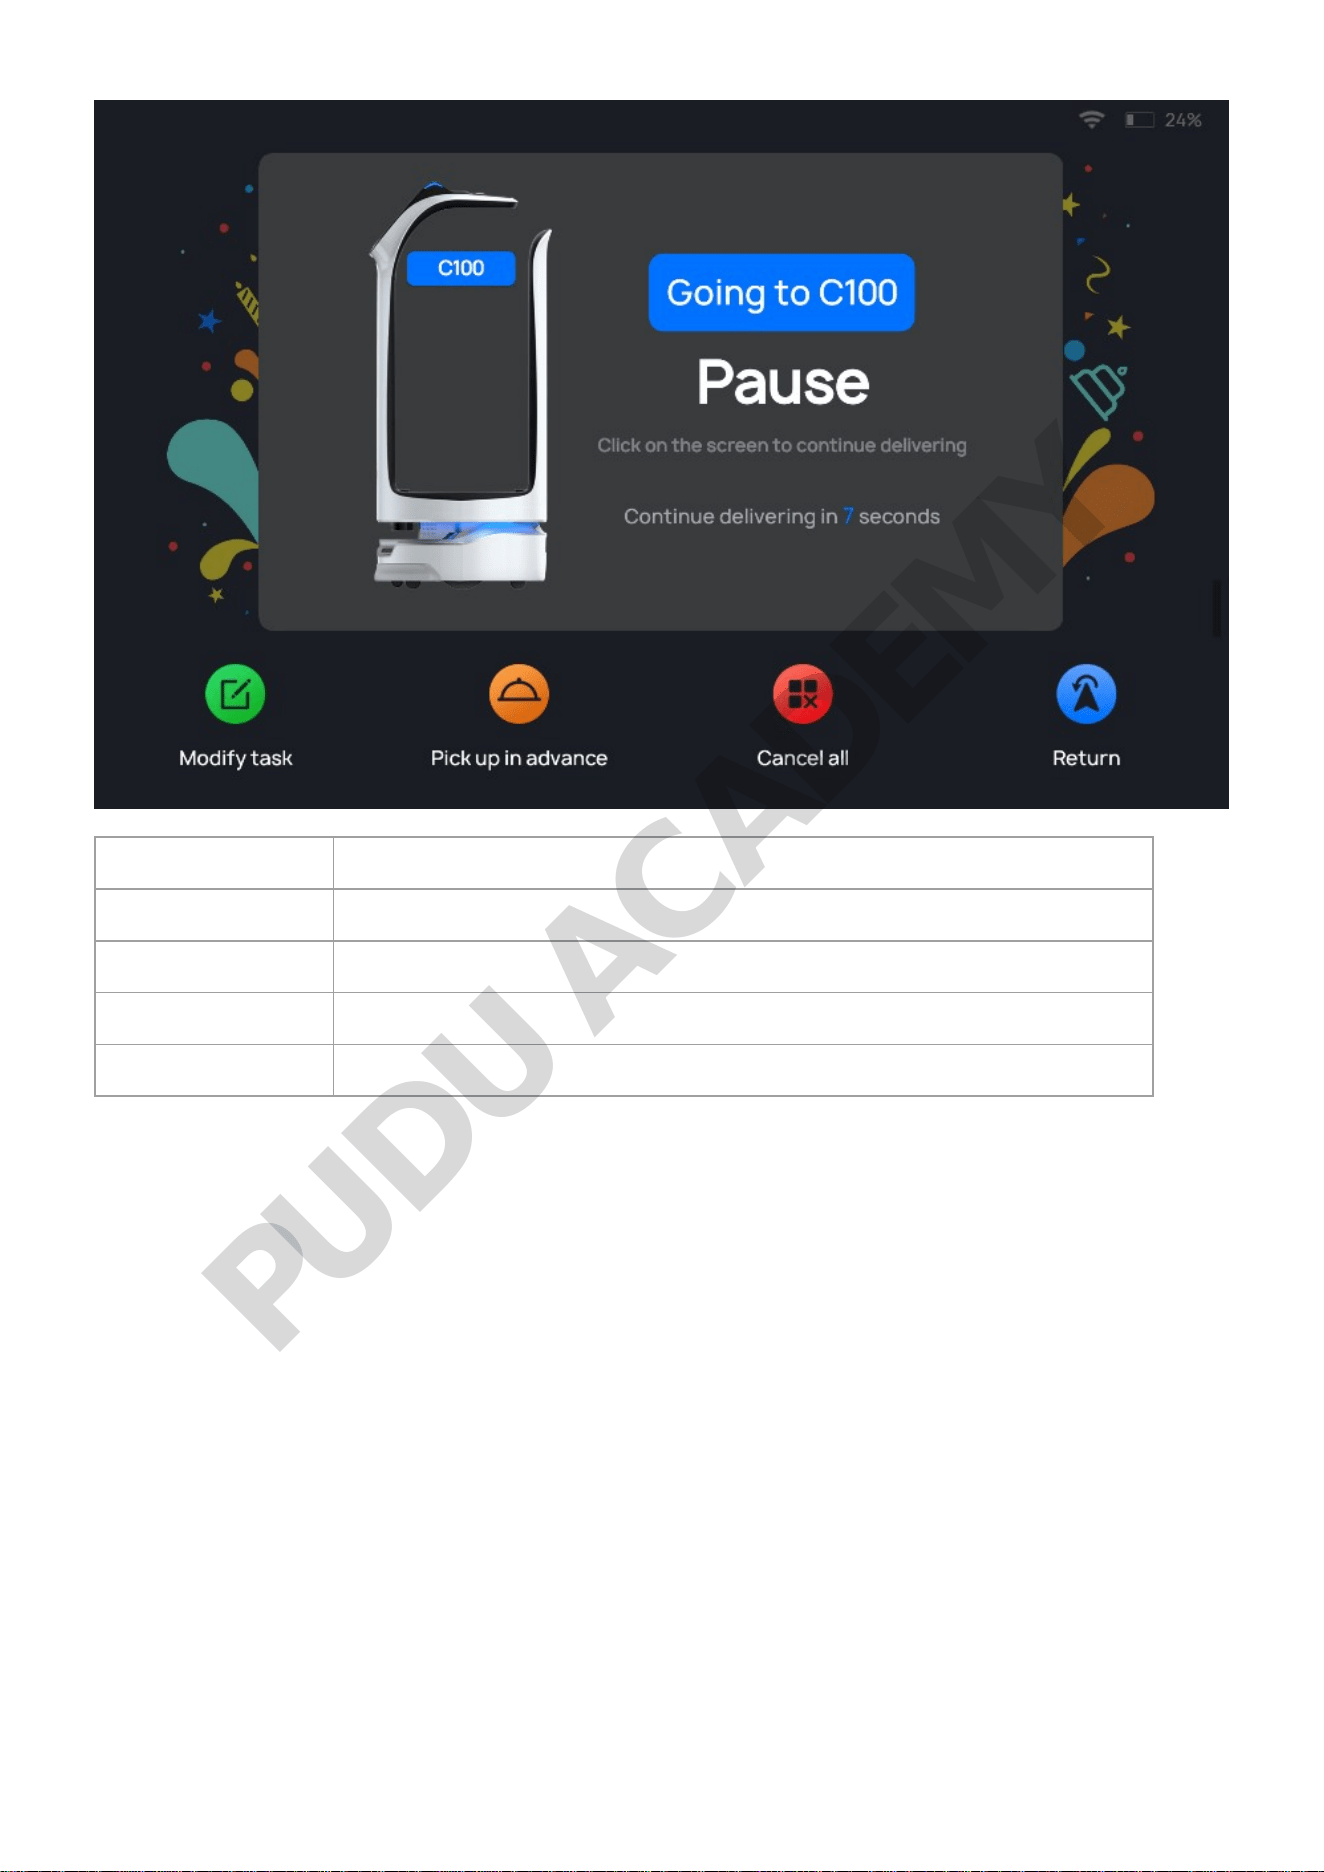
Button Description
Modify task Tap to modify the table number of delivery.
Pick up in advance Tap to pick up the dishes in advance and return to the pickup location.
Cancel all Tap to cancel the delivery task without returning to the pickup location.
Return Tap to return to the pickup location.
2.7 Special Mode
In the Special mode, the robot delivers dishes and plays music in special scenarios.
Step 1 Tap the menu bar at the pickup location and select Special mode.
PUDU ACADEMY
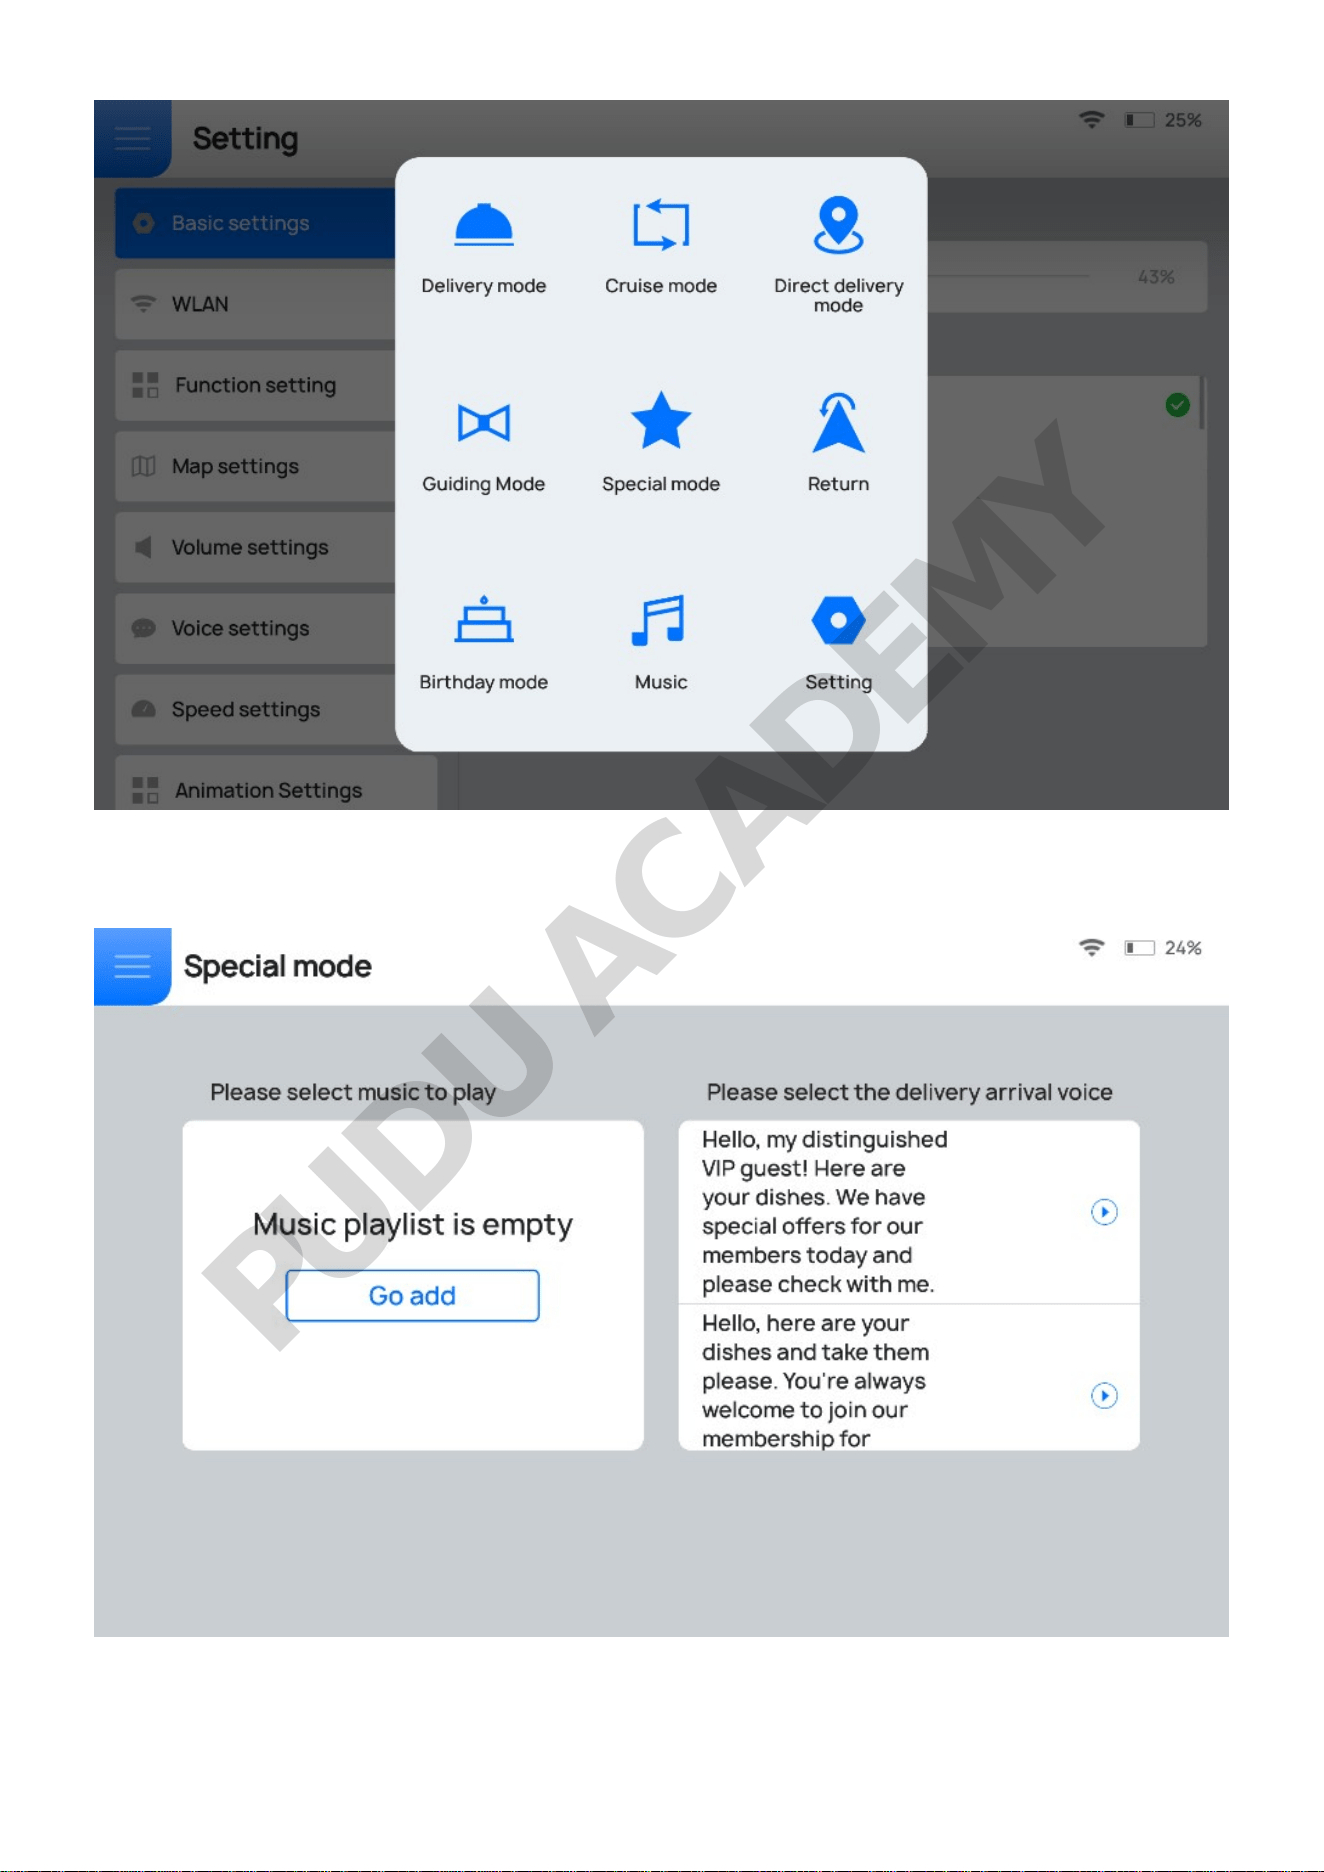
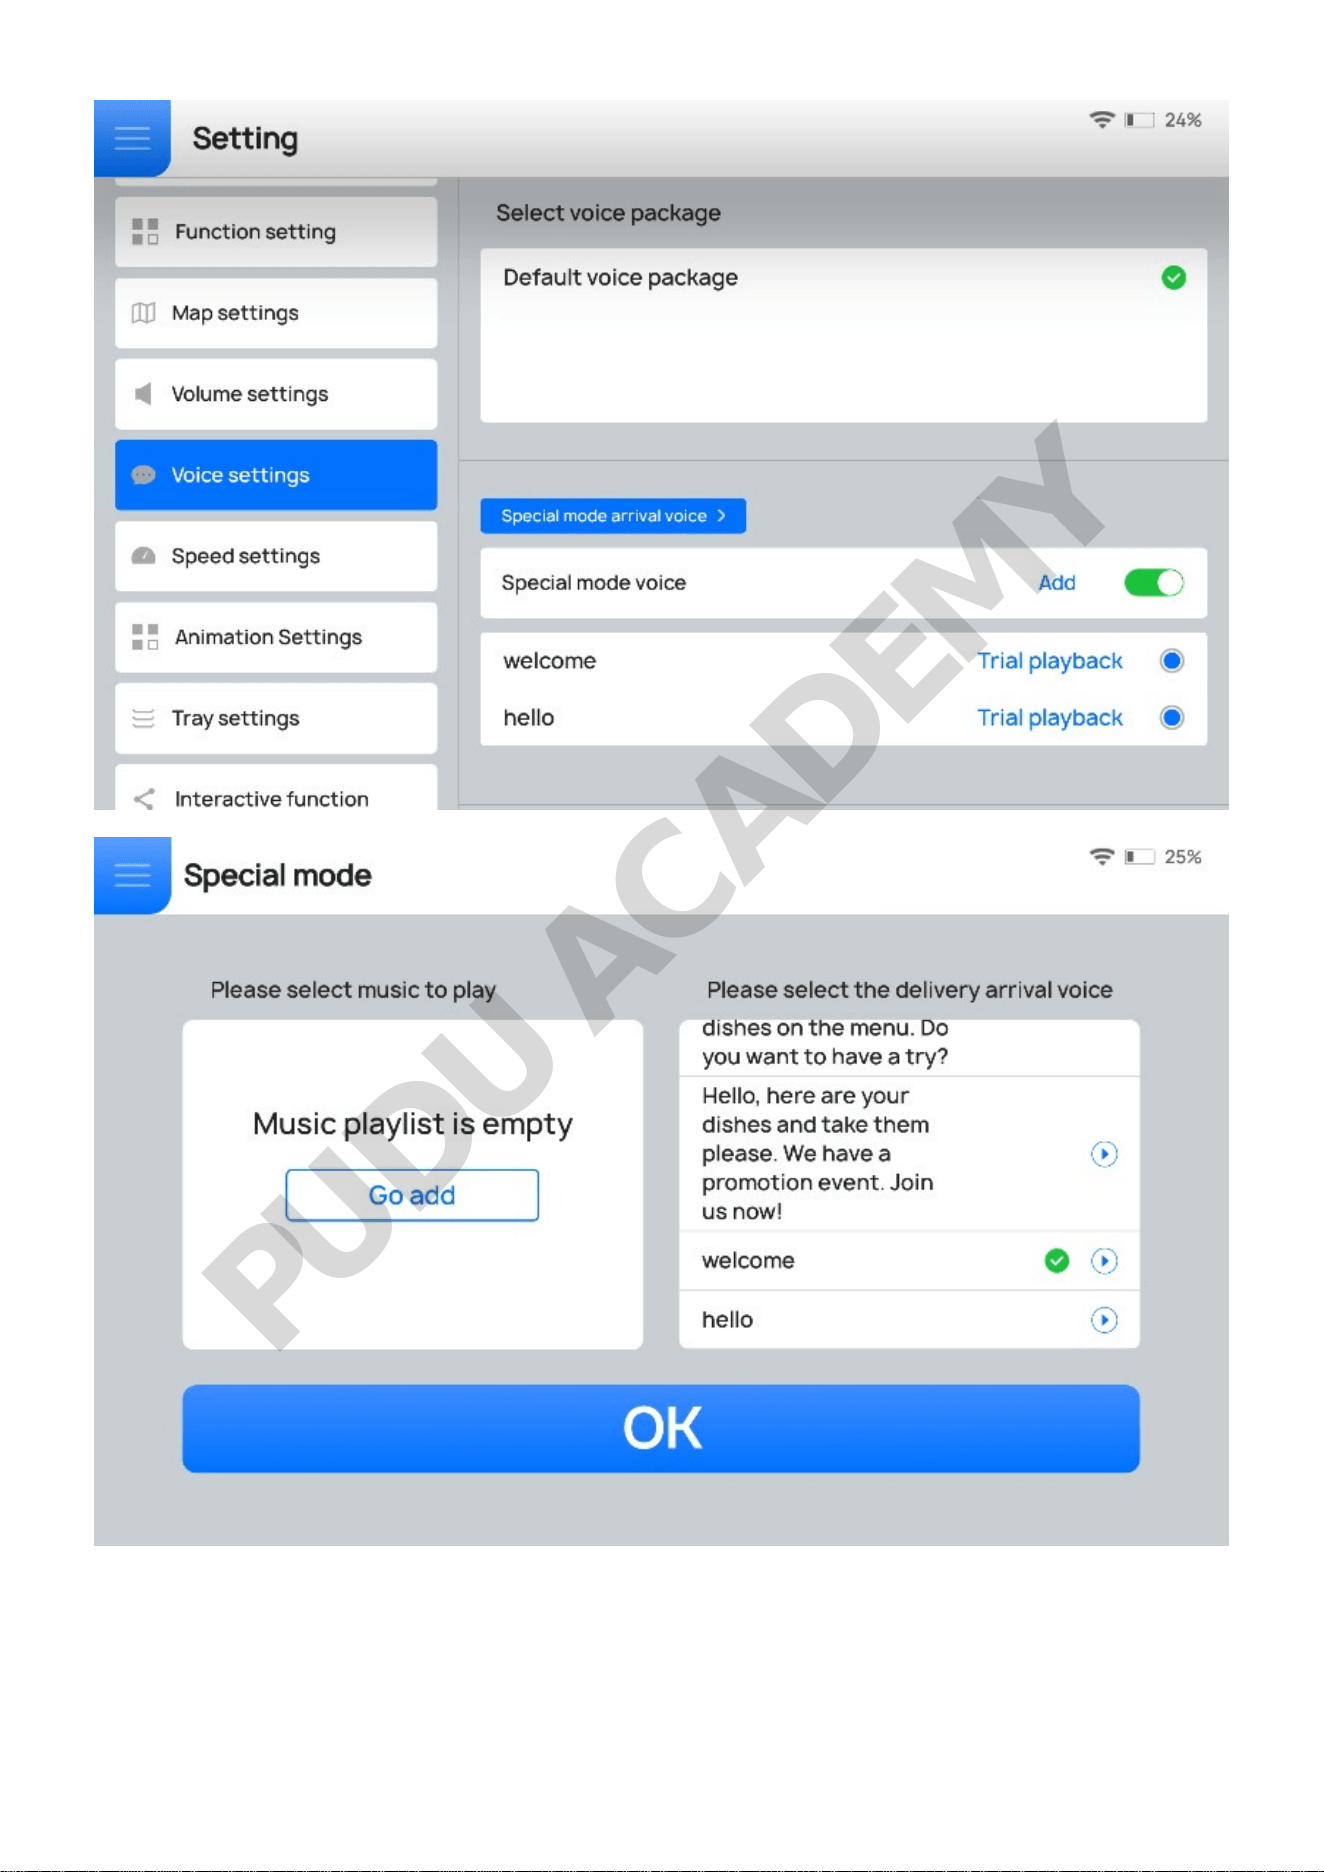
Step 2 Select the background music for this service and the voice reminder on arrival, and then tap
OK.
If you need to select a customized delivery arrival voice, please customize voice in the Setting >
Voice settings > Special mode arrival voice interface.
PUDU ACADEMY
Step 3 Place the gifts or dishes on the tray.
Step 4 Tap the tray with gifts or dishes, and then select the desired table number.
PUDU ACADEMY
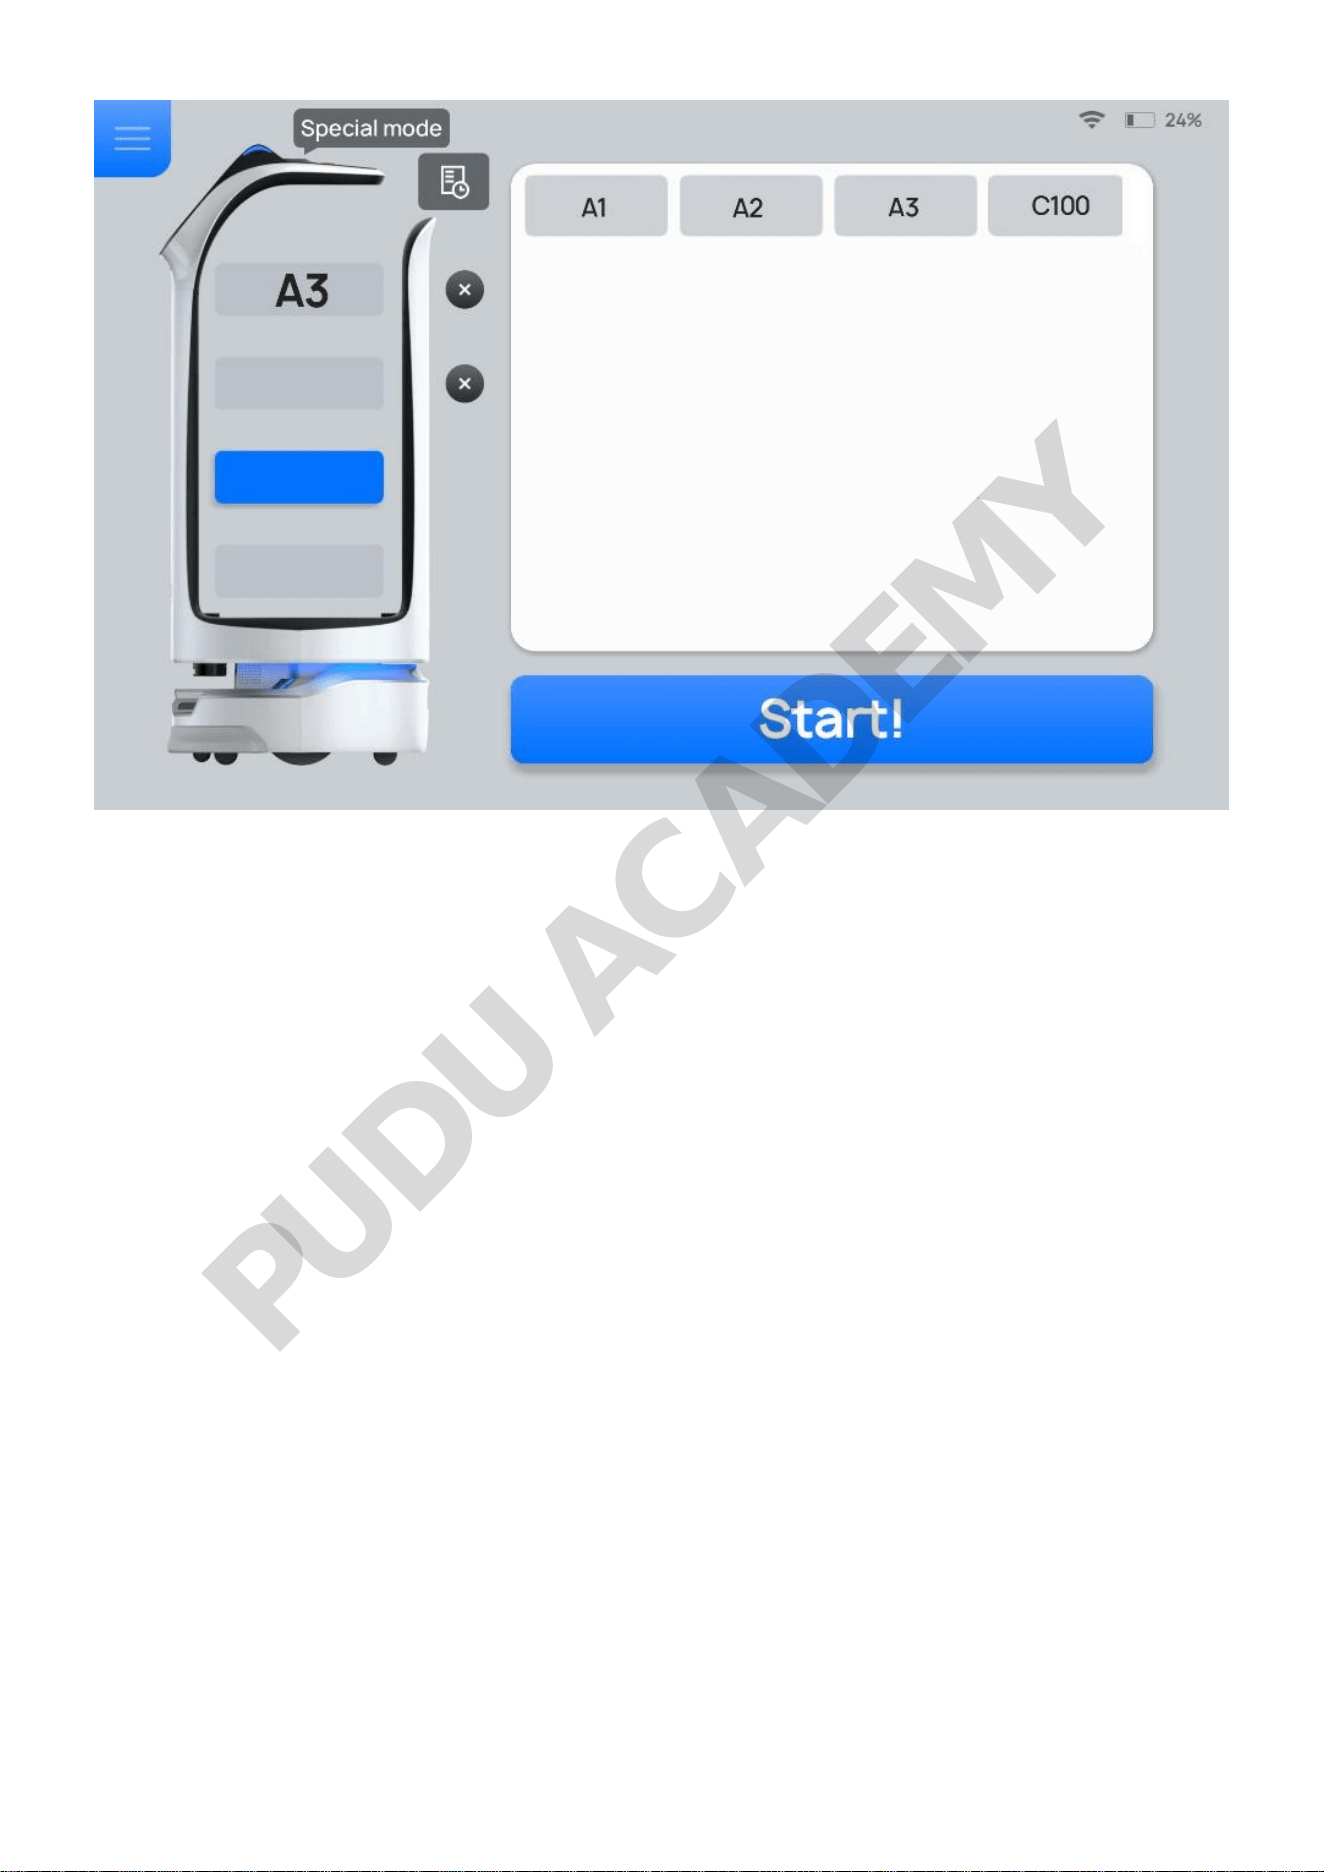
Step 5 After entering the table number, tap Start!
Step 6 Tap Done after the task is completed.
The robot returns to the pickup location.
To make any modifications during delivery (e.g., modify task, pick up in advance, cancel all, or
return), tap the screen or the lightning button on the robot's head to pause the robot before any
operation. If no operation is performed within the pause time (Non cruise mode auto resume time of
pause), the robot will proceed with its current task. Pause time (Non cruise mode auto resume time
of pause) can be set in the Advanced Settings interface.
PUDU ACADEMY
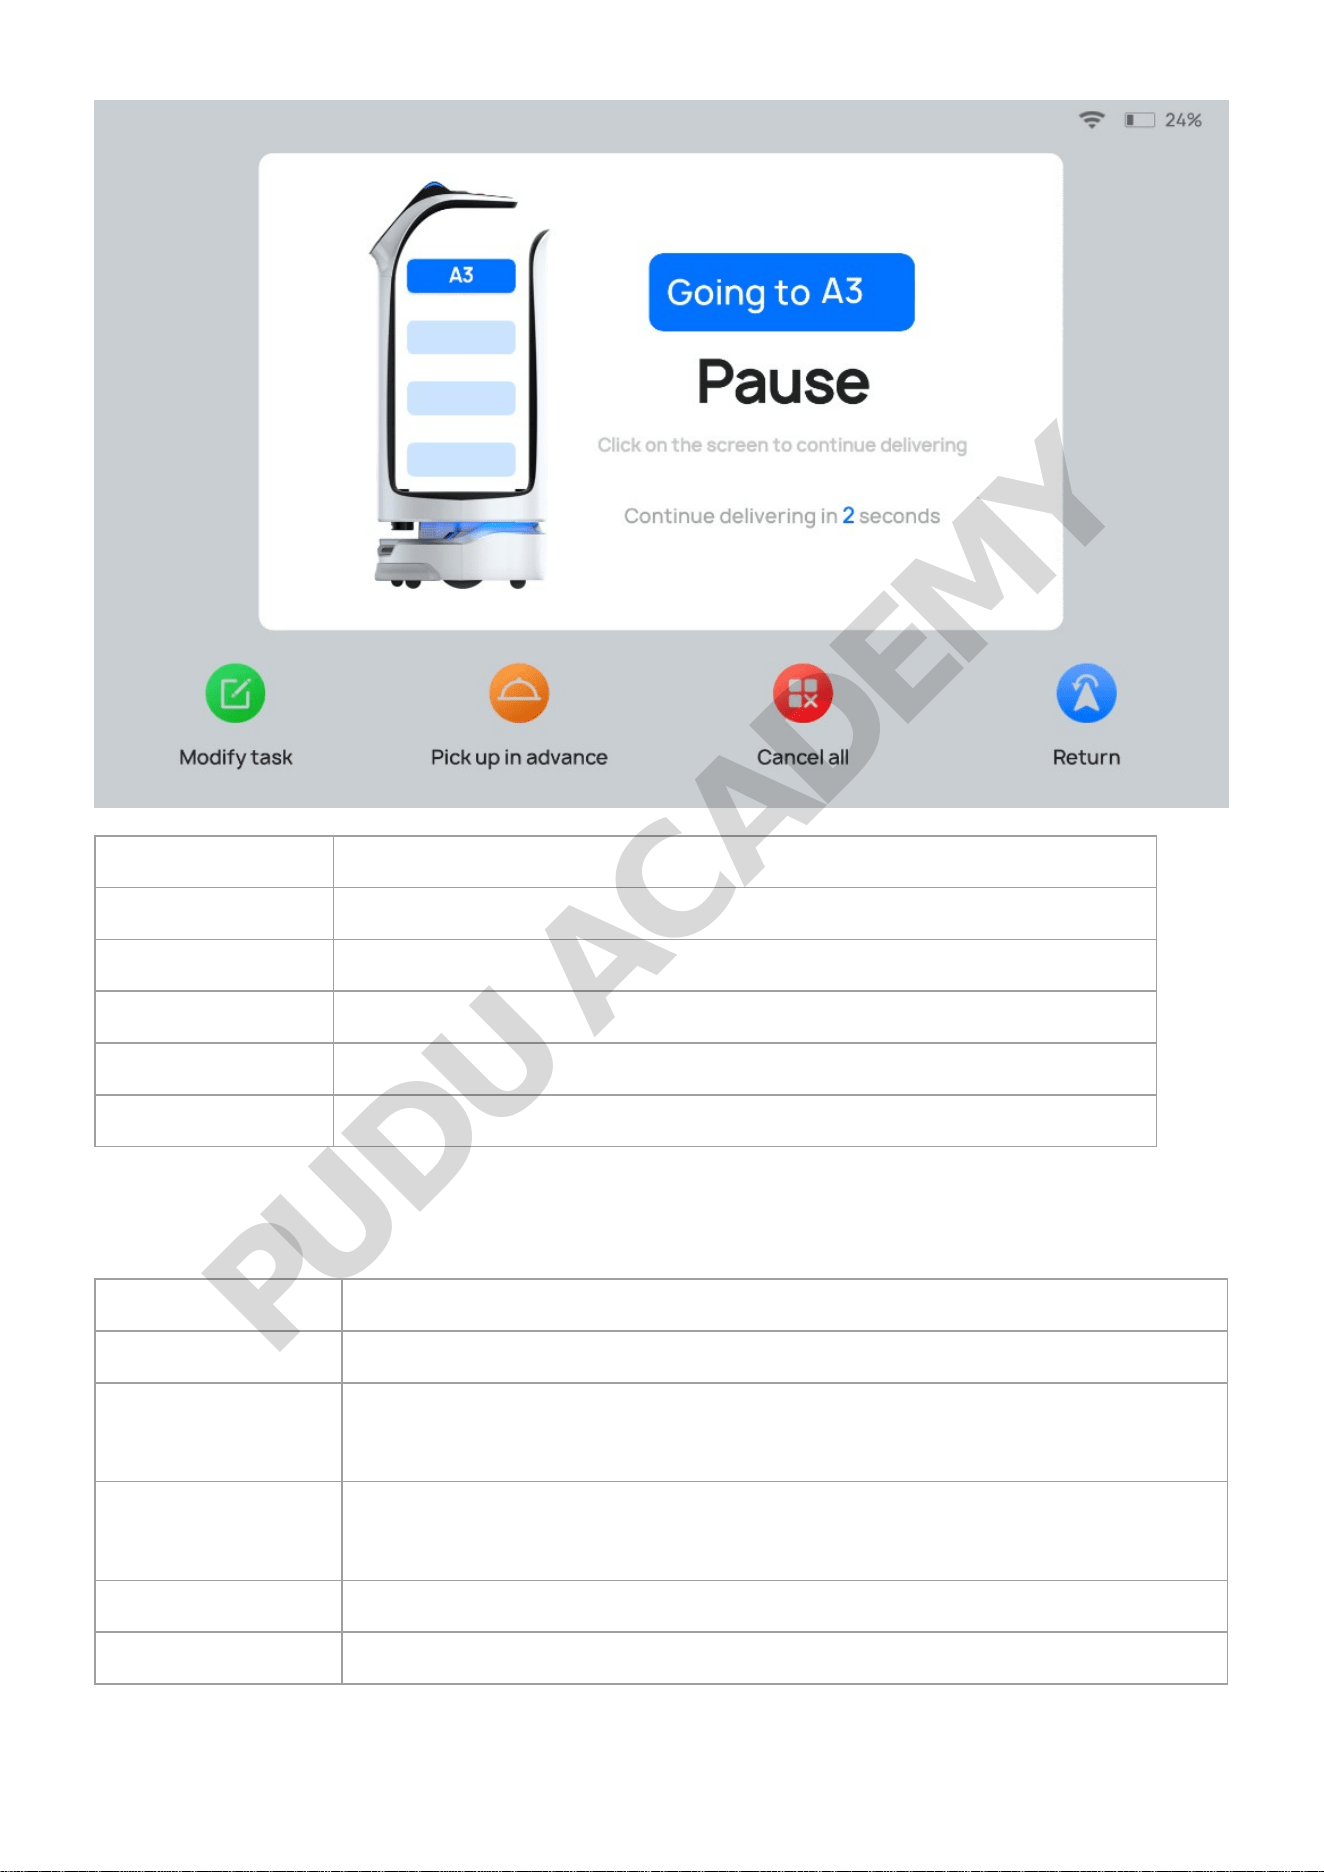
Button Description
Modify task Tap to modify the table number of delivery.
Button Description
Pick up in advance Tap to pick up the dishes in advance and proceed with the next task.
Cancel all Tap to cancel all delivery tasks without returning to the pickup location.
Return Tap to return to the pickup location.
3. Settings
Settings Description
Basic settings Set screen brightness and language.
WLAN
Set up the network connection.
The robot cannot upgrade or perform voice interaction without a network
connection.
Function setting
Choose whether to display robot functions on the main interface according to
the actual scenario.
All functions are displayed on the main interface by default.
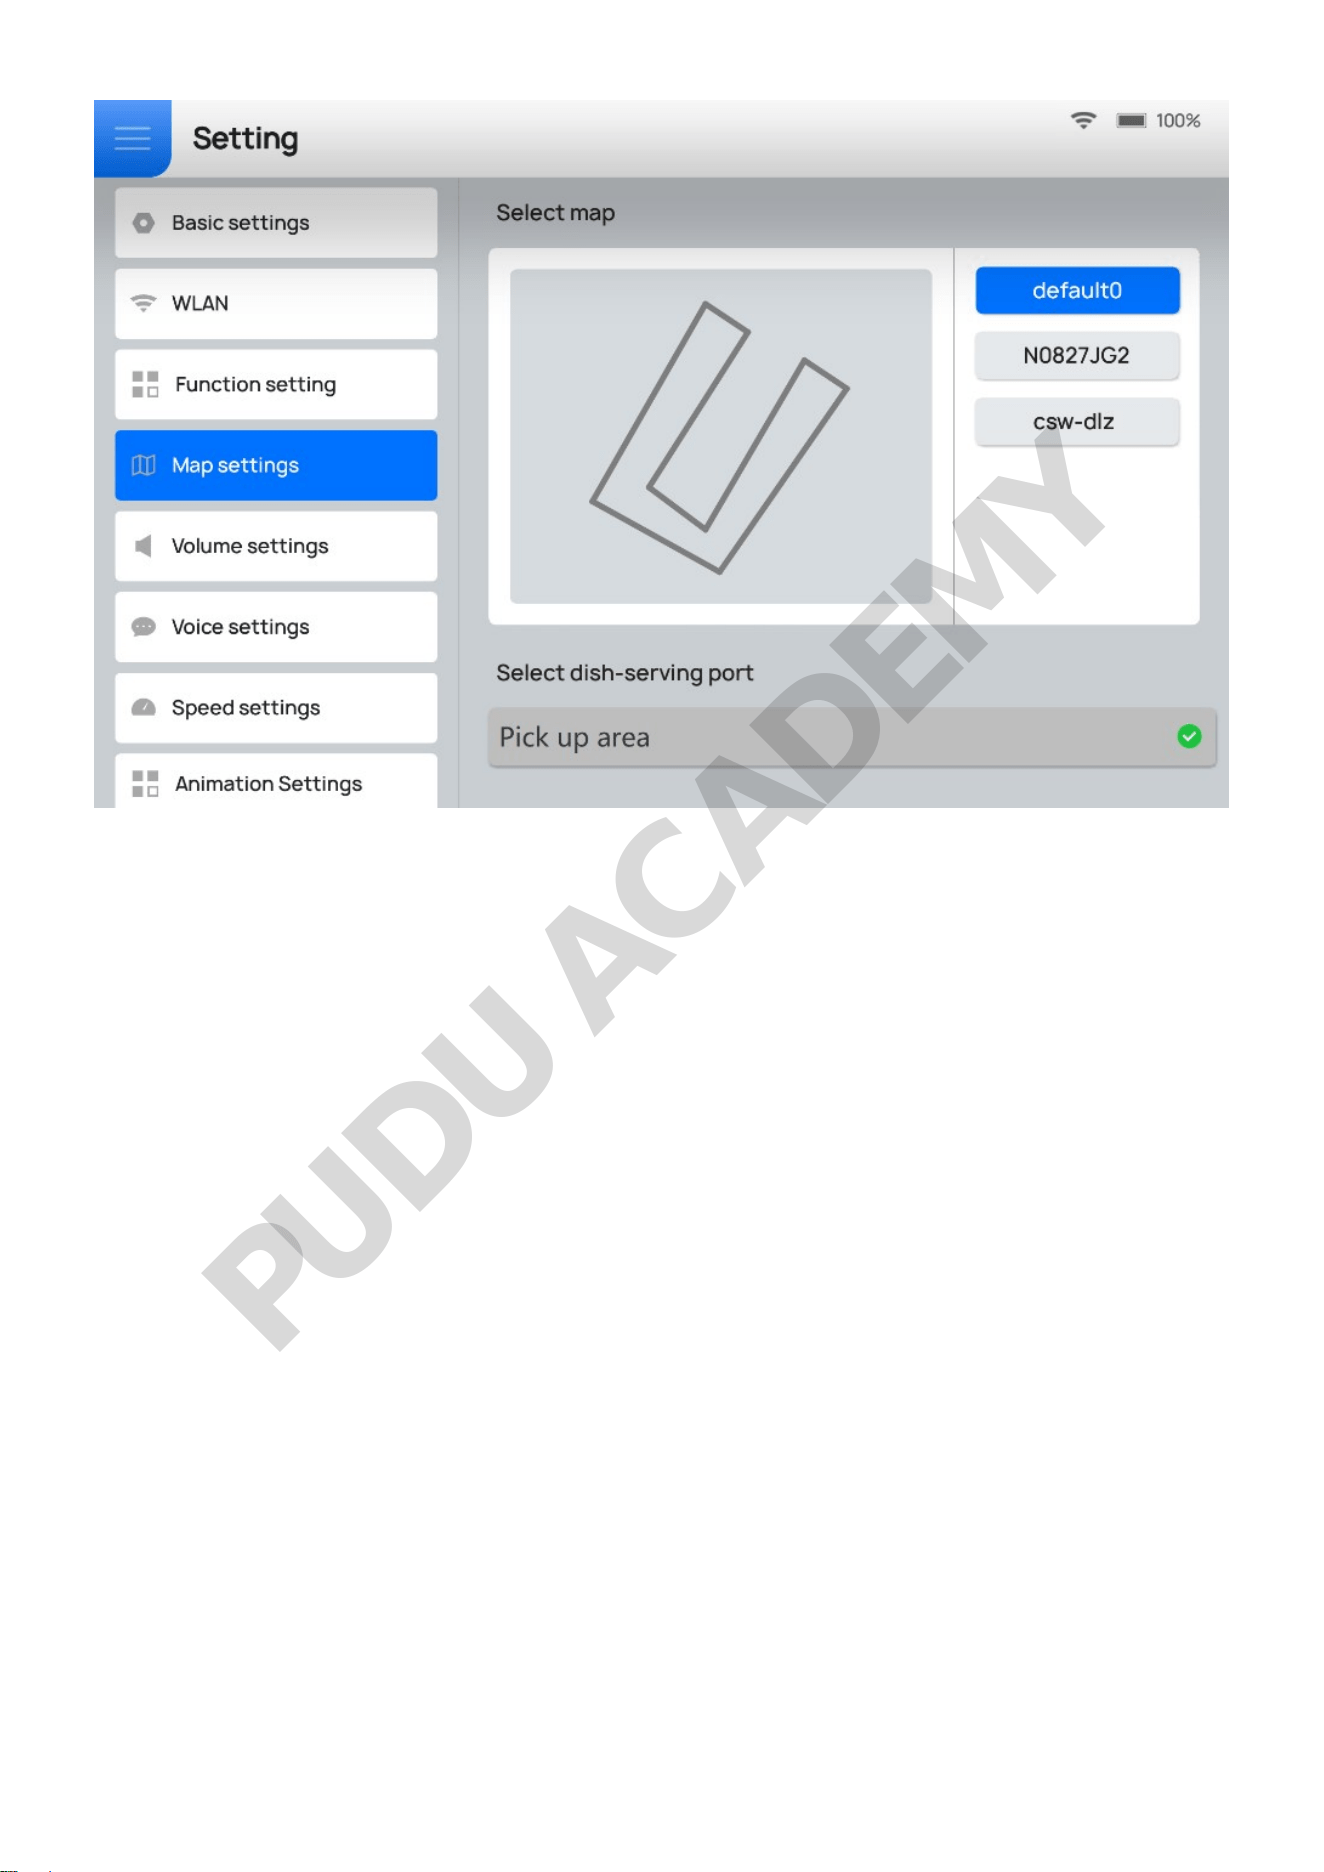
Map settings Switch between maps and select the pickup location in the corresponding map.
Volume settings Adjust the music volume, voice volume, and key tone volume.
PUDU ACADEMY

Settings Description
Voice settings
Replace the voice packet, customize the voice announcements in different
modes, enable Full voice broadcast after food delivery.
If Full voice broadcast after food delivery is enabled, after arriving at the
destination, the robot will play the voice broadcast first and then display Done.
Speed settings
Set the speed of the robot in different modes.
Speed range: 0.1m/s-1.2m/s (0.33ft/s-3.93ft/s)
Animation settings
• Choose whether to enable Screen animation.
The user can enable Screen animation in different modes as required.
• Choose whether to set the content for the dot matrix screen.
The user can set the content for the dot matrix screen as required. Enter up to
50 characters for auto-scrolling play. Currently, the function is only available
for the Cruise mode, Return mode, and Guiding mode.
Tray settings Set Tray Sensor Switch, Tray Error Reminder, Edit Tray, etc.
Settings Description
Interactive function
Set lucky draw.
After the interactive function is enabled, customers can participate in lucky
draws during the robot's delivery process.
The interactive function is only valid in Delivery mode, Birthday mode, and
Special mode.
Software update
Check if the current version of the software is the latest.
If not, you can download the latest version and upgrade the software.
Please keep the battery level above 20% to ensure a successful upgrade.
About us
Displays company service information, such as official website, robot operation
guide, etc.
Debug
Debugging robot parameters (for technical engineers only).
Pudu shall not be held responsible for any accident caused by unauthorized
operation.
Advanced settings
Enable Single-table multi-layer, Distribution parameter settings, etc.
The Advanced settings are used for advanced operations of the robot. Please
contact technical engineers for details. Pudu shall not be held responsible for
any accident caused by unauthorized operation.
3.1 Map Settings
Multiple maps can be installed for BellaBot to operate in different scenarios when paths change.
After a new map is selected, BellaBot will automatically synchronize table numbers, docking
locations, and settings. Choose the map according to the actual scenario, and select the pickup
location for the robot.
PUDU ACADEMY
3.2 Voice Settings
3.2.1 Voice Packet Replacement
If the default voice packets in the system cannot meet user requirements, the user can customize the
voice packets. Please contact technical engineers for details. Perform the following to replace the
customized voice packet.
Step 1 Check supported voice packets and download the selected voice packet.
PUDU ACADEMY
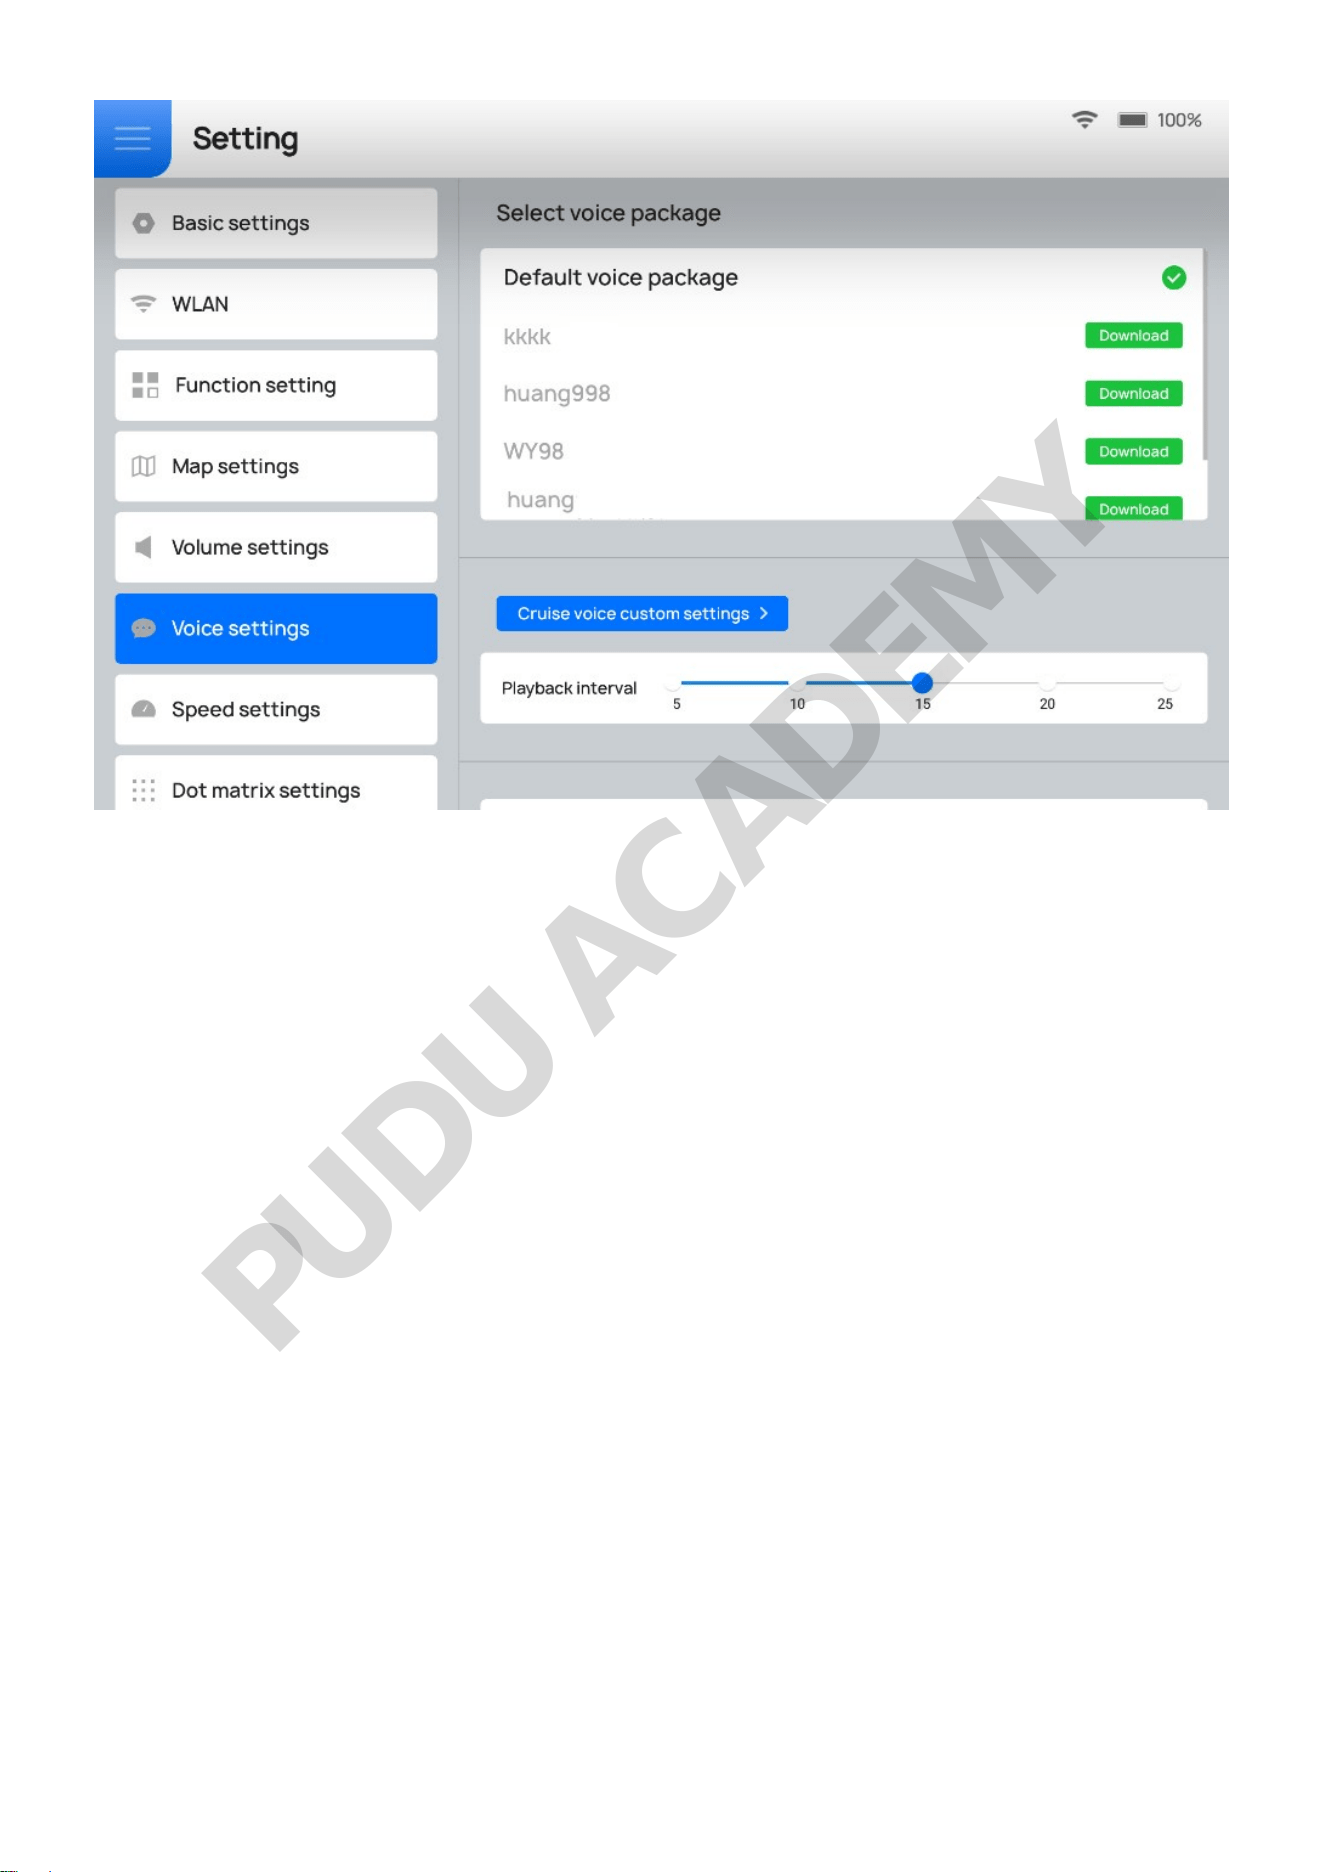
Step 2 Replace with the downloaded voice packet.
If you wish to remove a voice packet, tap and hold the voice packet to delete it.
3.2.2 Voice Customization
The user can customize the voice broadcast in different modes.
PUDU ACADEMY
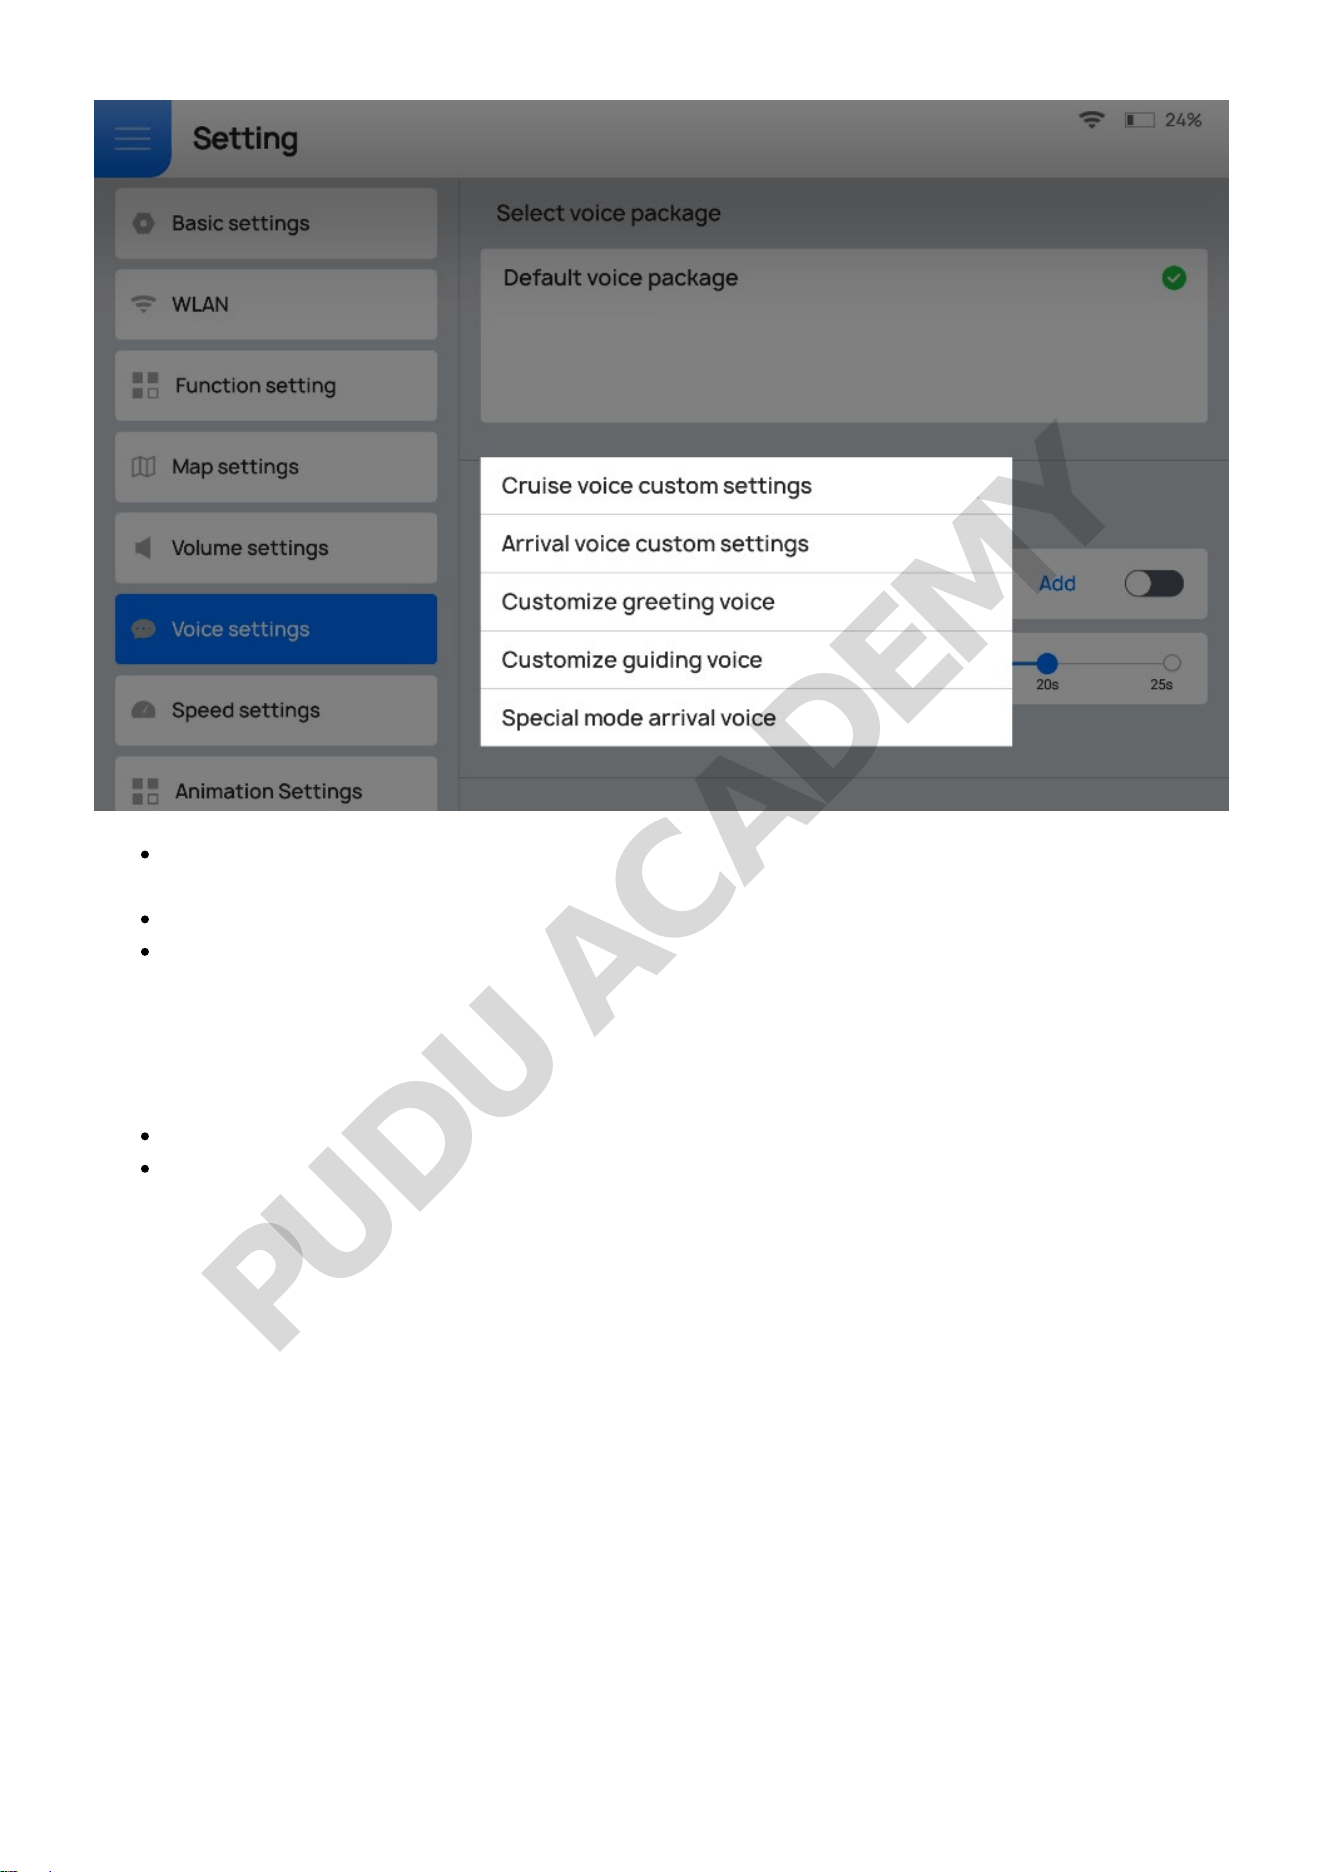
After the user selects the custom voice broadcast, the robot no longer plays the default voice
or customized voice packets.
A maximum of 5 voices and 50 characters per voice can be added.
In the Delivery mode, only one voice broadcast can be selected at a time. In the
Cruise mode or the Guiding mode, multiple voice broadcasts can be selected for random playback. In
the Special mode, multiple voices can be selected, but the voice to be played should be selected on
the Special Mode interface.
If you wish to remove a custom voice, tap and hold to delete it.
When customizing the voices for the Cruise mode, Greeting mode, or Guiding mode, the user
can also set the interval for the voices.
The following describes how to add a custom voice, taking Cruise Mode as an example:
Step 1 Select Cruise voice custom settings in the Voice settings interface.
PUDU ACADEMY
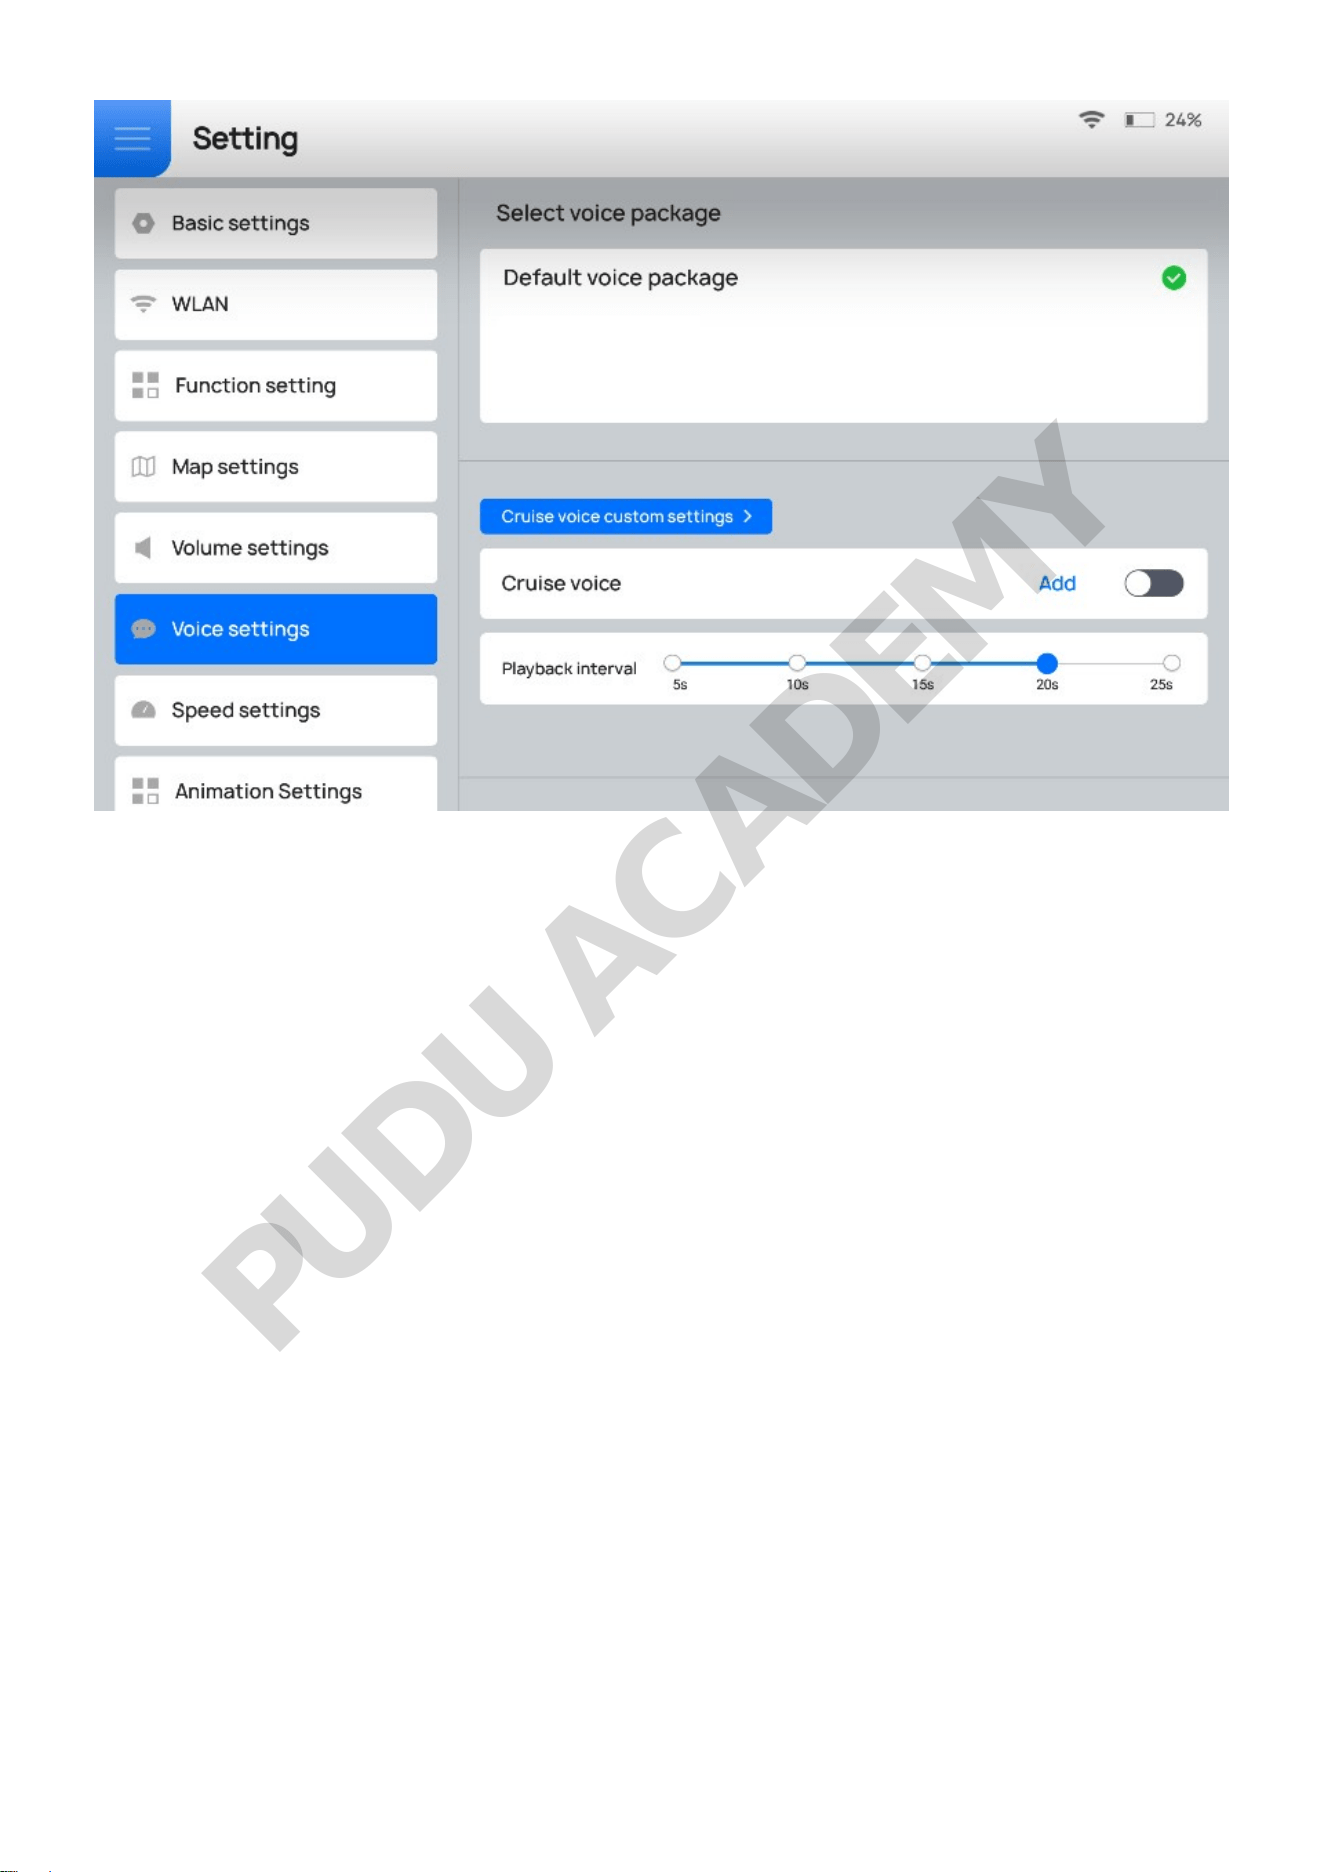
Step 2 Enable Cruise voice in the Cruise voice bar and tap Add.
The voice text editing window pops up.
Step 3 Enter the voice text to be played in the voice text editing window and tap OK to generate a
custom voice.
Step 4 Select the generated voice to be played in the Cruise mode.
If multiple voices are added, you can select more than one of them to be played randomly during
cruise.
3.3 Tray Settings
PUDU ACADEMY
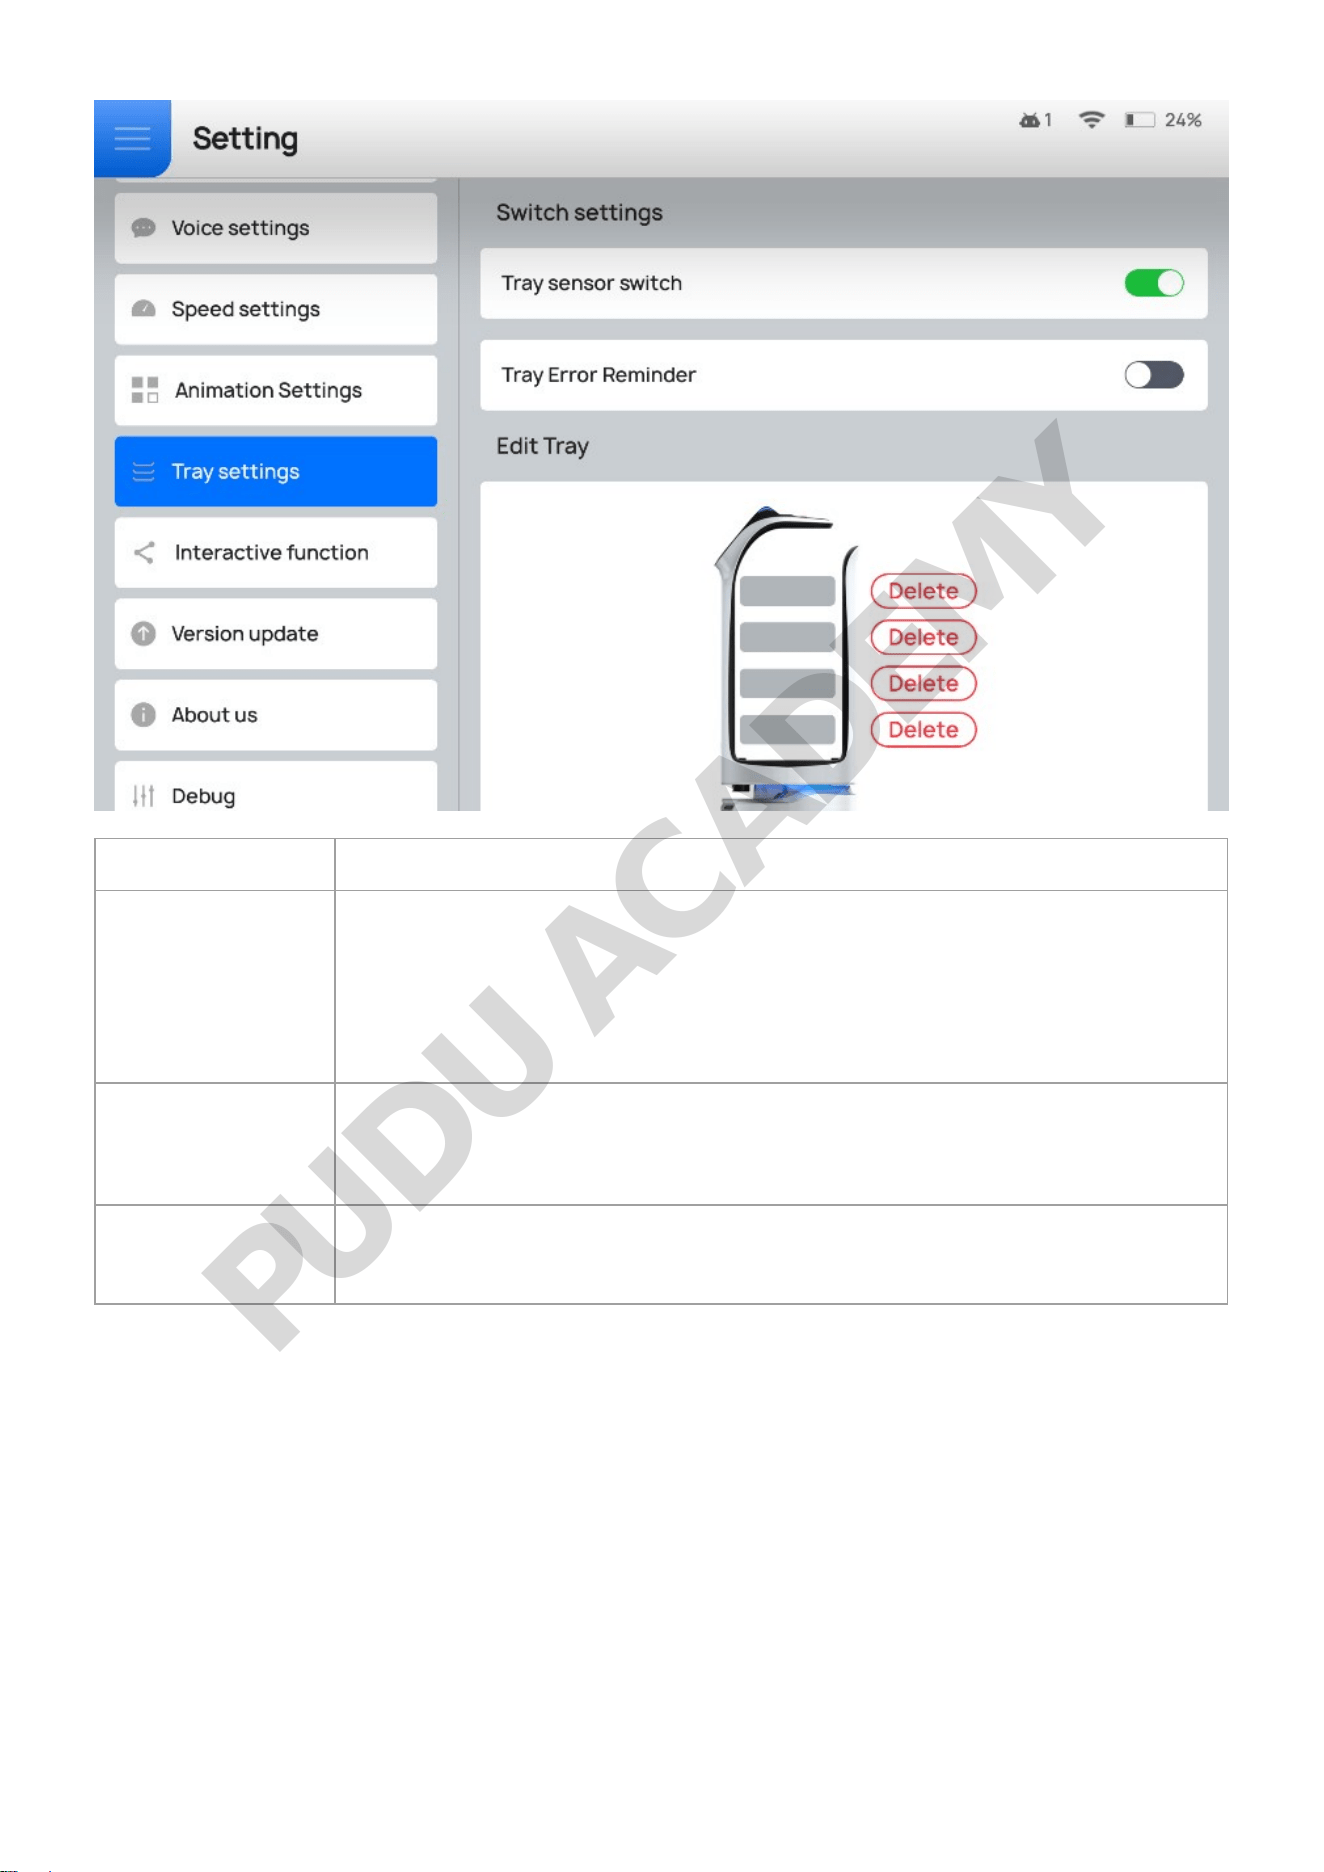
Function Description
Tray sensor switch
Choose whether to enable tray settings
If enabled, the corresponding light strip goes out after the dishes are taken. The
robot automatically completes the current task after 5 seconds and continue to
perform the next one.
The function is valid only when a single tray corresponds to a single dish.
The interactive function and the Tray settings cannot be enabled at the same
time. Otherwise, the lucky draw will be invalid.
Tray Error
Reminder
Choose whether to enable Tray Error Reminder
If enabled, the robot gives voice reminders when the dishes are taken by
mistake.
The voice reminder supports English and Chinese only.
Edit Tray
BellaBot has 4 layers of trays in total. If one of the trays is removed in the
actual usage, the corresponding tray number should be deleted in the interface
to avoid any delivery errors.
This function cannot be used when the tray is holding goblets, objects entirely made of glass, or
objects lower than 5 cm (0.16 in).
3.4 Interactive Function
Users can set up lucky draws on this screen. After the interactive function is enabled, customers can
participate in lucky draws during the robot's delivery process.
The interactive function is only valid in Delivery mode, Birthday mode, and Special mode.
Step 1 Turn on the Interactive function.
PUDU ACADEMY
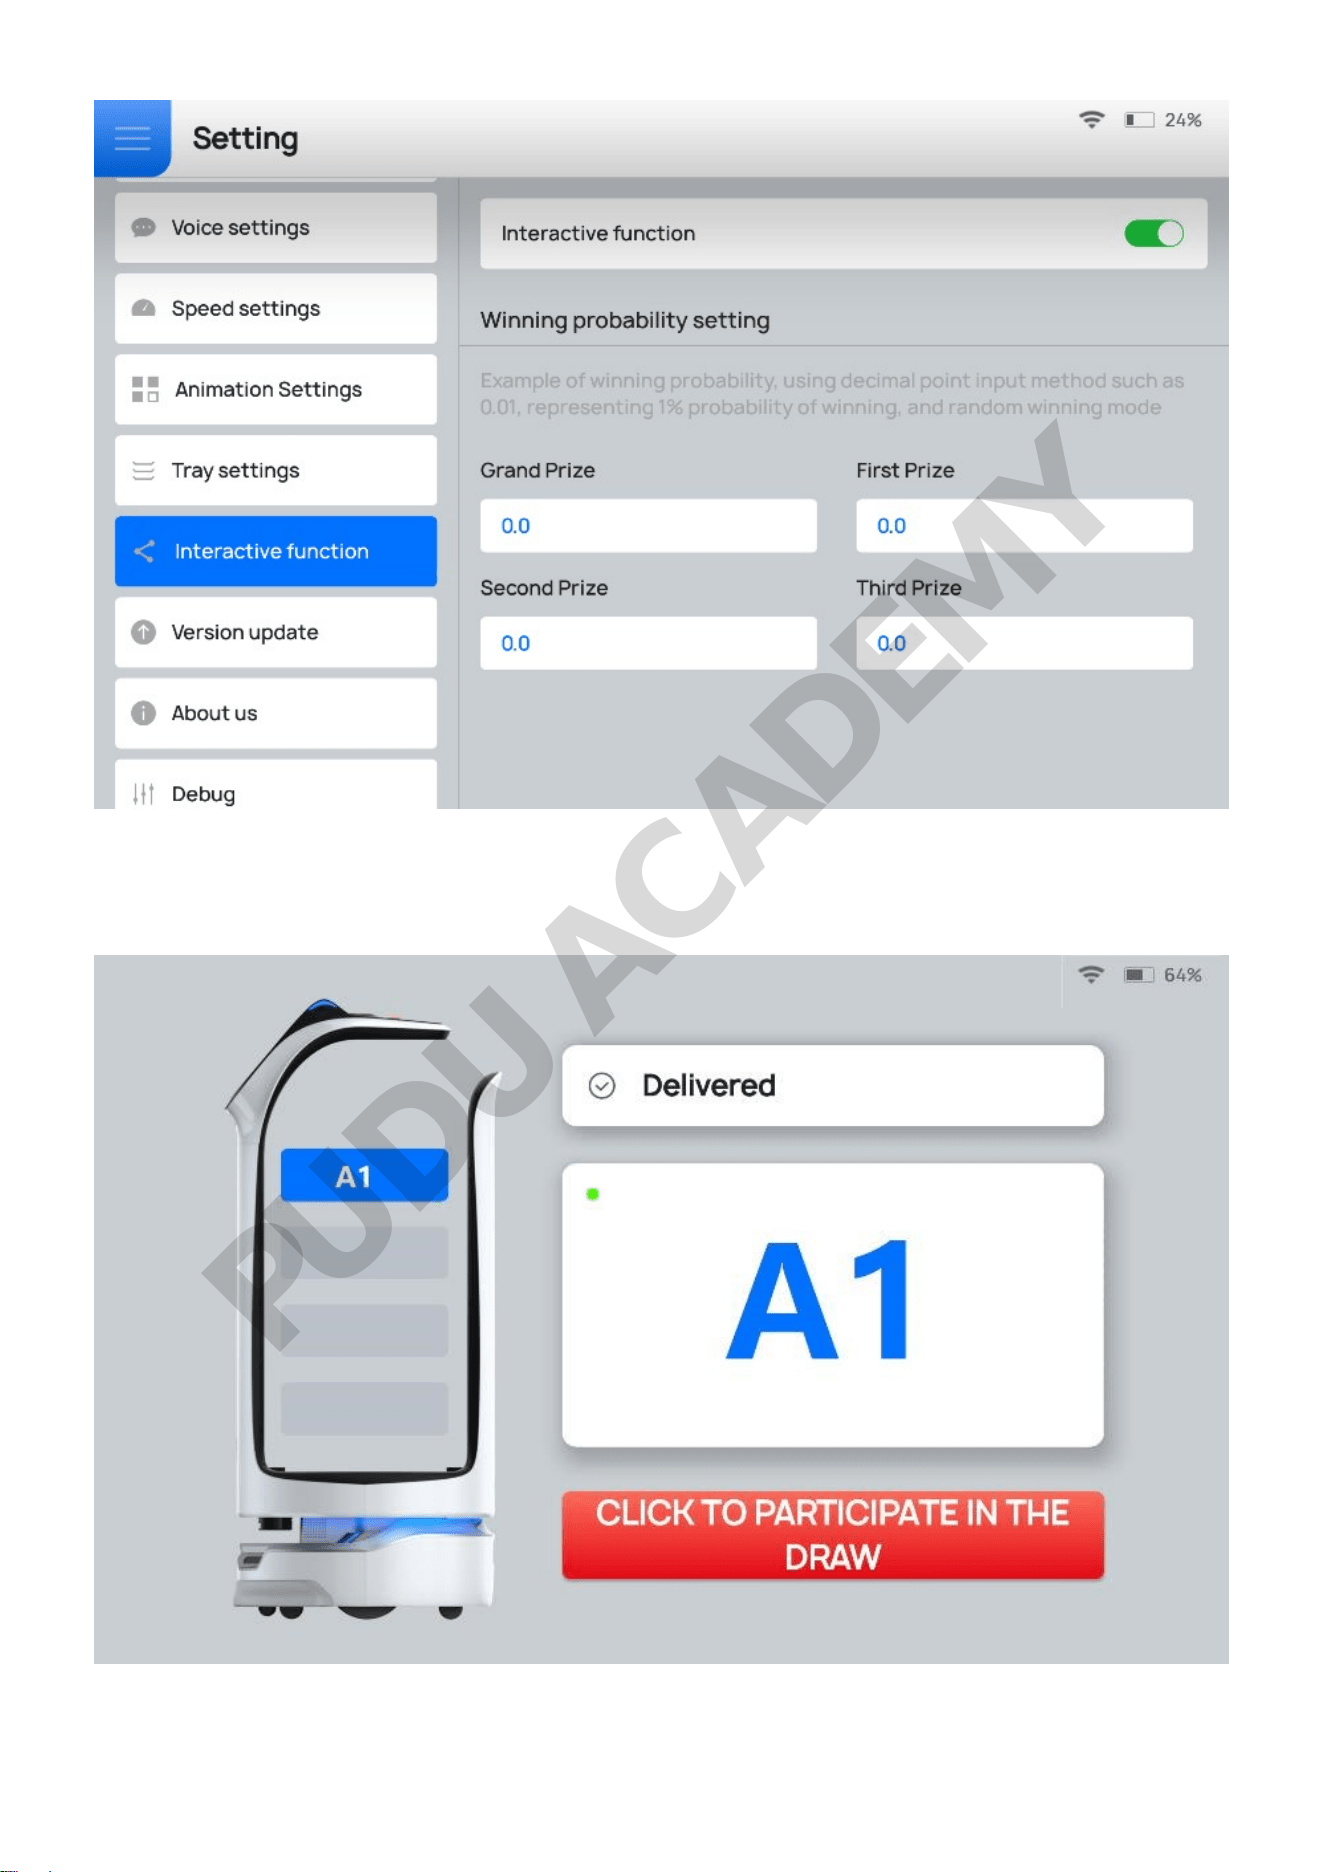
Step 2 Set the probabilities in decimals between 0 and 1. The probabilities should sum up to 1.
Step 3 After the dishes are delivered, customers can tap for a lucky draw.
If a customer wins a prize, he or she will be reminded to contact the waiter to redeem the prize after
taking a picture. Tap Please click this button after taking a picture for the robot to perform the
PUDU ACADEMY
next task. If the customer doesn't win a prize, the robot will perform the next task after 3 seconds.
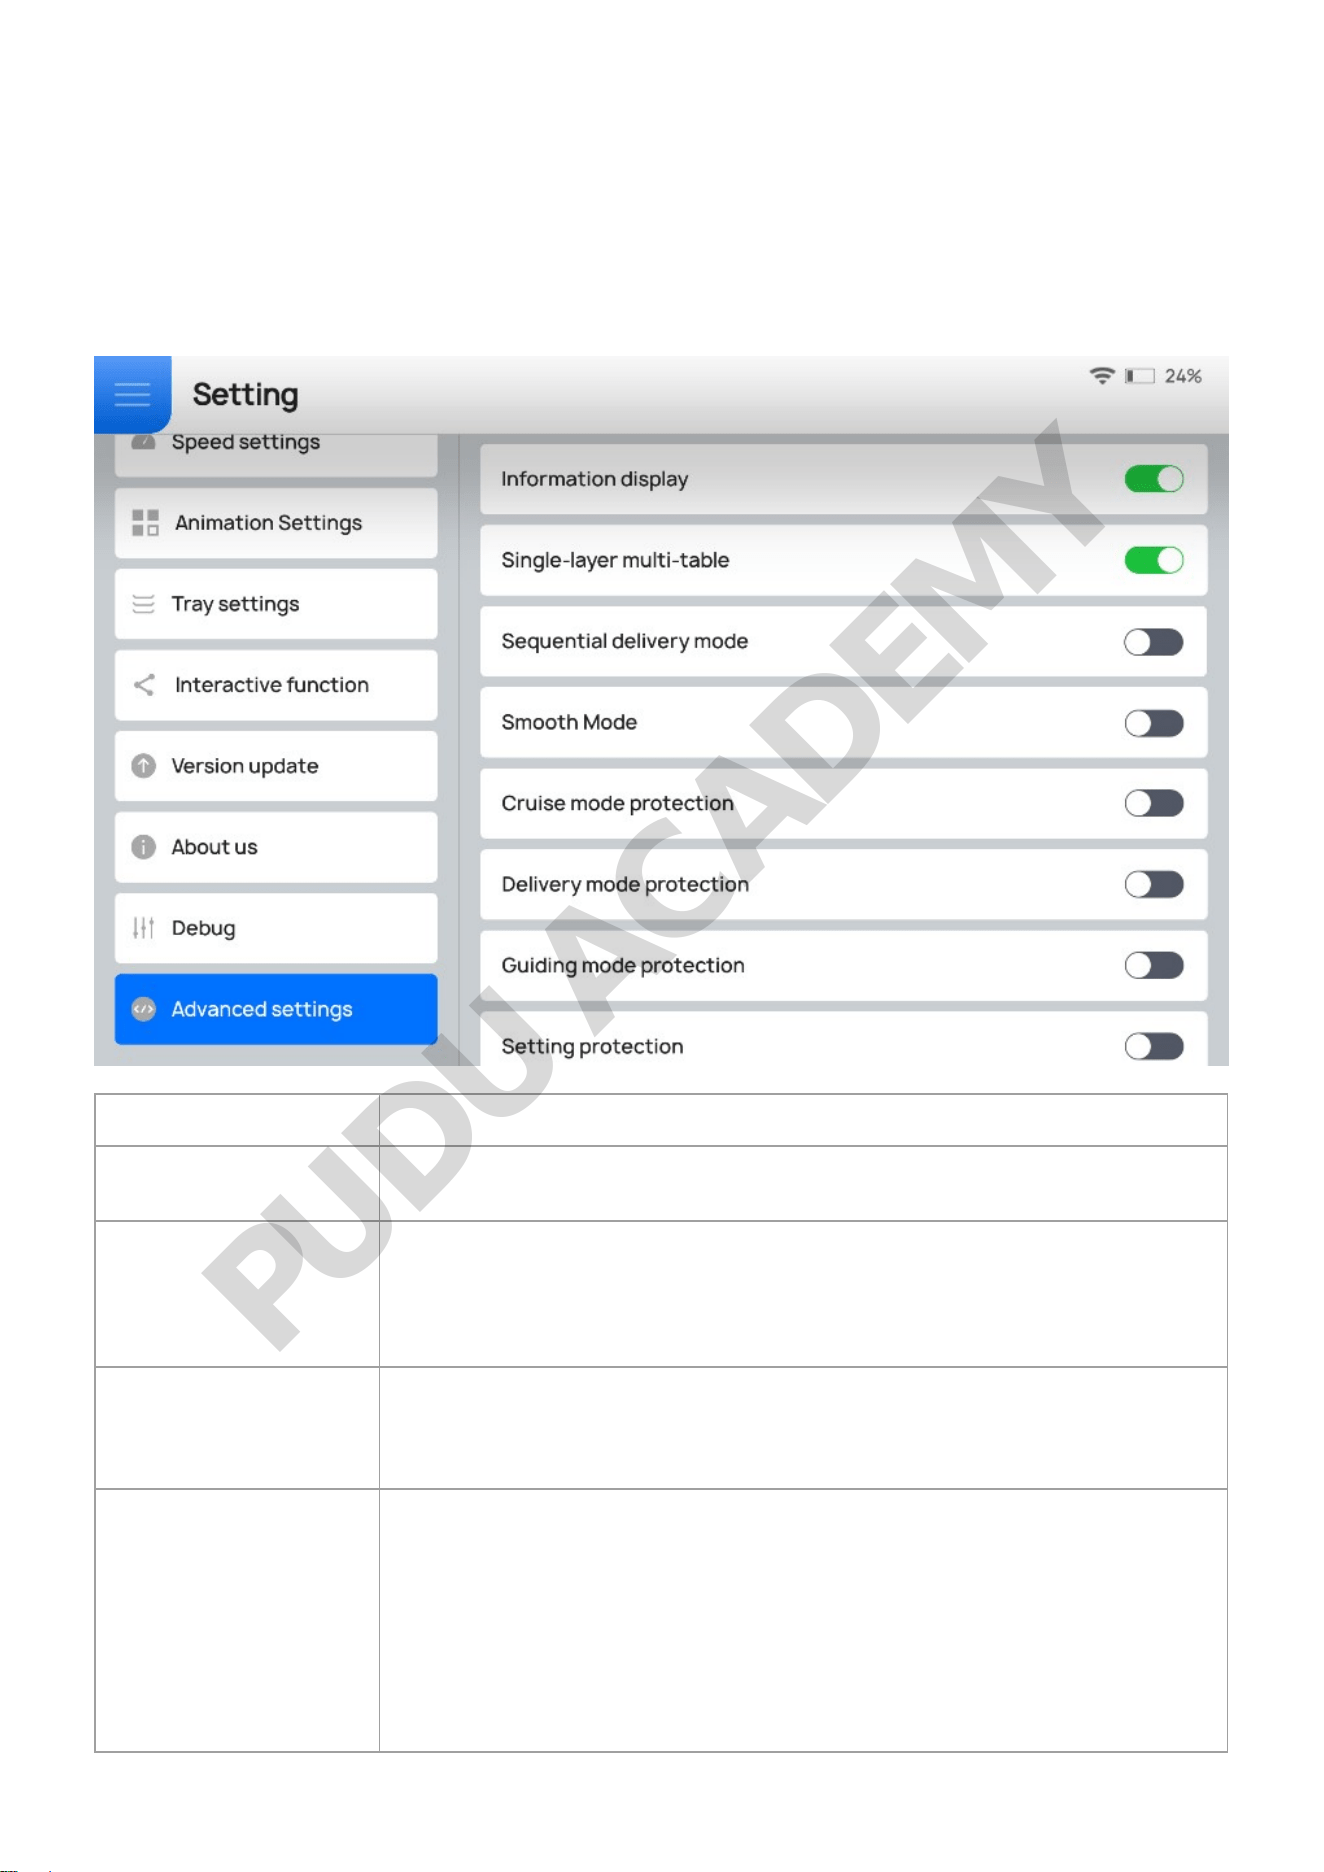
3.5 Advanced Settings
The Advanced settings are used for advanced operations of the robot. Please contact technical
engineers for details. Functions supported by Advanced settings are shown below.
Function Description
Information display
Choose whether to enable Information display
If not, the Setting > About us menu will be hidden.
Single-layer multi-
table
Choose whether to enable Single-layer multi-table function
If enabled, multiple table numbers can be set for a single layer of tray. Up
to 20 table numbers can be set for a single tray.
Single-layer multi-table function is only valid in Delivery mode, Cruise
mode, and Special mode.
Sequential delivery
mode
Choose whether to enable sequential delivery mode
If not, the robot delivers dishes according to the optimal path planning. If
enabled, the robot delivers dishes to tables according to the preset
sequence.
Smooth Mode
Choose whether to enable Smooth Mode
Smooth Mode is mainly used to deliver dishes with a small amount of soup.
If enabled, the interface will show the Smooth mode option.
• Enable once: Smooth Mode is only valid in the current task and will be
disabled by default after the task is completed.
• Enable permanently: Smooth Mode is enabled by default on the Task
interface.
• Repeat last: If enabled, the status of the Smooth mode in the current task
remains the same as in the previous task. That is, if the Smooth mode is
enabled in the previous task, it is enabled by default in the current task.
PUDU ACADEMY
Function Description
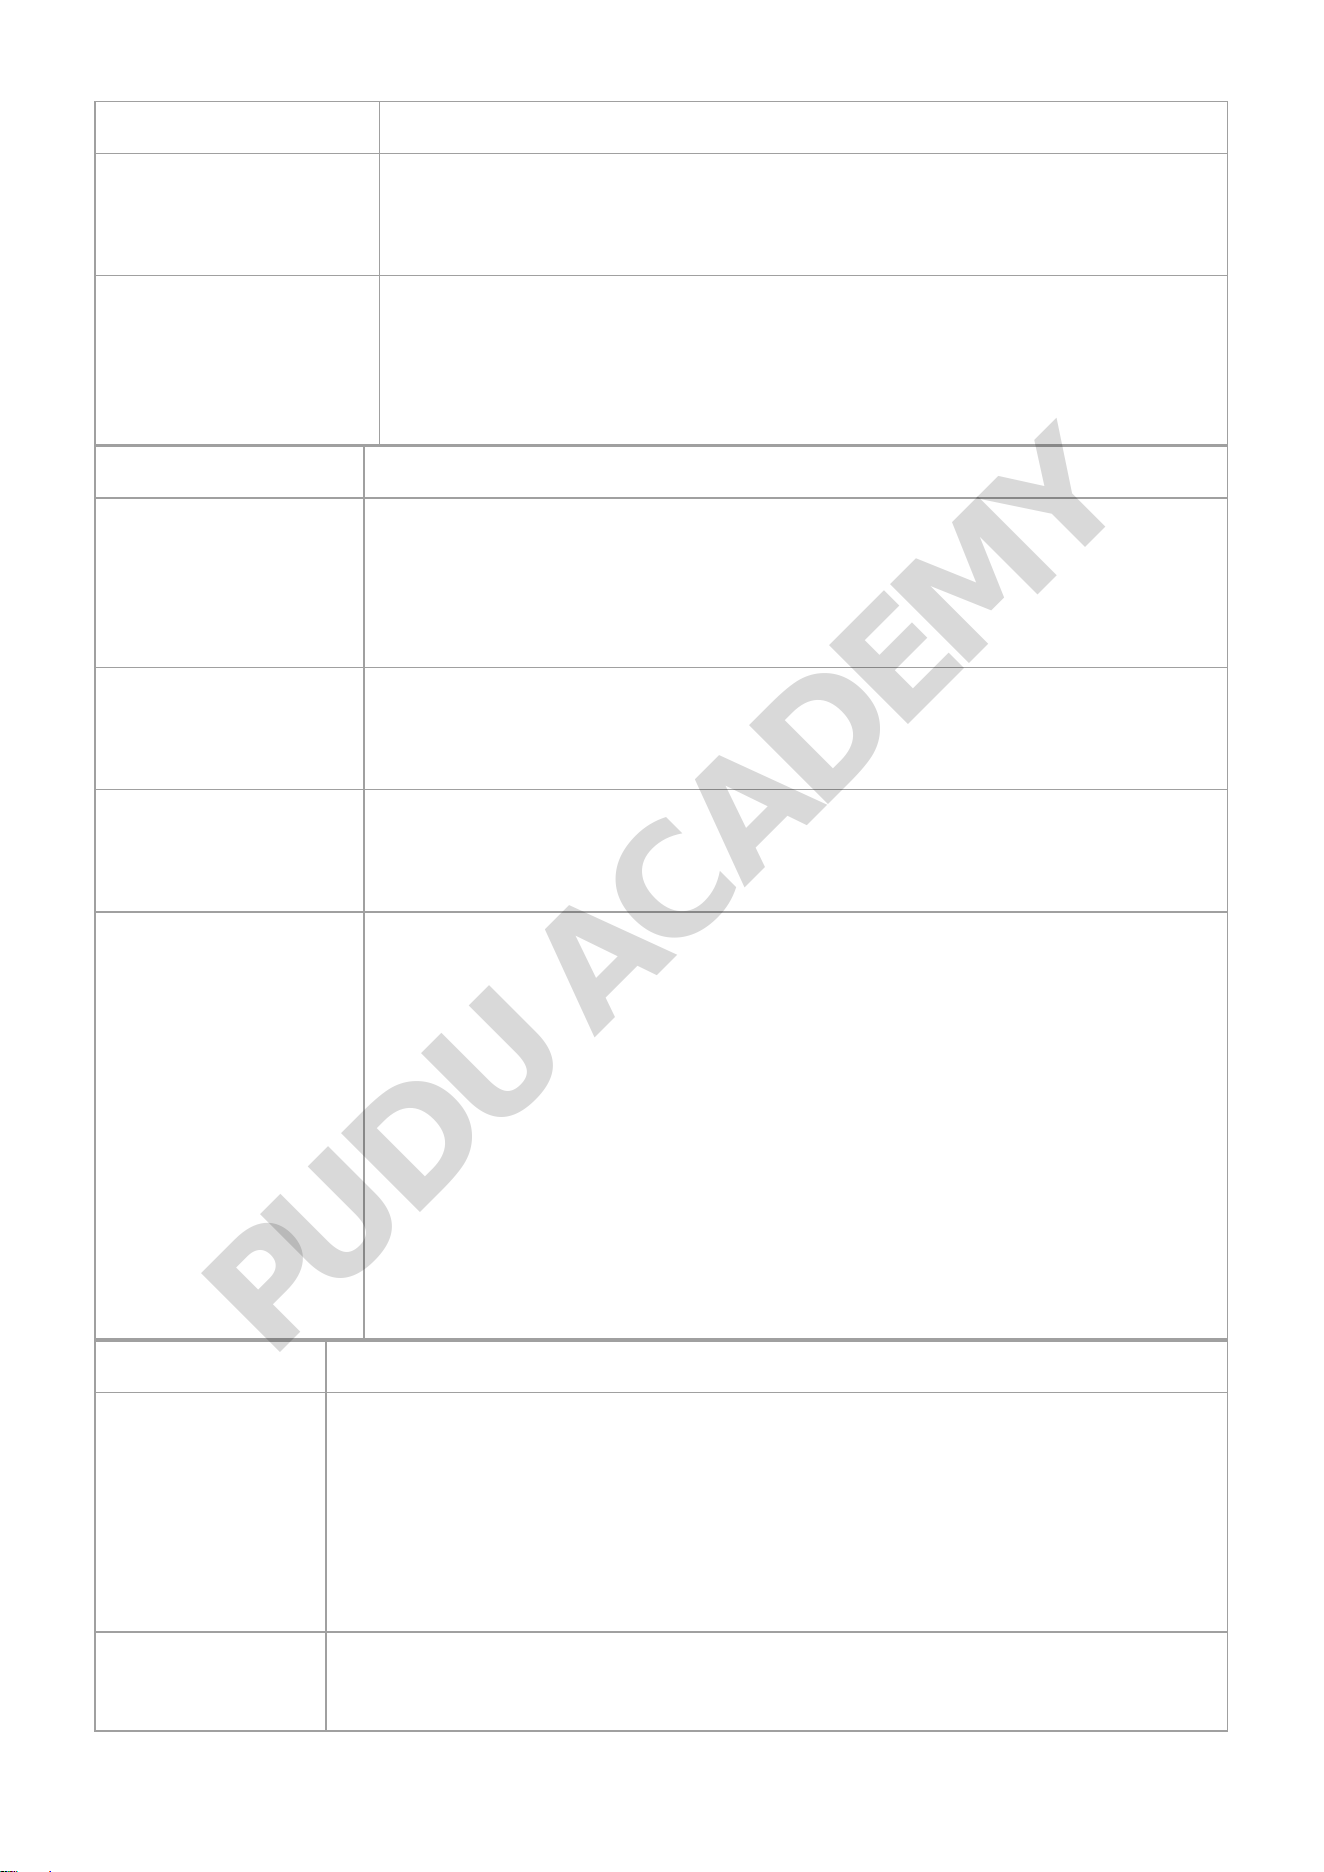
Cruise mode protection
Choose whether to enable Cruise mode protection
If enabled, a password is required to exit the Cruise mode. Please contact
Pudu's technical support for the password.
If not, the robot exits the Cruise mode directly.
Delivery mode
protection
Choose whether to enable Delivery mode protection.
If enabled, a password is required for any further operations (e.g., cancel
task, modify task, or return) during delivery. Please contact our technical
engineers for the password.
If disabled, the operations (e.g., cancel task, modify task, or return) can be
performed directly during delivery.
Function Description
Guiding mode
protection
Choose whether to enable Guiding mode protection.
If enabled, a password is required for any further operations (e.g., cancel
task or return to the greeting location) during guiding. Please contact our
technical engineers for the password.
If disabled, the operations (e.g., cancel task or return to the greeting
location) can be performed directly during guiding.
Setting protection
Choose whether to enable Setting protection.
If enabled, a password is required for any further operations on the Setting
interface. Please contact our technical engineers for the password.
If disabled, the Setting interface can be entered directly.
Repeat the previous
task
Choose whether to enable repeating the last task.
The function can be enabled when the robot delivers to the same destination
every time.
The function is only available in Delivery mode and Special mode.
Distribution
parameter settings
Set the time in different modes.
• Automatic pick up time: If Done is not tapped within the set time after the
robot arrives at the destination, the robot will automatically complete the
current task and proceed with the next one. Currently, the function is only
valid in the Delivery mode and Special mode. The time ranges from 1 to 600
seconds and is defaulted to 180 seconds.
• Auto complete time of guiding: If Done is not tapped within the set time
after the guiding is completed, the robot will automatically complete the task
and return to the greeting location.
The time ranges from 1 to 30 seconds and is defaulted to 15 seconds.
• Cycle broadcast time of delivery arrival: The interval of the cycled voice
broadcast after the robot arrives at the destination in the Delivery mode. The
robot stops the voice broadcast when the delivery is complete.
The time ranges from 1 to 30 seconds and is defaulted to 15 seconds.
• Non cruise resume time of pause: The time for the robot to automatically
resume work after a pause in a non-Cruise mode. That is, if no operation is
performed within the set time
Function Description
when the robot pauses, the robot automatically resumes work.
The time ranges from 5 to 600 seconds and is defaulted to 10 seconds.
• Cruise mode auto resume time of pause: The time for the robot to automatically
resume work after a pause in the Cruise mode. That is, if no operation is
performed within the set time when the robot pauses, the robot automatically
resumes work.
The time ranges from 5 to 600 seconds and is defaulted to 10 seconds.
The interactive function and the automatic pickup cannot be enabled at the same
time. Otherwise, the lucky draw will be invalid.
Delivery speed
Set Delivery speed, Cruise speed, Return speed, and Guiding speed. Higher
speeds are supported in advanced functions: 1.0m/s (3.28 ft/s), 1.1m/s (3.91 ft/s),
1.2m/s (3.94 ft/s).
PUDU ACADEMY
Function Description
Robot API
Choose whether to enable Robot API.
If Robot API is enabled, the robot can work with the PuduBeeper, as well as
support a third-party system.
Table Number
Input
Method
Select table number input methods:
• Enter upon smart search
• Enter upon selecting table number
Battery protection
settings
To avoid over-discharge or slow charging, the user can set the battery protection
level for the robot, i.e., set the reserved battery level. When the actual battery
level drops below the reserved battery level, the robot cannot be used.
If the battery level is below 30%, the function will not be available.
Braking Level
Specify braking level for emergency stop
Levels
Level 1: Emergency stop and start, with the shortest braking distance during
emergency stop.
Level 2: Suitable for light and medium load with smooth braking
Level 3: Suitable for heavy load with smooth braking
Reset
Choose whether to restore the robot to factory settings.
Doing so will delete contents such as the downloaded music, custom voice
packets, and maps. Please proceed with caution.
Function Description
If the battery level is below 10%, the operation cannot be performed.
4. Music Functions
In the Music interface, users can control the playing of music, set music for different modes, and
manage music files.
PUDU ACADEMY
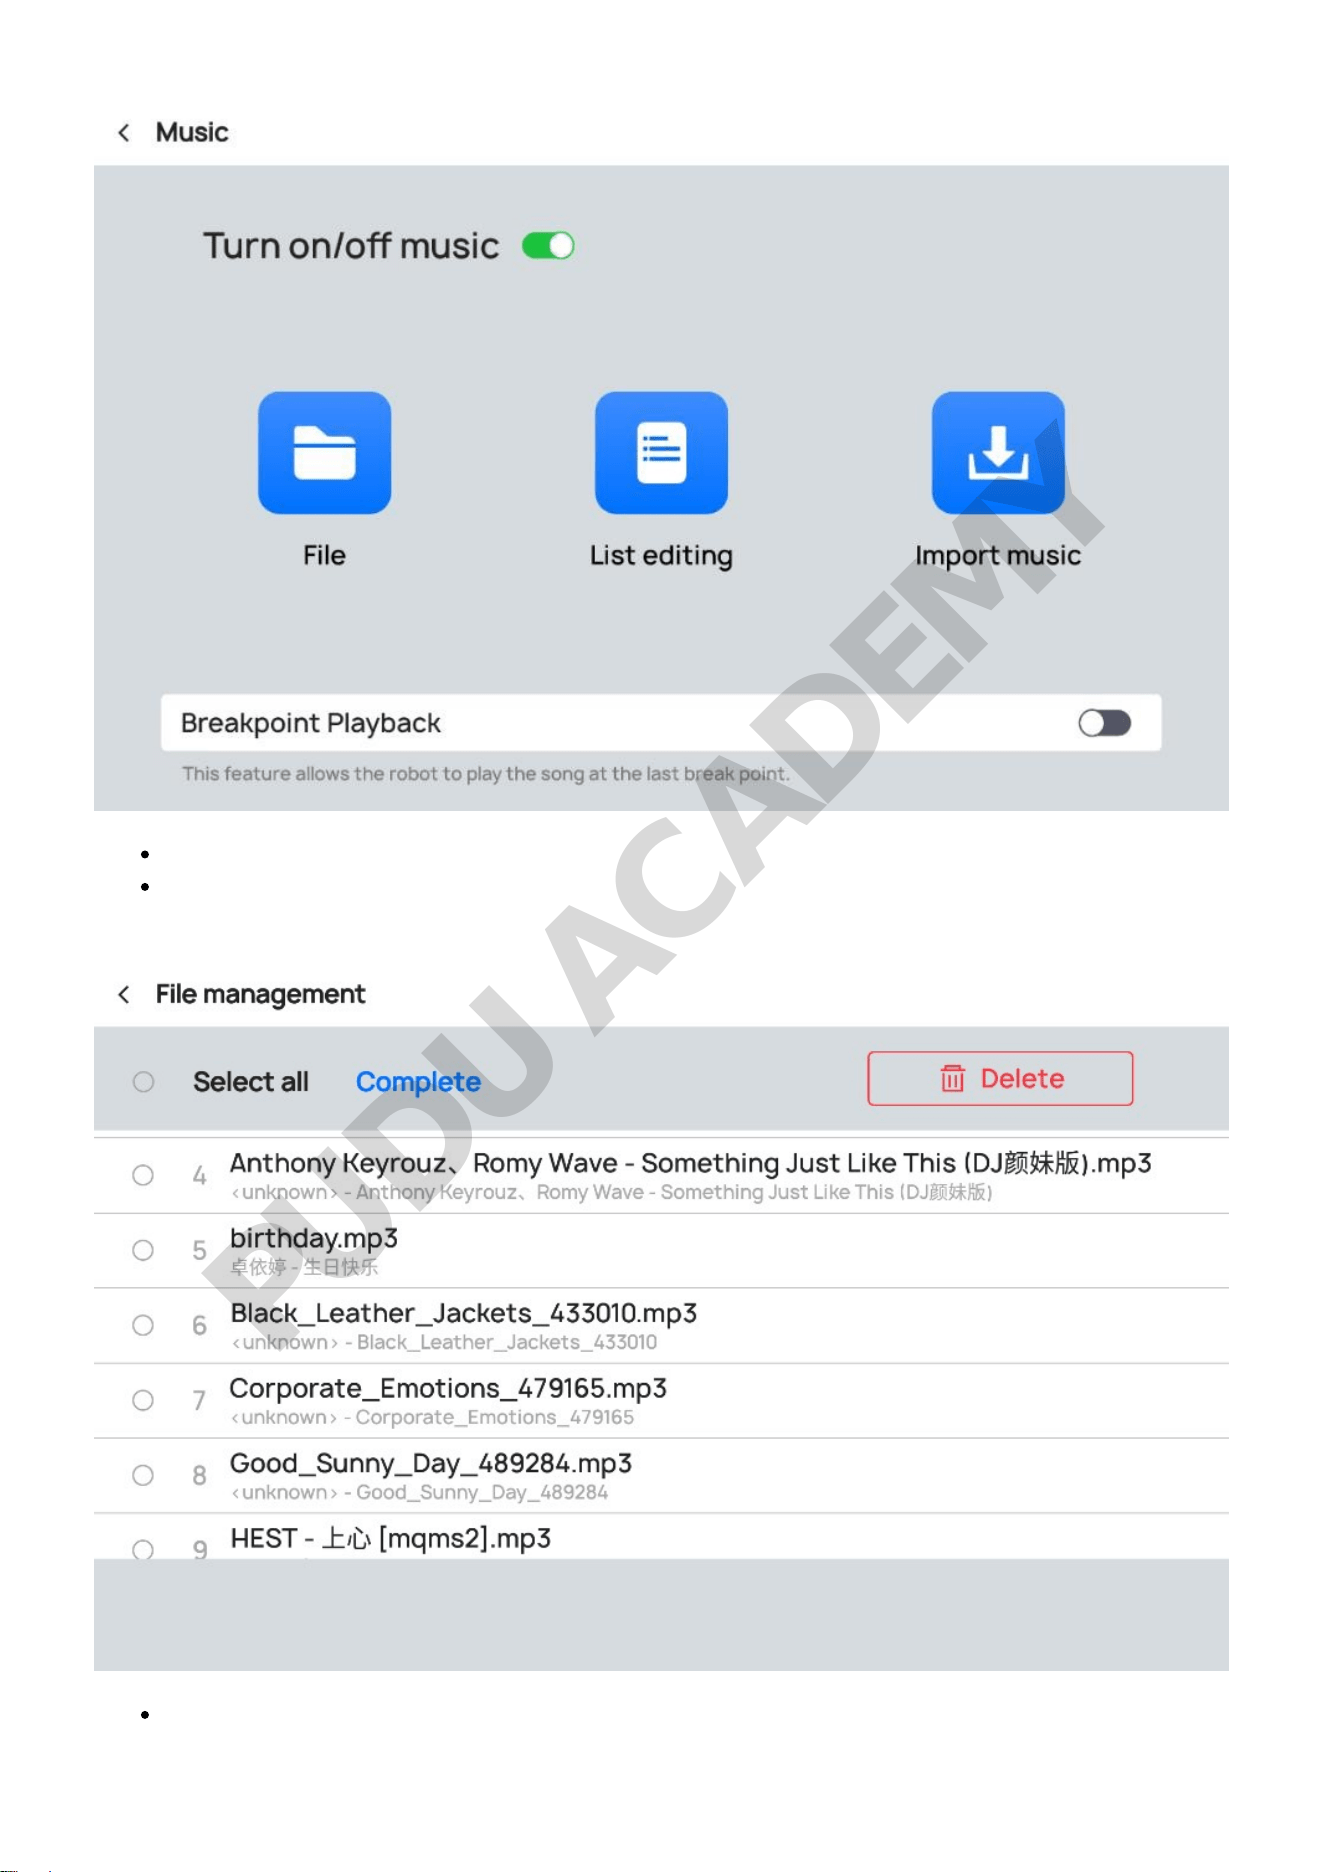
Slide the music switch to control the playing of music.
File management is used to manage the music files imported to the robot. Tap Edit to delete
selected music files.
List editing: Select List editing to view the music set for different modes. Tap the list of modes
to view, add, or delete music files for different modes.
PUDU ACADEMY
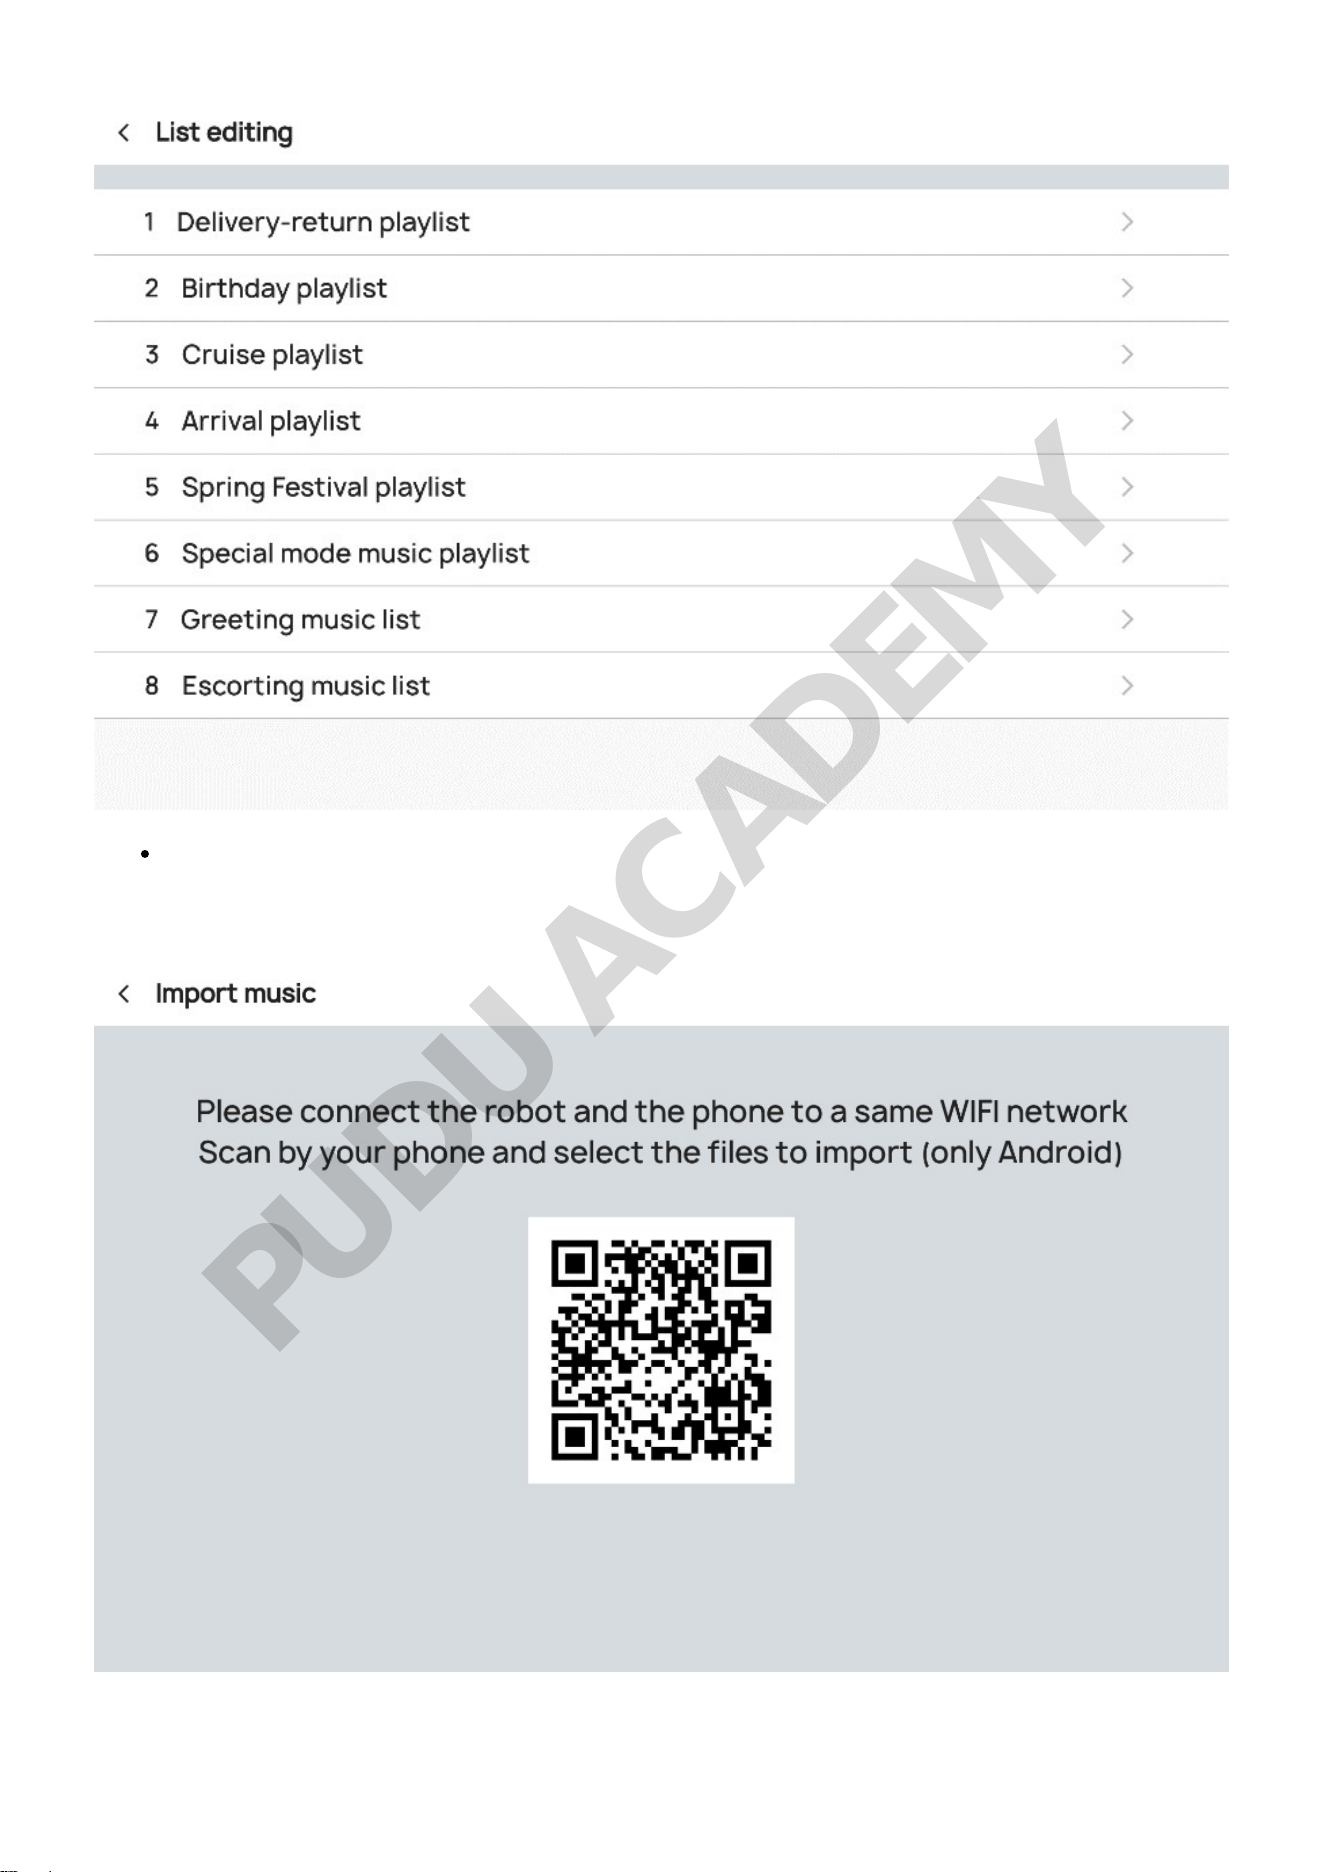
Import music: After the robot and the mobile phone are connected to the same WiFi
connection, music files can be uploaded directly with a scan. Supported music file formats
include mp3, wav, flac, aac, pcm, wma, and ape.
PUDU ACADEMY
5. Voice Interaction Descriptions
When the robot is stationary, you can use wake-up voice to activate voice interaction with the robot.
Please ensure that the robot is connected to a network before waking up by voice.
Note
If the robot is displaying the voice wake-up interface, its motor is locked, and the user cannot move
the robot at this time.
Method 1: Say "Bella, Bella" to the robot, and the robot will talk with you.
Method 2: Stand in front of the robot, the robot will take the initiative to talk with you.
6. Touch Interaction Descriptions
When the robot is stationary, touch its head or ears to activate touch interaction.
The robot behaves in a friendly and pleasant manner at the first touch and plays voice.
Continue touching the robot will trigger further pleasant expressions and voices.
Multiple consecutive touches may trigger unpleasant expressions and voices.
An angry expression and voice will be triggered if the robot is touched when it’s already
unpleasant.
7. Docking Instructions
BellaBot supports three docking modes. In actual scenarios where multiple robots cooperate, users
can select any docking mode during mapping. This section only covers the description of the three
docking modes. For details about mapping, please contact our technical engineers.
Three docking modes:
One-to-one Docking mode: Each robot has its fixed pickup location (docking location).
Free Docking mode: Set multiple pickup locations (docking locations) for the robot to dock by
priority, i.e., the robot chooses the nearest pickup location for docking.
Waiting mode: Set temporary docking location. When the robot has no task and there's no vacancy
at the pickup locations (docking locations), the robot docks at the temporary docking location. Once
a vacancy appears at a pickup location (docking location), the robot automatically goes there for
docking.
PUDU ACADEMY