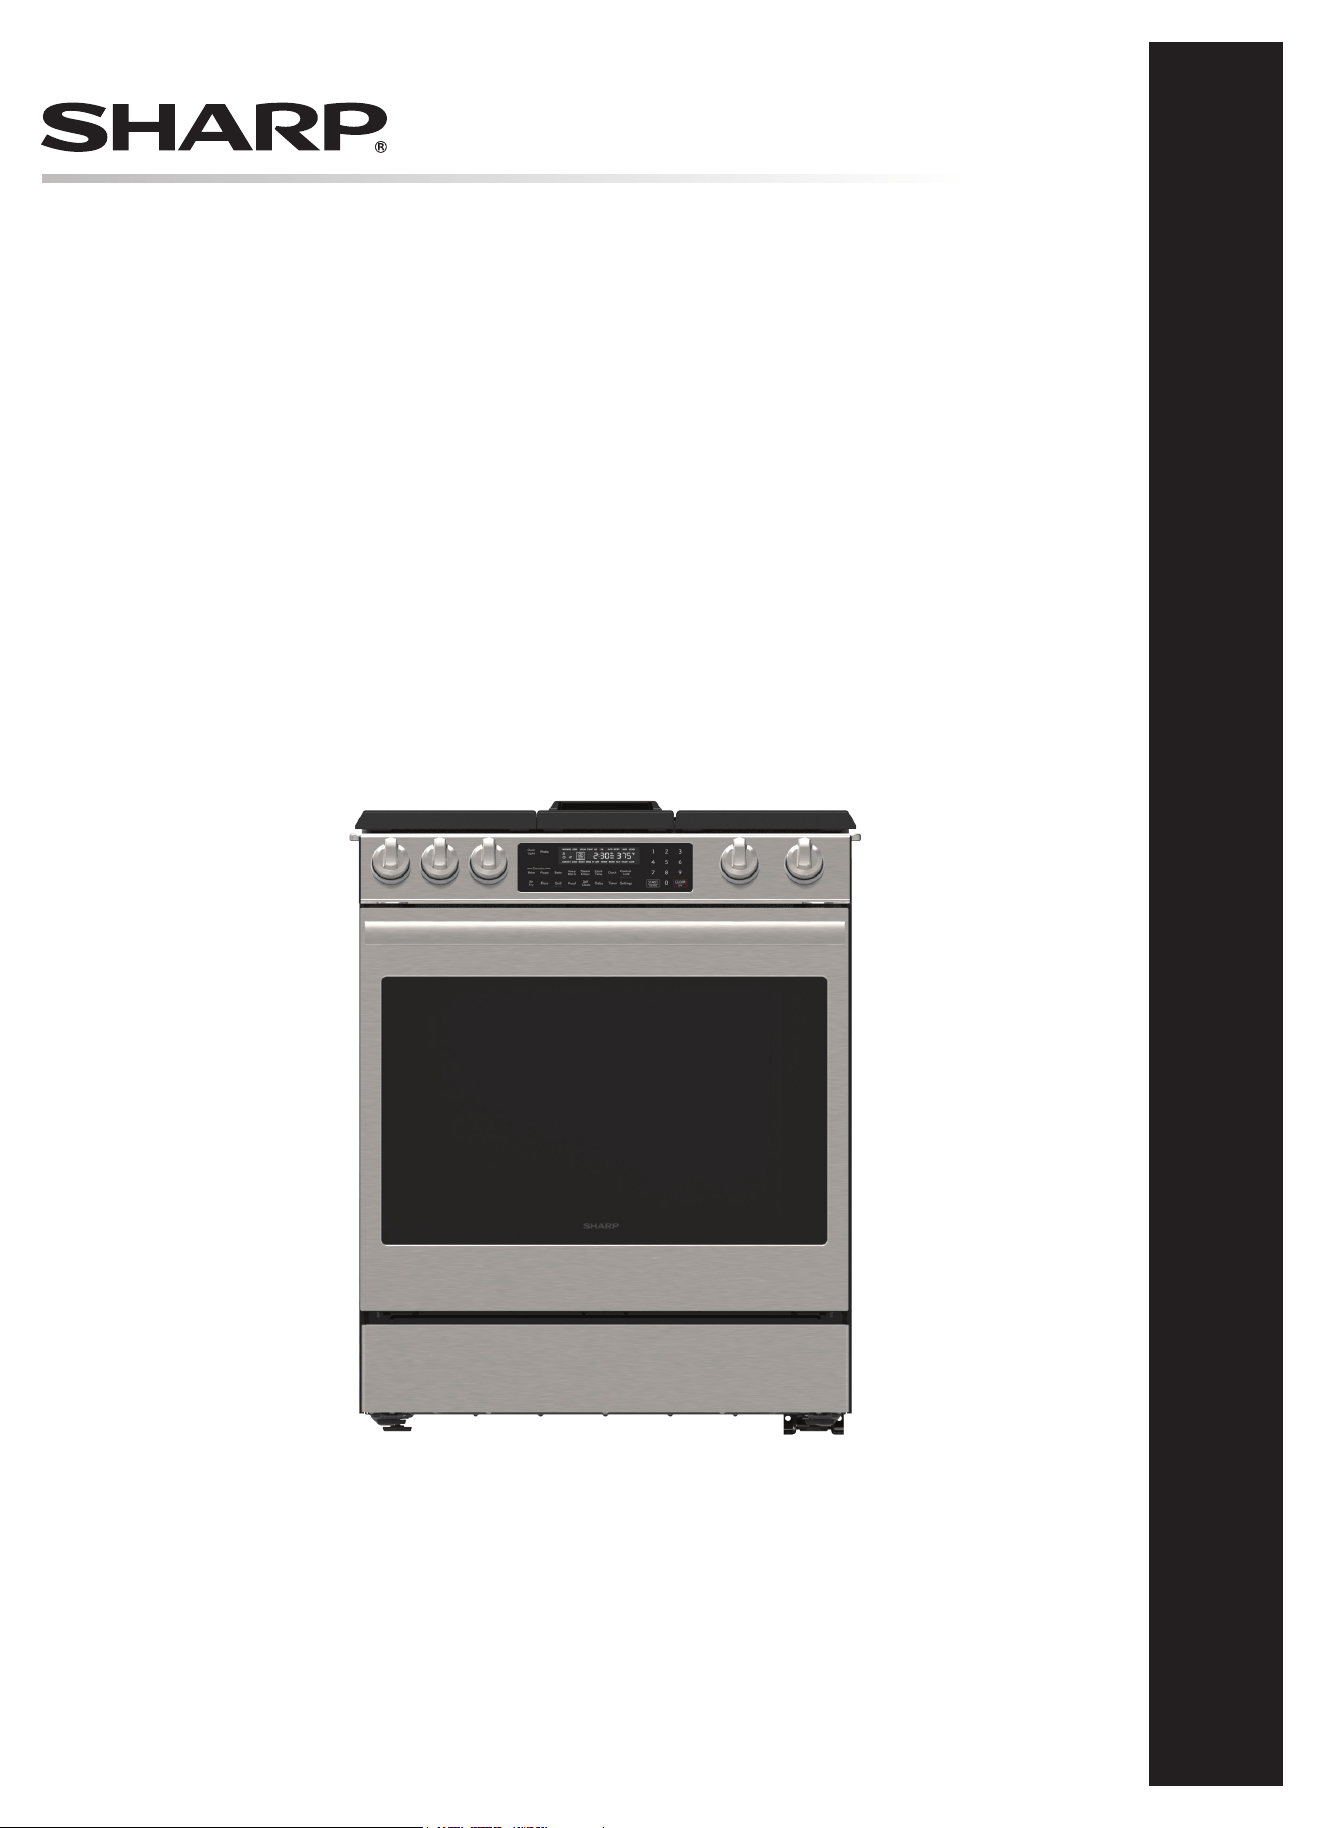
30" Slide-In Gas Range: Models SSG3074SNS, SSG3076SNS
OPERATION MANUAL
30" SLIDE-IN GAS RANGE
MODELS: SSG3074SNS, SSG3076SNS

2E
CONTENTS
WARNING
• Failure to follow these warning statements could result in re,
explosion, or burn hazard that could cause property damage,
personal injury, or death.
• Do not store or use gasoline or other ammable vapours and
liquids in the vicinity of this or any other appliance.
• Never operate the top surface cooking section of this appliance
unattended.
• If a re should occur, keep away from the appliance, and
immediately call your re department.
• DO NOT ATTEMPT TO EXTINGUISH AN OIL/GREASE
FIRE WITH WATER.
WHAT TO DO IF YOU SMELL GAS:
• Do not try to light any appliance.
• Do not touch any electrical switch.
• Do not use any phone in your building.
• lmmediately call your gas supplier from a neighbor's phone.
Follow the gas supplier's instructions.
• If you cannot reach your gas supplier, call the re department.
• Installation and service must be performed by a qualied
installer, service agency, or the gas supplier.
WARNING
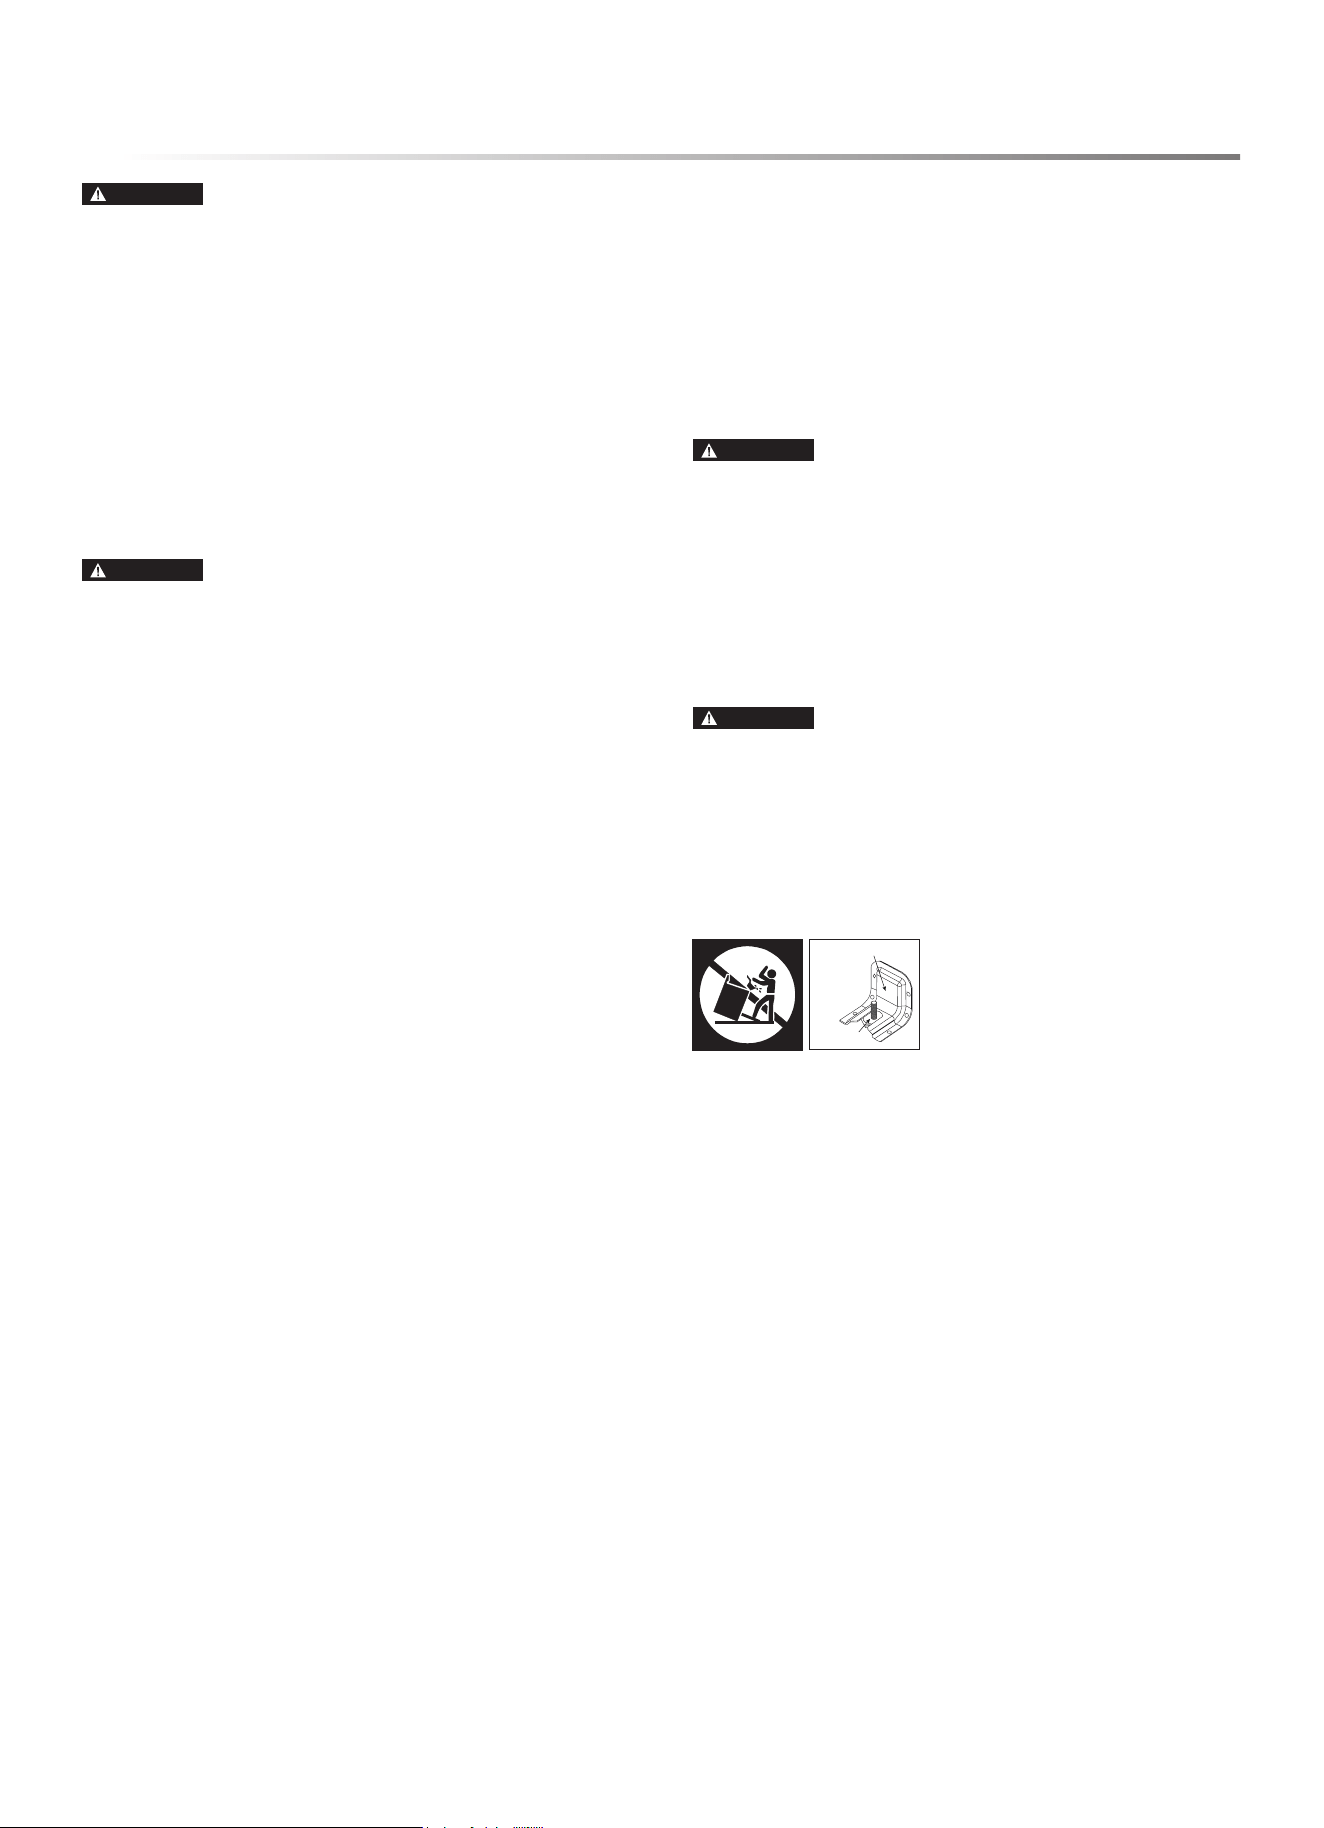
TIP-OVER HAZARD
• A child or adult can tip the range and be killed.
• Install the anti-tip device to the structure and/or the range.
Verify the anti-tip device has been properly installed and
engaged.
• Engage the range to the anti-tip device by screws. Ensure the
anti-tip device is re-engaged when the range is moved.
• Re-engage the anti-tip device if the range is moved. Do not
operate the range without the anti-tip device in place and
engaged.
• See installation instructions for details.
• Failure to do so can result in death or serious burns to children
or adults.
CUSTOMER ASSISTANCE ............................................ 3
US CONSUMER LIMITED WARRANTY ............................. 4
SAFETY PRECAUTIONS .............................................. 5
USING NATURAL GAS ............................................................. 5
GROUNDING THE APPLIANCE ................................................ 5
ANTI-TIP BRACKET ................................................................. 5
IMPORTANT SAFETY INSTRUCTIONS ...........................6-9
INSTALLATION AND MAINTENANCE....................................... 6
GENERAL SAFETY PRECAUTIONS ......................................... 6
COOKTOP SAFETY ................................................................. 7
OVEN SAFETY ........................................................................ 8
SELF CLEAN HAZARDS ........................................................... 8
ABOUT FOOD SAFETY ............................................................. 9
USDA RECOMMENDED TEMPERATURE ................................. 9
PARTS AND FEATURES..........................................10-14
TOP VIEW ............................................................................. 10
FRONT VIEW ......................................................................... 10
COOKTOP .............................................................................. 11
CONTROL KEYPAD AND DISPLAY ........................................ 11
SETTINGS ............................................................................. 12
CONTROL LOCK .................................................................... 12
TIMER ................................................................................... 12
OVEN LIGHT ........................................................................ 12
SABBATH MODE ................................................................... 14
HOLD TO KEEP WARM SETTING .......................................... 14
BEFORE OPERATING ................................................15
BEFORE FIRST USE .............................................................. 15
CONDITION OF THE UNIT .................................................... 15
SERVICE AND REPAIR WARNING ........................................ 15
PRODUCT DISPOSAL ............................................................ 15
COOKTOP USE ....................................................16-17
COOKTOP BURNER BTU RATING (NATURAL GAS) ............... 16
COOKTOP BURNER CONTROL .............................................. 16
OVEN USE .........................................................18-24
ABOUT OVEN COOKING ........................................................ 18
OVEN HEAT SOURCE BTU RATING (NATURAL GAS) ............ 18
OVEN RACKS ........................................................................ 18
COMPONENT COOLING FAN ................................................. 19
OVEN DOOR .......................................................................... 19
OVEN VENTS ......................................................................... 19
OVEN CONDENSATION AND TEMPERATURE ........................ 19
COOKING WITH CONVECTION ............................................. 20
ADVANTAGES OF CONVECTION COOKING............................ 20
PREHEAT .............................................................................. 21
BAKE .................................................................................... 21
BROIL HI/LOW ...................................................................... 21
PIZZA .................................................................................... 21
AIR-FRY ............................................................................... 21
CONVECTION BAKE ............................................................. 22
CONVECTION ROAST ............................................................ 22
KEEP WARM ........................................................................ 22
PROOF .................................................................................. 22
STEAM CLEAN ...................................................................... 22
SELF CLEAN .......................................................................... 23
DELAY ................................................................................... 23
COOK TIME ........................................................................... 23
PROBE .................................................................................. 24
CLEANING AND MAINTENANCE ................................25-27
COOKTOP CLEANING ............................................................ 25
CONTROL PANEL CLEANING ................................................ 25
OVEN INTERIOR CLEANING .................................................. 26
OVEN LIGHTS ....................................................................... 26
DRAWER AND DOOR ............................................................ 27
TROUBLESHOOTING .............................................28-29
BEFORE YOU CALL ............................................................... 28
ERROR CODES .......................................................30
E3
CUSTOMER ASSISTANCE UNITED STATES ONLY
REGISTER YOUR PRODUCT
Registering your new product is easy and offers benets that help you get the most
out of your Sharp product including:
9 Convenience: If you ever need warranty support, your product information is already on le.
9 Communication:Stay up to date with important notications and special offers from SHARP.
9 Support: Quickly access support content including Owner’s Manuals, FAQ’s,
How-to Videos, and much more.
3 EASY WAYS TO REGISTER TODAY!
PRODUCT SUPPORT
If you have questions about the setup or operation of your product, please refer to
the corresponding section within this manual.
Additionally, visit https://support.sharpusa.com/s/ to access exclusive content about
your product including:
Æ FAQ’s and How-To Videos
Æ Find or Request Service
Æ Extended Warranty Options
Æ Downloads including the Installation Guide, Spec Sheet, and Owner’s Manual
CONTACT US
If at any time you have questions or comments concerning your SHARP product,
please contact the SHARP Customer Assistance Center. We are available to
assist you through multiple contact methods for your convenience:
Scan this QR Code on your mobile device Visit http://www.sharpusa.com/register
ONLINE
Visit our sites to
learn more about
your product at
sharpusa.com and
sbl.sharpusa.com
See the Contact Us section on our sites
U.S. | https://support.sharpusa.com/s/
Contact a Sharp Advisor on the phone
Contact a Sharp Advisor on the phone
CALL US
US 800-BE-SHARP
800-237-4277
Mon-Fri: 7am-7pm CST
Sat-Sun: 9am-7pm CST
CALL US
US 800-BE-SHARP
800-237-4277
Mon-Fri: 7am-7pm CST
Sat-Sun: 9am-7pm CST
EMAIL
Available 24/7
US: sharpusa.com
CHAT ONLINE
Mon-Fri: 7am-7pm CST
Sat-Sun: 9am-7pm CST
SCAN
Use the camera or
QR code scanning
application on your
mobile device
TGANEB010MRR2 Sep 24, 2025
CUSTOMER ASSISTANCE

4E
US CONSUMER LIMITED WARRANTY
4E
SHARP ELECTRONICS CORPORATION (“Sharp”) warrants to the rst consumer purchaser (“Purchaserˮ) that this SHARP brand
product (“Productˮ), when shipped in its original container and sold or distributed in the United States by Sharp or an authorized
Sharp dealer or reseller, will be free from defective workmanship and materials, and agrees that it will, at its option, either repair
the defect or replace the defective Product or part thereof with a new or remanufactured equivalent at no charge to the Purchaser for
parts or labor for the period(s) set forth below.
This limited warranty does not apply to any appearance items of the Product nor to the additional excluded item(s) set forth below
nor to any Product the exterior of which has been damaged or defaced, which has been subjected to misuse, abnormal service or
handling, or which has been altered or modied in design or construction.
In order to enforce the rights under this limited warranty, the Purchaser should follow the steps set forth below and provide proof of
purchase to the servicer.
The limited warranty described herein is in addition to whatever implied warranties may be granted to Purchasers by law. ALL
IMPLIED WARRANTIES INCLUDING THE WARRANTIES OF MERCHANTABILITY AND FITNESS FOR USE ARE
LIMITED TO THE PERIOD(S) FROM THE DATE OF PURCHASE SET FORTH BELOW. Some states do not allow limitations
on how long an implied warranty lasts, so the above limitation may not apply to you.
Neither the sales personnel of the seller nor any other person is authorized to make any warranties other than those described herein,
or to extend the duration of any warranties beyond the time period described above on behalf of Sharp.
The warranties described herein shall be the sole and exclusive warranties granted by Sharp and shall be the sole and exclusive
remedy available to the Purchaser. Correction of defects, in the manner and for the period of time described herein, shall constitute
complete fulllment of all liabilities and responsibilities of Sharp to the Purchaser with respect to the Product, and shall constitute
full satisfaction of all claims, whether based on contract, negligence, strict liability or otherwise. In no event shall Sharp be liable,
or in any way responsible, for any damages or defects in the Product which were caused by repairs or attempted repairs performed
by anyone other than an authorized servicer. Nor shall Sharp be liable or in any way responsible for any incident or consequential
economic or property damage. Some states do not allow the exclusion of incidental or consequential damages, so the above exclusion
may not apply to you.
THIS LIMITED WARRANTY IS VALID ONLY IN THE FIFTY (50) UNITED STATES, THE DISTRICT OF COLUMBIA AND
PUERTO RICO.
Your product model number &
description
Model # SSG3074SNS, SSG3076SNS or 30" Slide-In Gas Range.
(Be sure to have this information available when you need service for your Product.)
Warranty period for this product: One (1) year parts and labor including in-home service.
Product must be accessible to provide service.
Additional item(s) excluded from
warranty coverage (if any):
Non-functional accessories, service calls to your home to instruct how to use your Slide-In
Gas Range, replace or repair house fuses or to correct house wiring, improper commercial use,
installation, or maintenance, damage to the product caused by delivery, accident, modications,
re, oods or acts of God.
Where to obtain service: From a Sharp Authorized Servicer located in the United States. To nd the location of the
nearest Sharp Authorized Servicer, call Sharp toll free at 1-800-237-4277 (1-800-BE-SHARP).
What to do to obtain service: In-home service is provided for one year from date of purchase. In-home service can be arranged
by calling 1-800-BE-SHARP. Be sure to have Proof of Purchase available.
TO OBTAIN SUPPLY, ACCESSORY OR PRODUCT INFORMATION, CALL 1-800-BE-SHARP or visit www.sharpusa.com.
SAVE THE PROOF OF PURCHASE AS IT IS NEEDED SHOULD YOUR APPLIANCE EVER REQUIRE WARRA NTY SERVICE.
E5
SAFETY PRECAUTIONS
WARNING
FIRE, EXPLOSION HAZARD
• NEVER store or use gasoline or other ammable vapors and
liquids in the vicinity of this or any other appliance, as these
materials may ignite and cause a re or explosion causing
property damage, personal injury or death.
• In the event of a re or explosion, move away from the appliance
immediately and call the local re department. NEVER attempt
to extinguish oil/grease re with water.
USING NATURAL GAS
Installation and service must be performed by a qualied installer,
service agency or the gas supplier. Have the installer show you
where the gas shut-off valve is located.
WARNING
CARBON MONOXIDE HAZARD
• NEVER cover any slots, holes or passages in the oven bottom
and NEVER cover an entire rack in the oven with materials
such as aluminum foil, as doing so blocks airow through the
oven and may cause risk of carbon monoxide poisoning.
• The Slide-In Gas Range is preset for use with Natural Gas and
can be converted for use with Propane (LP). Conversion for use
with propane must be performed by a qualied technician in
accordance with the installation instructions and local codes.
The agency performing this conversion assumes responsibility
for the conversion to propane use.
• To convert the range for use with Propane, have a qualied
technician follow the included instructions with the LP
Conversion kit.
GAS DETECTION
It is recommended to install a gas detector in any room with an
appliance using natural gas or propane.
If gas is detected or you smell gas, leave the area of the odor and
call the local gas company immediately. If the gas company is
unreachable, call the re department. In the meantime, follow
these precautions:
• Extinguish all open ames.
• Leave the premises of the suspected leak and keep others away.
Stay nearby until a gas company representative arrives.
• DO NOT use a phone inside the premises.
• DO NOT make a spark or ame with lighters, matches or
candles. DO NOT smoke.
• DO NOT turn on any electrical switches, appliances or lights,
as an electrical charge could create a spark.
Service must be performed by a qualied installer, service agency
or the gas supplier.
GROUNDING THE APPLIANCE
The Slide-In Gas Range requires connection to a 3-prong, 120VAC,
60Hz grounded electrical source. The oven is equipped with a cord
having a grounding wire with a grounding plug. It must be plugged
into a wall receptacle that is properly installed and grounded in
accordance with the National Electrical Code and local codes and
ordinances. In the event of an electrical short circuit, grounding
reduces risk of electric shock by providing an escape wire for the
electric current.
WARNING
SHOCK HAZARD
• Improper use of the grounding plug can cause risk of electric
shock. Do not use an extension cord. If the power supply cord
is too short, have a qualied electrician or service technician
install an outlet near the appliance.
If you have any questions about the grounding or electrical
instructions, consult a qualied electrician or service technician.
ANTI-TIP BRACKET
WARNING
TIP-OVER HAZARD
• If the Anti-Tip Bracket is not installed, there is risk of the
product tipping and causing injury if someone stands, sits or
leans on the open door.
• To reduce the risk of tipping of this appliance from abnormal
usage by excessive loading of the oven, the appliance must be
secured by installing the Anti-Tip Bracket supplied. Please refer
to the Installation Manual for more information.
To check if the bracket is installed
and engaged properly, open the oven
door fully and gently apply medium
force in the center of the handle
until movement of the appliance is
detected. Continue pressing until the Anti-Tip Bracket is engaged
and movement stops. A small amount of movement is acceptable
at the back of the appliance top, but it should be stable and not tip
once the Anti-Tip Bracket is engaged. Stop pressing on the door
and close the oven.
To check if the unit will not slide out, open the oven fully and
apply gentle outward pressure. The unit should not slide toward
you. If it does, refer to the Installation Manual.
Anti-Tip Bracket
Leveling Leg
READ AND SAVE THESE INSTRUCTIONS
FOR FUTURE REFERENCE

6E
IMPORTANT SAFETY INSTRUCTIONS
To reduce the risk of re, electrical shock, injury to persons or
damage when using the product, follow basic precautions, including
the following.
INSTALLATION AND MAINTENANCE
1 This appliance must be properly installed and electrically
grounded by a qualied technician. Refer to the Installation
Manual for instructions to connect to a properly grounded
outlet.
2 This appliance should be serviced only by a qualied service
technician. Contact the nearest authorized service center for
examination, repair or adjustment.
3 Do not repair or replace any part of the oven yourself unless
specically recommended. Refer service to an authorized
servicer.
4 If a burner is not ignited, ensure the knob is in the Off position.
When a control knob is in use to ignite or control a burner,
a LED illuminates behind the knob. In the event of a power
outage, the LED does not function. If a burner does not ignite,
return the knob to the Off position.
5 Do not operate this appliance if it is not working properly or
has been damaged until an authorized servicer has examined
and repaired it.
6 Install or locate this appliance only in accordance with the
Installation Manual. Do not store or use this appliance outdoors
or in areas near water, such as near a kitchen sink, in a wet
basement, near a swimming pool or similar locations.
7 DO NOT install this appliance with a ventilation system that
blows air downward toward the appliance. Use of a ventilation
system that blows air downward toward the appliance can cause
ignition and combustion problems with gas cooking appliances
and cause risk of personal injury or unintended operation.
8 Use this appliance only for its intended use as described in this
manual. Do not use corrosive chemicals, vapors or nonfood
products in this appliance. This type of oven is specically
designed to heat or cook. It is not designed for industrial or
laboratory use. The use of corrosive chemicals in heating or
cleaning will damage the appliance.
9 Do not allow grease or other ammable materials to accumulate
in or on the range, as grease in the oven or on the cooktop may
ignite.
10 Clean kitchen ventilating hoods frequently. Do not allow grease
to accumulate on hood or lter.
11 Clean the cooktop with caution. To avoid steam burns, allow the
cooktop to cool before wiping with wet sponge or cloth. Some
cleaners produce noxious fumes if applied to a hot surface.
12 Do not use oven cleaners or protective coating on any part of
this appliance.
13 Take care to not rub, damage or move the door gasket, which
seals the connection between the door and the oven. Do not
clean the door gasket with a scouring pad, knife or other
abrasive object. If necessary, gently wipe with a damp, soft
cloth. Chemicals such as detergents, bleach and degreaser will
deteriorate the gasket seal.
14 Clean only parts and areas listed in the CLEANING AND
MAINTENANCE section of this manual.
GENERAL SAFETY PRECAUTIONS
1 Read all instructions before using the appliance. Ensure that all
users of the gas appliance understand the necessary precautions
for use.
2 It is recommended to install a gas detector and smoke detector
in any room with this appliance. Follow manufacturers' recom-
mendations for installation.
3 To prevent accidents and achieve optimal ventilation, ensure
sufcient space around the cooking area.
4 Do not store any ammable materials or temperature sensitive
items inside oven or storage drawer or on top of or near cooktop,
including paper, plastic, potholders, linens, wall coverings,
curtains, drapes or cleaning chemicals.
5 Do not use this appliance to heat a room, as doing so may cause
risk of carbon monoxide poisoning and overheating of the oven.
6 Children should not be left alone or unattended in the area of
Slide-In Gas Range use. Do not allow children to play in or on
or otherwise interact with the range.
7 Do not allow anyone to climb, stand, lean, sit or hang on any
part of the appliance, especially the door, drawer or operation
panel. Failure to follow this warning statement could result in
property damage, personal injury, or death.
8 Do not store items of interest to children or pets in cabinets
above a range or in the backguard of the range, as children or
pets climbing on the range to reach items could be seriously
injured or cause unintentional operation.
9 Close supervision is necessary when children interact with the
Slide-In Gas Range. Teach children to not play with the knobs,
controls or any other part of the appliance.
10 For personal safety, tie long hair back and never wear loose-
tting or hanging garments while using the appliance. Be
careful when reaching for items stored over the appliance.
Flammable material could be ignited and cause severe burns.
11 Use only dry potholders. Moist or damp potholders on hot
surfaces may cause burns from steam. Do not let potholders
touch hot surfaces. Do not use towels or other bulky cloth.
12 Always place oven racks in desired position while the oven
is cool.
13 Keep hands and face clear when opening the oven door. Let
hot air or steam escape before removing or replacing food, as
hot air and steam can cause burns.
14 Use caution when opening and closing the oven door. The trim
on the top and sides of the oven door may become hot enough
to cause burns.
15 The Slide-In Gas Range has not been evaluated for use with
any 3rd party aftermarket systems. Do not attempt to use this
appliance with a wok ring or any other after-market device that
may block air to the burner or otherwise cause a re or carbon
monoxide hazard.
WARNING
NEVER use this appliance as a space heater to
heat or warm the room. Doing so may result in carbon monoxide
poisoning and overheating of the oven.
E7
IMPORTANT SAFETY INSTRUCTIONS
COOKTOP SAFETY
WARNING
When using electrical and gas appliances, take
safety precautions to reduce the risk of burns, electric shock, re,
injury to persons or property damage, including the following:
1 NEVER leave this appliance unattended while the top surface
cooktop is in use.
2 Always keep a Class ABC or Class K re extinguisher readily
accessible and near the appliance. Familiarize yourself and
other household members in advance with re extinguisher
operation.
3 If the knob is rotated quickly from Lite position to beyond Hi
without ignition, gas will continue to ow, resulting in risk
of carbon monoxide poisoning, re and explosion hazards. If
ignition does not occur and ame is not present, turn the knob
back to the Off position. See page 16 for Cooktop Controls.
4 If a burner is not ignited, ensure the knob is in the Off position.
When a control knob is in use to ignite or control a burner,
a LED illuminates behind the knob. In the event of a power
outage, the LED does not function. If a burner does not ignite,
return the knob to the Off position.
5 In the event that clothing or hair catches re, stop, drop and roll
immediately to extinguish ames.
6 DO NOT USE WATER ON GREASE FIRES. Smother ame
with a close-tting lid or metal tray or use a dry chemical or
foam-type extinguisher if you are trained in its usage. Never
attempt to move a aming pan. Flaming grease outside of cook-
ware can be extinguished by covering it with baking soda or by
a multi-purpose dry chemical or foam-type re extinguisher.
7 Only certain types of glass, glass-ceramic, ceramic, earthen-
ware or other glazed utensils are suitable for range-top service
without breaking due to sudden change in temperature. Follow
manufacturer’s recommendations.
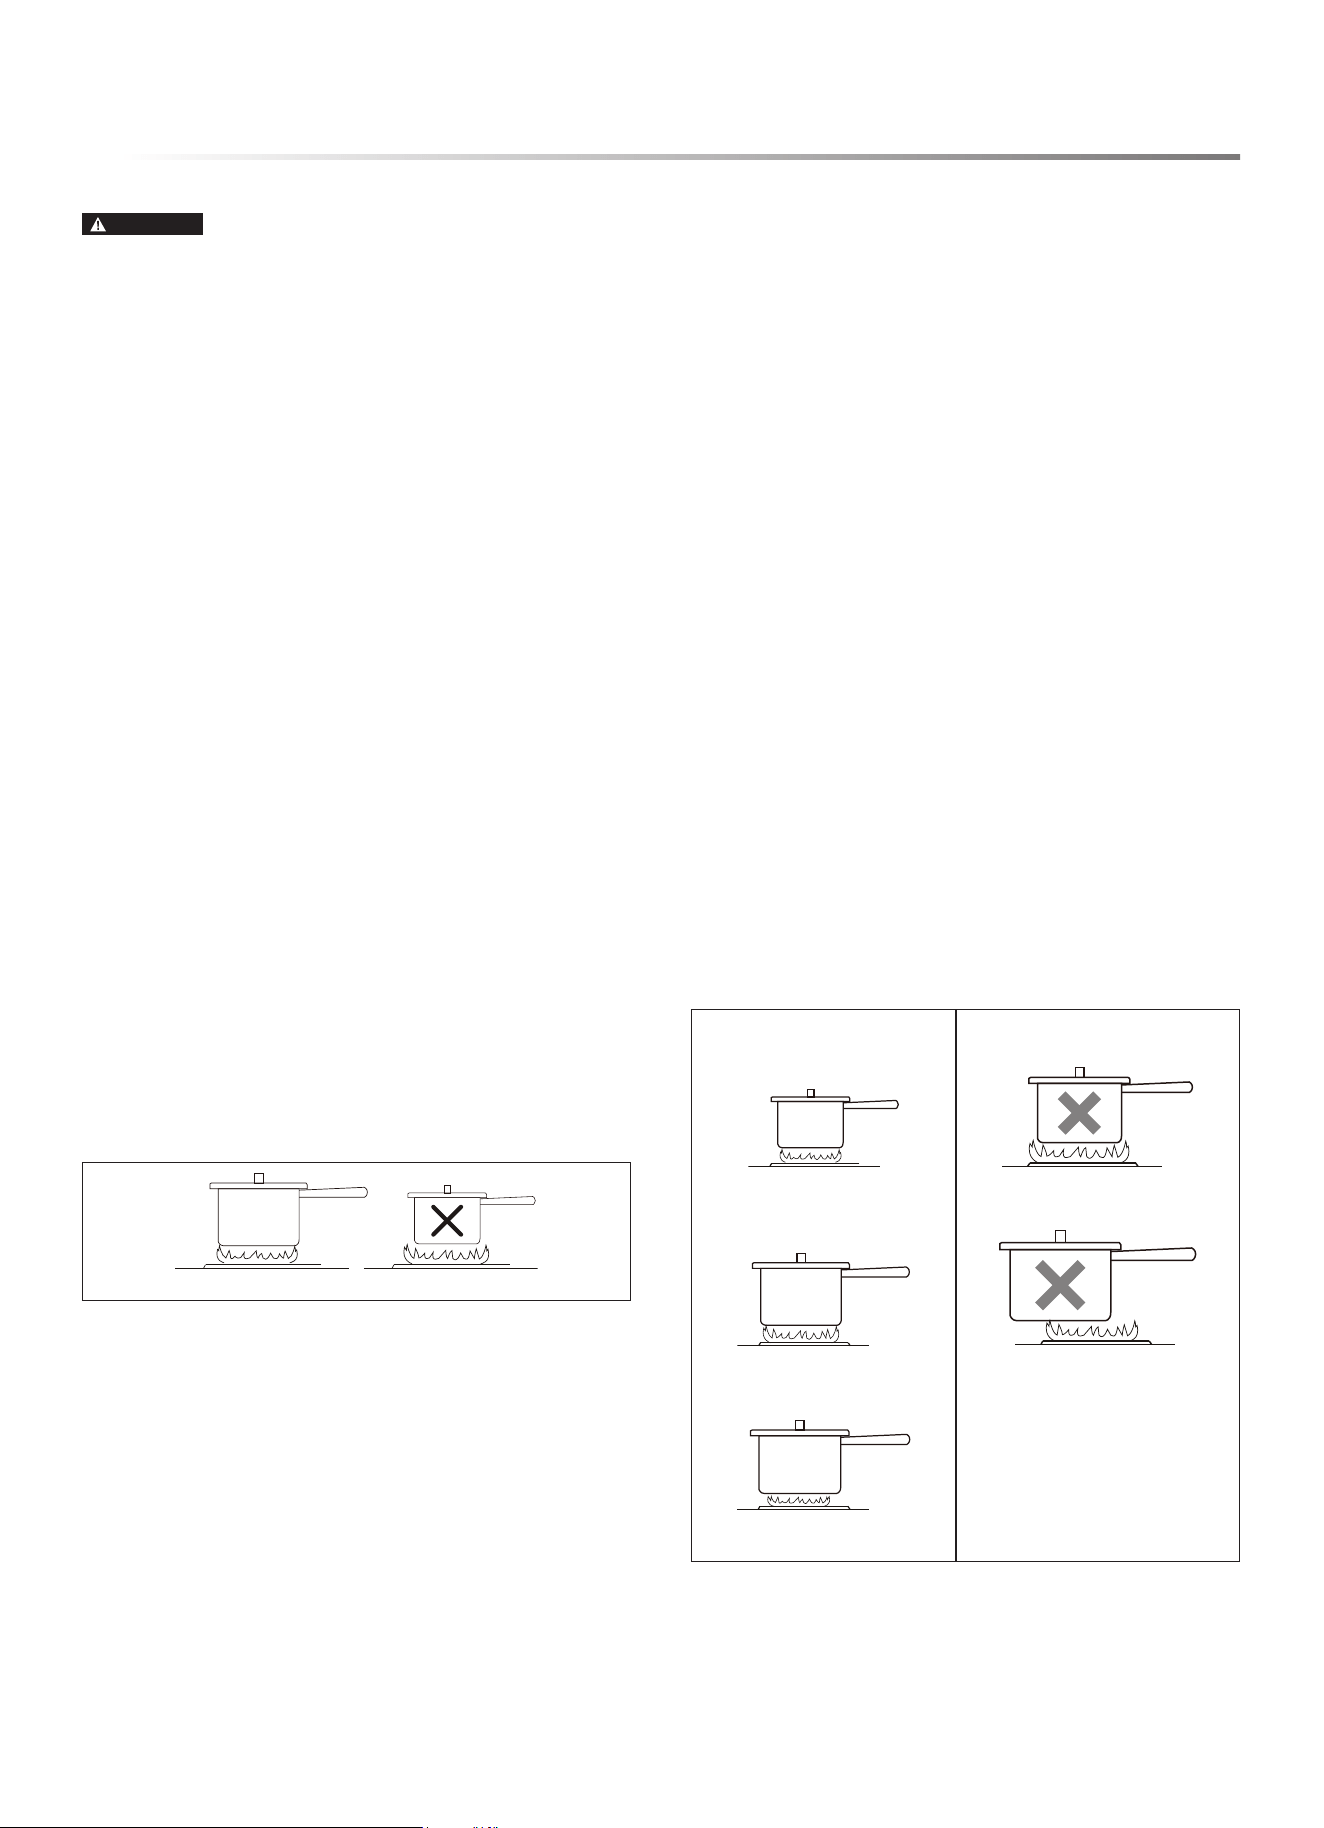
8 Flames extending beyond the edge of cookware are a burn
hazard. Set burner controls so ames do not extend beyond
the edge of cookware.
CORRECT INCORRECT
9 To reduce risk of burns, ignition of ammable materials and
spillage due to unintentional contact with a utensil, position
utensil handles turned inward so they do not extend over
adjacent cooktop burners or workspaces.
10 DO NOT TOUCH COOKTOP BURNERS, GRATES OR
AREAS NEAR BURNERS. The cooktop, grates and surfaces
facing the cooktop may be hot enough to cause burns even if no
ames are present. During and after use, do not touch or allow
clothing or other ammable materials to contact cooktop areas
until sufciently cooled.
11 Use proper pan size. The Slide-In Gas Range is equipped with
cooktop burners of different sizes. Select utensils having at
bottoms large enough to cover the entire burner and ame. The
use of undersized utensils will expose a portion of the ame
to direct contact and may result in ignition of clothing. Proper
relationship of utensil to burner will also improve efciency.
12 Carefully monitor foods being fried at high or medium-high
heat settings. Use extreme caution when moving a grease kettle
or disposing of hot grease after deep-fat frying.
13 Food for frying should be as dry as possible. Frost on frozen
foods or moisture on fresh foods can cause hot fat to bubble up
and over the sides of the pan.
14 Use little fat for effective shallow or deep fat frying. Overlling
a pan with fat can cause spillovers when food is added.
15 Always heat fat slowly and monitor as it heats. If a combination
of oils or fats will be used in frying, stir them slowly before
heating or as fats melt.
16 Use a deep fat thermometer whenever possible to prevent heat-
ing fat beyond the smoking point.
17 Always turn on the hood when cooking at high heat or when
ambéing food.
18 Never attempt to move cooking utensils containing hot oil or
grease, as it can cause severe burns. Allow oil or grease to cool
before moving or disposing.
19 Do not attempt to lift the cooktop, as it may damage the gas tub-
ing to the surface burners and cause a gas leak and risk of re.
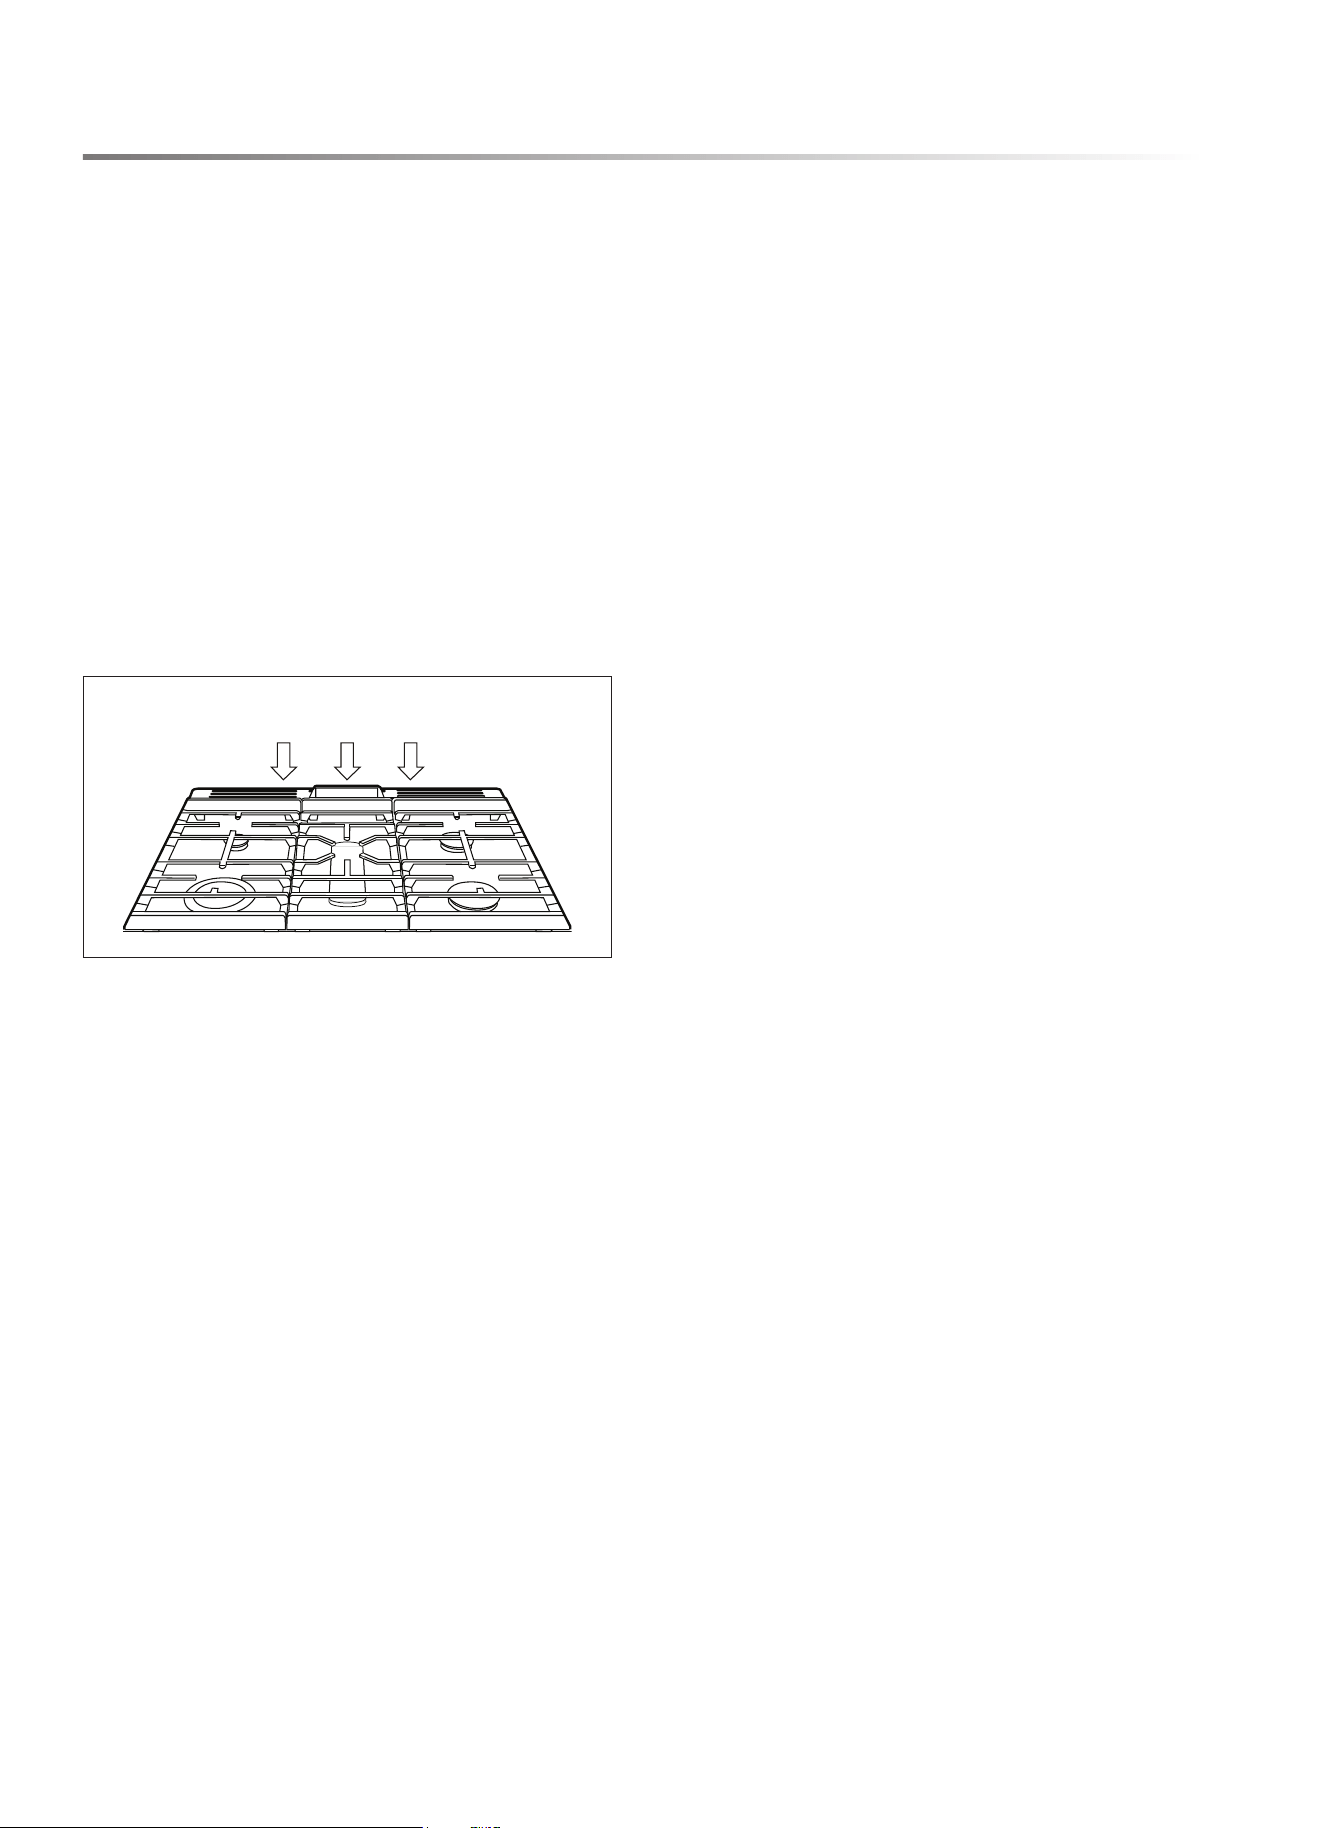
20 To reduce risk of burns and maximize cooking efciency, use
the correct burner for the pan size and center it on the burner.
Always ensure cookware is centered properly on the burner.
Do not use small pans with large burners.
CORRECT PLACEMENT INCORRECT PLACEMENT
small pan on small burner small pan on large burner
large pan on large burner pan off-center on burner
large pan on small burner
8E
IMPORTANT SAFETY INSTRUCTIONS
OVEN SAFETY
1 If materials inside the oven ignite, keep the door closed, turn
off any oven operation and disconnect power at the fuse or
breaker box. Wait for the re to extinguish and allow the
oven to cool before removing contents, cleaning the oven and
restoring power.
2 Never place anything, such as aluminum foil, spill mat, bak-
ing stone, cookware, etc., on the bottom of the oven cavity, as
these items can trap heat or melt and may cause damage to the
appliance and risk of electric shock, smoke or re.
3 Do not heat unopened food containers, as build-up of pressure
may cause the container to burst and cause injury.
4 Do not use a broiler pan without its insert. Do not cover the
broiler pan insert with aluminum foil, as exposed fat and grease
could ignite.
5 Do not obstruct oven vents or any other slots or openings on
the unit.
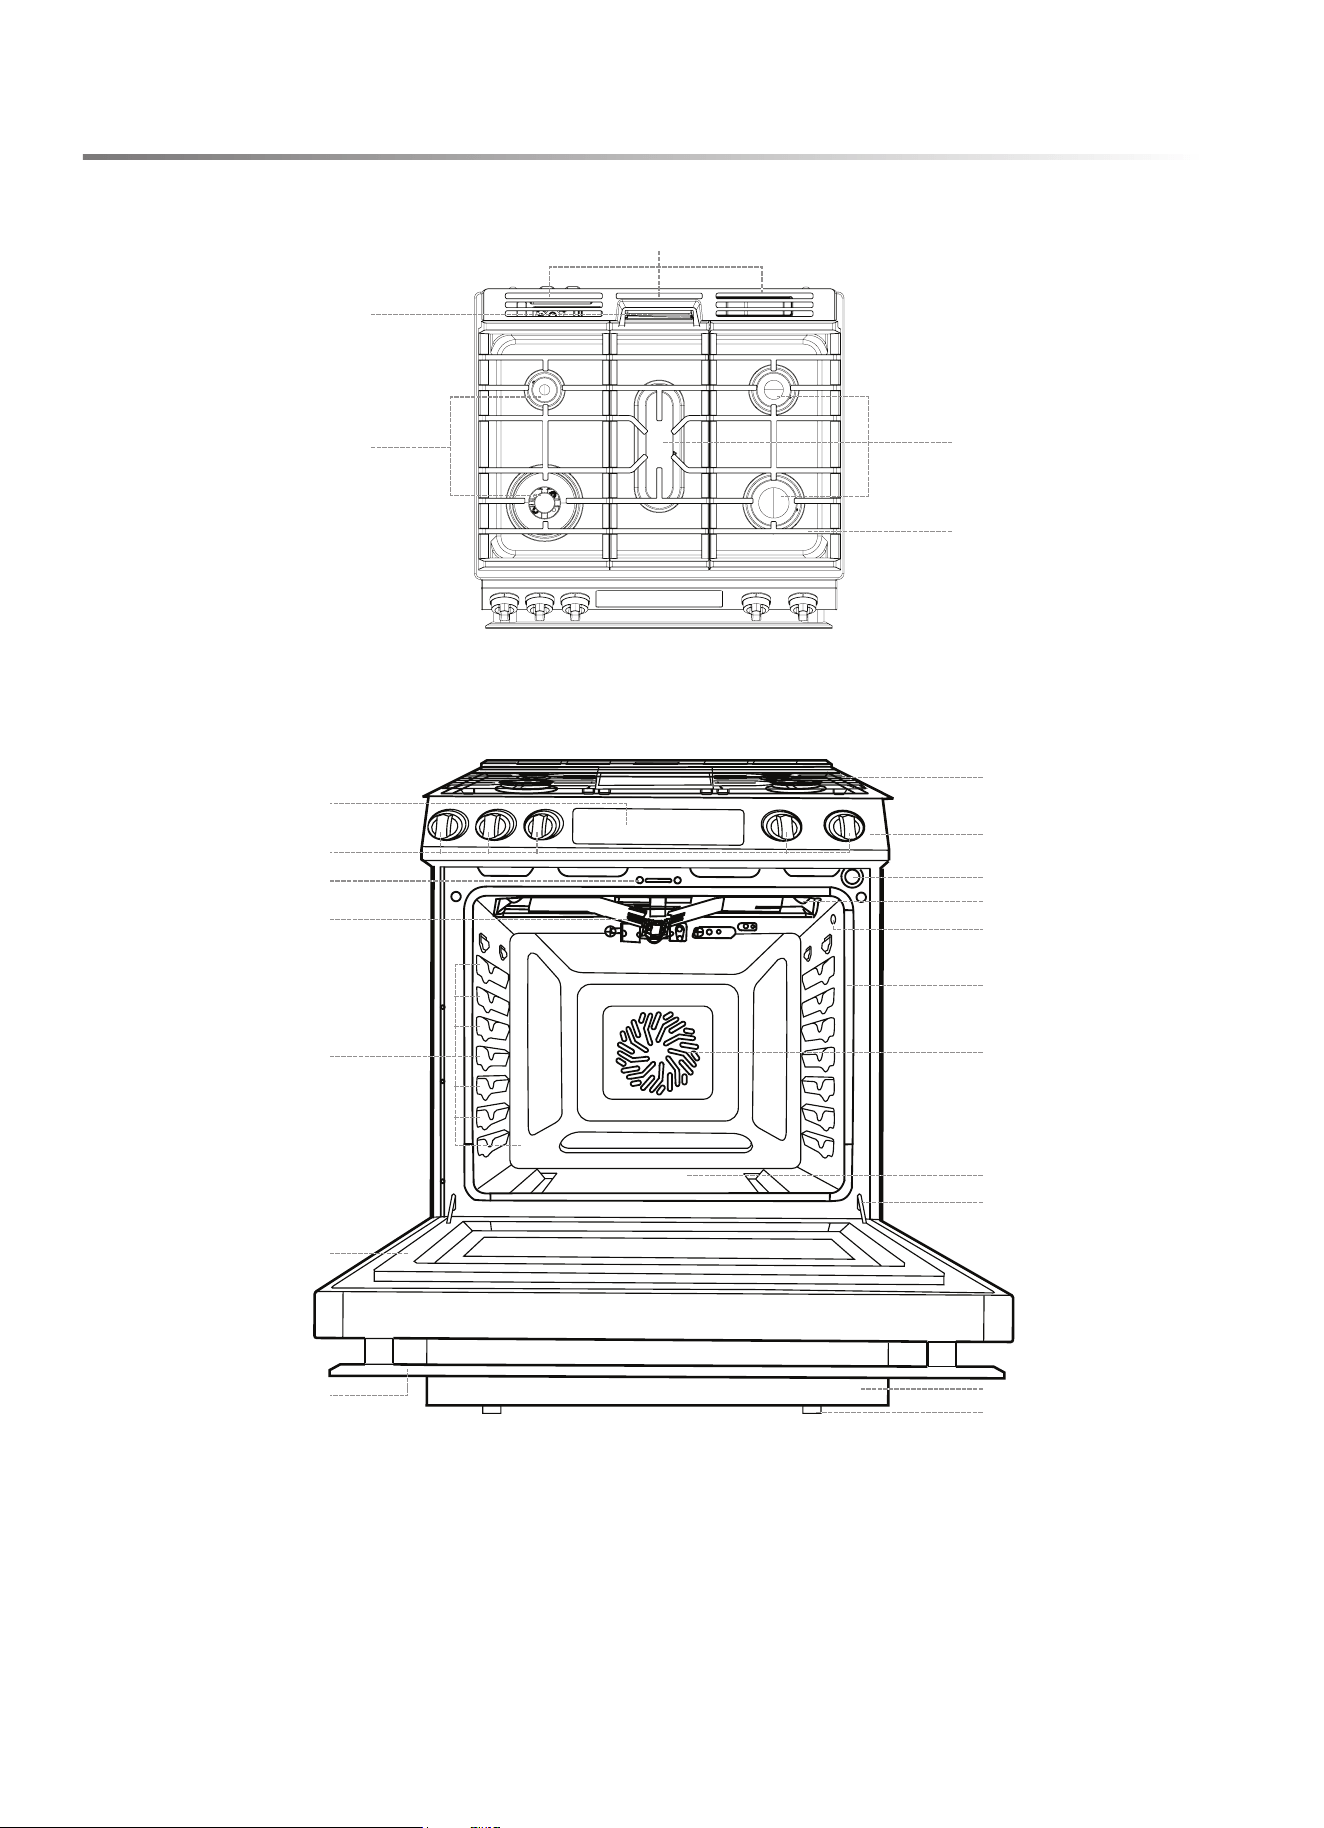
OVEN AND COOLING VENTS
DO NOT OBSTRUCT OVEN VENTS
6 DO NOT TOUCH OVEN BURNERS OR INTERIOR SUR-
FACES. Oven burners and surfaces may be hot even though
no ames are present. Interior surfaces of an oven become hot
enough to cause burns. During and after use, do not touch or
allow clothing or other ammable materials to contact oven
burners or interior surfaces until sufciently cooled. Other
surfaces, such as vent openings, surfaces near vent openings,
the oven door and the door window, also may become hot
enough to cause burns.
7 During oven operation, upper interior surfaces of the storage
drawer may become very hot. Do not touch interior surfaces
of the storage drawer until the oven has sufciently cooled. Do
not store ammable materials or temperature sensitive items in
the storage drawer at any time.
SELF CLEAN HAZARDS
1 Before starting Self Clean, ensure the oven is empty. Remove
broiler pan, racks, cookware and any other materials.
2 Before starting Self Clean, to avoid ignition, remove excess
grease or food from inside the oven.
3 The door locks several minutes after the start of Self Clean.
If the door is opened before it locks, Self Clean is canceled. If
the door does not lock within 15 minutes, cancel Self Clean
and contact an authorized servicer for repair.
4 During Self Clean, do not use the rangetop. It is not safe to
operate any part of the appliance during a Self Clean cycle.
5 If the appliance malfunctions in Self Clean, keep door closed,
turn off appliance, disconnect power at the fuse or breaker box
and contact an authorized servicer for repair.
6 If materials inside the oven ignite, turn off appliance, discon-
nect power at the fuse or breaker box and wait for the re to
extinguish. Do not force the door open. Wait for the oven to
cool before manually cleaning oven.
7 Some birds are extremely sensitive to the fumes produced
during a Self Clean cycle. Move caged pet birds outside or to
another well-ventilated room until process is complete and the
home is completely aired out.

E9
READ AND SAVE THESE INSTRUCTIONS
FOR FUTURE REFERENCE
IMPORTANT SAFETY INSTRUCTIONS
ABOUT FOOD SAFETY
Cook foods to safe temperatures recommended by the United States
Department of Agriculture (USDA). To check internal temperature
of foods to determine doneness, insert a temperature probe in a
thick or dense area away from fat or bone.
USDA RECOMMENDED TEMPERATURE
FOOD MINIMUM INTERNAL
TEMPERATURE
beef, pork, veal and lamb steaks,
chops and roasts
145 °F and allow to rest
for at least 3 minutes
ground meats 160 °F
ground poultry 165 °F
ham, fresh or smoked (uncooked) 145 °F and allow to rest
for at least 3 minutes
ham (fully cooked, to reheat) 165 °F
poultry breasts, whole bird, legs,
thighs, wings, giblets and stufng
165 °F
eggs 160 °F
sh and shellsh 145 °F
leftovers 165 °F
casseroles 165 °F
NOTE:
• ALWAYS use potholders to prevent burns when handling
utensils in contact with hot food. Heat from the food can transfer
through utensils to cause skin burns.
• Avoid steam burns by directing steam away from the face and
hands. Slowly lift the farthest edge of a dish covering and care-
fully open cooking bags and popcorn bags away from the face.
• Stay near the appliance when it is in use and check progress
frequently to avoid overcooking food.
• NEVER use the appliance for storing cookbooks or other items.
• Select, store and handle food carefully to preserve its high
quality and minimize the spread of foodborne bacteria.
10E
PARTS AND FEATURES
TOP VIEW
FRONT VIEW
1 Cooling Vents
2 Oven Vent
3 Cooktop Burners
4 Cast Iron Grates
5 Control Keypad and Display
6 Cooktop Control Knobs
7 Door Lock
8 Broil Burner
9 Rack Positions
10 Door
11 Door Handle
12 Cooktop
13 Control Panel
14 Door Switch
15 Oven Lights
16 Probe Jack
17 Door Gasket
18 Convection Fan
19 Oven Bottom
20 Door Hinge
21 Storage Drawer
22 Leveling Legs
2
3
1
4
3
12
13
14
15
16
17
18
19
20
21
22
5
7
8
9
10
11
6
E11
PARTS AND FEATURES
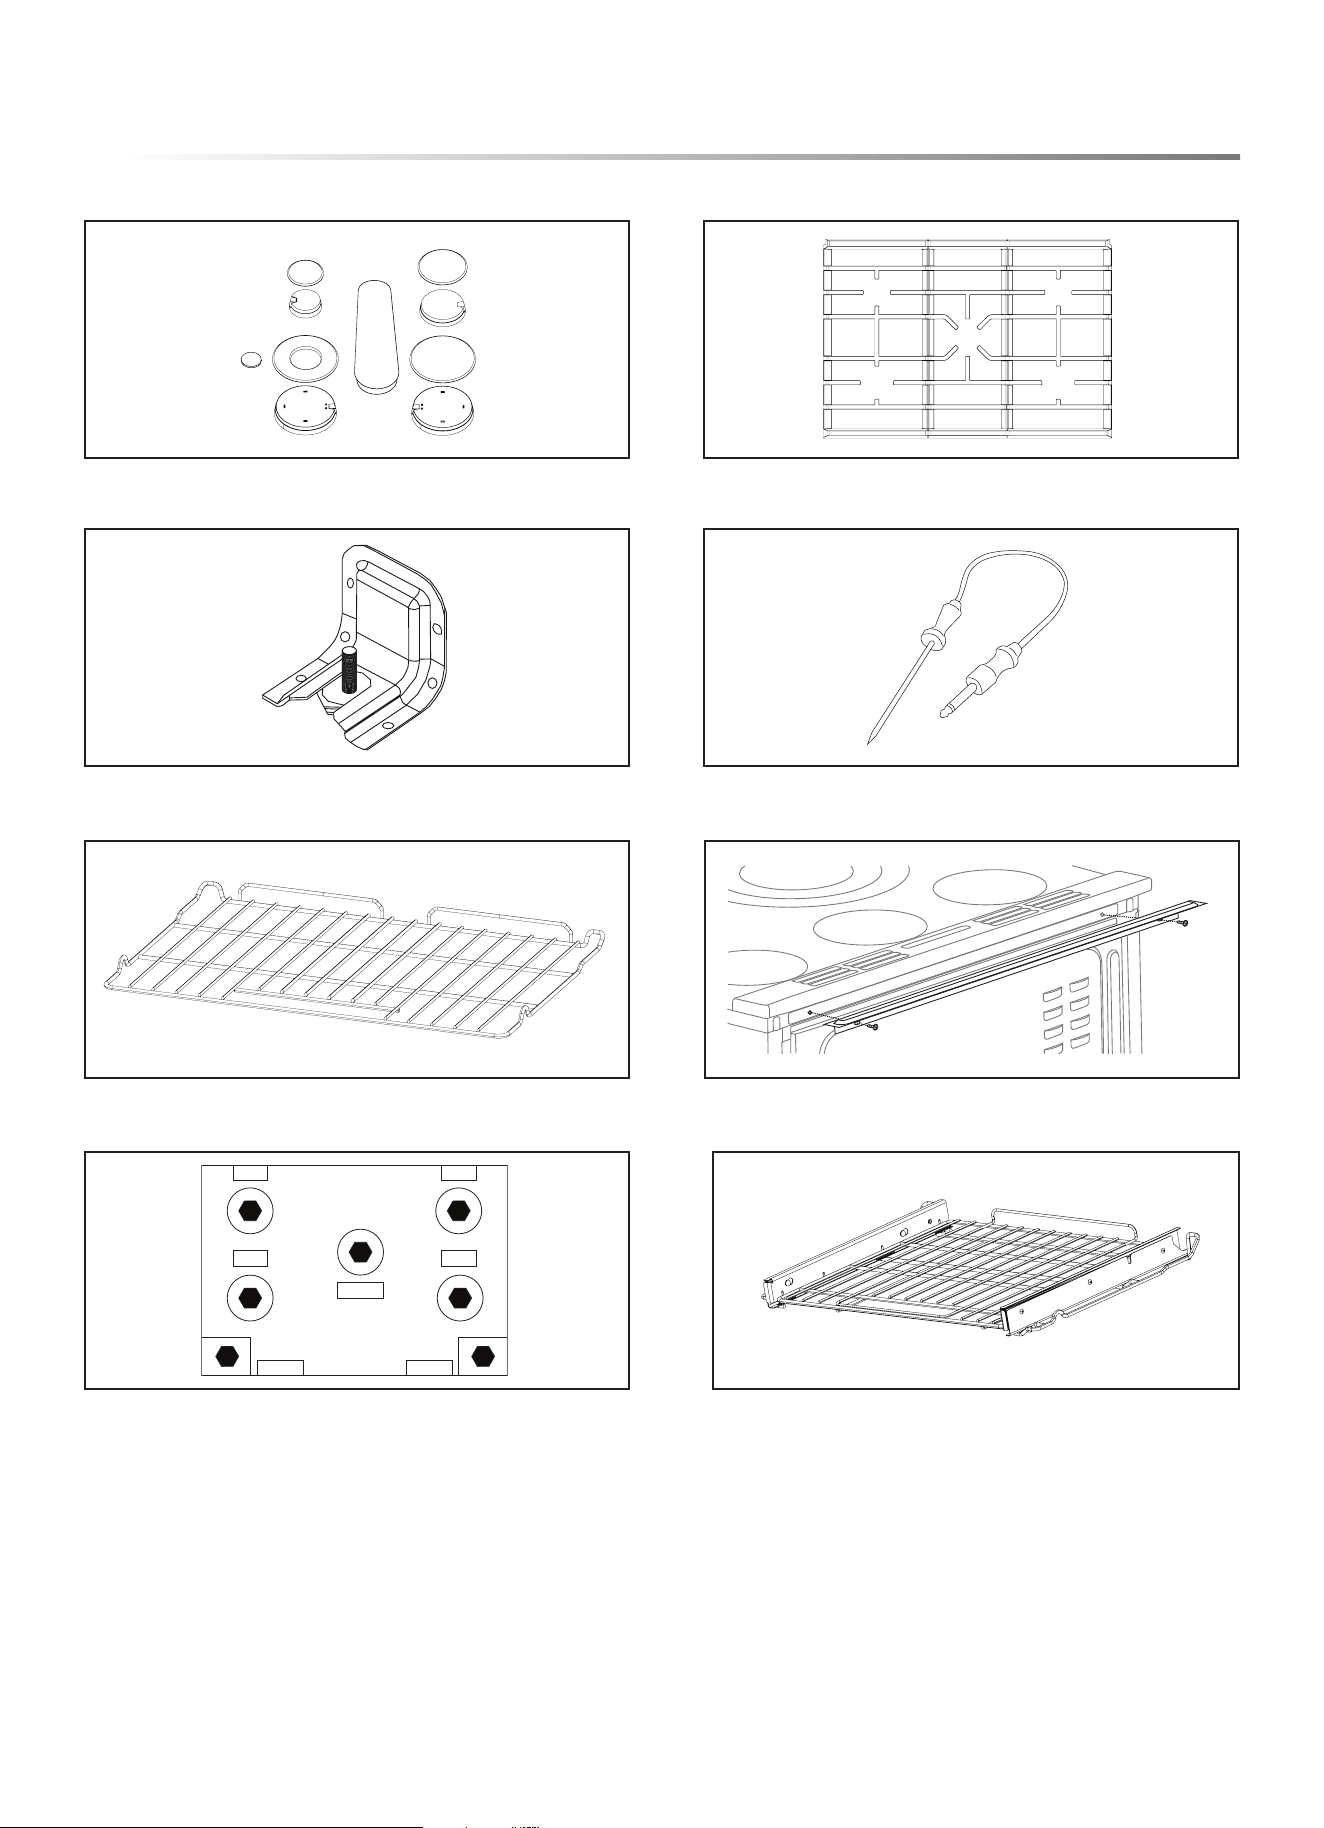
Surface Burners and Caps (6)
(Note: The center surface burner and cap come pre-assembled together)
Anti-Tip Bracket (1 bracket, 2 screws, 1 template)
Flat Rack (2 Racks - SSG3074SNS), (1 Rack - SSG3076SNS) Optional Rear Trim Kit (1 trim, 2 screws)
Surface Burner Grates (3)
Oven Probe (1)
LP Conversion Kit (1) Gliding Rack (1 Rack - SSG3076SNS Only)
INCLUDED ACCESSORIES
LP CONVERSION KIT
12E
PARTS AND FEATURES
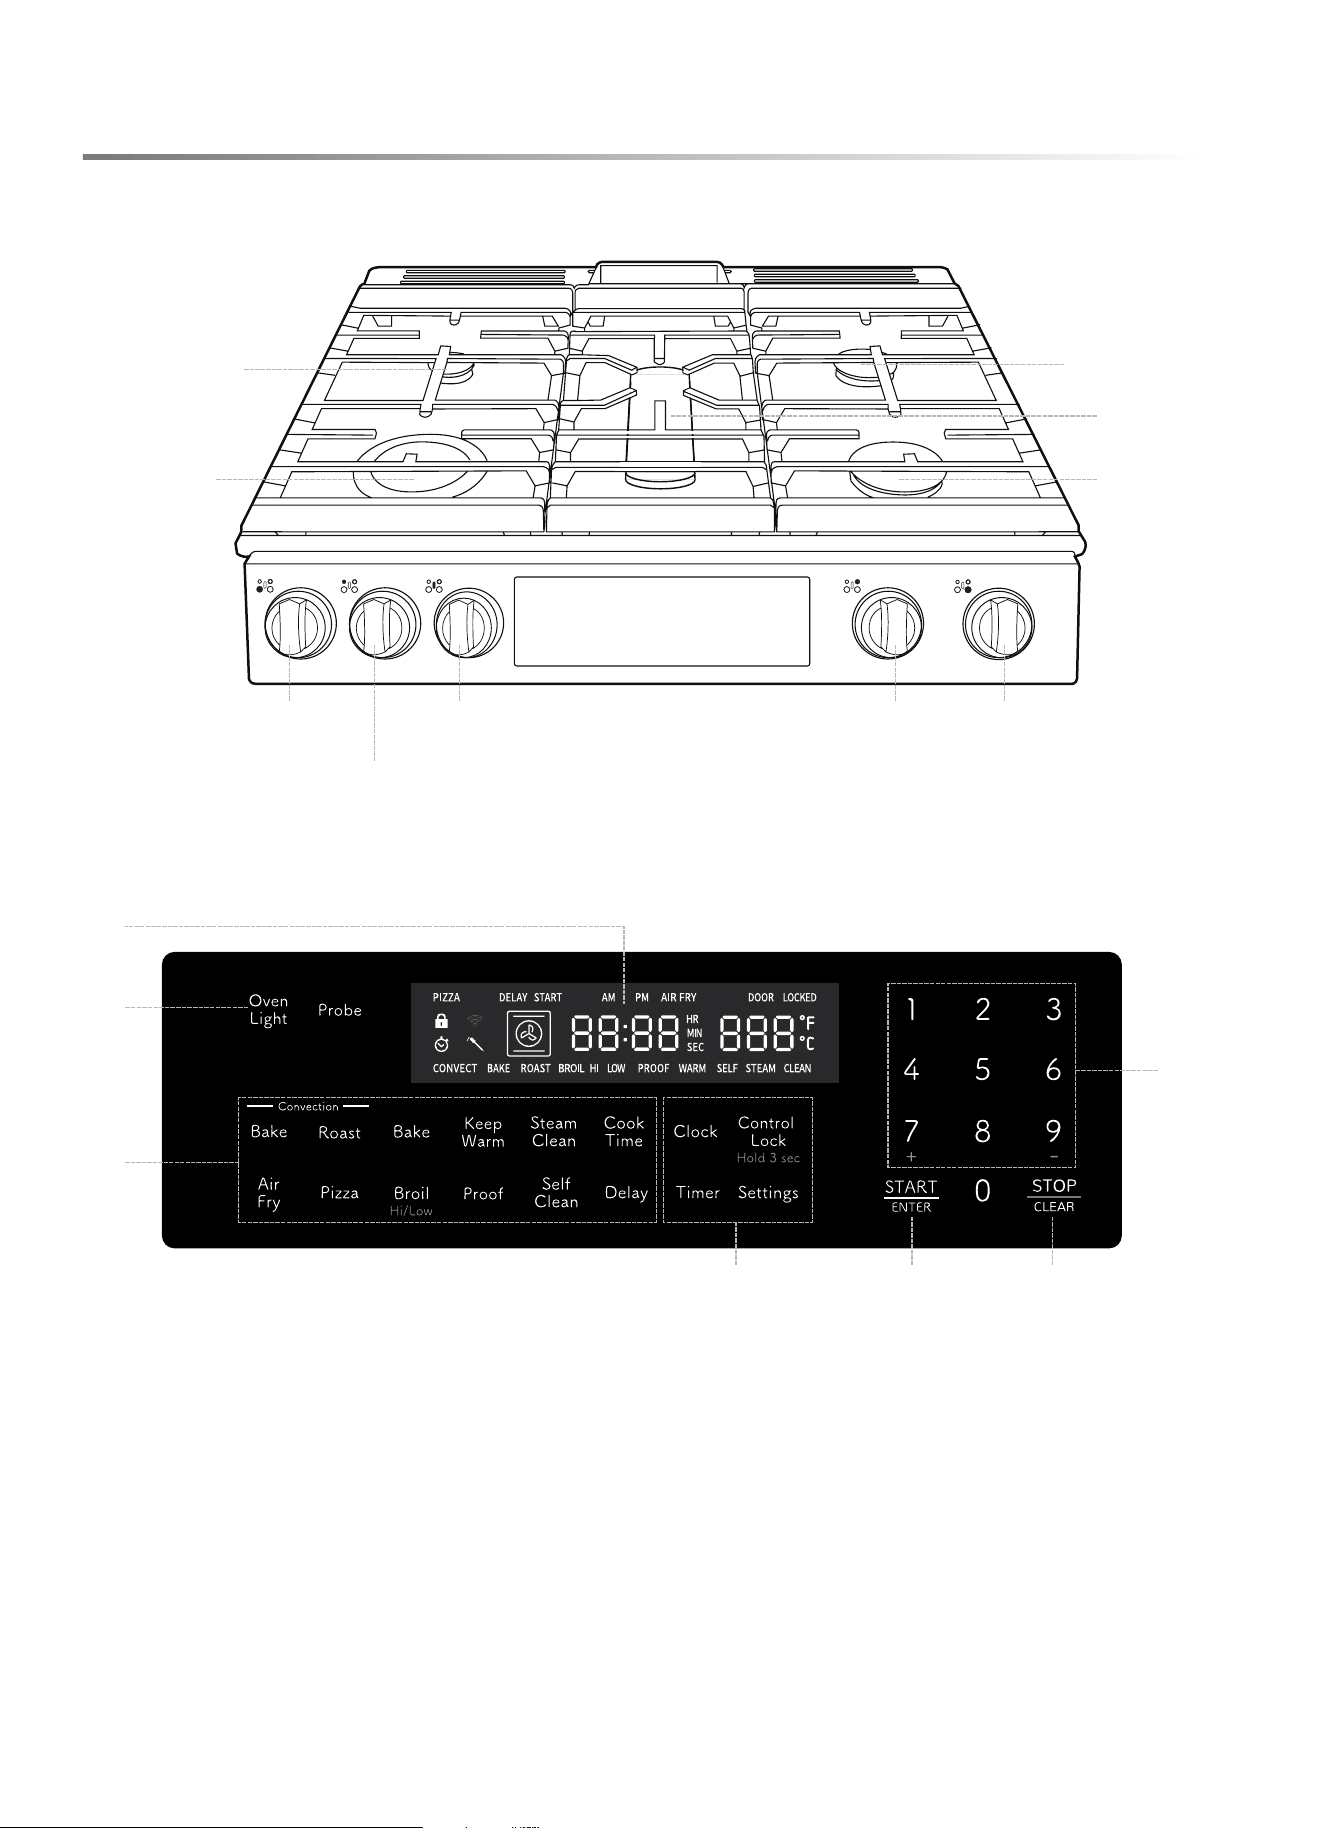
1 Display: communicates information, including time-of-day, oven temperature and cooking mode
2 Oven Light pad: controls interior oven light
3 Oven Operations: available operating modes
4 Auxiliary Features: useful features not associated with oven operation, such as Timer, Control Lock and Settings
5 START/ENTER pad: initiates the selected oven operation or selects an available option
6 STOP/CLEAR pad: immediately halts any oven operation
7 Numeric Input pads: used to enter desired oven temperature, set the clock, change settings or input other information
COOKTOP
CONTROL KEYPAD AND DISPLAY
LEFT-REAR
BURNER
LEFT-FRONT
BURNER
CONTROL
LEFT-REAR
BURNER
CONTROL
CENTER
BURNER
CONTROL
RIGHT-REAR
BURNER
CONTROL
RIGHT-FRONT
BURNER
CONTROL
54 6
3
2
1
7
RIGHT-REAR
BURNER
LEFT-FRONT
BURNER
RIGHT-FRONT
BURNER
CENTER
BURNER
E13
PARTS AND FEATURES
SETTINGS
Navigate through the Settings menu to customize the appliance.
Settings can only be adjusted when no other oven operation is in
progress.
TO SCROLL THROUGH SETTINGS
1 Touch Settings pad on the control panel. The rst menu option
VoL appears in ashing letters and the current setting appears
in solid letters.
2 Use the 7+ pad to scroll through the menu. Use the 9- pad to
scroll backwards through the menu.
3 Touch START/ENTER pad to select a menu item.
4 Touch 7+ and 9- pads to toggle through the setting options.
5 Touch START/ENTER pad to accept changes. Touch Settings
pad or STOP/CLEAR pad to reject changes.
6 Touch STOP/CLEAR pad to exit Settings menu.
CONTROL LOCK
The Control Lock function disables all pads on the control panel to
prevent accidental operation of the oven, such as by pets, children or
while cleaning. The STOP/CLEAR pad is never disabled. Control
Lock can be used after the start of a baking mode.
TO USE CONTROL LOCK
1 Touch and hold Control Lock pad for three seconds to activate
Control Lock.
2 Touch and hold Control Lock pad for three seconds to deac-
tivate Control Lock.
TIMER
This appliance includes a built-in kitchen timer.
TO SET THE TIMER
1 Touch Timer pad. 00:00 appears on the display.
2 Enter time in hours and minutes (hh:mm) and touch START/
ENTER pad. The clock begins to count down.
3 When the set time has passed and the clock reaches 00:00, an
audible alert sounds to signal the time is complete.
4 Touch Timer pad to clear the signal or exit Timer early.
OVEN LIGHT
Touch Oven Light pad to turn the oven light on or off. See page
26 for bulb replacement instructions.
SETTINGS MENU
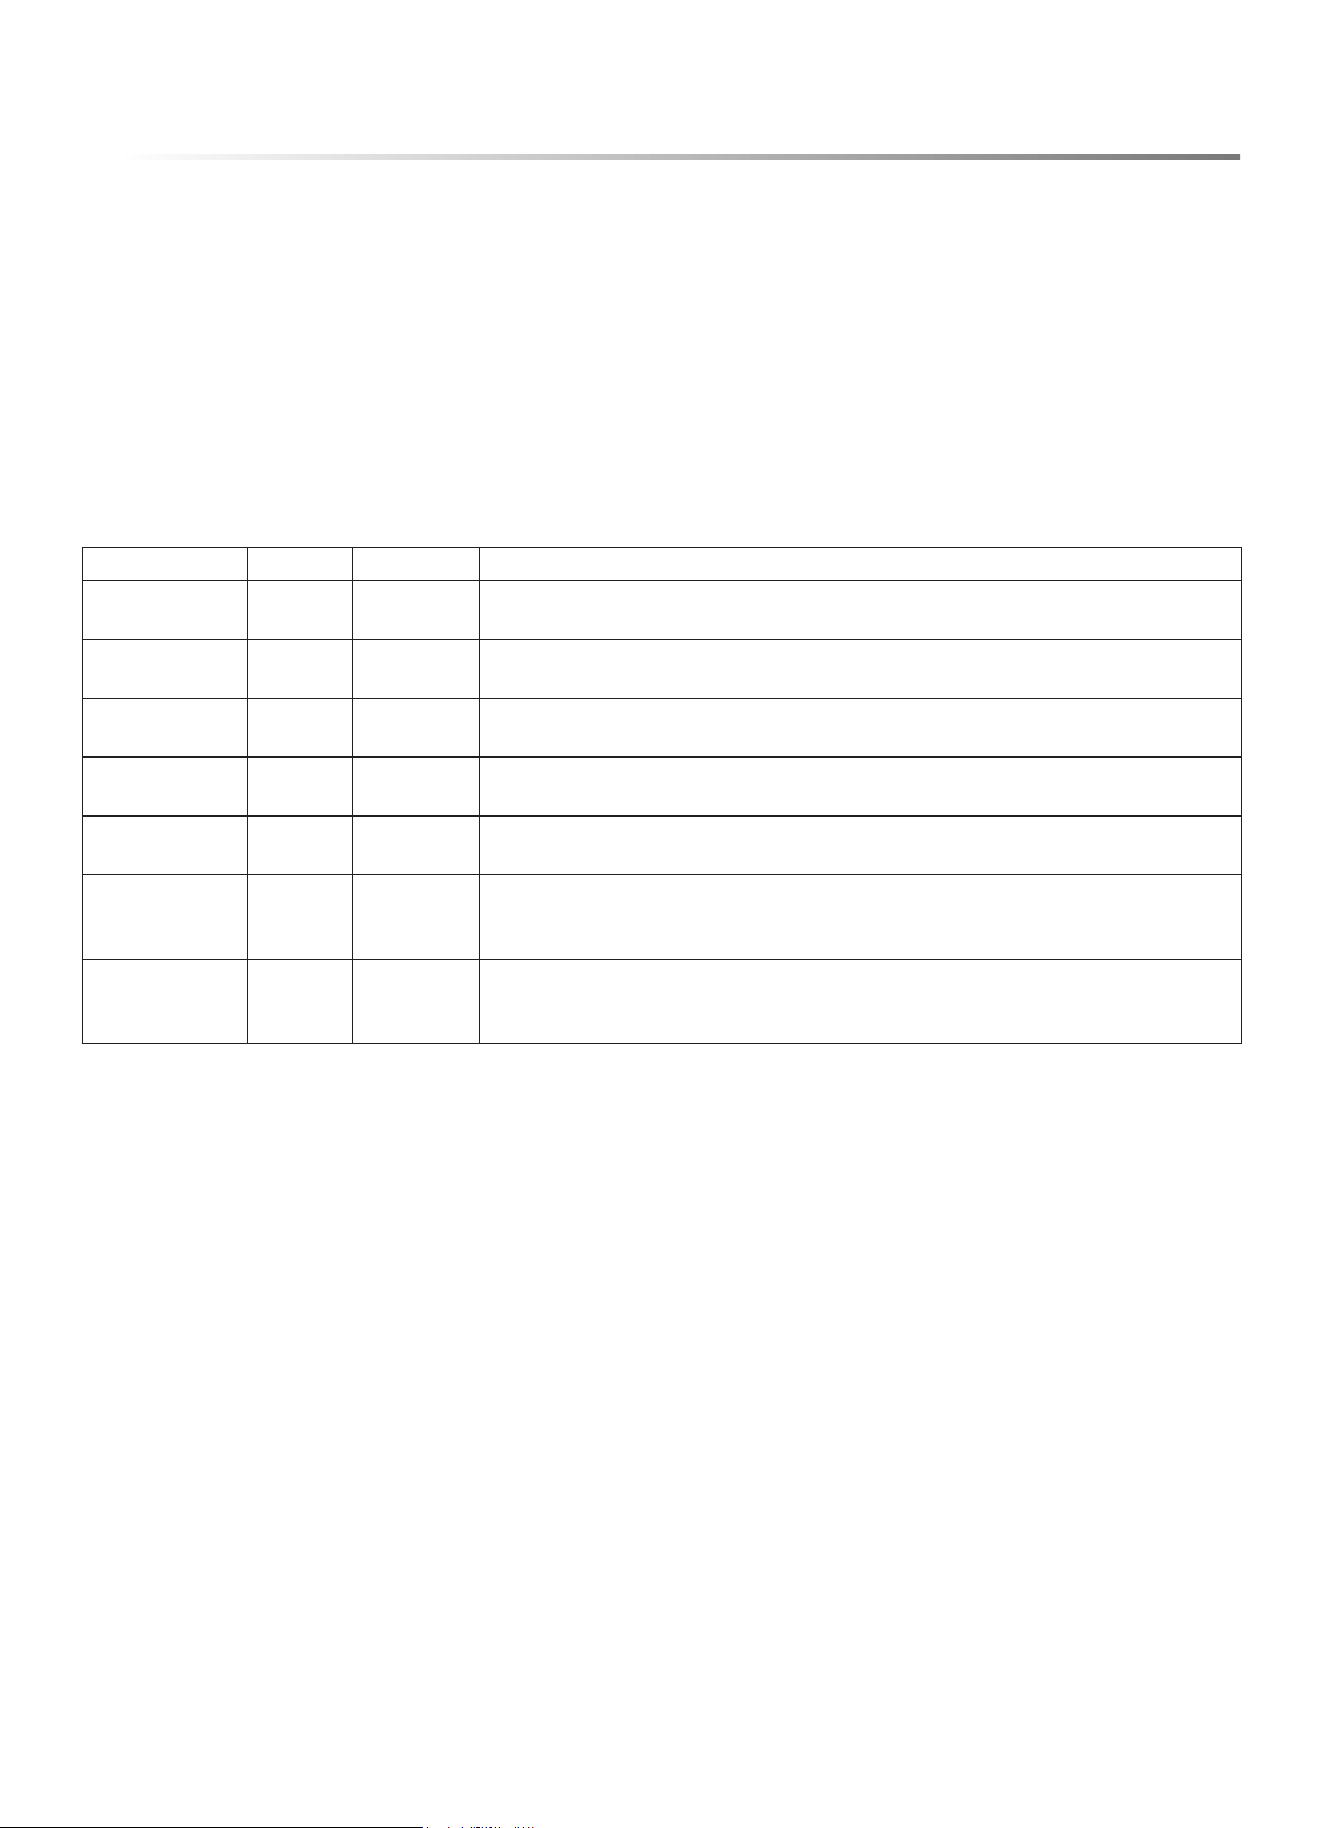
SETTING DISPL AY OPTIONS DESCRIPTION
Volume
VoL
1 or 2 The audible feedback of the control panel is programmed by default at maximum volume.
Use this setting option to reduce the volume.
Display
Brightness
dISP
1, 2 or 3 The display is programmed by default at maximum brightness. Use this setting option to
reduce the brightness of the display.
Hold after Cook
hold
OFF or ON When a timed bake function completes, the oven will turn off or, if the Hold setting is
turned on, the oven will maintain a warm temperature to keep the cooked food warm.
Sabbath Mode
SAbE
OFF or ON Use this setting to program the appliance into an operating mode compliant with the
standards required for use during Sabbath.
Degree Units
dEG
F or C The oven is programmed by default to use degrees Fahrenheit, but it can be changed to
operate in degrees Celsius.
Oven
Calibration
CAL
+ or - 25 ° If the oven temperature is higher or lower than expected based on outcomes of familiar
recipes, use this setting to offset the oven’s target temperature. Calibration can be offset
between -25 °F and +25 °F. Default calibration offset is zero.
Sales (Demo)
Mode
SALE
OFF or ON In Sales mode, or Demo mode, controls function as normal, but no cooking mode is
initiated, and heat is not produced. This setting is intended for use by retailers. By default,
Sales mode is off.

14E
PARTS AND FEATURES
SABBATH MODE
When in Sabbath mode, the oven operation may be controlled as
described below, however audible signals will not sound, the clock
is disabled, oven lights are disabled and changes to the display may
be delayed from 30 to 60 seconds. There is no need to remove
oven light bulbs during Sabbath mode. The oven will be allowed
to operate indenitely until Sabbath mode is exited, overriding
the factory 12-hour default maximum continuous oven operation.
TO SET SABBATH MODE
1 Touch Settings pad.
2 Use the 7+ pad to scroll through the menu until SAbE appears
on the display.
3 Touch START/ENTER pad to select the Sabbath mode.
4 By default, this setting is OFF. Touch 7+ and 9- pads to toggle
between ON and OFF.
5 Touch START/ENTER pad to turn on Sabbath mode. A single
] bracket appears on the display, indicating Sabbath mode is
active.
During Sabbath mode, the function of touchpads on the control
panel are modied as shown below.
FUNCTION DURING SABBATH MODE
1 2 3
Bake 200 ˚F Bake 250 ˚F Bake 300 ˚F
4 5 6
Bake 350 ˚F Bake 400 ˚F 90 minutes
7 8 9
2 hours 3 hours 4 hours
0
5 hours
TO CONTROL OVEN IN SABBATH MODE
1 For continuous baking operation, touch the pad corresponding
to the desired oven temperature. Touch START/ENTER pad.
2 For timed baking operation, touch the pad corresponding to the
desired oven temperature, then touch the pad corresponding to
the operating time. Touch START/ENTER pad.
3 After START/ENTER pad is touched, a random delay between
30 and 60 seconds elapses and a second bracket ] [ appears in
the display, indicating the oven is baking.
4 Temperature can be adjusted at any time. To adjust the oven
temperature, touch the pad corresponding to the desired oven
temperature then touch START/ENTER pad.
5 Touch STOP/CLEAR pad to cancel any baking operation in
progress. A random delay between 30 and 60 seconds elapses,
and a single bracket ] appears in the display.
TO EXIT SABBATH MODE
1 Quickly touch Settings pad three times to reopen the Settings
menu.
2 Use the 7+ pad to scroll through the menu until SAbE appears
on the display.
3 Touch START/ENTER pad to select the Sabbath mode.
4 Touch 7+ pad to toggle between ON and OFF.
5 When OFF appears on the display, touch START/ENTER pad
to turn off Sabbath mode.
HOLD TO KEEP WARM SETTING
The Hold to Keep Warm setting is designed to keep cooked foods
hot. When this setting is activated, the oven will remain on at a
lower temperature after cooking time has completed to keep food
at a suitable temperature for eating. For best results, do not leave
food in the oven for longer than 2 hours on Hold.
WARNING
FOODBORNE ILLNESS HAZARD
• Bacteria may grow in food at temperatures below 140 °F. This
mode is designed to keep cooked foods warm, not heat cold
foods.
TO SET HOLD TO KEEP WARM MODE
1 Touch Settings pad.
2 Use the 7+ pad to scroll through the menu until hold appears
on the display.
3 Touch START/ENTER pad to select the Hold setting.
4 By default, this setting is OFF. Touch 7+ and 9- pads to toggle
between ON and OFF.
5 Touch START/ENTER pad to accept changes. Touch STOP/
CLEAR pad to exit Settings menu.

E15
BEFORE OPERATING
BEFORE FIRST USE
1 Remove all packaging, literature, removable labels and protec-
tive plastic from the appliance. Check inside the oven, inside the
drawer and around the door and trim edges carefully.
2 Ensure the appliance is properly installed and connected to
power according to all instructions in the included Installation
Manual.
3 Wipe all surfaces, including inside oven and drawer, with a
damp, soft cloth to remove any dust that may have settled during
shipping and storage.
4 Read and understand this manual and familiarize yourself with
the controls and features described.
5 Conrm cooktop burners and oven operate as intended. Contact
Sharp customer support immediately if the appliance does not
work as expected.
6 Ventilate the kitchen, then touch Bake pad, adjust the tempera-
ture to 450 °F and touch START/ENTER pad. Allow the oven
to heat for 1 hour to remove any dust or impurities in the cavity.
During this initial operation, an odor is normal.
SET THE CLOCK
1 Touch Clock pad on the control panel.
2 Enter the time of day using the numeric keypad and touch Clock
pad to toggle between AM and PM.
3 Touch START/ENTER pad to accept the displayed time. Touch
STOP/CLEAR pad to reset.
CONDITION OF THE UNIT
Check the appliance for any damage. If there is any damage, do not
operate the appliance and contact your dealer or a Sharp Authorized
Servicer. Return the appliance to the nearest authorized service
facility for examination, repair or adjustment. Call 1-800-BE-
SHARP for support.
SERVICE AND REPAIR WARNING
Do not repair or replace any part of the Sharp Slide-In Gas Range.
If the display, heaters or touch controls fail, consult a Sharp
Authorized Servicer.
PRODUCT DISPOSAL
This product may not be treated as household waste. To dispose
of the appliance, deliver it to an applicable collection point for
the recycling of electrical and electronic equipment. Dispose of
this product correctly to prevent negative consequences for the
environment and human health, which could otherwise be caused
by inappropriate waste handling of this product. For more detailed
information about recycling of this product, please contact your
local city ofce, your household waste disposal service or the shop
where you purchased the product.
16E
COOKTOP USE
WARNING
FIRE, EXPLOSION HAZARD
• NEVER OPERAT E TH E COOKTOP U NATTEN DED. Failure
to follow this warning could result in re, explosion or burn
hazard that could cause property damage, personal injury or
death.
• If a re should occur, keep away from the appliance and
immediately call your re department.
• DO NOT ATTEMPT TO PUT OUT GREASE FIRES WITH
WATER. Smother ames with a close-tting lid or metal tray.
Never pick up a aming pan.
• Overboiling causes smoking and greasy spills that may ignite.
Always turn off all controls when nished with cooking.
• Do not place items that can melt or burn on the cooktop, even
when it is not in use.
• Do not wear loose-tting or hanging garments while using the
cooktop. Tie long hair back while using the cooktop.
WARNING
CARBON MONOXIDE HAZARD
• Do not line or cover grates or any other part of the cooktop
with aluminum foil, as this may cause risk of carbon monoxide
poisoning, overheating of cooktop surfaces and re.
• Burners and burner caps must be positioned and aligned
correctly for proper combustion. See page 25.
• To avoid risk of carbon monoxide poisoning, re and explosion
hazards, turn the knob to the Off position when the burner is
not in use or ame is not present.
CAUTION
BURN AND ELECTRIC SHOCK HAZARD
• Use cookware of proper size for the burner in use and adjust
burners so ames do not extend beyond the edge of cookware.
• To avoid burns, do not touch cooktop or grates after cooktop
use until completely cool.
• To avoid steam burns, do not use a wet sponge or cloth to clean
cooktop while it is still hot. Do not use wet potholders, as the
steam can cause burns.
• Do not allow cookware to boil dry or otherwise overheat.
• Never cook directly on the grates. Do not cook items packaged
in aluminum foil directly on the cooktop or grates. Do not use
aluminum foil or any material that could melt directly on the
cooktop. Always use appropriate cookware.
COOKTOP BURNER BTU RATING
BURNER
BTU/HOUR
(NATURAL GAS)
BTU/HOUR (LP)
left front 18,000 16,500
left rear 5,000 5,000
right front 15,000 12,500
right rear 10,000 8,500
center 10,000 8,500
cooktop 58,000 51,000
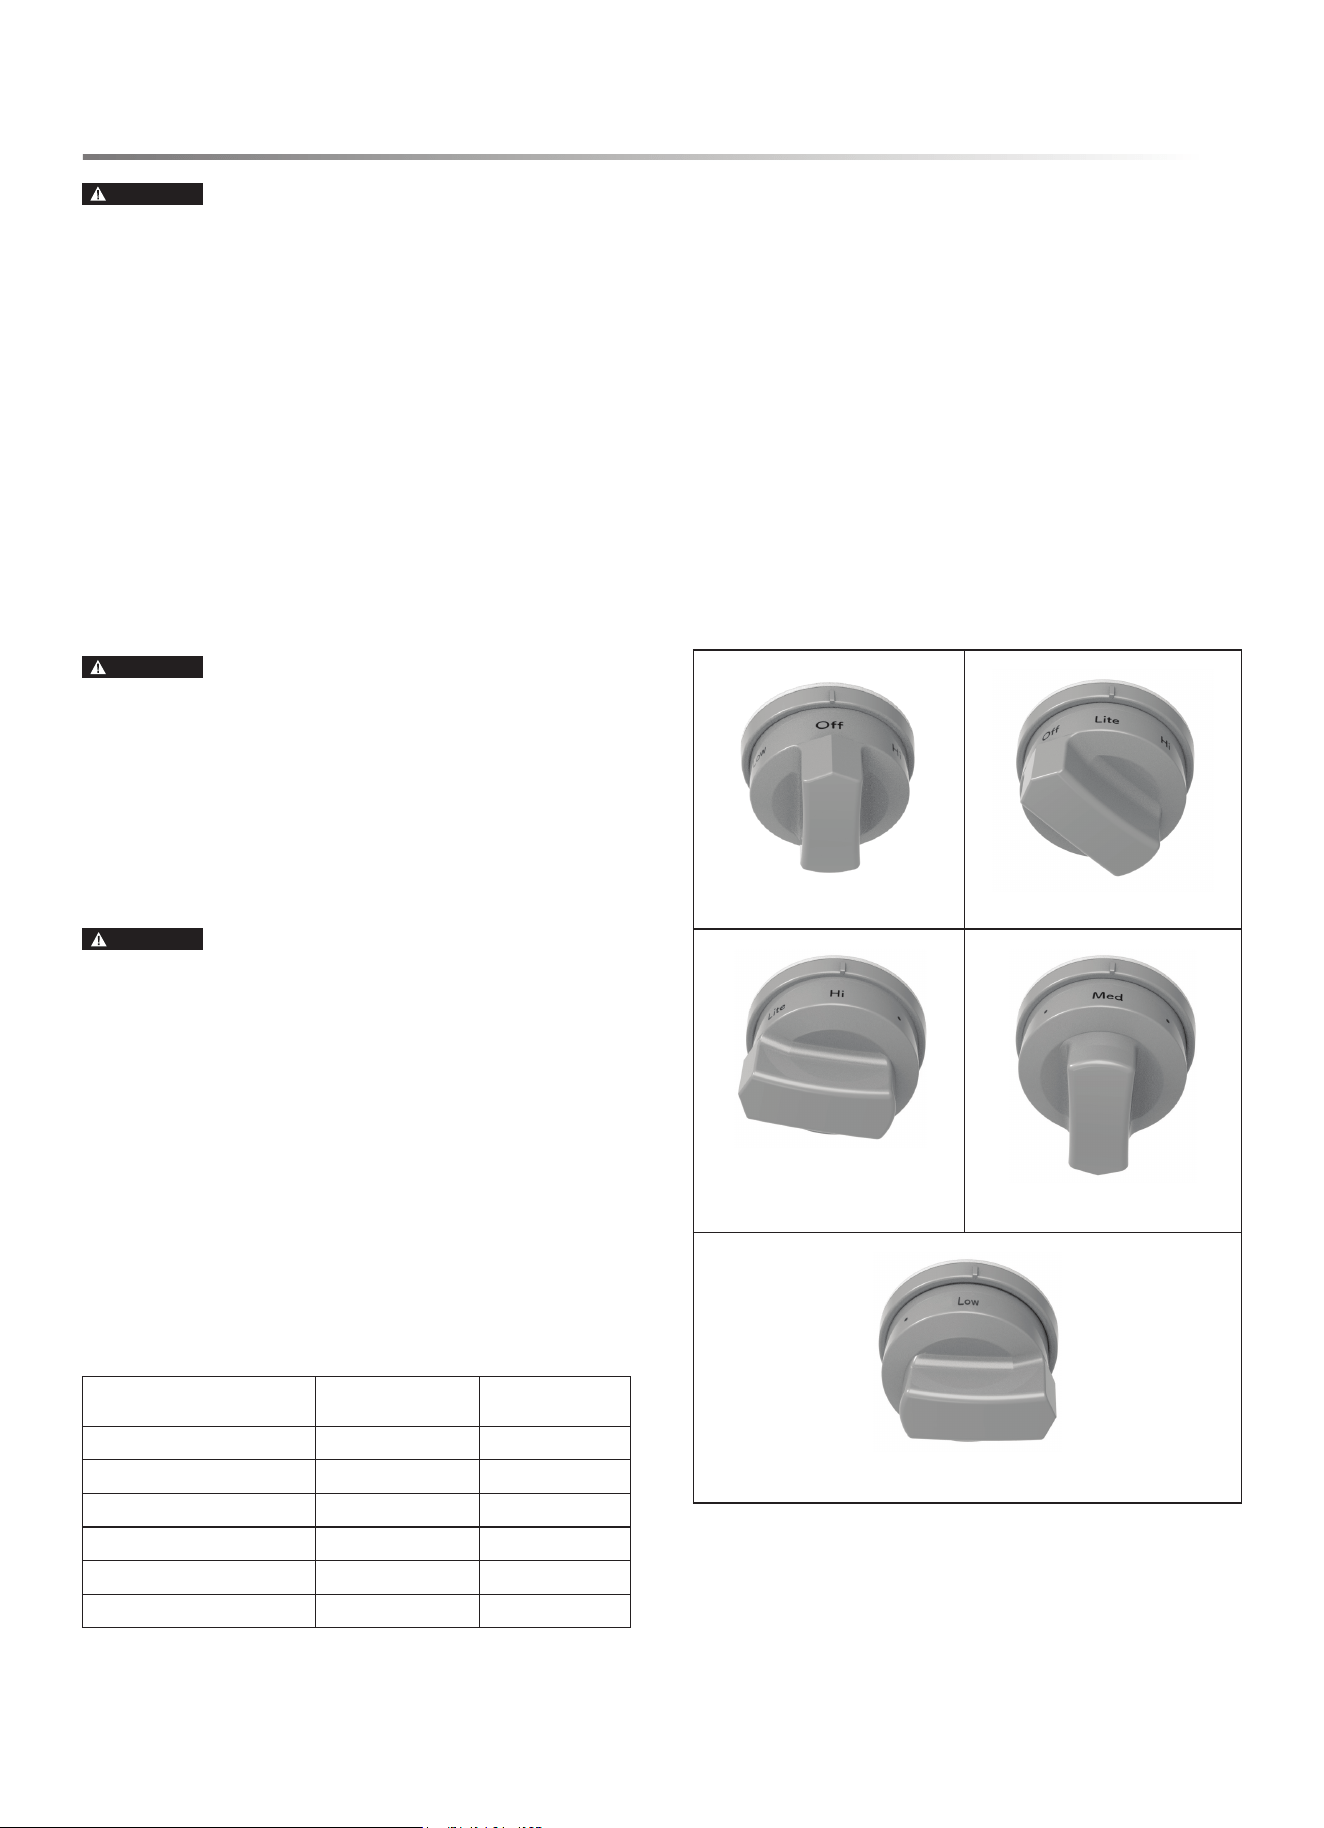
COOKTOP BURNER CONTROL
TO TURN ON COOKTOP BURNER
1 Push in the corresponding control knob and rotate left
(counterclockwise) to the Lite position. Gas ows and igniters
on all burners spark.
2 After the burner ignites, adjust to the desired heat setting by
aligning the power level on the knob to the indicator mark on
the control panel.
3 To turn off a burner, simply rotate the control knob right
(clockwise) to the Off position.
NOTES:
• A small icon above the control knob indicates which burner is
controlled by that knob.
• It is recommended to watch the ame rather than the knob when
adjusting burner setting.
OFF LITE, ALLOWS IGNITERS TO SPARK
HI, FOR HIGH HEAT LEVEL MED, FOR MEDIUM HEAT LEVEL
LOW, FOR LOW HEAT LEVEL

E17
COOKTOP USE
IN THE EVENT OF POWER FAILURE
In the event of power failure, electronic ignition does not function.
However, cooktop burners can be lit manually.
WARNING
BURN HAZARD
• Use extreme caution when lighting cooktop burners during
power outage. Use replace matchsticks or a grill lighter with
an extended wand to keep hands away from ames.
TO MANUALLY IGNITE COOKTOP BURNER
1 With the control knob turned to the Off position, light a match
or lighter and hold the ame near ports beneath the burner cap.
The ports are openings around the perimeter of the burner top.
2 Rotate the knob to the Lite position. The burner ame will
ignite.
3 Once the burner is lit, remove the match or lighter and adjust
the knob to the desired heat setting. The burner will function
as normal until turned off.
WARNING
FIRE, EXPLOSION HAZARD
• If the knob is rotated quickly from Lite position to beyond Hi
without ignition, gas will continue to ow, resulting in risk of
re and/or explosion hazards. If ignition does not occur and
ame is not present, turn the knob back to the Off position.
• If a burner is not ignited, ensure the knob is in the Off position.
When a control knob is in use to ignite or control a burner,
a LED illuminates behind the knob. In the event of a power
outage, the LED does not function. If a burner does not ignite,
return the knob to the Off position.
18E
WARNING
FIRE, CARBON MONOXIDE HAZARD
• If materials inside the oven ignite, keep the door closed, turn off
the appliance and disconnect the power at the circuit breaker.
Wait for the oven to cool before removing contents, then clean
the oven and restore power.
• Never place anything (aluminum foil, spill mat, baking stone,
cookware, etc.) on the bottom of the oven cavity. Items on the
bottom of the oven cavity can trap heat or melt, resulting in
damage to the appliance and risk of electric shock, smoke or re.
• Never cover any slots, holes or passages in the oven bottom and
never cover a rack with materials such as aluminum foil, as it
blocks airow and results in risk of carbon monoxide poisoning.
• Do not operate oven without cooktop grates in place, as the
grates direct vented air away from walls and cabinets.
CAUTION
BURN HAZARD
• Always use dry potholders or oven mitts when using the oven.
Moist or damp potholders in contact with hot surfaces may
cause steam and risk of burns.
• Do not block or cover oven vents, located along the rear of the
cooktop. When the oven is in use, this area may get very hot.
• Racks are designed to stop before coming completely out of the
oven to reduce the risk of dropped or spilled foods.
ABOUT OVEN COOKING
1 Preheating the oven is necessary for most oven cooking. Unless
the recipe specically instructs otherwise, place food in the
oven only after preheating is complete.
2 It is normal for steam or moisture to emit from the oven vent.
Moisture evaporates from food during any cooking process.
The moisture content of the food determines the amount of
steam or vapor emitted. The moisture may condense on any
surface cooler than the oven interior, such as door trim and
the control panel.
3 During operation, do not leave the oven door open longer than
necessary. If the door is left open too long during operation,
baking mode will automatically cancel.
4 During operation, the convection fan will automatically stop
when the oven door is opened.
5 All baking modes have a time limit of twelve hours. Broil mode
has a time limit of one hour. To continue cooking past time
limits, simply reset the oven.
6 Place a baking tray on a lower rack to catch drips and spills
during cooking.
7 If operating at altitudes greater than 3,000 feet, recipes may
require adjustment. Consult USDA or other trusted sources for
recommendations on high-altitude baking.
OVEN USE
OVEN HEAT SOURCE BTU RATING
(NATURAL GAS)
HEATING
ELEMENT
BTU/HOUR
(NATURAL GAS)
BTU/HOUR (LP)
broil burner (top) 16,000 btu/h 12,800 btu/h
bake burner (bottom) 18,500 btu/h 15,000 btu/h
OVEN RACKS
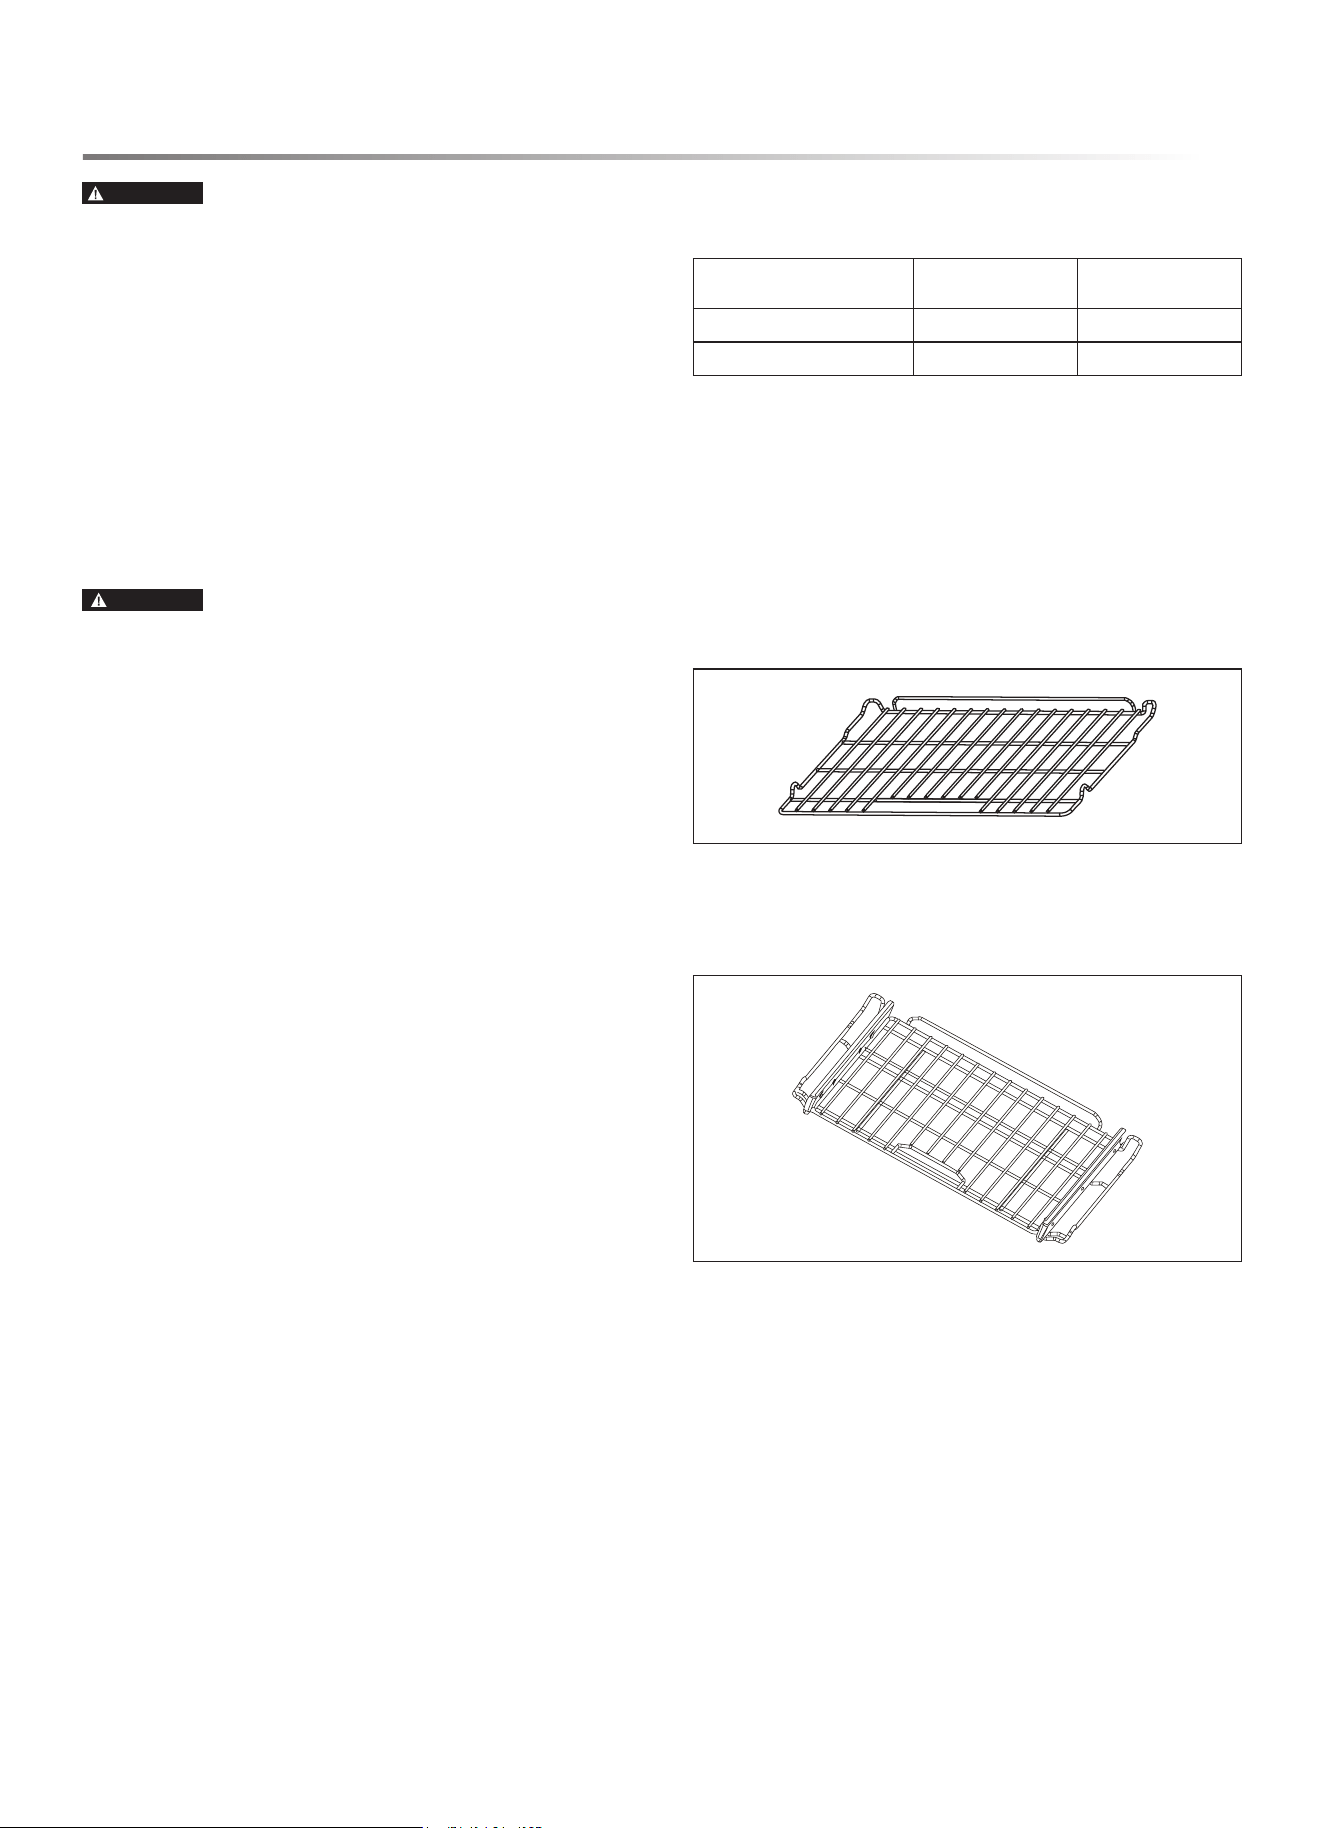
The SSG3074SNS model comes with two wire at racks, which can
be placed in any of the seven oven rack positions. The SSG3076SNS
model comes with one wire at rack and one gliding rack, which
can also be placed in any of the seven rack positions.
FLAT RACK
The at racks are versatile and low prole and slide in and out of
the oven on rack guides. Multiple racks can be used simultaneously.
GLIDING RACK
The gliding extension rack slides in and out of the oven on ball bear-
ing slides, allowing heavier dishes to be moved smoothly and easily.
E19
OVEN USE
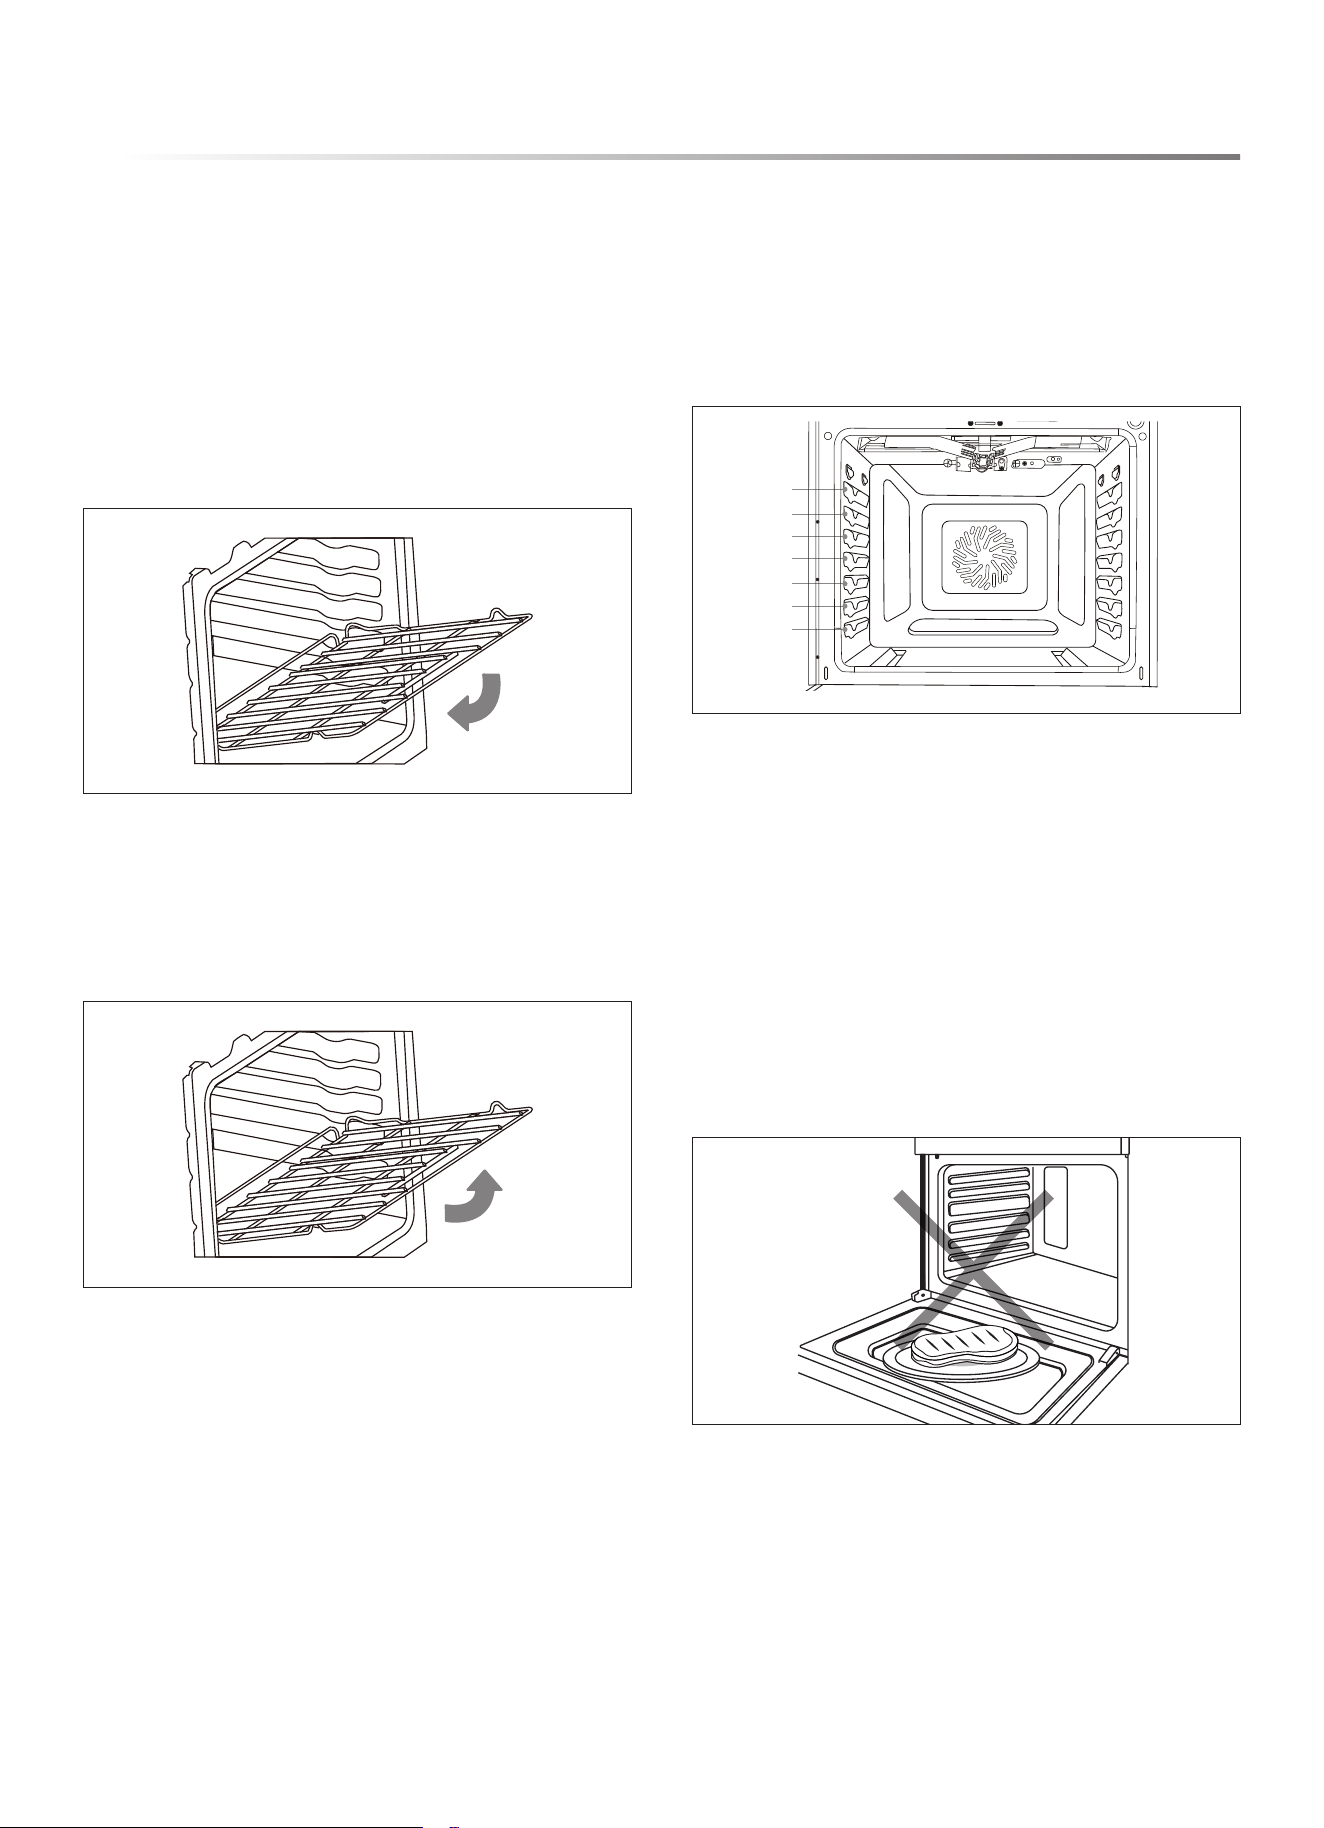
INSERT/REMOVE RACKS
TO INSERT RACK
NOTE: The rack can be installed in only one direction.
1 Orient the rack so the handle is toward the front and the interlock
features are on the top.
2 Tip the rack so the front is several inches higher than the back.
3 Slip the interlock features under the stop position on the rack
guides.
4 Lower the rack front while pushing back until completely
inserted.
TO REMOVE RACK
1 Remove all food and utensils from rack.
2 Firmly grasp rack from both sides.
3 Pull rack out until it reaches the stop position.
4 Lift up on the front of the rack and pull outward.
RACK POSITIONS
For best performance, adjust racks so food is positioned at the
center of the oven. For most foods, the best rack position is the
center position, the fourth from the bottom. For larger foods, such as
roasts or turkeys, use a lower position. When broiling, food should
be close to the broil burner in one of the top two rack positions.
When using multiple racks simultaneously, space out the food out
around the oven center.
7
6
5
4
3
2
1
COMPONENT COOLING FAN
The cooling fan activates during any cooking mode to cool inner
components and outer door surfaces. This air is exhausted through
the vent located above the oven door. It continues to run until
components have cooled sufciently. The cooling fan operates
at double speed (or RPM’s) whenever the inner components'
temperature becomes too high.
OVEN DOOR
To avoid oven door glass breakage:
• Always ensure racks are fully inserted and no bakeware extends
past the front edge of an oven rack before closing the oven door.
• Do not set objects on the glass surface of the oven door.
• Do not hit glass surfaces with bakeware or other objects.
• Do not wipe down glass surfaces until the oven has completely
cooled.
20E
OVEN USE
OVEN VENTS
Blocking or covering the oven vents will cause poor air circulation,
affecting cooking, cleaning and cooling results.
• Both the upper and lower oven vents allow fresh air to enter
the cooling system.
• The lower oven vent also allows hot air to be expelled from
the cooling system.
OVEN CONDENSATION AND
TEMPERATURE
• It is normal for a certain amount of moisture to evaporate from
food during any cooking process. The amount of condensation
depends on the moisture content of the food.
• The moisture may condense on any surface cooler than the
inside of the oven, such as the control panel.
• The Slide-In Gas Range has an electronic temperature sensor
to help maintain an accurate temperature. Your previous oven
may have had a mechanical thermostat that drifted gradually
to a higher temperature. You may need to adjust your favorite
recipes when cooking in a new oven.
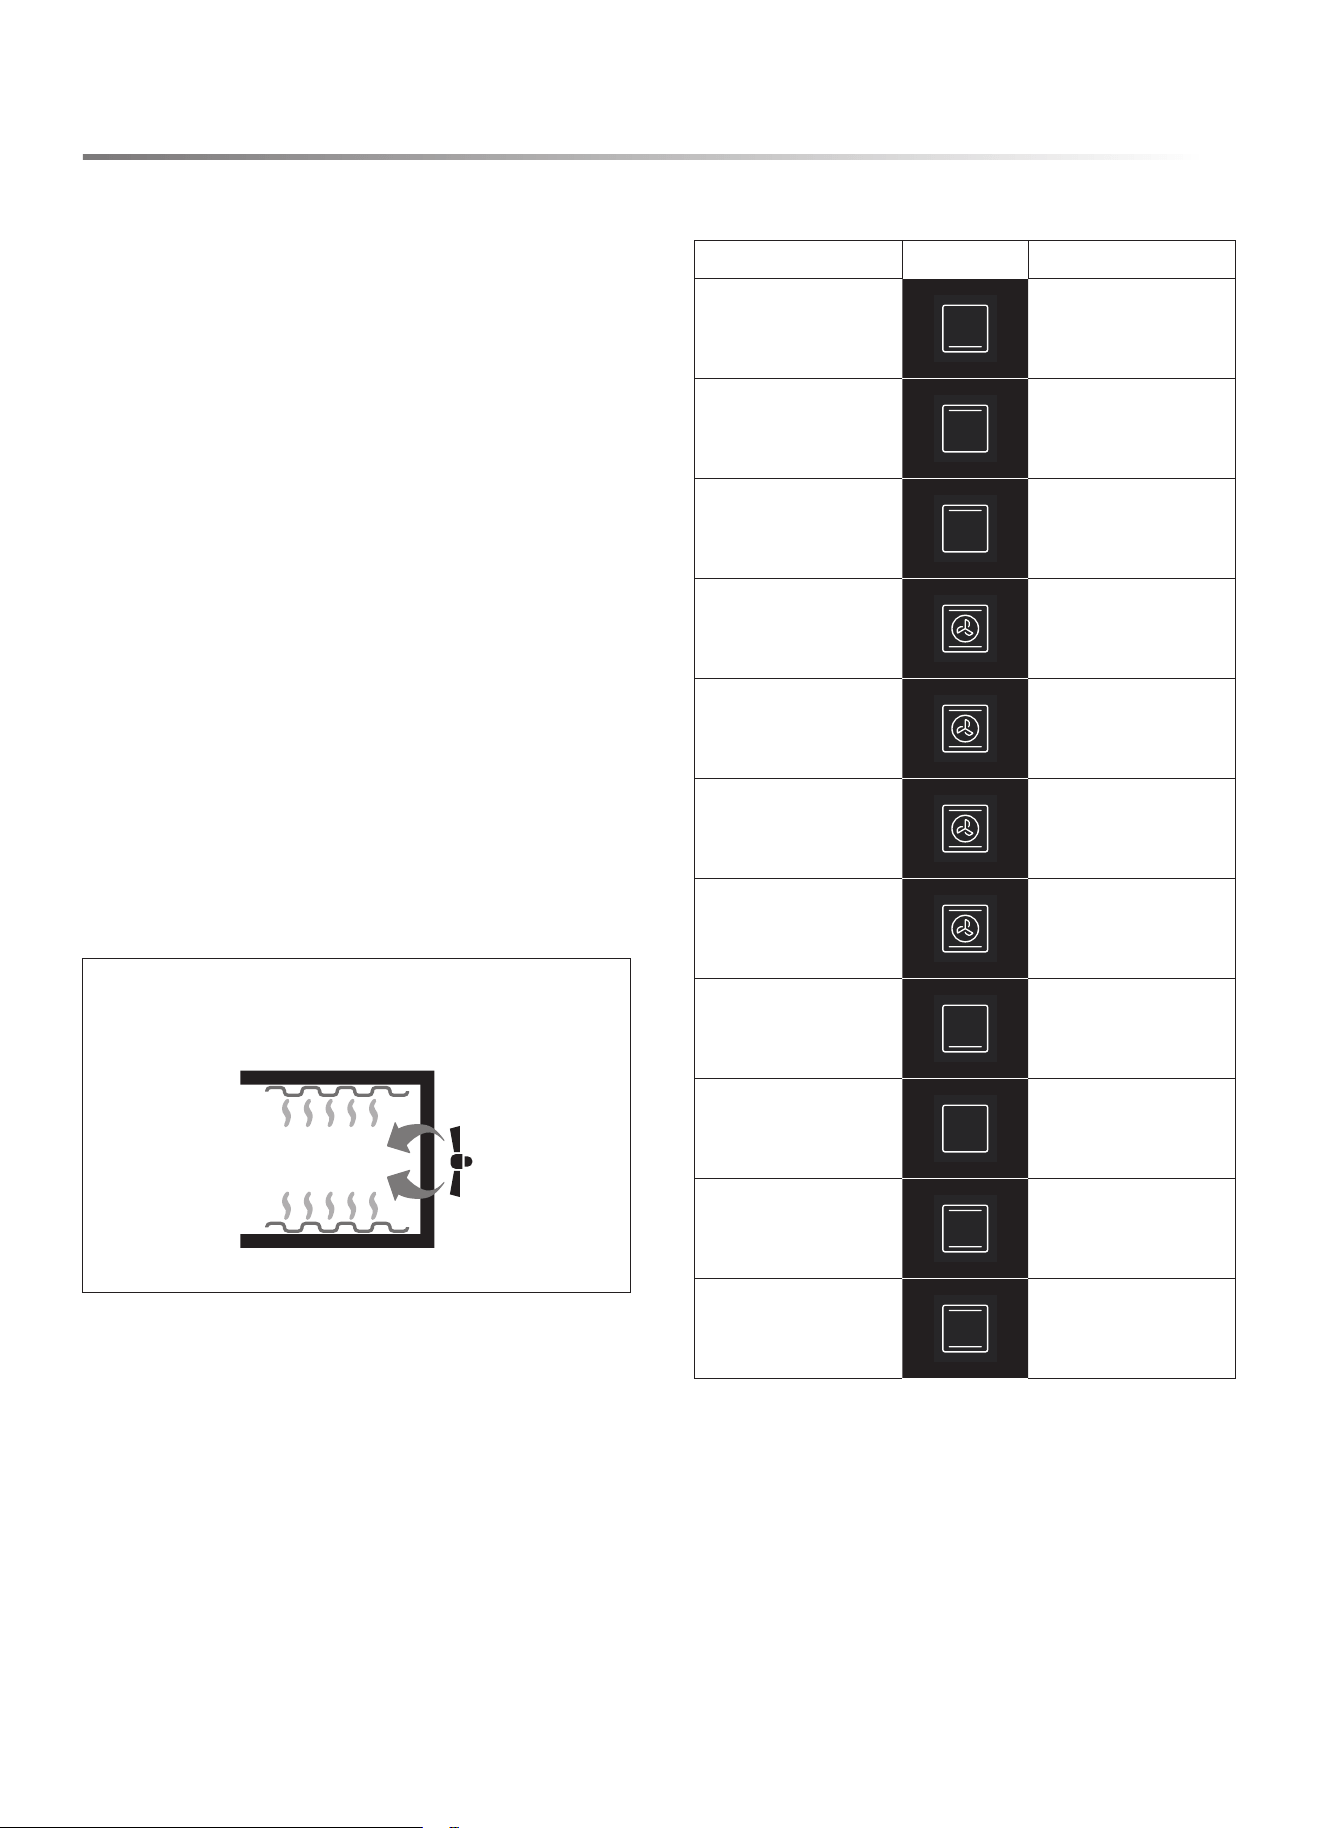
COOKING WITH CONVECTION
In a conventional oven, the heat sources cycle on and off to maintain
an average temperature in the oven cavity. As the temperature
gradually rises and falls, gentle air currents are produced within
the oven. This natural convection tends to be inefcient because
the currents are irregular and slow.
CONVENTIONAL CONVECTION
Bake Element and Broil Element
ADVANTAGES OF CONVECTION
COOKING
• Baking on multiple racks saves time and provides even cooking
results in food
• Prepares whole meals at once with no avor transfer
• Requires no specialized bakeware
• Dehydrates herbs, fruits and vegetables
• Saves time and energy
• Convection broiling allows for extraordinary grilling with
thicker cuts of food
OVEN OPERATION SYMBOLS
FUNCTION ICON
DEFAULT TEMP.
Bake 350 ˚F
Broil Hi 590 ˚F
Broil Low 550 ˚F
Pizza 400 ˚F
Air Fry 400 ˚F
Convection Bake 350 ˚F
Convection Roast 350 ˚F
Warm 150 ˚F
Proof
No default
temperature
Steam Clean
No default
temperature
Self Clean 790 ˚F

E21
OVEN USE
PREHEAT
For most oven cooking, preheating the oven is recommended and
desirable. Some foods, such as large pieces of meat where the
total cooking time is much longer than preheating time, do not
technically require preheating time.
In all oven modes that require preheating, the oven will automati-
cally enter preheat mode after START/ENTER is touched. The
temperature display will show the current oven temperature as
it increases until the set temperature is reached. Once the set
temperature is reached, an alert will sound indicating preheating
is complete.
BAKE
The Bake mode applies heat from both above and below the food
to achieve exceptional baking performance. The Bake mode works
best with small to medium sized foods requiring only one rack
positioned at the center of the oven, such as casseroles, frozen
dinners, single-layer cakes and individual racks of cookies.
TO BAKE
1 Touch Bake pad.
2 The default temperature for Bake mode is 350 °F. Use the
numeric keypad to adjust to the desired oven temperature.
3 Touch START/ENTER pad.
4 Allow the oven to preheat before placing food in oven.
5 When cooking is complete, touch STOP/CLEAR pad to exit
Bake mode.
BROIL HI/LOW
The Broil mode is designed to provide similar results to grilling
by exposing food to direct radiant heat from the broil burner at the
top of the oven. Broil can be used to cook steaks or other foods
where a seared exterior is preferred or in short durations to brown
casserole tops or melt cheese. Broil works best with food in rack
positions near the top of the oven. The Broil mode will not operate
if the oven door is open. If the door is left open, an alert will sound
to close the door, and if the door is not closed, Broil mode will
cancel automatically.
NOTES:
• The broil burner is very powerful. Monitor food closely to
avoid burning food.
• When broiling meat, it is recommended to use a broiling pan
to allow grease and juices to drain from the meat.
TO BROIL
1 Touch Broil pad.
2 The default setting is Hi Broil. To select Low Broil, touch Broil
pad again.
3 Touch START/ENTER pad. Allow the oven to operate 5–10
minutes before placing food in the oven. No preheat alert will
sound.
4 When broiling is complete, touch STOP/CLEAR pad to exit
Broil mode.
PIZZA
The Pizza mode uses a customized heating algorithm to bake fresh
pizza. Fresh pizza can be homemade or purchased from a store
or specialty shop.
TO BAKE PIZZA
1 Place oven rack in the middle position (position 4). Touch
Pizza pad.
2 The default temperature for Pizza mode is 400 °F. Use the
numeric keypad to adjust to the desired oven temperature.
3 Touch START/ENTER pad.
4 Allow the oven to preheat before placing food in oven.
5 When cooking is complete, touch STOP/CLEAR pad to exit
Pizza mode.
AIR-FRY
The Air Fry mode uses convection fans to cook foods with moist,
soft interiors and perfectly crisped exteriors without using cooking
oil.
1 Place an oven rack one position above center, then touch Air
Fry pad.
2 The default temperature for Air Fry mode is 400 °F. Use the
numeric keypad to adjust to the desired temperature.
3 Touch START/ENTER pad.
4 Allow the oven to preheat before placing food in oven.
5 Place food for air-frying on a at, non-stick baking tray and
heat according to the chart below or recipe.
6 When air-frying is complete, touch STOP/CLEAR pad to exit
Air Fry mode.
AIR-FRY FOODS TEMPERATURE
COOK TIME
(MINUTES)
frozen fries 475 ˚F 18
fresh fries 475 ˚F 22
frozen wings 450 ˚F 40
fresh wings 450 ˚F 30
frozen mozzarella sticks 475 ˚F 6
frozen chicken nuggets 440 ˚F 13
brussels sprouts 440 ˚F 15
chicken tenders 400 ˚F 30
NOTE: For more even and crispy results, ip foods halfway
through cooking time.

22E
OVEN USE
CONVECTION BAKE
The Convection Bake mode uses a fan inside the oven to circulate
hot air, providing even distribution of heat for more efcient bak-
ing. This mode is perfect for baking recipes that require the use
of multiple racks.
NOTE: Multiple rack heating works best with the racks arranged
evenly around the center of the oven.
TO CONVECTION BAKE
1 Touch Convection Bake pad.
2 The default temperature for Convection Bake mode is 350 °F.
Use the numeric keypad to adjust to the desired oven tem-
perature.
3 Touch START/ENTER pad.
4 Allow the oven to preheat before placing food in oven.
5 When cooking is complete, touch STOP/CLEAR pad to exit
Convection Bake mode.
CONVECTION ROAST
The Convection Roast mode is designed for roasting large pieces
of meat and uses a fan inside the oven to circulate hot air. This
provides an even distribution of heat for more efcient heating and
is better for browning roasts and creating crispier skin on poultry.
TO CONVECTION ROAST
1 Touch Convection Roast pad.
2 The default temperature for Convection Roast mode is
350 °F. Use the numeric keypad to adjust to the desired oven
temperature.
3 Touch START/ENTER pad and allow the oven to preheat
before placing food in oven.
4 When cooking is complete, touch STOP/CLEAR pad to exit
Convection Roast mode.
KEEP WARM
The Keep Warm mode is designed to keep cooked foods hot by
maintaining a maximum temperature of 150 °F. For best results,
do not use Keep Warm mode for more than 2 hours.
WARNING
FOODBORNE ILLNESS HAZARD
• Bacteria may grow in food at temperatures below 140 °F. Do
not attempt to cook food using Keep Warm mode. This mode
is designed to keep cooked foods warm, not heat cold foods.
TO KEEP WARM
1 Touch Bake pad twice.
2 Touch START/ENTER pad.
3 When warming is complete, touch STOP/CLEAR pad to exit
Keep Warm mode.
PROOF
The Proof mode uses the oven lights to provide a gently warm
environment for rising bread or dough. As high temperatures will
kill yeast, Proof mode will not start if the oven is too warm from
previous use.
TO PROOF
1 Touch Proof pad.
2 Touch START/ENTER pad. Preheat is not required. Place
food in oven immediately.
3 When proong is complete, touch STOP/CLEAR pad to exit
Proof mode.
STEAM CLEAN
CAUTION
BURN HAZARD
• Use caution to avoid contact with hot surfaces. Oven surfaces,
especially the oven bottom, may be hot.
• Hot surfaces may create steam in a wet sponge or cloth. If steam
occurs when wiping the oven, allow the oven to cool slightly
before wiping.
Steam Clean mode is designed to gently warm oven surfaces to
create steam and loosen grease and light soils.
TO STEAM CLEAN
1 Start with a cool oven and remove all items from inside, includ-
ing oven racks. Wipe out any large spills or excess debris. Scrape
off and remove any burnt-on debris with a stiff plastic utensil,
such as a hard plastic spatula or plastic paint scraper. To soften
tough stains, spray inside surfaces with water or wipe with a
wet sponge before using Steam Clean mode.
2 Pour 1 cup (8 oz) water in the center bottom of the oven and
close the door.
3 Touch Steam Clean pad. Touch START/ENTER pad. The
door does not lock during a Steam Clean cycle. Do not open
the door until the Steam Clean cycle is complete.
4 When the Steam Clean cycle is complete, soak up any water in
the oven bottom and wipe down interior surfaces with a soft,
nonabrasive sponge or cloth. Touch STOP/CLEAR pad to exit.

E23
OVEN USE
SELF CLEAN
WARNING
FIRE AND BURN HAZARDS
• Before starting a Self Clean cycle, ensure oven is empty.
Remove broiler pan, racks, cookware and any other materials
and remove excess grease or food from inside the oven to avoid
risk of ignition.
• Self Clean mode uses very high oven temperatures capable of
reducing stubborn oven spoils to ash that can be easily wiped
out once the oven is cool. The door locks several minutes after
the start of a Self Clean cycle. If the door is opened before it
locks, the Self Clean cycle is canceled. If the door does not lock
within 15 minutes, cancel Self Clean and contact an authorized
servicer for repair.
NOTES:
• Due to the high temperatures, it is advisable to use Self Clean
mode during cooler weather to avoid unnecessarily burdening
the home air conditioning system.
• Self Clean can be set to run for 3, 4 or 5 hours. Shorter times use
less energy, but longer times allow for more thorough cleaning.
• 3-, 4- and 5-hour cycles do not include cooling time. Allow an
additional 60 to 90 minutes for the door to unlock.
• During Self Clean, do not use the rangetop. It is not safe to
operate any part of the appliance during a Self Clean cycle.
TO SELF CLEAN
1 Start with a cool oven and remove all items from inside, includ-
ing oven racks. Wipe out any large spills or excess debris.
2 Touch Self Clean pad. Use the numeric pad to select the number
of hours of the Self Clean cycle.
3 Touch START/ENTER pad. The oven door is locked during
a Self Clean cycle.
4 When the oven has unlocked and cooled completely, wipe out
any ashy residue with a damp, nonabrasive sponge or cloth.
Touch STOP/CLEAR pad to exit. If a Self Clean cycle is
canceled prematurely, the oven remains locked until it has
cooled sufciently.
DEL AY
CAUTION
FOODBORNE ILLNESS HAZARD
• Foods that spoil easily, such as milk, eggs, sh, stufng, poultry
and pork, should not be allowed to sit for more than 1 hour
before cooking. Spoilage may occur sooner if oven is warm.
The Delay function allows you to delay the start of a baking
operation until a specied time.
NOTES:
• Once Delay has been set, it cannot be modied. To set a different
Delay start time, oven operation must be canceled and restarted.
• Delay cannot be used with Pizza or Broil modes.
• Delay start time cannot be set more than 12 hours in advance.
TO DELAY OVEN OPERATION
1 Select oven baking mode according to previous directions.
2 Touch Delay pad. The clock will begin to ash, indicating the
start time can be entered.
3 Use the numeric keypad to set the start time. Touch Delay pad
to toggle between AM and PM.
4 Touch START/ENTER pad. Place food in the oven.
5 Between time of entry and set Delay start time, the clock on
the display will alternate between the time of day and set Delay
start time. DELAY START will appear above the clock whenever
the Delay function is set.
6 When the Delay start time is reached, an alert sounds to indicate
the oven is starting.
COOK TIME
The Cook Time function is used to set oven operation for a specic
duration, after which time oven operation will stop. The Cook Time
function can be used in conjunction with the Delay function. To
use Cook Time with Delay, set the delayed start time as described
above rst, then set Cook Time as described below.
TO SET COOK TIME
1 Select oven baking mode by touching the corresponding
touchpad. Touch START/ENTER pad.
2 Touch Cook Time pad. The clock will display 00:00, indicating
the duration can be entered.
3 Use the numeric keypad to set the duration in hours and minutes
(hh:mm).
4 Touch START/ENTER pad. The clock begins to count down.
5 When the clock reaches 00:00, the display ashes and an alert
sounds to indicate the baking mode has ended. The oven will
turn off or, if it is set to Hold after Cooking, will maintain a
warm temperature to keep the cooked food warm. See page 13
for Control Settings.
6 Touch STOP/CLEAR pad to clear the signal or exit timed
bake early.
24E
OVEN USE
PROBE
CAUTION
FOODBORNE ILLNESS HAZARD
• Consuming undercooked food can result in foodborne illness.
Use the Probe feature only in accordance with the following
instructions to ensure all portions of the food reach minimum
safe cooking temperatures. Consult reputable government
sources (USDA, FDA or CDC) for recommended safe minimum
cooking temperatures.
WARNING
BURN HAZARD
• If the oven has preheated, the probe and jack are hot and could
cause burns. Use an oven mitt to open the jack and insert probe.
The oven probe supplied with the appliance can monitor the inter-
nal food temperature and turn off the oven when the food reaches
a set temperature. Some foods, particularly small or thin items, are
not suitable for cooking with the probe due to their size and shape.
NOTES:
• Use only the probe supplied with this oven. Do not use any
accessories not specically designed to work with this appli-
ance.
• To avoid damage to the probe, meat should be completely
defrosted prior to insertion.
• The Probe feature only works with Bake, Convection Bake and
Convection Roast modes.
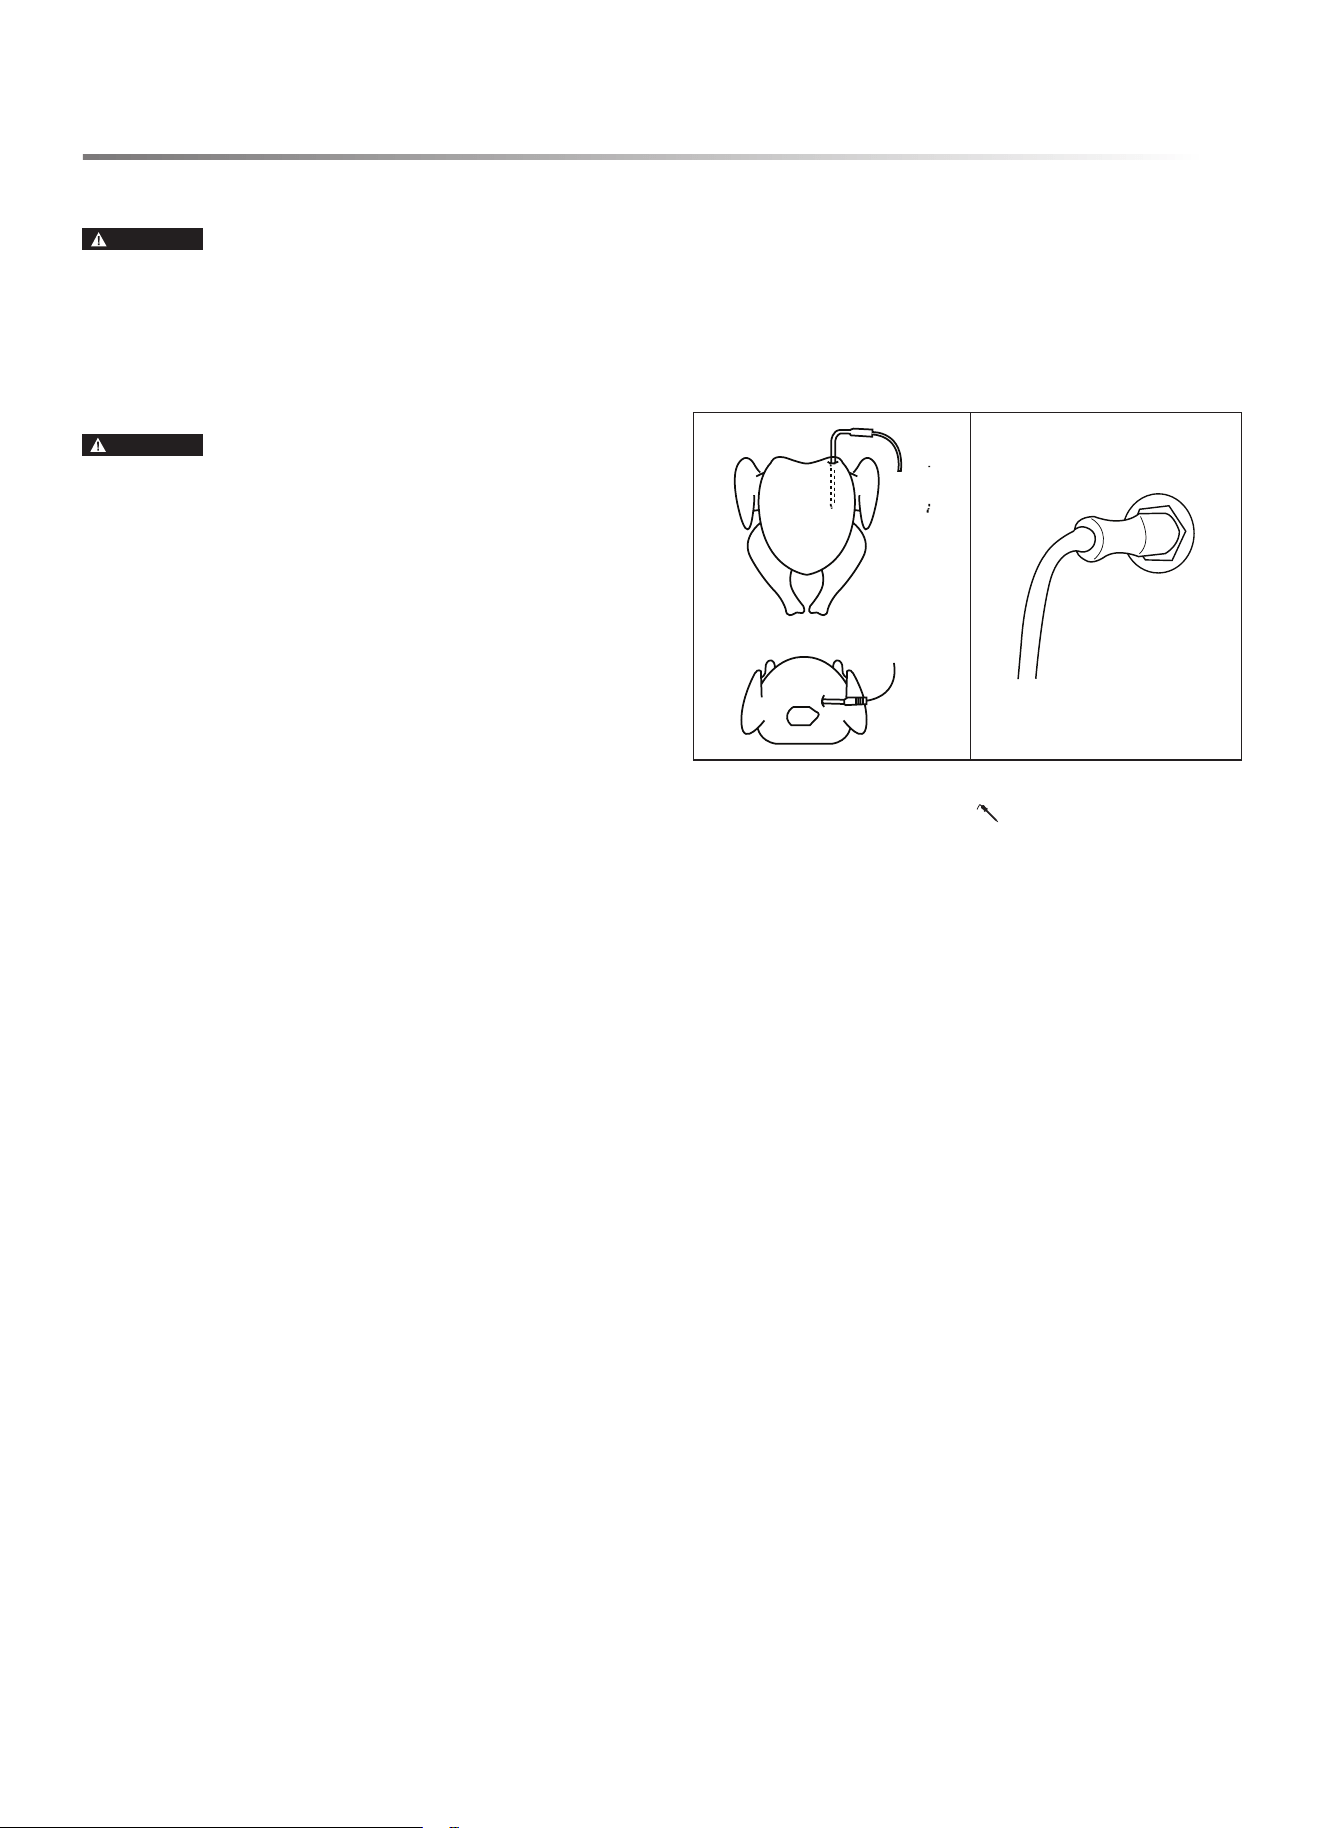
TO USE PROBE FEATURE
1 Place meat in an appropriate dish or pan and insert probe into
meat. Position the probe so the tip is in the approximate center
of the thickest part of the food, such as the thickest part of the
breast in whole poultry. The probe should not touch bone, fat
or gristle.
2 Place the meat in the oven, plug the probe into the jack and
close the door.
3 Select baking mode and oven temperature, then touch START/
ENTER pad. The Probe icon on the display panel ashes,
indicating the food temperature can be set.
4 Use the numeric keypad to set the desired food temperature,
then touch START/ENTER pad. While Probe function is in
operation, the display alternates between the oven temperature
and the probe temperature reading.
5 When the probe temperature reading reaches the set tem-
perature, the display ashes and an alert sounds to indicate the
baking mode has ended. The oven will turn off or, if it is set
to Hold after Cooking, will maintain a warm temperature to
keep the cooked food warm. See page 13 for Control Settings.
6 Touch STOP/CLEAR pad to clear the signal or exit timed
bake early.
E25
CLEANING AND MAINTENANCE
WARNING
TIP-OVER HAZARD
• Always conrm the anti-tip device is engaged per instructions
in Installation Manual before moving the appliance for cleaning,
servicing or any other reason. Failure to follow these instruc-
tions results in a risk of injury or death to a child or adult if
the range is tipped.
COOKTOP CLEANING
CAUTION
BURN, INHALATION HAZARDS
• Use caution when cleaning the cooktop. Some cleaners can
produce noxious fumes if applied to a hot surface.
• Allow the cooktop to cool completely before applying any
cleaning chemicals.
• To avoid steam burns, do not attempt to clean the cooktop with
a wet sponge or cloth while the cooking area is hot.
• Follow instructions carefully to ensure burners are located and
assembled correctly for proper combustion.
IMPORTANT: Do not wash burner grates, burner caps or burners
in a dishwasher.
TO CLEAN COOKTOP
1 For best results and a prolonged cooktop life, clean the cooktop
after each use. Before cleaning, ensure the cooktop, including
grates and burners, are completely cool.
2 Remove burner grates, burner caps and burners. Dump any
debris found inside burner. Handwash grates, caps and burners
with warm, soapy water. To prevent corrosion, do not soak in
water. For stubborn soils, use a plastic scouring pad or stiffy
nylon brush. Dry thoroughly and set aside.
3 With burners removed, carefully wipe out any debris from
inside burner openings with a dry paper towel, taking care to
not push any debris, water or cleaning material into the hole
in the brass orice.
4 Clean stainless-steel surfaces with any general-purpose
stainless-steel cleaner and follow the instructions provided by
the manufacturer. Rub in the direction of the brushed nish and
dry thoroughly to prevent corrosion and water marks.
5 Clean enameled surfaces and around burner bases with any
general-purpose kitchen cleaner and follow the instructions
provided by the manufacturer. Dry thoroughly to prevent cor-
rosion and water marks.
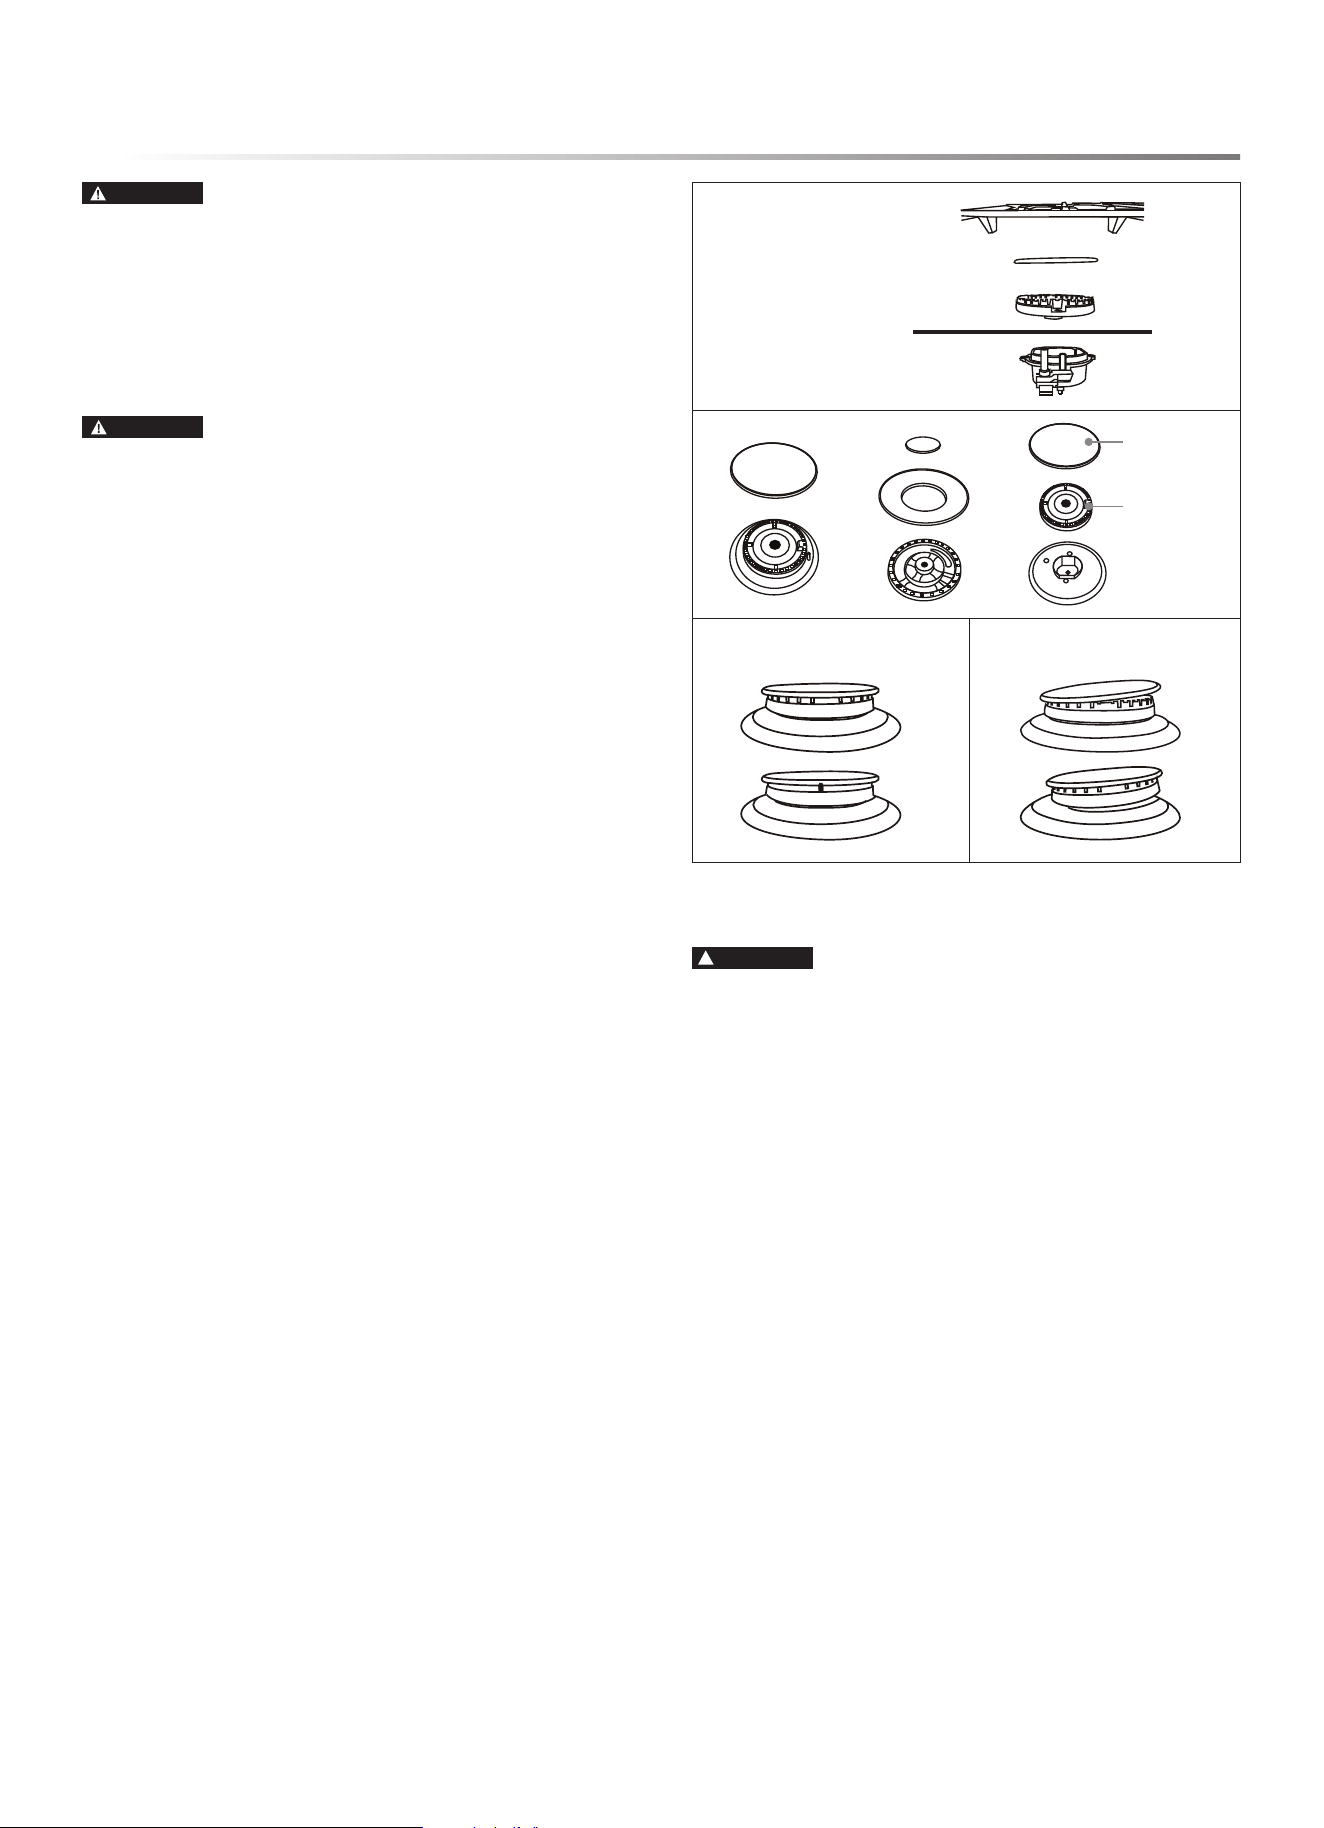
6 Replace burners and burner caps onto the cooktop at correct
locations and in correct orientation.
burner grate
burner cap
burner
cooktop surface
ignitor
Cap
Spreader
CORRECT INCORRECT
CONTROL PANEL CLEANING
CAUTION
ELECTRIC SHOCK HAZARD
• Do not use excessive water or cleaners to clean knob areas. Do
not spray kitchen cleaners directly into the openings behind the
knobs. If moisture is forced into openings behind knobs, there
is risk of electric shock.
IMPORTANT: Do not use scouring pads, abrasive cleaners, strong
liquid chemicals, steel wool or oven cleaners to clean the control
panel, as these may damage the nish and cause cosmetic damage.
NOTE: The control panel and oven control can be disabled during
cleaning by activating the Control Lock. Touch and hold Control
Lock pad for 3 seconds to activate or deactivate Control Lock.
26E
TO CLEAN CONTROL PANEL
1 For best results and a prolonged life, clean the user interface
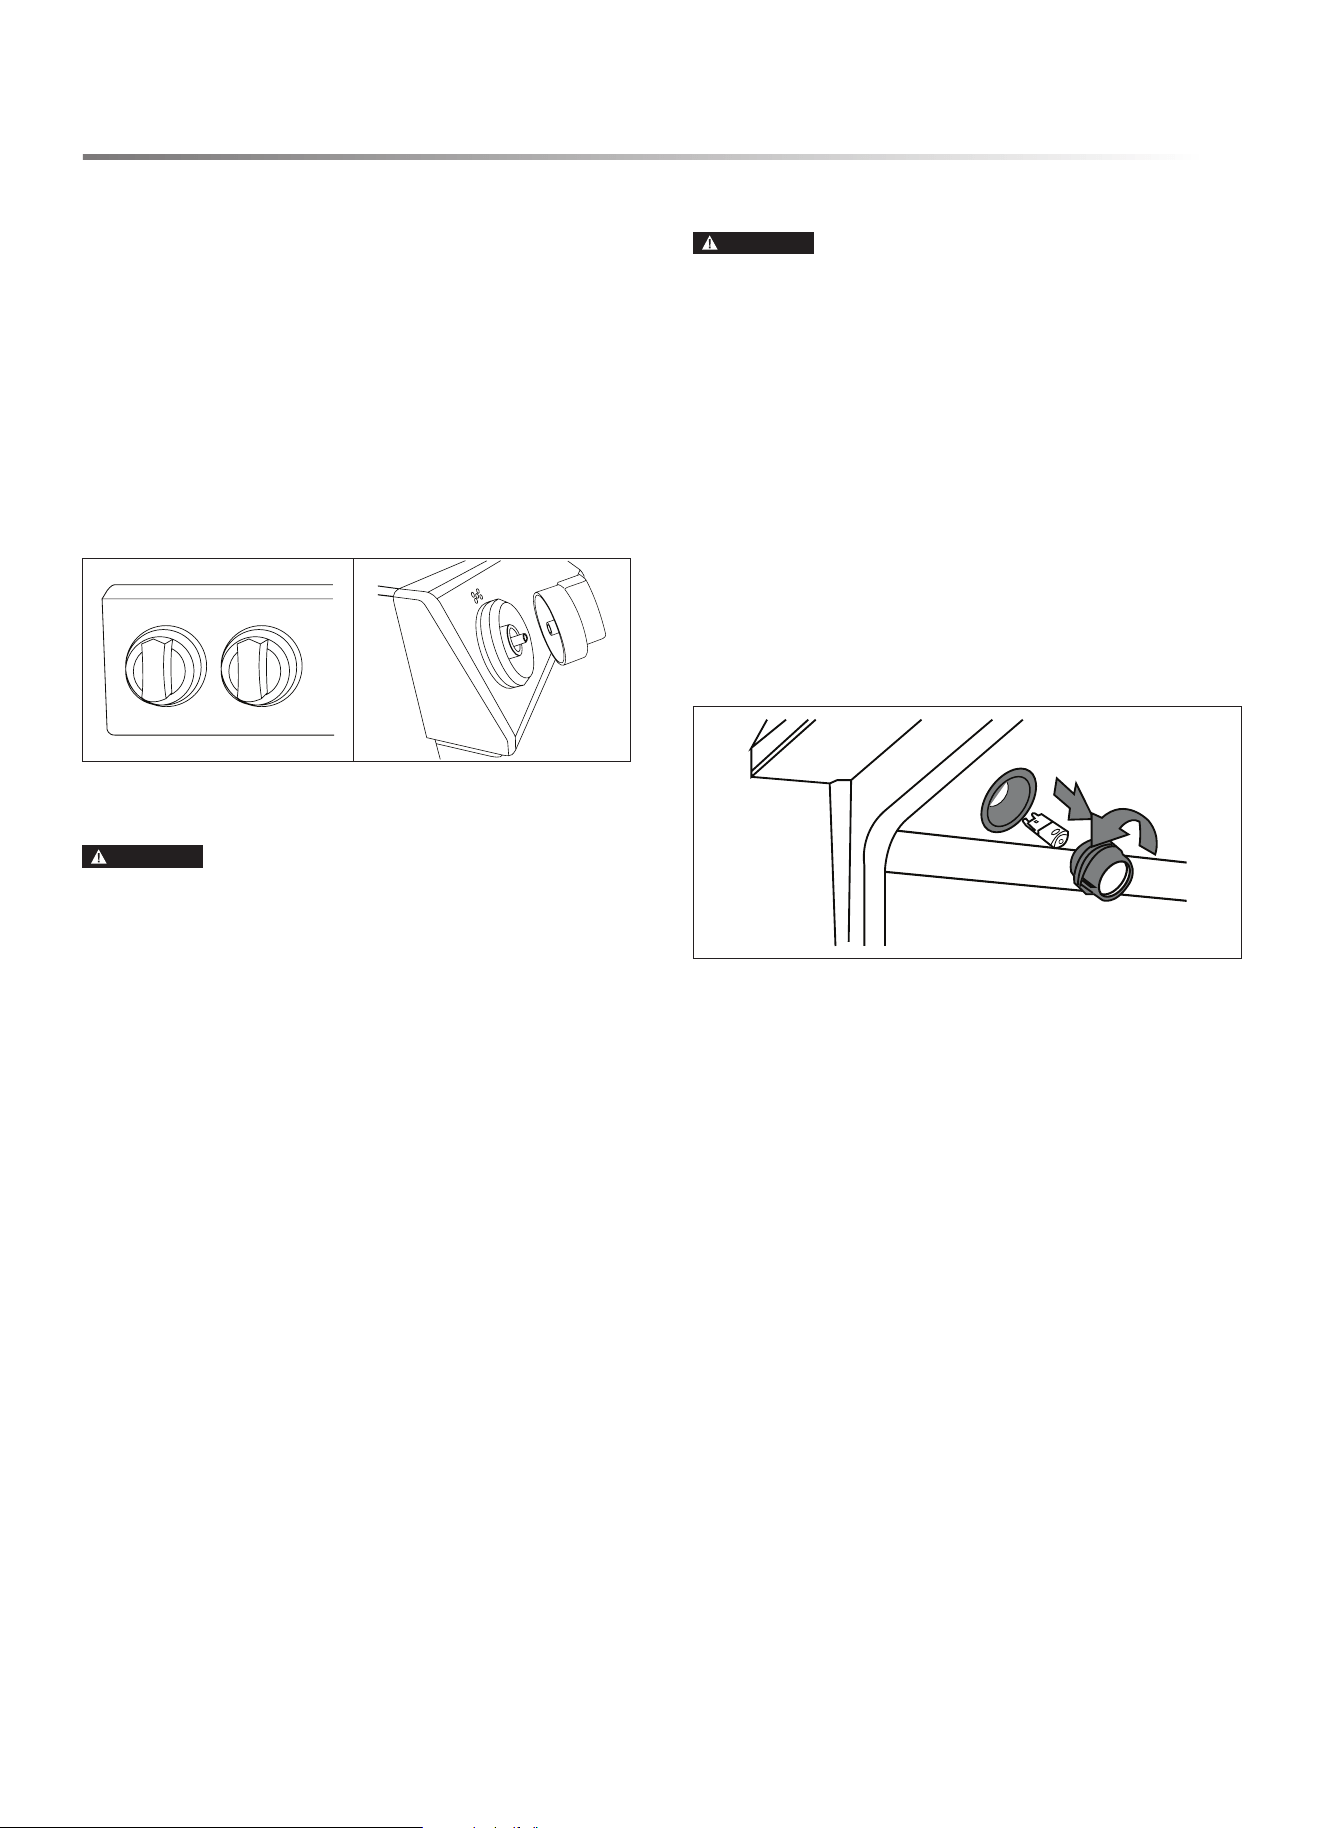
and control panel after each use. To remove knobs for easier
cleaning, ensure knobs are in the Off position, then pull straight
back with rm pressure to remove knob from stem.
2 Clean entire panel with a slightly damp, non-abrasive cloth,
using mild soap and water. Glass cleaner can be used on oven
control panel to remove streaks, and stainless-steel cleaner can
be used on exposed metal to remove streaks.
3 Handwash knobs in warm, soapy water.
4 Replace knobs, taking care to align the prole in the knob to
the stem shape to ensure a smooth t and avoid damage to
knob or control.
OVEN INTERIOR CLEANING
CAUTION
BURN HAZARD
• Oven surfaces may be hot, and hot surfaces may create hot
steam in a wet sponge or cloth when cleaning. Use caution to
avoid contact with hot surfaces and if steam is evident, wait
until the oven has cooled completely.
TO CLEAN OVEN INTERIOR
1 For best results and a prolonged life, check oven after each use
for spills or spattering that require clean-up and wipe out interior
with a slightly damp, non-abrasive cloth, using mild soap and
water to remove light spills.
2 For moderate soil, use Steam Clean. For stubborn or heavy soil,
use Self Clean. See pages 22 and 23.
OVEN LIGHTS
CAUTION
SHOCK, BURN, LACERATION HAZARDS
• Disconnect power to oven and allow oven to cool completely
before attempting to service light bulbs.
• Handle the glass lamp cover carefully. If the lamp cover is
difcult to remove, do not force it, as it may break. Contact a
qualied service provider for repairs.
• Never operate the oven without the glass lamp cover in place.
TO REPLACE OVEN LIGHT BULB
1 Locate oven lamps in the top of the oven, near the oven door.
2 Carefully unscrew the glass cover from the base. The light
bulb can be removed by rmly pulling straight out from the
light socket.
3 Replace the bulb only with G9 style 120V halogen bulb rated
25W or less.
4 Twist the glass cover back onto the lamp socket.
CLEANING AND MAINTENANCE
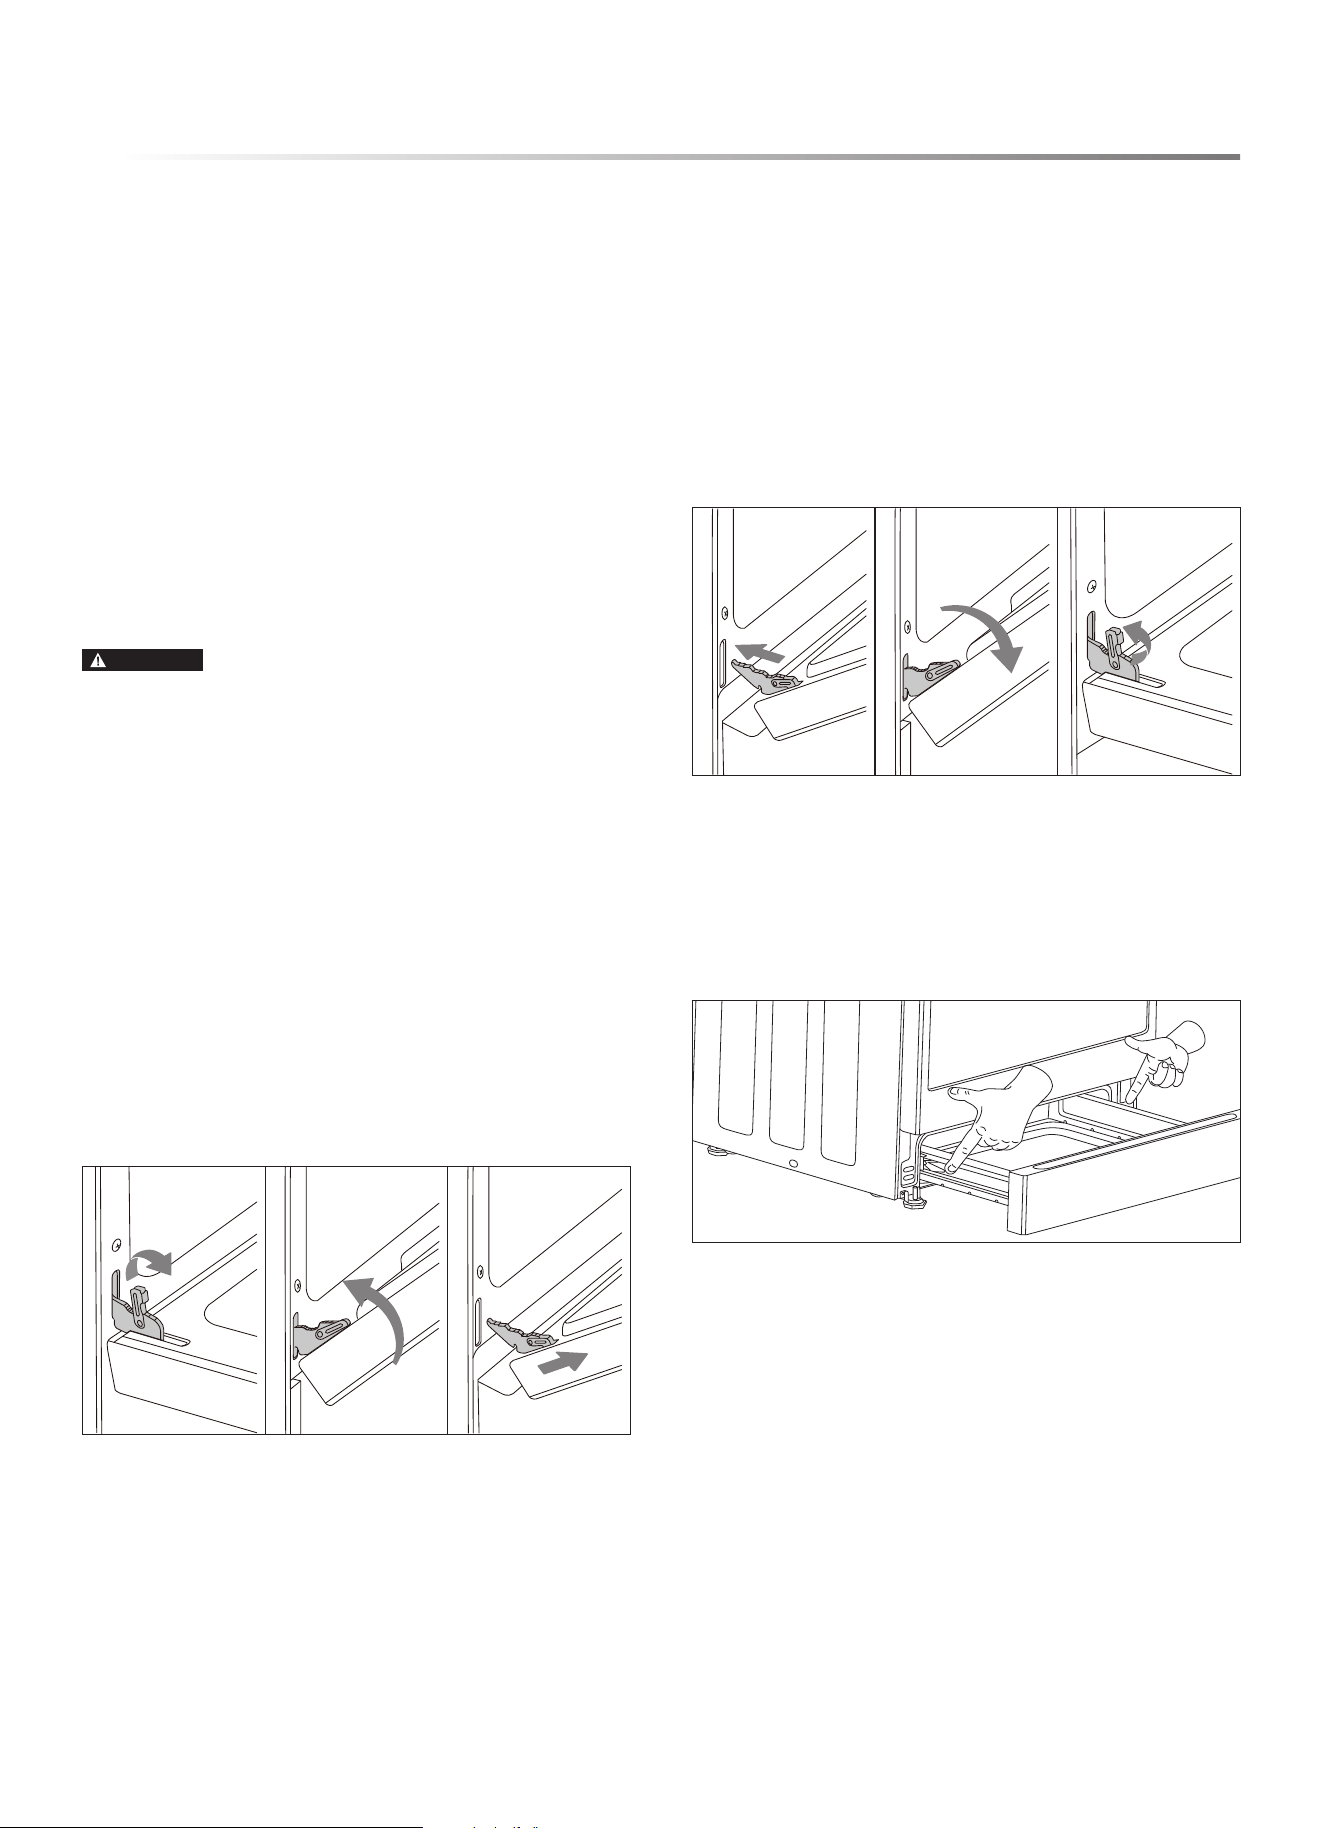
E27
CLEANING AND MAINTENANCE
DRAWER AND DOOR
IMPORTANT: Do not allow excess water or cleaner to enter any
holes or slots in the door.
TO CLEAN OVEN DOOR
1 Clean the door and drawer frequently to remove dust, spatters
and ngerprints. Wipe door surfaces with a slightly damp,
non-abrasive cloth, using mild soap and water.
2 For burned-on residue on interior door glass, use a glass clean-
ing compound and/or a razor scraper.
3 Clean enameled portions of the door interior with a non-abrasive
sponge and soapy water.
4 Clean exposed metal portions with stainless-steel cleaner to
remove streaks.
The oven door can be removed for easier cleaning, servicing or
installation.
WARNING
FIRE HAZARD
• When reinstalling the oven door, conrm it operates and seals
correctly. Heat escaping from around the door could ignite
cabinetry if the door gasket does not seal completely.
• If the gasket is worn, frayed or damaged in any way, contact a
qualied service provider for repair. To maintain proper door
seal, do not rub or clean the door gasket, as it has a very low
resistance to abrasion.
TO REMOVE OVEN DOOR
1 Open the door fully.
2 On both door hinges, ip down the lock mechanism. The lock
will engage with the door when the door is moved as if it is
being closed.
3 Rotate the door toward closed position, stopping when the door
is about 2 inches from closed position.
4 Grasp the door rmly from both sides and lift the door up and
away from the oven face. Do not lift the door by the handle.
TO REPLACE OVEN DOOR
1 Holding the door rmly from both sides, align the door to the
oven so the hinges slip back into the openings.
2 Rotate the door toward closed position, stopping when the door
is about 2 inches from closed position. Allow the door to drop
into the notches on the hinges.
3 Rotate the door until fully open and flip up the locking
mechanism.
4 Ensure the door opens and closes correctly and is sealed prop-
erly. If the door does not operate correctly, remove the door and
reattempt installation or contact a qualied service provider.
TO REMOVE DRAWER
It is not necessary to remove the drawer for cleaning, but if desired,
it can be.
1 Fully extend the drawer.
2 Engage the release levers on each side while gently pulling on
the drawer.
TO REPLACE DRAWER
1 Align the rails on the drawer with the slides on the range.
2 Gently push the drawer into place until fully closed. Open and
close the drawer to ensure slide rails operate properly.
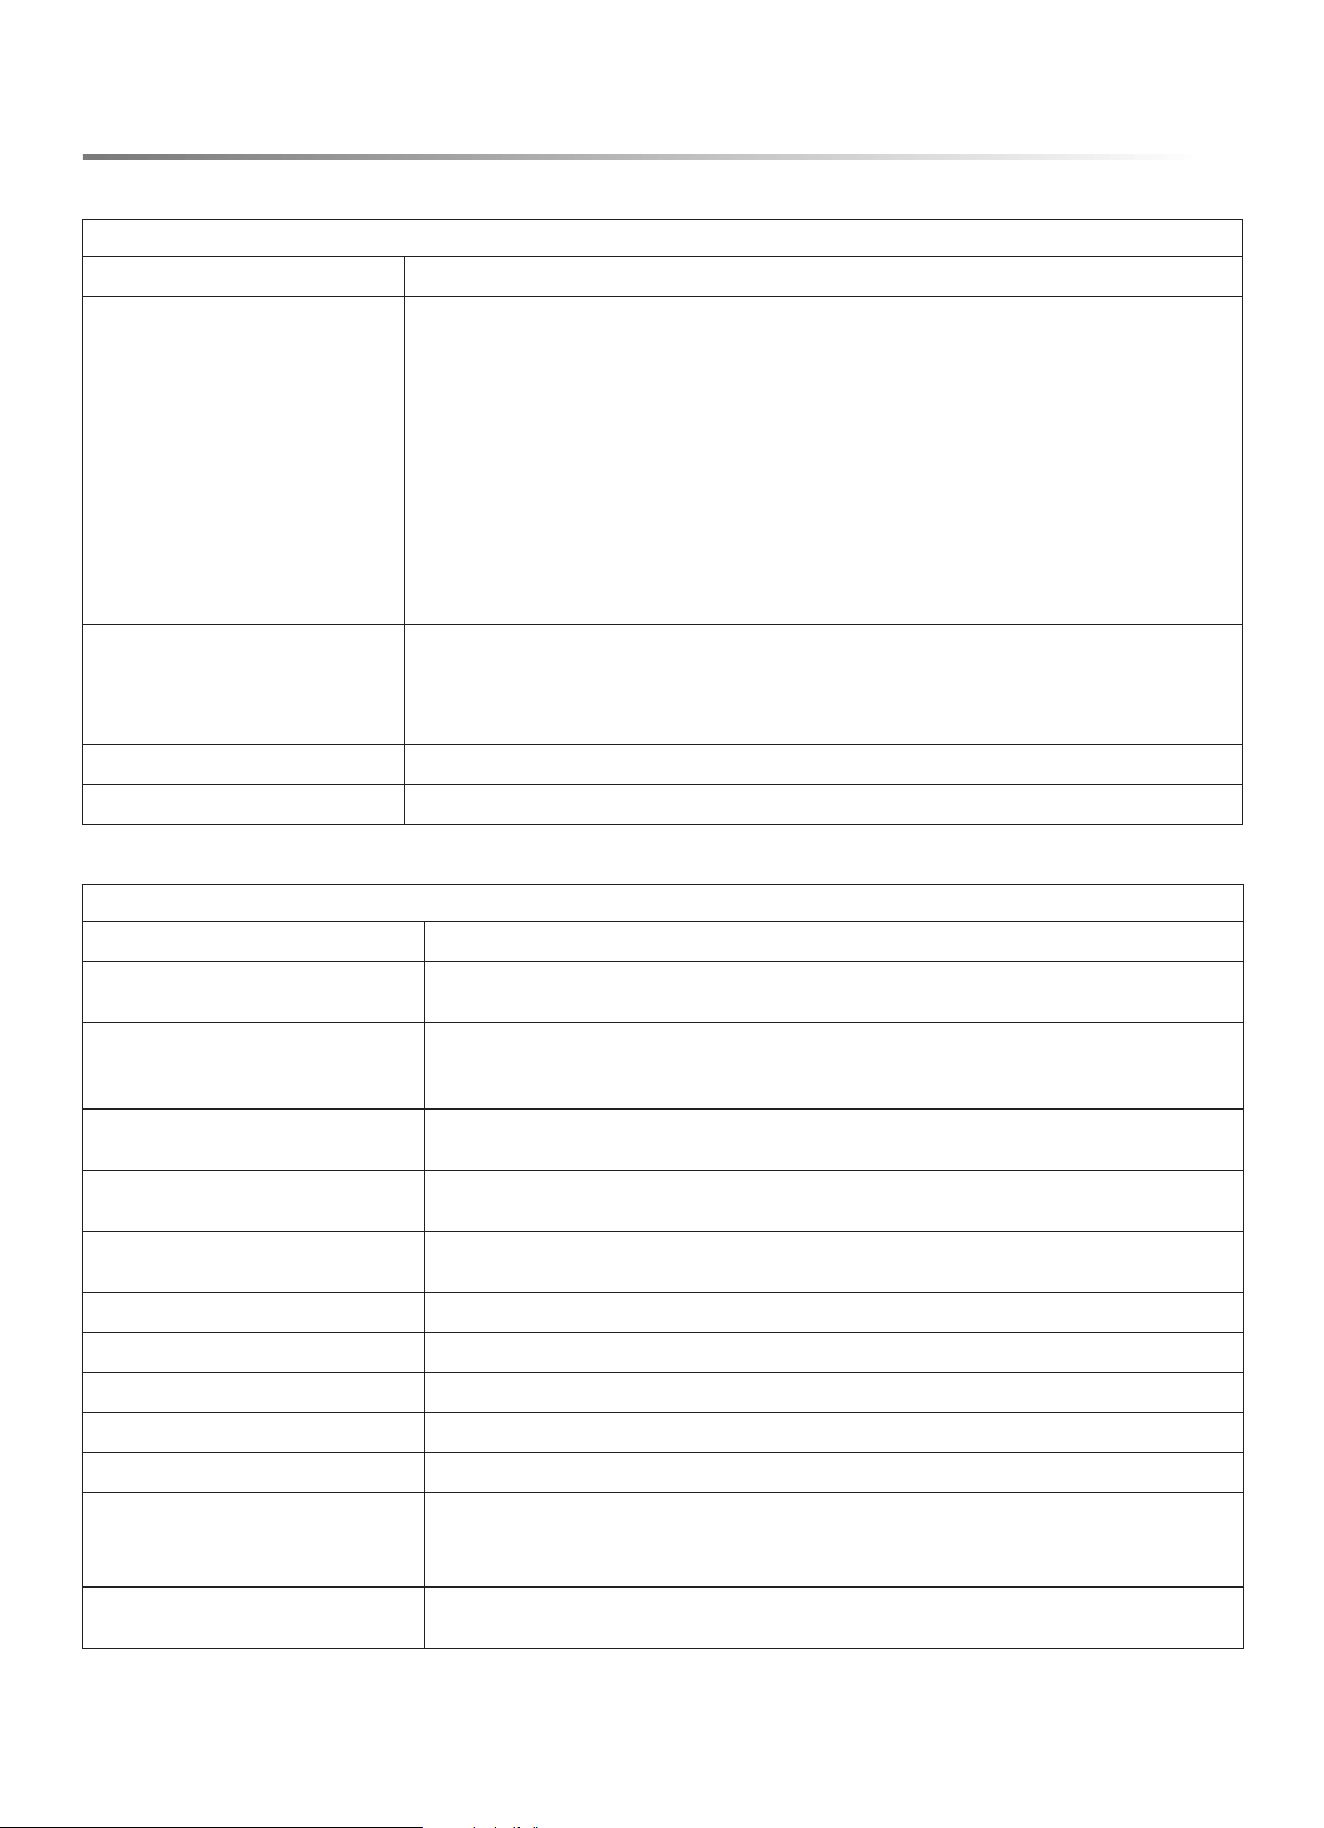
28E
TROUBLESHOOTING
BEFORE YOU CALL
COOKTOP
PROBLEM SOLUTION
Burners do not light 1 The appliance may be disconnected from the power source. If the Control Panel Display is not
illuminated or does not respond to manual commands, check the following:
• Power is connected at the circuit breaker.
• The fuse is still functional and not blown.
• The power cord is properly plugged in to a functional outlet.
2 If the Control Panel Display operates, check the following:
• Gas shut off valve is in the ON position, and gas supply to the residence is on.
• Burners and burner caps are properly positioned on cooktop.
• Burner ports (openings around perimeter of burner top) are not clogged.
• Igniters are clean, dry and sparking to the burners.
Unable to maintain a rolling boil or
cook fast enough
1 Improper cookware: Only use pans with at bottoms that match the diameter of the cooktop
burner in use. Adjust burner so ame does not extend beyond the edge of the pot.
2 Large pots and pans can lose signicant heat from the top. Cover pans with a lid to retain heat
better.
Flames around burner are uneven Ensure burner cap is seated properly on burner and ports are not clogged.
Cooktop is discolored Cooktop is not cleaned thoroughly.
OVEN
PROBLEM SOLUTION
Strong odor during initial use of new
oven
This is normal and will disappear after one or two uses. To be careful, ensure all packaging has
been removed from the appliance and check around door sides and inside drawer.
Clicking noise heard during oven
operation
This is normal. The oven burner cycles on and off to maintain oven temperature, and when a
burner turns on, the electric spark can be heard periodically for a few seconds, followed by the
sound of the burner igniting.
Control Panel Display is dark and
unresponsive
If the Control Panel Display shows only ] or ] [, the appliance is in Sabbath Mode. See page 14.
Control Panel Display is illuminated
but unresponsive
Control Lock may be activated. Touch and hold Control Lock pad for 3 seconds to unlock.
Alternatively, disconnect and reconnect power at the circuit breaker to reset.
Oven door is locked and will not open If a Self Clean cycle has recently nished, this is normal. Wait for the oven to cool fully, then
it will unlock.
Door will not close properly Door is not installed properly. See page 27.
Drawer will not close properly Drawer is not installed properly. See page 27.
Oven taking too long to cook Adjust the oven calibration. See page 13.
Food is overcooked Adjust the oven calibration. See page 13.
Food is not baking evenly Ensure racks are in the correct position. See page 19.
Oven light is not working 1 Oven light bulb may be burned out and need replacing. See page 26.
2 If the Control Panel Display shows only ] or ] [, the appliance is in Sabbath Mode. See page 14.
Oven will not start Self Clean cycle If the oven was recently used or the cooktop is currently in use, this is normal. Self Clean can
only be initiated when the oven is cool and the cooktop is not in operation.
E29
TROUBLESHOOTING
OVEN
PROBLEM SOLUTION
Metal popping sounds during Self
Clean cycle
This is normal.
Oven not clean after Self Clean cycle After a Self Clean cycle, remaining ash residue must still be wiped out by hand. If black soil
still remains, the oven may have been too heavily soiled for a single Self Clean cycle. Rerun Self
Clean on the longest possible setting. Some areas, such as bottom door corners, may remain too
cool to turn to ash and need to be cleaned by hand.
Convection fan runs in modes other
than Convection Bake or Convection
Roast
This is normal.
Hot air emitted from openings at back
of cooktop
This is normal.
Smoke or steam coming from openings
at back of cooktop
1 It is normal for steam to be released from the oven vent. If the exhaust has no smell or smells
like normal baking food, this is normal.
2 If the exhaust smells like burning food, check the food in the oven and ensure there is no
spillage or spattering producing smoke.
3 If the oven is in a Self Clean cycle, this is normal.
4 If the exhaust smells like something other than food and residue burning, such as plastic or
wood, turn off the oven and contact a qualied service provider.
Condensation on door glass This is normal.
Cooling fan continues to run after oven
is turned off
This is normal.
E + a number appears in the display This is an error code. Touch STOP/CLEAR pad to clear the display and stop beeping. If neces-
sary, reset power to the oven at the circuit breaker. If the error code remains or repeats, make
note of the error code and contact a qualied service provider.
30E
ERROR CODES
ERROR CODE DESCRIPTION
ERROR-003
Lower cavity temperature RTD open circuit
ERROR-004
Lower cavity temperature RTD short circuit
ERROR-005
Communication failure between power board and UI board (no data feedback from relay board)
ERROR-006
Meat probe sensor short circuit
ERROR-008
Lower cavity door lock/unlock failure
ERROR-009
Normal heating mode temperature too high
ERROR-010
High temperature self-cleaning mode temperature is too high
ERROR-011
Communication failure between display board and power board (no data feedback from display board)
ERROR-012
Self-cleaning mode door was opened
ERROR-013
Wrong state of door lock in self-clean mode
ERROR-014
Cooling fan failure
ERROR-015
Ignition control board error
ERROR-016
Temperature calibration error
ERROR-017
Heating abnormal (continuous heating 20 Min, temperature rise less than 25F)
ERROR-019
Touch chip communication failure
ERROR-020
or ERROR-030
Relay board MCU self-check failure
ERROR-040
or ERROR-050
UI board MCU self-check failure

E31

32E
SHARP ELECTRONICS CORPORATION • 100 Paragon Drive • Montvale, New Jersey 07645 • USA
1-800-BE-SHARP (1-800-237-4277)
CUSTOMER ASSISTANCE UNITED STATES ONLY
REGISTER YOUR PRODUCT
Registering your new product is easy and offers benets that help you get the most
out of your Sharp product including:
9 Convenience: If you ever need warranty support, your product information is already on le.
9 Communication:Stay up to date with important notications and special offers from SHARP.
9 Support: Quickly access support content including Owner’s Manuals, FAQ’s,
How-to Videos, and much more.
3 EASY WAYS TO REGISTER TODAY!
PRODUCT SUPPORT
If you have questions about the setup or operation of your product, please refer to
the corresponding section within this manual.
Additionally, visit https://support.sharpusa.com/s/ to access exclusive content about
your product including:
Æ FAQ’s and How-To Videos
Æ Find or Request Service
Æ Extended Warranty Options
Æ Downloads including the Installation Guide, Spec Sheet, and Owner’s Manual
CONTACT US
If at any time you have questions or comments concerning your SHARP product,
please contact the SHARP Customer Assistance Center. We are available to
assist you through multiple contact methods for your convenience:
Scan this QR Code on your mobile device Visit http://www.sharpusa.com/register
ONLINE
Visit our sites to
learn more about
your product at
sharpusa.com and
sbl.sharpusa.com
See the Contact Us section on our sites
U.S. | https://support.sharpusa.com/s/
Contact a Sharp Advisor on the phone
Contact a Sharp Advisor on the phone
CALL US
US 800-BE-SHARP
800-237-4277
Mon-Fri: 7am-7pm CST
Sat-Sun: 9am-7pm CST
CALL US
US 800-BE-SHARP
800-237-4277
Mon-Fri: 7am-7pm CST
Sat-Sun: 9am-7pm CST
EMAIL
Available 24/7
US: sharpusa.com
CHAT ONLINE
Mon-Fri: 7am-7pm CST
Sat-Sun: 9am-7pm CST
SCAN
Use the camera or
QR code scanning
application on your
mobile device
TGANEB010MRR2 Sep 24, 2025
TINSEB820MRR0 JUNE 01, 2026