USE + CARE
MANUAL
REV.022026
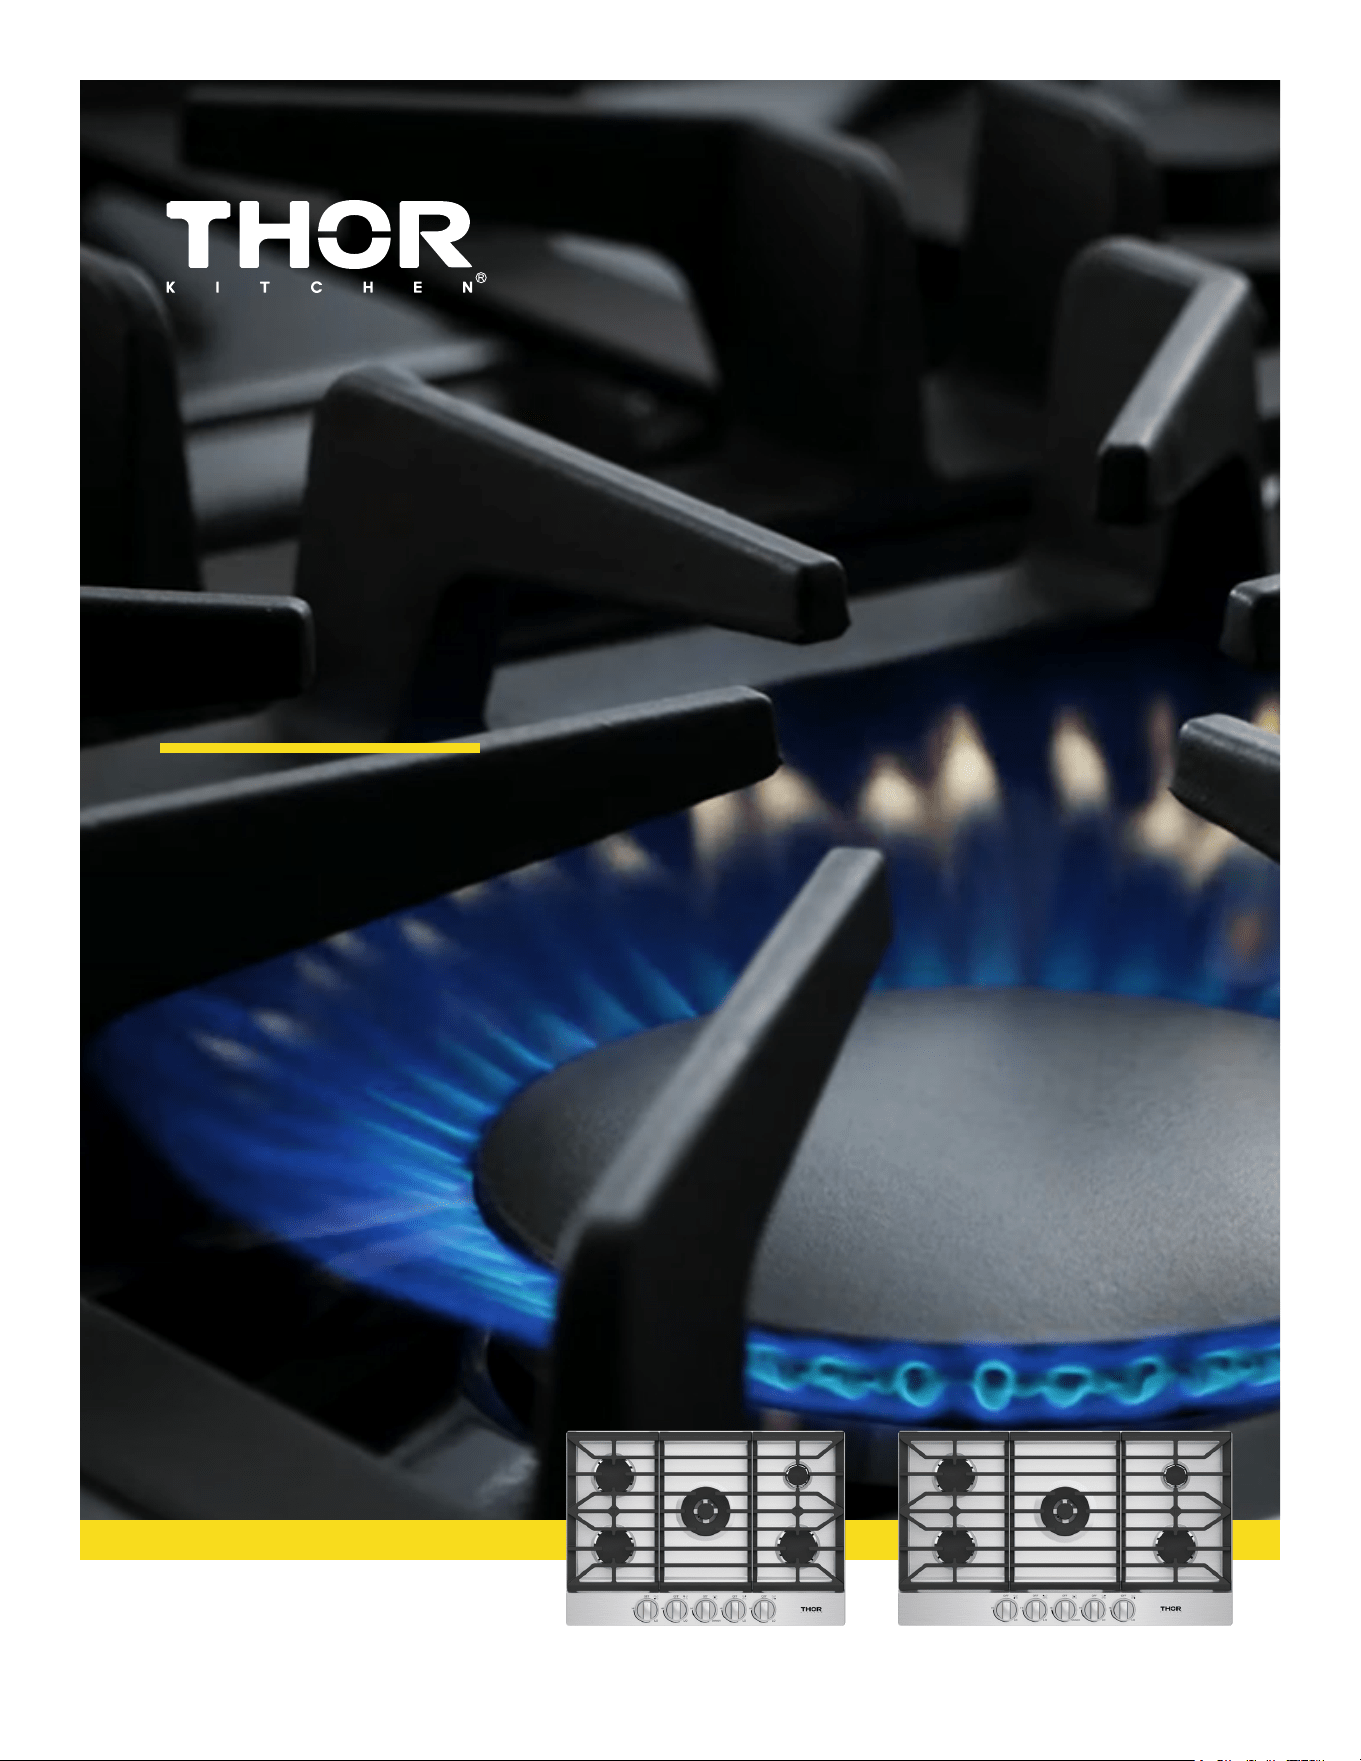
TGC PROFESSIONAL GAS COOKTOP
TGC30F | TGC36F

TGC
PROFESSIONAL
GAS COOKTOP
TGC30F/TGC36F
USE & CARE MANUAL

3
TABLE OF CONTENTS
SAFETY AND WARNINGS.....................................................................................................................4
OVERVIEW............................................................................................................................................10
Dimension........................................................................................................... 11
Circuit Diagram....................................................................................................................12
What’s Included............................................................................................................. 13
ELECTRICAL REQUIREMENTS................................... ......................... .....13
USING THE COOKTOP BURNERS......................................................................................................14
COOKWARE REQUIREMENT……………………………………………..…………………………………………………….15
Size limitations……………………………………………………………………………………...……………………15
Install The Grates……………………………………………………………………………………...……………………16
CARE AND CLEANING OF THE COOKTOP………………………………………………………………………………….17
C o o k t o p S u r f a c e … … … … … … … … … … … … … … … … … … … … … … … … … … … … … … … … … … . 17
Stainless Steel Surface………………………………………………………………………………………….17
C o n t r o l K n o b s … … … … … … … … … … … … … … … … … … … … … … … … … … … … … … … … … … … … . 17
Burner Grates and Components………………………………………………………………………………………….18
Burner Caps and Heads………………………………………………………………………………………… .18
Bu r ner Bas e s … … ………… … … ……………… … …………… … …………… … …………… … …………… … .18
Electrodes…………………………………………………………………………………………………………………… .18
Grates ………………………………………………………………………………………………………………………….19
Burner Head and Cap Replacement………………………………………………………………………………………….19
TROUBLESHOOTING………………..…………............................................................ …….21
Checkpoints……………………………………..…………............................................................…….21
WARRANTY…………………..…………..…………........... .................……......................................................….22

4
SAFETY AND WARNING
Read all instructions before using this appliance
• All electrical and gas equipment with moving parts can be dangerous. Please read the
important safety instructions for this appliance in this manual. The instructions must be
followed to minimize the risk of injury, death, or property damage.
• Save this manual. Please Do Not Discard.
Symbols used in this manual
WARNING
Hazards or unsafe practices that may result in severe personal injury or death.
CAUTION
Hazards or unsafe practices that may result in electric shock, personal injury, or property damage.
NOTE
Useful tips and instructions
These warning icons and symbols are here to prevent injury to you and others. Please follow them
explicitly. After reading this section, keep it in a safe place for future reference.
State of California Proposition 65 warning (US only)
WARNING
This product contains chemicals known to the State of California to cause cancer and birth defects
or other reproductive harm
Gas appliances can cause low-level exposure to Proposition65 listed substances, including but not
limited to, benzene, carbon monoxide, formaldehyde and soot, substances resulting from the
incomplete combustion of natural gas or LP fuels. For more information go to www.P65
warnings.ca.gov
Commonwealth of Massachusetts
This product must be installed by a licensed plumber or gasfitter qualified or licensed by the State
of Massachusetts. When using ball-type gas shut-off valves, you must use the T-handle type.
Multiple flexible gas lines must not be connected in series.

5
SAFETY AND WARNING
General safety
WARNING
To reduce the risk of fire, electric shock, personal injuries, and/or death, observe the following
precautions.
• Do not touch any part of the cooktop, including but not limited to cooktop burners during or
immediately after cooking.
• Know the location of the gas shut-off valve and how to shut it off.
• Make sure the hold down brackets are properly installed on the cooktop. See the installation
instructions for more information.
• Do not let children near the cooktop. Do not let children go onto the cooktop. Do not let children
play with the cooktop or any part(s) of the cooktop.
• Do not leave children unattended in an area where the cooktop is in use.
• Remove all packaging materials from the cooktop before operating to prevent ignition of these
materials. Keep all packaging materials out of children's reach. Properly dispose the packaging
materials after the cooktop is unpacked.
• Do not store any object of interest to children on the cooktop or back-guard of the cooktop.
Children climbing on the cooktop to reach items could be killed or seriously injured.
• Do not operate the cooktop if the cooktop or any part of the cooktop is damaged, malfunctioning,
or missing parts.
• Do not use the cooktop as a space heater. Use the cooktop for cooking only. Use only dry pot
holders .
• Do not use the cooktop to heat unopened food containers.
• Unplug or disconnect the power cord before servicing.
• Never store combustible materials (dishtowels, paper products, etc.) or packaged or canned
food under the cooktop in a way that would let them come in contact with the underside of the
cooktop. The combustible material could catch fire and the packaged or canned food could
explode.
• Make sure the gas line is not compressed or bent by heavy objects . Otherwise, gas leaks or
incomplete combustion may occur.
Fire safety
WARNING
To reduce the risk of fire, electric shock, personal injuries and/or death, observe the following
precautions.
• Do not store, place, or use flammable or combustible materials such as paper, plastic, pot
holders, linens curtains, gasoline or other flammable vapors or liquids near the cooktop
• Do not wear loose fitting or hanging garments while using the cooktop .
• To avoid grease buildup, regularly clean the vents.
• Do not let pot holders or other flammable materials touch a heating element, Do not use a
towel or other bulky items made out of cloth in place of a pot holder.
• Do not use water on a grease fire. To put out a grease fire, turn off the heat source and smother
the fire with a tight-fitting lid or use a multipurpose dry chemical or foam-type fire extinguisher.

6
SAFETY AND WARNING
• Do not heat unopened food containers . The buildup of pressure may cause the container to
burst and result in injury.
• Always check if the burners are combusting normally. Overheating may cause a fire, and
incomplete combustion may cause carbon-monoxide poisoning.
Gas safety
WARNING
To reduce the risk of fire, electric shock, personal injuries, and/or death, observe the following
precautions.
Checking for gas leaks
• Leak testing of the appliance must be conducted according to the manufacturer's instructions .
Do not use a flame to check for gas leaks. Use a brush to spread a soapy water mixture around
the area you are checking. If there is a gas leak, you will see small bubbles in the soapy water
mixture at the leak point.
If you smell gas:
• Close the valve and do not use the cooktop
• Do not light a match, candle, or cigarette .Do not turn on any gas or electric appliances ..Do not
touch any electrical switches or plug a power cord into an outlet.
• ·Do not use any phone in your building.
• Evacuate the room, building, or area of all occupants.
• Immediately call your gas supplier from a neighbor’s phone. Follow the gas supplier's
instructions
• If you cannot reach your gas supplier, call the fire department.
Electrical and grounding safety
WARNING
To reduce the risk of fire, electric shock, personal injuries, and/or death, observe the following
precautions.
• Plug the power cord into a grounded 3-prong outlet.
• Do not remove the grounding prong.
• Do not use an adapter or an extension cord.
• Do not use a damaged power plug, power cord, or loose power outlet
• Do not modify the power plug, power cord, or power outlet in any way.
• Do not put a fuse in a neutral or ground circuit.
• Use a dedicated 120-volt, 60-Hz, 20-amp, AC, fused electrical circuit for this cooktop. A time-
delay fuse or circuit breaker is recommended. Do not plug more than one appliance into this
circuit.
• Do not connect the ground wire to plastic plumbing lines, gas lines, or hot water pipes.
• This cooktop must be Earth grounded. in the event of a malfunction or breakdown, grounding
will reduce the risk of electrical shock by providing a path for the electric current. This cooktop
is equipped with a cord having a grounding plug. The plug must be firmly plugged into an outlet
that is property installed and grounded in accordance with the local codes and ordinances.

7
SAFETY AND WARNING
If you are unsure whether your electrical outlets properly grounded, have it checked by a licensed
electrician.
• The cooktop is supplied with a 3-pronged grounded plug. This cord must be plugged into a
matching. grounded 3-prong outlet that meets all local codes and ordinances. f codes permit
the use of a separate ground wire, we recommend that a qualified electrician determine the
proper path for this ground wire.
• Electrical service to the cooktop must conform to local codes. Baring local codes, it should
meet the latest ANSINFPA No. 70 - Latest Revision(for the U.S.) or the Canadian Electrical Code
CSA C22.1- Latest Revisions.
• It is the personal responsibility of the cooktop owner to provide the correct electrical service for
this cooktop.
Installation safety
WARNING
To reduce the risk of fire, electric shock, personal injuries, and/or death, observe the following
precautions.
• Have your cooktop installed and properly grounded by a qualified installer, in accordance with
the installation instructions. Any adjustment and service should be performed only by qualified
gas cooktop installers or service technicians.
• Do not attempt to service, modify, or replace your cooktop or any part of your cooktop unless it
is specifically recommended in this manual. All other service should be referred to a qualified
technician.
• Always use new flexible connectors when installing a gas appliance. Do not use old flexible
connectors.
• Make sure the hold down brackets are properly installed on the cooktop. See the installation
instructions for more information.
• Remove all tape and packaging materials.
• Remove all accessories from the cooktop, Grates and griddles are heavy. Use caution when
handling them.
• Make sure no parts came loose during shipping.
• Make sure your cooktop is correctly installed and adjusted by a qualified service technician or
installer for the type of gas (natural or LP) you will use. For your cooktop to utilize LP gas, the
installer must replace the 4 or 8 surface burner orifices with the provided LP orifice set, and
reverse the GPR adapter. Furthermore the bypass in burner valve will need to be adjusted.
These adjustments must be made by a qualified service technician in accordance with the
manufacturer's instructions and all codes and requirements of the authority having jurisdiction.
The qualified agency performing this work assumes the gas conversion responsibility.
• Installation of this cooktop must conform with local codes or, in the absence of local codes,
with the National Fuel Gas Code ANSI Z223.1/NFPA.54, latest edition. in Canada, installation
must conform with the current Natural Gas installation Code, CAN/CGA-B149.1or the current
Propane installation Code, CAN/CGA-8149.2, and with local codes where applicable. This
cooktop has been design-certified by ETL according to ANSI Z21.1, latest edition, and Canadian
Gas Association according to CAN/CGA-1.1, latest edition.

8
SAFETY AND WARNING
• Make sure the middle valve has adequate capacity and is not clogged. This cooktop must be
installed by a qualified technician. Otherwise, gas leaks, fire, or defective ignition may occur.
Location safety
WARNING
To reduce the risk of fire, electric shock, personal injuries, and/or, observe the following
precautions.
• This cooktop is for indoor, household use only. Do not install the cooktop in areas exposed to the
weather and/or water.
• Do not install the cooktop in a place which is exposed to a strong draft.
• Select a location where a grounded, 3-prong outlet is easily accessible.
• If the cooktop is located near a window, do not hang long curtains or paper blinds on that
window.
• For the cooktop to ventilate properly, there must be enough clearance at the top, back and sides
of the cooktop, and underneath the cooktop. The vents allow the necessary exhaust for the
cooktop to operate properly with correct combustion.
• Make sure the wall coverings around the cooktop can withstand heat up to 194 “F (90 “C).
• Cabinet storage above the surface of the cooktop should be avoided. If cabinet storage above the
cooktop is necessary: allow a minimum clearance of 30 inches (76.2 cm) between the cooking
surface and the bottom of the cabinets.
Cooktop safety
WARNING
To reduce the risk of fire, electric shock, personal injuries, and/or death, observe the following
precautions.
• Select cookware that is designed for range top cooking. Use cookware that is large enough to
cover the burner grates. Adjust the burner flames so that the flames do not extend beyond the
bottom of the cookware.*Make sure all burners are off when not in use.
• Do not use aluminum foil to line the grates or any part of the cooktop.
• Do not leave burners unattended on medium or high heat settings.
• Before igniting, make sure all burner caps are properly in place and all burners are level.
• Always use the LITE position when igniting the burners and make sure the burners have ignited.
If ignition fails, turn the knob to OFF and wait until the gas has dissipated.
• When you set a burner to simmer, do not turn the knob quickly. Make sure the flame stays on.
• Do not place any objects other than cookware on the cooktop.
• If foods are flamed, they should only be flamed under a ventilation hood that is on. Before
removing or changing cookware, turnoff the burners,
• Remove food and cookware immediately after cooking.
• Before removing any parts of the burner for cleaning, make sure the cooktop is off and
completely cool.

9
SAFETY AND WARNING
• After cleaning the burner spreader, make sure it is completely dry before re-assembling.
• To avoid carbon monoxide poisoning, do not pour water into the cooktop well while cleaning.
• To avoid cookware discoloration, deformity, and/or carbon monoxide poisoning, do not use
cookware that is substantially larger than the grate.
• Make sure cookware handles are turned to the side or rear of the cooktop and not over other
surface burners.
• Stand away from the cooktop while frying.
• Always heat frying oils slowly, and watch as they heat. If you are frying foods at high heat,
carefully watch during the cooking process. If a combination of fats or oils is to be used during
frying, mix them together before heating.
• Use a deep-fryer thermometer whenever possible. This prevents overheating the fryer beyond
the smoking point.
• Use a minimum amount of oil when shallow pan-frying or deep-frying. Avoid cooking unthawed
food or food with excessive amounts of ice.
• Before moving cookware full of fats or oils, make sure it has completely cooled.
• To prevent delayed eruptive boiling, always allow heated liquids to stand at least 20 seconds
after you have turned of the burner so that the temperature in the liquid can stabilize. In the
event of scalding, follow these first aid instructions:
1.Immerse the scalded area in cool or lukewarm water for at least 10 minutes.
2.Do not apply any creams, oils, or lotions.
3.Cover with a clean, dry cloth.
• If a power failure occurs or the electric ignition fails to operate, do not use matches or lighters
to ignite the burners. This may cause a fire or physical burns.
• Do not place and use electric, powered cooking devices such as IH rice cookers or desktop
cooking heaters on top of your cooktop. Electromagnetic forces from these appliances may
cause the cooktop to malfunction.
10
OVERVIEW
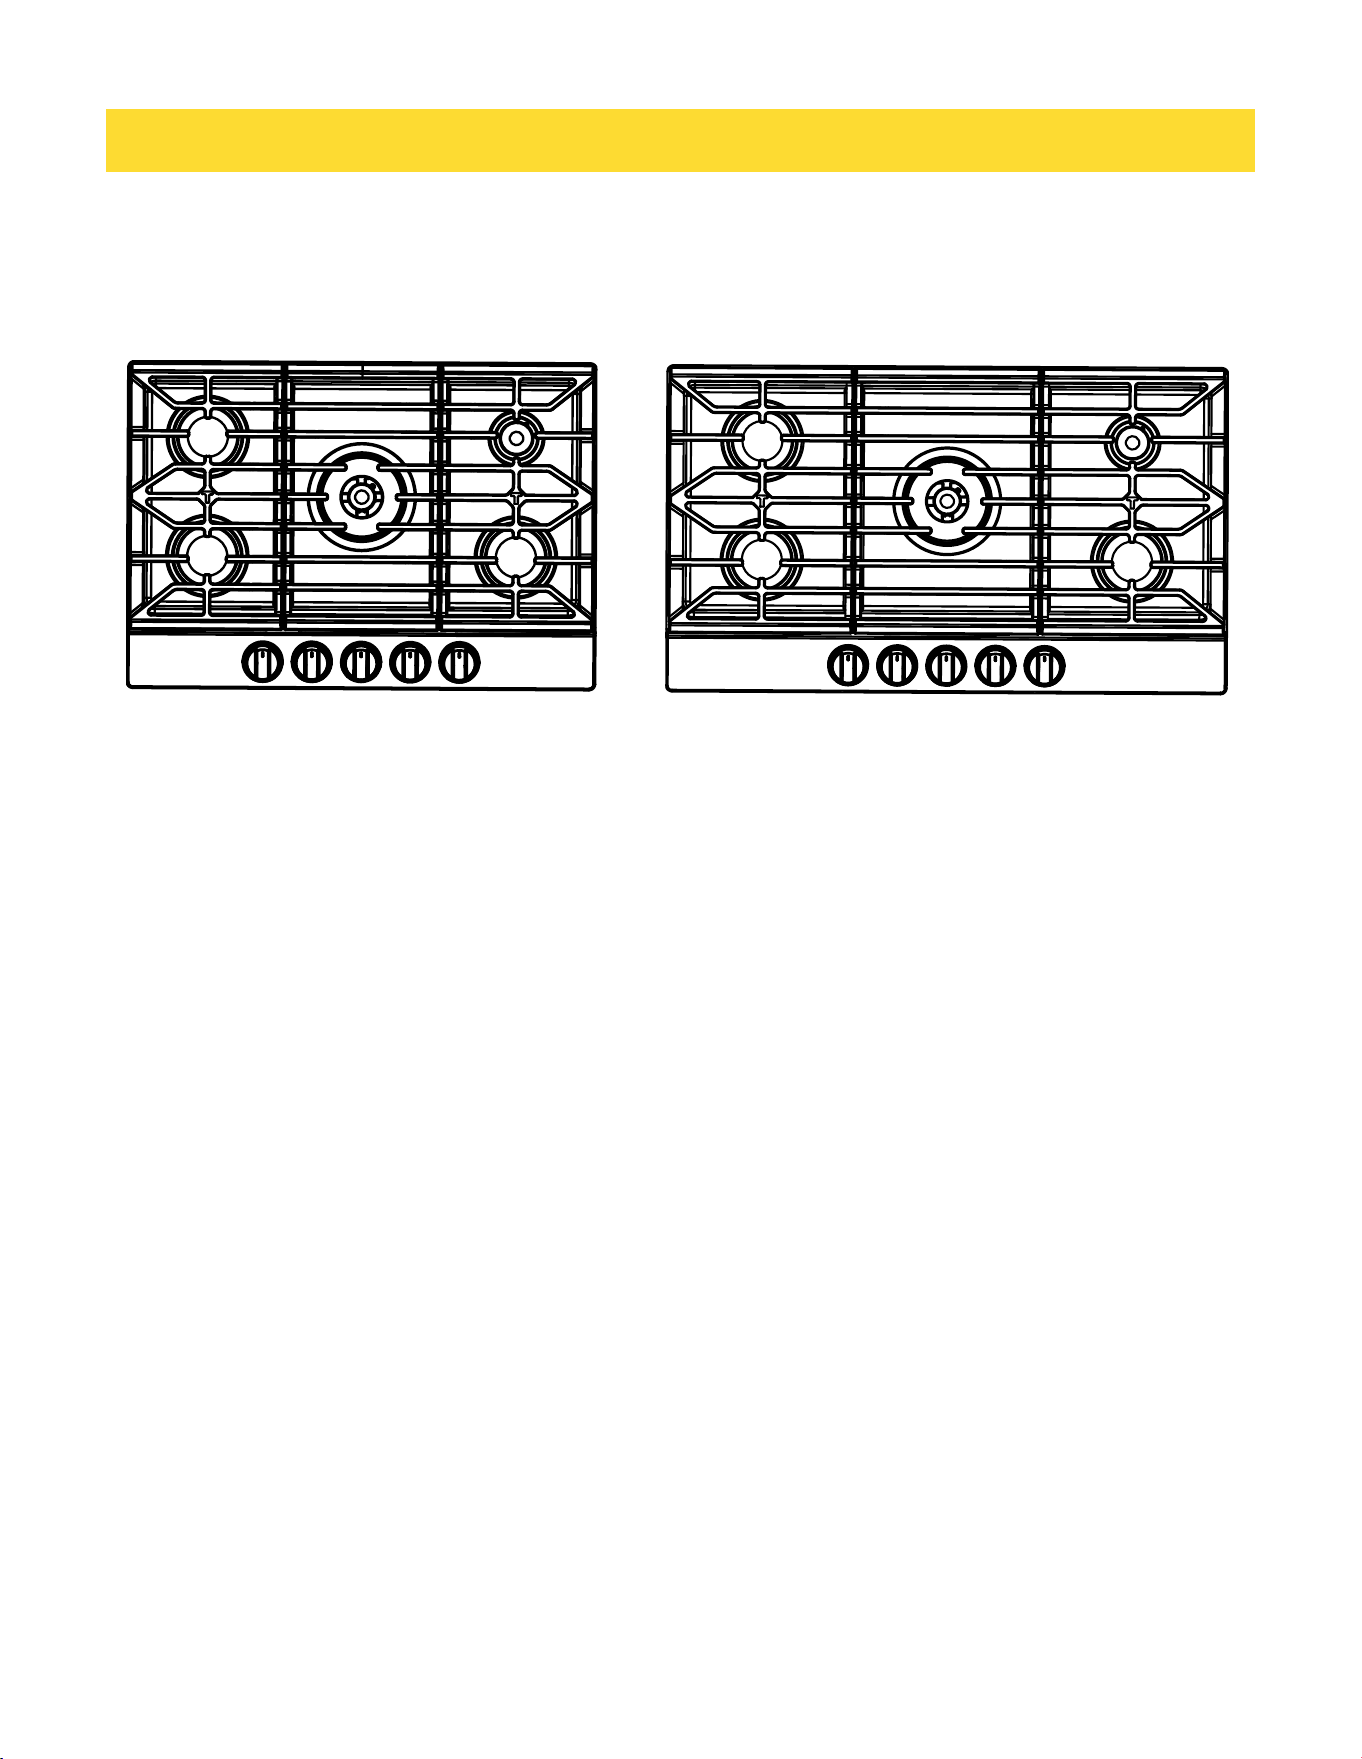
30" / 36"Model:TGC30F/TGC36F
TGC30F TGC36F
Left Front NG/LP:12000 BTU/H
Left Rear NG/LP:9000 BTU/H
Middle NG:22000 BTU/H, LP:18000 BTU/H
Right Front NG/LP:10000 BTU/H
Right Rear NG/LP:6000 BTU/H
Left Front NG/LP:12000 BTU/H
Left Rear NG/LP:9000 BTU/H
Middle NG:22000 BTU/H, LP:18000 BTU/H
Right Front NG/LP:10000 BTU/H
Right Rear NG/LP:6000 BTU/H
11
OVERVIEW
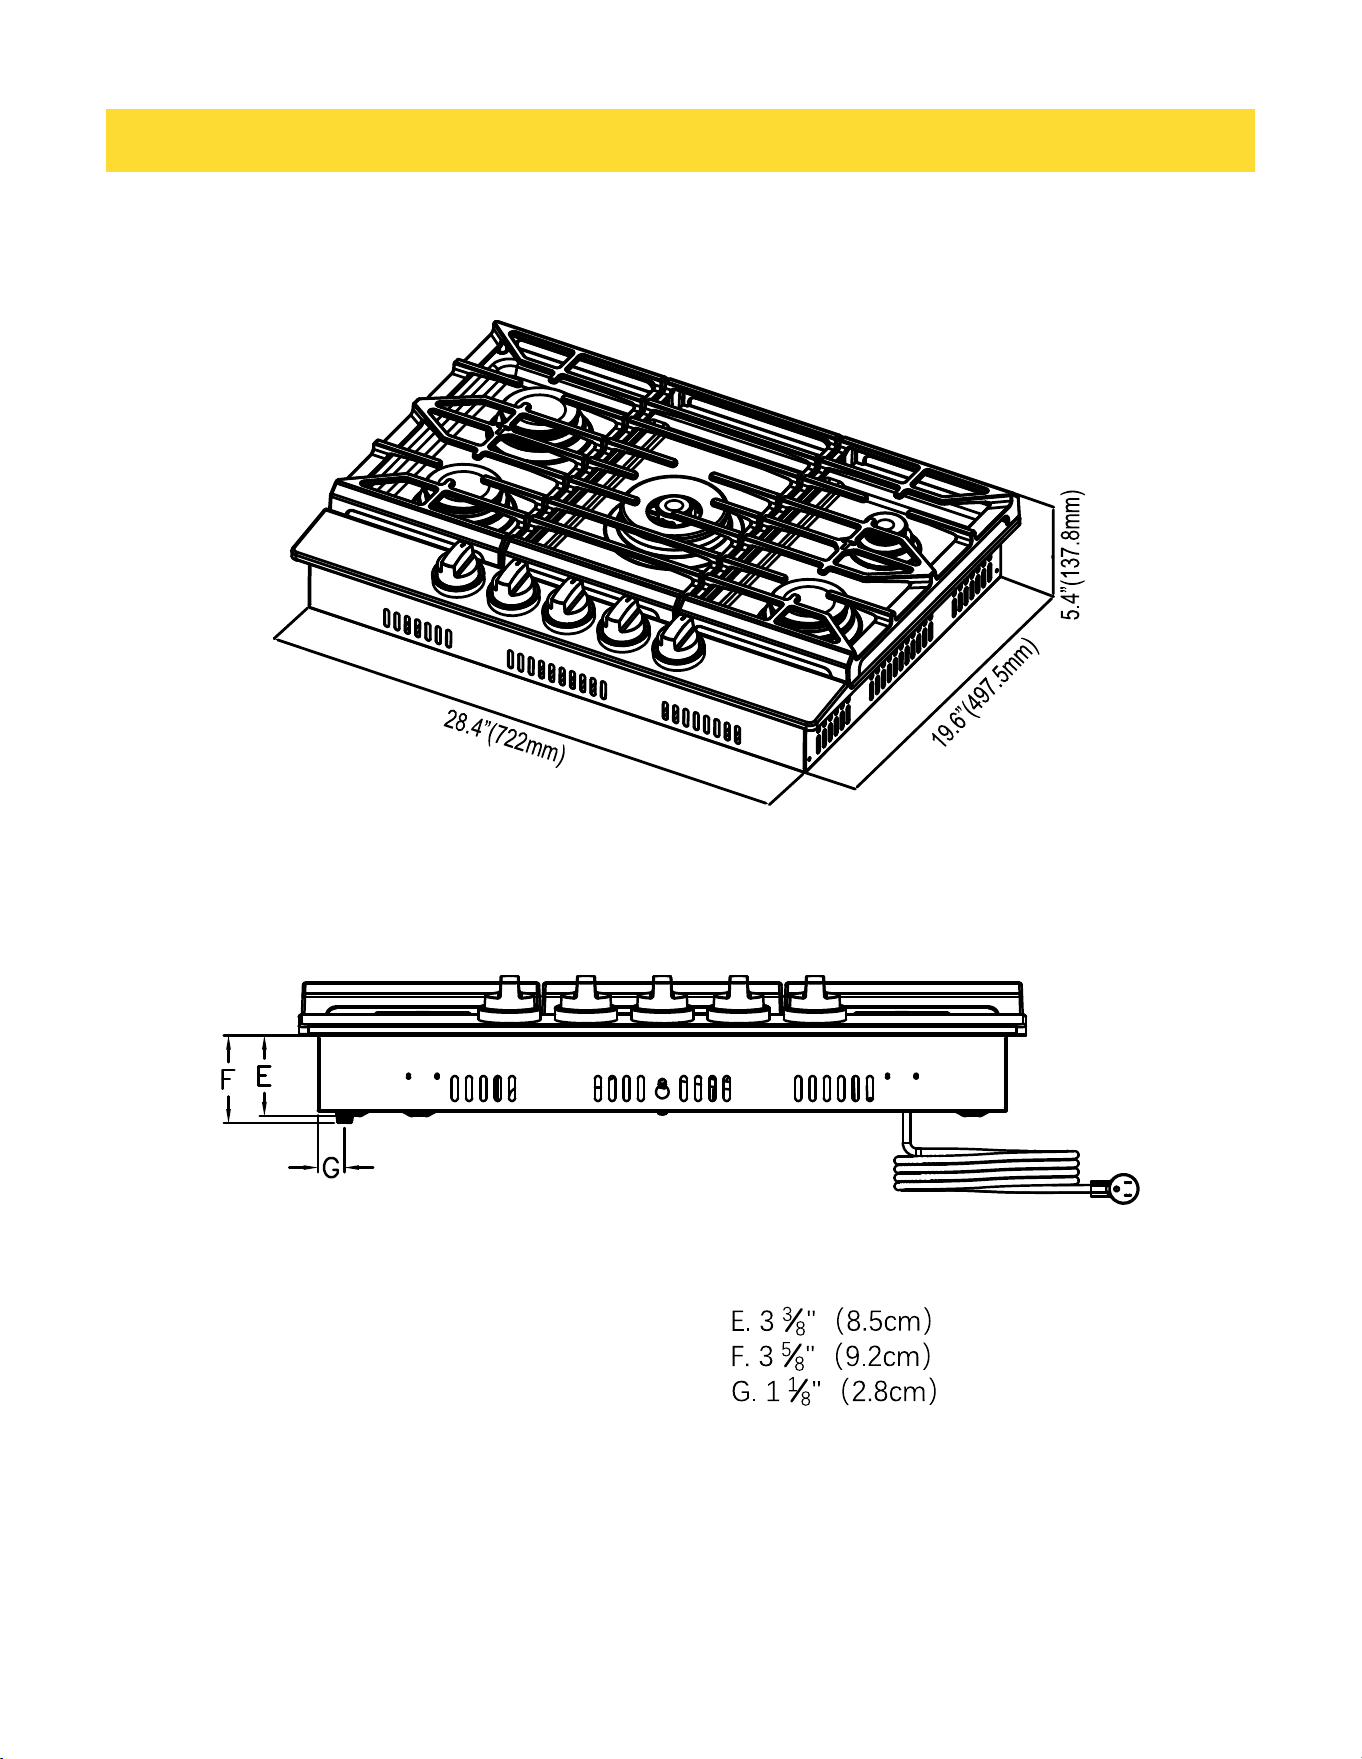
Dimension
TGC30F
12
OVERVIEW
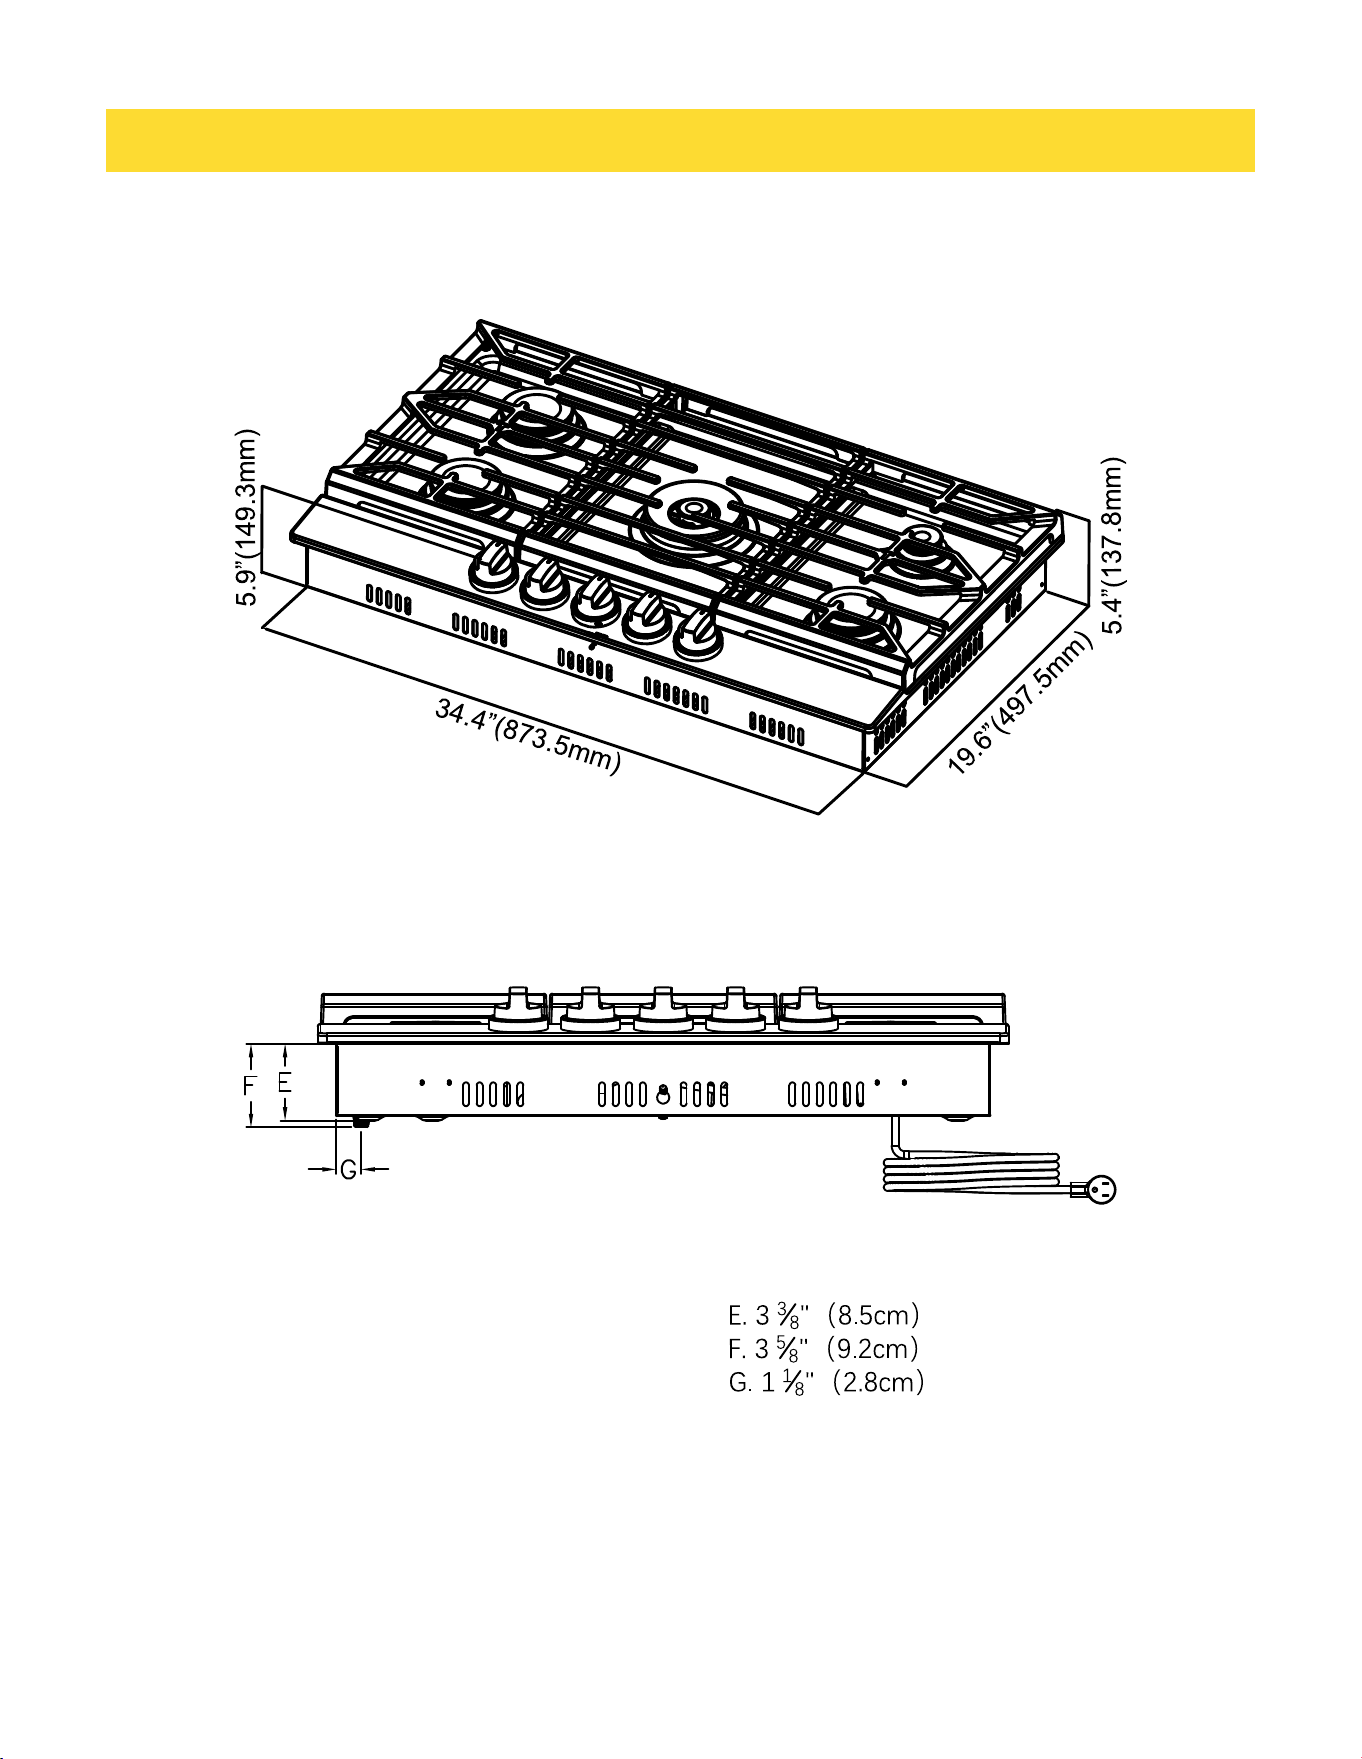
Dimension
TGC36F
13
WHAT’S INCLUDED
What’s included
TGC30F:
1.Surface burner gratesx3
2.Surface burnersx5
3.Surface burners capsx5
TGC36F:
1.Surface burner gratesx3
2.Surface burnersx5
3.Surface burners capsx5
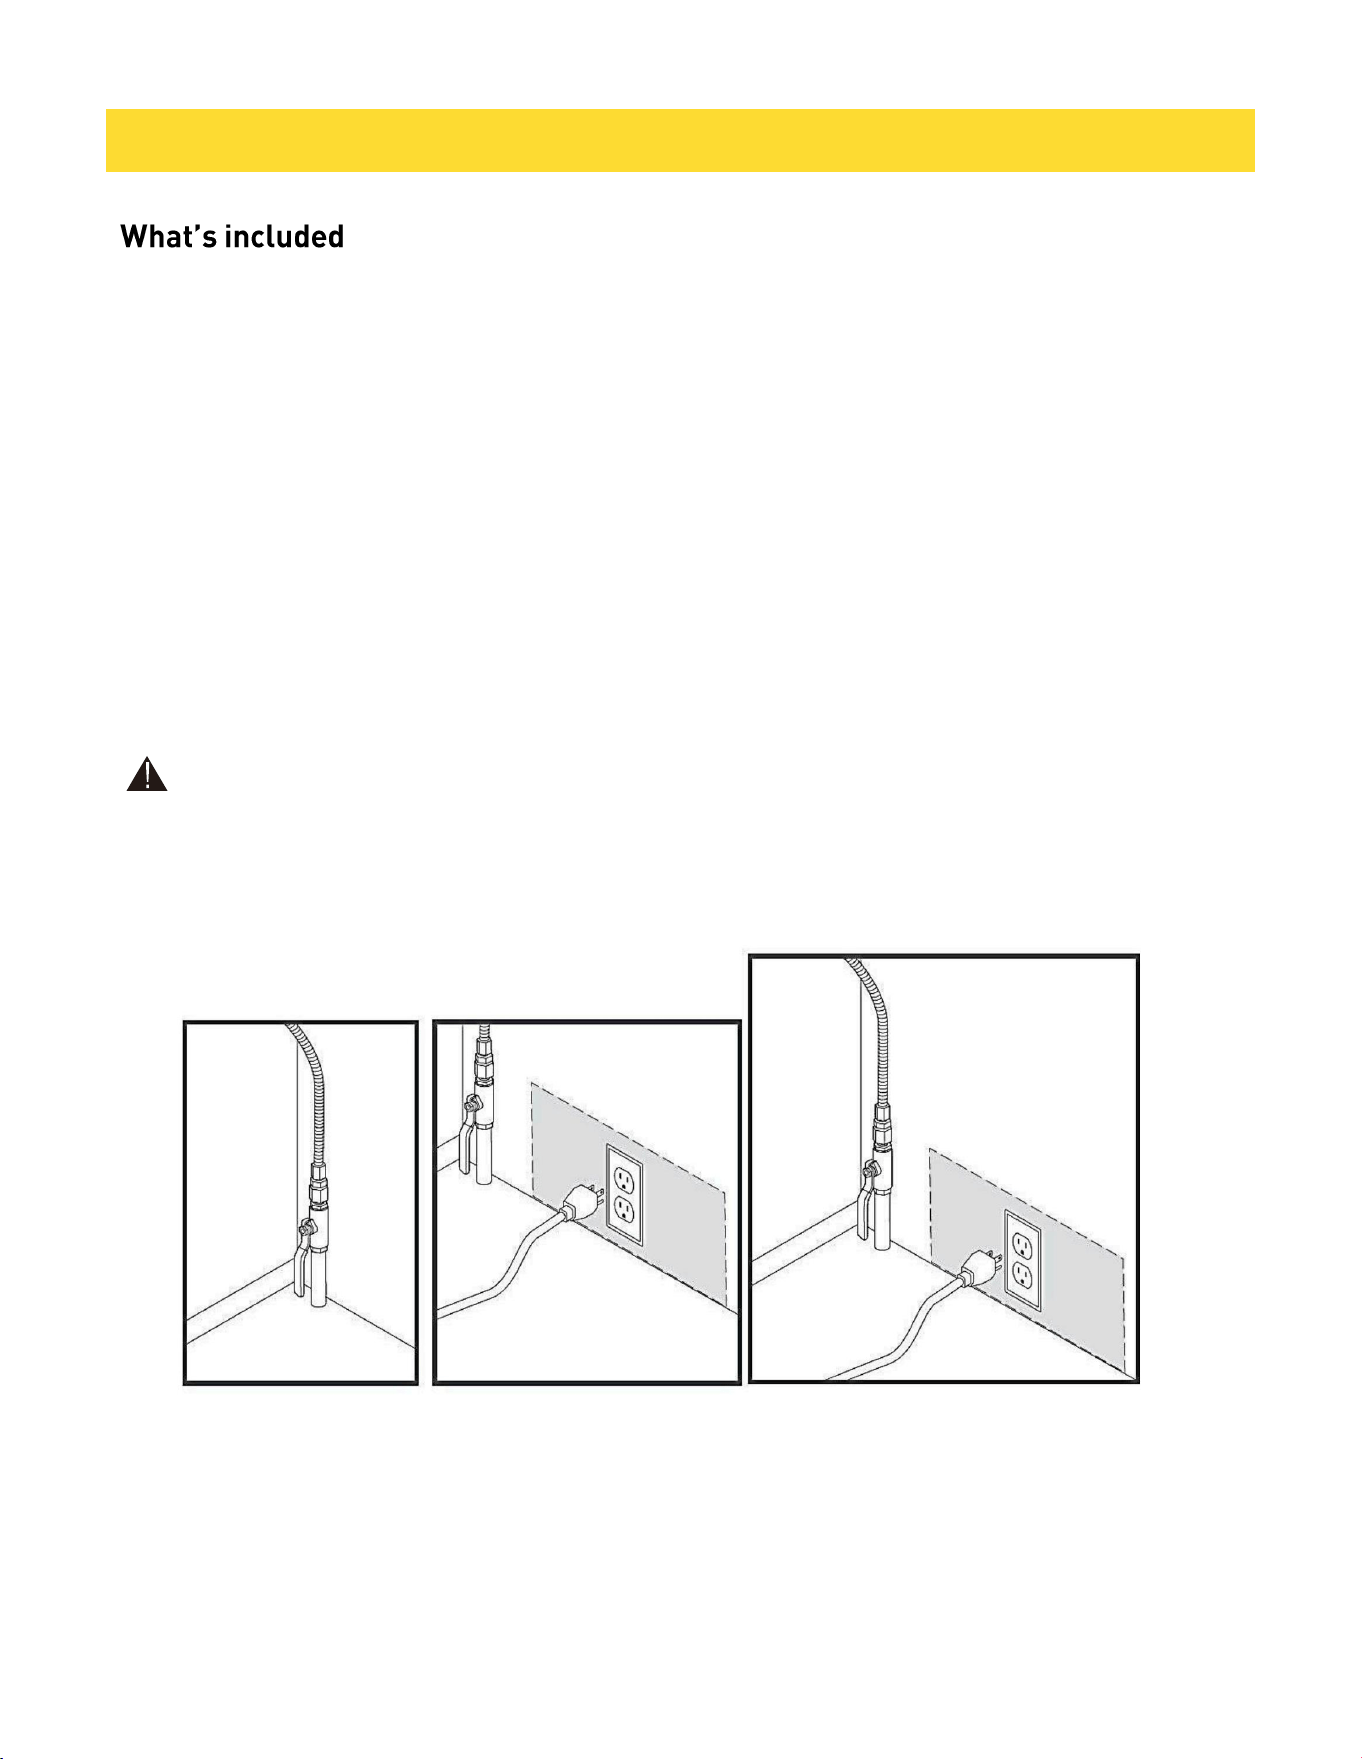
ELECTRICAL REQUIREMENTS
Thor Kitchen Gas cooktop requires 120 volts, 60 Hz electrical supply to operate the ignition
system.
WARNING
Electrical Grounding Instructions. This appliance is equipped with a (three-prong)(four-prong)
grounding plug for your protection against shock hazard and should be plugged directly into a
properly grounded receptacle. Do not cut or remove the grounding prong from this plug.
14
CAUTION
The knob LED indicates if a burner knob has been turned on. It does not indicate if the burner
flame is on. Check for an actual flame, whether the knob LED is on or off. Make sure all cooktop
burners are properly installed. A statement of the gas supply pressure for checking the
regulator setting. [The pressure stated shall be at least NG 5 in w.c/LP 10 in w.c above the
manufacturer’s specified manifold pressure.]
To light a burner:
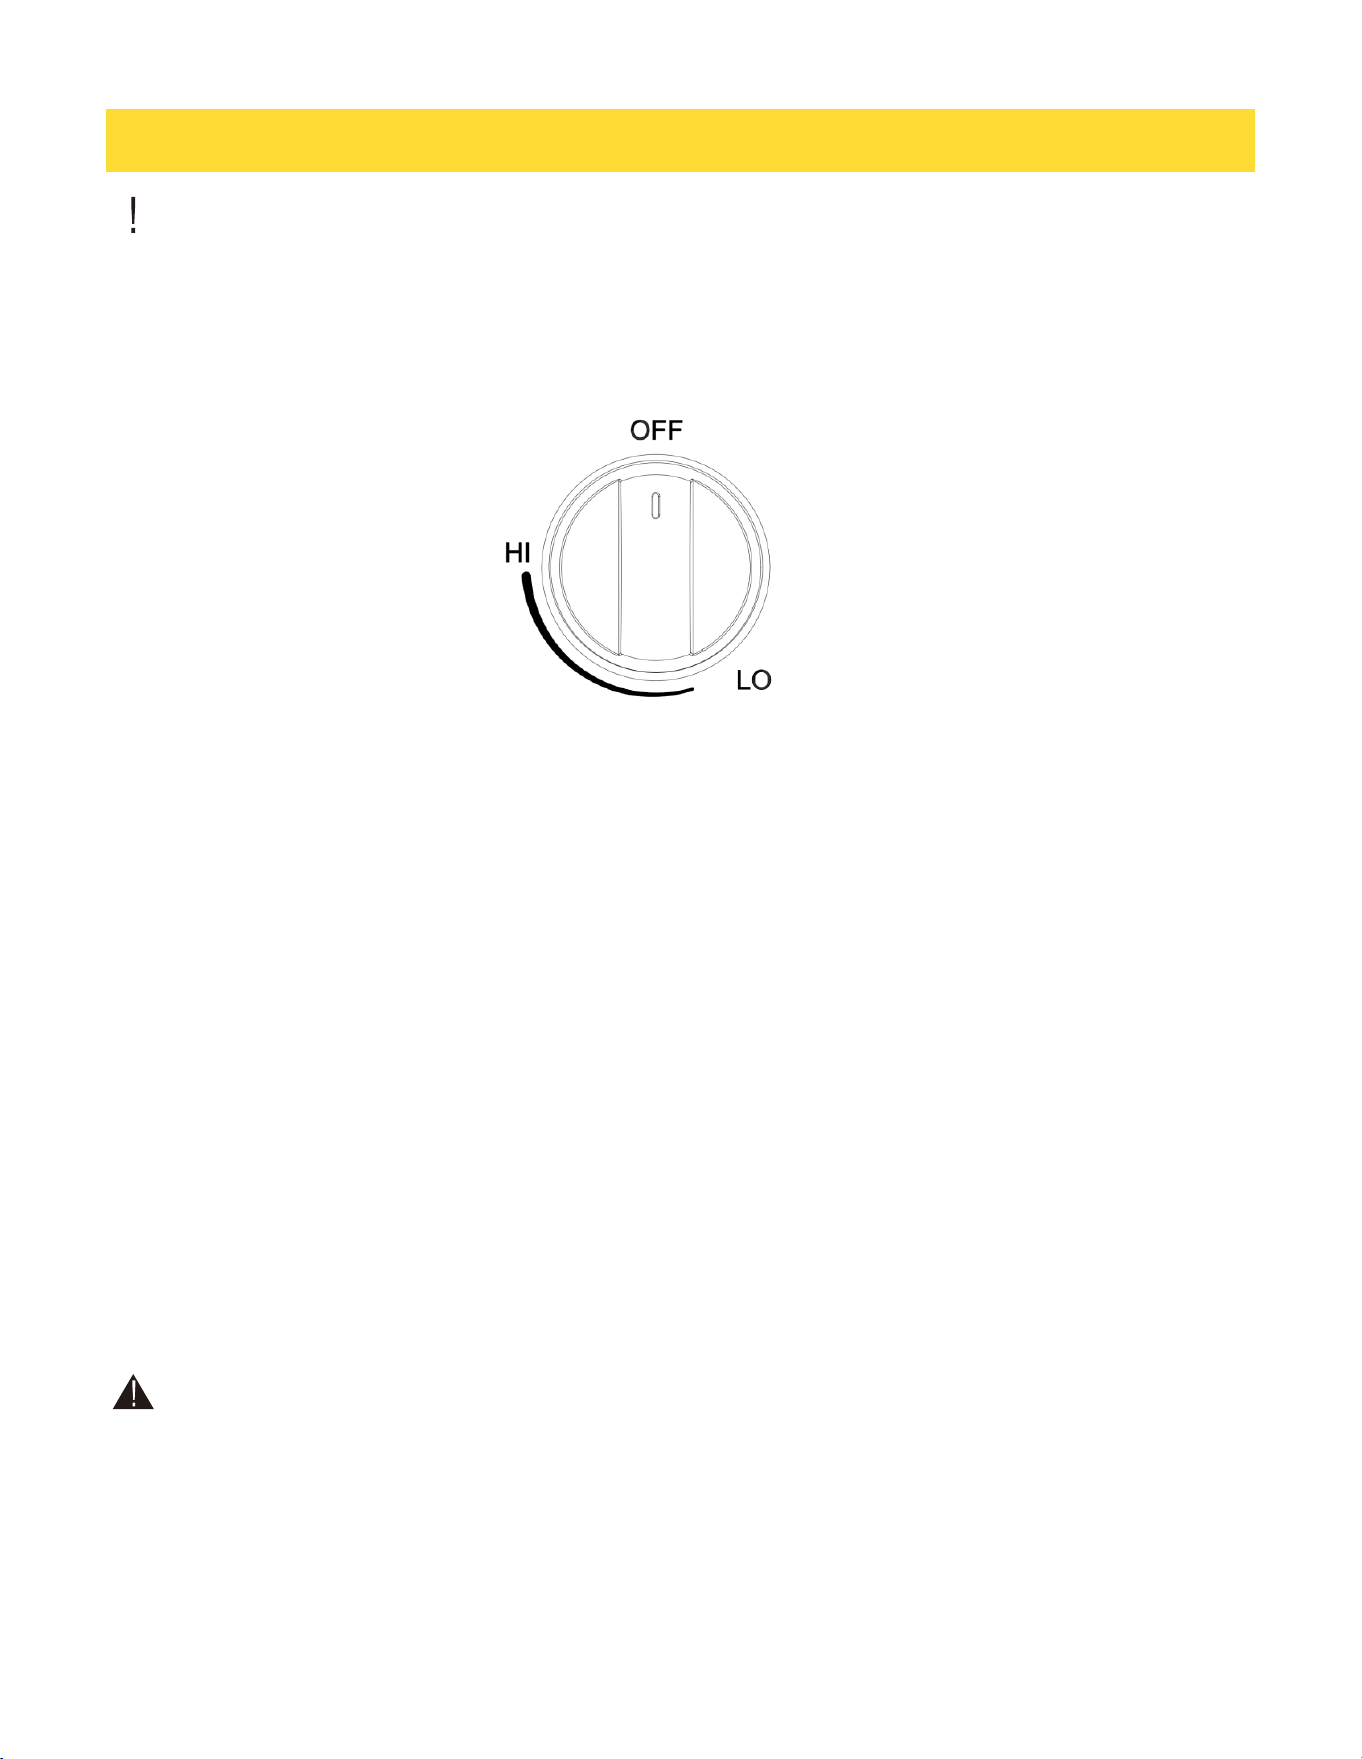
1.Your cooktop equip with an automatic ignition system and then turn anticlockwise to the ignite
position, push in the control knob, the knob LED turns on and you will hear a continuous
“clicking" sound indicating the electronic ignition system is working properly.
2.After the cooktop burner lights, turn the control knob to shift it out of the Lite position and
turn off the electronic ignition system.
3.Turn the control knob to adjust the flame Level.
Manual ignition
If there is a power failure, you can ignite the burner manually. Use caution when doing this
1.Hold a long gas grill lighter to the cooktop burner you want to light.
2.Push in the control knob for that burner, and then turn it to the HI position . Turn on the grill
lighter to ignite the burner.
3.After the burner is lit, turn the control knob to adjust the flame level .
Flame level
The flames on the burners should always stay under the cookware and should not extend
beyond the cookware bottom at any time.
WARNING
• Flames larger than the cookware bottom may result in a fire or physical injury.
• After turning on a surface burner, make sure that the burner has ignited even if the knob LED
is on. Adjust the level of the flame by turning the burner knob.
• Always turnoff the surface burner controls before removing cookware. All surface burner
controls should be turned OFF when you are not cooking.
• Always turn the burners off before you go to sleep or go out.*If you smell gas, turn off the gas
to the cooktop and call a qualified service technician. NEVER use an open flame to locate a
leak.
USING THE COOKTOP BURNERS

15
COOKWARE REQUIREMENTS
• If the LED on the control knob doesn't go on when the surface burner has ignited, please call
Thor kitchen customer service. If the knob LED illuminates, but the surface burner does not
ignite, turn off the control knob immediately.
• Do not operate the burner for an extended period of time without cookware on the grate. The
finish on the grate may chip without cookware to absorb the heat.
• Be sure the burners and grates are cool before you place your hand, a potholder, cleaning
cloths or other materials on them.
NEVER use this appliance as a space heater to heat or warm the room. Doing so may result in
carbon monoxide poisoning and overheating of the oven.
Cookware Requirements
• Flat bottom and straight sides
• Tight-fitting lid
• Well-balanced with the handle weighing less than the main portion of the pot or pan.
Size limitations
CAUTION
• Do not place a pan or pot with a bottom diameter of about 10 inches or more on the Left
Front or Right Front burner.
• Always make sure cookware handles are turned to the side or rear of the cooktop and not
over other surface burners. This will minimize the chance of burns, spillovers, and the
ignition off flammable materials that can occur if pots or pans are bumped accidently.
• If using glass cookware, make sure it is designed for cooktop cooking.
• Never leave plastic items on the cooktop. They can melt or ignite, Heating a sealed plastic
container can cause a building up of dangerous pressure which can cause the container to
explode.
• When use a wok, make sure you hold the handle of a wok or a small one-handled pot while
cooking.

16
COOKWARE REQUIREMENTS
Install the grates
Install the grates as instructed below for longest life. When installed properly, the openings in
the grates are centered over the burners.
The three cooktop grates are designed to fit in specific positions on the cooktop. For maximum
stability, these grates should only be used in their proper positions. The back of the right grate
is notched to help you orient the grates correctly. See the illustration below.
To replace the grates correctly, follow these steps:
1.Locate the notch on the back of the right grate.
2.Orient the right grate so that it is on the right side of the cooktop with the notch in the back.
3.Gently lower the legs of the right grate into the corresponding dimples on the cooktop.
4.Gently lower the legs of the remaining two grates into the corresponding dimples on the
cooktop as shown in the illustration
CAUTION
• Do not use an oversized pan. The burner flames may spread out, causing damage nearby.
• This cooktop is not designed to flame foods. If foods are flamed, they should only be flamed
under a ventilation hood that is on.

17
CARE AND CLEANING OF THE COOKTOP
WARNING
• Be sure electrical power is off and all surfaces are cool before cleaning any part of the
cooktop.
Cooktop surface
• We recommend that you remove food spills immediately after they take place.
• 1.Turn off all surface burners.
• 2.Wait until all burner grates cool down, and then remove them.
• 3.Clean the cooktop surface using a soft cloth. If food spills run into gaps of the burner
components, remove the burner cap and the head, and wipe up the spills.
• 4.When you are done cleaning, reinsert the burner components, and then put the burner
grates back into position.
Stainless steel surfaces
• 1.Do not remove any spills, spots, and grease stains using a soft, wet cloth until surface is
cool.
• 2.Apply an approved stainless steel cleanser to a cloth or paper towel.
• 3.Clean one small area at a time, rubbing with the grain of the stainless steel if applicable.
• 4.When done, dry the surface using a soft, dry cloth.
• 5.Repeat steps 2 through 4 as many times as necessary.
CAUTION
• Do not use a steel-wool pad or abrasive cleaner, which can scratch or damage the surface.
• Do not remove the cooktop surface to clean it. The gas lines leading to the burner manifolds
can be damaged, resulting in a fire or system failure.
• Do not pour water into the cooktop well while cleaning the cooktop. This could leak down into
the cooktop gas and electrical systems creating a risk of electrical shock or high levels of
Carbon Monoxide due to corrosion of the gas valves or ports.
• Do not spray any type of cleanser into the manifold holes, The ignition system is located in
those holes and must be kept free of moisture.
Control knobs
Make sure all surface burner knobs are in OFF position.
1.Grasp each knob and pull straight up to remove
2.Clean the knobs with soft cloth and warm, soapy water. Then rinse and dry them thoroughly.
3.Clean the stainless steel surfaces using stainless steel cleaner.
4.Re-attach the knobs in the OFF position to the control valve stems.
5.Do not remove spill protector.
Do not clean the control knobs in a dishwasher.
Do not spray cleansers directly onto the control panel.
Moisture entering the electric circuits may cause electric shock or product damage.
01 Grasp each knob and pull straight up to remove.
02 Do not remove spill protector.

18
CARE AND CLEANING OF THE COOKTOP
Burner grates and components
Turn off all surface burners and make sure they have all cooled down.
1.Remove the burner grates.
2.Remove the burner caps from the burner heads.
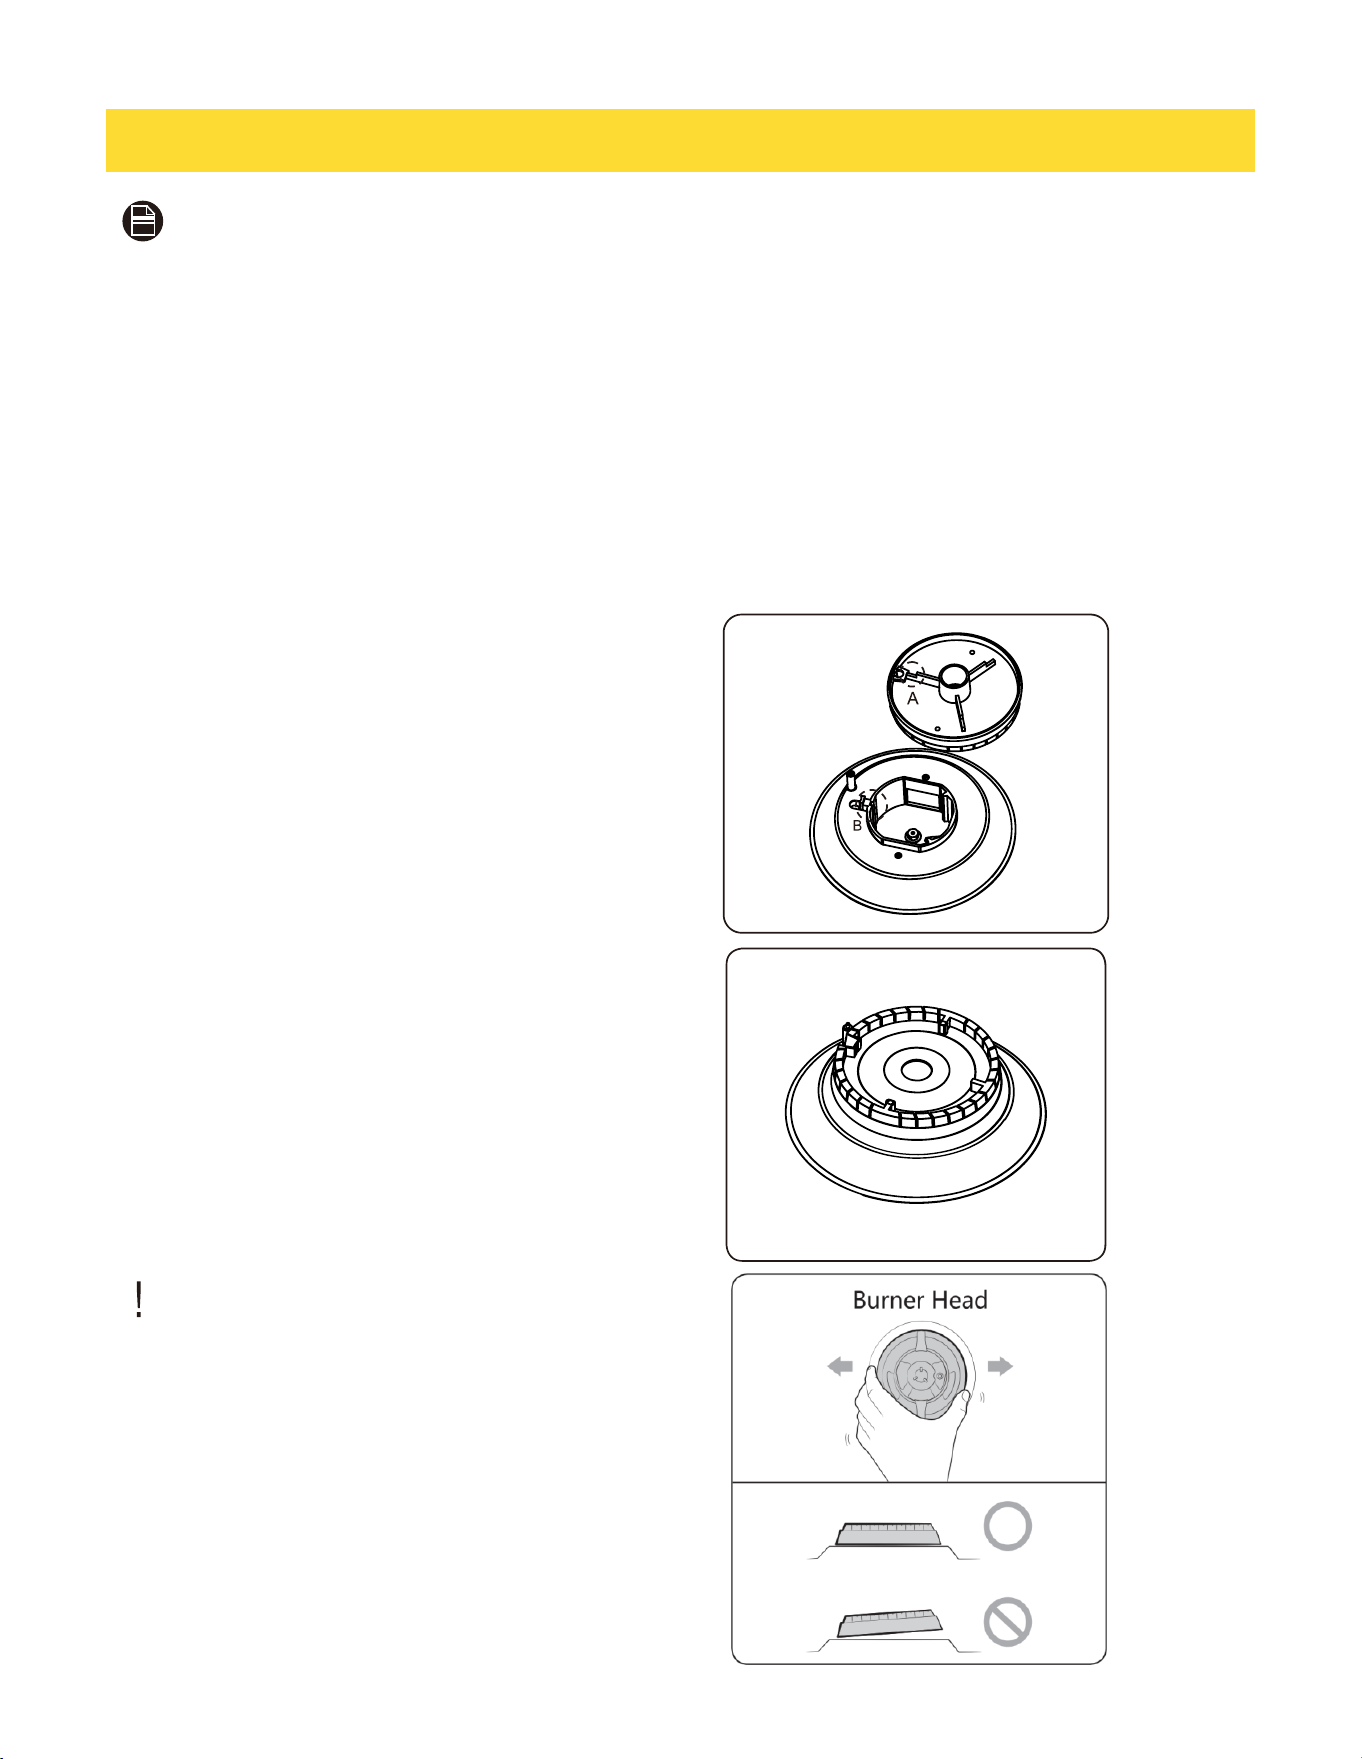
3.Remove the burner heads from the valve manifolds to reveal the starter electrodes.
4.Clean all removable grates and burner components in warm, soapy water. Do not use steel-
wool pads or abrasive cleaners.
5.Rinse and dry grates and burner components thoroughly.
6.Return the burner heads to their positions on top of the manifold valves. Make sure a starter
electrode is inserted through the hole in each burner head burner component re-assembly
instructions.
7.Return the burner caps to their positions on top of the burner heads. To ensure proper and
safe operation, make sure the burner caps lie flat on top of the burner heads.
8.Re-install the burner grates in their respective positions.
9.Turn on each burner and check if it operates properly. After verifying that a burner operates
normally, turn it off.
Burner caps and heads
NOTE
Before removing the burner caps and heads, remember their size and location. Replace them in
the same location after cleaning.
Wash burner caps and burner heads in hot, soapy water and rinse with clean running water.
You may scour with a plastic scouring pad to remove burned-on food particles.
Use a sewing needle or twist tie to unclog the small holes in the burner head, if required.
CAUTION
Do not wash any burner parts in a dishwasher.
Do not use steel wool or scouring powders to clean the burners.
Burner bases
CAUTION
The burner bases cannot be removed for cleaning. Make sure that no water gets into the burner
bases and the brass gas orifices, Wipe clean with a damp cloth. Be careful not to scratch,
deform, or damage the bases. Allow them to dry fully before using.
Electrodes
Do not attempt to remove the electrode from the cooktop or burner bases. Be careful not to
push in any cooktop controls while cleaning the cooktop. A slight electrical shock might result
which could cause you to knock over hot cookware. Make sure that the white ceramic
electrodes in the cooktop are clear of soil and dry. Clean the metal part of the electrode with a
soft cloth. Do not use water to clean the igniters. Before reassembling the surface burners,
push down gently on each of the white ceramic, electrodes to make sure they are pressed
against the burners bases.
19
NOTE
Do not attempt to remove the electrode from the cooktop.
Grates
Do not clean the grates in a dishwasher. They will be damaged. Lift grates out when cool.
Grates should be washed regular and after spillovers. Wash them in hot, soapy water and rinse
with clean water. When replacing the grates, be sure they are positioned securely over the
burners.
Burner head and cap replacement
Round Burner head
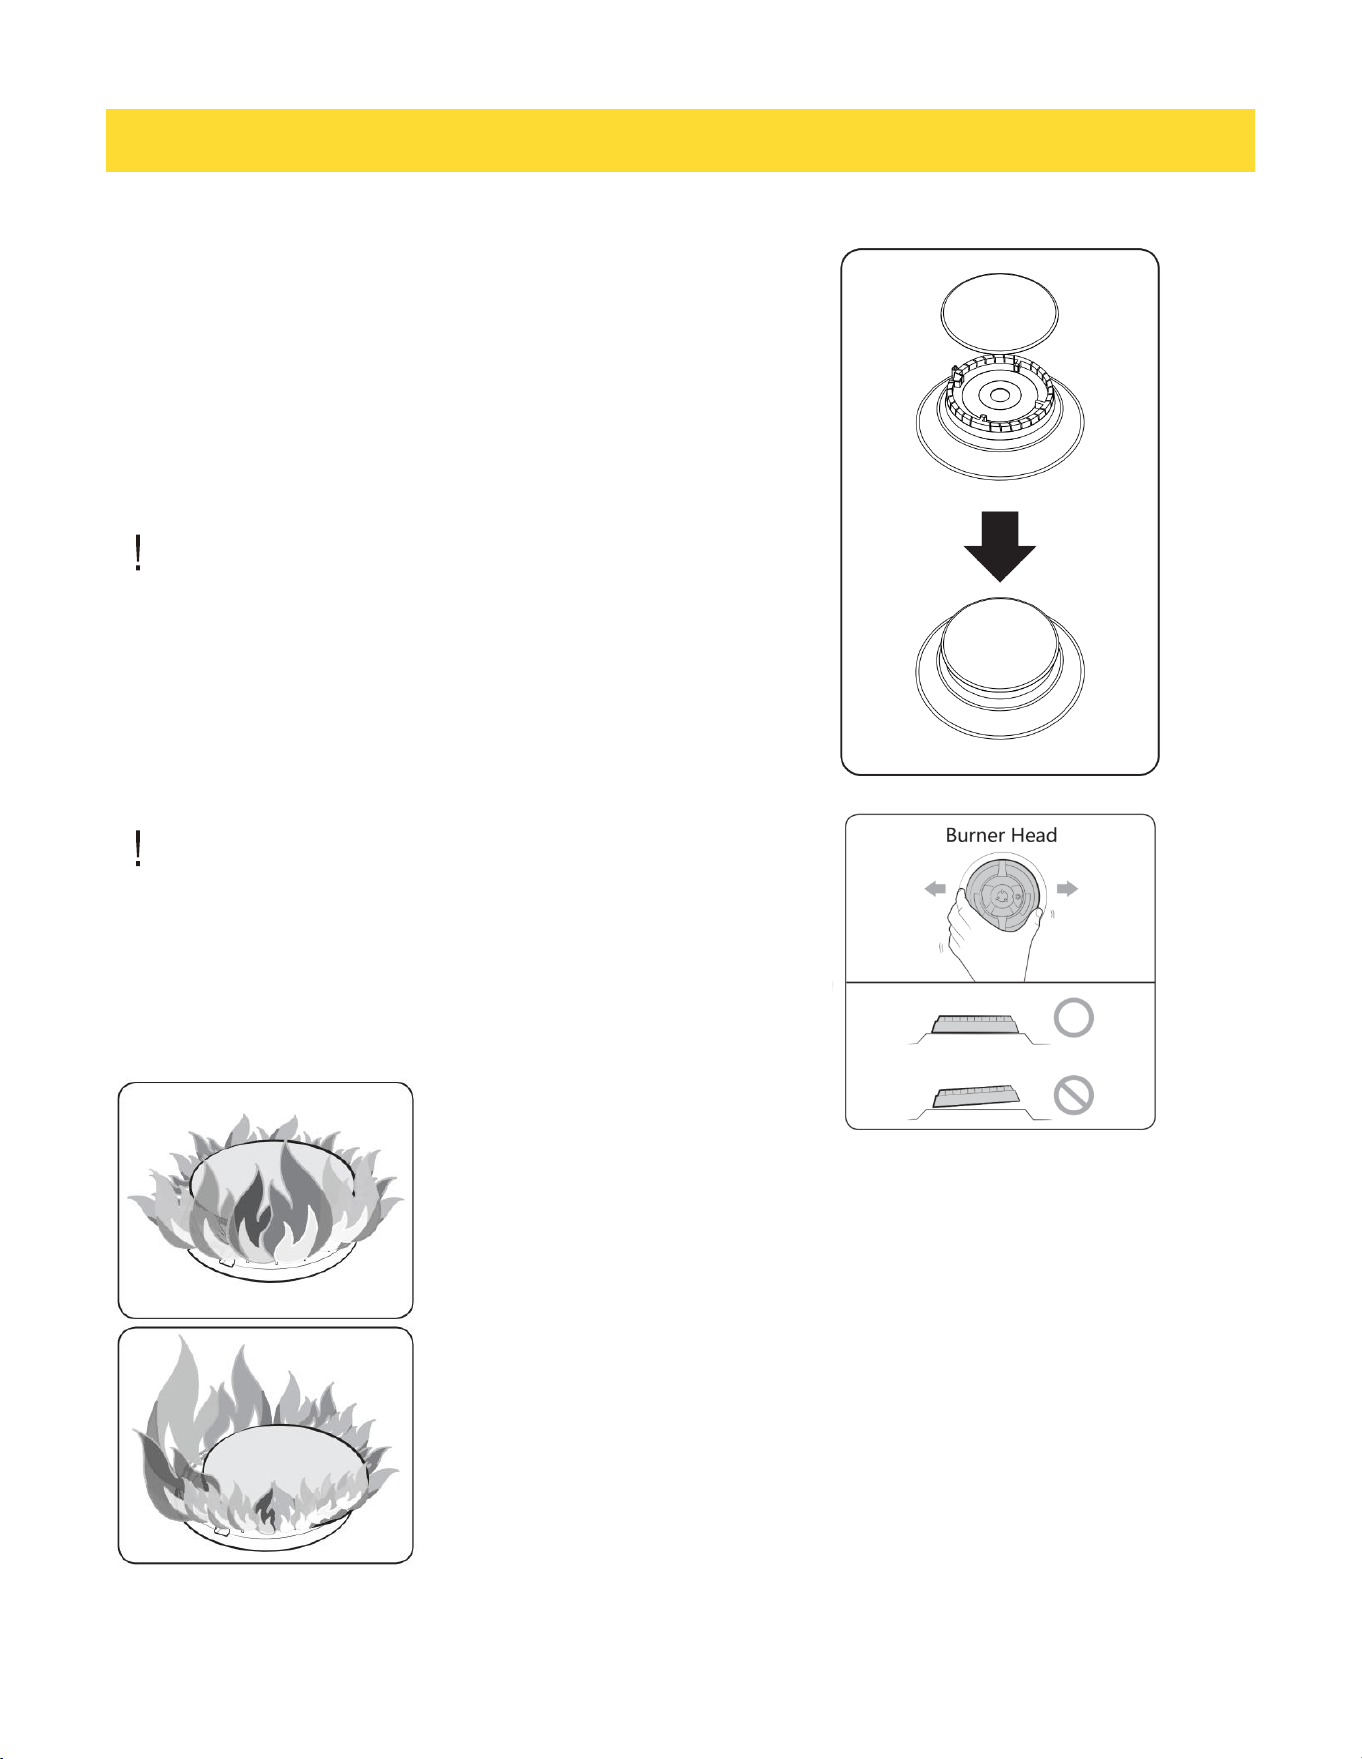
1.Align the burner (point A) with the notch
in the bottom cup.(point B)
2.Turn the burner over and cover the burner cap.
CAUTION
Make sure all burner components(heads and caps)
are re-installed properly. They will be stable and
rest flat when correctly installed.
CARE AND CLEANING OF THE COOKTOP
20
CARE AND CLEANING OF THE COOKTOP
Burner cap
1.Match the burner caps to the burners by size, and
then re-install the caps on the burner heads.
CAUTION
Make sure each cap is re-installed on the correct
burner head, is centered on the burner head, and lies
flat.
CAUTION
Make sure all burner components(heads and caps)
are re-installed properly. They will be stable and
rest flat when correctly installed.
After installation of surface burners, check the
ignition.
Incorrect placement of a burner head or cap will
result in poor ignition or uneven flames (as
shown in the pictures).

21
TROUBLE SHOOTING
Troubleshooting
If you encounter a problem with the cooktop, check the tables starting below, and then try the
suggested actions.
Checkpoints
Gas safety
Problem
Possible cause
Action
You smell gas.
The surface burner knob is
not in the
OFF position and
the burner is not lit.
Turn the burner knob to
OFF.
Surface
burners do not
light.
There is a gas leak.
Clear the room, building, or area of
all occupants. Immediately call your
gas supplier from a neighbor's
phone. Do not call from your phone.
It is electrical and could cause a
spark that could ignite the gas.
Follow the gas supplier's
instructions. If you cannot reach your
gas supplier, call the fire
department.
The control knob is not set
properly.
Push in the control knob and turn it
to the Lite position.
A surface burner clicks
during operation .
The burner caps are not in place.
The burner base is misaligned.
After the burner lights, turn the
control knob to a desired setting. If
the burner still clicks, contact a
service technician.
Very large or yellow
surface burner flames.
The wrong burner orifice is
installed.
Check the burner orifice size.
Contact your installer if you have the
wrong orifice (LP gas instead of
natural gas or natural gas instead of
LP gas).

22
Warranty&Service
This product has been manufactured by Thor International, 4651 E Airport Dr, Ontario, CA 91761
For Customer Service, please call (877) 288 - 8099
For the most up to date warranty and service policy, please refer to our website
WWW.THORKITCHEN.COM/WARRANTY-REGISTRATION
For in-warranty service requests, please visit our website at
WWW.THORKITCHEN.COM/SERVICE
Please Note: You must provide proof of purchase or installation date for any in- warranty service
requests
WARRANTY
Warranty Registration
Made Easy.
We Stand Behind
the Quality of Our
Appliances.
Reliability and customer satisfaction are our top priorities. We offer a
solid two-year warranty on both parts and labor. Enjoy professional-grade
performance with the condence that we’ve got you covered.
01
02
03
Scan the QR Code or visit thorkitchen.
com/register-your-product.
Input your purchase and product
information and select register.
That’s it. You’re all set.
Enjoy!
WARRANTY
PARTS
Questions: [email protected]