
Write Model and Serial Numbers here:
Model _________________________
Serial No. ______________________
Felix Storch, Inc.
An ISO 9001:2015 registered company
770 Garrison Ave
Bronx, New York 10474
www.summitappliance.com
User Manual
BEFORE USE, PLEASE READ AND FOLLOW ALL SAFETY RULES AND OPERATING INSTRUCTIONS.
COMMERCIAL MICROWAVE
Models:
SCM2100M2

IMPORTANT SAFETY INSTRUCTIONS ................................................................................ 1
SPECIFICATIONS .................................................................................................................. 4
MICROWAVE USAGE ............................................................................................................ 5
INSTALLATION ...................................................................................................................... 7
OPERATION .........................................................................................................................10
MAINTENANCE ....................................................................................................................18
TROUBLESHOOTING ..........................................................................................................20
LIMITED WARRANTY ...........................................................................................................22
TABLE OF CONTENTS

1. Read all instructions before using the appliance.
2. Read and follow the specific: "PRECAUTIONS TO AVOID POSSIBLE EXPOSURE TO
EXCESSIVE MICROWAVE ENERGY" found on page 2.
3. This appliance must be grounded. Connect only to properly grounded outlet. See
"GROUNDING INSTRUCTIONS" found on page 5.
4. Install or locate this appliance only in accordance with the provided installation
instructions.
5. Some products such as whole eggs and sealed containers - for example, closed glass jars
- are able to explode and should not be heated in this microwave.
6. Use this appliance only for its intended use as described in the manual. Do not use
corrosive chemicals or vapors in this appliance. This type of microwave is specifically
designed to heat, cook or dry food. It is not designed for industrial or laboratory use.
7. HOT CONTENTS CAN CAUSE SEVERE BURNS. DO NOT ALLOW CHILDREN TO USE
THE MICROWAVE. Use caution when removing hot items.
8. Do not operate this appliance if it has a damaged cord or plug, if it is not working properly,
or if it has been damaged or dropped.
9. This appliance should be serviced only by qualified service personnel. Contact nearest
authorized service facility for examination, repair, or adjustment.
10. Do not cover or block any openings on the appliance.
11. Do not store this appliance outdoors. Do not use this product near water - for example,
near a kitchen sink, in a wet basement, near a swimming pool, or similar location.
12. Do not immerse cord or plug in water.
13. Keep cord away from heated surface.
14. Do not let cord hang over edge of table or counter.
15. When cleaning surfaces of door and microwave that comes together on closing the door,
use only mild, nonabrasive soaps, or detergent applied with a sponge or soft cloth.
16. To reduce the risk of fire in the microwave cavity:
1). Do not overcook food. Carefully attend appliance when paper, plastic, or other
combustible materials are placed inside the microwave to facilitate cooking.
2). Remove wire twist-ties from paper or plastic bag before placing bag in microwave.
3). If material inside of the microwave ignite, keep microwave door closed, turn microwave
off, and disconnect the power cord, or shut off power at the fuse or circuit breaker panel.
4). Do not use the cavity for storage purposes. Do not leave paper products, cooking
utensils, or food in the cavity when not in use.
to excessive microwave energy:
IMPORTANT SAFETY INSTRUCTIONS
When using electrical appliances basic safety precautions should be followed, including the
following:
WARNING - To reduce the risk of burns, electric shock, fire, injury to persons or exposure
1

17. Liquids, such as water, coffee, or tea are able to be overheated beyond the boiling
point without appearing to be boiling. Visible bubbling or boiling when the container is
removed from the microwave microwave is not always present.
THIS COULD RESULT IN VERY HOT LIQUID SUDDENLY BOILING OVER WHEN
THE CONTAINER IS DISTURBED OR A UTENSIL IS INSERTED INTO THE LIQUID.
To reduce the risk of injury to persons:
1) Do not overheat the liquid.
2) Stir the liquid both before and halfway through heating it.
3) Do not use straight-sided containers with narrow necks.
4) After heating, allow the container to stand in the microwave for a short time before
removing the container.
5) Use extreme care when inserting a spoon or other utensil into the container.
SAVE THESE INSTRUCTIONS
Precautions to Avoid Possible Exposure to Excessive
Microwave Energy
(a) Do
no
t attempt to operate this microwave wi
th the door open since open door
operation can result in harmful exposure to microwave energy.
It is important not to defeat or tamper with the safety interlocks.
(b) Do not place any object between the microwave front face and the door or allows soil
or cleaner residue to accumulate on sealing surfaces.
(c) Do not operate the microwave if it is damaged. It is particularly important that
the microwave door close properly and that there is no damage to the:
(1) DOOR (bent)
(2) HINGES AND LATCHES (broken or loosened)
(3) DOOR SEALS AND SEALING SURFACES
(d) The microwave should not be adjusted or repaired by anyone except properly
qualified service personnel.
2

1. Operation of the microwave may cause interference to your radio, TV or similar
equipment.
2. When there is interference, it may be reduced or eliminated by taking the following
measures:
a. Clean door and sealing surface of the microwave.
b. Reorient the receiving antenna of radio or television.
c. Relocate the microwave with respect to the receiver.
d. Move the microwave away from the receiver.
e. Plug the microwave into a different outlet so that microwave and receiver are on
different branch circuits.
Radio Interference
3. This equipment generates, uses, and can emit radio frequency energy. If not installed
and used according to the instructions, it may cause harmful interference to radio
communications. However, there is no guarantee that interference will not occur in a
specific installation. If this equipment does cause harmful interference to radio or
television reception—determined by turning the equipment off and on—users are
encouraged to try one or more of the following measures to correct the interference:
a. Reorient or relocate the receiving antenna.
b. Increase the separation between the equipment and receiver.
c. Connect the equipment into an outlet on a circuit different from that to which the
receiver is connected.
d. Consult the dealer or an experienced radio/TV technician for help.
3

Grounding Instructions
This appliance must be grounded. In the event of an electrical short circuit, grounding
reduces the risk of electric shock by providing an escape wire for the electric current.
This appliance is equipped with a cord having a grounding wire with a grounding plug.
The plug must be plugged into an outlet that is properly installed and grounded.
WARNING:
Improper use of the grounding can result in a risk of electric shock. Consult
a qualified electrician or serviceman
if the grounding instructions are not
completely
understood, or if doubt exists as to whether the appliance is properly grounded. If it is
necessary to use an extension cord, use only a 3-wire extension cord that has a 3-blade
grounded plug, and 3-slot receptacle that will accept the plug on the appliance. The
marked rating of the extension cord shall be equal to or greater than the electrical rating
of the appliance.
DANGER:
Electric Shock Hazard
Touching some of the internal components can cause serious personal injury or death.
Do not disassemble this appliance.
WARNING:
Electric Shock Hazard
Improper use of the grounding can result in electric shock. Do not plug into an outlet until
appliance is properly installed and grounded.
1. A short power-supply cord is provided to reduce the risks resulting from becoming
entangled in or tripping over a longer cord.
2. Longer cord sets or extension cords are available and may be used if care is exercised
in their use.
3. If a long cord or extension cord is used:
a. The marked electrical rating of the cord set or extension cord should be at least
as
great as the electrical rating of the appliance.
b. The extension cord must be a grounding-type 3-wire cord.
c. The longer cord should be arranged so
that it will not drape over the counter top
or
tabletop where it can be pulled on by
children or tripped over unintentionally.
SPECIFICATIONS
Model:
Rated Voltage:
Rated Input Power(Microwave):
Rated Output Power(Microwave):
208/230VAC 60Hz
SCM2100M2
2100 W
3200 W
4

1. The microwave must be on a leveled surface.
2. Use only the specified bag size when using Direct Access Popcorn.
3. The microwave has several built-in safety switches to ensure that the power remains
off when the door is open. Do not tamper with these switches.
4. Do not operate the microwave empty. Operating the microwave with no food or food
that is extremely low in moisture can cause fire, charring, or sparking.
5. Do not heat baby bottles or baby food in the microwave. Uneven heating
may occur and could cause physical injury.
6. Do not heat narrow-necked containers, such as syrup bottles.
7. Do not attempt to deep-fry in your microwave.
8. Do not attempt home canning in this microwave, as it is impossible to be sure all
contents of the jar have reached boiling temperature.
9. To prevent delayed eruptive boiling of hot
liquids and beverages or scalding
yourself, stir liquid before placing the container in the microwave and again halfway
through cooking time. Let stand in the microwave for a short time and stir again
before removing the container.
10. Use carefully when cooking food in the microwave to avoid burning due to excessive
cooking.
11. Failure to maintain the microwave in a clean condition could lead to deterioration that
could adversely affect the life of the appliance and possibly result in a hazardous
situation.
This device complies with part 18 of the FCC Rules.
MICROWAVE USAGE
Important Safety and Usage Guidelines for Your Microwave
5

1. Fill a microwave-safe container with 1 cup (250ml) of cold water and place the utensil inside.
2. Microwave on high for 1 minute.
3. Carefully check the utensil. If it feels warm, do not use it in the microwave.
4. Do not exceed the 1-minute cooking time.
Microwave-Safe Utensils:
• Browning dish
• Dinnerware
• Glass jars
• Glassware
• Microwave cook bag
• Paper plates and cups
Safe and Unsafe Materials for Microwave Use
For safety, refer to the sections on "Materials Safe for Microwave Use" and "Materials to Avoid."
Some non-metallic utensils may not be microwave-safe. If you're unsure, you can test them
using the procedure below.
CAUTION!
Tightly closed containers may explode. Always open closed containers and pierce plastic
pouches before microwaving.
Utensil Test:
• Aluminum tray
• Food carton with metal handle
• Metal or metal-trimmed utensils
• Metal twist ties
• Paper towels
• Parchment paper
• Plastic containers
• Plastic Wrap
• Thermometers
• Wax paper
• Paper bags
• Plastic foam
• Wood
Avoid in Microwave:
• Always follow the manufacturer’s instructions.
• Don’t use cracked or chipped items.
• Don’t leave the microwave unattended.
• Supervise when cooking or reheating.
General Safety Tips:
6
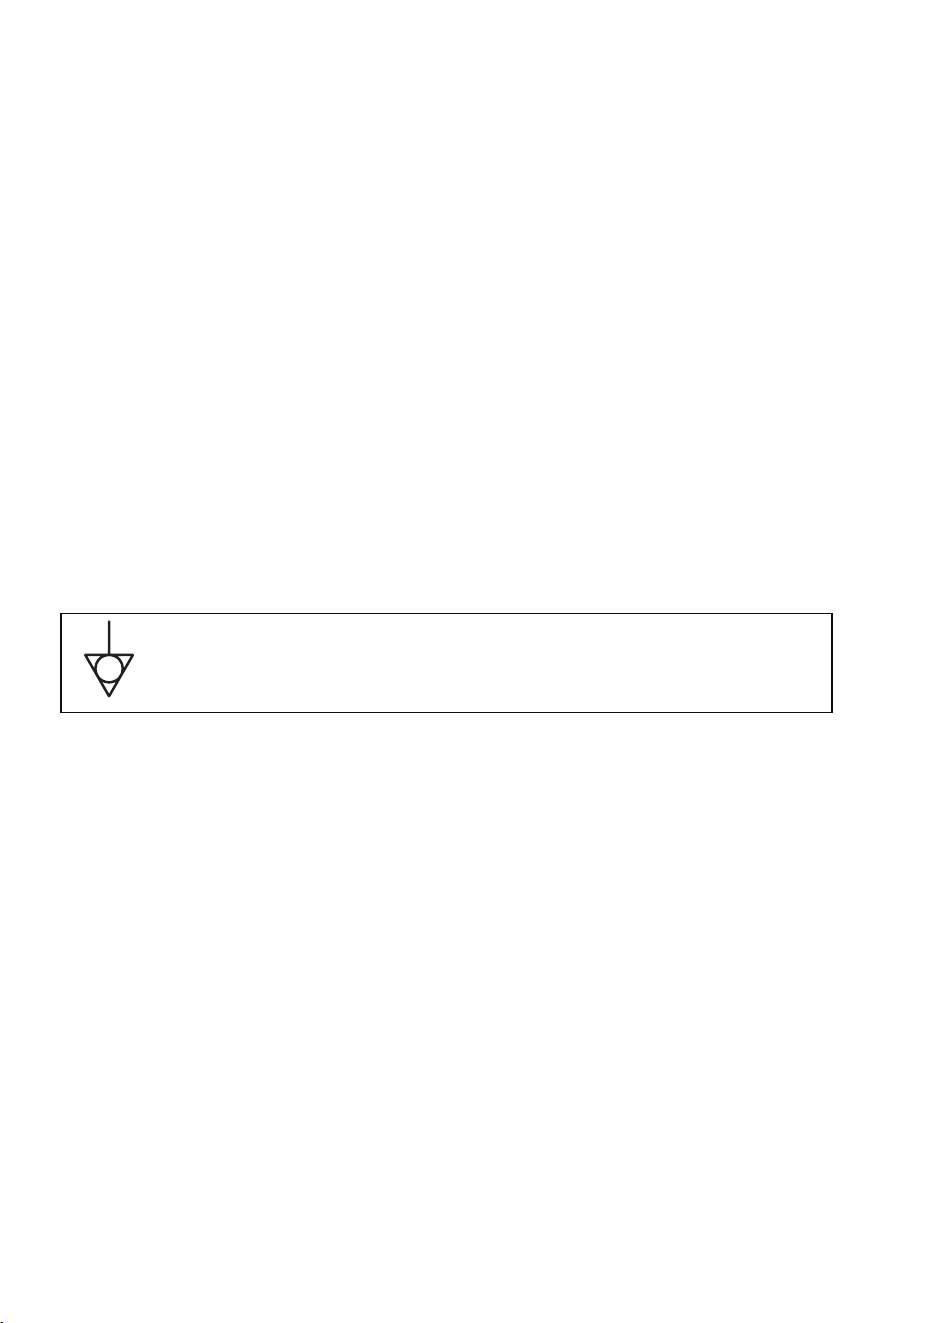
Symbol for the external connection of equipotential bonding
conductors.
1.
The switching operation of this microwave can cause voltage fluctuations on the supply
line. The operation of this microwave under unfavorable voltage supply
conditions can
have adverse effects. This device is intended for the connection to a power supply
system with a maximum permissible system impedance Zmax of 0.2 Ohms at the
interface point of the user’s supply. The user has to ensure that this device is connected
only to a power supply system that fulfills the requirement above. If necessary, the user
can ask the public power supply company for the system impedance at the interface
point.
2.
I f there is no equipotential bonding conductor in the electric supply, an external
equipotential bonding conductor must be installed at the rear of the appliance (see
symbol). This terminal shall be ineffective electrical contact with all fixed exposed metal
parts and shall allow the connection of a conductor having a nominal cross-sectional
area up to 10 mm².
INSTALLATION
Electrical Installation and System Compatibility
7

1. Unpack the Microwave
Remove all packing materials and
accessories from the microwave.
2. Check for Damage
Inspect the microwave for any visible
damage, such as dents or a broken door.
Do not proceed with installation if the
microwave is damaged.
3. Remove Protective Film
If present, carefully peel off any protective
film
from the surface of the microwave
cabinet.
A
B
C
Fig 1
Fig 2
30cm
OPEN
Maintain a spacing of 4 inches (10 cm)
between the appliance and the right and back
walls, and a spacing of 12 inches (30 cm) above
the appliance. Do not remove the appliance's
feet or block the air intake and exhaust
openings. The left side must remain unobstructed.
12 inch( )
4.0 inch(10cm)
4.0 inch(10cm)
Choosing a Location
Select a level surface that provides enough
open space for the intake and outlet vents
(see Figure 1).
• Blocking the intake and outlet openings
can damage the microwave.
•
•
Position the microwave as far away from
radios and TVs as possible, as the operation
of the microwave may cause interference
with reception.
Plug the microwave into a standard
household outlet, ensuring that the voltage
and frequency
match the specifications on
the rating label.
Warning: Keep the plug socket, electrical
appliances, and any items sensitive to heat and
moisture away from the microwave's vents.
Mounting the Top Microwave:
You may mount a second microwave
(see Figure 2).
Warning: Do not stack more than two
microwaves.
1.
Remove the mounting plates (A).
2.
Remove the four (4) side screws (B).
3.
Align the microwave and attach the
mounting plates with the four screws
from step 2 (C).
Pre-Installation Inspection and
Preparation:
8
NOTE: This microwave does not vent
from the top. The 12-inch space above is
to let air flow from the back. When
stacking two units, ensure the back vent
of the lower microwave is not blocked.
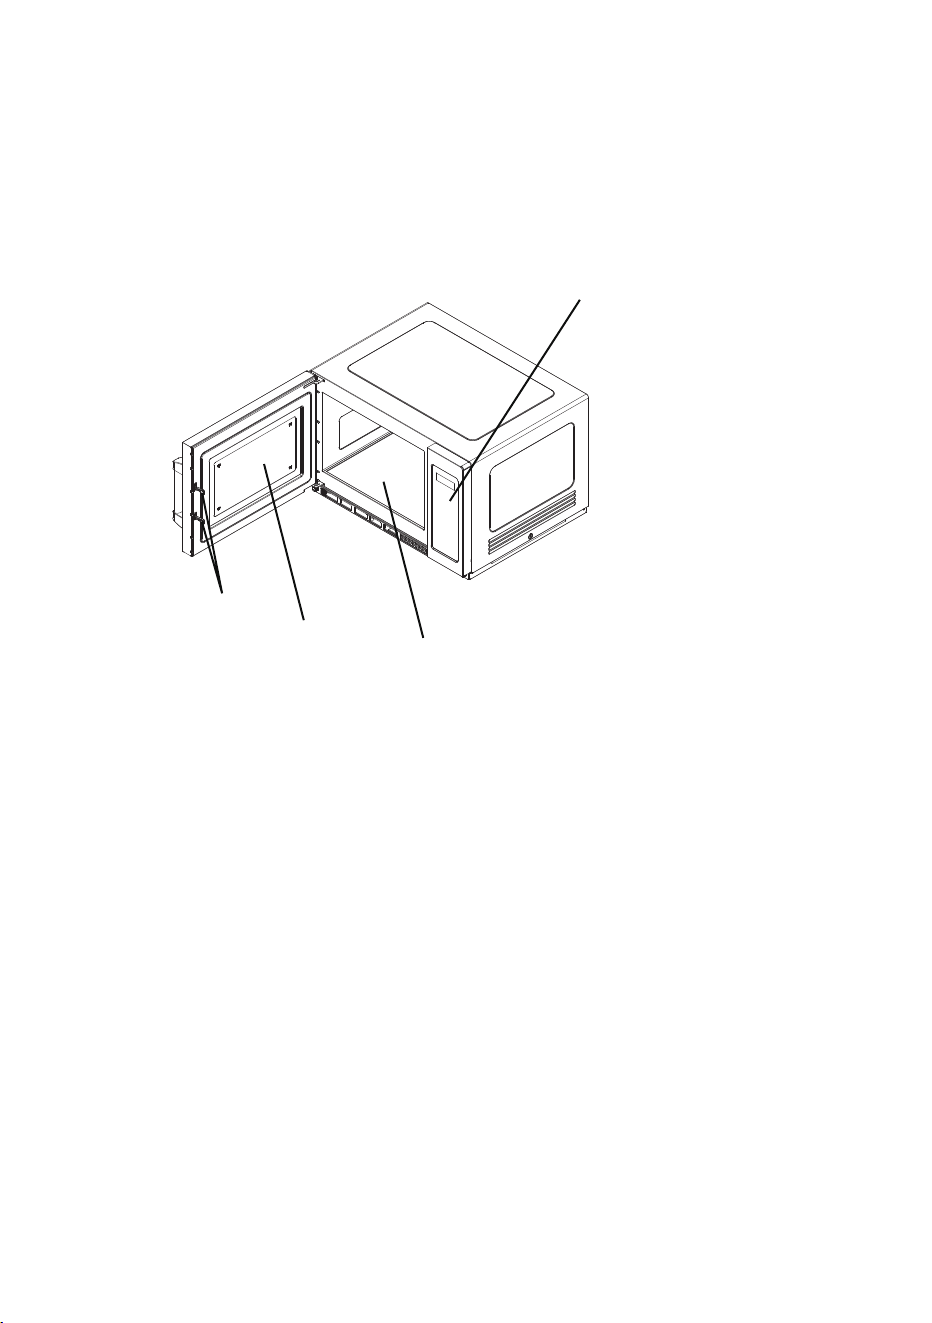
C
B
D
A) Control Panel
B) Safety Interlock System
C) Observation Window
D) Ceramic Board
A
Parts And Accessories
(part locations may differ between models)
Remove the microwave and all materials from the carton and microwave cavity.
Your microwave comes with the following accessories:
Important Safety Guidelines for Ceramic Board Use
1. Avoid pressing the ceramic board with excessive force.
2. Gently place and remove utensils during operation to prevent damage to the ceramic
board.
3. After use, refrain from touching the ceramic board with your hands to avoid the risk of
burns from high temperatures.
9
OPERATION
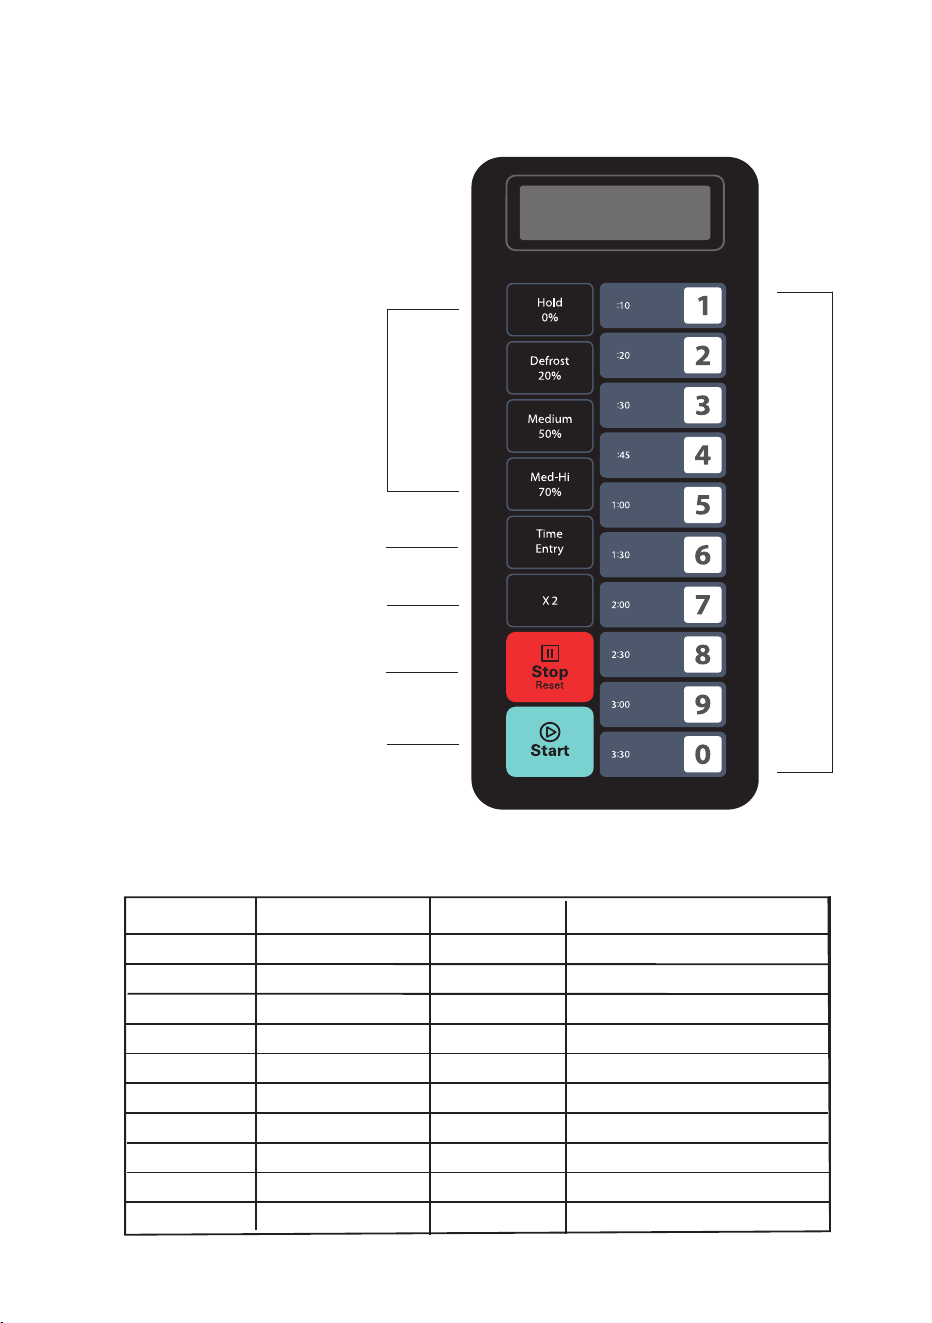
Control Panel and Features:
(1)
Power Buttons
(2)
Time Entry Button
(3)
Double Quantity Button
(4)
Stop/Reset Button
(5)
Start Button
(6)
Number Keyboard
(4)
(5)
(3)
(2)
(1)
(6)
Button
Display (Time)
Power
1
2
3
4
5
6
7
8
9
0
0:10
0:20
0:30
0:45
1:00
1:30
2:00
0
100%
100%
100%
100%
100%
100%
100%
100%
100%
100%
Cook Factor
80%
80%
80%
80%
80%
80%
80%
80%
80%
80%
The microwave will be shipped with the following preset cook times.
2:30
3:00
3:3
10
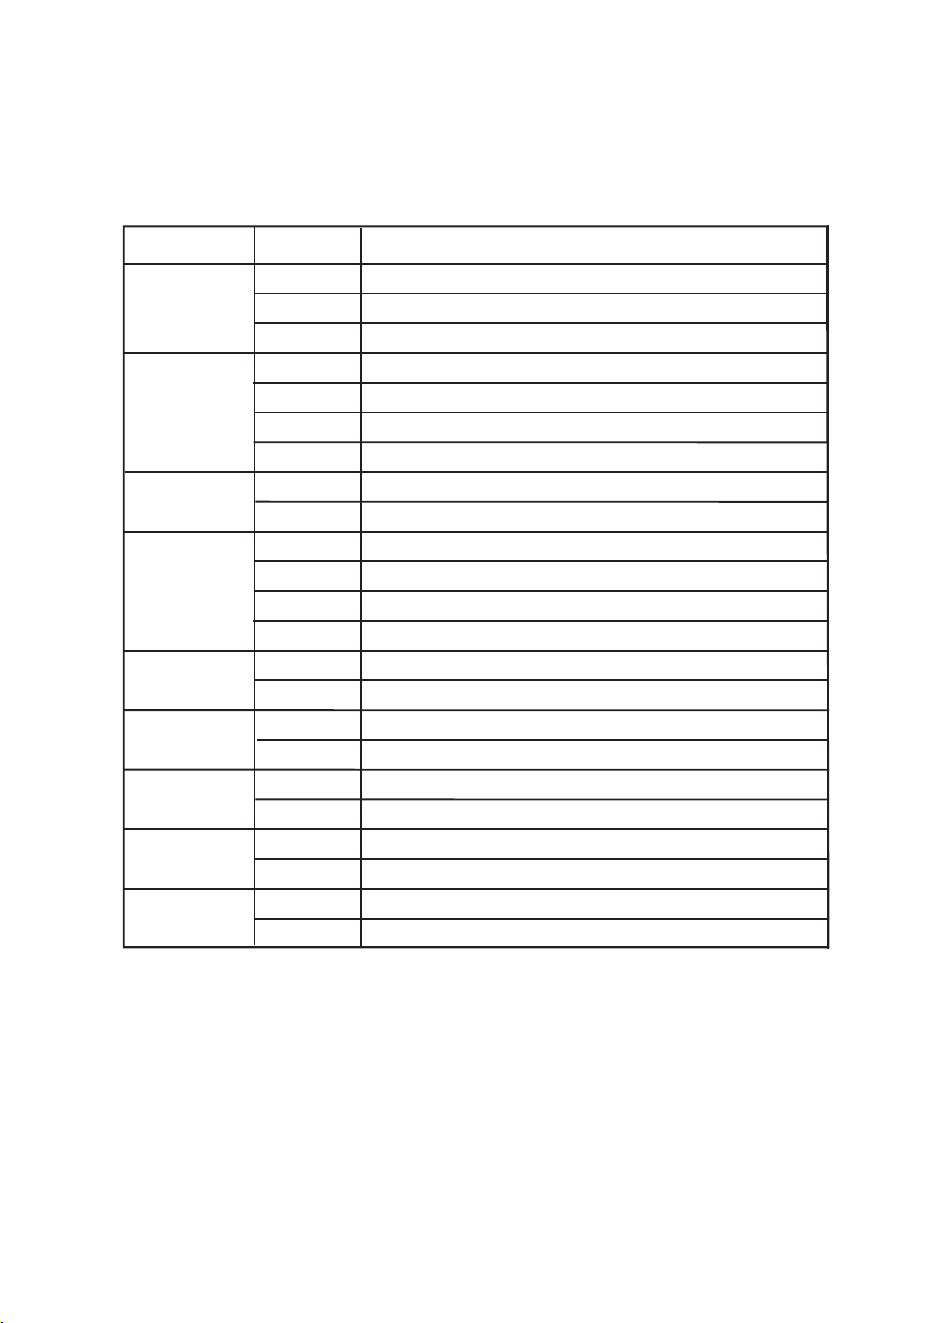
SETTING
OPTION
DESCRIPTION
1
End Of Cycle
Beep
2
Beep
Volume
3
Key Pad Beep
5
On the Fly
6
Door Reset
8
Programming
9
Double Digit
OP:11
OP:12
OP:20
OP:21
OP:23
OP:30
OP:40
OP:41
OP:43
OP:50
OP:61
OP:71
OP:80
OP:91
4
Display
Window
7
Max Time
Continuous beep until door opens
5 repeating beeps until door opens
No beep
Low Volume
High Volume
No beeping for key pad
15 seconds
30 seconds
2 minutes
On-the-Fly Disable
Door Reset Enabled
10 Minute Maximum Cook Time
Manual Programming Disabled
Double Digit Mode-100 programs
Program Settings
Enables beeping for the keypad
3 second beep
Medium Volume
1 minute
On the Fly Enabled
Door Reset Disabled
60 Minute Max. Cook Time
Manual Programming Enabled
Single Digit Mode - 10 Programs
OP:10
OP: 22
OP:31
OP:42
OP:51
OP:60
OP:70
OP:81
OP:90
Factory Settings in Bold
11

The start up display “------” will appear when the microwave is powered on for the first time.
The microwave will enter idle mode when the [Stop/Reset] button is pressed.
Note: In Idle Mode, no buttons can be pressed.
a. The microwave will automatically enter Idle Mode after a set period of inactivity (no
button presses or door activity) while in Ready Mode. The duration for this timeout can
be adjusted in User Option 4.
b. While in Idle Mode, the display will show “ECO”
c. Opening and closing the microwave door will exit Idle Mode and return the microwave
to Ready Mode.
a. In Ready Mode, the microwave is prepared to start either a manual or preset
cooking cycle.
b. Opening and closing the door while in Idle Mode will switch the microwave to
Ready Mode.
c. While in Ready Mode, the display will show “READY.”
d. From Ready Mode, the microwave can transition to most other modes.
a. When the door is open, the microwave enters Door Open Mode.
b. The display shows "DOOR OPEN," and the fan and light stay on.
c. If the door is closed and User Option OP:60 is selected during a cooking cycle, the
microwave will pause. Otherwise, it will return to Door Open Mode. With User
Option OP:61, opening and closing the door will clear the current cooking program.
d. When the door is opened during cooking, "DOOR OPEN" will briefly appear, then
the remaining cooking time will display.
2.
Idle Mode
3. Ready Mode
4. Door Open Mode
1. Start Up
12

a. Pause Mode allows users to temporarily stop the cooking cycle to inspect or stir the
food.
b. In Manual Cook Mode or Preset Program Cook Mode, the microwave will enter
Pause Mode if the door is opened and closed or if the [Stop/Reset] button is
pressed.
c. While paused, the display will show the remaining cooking time.
d. Pause Mode will return to Idle Mode based on User Option 4, similar to how
Ready Mode transitions. Pressing the [Stop/Reset] button will immediately return
the microwave to Ready Mode. Pressing the [Start] button will resume the cooking
cycle.
a. Manual Cook Mode allows you to cook food. Press the [Start] button in Manual
Cook Entry Mode to begin.
b. During cooking, the remaining time will be displayed, and the fan and microwave
light will turn on.
c. Once the cooking cycle is complete, the microwave will enter End of Cook Cycle
Mode. If the [Stop/Reset] button is pressed during cooking, the microwave will
switch to Pause Mode.
5. Pause Mode
6. Manual Cook Entry Mode
7. Manual Cook Mode
a. In Manual Cook Entry Mode, the user can manually enter a cooking time and
power level.
b. While in Ready Mode, press the "Time Entry" buttons to activate Manual Cook
Entry Mode.
c. The display will show "00:00"; input the desired cooking time.
d. Press any Power Button to select a power level. The display will show the
selected power setting. Press the same Power Button twice to set the
microwave to full power. If no power level is selected, full power will be the
default.
e. Once the settings are complete, press the [Start] button to begin cooking, or
press the [Stop/Reset] button to return to Ready Mode.
13

a. After the cooking time expires in Manual Cook Mode or Preset Program Cook
Mode, the microwave will enter End of Cook Cycle Mode.
b. During this mode, the display will show "DONE."
c. The microwave will behave as follows based on the selected User Option:
a. Preset Program Mode allows for cooking food items with a single key press. While
in Ready Mode, pressing one of the digit keys will start the associated Preset
Program.
b. During cooking, the display will show the remaining time. For multi-stage cooking,
the total remaining time will not reflect the time for each specific stage.
c. Once the cooking cycle is complete, the microwave will enter End of Cook Cycle
Mode. If the [Stop/Reset] button is pressed during this mode, the microwave will
switch to Pause Mode.
8. End of Cook Cycle Mode
9. Preset Program Cook Mode
10. On the Fly Cooking Mode
a. While the microwave is cooking, if User Option OP:51 is selected, pressing the
number buttons will automatically start the associated preset cooking program.
b. The display will show the remaining cooking time.
c. When the cooking program is complete, the microwave will enter End of Cook
Cycle Mode.
• User Option OP:11: The microwave will continue to sound until the user opens
and closes the door or presses the [Stop/Reset] button.
• User Option OP:12: The microwave will emit five quick beeps repeatedly until
the user opens and closes the door or presses the [Stop/Reset] button.
• User Option OP:10: After a three-second beep, the display will show "DONE"
followed by "READY." If there is no further interaction, the microwave will
eventually enter Idle Mode.
14

11. Programming Mode
This mode allows the user to assign cook times and power levels to the once-touch button.
a. Open the door and press and hold the "1" button for 5 seconds to enter
Programming Mode. The buzzer will sound, and "PROGRAM" will display.
b. Press any number from 0 to 9 to view the saved cooking time.
c. To change the cooking factor, press [X2] and adjust the factor (default is 80% or
"CF:08"). Press [Start] to save or skip if no change is needed.
d. Enter the desired cooking time using the number keys.
e. Press any Power Button to set the power level. Pressing the same button twice will
set the power to 100%. If no power level is selected, 100% will be the default.
Note: Set the time first, then choose the power level.
f. Press [Start] to save the cooking program. "PROGRAM" will display.
g. If the cooking time exceeds the maximum limit, pressing [Start] will cause the
buzzer to sound three times, and the time will remain unchanged.
h. Close the door to return to Ready Mode. If the [Stop/Reset] button is pressed
during setup, the microwave will enter Door Open Mode and any unsaved
programs will be lost. If a program is saved, pressing the corresponding number
button will start it. If no program is saved, the buzzer will sound and the microwave
will not respond.
Setting Program Example:
• Power level: 70%
• Cooking time: 1 minute and 25 seconds
Step 1: Open the door, press the number button "1" for 5 seconds. "PROGRAM" will
display.
Step 2: Press the number button "3"; the display will show "P:03." After two seconds,
it will show the related time ":30."
Step 3: Press the number buttons "1", "2", then "5" to input the cooking time.
Step 4: Press the [Med-Hi 70%] button; the display will show "1:25 70" indicating the
setting is complete.
Step 5: Press the [Start] button to save. Next time you use the program, just press
"3" and the related program will start.
• If there is a power interruption, the saved program will not be lost.
• To reset the program, simply repeat the above steps.
• If [Stop/Reset] button is pressed at the last step, the microwave will return to
Door Open Mode, and the settings will be invalid.
Note:
15

13. Stage Cooking Programming
This feature allows users to cook food items in both Manual Cook Mode and
Programming Mode.
1. Up to three stages can be set in either mode. After setting the power and time for the
first stage, press [Time Entry] to set the second stage, and repeat the process for the
third stage.
2. While setting the second and third stages, pressing [Time Entry] will display "STAGE-2"
and "STAGE-3," respectively.
3. Press the
[Start] button to begin cooking.
Example: In Programming Mode, to set two cooking stages:
- The first stage is 70% power for 1 minute and 25 seconds
- The second stage is 50% power for 5 minutes and 40 seconds
12. Double Quantity Cooking
The user can easily double the cooking time for a specific food item by pressing the [X2]
button.
a. Pressing the [X2] button in Ready Mode before starting a Preset Program, or within 5
seconds of starting, will double the preset cooking time.
b. Pressing [X2] will display "DOUBLE." When you press a number button, the screen will
show the doubled preset time.
Example: If pressing "5" starts a preset time of 1 minute, pressing [X2] will change it to
1:48 (1 minute + 80%).
c. When the cooking program is complete, the microwave will enter End of Cook Cycle
Mode
.
a. Open the door and press the number button “1” for 5 seconds; “PROGRAM” will display.
b. Press the number button “3”; the screen will show “P:03.” After two seconds, the display
will show the related time ":30."
c. Press "1", "2", then "5" to input the cooking time; "1:25" will display.
d. Press [Med-Hi 70%]; the display will show "1:25 70."
e. Press [Time Entry]; "STAGE-2" will display.
f. Press "5", "4", then "0"; "5:40" will display.
g. Press [Medium 50%]; the display will show "5:40 50," indicating the second stage is set.
h. Press the [Start] button to save the program.
Steps:
16

14. User Option Mode
This mode allows the user to select different operational settings for the microwave.
a. Open the microwave door and press and hold the "2" button for 5 seconds. The buzzer
will sound once, indicating entry into User Option Mode.
b. The screen will display "OP: - -"
c. Press any number button to access the corresponding mode setting.
Example: To set the buzzer volume to medium, press "2" and "OP:22" will display. If
you want to adjust it further, continue pressing "2"; the screen will cycle through
"OP:20," "OP:21," "OP:22," "OP:23," and back to "OP:20."
d. Press the [Start] button to save the current setting. After saving, "OP: - -" will display
again.
e. During the setting process, pressing the [Stop/Reset] button will exit to Door Open
Mode. Closing the door will return the microwave to Ready Mode.
f. If the [Start] button is not pressed, the program will not be saved, and the microwave
will revert to the previous setting.
15. Factory-Default Setting
In Ready Mode, press the [Start] button followed by "0" to restore factory-default settings.
1. Press the [Start] button
, then press "0." The buzzer will sound once.
• If the microwave is in factory-default settings: The screen will display "CHECK,"
followed by "11" after three seconds, indicating the microwave has returned to Ready
Mode.
• If it is not in factory-default settings: The screen will show "00" Pressing the [Start]
button will initiate the factory-default setting, and the display will show "CLEAR." The
buzzer will sound once, and after self-testing, the screen will display either "11" or "00".
2. If the [Start] button is not pressed when "00" is displayed, the reset will be canceled after
10 seconds.
Note: Use caution when operating this function, as it will restore all settings to their factory
defaults.
17

1. Cleaning the Glass Viewing Window, Inner Door Panel, and Front Face
To ensure optimal performance and safety, keep the inner door panel and
microwave front face free of food and grease buildup. Wipe these surfaces with a
mild detergent, then rinse and dry. Avoid using abrasive powders or pads.
2. Cleaning the Control Panel and Plastic Parts
Do not apply detergent or alkaline liquid sprays to the control panel and plastic
components, as this may cause damage. Instead, use a dry cloth (not soaked) to
clean these areas.
3. Cleaning the Microwave's Interior
After use, promptly clean up any spilled liquids, oil splatters, and food debris. Using
the microwave while dirty can reduce efficiency and cause odors. Clean the interior
with a cloth soaked in lukewarm water mixed with mild detergent, then rinse with a
damp cloth to remove any soap residue.
4. Cleaning the Splash Shield Cover
Regularly check and clear the oil blockage to prevent stains from dripping onto food.
5. Cleaning the Filter
Keep the filter clear by cleaning it regularly. A blocked filter can cause the appliance
to overheat.
6. Correct Installation of Splash Shield Cover and Filter
Ensure the splash shield cover and filter are properly positioned during operation to
avoid damaging other components.
CAUTION: Avoid using bleach, thinners, or other harsh cleaning agents on the plastic
and painted sections of the microwave, as these substances may cause damage or
alter the surface.
MAINTENANCE
Cleaning Instructions
Always keep the microwave clean
18
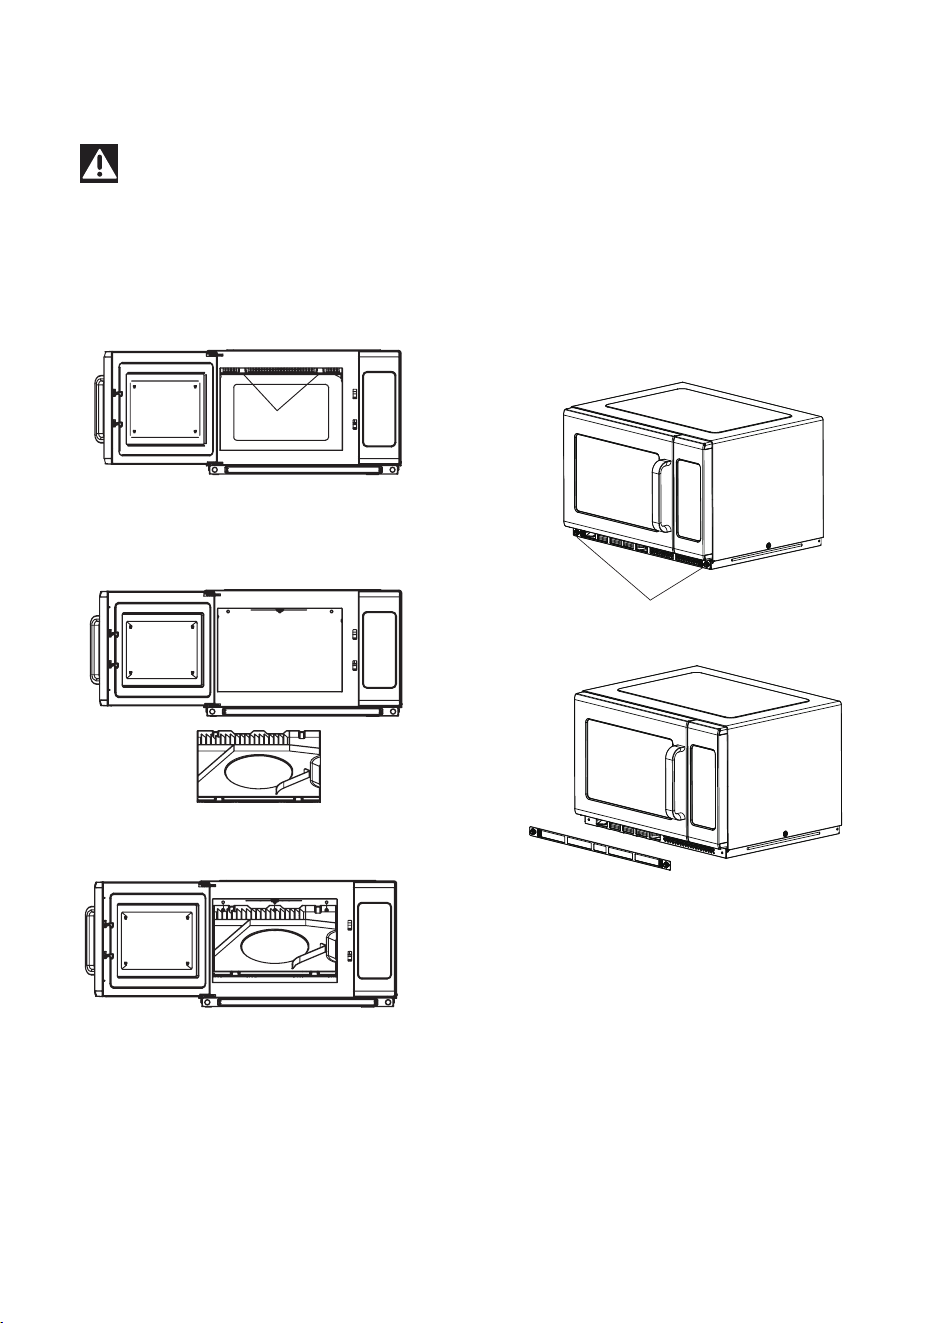
Press here
1. Press on the clips and pull
down to remove the splash shield
2. Wipe off any grease or food residue.
3. Align the splash shield back in its
original position and snap it back
into place by pressing upward.
Warning: Before removing or installing the splash shield cover and filter, make sure
the appliance is unplugged to prevent electric shock and avoid burns from high
temperatures.
How to Clean the Splash Shield Cover:
2. Clean the filter, then reinstall it.
1. Remove the screws to detach the filter.
How to Clean the Filter:
19

TROUBLE
Microwave will not
start
POSSIBLE CAUSE POSSIBLE REMEDY
a. Electrical cord for microwave
is not plugged in.
b. Door is open.
c. Wrong operation is set.
a. Plug into the outlet.
b. Close the door and try again.
c. Check instructions.
Arcing or sparking
a. Materials to be avoided in
microwave were used.
b. The microwave is operated
when empty.
c. Spilled food remains in the
cavity.
a. Use microwave-safe
cookware only.
b. Do NOT operate while
empty.
c. Clean cavity with wet towel.
Unevenly cooked
foods
a. Use microwave-safe
cookware only.
b. Completely defrost food.
c. Use correct cooking time,
power level.
d. Turn or stir food.
Overcooked foods
Cooking time, power level is
not suitable.
Use correct cooking time,
power level.
Undercooked foods
a. Materials not suitable for
microwave use were used.
b. Food is not defrosted
completely.
c. The ventilation ports are
restricted.
d. Cooking time, power level is
not suitable.
a. Use microwave-safe
cookware only.
b. Completely defrost food.
c. Check to see that the
ventilation ports are not
restricted.
d. Use correct cooking time,
power level.
Improper defrosting
a. Materials not suitable for
microwave use were used.
b. Cooking time, power level is
not suitable.
c. Food is not turned or stirred.
a. Use microwave-safe
cookware only.
b. Use correct cooking time,
power level.
c. Turn or stir food.
TROUBLESHOOTING
Refer to the chart below to identify your issue and try the suggested solutions. If the
microwave continues to malfunction, please contact our service technicians.
a. Materials to be avoided in
microwave were used.
b. Food is not defrosted
completely.
c. Cooking time, power level is
not suitable.
d. Food is not turned or stirred.
If you have checked the table above and find that you still need help with your appliance, call
our Customer Service facility at 800-932-4267 (Ext. 513) between 9:00 AM and 5:00 PM ET or
visit www.summitappliance.com/support. We will do our best to answer your questions.
20

NOTES
21

WARNING:
This product
can expose you to chemicals
including Nickel (Metallic)
which is known to the State of California to cause cancer.
For
more information go to www.P65Warnings.ca.gov
Note: Nickel is a component in all stainless steel and some other metallic compositions.
LIMITED
WARRANTY
For parts and accessory ordering,
troubleshooting and helpful hints, visit:
www.summitappliance.com/support
Summit Appliance
Division of Felix Storch, Inc.
An ISO 9001:2015 registered company
770 Garrison Avenue
Bronx, NY 10474
www.summitappliance.com
22
90-DAY LIMITED WARRANTY
Within the 48 contiguous United States, for 90 days from the date of purchase, when this appliance is
operated and maintained according to instructions attached to or furnished with the product, warrantor will pay
for factory-specified parts and repair labor to correct defects in materials or workmanship. Service must be
provided by a designated service company. Outside the 48 states, all parts are warranted for 90 days from
manufacturing defects. Plastic parts, shelves and cabinets are warranted to be manufactured to
commercially acceptable standards, and are not covered from damage during handling or breakage.
ITEMS WARRANTOR WILL NOT PAY FOR:
1. Service calls to correct the installation of your appliance,
to instruct you on how to use your appliance,
to replace or repair fuses or to correct wiring or plumbing.
2. Service calls to repair or replace appliance light bulbs or broken shelves. Consumable parts (such as
filters) are excluded from warranty coverage.
3. Damage resulting from accident, alteration, misuse, abuse, fire, flood, acts of God, improper
installation, installation not in accordance with electrical or plumbing codes, or use of products not
approved by warrantor.
4. Replacement parts or repair labor costs for units operated outside the United States.
5. Repairs to parts or systems resulting
from unauthorized modifications made to the appliance.
6. The removal and reinstallation of your appliance if it is installed in an inaccessible location or is not
installed in accordance with published installation instructions.
DISCLAIMER OF IMPLIED WARRANTIES; LIMITATION OF REMEDIES
CUSTOMER'S SOLE AND EXCLUSIVE REMEDY UNDER THIS LIMITED WARRANTY SHALL BE
PRODUCT REPAIR AS PROVIDED HEREIN. IMPLIED WARRANTIES, INCLUDING WARRANTIES OF
MERCHANTABILITY OR FITNESS FOR A PARTICULAR PURPOSE, ARE LIMITED TO 90
DAYS. WARRANTOR SHALL NOT BE LIABLE FOR INCIDENTAL OR CONSEQUENTIAL
DAMAGES. SOME STATES DO NOT ALLOW THE EXCLUSION OR LIMITATION OF INCIDENTAL
OR CONSEQUENTIAL DAMAGES, OR LIMITATIONS ON THE DURATION OF IMPLIED
WARRANTIES OF MERCHANTABILITY OR FITNESS, SO THESE EXCLUSIONS OR LIMITATIONS
MAY NOT APPLY TO YOU. THIS WARRANTY GIVES YOU SPECIFIC LEGAL RIGHTS AND YOU
MAY ALSO HAVE OTHER RIGHTS, WHICH VARY FROM STATE TO STATE.
Revised: 2025-06-23
Printed in China