
PROLO RING USER MANUAL
COVER PAGE
Prolo Ring
The All-in-One Ring Mouse Controller
1. OVERVIEW
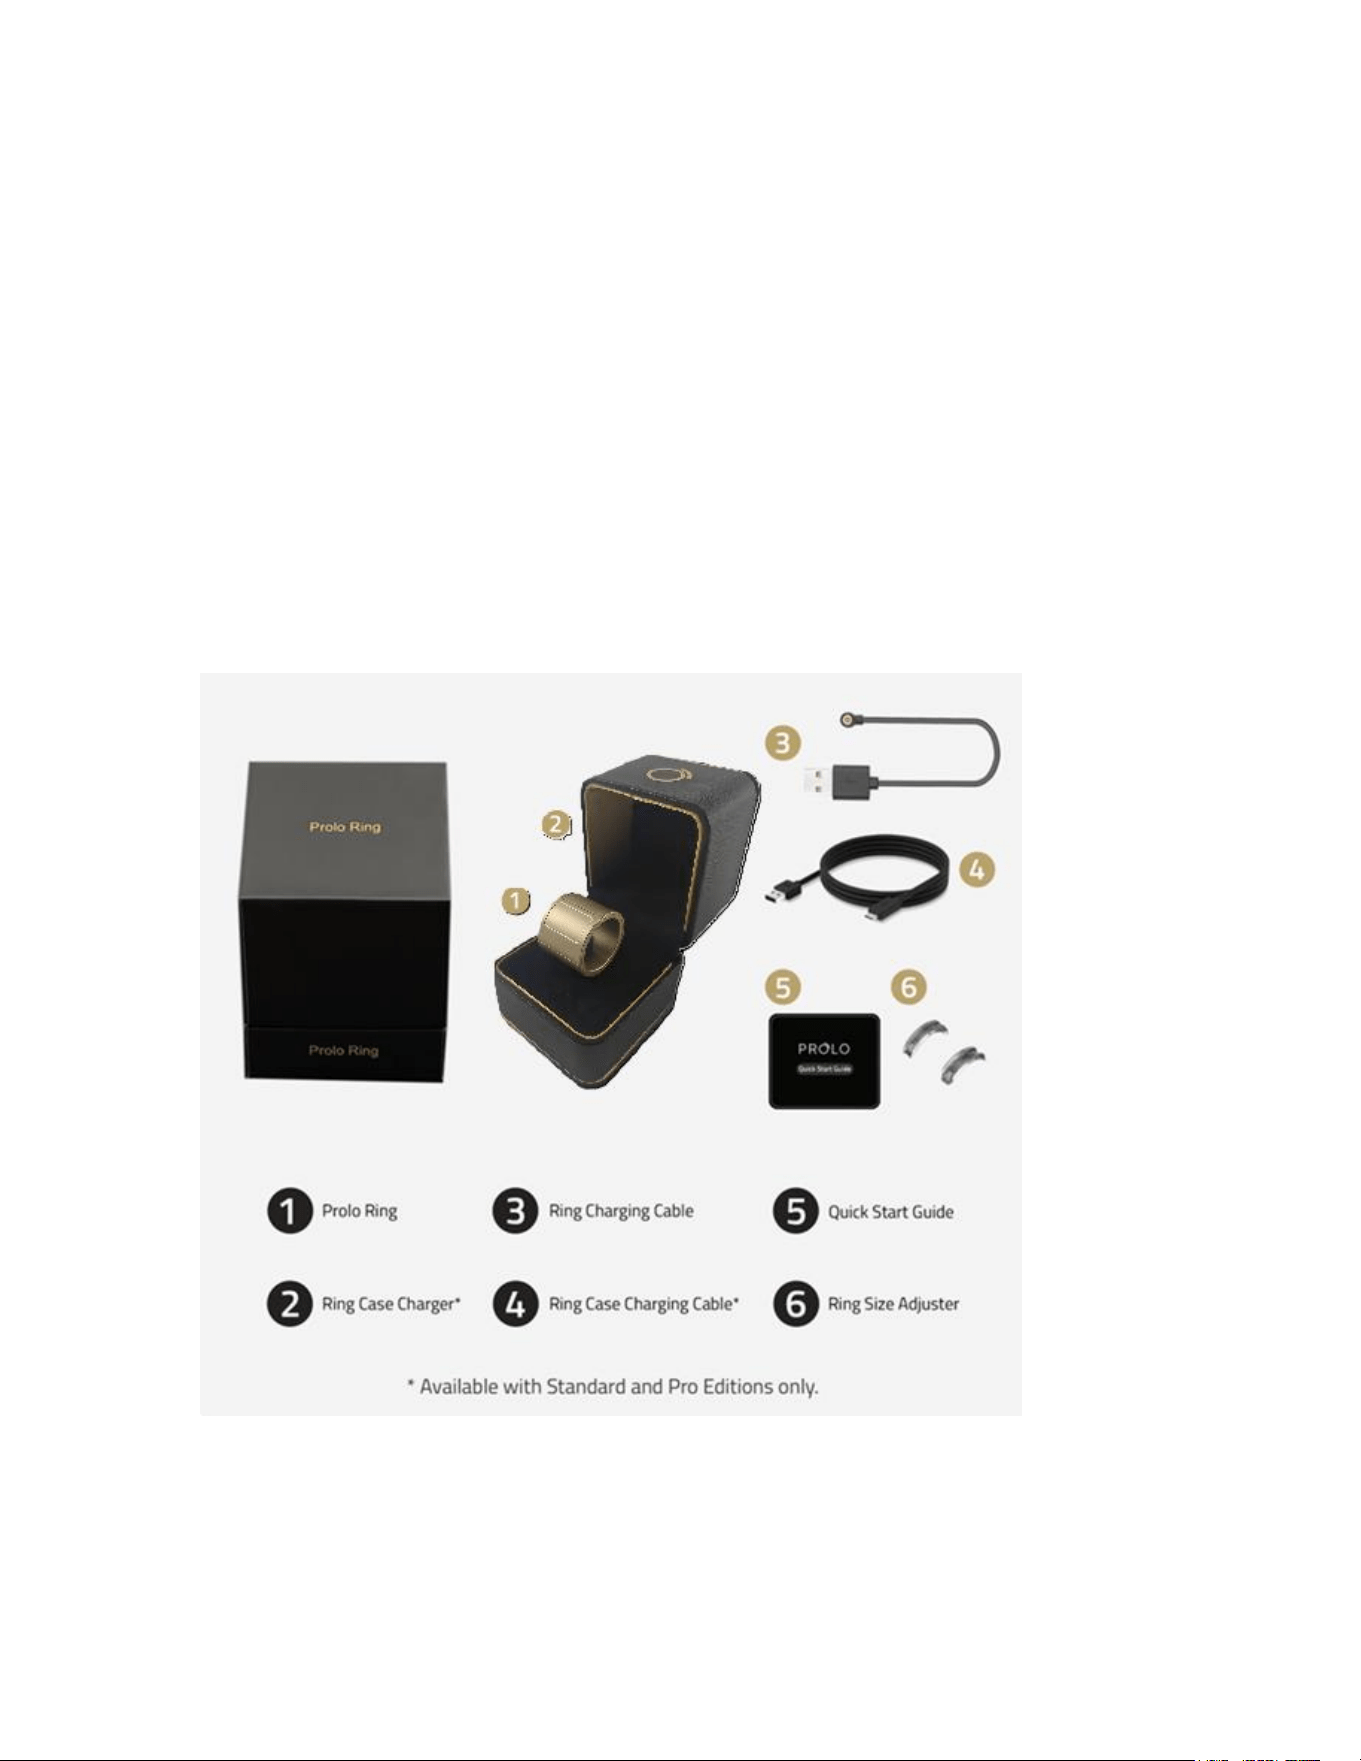
Inside the Box
• Prolo Ring
• Ring Charging Cable
• Quick Start Guide
• Ring Sizing Adjuster
• Ring Case Charger*
• Ring Case Charging Cable*
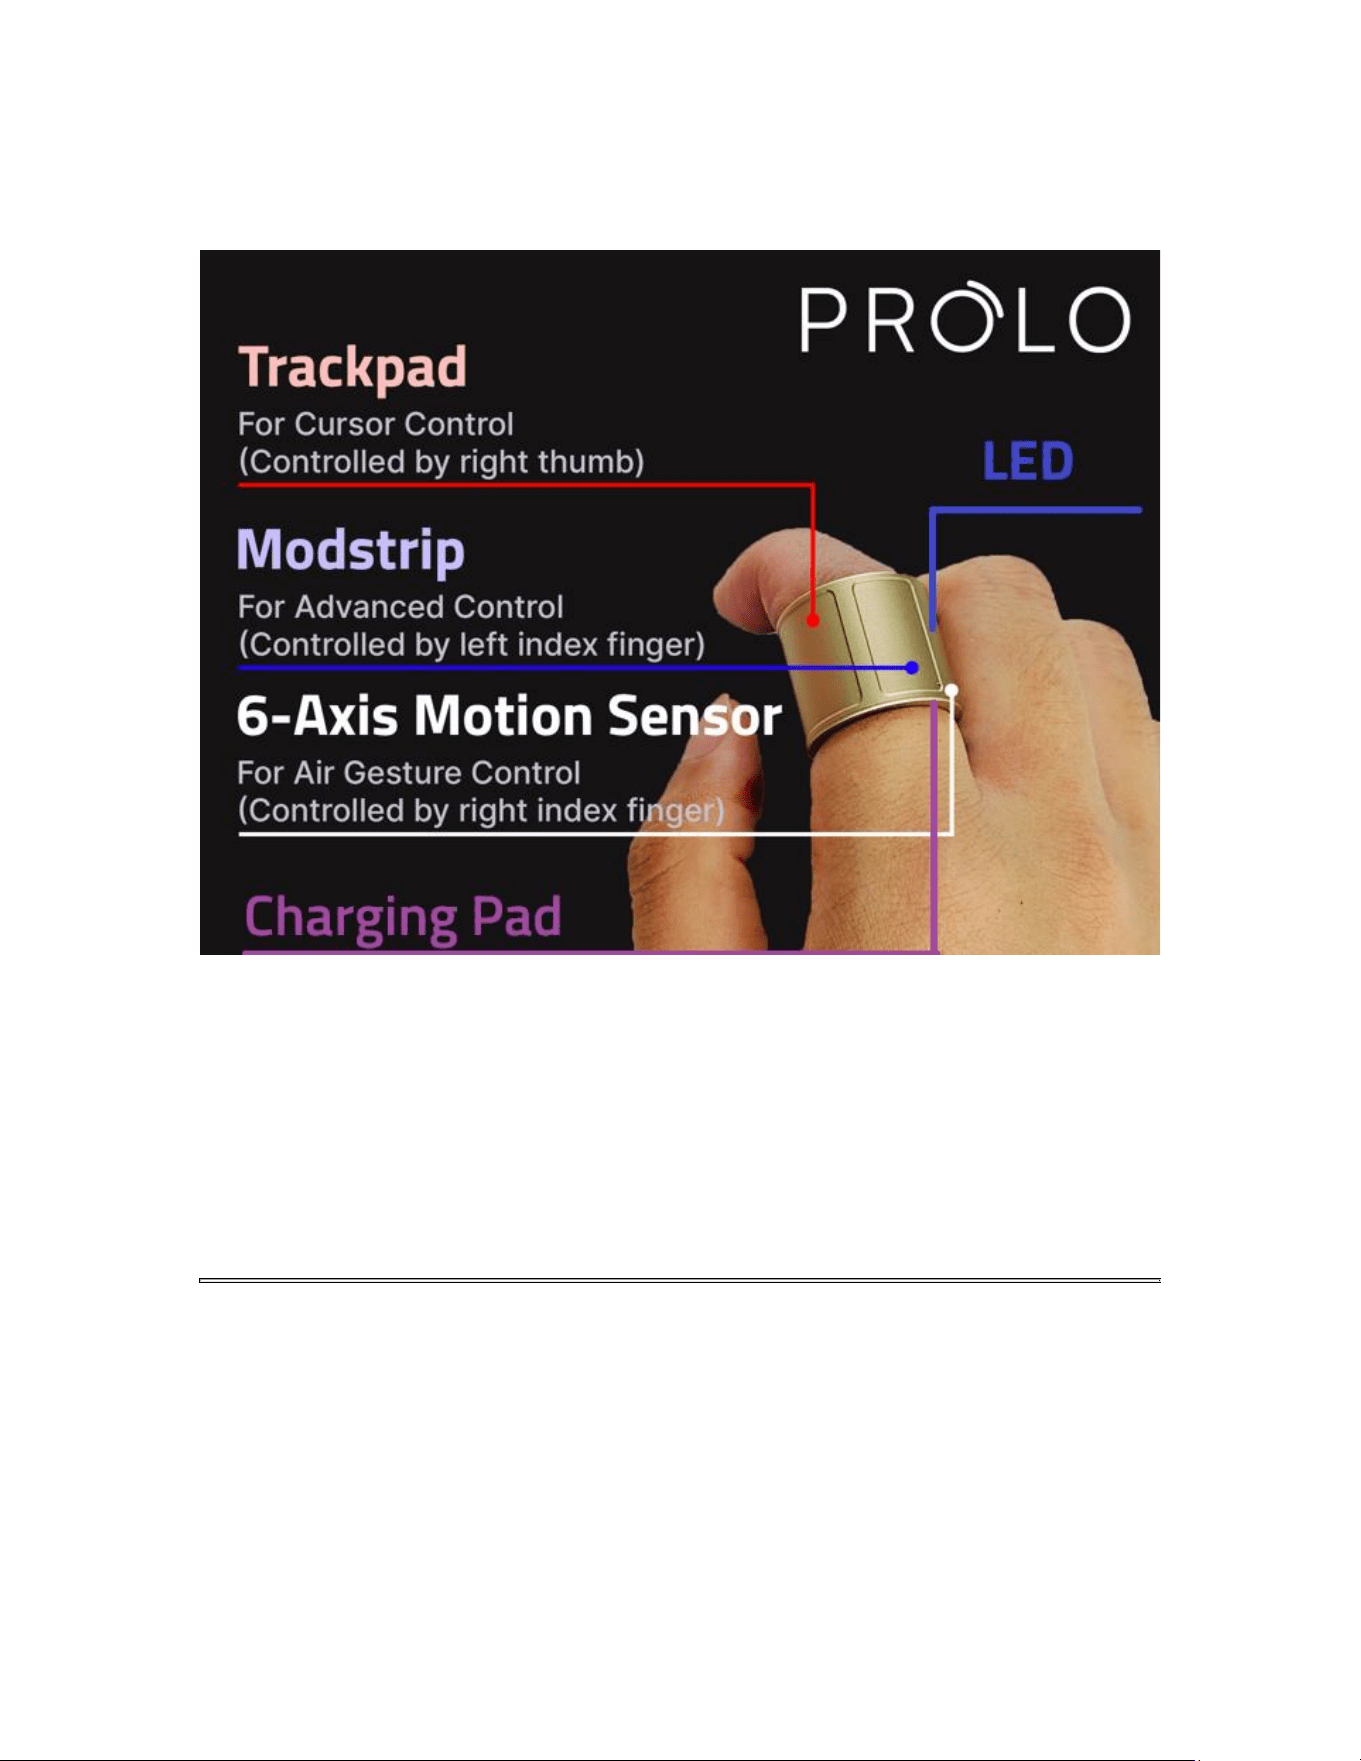
Device Overview
1. Trackpad Zone – Thumb surface for cursor and click control.
2. Modstrip – Top touch strip for mode switching and shortcuts.
3. 6-Axis Motion Sensor – Enables Air Mode motion gestures.
4. LED Indicator – Displays power, Bluetooth, and mode status.
5. Charging Pads – Magnetic connectors for charging (inside).
2. QUICK SETUP
1. Before First Use
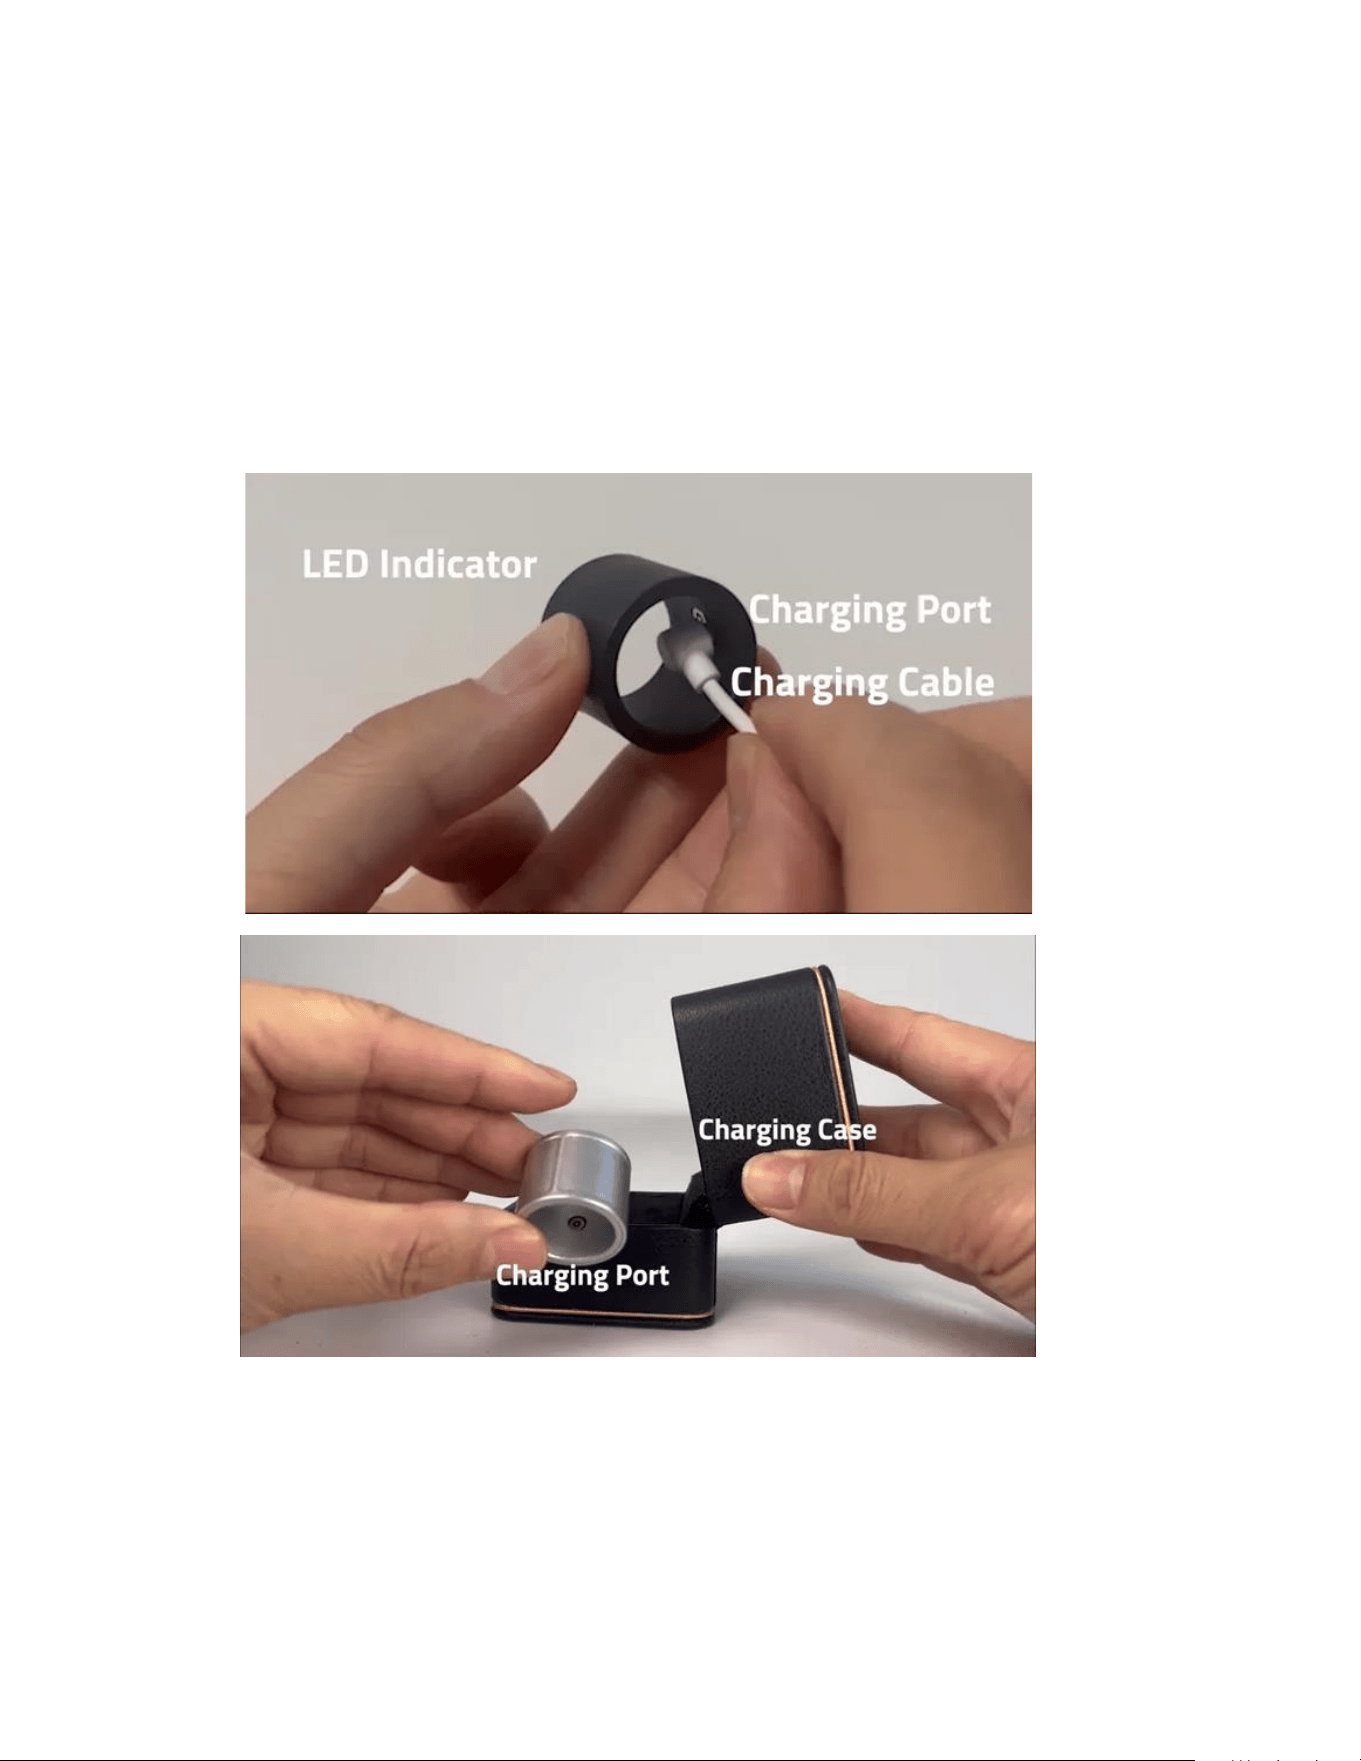
Charge the Prolo Ring fully before first use. Charge using either the Ring
Charging Cable or the Ring Case Charger.
The magnetic pins auto-align, and the LED indicator lights up to confirm
charging and show battery status.
Slow white breathing (up to 20 seconds) = Charging | Solid white = Full
charge
2. Wear the Ring
Remove the ring from the charger. Place on your right or left index finger,
whichever feels more natural. Make sure the trackpad is facing the thumb at the
bottom, and the Modstrip is on top.
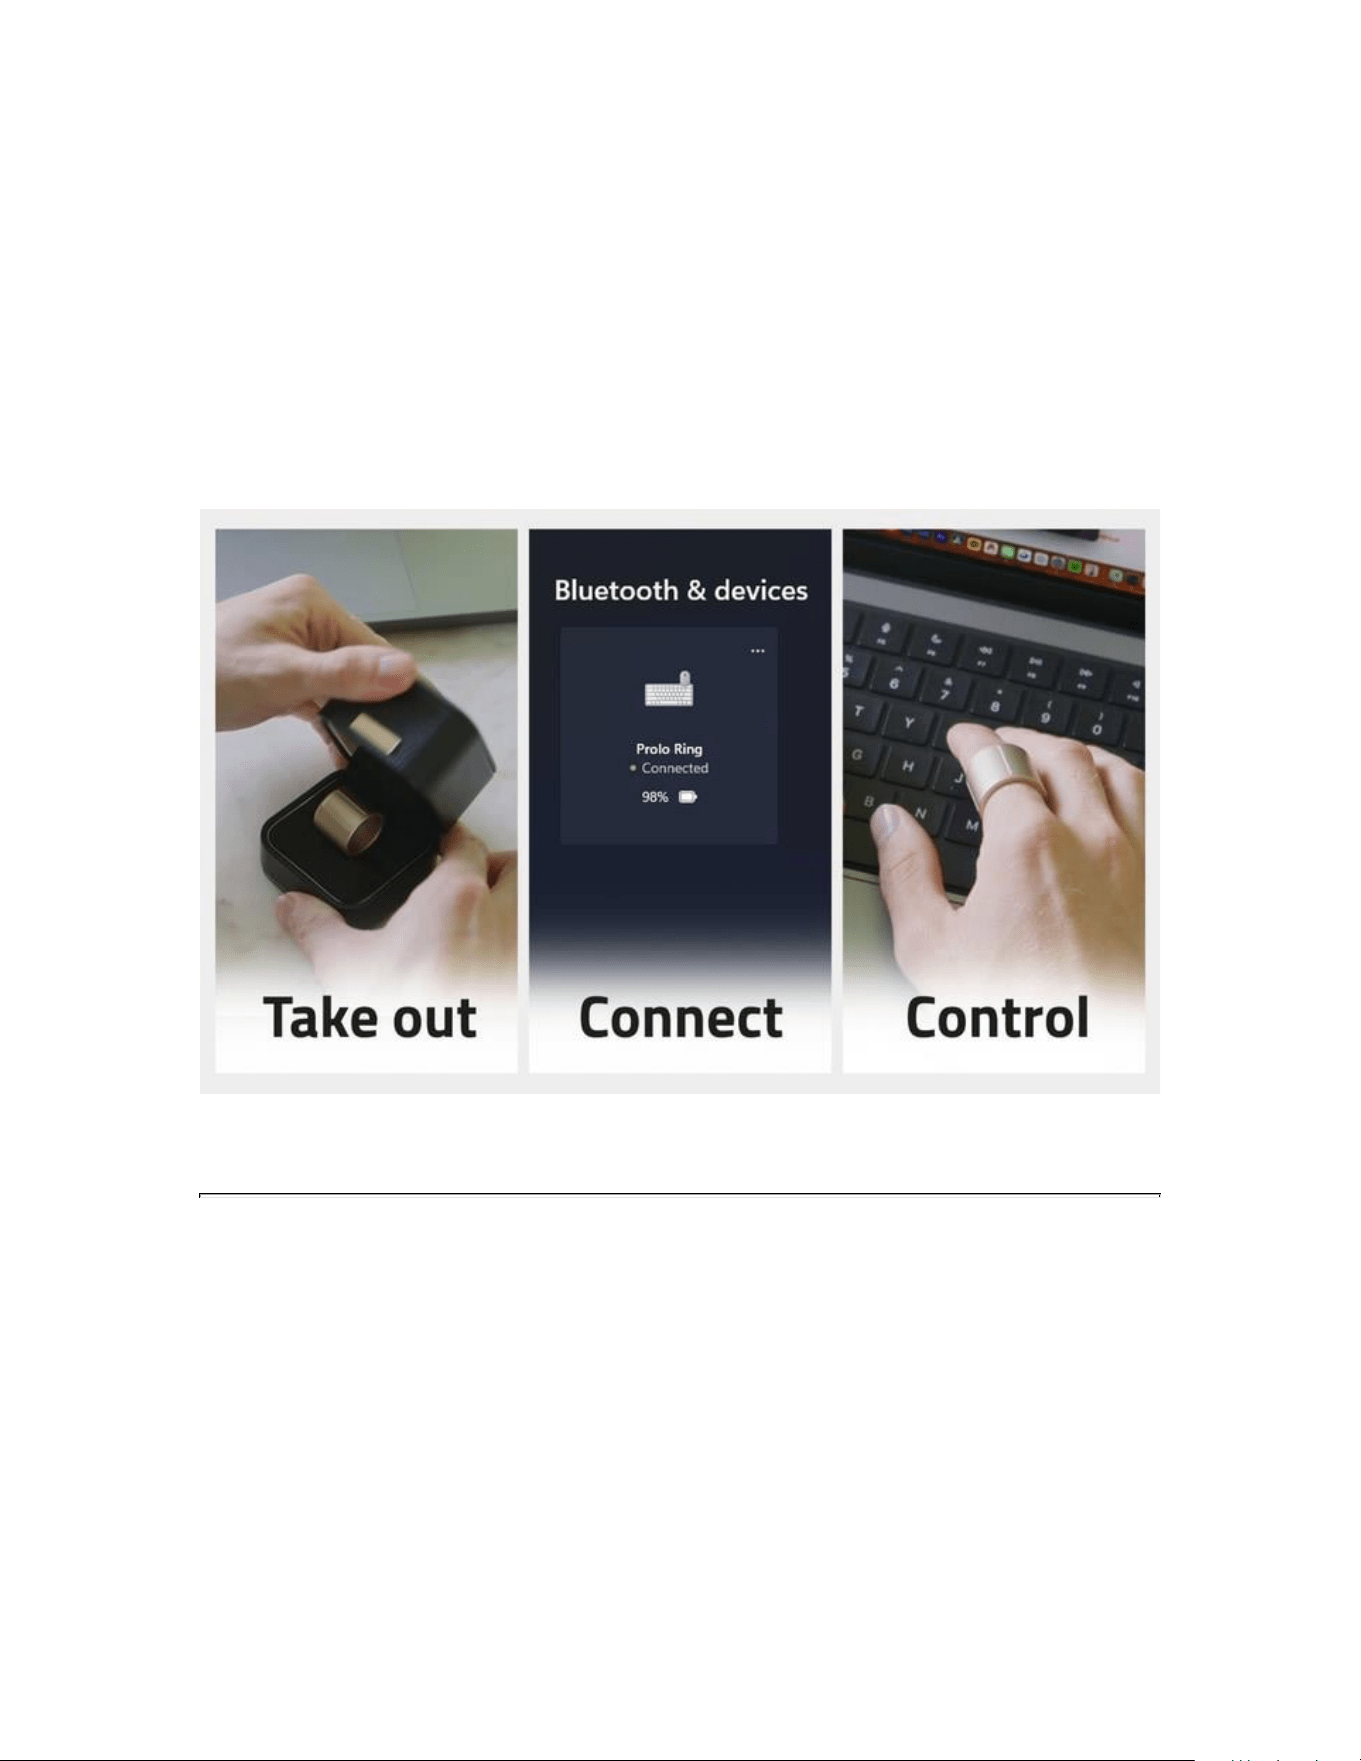
3. Automatic Power-On
The ring powers on automatically when removed from the charger — no button
needed.
4. Pair via Bluetooth
Open Bluetooth Settings on your device and select “Prolo Ring.”
3 LEDs Solid for ~2 seconds = connected.
5. Start Controlling
Prolo Ring starts with the cursor mode or the last functional mode.
3. MODES AND GESTURES
Prolo features three control MODES: Cursor Mode, Touch Mode, and Air Mode.
Each mode includes two gesture sets: Standard (default) and Modified (for
advanced or macro actions). The modes and gesture sets are
selected/toggled using Modstrip and Trackpad.
Quick Mode Reference
Mode
Set Name
Use
How to Enter
Cursor
Standard
Mouse & Cursor control
Swipe Left on Modstrip
Modified (Navigation)
Navigation & zoom
Swipe Right on Modstrip
Touch
Standard
Media & shortcut control
Swipe Right + Hold Modstrip
Modified (ModTouch)
Macro layer
Hold Modstrip in Touch Mode
Air
Standard
Motion control
Swipe Left + Hold Modstrip
Modified (AirTouch)
AirTouch layer
Hold Trackpad in Air Mode
Cursor Mode
Standard Gestures — Cursor and scrolling.
Move
Move cursor
Move + Mod Hold
Precision cursor move
Single Tap
Left click
Dual-Finger Tap
Double click
Long Hold
Right click
Mod Hold + Trackpad Move
Click-and-drag while holding Modstrip
Modifier Set — Advanced navigation and scrolling.
Swipe Up
Page up
Swipe Down
Page down
Swipe Right
Navigate right
Swipe Left
Navigate left
Dual-Finger Up
Vertical Scroll Up
Dual-Finger Down
Vertical Scroll Down

Dual-Finger Right
Pan Right
Dual-Finger Left
Pan Left
Dual-Finger Pinch In
Zoom out
Dual-Finger Pinch Out
Zoom in
Touch Mode
Standard Set — Quick control for media.
Swipe Up
Volume up
Swipe Down
Volume down
Swipe Right
Next track
Swipe Left
Previous track
Tap
Play / Pause
Double Tap
Mute
Triple Tap
Customizable*
Mod Hold + Swipe Right
Fast Forward
Mod Hold + Swipe Left
Rewind
Modified Set — Perform while holding the Modstrip.
Mod Hold + Swipe Up / Down
Customizable*
Mod Hold + Tap / Double Tap / Triple Tap
Customizable*
Air Mode
Standard Set — Control without touching any surface.
Swipe Left / Right
Customizable*
Air Click
Customizable*
Air Double-Click
Customizable
Modified Set — Hold the Trackpad while in Air Mode.
Hold + Swipe Left / Right
Customizable*
Hold + Air Click
Customizable*
Hold + Air Double-Click
Customizable

Air Gesture Trigger (Pro Edition)
Air gestures are available on Pro Edition only.
How to trigger Air Gestures
1. Tilt your finger so the charging port is at the bottom of the ring.
2. When the ring detects the correct orientation, the 3 LEDs turn on (●●●) to
indicate Air-Ready.
3. While Air-Ready is on, perform an air gesture with strong acceleration and
deceleration (a quick, deliberate motion).
4. When an air gesture is recognized, the 3 LEDs flicker briefly to confirm the
gesture was triggered.
5. Supported air gestures:
o Air-swipe left
o Air-swipe right
o Air click (single click)
o Air double-click
6. Left-hand use: enable Left-Handed Settings in Prolo Studio to use air
gestures on the left hand.
Tip: If the 3 LEDs do not turn on, adjust the tilt angle until the charging port points
down more clearly.
System & Mode Switch Action
Use Modstrip to trigger the following system actions.
Swipe Left
Enter Cursor Mode (Standard)
Swipe Right
Enter Navigation Set (Cursor Modified)
Swipe Right & Hold
Enter Touch Mode
Swipe Left & Hold
Enter Air Mode
1x Tap + Press & Hold
Connect / Switch / Unlock
2x Tap + Press & Hold
Enter Pairing to Add a New Device
3x Tap + Press & Hold
Toggle Device Status → App Status
4x Tap + Press & Hold
Shutdown (Requires Charging to Wake Up)

5x Tap + Press & Hold
Reset to Factory Default
Palm Hold
Lock (Requires Unlock Gesture or Charging to Unlock)
Palm Hold is a natural gesture for moments when you’re taking off the ring—or
when you want to quickly lock it to prevent accidental inputs for a short time.
To unlock, simply single tap + press-and-hold on the ModStrip, or place the ring
back onto the charger. When locked, 1x Tap + Press & Hold performs Unlock only
(no device switching).
For longer breaks, we recommend removing the ring and storing it on the charger.
Note: Customizable gestures are available only with Pro Edition and above.

4. BUILT-IN FUNCTIONS
These core functions work instantly after pairing — no app required.
Works across all major systems (Windows, macOS, Android, iOS, Linux).
Cursor Control
• Move Cursor
• Left / Right / Middle Click
• Click-and-Drag / Drag-and-Drop
Navigation
• Page Up / Down
• Scroll Up / Down
• Arrow Left / Right
• Pan Left / Right
• Pinch In / Out (Zoom)
Media Control
• Camera Shutter
• Volume Up / Down
• Next / Previous Track
• Fast Forward / Rewind
• Play / Pause
• Mute

5. SYSTEM COMMANDS
The Prolo Ring uses standard Bluetooth HID and does not require any drivers or
software for basic operation.
Automated First-Time Pairing
1. Remove the ring from the charger or touch the trackpad to wake it.
2. Open Bluetooth Settings on your device and search for:
“Prolo Ring”
3. Select it to connect.
LED Behavior
• Slow triple-blink = Ring is in pairing / advertising mode (discoverable)
• Connecting chase (1→2→3 sweep repeating) = Ring is trying to connect /
switching hosts
• Solid 3 LEDs for 2 seconds (●●●) then off = Successfully connected
System Commands on the Modstrip (Tap + Hold)
System commands are performed on the Modstrip.
Tap Preview (Bar Pattern)
• With each tap, the LED bar grows: 1 → 2 → 3
• For 4–5 taps, the bar wraps but becomes more obvious:
o 4 taps = 1-bar noticeably brighter
o 5 taps = 2-bar noticeably brighter
When the tap count is reached, press & hold the Modstrip to execute the command.
Success & Abort Rules
• Success confirmation: all 3 LEDs fast triple-strobe (3x)
• Abort conditions:
o Any touchpad touch cancels the pending command
o No press-and-hold detected within 2 seconds from the last tap
• Abort indication: Down-sweep (3→2→1), then off

1x Tap + Press & Hold – Connect / Switch / Unlock
This is your main Bluetooth control gesture.
Gesture:
• 1 tap + press & hold on the Modstrip
Behavior:
• If the ring is not connected
o The ring will try to reconnect to the last used host (A).
o If it cannot connect after a short search, it stops.
• If the ring is already connected to a host (A)
o The ring will auto-search and switch to the next remembered device
(B, C, …) and try to connect.
o If no other device responds, it reverts to A.
• If you repeat the gesture within 10 seconds of the last connect attempt
o The ring enters auto-search and switch mode, cycling through other
remembered devices in order.
o when a connection succeeds:
▪ LED: 3 LEDs solid for ~2 seconds to confirm the new host.
LED during operation:
• Tap preview: 1-bar
• While searching/connecting: Connecting chase (1→2→3 sweep repeating)
• On success: 3 fast-strobes (all LEDs) + 3 LEDs solid ~2s
Tip: The ring remembers multiple bonded hosts (e.g., laptop, tablet, phone) and lets
you roam between them using just this one gesture.

2x Tap + Press & Hold – Add a New Device (Pairing)
Use this when you want to pair the ring with a new host (e.g., a new laptop or
phone).
Gesture:
• 2 taps + press & hold on the Modstrip
LED:
• Tap preview: 2-bar
• While waiting: slow triple-blink (pairing)
• On success: 3 fast-strobes (all LEDs) + 3 LEDs solid ~2s
Behavior:
• Puts the ring into pairing / advertising mode so new devices can discover it.
• LED: pairing pattern (slow triple-blink) while it waits for a new connection.
Important:
Before adding a new device, please disable Bluetooth or disconnect the ring from
any devices it’s already paired and connected to.
This prevents existing hosts from “stealing” the connection while you are trying to
pair a new one.
Then, on the new device:
1. Open Bluetooth Settings
2. Select “Prolo Ring”
3. Wait for the LEDs to show 3 solid bars for ~2 seconds to confirm pairing.
The ring stores up to 3-5 previously paired devices depending on the edition.
3x Tap + Press & Hold – Toggle Device Status / App Status
Use this when switching between standalone HID device status and Prolo Studio
App Status.
Gesture:
• 3 taps + press & hold on the Modstrip
Behavior:

Toggles between:
• Device Status – default, plug-and-play Bluetooth HID (no software required)
o LED: 3 LEDs ramp down (max → min), then reboot indication
• App Status – connects to Prolo Studio for advanced customization, macros,
and profiles
o LED: 3 LEDs ramp up (min → max), then reboot indication
o The broadcast name becomes “Prolo App Ring” (not shown as a
standard HID device)
LED:
• Tap preview: 3-bar
• On success: 3 fast-strobes (all LEDs), then ramp up/down + reboot
animation
4x Tap + Press & Hold – Shutdown (Requires Charging to Wake Up)
Use this to fully power off the ring for storage, long time travel, or to recover from
unusual behavior.
Gesture:
• 4 taps + press & hold on the Modstrip
Behavior:
• Powers the ring completely off (not sleep mode)
• The ring will stop advertising over Bluetooth and will not respond to
gestures
• Charging is required to wake it up
o Attach the magnetic charging cable or place it in the case charger to
turn it back on
Notes:
• Shutdown is useful when you want to prevent accidental inputs in a
bag/pocket
• If the ring becomes unresponsive, try Shutdown, then reconnect power to
restart cleanly

LED:
• Tap preview: 1-bar noticeably brighter
• On success: 3 fast-strobes (all LEDs), then a short shutdown sweep, then
off
5x Tap + Press & Hold – Reset & Clear All Bonds
Use this as a factory-style reset for Bluetooth and settings.
Gesture:
• 5 taps + press & hold on the Modstrip
Behavior:
• Clears all Bluetooth pairings (bonds) from the ring
• Resets settings to default (including profiles stored on the ring)
• Automatically enters pairing mode so you can set it up again
After reset:
1. Open Bluetooth settings on your main device
2. Pair again with “Prolo Ring”
3. Reconfigure Prolo Studio if needed
LED:
• Tap preview: 2-bar noticeably brighter
• On success: 3 fast-strobes (all LEDs), reset sweep, then slow triple-blink
(pairing)
Palm Lock (Quick Lock / Temporary Input Block)
Use this to temporarily prevent accidental inputs while the ring stays powered on.
Gesture:
• Palm Hold (place your palm against the touch surface and hold)
Behavior:
• Locks input (no cursor/gesture output) until unlocked
• Useful when adjusting the ring, taking it off briefly, or when you expect
accidental touches

LED:
• On lock: 3 fast-strobes (all LEDs), then LEDs turn off
Unlock:
• 1x Tap + Press & Hold on the Modstrip unlocks the ring
• When locked, 1x Tap + Press & Hold performs Unlock only (no device
switching)
• Placing the ring on the charger also exits Palm Lock.
Connection Status Summary
These LEDs only show briefly during actions. If nothing is happening, the ring may be
idle or asleep.
• Pairing mode (discoverable): slow triple-blink (●●●). Waiting for a new
device to pair.
• Connecting / switching hosts: current slot LED breathing (●○○ ). The
breathing LED indicates which saved device slot is being used.
• Connected successfully: slot bar briefly → solid 3 LEDs (~2 s) → off.
Confirms the connection / pairing completed.
Supported Devices
Prolo Ring connects to:
• Windows / macOS / Linux
• iOS / Android
• Tablets, phones, smart TVs
• VR headsets, AI glasses, projectors, media boxes
No drivers or apps required for basic use.

6. LED INDICATORS
The Prolo Ring uses three white LEDs to provide visual feedback for modes,
gestures, charging, system commands, and connection status.
Mode Indicators (Swipe Gestures)
Mode
Trigger Gesture
LED Pattern
Cursor Mode
Swipe Left
1-bar single pulse (●○○)
Cursor Mode – Navigation
Set
Swipe Right
1-bar double pulse
(●○○) (●○○)
Touch Mode
Swipe Right + Hold
2-bar steady then off
(●●○)
Air Mode
Swipe Left + Hold
3-bar steady then off
(●●●)
Gesture Feedback Flicks
Mode
LED Used
Pattern
Cursor Mode
LED 1
●○○
Touch Mode
LED 2
○●○
Air Mode
LED 3
○○●
Air Mode
Air-Ready: 3 LEDs solid (●●●) when the charging port is facing downward and air
gestures are enabled (Pro Edition).
Air Gesture Detected: LED3 quick flick once (○○●) when an air gesture is
recognized.
System Commands (Tap + Hold Gestures)
System-level actions use a unified Bar + Strobe pattern.
Tap Preview (Bar Rule)
• Tap count preview: 1 → 2 → 3 bars
• 4 taps: bar wraps to 1, shown as strong/brighter

• 5 taps: bar wraps to 2, shown as strong /brighter
Success Rule
• All 3 LEDs fast-strobe 3 times to confirm success
Abort Rule
• If canceled by touchpad touch OR timed out (2 seconds after last tap): All
LED off
System Command LED Table
Gesture
(Tap + Hold)
Action
Tap
Preview
During
Action
Success /
Follow-Up
1x
Connect/Switch/Unlock
1-bar
Connecting
chase
(1→2→3
sweep
repeating)
3-LED 3
strobes + 3-
LED solid
(~2s)
2x
Add Device (Pairing)
2-bar
Pairing (slow
triple-blink)
3-LED 3
strobes + 3-
LED solid
(~2s)
3x
Toggle Device/App
Status
3-bar
3-LED ramp
(down/up) +
reboot
sweep
3-LED 3
strobes +
reboot
4x
Shutdown
1-bar
Brighter
Shutdown
sweep
3-LED 3
strobes + off
5x
Reset Default
2-bar
Brighter
Reset sweep
3-LED 3
strobes +
pairing
triple-blink
Palm
Lock
3-LED fast
3-strobes
Lock sweep
3-LED 3
strobes +
lock

Connection & Pairing Indicators
LED Pattern
Meaning
All 3 LEDs breathe for ~3 seconds, then
off
Pairing / advertising (discoverable)
One LED breathes (slot indicator), then
off
Connecting / switching hosts
Slot bar briefly → 3 LEDs solid (~2 s) →
off
Successfully paired / connected
Charging Indicators
LED Pattern
Meaning
Slow white breathing (20 seconds)
Charging (initial display window)
Solid white
Fully charged
No light after 20 seconds
Charging idle (while on charger, touch
to wake)
Battery Indicators
LED Pattern
Meaning
3-bar fast blink ping (periodic every 15
seconds )
Background low-battery ping
3-bar 3 fast blinks then shutdown
Critically low battery
Idle / Background Behavior
LED Pattern
Meaning
LED1 short tick once every ~10 seconds
Idle and connected
Paused automatically
During foreground/system animations
State Transitions
LED Pattern
Meaning
Sweep LED Animations
Boot startup / Wake from sleep /
Shutdown / Charger detached / Lock

Quick Reference Summary
Category
LED Behavior
Modes
1-bar, 2-bar, 3-bar pulses
Gesture Feedback
One LED tick based on active mode
System Commands
Tap preview bar + 3 success strobes
Pairing
Slow triple blink
Connection / Switching
Connecting chase (1→2→3 sweep
repeating)
Connected
3-LED solid (~2 seconds)
Charging
Breathing → off after 20 seconds
Low Battery
3-LED fast blink
Shutdown
Shutdown sweep → off
7. CUSTOMIZATION WITH PROLO STUDIO
Prolo Studio Introduction
Unlock advanced features with Prolo Studio, available for Windows, macOS, and
Linux.
You can map gestures to shortcuts, control media, launch apps, or build complex
macros — all from one interface.
Download Prolo Studio: proloring.com/downloads
(Prolo Studio customization features require the Pro Edition.)
Device Status & App Status
Prolo Ring operates in two distinct statuses to support both universal compatibility
and advanced features.
Device Status (Default)
Device Status is the standard operating status of the Prolo Ring.
• Works on all devices using Bluetooth HID
• No software required

• Provides all built-in gestures, cursor control, media control, and motion
features
• Behaves like a universal mouse/remote
• Ideal for laptops, desktops, tablets, phones, smart TVs, projectors, VR, and
more
Use Device Status whenever you want instant pairing, plug-and-play control, or
when you’re using a computer where installing apps is restricted (school, office,
shared workstations).
App Status (For Advanced Features)
App Status activates when the ring connects directly to Prolo Studio on your
computer.
In this mode, the Studio app becomes a “translator,” converting customized
gestures into advanced commands.
In App Status, you can:
• Fine-tune sensitivity, LEDs and Bluetooth transmission power
• Save configurations back to the ring
• Access gesture animation previews and real-time diagnostics
For Pro Editions, you can also:
• Create & switch multiple profiles instantly
• Build complex macros
• Insert key sequences, combos, or automation chains
• Launch applications
Important:
• App Status requires the Prolo Studio app running in the background
• Only one ring can be actively registered with the Studio app at a time
• The ring must manually switch into App Status using a gesture.
Switching Between Status
Toggle Device Status / App Status:
• 3x Tap + Press & Hold on the Modstrip
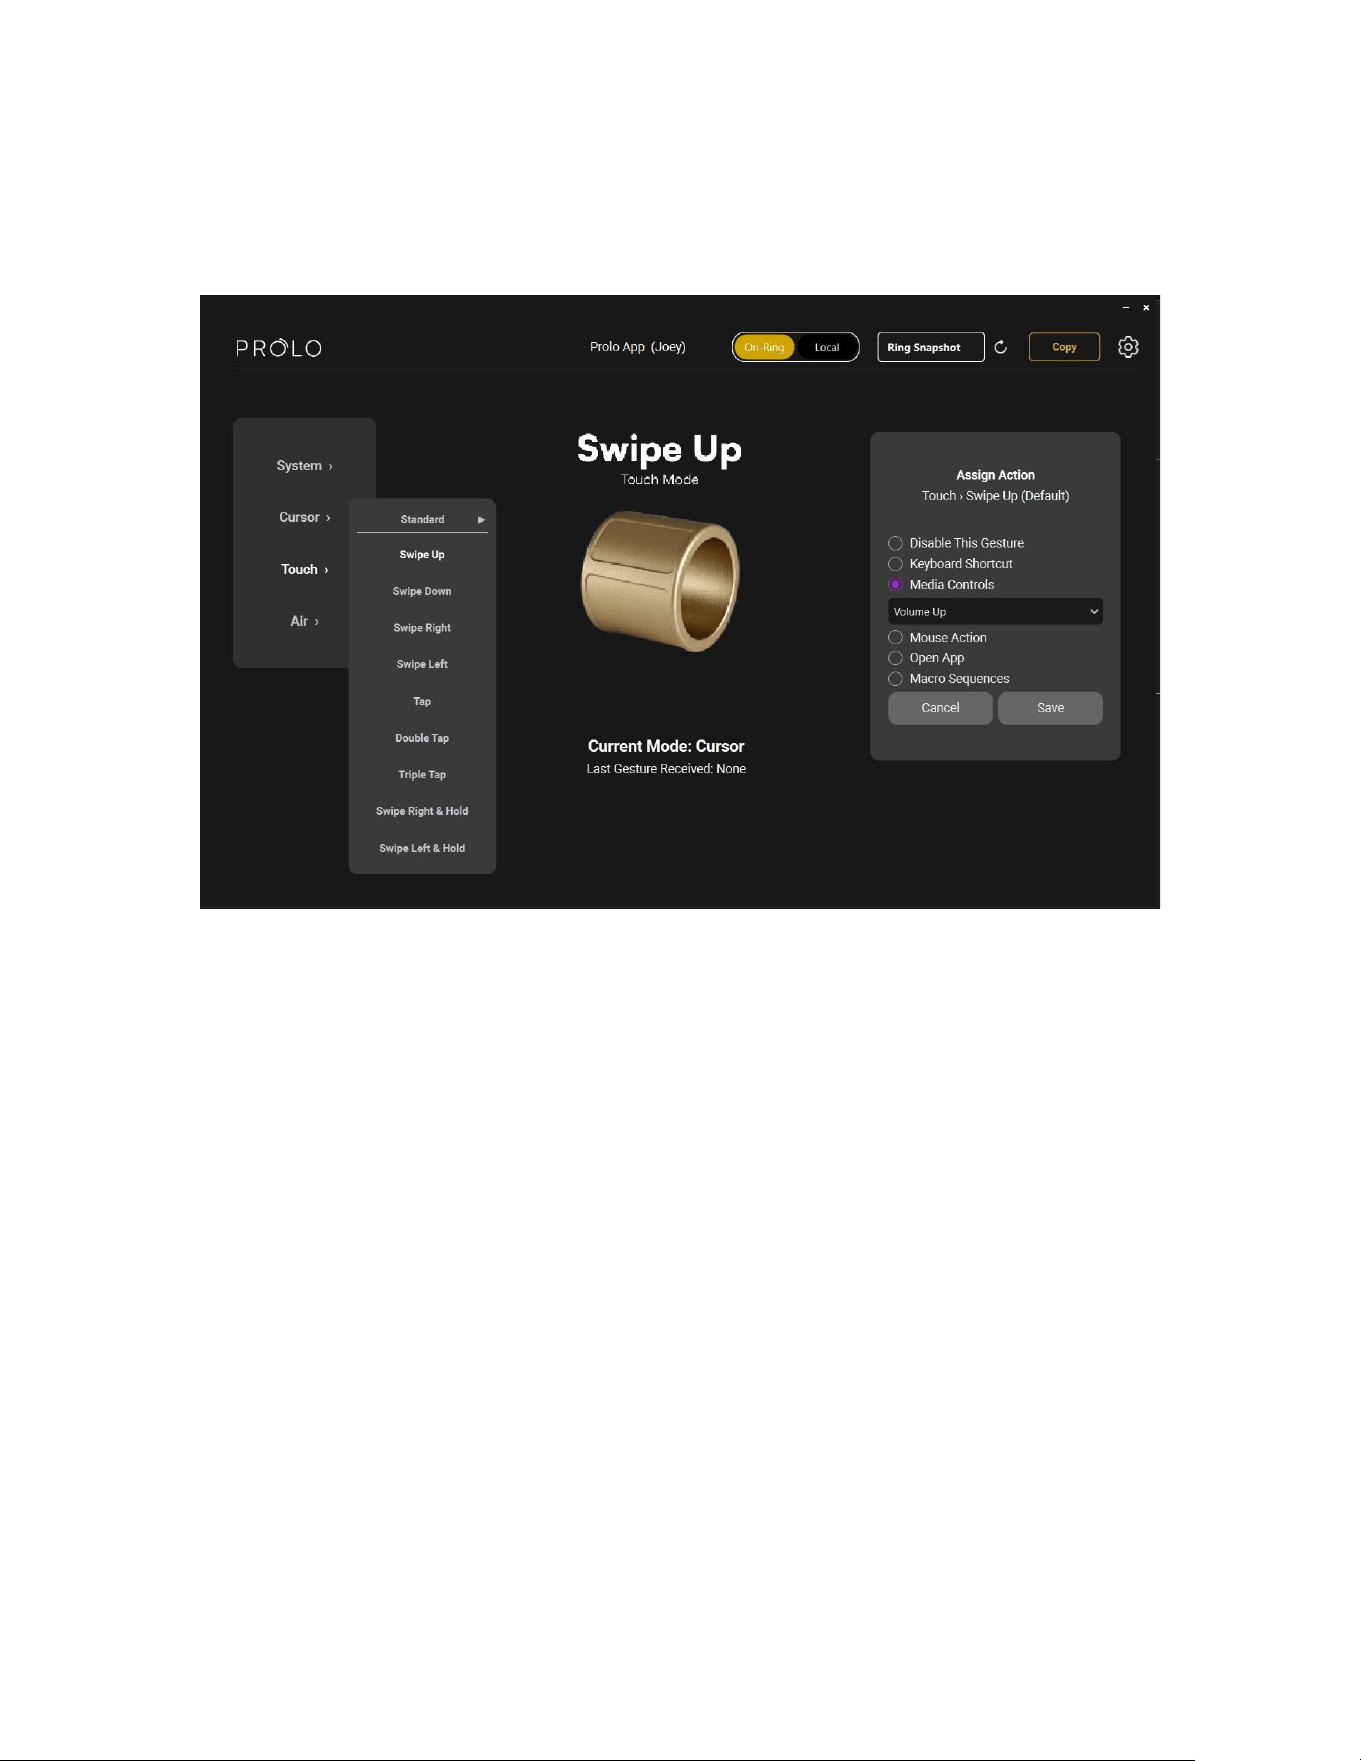
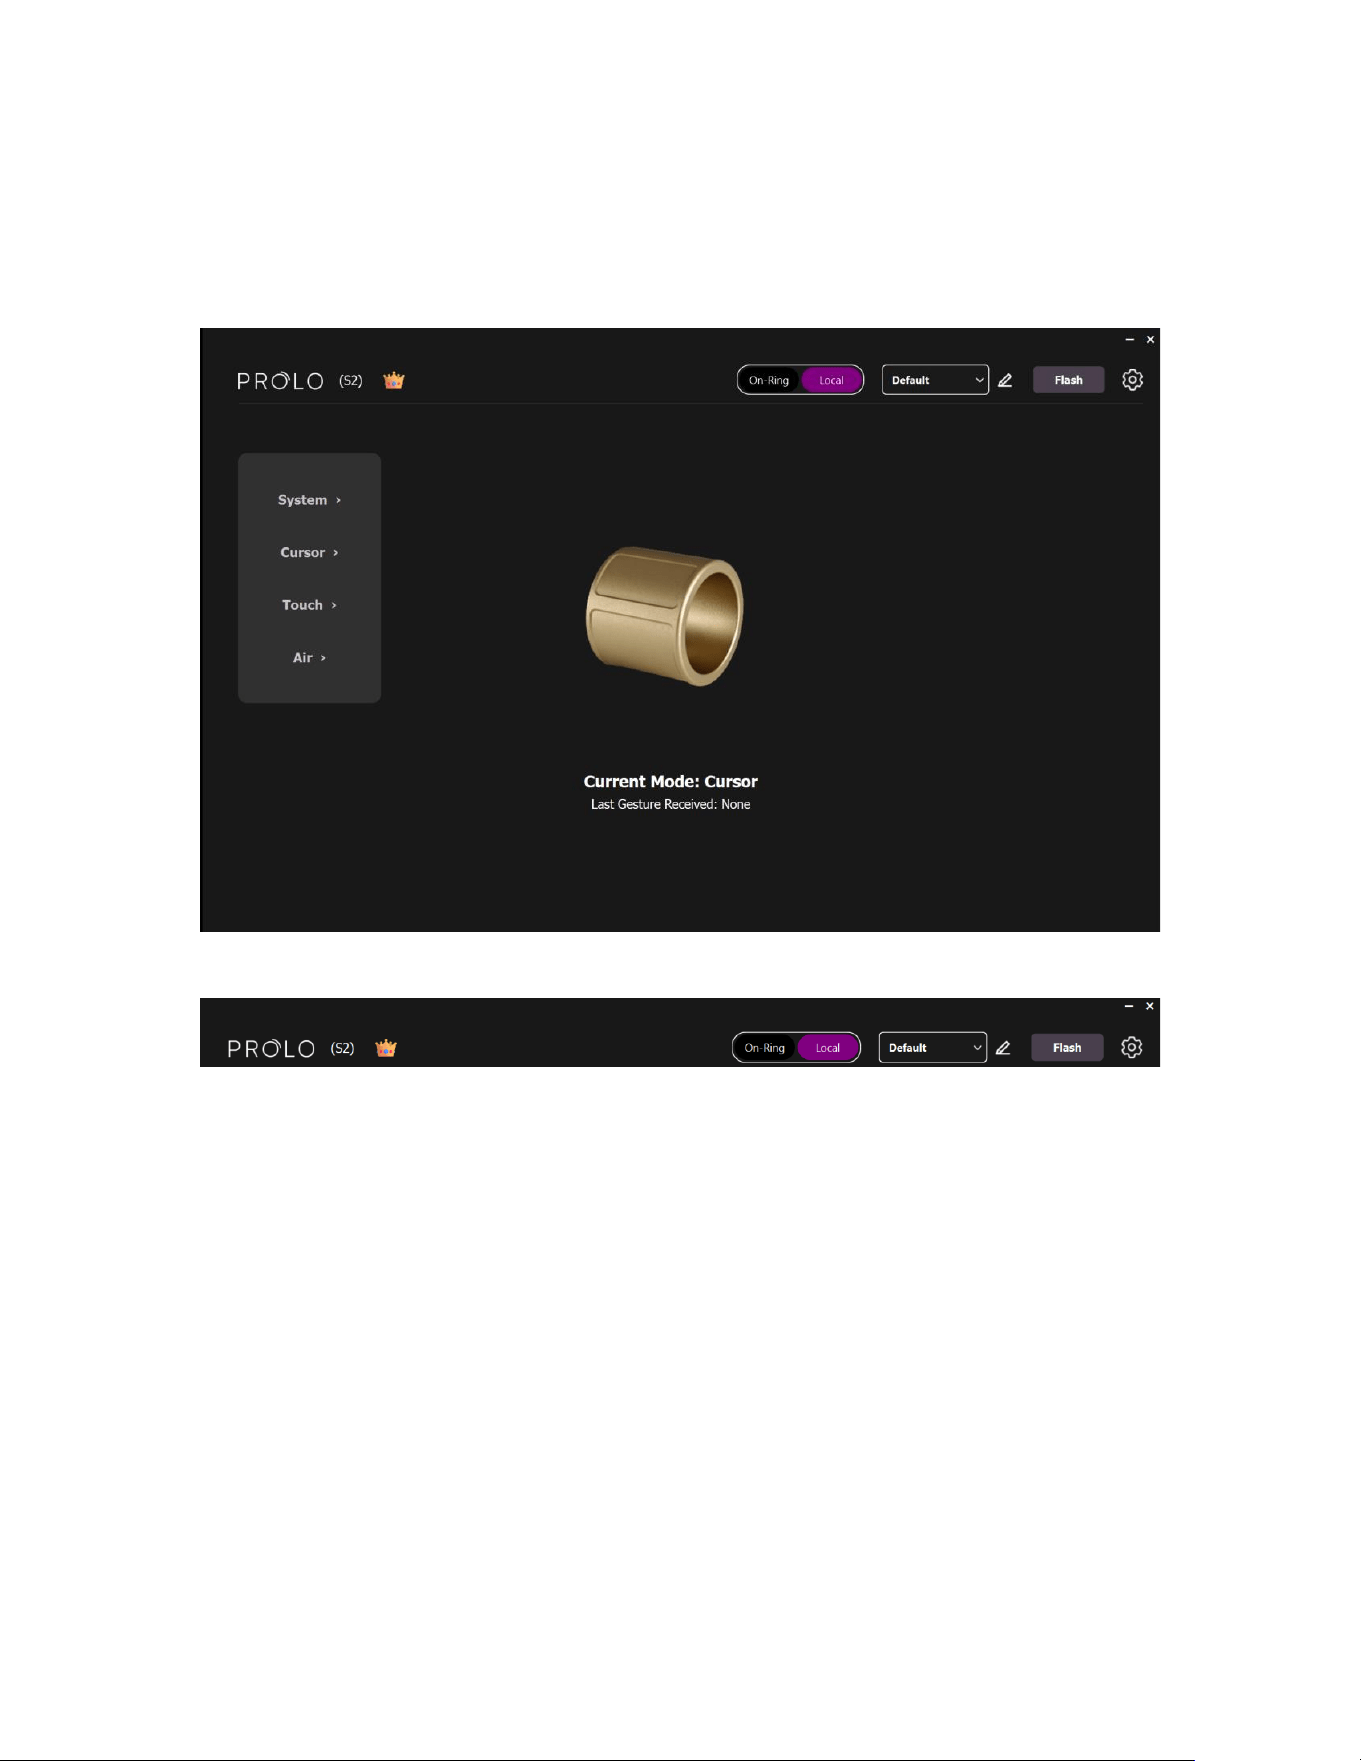
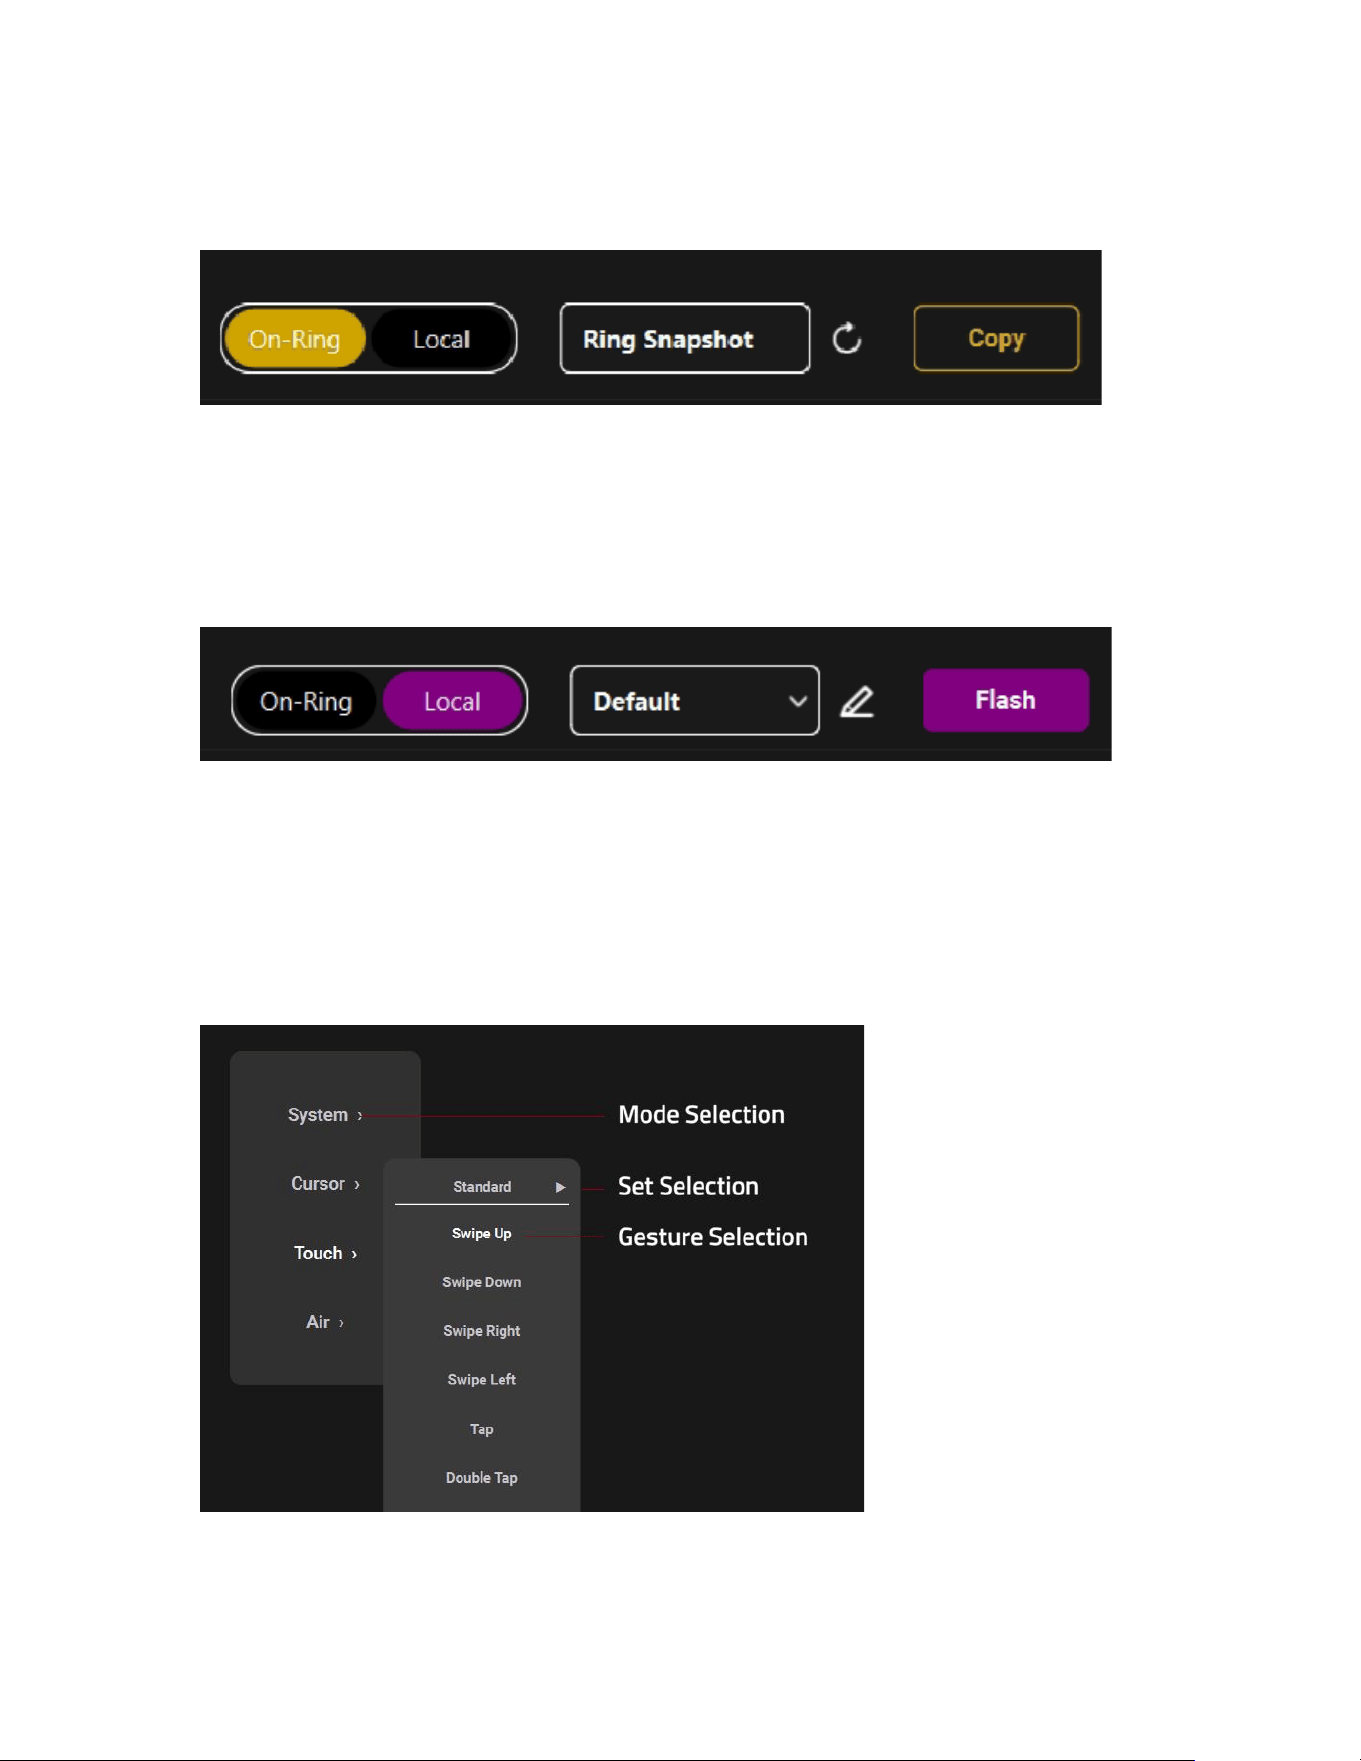
Main Dashboard
Top bar (from Left to Right):
- Logo
- Owner name
- Version (Standard / Pro / Founder)
- Profile Toggle (On-Ring / Local)
- Profile selector (dropdown)
o Secondary action (e.g., Refresh / Rename)
o Primary action (e.g., Copy / Flash)
- Configuration
Profiles
On-Ring Profile (Read-Only)
The On-Ring Profile is read-only inside Prolo Studio.
You can copy the ring’s current configuration (“Ring Snapshot”) to a Local Profile
for editing.
Local Profiles
Local Profiles are stored on your computer and appear in the profile dropdown.
• Select a Local Profile to edit it
• Flash it to the ring to run customized gestures without relying on the app
(when supported by your edition/firmware)
Left Panel (Selection)
• Level 1: Mode selection

• Level 2: Set selection
• Level 3: Gesture selection
Middle Panel (Gesture Details)
- Gesture name
- Gesture animation tutorial / preview
- Current mode
- Last gesture received (live feedback)
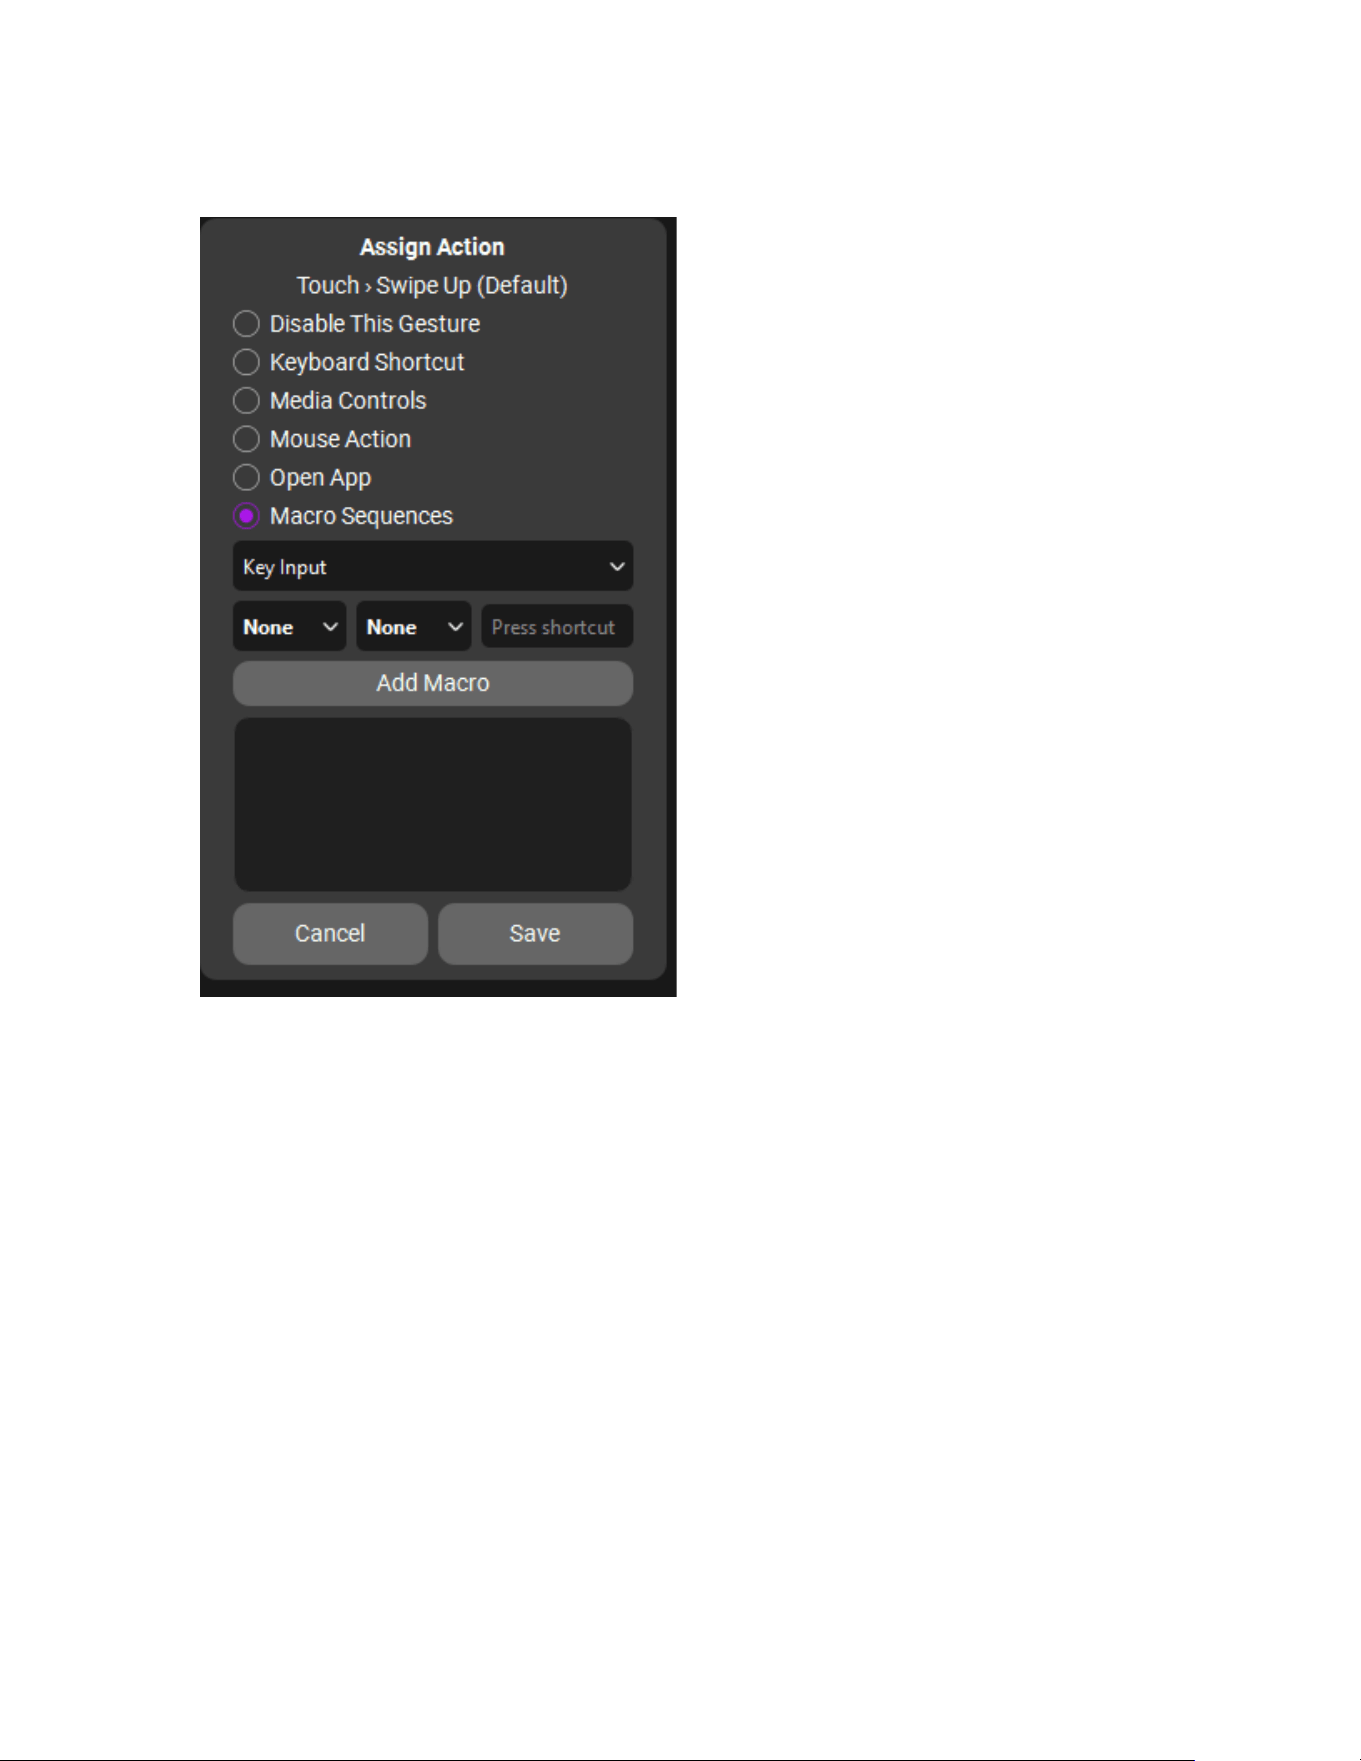
Right Panel (Remap & Assign Actions)
Assign an action to the selected gesture.
Available Action Types:
• Keyboard Shortcuts – Map gestures to specific keys.
• Media Controls – Adjust volume, play/pause, or skip tracks.
• Mouse Actions – Click, drag, or scroll.
• Open App – Launch any program instantly.
• Macro Sequences – Combine multiple actions into one gesture.
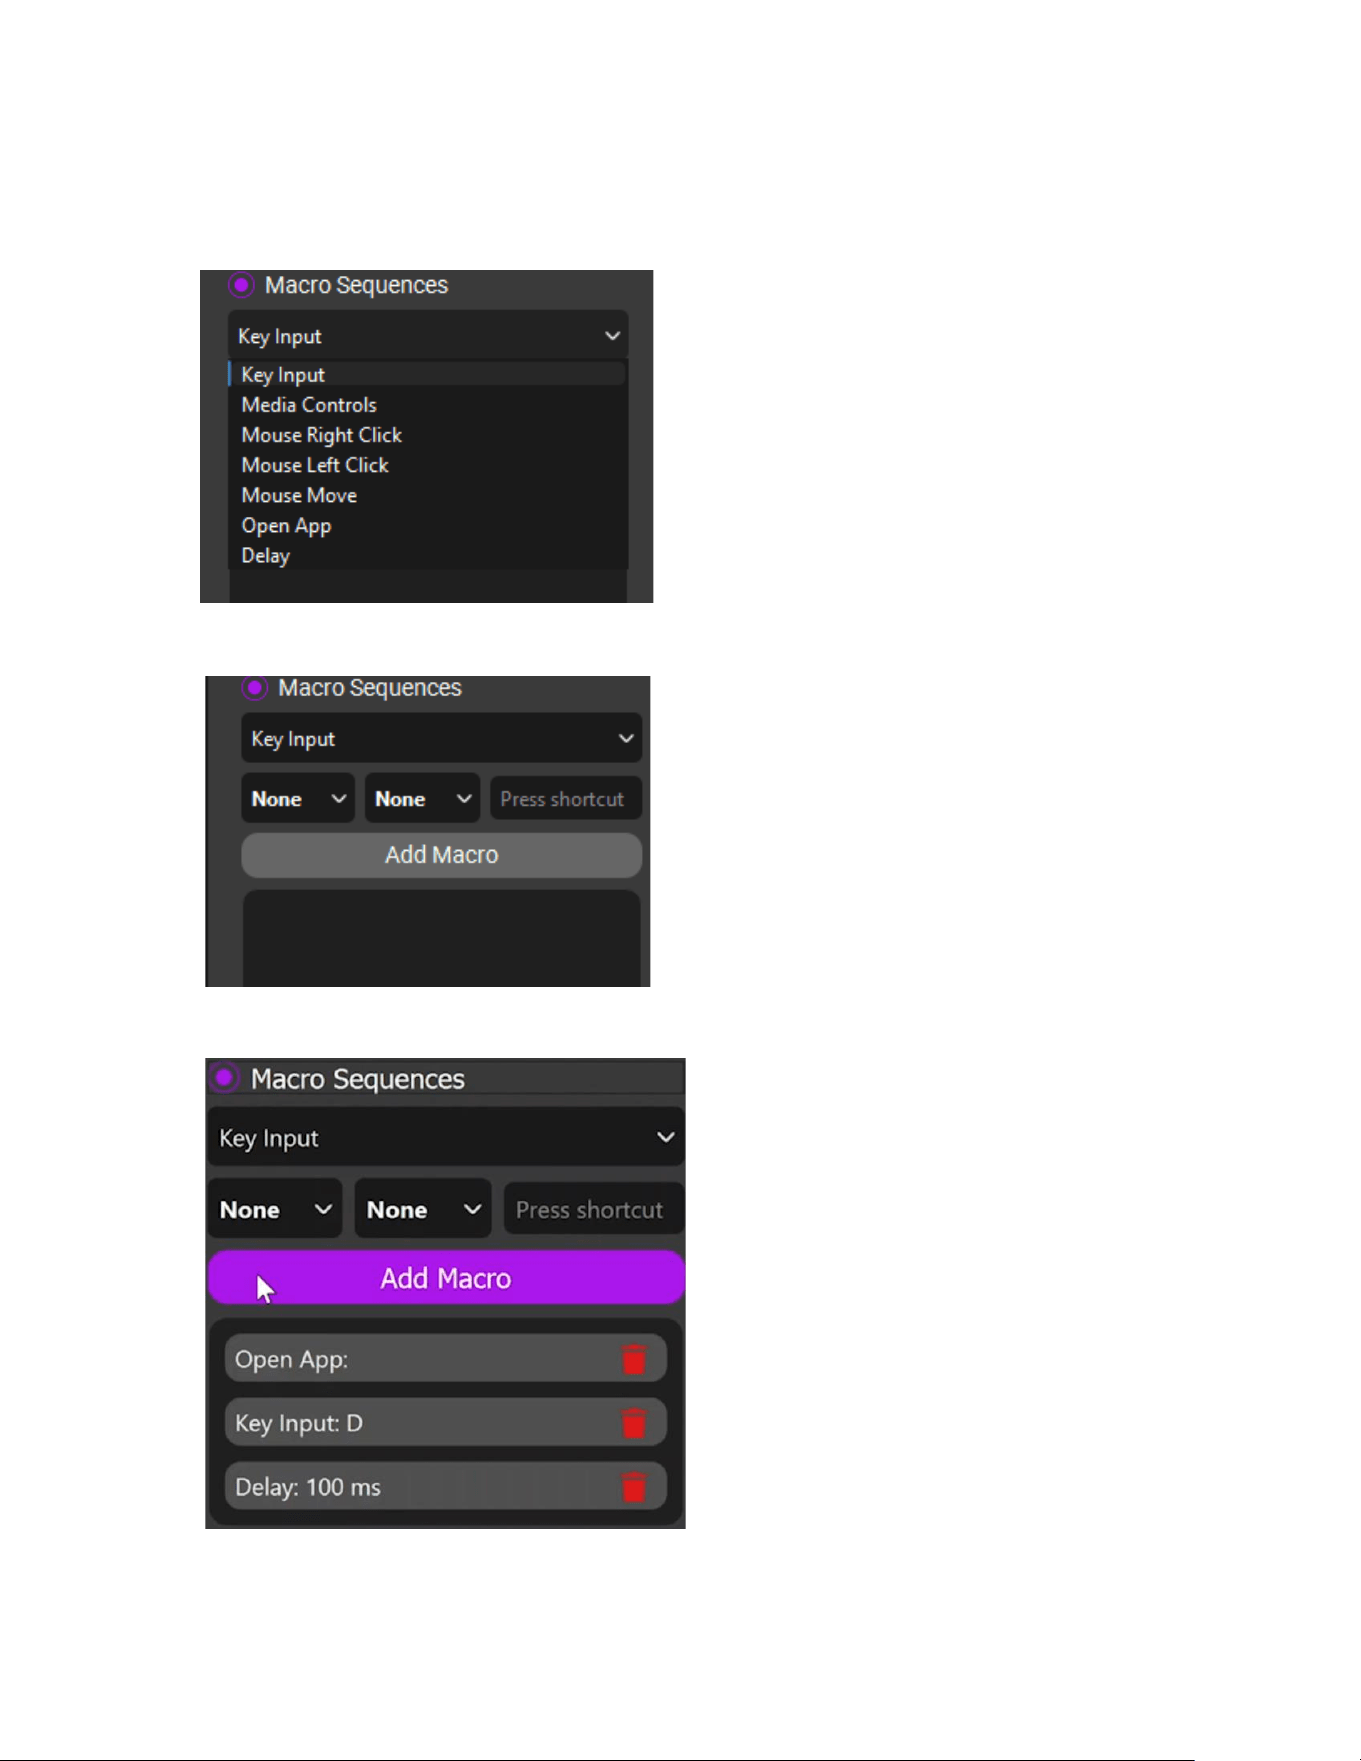
Macro Building
- Choose from the following action.
- Add them into the sequences
- Save the sequences to form a macro.
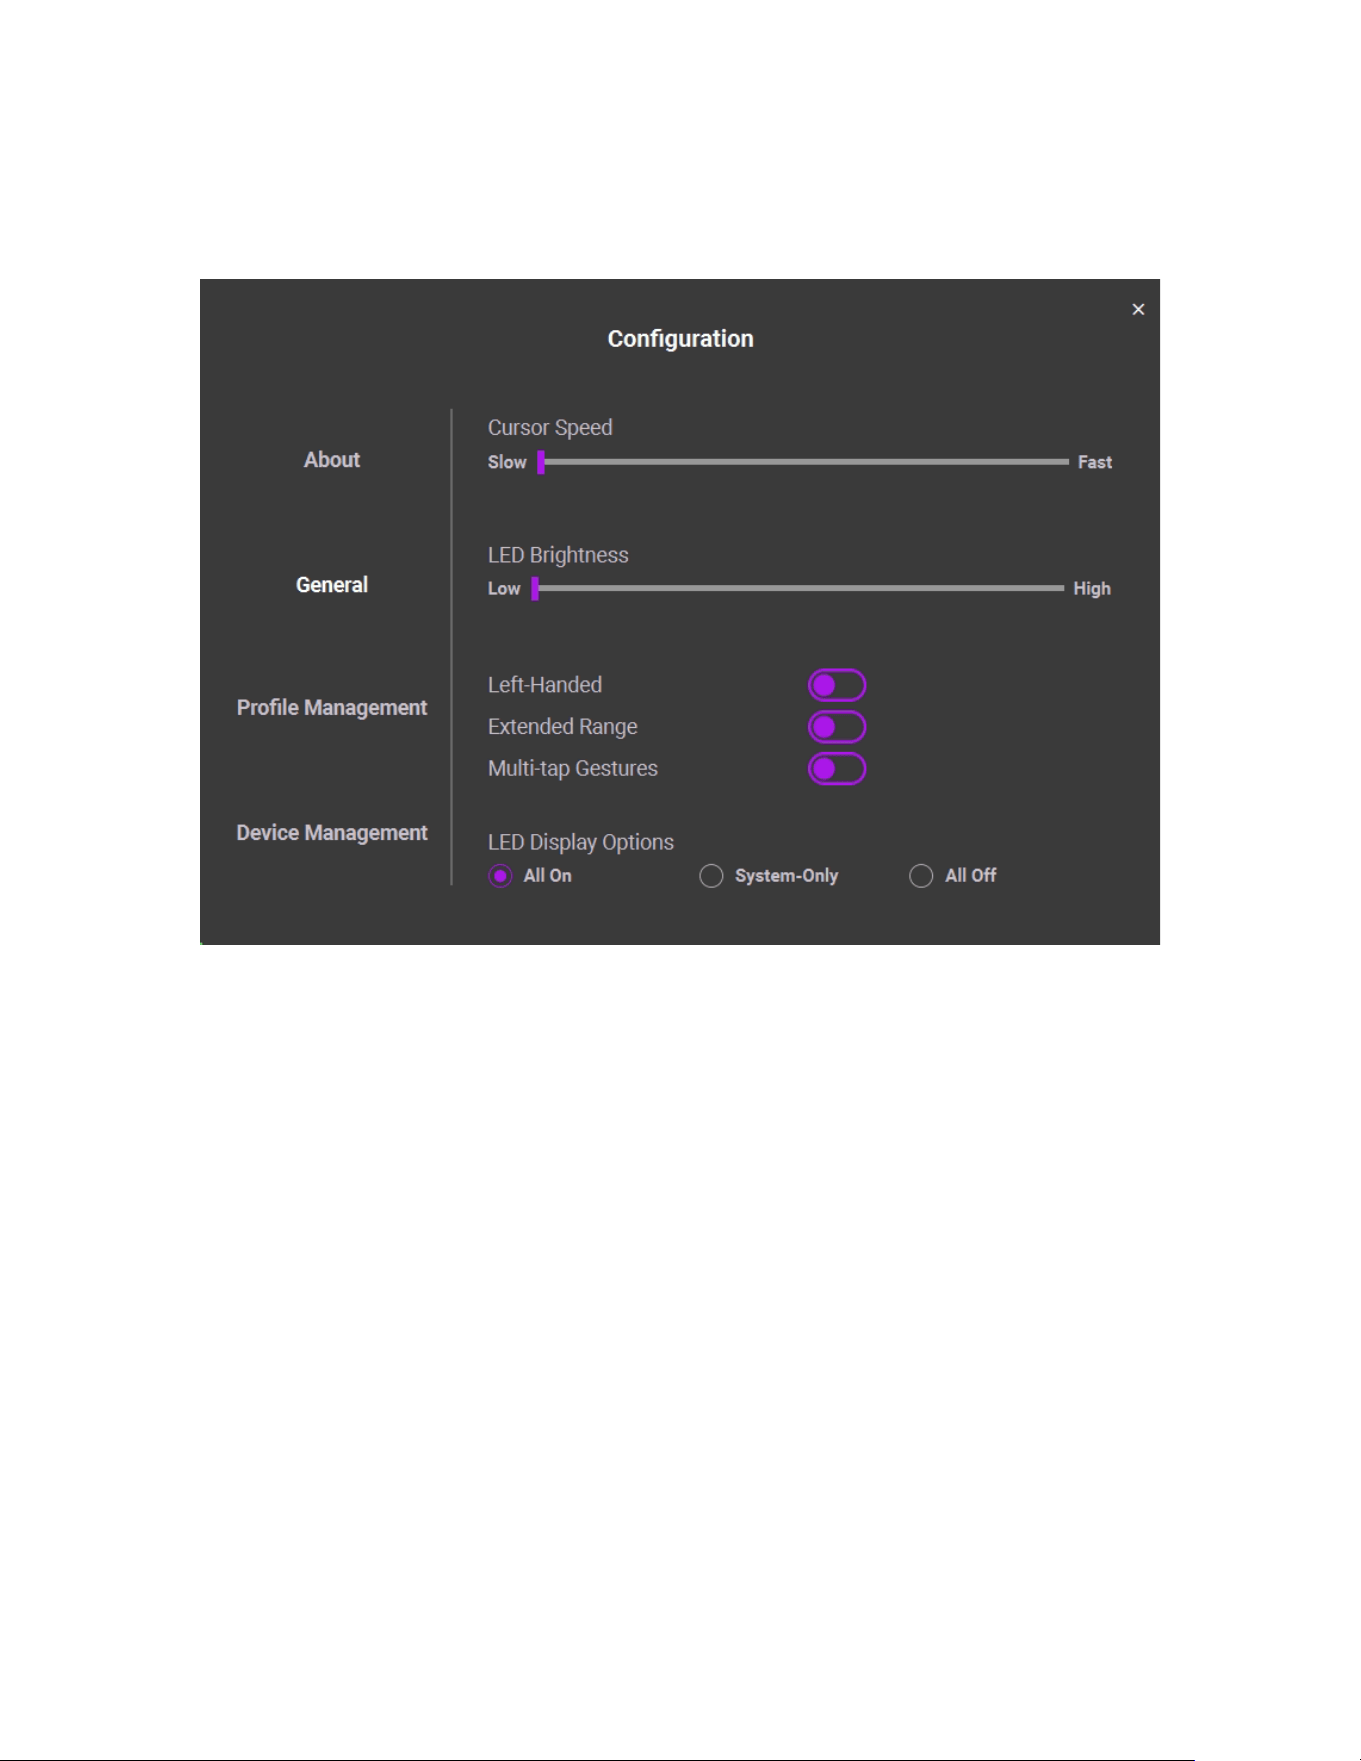
Configuration
General
Go to Config → General to adjust global settings.
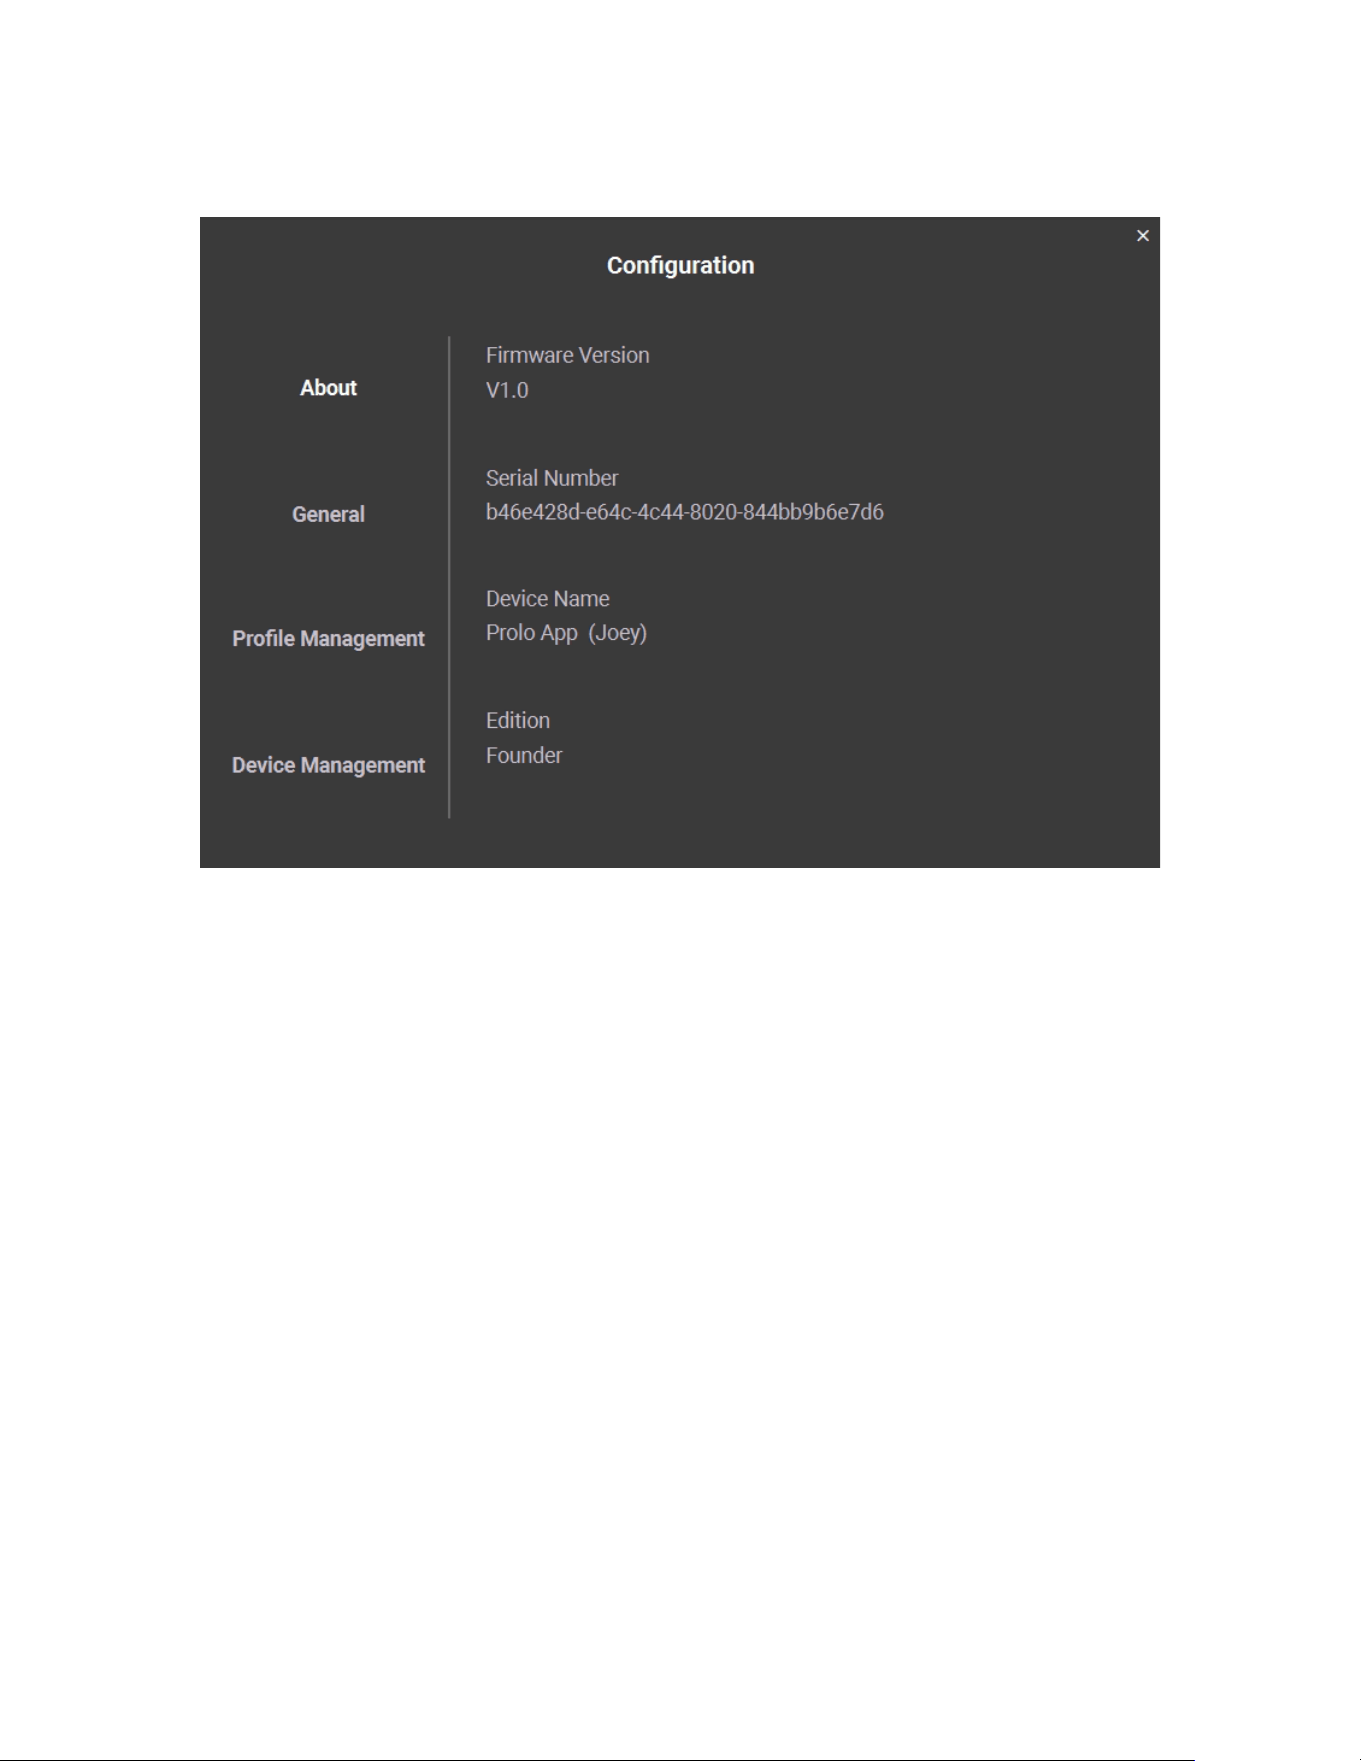
About
Go to Config → About to view version info and device details.
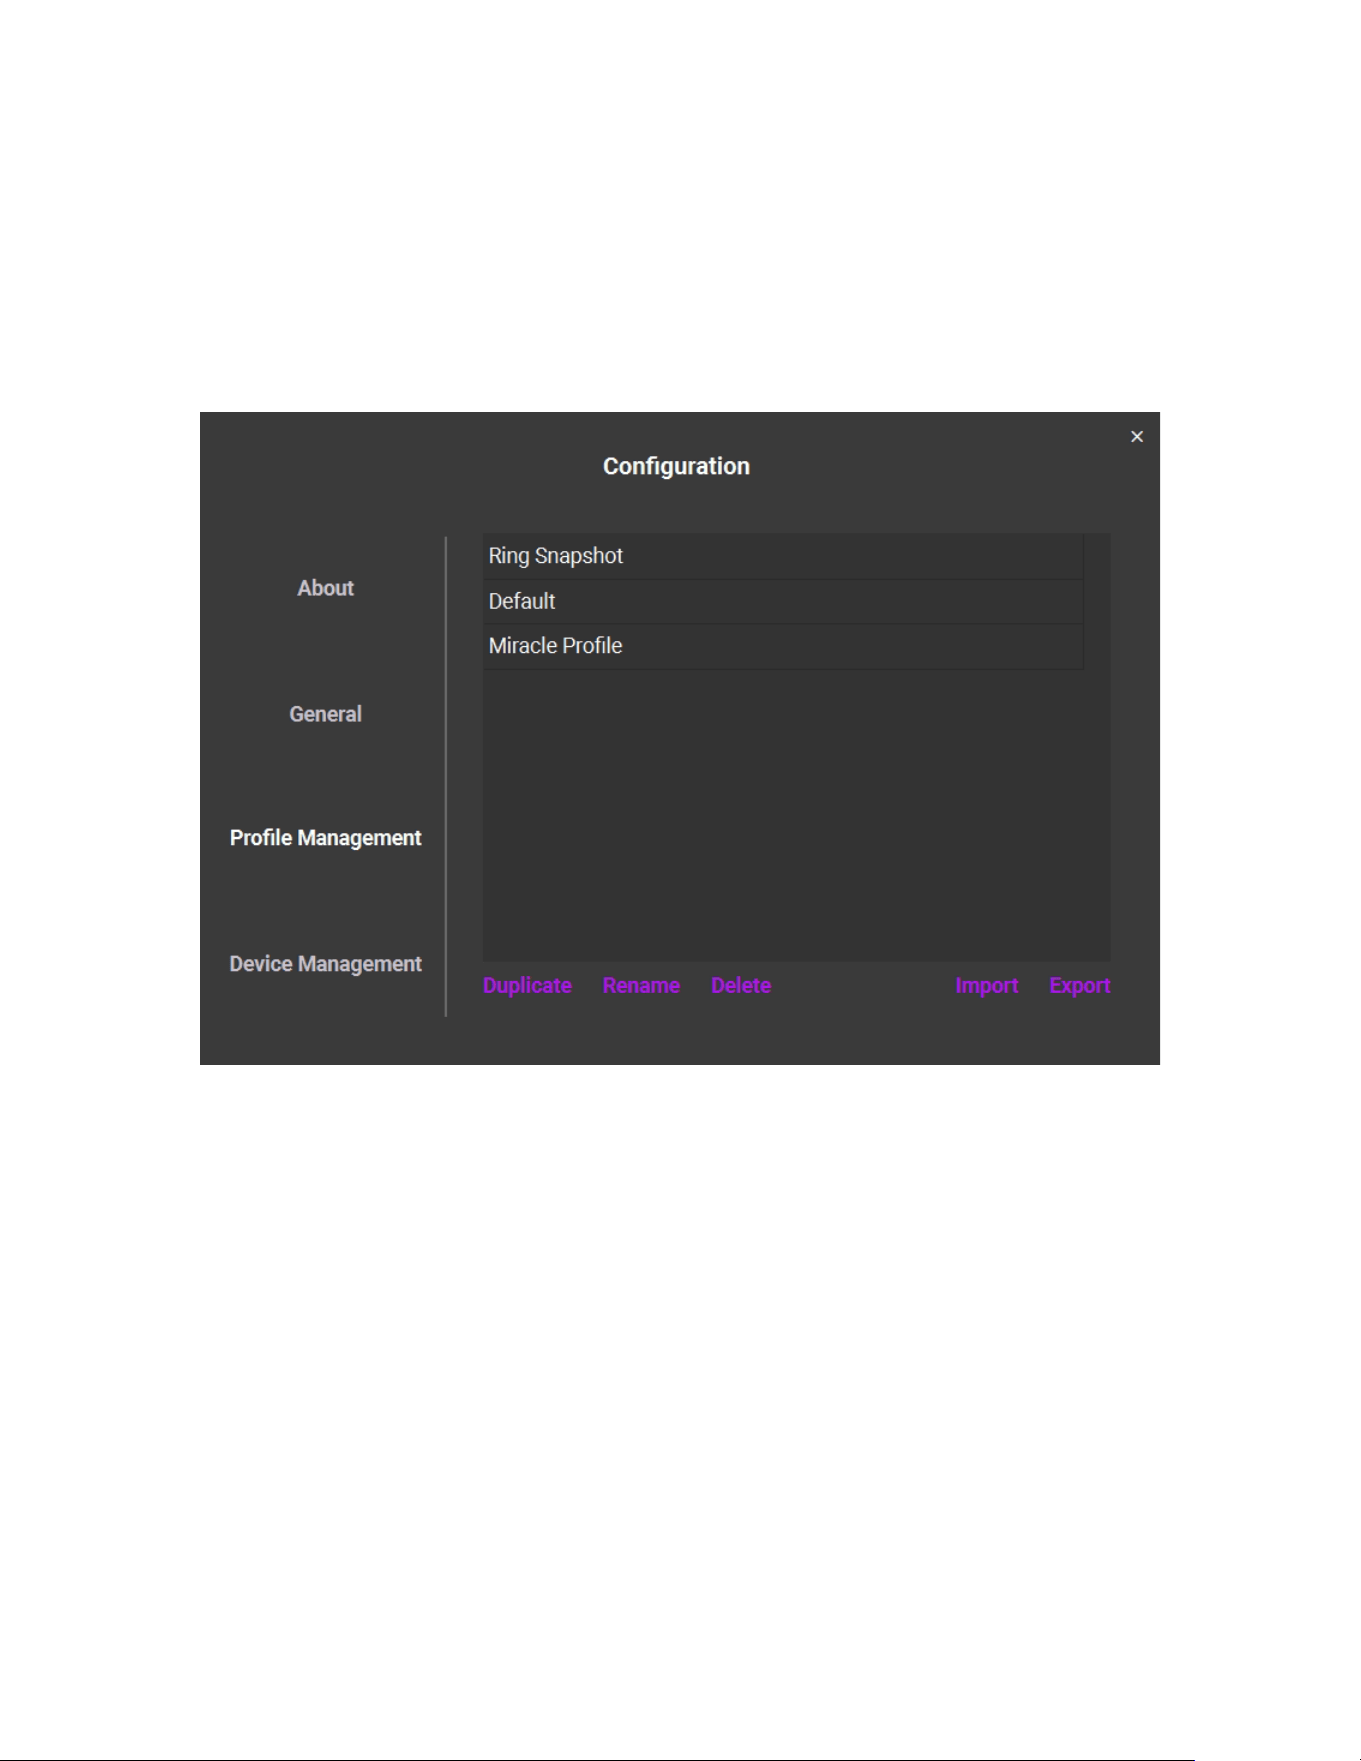
Profiles Management
- Create and switch profile on the up-right corner of main dashboard.
- Ring Snapshot and Default are read-only. Duplicate and rename them to
create editable profiles.
- Import profiles from local files. Export profile to local files.
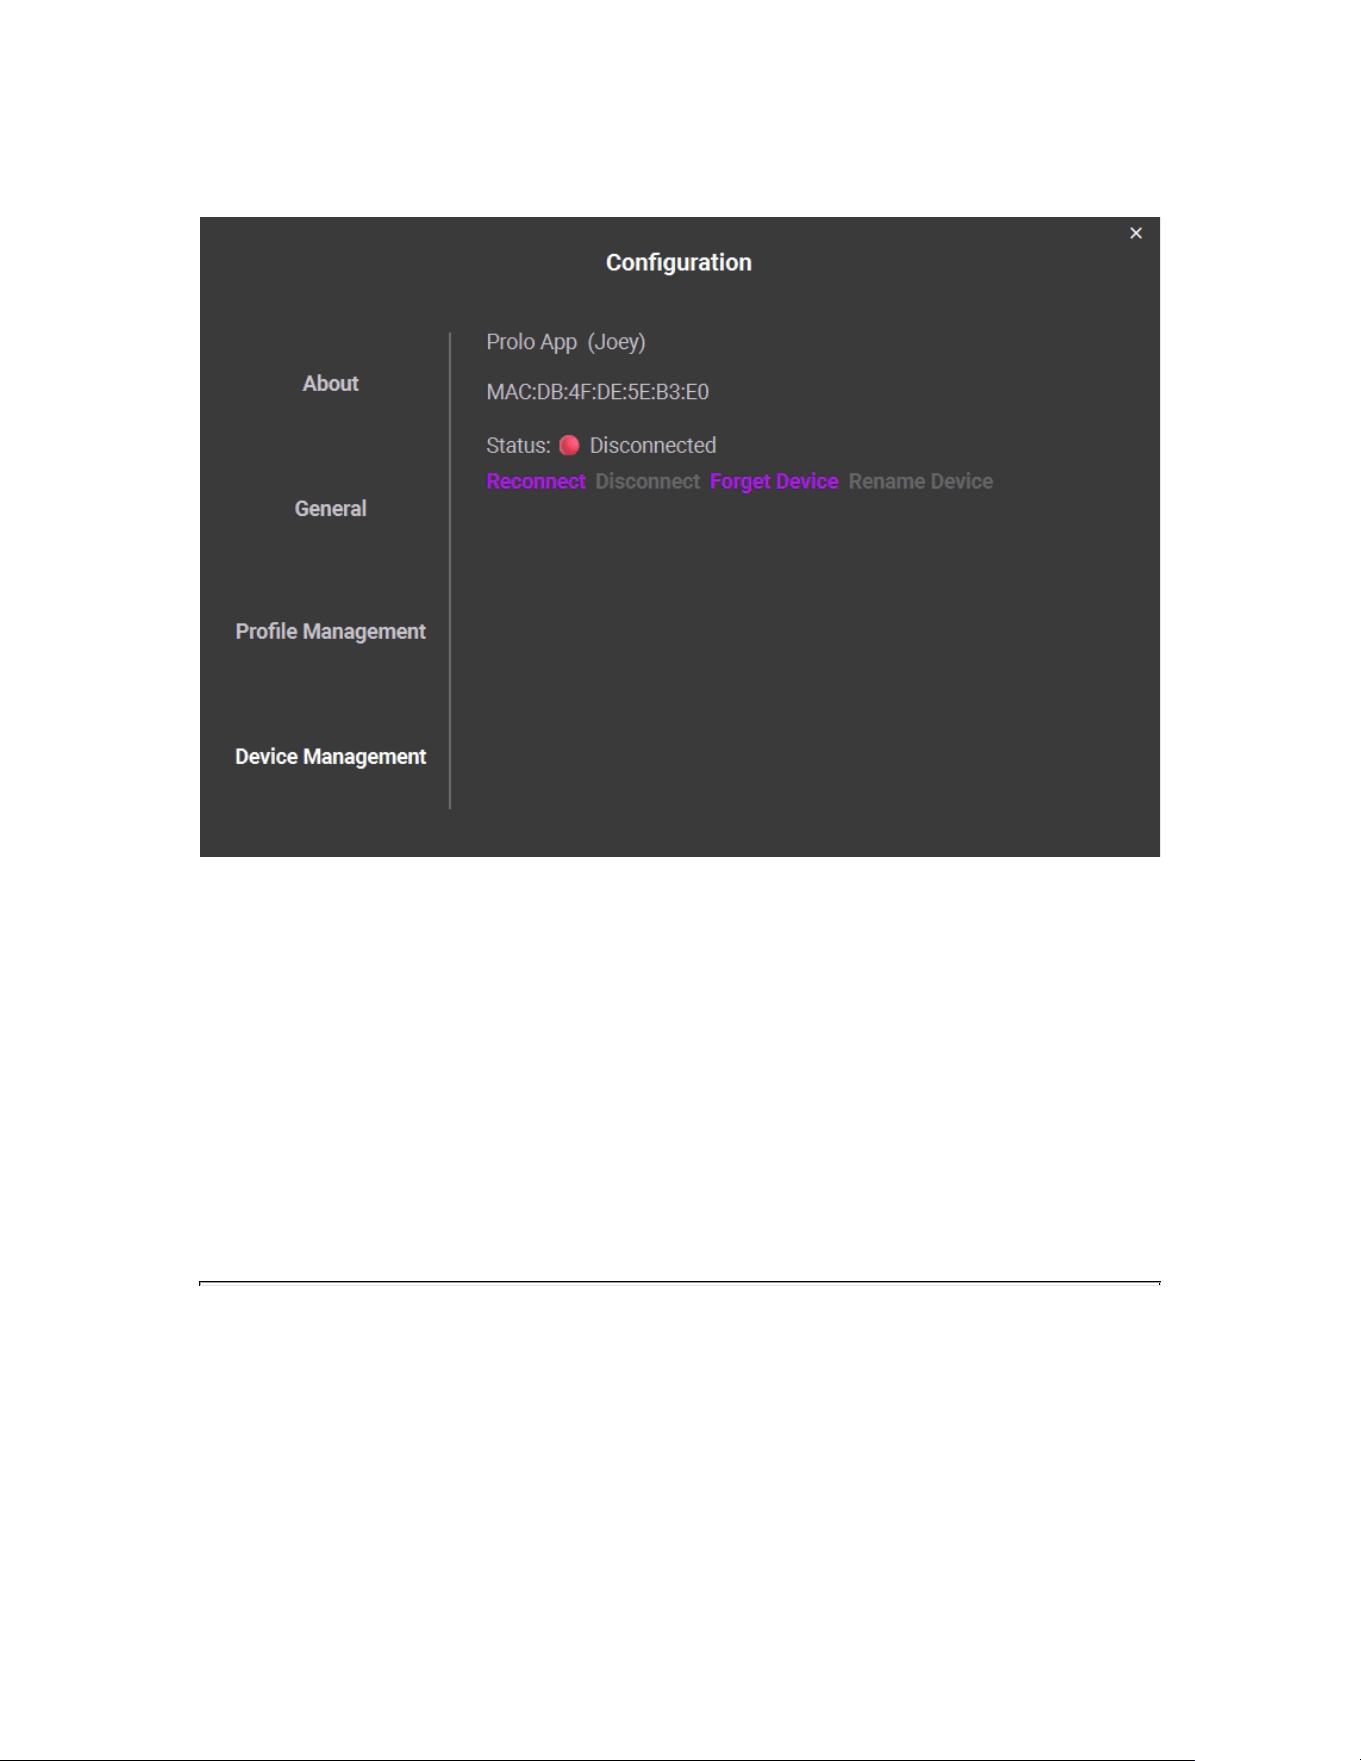
Device Management
Go to Config → Device Management to register a ring with Prolo Studio.
• Only one ring can be registered at a time
• The ring must be discoverable by Prolo Studio (Bluetooth active and in the
correct status)
• Switch statuses with: 3× Tap + Press & Hold (Modstrip)
Tip: If the ring doesn’t appear in Prolo Studio, confirm Bluetooth is enabled, then
toggle statuses again using the 3x Tap + Press & Hold system command.

8. TROUBLESHOOTING & RESET
(Insert small troubleshooting icon illustration)
Issue
Possible Cause
Solution
Not connecting
Already paired with another device
Switch Device
Unresponsive
Low battery or Shutdown
Charge for 10+ minutes
LED flashing
white
Battery critically low
Connect to charger
9. SPECIFICATIONS
Prolo Ring — Specifications
Feature
Specification
Control Surface
18 × 30 mm capacitive touch
Resolution
1024 × 1792
Sizing
US 7, 8, 9, 10, 11, 12, 13, 14, 15, 16
(fits size 6 with sizing adjuster)
Weight
4.1 g – 5.2 g
Width
23 mm
Thickness
2.9 mm
Color Options
Champagne Gold, Future Silver, Carbon Black, Rose Gold
Materials
Biocompatible PC shell
IC
High-precision touch sensor, 6-axis motion sensor, BLE SoC
Battery Life
Up to 10 hours (typical use)
Charge Time
< 30 min
Compatibility
Computers / Smartphones / Tablets (Windows / macOS / Linux)
Prolo Ring Case Charger — Specifications
Feature
Specification
Battery Capacity
Li-Po 800 mAh
Extended Use
Up to 30 days of recharges
Charging Method
USB Type-C
Charging Time
~120 minutes (full charge)
Charging Cycles
500 cycles
10. SUPPORT & WARRANTY
• Avoid exposure to high humidity or direct heat while charging.
• Avoid wearing for longer periods of time or overnight.
• Do not rinse or immerse in water.
• Use only the official charging accessories.
• For troubleshooting and updates, visit proloring.com/faq.
• Contact us at [email protected] for warranty or repair inquiries.
© 2026 Prolo Technologies. All rights reserved.

FCC Warnning:
This equipment has been tested and found to comply with the limits for a Class B digital device,
pursuant to part 15 of the FCC Rules. These limits are designed to provide
reasonable
protection against harmful interference in a residential installation. This equipment generates,
uses and can radiate radio
frequency
energy
and,
if
not
installed
and
used
in
accordance
with
the
instructions,
may cause
harmful
interference
to
radio
communications.
However,
there
is
no
guarantee
that interference
will
not
occur
in
a
particular
installation.
If
this
equipment
does
cause
harmful interference to radio or television reception, which can be
determined by turning the equipment off
and
on,
the
user
is
encouraged
to
try
to
correct
the interference
by
one
or
more
of
the following measures:
•
Reorient or relocate the receiving antenna.
•
Increase the separation between the equipment and receiver.
•
Connect the equipment into an outlet on a circuit different from that to which the receiver is
connected.
• Consult the dealer or an experienced radio/TV technician for help.
Caution:
Any
changes
or
modifications
to
this
device
not
explicitly
approved
by
manufacturer
could void your authority to operate this equipment.
This
device
complies
with
part
15
of
the
FCC
Rules.
Operation
is
subject
to
the
following
two
conditions:
(1)This
device
may
not
cause
harmful
interference,
and
(2)
this
device
must
accept
any
interference received, including interference that may cause undesired operation.
This
equipment
complies
with
FCC
radiation
exposure
limits
set
forth
for
an
uncontrolled
environment.
This
equipment
should
be
installed
and
operated
with
minimum
distance
0cm
between the radiator and your body.