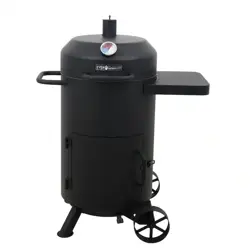
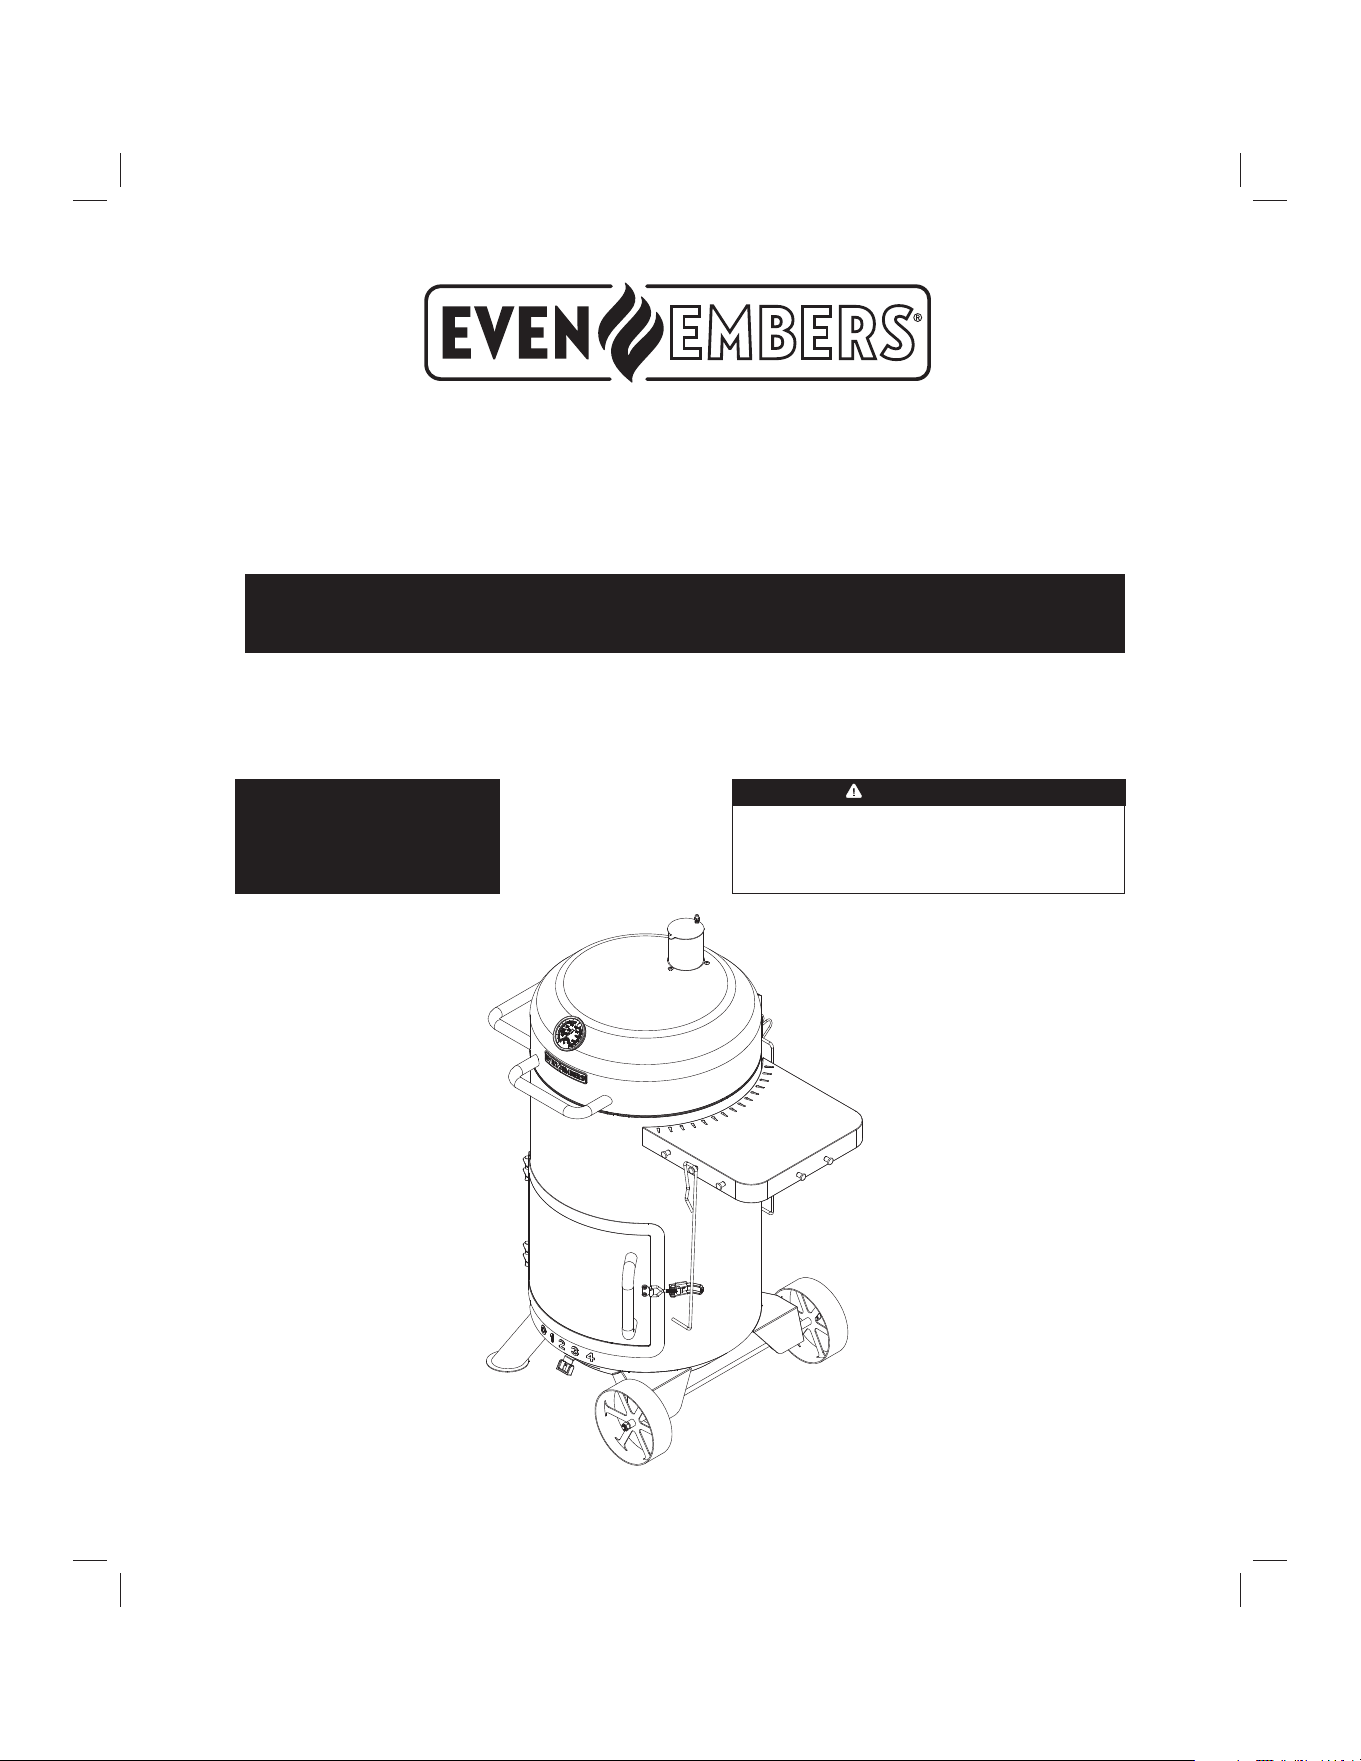
20” DRUM SMOKER
Model SMK6020AS
OWNER’S MANUAL
ASSEMBLY AND OPERATING IN STRUC TIONS
WARNING
HAZARDOUS EXPLOSION MAY RESULT IF THESE
WARNINGS AND INSTRUCTIONS ARE IGNORED. READ
AND FOLLOW ALL WARNINGS AND INSTRUCTIONS
IN THIS MANUAL TO AVOID PERSONAL INJURY,
INCLUDING DEATH OR PROPERTY DAMAGE.
NOTICE TO INSTALLER:
LEAVE THESE INSTRUCTIONS
WITH THE SMOKER OWNER FOR
FUTURE REFERENCE .
SAVE THIS MANUAL FOR FUTURE REFERENCE
OM_SMK6020AS.indd Cov1OM_SMK6020AS.indd Cov1 11/18/2025 4:02:38 PM11/18/2025 4:02:38 PM

1
WARNING
• Only use this smoker on a hard, level, non-combustible, stable surface (concrete, ground, etc.) capable
of supporting the weight of the smoker. Never use on wooden or other sur fac es that could burn.
• DO NOT use smoker without charcoal tray in place. DO NOT attempt to remove charcoal tray while tray
contains hot coal.
• Proper clearance of 10 feet between the smoker and com bus ti ble material (bushes, trees, wooden decks,
fences, buildings, etc.) or construction should be maintained at all times when smoker is in use. Do not
place smoker under a roof overhang or other enclosed area.
• For outdoor use only. Do not operate smoker indoors or in an enclosed area.
• For household use only. Do not use this smoker for other than its intended purpose.
• We recommend the use of a Charcoal Chimney Starter (not included) to avoid the dangers associated
with charcoal lighting fluid. If you choose to use charcoal lighting fluid, only use lighting fluid approved
for lighting charcoal. Care ful ly read man u fac tur er’s warnings and instructions on the charcoal lighting
fluid and charcoal prior to the use of their product. Store charcoal lighting fluid safely away from smoker.
• When using charcoal lighting fluid, allow charcoal to burn with smoker lid open until covered with a light
ash (approximately 20 min utes). This will allow charcoal lighting fluid to burn off. Failure to do this could
trap fumes from charcoal lighting fluid in smoker and may result in a flash fire or explosion when lid is
opened.
• Do not use gasoline, kerosene or alcohol for lighting char coal. Use of any of these or similar products
could cause an explosion possibly leading to severe bodily injury.
• Never add charcoal lighting fluid to hot or even warm coals as flashback may occur causing severe
burns.
• Place smoker in an area where children and pets cannot come into contact with unit. Close supervision
is necessary when smoker is in use.
• Do not leave smoker unattended when in use.
• When adding charcoal and/or wood, use extreme caution and follow instructions in “Adding Charcoal/
Wood During in the Firebox” section of this manual.
• Do not store or use smoker near gasoline, other flammable liquids or where flammable vapors may be
present.
• Do not store lighter fluid or other flammable liquids or material under the smoker.
• When smoking, grease from meat may drip into the charcoal and cause a grease fire. If this should
happen close lid to suffocate the flame. Do not use water to extinguish grease fires.
• Use caution since flames can flare-up when fresh air sud den ly comes in contact with fire. When
opening the door, keep hands, face and body a safe distance from hot steam and flame flare-ups.
IMPORTANT SAFETY WARNINGS
WE WANT YOU TO ASSEMBLE AND USE YOUR SMOKER AS SAFELY AS POSSIBLE.
THE PURPOSE OF THIS SAFETY ALERT SYMBOL
IS TO ATTRACT YOUR ATTENTION TO POSSIBLE HAZARDS AS YOU ASSEMBLE AND USE YOUR SMOKER.
WHEN YOU SEE THE SAFETY ALERT SYMBOL, PAY CLOSE ATTENTION TO THE INFORMATION WHICH FOLLOWS!
READ ALL SAFETY WARNINGS AND INSTRUCTIONS CAREFULLY
BEFORE ASSEMBLING AND OPERATING YOUR SMOKER.
OM_SMK6020AS.indd 2OM_SMK6020AS.indd 2 11/18/2025 4:02:39 PM11/18/2025 4:02:39 PM

2
WARNING
• Smoker is hot when in use. To avoid burns:
• DO NOT attempt to move the smoker.
• Brace smoker so the unit does not accidentally move.
• Wear protective gloves or oven mitts.
• DO NOT touch any hot surfaces.
• DO NOT wear loose clothing or allow hair to come in contact with smoker.
• Never place more than 15 pounds on side shelf.
• Use caution when assembling and operating your smoker to avoid scrapes or cuts from sharp edges
of metal parts. Use caution when reaching into or under smoker.
• When opening lid, make sure it is pushed all the way open. If lid is not fully open, it could fall back to
a closed position and cause bodily injury.
• In windy weather, place smoker in an outdoor area that is protected from the wind.
• Close lid, door, smoke stack and air shutter to suffocate flame.
• Never leave coals and ashes in smoker unattended. Before smoker can be left unattended, remaining
coals and ashes must be removed from smoker. Use caution to protect yourself and property.
Carefully place remaining coals and ashes in a non-combustible metal container and saturate
completely with water. Allow coals and water to remain in metal container 24 hours prior to disposing.
• Extinguished coals and ashes should be placed a safe distance from all structures and combustible
materials.
• With a garden hose, completely wet the surface beneath and around smoker to extinguish any ashes,
coals or embers which may have fallen during the cooking or cleaning pro cess.
• After each use, clean the smoker thoroughly and apply a light coat of vegetable oil to interior to
prevent rusting. Cover the smoker to protect it from excessive rusting.
• Use caution when lifting or moving smoker to prevent strains and back injuries.
• We advise that a fire extinguisher be on hand. Refer to your local authority to determine proper size
and type of fire extinguisher.
• Accessory attachments not manufactured by Even Embers for this particular product are not
recommended and may lead to personal injury or property damage.
• Store the smoker out of reach of children and in a dry location when not in use.
• Do not attempt to service smoker other than normal main te nance as explained in “After-Use Safety”
and “Proper Care & Maintenance” sections of this manual.
• Remove all stickers and labels before first use.
• Properly dispose of all packaging material.
USE CAUTION AND COMMON SENSE WHEN OPERATING YOUR SMOKER.
FAILURE TO ADHERE TO SAFETY WARNING AND GUIDELINES IN THIS MANUAL COULD RESULT
IN BODILY INJURY OR PROPERTY DAMAGE.
SAVE THIS MANUAL FOR FUTURE REFERENCE.
For accessories and replacement parts, contact us at www.evenembers.com
OM_SMK6020AS.indd 3OM_SMK6020AS.indd 3 11/18/2025 4:02:39 PM11/18/2025 4:02:39 PM
ASSEMBLY INSTRUCTIONS
READ ALL SAFETY WARNINGS & ASSEMBLY INSTRUCTIONS CAREFULLY
BEFORE ASSEMBLING OR OPERATING YOUR SMOKER.
FOR MISSING PARTS, PLEASE CALL CUSTOMER SERVICE AT 855-735-9922.
Inspect contents of the box to ensure all parts are included and undamaged.
3
We recommend two people work together when as sem bling this unit.
The following tools are required (not included) to assemble this Drum Smoker:
• Pliers
• Phillips & Flathead Screwdrivers
• Adjustable Wrench
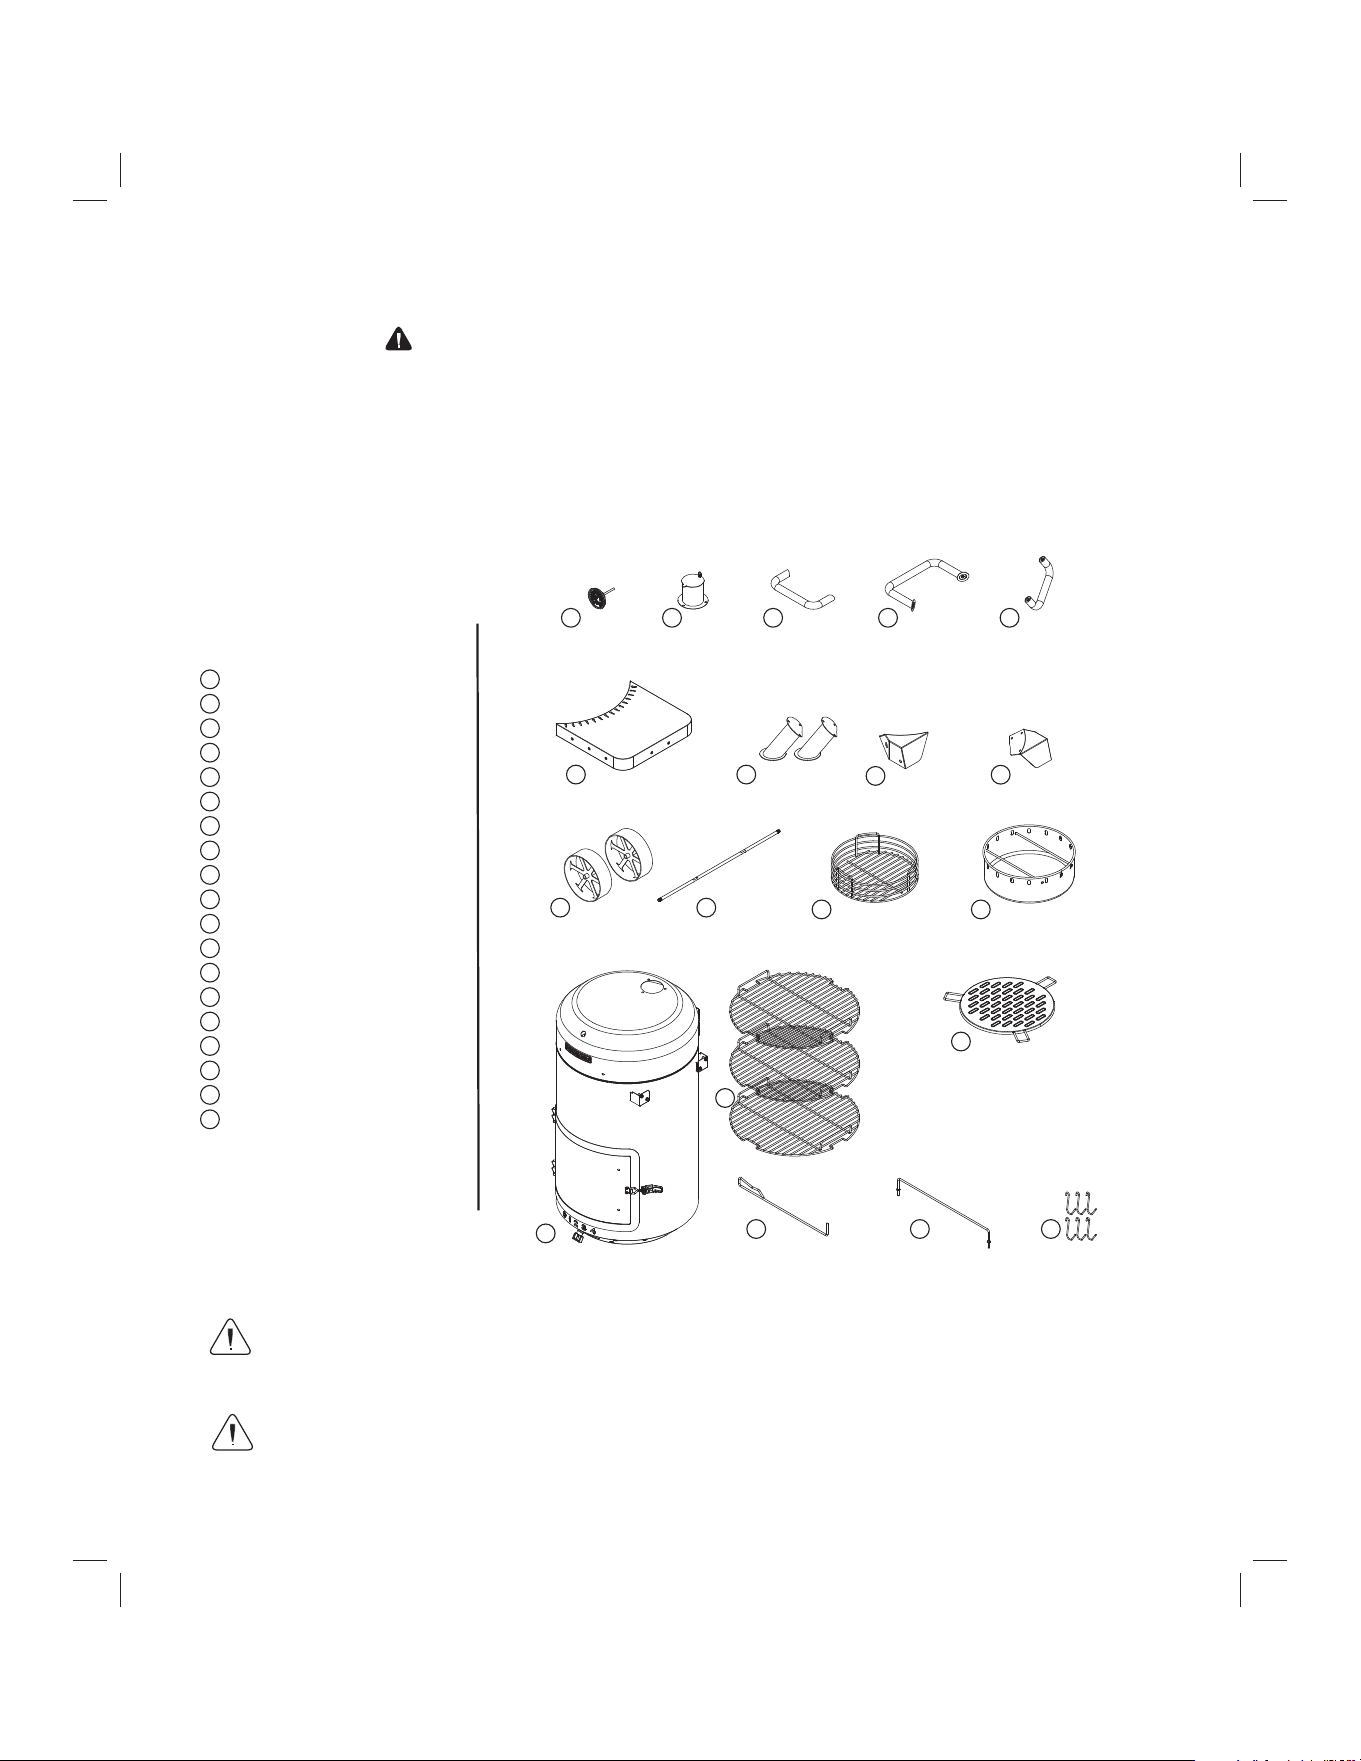
PARTS LIST:
1
1 Temperature Gauge
2
1 Chimney
3
1 Lid Handle
4
1 Drum Handle
5
1 Door Handle
6
1 Side Table
7
2 Legs
8
1 Front Axle Bracket
9
1 Rear Axle Bracket
10
2 Wheels
11
1 Wheel Axle
12
1 Charcoal Grate
13
1 Ash Tray
14
1 Firebox
15
3 Cooking Grates
16
1 Diffuser
17
1 Rake
18
1 Food Hook Rod
19
6 Food Hooks
CALIFORNIA PROPOSITION 65 WARNING
WARNING: This product can expose you to chemicals including carbon monoxide, which is
known to the State of California to cause birth defects or other reproductive harm.
For more information, go to www.P65Warnings.ca.gov
WARNING: CONTAINS LEAD. MAY BE HARMFUL IF EATEN OR CHEWED. COMPLIES
WITH FEDERAL STANDARDS. KEEP OUT OF REACH OF CHILDREN.
1 2 3 4 5
6 7
8
9
10 11
12 13
15
16
17
14
18 19
OM_SMK6020AS.indd 4OM_SMK6020AS.indd 4 11/18/2025 4:02:39 PM11/18/2025 4:02:39 PM
4
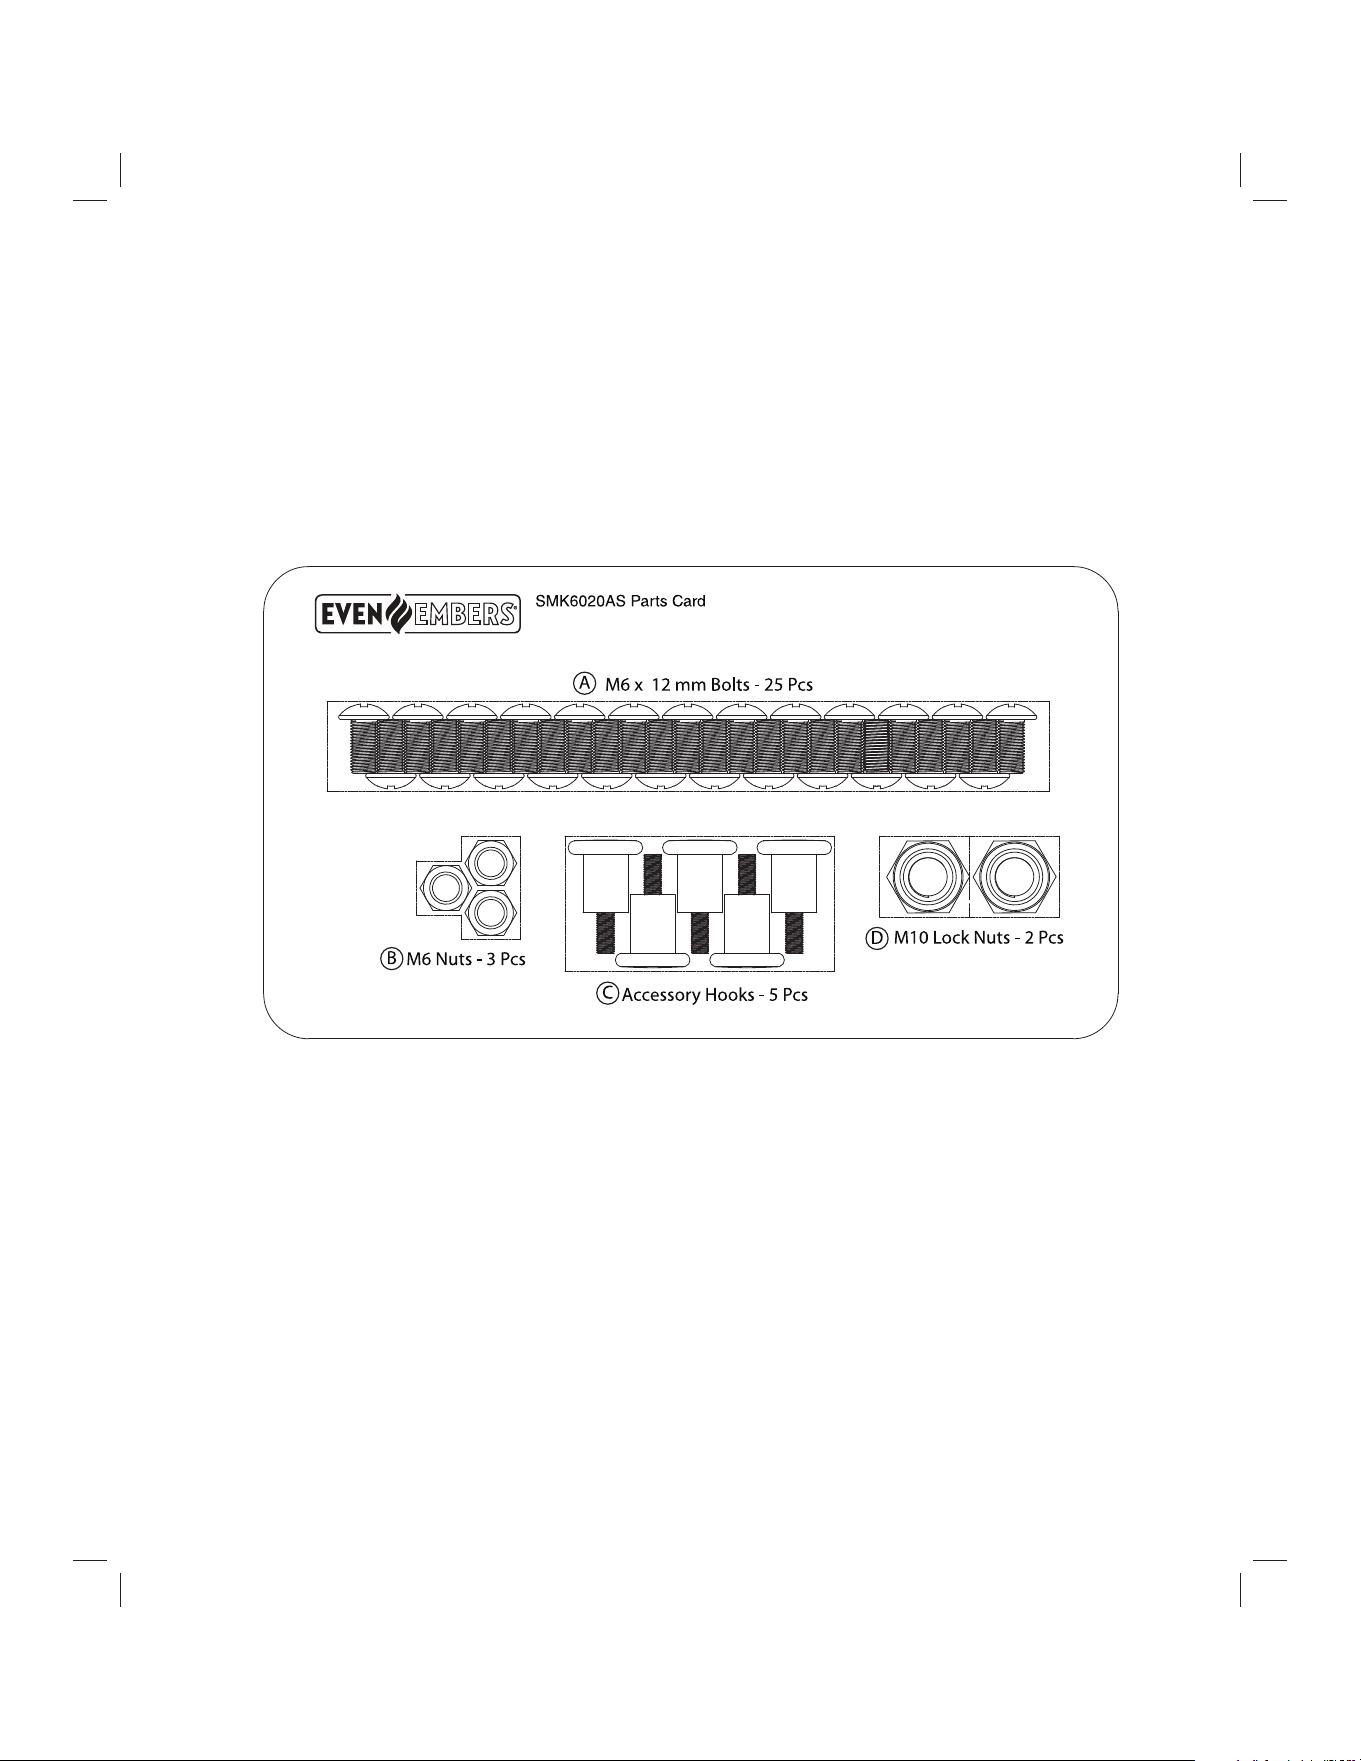
Parts Card Contents
OM_SMK6020AS.indd 5OM_SMK6020AS.indd 5 11/18/2025 4:02:39 PM11/18/2025 4:02:39 PM
5
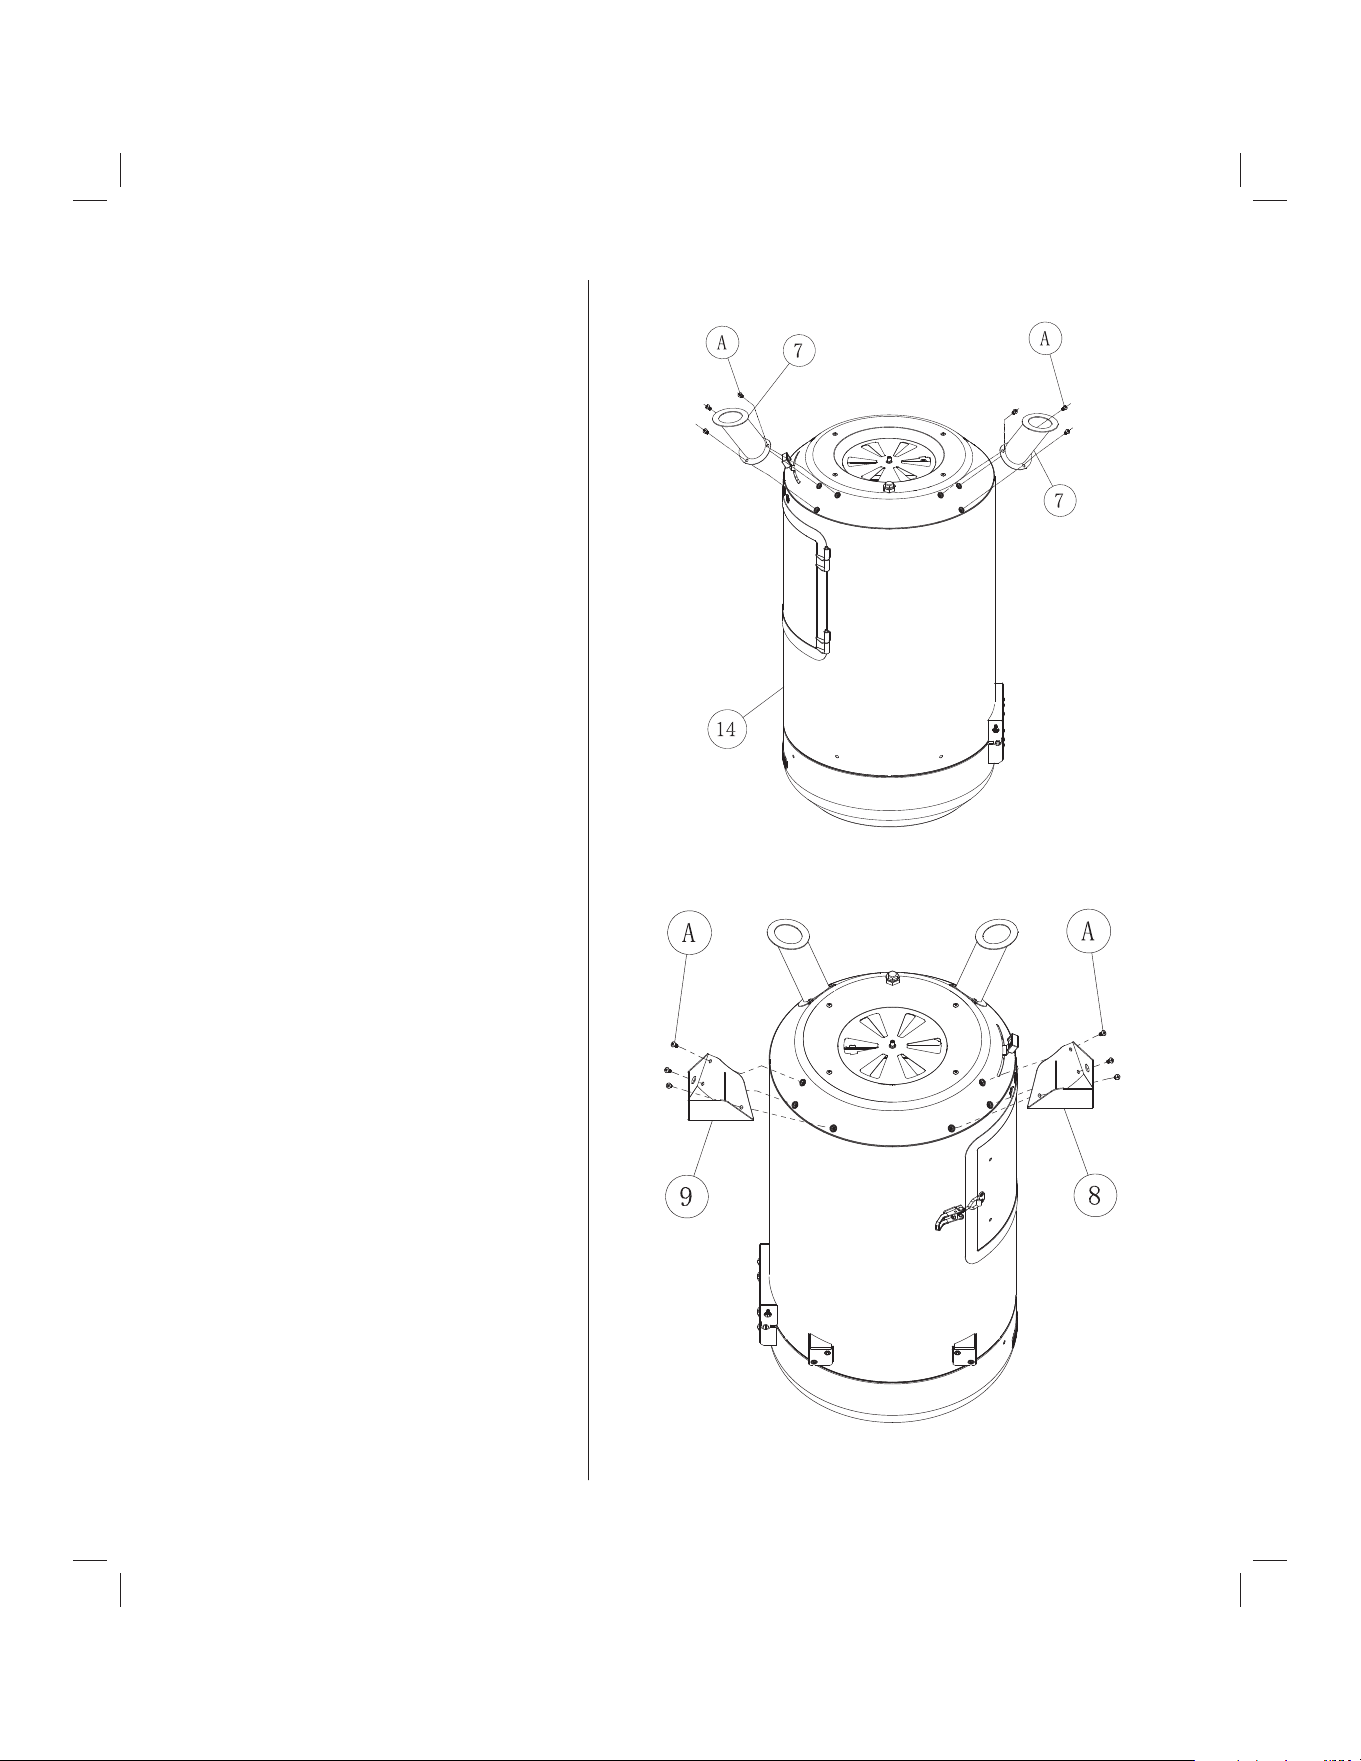
Choose a good, cleared assembly area
and get a friend to help you put your
smoker together. Lay card board down
to protect smoker finish and assembly
area. Turn the smoker on its top to begin
assembly.
Step 1
Attach legs to firebox using six M6 X
12 mm bolts.
Step 2
Attach front and rear axle brackets to
firebox using six M6 x 12 mm bolts.
Do not tighten bolts at this time.
OM_SMK6020AS.indd 6OM_SMK6020AS.indd 6 11/18/2025 4:02:39 PM11/18/2025 4:02:39 PM
6
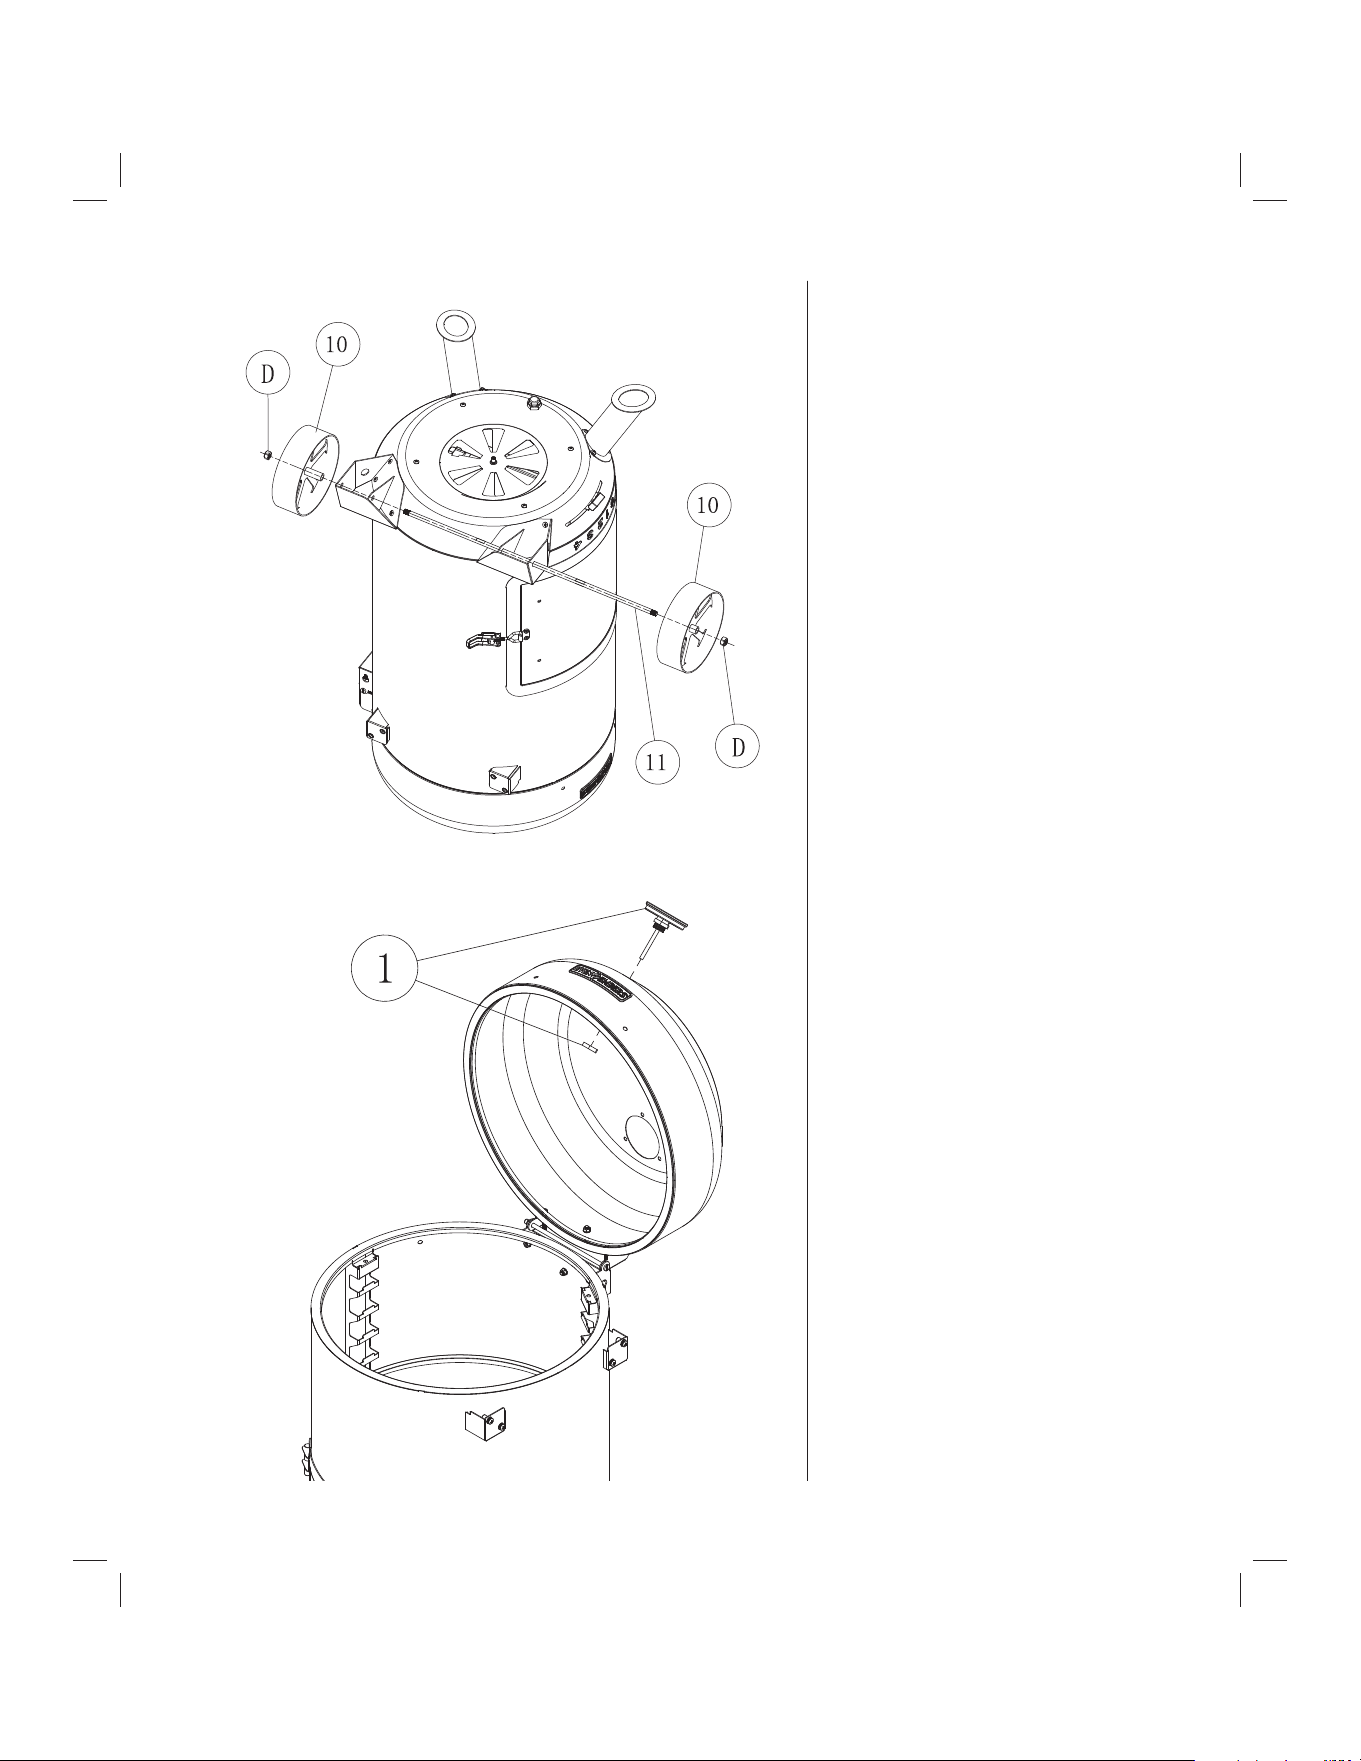
Step 3
Insert axle rod through front and
rear axle brackets as illustrated.
Attach wheels onto axle rod and
secure with two M10 lock nuts.
Tighten bolts on axle brackets
from Step 2.
Step 4
Attach temperature gauge to lid
using pre-attached retaining nut.
OM_SMK6020AS.indd 7OM_SMK6020AS.indd 7 11/18/2025 4:02:40 PM11/18/2025 4:02:40 PM
7
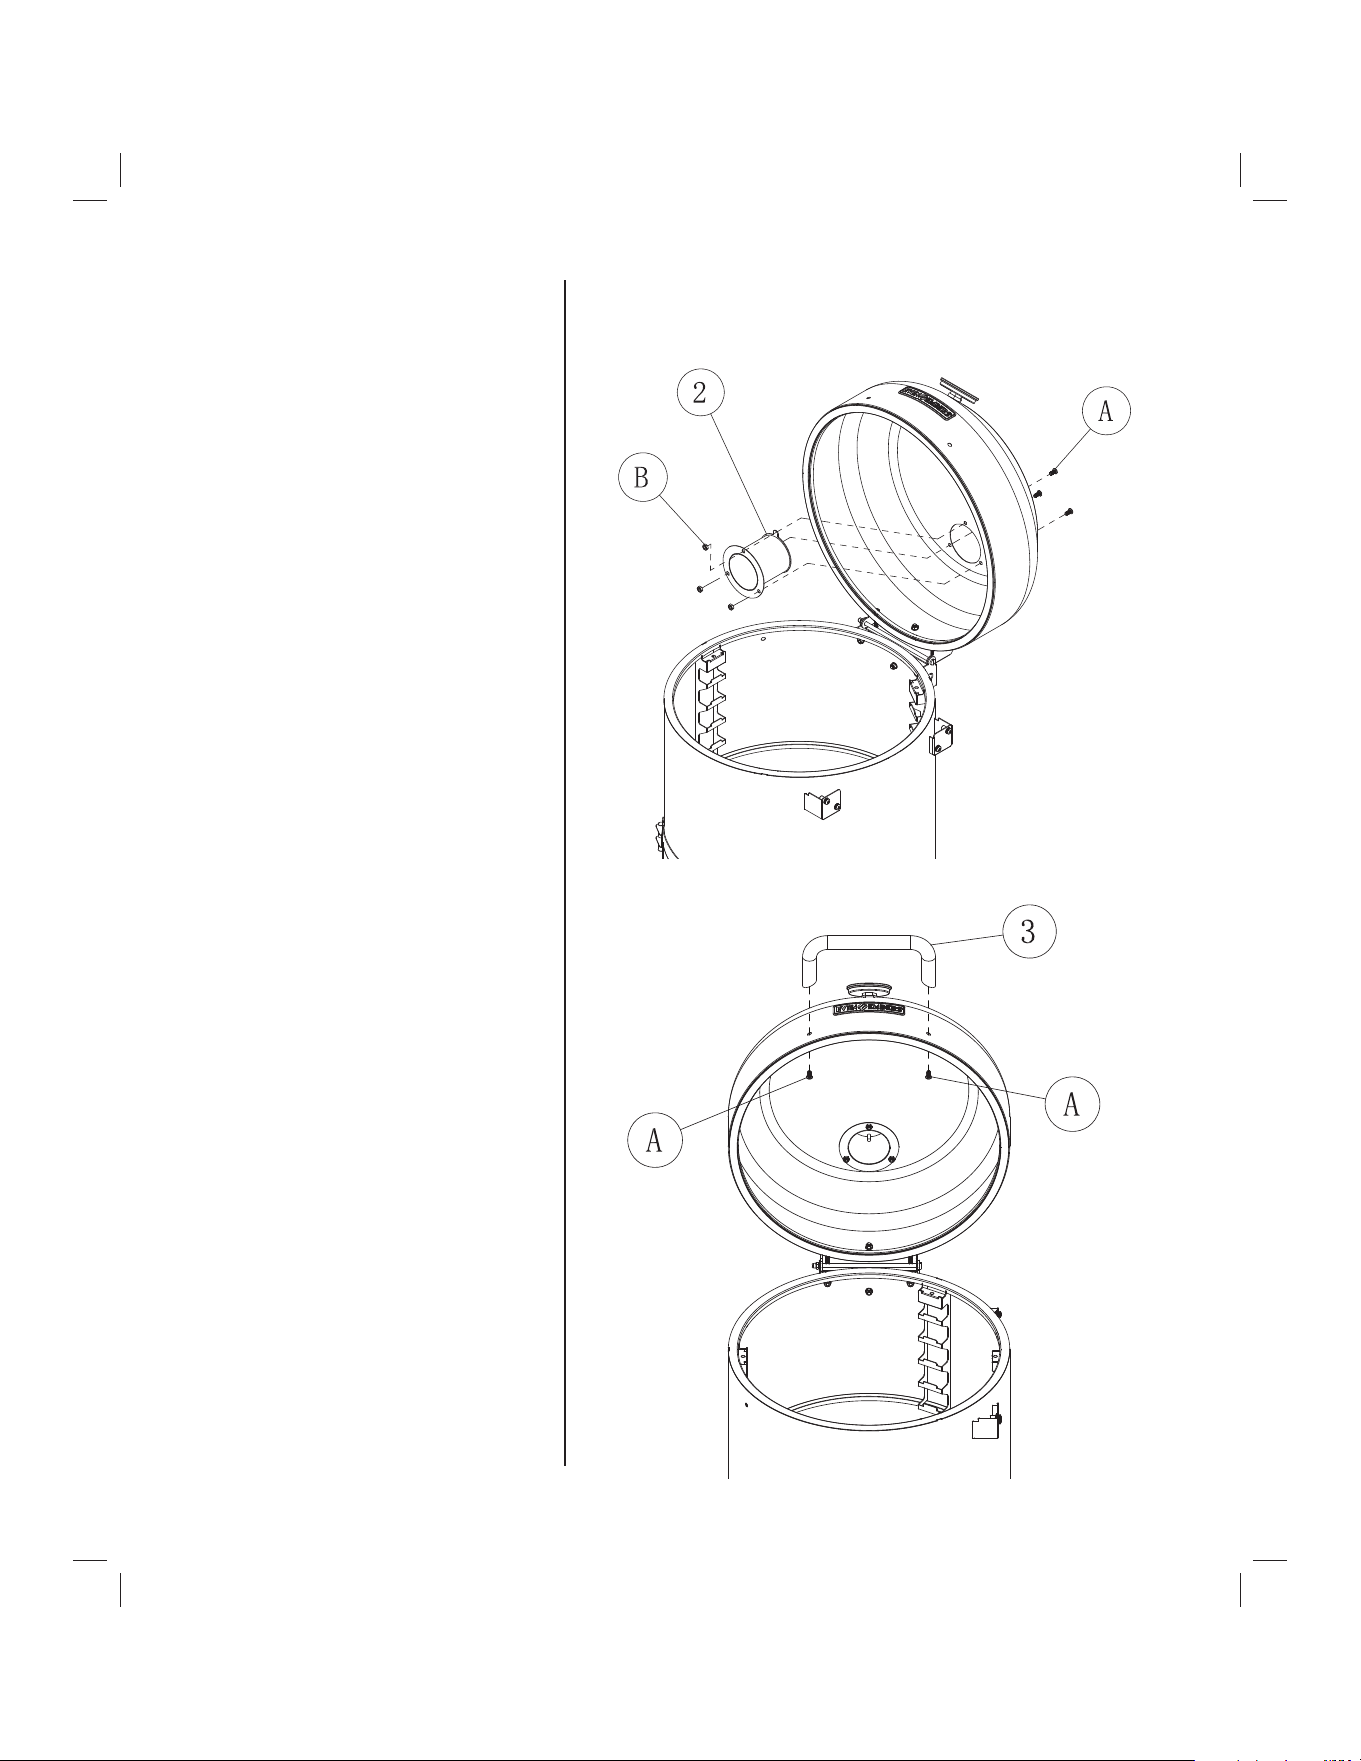
Step 5
Insert chimney through
smoker lid and secure with
three M6 x 12 mm bolts and
M6 nuts
Step 6
Attach lid handle to smoker lid
using two M6 X 12 mm bolts.
OM_SMK6020AS.indd 8OM_SMK6020AS.indd 8 11/18/2025 4:02:40 PM11/18/2025 4:02:40 PM
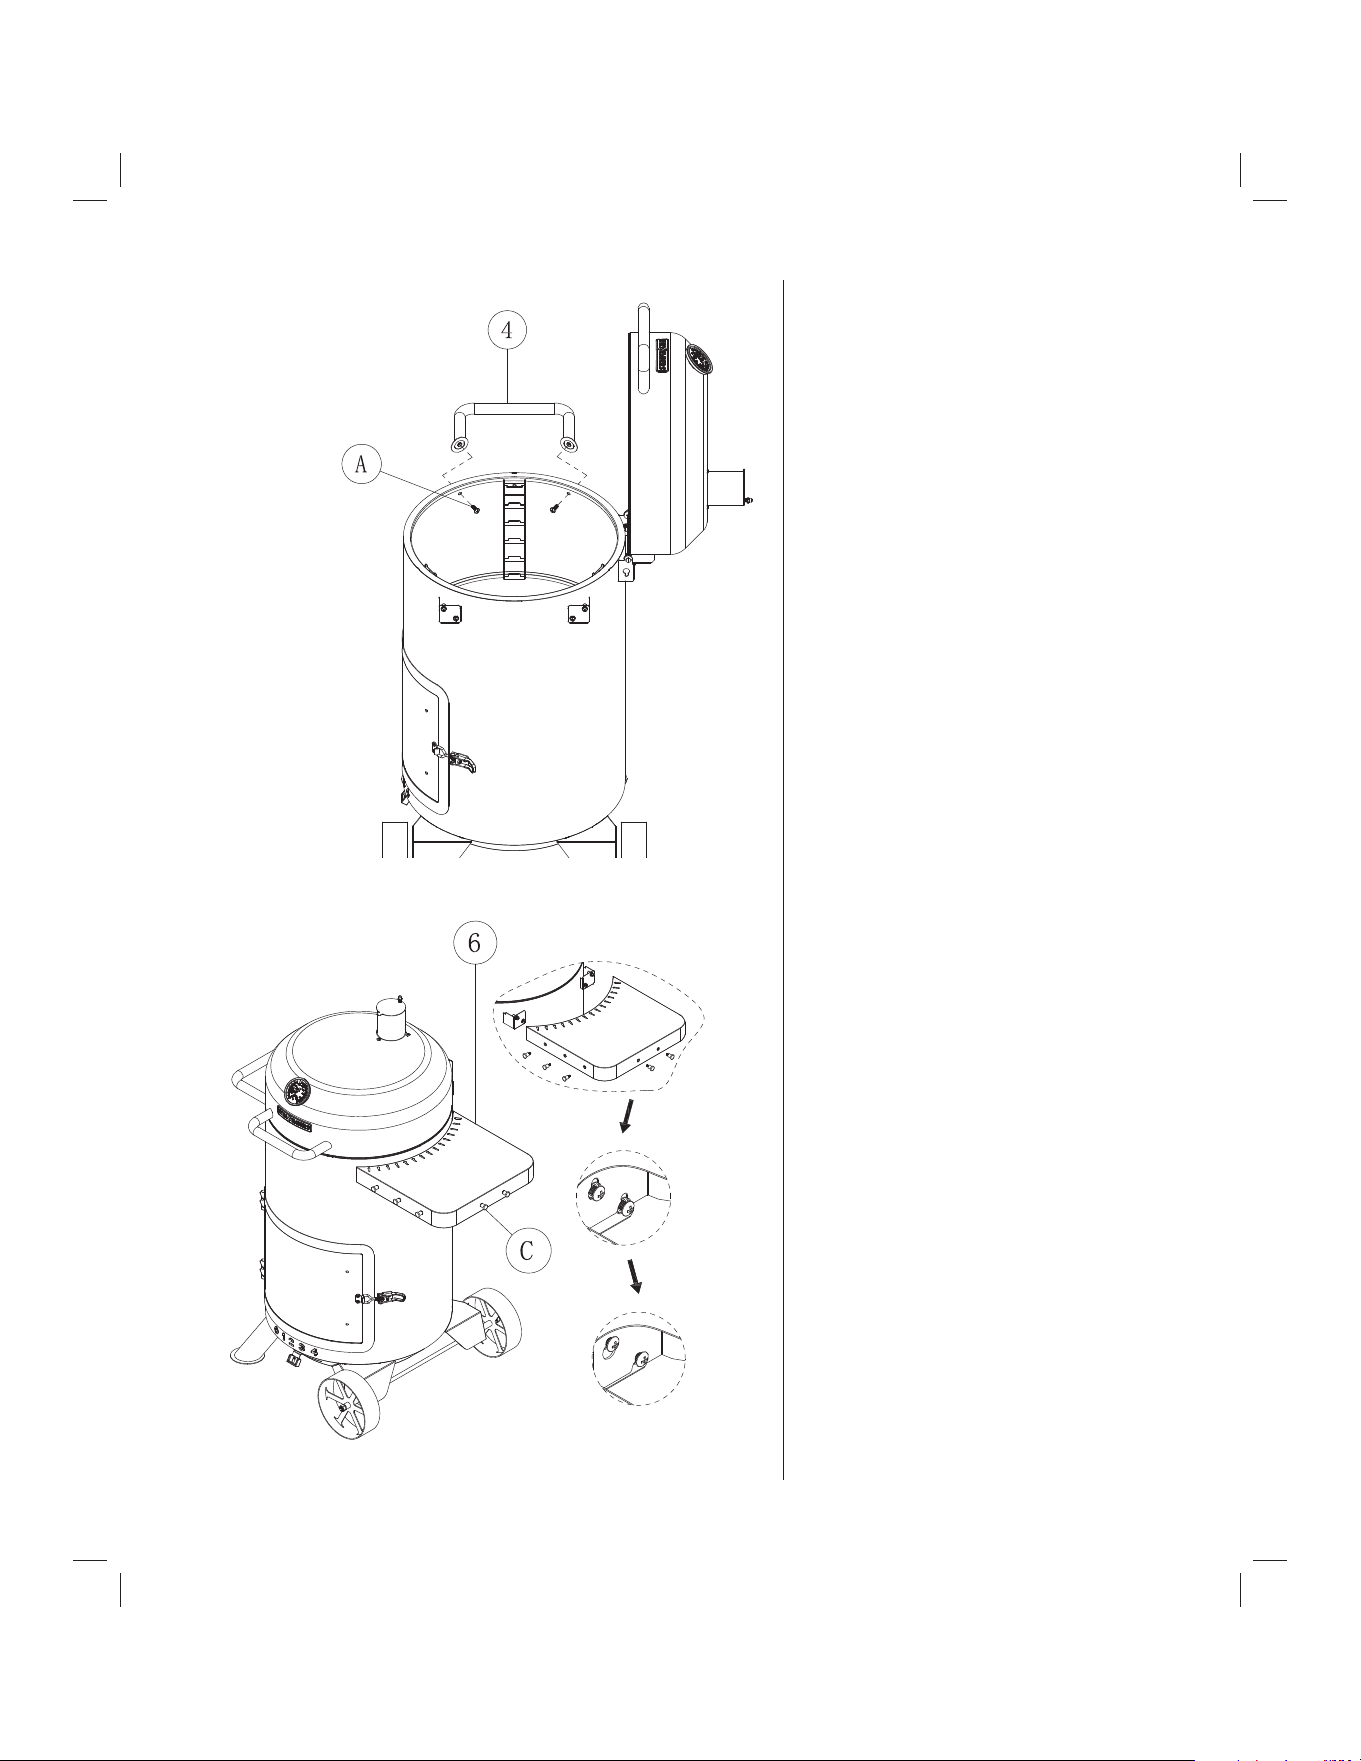
Step 7
Attach drum handle to firebox using
two M6 x 12 mm bolts.
Step 8
Insert four M6 x 12 mm bolts
halfway into side table brackets.
Then attach side table keyholes
over bolts, slide table down and
tighten bolts.
Attach five accessory hooks to side
table.
8
OM_SMK6020AS.indd 9OM_SMK6020AS.indd 9 11/18/2025 4:02:40 PM11/18/2025 4:02:40 PM
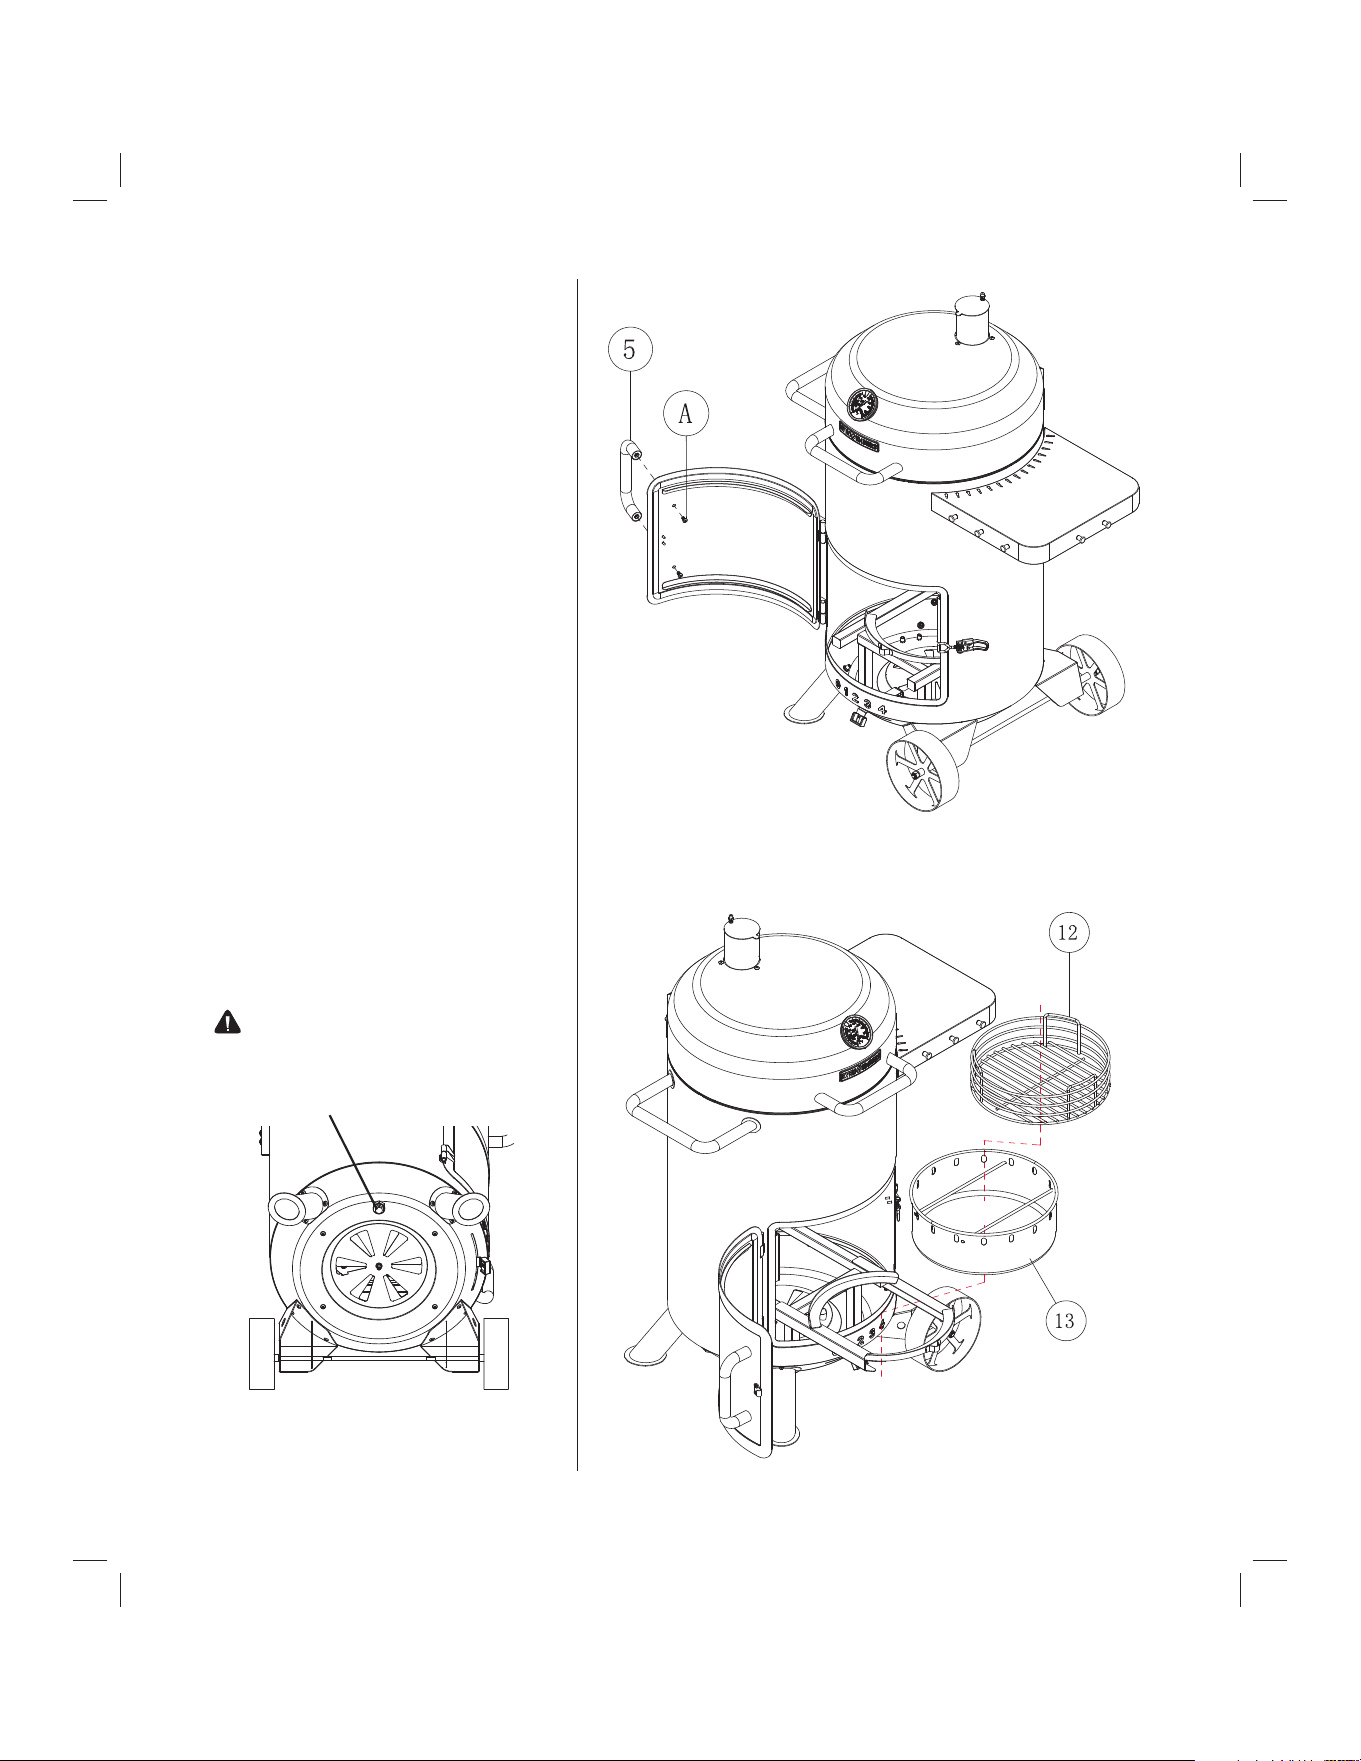
Step 9
Attach door handle to door using
two M6 x 12 mm bolts.
Step 10
Insert ash tray and charcoal grate
into sliding bracket in bottom of
firebox.
WARNING: Do not use smoker
without drain plug in place.
9
Drain Plug
OM_SMK6020AS.indd 10OM_SMK6020AS.indd 10 11/18/2025 4:02:40 PM11/18/2025 4:02:40 PM
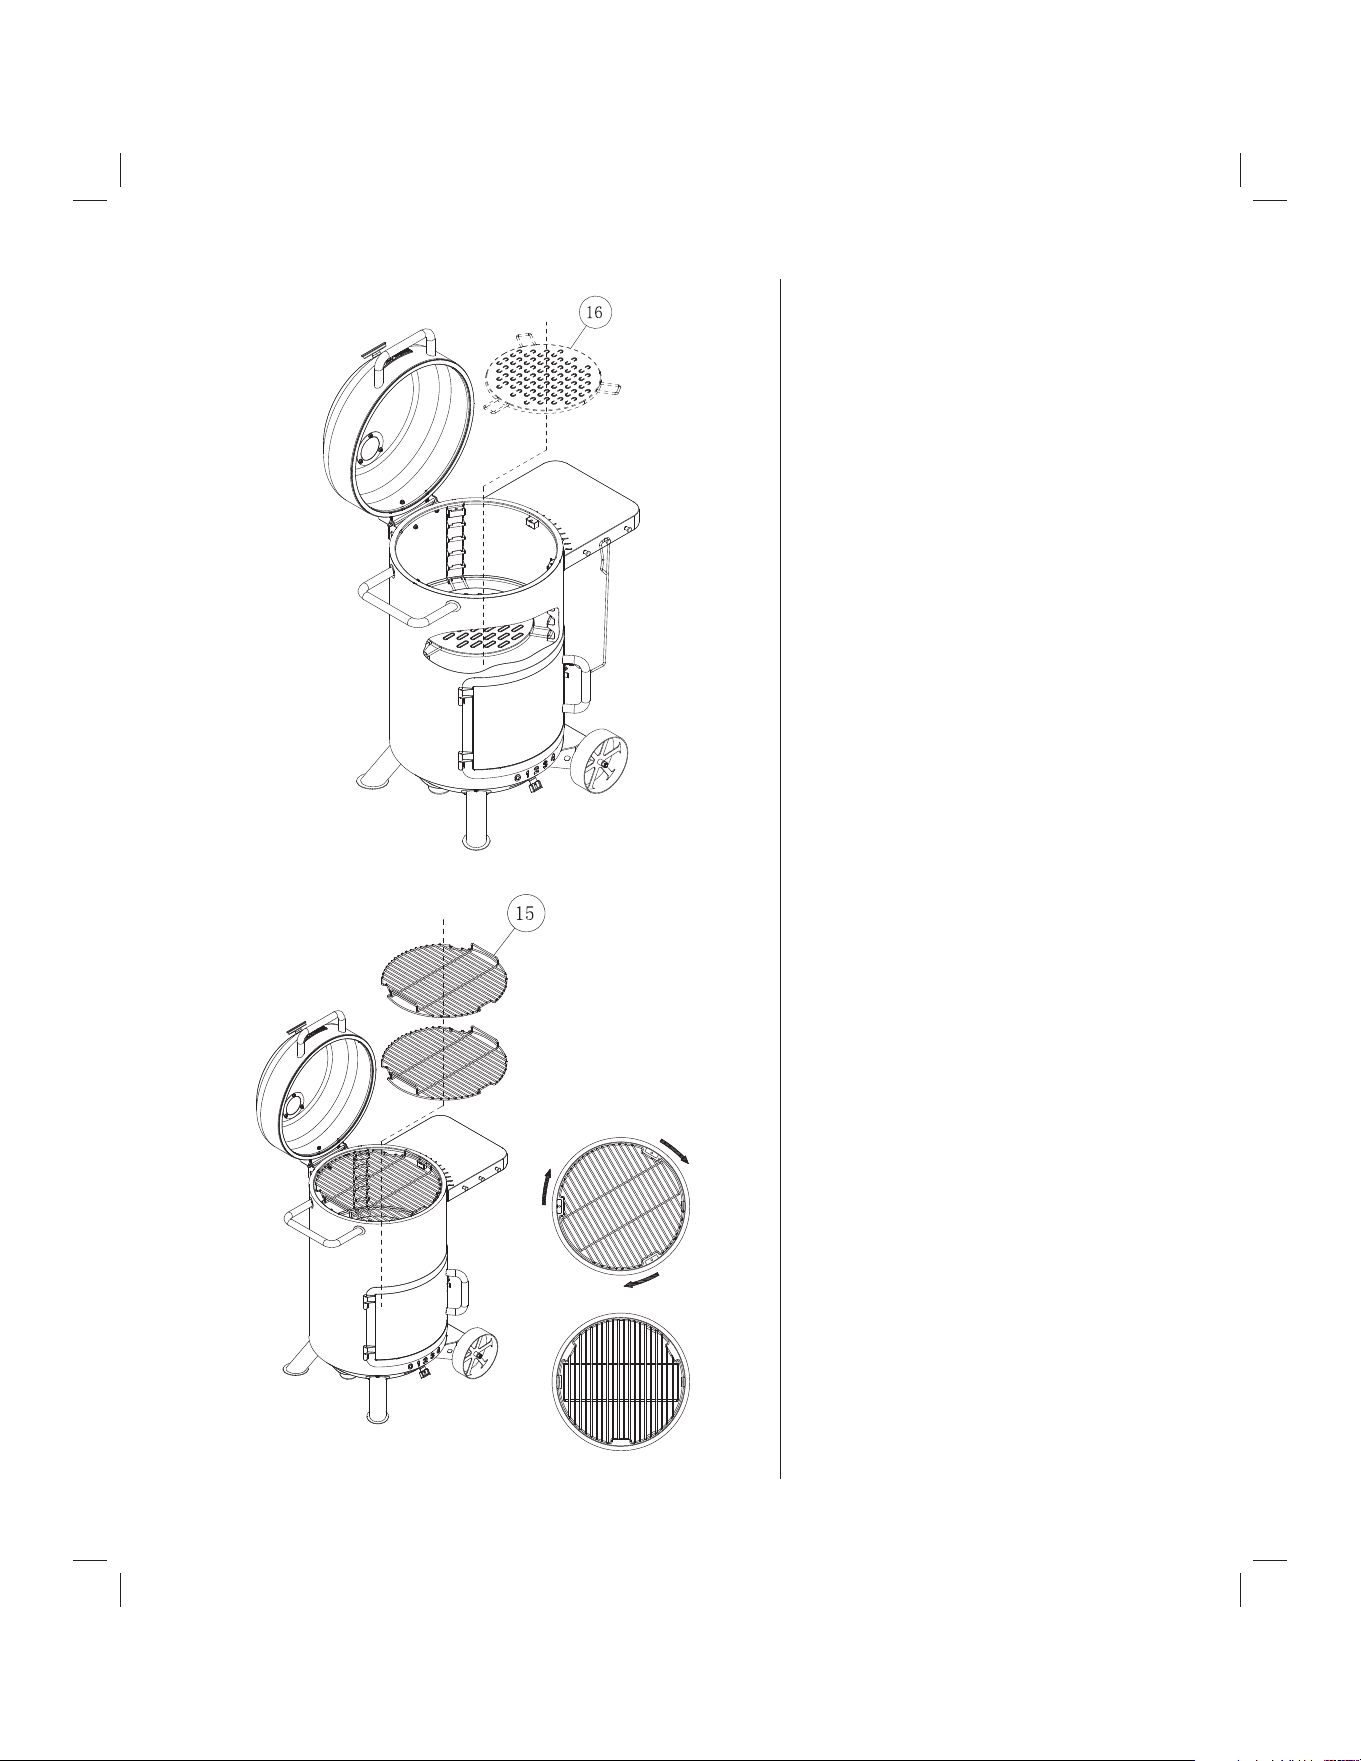
Step 11
Set diffuser on lowest brackets
inside firebox.
Step 12
Set cooking grates on brackets
inside firebox by aligning grates
with top brackets and lowering to
desired level, then rotate grate to
rest on brackets.
10
OM_SMK6020AS.indd 11OM_SMK6020AS.indd 11 11/18/2025 4:02:40 PM11/18/2025 4:02:40 PM
PREPARATION FOR USE
& LIGHTING IN STRUC TIONS
PLACE THE SMOKER OUTDOORS ON A HARD, LEVEL, NON-COMBUSTIBLE SURFACE
AWAY FROM ROOF OVERHANG OR ANY COMBUSTIBLE MATERIAL. NEVER USE ON WOODEN OR OTHER SURFACES THAT
COULD BURN. PLACE THE SMOKER AWAY FROM OPEN WIN DOWS OR DOORS TO PREVENT SMOKE FROM ENTERING YOUR
HOUSE. IN WINDY WEATHER, PLACE THE SMOKER IN AN OUTDOOR AREA THAT IS PRO TECT ED FROM THE WIND.
READ ALL SAFETY WARNINGS AND INSTRUCTIONS CAREFULLY
BEFORE OPERATING YOUR SMOKER.
FOLLOW INSTRUCTIONS ON CHARCOAL, CHARCOAL LIGHTER
FLUID OR CHARCOAL LIGHTING DEVICES.
Prior to your first use of the Even Embers Drum Smoker, follow
the in struc tions below carefully to cure your smoker. Curing your
smoker will minimize damage to the exterior finish as well as rid
the smoker of paint odor that can impart unnatural flavors to the
first meal prepared on your Even Embers Drum Smoker.
IMPORTANT: To protect your smoker from excessive rust, the
unit must be properly cured and covered at all times
when not in use.
Step 1
Remove cooking grates from cooking cham ber and set aside.
Step 2
Lightly coat all interior surfaces of the smoker including cooking
grates with vegetable oil or vegetable oil spray. Do not coat
charcoal grate or ash tray.
Step 3
Open lid, place 2.5 lbs. of charcoal on charcoal grate and carefully
light charcoal.
WARNING: DO NOT use smoker without ash tray in place.
DO NOT attempt to remove charcoal ash tray while
tray contains hot coals.
Step 4
After flames die down and charcoal is covered with a white ash,
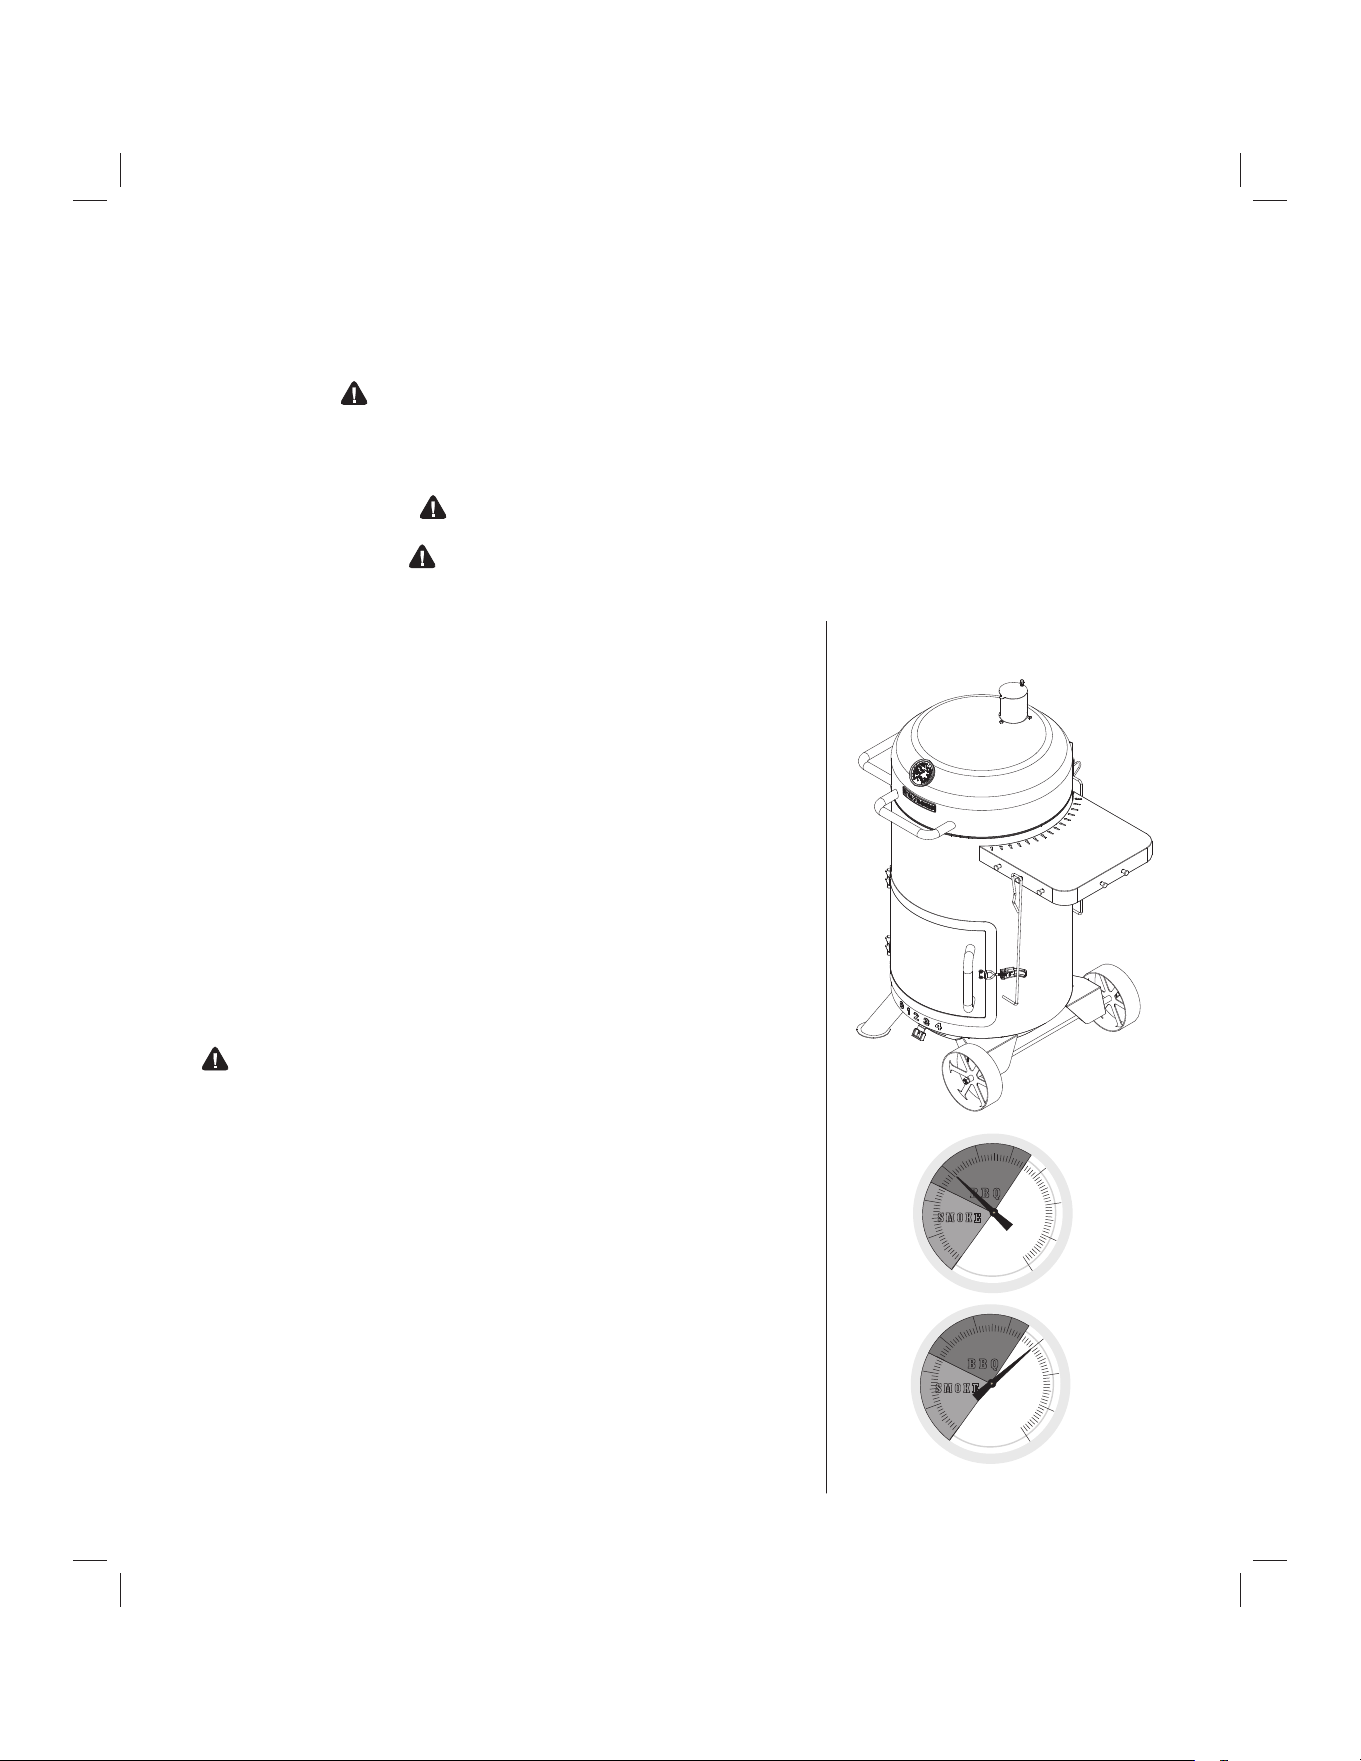
close lid. Allow temperature to reach 250°F on heat indicator.
Maintain this temperature for 2 hours.
Step 5
Increase the temperature to approximately to 400°F. This can
be achieved by opening the chimney damper and adding more
charcoal and/or wood. Maintain this temperature for 1 hour then
allow unit to cool completely.
NOTE: Never exceed a temperature of 450°F in cooking
chamber. It is important that the exterior of the smoker is not
scraped or rubbed during the curing process.
YOUR EVEN EMBERS DRUM SMOKER
IS NOW CURED AND READY FOR USE.
Curing Your Smoker
11
ºF
Cooking
Temperature
500
450
400
350
300
250
200
150
100
BBQ
SMOKE
ºF
Cooking
Temperature
500
450
400
350
300
250
200
150
100
BBQ
SMOKE
OM_SMK6020AS.indd 12OM_SMK6020AS.indd 12 11/18/2025 4:02:40 PM11/18/2025 4:02:40 PM
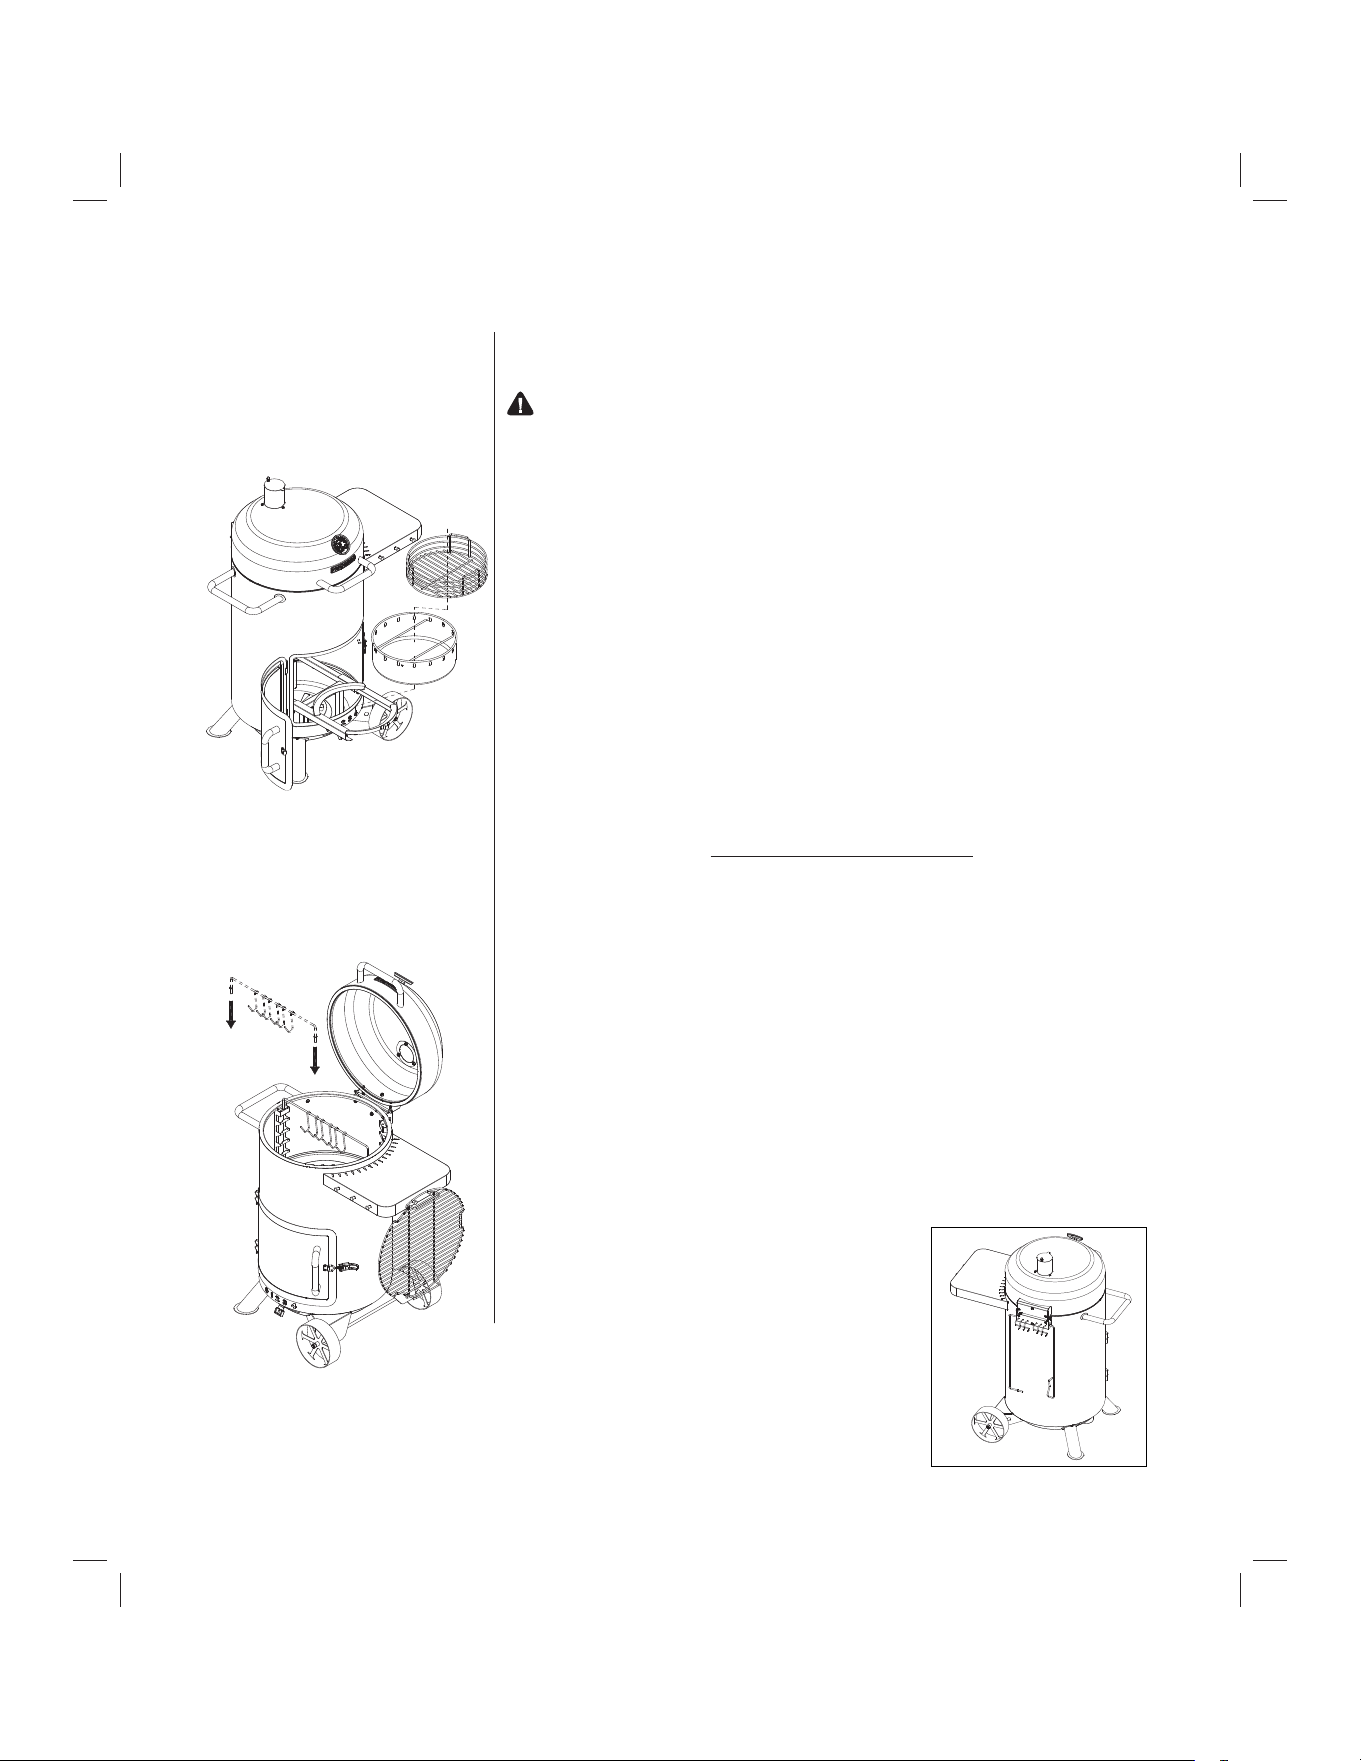
Step 1
Place the ash tray and charcoal grate in firebox, then follow instructions
below carefully to build a fire.
WARNING: Do not use smoker without a drain plug in place.
Step 2
Open lid and carefully light charcoal and slide charcoal grate and ash tray
into firebox. Close door.
Step 3
After flames die down and charcoal is covered with a white ash, place
food on cooking grates.
Step 4
Position food in the center of each cooking grate for optimal
performance. Food can be cooked with the lid open or closed. If lid is
closed, adjust air shutter and chimney damper for temperature control.
Step 5
The ideal smoking temperature is between 175°F and 250°F. For large
cuts of meat, allow approximately one hour of cooking time per pound of
meat. Always use a meat thermometer to ensure food is fully cooked
before removing from smoker.
Step 6
Allow smoker to cool completely, then follow instructions in the
“After-Use Safety” and “Proper Care & Maintenance” sections of this
manual.
Step 1
Open lid and remove cooking grates. Insert food hook rod with food
hooks into holes in top brackets of firebox.
Step 2
Follow the steps above to build a fire.
Step 3
Place food on hooks and keep in center of drum for optimal performance.
Food can be cooked with the lid open or closed. If lid is closed, adjust air
shutter and chimney damper for temperature control.
Step 4
The ideal smoking temperature is between 175°F and 250°F. For large
cuts of meat, allow approximately one hour of cooking time per pound of
meat. Always use a meat thermometer to ensure food is fully cooked
before removing from smoker.
Step 5
Allow smoker to cool completely. The food
hook rod, food hooks and rake can be stored
on back of smoker as shown in figure.
OPERATING INSTRUCTIONS
12
Smoking on
Cooking Grates
Smoking on
Food Hooks
OM_SMK6020AS.indd 13OM_SMK6020AS.indd 13 11/18/2025 4:02:41 PM11/18/2025 4:02:41 PM

13
To obtain your favorite smoke flavor, ex per i ment by using chunks, sticks
or chips of flavor producing wood such as hickory, pecan, apple, cherry, or
mesquite. Most fruit or nut tree wood may be used for smoke flavoring. Do
not use resinous wood such as pine as it will produce an unpleasant taste.
Wood chunks or sticks 3” to 4” long and 1” to 2” thick work best. Unless the
wood is still green, soak the wood in water for 30 minutes or wrap each piece
in foil and tear several small holes in the foil to pro duce more smoke and
prevent the wood from burning too quickly. A lot of wood is not required to
obtain a good smoke flavor. A recommended amount for the Drum Smoker is
5 to 6 wood chunks or sticks. Experiment by using more wood for stronger
smoke flavor or less wood for milder smoke flavor.
Additional flavoring wood should not have to be added during the cooking
process. However, it may be necessary when cooking very large pieces of
food. Follow instructions and cautions in the “Adding Charcoal/Wood in the
Firebox” section of this manual to avoid injury while adding wood.
To increase heat and air circulation, fully open firebox air shutter and chimney
damper. If increased air circulation does not raise temperature sufficiently,
more wood and/or char coal may be needed.
NOTE: Dry wood burns hotter than charcoal, so you may want to increase
the ratio of wood to charcoal to increase the cooking tem per a ture. Hardwood
such as oak, hickory, mesquite, fruit and nut wood are an excellent fuel
because of their burning rate. When using wood as fuel, make sure the wood
is seasoned and dry. DO NOT use resinous wood such as pine as it will
produce an unpleasant taste.
Flavoring Wood
Regulating Heat
Adding Charcoal/Wood in the Firebox
Step 1
Stand back and carefully open firebox door. Use caution since flames can flare-up when fresh air suddenly
comes in contact with fire.
Step 2
Use rack to slide the ash tray and charcoal grate out from firebox. Wear oven mitts/gloves and use long
cooking tongs to lightly brush aside ashes on hot coals. Use cooking tongs to add charcoal and/or wood,
being careful not to stir-up ashes and sparks.
WARNING: Never add charcoal lighting fluid to hot or even warm coals as flashback may occur causing
severe burns.
Step 3
When charcoal is burning strong again, carefully slide ash tray and charcoal grate into firebox.
Step 4
Close the firebox door and allow food to continue cooking.
Adding Charcoal/
Wood in the
Firebox
Smoke Cooking
Tips
If food is excessively browned or flavored with smoke, wrap food in aluminum
foil after the first few hours of smoking. This will allow food to continue
cooking without further browning or smoke flavoring.
During the smoking process, avoid the temptation to open lid to check food.
Opening the lid allows heat and smoke to escape, making ad di tion al cooking
time necessary.
OM_SMK6020AS.indd 14OM_SMK6020AS.indd 14 11/18/2025 4:02:41 PM11/18/2025 4:02:41 PM

14
• Always allow smoker and all components to cool completely before handling.
• Never leave coals and ashes in smoker unattended. Make sure coals and ashes are completely
extinguished before removing.
• Before smoker can be left unattended, remaining coals and ashes must be removed from smoker.
Use caution to protect yourself and property. Place re main ing coals and ashes in a noncombustible
metal container and completely saturate with water. Allow coals and water to remain in metal
container 24 hours prior to disposing.
• Extinguished coals and ashes should be placed a safe distance from all struc tures and combustible
materials.
• With a garden hose, completely wet surface beneath and around the smoker to extinguish any ashes,
coals or embers which may have fallen during the cooking or cleaning process.
• Allow metal bucket or tin can and its contents to cool com plete ly before removing. Dispose of
contents properly.
• Cover and store smoker in a protected area away from children and pets.
AFTER-USE SAFETY
WARNING
Proper Care
& Maintenance
• To protect your smoker from excessive rust, the unit
must be properly cured and covered at all times when not
in use.
• Wash cooking grates with hot, soapy water, rinse well
and dry. Lightly coat grates with vegetable oil or
vegetable oil spray.
• Clean inside and outside of smoker by wiping off with
a damp cloth. Apply a light coat of vegetable oil or
vegetable oil spray to the interior surface to prevent
rusting.
• If rust appears on the exterior surface of your smoker,
clean and buff the affected area with steel wool or fine
grit emery cloth. Touch-up with a good quality high-
temperature re sis tant paint.
• Never apply paint to the interior surface. Rust spots
on the interior surface can be buffed, cleaned, then
lightly coated with vegetable oil or vegetable oil spray to
minimize rusting.
• For cleaning, remove drain plug to drain grease and
debris out the bottom of the smoker.
OM_SMK6020AS.indd 15OM_SMK6020AS.indd 15 11/18/2025 4:02:41 PM11/18/2025 4:02:41 PM

For 1-year from date of purchase, Fair Game Group warrants the Drum Smoker against defects due to workmanship or materials to the
original pur chas er. Fair Game Group’s obligations under this warranty are limited to the following guidelines:
• This warranty does not cover smokers that have been altered/modified or damaged due to: normal wear, rust, abuse, improper
maintenance and/or improper use.
• This warranty does not cover surface scratches or heat damage to the finish, which is considered normal wear.
• Fair Game Group may elect to repair or replace damaged units covered by the terms of this warranty.
• This warranty extends to the original purchaser only and is not trans fer able or assignable to subsequent purchasers.
Fair Game Group requires reasonable proof of purchase. Therefore, we strongly recommend that you retain your sales receipt or invoice.
To obtain replacement parts for your Drum Smoker under the terms of this warranty, please contact Customer Service Department at 855-
735-9922 or [email protected] for a Return Authorization Number and further instructions. A receipt or proof of purchase will be
required. Fair Game Group will not be responsible for any smokers forwarded to us without prior authorization.
EXCEPT AS ABOVE STATED, FAIR GAME GROUP MAKES NO OTHER EXPRESS WARRANTY.
THE IMPLIED WARRANTIES OF MERCHANTABILITY AND FITNESS FOR A PARTICULAR PURPOSE ARE LIMITED IN DURATION TO
1-YEAR FROM THE DATE OF PURCHASE. SOME STATES DO NOT ALLOW LIM I TA TIONS ON HOW LONG AN IMPLIED WARRANTY LASTS,
SO THE ABOVE LIMITATION MAY NOT APPLY TO YOU.
ANY LIABILITY FOR INDIRECT, INCIDENTAL OR CONSEQUENTIAL DAMAGES ARISING FROM THE FAILURE OF THE DRUM SMOKER TO
COMPLY WITH THIS WARRANTY OR ANY IMPLIED WARRANTY IS EXCLUDED. CUSTOMER ACKNOWLEDGES THAT THE PURCHASE
PRICE CHARGED IS BASED UPON THE LIMITATIONS CONTAINED IN THE WARRANTY SET OUT ABOVE. SOME STATES DO NOT ALLOW
THE EXCLUSION OR LIMITATION OF INCIDENTAL OR CONSEQUENTIAL DAMAGES, SO THE ABOVE LIMITATION OR EXCLUSION MAY
NOT APPLY TO YOU. THIS WARRANTY GIVES YOU SPECIFIC LEGAL RIGHTS, AND YOU MAY ALSO HAVE OTHER RIGHTS WHICH VARY
FROM STATE TO STATE.
1-YEAR LIMITED WARRANTY
©2025 Fair Game Group LLC.
Carrollton, Texas 75006 U.S.A.
www.evenembers.com
Owner’s Manual for Model
SMK6020AS
OM6020AS
1125
OM_SMK6020AS.indd 16OM_SMK6020AS.indd 16 11/18/2025 4:02:41 PM11/18/2025 4:02:41 PM