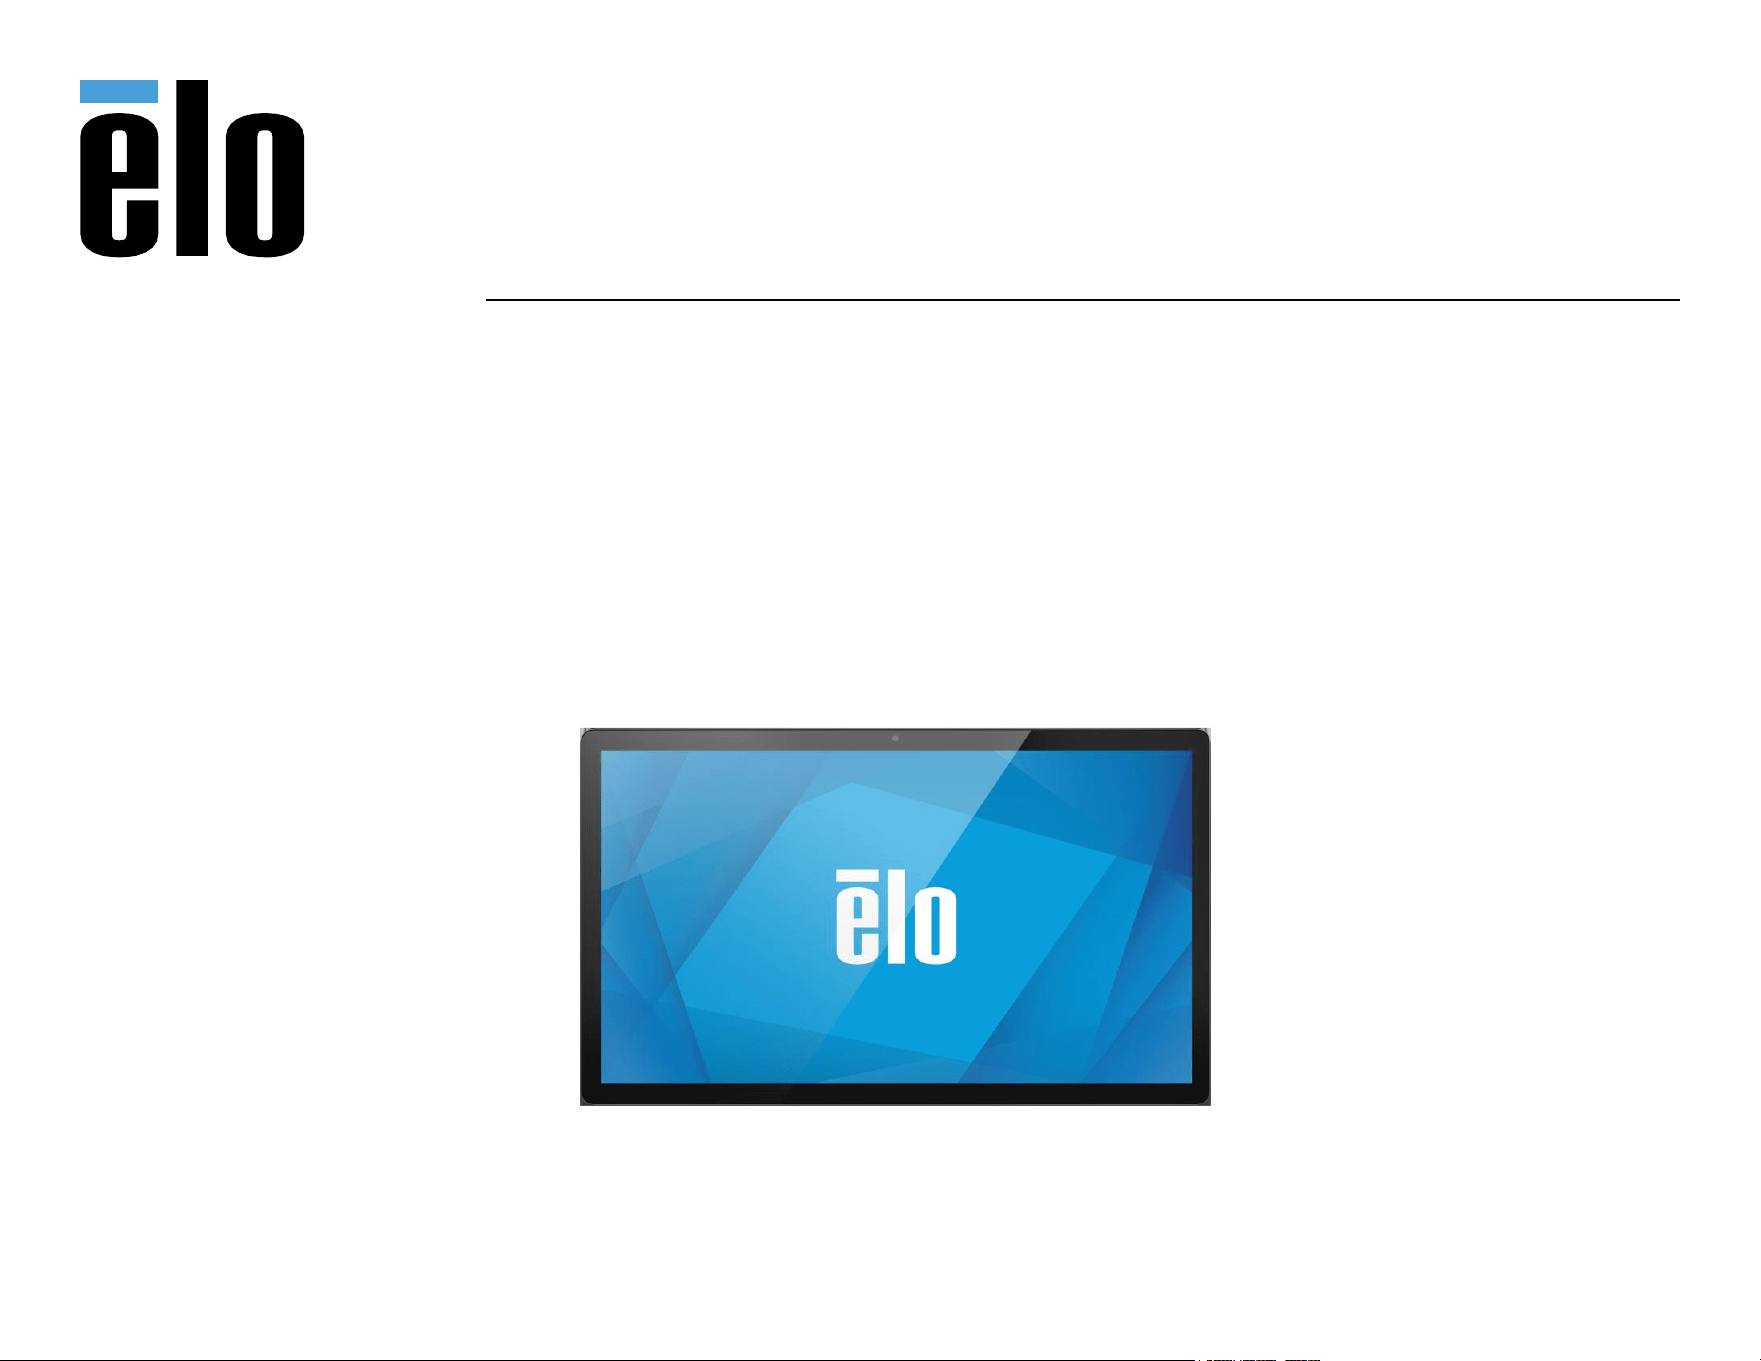
USER MANUAL
Elo Touch Solutions
Elo I-Series 5 Slate Models
ESY15I1E-C

UM600853 Rev B page 2 of 85
User Manual –I-Series 5 Slate
Copyright © 2020 Elo Touch Solutions, Inc. All Rights Reserved.
No part of this publication may be reproduced, transmitted, transcribed, stored in a retrieval system, or translated into any language or computer
language, in any form or by any means, including, but not limited to, electronic, magnetic, optical, chemical, manual, or otherwise without prior written
permission of Elo Touch Solutions, Inc.
Disclaimer
The information in this document is subject to change without notice. Elo Touch Solutions, Inc., and its Affiliates (collectively “Elo”) makes no representations or
warranties with respect to the contents herein, and specifically disclaims any implied warranties of merchantability or fitness for a particular purpose. Elo
reserves the right to revise this publication and to make changes from time to time in the content hereof without obligation of Elo to notify any person of such
revisions or changes.
Trademark Acknowledgments
Elo, Elo (logo), Elo Touch, Elo Touch Solutions, EloView, are trademarks of Elo and its Affiliates.

UM600853 Rev B page 3 of 85
User Manual –I-Series 5 Slate
Contents
SECTION 1 ................................................................................................................................................................................................................................................ 7
PRODUCT DESCRIPTION ........................................................................................................................................................................................................................................ 8
I-SERIES 5 SLATE HEAD......................................................................................................................................................................................................................................... 8
Specifications ............................................................................................................................................................................................................................................. 8
Features ..................................................................................................................................................................................................................................................... 9
Feature Locations ....................................................................................................................................................................................................................................... 9
IO HUB ........................................................................................................................................................................................................................................................... 10
Features & Specifications ......................................................................................................................................................................................................................... 10
Feature Locations ..................................................................................................................................................................................................................................... 10
FULL POS STAND WITH INTEGRATED IO AND NO CFD ................................................................................................................................................................................... 11
Features and Specifications ............................................................................................................................................................................................................ 11
Feature Locations ............................................................................................................................................................................................................................... 11
FULL POS STAND WITH INTEGRATED IO AND CFD ......................................................................................................................................................................................... 12
Features & Specifications ................................................................................................................................................................................................................. 12
Feature Locations ............................................................................................................................................................................................................................... 12
SECTION 2 .............................................................................................................................................................................................................................................. 13
UNPACKING AND INSTALLATION ........................................................................................................................................................................................................................... 15
I-Series 5 Slate with IO Hub ...................................................................................................................................................................................................................... 15
Mounting .................................................................................................................................................................................................................................................. 15
EloPOS Z30 with or without CFD Display .................................................................................................................................................................................................. 15
POWERING THE SYSTEM ..................................................................................................................................................................................................................................... 16
Power Button ........................................................................................................................................................................................................................................... 16
Power LED Status ..................................................................................................................................................................................................................................... 16
Power button On-Screen display menu .................................................................................................................................................................................................... 17
OUT OF BOX EXPERIENCE (OOBE) ....................................................................................................................................................................................................................... 18
ELO HOME APK HOME SCREEN – ENROLL WITH ELOVIEW ........................................................................................................................................................................................ 19
ANDROID LOCK AND HOME SCREENS - GMS .......................................................................................................................................................................................................... 21
Notification Panel ..................................................................................................................................................................................................................................... 23
Quick Access Panel ................................................................................................................................................................................................................................... 24
Application Drawer & Google Application .............................................................................................................................................................................................. 25
Customize and add a shortcut to the Home Screen. ................................................................................................................................................................................ 26
SECTION 3 .............................................................................................................................................................................................................................................. 27
NETWORK & INTERNET ....................................................................................................................................................................................................................................... 28
WLAN ....................................................................................................................................................................................................................................................... 28
Ethernet .................................................................................................................................................................................................................................................... 30
Airplane mode .......................................................................................................................................................................................................................................... 30
Hotspot & tethering ................................................................................................................................................................................................................................. 31

UM600853 Rev B page 4 of 85
User Manual –I-Series 5 Slate
CONNECTED DEVICES .......................................................................................................................................................................................................................................... 32
Bluetooth .................................................................................................................................................................................................................................................. 32
Cast .......................................................................................................................................................................................................................................................... 32
Printing ..................................................................................................................................................................................................................................................... 34
APPS & NOTIFICATIONS ...................................................................................................................................................................................................................................... 36
Setting notifications ................................................................................................................................................................................................................................. 36
Setting Permission manager on apps using storage, phone, and location .............................................................................................................................................. 38
Setting Emergency alerts ......................................................................................................................................................................................................................... 38
STORAGE ......................................................................................................................................................................................................................................................... 39
STORAGE MANAGER ......................................................................................................................................................................................................................................... 39
SOUND ............................................................................................................................................................................................................................................................ 40
Volume Setting ......................................................................................................................................................................................................................................... 40
Do not Disturb .......................................................................................................................................................................................................................................... 40
Default Notification Sound ....................................................................................................................................................................................................................... 41
Default Alarm Sound ................................................................................................................................................................................................................................ 42
Audio Policy ............................................................................................................................................................................................................................................. 42
DISPLAY ........................................................................................................................................................................................................................................................... 43
Auto Idle mode ......................................................................................................................................................................................................................................... 43
Brightness Level ....................................................................................................................................................................................................................................... 43
Dark theme............................................................................................................................................................................................................................................... 43
Night Light Feature .................................................................................................................................................................................................................................. 43
Screen timeout ......................................................................................................................................................................................................................................... 44
Auto-rotation screen ................................................................................................................................................................................................................................ 44
Font size ................................................................................................................................................................................................................................................... 44
Display size ............................................................................................................................................................................................................................................... 44
Screen saver ............................................................................................................................................................................................................................................. 45
WALLPAPER ..................................................................................................................................................................................................................................................... 48
Wallpaper ................................................................................................................................................................................................................................................. 48
ACCESSIBILITY ................................................................................................................................................................................................................................................... 49
SECURITY & PRIVACY ......................................................................................................................................................................................................................................... 51
Security .................................................................................................................................................................................................................................................... 51
App Security ............................................................................................................................................................................................................................................. 51
DEVICE UNLOCK ............................................................................................................................................................................................................................................... 51
ACCOUNT SECURITY ........................................................................................................................................................................................................................................... 52
DEVICE FINDERS ............................................................................................................................................................................................................................................... 52
SYSTEM & UPDATES .......................................................................................................................................................................................................................................... 53
Privacy ..................................................................................................................................................................................................................................................... 53
PERMISSION MANGER ....................................................................................................................................................................................................................................... 53
PRIVACY DASHBOARD ........................................................................................................................................................................................................................................ 54
ADS ................................................................................................................................................................................................................................................................ 54
DATA SHARING UPDATES FOR LOCATION ............................................................................................................................................................................................................... 54
More security & privacy .......................................................................................................................................................................................................................... 54
LOCATION ........................................................................................................................................................................................................................................................ 55
PASSWORDS AND ACCOUNTS ............................................................................................................................................................................................................................... 56

UM600853 Rev B page 5 of 85
User Manual –I-Series 5 Slate
DIGITIAL WELL-BEING & PARENTAL CONTROLS ......................................................................................................................................................................................................... 57
GOOGLE .......................................................................................................................................................................................................................................................... 58
SYSTEM ........................................................................................................................................................................................................................................................... 59
Languages ................................................................................................................................................................................................................................................ 59
Gestures ................................................................................................................................................................................................................................................... 60
Date & Time ............................................................................................................................................................................................................................................. 60
Advanced Settings .................................................................................................................................................................................................................................... 60
Reset options ........................................................................................................................................................................................................................................... 60
Multiple users .......................................................................................................................................................................................................................................... 60
DEVELOPER ...................................................................................................................................................................................................................................................... 61
ABOUT DEVICE.................................................................................................................................................................................................................................................. 62
SECTION 4 .............................................................................................................................................................................................................................................. 63
ABOUT CAMERA APP (SNAPDRAGON) ................................................................................................................................................................................................................... 64
Camera Features ...................................................................................................................................................................................................................................... 64
Advanced Camera Settings ...................................................................................................................................................................................................................... 65
VIDEO FEATURES ............................................................................................................................................................................................................................................... 66
TESTING THE CAMERA ........................................................................................................................................................................................................................................ 68
Take a Picture and Record Video.............................................................................................................................................................................................................. 68
Take a Screenshot .................................................................................................................................................................................................................................... 69
FILE APPLICATION .............................................................................................................................................................................................................................................. 69
Delete Files ............................................................................................................................................................................................................................................... 69
Copy and Move Files ................................................................................................................................................................................................................................ 70
Share Files ................................................................................................................................................................................................................................................ 70
DEBUG BRIDGE (ADB) CONTROL (DEVELOPERS ONLY) ............................................................................................................................................................................................. 71
Set I-Series 5 Slate to (Developer) ............................................................................................................................................................................................................ 71
To connect via Wi-Fi ................................................................................................................................................................................................................................. 71
To connect via USB ................................................................................................................................................................................................................................... 72
FACTORY FULL RESET ......................................................................................................................................................................................................................................... 73
OPTIONAL PERIPHERALS ..................................................................................................................................................................................................................................... 74
SECTION 5: TECHNICAL SUPPORT AND MAINTENANCE .......................................................................................................................................................................... 75
TECHNICAL ASSISTANCE ...................................................................................................................................................................................................................................... 75
ELO I-SERIES 5 SLATE CARE AND HANDLING ........................................................................................................................................................................................................... 76
OPERATING TIME AND PANEL IMAGE STICKING ........................................................................................................................................................................................................ 77
SECTION 6: REGULATORY INFORMATION .............................................................................................................................................................................................. 78
ELECTRICAL SAFETY INFORMATION ........................................................................................................................................................................................................................ 78
EMISSIONS AND IMMUNITY INFORMATION ............................................................................................................................................................................................................. 78
RADIO EQUIPMENT DIRECTIVE ............................................................................................................................................................................................................................. 81
AGENCY CERTIFICATIONS .................................................................................................................................................................................................................................... 82
WASTE ELECTRICAL & ELECTRONIC EQUIPMENT DIRECTIVE (WEEE) ........................................................................................................................................................................... 82
ENERGY STAR ................................................................................................................................................................................................................................................... 83


UM600853 Rev B page 7 of 85
User Manual –I-Series 5 Slate
Section 1
Introduction
UM600853 Rev B page 8 of 85
User Manual –I-Series 5 Slate
Product Description
Your new I-Series 5 Slate Android system combines reliable performance from Elo with the
latest developments in touchscreen technology and display design. This combination of
features creates a natural flow of information between a user and the I-Series 5 Slate system.
This product is available in 4 versions.
• I-Series 5 Slate with IO Hub.
• EloPOS Z10 System
• EloPOS Z30 System without integrated CFD
• EloPOS Z30 System with integrated CFD
I-Series 5 Slate Head
Specifications
Feature
Specification
Operating System
Android
TM
14
Processor
Qualcomm QCS6490
Memory
8GB
Internal Storage
64GB
Display
15.6 inch 1920 x 1080
Aspect Ratio
16:9
Touch Screen
Capacitive touch; up to 10 touches
Camera
8MP - 3264*2448, Auto Focus
Wi-Fi + Bluetooth
IEEE 802.11a/b/g/n/ac/ax +
Bluetooth 5.2 with BLE
Microphone
2x Digital Microphones
Speaker
2x 1W
USB Port
1x Type-C USB3.0/2.0
1x µUSB (Factory Debug)
Temperature
Operating: 0°C to 40°C (32°F to 104°F)
Storage: -20°C to 50°C (-4°F to 122°F)
Humidity
Operating: 20% to 80%
Storage: 10% to 90%
Rating
9V/3A, 15V/3A, 20V/2.25A
NFC
ISO 14443-A/B, MiFare, FeliCa, ISO 15693
UM600853 Rev B page 9 of 85
User Manual –I-Series 5 Slate
Features
• 15.6-inch Display
• 8 MegaPixel Camera
• Dual BeamForming Microphones
• Dual Speakers
• 2 MIMO WiFi Antennas
• 75mm Vesa Mounting pattern
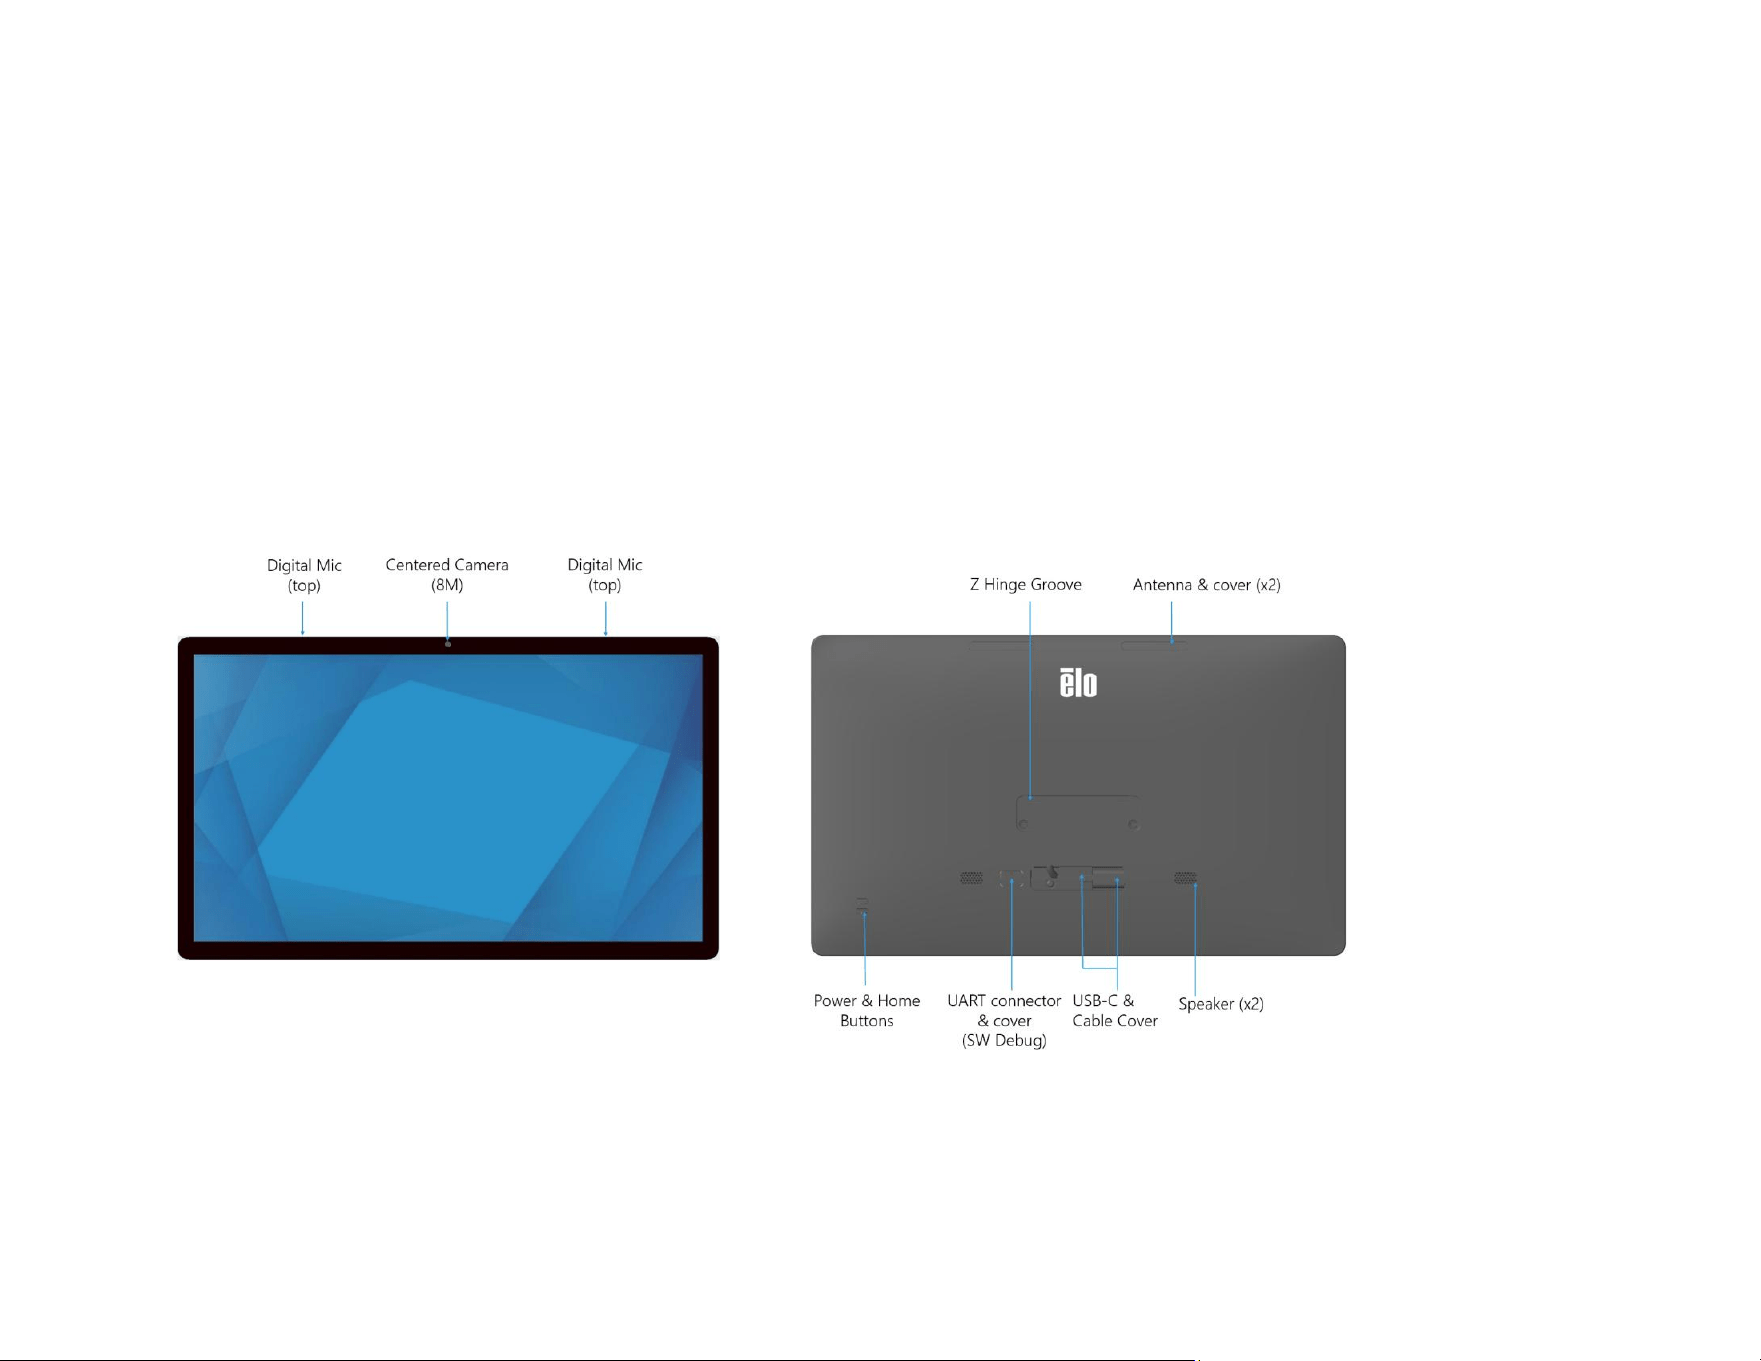
Feature Locations
The I-Series 5 Slate features a sleek Z hinge design and pairs seamlessly with the Z10 Gen2 and Z30 Gen2. With the VESA bracket,
it easily transforms to support versatile VESA mounting
UM600853 Rev B page 10 of 85
User Manual –I-Series 5 Slate
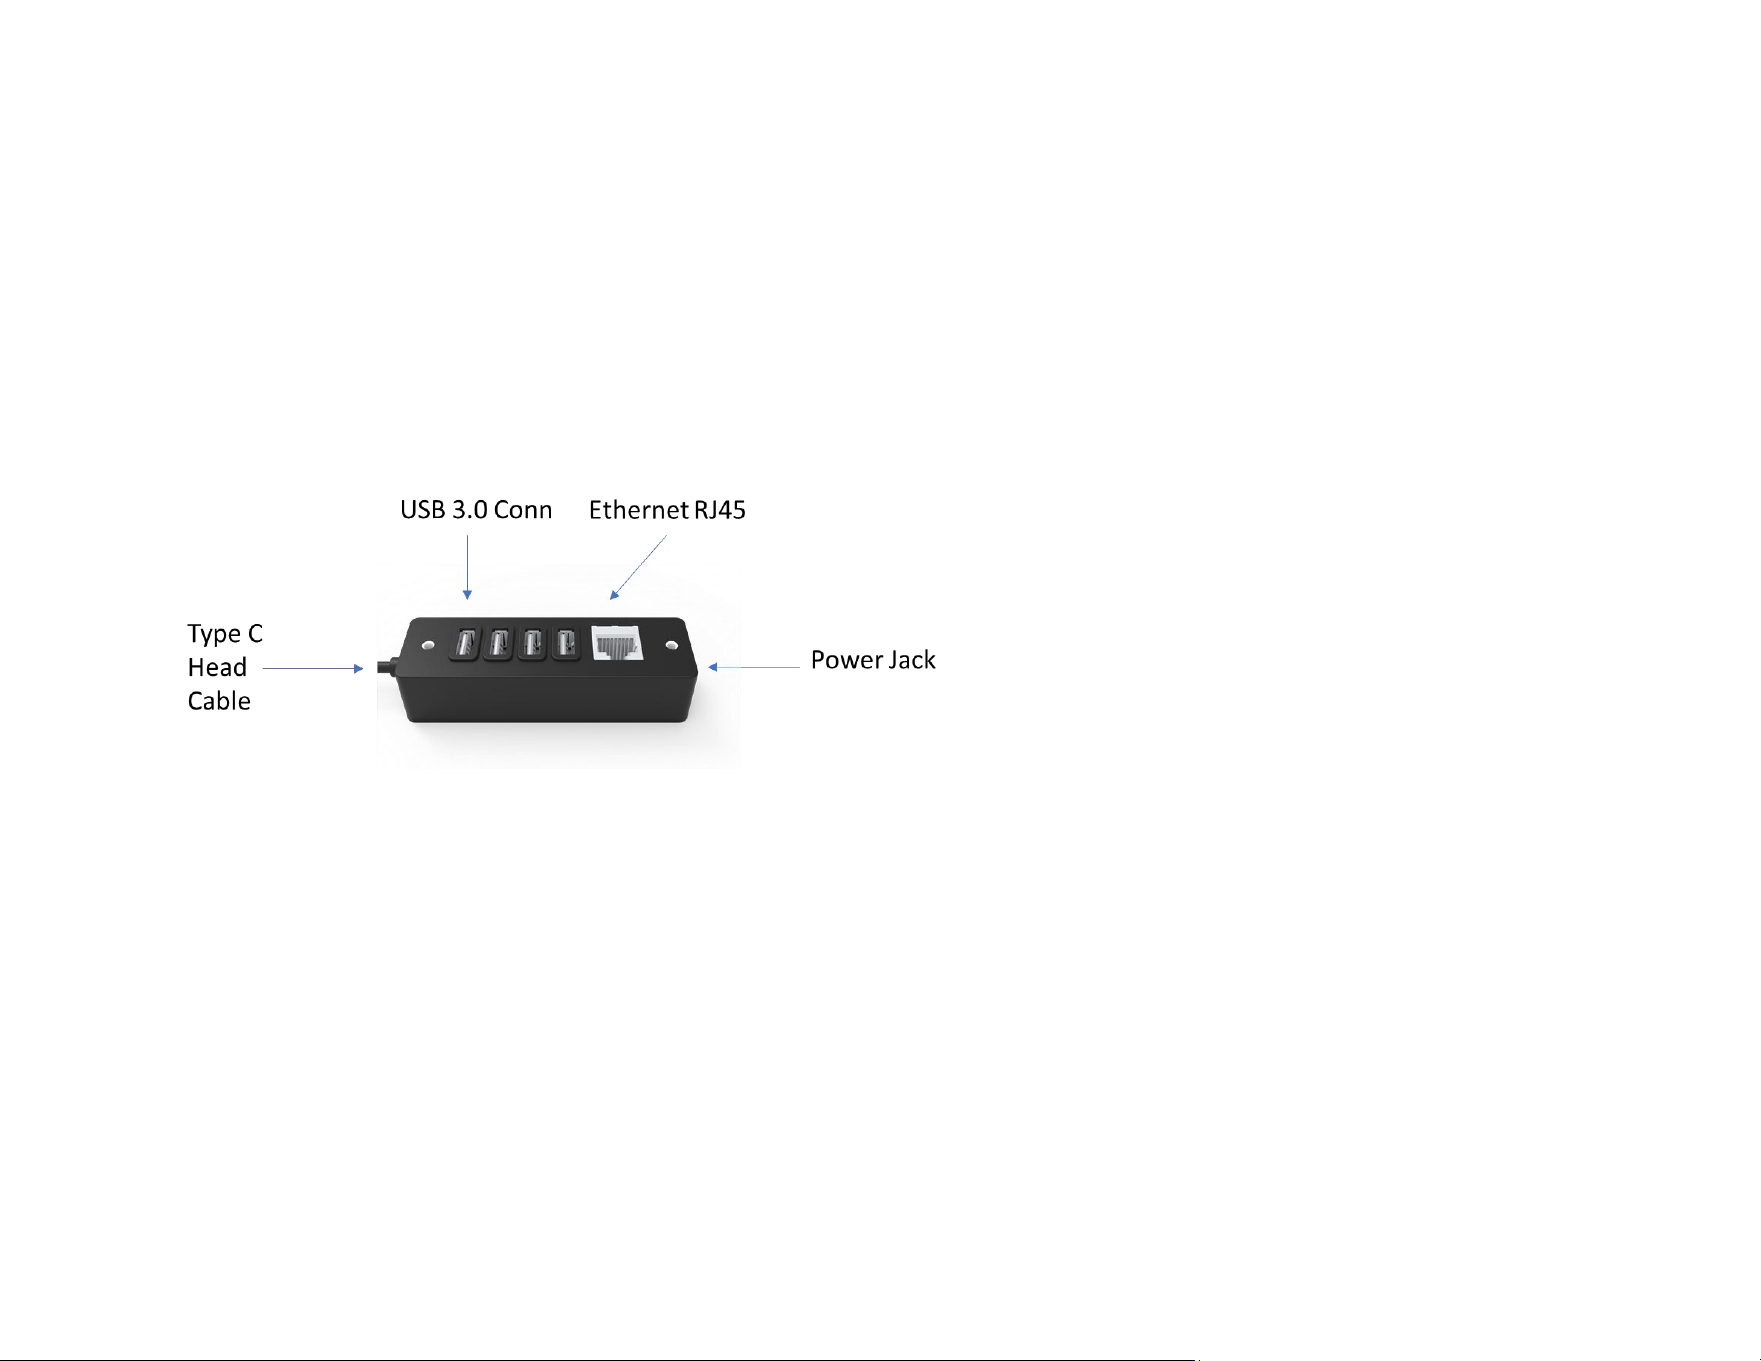
IO Hub
Features & Specifications
• 1GB RJ45 Ethernet Connector
• 4 x USB 3.0 Type A Connector
• Power Plug connector
• 1.2-meter Type C connection to I-Series 5 Slate Head
Feature Locations
UM600853 Rev B page 11 of 85
User Manual –I-Series 5 Slate
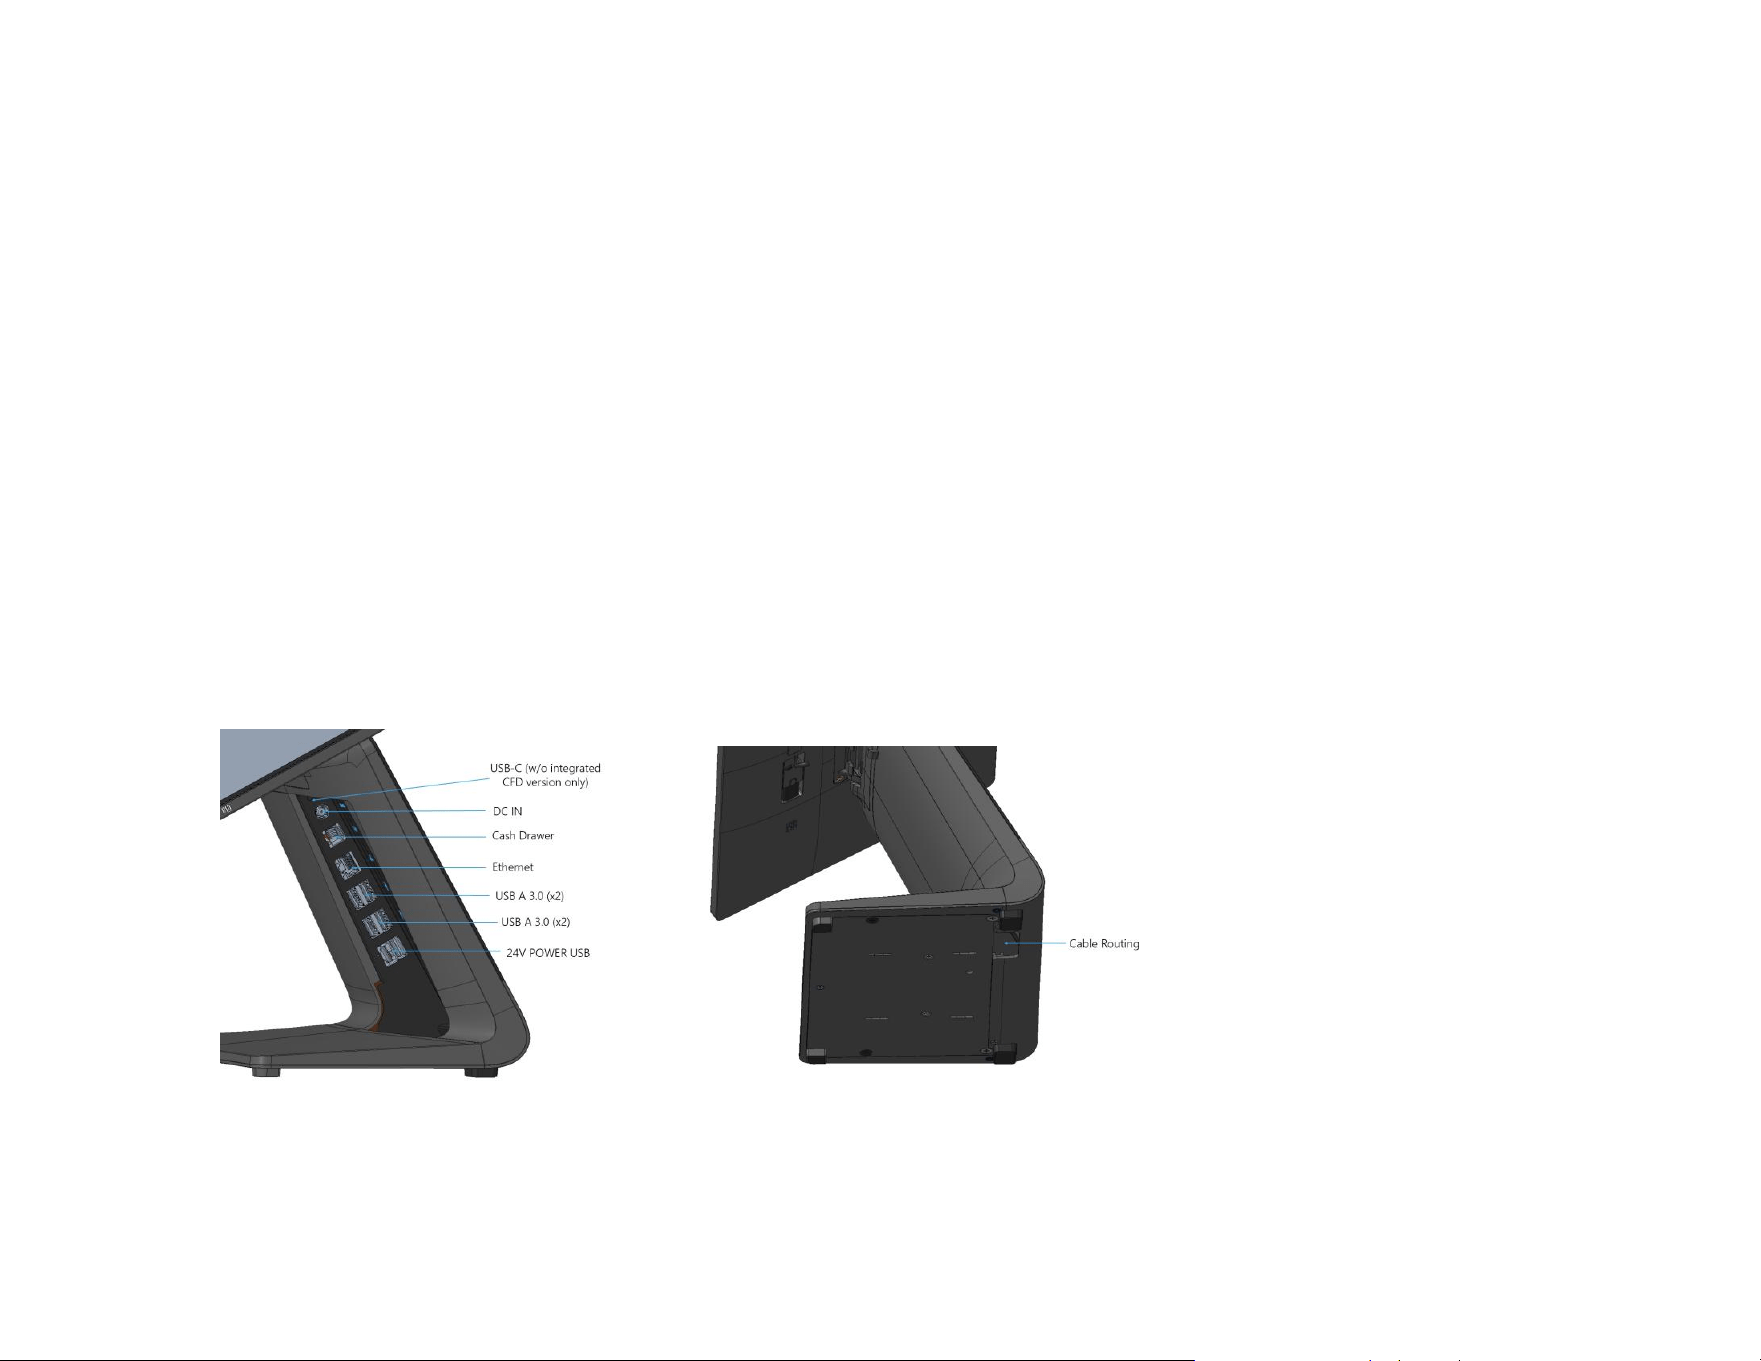
Full POS Stand with Integrated IO and no CFD
Features and Specifications
• 1GB RJ45 Ethernet Connector
• 4 x USB 3.0 Type A Connectors
• External Display Port (USBC)
• USBC output support for 5V/3A, 9V/3A, 15V/1.8A, 20V/1.35A, max 27W
• Powered USB Port 24V
• Cash Drawer Support User Selectable (24V/12V)
Customer Facing displays are supported
▪ 0702L – Elo P/N: E796382
▪ 1002L – Elo P/N: E155834 and E324341
▪ 1302L – Elo P/N: E324341 and E683787
▪ 1502L – Elo P/N: E125496
Feature Locations
UM600853 Rev B page 12 of 85
User Manual –I-Series 5 Slate
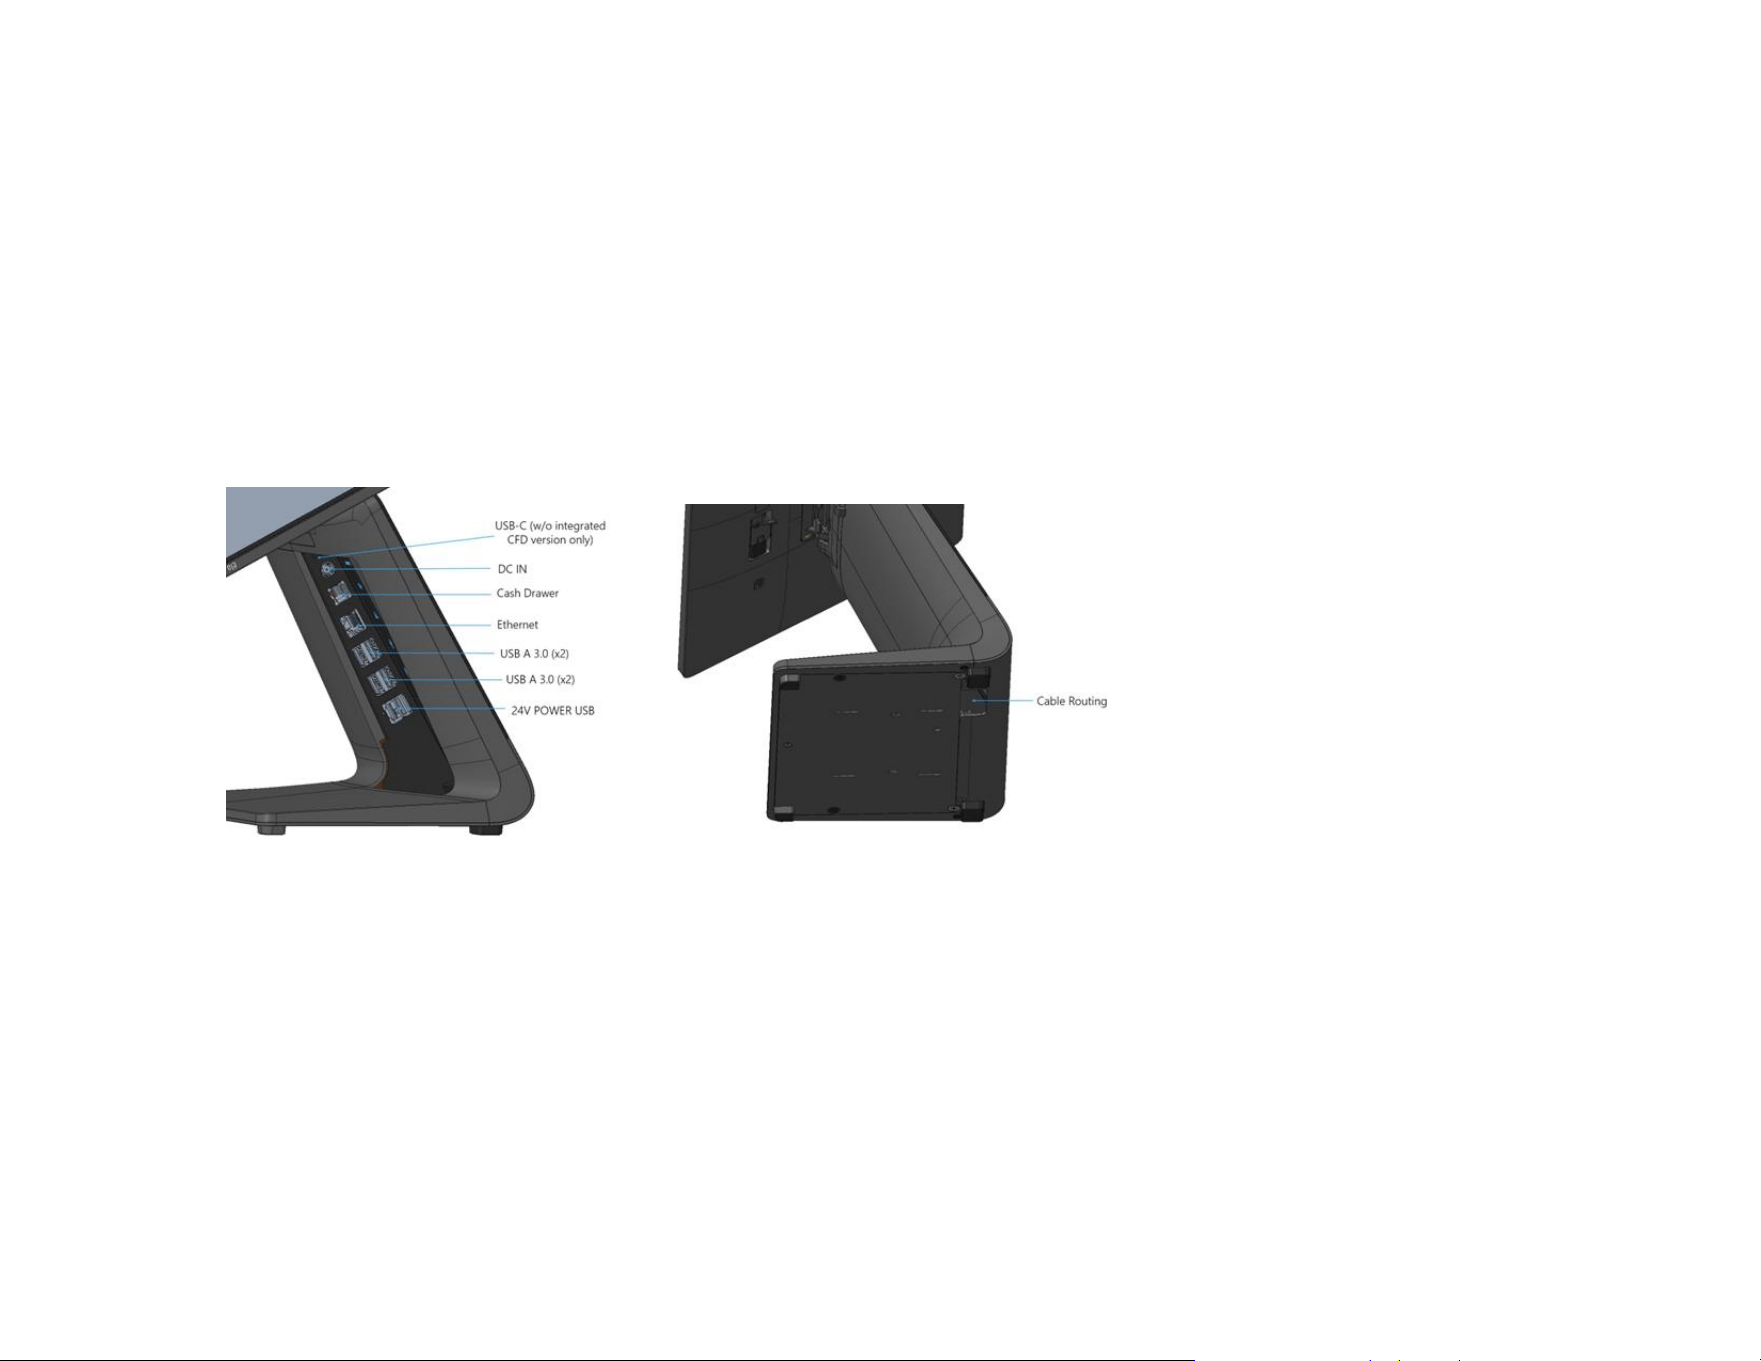
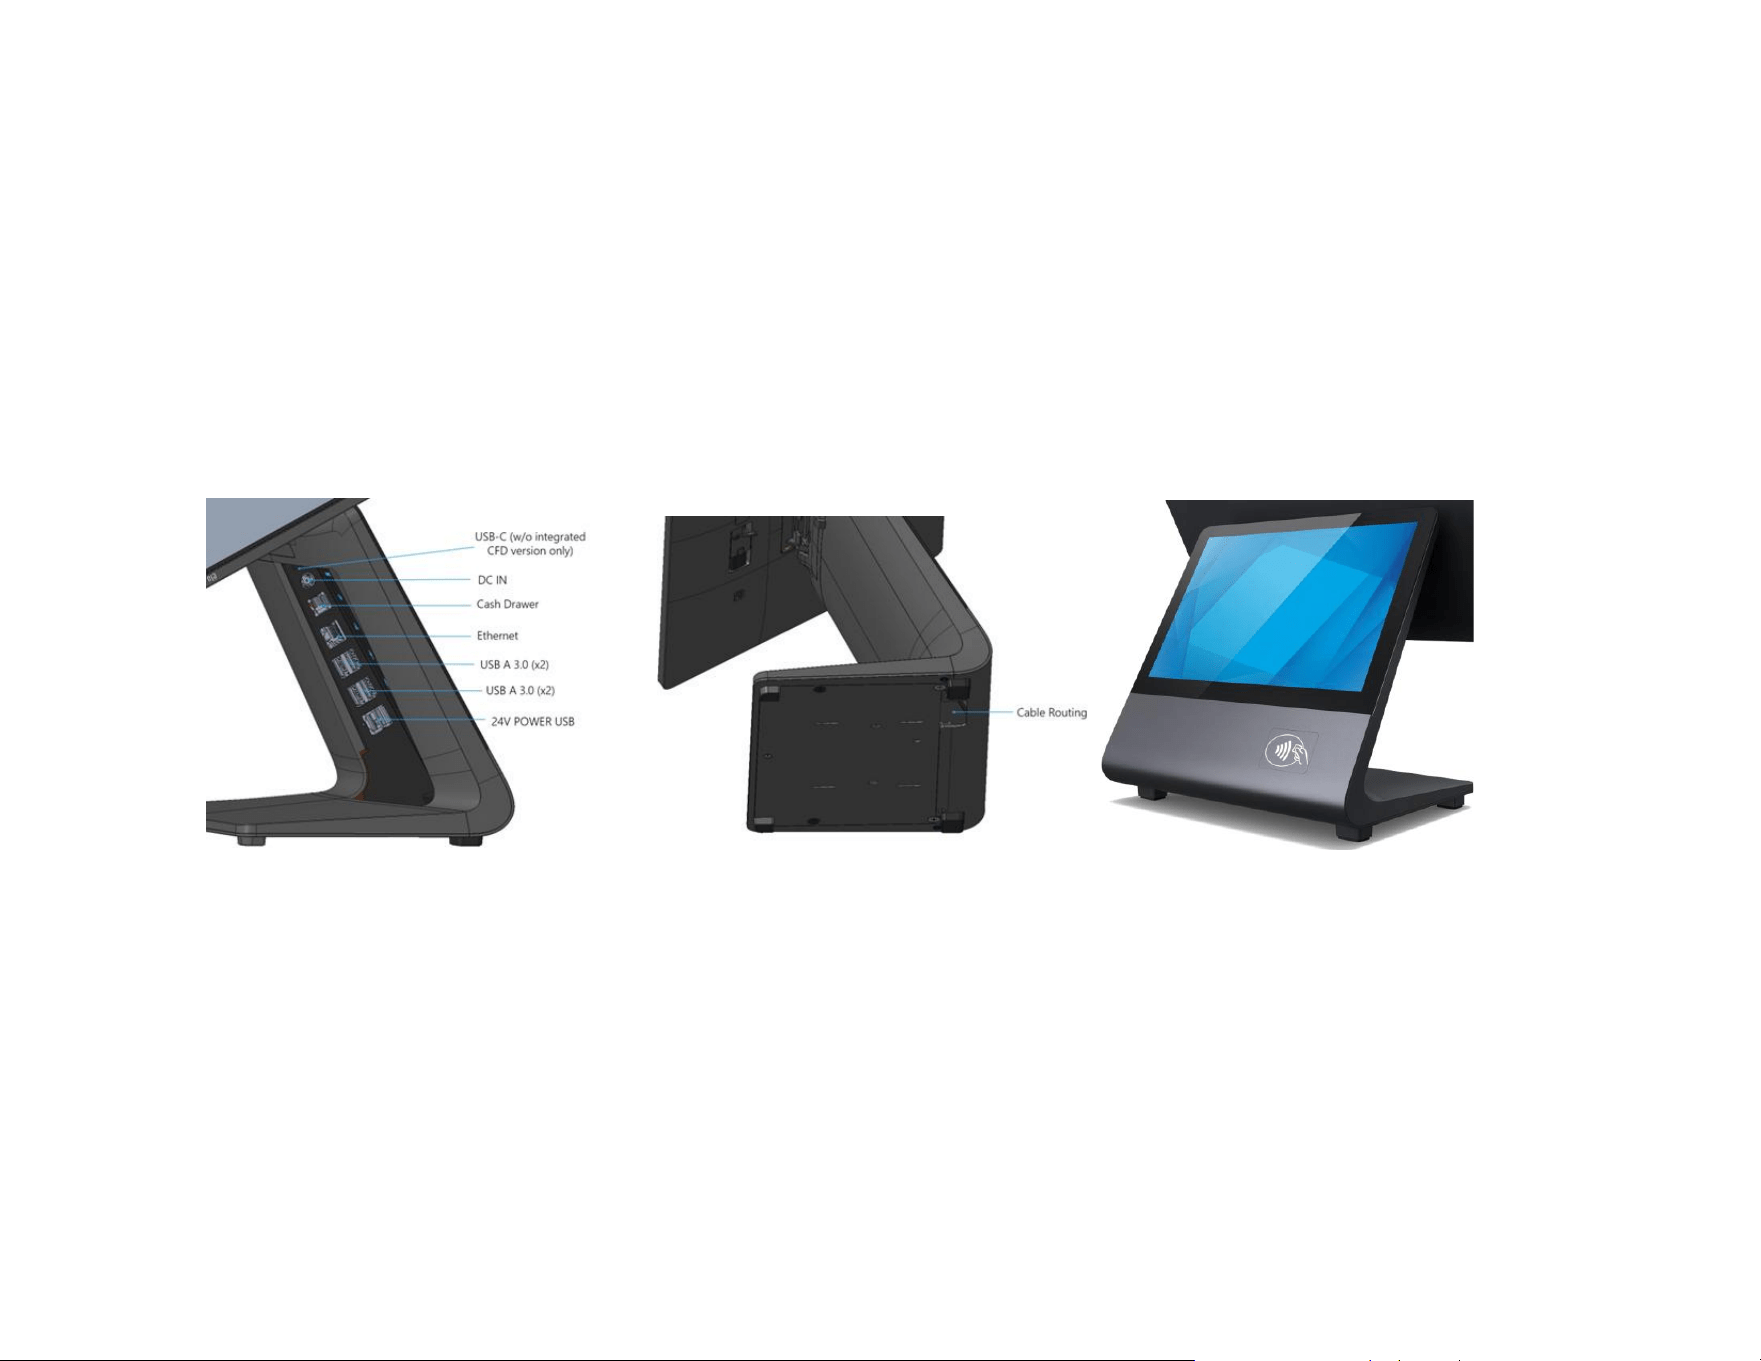
Full POS Stand with Integrated IO and CFD
Features & Specifications
• 1GB RJ45 Ethernet Connector
• 4 x USB 3.0 Type A Connector
• Powered USB Port 24V
• Cash Drawer Support User Selectable (24V/12V)
• 10 Inch Customer facing display with 1920x1200 resolution
Feature Locations
UM600853 Rev B page 13 of 85
User Manual –I-Series 5 Slate
Full POS Stand with NFC
Features & Specifications
• 1GB RJ45 Ethernet Connector
• 4 x USB 3.0 Type A Connector
• Powered USB Port 24V
• Cash Drawer Support User Selectable (24V/12V)
• 10 Inch Customer facing display with 1920x1200 resolution
• NFC
Feature Locations

UM600853 Rev B page 14 of 85
User Manual –I-Series 5 Slate
Section 2
Getting Started

UM600853 Rev B page 15 of 85
User Manual –I-Series 5 Slate
Unpacking and Installation
I-Series 5 Slate with IO Hub
Verify that the box contains:
• Elo I-Series 5 Slate
• IO Hub
• 65W Power Brick with Power Cable
• Quick Install Guide
• 4x M4x6 pan head screws
Remove all protective materials from the device.
Inspect the device for damage.
Report immediately if the system has damage and/or missing items as listed above.
Follow Quick Install Guide for installation
• If using Z10 POS Stand. Remove the VESA bracket prior to mount I-Series to Stand
• Mount IO Hub to User Surface
Plug in 65-Watt Power Brick to wall socket
Attach Ethernet Cable and USB peripherals
Mounting
The I-Series 5 Slate with IO Hub has 75mm through-hole mounting pattern. The mounting holes on the rear side are thread for use with four
M4x6 pan-head screws. 4 pcs pan-head screws are attached in accessory for application with mounting bracket (thickness Max. 3mm)
EloPOS Z30 with or without CFD Display
Verify that the box contains:
• Elo POS Z30
• 150W Power Brick with Power Cable
• Base Plate
• 1 M4x6 mm screw in a plastic bag
• Quick Install Guide
• Tie-wrap
UM600853 Rev B page 16 of 85
User Manual –I-Series 5 Slate
Remove all protective materials from the device.
Inspect the device for damage.
Report immediately if the system has damage and/or missing items as listed above.
Follow Quick Install Guide for installation
Plug in 150 Watt Power Brick to wall socket
Attach Ethernet Cable
Attach any external devices (Cash drawers, Printers, etc)
Powering the System
Power Button
Note: As soon as power is applied to the system, the device will boot up.
Do not touch the screen during the system boot up.
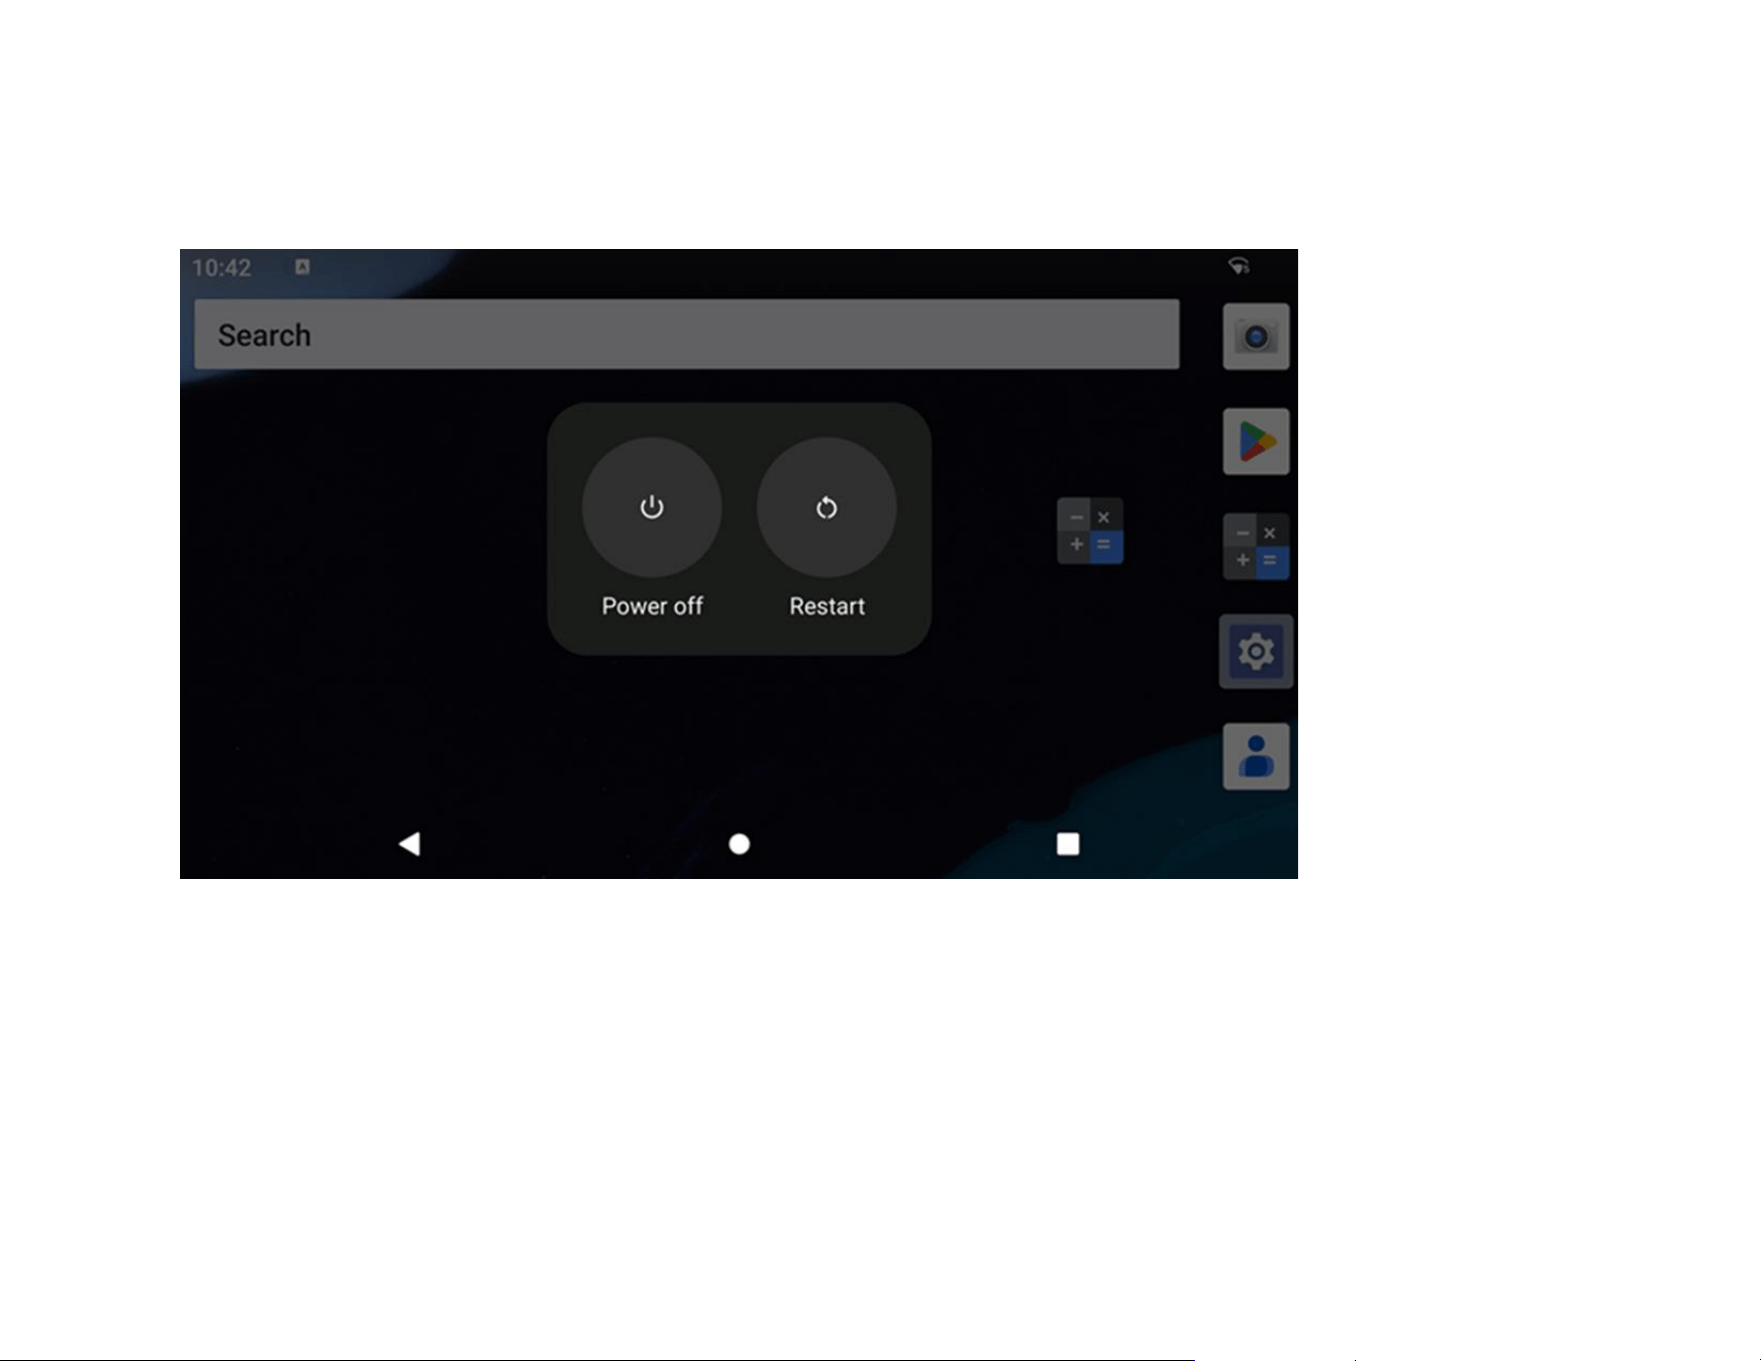
• To turn ON the system, press power button for 1 second.
• To Shut down or Restart, press and hold the power button for more than 2 seconds and follow the on-screen display
menu.
• To force the system to Shut down, press and hold the power button for 12 seconds.
• To bring the system out of sleep/standby mode, either press the power button once or touch the
screen.
Power LED Status
POWER LED STATUS
DESCRIPTION
OFF
OFF
Solid White
Power ON
Solid Orange
Power OFF
Blinking White
Idle Mode
UM600853 Rev B page 17 of 85
User Manual –I-Series 5 Slate
Power button On-Screen display menu
If the power button is pressed for more than 2 seconds, a pop-up screen menu will appear.
UM600853 Rev B page 18 of 85
User Manual –I-Series 5 Slate
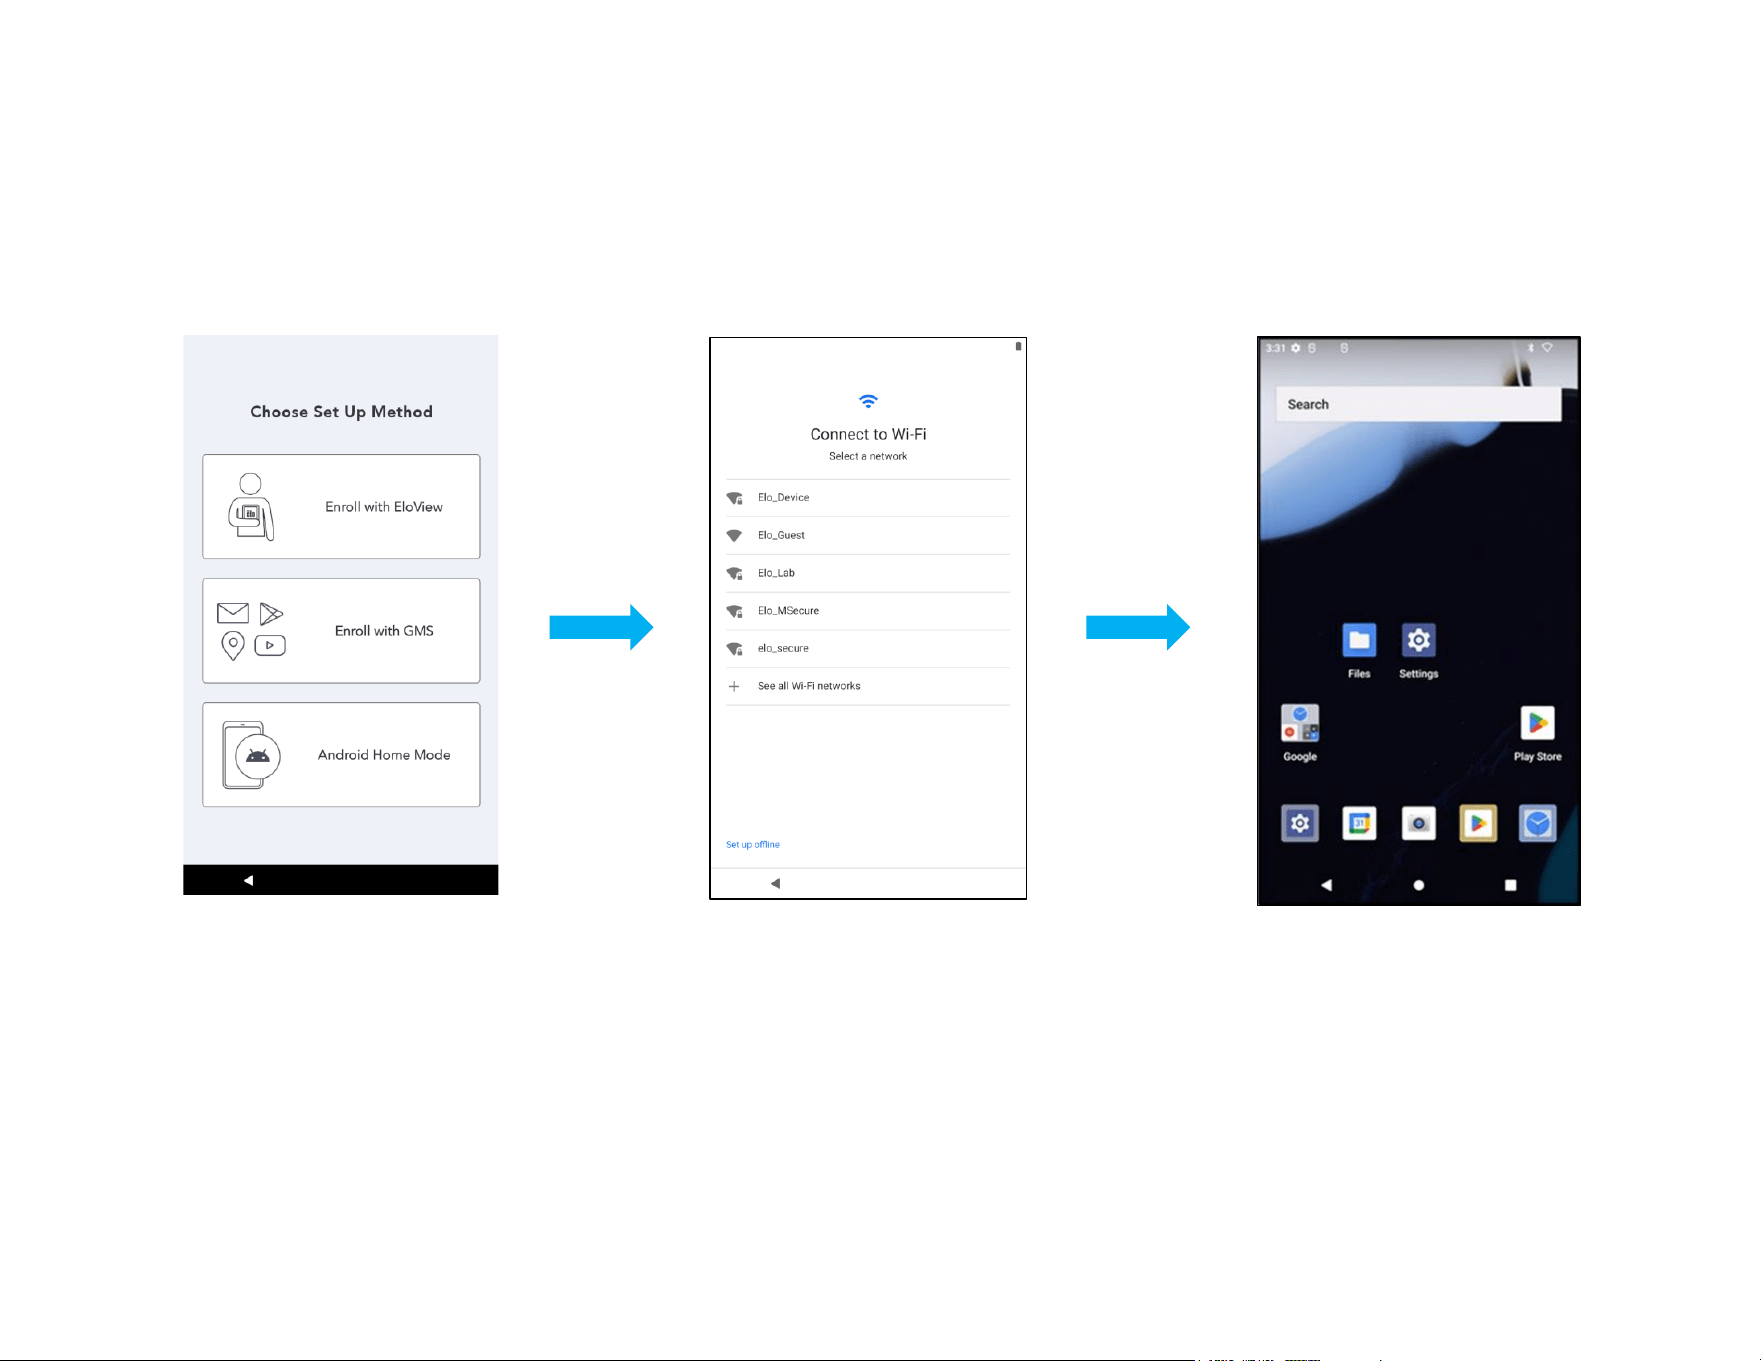
Out of Box Experience (OOBE)
Step 1:
• Choose the following set up
method.
Step 2:
• Follow on-screen instructions to
complete the setup.
• To enroll with EloView® you
must connect to Wi-Fi.
Step 3:
• Go to Page 17-18 for EloView®
Home (screen locked at default).
• Go to Page 19-24 for GMS and
Android Home

UM600853 Rev B page 19 of 85
User Manual –I-Series 5 Slate
Elo Home APK Home Screen – Enroll with Eloview
Refer to ELOVIEW SUPPORT PAGE on www.elotouch.com for Eloview information
The Elo Home APK Home Screen is the starting point for navigating of the device. You can place your favorite apps and widgets here.
Note: The images below may appear different from the actual device.
Elo View
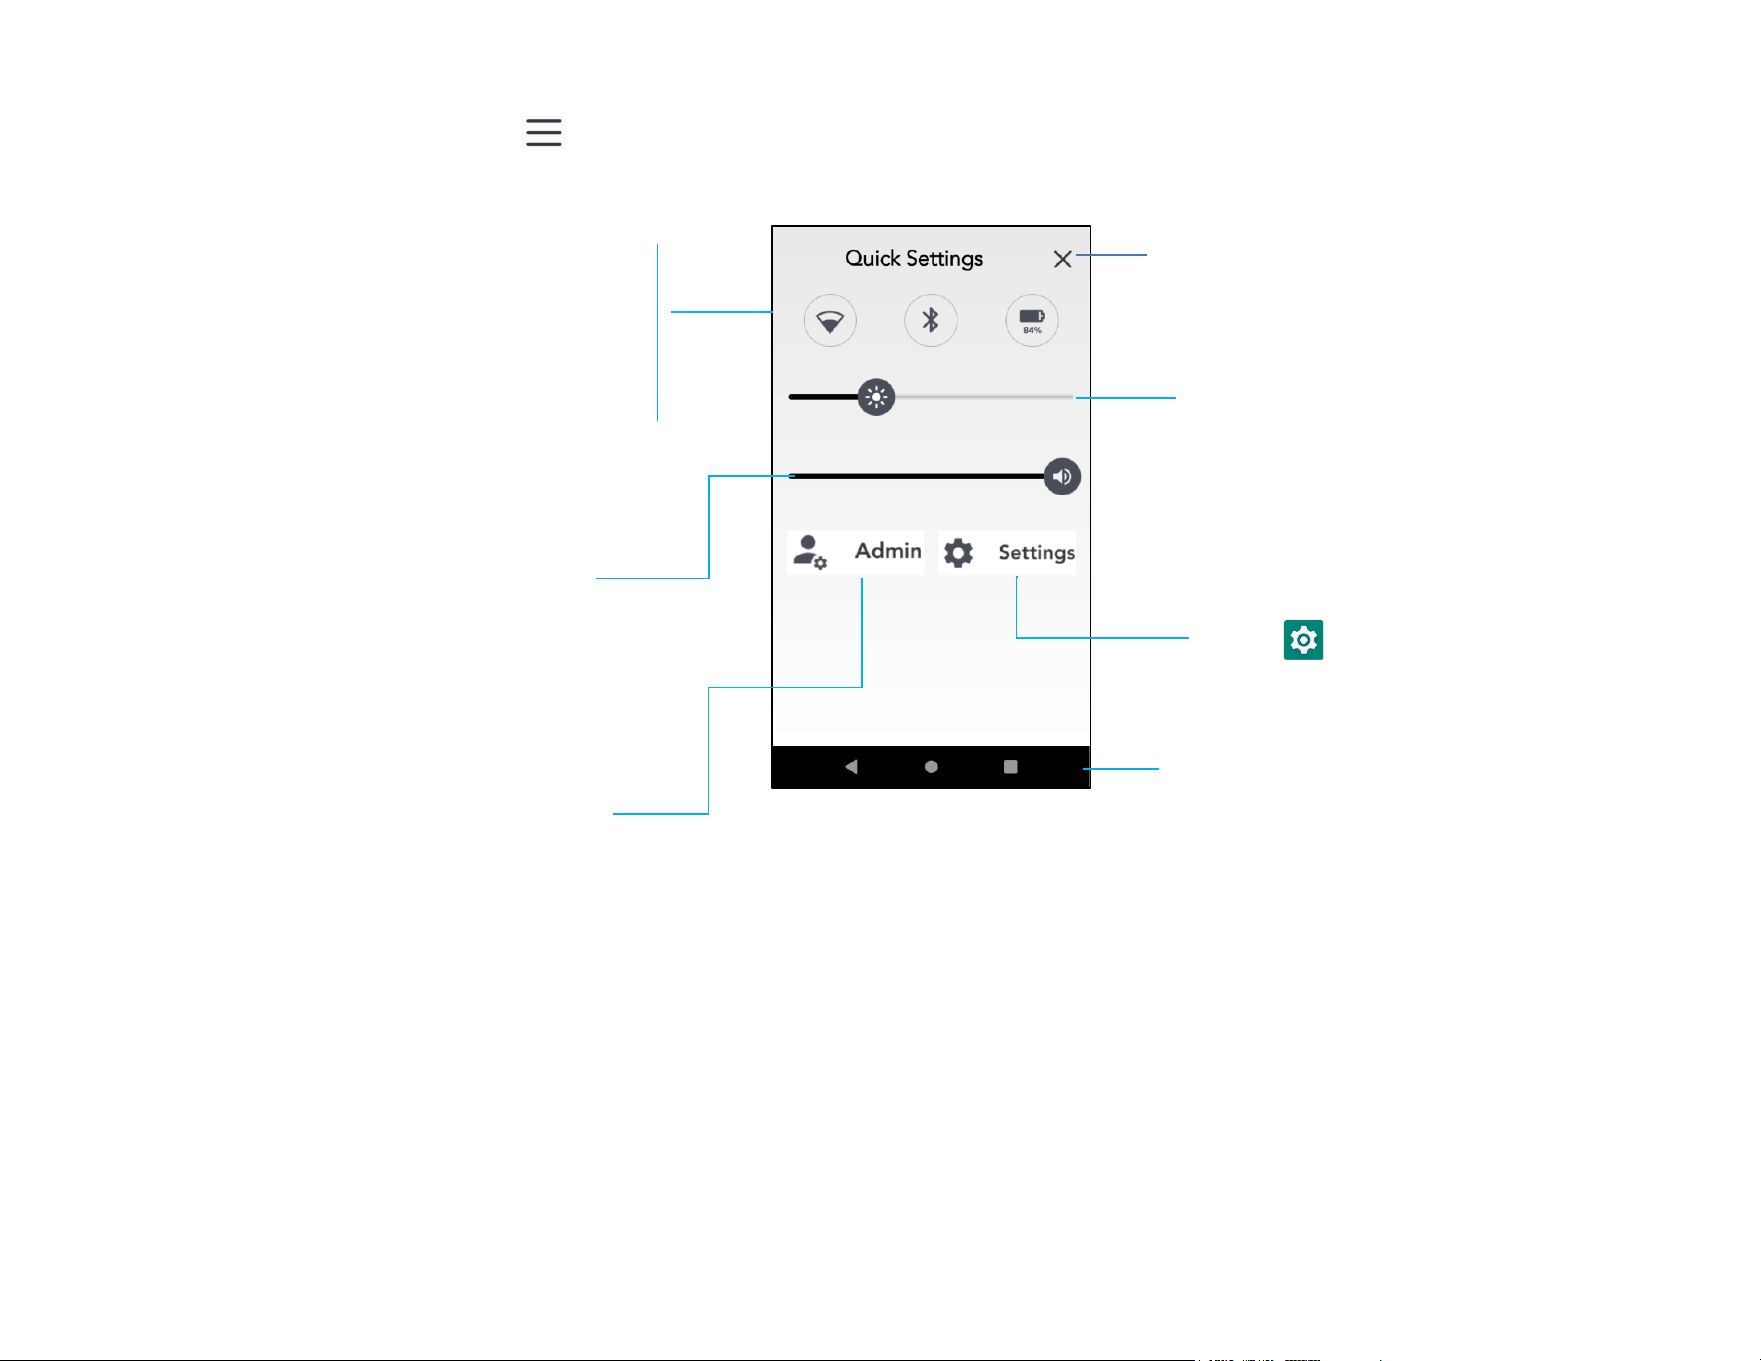
Quick Settings
UM600853 Rev B page 20 of 85
User Manual –I-Series 5 Slate
Elo Home APK Quick Settings
To access the Quick Settings, tap 3 lines menu from Elo Home APK Home Screen. Located on the upper right side.
Navigation Bar
“if enabled in
Eloview
Brightness
❖ Move the slider bar left or
right to adjust the brightness
level.
Volume
❖ Move slide bar Left or Right to
adjust the volume.
Shortcut to System
Settings
Settings:
❖ Wi-Fi
❖ Bluetooth
❖ Battery
• Tap an Icon once to enable
or disable.
• Press and hold an Icon to
access the settings.
Exit
Admin
Settings
UM600853 Rev B page 21 of 85
User Manual –I-Series 5 Slate
Android Lock and Home Screens - GMS
Note: The images below may appear different from the actual computer.
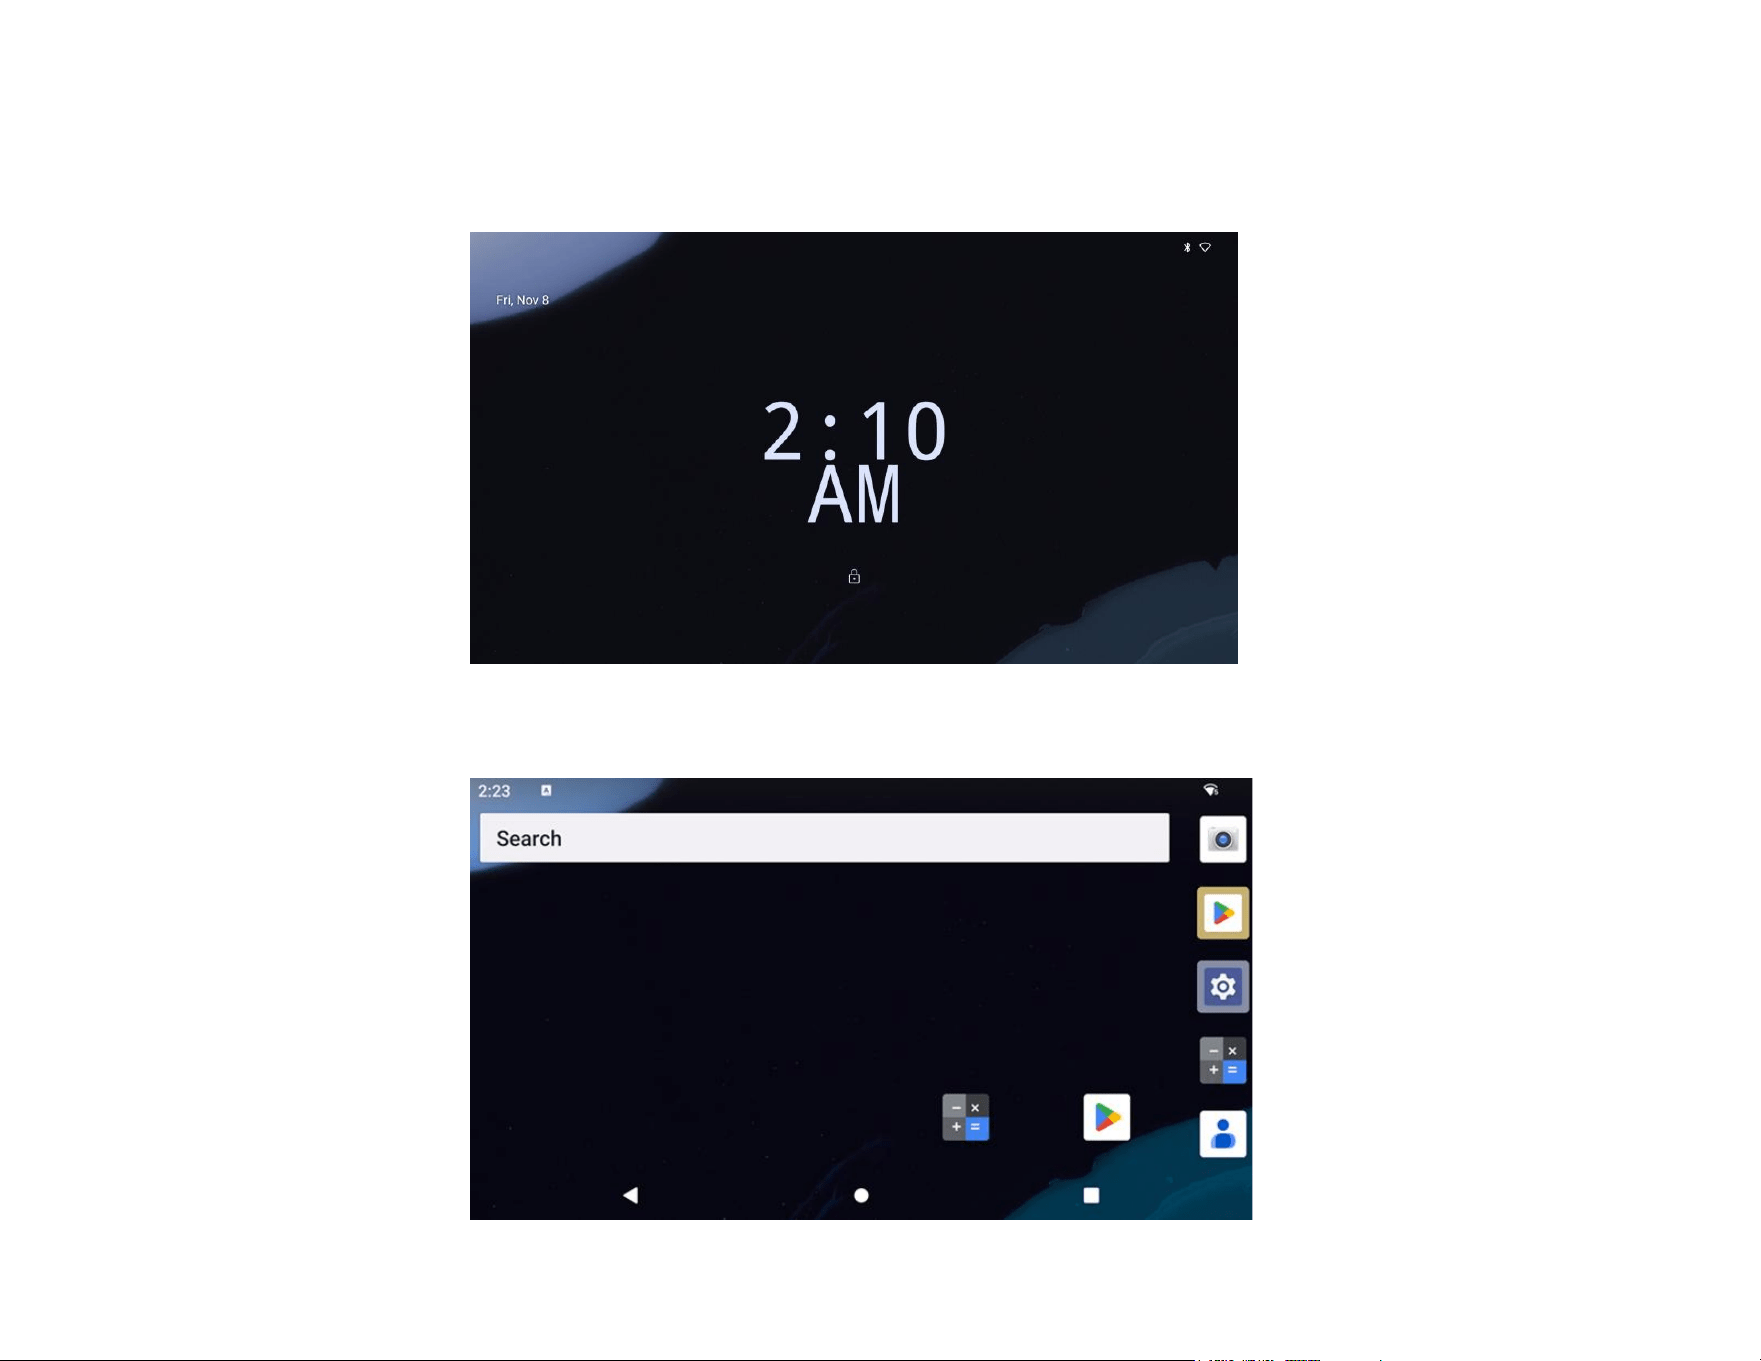
Home Screen
Lock Screen

UM600853 Rev B page 22 of 85
User Manual –I-Series 5 Slate
Home Screen is the starting point for navigating the I-Series device. You can place your favorite apps and widgets here.
• To unlock the screen to Home Screen, swipe up on the Lock Screen.
Note: The default security is Swipe. Refer to the Security settings section in this manual for advanced settings.
• To Lock the screen, press the power button once.
Navigation Bar
Back - Switch between recently used apps.
Home - Return to the home screen.
Recent App - Return to the previous page
UM600853 Rev B page 23 of 85
User Manual –I-Series 5 Slate
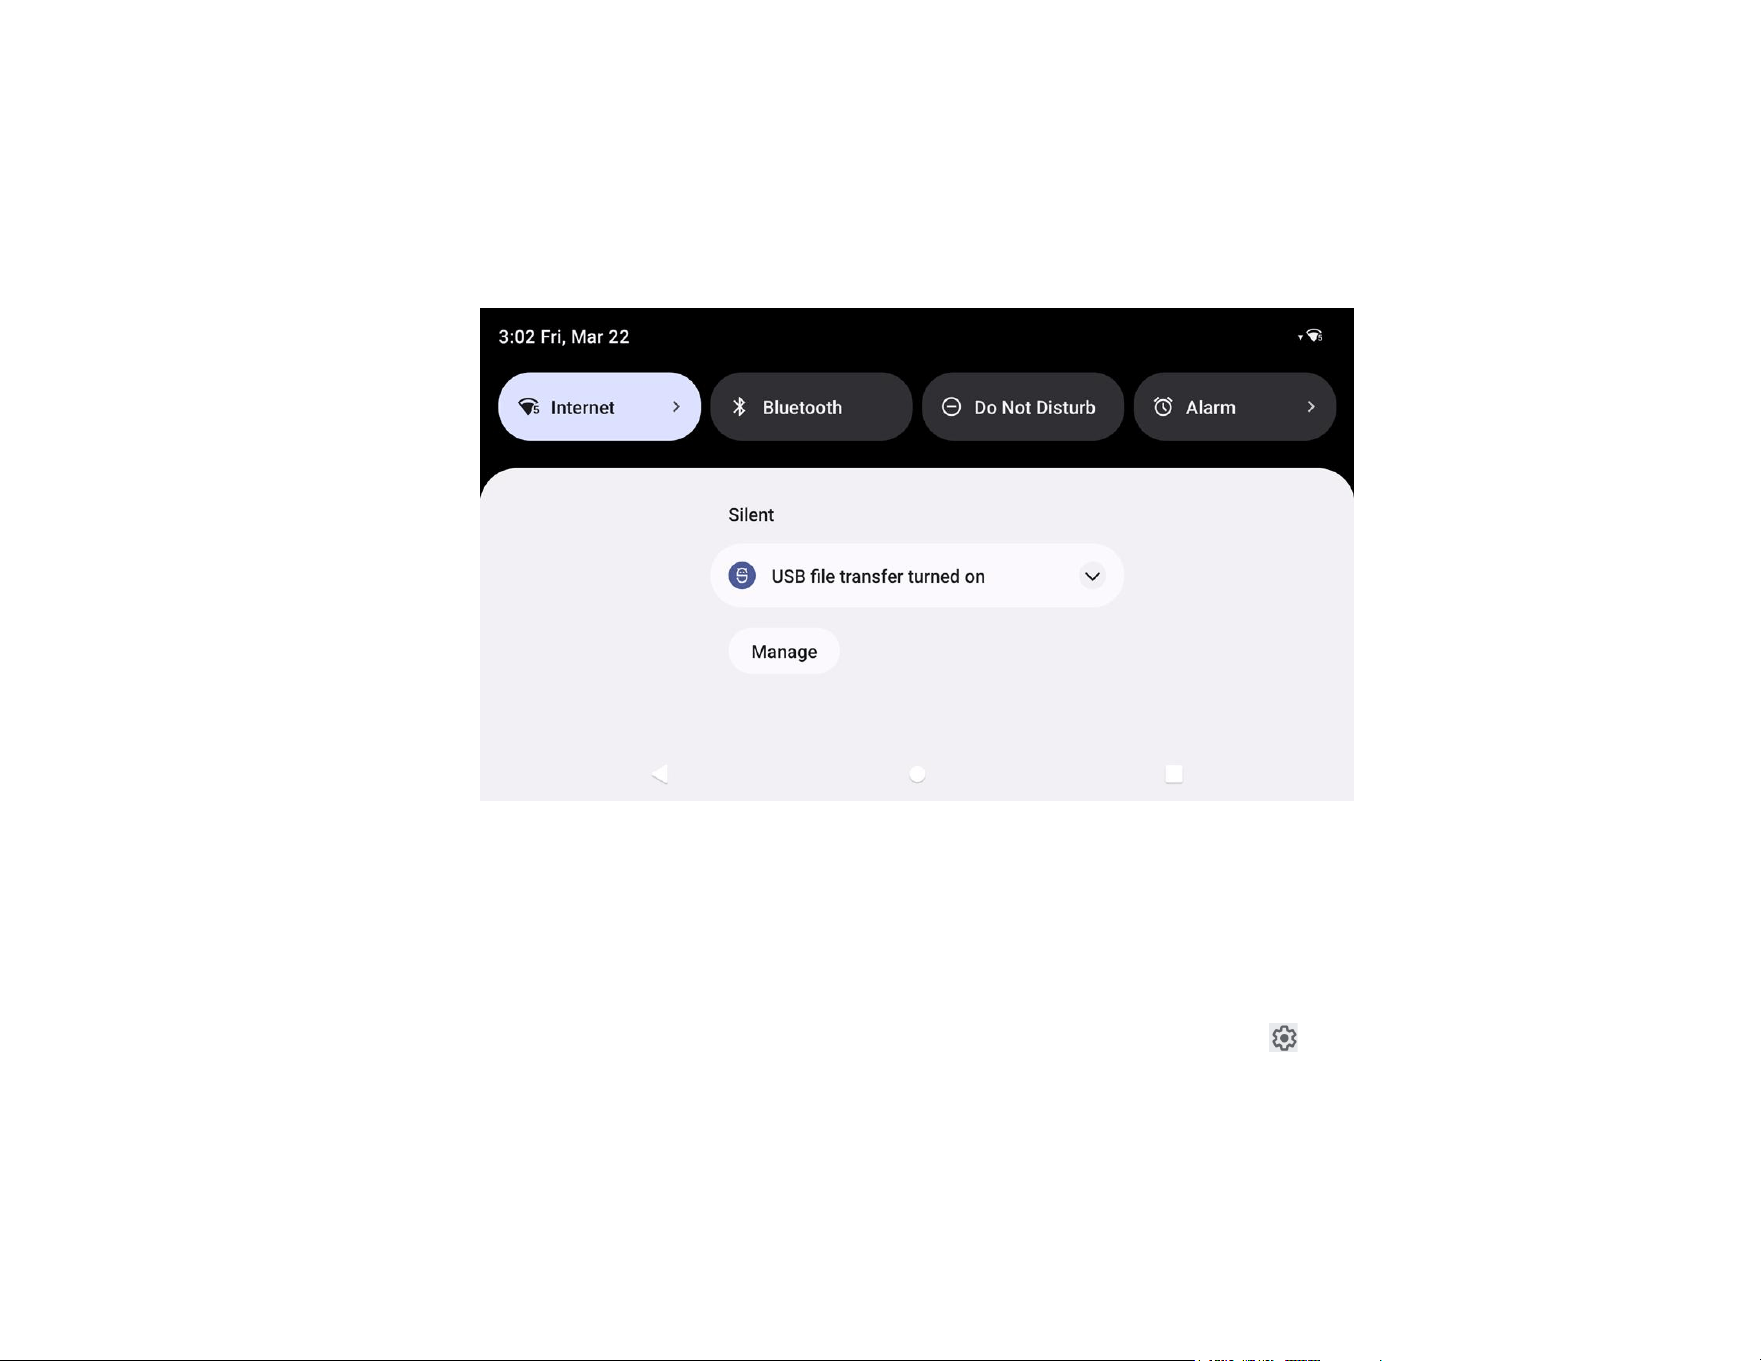
Notification Panel
The notification panel allows for quick access to setting shortcuts and notification alerts.
Note: The images below may appear different from the actual device.
To open the Notification Panel
• From the Home Screen, swipe down from the top of the touch screen.
• To clear a single notification alert, drag the notification all the way to the left or right.
• To clear all notification alerts, tap “Clear”.
• To customize notification alerts, drag the notification halfway to the left or right then tap setting.
• To exit, tap the Navigation Bar feature or swipe up the notification alert menu.
UM600853 Rev B page 24 of 85
User Manual –I-Series 5 Slate
Quick Access Panel
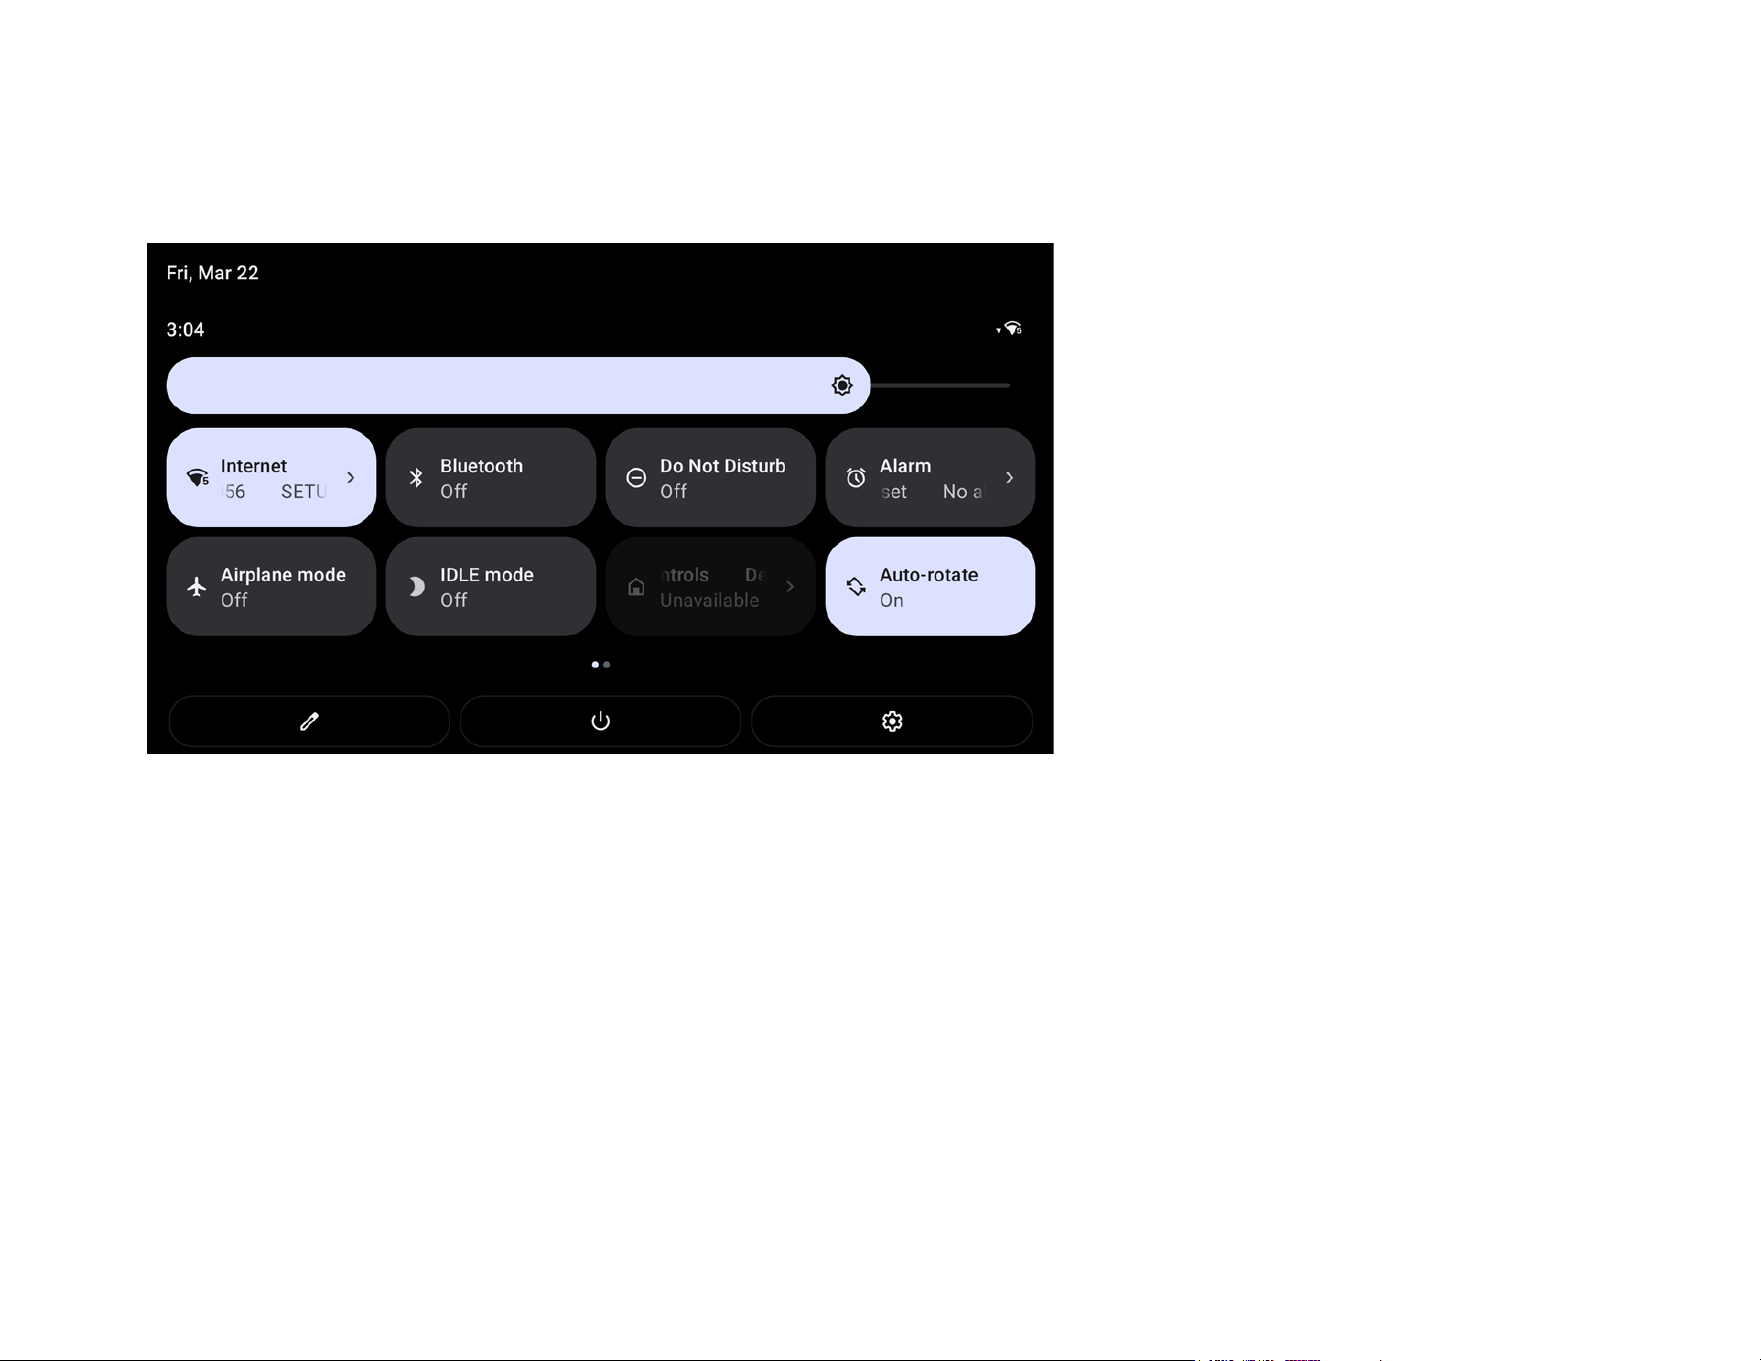
Access Panel allows for quick access frequently used settings, Brightness, and a shortcut to System Settings.
Note: The images below may appear different from the actual computer.
To open the Full Quick Access Panel
• From the Lock Screen, swipe down from top of the touch screen once.
• From the Home Screen, swipe down with two fingers from top of the touch screen.
• If the Notification Panel is open swipe down from the Quick Settings bar.
• For additional shortcut Icon’s swipe screen from right to left.
• Tap Navigation Bar to exit.
UM600853 Rev B page 25 of 85
User Manual –I-Series 5 Slate
Application Drawer & Google Application
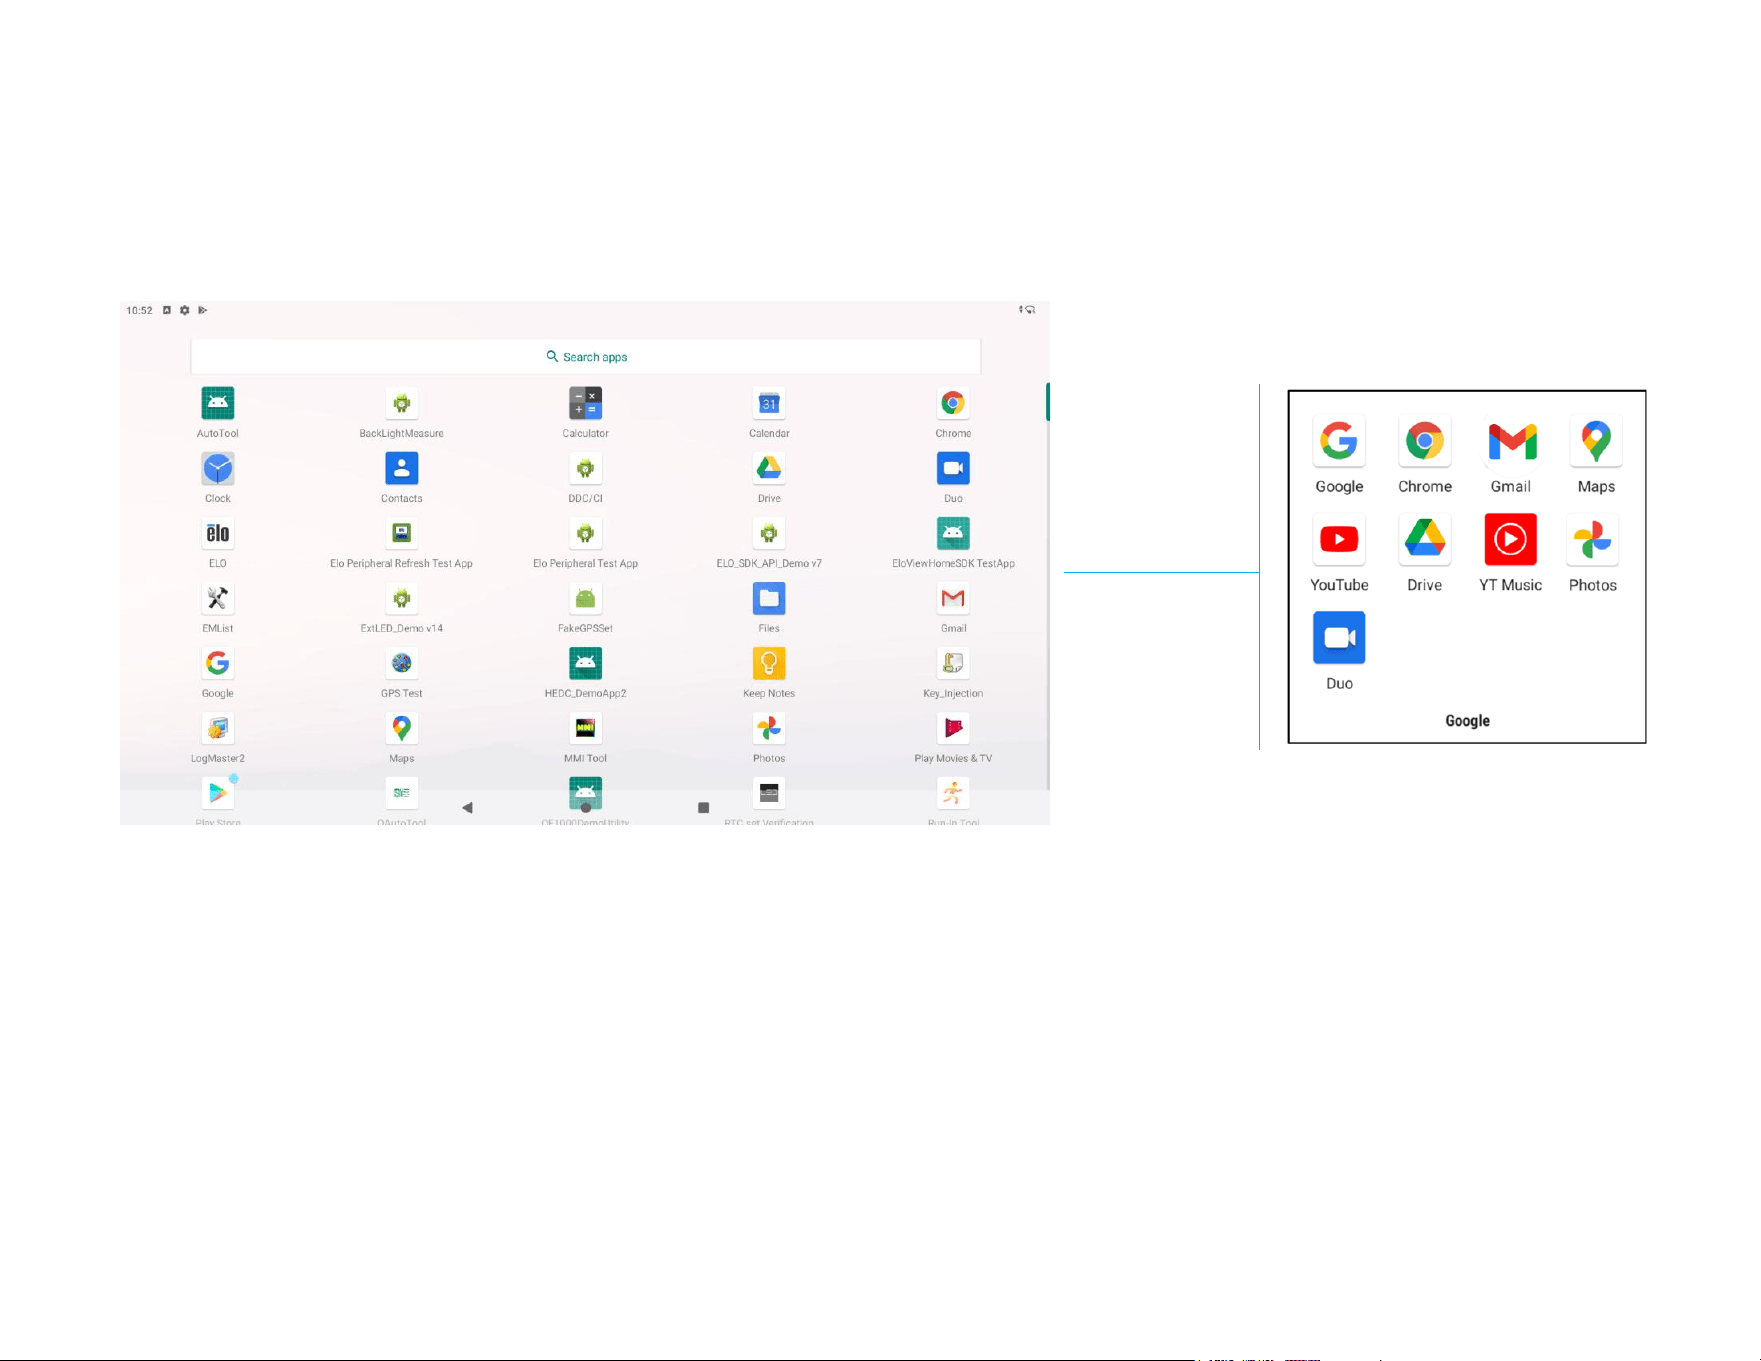
The application drawer is a menu containing all of the applications installed on the device including System Settings. This is
different from the Home Screen, as it contains every installed app and cannot be customized.
Note: The images below may appear different from the actual computer.
To open the Application Drawer (Manager)
• Swipe up the Navigation Bar from the Home screen.
• To open an application, tap once.
• To exit from the Application Drawer, tap the Navigation Bar or swipe down.
Google Application
UM600853 Rev B page 26 of 85
User Manual –I-Series 5 Slate
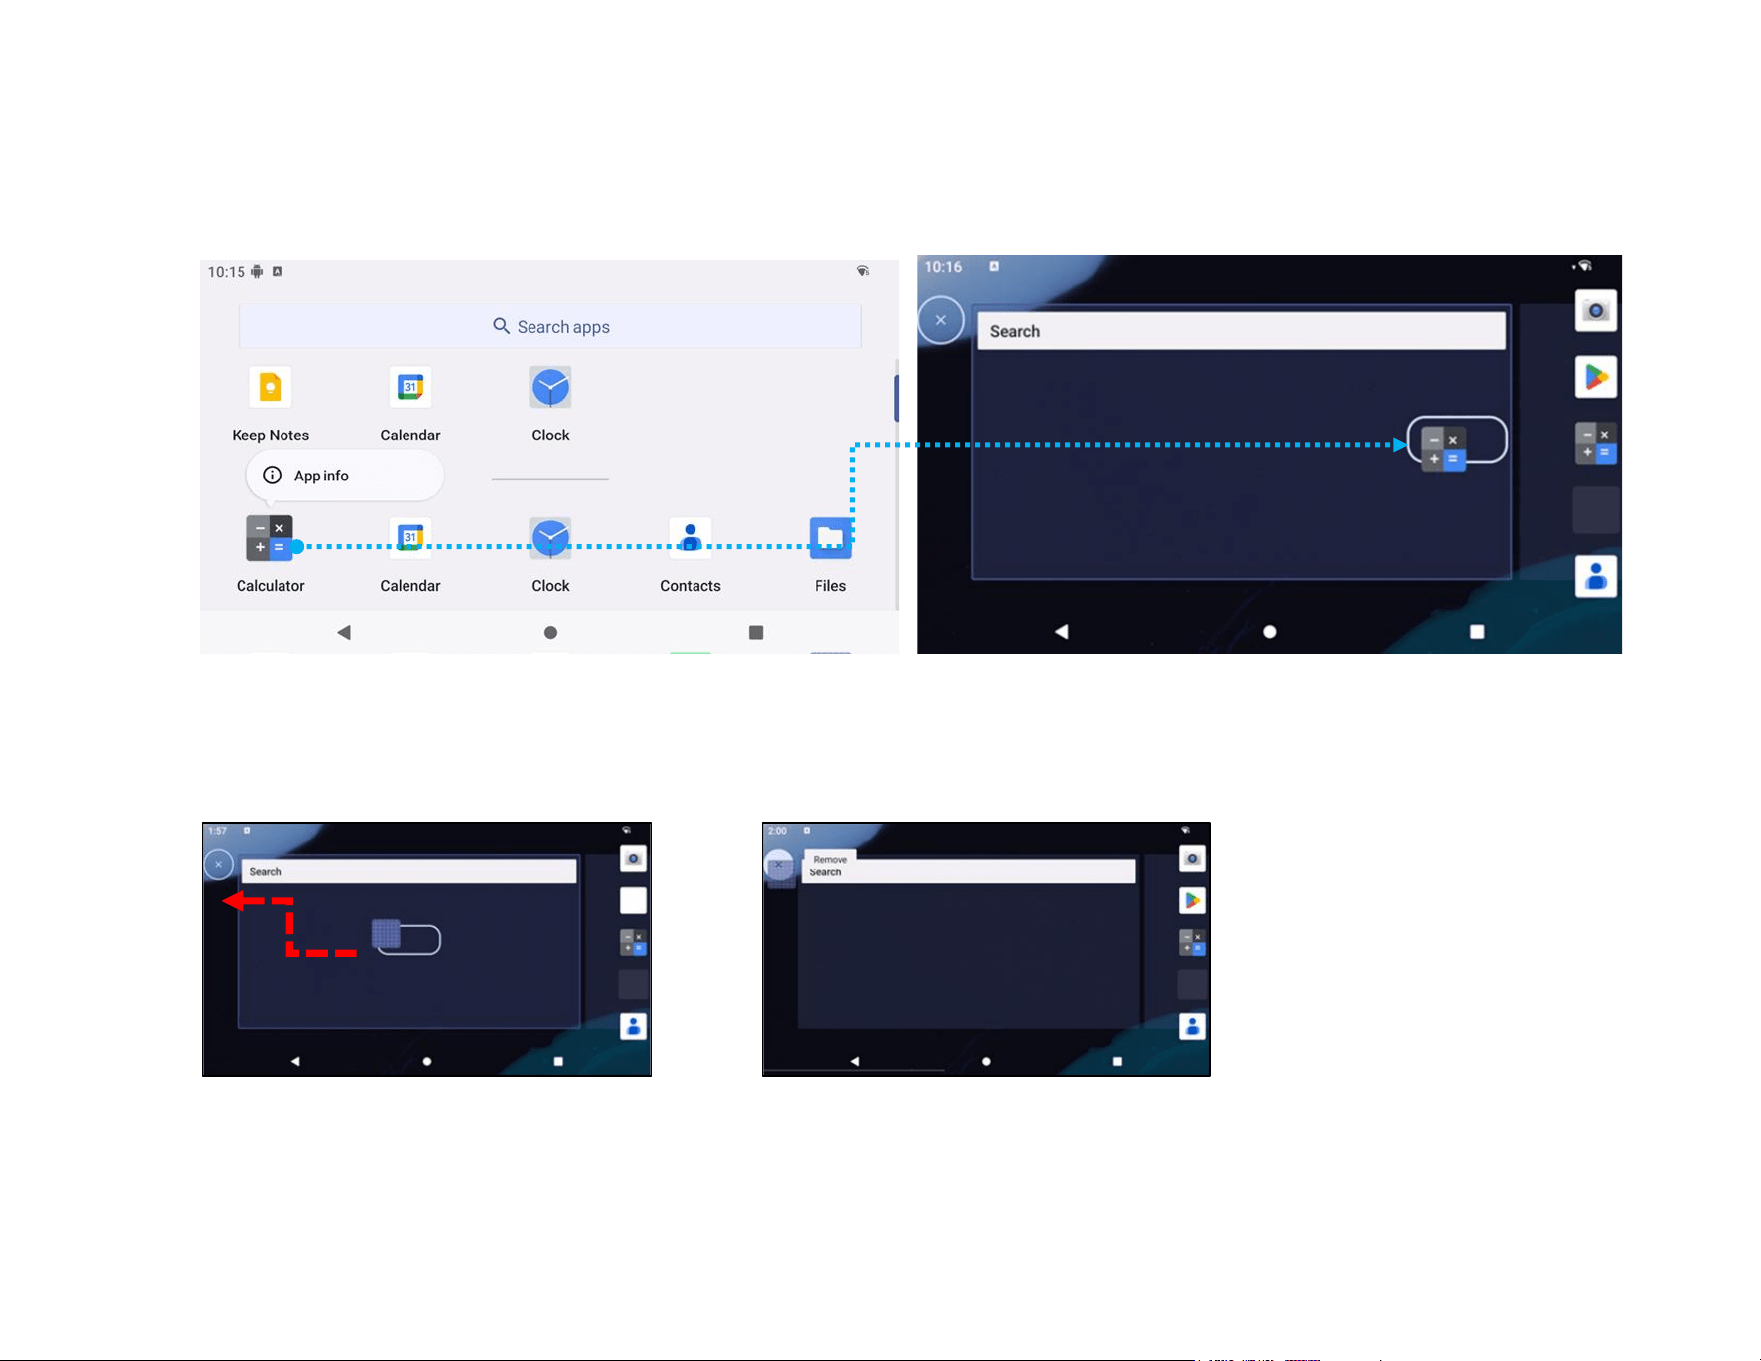
Customize and add a shortcut to the Home Screen.
Note: The images below may appear different from the actual computer.
• From the Application drawer, press and hold an app or (Icon) then drag the Icon to move the app to the Home Screen.
• Drag the Icon into new location and release.
• To cancel, drag the icon to “X Cancel”.
• To remove a shortcut Icon from home screen, press and hold the Icon then drag the Icon to “X Remove”.
• To uninstall an app, press and hold then drag the icon to “Uninstall”.

UM600853 Rev B page 27 of 85
User Manual –I-Series 5 Slate
Section 3
System Settings
UM600853 Rev B page 28 of 85
User Manual –I-Series 5 Slate
The System Settings menu allows you to control most aspects of your device - everything from establishing a new Wi-Fi or Bluetooth
connection, to installing a third-party onscreen keyboard, to adjusting system sounds and screen brightness.
Network & Internet
The Network & Internet application allows you to access Wi-Fi, Airplane Mode, Mobile plan, Hotspot, Tethering and
Advanced settings of Data Saver, VPN and DNS.
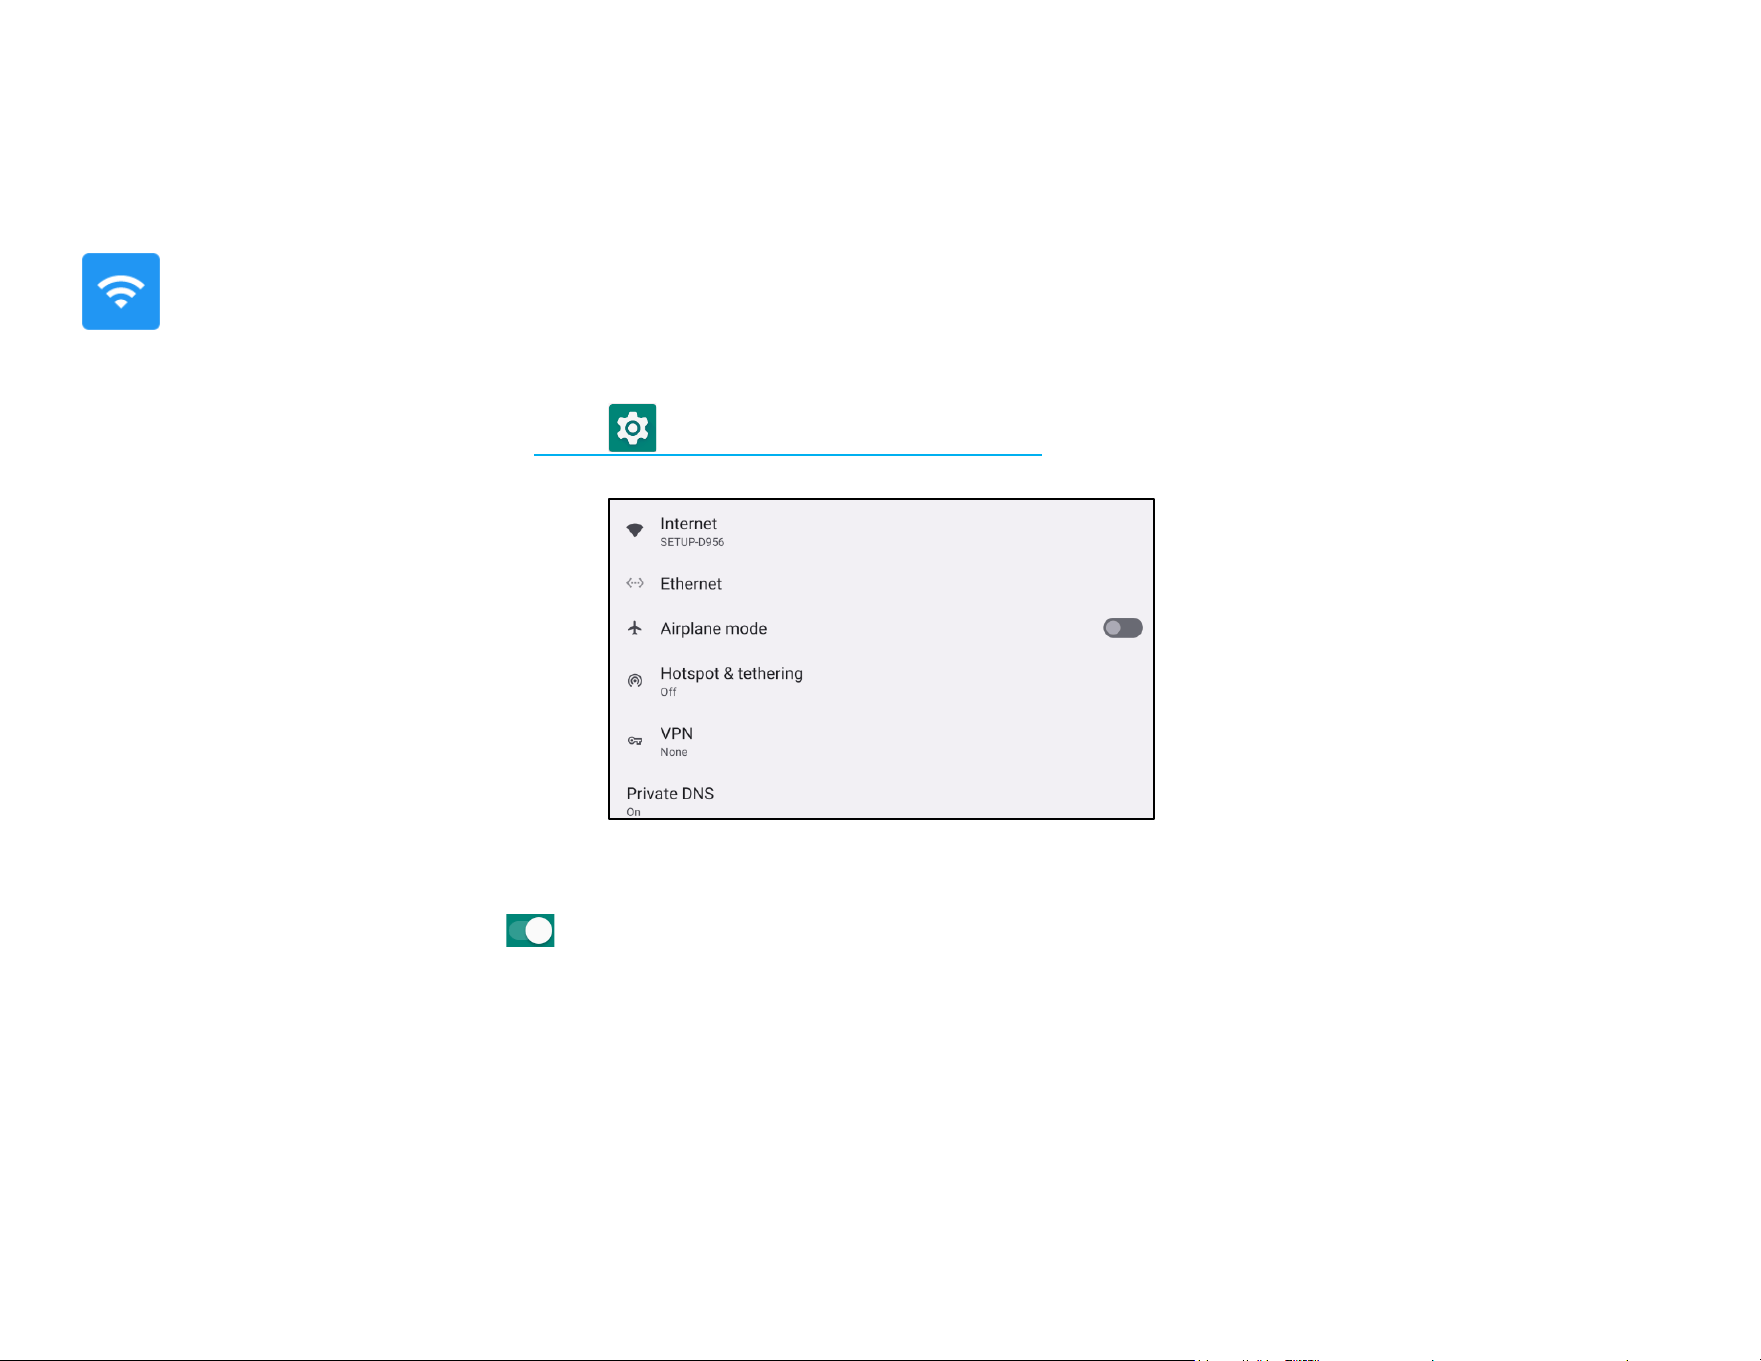
To set up Network and Internet, enter Settings → Network & Internet →
WLAN
• Tap Internet.
• Tap WLAN to enable .
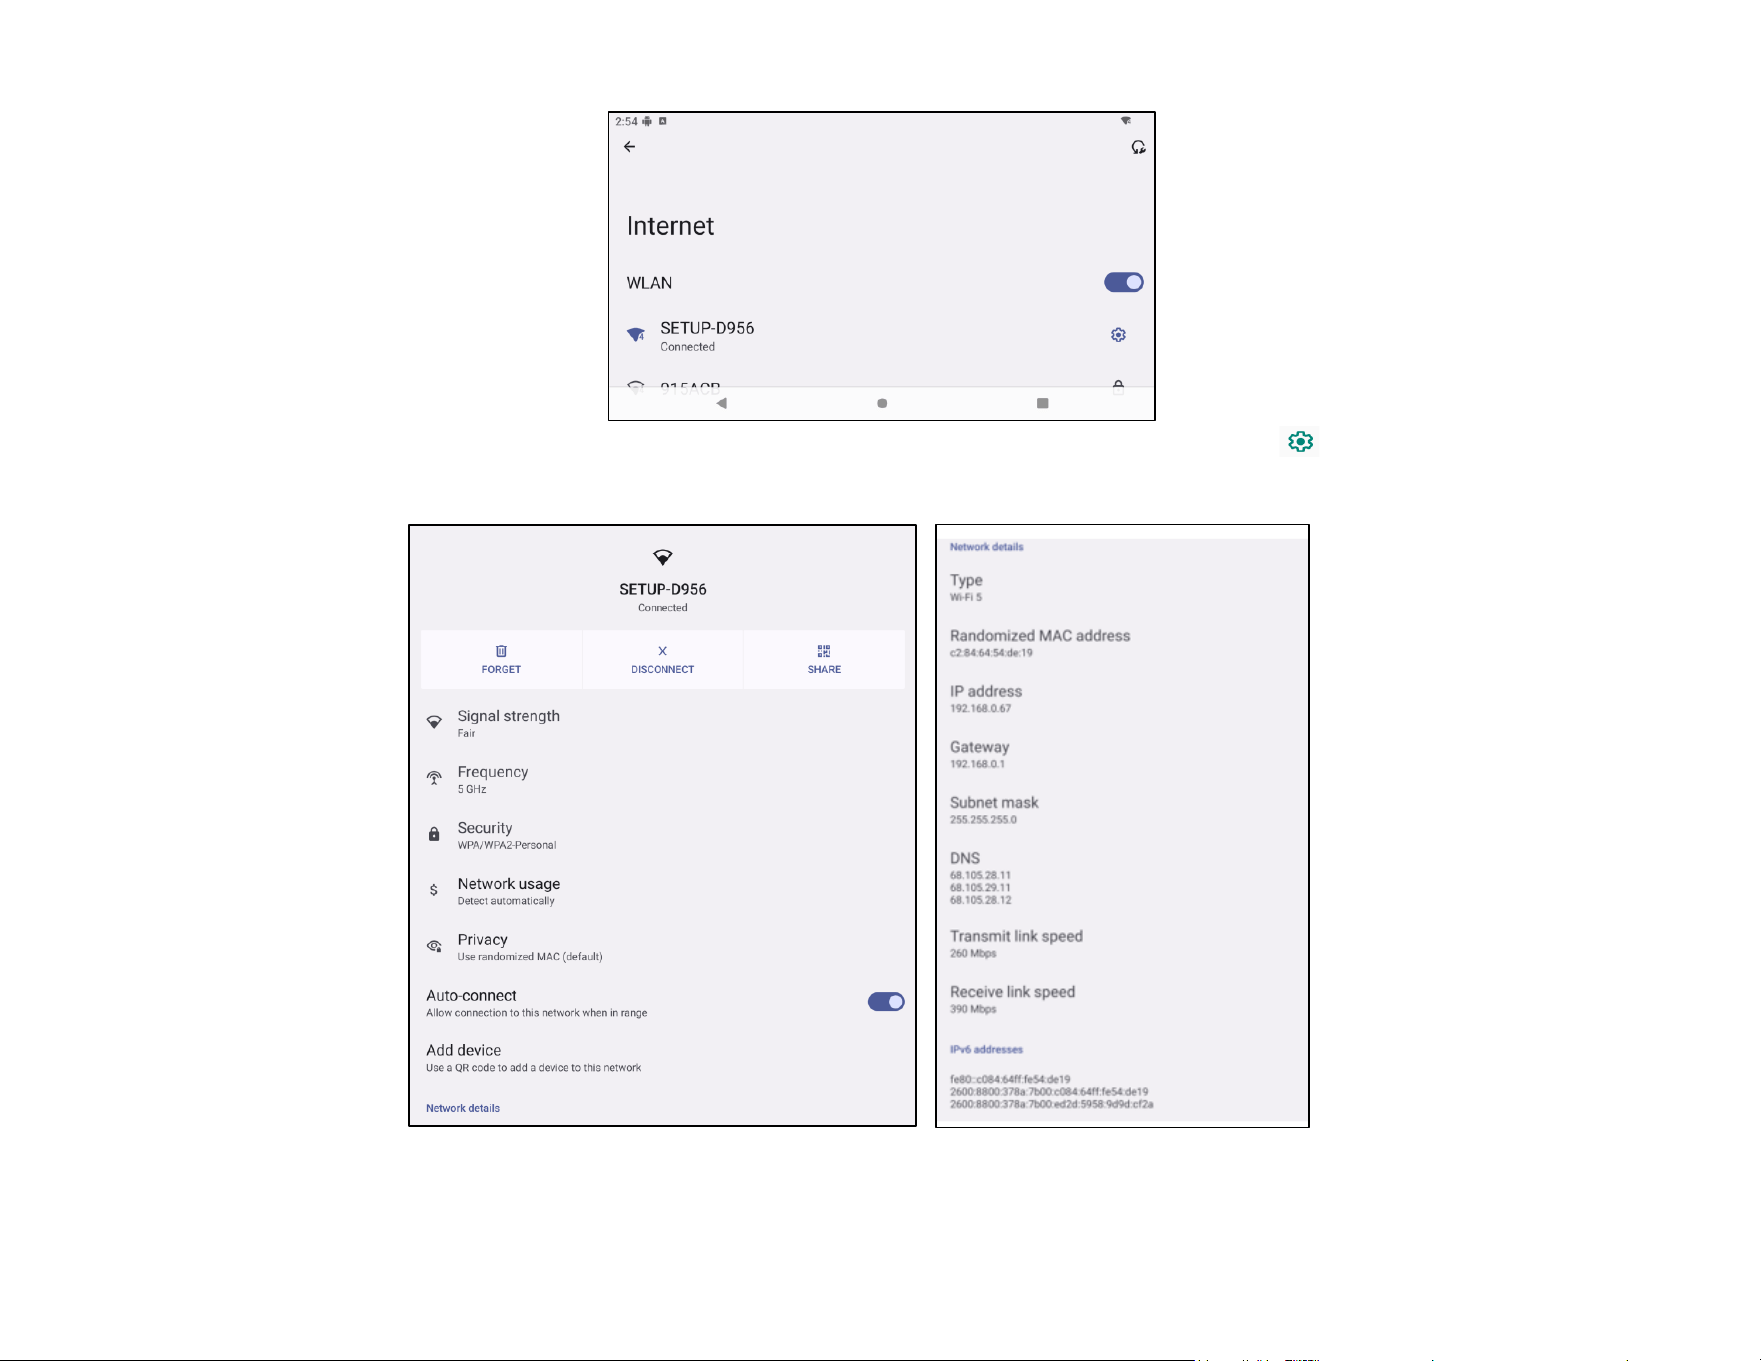
• From the list, select a wireless network.
• When prompted enter the network password.
• Tap Connect.
UM600853 Rev B page 29 of 85
User Manual –I-Series 5 Slate
For additional Network detail information’s (IP address, Security, Frequency and Advanced), tap setting of the network (e.g.
SETUP_D956).
UM600853 Rev B page 30 of 85
User Manual –I-Series 5 Slate
Joining Wi-Fi using QR code
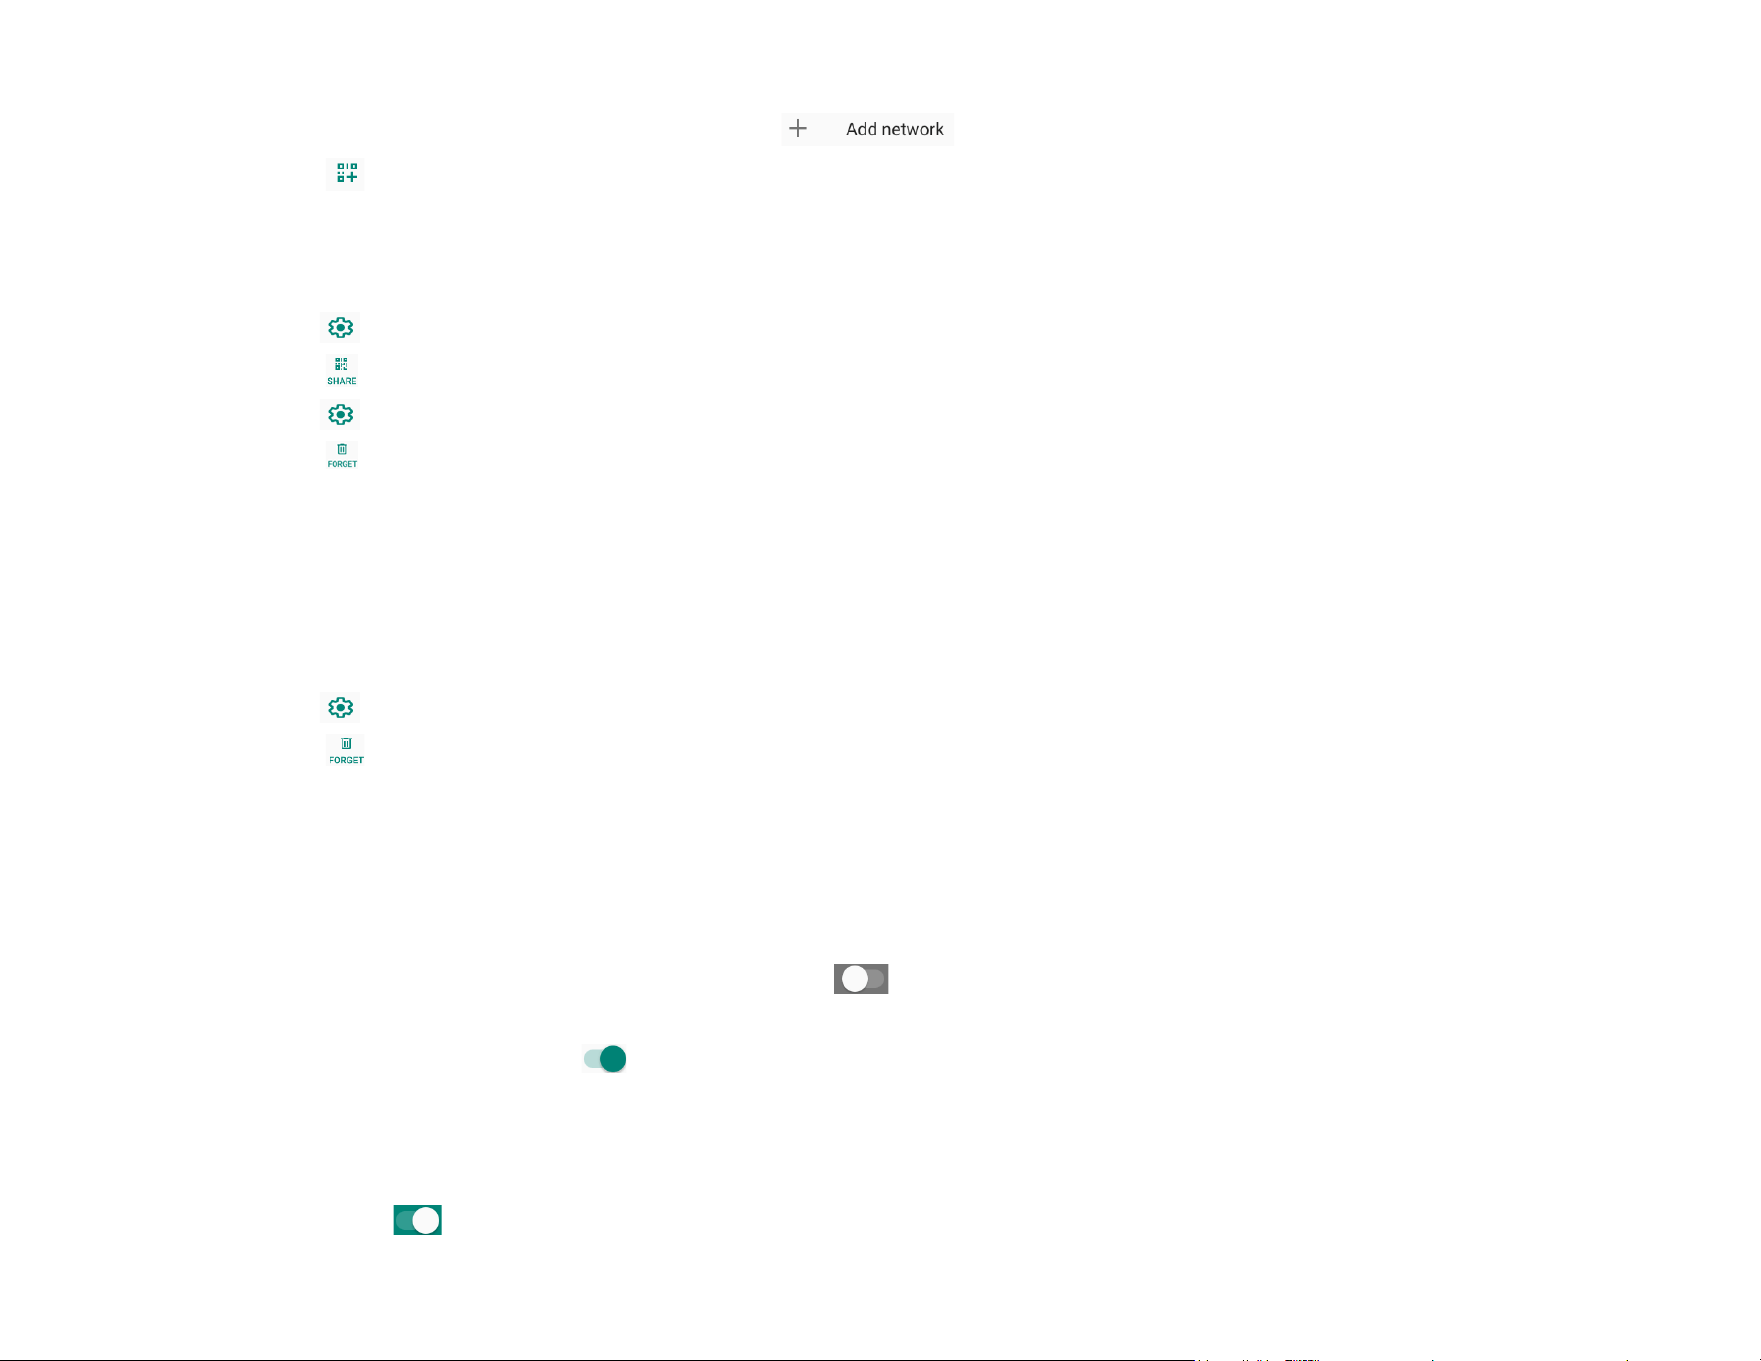
• From the list of saved Wi-Fi scroll down and tap .
• Tap (QR code) icon to the right of Add network.
• Position the viewfinder over the QR code on another device.
Sharing Wi-Fi using QR code
• Tap setting of the connected device.
• Tap (Share) icon.
• Tap setting of the connected device.
• Tap (FORGET) icon to disconnect.
Enabling Dynamic Frequency Selection (DFS) channels
• From the Wi-fi settings page, select Network preferences
• Enable or Disable the DFS selection option
Disconnecting a connected Wireless Network
• Tap setting of the connected device.
• Tap (FORGET) icon to disconnect.
Ethernet
Note: To connect the I-Series 5 Slate to Ethernet, it will need an Elo I/O hub (E955492) or a POS stand (E767561/E768749). When available, the
I-Series 5 Slate will automatically prioritize the ethernet connection. If the I-Series 5 Slate does not, please follow the steps below.
• Set Wi-Fi to disable.
• Go to Internet settings, tap WLAN to disable .
• Tap Ethernet.
• Tap toggle switch to enable .
Airplane mode
This will disable all of the wireless transmission functions. Including cellular, Wi-Fi, and Bluetooth.
• To enable , tap Airplane mode.

UM600853 Rev B page 31 of 85
User Manual –I-Series 5 Slate
Hotspot & tethering
WLAN tethering
This feature is for sharing Internet connection to another device using Wi-Fi.
Note: The I-Series 5 must be connected to Wi-Fi. See Network & Internet connection on this user manual.
• Tap Hotspot and tethering.
• Tap USB tethering, to enable .
USB tethering
This feature is for sharing Internet connection to another device using a USB cable.
Note: The USB cable must be connected first from I-Series 5 to another device or PC. If using the IO Hub plug in a USB type A cable
from your PC in any one of the four USB type A ports. If using the POS stand, plug in to one of the four USB ports in the neck of the
stand behind the Display. See Connected device → USB on this user manual.
• Tap Hotspot and tethering.
• Tap USB tethering, to enable .
Bluetooth tethering
This feature is for sharing internet network connection to another device using Bluetooth.
Note: The Bluetooth must be paired first from I-Series 5 to another device or PC. See Connected devices → Bluetooth on this user
manual.
• Tap Hotspot and tethering.
• To enable , tap Bluetooth tethering.
UM600853 Rev B page 32 of 85
User Manual –I-Series 5 Slate
Connected devices
The Connected devices application allows you to pair Bluetooth devices, NFC, and USB (Tethering File transfer MDI and PTP)
To setup, enter Settings → Connected devices →
Bluetooth
Note: Make sure the BT device is on and is discoverable.
• Tap Connection preferences.
• Tap Bluetooth.
• Tap toggle switch to ON .
• Tap + Pair new device.
• From Available devices screen, tap a device to pair.
• When a pairing request message appears.
• Verify the pairing number is the same.
• If the pairing requests a PIN, enter the PIN.
• Tap PAIR, to connect.
• When the Bluetooth device is successfully connected to I-Series 5, the connection will show as Active or Connected.
Unpair a paired Bluetooth Device
• Navigate back to ‘Connected devices’ screen, from AVAILABLE MEDIA DEVICES or PREVIOUSLY CONNECTED DEVICES.
• Tap settings of the connected device.
• In the settings menu, it is possible to DISCONNECT, FORGET (to unpair the device) and to enable and disable Phone calls, Media
audio and Contact sharing.
Cast
This allows to mirror the I-Series display onto a wireless display device (e.g. Smart TV).
Note: Make sure the wireless display capable device and I-Series 5 are on the same wireless network. See Network & Internet connection on
this user manual.
• Tap Connection preferences.
• Tap Cast.
UM600853 Rev B page 33 of 85
User Manual –I-Series 5 Slate
Device Setting
Wireless Display name
Setting
• Tap 3-dots menu.
• Tap Enable wireless display to begin scanning for compatible displays.
• From the list, tap a wireless display (e.g. TV). From the Wireless Display device (TV), if promoted tap Allow.
Disconnect and forget a connected wireless display
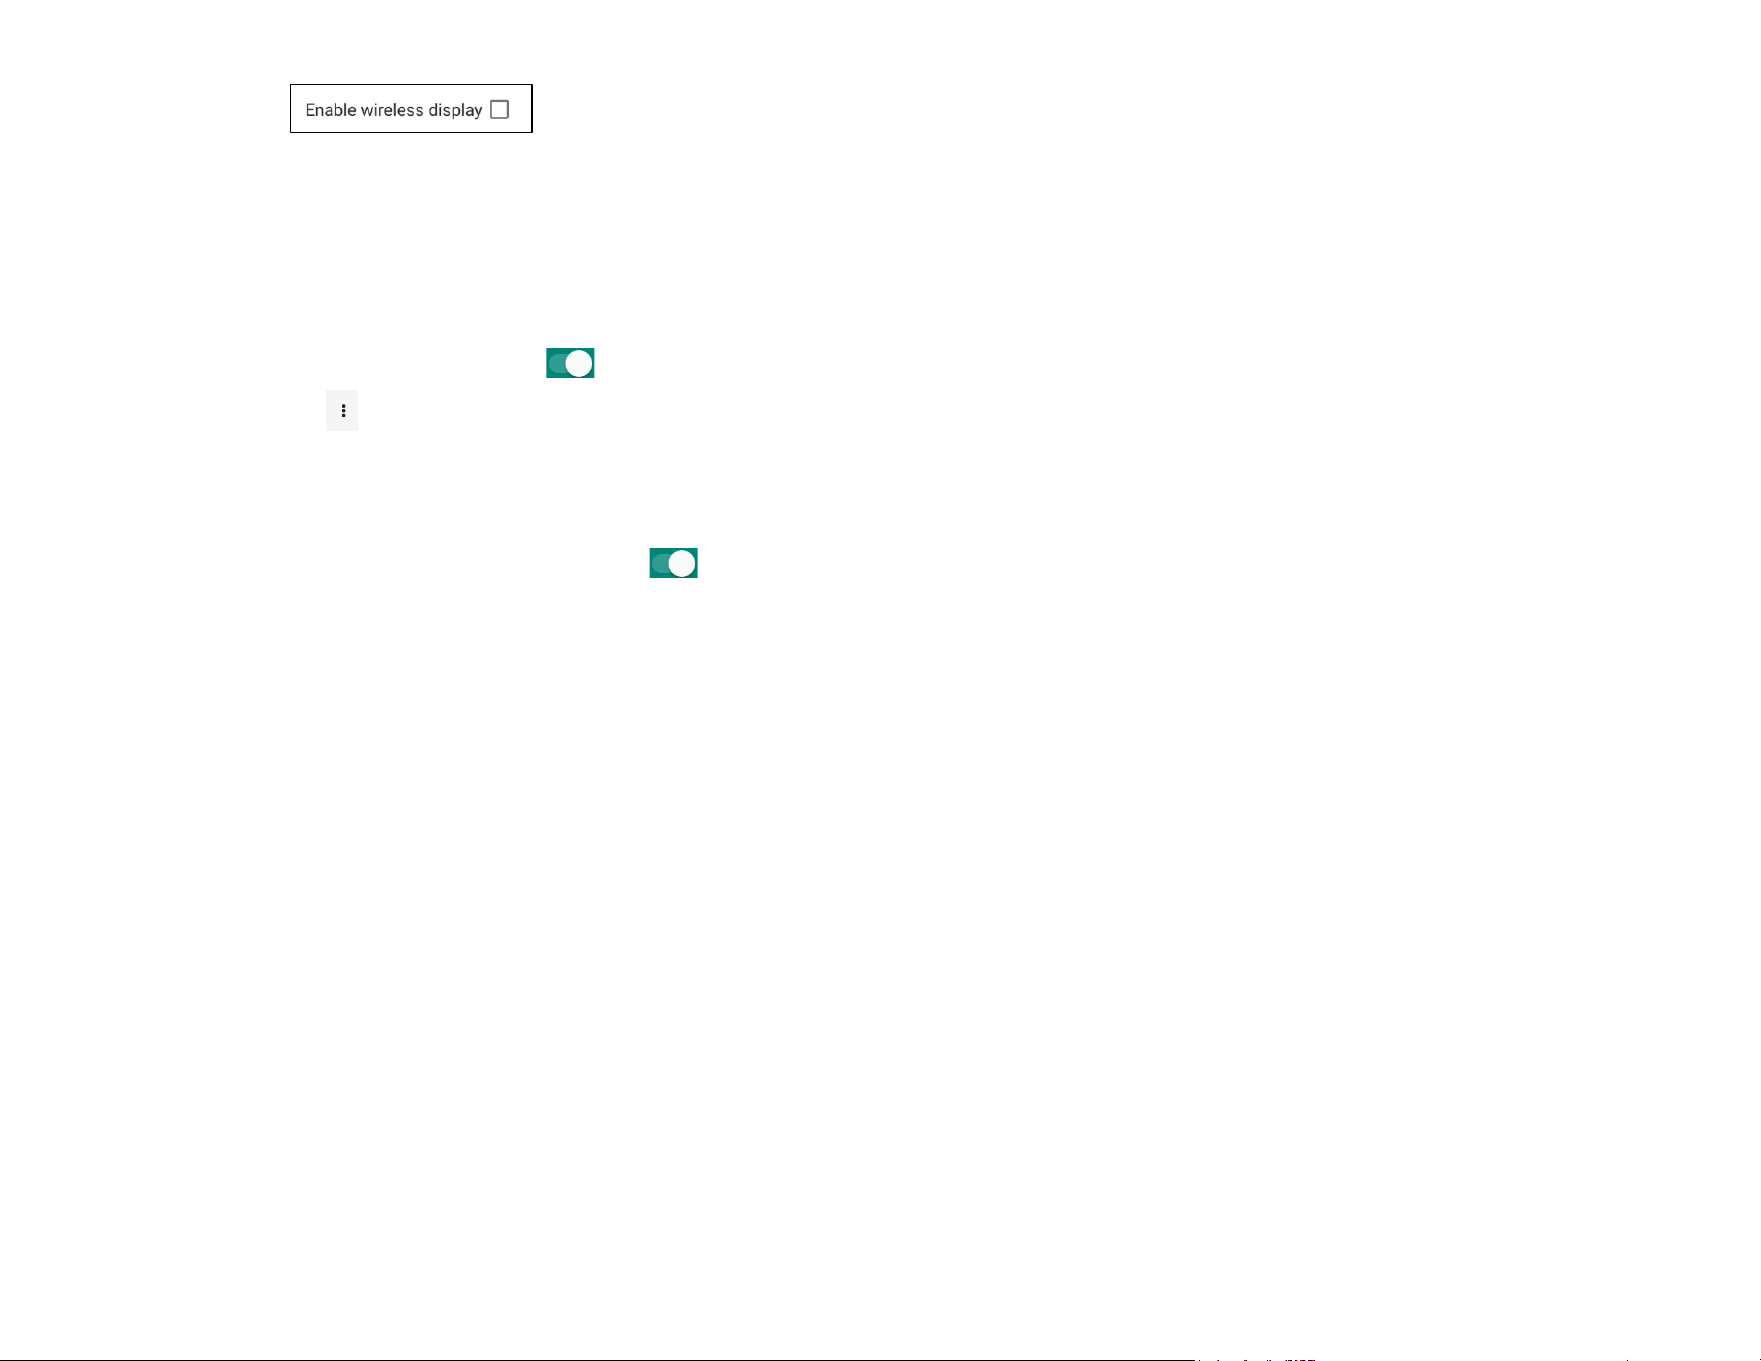
• To stop the device from casting, tap the connected wireless display (e.g. TV).
• Tap DISCONNECT.
To forget a device
• Tap setting of connected wireless display.
• From wireless display options screen, tap FORGET.
To stop scanning available wireless display to cast
• Tap 3-dots menu.
• Tap Enable wireless display to be unchecked
UM600853 Rev B page 34 of 85
User Manual –I-Series 5 Slate
Printing
Note: Make sure I-Series 5 and printer are connected to the same network.
• Tap Connection preferences.
• Tap Printing.
• Tap Default Print Service.
• Tap toggle switch to ON .
• Tap 3-dots menu.
• Tap Add printer.
To add a printer using Wi-Fi printer:
• Tap Wi-Fi direct printing to enable .
• If prompted, tap ‘ALLOW ONLY WHILE USING THE APP’ to allow the device.
• Tap Wi-Fi Direct printers to start searching for a Wi-Fi printer to add.
• Tap the printer’s name to connect.
To add a printer entering IP address:
• Tap Add printer by IP address.
• Enter the printer’s IP address.
•
Files received via Bluetooth
This menu will show a list of all the files that have been transferred via Bluetooth.
UM600853 Rev B page 35 of 85
User Manual –I-Series 5 Slate
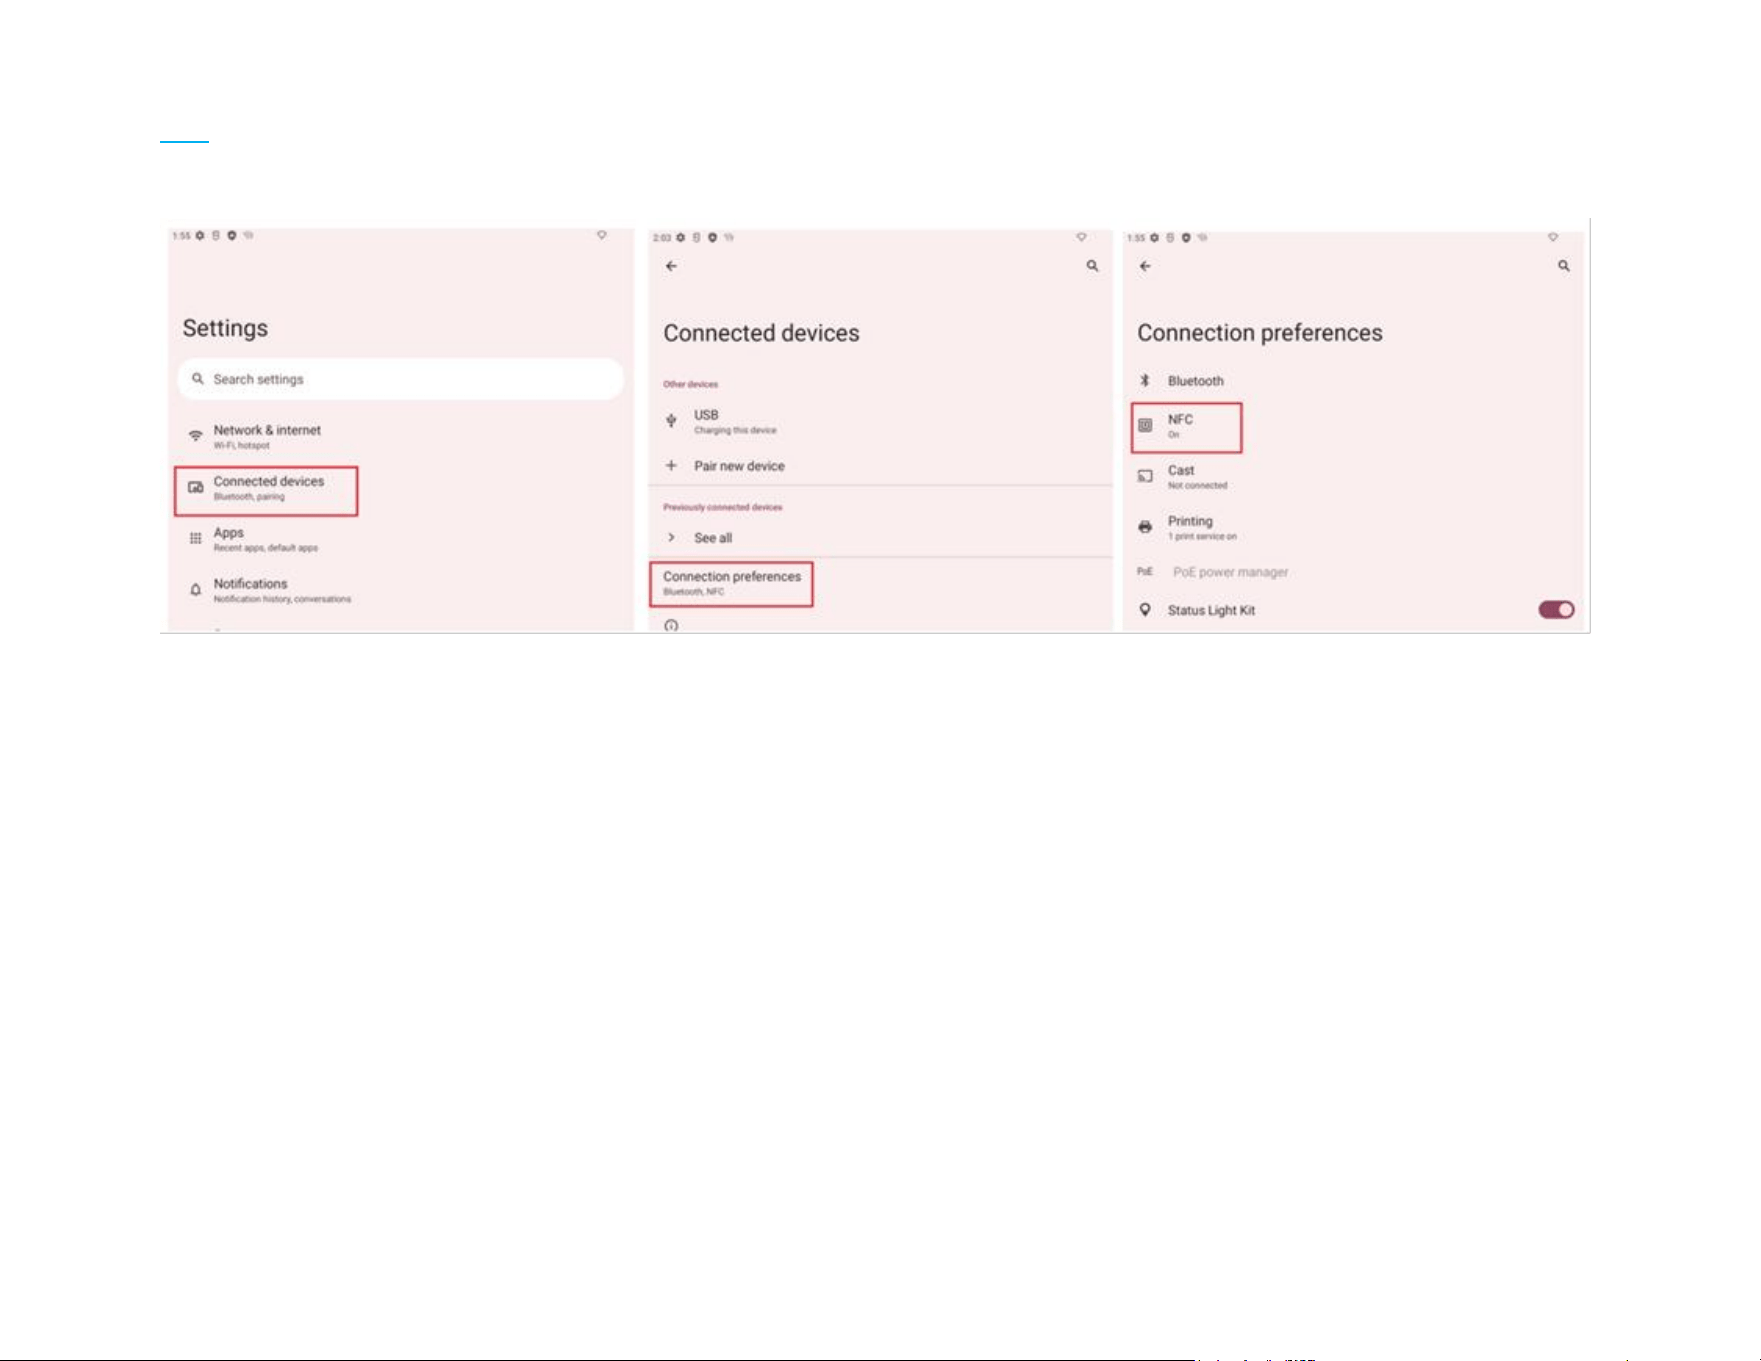
NFC
To enter the NFC setting, navigate to Android settings → Connected devices → Connection preferences → NFC
UM600853 Rev B page 36 of 85
User Manual –I-Series 5 Slate
Apps & Notifications
App & Notification settings are to streamline app alerts by changing which apps send notifications and how the
notifications alert you.
To manage App & Notification, enter Settings → App & Notification
Setting notifications
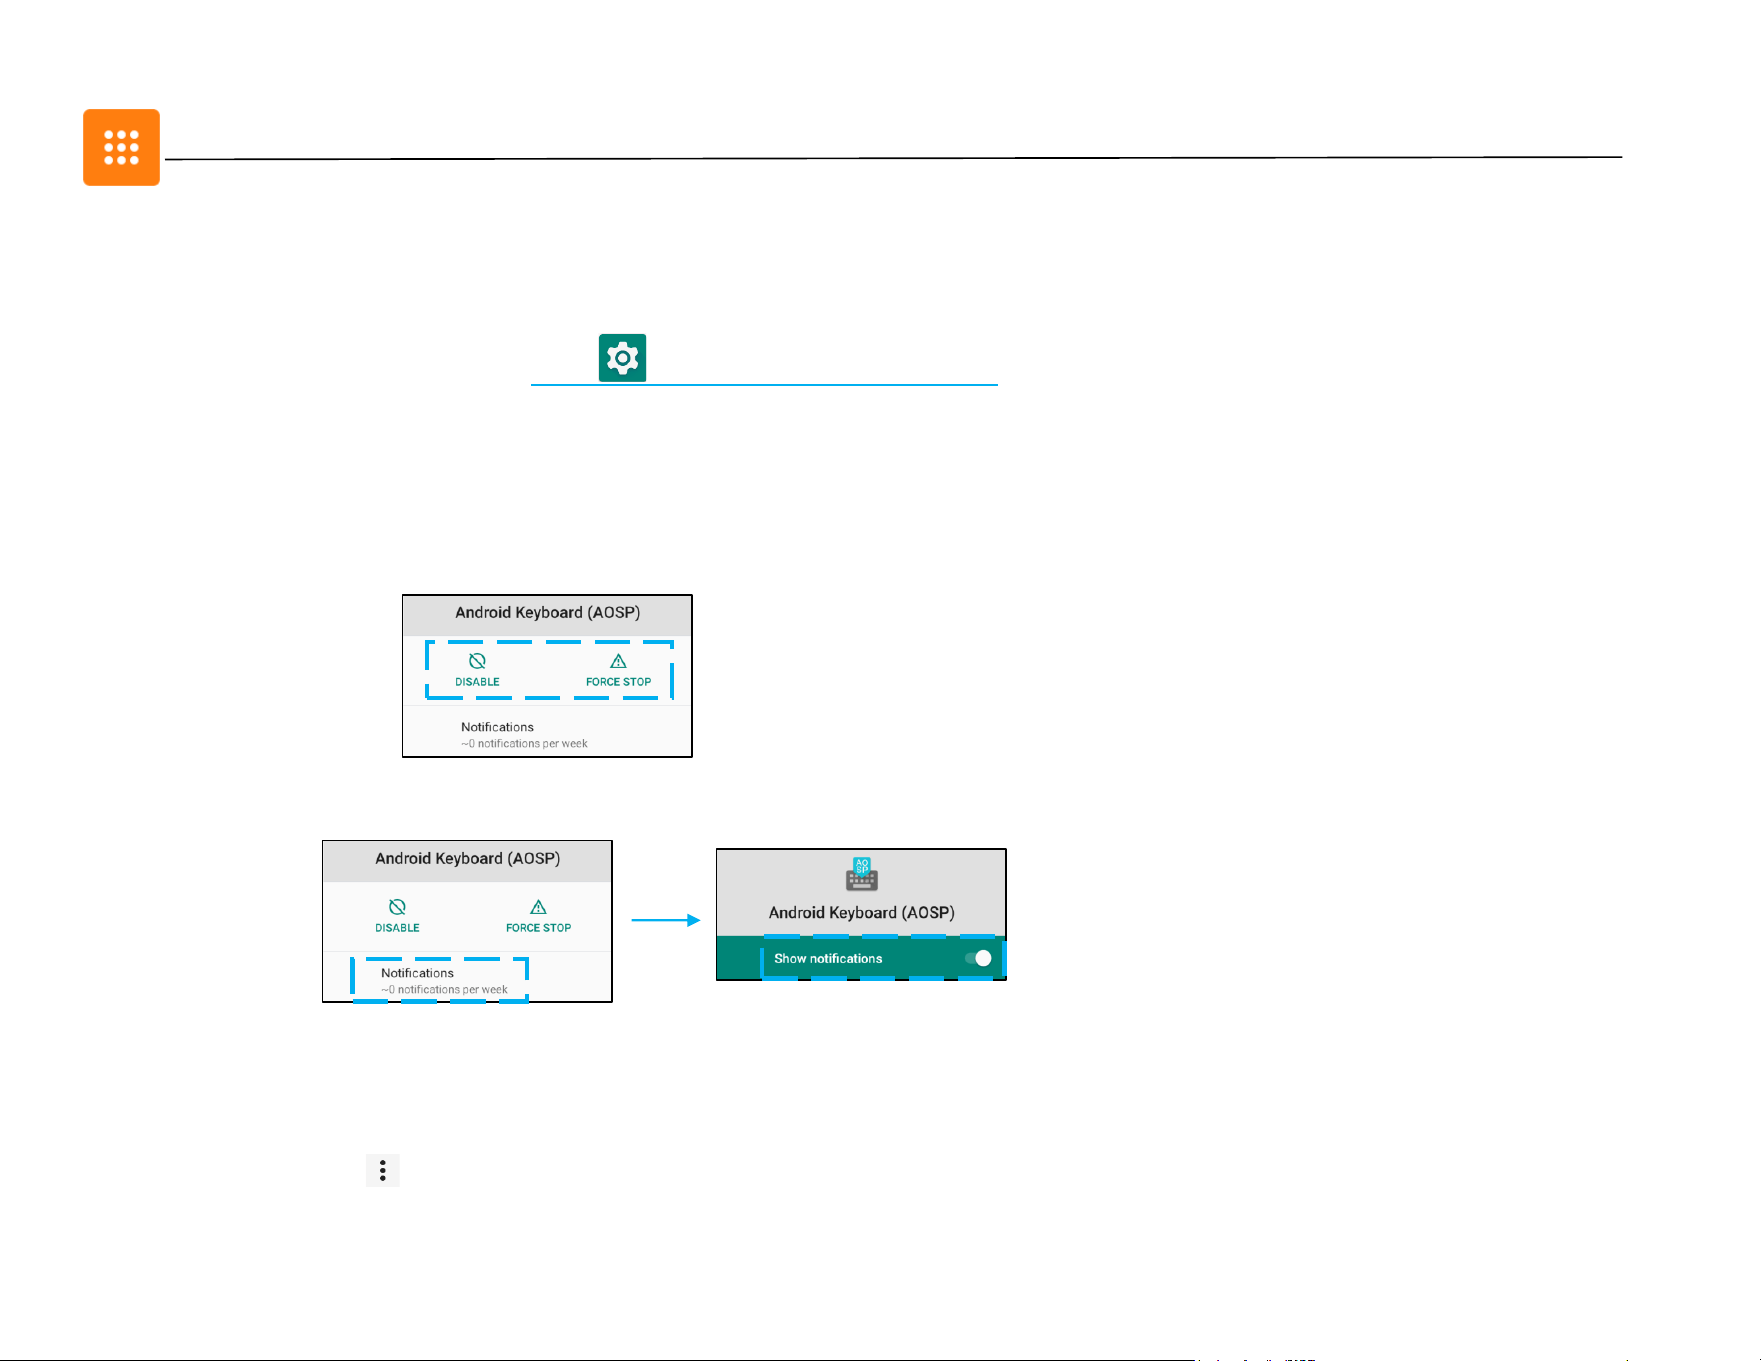
• In the Recently opened apps, tap SEE ALL APPS.
• From App Info screen tap an App to set the notification (e.g. Keyboard).
❖ In the App property settings you can also DISABLE, ENABLE, and FORCE STOP the app.
• To enable or disable notifications, tap Notifications. Then select Show notifications.
• To add a dot for unread notifications, tap Advanced then tap Allow notification dot.
Resetting app preferences
This will not lose any app data.
• Tap 3-dots menu from App Info screen.
• Tap Reset app preferences then tap RESET APP.
UM600853 Rev B page 37 of 85
User Manual –I-Series 5 Slate
Setting Permission manager to an application
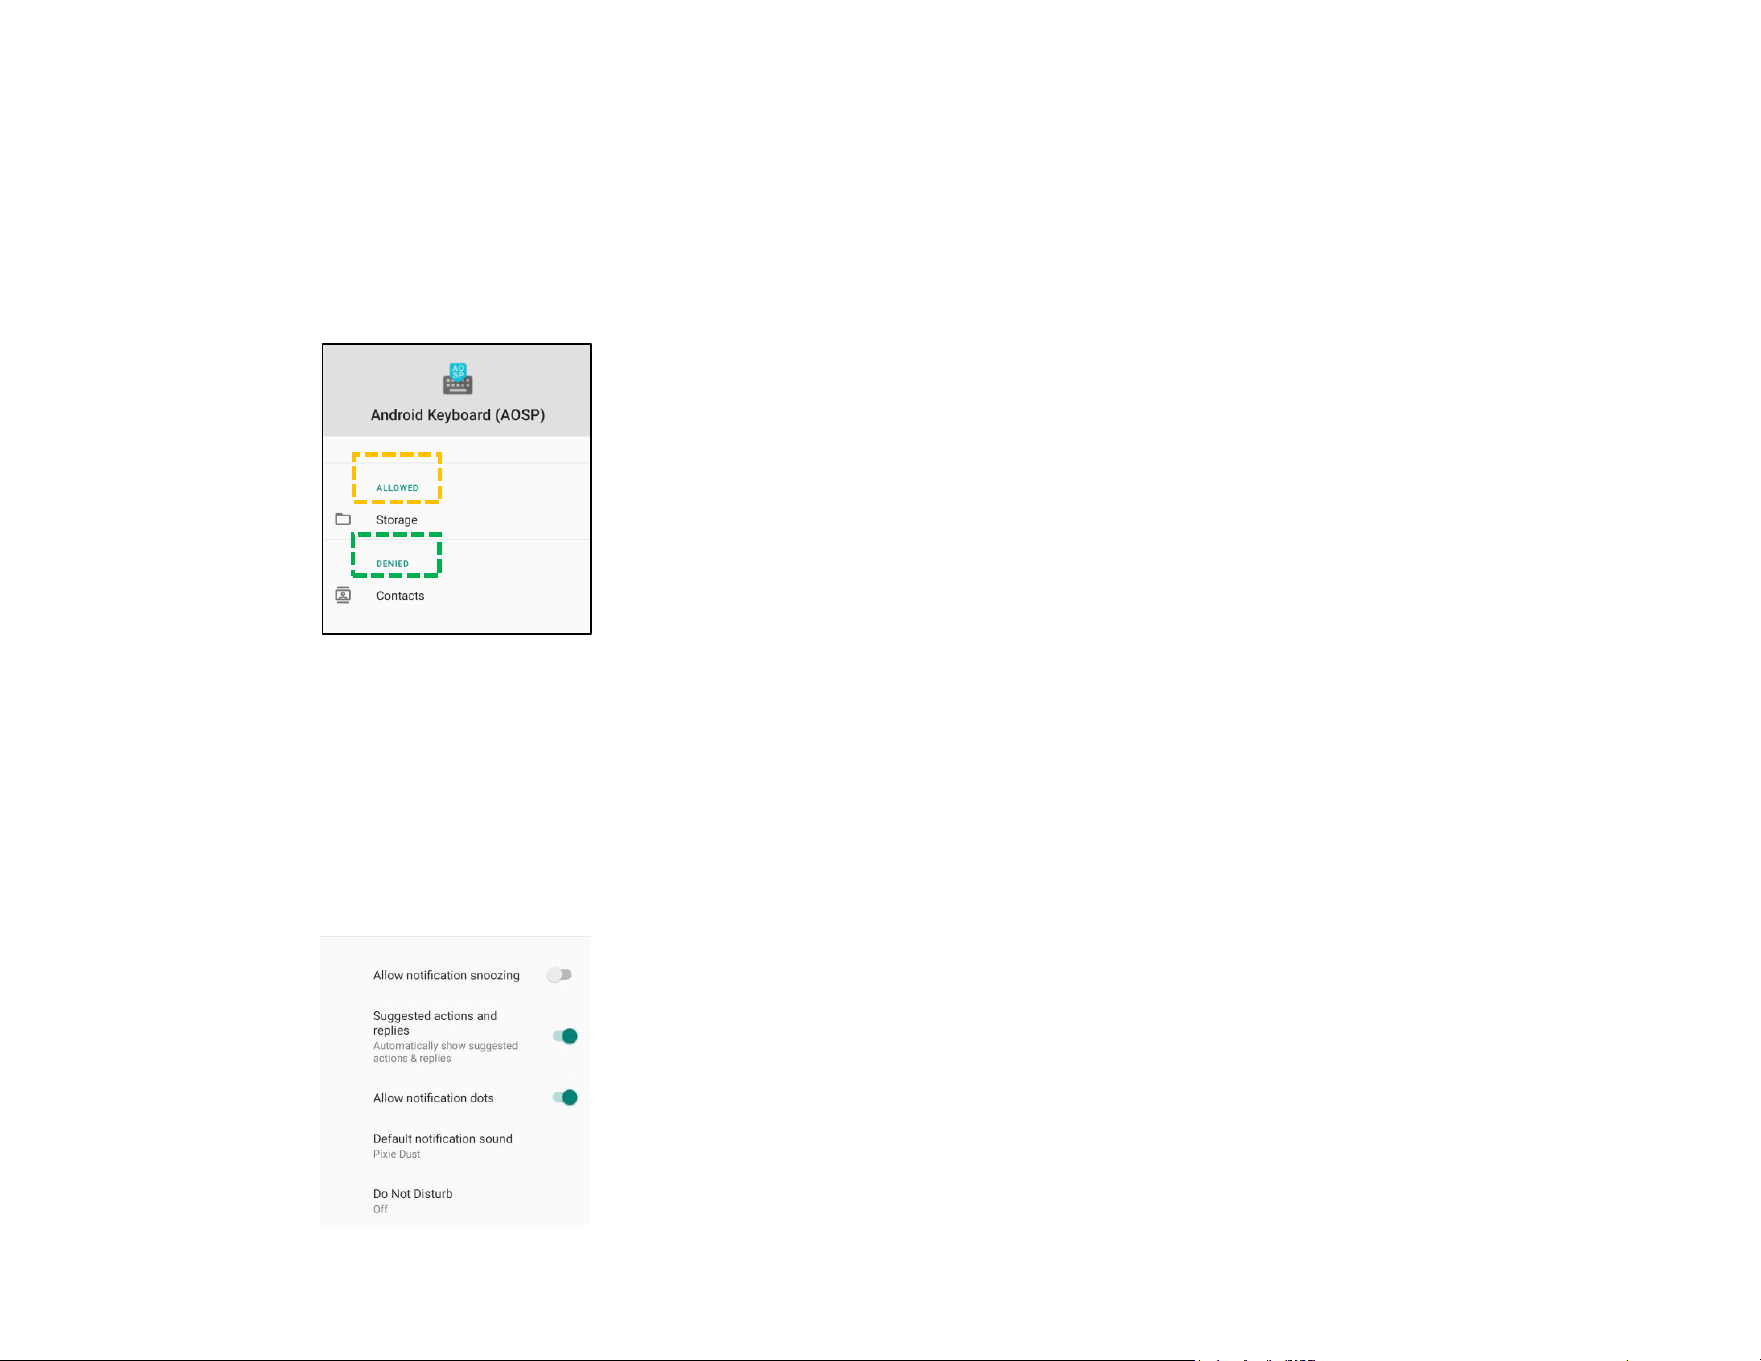
• To manage a preference’s permissions to an app (e.g. Keyboard), tap Permissions.
• To allow a permission to an application, tap an app from DENIED menu.
• To deny a permission to an application, tap an app from ALLOWED menu.
Setting notifications in the lock screen
• To set up notification in the lock screen from Apps and notification screen, tap Notifications.
• Tap Notification on lock screen. Then follow on-screen instruction on how notifications appear in the lock screen.
For additional settings
• Tap Advanced.
• Tap a feature to enable or disable.
UM600853 Rev B page 38 of 85
User Manual –I-Series 5 Slate
Setting Permission manager on apps using storage, phone, and location
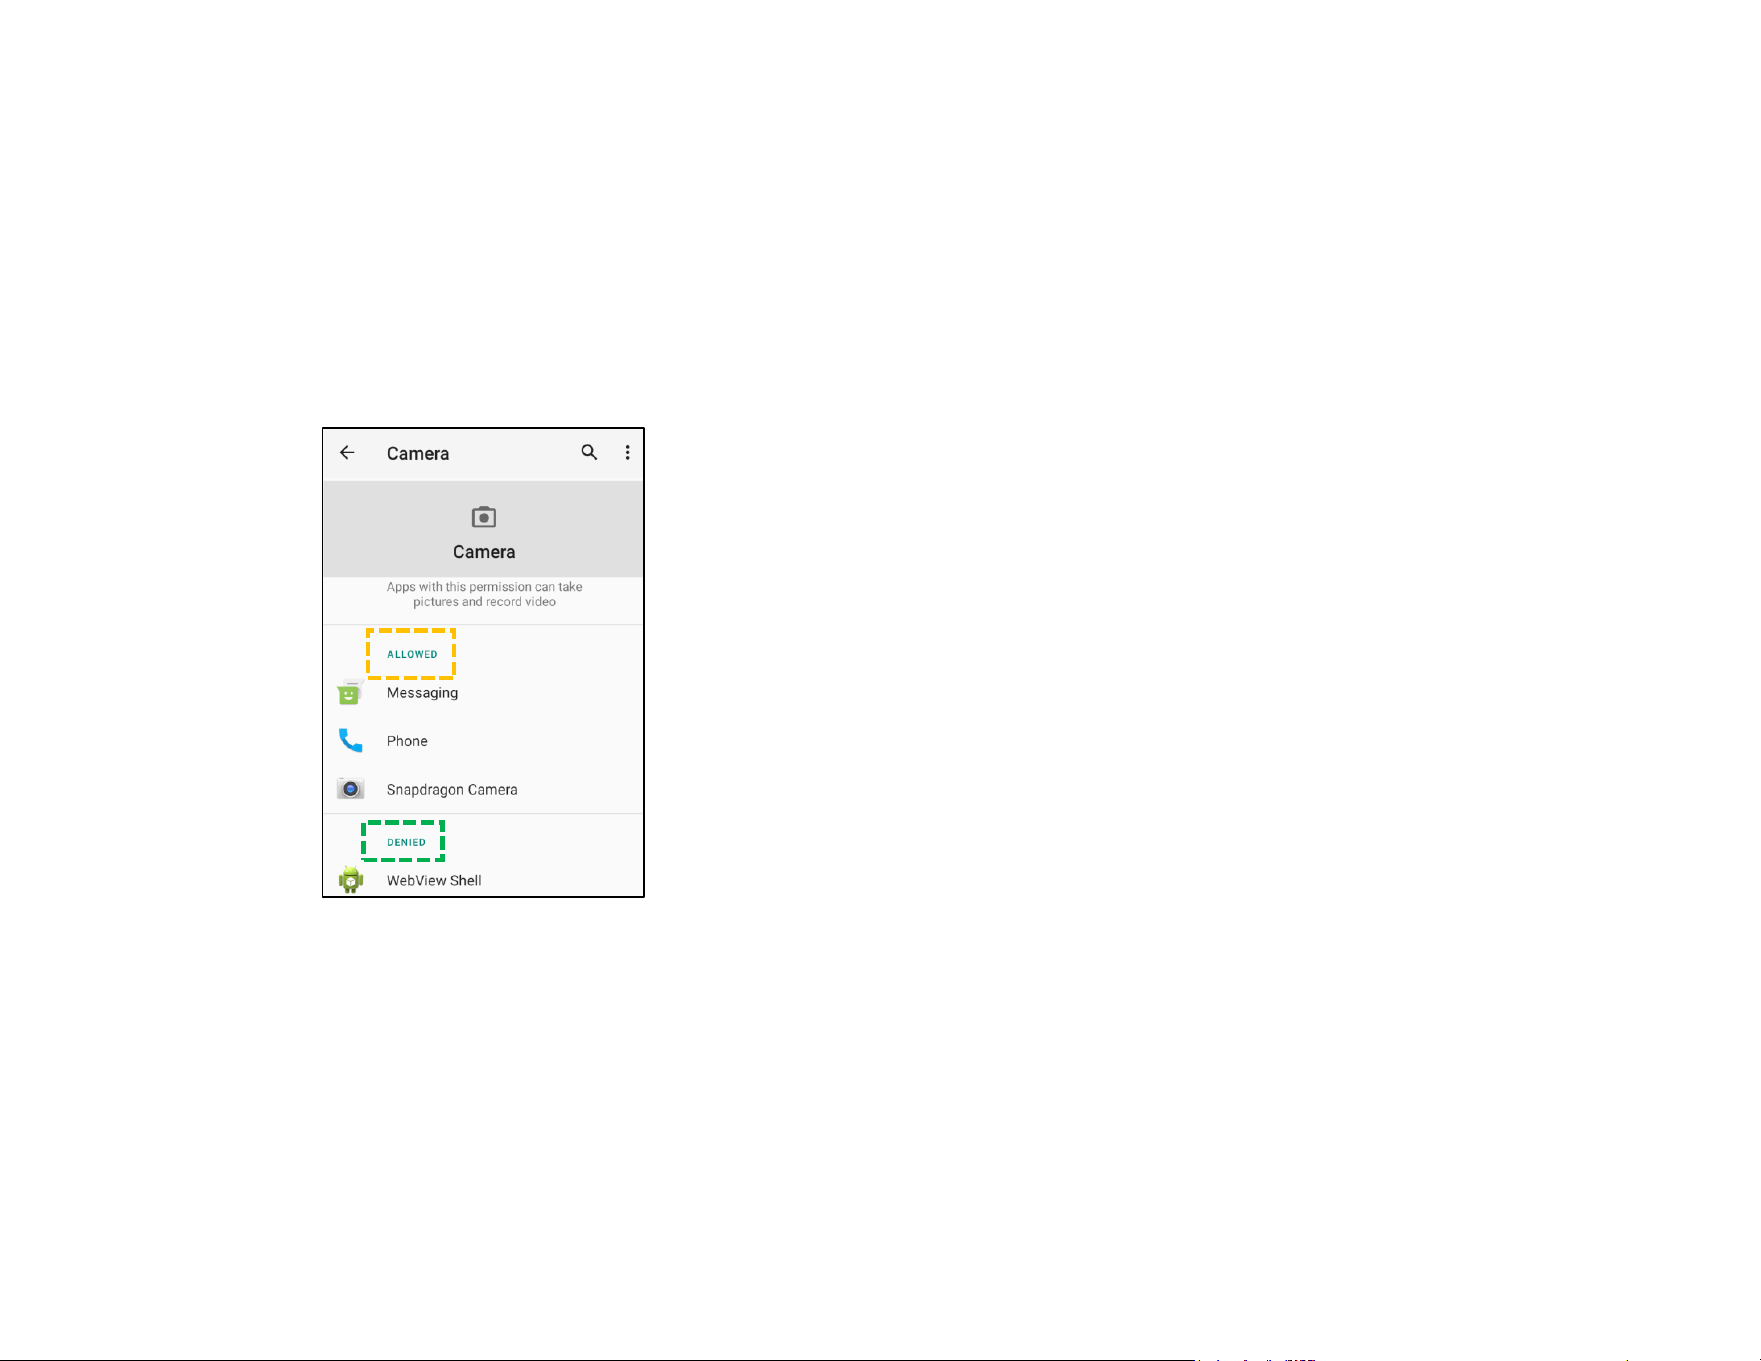
• To give permission to an app, tap Permission manager from Apps and notifications screen.
• In the menu of permission manager, tap an app to manage that app’s permissions (e.g. Camera).
• From the camera properties, choose an app to manage.
• To allow a permission to an application, tap an app from DENIED menu.
• To deny a permission to an application, tap an app from ALLOWED menu.
Setting Emergency alerts
• Tap Advanced from the Apps and notifications screen.
• Tap Emergency alerts.
• From the menu of alerts, tap a feature (e.g. AMBER alerts) to enable or disable.
• For Sound and Vibration settings, tap Vibration to enable or disable under Alert Preferences.
• For Alert reminder settings, tap Alert reminder sound.
UM600853 Rev B page 39 of 85
User Manual –I-Series 5 Slate
Storage
To manage Storage, enter Settings → Storage →
Storage Manager
This feature is to help free up storage space, storage manager removes backed up photos and video from the device.
• To enable or disable , tap Storage manager.
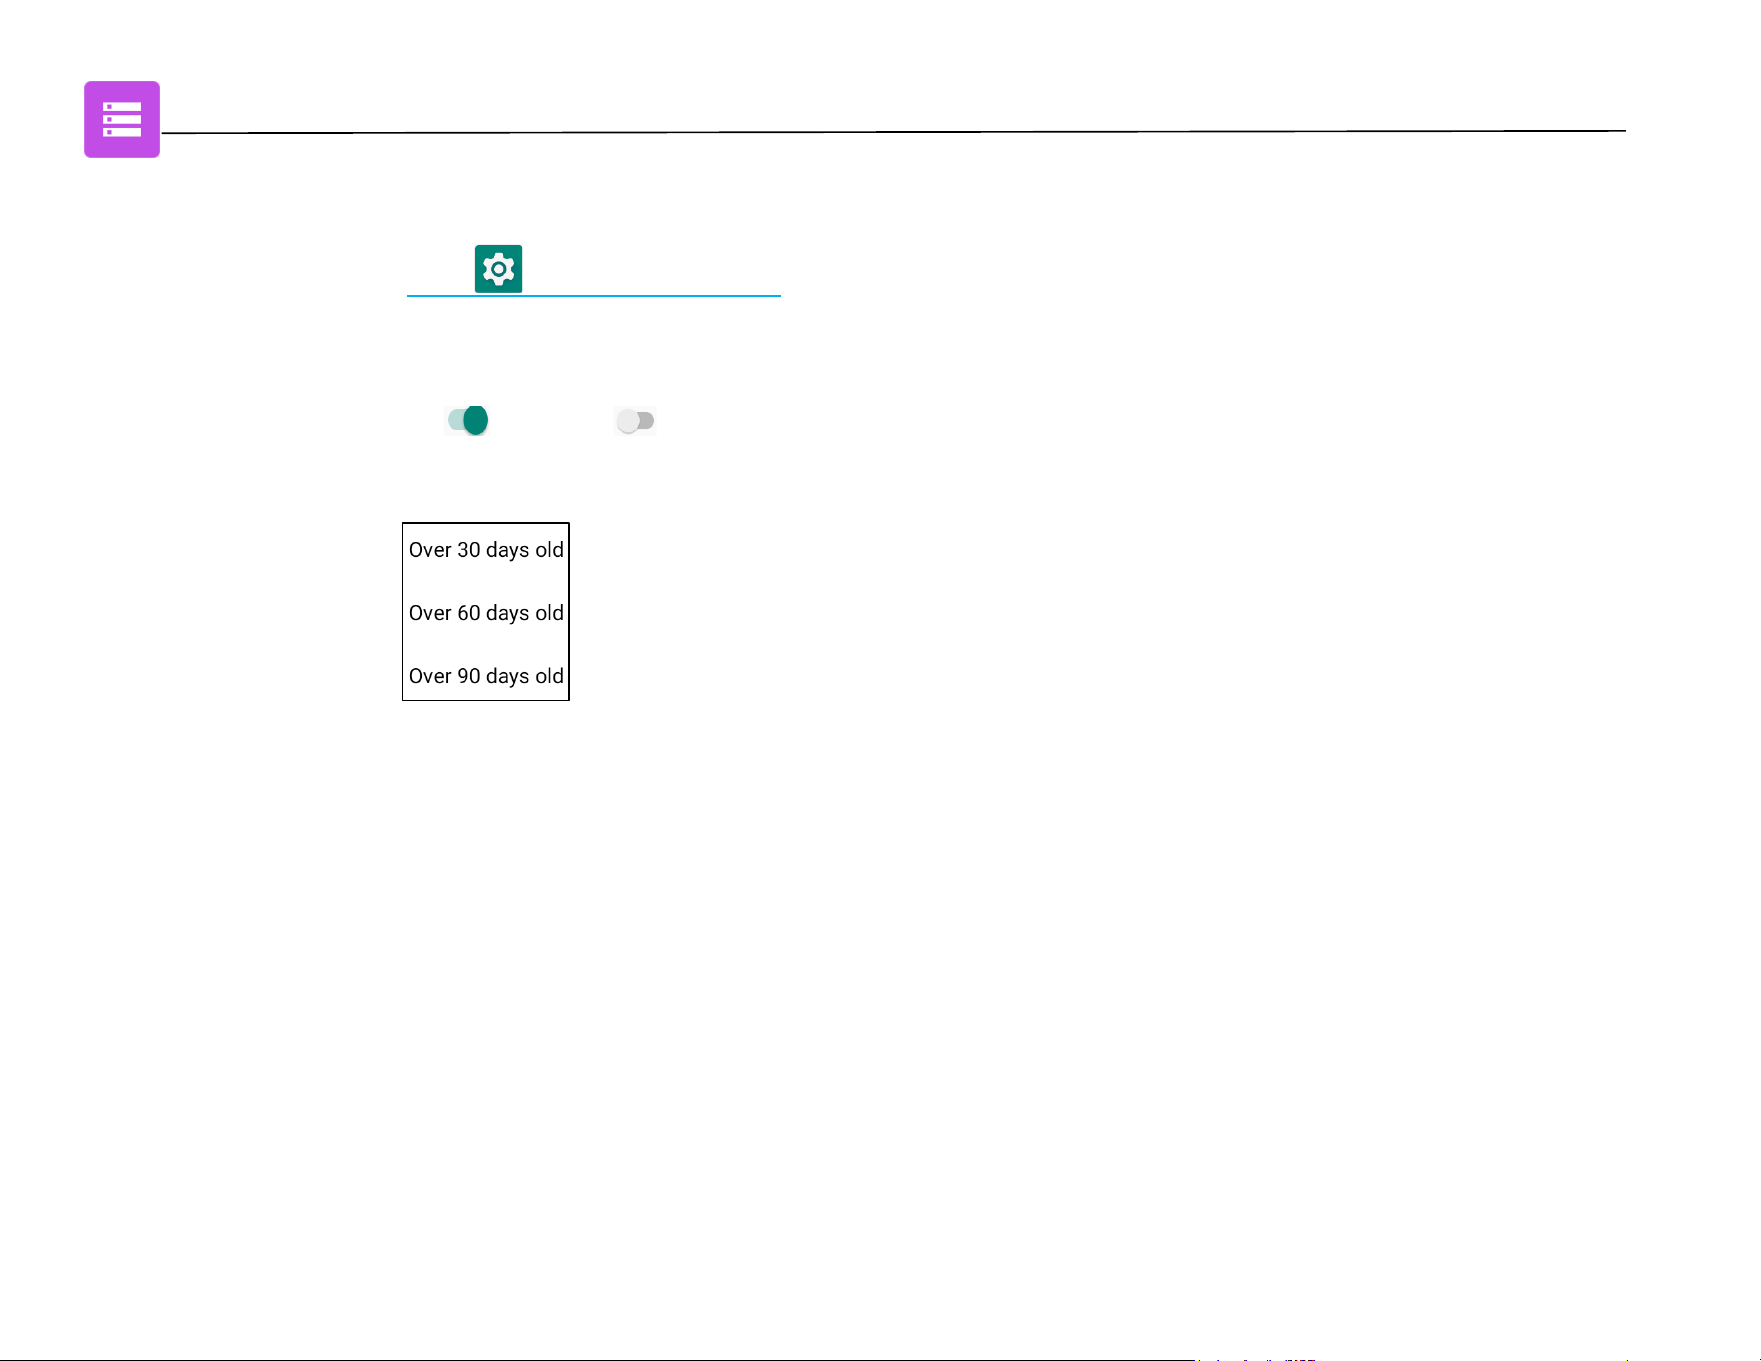
• To make changes to set days on removing photos and videos, tap Storage manager then tap Remove photos & Videos.
❖ Select from the options below.
• Tap Back to exit.
UM600853 Rev B page 40 of 85
User Manual –I-Series 5 Slate
Sound
The sound application is to manage audio, vibration and Do not Disturb features.
To modify settings, enter Settings → Sound →
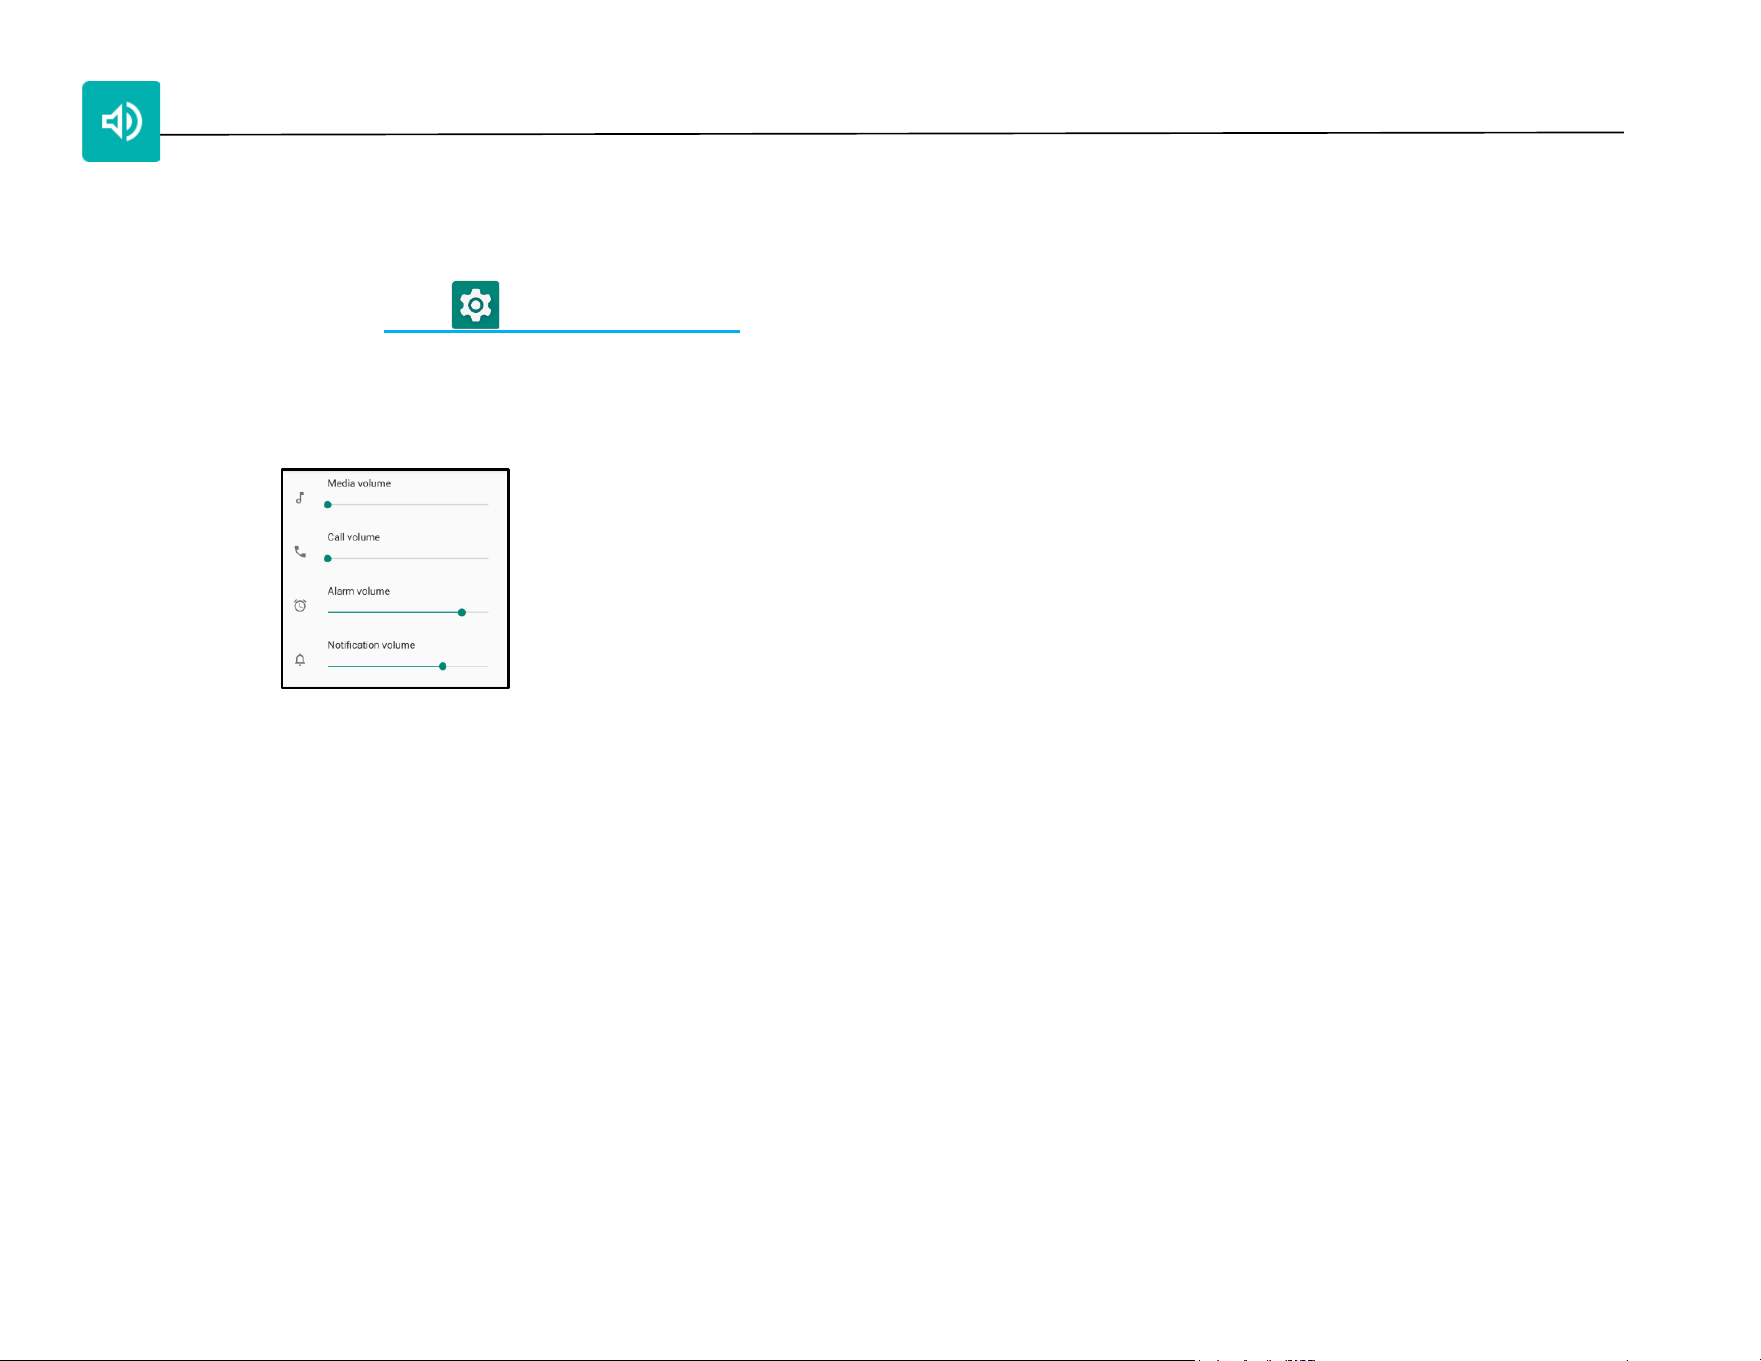
Volume Setting
• To decrease or increase the following sound volume, drag slider left or right.
Do not Disturb
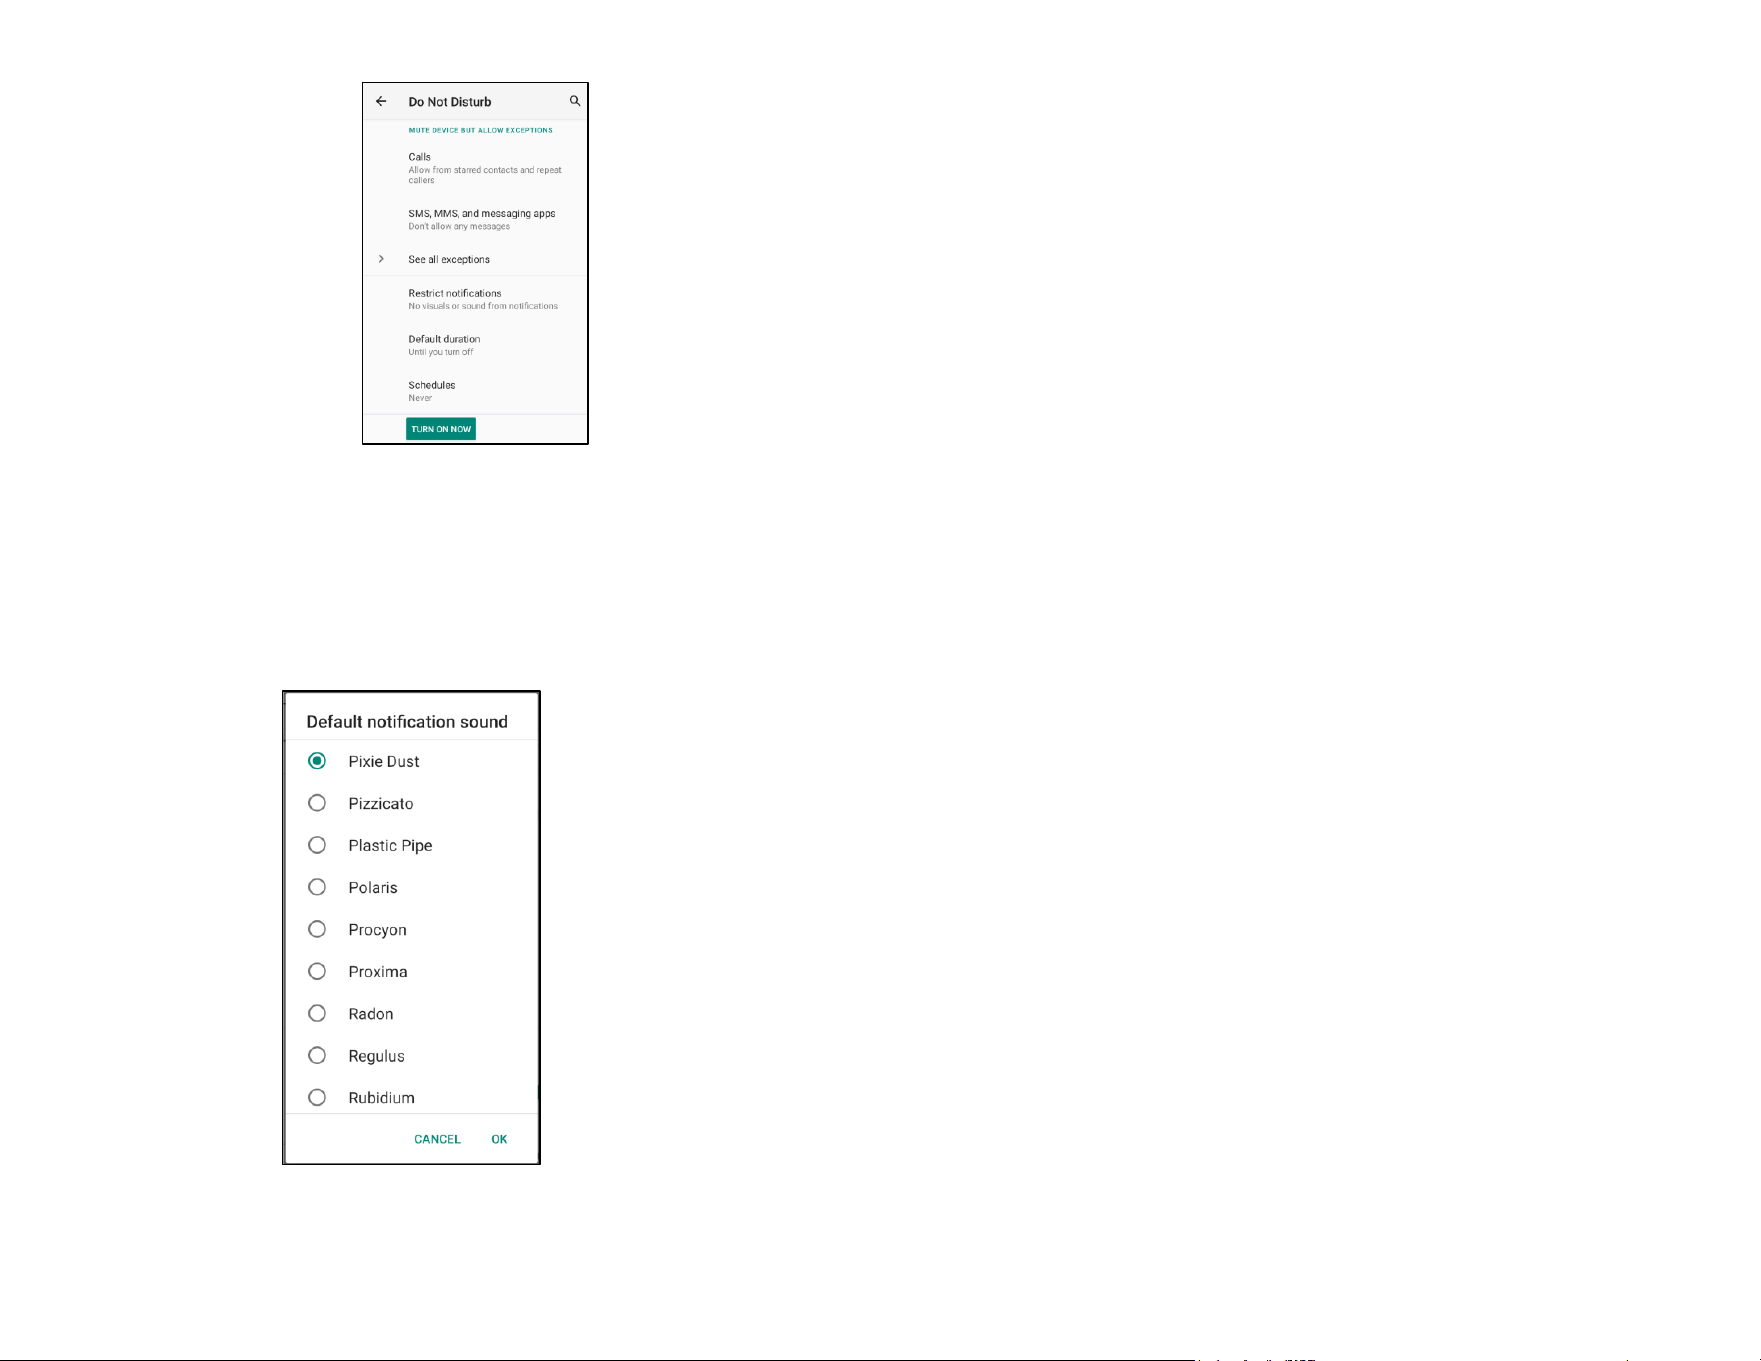
• Tap Do not Disturb.
• Tap TURN ON NOW, to enable Do not Disturb,
❖ To manage settings, tap a feature you wish to manage and follow on-screen instructions to complete the set up.
UM600853 Rev B page 41 of 85
User Manual –I-Series 5 Slate
• To disable, tap TURN OFF NOW
Default Notification Sound
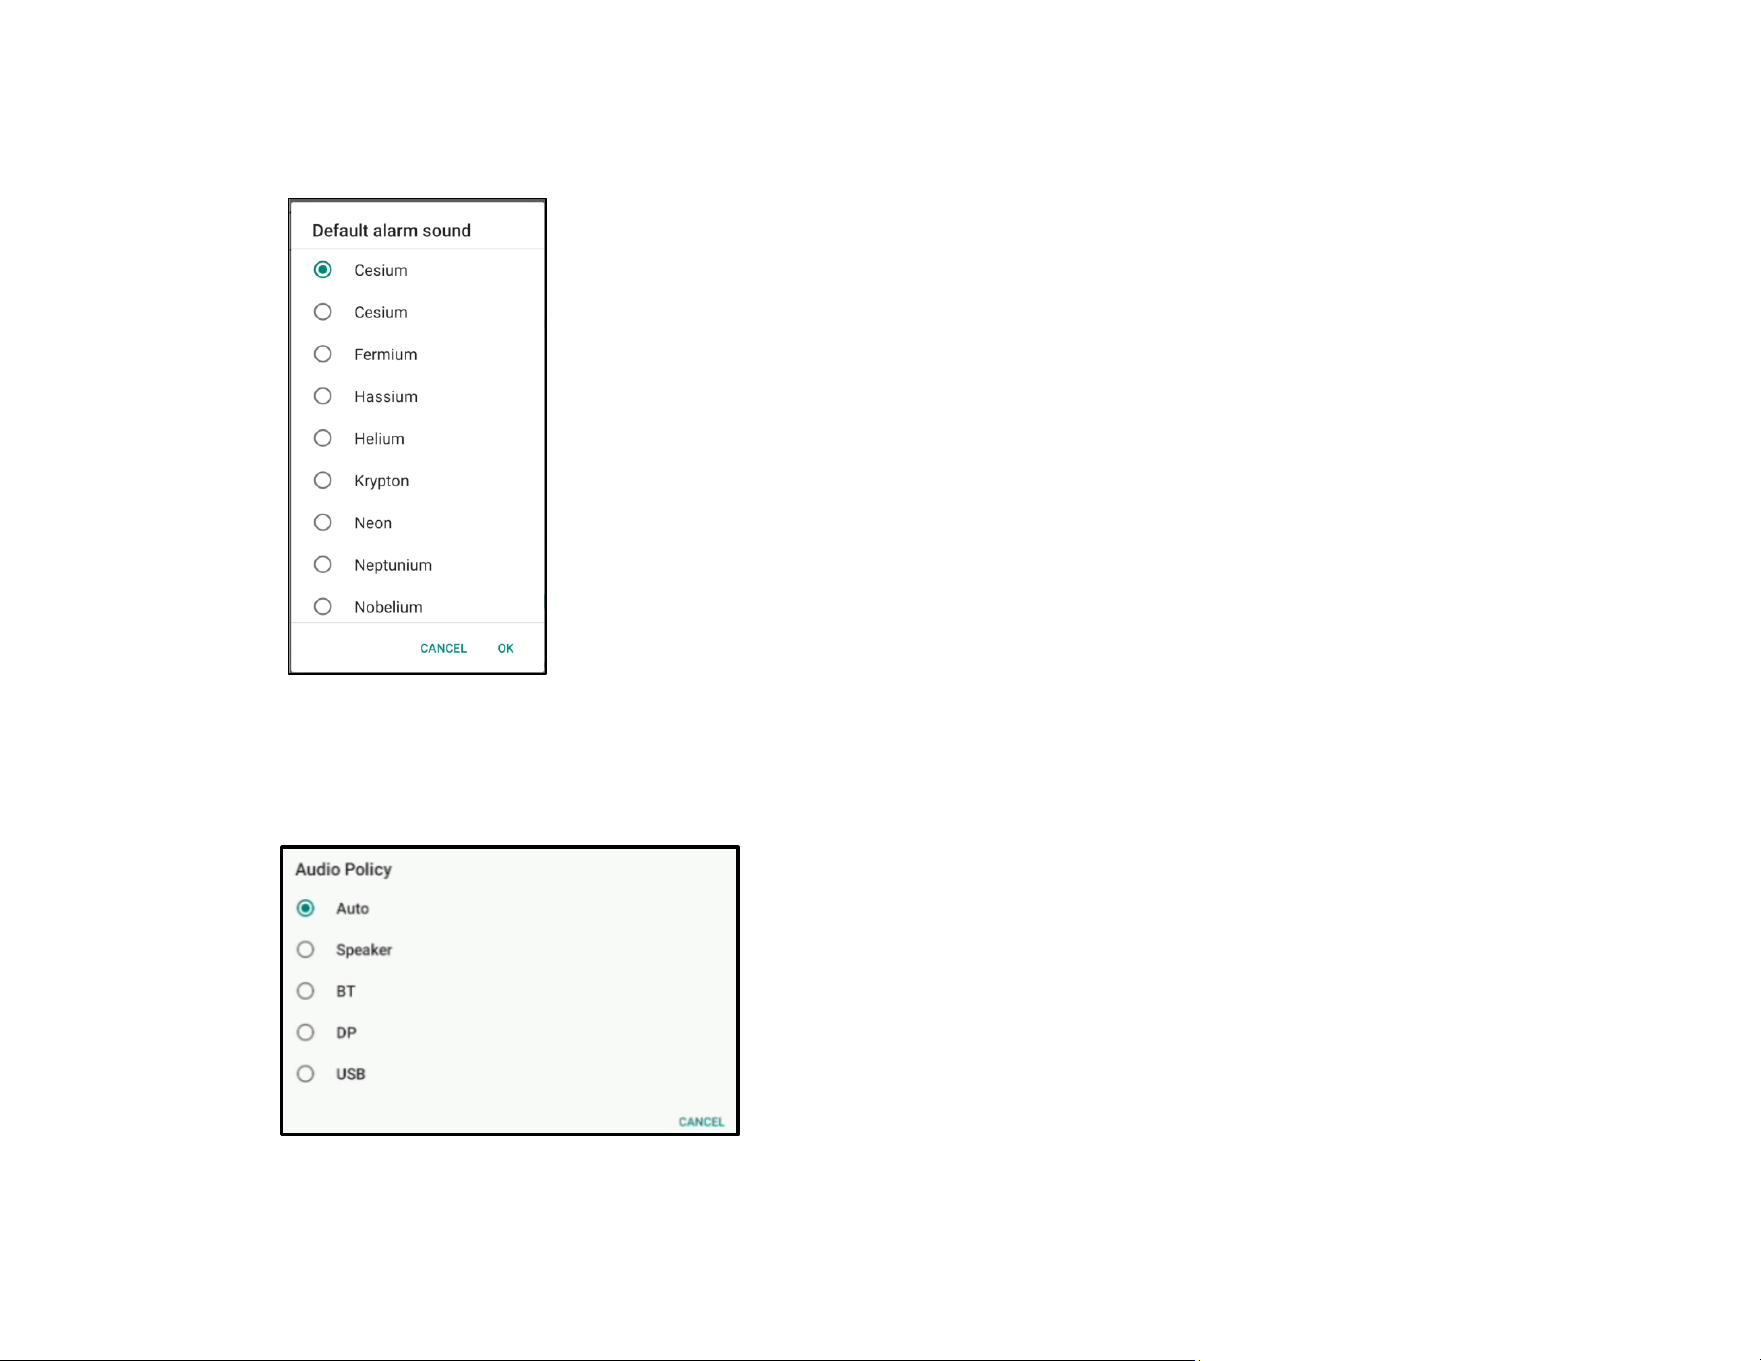
• Tap Default notification sound.
• Select a sound from the list (e.g. Pixie Dust) and tap OK to save.
UM600853 Rev B page 42 of 85
User Manual –I-Series 5 Slate
Default Alarm Sound
• Tap Default Alarm sound.
• Select an alarm sound from the list (e.g. Cesium) and tap OK to save.
Audio Policy
• Select to audio output port.
• Default is Auto
UM600853 Rev B page 43 of 85
User Manual –I-Series 5 Slate
Display
The Display application manages the screen’s display settings.
To modify Display settings, enter Settings →Display
Auto Idle mode
• Tap Auto idle mode to enable or disable .
• When enabled, the backlight will turn off between the hours of 00:00 and 06:00 daily.
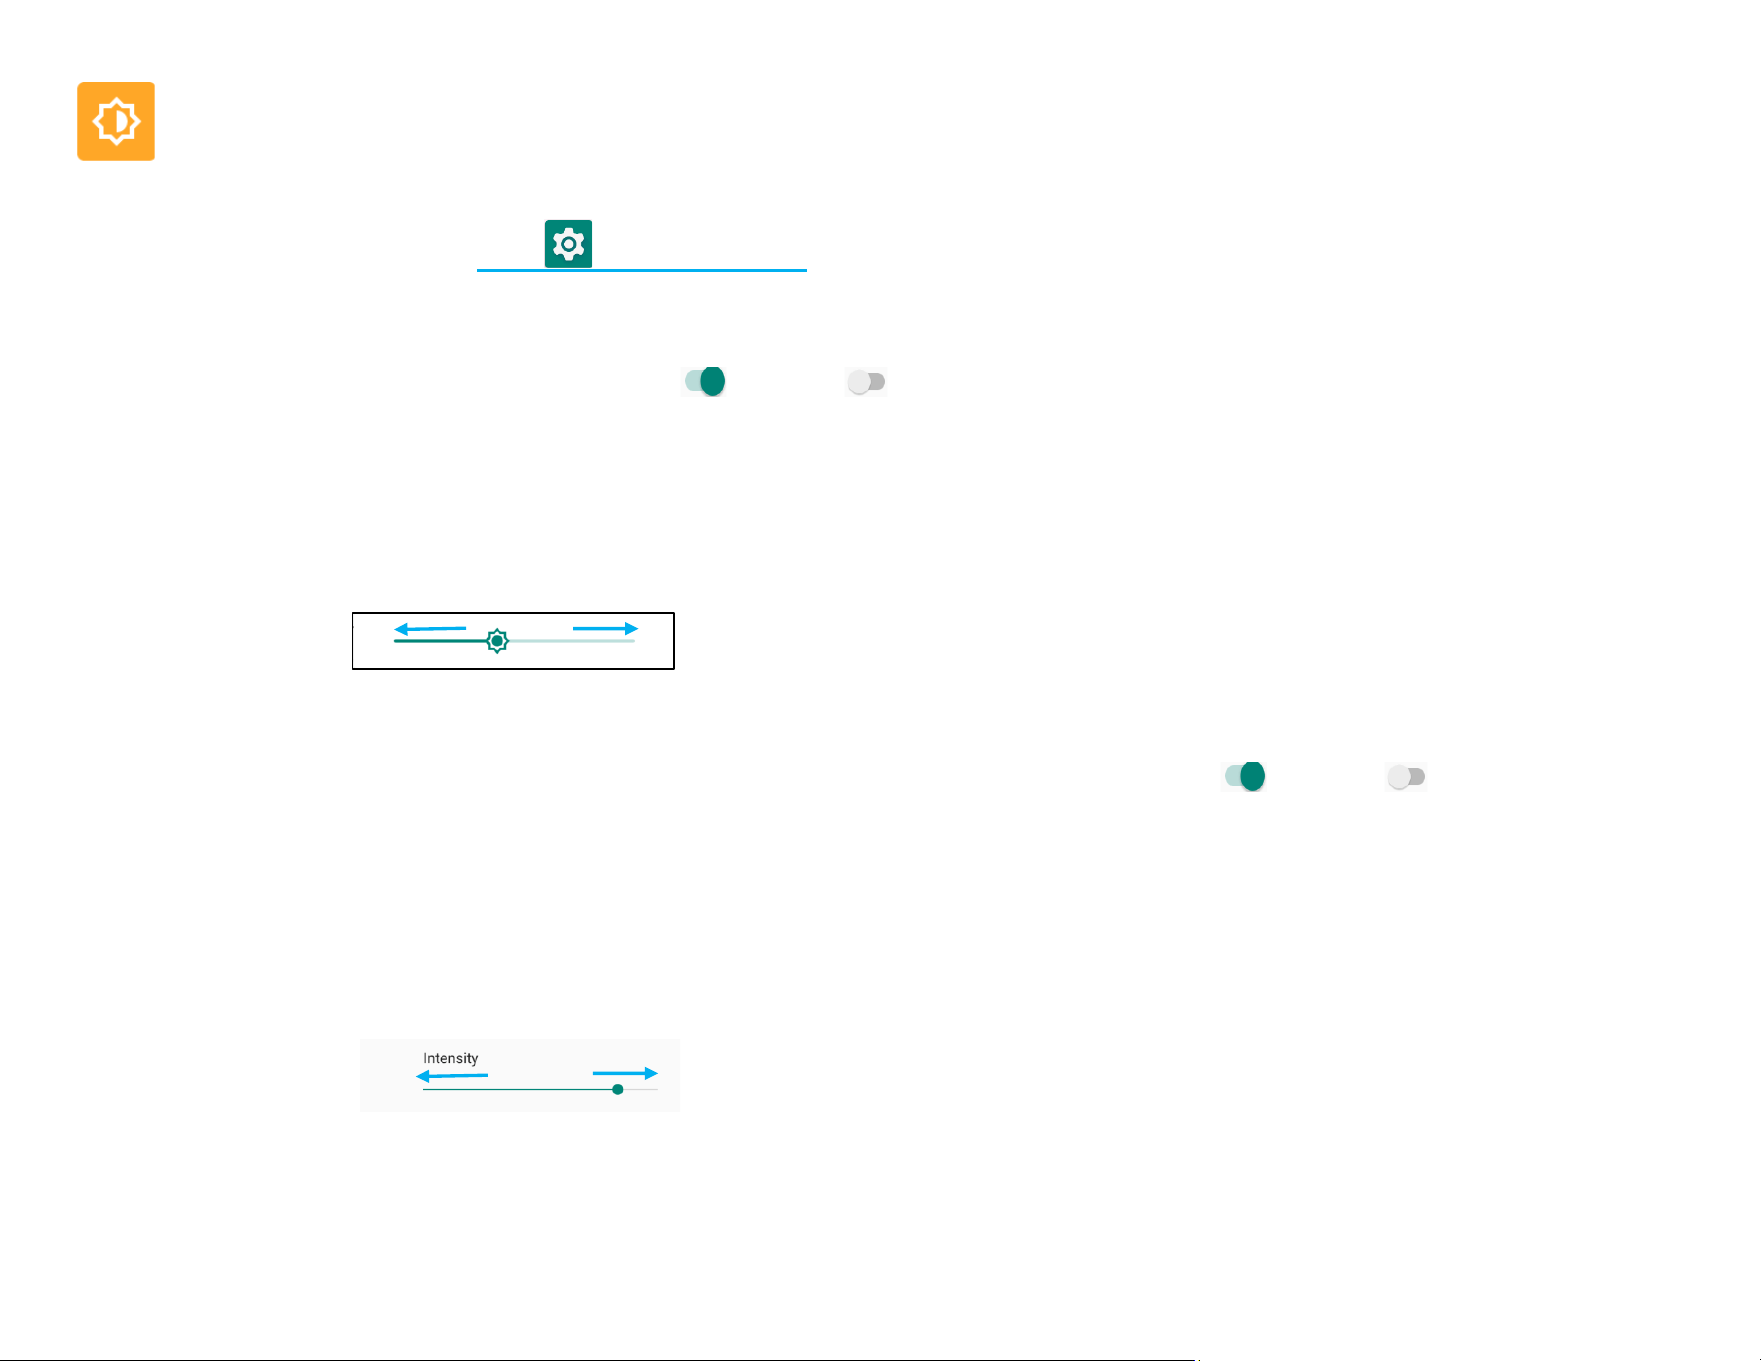
Brightness Level
• Tap Brightness level.
• Move the slider bar right or left to adjust the screen’s brightness.
Dark theme
• To switch screen theme between dark (black color) or light (white color), enable or disable .
Night Light Feature
This feature will tint the screen to amber. This makes easier to look at the screen or read in dim light.
• Tap Night Light.
• Tap TURN ON NOW.
• To adjust intensity, move the slider bar right or left.
• To disable, tap TURN OFF NOW.
Customizing a time schedule
• Tap Schedule.
• Select Turn on at custom time.
UM600853 Rev B page 44 of 85
User Manual –I-Series 5 Slate
❖ Tap Start time to set the time (for example at 10:00PM).
• Tap OK to execute.
❖ Tap Enter time to set the time (for example at 6:00AM),
• Tap OK to execute.
To disable the time schedule
• Tap Schedule.
• Tap None.
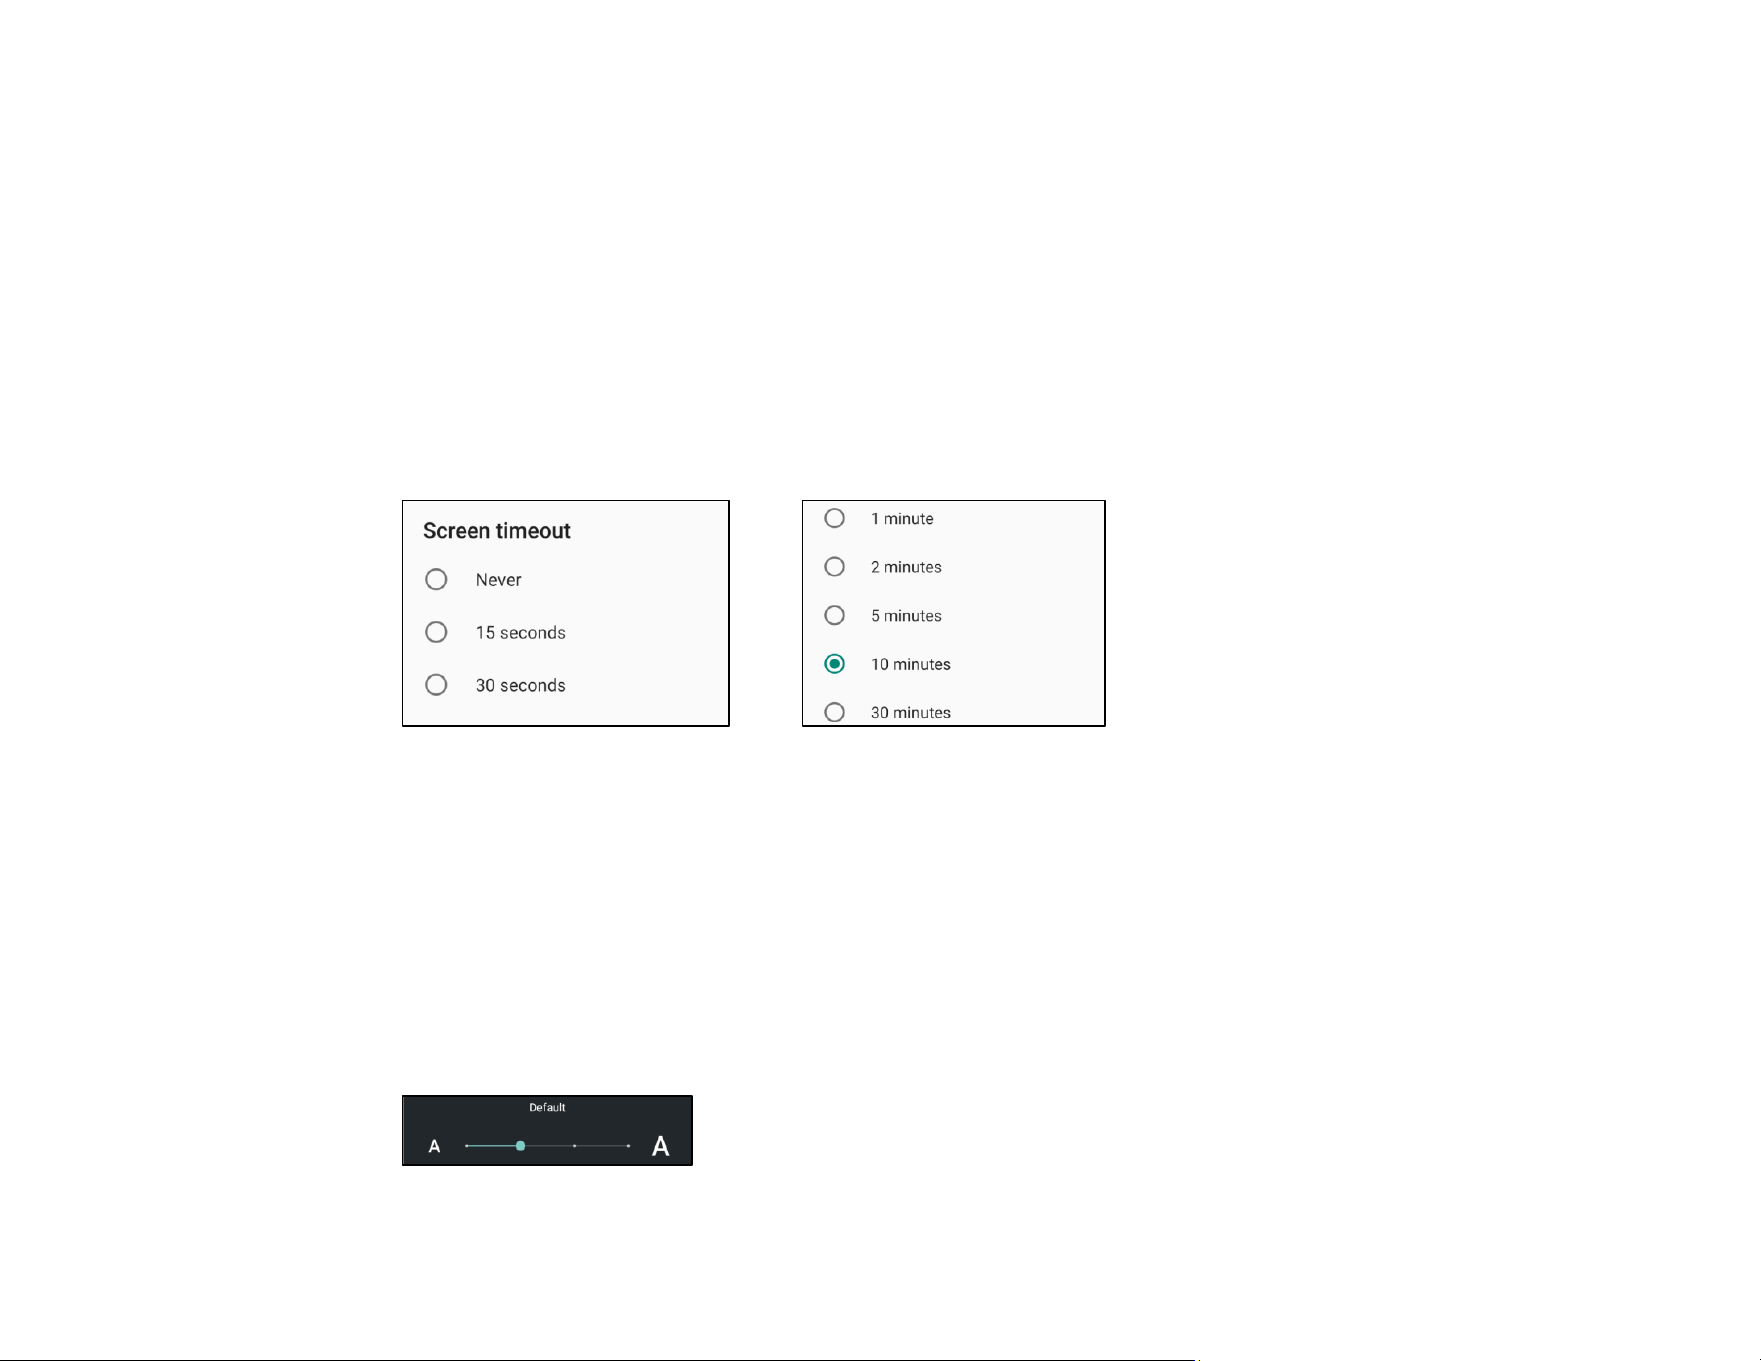
Screen timeout
• Tap Screen timeout.
• Select the time limit from the following option.
• Tap to save.
Auto-rotation screen
• Tap Auto-rotation screen to enable or disable.
Font size
• Tap Font size.
• Move the slider bar left or right to adjust the text size.
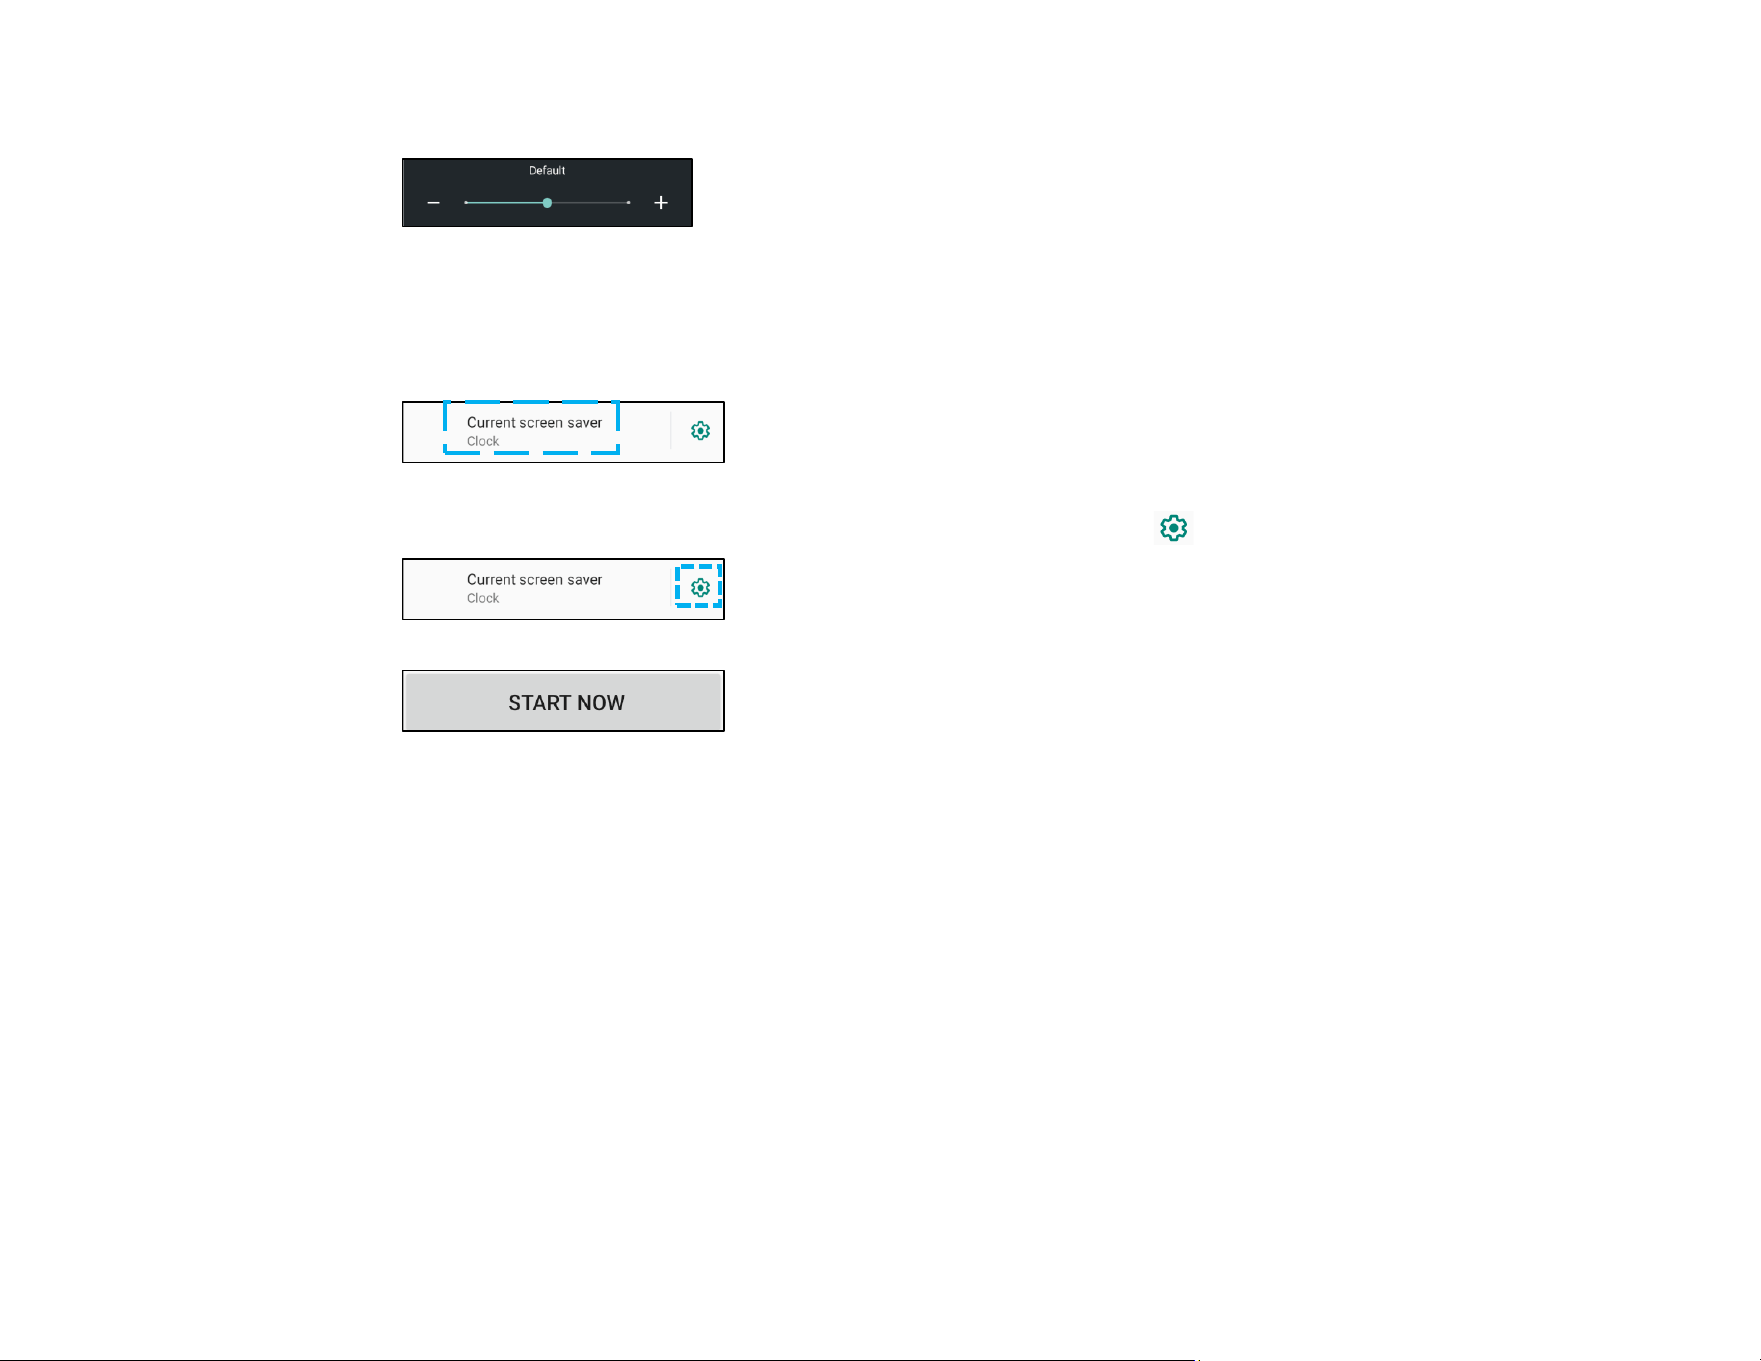
Display size
UM600853 Rev B page 45 of 85
User Manual –I-Series 5 Slate
• Tap Display size.
• Move the slider bar to left or right to adjust the screen size.
Screen saver
• Tap Screen saver.
• Tap Current screen saver to make changes to the current settings.
• Select a screen saver from Clock, Colors, Photo Frame, and Photo Table.
• For additional clock, Photo Frame, and Photo Table screen savers, tap setting.
• To activate Screen saver, tap START NOW.
UM600853 Rev B page 46 of 85
User Manual –I-Series 5 Slate
External Screen Orientation
• Tap External Screen Orientation to change the orientation of the second screen.
• Select the orientation from the following option.
• Tap to save.
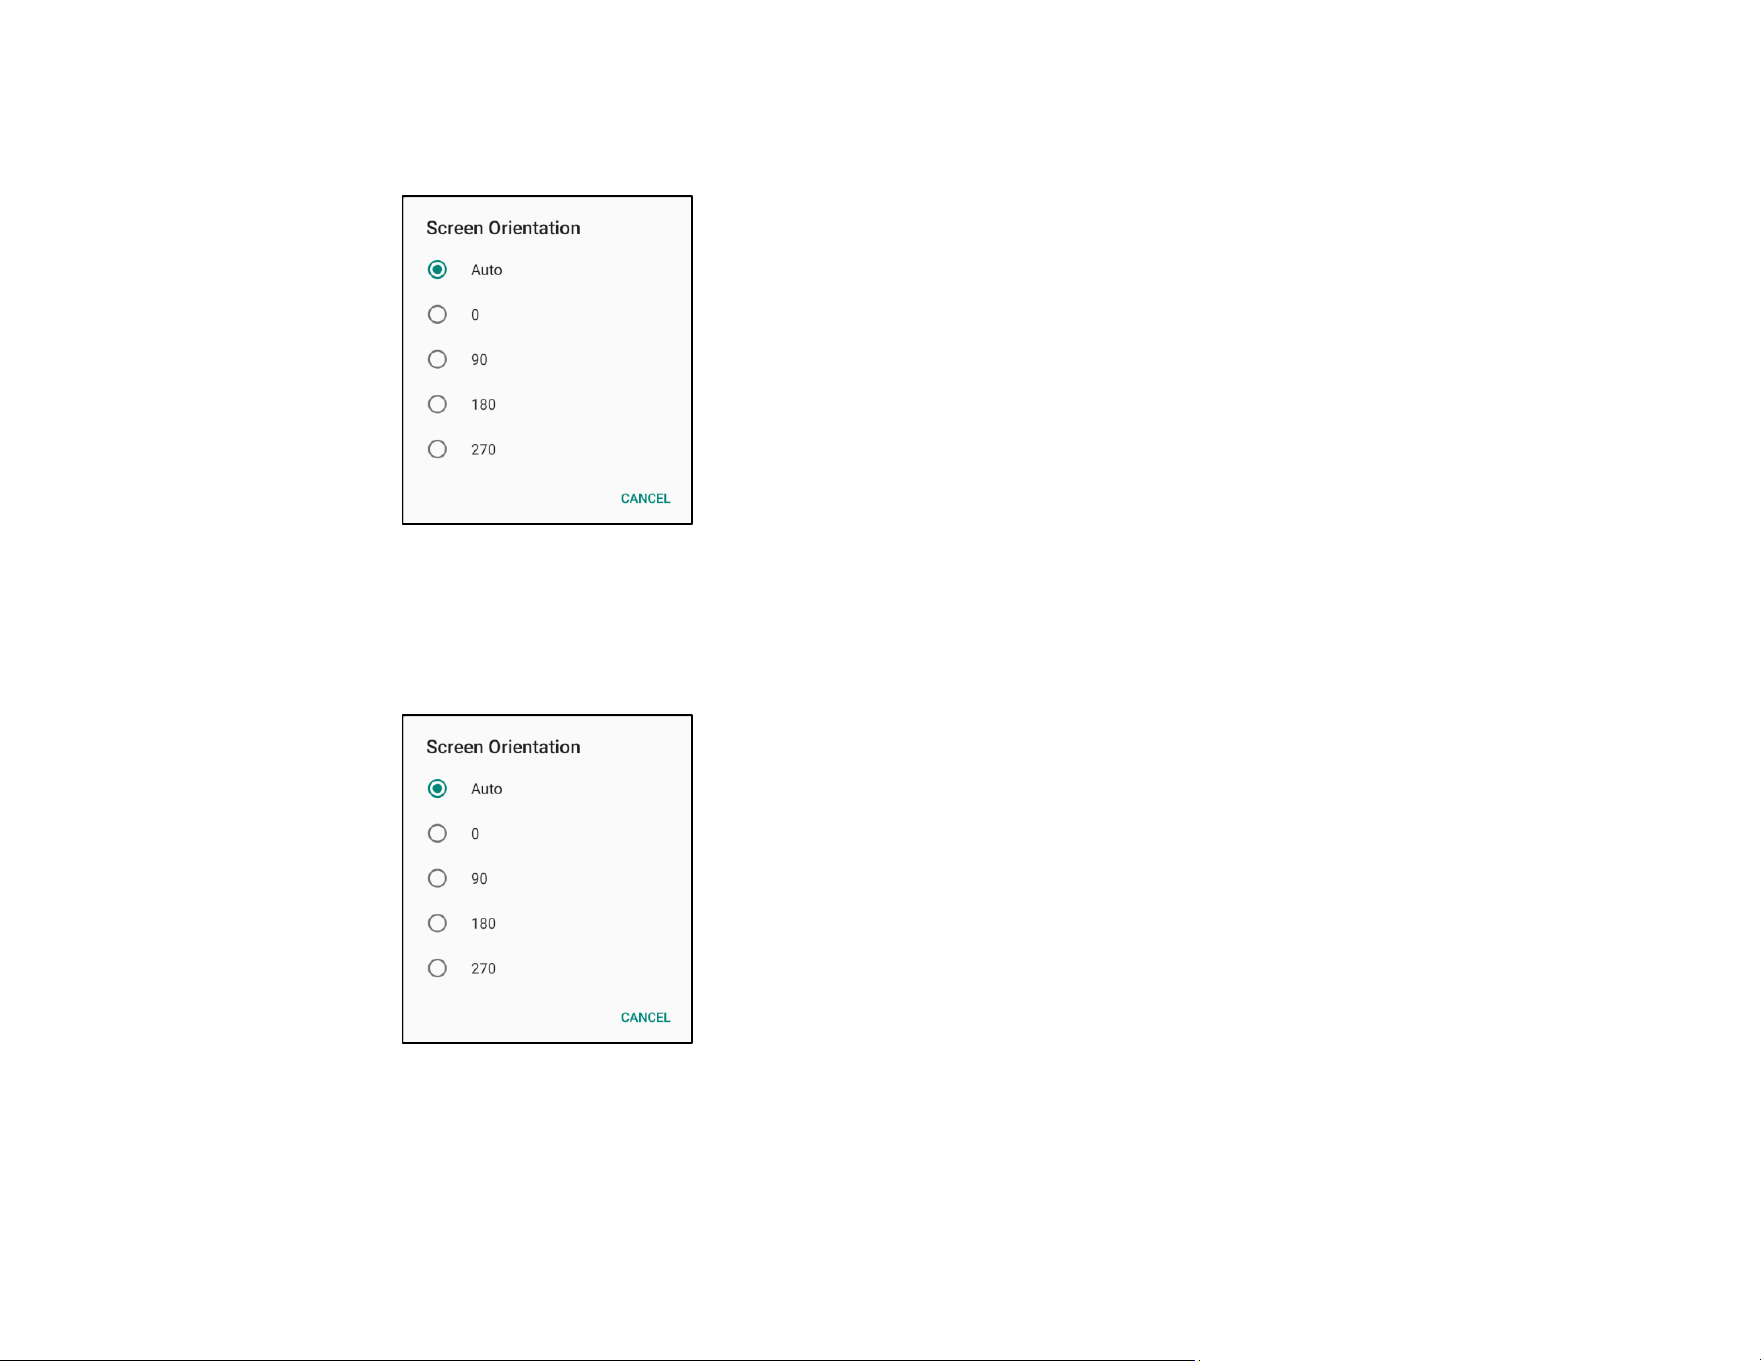
Screen Orientation
• Tap Screen Orientation.
• Select the orientation from the following option.
• Tap to save.

UM600853 Rev B page 47 of 85
User Manual –I-Series 5 Slate
Touch Through Mode
• Use the toggle switch to enable or disable the touch through mode.
• Limitations of touch through are:
o 2 touch at up to 3mm (0.12in) plastic and 6mm (0.24) glass
Screen Density
• Provides the ability to change between 160 MDPI or 240 HDPI
UM600853 Rev B page 48 of 85
User Manual –I-Series 5 Slate
Wallpaper
To modify Wallpaper settings, enter Settings →Wallpaper
Wallpaper
• Tap Wallpaper.
• Select a wallpaper from the following options.
❖ Live Wallpapers
❖ Photos
❖ Wallpaper & style
• Select an image or picture you want as a wallpaper from the folders.
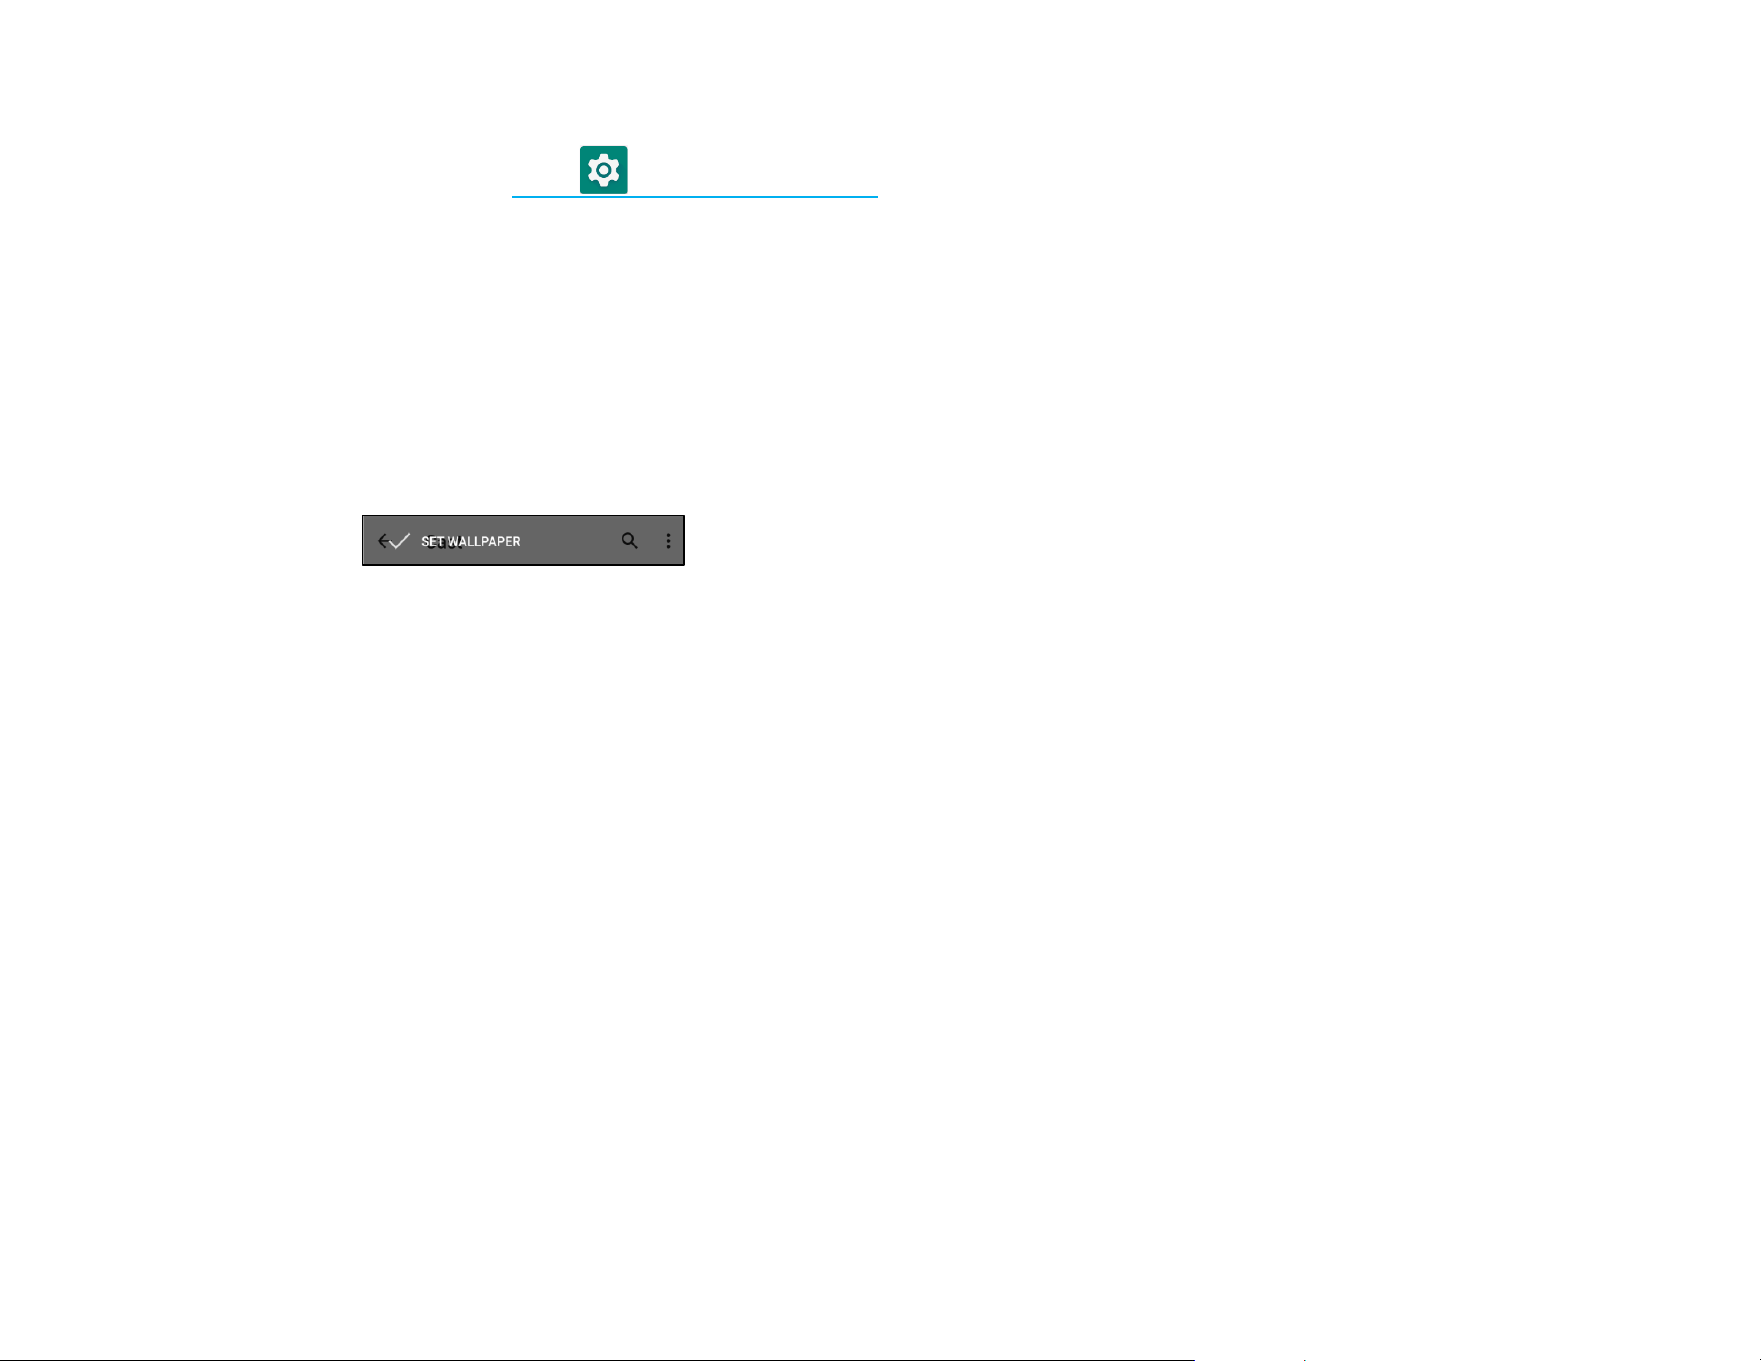
• Tap SET WALLPAPER.
UM600853 Rev B page 49 of 85
User Manual –I-Series 5 Slate
Accessibility
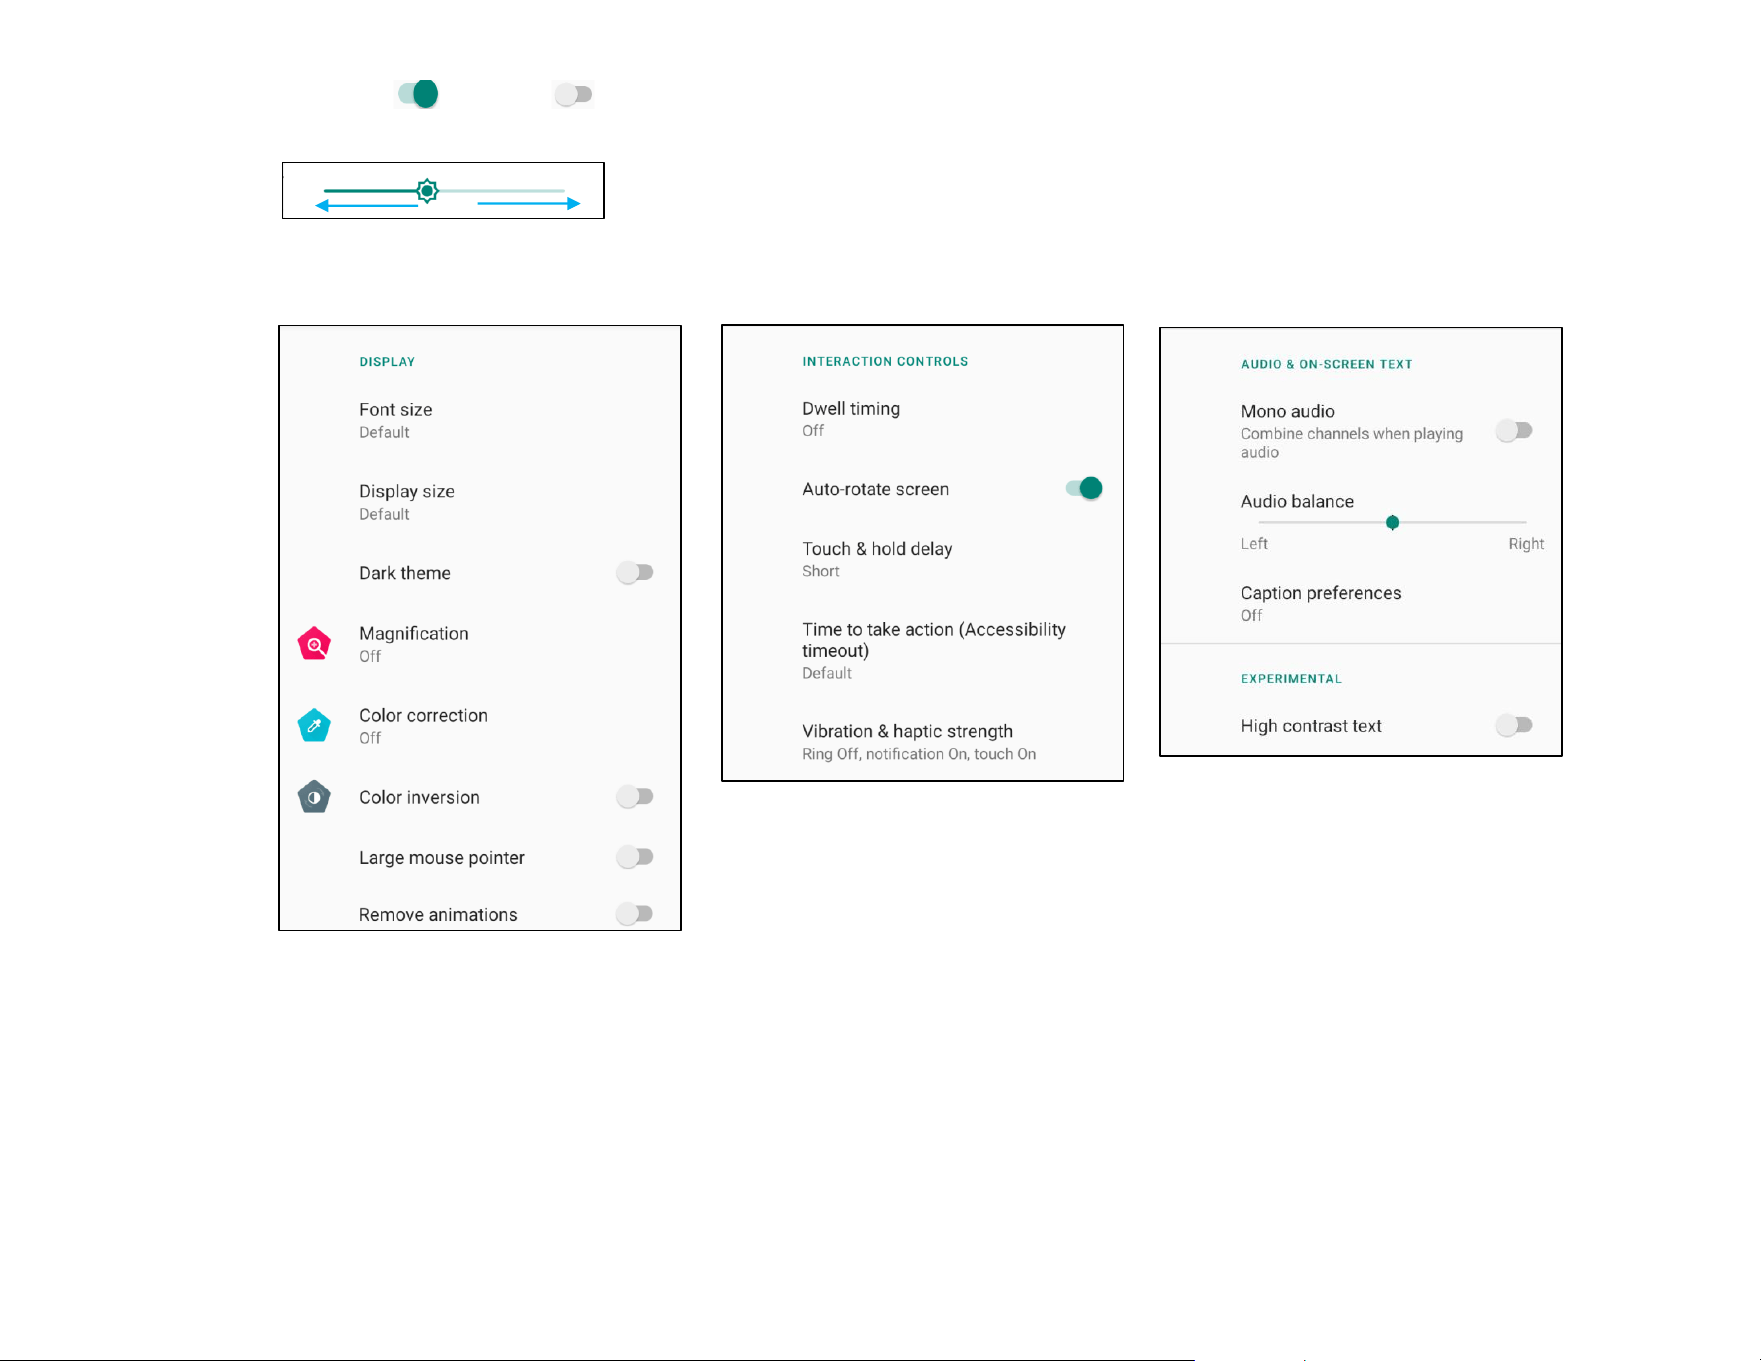
The Accessibility is a large on-screen menu to control the Elo I-Series device. You can control display, audio & on-screen text and more.
To modify settings, enter Settings → Accessibility
• From the menu, select a feature to change the setting.
• Select to Speak
❖ If enabled, will speak the text word when it is clicked on.
• TalkBack
❖ If enabled, will provide feedback to use the device without having to look at it.
• Text-to-speech output
❖ Will convert text into speech.
❖ There are also options to change the language, speech rate and pitch
UM600853 Rev B page 50 of 85
User Manual –I-Series 5 Slate
• To enable or disable , tap the feature.
• To adjust slide bar, drag slider right or left.
• For other settings, tap the feature and follow the on-screen instruction to complete the setup.
UM600853 Rev B page 51 of 85
User Manual –I-Series 5 Slate
Security & Privacy
The security & privacy application is to manage App security, device lock and permissions.
Security
App Security
• Tap App Security.
Device Unlock
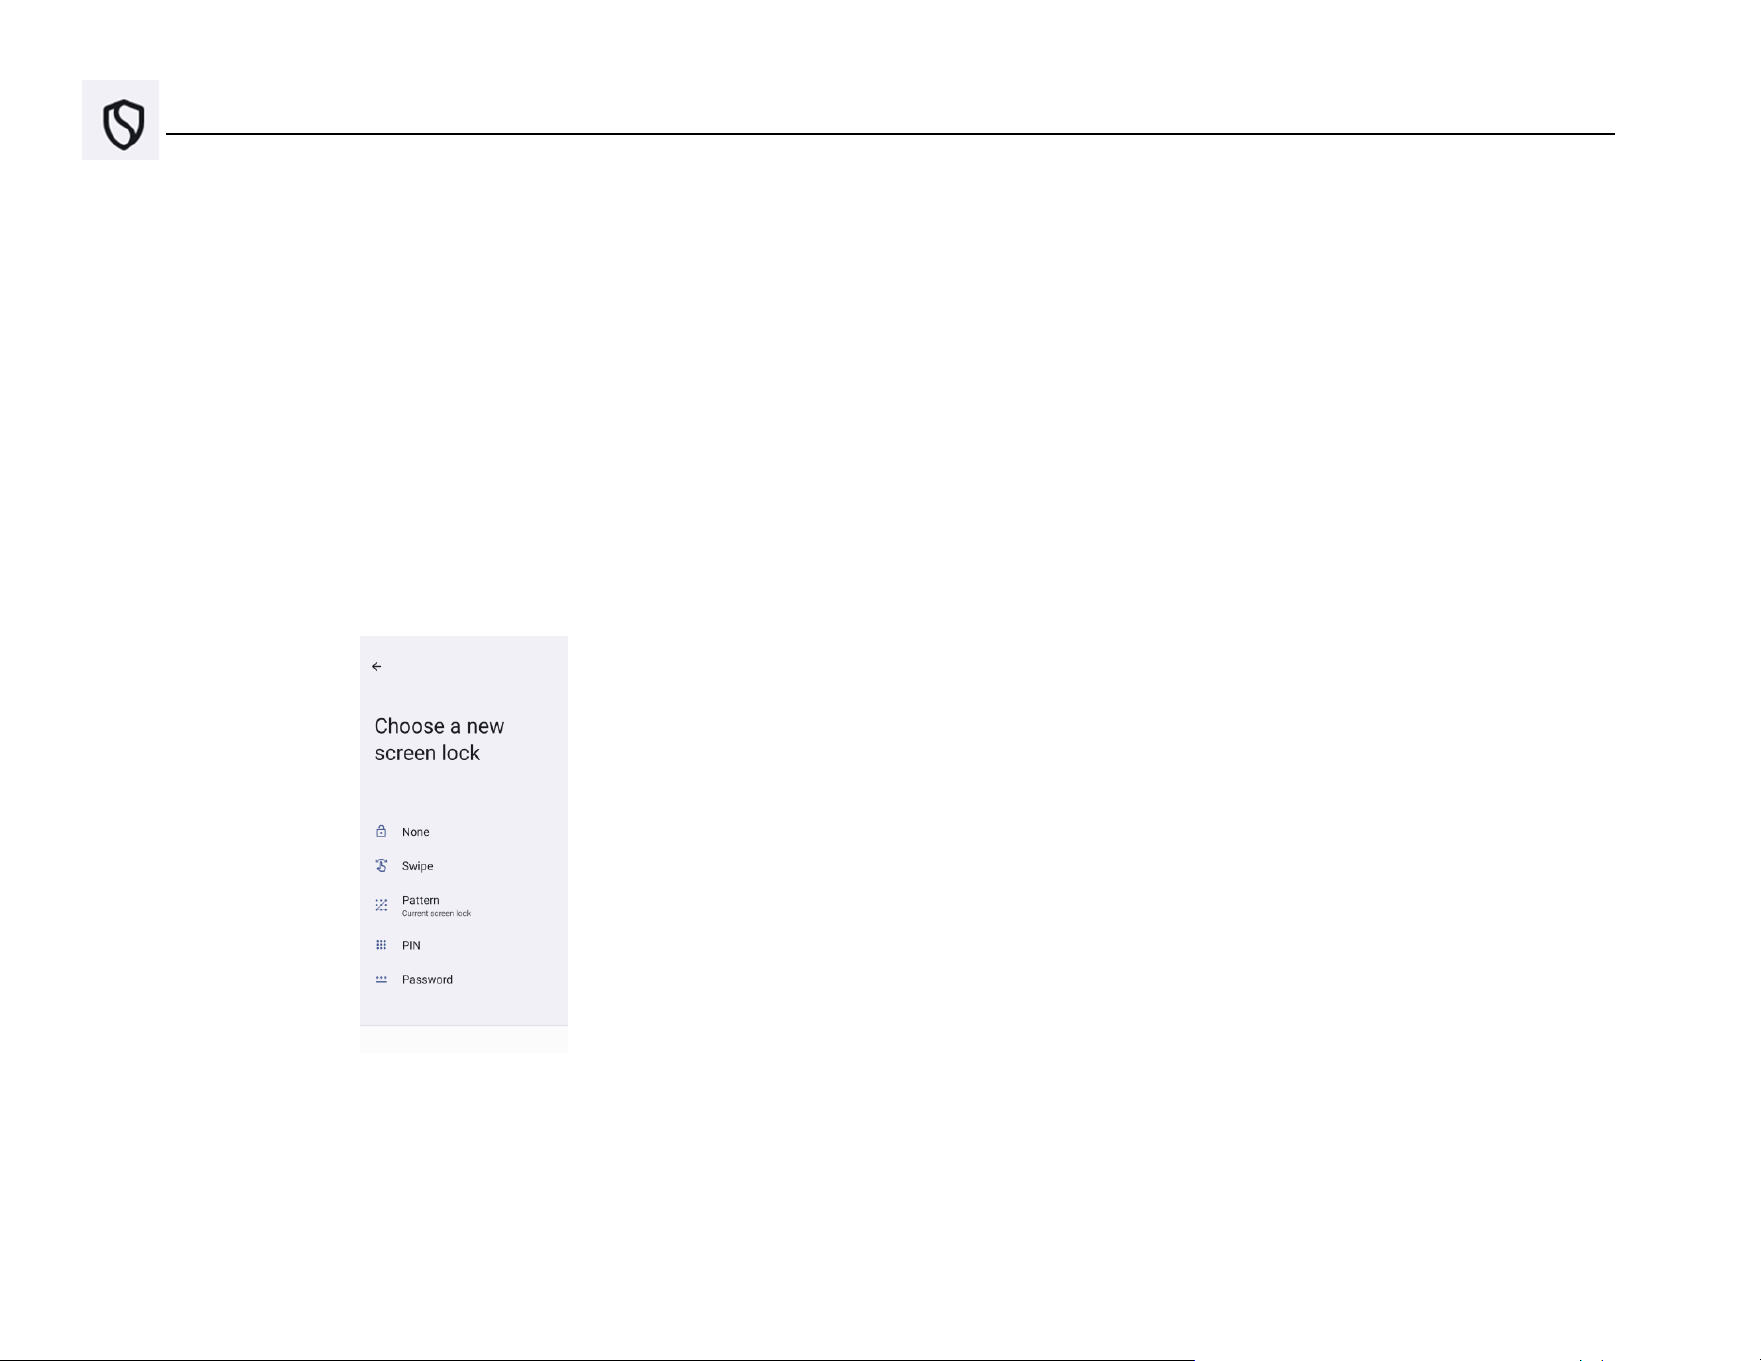
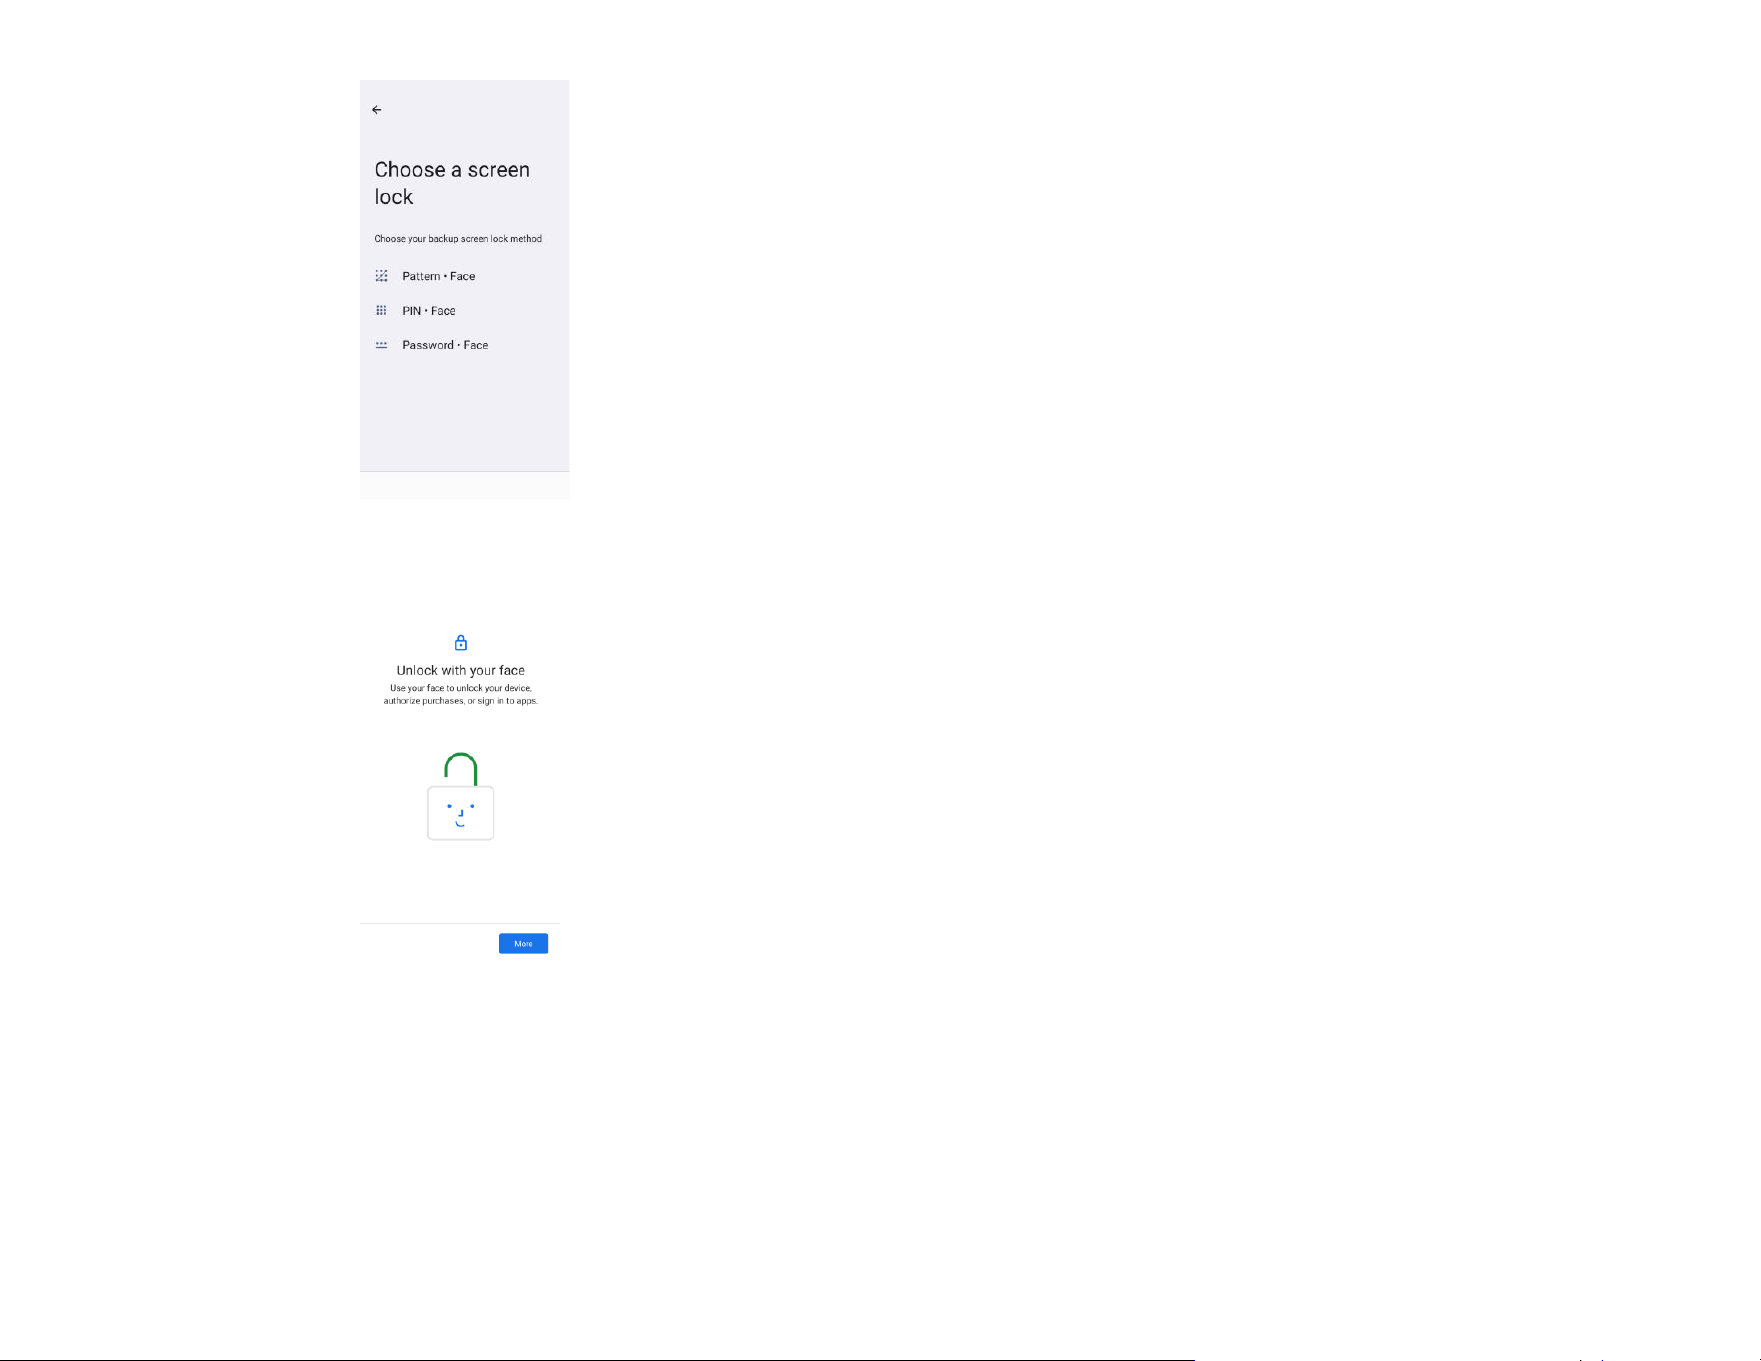
• Tap Device Unlock to manage screen lock, face unlock.
• Screen lock
• Choose a new screen lock
• Follow the instruction to set the screen lock
• Face Unlock
• Choose a screen lock
UM600853 Rev B page 52 of 85
User Manual –I-Series 5 Slate
• Unlock your face
• Follow the instruction on the screen to set up Face Unlock
Account security
• Tap account security
• To set the security checkup and password checkup.
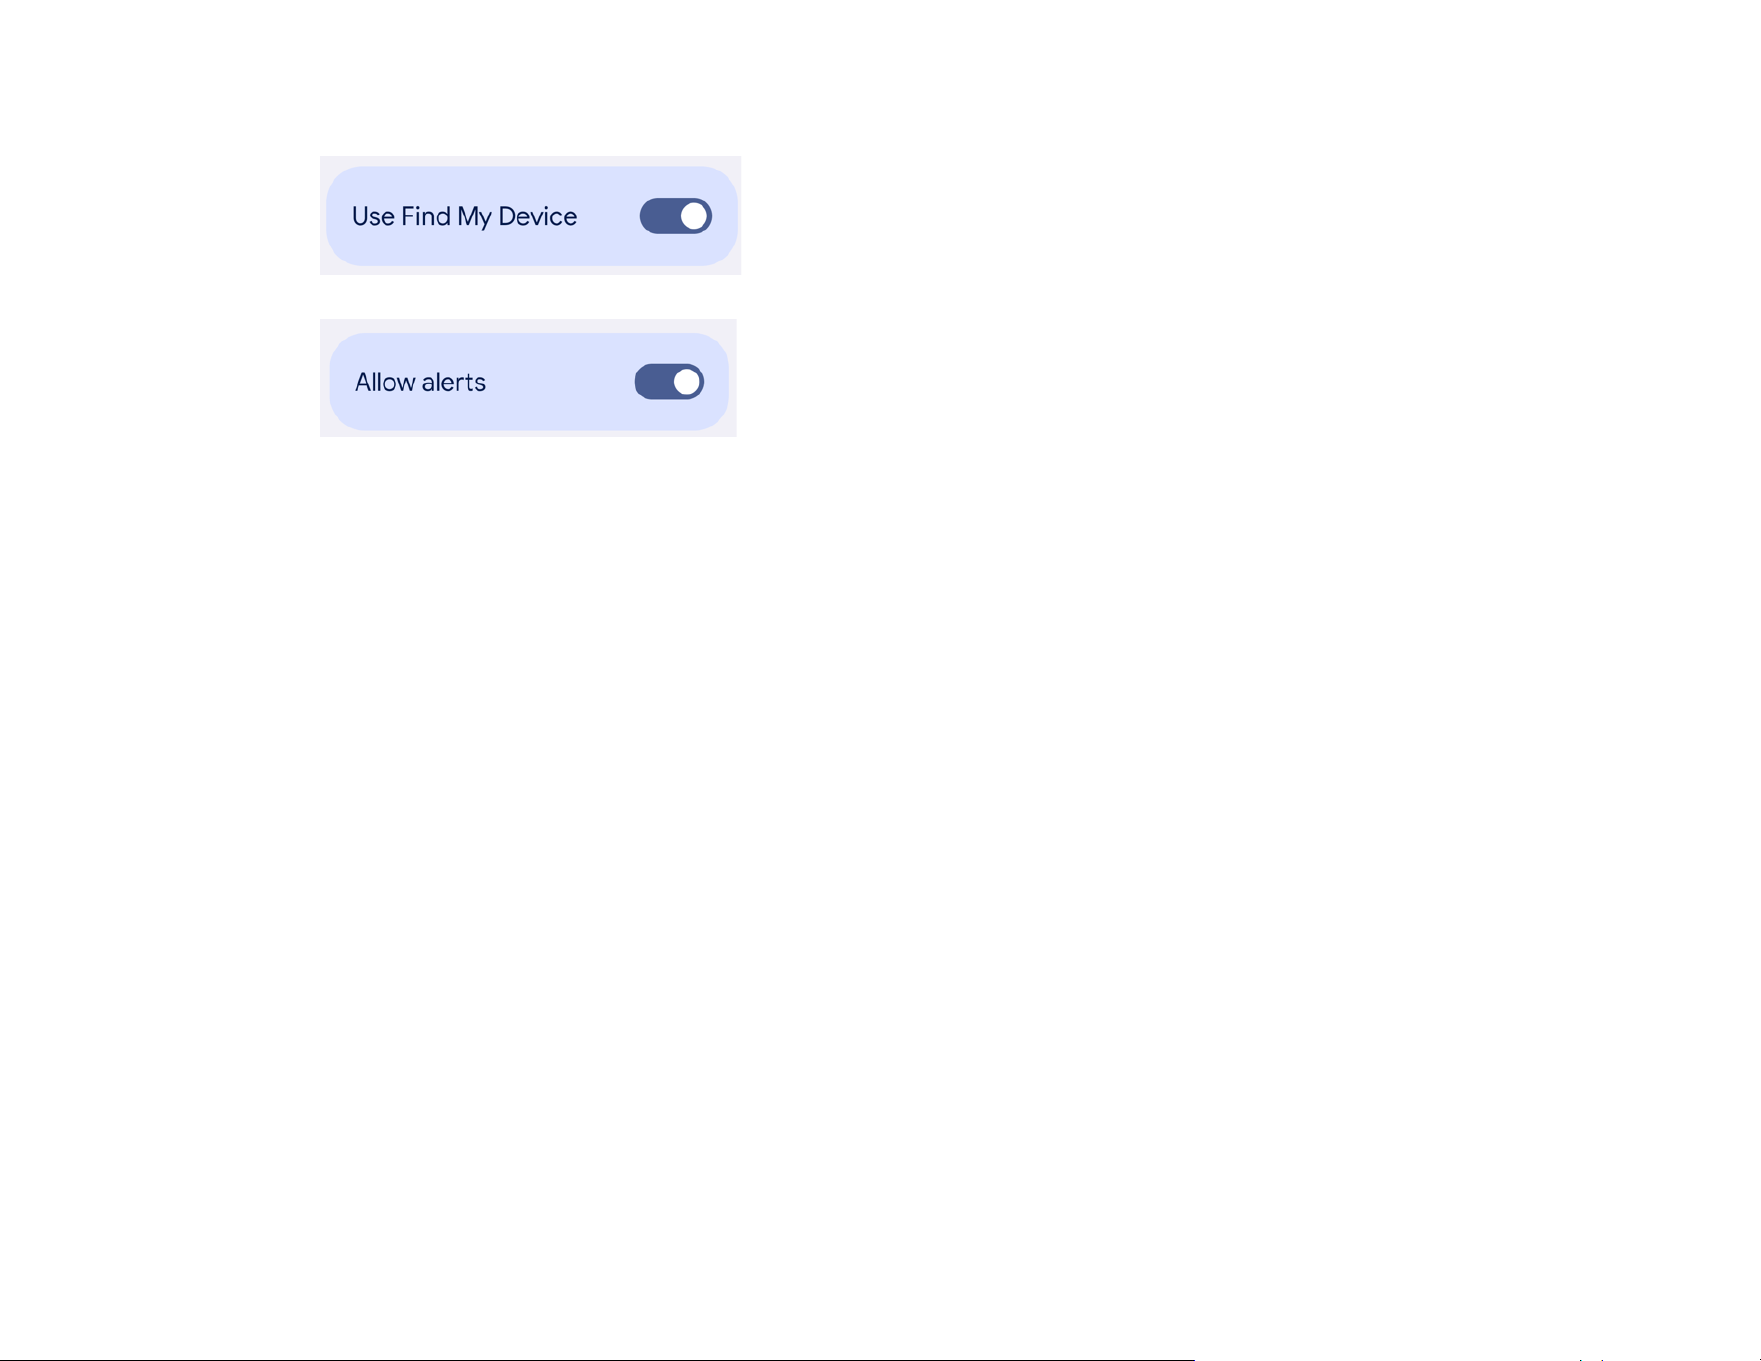
Device Finders
UM600853 Rev B page 53 of 85
User Manual –I-Series 5 Slate
• Tap Device Finders
• To set find my device, to enable use Find My Device
• To set Unknown tracker alerts, to enable Allow alerts
System & updates
• Tap Systems & updates
• To set the system update and backup
Privacy
The Privacy application is to give you control over what permissions of applications can have.
Permission Manger
This is to grant permission of an App that uses storage, phone, and location etc.
• To manage permissions to an app, tap Permission manager.
• From the menu of permission manager, tap a permission type which you wish to manage (e.g. Camera).
• To change an app’s permission, tap the app, then choose your permission settings
• To change the permission setting, tap it, then choose Allow or Don't allow.
• You may be able to choose
All the time: For location only. The app can use the permission at any time, even when you’re not using the app.
Allow only while using the app: The app can use the permission only when you're using that app.
Ask every time: Every time you open the app, it'll ask to use the permission. It can use the permission until you’re done with the app.
Don't allow: The app cannot use the permission, even when you’re using the app.

UM600853 Rev B page 54 of 85
User Manual –I-Series 5 Slate
Privacy dashboard
This shows which apps recently used permissions
Ads
Manage device data used to show your ads.
Data sharing updates for location
Review apps that changed the way they may share your location data
More security & privacy
Supports additional security and privacy settings like app pinning and notifications on lock screen.
UM600853 Rev B page 55 of 85
User Manual –I-Series 5 Slate
Location
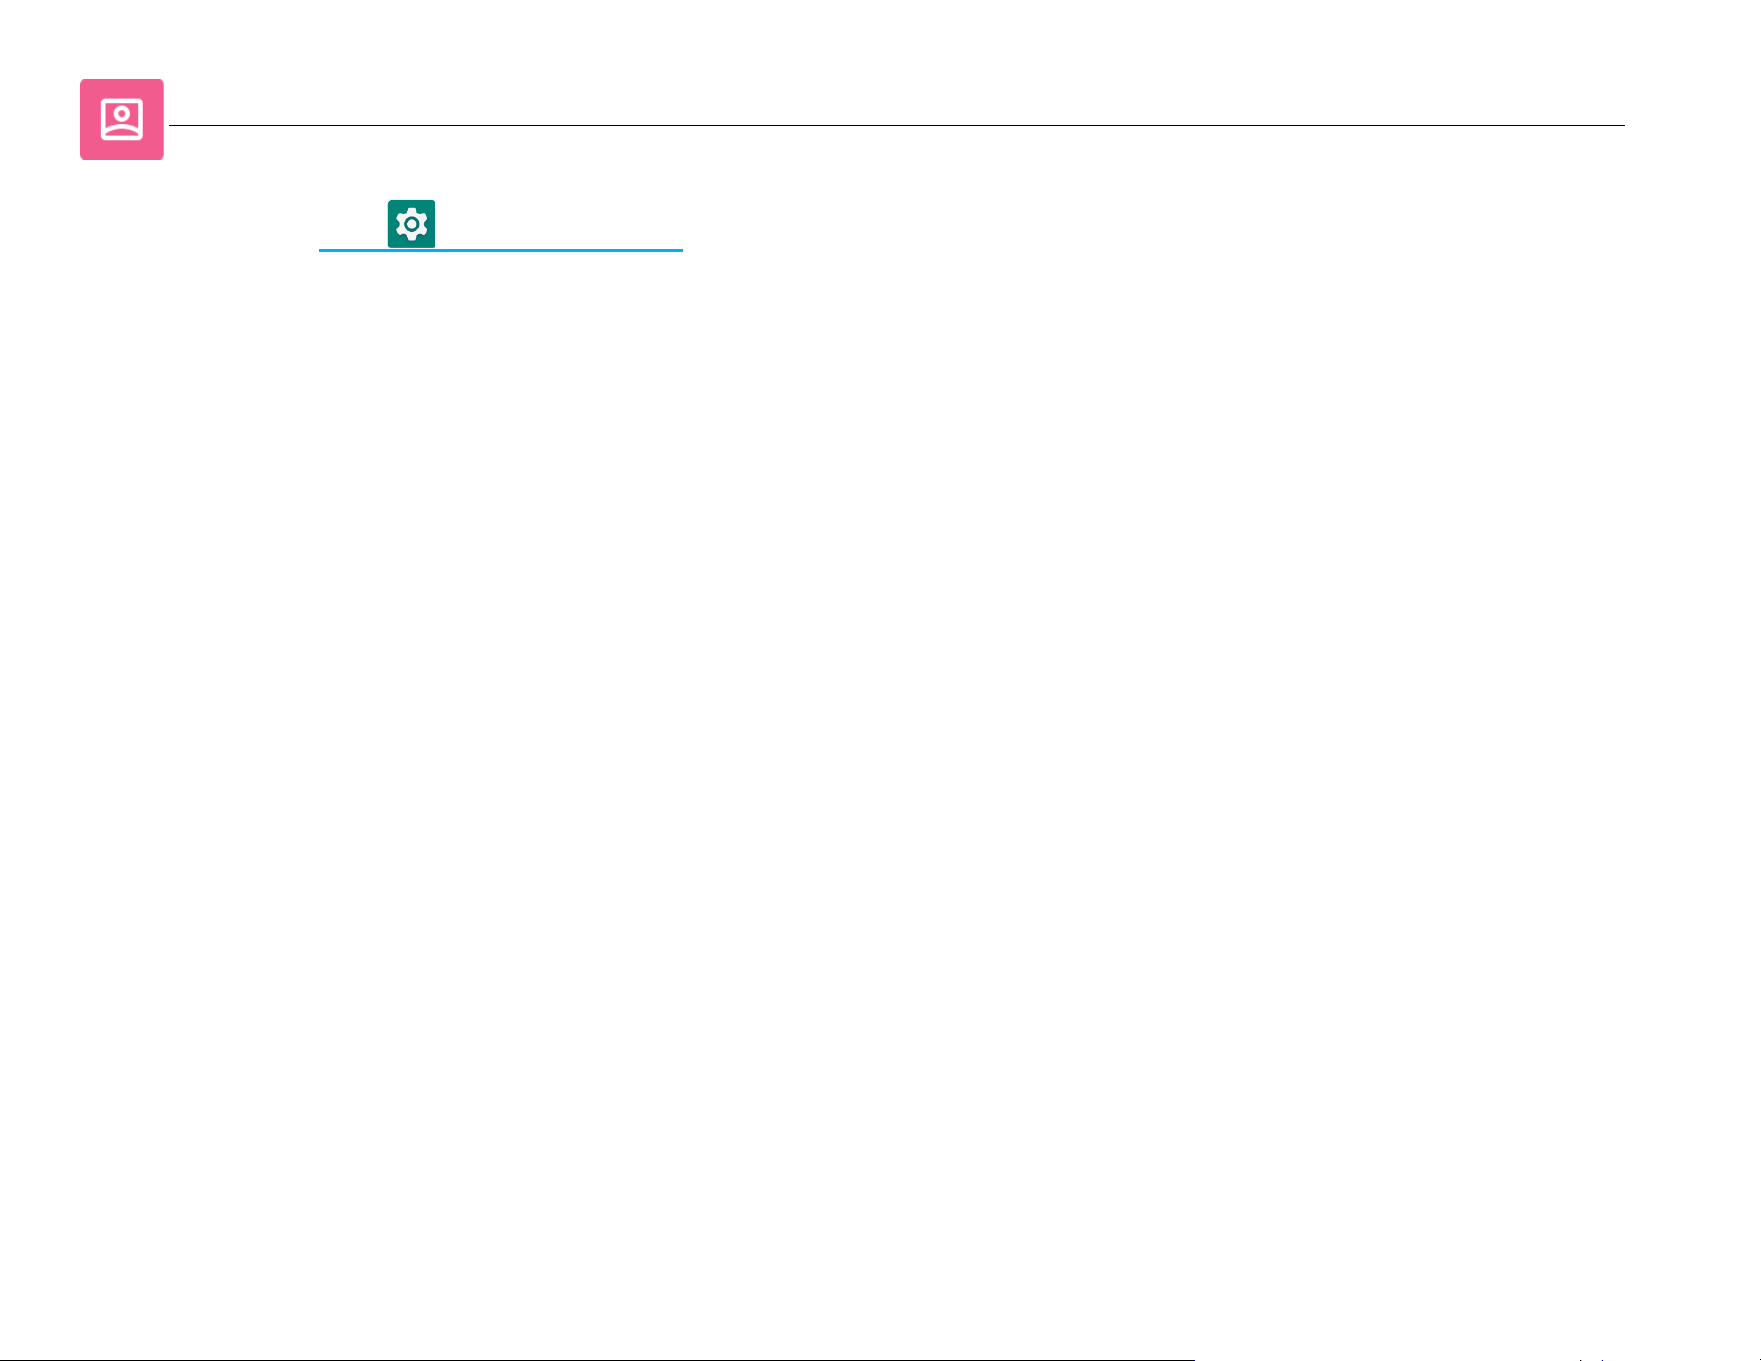
To modify Locations settings, enter Settings → Location
• Tap Location.
• To enable or disable, tap Use location
• For apps have requested location recently, tap See all.
• To update permission, tap App permission.
• To scan for Wi-Fi networks and Bluetooth, tap Wi-Fi and Bluetooth scanning,
Note: This feature allows apps and services to scan for Wi-fi networks and Bluetooth anytime. This can be used to
improve location-based features and services.
UM600853 Rev B page 56 of 85
User Manual –I-Series 5 Slate
Passwords and Accounts
To add an account, enter Settings → Accounts
• To set up an account, tap Account.
• Tap + Add account.
• Enter an email account.
• Enter an Account type you want to add (PERSONAL - POP3 or PERSONAL – IAMP).
• Follow the on-screen instructions to complete the setup.
UM600853 Rev B page 57 of 85
User Manual –I-Series 5 Slate
Digitial well-being & parental controls
• Digital Well-being and Parental controls are available here.
UM600853 Rev B page 58 of 85
User Manual –I-Series 5 Slate
Google
• Sign in to your Google Account is available here.
UM600853 Rev B page 59 of 85
User Manual –I-Series 5 Slate
System
To modify settings, enter Settings → System →
Languages
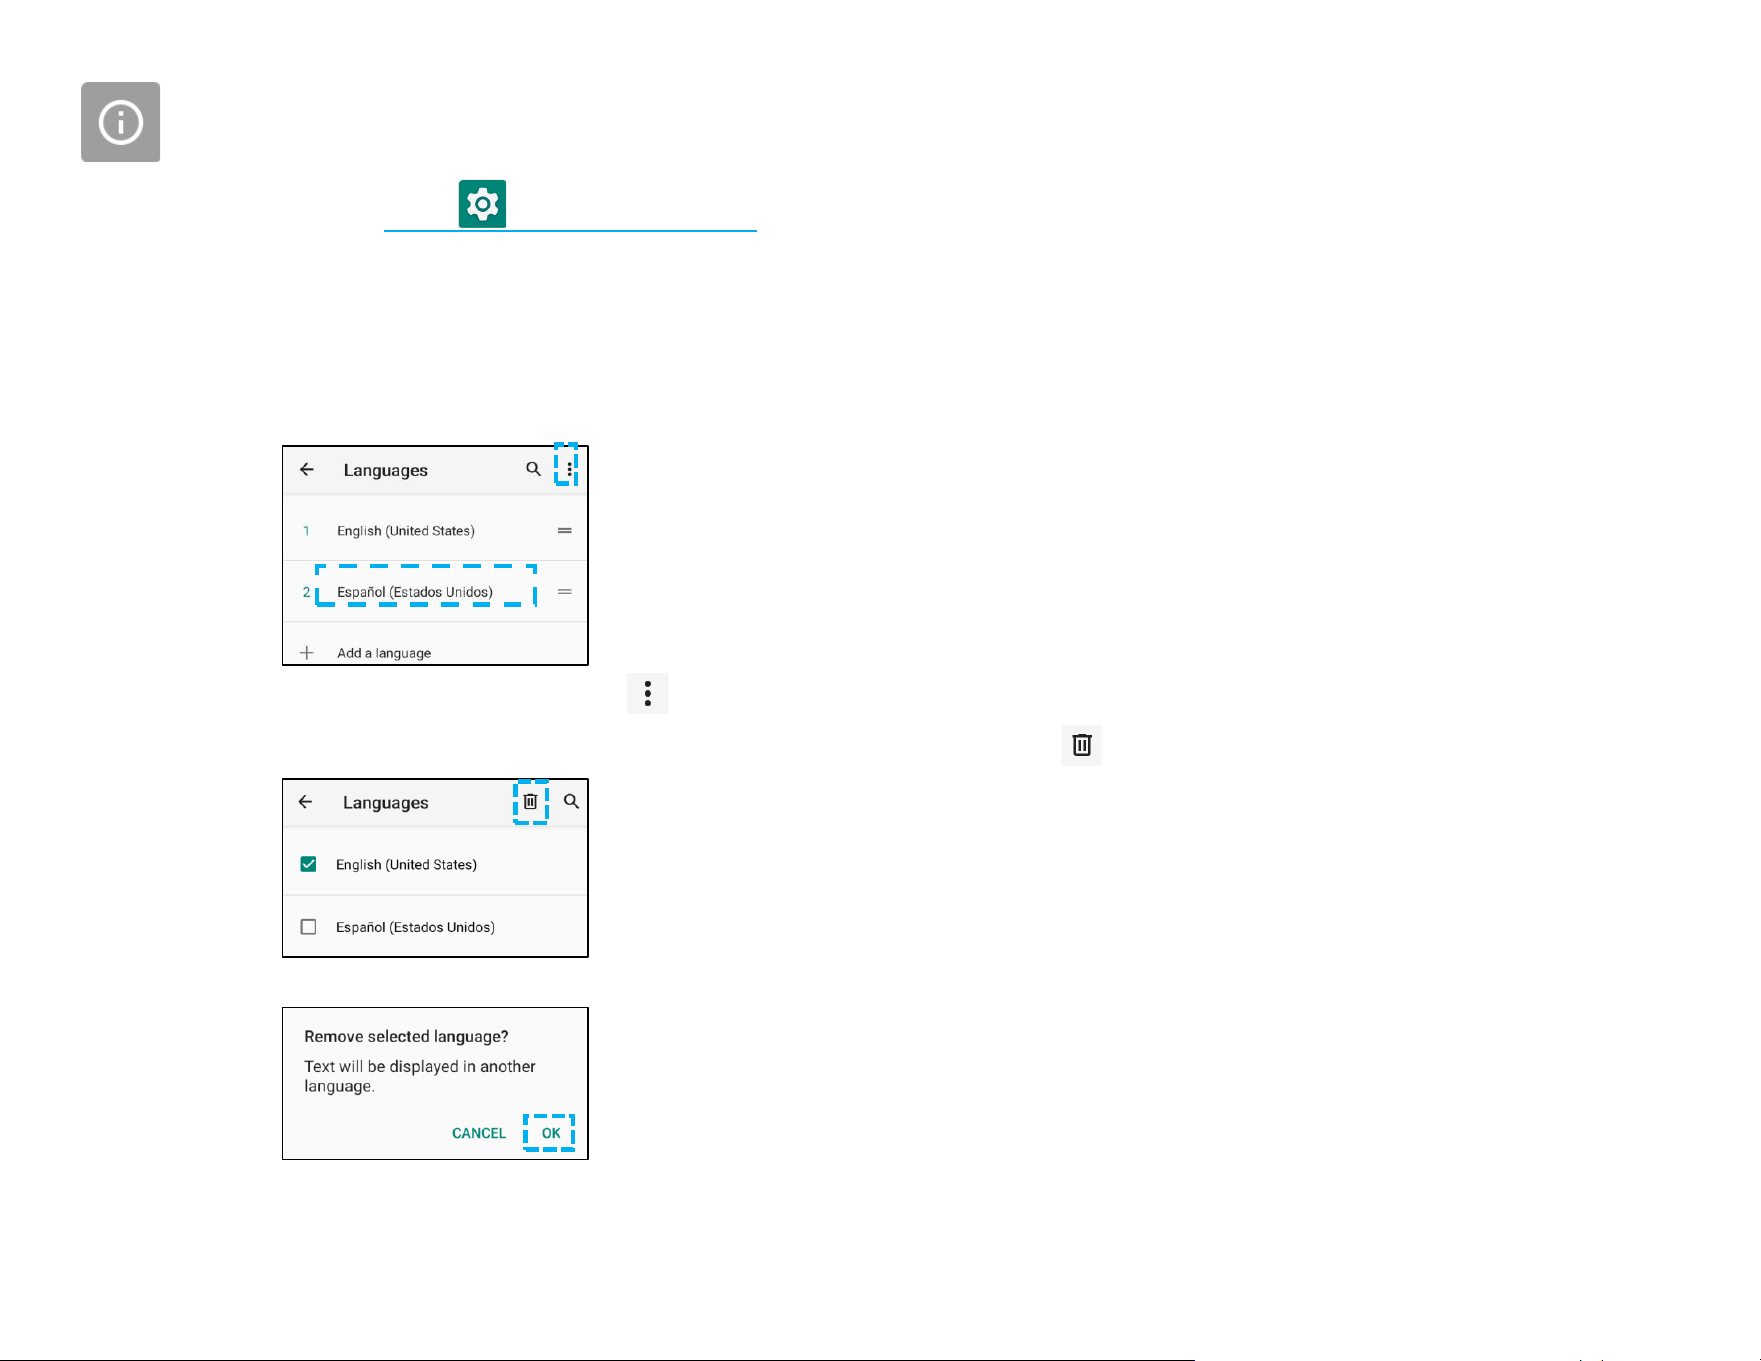
• To change language, tap Languages.
• Tap System Language.
• Tap + Add a language, then choose from the list of languages to add (e.g. Espanol).
• After choosing a language, tap 3-dots menu then tap Remove.
• To change a language e.g. from English to Espanol, tap English then tap .
• Tap OK to remove selected language.
UM600853 Rev B page 60 of 85
User Manual –I-Series 5 Slate
Gestures
• Tap Gestures.
For camera gesture
• Tap Quickly open camera.
• Tap Quickly open camera to enable or disable .
❖ When set to enable, pressing power button twice will activate, the digital camera.
Date & Time
Note: The recommended setting for “Date & time” is to use, “Set time automatically”.
Advanced Settings
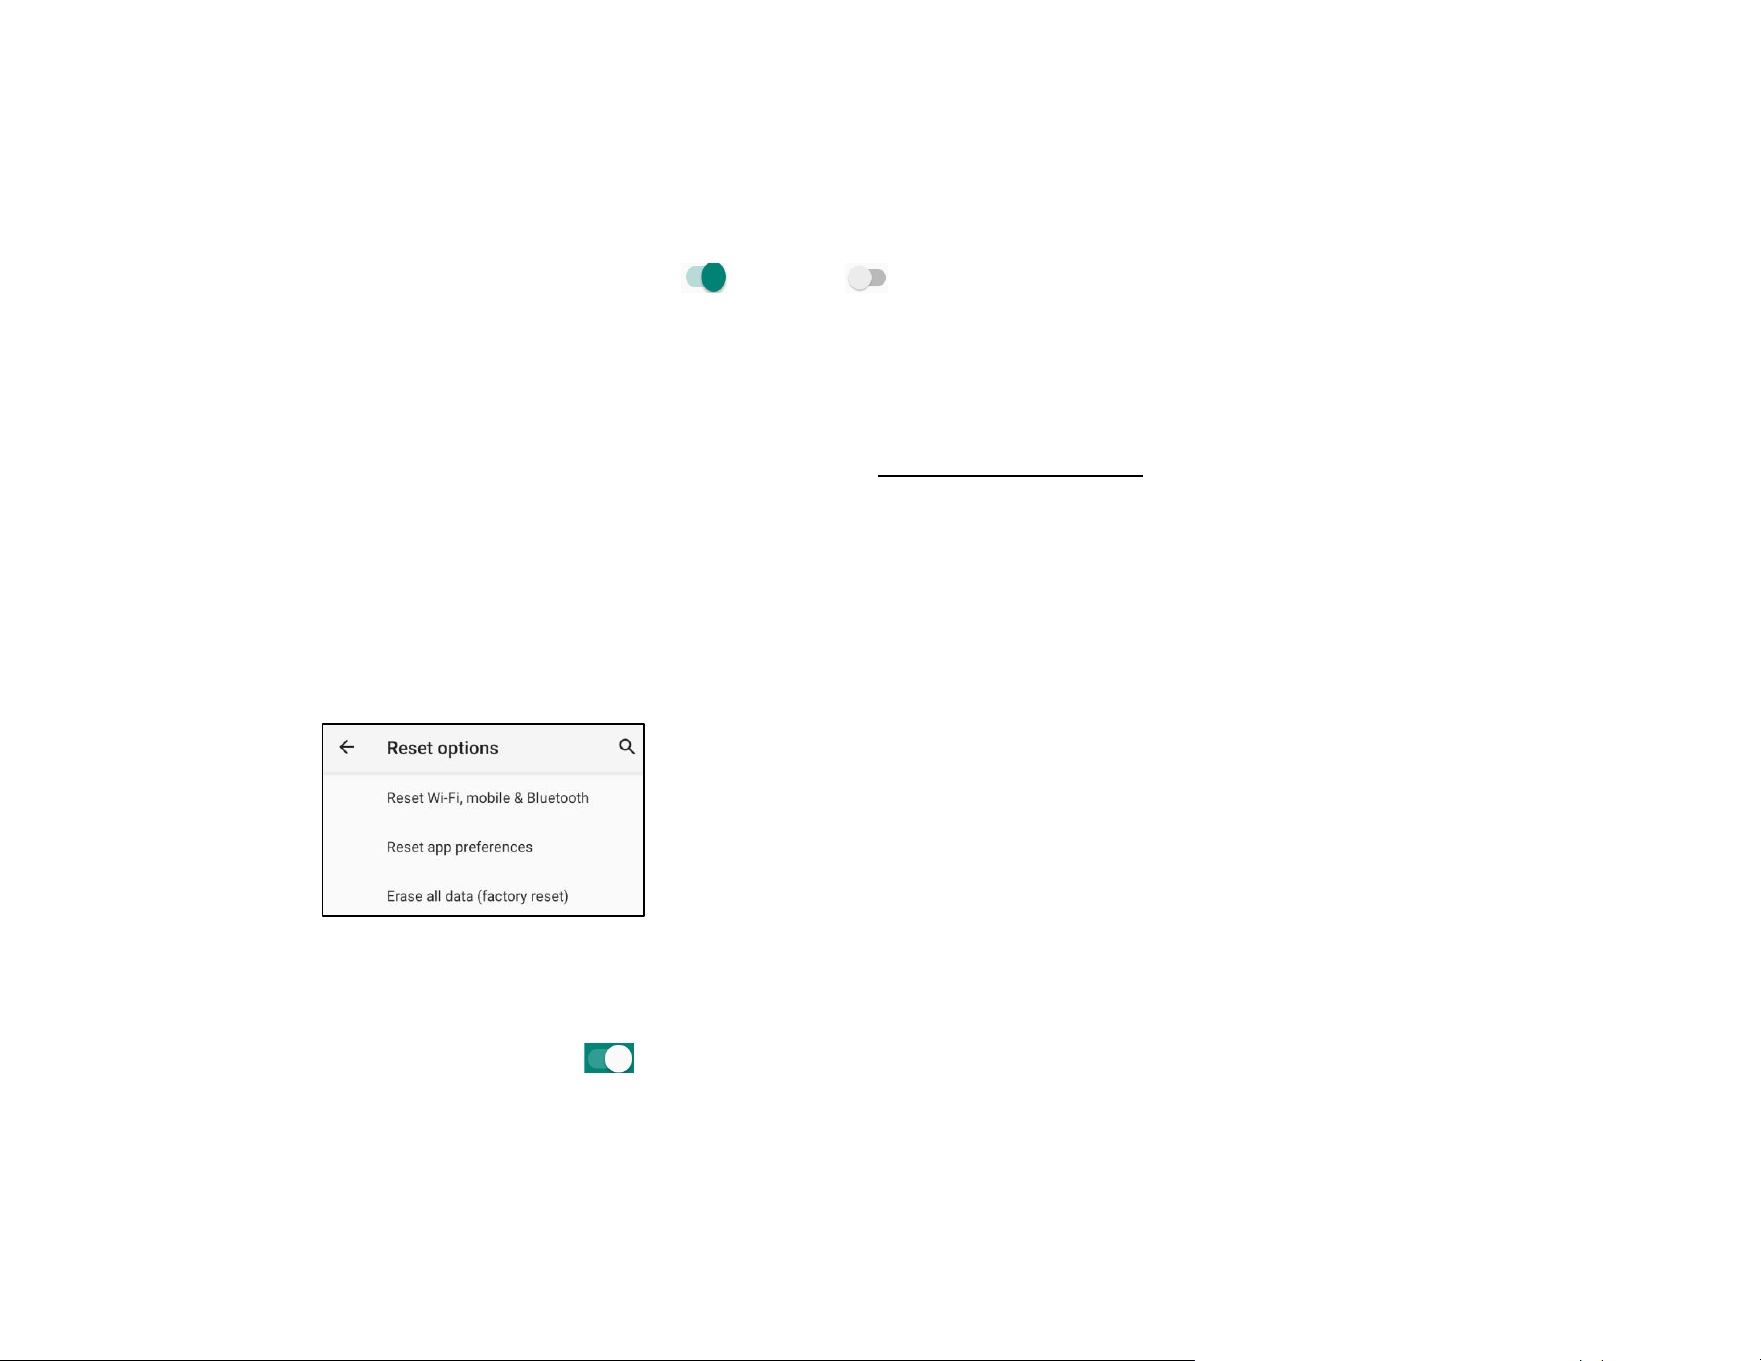
Reset options
• To select a following option to reset, tap Reset options.
• From the list, select an item to reset then tap to execute and follow on-screen instruction.
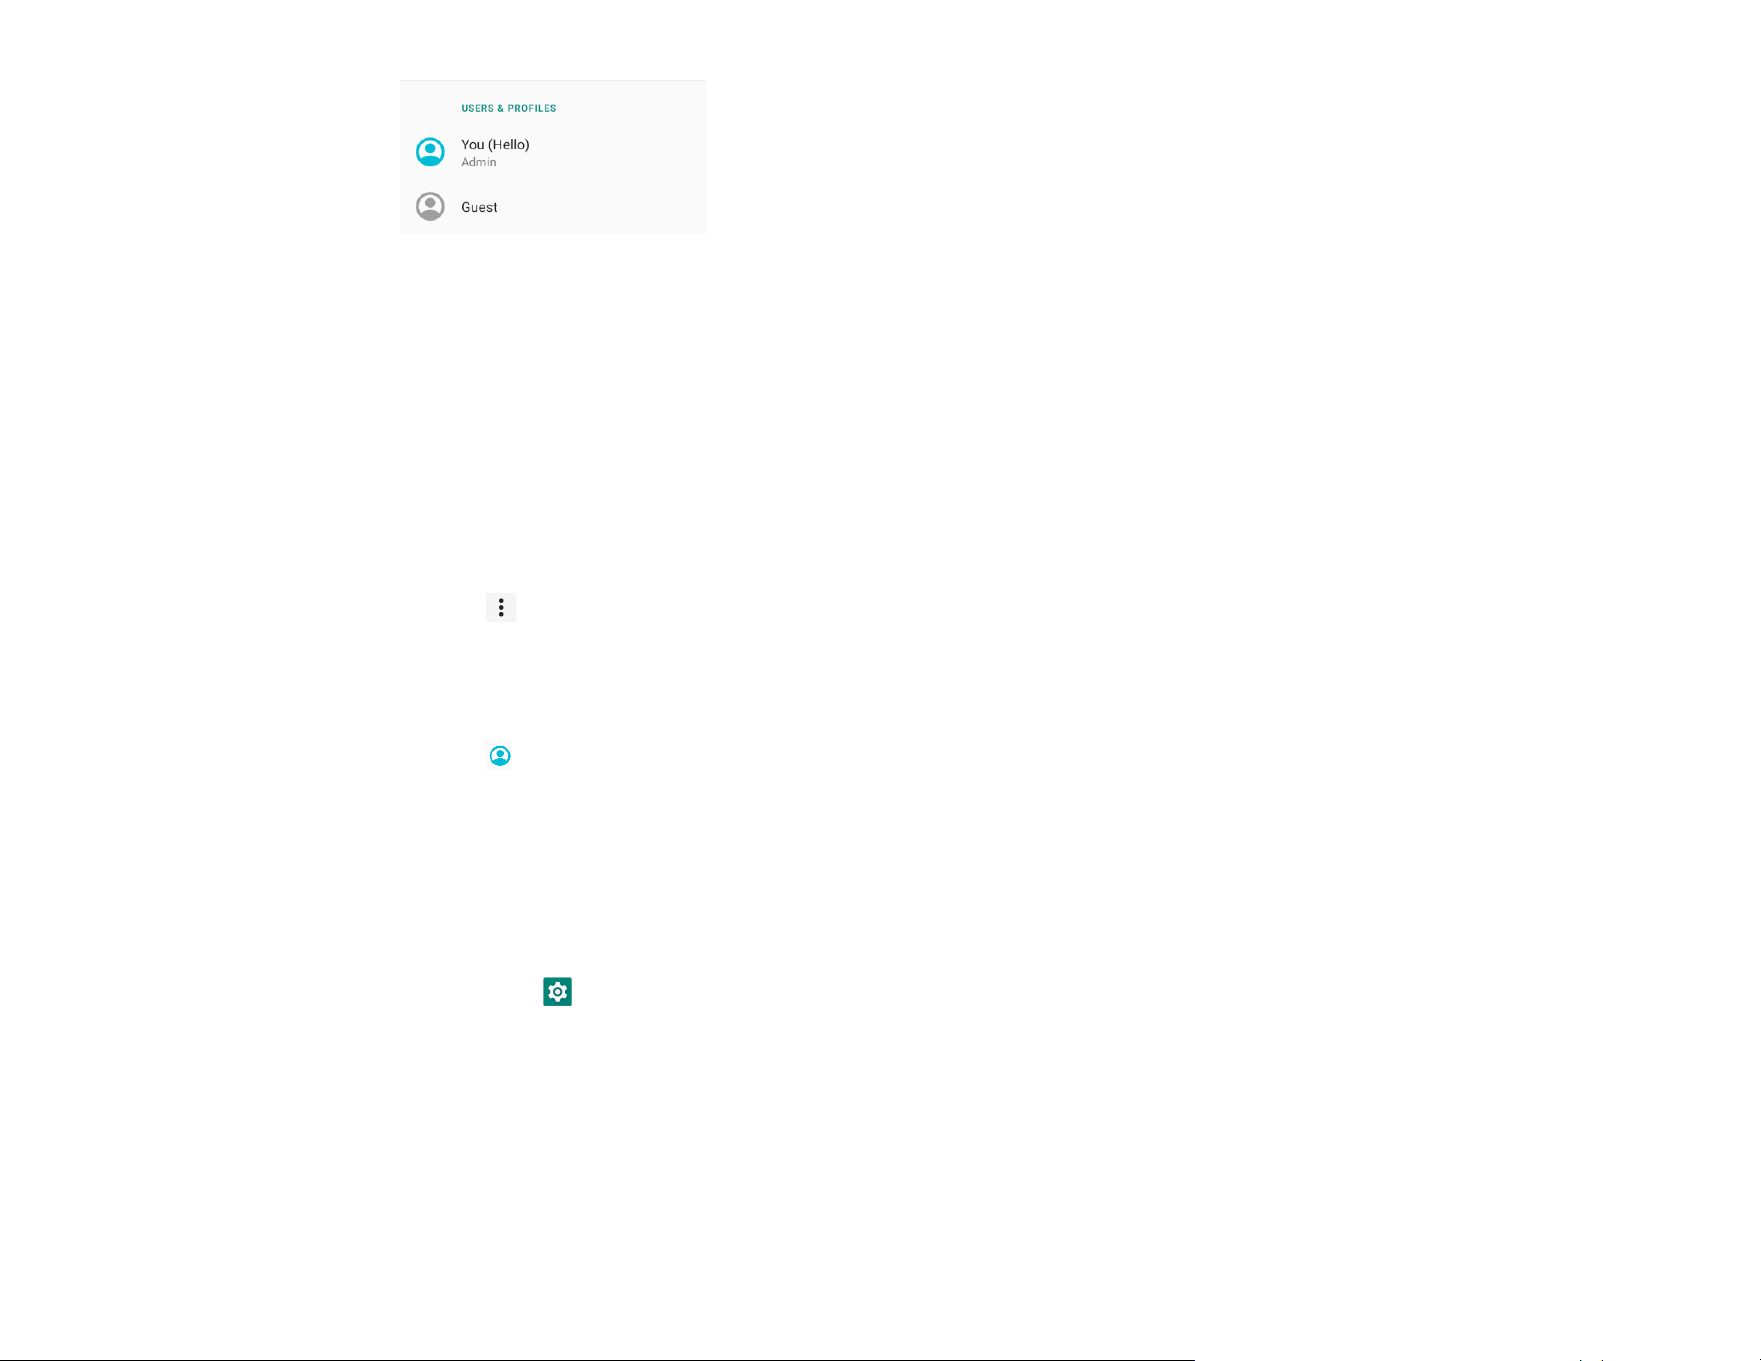
Multiple users
• Tap Multiple users.
• Tap toggle switch to ON.
To switch users
• Tap a user or name from the following option.
UM600853 Rev B page 61 of 85
User Manual –I-Series 5 Slate
To add user
Note: only admin can add users.
• Tap + Add user or profile.
• To set up apps and contents for the user, tap User.
Follow on-screen instructions to complete account set up.
• To set up restriction access to apps and content for the users, tap Restricted profile.
Follow on-screen instructions to complete account set up.
To delete guest from the device
• Tap 3-dot menu from Multiple Users screen.
• Tap Delete Guest from this device.
To rename Admin Profile info
• Tap admin
• Enter the name.
• Tap OK to save.
Developer (Accessing developer option menu)
• To access Developer option menu, go to About tablet →Build number.
• Tap Build number 7 times. When successfully done you will see the message “You are now a developer”.
• Then go back to → System → Advanced.
UM600853 Rev B page 62 of 85
User Manual –I-Series 5 Slate
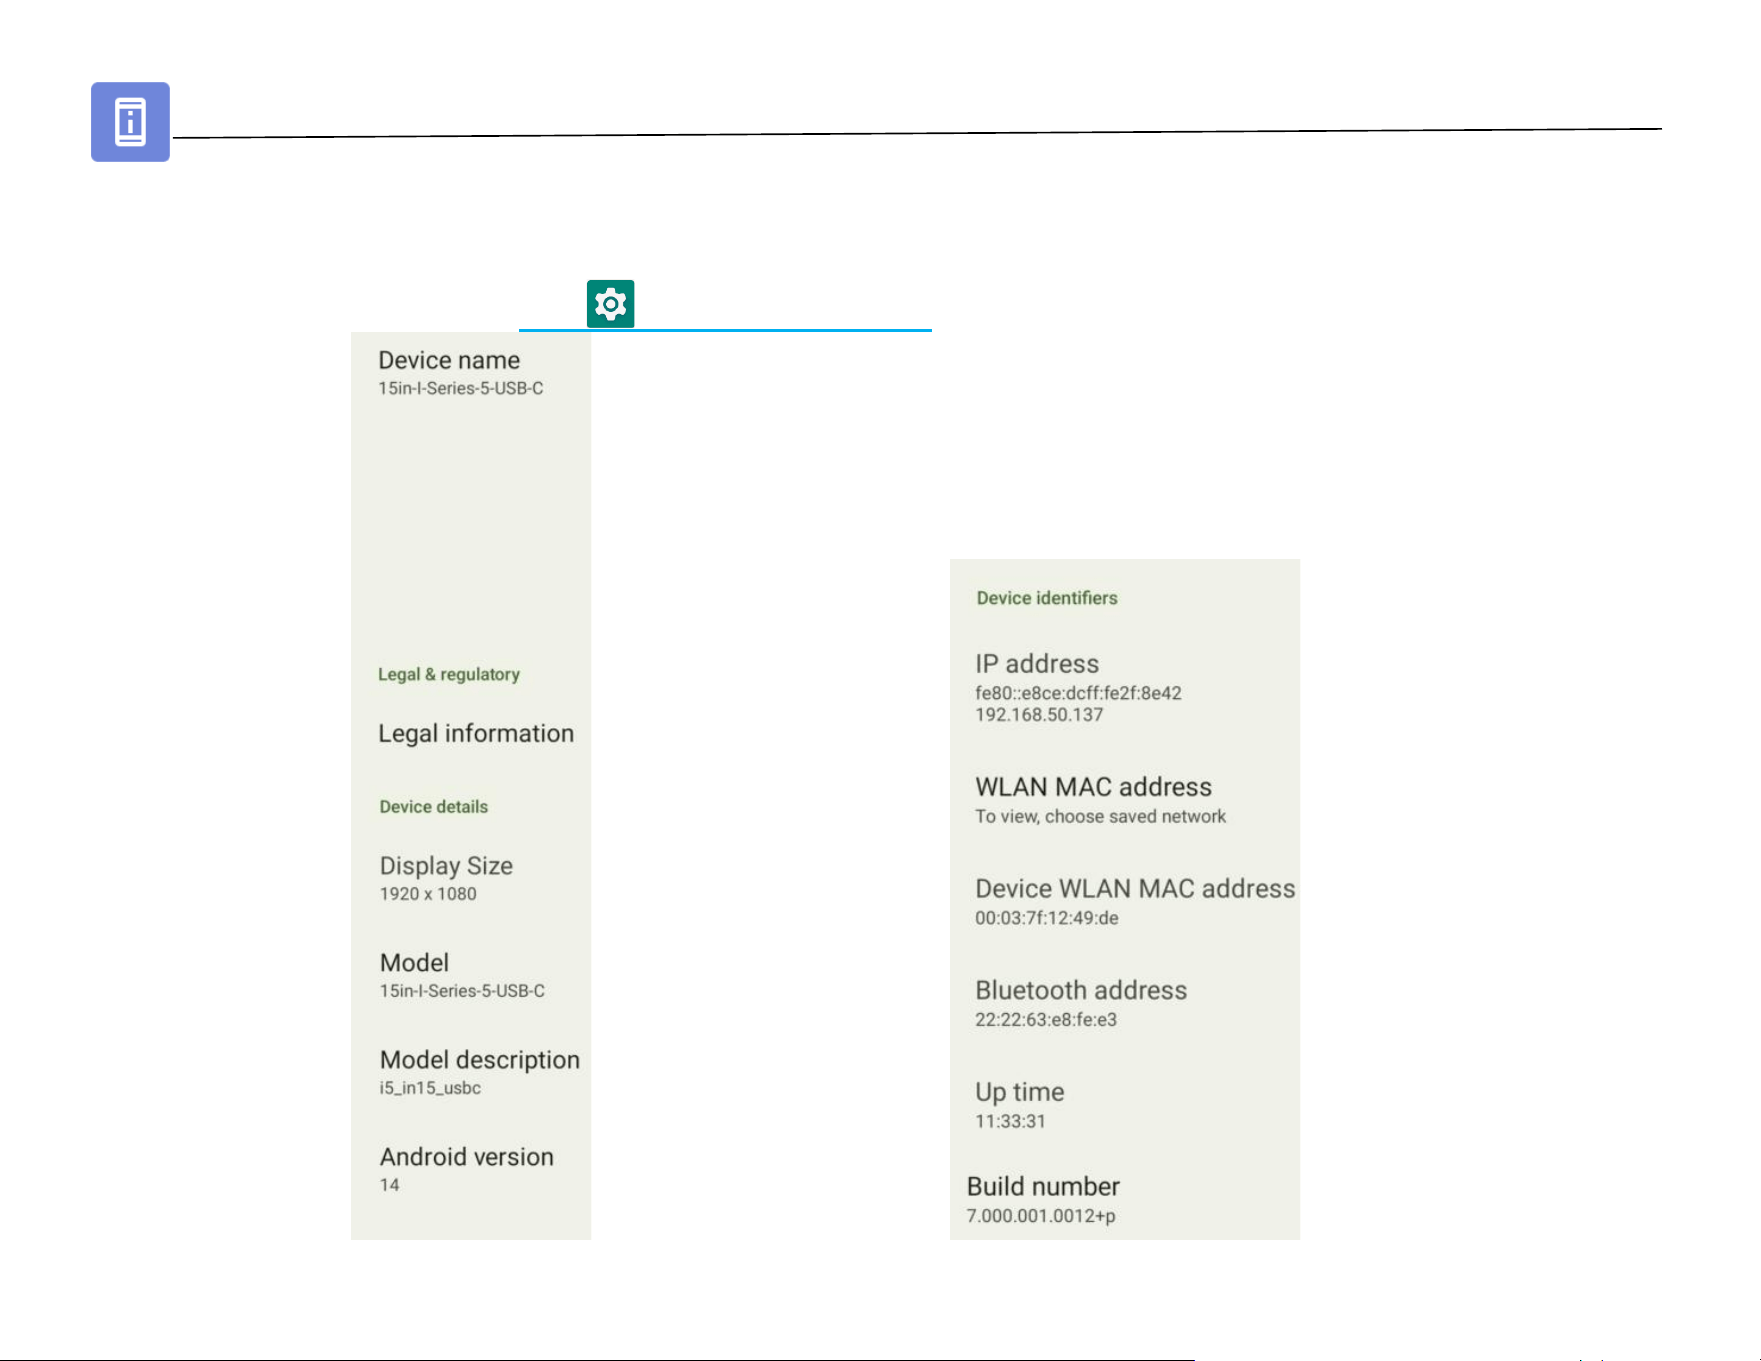
About device
For viewing specific information of I-Series device.
To view and modify settings, enter Settings → About device

UM600853 Rev B page 63 of 85
User Manual –I-Series 5 Slate
Section 4
Operational
UM600853 Rev B page 64 of 85
User Manual –I-Series 5 Slate
About Camera App (Snapdragon)
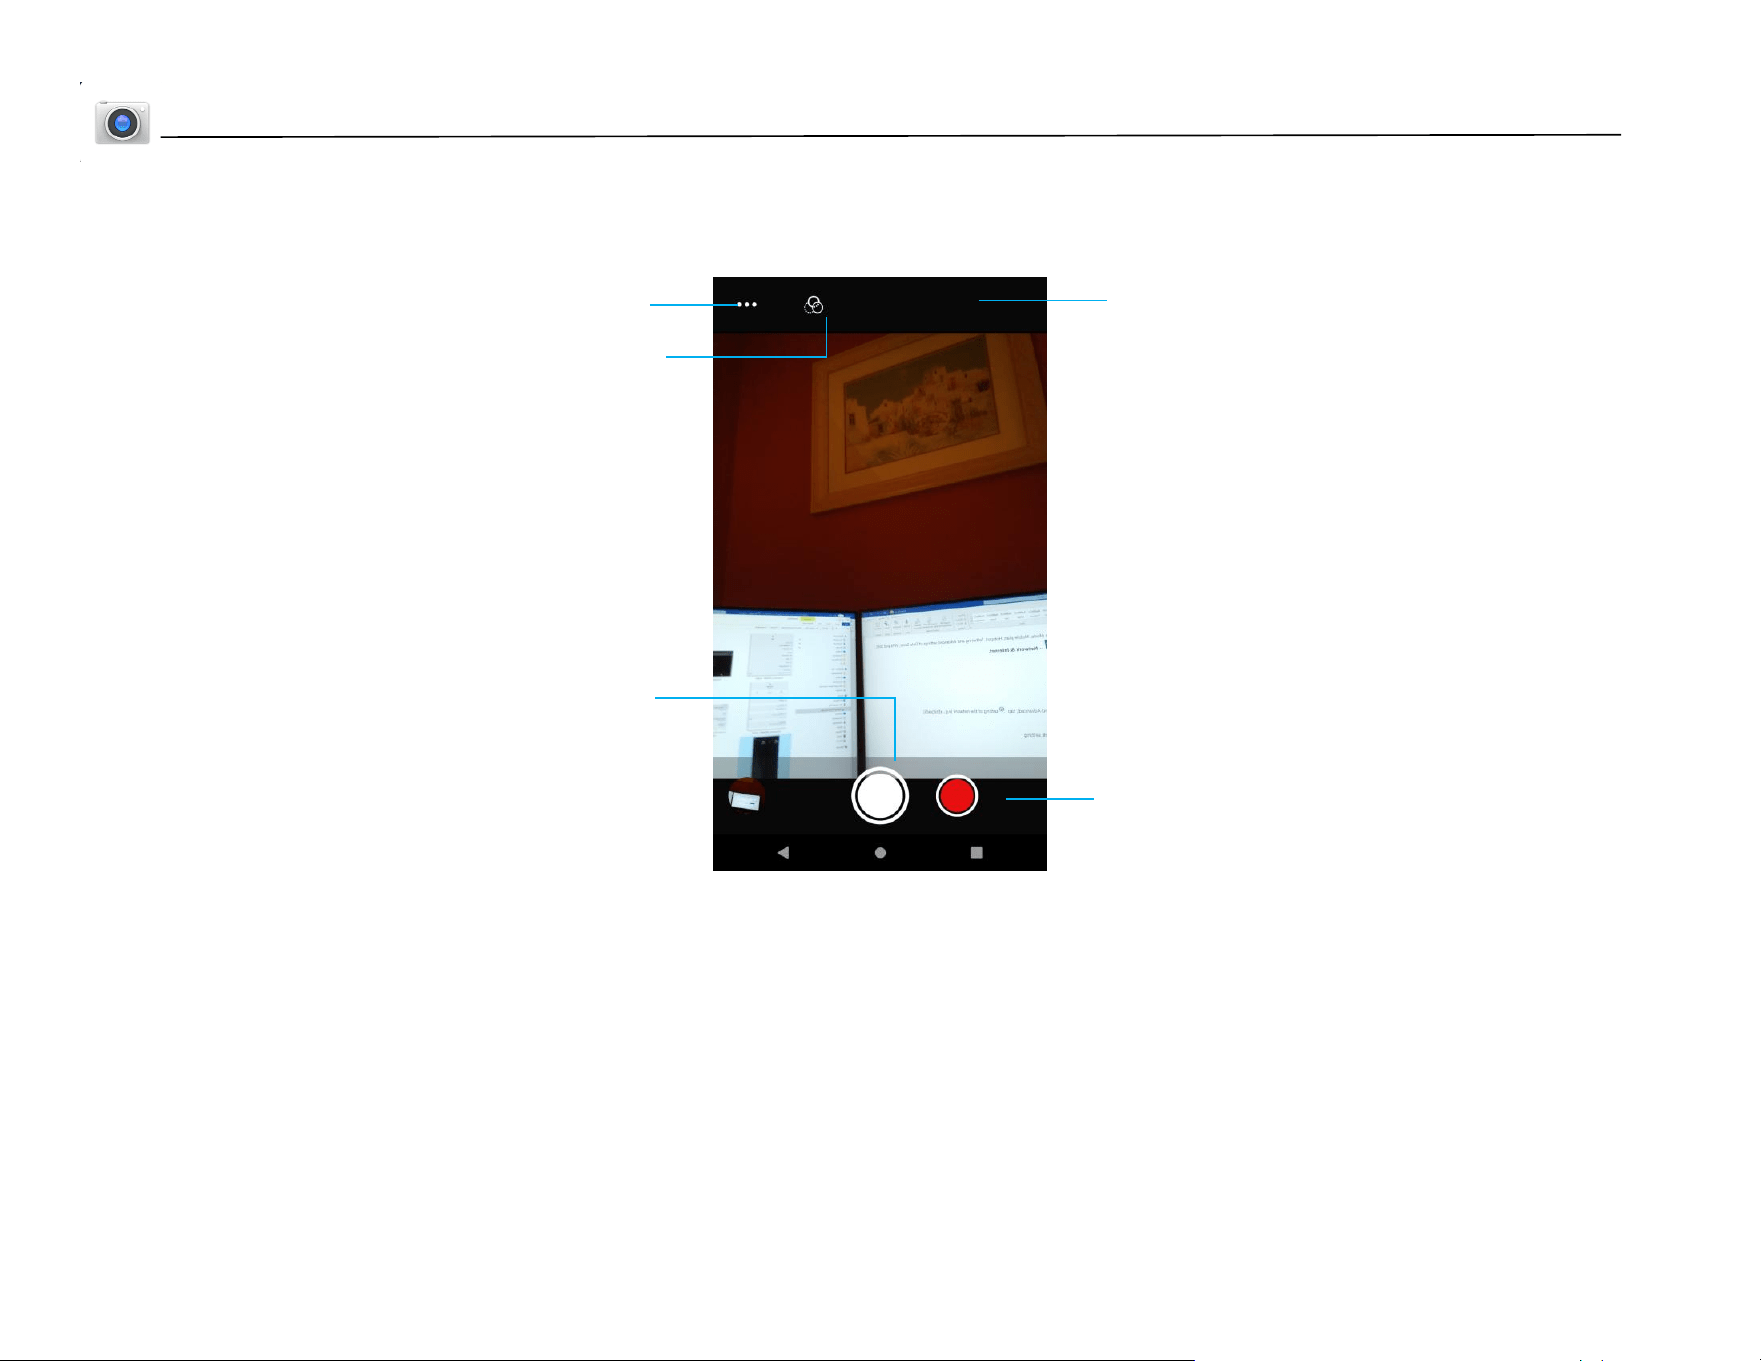
Camera Features
• Switch - A switch between Camera to Video.
• Scene Mode - For selecting the best exposure settings to fit the type of scene being shot.
That is, in addition to the amount of light in the scene.
• Flash Mode - For flash control. Options include Auto, On, Off.
• Color Filter - For photo effect. Options include Mono – Sepia – Negative – Solarize –
Posturize – Aqua.
• Shutter Release - For taking picture.
Scene Mode
Color Filters
Flash Mode
Switch
Shutter Release
UM600853 Rev B page 65 of 85
User Manual –I-Series 5 Slate
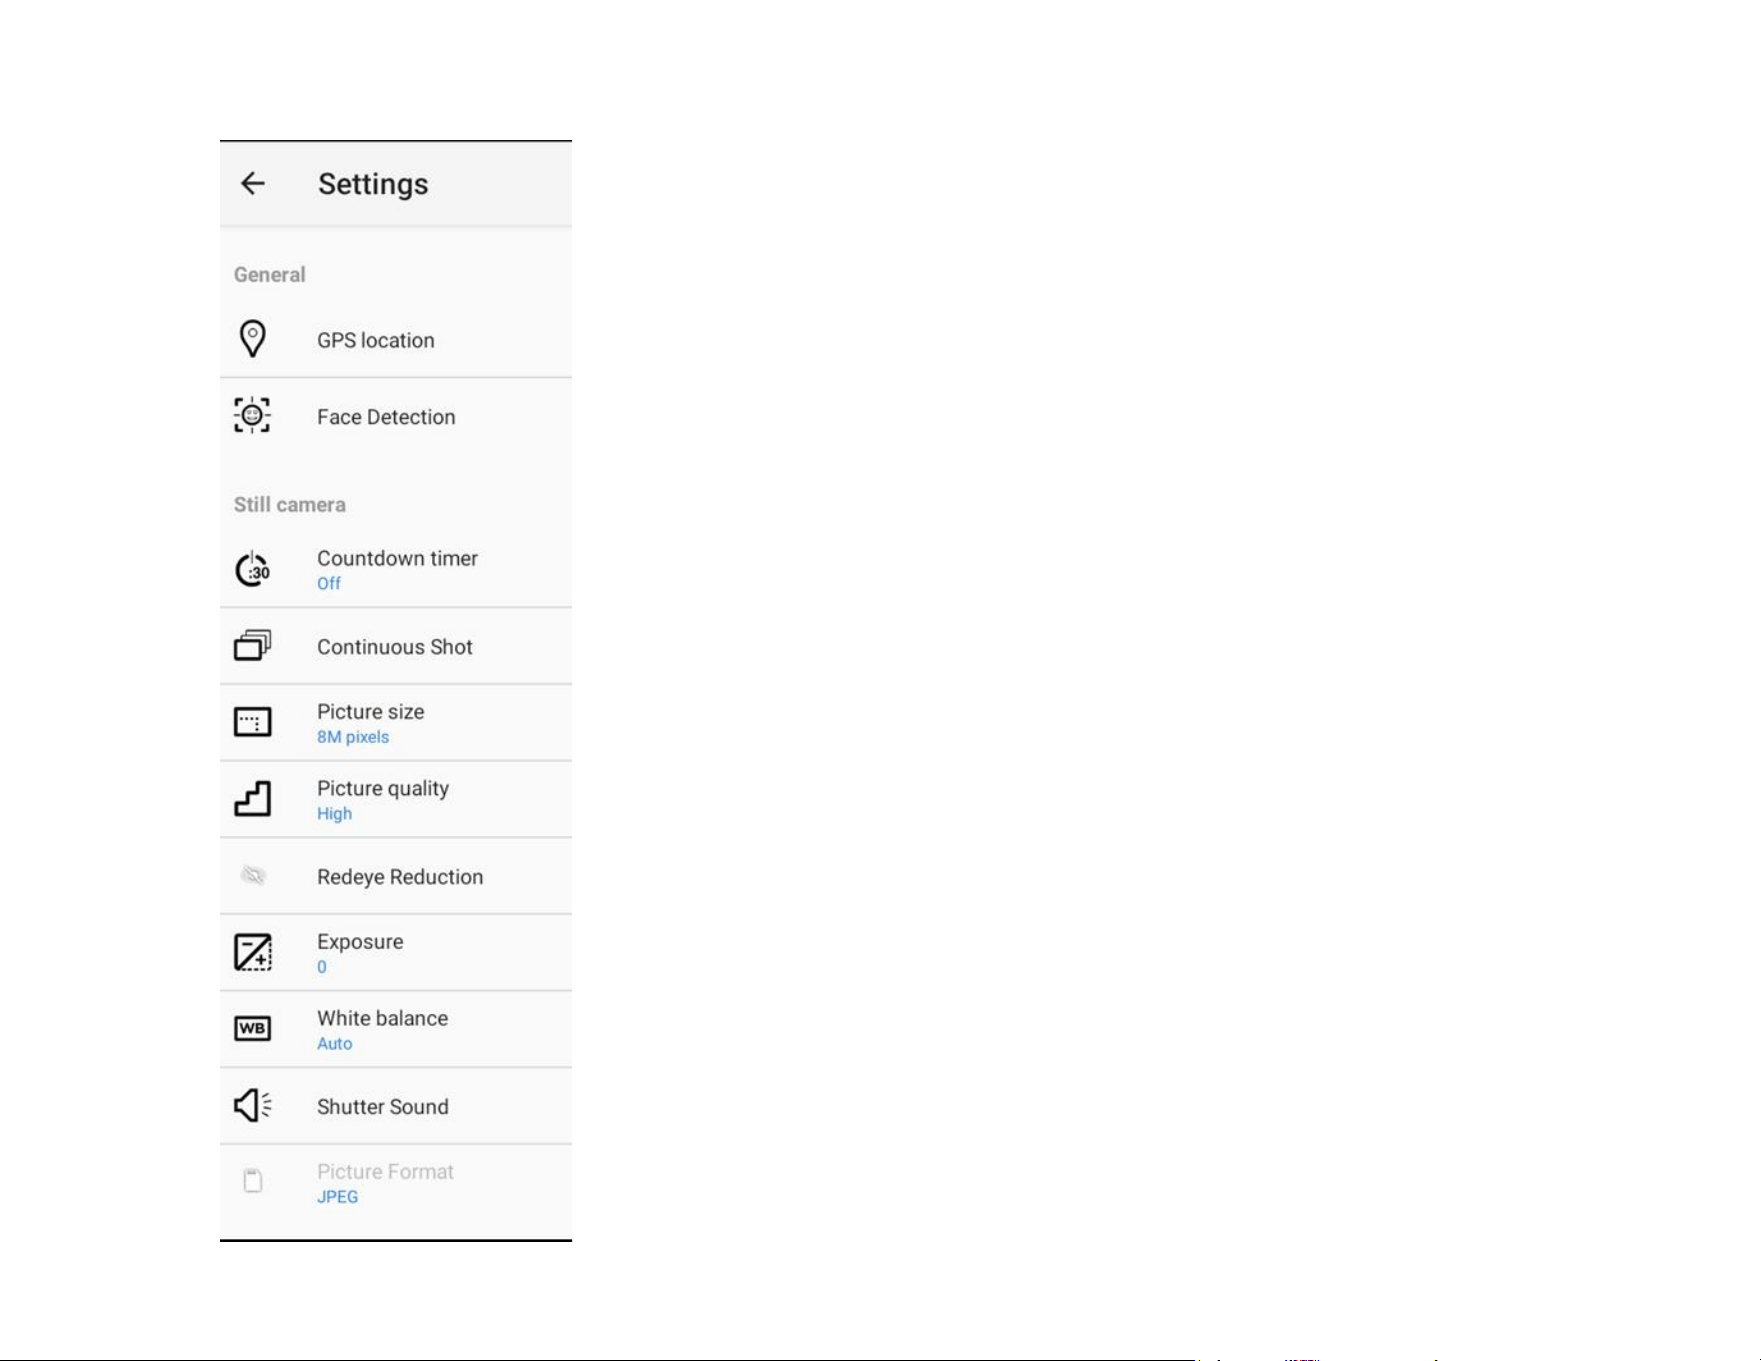
Advanced Camera Settings
• For showing location information in an image to show the photographer where
the camera was when the photo was taken.
• For detecting faces in the images and recognize them to automatically adjust focus and
exposure.
• Is a timer that gives a delay between pressing the shutter release. It is most used to let
photographers to take a photo themselves (often with family), hands free.
• For taking multiple photographs to be taken within a short timeframe and in rapid
succession.
• For changing picture resolution.
• For enhancing photos and images.
• For reducing redeye when taking a picture using flash.
• Exposure is the amount of light which reaches your camera sensor. It is a crucial part of
how bright or dark your pictures appear.
• For eliminating the discoloration in an image due to certain colors in the scene having
more intensity and/or a higher or lower “temperature”.
• Play a tone when taking a picture.
• For changing the file format of picture.
UM600853 Rev B page 66 of 85
User Manual –I-Series 5 Slate
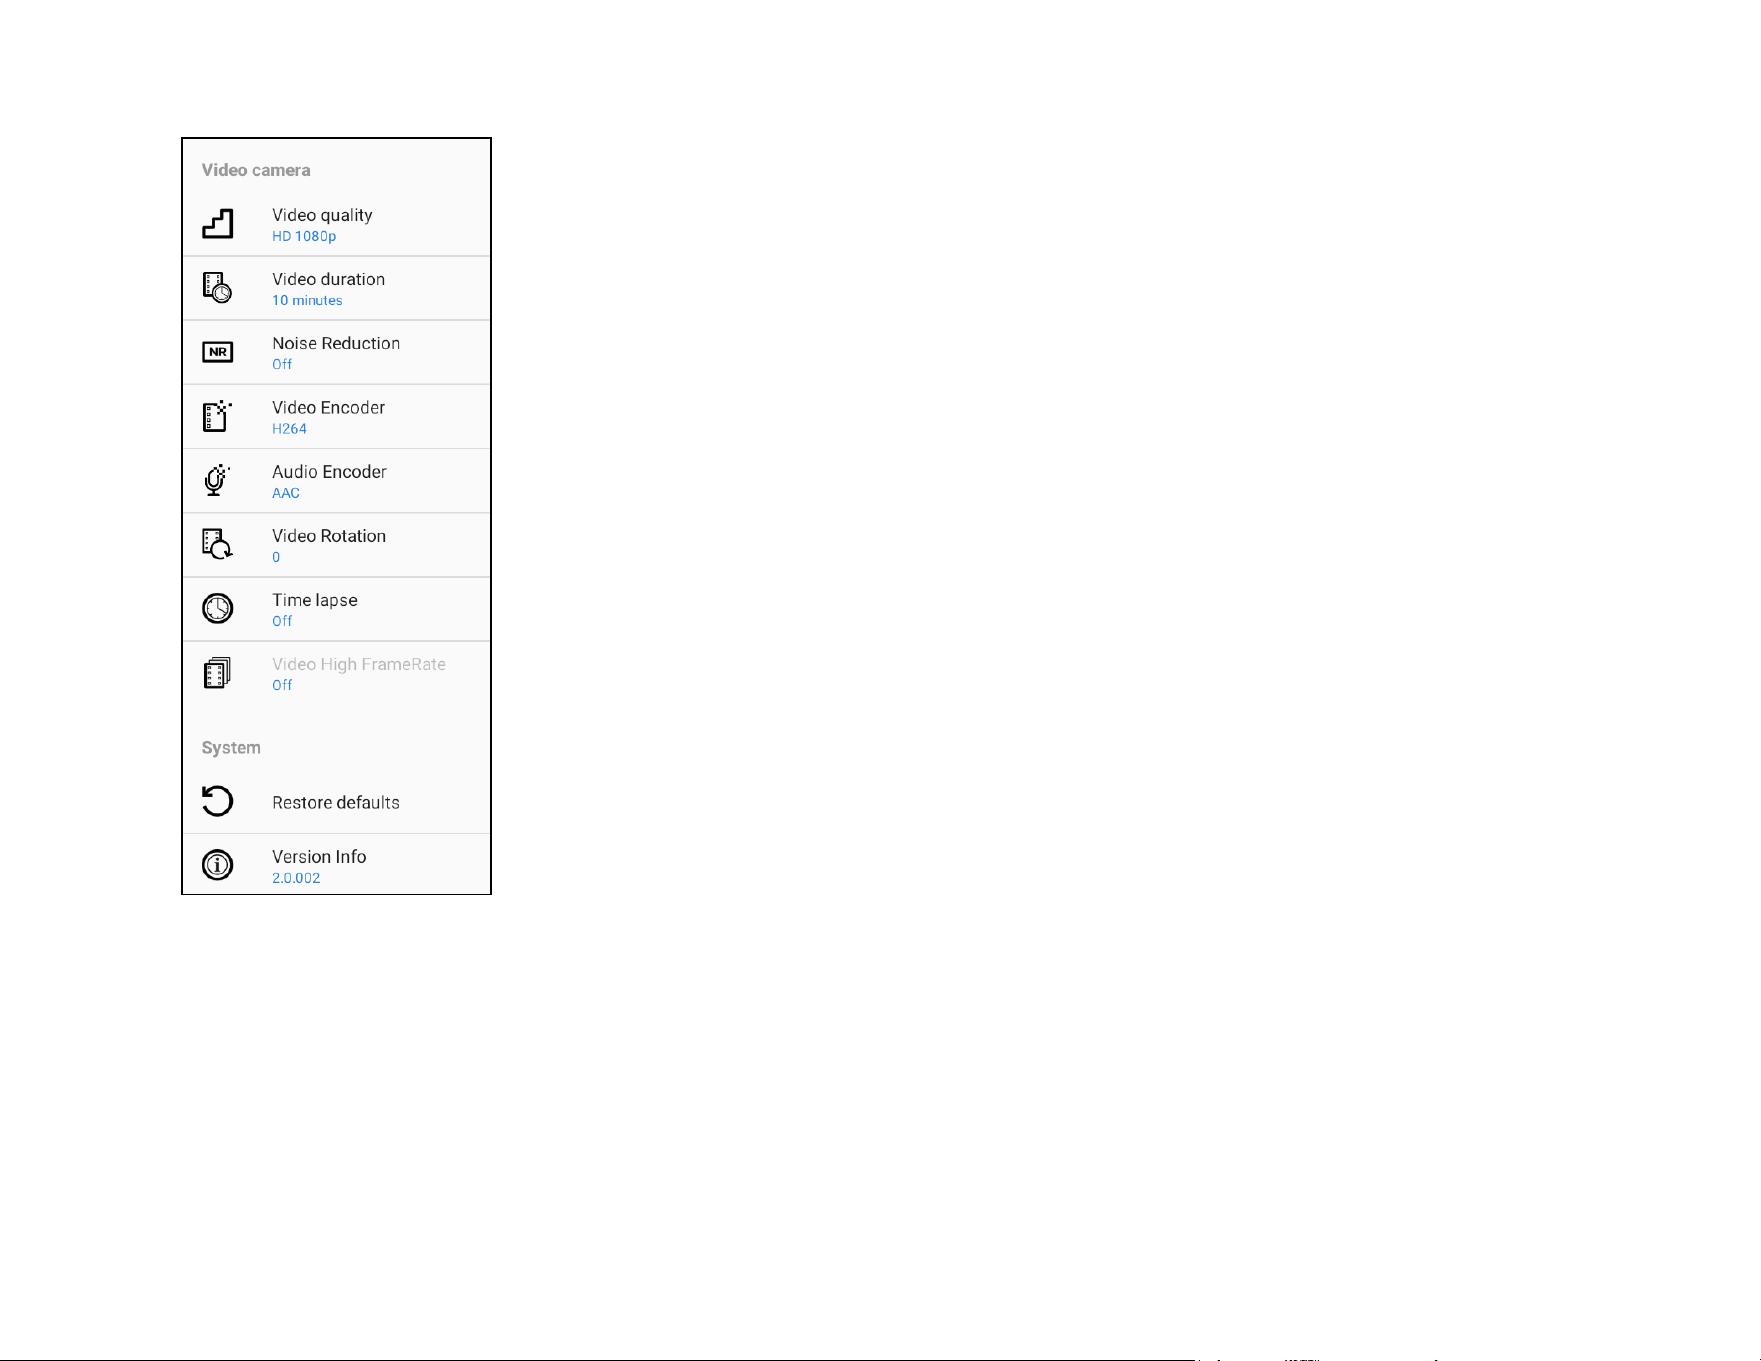
Video Features
Shutter Release – Taking a picture while video recording is in progress.
Video Capture Control – Start/Stop capturing video.
Pause/Resume – Pause/Resume capturing video.
Flash Mode – For flash control. Options include Auto, On, Off.
Microphone – For capturing sound on video.
Flash Mode
Microphone
Pause/Resume
Video Capture Control
Shutter Release
UM600853 Rev B page 67 of 85
User Manual –I-Series 5 Slate
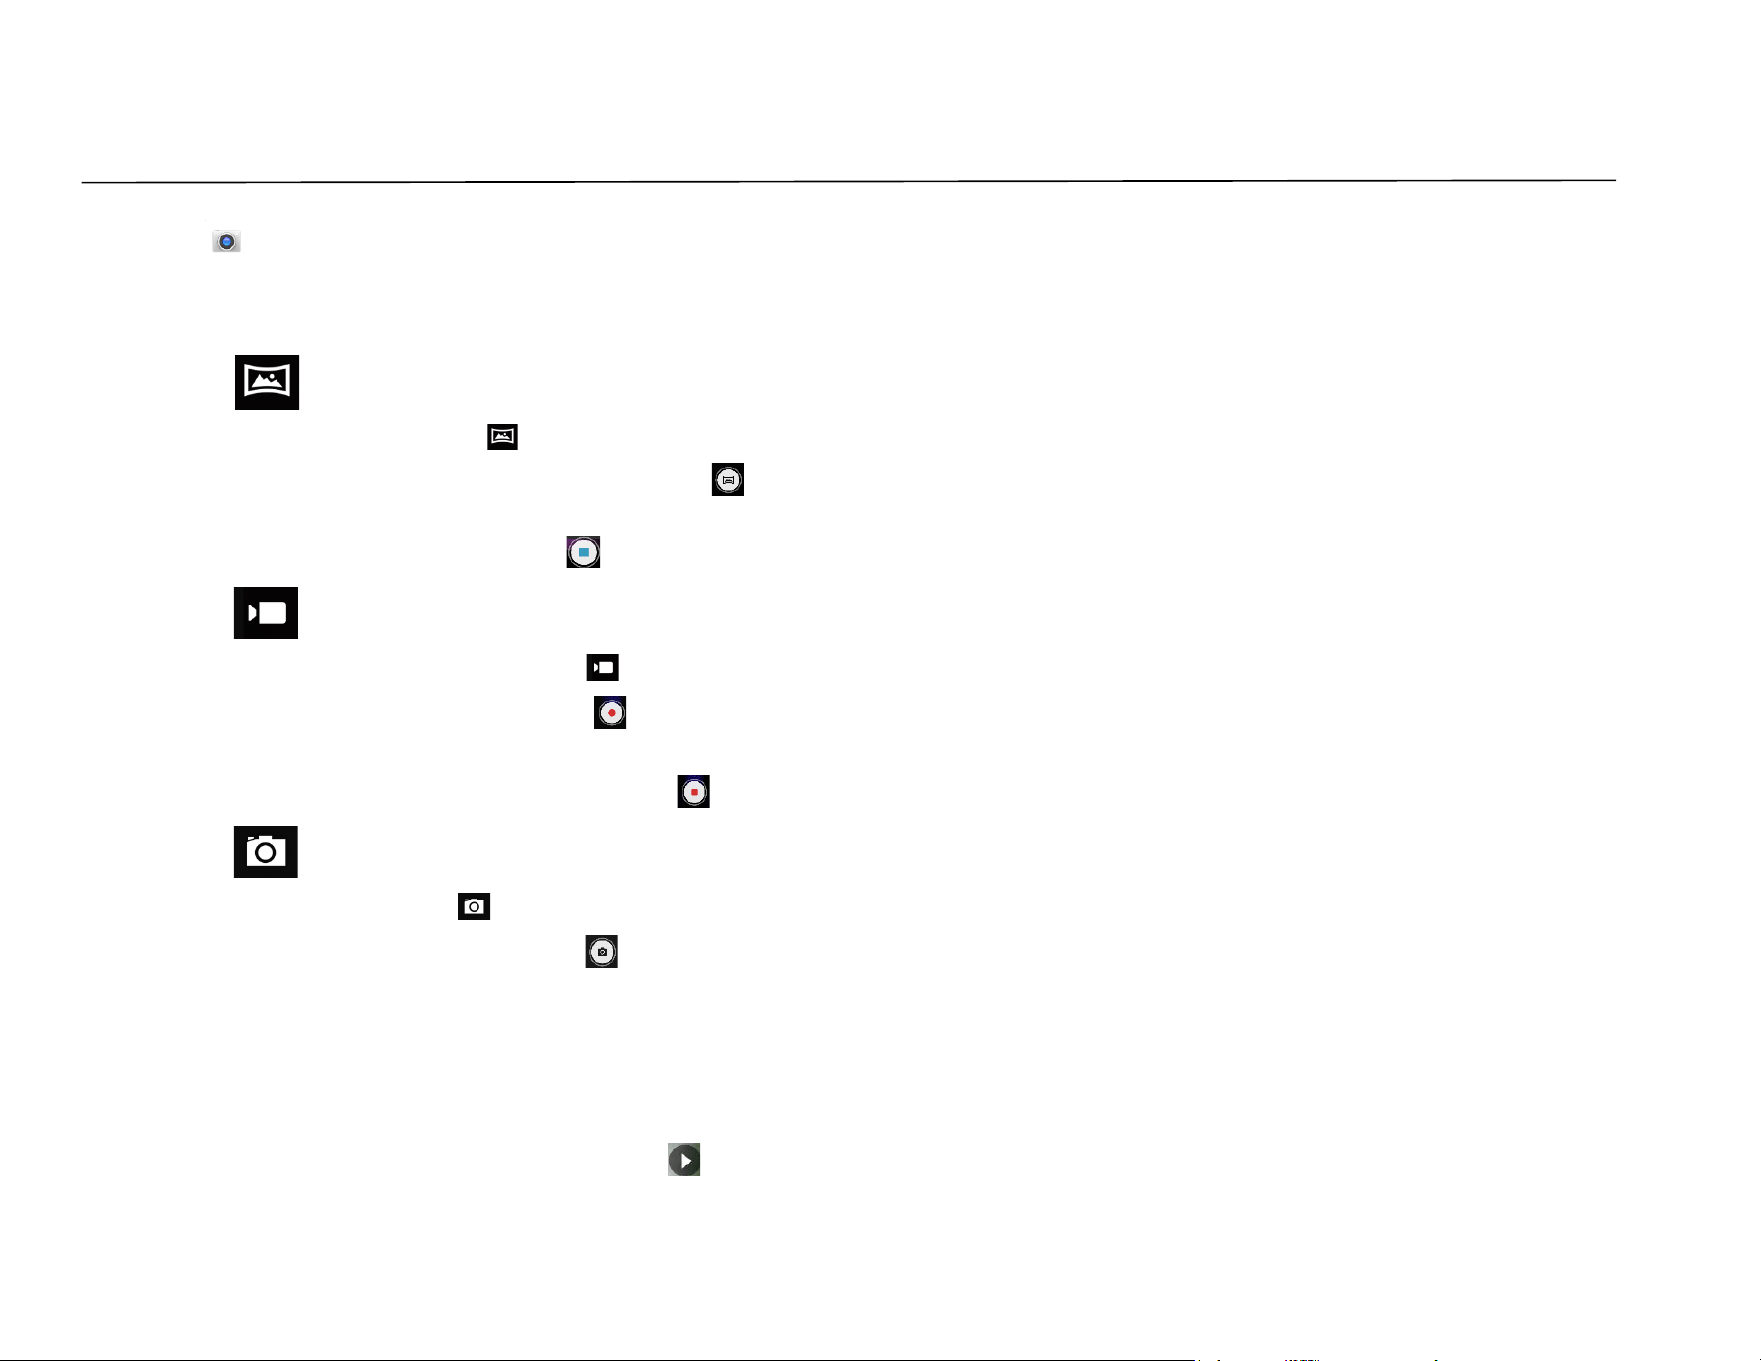
Advanced Settings
• For changing video resolution.
• Is an auto timer to stop video recording without pressing video capture Icon.
• Is a feature reducing noise and causes the image to lose its sharpness. This mode is only
recommended to use while you are taking pictures in artificial light like indoors.
• For changing video encoder for the video file.
• For changing audio encoder for the video file.
• For changing rotation of the video.
• For changing interval when time lapse feature is enabled.
• HFR refers to higher frame rates than typical prior practice (e.g., 24 fps for standard movies).
• For restoring default settings.
• Shows camera application version information.
UM600853 Rev B page 68 of 85
User Manual –I-Series 5 Slate
Testing the Camera
Take a Picture and Record Video
• Tap Snapdragon camera app to access the Digital camera.
• To change camera and video settings, see features.
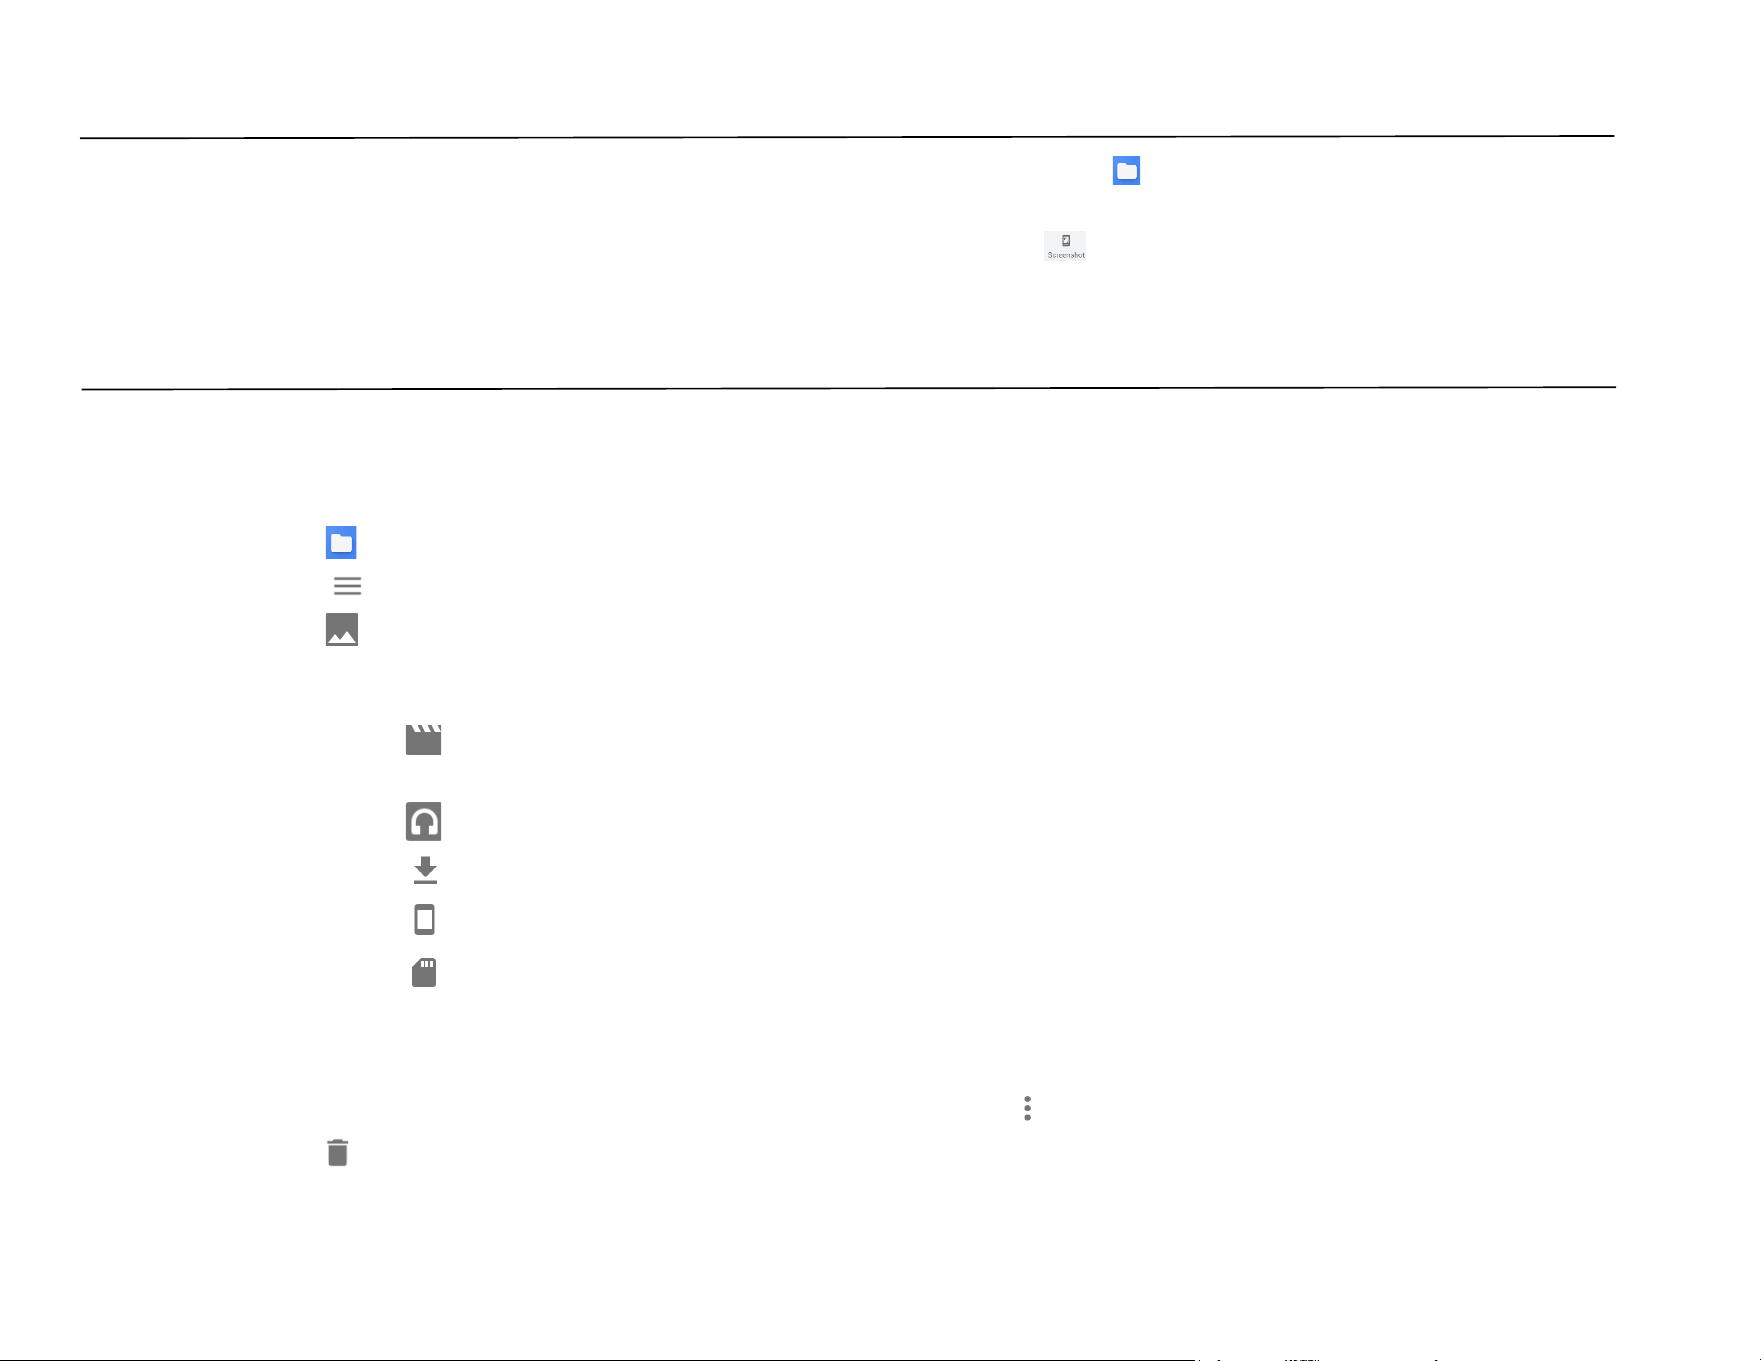
• From the switch, located on bottom left side of the I-Series 5 select one from the following options.
For Panorama, tap Panorama Icon.
❖ To take panoramic pictures, tap panorama shutter Icon.
❖ Slowly move the device across to take a panoramic picture.
❖ When finished, tap stop Icon.
For Video recording, tap Video Icon.
❖ To record videos, tap capture Icon.
❖ To mute and unmute sound while recording, tap microphone Icon.
❖ When finished recording, tap stop Icon
For camera, tap Camera Icon.
❖ To take pictures, tap shutter release Icon.
❖ To enable and disable shutter sound, go to advanced settings. See camera features.
❖ To zoom an object or scene place two fingers on the screen together, spreads them apart to zoom in and pinch
to zoom out.
❖ To auto focus an object or scene, tap touch screen.
❖ To view pictures and play recorded videos, tap gallery.
❖ To play recorded video, tap play.
UM600853 Rev B page 69 of 85
User Manual –I-Series 5 Slate
Take a Screenshot
For capturing an image of the screen. The device will automatically save the image in the File folder application.
• Tap the Recent App of Navigation Bar, a pop-up screen menu will appear then tap screenshot.
File Application
The File Manager app helps to manage, delete, print, shares and transfer files between the mobile storage and a computer.
To access pictures, videos, screenshots, audios, downloads, and mobile internal / external storage, go to application drawer.
• Tap file application from the application drawer.
• Tap 3 lines menu and choose one of the following options.
• Tap Image Icon for pictures and screenshots.
❖ Tap Camera folder for photos.
❖ Tap Screenshots folder for screenshot images.
❖ Tap Video for recorded videos.
❖ Tap Camera folder.
❖ Tap Audio for recorded audios.
❖ Tap for Downloaded items.
❖ Tap for mobile internal storage folders.
❖ Tap for mobile external storage folders.
Delete Files
• To delete files from the folders above, press and hold an item or tap 3 dots menu to select all items in the folder.
• Tap to delete.
• Tap OK to confirm.

UM600853 Rev B page 70 of 85
User Manual –I-Series 5 Slate
Copy and Move Files
• To copy or move files into new location press and hold an item from the folders above or tap 3 dots menu to select all items in
the folder.
• Tap 3 dots menu again and choose “Copy to” or “Move to”.
• Tap 3 lines menu and choose from the following options where you want to move or copy the item.
• To create a new folder, tap 3 dots menu.
• Rename the folder.
• Tap Copy or Move to confirm.
• Print File
• Note: To print you must set a printer. See Settings → Connected device → Print.
• To print files from the folders above, tap an item once.
• Tap 3 dots menu and tap Print.
Share Files
Note: Make sure both device Bluetooth are paired. See Connected devices → Bluetooth on this user manual.
• To share files from the folders above, press and hold an item.
• tap share Icon.
• To share via Bluetooth, tap Bluetooth Icon.
• To share via Email, tap email Icon
• For more options hold an item from the folders above.
• Tap 3 dots menu and choose from the following options and follow on-screen instructions.
UM600853 Rev B page 71 of 85
User Manual –I-Series 5 Slate
G-Sensor
All I-Series 5 Slate units are equipped with a g-sensor and will rotate the video based on the orientation of the device.
Debug Bridge (ADB) control (Developers Only)
Elo device supports debugging via Wi-Fi/Ethernet or using the a separate microUSB cable(not included).
Set I-Series 5 Slate to (Developer)
• Enter Settings → About Device → Build Number.
• Tap Build Number 7 times to enter developer mode.
• Go back to the Settings → System and you will see “Developer Options”.
• From Developer options on- screen display, enable the option called “USB debugging” or “Wireless Debugging”.
To connect via Wi-Fi
Ensure that your computer is online and not behind a firewall.
• Find the IP address (by going to Settings → Network & Internet → Wi-Fi →Tap the active connection → Advanced→ IP Address.
• On your host computer, use the command ADB connect <IP address> to be able to perform ADB actions.
UM600853 Rev B page 72 of 85
User Manual –I-Series 5 Slate
To connect via USB
To connect for USB debugging, please follow these steps
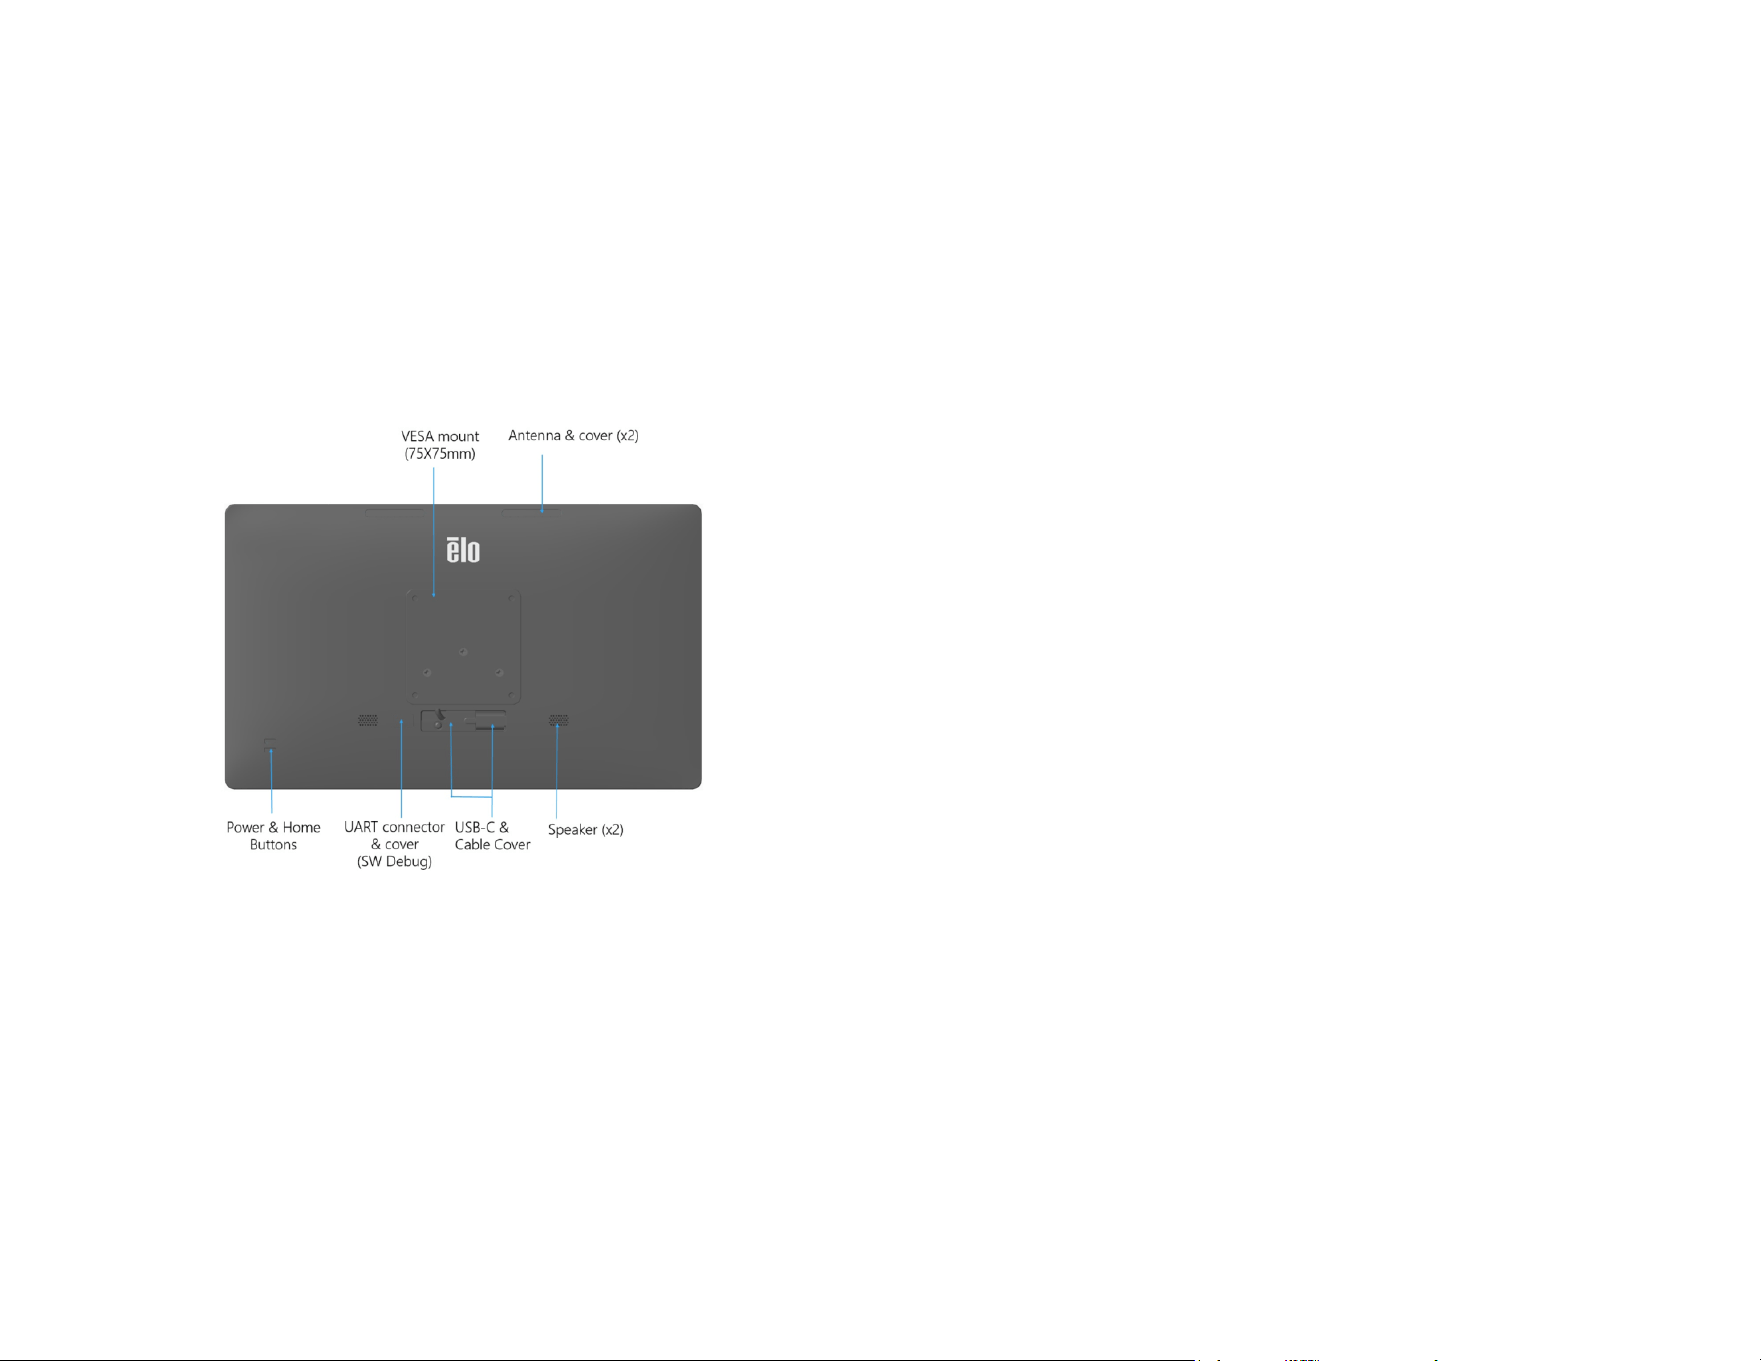
• Locate the SW Debug port on the rear of Head as shown in the figure below.
• This will require removing the head from the stand.
• Remove Rubber Plug and plug in MicroUSB Cable.
• Plug USB cable (Micro B side) into the device and (type A) to host PC.
• In the host PC, input “ADB devices” to check if the device serial number shows up. If it is
there, then you have connected successfully.
UM600853 Rev B page 73 of 85
User Manual –I-Series 5 Slate
Factory Full Reset
A full factory reset should only performed if all other recovery methods have failed and all other troubleshooting options. Perfoming
a full factory reset results in loss of data. This options will recover the original factory image state by erasing all data in the main
storage on the Elo handheld computer.
Note: Performing a factory reset on bootloader menu, if you added a Google Account to Elo handheld Computer make sure you
have your Google credential (Username and password) associated with the Elo handheld computer. If you don’t have it you will not
be able to use the device after reset. This is a security measure that prevents unauthorized user from using the device if they do a
factory reset on bootloader menu.
To Reset
• Enter Settings System Advanced Reset Options.
• Tap Erase all data.
• Under Erase all data (factory reset), tap Erase all data .
• Under Erase all data?, tap Erase all data.
• When successfully don, the device will auto reboot.
UM600853 Rev B page 74 of 85
User Manual –I-Series 5 Slate
Optional Peripherals
Stands
IO Hub
Reading NFC
Tag
To test the functionality of the NFC, set the NFC to enable, go to Android Setting → Connected Device → Connection preferences → NFC.
Load a 3
rd
party NCF application e.g. TagWriter.
• To start reading NFC tag, open (TagWriter APK) or depending which application is installed
• Tap “Read Tags”.
• When device is ready to read, place the card on the icon of NFC logo.
• When the NFC card is read by default a beep sound will turn ON and display the NFC content.
• There is a white, red and green indicator LED under the NFC logo, the white LED is on by default.
• The LED on NFC is implemented as a LED class device
• The different LED illumination can be controlled by EloView Peripheral SDK. Please visit DeveloperPortal (elotouch.com) to get
more information.
.
Part Number
Comment
Description
E767159
Z10 POS Stand
KIT, Z10-POS-STAND-GEN2-10
E767561
Z30 POS Stand w/o integrated CFD
KIT, Z30-POS-STAND-GEN2-15
E768749
Z30 POS Stand with integrated CFD
KIT, Z30-POS-STAND-CFD-GEN2-15
E769881
Z30 POS Stand with NFC
KIT, Z30-POS-STAND-CFD-GEN2-15-NFC
Part Number
Comment
E955492
Replacement IO Hub

Elo I-Series 5 Slate Care and Handling
The following tips will help maintain optimal performance of your Elo I-Series 5:
• To prepare for cleaning the touchscreen, power down the device (if possible), or ensure your on-screen software
can tolerate false touches while you clean.
• Do not get liquids inside the unit. Do not spray the Elo product directly. Instead, use wet wipes, a sprayed cloth or
a dampened cloth with the excess moisture squeezed off.
• Select only non-abrasive cleaning wipes or cloths to avoid scratching touchscreens.
• Avoid highly concentrated alcohol (> 70%), non-diluted bleach or ammonia solutions, as these may cause
discoloration.
• Wipe the surfaces with the appropriate wipes or cloths and approved cleaning products and allow them to dry.
• For additional cleaning methods, recommended cleaning and disinfectant solutions, please visit
https://www.elotouch.com/support/technical-support/cleaning

Operating time and Panel Image Sticking
*Notice that this product’s maximum continuous operating time is 20/7, please pay attention to the following instructions.
What is Image Sticking? What Causes Image Sticking?
Image persistence, image burn-in, and image sticking are terms used to describe LCD image retention. LCD image retention occurs when a fixed
pattern is displayed over a prolonged period of time. The fixed pattern causes a parasitic capacitance to build up within the LCD component,
which prevents the liquid crystal molecules from returning to their normal relaxed state. All LCDs/CRTs and color plasma displays are susceptible to
image retention, at varying degrees. Phosphor based display devices, such as CRTs and color plasma displays are most susceptible, and image
retention on phosphor-based devices is often irreversible. Transmissive devices, such as LCDs are less susceptible, and in most cases LCD image
retention can be reversed. The rate of image sticking depends on the image pattern, duration of fixed image, the temperature, and production
variations. Likewise, the rate of diffusion of the image sticking (recovery time) also depends on these factors.
What Can Be Done about It?
The best way to avoid image burn-in is to limit the amount of static content on the display. Image sticking may be avoided by turning the display
off periodically for a period of time between 2 to 4 hours. To reduce the possibility of image retention, we recommend: Displaying alternating
black/white images for 2 to 4 hours Using a screen saver when the touchscreen is not in use Image retention caused by static (non-moving)
images displayed for lengthy periods (image burn-in) is not covered under Elo warranty.

Section 6: Regulatory Information
Electrical Safety Information
Compliance is required with respect to the voltage, frequency, and current requirements indicated on the
manufacturer’s label. Connection to a different power source than those specified herein will likely result in improper
operation, damage to the equipment, or pose a fire hazard if the limitations are not followed.
There are no operator serviceable parts inside this equipment. There are hazardous voltages generated by this
equipment which constitute a safety hazard. Service should be provided only by a qualified service technician.
Contact a qualified electrician or the manufacturer if there are questions about the installation prior to connecting the
equipment to mains power.
Emissions and Immunity Information
Notice to Users in the United States: This device complies with part 15 of the FCC Rules. Operation is subject to the
following two conditions: (1) This device may not cause harmful interference, and (2) this device must accept any
interference received, including interference that may cause undesired operation of the device.
Changes or modifications not expressly approved by the party responsible for compliance could void the user‘s
authority to operate the equipment.
NOTE: This equipment has been tested and found to comply with the limits for a Class B digital device, pursuant to part
15 of the FCC Rules. These limits are designed to provide reasonable protection against harmful interference in a
residential installation. This equipment generates, uses, and can radiate radio frequency energy and, if not installed and
used in accordance with the instructions, may cause harmful interference to radio communications. However, there is
no guarantee that interference will not occur in a particular installation. If this equipment does cause harmful
interference to radio or television reception, which can be determined by turning the equipment off and on, the user is
encouraged to try to correct the interference by one or more of the following measures:
—Reorient or relocate the receiving antenna.
—Increase the separation between the equipment and receiver.
—Connect the equipment into an outlet on a circuit different from that to which the receiver is connected.
—Consult the dealer or an experienced radio/TV technician for help.

FCC Radiation Exposure Statement:
This equipment complies with FCC radiation exposure limits set forth for an uncontrolled environment. This equipment
should be installed and operated with minimum distance 20cm between the radiator & your body.
Changes or modifications not expressly approved by the party responsible for compliance could void the user's
authority to operate the equipment.
6XD:
Operation of transmitters in the 5.925-7.125 GHz band is prohibited for control of or communications with unmanned
aircraft systems.
Notice to Users in Canada for IC compliance: This equipment complies with the Class B limits for radio noise emissions
from digital apparatus as established by the Radio Interference Regulations of Industrial Canada.
CAN ICES3 (B)/NMB3(B)*
*Z30 w CFD = CAN ICES3 (A)/NMB3(A)
This device contains license-exempt transmitter(s)/receiver(s) that comply with Innovation, Science and Economic
Development Canada’s license-exempt RSS(s). Operation is subject to the following two conditions:
(1) This device may not cause interference.
(2) This device must accept any interference, including interference that may cause undesired operation of the device.
L’émetteur/récepteur exempt de licence contenu dans le présent appareil est conforme aux CNR d’Innovation,
Sciences et Développement économique Canada applicables aux appareils radio exempts de licence. L’exploitation
est autorisé e aux deux conditions suivantes :
(1) L’appareil ne doit pas produire de brouillage;
(2) L’appareil doit accepter tout brouillage radioélectrique subi, même si le brouillage est susceptible d’en
compromettre le fonctionnement.

IC Radiation Exposure Statement:
This equipment complies with IC RSS-102 radiation exposure limit set forth for an uncontrolled environment. This equipment
should be installed andoperated with minimum distance 20cm between the radiator and your body.
Déclaration d’exposition à la radiation : Cet équipement respecte les limites d’exposition aux rayonnements IC définies pour
un environnement non
contrôlé. Cet équipement doit être installé et mis en marche à une distance minimale de 20 cm qui sépare l’élément
rayonnant de votre corps.
L’émetteur ne doit ni être utilisé avec une autre antenne ou un autre émetteur ni se trouver à leur proximité.
Notice to Users in the European Union: Use only the provided power cords and interconnecting cabling provided with
the equipment. Substitution of provided cords and cabling may compromise electrical safety or CE Mark Certification
for emissions or immunity as required by the following standards:
This Information Technology Equipment (ITE) is required to have a CE Mark on the Manufacturer’s label which means
that the equipment has been tested to the following Directives and Standards: This equipment has been tested to the
requirements for the CE Mark as required by EMC Directive 2014/30/ EU as indicated in European Standard EN 55032
Class B and the Low Voltage Directive 2014/35/EU as indicated in European Standard EN 62368-1.
General Information to all Users:
This equipment generates, uses, and can radiate radio frequency energy. If not installed and used according to this
manual the equipment may cause interference with radio and television communications. There is, however, no
guarantee that interference will not occur in any particular installation due to site-specific factors.
1.
In order to meet emission and immunity requirements, the user must observe the following:
a.
Use only the provided I/O cables to connect this digital device with any computer.
b.
To ensure compliance, use only the provided manufacturer’s approved line cord.
c.
The user is cautioned that changes or modifications to the equipment not expressly approved by the party
responsible for compliance could void the user’s authority to operate the equipment.
2.
If this equipment appears to cause interference with radio or television reception, or any other device:
a.
Verify as an emission source by turning the equipment off and on. If you determine that this equipment is causing
the interference, try to correct the interference by using one or more of the following measures:
i.
Move the digital device away from the affected receiver.
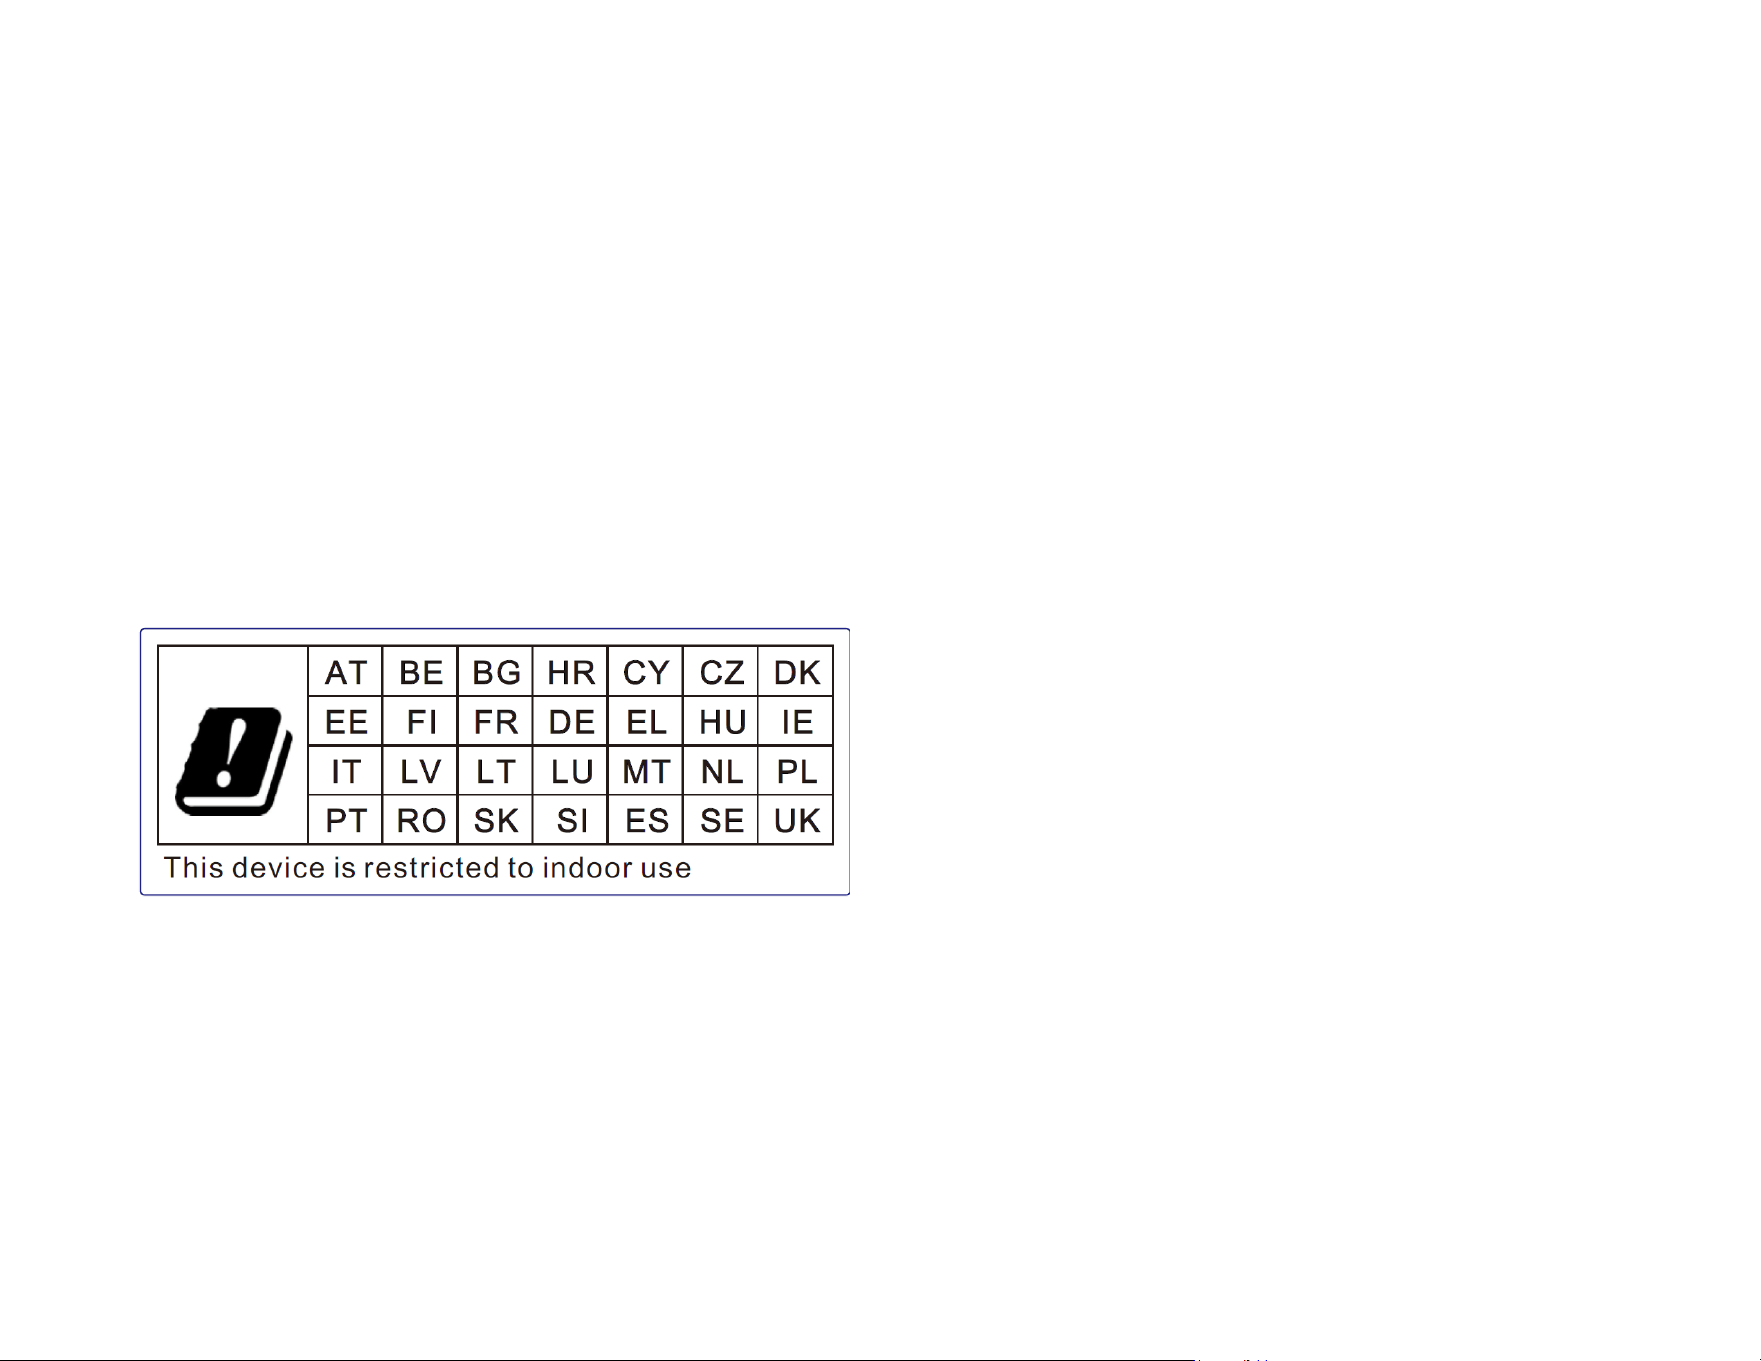
ii.
Reposition (turn) the digital device with respect to the affected receiver.
iii.
Reorient the affected receiver’s antenna.
iv.
Plug the digital device into a different AC outlet so the digital device and the receiver are on
different branch circuits.
v.
Disconnect and remove any I/O cables that the digital device does not use. (Unterminated I/O cables are a potential
source of high RF emission levels.)
vi.
Plug the digital device into only a grounded outlet receptacle. Do not use AC adapter plugs. (Removing or cutting the
line cord ground may increase RF emission levels and may also present a lethal shock hazard to the user.)
If you need additional help, consult your dealer, manufacturer, or an experienced radio or television technician.
Radio Equipment Directive
Elo hereby declares that the radio equipment type, Elo handheld Computer, is in compliance with Directive 2014/53/EU.
The full text of the EU Declaration of Conformity is available at the following internet address: www.elotouch.com
This device is designed and intended for indoor use only.
Operation frequency and radio-frequency power are listed as below:
o WLAN 802.11b/g/n/ax 2400MHz-2483.5MHz ≤ 20 dBm
WLAN 802.11a/n/ac/ax 5150MHz-5725MHz <23 dBm
WLAN 802.11a/n/ac/ax 5725MHz-5825MHz <13.98 dBm
WLAN 802.11ax 59450MHz-6425MHz <23 dBm
o Bluetooth BREDRLE 2400MHz-2483.5MHz ≤ 20 dBm
ECC/DEC/ (04)08:
The use of the frequency band 5 150-5 350 MHz is restricted to indoor operation because of the protection requirements of
satellite services
EC R&TTE Directive EU Directive 2014/53/EU of the European Parliament and of the Council of 16 April 2014 on the
harmonization of the laws of the Member States relating to the making available on the market of radio
equipment and repealing Directive 1999/5/EC Text with EEA relevance.
Identification mark the relevant technical documentation is held at: Elo Touch Solutions, Inc. 670 N. McCarthy
Boulevard Suite 100 Milpitas, CA 95035 USA
Agency Certifications
The following certifications and marks have been issued or declared for this peripheral:
• UL, FCC (US) – Class B
• cUL, IC (Canada)
• CB (International Safety)
• CE (Europe) – Class B
• VCCI (Japan)
• RCM (Australia)
• China RoHS
Waste Electrical & Electronic Equipment Directive (WEEE)
This product should not be disposed of with household waste. It should be deposited at a facility that enables recovery and recycling.
Elo has put in place recycling arrangements in certain parts of the world. For information on how you can access these arrangements,
please visit www.elotouch.com/e-waste-recycling-program/.
Replace the battery with same type only. Improper replacement of battery may cause in risk of burns, fire, and explosions.
Dispose the battery according to local regulations. Risk of fire and burns if properly handled. Do not open and crush, heat
above 60˚ C / 140˚ F or incinerate. If there is a serious swelling of the battery, do not continue using.

Energy Star
The I-Series Slate, Z10 & Z30 EloPOS devices can meet Energy Star 8.0 requirements
Energy Star is a program run by the U.S. Environmental Protection Agency (EPA) and U.S. Department of Energy (DOE) that promotes
energy efficiency.
This product qualifies for ENTERGY STAR in the “factory default” settings and this is the setting in which power savings will be achieved.
Changing the factory defaule picture settings or enabling other features will increase power consumption that could exceed the limits
necessary to qualify for ENERGY STAR rating.
For more information on the ENERGY STAR program, refer to engergystar.gov
Child Safety Warning
This Product is not intent for use by children. This product is not suitable for use in locations where children are likely to be present.


© 2020 Elo Touch Solutions, Inc. All rights reserved.
User Manual – Elo I-Series 5 Slate
www.elotouch.com
Visit our website for the latest
• Product Information
• Specifications
• Upcoming Events
• Press Releases
• Software Drivers
Google, Android, Google Play and YouTube and other marks are trademarks of Google LLC.
To find out more about our extensive range of Elo touch solutions, go to www.elotouch.com, or call the
office nearest you.
North America
Tel +1 408 597 8000
Fax +1 408 597 8001
elosales[email protected]
Europe
Tel +32 (0)16 70 45 00
Fax +32 (0)16 70 45 49
elosales@elotouch.com
Asia-Pacific
Tel +86 (21) 3329 1385
Fax +86 (21) 3329 1400
www.elotouch.com.cn
Latin America
Tel +52 55 2281-6958
elosales[email protected]