USER GUIDE
CARB-REDUCING RICE COOKER

2
IMPORTANT
SAFEGUARDS
Basic safety precautions should always be
followed when using electrical appliances,
including the following:
1. IMPORTANT: Read all instructions carefully
before first use.
2. Do not touch hot surfaces.
3. Use only on a level, dry and
heat-resistant surface.
4. To protect against fire, electric shock and injury
to persons, do not immerse cord, plug or the
appliance in water or any other liquid.
5. Close supervision is necessary when the
appliance is used by or near children.
6. Unplug from outlet when not in use and before
cleaning. Allow unit to cool before putting on
or taking off parts and before cleaning
the appliance.
7. Do not operate any appliance with a
damaged cord or plug or after the appliance
malfunctions or has been damaged in any
manner. Return appliance to the nearest
authorized service facility for examination,
repair or adjustment.
8. The use of accessory attachments not
recommended by appliance manufacturer may
result in fire, electrical shock or injury.
9. Do not use outdoors.
10. Do not let cord touch hot surfaces or hang
over the edge of a counter or table.
11. Do not place on or near a hot gas or electric
burner or in a heated oven.
12. Do not use the appliance for other than
its intended use.
13. Extreme caution must be used when moving
the appliance containing rice, hot oil or
other liquids.
14. Do not touch, cover or obstruct the steam vent
on the top of the rice cooker as it is extremely
hot and may cause scalding.
15. Use only with a 120V AC power outlet.
16. Always unplug from the base of the wall
outlet. Never pull on the cord.
17. The rice cooker should be operated on
a separate electrical circuit from other
operating appliances. If the electrical circuit
is overloaded with other appliances, the
appliance may not operate properly.
18. Always make sure the outside of the inner
cooking pot is dry prior to use. If the inner
pot is returned to the cooker when wet, it may
damage or cause the product to malfunction.
19. Use extreme caution when opening the
lid during or after cooking. Hot steam will
escape and may cause scalding.
20. Rice should be left in the inner cooking
pot with the Keep-Warm function on for
no more than 3 hours.
21. To prevent damage or deformation,
do not use the inner cooking pot on a
stovetop or burner.
22. Always attach plug to appliance first,
then plug cord into the wall outlet. To
disconnect, turn any control to “off”,
then remove plug from wall outlet.
23. To reduce the risk of electrical shock,
cook only in the removable inner
cooking pot provided.
24. Do not wrap or tie cord
around appliance.
25. Intended for countertop use only.
26. WARNING: Spilled food can cause
serious burns. Keep appliance and cord
away from children. Never drape cord
over edge of counter and never use
outlet below counter.
27. Do not use for deep frying.
SHORT CORD INSTRUCTIONS
A short power supply cord is provided to
reduce the hazards resulting from becoming
entangled in or tripping over a longer cord.
Longer extension cords may be used if
care is exercised. If a long extension cord
is used, the marked electrical rating of the
extension cord should be at least as great
as the electrical rating of the appliance,
and the longer cord should be arranged
so that it will not drape over the countertop
or tabletop where it can be pulled on by
children or animals or tripped over. If the
appliance is of the grounded type, the
eextension cord should be a grounding
3-wire cord.
GROUNDING INSTRUCTIONS
This appliance must be grounded while
in use to protect the operator from electrical
shock. The appliance is equipped with
a 3-conductor cord and a 3-prong
grounding type plug to fit the proper
grounding-type receptacle.
SAVE THESE
INSTRUCTIONS
FOR
HOUSEHOLD
USE ONLY

3
CONTENTS
Parts
Before First Use
Control Panel
Operation
Quick Tips
Storage
Cleaning & Maintenance
Troubleshooting
Warranty
HEALTHY
COOKING
STARTS WITH
GREENPAN
Since inventing healthy ceramic nonstick
in 2007, we’ve dedicated ourselves to
unique advances that make cooking
better for everyone. From healthy ceramic
nonstick cookware to revolutionary home
appliances, our groundbreaking designs
deliver remarkable performance so you
can focus on the flavor. Enjoy!
04
04
04
05
07
07
08
09
10
4
1. Warm/Cancel
a. Press and hold 1 second to enter
Keep Warm mode.
b. Press and hold for 1 second to stop
after cooking is completed if you
don’t want to keep your rice warm.
2. Delay Timer
Press Delay Timer to delay the start of your
cooking cycle. The unit will only start to cook
after the countdown is complete. Use + or - to
increase or decrease the desired start time,
in increments of 30 minutes. Delay can be
set between 1-24 hours.
• Cooking times will vary depending on
the type of rice, room temperature, water
temperature, water amount, etc.
• Keep warm should be used for a maximum of
3 hours to prevent rice from burning.
BEFORE FIRST USE
1. Read all instructions and important
safeguards.
2. Remove all packaging materials and check
that all items have been received in good
condition.
3. Tear up all plastic bags and dispose of
properly as they can pose a suffocation or
choking risk to children.
4. Wash all accessories in warm, soapy water.
Rinse and dry thoroughly.
5. Remove the inner pot from rice cooker and
clean with warm, soapy water.
Rinse and dry thoroughly before
returning to cooker.
6. Wipe unit clean with a damp cloth.
NOTE: Do not use harsh abrasive cleaners,
scouring pads or products that are not
considered safe to use on nonstick coatings.
If washing pieces in the dishwasher, a slight
discoloration to the inner pot and accessories
may occur. This is cosmetic only and will not
affect performance.
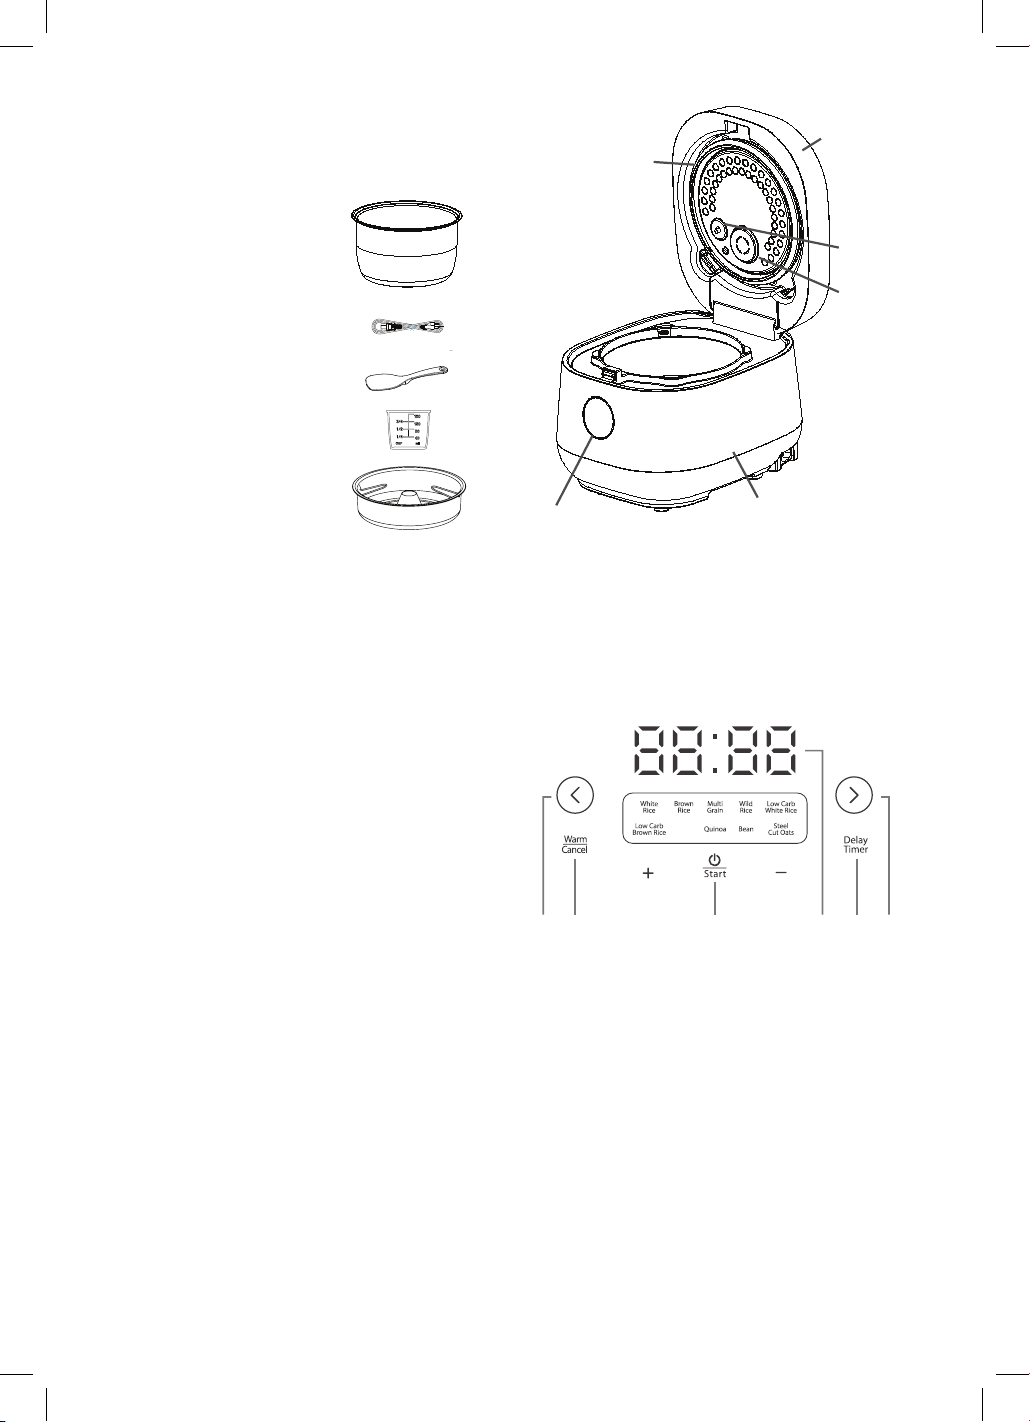
PARTS
A. Lid
B. Top Temperature
Sensor
C. Steam Valve
D. Inner Cover
(Removable)
E. Inner Pot
(Removable)
F. Button (Push
to Open)
G. Body
H. Rice Spatula
I. Measuring Cup
J. 3 Pin Power Cord
K. Stainless Steel Carb
Reducing Insert
CONTROL PANEL
A.
B.
C.
D.
E.
J.
H.
I.
F.
K.
G.
1. 2.3. 3.4. 5.
Barley

5
Option One
1. After plugging the unit in, press
Delay Timer.
2. Press + or - to adjust the desired time.
3. Press < or > to select the desired function.
4. Press Start.
Option Two
1. After plugging the unit in, press < or > to select
the desired function.
2. Press Delay Timer.
3. Press + or - to adjust to the desired time.
4. Press Start.
3. < and >
Press < or > to scroll through preset functions,
White Rice, Brown Rice, Quinoa, Bean, Steel Cut
Oats, Low Carb Brown Rice, Low Carb White Rice,
Barley, Multi Grain, or Wild Rice. The function will
flash to show which function is selected. Press Start
if cooking time is okay. Use + and - if you want to
adjust time.
4. Start/Power
a. After plugging in the unit, press start to activate
control panel.
b. After selecting the function, press and hold start
for 1 second to start cooking.
5. Timer
a. Press + or - to adjust cooking time.
b. After pressing Delay Timer, use the + or - to set
the desired start time. Delay can be set between
1-24 hours.
OPERATION
Rice
MEASURE THE RICE WITH LEVEL SCOOPS.
DON’T OVERFILL.
1. Use the provided measuring cup to
add the desired amount of the rice to the
inner pot.
2. Rinse rice or grain to remove excess
starch and drain.
3. Fill Removable Inner Pot with water to the
line matching the number of cups of rice
being cooked, or the amount specified on
the diagram on page 7.
4. Place the Inner Pot into the
Carb-Reducing Rice Cooker.
5. Close the Lid.
6. Plug the Carb-Reducing Rice Cooker into
an available 120V AC outlet.
7. Press < or > to select White Rice or Brown
Rice, depending upon the type of rice
being cooked.
8. Press Start, Carb-Reducing Rice Cooker
will begin cooking and the LED display
will begin to countdown.
9. To Cancel or Stop any operation, press
and hold the blinking Cancel/ Keep
Warm Button for 1 sec.
10. Once cooking is finished, the Carb-
Reducing Rice Cooker will automatically
switch to Keep Warm.
11. When finished, press Stop and unplug the
Power Cord.
Note
• Brown rice requires a longer cooking
cycle than other rice varieties due to
the extra bran layers on the grains. The
Brown rice function allows extra time and
adjusted heat settings in order to cook
the rice properly. If it appears the Carb-
Reducing Rice Cooker is not heating up
immediately when cooking brown rice,
this is due to a low-heat soak cycle that
precedes the cooking cycle to produce
better brown rice results.
• Before placing the Inner Pot into Carb-
Reducing Rice Cooker, check that the
outside is dry and free of debris. Adding
the Inner Pot when wet may damage the
Carb-Reducing Rice Cooker
Accessory
6
Use the provided Measuring Cup or your own measuring
cup for dry ingredients (white rice, brown rice, steel cut
oats and quinoa). Use the measuring line on the removable
pot for maximum water level. (Measurements are based on
Measuring Cup provided. Ok to use your own).
Accessory
6
6
• Cooking times are approximate. Altitude,
humidity and outside temperature will
change cooking times.
• Opening the Lid during the cooking cycle
causes a loss of heat and steam. Cooking
time may be prolonged if the Lid is opened
before the rice is finished.
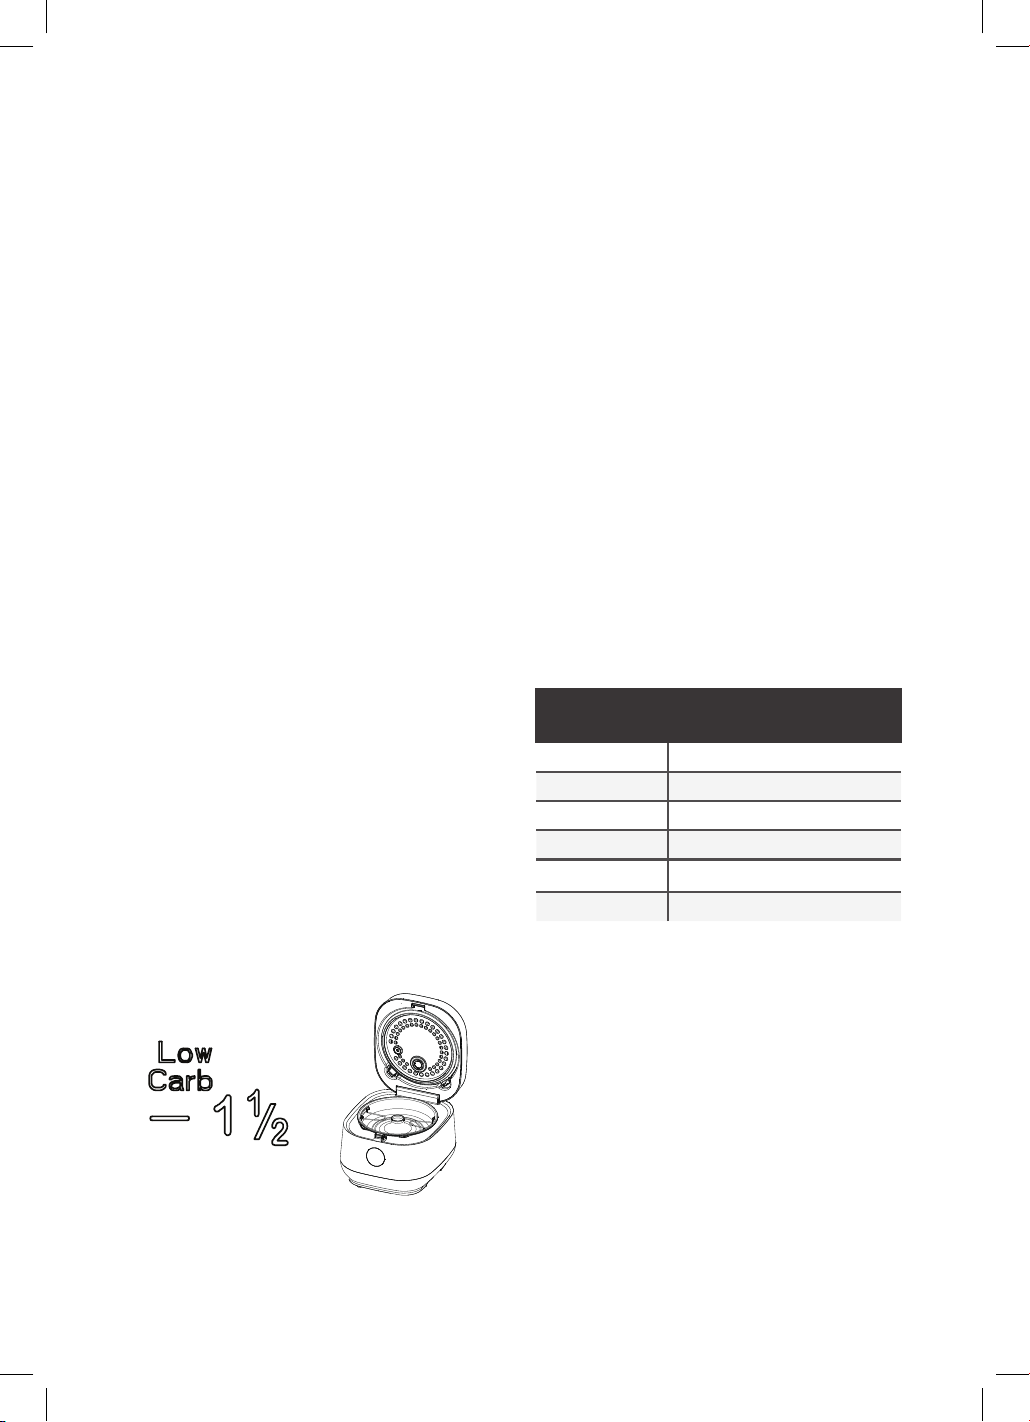
LOW CARB MODES
1. Use the provided measuring cup to add the
desired amount of the rice to the inner pot.
The max cups of rice for white and brown
rice is 1 1/2 cups.
2. Rinse rice or grain to remove excess starch
and drain. (Optional)
3. Fill Removable Inner Pot with water to the
line for Low Carb. (Ref 1. Below)
4. Place the Inner Pot into the Carb-Reducing
Rice Cooker.
5. Add the Stainless Steel Carb Reducing Insert
to the top of the bowl and ensure that the
Stainless Steel Carb Reducing Insert is facing
upward. The handles should be visible and
top of the funnel should be pointed towards
lid. (Ref 2. Below)
6. Close the Lid.
7. Press < or > to select Low Carb White Rice
or Low Carb Brown Rice and time for
desired denseness.
8. Once the Low Carb cooking cycle
completes there will be excess water
and starch in the Stainless Steel Carb
Reducing Insert.
Caution: Use a pair of oven mitts or heat
resistant gloves to remove tray from the
bowl. Discard of the excess water and starch
in the Stainless Steel Carb Reducing Insert.
SOAKED
BEANS MODE
1. Sort and wash dry beans. Pick through the
beans and discard any shriveled beans or
debris you find.
2. Soak the dry beans in water (this should
be about double the volume of the beans
themselves, for example if the bowl is ¼
filled with beans this should at minimum
be a half full bowl once water has been
added). See bean packaging for suggested
soak time.
3. After soaking is complete drain the beans
from soaking liquid and then rinse them with
fresh water.
4. Add Beans to the rice cooker in either 1
or 2 cup increments Reference the water
marks of White Rice as the standard ratio of
soaked beans and water.
5. Use suggested cooking times below, cooking
time will slightly vary by bean type.
6. Cook to desired taste or texture. Less Time
will result in firmer beans while more time
will result in softer beans
NOTE
For firmer beans use less cooking times for
softer textured beans add more cooking time.
Use measuring cup provided and white rice
cooking line for easy measurement.
Type of
Bean
Suggested
Cooking Time
Red Beans 60-120 Minutes
Black Beans 60-120 Minutes
Pinto Beans 60-120 Minutes
Black Eyed Peas 60-120 Minutes
Kidney Beans 60-120 Minutes
Other Beans Use suggested times on packaging
Ref 1. Ref 2.

7
QUICK TIPS
• 1 measuring cup is about 2/3 U.S. cup.
(Note Measuring Cup is included with unit.)
• This chart is only a general measuring guide.
As there are many types of rice available,
rice/water measurements may vary.
• Rinse rice prior to cooking to remove
excess bran and starch. This will help
reduce browning.
• To get perfect brown rice without the wait use
the Delay Timer. Add rice and water in the
morning and set the Delay Timer for when
rice will be needed that night.
• For quinoa and steel cut oats, use caution
to avoid escaping steam, open the Lid and
stir occasionally with a long-handled
wooden spoon.
• Default time is the preset function time, adjust
as per your preference using + or - . Please
refer to cooking time in chart.
• For better taste and textured oats, let oats sit
for 5-10 minutes after cooking.
• If Rice or Grains are slightly underdone after
your cooking function is completed. Let this sit
on keep warm until desired texture is reached
STORAGE
Ensure the Carb-Reducing Rice Cooker is cool
and dry before storing. Secure power cord
with twist tie.
Function Rice/Grain
Amount
Water Amount Default Time Cooking Time
White Rice 1 Cup
2 Cups
3 Cups
4 Cups
Use Line 1
Line 2
Line 3
Line 4 of White Rice
40 Minutes 25-60 Minutes
Brown Rice 1 Cup
2 Cups
3 Cups
4 Cups
Use Line 1
Line 2
Line 3
Line 4 of Brown Rice
70 Minutes 50-90 Minutes
Quinoa 1 Cup
2 Cups
1-1/2 Cups
3 Cups
30 Minutes 20-40 Minutes
Steel Cut Oats 1/2 Cup
1 Cup
2 Cups
1 1/4 Cups
2 1/2 Cups
5 Cups
30 Minutes 20-40 Minutes
Low Carb
White Rice
1-1/2 Cups Use Line 1-1/2
of Low Carb
45 Minutes 30-50 Minutes
Low Carb
Brown Rice
1-1/2 Cups Use Line 1-1/2
of Low Carb
80 Minutes 60-85 Minutes
Soaked Beans 2 Cups Line 2 of White Rice 60 Minutes 50-150 Minutes
Barley 1 Cup
2 Cups
Use Line 1
Line 2 of Brown Rice
60 Minutes 60-120 Minutes
Multi Grain 1 Cup
2 Cups
Use Line 1
Line 2 of Brown Rice
60 Minutes 50-90 Minutes
Wild Rice 1 Cup
2 Cups
1-1/2 Cups
3 Cups
60 Minutes 50-80 Minutes

8
CLEANING &
MAINTENANCE
1. Detach the Inner Cover and Steam Valve
from Lid by gently pulling it outward.
2. Inner Pot, Inner Cover, and all Accessories
are top-rack dishwasher safe.
3. Wipe Body, Base, and Lid clean with a
damp cloth.
4. Thoroughly dry Body and Accessories.
Reassemble for next use.
• DO NOT use harsh abrasive cleaners,
scouring pads, or products that are not
considered safe to use on nonstick coatings.
• If using the dishwasher, a slight discoloration
to the Inner Pot and Accessories may occur.
This is cosmetic only and will not affect
performance.
BEFORE RETURNING
YOUR GREENPAN
PRODUCT
If you are experiencing problems with your
GreenPan Product, please call GreenPan
customer service at 914-372-7777 before
returning the product. A representative can
confirm whether the product is under warranty
and advise on next steps.
LOW CARB
RICE TESTING
Objective
To test for the reduction of starch in rice
varietals when using the Low Carb Modes of
the Rice Cooker.
Samples
5 separate Rice types were used including Long
Grain White, Long Grain Brown, Thai Rice,
Japanese Rice and Short Grain White Rice.
A total of 2 GreenPan Rice and Grain Cooker
with Carb Reducing Technology were used in
the testing.
• Quantity = 2, 8 Cup Capacity Machines
Laboratory
Testing was conducted by:
STC Guangdong Company Limited No.68,
Fumin South Road, Dalang, Donngguan,
Giangdon, China
Procedure
Samples of rice were cooked by the traditional
method using the White Rice and Brown
Rice modes and compared to samples of rice
cooked with the stainless-steel carb reducing
insert using the Low Carb White Rice and Low
Carb Brown Rice modes.
All tests used tap water unless otherwise
specified.
Cooked rice samples are analyzed for
their resistant starch by “Official Methods
of Analysis of AOAC International (2005),
18th Ed., AOAC International, Gaithersburg,
Maryland, USA, Official Method 2002.02”
and digestible starch by “Official Methods of
Analysis of AOAC International (2005), 18th
ED, AOAC International, Gaithersburg, MD,
USA, Official Method 996.11 (mod.)”
Results in percent reduction of digestible
starches are provided.
Conclusion
Using the Low Carb cooking method can
reduce the carbs in cooked rice by up to 37%.
Part Dish Washer
Safe Top Rack
Only Or Hand
Wash Safe
Wipe
with
Damp
Cloth
Inner Pot X
Inner Cover X
Rice Spatula X
Stainless Steel
Carb Reducing
Insert
X
Measuring Cup X
Body X
Base X
Lid X

9
TROUBLESHOOTING
Issue Cause Solution
Rice Cooker
does not start
after selecting
menu option
Incorrect Operation Make sure to hold down Start for at least 1 second to start cooking.
Rice Cooker
does not
turn on
Improper Electrical
Connection
Check whether the power plug is connected to a functional, grounded electrical outlet
and power cord is connected to base of unit. If issue is not resolved after changing
outlets and ensuring that power plug is properly plugged into base of unit, contact
customer service for replacement.
Rice or grains
are overcooked
Timing needs to be
adjusted
If Rice is overcooked ensure that correct amount of water is being added and adjust
time setting to your desired doneness, less time will result in firmer rice and grains.
Please also ensure that you are using the rice measuring cup provided for volume of
grains. If lost, please contact customer service for replacement cup or use standard US
measuring cup. A Rice/Grains measurement is 2/3 of a US cup.
Rice or
grains are
undercooked
Timing needs to be
adjusted
If Rice is undercooked ensure that correct amount of water is being added. Adjust time
setting to your desired doneness, more time will result in softer rice and grains.
Please also ensure that you are using the rice measuring cup provided for volume of
grains. If lost, please contact customer service for replacement cup or use standard US
measuring cup. A Rice/Grains measurement is 2/3 of a US cup.
E0 Bottom Sensor Over
Temperature
Turn the unit off and wait for unit to cool then turn product on again. If this error still
occurs please contact Customer Service. for replacement.
E1 Internal Error Contact Customer Service.
E2 Internal Error Contact Customer Service.
E3 Internal Error Turn off the unit and unplug the power cord.
Wait for 1 hour until the rice cooker completely cools down.
Check for any debris or excess water between bowl and inner housing.
Follow C&U to restart the unit. If issue persist, contact customer service.
E4 Internal Error Contact Customer Service.
E5 Internal Error Contact Customer Service.

10
LIMITED
WARRANTY
GreenPan Electrics are covered by a limited
warranty against defects in materials and
workmanship, beginning on the date of
purchase and lasting for two years. If your
GreenPan Electrics product has a defect during
the warranty period, The Cookware Company
(USA), LLC will either repair or replace the
product. Further information on the warranty
claim process, exclusions from warranty
coverage, and other terms can be found in
the complete limited warranty for this product,
available online at greenpan.us/warranty.
TERMS OF SALE;
ARBITRATION
The terms on which The Cookware Company
(USA), LLC sells GreenPan Electrics are
available online at greenpan.us/pages/
terms-of-sale (the “Terms”). The Terms contain
very important information regarding your
rights and obligations, as well as conditions,
limitations, and exclusions that may apply to
you. Please read them carefully.
In particular, the Terms provide that, by
your purchase of this product, you and The
Cookware Company (USA), LLC are agreeing
to give up any rights to litigate in a court
or before a jury, or to participate in a class
action or representative action with respect to
a claim. Other rights that you would have if
you went to court may also be unavailable or
limited in arbitration. Any claim, dispute, or
controversy between you and The Cookware
Company (USA), LLC arising from or relating
in any way to your purchase of products or
services will be resolved exclusively and finally
by binding arbitration.
The arbitration will be administered by the
American Arbitration Association (“AAA”) in
accordance with the Consumer Arbitration
Rules (the “AAA Rules”) then in effect, except
as modified hereby. (The AAA Rules are
available at adr.org or by calling the AAA at
1-800-778-7879.) The Federal Arbitration Act
will govern the interpretation and enforcement
of this arbitration and waiver provision.
The Cookware Company (USA), LLC will be
responsible for the AAA filing fee of any such
proceeding. Other than your right to pursue a
claim in small claims court, as described in the
Terms, the arbitrator will have exclusive authority
to resolve any dispute relating to arbitrability
and/or enforceability of this arbitration
provision, including any unconscionability
challenge or any other challenge that the
arbitration provision or these Terms are void,
voidable or otherwise invalid. The arbitrator
will be empowered to grant whatever relief
would be available in court under law or in
equity. Any award of the arbitrator(s) will be
final and binding on each of the parties and
may be entered as a judgment in any court of
competent jurisdiction. Attorney fee shifting in
this case is governed by the Terms. You agree
to an arbitration on an individual basis. In any
dispute, NEITHER YOU NOR THE COOKWARE
COMPANY (USA), LLC WILL BE ENTITLED
TO JOIN OR CONSOLIDATE CLAIMS BY OR
AGAINST OTHER CUSTOMERS IN COURT OR
IN ARBITRATION OR OTHERWISE PARTICIPATE
IN ANY CLAIM AS A CLASS REPRESENTATIVE,
CLASS MEMBER OR IN A PRIVATE ATTORNEY
GENERAL CAPACITY. The arbitral tribunal may
not consolidate more than one person’s claims
and may not otherwise preside over any form
of a representative or class proceeding. The
arbitral tribunal has no power to consider the
enforceability of this class arbitration waiver
and any challenge to the class arbitration
waiver may only be raised in a court of
competent jurisdiction.
If any provision of the arbitration agreement
described herein and in the Terms is found
unenforceable, the unenforceable provision
will be severed and the remaining arbitration
terms will be enforced.

11
NOTES

1400028232