User manual
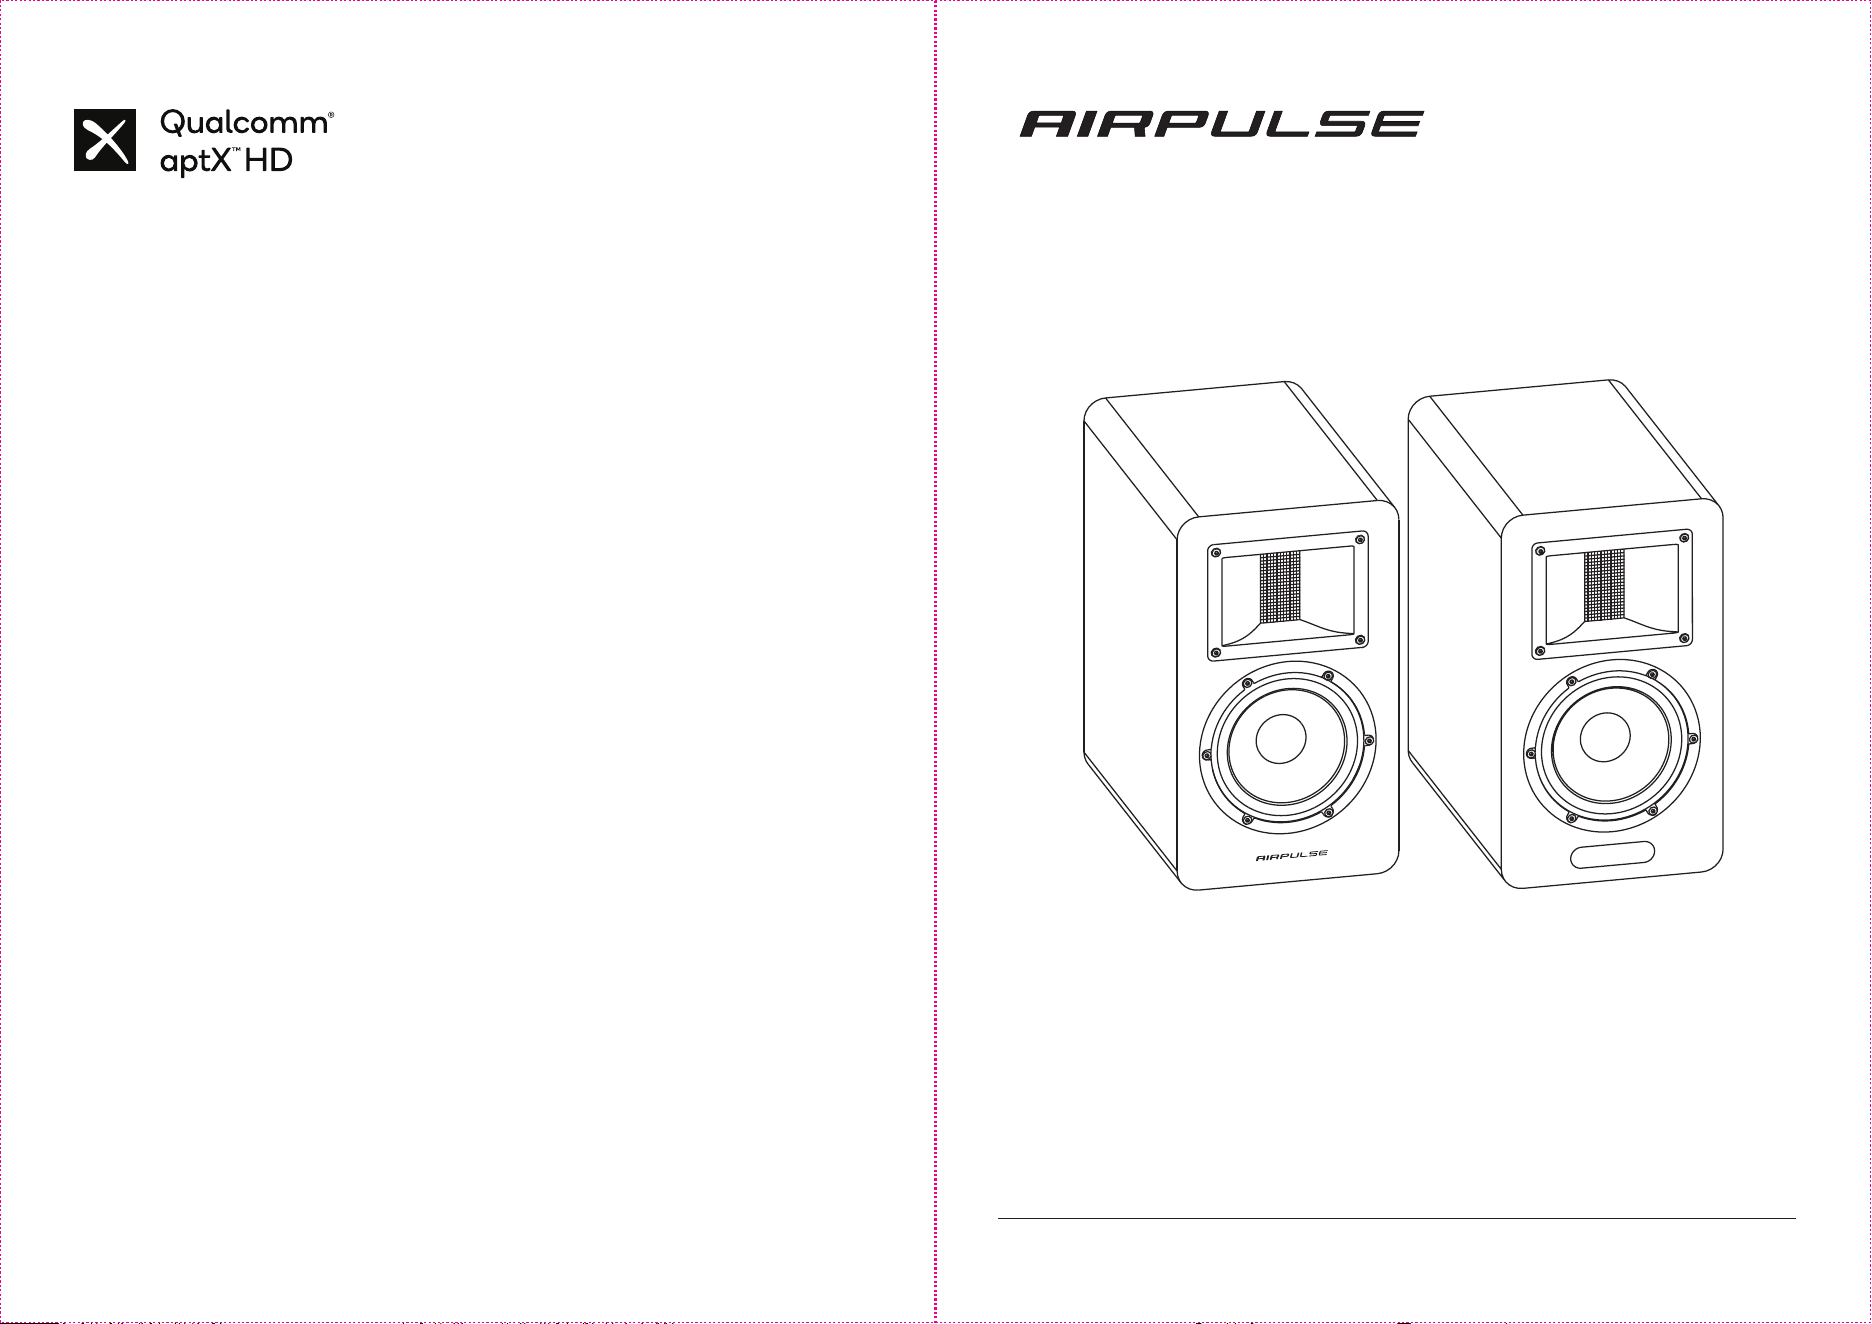
A200T
ACTIVE SPEAKER SYSTEM
Qualcomm aptX is a product of Qualcomm Technologies, Inc. and/or its subsidiaries.
Qualcomm is a trademark of Qualcomm Incorporated, registered in the United States and other
countries. aptX is a trademark of Qualcomm Technologies Interna�onal, Ltd., registered in the
United States and other countries.
Dongguan Pla�num Audio Systems Co., Ltd.
Printed in China
Room 609, Building 5, No. 2 Industrial East Road, Songshan Lake
Park, Dongguan City, Guangdong Province, China.
www.airpulseaudio.com
12
Please read the following contents carefully before turning on your equipment; and follow the
instruc�ons below.
Important safety instruc�on Important safety instruc�on
Keep this informa�on around for future reference.
1. Please read the instruc�ons carefully. Keep it in safe place for future reference.
2. Heed all warning.
3. Follow all instruc�ons.
4. Do not install near any heat sources such as radiators, heat registers, stoves, or other apparatus
(including amplifiers) that produce heat.
5. Do not defeat the safety purpose of the polarized or grounding-type plug. A polarized plug has
two blades with one wider than the other. A grounding type plug has two blades and a third
grounding prong. The wide blade or the third prong are provided for your safety. If the provided
plug does not fit into your outlet, consult an electrician for replacement of the obsolete outlet.
6. Protect the power cord from being walked on or pinched par�cularly at plugs, convenience
receptacles, and the point where they exit from the speaker.
7. Only use a�achments/accessories specified by the manufacturer.
8. Unplug this speaker during lightning storms or when unused for long periods of �me.
9. Before connec�ng speakers to power source, please turn off the power switch and make sure the
volume is set at minimum level.
10. Please do not place power cable and signal cable near heat source (such as electric heater and
radiator).
Do not leave cables where they can easily be stepped on or compressed.
11. Use electric outlets that allow power cable be pulled out easily. When speakers are not being
used for an extended period of �me, please turn off power switch and disconnect power plug.
12. In order to avoid damage from thunder and lightning, turn off power switch and disconnect
speaker from power source during a rain storm.
13. Please do not drag power cable when disconnec�ng from wall socket. Hold power cord firmly at
the top to unplug from the wall socket.
14. Use the speakers only within voltage specifica�ons. Using the speakers with voltage higher than
specifica�ons is dangerous and can cause equipment damage, fire damage or bodily injury.
15. These speakers do not include any self serviceable parts. Do not a�empt to open the speaker to
uninstall any parts or do any type of modifica�ons. If problems occur during use please contact
professional technicians only for repair.
16. Please refer to the trouble shoo�ng sec�on in owner’s manual for common opera�on errors and
to determine possible malfunc�on.
17. Please do not place speakers in places where they can be easily hit by falling objects or dropping
and splashing liquid. Do not place any lit fire (such as candle) on top of speaker as this may lead
to fire hazard.
Do not place any liquid containers on top of speaker as this may fall on speakers and causing
electric shock and damage to speaker.
18. Place speakers in a stable posi�on so they will not easily fall off causing damage and injury.
19. Place speakers in a well ven�lated and dry posi�on, far from direct sunlight, heat source,vibra-
�on, dust, moist or extremely cold condi�on. For op�mal performance, please leave at least
20cm distance space around the speaker.
20. Please do not use speaker at maximum volume for an extended period of �me, this may cause
damage to your hearing.
21. Before moving the speakers, please first turn off power switch and disconnect from powe source.
22. When the following symptoms occur, please turn off power switch and disconnect from power
source:
‒ Power cable or plug is worn or damaged.
‒ Abnormal odor or smoke is detected.
‒ Small objects falling inside the speaker.
‒ Sudden break off while playing music.
Consult a professional repair technician to diagnose and repair the speaker.
23. Do not use chemical solvent to clean the surface of speaker. To avoid surface damage, use a clean
and so� cloth only.
24. Do not use the speakers in proximity closer than 22cm to individuals wearing cardiac pacemaker
or defibrillator.
The MAINS plug is used as the disconnect device, the disconnect device shall remain readily
operable.
This symbol indicates that the product is for indoor use only.
This symbol is to alert the user to the presence of un-insulated dangerous voltage within
the product's enclosure that may be of sufficient magnitude to cons�tute a risk of electric
shock to persons.
This symbol is to warn the user not to disassemble the enclosure of the product and
there is no user-replaceable part inside. Take the product to an authorized service center
for repair.
1. Use the same type of ba�ery only to replace ba�ery in remote control.
2. Never disassemble, smash, or compress ba�ery inside remote control; or toss it into a fire.
3. Please stop using the remote control if it has the appearance of bulging, leaking, discoloring or
any other abnormal symptoms. Improper use of ba�ery can cause explosion or leaking which
leads to burn or other bodily injury. Please dispose ba�ery by referring to local legisla�on.
Warning:
Correct Disposal of this product. This marking indicates that this product should not be
disposed with other household wastes throughout the EU. To prevent possible harm to the
environment or human health from uncontrolled waste disposal, recycle it responsibly to
promote the sustainable reuse of material resources. To return your used device, please
use the return and collec�on systems or contact the retailer where the product was
purchased. They can take this product for environmental safe recycling.
Use only with the cart, stand, tripod, bracket, or table specified by the manufacturer, or
sold with the speakers. When a cart is used, use cau�on when moving the cart/speakers
combina�on to avoid injury from �p-over.
Excessively loud music may lead to hearing loss. Please keep the volume in a safe range.
1. Place the product near the power outlet for easy use.
2. Before use, make sure that the opera�ng voltage is the same as your local power supply.
Correct opera�ng voltage can be found on the product plate.
3. For safety purpose, unplug the product during lightning storms or when unused for extended
periods of �me.
4. Under normal condi�ons, the power supply may get hot. Please keep good ven�la�on in the
area and exercise cau�on.
5. Safety warning labels on the housing or bo�om of the product or power adaptor.
Power warning:
1. Wireless product may generate shortwave radio frequencies and interfere with the normal use
of other electronic devices or medical equipment.
2. Turn off the product when it’s disallowed. Do not use the product in medical facili�es, on airplane,
at gas sta�ons, near automa�c gates, automa�c fire alarm system or other automated devices.
3. Do not use the product in the vicinity of a pacemaker within a 20cm range. The radio waves may
affect the normal opera�on of the pacemaker or other medical devices.
For wireless product:
25. The product must be used at an al�tude of lower than 2000m.
26. The product can be safely used in tropical climate.
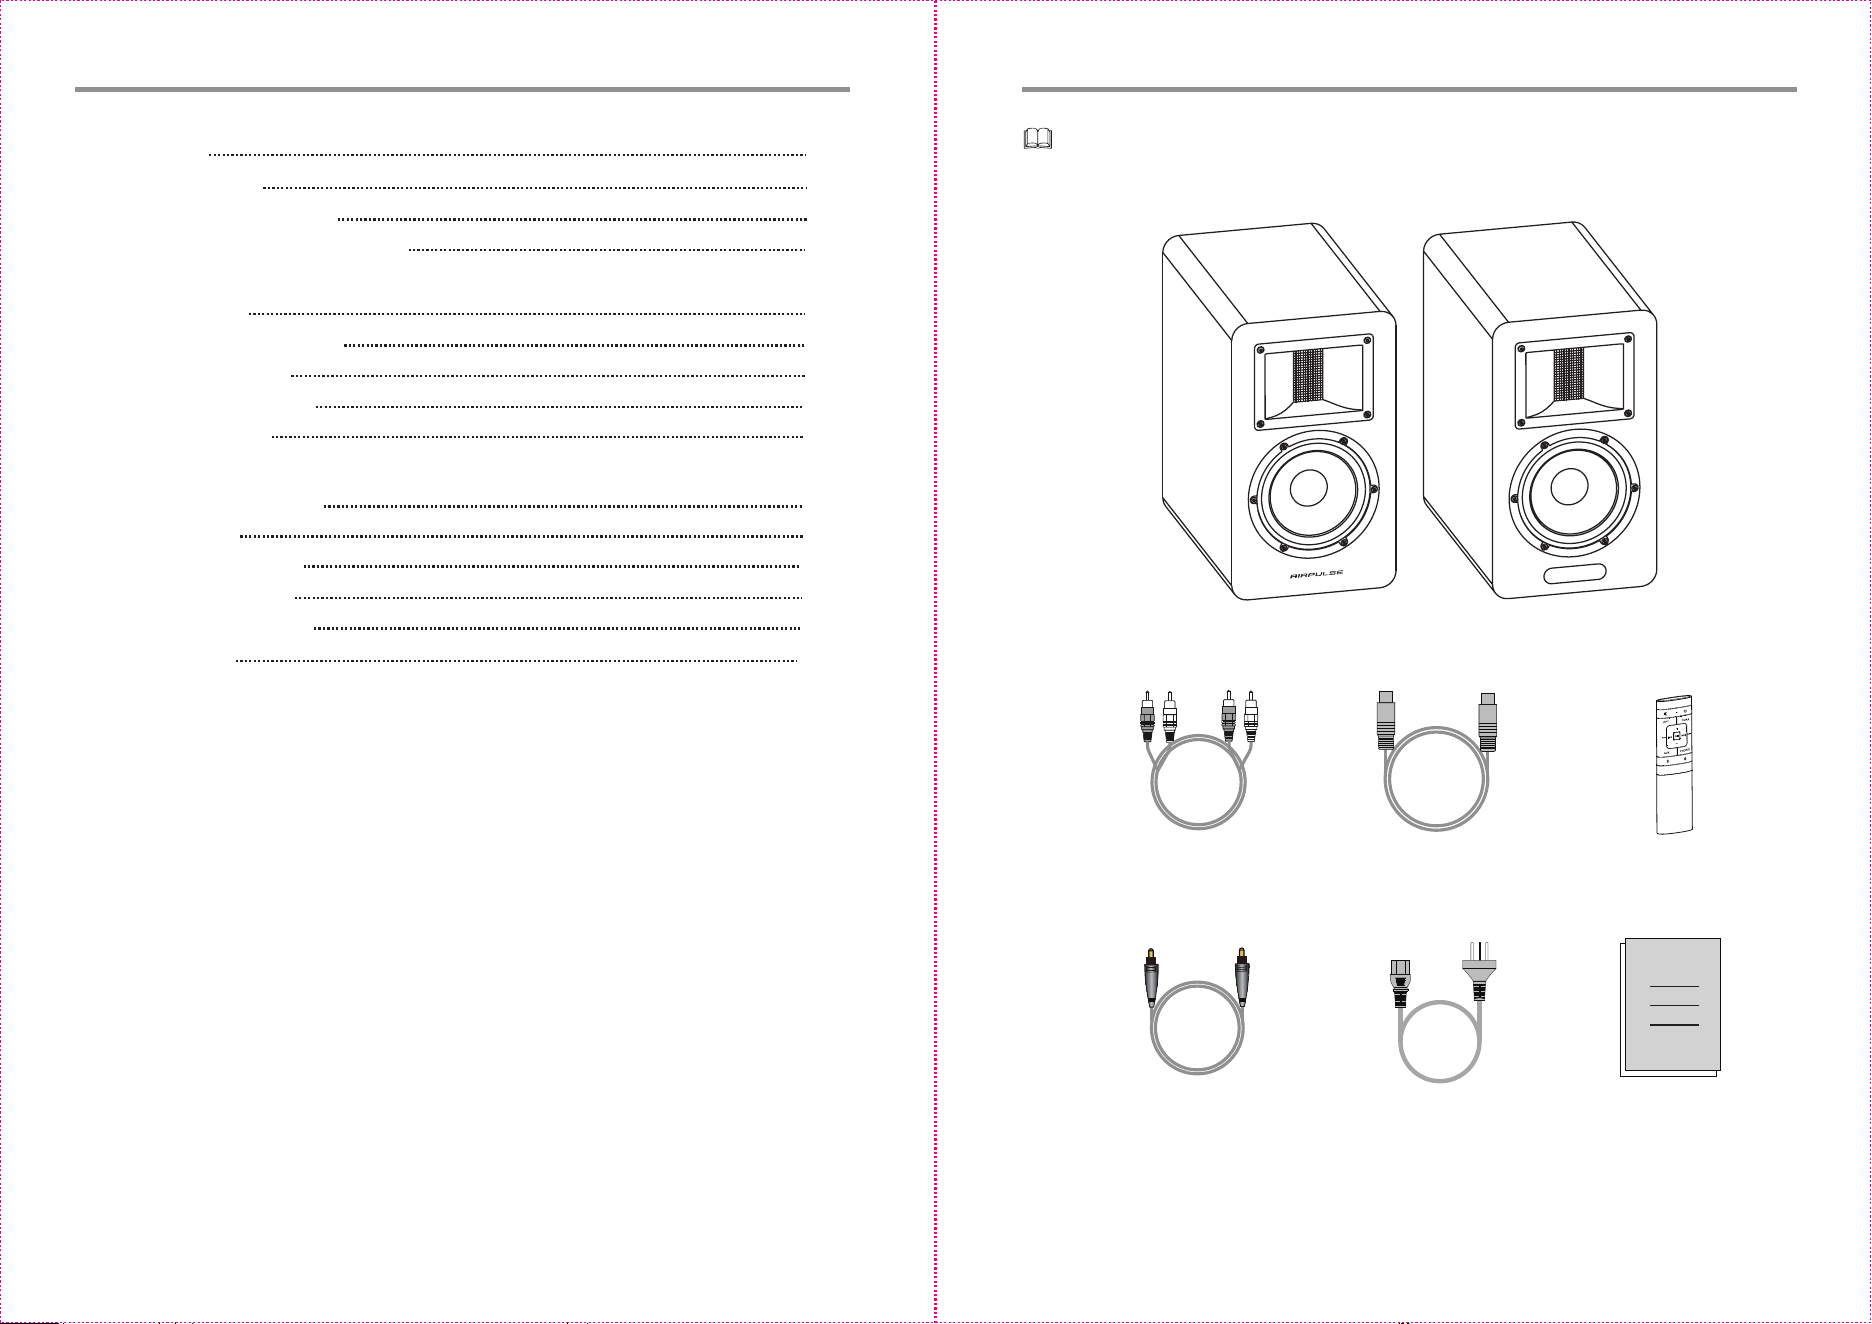
User manual x1
Power cable x1
RCA audio cable x1
Fiber op�c input audio cable x1
Remote control x1
Passive speaker x1
Box Contents
Catalog
Box Contents
Speaker Illustra�on
Remote Control Illustra�on
Installing Ba�ery in Remote Control
Prepara�ons
Connect speakers
Connect to playback devices
Connect to subwoofer
Connect to power source
Speaker Placement
Playing
PHONO/LINE Input Mode
AUX Input Mode
OPT/COAX Input Mode
Bluetooth Input Mode
Specifica�ons/Statement
Troubleshoo�ng
4
5
6
7
8
8
8
9
9
10
11
12
13
14
14
34
A�er opening the box, you will see the following product and accessories.
Please contact customer service if there is any discrepancy.
Note: Images are for illustra�ve purposes only and may differ from the actual product.
Ac�ve speaker x1
Speaker connec�ng cable x1
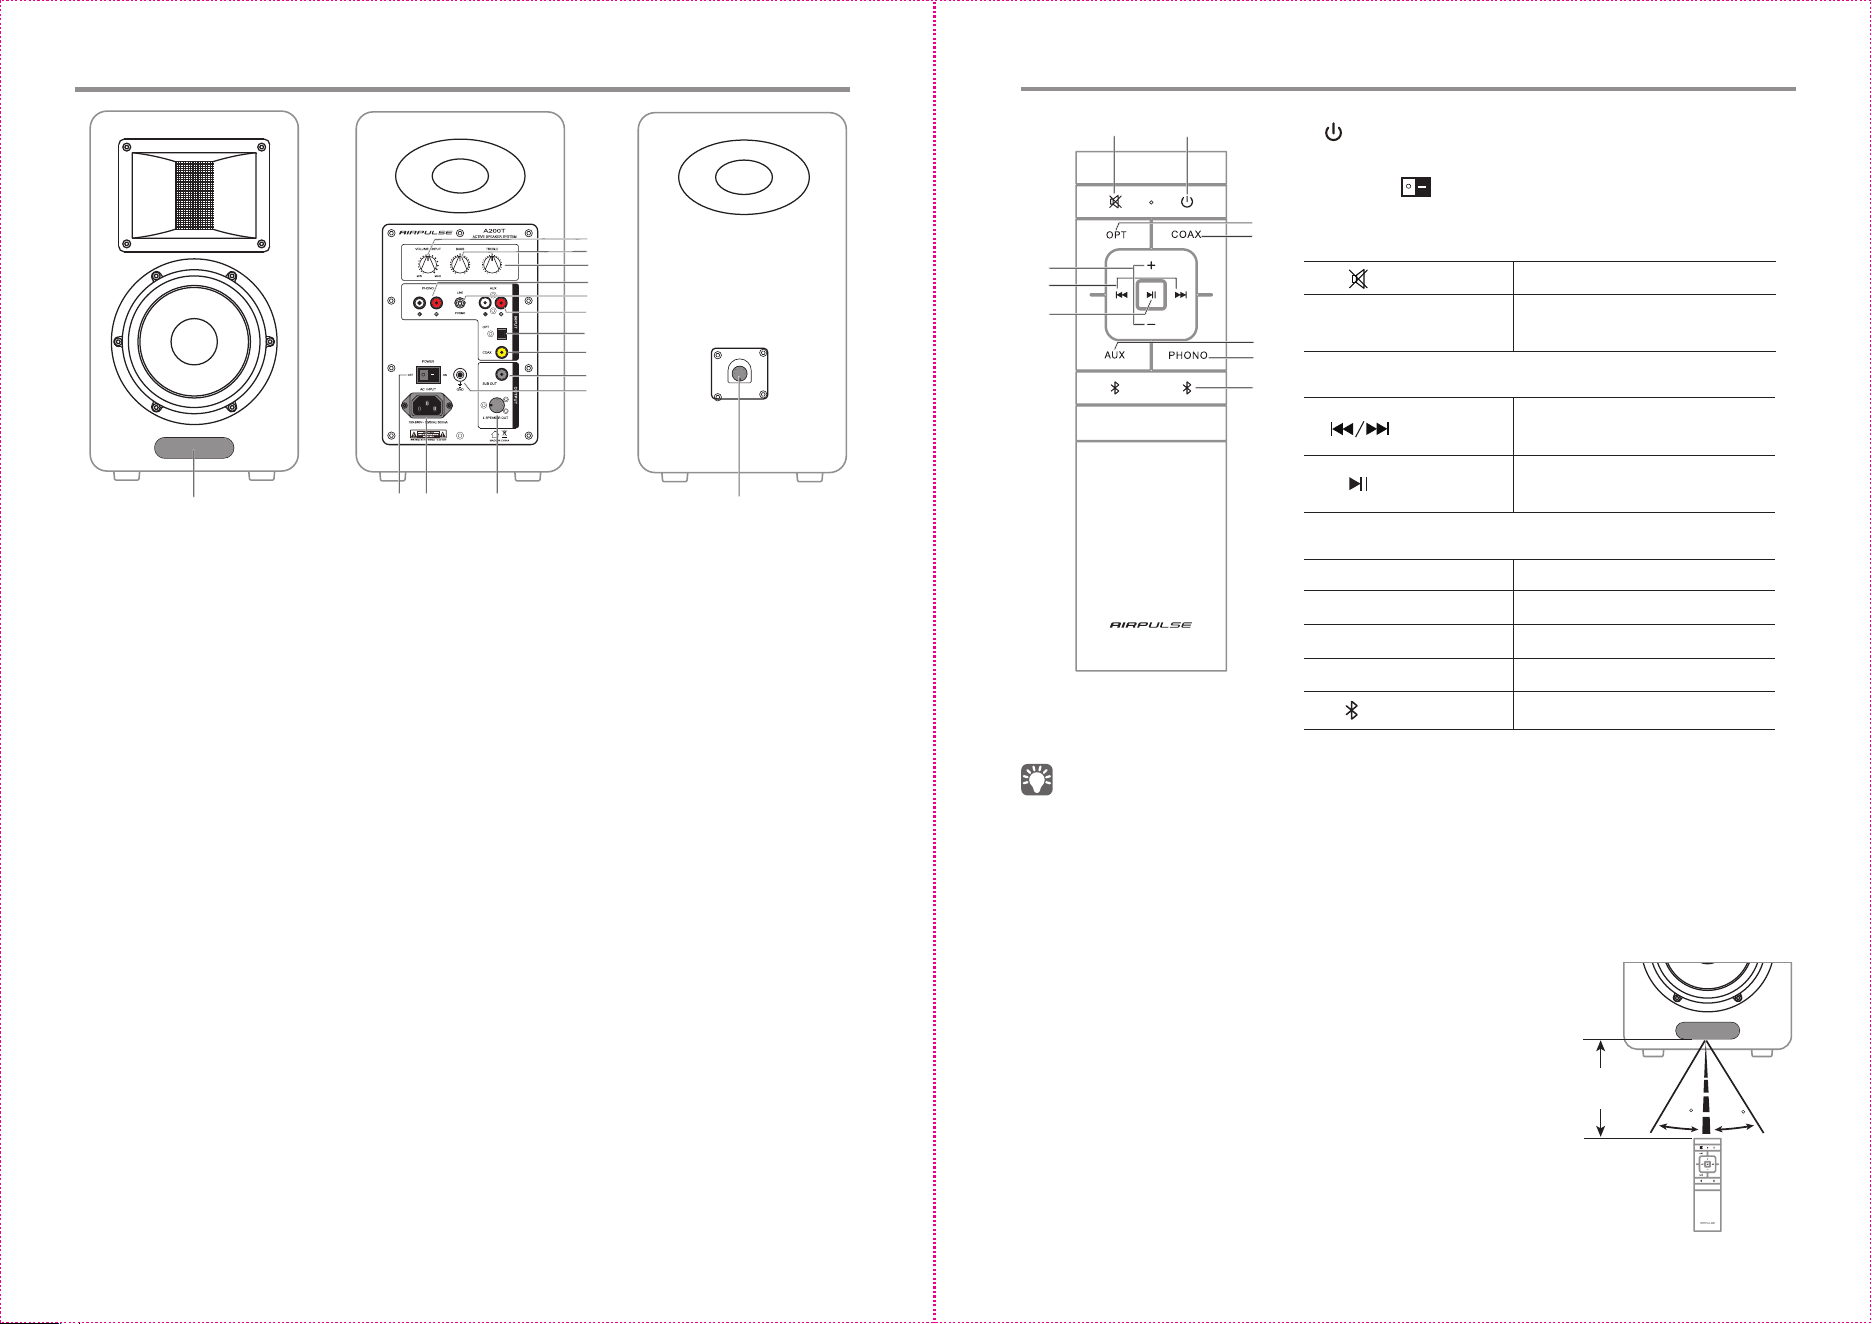
Speaker Illustra�on
Remote Control Illustra�on
56
6. LINE/PHONO input selec�on
Push up to switch to LINE input mode,
and push down to switch to PHONO
input mode.
7. AUX input port
Connect to audio source devices with
RCA output port using RCA audio cable.
8. OPT input port
Connect to audio source devices with
op�cal output port using fiber op�c
input audio cable.
9. COAX input port
Connect to audio source devices with
coaxial output port using coaxial cable.
10. SUB OUT port
Connect to subwoofer using RCA audio
cable.
11. GND port
If the phonograph has a grounding port,
users can use a grounding wire to connect
the phonograph to the grounding terminal
of the speaker according to their needs.
12. POWER ON/OFF
Turn on/off speaker power.
13. AC input socket
Connect to plug of power cord.
14. L SPEAKER OUT
Connect to passive speaker using speaker
connec�ng cable.
15. LEFT SPEAKER
Connect to ac�ve speaker using speaker
connec�ng cable.
30
PHONO
COAX
30
Within
7 meters
Aim remote control at the remote control receiving window.
The op�mum opera�onal distance is within 7 meters.
When the system receives remote control commands,
display value of display window will alert or flash.
How to operate remote control
* When playing music in Bluetooth mode and switching to other modes, Bluetooth
connec�on will automa�cally return if selec�ng Bluetooth mode again.
Playback selec�on bu�ons
4.
Previous/
Next track
Previous/Next track in
Bluetooth mode
5.
Play/Pause
Audio source Play/Pause
in Bluetooth mode
Input source selec�on bu�ons
Op�cal input mode
6.
OPT
Coaxial input mode
7.
COAX
AUX input mode
8.
AUX
Phonograph input mode
9.
PHONO
Bluetooth input mode
10.
(BLUETOOTH)
Volume control bu�ons
2.
Mute
Mute off speaker output
3.
Adjust playing volume
Volume up/
down
+/-
Turn on/off speaker power.
Press the “ ” bu�on on the rear panel to turn on/off
the main power.
1. Power bu�on
2
1
3
4
5
6
7
8
9
10
151
-6
-6
+6
+6
2
3
4
5
6
7
8
9
10
11
12
13 14
1. LCD indicator/remote control receiving window
Indicates current input mode based on audio
sources and input selec�on.
2. Volume control/input selec�on
Volume control
Rotate clockwise to increase volume;
rotate counter clockwise to reduce volume.
When reaching maximum volume level, con�nue
to rotate volume control will not change volume.
Input selec�on
Press to switch between PHONO--AUX--OPT--
COAX--Bluetooth modes.
(As DSP will be reconfigured when input mode
is switched, it is recommended to press a�er
the current mode indicator is on.)
3. BASS level adjustment
Room acous�cs may dictate which type of
adjustment you need to make to retain the
proper frequency response from the speaker.
Turn from “0” to le� to reduce low frequencies;
Turn from “0” to right to increase low
frequencies.
4. TREBLE level adjustment
Room acous�cs may dictate which type of
adjustment you need to make to retain the
proper frequency response from the speaker.
Turn from “0” to le� to reduce high
frequencies;
Turn from “0” to right to increase high
frequencies.
5. PHONO input port
Connect to phonograph with a MM cartridge
using RCA audio cable.
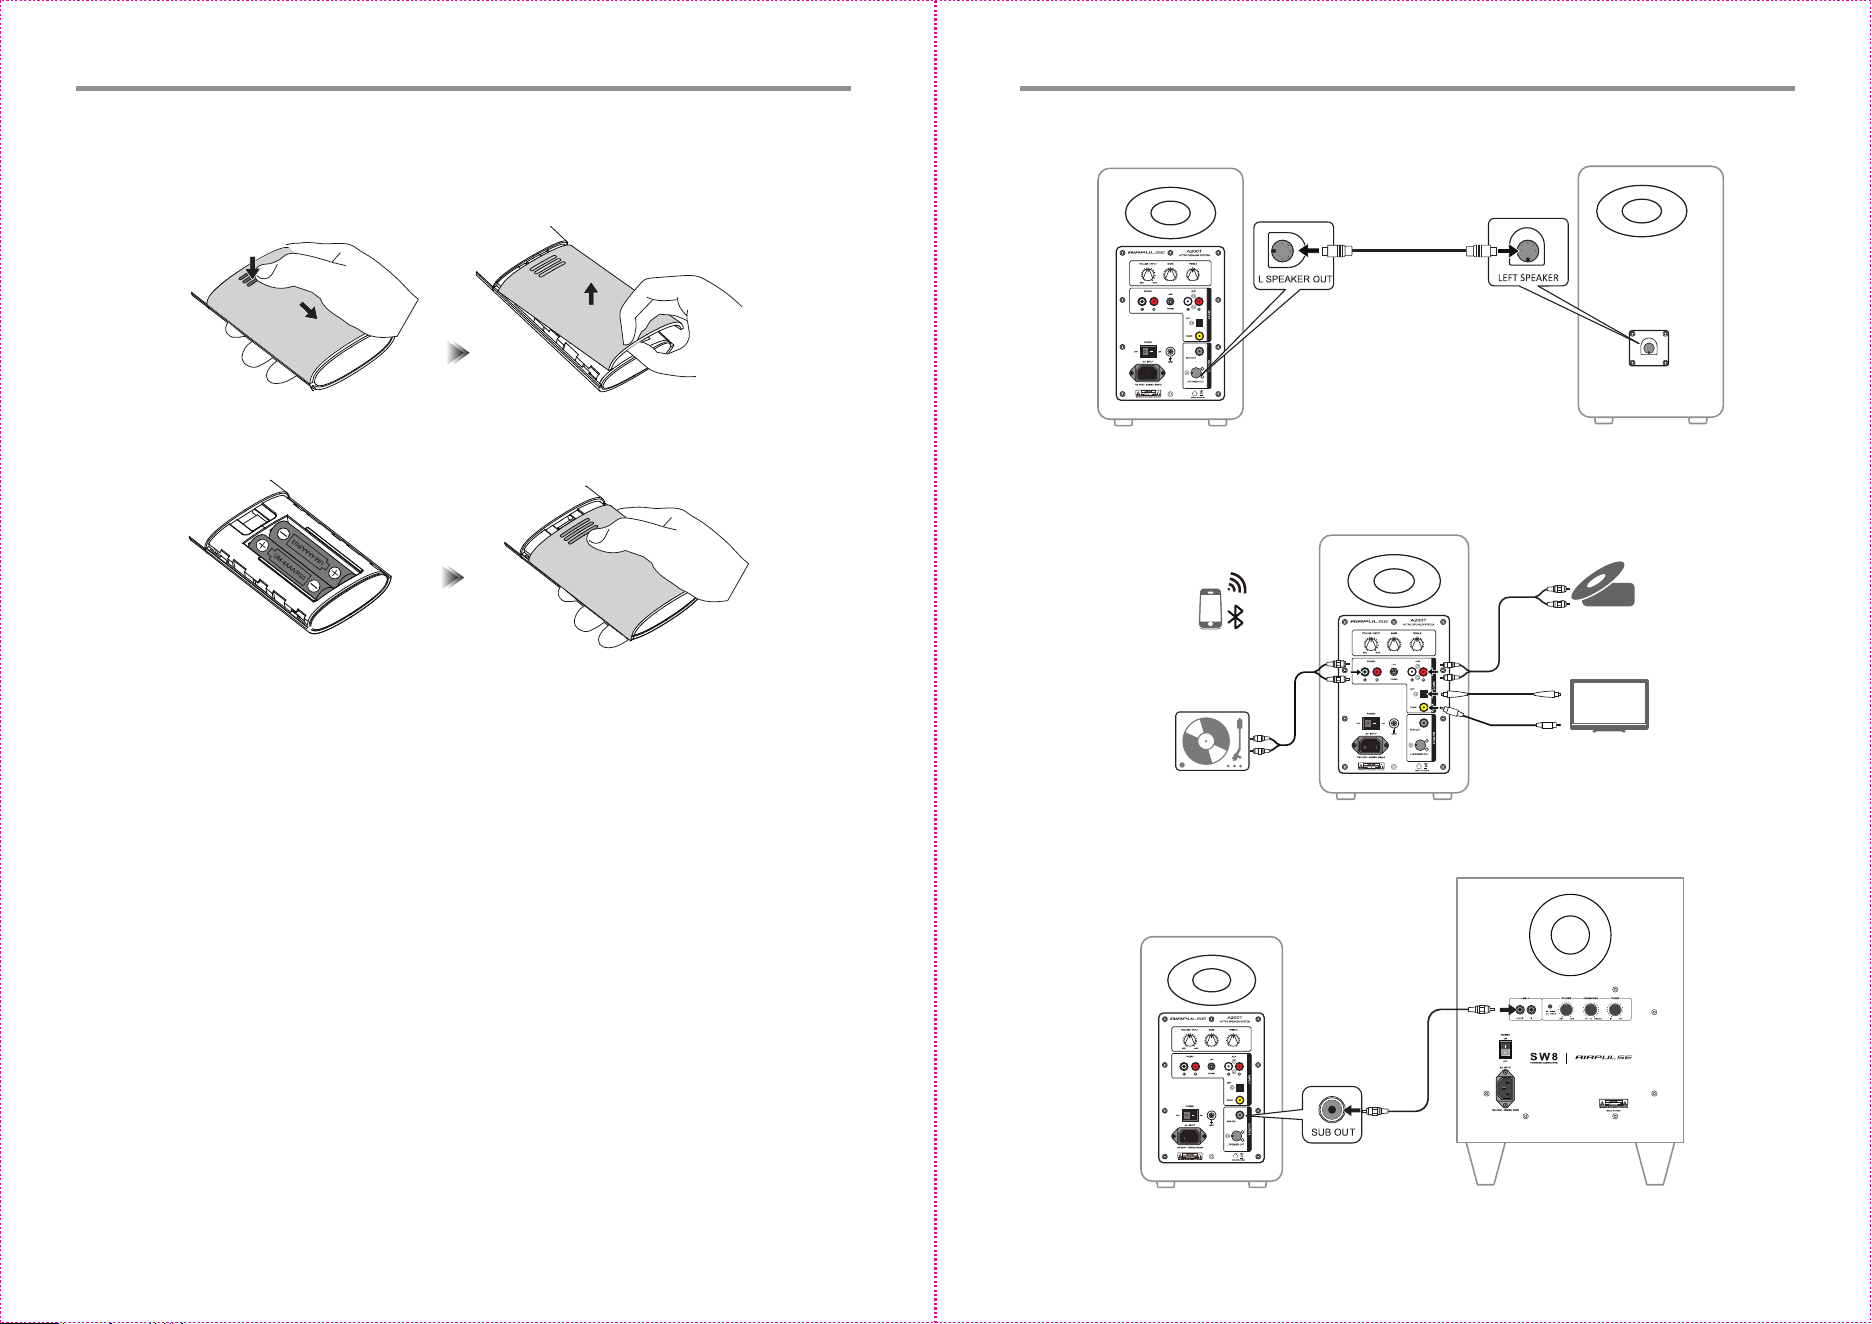
Install or replace remote control ba�ery
1. As the illustra�on shows, with thumb press down the slot of ba�ery cover and slide to
remove the cover.
2. Place the two AAA ba�eries (note the “+” and “-”pole) into the remote control and
close the ba�ery cover.
1. The ba�ery life is normally about 6 months; please replace it when the remote control
is not sensi�ve or the control distance to be shortened.
2. Remove the ba�ery immediately when exhausted to avoid explosion or acid leaks.
3. Discard the ba�ery immediately in the event of ba�ery leakage, paying a�en�on not to
touch the leaking materials.
If leaking is in contact with skin or gets in eyes/mouth, rinse immediately and seek
emergency treatment immediately. Please clean the ba�ery compartment thoroughly
prior to installing new ba�ery.
4. Never use the remote control in condi�ons below:
– Places with high humidity, e.g. a bathroom
– Places with high temperature, e.g. near a heater or stove
– Places with extremely low temperature
– In dusty places
5. Never swallow the ba�eries in case of chemical burning risk.
6. Never mix old and new ba�eries. This will shorten new ba�ery life or cause old ba�ery
leakage.
7. Remove the ba�ery when unused for a long period of �me to avoid ba�ery leakage.
8. Never use this product when ba�ery compartment is not securely closed, and keep the
remote control away from children. Never let children touch the ba�ery.
9. If the ba�ery is accidentally swallowed, rush to hospital immediately.
10. Danger of explosion if ba�ery is incorrectly replaced.
Replace only with the same or equivalent.
11. The ba�ery should not be exposed to excessive heat such as direct sun, fire or similar.
Note
Installing Ba�ery in Remote Control
Prepara�ons
78
1. Connect speakers
-6
-6
+6
+6
Use the speaker
connec�ng cable
included for connec�on
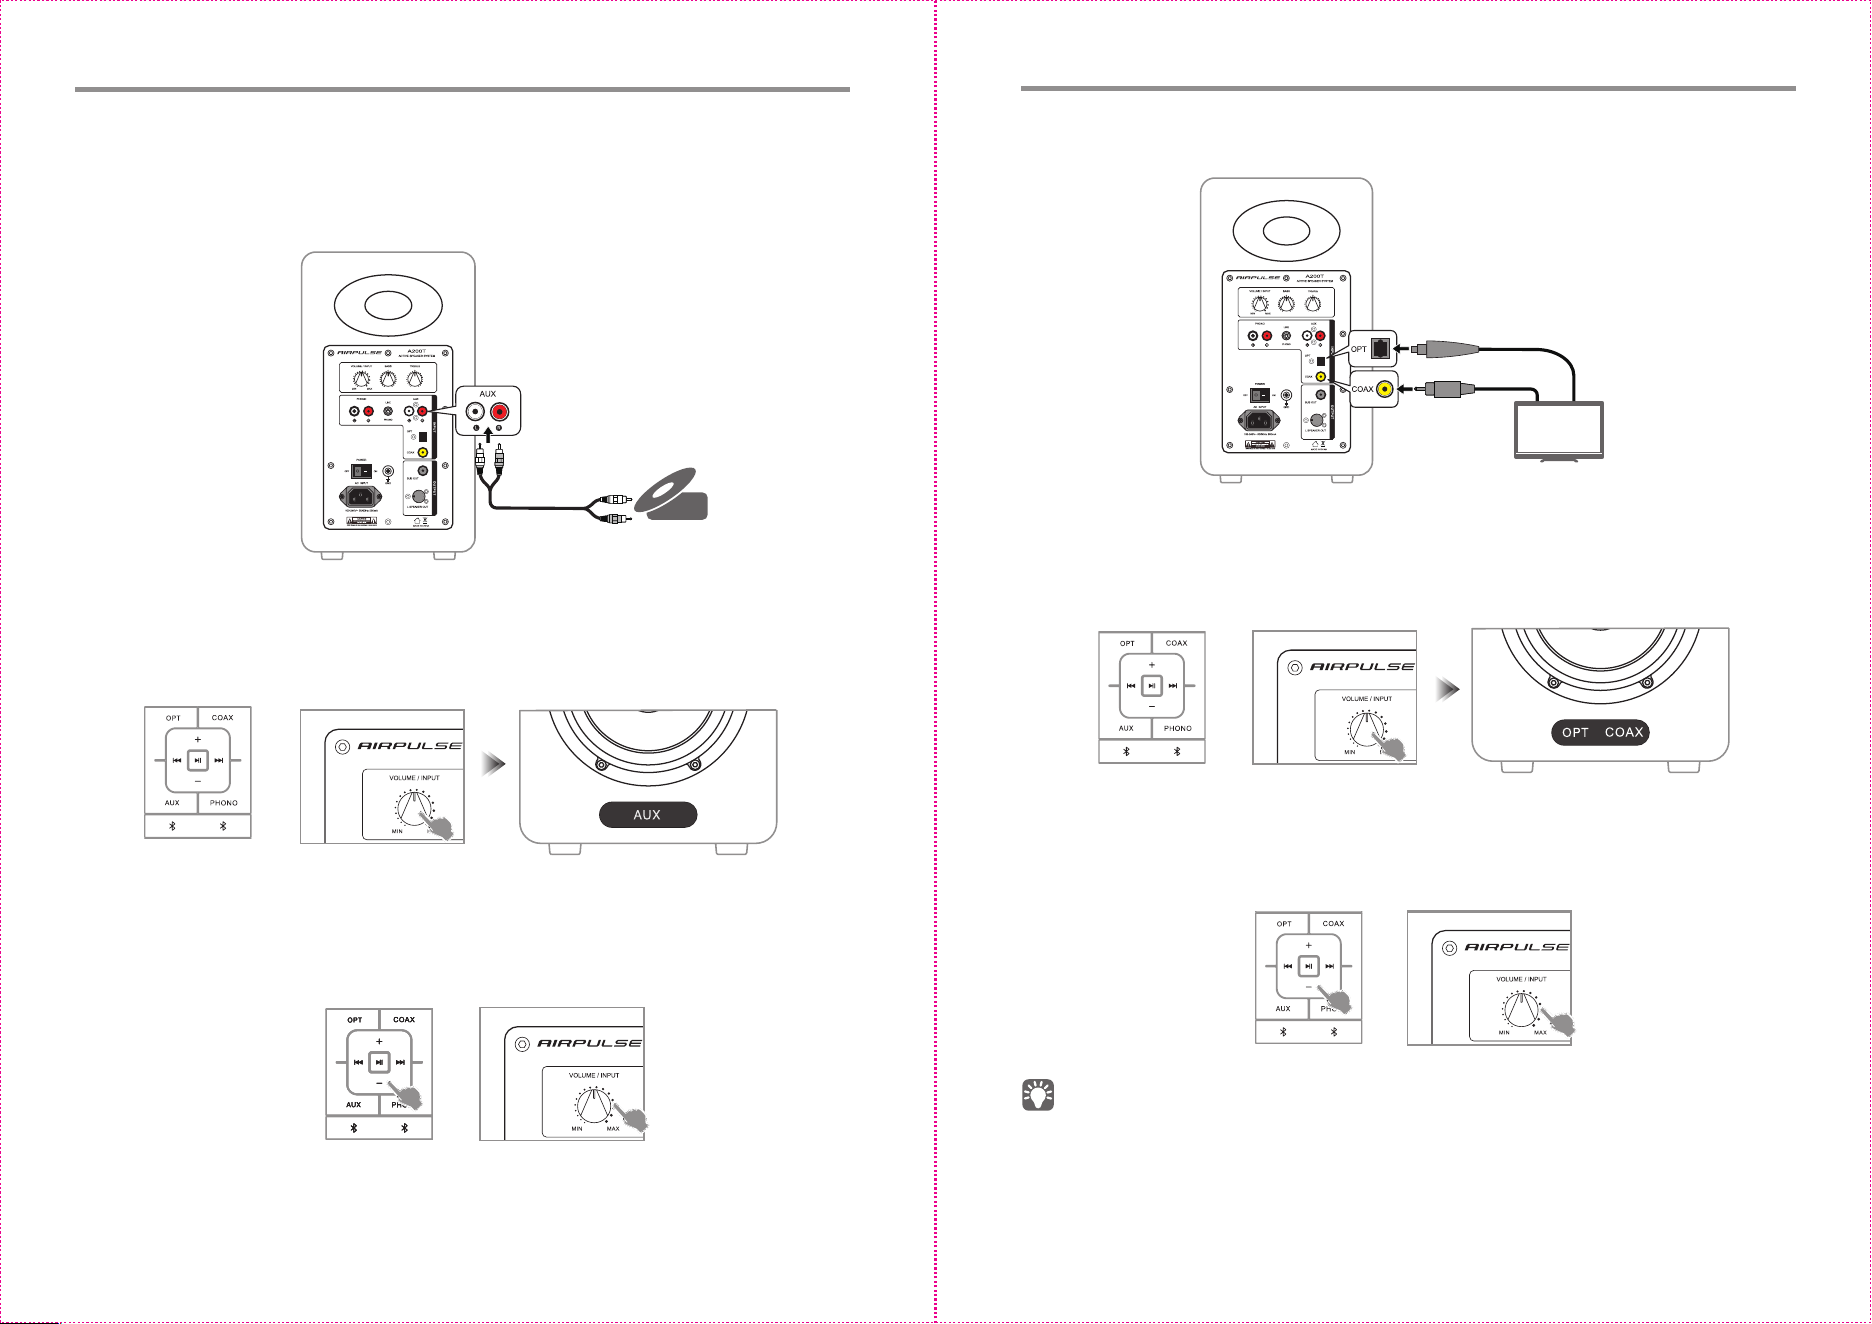
2. Conncet to playback devices
3. Connect to subwoofer
-6
-6
+6
+6
* The subwoofer needs to be purchased separately.
CD player
-6
-6
+6
+6
TV/CD player/
Blu-ray player
Coaxial cable
CD player/music
player
RCA audio cable
Fiber op�c input
audio cable
RCA audio
cable
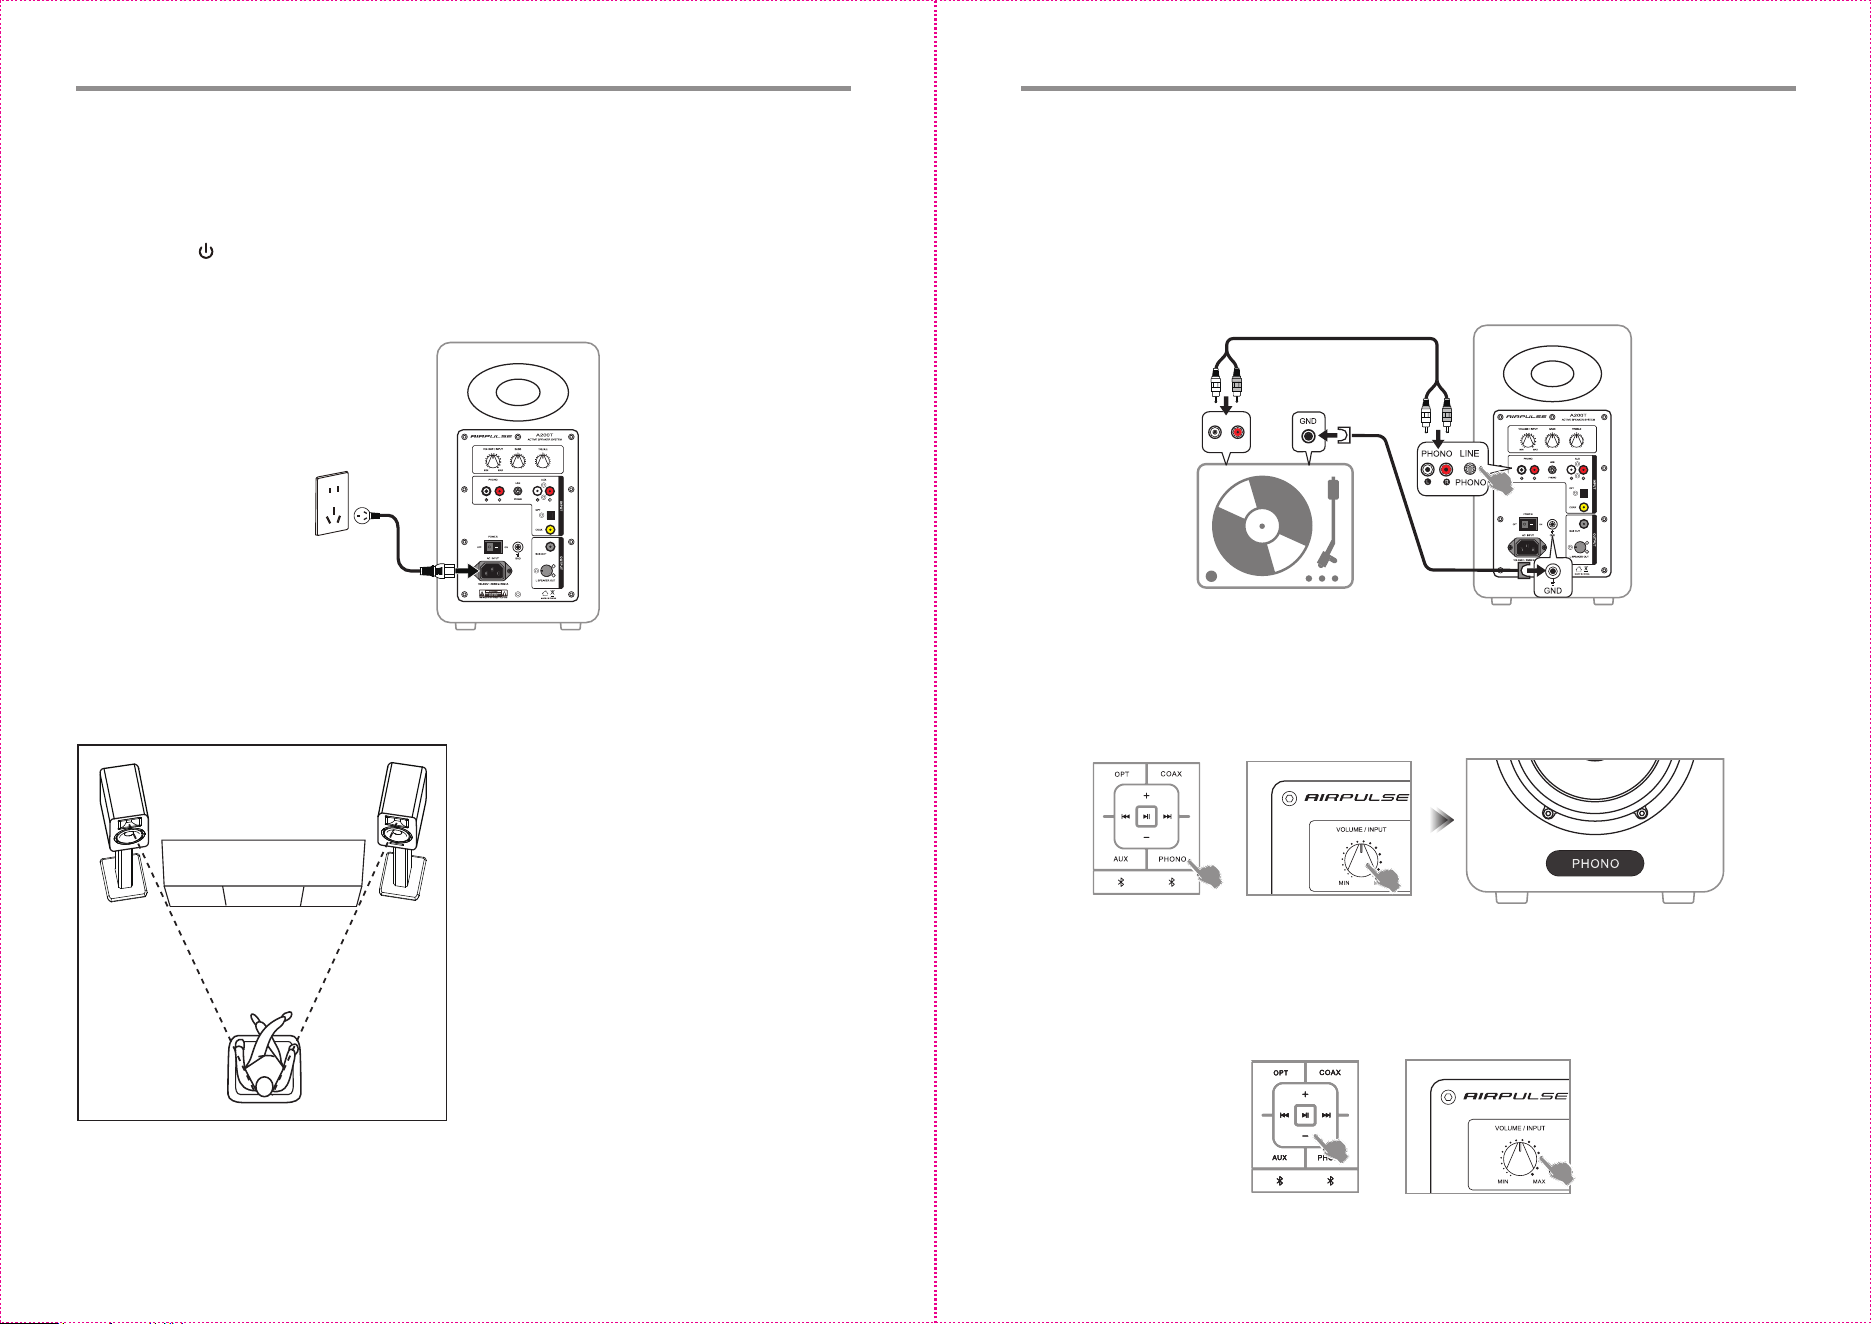
PHONO/LINE Input Mode
Prepara�ons
9 10
4. Connect to power source
* Connect the power cable included to power input port on the rear panel, and then
insert power plug into wall outlet;
* A�er all cables are connected securely, press power switch on the rear panel to turn
on main power;
* Press the “ ” on the remote control to turn off power source;
* LCD indicator will be lit to show current audio mode, please select the correct audio
source with the corresponding connec�on.
-6
-6
+6
+6
5. Speaker placement
Passive speaker
Ac�ve speaker
2. Press the “PHONO” bu�on on the remote control or press the “VOLUME / INPUT”
bu�on on the rear panel of the ac�ve speaker to select PHONO input mode, LCD
indicator on the ac�ve speaker will display “PHONO”.
3. Play music on the connected device, press the “+/-” bu�on on the remote control or
rotate the “VOLUME / INPUT” bu�on on the rear panel of the ac�ve speaker to adjust
volume to a desired level.
-6
-6
+6
+6
Audio Out
R
L
RCA audio cable
* Place the passive and ac�ve speaker on
a solid, leveled and steady surface. For the
op�mum sound posi�oning and layering,
using the special stands of A200T is
recommended.
* For the op�mum stereo sound effect,the
listener can slightly adjust speaker angel.
* For the most accurate sound and balance,
the listener should be in the axis of
equilateral triangle formed by the ac�ve
and passive speakers.
* High frequency has a much higher direc�vity,
and for more accurate sound effect the
speaker's tweeter should be at ear level of
the listener.
1. Insert RCA audio cable into PHONO input port on the rear panel of the ac�ve speaker
(pay a�en�on to L/R connector matching); then connect RCA audio cable to phonographs
(MM pickup). When selec�ng different modes of PHONO/LINE output on the phonograph,
it is necessary to switch the speaker to the corresponding PHONO/LINE input mode
that matches it. In addi�on, the ground terminal of the phonograph can be connected
to the ground wire of the speaker according to the needs to reduce noise.
-6
+6
Or
-6
+6
OrOrOr
AUX Input Mode
OPT/COAX Input Mode
11 12
2. Press the “AUX” bu�on on the remote control or press the “VOLUME / INPUT” bu�on
on the rear panel of the ac�ve speaker to select AUX input mode, LCD indicator on the
ac�ve speaker will display “AUX”.
Or
3. Play music on the connected device, press the “+/-” bu�on on the remote control or
rotate the “VOLUME / INPUT” bu�on on the rear panel of the ac�ve speaker to adjust
volume to a desired level.
* Only the standard PCM audio signals (44.1kHz/48kHz/96kHz/192kHz) func�on in
op�cal or coaxial mode.
* If the op�cal digital output of playing device is ACC, such as on a TV, please switch
it to PCM.
2. Press the “OPT”or“COAX” bu�on on the remote control or press the “VOLUME /
INPUT” bu�on on the rear panel of the ac�ve speaker to select op�cal or coaxial
input mode, LCD indicator on the ac�ve speaker will display “OPT” or “COAX”.
Or
or
1. Connect this product to audio source device with op�cal or coaxial digital output
port using fiber op�c input audio cable or coaxial cable.
3. Play music on the connected device, press the “+/-” bu�on on the remote control
or rotate the “VOLUME / INPUT” bu�on on the rear panel of the ac�ve speaker to
adjust volume to a desired level.
Or
1. Insert RCA audio cable into AUX input port on the rear panel of the ac�ve speaker
(pay a�en�on to L/R connector matching); then connect RCA audio cable to audio
source devices with RCA output port (CD player/audio decoder/PC/music player/
mobile phone).
-6
+6
OrOr
-6
+6
Or
CD player
-6
-6
+6
+6
RCA audio cable
CD player/music player
-6
+6
-6
+6
-6
-6
+6
+6
TV/CD player/
Blu/ray player,etc.
Troubleshoo�ng
Bluetooth Input Mode
Specifica�ons/Statement
13 14
If you want to find out more about AIRPULSE, please visit our website at
www.airpulseaudio.com
Problem Solu�on
• Check if the power indicator light is ON.
• Try to turn up the volume using either the
master volume control or remote control.
• Ensure the audio cables are firmly connected
and the input is set correctly on the speakers.
• Check if there is signal output from the audio source.
• Effec�ve Bluetooth transmission range is 10 meters,
please make sure opera�on is within the range.
• Try another Bluetooth device for connec�on.
No sound
Cannot connect via Bluetooth
• Check if mains power is connected or if the wall
outlet is switched on.
The A200T does not turn on
• Make sure the speaker is switched to Bluetooth input;
Bluetooth cannot be paired or connected in other
audio input mode.
Disconnect from any Bluetooth device by pressing
and holding the volume dial in Bluetooth mode,
and then try again.
Tweeter: Horn Loaded Ribbon Tweeter featuring High-Gauss neodymium
magnet
Mid-Woffer: “LONG THRO” 5.25 inch Aluminum cone Mid-Woofer
Power Output: L/R(Treble): 10W+10W
L/R(Woofer): 55W+55W
Frequency Range: 46Hz-40kHz
Signal-Noise Ra�o: ≥90dB(A)
Input Mode: PHONO/AUX/OPT/COAX/Bluetooth
Input Sensi�vity: PHONO: 5mV±0.25mV
LINE: 180±50mV
AUX: 550±50mV
OPT: 350±50mFFs
COAX: 350±50mFFs
Bluetooth: 500±50mFFs
Mains Voltage: 100-240V AC 50/60Hz
Cabinet Size(WxHxD): Ac�ve Speaker: 180x328x313mm
Passive Speaker: 180x328x295mm
Net Weight: 16.4Kg/Set
NOTICE: For the need of technical improvement and system upgrade, informa�on
contained herein may be subject to change from �me to �me without prior no�ce.
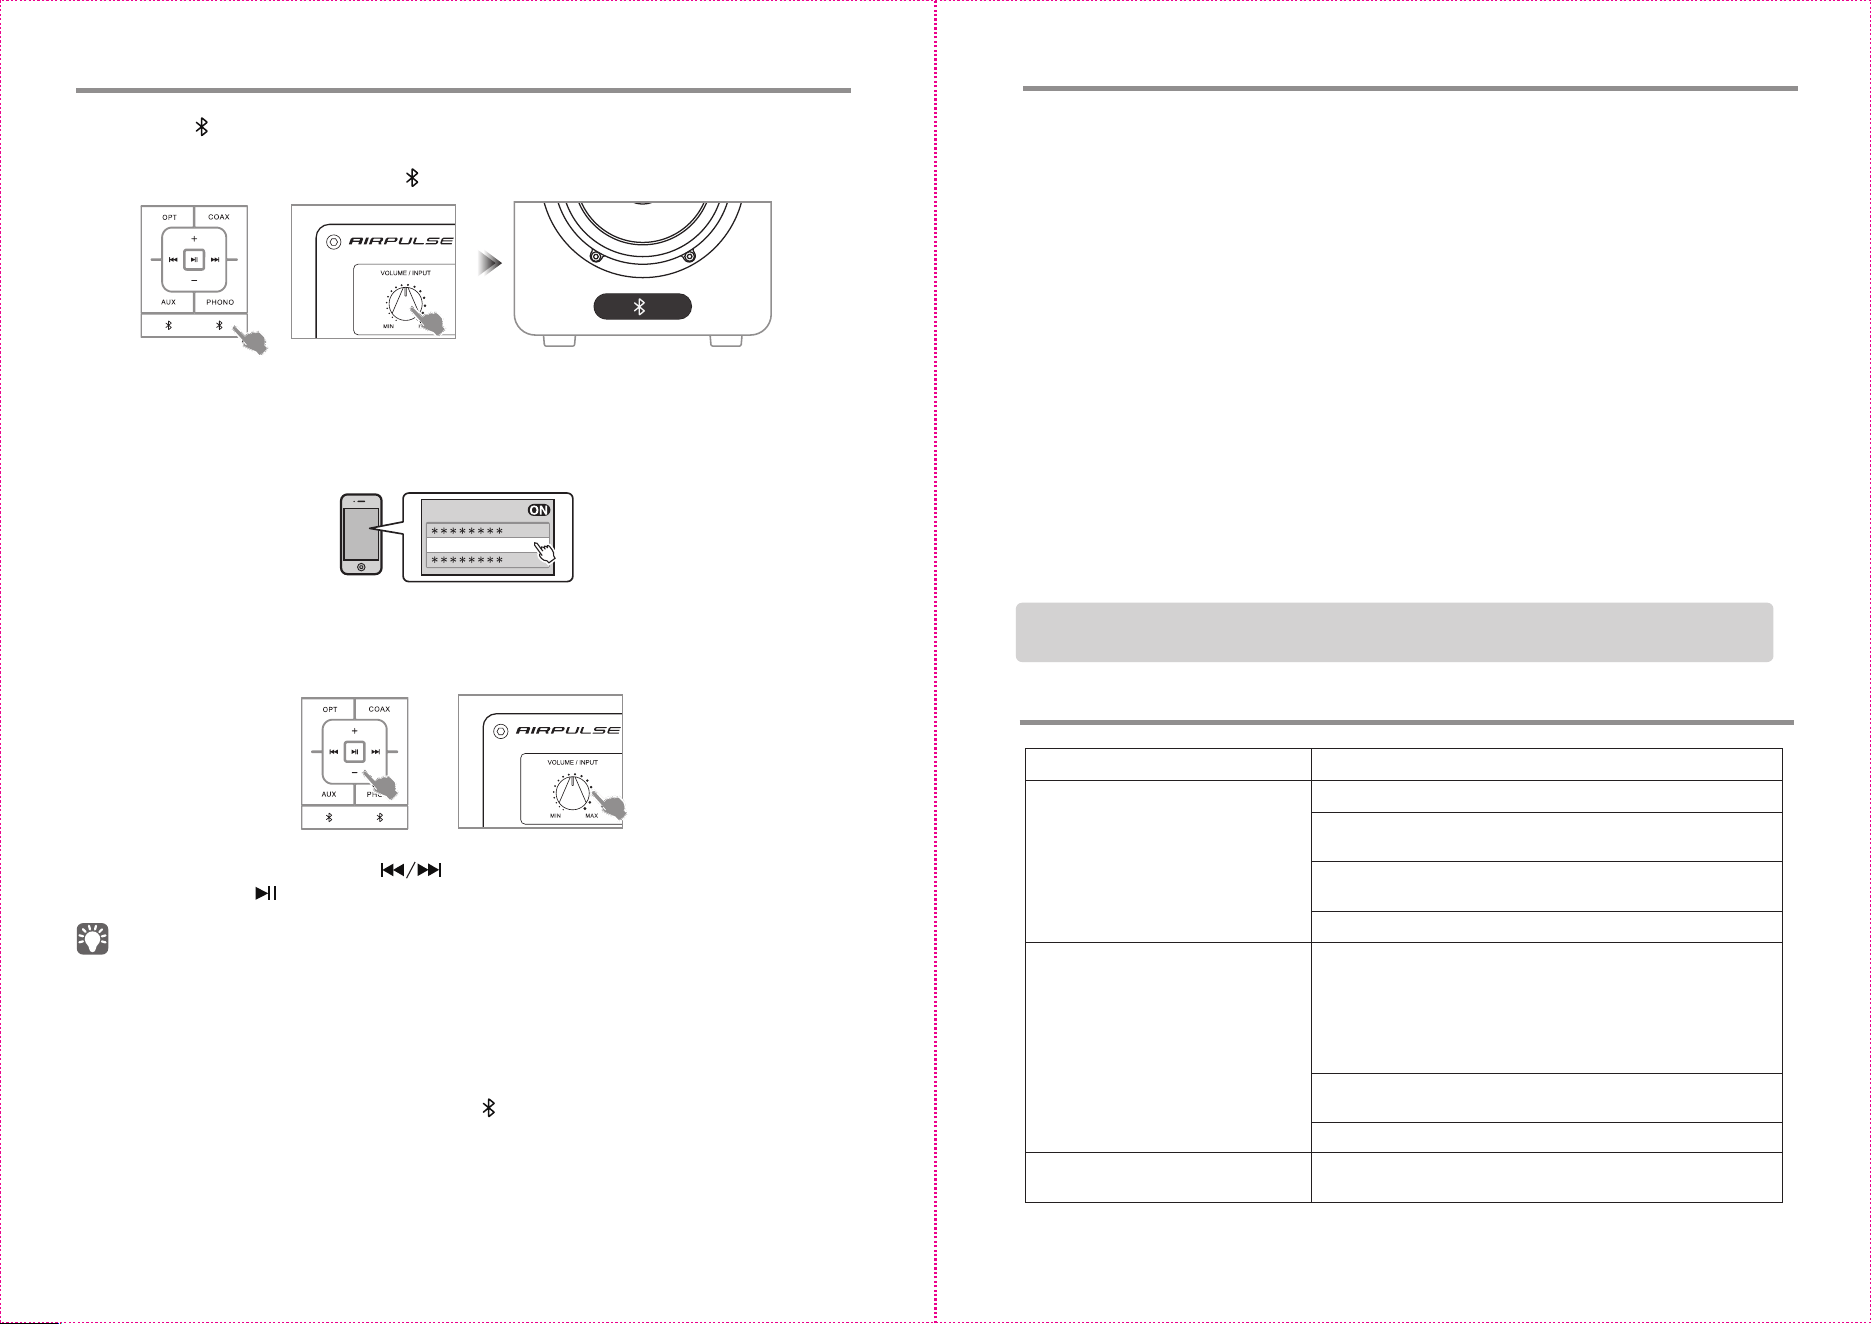
1. Press the “ ” bu�on on the remote control or press the “VOLUME / INPUT” bu�on
on the rear panel of the ac�ve speaker to select Bluetooth input mode, LCD indicator
on the ac�ve speaker will display “ ”.
Or
AIRPULSE A200T
Bluetooth
2. Set your Bluetooth device to search for and connect to “AIRPULSE A200T”; pin
code for connec�on is “0000” if needed.
Opera�ons may be different between different devices, please refer to the opera�onal
instruc�ons a�ached with the devices.
* Effec�ve Bluetooth connec�on distance is within 10 meters.
* The Bluetooth of A200T can only be searched and connected in Bluetooth input. The
exis�ng Bluetooth connec�on will be disconnected once the speaker is switched into
other audio inputs. When switched to Bluetooth input, the speaker will try to connect
to the Bluetooth device connected last �me.
* To disconnect Bluetooth, press and hold the “ ” bu�on on the remote control for
above 2 seconds.
* To enjoy all Bluetooth func�ons please ensure your audio device has A2DP and AVRCP
profiles.
* When connected to this product, Bluetooth connec�vity and func�ons may be different
between different Bluetooth devices,depending on so�ware se�ngs of Bluetooth devices.
3. Play music on the connected Bluetooth device, press the “+/-” bu�on on the remote
control or rotate the “VOLUME / INPUT” bu�on on the rear panel of the ac�ve speaker
to adjust volume to a desired level.
Or
4. In Bluetooth mode, press the “ ” bu�on on the remote control to switch
songs,press the “ ” bu�on to play/pause songs.
-6
+6
-6
+6