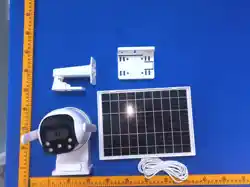

Dual Lens PTZ IP Camera
U
ser Manual
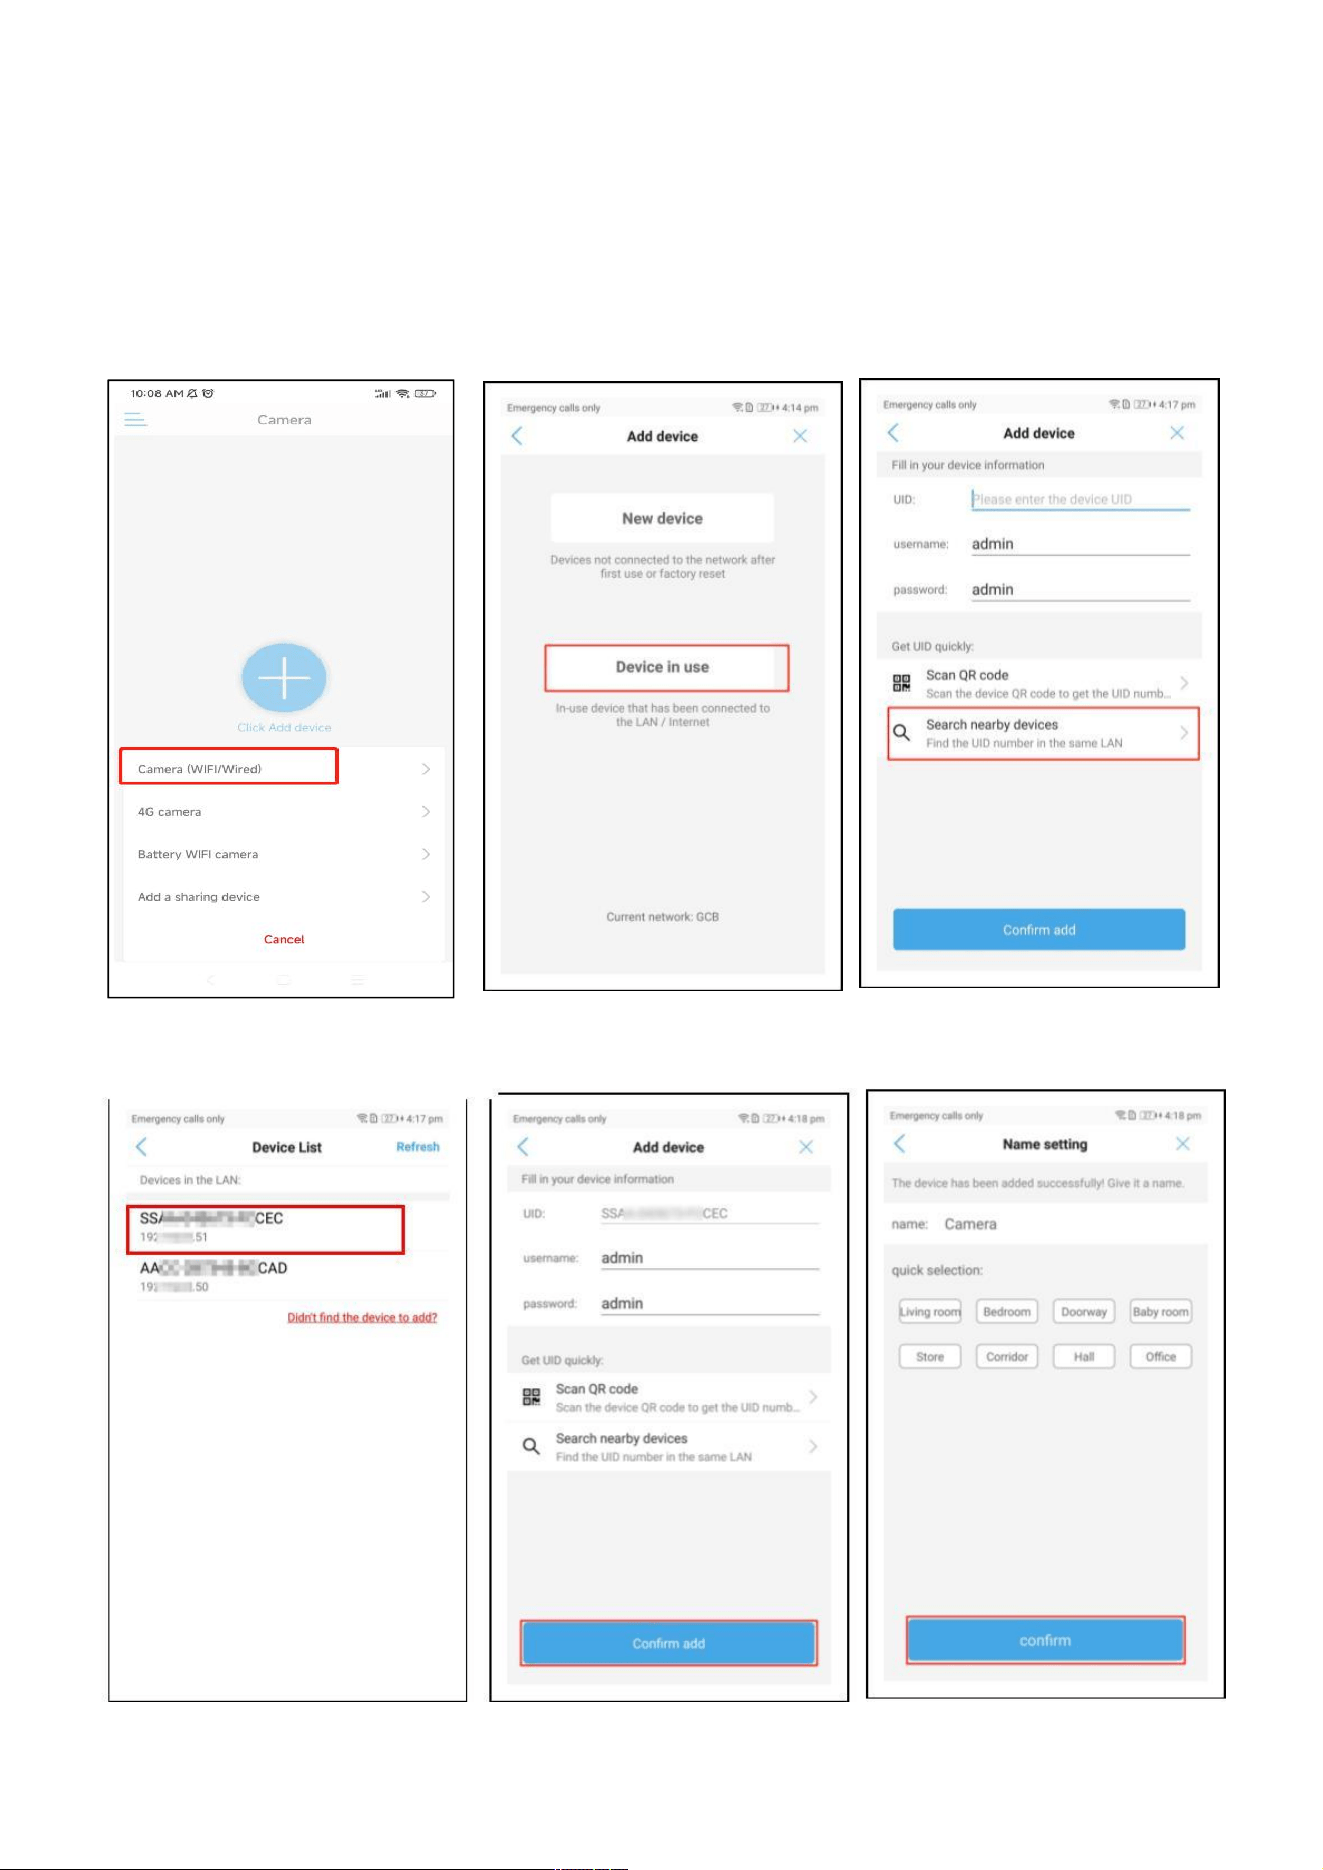
Connect the camera to the power supply and connect to the network cable. (Note: The networ
1、Wired Connection
k
connected by the camera needs to be the same network as the network connected by the mobile phone)
Wait for the device to self-check.
(2)Click“Device in use(1)Click“+”and select
Camera(Wired)
”
(3)Click“Search Nearby
Devices”
(4)Click the device which was
searched
(5)Click“Confirm Add” (6)Click confirm to add
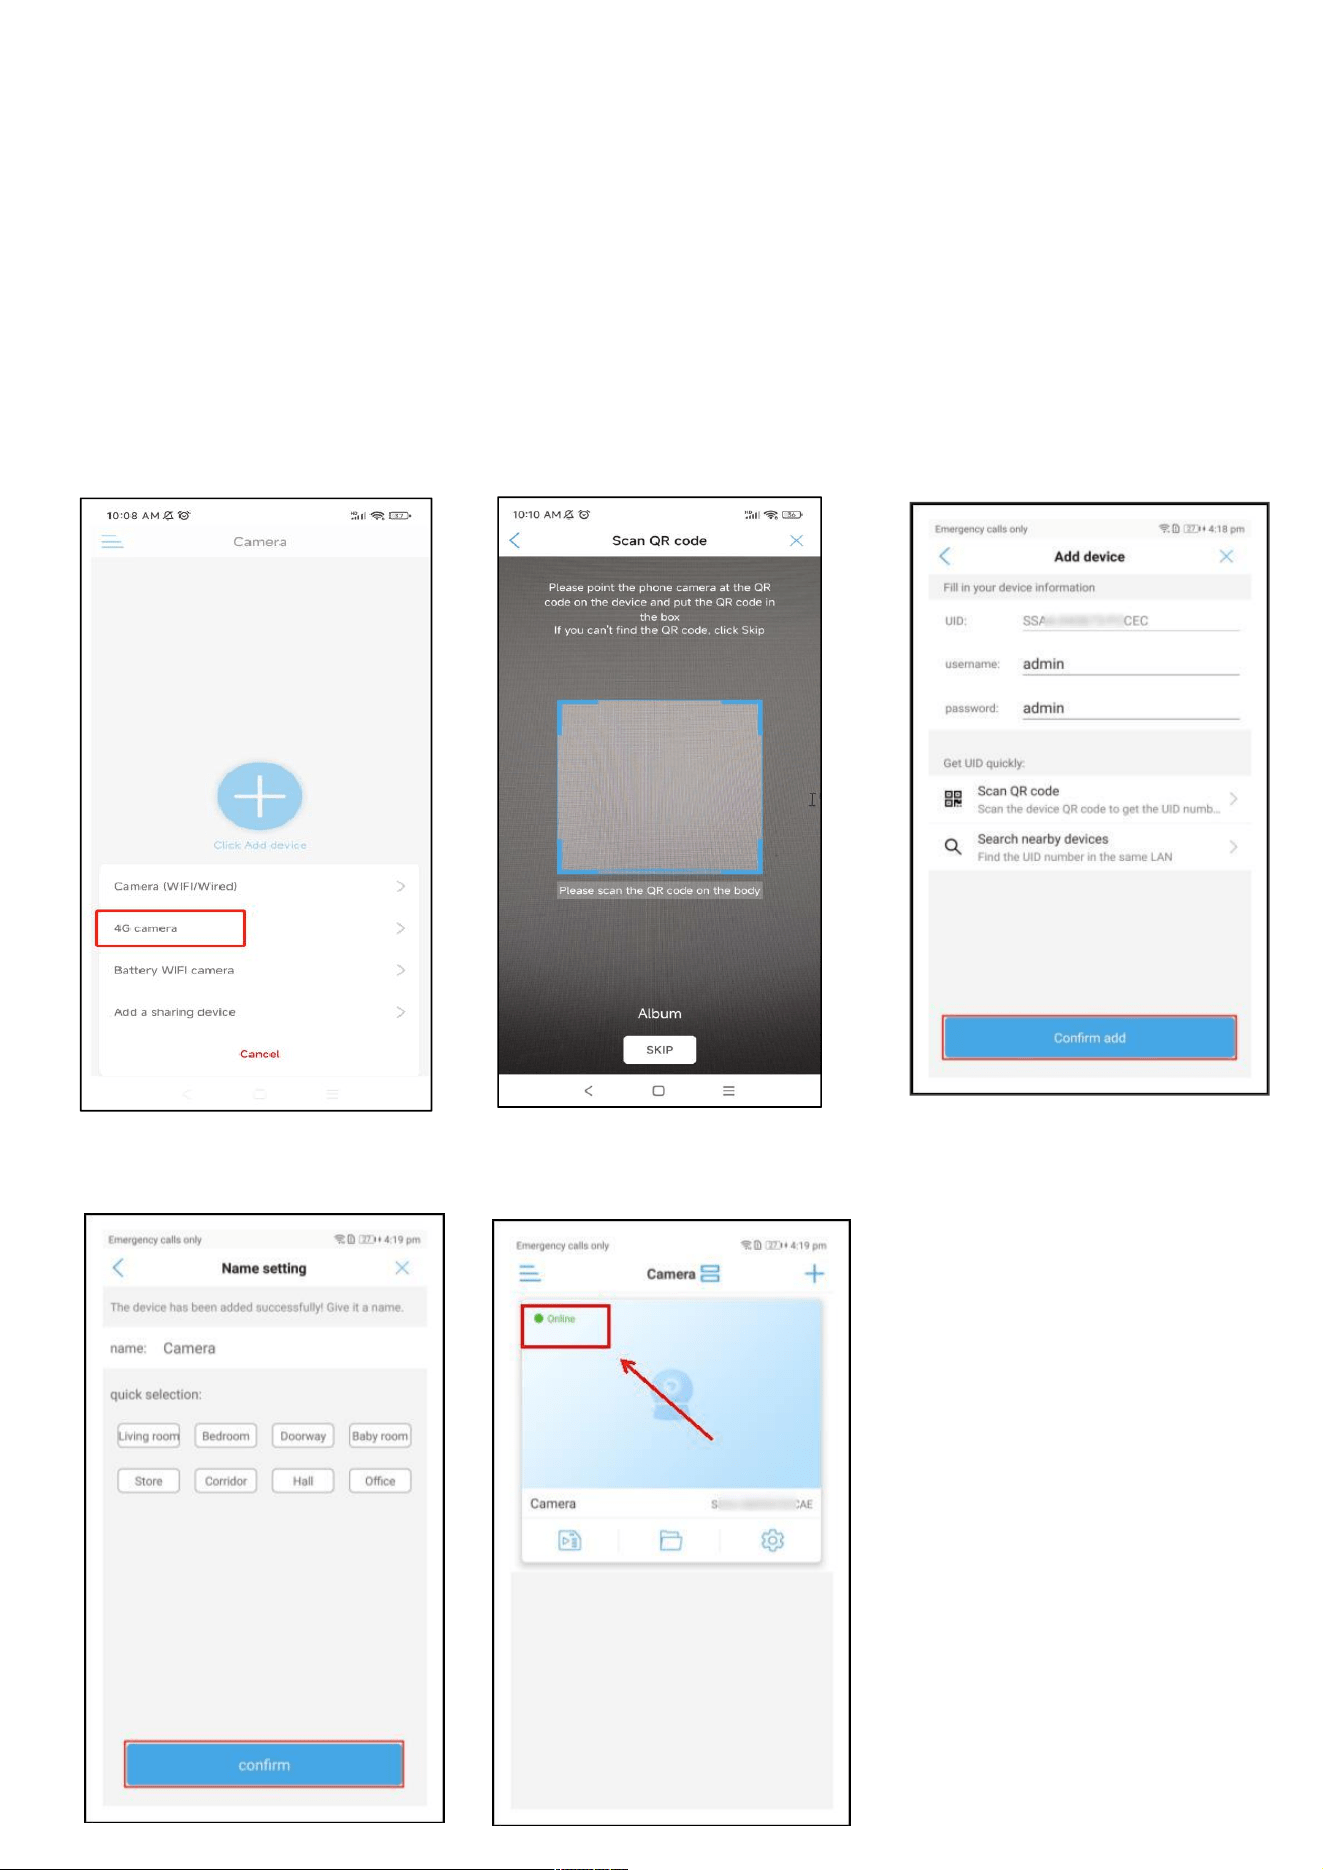
2)、4G version connection (Make sure the camera is installed in operator 4G network
coverage, non-4G version negligible)
Insert the SIM card into the camera, pay attention to the SIM card direction (ensure that the 4G card has
flow and within the validity period) connected to the power supply, waiting for the equipment
self-inspection completed. Next open APP and add 4g cameras.
2.1、Scan QR Code Add Device
(1)Click“+”and select“4G (2)Scan QR code on cameras’ body
camera”
(3)Aim at QR code and
scan,get UID number,click
“Confirm add”
(4)Give a name and Click
“confirm”to finish
(5)Waiting for the camera
Status to"online"click on the
Camera to browse the screen
3. Share add camera
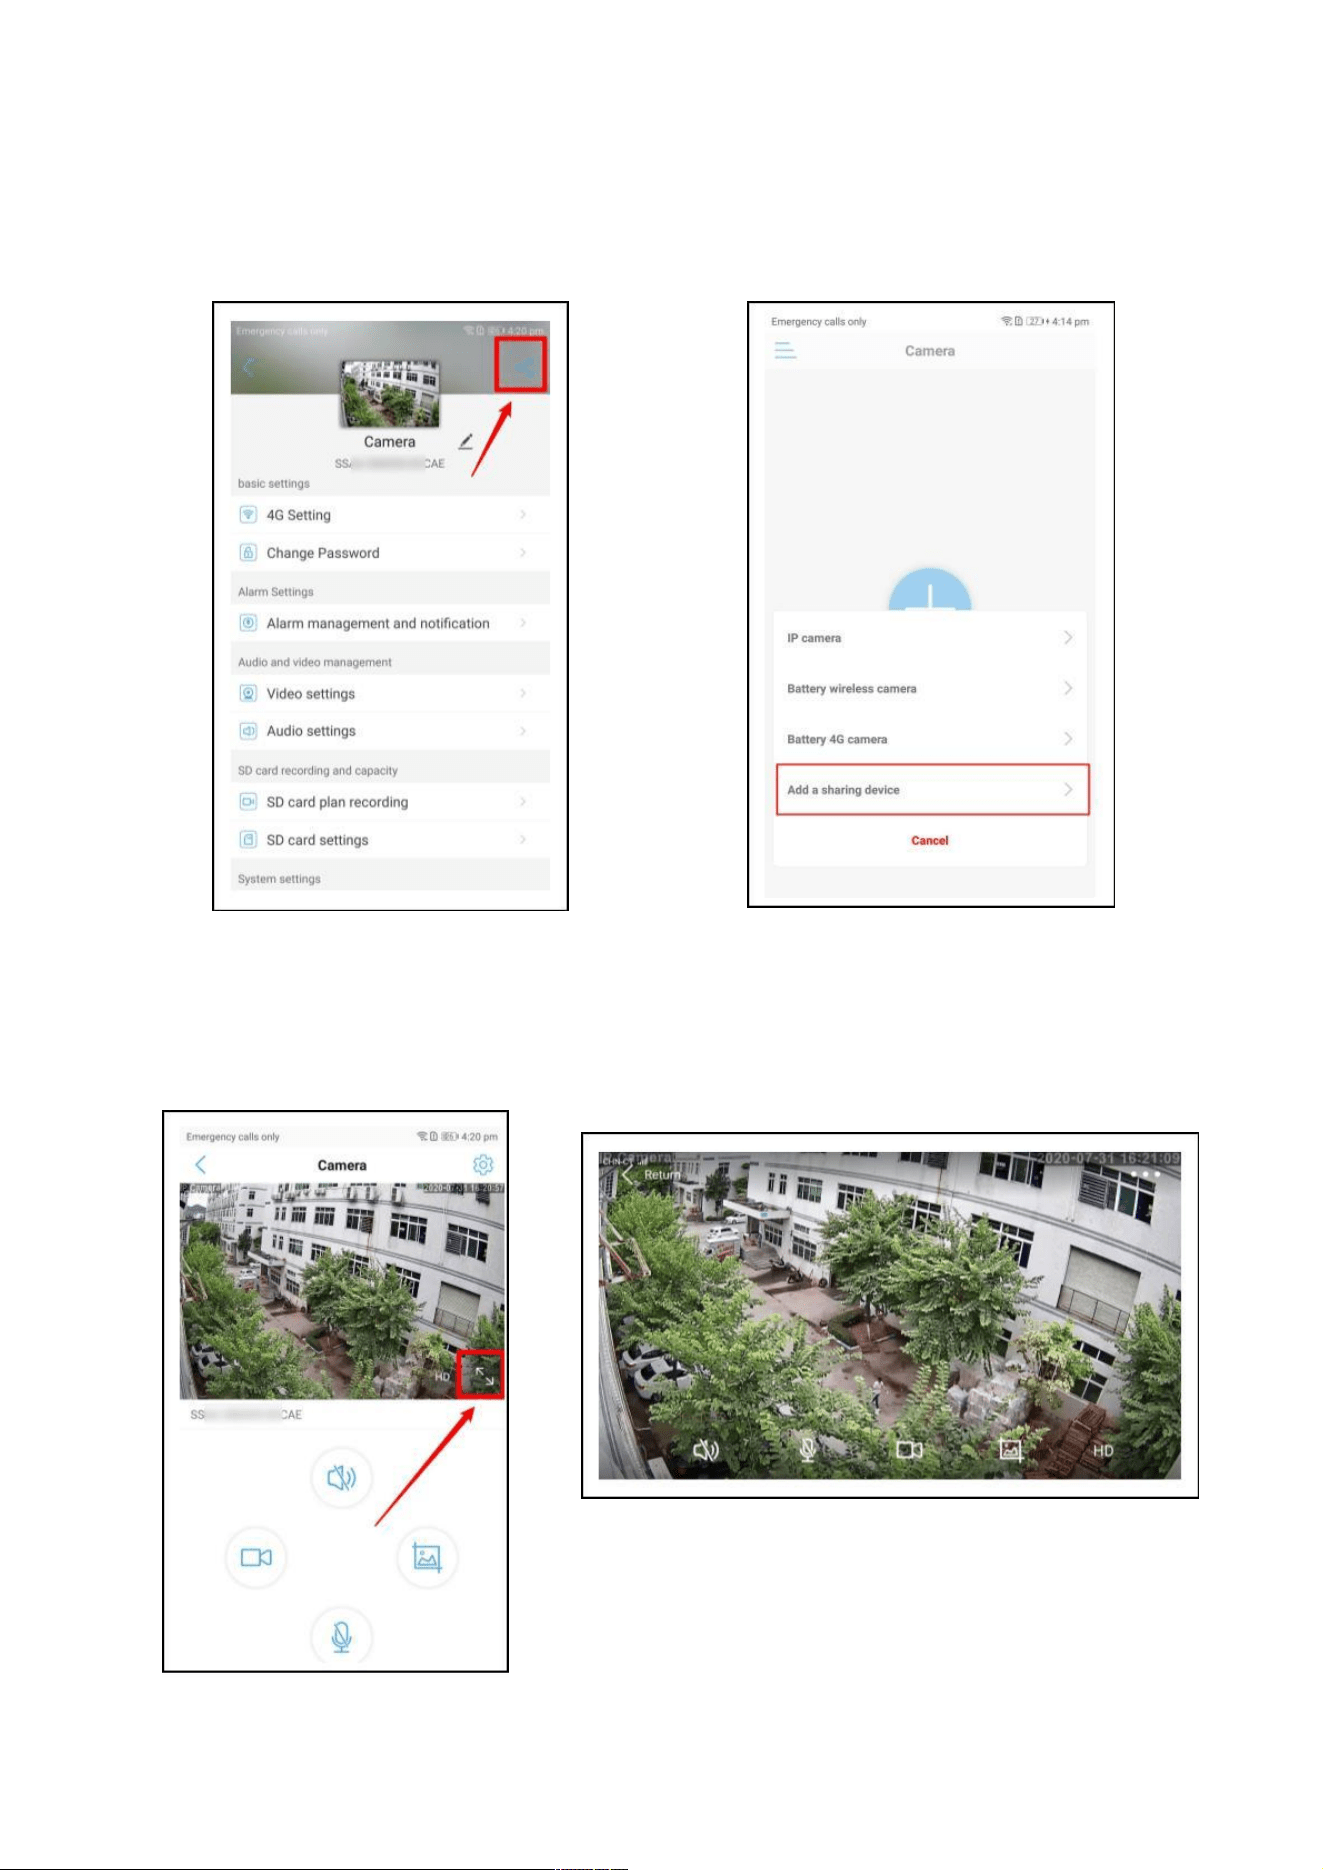
When a camera is added normally on a mobile phone, click the camera settings button to enter the
camera settings interface, and then click the sharing button in the upper right corner of the interface, APP
automatically generate a QR code. After receiving the QR code, click add sharing device, scan the QR
code, click add, and add it.
4. Additional instructions
1). After the camera is added, click to enter the main interface; slide the picture area and turn the
camera to view the picture. By default in vertical screen mode display, click "full screen" to change
the screen to full screen;
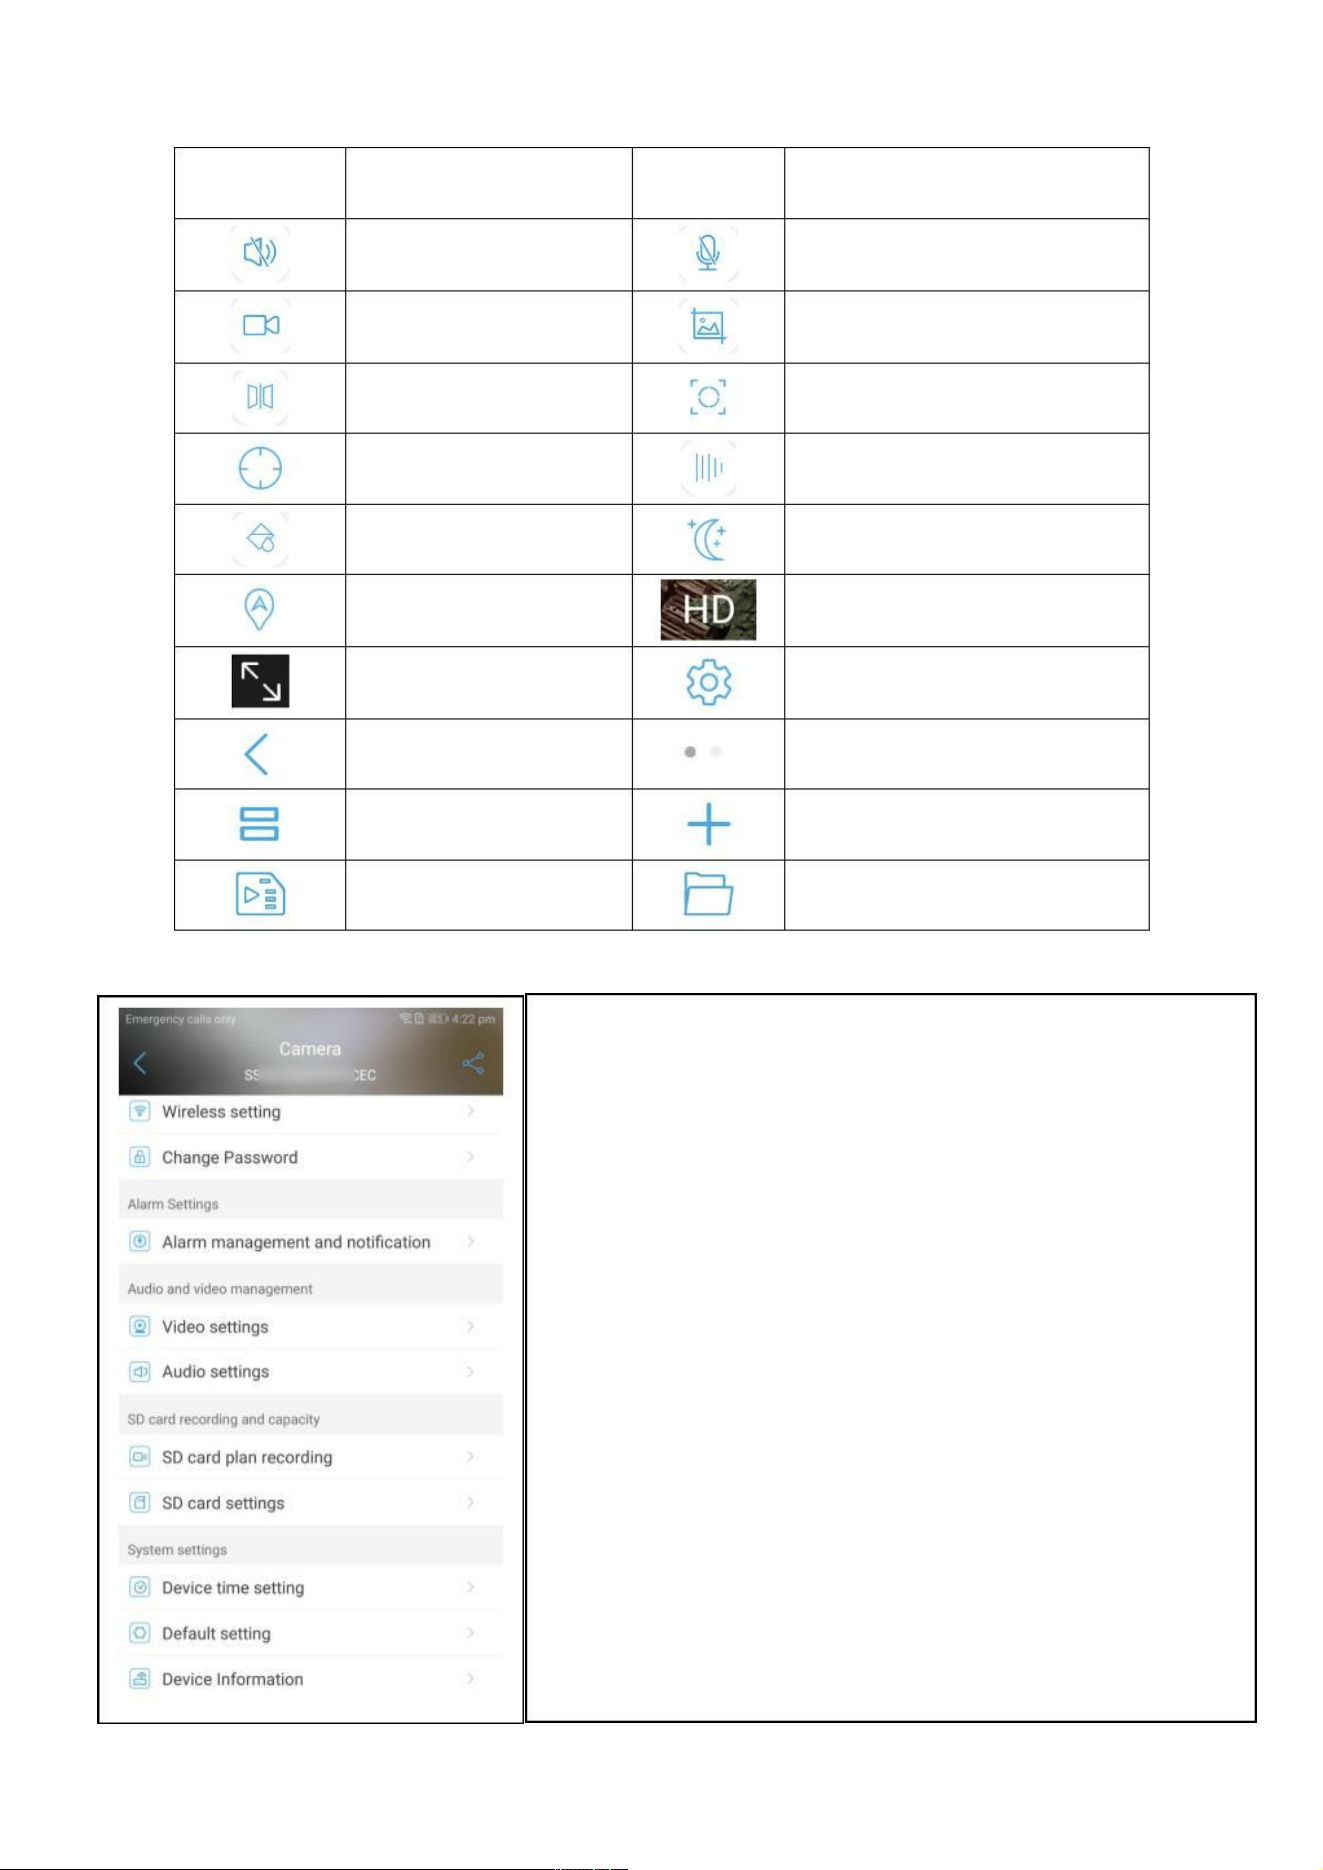
2)、 Functions represented by each icon:
icon
Function
Remote monitoring
Cell phone video
Mirror/flip
icon
Function
Voice intercom
Cell phone capture
Focused Addition
Volume control
Night vision mode
Fluent/HD
Preset
Image Regulation
Mobile tracking
Full/vertical
Settings
Return
Next page
List Display Mode
Playback
Add new equipment
Local documents
3)、Camera function settings:
1)
2)
Wireless settings: set camera to connect wireless network;
Change password: change the password of camera, use more
secure;
3)
Alarm management and notification:
Receive alarm push: select open or close;
Equipment alarm: support move detection or humanoid alarm;
Alarm linkage: when the alarm is triggered, The horn will sound a
warning or send a message to the mobile phone or send email to your
designated email address;
4)
Video settings: set the video stream, frame rate, coding level, video
format (non-professional please don’t try to change);
Audio settings: Set audio input or output volume (be sure to select
microphone input);
5)
6)
7)
8)
SD card plan recording: set video time and time period;
SD card settings: view SD card space, formatted SD card;
Device time setting: can synchronize mobile phone time to camera
and set time zone;
9)
Default setting: can restart the camera, restore factory settings;
10) Device Information: camera hardware and software version and
other information;
5. Video playback and download
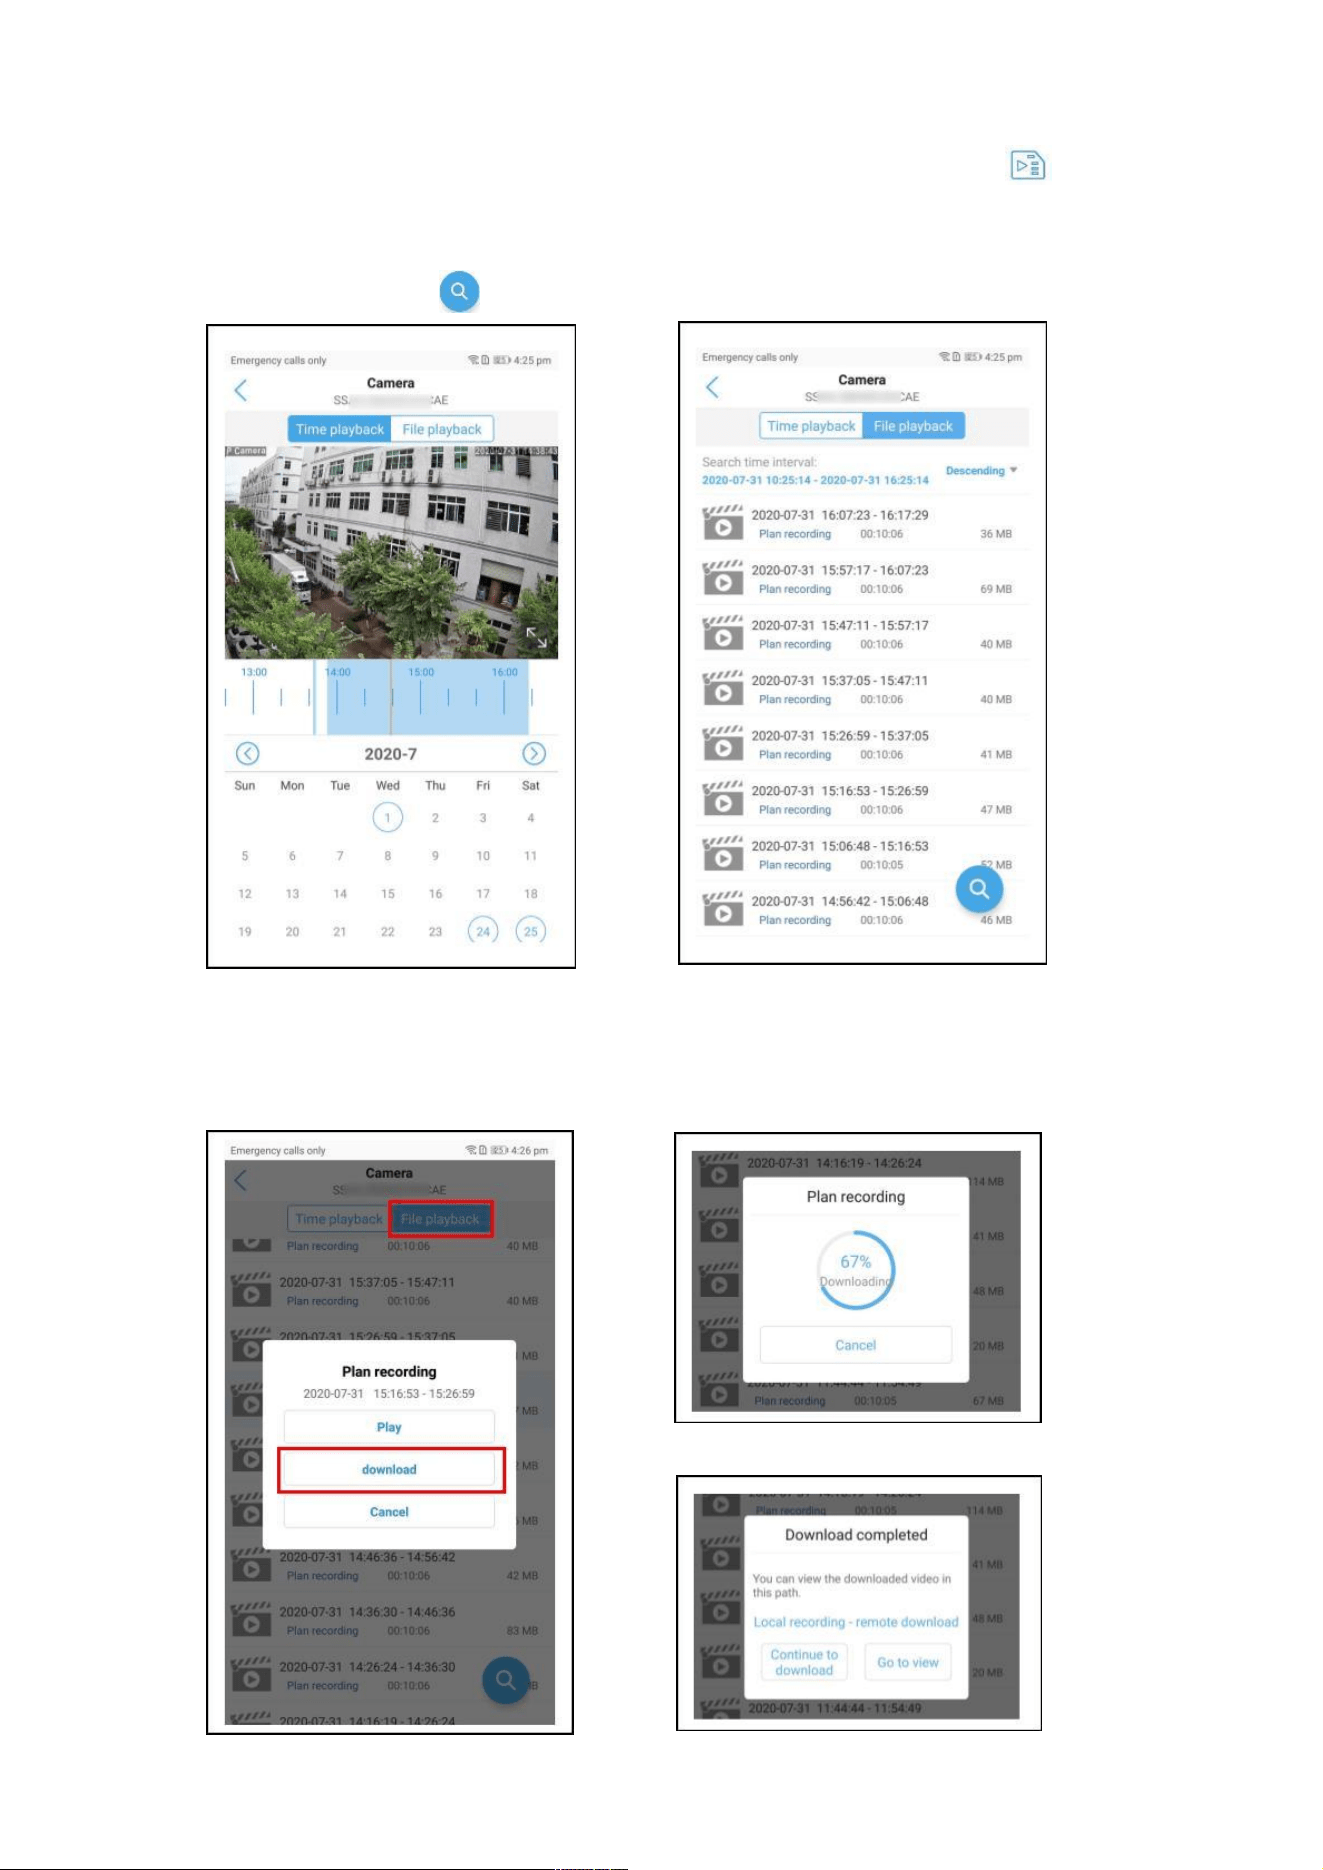
1).Video playback: Click the Video playback key on the device list interface "
" Enter the video
playback interface, there are "time playback" and "file playback" two playback options ;" time playback
"directly drag the timeline to the time point you want to play back ," file playback" select playback time
point play. Click the Query Key "
" Time period can be queried.
2).Video download: in the "file playback" interface select any segment of the video file selection
"download "
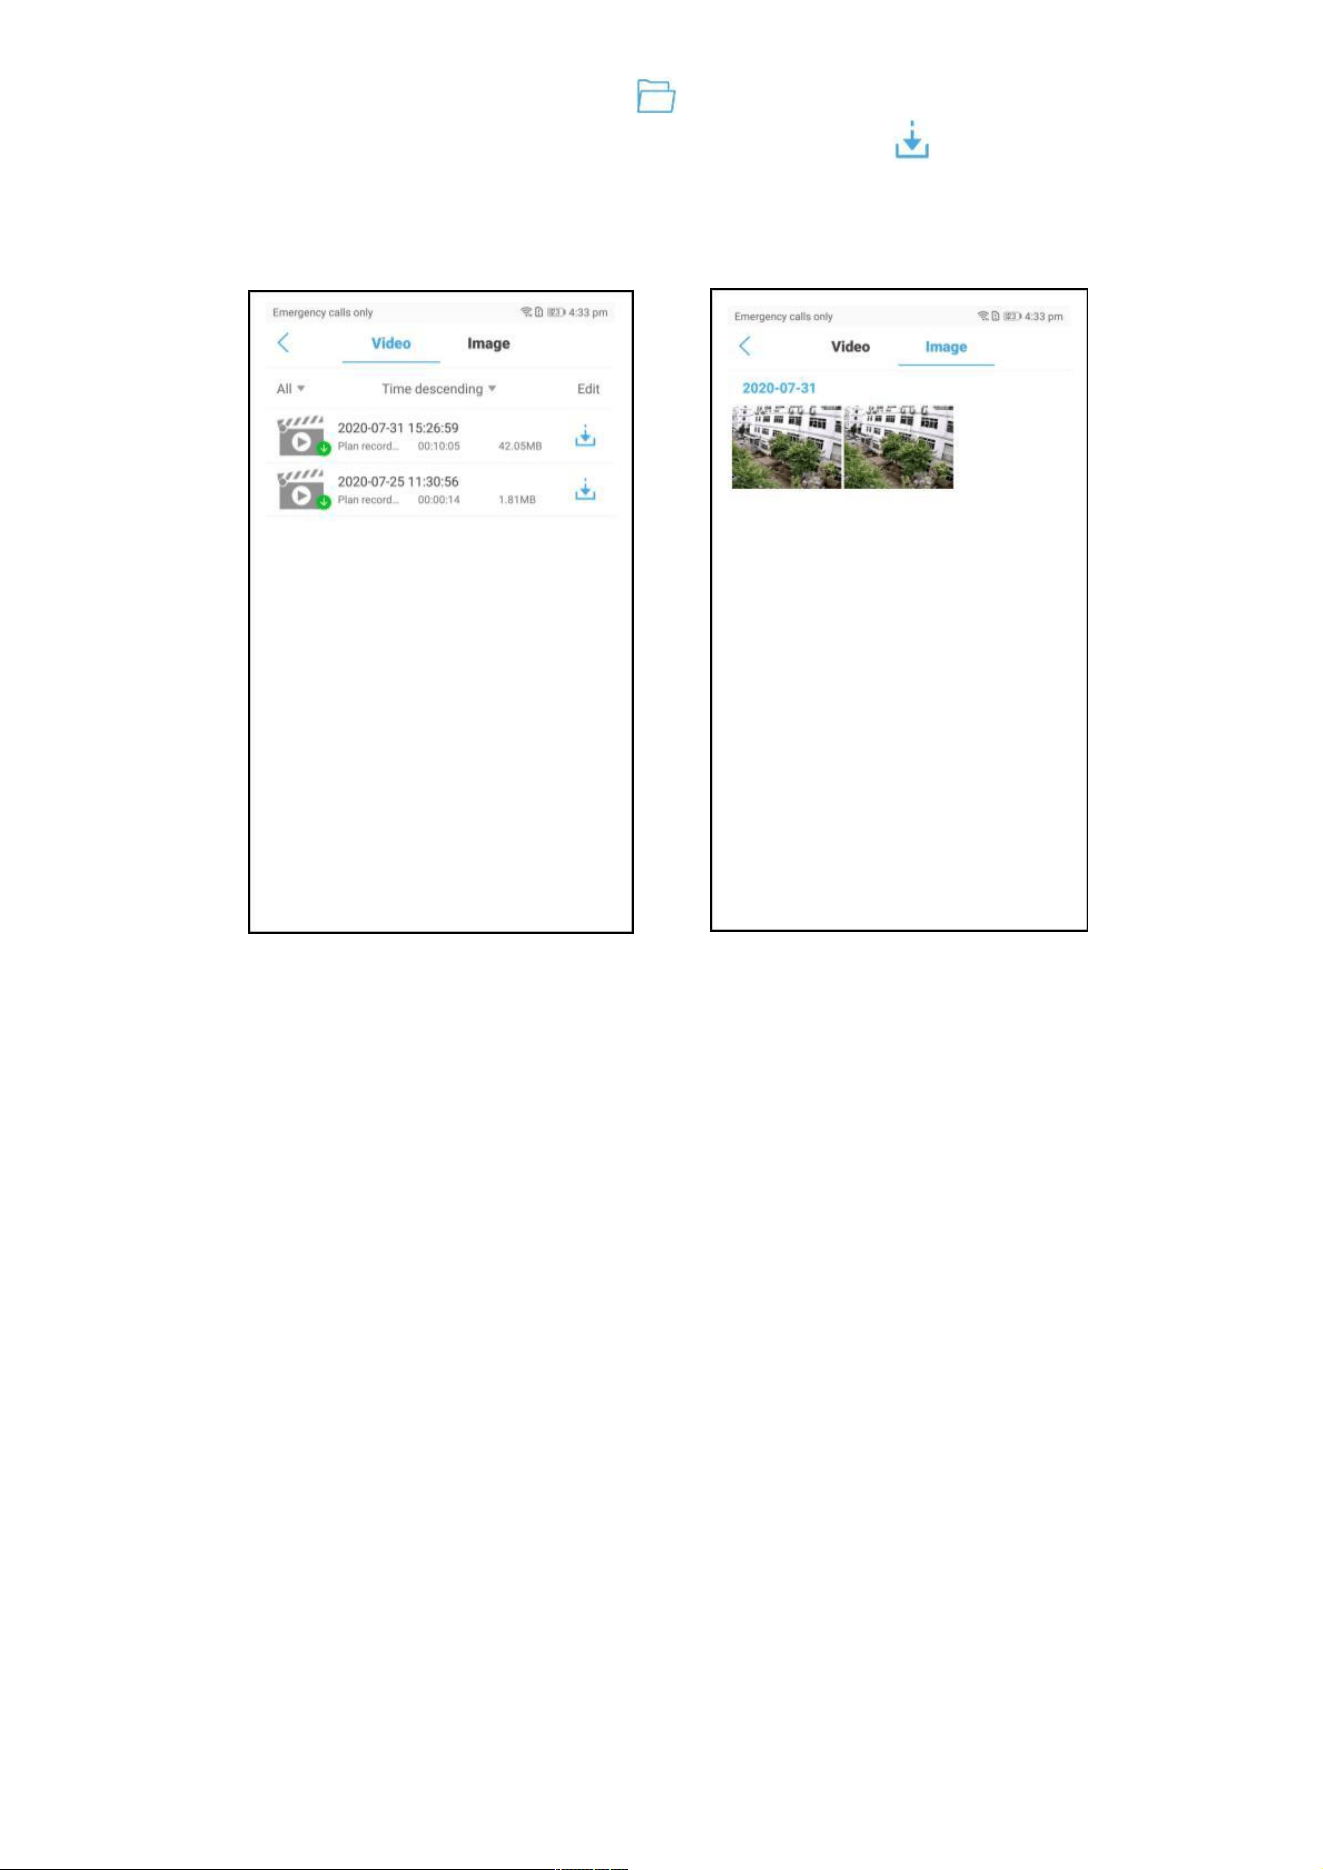
3).View local videos and screenshots: Click "
" on the device list interface to view the video and
screenshots in the phone; click on the file to play directly, click on the "
save the downloaded file transcoding to the phone album
" save icon on the right to
FCC Statement
This device complies with part 15 of the FCC rules. Operation is subject to the following
two conditions: (1) this device may not cause harmful interference, and (2) this device
must accept any interference received, including interference that may cause undesired
operation.
Changes or modifications not expressly approved by the party responsible for compliance
could void the user's authority to operate the equipment.
NOTE: This equipment has been tested and found to comply with the limits for a Class B
digital device, pursuant to part 15 of the FCC Rules. These limits are designed to provide
reasonable protection against harmful interference in a residential installation. This
equipment generates uses and can radiate radio frequency energy and, if not installed and
used in accordance with the instructions, may cause harmful interference to radio
communications. However, there is no guarantee that interference will not occur in a
particular installation. If this equipment does cause harmful interference to radio or
television reception, which can be determined by turning the equipment off and on, the
user is encouraged to try to correct the interference by one or more of the following
measures:
?Reorient or relocate the receiving antenna.
?Increase the separation between the equipment and receiver.
?Connect the equipment into an outlet on a circuit different from that to which the receiver
is connected.
?Consult the dealer or an experienced radio/TV technician for help.
This equipment complies with FCC radiation exposure limits set forth for an uncontrolled
environment. This equipment should be installed and operated with minimum distance
20cm between the radiator & your body.