BE A PRO IN YOUR KITCHEN
WWW.KUCHT.COM
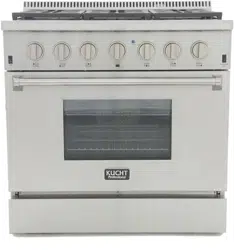
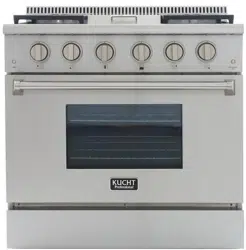
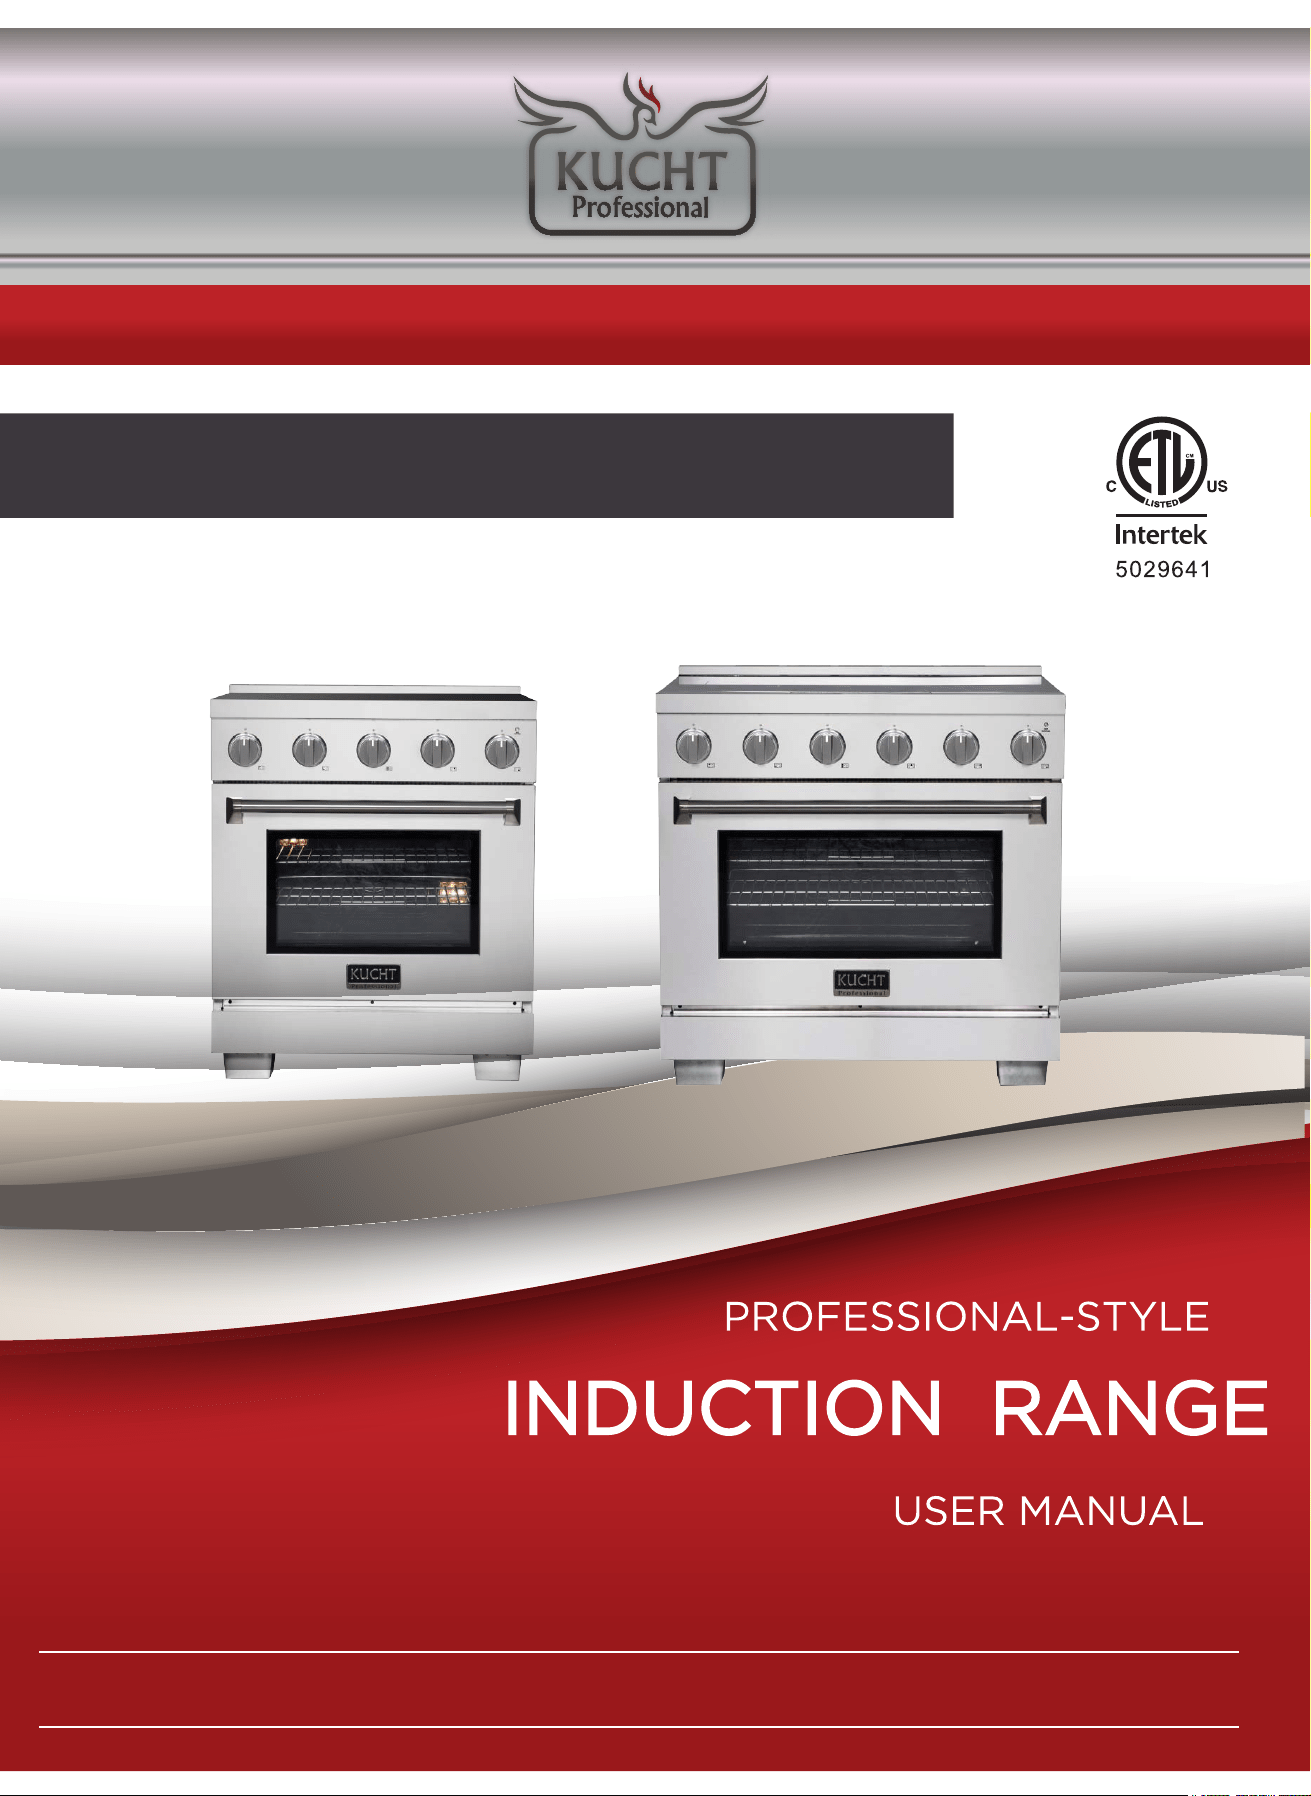
APPLICABLE MODEL: KIN30-SS KIN30-GL KIN36-SS KIN36-GL

Thank you for purchasing your professional-style Induction Range.
We appreciate your business and we recommend that you read this
entire user’s manual before operating your new appliance for the
first time.
This manual contains instructions on how to properly install and
setup your new range, as well as insights into many of the unique
features that our product offers. Please keep this manual for future
reference, as it contains the answers to questions that you might
have as you begin to cook.

Contents
Safety Instruction................................................................4
Unpackage Instruction........................................................9
Installation Instruction........................................................10
Door Handle Instruction...............................................14
Oven Rack Instruction..................................................14
Electrical.......................................................................15
Product Dimension and Cabinets.................................17
Operation
Product Description.......................................................18
Use Range For The First Time......................................19
Compatible Cookware...................................................19
Operation Cooktop Noise.............................................. 20
Cooktop..........................................................................21
Digital Display..............................................................
..
24
Care & Cleaning....................................................................28
Trouble Shooting...................................................................30
Warranty & Product Registration..................................
........
34
Wire Diagram..................................................................
......
32
Exhaust Hood Installation............................................13
Installation of Induction Range....................................13
Important Precautions and Recommendations...........11
Your safety and the safety of others are very important.
We have provided many important safety messages in this manual and on your appliance.
Always read and obey all safety messages.
This is a safety alert symbol. It will alert you to potential personal or property safety hazards.
Obey all safety messages to avoid any property damage, personal injury or death.
WARNING indicates a potentially hazardous situation which, if not avoided, could result in
serious injury or death.
CAUTION indicates a moderate hazardous situation which, if not avoided, could result in
minor or moderate injury.
All safety messages will alert you what the potential hazard is, tell you how to reduce the
chance of injury, and let you know what can happen if the instructions are not followed.
SAFETY INSTRUCTION
If the information in this manual is not followed exactly, a fire or explosion may result, causing
property damage, personal injury or death.
Do not store or use gasoline or other flammable vapors and liquids in the vicinity of this or any
other appliance.
Important – Save for the local electrical inspector's use
WARNING! CALIFORNIA RESIDENTS
Cancer and Reproductive Harm
WWW.P65Warnings.ca.gov
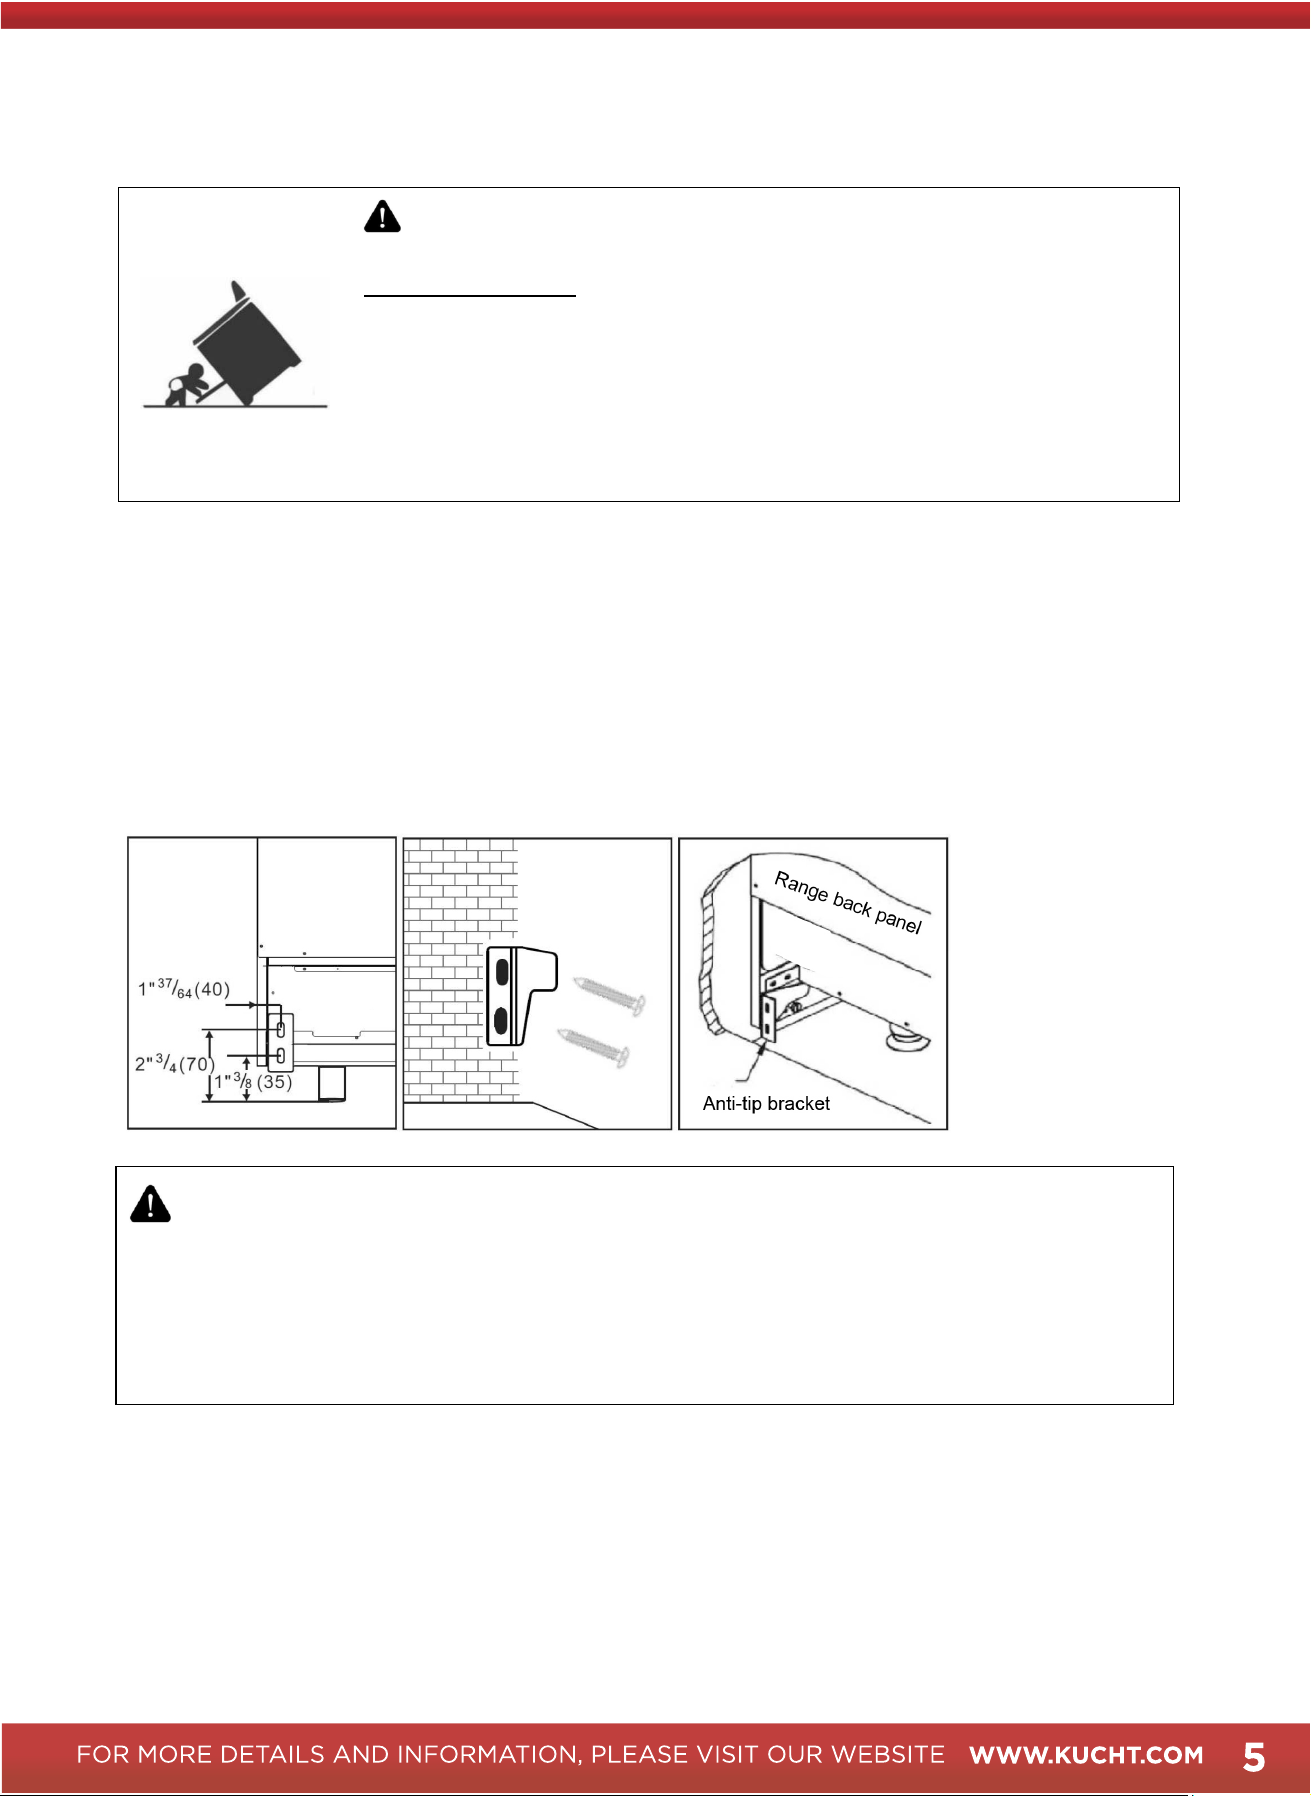
ANTI-TIP DEVICE
WARNING
Tip-over Hazard
A Child or adult can tip the range which can result in serious injuries or death.
Install the anti-tip device to the range and/or structure per installation instructions.
Engage the range to the Anti-tip device installed to the structure.
Re-engage the anti-tip device if the range is removed.
Failure to follow these instructions can result in death or serious injuries and/or
burns to children and adults.
To reduce the risk of tipping the range, the range must be secured by properly installed anti-tip device
packed with the range. See installation instructions shipped with the bracket for complete details before
attempting to install.
All ranges can tip and cause injuries.
WARNING
Never operate the top surface cooking section of the appliance unattended
Failure to follow this warning statement may result in fire, explosion or burn hazard that could
cause property damage, personal injury or death.
If a fire should occur, keep away from the appliance and immediately call your fire
department. DO NOT ATTEND TO EXTINGUISH AN OIL/GREASE FIRE WITH WATER
Make sure the anti-tip bracket is installed.
Slide range forward.
Make sure the anti-tip bracket is securely attached to the wall behind the range.
3. Any adjustment and service should be performed only by a qualified Professional installation
or service technician. Do not attempt to repair or replace any part of your range unless it is
specifically recommended in this manual.
4. Your range into a 240-volt grounded outlet only. Do not removed the round grounding
p
r
o
ng from the plug. If in doubt about the grounding of the home electrical system, it is your
responsibility and obligation to have an ungrounded outlet in accordance with the National
E
l
e
c
t
r
ical Code. Do not use an extension code with this range.
5.
Before any maintenance, unplug the stove or disconnect the power supply by turning off
the circuit breaker.
6. Be sure all packing materials are removed from the range before operating to prevent
ignition of these materials.
7. Avoid scratching or impacting glass displays. Doing so may lead to glass breakage. Do not
cook on a product with broken glass. Shock, fire, or cuts may occur.
8. Do not leave children alone or unattended in an area where an appliance is in use. They
should never be allowed to climb, sit or stand on any part of the range.
9.
Do not store items of interest to children in cabinets above an oven-children
who climb onto the oven to reach items could be seriously injured.
10.
Never block the vents (air openings) of the range. These vents provide the necessary air
inlets and outlets for the range to operate properly. Air openings are located at the rear of the
cooktop, at the top and bottom of the oven door, and at the bottom of the range.
11.
Only use dry pots - wet cookware on hot surfaces may cause steam burns. Don't put
towels or other heavy fabrics under the bottom of the pot.
12.
DO NOT TOUCH SURFACE UNITS OR AREAS NEAR UNITS, HEATING ELEMENTS,
INTERIOR SURFACES OF OVEN–Heating Elements and Surface units may be hot even
though they are dark in color. Interior surfaces of an oven and Areas near surface units become
hot enough to cause burns. During and after use, do not touch, or let clothing or other flammable
materials contact heating elements, interior surfaces of oven, surface units or areas near units
until they have had sufficient time to cool. Other surfaces of the appliance may become hot
enough to cause burns –among these surfaces are cooktop, oven vent openings, surfaces near
these openings, oven doors, and windows of oven doors.
13. Do not heat unopened food containers. Pressure could build up and the container could
burst, causing any injury.
Extremely Heavy.
Proper equipment and adequate manpower are needed when move the range to avoid
personal injury or damage to the unit or the floor.
Failure to follow this advice may result in damage or personal injury.
1. Use this range for its intended purpose as described in this instruction manual.
2. Have your range installed and properly grounded by a qualified installer in accordance with
the provided installation instructions.
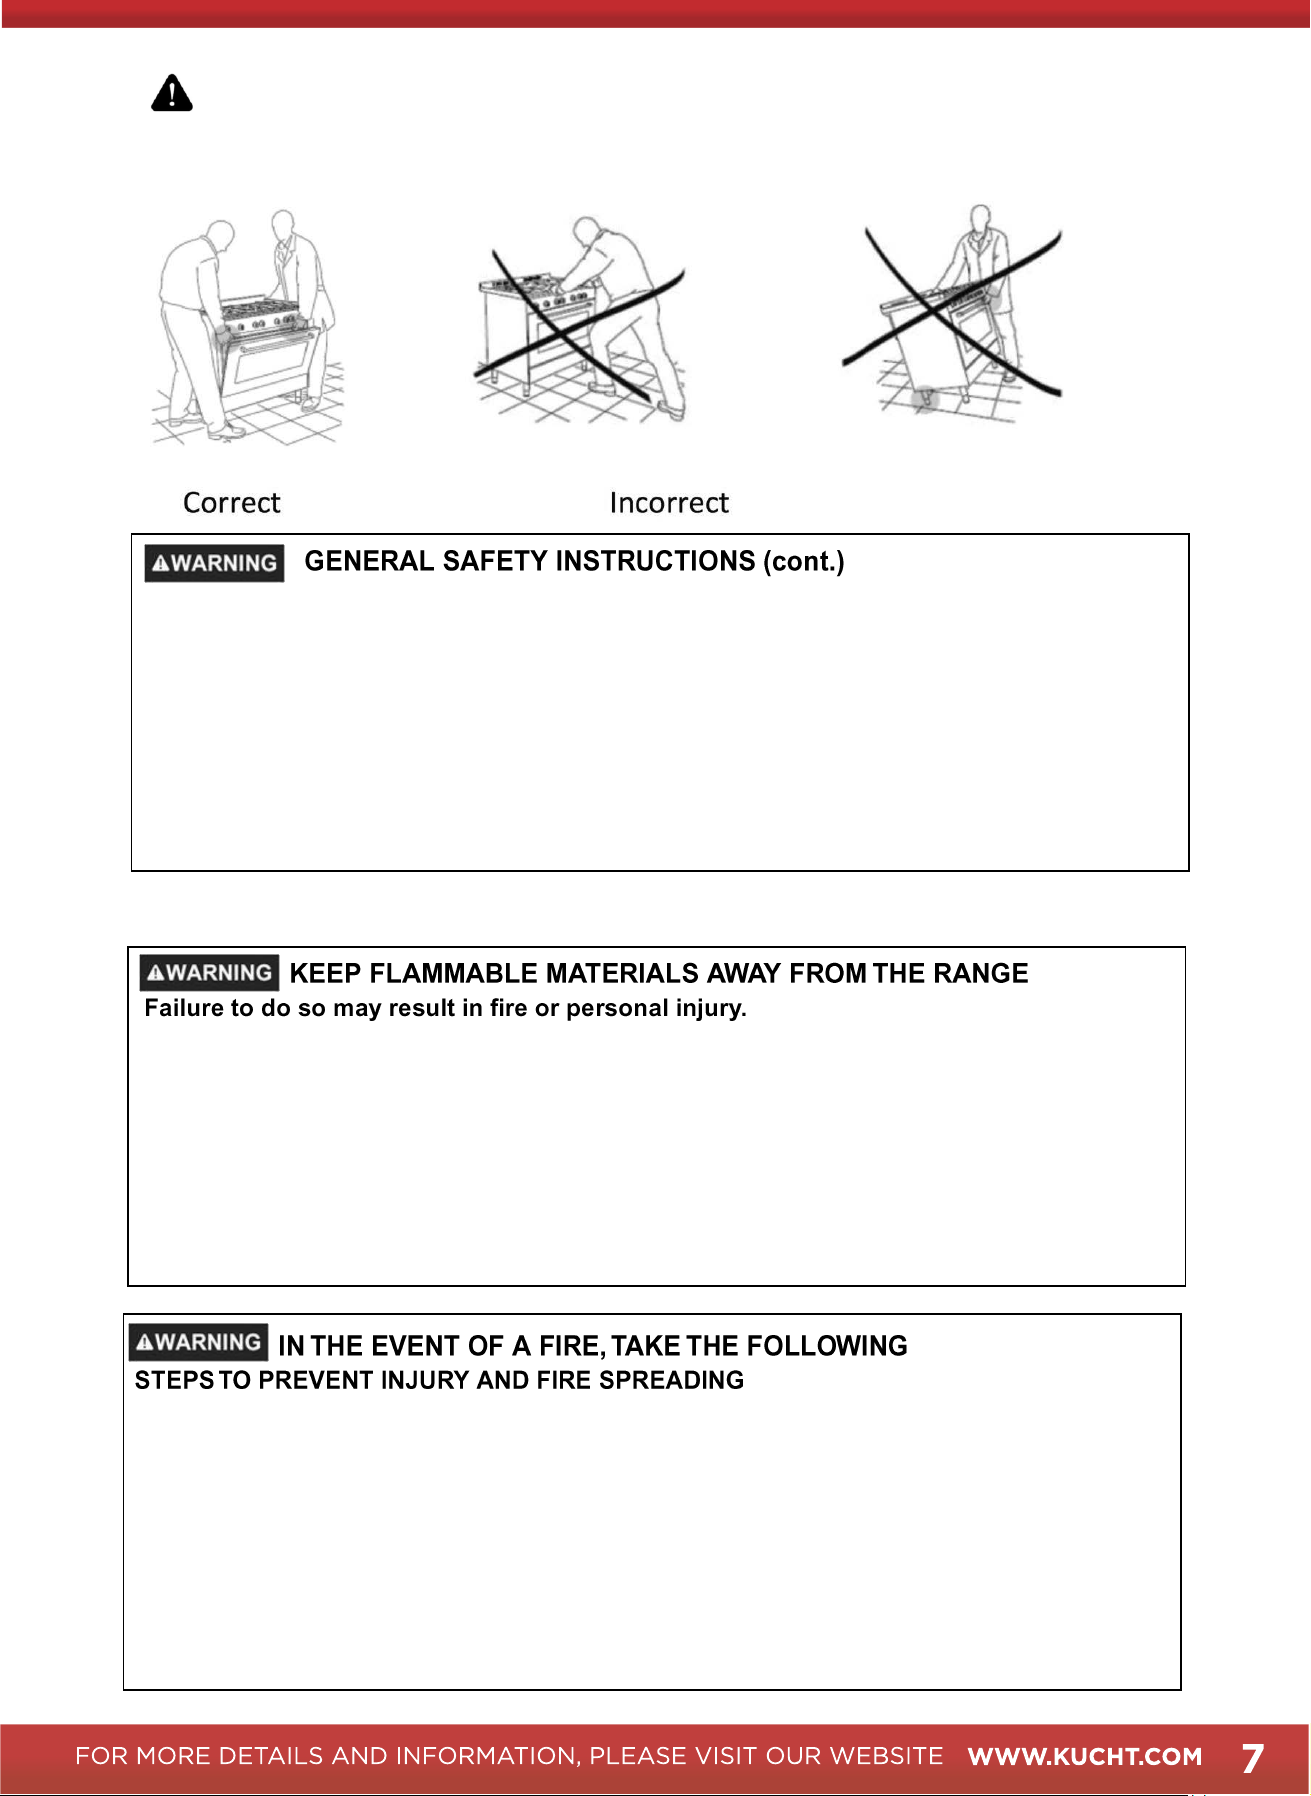
DO NOT carry or lift the cooking range by the oven door handle or the control panel!
Cook food thoroughly to help protect against foodborne illness. Minimum safe food temperature
recommendations can be found at www.IsItDoneYet.gov and www.fsis.usda.gov. Use a food
thermometer to take food temperatures and check several locations.
Do not allow anyone to climb, stand or hang on the oven door, drawer or cooktop. They could
damage the range or tip it over causing severe injury or death.
Keep the ventilator hood and grease filter clean to maintain good venting and to avoid grease
fires. Turn the ventilator OFF in case of a fire or when intentionally "flaming" liquor or other
spirits on the cooktop. The blower if in operation, could spread
the flames.
Do not store or use flammable materials in an oven or near the cooktop, including paper,
Do not use water on grease fires. Never pick up a flaming pan. Turn the controls off. Smother a
flaming pan on a surface unit by covering the pan completely with a well-fitting lid, cookie sheet
or flat tray. Use a multi-purpose dry chemical or foam-type fire extinguisher.
If there is a fire in the oven during baking, smother
the fire by closing the oven door and
turning the oven off or by using a multi-purpose dry chemical or foam-type fire extinguisher.
If there is a fire in the oven during self-clean, turn
the oven off and wait for the fire to go out.
Failure to follow this instruction may result in severe burns.
Do not store or use flammable materials in an oven or near the cooktop, including paper,
plastic, pot holders, linens, wall coverings, curtains, drapes and gasoline or other flammable
vapors and liquids.
Never wear loose-fitting or hanging garments while using the appliance. These garments may
ignite if they contact hot surfaces causing severe burns.
Do not let cooking grease or other flammable materials accumulate in or near the range.
Grease in the oven or on the cooktop may ignite.
WARNING
NEVER cover any slots, holes, or passages in the oven bottom or cover an entire rack with
materials such as aluminum foil or oven liners. Doing so blocks air flow through the oven and may
cause carbon monoxide poisoning. Never place foil or oven liners on the oven bottom. They can trap
heat causing risk of smoke or fire.
Stand away from the range when opening the oven door. Escaping hot air or steam can cause
burns to hands, face and/or eyes.
Never place cooking utensils, pizza or baking stones, or any type of foil or liner on the oven floor.
These items can trap heat or melt, resulting in damage to the product and risk of shock, smoke or
fire.
Place oven racks in desired location while oven is cool. If the rack must be moved while the oven is
hot, be careful to avoid touching hot surfaces.
Do not leave items such as paper, cooking utensils, or food in the oven when not in use. Items stored
in an oven can ignite.
Do not leave items on the cooktop near the oven vent. Items may overheat resulting in a risk of fire
or burns.
Never broil with the door open. Open-door broiling is not advised due to overheating of control knobs.
Never leave the surface heater unattended at medium or high heat settings. Foods, especially oily
foods, may ignite resulting in fire that could spread to surrounding cabinets.
Never leave oil unattended while frying. If allowed to heat beyond its smoking point, oil may ignite
resulting in fire that may spread to surrounding cabinets. Use a deep fat thermometer whenever
possible to monitor oil temperature.
To avoid oil spillover and fire, use the minimum amount of oil when frying in a shallow pan and
avoid cooking frozen foods with excessive amounts of ice.
Use the proper size of the pot to avoid instability or easy tilting. Select a cooker that matches the
size of the heater. The heater temperature should be adjusted, and excessive heating may be
dangerous.
When using glass/ceramic cookware, make sure it is suitable for cooktop use; others may break
because of a sudden change in temperature.
To minimize the possibility of heater, ignition of flammable materials and spillage, cookware handles
should be turned toward the center of the range without extending over nearby heater.
Do not cover any part of the heater or decorative stove with aluminum foil. Doing so may cause
overheating of the cooktop surface and fire hazard.
UNPACKING AND HANDLING
WARNING
HAVE THIS RANGE INSTALLED BY A QUALIFIED INSTALLER.
Improper installation, adjustment, alteration or maintenance can cause injury or property damage.
Consult a qualified installer or service agency.
INSTALLATION INSTRUCTIONS
IMPORTANT – SAVE FOR THE LOCAL ELECTRICAL INSPECTOR’S USE.
BEFORE USING YOUR INDUCTION RANGE
•
Remove the exterior and interior packing.
•
Check to be sure you have all of the following parts:
•
2 Oven Racks
•
2 Wall-against mat
(Packed in the Styrofoam packing above the range – DO NOT DISCARD)
•
1 Anti-tip Bracket
•
(Packed in the Styrofoam packing above the range – DO NOT DISCARD)
1 Oven door handle
1 Manual
•
Clean the interior surface with lukewarm water using a soft cloth.
•
Have your range installed and properly grounded by a qualified installer in accordance with
the installation instructions.
•
Do not attempt to repair or replace any part of your range unless it is specifically
recommended in this manual.
•
Do not remove permanently affixed labels, warnings, or plates from the product. This may
void the warranty.
•
The installer should leave these instructions with the consumer who should retain for local
inspector’s use and for future reference.
•
Please observe all local and national codes and ordinances.
IMPORTANT:
This range is designed and manufactured solely for the cooking of domestic (household) food and
is not suitable for any non-domestic application and therefore should not be used in a commercial
environment.
The range warranty will be void if the range is used within a non-domestic environment i.e. a semi
commercial, commercial or communal environment.
•
1 Air Fry Basket
•

Important Precautions and Recommendations
After having unpacked the range, check to ensure that it is not damaged, and the oven door closes
correctly. In case of doubt, do not use it and consult your supplier or a professionally qualified
technician.
Packing elements (i.e. plastic bags, polystyrene foam, packing straps, etc.) should not be left around
within easy reach of children, as these may cause serious injuries.
The range has been thoroughly tested for safe and efficient operation. However, as with any
appliance, there are specific installation and safety precautions that must be followed to ensure safe
and satisfactory operation.
•
Do not attempt to modify the technical characteristics of the appliance as this may become
dangerous to use.
•
Do not carry out cleaning or maintenance operations on the appliance without having
previously disconnected it from the electric power supply.
•
After use, ensure that the knobs are in position .
•
Never touch the appliance with wet hands or feet.
•
Do not operate the appliance barefooted.
•
Do not allow children or other incapable people to use the appliance without supervision.
•
During and after use of the range, certain parts will become very hot. Do not touch cooktop.
•
Keep children away from the range when it is in use.
•
Fire Risk! Do not store flammable materials in the oven .
•
Fire Risk! Do not attempt to dry clothing or any other type of textile in the oven
.
•
Make sure that electrical cables connecting other appliances in the proximity of the range
cannot come into contact with the hob or become entrapped in the oven door.
•
Do not line the oven walls with aluminum foil. Do not place shelves, pans, backing trays, broil
tray or other cooking utensils on the base of the oven chamber.
•
The manufacturer declines all liability for injury to persons or damage to property caused by
incorrect or improper use of the range.
•
To avoid any possible hazard, the appliance must be installed by qualified personnel only.
Any repairs by unqualified persons may result in electric shock or short circuit. In order to
avoid possible injuries to your body or to the range, do not attempt and repairs by
yourself. Such work should be carried out by qualified service personnel only.
•
Burn Hazard! The oven and cooking accessories may become very hot during operation.
Make sure children are kept out of reach and warn them accordingly. To avoid burns use
oven mitts or heat-resistant gloves when handling hot parts or utensils.
•
Stand away from the range when operating oven door. Hot air or steam which escapes can
cause burns to hands, face, and/or eyes.
•
Never clean the oven with any high-pressure steam cleaning devices, as it may provoke a
short circuit.
•
Do not leave anything on the top of oven vent. Never cover the oven vent opening with
aluminum foil or any other material.
•
This range is intended for household use. Never use the appliance for any other purpose.
•
If you should decide not to use the range any longer (or decide to substitute an older model),
before disposing of it, it is recommended that it be made inoperative in an appropriate manner
in accordance to health and environmental protection regulations, ensuring in particular that
all potentially hazardous parts be made harmless, especially in relation to children who could
play with old appliances. Remove the door before disposal to prevent entrapment.

•
Proper Installation – Be sure your appliance is properly installed and grounded by a qualified
technician.
Never Use Your Appliance for Warming or Heating the Room.
Do Not Leave Children Alone – Children should not be left alone or unattended in area where
appliance is in use. They should never be allowed to sit or stand on any part of the appliance.
Wear Proper Apparel – Loose-fitting or hanging garments should never be worn while using
the appliance.
User Servicing – Do not repair or replace any part of the appliance unless specifically
recommended in the manual. All other servicing should be referred to a qualified technician.
Storage in or on Appliance – Flammable materials should not be stored in an oven or near
surface units.
Do Not Use Water on Grease Fires – Smother fire or flame or use dry chemical or foamtype
extinguisher.
Use Only Dry Potholders – Moist or damp potholders on hot surfaces may result in burns from
steam. Do not let potholder touch hot heating elements. Do not use a towel or other bulky
cloth.
Use Proper Pan Size – This appliance is equipped with one or more surface units of different
size. Select utensils having flat bottoms large enough to cover the surface unit heating
element. The use of undersized utensils will expose a portion of the heating element to direct
contact and may result in ignition of clothing. Proper relationship of utensil to burner will also
improve efficiency.
Never Leave Surface Units Unattended at High Heat Settings – Boilover causes smoking and
greasy spillovers that may ignite.
Make Sure Reflector Pans or Drip Bowls Are in Place – Absence of these pans or bowls during
cooking may subject wiring or components underneath to damage.
Protective Liners – Do not use aluminum foil to line surface unit drip bowls or oven bottoms,
except as suggested in the manual. Improper installation of these liners may result in a risk of
electric shock, or fire.
Glazed Cooking Utensils – Only certain types of glass, glass/ceramic, ceramic,
earthenware, or other glazed utensils are suitable for range-top service without breaking due to
the sudden change in temperature.
Utensil Handles Should Be Turned Inward and Not Extend Over Adjacent Surface Units – To
reduce the risk of burns, ignition of flammable materials, and spillage due to unintentional
contact with the utensil, the handle of a utensil should be positioned so that it is turned inward,
and does not extend over adjacent surface units.
Do Not Soak Removable Heating Elements – Heating elements should never be immersed in
water.
Use Care When Opening Door – Let hot air or steam escape before removing or replacing
food.
Do Not Heat Unopened Food Containers – Build-up of pressure may cause container to burst
and result in injury.
Keep Oven Vent Ducts Unobstructed.
Placement of Oven Racks – Always place oven racks in desired location while oven is cool. If
rack must be moved while oven is hot, do not let potholder contact hot heating element in
oven.
Do Not Cook on Broken Cook-Top – If cook-top should break, cleaning solutions and spillovers
may penetrate the broken cook-top and create a risk of electric shock. Contact a qualified
technician immediately.
Clean Cook-Top With Caution – If a wet sponge or cloth is used to wipe spills on a hot cooking
area, be careful to avoid steam burn. Some cleaners can produce noxious fumes if applied to a
hot surface.
Do not place metallic objects such as knives, forks, spoons and lids on the cooktop surface
since they can get hot.
•
•
•
•
•
•
•
•
•
•
•
•
•
•
•
•
•
•
•
•
•
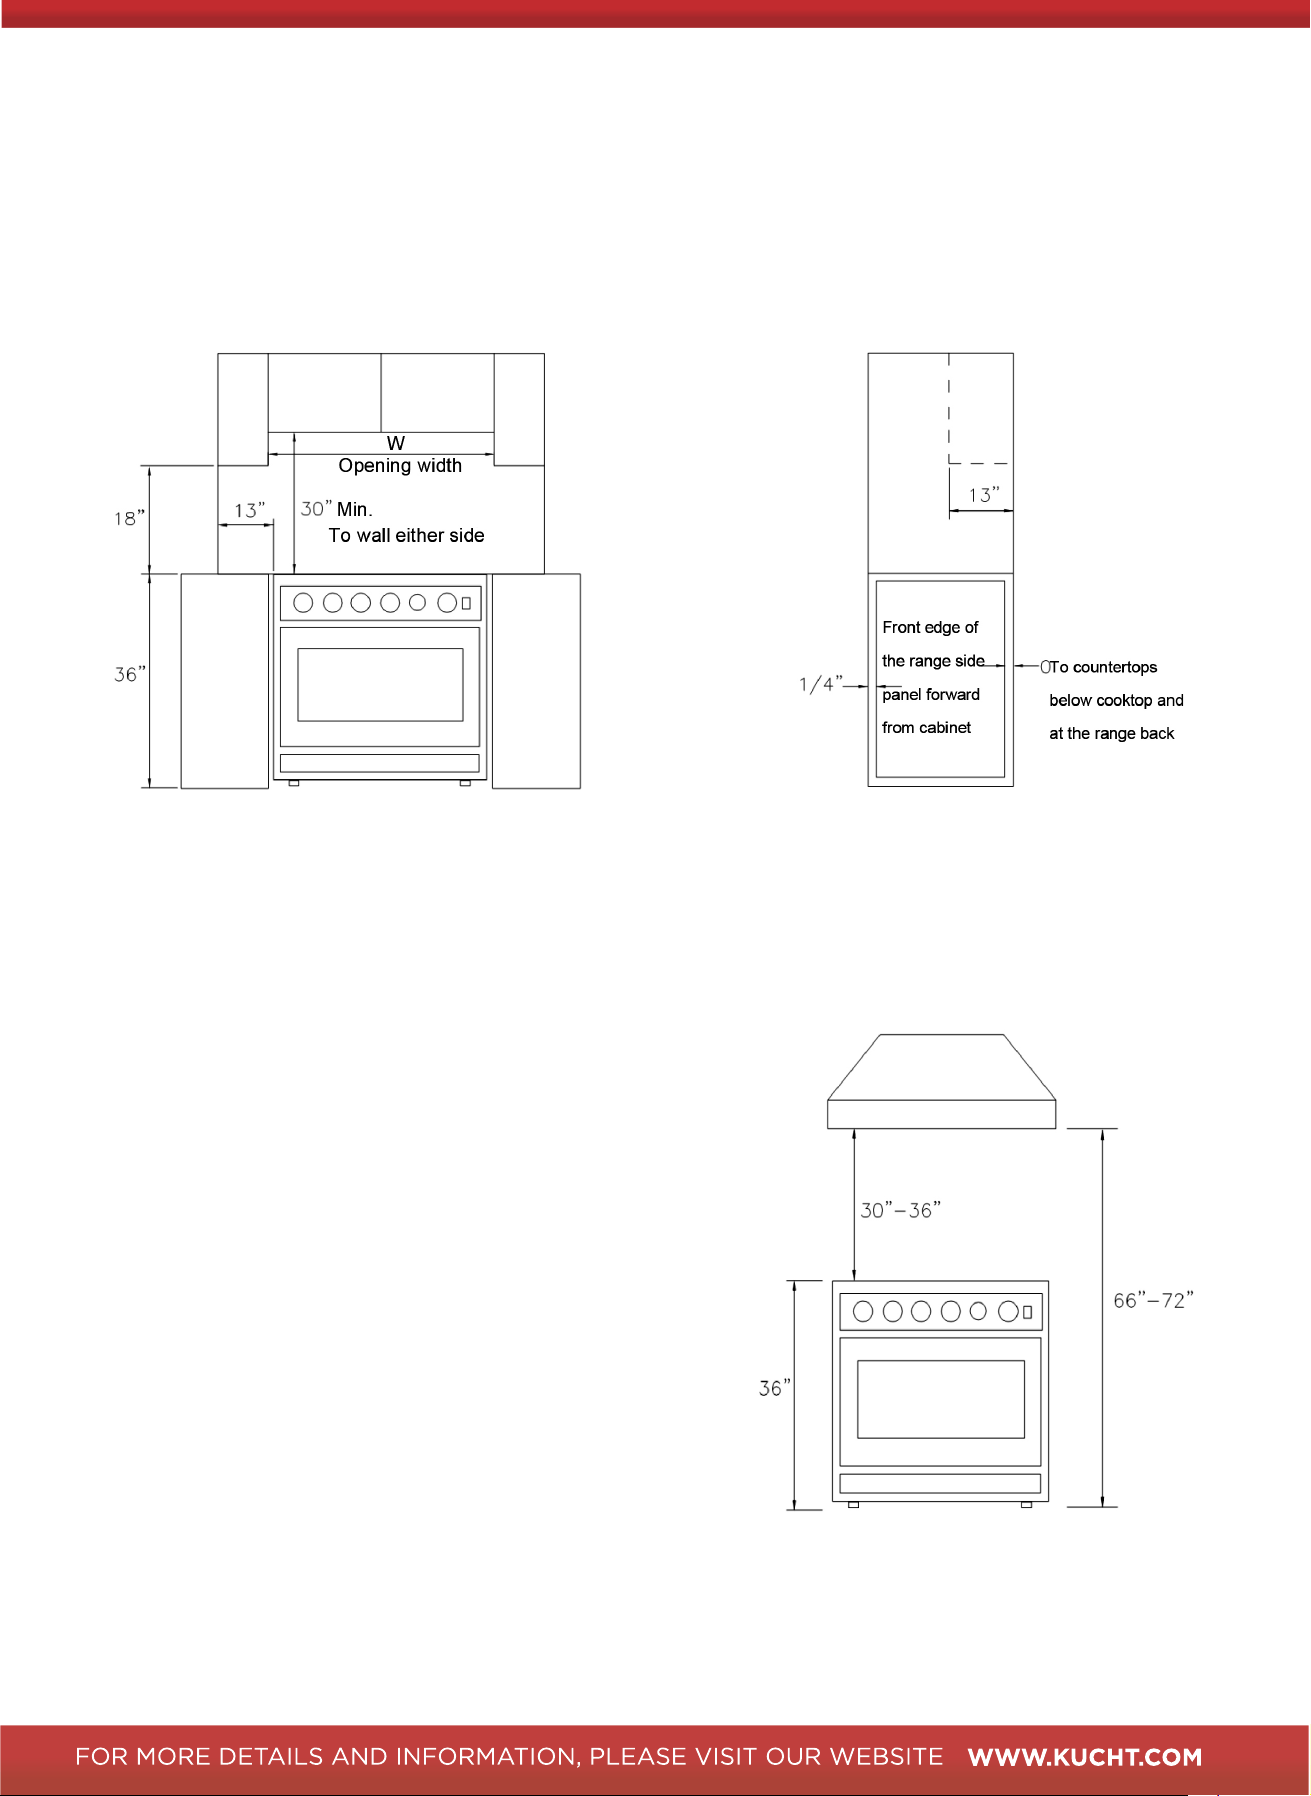
Opening width
30" Model
36" Model
W
3
0"
(
7
62mm)
36"
(914mm)
Exhaust Hood Installation
The bottom of the hood should be 30" min. to 36"
above the countertop. This would typically result in
the bottom of the hood being 66" to 72" above the
floor. These dimensions provide safe and efficient
operation of the hood.
Installation of Induction Range
Minimum to cabinets on either sides of the range
Maximum depth for cabinets above countertop
13
•
The induction range must be installed by a qualified technician. Make sure you have everything
necessary for correct installation. It is the installer’s responsibility to comply with installation
clearances specified in the manual.
•
Cabinet opening dimensions that are shown above must be used. Given dimensions are
minimum clearances. The minimum spacings must be maintained between the appliance
cooking surface and the horizontal surface above the cooking top.
•
30 inches is the minimum clearance between the top of the cooking surface and the bottom of
an unprotected wood or metal cabinet
•
To eliminate the risk of burns or fire by reaching over heated surface units, cabinet storage
space located above the surface units should be avoided. If cabinet storage is to be provided,
the risk can be reduced by installing a range hood that projects horizontally a minimum of 5
inches beyond the bottom of the cabinets.
•
Place your induction range on a floor that is strong enough to support it when it is fully
assembled as above picture. To level your induction range, adjust the leveling legs at
the bottom of the unit.
•
Avoid locating the unit in moist areas. As this may result in the risk of electrical shock.
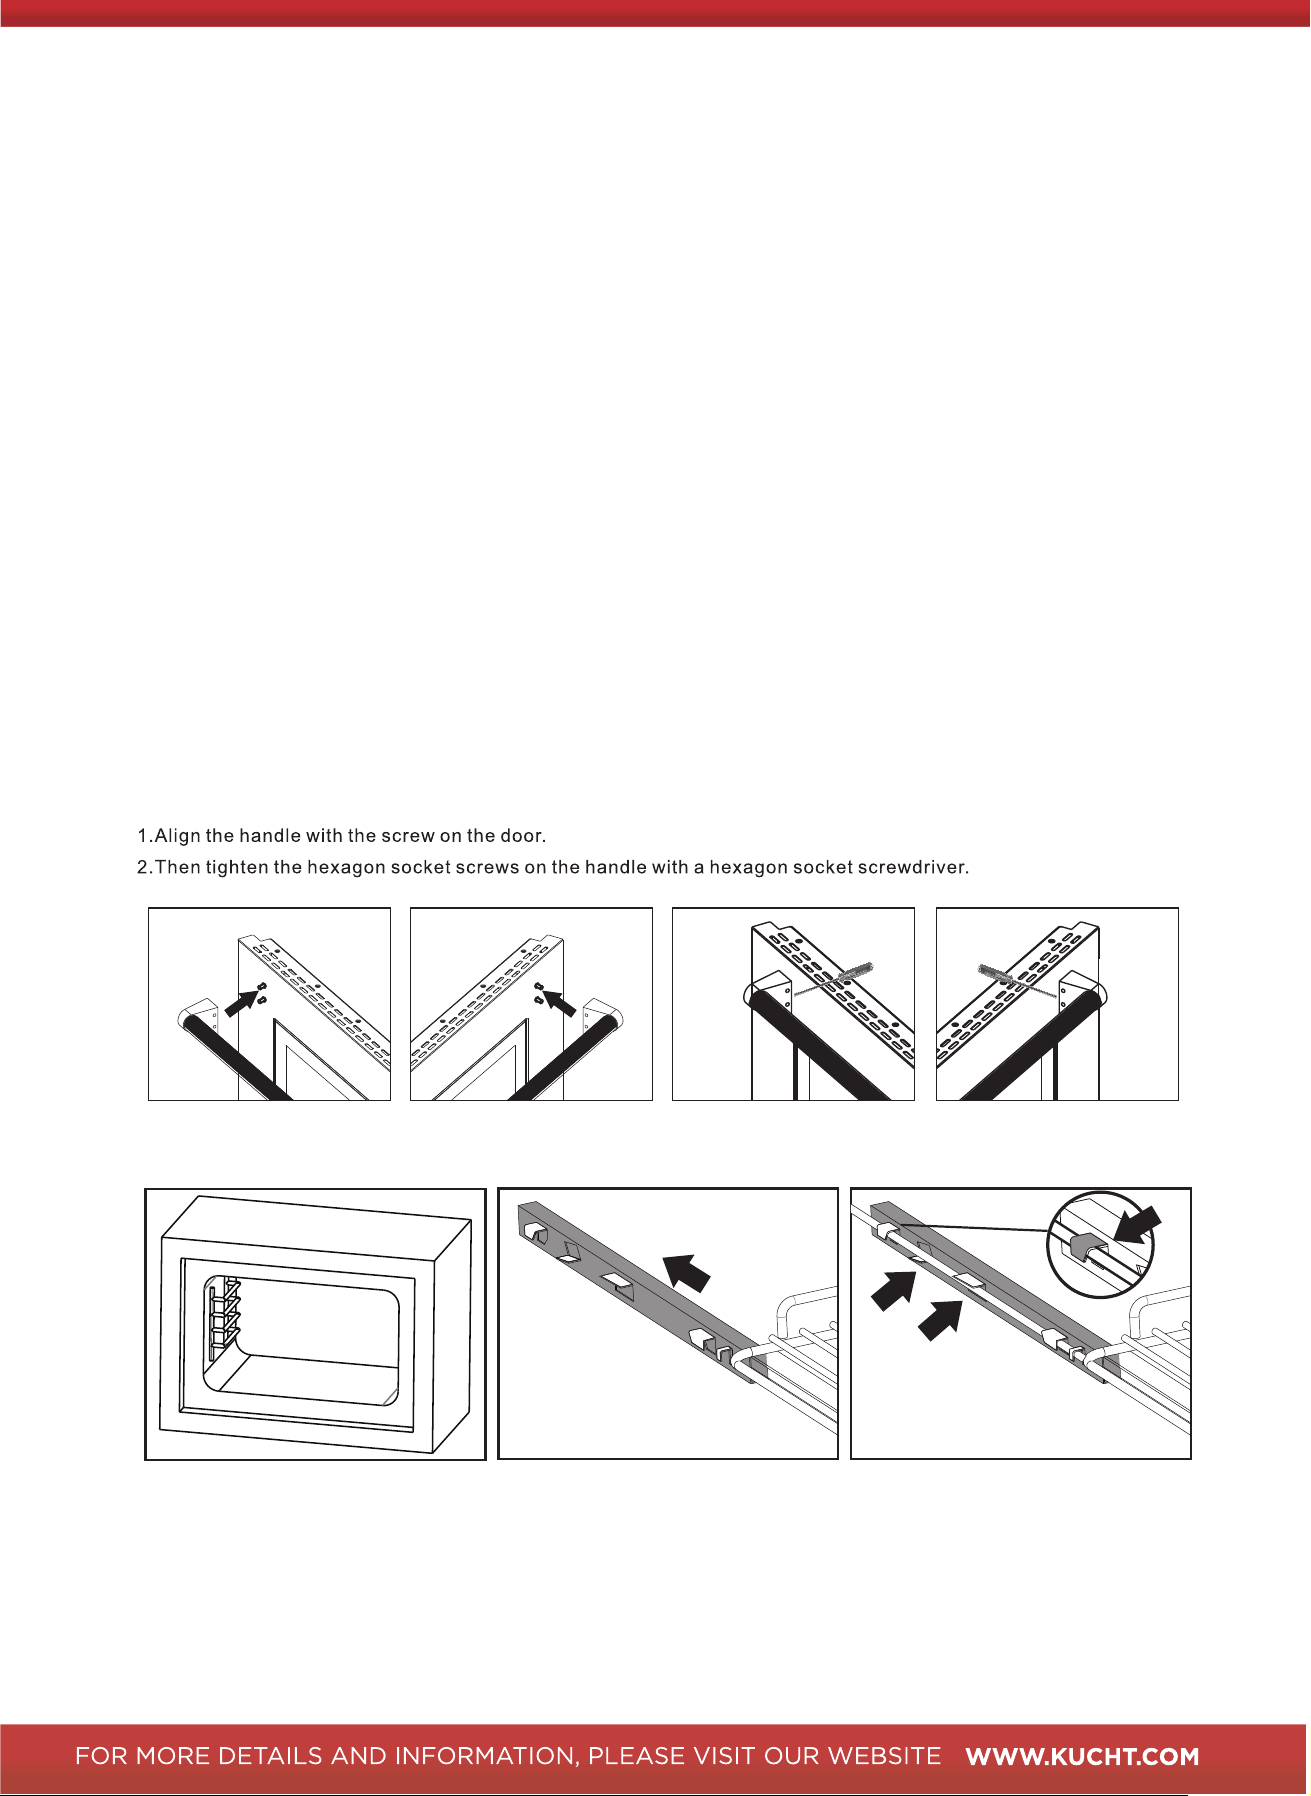
Door handle installations
The door handle is not pre-installed. Follow the illustrations below to install the door handle
quickly and easily.
Oven Racks Installation
1-Open the oven door 2- Pull the rail outwards 3- Make sure the first hinge slides on
top of the arm, the second hinge at the
bottom, and the two front should be on the
top of the arm. Push the rack completely
towards the back. This complete the
installation.
14
CAUTION Label all wires prior to disconnection when servicing controls. Wiring errors can
cause improper and dangerous operation. Verify proper operation after servicing.
Grounding
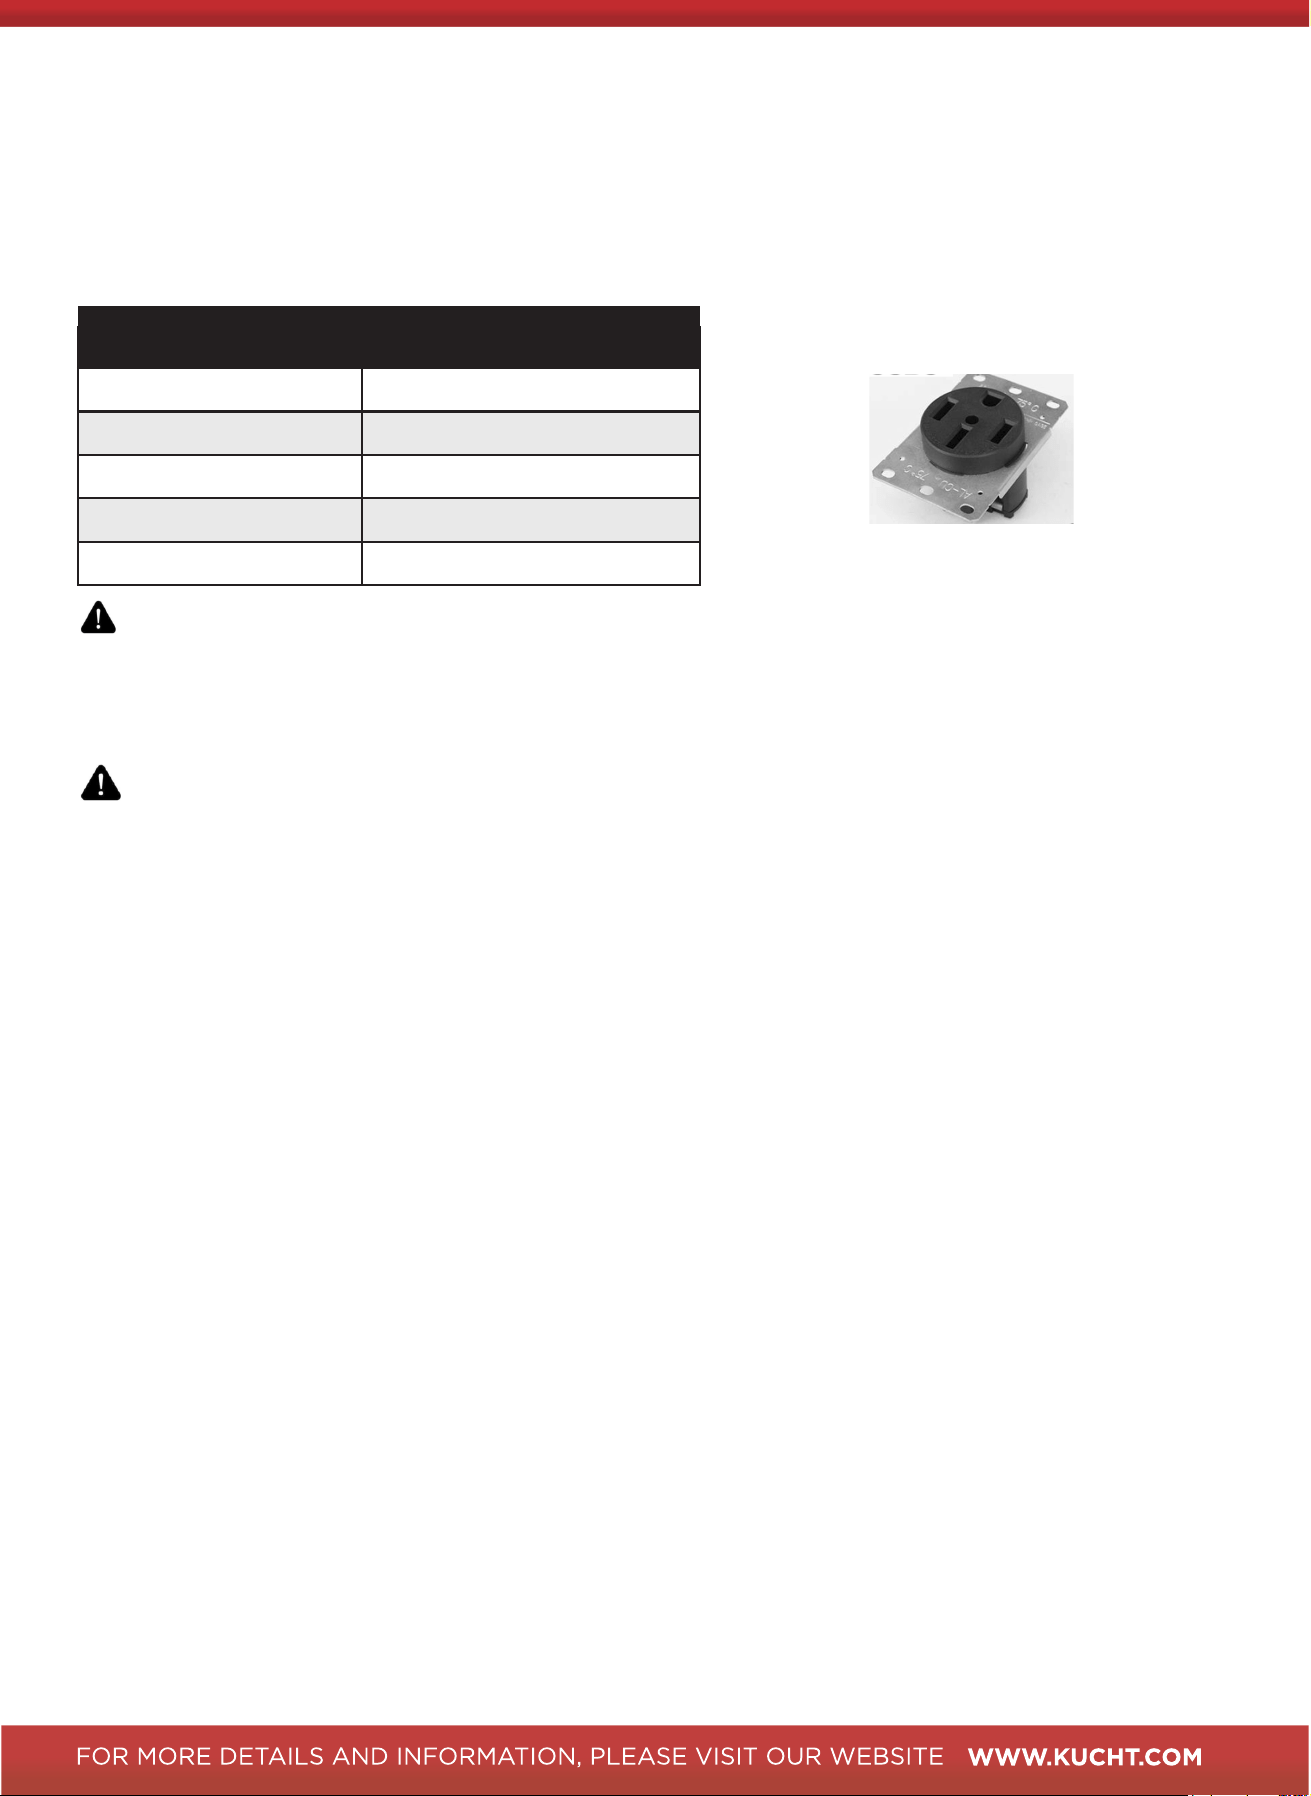
The power cord is equipped with a four-prong (grounding) plug which mates with a standard four-prong
grounding wall receptacle to minimize the possibility of electrical shock hazard from the range.
All cord connected appliance shall include instructions relative to location of the wall receptacle and a
warning to the user to disconnect the electrical supply before serving the appliance.
Where a standard three-prong wall receptacle is encountered, it is the responsibility and obligation of
the customer to have it replaced with a properly grounded four-prong wall receptacle. Do not cut or
remove the grounding prong from the power cord.
ELECTRICAL SHOCK HAZARD Disconnect electrical power at the circuit breaker box or
fuse box before installing the appliance. Provide appropriate ground for the appliance. Use copper
conductors only. Failure to follow these instructions could result in serious injury or death.
Wire Connection:
1. Connect the L1 receptacle terminal to the incoming RED electrical supply wire (L1-hot wire).
2. Connect the L2 receptacle terminal to the incoming BLACK electrical supply wire (L2-hot wire).
3. Connect the NEUTRAL receptacle terminal to the incoming NEUTRAL (WHITE) electrical
supply wire.
4. Connect the GROUND receptacle terminal to the incoming GROUND (GREEN) electrical supply wire.
This appliance is equipped at the factory with an electric supply cord set 4 wires type with ring
terminals (L1, L2, N, Ground) suitable for range use UL/CSA listed type SRDT/DRT 2X8AWG
(L1, L2) + 2X10AWG (N,G) rated 300V, 40A with plug type NEMA 14-50P; cable length 1.2m; in
case the supply cord set must be replaced, it shall be replaced with an identical set having the
same technical specs and following carefully the instructions and diagrams.
It can only be performed by a qualified technician.
Electrical
Your range must be electrically grounded in accordance with local codes or, in the absence of local codes, in
accordance with the National Electrical Code (ANSI/NFPA 70, latest edition). In Canada, electrical grounding must
be in accordance with the current CSA C22.1 Canadian Electrical Code Part 1 and/or local codes.
The power supply must be the correct polarity. If there is any doubt as to whether the power supply has the correct
polarity or grounded, have it checked by a qualified electrician.
Socket
Electrical Supply Grounded, 240 VAC, 60Hz
Service
2/C 8AWG+2/C 10AWG
Receptacle 4-prong grounding-type
PowerCord 3.9' (1.2m)
Max connected load
KIN30 (10.6kW) KIN36(11.6kW)
WARNING
Electrical grounding Instructions: This range is equipped with a four-prong (grounding) plug
for your protection against shock hazard and should be plugged directly into a properly grounded four-prong receptacle.
Do not cut or remove the grounding pin from the plug.
Electrical Requirement- KIN30 \ KIN36
15
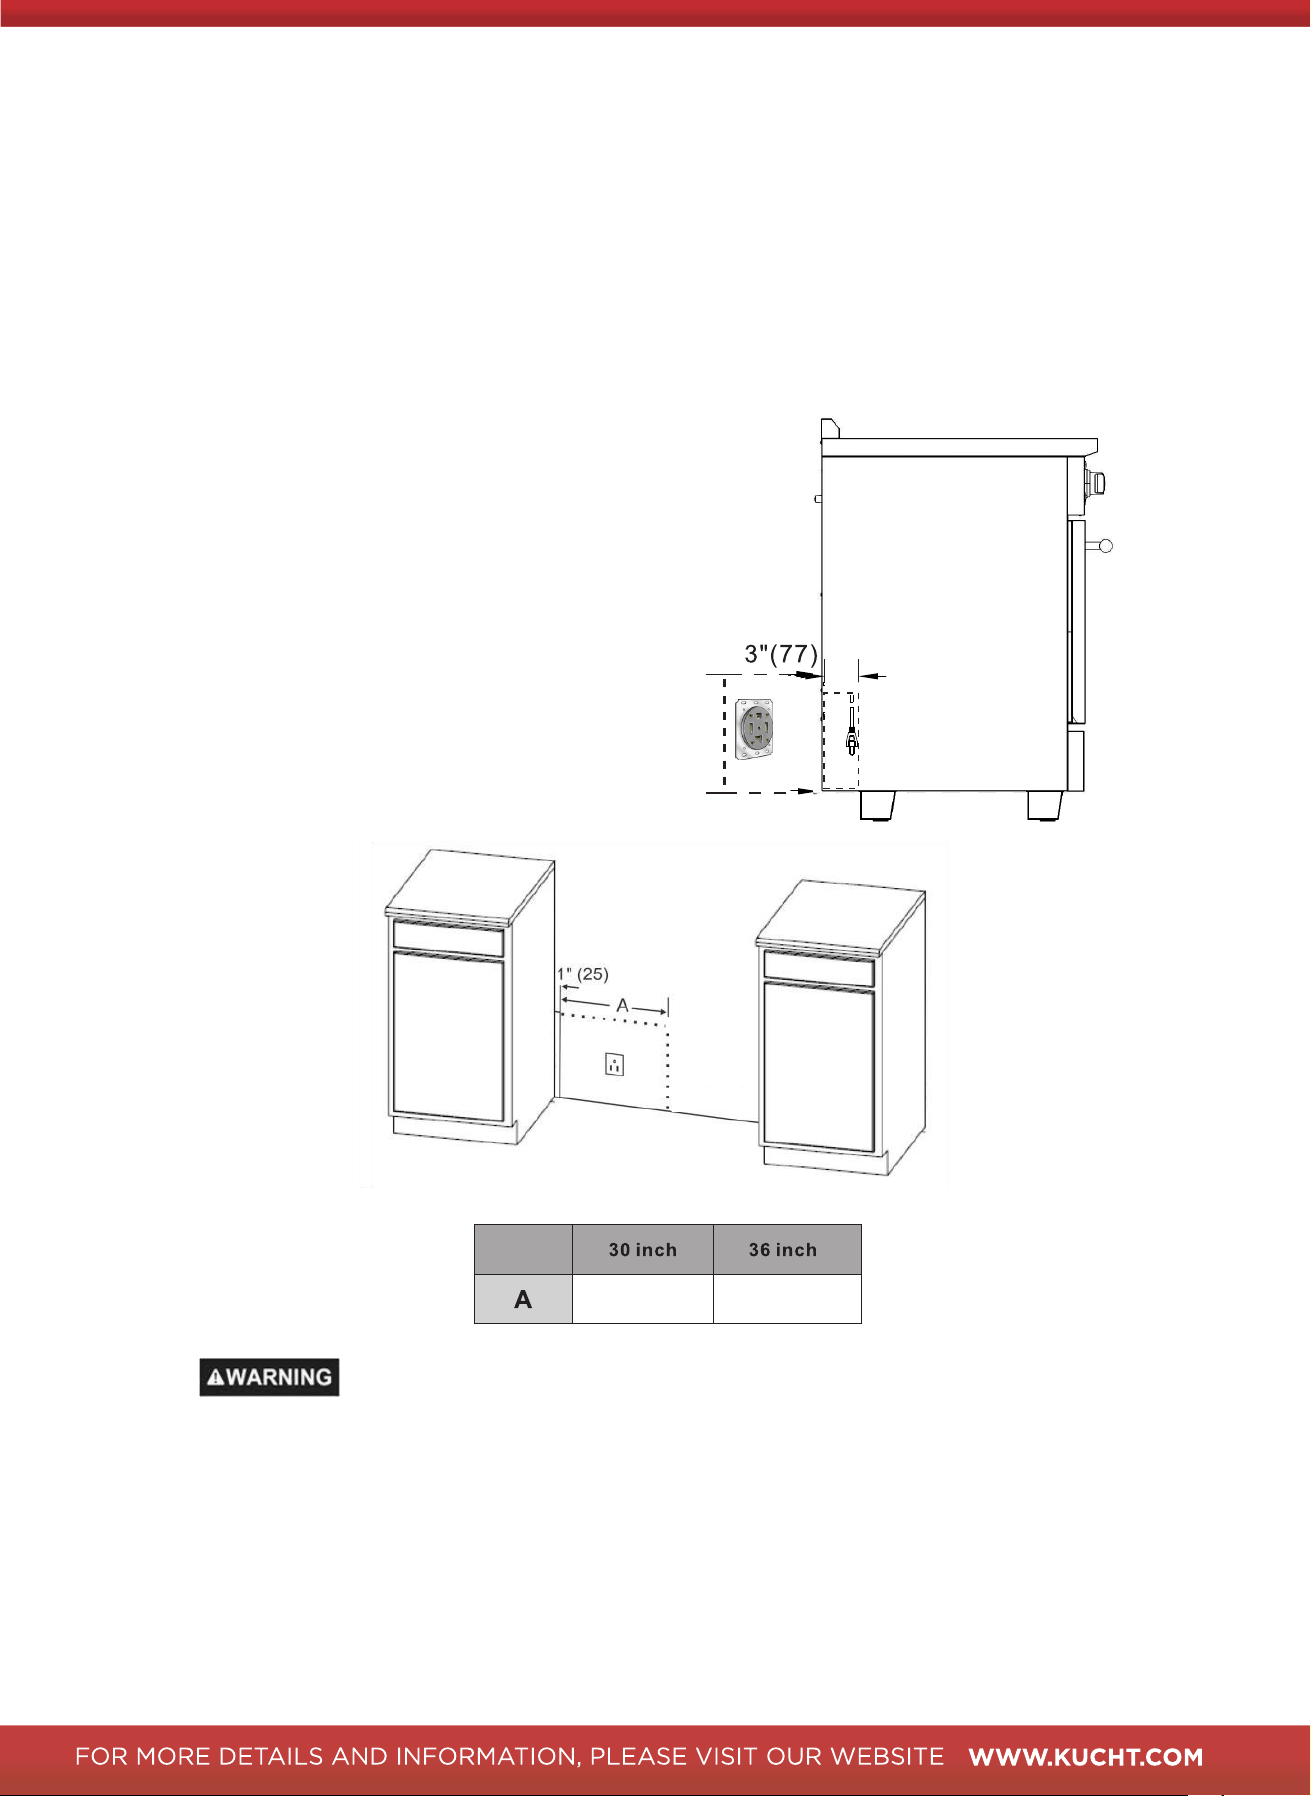
28" (715)
34" (866)
Maximum space to place outlet
shown by range size.
Please note that the maximum height may vary if you adjust
the height of the unit's legs. For accurate measurements, we
recommend referring to the actual object rather than relying
solely on reference materials.
Electric Power Supply Requirements
Your unit is equipped with a small cavity located
at the lower back, which is specifically designed
to accommodate all your electric and gas
requirements for a seamless flush-to-wall
installation. It is important to ensure that all
components are positioned below the
measurements provided below.
height power outlet
Max. 4.8" (124mm)
Recommended
16
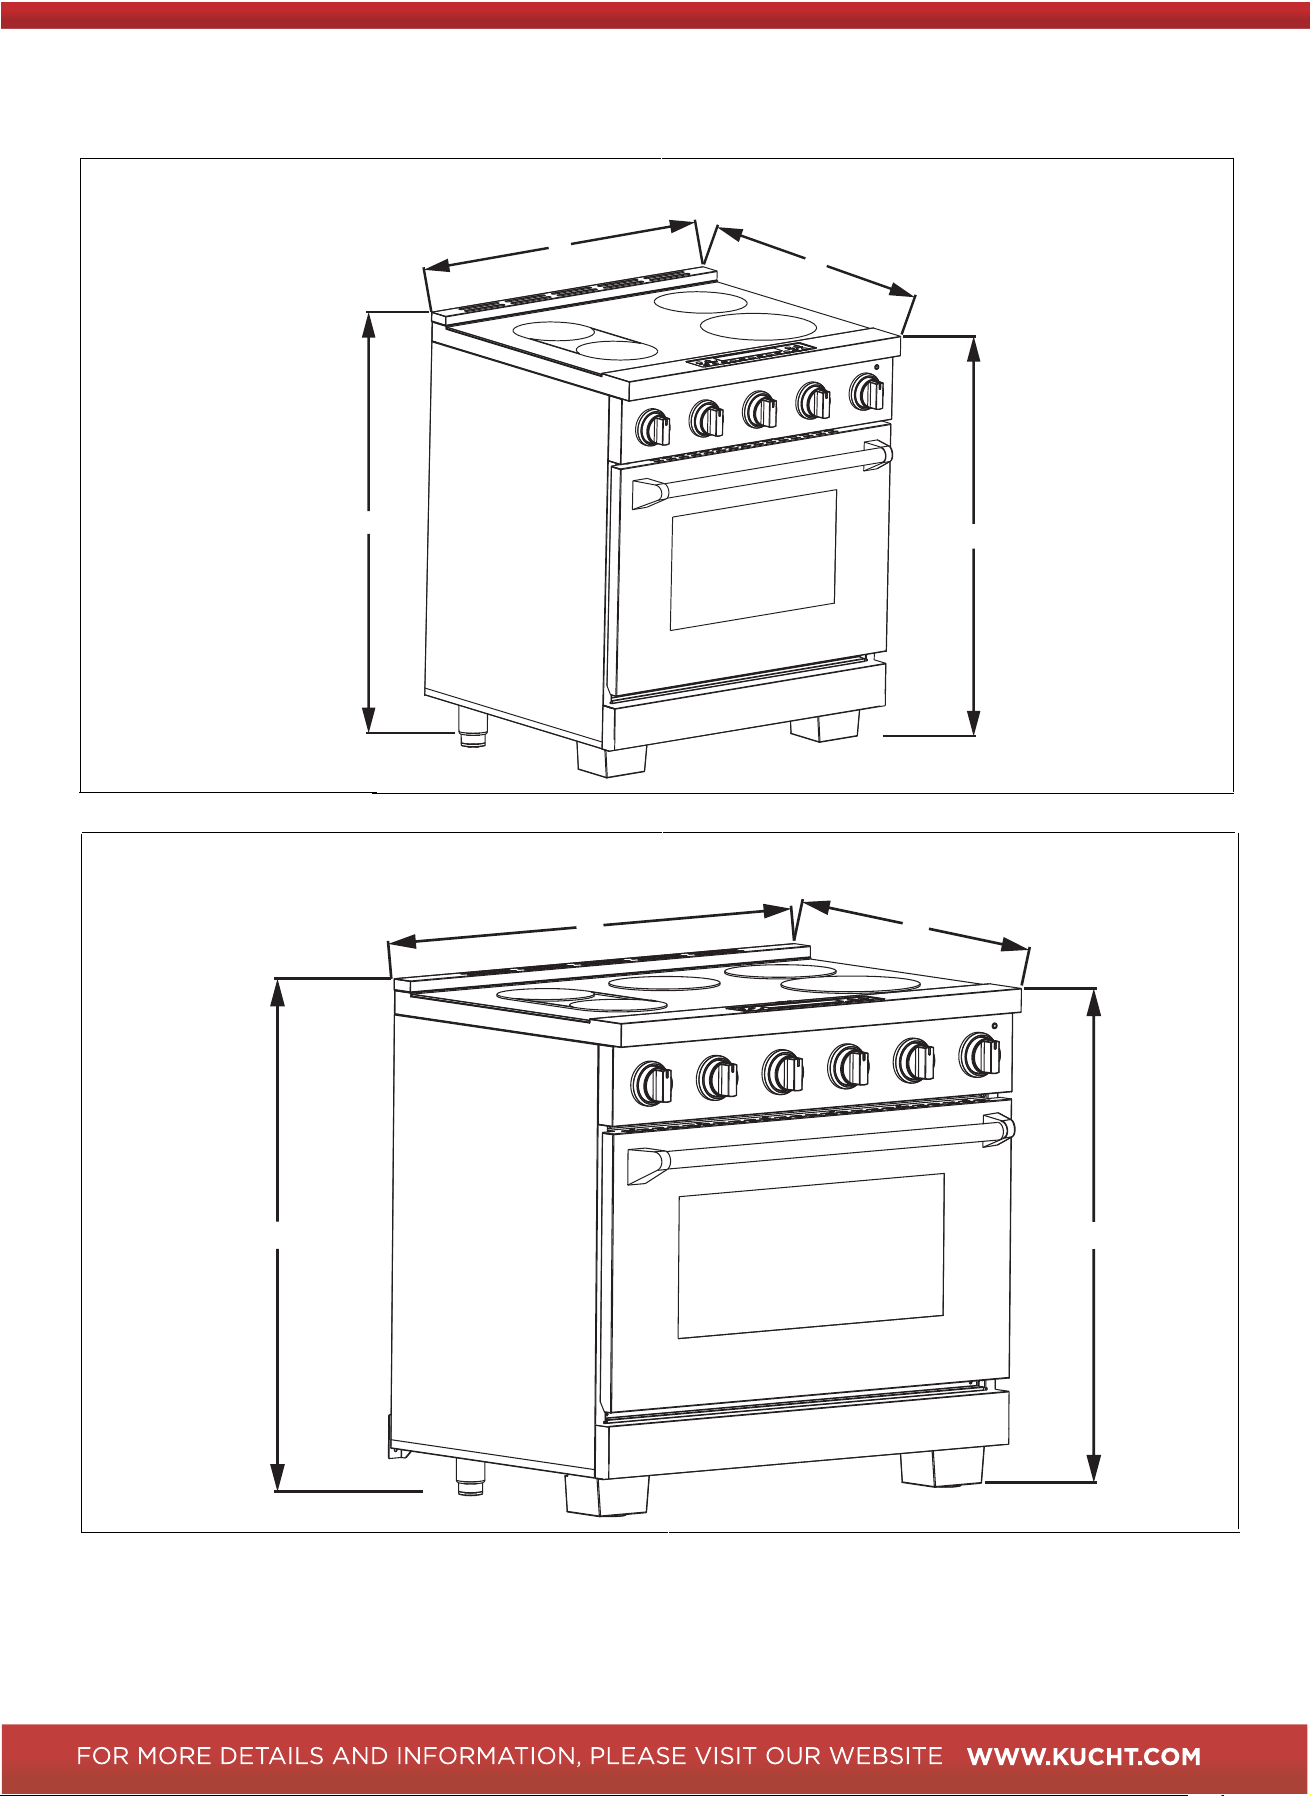
Product Dimensions and Cabinets
This range may be installed directly adjacent to existing countertop-height cabinets (36" or 91.5 cm from the
floor). To achieve the best look, the cooktop should be level with the cabinet countertop. This can be
accomplished by raising the unit using the adjustment spindles on the legs.
Model: KIN30-SS KIN30-GL
Model: KIN36-SS KIN36-GL
30" (762mm)
27" (689mm)
36.9" (936mm)
36" (915mm)
27" (689mm)
36" (915mm)
36.9" (936mm)
36" (914mm)
17
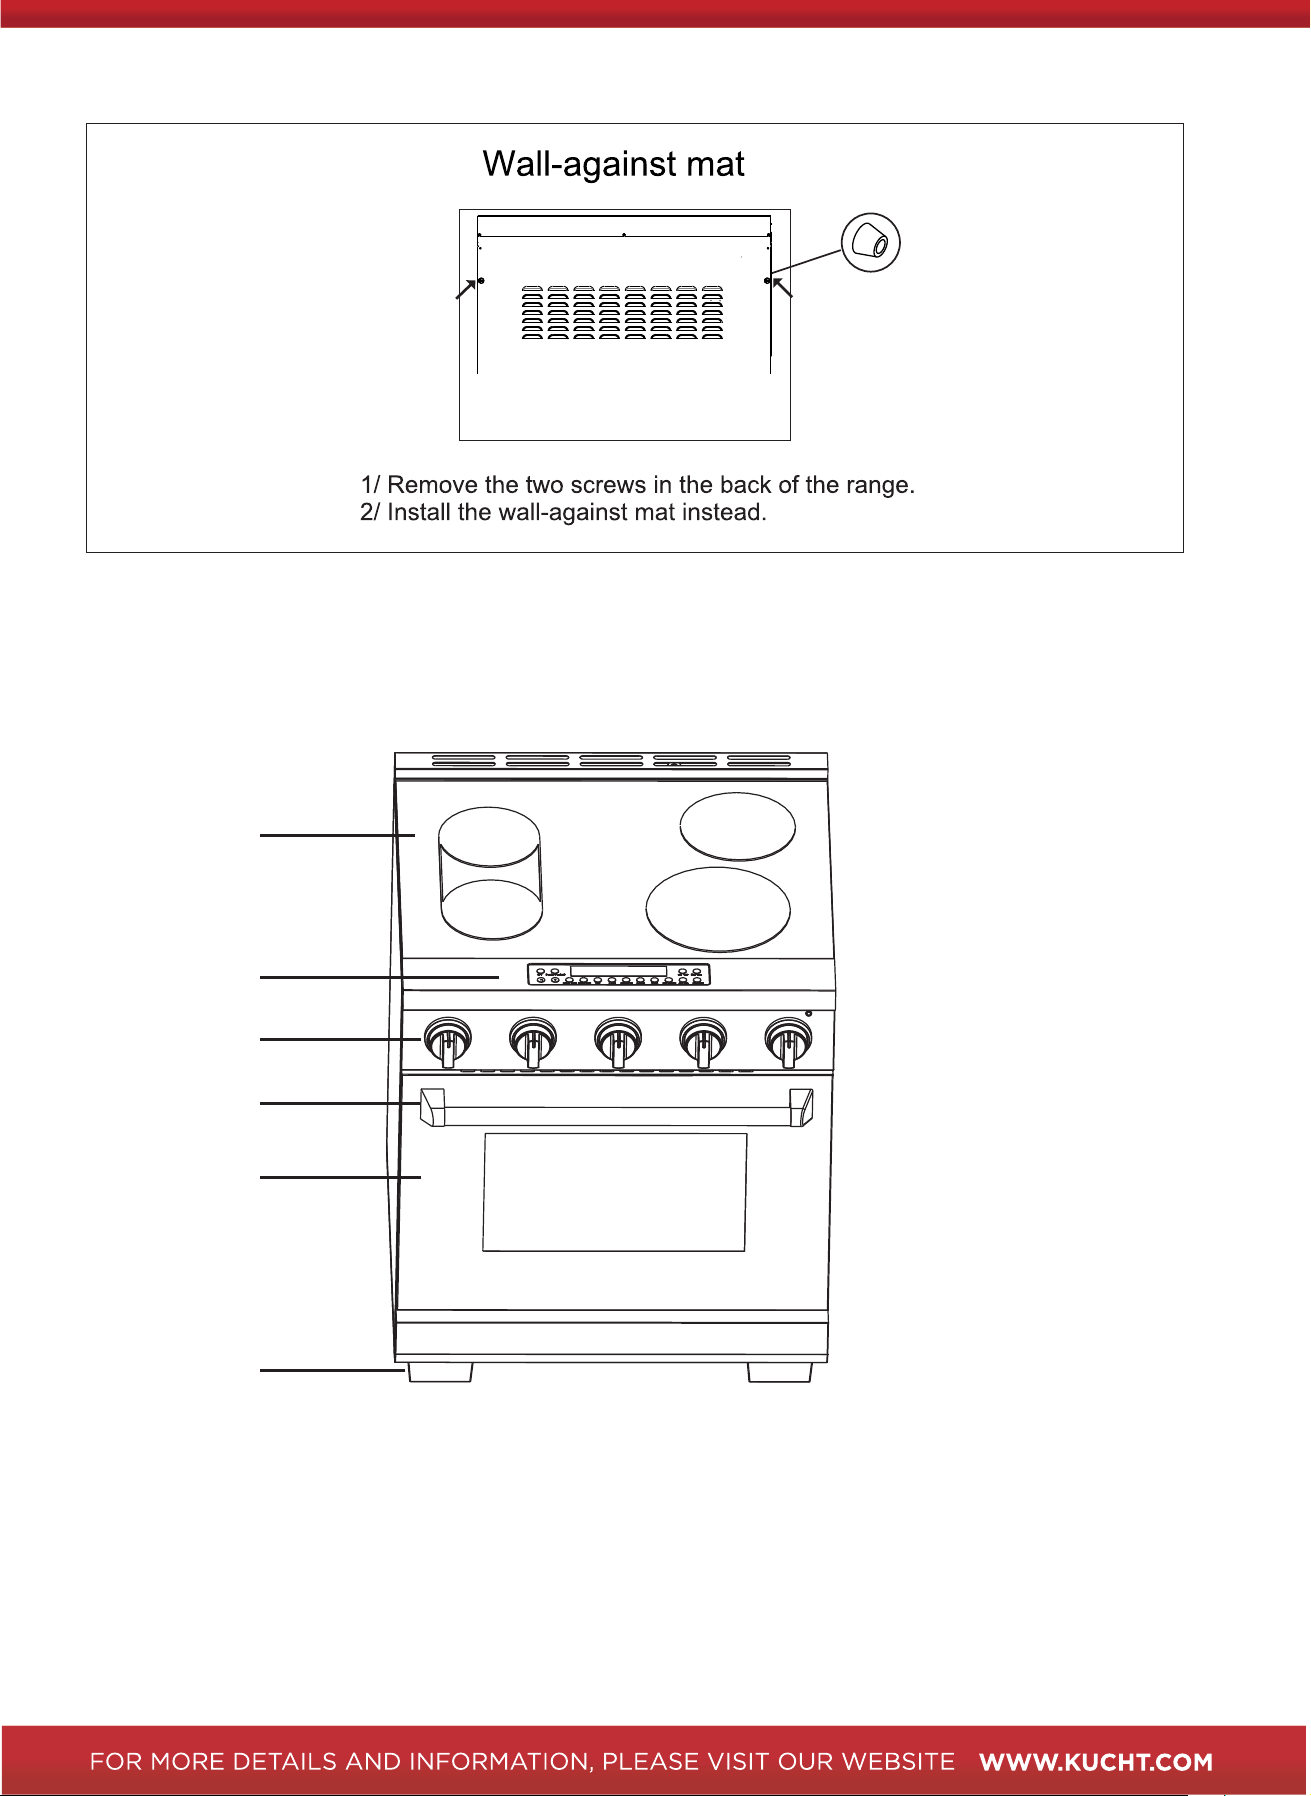
1
2
3
4
5
6
1. Cooking Surface
2. Touch Screen Control
3. Control Knobs
4. Handles
5. Door
6. Legs
OPERATION
Product Description
18

Use Range For The First Time
•
We recommend that before you cook in your new range, you heat the oven to roughly 400 °F
(204 °C) for 2 hours. After the oven cools, wipe it out with hot water and a kitchen-safe
cleaner. We also recommend cleaning the racks and shelves before use.
•
When using the range for the first time you may notice the following:
•
There may be a smell. This is quite normal when the range is first heated as residual oil
from production of parts will be burnt off quickly.
•
There may be noises. This is also quite normal, as new parts move and settle into
place during the initial heating process.
Compatible Cookware
•
The quality of your cooking is dependent on the cookware you use. Because induction
cooking requires a magnetic vessel for heating, only certain materials can be used on
your range top.
•
Induction requires pots and pans that are made of ferrous materials (metals that
contain iron).
•
Flat-bottomed pots or pans made from cast iron, enameled iron, nickel, or magnetic
stainless steel work best on induction cooktops.
•
Check your cookware’s retail box for the induction symbol. To tell if your current
cookware is compatible with the induction technology, grab a magnet and see if it holds to
the bottom of the cookware. If your magnet stays on then your cookware is ready to be
used on the induction range top.
Induction
Ideally, the cookware will have this induction image on the retail box.
•
The following are NOT compatible: heat-resistant glass, ceramic, copper, aluminum
pots/pans, aluminum or copper without a magnetic base, pure stainless steel, wood,
porcelain, or earthenware, round-bottomed cookware, or cookware with a diameter less
than 5" (127 mm).
NOTE: Some cookware can produce noises when used on induction cooking zones. This
is not an issue in the range top, and its function will not be impaired in any way as a result.
19

Compatible Cookware
•
•
The induction fields are generated by electronic equipment, which is fairly silent but does
produce heat at high power levels. A soft-sounding cooling fan runs when the unit is
running multiple cooking elements at high settings at once or when a cooking element is
set at very high power settings.
What sometimes produces sound with induction cooking is not the electronic equipment,
but the cookware itself. Slight sounds may be produced by different types of cookware.
•
Heavier pans such as enameled cast iron produce less noise than a lighter weight multi-
ply stainless steel pan; light weight cookware may also vibrate. Heavy weight quality
cookware is recommended.
•
Cookware with irregular or warped bottoms can vibrate audibly on the glass surface,
though again typically only at high power settings.
•
A “cracking” noise may be heard if the cookware base is made of layers of
different material.
•
A low “humming” noise occurs when cooking, which is normal particularly at high
power settings.
•
Whistling can occur if both elements are being used at the same time at high settings,
and the cookware has bases made of layers of different material.
•
Loose-fitting handles on cookware, typically when riveted on, can vibrate slightly.
•
High quality cookware of solid cast iron, including enamelware, will lower the noise.
20
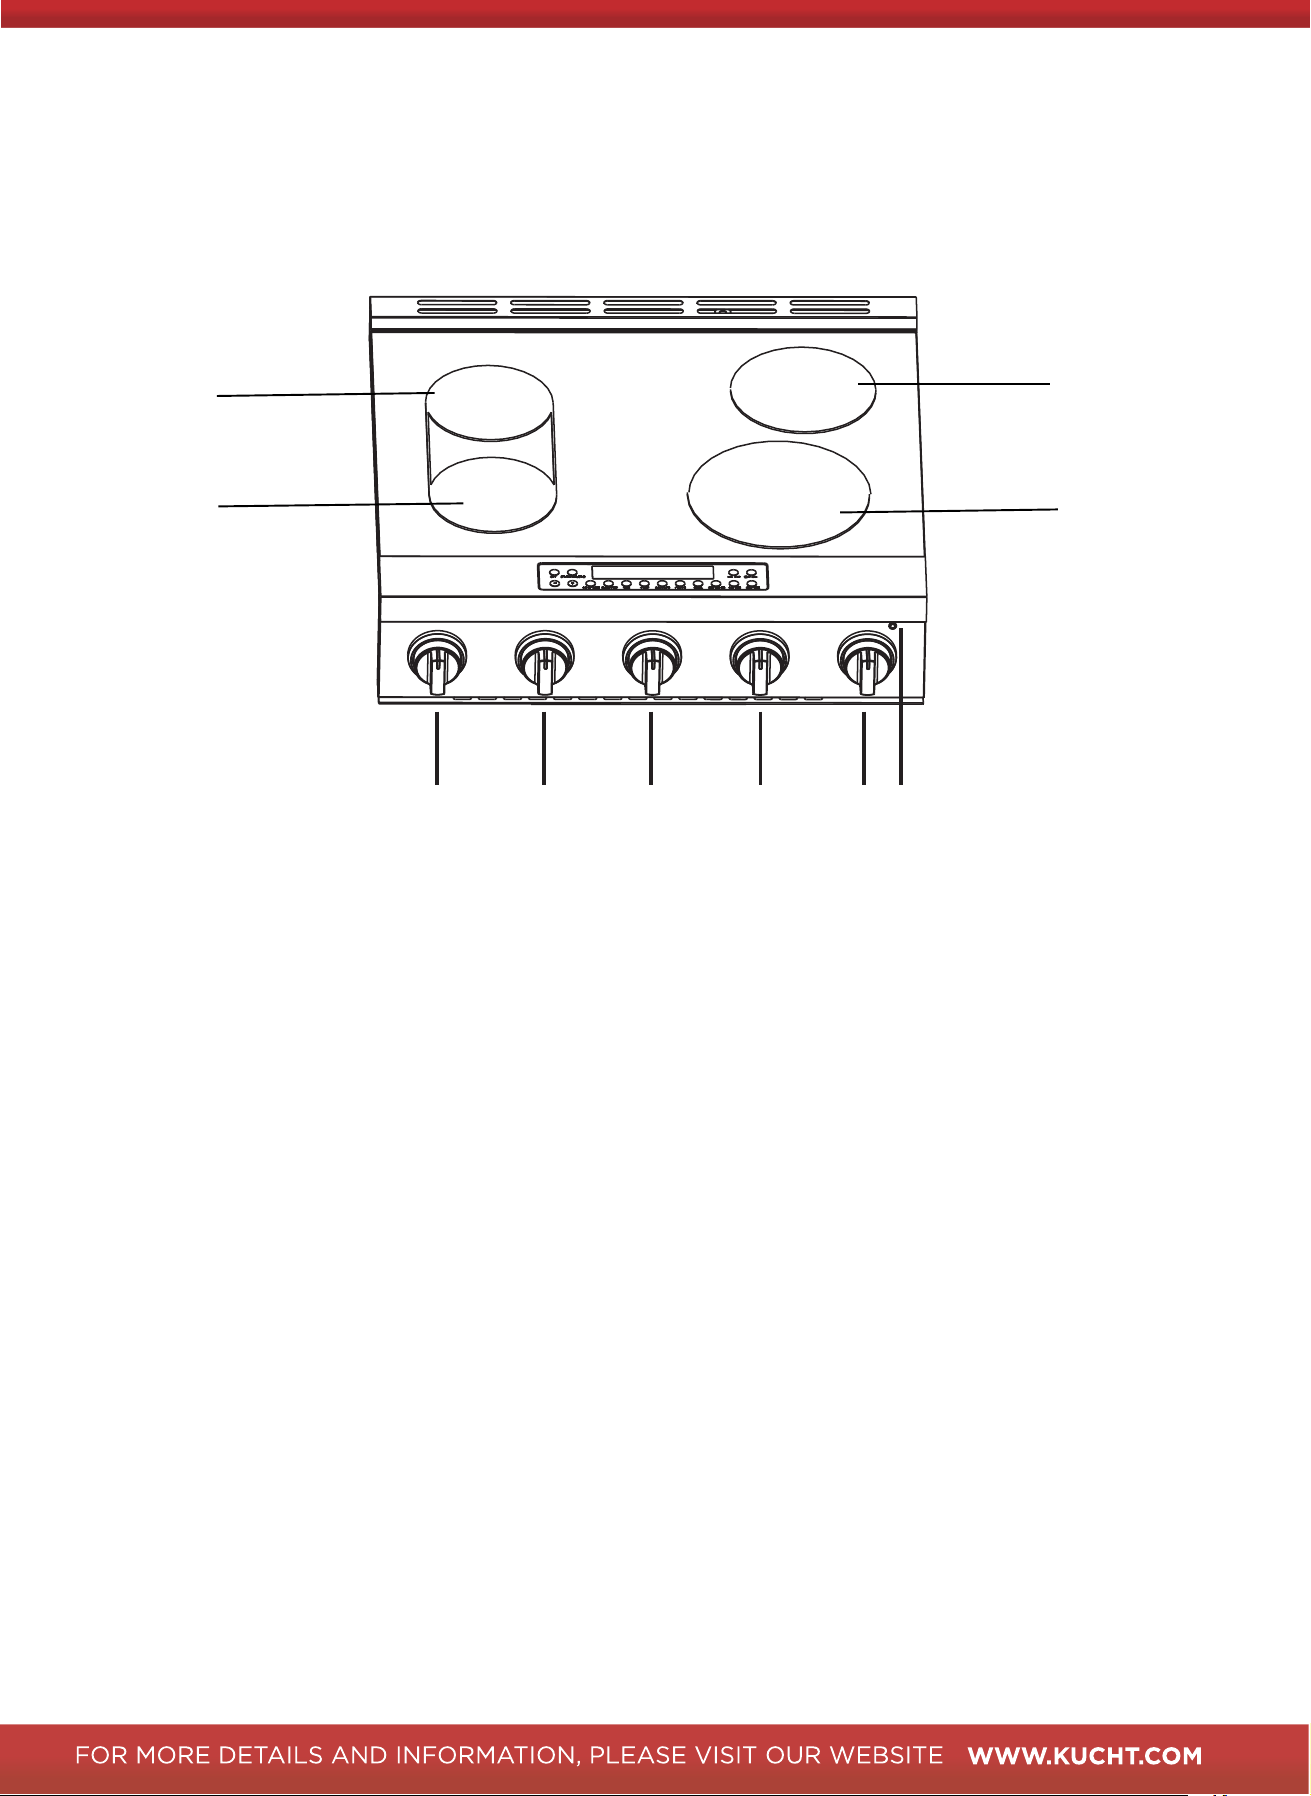
Cooktop
2.
Left rear cooking element control knob
Left front cooking element control knob
3.
Left bridge cooking element control knob
4.
Right rear cooking element control knob
5.
Right front cooking element control knob
6.
Hot surface light
7. Cooking element 7" 1500W
8. Cooking element 7" 1500W
9. Cooking element 8" 2100W
10. Cooking element 10" 3700W
1 2 3 4 5 6
7
8
9
10
1.
21
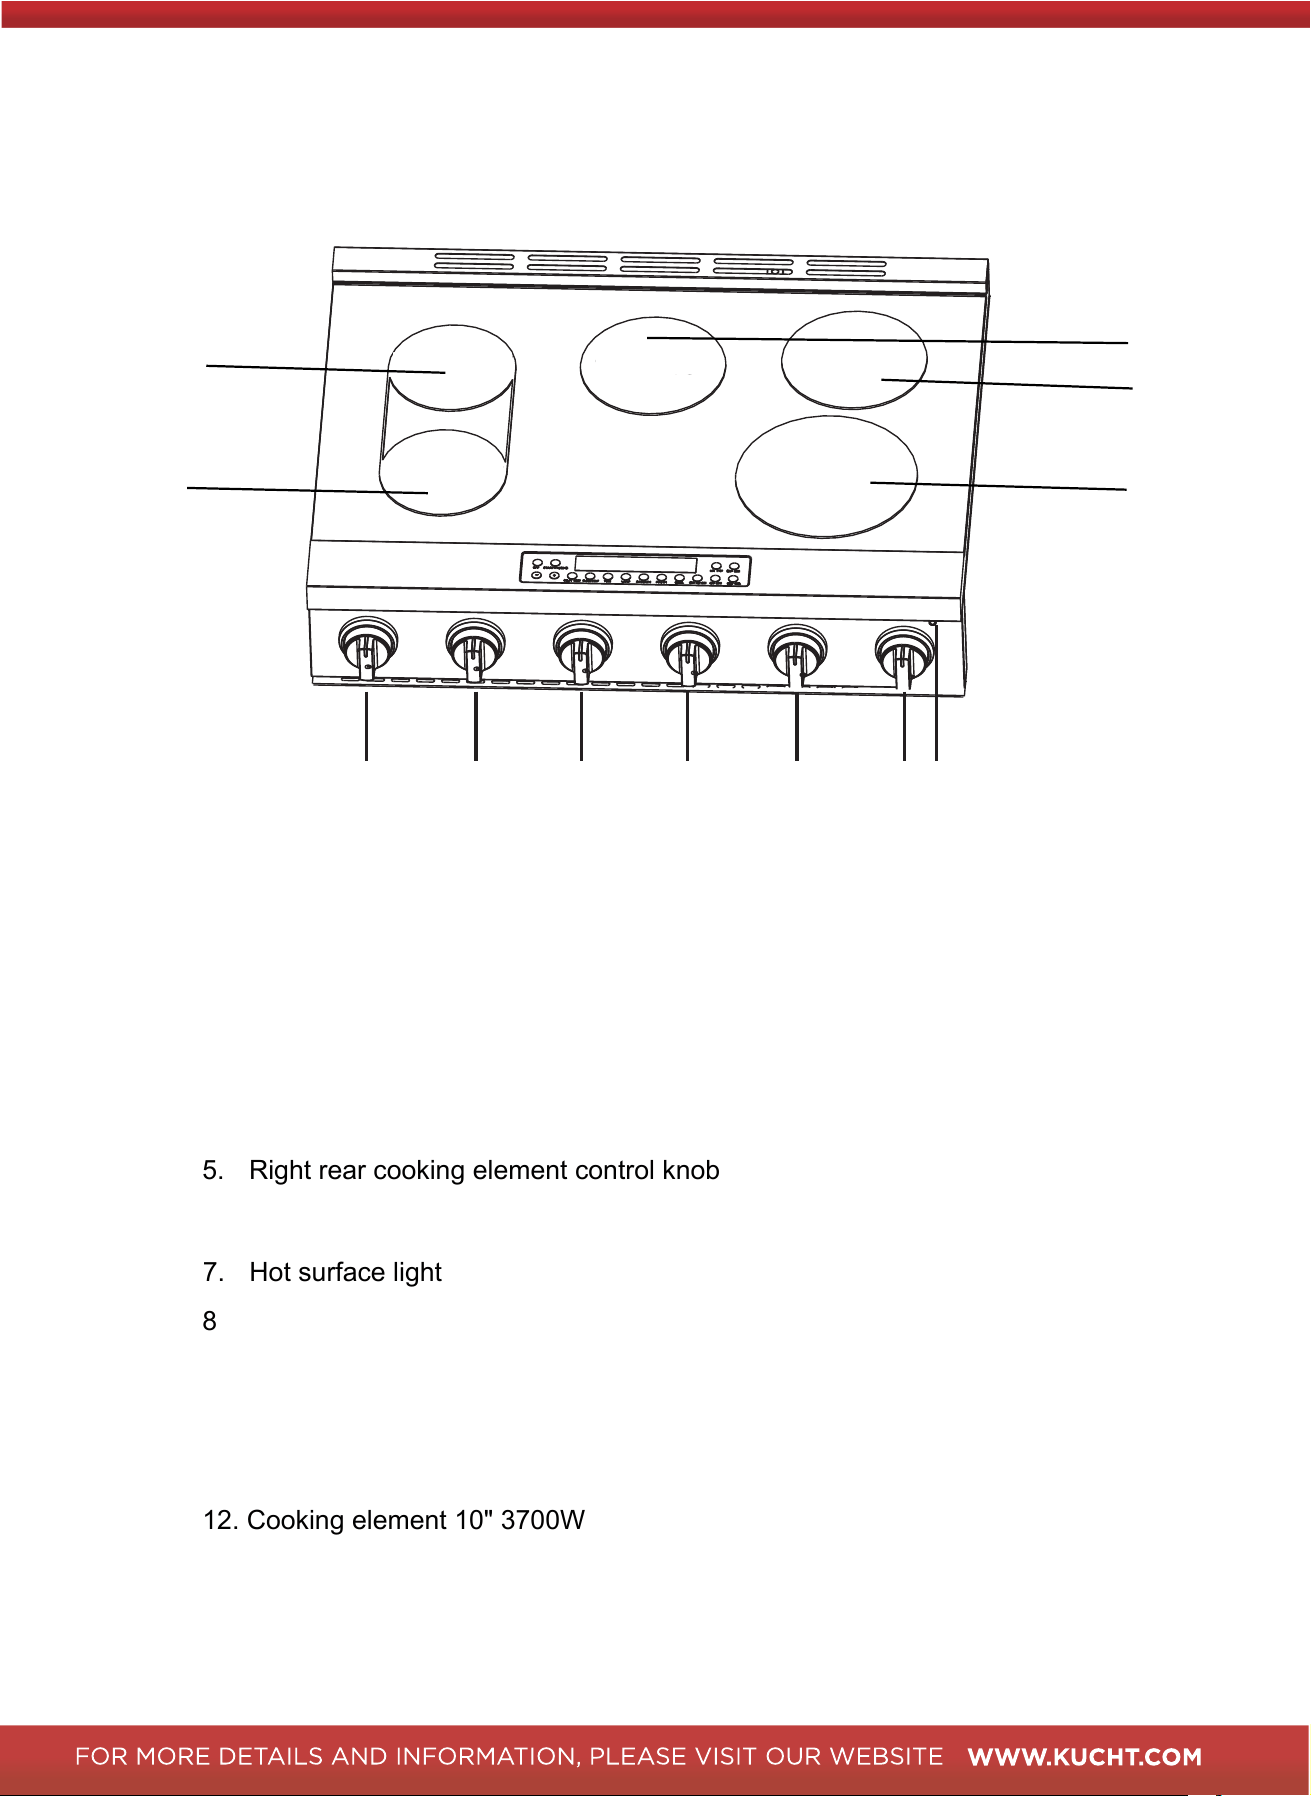
8. Cooking element 7" 1500W
9. Cooking element 7" 1500W
10. Cooking element 8" 2100W
11. Cooking element 8" 2100W
12. Cooking element 10" 3700W
1 2 3 4 5 6 7
8
9
10
11
12
1. Left rear cooking element control knob
2. Left front cooking element control knob
3. Left Bridge cooking element control knob
4. Middle cooking element control knob
5. Right rear cooking element control knob
6. Right front cooking element control knob
7. Hot surface light
22
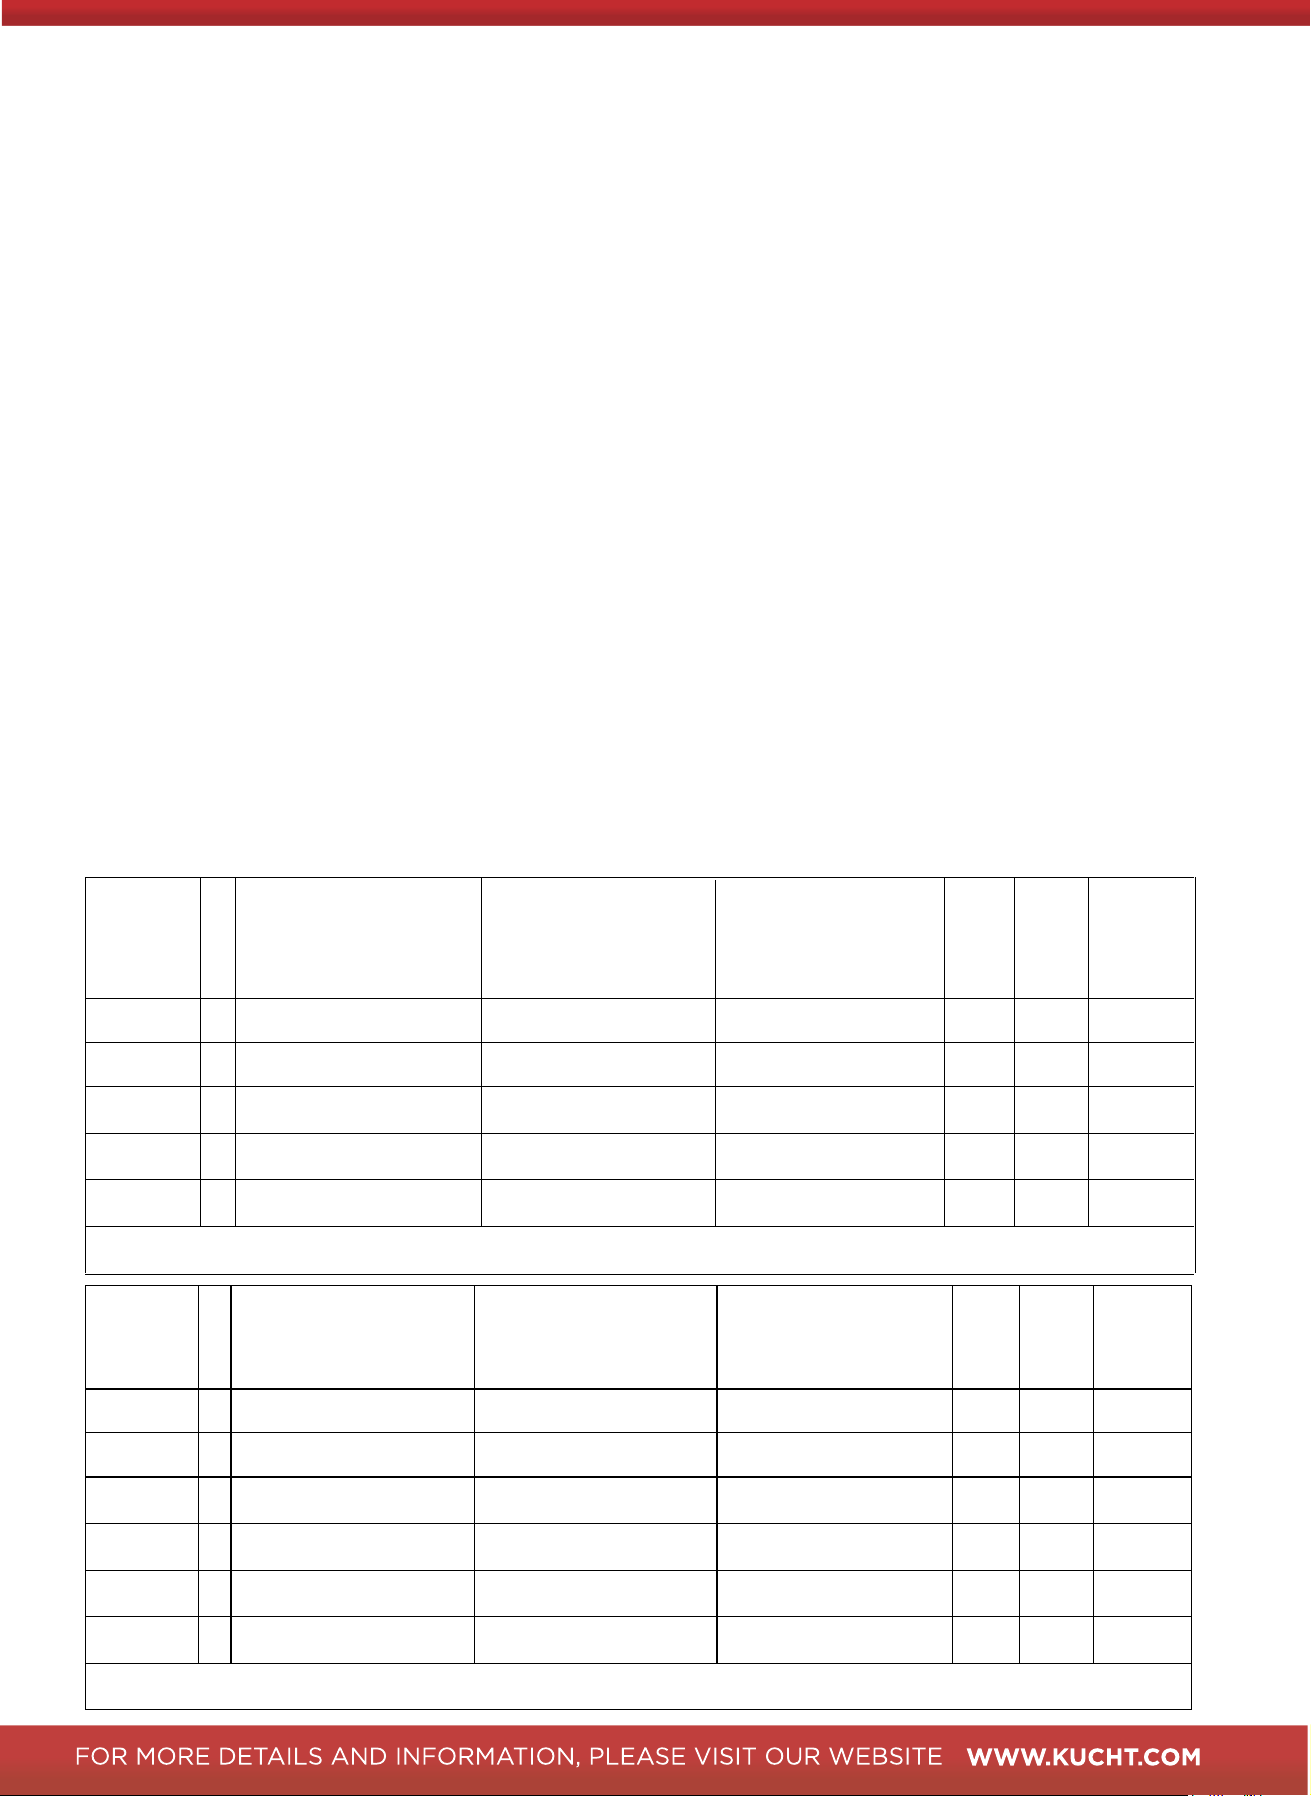
Position
Rate
d
Operation method
1 Standby mode: Plug the power cord into the power socket. After the induction cooker emits a "B"
sound and the full display flashes once, the induction cooker enters the standby mode.
2 Power on: In the standby mode, press the corresponding burner "knob switch" and rotate it to
the corresponding gear position to directly enter the corresponding heating power gear position.
The burner indicator light is on.
3 Bridge burner: When the left front and left rear burners are both in the off state, press the bridge
burner " knob switch" and rotate it to the corresponding position to directly enter the corresponding
heating power gear position. The bridge burner indicator light is on.
4 Power off: In the on state, rotate the burner "knob switch" to the OFF position. The buzzer
sounds once, the corresponding burner stops heating, the burner indicator light goes out, and the
induction cooker enters the standby mode.
Note:
(1.)
If a single burner works for 2 hours without operation, it will automatically shut down.
(2.)
After shutting down, when the NTC detection temperature of the furnace surface is greater than
about 50℃, the high temperature warning light will be on. When the NTC detection temperature of
the furnace surface
is lower than about 45℃, the high temperature warning light will be off.
5 Power adjustment: In the heating state, rotate the "knob switch" of the furnace head to adjust the
heating power of the induction cooker; the gear position and power adjustment range of each furnace
head are shown in the following table:
power
0 1 2 3 4 5
6
(
Boost
)
L/H
Position
Rated
power
0
0
200(800W ON ,OFF)
1
400(800W ON,OFF)
2
600(800W ON,OFF)
3
900
4
1200
5
1500
6
(
Boost
L/F
)
0
L/H
200((800W ON ,OFF)
0
400(800W ON,OFF)
200(800W ON ,OFF)
600(800W ON,OFF)
400(800W ON,OFF)
900
600(800W ON,OFF)
1200
900
1500
1200
Left Bridge
1500
0
L/F
400(1600W ON, OFF)
0
800(1600W ON,OFF)
200((800W ON ,OFF)
1200(1600W ON,OFF)
400(800W ON,OFF)
1800
600(800W ON,OFF)
2400
900
3000
1200
R/F
1500
0
Left Bridge
300(1300W ON,OFF)
0
700(1300W ON, OFF)
400(1600W ON, OFF)
1100(1300W ON,OFF)
800(1600WON,OFF)
1800
1200(1600W ON,OFF)
2300
1800
3700
2400
R/B
3000
0
Middle
200(1000W ON,OFF)
0
600(1000W ON OFF)
200(1000W ONOFF)
1000
600(1000W ON,OFF)
1400
1000
1800
1400
2100
1800 2100
R/B
0 200(1000W ON,OFF) 600(1000W ON,OFF) 1000 1400 1800 2100
R/F
0 300(1300W ON,OFF) 700(1300W ON,OFF) 1100(1300W ON, OFF) 1800 2300 3700
KIN-36SS KIN-36GL
KIN-30SS KIN-30GL
23
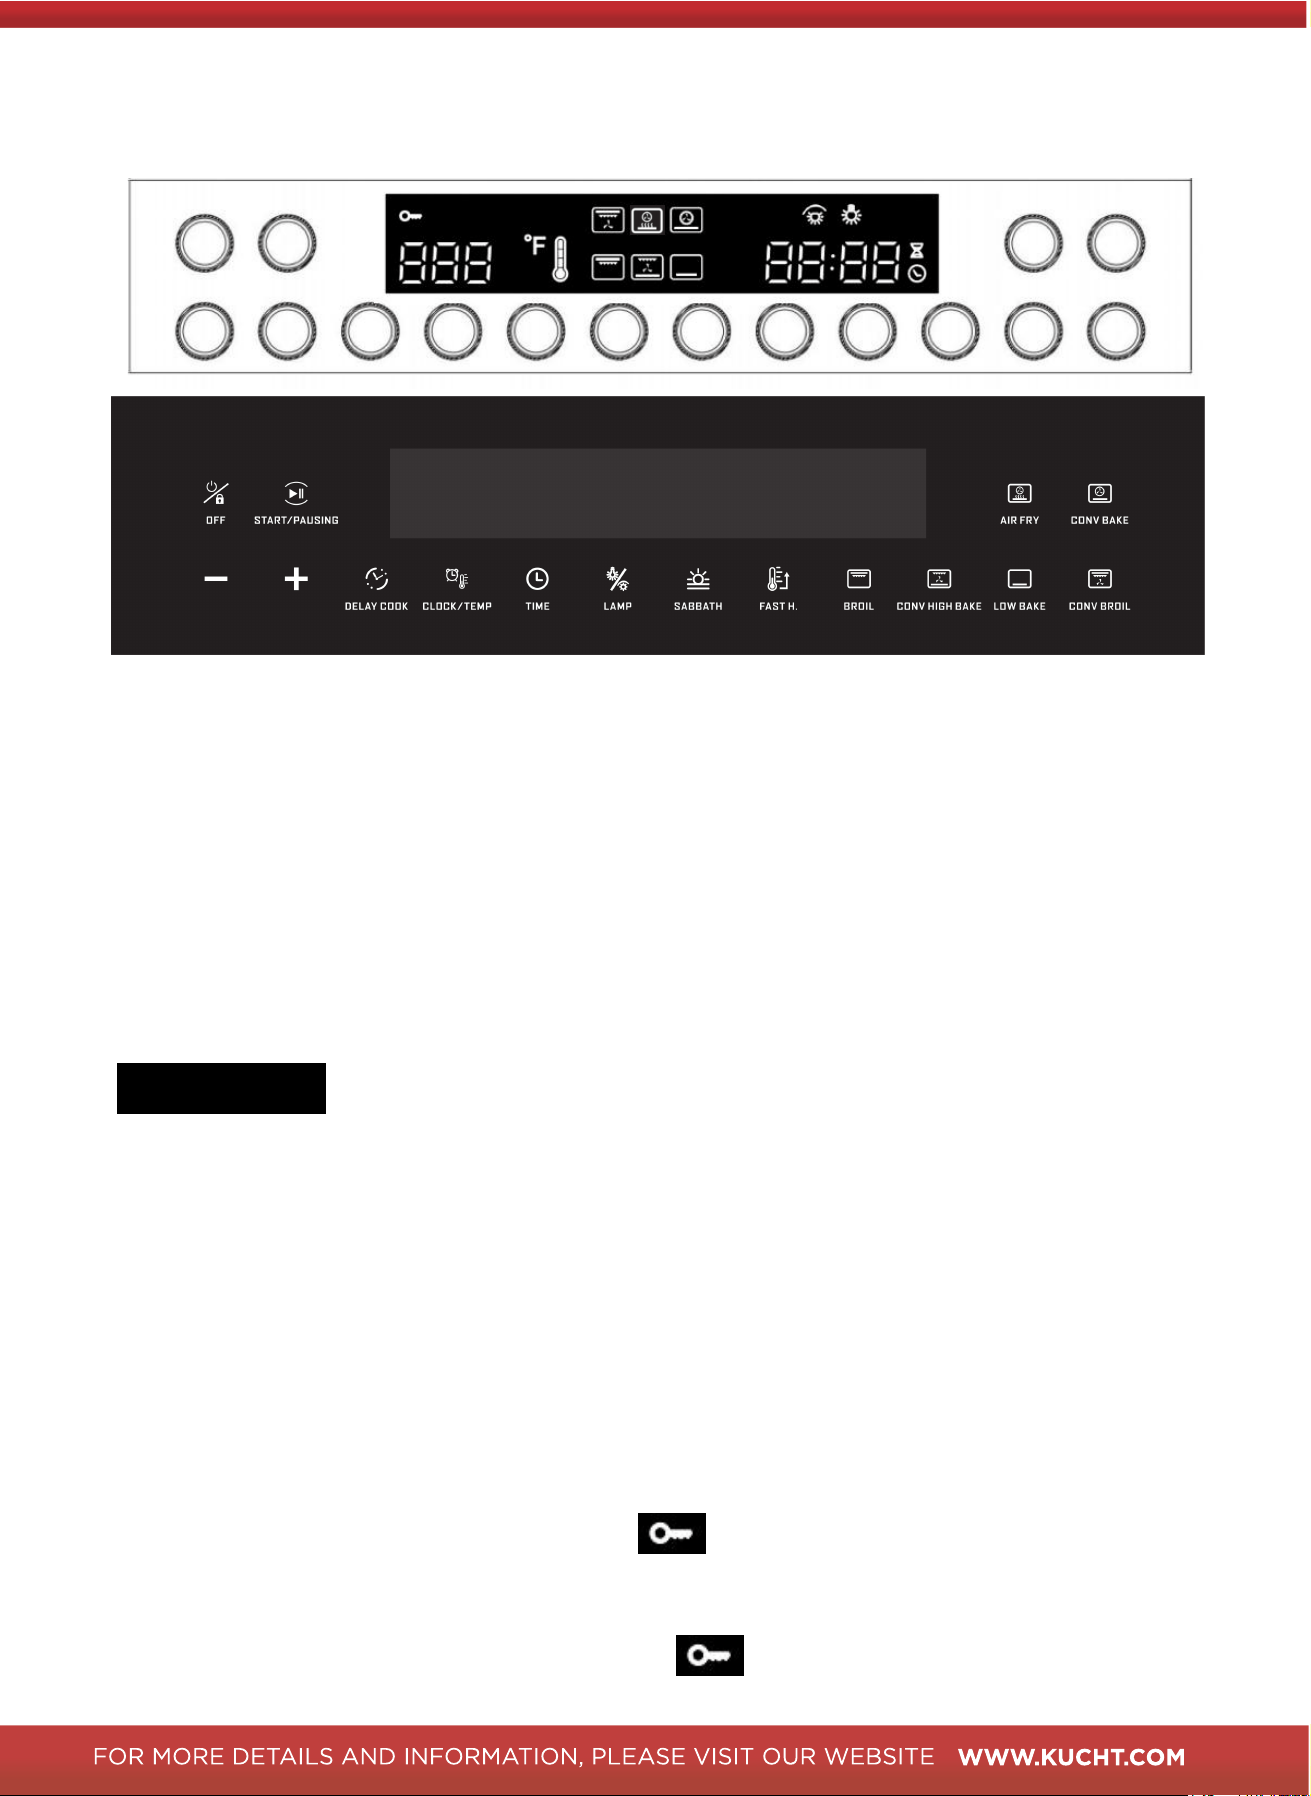
1. Power-on status
Upon first power-up, the buzzer emits a "beep" sound, all indicators illuminate for 1 second, and
then the unit enters the shutdown state. (If it was in Sabbath mode before power-off, it will not
light up and the buzzer will not sound when powered on again.)
2. Button
The buttons are arranged (from left to right) as follows:
【
POWER/CHILD
LOCK
】【
START/PAUSING
】【
AIR FRY
】 【
CONV BAKE
】【-】【+】
【DELAY COOK】【CLOCK/TEMP】【TIME】【LAMP】【SABBATH】【FAST HEAT】
【BROIL】【CONV HIGH BAKE】【LOW BAKE】【CONV BROIL】
Button Function
A)
【POWER/CHILD LOCK】
OFF:
Short press the [Power/Child Lock] button to turn off the device and disable all functions.
ON:
Short-press the [Power/Child Lock] button to turn on, the power indicator lights up. The left side
of the digital display shows the actual temperature. (If Time was enabled before shutdown, the
right side of the digital display shows Time.)
CHILD LOCK:
When the device is powered on, press and hold the [Child Lock] button for 3 seconds to turn
on the lock screen function.
The child lock indicator light flashes, the icon
lights up, and pressing other buttons will be
invalid. There will be a prompt tone. Press and hold the [Child Lock] button for 3 seconds again to
turn off the lock screen function.
The indicator light returns to normal and the icon
turns off.
Digital Display
24
B)
【TIME
】
TIME:
When the device is powered on or in standby mode, short press the [Time] button to turn on the
time and the time icon
lights up. Short press again to turn off the time display, and the icon
goes out.
TIME SETTING:
Minute setting range: 00~59 cycle adjustment.
C)
【SABBATH
Press and hold the [Time] key for 3 seconds to enter the time setting mode, the 【+
】/【-】
button lights up, and the "hour" part of the display flashes. Then short-press the [Time] key to
switch the "minute". Press the【+】/【-】 keys to adjust the time. Short-press the [Time] key
again to confirm the set time or wait for 10 seconds to automatically restore the original time
Hour setting range: 00~12 cycle adjustment;
】
D)
【
LAMP】
In standby mode, press
and hold the [Sabbath] button for four seconds to enter Sabbath
standby. The default temperature of 250°F will be displayed, which can be adjusted
between 150°F and 350°F. The default operating time is 72 hours unless manually exited
earlier. After setting the temperature, press the【START/PAUSING】button to start
Sabbath mode. In this mode, all displays, beep, and indicator lights for oven remain
off, and the oven light cannot be turned on. Press and hold the [Sabbath] button for four
seconds to turn off and exit Sabbath mode. In the event of a sudden power outage,
Sabbath mode will remain active after restarting.
Note: If no further operation is performed after entering the Sabbath setup mode, it will
automatically exit after 30 seconds.
Oven light:
In the power-on state, short press the [Lamp] button to turn on the oven light, the oven light
indicator light up, and the icon
light up. Press it again to turn off the oven light, the indicator
goes out. The oven light comes on automatically when the door
Ambient light:
When the machine is powered on, press and hold the [Lamp] button for 3 seconds to turn on the
ambient light, the oven light indicator light, and the icon
the oven light, the indicator light, and the icon
go out.
E)
【
CLOCK/TEMP】
In menu mode, short press the [Clock/Temp] button to adjust the menu temperature. The
temperature on the display will flash. Short press the 【
+】/【-】button to adjust the
temperature. Short press the [Clock/Temp] button again to switch to the time hour/minute. The
time on the display will flash. Short press the 【+】/【-】button to adjust the time. Short press
the [Start/Pausing] key again to confirm or wait for 10 seconds for automatic confirmation and
operation.
light goes out, and the icon
light up. Press it again to turn off
25
is opened and goes off when the door is closed, unless it was already switched on before opening
the door.
G)
【-】
In the temperature or time setting mode, short press the 【-】key to adjust the temperature or
time down, long press to continuously adjust down by 5℉
, and stop when reaching the range.
When in the time setting mode, short press the【-】, press once to reduce a time scale (hour
or minute), and long press to continuously decrease.
H)
【START/PAUSING】
START:
After the time and temperature are selected, short press the [Start/Pausing] button to start
working or wait for 10 seconds to start working automatically. The [Start] indicator light turns
on, the icon lights up, and the [Clock/Temp] indicator turns off.
PAUSING:
When the oven is working, short press the [Start/Pausing] button to pause operation. The
[Start/Pausing] indicator light flashes, the icon flashes, and the [Clock/Temp] button lights
up.
CANCEL:
Long press the [Start/Pausing] button to turn off the running mode, and the icon goes out.
After 1 minute, it enters the power saving mode and automatically shuts down.
In working state, short press the [Fast H] key, the [Fast H] key will light up and start fast
heating. Short press the [Fast H] key again to turn off fast heating, and the [Fast H] key will
go out.
I)
J)【FAST HEAT
】
K)WORKING MODE
In standby mode, press each working mode button to enter the corresponding working mode.
The display shows the default temperature and time of the function, the corresponding
indicator lights up, and the corresponding icon flashes. After the mode, temperature and time
are determined, press the [Start/Pausing] button to start the oven. After the countdown is
completed, the switch display "END" flashes and the buzzer alarms
【DELAY COOK】
After setting the temperature and time, short press the [Delay Cook] button to set the
appointment, the [Delay Cook] button flashes. Short press the [Delay Cook] button to switch
between
hours and minutes. You can press the 【
+】/【-】 button to adjust the time (max 12
hours). Short press the [Start/Pausing] button to confirm the set time. Wait for 10 seconds and
the countdown will start automatically. The [Delay Cook] button will light up. The countdown
ends and the work starts.
26
In the temperature or time setting mode, short press the【+】key to increase the temperature or
time, long press to continuously increase by 5℉
, and stop when reaching the range.
When in the time setting mode, short press the【+】key once to increase a time scale (hour or
minute), and long press to continuously increase.
F)【+】
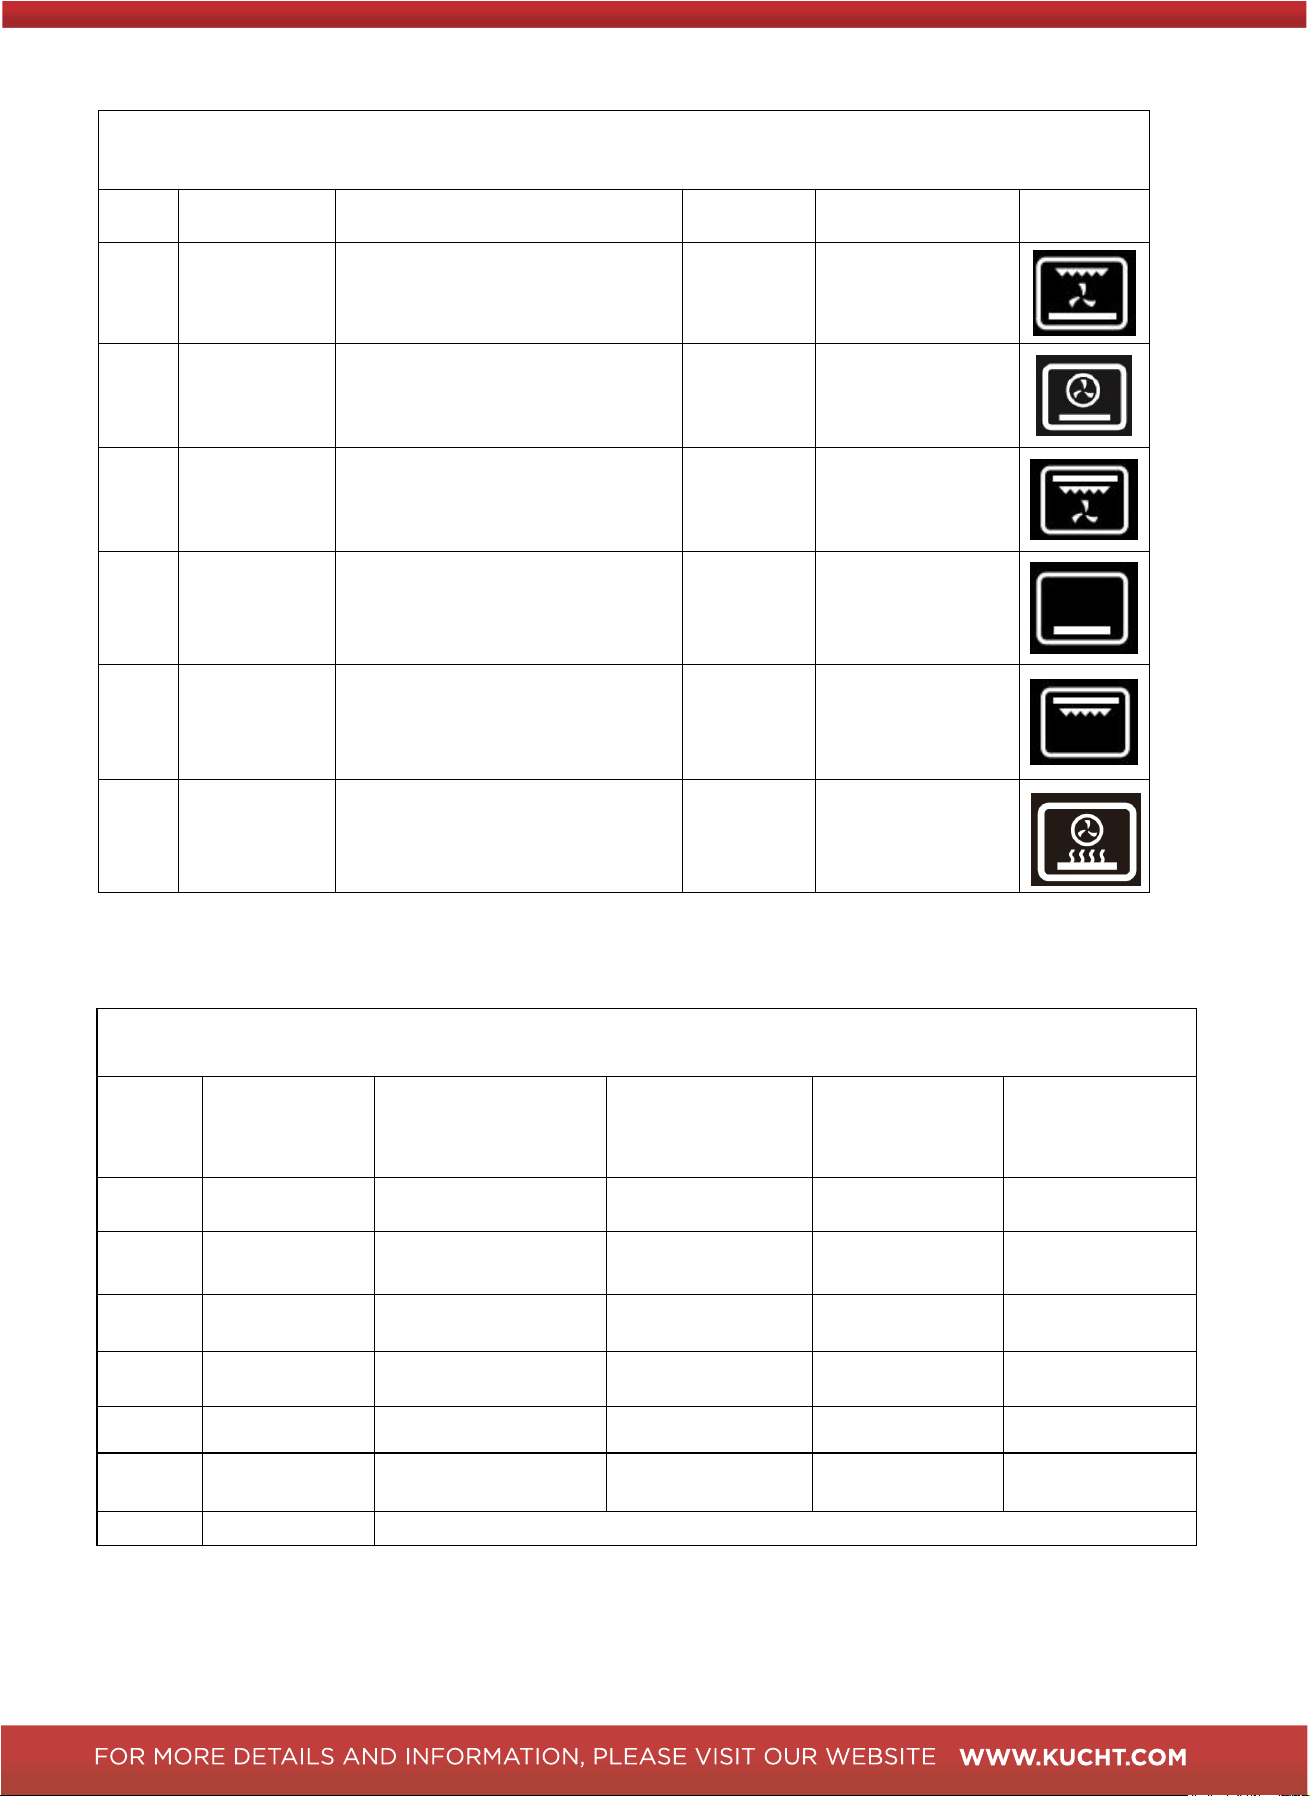
Load power in each working mode
No Mode
Corresponding working
electrical components
Voltage
Load power(
W)
Icon
1
CONV HIGH
BAKE
Upper inner + fan + lower 240VAC 3015
2 CONV BAKE Back + fan + bottom 240VAC 3515
3
CONV
BROIL
Upper outer + upper inner + fan 240VAC 2815
4 LOW
BAKE
Low 240VAC 2000
5 BROIL Upper outer + upper inner 240VAC 2800
6 AIR FRY Back + fan + bottom 240VAC 3515
Temperature and time of each working mode
No Mode
Default operating
temperature
(℉)
Temperature
range (℉)
Default time
(hours)
Time Range
(hours)
1
CONV HIGH
BAKE
350℉ 150℉-500℉
5:00
00:01-24:00
2
CONV BAKE 325℉ 150℉-500℉ 5:00
00:01-24:00
3
CONV BROIL
450℉ 150℉-500℉
5:00
00:01-24:00
4
LOW BAKE 325℉ 150℉-500℉ 5:00
00:01-24:00
5
BROIL
500℉ 300℉-500℉
5:00
00:01-24:00
6
AIR FRY
420℉ 150℉-500℉
5:00
00:01-24:00
7 DELAY COOK The delay time is adjustable from 0 to 12 hours, and all modes can be booked
Other Features
Automatic shutdown function
When no function is turned on and the device is in standby mode, it will automatically shut down
after 1 minute.
27
Note: During the initial heating phase in "BROIL" mode, the convection fan operates
simultaneously until the set temperature is reached. Once the temperature attains the set value,
the convection fan stops working.

CARE AND CLEANING
Important: Before any operation of cleaning and maintenance disconnect the
appliance from the electrical supply.
•
Allow the cooking surface to cool down.
•
For spills and burned-on food, use a metal scraper with a clean blade, holding it at 45-
degree angle.
•
Put a small amount of multi-surface cleaner cream on a damp towel or soft cloth, scrubbing
in a circular motion. Add more cleaner if needed, completely removing it all with a
clean damp paper towel.
•
For everyday cleaning and touch-ups, dilute a mild detergent, such as dishwashing liquid,
with water, and spray it over the surface.
•
Use a soft sponge or a damp towel to clean the cooktop.
•
Restore the cooktop’s aspect with a soft, dry cloth.
Control Panel, Door Handle, Control Housing
Clean the control panel, door handle and control housing with a solution of mild detergent
and warm water.
•
Do not use abrasive cleaners or scrubbers, they will permanently damage the finish.
•
Dry the components with a soft, lint-free cloth.
•
Oven Window
Clean all glass surfaces with a solution of mild detergent and hot water. Use a mild glass
cleaner to remove fingerprint or smears.
•
Dry completely with a soft, lint-free cloth.
•
Porcelain Surfaces
Clean oven interior and inner door liners with a solution of mild detergent and hot water.Rinse
and dry with a soft cloth, Do not use abrasives or commercial oven cleaners.
•
Stainless Steel Surfaces
Do not use any cleaning product containing chlorine bleach.
•
•
Do not use a steel-wool pad; it will scratch the surface.
Use a hot, damp cloth with a mild detergent. Use a clean, hot, damp cloth to remove soap. Dry
with a dry, clean cloth.
•
Glass Cooktop Surface
28

29
Metal Finishes
Wash with soap and water, glass cleaner, or mild liquid sprays
Plastic Finishes
When control panel trim and end caps are cool, clean with soap and water, rinse and dry.
Use a glass cleaner and soft cloth.
Oven Racks
Clean oven racks with solution of detergent and hot water. To clean heavy soil, use a
scouring pad such as steel wool with plenty of water.
Oven Frame
Clean with hot water, soap-filled steel-wool pads or cleaners. Rinse well with clean water
and dry.
Oven Gasket
Do not clean the gasket, The fiberglass material of the oven door gasket cannot
withstand abrasion.
It is necessary for the gasket to remain intact.
Replacing the Oven Light
Turn off the power at the main power supply.
Remove the lens cover from the housing by pulling straight out.
To prevent electrical shock or personal injury, make sure the oven and light bulb are cool and
power to the oven has been turned off before replacing the light bulb. Make sure the lens cover
is in place when using the oven.
Outer Oven Door
Use soap and water to thoroughly clean the top, sides and front of the oven door. Rinse well.
You may also use a glass cleaner to clean the glass on the outside of the door.
Do not use oven cleaners, cleansing powders of harsh abrasives on the outside of the door.
Inner Oven Door
Do not allow excess water to run into any holes or slots in the door. Any soap left onthe liner causes
additional stains when the oven is heated.
30
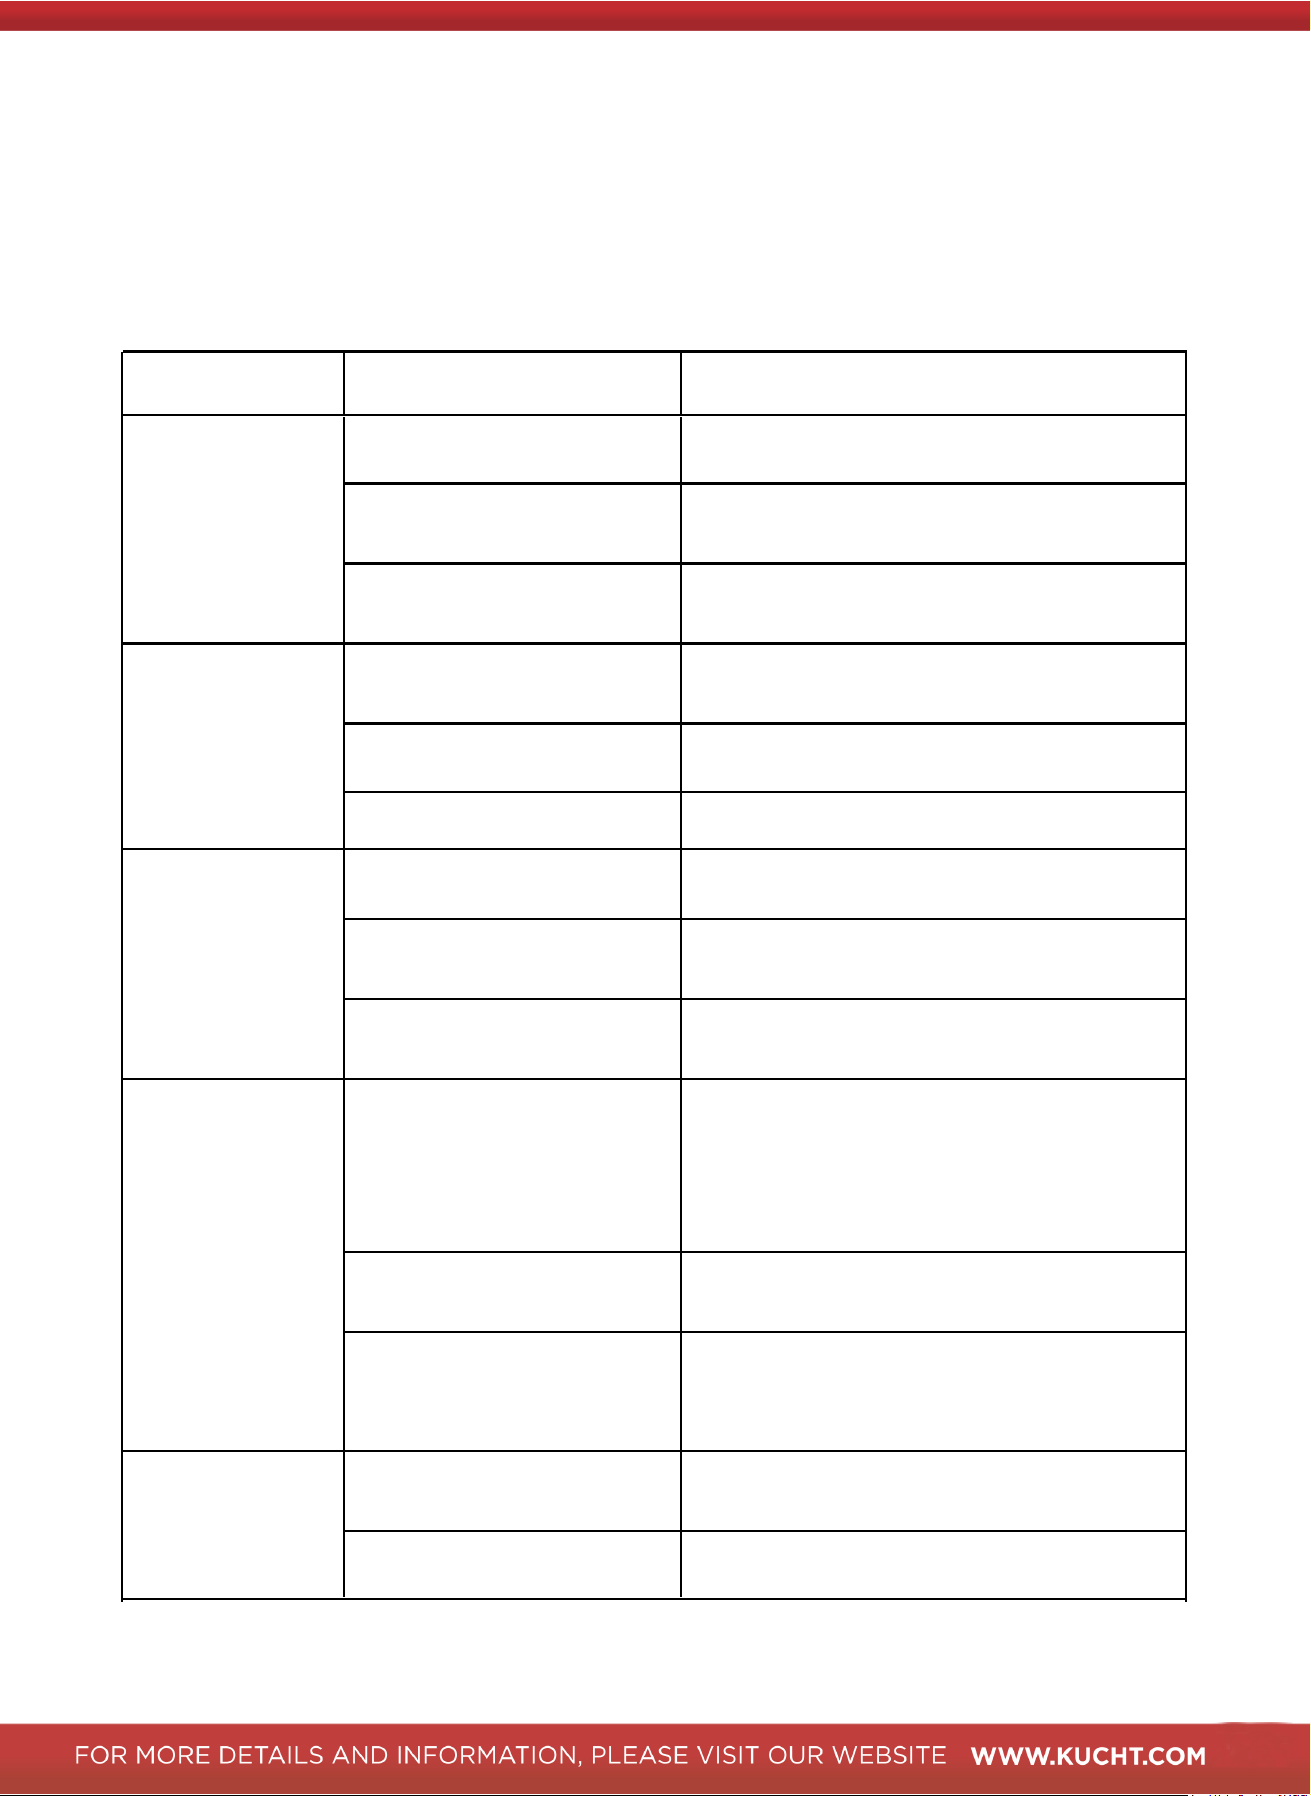
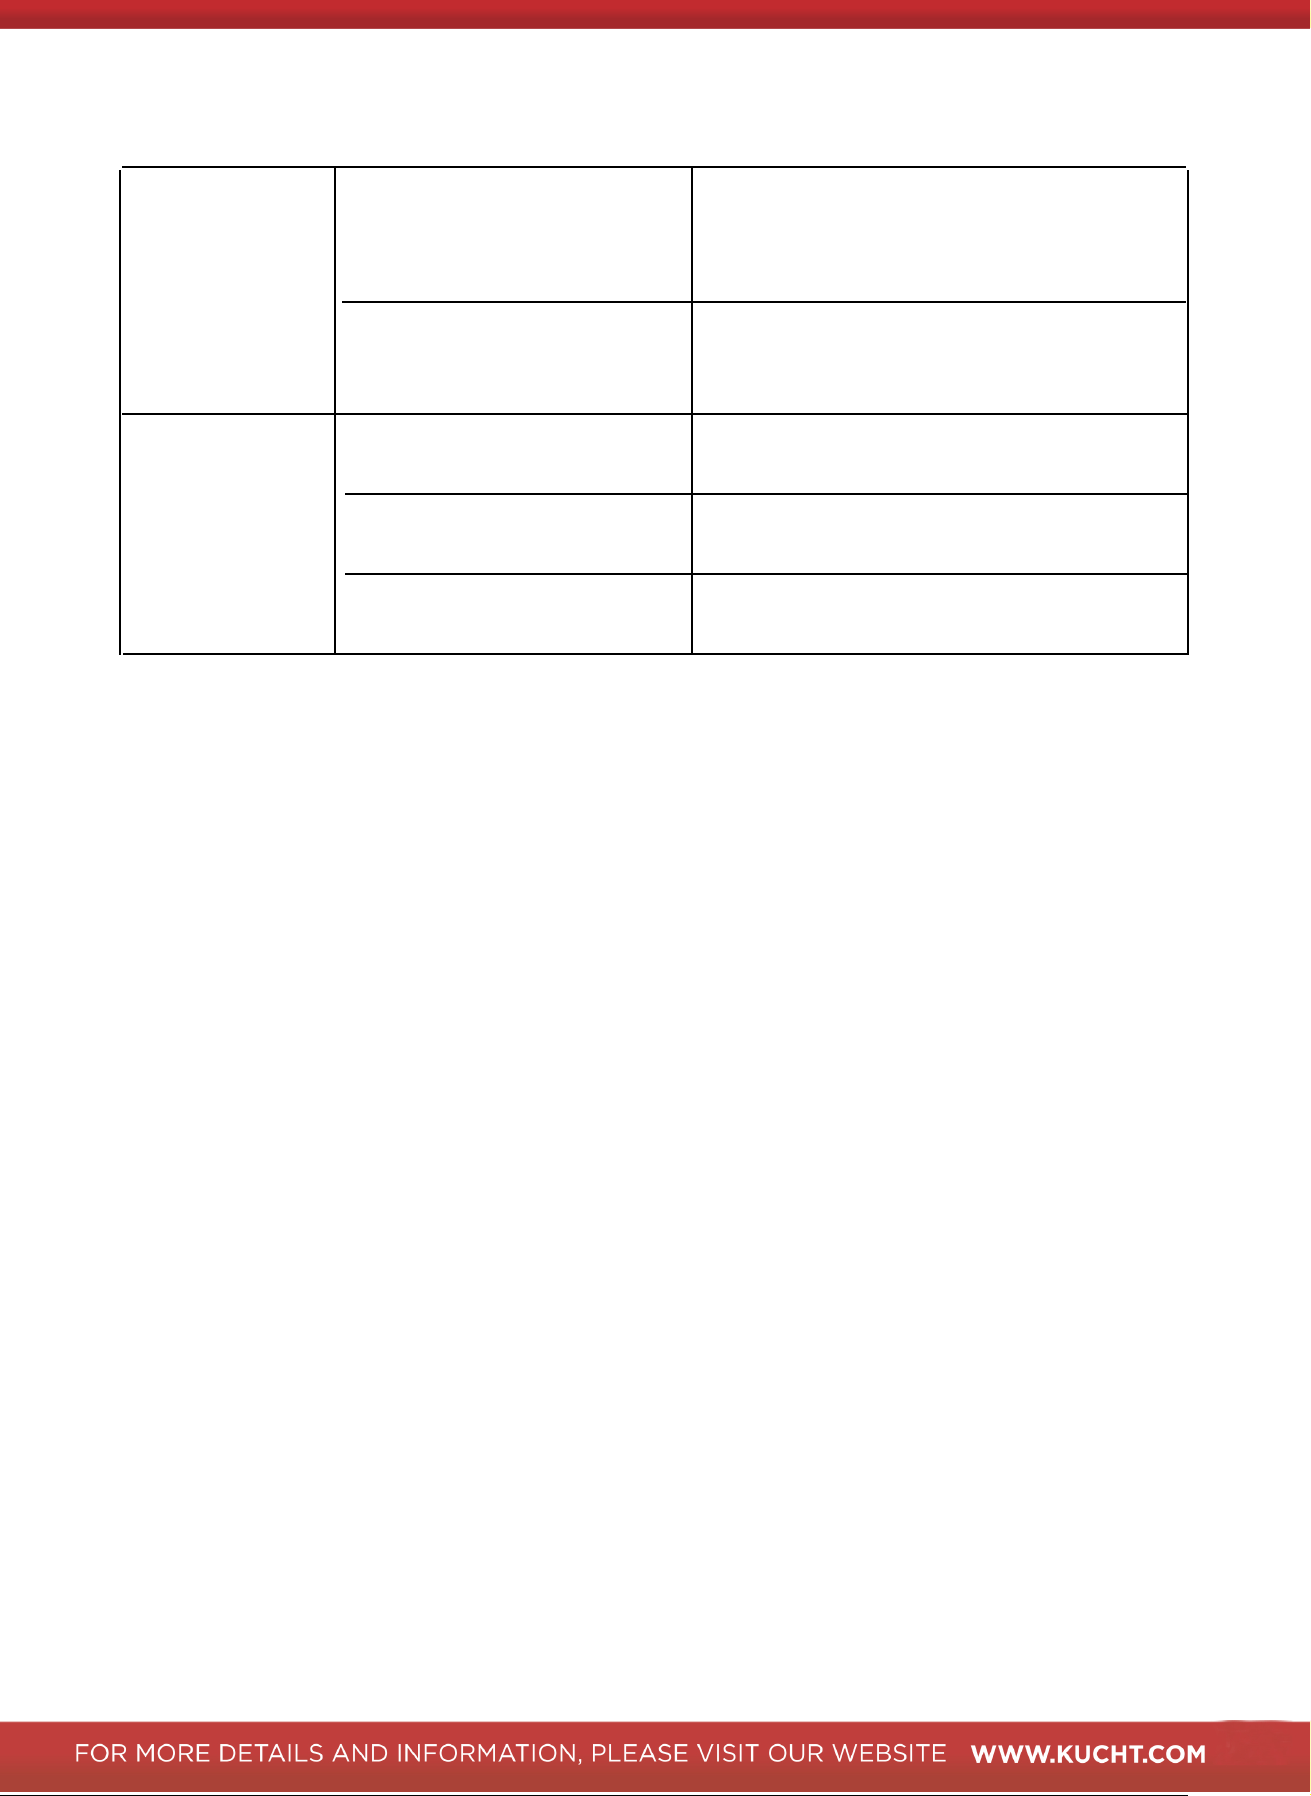
TROUBLESHOOTING
Before you call for service, please review the potential problem / possible causes
and remedies shown in the table below.
Problem Possible Causes Solutions
Range won't turn
on / No power
• Power cord not connected • Ensure power cord is plugged in securely
• Circuit breaker tripped or
fuse blown
• Reset circuit breaker or replace fuse
• Incorrect power supply
• Verify the power supply matches the
appliance requirements
The cooking zone
does not heat up
• Cookware not suitable (non-
magnetic)
• Use induction-compatible cookware
(magnetic base)
• Pan too small or uneven
• Ensure cookware meets minimum size
requirement
• Pan not placed correctly • Reposition cookware on the cooking zone
Hob shuts off
during cooking
• Automatic safety shutoff (no
pan detected).
• Reposition the pan correctly on the cooking
zone.
• The cookware bottom is
warped, making poor contact.
• Use flat-bottomed cookware.
• Overheating protection
activated
• Clean any spilled food from the surface, as
it can cause overheating.
Unusual noise
(buzzing,
humming, fan)
• Buzzing/Humming: Normal.
Caused by interaction
between the cookware and
the electromagnetic field. May
vary by pan.
• Try using a different pan if the noise is
excessive. Cast iron is often quieter.
• Clicking: Normal when first
turned on or adjusting power.
• Ensure the pan is flat on the surface.
• Fan noise: Normal. The
cooling fan runs to protect
electronics.
• Fan noise is standard, especially at high
power settings, and may continue after
turning off until the unit cools.
Touch controls are
unresponsive
• The control panel is locked
(Child Lock).
• Holding "child Lock" button for 3 seconds to
unlock.
• It is under sabbath mode
• Holding "sabbath" button for 3 seconds to
unlock.
Scratched or
cracked cooktop
• Physical damage from
sliding cookware or a heavy
impact.
• For a crack: Discontinue use
immediately. Turn off power at the circuit
breaker and call a technician. Risk of
electrical shock exists.
• Thermal shock from a very
cold pan placed on a very hot
zone.
• Small scratches are often cosmetic. Avoid
sliding pots and pans.
Error code is
displayed
• E-4: Communication failure
• Call for service
• E-1: Temperature sensor
failure
• Call for service
• Door: Door not close rightly
• Close the door
31
32
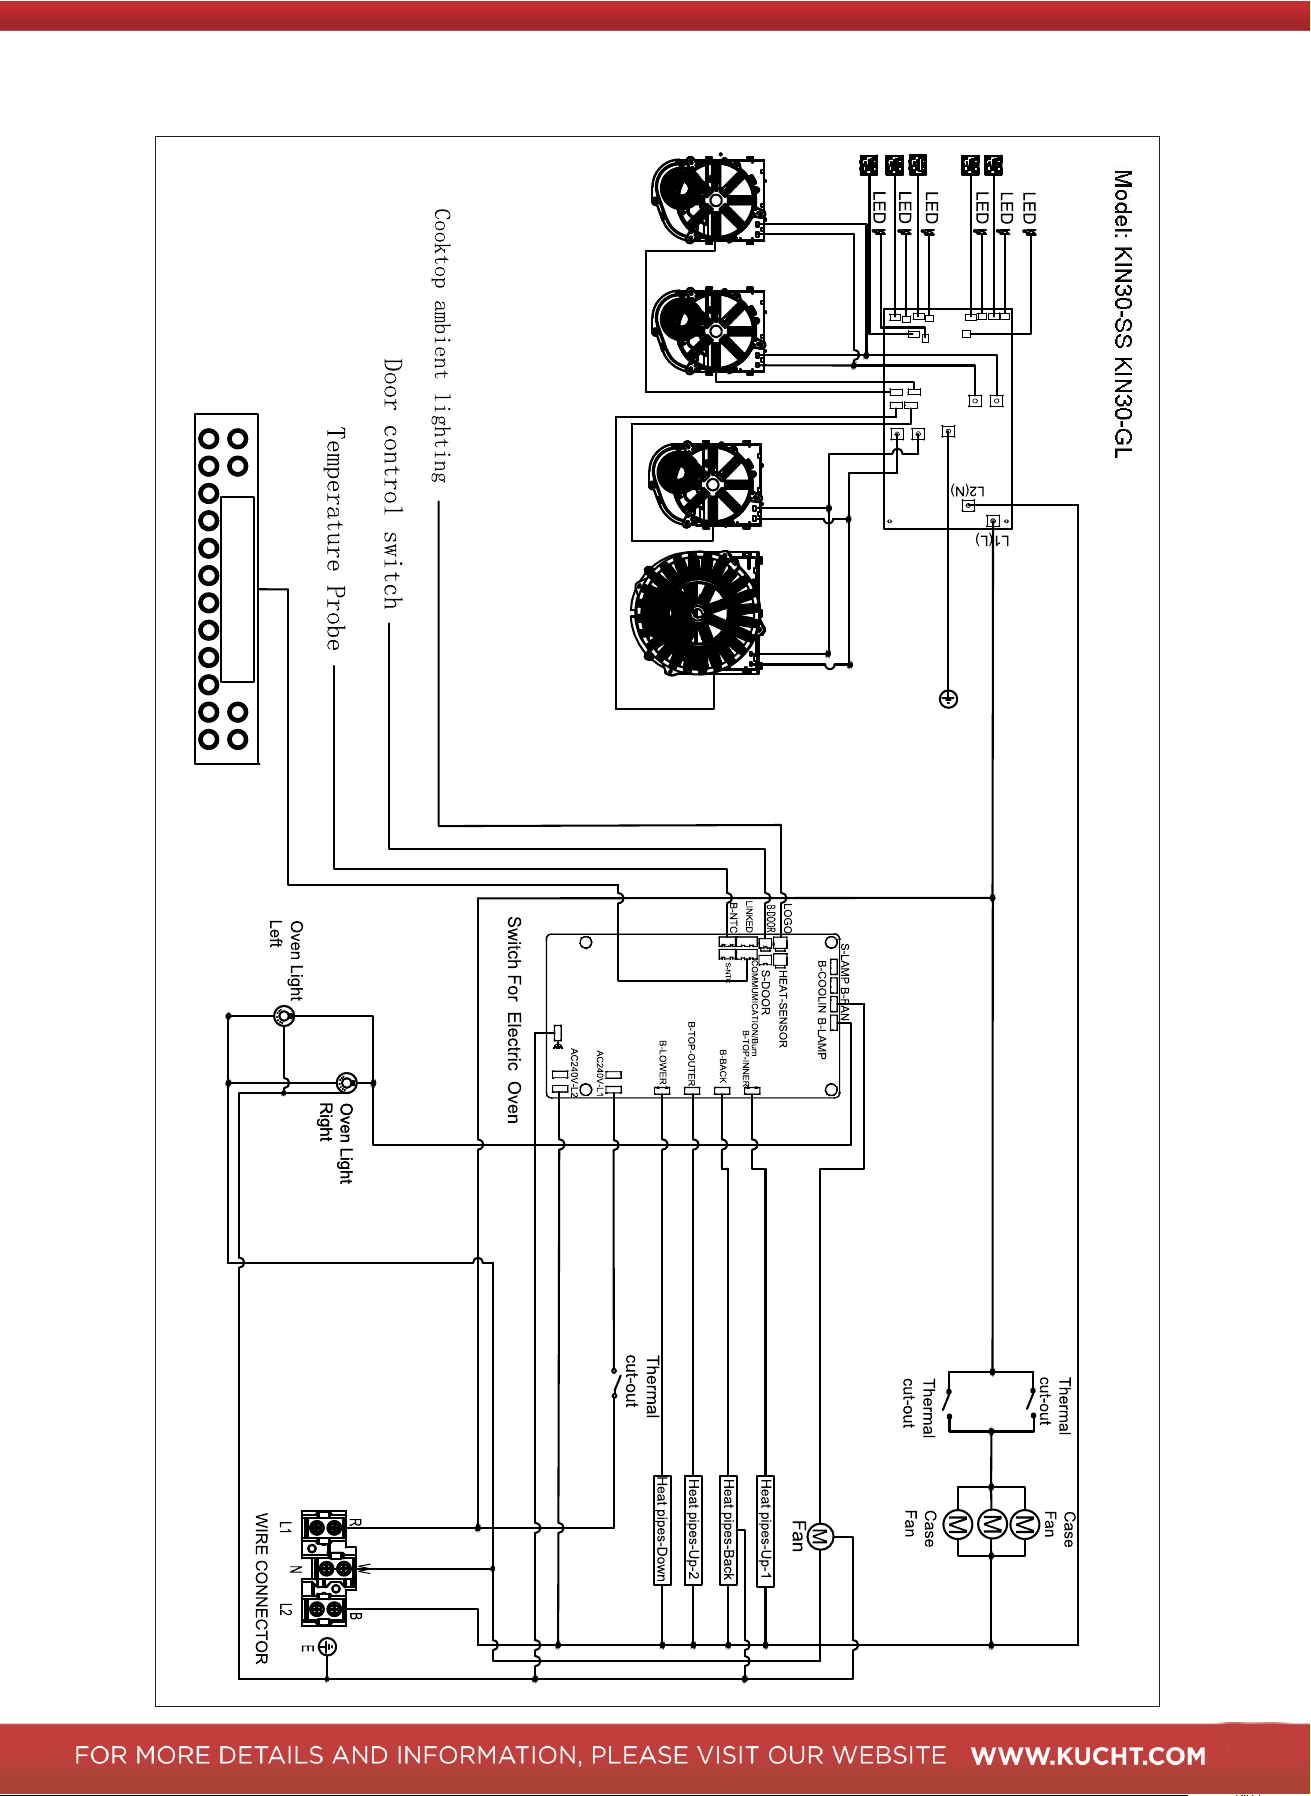
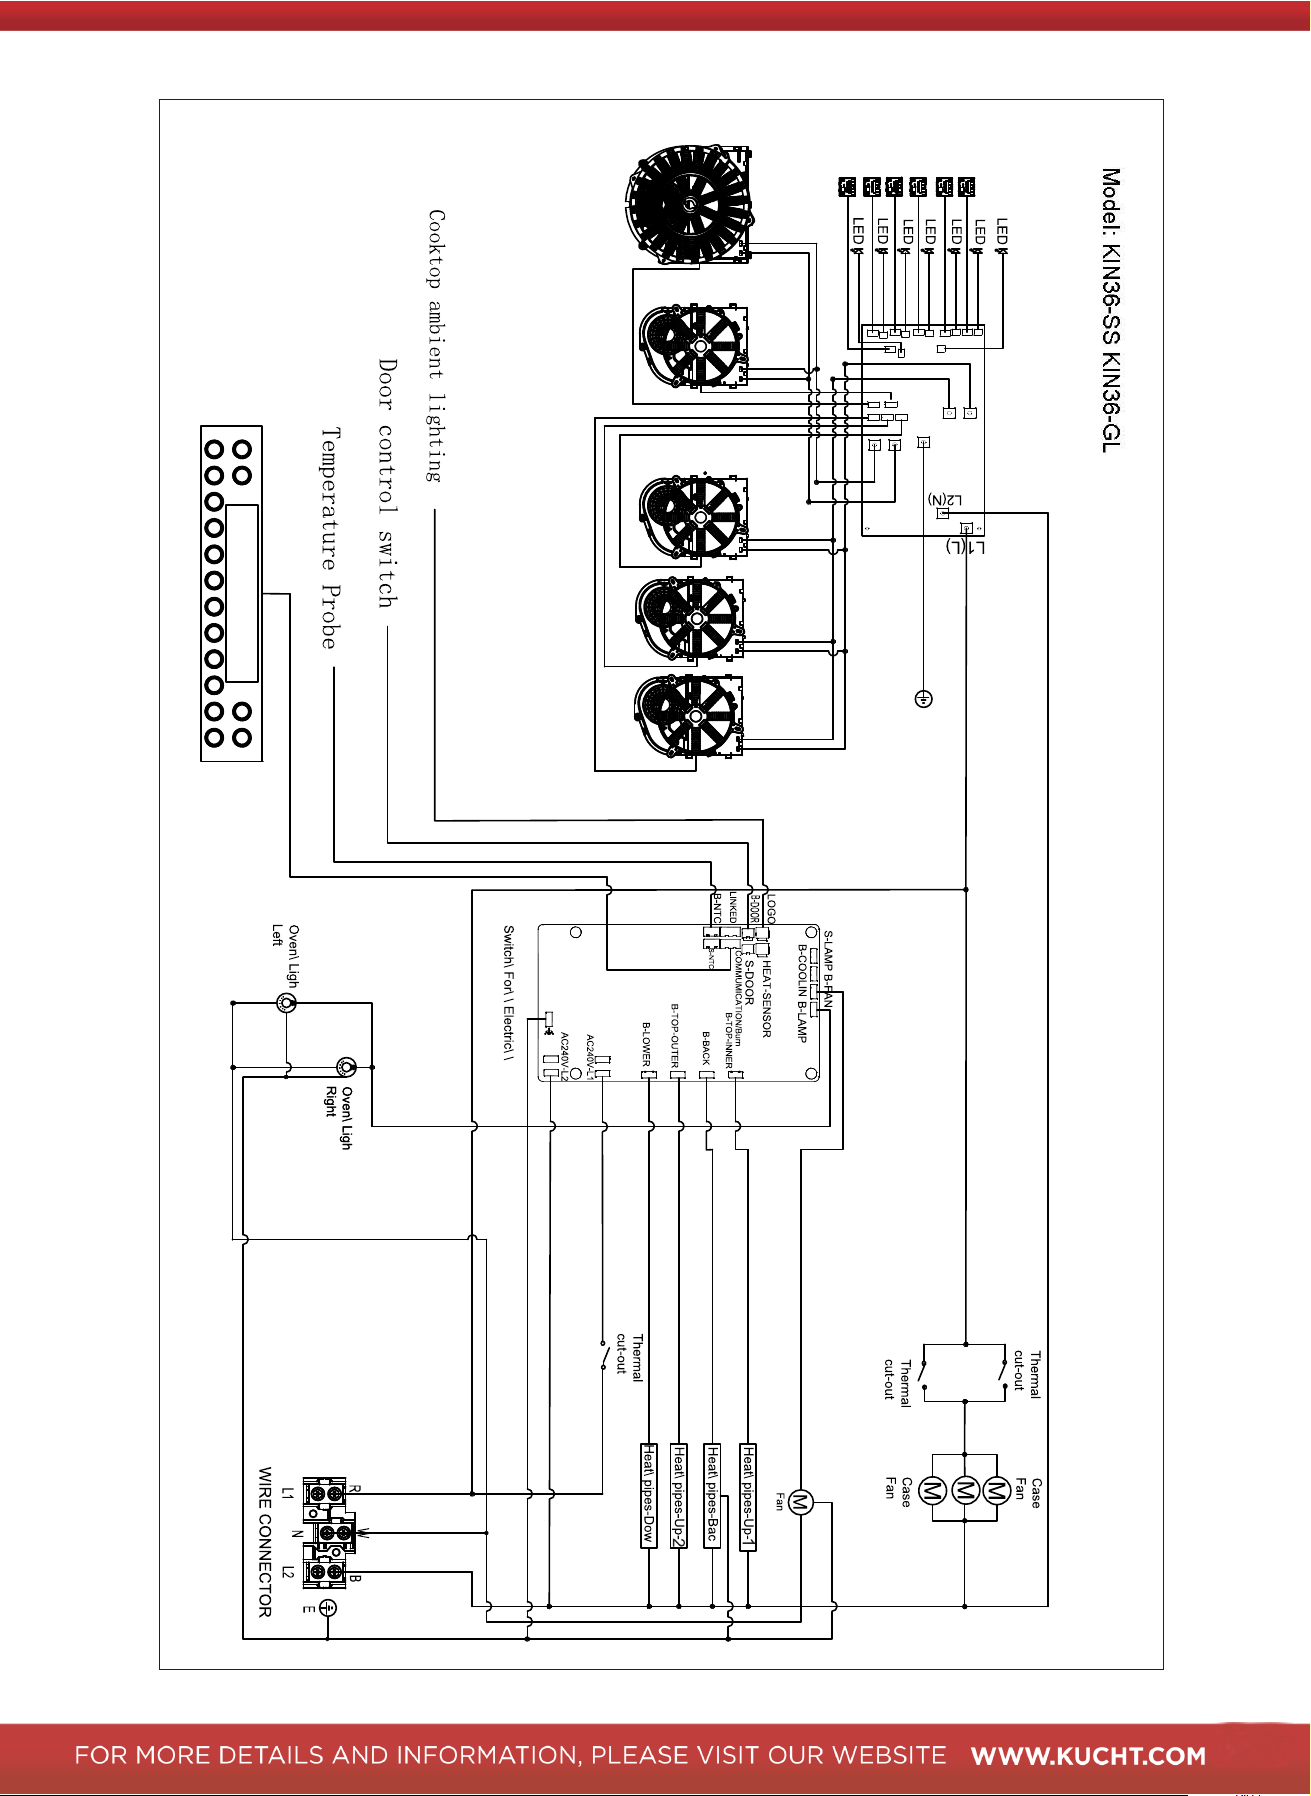
WIRE
D
IAGRAM
33
34
Serial Number : __________________________________________