EnglishFrançaisEspañol

CK88 CK61 Owner’s Manual
S2
(529-M02 FCC sdoc YCA 01)
COMPLIANCE INFORMATION STATEMENT
(Supplierʼs declaration of conformity procedure)
Responsible Party: Yamaha Corporation of America
Address: 6600 Orangethorpe Ave., Buena Park, Calif. 90620
Telephone: 714-522-9011
Type of Equipment: STAGE KEYBOARD
Model Name: CK88, CK61
This device complies with Part 15 of the FCC Rules.
Operation is subject to the following two conditions:
1) this device may not cause harmful interference, and
2) this device must accept any interference received including interference that may cause undesired operation.
1. IMPORTANT NOTICE: DO NOT MODIFY THIS UNIT!
This product, when installed as indicated in the instructions contained in this manual, meets FCC requirements. Modifications
not expressly approved by Yamaha may void your authority, granted by the FCC, to use the product.
2. IMPORTANT: When connecting this product to accessories and/or another product use only high quality shielded cables.
Cable/s supplied with this product MUST be used. Follow all installation instructions. Failure to follow instructions could void your
FCC authorization to use this product in the USA.
3. NOTE: This product has been tested and found to comply with the requirements listed in FCC Regulations, Part 15 for Class “B”
digital devices. Compliance with these requirements provides a reasonable level of assurance that your use of this product in a
residential environment will not result in harmful interference with other electronic devices. This equipment generates/uses radio
frequencies and, if not installed and used according to the instructions found in the users manual, may cause interference harm-
ful to the operation of other electronic devices. Compliance with FCC regulations does not guarantee that interference will not
occur in all installations. If this product is found to be the source of interference, which can be determined by turning the unit
“OFF” and “ON”, please try to eliminate the problem by using one of the following measures:
- Relocate either this product or the device that is being affected by the interference.
- Utilize power outlets that are on different branch (circuit breaker or fuse) circuits or install AC line filter/s.
- In the case of radio or TV interference, relocate/reorient the antenna. If the antenna lead-in is 300 ohm ribbon lead, change the
lead-in to co-axial type cable.
If these corrective measures do not produce satisfactory results, please contact the local retailer authorized to distribute this type
of product. If you cannot locate the appropriate retailer, please contact Yamaha Corporation of America, 6600 Orangethorpe
Ave., Buena Park, CA90620, USA.
The above statements apply ONLY to those products distributed by Yamaha Corporation of America or its subsidiaries.
(529-M04 FCC class B YCA 01)
FCC INFORMATION (U.S.A.)
CK88 CK61 Owner’s Manual
S3
For AC adaptor
Explanation of Graphical Symbols
The lightning flash with arrowhead symbol
within an equilateral triangle is intended to
alert the user to the presence of uninsulated
“dangerous voltage” within the product’s
enclosure that may be of sufficient magnitude
to constitute a risk of electric shock to
persons.
The exclamation point within an equilateral
triangle is intended to alert the user to the
presence of important operating and
maintenance (servicing) instructions in the
literature accompanying the product.
IMPORTANT SAFETY INSTRUCTIONS
1 Read these instructions.
2 Keep these instructions.
3 Heed all warnings.
4 Follow all instructions.
5 Do not use this apparatus near water.
6 Clean only with dry cloth.
7 Do not block any ventilation openings. Install in
accordance with the manufacturer’s instructions.
8 Do not install near any heat sources such as
radiators, heat registers, stoves, or other apparatus
(including amplifiers) that produce heat.
9 Do not defeat the safety purpose of the polarized or
grounding-type plug. A polarized plug has two
blades with one wider than the other. A grounding
type plug has two blades and a third grounding
prong. The wide blade or the third prong are
provided for your safety. If the provided plug does
not fit into your outlet, consult an electrician for
replacement of the obsolete outlet.
10 Protect the power cord from being walked on or
pinched particularly at plugs, convenience
receptacles, and the point where they exit from the
apparatus.
11 Only use attachments/accessories specified by the
manufacturer.
12 Use only with the cart, stand,
tripod, bracket, or table
specified by the manufacturer,
or sold with the apparatus.
When a cart is used, use
caution when moving the cart/
apparatus combination to
avoid injury from tip-over.
13 Unplug this apparatus during lightning storms or
when unused for long periods of time.
14 Refer all servicing to qualified service personnel.
Servicing is required when the apparatus has been
damaged in any way, such as power-supply cord or
plug is damaged, liquid has been spilled or objects
have fallen into the apparatus, the apparatus has
been exposed to rain or moisture, does not operate
normally, or has been dropped.
(502-M01 UL 60065-1 en 01)
CAUTION: TO REDUCE THE RISK OF
ELECTRIC SHOCK, DO NOT REMOVE
COVER (OR BACK). NO USER-SERVICEABLE
PARTS INSIDE. REFER SERVICING TO
QUALIFIED SERVICE PERSONNEL.
CAUTION
RISK OF ELECTRIC SHOCK
DO NOT OPEN
WARNING
TO REDUCE THE RISK OF FIRE OR ELECTRIC SHOCK, DO NOT EXPOSE THIS APPARATUS TO RAIN OR MOISTURE.
CK88 CK61 Owner’s Manual
S4
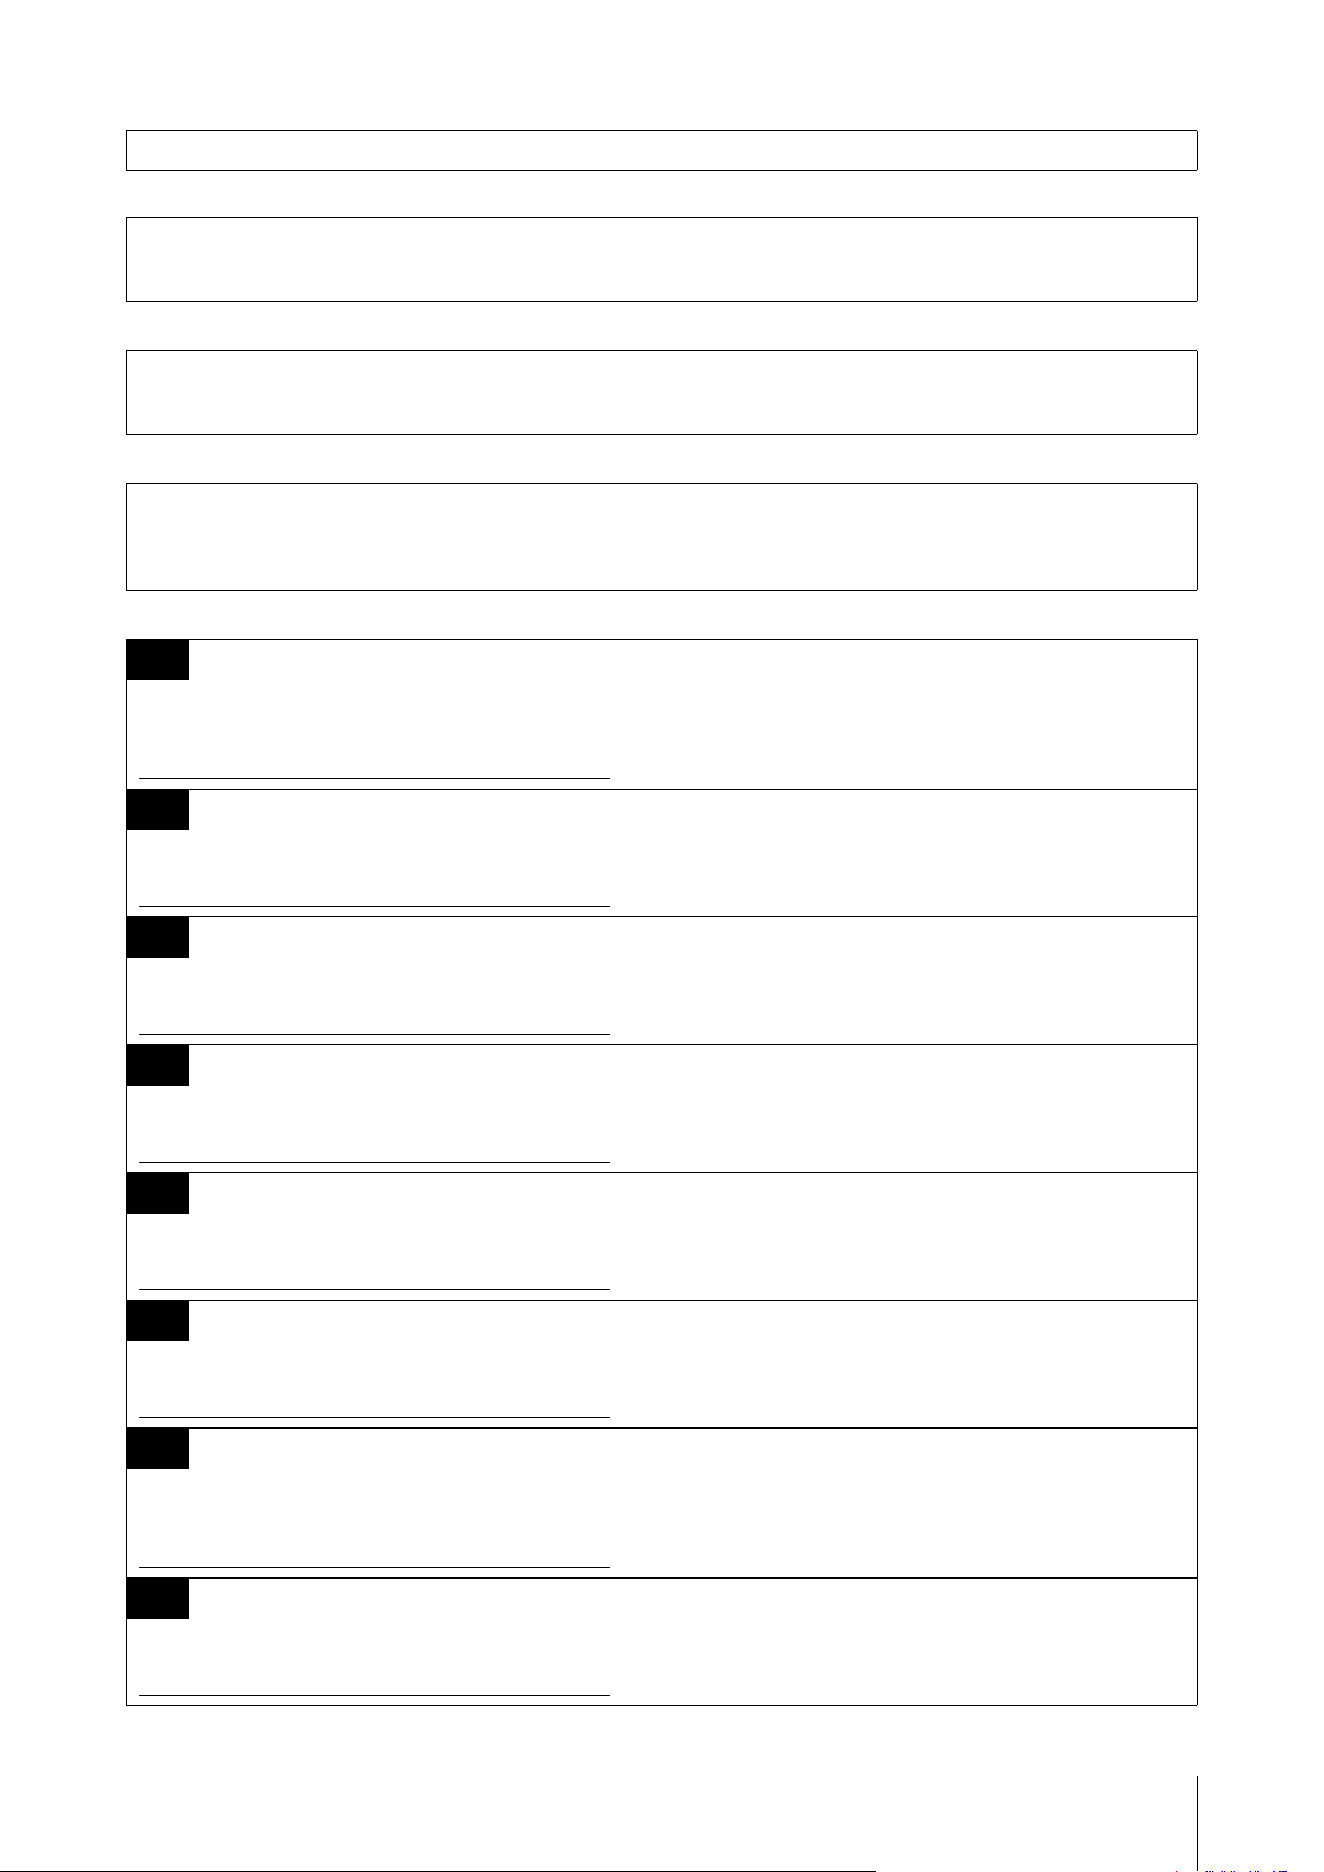
(58-M03 WEEE battery en 01)
Information for users on collection and disposal of old equipment and used batteries:
These symbols on the products, packaging, and/or accompanying documents mean that used electrical and electronic
products and batteries should not be mixed with general household waste.
For proper treatment, recovery and recycling of old products and used batteries, please take them to applicable
collection points, in accordance with your national legislation.
By disposing of these products and batteries correctly, you will help to save valuable resources and prevent any
potential negative effects on human health and the environment which could otherwise arise from inappropriate waste
handling.
For more information about collection and recycling of old products and batteries, please contact your local
municipality, your waste disposal service or the point of sale where you purchased the items.
For business users in the European Union:
If you wish to discard electrical and electronic equipment, please contact your dealer or supplier for further
information.
Information on Disposal in other Countries outside the European Union:
These symbols are only valid in the European Union. If you wish to discard these items, please contact your local
authorities or dealer and ask for the correct method of disposal.
Note for the battery symbol (bottom symbol example):
This symbol might be used in combination with a chemical symbol. In this case it complies with the requirement set by
the EU Battery Directive for the chemical involved.
The model number, serial number, power requirements, etc., may be
found on or near the name plate, which is at the bottom of the unit.
You should note this serial number in the space provided below and
retain this manual as a permanent record of your purchase to aid iden-
tification in the event of theft.
Model No.
Serial No.
(1003-M06 plate bottom en 01)
For Singapore
Users are only allowed to use EN 50075 detachable and interchangeable 2-pin plugs or BS 1363-3 or SS 145-3 detachable and
interchangeable 3-pin plugs that are approved and suitable to use in Singapore.
(604-M02 SG adaptor 01)
CK88 CK61 Owner’s Manual
S5
(554-M01)
(554-M03 FCC mobile SAR 01)
(555-M04 ISED mobile SAR en 01)
(555-M13 ISED RSS en 01)
This transmitter must not be co-located or operated in conjunction with any other antenna or transmitter.
This equipment complies with FCC radiation exposure limits set forth for an uncontrolled environment and meets the FCC radio
frequency (RF) Exposure Guidelines. This equipment should be installed and operated keeping the radiator at least 20 cm or more
away from personʼs body.
This equipment complies with ISED radiation exposure limits set forth for an uncontrolled environment and meets RSS-102 of the
ISED radio frequency (RF) Exposure rules. This equipment should be installed and operated keeping the radiator at least 20 cm or
more away from person’s body.
This device contains licence-exempt transmitter(s)/receiver(s) that comply with Innovation, Science and Economic Development
Canada’s licence-exempt RSS(s). Operation is subject to the following two conditions:
1. This device may not cause interference.
2. This device must accept any interference, including interference that may cause undesired operation of the device.
EN
SIMPLIFIED EU DECLARATION OF CONFORMITY / SIMPLIFIED UK DECLARATION OF CONFORMITY
Hereby, Yamaha Music Europe GmbH declares that the radio equipment type [CK88, CK61] is in compliance with Directive 2014/53/
EU and the radio equipment regulations of UK. The full texts of the EU declaration of conformity and the UK declaration of conformity
are available at the following internet address:
https://europe.yamaha.com/en/support/compliance/doc.html
FR
DECLARATION UE DE CONFORMITE SIMPLIFIEE
Le soussigné, Yamaha Music Europe GmbH, déclare que l'équipement radioélectrique du type [CK88, CK61] est conforme à la
directive 2014/53/UE. Le texte complet de la déclaration UE de conformité est disponible à l'adresse internet suivante :
https://europe.yamaha.com/en/support/compliance/doc.html
DE
VEREINFACHTE EU-KONFORMITÄTSERKLÄRUNG
Hiermit erklärt Yamaha Music Europe GmbH, dass der Funkanlagentyp [CK88, CK61] der Richtlinie 2014/53/EU entspricht. Der
vollständige Text der EU-Konformitätserklärung ist unter der folgenden Internetadresse verfügbar:
https://europe.yamaha.com/en/support/compliance/doc.html
SV
FÖRENKLAD EU-FÖRSÄKRAN OM ÖVERENSSTÄMMELSE
Härmed försäkrar Yamaha Music Europe GmbH att denna typ av radioutrustning [CK88, CK61] överensstämmer med direktiv 2014/
53/EU. Den fullständiga texten till EU-försäkran om överensstämmelse finns på följande webbadress:
https://europe.yamaha.com/en/support/compliance/doc.html
IT
DICHIARAZIONE DI CONFORMITÀ UE SEMPLIFICATA
Il fabbricante, Yamaha Music Europe GmbH, dichiara che il tipo di apparecchiatura radio [CK88, CK61] è conforme alla direttiva 2014/
53/UE. Il testo completo della dichiarazione di conformità UE è disponibile al seguente indirizzo Internet:
https://europe.yamaha.com/en/support/compliance/doc.html
ES
DECLARACIÓN UE DE CONFORMIDAD SIMPLIFICADA
Por la presente, Yamaha Music Europe GmbH declara que el tipo de equipo radioeléctrico [CK88, CK61] es conforme con la Directiva
2014/53/UE. El texto completo de la declaración UE de conformidad está disponible en la dirección Internet siguiente:
https://europe.yamaha.com/en/support/compliance/doc.html
PT
DECLARAÇÃO UE DE CONFORMIDADE SIMPLIFICADA
O(a) abaixo assinado(a) Yamaha Music Europe GmbH declara que o presente tipo de equipamento de rádio [CK88, CK61] está em
conformidade com a Diretiva 2014/53/UE. O texto integral da declaração de conformidade está disponível no seguinte endereço de
Internet:
https://europe.yamaha.com/en/support/compliance/doc.html
NL
VEREENVOUDIGDE EU-CONFORMITEITSVERKLARING
Hierbij verklaar ik, Yamaha Music Europe GmbH, dat het type radioapparatuur [CK88, CK61] conform is met Richtlijn 2014/53/EU. De
volledige tekst van de EU-conformiteitsverklaring kan worden geraadpleegd op het volgende internetadres:
https://europe.yamaha.com/en/support/compliance/doc.html
CK88 CK61 Owner’s Manual
S6
BG
ОПРОСТЕНА ЕС ДЕКЛАРАЦИЯ ЗА СЪОТВЕТСТВИЕ
С настоящото Yamaha Music Europe GmbH декларира, че този тип радиосъоръжение [CK88, CK61] е в съответствие с
Директива 2014/53/ЕС. Цялостният текст на ЕС декларацията за съответствие може да се намери на следния интернет
адрес:
https://europe.yamaha.com/en/support/compliance/doc.html
CS
ZJEDNODUŠENÉ EU PROHLÁŠENÍ O SHODĚ
Tímto Yamaha Music Europe GmbH prohlašuje, že typ rádiového zařízení [CK88, CK61] je v souladu se směrnicí 2014/53/EU. Úplné
znění EU prohlášení o shodě je k dispozici na této internetové adrese:
https://europe.yamaha.com/en/support/compliance/doc.html
DA
FORENKLET EU-OVERENSSTEMMELSESERKLÆRING
Hermed erklærer Yamaha Music Europe GmbH, at radioudstyrstypen [CK88, CK61] er i overensstemmelse med direktiv 2014/53/EU.
EU-overensstemmelseserklæringens fulde tekst kan findes på følgende internetadresse:
https://europe.yamaha.com/en/support/compliance/doc.html
ET
LIHTSUSTATUD ELI VASTAVUSDEKLARATSIOON
Käesolevaga deklareerib Yamaha Music Europe GmbH, et käesolev raadioseadme tüüp [CK88, CK61] vastab direktiivi 2014/53/EL
nõuetele. ELi vastavusdeklaratsiooni täielik tekst on kättesaadav järgmisel internetiaadressil:
https://europe.yamaha.com/en/support/compliance/doc.html
EL
ΑΠΛΟΥΣΤΕΥΜΕΝΗ ΔΗΛΩΣΗ ΣΥΜΜΟΡΦΩΣΗΣ ΕΕ
Με την παρούσα ο/η Yamaha Music Europe GmbH, δηλώνει ότι ο ραδιοεξοπλισμός [CK88, CK61] πληροί την οδηγία 2014/53/ΕΕ. Το
πλήρες κείμενο της δήλωσης συμμόρφωσης ΕΕ διατίθεται στην ακόλουθη ιστοσελίδα στο διαδίκτυο:
https://europe.yamaha.com/en/support/compliance/doc.html
HR
POJEDNOSTAVLJENA EU IZJAVA O SUKLADNOSTI
Yamaha Music Europe GmbH ovime izjavljuje da je radijska oprema tipa [CK88, CK61] u skladu s Direktivom 2014/53/EU. Cjeloviti
tekst EU izjave o sukladnosti dostupan je na sljedećoj internetskoj adresi:
https://europe.yamaha.com/en/support/compliance/doc.html
LV
VIENKĀRŠOTA ES ATBILSTĪBAS DEKLARĀCIJA
Ar šo Yamaha Music Europe GmbH deklarē, ka radioiekārta [CK88, CK61] atbilst Direktīvai 2014/53/ES. Pilns ES atbilstības
deklarācijas teksts ir pieejams šādā interneta vietnē:
https://europe.yamaha.com/en/support/compliance/doc.html
LT
SUPAPRASTINTA ES ATITIKTIES DEKLARACIJA
Aš, Yamaha Music Europe GmbH, patvirtinu, kad radijo įrenginių tipas [CK88, CK61] atitinka Direktyvą 2014/53/ES. Visas ES atitikties
deklaracijos tekstas prieinamas šiuo interneto adresu:
https://europe.yamaha.com/en/support/compliance/doc.html
HU
EGYSZERŰSÍTETT EU-MEGFELELŐSÉGI NYILATKOZAT
Yamaha Music Europe GmbH igazolja, hogy a [CK88, CK61] típusú rádióberendezés megfelel a 2014/53/EU irányelvnek. Az EU-
megfelelőségi nyilatkozat teljes szövege elérhető a következő internetes címen:
https://europe.yamaha.com/en/support/compliance/doc.html
PL
UPROSZCZONA DEKLARACJA ZGODNOŚCI UE
Yamaha Music Europe GmbH niniejszym oświadcza, że typ urządzenia radiowego [CK88, CK61] jest zgodny z dyrektywą 2014/53/
UE. Pełny tekst deklaracji zgodności UE jest dostępny pod następującym adresem internetowym:
https://europe.yamaha.com/en/support/compliance/doc.html
RO
DECLARAȚIA UE DE CONFORMITATE SIMPLIFICATĂ
Prin prezenta, Yamaha Music Europe GmbH declară că tipul de echipamente radio [CK88, CK61] este în conformitate cu Directiva
2014/53/UE. Textul integral al declarației UE de conformitate este disponibil la următoarea adresă internet:
https://europe.yamaha.com/en/support/compliance/doc.html
SK
ZJEDNODUŠENÉ EÚ VYHLÁSENIE O ZHODE
Yamaha Music Europe GmbH týmto vyhlasuje, že rádiové zariadenie typu [CK88, CK61] je v súlade so smernicou 2014/53/EÚ. Úplné
EÚ vyhlásenie o zhode je k dispozícii na tejto internetovej adrese:
https://europe.yamaha.com/en/support/compliance/doc.html

CK88 CK61 Owner’s Manual
S7
(559-M01 RED DoC URL 02)
SL
POENOSTAVLJENA IZJAVA EU O SKLADNOSTI
Yamaha Music Europe GmbH potrjuje, da je tip radijske opreme [CK88, CK61] skladen z Direktivo 2014/53/EU. Celotno besedilo
izjave EU o skladnosti je na voljo na naslednjem spletnem naslovu:
https://europe.yamaha.com/en/support/compliance/doc.html
FI
YKSINKERTAISTETTU EU-VAATIMUSTENMUKAISUUSVAKUUTUS
Yamaha Music Europe GmbH vakuuttaa, että radiolaitetyyppi [CK88, CK61] on direktiivin 2014/53/EU mukainen. EU-
vaatimustenmukaisuusvakuutuksen täysimittainen teksti on saatavilla seuraavassa internetosoitteessa:
https://europe.yamaha.com/en/support/compliance/doc.html
TR
BASİTLEŞTİRİLMİŞ AVRUPA BİRLİĞİ UYGUNLUK BİLDİRİMİ
İşbu belge ile, Yamaha Music Europe GmbH, radyo cihaz tipinin [CK88, CK61], Direktif 2014/53/ AB'ye uygunluğunu beyan eder. AB
uyumu beyanının tam metni aşağıdaki internet adresinden edinilebilir:
https://europe.yamaha.com/en/support/compliance/doc.html
CK88 CK61 Owner’s Manual
2
PRECAUTIONS
PLEASE READ CAREFULLY BEFORE PROCEEDING
Please keep this manual in a safe and handy place for future reference.
WARNING
Always follow the basic precautions listed below to avoid the possibility of serious injury or even death from
electrical shock, short-circuiting, damages, fire or other hazards. These precautions include, but are not
limited to, the following:
Power supply
• Do not place the power cord near heat sources such as
heaters or radiators. Also, do not excessively bend or
otherwise damage the cord, or place heavy objects on it.
• Do not touch the product or the power plug during an
electrical storm.
• Use only the correct voltage specified for the product. The
required voltage is printed on the name plate of the
product.
• Use the specified adaptor (page 69).
• Check the power plug periodically and remove any dirt or
dust which may have accumulated on it.
• Insert the power plug firmly all the way into the AC outlet.
Using the product when it is not plugged in sufficiently can
cause dust to accumulate on the plug, possibly resulting in
fire or skin burns.
• When setting up the product, make sure that the AC outlet
you are using is easily accessible. If some trouble or
malfunction occurs, immediately turn off the power switch
and disconnect the plug from the outlet. Even when the
power switch is turned off, as long as the power cord is not
unplugged from the wall AC outlet, the product will not be
disconnected from the power source.
• Do not connect the product to an electrical outlet using a
multi-plug outlet extender. Doing so can result in lower
sound quality, or possibly cause overheating in the outlet.
• When disconnecting the power plug, always hold the plug
itself and not the cord. Pulling by the cord can damage it
and cause electric shocks or a fire.
• If not using the product for long periods of time, be sure to
pull the power plug from the AC outlet.
Do not disassemble
• Do not attempt to disassemble the internal parts or modify
them in any way.
Water warning
• Do not expose the product to rain, use it near water or in
damp or wet conditions, or place on it any containers (such
as vases, bottles or glasses) containing liquids which might
spill into any openings or places where water may drop. A
liquid such as water getting into the product may cause a
fire, electric shocks, or malfunctions.
• Use the AC adaptor indoors only. Do not use in any wet
environments.
• Never insert or remove a power plug with wet hands.
Fire warning
• Do not place any burning items or open flames near the
product, since they may cause a fire.
Wireless unit
• Radio waves from this product may affect electro-medical
devices, such as a heart pacemaker implant or defibrillator
implant.
- Do not use the product near medical devices or inside
medical facilities. Radio waves from this product may
affect electro-medical devices.
- Do not use the product within 15 cm (6 in.) of persons
with a heart pacemaker implant or a defibrillator implant.
Handling
• Magnetism from this product may affect electro-medical
devices, such as a heart pacemaker implant or defibrillator
implant.
- Keep the product away from a heart pacemaker implant
or a defibrillator implant.
Batteries
• Do not dispose of a battery in a fire.
• Do not expose the battery to conditions of extreme low air
pressure, cold or heat (such as in direct sunlight or a fire) or
excessive dust or humidity.
Doing so may result in the battery bursting, causing a fire or
injury.
• Follow the precautions below. Failure to do so might result
in battery fluid leakage. If the contents of the battery gets
on your hands or in your eyes, it can cause blindness,
chemical burns, and damage of the product.
- Use the specified battery type (page 69) only.
- Do not use new batteries together with old ones.
- Do not mix battery types.
- Always make sure all batteries are inserted in conformity
with the +/- polarity markings.
- Do not disassemble a battery.
(DMI-10) 1/2
CK88 CK61 Owner’s Manual
3
- When the batteries run out, or if the product is not to be
used for a long time, remove the batteries from the
product.
- Do not attempt to recharge batteries that are not
designed to be charged.
• If the batteries do leak, avoid contact with the leaked fluid.
If the battery fluid should come in contact with your eyes,
mouth, or skin, wash immediately with water and consult a
doctor. Battery fluid is corrosive and may possibly cause
loss of sight or chemical burns.
• When using rechargeable batteries, follow the instructions
that came with the batteries. Use only the specified charger
device and within the specified charging temperature
range when charging.
Charging with an unspecified charger or at a temperature
outside the range may cause leakage, overheating,
explosion, or malfunction.
• Keep batteries away from children. A child could
accidentally swallow a battery. Failure to observe this may
also cause inflammation due to battery fluid leaks.
• Do not put batteries in a pocket or bag, or carry or store
them together with pieces of metal. Batteries kept in such
condition could short, burst, or leak, causing a fire or injury.
If you notice any abnormality
• If any of the following problems occur, immediately turn off
the power switch and disconnect the power plug from the
outlet. If you are using batteries, remove all batteries from
the product.
Finally have the device inspected by Yamaha service
personnel.
- The power cord or plug becomes frayed or damaged.
- Unusual smells or smoke are emitted.
- Some object, or water has been dropped into the
product.
- There is a sudden loss of sound during use of the product.
- Cracks or other visible damage appear on the product.
CAUTION
Always follow the basic precautions listed below to avoid the possibility of physical injury to you or others, or
damage to the product or other property. These precautions include, but are not limited to, the following:
Location
• Do not place the product in an unstable position or a
location with excessive vibration, where it might
accidentally fall over and cause injury.
Connections
• Before connecting the product to other electronic
components, turn off the power for all components. Before
turning the power on or off for all components, set all
volume levels to minimum.
• Be sure to set the volumes of all components at their
minimum levels and gradually raise the volume controls
while playing the product to set the desired listening level.
Handling
• Do not insert foreign materials such as metal or paper into
any openings or gaps of the product. Failure to observe this
may cause a fire, electric shocks, or malfunctions.
• Do not rest your weight on, or place heavy objects on the
product, and do not use excessive force on the buttons,
switches or connectors.
• Do not use the product or headphones for a long period of
time at a high or uncomfortable volume level, since this can
cause permanent hearing loss. If you experience any
hearing loss or ringing in the ears, consult a physician.
• Remove the power plug from the AC outlet before cleaning
the unit. Failure to observe this may cause electric shocks.
Yamaha cannot be held responsible for damage caused by improper use or modifications to the product, or data that is lost or
destroyed.
Always turn the power off when the product is not in use.
Even when the [P] (Standby/On) switch is in standby status (display is off), electricity is still flowing to the product at the
minimum level.
When you are not using the product for a long time, make sure you unplug the power cord from the wall AC outlet.
Make sure to discard used batteries according to local regulations.
(DMI-10) 2/2

CK88 CK61 Owner’s Manual
4
NOTICE
To avoid the possibility of malfunction/ damage to the
product, damage to data, or damage to other property, follow
the notices below.
Handling
• Do not use the instrument in the vicinity of a TV, radio,
stereo equipment, mobile phone, or other electric devices.
Otherwise, the instrument, TV, or radio may generate noise.
• When you use the instrument along with an app on your
smart devices, such as a smartphone or tablet, we
recommend that you enable “Airplane Mode” on the device
to avoid noise caused by communication. When turning on
airplane mode, Bluetooth® settings may be turned off.
Make sure that the setting is turned on before use.
• Depending on the condition of surrounding radio waves,
the instrument may possibly malfunction.
• Do not expose the instrument to excessive dust or
vibrations, or extreme cold or heat (such as in direct
sunlight, near a heater, or in a car during the day) to prevent
the possibility of disfiguration, damage to the internal
components, or unstable operation.
• Do not place vinyl, plastic, or rubber objects on the
instrument, since this might discolor the instrument.
Maintenance
• When cleaning the instrument, use a soft and dry/slightly
damp cloth. Do not use paint thinners, solvents, alcohol,
cleaning fluids, or chemical-impregnated wiping cloths.
Saving settings
• Edited settings are lost when you turn off the power to the
instrument. This also occurs when the power is turned off
by the Auto Power Off function (page 22). Save the settings
to the instrument, or a USB flash drive (page 27). However,
the settings saved to the instrument may be lost due to
some failure, an operation mistake, etc. Save your
important settings onto a USB flash drive (page 27). Before
using a USB flash drive, make sure to refer to page 23.
• To protect against settings loss through USB flash drive
damage, we recommend that you save your important
settings onto a spare USB flash drive as a backup file.
Information
About copyrights
The copyright of the “content”
*1
installed in this product
belongs to Yamaha Corporation or its copyright holder.
Except as permitted by copyright laws and other relevant
laws, such as copying for personal use, it is prohibited to
“reproduce or divert”
*2
without the permission of the
copyright holder. When using the content, consult with a
copyright expert.
If you create music or perform with the contents through the
original use of the product, and then record and distribute
them, the permission of Yamaha Corporation is not required
regardless of whether the distribution method is paid or free
of charge.
*1: The word “content” includes a computer program, audio
data, Accompaniment Style data, MIDI data, waveform
data, voice recording data, music score, and score data,
etc.
*2: The phrase “reproduce or divert” includes taking out the
content itself in this product, or recording and
distributing it without changes in a similar manner.
About this manual
• The illustrations and LCD screens as shown in this manual
are for instructional purposes only.
• Unless indicated otherwise, the illustrations and displays as
shown in this manual are based on the CK61 (in English).
• iPhone and iPad are trademarks of Apple Inc., registered in
the U.S. and other countries.
•The Bluetooth® word mark and logos are registered
trademarks owned by Bluetooth SIG, Inc. and any use of
such marks by Yamaha Corporation is under license.
• The company names and product names in this manual are
the trademarks or registered trademarks of their respective
companies.
About disposal
When disposing of this product, please contact the
appropriate local authorities.
Firmware
To implement new functions and improve operability, this
keyboard may be shipped with an updated version of the
firmware installed. A set of manuals for the updated version of
the firmware can be downloaded from the website below.
Yamaha Downloads: https://download.yamaha.com/
The firmware version of your keyboard can be checked from
[MENU] Version Info.

CK88 CK61 Owner’s Manual
5
MEMO

CK88 CK61 Owner‘s Manual
6
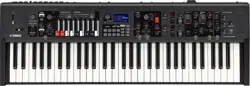
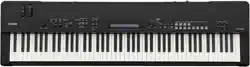
Thank you for purchasing this Yamaha CK88 or CK61 Stage Keyboard!
As the name implies, it is an instrument designed especially for live performance.
With its high-quality sounds and comprehensive features, the CK is ideal in an exceptionally wide range of
situations—from live venues, both indoors and outdoors, to studio rehearsal and recording, as well as practice and
enjoyment at home.
We recommend that you read this manual carefully so that you can fully take advantage of the advanced and
convenient functions of the CK. We also recommend that you keep this manual in a safe and handy place for future
reference.
Owner’s Manual (this book) × 1
AC adaptor (PA-150B) × 1
Welcome
Accessories
CK88 CK61 Owner’s Manual
7
PRECAUTIONS .............................................................................2
NOTICE...........................................................................................4
Information ..................................................................................4
Welcome 6
Accessories 6
About the CK88 and CK61 8
Main features............................................................................... 8
Basic structure............................................................................. 8
Sound management system..................................................9
Panel controls 10
Front panel ................................................................................10
Rear panel ..................................................................................18
Setting up 20
Using an AC adaptor...............................................................20
Using batteries..........................................................................21
Turning the power on ............................................................22
Turning the power off ............................................................22
Setting the Auto Power Off function................................22
Connecting headphones ......................................................22
Using a USB flash drive ..........................................................23
Basic operations 24
Top screen configuration......................................................24
Creating a Live Set Sound.....................................................24
Saving the Live Set Sound ....................................................24
Other Live Set Sound features 25
Applying effects to audio signals from the A/D INPUT
jacks ..............................................................................................25
Playing back an audio file .....................................................25
Managing Live Set Sounds 26
Editing Live Set Sound names.............................................26
Swapping or copying Live Set Sounds.............................26
Initializing a Live Set Sound .................................................26
Saving the Live Set Sound to a USB flash drive.............27
Changing a previously saved file name...........................27
Loading a Live Set Sound from a USB flash drive.........27
Advanced settings 28
Live Set (SETTINGS button) ..................................................28
Entire instrument (MENU button) .....................................36
Shortcut operations................................................................42
Effect list......................................................................................43
Using with External Devices 46
Precautions when using the USB [TO HOST] terminal
........................................................................................................46
Using Smart Devices...............................................................46
Connecting to a computer...................................................47
Controlling a synthesizer or tone generator module
from the CK................................................................................47
Controlling the CK from an external keyboard.............48
Setting the MIDI transmit and receive channels..........48
Disabling the internal tone generator sound when the
built-in keyboard is played ..................................................48
Setting how the MIDI terminals are used (MIDI Port
settings) ......................................................................................48
Data List 49
Live Set Sound List ..................................................................49
Voice List.....................................................................................52
Control Change Number ......................................................54
MIDI Data Format ....................................................................56
MIDI Data Table........................................................................58
MIDI Implementation Chart.................................................64
Other information 66
Troubleshooting ......................................................................66
Display messages ....................................................................68
Specifications............................................................................69
Index.............................................................................................70
Contents
CK88 CK61 Owner‘s Manual
8
Main features
The CK88 and CK61 are stage keyboards that are ideal for a wide variety of applications and locations.
Uncompromising performance capabilities—on stage, in the studio, even outdoors
• Loaded with authentic keyboard sounds such as pianos, electric pianos, and organs, as well as many other
sounds crucial for contemporary keyboard performance.
• Allows various combinations of three independent parts using layer and split functions, and features
connectivity to an external keyboard, computer, or smartphone.
• With its built-in stereo speakers and battery operation capability, you can use the CK virtually anywhere you
want.
Intuitive controls for instant sound crafting
• Features independent control sections for the filter, EG, and effects blocks. These are essential for dynamic
sound-making, letting you tweak the sounds in real time as you perform.
• Built-in drawbars exclusively for real-time Organ Voice control—just as on an actual vintage organ.
• Single-button operation for enabling Portamento or unison sounds.
Extensive support functions for creative performance
• Convenient A/D INPUT jacks let you connect a microphone, and use exclusive built-in effects for the input. This
is useful for singing and playing the keyboard in rehearsal or in small-group performances.
• Audio playback function via Bluetooth Audio connection enables performance along with playback of your
favorite tunes or using background music from a Bluetooth-equipped device.
• Since the CK88 and CK61 are USB-compatible, connection with a computer or a smartphone is extremely quick
and easy—a significant timesaver when setting up for video recording and online live streaming.
Basic structure
The front panel of this keyboard is divided into three areas. Combining the settings in each of these areas gives you
enormous flexibility in creating sounds.
Select a Voice for each of the three keyboard Parts A to C, as well as the On/Off settings and volume balance of each
Part, the keyboard split, and effect settings, and then save these settings. You can call up these settings freely as you
play and perform.
About the CK88 and CK61
Select a voice and combine voices
Create and adjust the organ voice Applying sound effects
About the CK88 and CK61
CK88 CK61 Owner‘s Manual
9
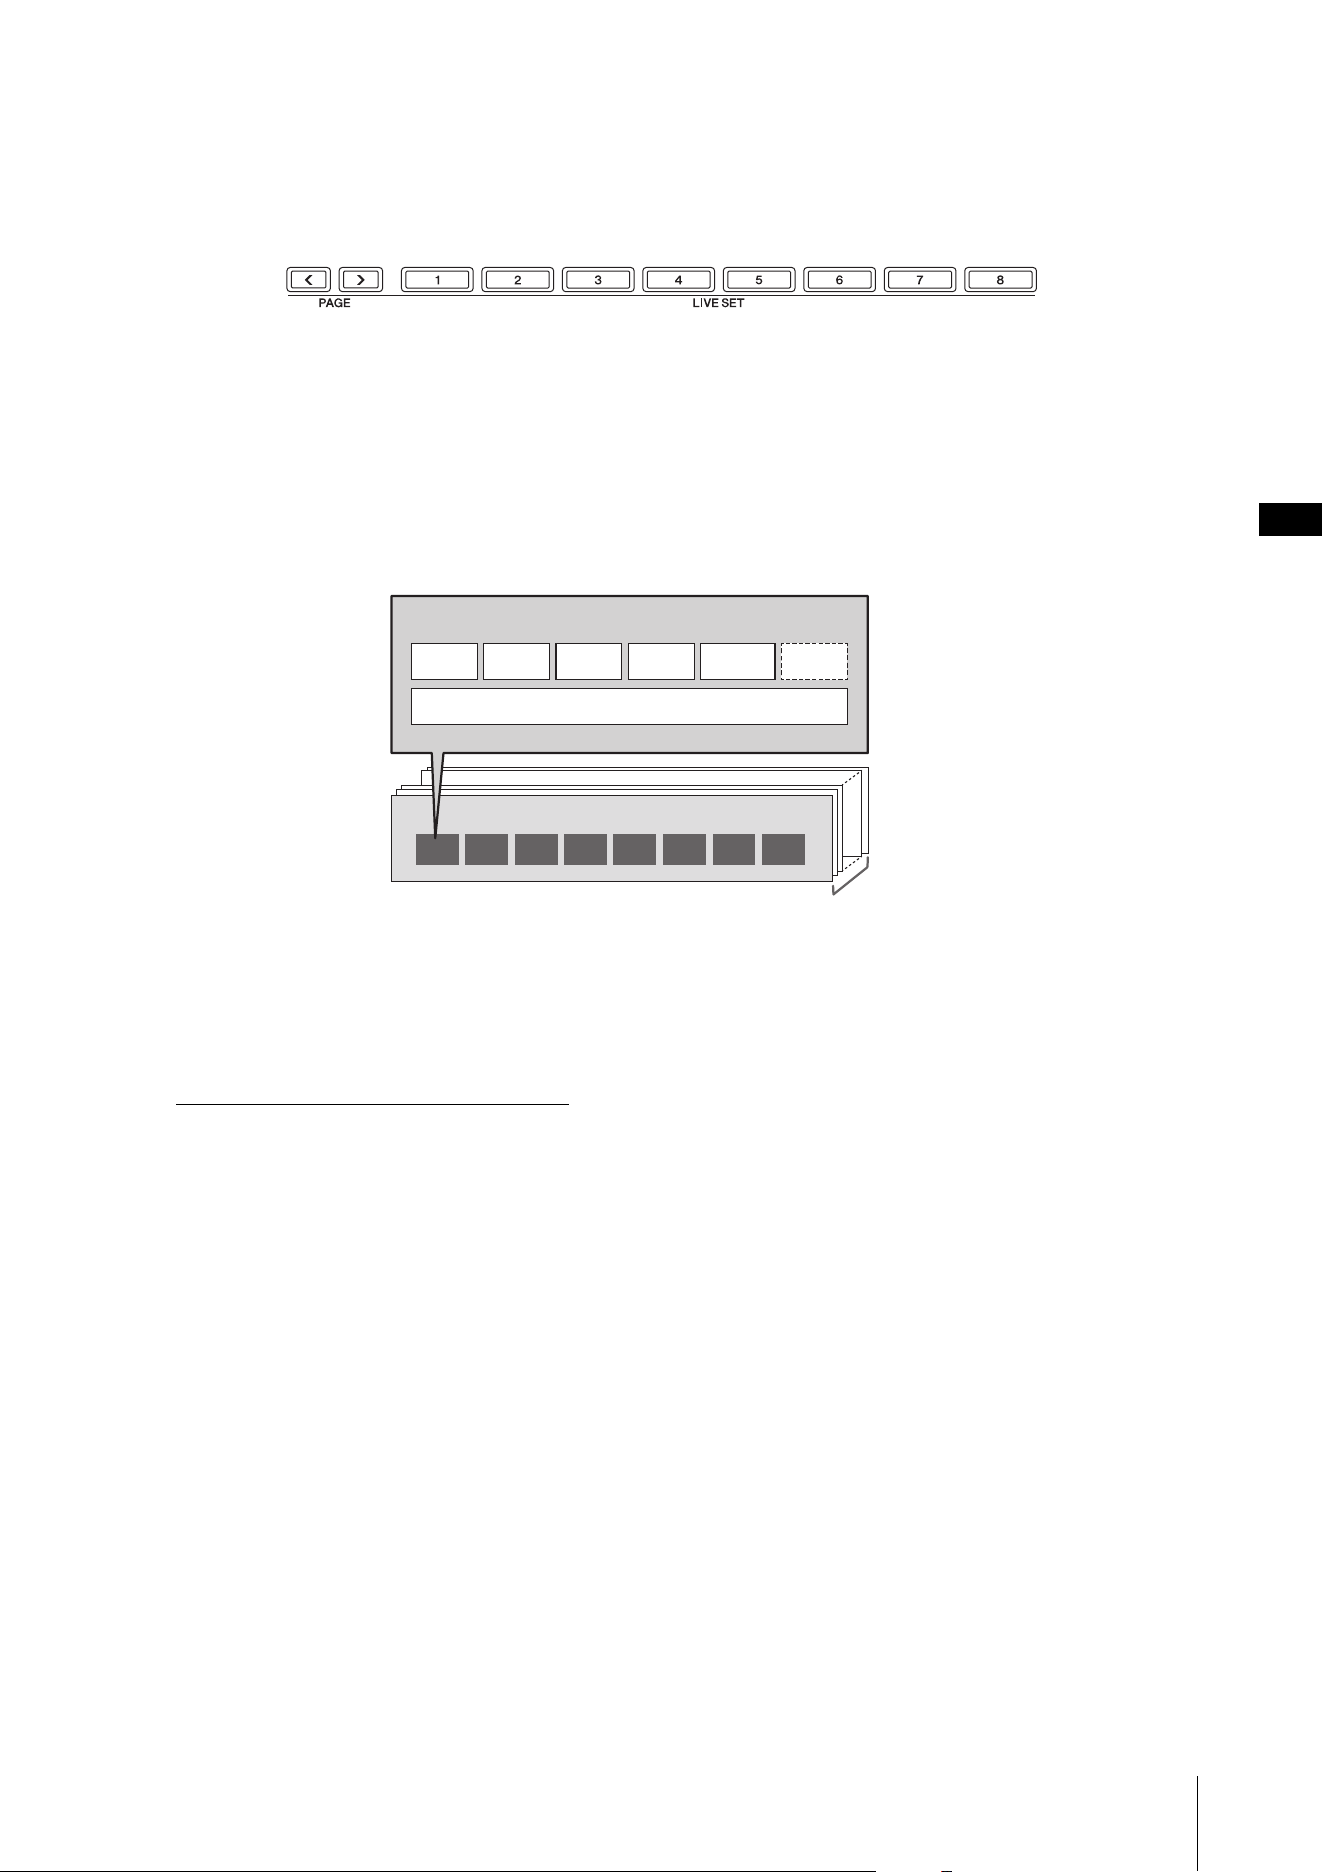
Sound management system
The sound you create by combining these settings is managed through the Live Set function.
Within each Live Set you can save a group of settings. One group of settings saved in the Live Set is called a “Live Set
Sound.”
Live Set Sounds can be switched instantly by using eight Live Set buttons on the front panel, even during a
performance.
Also, eight Live Set Sounds can be registered on a Live Set Page, and you can call up other Live Set Pages by pressing
the PAGE buttons.
There are 20 Live Set Pages, allowing you to use a total of 160 voices through this function.
As a factory default, Live Set Pages 1 to 10 contain preset Live Set Sounds.
Live Set Sounds can be saved to the internal memory of the keyboard or the USB flash drive, or through
Soundmondo for backup and sharing.
• Internal memory
•USB flash drive
• Soundmondo (sound management and sharing service)
https://www.yamaha.com/2/soundmondo
1 2 3 4 5 6 7 8
Live Set
Live Set Sound
Live Set Page
20 pages
Part A Part B Part C EQREVERBDELAY
SETTINGS
CK88 CK61 Owner’s Manual
10
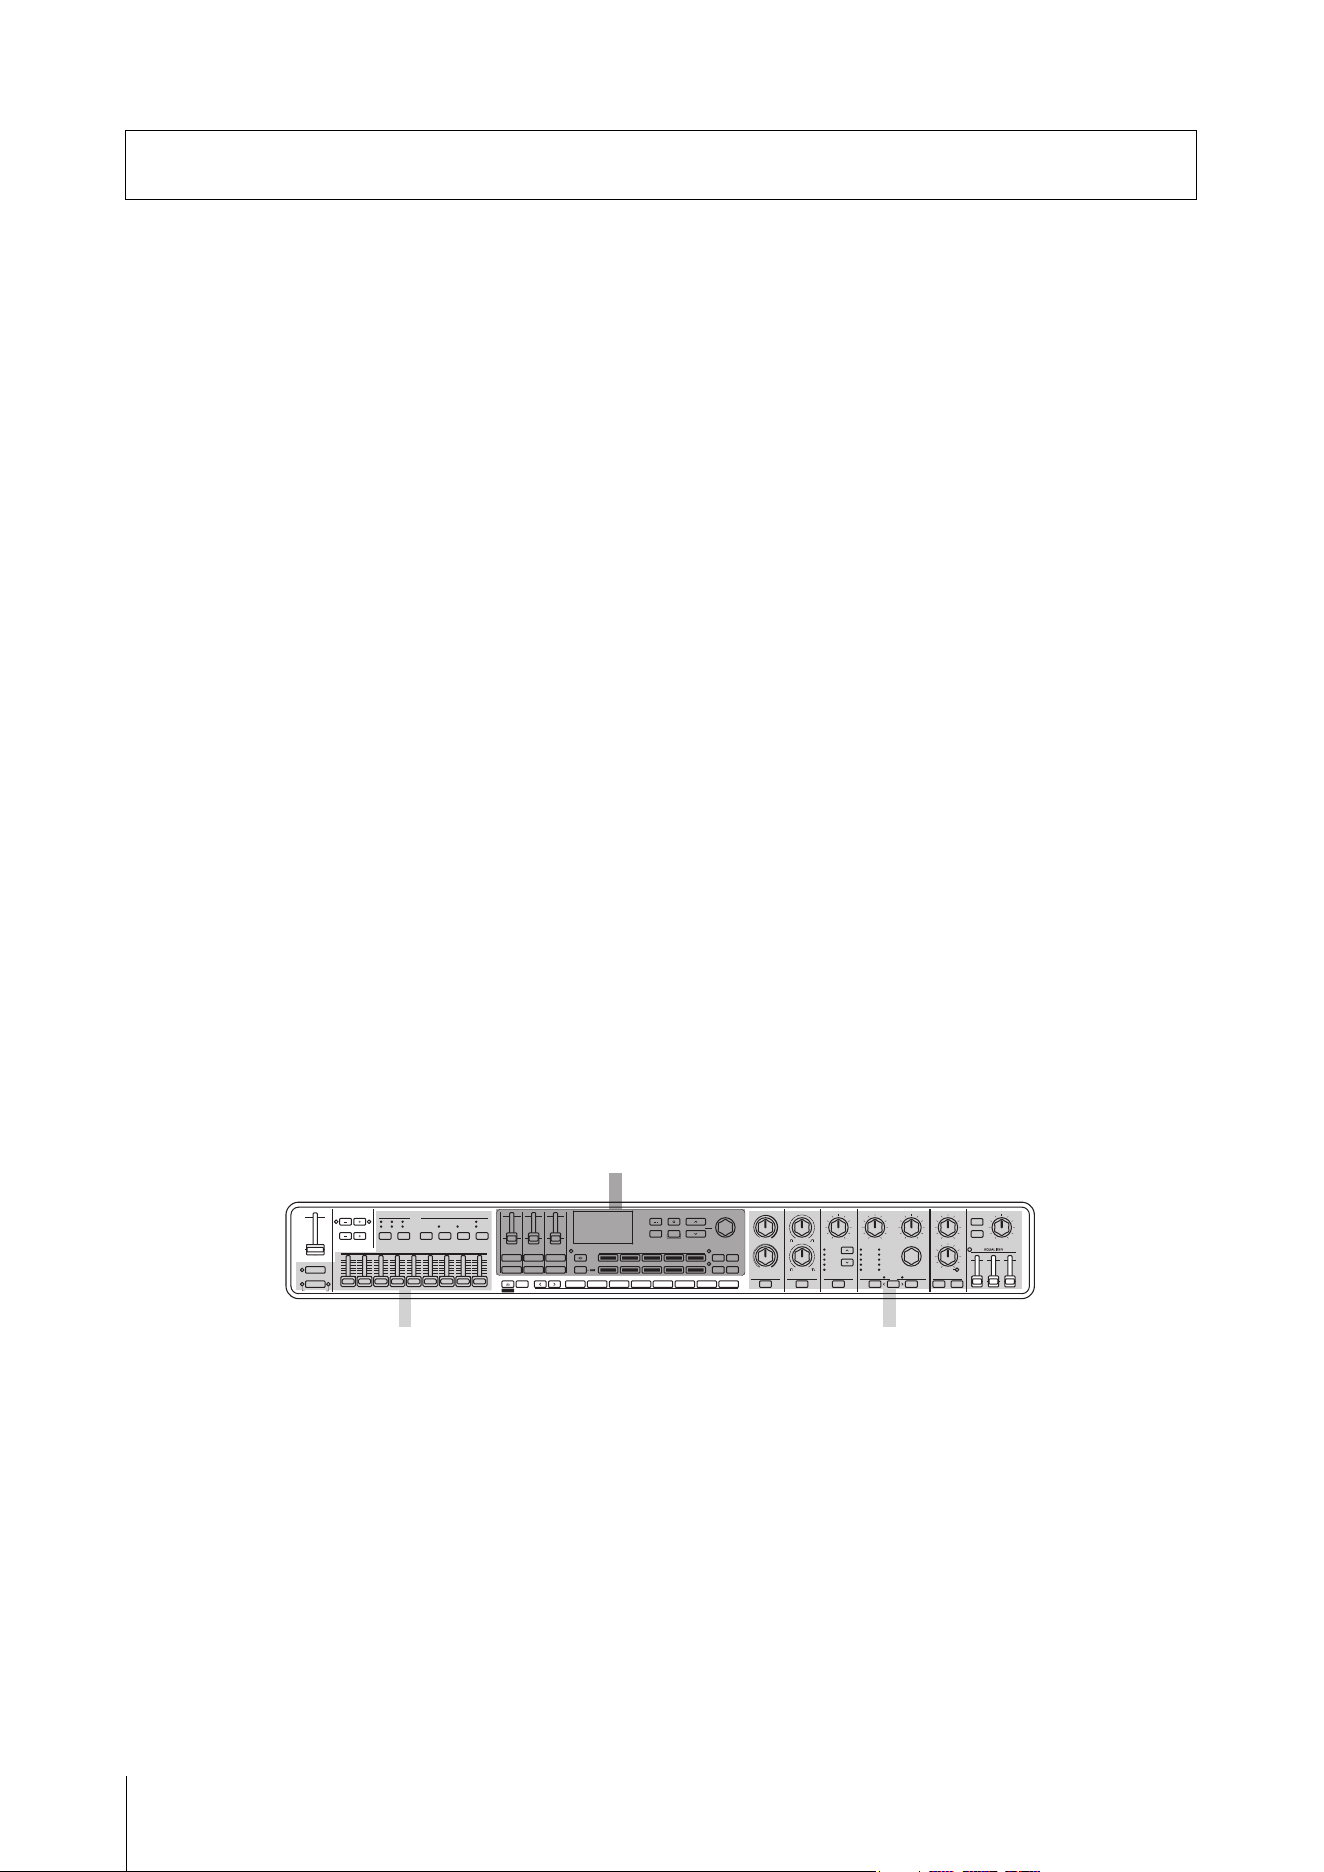
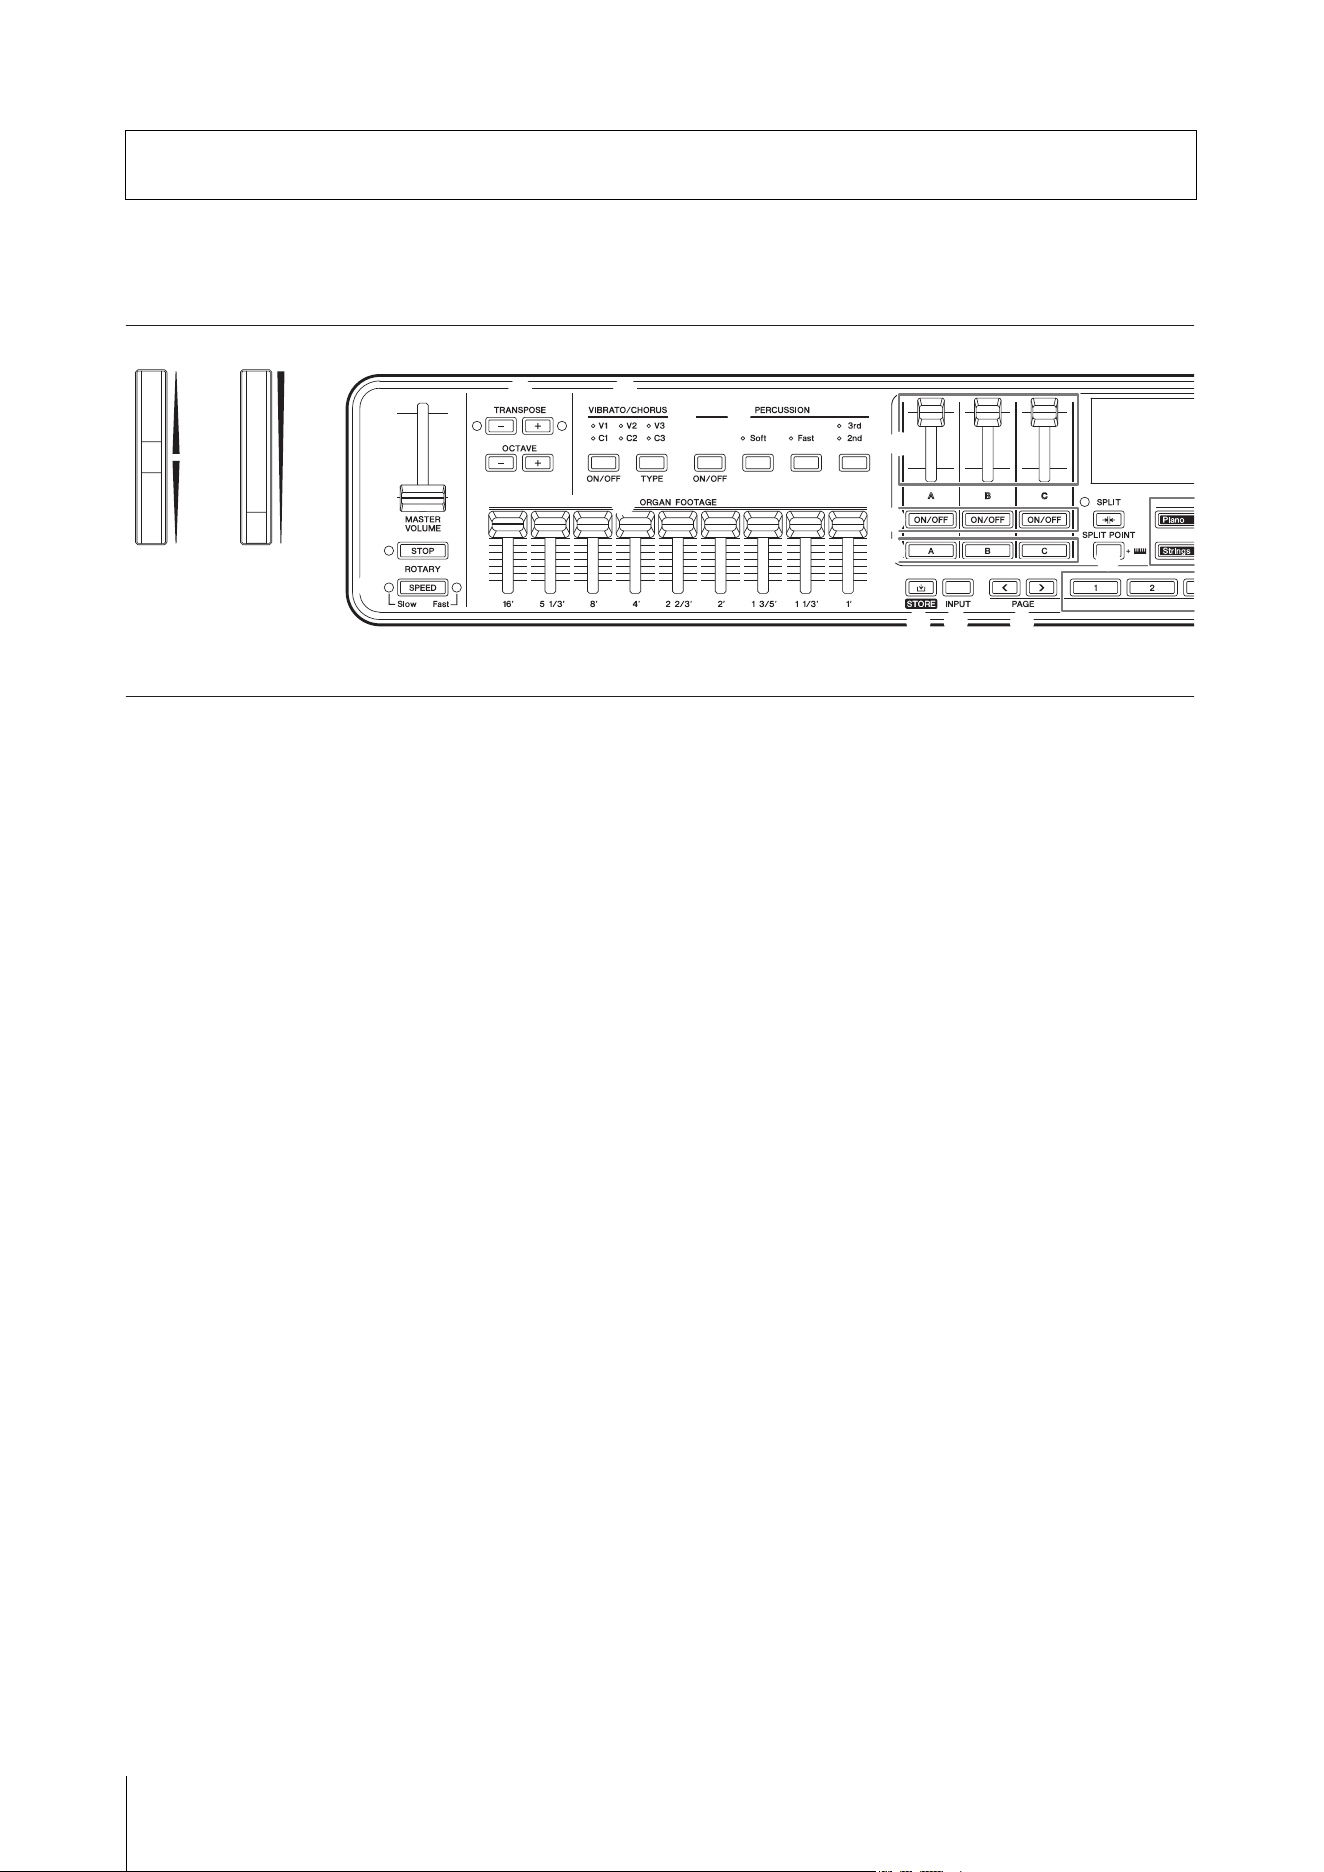
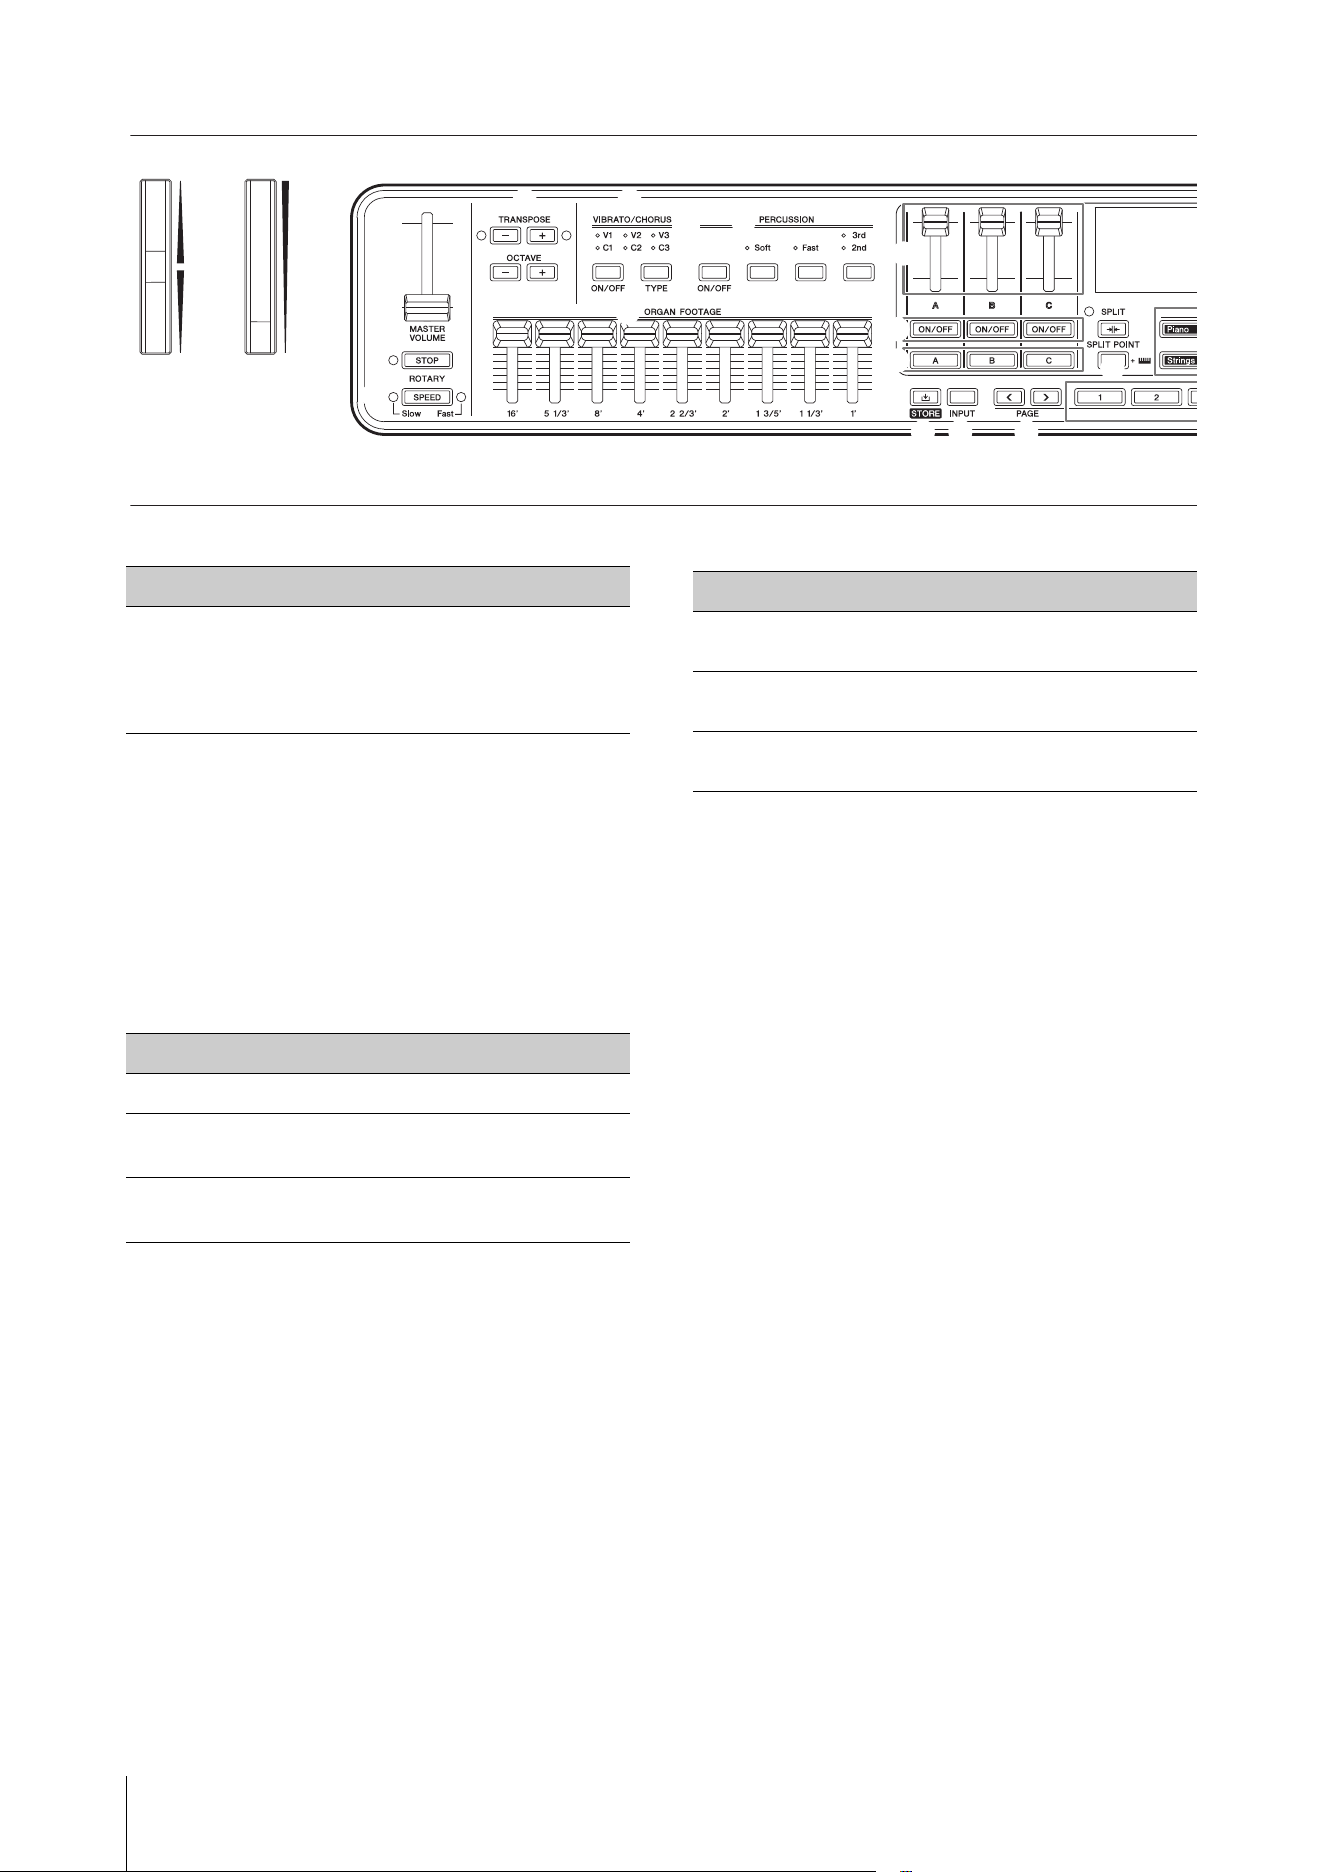
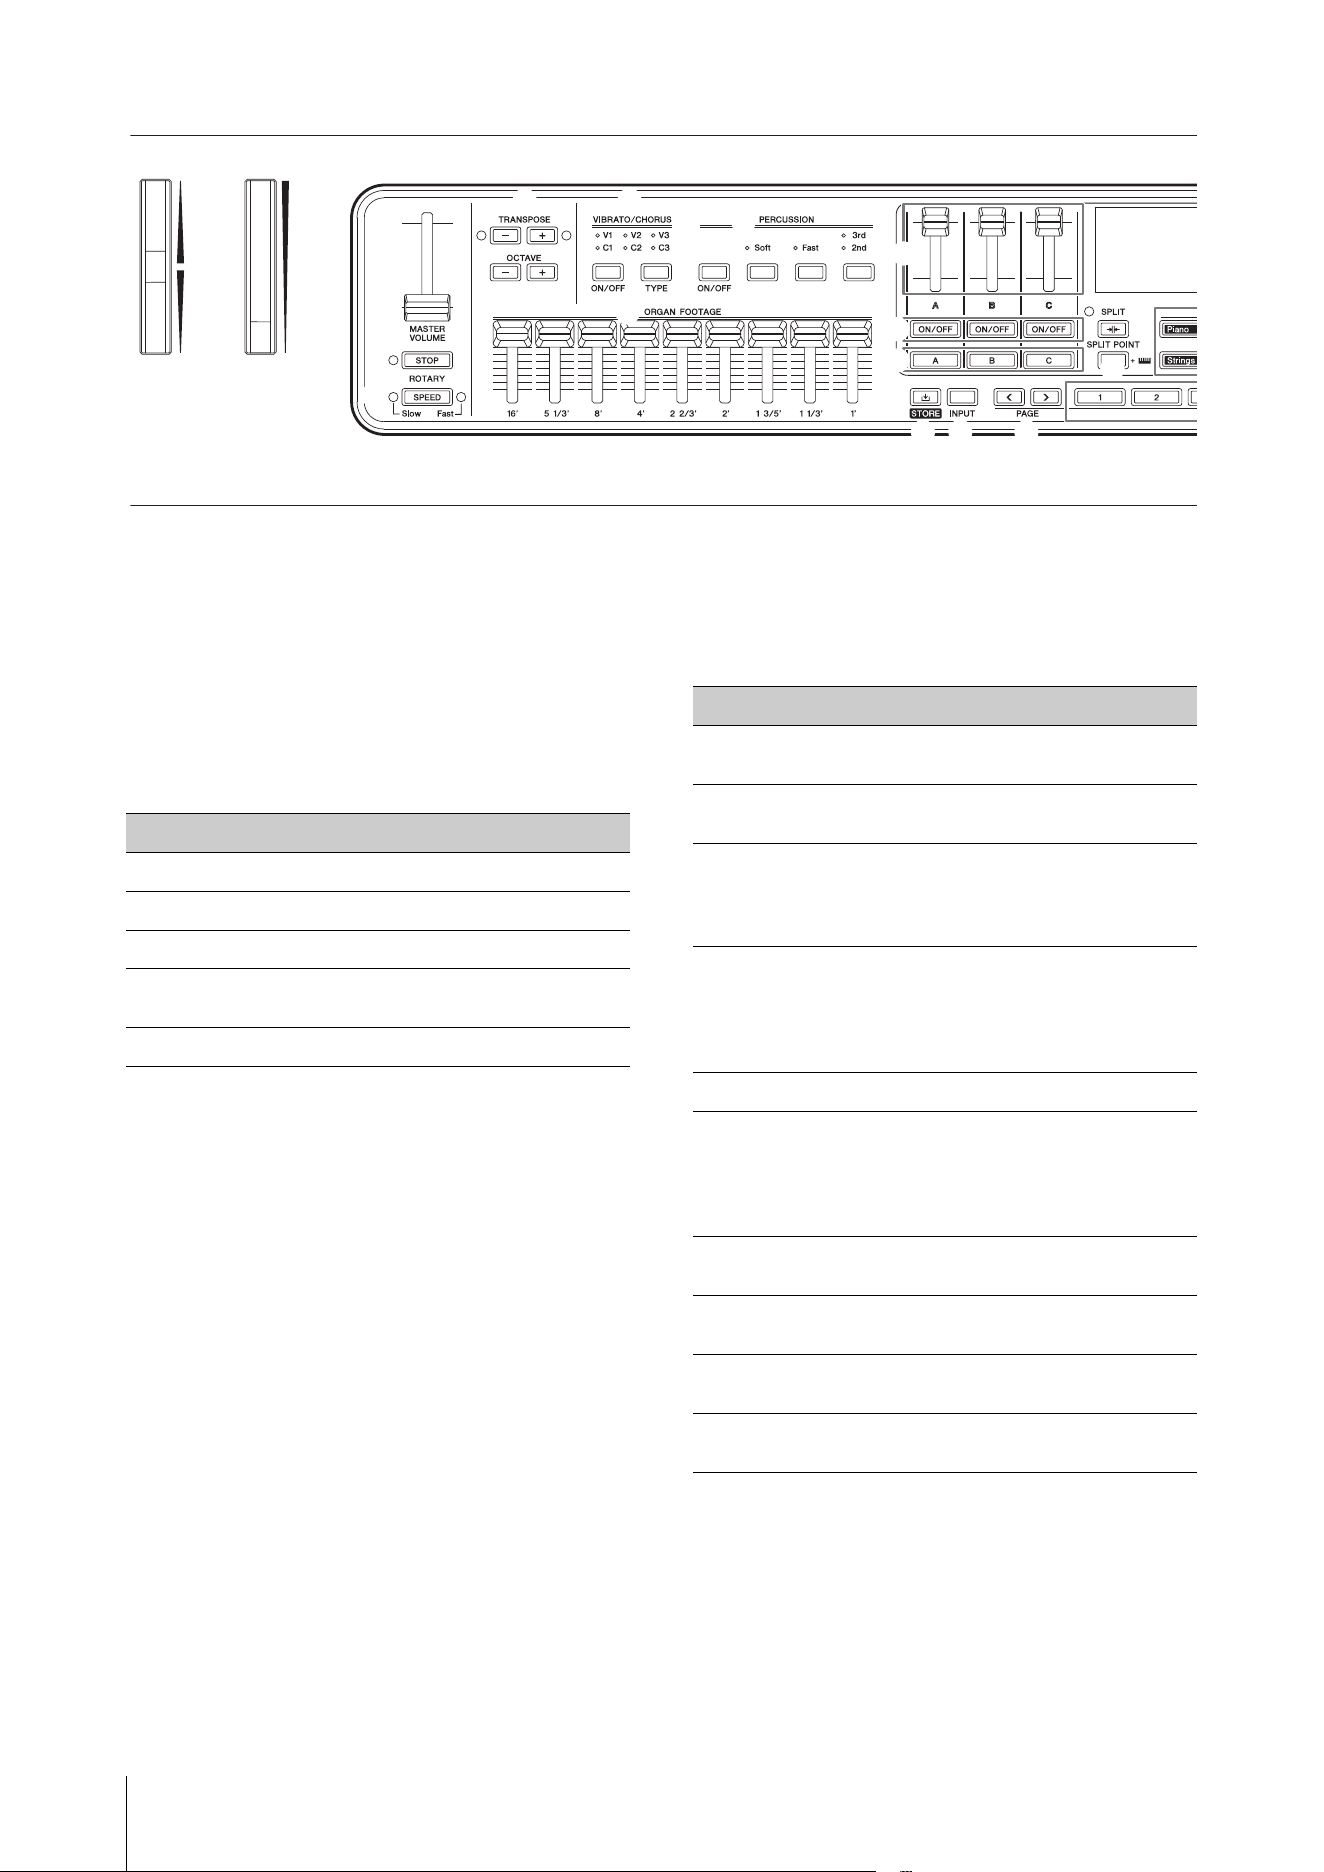
Front panel
1 Pitch Bend Wheel
For use as the Pitch Bend controller.
The Pitch Bend range can be set from the [SETTINGS]
button Controllers Pitch Bend Range for each Part
(page 31).
2 Modulation Wheel
For applying modulation to the sound. The
modulation can be applied to pitch, amplitude, or
filter.
You can change the Control Change number assigned
to the wheel. Change the setting from the [SETTINGS]
button Controllers Mod Wheel Assign (page 31).
NOTE
• Change the modulation depth and speed from the [SETTINGS]
button Sound (Part) Modulation (page 29).
• Modulation can be assigned to a different controller.
3 [MASTER VOLUME] slider
For adjusting the overall volume of the CK.
4 ROTARY [STOP] button
For stopping the rotation effect of the rotary speaker.
5 ROTARY [SPEED] button
For changing the rotation speed of the rotary speaker.
When the DRIVE is off, or the Drive Type other than
Rotary A and Rotary B is selected, pressing the ROTARY
[SPEED] button will activate the function and select
Rotary A.
6 TRANSPOSE buttons
For adjusting the pitch of the entire keyboard in
semitones. The value is transmitted as a MIDI message,
but not saved for the Live Set Sound.
Simultaneously press the [−] and [+] buttons to restore
the value to “0.”
NOTE
Simultaneously press one of the TRANSPOSE buttons and the
[ENTER] button to set the Sound Transpose for the Live Set Sound
(page 42).
The Sound Transpose setting is stored in a Live Set Sound.
7 OCTAVE buttons
For changing the range of the keyboard in octaves.
The value is transmitted as a MIDI message, but not
saved for the Live Set Sound.
Simultaneously press the [−] and [+] buttons to restore
the value to “0.”
The octave setting can be set independently for each
part by using the Note Shift function.
Pressing the OCTAVE button while holding down the
PART button will make the OCTAVE button light in the
corresponding part color (page 42).
The octave setting for the part (Note Shift setting) can
be stored in a Live Set Sound.
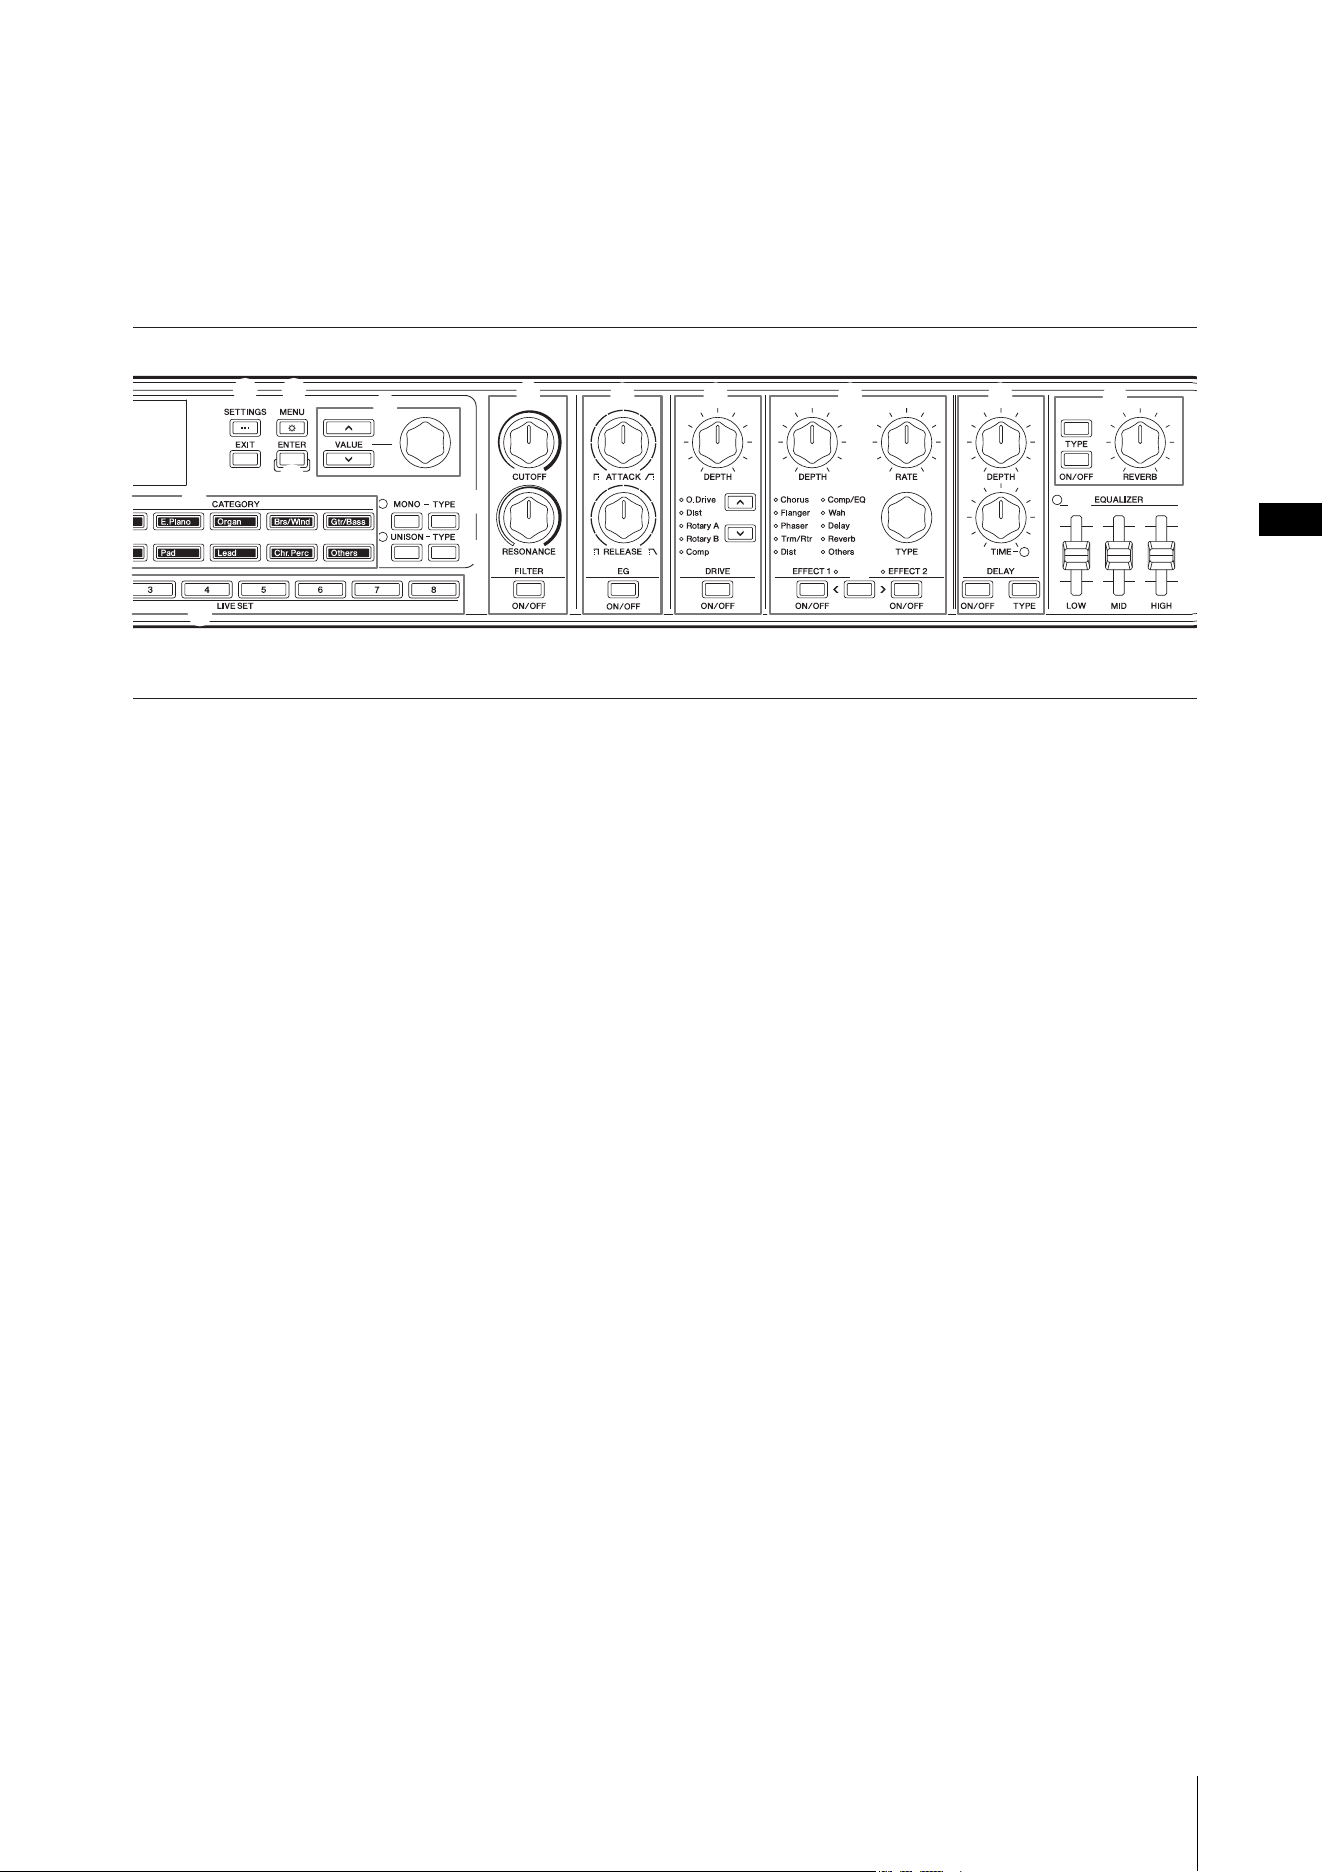
Panel controls
12
3
4
5
6
7
8
9
)
A
F
!
@
B
G
H
#
$
Panel controls
CK88 CK61 Owner’s Manual
11
8
VIBRATO/CHORUS [ON/OFF] button
VIBRATO/CHORUS [TYPE] button
For setting the Vibrato/Chorus effects for the Organ
voice.
These buttons can be used when the Organ Voices
using the Organ Flutes tone generator (H, V, F, A, and Y)
are selected (page 13).
Use the [ON/OFF] button to turn the Vibrato/Chorus
effects on or off, and the [TYPE] button to select a
vibrato or chorus type.
Pressing the button alternates sequentially between
V (vibrato) 1 to 3 and C (chorus) 1 to 3.
NOTE
Simultaneously press the [ENTER] and VIBRATO/CHORUS [TYPE]
buttons to show the list of VIBRATO/CHORUS types in reverse order.
This is convenient for selecting a previous type on the list (page 42).
9 PERCUSSION [ON/OFF] button
PERCUSSION [Soft] button
PERCUSSION [Fast] button
PERCUSSION [2nd 3rd] button
For setting up the percussion sounds for Organ voice.
These buttons can be used when the Organ Voices
using the Organ Flutes tone generator (H, V, F, A, and Y)
are selected.
Use the [ON/OFF] button to turn the percussion
sounds on or off, the [Soft] button to lower the volume,
and the [Fast] button to set the faster decay speed for
the Percussion sounds.
Use the [2nd 3rd] button to change the pitch of the
percussion sounds.
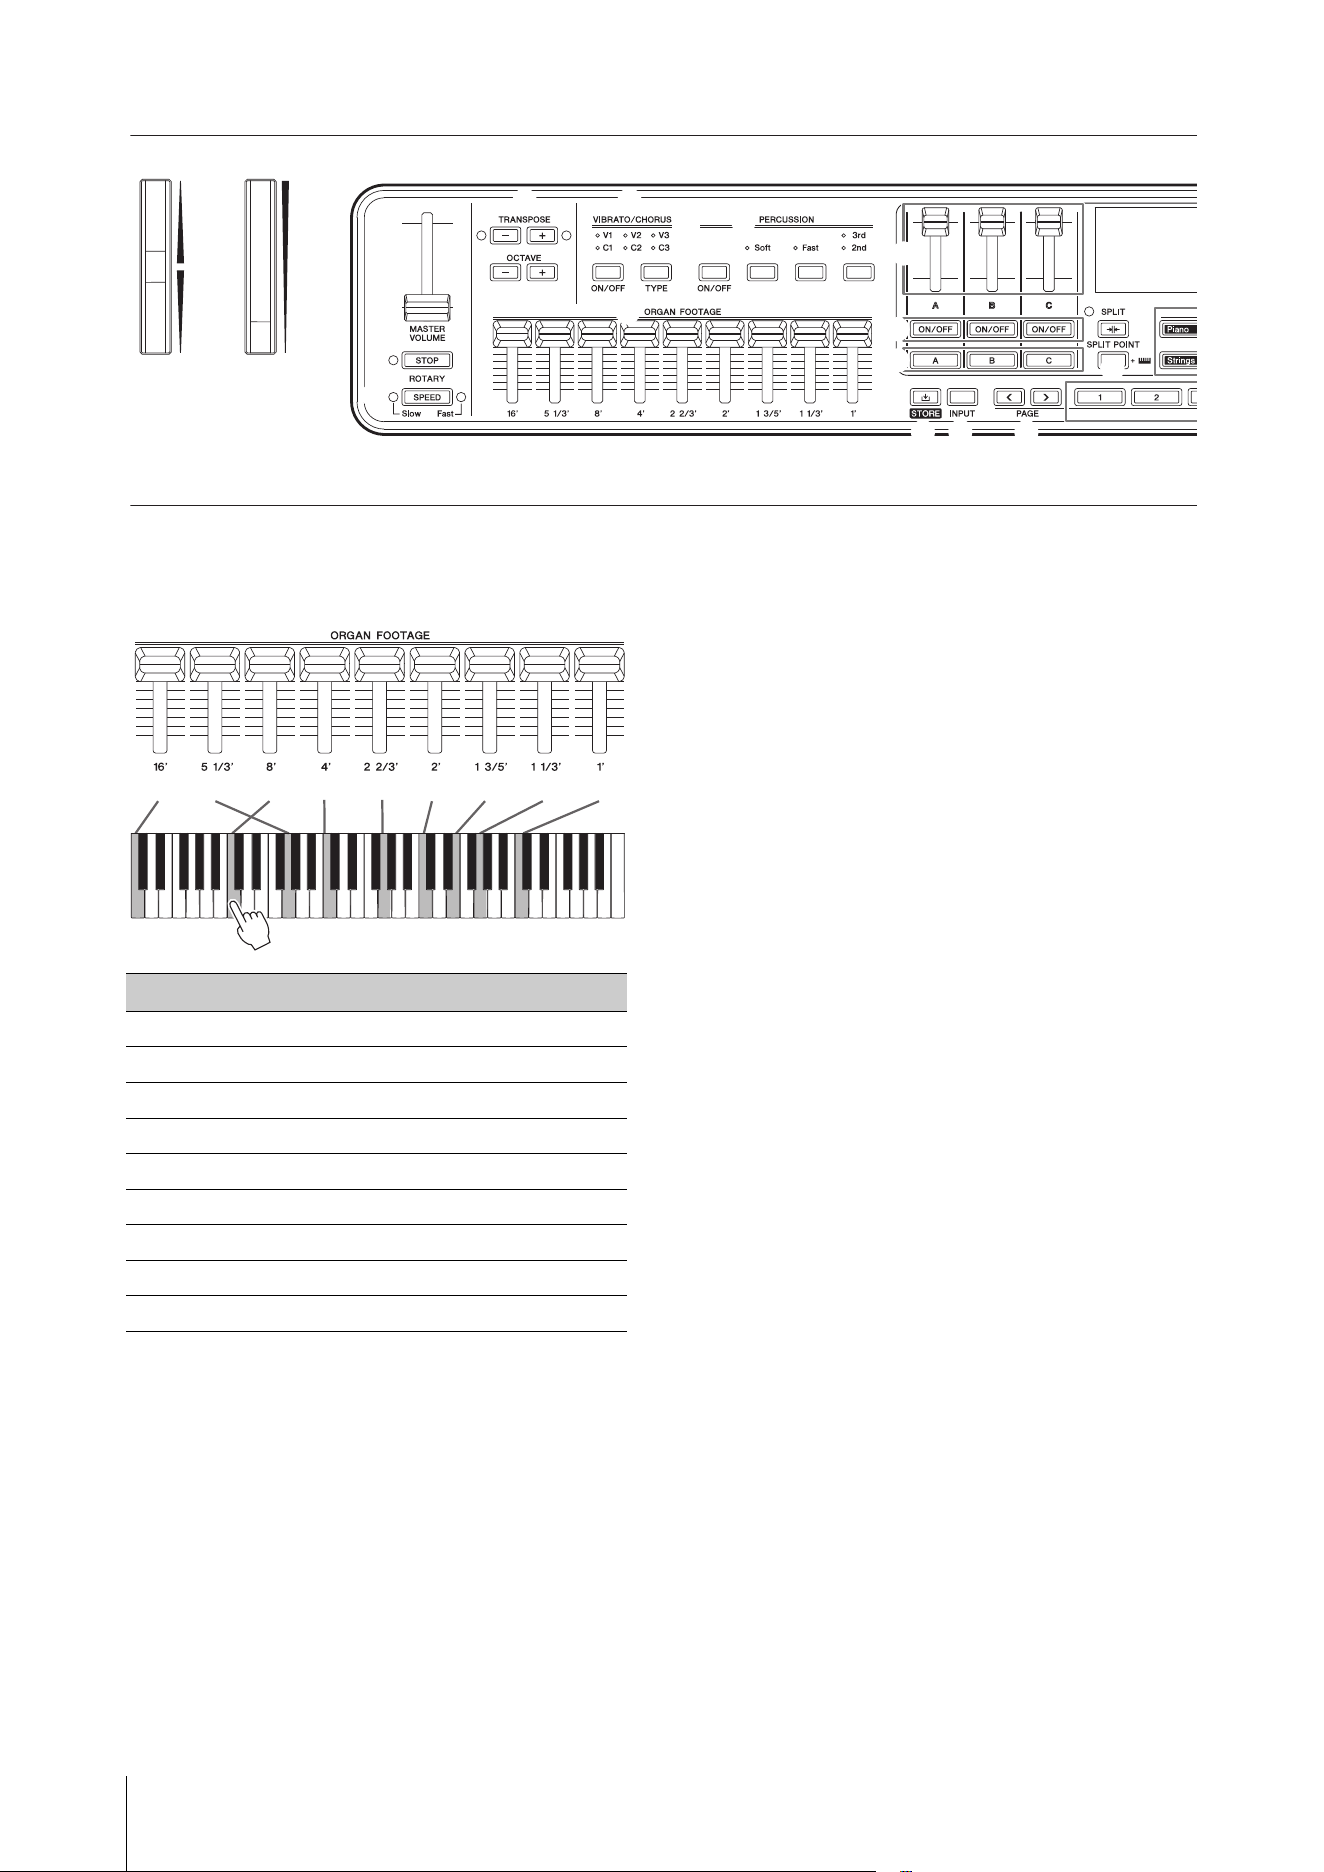
) ORGAN FOOTAGE sliders
For setting the component elements of the Organ
Voice.
These sliders can be used only when the Organ Voices
using the Organ Flutes tone generator (H, V, F, A, and Y)
are selected.
Just as with the drawbars on a vintage organ, moving
the sliders downwards (toward you) increases the
volume of the component elements to make the
overall organ tone louder. To create the organ tone you
desire, you can move each of these sliders to change
the component elements of the sound.
NOTE
• No organ sound will be produced if all the ORGAN FOOTAGE
sliders are moved up.
• In many cases when calling up a setting from LIVE SET [1]–[8], the
actual position of the sliders and the value of the setting do not
match. Once you move a slider, its position is reflected in the
settings. For changing the settings so that the values for the
positions of all the sliders are immediately reflected in the settings
without having to move the sliders, change the setting from the
[MENU] button General Control Panel Controller Mode
(page 39).
*
(
D
E
&
K L
O
P
M
J
N
^
C
I
$
%
Panel controls
CK88 CK61 Owner’s Manual
12
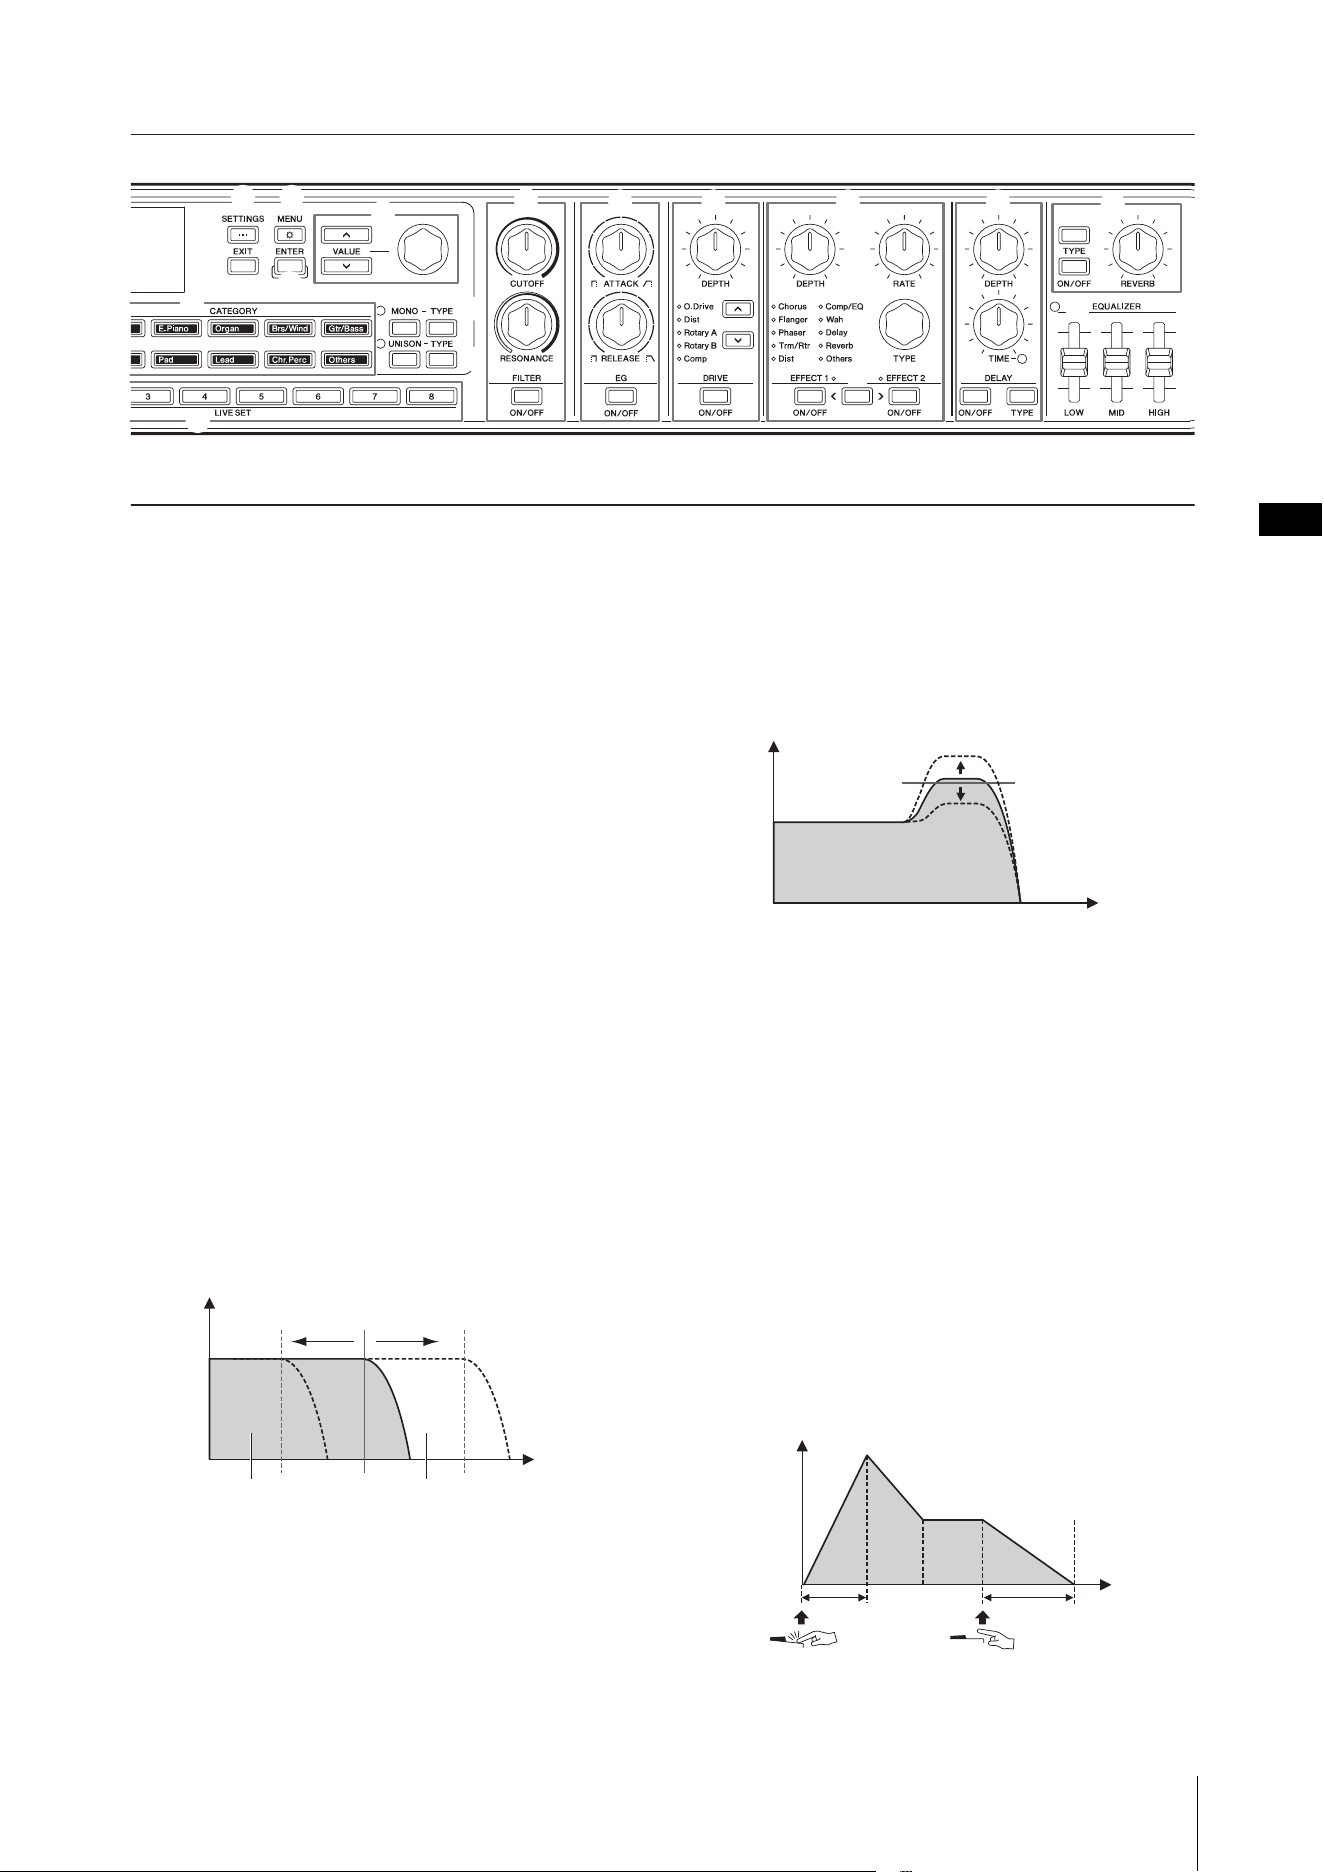
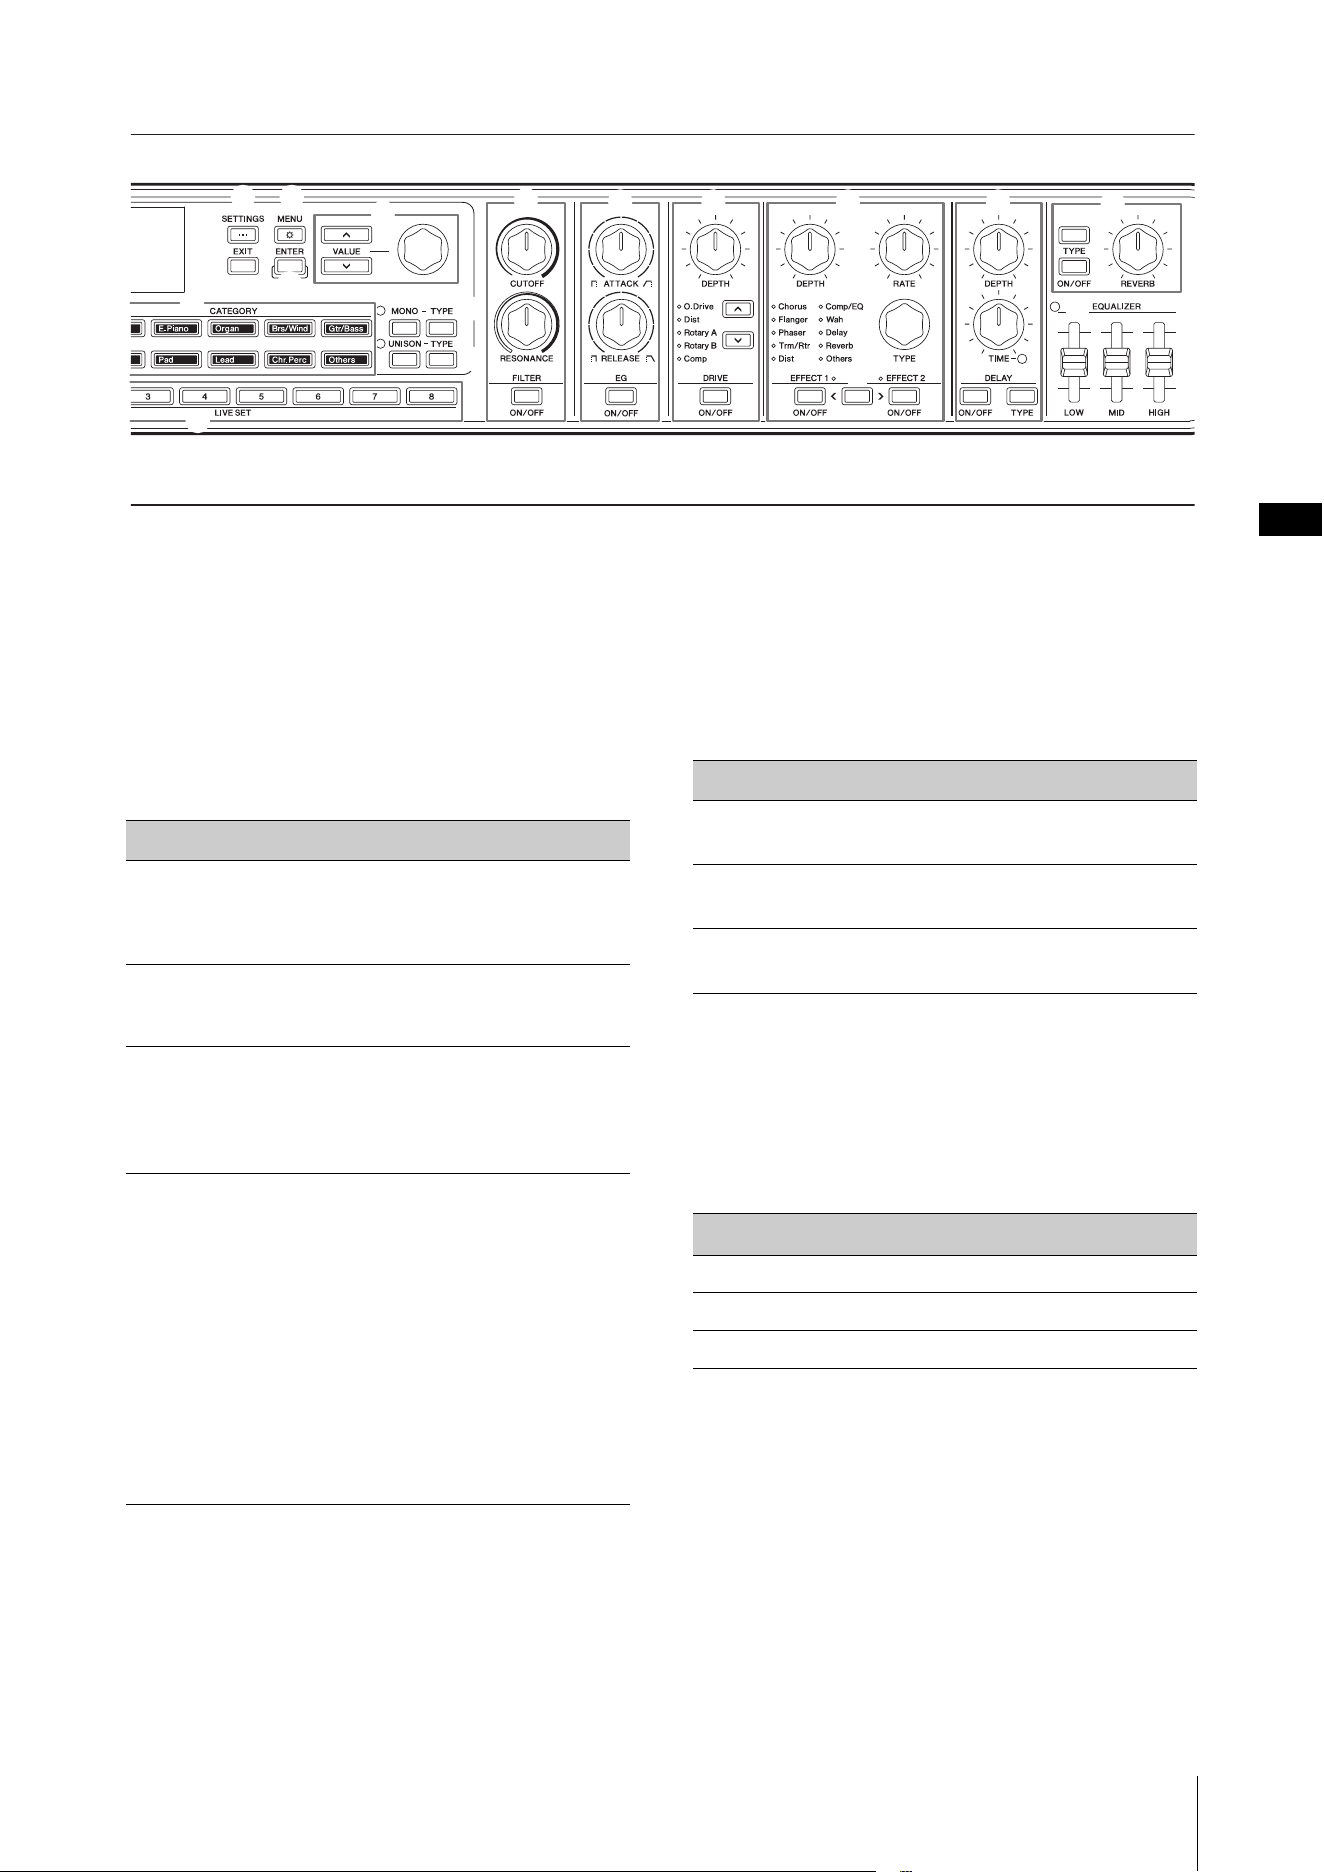
The component tones produced by moving each of
the sliders are shown below.
! Part Volume Sliders
For setting the volume for each Part.
@ Part [ON/OFF] buttons
For switching each Part on or off.
# Part [A]–[C] select buttons
For selecting the desired Part for changing the
settings.
When the Part is enabled here, you can control the
following settings from the front panel.
• Voice category selection
• Organ voice settings
• MONO and UNISON settings
•Filter
•EG
•Drive
•Effect1 and Effect2
By pressing multiple Part select buttons, you can set
the same filter and effects for those selected Parts at
once.
NOTE
By simultaneously holding down two of the Part select buttons, you
can swap the settings for those Parts (page 42). This is convenient
when you wish to switch the right- and left-hand Parts for the Split
setting.
$ Display (LCD)
For displaying the system messages, parameter
settings, and other information depending on the
function currently being used.
% [SETTINGS] button
For calling up the screens for making detailed settings
for the currently selected Live Set Sound (page 28).
You can make various settings, including the Part
sound and controller customizations, Audio Trigger
function, and the effects for A/D Input.
After editing the settings, press the [STORE] button to
store the settings.
Settings made here are stored in the Live Set Sound.
NOTE
Simultaneously press the [ENTER] and [SETTINGS] buttons to
instantly initialize the Live Set Sound (page 42).
^ [EXIT] button
While using the MENU and SETTINGS screens, press
this button to exit from the current screen and return
to the previous level.
Holding down the [EXIT] button returns to the Top
screen.
Sliders Ton e
1
16' 8 scale degrees below
2
5 1/3' 5 scale degrees above
3
8' Fundamental tone
4
4' 8 scale degrees above
5
2 2/3' 12 scale degrees above
6
2' 15 scale degrees above
7
1 3/5' 17 scale degrees above
8
1 1/3' 19 scale degrees above
9
1' 22 scale degrees above
1234 56789
12
3
4
5
6
7
8
9
)
A
F
!
@
B
G
H
#
$
Panel controls
CK88 CK61 Owner’s Manual
13
& [MENU] button
For calling up the screens for making overall settings
(page 36).
Simultaneously press the [ENTER] and [MENU] buttons
to switch the panel lock on or off (page 42).
* [ENTER] button
For confirming the parameter value or each operation.
By holding down the [ENTER] button and operating
other buttons or knobs, you can use shortcut
operations (page 42).
( VALUE buttons
Encoder dial
For changing the currently selected parameter value.
In the MENU and SETTINGS screens, use the encoder
dial to move the cursor (or highlight) up and down.
A [SPLIT] button
For selecting the Split settings.
Pressing the button turns on the Split function, and
each time you press the button, the settings change
alternately in the order listed below.
The lamp is on while the Split setting is selected, and
the lamp is off while the Split setting is deselected, and
the Layer setting is selected.
The Split setting can be changed from the [SETTINGS]
button Sound Common Layer/Split Mode
(page 30).
B [SPLIT POINT] button
For viewing the screen for changing the Split Point or
the lowest note on the right section.
Turn the Encoder dial or simply press the key you wish
to assign as the Split Point.
Settings made here are stored in the Live Set Sound.
NOTE
• The Split Point can be set by simultaneously pressing the [SPLIT
POINT] button and the key you wish to assign as a Split Point.
• The Split Point can be changed from the [SETTINGS] button
Sound Common Layer/Split Split Point (page 30).
C CATEGORY buttons
For selecting a Voice from the Voice Category to use for
the Part.
Every time you press the same button, the cursor
moves to the next Voice in the same Category. Quickly
pressing the button twice displays the Voice list.
The Organ voices using the Organ Flutes tone
generator (H, V, F, A, and Y) are available from the
[Organ] button. These voices can be set using the
ORGAN FOOTAGE sliders, PERCUSSION buttons, and
VIBRATO/CHORUS buttons.
Settings Descriptions
A/BC
Part A on the left section and Part B and C on the
right section of the keyboard
AB/C
Part A and B on the left section and Part C on the
right section of the keyboard
A/B/C
Part A on the left section, Part B on the center
section, and Part C on the right section of the
keyboard
ABC
Voices on Part A, B, and C are layered
Types Descriptions
H
A distinctive electric organ from the 1960s,
characterized by sine-like waveforms that are simple
yet warm. This type of organ was used in many genres
of music, such as rock, pop, and jazz.
V
A transistor organ from the 1960s. With harmonic
content very close to that of a square wave, it had a
sound of great presence. This type of organ was often
used in psychedelic rock and ska.
F
A transistor organ from the 1960s. This type of organ is
notable for its thick sound with the sawtooth
components boosted in volume. It was often used in
60s pop music and alternative pop of the 90s.
A
A transistor organ made in Japan during the 1970s. This
type of organ was notable for a bright sound similar to
that produced by the sawtooth waveforms of a
synthesizer.
*
(
D
E
&
K L
O
P
M
J
N
^
C
I
$
%
Panel controls
CK88 CK61 Owner’s Manual
14
D MONO-TYPE buttons
For setting the tone generation mode for the selected
Part.
Use the [MONO] button to switch between Mono and
Poly. The Mono mode is for playing a single note at a
time and the Poly mode is for playing chords. Use the
MONO [TYPE] button to select the Mono mode type.
This also features Portamento types commonly used
for classic pitch slides in synth lead sounds.
NOTE
• The time and mode for Portamento can be changed from the
[SETTINGS] button Sound Part Mono/Portamento
(page 28).
• Simultaneously press the [ENTER] and MONO [TYPE] buttons to
view the screen for the Portamento time setting (page 42).
E UNISON-TYPE buttons
For setting Unison for the selected Part.
Use the [UNISON] button to turn the Unison mode on
or off, and the UNISON [TYPE] button to select a Unison
type. When the Unison mode is on, the Part sounds are
layered to make them sound richer and thicker. In this
Unison function, the Part sounds including the
Insertion Effects are layered.
Change the Unison volume and Detune setting from
the [SETTINGS] button Sound Part Unison
(page 28).
NOTE
Simultaneously press the [ENTER] and UNISON [TYPE] buttons to
view the screen for the Unison Detune setting (page 42).
F [STORE] button
For saving (storing) the edited Live Set Sound.
When storing, the following settings are saved to the
internal memory of the keyboard.
Stored settings will be retained when the CK is turned
off.
• Voices on Part A–C
• Organ voice settings (Rotary Speaker, Vibrato/
Chorus, and Percussion)
•Filter
•EG
•Drive
•Effect1 and Effect2
•Delay
• Reverb
• [SETTINGS] (including Split and Transpose)
NOTE
EQUALIZER settings are stored to a Live Set Sound if Live Set EQ is set
to On (page 30).
G [INPUT] button
For setting the volume and effects for the audio input
from the A/D INPUT jack.
Pressing this button shows the same screen as
pressing the [SETTINGS] button A/D Input.
Y
A Yamaha transistor organ released in 1972. With
harmonic content very close to that of a square wave, it
was characterized by significant presence in the high
range and extreme sound clipping with increased
distortion.
Type Descriptions
Normal
Simple Mono mode without Portamento
Fingered
Portamento
Mono mode with Portamento used only
while playing legato
Full-Time
Portamento
Mono mode with Portamento used even
when lifting your fingers from the keyboard
Types Descriptions
Type Description
Multi Layer
Unison that layers the Part sound played on
the keyboard
Harmonics
Unison that layers the Part sound played on
the keyboard at one octave higher
Sub Harmonics
Unison that layers the Part sound played on
the keyboard at one octave lower
12
3
4
5
6
7
8
9
)
A
F
!
@
B
G
H
#
$
Panel controls
CK88 CK61 Owner’s Manual
15
H PAGE buttons
For switching the Live Set Page. The Live Set Sound
changes accordingly.
Simultaneously press the [l] and [r] buttons to call
up the Live Set View. In the Live Set View, you can use
the VALUE buttons and the Encoder Dial to select a
Live Set Sound from a different Live Set Page. To go
back to the Top screen, press the [EXIT] button.
I LIVE SET [1]–[8] buttons
For calling up a Live Set Sound from the eight of the
Live Set Sounds in the currently selected Live Set Page.
Change the Live Set Page using the PAGE button.
J FILTER [ON/OFF] button
FILTER [CUTOFF] knob
FILTER [RESONANCE] knob
For applying a filter to the currently selected Part.
By setting the [ON/OFF] button to off, the filter is
instantly reset to the initial value for the Voice.
[CUTOFF] knob
For setting the cutoff frequency of the low-pass filter.
The sound can be brightened by moving the knob to
the right or darkened by moving it to the left.
NOTE
How the filter is applied varies depending on the Voice being used.
[RESONANCE] knob
For setting the resonance, which changes the
character of the sound. This effect can be made more
pronounced by moving the knob to the right and less
pronounced by moving it to the left.
K EG [ON/OFF] button
EG [ATTACK] knob
EG [RELEASE] knob
For applying an EG (Envelope Generator) to the
currently selected Part.
By setting the [ON/OFF] button to off, the EG is
instantly reset to the initial value for the Voice.
[ATTACK] knob
For adjusting the attack for the EG. Turn the knob to
the left to make the attack faster, and to the right to
make the attack slower.
[RELEASE] knob
For adjusting the release for the EG. Turn the knob to
the left to make the release faster, and to the right to
make the release slower.
NOTE
How the EG is applied varies depending on the Voice being used.
Volume
Cutoff Frequency
Frequency
(pitch)
Cutoff range
These frequencies are
“passed” by the filter
Volume
Frequency
(pitch)
Resonance
Level
Key on Key off
Time
Attack Release
*
(
D
E
&
K L
O
P
M
J
N
^
C
I
$
%
Panel controls
CK88 CK61 Owner’s Manual
16
L DRIVE [ON/OFF] button
DRIVE [DEPTH] knob
Drive type select buttons
For setting Drive, which applies on overdrive effect to
the currently selected Part.
Use the [ON/OFF] button to turn Drive on or off, and
use the [DEPTH] knob to adjust values. Use the Drive
Type select buttons to select a type.
M EFFECT 1 [ON/OFF] button
EFFECT 2 [ON/OFF] button
EFFECT [DEPTH] knob
EFFECT [RATE] knob
EFFECT [TYPE] knob
EFFECT1–EFFECT2 select button
For applying Insertion Effects to the currently selected
Part. The Insertion Effects are applied in a path to
Effect 1 and then to Effect 2.
Use the [ON/OFF] button to turn the Effect on or off,
and use the EFFECT1–EFFECT2 select button to select
EFFECT1 or EFFECT2. The [TYPE] knob is used to select
a type, the [DEPTH] knob to adjust the Insertion Effect
depth, and the [RATE] knob to adjust the Insertion
Effect rate.
NOTE
Simultaneously press the [ENTER] and EFFECT1–EFFECT2 select
buttons to swap the EFFECT 1 and EFFECT 2 settings. This
conveniently lets you change the order of the applied effects
(page 42).
There are various types of Insertion Effects with
different characteristics.
There are 10 effect type categories available. The
category lamp for the selected effect type lights up.
For more information on the effect types, see the
“Effect list” on page 43.
NOTE
By holding down the [ENTER] button and operating the EFFECT
[TYPE] knob, you can select the first item of the previous or the next
category. This is convenient for quickly finding the category you
wish to use (page 42).
Type Description
O.Drive
Warm distortion effect (overdrive)
Dist
Hard rock distortion
Rotary A
Standard rotary speaker for organ.
Rotary B
The rotary speaker connected to a transistor
preamplifier with strong distortion.
Comp
Versatile compressor controlled by a single knob
Category Description
Chorus
Adds spaciousness and thickness to the sound,
as if multiple sounds are played at once.
Flanger
Creates metallic sweeping sounds like a jet
plane.
Phaser
Creates a phase-shifting effect that uses
feedback circuitry as well as phase shift circuitry
that mixes the phase-shifted sound with the
original sound.
Trm/Rtr
Trm (Tremolo) is an effect that cyclically
modulates the volume.
Rtr (Rotary Speaker) is an effect that simulates a
rotary speaker, which is popular for Organ
sounds.
Dist
An effect that distorts sounds.
Comp/EQ
Comp (compressor) is an effect that compresses
loud sounds or boosts soft sounds to even out
the dynamics of the audio signal.
EQ is an effect that changes the tonal character
of the sound.
Wah
Creates a characteristic “wah-wah” sound by
changing the frequency response of the filter.
Delay
Creates echo effects by delaying the time of the
input sound.
Reverb
Creates a sense of space and ambience by
artificially producing complex echoes.
Others
Other types of effects that are not included in
the above categories.
12
3
4
5
6
7
8
9
)
A
F
!
@
B
G
H
#
$
Panel controls
CK88 CK61 Owner’s Manual
17
N DELAY [ON/OFF] button
DELAY [TYPE] button
DELAY [DEPTH] knob
DELAY [TIME] knob
Use the [ON/OFF] button to turn the Delay on or off.
Use the [TYPE] button to select a type, the [DEPTH]
knob to set the delay depth, and the [TIME] knob to
adjust the delay length.
O REVERB [ON/OFF] button
REVERB [TYPE] button
REVERB DEPTH knob
Use the [ON/OFF] button to turn the Reverb on or off.
Use the [TYPE] button to select a type and the REVERB
DEPTH knob to adjust the reverb depth.
P EQUALIZER slider
For adjusting the Master EQ. The lamp turns on when
the slider value is set to a value other than 0.
Set the Frequency for each type from the [MENU]
button General System Master EQ (page 36).
EQUALIZER settings are stored to a Live Set Sound if
Live Set EQ is set to On (page 30).
The Live Set EQ setting is changed from the [SETTINGS]
button Sound Common Live Set EQ (page 30).
Type Description
Digital
Delay
Clean digital delay
Use the [DEPTH] knob to adjust the depth and
feedback level, and the [TIME] knob to adjust the
delay time.
Analog
Delay
Delay with warm analog sound
Use the [DEPTH] knob to adjust the feedback level
and the [TIME] knob to adjust the delay time.
Cross
Delay
Delay that crosses the delay sound from left to right
and from right to left
Use the [DEPTH] knob to adjust the depth and
feedback level, and the [TIME] knob to adjust the
speed.
Tempo
Delay
A special delay that syncs to the tempo of the song.
The delay is applied by specifying the Tempo (Tempo
Delay Time) and the note length.
The initial value is 1/4 (quarter note).
Use the [DEPTH] knob to change the delay depth
and feedback level, and the [TIME] knob to adjust
the delay tempo.
Another intuitive way of setting the tempo is to tap
the [ENTER] button at least three times.
Tempo Delay Time can be set by using the [TIME]
knob while holding down the [ENTER] button
(page 42), or from the [SETTINGS] button Sound
Common Tempo Delay Time.
Type Description
Hall
Reverb
Simulates the sound of a concert hall.
Room
Reverb
Simulates the sound of a room.
Plate
Reverb
Simulates the sound of a plate reverb.
Type
Description
[HIGH] Gain for the high-frequency band (500 Hz–16 kHz)
[MID] Gain for the mid-frequency band (100 Hz–10 kHz)
[LOW] Gain for the low-frequency band (32 Hz–2 kHz)
*
(
D
E
&
K L
O
P
M
J
N
^
C
I
$
%
Panel controls
CK88 CK61 Owner’s Manual
18
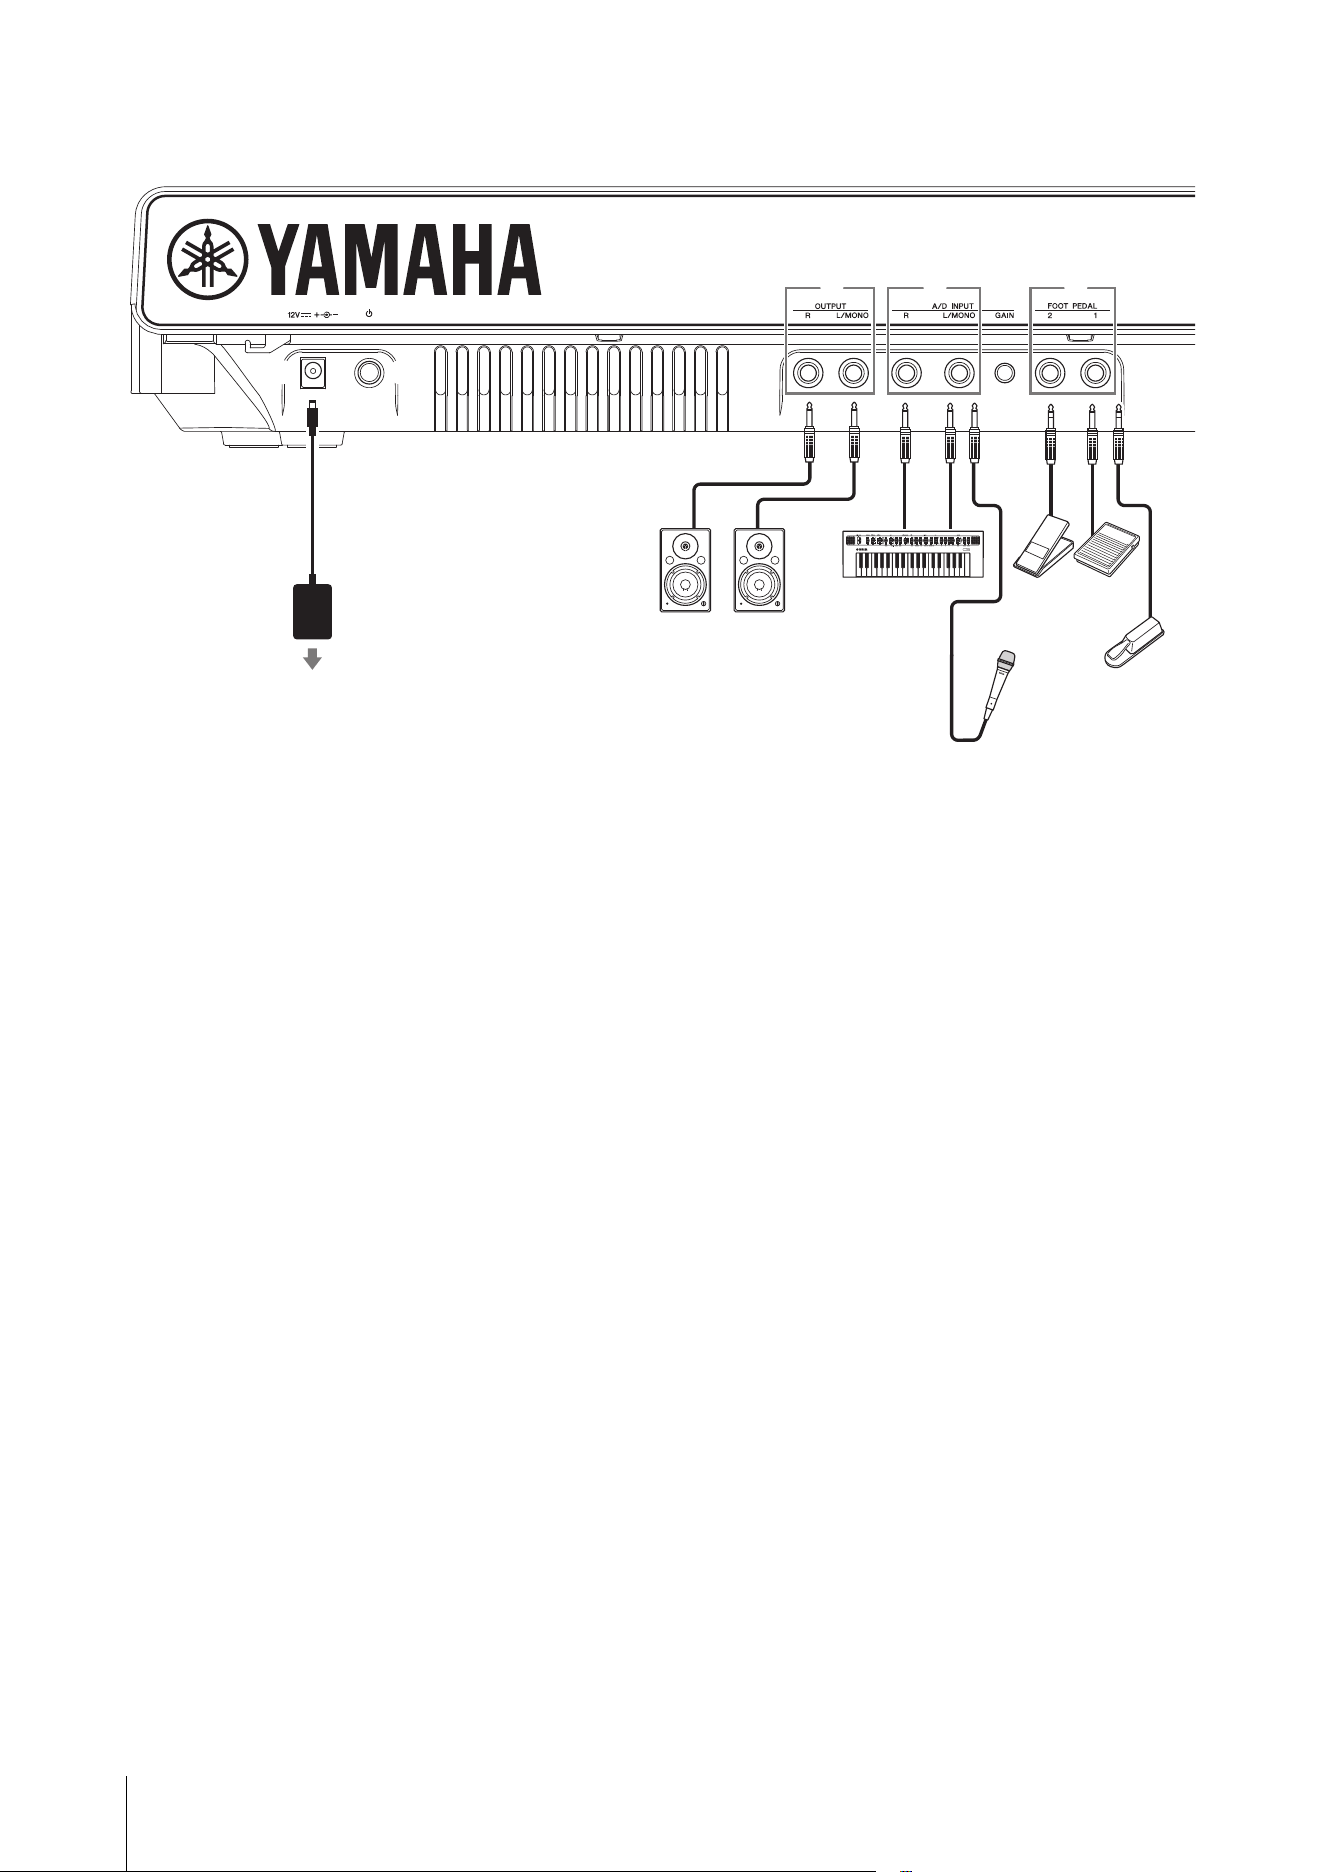
Rear panel
1 [DC IN] jack (page 20)
For connecting the included AC adaptor.
2 [P] (STANDBY/ON) switch (page 22)
For switching the CK to standby (N) or turning it
on (O).
3 OUTPUT jacks
Standard phone (unbalanced) jacks for outputting
audio signals. For output in mono, connect only to the
[L/MONO] jack.
4 A/D INPUT jacks
Standard phone jacks (1/4" mono phone plug) for
receiving audio from the external audio device.
Musical instruments such as synthesizers, audio
devices, such as portable music players, as well as
dynamic microphones can be connected to these
jacks, and the audio input signals can be played as an
audio Part. In addition, the effects can be applied to
external audio signals. The effect type can be set from
the [INPUT] button.
To switch the input source (to Line or MIC), use the
[MENU] button General Audio A/D Input Type.
NOTE
The CK does not support phantom-powered condenser
microphones.
5 A/D INPUT [GAIN] knob
The external audio source input via these jacks is
mixed in with the sounds played by the CK. Use this
knob to adjust the balance between the external audio
and the CK sounds.
6 FOOT PEDAL jacks
For connecting a separately sold sustain pedal. The
compatible pedals are Foot Pedal FC3A, Footswitch
FC4A, Footswitch FC5, and Foot Controller FC7.
Set the pedal type from the [MENU] button General
Foot Pedal.
NOTE
When the pedal connected to the jack and the Foot Pedal setting do
not match, the pedal may not work properly or may malfunction.
Make sure to select the correct pedal type for the pedal connected
to the jack.
You can assign functions such as sustain or sostenuto
from the [SETTINGS] button Controllers Foot
Pedal 1 or Foot Pedal 2 Assign (page 31).
7 SPEAKERS switch
For tuning the built-in speakers on or off.
If this switch is on and the Speaker Mute is set to Auto,
the built-in speakers will automatically be muted when
the headphones are connected.
To change the Speaker Mute setting, set from the
[MENU] button General System Speaker
Speaker Mute.
3 4 5 6
1 2
AC adaptor
Keyboard amplifier
or
Monitor speakers
External
synthesizer
Dynamic mic
FC3A,
FC4A
AC outlet
FC7 FC5
Panel controls
CK88 CK61 Owner’s Manual
19
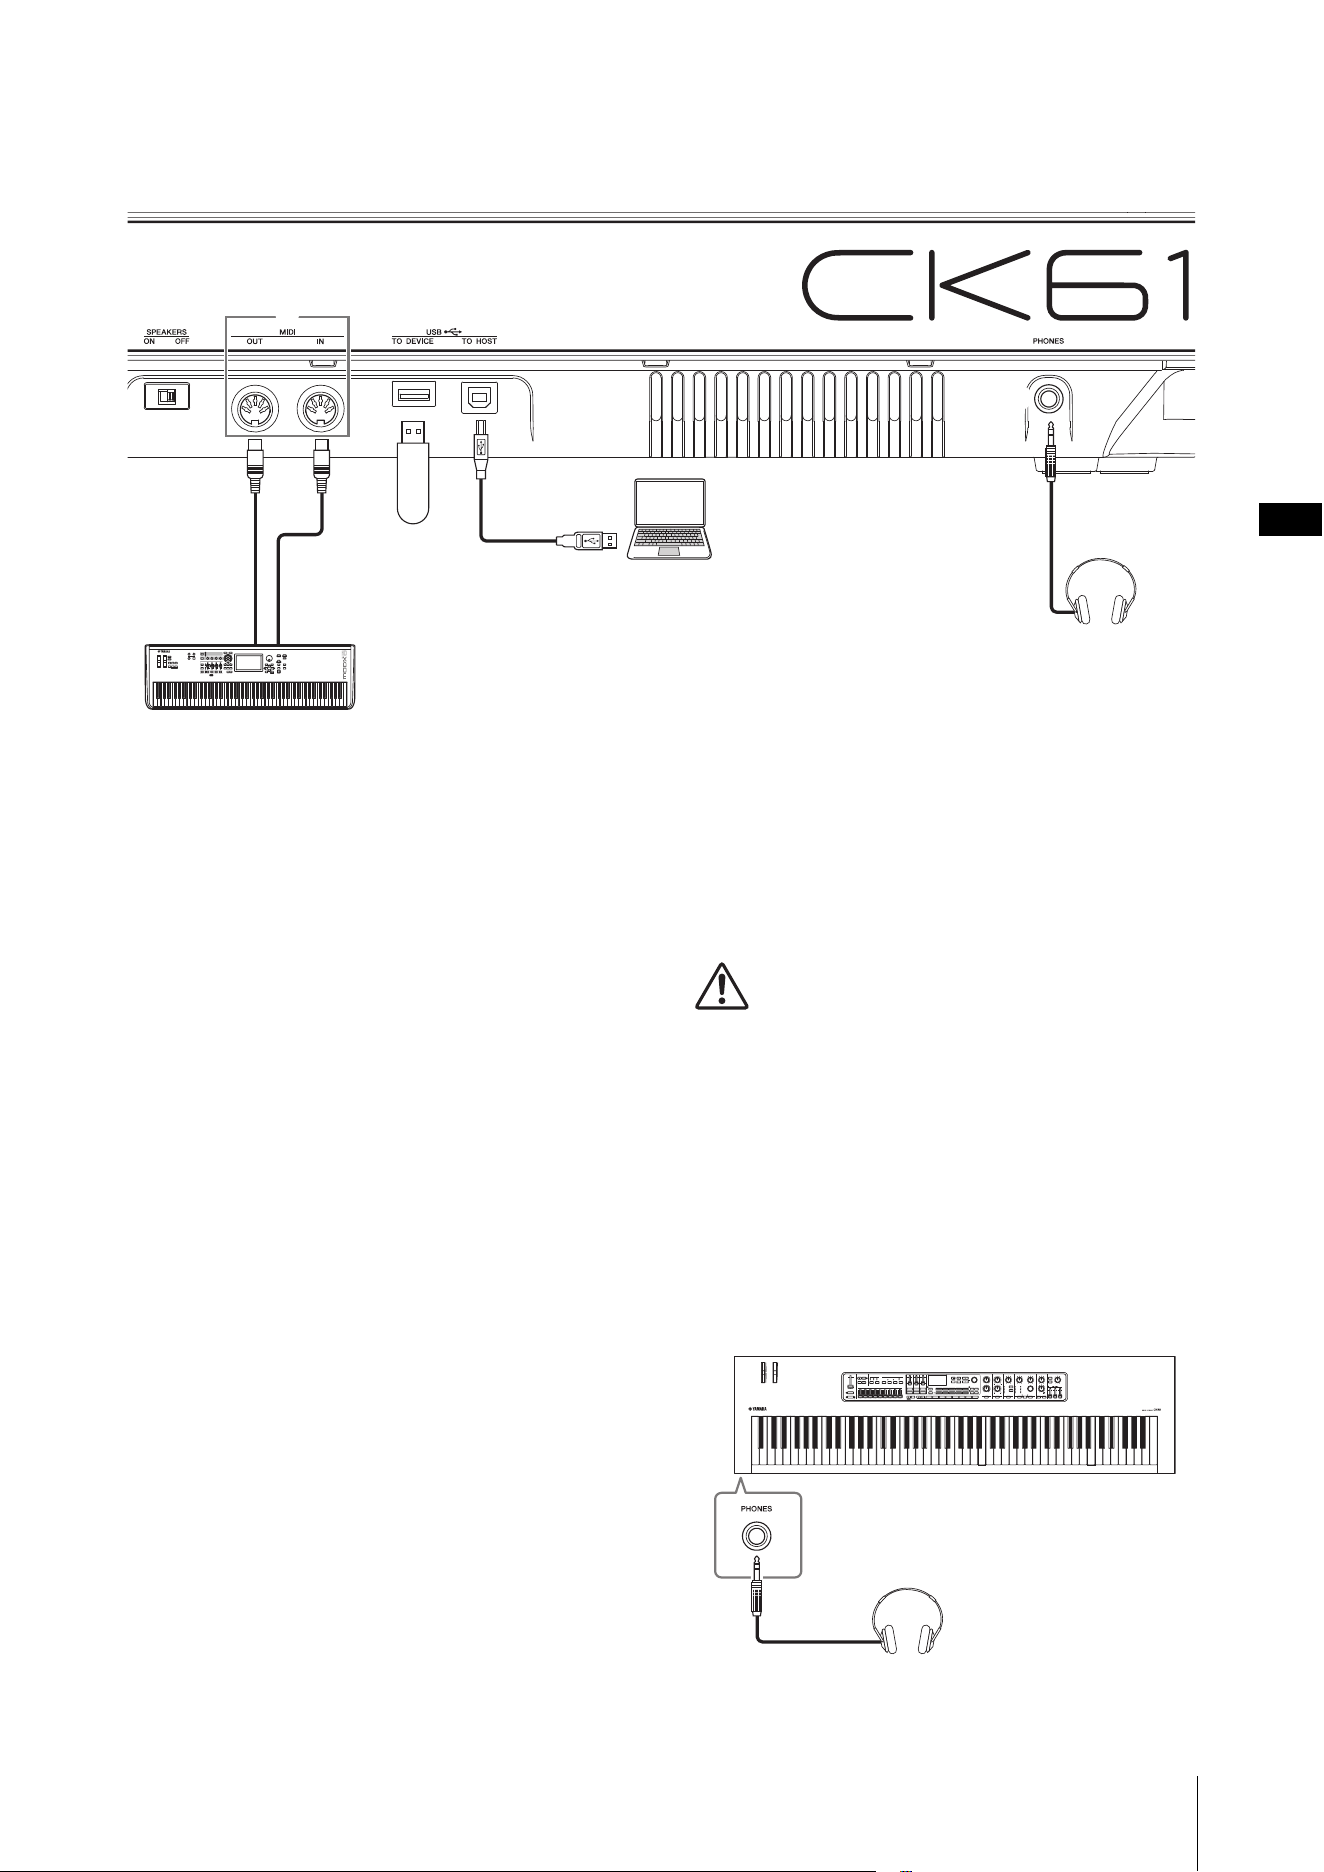
8 MIDI terminals
With a standard MIDI cable (commercially available),
you can connect an external MIDI instrument, and
control it from the CK. Likewise, you can use an
external MIDI device (such as a keyboard or sequencer)
to control the internal tone generator on the CK.
9 USB [TO DEVICE] terminal
For connecting a USB flash drive to the CK, allowing
you to save a Live Set Sound you have stored, load a
Live Set Sound back to the CK, or play audio files.
NOTE
• Only a USB flash drive can be connected to the USB [TO DEVICE]
jack. No other USB devices such as a hard disk drive, CD-ROM
drive, or USB hub can be used.
• You cannot record your performance onto a USB flash drive.
) USB [TO HOST] terminal
For connecting the CK to a computer, iPhone, or iPad
via a USB cable for using the MIDI and audio capability.
With the USB [TO HOST] terminal, two MIDI ports
(page 48) can be used simultaneously.
NOTE
The USB [TO HOST| terminal has the capacity for handing two mono
channels (or one stereo channel) of 24-bit audio at a sampling rate of
44.1 kHz.
! [PHONES] jack
For connecting a 6.3-mm standard stereo phone jack
to connect headphones.
When the Speaker Mute is set to Auto, the built-in
speakers will be muted when the headphones are
connected.
CAUTION
• To prevent hearing loss, avoid using headphones at high
volumes for extended periods of time.
• Whenever connecting external audio devices, ensure that
all devices are turned off.
NOTE
The sound output via the headphones is identical to that output via
the OUTPUT jacks. The sound is output via OUTPUT jacks regardless
of whether or not the headphones are connected.
The [PHONES] jack on the CK88 can be found on the
front side.
For CK88
7 8 9 )
!
USB flash drive
MIDI device
Computer
Headphones
Headphones
CK88 CK61 Owner’s Manual
20
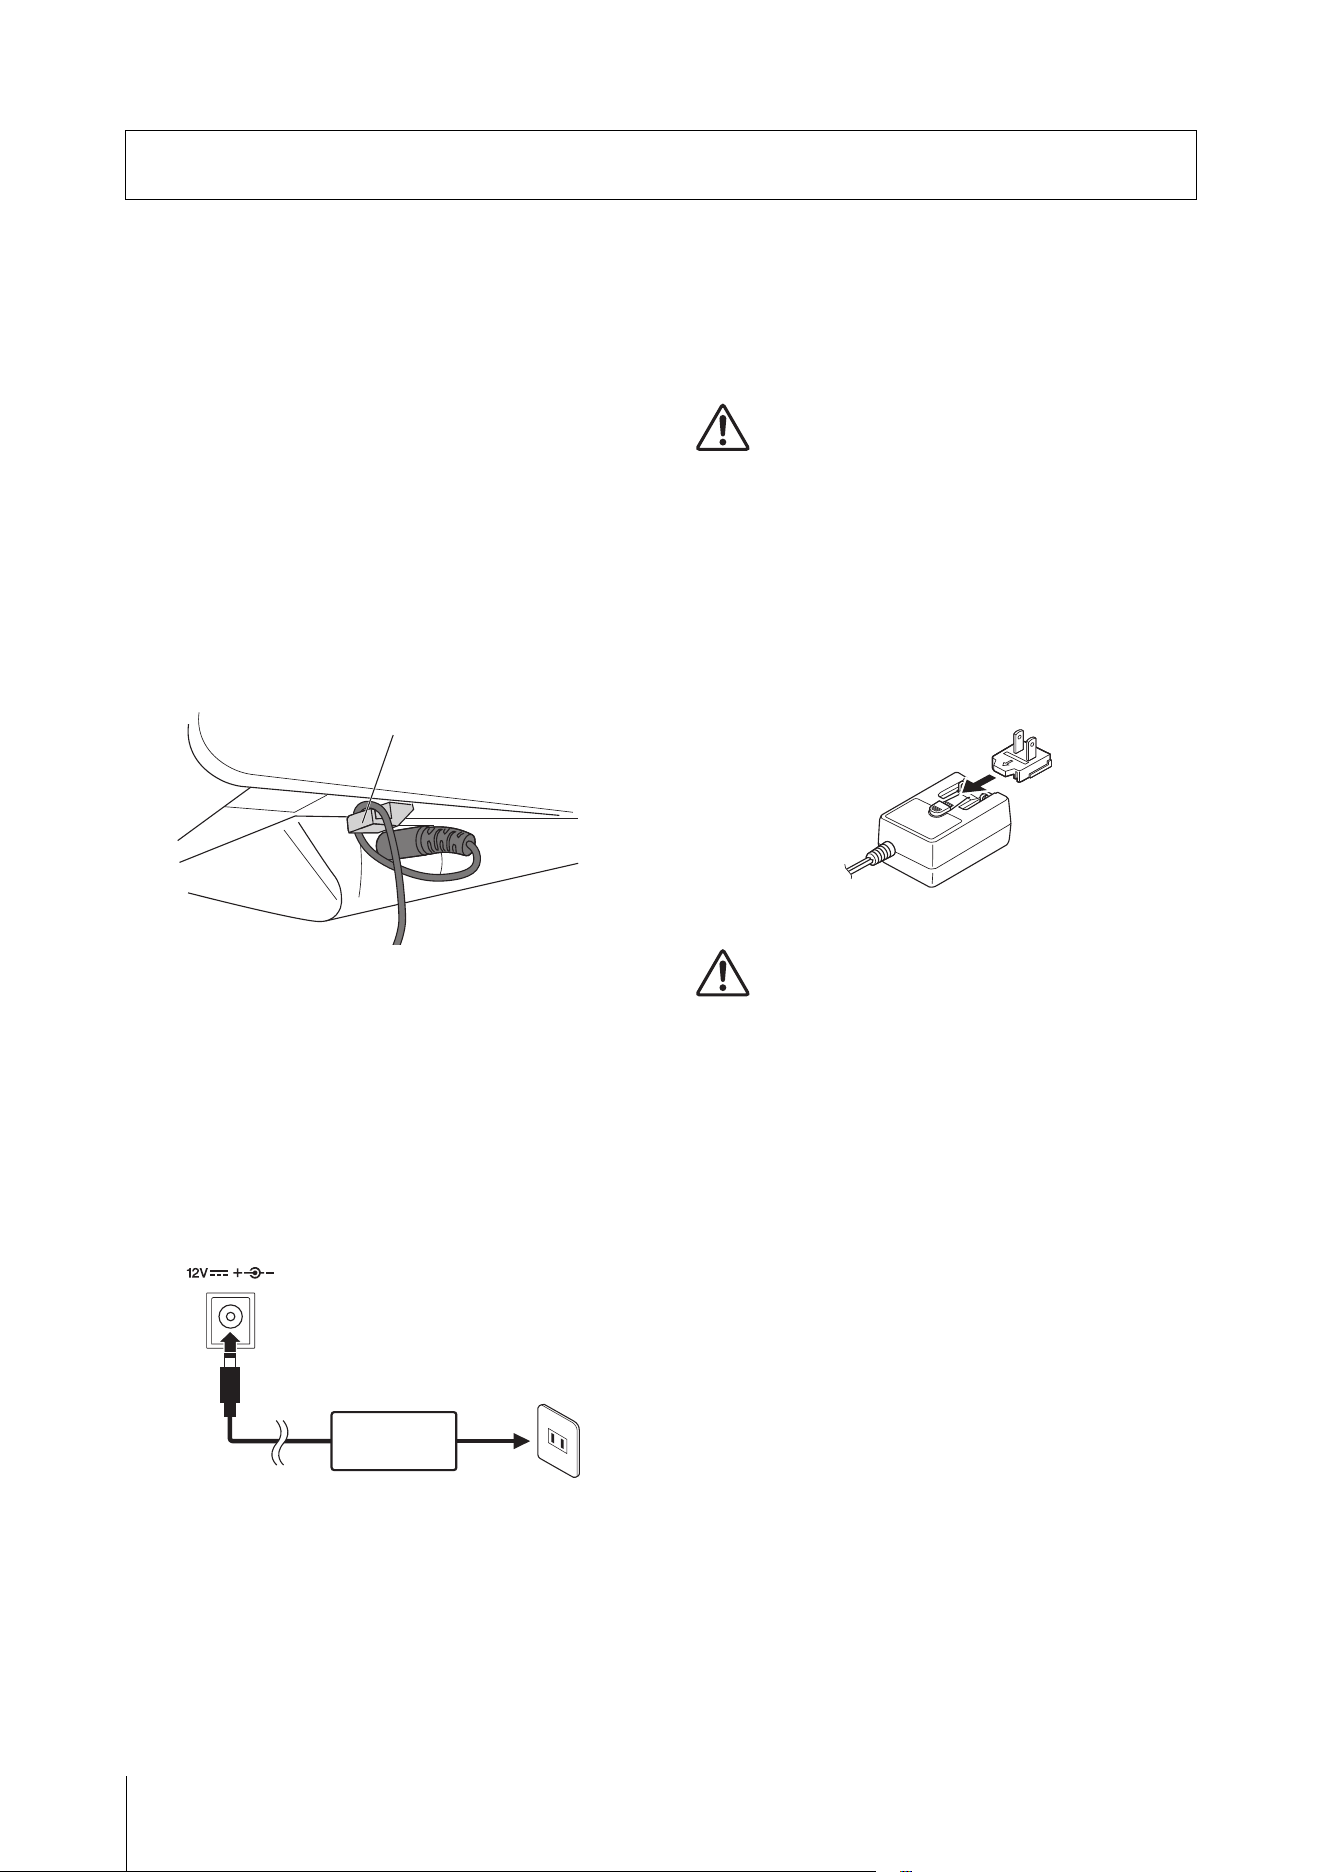
Although the CK will run either from an AC adaptor or batteries, Yamaha recommends the use of an AC adaptor
whenever possible. An AC adaptor is more environmentally friendly than batteries and does not deplete resources.
NOTICE
It is recommended to use the AC adaptor when executing USB flash drive operations, since battery power may not be reliable
enough to last through these crucial operations.
Using an AC adaptor
Make sure that the [P] (Standby/On) switch is in a
standby position (the switch is up), then connect the
AC adaptor in the order shown in the illustration.
1. Wrap the DC output cable of the AC adaptor
around the cord hook (as shown below),
and then connect the plug of the adaptor to
the DC IN jack on the rear panel.
NOTICE
Use of the cord hook prevents accidental unplugging of
the cable during operation. Make sure to avoid
tightening the cord more than necessary or pulling on
the cord strongly while it is wrapped around the cord
hook, in order to prevent wear on the cord or possible
breakage of the hook.
2. Connect the other end of the AC adaptor to
an AC outlet.
WARNING
• Use the specified AC adaptor (page 69) only. Using the
wrong AC adaptor can result in damage to the instrument
or overheating.
• When using the AC adaptor with a removable plug, make
sure to keep the plug attached to the AC adaptor. Using
the plug alone can cause electric shock or fire.
• If the plug is accidentally removed from the AC adaptor,
never touch the metallic section when attaching the plug.
To avoid electric shock, short circuit, or damage, also be
careful that there is no dust between the AC adaptor and
plug.
CAUTION
When setting up the product, make sure that the AC outlet
you are using is easily accessible. If some trouble or
malfunction occurs, immediately turn the power off and
disconnect the plug from the outlet.
NOTE
• Follow the order shown above in reverse when disconnecting the
AC adaptor.
• When the AC adaptor is connected, the adaptor is used for
supplying power to the instrument regardless of whether or not
the batteries are installed to the instrument.
• Do not insert or remove the DC plug with the [P] (Standby/On)
switch set to the On position (O). Failure to observe this
precaution can lead to malfunction.
Setting up
Cord hook
2
1
AC outlet
AC adaptor
DC IN jack
(page 69)
Plug
Slide the plug
as indicated.
The shape of the plug differs depending on
your area.
Setting up
CK88 CK61 Owner’s Manual
21
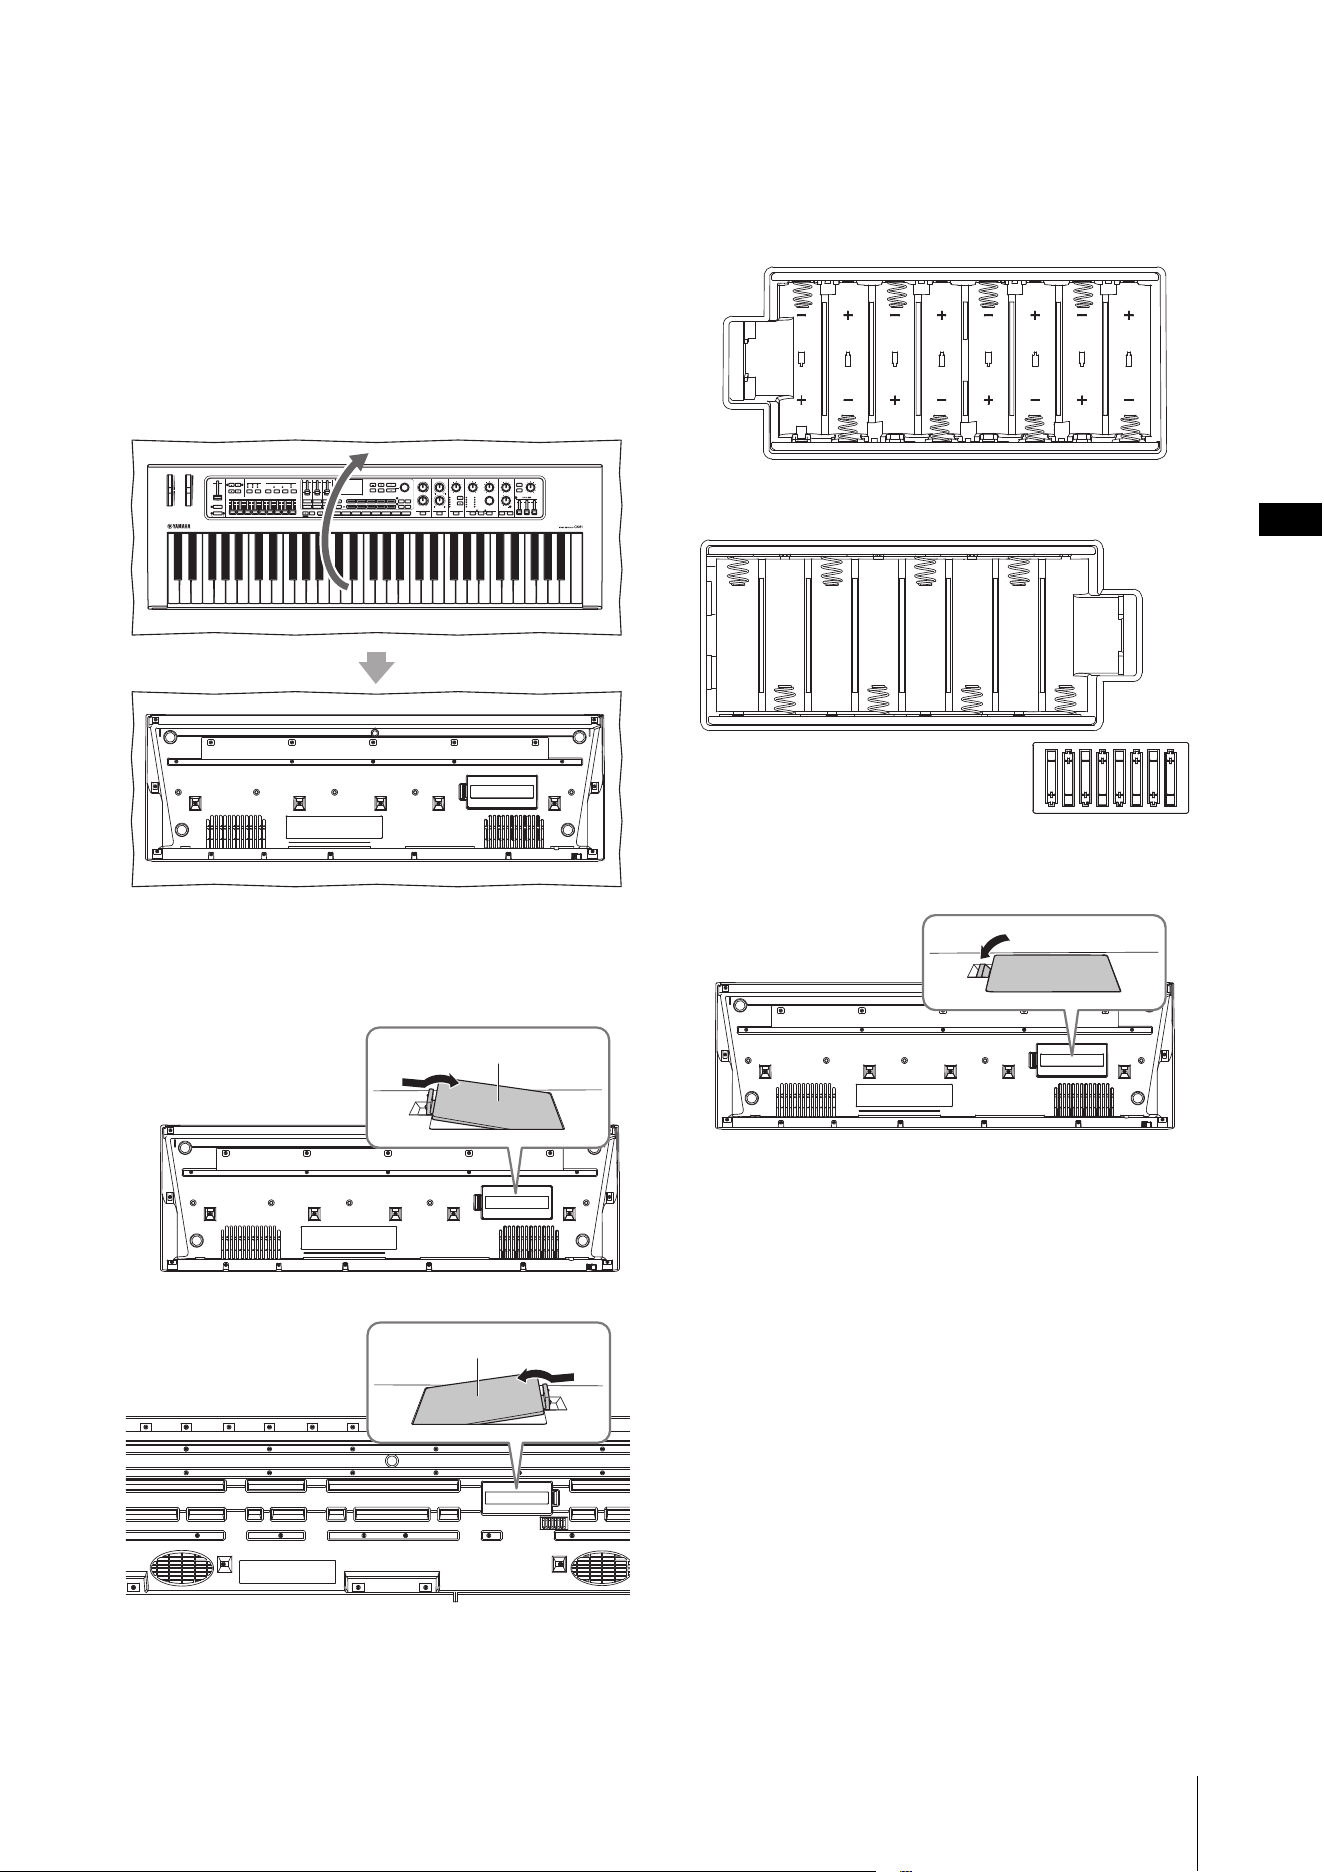
Using batteries
The CK requires eight “AA” size, Alkaline (LR6) or
rechargeable nickel-metal hydride batteries
(rechargeable Ni-MH batteries).
Use of the AC adaptor is recommended when keeping
the CK on for an extended time.
1. Make sure that the CK is turned off.
2. Turn the CK over and place the top side on a
soft cloth.
3. Open the battery compartment cover.
4. Insert the eight new batteries, being careful
to follow the polarity markings on the
inside (or next to) the compartment.
CK61
CK88
5. Close the compartment cover until it clicks
into place.
6. Turn the CK face up.
Do not leave the CK with the front panel side down.
NOTICE
• Connecting or disconnecting the AC adaptor with
batteries installed may turn the power off, resulting in loss
of data being edited at the time.
• When battery power becomes too low for proper
operation, the volume may be reduced, the sound may be
distorted, and other problems may occur. When this
happens, make sure to replace all batteries with new ones
or already recharged ones.
NOTE
• This instrument cannot be used to charge the batteries. Use only
the specified charger device when charging.
• Power will be automatically drawn from the AC adaptor if an AC
adaptor is connected while batteries are installed in the
instrument.
The bottom of the CK
Battery compartment cover
CK61
Battery compartment cover
CK88
Setting up
CK88 CK61 Owner’s Manual
22
Remaining battery power indication
Turning the power on
Turning the power off
Make sure the volume settings of the CK and external
devices such as powered speakers are turned down to
the minimum before turning the power on. When
connecting the CK to monitor speakers, turn on the
power switch on each device in the following order.
Turning on
Turn the [MASTER VOLUME] slider of the CK to its
minimum set the [P] (STANDBY/ON) switch to
on (O). turn the amplifier or speaker power on.
Turning off
Turn the [MASTER VOLUME] slider of the CK to its
minimum turn the amplifier or speaker power off
set the [P] (STANDBY/ON) switch to standby (N).
Setting the Auto Power Off
function
The Auto Power Off function automatically turns off the
CK after 15 minutes of inactivity. As a factory default,
Auto Power Off is set to Auto.
With the Auto setting, the Auto Power Off function is
disabled while the AC adaptor is being used, and
enabled while the batteries are being used.
NOTICE
• The setting will revert to its default value if not backed up
before the power is turned off. Make sure to store the
settings before the Auto Power Off function becomes
activated (page 24).
• When the instrument is not operated for a specified
period of time while connected to an external device such
as an amplifier, speaker, or computer, make sure to follow
the instructions in the Owner’s Manual to turn off the
power to the instrument and the connected devices in the
proper sequence, in order to protect the devices from
damage. If you do not want the power to turn off
automatically when a device is connected, disable Auto
Power Off.
Auto Power Off setting
Change the setting from the [MENU] button General
System Auto Power Off (page 36).
Connecting headphones
Connect a pair of headphones to the [PHONES] jack.
When a set of headphones are connected while the
Speaker Mute is set to Auto, the built-in speakers will be
muted. When set to Manual, the built-in speakers will
be muted by setting the SPEAKERS switch on the rear
panel to OFF.
The setting can be changed from the [MENU] button
General System Speaker.
While the built-in speakers are muted, the output from
the [PHONES] jack will also be output from OUTPUT
jacks.
CAUTION
• Do not use the headphones for a long period of time at a
high volume level, since this can cause permanent hearing
loss.
• Before connecting the instrument to other electronic
components, turn off the power of all the components.
Also, before turning any components on or off, make sure
to set all volume levels to a minimum. Otherwise, damage
to the components or electrical shock may occur.
NOTICE
To avoid possible damage to the external device, first turn
on the power to the instrument, and then to the external
device. When turning off the power, do so in reverse order:
first turn off the power to the external device, and then to
the instrument.
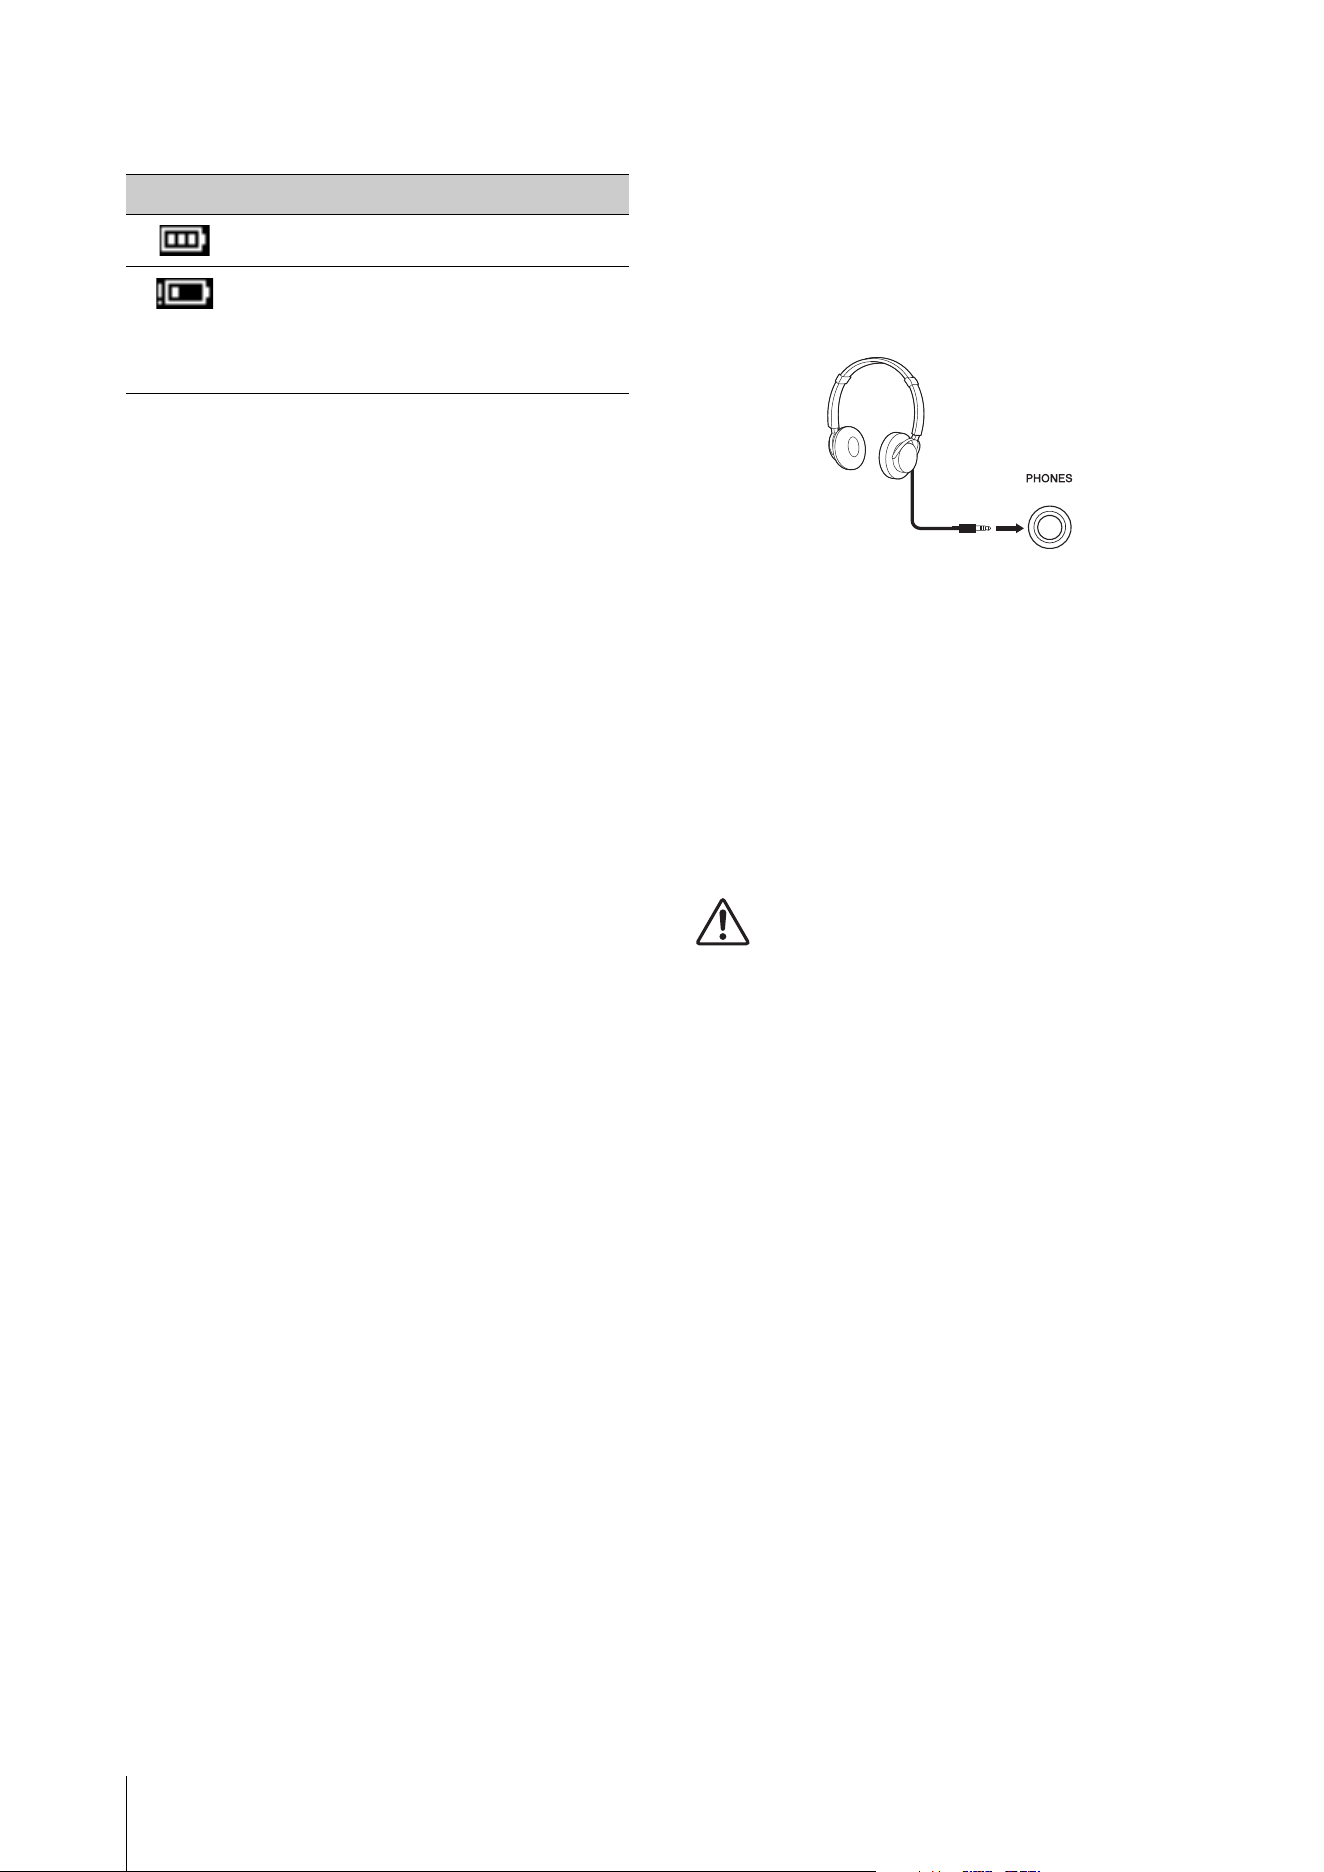
Indication Description
Indicates that the remaining power is sufficient.
Indicates that the remaining power is insufficient
for operation. The built-in speakers will be turned
off after this indication is shown. Save the settings
you are editing and replace all the batteries with
new ones.
Standard stereo phone plug

Setting up
CK88 CK61 Owner’s Manual
23
Using a USB flash drive
By connecting a USB flash drive to the USB [TO DEVICE]
terminal on the rear panel, you can save the Live Set
Sounds as backup files or load settings back from the
backup files.
Precautions when using the USB [TO
DEVICE] terminal
When connecting a USB flash drive to the USB [TO
DEVICE] terminal, be sure to follow the important
precautions shown below.
NOTE
For more information on the handling of the USB flash drives, refer to
the Owner’s Manual of your USB flash drive.
Compatible USB devices
• USB flash drives only
Other USB devices such as a USB hub, computer
keyboard, or mouse cannot be used.
The instrument does not necessarily support all
commercially available USB devices. Yamaha cannot
guarantee the operation of USB devices that you
purchase. Before purchasing a USB device for use with
this instrument, please visit the following web page:
https://download.yamaha.com/
Although USB 1.1 and 2.0 devices can be used on the
CK, the amount of time for saving to or loading from
the USB flash drive may differ depending on the type
of data or the status of the instrument.
NOTICE
The rating of the USB [TO DEVICE] terminal is a maximum of
5 V / 500 mA. Do not connect USB devices having a rating
above this, since this can cause damage to the instrument
itself.
Connecting a USB flash drive
When connecting a USB flash drive to the USB [TO
DEVICE] terminal, make sure that it is connected in the
proper direction.
NOTICE
• Avoid connecting or disconnecting the USB device during
file management operations (such as Save, Copy, Delete,
and Format), or when accessing the USB flash drive.
Failure to observe this may result in “freezing” of the
operation of the instrument or corruption of the USB flash
drive.
• When connecting then disconnecting the USB flash drive
(and vice versa), make sure to wait a few seconds between
the two operations.
• Do not use cables for connecting the USB flash drive.
Formatting the USB flash drive
Some USB flash drives should be formatted with this
instrument before they can be used (page 36). The USB
flash drives formatted on other instruments or devices
may not work properly.
NOTICE
The format operation erases any existing files. Make sure
that the USB flash drive you are formatting does not contain
any important files.
To protect your files (Write Protection)
To prevent important files from being inadvertently
erased, write-protect the USB flash drive. When you are
saving files to the USB flash drive, make sure you
disable the write-protection first.
Turning off the instrument
When turning off the instrument, make sure that the
instrument is NOT accessing the USB flash drive by file
management (such as during Save, Copy, Delete and
Format operations). Failure to do so may corrupt the
USB flash drive and the files.
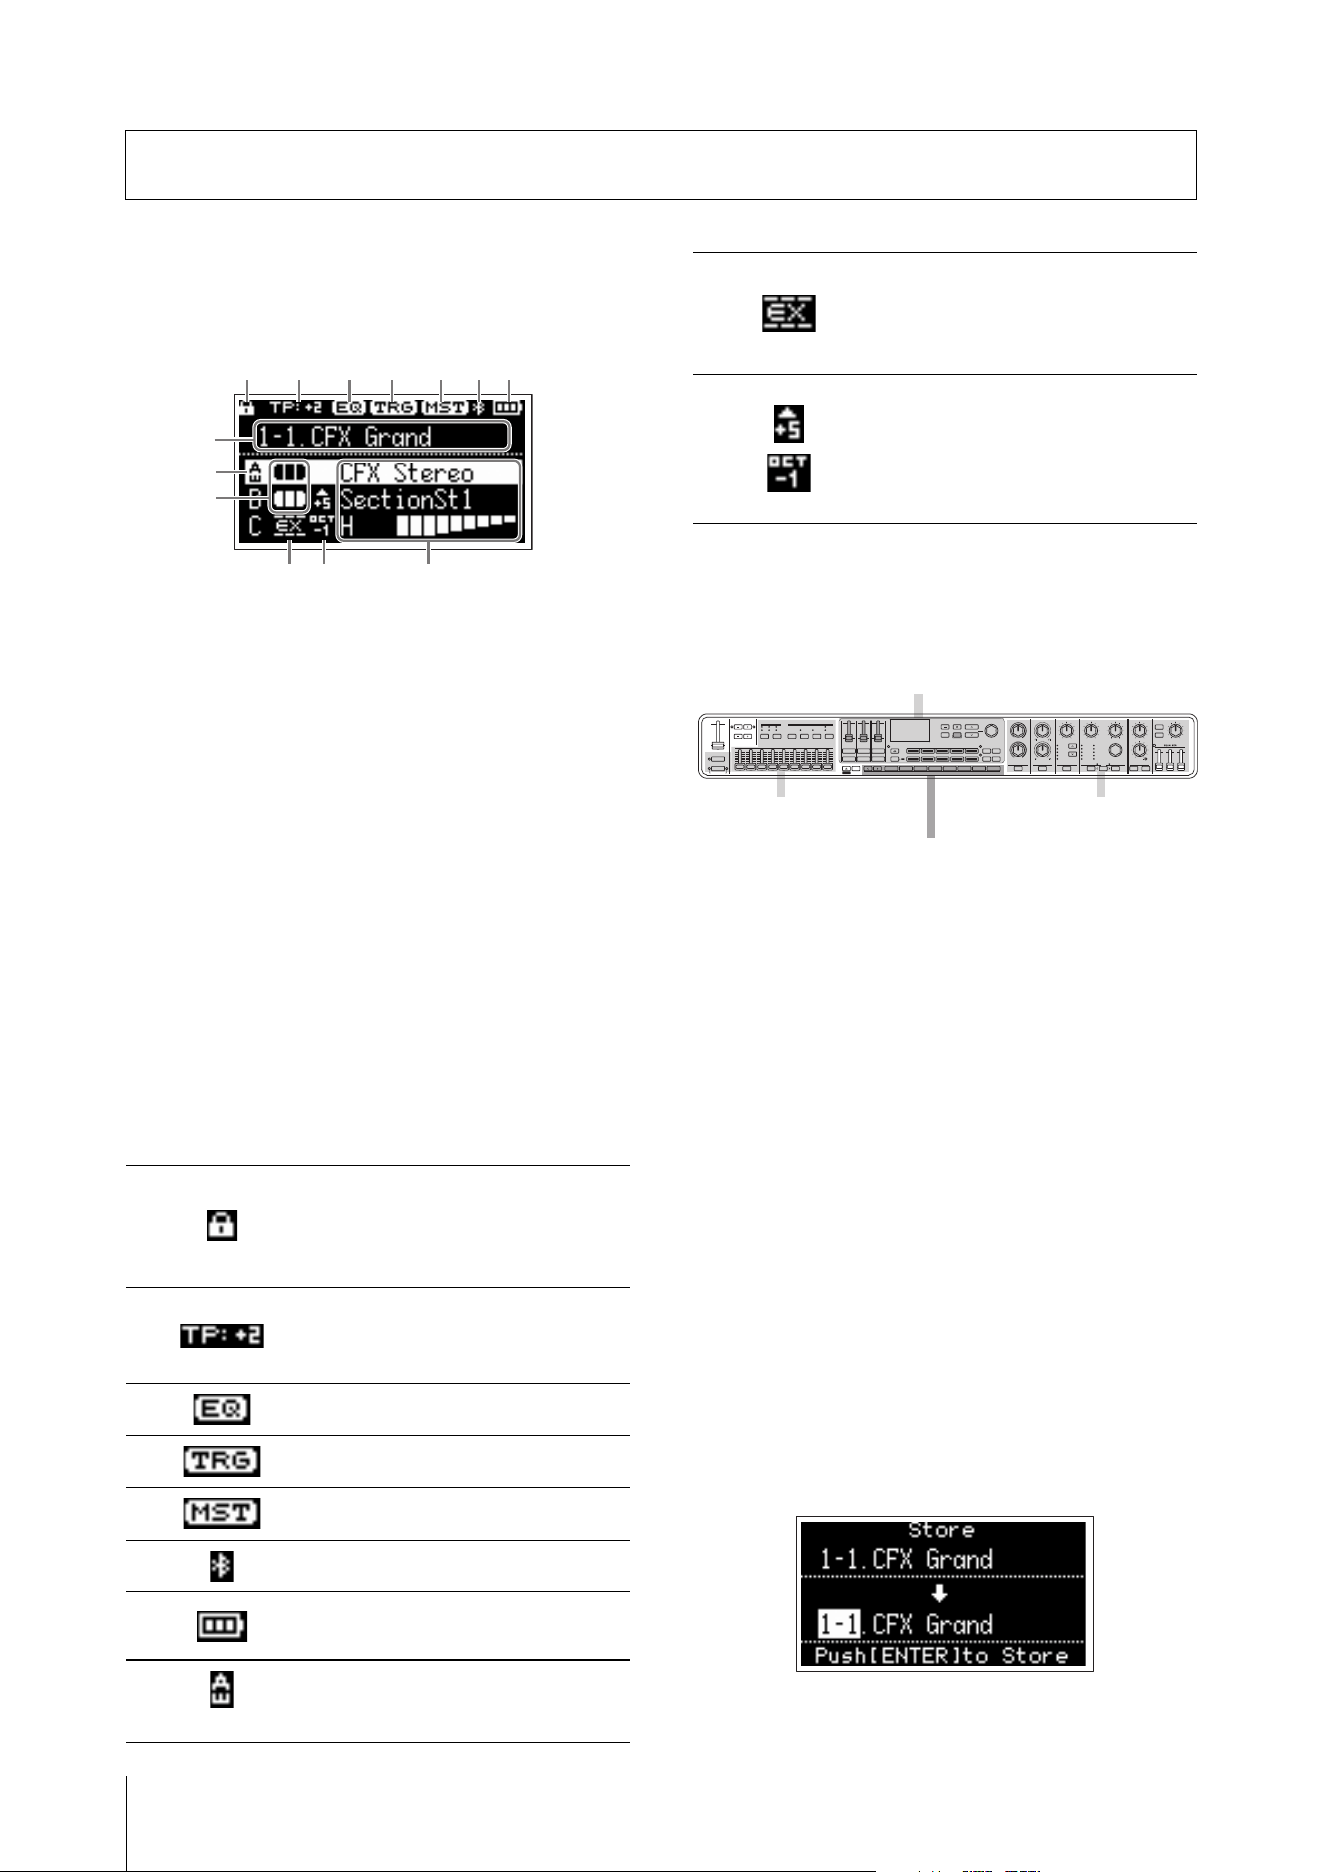
CK88 CK61 Owner’s Manual
24
Top screen configuration
This section explains the Top screen which appears
when the CK is turned on.
1 Live Set Sound number
Shows the currently selected Live Set Sound number.
With the initial setting, number 1-1 will be called up at
startup.
To use a different Live Set Sound number for startup,
change the setting from the [MENU] button General
System Power on Sound (page 36).
2 Voice
Shows the Voice name when the Part is on.
With some Organ voices, the Voice name and the
Drawbar settings will be shown.
3 Split and Layer
Shows the current split and layer status of each Part.
The split point is the lowest key on the right keyboard
range.
Other icons
Creating a Live Set Sound
Use the Live Set Sound for sound-making.
The basic sound-making procedures are as shown
below.
1. Select a Live Set Sound.
2. Select a Voice for each Part.
3. Set a combination of these Voices.
4. Creating an Organ voice.
5. Modify sounds using EG, Filter, Effects,
MONO, and Unison settings.
6. Save the Live Set Sound.
Saving the Live Set Sound
Edited Live Set Sounds are saved to the internal
memory of the CK by pressing the [STORE] button.
1. Press the [STORE] button.
A screen for selecting the Live Set Sound to be
stored appears.
Basic operations
4
Panel lock is on.
The setting can be changed by
simultaneously pressing both the
[ENTER] and [MENU] buttons.
5
Sound Transpose for the Live Set
Sound is set to a value other than 0
(−12 to +12).
6
Live Set EQ is set to on.
7
Audio Trigger is set to ON.
8
Master Keyboard is set to ON.
9
Connected via Bluetooth.
)
Battery level (shown only during
battery operation).
!
(For Part A)
Touch Sensitivity for the Part has
been changed.
1
4 5 6 7 8 9 )
2
@ #
3
!
@
External Keyboard for the Part is set
to ExtOnly
Play the external keyboard to sound
the internal tone generator.
#
Note Shift for the Part is set to a
value other than 0 (±24)
When the note value is −24, −12,
+12, and +24, it is shown as OCT−2,
OCT−1, OCT+1, and OCT+2
Select a voice and combine voices
Adjust the organ sound Apply sound effects
Select a Live Set Sound
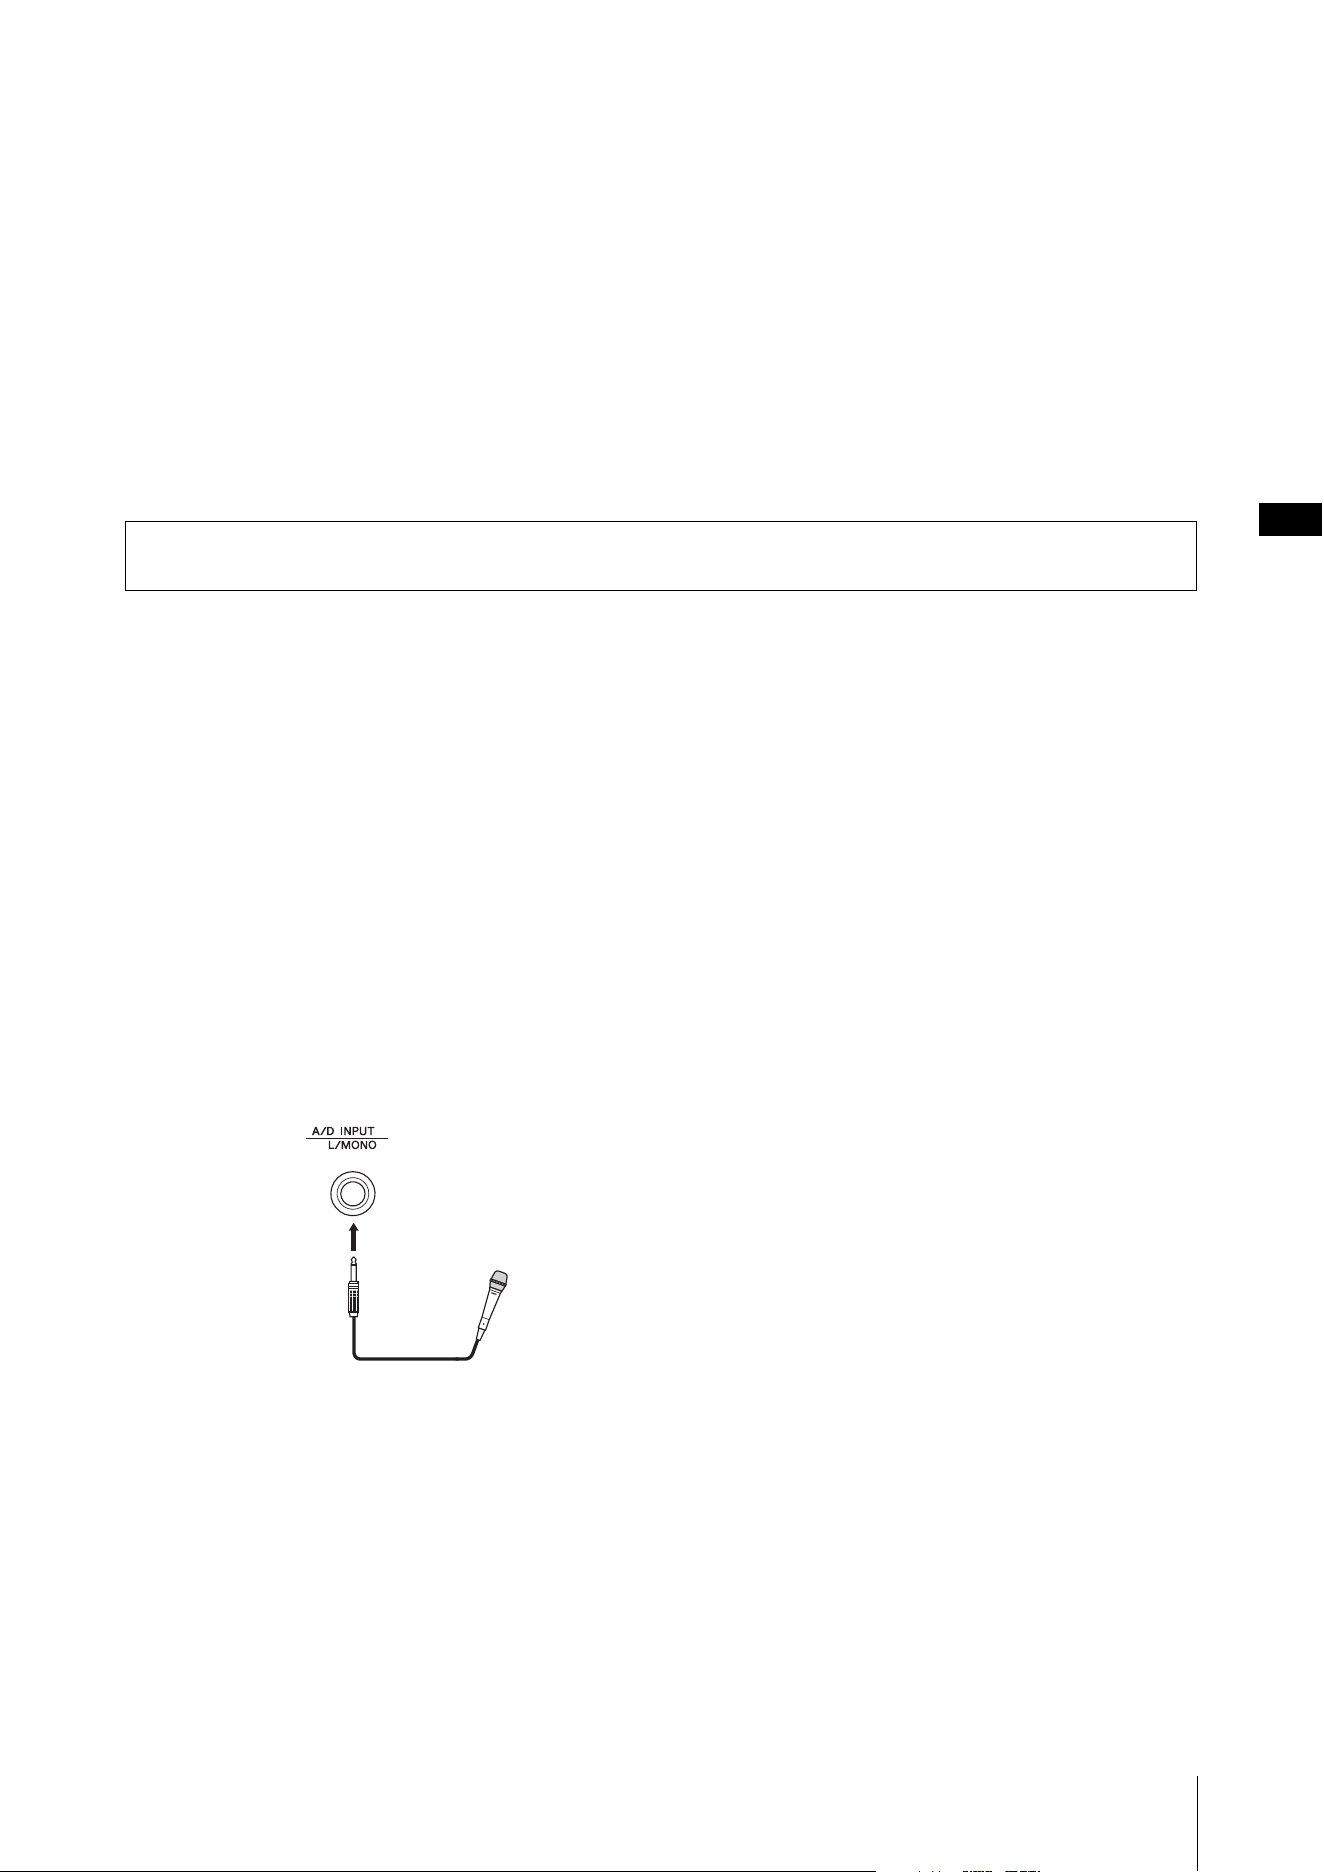
CK88 CK61 Owner’s Manual
25
2. Use the Encoder dial to select the desired
Live Set Sound number for saving to.
You can audition the Voice already saved to the
Live Set Sound number by playing the keyboard
before saving the new one.
NOTICE
• The settings will be overwritten if you select the same
number as an existing Live Set Sound.
• The settings currently editing will be lost if you select
a different Live Set Sound or turn off the power before
storing the settings.
3. Press the [ENTER] button to store.
When the store operation is complete, the message
“Completed” will appear and operation returns to
the Top screen.
If a different Live Set Sound Number was selected
when saving the currently editing Live Set Sound,
the Live Set Sound before the edit will be kept
unchanged in the original Live Set Sound Number.
NOTE
If you have accidentally changed to a different Live Set Sound
causing your edits to be lost, you can use the Edit Recall function
to recall the last edited status (page 40).
These powerful and convenient features for Live Set Sound let you apply effects to the audio input via A/D input or
play back an audio file while performing on the keyboard.
Applying effects to audio signals
from the A/D INPUT jacks
You can connect another electronic musical
instrument, guitar, or a microphone to the A/D INPUT
jacks, and apply dedicated effects to those external
audio sources.
Here, we’ll cover how to use a dynamic microphone.
1. Connect a dynamic mic to the A/D Input [L/
MONO] jack on the rear panel.
Example for a dynamic mic
2. Select Mic from the [MENU] button
General Audio A/D Input Type.
3. Press the [INPUT] button.
The A/D Input screen appears.
4. Select an effect type from the Input Effect1
or Input Effect2 TYPE.
This completes the setup.
Press the [STORE] button to save the A/D Input settings
to the Live Set Sound.
Playing back an audio file
While playing the Live Set Sound, you can play back an
audio file saved on a USB flash drive using a single key
on the keyboard.
1. Save the desired audio file (.wav) to the USB
flash drive from a computer.
The supported audio file is in .wav format (44.1 kHz,
16-bit, Stereo). Files of .wav format in 48-kHz or
mono cannot be played back on the CK.
2. Insert the USB flash drive to the USB [TO
DEVICE] terminal on the rear panel.
3. Select from the [SETTINGS] button
Function Audio Trigger.
4. Change the settings.
• Switch: Set to ON
• File: Select the audio file to play back
• Volume: Set the playback volume
• Key Assign: Select the rightmost key or the
leftmost key to start or stop playback.
• Play Mode: Sets the mode for playback
5. Press the key specified in Key Assign to start
playback at the desired timing.
Playback then starts.
Set the mode for playing back audio files from Play
Mode.
The Play Mode setting can be changed from the
[SETTINGS] button Function Audio Trigger
Play Mode (page 32).
Other Live Set Sound features
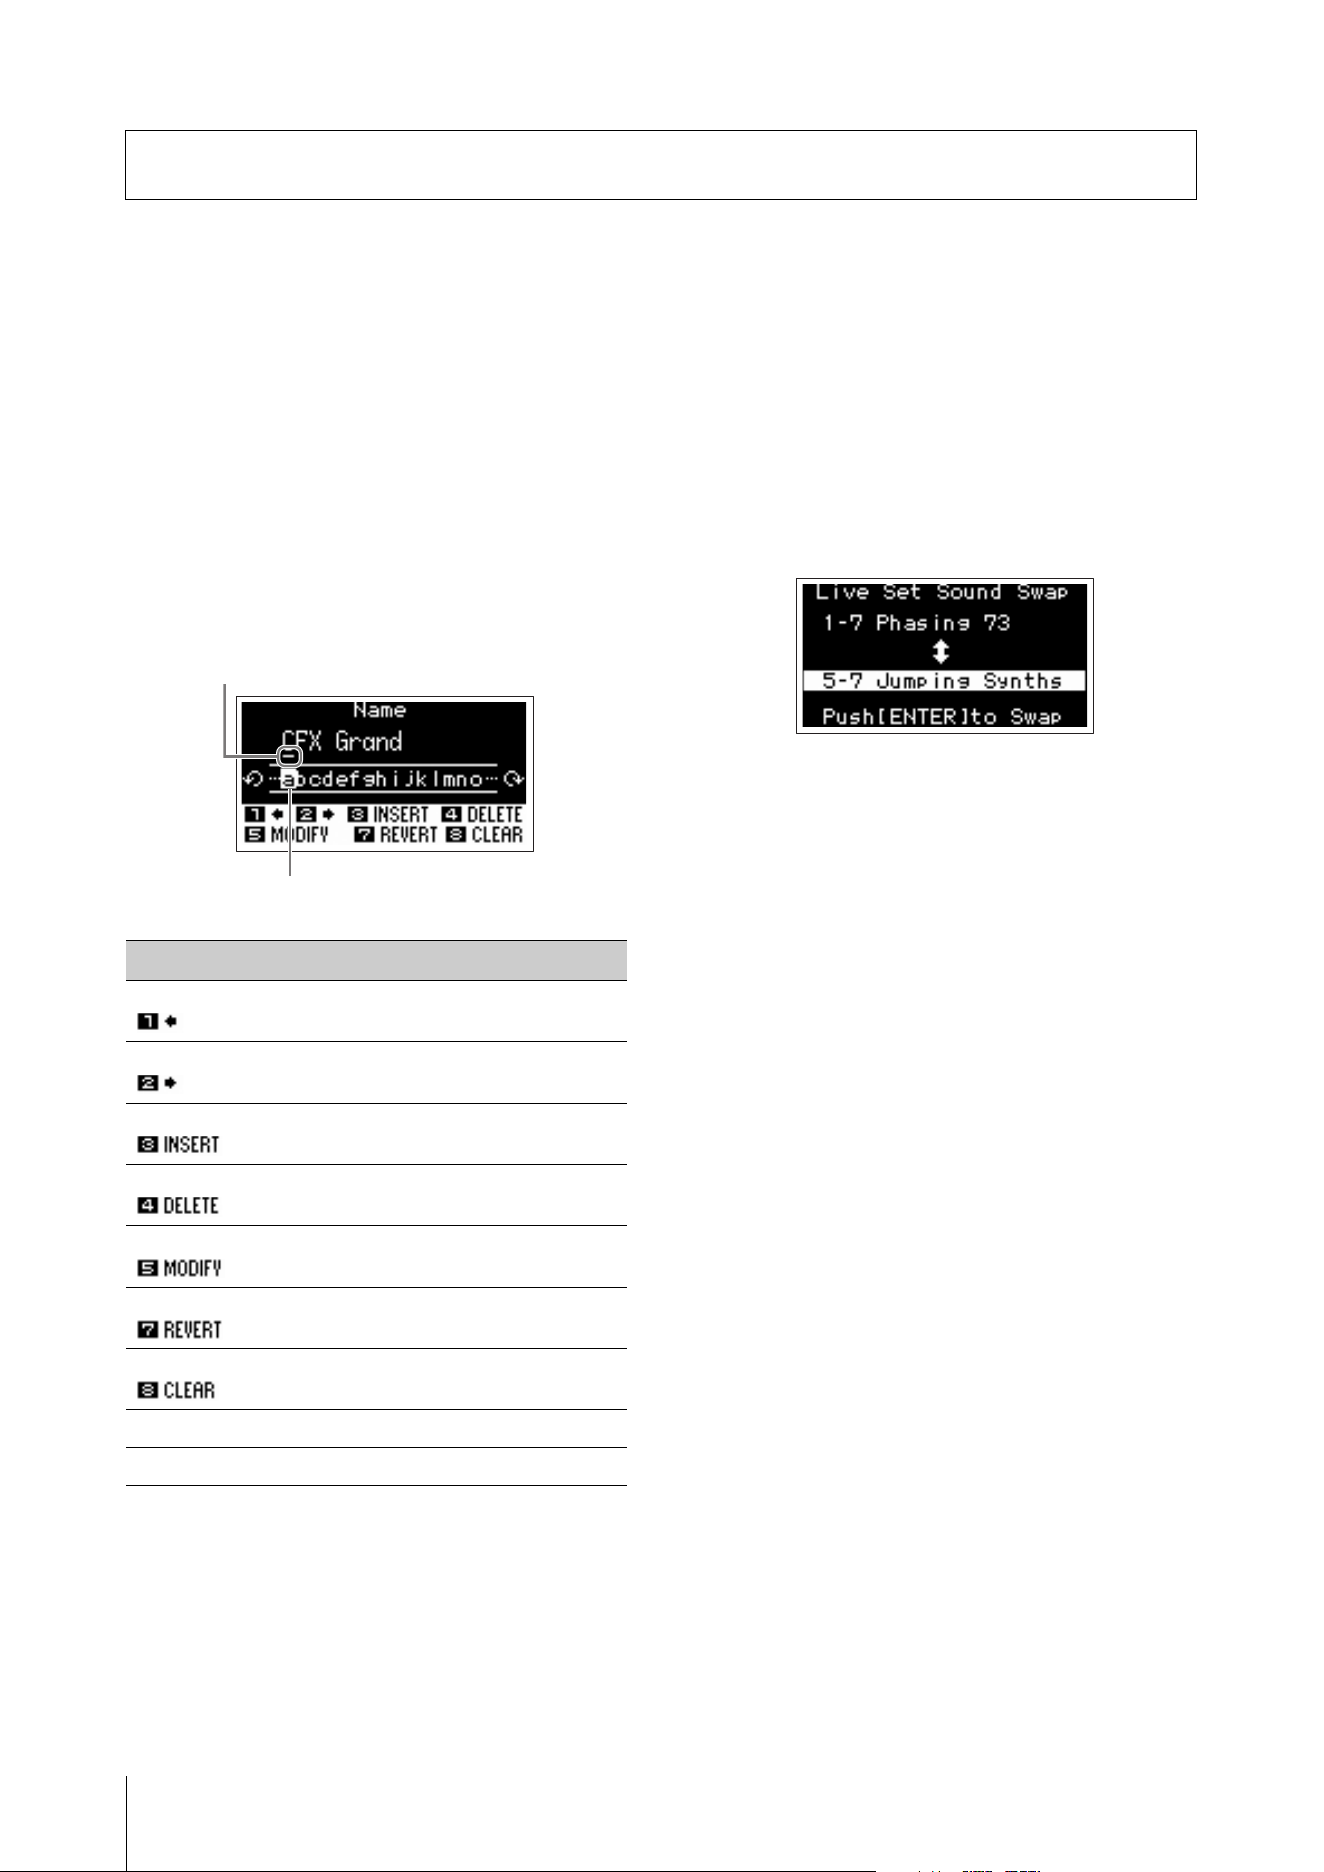
CK88 CK61 Owner’s Manual
26
Editing Live Set Sound names
Select the desired Live Set Sound for which you wish to
edit the name [SETTINGS] button Name Edit
the name [ENTER] button Select Store.
NOTE
If “Do not store now” is selected, the Live Set Sound will not be
stored, but the edited name will be retained.
Operations during name edit
Use the Live Set Sound [1] and [2] buttons to move the
cursor to the position of the character you wish to edit.
Use the VALUE buttons and Encoder dial to select
characters, and then use other buttons as listed below
to edit the name.
Swapping or copying Live Set
Sounds
1. Call up the Live Set Sound you want to swap
from or copy from.
2. Use the [MENU] button Job Live Set
Manager Swap or Copy.
3. Use the Encoder dial to select the desired
Live Set Sound to swap to or to copy to.
4. Press the [ENTER] button.
When the operation is completed, the message
“Completed” appears on the screen, and then
operation returns to the Top screen.
Initializing a Live Set Sound
When initializing a Live Set Sound, only Part A is
enabled (set to ON), and the first Voice in the Piano
category will be selected. All settings for Filters, EG,
and effects will be reset to their initial values.
1. Call up the Live Set Sound you want to
initialize.
2. Select from the [MENU] button Job
Live Set Manager Initialize.
3. Use the Encoder dial to select Live Set Sound
Init.
4. Press the [ENTER] button.
When initialization is complete, the message
“Completed” appears on the screen, and then
operation returns to the Top screen.
NOTE
If you want to reset the Live Set Sound to the default settings,
simultaneously press the [EXIT] and [SETTINGS] buttons (page 42).
This operation does not overwrite the stored Live Set Sound.
Managing Live Set Sounds
Buttons Functions
LIVE SET [1] Moves the cursor to left.
LIVE SET [2] Moves the cursor to right.
LIVE SET [3] Inserts a highlighted character at the cursor
position.
LIVE SET [4] Deletes the character at the cursor position.
LIVE SET [5] Changes the highlighted character at the
cursor position to the desired one.
LIVE SET [7] Reverts all characters to the unedited
name.
LIVE SET [8] Deletes all characters.
[ENTER] Saves the name and ends editing.
[EXIT] Ends editing without saving the name.
Cursor
Character selected for entry
Managing Live Set Sounds
CK88 CK61 Owner’s Manual
27
Saving the Live Set Sound to a
USB flash drive
The Live Set Sound stored in the internal memory of
the CK can be saved to a USB flash drive as a backup
file.
Before using a USB flash drive, be sure to read
“Precautions when using the USB [TO DEVICE]
terminal” (page 23).
1. Connect a USB flash drive to the USB [TO
DEVICE] terminal of the CK.
2. Select the [MENU] button File.
3. Select the type of file you wish to save.
4. Select Save and press the [ENTER] button to
call up the screen for selecting the
destination.
When saving as a new file
Select New File.
When overwriting an existing file
Select the desired file from the displayed list.
5. Press the [ENTER] button.
The Save *** File screen for editing file name
appears. For details on name editing operations,
see “Operations during name edit” (page 26).
6. Press the [ENTER] button to save.
When the save operation is complete, a
“Completed” message appears in the display, and
then operation returns to the Top screen.
Changing a previously saved
file name
[MENU] button File File Utility Rename
Select the desired file for which you wish to edit the
name Edit the name [ENTER] button to save the
file.
Loading a Live Set Sound from a
USB flash drive
For file types other than a Live Set Sound File, you can
select and load a single desired Live Set Sound
included in the file.
To do this, select Load Live Set Sound in step 6 to call up
the screen for selecting a specific Live Set Sound in the
file. Then select the desired Live Set Sound to load. The
setting is loaded into the currently selected Live Set
Sound number.
NOTICE
The Load operation overwrites the Live Set Sounds stored in
the CK. Important settings should always be saved to a USB
flash drive.
1. Connect a USB flash drive to the USB [TO
DEVICE] terminal of the CK.
2. Select the [MENU] button File.
3. Select the type of file you wish to load from
the USB flash drive.
4. Select Load and press the [ENTER] button.
5. Select the file in the USB flash drive.
To cancel the load operation, select Cancel and
press the [ENTER] button.
6. Select Load All or Load to *** and then press
the [ENTER] button.
When the load operation is complete a “Completed”
message appears in the display, and then operation
returns to the Top screen.
File type Description
Back Up File All Live Set Sounds including the
settings for the entire instrument.
Live Set All File All Live Set Pages.
Live Set Page File Currently selected Live Set Page.
Live Set Sound File Currently selected Live Set Sound.
File type Description
Back Up File
(Extension .Y1A)
All Live Set Sounds including the
settings for the entire instrument.
Live Set All File
(Extension .Y1L)
All Live Set Pages.
Live Set Page File
(Extension .Y1P)
One Live Set Page.
The file will be loaded to the
currently selected Live Set Page.
Live Set Sound File
(Extension .Y1S)
One Live Set Sound.
The file will be loaded to the
currently selected Live Set Sound.

CK88 CK61 Owner’s Manual
28
Live Set (SETTINGS button)
From the [SETTINGS] button, you can configure and store the various settings of the currently selected Live Set
Sound. After editing, make sure to save the settings by pressing the [STORE] button.
The changes made here will be stored to the Live Set Sound.
Operation
1. Press the [SETTINGS] button.
2. Use the VALUE buttons and Encoder dial to select an item, and then press the [ENTER] button.
NOTE
You can also use the LIVE SET buttons [1] to [6] to select the item. The LIVE SET buttons [1] to [6] correspond to the items shown on the display
in order from the top. The buttons light up when this feature is available.
3. Use the VALUE buttons or Encoder dial to change the value, and then press the [ENTER] button.
When the setting has been changed, the operation goes back to the previous screen for selecting the settings
item.
Sound
Advanced settings
Function name Description
Part A
Part B
Part C
Mono/
Portamento
Mono/Poly
Selects whether to play the Part as monophonic (Mono) or polyphonic (Poly).
Default:
Poly
Type
Determines how the portamento effect is used depending on how you play
the keys.
• Normal: The normal mono sound is played. Portamento is not used.
• Fingered: Portamento is used only when you play legato (playing a key while
still holding the previous key).
• Full-time: Portamento is always used.
Default:
Normal
Portamento Time
Determines the speed or time that takes for the portamento pitch change.
Settings:
0–127
Portamento Time Mode
Determines the time standard for portamento pitch change.
• Rate: The pitch changes at the specified speed.
• Time: The pitch changes over the specified time.
Default:
Rate
Unison Switch
Enables or disables the Unison function.
Type
Selects a Unison type.
• Multi Layer: The Part sound played on the keyboard is layered
• Harmonics: The Part sound played on the keyboard is layered at one octave
higher
• Sub Harmonics: The Part sound played on the keyboard is layered at one
octave lower
Default:
Multi Layer
Volume
Adjusts the Part volume layered with the Unison function.
Settings:
0–127
Detune
Sets the amount of detuning between the Parts layered with the Unison
function. By layering the detuned sounds, you can achieve a chorus-like effect.
Settings:
0–127
Advanced settings
CK88 CK61 Owner’s Manual
29
Part A
Part B
Part C
Note Shift
Shifts the keyboard pitch in semitones.
Settings:
−24–+0–+24
Default: +0
NOTE
The value is not transmitted as a MIDI message.
Modulation P.Mod Depth
Pitch Modulation cyclically changes the pitch. P.Mod Depth determines the
pitch modulation depth.
Settings:
0–127
F.Mod Depth
Filter Modulation cyclically changes the cutoff frequency. F.Mod Depth
determines the filter modulation depth.
Settings:
0–127
A.Mod Depth
Amplitude Modulation cyclically changes the volume. A.Mod Depth
determines the amplitude modulation depth.
Settings:
0–127
Modulation Speed
Determines the modulation speed. This setting is applied commonly to P. M o d ,
F. Mo d, and A.Mod.
Settings:
−64–+0–+63
Touch
Sensitivity
Depth
Determines the degree to which the resulting volume of the tone generator
responds to your playing strength. The higher the value, the more the volume
changes in response to your playing strength (as shown below).
Settings:
0–127
Function name Description
127
0
127
When Offset (below) is set to 64
Actual resulting
velocity (affecting
the tone generator)
Velocity with which you play a note
Depth = 127
Depth = 64
Depth = 32
Depth = 0
Advanced settings
CK88 CK61 Owner’s Manual
30
Part A
Part B
Part C
Touch
Sensitivity
Offset
Determines the amount by which played velocities are adjusted for the actual
resulting velocity effect. This lets you raise or lower all velocities based on this
setting value—allowing you to automatically compensate for playing too
strongly or too softly. However, because of automatic compensation, the value
will be set to 1 when the result is smaller than 1, and the value will be set to
127 when the result is larger than 127.
Settings:
0–127
Common Transpose
Changes the pitch up or down in semitones.
Settings:
−12–+12
Default: +0
NOTE
This setting does not affect MIDI output messages.
Layer/Split Mode
Selects the combination of Layer and Split.
You can also use the [SPLIT] button for this setting.
Settings:
ABC, A/BC, AB/C, A/B/C
Default: ABC
Split Point
Sets the Split Point or the lowest note on the right keyboard range using a
note name.
When using the split mode A/B/C, two Split Points are needed.
You can also use the [SPLIT] button to set the split point.
Settings:
C#-2–G8
Default: G2
C3 is MIDI note number 60.
Live Set EQ Mode SW
Turns the Live Set EQ Mode on/off.
Default:
Off
EQ Settings
Sets the EQ for the Live Set Sound.
High Gain
Sets the gain for the high band.
Settings:
−12 dB–0–+12 dB
High Frequency
Sets the frequency for the high band.
Settings:
500 Hz–16 kHz
Function name Description
127
012764
127
64
127
0
12764
127
0
When Depth = 64
and Offset = 32
Actual resulting
velocity (affecting
the tone generator)
Velocity with which you play a note
Actual resulting
velocity (affecting
the tone generator)
Velocity with which you play a note
Actual resulting
velocity (affecting
the tone generator)
Velocity with which you play a note
When Depth = 64
and Offset = 64
When Depth = 64
and Offset = 96
Advanced settings
CK88 CK61 Owner’s Manual
31
Controllers
Common Live Set EQ EQ
Settings
Mid Gain
Sets the gain for the mid-band.
Settings:
−12 dB–0–+12 dB
Mid Frequency
Sets the frequency for the mid-band.
Settings:
100 Hz–10 kHz
Low Gain
Sets the gain for the low band.
Settings:
−12 dB–0–+12 dB
Low Frequency
Sets the frequency for the low band.
Settings:
32 Hz–2.0 kHz
Tempo Delay Time
When Tempo Delay is selected for Delay, this sets the delay time in note lengths
to match the tempo.
Settings:
1/32 Tri.–1/2
Default: 1/4
NOTE
The tempo should be set with the [TIME] knob or with Tap Tempo using the [ENTER]
button.
Function name Description
Pitch Bend Range Part A
Determines the pitch bend range in semitones.
Settings:
−24–+0–+24
Default: +2
Part B
Part C
Mod Wheel Assign
Determines the function to be assigned to the Modulation wheel.
You can assign the Modulation wheel to Control Change numbers 1 to 119 or the
USB Audio volume.
Settings:
Off, 1–119, USB Audio Volume
Default: 1 (Modulation)
Foot Pedal 1
Foot Pedal 2
Assign
Determines the Control Change number to be assigned to a pedal connected to
the FOOT PEDAL jack.
You can assign each Foot Pedal to Control Change numbers 1 to 119, or to control
the USB Audio volume.
Settings:
Off, 1–119, USB Audio Volume
Default:
Foot Pedal 1: 64 (Sustain)
Foot Pedal 2: 11 (Expression)
Limit Low
Determines the lowest value for the foot controller (FC7) connected to the FOOT
PEDAL jack.
Settings:
0–127
Default: 0
Limit High
Determines the highest value for the foot controller (FC7) connected to the FOOT
PEDAL jack.
Settings:
0–127
Default: 127
Receive SW Expression Part A
Part B
Part C
Determines whether each Part receives (On) or ignores (Off) the corresponding
MIDI messages received from external devices or the messages generated by
operating the footswitch or foot controller.
Default:
On
Sustain
Sostenuto
Soft
Function name Description
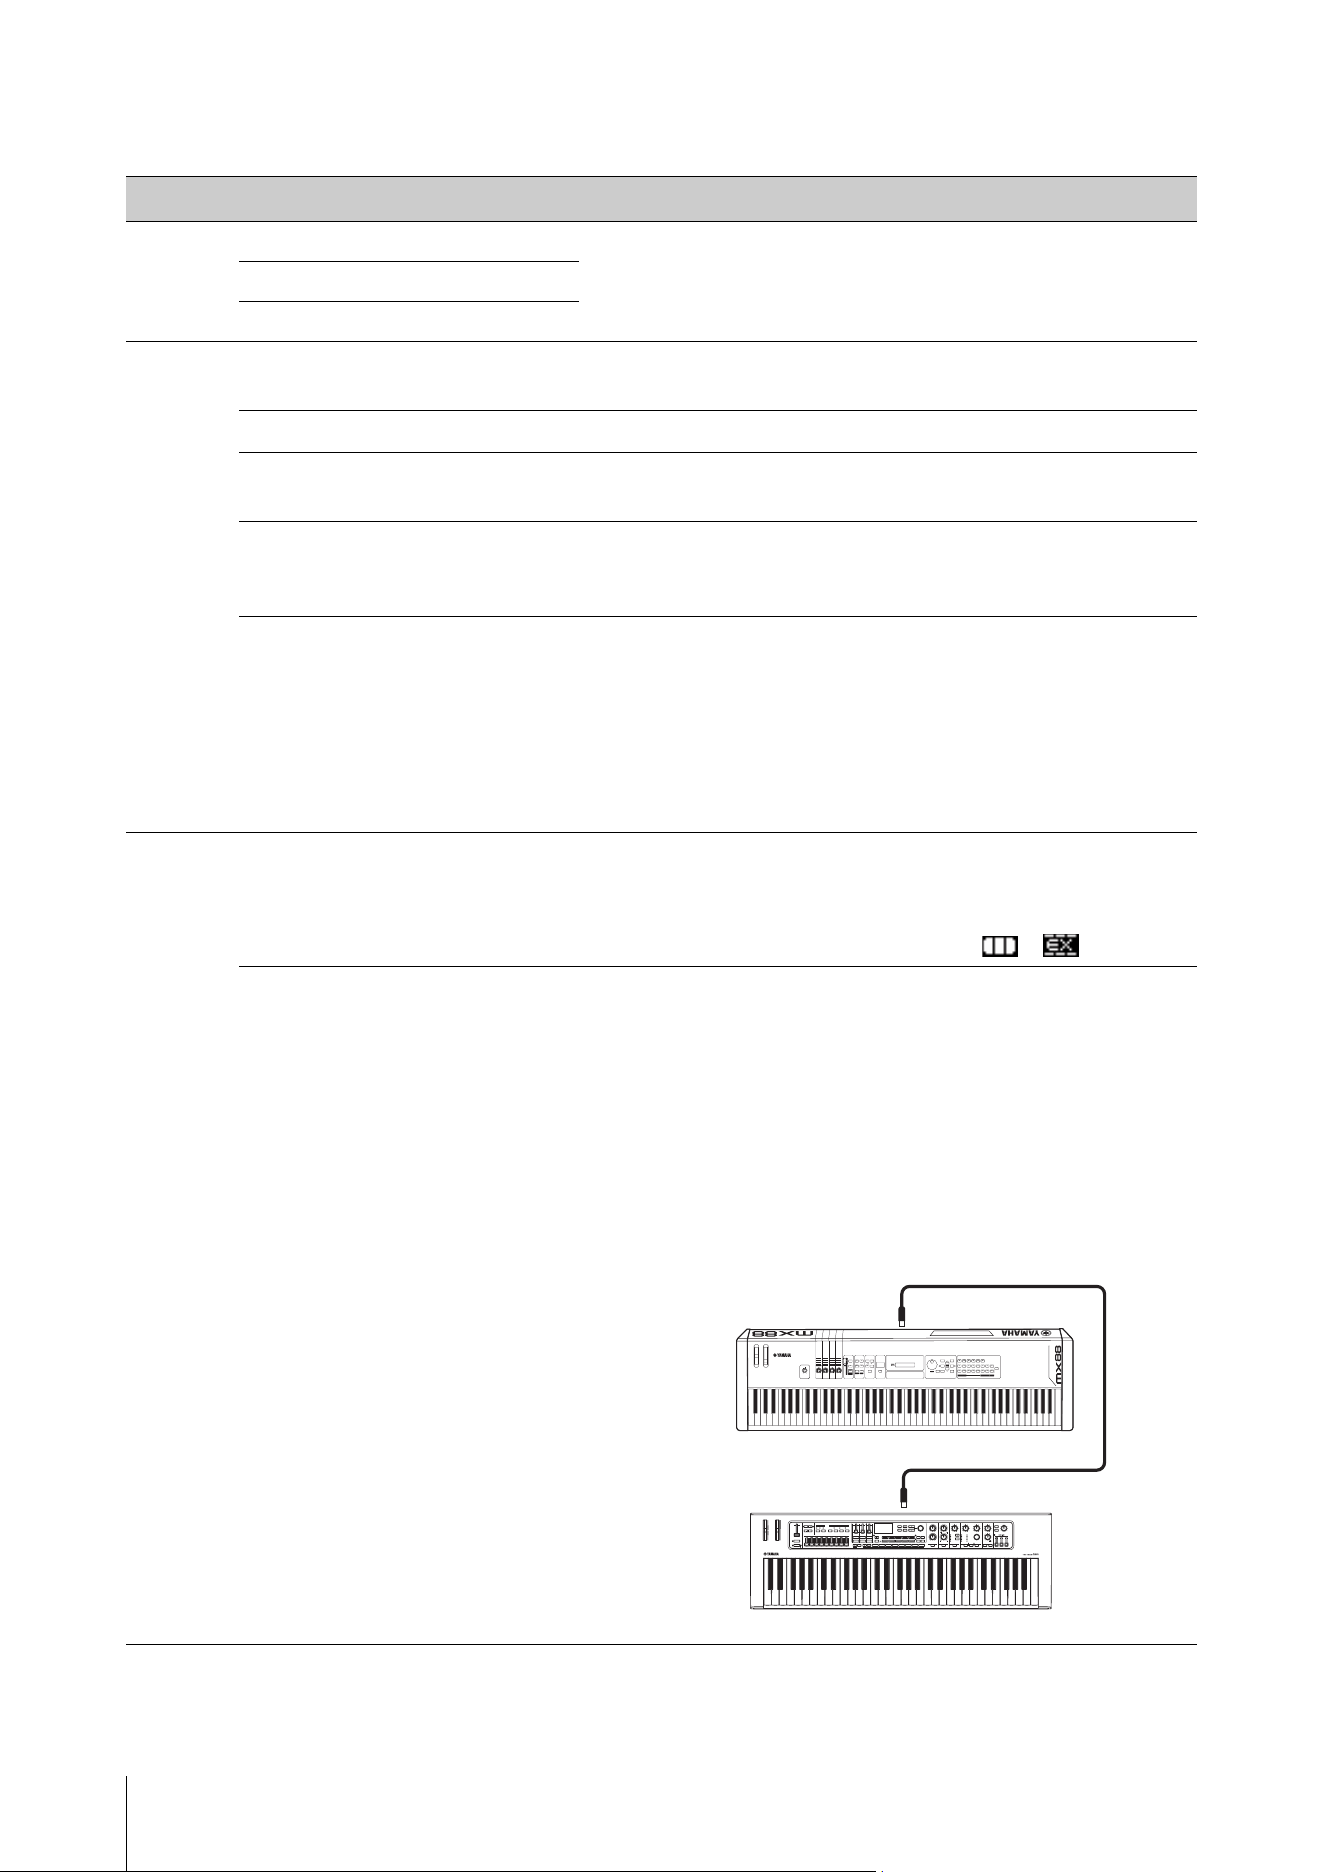
Advanced settings
CK88 CK61 Owner’s Manual
32
Function
Function name Description
Part Color Part A
Sets the LED color for the Part.
Settings:
Red, Orange, Yel low, Lime, Green, Spring, Cyan, Azure, Blue, Violet, Magenta,
Rose
Part B
Part C
Audio
Trigger
Switch
Switches the Audio Trigger function.
Default:
Off
File
Selects the audio file to use with the Audio Trigger function.
Volume
Sets the playback volume for the audio file.
Settings:
0–127
Key Assign
Selects the key for starting playback of the audio file.
Settings:
Lowest, Highest
Default: Highest
Play Mode
Sets the playback mode for the audio file.
• One Shot: Plays back the audio file from the beginning every time the key is
pressed.
• Play/Stop: Starts or stops the playback of the audio file each time the key is
pressed. The playback starts from the beginning of the file.
• Play/Pause: Starts or pauses the playback of the audio file each time the key is
pressed. The playback resumes from the paused place.
Default:
One Shot
External
Keyboard
Determines how the Parts are played when the CK receives performance information (key-on, key-off) MIDI messages from an
external MIDI device. You can set up the CK with an external keyboard like a two-manual organ, or set up only a specific Part to
play from the external keyboard.
NOTE
For Parts that are played only from an external keyboard, the Split setting shown on the Top screen changes from to .
Part A
Part B
Part C
• Ext+Int: Internal tone generator plays sounds with both key-on signals received
from an external MIDI device and performance on the CK’s keyboard.
• ExtOnly: Internal tone generator plays sounds only for key-on signals received
from an external MIDI device. No sound is played when the keyboard on the CK
is played.
• Off: Internal tone generator does not play sounds for key-on signals received
from an external MIDI device. Sound is played only when the keyboard on the
CK is played.
Default:
Ext+Int
Connection example (for setting up the piano for Part A on the
CK61 to be played only on the MX88)
Part A = ExtOnly, Part B = Off, Part C = Off
CK61
MX88
MIDI [IN] terminal
MIDI [OUT] terminal

Advanced settings
CK88 CK61 Owner’s Manual
33
Master
Keyboard
This function is for using the CK as a master keyboard. It allows you to assign different areas of the keyboard to up to four zones,
each of which can control a separate tone generator. For example, you can make a Live Set Sound combining Voices from both
the CK and the connected external tone generators, or a Live Set Sound composed entirely with Voices of external tone
generators.
Example for combining the internal tone generator and Zones 1 to 3
Mode SW
Switches the Master Keyboard mode. When On is selected, the Master Keyboard
mode is enabled, and the indication appears on the Top screen.
Default:
Off
Advanced Zone SW
Changes the settings shown for Master Keyboard mode. When On is selected, the
items with an asterisk (*) will be shown on the display.
Default:
Off
Zone
Settings
Zone1
Zone2
Zone3
Zone4
Zone Switch
Determines whether to enable (On) or disable (Off) the zone.
Default:
Zone 1 = On, Zone 2–4 = Off
Tx Channel
Determines the MIDI transmit channel for the zone.
Settings:
1–16
Default: Zone 1 = 1, Zone 2 = 2, Zone 3 = 3, Zone 4 = 4
Octave Shift
Shifts the pitch of the zone in octaves.
Settings:
−3–+3
Default: +0
Transpose
Changes the pitch of the zone in semitones.
Settings:
−11–+11
Default: +0
Note Limit
Low
Sets the lowest key in the zone.
Default:
C−2
Note Limit
High
Sets the highest key in the zone.
Default:
G8
Bank MSB *
Determines the Bank Select MSB sent as a MIDI message to the external tone
generator played by the zone.
Default:
0
Bank LSB *
Determines the Bank Select LSB sent as a MIDI message to the external tone
generator played by the zone.
Default:
0
Function name Description
Internal
tone
generator
External
tone
generator
(Zone)
Zone 1
Zone 2
Zone 3

Advanced settings
CK88 CK61 Owner’s Manual
34
Master
Keyboard
Zone
Settings
Zone1
Zone2
Zone3
Zone4
Program
Change *
Determines the Program Change Number sent as a MIDI message to the external
tone generator played by the zone.
Default:
1
Volume *
Determines the volume sent as a MIDI message to the external tone generator
played by the zone.
Default:
100
Pan *
Determines the panning sent as a MIDI message to the external tone generator
played by the zone.
Default:
C
Tx SW Note *
Determines whether to transmit (On) or not transmit (Off) MIDI note messages to
the external tone generator played by the zone.
Default:
On
Tx SW Bank *
Determines whether to transmit (On) or not transmit (Off) MIDI Bank Select
messages to the external tone generator played by the zone.
Default:
On
Tx SW
Program *
Determines whether to transmit (On) or not transmit (Off) MIDI Program Change
messages to the external tone generator played by the zone.
Default:
On
Tx SW
Volume *
Determines whether to transmit (On) or not transmit (Off) MIDI volume messages
to the external tone generator played by the zone.
Default:
On
Tx SW Pan *
Determines whether to transmit (On) or not transmit (Off) MIDI Pan messages to
the external tone generator played by the zone.
Default:
On
Tx SW PB *
Determines whether to transmit (On) or not transmit (Off) MIDI Pitch Bend
messages to the external tone generator played by the zone.
Default:
On
Tx SW Mod *
Determines whether to transmit (On) or not transmit (Off) MIDI Modulation
messages to the external tone generator played by the zone.
Default:
On
Tx SW Foot
Pedal 1 *
Determines whether to transmit (On) or not transmit (Off) MIDI messages for
FOOT PEDAL [1] to the external tone generator played by the zone.
Default:
On
Tx SW Foot
Pedal 2 *
Determines whether to transmit (On) or not transmit (Off) MIDI messages for
FOOT PEDAL [2] to the external tone generator played by the zone.
Default:
On
Function name Description
Advanced settings
CK88 CK61 Owner’s Manual
35
A/D Input
Name
Determines the name of a Live Set Sound. For details on editing Live Set Sound names, see Editing Live Set Sound
names (page 26).
To store the edited Live Set Sound names, you’ll need to use the Store operation (page 10).
Function name Description
Volume
Adjusts the volume of the audio signal input from the A/D INPUT jack for the Live Set
Sound.
NOTE
Adjust the overall volume with the A/D INPUT [GAIN] knob.
Settings: 0–127
Input Effect 1
Input Effect 2
Type
Selects the type of Effect applied to the audio.
Settings:
Thru, Effect type (see “Effect list” on page 43)
Default: Thru
Depth
Adjusts the depth of the Effect applied to the audio.
Settings:
0–127
Rate
Adjusts the rate of Effect applied to the audio.
Settings:
0–127
Input EQ
Sets the 3-band EQ for the audio.
High Gain
Sets the signal level for the high band.
Settings:
−12 dB–0–+12 dB
High Frequency
Sets the frequency for the high band.
Settings:
500 Hz–16 kHz
Mid Gain
Sets the signal level for the mid-band.
Settings:
−12dB–0–+12dB
Mid Frequency
Sets the frequency for the mid-band.
Settings:
100 Hz–10 kHz
Low Gain
Sets the signal level for the low band.
Settings:
−12 dB–0–+12 dB
Low Frequency
Sets the frequency for the low band.
Settings:
32 Hz–2.0 kHz
Noise Gate Switch
Turns the noise gate for the audio on/off.
Settings:
Off, On
Default: Off
Threshold
Sets the threshold for the noise gate for the audio.
Settings:
−73 dB–−30 dB
Default: −45 dB

Advanced settings
CK88 CK61 Owner’s Manual
36
Entire instrument (MENU button)
From the [MENU] button, you can configure various parameters and functions that affect the entire instrument.
The changes made here will be stored in the CK.
NOTICE
After the value has been changed, the setting will be saved when the operation goes back to the Top screen.
Changes will not be saved if the CK has been turned off before the operation has gone back to the Top screen.
Operation
1. Press the [MENU] button.
2. Use the VALUE buttons and Encoder dial to select an item, and then press the [ENTER] button.
NOTE
You can also use the LIVE SET buttons [1] to [6] to select the item. The LIVE SET buttons [1] to [6] correspond to the items shown on the display
in order from the top. The buttons light up when this feature is available.
3. Use the VALUE buttons and Encoder dial to change the value, and then press the [ENTER] button.
When the setting has been changed, the operation goes back to the previous screen for selecting the menu item.
General
Function name Description
System Master Tune
Determines the tuning for the entire instrument.
Settings:
414.72 Hz–466.78 Hz
Default: 440.00 Hz
Master EQ
Sets the Master EQ.
High Frequency
Sets the frequency for the high band.
Settings:
500 Hz–16 kHz
Mid Frequency
Sets the frequency for the mid-band.
Settings:
100 Hz–10 kHz
Low Frequency
Sets the frequency for the low band.
Settings:
32 Hz–2.0 kHz
Speaker Speaker EQ
Selects the optimal sound quality of the built-in speakers for setting the CK on a
keyboard stand where the bottom of the CK is open (Normal) or for setting on the table
where the bottom of the CK is covered (Tabl e).
Settings:
Normal, Ta bl e
Default: Normal
Speaker Mute
Selects to mute the built-in speakers automatically (Auto) or to mute the built-in
speakers manually using the SPEAKERS switch (Manual) when the headphones are
connected.
Settings:
Auto, Manual
Default: Auto
Auto Power Off
Switches the Auto Power Off function setting.
• Disable: The CK is not automatically turned off.
• Enable: The CK is turned off automatically after being inactive for 15 minutes.
• Auto: The Auto Power Off function is disabled while the AC adaptor is being used, and
enabled while batteries are being used.
Default:
Auto
Power On Sound
Selects which Live Set Sound is automatically called up when the CK is turned on.
Default:
1-1

Advanced settings
CK88 CK61 Owner’s Manual
37
MIDI MIDI Port MIDI
Determines whether to use the MIDI terminals for transmitting or receiving MIDI
messages with the internal tone generator.
• On: Used as Port 1 (transmit or receive MIDI messages with the internal tone
generator).
• O: Used as Port 2 (USB-MIDI interface).
In this case, MIDI messages received by the MIDI [IN] terminal are sent to USB Port 2
(MIDI OUT 2). MIDI messages received by the USB Port 2 (MIDI IN 2) are sent to the
MIDI [OUT] terminal.
Default:
On
USB
Determines whether to use (On) the USB [TO HOST] terminal for transmission/
reception of MIDI messages, or not (Off).
Default:
On
MIDI
Channel
Transmit
Determines the MIDI transmit channel. When this is set to Off, MIDI messages are not
transmitted.
Settings:
1–16, Off
Default: 1
Receive
Determines the MIDI receive channel. When this is set to All, MIDI messages will be
received over all channels.
Settings:
1–16, All
Default: 1
MIDI Control
Sets the MIDI control message to be sent out when using knobs and sliders on the front
panel. For MIDI Control, the keyboard, Pitch Bend, Modulation, and pedals are excluded.
• On: MIDI messages are transmitted when the corresponding controllers such as
knobs and sliders are used, allowing you to use a DAW and external MIDI devices to
receive and record the operation information.
• Off: MIDI messages are not transmitted when the corresponding controllers are used.
Default:
Off
NOTE
• When MIDI messages corresponding to knobs and sliders are received from the DAW, the settings
for those knobs and sliders are changed.
• The MIDI message assignment for each knob or the slider is fixed. If you want to control the
parameters in the DAW from the knobs and sliders on the CK, set up the computer to receive
messages from the knobs and sliders. For details on MIDI messages, see page 54.
Local Control
Determines whether Local Control is on or off.
When this is set to Off, the CK’s tone generator is disconnected from the keyboard, and
no sound will be produced when the keyboard is played. However, regardless of the
setting here, performance information from the CK’s keyboard is transmitted as MIDI
messages, and the CK’s tone generator will continue to produce sound in response to
the MIDI messages received from MIDI input, depending on the MIDI settings.
Default:
On
Controller Reset
Determines whether to keep (Hold) or initialize (Reset) the values of controllers (such as
Modulation wheel and Foot Controller) when switching to a different Live Set Sound.
When this is set to Reset, the controllers are reset to the default as shown below when
switching to a different Live Set Sound.
•Pitch Bend: Center
•Modulation: Minimum
• Expression: Maximum
• Pedal Wah: Minimum
Default:
Reset
Function name Description
Advanced settings
CK88 CK61 Owner’s Manual
38
MIDI Advanced Device Number
Determines the MIDI device number. The device number of the CK must match the
device number of the external MIDI device when transmitting or receiving Bulk Dump,
Parameter Changes, or other System Exclusive messages.
Settings:
1–16, All, Off
Default: All
Control Delay
Adjusts the transmission timing for MIDI control messages transmitted when switching
to a different Live Set Sound. Adjust the setting when the application on your
computer does not receive messages correctly.
Settings:
0–1500 msec
Default: 0 msec
Tx/Rx Pgm
Change
Determines whether transmission/reception of Program Change messages between
the CK and external MIDI devices is enabled (On) or disabled (Off).
Default:
On
Tx/Rx Bank
Select
Determines whether transmission/reception of Bank Select messages between the CK
and external MIDI devices is enabled (On) or disabled (Off).
Default:
On
Audio Output Gain
Adjusts the overall final output level of the CK.
Settings:
−24 dB–+0 dB–+24 dB
Default: +0 dB
A/D Input Type
Selects a line input (Line) or a dynamic mic (Mic) for use as the input source from the
A/D INPUT jack.
Default:
Line
USB Audio Volume
Determines the volume of the USB Audio input.
Settings:
0–127
Default: 64
USB Audio Loopback
Determines whether to mix the USB Audio input to the USB Audio Output (On) or not
(Off).
Default:
Off
Control
Panel
Panel Lock
Settings
Live Set
When the Panel Lock function is enabled, this allows you to set Panel Lock for specific
functions/operations on or off.
Default:
On
Organ
Filter/EG
Drive/Effect
Delay/Reverb
Equalizer
Display Value Indication
Determines whether to show (On) or not show (Off) the values on the display (LCD)
when the values for the controllers of each Part are changed.
Default:
On
LCD Switch
Determines whether to show (On) or not show (Off) the Top screen on the display
(LCD).
The MENU and SETTINGS screens are always shown on the display regardless of the
settings selected here.
Default:
On
LCD Contrast
Adjusts the contrast of the Display (LCD).
Settings:
-10–+10
Default: +0
Function name Description

Advanced settings
CK88 CK61 Owner’s Manual
39
Control
Panel
Controller Mode
Sets the conditions for a controller position to be reflected when the controllers’ actual
position and values called up with the LIVE SET [1] to [8] buttons do not match.
• Jump: The position of a controller is reflected immediately when that controller is
moved.
• Catch: The current setting will be held until the controller’s position matches (catches)
values called up with the LIVE SET [1] to [8] buttons. Once the values have matched,
the controller’s position will be reflected.
Default:
Jump
Filter/EG Reset
Determines whether to reset (On) or maintain without resetting (Off) the EG and FILTER
parameters when a Voice for the Part has been changed.
Default:
On
Effect On/Off Reset
Determines whether to reset (On) or maintain without resetting (Off) the Effect
parameters when a Voice for the Part has been changed.
Default:
On
Keyboard Touch Curve
Determines how actual velocities will be generated according to the strength with
which you play notes on the keyboard.
• Normal: This linear “curve” produces one-to-one correspondence between the
strength of your keyboard playing (velocity) and the actual sound change.
• Soft: This curve provides an increased response, especially for lower velocities.
• Hard: This curve provides an overall decreased response, especially for higher
velocities, meaning that greater strength is needed to produce louder sound.
• Wide: This curve accentuates your playing strength by producing lower velocities in
response to softer playing and louder velocities in response to harder playing. As
such, you can use this setting to expand your dynamic range.
• Fixed: This setting produces the same amount of sound change, no matter what your
playing strength. The velocity of the notes you play is fixed at the value set here.
Default:
Normal
Fixed Velocity
When Touch Curve above is set to Fixed, this lets you set the desired fixed velocity,
letting you keep the same, regardless of how hard or soft you play the keyboard.
Settings:
1–127
Default: 64
Foot Pedal Pedal 1
Pedal 2
Pedal Type
Sets the type of pedal connected to the FOOT PEDAL [1] jack or the FOOT PEDAL [2]
jack. Select FC3A (HalfOn) when using a Half Damper pedal.
Settings:
FC3A (HalfOn), FC3A (HalfOff), FC4A/FC5, FC7
Default:
Pedal 1: FC3A (HalfOn)
Pedal 2: FC7
Live Set Inc/Dec
Sets the type of operation for using the pedals connected to the FOOT PEDAL [1] jack or
the FOOT PEDAL [2] jack.
• Off: Operates the control change assigned to the Live Set Sound.
• Live Set Inc: Selects the next Live Set Sound when operating the pedal.
• Live Set Dec: Select the previous Live Set Sound when operating the pedal.
Default:
Off
Function name Description
Advanced settings
CK88 CK61 Owner’s Manual
40
Job
Function name Description
Live Set
Manager
Swap
Swaps the currently selected Live Set Sound with another user-specified Live Set
Sound.
Copy
Copies the currently selected Live Set Sound to another user-specified Live Set Sound.
Initialize
Resets all parameters of the currently selected Live Set Sound to their defaults.
Part/Effect
Manager
Copy Part A
Copies the Part A settings of the Live Set Sound.
Part B
Copies the Part B settings of the Live Set Sound.
Part C
Copies the Part C settings of the Live Set Sound.
Delay
Copies the Delay settings of the Live Set Sound.
Reverb
Copies the Reverb settings of the Live Set Sound.
Paste Part A
Pastes the copied settings. The paste function cannot be used when nothing has been
copied.
Part B
Part C
Delay
Reverb
Swap Part Part A B
Swaps the Part A settings and the Part B settings of the Live Set Sound.
Part B C
Swaps the Part B settings and the Part C settings of the Live Set Sound.
Part C A
Swaps the Part C settings and the Part A settings of the Live Set Sound.
Swap
EFFECT 1/2
Part A
Swaps the EFFECT 1 settings and the EFFECT 2 settings of a specified Part in the Live Set
Sound.
Part B
Part C
Edit Recall
Recalls the last edited but not yet stored Live Set Sound settings. If, while editing a Live
Set Sound, you select a different Live Set Sound and then return to the one currently
being edited, the latest stored version will be called up instead of the current one. If this
occurs, use this function to restore the Live Set Sound setting you are currently editing.
NOTICE
The latest edited Live Set Sound will be lost when the CK is turned off.
Menu Initialize
Resets the settings of MENU screens to the default values.
Factory Reset
Restores the CK including all Live Set Sounds to its factory default.
Advanced settings
CK88 CK61 Owner’s Manual
41
File
* You can load a single Live Set Sound you choose from a file containing multiple Live Set Sounds such as Backup file, Live Set All file, and Live Set
Page file.
Bluetooth
*1 When the Switch is set to Off, Volume and Pairing will be hidden.
Version Info
Shows the version of the CK’s firmware.
Function name Description
Back Up File Save
Saves all the Live Set settings and other settings for the entire instrument stored in the CK to a USB
flash drive as a backup file (with the extension .Y1A).
Load (*)
Loads the settings to the CK from a backup file saved on a USB flash drive.
Live Set All File Save
Saves all the Live Set settings stored in the CK to a USB flash drive as a Live Set All File (with the
extension .Y1L).
Load (*)
Loads the settings to the CK from a Live Set All File saved on a USB flash drive.
Live Set Page File Save
Saves the currently selected Live Set Page stored in the CK to a USB flash drive as a Live Set Page File
(with the extension .Y1P).
Load (*)
Loads the settings to the CK from a Live Set Page File saved on a USB flash drive.
Live Set Sound File Save
Saves the currently selected Live Set Sound stored in the CK to a USB flash drive as a Live Set Sound
File (with the extension .Y1S).
Load
Loads the settings to the CK from a Live Set Sound File saved on a USB flash drive.
File Utility Rename
Changes the name of a file in a USB flash drive.
Delete
Deletes a file in a USB flash drive.
Format
Formats (initializes) a USB flash drive. Formatting is required when using a new USB flash drive.
NOTICE
When a USB flash drive is formatted, all of its content will be deleted. Make sure before formatting
that the USB flash drive contains no irreplaceable data.
Function name Description
Switch
Switches the Bluetooth function on/off.
Settings:
Off, On
Default: Off
Volume
*1
Adjusts the Bluetooth audio volume.
Settings:
0–127
Default: 64
Pairing
*1
Pairs with the Bluetooth-equipped device.
Advanced settings
CK88 CK61 Owner’s Manual
42
Shortcut operations
By using the buttons or knob, while holding down the [ENTER] button, you can use the shortcut operations to access
the functions in the Live Set Sound SETTINGS.
When using Tempo Delay for DELAY
Locations Operations Descriptions
Transpose &
Octave
[ENTER] button + TRANSPOSE [−] button Transposes the pitch of the keyboard up or down in semitones.
This operation is the same as Sound Transpose.
NOTE
The value is not transmitted as a MIDI message.
[ENTER] button + TRANSPOSE [+] button
TRANSPOSE buttons [−] + [+] (together) Keyboard Transpose is set to “0.”
Part select button ([A]–[C]) + OCTAVE [−]
button
Shifts the octave range of the specified Part up or down.
This operation is the same as setting the Note Shift to “+12” or “−12.” The Note
Shift range is from −12 to +12.
NOTE
The value is not transmitted as a MIDI message.
Part select button ([A]–[C]) + OCTAVE [+]
button
OCTAVE buttons [−] + [+] Keyboard Octave is set to “0.”
Organ [ENTER] button + VIBRATO/CHORUS
[TYPE] button
Switches the Vibrato/Chorus type in reverse order. This is useful when you
want to return to the previous type.
Live Set Pressing two or three Part select buttons
([A]–[C]) at once
Selects multiple Parts at once. Useful for selecting the same settings for Filter,
EG, and Insertion Effects.
Holding down two of the Part select
buttons ([A]–[C]) at once
Swaps the settings of the selected Parts.
This operation is the same as [MENU] button Job Part/Effect Manager
Swap Part.
[ENTER] button + [SETTINGS] button Resets the Live Set Sound currently being edited to its default state. This
operation does not overwrite the stored Live Set Sound. This operation is
useful when you want to reset all values to start over.
NOTE
To reset both the Live Set Sound currently being edited as well as the stored Live Set
Sound, use the [MENU] button Job Live Set Manager Initialize (page 40).
[ENTER] button + [MENU] button Determines whether the panel lock function is enabled (On) or disabled (Off).
[ENTER] button + MONO [TYPE] button Opens the Portamento Time setting screen.
[ENTER] button + UNISON [TYPE] button Opens the Unison Detune setting screen.
PAGE buttons [l] + [r]
Shows the Live Set View.
To close the Live Set View, press the [EXIT] button.
Effect [ENTER] button + EFFECT1–EFFECT2
select button
Swaps the settings of EFFECT 1 and EFFECT 2 in the selected Part. This
operation is useful when you want to change the order in which the two
Insertion Effects are applied.
This operation is the same as the [MENU] button Job Part/Effect Manager
Swap EFFECT 1/2.
[ENTER] button + Effect [TYPE] knob Moves to the beginning of the next or previous category. This operation is
useful when you want to quickly switch to the desired type.
For more information on Insertion Effect Types, see the “Effect list” (page 43).
Operations Descriptions
[ENTER] button Use the [ENTER] button as a Tap button. Press the button at least three times to
set the tempo.
[ENTER] button + DELAY [TIME] knob
Changes the Tempo Delay Time.
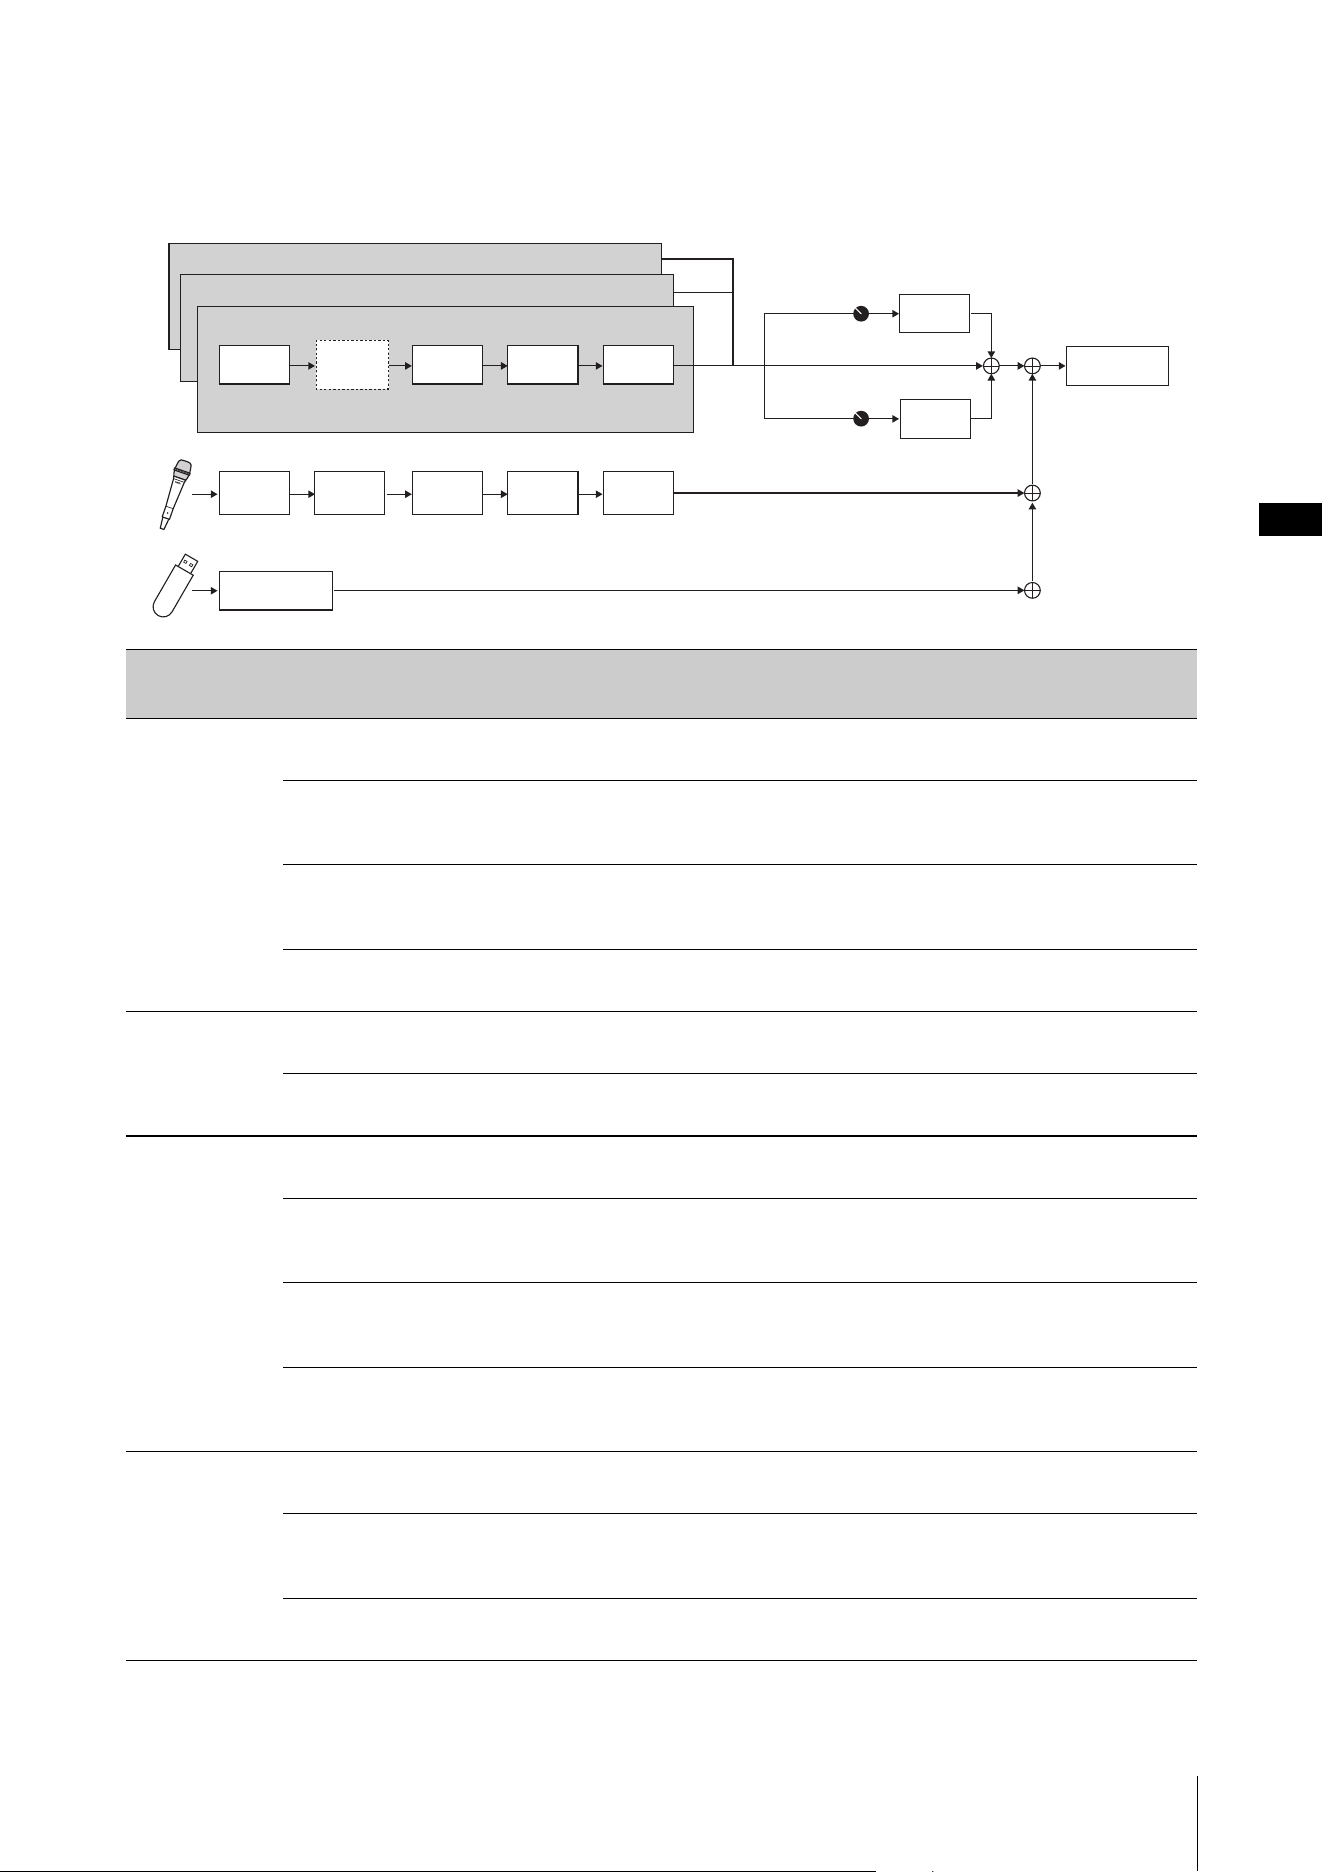
Advanced settings
CK88 CK61 Owner’s Manual
43
Effect list
Effect diagram
Category Type Description Stereo/
Mono
Chorus G Chorus
Chorus effect that produces a deep sound with complex modulation. Turn the [DEPTH]
knob to adjust the depth, and the [RATE] knob to adjust the speed.
Stereo
SPX Chorus
Chorus effect that uses a three-phase LFO to create a richer and warmer sound, with a
wider stereo spread. Turn the [DEPTH] knob to adjust the depth, and the [RATE] knob to
adjust the speed.
Stereo
Symphonic
Chorus effect that features multiple sound modulations to give a greater sense of
spaciousness. Turn the [DEPTH] knob to adjust the depth, and the [RATE] knob to adjust
the speed.
Stereo
816 Chorus
Chorus effect that simulates the detuned FM chorus of the TX816. Turn the [DEPTH]
knob to adjust the modulation depth, and the [RATE] knob to adjust the speed.
Stereo
Flanger VCM Flanger
Vintage flanger effect featuring a warm analog sound. Turn the [DEPTH] knob to adjust
the depth and feedback level, and the [RATE] knob to adjust the speed.
Stereo
Cross FB Flanger
Vintage flanger effect featuring a complex sound by cross feedback. Turn the [DEPTH]
knob to adjust the depth and feedback level, and the [RATE] knob to adjust the speed.
Stereo
Phaser VCM Stereo
Phaser
Vintage phaser effect featuring a warm analog sound. Turn the [DEPTH] knob to adjust
the depth and feedback level, and the [RATE] knob to adjust the speed.
Stereo
Small Phaser
Vintage phaser effect that features a smooth and unique sweeping effect. Turn the
[DEPTH] knob to switch the modulation type—which differs depending on whether
the knob is set to the left or the right—and turn the [RATE] knob to adjust the speed.
Mono
Max90
Classic vintage phaser effect. Turn the [DEPTH] knob to switch the feedback level
type—which differs depending on whether the knob is set to the left or the right—and
turn the [RATE] knob to adjust the speed.
Mono
Dual Phaser
Vintage phaser effect that features two phasers with different characteristics. Turn the
[DEPTH] knob to adjust the speed of the phaser 1, and the [RATE] knob to adjust the
speed of the phaser 2.
Mono
Trm/Rtr Tremolo
A modulation effect that changes the volume cyclically. Turn the [DEPTH] knob to
adjust the depth, and the [RATE] knob to adjust the speed.
Stereo
Auto Pan
A modulation effect that moves the sound in the stereo field cyclically left and right.
Turn the [DEPTH] knob to adjust the width for the stereo field, and the [RATE] knob to
adjust the speed.
Stereo
Simple Rotary
Simple rotary speaker effect. Turn the [DEPTH] knob to adjust the volume and
distortion level, and the [RATE] knob to adjust the rotation speed.
Mono
*
* Available only for the Organ Voices using the Organ Flutes tone generator (H, V, F,
A, and Y).
Send Level is the same for all parts
EQUALIZER
Delay
Reverb
Voice Drive Effect1 Effect2
Vibrato/
Chorus
A/D
Input
Noise
Gate
Input
EQ
Input
Effect 1
Input
Effect 2
Audio Trigger
Part A
Part C
Part B

Advanced settings
CK88 CK61 Owner’s Manual
44
Dist British Combo
Warm distortion effect (overdrive). Turn the [DEPTH] knob to adjust the distortion level,
and the [RATE] knob to adjust the brilliance (brightness of the sound).
Mono
British Lead
Hard rock type distortion effect. Turn the [DEPTH] knob to adjust the distortion level,
and the [RATE] knob to adjust the treble (attack for the high band).
Mono
Small Stereo
Stereo distortion effect. Turn the [DEPTH] knob to adjust the distortion level, and the
[RATE] knob to adjust the presence (clearness of sound).
Stereo
Comp/EQ Compressor
Stereo compressor. Turn the [DEPTH] knob to adjust the threshold, and the [RATE] knob
to adjust the output volume.
Stereo
Tone Control
Shelving equalizer.
Use the [DEPTH] knob to adjust the low band, and the [RATE] knob to adjust the high
band.
Stereo
1 Band EQ
Narrow
Peaking equalizer with narrow Q (bandwidth).
Use the [DEPTH] knob to adjust the gain, and the [RATE] knob to adjust the center
frequency.
Stereo
1 Band EQ Wide
Peaking equalizer with wide Q (bandwidth).
Use the [DEPTH] knob to adjust the gain, and the [RATE] knob to adjust the center
frequency.
Stereo
Wah Auto Wah
Wah modulation effect that changes cyclically. Turn the [DEPTH] knob to adjust the
resonance level, and the [RATE] knob to adjust the speed.
Stereo
Touch Wah
Wah effect that responds to volume changes by keyboard touch.
Turn the [DEPTH] knob to adjust the sensitivity, and the [RATE] knob to adjust the
resonance level.
Stereo
Pedal Wah
Wah effect that is pedal-controlled. Turn the [DEPTH] knob to adjust the distortion
level, and the [RATE] knob to adjust the resonance level. The pedal wah effect can be
controlled with a pedal if Foot Pedal Assign is set to 4 (Pedal Wah).
Stereo
Delay Digital Delay
Clean digital delay. Turn the [DEPTH] knob to adjust the depth and feedback level, and
the [RATE] knob to adjust the delay time.
Stereo
Analog Delay
Delay featuring a warm analog sound. Turn the [DEPTH] knob to adjust the feedback
level, and the [RATE] knob to adjust the delay time.
Stereo
Cross Delay
Delay that alternates between the left and right. Turn the [DEPTH] knob to adjust the
depth and feedback level, and the [RATE] knob to adjust the delay time.
Stereo
Reverb Hall Reverb
Simulates the reverberation of a hall. Turn the [DEPTH] knob to adjust the depth, and
the [RATE] knob to adjust the reverb time (reverberation length).
Stereo
Room Reverb
Simulates the reverberation of a room. Turn the [DEPTH] knob to adjust the depth, and
the [RATE] knob to adjust the reverb time (reverberation length).
Stereo
Reverse Reverb
The effect that simulates reverse playback Gated Reverb. Turn the [DEPTH] knob to
adjust the depth, and the [RATE] knob to adjust the reverb time (reverberation length).
Stereo
Others Ring Modulator
An effect that changes the sound in metallic and wildly distorting synth ways. Turn the
[DEPTH] knob to adjust the depth, and the [RATE] knob to adjust the frequency.
Stereo
Slicer
An effect that slices the input sound into rhythmically interrupted segments. Turn the
[DEPTH] knob to adjust the gate time (length for the sliced note), and the [RATE] knob
to adjust the fineness of slicing.
Stereo
LP Filter
Filter that cuts sounds at frequencies higher than the cutoff frequency. Turn the
[DEPTH] knob to adjust the cutoff frequency, and the [RATE] knob to adjust the
resonance.
Stereo
HP Filter
Filter that cuts sounds at frequencies lower than the cutoff frequency. Turn the [DEPTH]
knob to adjust the cutoff frequency, and the [RATE] knob to adjust the resonance.
Stereo
Category Type Description Stereo/
Mono

Advanced settings
CK88 CK61 Owner’s Manual
45
Others Lo-Fi
An effect that re-samples and degrades the input sound.Turn the [DEPTH] knob to
adjust the coarseness of the sound, and the [RATE] knob to adjust the sampling
frequency. Turn each knob clockwise to make them sound more degraded and less
clear.
Mono
Damper
Resonance
An effect that reproduces the sound produced by open strings of a piano while the
damper pedal is pressed. Turn the [DEPTH] knob to adjust the depth, and the [RATE]
knob to adjust the damper openness.
Stereo
Harmonic
Enhancer
An effect that adds harmonic overtones to the input sound to makes the sound stand
out. Turn the [DEPTH] knob to adjust the cutoff frequency of the high-pass filter, and
the [RATE] knob to adjust the effect level.
Stereo
Category Type Description Stereo/
Mono

CK88 CK61 Owner’s Manual
46
By connecting external devices, you can take advantage of various convenient and powerful features of the CK.
For example, you can:
• Play the CK along with the songs played on your smartphone or a portable music player.
• Use smart device apps to manage the Live Set Sounds, create videos, and post videos on social media.
• Play the CK using sounds on external sound modules or other synthesizers.
• Play the CK sounds from an external keyboard.
Using Smart Devices
There are two ways of connecting a smart device:
wireless connection via Bluetooth Audio and wired
connection using a USB cable.
For more information on smart device applications
that you can use with the CK, refer to the following
website.
https://www.yamaha.com/kbdapps/
NOTICE
Be sure to place your smart device on a stable surface to
prevent it from falling over and being damaged.
NOTE
To eliminate the risk of interference due to noise by your smart
device when used in combination with the CK, turn on the Airplane
Mode and then turn on Wi-Fi.
Connecting via Bluetooth audio
Bluetooth capability
Depending on the country in which you purchased the
product, the CK may not have Bluetooth capability.
By using the Bluetooth audio function, you can
connect a Bluetooth-equipped device such as a
smartphone and portable audio player wirelessly to
the CK and use the speakers on the CK to play back the
audio from the Bluetooth device.
NOTE
• Bluetooth headphones or speakers cannot be connected.
• There is no Bluetooth MIDI capability on the CK.
Pairing with a Bluetooth-equipped
device
“Pairing” means registering Bluetooth-equipped smart
devices on the CK and establish mutual recognition for
wireless communication between the two.
Once the device is paired with the CK, it is not
necessary to pair the two again (unless you’ve disabled
pairing.)
1. Select the setting from the [MENU] button
Bluetooth Switch to On press the
[ENTER] button Pairling.
The CK will be paired, and the “Bluetooth pairing...”
message will appear on the display.
To cancel the pairing, press the [EXIT] button.
2. Turn the Bluetooth setting ON on the
Bluetooth-equipped device and select
CK61 or CK88 from the list.
• Make sure to complete the settings on the smart
device within a minute. After that, the pairing
mode ends automatically.
• If you are required to enter a passkey, enter the
numerals “0000.”
When the pairing is completed, the (Bluetooth)
mark appears on the top screen.
Use the Bluetooth-equipped device to adjust the
volume of the sound input via Bluetooth. To adjust
Using with External Devices
Precautions when using the
USB [TO HOST] terminal
When connecting the computer to the USB [TO
HOST] terminal, make sure to observe the
following points to avoid freezing the computer/
instrument and corrupting or losing the edited
settings in SETTINGS.
NOTICE
• Use an AB type USB cable of less than 3 meters.
USB 3.0 cables cannot be used.
• Perform the following before turning the power to
the instrument on/off or plugging/unplugging the
USB cable to/from the USB [TO HOST] terminal.
- Quit any open application software on the
computer.
- Make sure that MIDI data is not being transmitted
from the instrument. (MIDI data is transmitted when
the notes on the keyboard are played.)
• While the computer is connected to the instrument,
you should wait for six seconds or more between
these operations: (1) when turning the power of the
instrument off then on again, or (2) when alternately
connecting/disconnecting the USB cable.
If the computer or the instrument freezes, restart
the application software or the computer OS or
turn the power to the instrument off then on
again.
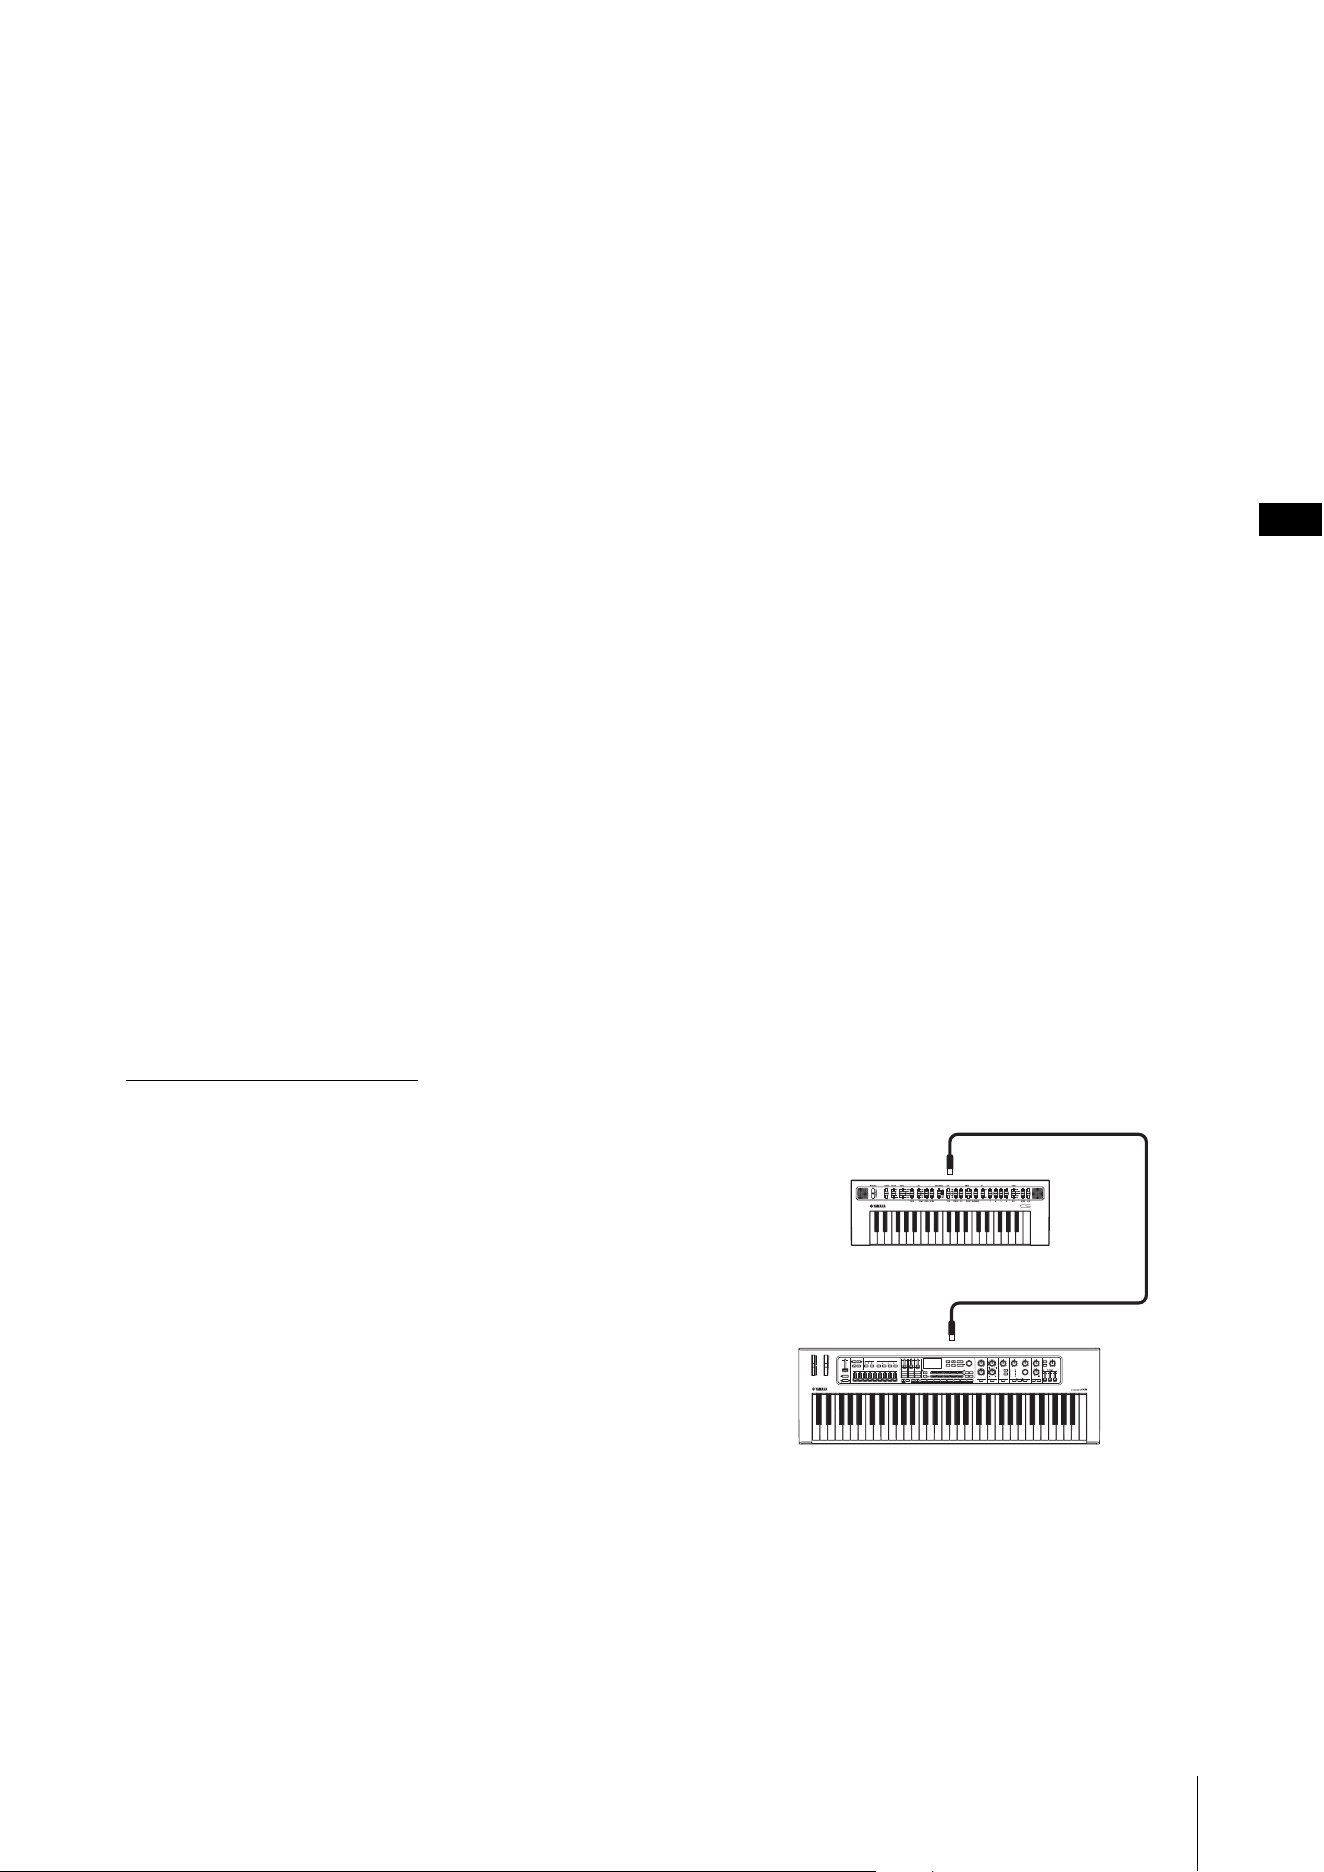
Using with External Devices
CK88 CK61 Owner’s Manual
47
the volume balance between the sound input via
Bluetooth and your performance on the CK, you
can also use the [MENU] button Bluetooth
Volume.
3. Playback audio on the Bluetooth-equipped
device to confirm that the built-in speakers
or the headphones connected to the CK can
output the audio sound.
When you turn on the CK the next time, the last
connected smart device will be connected to the
CK automatically if the Bluetooth function of the
smart device and the CK are set to on. If it is not
connected automatically, select the model name of
the CK from the connection list on the smart
device.
Switching the Bluetooth off
Select the setting from the [MENU] button Bluetooth
Switch to Off.
Connecting using the USB [TO HOST]
terminal
For more information on how to connect a device to
the USB [TO HOST] terminal, refer to the “Smart Device
Connection Manual.”
Smart Device Connection Manual
Access the website below and then open “Manual
Library.” Select your language, and then enter “smart
device” in the “Model Name or Keyword” field and
finally click “Search.”
https://download.yamaha.com/
For setting the sound input from the USB audio to
output to the computer or smart device connected to
the USB [TO HOST] jack of the CK, set from the [MENU]
button General Audio USB Audio Loopback
(page 38).
Connecting to a computer
By connecting the CK to your computer, you can
expand your musical possibilities by using music
production software or DAWs. Here are some of the
creative options you can explore.
• Recording your performance to a DAW
• Playing the software synthesizer from the CK
• Playing the internal sound generator of the CK from
a DAW
A USB cable and the Yamaha Steinberg USB Driver are
necessary to connect the CK to the computer.
Follow the instructions below to make the connection.
Before connecting the USB [TO HOST] terminal to a
computer, be sure to read “Precautions when using the
USB [TO HOST] terminal” on page 46.
1. Download the latest Yamaha Steinberg USB
Driver from the URL below.
https://download.yamaha.com/
NOTE
• For more information on the system requirements for the
Yamaha Steinberg USB Driver, refer to the URL above.
• The Yamaha Steinberg USB Driver may be revised and
updated without prior notice. For details and the latest
information, refer to the URL above.
2. Install the Yamaha Steinberg USB Driver on
your computer.
Refer to the Installation Guide included in the
downloaded file.
3. Change the settings from the [MENU]
button General MIDI MIDI Port
USB to On to set the CK to send and receive
MIDI through the USB [TO HOST] terminal.
Controlling a synthesizer or
tone generator module from
the CK
You can play the sounds of an external MIDI tone
generator by playing on the CK’s keyboard.
By setting the [MENU] button General MIDI
MIDI Control to On (page 37), you can use the ORGAN
FOOTAGE sliders and knobs for Filter and EG, for
example, for controlling an external device.
CK61
MIDI [IN] terminal
Synthesizer or tone generator module, etc.
MIDI [OUT] terminal
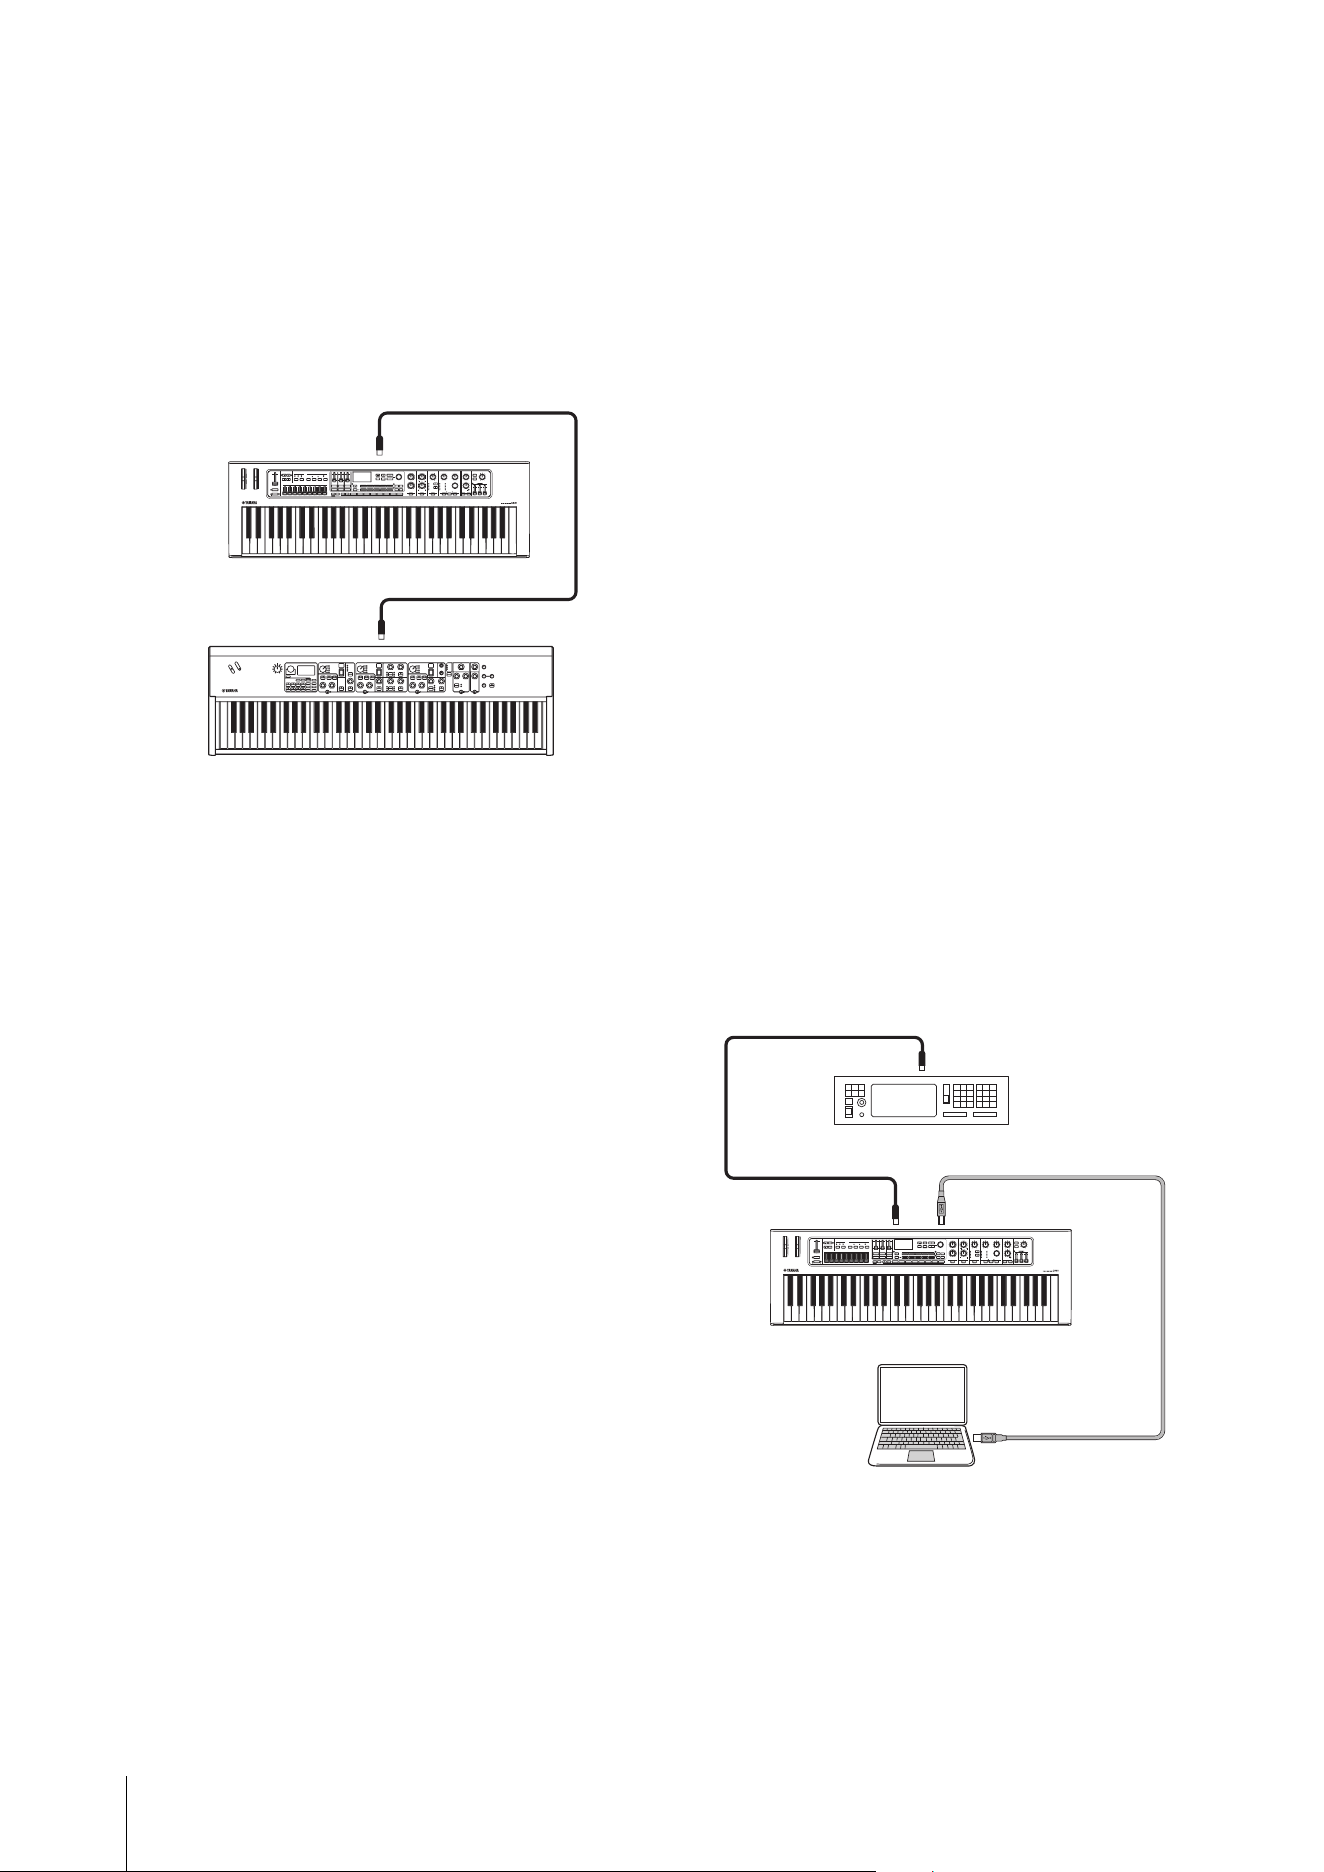
Using with External Devices
CK88 CK61 Owner’s Manual
48
Controlling the CK from an
external keyboard
By combining with another keyboard, you can have
the two connected instruments function like a two-
manual organ. For example, if you wish to play both
the CK and the other instrument by setting the
[SETTINGS] button Function External Keyboard
(page 32) to Ext+Int, or to play only the other
instrument by setting to ExtOnly.
Setting the MIDI transmit and
receive channels
To control a device using MIDI, you must set the
transmit channel on the controlling device and the
receive channel on the controlled device to match.
You can change the transmit channel (Tx) and receive
channel (Rx) on the CK from the [MENU] button
General MIDI MIDI Channel.
NOTE
For details on setting the transmit channel of an external MIDI
keyboard or the receive channel of an external MIDI tone generator,
refer to the owner’s manual of that device.
Disabling the internal tone
generator sound when the
built-in keyboard is played
If you want only the external tone generator
connected to the MIDI [OUT] terminal or USB [TO
HOST] terminal to produce sound when the keyboard
of the CK is played, you can lower the CK’s volume, or
turn off all Parts, or set the value for Local Control under
the [MENU] button General MIDI Local Control
to Off (page 37). The last method is especially
convenient when recording with a DAW.
Setting how the MIDI terminals
are used (MIDI Port settings)
The CK provides two MIDI ports, each with different
purposes.
• Port 1: For communication between the CK and a
computer.
• Port 2: For communication between a computer and
an external MIDI device by using the CK.
You can set whether to use the MIDI terminals as Port 1
or Port 2, from the [MENU] button General MIDI
MIDI Port MIDI (page 37). Initially, it is set to
Port 1.
Port 1
Use this Port to control the tone generator of the CK
from an external device, or to control an external tone
generator from the CK.
Set the value under the [MENU] button General
MIDI MIDI Port MIDI to On.
Port 2
Use this port when you want to connect an external
MIDI device to a computer via the CK.
Set the values under the [MENU] button General
MIDI MIDI Port as follows.
• MIDI: Off
• USB: On
Example
CK61
MIDI [IN] terminal
External keyboard
MIDI [OUT] terminal
CK61
MIDI [IN] terminal
External MIDI device such as tone generator
USB [TO HOST] terminalMIDI [OUT] terminal
USB cable
USB terminal
Computer
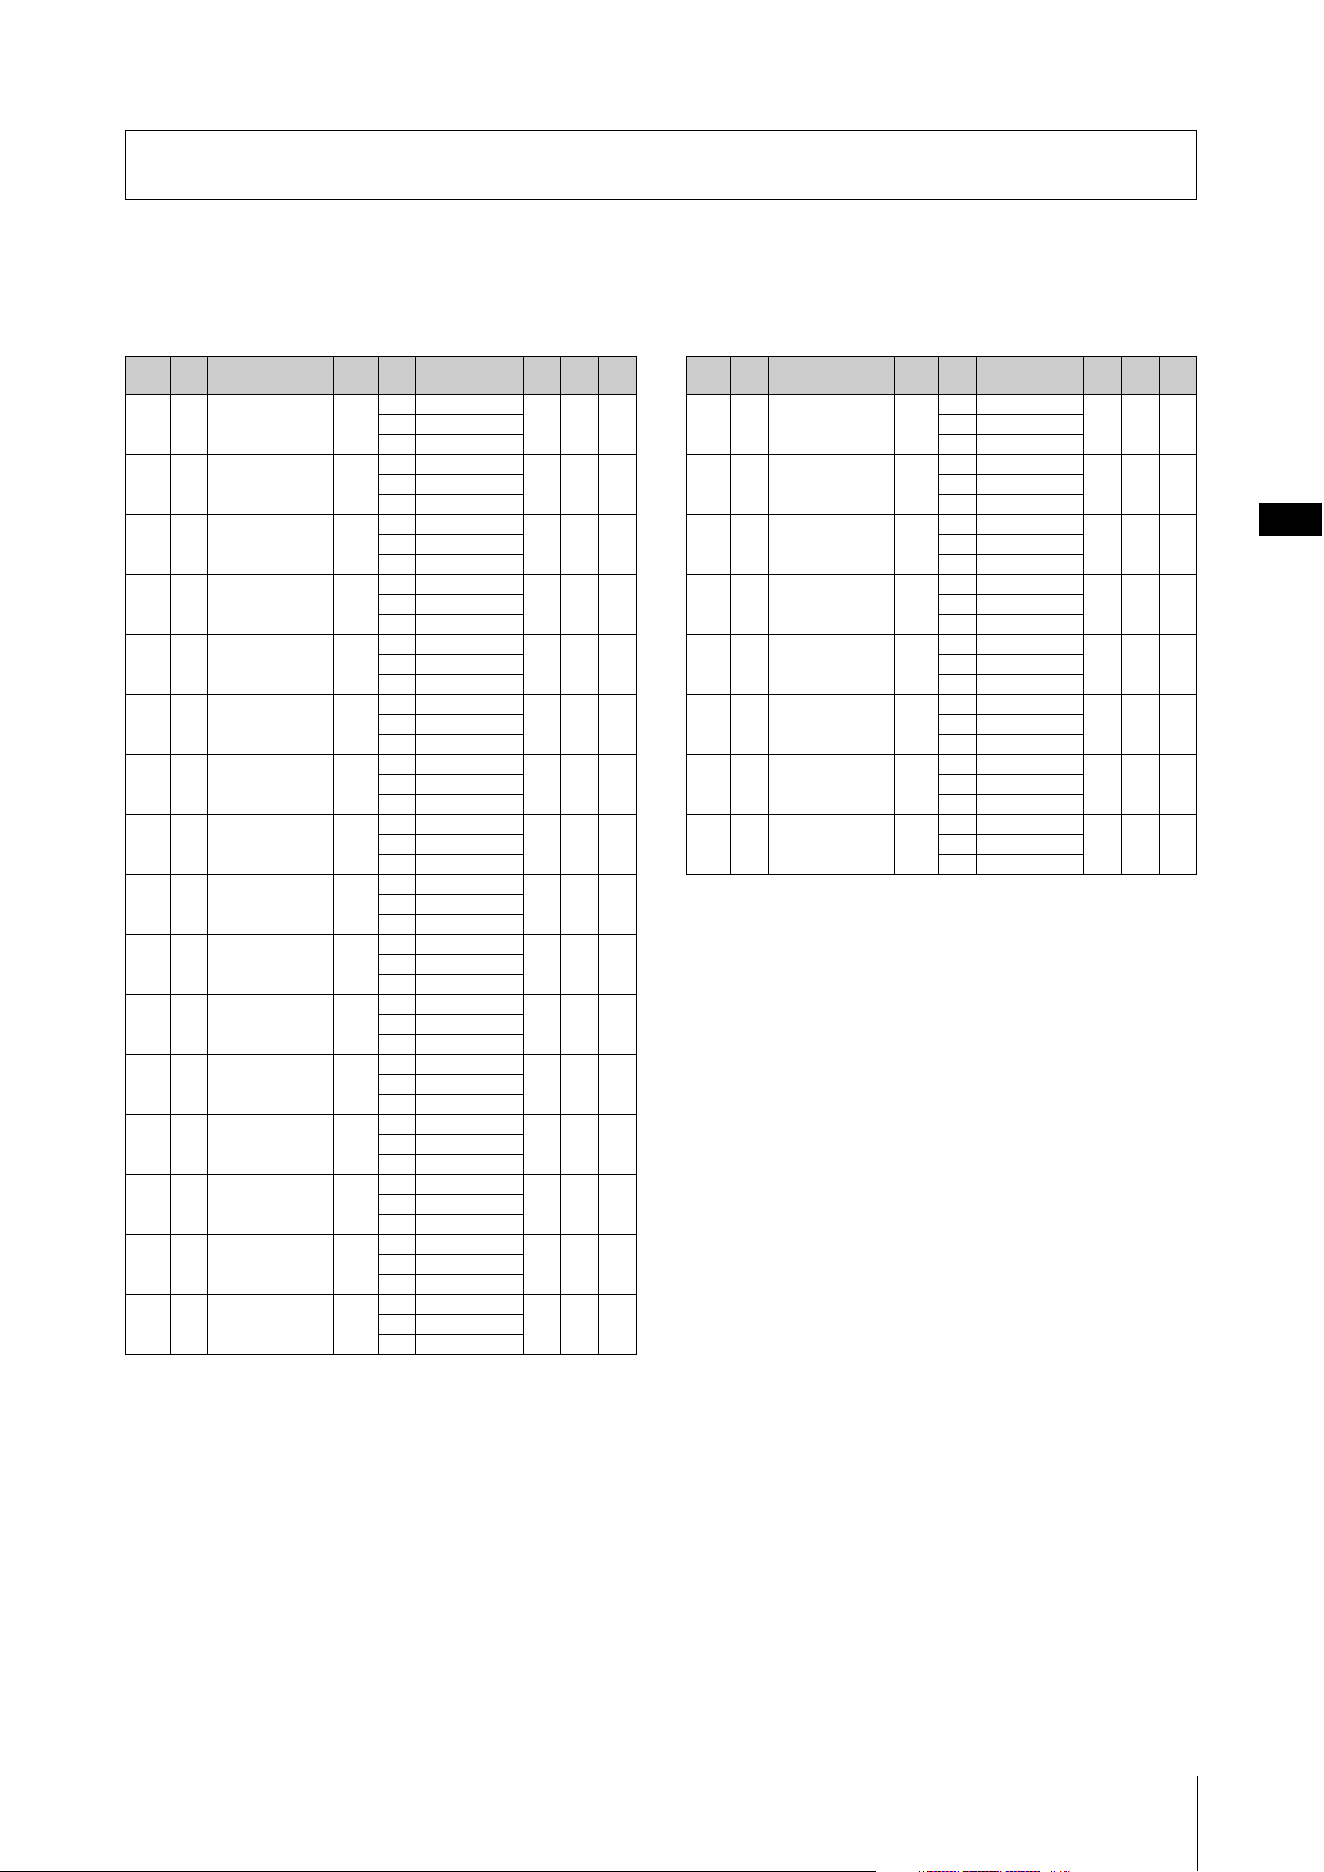
CK88 CK61 Owner’s Manual
49
Live Set Sound List
CK88
Data List
Page No. Name
Split
Point
Part Voice Name MSB LSB PC
1 1 CFX Grand G2 A CFX Stereo 63 0 1
B–
C–
1 2 Mono U1 G2 A U1 63 0 2
B–
C–
1 3 CF3 Pad G2 A Live CF3 63 0 3
B Back Pad
C–
1 4 Acoustic Split G2 A Acoustic Bass 63 0 4
BU1
CH
1 5 Panning Tines G2 A 78Rd 63 0 5
B–
C–
1 6 Warm Reeds G2 A Wr Warm 63 0 6
B–
C–
1 7 Jazz Split C3 A H 63 0 7
BH
C–
1 8 Orchestra G2 A Orchestra 2 63 0 8
B Concert Str
C Horn Section
2 1 S700 Grand G2 A S700 63 1 1
B–
C–
2 2 Rock Piano G2 A Live CF3 63 1 2
B–
C–
2 3 80’s Layer G2 A CFX St Bright 63 1 3
B 73Rd Studio
C–
2 4 DX/Minilead G2 A DX 7 II 63 1 4
B Classic Mini
C–
2 5 78Rd Chorus G2 A 78Rd 63 1 5
B–
C–
2 6 Funky Land Clav G2 A Clavi S 63 1 6
B–
C–
2 7 Rock Rotary G2 A H 63 1 7
B–
C–
2 8 Brass Section G2 A BrassSection5 63 1 8
B–
C–
Page No. Name
Split
Point
Part Voice Name MSB LSB PC
3 1 CP80 Dirty Funk G2 A CP80 1 63 2 1
B–
C–
3 2 Phasing 73 G2 A 73Rd Studio 63 2 2
B–
C–
3 3 Fusion Layer G2 A 73Rd Studio 63 2 3
B OB Brass 1
C–
3 4 EDM Pluck Split G2 A Synth Bass 2 63 2 4
B Popcorn
CSky Walk
3 5 Amped Tines G2 A 73Rd Studio 63 2 5
B–
C–
3 6 The Red Organ G2 A V 63 2 6
B–
C–
3 7 JP Strings G2 A JP Strings 63 2 7
B–
C–
3 8 Soft Synth Lead G2 A Wire Lead 63 2 8
B–
C–
Data List
CK88 CK61 Owner’s Manual
50
CK61 CK88 CK61
Page No. Name
Split
Point
Part Voice Name MSB LSB PC
1 1 CFX Grand G2 A CFX Stereo 63 0 1
B–
C–
1 2 Panning Tines G2 A 78Rd 63 0 2
B–
C–
1 3 Warm Reeds G2 A Wr Warm 63 0 3
B–
C–
1 4 80’s Layer G2 A CFX St Bright 63 0 4
B 73Rd Studio
C–
1 5 Funky Land Clav G2 A Clavi S 63 0 5
B–
C–
1 6 Brass Section G2 A BrassSection5 63 0 6
B–
C–
1 7 Jazz Split C3 A H 63 0 7
BH
C–
1 8 Soft Synth Lead G2 A Wire Lead 63 0 8
B–
C–
2 1 S700 Grand G2 A S700 63 1 1
B–
C–
2 2 78Rd Chorus G2 A 78Rd 63 1 2
B–
C–
2 3 CP80 Dirty Funk G2 A CP80 1 63 1 3
B–
C–
2 4 CF3 Pad G2 A Live CF3 63 1 4
B Back Pad
C–
2 5 Amped Tines G2 A 73Rd Studio 63 1 5
B–
C–
2 6 JP Strings G2 A JP Strings 63 1 6
B–
C–
2 7 Rock Rotary G2 A H 63 1 7
B–
C–
2 8 Orchestra G2 A Orchestra 2 63 1 8
B Concert Str
C Horn Section
3 1 Mono U1 G2 A U1 63 2 1
B–
C–
3 2 Rock Piano G2 A Live CF3 63 2 2
B–
C–
3 3 Phasing 73 G2 A 73Rd Studio 63 2 3
B–
C–
3 4 DX/Minilead G2 A DX 7 II 63 2 4
B Classic Mini
C–
3 5 Acoustic Split G2 A Acoustic Bass 63 2 5
BU1
CH
3 6 Fusion Layer G2 A 73Rd Studio 63 2 6
B OB Brass 1
C–
3 7 The Red Organ G2 A V 63 2 7
B–
C–
3 8 EDM Pluck Split G2 A Synth Bass 2 63 2 8
B Popcorn
CSky Walk
Page No. Name
Split
Point
Part Voice Name MSB LSB PC
4 1 Live CF3 Grand G2 A Live CF3 63 3 1
B–
C–
4 2 Pretty Upright G2 A U1 63 3 2
B–
C–
4 3 Honky Dogs G2 A S700 63 3 3
BU1
C–
4 4 House Piano G2 A Digi Piano 2 63 3 4
B–
C–
4 5 Bubble Rds C4 A 78Rd 63 3 5
B–
C–
4 6 Bright Reeds G2 A Wr Bright 63 3 6
B–
C–
4 7 Clavi S G2 A Clavi S 63 3 7
B–
C–
4 8 Trippy DX G2 A DX Legend 63 3 8
B–
C–
5 1 Comping Drawbar G2 A H 63 4 1
B–
C–
5 2 Jazz Swish G2 A H 63 4 2
B–
C–
5 3 Gospel Layers G2 A H 63 4 3
BH
C–
5 4 Lead Organ G2 A H 63 4 4
B–
C–
5 5 British Organ G2 A V 63 4 5
B–
C–
5 6 Aged Tone Organ G2 A A 63 4 6
BA
C–
5 7 Concert Organ G2 A Concert Organ 63 4 7
B Church Organ1
C Church Organ1
5 8 Big Pipes G2 A Organo Pleno 63 4 8
B Concert Organ
C–
6 1 Echo Guitar G2 A Nylon Guitar1 63 5 1
B–
C–
6 2 Acoustic Steel G2 A Steel Gt 2 63 5 2
B–
C–
6 3 Clean El-Gtr G2 A Clean Gt 1 63 5 3
B–
C–
6 4 Overdrive Gtr G2 A Clean Gt 3 63 5 4
B–
C–
6 5 Slap Bass G2 A Slap Bass 63 5 5
B–
C–
6 6 101 Bass G2 A Synth Bass 3 63 5 6
B Fundamental
C–
6 7 Mini Bass G2 A Unison Bass 63 5 7
B–
C–
6 8 Click Syn Bass G2 A Click SynBass 63 5 8
B–
C–
Data List
CK88 CK61 Owner’s Manual
51
7 1 Quartet Strings G2 A Quartet 63 6 1
B–
C–
7 2 Ancient Sampler G2 A Tron Strings 63 6 2
B–
C–
7 3 On top G2 A Orchestra 1 63 6 3
B Oboe
C French Horn
7 4 2310 Orchestra G2 A Alto Flute 63 6 4
B Orchestra 2
C Section Str 2
7 5 Party Brass G2 A BrassSection2 63 6 5
B Forte Brass
C BrassSection3
7 6 Sax Section G2 A Sax Section 2 63 6 6
B–
C–
7 7 Flute G2 A Flute 1 63 6 7
B–
C–
7 8 Epic Calliope G2 A Calliope Ld 1 63 6 8
B–
C–
8 1 Comp and Solo G2 A 73Rd Studio 63 7 1
BDynmic Mini
C–
8 2 Nu Saw Lead C3 A – 63 7 2
B Saw Lead 1
C–
8 3 Arena Lead G2 A Dancy Hook 63 7 3
B–
C–
8 4 Vx Based PolyLd C4 A – 63 7 4
B–
CV
8 5 Analog Pad G2 A Soft Pad 2 63 7 5
B–
C–
8 6 Zen Pad C4 A Atmosphere 63 7 6
B ZEN
C–
8 7 Magic Bells Pad G2 A Bell Pad 1 63 7 7
B Slow Choir
C Glocken 1
8 8 Slow Choir G2 A Slow Choir 63 7 8
B–
C–
9 1 OB Brass G2 A OB Brass 1 63 8 1
B–
C–
9 2 Synth F.Horns G2 A Analog Brass1 63 8 2
B–
C–
9 3 Jumping Synths G2 A Jump Brass 63 8 3
B–
C–
9 4 Synth Strings G2 A Analog Str 63 8 4
B Syn Strings 1
C–
9 5 Warm Analog Str G2 A Lite Strings2 63 8 5
B Back Pad
C–
9 6 Mallet Lead G2 A Marimba 1 63 8 6
B–
C–
9 7 Dream Vibes G2 A Vibraphone 63 8 7
B–
C–
9 8 Enchantment G2 A Glocken 1 63 8 8
B–
C–
Page No. Name
Split
Point
Part Voice Name MSB LSB PC
10 1 Sweet Piano G2 A S700 63 9 1
B Warm Strings
C–
10 2 BrghtPianoLayer G2 A CFX Stereo 63 9 2
B CP80 1
C DX Woody
10 3 80’s CP Brassy G2 A CP80 1 63 9 3
B Synth Brass 2
C–
10 4 Gtr Pad Strings G2 A Classic Gt 63 9 4
B Soft Pad 2
C Warm Strings
10 5 Slow Piano Pad G2 A Live CF3 63 9 5
BV
C Ring Pad
10 6 Cinematic G2 A High Brass 63 9 6
B Orchestra 1
C–
10 7 Ambient Piano G2 A CFX St Warm 63 9 7
BCFX St Warm
CBalimba
10 8 Tricky Piano G2 A CFX Stereo 63 9 8
B–
C–
Page No. Name
Split
Point
Part Voice Name MSB LSB PC
Data List
CK88 CK61 Owner’s Manual
52
Voice List
Category
Sub
Category
No Name
Parameter
Value
Piano Grand 1 CFX Stereo 0
2 CFX St Bright 1
3CFX St Warm 2
4 CFX Mono 3
5 CFX Mn Bright 4
6 CFX Mn Warm 5
7 S700 6
8Live CF3 7
9 Digi Piano 1 8
10 Digi Piano 2 9
Upright 11 U1 10
CP 12 CP80 1 11
13 CP80 2 12
E.Piano Rd 1 78Rd 13
2 73Rd Studio 14
Wr 3 Wr Warm 15
4 Wr Bright 16
Clavi 5 Clavi B 17
6Clavi S 18
7 Harpsi 1 19
8 Harpsi 2 20
FM 9 DX Legend 21
10 DX Woody 22
11 DX FTine 23
12 DX 7 II 24
13 DX Mellow 25
14 DX Crisp 26
Organ
Tone Wheel
1H 27
Combo 2 V 28
3F 29
4A 30
5Y 31
Pipe 6 Pipe Organ 1 32
7 Pipe Organ 2 33
8 Concert Organ 34
9 Grand Jeu 35
10 FondsEtAnches 36
11 Organo Pleno 37
12 Diapason 38
13 Claribel&Flut 39
14 Soft Reeds 40
15 Church Organ1 41
16 Church Organ2 42
17 Church Organ3 43
18 Church Organ4 44
Accordion 19 Accordion 45
20 Musette 46
Brs/Wind
(Brass/
Woodwind)
Ensemble 1 BrassSection1 47
2 BrassSection2 48
3 BrassSection3 49
4 BrassSection4 50
5 BrassSection5 51
6 Sfz Brass 52
7 Forte Brass 53
8 SforzandoFall 54
9 High Brass 55
10 Mellow Brass1 56
11 Mellow Brass2 57
12 Soft Brass 58
13 Tp&Tb Section 59
14 Trb. Section 60
15 Horn Section 61
16 Horn Strings 62
17 Brass Strings 63
Category
Sub
Category
No Name
Parameter
Value
Brs/Wind
(Brass/
Woodwind)
Solo 18 Sweet Trumpet 64
19 Trumpet 65
20 Trombone 66
21 French Horn 67
22 Horn 68
Saxophone 23 Sax Section 1 69
24 Sax Section 2 70
25 Sax Section 3 71
26 Sweet Alto 72
27 Alto Sax 73
28 Tenor Sax 1 74
29 Tenor Sax 2 75
30 Soprano Sax 76
31 Baritone Sax 77
Woodwind 32 Oboe 78
33 Bassoon 79
34 Clarinet 80
35 Flute 1 81
36 Flute 2 82
37 Alto Flute 83
38 Tape Flute 84
39 Recorder 85
40 Pan Flute 1 86
41 Pan Flute 2 87
42 Bottle 88
43 Shakuhachi 89
44 Ocarina 90
45 Harmonica 1 91
46 Harmonica 2 92
47 Bagpipe 93
Synth 48 Synth Brass 1 94
49 Synth Brass 2 95
50 Synth Brass 3 96
51 Synth Brass 4 97
52 Jump Brass 98
53 OB Brass 1 99
54 OB Brass 2 100
55 OB Brass 3 101
56 OB Brass 4 102
57 OB Brass 5 103
58 SoftSynBrs 1 104
59 SoftSynBrs 2 105
60 Big Squish 106
61 Analog Brass1 107
62 Analog Brass2 108
Gtr/Bass
(Guitar/
Bass)
Guitar 1 Classic Gt 109
2 Nylon Guitar1 110
3 Nylon Gt Harm 111
4 Nylon Guitar2 112
5 Steel Gt 1 113
6 Steel Gt 2 114
7 Steel Gt 3 115
8 12 Str Gt 1 116
9 12 Str Gt 2 117
10 Clean Gt 1 118
11 Clean Gt 2 119
12 Clean Gt 3 120
13 60's Clean Gt 121
14 Funk Guitar 122
15 12 Str Clean 123
16 Dist Guitar 1 124
17 Dist Guitar 2 125
18 Over The Top 126
19 Crunch Guitar 127
20 Crunch Oct 128
21 Mute Dist 129
22 Jazz Guitar 130
23 Hawaiian Gt 131
Category
Sub
Category
No Name
Parameter
Value
Gtr/Bass
(Guitar/
Bass)
Bass 24 Acoustic Bass 132
25 Upright Bass 133
26 Finger Bass 1 134
27 Finger Bass 2 135
28 Finger Bass 3 136
29 Finger Bass 4 137
30 Pick Bass 1OM 138
31 Pick Bass 1 M 139
32 Pick Bass 1 O 140
33 Pick Bass 2 141
34 Slap Bass 142
35 Fretless Ba 1 143
36 Fretless Ba 2 144
Bass
+Drum
37 A.Bass + Cym 145
38 E.Bass + Cym 146
Synth 39 Synth Bass 1 147
40 Synth Bass 2 148
41 Synth Bass 3 149
42 Synth Bass 4 150
43 Synth Bass 5 151
44 Big Bass 152
45 101 Bass 153
46 Competitor 154
47 Perc Punch 155
48 Trance Bass 156
49 Dark Bass 157
50 Click SynBass 158
51 Acid Bass 159
52 Square Bass 160
53 Long Spit 161
54 Fundamental 162
55 One Voice 163
56 Fat Sine 164
57 Fat Sine Res 165
58 Unison Bass 166
Strings Ensemble 1 Section Str 1 167
2 Section Str 2 168
3 Section Str 3 169
4 Strings 1 170
5 Strings 2 171
6 Orchestra 1 172
7 Orchestra 2 173
8 Arco String 174
9 Fast Strings 175
10 Marcato Str 176
11 Concert Str 177
12 Legato Str 178
13 Warm Strings 179
14 Slow Str 1 180
15 Slow Str 2 181
16 Slow Str 3 182
17 60's Strings 183
18 70's Strings1 184
19 70's Strings2 185
20 SlwAtkTremolo 186
21 Tremolo Str 187
22 Velo Strings 188
23 Quartet 189
24 Tron Strings 190
25 Tape Strings 191
26 Flute Strings 192
Solo 27 Sweet Violin 193
28 Violin 194
29 Cello 195
Pizzicato 30 Pizzicato 1 196
31 Pizzicato 2 197
32 Harp 198
Data List
CK88 CK61 Owner’s Manual
53
Strings Synth 33 Syn Strings 1 199
34 Syn Strings 2 200
35 Syn Strings 3 201
36 Analog Str 202
37 Lite Strings1 203
38 Lite Strings2 204
39 JP Strings 205
40 Pop Syn Str 206
41 Unison Str 207
42 Oct Syn Str 208
Pad Pad 1 Bell Pad 1 209
2 Bell Pad 2 210
3 BrightPadBell 211
4 Sharp Teeth 212
5 Ring Pad 213
6 Anlg Rez Pad 214
7 LFO Pad 215
8 Chill Scap 216
9 Strings Pad 217
10 Back Pad 218
11 Planet 219
12 Atmosphere 220
13 Click Pad 221
14 Pad 80 222
15 Poly Pad 223
16 Glass Harp 224
17 Digi Stuff 225
18 New Age Pad 226
19 Darklight 227
20 Neo Crystal 228
21 Vapor 229
22 Soft Pad 1 230
23 Soft Pad 2 231
24 VP Soft 232
25 Glass Pad 233
26 Sine Pad 234
27 Echoes 235
28 Ambient Pad 236
29 Pan Pad 237
30 Sci-Fi 238
31 Big Pan 239
32 Goblins 240
33 Sweep Pad 1 241
34 Sweep Pad 2 242
35 Nowhere 243
36 Goblins Synth 244
37 Celestial 245
38 Converge 246
39 Creation 247
40 Ancestral 248
41 Soundtrack 249
42 Echo Pad 250
43 Rain 251
44 Analog Pad 252
45 Dark Light 253
46 Digi Pad 254
47 Noble Pad 255
48 Pop Pad 256
49 Fat Saw 257
50 Angel Pad 258
Category
Sub
Category
No Name
Parameter
Value
Pad Choir 51 Choir 1 259
52 Choir 2 260
53 Choir 3 261
54 Air Choir 262
55 Choir Aah 263
56 Voice Oohs 264
57 Slow Vox 265
58 Slow Choir 266
59 Itopia 267
60 Mystic Pad 268
Sound FX 61 Twist 269
62 Da Pad 270
63 Dark Star 271
64 Mind Bell 272
65 ZEN 273
Lead Analog 1 Dancy Hook 274
2 Faaat Dance 275
3 Techno Brass 276
4 After 1984 277
5 Analog Lead 1 278
6 Analog Lead 2 279
7 Analog Lead 3 280
8 Analog Lead 4 281
9 Saw Lead 1 282
10 Saw Lead 2 283
11 Saw Lead 3 284
12 Wire Lead 285
13 Classic Mini 286
14 Big Lead 1 287
15 Big Lead 2 288
16 Early Lead 289
17 Troy 290
18 Sync Saw Lead 291
19 Punch Lead 292
20 Soft RnB 293
21 Popcorn 294
22 Synth Trumpet 295
23 Dynmic Mini 296
24 Crying 297
25 Funky Mini 298
26 Funky Poly 299
27 Mini Three 300
28 Nu Mini 301
29 Sky Walk 302
30 Mini Soft 303
31 Mini Lead 304
32 Inda Night 305
33 Sine Lead 306
34 Tiny Lead 307
35 Synth Whistle 308
36 Raplead 309
37 Funk Lead 1 310
38 Funk Lead 2 311
39 Rezz Punch 312
40 Square Lead 1 313
41 Square Lead 2 314
42 Square Lead 3 315
43 Soft Square 316
44 5th Lead 317
Digital 45 Digital Lead 318
46 Voice Lead 319
47 Wind Lead 320
48 Calliope Ld 1 321
49 Calliope Ld 2 322
50 Orchestra Hit 323
51 Impact 324
Category
Sub
Category
No Name
Parameter
Value
Chr.Perc
(Chromatic
Percussion)
Mallet 1 Marimba 1 325
2 Marimba 2 326
3 Xylophone 1 327
4 Xylophone 2 328
5 Balimba 329
6 Vib ST 330
7 Vibraphone 331
8 Hard Vibes 332
9 Glocken 1 333
10 Glocken 2 334
11 Music Box 335
Bell 12 Soft Crystal 336
13 Tinkle Bell 337
14 Tubular Bell 338
15 Carillon 339
Synth Bell 16 Digi Bell 1 340
17 Digi Bell 2 341
18 Digi Bell 3 342
19 Nice Bell 343
20 Stack Bell 344
21 Bell Harp 345
22 Harp Vox 346
23 Round Glock 347
24 Air Bells 348
25 Star Dust 349
26 Heaven Bell 350
Others Ethnic 1 Kalimba 351
2 Kanoon 352
3 Shamisen 353
4 Sitar 1 354
5 Sitar 2 355
6 Banjo 356
7 Mandolin 357
8 Dulcimer 358
9 Koto 359
Percussion 10 Timpani 360
11 Steel Drums 361
12 Agogo 362
Category
Sub
Category
No Name
Parameter
Value
Data List
CK88 CK61 Owner’s Manual
54
Control Change Number
* CC numbers A, B, and C correspond to each of Part A, B, and C.
The parameters shown in parenthesis will not affect the internal tone generator.
For parameter values, see tables A to C on the next page.
CC No.
Display Controllers Table
A B C
Rotary 9
4
ROTARY [STOP] button C
9
5
ROTARY [SPEED] button C
Organ 18 77 111
)
ORGAN FOOTAGE slider [16'] D
19 78 112 ) ORGAN FOOTAGE slider [5 1/3'] D
20 79 113 ) ORGAN FOOTAGE slider [8'] D
21 80 114 ) ORGAN FOOTAGE slider [4'] D
22 81 115 ) ORGAN FOOTAGE slider [2 2/3'] D
23 82 116 ) ORGAN FOOTAGE slider [2'] D
24 83 117 ) ORGAN FOOTAGE slider [1 3/5'] D
25 85 118 ) ORGAN FOOTAGE slider [1 1/3'] D
26 86 119 ) ORGAN FOOTAGE slider [1'] D
Volume 12 Volume
!
Part Volume slider [A] A
27 ! Part Volume slider [B] A
87 ! Part Volume slider [C] A
Filter 74 30 104 Cutoff
J
FILTER [CUTOFF] knob A
71 31 105 Resonance
J
FILTER [RESONANCE] knob A
EG 73 28 102 Attack
K
EG [ATTACK] knob A
72 29 103 Release
K
EG [RELEASE] knob A
Drive 13 68 106 Depth
L
DRIVE [DEPTH] knob A
Effect1 14 69 107 Depth
M
EFFECT [DEPTH] knob A
15 70 108 Rate M EFFECT [RATE] knob A
Effect2 16 75 109 Depth M EFFECT [DEPTH] knob A
17 76 110 Rate M EFFECT [RATE] knob A
Delay 93 Depth
N
DELAY [DEPTH] knob A
92 Time N DELAY [TIME] knob A
Reverb 91 Depth
O
REVERB DEPTH knob A
Equalizer 90 Equalizer Gain
P
EQUALIZER slider [LOW] B
89 P EQUALIZER slider [MID] B
88 P EQUALIZER slider [HIGH] B
CC
No.
Display* Controllers Table
Foot Pedal 1,
Foot Pedal 2,
Modulation
Wheel
1 Modulation
4Pedal Wah
5 (Portamento Time)
6 (Data Entry MSB)
7All Volume
9 Rotary Slow/Fast
4
ROTARY [STOP] button C
5
ROTARY [SPEED] button C
10 (Pan)
11 Expression
12 A: Volume
!
Part Volume slider [A] A
13 A: Drive Depth
L
DRIVE [DEPTH] knob A
14 A: Effect1 Depth
M
EFFECT [DEPTH] knob A
15 A: Effect1 Rate
M
EFFECT [RATE] knob A
16 A: Effect2 Depth
M
EFFECT [DEPTH] knob A
17 A: Effect2 Rate
M
EFFECT [RATE] knob A
18 A: Drawbar 16'
)
ORGAN FOOTAGE slider [16'] A
19 A: Drawbar 5 1/3
)
ORGAN FOOTAGE slider [5 1/3'] A
20 A: Drawbar 8'
)
ORGAN FOOTAGE slider [8'] A
21 A: Drawbar 4'
)
ORGAN FOOTAGE slider [4'] A
22 A: Drawbar 2 2/3
)
ORGAN FOOTAGE slider [2 2/3'] A
23 A: Drawbar 2'
)
ORGAN FOOTAGE slider [2'] A
24 A: Drawbar 1 3/5'
)
ORGAN FOOTAGE slider [1 3/5'] A
25 A: Drawbar 1 1/3'
)
ORGAN FOOTAGE slider [1 1/3'] A
26 A: Drawbar 1'
)
ORGAN FOOTAGE slider [1'] A
CC
No.
Display* Controllers Table
Foot Pedal 1,
Foot Pedal 2,
Modulation
Wheel
27 B: Volume
!
Part Volume slider [B] A
28 B: Attack
K
EG [ATTACK] knob A
29 B: Release
K
EG [RELEASE] knob A
30 B: Cutoff
J
FILTER [CUTOFF] knob A
31 B: Resonance
J
FILTER [RESONANCE] knob A
32 (Bank LSB)
38 (Data Entry LSB)
64 Sustain
65 (Portamento)
66 Sostenuto
67 Soft
68 B: Drive Depth
L
DRIVE [DEPTH] knob A
69 B: Effect1 Depth
M
EFFECT [DEPTH] knob A
70 B: Effect1 Rate
M
EFFECT [RATE] knob A
71 A: Resonance
J
FILTER [RESONANCE] knob A
72 A: Release
K
EG [RELEASE] knob A
73 A: Attack
K
EG [ATTACK] knob A
74 A: Cutoff
J
FILTER [CUTOFF] knob A
75 B: Effect2 Depth
M
EFFECT [DEPTH] knob A
76 B: Effect2 Rate
M
EFFECT [RATE] knob A
77 B: Drawbar 16'
)
ORGAN FOOTAGE slider [16'] A
78 B: Drawbar 5 1/3
)
ORGAN FOOTAGE slider [5 1/3'] A
79 B: Drawbar 8'
)
ORGAN FOOTAGE slider [8'] A
80 B: Drawbar 4'
)
ORGAN FOOTAGE slider [4'] A
81 B: Drawbar 2 2/3
)
ORGAN FOOTAGE slider [2 2/3'] A
82 B: Drawbar 2'
)
ORGAN FOOTAGE slider [2'] A
83 B: Drawbar 1 3/5'
)
ORGAN FOOTAGE slider [1 3/5'] A
84 (Portamento Ctrl)
85 B: Drawbar 1 1/3'
)
ORGAN FOOTAGE slider [1 1/3'] A
86 B: Drawbar 1'
)
ORGAN FOOTAGE slider [1'] A
87 C: Volume
!
Part Volume slider [C] A
88 Equalizer High
P
EQUALIZER slider [LOW] B
89 Equalizer Mid
P
EQUALIZER slider [MID] B
90 Equalizer Low
P
EQUALIZER slider [HIGH] B
91 Reverb Depth
O
REVERB DEPTH knob A
92 Delay Time
N
DELAY [DEPTH] knob A
93 Delay Depth
N
DELAY [TIME] knob A
95 (Effect5 Depth)
96 (Data Increment)
97 (Data Decrement)
98 (NRPN LSB)
99 (NRPN MSB)
100 (RPN LSB)
101 (RPN MSB)
102 C: Attack
K
EG [ATTACK] knob A
103 C: Release
K
EG [RELEASE] knob A
104 C: Cutoff
J
FILTER [CUTOFF] knob A
105 C: Resonance
J
FILTER [RESONANCE] knob A
106 C: Drive Depth
L
DRIVE [DEPTH] knob A
107 C: Effect1 Depth
M
EFFECT [DEPTH] knob A
108 C: Effect1 Rate
M
EFFECT [RATE] knob A
109 C: Effect2 Depth
M
EFFECT [DEPTH] knob A
110 C: Effect2 Rate
M
EFFECT [RATE] knob A
111 C: Drawbar 16'
)
ORGAN FOOTAGE slider [16'] A
112 C: Drawbar 5 1/3
)
ORGAN FOOTAGE slider [5 1/3'] A
113 C: Drawbar 8'
)
ORGAN FOOTAGE slider [8'] A
114 C: Drawbar 4'
)
ORGAN FOOTAGE slider [4'] A
115 C: Drawbar 2 2/3
)
ORGAN FOOTAGE slider [2 2/3'] A
116 C: Drawbar 2'
)
ORGAN FOOTAGE slider [2'] A
117 C: Drawbar 1 3/5'
)
ORGAN FOOTAGE slider [1 3/5'] A
118 C: Drawbar 1 1/3'
)
ORGAN FOOTAGE slider [1 1/3'] A
119 C: Drawbar 1'
)
ORGAN FOOTAGE slider [1'] A
USB Audio Volume
Data List
CK88 CK61 Owner’s Manual
55
Table A
Table B
Table C
Table D
Parameters
Controller Value
Transmitted Recognized
0-127 0-127 0-127
Parameters
Controller Value
Transmitted Recognized
-12dB 52 0-5 0-5
-11dB 53 6-10 6-10
-10dB 54 11-15 11-15
-9dB 55 16-20 16-20
-8dB 56 21-25 21-25
-7dB 57 26-30 26-30
-6dB 58 31-35 31-35
-5dB 59 36-40 36-40
-4dB 60 41-46 41-46
-3dB 61 47-51 47-51
-2dB 62 52-56 52-56
-1dB 63 57-61 57-61
0dB 64 62-66 62-66
1dB 65 67-71 67-71
2dB 66 72-76 72-76
3dB 67 77-81 77-81
4dB 68 82-87 82-87
5dB 69 88-92 88-92
6dB 70 93-97 93-97
7dB 71 98-102 98-102
8dB 72 103-107 103-107
9dB 73 108-112 108-112
10dB 74 113-117 113-117
11dB 75 118-122 118-122
12dB 76 123-127 123-127
Parameters
Controller Value
Transmitted Recognized
Slow 0 0-63
Stop 64 64
Fast 127 65-127
Parameters
Controller Value
Transmitted Recognized
000
1 1-18 1-18
2 19-36 19-36
3 37-54 37-54
4 55-72 55-72
5 73-90 73-90
6 91-108 91-108
7 109-126 109-126
8 127 127
Data List
CK88 CK61 Owner’s Manual
56
MIDI Data Format
1 Scope
The specifications described herein apply to transmission and reception of MIDI data by a
CK88 or CK61 Stage Keyboard.
2 Compliance
The specifications described herein comply with the MIDI 1.0 standard.
(1) TRANSMIT FLOW
MIDI <-+--[SW1]--+---------NOTE OFF 8nH
OUT |
| +---------NOTE ON 9nH
| |
| +---------CONTROL CHANGE
| | SUSTAIN BnH,40H
| | ASSIGNABLE CONTROLLER BnH,(01H...77H)
| |
| |
| |
| |
| |
| +--[SW3]--BANK SELECT MSB BnH,00H
| | BANK SELECT LSB BnH,20H
| |
| +--[SW4]--PROGRAM CHANGE CnH
| |
| +---------PITCH BEND CHANGE EnH
|
+-------------------SYSTEM REALTIME MESSAGE
| ACTIVE SENSING FEH
|
+--[SW2]--+---------SYSTEM EXCLUSIVE MESSAGE
| |
| +---------<BULK DUMP>
| | F0H 43H 0nH 7FH 1CH bhH blH 0BH ahH amH
| | alH ddH....ddH ccH F7H
| |
| +---------<PARAMETER CHANGE>
| F0H 43H 1nH 7FH 1CH 0BH ahH amH alH
| ddH...ddH F7H
|
+-------------------SYSTEM EXCLUSIVE MESSAGE
IDENTITY REPLY
F0H 7EH 7FH 06H 02H 43H 00H 41H ddH ddH
mmH 00H 00H 7FH F7H
dd: Device family number/code
CK61: 62H 06H
CK88: 63H 06H
mm: version
mm =(version no.-1.0) * 10
e.g.)version 1.0mm =(1.0-1.0) * 10 = 0
version 1.5mm =(1.5-1.0) * 10 = 5
[SW1] MIDI Transmit Channel
Complies with Zone Transmit Channel when the Master Keyboard Mode SW is set to
on.
Complies with MIDI Transmit Channel in any other case.
[SW2] SYSTEM MIDI Device Number
When set to “all,” transmitted via “1.”
[SW3] SYSTEM Bank Select Switch
[SW4] SYSTEM Program Change Switch
(2) RECEIVE FLOW
MIDI >-+--[SW1]--+---------NOTE OFF 8nH
| |
| |---------NOTE ON/OFF 9nH
| |
| +---------CONTROL CHANGE
| | MODULATION BnH,01H
| | PEDAL WAH BnH,04H
| | CHANNEL VOLUME BnH,07H
| | EXPRESSION BnH,0BH
| | SUSTAIN BnH,40H
| | SOSTENUTO BnH,42H
| | SOFT BnH,43H
| | PORTAMENTO CONTROL BnH,54H
| |
| +--[SW3]--BANK SELECT MSB BnH,00H
| | BANK SELECT LSB BnH,20H
| |
| +---------CHANNEL MODE MESSAGE
| | ALL SOUND OFF BnH,78H
| | RESET ALL CONTROLLERS BnH,79H
| | ALL NOTES OFF BnH,7BH
| | OMNI MODE OFF BnH,7CH
| | OMNI MODE ON BnH,7DH
| |
| +--[SW4]--PROGRAM CHANGE CnH
| |
| +---------PITCH BEND CHANGE EnH
|
+-------------------SYSTEM REALTIME MESSAGE
| ACTIVE SENSING FEH
|
+--[SW2]--+---------SYSTEM EXCLUSIVE MESSAGE
| |
| +---------<BULK DUMP>
| | F0H 43H 0nH 7FH 1CH bhH blH 0BH ahH amH
| | alH ddH...ddH ccH F7H
| |
| +---------<PARAMETER CHANGE>
| | F0H 43H 1nH 7FH 1CH 0BH ahH amH alH
| | ddH...ddH F7H
| |
| +---------<BULK DUMP REQUEST>
| | F0H 43H 2nH 7FH 1CH 0BH ahH amH alH F7H
| |
| +---------<PARAMETER REQUEST>
| F0H 43H 3nH 7FH 1CH 0BH ahH amH alH F7H
|
+-------------------SYSTEM EXCLUSIVE MESSAGE
IDENTITY REQUEST F0H 7EH 0nH 06H 01H F7H
[SW1] Complies with MIDI Receive Channel.
[SW2] SYSTEM MIDI Device Number
[SW3] SYSTEM Bank Select Switch
[SW4] SYSTEM Program Change Switch
(3) TRANSMIT/RECEIVE DATA
(3-1) CHANNEL VOICE MESSAGES
(3-1-1) NOTE OFF
STATUS 1000nnnn(9nH) n = 0–15 CHANNEL NUMBER
NOTE No. 0kkkkkkk k = 0(C-2)–127(G8)
VELOCITY 0vvvvvvv v = 64 Transmit
(3-1-2) NOTE ON/OFF
STATUS 1000nnnn(8nH) n = 0–15 CHANNEL NUMBER
NOTE No. 0kkkkkkk k = 0(C-2)–127(G8)
VELOCITY NOTE ON 0vvvvvvv(v≠0)
NOTE OFF 0vvvvvvv(v=0)
(3-1-3) CONTROL CHANGE
STATUS 1011nnnn(BnH) n = 0–15 CHANNEL NUMBER
CONTROL NUMBER 0ccccccc
CONTROL VALUE 0vvvvvvv
*TRANSMITTED CONTROL NUMBER
c = 0 BANK SELECT MSB ; v = 0 - 127 *1
c = 32 BANK SELECT LSB ; v = 0 - 127 *1
c = 64 SUSTAIN ; v = 0 - 127 *3
c = 1..119 ASSIGNABLE CONTROLLER ; v = 0 - 127 *2
*RECEIVED CONTROL NUMBER
c = 0 BANK SELECT MSB ; v = 0 - 127 *1
c = 32 BANK SELECT LSB ; v = 0 - 127 *1
c = 1 MODULATION ; v = 0 - 127
c = 4 PEDAL WAH ; v = 0 - 127
c = 7 CHANNEL VOLUME ; v = 0 - 127
c = 11 EXPRESSION ; v = 0 - 127
c = 64 SUSTAIN ; v = 0 - 127
c = 66 SOSTENUTO ;v=0-63:OFF, 64-127:ON
c = 67 SOFT ; v = 0 - 127
c = 84 PORTAMENTO CONTROL ; v = 0 - 127
*1 Relation between BANK SELECT and PROGRAM is as follows:
*2 The default CONTROL NUMBERS of ASSIGNABLE CONTROLLER are as
follows:
MODULATION WHEEL 1
FOOT PEDAL 1 64
FOOT PEDAL 2 11
*3
Foot Pedal Type
is set to
FC3A (HalfOff)
or
FC4A/FC5
, the foot
pedal operation transmits the value 0 (off) or 127 (on).
Bank Select will be actually executed when a Program Change message is received.
Bank Select and Program Change numbers that are not supported by this instrument
will be ignored.
(3-1-4) PROGRAM CHANGE
STATUS 1100nnnn(CnH) n = 0–15 CHANNEL NUMBER
PROGRAM NUMBER 00000ppp p = 0–7
(3-1-5) PITCH BEND CHANGE
STATUS 1110nnnn(EnH) n = 0–15 CHANNEL NUMBER
LSB 0vvvvvvv PITCH BEND CHANGE LSB
MSB 0vvvvvvv PITCH BEND CHANGE MSB
Transmitted with a resolution of 7 bits.
(3-2) CHANNEL MODE MESSAGES
STATUS 1011nnnn(BnH) n = 0–15 CHANNEL NUMBER
CONTROL NUMBER 0ccccccc c = CONTROL NUMBER
CONTROL VALUE 0vvvvvvv v = DATA VALUE
CATEGORY MSB LSB PROGRAM No.
Live Set Page 1 63 0 0..7
:: :
Live Set Page 20 63 19 0..7
See the following information for the
Control Change to be valid when MIDI
Control is set to On.
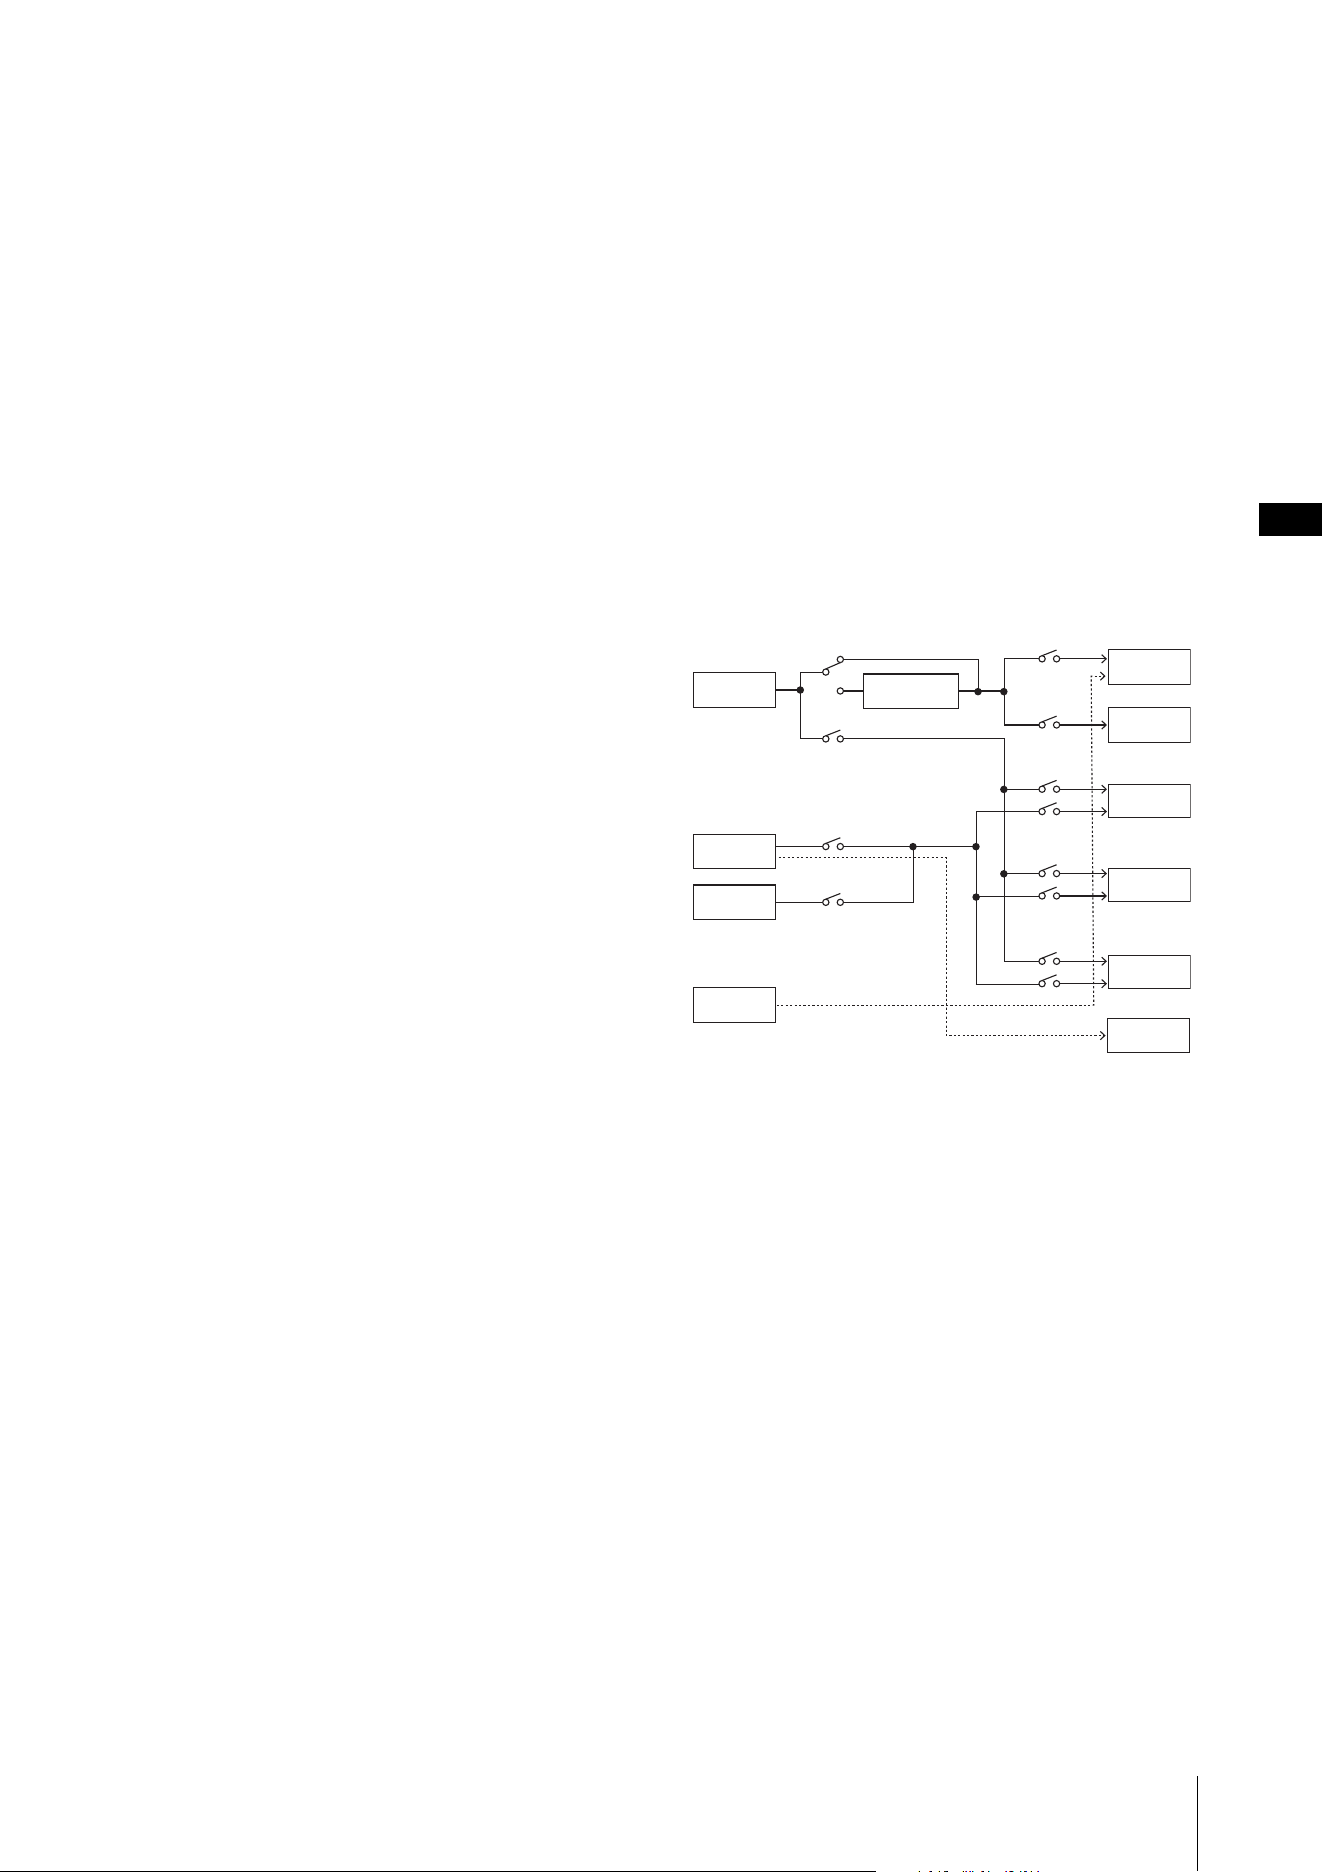
Data List
CK88 CK61 Owner’s Manual
57
(3-2-1) ALL SOUND OFF (CONTROL NUMBER = 78H, DATA VALUE = 0)
All the sounds currently being played, including channel messages such as note-on
of a certain channel, are muted this message is received.
(3-2-2) RESET ALL CONTROLLERS (CONTROL NUMBER = 79H, DATA VALUE = 0)
Resets the values set for the following controllers.
PITCH BEND CHANGE 0 (center)
MODULATION 0 (minimum)
PEDAL WAH 0 (minimum)
EXPRESSION 127 (maximum)
SUSTAIN 0 (off)
SOSTENUTO 0 (off)
SOFT 0 (off)
PORTAMENTO CONTROL Clear the reserved note number
Doesn’t reset the following data:
PROGRAM CHANGE, BANK SELECT MSB/LSB, VOLUME
(3-2-3) ALL NOTES OFF (CONTROL NUMBER = 7BH, DATA VALUE = 0)
All the notes currently set to on in certain channel(s) are muted when receiving this
message. However, if Sustain or Sostenuto is on, notes will continue sounding until
these are turned off.
(3-2-4) OMNI MODE OFF (CONTROL NUMBER = 7CH, DATA VALUE = 0)
Performs the same function as when receiving ALL NOTES OFF.
(3-2-5) OMNI MODE ON (CONTROL NUMBER = 7DH, DATA VALUE = 0)
Performs the same function as when receiving ALL NOTES OFF.
(3-3) SYSTEM REAL TIME MESSAGES
(3-3-1) ACTIVE SENSING
STATUS 11111110(FEH)
Transmitted every 200 msec.
Once this code is received, the instrument starts sensing. When neither status
messages nor data are received for more than approximately 350 ms, the MIDI
receive buffer will be cleared, and the sounds currently being played are forcibly
turned off.
(3-4) SYSTEM EXCLUSIVE MESSAGE
(3-4-1) UNIVERSAL NON REALTIME MESSAGE
(3-4-1-1) IDENTITY REQUEST (Receive only)
F0H 7EH 0nH 06H 01H F7H (“n” = Device No. However, this
instrument receives under “omni.”)
(3-4-1-2) IDENTITY REPLY (Transmit only)
F0H 7EH 7FH 06H 02H 43H 00H 41H ddH ddH mmH 00H 00H 7FH
F7H
dd: Device family number/code
CK61: 62H 06H
CK88: 63H 06H
mm: version
mm = (version no. - 1.0) * 10
e.g.) version 1.0 mm = (1.0 - 1.0) * 10 = 0
version 1.5 mm = (1.5 - 1.0) * 10 = 5
(3-4-2) UNIVERSAL REALTIME MESSAGE
(3-4-3)PARAMETER CHANGE
(3-4-3-1) NATIVE PARAMETER CHANGE, MODE CHANGE
11110000 F0 Exclusive status
01000011 43 YAMAHA ID
0001nnnn 1n Device Number
01111111 7F Group ID High
00011100 1C Group ID Low
00001011 0B Model ID
0aaaaaaa aaaaaaa Address High
0aaaaaaa aaaaaaa Address Mid
0aaaaaaa aaaaaaa Address Low
0ddddddd ddddddd Data
| |
11110111 F7 End of Exclusive
For parameters with data size of 2 or more, the appropriate number of data
bytes will be transmitted.
See the following MIDI Data Table for Address.
(3-4-4) BULK DUMP
11110000 F0 Exclusive status
01000011 43 YAMAHA ID
0000nnnn 0n Device Number
01111111 7F Group ID High
00011100 1C Group ID Low
0bbbbbbb bbbbbbb Byte Count
0bbbbbbb bbbbbbb Byte Count
00001011 0B Model ID
0aaaaaaa aaaaaaa Address High
0aaaaaaa aaaaaaa Address Mid
0aaaaaaa aaaaaaa Address Low
0 0 Data
| |
0ccccccc ccccccc Check-sum
11110111 F7 End of Exclusive
See the following MIDI Data Table for Address and Byte Count.
Checksum is the value that results in a value of 0 for the lower 7 bits when
the Byte Count, Start Address, Data and Checksum itself are added.
(3-4-5) DUMP REQUEST
11110000 F0 Exclusive status
01000011 43 YAMAHA ID
0010nnnn 2n Device Number
01111111 7F Group ID High
00011100 1C Group ID Low
00001011 0B Model ID
0aaaaaaa aaaaaaa Address High
0aaaaaaa aaaaaaa Address Mid
0aaaaaaa aaaaaaa Address Low
11110111 F7 End of Exclusive
See the following MIDI Data Table for Address.
(3-4-6) PARAMETER REQUEST
11110000 F0 Exclusive status
01000011 43 YAMAHA ID
0011nnnn 3n Device Number
01111111 7F Group ID High
00011100 1C Group ID Low
00001011 0B Model ID
0aaaaaaa aaaaaaa Address High
0aaaaaaa aaaaaaa Address Mid
0aaaaaaa aaaaaaa Address Low
11110111 F7 End of Exclusive
See the following MIDI Data Table for Address.
(4) SYSTEM OVERVIEW (Keyboard and Tone Generator)
ALL SOUND OFF clears all the sounds in the specific channel(s) played by both the keyboard
and the data via MIDI.
ALL NOTES OFF received via MIDI clears the sounds in the specific channel(s) played via
MIDI.
USB Port 2 is enabled when ‘MIDI Port MIDI SW = OFF’
and ‘MIDI Port USB SW = ON’
Keyboard
MIDI Out
USB Port 1
Part A
USB Port 2
MIDI IN
USB Port 1
USB Port 2
Zone Settings
Zone Mode SW
Local Control
MIDI Port
MIDI SW
MIDI Port
MIDI SW
MIDI Port
USB SW
Part A
External Keyboard SW
Part B
External Keyboard SW
Part C
External Keyboard SW
MIDI Port
USB SW
Part B
Part C
Data List
CK88 CK61 Owner’s Manual
58
MIDI Data Table
Bank Select
Parameter Base Address
Group Number = 7F 1C, Model ID = 0B
Bulk Dump Block
“Top Address” indicates the top address of each block designated by the bulk dump operation.
“Byte Count” indicates the data size contained in each block designated by the bulk dump
operation.
The block from the Bulk Header to the Bulk Footer of the Live Set Sound can be received
regardless of their order; however, they cannot be received if an irrelevant Block is included.
To execute 1 Live Set Sound bulk dump request, designate its corresponding Bulk Header
address.
For information about “pp” and “n” shown in the following list, refer to the MIDI PARAMETER
CHANGE TABLE (BULK CONTROL).
Group Number = 7F 1C, Model ID = 0B
n: Device Number
gh: Group Number High
gl: Group Number Low
bh: Byte Count High
bl: Byte Count Low
id: Model ID
ah: Parameter Address High
am: Parameter Address Middle
al: Parameter Address Low
dt: Data
cc: Data Checksum
MSB LSB
Program
No.
Type Memory Description
DEC HEX DEC HEX
63 3F 0 00 0–7 Live Set
Sound
User Live Set Page 1
1 01 0–7 User Live Set Page 2
2 02 0–7 User Live Set Page 3
3 03 0–7 User Live Set Page 4
4 04 0–7 User Live Set Page 5
5 05 0–7 User Live Set Page 6
6 06 0–7 User Live Set Page 7
7 07 0–7 User Live Set Page 8
8 08 0–7 User Live Set Page 9
9 09 0–7 User Live Set Page 10
10 0A 0–7 User Live Set Page 11
11 0B 0–7 User Live Set Page 12
12 0C 0–7 User Live Set Page 13
13 0D 0–7 User Live Set Page 14
14 0E 0–7 User Live Set Page 15
15 0F 0–7 User Live Set Page 16
16 10 0–7 User Live Set Page 17
17 11 0–7 User Live Set Page 18
18 12 0–7 User Live Set Page 19
19 13 0–7 User Live Set Page 20
Parameter Block
DescriptionTop Address
High Mid Low
System 20 00 00 Common
20 40 00 Master EQ
00 7F 00 Soundmondo Format Version
BULK CONTROL 0E 00 00 Header
0F 00 00 Footer
STORE TO FLASH 0D 00 00 Store To Flash
Live Set Common 46 00 00 Common
46 40 00 Live Set EQ
46 10 00 Audio Trigger Path
4A zz 00 Zone (zz: 00–03)
Live Set Part 50 0p 00 Part
Parameter Block Description
Byte Count Top Address
DEC HEX High Mid Low
System Common 5638200000
Master EQ 20 14 20 40 00
Live Set Sound Bulk Header 0 00 0E pp 0n
Soundmondo Format Version 4 04 00 7F 00
Common Common 83 53 46 00 00
Live Set EQ 20 14 46 40 00
Audio Trigger 255 FF 46 10 00
Zone Zone 1 16 10 4A 00 00
: :
Zone 4 03
Part Part A 105 69 50 00 00
Part B 01
Part C 02
Bulk Footer 0 00 0F pp 0n
Message Type Data
Parameter Change F0, 43, 1n, gh, gl, id, ah, am, al, dt, … F7
Parameter Request F0, 43, 3n, gh, gl, id, ah, am, al F7
Bulk Dump F0, 43, 0n, gh, gl, bh, bl, id, ah, am, al, dt, …, cc, F7
Bulk Request F0, 43, 2n, gh, gl, id, ah, am, al, F7
Data List
CK88 CK61 Owner’s Manual
59
MIDI PARAMETER CHANGE TABLE (BULK
CONTROL)
Group Number = 7F 1C, Model ID = 0B
SYSTEM
Common
Group Number = 7F 1C, Model ID = 0B
TOTAL SIZE = 56 38 (HEX)
Master EQ
TOTAL SIZE = 20 14 (HEX)
Soundmondo Format Version
TOTAL SIZE = 4 4 (HEX)
Address
Size
Data
Range
(HEX)
Parameter
Name
Description
Default
(HEX)
Notes
High Mid Low
0E pp 0n 1 - Bulk Header Live Set Sound User
(pp = 0–19, n = 0–7)
-
7F 00 1 - Current Sound Buffer -
0F pp 0n 1 - Bulk Footer Live Set Sound User
(pp = 0–19, n = 0–7)
-
7F 00 1 - Current Sound Buffer -
Address
Size
Data
Range
Parameter
Name
Description
Default
(HEX)
Notes
High Mid Low
20 00 00 1 reserved
01 1 reserved
02 4 00–00
00–07
00–0F
00–0F
Master Tune
414.72–466.78 [Hz]
1st bit3-0: bit15-12
2nd bit3-0: bit11-8
3rd bit3-0: bit 7-4
4th bit3-0: bit 3-0
00
04
00
00
06 1 3D–43 Keyboard Octave
Shift
−3–0–+3 40
Excluded
from the
save
operation
07 1 34–4C Keyboard
Transpose
−12–+12
[semitones]
40
Excluded
from the
save
operation
08 1 00–01 Controller Reset Hold, Reset 01
09 1 00–01 Local Control Off, On 01
0A 1 00–0F,
7F
Tx Channel 1–16, Off 00
0B 1 00–10 Rx Channel 1–16, All 00
0C 1 00–01 MIDI Control Off, On 00
0D 1 reserved
0E 1 38–48 Output Gain −24–0–+24 [dB] 3E
0F 1 reserved
10 1 00–04 Keyboard Touch
Curve
Normal, Soft, Hard,
Wide, Fixed
00
11 1 01–7F Keyboard Fixed
Velocity
1–127 40
12 1 00–01 Transmit/Receive
Bank Select
Off, On 01
13 1 00–01 Transmit/Receive
Program Change
Off, On 01
14 1 reserved
15 1 00–01 MIDI In/Out Off, On 01
16 1 00–01 USB In/Out Off, On 01
17 1 reserved
18 1 reserved
19 1 reserved
1A 1 reserved
1B 1 00–01 Value Indication Off, On 01
1C 1 00–01 Controller Mode Jump, Catch 00
1D 1 reserved
1E 1 00–01 LCD Switch Off, On 01
1F 1 36–4A LCD Contrast −10–0–+10 40
20 1 00–01 Panel Lock
Live Set
Off, On 01
21 1 00–01 Panel Lock Organ Off, On 01
22 1 00–01 Panel Lock Filter/
EG
Off, On 01
23 1 00–01 Panel Lock Drive/
Effect
Off, On 01
24 1 00–01 Panel Lock Delay/
Reverb
Off, On 01
25 1 00–01 Panel Lock
Equalizer
Off, On 01
26 1 reserved
27 1 reserved
28 1 00–13 Power On Page 1–20 00
29 1 00–07 Power On Sound 1–8 00
2A 1 00–03 Foot Pedal 1–
Pedal Type
FC3A (Half On),
FC3A (HalfOff),
FC4A/FC5, FC7
00
2B 1 00–02 Foot Pedal 1–Live
Set Inc/Dec
Off, Live Set Inc,
Live Set Dec
00
2C 1 00–03 Foot Pedal 2–
Pedal Type
FC3A (Half On),
FC3A (HalfOff),
FC4A/FC5, FC7
03
2D 1 00–02 Foot Pedal 2–Live
Set Inc/Dec
Off, Live Set Inc,
Live Set Dec
00
2E 1 00–01 Filter/EG Reset Off, On 01
2F 1 00–01 Effect On/Off
Reset
Off, On 01
30 1 00–02 reserved
31 1 USB Audio
Volume
0–127 40
32 1 00–7F Bluetooth Volume 0–127 40
33 1 00–7F A/D Input Type Mic, Line 01
34 1 00–01 USB Audio
Loopback
Off, On 00
35 1 reserved
36 1 00–01 Speaker EQ Normal, Table 00
37 1 00–01 Speaker Mute Auto, Manual 00
Address
Size
Data
Range
Parameter
Name
Description
Default
(HEX)
Notes
High Mid Low
20 40 00 1 34–4C Low Gain −12dB–+12dB 40
Excluded
from the
save oper-
ation
01 1 04–28 Low Frequency 32Hz–2.0kHz 0C
02 1 reserved
03 1 reserved
04 1 reserved
05 1 reserved
06 1 reserved
07 1 reserved
08 1 34–4C Mid Gain −12dB–+12dB 40
Excluded
from the
save oper-
ation
09 1 0E–36 Mid Frequency 100Hz–10kHz 22
0A 1 reserved
0B 1 reserved
0C 1 reserved
0D 1 reserved
0E 1 reserved
0F 1 reserved
10 1 34–4C High Gain −12dB–+12dB 40
Excluded
from the
save oper-
ation
11 1 1C–3A High Frequency 500Hz–16kHz 30
12 1 reserved
13 1 reserved
Address
Size
Data
Range
Parameter Name Description
Default
(HEX)
Notes
High Mid Low
00 7F 00 1 00–7F Soundmondo Format
Version Major
01
1 00–7F Soundmondo Format
Version Minor
00
1 00–7F Soundmondo Format
Version Bugfix
00
1 reserved 00
Address
Size
Data
Range
Parameter
Name
Description
Default
(HEX)
Notes
High Mid Low
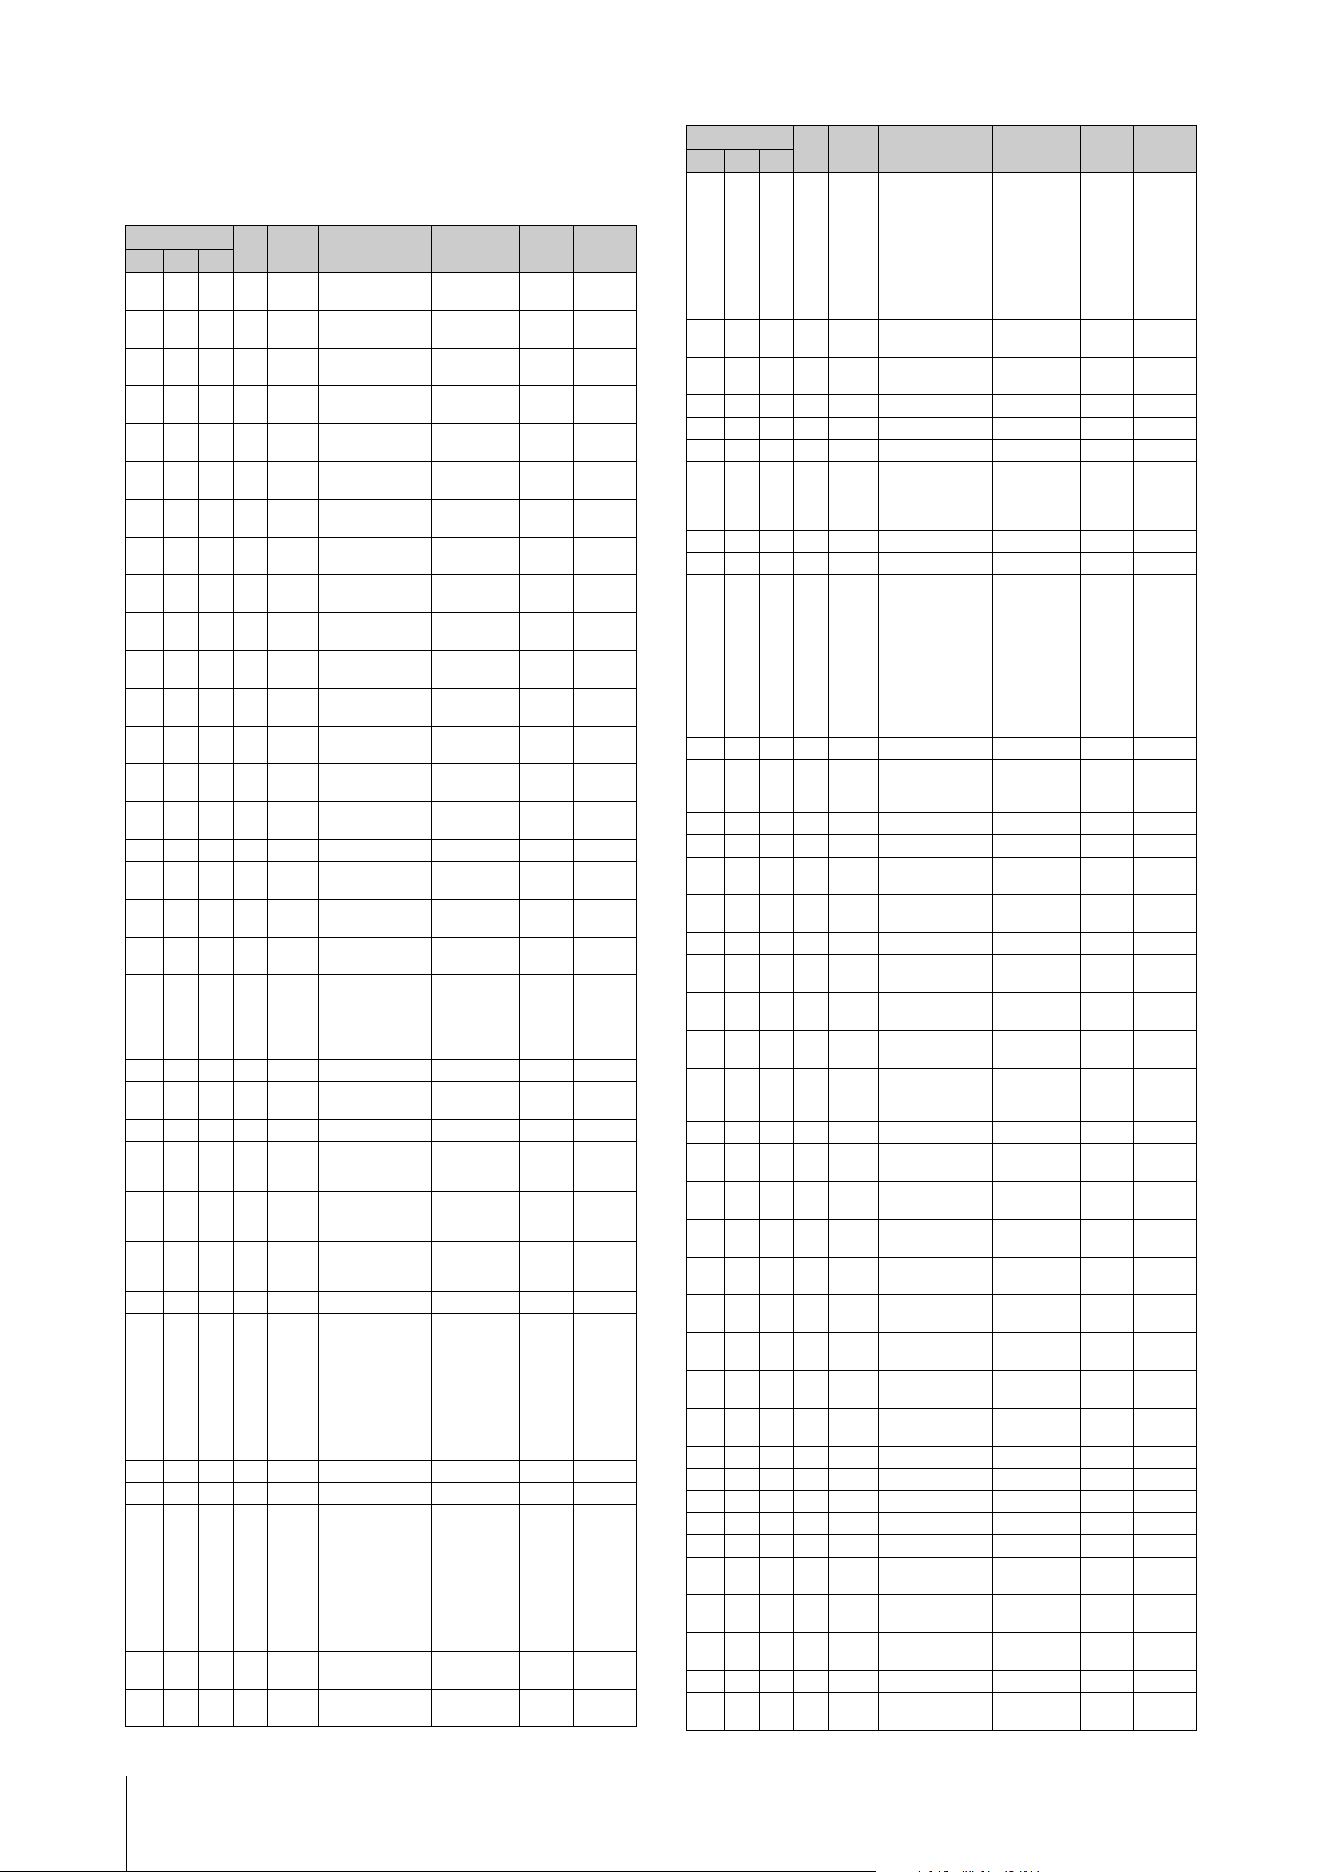
Data List
CK88 CK61 Owner’s Manual
60
Live Set Common
Common
Group Number = 7F 1C, Model ID = 0B
Address
Size
Data
Range
Parameter Name Description
Default
(HEX)
Notes
High Mid Low
46 00 00 1 20–7E Live Set Sound
Name 1
32–126
(ASCII)
49 'I'
01 1 20–7E Live Set Sound
Name 2
32–126
(ASCII)
6E 'n'
02 1 20–7E Live Set Sound
Name 3
32–126
(ASCII)
69 'i'
03 1 20–7E Live Set Sound
Name 4
32–126
(ASCII)
74 't'
04 1 20–7E Live Set Sound
Name 5
32–126
(ASCII)
20 ' '
05 1 20–7E Live Set Sound
Name 6
32–126
(ASCII)
53 'S'
06 1 20–7E Live Set Sound
Name 7
32–126
(ASCII)
6F 'o'
07 1 20–7E Live Set Sound
Name 8
32–126
(ASCII)
75 'u'
08 1 20–7E Live Set Sound
Name 9
32–126
(ASCII)
6E 'n'
09 1 20–7E Live Set Sound
Name 10
32–126
(ASCII)
64 'd'
0A 1 20–7E Live Set Sound
Name 11
32–126
(ASCII)
20
0B 1 20–7E Live Set Sound
Name 12
32–126
(ASCII)
20
0C 1 20–7E Live Set Sound
Name 13
32–126
(ASCII)
20
0D 1 20–7E Live Set Sound
Name 14
32–126
(ASCII)
20
0E 1 20–7E Live Set Sound
Name 15
32–126
(ASCII)
20
0F 1 reserved
10 1 00–01 Live Set EQ Mode
Switch
Off, On 00
11 1 00–01 Master Keyboard
Mode Switch
Off, On 00
12 1 00–01 Advanced Zone
Switch
Off, On 00
13 2 00–12
00–7F
Tempo 42.0–240.0
1st bit6-0
bit13-7
2nd bit6-0
bit6-0
09
30
15 1 34–4C Sound Transpose −12–+12 40
16 1 00–03 Layer Split Mode ABC, A/BC,
AB/C, A/B/C
00
17 1 reserved
18 1 01–7F Split Point C#−2–G8 37
Only for
splitting in
two
19 1 01–7E Split Point A-B C#−2–F#837
Only for
splitting in
three
1A 1 02–7F Split Point B-C D−2–G8 4F
Only for
splitting in
three
1B 1 reserved
1C 1 00–78 Modulation Wheel
Assign
0–119, 120
(USB Audio
Volume)
For more
information,
see “Control
Change
Number”
(page 54).
01
1D 1 reserved
1E 1 reserved
1F 1 00–78 Foot Pedal 1 Assign 0–119, 120
(USB Audio
Volume)
For more
information,
see “Control
Change
Number”
(page 54).
40
20 1 00–7F Foot Pedal 1 Limit
Low
0–127 00
21 1 00–7F Foot Pedal 1 Limit
High
0–127 7F
22 1 00–78 Foot Pedal 2 Assign 0–119, 120
(USB Audio
Volume)
For more
information,
see “Control
Change
Number”
(page 54).
0B
23 1 00–7F Foot Pedal 2 Limit
Low
0–127 00
24 1 00–7F Foot Pedal 2 Limit
High
0–127 7F
25 1 reserved
26 1 reserved
27 1 00–01 Delay Switch Off, On 00
28 1 00–03 Delay Type Digital Delay,
Analog Delay,
Cross Delay,
Tempo Delay
00
29 1 00–7F Delay Depth 0–127 40
2A 1 00–7F Delay Time 0–127 40
2B 1
00–0E
Delay Tempo Delay
Time
1/32 Tri.,
1/64 Dot.,
1/32, 1/16 Tri.,
1/32 Dot.,
1/16, 1/8 Tri.,
1/16 Dot, 1/8,
1/4 Tri.,
1/8 Dot., 1/4,
1/2 Tri.,
1/4 Dot., 1/2
0B
2C 1 00–01 Reverb Switch Off, On 01
2D 1 00–02 Reverb Type Hall Reverb,
Room Reverb,
Plate Reverb
00
2E 1 00–7F Reverb Depth 0–127 14
2F 1 reserved
30 1 00–01 Rotary Speaker
Slow/Fast
Slow, Fast 00
31 1 00–01 Rotary Speaker
Stop
Off, On 00
32 1 reserved
33 1 00–01 Audio Trigger
Switch
Off, On 00
34 1 00–7F Audio Trigger
Volume
0–127 40
35 1 00–01 Audio Trigger Key
Assign
Lowest,
Highest
01
36 1 00–02 Audio Trigger Play
Mode
One Shot,
Play/Stop,
Play/Pause
00
37 1 reserved
38 1 04–28 A/D Input–EQ Low
Freq
32 Hz–2.0 kHz 12
39 1 34–4C A/D Input–EQ Low
Gain
−12 dB–+12
dB
40
3A 1 0E–36 A/D Input–EQ Mid
Freq
100 Hz–10 kHz 29
3B 1 34–4C A/D Input–EQ Mid
Gain
−12 dB–+12
dB
40
3C 1 1C–3A A/D Input–EQ High
Freq
500 Hz–16 kHz 34
3D 1 34–4C A/D Input–EQ High
Gain
−12 dB–+12
dB
40
3E 1 00–01 A/D Input–Noise
Gate Switch
Off, On 00
3F 1 36–61 A/D Input–Noise
Gate Threshold
−73 dB–−30
dB
52
40 1 reserved
41 1 reserved
42 1 reserved
43 1 reserved
44 1 reserved
45 1 00–22 A/D Input–Effect 1
Type
*1 00
46 1 00–7F A/D Input–Effect 1
Depth
0–127 40
47 1 00–7F A/D Input–Effect 1
Rate
0–127 40
48 1 reserved
49 1 00–22 A/D Input–Effect 2
Type
*1 00
Address
Size
Data
Range
Parameter Name Description
Default
(HEX)
Notes
High Mid Low
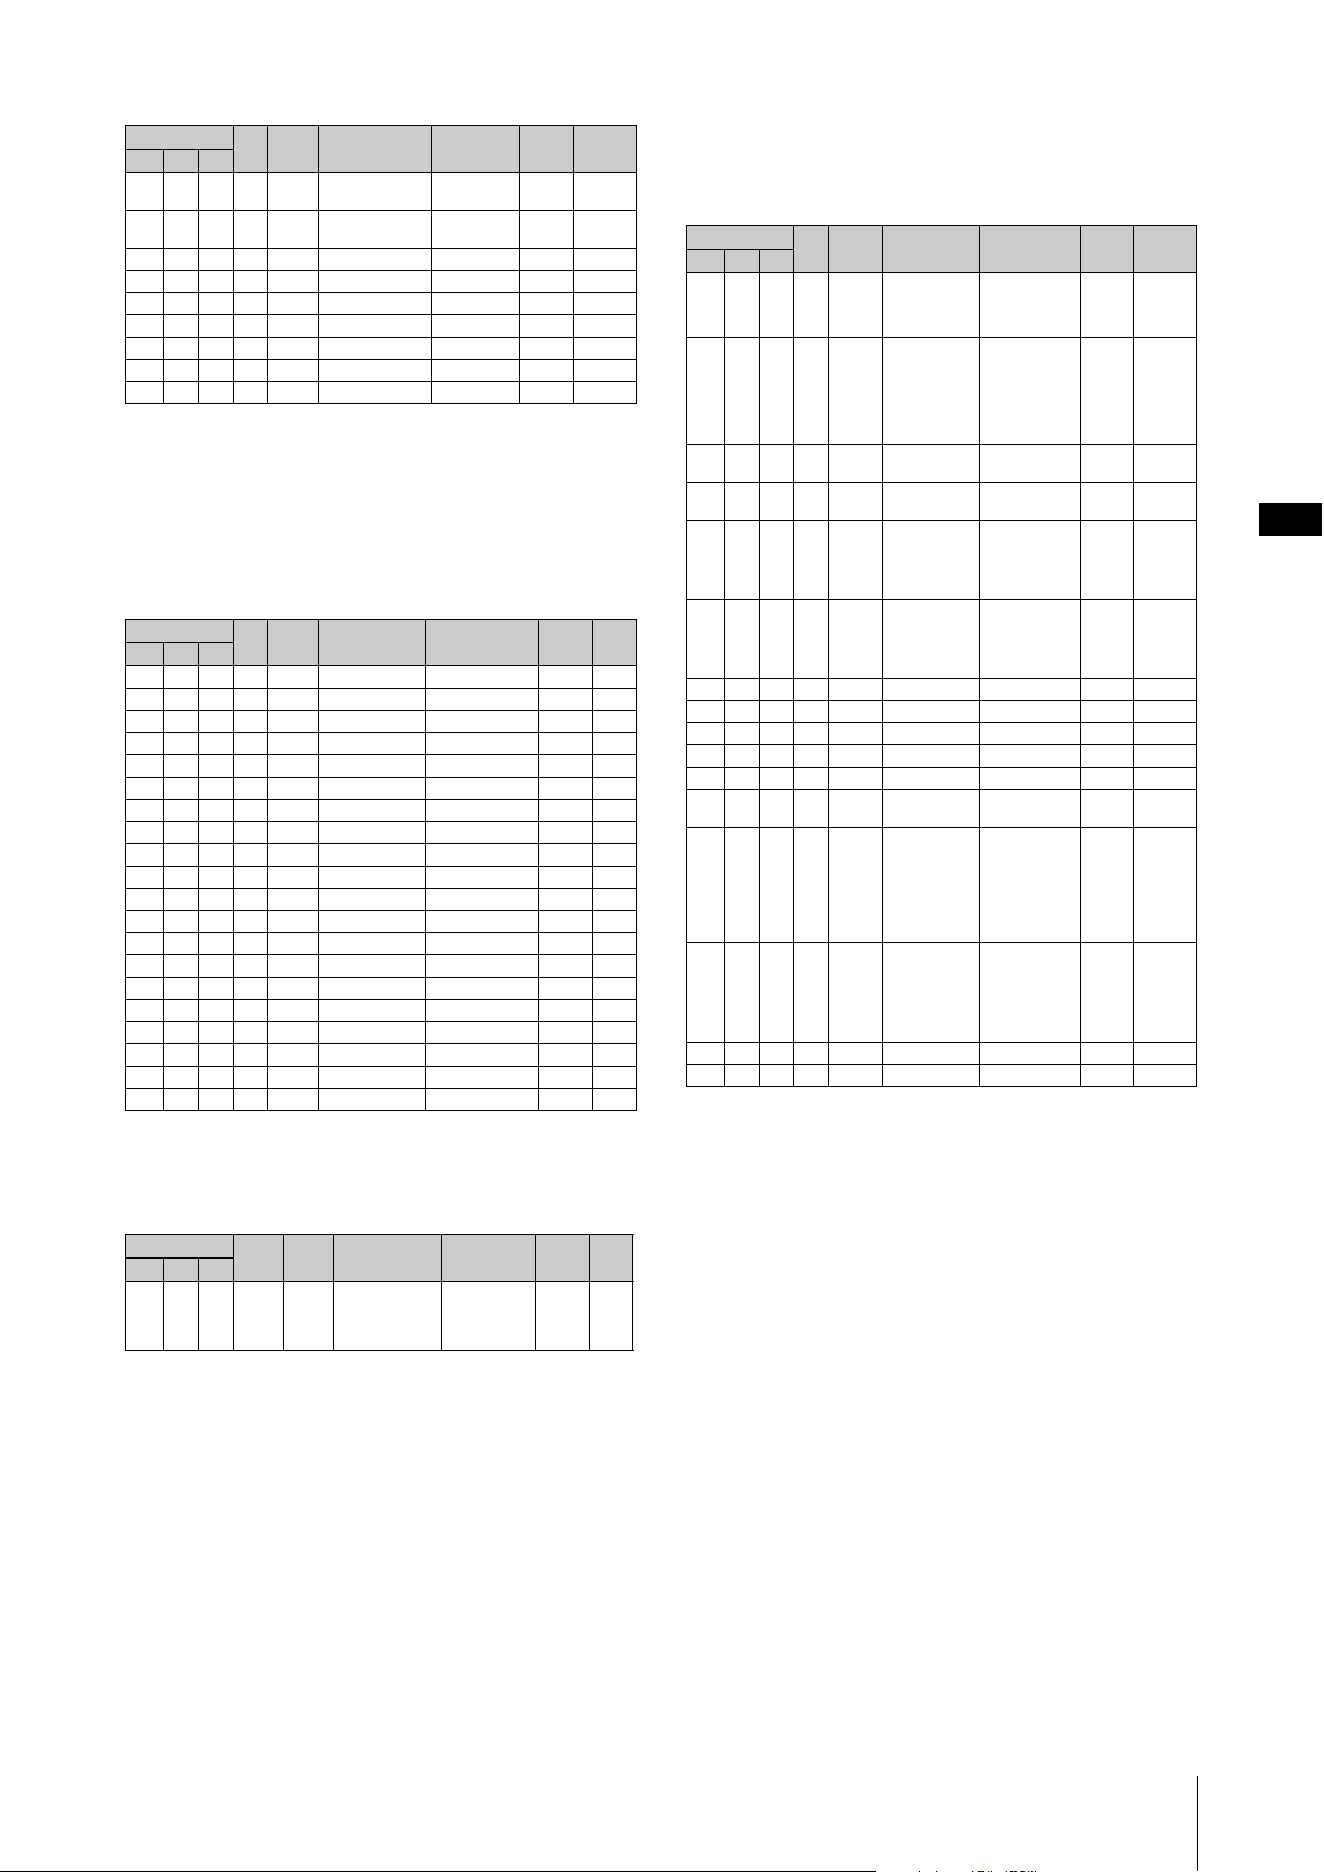
Data List
CK88 CK61 Owner’s Manual
61
TOTAL SIZE = 83 53 (HEX)
*1: G Chorus, SPX Chorus, Symphonic, 816 Chorus, VCM Flanger, Cross FB Flanger, VCM Stereo
Phaser, Small Phaser, Max90, Dual Phaser, Tremolo, Auto Pan, Simple Rotary, British Combo,
British Lead, Small Stereo, Compressor, Tone Control, 1 BandEQ Narrow, 1 BandEQ Wide, Touch
Wah, Pedal Wah, Cross Delay, Digital Delay, Analog Delay, Room Reverb, Hall Reverb, Reverse
Reverb, Ring Modulator, Slicer, LP Filter, HP Filter, Lo-Fi, Harmonic Enhancer
Live Set EQ
TOTAL SIZE = 20 14 (HEX)
Audio Trigger
TOTAL SIZE = 255 FF (HEX)
ZONE
Zone
Group Number = 7F 1C, Model ID = 0B
TOTAL SIZE = 16 10 (HEX)
zz = Zone Number
00–03 (HEX)
4A 1 00–7F A/D Input–Effect 2
Depth
0–127 40
4B 1 00–7F A/D Input–Effect 2
Rate
0–127 40
4C 1 00–7F A/D Input–Volume 0–127 7F
4D 1 reserved
4E 1 reserved
4F 1 reserved
50 1 reserved
51 1 reserved
52 1 reserved
Address
Size
Data
Range
Parameter
Name
Description
Default
(HEX)
Notes
High Mid Low
46 40 00 1 34–4C Low Gain −12 dB–+12 dB 40
01 1 04–28 Low Frequency 32 Hz–2.0 kHz 0C
02 1 reserved
03 1 reserved
04 1 reserved
05 1 reserved
06 1 reserved
07 1 reserved
08 1 34–4C Mid Gain −12 dB–+12 dB 40
09 1 0E–36 Mid Frequency 100 Hz–10 kHz 22
0A 1 reserved
0B 1 reserved
0C 1 reserved
0D 1 reserved
0E 1 reserved
0F 1 reserved
10 1 34–4C High Gain −12 dB–+12 dB 40
11 1 1C–3A High Frequency 500 Hz–16 kHz 30
12 1 reserved
13 1 reserved
Address
Size
Data
Range
Parameter
Name
Description
Default
(HEX)
Notes
High Mid Low
46 10 00 255 at
the
maxi-
mum
Wave File Path 32–127 (ASCII)
Address
Size
Data
Range
Parameter Name Description
Default
(HEX)
Notes
High Mid Low
Address
Size
Data
Range
Parameter
Name
Description
Default
(HEX)
Notes
High Mid Low
4A zz 00 1 00–01 Zone Switch Off, On 00–01
With
Default, only
Zone 1 is
ON.
01 1 00–0F Transmit
Channel
1–16 00–03
With
Default,
Zone 1 is 0,
Zone 2 is 1,
Zone 3 is 2,
and Zone 4
is 3.
02 1 3D–43 Transpose
(Octave)
−3–+3 40
03 1 35–4B Transpose
(Semitone)
−11–+11 40
04 1 00–7F Note Limit Low C−2–G8 00
The highest
value is
defined with
Note Limit
High
.
05 1 00–7F Note Limit High C−2–G8 7F
The lowest
value is
defined with
Note Limit
Low
.
06 1 reserved
07 1 00–7F MIDI Volume 0–127 7F
08 1 00–7F MIDI Pan L64–C–R63 40
09 1 00–7F MIDI Bank MSB 000–127 00
0A 1 00–7F MIDI Bank LSB 000–127 00
0B 1 00–7F MIDI Program
Number
001–128 00
0C 1 00–1F Transmit Bank
Select
Transmit
Program Change
Transmit Volume
Transmit Pa n
bit0: Off, On
Bank Select
bit1: Off, On
Program Change
bit2: Off, On
Volume
bit3: Off, On Pan
1F
When the
Volume
is
Off
, CC#11
(Expres-
sion) will
not be
transmitted.
0D 1 00–3F Transmit PB
Transmit Mod
Transmit Foot
Pedal 1
Transmit Foot
Pedal 2
bit0: Off, On PB
bit1: Off, On Mod
bit2: Off, On Foot
Pedal 1
bit3: Off, On Foot
Pedal 2
0F
0E 1 reserved
0F 1 reserved
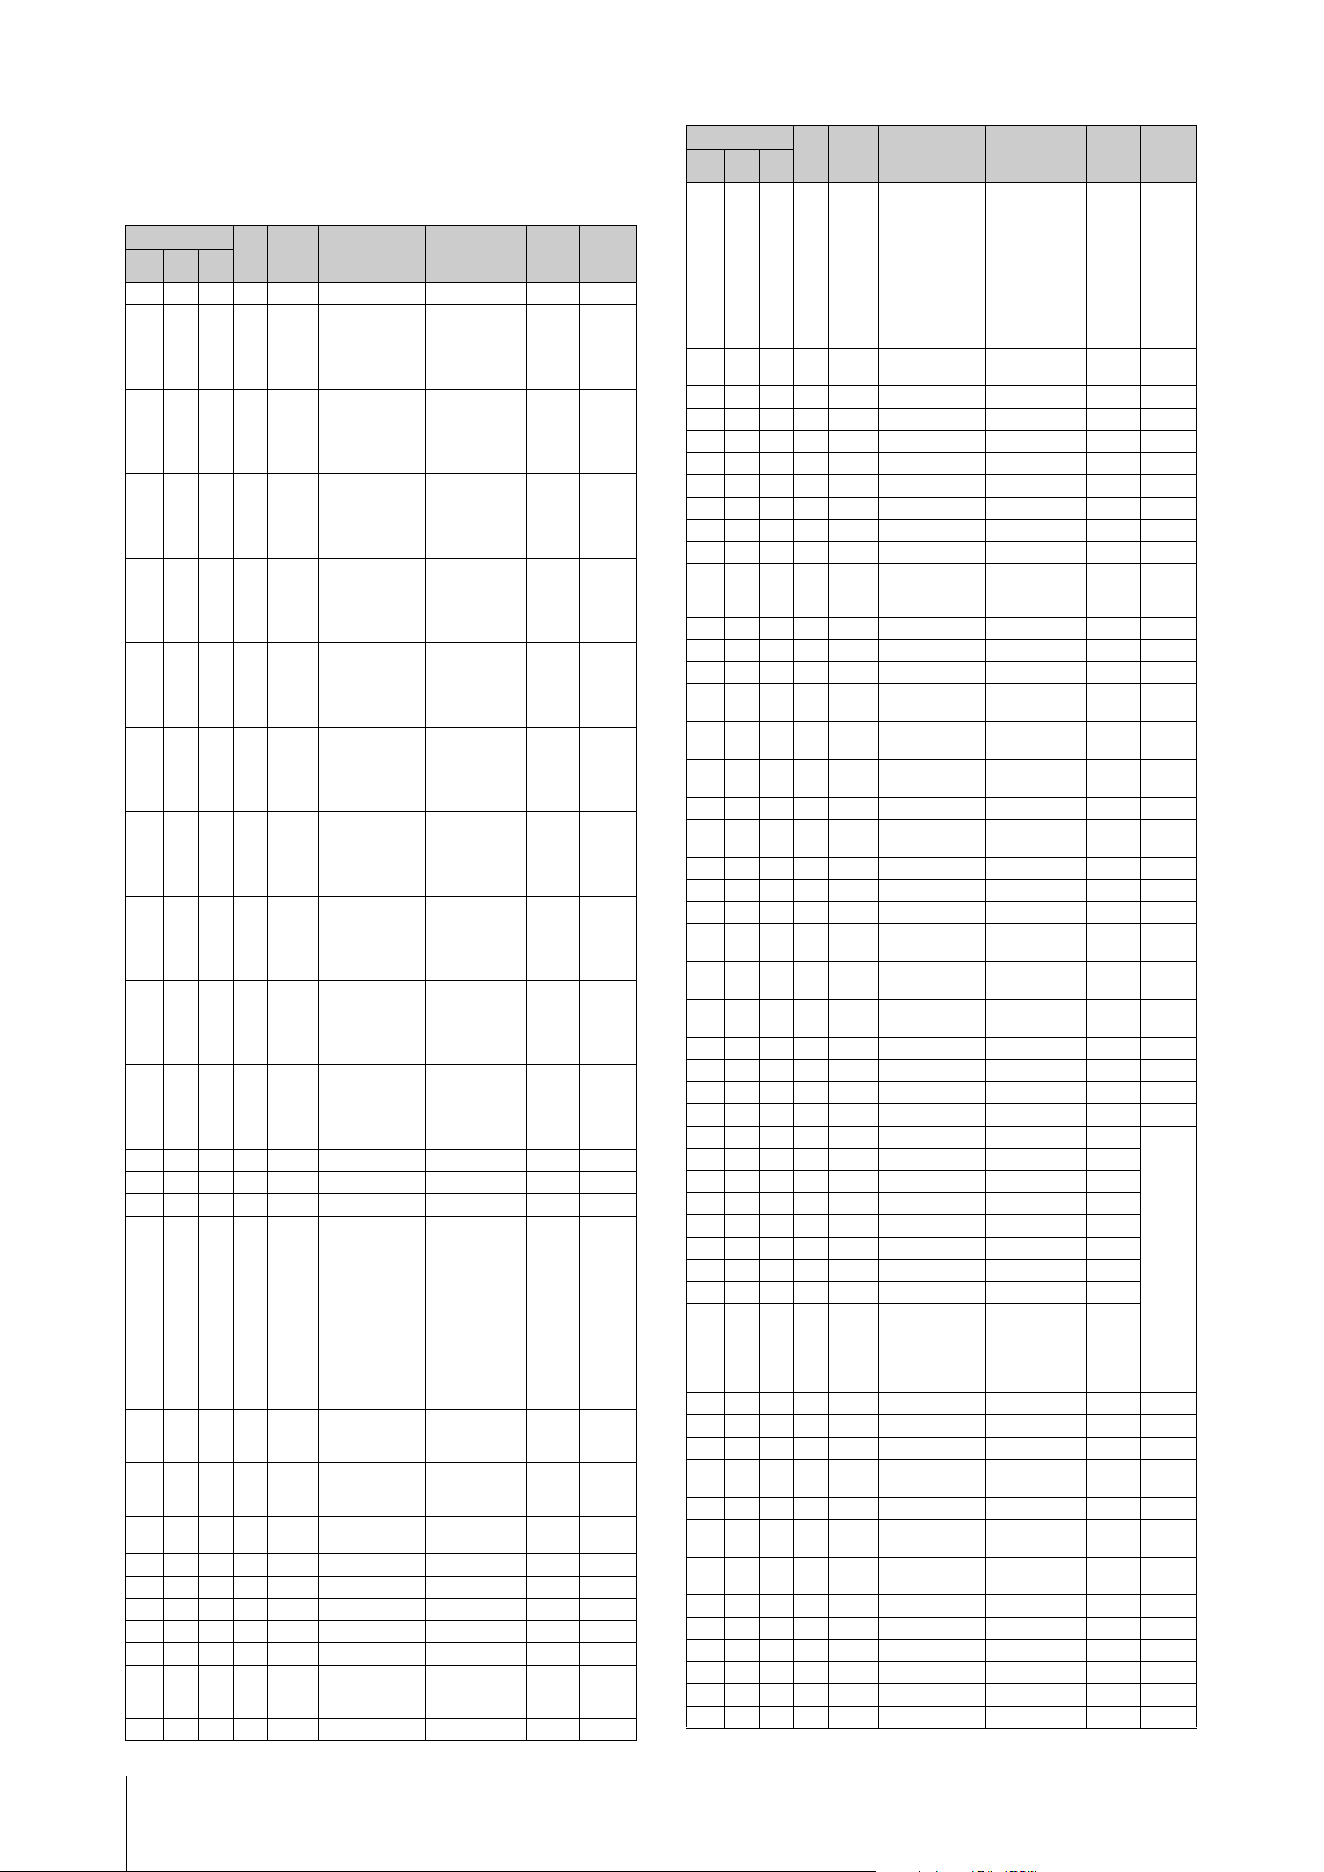
Data List
CK88 CK61 Owner’s Manual
62
Live Set Part
Part
Group Number = 7F 1C, Model ID = 0B
Address
Size
Data
Range
(HEX)
Parameter
Name
Description
Default
(HEX)
Notes
High Mid Low
50 0p 00 1 00–09 Current Category 00
01 2 00–7F
00–7F
Category 1 Voice
Number
0–12
1st bit6-0
bit13-7
2nd bit6-0
bit6-0
00 00 Piano
03 2 00–7F
00–7F
Category 2 Voice
Number
13–26
1st bit6-0
bit13-7
2nd bit6-0
bit6-0
00 00 E.Piano
05 2 00–7F
00–7F
Category 3 Voice
Number
27–46
1st bit6-0
bit13-7
2nd bit6-0
bit6-0
00 00 Organ
07 2 00–7F
00–7F
Category 4 Voice
Number
47–108
1st bit6-0
bit13-7
2nd bit6-0
bit6-0
00 00 Brs/
Wind
09 2 00–7F
00–7F
Category 5 Voice
Number
109–166
1st bit6-0
bit13-7
2nd bit6-0
bit6-0
00 00 Gtr/Bass
0B 2 00–7F
00–7F
Category 6 Voice
Number
167–208
1st bit6-0
bit13-7
2nd bit6-0
bit6-0
00 00 Strings
0D 2 00–7F
00–7F
Category 7 Voice
Number
209–273
1st bit6-0
bit13-7
2nd bit6-0
bit6-0
00 00 Pad
0F 2 00–7F
00–7F
Category 8 Voice
Number
274–324
1st bit6-0
bit13-7
2nd bit6-0
bit6-0
00 00 Lead
11 2 00–7F
00–7F
Category 9 Voice
Number
325–350
1st bit6-0
bit13-7
2nd bit6-0
bit6-0
00 00 Chr.Perc
13 2 00–7F
00–7F
Category 10 Voice
Number
351–362
1st bit6-0
bit13-7
2nd bit6-0
bit6-0
00 00 Others
15 1 reserved
16 1 28–58 Note Shift −24–0–+24 40
17 1 00–7F Part Volume 0–127 7F
18 1 00–0B Part Color 0: Red,
1: Orange,
2: Yellow,
3: Lime,
4: Green,
5: Spring,
6: Cyan,
7: Azure,
8: Blue,
9: Violet,
10: Magenta,
11: Rose
A: 02,
B: 08,
C: 04
19 1 00–01 Part Switch Off, On A: 01,
B: 00,
C: 00
1A 1 00–01 Part Selected Off, On A: 01,
B: 00,
C: 00
1B 1 00–01 Effect Select 0: Effect1,
1: Effect2
00
1C 1 reserved
1D 1 reserved
1E 1 reserved
1F 1 reserved
20 1 00–01 Mono/Poly Mono, Poly 01
21 1 00–02 Mono Type Normal, Fingered
Portamento, Full-
time Portamento
00
Invalid for
Organ
Flute voice
22 1 reserved
23 1 00–7F Portamento Time 0–127 14
Invalid for
Organ
Flute voice
(for both
Porta-
mento
Time
and
Porta-
mento
Time
Mode
)
24 1 00–01 Portamento Time
Mode
Rate, Time 00
25 1 reserved
26 1 reserved
27 1 reserved
28 1 reserved
29 1 reserved
2A 1 reserved
2B 1 reserved
2C 1 00–01 Unison Switch Off, On 00
2D 1 00–02 Unison Type Multi Layer,
Harmonics,
Sub Harmonics
00
2E 1 00–7F Unison Volume 0–127 7F
2F 1 00–7F Unison Detune 0–127 40
30 1 28–58 Pitch Bend Range −24–0–+24 42
31 1 00–7F Pitch Modulation
Depth
0–127 0A
32 1 00–7F Amplifyer
Modulation Depth
0–127 00
33 1 00–7F Filter Modulation
Depth
0–127 00
34 1 00–7F Modulation Speed −64–0–+63 40
35 1 00–01 Receive
Expression
Off, On 01
36 1 00–01 Receive Sustain Off, On 01
37 1 00–01 Receive Sostenuto Off, On 01
38 1 00–01 Receive Soft Off, On 01
39 1 00–02 External Keyboard Ext+Int, ExtOnly,
Off
00
3A 1 00–7F Touch Sensitivity
Depth
0–127 40
3B 1 00–7F Touch Sensitivity
Offset
0–127 40
3C 1 reserved
3D 1 reserved
3E 1 reserved
3F 1 reserved
40 1 00–7F Drawbar 16' 0–127 7F
Correla-
tion
between
the draw-
bar posi-
tions and
parameter
values
0: 0
1: 1–18
2: 19–36
3: 37–54
4: 55–72
5: 73–90
6: 91–108
7: 109–
126
8: 127
41 1 00–7F Drawbar 5 1/3' 0–127 7F
42 1 00–7F Drawbar 8' 0–127 7F
43 1 00–7F Drawbar 4' 0–127 00
44 1 00–7F Drawbar 2 2/3' 0–127 00
45 1 00–7F Drawbar 2' 0–127 00
46 1 00–7F Drawbar 1 3/5' 0–127 00
47 1 00–7F Drawbar 1 1/3' 0–127 00
48 1 00–7F Drawbar 1' 0–127 00
49 1 00–01 Percussion Switch Off, On 00
4A 1 00–01 Percussion Type 3rd, 2nd 00
4B 1 00–01 Percussion Decay Slow, Fast 00
4C 1 00–01 Percussion
Volume
Normal, Soft 00
4D 1 reserved
4E 1 00–01 Vibrato/Chorus
Switch
Off, On 00
4F 1 00–05 Vibrato/Chorus
Type
V1, C1, V2, C2,
V3, C3
05
50 1 00–01 Filter Switch Off, On 01
51 1 00–7F Filter Cutoff 0–127 40
52 1 00–7F Filter Resonance 0–127 40
53 1 00–01 EG Switch Off, On 01
54 1 00–7F EG Attack 0–127 40
55 1 00–7F EG Release 0–127 40
Address
Size
Data
Range
(HEX)
Parameter
Name
Description
Default
(HEX)
Notes
High Mid Low

Data List
CK88 CK61 Owner’s Manual
63
TOTAL SIZE = 105 69 (HEX)
p = Part number
0–2 0: A, 1: B, 2: C
*2: G Chorus, SPX Chorus, Symphonic, 816 Chorus, VCM Flanger, Cross FB Flanger, VCM Stereo
Phaser, Small Phaser, Max90, Dual Phaser, Tremolo, Auto Pan, Simple Rotary, British Combo,
British Lead, Small Stereo, Compressor, Tone Control, 1 BandEQ Narrow, 1 BandEQ Wide, Auto
Wah, Touch Wah, Pedal Wah, Cross Delay, Digital Delay, Analog Delay, Room Reverb, Hall Reverb,
Reverse Reverb, Ring Modulator, Slicer, LP Filter, HP Filter, Lo-Fi, Damper Resonance, Harmonic
Enhancer
56 1 00–01 Drive Switch Off, On 00
57 1 00–04 Drive Type O.Drive, Dist,
Rotary A, Rotary
B, Comp
00
58 1 00–7F Drive Depth 0–127 40
59 1 00–01 Effect 1 Switch Off, On 00
5A 1 00–23 Effect 1 Type *2 00
5B 1 00–7F Effect 1 Depth 0–127 40
5C 1 00–7F Effect 1 Rate 0–127 40
5D 1 00–01 Effect 2 Switch Off, On 00
5E 1 00–23 Effect 2 Type *2 00
5F 1 00–7F Effect 2 Depth 0–127 40
60 1 00–7F Effect 2 Rate 0–127 40
61 1 reserved
62 1 reserved
63 1 reserved
64 1 reserved
65 1 reserved
66 1 reserved
67 1 reserved
68 1 reserved
Address
Size
Data
Range
(HEX)
Parameter
Name
Description
Default
(HEX)
Notes
High Mid Low
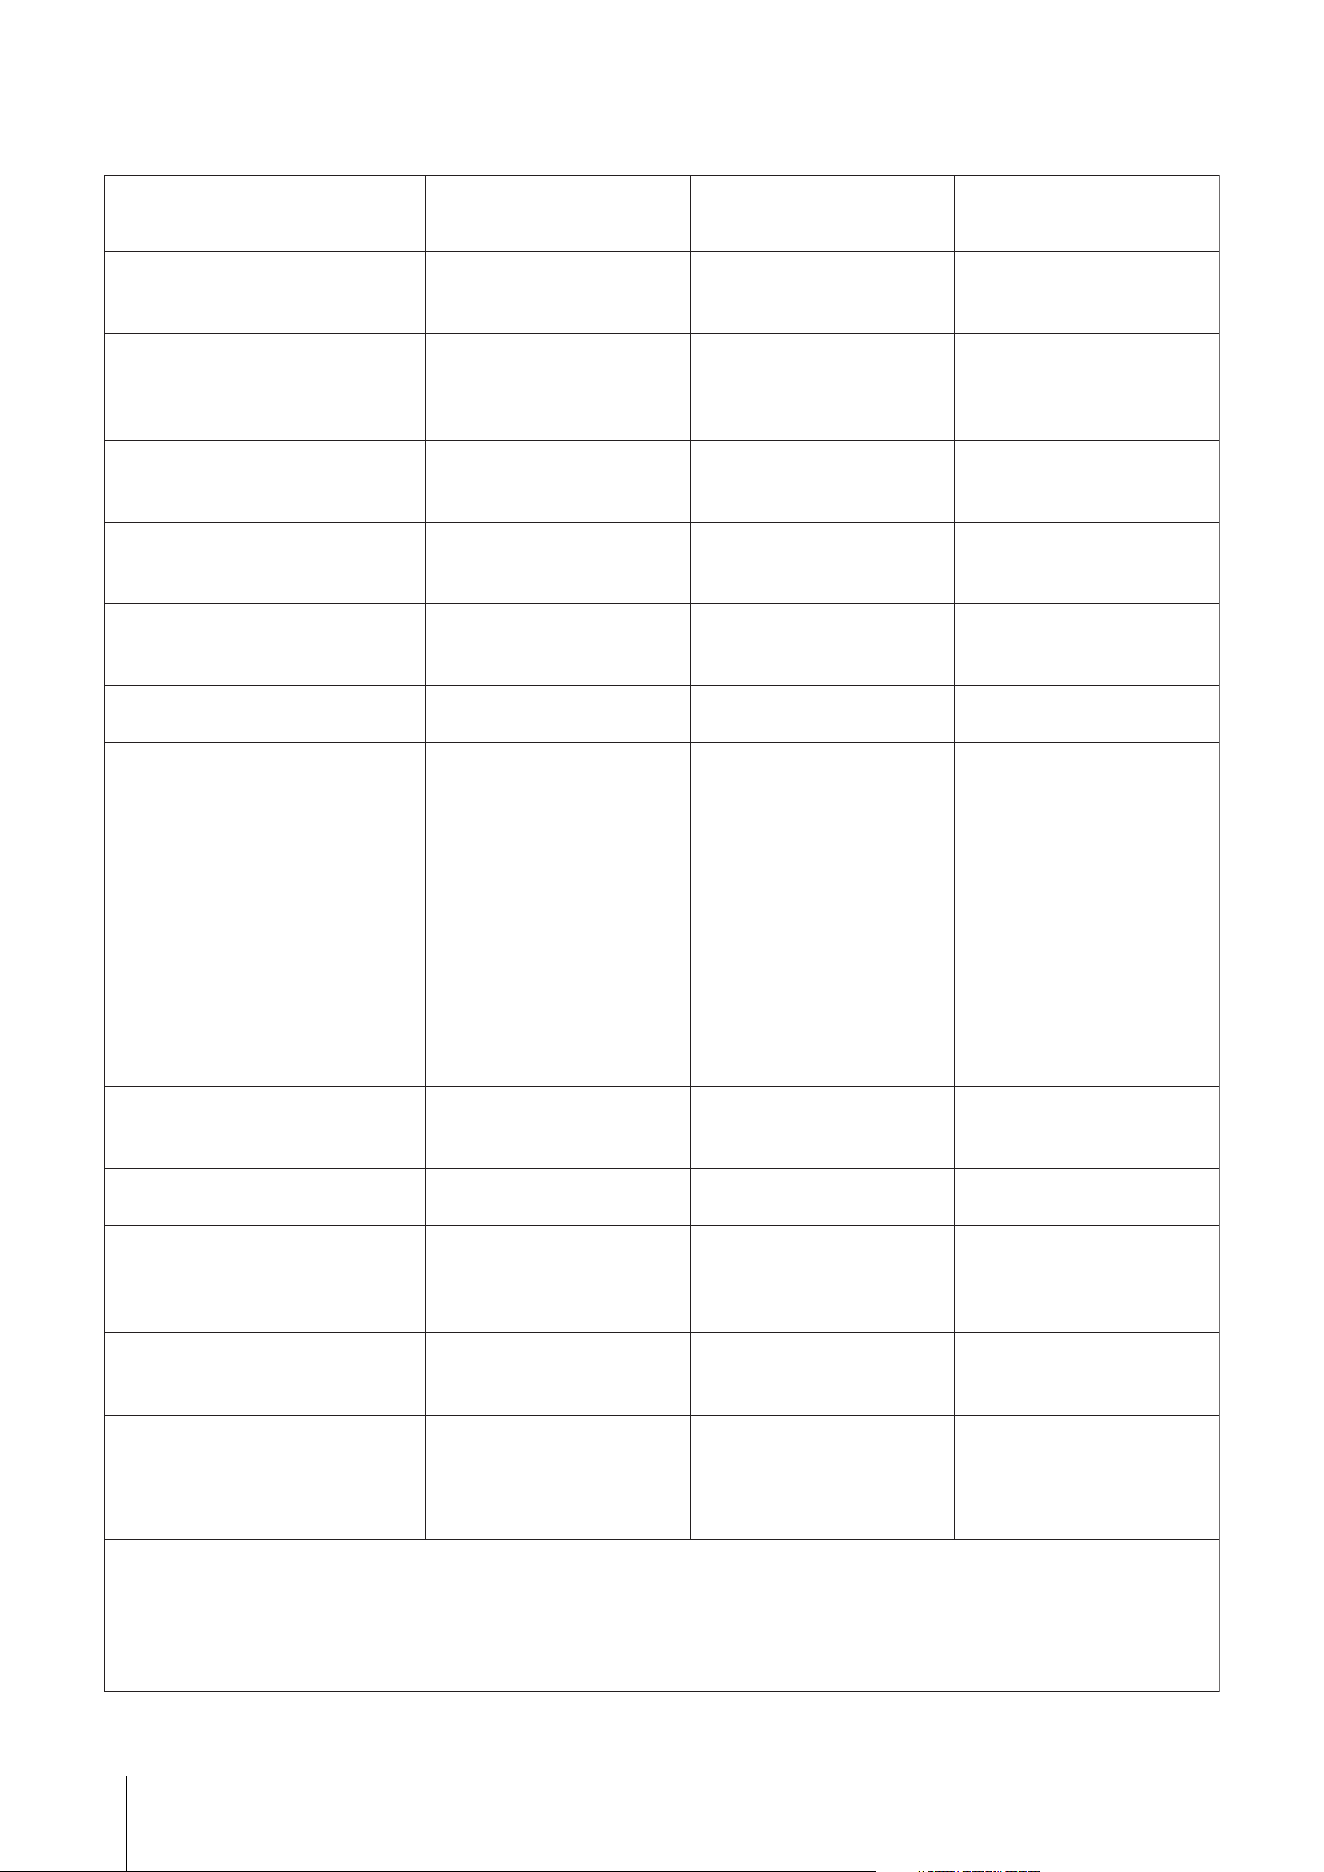
Data List
CK88 CK61 Owner’s Manual
64
MIDI Implementation Chart
TransmittedFunction... Recognized Remarks
Basic
Channel
Note
Number : True voice
Velocity
After
Touch
Pitch Bend
Control
Change
Prog
Change : True #
System Exclusive
: Song Pos.
Common : Song Sel.
: Tune
System : Clock
Real Time : Commands
: All Sound Off
Aux :
Reset
All
Cntrls
: Local On/Off
Mes- : All Notes Off
sages: Active Sense
: Reset
Notes:
Mode
Default
Changed
Note On
Note Off
Key's
Ch's
0,32
1
7,11,67,84
64
66
9,12-31
68-83
85-93
102-119
1-119
1 - 16
1 - 16
O 9nH,v=1-127
X 8nH,v=64
X
X
O *2
O
X
O
X
O *1
O *1
O *1
O *1
O *3
O 0 - 127 *2
X
X
X
X
X
X
X
X
X
O
X
*1 receive/transmit if MIDI control mode is on.
*2 receive/transmit if switch is on.
*3 transmit if assigned to controllers.
3
X
**************
0 - 127
**************
O
Mode 1 : OMNI ON , POLY Mode 2 : OMNI ON ,MONO
Mode 3 : OMNI OFF, POLY Mode 4 : OMNI OFF,MONO
O
1 - 16
1 - 16
O 9nH,v=1-127
O 9nH,v=0 or 8nH
X
X
O *2
O
O
O *2
O *2
O *1
O *1
O *1
O *1
X
X
X
X
X
X
O (120)
O (121)
X
O (123-125)
O
X
3
X
X
0 - 127
0 - 127
O
O
O : Yes
X : No
Default
Messages
Altered
YAMAHA [Stage Keyboard] Date :16-JUL-2021
Model CK88 CK61 MIDI Implementation Chart Version : 1.0
Memorized
Memorized
Bank Select
Sustain Sw
Sostenuto
O 0 - 7 *2

Data List
CK88 CK61 Owner’s Manual
65
Apache License 2.0
Copyright (c) 2009-2018 Arm Limited. All rights reserved.
SPDX-License-Identier: Apache-2.0
Licensed under the Apache License, Version 2.0 (the License);
you may not use this le except in compliance with the License.
You may obtain a copy of the License at
www.apache.org/licenses/LICENSE-2.0
Unless required by applicable law or agreed to in writing, software
distributed under the License is distributed on an AS IS BASIS,
WITHOUT WARRANTIES OR CONDITIONS OF ANY KIND,
either express or implied. See the License for the specic
language governing permissions and limitations under the
License.
The Clear BSD license
The Clear BSD License
Copyright 1997-2016 Freescale Semiconductor, Inc.
Copyright 2016-2018 NXP
All rights reserved.
Redistribution and use in source and binary forms, with or without
modication, are permitted (subject to the limitations in the
disclaimer below) provided that the following conditions are met:
Redistributions of source code must retain the above copyright
notice, this list of conditions and the following disclaimer.
Redistributions in binary form must reproduce the above
copyright notice, this list of conditions and the following disclaimer
in the documentation and/or other materials provided with the
distribution.
Neither the name of the copyright holder nor the names of its
contributors may be used to endorse or promote products derived
from this software without specic prior written permission.
NO EXPRESS OR IMPLIED LICENSES TO ANY PARTY'S
PATENT RIGHTS ARE GRANTED BY THIS LICENSE. THIS
SOFTWARE IS PROVIDED BY THE COPYRIGHT HOLDERS
AND CONTRIBUTORS “AS IS” AND ANY EXPRESS OR
IMPLIED WARRANTIES, INCLUDING, BUT NOT LIMITED TO,
THE IMPLIED WARRANTIES OF MERCHANTABILITY AND
FITNESS FOR A PARTICULAR PURPOSE ARE
DISCLAIMED. IN NO EVENT SHALL THE COPYRIGHT
HOLDER OR CONTRIBUTORS BE LIABLE FOR ANY DIRECT,
INDIRECT, INCIDENTAL, SPECIAL, EXEMPLARY, OR
CONSEQUENTIAL DAMAGES (INCLUDING, BUT NOT
LIMITED TO, PROCUREMENT OF SUBSTITUTE GOODS OR
SERVICES; LOSS OF USE, DATA, OR PROFITS; OR
BUSINESS INTERRUPTION) HOWEVER CAUSED AND ON
ANY THEORY OF LIABILITY, WHETHER IN CONTRACT,
STRICT LIABILITY, OR TORT (INCLUDING NEGLIGENCE
OR OTHERWISE) ARISING IN ANY WAY OUT OF THE USE OF
THIS SOFTWARE, EVEN IF ADVISED OF THE POSSIBILITY
OF SUCH DAMAGE.
Modified BSD license
COPYRIGHT(c) 2016 STMicroelectronics
Redistribution and use in source and binary forms, with or without
modification,
are permitted provided that the following conditions are met:
1. Redistributions of source code must retain the above
copyright notice, this list of conditions and the following
disclaimer.
2. Redistributions in binary form must reproduce the above
copyright notice, this list of conditions and the following
disclaimer in the documentation and/or other materials
provided with the distribution.
3. Neither the name of STMicroelectronics nor the names of its
contributors may be used to endorse or promote products
derived from this software without specific prior written
permission.
THIS SOFTWARE IS PROVIDED BY THE COPYRIGHT
HOLDERS AND CONTRIBUTORS "AS IS" AND ANY EXPRESS
OR IMPLIED WARRANTIES, INCLUDING, BUT NOT LIMITED
TO, THE IMPLIED WARRANTIES OF MERCHANTABILITY AND
FITNESS FOR A PARTICULAR PURPOSE ARE DISCLAIMED.
IN NO EVENT SHALL THE COPYRIGHT HOLDER OR
CONTRIBUTORS BE LIABLE FOR ANY DIRECT, INDIRECT,
INCIDENTAL, SPECIAL, EXEMPLARY, OR CONSEQUENTIAL
DAMAGES (INCLUDING, BUT NOT LIMITED TO,
PROCUREMENT OF SUBSTITUTE GOODS OR SERVICES;
LOSS OF USE, DATA, OR PROFITS; OR BUSINESS
INTERRUPTION) HOWEVER CAUSED AND ON ANY THEORY
OF LIABILITY, WHETHER IN CONTRACT, STRICT LIABILITY,
OR TORT (INCLUDING NEGLIGENCE OR OTHERWISE)
ARISING IN ANY WAY OUT OF THE USE OF THIS
SOFTWARE, EVEN IF ADVISED OF THE POSSIBILITY OF
SUCH DAMAGE.
CK88 CK61 Owner’s Manual
66
Troubleshooting
If the CK does not behave as expected—for example, not producing the correct sound or producing no sound at
all—you can try to resolve the issue as described below. Many issues can also be resolved by carrying out the Factory
Reset (page 67) operation. If any specific issue should persist, please contact your Yamaha dealer or a service center
(see the back of this booklet).
Other information
Issue Suspected cause Solution
The CK turns off unexpectedly. This is normal when the Auto Power Off
function is enabled.
If necessary, you can disable the Auto Power
Off function to prevent it from turning off
the CK again (page 36).
No sound is produced. All the Part [ON/OFF] buttons are OFF. Set the desired Part [ON/OFF] button to ON.
The Part volume is turned fully down. Use the Part Volume sliders to adjust the
volume.
Local Control is set to Off. When Local Control is set to Off, the internal
tone generator will not play a sound when
you play the keyboard. Set Local Control to
On (page 37).
MIDI volume or expression has been set to a
very low level by an external MIDI controller.
Try changing a Live Set Sound.
If a pedal has been connected to the FOOT
PEDAL jacks, move the pedal to change the
volume.
No sound is produced
from the built-in
speakers.
SPEAKERS switch is set to OFF. Set the SPEAKERS switch to ON.
When the headphones are connected, the
built-in speakers may be muted in certain
settings as shown below.
• When the [MENU] button General
System Speaker Speaker Mute is set
to Auto.
• When the [MENU] button General
System Speaker Speaker Mute is set to
Manual and the SPEAKERS switch is set to
OFF.
Disconnect the headphones.
Set the SPEAKERS switch to ON.
No sound is produced
from the connected
external device.
Power to the CK or the connected external
audio device is not turned on.
Check the power to the CK and the
connected external audio device is turned
on.
The volume of the CK and the connected
external audio equipment are turned fully
down.
Adjust the volume. Use the [MASTER
VOLUME] slider to adjust the volume. If a
pedal has been connected to the FOOT
PEDAL jacks, try moving the pedals.
A sound continues to play indefinitely. An Effect (such as delay) continues. Lower the [DEPTH] knob or set the EFFECT1
or EFFECT2 [ON/OFF] button to OFF. If a Live
Set Sound has been changed while a sound
continues to play, try selecting a different
Live Set Sound.
Sounds are distorted. Effect settings are not appropriate. Sound will be distorted depending on the
effect types and the settings. Change the
effect types and the settings.
Volume is set too high.
Output Gain is set too high.
Adjust the volume. To adjust the overall
volume of the CK, move the [MASTER
VOLUME] slider. Or, use the [MENU] button
General Audio Output Gain
(page 38).
Other information
CK88 CK61 Owner’s Manual
67
Restoring the Factory Default Settings (
Factory Reset
)
The Factory Reset function allows you to restore the CK to its initial condition.
NOTICE
When the Factory Reset function is carried out, all the Live Set Sounds you have stored, as well as the settings of MENU screens
and SETTINGS screens will be overwritten with their defaults. It is wise, therefore, to regularly save backups of important settings
on a USB flash drive.
Carrying out the Factory Reset
To reset all values to the factory defaults, press the [MENU] button Job Factory Reset (page 40).
Sounds are distorted.
The Volume of the connected external
audio device is set too high.
Adjust the volume of the connected
external audio device or use the A/D INPUT
[GAIN] knob of the CK. Or, you can also
adjust the volume from the [MENU] button
General Audio USB Audio Volume
(page 38).
Sound output is intermittent and stutters. The total number of notes has exceeded the
maximum polyphony (128 notes).
Be careful not to exceed the maximum
polyphony.
No effect is applied. Effects are set to OFF. Set the effects ON with the EFFECT 1 [ON/
OFF] button or the EFFECT 2 [ON/OFF]
button.
The depth is turned to the minimum level. Use the [DEPTH] knob to adjust the effect
depth.
Moving the Pitch Bend Wheel or Modulation
Wheel does not change the sound.
The value is set to “0.” Change the value.
Nothing is shown on the Display (LCD). The [MENU] button General Control
Panel Display LCD Switch is set to Off.
Make sure to set the [MENU] button
General Control Panel Display LCD
Switch to On (page 38).
If the menu items are not visible, adjust the
contrast from the [MENU] button General
Control Panel Display LCD Contrast
(page 38).
A pedal does not work. The pedal type is not correct. Set from the [MENU] button General
Foot Pedal
Pedal 1 or Pedal 2 (page 39).
The pedal is not correctly connected. Make sure that the pedal’s plug is fully and
firmly inserted.
Receive SW is turned off. From the [SETTINGS] button Controllers
Receive SW, select a pedal and set it to ON
(page 31).
Cannot save files to the external USB flash drive. The USB flash drive is write-protected. Disable the write protection.
The USB flash drive is not formatted
properly.
Format the USB flash drive again.
Communication between the computer and the
CK does not work properly.
The Port settings on the computer are not
appropriate.
Check the port settings on the computer.
MIDI bulk data transmission does not work
properly.
Use of the wrong terminals (MIDI or USB). Check the settings.
Wrong MIDI device number. Check the MIDI device number.
Issue Suspected cause Solution
Other information
CK88 CK61 Owner’s Manual
68
Display messages
Messages Description
Auto power off disabled.
This message appears when Auto Power Off is disabled.
Bluetooth pairing...Press [EXIT] button to
cancel pairing.
The Bluetooth device and the CK are being paired. Press the [EXIT] button to cancel pairing.
Change [Pedal Live Set Inc/Dec] to [Off].
Before changing the foot pedal assignment from the [SETTINGS] button, you need to set
the Live Set Inc/Dec parameter to off from the [MENU] button.
Completed.
The specified operation (Load, Save, Format or another Job) has been completed.
Connect a USB device.
There is no connected USB device.
Connecting to USB device…
Currently recognizing the USB flash drive connected to the USB [TO DEVICE] terminal.
Device number is off.
Bulk data cannot be transmitted or received because the device number is off.
Device number mismatch.
Bulk data cannot be received because the device numbers do not match.
File or folder already exists.
A file or a folder having the same name as the one you are about to save already exists.
File or folder path is too long.
The file or folder cannot be accessed because the maximum length for the file name or the
pathname has been exceeded.
Illegal bulk data.
An error occurred while receiving a Bulk data or Bulk Request message.
Illegal file name.
The specified file name is invalid. Try entering a different name.
Illegal file.
The specified file is unusable by the CK or cannot be loaded.
Incompatible USB device.
A USB device that cannot be used with the CK has been connected to the USB [TO DEVICE]
terminal.
Low Battery!
The batteries are low. Replace the batteries.
MIDI buffer full.
Failed to process the MIDI data because too much data was received at one time.
MIDI checksum error.
An error occurred when receiving bulk data.
No read/write authority to the file.
Indicates that you do not have the authority to read or write to the file.
Now receiving MIDI bulk data…
Indicates the CK is receiving MIDI bulk data.
Now transmitting MIDI bulk data…
Indicates the CK is transmitting MIDI bulk data.
Please reboot to maintain internal
memory.
Reboot the CK to restore the internal memory.
Press both [ENTER]+[MENU] buttons.
Press the [ENTER] button and the [MENU] button simultaneously to disable the panel lock.
Speaker EQ is set to [Table].
Speaker EQ has been set to Tab le .
Split Point does not exist.
Cannot change the Split Point because it has not been set.
Unsupported USB device.
This message appears when the connected USB flash drive is either unformatted, or
formatted in a way that the CK does not support. Please format the USB flash drive using
the CK.
USB connection terminated.
Communication with the USB flash drive has been shut down due to overcurrent to the USB
flash drive. Disconnect the USB flash drive from the USB [TO DEVICE] terminal, and then
reboot the CK.
USB device is full.
The USB flash drive is full and no more data can be saved. Use a new USB flash drive, or
make space by erasing unwanted data from the USB flash drive.
USB device is write-protected.
This message appears when you have attempted to write to a protected USB flash drive.
USB device read/write error.
An error occurred while reading from or writing to a USB flash drive.
Other information
CK88 CK61 Owner’s Manual
69
Specifications
The contents of this manual apply to the latest specifications as of the publishing date. To obtain the latest manual, access the Yamaha website then download the
manual file. Since specifications, equipment or separately sold accessories may not be the same in every locale, please check with your Yamaha dealer.
Item Details
CK88 CK61
Keyboard Type GHS keyboard: matte black keytops FSB keyboard, initial touch
Number of Keys 88 61
Tone
Generation
Tone Generation Technology AWM2, AWM (Organ Flutes)
Polyphony (max.) 128
Voices Number of Live Set Sounds 160 (Preset Live Set Sounds: 80)
Number of Voices 363
Effects Insertion Effect Drive 1 system (5 types)
Effect 2 systems (1: 36 types, 2: 36 types)
Delay 4 types
Reverb 3 types
Master EQ 3-band
Display Type Full Dot LCD (128 × 64 dots)
Connectivity OUTPUT [L/MONO]/[R] (6.3 mm, standard phone jacks, unbalanced)
A/D INPUT [L/MONO]/[R] (6.3 mm, standard phone jacks)
[PHONES] (6.3 mm, standard stereo phone jack)
FOOT PEDAL [1]/[2]
MIDI [IN]/[OUT]
USB [TO HOST]/[TO DEVICE]
[DC IN]
Bluetooth
(May not have
this
functionality
depending on
the country in
which you
purchased the
product.)
Bluetooth version 4.1
Supported profile A2DP
Compatible codec SBC
Wireless output Bluetooth class 2
Maximum communication
distance
about 10 m
Radio Frequency
(Operational Frequency)
2401–2481 MHz
Maximum output power (EIRP) 4 dBm
Type of modulation FHSS
USB audio
interface
Sampling Frequency 44.1 kHz
Channels In: 2 channels (1 stereo channel)
Out: 2 channels (1 stereo channel)
Sound System Amplifiers 6 W × 2
Speakers (12 cm × 6 cm) × 2, Switchable ON/OFF
Power Supply Power Supply AC adaptor PA-150B or an equivalent recommended by Yamaha (Output: DC 12V, 1.5 A)
Batteries Eight “AA” size alkaline (LR6) or Ni-MH rechargeable batteries
Power Consumption
11 W (When using PA-150B AC adaptor)
Standby Power Consumption
0.3 W
Size/Weight Dimensions (W
×
D
×
H)
1333 mm × 354 mm × 148 mm
(52-1/2 inch × 13-15/16 inch × 5-13/16 inch)
910 mm × 291 mm × 109 mm
(35-13/16 inch × 11-7/16 inch × 4-5/16 inch)
Weight 13.1 kg (28 lb 14 oz)
(not including batteries)
5.6 kg (12 lb 6 oz)
(not including batteries)
Included Accessories AC adaptor*, Owner’s Manual
*May be included depending on your locale

Other information
CK88 CK61 Owner’s Manual
70
Index
Symbols
.wav ..........................................................................................................25
.wav See also audio file
A
audio file ..................................................................................19, 25, 32
Audio Trigger ................................................................................12, 24
B
Backup ....................................................................................................27
Bluetooth pairing ................................................................................46
built-in speakers ..................................................................................36
E
Edit Recall .......................................................................................25, 40
External Keyboard ..............................................................................32
F
Factory default. See also Factory Reset
Factory Reset .................................................................................40, 67
File type ..................................................................................................27
Foot Controller ......................................................................18, 31, 37
Foot Pedal ..............................................................................................18
I
Initialize
factory reset ................................................................................67
Live Set Sound ............................................................................26
MENU .............................................................................................40
L
Live Set Overview ................................................................................. 9
Load
Backup File ...........................................................................27, 41
M
Master Keyboard ..........................................................................24, 33
Master Tune ..........................................................................................36
Mic input .........................................................................................25, 38
Modulation .......................................................................10, 29, 31, 37
N
Note Shift ...............................................................................................29
P
Panel lock .................................................................................24, 38, 42
Portamento ....................................................................................14, 28
S
Save
saving settings to a USB flash drive ....................................27
saving settings to the CK. See also Store
Speaker EQ .............................................................................................36
Speakers
built-in speakers .........................................................................18
Store ..................................................................................................14, 24
Sustain ..............................................................................................18, 31
T
Touch Sensitivity ..........................................................................29, 30
U
USB Audio .......................................................................................31, 38
USB MIDI .................................................................................................19
Y
Yamaha Steinberg USB Driver ........................................................47

MEMO

Deutsch
Français
Nederlands
Español
Italiano
Português
ǼȜȜȘȞȚțȐ
Svenska
Norsk
Dansk
Suomi
Polski
ýHãWLQD
Magyar
Eesti
/DWYLHãX
/LHWXYLǐ
6ORYHQþLQD
6ORYHQãþLQD
Ȼɴɥɝɚɪɫɤɢ
5RPkQă
English
Hrvatski
Türkçe
Important Notice: Power management information for customers in European Economic Area (EEA),
Switzerland and Turkey
Remarque importante : Informations sur la gestion de l'alimentation pour les clients de l'Espace
économique européen (EEE), de Suisse et de Turquie
Yamaha-Produkte sind mit einer Power-Management-Funktion ausgestattet. Bei einigen Produkten können Sie diese Funktion ausschalten oder
die Zeitdauer, die verstreicht, bis das Instrument ausgeschaltet oder in Bereitschaft versetzt wird, verlängern. In diesen Fällen erhöht sich der
Energieverbrauch.
Les produits Yamaha sont équipés d’une fonction de gestion de l’alimentation. Certains produits vous permettent de désactiver cette fonction ou
d'allonger le délai avant la mise hors tension ou la mise en veille. Dans ces cas, la consommation d’énergie augmente.
Yamaha-producten zijn uitgerust met een energiebeheerfunctie. Bij sommige producten kunt u die functie uitschakelen of de tijd verlengen die
verstrijkt voordat de stroom wordt uitgeschakeld of in stand-by wordt gezet. In deze gevallen zal het energieverbruik toenemen.
Los productos Yamaha están equipados con una función de administración de energía. Algunos productos permiten desactivar esa función o
ampliar el tiempo que transcurre antes de apagar la alimentación o poner el producto en modo de espera. En estos casos, el consumo de energía
aumentará.
I prodotti Yamaha sono dotati di una funzione di gestione dell'alimentazione. Alcuni prodotti consentono di disattivare tale funzione o di
estendere il periodo di tempo che trascorre prima che l'alimentazione venga spenta o impostata in standby. In questi casi, il consumo energetico
aumenterà.
Yamaha products are equipped with a power management function. Some products allow you to disable that function, or to extend the amount of
time that elapses before the power is turned off or set to standby. In these cases, energy consumption will increase.
Os produtos Yamaha são equipados com uma função de gerenciamento de energia. Alguns produtos permitem desativar essa função ou
estender o tempo decorrido antes de se desligar ou entrar em standby. Nesses casos, o consumo de energia aumentará.
ȉĮʌȡȠȧȩȞIJĮIJȘȢ<DPDKDİȓȞĮȚİȟȠʌȜȚıȝȑȞĮȝİȝȚĮȜİȚIJȠȣȡȖȓĮįȚĮȤİȓȡȚıȘȢȚıȤȪȠȢȅȡȚıȝȑȞĮʌȡȠȧȩȞIJĮıȐȢįȓȞȠȣȞIJȘįȣȞĮIJȩIJȘIJĮȞĮ
ĮʌİȞİȡȖȠʌȠȚİȓIJİĮȣIJȒIJȘȜİȚIJȠȣȡȖȓĮȒȞĮİʌİțIJİȓȞİIJİIJȠȤȡȠȞȚțȩįȚȐıIJȘȝĮȝȑȤȡȚIJȘȞĮʌİȞİȡȖȠʌȠȓȘıȘȒIJȘșȑıȘıİțĮIJȐıIJĮıȘĮȞĮȝȠȞȒȢȈİ
ĮȣIJȑȢIJȚȢʌİȡȚʌIJȫıİȚȢȘțĮIJĮȞȐȜȦıȘİȞȑȡȖİȚĮȢșĮĮȣȟȘșİȓ
Yamaha-produkterna är utrustade med en energihanteringsfunktion. För vissa produkter kan du inaktivera den funktionen eller för att förlänga
tiden som förflutit innan strömmen stängs av eller ställs i vänteläge. I dessa fall ökar energiförbrukningen.
Yamahas produkter har en strømstyringsfunktion. På nogle produkter er det muligt at deaktivere denne funktion eller at forlænge den tid, der går,
før der slukkes for strømmen, eller sættes på standby. I disse tilfælde vil strømforbruget stige.
Yamaha-tuotteet on varustettu virranhallintatoiminnolla. Joissakin tuotteissa voit poistaa toiminnon käytöstä tai pidentää aikaa, joka kuluu ennen
virran katkaisemista tai valmiustilaan asettamista. Näissä tapauksissa energiankulutus kasvaa.
3URGXNW\<DPDKDVąZ\SRVDĪRQHZIXQNFMĊ]DU]ąG]DQLDHQHUJLą1LHNWyUHSURGXNW\XPRĪOLZLDMąZ\áąF]HQLHWHMIXQNFMLOXEZ\GáXĪHQLHF]DVX
MDNLXSá\ZDGRZ\áąF]HQLD]DVLODQLDOXESU]HMĞFLDZWU\EJRWRZRĞFL:WDNLFKSU]\SDGNDFK]XĪ\FLHHQHUJLLZ]URĞQLH
3URGXNW\<DPDKDMVRXY\EDYHQ\IXQNFtVSUiY\QDSiMHQt1ČNWHUpSURGXNW\XPRåĖXMtWXWRIXQNFL]DNi]DWQHERSURGORXåLWGREXNWHUiPi
XEČKQRXWSĜHGY\SQXWtPQDSiMHQtQHERSRKRWRYRVWQtPUHåLPHP9WČFKWRSĜtSDGHFKVH]YêãtVSRWĜHEDHOHNWĜLQ\
$<DPDKDWHUPpNHNHQHUJLDPHQHG]VPHQWIXQNFLyYDOYDQQDNHOOiWYD(J\HVWHUPpNHNOHKHWĘYpWHV]LNKRJ\OHWLOWVDH]WDIXQNFLyWYDJ\
PHJKRVV]DEEtWVDDNLNDSFVROiVYDJ\NpV]HQOpWLiOODSRWEDKHO\H]pVHOĘWWHOWHOWLGĘW(]HNEHQD]HVHWHNEHQD]HQHUJLDIRJ\DV]WiVQ|YHNHGQLIRJ
Yamaha tooted on varustatud toitehalduse funktsiooniga. Mõned tooted võimaldavad teil selle funktsiooni keelata või pikendada aega, mis
P||GXEHQQHWRLWHYlOMDOOLWDPLVWY}LRRWHUHåLLPLVHDGPLVW6HOOLVWHOMXKWXGHOVXXUHQHEHQHUJLDWWDUELPLQH
<DPDKDL]VWUƗGƗMXPLLUDSUƯNRWLDUEDURãDQDVSƗUYDOGƯEDVIXQNFLMX'DåLHPL]VWUƗGƗMXPLHPãRIXQNFLMXYDUDWVSƝMRWYDLSDLOG]LQƗWODLNXNDP
MƗSDLHWSLUPVEDURãDQDVDWVOƝJãDQDVYDLSƗULHãDQDVJDLGVWƗYHVUHåƯPƗâƗGƗJDGƯMXPƗSDOLHOLQƗVLHVHQHUƧLMDVSDWƝULƼã
Ä<DPDKD³JDPLQLXRVH\UDHQHUJLMRVVąQDXGǐYDOG\PRIXQNFLMD.DLNXULHJDPLQLDLOHLGåLDLãMXQJWLãLąIXQNFLMąDUEDSUDWĊVWLODLNąSUDơMXVƳSULHã
LãMXQJLDQWPDLWLQLPąDUEDƳMXQJLDQWEXGơMLPRUHåLPą7RNLDLVDWYHMDLVHQHUJLMRVVXYDUWRMLPDVSDGLGơV
3URGXNW\VSRORþQRVWL<DPDKDV~Y\EDYHQpIXQNFLRXVSUiY\QDSiMDQLD1LHNWRUpSURGXNW\YiPXPRåĖXM~W~WRIXQNFLXY\SQ~ĢDOHERSUHGĎåLĢþDV
SRXSO\QXWtNWRUêFKVDQDSiMDQLHY\SQHDOHERQDVWDYtGRSRKRWRYRVWQpKRUHåLPX9WDNêFKWRSUtSDGRFKVD]YêãLVSRWUHEDHQHUJLH
<DPDKLQLL]GHONLLPDMRIXQNFLMRXSUDYOMDQMD]QDSDMDQMHP1HNDWHULL]GHONLYDPRPRJRþDMRGDRQHPRJRþLWHWRIXQNFLMRDOLSRGDOMãDWHþDVNLPRUD
SUHWHþLSUHGHQVHQDSDMDQMHL]NORSLDOLQDVWDYLYVWDQMHSULSUDYOMHQRVWL9WHKSULPHULKVHERSRUDEDHQHUJLMHSRYHþDOD
ɉɪɨɞɭɤɬɢɬɟɧɚ<DPDKDɫɚɫɧɚɛɞɟɧɢɫɮɭɧɤɰɢɹɡɚɭɩɪɚɜɥɟɧɢɟɧɚɡɚɯɪɚɧɜɚɧɟɬɨɇɹɤɨɢɩɪɨɞɭɤɬɢɜɢɩɨɡɜɨɥɹɜɚɬɞɚɡɚɛɪɚɧɢɬɟɬɚɡɢ
ɮɭɧɤɰɢɹɢɥɢɞɚɭɞɴɥɠɢɬɟɜɪɟɦɟɬɨɤɨɟɬɨɳɟɢɡɬɟɱɟɩɪɟɞɢɡɚɯɪɚɧɜɚɧɟɬɨɞɚɫɟɢɡɤɥɸɱɢɢɥɢɞɚɫɟɧɚɫɬɪɨɢɜɪɟɠɢɦɧɚɝɨɬɨɜɧɨɫɬ
ȼɬɟɡɢɫɥɭɱɚɢɤɨɧɫɭɦɚɰɢɹɬɚɧɚɟɧɟɪɝɢɹɳɟɫɟɭɜɟɥɢɱɢ
3URGXVHOH<DPDKDVXQWHFKLSDWHFXRIXQF܊LHGHJHVWLRQDUHDHQHUJLHL8QHOHSURGXVHYăSHUPLWVăGH]DFWLYD܊LDFHDVWăIXQF܊LHVDXVăSUHOXQJL܊L
SHULRDGDGHWLPSFDUHWUHFHvQDLQWHFDDOLPHQWDUHDVăILHRSULWăVDXVHWDWăvQVWDQGE\ÌQDFHVWHFD]XULFRQVXPXOGHHQHUJLHYDFUH܈WH
<DPDKDSURL]YRGLRSUHPOMHQLVXIXQNFLMRPXSUDYOMDQMDSRWURãQMRPHQHUJLMH1HNLYDPSURL]YRGLRPRJXüXMXRQHPRJXüDYDQMHWHIXQNFLMHLOL
SURGXOMHQMHYUHPHQDNRMHSURWHNQHSULMHLVNOMXþLYDQMDQDSDMDQMD
LOLSRVWDYOMDQMDXVWDQMHSULSUDYQRVWL8WLPüHVHVOXþDMHYLPDSRYHüDWLSRWURãQMD
energije.
<DPDKDUQOHULQGHJo\|QHWLPLLúOHYLYDUGÕU%D]ÕUQOHUEXLúOHYLGHYUHGÕúÕEÕUDNPDQÕ]DYH\DJoNDSDWÕOPDGDQ\DGDEHNOHPHPRGXQD
DOÕQPDGDQ|QFHJHoHQVUH\LX]DWPDQÕ]DRODQDNWDQÕU%XJLELGXUXPODUGDHQHUMLWNHWLPLDUWDFDNWÕU
(574-M06EUerp01)

MEMO

MEMO

Important Notice:
U.S. LIMITED WARRANTY for Customers in the United States
For detailed information about this Yamaha product and warranty service, please either
visit the following website address (printable file is available at our website) or contact
Customer Service at the address or telephone number identified below.
Website Address:
Yamaha.io/SynthAndStageWarranty
Customer Service:
Yamaha Corporation of America
6600 Orangethorpe Avenue, Buena Park, CA 90620-1273
Telephone: 800-854-1569

Yamaha Worldwide Representative Offices
For details on the product(s), contact your nearest Yamaha
representative or the authorized distributor, found by accessing
the 2D barcode below.
English
Wenden Sie sich für nähere Informationen zu Produkten an eine
Yamaha-Vertretung oder einen autorisierten Händler in Ihrer Nähe.
Diese finden Sie mithilfe des unten abgebildeten 2D-Strichodes.
Deutsch
Pour obtenir des informations sur le ou les produits, contactez
votre représentant ou revendeur agréé Yamaha le plus proche.
Vous le trouverez à l'aide du code-barres 2D ci-dessous.
Français
Para ver información detallada sobre el producto, contacte con
su representante o distribuidor autorizado Yamaha más cercano.
Lo encontrará escaneando el siguiente código de barras 2D.
Español
Neem voor meer informatie over de producten contact op met uw
dichtstbijzijnde Yamaha-vertegenwoordiger of de geautoriseerde
distributeur, te vinden via de onderstaande 2D-barcode.
Nederlands
Para mais informações sobre o(s) produto(s), fale com seu
representante da Yamaha mais próximo ou com o distribuidor
autorizado acessando o código de barras 2D abaixo.
Português
$E\X]\VNDüV]F]HJyáRZHLQIRUPDFMHQDWHPDWSURGXNWyZ
VNRQWDNWXMVLĊ]QDMEOLĪV]\PSU]HGVWDZLFLHOHPILUP\<DPDKDOXE
autoryzowanym dystrybutorem, którego znajdziesz za
SRĞUHGQLFWZHPSRQLĪV]HJRNRGXNUHVNRZHJR'
Polski
ɑɬɨɛɵɭɡɧɚɬɶɩɨɞɪɨɛɧɟɟɨɩɪɨɞɭɤɬɟɩɪɨɞɭɤɬɚɯɫɜɹɠɢɬɟɫɶ
ɫɛɥɢɠɚɣɲɢɦɩɪɟɞɫɬɚɜɢɬɟɥɟɦɢɥɢɚɜɬɨɪɢɡɨɜɚɧɧɵɦ
ɞɢɫɬɪɢɛɶɸɬɨɪɨɦ<DPDKDɜɨɫɩɨɥɶɡɨɜɚɜɲɢɫɶɞɜɭɯɦɟɪɧɵɦ
ɲɬɪɢɯɤɨɞɨɦɧɢɠɟ
Ɋɭɫɫɤɢɣ
Om du vill ha mer information om produkterna kan du kontakta
närmaste Yamaha-representant eller auktoriserade distributör
med hjälp av 2D-streckkoden nedan.
Svenska
Hvis du vil have detaljer om produktet/produkterne, kan du kontakte den
nærmeste Yamaha-repræsentant eller autoriserede Yamaha-distributør,
som du finder ved at scanne 2D-stregkode nedenfor.
Dansk
https://manual.yamaha.com/mi/address_list/
Head Office/Manufacturer: Yamaha Corporation 10-1, Nakazawa-cho, Chuo-ku, Hamamatsu, 430-8650, Japan
Importer (European Union): Yamaha Music Europe GmbH Siemensstrasse 22-34, 25462 Rellingen, Germany
Importer (United Kingdom): Yamaha Music Europe GmbH (UK) Sherbourne Drive, Tilbrook, Milton Keynes, MK7 8BL, United Kingdom
DMI37_22m
Per dettagli sui prodotti, contattare il rappresentante Yamaha o
il distributore autorizzato più vicino, che è possibile trovare
tramite il codice a barre 2D in basso.
Italiano
3RGUREQRVWLRSURGXNWXHFK]tVNiWHRGQHMEOLåãtKR]iVWXSFH
VSROHþQRVWL<DPDKDQHERDXWRUL]RYDQpKRGLVWULEXWRUDNWHUêE\O
QDOH]HQSĜLSRXåLWt'þiURYpKRNyGXQtåH
ýHãWLQD
3RGUREQpLQIRUPiFLHRSURGXNWHRFKYiPSRVN\WQHQDMEOLåãt
]iVWXSFDVSRORþQRVWL<DPDKDDOHERDXWRUL]RYDQêGLVWULE~WRU
NWRUpKRQiMGHWHSRPRFRXQLåãLHXYHGHQpKR'þLDURYpKRNyGX
6ORYHQþLQD
A termék(ek)re vonatkozó részletekért forduljon a legközelebbi
Yamaha képviselethez vagy a hivatalos forgalmazóhoz, amelyet
az alábbi 2D vonalkód segítségével találhat meg.
Magyar
ýHåHOLWHSRGUREQHMãHLQIRUPDFLMHRL]GHONLKVHREUQLWHQD
QDMEOLåMHJD<DPDKLQHJDSUHGVWDYQLNDDOLSRREODãþHQHJD
distributerja, ki ga najdete prek 2D-kode v nadaljevanju.
6ORYHQãþLQD
/DLLHJnjWXSODãƗNXLQIRUPƗFLMXSDUL]VWUƗGƗMXPLHPVD]LQLHWLHV
DUWXYƗNR<DPDKDSƗUVWƗYLYDLSLOQYDURWRL]SODWƯWƗMXNXUX
DWUDGƯVLHWL]PDQWRMRWWƗOƗNSLHHMDPR'VYƯWUNRGX
/DWYLHãX
Ɂɚɩɨɞɪɨɛɧɨɫɬɢɨɬɧɨɫɧɨɩɪɨɞɭɤɬɚɢɬɟɫɟɫɜɴɪɠɟɬɟɫɧɚɣɛɥɢɡɤɢɹ
ɩɪɟɞɫɬɚɜɢɬɟɥɧɚ<DPDKDɢɥɢɨɬɨɪɢɡɢɪɚɧɞɢɫɬɪɢɛɭɬɨɪɤɨɣɬɨ
ɦɨɠɟɬɟɞɚɨɬɤɪɢɟɬɟɤɚɬɨɢɡɩɨɥɡɜɚɬɟ'ɛɚɪɤɨɞɚɩɨɞɨɥɭ
Ȼɴɥɝɚɪɫɤɢ
1RUơGDPLJDXWLGDXJLDXLQIRUPDFLMRVDSLHJDPLQƳLXV
NUHLSNLWơVƳDUWLPLDXVLąÄ<DPDKD³DWVWRYąDUEDƳJDOLRWąMƳ
SODWLQWRMąNXUƳUDVLWHQXVNDLWĊWROLDXSDWHLNWą'EUnjNãQLQƳNRGą
/LHWXYLǐ
Toodete kohta täpsema teabe saamiseks võtke ühendust lähima
Yamaha esindaja või autoriseeritud levitajaga, kelle leiate
allpool asuva 2D-vöötkoodi kaudu.
Eesti
hUQOHUKDNNÕQGDD\UÕQWÕODULoLQDúD÷ÕGDNL'NRGOXPRWRUD
HULúHUHNEXOXQDQVL]HHQ\DNÕQ<DPDKDWHPVLOFLVLQHYH\D\HWNLOL
ED\L\HEDúYXUXQ
Türkçe
Za detalje o proizvodima obratite se lokalnom predstavku ili
RYODãWHQRPGLVWULEXWHUXWYUWNH<DPDKDNRMHJPRåHWHSURQDüL
VNHQLUDQMHP'FUWLþQRJNRGDXQDVWDYNX
Hrvatski
3HQWUXGHWDOLLSULYLQGSURGXVHOHFRQWDFWD܊LFHOPDLDSURSLDW
reprezentant Yamaha sau distribuitorul autorizat, pe care îl
SXWH܊LJăVLDFFHVkQGFRGXOGHEDUH'GHPDLMRV
5RPkQă

10-1 Nakazawa-cho, Chuo-ku, Hamamatsu, 430-8650 Japan
© 2022 Yamaha Corporation
Published 04/2025 MWMA-E0
VJG0290