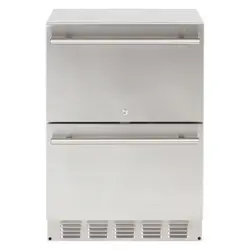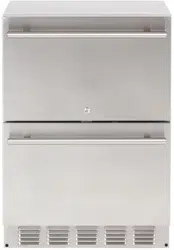

24" Refrigerator Drawers
Operator’s Manual
SRD24 Indoor & Outdoor Models
SapphireAppliances.com | 866.754.6672
Wine Refrigerators | Ice Machines | Beverage Centers | Glass Door Refirgerators | Accessories
Adapng to Your Environment
Indoor, Outdoor and ADA
072622
SAPMN03

C ongratulations on your new S A PPH I RE D rawer Refrigerator. To ensure proper operation, please read this
Operator’ s M anual carefully before using this product. K eep this manual in a safe place for future reference.
!
W ARNING
C a l i f o r n i a Pr o p o s i t i o n 6 5
C e r t a i n c o m p o n e n t s i n t h i s p r o d u c t a n d i t s r e l a t e d a c c e s s o r i e s c o n t a i n c h e m i c a l s
k n o w n t o t h e s t a t e o f C a l i f o r n i a t o c a u s e c a n c e r , b i r t h d e f e c t s o r o t h e r r e p r o d u c t i v e h a r m .
PRODUCT REGISTRATION INFORMATION
Please record your model’s information. You will need to know this information whenever you call to request information or service.
The model’s information appears on a serial number plate.
Model Number:
Serial Number:
You can register your appliance at:
SapphireAppliances.com
Or
Fill out the provided Warranty Registration Card and mail in.

1
© 2022 S A PPH I RE
S A PPH I RE Refrigerator D rawers
Operator’ s M anual
TAB L E OF C ONTENTS
S AF TEY . . . . . . . . . . . . . . . . . . . . . . . . . . . . . . . . . . . . . . . . . . . . . . . . . . . . . . . . . . . . . . . . . . . . . . . . . . . . . . . . . . . . . . . . . . . . . . . . . . . . . . . . . . . . . . . . . . . . . . . . . . . . . . . . . . . . . . . . . . . . . . . 3
S A FETY D EFI NI TI ONS ......................................................................................................................3
S A FETY PREC A U TI ONS ..................................................................................................................3
S PEC IF IC ATIONS . . . . . . . . . . . . . . . . . . . . . . . . . . . . . . . . . . . . . . . . . . . . . . . . . . . . . . . . . . . . . . . . . . . . . . . . . . . . . . . . . . . . . . . . . . . . . . . . . . . . . . . . . . . . . . . . . . . . . . . . . . . . . . 6
S A PPH I RE 24-I NC H I ND OOR D RA W ER REFRI G ERA TOR ..........................................................6
INS TAL L ING THE UNIT . . . . . . . . . . . . . . . . . . . . . . . . . . . . . . . . . . . . . . . . . . . . . . . . . . . . . . . . . . . . . . . . . . . . . . . . . . . . . . . . . . . . . . . . . . . . . . . . . . . . . . . . . . . . . . . . . . . . 7
REQ U I RED C A B I NET OPENI NG .....................................................................................................9
B U I L T-I N C A B I NET D I M ENS I ONS ...................................................................................................9
S A PPH I RE 24-I nch I ndoor C abinet D imensions ............................................................................9
EL EC TRI C A L C ONNEC TI ON..........................................................................................................10
A V OI D I NG U S E OF EX TENS I ON C ORD S .....................................................................................10
L EV EL I NG TH E U NI T....................................................................................................................... 11
C U S TOM D OOR PA NEL ..................................................................................................................12
I nstalling the C ustom D oor Panel .................................................................................................13
A NTI -TI P S YS TEM ...........................................................................................................................14
I NTEG RA TED G RI L L /PL I NTH .........................................................................................................14
OPERATING THE UNIT. . . . . . . . . . . . . . . . . . . . . . . . . . . . . . . . . . . . . . . . . . . . . . . . . . . . . . . . . . . . . . . . . . . . . . . . . . . . . . . . . . . . . . . . . . . . . . . . . . . . . . . . . . . . . . . . . . . 1 5
U S I NG TH E C ONTROL S .................................................................................................................15
Turning the U nit On ......................................................................................................................15
Turning the Unit O ......................................................................................................................16
Entering the D isplay of M enu I tems..............................................................................................17
L ighting Options............................................................................................................................19
L ighting Options - S cheduling Nightlight.......................................................................................20
Lighting Options - Turning Nightlight O.......................................................................................29
S etting Temperature .....................................................................................................................30

TAB L E OF C ONTENTS
2
© 2022 S A PPH I RE
S A PPH I RE C lear I ce M achine
Operator’ s M anual
© 2022 S A PPH I RE
S A PPH I RE Refrigerator D rawers
Operator’ s M anual
Entering S abbath M ode................................................................................................................31
Ex iting or C ancelling S abbath M ode ............................................................................................33
C hanging / A djusting the Temperature..........................................................................................33
D efault Temperature .....................................................................................................................34
C learing S imple Error C odes........................................................................................................35
Other / A dditional Error C odes......................................................................................................35
M anually C learing Temp Out of Range Error C ode ......................................................................36
EX PEC TI NG NORM A L S OU ND S ...................................................................................................37
D EA L I NG W I TH POW ER FA I L U RE................................................................................................37
C ARE AND M AINTENANC E. . . . . . . . . . . . . . . . . . . . . . . . . . . . . . . . . . . . . . . . . . . . . . . . . . . . . . . . . . . . . . . . . . . . . . . . . . . . . . . . . . . . . . . . . . . . . . . . . . . . . . . . . . . 3 8
C L EA NI NG A ND M A I NTA I NI NG TH E U NI T ...................................................................................38
C leaning the U nit’ s Ex terior ..........................................................................................................38
C leaning the U nit’ s I nterior ...........................................................................................................38
Ex tended Periods of Non-U se ......................................................................................................39
Recommissioning the U nit............................................................................................................39
S tarting U p the U nit ......................................................................................................................39
C leaning the C ondenser...............................................................................................................39
TROUB L ES HOOTING. . . . . . . . . . . . . . . . . . . . . . . . . . . . . . . . . . . . . . . . . . . . . . . . . . . . . . . . . . . . . . . . . . . . . . . . . . . . . . . . . . . . . . . . . . . . . . . . . . . . . . . . . . . . . . . . . . . . . 4 1
D IS POS ING THE UNIT. . . . . . . . . . . . . . . . . . . . . . . . . . . . . . . . . . . . . . . . . . . . . . . . . . . . . . . . . . . . . . . . . . . . . . . . . . . . . . . . . . . . . . . . . . . . . . . . . . . . . . . . . . . . . . . . . . . . 4 2
W ARRANTY . . . . . . . . . . . . . . . . . . . . . . . . . . . . . . . . . . . . . . . . . . . . . . . . . . . . . . . . . . . . . . . . . . . . . . . . . . . . . . . . . . . . . . . . . . . . . . . . . . . . . . . . . . . . . . . . . . . . . . . . . . . . . . . . . . . . . . 4 3
3
S AF ETY
© 2022 S A PPH I RE
S A PPH I RE Refrigerator D rawers
Operator’ s M anual
1
S AF ETY D EF INITIONS
The words D A NG ER, W A RNI NG , C A U TI ON and NOTI C E are used throughout this manual to highlight important
information. B e certain that the meanings of these alerts are known to all who operate and install the appliance.
!
D ANGER
In d i c a t e s a h a z a r d o u s s i t u a t i o n t h a t , i f n o t a v o i d e d , w i l l r e s u l t i n d e a t h o r s e r i o u s i n j u r y .
!
W ARNING
In d i c a t e s a h a z a r d o u s s i t u a t i o n t h a t , i f n o t a v o i d e d , c o u l d r e s u l t i n d e a t h o r s e r i o u s i n j u r y .
!
C AUTION
In d i c a t e s a h a z a r d o u s s i t u a t i o n t h a t , i f n o t a v o i d e d , c o u l d r e s u l t i n m i n o r o r m o d e r a t e i n j u r y .
NOTICE
Indicates a situation that can cause damage to the appliance and/ or the environment, or cause the appliance
to operate improperly.
S AF ETY PREC AUTIONS
POWER CORD PRECAUTIONS
• Do not use the appliance if the power cord is damaged. If the power cord is damaged, have a ualied
electrician replace the power cord.
• Never lift, carry or drag the appliance by the power cord.
• D o not connect or disconnect the electric plug when your hands are wet.
• Never unplug the appliance by pulling on the power cord. Always grip the plug rmly and pull straight out
from the outlet.

S AF ETY
4
© 2022 S A PPH I RE
S A PPH I RE Refrigerator D rawers
Operator’ s M anual
INSTALLING PRECAUTIONS
• K eep ventilation openings, in the appliance enclosure or in the built-in structure, clear of obstruction.
• To avoid a haz ard due to instability of the appliance, the appliance must be installed in accordance with the
instructions.
MOVING PRECAUTIONS
• W hen moving the appliance, do not turn it upside-down and do not unlevel it more than
45 degrees.
• D o not move the appliance without emptying it and securing the door in the closed position.
OTHER PRECAUTIONS
• To ensure proper ventilation for the appliance, keep obstructions away from the front of the unit.
• eep ngers out of the “pinch point” areas. Clearance between the door and cabinet are necessarily small.
B e careful closing the door when children are in the area.
• D o not touch the evaporator with your hand when the appliance is operating.
• Do not attempt to repair or replace any part of your appliance unless this manual specically recommends it.
Have a ualied technician perform all other service on the unit.
• C hildren 8 years of age and older and people with reduced physical, sensory or mental capabilities or lack
of ex perience and knowledge can use this appliance if they have been given supervision or instruction
concerning use of the appliance in a safe way and they understand the haz ards involved.
• Never allow children to operate, play with or crawl inside the appliance.
• Never allow children to clean and maintain the appliance without supervision.
• D o not use the appliance other than for its intended purpose.
• D o not touch the condenser surfaces. They are sharp and can be easily damaged.
• D o not use electrical appliances inside the food storage compartments of the appliance, unless they are of
the type recommended by the manufacturer.
CLEANING AND MAINTENANCE PRECAUTIONS
• Never clean the appliance parts with ammable uids. Do not store or use gasoline or other ammable
vapors and liuids in the vicinity of this appliance or any other appliances. The fumes can create a re
haz ard or ex plosion.
• D o not use solvent-based cleaning agents or abrasives on the interior. These cleaners may transmit taste to
the food, or damage or discolor the interior.
• I f the appliance will not be used for a long time, thoroughly clean it before the nex t use. C arefully follow
any instructions provided for cleaning or the use of sanitiz ing solution. D o not leave any solution inside the
appliance after cleaning.

S AF ETY
5
© 2022 S A PPH I RE
S A PPH I RE Refrigerator D rawers
Operator’ s M anual
• D o not use mechanical devices or other means to accelerate the defrosting process, other than those
recommended by the manufacturer.
• D o not damage the refrigerant circuit.
TH E M A NU F A CTU R ER D IS CL A IM S A NY R ES P ONS IB IL ITY IF TH E A B OV E INS TR U CTIONS A R E NOT
F OL L OW ED .
6
S PEC IF IC ATIONS
© 2022 S A PPH I RE
S A PPH I RE Refrigerator D rawers
Operator’ s M anual
2
S APPHIRE 2 4 - INC H REF RIGERATOR D RAW ERS
FEATURES
24-INCH
REFRIGERATOR DRAWERS
Electrical Requirement 115V/60Hz
Maximum Amp Fuse 15 amp
Net Capacity 4.6 cu-ft (130 L)
Temperature Setting 34°- 65°F (1°- 18°C)
Defrost Type Automatic
7
INS TAL L ING
THE UNIT
© 2022 S A PPH I RE
S A PPH I RE Refrigerator D rawers
Operator’ s M anual
3
!
W ARNING
F i r e / Ex p l o s i o n Ha z a r d
DO NOT install in spaces containing gasoline engines, fuel tanks or fuel line ttings. This device
does not meet federal requirement for ignition protection.
IM PORTANT:
El e c t r i c a l Ti p s
• This appliance must be installed with all electrical connections in accordance with state and local codes.
• This unit req uires a standard electrical supply properly grounded in accordance with National Electrical C ode
and local codes and ordinances.
• The fuse (or circuit breaker) siz e should be 15 amperes for 110V .
• The manufacturer recommends that you provide a separate circuit that services only your appliance. U se
receptacles that cannot be turned o by a switch or pull chain.
• Plug the appliance into a grounded three-prong outlet. D o not remove the grounding prong, do not use an
adapter, and do not use an ex tension cord.
• D o not kink, pinch or damage the power supply cord between the appliance and wall or cabinet.
• B efore connecting the appliance to the power source, let it stand upright for approx imately 4 hours. Following
this step will reduce the possibility of a malfunction in the cooling system brought on by handling during
transportation.
• M ake sure to install the unit on a level surface.
Tips on Moving and Setting up the Unit
!
CAUTION
Ti p Ha z a r d
Be sure to use caution when working around an uninstalled unit. The unit is capable of tipping over
if it is not installed and properly anchored.
• U se two or more people to move and install the appliance. Failure to do so can result in back or other injury.
• Remove the packing materials and clean the appliance before using it.

INS TAL L ING THE UNIT
8
© 2022 S A PPH I RE
S A PPH I RE Refrigerator D rawers
Operator’ s M anual
Factors Aecting the Unit
OTE:N Do not use an appliance intended for indoor use outside. Only use an appliance that is intended for outdoor
use outdoors.
• Never keep the appliance nex t to ovens, grills or other high-heat resources.
• K eep the appliance on a hard, level surface that can support the unit when the unit is full. K eep the appliance
level to help ensure it works properly. You may need to make several adjustments to level the unit. I f
necessary, adjust the height of the appliance by turning the feet. S ee “ L eveling the U nit” on page 11.
• To ensure proper service access and ventilation, all S A PPH I RE units should not have the grill openings
covered. There are no additional req uirements for venting at the top, side or rear of the unit.
• These units are to be installed under a counter. Follow the recommended spacing dimensions listed in this
manual. Place the electrical supply in the recommended location.
INS TAL L ING THE UNIT
9
© 2022 S A PPH I RE
S A PPH I RE Refrigerator D rawers
Operator’ s M anual
REQUIRED CABINET OPENING
!
W ARNING
F i r e / Ex p l o s i o n Ha z a r d
DO NOT install in spaces containing gasoline engines, fuel tanks or fuel line ttings. This device
does not meet federal requirement for ignition protection. Failure to comply could result in injury or
death.
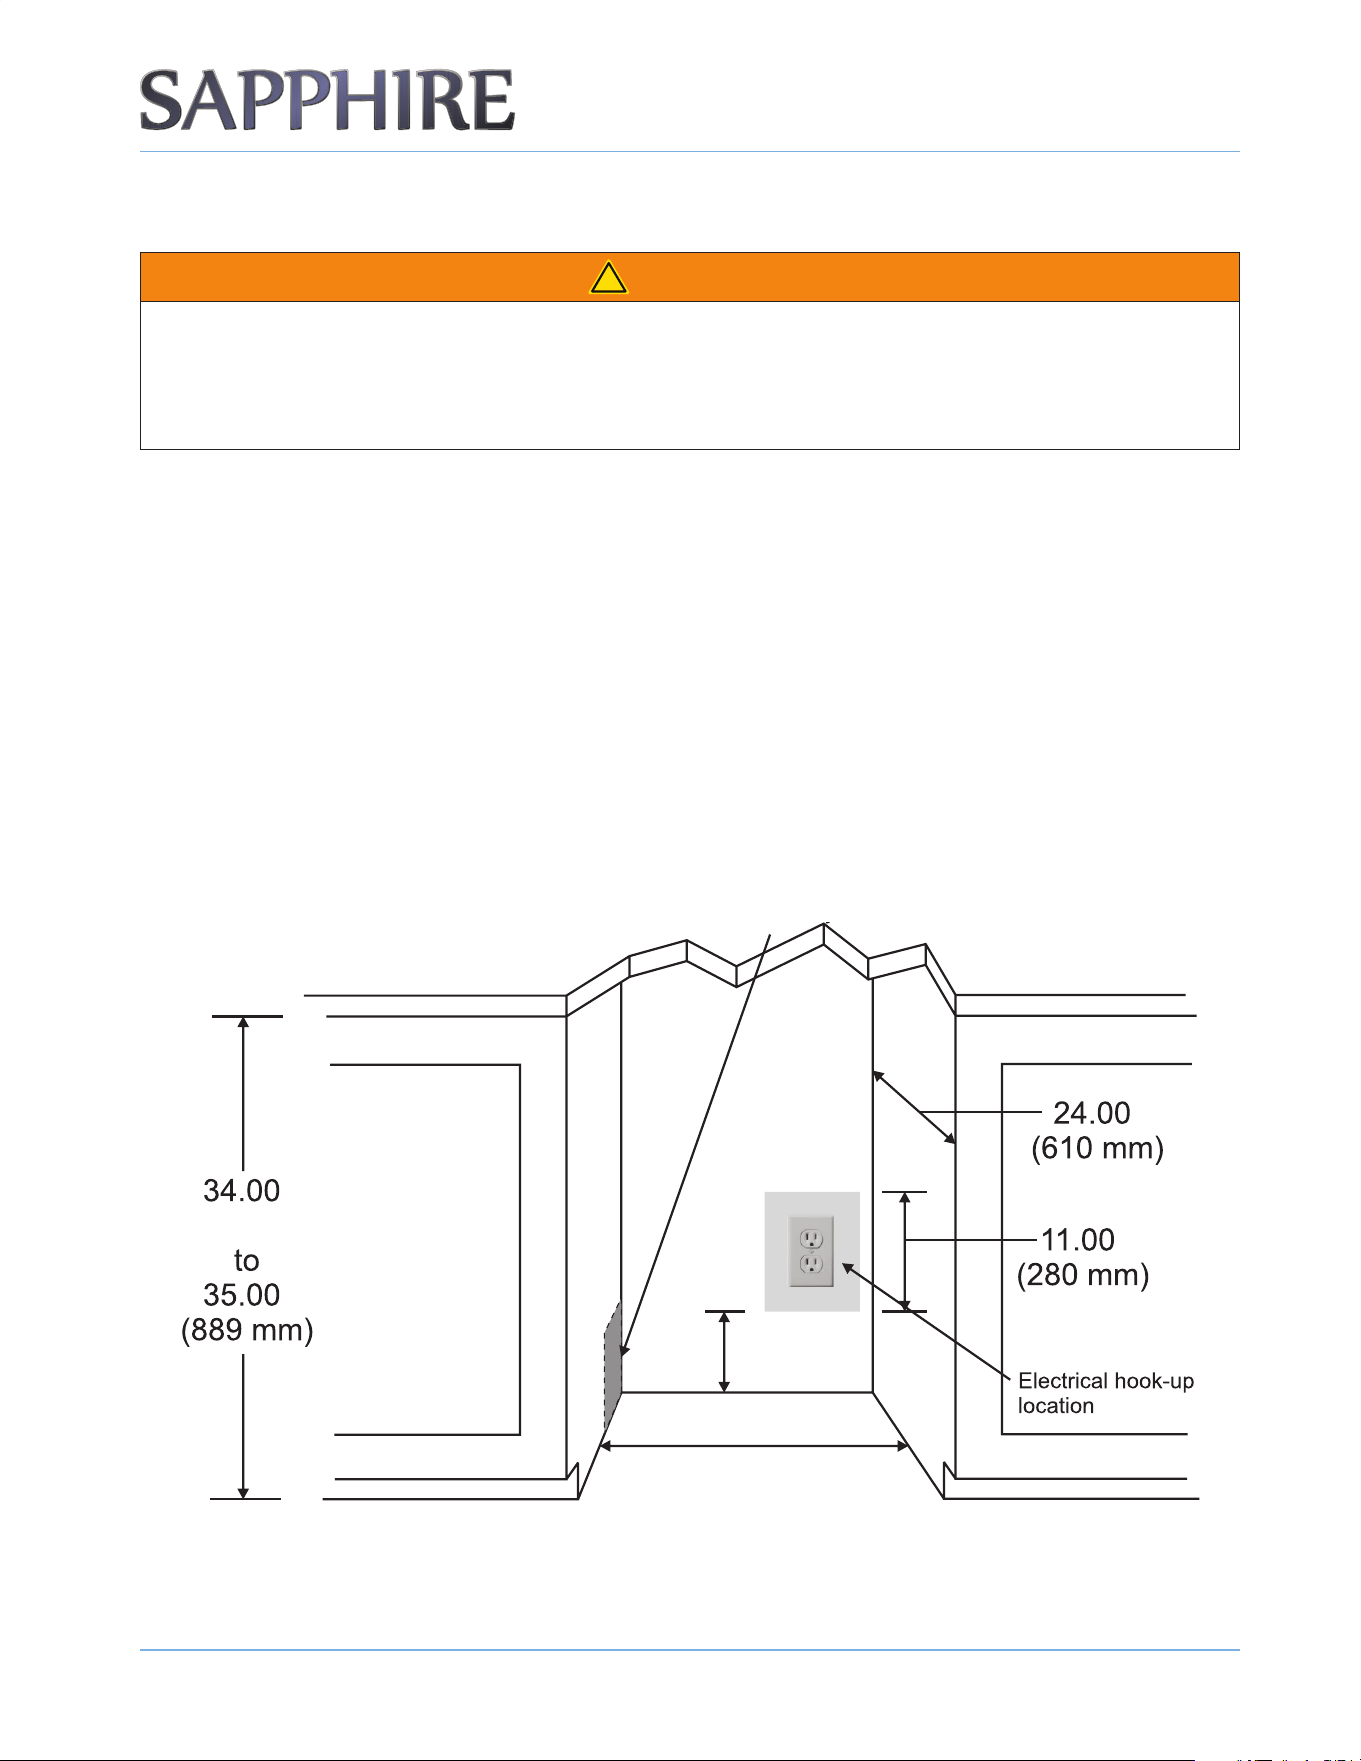
A built-in installation will allow you to install the appliance under a counter or in a kitchen cabinet if you respect
the req uired clearance space around the appliance. The appliance must be located to allow clearance for the
electrical connection in the rear of the unit.
BUILT-IN CABINET DIMENSIONS
A built-in unit is designed for z ero clearance at the top and each side of the unit. The unit uses fan-forced
condenser cooling, which req uires air circulation through the lower section of the unit.
OTE:N To ensure proper service access and ventilation, all SAPPHIRE units should not have the grill openings covered. There are no
additional requirements for venting at the top, side or rear of the unit.
SAPPHIRE 24-INCH INDOOR CABINET DIMENSIONS
Recommended location for electrical connection in either adjacent cabinet.
24.00"
(610 mm)
7.00"
(177 mm)
(864 mm)
"
"
"
"

INS TAL L ING THE UNIT
1 0
© 2022 S A PPH I RE
S A PPH I RE Refrigerator D rawers
Operator’ s M anual
NOTICE
• If you remove the rubber feet from the bottom of the unit, reinstall the mounting screws into the bottom of
the cabinet to avoid damage to components mounted to the base pan.
• Ensure that the air path for the grill remains unrestricted. Any restriction of airow through
the grill will disrupt normal operation of the unit, resulting in damage to components, and
voids warranty.
ELECTRICAL CONNECTION
D o not, under any circumstances, cut or remove the third (ground) prong from the power cord.
For personal safety, you must properly ground this appliance. The power cord of this appliance features a three-
prong grounding plug that mates with a standard three-prong grounding wall outlet to minimiz e the possibility of
electric shock hazard from the appliance. Have a ualied electrician check the wall outlet and circuit to make
sure the outlet is properly grounded. I t is your responsibility and obligation to have a standard two-prong wall
outlet replaced with a properly grounded three-prong wall outlet.
A lways plug the appliance into its own individual electrical outlet. The voltage rating of the outlet must match
the rating label on the appliance. This match provides the best performance and also prevents overloading the
electrical circuits, which could cause a re hazard from overheated wires.
Never unplug your appliance by pulling on the power cord. Always grip the plug rmly and pull straight out from
the outlet.
Repair or replace immediately all power cords that have become frayed or damaged. D o not use a cord that
shows cracks or abrasion damage along its length or at either end.
W hen moving the appliance, take care not to damage the power cord.
If the supply cord suers damage, have the manufacturer, its service agent, or similarly ualied persons replace
the supply cord to avoid a haz ard.
AVOIDING USE OF EXTENSION CORDS
B ecause of potential safety haz ards under certain conditions, the manufacturer strongly recommends that you do
not use an ex tension cord with this appliance.
INS TAL L ING THE UNIT
1 1
© 2022 S A PPH I RE
S A PPH I RE Refrigerator D rawers
Operator’ s M anual
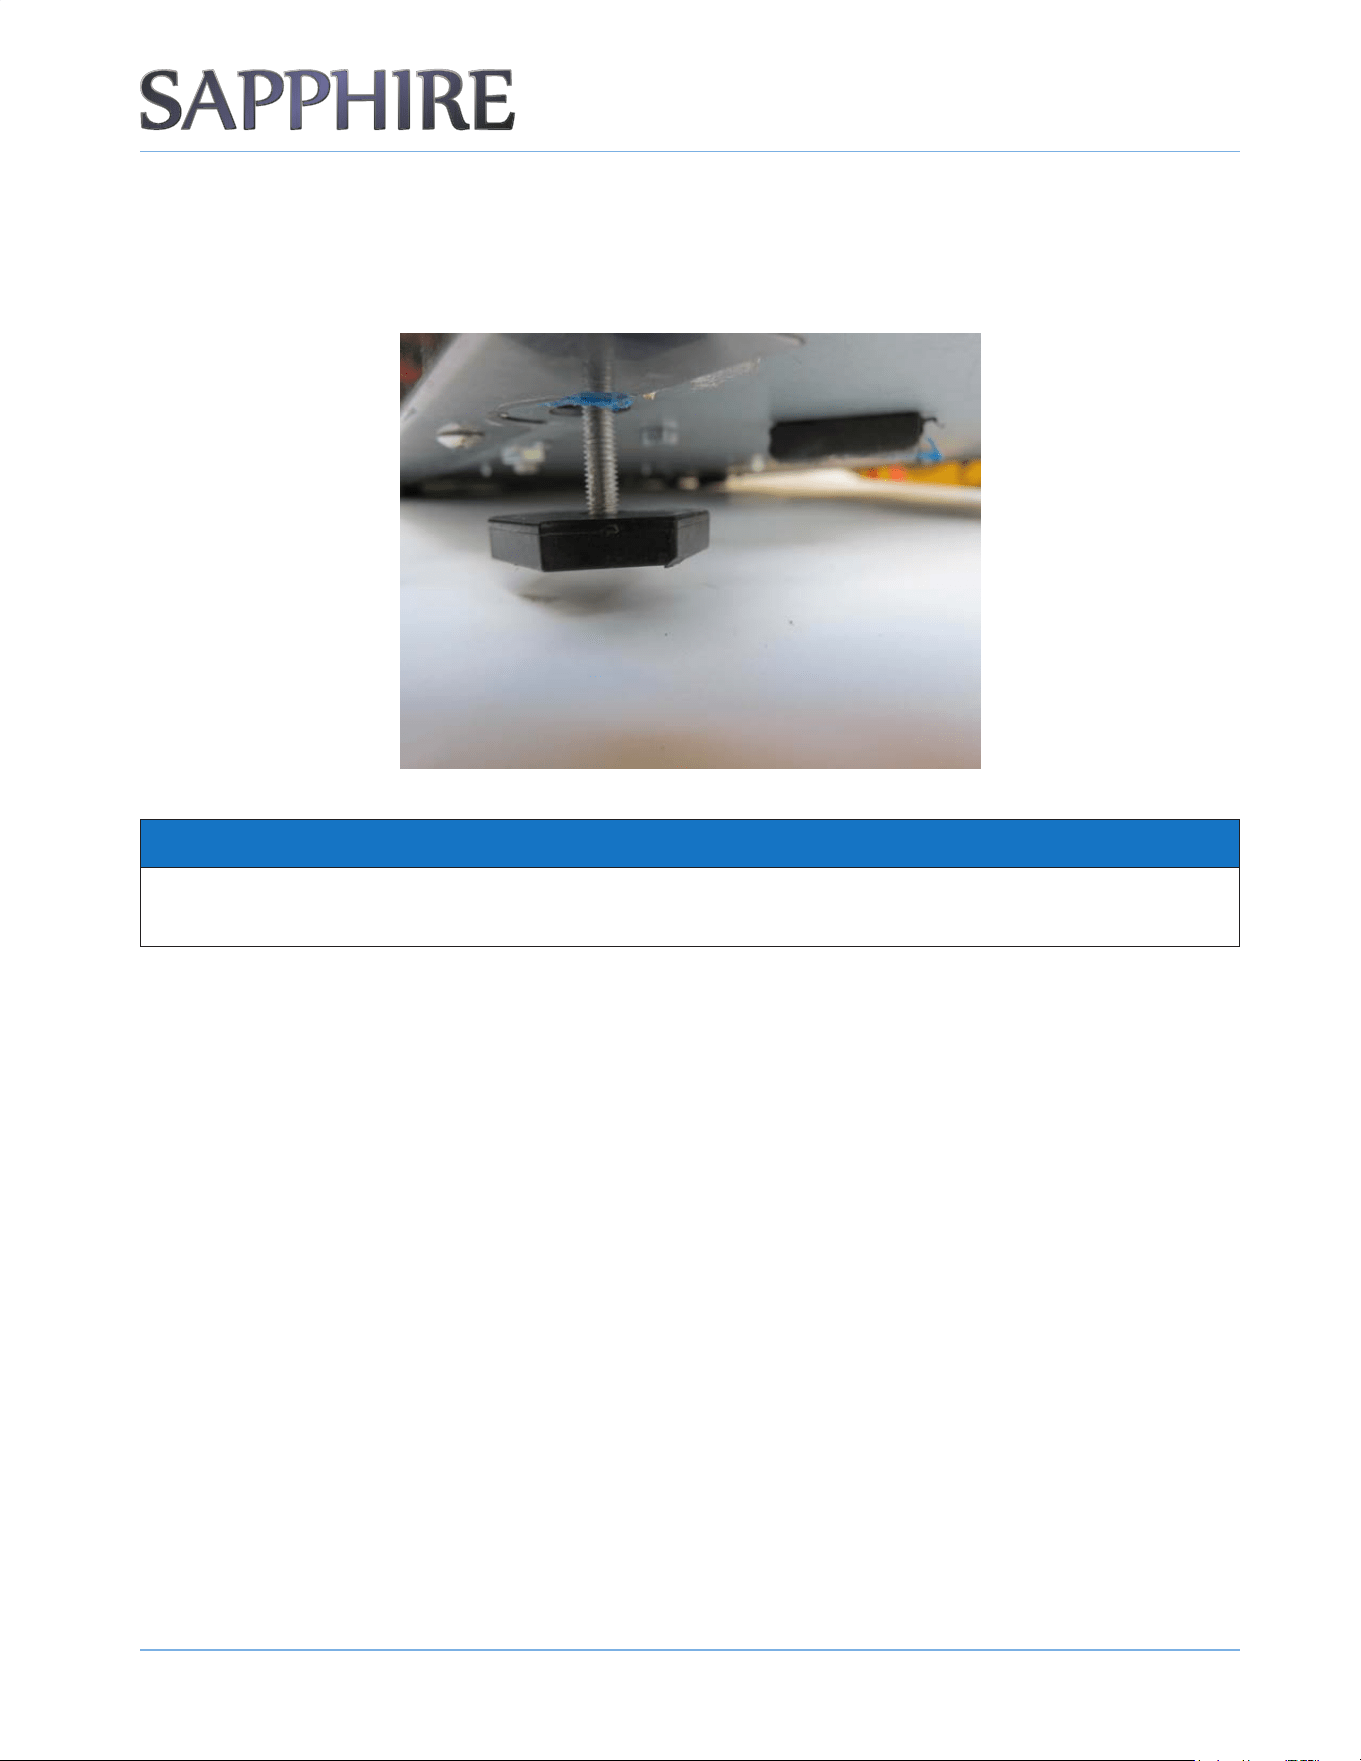
LEVELING THE UNIT
The appliance req uires leveling before it can work properly. I f necessary, raise or lower the unit by turning the
four leveling feet on the bottom. The manufacturer recommends using a carpenter’ s level to check the appliance.
NOTICE
It is extremely important that the appliance is level for optimum performance.
A djust all four leveling feet evenly so that the top of the appliance is at the desired installation height and is level.
1. On a level surface, place a carpenter’ s level on top of the appliance to see if it is level from front to back and
side to side.
2. A djust the height of the leveling feet as follows:
• Turn the leveling feet to the right to lower that side of the appliance.
• Turn the leveling feet to the left to raise that side of the appliance.
INS TAL L ING THE UNIT
1 2
© 2022 S A PPH I RE
S A PPH I RE Refrigerator D rawers
Operator’ s M anual
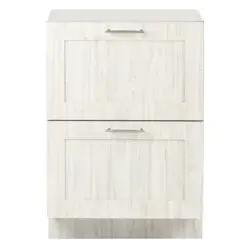
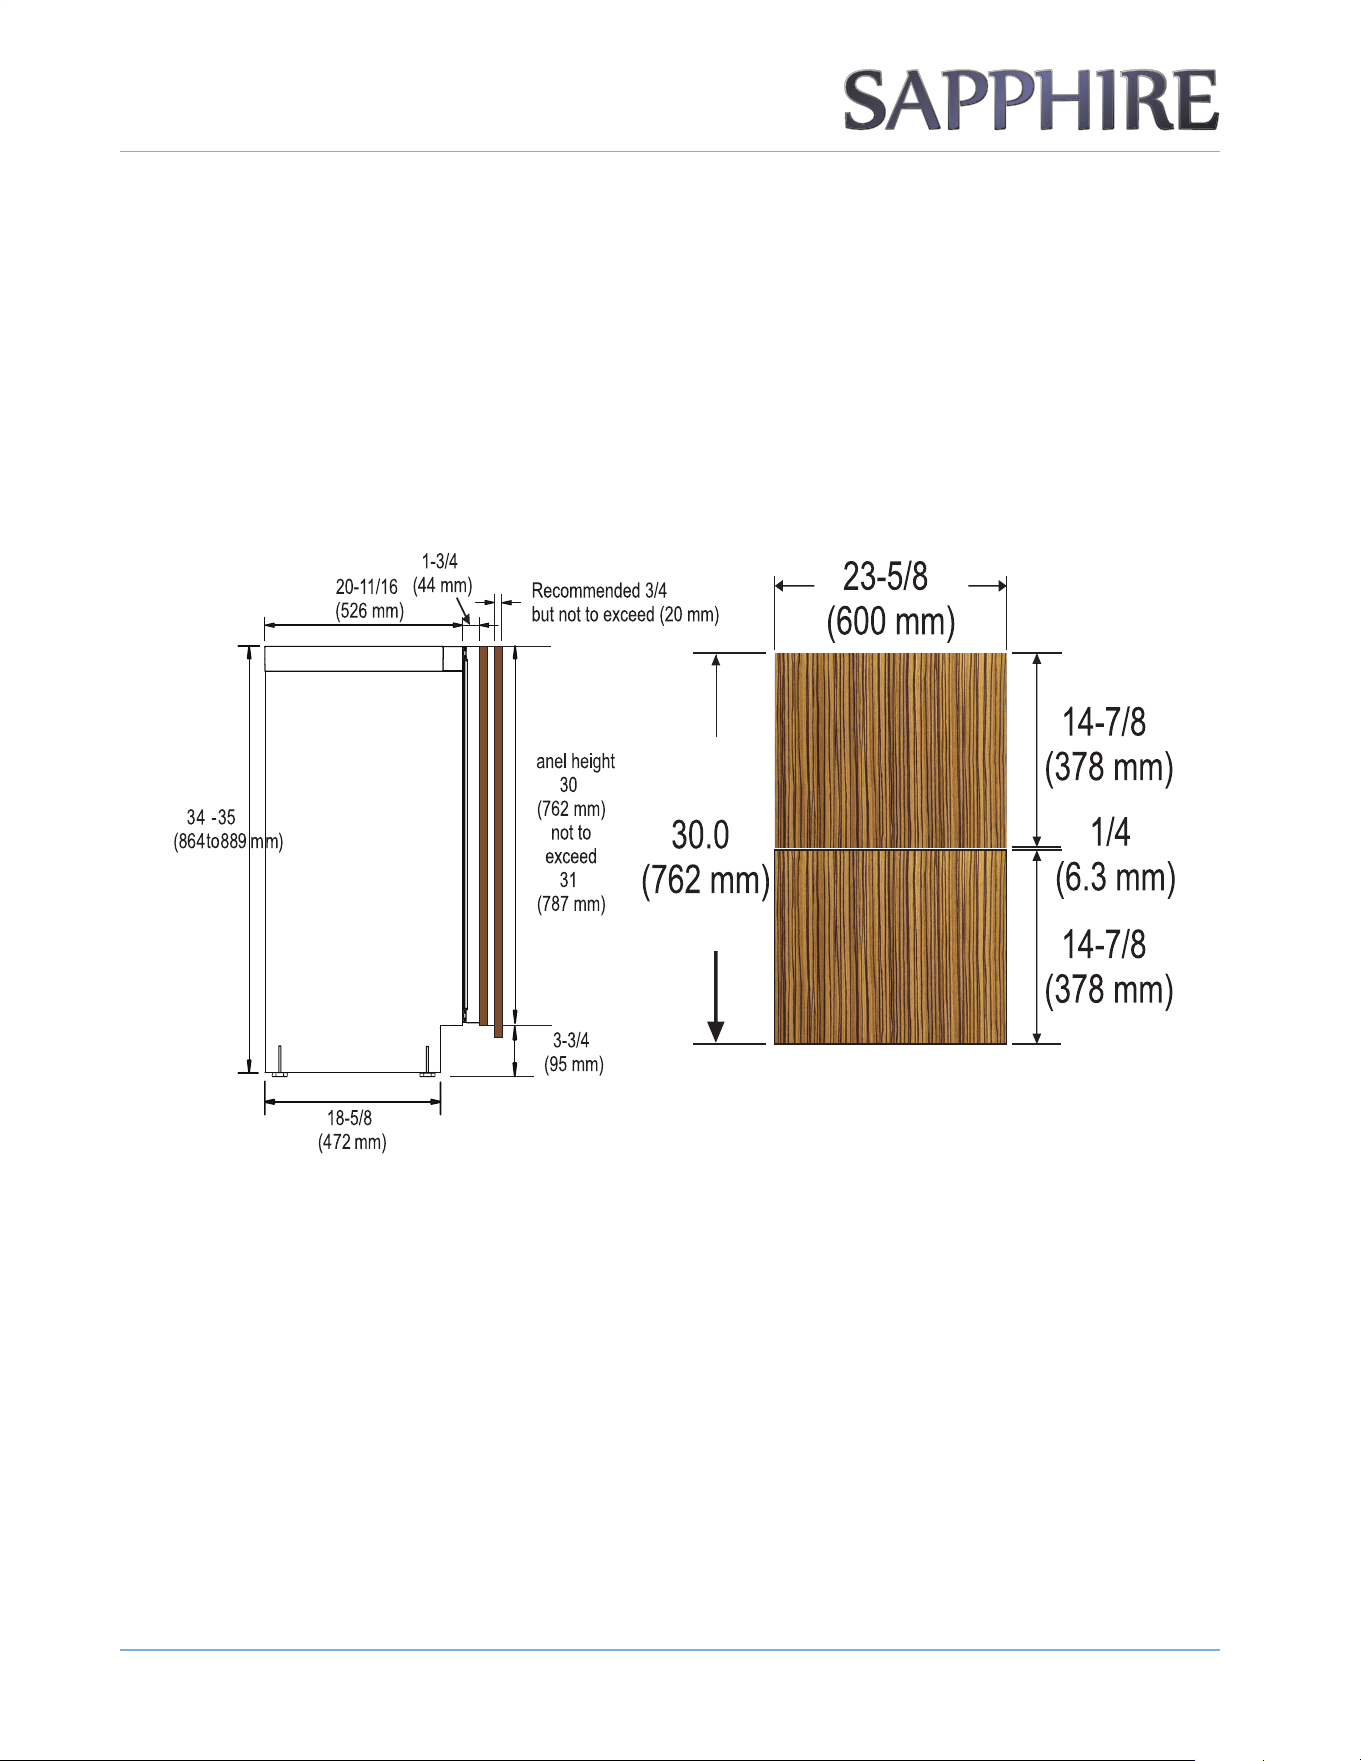
CUSTOM DOOR PANEL
A custom door panel/frame can be fabricated for the appliance. H andle hardware must also be provided, if
needed.
OTE:N Do not cover a glass door with a solid panel.
Finish all sides of the custom panel. They may be visible when the door is open.
24-INCH INDOOR PANELS
"
""
"
"
"
"
"
"
"
"
"
"
"
P
INS TAL L ING THE UNIT
1 3
© 2022 S A PPH I RE
S A PPH I RE Refrigerator D rawers
Operator’ s M anual
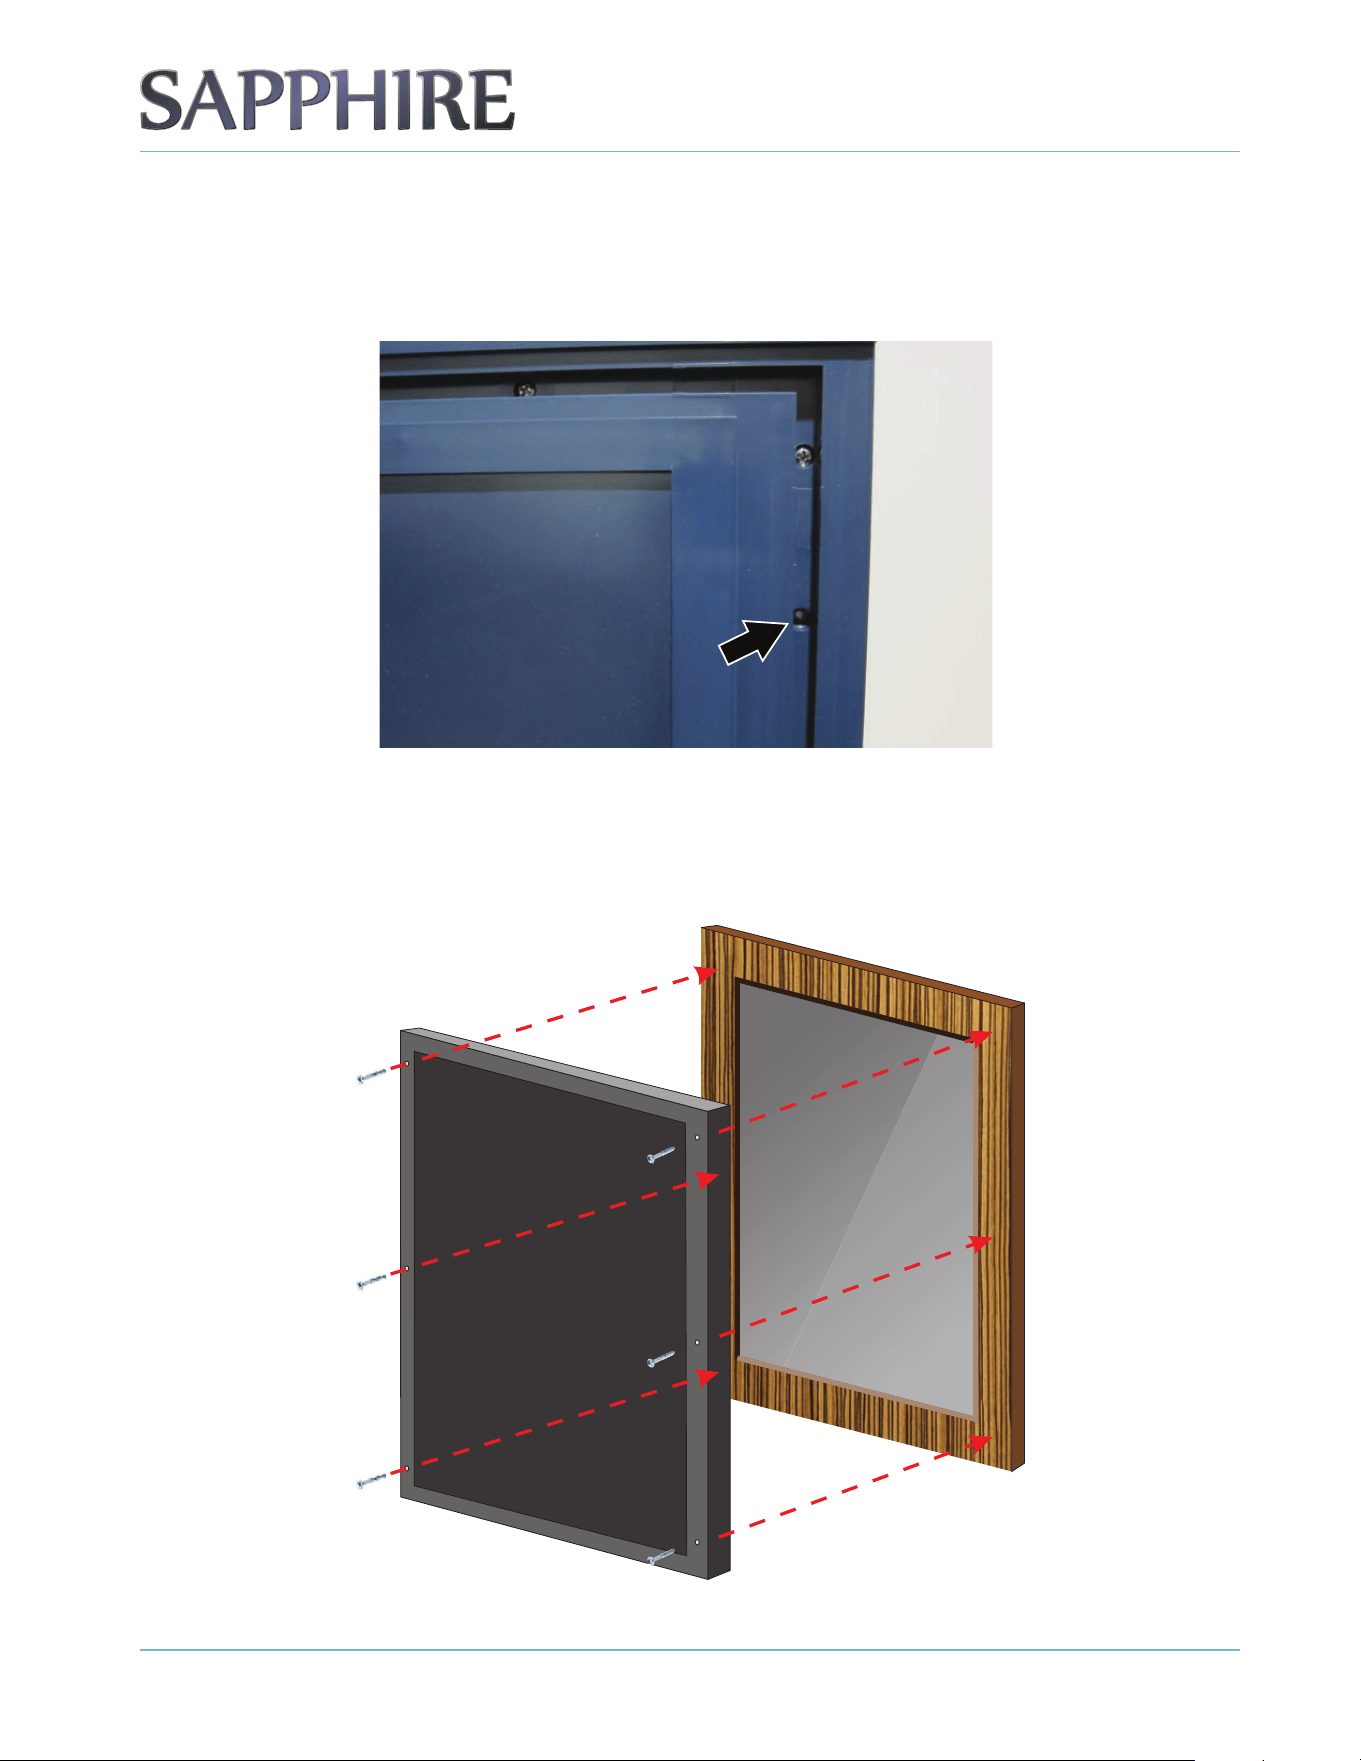
INSTALLING THE CUSTOM DOOR PANEL
1. Remove the door from the unit.
2. Remove the door seal to gain access to the custom door panel mounting holes.
3. Align the top of the custom door panel ush with the top of the door.
4. A djust the overlap of the custom door panel so it is eq ual on both sides of the door.
5. S ecure the custom door panel to the door using six wood screws (provided).
INS TAL L ING THE UNIT
1 4
© 2022 S A PPH I RE
S A PPH I RE Refrigerator D rawers
Operator’ s M anual
6. Reinstall the door seal. B e sure the seal is properly seated.
7. Reinstall the door to the unit.
ANTI-TIP SYSTEM
1. On built-in installations, once the appliance is in place and leveled, secure the two anti-tip brackets
underneath the countertop using the two provided screws.
2. I f the brackets for the anti-tip system cannot be secured above the appliance and no wood is available,
Relocate the brackets for the anti-tip system to the side of the appliance for securing into an adjacent
cabinet.
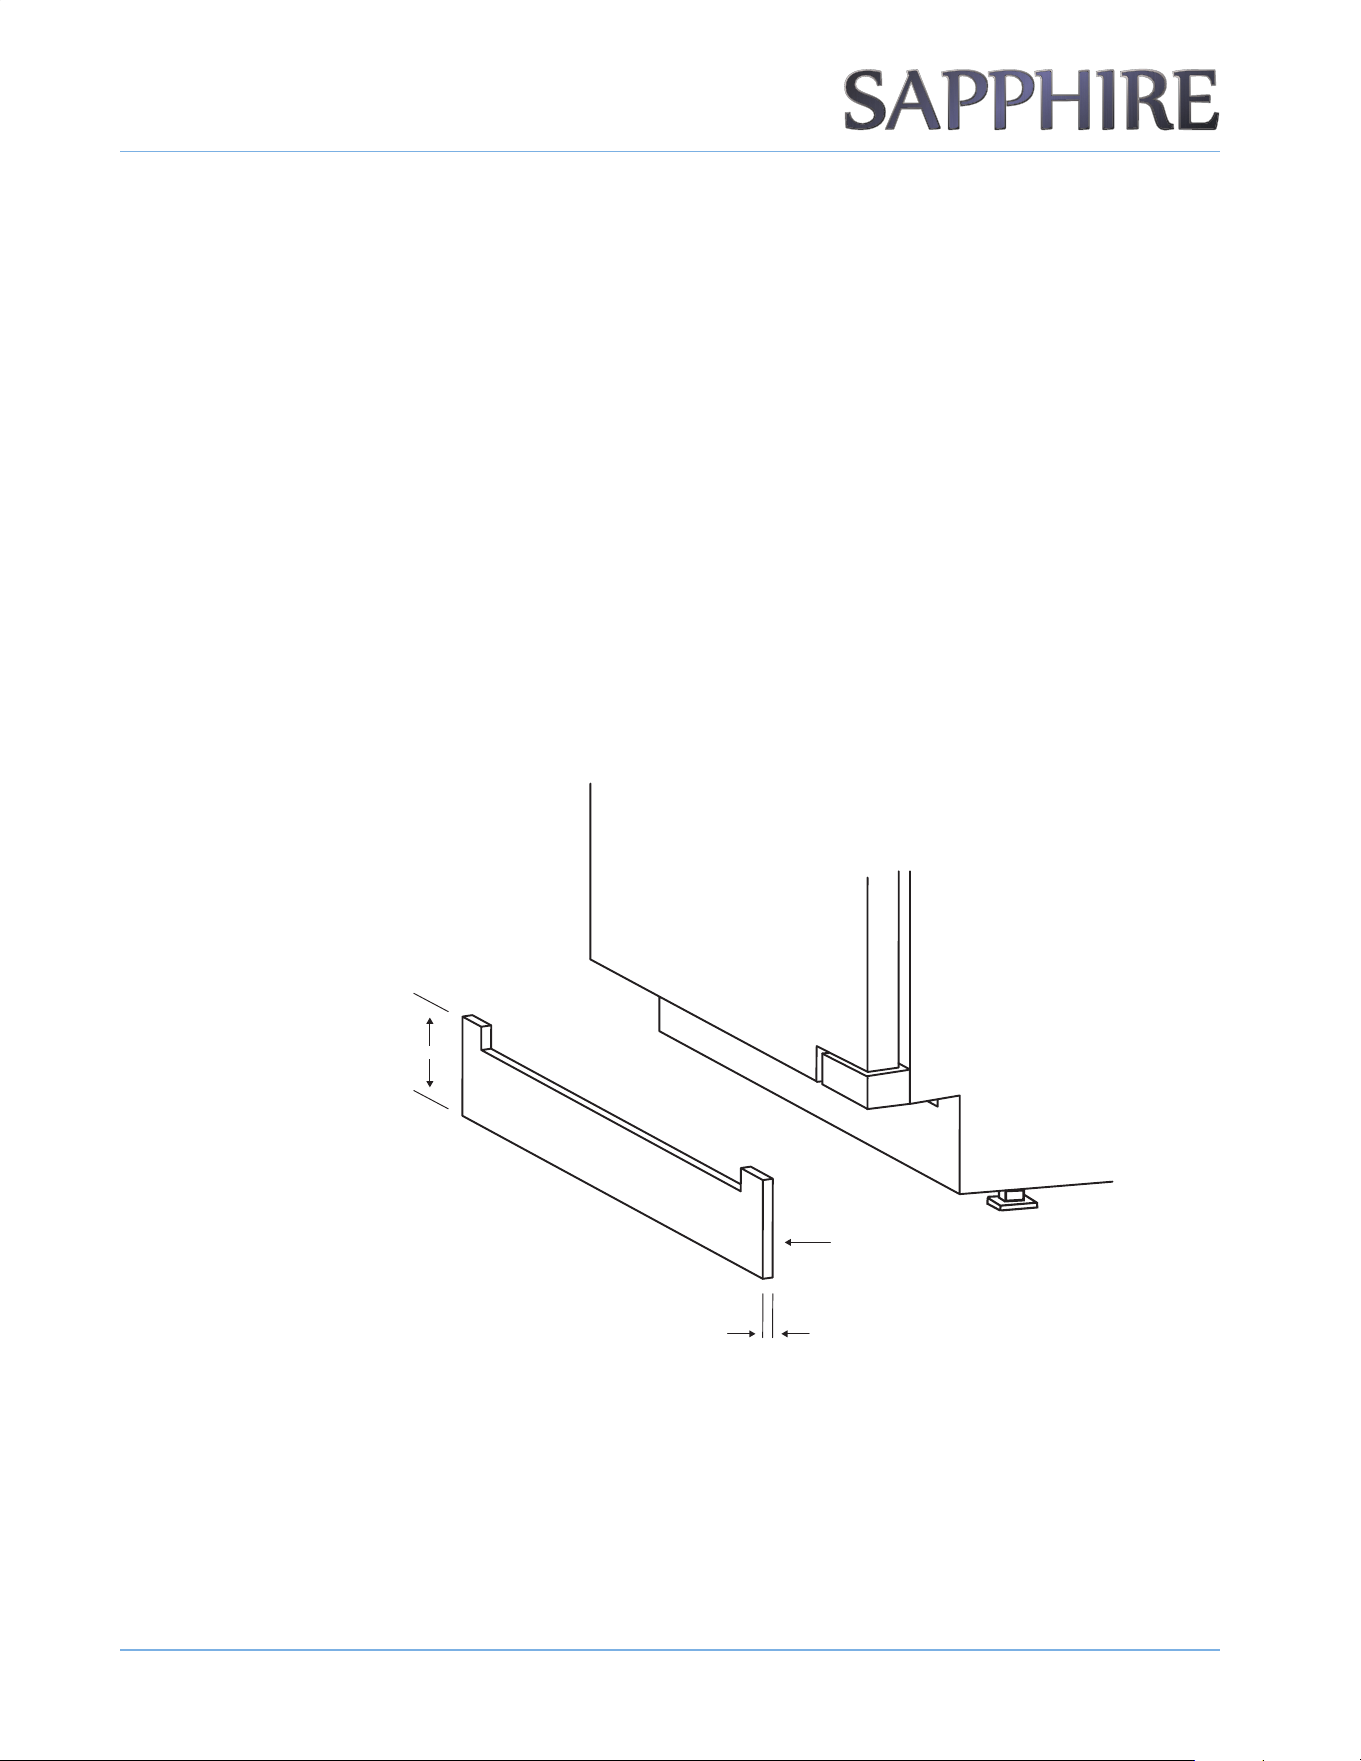
INTEGRATED GRILL/PLINTH
1. A n integrated grill/plinth can be fabricated if desired. The thickness of the panel should be between 1/4
in. to 3/8 in. (6 mm to 9 mm) and the height will vary between 3-5/16 in. to 4-5/16 in. (84 mm to 110 mm)
depending on your grill/plinth height.
OTE:N When nishing the grill/plinth, be sure to stain the front, back and all edges to prevent warping.
2. A pply double-sided tape to the surrounding edges of the integrated grill/plinth.
3. Remove the backing paper from the double-sided tape. C arefully align the grill/plinth over the integrated grill/
plinth and press it into position.
1/4 - 3/8 in.
(6-9 mm)
3-5/16 - 4-5/16 in.
(84-110 mm)
Double-Sided Tape
(Back Side)
1 5
OPERATING
THE UNIT
© 2022 S A PPH I RE
S A PPH I RE Refrigerator D rawers
Operator’ s M anual
4
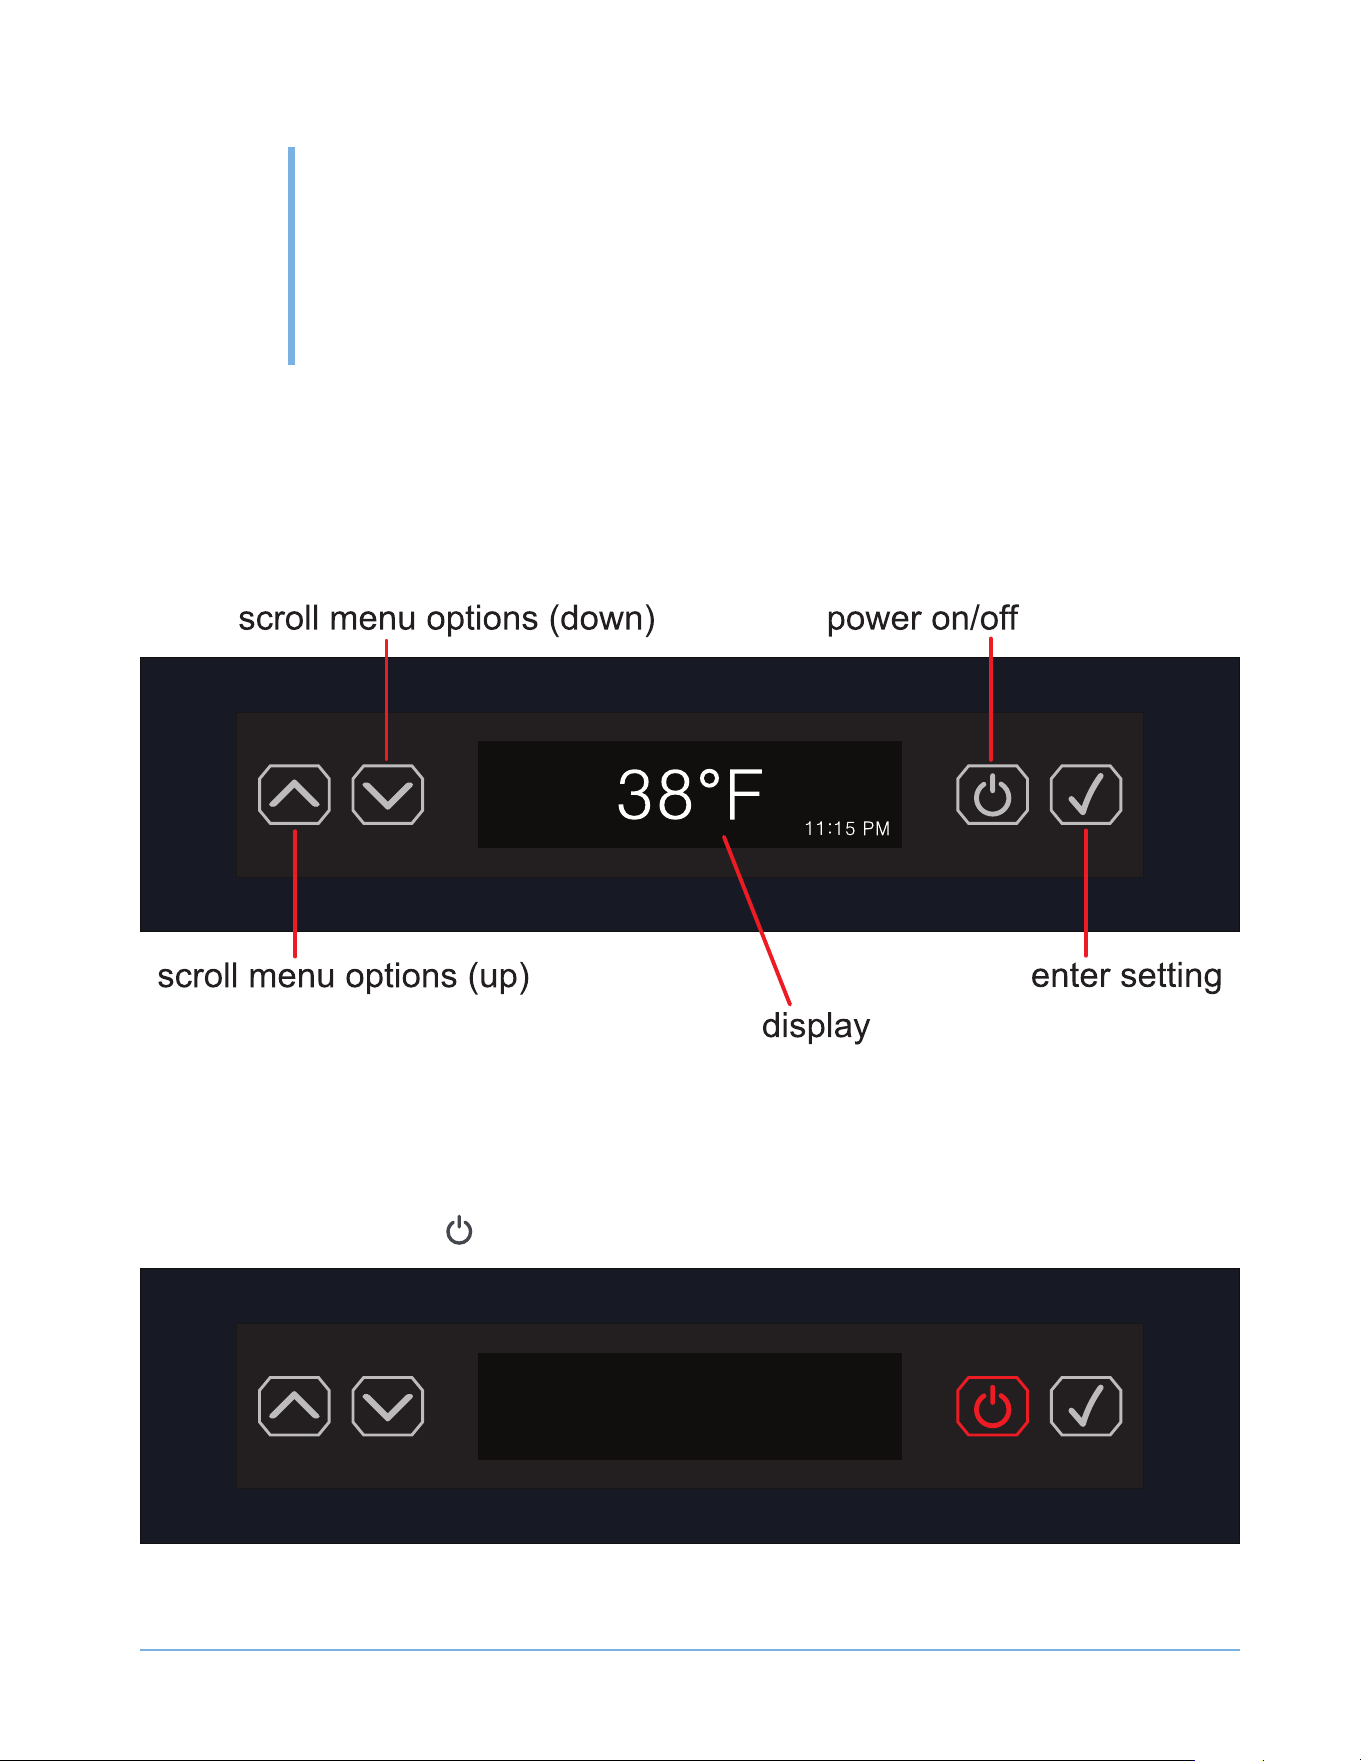
US ING THE C ONTROL S
The control panel is located at the top of the appliance.
OTE:N You have 30 seconds to make a control change before the display reverts to the default screen.
OTE:N The clock time only displays if the user has set the NIGHTLIGHT function; otherwise the clock time does not appear on the screen.
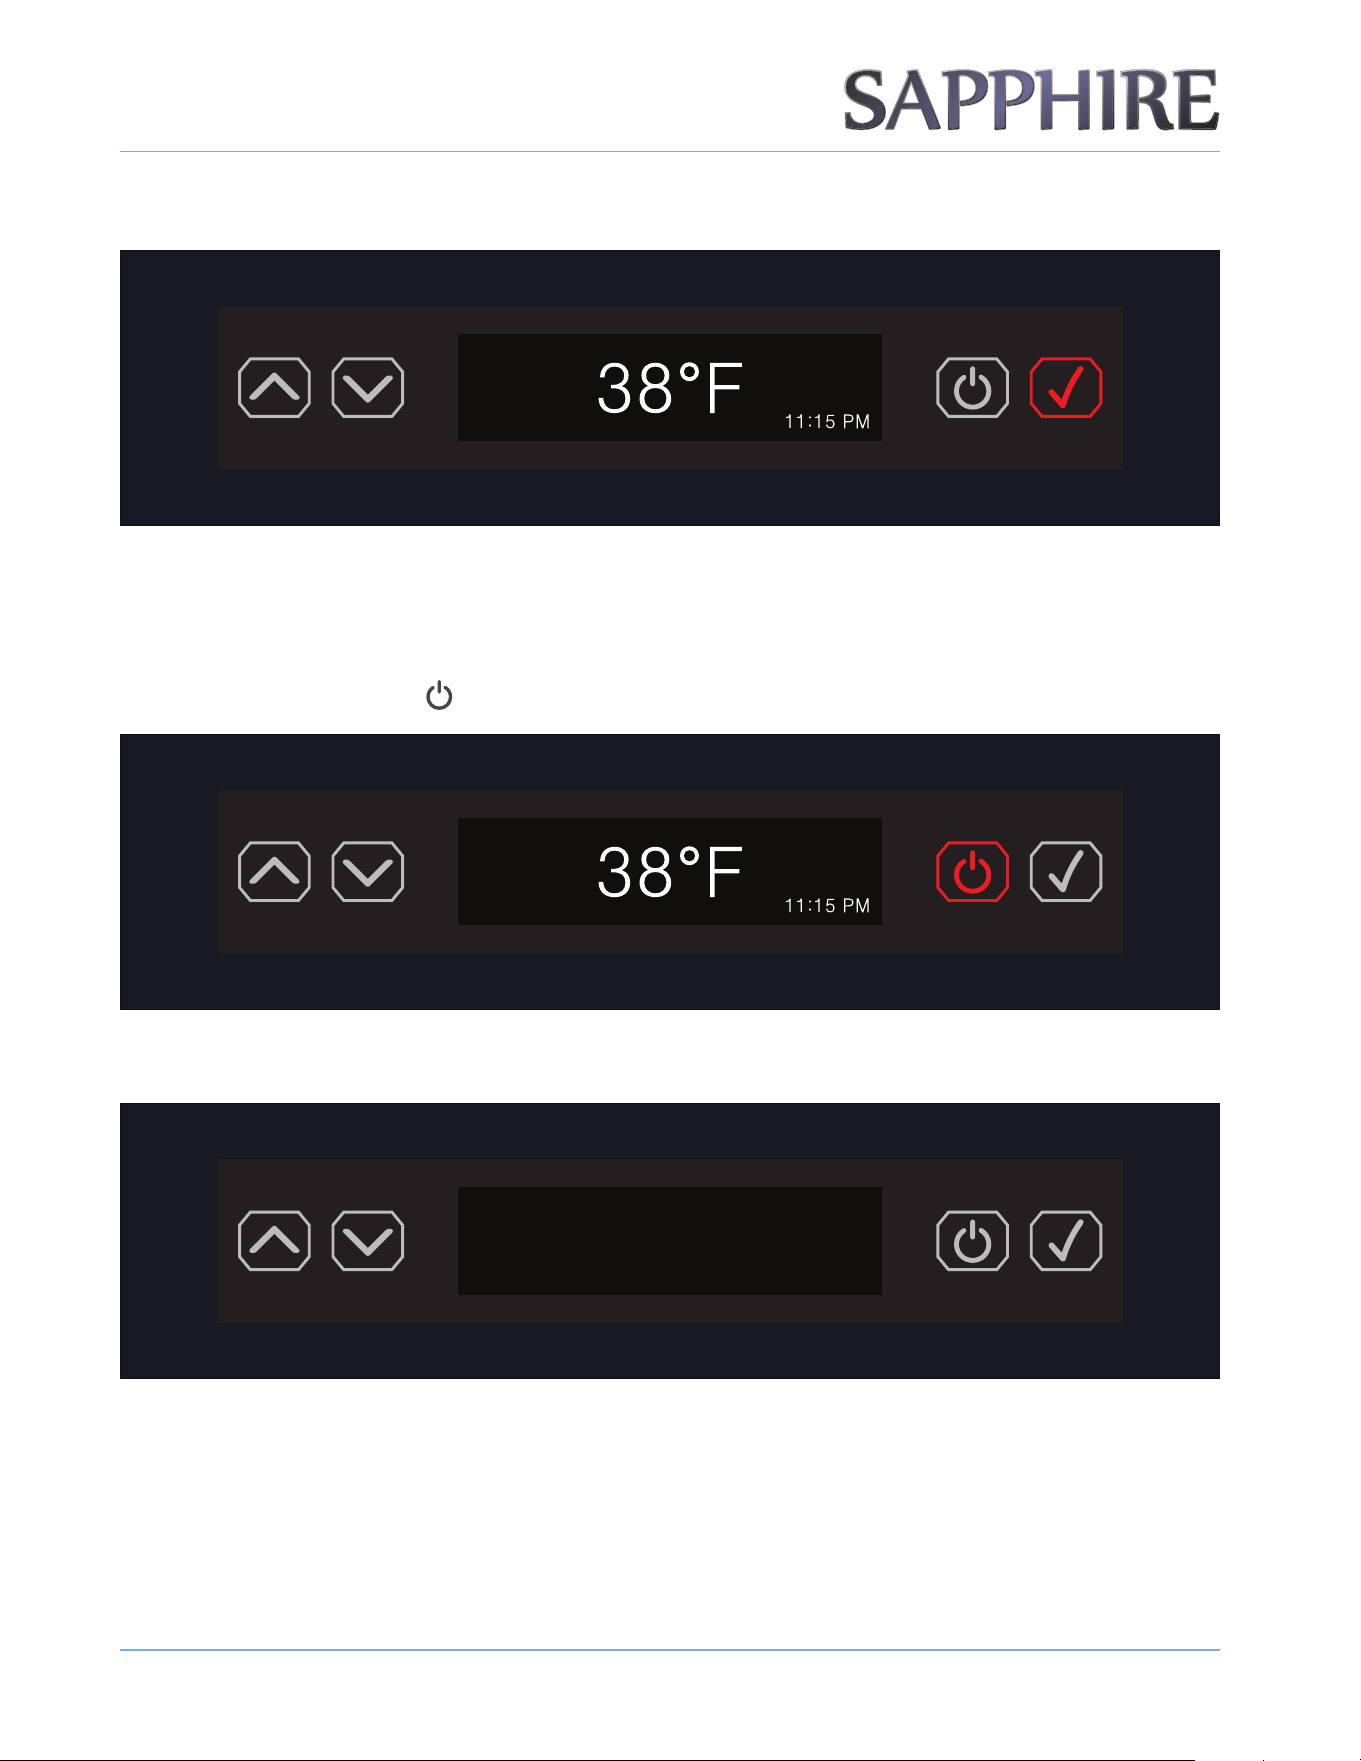
TURNING THE UNIT ON
1. Press the ON/OFF button ( ).
OPERATING THE UNIT
1 6
© 2022 S A PPH I RE
S A PPH I RE Refrigerator D rawers
Operator’ s M anual
2. The refrigerator powers up and displays the default temperature screen.
OTE:N The factory default temperature must be 38°F.
TURNING THE UNIT OFF
1. Press the ON/OFF button ( ) and hold for 3 seconds.
2. The refrigerator powers o and nothing displays.
OPERATING THE UNIT
1 7
© 2022 S A PPH I RE
S A PPH I RE Refrigerator D rawers
Operator’ s M anual
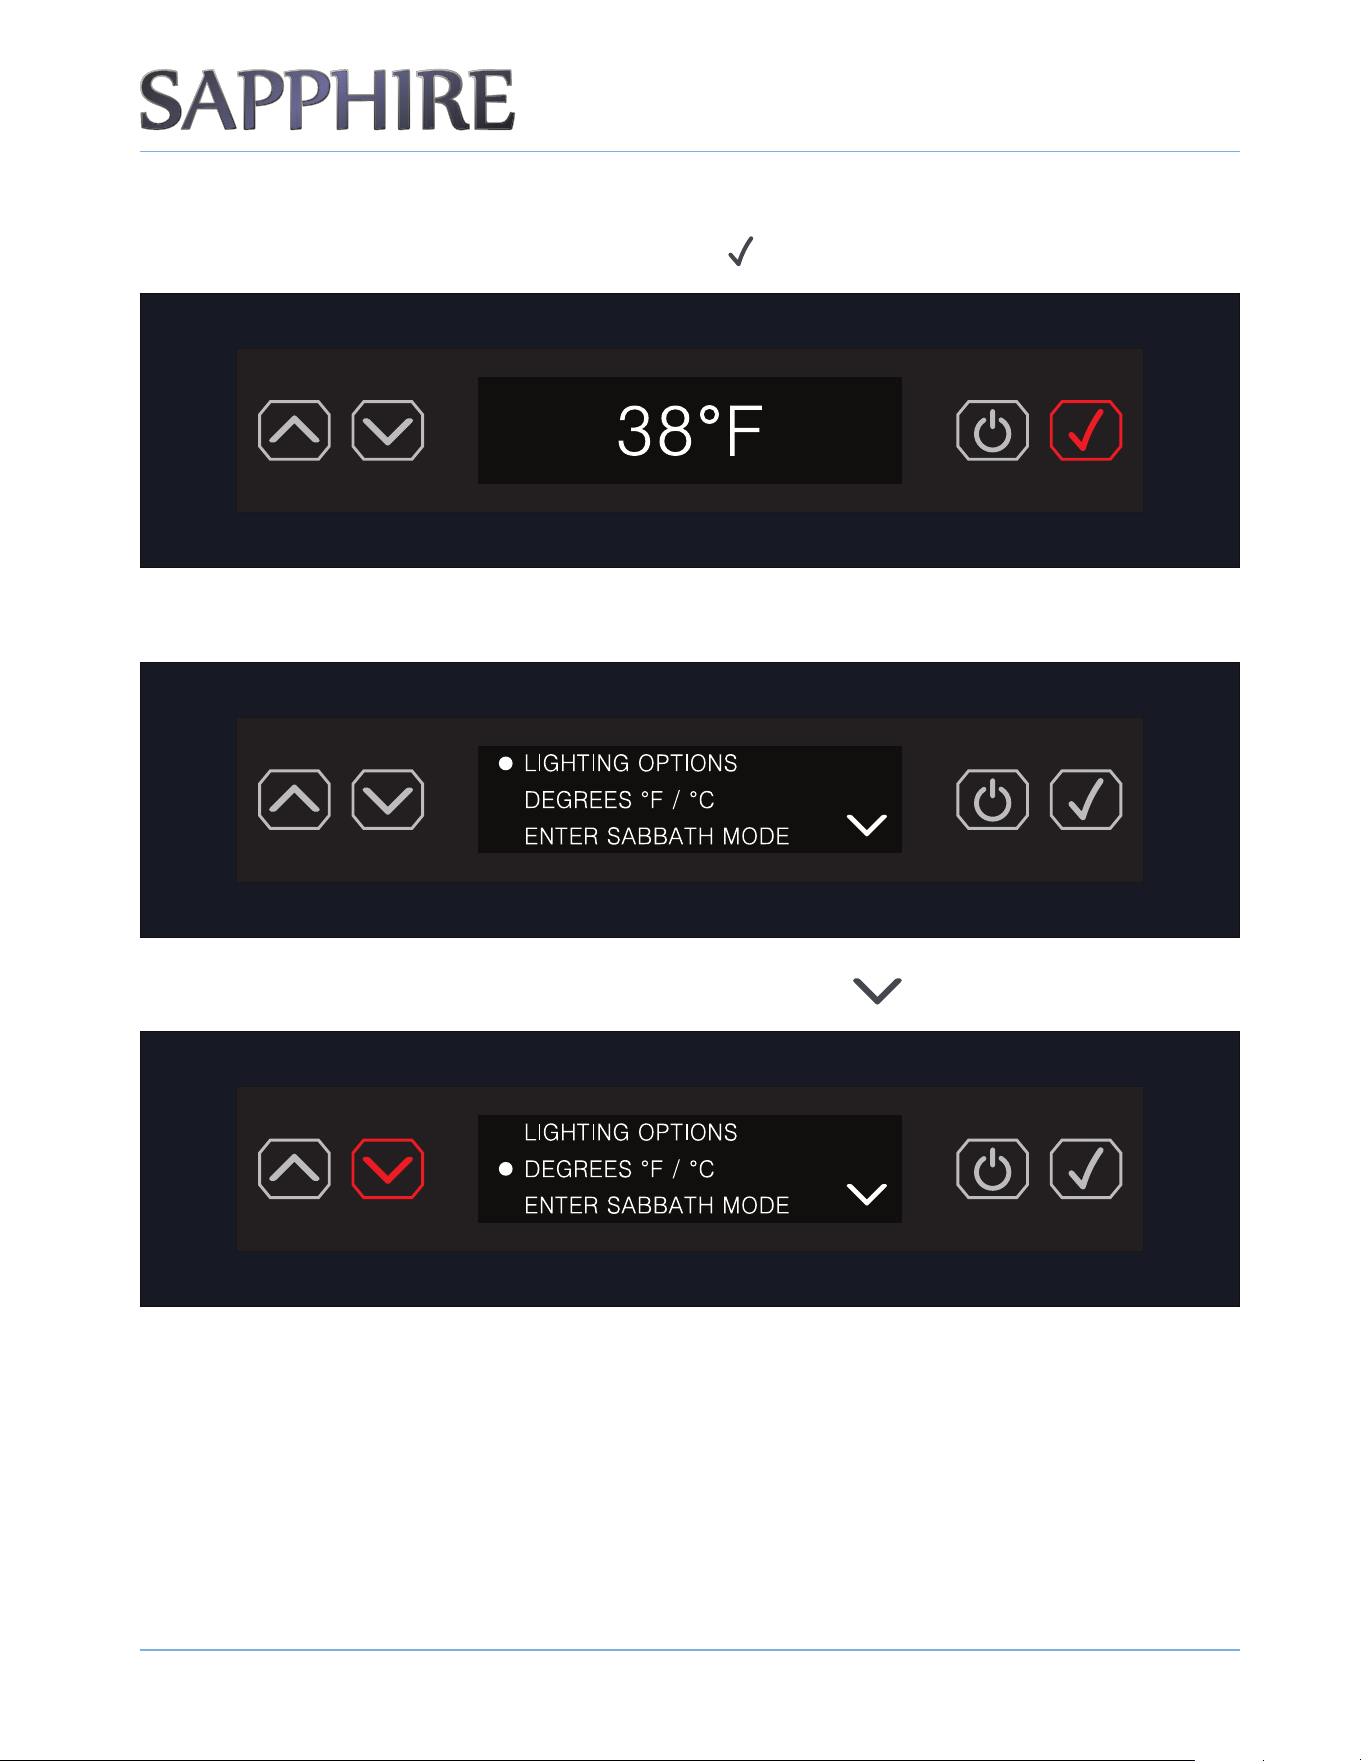
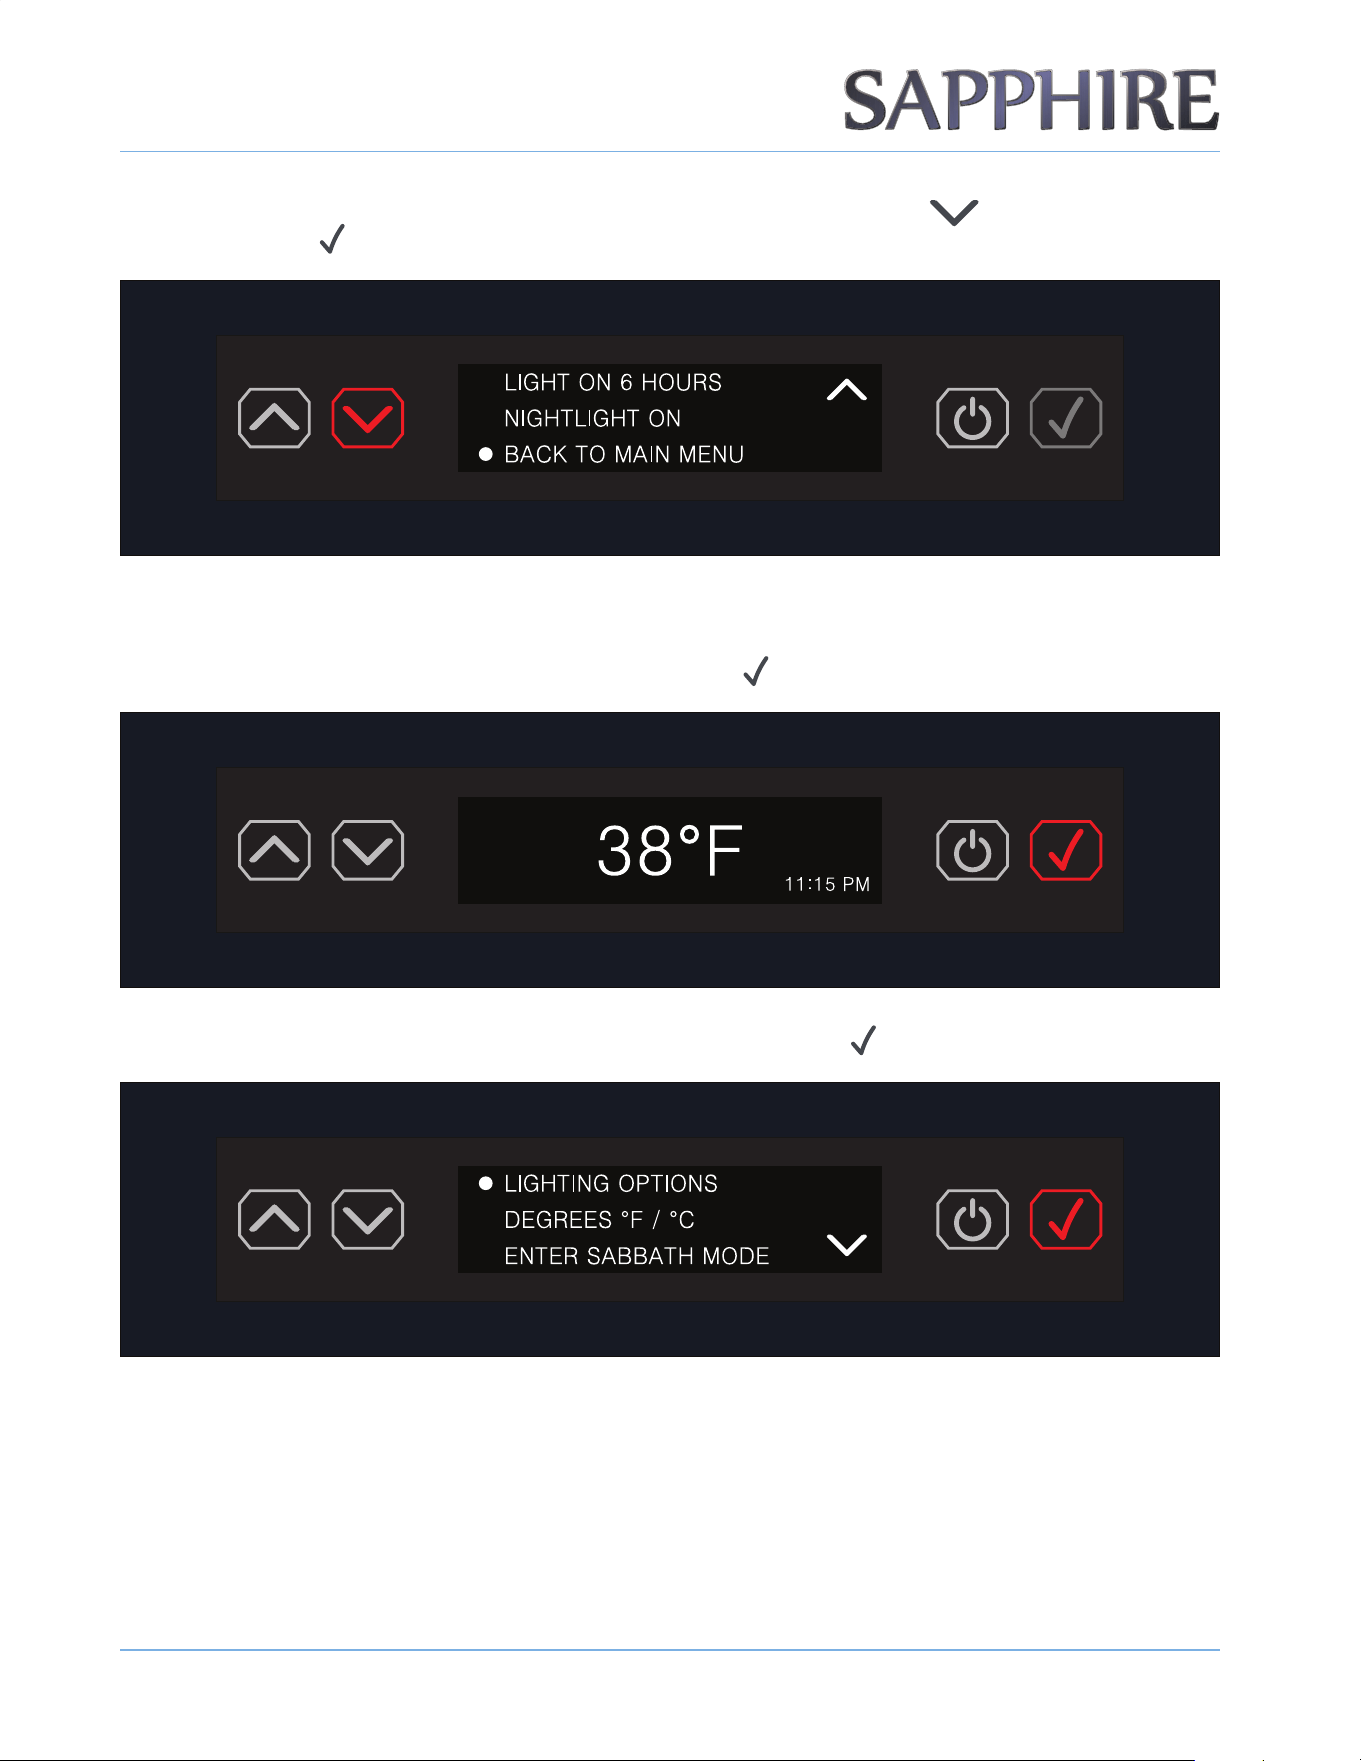
ENTERING THE DISPLAY OF MENU ITEMS
1. To enter the menu of settings, press the ENTER button ( ).
2. The display shows the rst menu item, LIGHTING OPTIONS.
3. Scroll to the next menu item by pressing the DOWN ARROW button ( ).
OPERATING THE UNIT
1 8
© 2022 S A PPH I RE
S A PPH I RE Refrigerator D rawers
Operator’ s M anual
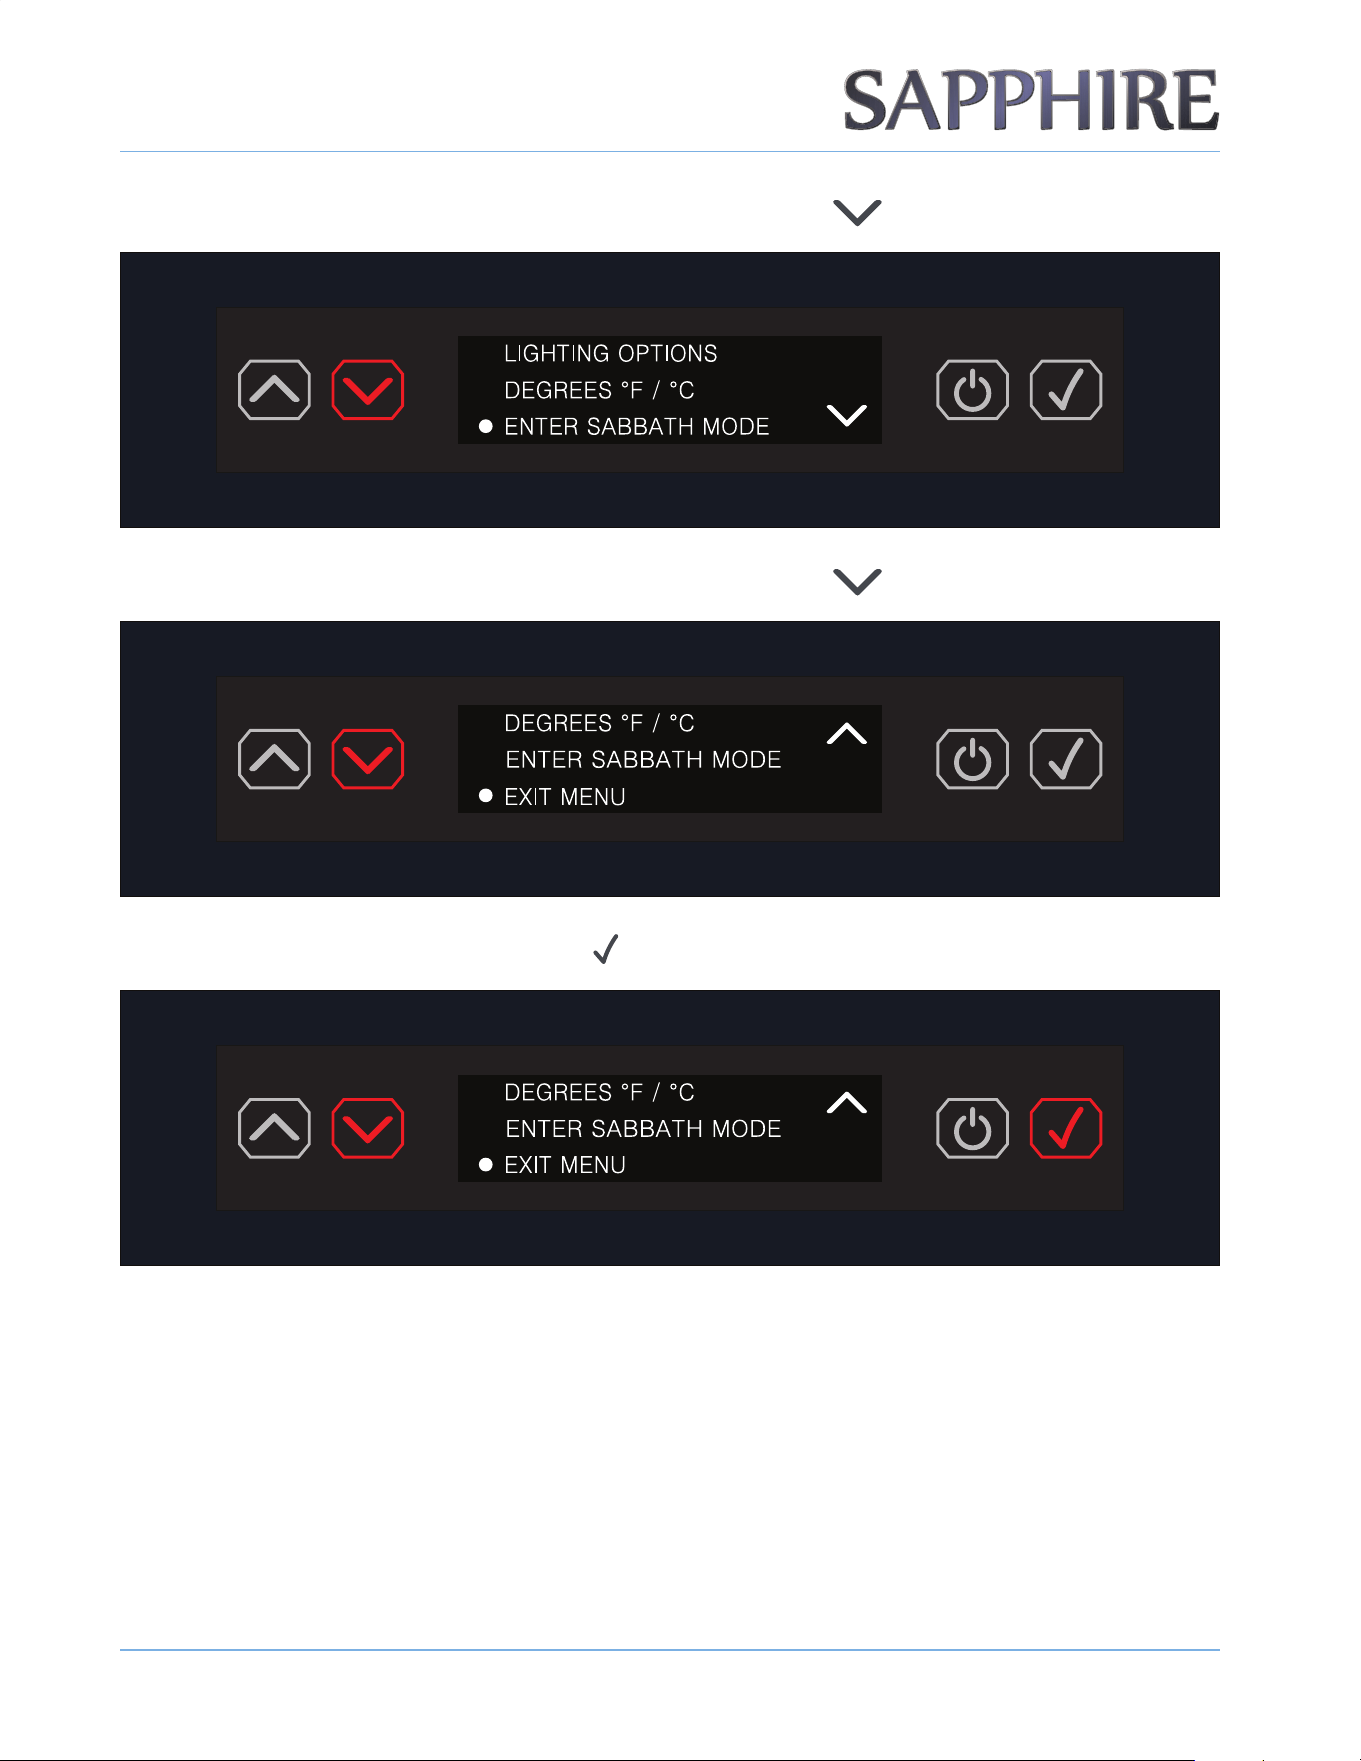
4. Scroll to the next menu item by pressing the DOWN ARROW button ( ).
5. Scroll to the next menu item by pressing the DOWN ARROW button ( ).
6. To exit the menu, press the ENTER button ( ).
OTE:N Once you select a menu item, the system takes you directly to that particular setting.
OPERATING THE UNIT
1 9
© 2022 S A PPH I RE
S A PPH I RE Refrigerator D rawers
Operator’ s M anual
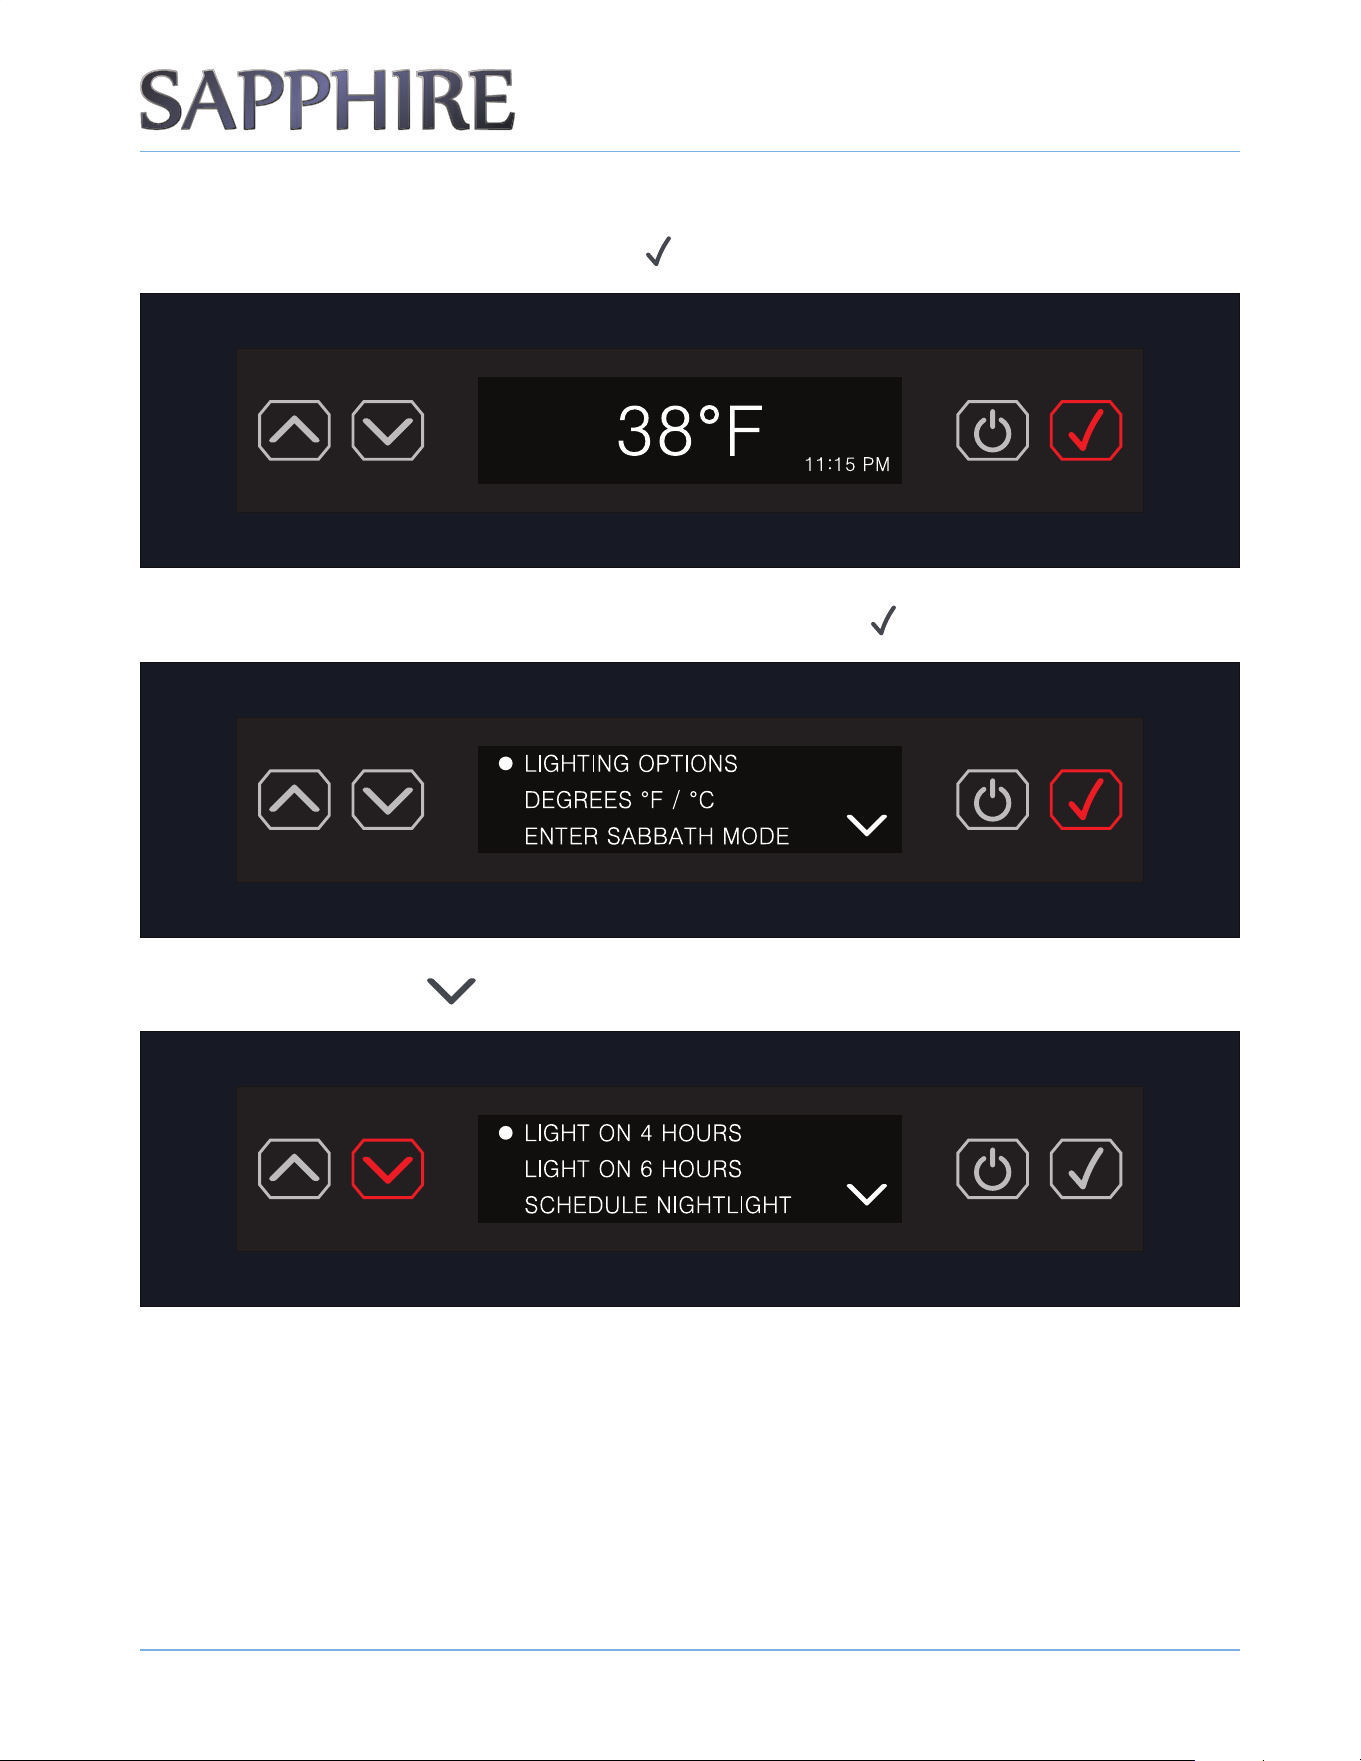
LIGHTING OPTIONS
1. To adjust the lighting, press the ENTER button ( ) to access the menu.
2. The rst menu item is LIGHTING OPTIONS. Press the ENTER button ( ).
3. Press the DOWN arrow ( ) to reach the desired setting.
OPERATING THE UNIT
2 0
© 2022 S A PPH I RE
S A PPH I RE Refrigerator D rawers
Operator’ s M anual
4. To return back to the main menu, scroll down by pressing the DOWN ARROW ( ) and then press the
ENTER button (
).
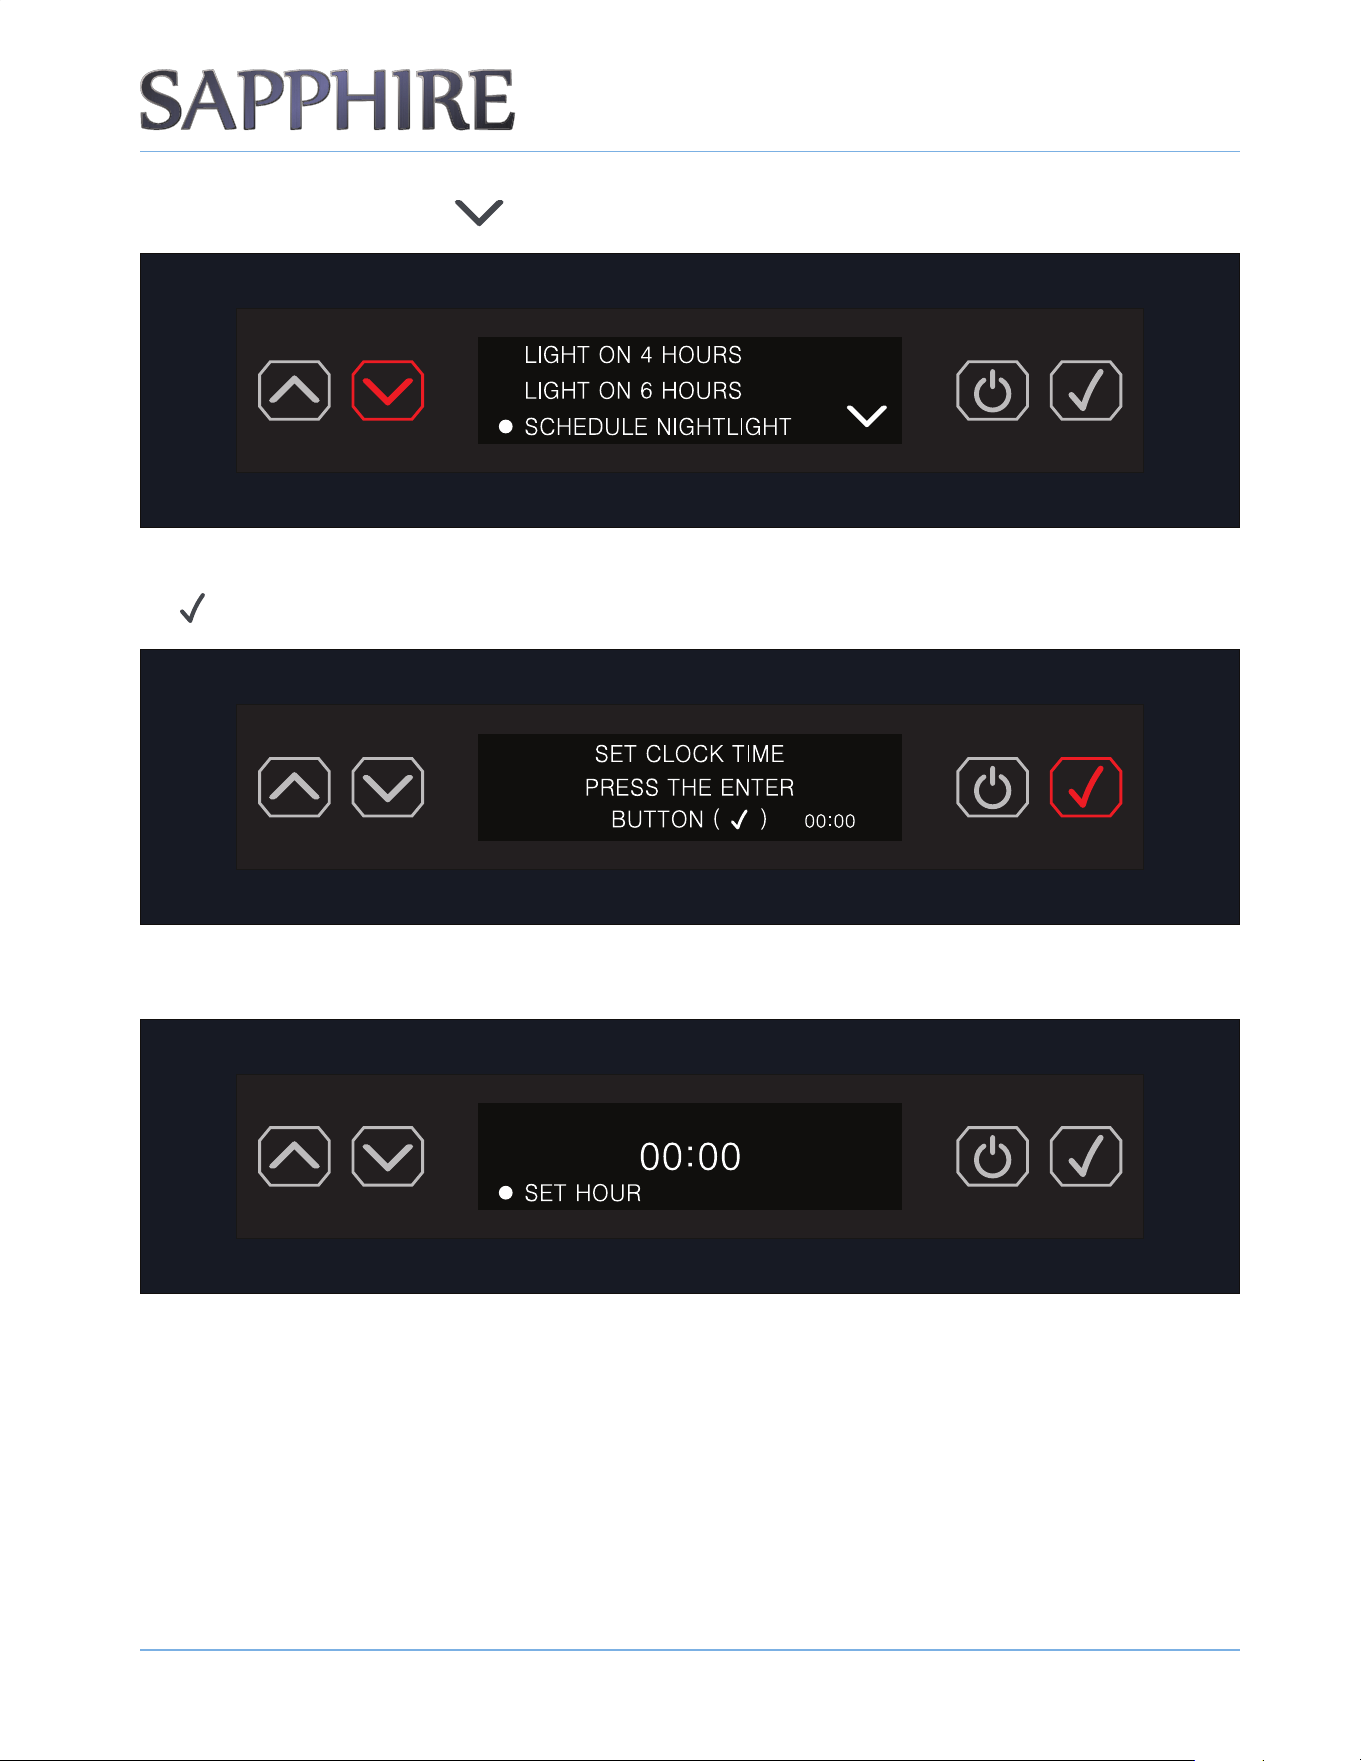
LIGHTING OPTIONS - SCHEDULING NIGHTLIGHT
1. To schedule the nightlight setting, press the ENTER button ( ) to access the menu.
2. The rst menu item is LIGHTING OPTIONS. Press the ENTER button ( ).
OPERATING THE UNIT
2 1
© 2022 S A PPH I RE
S A PPH I RE Refrigerator D rawers
Operator’ s M anual
3. Press the DOWN ARROW ( ) to reach the SCHEDULE NIGHTLIGHT setting.
4. Set the clock time before reaching the desired SCHEDULE NIGHTLIGHT setting. Press the ENTER button (
).
5. The display will show the clock at 00:00 and prompt you to set the hour.
OPERATING THE UNIT
2 2
© 2022 S A PPH I RE
S A PPH I RE Refrigerator D rawers
Operator’ s M anual
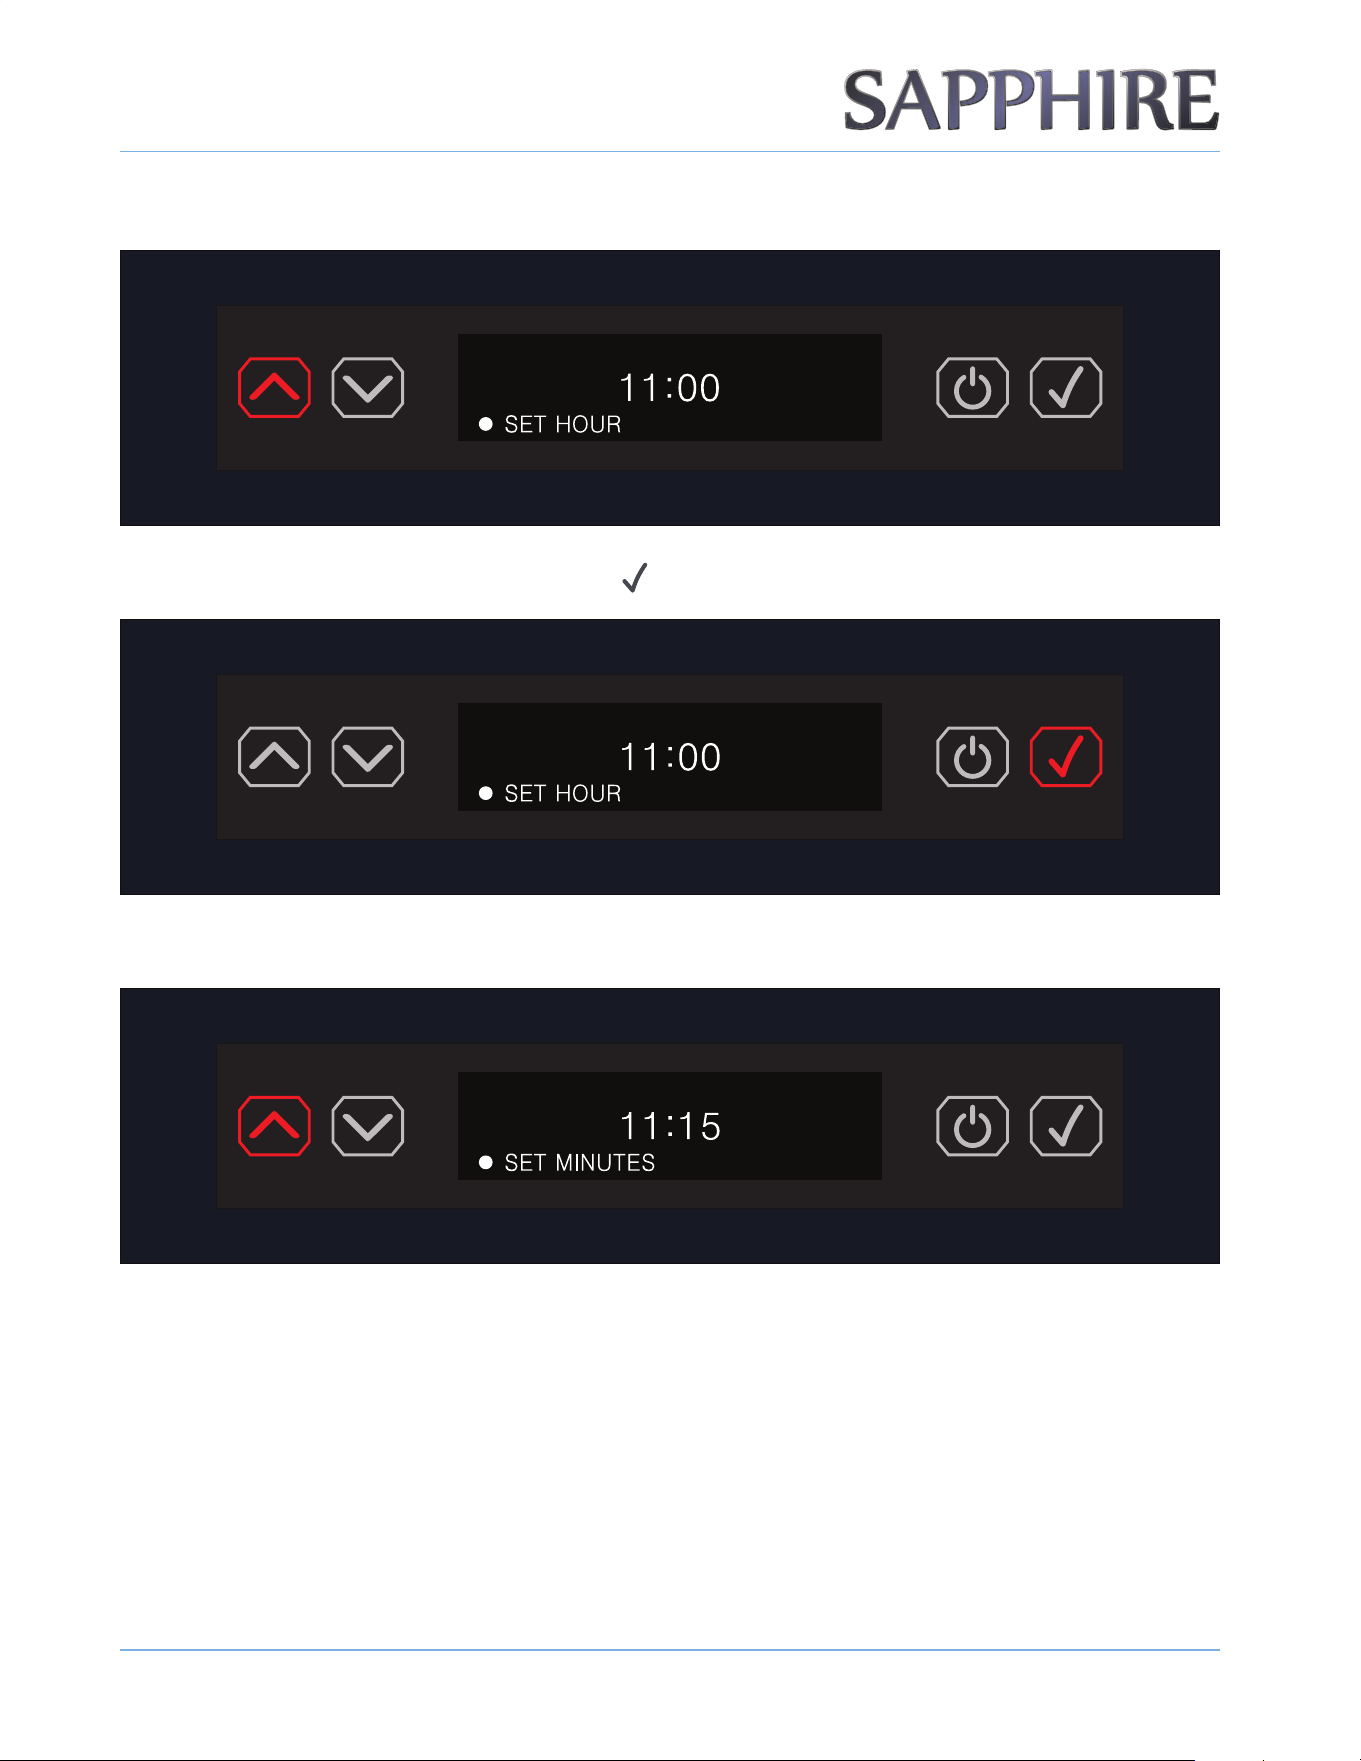
6. Set the hour using the UP / DOWN ARROW buttons.
7. Once the hour is set, press the ENTER button ( ).
8. Set the minutes using the UP / DOWN ARROW buttons.
OPERATING THE UNIT
2 3
© 2022 S A PPH I RE
S A PPH I RE Refrigerator D rawers
Operator’ s M anual
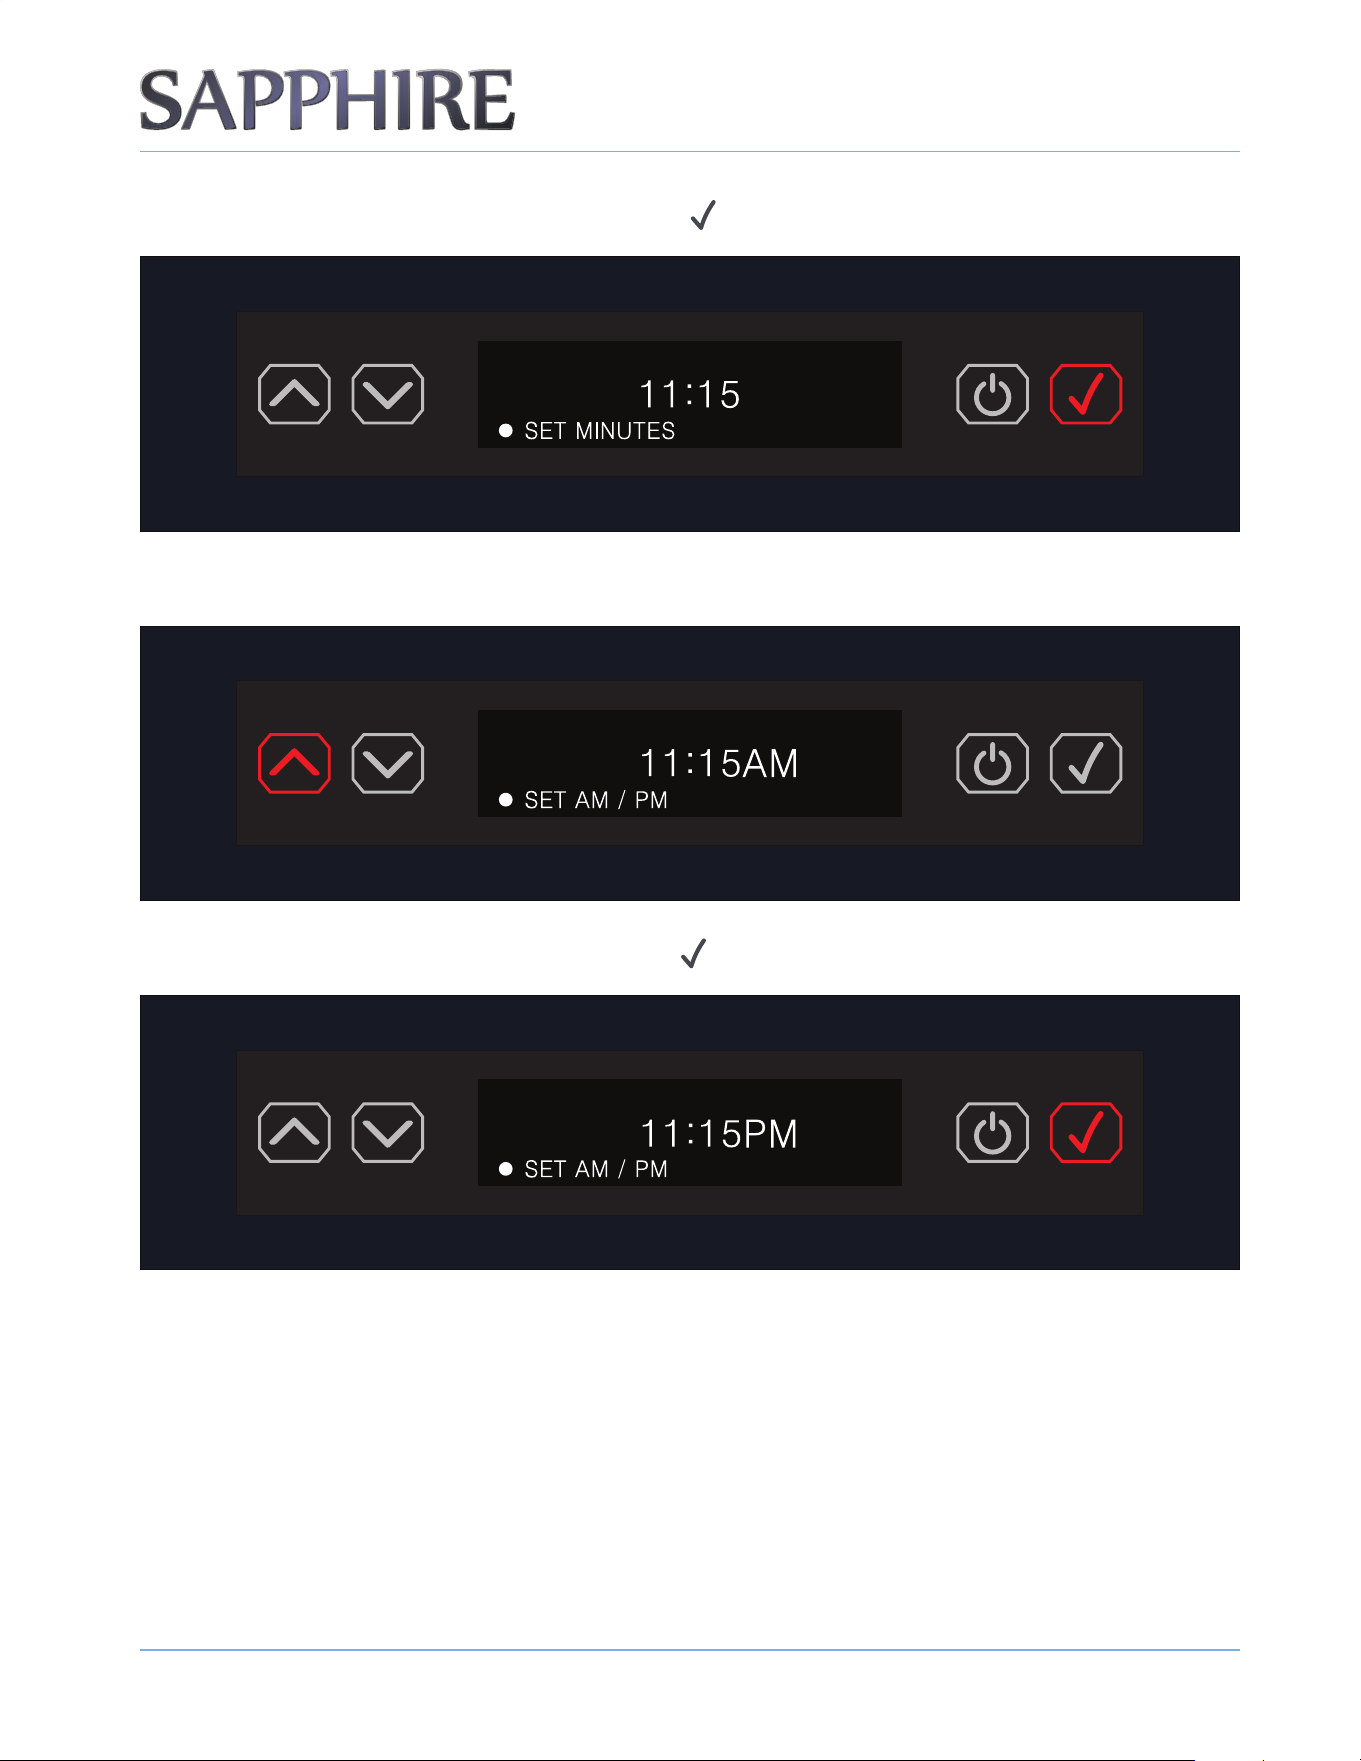
9. Once the minutes are set, press the ENTER button ( ).
10. Select AM or PM using the UP / DOWN ARROW buttons.
11. Once the AM / PM is set, press the ENTER button ( ).
OPERATING THE UNIT
2 4
© 2022 S A PPH I RE
S A PPH I RE Refrigerator D rawers
Operator’ s M anual
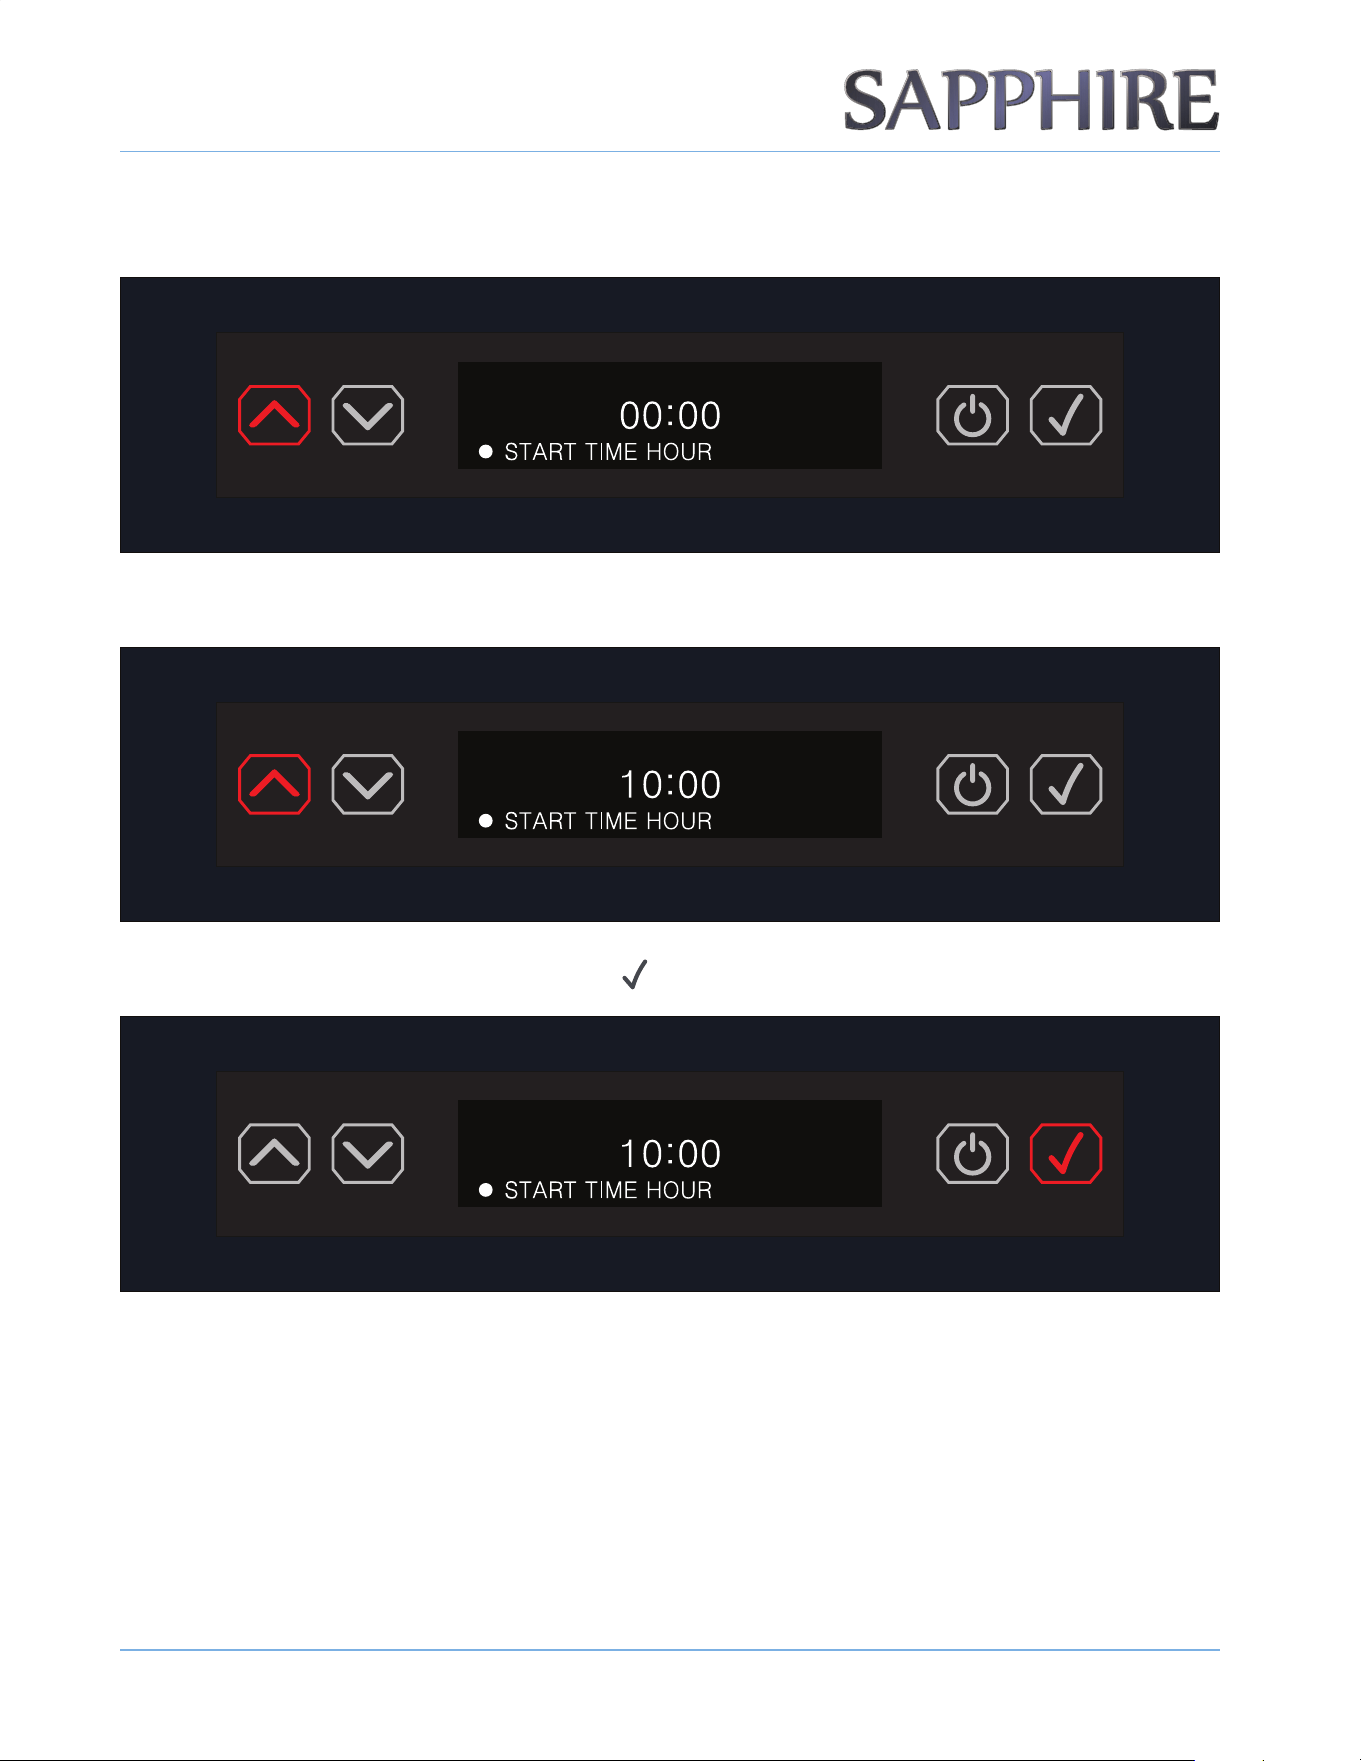
12. Once the time is properly set, set the START TIME HOUR for the SCHEDULE NIGHTLIGHT by pressing the
UP or DOWN ARROW buttons.
13. Using the UP / DOWN ARROW buttons, set the START TIME HOUR.
14. Once the hour is set, press the ENTER button ( ).
OPERATING THE UNIT
2 5
© 2022 S A PPH I RE
S A PPH I RE Refrigerator D rawers
Operator’ s M anual
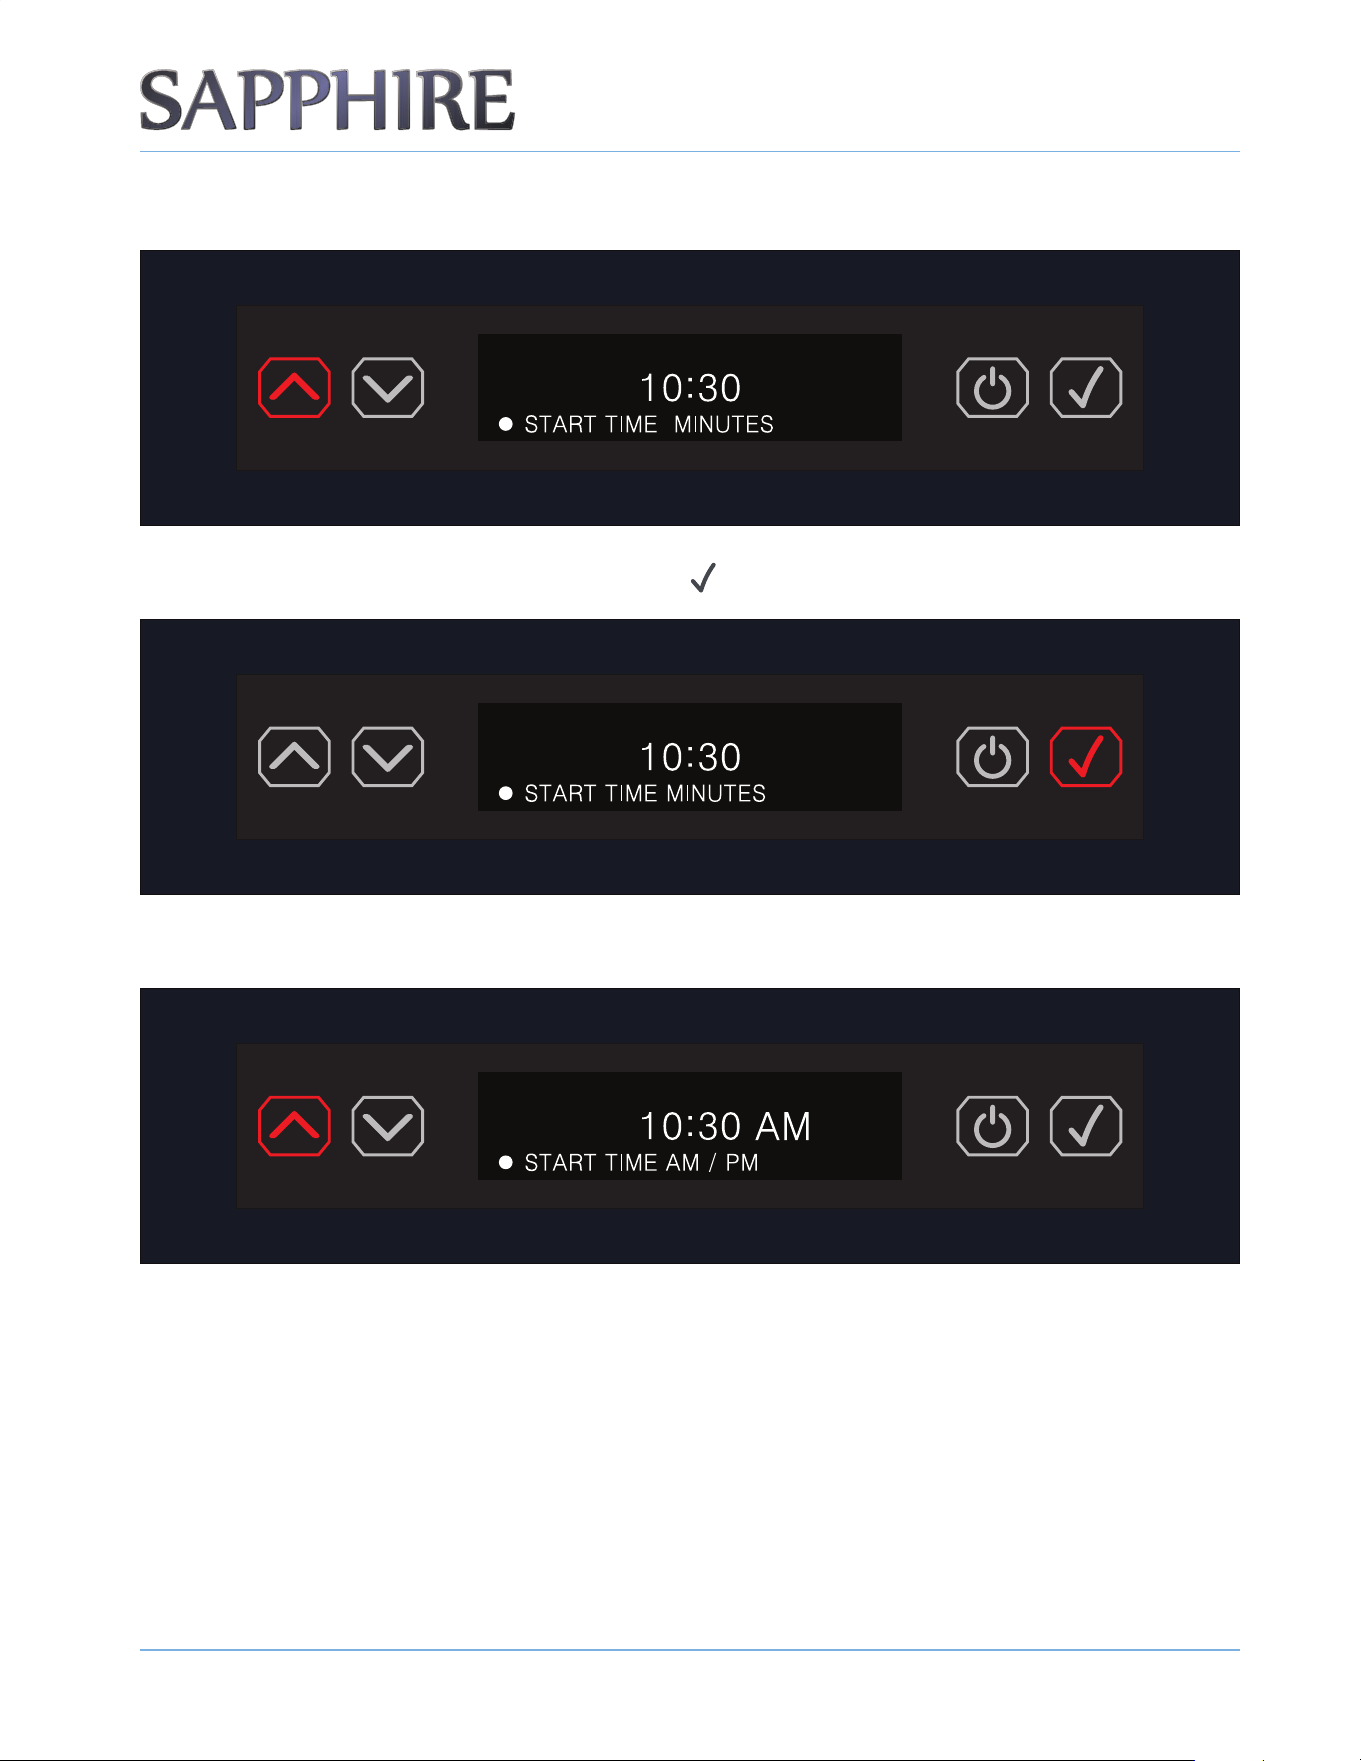
15. Using the UP / DOWN ARROW buttons, set the START TIME MINUTES.
16. Once the minutes are set, press the ENTER button ( ).
17. Using the UP / DOWN ARROW buttons, select START TIME AM / PM.
OPERATING THE UNIT
2 6
© 2022 S A PPH I RE
S A PPH I RE Refrigerator D rawers
Operator’ s M anual
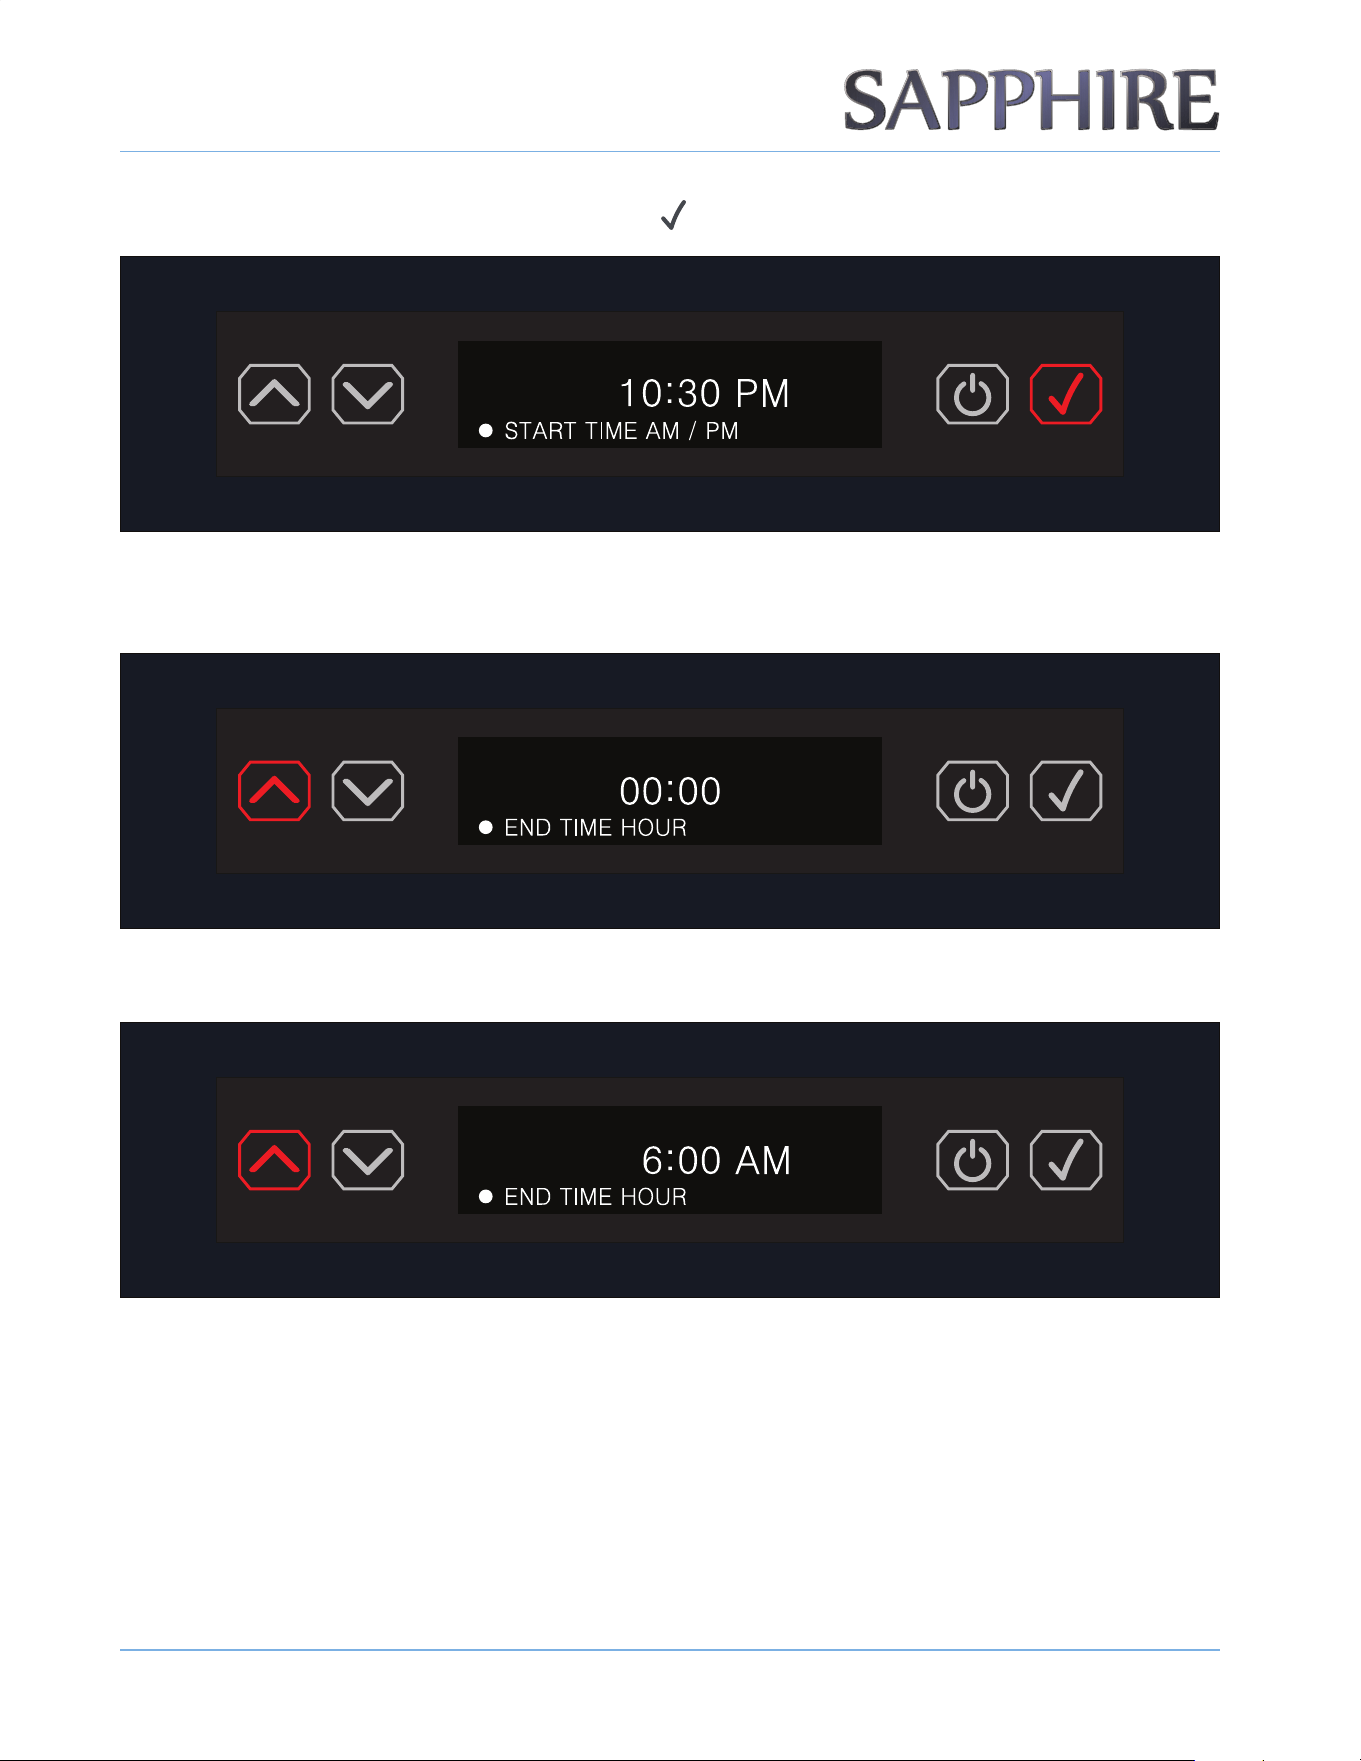
18. Once the AM / PM is set, press the ENTER button ( ).
19. Once the start time is properly set, set the END TIME HOUR for the SCHEDULE NIGHTLIGHT by pressing
the UP or DOWN ARROW buttons.
20. Using the UP / DOWN ARROW buttons, select the END TIME HOUR.
OPERATING THE UNIT
2 7
© 2022 S A PPH I RE
S A PPH I RE Refrigerator D rawers
Operator’ s M anual
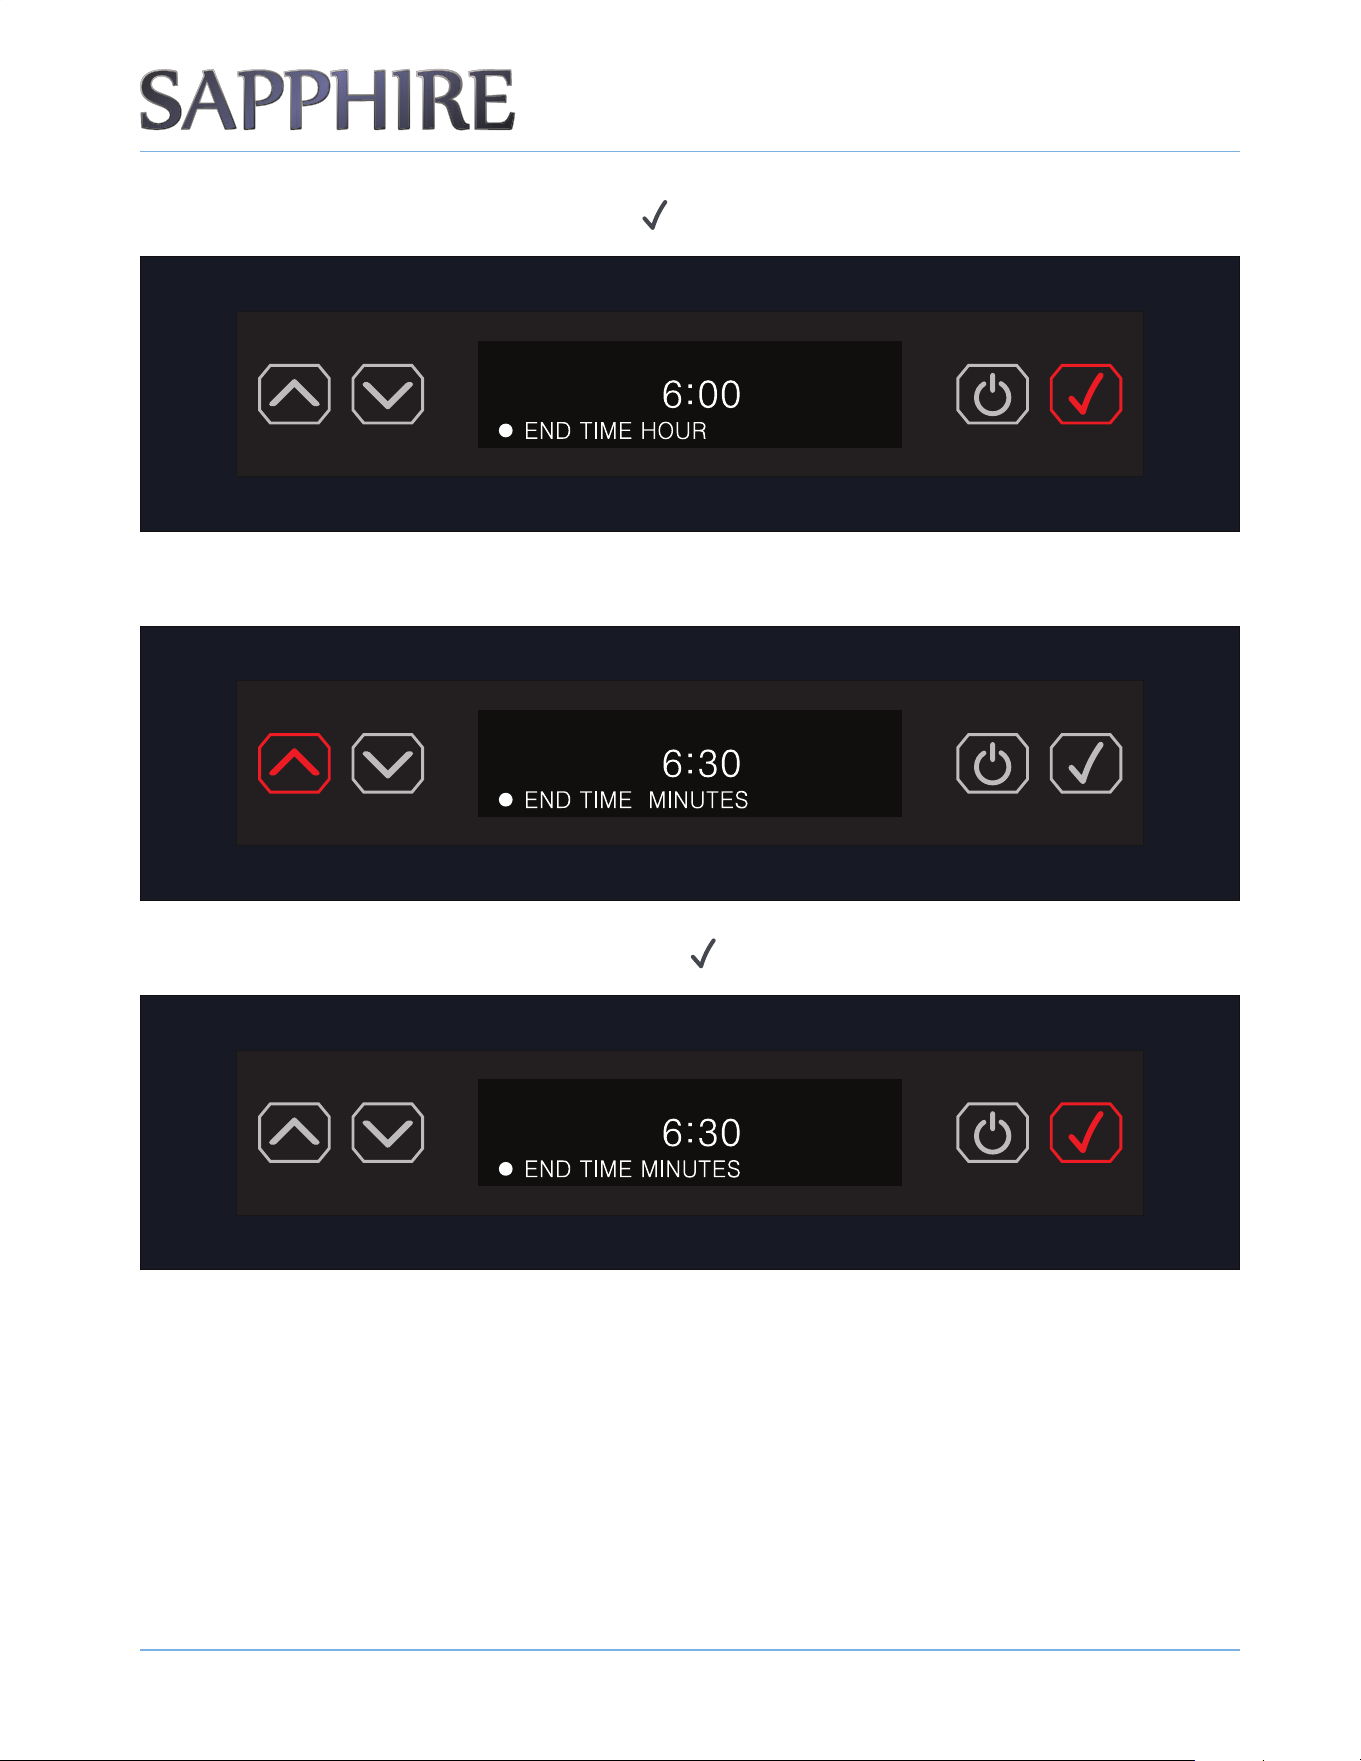
21. Once the hour is set, press the ENTER button ( ).
22. Using the UP / DOWN ARROW buttons, set the END TIME MINUTES.
23. Once the minutes are set, press the ENTER button ( ).
OPERATING THE UNIT
2 8
© 2022 S A PPH I RE
S A PPH I RE Refrigerator D rawers
Operator’ s M anual
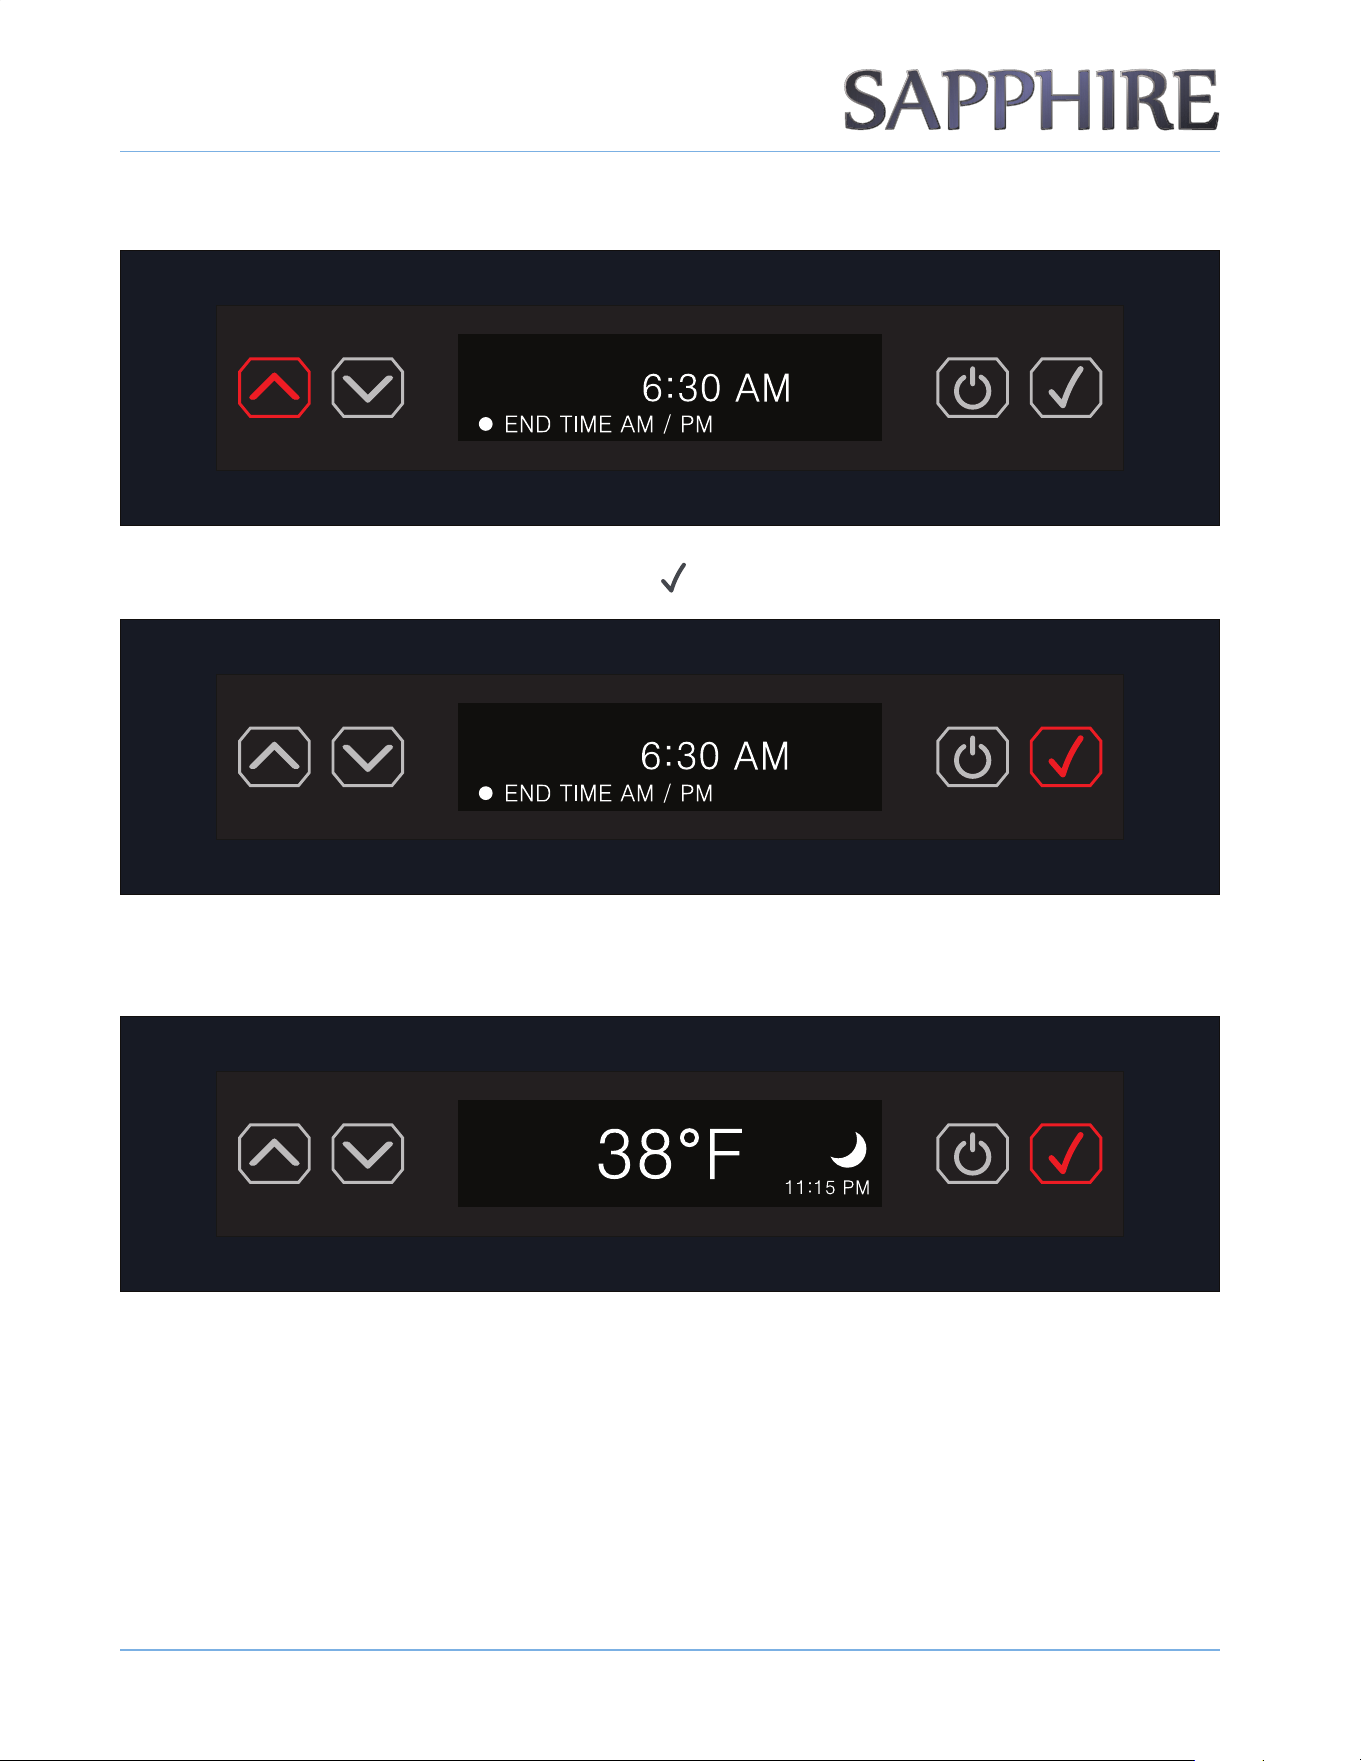
24. Using the UP / DOWN ARROW buttons, select END TIME AM / PM.
25. Once the AM / PM is set, press the ENTER button ( ).
26. SCHEDULE NIGHTLIGHT is now set and the display will show the default temperature screen with the
crescent moon icon and the time set.
OTE:N The factory default lighting setting is DOOR OPEN ONLY.
OPERATING THE UNIT
2 9
© 2022 S A PPH I RE
S A PPH I RE Refrigerator D rawers
Operator’ s M anual
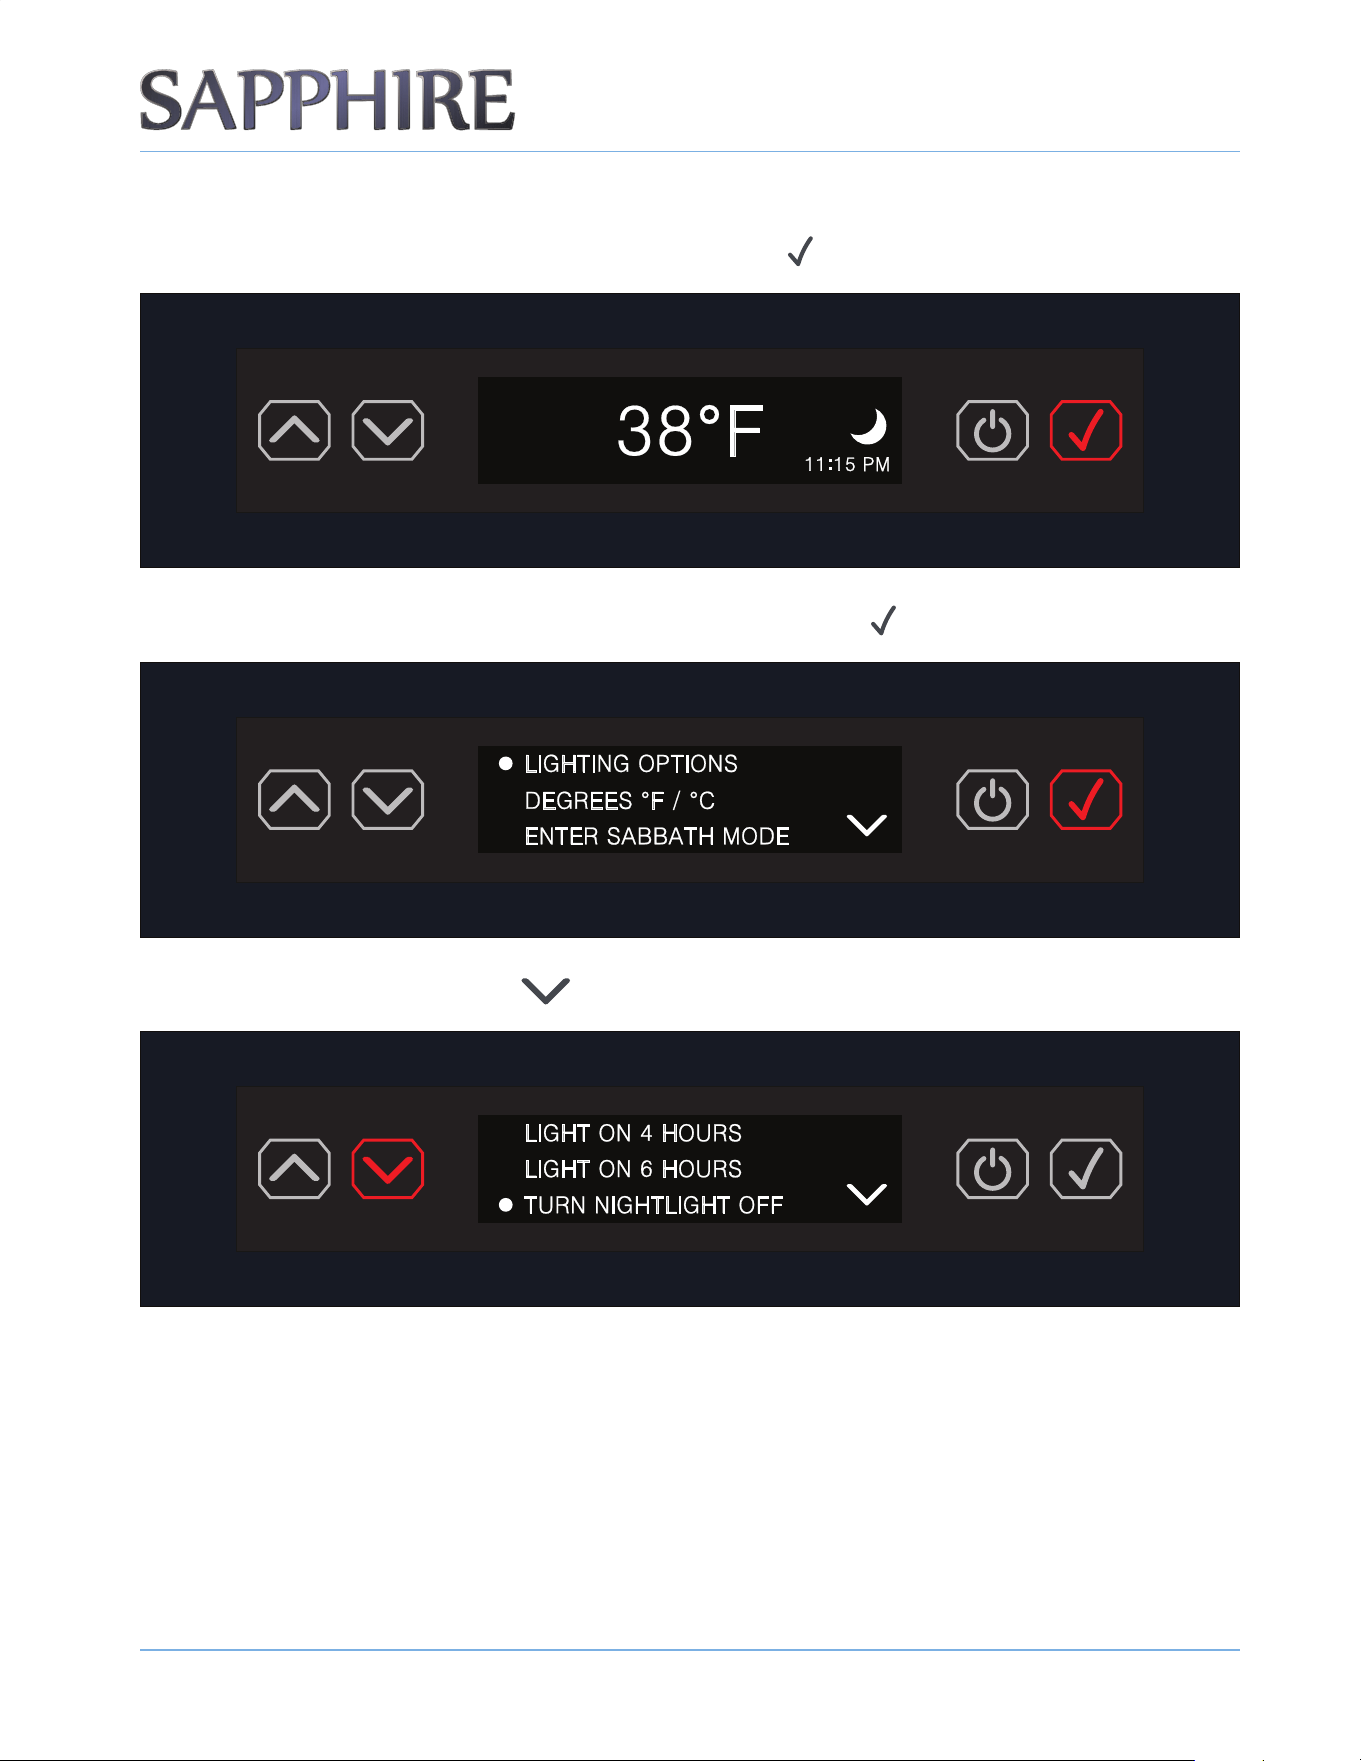
LIGHTING OPTIONS - TURNING NIGHTLIGHT OFF
1. To turn o the NIGHTLIGHT setting, press the ENTER button ( ) to access the menu.
2. The rst menu item is LIGHTING OPTIONS. Press the ENTER button ( ).
3. Press the DOWN ARROW button ( ) to reach the menu item TURN NIGHTLIGHT OFF.
OTE:N The NIGHTLIGHT setting will remain on until user turns it off.
OPERATING THE UNIT
3 0
© 2022 S A PPH I RE
S A PPH I RE Refrigerator D rawers
Operator’ s M anual
4. To conrm the setting, press the ENTER button ( ).
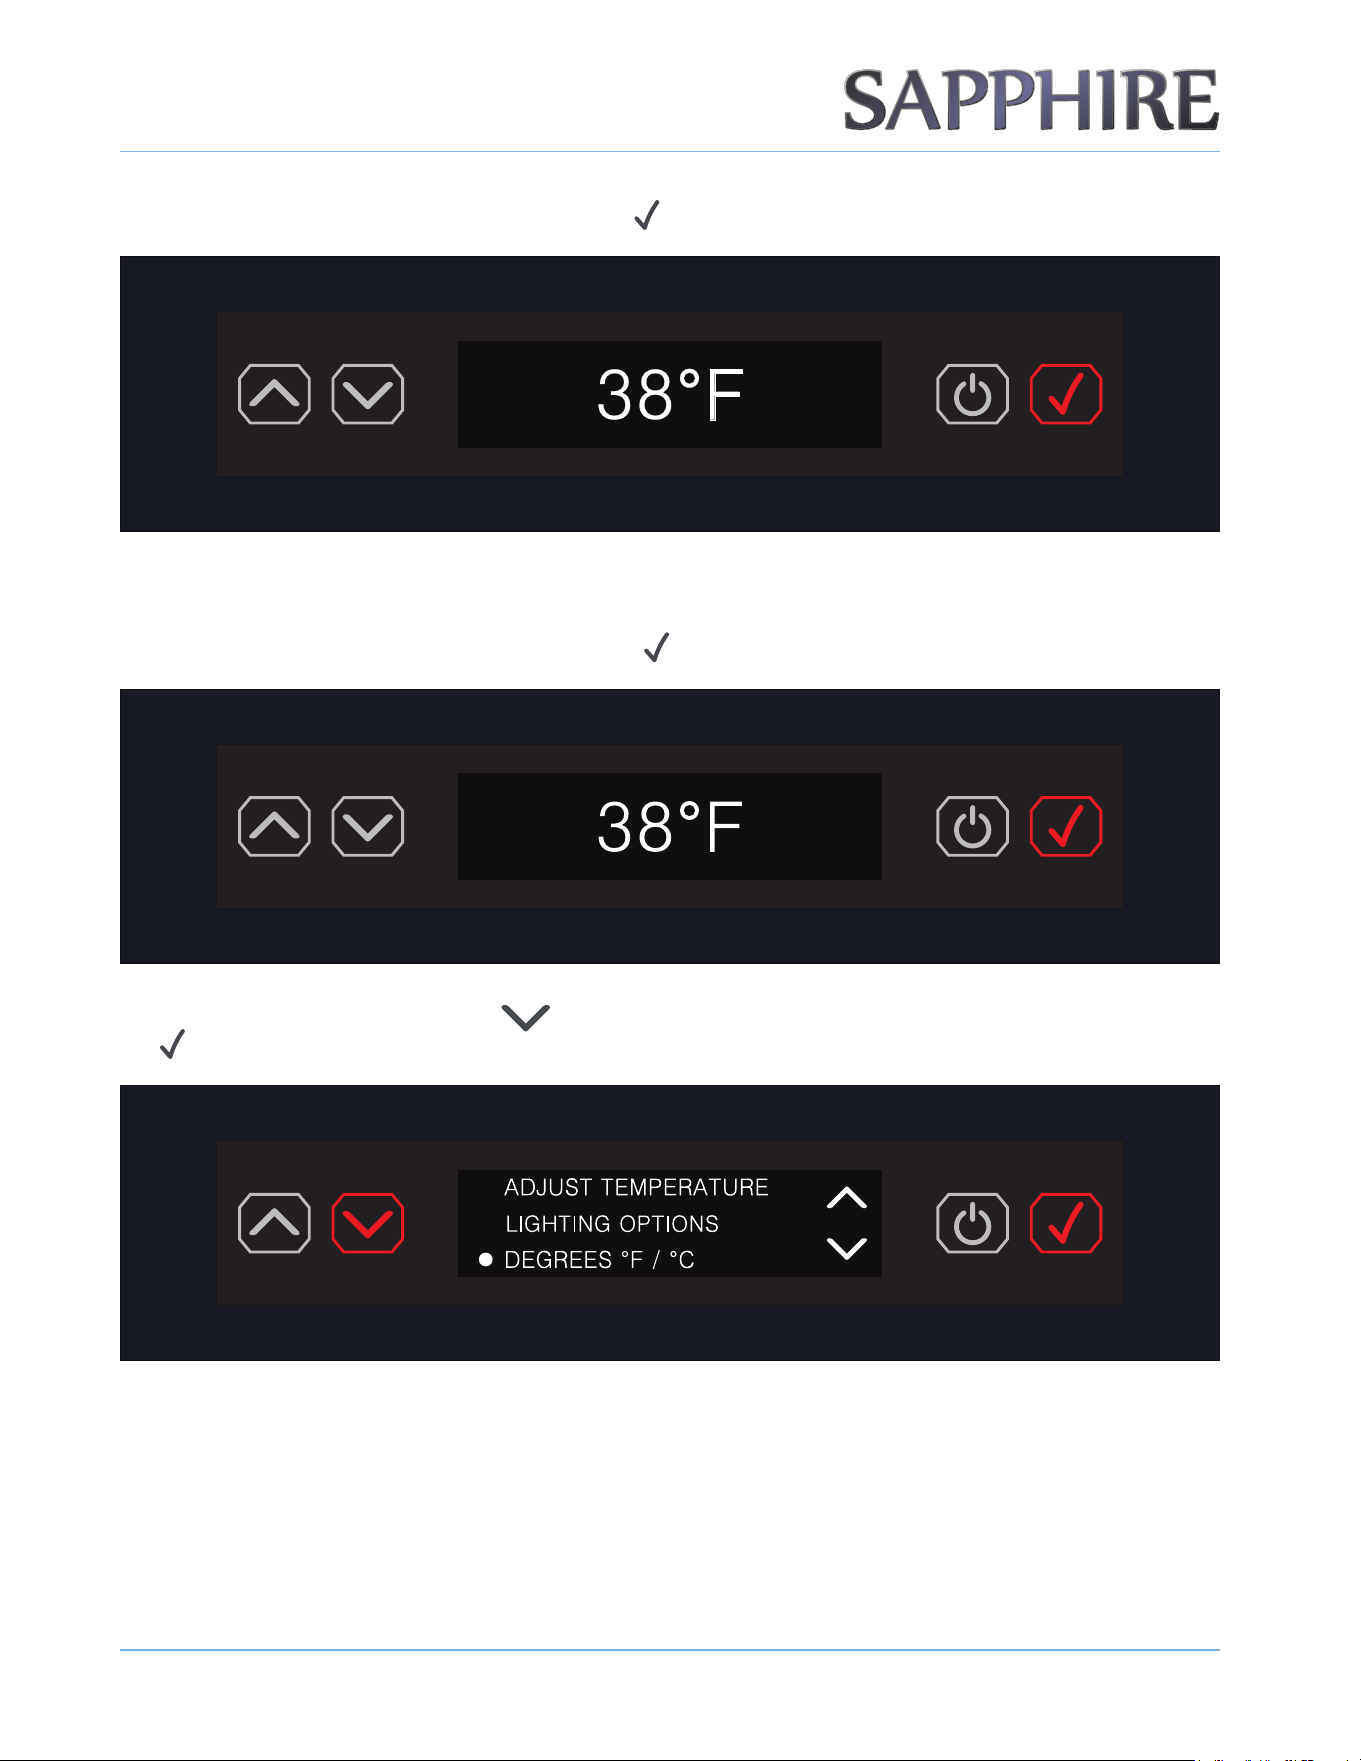
SETTING TEMPERATURE
1. To set the temperature, press the ENTER button ( ).
2. Press the DOWN ARROW button ( ) to the item DEGREES °F / °C and then press the ENTER button (
).
OPERATING THE UNIT
3 1
© 2022 S A PPH I RE
S A PPH I RE Refrigerator D rawers
Operator’ s M anual
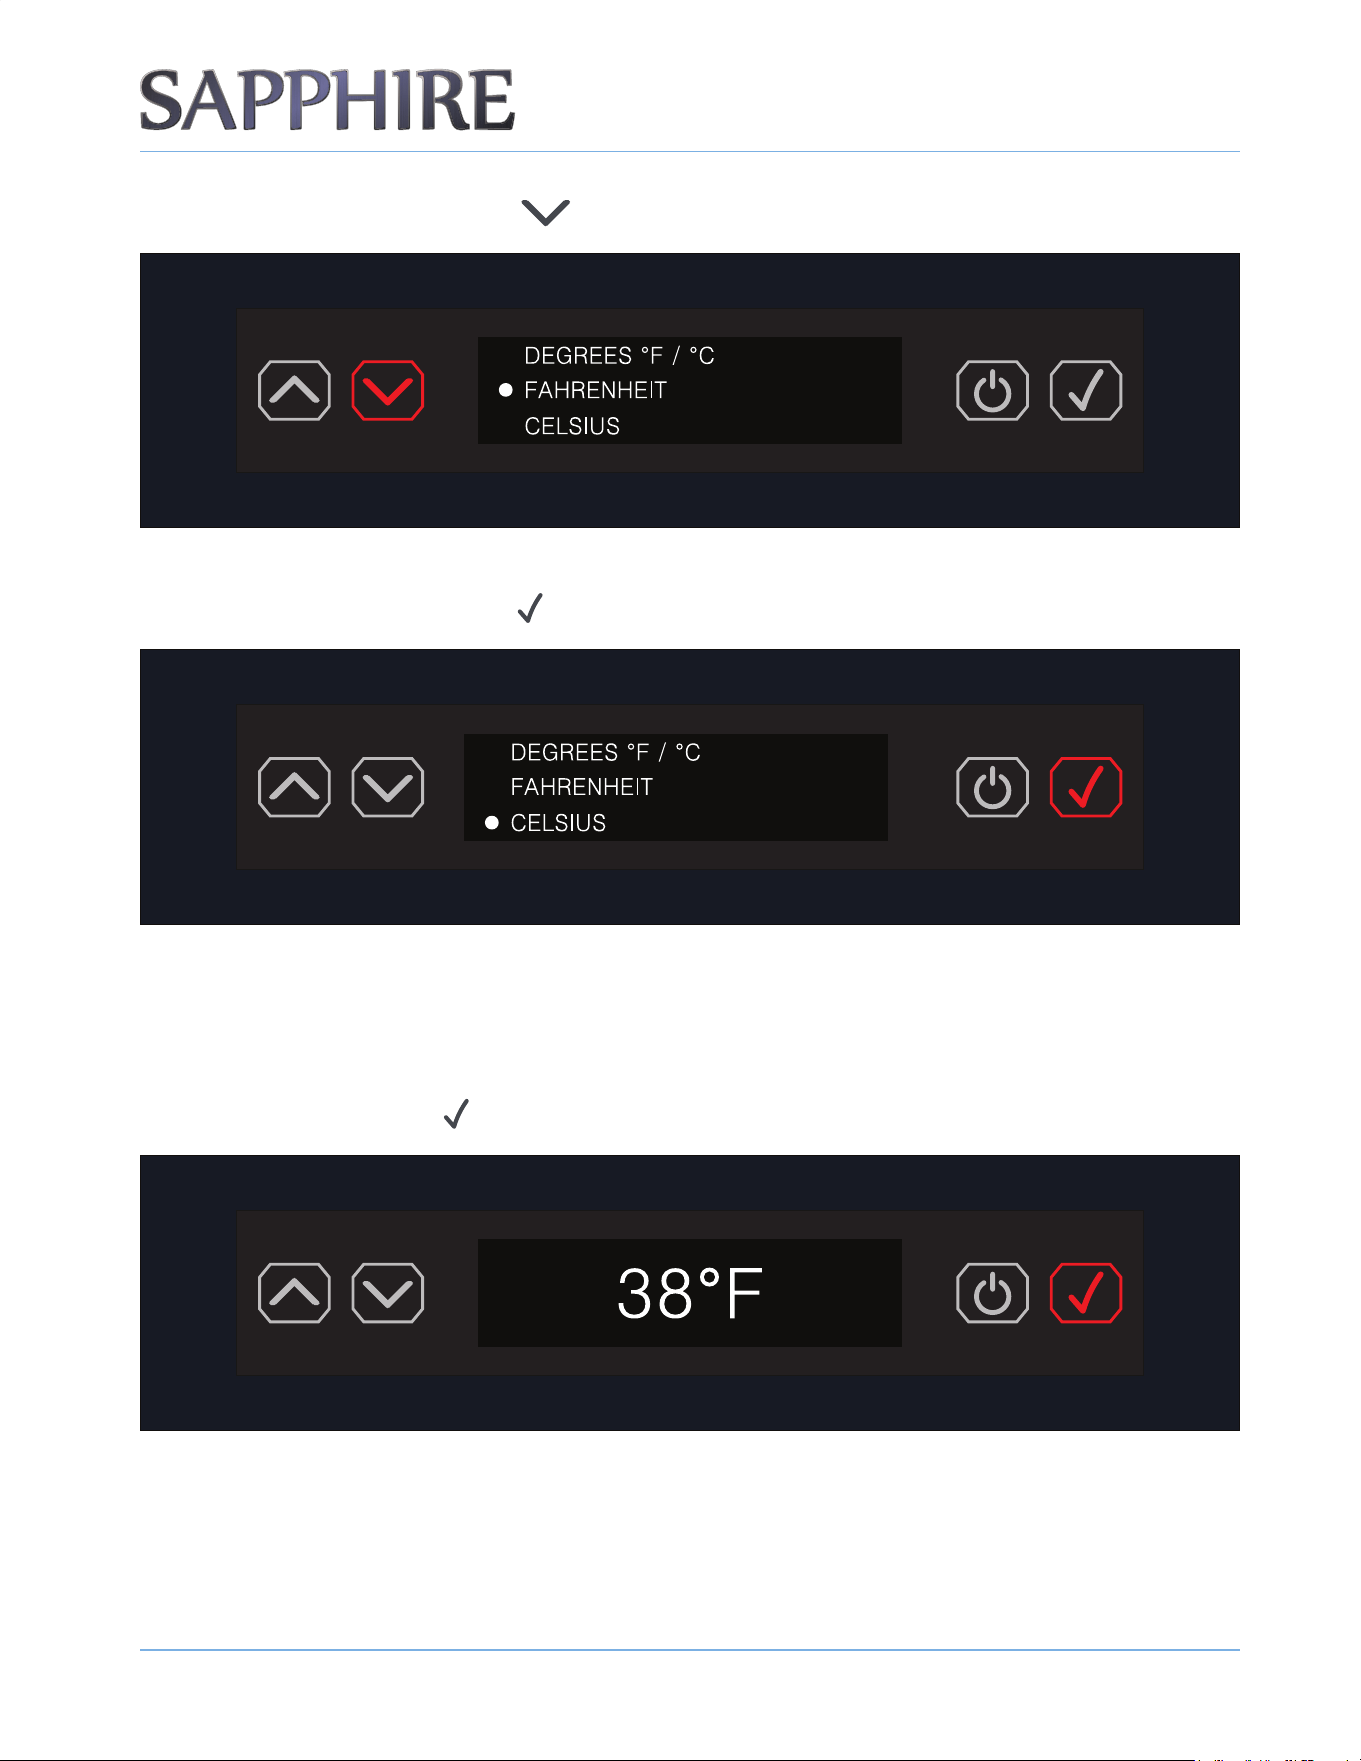
3. Press the DOWN ARROW button ( ) to reach the desired setting.
4. The default unit setting is DEGREES FAHRENHEIT (°F). To maintain the DEGREES FAHRENHEIT (°F)
setting, press the ENTER button (
).
OTE:N DEGREES FAHRENHEIT (°F) is the default setting and displays in increments of 1 degree. DEGREES CELSIUS (°C) displays in
increments of 0.5 degrees.
ENTERING SABBATH MODE
1. Press the ENTER button ( ) to enter the menu.
OPERATING THE UNIT
3 2
© 2022 S A PPH I RE
S A PPH I RE Refrigerator D rawers
Operator’ s M anual
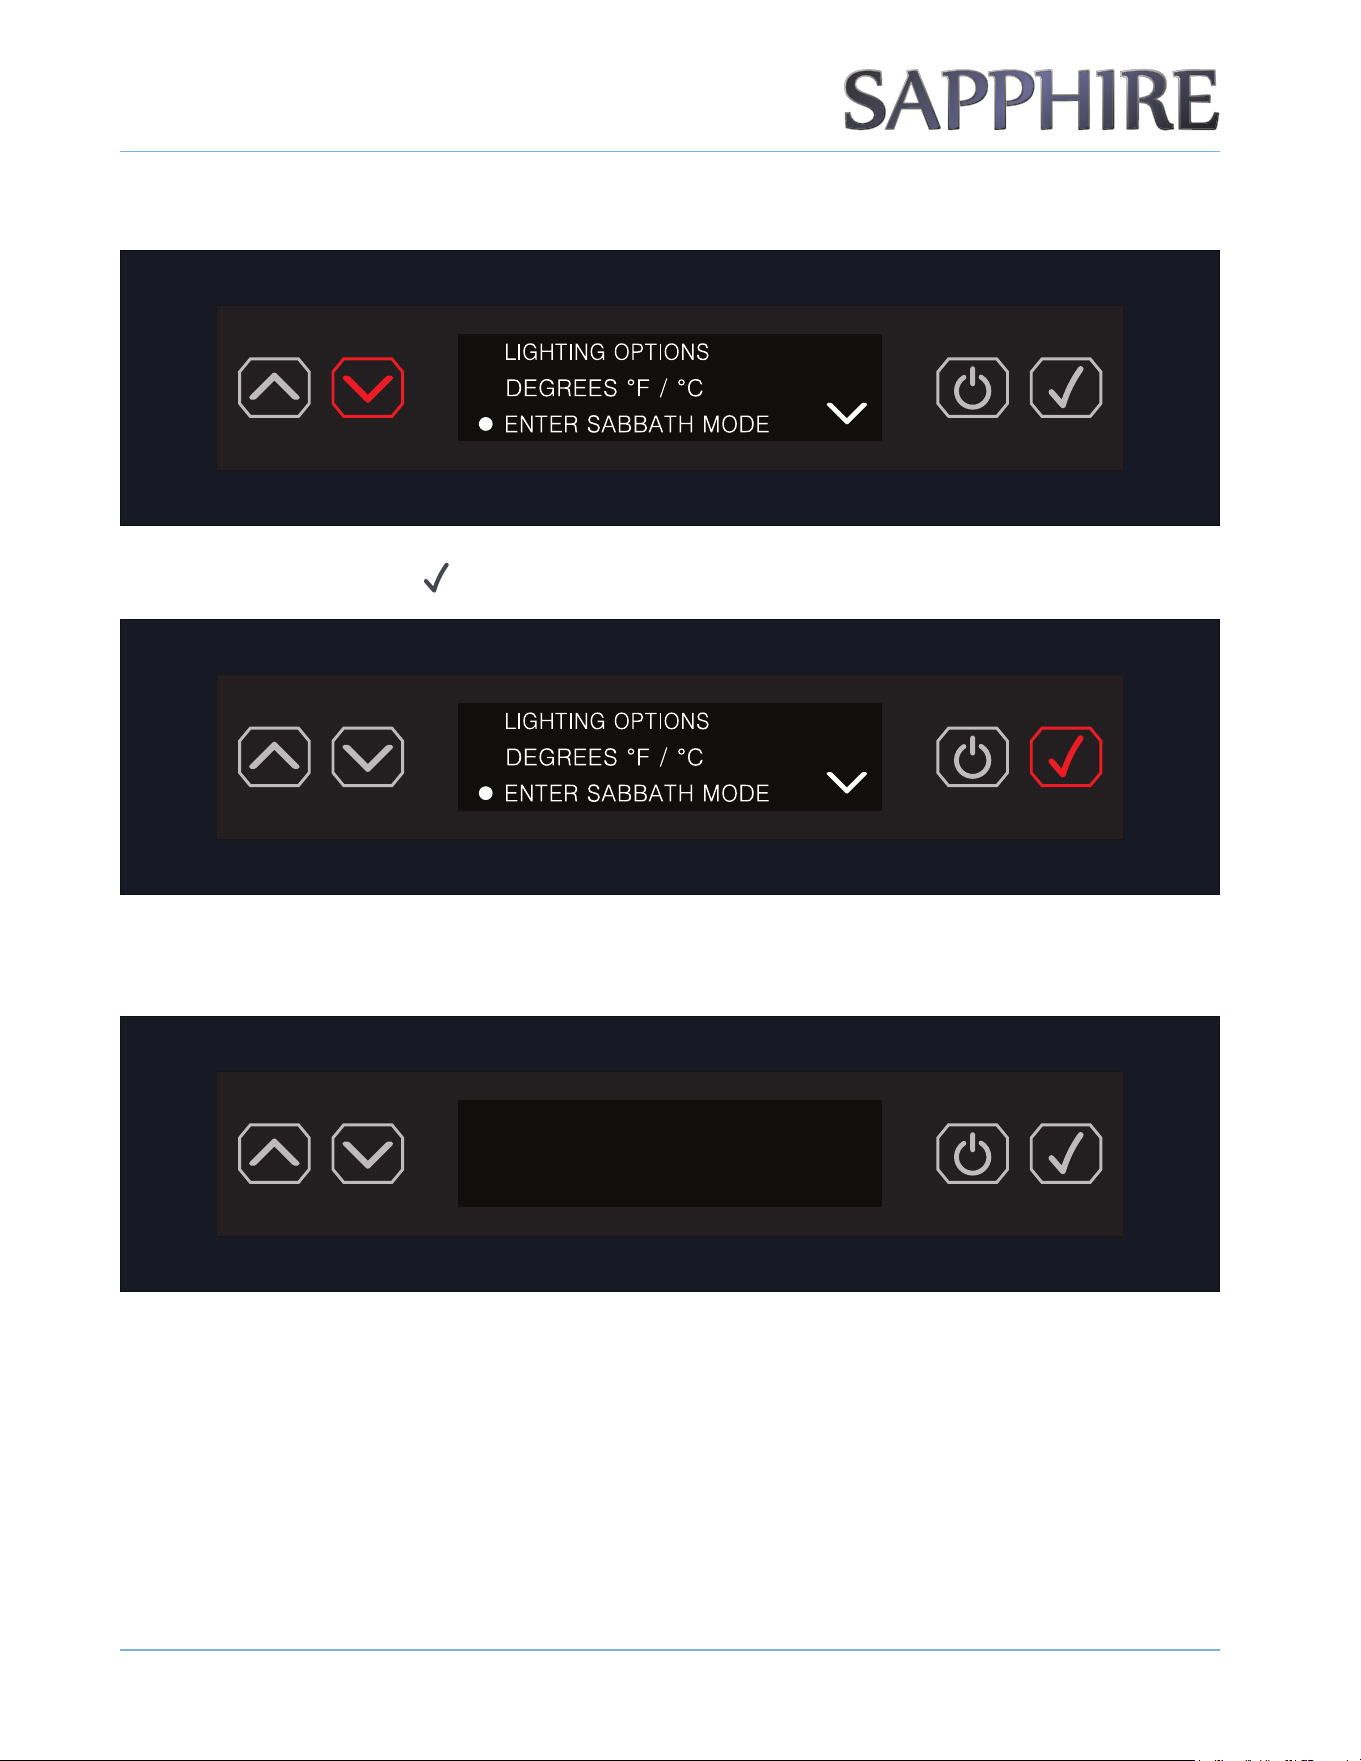
2. Scroll down to the ENTER SABBATH MODE setting.
3. Press the ENTER button ( ).
4. The display shows nothing but is still running and in SABBATH MODE. The display shows nothing, but the
unit maintains the set temperature during the ENTER SABBATH MODE cycle until cancelled.
OTE:N Door opening or closing will result in a 20-second delay with compressor, fan or damper function.
OTE:N In the event of a power failure during SABBATH MODE, SABBATH MODE remains in effect.
OTE:N The LIGHT is always OFF within SABBATH MODE.
OPERATING THE UNIT
3 3
© 2022 S A PPH I RE
S A PPH I RE Refrigerator D rawers
Operator’ s M anual
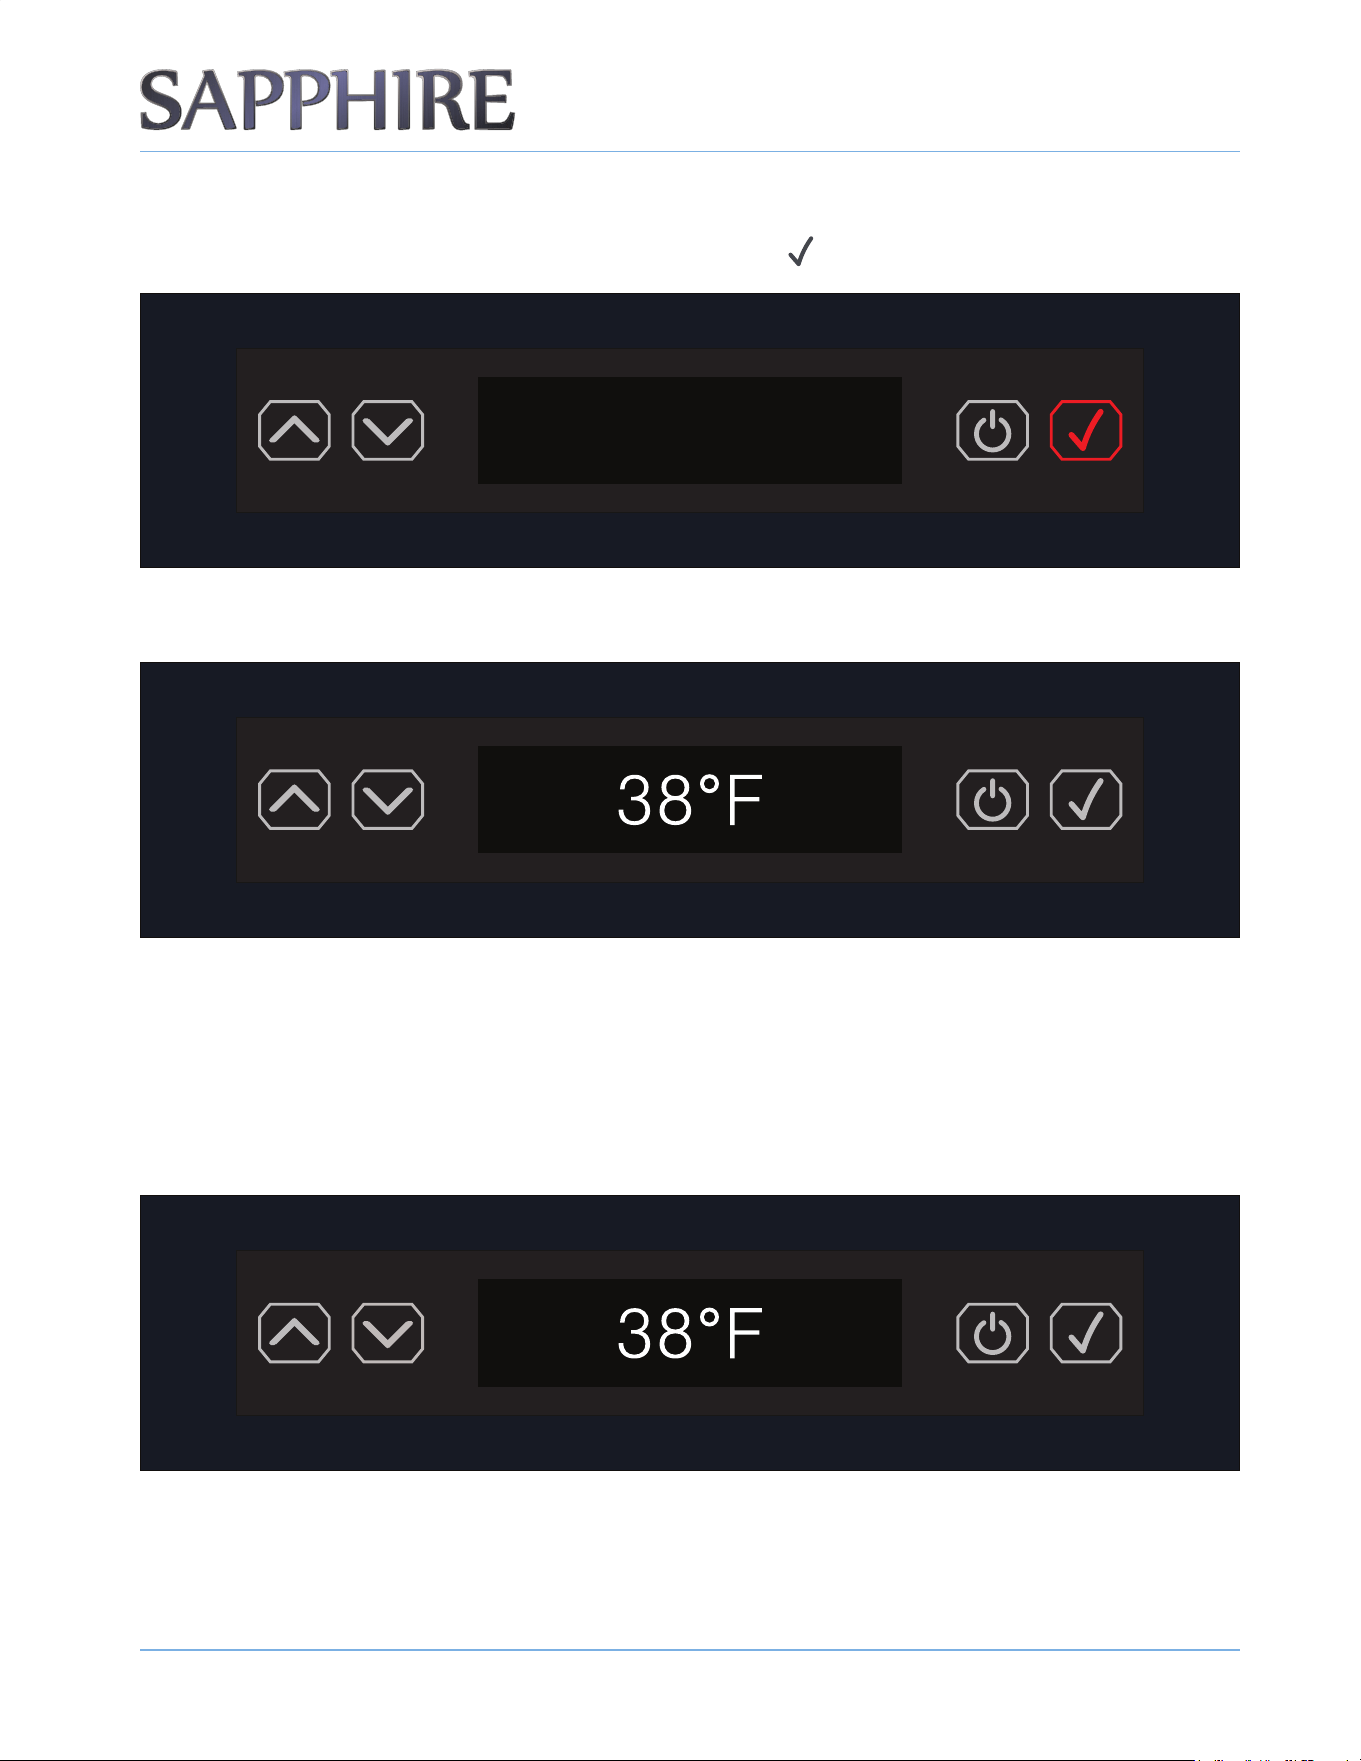
EXITING OR CANCELLING SABBATH MODE
1. To exit or cancel SABBATH MODE, press the ENTER button ( ).
2. The display reverts back to the default screen.
OTE:N The clock time in the lower right of the display appears ONLY if the clock time has been set in the NIGHTLIGHT function. Otherwise,
no time will appear on the screen.
CHANGING / ADJUSTING THE TEMPERATURE
1. To change the temperature setting, press the UP or DOWN ARROW buttons to reach the
desired setting.
OPERATING THE UNIT
3 4
© 2022 S A PPH I RE
S A PPH I RE Refrigerator D rawers
Operator’ s M anual
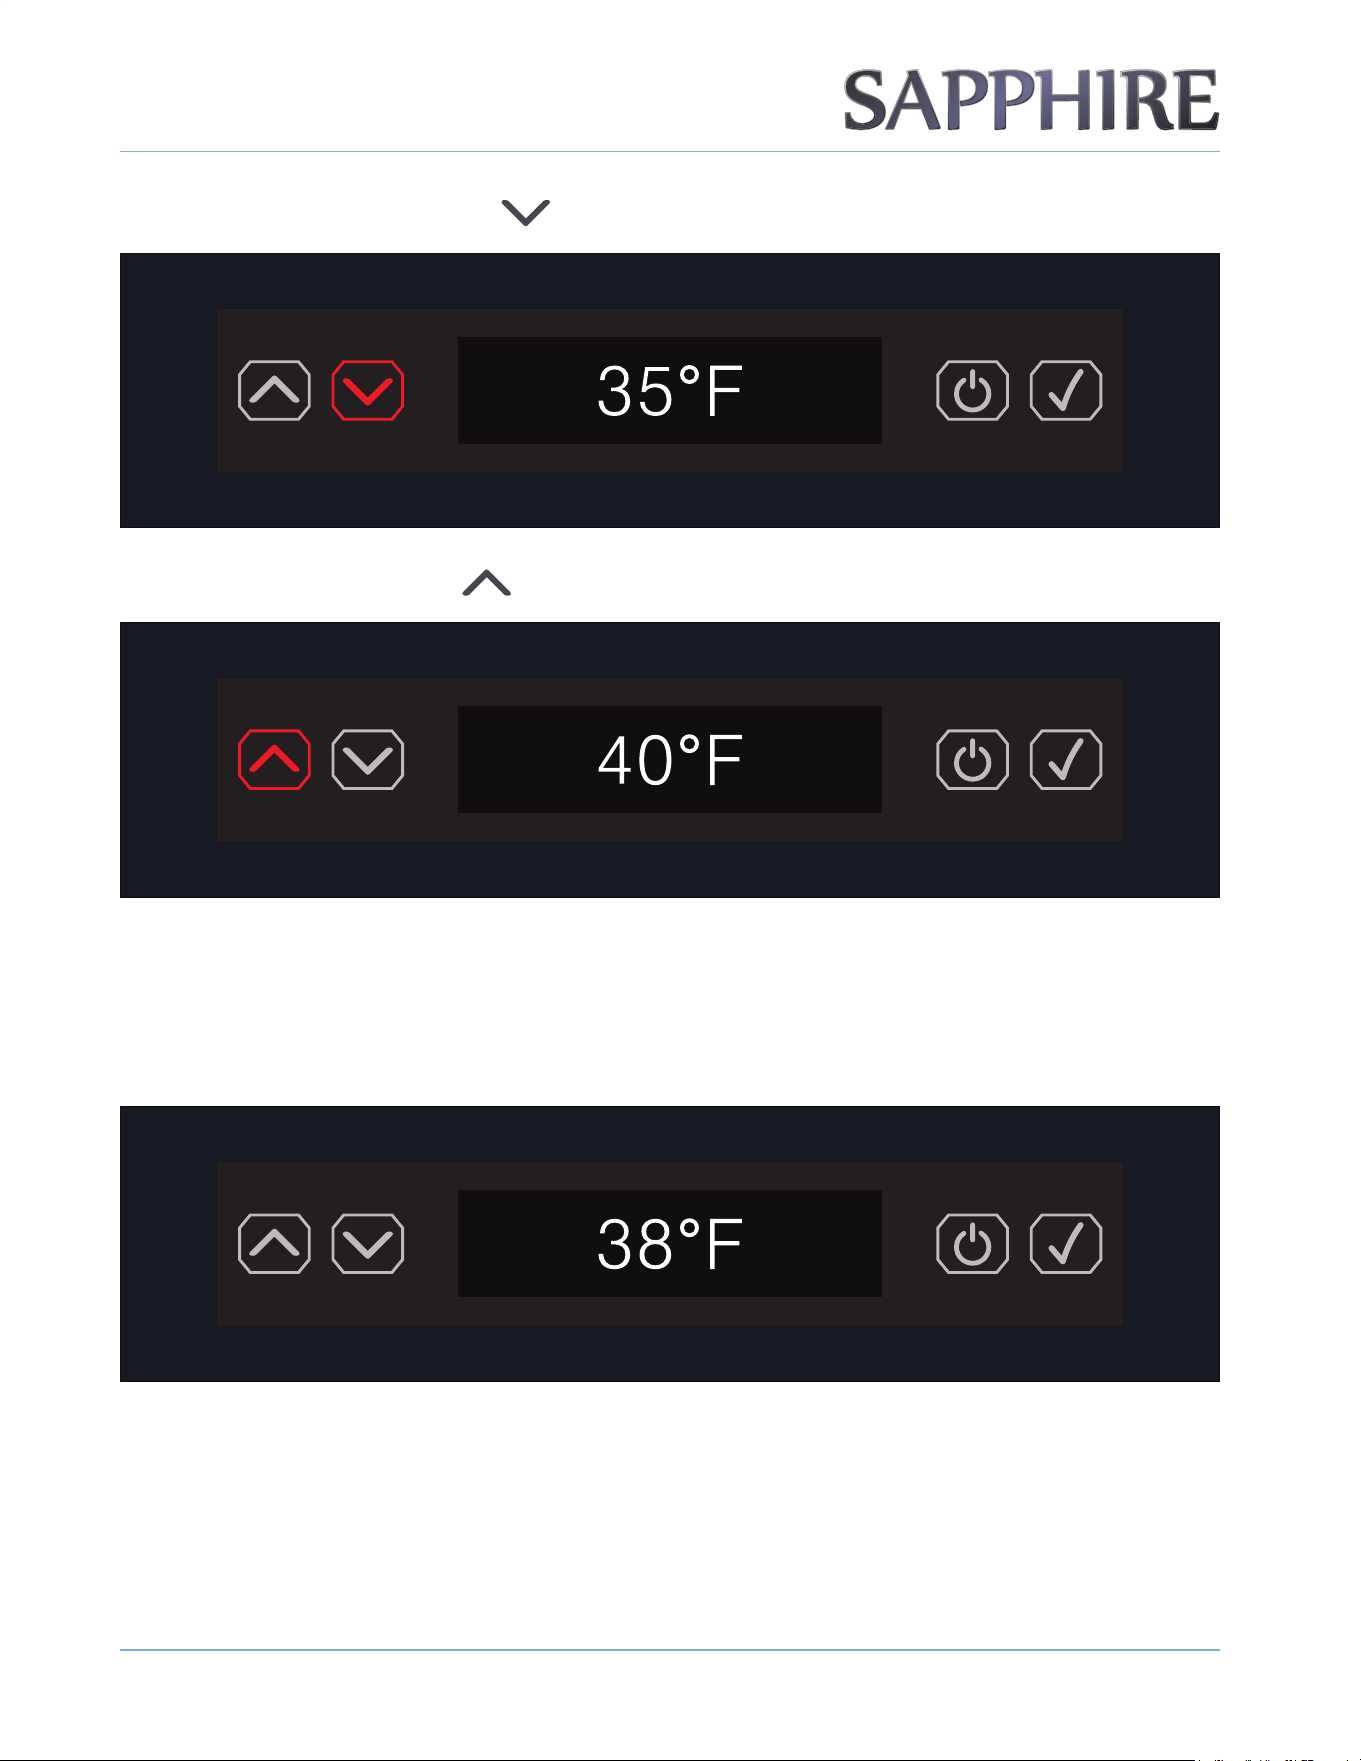
2. Press the DOWN ARROW button ( ) to change / adjust temperature lower.
3. Press the UP ARROW button ( ) to change / adjust temperature higher.
OTE:N You do not need to press the ENTER button. The new setting will remain unless changed.
DEFAULT TEMPERATURE
The default temperature is 3 8 ° F .
OTE:N Once you enter a nal selection in the menu, the control / display always reverts back to the default display screen shown above.
OPERATING THE UNIT
3 5
© 2022 S A PPH I RE
S A PPH I RE Refrigerator D rawers
Operator’ s M anual
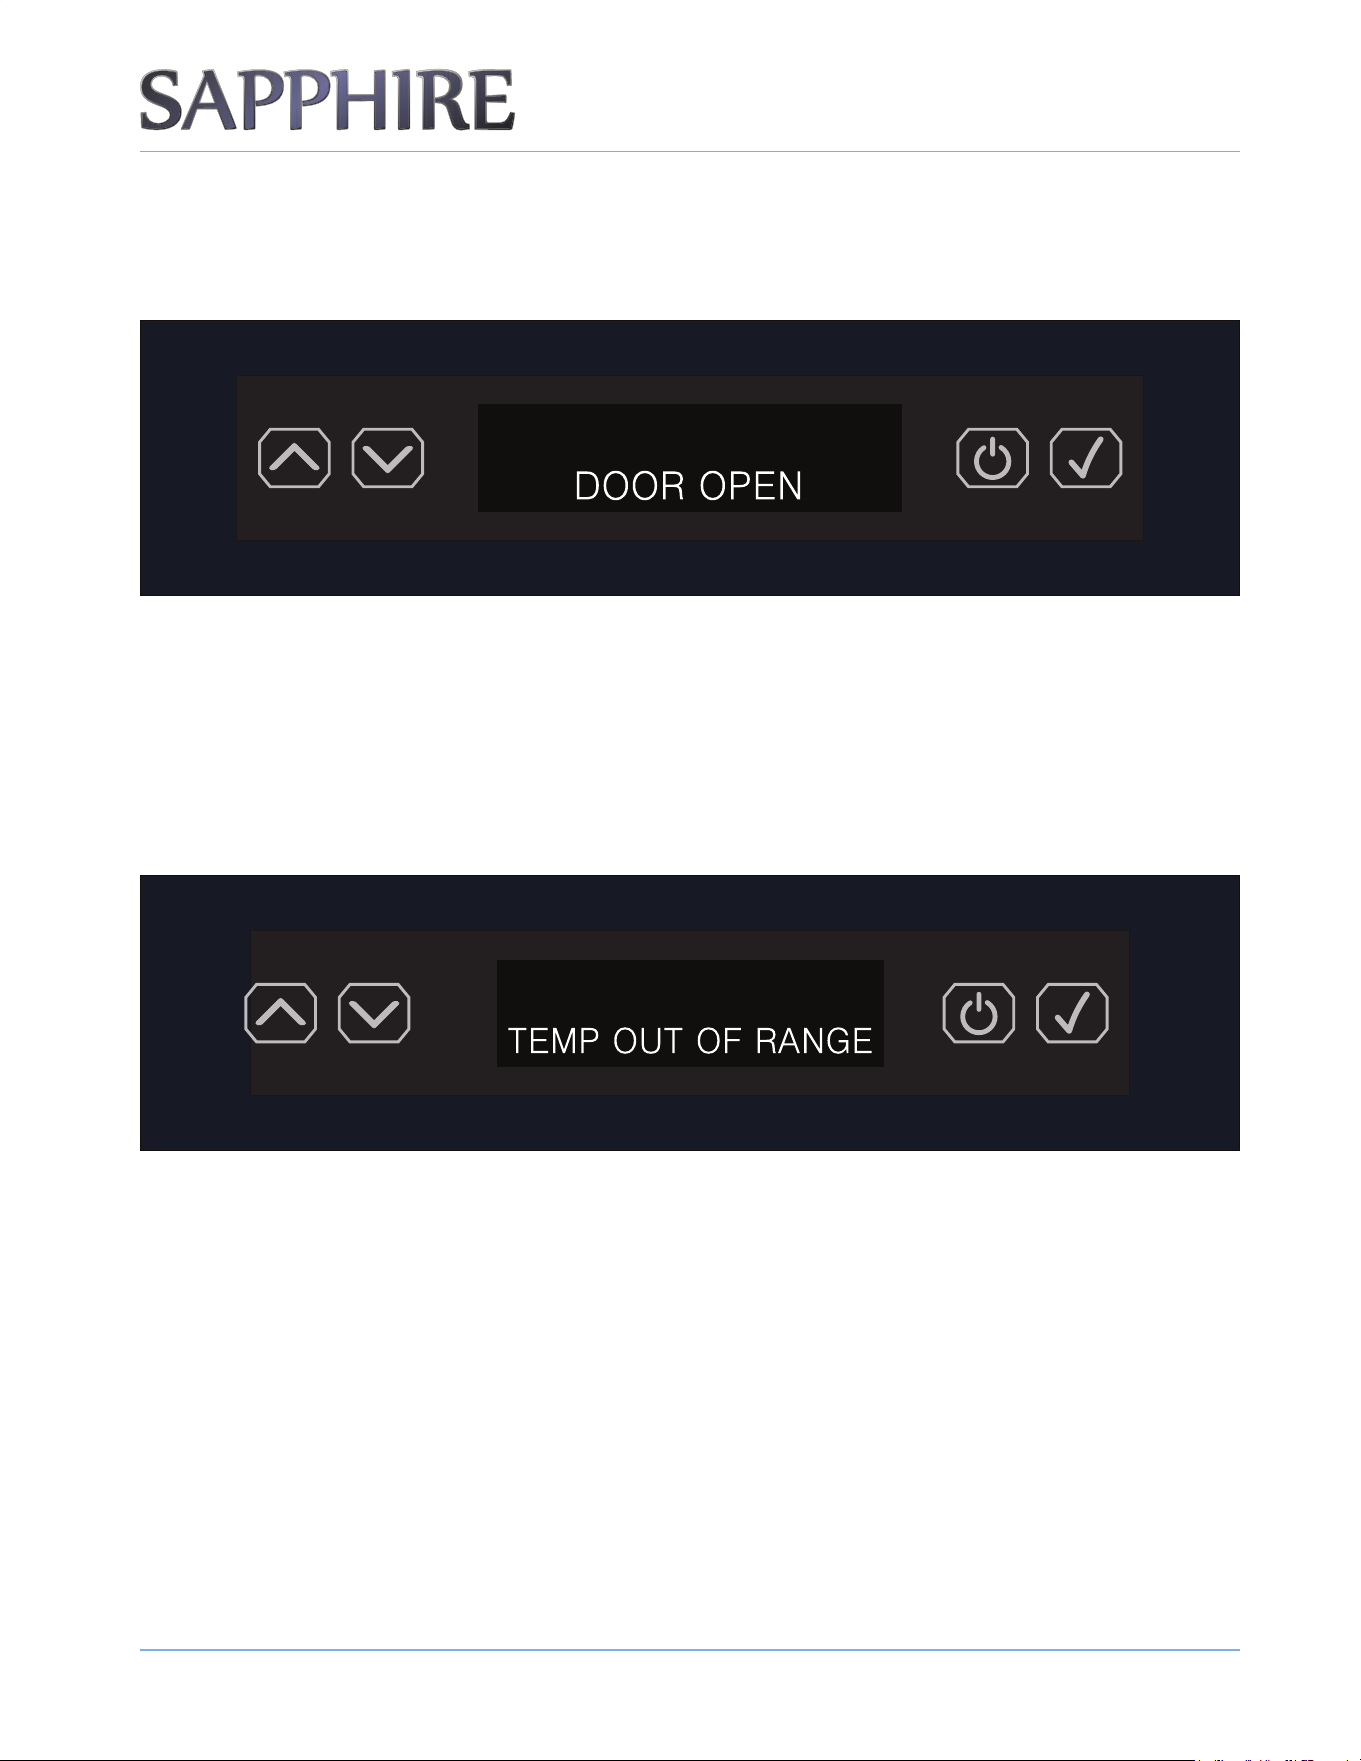
CLEARING SIMPLE ERROR CODES
The DOOR OPEN alert sounds and shows DOOR OPEN in the display. The alert automatically clears when you
properly close the door.
OTE:N The audible alert emits three beeping sounds that occur every 30 seconds after the door has remained open for more than 2
minutes. The alert automatically clears when you properly close the door. This methodology applies to any error or alert that
requires an audible alert.
OTHER / ADDITIONAL ERROR CODES
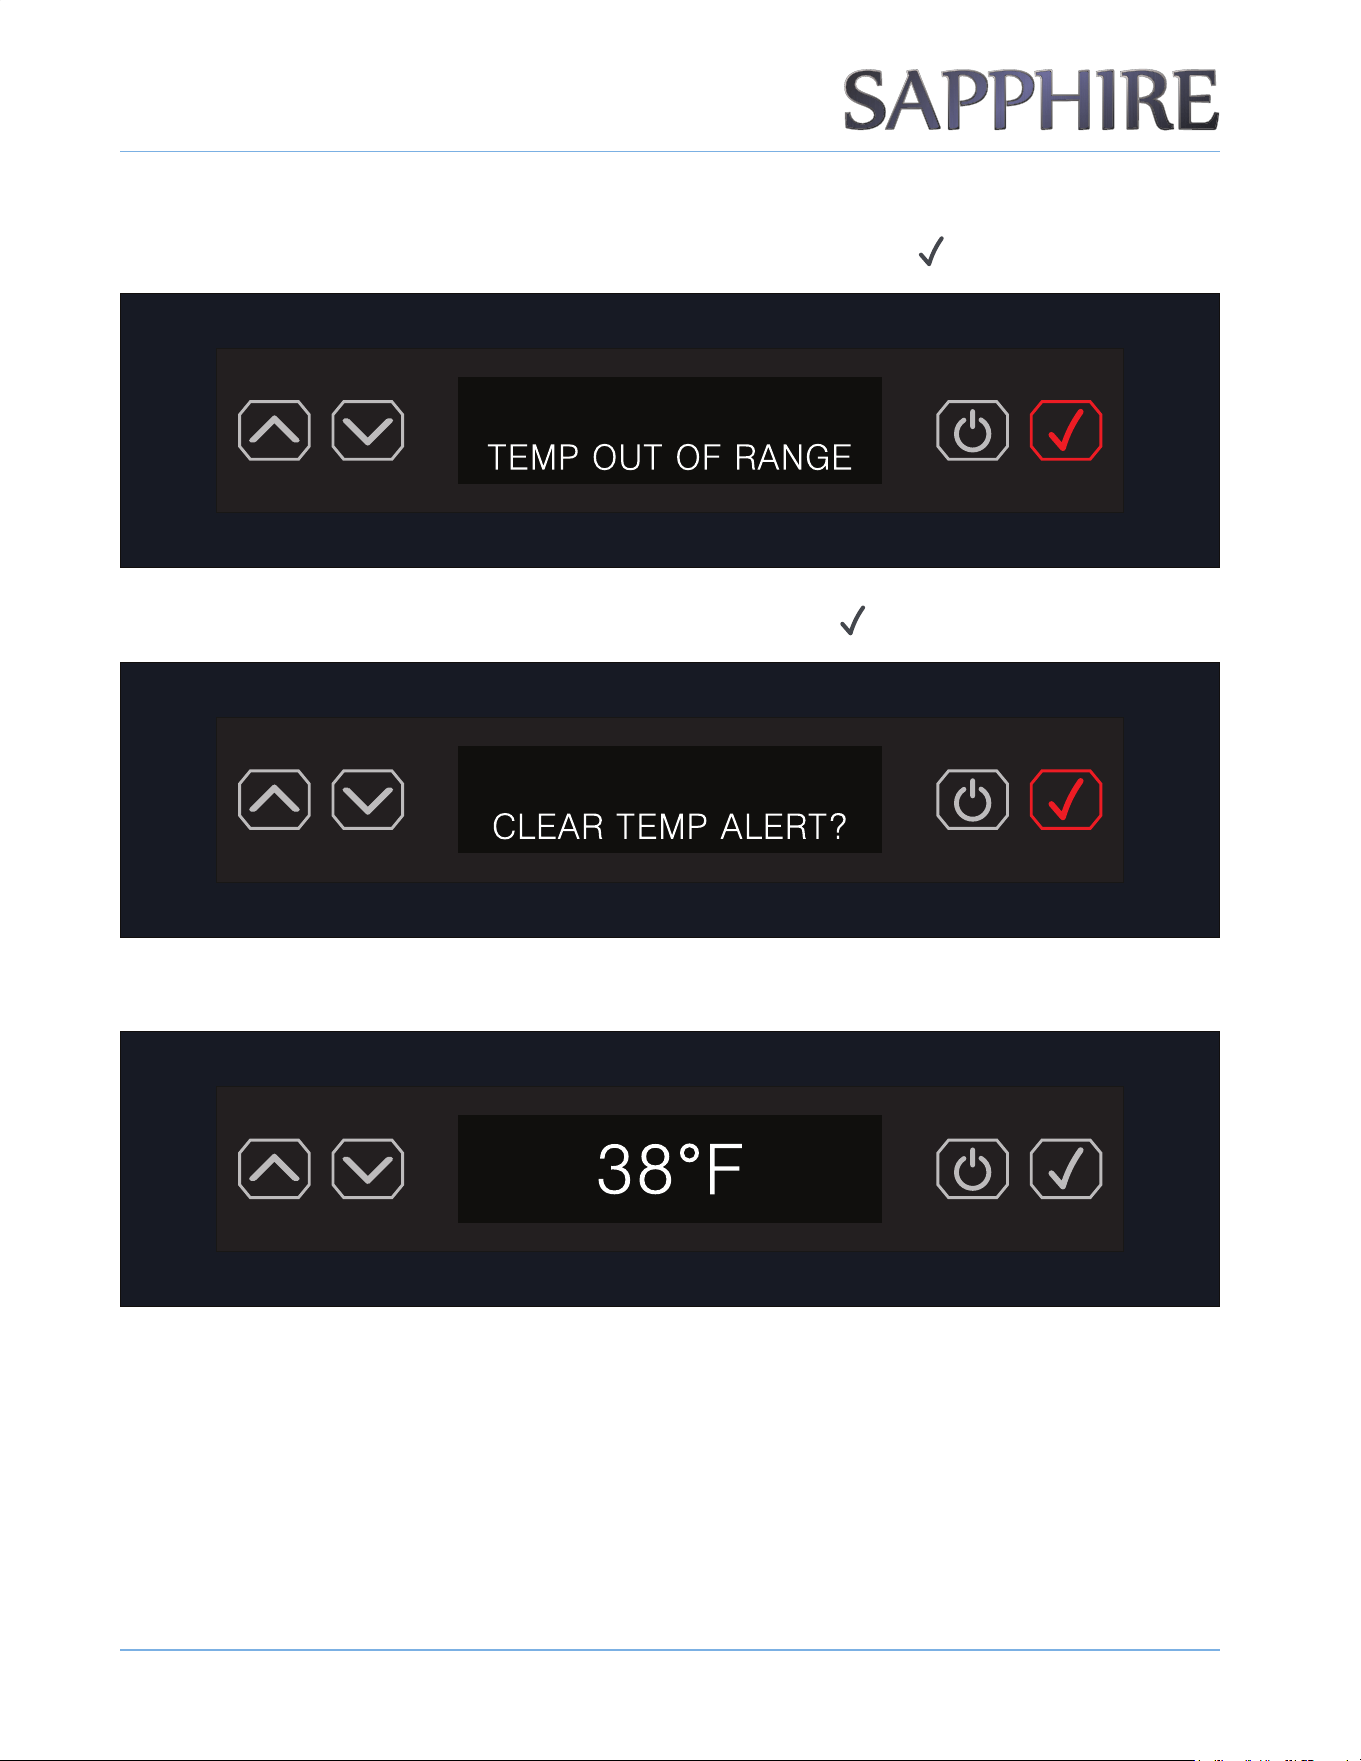
The TEMP OUT OF RANGE alert sounds and shows TEMP OUT OF RANGE in the display until the set
temperature is restored.
The TEMP OUT OF RANGE alert activates when the temperature level is out of range by 10 degrees Fahrenheit
for a 12-hour time period.
The audible alert emits three beeping sounds that occur every 30 seconds until the set temperature
is restored.
To manually clear the TEMP OUT OF RANGE alert, see the steps in “Manually Clearing Temp Out of Range Error
Code” on page 36.
OPERATING THE UNIT
3 6
© 2022 S A PPH I RE
S A PPH I RE Refrigerator D rawers
Operator’ s M anual
MANUALLY CLEARING TEMP OUT OF RANGE ERROR CODE
1. To manually clear the TEMP OUT OF RANGE alert, press the ENTER button ( ).
2. The display shows CLEAR TEMP ALERT?. Press the ENTER button ( ).
3. The display reverts back to the default display and the TEMP OUT OF RANGE alert clears.
OTE:N If the unit does not meet the set temperature within 12 hours, the TEMP OUT OF RANGE alert will initiate again.

OPERATING THE UNIT
3 7
© 2022 S A PPH I RE
S A PPH I RE Refrigerator D rawers
Operator’ s M anual
EX PEC TING NORM AL S OUND S
Your new appliance may make sounds that are not familiar to you. Hard surfaces like the oor and walls can make
the sounds seem louder than they actually are. The following describes the kinds of sounds that might be new to
you and the source of those sounds:
• Rattling noises may come from the ow of the refrigerant. Items stored on top of the appliance can also make
noises.
• The high-eciency compressor may make a pulsating or high-pitched sound.
• You may hear the sound of the condenser fan forcing air over the condenser.
D EAL ING W ITH POW ER F AIL URE
Most power failures are corrected within a few hours and should not aect the temperature of your appliance if
you minimize the number of times you open the appliance door. If the power is going to be o for a longer period
of time, take the proper steps to disconnect your appliance.
W ARNING
F a i l u r e t o u n p l u g t h e a p p l i a n c e c o u l d r e s u l t i n e l e c t r i c a l s h o c k o r p e r s o n a l i n j u r y .
OTE:N When the appliance is operating, the evaporator is the only component that is cold.

CARE AND MAINTENANCE
38
© 2022 SAPPHIRE
SAPPHIRE Refrigerator Drawers
Operator’s Manual
5
!
WARNING
Electrical Shock Hazard
Always disconnect power at the source before working on the unit. Failure to unplug the appliance
could result in electrical shock or personal injury.
• Do not touch the power plug when your hands are wet.
• Never unplug the unit by pulling on the cord. Grasp the plug and pull it out rmly.
CLEANING AND MAINTAINING THE UNIT
Perform periodic cleaning and proper maintenance to ensure eciency, top performance and long life. The
maintenance intervals listed in this manual are based on normal conditions. You may want to shorten the
intervals if you have pets or other special considerations.
Periodically vacuum dust and dirt from the condenser, which is located behind the grill at the bottom front of the
unit.
CLEANING THE UNIT’S EXTERIOR
Clean the door and cabinet with a mild detergent and warm-water solution, such as 1 oz. ( g) of dish-washing
liuid mixed with gallons of warm water. Do not use solvent-based or abrasive cleaners. Use a soft sponge
and rinse the unit with clean water. Wipe the unit with a soft, clean towel to prevent water spotting.
Clean stainless steel with a mild detergent, a warm-water solution and a damp cloth. Never use an abrasive
cleaning agent.
CLEANING THE UNIT’S INTERIOR
When necessary, thoroughly clean the inside of the unit with mild soap and water.
When cleaning, leave the unit turned o and leave the door open. Leaving the door open allows air to dry the
inside of the cabinet, reducing the chance for mildew and damage to the mold mechanisms components.
C ARE AND M AINTENANC E
3 9
© 2022 SAPPHIRE
SAPPHIRE Refrigerator Drawers
Operator’s Manual
EXTENDED PERIODS OF NON-USE
!
W ARNING
El e c t r i c a l S h o c k Ha za r d
Al w a y s d i s c o n n e c t p o w e r a t t h e s o u r c e b e f o r e w o r k i n g o n t h e u n i t .
OTE:N Do not winterize this unit with ANY type of anti-freeze; damage to the mold coating will occur, invalidating product’s Limited
Warranty and creating potential health hazards.
1. Turn o the electric supply at the main power source. Remove the power cord from the electrical outlet.
. Leave the door open to allow for circulation and to prevent mold and mildew.
3. Leave the power cord unplugged until ready to use.
NOTICE
N ever pull on the power cord to unplug the appliance from the electrical outlet. G rasp the plug of the power
cord and pull it out rmly.
RECOMMISSIONING THE UNIT
1. Restore power to the unit.
. After an initial cooldown period of -60 minutes, the unit will cycle approximately every 0 minutes.
STARTING UP THE UNIT
1. Turn on the power.
. Turn on the unit by pressing the power button.
3. The fan and compressor will normally turn on immediately, resulting in air circulation through the grill and a
faint hum from the compressor.
CLEANING THE CONDENSER
!
W ARNING
El e c t r i c a l S h o c k Ha z a r d
Al w a y s d i s c o n n e c t t h e p o w e r a t t h e s o u r c e b e f o r e w o r k i n g o n t h e u n i t .

C ARE AND M AINTENANC E
4 0
© 2022 SAPPHIRE
SAPPHIRE Refrigerator Drawers
Operator’s Manual
!
C AUTION
S h a r p Ob j e c t Ha z a r d
D O NOT t o u c h t h e c o n d e n s e r s u r f a c e . Th e c o n d e n s e r h a s s h a r p e d g e s a n d c a n b e
easily damaged.
A dirty or clogged condenser prevents proper airow and causes higher-than-recommended operating
temperatures that may lead to component failure. Clean the condenser or have it cleaned at least once every
six months.
1. Unplug the appliance or disconnect power.
. Remove the two screws under the front of the unit. Gently pull on the grill and remove it.
3. Remove dirt and lint from the condenser and the unit compartment with the brush attachment of a vacuum
cleaner.
. Position the grill on the unit and secure it with two screws.
. Plug in the appliance or reconnect power.

4 1
TROUB L ES HOOTING
© 2022 S A PPH I RE
S A PPH I RE Refrigerator D rawers
Operator’ s M anual
6
PROB L EM POS S IB L E C AUS ES S OL UTIONS
• The appliance does not operate. • Power failure.
• A ppliance not plugged in.
• H ouse fuse blown or circuit
breaker tripped.
• Plug in the appliance.
• Replace blown fuse or reset circuit
breaker.
• The appliance is not cold enough. • D oor is opened too often.
• D oor does not close completely.
• D oor seal does not seal properly.
• Front bottom grill does not have
sucient ventilation.
• A ppliance too close to a heat
source.
• D o not open door too freq uently.
• S ee “ The D oor D oes Not C lose
Properly” below.
• B e sure door seal is properly
seated in groove.
• G rills must be completely
unobstructed.
• K eep appliance away from heat
sources.
• The appliance turns on and o
freq uently.
• L arge amount of contents has
been added.
• D oor is open too often.
• D oor does not close completely.
• D oor seal not sealing properly.
• Reduce amount of content added
at a time.
• D o not open door too freq uently.
• S ee “ The D oor D oes Not C lose
Properly” below.
• B e sure door seal is properly
seated in groove.
• The door does not close properly. • A ppliance not level.
• D oor was reversed and not
properly installed.
• The shelves are out of position.
• B e sure appliance is installed on
hard level surface.
• V erify door is properly installed.
• V erify shelves are properly
installed.
• Noise during operation. • Feet are not leveled.
• C ertain sounds are normal.
• L evel the feet. S ee “ L eveling the
U nit” on page 11.
• S ee “ Ex pecting Normal S ounds”
on page 37.
• The compressor works abnormally
with a buz z ing noise.
• The voltage is lower than
recommended.
• S top the appliance and do not
restart until the voltage is normal.
4 2
D IS POS ING
THE UNIT
© 2022 S A PPH I RE
S A PPH I RE Refrigerator D rawers
Operator’ s M anual
7
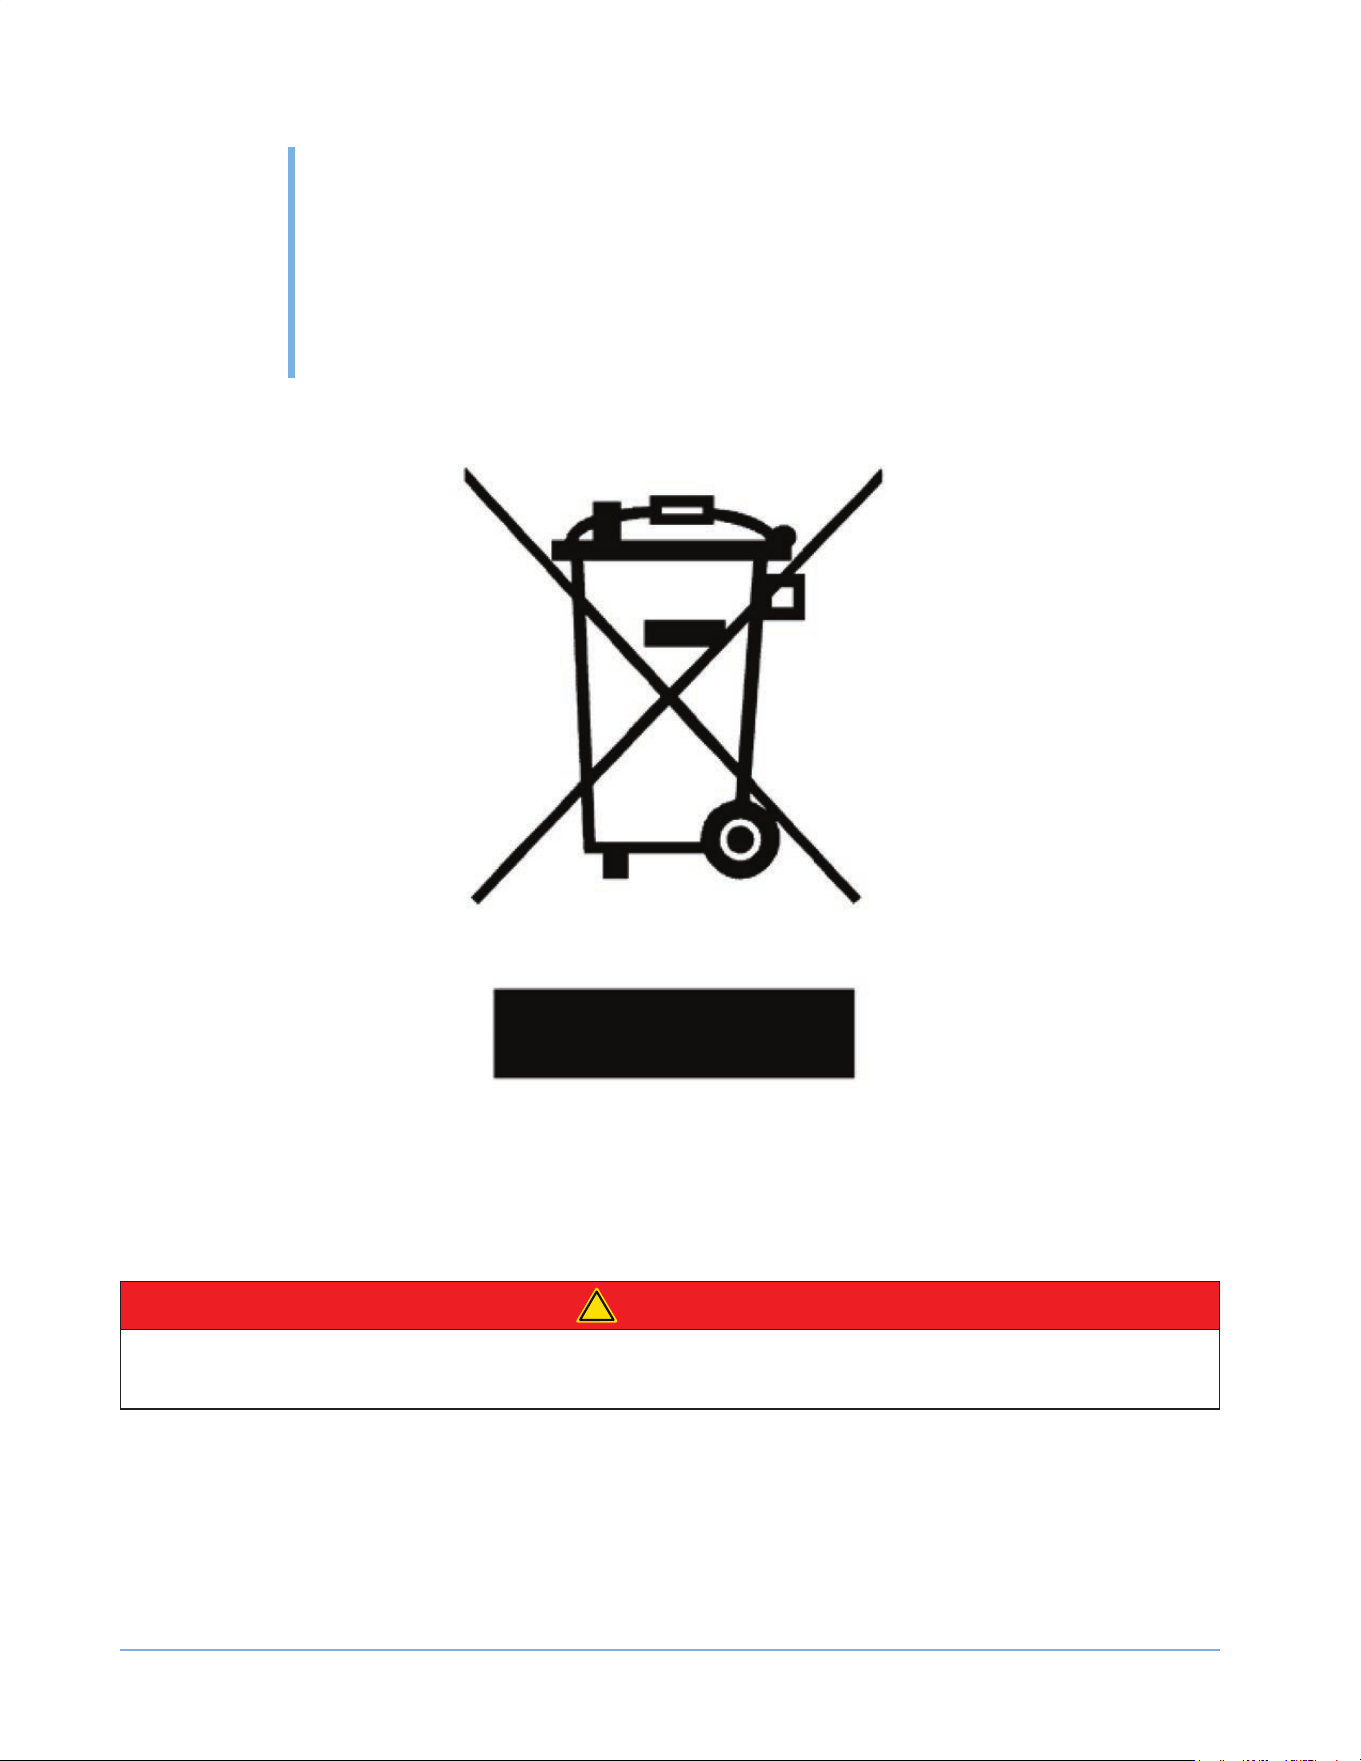
This symbol on the product or its packaging indicates that you cannot treat this product as normal domestic
trash; you must hand it in to a collection point for recycling electric and electronic appliances. Your contribution to
the correct disposal of this product protects the environment.
C ontact your local municipal authority if you need more information about recycling this product.
!
D ANGER
Al w a y s r e m o v e t h e d o o r a n d k e e p t h e s h e l v e s i n p l a c e w h e n d i s c a r d i n g t h i s a p p l i a n c e s o c h i l d r e n
m a y n o t b e c o m e e n t r a p p e d .

43
WARRANTY
© 2022 S A PPH I RE
S A PPH I RE Refrigerator D rawers
Operator’ s M anual
LIMITED WARRANTY COV ERAGE
The L egacy C ompanies, warrants to the original purchaser of its S A PPH I RE products that they will be free
from defects in materials and workmanship for the following time periods from the date of purchase shown
on the sales receipt:
Two (2) year Parts & On-site L abor
Five (5) years C ompressor W arranty (Parts only)
WARRANTY EXCLUSIONS
NO CONSEQ UENTIAL DAMAGES: S A PPH I RE and The L egacy C ompanies are not responsible for any
economic loss or special, indirect or conseq uential damages including without limitation; loss of revenue and
loss or damage arising from food or product spoilage claims.
WARRANTY IS NOT TRANSFERAB LE: This warranty is not transferable or assignable and applies only to
the original veried purchaser.
NO IMP LIED WARRANTY OF MERCHANTAB ILITY OR FITNESS FOR P ARTICULAR SERV ICE: There
are no other warranties statutory, ex press, or implied. This L imited W arranty is the ex clusive warranty and
made in lieu of all other warranties including any implied warranties or any warranties of merchantability or
tness for a particular purpose.
FILING WARRANTY CLAIMS: A ll warranty claims for S A PPH I RE products must be made directly through
The L egacy C ompany’ s Technical S ervice D epartment. A ll claims should include: model and serial number,
proof of purchase, date of installation, location purchased, and all pertinent information supporting the
ex istence of the claim.
IMP ROP ER ELECTRICAL AND WATER CONNECTIONS: S A PPH I RE and The L egacy C ompanies are
not responsible for the repair or replacement of any failed or damaged components resulting from electrical
power failure, the use of ex tension cords, low voltage or voltage spikes to the unit. L ikewise, repair or
replacement attributable to low water pressure, high water pressure or contaminated water are not covered
by this L imited W arranty.
IMP ROP ER USAGE: Neither S A PPH I RE nor The L egacy C ompanies assumes liability for parts or labor
coverage for component failure or other damages resulting from improper usage or installation or failure to
clean and/or maintain the product as set forth in the Owner’ s M anual provided with each unit.

WARRANTY
44
© 2022 S A PPH I RE
S A PPH I RE Refrigerator D rawers
Operator’ s M anual
CONSUMAB LES: This warranty does not include consumable parts such as water lters and light bulbs.
ADJ USTMENTS & CALIB RATIONS: A djustments including calibrations, leveling, tightening of fasteners,
or utility connections normally associated with the original installation are the responsibility of the dealer,
installer or the end user and not the responsibility of S A PPH I RE or The L egacy C ompanies and will not be
considered warranty issues for this L imited W arranty.
CONSEQ UENTIAL DAMAGES: This warranty does not cover any defect due to, or resulting from, ordinary
wear and tear, handling, abuse, misuse, or harsh chemical action, nor shall it ex tend to any product from
which the serial number has been removed or altered, or modications made by unauthorized service
personnel or damage by ood, re, earthuake or other Acts of God.
OUTSIDE U.S. & CANADA: This warranty does not apply to, and S A PPH I RE and The L egacy C ompanies
are not responsible for any warranty claims made on products sold or used outside of the U nited S tates and
C anada or any territories of the U nited S tates of A merica.
ALL REP AIRS AND SERV ICE MUST B E MADE B Y A SAP P HIRE AUTHORIZ ED TECHNICIAN.
C ustomer S ervice: 1.866.754.6672
S A PPH I RE A ppliances | The L egacy C ompanies
3355 Enterprise A venue, S uite 160, Fort L auderdale, FL 33331
email@ sapphireappliances.com | S apphireA ppliances.com

WARRANTY
45
© 2022 S A PPH I RE
S A PPH I RE Refrigerator D rawers
Operator’ s M anual
NOTES

SapphireAppliances.com | 866.754.6672
SAPPHIRE Appliances | The Legacy Companies
3355 Enterprise Avenue, Suite 160, Fort Lauderdale, FL 33331
© 2 022
072622
P/N D RREF 1-21