

en-us
2
Further information and explanations are available online:
Table of contents
1 IMPORTANT SAFETY INSTRUCTIONS.................... 4
1.1 Safety definitions....................................................... 4
1.2 IMPORTANT SAFEGUARDS ................................... 4
1.3 Safe use.................................................................... 4
1.4 Child safety ............................................................... 5
1.5 Food safety ............................................................... 6
1.6 Proper installation and maintenance ......................... 6
1.7 Remote operation ..................................................... 6
1.8 State of California Proposition 65 Warnings .............. 6
2 Preventing material damage .................................... 7
3 Environmental protection and energy-saving ........ 7
3.1 Disposal of packaging ............................................... 7
3.2 Saving energy ........................................................... 7
4 Familiarizing yourself with your appliance ............. 7
4.1 Appliance .................................................................. 7
4.2 Control panel............................................................. 7
4.3 Sabbath mode........................................................... 8
4.4 Lighting ..................................................................... 8
4.5 Safety shut-off........................................................... 8
5 Before using for the first time .................................. 9
5.1 Cleaning and heating up the appliance before
using it for the first time ............................................. 9
6 Cookware................................................................... 9
6.1 Cookware for appliances with a height of 5½"
(14cm)...................................................................... 9
6.2 Cookware for appliances with a height of 8½"
(21.5cm)................................................................... 9
7 Basic Operation ........................................................ 9
7.1 Opening the appliance .............................................. 9
7.2 Closing the appliance................................................ 9
7.3 Switching on the appliance........................................ 9
7.4 Switching off the appliance........................................ 9
7.5 Setting the temperature............................................. 9
7.6 Adjusting the default temperature............................ 10
7.7 Starting the Sabbath mode function ........................ 10
7.8 Ending the Sabbath mode function ......................... 10
8 Preheating tableware.............................................. 10
8.1 Starting the "Preheat tableware" function ................ 10
8.2 Ending the "Preheat tableware" function ................. 10
9 Preheating cups ...................................................... 10
9.1 Starting the "Preheat cups" function........................ 10
9.2 Ending the "Preheat cups" function ......................... 10
10 Keeping food warm................................................ 11
10.1 Starting the "Keep food warm" function .................. 11
10.2 Ending the "Keep food warm" function ................... 11
11 Low-temperature cooking...................................... 11
11.1 Tips for low-temperature cooking ........................... 11
11.2 Starting the "Low-temperature cooking" function .... 11
11.3 Ending the "Low-temperature cooking" function ..... 12
12 Additional applications.......................................... 12
13 Defrosting ............................................................... 12
13.1 Defrosting food....................................................... 12
14 How it works ........................................................... 13
14.1 Recommended settings for keeping food warm...... 13
14.2 Recommended settings for low-temperature
cooking................................................................... 13
14.3 Recommended settings for other applications ........ 14
14.4 Recommended settings for defrosting .................... 15
15 HomeConnect® .................................................... 15
15.1 Setting upHomeConnect®.................................... 15
15.2 Resetting the Wi-Fi settings and switching off
the Wi-Fi................................................................. 15
15.3 Software update ..................................................... 15
15.4 Data Protection ...................................................... 16
16 Cleaning and maintenance.................................... 16
16.1 Cleaning agents ..................................................... 16
16.2 Cleaning the appliance........................................... 16
16.3 Cleaning the stainless steel surfaces...................... 16
16.4 Cleaning the glass front.......................................... 16
16.5 Cleaning the glass plate ......................................... 16
17 Troubleshooting..................................................... 17
17.1 Demo mode............................................................ 18
18 Information regarding Free and Open Source
Software.................................................................. 18
19 Customer Service................................................... 18
19.1 Model number (E-Nr.), production number (FD)
and consecutive numbering (Z-Nr.) ........................ 18
19.2 Rating plate location............................................... 19
20 Disposal .................................................................. 19
20.1 Disposal of your old appliance................................ 19
21 STATEMENT OF LIMITED PRODUCT
WARRANTY ............................................................ 19
21.1 What this warranty covers & Who it applies to........ 19
21.2 How long the warranty lasts ................................... 19

en-us
3
21.3 Repair/replace as your exclusive remedy.............. 19
21.4 Out of warranty product......................................... 20
21.5 Warranty exclusions.............................................. 20
21.6 Obtaining warranty service.................................... 21
21.7 Product information ............................................... 21

en-us
4
Read all of the instructions carefully before using the
appliance. In order to reduce the risk of fire, electric
shocks and personal injuries when using the appliance,
follow the basic safety precautions, including the following
safety instructions.
1.1 Safety definitions
Here you can find explanations of the safety signal words
used in this manual.
WARNING
This indicates that death or serious injuries may occur as
a result of non-observance of this warning.
CAUTION
This indicates that minor or moderate injuries may occur
as a result of non-observance of this warning.
NOTICE:
This indicates that damage to the appliance or property
may occur as a result of non-compliance with this
advisory.
Note:This alerts you to important information and/or tips.
1.2 IMPORTANT SAFEGUARDS
WARNING
When using electrical appliances, basic safety precautions
should always be followed including the following:
▶ Read all instructions.
▶ Do not touch hot surfaces. Use the touch keys on the
control panel.
▶ To protect against electrical shock do not immerse the
power cord or plugs in water or other liquids.
▶ Close supervision is necessary when any appliance is
used by or near children.
▶ Allow to cool before putting on or taking off parts.
▶ Do not operate any appliance with a damaged cord or
plug, or after the appliance malfunctions or has been
damaged in any manner. Return the appliance to the
nearest authorized service provider for examination,
repair, or adjustment.
▶ Do not use the appliance outdoors.
▶ Do not let the power cord touch hot surfaces.
▶ Extreme caution must be used when opening the
drawer if it contains a receptacle with hot liquids.
▶ Always attach the plug to appliance first, then plug the
power cord into the wall outlet. To disconnect, turn any
control to "off", then remove the plug from wall outlet.
▶ Do not use the appliance for other than its intended
use.
▶ Save these instructions.
1.3 Safe use
WARNING
When properly cared for, your new appliance has been
designed to be safe and reliable.
▶ Read all instructions carefully before use. These
precautions will reduce the risk of burns, electric shock,
fire, and injury to persons.
▶ When using kitchen appliances, basic safety
precautions must be followed, including those in the
following pages.
This appliance is intended for normal family household
use only. It is not approved for outdoor use. See the
Statement of Limited Product Warranty. If you have any
questions, contact the manufacturer.
Examine the appliance after unpacking it. In the event of
transport damage, do not plug it in.
WARNING
Do not touch the interior surfaces of the drawer while it is
in use. The interior of the drawer could become hot
enough to cause burns.
▶ Allow drawer and rack (if equipped) to cool before
handling.
WARNING
Storage in or on Appliance - The use of corrosive
chemicals in heating or cleaning will damage the
appliance and could result in injury.
▶ Flammable materials, corrosive chemicals, vapors or
non-food products should not be stored or used in an
oven or on or near surface units.
▶ The appliance is specifically designed for use when
heating or cooking food.
WARNING
If materials inside an oven or warming drawer should
ignite, keep door closed.
▶ Turn off the appliance and disconnect the circuit at the
circuit breaker box.
IMPORTANT SAFETY INSTRUCTIONS
READ AND SAVE THESE INSTRUCTIONS

en-us
5
WARNING
Using this appliance other than for its intended use can
cause fire or injury to persons.
▶ Use this appliance only for its intended use as
described in this manual.
▶ NEVER use your appliances as a space heater for
warming or heating the room. Doing so may result in
overheating the appliance.
▶ Never use the appliance for storage.
WARNING
A fire could occur during cooking.
▶ Always have a working smoke detector near the
kitchen.
▶ Have an appropriate fire extinguisher available, nearby,
highly visible and easily accessible near the appliance.
In the event that personal clothing or hair catches fire,
drop and roll immediately to extinguish flames.
Do Not Use Water on Grease Fires.
▶ Smother fire or flame or use dry chemical or foam-type
extinguisher.
WARNING
Do not heat or warm unopened food containers. Build-up
of pressure may cause the container to burst and cause
injury.
WARNING
Use Only Dry Potholders - Moist or damp potholders on
hot surfaces may result in burns from steam.
▶ Do not let potholders touch hot heating elements.
▶ Do not use a towel or other bulky cloth.
To prevent burns, do not remove the drawer while it is hot.
Be sure the drawer is empty before removing it.
WARNING
Wear Proper Apparel. Loose-fitting or hanging garments,
such as ties, scarves, jewelry, or dangling sleeves, should
never be worn while using the appliance.
▶ Tie long hair so that it does not hang loose.
▶ Secure all loose garments, etc. before beginning.
NOTICE:
Plastic containers or plastic wrap can melt if they come in
direct contact with the drawer or a hot utensil. If it melts
onto the drawer, it may not be removable.
WARNING
The light emitted by LED lights is very dazzling, and can
damage the eyes.
▶ Do not look directly into the switched-on LED lights for
longer than 100seconds.
WARNING
While cooking food items, small amounts of certain by-
products, such as particulate matter / soot, can be
released. To minimize exposure to these substances:
▶ Always ensure proper ventilation by using an
appropriate ventilation fan or hood vented to the
outside and/or an open window.
▶ Always operate the unit according to the instructions in
this manual.
WARNING
Overheated materials can cause fire or burns and may
produce potentially harmful smoke or fumes.
▶ To prevent overheating, turn ventilation hood ON when
heating grease, fats or frying using medium to high heat
settings.
▶ Avoid heating empty pots and pans.
▶ Do not allow pans to boil dry.
▶ Do not allow aluminum foil, plastic, paper, or cloth to
come in contact with a hot surface element, burner, or
grate.
1.4 Child safety
This appliance is not intended for use by persons
(including children) with reduced physical, sensory or
mental capabilities, or lack of experience and knowledge,
unless they have been given supervision or instruction
concerning use of the appliance by a person responsible
for their safety.
When children become old enough to use the appliance, it
is the responsibility of the parents or legal guardians to
ensure that they are instructed in safe practices by
qualified persons.
Children should be supervised to ensure that they do not
play with the appliance.
WARNING
Do not allow children to use this appliance unless closely
supervised by an adult.
▶ Children and pets should not be left alone or
unattended in the area where the appliance is in use.
They should never be allowed to play in its vicinity,
whether or not the appliance is in use.
IMPORTANT SAFETY INSTRUCTIONS
READ AND SAVE THESE INSTRUCTIONS
en-us
6
Do not allow anyone to climb, stand, lean, sit, or hang on
any part of an appliance, especially a door, warming
drawer, or storage drawer.
▶ This can damage the appliance, and the unit may tip
over, potentially causing severe injury.
Do not let children play with the appliance.
CAUTION
Do not store items of interest to children in an appliance,
in cabinets above an appliance or on the backguard of an
appliance. Children climbing on the appliance to reach
items could be seriously injured.
Do Not Leave Children Alone.
▶ Children should not be left alone or unattended in the
area where the appliance is in use.
▶ They should never be allowed to sit or stand on any
part of the appliance.
WARNING
To avoid the risk of suffocation:
▶ Do not allow children to play with packaging material.
1.5 Food safety
CAUTION
To maintain food safety, follow these guidelines
▶ DO NOT use a warming drawer to heat cold food. It is
safe to use the drawer to crisp crackers, chips or dry
cereal and to warm plates.
▶ Be sure to maintain proper food temperature. The
USDA recommends holding hot food at 140°F or
warmer.
▶ DO NOT leave food in the warming drawer for more
than one hour before or after cooking.
▶ Plastic containers, plastic wrap or aluminum foil can
melt if in direct contact with the drawer or a hot cooking
container. If it melts onto the drawer, it may not be
removable.
1.6 Proper installation and maintenance
WARNING
In the event of a malfunction, it might become necessary
to turn off the power supply.
▶ Have the installer show you the circuit breaker or fuse.
Mark it for easy reference.
To avoid electrical shock hazard, before servicing the
appliance, turn power off at the service panel and lock the
panel to prevent the power from being switched on
accidentally.
Proper Installation - Improper installation or grounding can
cause electric shock.
▶ This appliance must be properly installed and grounded
by a qualified technician.
▶ Connect only to properly grounded outlet.
▶ Refer to installation instructions for details.
User Servicing - Do not repair or replace any part of the
appliance unless specifically recommended in this
manual.
▶ All other servicing should be referred to an authorized
service provider.
WARNING
Malfunctions can cause injuries.
▶ Do not operate this appliance if it is not working
properly, or if it has been damaged. Contact an
authorized service provider.
1.7 Remote operation
CAUTION
This appliance may be configurable to allow remote
operation at any time.
▶ Do not store any flammable materials or temperature
sensitive items inside, on top or near surface units of
the appliance.
1.8 State of California Proposition 65
Warnings
This product may contain a chemical known to the State
of California, which can cause cancer or reproductive
harm. Therefore, the packaging of your product may bear
the following label as required by California:
IMPORTANT SAFETY INSTRUCTIONS
READ AND SAVE THESE INSTRUCTIONS
Preventing material damage en-us
7
Preventing material damage
2 Preventing material damage
Preventing material damage
NOTICE:
Excessive weight may damage the appliance.
▶ The appliance has a maximum load capacity of 55lbs
(25kg).
Moisture may damage the appliance.
▶ Do not use the appliance to store food and drinks. The
moisture in the food may cause corrosion damage.
Carrying the appliance by the appliance frame may cause
it to bend. The appliance frame cannot support the weight
of the appliance.
▶ Do not lift the appliance using the appliance frame.
▶ Always lift the appliance at the casing.
Environmental protection and energy-saving
3 Environmental protection and
energy-saving
Environmental protection and energy-saving
3.1 Disposal of packaging
The packaging materials are environmentally compatible
and can be recycled.
▶ Sort the individual components by type and dispose of
them separately.
3.2 Saving energy
If you follow these instructions, your appliance will use
less power.
To preheat tableware efficiently, distribute the tableware
evenly throughout the appliance.
It is more energy-efficient to prepare food, e.g. low-
temperature cooking, in the warming drawer rather than in
the oven.
Familiarizing yourself with your appliance
4 Familiarizing yourself with your
appliance
Familiarizing yourself with your appliance
This Use and Care Manual covers several models. Your
model may have some but not all of the features listed.
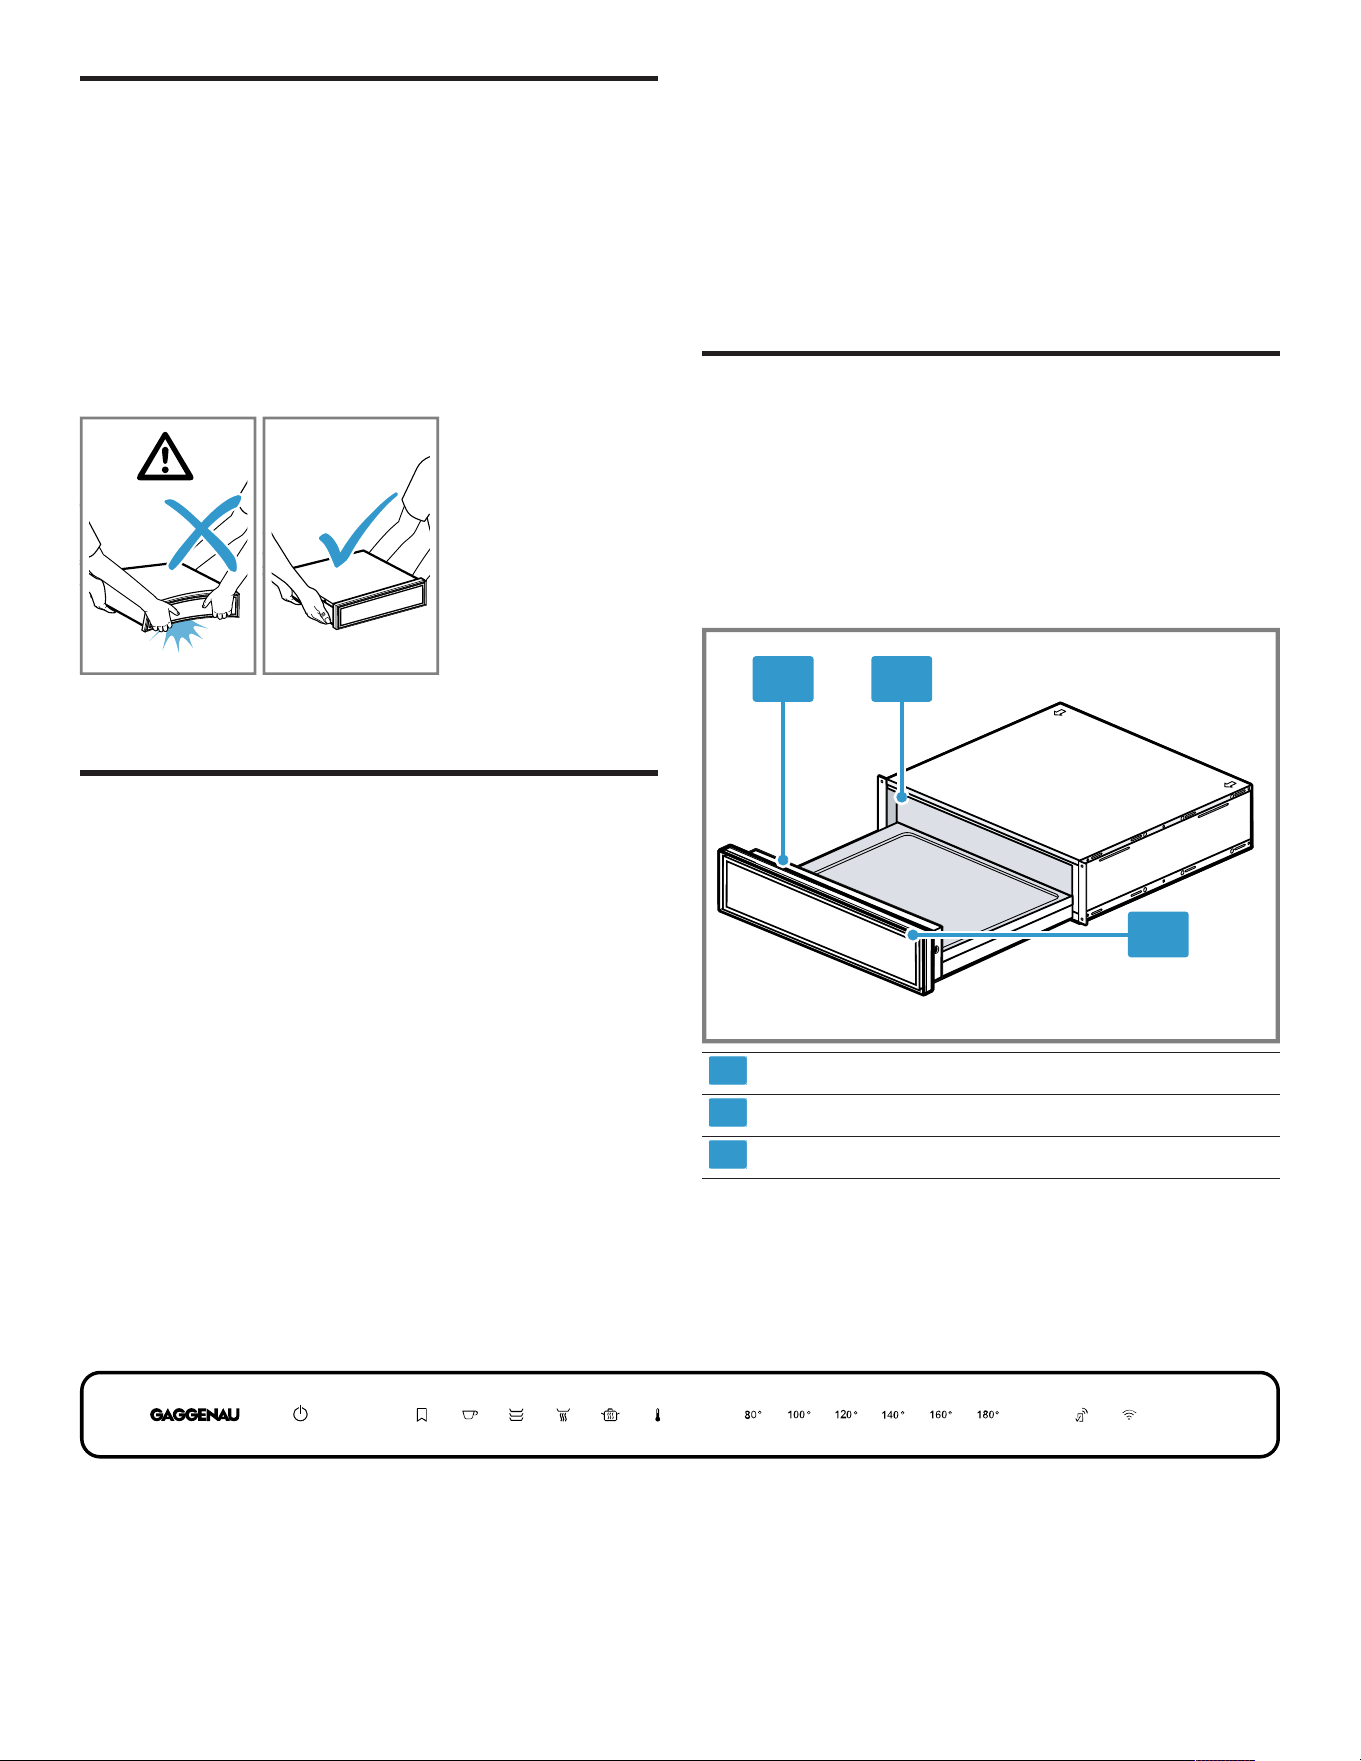
4.1 Appliance
Here you can find an overview of the parts of your
appliance.
1 2
3
1
Control panel
2
Lighting
3
Operation indicator
4.2 Control panel
You can use the control panel to configure all functions of your appliance and to obtain information about the operating
status.
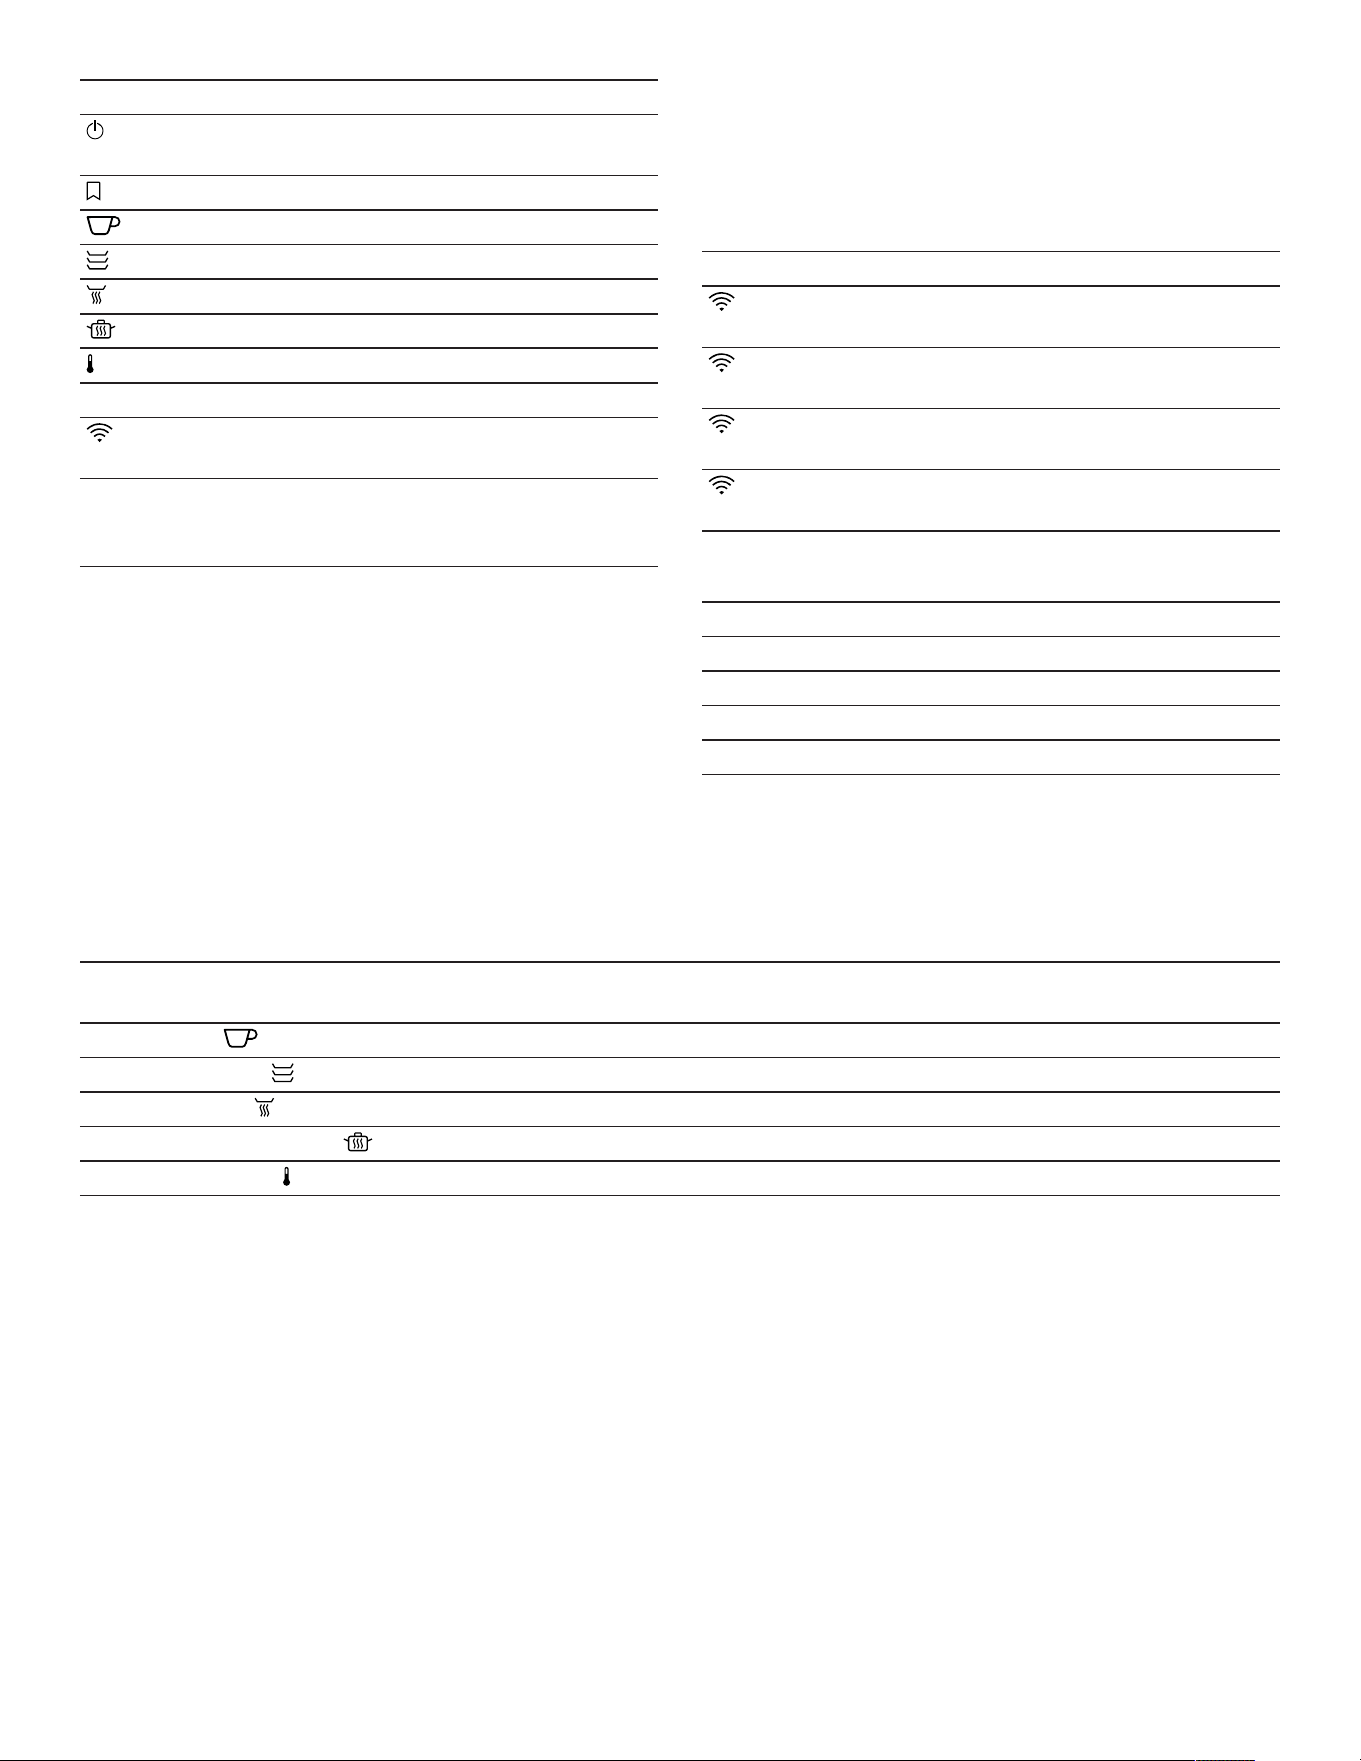
Touch fields
Touch fields are touch-sensitive surfaces. To select a
function, press the relevant field.
en-us Familiarizing yourself with your appliance
8
Touch field Function
Switching the appliance on
or off
Adding favorites
1
Preheating cups
Preheating tableware
Keeping food warm
Low-temperature cooking
Setting the temperature
80° - 180° Selecting a temperature
2
Starting HomeConnect®
pairing
1
Only available if the appliance is connected to
HomeConnect®.
2
Depending on the selected operating mode.
Notes
¡ If you touch the touch field, the appliance performs the
corresponding function.
¡ Touch fields that cannot currently be selected do not
light up.
¡ The settings that are currently selected light up in color.
¡ Always keep the controls dry. Moisture reduces their
effectiveness.
Displays
The displays on the control panel show the operating
status of the appliance.
Display Function
lights up white HomeConnect® is
available.
flashes white Appliance connects to
HomeConnect®.
lights up in color Appliance is connected to
HomeConnect®.
flashes in color Connection to
HomeConnect® is faulty.
The operation indicator is located on the appliance's front
panel.
Operation indicator Function
Off Appliance OFF
Lights up Appliance ON
Flashes Heating-up display
Flashes quickly Fault
Default temperature and temperature range
The appliance displays the possible temperature range depending on the operating mode selected. The selected
operating mode and the corresponding default temperature light up in color.
When the appliance is switched on, the operating mode and temperature that were last set light up in color.
Operating mode Default temperature in °F (°C) Adjustable temperature range in °F
(°C)
Preheat cups 120 (50) 100-140 (40-60)
Preheat cookware 140 (60) 120-160 (50-70)
Keep food warm 160 (70) 140-180 (60-80)
Low-temperature cooking 180 (80) 160-180 (70-80)
Temperature range 120 (50) 80-180 (30-80)
4.3 Sabbath mode
Your appliance maintains the temperature of your food
between 80 and 180°F (30 and 80°C) over a longer
period of time.
You can keep food warm for up to 74hours without having
to switch the appliance on or off. Bear in mind that food
which spoils easily should not be left in the appliance for
too long.
If you open the appliance for this function, the appliance
continues to heat up and the fan runs.
With "Sabbath mode" the interior light remains always off.
4.4 Lighting
By default, the lighting switches on automatically when the
appliance is opened.
You can switch the lighting on and off, and change the
factory setting, using the HomeConnect® app.
4.5 Safety shut-off
For your safety, the appliance has a safety switch-off
function. Any heating process is switched off after
24hours if the appliance controls are not used during this
time. All displays are off. When the appliance switches off,
a signal tone sounds. The appliance also remains
switched off after a power failure.
When the function "Sabbath mode" is active, the the safety
shut-off is deactivated.
Before using for the first time en-us
9
Before using for the first time
5 Before using for the first time
Before using for the first time
Prepare the appliance for use.
5.1 Cleaning and heating up the appliance
before using it for the first time
Note:When the appliance is switched on for the first time,
it takes approx.60seconds until the appliance is ready to
use. A signal tone sounds. The touch fields light up in
ascending order from left to right.
Requirement:There are no objects in the appliance.
1. Press on the appliance's front panel.
a The appliance opens and can be pulled out all the way
by the sides or underside of the front panel.
2. Clean the appliance with a damp cloth and neutral
cleaning agents, such as dish soap and water.
3. Press .
a A signal tone sounds.
4. Press .
5. Press 180°F (80°C) and close the appliance.
a The operation indicator flashes while the appliance is
preheating.
6. Heat up the appliance at 180 °F (80 °C) for an hour.
Smoke development and odor development are normal.
Ventilate the installation room well.
Cookware
6 Cookware
Cookware
Observe the instructions for filling the appliance. The
warming drawer has a maximum load capacity of 55lbs
(25kg). You can heat a different quantity of cookware
depending on the appliance height.
6.1 Cookware for appliances with a height of
5½" (14cm)
You can use an appliance with a height of 5½" (14cm) to
preheat the place settings for 6people, for example.
Cookware Dimensions
6 dinner plates 10½" (27cm) diameter
6 soup bowls 5" (13cm) diameter
1 bowl 7¾" (20cm) diameter
1 bowl 7" (18cm) diameter
1 bowl 5½" (14cm) diameter
1meat platter 12½"x7¾" (32x20cm)
6.2 Cookware for appliances with a height of
8½" (21.5cm)
You can use an appliance with a height of 8½" (21.5cm)
to preheat the place settings for 9people, for example.
Cookware Dimensions
9 dinner plates 10½" (27cm) diameter
Cookware Dimensions
9 soup bowls 5" (13cm) diameter
1 bowl 9½" (24cm) diameter
1 bowl 8¼" (21cm) diameter
1 bowl 6½" (17cm) diameter
2meat platters 12½"x7¾" (32x20cm)
Basic Operation
7 Basic Operation
Basic Operation
7.1 Opening the appliance
WARNING
The rear of the front panel becomes very hot during
operation.
▶ To open the appliance, only touch the front panel on the
side or the underside.
▶ Press on the appliance's front panel.
a The appliance opens and can be pulled out all the way
by the sides or underside of the front panel.
7.2 Closing the appliance
▶ Slide in the front panel as far as it will go.
7.3 Switching on the appliance
1. Press .
a A signal tone sounds.
2. Select an operating mode.
a The default temperature lights up in color.
a The available temperatures light up.
3. If required, select another temperature.
a The selected temperature lights up in color.
4. Close the appliance.
a The operation indicator flashes while the appliance is
preheating.
a The operation indicator lights up, the appliance heats
up, and the fan runs.
7.4 Switching off the appliance
▶ Press .
a A signal tone sounds.
7.5 Setting the temperature
1. Press .
a The default temperature lights up in color.
a The temperatures that can be set light up white.
2. Select a temperature.
a The selected temperature lights up in color.

en-us Preheating tableware
10
7.6 Adjusting the default temperature
1. Select the operating mode.
2. Press and hold the symbol for the required default
temperature until the signal tone sounds.
a The default temperature has changed.
7.7 Starting the Sabbath mode function
1. Press .
a A signal tone sounds.
2. Press .
a The default temperature lights up in color.
3. Set the desired temperature between 80°F and 180°F
(30°C) and (80°C).
4. Press and at the same time.
a lights up in color. 80° lights up white.
5. Press 80°.
a 80° lights up in color.
6. Press and hold until a signal sounds.
a lights up white.
a and the set temperature light up in color. The
brightness of the display is dimmed.
7. Close the appliance.
a The operation indicator lights up, the appliance heats
up, and the fan runs.
a If you open the appliance for this function, the appliance
continues to heat up and the fan runs.
7.8 Ending the Sabbath mode function
1. Press .
a The "Sabbath mode" function has ended.
2. Press again to switch off the appliance.
a A signal tone sounds.
Tip:If you have connected the appliance to
HomeConnect®, you can program a switch-off timer in
the HomeConnect® app.
Preheating tableware
8 Preheating tableware
Preheating tableware
Food remains warm for longer in preheated tableware.
8.1 Starting the "Preheat tableware" function
1. Place the tableware in the appliance.
‒ To guarantee that hot air can circulate efficiently,
ensure that no tall items of tableware or stacks of
plates are blocking the ventilation slots on the rear
wall of the appliance.
‒ Distribute the tableware across the entire bottom of
the appliance to reduce the preheating time.
The preheating time depends on the material,
thickness, quantity, and distribution of the tableware.
For place settings for 6people, the preheating time is
approx.30-40minutes.
2. Press .
a The default temperature lights up in color.
a The available temperatures light up.
3. If required, select another temperature.
4. Close the appliance.
a The operation indicator flashes while the appliance is
preheating.
a The operation indicator lights up, the appliance heats
up, and the fan runs.
8.2 Ending the "Preheat tableware" function
WARNING
The accessories and tableware become very hot during
operation.
▶ Always use oven gloves when removing hot
accessories or tableware from the appliance.
1. Open the appliance.
2. Switch off the appliance.
3. Remove the tableware.
Preheating cups
9 Preheating cups
Preheating cups
Drinks remain warm for longer in preheated cups.
9.1 Starting the "Preheat cups" function
WARNING
There is a risk of burns if the temperatures are too high.
▶ Always set temperatures below 140°F (60°C) for
cups.
1. Place the cups in the appliance.
‒ Distribute the cups across the entire bottom of the
appliance to reduce the preheating time.
The preheating time depends on the material,
thickness, quantity, and distribution of the cups.
2. Press .
a The default temperature lights up in color.
a The available temperatures light up.
3. If required, select another temperature.
4. Close the appliance.
a The operation indicator flashes while the appliance is
preheating.
a The operation indicator lights up, the appliance heats
up, and the fan runs.
9.2 Ending the "Preheat cups" function
WARNING
The accessories and tableware become very hot during
operation.
▶ Always use oven gloves when removing hot
accessories or tableware from the appliance.
1. Open the appliance.

Keeping food warm en-us
11
2. Switch off the appliance.
3. Remove the cups.
Keeping food warm
10 Keeping food warm
Keeping food warm
You can use the appliance to keep food warm for a certain
period of time.
Note the recommended settings.
→
"Recommended settings for keeping food warm",
Page13
10.1 Starting the "Keep food warm" function
1. To prevent spillage, do not completely fill the tableware.
2. Cover the food with heat-resistant cling film, aluminum
foil or a heat-resistant cover.
3. Place the tableware in the appliance.
4. Press .
a The default temperature lights up in color.
a The available temperatures light up.
5. If required, select another temperature.
6. Close the warming drawer.
a The operation indicator flashes while the appliance is
preheating.
a The operation indicator lights up, the appliance heats up
and the fan runs.
10.2 Ending the "Keep food warm" function
WARNING
The accessories and tableware become very hot during
operation.
▶ Always use oven gloves when removing hot
accessories or tableware from the appliance.
1. Open the appliance.
2. Switch off the appliance.
3. Remove the tableware.
Low-temperature cooking
11 Low-temperature cooking
Low-temperature cooking
Low-temperature cooking is the ideal cooking method for
cooking all tender pieces of meat which are to be cooked
medium rare or "à point". The meat remains very juicy and
turns out as soft as butter. Since the times for low-
temperature cooking are considerably longer, you have
plenty of leeway for menu planning. Meat that is cooked at
a low temperature is easy to keep warm.
Note the recommended settings.
→
"Recommended settings for low-temperature cooking",
Page13
11.1 Tips for low-temperature cooking
Here you will find tips for achieving good results when
cooking at a low temperature.
¡ Only use fresh, good-quality meat. Carefully remove
sinews and fat from around the edge. Fat develops a
strong, distinct taste during low-temperature cooking.
¡ Even larger joints of meat do not need to be turned.
¡ You can cut the meat immediately after low-temperature
cooking. No standing time is required.
¡ Due to the special cooking method, the meat always
looks pink on the inside. This does not mean, however,
that the meat is raw or not well done enough.
¡ Meat that is cooked at a low temperature is not as hot
as conventionally roasted meat. Ensure that the sauces
are very hot when you serve them. Place the plates in
the appliance in the last 20-30minutes.
¡ If you want to keep meat that is cooked at a low
temperature warm, select 140°F (60°C). Small pieces
of meat can be kept warm for up to 45minutes and
large pieces for up to 2hours.
11.2 Starting the "Low-temperature cooking"
function
1. Only use suitable cookware made from glass, porcelain,
or ceramic with lid, e.g. a glass roasting dish.
2. If no lid is available for the cookware, use heat-resistant
plastic wrap to cover the cookware.
3. Place the cookware on the bottom of the appliance.
4. Press to preheat the cookware.
5. Close the appliance.
a The operation indicator flashes while the appliance is
preheating.
a The operation indicator lights up, the appliance heats
up, and the fan runs.
6. Rapidly heat a little fat in a pan.
7. Sear the meat.
8. Place the meat into the preheated cookware.
9. Put the lid on the cookware or cover it using heat-
resistant plastic wrap.
10.Place the cookware with the meat in the appliance.
11.Press .
a The default temperature lights up in color.
a The available temperatures light up.
12.If required, select another temperature.
13.Close the appliance.
a The operation indicator flashes while the appliance is
preheating.
a The operation indicator lights up, the appliance heats
up, and the fan runs.

en-us Additional applications
12
11.3 Ending the "Low-temperature cooking"
function
WARNING
The accessories and tableware become very hot during
operation.
▶ Always use oven gloves when removing hot
accessories or tableware from the appliance.
1. Open the appliance.
2. Switch off the appliance.
3. Remove the tableware.
Additional applications
12 Additional applications
Additional applications
Your appliance offers additional useful applications.
Note the recommended settings.
→
"Recommended settings for other applications",
Page14
Defrosting
13 Defrosting
Defrosting
You can use your appliance to defrost frozen food gently
and more evenly than in the microwave.
Note the recommended settings.
→
"Recommended settings for defrosting", Page15
13.1 Defrosting food
WARNING
When defrosting food from animal sources, the
transmission of germs is possible.
▶ When defrosting food from animal sources, you must
remove the liquid that escapes during defrosting.
▶ Ensure that the liquid that escapes during defrosting
never comes into contact with other foods.
1. Remove the food from the packaging before defrosting.
2. Only defrost the amount of food that you require
immediately.
3. After half the defrost time has elapsed, turn the meat or
fish.
4. Break up frozen clumps of food comprising many
pieces, e.g. berries and pieces of meat.
Notes
¡ The defrosting time depends on the size, weight and
shape of the frozen food. To reduce the defrosting time,
freeze food flat or in individual portions.
¡ In some cases, defrosted food may no longer be kept
for as long and it may spoil more quickly than fresh
food. Prepare defrosted food immediately and cook it
thoroughly.
¡ Fish does not need to be fully defrosted. It is sufficient
to defrost fish until the surface is soft enough for
seasoning/spices to stick.

How it works en-us
13
How it works
14 How it works
How it works
14.1 Recommended settings for keeping food warm
Observe the following recommended settings when keeping food warm. To prevent the food from drying out, observe the
maximum duration in the overview.
Food Preheating tableware Temperature in °F
(°C)
Duration in minutes Notes
Boiled eggs,
scrambled eggs
yes 120 (50) maximum 60 Cover the food
Toasting bread, rolls yes 140 (60) maximum 60
Delicate foods, e.g.
cooked meat
no 140 (60) maximum 60 Carve the meat just
before serving; cover
the food
Food yes 180 (80) maximum 60 Cover the food
Drinks yes 160 (70) maximum 60 Cover drinks
14.2 Recommended settings for low-temperature cooking
The following settings have been specially tested for your
appliance.
All tender joints of beef, pork, veal, lamb, game and
poultry are suitable for low-temperature cooking. The
searing and cooking times depend on the size of the piece
of meat. The searing times apply to food placed into the
hot oil.
Small pieces of meat
Food Searing time on the
cooking zone
Continued cooking time in
the warming drawer
Temperature in °F (°C)
Cubes or strips On all sides for 1-2minutes 20-30minutes 180 (80)
Small escalopes, steaks or
medallions, approx. ⅜" - ¾"
(1-2cm) thick
1-2minutes per side 35-50minutes 180 (80)
Medium-sized pieces of meat
Food Searing time on the
cooking zone
Continued cooking time in
the warming drawer
Temperature in °F (°C)
Fillet, 0.8 - 1.8lbs
(400-800g)
On all sides for 4-5minutes 75-120minutes 180 (80)
Saddle of lamb, approx.1lb
(450g)
2-3minutes per side 50-60minutes 180 (80)
Lean joints of meat, 1.8 -
2.2lbs (800-1000g)
On all sides for 6-8minutes 120-180minutes 180 (80)
Large pieces of meat
Food Searing time on the
cooking zone
Continued cooking time in
the warming drawer
Temperature in °F (°C)
Fillet, from 1.8 - 4.4lbs
(800-2000g)
On all sides for 6-8minutes 120-210minutes 180 (80)
Sirloin, 2.2 - 4.4lbs (1-2kg) On all sides for 8-10minutes 180-210minutes 180 (80)

en-us How it works
14
Other food
Food Searing time on the
cooking zone
Continued cooking
time in the warming
drawer
Temperature in °F
(°C)
Notes
Ragout On all sides for
6-8minutes
15hours 180 (80)
80
In the roasting dish
with lid
Confit meat 20hours 180 (80) In the roasting dish
with lid, e.g. confît de
canard (speciality from
South-West France)
14.3 Recommended settings for other applications
Observe the following recommended settings.
Warming
Food Temperature in °F (°C) Duration in minutes Notes
Egg and flour-based foods,
e.g. crêpes, pancakes,
wraps, tacos
180 (80) 10-60 Cover the food
Cakes, e.g. cakes with
crumble topping, muffins
180 (80) 30-45 Cover the food
Melting
Food Temperature in °F (°C) Duration in minutes Notes
Dissolving gelatin 180 (80) 10-15 Before melting the gelatine
leaves, soak them in water
and wring them out
Cooking chocolate or
couverture chocolate
140 (60) 30-45 Break the chocolate into
pieces
Butter 180 (80) 30-45 Cut the butter into cubes
Drying
Food Temperature in °F (°C) Duration in minutes Notes
Fresh herbs 140 (60) 90
Meringues 180 (80) 150-180 1¼" - 1⅝" (3-4cm)
diameter
Apple rings 160 (70) 420-480 Cut the apples into thin
slices or rings
Flavoring oil
Food Temperature in °F (°C) Duration in minutes Notes
Flavored oil 180 (80) 90-120 E.g. olive oil with lemon,
rosemary, chilli
HomeConnect® en-us
15
Heating cotton cloths
Table linen Temperature in °F (°C) Duration in minutes Notes
Hot cotton cloths 180 (80) 60 Moisten and roll up the
cotton cloths before heating.
Add the cotton cloths to a
plate or cooking container.
Place the plate or the
cooking container in the
warming drawer.
14.4 Recommended settings for defrosting
Take note of the following recommended settings for defrosting food.
Food Temperature in °F (°C) Duration in minutes
Delicate frozen food, e.g. butter,
cheese, berries
100 (40) 45-60
Bread, bread rolls, baguettes, cake 140 (60) 15-30
Meat, fish 140 (60) 30-60
HomeConnect®
15 HomeConnect®
HomeConnect®
This appliance is network-capable. Connecting your
appliance to a mobile device lets you control its functions
via the HomeConnect® app, adjust its basic settings and
monitor its operating status.
The HomeConnect® services are not available in every
country. The availability of the HomeConnect® function
depends on the availability of the HomeConnect®
services in your country. You can find information on this
at: www.home-connect.com.
The HomeConnect® app guides you through the entire
registration process. Follow the instructions, noting the
information in the HomeConnect® app.
Notes
¡ Note the safety information in this instruction manual
and ensure that it is also observed when operating the
appliance using the HomeConnect® app.
¡ Operating the appliance on the appliance itself always
takes priority. It is not possible to operate the appliance
using the HomeConnect® app during this time.
¡ In networked standby mode, the appliance requires a
maximum of 2watts.
15.1 Setting upHomeConnect®
Requirements
¡ The appliance is connected to the power supply and is
switched on.
¡ You have a mobile device with a current version of the
iOS or Android operating system, e.g. a smartphone.
¡ The appliance receives signals from the WLAN home
network (Wi-Fi) at its installation location.
¡ The mobile device and the appliance are within range of
your home network's Wi-Fi signal.
1. Scan the following QR code.
You can install the HomeConnect® app and connect
your appliance via the QR code.
2. Follow the instructions in the HomeConnect® app.
15.2 Resetting the Wi-Fi settings and
switching off the Wi-Fi
1. Press and hold until a signal tone sounds.
a flashes white once.
a The Wi-Fi is reset. The appliance searches for a
connection to another mobile device.
2. Press and hold until a signal tone sounds.
a lights up for approximately 2 seconds.
a The Wi-Fi is switched off.
15.3 Software update
Your appliance's software can be updated using the
software update function, e.g. for the purposes of
optimization, troubleshooting or security updates.
To do this, you must be a registered
HomeConnect®user, have installed the app on your
mobile device and be connected to the
HomeConnect®server.

en-us Cleaning and maintenance
16
As soon as a software update is available, you will be
informed via the HomeConnect®app and will be able to
start the software update via the app. Once the update
has been successfully downloaded, you can start installing
it via the HomeConnect®app if you are in your home
network (Wi-Fi). The HomeConnect®app informs you
once the installation is successful.
Notes
¡
The software update consists of two steps.
– The first step is the download.
– The second step is the installation on your appliance.
¡ You can continue to use your appliance as normal while
updates are downloading. Depending on your personal
settings in the app, software updates can also be set to
download automatically.
¡ Installation takes a few minutes. You cannot use your
appliance during installation.
¡ We recommend that you install security updates as
soon as possible.
15.4 Data Protection
Please read this information on data protection.
The first time your appliance is registered on a home
network connected to the Internet, your appliance
transmits the following types of data to the
HomeConnect® server (initial registration):
¡ Unique appliance identification (consisting of appliance
codes as well as the MAC address of the installed Wi-Fi
communication module).
¡ Security certificate of the Wi-Fi communication module
(to ensure a secure data connection).
¡ The current software and hardware version of your
home appliance.
¡ Status of any previous reset to factory settings.
This initial registration prepares the HomeConnect®
functions for use and is only required when you want to
use the HomeConnect® functions for the first time.
Note:Please note that the HomeConnect® functions can
only be used in conjunction with the HomeConnect® app.
Information on data protection can be retrieved in the
HomeConnect® app.
Cleaning and maintenance
16 Cleaning and maintenance
Cleaning and maintenance
16.1 Cleaning agents
You can obtain suitable cleaning products from Customer
Service or the online shop.
NOTICE:
Unsuitable cleaning agents may damage the surfaces of
the appliance.
▶ Do not use strong or abrasive cleaning agents.
▶ Do not use cleaning agents with a high alcohol content.
▶ Do not use hard scouring pads or cleaning sponges.
▶ Only use glass cleaners, glass scrapers or stainless
steel care products if recommended in the cleaning
instructions for the relevant part.
▶ Wash sponge cloths thoroughly before use.
16.2 Cleaning the appliance
WARNING
Moisture intrusion may cause an electric shock.
▶ Do not use any steam cleaners or high-pressure
cleaners to clean the appliance.
WARNING
The appliance becomes hot during operation.
▶ Allow the appliance to cool down before cleaning.
Requirement:The appliance is switched off.
1. Clean the appliance with a damp cloth and neutral
cleaning agents, such as dish soap and water.
2. Dry with a soft cloth.
16.3 Cleaning the stainless steel surfaces
1. Always remove limescale, grease, starch or albumin
stains immediately.
Corrosion may form under such stains.
2. Clean with water and some dish soap.
3. Dry with a soft cloth.
16.4 Cleaning the glass front
▶ Clean the glass front using a glass cleaning product and
a soft cloth.
‒ Do not use any abrasive sponges that may scratch or
any glass scrapers.
16.5 Cleaning the glass plate
1. Clean the glass plate using a glass cleaning product
and a soft cloth.
‒ Do not use any abrasive sponges that may scratch or
any glass scrapers.
2. Dry with a soft cloth.

Troubleshooting en-us
17
Troubleshooting
17 Troubleshooting
Troubleshooting
You can eliminate minor issues on your appliance
yourself. Please read the information on eliminating issues
before contacting Customer Service. This may avoid
unnecessary repair visits.
WARNING
To avoid risk of injury from improper repairs, observe the
following.
▶ Only qualified technicians or authorized service
providers should perform repairs.
▶ If the power cord or the appliance power cable of this
appliance becomes damaged, it must be replaced with
a special power cord or special appliance power cable,
which is available from the manufacturer or the
manufacturer's Customer Service.
▶ If the power cord of this appliance is damaged, it must
be replaced by trained, specialist personnel.
▶ Only genuine spare parts may be used to repair the
appliance.
▶ If the appliance has an issue, call Customer Service.
Issue Cause and troubleshooting
The tableware or food is not
heating up.
There has been a power failure.
▶ Check whether the lighting in your kitchen or other appliances in the room are
working.
The appliance is switched off.
▶ Switch on the appliance.
The appliance is not completely closed.
▶ Close the appliance.
The tableware covers the ventilation system slots and the appliance switches on the
overheating protection.
1. Wait until the appliance has cooled down.
2. Ensure that the ventilation slots on the back wall of the appliance are not
covered.
3. Use the main switch to switch the appliance off and back on again.
4. Select the required operating mode and temperature.
The appliance is not working. The circuit breaker in the circuit breaker panel has tripped.
▶ Check the breaker panel.
The tableware or food does not get
warm enough.
There has been a power failure.
▶ Check whether the lighting in your kitchen or other appliances in the room are
working.
The cookware or food has not been heated for long enough.
▶ Heat the tableware or the food for a longer period of time.
The appliance is not completely closed.
▶ Close the appliance.
The appliance switches off. All
displays are off.
The safety shut-off has switched the appliance off.
▶ Switch the appliance back on.
The operation indicator flashes. The appliance heats up.
▶ Wait until the appliance has finished heating up.
The appliance is switched on. The
operation indicator does not light
up.
The operation indicator is defective.
▶ Call
→
"Customer Service", Page18
.
The fuse in the fuse box has
blown.
The circuit breaker in the circuit breaker panel has tripped.
▶ Call
→
"Customer Service", Page18
.
The indicators light up. The
appliance does not heat up.
Demo mode is activated.
▶
Deactivate demo mode. →
Page18

en-us Information regarding Free and Open Source Software
18
Issue Cause and troubleshooting
Home Connect display flashes in
color.
Network fault
1. Check the connection to the home network, e.g. with a mobile phone near the
appliance.
2. Restart the router.
▶ If the problem persists, contact Customer Service.
→
"Customer Service", Page18
The front panel is not aligned. The front panel was not aligned during installation.
▶ Adjust the front panel.
The lighting does not work. The lighting is not activated in the HomeConnect®app.
▶ Change the settings in the HomeConnect®app.
17.1 Demo mode
If demo mode is activated, the indicators light up but the
appliance does not heat up.
Deactivating demo mode
1. Briefly disconnect the appliance from the mains.
‒ Unplug the appliance from the mains or switch off the
household fuse or circuit breaker in the fuse box.
2. Deactivate demo mode within the next 3minutes.
‒ Press and hold and at the same time until and
30° light up in color.
‒ Press 30° until 30° lights up white.
3. To save the settings, press and hold until all
indicators go out.
Information regarding Free and Open Source Software
18 Information regarding Free and
Open Source Software
Information regarding Free and Open Source Software
This product includes software components that are
licensed by the copyright holders as free or open source
software.
The applicable license information is stored on your home
appliance. You can also access the applicable license
information via your HomeConnect® app: "Profile ->
Legal information -> License Information". You can
download the license information on the brand product
website. (Please search on the product website for your
appliance model and additional documents). Alternatively,
you can request the relevant information from
[email protected] or BSH Hausgeräte GmbH, Carl-
Wery-Str. 34, 81739 Munich, Germany.
The source code will be made available to you on request.
Please send your request to [email protected] or
BSH Hausgeräte GmbH, Carl-Wery-Str.34, 81739 Munich,
Germany.
Subject: „OSSREQUEST“
The cost of performing your request will be charged to
you. This offer is valid for three years from the date of
purchase or at least as long as we offer support and spare
parts for the relevant appliance.
Customer Service
19 Customer Service
Customer Service
With any warranty repair, we will make sure your
appliance is repaired by an authorized service provider
using genuine replacement parts. We use only genuine
replacement parts for all repairs.
Detailed information on the warranty period and terms of
warranty can be found in the Statement of Limited Product
Warranty, from your retailer, or on our website.
If you contact Customer Service, you will need the model
number (E-Nr.), the production number (FD) and the
consecutive numbering (Z-Nr.) of your appliance.
The LED light sources are available as a spare part and
should only be replaced by an authorized service provider.
USA:
1-877-442-4436
www.gaggenau.com
www.gaggenau.com/us/appliances/eshop
CA:
1-877-442-4436
www.gaggenau.com
www.gaggenau.ca
For assistance with connecting to HomeConnect®, you
can also view instructions here:
www.home-connect.com/us/en/help-support/set-up
19.1 Model number (E-Nr.), production
number (FD) and consecutive
numbering (Z-Nr.)
You can find the model number (E-Nr.), the production
number (FD) and the consecutive numbering (Z-Nr.) on
the appliance's rating plate.
Making a note of your appliance's details and the
Customer Service telephone number will enable you to
find them again quickly.
Disposal en-us
19
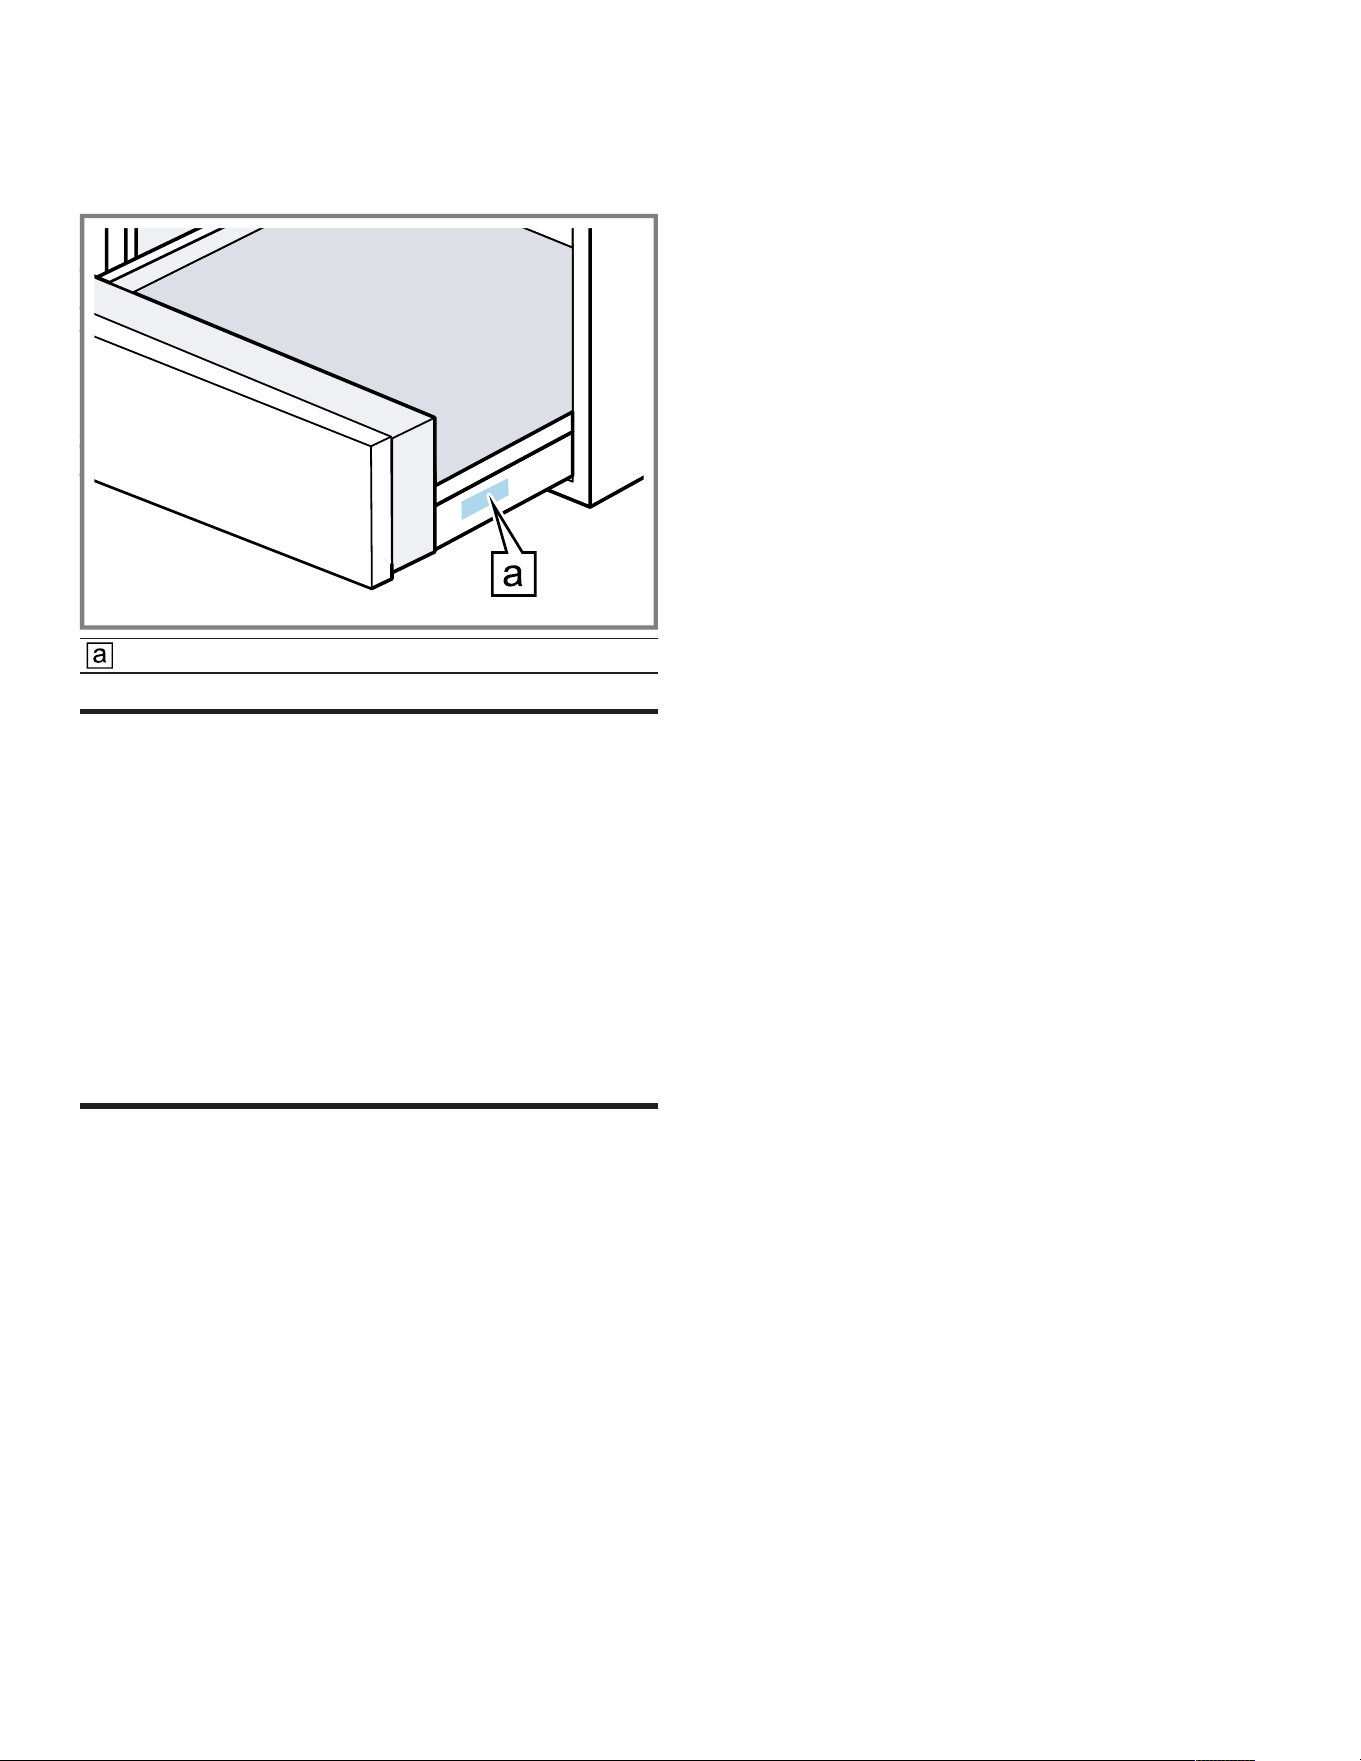
19.2 Rating plate location
You can find the rating plate of your appliance:
¡ at the right side of the drawer. Open the drawer to view
it.
Rating plate
Disposal
20 Disposal
Disposal
20.1 Disposal of your old appliance
Environmentally compatible disposal allows valuable raw
materials to be recycled.
1. Unplug the appliance from the power supply.
2. Cut through the power cord.
3. Dispose of the appliance in an environmentally
responsible manner.
Information about current disposal methods can be
obtained from your specialist dealer or local authority.
STATEMENT OF LIMITED PRODUCT WARRANTY
21 STATEMENT OF LIMITED
PRODUCT WARRANTY
STATEMENT OF LIMITED PRODUCT WARRANTY
21.1 What this warranty covers & Who it
applies to
The limited warranty provided by BSH Home Appliances
(“Gaggenau“) in this Statement of Limited Product
Warranty applies only to the Gaggenau appliance sold to
you (“Product“), provided that the Product was purchased:
¡ For your normal, household (non-commercial) use, and
has in fact at all times only been used for normal
household purposes.
¡ New at retail from a BSH authorized dealer or directly
from BSH (not a display, "as is", or previously returned
model), and not for resale, or commercial use.
¡ Within the United States or Canada, and has at all times
remained within the country of original purchase.
The warranties stated herein apply to the original
purchaser of the product warranted herein and to each
succeeding owner of the product purchased for ordinary
home use during the term of the warranty.
Please make sure to register your Product; while not
necessary to effectuate warranty coverage, it is the best
way for Gaggenau to notify you in the unlikely event of a
safety notice or product recall.
21.2 How long the warranty lasts
Gaggenau warrants that the Product is free from defects in
materials and workmanship for a period of seven hundred
and thirty (730) days from the date of the original delivery.
The foregoing timeline begins to run upon the date of
original delivery, and shall not be stalled, tolled, extended,
or suspended, for any reason whatsoever. This Product is
also warranted to be free from cosmetic defects in
material and workmanship (such as scratches of stainless
steel, paint/porcelain blemishes, chips, dents, or other
damage to the finish) of the Product, for a period of sixty
(60) days from the date of delivery or closing date for new
construction. This cosmetic warranty excludes slight color
variations due to inherent differences in painted and
porcelain parts, as well as differences caused by kitchen
lighting, product location, or other similar factors. This
cosmetic warranty specifically excludes any display, floor,
“As Is”, or “B” stock appliances.
21.3 Repair/replace as your exclusive
remedy
During this warranty period, Gaggenau or one of its
authorized service providers will repair your Product
without charge to you (subject to certain limitations stated
herein) if your Product proves to have been manufactured
with a defect in materials or workmanship. If reasonable
attempts to repair the Product have been made without
success, then Gaggenau will replace your Product
(upgraded models may be available to you, in Gaggenau's
sole discretion, for an additional charge). Nothing in this
warranty requires damaged or defective parts to be
replaced with parts of a different type or design than the
original parts. All removed parts and components shall
become the property of Gaggenau at its sole option. All
replaced and/or repaired parts shall assume the identity of
the original part for purposes of this warranty and this
warranty shall not be extended with respect to such parts.
Gaggenau's sole liability and responsibility hereunder is to
repair manufacturer-defective Product only, using a
Gaggenau authorized service provider during normal
business hours. For safety and property damage
concerns, Gaggenau highly recommends that you do not
attempt to repair the Product yourself, or use a non-
authorized service provider; Gaggenau will have no
responsibility or liability for damage resulting from repairs
or work performed by a non-authorized service provider.
Authorized service providers are those persons or
companies that have been specially trained on Gaggenau
products, and who possess, in Gaggenau's opinion, a

en-us STATEMENT OF LIMITED PRODUCT WARRANTY
20
superior reputation for customer service and technical
ability (note that they are independent entities and are not
agents, partners, affiliates or representatives of
Gaggenau). Nevertheless, taking your product to be
serviced by a repair shop that is not affiliated with or an
authorized dealer of Gaggenau will not void this warranty.
Also, using third-party parts will not void this warranty.
Notwithstanding the foregoing, Gaggenau will not incur
any liability, or have responsibility, for the Product if it is
located in a remote area (more than 100 miles from an
authorized service provider) or is reasonably inaccessible,
hazardous, threatening, or treacherous locale,
surroundings, or environment; in any such event, if you
request, Gaggenau would still pay for labor and parts and
ship the parts to the nearest authorized service provider,
but you would still be fully liable and responsible for any
travel time or other special charges by the service
company, assuming they agree to make the service call.
Further, to the extent you have installed the Product in a
difficult-to-access location or have otherwise installed
temporary or permanent fixtures that create barriers to
accessing or removing the Product, Gaggenau will not
incur any liability for, or have responsibility, for work or
costs associated with moving the Product or otherwise
creating access to the Product in order to repair or replace
it. All such costs shall be your sole responsibility.
21.4 Out of warranty product
Gaggenau is under no obligation, at law or otherwise, to
provide you with any concessions, including repairs,
prorates, or Product replacement, once this warranty has
expired.
21.5 Warranty exclusions
The warranty coverage described herein excludes all
defects or damage that are not the direct fault of
Gaggenau, including without limitation, one or more of the
following:
¡ Use of the Product in anything other than its normal,
customary and intended manner (including without
limitation, any form of commercial use, use or storage of
an indoor product outdoors, use of the Product in
conjunction with air or water-going vessels).
¡ Any party's willful misconduct, negligence, misuse,
abuse, accidents, neglect, improper operation, failure to
maintain, improper or negligent installation, tampering,
failure to follow operating instructions, mishandling,
unauthorized service (including selfperformed "fixing" or
exploration of the appliance's internal workings).
¡ Adjustment, alteration or modification of any kind.
¡ A failure to comply with any applicable state, local, city,
or county electrical, plumbing and/or building codes,
regulations, or laws, including failure to install the
product in strict conformity with local fire and building
codes and regulations.
¡ Ordinary wear and tear, spills of food, liquid, grease
accumulations, or other substances that accumulate on,
in, or around the Product.
¡ Any external, elemental and/or environmental forces
and factors, including without limitation, rain, wind,
sand, floods, fires, mud slides, freezing temperatures,
excessive moisture or extended exposure to humidity,
lightning, power surges, structural failures surrounding
the appliance, and acts of God.
¡ Service calls to correct the installation of your Product,
to instruct you how to use your Product, to replace
house fuses or correct house wiring or plumbing.
¡ Removal and replacement of trim or decorative panels
that interfere with servicing the Product.
¡ Damage or defects caused by labor or parts installed by
any non-authorized service provider, unless approved
by Gaggenau before service is performed.
In no event shall Gaggenau have any liability or
responsibility whatsoever for damage to surrounding
property, including cabinetry, floors, ceilings, and other
structures or objects around the Product. Also excluded
from this warranty are Products, on which the serial
numbers have been altered, defaced, or removed; service
visits to teach you how to use the Product, or visits where
there is nothing wrong with the Product; correction of
installation problems (you are solely responsible for any
structure and setting for the Product, including all
electrical, plumbing or other connecting facilities, for
proper foundation/flooring, and for any alterations
including without limitation cabinetry, walls, floors,
shelving, etc.); and resetting of breakers or fuses.
TO THE EXTENT ALLOWED BY LAW, THIS WARRANTY
SETS OUT YOUR EXCLUSIVE REMEDIES WITH
RESPECT TO PRODUCT, WHETHER THE CLAIM
ARISES IN CONTRACT OR TORT (INCLUDING STRICT
LIABILITY, OR NEGLIGENCE) OR OTHERWISE. THIS
WARRANTY IS IN LIEU OF ALL OTHER WARRANTIES,
WHETHER EXPRESS OR IMPLIED. ANY WARRANTY
IMPLIED BY LAW, WHETHER FOR MERCHANTABILITY
OR FITNESS FOR A PARTICULAR PURPOSE, OR
OTHERWISE, SHALL BE EFFECTIVE ONLY FOR THE
PERIOD THAT THIS EXPRESS LIMITED WARRANTY IS
EFFECTIVE. IN NO EVENT WILL THE MANUFACTURER
BE LIABLE FOR CONSEQUENTIAL, SPECIAL,
INCIDENTAL, INDIRECT, "BUSINESS LOSS", AND/OR
PUNITIVE DAMAGES, LOSSES, OR EXPENSES,
INCLUDING WITHOUT LIMITATION TIME AWAY FROM
WORK, HOTELS AND/OR RESTAURANT MEALS,
REMODELLING EXPENSES IN EXCESS OF DIRECT
DAMAGES WHICH ARE DEFINITIVELY CAUSED
EXCLUSIVELY BY GAGGENAU, OR OTHERWISE.
SOME STATES DO NOT ALLOW THE EXCLUSION OR
LIMITATION OF INCIDENTAL OR CONSEQUENTIAL
DAMAGES, AND SOME STATES DO NOT ALLOW
LIMITATIONS ON HOW LONG AN IMPLIED WARRANTY
LASTS, SO THE ABOVE EXCLUSIONS OR
LIMITATIONS MAY NOT APPLY TO YOU. THIS
WARRANTY GIVES YOU SPECIFIC LEGAL RIGHTS,
AND YOU MAY ALSO HAVE OTHER RIGHTS WHICH
VARY FROM STATE TO STATE.
No attempt to alter, modify or amend this warranty shall be
effective unless authorized in writing by an officer of BSH.

STATEMENT OF LIMITED PRODUCT WARRANTY en-us
21
21.6 Obtaining warranty service
To obtain warranty service for your product, you should
contact Gaggenau Customer Support at 1-877-442-4436
to schedule a repair.
21.7 Product information
For handy reference, copy the information below from the
rating plate. Keep your invoice and/or delivery documents
for warranty validation.
Model number (E-Nr.)
Production number
(FD)
Date of delivery


BSH Home Appliances Corporation
1901 Main Street, Suite 600
Irvine, CA 92614
USA
www.gaggenau.com
1-877-442-4436
© 2025 BSH Home Appliances Corporation
*9001894422*
9001894422 en-us (050811)
