MUTE BOX PUMP
Thank you for buying our new condensate pump of MUTE BOX.
This manual gives instructions on the correct installation. Please record the
following information for your future reference.
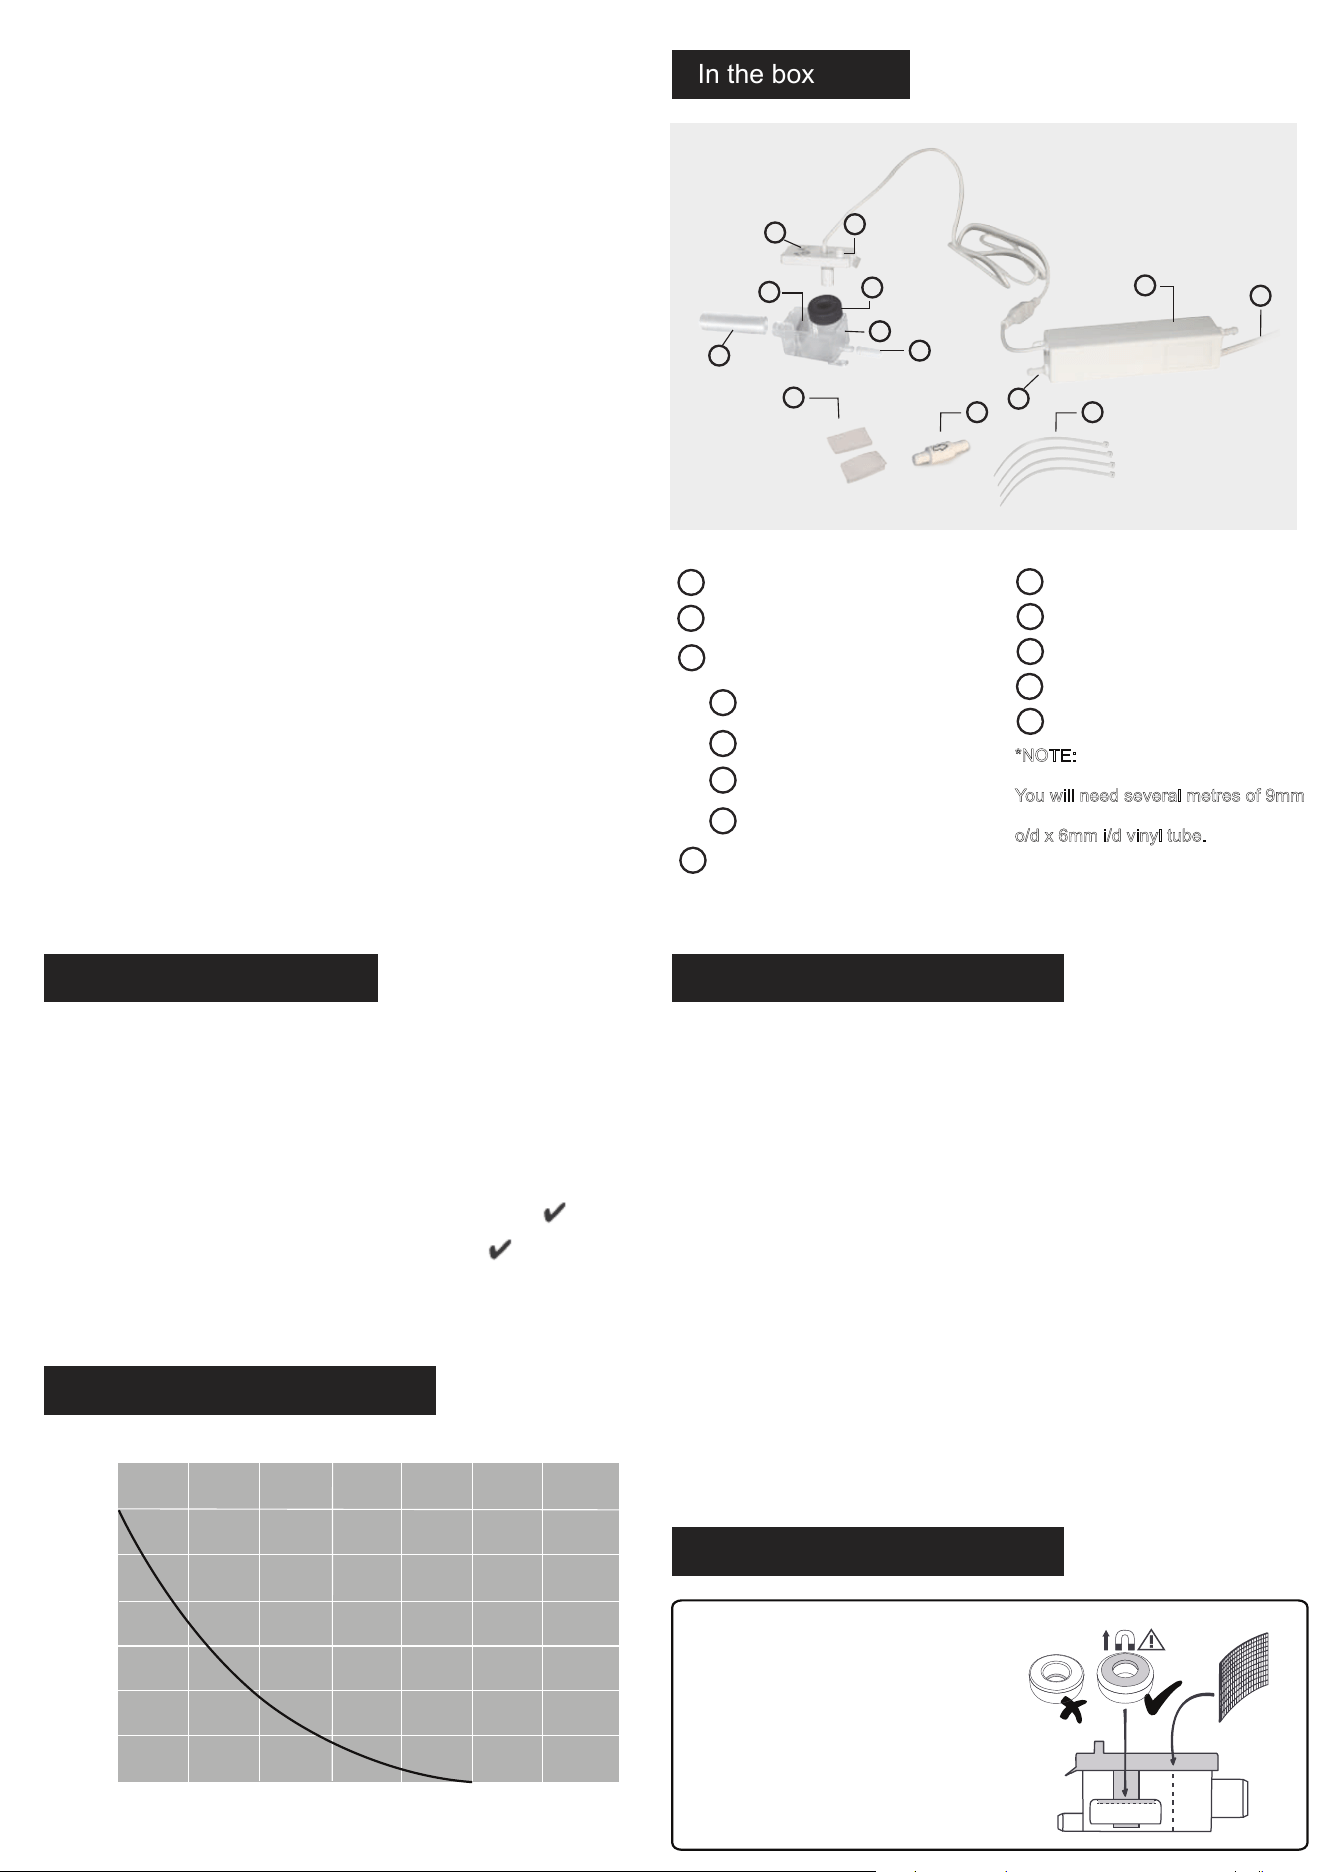
Assembled mute box
6mm i/d vinyl tube
Assembled Inline reservoir, including:
lid & sensor cable
float
filter
reservoir
1.5m length of 6mm i/d vinyl tube
4 x 200mm x 5mm cable ties
Inlet tube
In the box
1
5
6
2 x self adhesive velcro strips
Check valve
7
8
9
2
3
4
3a
3b
3c
3d
*NOTE:
You will need several metres of 9mm
o/d x 6mm i/d vinyl tube.
6
8
6
7
Technical Data
Typical Performance
• Power supply :100-240V AC
50/60Hz <4W
• Max.flow:22L/h @ 0 head
• Sound level:<19dB(A) @ 1m
• Max.recommended head:20m
• Max.suction lift:2m
• Max.unit output: 28kw / 95550 Btu/h
• Safety switch:3A Normally closed
• Max.water temperature:70ºC
• Discharge tube:6mmID
• Class:II appliance
• Rated:continuous
• IP Protection:IPX5
• Thermal protection:
• Fully potted:
• CE marked
• LxWxH:185mmx36mmx34mm
0 4 7 11 16 22 29 37
25
20
15
11
8
5
2
0
LITRES PER HOUR
METRES HEAD
Product Safety
Installation
• CAUTION: The MUTE BOX Pump has
been evaluated for use with water only.
• WARNING: Risk of electric shock. This
pump has not been investigated for use
in swimming pool or marine areas.
• The means for isolation must be
incorporated in the fixed wiring in
accordance with wiring regulations.
• Ensure the pump is disconnected from
the mains supply before carrying out any
adjustments or servicing.
• The supply cord can not be replaced. If the
cord is damaged, this pump must be discarded.
• Do not run this pump dry.
• Always ensure the metal magnet
in the float is facing upwards.
• Always ensure the reservoir is
sitting flat and horizontal.
• The Pump is ideal for most working
and living environments. It is not
recommended where the environment
is oily or particularly dusty.
• Acceptable for indoor use only.
• Non-submersible pump.
1、Ensure float is positioned in
reservoir with magnet
uppermost, the filter is in place
and the lid is clipped firmly onto
reservoir.
1
2
4
6
5
3a
3b
3c
3d
4
97
8
Power cable
*NOTE:
You will need several metres of 9mm
o/d x 6mm i/d vinyl tube.
• Do not run this pump dry.
• Always ensure the metal magnet
in the float is facing upwards.
• Always ensure the reservoir is
sitting flat and horizontal.
• The Pump is ideal for most working
and living environments. It is not
recommended where the environment
is oily or particularly dusty.
• Acceptable for indoor use only.
• Non-submersible pump.
2、Secure reservoir horizontally using
velcro strips and for the inline reservoir use
the inlet hose to connect firmly to drainage
pipe.
3、Fit breather tube to
reservoir lid.
4、
Velcro strips
1.
2.
3.
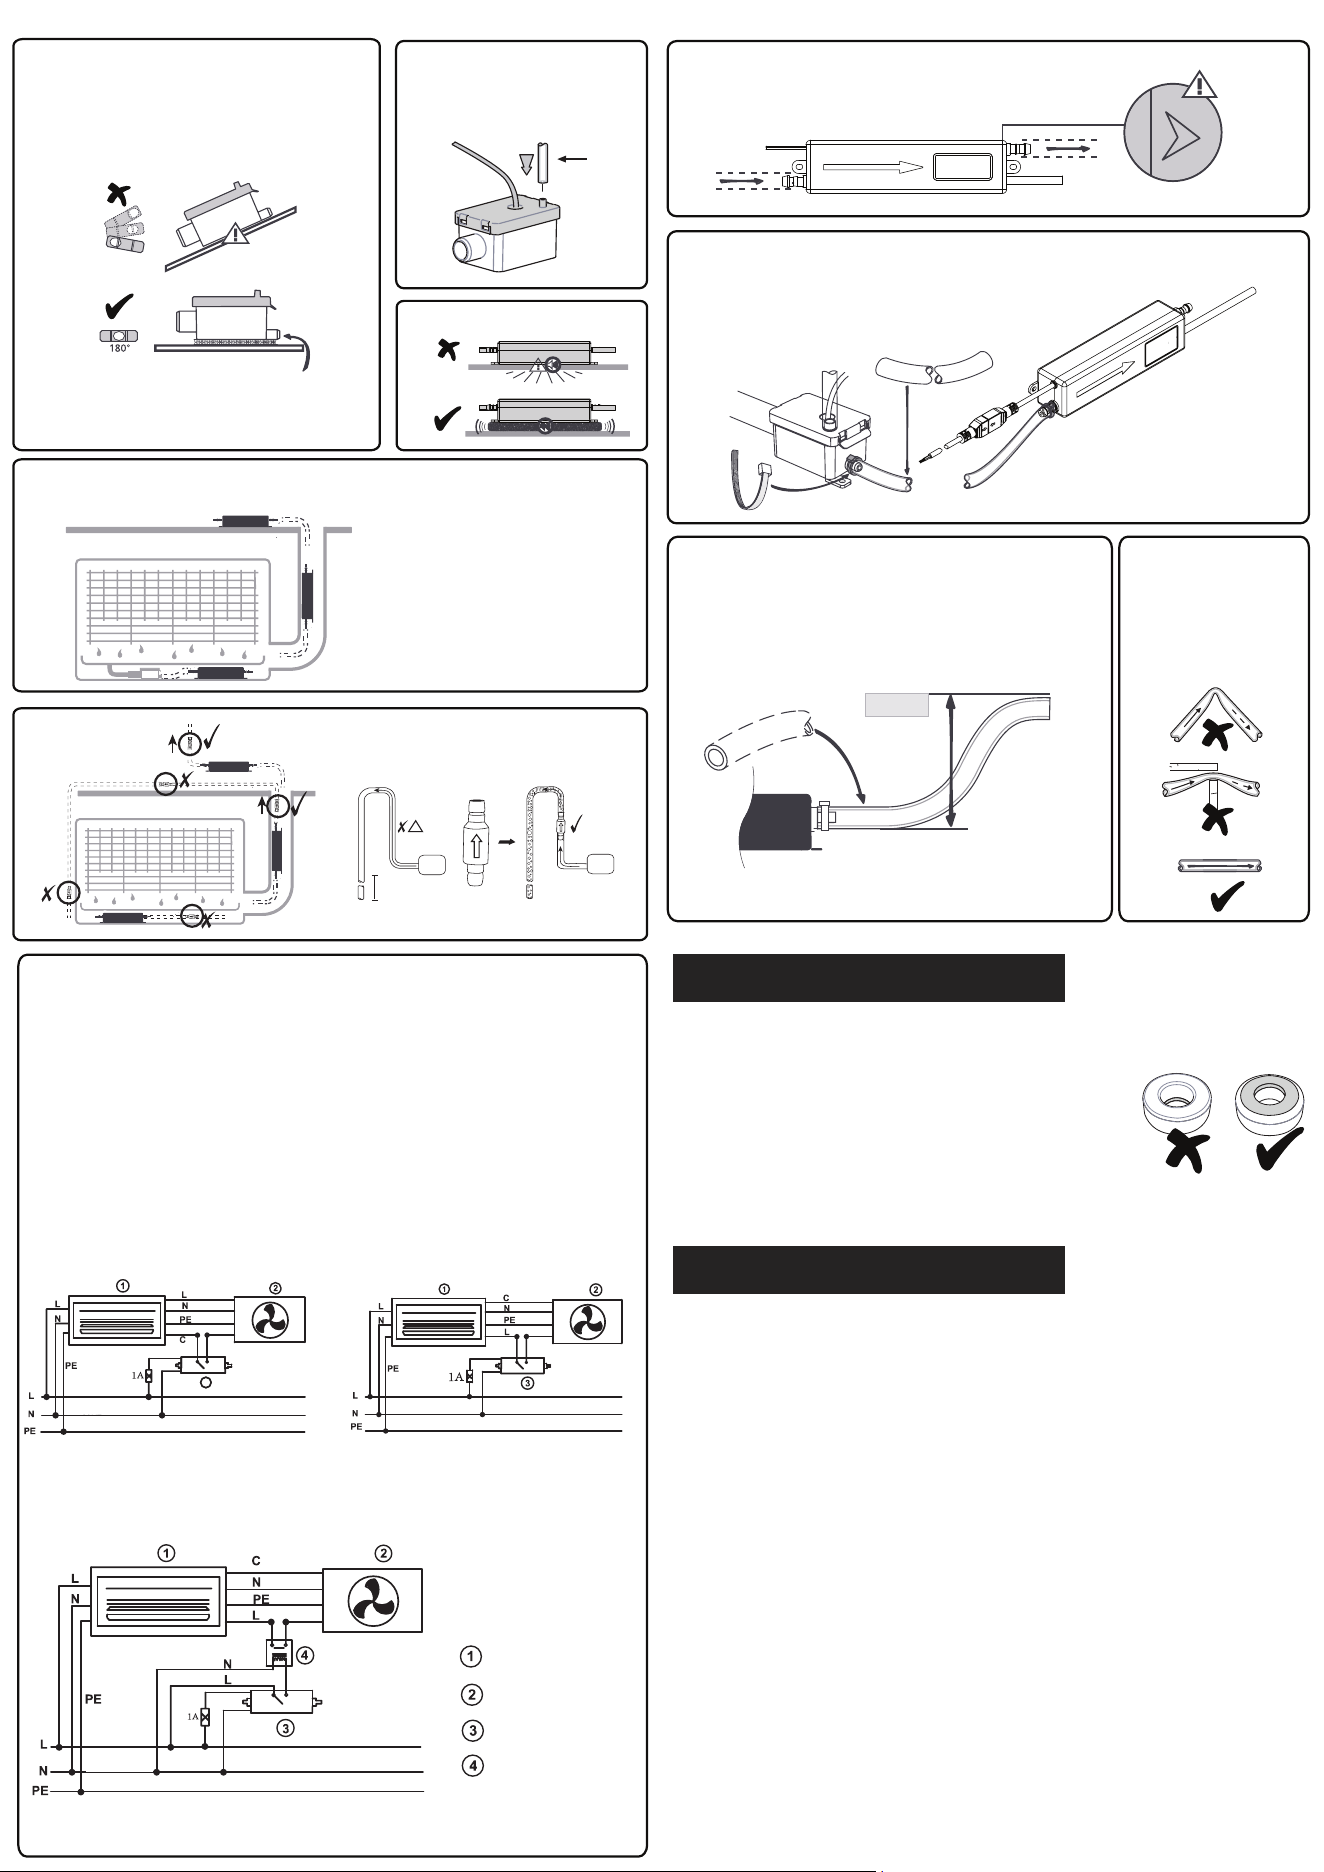
5、Install pump drive unit above the ceiling where possible.
1、Above ceiling
2、Inside conduit
3、Under condensate
drain tray
1、Siphoning
2、Anti-siphoning device
3、Air intake = No siphoning
Caution: The reflux valve could only be installed in vertical,
otherwise it won't have any function on antisiphoning.
≤ 20 m
8、Push the 9mm o/d x 6mm i/d tube onto the reservoir and the pump.
Secure with cableties. Ensure length is under 2 metres.
9、Connect your 9mm o/d x 6mm i/d vinyl discharge
tube to the outlet barb on the SLIM BOX and secure
with a cable tie.
10、Channel discharge
tube to an appropriate
drain, avoiding
restrictions
7、Note direction of water flow
3
(1) Signal-line connection
(2) Strong electric control connection
(Current <3A)
(3) Strong electric control connection (Current >3A)
Indoor unit
Outdoor
Pump unit
Contactor Relay
(Normally Open)
10、A high-level alarm switch should be wired into the cooling signal
wire, to prevent the continued operation of the air conditioning unit in
the event of the pump failing.
IMPORTANT: This diagram is an example of how the pump could be
installed and is therefore for reference only. All pump units must be
installed by qualified engineers, who have assessed the set-up of
the individual a/c unit.
100-240V 50/60Hz
100-240V 50/60Hz
100-240V 50/60Hz
Servicing
Trouble shooting
• This Pump, like all mechanical equipment, requires maintenance.
• Every six months the reservoir should be removed, taking care
to clean the filter, float and reservoir thoroughly prior to
reassembly. We recommend this is done in the Spring and the
Autumn, using a chemically compatible anti-bacterial wash.
• Take great care to replace the float with the magnet facing upwards.*
• Additional inline filters are available if required.
Fault: Pump runs all the time
1. Is float positioned with the magnet uppermost?
2. Is the reservoir lid (sensor) located firmly onto
the reservoir, with the float located inside the
reservoir, around the sensor column?
3. Is there sludge inside the reservoir, preventing
float from resting on the bottom? (This may occur
if pump has been in operation for some time
without cleaning. Clean using an anti-bacterial wash.)
Please note:
• After installation and during operation, if you
notice air in the pipe between the reservoir and
the pump, you have a siphoning problem. (Follow
advice in ‘Preventing Siphoning’ section).
• The pump will only switch off when the float is
at the bottom of the reservoir.
Fault: Pump stops and starts and
makes a loud noise.
1. The water is siphoning back
through the pump. Follow advice in
‘Preventing Siphoning’ section.
Fault: Pump runs but does not
pump any water.
1. Are there any air-leaks in the pipe
running to the pump?
2. Check that reservoir and inlet tube
are free of sludge and debris.
Fault: Pump isn’t operating at all.
1. Is power reaching the pump?
Is it correctly wired? Is the voltage
correct?
2. Is pump very hot? A thermal
cut-out may have been activated to
protect pump. This will automatically
reset once pump has cooled down.
6、
>2m
Pump
1.
2.
!
Pump
3.