AI Smart Recorder
User Manual
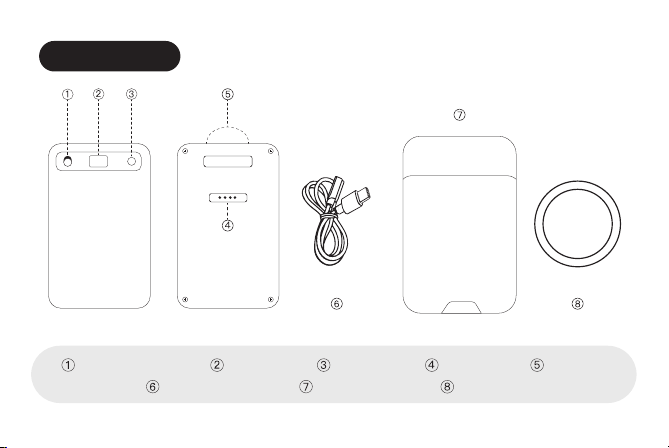
Product Overview
Please read this manual carefully before use and keep it in a safe place.
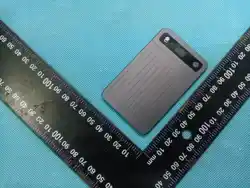
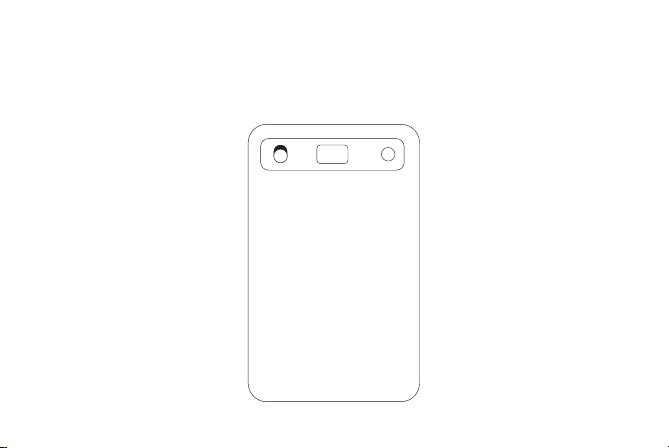
Switch Recording Mode Status Display Record button Charging port microphone
Magnetic charging cable Magnetic leather case Magnetic ring
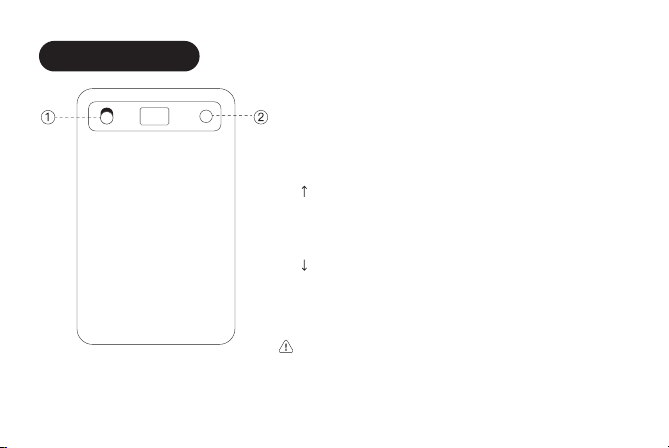
Device Button Guide
Ⅱ. Switching recording scenes
Ⅰ. Power/Record Button
Press and hold for 3 seconds: Turn on/off
Press once: Start recording/Stop recording.
Note: When using call mode, attach the recording card to
the back of your phone using the magnetic case, and
ensure the phone is in speakerphone mode
(not a Bluetooth call).
Scroll up: Mobile calling scenarios
Suitable for telephone communication, such as
teleconferences,phone interviews, and customer service
recordings.
Swipe down: Common recording scenarios
Ideal for face-to-face interactions, such as meetings,
classrooms, interviews, and other in-person settings.
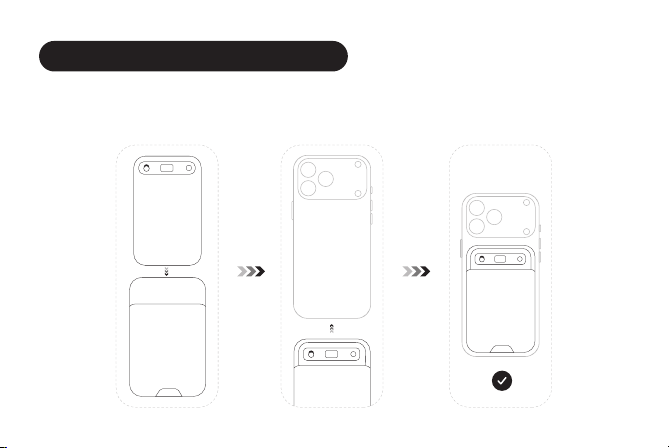
How to attach the audio card to your phone
Bring your own magnetically compatible phone (such as the iPhone 12 or later).
No magnetic ring is needed—simply insert the recording card into the case and attach the case to
the back of your phone.
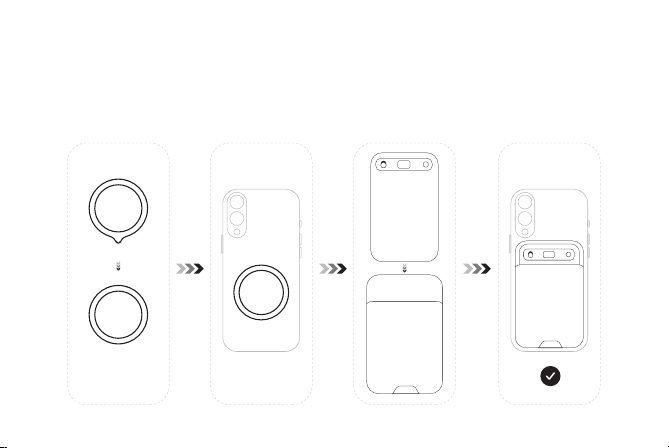
For non-magnetic phones (such as Android devices), a magnetic ring is required.
Step 1. First, mark the spots on the back of your phone where the leather case and magnetic ring will go;
Step 2. Peel off the protective film from the magnetic ring and attach it to the back of your phone;
Step 3. Insert the recording card into the case, then attach the case to the back of your phone.
Connect the app to enable smart recording
Once you connect the app, you can experience new-generation voice recording features such as speech-to-text
conversion and AI summarization.
Search for “soninote” in the App Store, then download and install it
Ⅰ. Install the app
1. Internet connection: Make sure your phone is connected to the internet to enable real-time transcription
while recording.
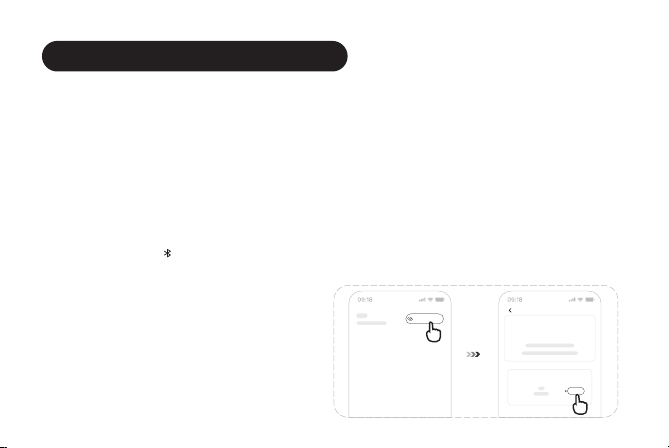
2. Bluetooth Connection: Press and hold button ② on the voice recorder to turn it on. In the app, tap “Scan.”
Once the voice recorder is detected, tap “Connect” (as shown below). If the Bluetooth icon on the voice
recorder’s LCD screen is flashing, it means the Bluetooth connection was not established; you will need to
reconnect (you can try restarting the voice recorder or the app). Note: Make sure Bluetooth is enabled on your
phone and grant the app the necessary permissions.
Ⅱ. Preparations Before Recording
Search fo r devices
Connect devices
Discove r the following eq uipment
Connect
Equipment:

III. Choosing a Recording Setting
Mobile phone call scenarios: Suitable for telephone communications, such as remote meetings, phone
interviews, and customer service recordings.
Press button ① on the voice recorder: slide it up to record phone calls, and slide it down to record regular audio.
Place the audio card as close to the sound source as possible to improve sound pickup accuracy.
Common recording scenarios: Ideal for face-to-face interactions, such as meetings, classrooms, interviews,
and other in-person settings.
Method 1: Select any recording mode (Recording/Transcription, Bilingual Conversation, or Simultaneous
Interpretation) in the mobile app to start recording. The voice recorder will vibrate gently once to indicate that
recording has begun.
Method 2: Press and hold button 2 on the voice recorder to start recording (this method defaults to transcription
mode). The voice recorder will vibrate gently once to indicate that recording has begun.
Note:When recording, select the appropriate language in the app for faster and more accurate transcription. This device supports speech
recognition and transcription in 100 languages (see the list of languages below).
Ⅳ. Start Recording/Transcription

Scan the QR code to
access more tutorials
V. Stop recording/transcribing
Method 1: Tap “Stop” in the mobile app to stop recording.
Method 2: Press and release button ② on the voice recorder to stop recording.
You can perform the following actions on files via the app or the web interface (soninote.bfsign.com): rename,
translate, generate AI summaries, copy, export, share, and delete.
VI. Further Processing of Audio Files

The device won't turn on: The battery is likely dead. Do not attempt to turn it on; charge it immediately.
Button stuck: Press and hold the power button for 10 seconds to reset the device.
Unable to record: Restart your device and the app.
Please use a charger that meets the specified standards; failure to do so may result in accidents or equipment
malfunction (which would be considered user damage and is not covered by the warranty).
Troubleshooting
Charger Specifications
AC 110-240V 50/60Hz,Max 100mAInput:
DC 5.0V 1AOutput:
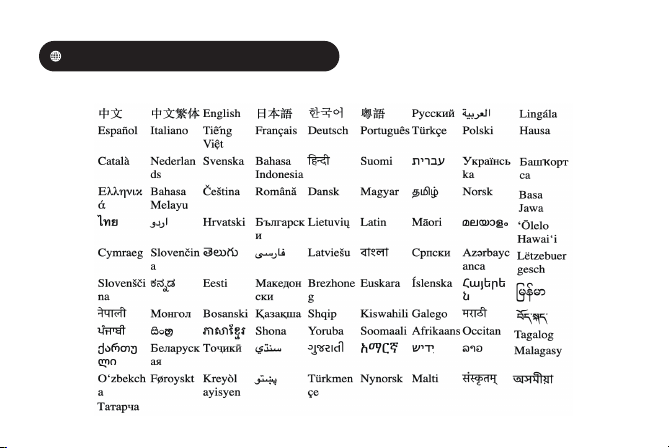
Language Recognition Features and List
Supports recognition, transcription, and translation in over 100 languages (see the app for details)
This product does not include a power adapter.
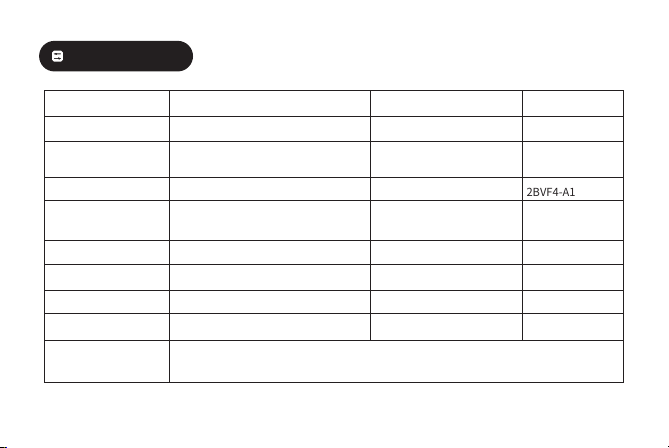
Basic Parameters
Product Name
Product Dimensions
microphone
Memory
Bluetooth version
Bluetooth frequency
Charging Cable Type
Rated power
Housing Material
Product Model
Net weight of the product
Microphone
sensitivity
FCC-ID
Bluetooth transmission
power
Bluetooth profiles
Battery
Rated voltage
Operating temperature
A1
About 30 g
-36db
2BVF4-A1
-5.57dBm
******
400mAh
4.2V
-10 ~55℃
Supported Operating
Systems
iOS 12.0, Android 10.0, Windows 7.0 and later
64G
5.3
2.4GHz
Type-C to Magnetic Charging Cable
70 milliwatts
aluminum alloy
AI Smart Recorder
86x54x3.2mm
2 x silicon microphones,
1 x bone conduction microphone
This product uses flash memory to store data. Please sync with the app or back up your data on a computer
promptly. The company assumes no liability for any loss of data.
The illustrations in this manual regarding the product and its operation are for reference only and may differ
from the actual product. Please refer to the actual product.
The Company reserves the right to the final interpretation of this disclaimer.
Disclaimer
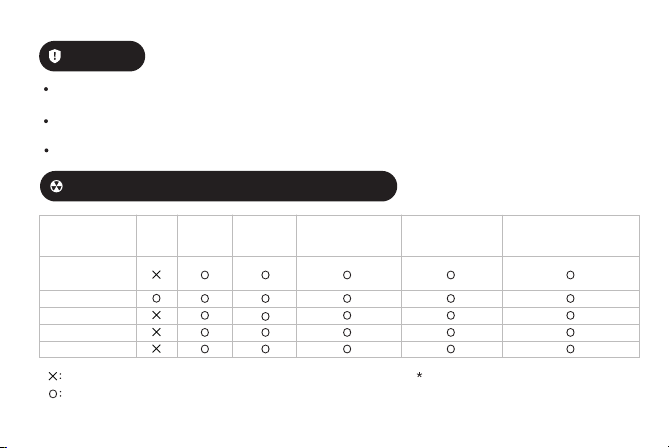
Declaration of Toxic and Hazardous Substances or Elements
Part Name
PCB Boards
and Accessories
Plastic
Metal
Battery
Other
Lead
(Pb)
The concentration of harmful substances exceeds the standard limit
This table has been prepared in accordance
with the SJ/T 11363 standard.
The levels of harmful substances are below the standard limits
Mercury
(Hg)
Cadmium
(Cd)
Hexavalent
chromium (Cr(VI))
Polybrominated
biphenyls (PBB)
Polybrominated
diphenyl ethers (PBDE)

Follow these warnings to prevent injury or damage to equipment:
Do not allow children or animals to chew on or swallow the device.
If the device is damaged, do not attempt to disassemble it yourself. Improper handling may cause the lithium
battery to catch fire or explode.
Do not turn on or use the device if the battery compartment is exposed.
If the equipment shows signs of cracks, damage, or abnormal overheating, stop using it immediately.
Do not use the equipment outdoors during thunderstorms.
Keep the device dry and avoid contact with liquids; this device is not waterproof.
Do not store the device near heaters, microwaves, cooking appliances, or high-pressure containers.
Do not store the device in excessively hot or humid environments. Recommended operating
temperature: -5°C to 35°C.
Do not poke your eyes, ears, or any other part of your body with the device, and do not put it in your mouth.
Warning
Ⅰ.3-month free exchange and warranty
If the product develops a performance defect due to non-human factors within three months of the user’s
receipt of the product, the Company will replace it with a product of the same model and specifications or
repair it free of charge.
Ⅱ.12-month free warranty
For a period of 12 months from the date the user receives the product, if the product experiences a
performance failure not caused by human error, our company will provide free repair services.
After-sales service during the warranty periodⅢ.
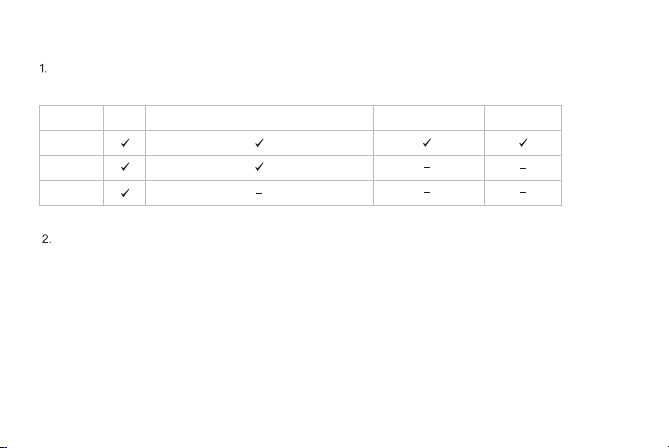
1. Warranty Coverage:
Product Type
Host
Plastic
Warranty Coverage
Audio capture card
data cable
Warranty Period
12 months
Service Options
For repair
No warranty
After-Sales Service Standards

The following situations are not covered by our exchange or warranty policy:
The warranty certificate does not match the product model.
The warranty period has expired.
Any modification, disassembly, or repair not authorized by the Company.
Damage caused during return, exchange, or repair shipping due to transportation or handling.
The product's tamper-evident label has been removed or damaged, and is now blurred and unreadable.
Product malfunctions or damage resulting from failure to install, use, maintain, or store the product in
accordance with the instructions in the user manual.
Failures or damage caused by force majeure (such as fire, earthquake, flood, etc.).
Damage caused by unforeseen factors or human error. Examples include: liquid ingress, physical impact,
exposure to improper voltage, excessive pressure, deformation of the main board, and scratches on the
exterior. For power adapters, this includes visible damage from hard objects, cracks, broken pins, severe
deformation, as well as damage to the power cord, such as fraying, broken wir
Ⅳ.Returns, Exchanges, and Repair Service Guidelines
Before returning, exchanging, or sending an item in for repair, please make sure you have the
following items ready:
Before sending the device in for repair, users should back up their personal data in advance. Data loss
may occur during the repair process. While we are committed to maintaining the confidentiality of all
personal information and data obtained, accessed, or stored during the repair process, we assume no
liability for any damage to or loss of personal information or data that may occur during the repair
process.ring the repair process, we assume no liability for any damage to or loss of personal information
or data that may occur during the repair process.
Host
Exchange
Returns
Repair
Packaging and accessories are complete
Invoice (unaltered)
Gifts (if any)

Product Model:
Warranty Period:
Cause of the malfunction:
Dealer:
Phone:
Client Name:
Phone number:
One-year warranty
Product Warranty Card

For after-sales service, please visit our official website at soninote.bfsign.com or contact us via email at
support@bfsign.comContact
Address: 9th Floor, Building D9, Phase 1, Zhong'an Chuanggu Technology Park, 900 Wangxi Road,
Shushan District, Hefei, Anhui Province, China
Manufacturer: Anhui Shengyun Intelligent Technology Co., Ltd.
Address: Room 2212, Baoshan Times Building, Minqiang Community, Minzhi Subdistrict, Longhua District,
Shenzhen, Guangdong Province, China
Client: Shenzhen Sibomi Technology Co., Ltd.
Date of repair Fault Description and Replacement Parts Service Center Service Engineer
Maintenance Log
FCC Caution:
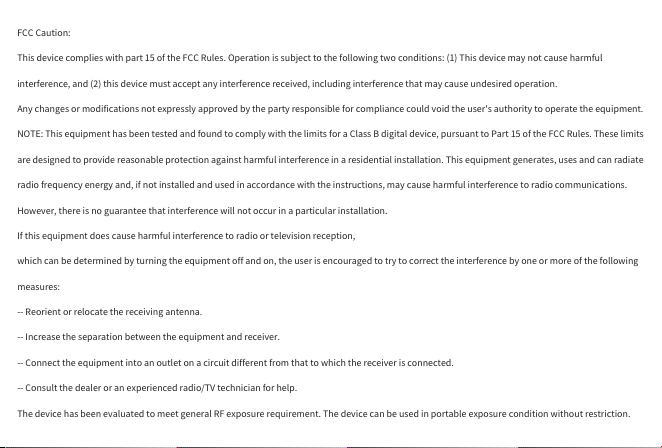
This device complies with part 15 of the FCC Rules. Operation is subject to the following two conditions: (1) This device may not cause harmful
interference, and (2) this device must accept any interference received, including interference that may cause undesired operation.
Any changes or modifications not expressly approved by the party responsible for compliance could void the user's authority to operate the equipment.
NOTE: This equipment has been tested and found to comply with the limits for a Class B digital device, pursuant to Part 15 of the FCC Rules. These limits
are designed to provide reasonable protection against harmful interference in a residential installation. This equipment generates, uses and can radiate
radio frequency energy and, if not installed and used in accordance with the instructions, may cause harmful interference to radio communications.
However, there is no guarantee that interference will not occur in a particular installation.
If this equipment does cause harmful interference to radio or television reception,
which can be determined by turning the equipment off and on, the user is encouraged to try to correct the interference by one or more of the following
measures:
-- Reorient or relocate the receiving antenna.
-- Increase the separation between the equipment and receiver.
-- Connect the equipment into an outlet on a circuit different from that to which the receiver is connected.
-- Consult the dealer or an experienced radio/TV technician for help.
The device has been evaluated to meet general RF exposure requirement. The device can be used in portable exposure condition without restriction.