
Nighthawk M7
Models:
MH7110
MH7150
User Manual
202-12848-03
April 2026

Support and Community
Get your questions answered and access the latest downloads at h7ps://www.netgear.com/
support/home, and check out our NETGEAR Community at h7ps://community.netgear.com.
Regulatory and Legal
For regulatory compliance information including the EU and UKCA Declarations of Conformity,
visit h7ps://www.netgear.com/about/regulatory. See the regulatory compliance document
before connecting the power supply. For NETGEAR’s Privacy Policy, visit
h7ps://www.netgear.com/about/privacy-policy.
Where permi7ed by law, by using this device, you are agreeing to NETGEAR’s Terms and
Conditions at h7ps://www.netgear.com/about/terms-and-conditions. If you do not agree, return
the device to your place of purchase within your return period.
For 6 GHz devices not designed for outdoor use: Only use the device indoors. The operation of 6
GHz devices is prohibited on oil platforms, cars, trains, boats, and aircraft, except that operation
of this device is permi7ed in large aircraft while 6ying above 10,000 feet. Operation of
transmi7ers in the 5.925-7.125 GHz band is prohibited for control of or communications with
unmanned aircraft systems.
Trademarks
Trademarks© NETGEAR, Inc., NETGEAR, and the NETGEAR Logo are trademarks of NETGEAR,
Inc. Any non-NETGEAR trademarks are used for reference purposes only.
Restrictions applicable in North America:
Operation in 5180-5240 MHz is restricted to indoor use only in Canada.
FCC SAR and ISED SAR is measured with the device at 10 mm to the body, while transmi7ing at
the highest certi5ed output power level in all frequency bands of the device. The maximum SAR
value is 1.25 W/kg (body) averaged over 1 grams of tissue.
Restrictions applicable in AT/BE/BG/CZ/DK/EE/FR/DE/IS/IE/IT/EL/ES/CY/ LV/
LI/LT/LU/HU/MT/NL/NO/PL/PT/RO/SI/SK/TR/ FI/SE/CH/UK(NI)/HR/HK/UK:
5150-5250 MHz is for indoor use including installations inside road vehicles, trains and aircraft. If
used outdoors, equipment shall not be a7ached to a 5xed installation or to the external body of
road vehicles, a 5xed infrastructure or a 5xed outdoor antenna.
CE/RCM SAR is measured with the device at 5 mm to the body, while transmi7ing at the highest
certi5ed output power level in all frequency bands of the device. The maximum SAR value is 1.70
W/kg (body) averaged over 10 grams of tissue.
Nighthawk M7 NETGEAR

Revision History
Publication
Part Number
Publish Date Comments
202-12848-03 April 2026
Corrections to some web interface-related and style related
content.
202-12848-02 January 2026
Corrections to some web interface-related and app related
content. Error code topic addition. SIM tile image addition.
202-12848-01 December 2025 Initial release.
Nighthawk M7 NETGEAR

Contents
Overview and Setup................................................................................................................3
Nighthawk 5G M7 hardware overview ................................................................................. 4
Charge the battery................................................................................................................5
Charging best practices ................................................................................................. 6
Download the NETGEAR app ............................................................................................... 6
Power on and set up your mobile hotspot ............................................................................7
View the home screen ...........................................................................................................8
Navigate the mobile hotspot screens................................................................................... 9
Set up an eSIM or install a SIM card ................................................................................... 11
Purchase and install an eSIM in the NETGEAR app .................................................... 11
Set up a third-party eSIM in the NETGEAR app.......................................................... 12
Install or replace a physical SIM card ..........................................................................13
Charge a mobile device with Reverse Charging ................................................................ 14
Standby, power off, or reset ............................................................................................... 15
Connect devices to the Internet ........................................................................................16
Connect to WiFi using the QR code .................................................................................... 16
Connect to WiFi using the SSID and password .................................................................. 17
Connect a computer to the Internet using tethering ......................................................... 18
Connect a computer to the Internet using an Ethernet adapter ...................................... 19
View alerts and mobile hotspot information ................................................................ 20
View alerts from your mobile hotspot ................................................................................ 20
Update software from an Update Available alert ............................................................. 21
View details about your mobile hotspot ............................................................................. 21
Manage your mobile hotspot from the NETGEAR app .............................................. 22
Manage eSIMs and physical SIM......................................................................................... 23
Best practices for travel eSIMs .................................................................................... 23
Switch between eSIMs and physical SIM...................................................................... 24
Delete eSIMs ................................................................................................................. 25
Change WiFi band settings ................................................................................................. 25
Change WiFi network name, password, encryption, or channel settings ........................ 26
Change WiFi standby, range, bandwidth, and info display settings................................. 27
Enable or disable WiFi offloading ......................................................................................27
Configure cellular settings .................................................................................................. 28
Configure access point names (APNs)................................................................................ 28
Add an APN for another network ................................................................................ 29
Select an APN to use..................................................................................................... 29
Nighthawk M7 NETGEAR
Copyright © 2026 NETGEAR

Remove an APN entry................................................................................................... 30
View data usage .................................................................................................................. 30
Change display settings ...................................................................................................... 31
View details about your mobile hotspot ............................................................................. 31
Update firmware ................................................................................................................. 31
Factory reset your mobile hotspot ..................................................................................... 32
View and change the web user interface login password .................................................32
Manage advanced settings from the web user interface.......................................... 34
Log in to the web user interface from a browser............................................................... 35
Log in to the web user interface from the NETGEAR app.................................................35
View SMS messages from the web user interface ............................................................. 36
Delete an SMS message from the web user interface....................................................... 36
View details about your mobile hotspot from the web user interface.............................. 36
Connect through local WiFi to conserve data.................................................................... 36
Enable WiFi offloading from the web user interface.................................................. 37
Disable WiFi offloading from the web user interface................................................. 37
Change WiFi band settings from the web user interface.................................................. 38
Change WiFi network name, password, encryption, or channel settings from the web
user interface....................................................................................................................... 38
Change WiFi standby, range, bandwidth, and info display settings from the web user
interface............................................................................................................................... 39
Enable or disable Airplane Mode from the web user interface ........................................40
Configure access controls from the web user interface.................................................... 40
Enable SIM security from the web user interface .............................................................. 41
Change the web user interface login password................................................................. 41
Update firmware from the web user interface.................................................................. 42
Back up mobile hotspot settings from the web user interface.......................................... 42
Restore backed up settings from the web user interface.................................................. 42
Factory reset your mobile hotspot from the web user interface ......................................43
Disable the factory reset button from the web user interface ......................................... 43
Disable or re-enable the DHCP server feature from the web user interface .................. 43
Change tethering settings from the web user interface ................................................... 44
View data usage from the web user interface................................................................... 44
Configure cellular settings from the web user interface ................................................... 45
Configure access point names (APNs) from the web user interface ................................ 45
Add an APN for another network ................................................................................ 45
Select an APN to use..................................................................................................... 46
Remove an APN entry................................................................................................... 46
Nighthawk M7 NETGEAR
Copyright © 2026 NETGEAR

Configure port forwarding from the web user interface .................................................. 46
Configure port filtering from the web user interface........................................................ 47
Change display settings from the web user interface ....................................................... 48
Change the date and time format from the web user interface ...................................... 48
Disable or re-enable VPN passthrough from the web user interface .............................. 48
Disable or re-enable UPnP from the web user interface ..................................................49
Configure a DMZ server from the web user interface....................................................... 50
Troubleshooting ..................................................................................................................... 51
View alerts ...........................................................................................................................51
SIM Error — Check SIM or SIM Not Installed ............................................................... 51
SIM Locked .................................................................................................................... 51
Temperature-related alerts ......................................................................................... 52
Error messages............................................................................................................. 53
Extend battery life............................................................................................................... 54
Troubleshooting third-party power adapters and USB cables .........................................54
Factory reset your mobile hotspot ..................................................................................... 55
Specifications ......................................................................................................................... 56
Product information labeling and e-labeling..................................................................... 56
Band specifications ............................................................................................................. 58
WiFi specifications .............................................................................................................. 58
Nighthawk M7 NETGEAR
Copyright © 2026 NETGEAR
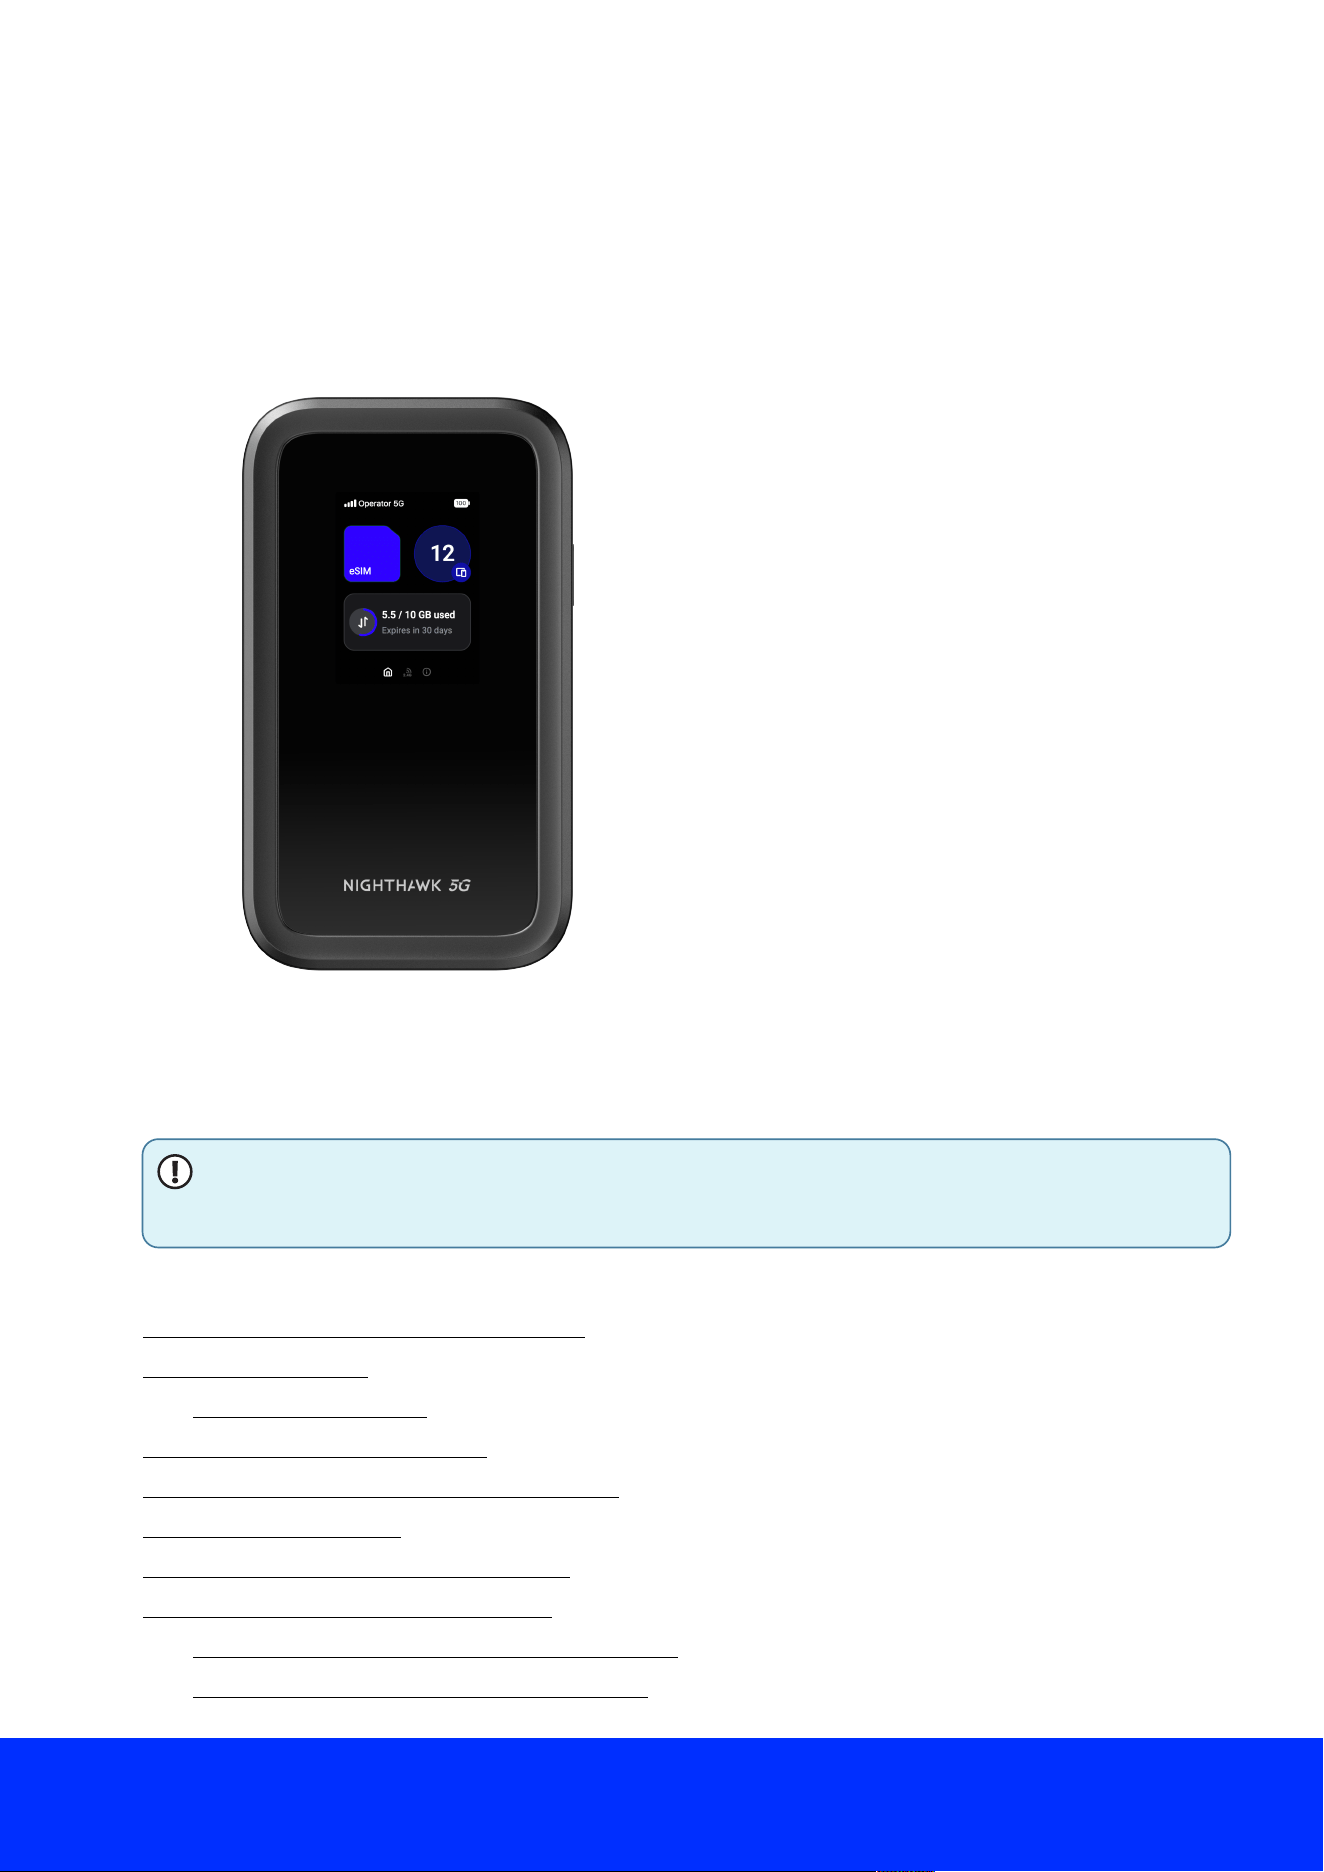
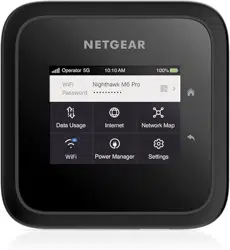
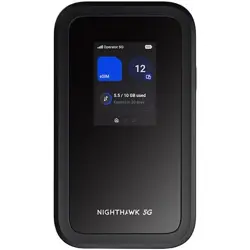
Figure 1.Nighthawk 5G M7 Mobile WiFi Hotspot with eSIM
Overview and Setup
This user manual is for the NETGEAR Nighthawk 5G M7 Mobile WiFi Hotspot with eSIM.
This manual describes how to manage your mobile hotspot from the NETGEAR app, mobile
hotspot user interface and web user interface (web UI).
NOTE: This manual might refer to the Nighthawk 5G M7 mobile hotspot router as the
mobile hotspot
or
hotspot
.
This chapter contains the following sections:
● Nighthawk 5G M7 hardware overview
● Charge the ba/ery
○ Charging best practices
● Download the NETGEAR app
● Power on and set up your mobile hotspot
● View the home screen
● Navigate the mobile hotspot screens
● Set up an eSIM or install a SIM card
○ Purchase and install an eSIM in the NETGEAR app
○ Set up a third-party eSIM in the NETGEAR app
Nighthawk M7 NETGEAR
3
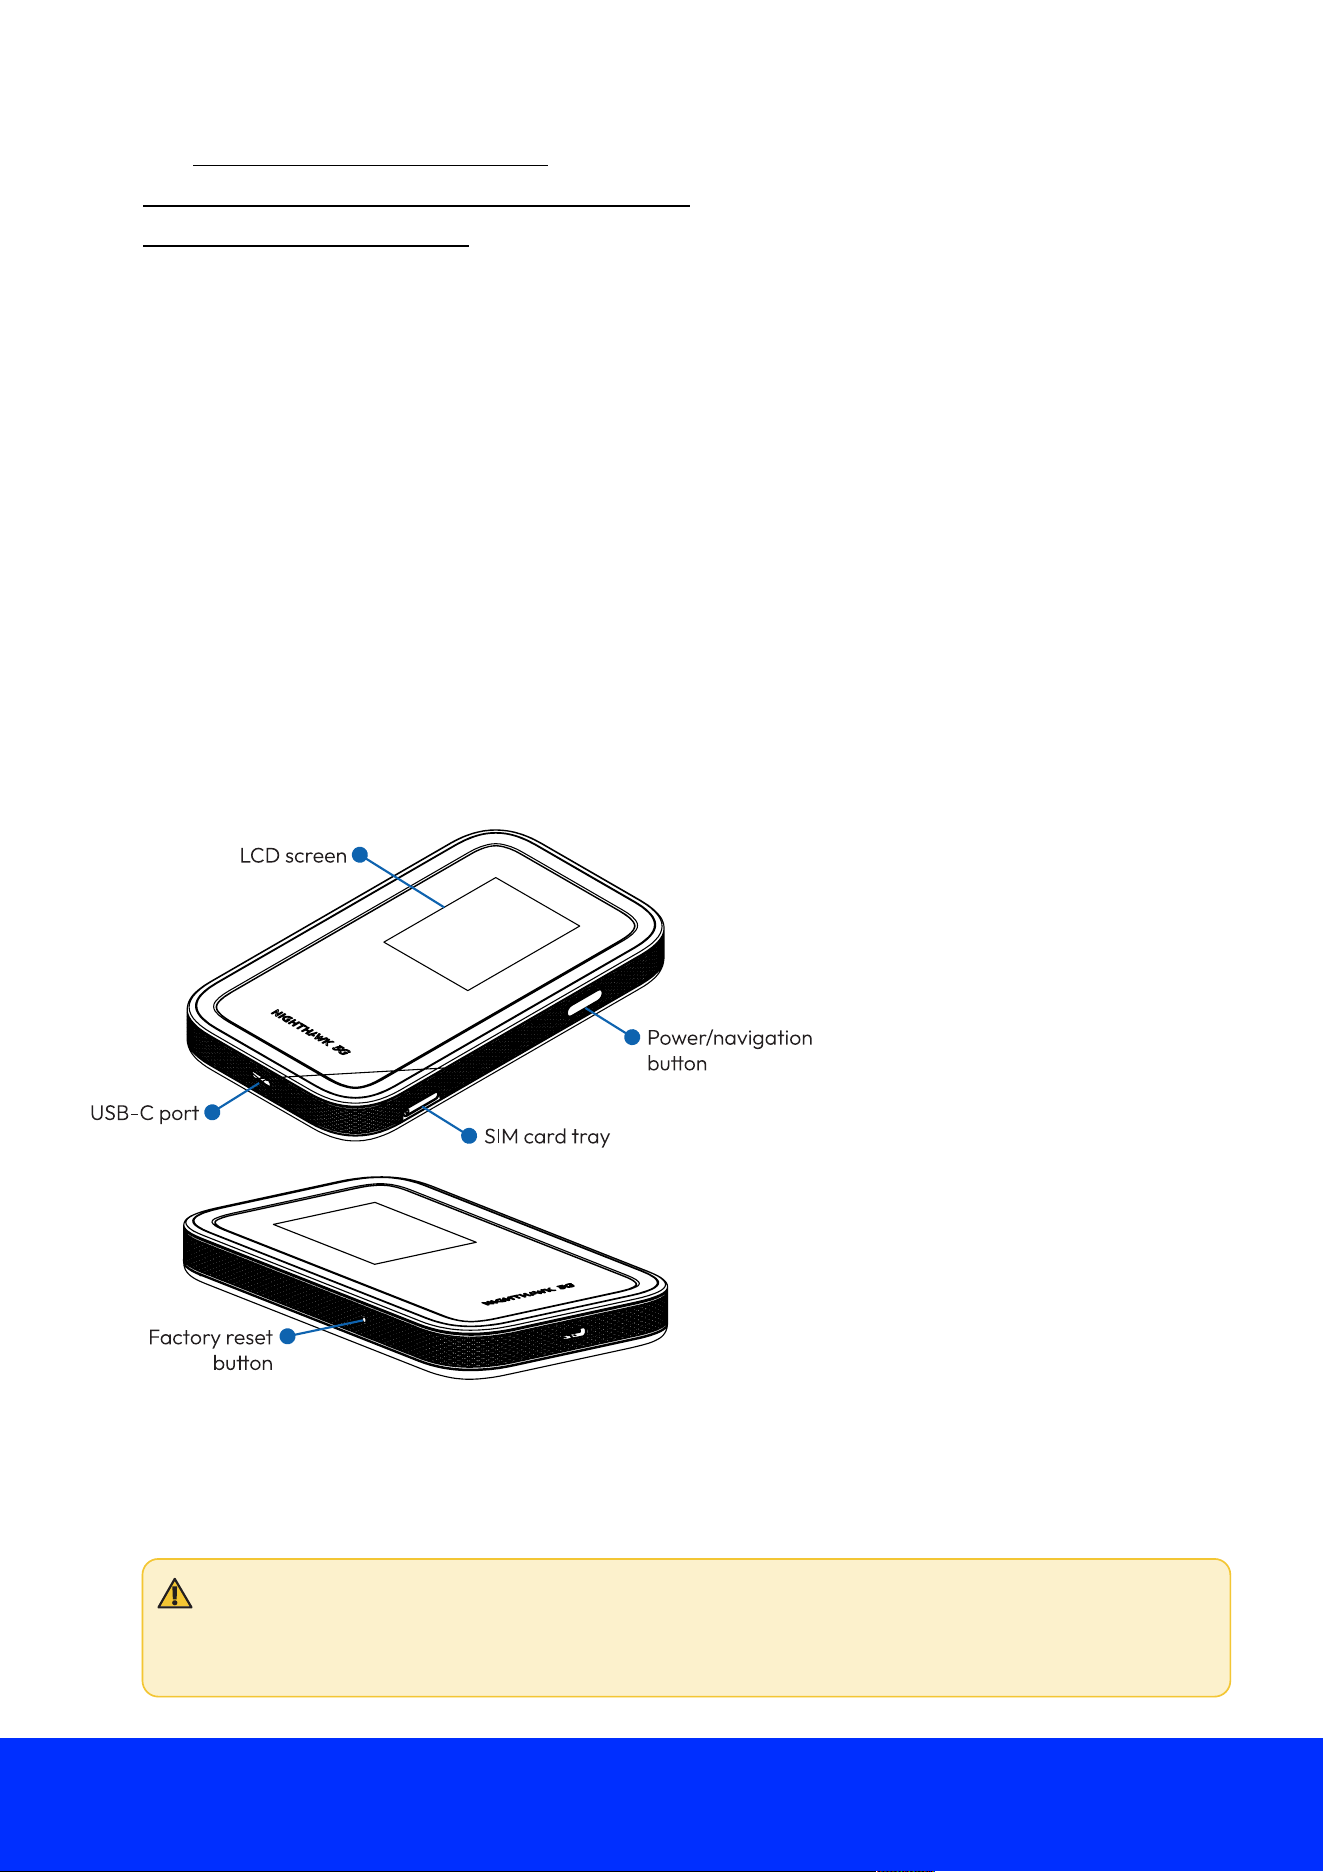
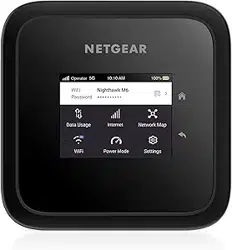
Figure 2.Nighthawk 5G M7
○ Install or replace a physical SIM card
● Charge a mobile device with Reverse Charging
● Standby, power o-, or reset
For more information about the topics covered in this manual, visit the support website at
netgear.com/support.
Nighthawk 5G M7 hardware overview
The Nighthawk 5G M7 package includes the following items:
● Nighthawk 5G M7 mobile hotspot
● USB-C charging and tethering cable
● SIM card release tool
The Nighthawk 5G M7 has an LCD screen, a Power/Navigation bu7on to navigate the mobile
hotspot screens, and a USB-C port for charging and tethering. A SIM card tray is provided for a
physical 4FF Nano SIM card (optional).
The Nighthawk 5G M7 factory reset bu7on is located in a small recess on the side panel. You can
use the included SIM card release tool, or a paperclip or similar object to access the bu7on. For
more information, see Factory reset your mobile hotspot on page 55.
CAUTION: The Nighthawk 5G M7 back cover requires tools to remove, and should only
be removed for ba7ery replacement by a trained service technician. A7empting to
force the back cover open can cause physical damage and void your warranty.
Nighthawk M7 NETGEAR
4
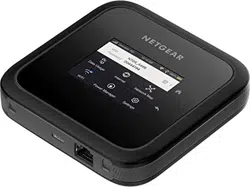
Figure 3.Nighthawk 5G M7 battery charging
Charge the battery
Your mobile hotspot ba7ery comes partially charged. We recommend that you fully charge the
ba7ery before using your mobile hotspot away from home.
NOTE: For the fastest possible charging, use the USB cable included with your mobile
hotspot and a high quality Quick Charge 2.0-certi5ed or Quick Charge 3.0-certi5ed
USB power adapter. Low quality third-party USB power adapters and computer USB
ports typically do not provide su4icient current and will not charge your ba7ery as
quickly. Third-party cables can also limit ba7ery charging speed.
To charge your ba3ery:
1. Connect the USB charging cable to your mobile hotspot.
2. Connect the other end of the charging cable to a USB power source.
Nighthawk M7 NETGEAR
5

Charging best practices
Charging your mobile hotspot properly is important to ensure its longevity and maintain its
performance. Follow these best practices when charging your mobile hotspot:
● Use a high quality USB cable and power adapter: Typical third-party USB power adapters
and computer USB ports do not provide the same amount of current as o4icial NETGEAR
power adapters and will not charge your ba7ery as quickly. Third-party cables can also limit
ba7ery charging speed. However, high quality third-party USB power adapters and cables
that meet certain standards should provide similar performance to the o4icial NETGEAR
parts. For more information, see Troubleshooting third-party power adapters and USB
cables on page 54.
● Check the charging status: When you plug in the charging cable, check the mobile hotspot's
charging status. The charging indicator in the status bar shows a lightning bolt over the
ba7ery icon if the mobile hotspot is charging. If the charging indicator does not appear, try
unplugging the cable and plugging it back in.
● Charge the mobile hotspot fully: We recommend that you charge the mobile hotspot fully
before using it for the 5rst time, and that you let the mobile hotspot recharge fully before
using it again when you discharge the ba7ery. This helps to maintain the ba7ery's lifespan
and overall performance.
● Avoid overcharging: Overcharging the mobile hotspot can damage the ba7ery and shorten
its lifespan. When the mobile hotspot is fully charged, unplug it from the power source. Don't
leave it plugged in overnight or for long periods of time.
● Charge in a well-ventilated area: Charging your mobile hotspot in a well-ventilated area
can prevent overheating and ensures that the mobile hotspot charges e4iciently. Avoid
charging the mobile hotspot in an enclosed space or in direct sunlight.
By following these guidelines, you can ensure that your mobile hotspot stays charged and
performs well for years to come.
Download the NETGEAR app
We recommend that you use the NETGEAR app to set up your mobile hotspot. After your mobile
hotspot is set up, the NETGEAR app provides an easy way to manage your mobile hotspot and
change se7ings when needed.
Figure 4. NETGEAR app icon
Nighthawk M7 NETGEAR
6
To download the app, visit the NETGEAR app page on your mobile device, or download from the
Apple App Store or Google Play Store (depending on your mobile device).
Power on and set up your mobile hotspot
After charging your mobile hotspot, power on the mobile hotspot to complete the setup process.
NOTE: When idle, the screen goes dark to save power. Quickly press and release the
Power/Navigation bu7on to wake the screen.
To power on and set up your mobile hotspot:
1. Press and hold the Power/Navigation bu7on for thirty seconds.
The NETGEAR logo displays and your mobile hotspot starts up.
The welcome screen displays.
2. Set your mobile hotspot up using either the NETGEAR app or the web UI.
To set up using the NETGEAR app (recommended):
a. With an iOS or Android mobile device, download the NETGEAR app from
ntgrapp.netgear.com or use your mobile device's camera app to scan the QR code
displayed on the mobile hotspot screen.
b. Launch the mobile app and follow the prompts to log into or create your NETGEAR
account.
c. When prompted, use the app to scan the QR code displayed on the mobile hotspot
screen.
d. Follow the in-app prompts to set up your mobile hotspot.
To set up using the web UI
a. With a computer or mobile device, connect to the WiFi network credentials displayed on
the mobile hotspot screen.
Nighthawk M7 NETGEAR
7
Figure 5.Home screen
Figure 6.Example home screen variations depending on SIM type and device settings
b. On your computer or mobile device, launch a web browser and visit mywebui.net or
192.168.10.1 (the mobile hotspot's default IP address).
c. Follow the on-screen instructions to set up your mobile hotspot.
View the home screen
From your mobile hotspot's home screen, you can view information about your mobile hotspot
and connection status.
Nighthawk M7 NETGEAR
8
Table 1.Icons
Icons Description
Indicates the strength of the mobile broadband network signal.
Indicates that you are connected to the 5G network.
Indicates the amount of charge in the ba7ery.
Navigate the mobile hotspot screens
You can navigate through your mobile hotspot's screens using the Power/Navigation bu7on on
the mobile hotspot. To navigate to the next screen on the mobile hotspot, press the bu7on one
time.
The icons at the bo7om of the screen indicate which screen in the sequence you are currently
viewing. After you have cycled through every screen, pressing the bu7on again returns you to the
5rst screen.
Nighthawk M7 NETGEAR
9

To perform an action when the mobile hotspot prompts you, press and hold the bu7on.
NOTE: If no prompt is displayed, pressing and holding the bu7on opens the Power
Options menu, where you can shut o4 or restart the mobile hotspot.
Nighthawk M7 NETGEAR
10

Set up an eSIM or install a SIM card
To access the Internet with your Nighthawk 5G M7 hotspot, you can purchase a travel eSIM^ via
the NETGEAR app, set up an existing eSIM* with the NETGEAR app, or install a physical SIM card.
NOTE: If you use your own third-party eSIM or physical SIM card for cellular data,
check with your carrier to make sure it's valid, activated, and compatible with mobile
hotspots. NETGEAR cannot guarantee compatibility with eSIMs or SIM cards
purchased from other vendors.
* Not applicable to model MH7110-1TLAUS at launch. To be enabled in future update.
^ NETGEAR eSIM Marketplace is only available on MH7150 models.
Purchase and install an eSIM in the NETGEAR app
The quickest way to get online with your Nighthawk 5G M7 is to purchase a travel eSIM from the
NETGEAR app. You can purchase an eSIM for various countries and regions.
NOTE: The NETGEAR eSIM Marketplace is only available on MH7150 models.
NOTE: When you are using your hotspot with a NETGEAR eSIM, you might notice that
some online services identify your connection as being in a di4erent location.
The NETGEAR eSIM marketplace provides roaming eSIM services globally through its
sponsor network. This network is EU-based and GDPR-compliant.
Because this network routes NETGEAR eSIM data tra4ic through Europe, some services
might respond as if your connection originates from a European location, including:
● Websites or services translating content into a di4erent language
● Applications indicating that your mobile hotspot connects from a European location
● Speed test results showing a European server location
This is normal behavior during international roaming and
does not
re6ect your physical
location or impact your privacy.
When you are using your hotspot with a NETGEAR eSIM, you might notice that some
online services identify your connection as being in a di4erent location.
To purchase and install an eSIM in the NETGEAR app:
1. From the NETGEAR app dashboard, tap Buy an eSIM.
You can also tap Get a NETGEAR eSIM from the mobile hotspot dashboard, and tap
Continue.
The eSIM marketplace page displays.
2. Tap Region to shop for eSIMs based on a larger region, or Country to search for eSIMs by
speci5c country.
Nighthawk M7 NETGEAR
11
All eSIM plans are regional, but searching by country can help you 5nd a plan that works for
your travel needs.
3. Click the Continue bu7on.
4. Scroll to 5nd your desired country or region, then tap the country or region.
The data plan selection page displays.
5. Tap the plan option that best meets your needs, then tap the Checkout bu7on.
The Checkout screen displays.
6. Select a payment method, review your purchase and check the box to indicate you agree
with NETGEAR's Terms of Service and Privacy Policy.
If you have a discount code, you can enter it in the Add Discount Code 5eld and apply it to
your purchase.
7. Tap the Pay Now bu7on to complete your eSIM purchase.
8. Tap the Continue bu7on to download and save your eSIM to your mobile hotspot.
9. Tap Use eSIM Now to activate your eSIM immediately, or Use eSIM Later to manually
activate your eSIM later on.
Your eSIM purchase and install is complete.
Set up a third-party eSIM in the NETGEAR app
Your Nighthawk 5G M7 hotspot supports eSIMs so you can access the Internet without a physical
SIM card. If you have an existing hotspot-capable eSIM or purchase an eSIM from a third-party
marketplace, you can set it up in the NETGEAR app.
NOTE: Model MH7110-1TLAUS only supports physical SIM cards at launch. eSIM
functionality will be enabled in a future update.
To set up a third-party eSIM in the NETGEAR app:
1. From the NETGEAR app dashboard, tap Manage SIMs.
The SIM Management page displays.
2. Tap the + (plus) symbol in the top right corner, then Add My Own eSIM.
The Add your own eSIM screen displays.
3. Select Scan QR Code and scan the eSIM QR code to add your eSIM.
Your third-party eSIM is set up.
Nighthawk M7 NETGEAR
12
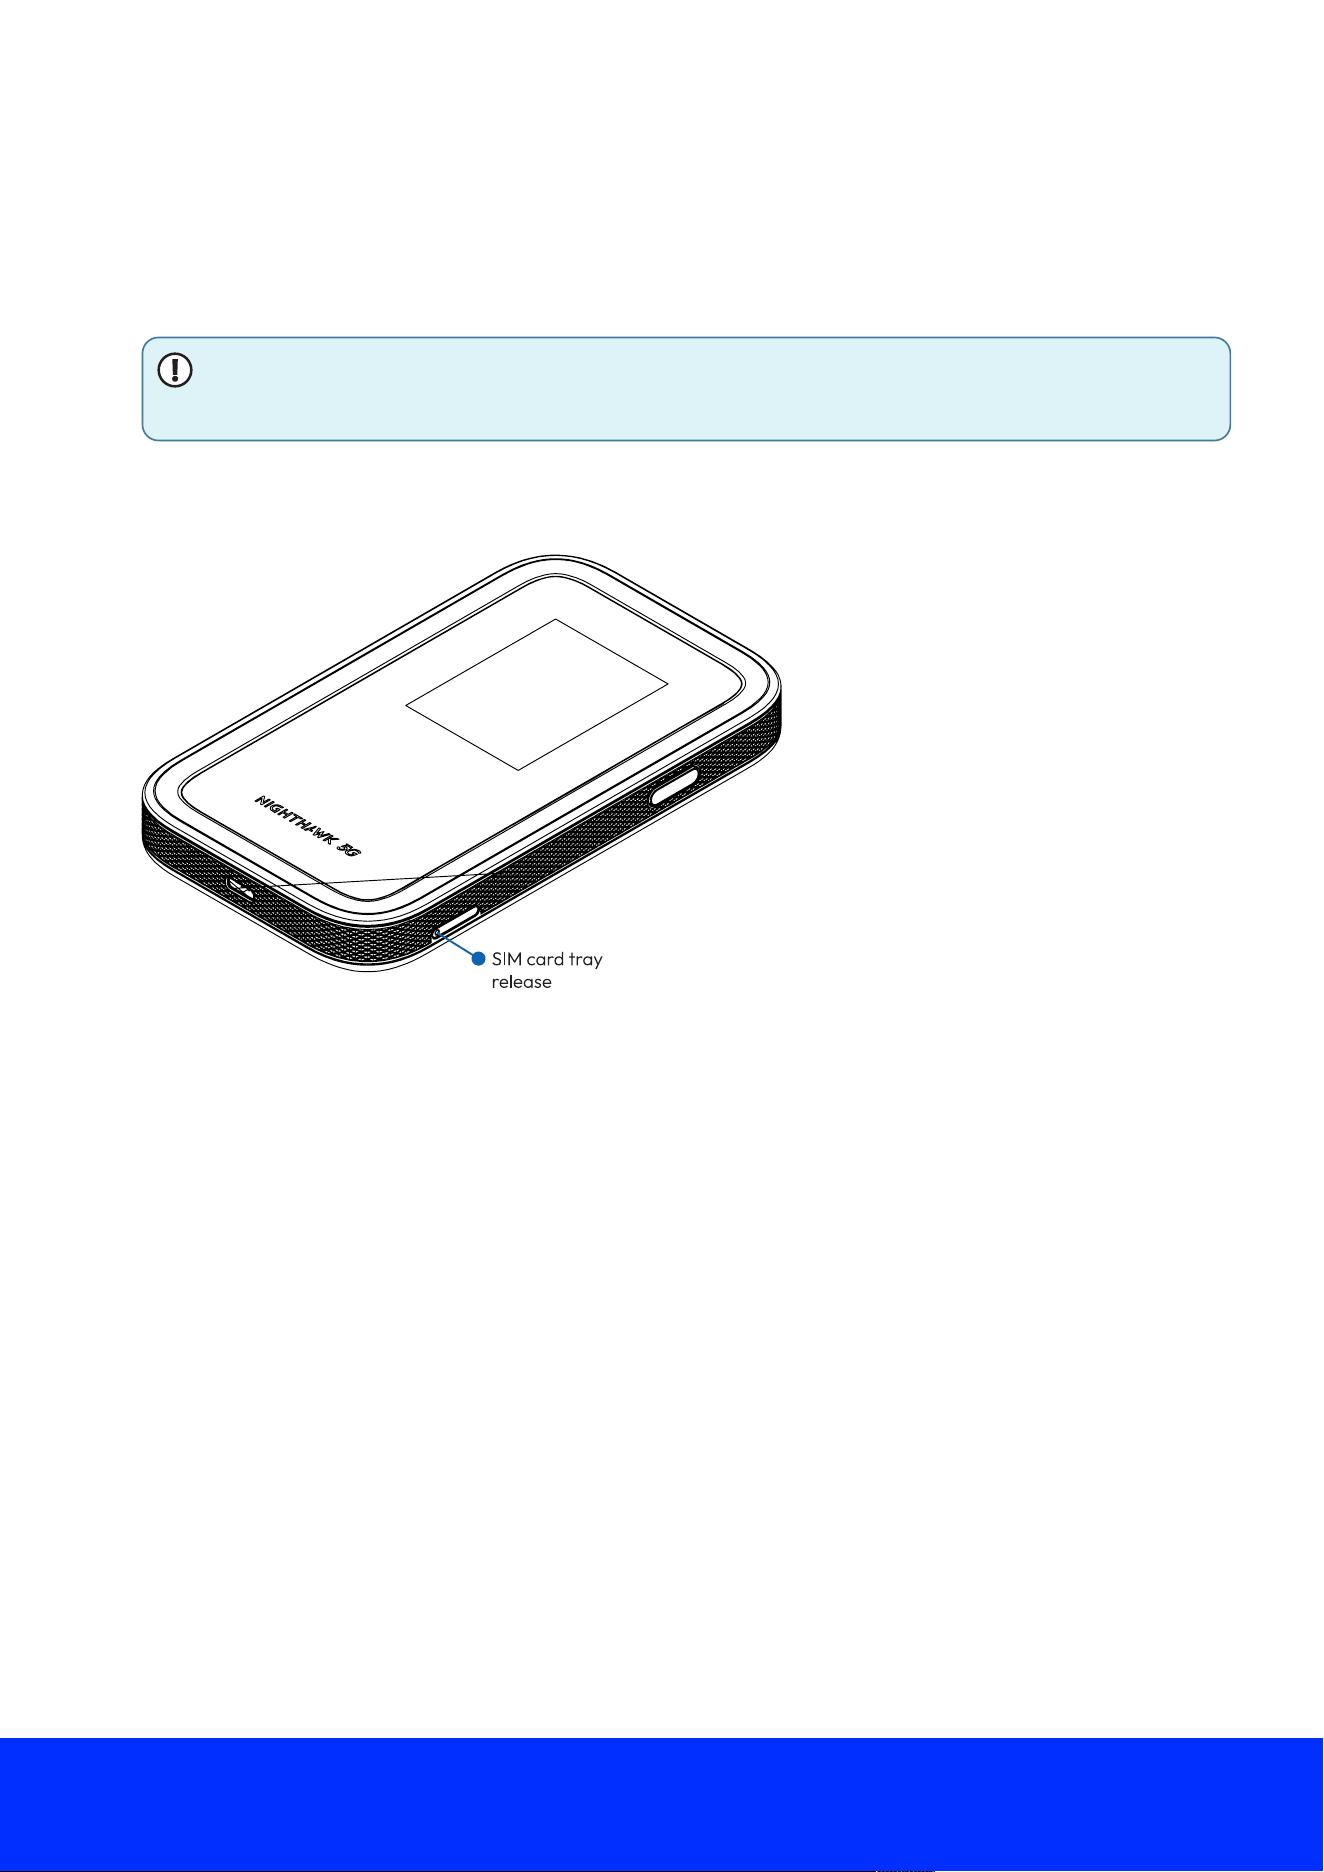
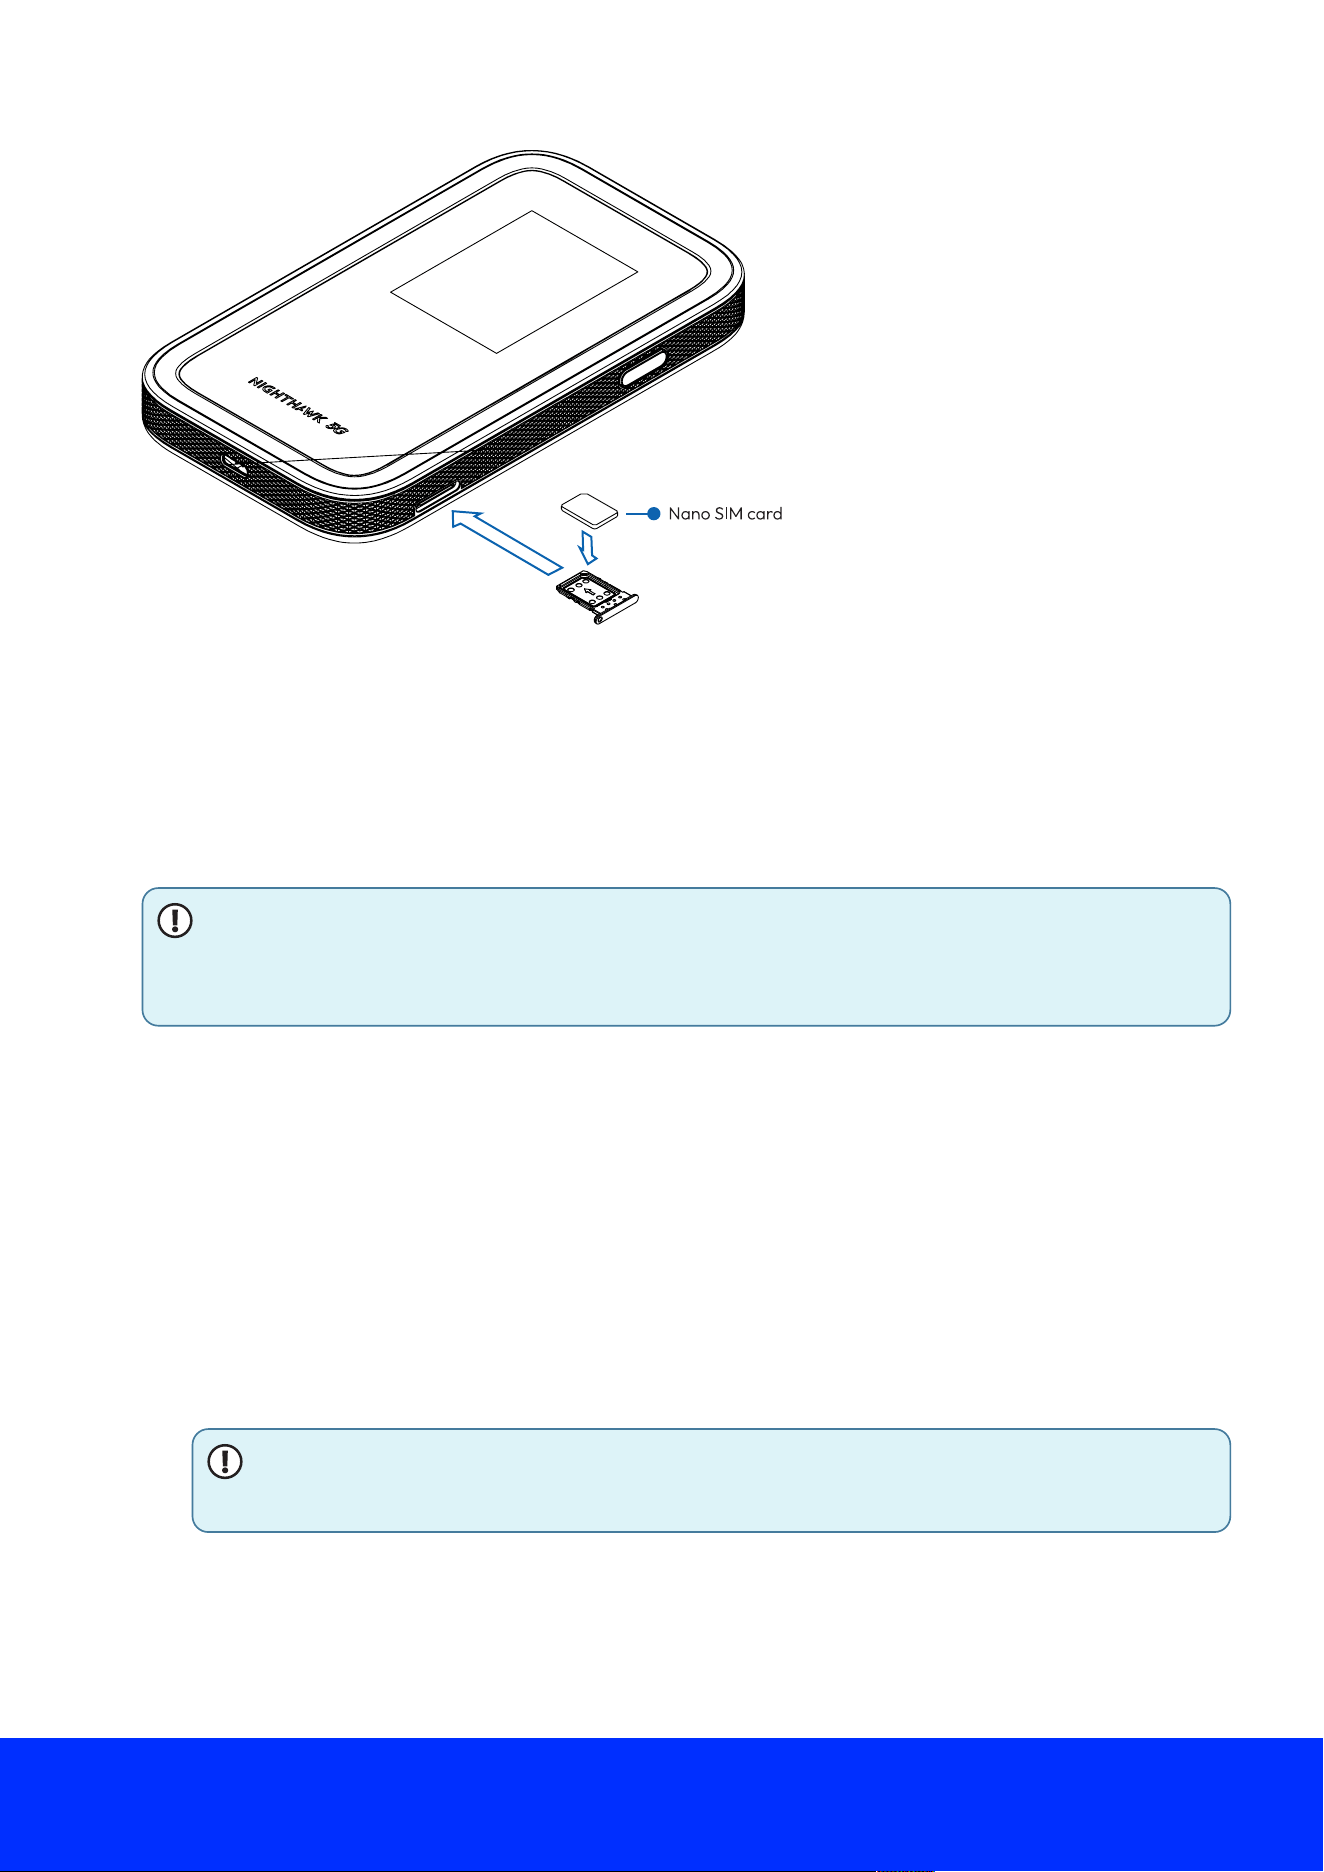
Figure 7.SIM card installation
Install or replace a physical SIM card
In addition to eSIMs, your Nighthawk 5G M7 supports physical 4FF Nano SIM cards. You can
install a SIM card in the provided tray on the mobile hotspot.
NOTE: If you use a physical SIM card and then change your mobile data provider or
plan, you might need to replace the SIM card that you previously installed.
To install or replace a SIM card:
1. Locate the SIM card tray on the mobile hotspot.
2. Using the included release tool, press into the hole on the SIM card tray to eject the tray.
3. If a SIM card is already installed in the tray, remove the SIM card.
4. Insert the replacement SIM card in the tray.
5. Insert the SIM card tray back into its slot on the mobile hotspot.
Nighthawk M7 NETGEAR
13
Charge a mobile device with Reverse Charging
Your mobile hotspot's Reverse Charging feature can charge other devices via the USB-C port.
The mobile hotspot provides 5V @ 500mA (or 2.5W) over USB to charge compatible mobile
devices.
NOTE: Certain mobile devices can also be set up to charge your mobile hotspot's
ba7ery instead of receiving a charge. You might need to con5gure your device's USB
se7ings to enable this function.
To charge a mobile device with Reverse Charging:
1. Locate a suitable cable with a USB-C connection on one end and your mobile hotspot's
connection on the other end.
This might be a Micro USB, Apple Lightning, or USB-C connection depending on your mobile
device.
2. Connect the USB-C end of the cable to your mobile hotspot.
3. Connect the other end of the cable to your mobile device.
If your mobile device is compatible with Reverse Charging, the charge indicator displays.
Your mobile device is charging.
NOTE: Charging external devices with Reverse Charging increases mobile hotspot
ba7ery usage.
Nighthawk M7 NETGEAR
14

Standby, power off, or reset
The Nighthawk 5G M7 has three power options:
● Standby: Disables WiFi and conserves ba7ery life while keeping the mobile hotspot powered
on.
● Power o1: Turns o4 the mobile hotspot if you won't use it for an extended period.
● Restart: Restarts the mobile hotspot.
Plugging in the mobile hotspot displays the standby and restart options only.
1. Hold down the Power/Navigation bu7on for 5ve seconds.
The Standby/Power O4/Restart menu appears.
2. Press the Power/Navigation bu7on to select an option, then press and hold to con5rm.
Depending on your selection, your mobile hotspot enters standby, powers o4, or restarts.
Nighthawk M7 NETGEAR
15
Connect devices to the Internet
When you turn on your mobile hotspot, it automatically connects to the mobile broadband
network in your area. To access the Internet on other devices, connect them to your mobile
hotspot's WiFi or wired network.
This chapter contains the following sections:
● Connect to WiFi using the QR code
● Connect to WiFi using the SSID and password
● Connect a computer to the Internet using tethering
● Connect a computer to the Internet using an Ethernet adapter
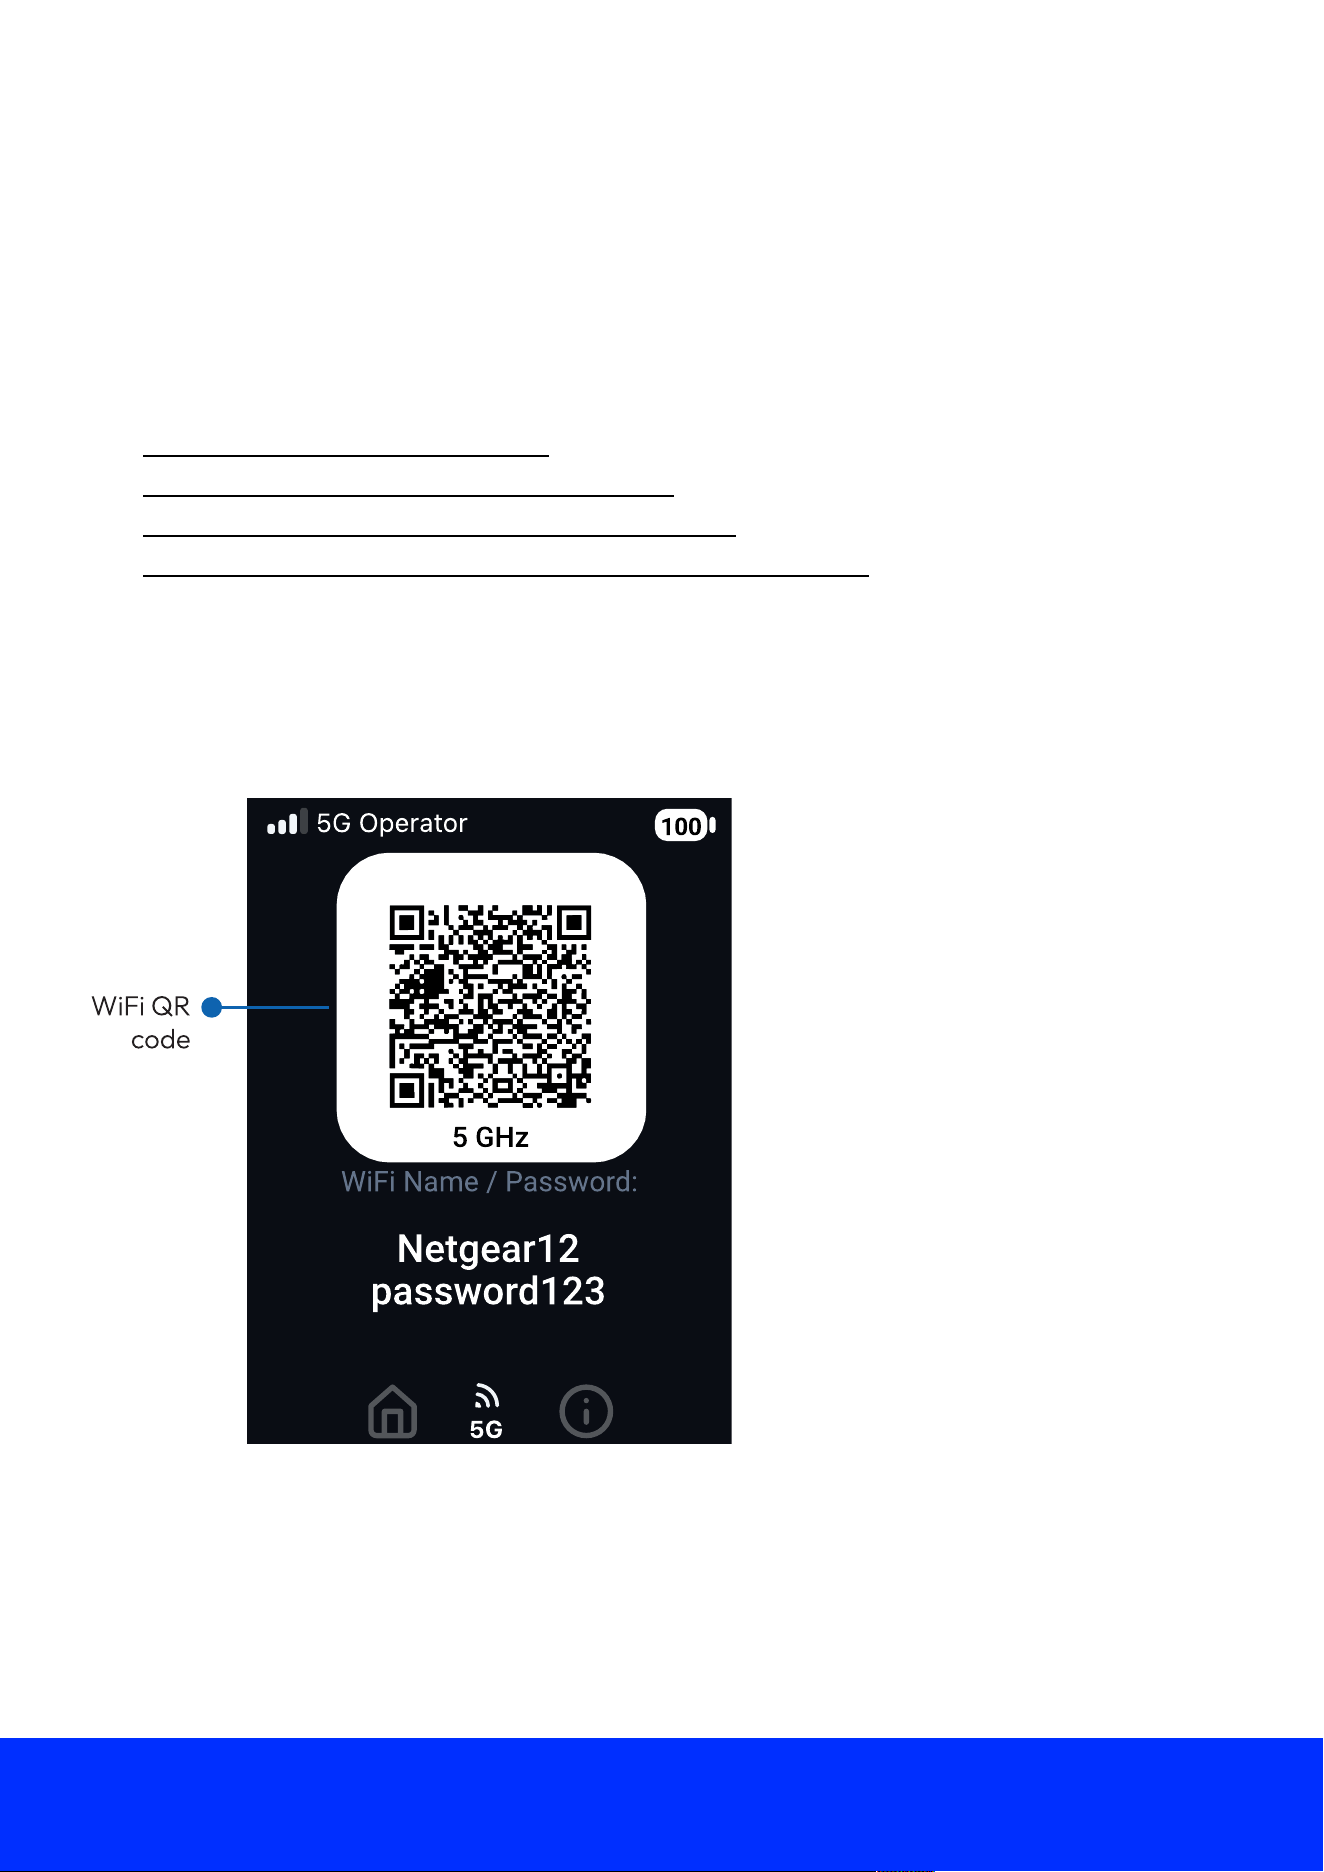
Connect to WiFi using the QR code
Your mobile hotspot's WiFi QR code enables mobile devices like smartphones and tablets to
connect to WiFi without manually entering an SSID and password.
To connect to WiFi using the QR code:
1. Quickly press and release the Power/Navigation bu7on to wake your mobile hotspot.
The home screen displays.
Nighthawk M7 NETGEAR
16
2. Press the Power/Navigation bu7on one time to cycle to the WiFi screen.
NOTE: If you have dual-band WiFi enabled, you can cycle to either the 2.4 GHz or
the 5 GHz screen and connect to the 2.4 GHz band (slower speeds, longer range)
or the 5 GHz band (faster speeds, shorter range) band as desired.
The WiFi screen displays with a QR code that you can scan to connect directly to the
network.
3. Open your mobile device's camera application and aim the camera at the QR code.
Depending on your mobile device, you might need to tap the QR code in your camera app to
proceed.
Your mobile device connects to your mobile hotspot's WiFi network.
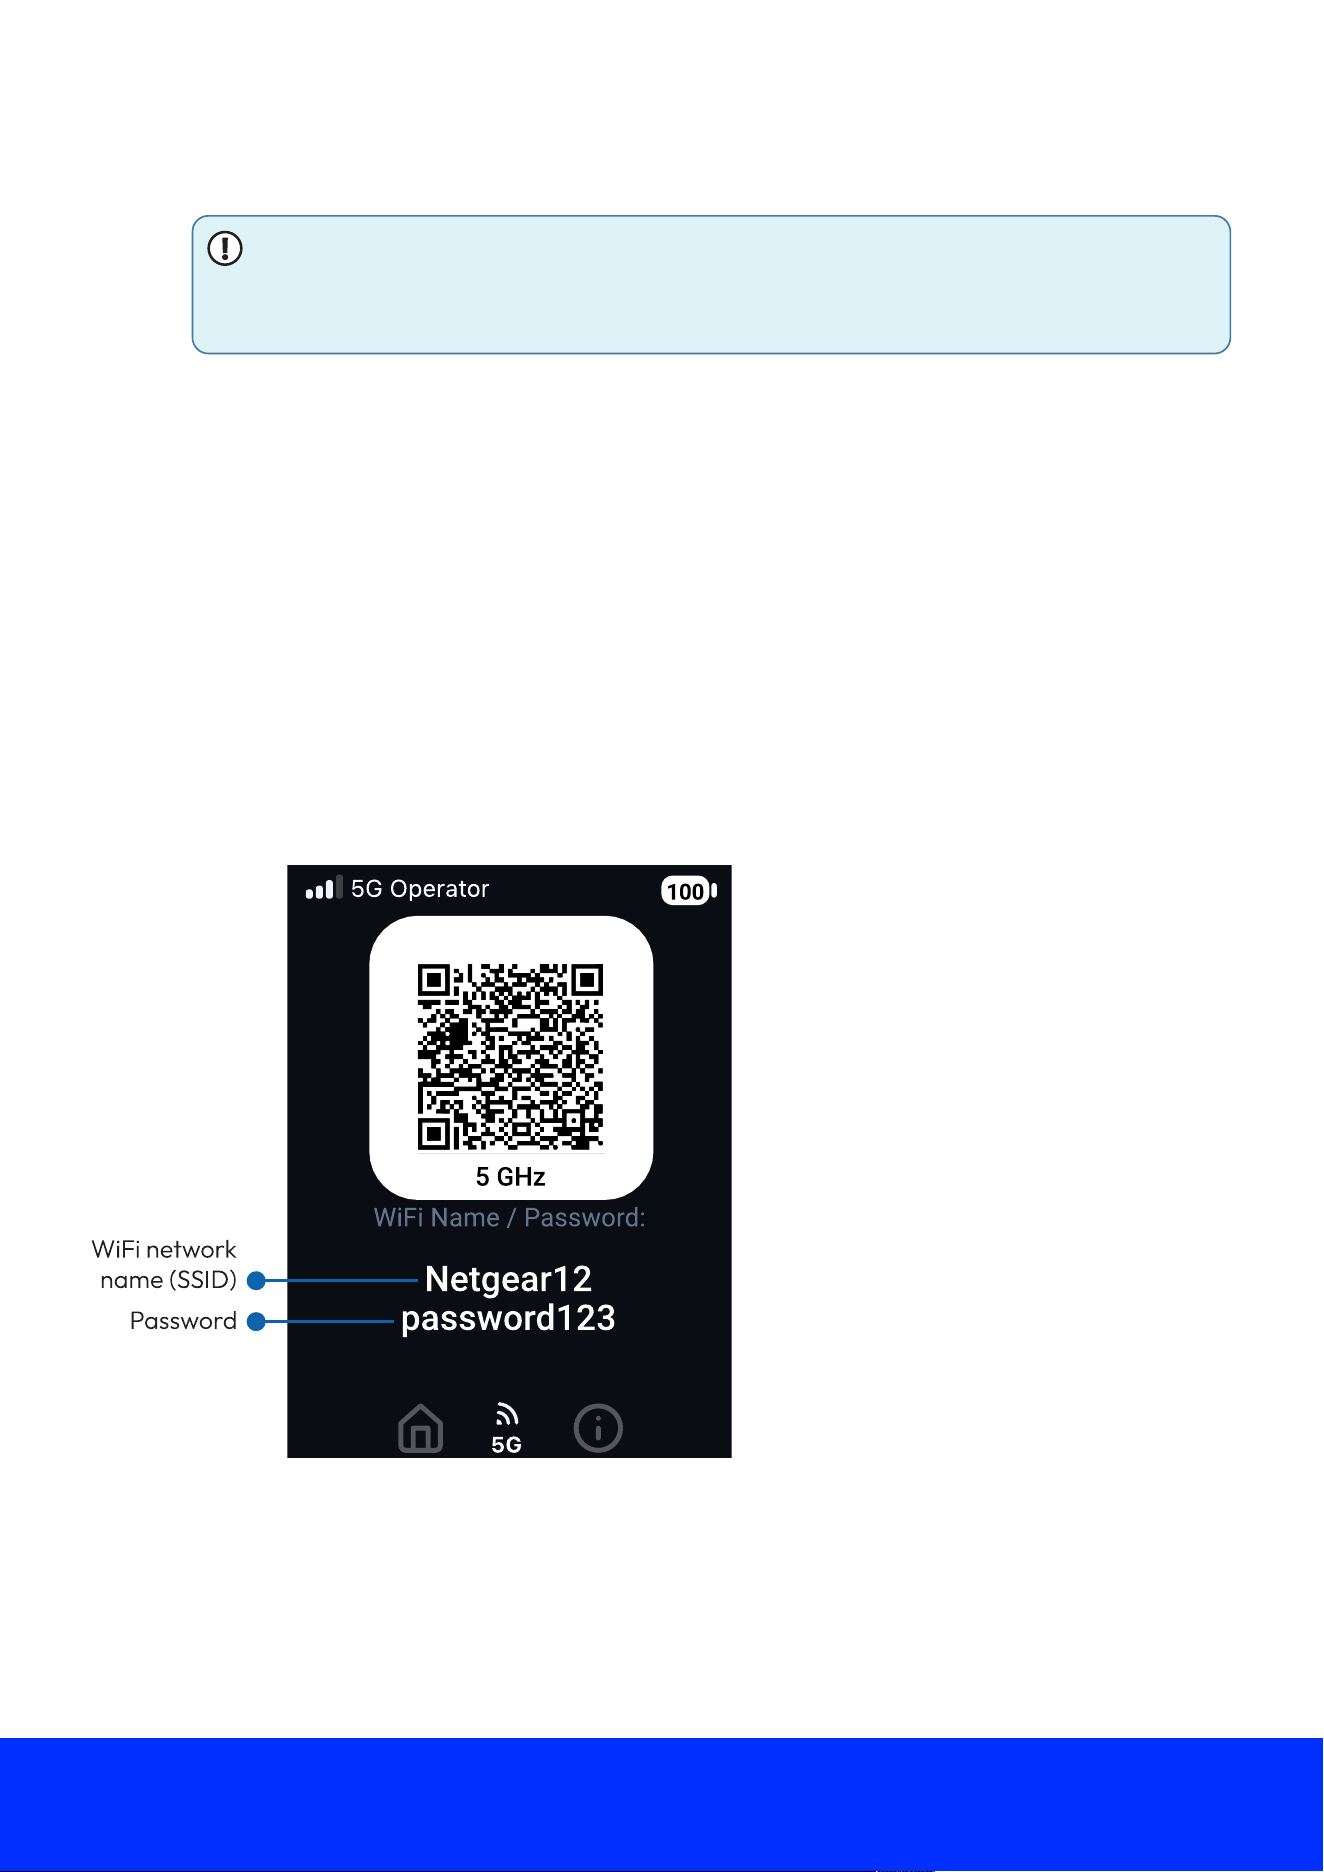
Connect to WiFi using the SSID and password
When your mobile hotspot is powered on, it broadcasts a WiFi network name (SSID) and
password. You can connect to the Internet by selecting your mobile hotspot's SSID and entering
the password on your WiFi devices.
To connect to WiFi using the SSID and password:
1. Quickly press and release the Power/Navigation bu7on to wake your mobile hotspot.
The home screen displays.
Nighthawk M7 NETGEAR
17
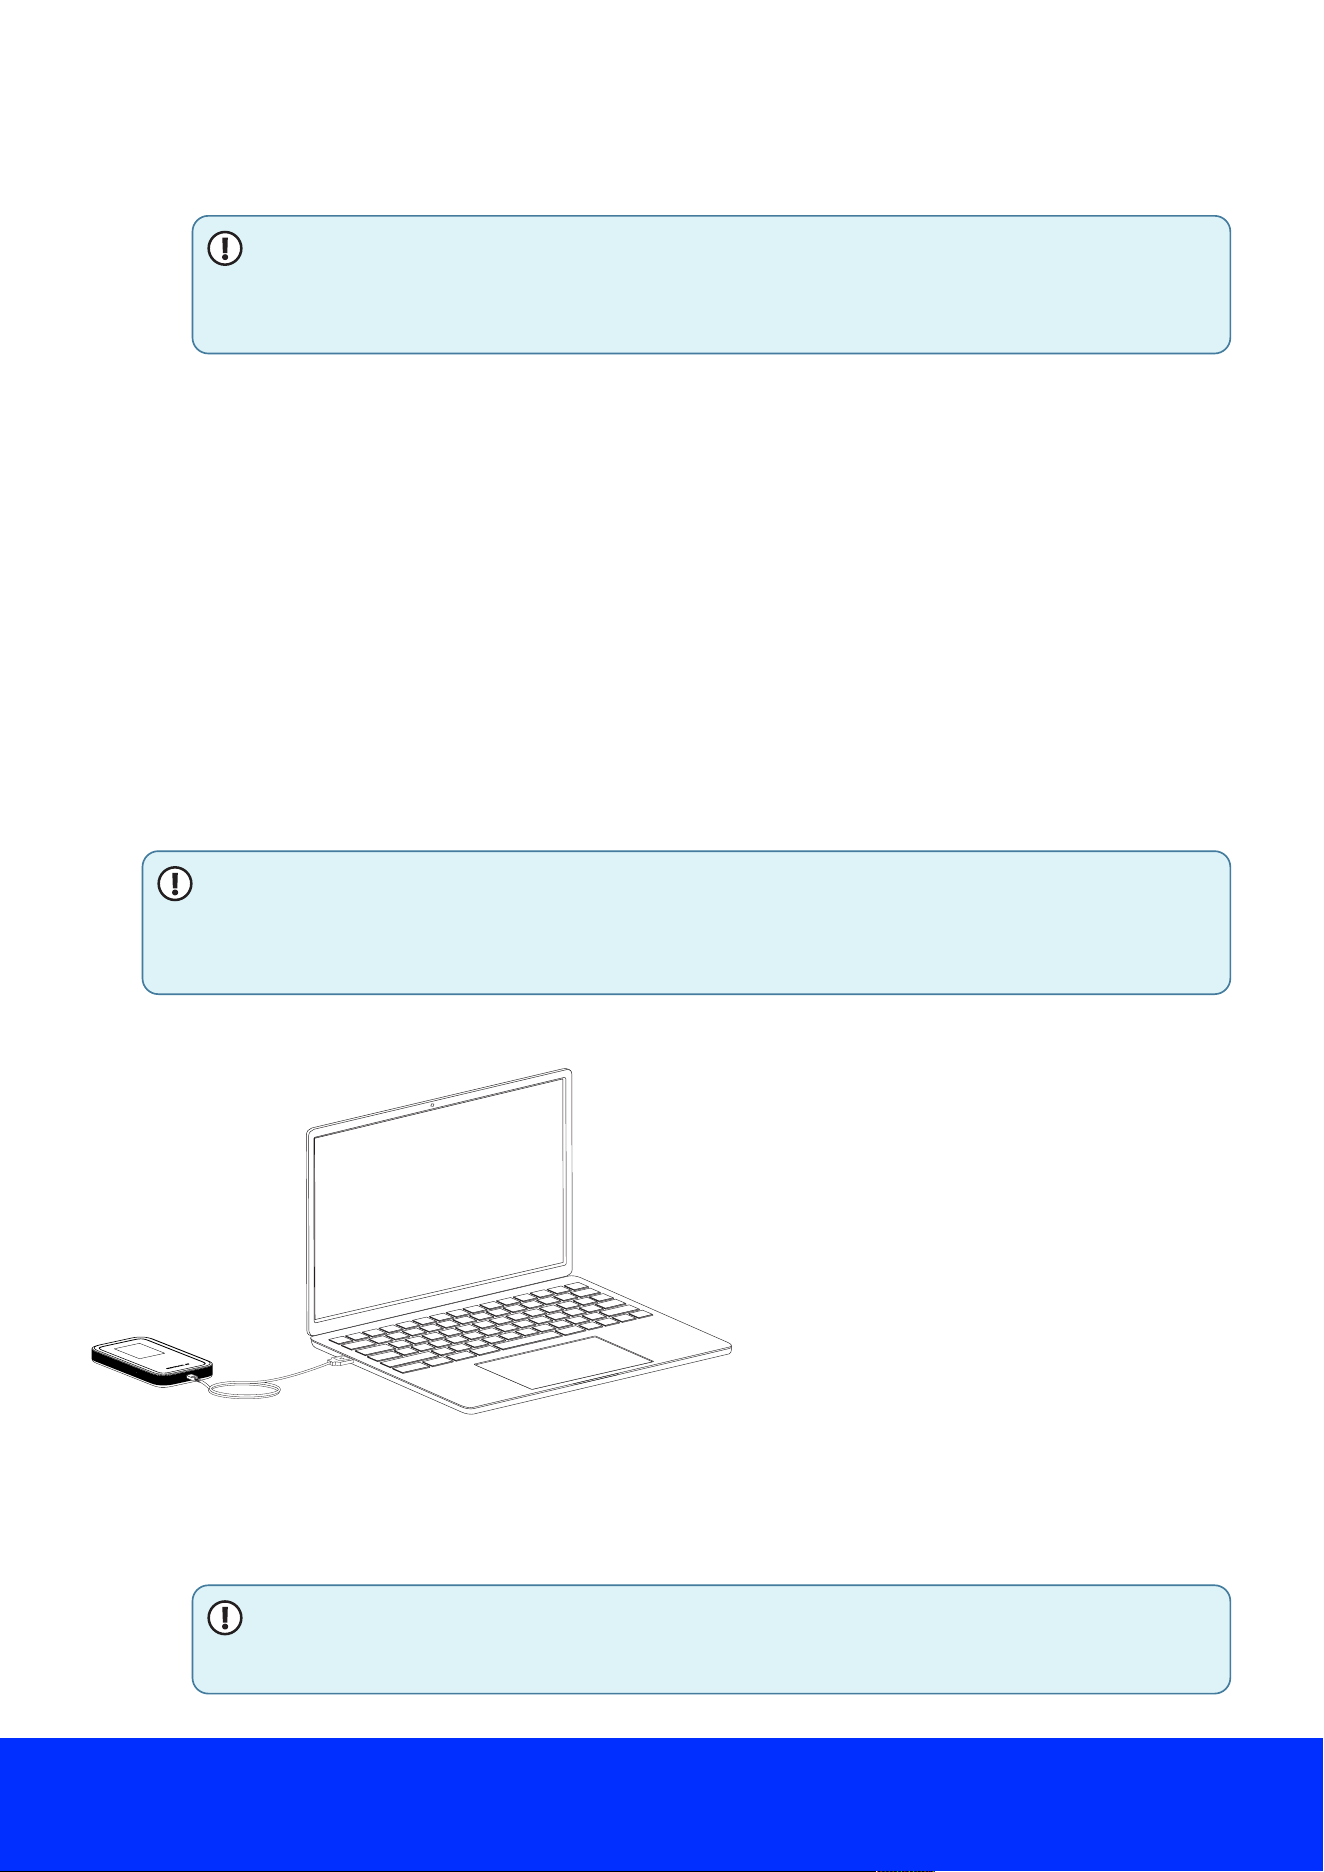
Figure 8.Nighthawk 5G M7 battery charging
2. Press the Power/Navigation bu7on one time to cycle to the WiFi screen.
NOTE: If you have dual-band WiFi enabled, you can cycle to either the 2.4 GHz or
the 5 GHz screen and connect to the 2.4 GHz band (slower speeds, longer range)
or the 5 GHz band (faster speeds, shorter range) band as desired.
The screen displays your mobile hotspot SSID in the WiFi Name 5eld and your mobile hotspot
password in the Password 5eld for other devices to connect with.
3. From your WiFi device, open your WiFi network connection manager.
4. Select or enter the SSID shown on your mobile hotspot's home screen.
5. Enter the password shown on your mobile hotspot's home screen.
Your WiFi device connects to your mobile hotspot's WiFi network.
Connect a computer to the Internet using tethering
You can connect a computer to your mobile hotspot using the included USB cable instead of
connecting with WiFi. This kind of cable connection is called tethering.
NOTE: There might be a brief delay when your computer's operating system detects
the mobile hotspot the 5rst time you use the USB cable to connect your mobile hotspot
to your computer.
To connect a computer to the Internet using tethering:
1. Connect your mobile hotspot to your computer using the included USB cable.
2. Wait for your computer to detect the mobile hotspot.
NOTE: Depending on your computer's con5guration, you might need to manually
select your mobile hotspot as the preferred Internet connection.
Your computer connects to the Internet.
Nighthawk M7 NETGEAR
18
Connect a computer to the Internet using an Ethernet adapter
You can connect a computer to your mobile hotspot through Ethernet by using an external USB-C
to Ethernet adapter (not included).
To connect a computer to the Internet using Ethernet:
1. Insert the USB-C end of the USB-C to Ethernet adapter into your mobile hotspot's USB-C
port.
2. Using an Ethernet cable, connect your mobile hotspot to your computer.
Your computer detects the Ethernet connection.
NOTE: If your computer does not automatically switch to the Ethernet connection,
you might need to manually select the Ethernet connection from your computer's
network connection manager.
Your computer connects to the Internet.
Nighthawk M7 NETGEAR
19
View alerts and mobile hotspot
information
This chapter contains the following sections:
● View alerts from your mobile hotspot
● Update software from an Update Available alert
● View details about your mobile hotspot
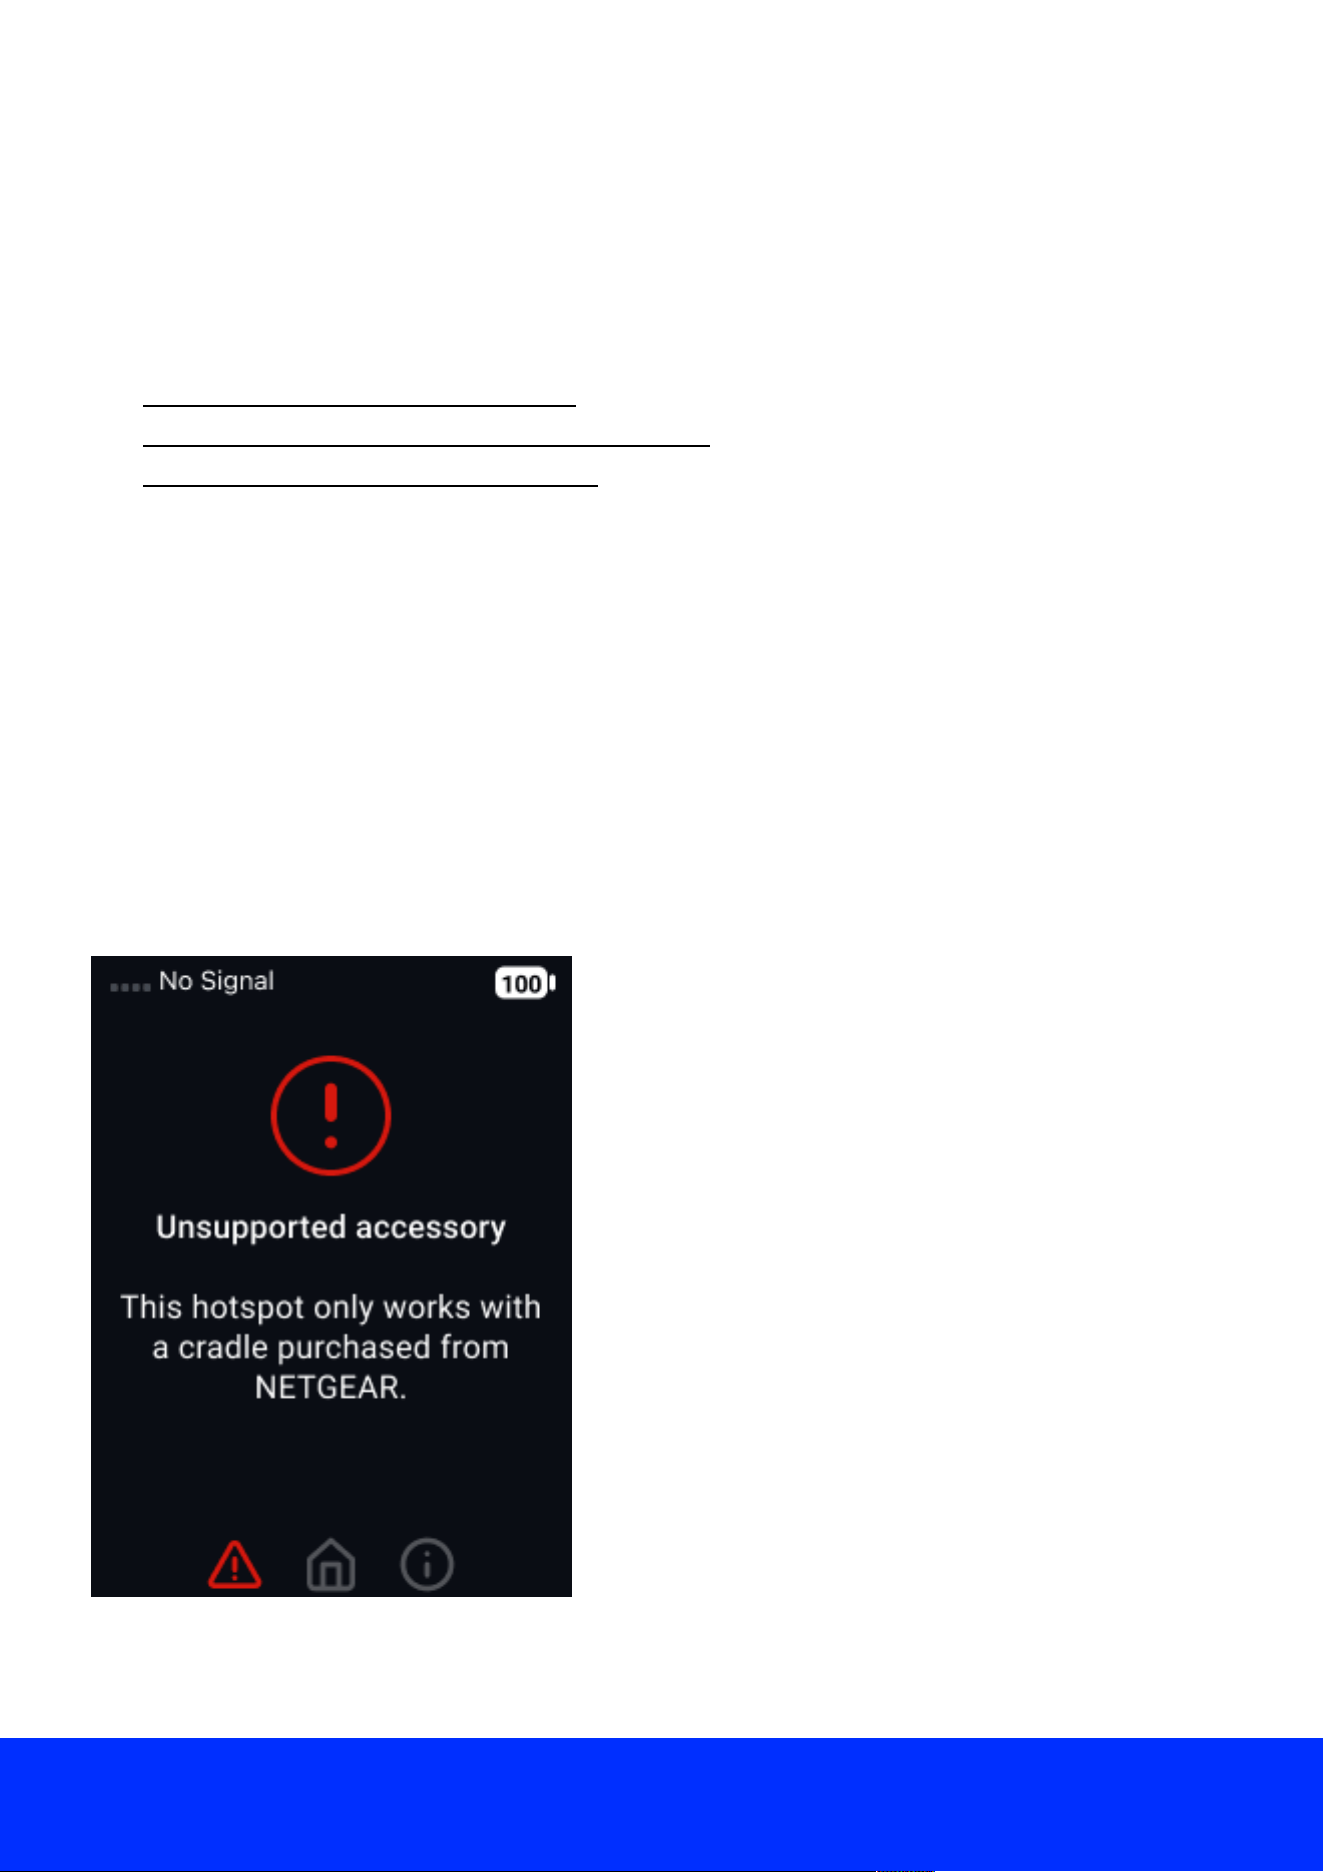
View alerts from your mobile hotspot
Your mobile hotspot displays alerts on the LCD screen to inform you of mobile hotspot status
changes. Alerts display as long as the cause of the alert is present. When the cause of an alert is
resolved, the corresponding alert is removed automatically.
To view alerts from your mobile hotspot:
Quickly press and release the Power/Navigation bu7on to wake your mobile hotspot.
The home screen displays.
If any alerts are active, your mobile hotspot displays them.
For example, if you use an unsupported accessory, the following alert appears:
For more information about error messages, see Error messages on page 53.
Nighthawk M7 NETGEAR
20
Update software from an Update Available alert
Your mobile hotspot automatically checks for new software updates. If an update becomes
available, your mobile hotspot displays an alert. Because software updates typically improve
mobile hotspot performance and usability, we recommend that you update your mobile hotspot
whenever possible.
NOTE: Updating your mobile hotspot temporarily interrupts your network connection.
Make sure that you are prepared to lose connectivity before starting the update
process.
To update software from an Update Available alert:
1. Quickly press and release the Power/Navigation bu7on to wake your mobile hotspot.
The home screen displays a Software Update Available alert, and your mobile hotspot
downloads the update.
2. Do one of the following:
● Press and hold the Power/Navigation bu7on to install the update immediately.
● Press the Power/Navigation bu7on to install the update later and return to the home
screen.
NOTE: Your mobile hotspot ba7ery must have a charge of at least 20% to install
updates.
View details about your mobile hotspot
You can view details about your mobile hotspot, such as the model number, software version,
serial number, and more.
To view details about your mobile hotspot:
1. Quickly press and release the Power/Navigation bu7on to wake your mobile hotspot.
The home screen displays.
2. Press the Power/Navigation bu7on until you reach the information screen.
The information screen displays the following:
● Model Number
● Software Version
● Serial Number
● IMEI 1
● IMEI 2
● ICCID
You can also press and hold the Power/Navigation bu7on to view regulatory e-label
information for your mobile hotspot.
Nighthawk M7 NETGEAR
21
Manage your mobile hotspot from
the NETGEAR app
The NETGEAR app provides an easy way to manage your mobile hotspot and change se7ings
when needed. If you didn't download the NETGEAR app when you 5rst set up your mobile
hotspot, visit the NETGEAR app page on your mobile device, or download from the Apple App
Store or Google Play Store (depending on your mobile device).
Figure 9. NETGEAR app icon
This chapter contains the following sections:
● Manage eSIMs and physical SIM
○ Best practices for travel eSIMs
○ Switch between eSIMs and physical SIM
○ Delete eSIMs
● Change WiFi band se/ings
● Change WiFi network name, password, encryption, or channel se/ings
● Change WiFi standby, range, bandwidth, and info display se/ings
● Enable or disable WiFi o-loading
● Con.gure cellular se/ings
● Con.gure access point names (APNs)
○ Add an APN for another network
○ Select an APN to use
○ Remove an APN entry
● View data usage
● Change display se/ings
Nighthawk M7 NETGEAR
22
● View details about your mobile hotspot
● Update .rmware
● Factory reset your mobile hotspot
● View and change the web user interface login password
Manage eSIMs and physical SIM
You can manage your eSIMs and physical SIM directly in the NETGEAR app.
NOTE: For instructions on purchasing a new eSIM, see Purchase and install an eSIM in
the NETGEAR app on page 11.
Best practices for travel eSIMs
The Nighthawk 5G M7 supports several eSIM pro5les, including NETGEAR eSIMs and eSIMs from
other carriers. You can complete the following steps to help ensure reliable Internet access when
traveling:
Before Travel
We recommend se7ing up a travel eSIM while you have access to reliable Internet and a power
source. The following steps help to ensure a smooth activation process:
● Purchase a travel eSIM in advance to prepare connectivity for when you arrive.
● Download and install the eSIM while connected to a secure and reliable WiFi network.
● Verify the plan region or coverage area. Some eSIMs support multiple countries or regional
zones.
● Check roaming and APN se7ings for the carrier providing the travel eSIM.
● Con5rm that the mobile hotspot 5rmware is up to date.
NOTE: It can be helpful to keep a physical SIM or secondary eSIM pro5le as an
alternate option.
After Arrival
When you arrive at the destination, the mobile hotspot can need a network refresh. Your mobile
hotspot might also require a SIM switch to connect to a local carrier.
● Select the correct travel eSIM pro5le or physical SIM card.
● Use the eSIM marketplace to purchase the appropriate regional or country-speci5c eSIM.
● Check the mobile hotspot home screen for local carrier signal strength and network type.
● Verify the data usage immediately after connecting to avoid unexpected data use.
● If available, enable WiFi o4loading to reduce cellular data usage on trusted local networks.
For more information, see Enable WiFi o4loading from the web user interface on page 37.
● Restart the mobile hotspot if the eSIM does not automatically connect to the local network.
Nighthawk M7 NETGEAR
23
For more information on installing eSIM pro5les, see Purchase and install an eSIM in the
NETGEAR app on page 11 and Set up a third-party eSIM in the NETGEAR app on page 12.
Switch between eSIMs and physical SIM
You can use the NETGEAR app to switch between NETGEAR eSIMs, third party eSIMs, or a
physical SIM.
NOTE: To switch between eSIMs, the eSIMs must be downloaded in the NETGEAR app.
To switch between eSIMs and SIMs:
1. From the NETGEAR app dashboard, tap your mobile hotspot.
The mobile hotspot dashboard displays.
2. Tap Manage SIMs.
The SIM management page displays with all available eSIMs and SIM cards.
The NETGEAR eSIM wallet stores both active and inactive eSIMs, and displays your physical
SIM card (if installed). The displayed eSIMs include NETGEAR travel eSIMs and third-party
eSIMs.
3. Select the SIM card or eSIM to use:
● A NETGEAR travel eSIM for international roaming or travel plans.
● A third-party eSIM if you installed an eSIM from another provider.
● A physical SIM if you have a physical 4FF nano SIM card installed in the SIM slot.
4. Tap use eSIM or use SIM.
The option displayed di4ers depending on the selected SIM type.
The mobile hotspot might brie6y disconnect and reconnect while switching networks.
5. Check the home screen for updated carrier name, signal strength, and network type to
con5rm your connection.
The selected SIM becomes the active data source. Any inactive eSIMs remain stored in the
eSIM wallet and can be switched to later.
NOTE: If the mobile hotspot does not connect to the expected network, try
restarting the mobile hotspot or selecting a di4erent eSIM pro5le.
Nighthawk M7 NETGEAR
24
Delete eSIMs
You can remove an unused or expired eSIM from the eSIM wallet using the NETGEAR app. Before
deleting, con5rm that the eSIM to delete is not currently active. You must switch to another SIM
before deleting an eSIM.
To delete eSIMs:
1. From the NETGEAR app dashboard, tap your mobile hotspot.
The mobile hotspot dashboard displays.
2. Tap Manage SIMs.
The SIM management page displays.
3. Navigate to the eSIM section.
4. Tap the Se7ings icon to the right of the eSIM you want to delete.
NOTE: If the eSIM is currently active, switch to another SIM before continuing.
5. Tap Remove From Device.
6. Tap Remove when prompted.
NOTE: Deleting an eSIM permanently removes it from the mobile hotspot. You
might need the original activation details to reinstall it later.
The eSIM is deleted.
Change WiFi band settings
By default, your mobile hotspot broadcasts WiFi on the 5 GHz band. Your mobile hotspot can also
broadcast WiFi on the 2.4 GHz band for dual-band WiFi. Note that the overall throughput speed
could decrease when dual-band WiFi is enabled.
NOTE: If you have dual-band WiFi enabled, you can cycle to either the 2.4 GHz or the
5 GHz screen and connect to the 2.4 GHz band (slower speeds, longer range) or the 5
GHz band (faster speeds, shorter range) band as desired.
To change WiFi band se3ings:
1. From the app dashboard, tap the Se7ings icon in the bo7om right corner.
The Se7ings page displays.
2. Tap Wi-Fi Se3ings.
The Wi-Fi page displays.
3. Select or clear the check box for the 2.4 GHz WiFi band to enable or disable 2.4 GHz WiFi.
Nighthawk M7 NETGEAR
25
4. Tap the Apply bu7on.
A message displays telling you that to save this change, your mobile hotspot must restart
WiFi connections.
5. Tap the Continue bu7on.
Your se7ings are saved.
Change WiFi network name, password, encryption, or channel
settings
The WiFi network name (SSID) identi5es your WiFi network and is visible to other WiFi-enabled
devices. From the web UI, you can change the SSID, password, WiFi encryption type, and
broadcast channel se7ings. When WiFi o4loading is enabled (default se7ing), the WiFi channel is
set to Auto and cannot be changed. To select a speci5c channel, you must disable WiFi
o4loading. See for more information.
NOTE: In some regions, not all channels are available. Do not change the channel
unless you experience interference (shown by lost connections or slow data transfers).
If this happens, experiment with di4erent channels to see which is the best.
To change the WiFi network name, password, encryption, or channel se3ings:
1. From the app dashboard, tap the Se7ings icon in the bo7om right corner.
The Se7ings page displays.
2. Tap Wi-Fi Se3ings.
The Wi-Fi page displays.
3. Enter a WiFi Name and WiFi Password.
4. Select an Encryption Type and Channel.
The following encryption (WiFi security) types are available:
● WPA2 Personal AES
● WPA2 + WPA3 mixed
● WPA3 Personal AES
Your WiFi client devices must support the encryption type that you select for your mobile
hotspot, or they will not be able to connect.
NOTE: Wi-Fi Protected Access (WPA) is a security standard that protects your
WiFi network. WPA3 is the latest and strongest version. However, some older WiFi
devices do not support WPA3 connections. We recommend that you use WPA2 +
WPA3 mixed for the best possible security if you need to connect older WiFi
devices.
5. Clear or select the Broadcast WiFi Name SSID check box.
Nighthawk M7 NETGEAR
26

If you clear the check box, you must manually enter your SSID when connecting your WiFi
devices.
6. Tap the Apply bu7on
A message displays telling you that to save this change, your mobile hotspot must restart
WiFi connections.
7. Tap the Continue bu7on.
Your se7ings are saved.
If you changed the SSID or password, your previously connected WiFi devices must
reconnect using the new credentials.
Change WiFi standby, range, bandwidth, and info display settings
To change WiFi standby, range, bandwidth, and info display se3ings:
1. From the app dashboard, tap the Se7ings icon in the bo7om right corner.
The Se7ings page displays.
2. Tap Wi-Fi.
The Wi-Fi page displays.
3. Scroll down to Advanced Se3ings.
4. Select a WiFi Standby time period and WiFi Range se7ing.
5. Select a Bandwidth (channel frequency) option for each WiFi band that your mobile hotspot
supports.
6. To allow the WiFi information to be displayed on your mobile hotspot home screen, leave the
Display info on LCD check box selected.
7. Tap the Apply bu7on.
A message displays telling you that to save this change, your mobile hotspot must restart
WiFi connections.
8. Tap the Continue bu7on.
Your se7ings are saved.
Enable or disable WiFi offloading
To enable or disable WiFi o4loading:
1. Using a mobile device, connect to your hotspot’s WiFi network.
2. Launch the NETGEAR app and log in to your NETGEAR account.
The NETGEAR app dashboard displays.
3. Select your mobile hotspot.
Nighthawk M7 NETGEAR
27

The mobile hotspot dashboard displays.
4. Select Wi-Fi O4load.
The Wi-Fi O4load page displays.
5. Tap the Wi-Fi O4load toggle to enable or disable WiFi o4loading.
● If the toggle is green, WiFi o4loading is enabled and used when available.
● If the toggle is gray, WiFi o4loading is disabled.
6. Tap the Continue bu7on.
Your hotspot’s WiFi restarts.
7. Reconnect to your hotspot’s WiFi network.
8. Select the network name to access.
9. Enter the network password and tap Connect.
10. Tap the Continue bu7on.
WiFi o4loading is enabled or disabled.
Configure cellular settings
To con2gure cellular se3ings:
1. From the app dashboard, tap the Se7ings icon in the bo7om right corner.
The Se7ings page displays.
2. Tap Network > Cellular.
The Cellular page displays.
3. Change the data, band region, and network mode se7ings as needed.
Configure access point names (APNs)
Your mobile hotspot comes precon5gured with the access point names (APNs) for most cellular
network service providers. You can add additional APNs and select among the con5gured APNs
for use by the mobile hotspot. The mobile hotspot checks the APN to determine the type of
network connection to establish.
NOTE: Your carrier determines its own APN information and must provide you the
information for its own data plan. APN se7ings can also vary depending on the type of
plan that you subscribe to. We recommend that you contact your carrier for the
correct APN se7ings and only use the APN that your carrier instructs you to use for
your speci5c plan.
Nighthawk M7 NETGEAR
28
Add an APN for another network
To add an APN for another network:
1. From the app dashboard, tap the Se7ings icon in the bo7om right corner.
The Se7ings page displays.
2. Tap Network > Cellular.
The Cellular page displays.
3. Tap Add.
The APN page displays.
4. Specify the APN name.
The APN name is a label for display in the UI.
5. Specify the APN.
This step speci5es the APN as de5ned by the carrier.
6. Change the PDP (data protocol), if necessary:
○ IPV4
○ IPV6
○ IPV4V6
7. Change the PDP roaming protocol, if necessary. Using IPV4V6 is recommended:
○ None
○ IPV4
○ IPV6
○ IPV4V6
NOTE: PDP roaming protocol is the IP protocol used while you are roaming (for
example when you are traveling and the roaming network does not support IPv6).
8. Select the network authentication mode supplied by the network provider:
○ None
○ PAP
○ CHAP
○ PAPCHAP
9. Enter the name and password, if they are required for the network.
10. Tap Add.
The entry is added to the table.
Select an APN to use
To select an APN to use:
Nighthawk M7 NETGEAR
29

1. From the app dashboard, tap the Se7ings icon in the bo7om right corner.
The Se7ings page displays.
2. Tap Network > Cellular.
The Cellular page displays.
3. Select the Active radio bu7on next to the APN entry.
The APN is selected.
Remove an APN entry
To remove an APN entry:
1. From the app dashboard, tap the Se7ings icon in the bo7om right corner.
The Se7ings page displays.
2. Tap Network > Cellular.
The Cellular page displays.
3. Select the box to the left of the APN.
4. Tap Delete.
The APN is removed.
View data usage
To view data usage:
1. From the app dashboard, tap the Se7ings icon in the bo7om right corner.
The Se7ings page displays.
2. Tap Network > Data usage.
The Data usage page displays.
3. (Optional) To reset the data usage counter, tap the Reset bu7on.
The counter is reset.
4. (Optional) To set a regular reset date or data plan limit, select the appropriate check box and
enter or select your desired values.
NOTE: You must turn o4 WiFi o4loading to reset the data usage counter, set a
regular reset rate or data plan limit.
5. Tap the Apply bu7on.
Your se7ings are saved.
Nighthawk M7 NETGEAR
30

Change display settings
You can change your mobile hotspot's display se7ings from the NETGEAR app. Lowering the LCD
screen’s brightness level or reducing the screen time-out to a shorter period reduces power
consumption and might increase your mobile hotspot's ba7ery life.
To change display se3ings
1. From the app dashboard, tap the Se7ings icon in the bo7om right corner.
The Se7ings page displays.
2. Select Router > Display.
The Display page displays.
3. Adjust the following se7ings:
○ Screen Brightness: From the menu, select the screen brightness level.
○ Screen Timeout: From the menu, select a time period.
4. Tap the Apply bu7on.
Your se7ings are saved.
View details about your mobile hotspot
You can view details about your mobile hotspot from the NETGEAR app.
To view details about your mobile hotspot:
1. From the app dashboard, tap the Se7ings icon in the bo7om right corner.
The Se7ings page displays.
2. Select Router > Router information.
The Router information page displays.
3. Review the following information about your mobile hotspot:
○ Hardware Version
○ Firmware Version
○ Software Version
○ GUI Version
○ PRI Version
Update firmware
To update 2rmware from the web UI:
1. From the app dashboard, tap the Se7ings icon in the bo7om right corner.
The Se7ings page displays.
2. Select Router > Software update.
Nighthawk M7 NETGEAR
31
The Software update page displays.
3. Tap the Check for Updates bu7on.
If a 5rmware update is available, a blue Install New Firmware bu7on displays.
4. Click or tap the Install Now bu7on.
The update downloads.
5. Follow the onscreen instructions to install the update.
After the update completes, your mobile hotspot reboots.
Your 5rmware is updated.
Factory reset your mobile hotspot
To factory reset your mobile hotspot:
1. From the app dashboard, tap the Se7ings icon in the bo7om right corner.
The Se7ings page displays.
2. Select Router > Factory reset.
The Factory reset page displays.
3. Tap the Reset bu7on.
4. Tap Yes to con5rm.
Your mobile hotspot resets and returns to its factory se7ings.
NOTE: When you reset your mobile hotspot, any connected devices are
disconnected and must reconnect after the mobile hotspot restarts. A factory
reset restores the mobile hotspot to its default se7ings but does not remove
installed eSIMs.
View and change the web user interface login password
If you set your mobile hotspot using the NETGEAR app, it uses a randomly generated web UI login
password (also known as an admin password). If you later access the mobile hotspot using the
app after completing setup through the web UI, the app prompts you to enter this password. If
you set up your mobile hotspot from the web UI, you created your own password during initial
setup. You can view or change the password from the NETGEAR app.
NOTE: If you set your mobile hotspot up with the web user interface and then access
your mobile hotspot from the app, the app prompts you for your password to con5rm
your access privileges.
To change the web UI login password:
1. From the app dashboard, tap the Se7ings icon in the bo7om right corner.
Nighthawk M7 NETGEAR
32

The Se7ings page displays.
2. Tap Advanced Se3ings.
The Advanced Se7ings page displays.
3. In the Admin Se7ings section, tap the Password 5eld to view the current password.
You might need to enter your mobile hotspot passcode to proceed and view the current
password.
4. Tap Edit Password to change the password.
The Edit Password page displays.
5. In the New Password 5eld, enter the password that you want to use.
The password must be between 8 and 31 characters, and must include an uppercase le7er, a
special character, and a number.
6. In the Con2rm Password 5eld, enter the new password a second time to con5rm.
7. Tap the Submit bu7on.
Your se7ings are saved.
Nighthawk M7 NETGEAR
33

Manage advanced settings from the
web user interface
Your mobile hotspot is equipped with a web user interface (web UI) that you can use to change
se7ings and access advanced features.
This chapter contains the following sections:
● Log in to the web user interface from a browser
● Log in to the web user interface from the NETGEAR app
● View SMS messages from the web user interface
● Delete an SMS message from the web user interface
● View details about your mobile hotspot from the web user interface
● Connect through local WiFi to conserve data
○ Enable WiFi o-loading from the web user interface
○ Disable WiFi o-loading from the web user interface
● Change WiFi band se/ings from the web user interface
● Change WiFi network name, password, encryption, or channel se/ings from the web user
interface
● Change WiFi standby, range, bandwidth, and info display se/ings from the web user
interface
● Enable or disable Airplane Mode from the web user interface
● Con.gure access controls from the web user interface
● Enable SIM security from the web user interface
● Change the web user interface login password
● Update .rmware from the web user interface
● Back up mobile hotspot se/ings from the web user interface
● Restore backed up se/ings from the web user interface
● Factory reset your mobile hotspot from the web user interface
● Disable the factory reset bu/on from the web user interface
● Disable or re-enable the DHCP server feature from the web user interface
● Change tethering se/ings from the web user interface
● View data usage from the web user interface
● Con.gure cellular se/ings from the web user interface
● Con.gure access point names (APNs) from the web user interface
○ Add an APN for another network
○ Select an APN to use
○ Remove an APN entry
● Con.gure port forwarding from the web user interface
Nighthawk M7 NETGEAR
34

● Con.gure port .ltering from the web user interface
● Change display se/ings from the web user interface
● Change the date and time format from the web user interface
● Disable or re-enable VPN passthrough from the web user interface
● Disable or re-enable UPnP from the web user interface
● Con.gure a DMZ server from the web user interface
Log in to the web user interface from a browser
You can access the mobile hotspot web UI by visiting either mywebui.net or the mobile hotspot's
IP address in a web browser on a computer, laptop, or other WiFi device.
To log in to the web UI:
1. From a computer or WiFi device that is connected to the mobile hotspot, launch a web
browser.
2. Enter either mywebui.net or your mobile hotspot's IP address.
By default, the IP address is 192.168.10.1. If you've con5gured a di4erent IP address, are using
WiFi o4loading, or are using other advanced features, your IP address might be di4erent.
The mobile hotspot web page displays.
3. Log in using your web UI password (admin password).
If you set up your mobile hotspot via the web UI, the password is the one that you speci5ed
when you set up your mobile hotspot. The password is case sensitive.
If you set up your mobile hotspot using the NETGEAR app, the default password is displayed
on and can be changed from the app's Se3ings > Advanced Se3ings > Admin Se3ings
screen.
The web UI dashboard displays. The dashboard displays any active alerts.
Log in to the web user interface from the NETGEAR app
You can also access the mobile hotspot web UI from the NETGEAR app on a mobile device.
To log in to the web UI from the NETGEAR app:
1. From the app dashboard, tap the Se7ings icon in the bo7om right corner.
The Se7ings page displays.
2. Tap Advanced Se3ings.
The Advanced Se7ings page displays.
3. Tap web user interface.
The web UI dashboard displays. The dashboard displays any active alerts.
Nighthawk M7 NETGEAR
35

View SMS messages from the web user interface
Your mobile hotspot can receive text (SMS) messages. You can view them from the web UI.
To view SMS messages from the web UI:
1. From the web UI dashboard, select Messages.
A list of messages displays, showing the 5rst portion of the text.
2. Click or tap a message to read the full text.
Delete an SMS message from the web user interface
You can delete SMS messages from the web UI when you are done reading them.
To delete an SMS message from the web UI:
1. From the web UI dashboard, select Messages.
A list of messages displays, showing the 5rst portion of the text.
2. Select a message and click or tap Delete.
The message is deleted.
View details about your mobile hotspot from the web user interface
You can view details about your mobile hotspot from the web UI.
To view details about your mobile hotspot from the web UI:
1. From the web UI dashboard, select Se3ings > Status.
Depending on your path, the menu might expand or display the following pages without
expanding.
2. Select one of the following pages to view additional information:
○ Account: Displays cellular account info, such as your service number, IMEI, and MAC
address.
○ Network: Displays network connection info, such as your time connected, data transfer
totals, and IP addresses.
○ Device: Displays mobile hotspot info, such as the hardware and software versions.
○ WiFi Details: Displays WiFi network info, such as your encryption type, connected
devices, and broadcast mode.
○ Diagnostics: Displays diagnostic info, such as cellular band technical info, mobile
hotspot temperature, and ba7ery voltage.
Connect through local WiFi to conserve data
Your mobile hotspot supports WiFi o4loading, which can lower your mobile hotspot's cellular data
usage and power consumption, along with other bene5ts:
● WiFi o1loading lets your mobile hotspot use a local WiFi Internet connection for data
Nighthawk M7 NETGEAR
36

instead of your cellular network. WiFi o4loading can extend your ba7ery life, prevent
connection interruptions when switching between networks, and enable consistent Internet
access in areas where cellular coverage is weak or unavailable.
You might want to use WiFi o4loading in locations where a public Internet connection is available,
but you get poor cellular reception on your mobile hotspot or want to conserve cellular data
usage.
For example, if you need to use the Internet at a hotel that provides public WiFi, you can set up
your mobile hotspot to o4load data to the hotel WiFi. You can use WiFi o4loading to purchase a
travel eSIM through the NETGEAR eSIM marketplace before you leave the hotel. In addition to
conserving your cellular data, using o4loading to connect through your mobile hotspot to public
Internet connections provides an extra layer of security for your devices.
Enable WiFi offloading from the web user interface
To enable WiFi o1loading from the web UI:
1. From the web UI dashboard, select Se3ings > General > Internet.
The Internet page displays.
2. Select WiFi O1loading to enable WiFi o4loading.
WiFi o4loading is enabled by default.
3. Click or tap the Apply bu7on.
A message displays telling you that to save this change, your mobile hotspot must restart
WiFi connections.
4. Click or tap the Continue bu7on.
Wi5 restarts.
5. Select the Wi5 network to use for o4loading.
6. Enter the network credentials and click or tap the Connect bu7on.
WiFi o4loading is enabled.
Disable WiFi offloading from the web user interface
To disable WiFi o1loading from the web UI:
1. From the web UI dashboard, select Se3ings > General > Internet.
The Internet page displays.
2. Click or tap WiFi O1loading and select 4G/5G Only (no o4loading).
3. Click or tap the Apply bu7on.
A message displays telling you that to save this change, your mobile hotspot must restart
WiFi connections.
Nighthawk M7 NETGEAR
37

4. Click or tap the Continue bu7on.
WiFi restarts.
5. Reconnect to your hotspot's WiFi network.
WiFi o4loading is disabled.
Change WiFi band settings from the web user interface
By default, your mobile hotspot broadcasts WiFi on the 5 GHz band. Your mobile hotspot can also
broadcast WiFi on the 2.4 GHz band for dual-band WiFi. Note that the overall throughput speed
could decrease when dual-band WiFi is enabled.
To change WiFi band se3ings from the web UI:
1. From the web UI dashboard, select Se3ings > General > Wi-Fi.
The Wi-Fi page displays.
2. Select or clear the check box for the 2.4 GHz WiFi band to enable or disable 2.4 GHz WiFi.
3. Tap Apply.
A message displays telling you that to save this change, your mobile hotspot must restart
WiFi connections.
4. Tap Continue.
Your se7ings are saved.
Change WiFi network name, password, encryption, or channel
settings from the web user interface
The WiFi network name (SSID) identi5es your WiFi network and is visible to other WiFi-enabled
devices. From the web user interface, you can change the SSID, password, WiFi encryption type,
and broadcast channel se7ings. When WiFi o4loading is enabled (default se7ing), the WiFi
channel is set to Auto and cannot be changed. To select a speci5c channel, you must disable WiFi
o4loading. See Disable WiFi o4loading from the web user interface on page 37 for more
information.
NOTE: In some regions, not all channels are available. Do not change the channel
unless you experience interference (shown by lost connections or slow data transfers).
If this happens, experiment with di4erent channels to see which is the best.
To change the WiFi network name, password, encryption, or channel se3ings from the web UI:
1. From the web UI dashboard, select Se3ings > General > Wireless Se3ings.
The Wireless Se7ings page displays.
2. Enter a WiFi Name and WiFi Password.
Nighthawk M7 NETGEAR
38
3. Select an Encryption Type and Channel.
The following encryption (WiFi security) types are available:
○ WPA2 Personal AES
○ WPA2 + WPA3 mixed
○ WPA3 Personal AES
Your WiFi client devices must support the encryption type that you select for your mobile
hotspot, or they will not be able to connect.
NOTE: Wi-Fi Protected Access (WPA) is a security standard that protects your
WiFi network. WPA3 is the latest and strongest version. However, some older WiFi
devices do not support WPA3 connections. We recommend that you use WPA2 +
WPA3 mixed for the best possible security if you need to connect older WiFi
devices.
4. Clear or select the Broadcast WiFi Name SSID check box.
If you clear the check box, you must manually enter your SSID when connecting your WiFi
devices.
5. (Optional) Under Advanced Se7ings, select the Isolate all client data from each other check
box cleared to prevent your client devices from communicating with each other.You might
want to enable this if you allow others' untrusted devices to connect to your mobile hotspot.
6. Click or tap the Apply bu7on.
A message displays telling you that to save this change, your mobile hotspot must restart
WiFi connections.
7. Click or tap the Continue bu7on.
Your se7ings are saved.
If you changed the SSID or password, your previously connected WiFi devices must
reconnect using the new credentials.
Change WiFi standby, range, bandwidth, and info display settings
from the web user interface
To change WiFi standby, range, bandwidth, and info display se3ings from the web UI:
1. From the web UI dashboard, select Se3ings > General > Wireless Se3ings.
The Wireless Se7ings page displays.
2. Scroll down to Advanced Se3ings.
3. Select a WiFi Standby time period and WiFi Range se7ing.
4. Select a Bandwidth (channel frequency) option for each WiFi band that your device
supports.
Nighthawk M7 NETGEAR
39

5. To allow the WiFi information to be displayed on your mobile hotspot home screen, leave the
Display info on LCD check box selected.
6. Click or tap the Apply bu7on.
A message displays telling you that to save this change, your mobile hotspot must restart
WiFi connections.
7. Click or tap the Continue bu7on.
Your se7ings are saved.
Enable or disable Airplane Mode from the web user interface
You can turn on Airplane Mode to disable cellular service, but keep your WiFi connection active.
Airplane Mode is disabled by default.
To enable or disable Airplane Mode from the web UI:
1. From the web UI dashboard, select Se3ings > General > Airplane Mode.
The Airplane Mode page displays.
2. Select the Enable check box to enable Airplane Mode, or clear the check box to disable
Airplane Mode.
3. Click or tap the Apply bu7on.
A message displays telling you that to save this change, your mobile hotspot must restart
WiFi connections.
4. Click or tap the Continue bu7on.
Airplane Mode is enabled.
Configure access controls from the web user interface
You can use access control to set up a list of speci5c devices to be allowed access or blocked from
accessing your mobile hotspot's Internet connection.
To con2gure access controls from the web UI:
1. From the web UI dashboard, select Se3ings > Security > Access Controls.
The Access Controls page displays.
2. Select the Enable check box.
3. From the Filter Type menu, select Allow List or Block List.
Depending on your selection, the page displays an Allow List or a Block List.
4. To add a device to the list, click or tap Add.
The Add Device window displays.
5. Enter a Device Name and MAC Address.
Nighthawk M7 NETGEAR
40
6. Click or tap Add.
The device is added to the list.
7. To remove a device from the list, select the device and then click or tap Delete.
The device is removed from the list.
Enable SIM security from the web user interface
You can create another level of security by con5guring a PIN that you must enter each time that
you power on your mobile hotspot.
To enable SIM security from the web UI:
1. From the web UI dashboard, select Se3ings > Security > SIM Security.
The SIM Security page displays.
2. Click or tap ACTIVATE.
3. Enter a PIN to use for your mobile hotspot and click or tap the Apply bu7on.
Your PIN is saved.
NOTE: If you enter an incorrect PIN three times, the SIM is blocked. If the SIM is
blocked, contact your cellular data service provider to receive a PUK number to
unblock the SIM. After 10 unsuccessful PUK a7empts, the SIM card is disabled
entirely. Contact your service provider for a replacement SIM card if your SIM
card is disabled. If you enter an incorrect PUK 10 times, the SIM is permanently
disabled and you must obtain a new SIM card from your service provider.
Change the web user interface login password
When you 5rst set up your mobile hotspot, you choose an web UI login password (also known as
an admin password) for your mobile hotspot. You can change the password later on from the
web UI.
To change the web UI login password:
1. From the web UI dashboard, select Se3ings > Administration > Set Password.
The password se7ings are displayed.
2. In the New Password 5eld, enter the password that you want to use.
The password must be between 8 and 31 characters, and must include an uppercase le7er, a
special character, and a number.
3. In the Repeat Password 5eld, enter the new password a second time to con5rm.
4. Click or tap the Apply bu7on.
Your se7ings are saved.
Nighthawk M7 NETGEAR
41
Update firmware from the web user interface
To update 2rmware from the web UI:
1. From the web UI dashboard, select Se3ings > Administration > Software Update.
The Software Update page displays.
2. Click or tap the Check for Updates bu7on.
If a 5rmware update is available, a blue Install New Firmware bu7on displays.
3. Click or tap the Install Now bu7on.
The update downloads.
4. Follow the onscreen instructions to install the update.
After the update completes, your mobile hotspot reboots.
Your 5rmware is updated.
Back up mobile hotspot settings from the web user interface
You can back up and restore mobile hotspot se7ings. Backing up and restoring is useful if you use
more than one mobile hotspot and you want the same se7ings on all of your devices.
You can also save your se7ings before rese7ing to factory defaults or changing the se7ings.
To back up mobile hotspot se3ings from the web UI:
1. From the web UI, select Se3ings > Administration > Backup Se3ings. The Backup Se7ings
page displays.
2. Click or tap the Backup bu7on. By default, the 5le (export.cfg) is saved to your
Downloads folder.
NOTE: You can only access Backup Se3ings via your pc.
Restore backed up settings from the web user interface
To restore backed up se3ings from the web UI:
1. From the web UI dashboard, select Se3ings > Administration > Backup Se3ings.
The Backup Se7ings page displays.
2. Select the export.cfg 5le to restore using one of the following methods:
○ To browse and select a local 5le, click the Choose File bu7on.
○ To select a backup 5le from the network, click or tap the Upload bu7on.
By default, mobile hotspot se7ing 5les are saved to your Downloads folder.
3. Click or tap Open.
Your mobile hotspot is restored with the uploaded 5le's se7ings.
Nighthawk M7 NETGEAR
42

Factory reset your mobile hotspot from the web user interface
To factory reset your mobile hotspot from the web UI:
1. From the web UI dashboard, select Se3ings > Administration > Factory Reset.
The Factory Reset page displays.
2. Click or tap the Reset bu7on.
3. Click or tap Yes to con5rm.
Your mobile hotspot resets and returns to its factory se7ings.
NOTE: When you reset your mobile hotspot, any connected devices are
disconnected and must reconnect after the mobile hotspot restarts. A factory
reset restores the mobile hotspot to its default se7ings but does not remove
installed eSIMs.
Disable the factory reset button from the web user interface
To prevent users from rese7ing the mobile hotspot using the Reset bu7on, you can disable the
hardware bu7on.
To disable the factory reset bu3on from the web UI:
1. From the web UI dashboard, select Se3ings > Administration > Factory Reset.
The Factory Reset page displays.
2. Click or tap to clear the Enable check box.
3. Click or tap the Apply bu7on.
Your se7ings are saved.
Disable or re-enable the DHCP server feature from the web user
interface
By default, your mobile hotspot acts as a DHCP server. The server assigns IP, DNS server, and
default gateway addresses to all computers connected to the LAN. The assigned default
gateway address is the LAN address of the mobile hotspot.
You can use another device on your network as the DHCP server, or specify the network se7ings
of all your computers.
To disable or re-enable the DHCP server feature from the web UI:
1. From the web UI dashboard, select Se3ings > Advanced > Mobile Router Setup.
The Mobile Router Setup page displays.
2. Clear the Use mobile router as DHCP server check box to disable the DHCP server feature,
or select the check box to re-enable it.
Nighthawk M7 NETGEAR
43

3. Click or tap the Apply bu7on
A message displays telling you that to save this change, your mobile hotspot must restart.
4. Click or tap the Continue bu7on.
Your se7ings are saved.
Change tethering settings from the web user interface
By default, tethering is enabled on your mobile hotspot, and it continues broadcasting WiFi when
tethering is used. You can change these se7ings from the web UI.
To change tethering se3ings from the web UI:
1. From the web UI dashboard, select Se3ings > Advanced > Mobile Router Setup.
The Mobile Router Setup page displays.
2. In the TETHERING section, select the Turn o1 WiFi when tethering check box to disable WiFi
broadcasting when tethered, or clear it to enable WiFi broadcasting when tethered.
3. Select an option from the Use USB port for drop-down:
○ Charge + tether (default): your mobile hotspot ba7ery charges and uses WiFi tethering
when connected to a computer USB port.
○ Charge only: tethering is disabled and your mobile hotspot only charges when
connected to a computer USB port.
4. Click or tap the Apply bu7on.
Your se7ings are saved.
View data usage from the web user interface
To view data usage from the web UI:
1. From the web UI dashboard, click or tap See data usage, or select Se3ings > Advanced >
Data Usage.
The Data Usage page displays.
2. (Optional) To reset the data usage counter, click or tap the Reset bu7on.
When WiFi o4loading is enabled (default se7ing), the data usage counter cannot be reset. To
reset the data usage counter, you must disable WiFi o4loading. See Disable WiFi o4loading
from the web user interface on page 37 for more information.
The counter is reset.
3. (Optional) To set a regular reset date or data plan limit, select the appropriate check box and
enter or select your desired values.
4. Click or tap the Apply bu7on.
Your se7ings are saved.
Nighthawk M7 NETGEAR
44
Configure cellular settings from the web user interface
To con2gure cellular se3ings from the web UI:
1. From the web UI dashboard, select Se3ings > Advanced > Cellular.
The Cellular page displays.
2. Change the data, band region, and network mode se7ings as needed.
Configure access point names (APNs) from the web user interface
Your mobile hotspot comes precon5gured with the access point names (APNs) for most cellular
network service providers. You can add additional APNs and select among the con5gured APNs
for use by the mobile hotspot. The mobile hotspot checks the APN to determine the type of
network connection to establish.
NOTE: Your carrier determines its own APN information and must provide you the
information for its own data plan. APN se7ings can also vary depending on the type of
plan that you subscribe to. We recommend that you contact your carrier for the
correct APN se7ings and only use the APN that your carrier instructs you to use for
your speci5c plan.
Add an APN for another network
To add an APN for another network:
1. From the web UI dashboard, select Se3ings > Advanced > Cellular.
The Cellular page displays.
2. Click or tap Add.
The APN page displays.
3. Specify the APN name.
The APN name is a label for display in the web UI.
4. Specify the APN.
This step speci5es the APN as de5ned by the carrier.
5. Change the PDP (data protocol), if necessary. Using IPV4V6 is recommended.
○ IPV4
○ IPV6
○ IPV4V6
6. Change the PDP roaming protocol, if necessary:
○ None
○ IPV4
○ IPV6
Nighthawk M7 NETGEAR
45
○ IPV4V6
NOTE: PDP roaming protocol is the IP protocol used while you are roaming (for
example when you are traveling and the roaming network does not support IPv6).
7. Select the network authentication mode supplied by the network provider:
○ None
○ PAP
○ CHAP
○ PAPCHAP
8. Enter the name and password, if they are required for the network.
9. Click or tap Add.
The entry is added to the table.
Select an APN to use
To select an APN to use:
1. From the web UI dashboard, select Se3ings > Advanced > Cellular.
The Cellular page displays.
2. Select the Active radio bu7on next to the APN entry.
The APN is selected.
Remove an APN entry
To remove an APN entry:
1. From the web UI dashboard, select Se3ings > Advanced > Cellular.
The Cellular page displays.
2. Select the box to the left of the APN.
3. Click or tap Delete.
The APN is removed.
Configure port forwarding from the web user interface
Port forwarding is an advanced feature. If your computer is hosting a server, you can enable port
forwarding so that other users can access the server. This can be useful for accessing your
computer remotely, sharing something running on your laptop, or helping certain online games
and apps work correctly.
NOTE: Port forwarding creates a security risk. When not required, disable port
forwarding.
Nighthawk M7 NETGEAR
46

To con2gure port forwarding from the web UI:
1. From the web UI dashboard, select Se3ings > Advanced > Port Forwarding.
The Port Forwarding page displays.
2. Click or tap to select the Enable check box.
The Port Forwarding list displays.
Incoming tra4ic is forwarded to speci5c ports and devices on your network using their local
IP addresses.
3. To add a port forwarding address, click or tap Add.
The Add Service page displays.
4. Enter the following port forwarding information:
○ Rule Name. Enter a descriptive name.
○ IP Address. Enter the IP address of the connected device.
○ Port. Enter the port number or range of port numbers that the application uses.
○ Protocol. If you are unsure, select TCP.
5. Click or tap Add.
6. Click or tap the Apply bu7on.
Your se7ings are saved.
Configure port filtering from the web user interface
Port Filtering is an advanced security tool that lets you choose which apps or services can access
the Internet. You can select which applications (for example, HTTP, FTP, email servers) can
access the Internet. Combined with your 5rewall, port 5ltering can help keep your network safer.
To con2gure port 2ltering from the web UI:
1. From the web UI dashboard, select Se3ings > Advanced > Port Filtering.
The Port Filtering page displays.
2. Click or tap to select the Enable check box.
The Port Table list displays.
3. Click or tap Add.
4. Identify the ports to 5lter.
Enter a meaningful label that describes the application or service.
5. Enter the port being used.
6. Enter the communication protocol being used.
7. Click or tap the Apply bu7on.
Your se7ings are saved.
Nighthawk M7 NETGEAR
47

Change display settings from the web user interface
You can change your mobile hotspot's display se7ings from the web UI. Lowering the LCD
screen’s brightness level or reducing the screen time-out to a shorter period reduces power
consumption and might increase your mobile hotspot's ba7ery life.
To change display se3ings from the web UI:
1. From the web UI dashboard, select Se3ings > Advanced > Device.
The Device page displays.
2. Adjust the following se7ings:
○ Screen Brightness: From the menu, select the screen brightness level.
○ Screen Timeout: From the menu, select a time period.
3. Click or tap the Apply bu7on.
Your se7ings are saved.
Change the date and time format from the web user interface
Your mobile hotspot is initially set to display a date and time format that is common for your
region. However, if you prefer to use a di4erent date and time format, you can change the
format that your mobile hotspot uses.
To change the date and time format from the web UI:
1. From the web UI dashboard, select Se3ings > Advanced > Device.
The Device page displays.
2. In the Date Time Format section, select an option for the following se7ings:
○ Date Format
○ Time Format
3. Click or tap the Apply bu7on.
Your se7ings are saved.
Disable or re-enable VPN passthrough from the web user interface
VPN passthrough allows VPN tra4ic to pass through your mobile hotspot so you can connect to
workplace VPN networks. VPN passthrough is enabled by default, but can be disabled if you don’t
use VPN tools.
NOTE: The VPN passthrough feature allows devices like mobile phones, laptops, and
tablets to connect to third-party VPN services through your Nighthawk 5G M7. The
Nighthawk 5G M7 does not run a VPN or include a built-in VPN client or service.
To disable or re-enable VPN passthrough from the web UI:
1. From the web UI dashboard, select Se3ings > Advanced > Other.
Nighthawk M7 NETGEAR
48

The Other page displays.
2. In the VPN Passthrough section, clear the Enable check box to disable VPN passthrough, or
select the check box to re-enable it.
VPN passthrough is enabled by default.
3. Click or tap the Apply bu7on.
Your se7ings are saved.
Disable or re-enable UPnP from the web user interface
UPnP (Universal Plug and Play) allows devices to discover each other and automatically con5gure
the network as needed. This improves experiences in multiplayer games, peer-to-peer apps, and
real-time communication tools.
UPnP is enabled by default. Disabling UPnP stops devices from automatically managing router
se7ings like port forwarding.
To disable or re-enable UPnP from the web UI:
1. From the web UI dashboard, select Se3ings > Advanced > Other.
The Other page displays.
2. In the UPnP section, clear the Enable check box to disable UPnP, or select the check box to
re-enable it.
UPnP is enabled by default.
3. (Optional) If you enabled UPnP, select a UPnP IGD Version from the menu.
This se7ing typically does not need to be changed unless a speci5c application or device
requires it.
4. Click or tap the Apply bu7on.
Your se7ings are saved.
Nighthawk M7 NETGEAR
49
Configure a DMZ server from the web user interface
A DMZ (Demilitarized Zone) places one device outside your 5rewall so the device can receive all
inbound Internet tra4ic. This isolates the rest of your network for added security, but the exposed
device must be secure since it has minimal protection.
To con2gure a DMZ server from the web UI:
1. From the web UI dashboard, select Se3ings > Advanced > Other.
The Other page displays.
2. In the DMZ section, select the Enable check box.
3. In the DMZ Address 5eld, enter the IP address of the computer to which you want all data
sent.
If your mobile hotspot is tethered using a USB cable, this address is 192.168.10.4. If your
mobile hotspot is connected using WiFi, the 5rst WiFi client’s IP address is usually
192.168.10.<XX>. You can typically check the IP address of your client device from the device's
WiFi se7ings menu or control panel.
NOTE: IPv6 addresses are not supported.
4. Click or tap the Apply bu7on.
Your se7ings are saved.
Nighthawk M7 NETGEAR
50

Troubleshooting
This chapter provides suggestions for troubleshooting problems that might arise when you are
using your mobile hotspot.
This chapter covers the following topics:
● View alerts
○ SIM Error — Check SIM or SIM Not Installed
○ SIM Locked
○ Temperature-related alerts
○ Error messages
● Extend ba/ery life
● Troubleshooting third-party power adapters and USB cables
● Factory reset your mobile hotspot
View alerts
Your mobile hotspot displays alerts to advise you of mobile hotspot status changes.
SIM Error — Check SIM or SIM Not Installed
Ensure that your cellular data carrier’s SIM card is fully inserted in your mobile hotspot's SIM card
slot. If a problem still exists, contact your carrier's customer service. The SIM card might be
damaged and need replacement.
SIM Locked
If your SIM card is locked, you can unlock the SIM.
To unlock the SIM card:
1. If you did not add a PIN for the SIM, contact your cellular data carrier's customer service for
the PIN to unlock the SIM card.
2. From a computer or WiFi device that is connected to the mobile hotspot, launch a web
browser and visit mywebui.net or 192.168.10.1 (the mobile hotspot's default IP address)
The mobile hotspot web page displays.
3. Log in using your admin password.
The web user interface (web UI) dashboard displays.
4. Enter the SIM PIN when prompted.
5. Click or tap the Apply bu7on.
Your se7ings are saved.
Nighthawk M7 NETGEAR
51

Temperature-related alerts
To get the best performance and longest life from your mobile hotspot, managing the mobile
hotspot’s temperature is important. As your mobile hotspot’s temperature increases, its
performance is reduced, while overheating the mobile hotspot will cause it to shut down entirely.
Considering thermal management when you use your mobile hotspot can prevent it from
overheating and ensure that you have the best experience with your mobile hotspot.
Your mobile hotspot has speci5c heat limits for each operating mode. When your mobile hotspot
exceeds its heat limit for an operating mode, an alert displays and the mobile hotspot reduces
performance as follows:
● Level 1: Ba7ery charging slows. Carrier 4G, and 5G connections are limited to fewer bands.
Mobile hotspot speed is reduced.
● Level 2: Ba7ery stops charging. Carrier 4G connections are limited to one band. 5G bands
stop operating. Mobile hotspot speeds are reduced further, and data connection errors
might occur.
● Level 3 (Critical): Mobile hotspot shuts down to protect itself.
Managing Temperature for Best Performance
The following tips can help you manage your mobile hotspot’s heat to get the best performance:
● Ensure proper ventilation: Use your mobile hotspot in a well-ventilated area to help keep it
cool. Avoid using the mobile hotspot on soft surfaces like beds or couches, because they can
block air6ow and trap heat.
● Avoid extreme temperatures: The mobile hotspot is designed for safe operation in the 0°C
to 35°C (32° F to 95°F) ambient air temperature range. Avoid exposing the mobile hotspot to
direct sunlight, high-temperature environments, or extremely cold conditions, because they
can reduce performance and cause mobile hotspot problems.
● Reduce load on the mobile hotspot: When using your mobile hotspot in higher temperature
environments, limit the number of simultaneous connections and bandwidth-intensive
activities. This can help reduce the heat generated by the mobile hotspot.
● Install 2rmware updates: Keep your mobile hotspot’s 5rmware up to date. NETGEAR
5rmware updates can include performance optimizations and thermal management
improvements, ensuring the best performance for your mobile hotspot.
Nighthawk M7 NETGEAR
52
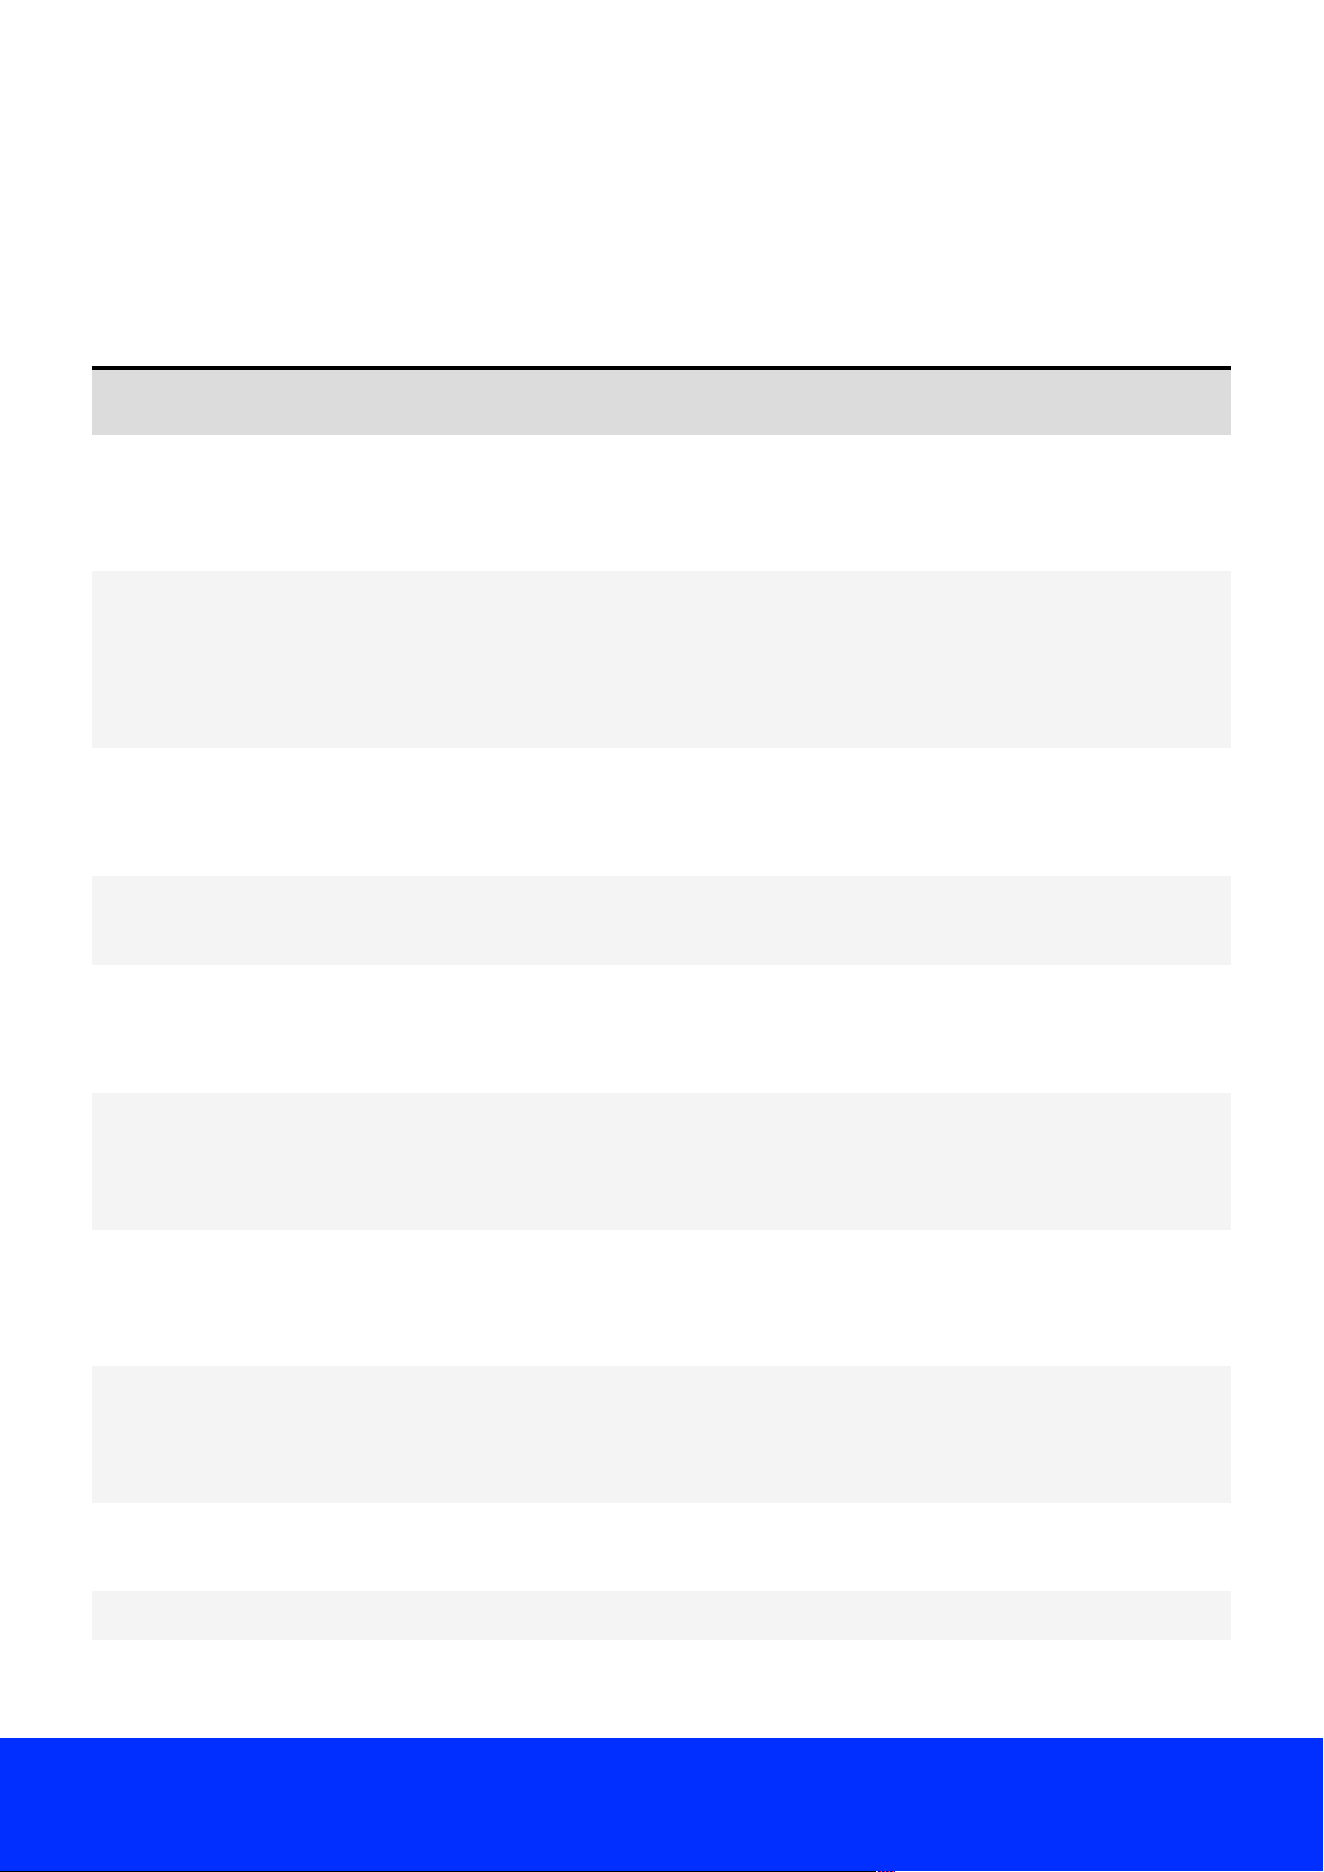
Error messages
Your mobile hotspot displays error messages to advise you of mobile hotspot and connection
problems.
Table 2.Error Messages
Error Message Meaning
Ba7ery too low
Charge for a few minutes before
powering on.
The ba7ery level is too low to power on the mobile
hotspot. Charge the mobile hotspot for a few minutes
and try again.
Connection error
There is a temporary network failure.
Please try again later or contact your
provider with code: ESM #33.
There is a temporary network issue preventing the
connection. Try again later or contact your provider.
Data Exhausted
Your data plan has been used before its expiration
date. Buy an eSIM in the NETGEAR app to add more
data.
Device is hot
The mobile hotspot temperature is too high. Allow the
mobile hotspot to cool down before trying again.
Incorrect APN
The access point name (APN) is incorrect. The active
internet source is cellular. Check your APN se7ings or
contact your network provider.
M7 is overheating
Your cellular connection is being thro7led
due to high temperatures.
Your cellular connection is being slowed due to high
temperatures. Allow the mobile hotspot to cool down
and try again.
M7 is overheating
Your mobile hotspot is shu7ing down to
cool o4 and prevent damage.
The mobile hotspot is shu7ing down to cool o4 and
prevent damage.
Mobile Data isn't available right now
Open the NETGEAR app to make sure
your SIM is set up.
Mobile data is currently unavailable. Open the
NETGEAR app to make sure your SIM is set up.
Network unavailable
The mobile hotspot cannot connect to the network at
this time. Try again later.
Not started Your data plan has not started yet.
Plan Expired
Your SIM plan has expired. Buy an eSIM in the
NETGEAR app to restore data.
Nighthawk M7 NETGEAR
53

Error Message Meaning
SIM Blocked. Enter PUK in NETGEAR app
The SIM card is blocked. Enter the PUK in the
NETGEAR app.
SIM Locked. Enter PIN in NETGEAR app
The SIM card is locked. Enter the PIN in the NETGEAR
app.
Unsupported accessory
This mobile hotspot only works with a
cradle purchased from NETGEAR.
This mobile hotspot only works with a cradle
purchased from NETGEAR. Using an unsupported
accessory may not work.
Unsupported accessory, Device is hot,
Network unavailable
Multiple errors are happening at the same time. Error
messages are shown together when there is more than
one issue.
Extend battery life
By default, your mobile hotspot is con5gured to optimize ba7ery life. The following factors can
a4ect ba7ery life:
● Screen brightness
● Standby time
● Data throughput
● Mobile broadband signal strength (the be7er the signal, the longer the ba7ery life)
● WiFi range
For example, you can increase ba7ery life by reducing the LCD screen’s brightness level, or set
the screen time-out to a shorter period.
You might want to try the following to improve your ba7ery life:
● Change WiFi standby, range, bandwidth, and info display se7ings from the web user
interface on page 39
● Change display se7ings from the web user interface on page 48
Troubleshooting third-party power adapters and USB cables
The power adapter and USB cable that you use with your mobile hotspot must meet certain
standards to provide su4icient power for mobile hotspot charging and operation. Many third-
party power adapters and USB cables can't deliver enough power to operate and charge the
mobile hotspot at the same time. If your mobile hotspot has problems when connected to a
speci5c power adapter or USB cable, the adapter or cable probably doesn't deliver enough
power for your mobile hotspot.
O4icial NETGEAR power adapters are either Quick Charge 2.0-certi5ed or Quick Charge
3.0-certi5ed (depending on region). NETGEAR cannot guarantee the performance of speci5c
Nighthawk M7 NETGEAR
54
Figure 10.Nighthawk M7 factory reset button
third-party power adapters or USB cables with your mobile hotspot. However, high quality third-
party power adapters and USB cables that meet the following standards should provide similar
performance to the o4icial NETGEAR parts:
● Quick Charge 2.0 power adapter with USB 3.2 Type-A to Type-C cable
● Quick Charge 3.0 power adapter with USB 3.2 Type-A to Type-C cable
● Quick Charge 4.0 power adapter with USB 3.2 Type-C cable
● USB Power Delivery 3.0 power adapter with USB 3.2 Type-C cable
Factory reset your mobile hotspot
You can reset your mobile hotspot to the factory se7ings. This is useful if you reset the web UI
password (also known as an admin password) and forgot the new password, or if you want to set
up your mobile hotspot in a di4erent way.
To reset your mobile hotspot, use the included SIM card release tool to press and hold the factory
reset bu7on on the side of the mobile hotspot for 5 seconds, then release the bu7on.
NOTE: When you reset your mobile hotspot, any connected devices are disconnected
and must reconnect after the mobile hotspot restarts. A factory reset restores the
mobile hotspot to its default se7ings but does not remove installed eSIMs.
You can also reset your mobile hotspot from the web UI. For more information, see Factory reset
your hotspot from the web UI on page 0.
Nighthawk M7 NETGEAR
55
Figure 11.Nighthawk 5G M7 Mobile WiFi Hotspot rear
MODEL: MH7150
NETGEAR INTL LTD
Floor 6, Penrose Two,
Penrose Dock, Cork,
T23 YY09, Ireland
IMEI-1: 123456789012345
IMEI-2: 123456789012345
Specifications
This appendix covers the following topics:
● Product information labeling and e-labeling
● Band speci.cations
● WiFi speci.cations
Product information labeling and e-labeling
NOTE: The following illustrations and screenshots are provided for reference purposes
only. The actual product label, information screen and e-labeling information vary by
region and mobile hotspot.
The product information label on the back of the mobile hotspot indicates the speci5c model and
mobile hotspot IMEI.
You can view additional information about the mobile hotspot, including required regulatory e-
labeling from the user interface.
To view the regulatory e-labeling from the mobile hotspot user interface:
1. Power on your mobile hotspot to display the home screen.
Nighthawk M7 NETGEAR
56

Figure 12.Information screen
2. Press the Power/Navigation bu7on one time to display the WiFi screen, then press it again
to display the information screen (including model number).
3. Press and hold the Power/Navigation bu7on to view the regulatory e-labeling information
(including FCC/IC statements and IDs).
Figure 13. E-labeling screens
Nighthawk M7 NETGEAR
57
Band specifications
The following table indicates the Nighthawk M7 family mobile band speci5cations.
Table 3.Mobile bands (MH7110-111PAS, MH7150-100PAS)
Technology Band
4G/LTE bands
B1, B2, B3, B4, B5, B7, B12, B13, B14, B17, B25, B26, B28, B30, B38, B41,
B42, B43, B48, B66, B71
5GNR bands
n1, n2, n3, n5, n7, n12, n13, n14, n25, n26, n28, n30, n38, n41, n48, n66,
n70, n71, n77, n78
Table 4.Mobile bands (MH7110-111EUS, MH7110-111APS, MH7150-100EUS, MH7150-100APS)
Technology Band
4G/LTE bands
B1, B2, B3, B4, B5, B7, B8, B18, B19, B20, B25, B26, B28, B38, B40, B41,
B42, B43, B66
5GNR bands n1, n2, n3, n5, n7, n8, n20, n25, n26, n28, n38, n40, n41, n66, n77, n78
Table 5.Mobile bands (MH7110-1TLAUS)
Technology Band
4G/LTE bands
B1, B2, B3, B4, B5, B7, B12, B13, B14, B17, B25, B26, B28, B30, B38, B41,
B42, B43, B48, B66, B71
5GNR bands
n1, n2, n3, n5, n7, n12, n13, n14, n25, n26, n28, n30, n38, n41, n48, n66,
n70, n71, n77, n78
WiFi specifications
WiFi support
● WiFi 802.11a/b/g/n/ac/ax/be, 2x2 MIMO
● 2.4/5 GHz Standalone
Frequency Specifications
Table 6.Frequency specifications (MH7110-111PAS, MH7150-100PAS)
GHz Range
2.4 GHz 2412-2462 MHz
5 GHz 5180-5240 MHz, 5745-5875 MHz
Table 7.Frequency specifications (MH7110-1TLAUS, MH7110-111EUS, MH7110-111APS, MH7150-100EUS, MH7150-100APS)
GHz Range
2.4 GHz 2412-2472 MHz
Nighthawk M7 NETGEAR
58

GHz Range
5 GHz 5180-5240 MHz
Nighthawk M7 NETGEAR
59