USE + CARE
MANUAL
REV.092025
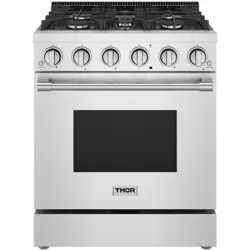
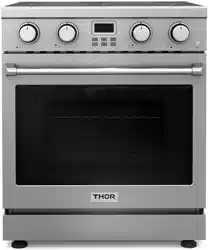
XRI Model Induction Ranges
XRI30E | XRI36E

USE & CARE MANUAL
XRI MODELS
XRI30
E|
X
RI36E

Table of Contents
Important Safety Information.....................................................................................................1
Cooking Recommenations..........................................................................................................7
Product Dimensions....................................................................................................................10
Preparing To Install The Range.................................................................................11
Connecting The Power...............................................................................................12
Before Setting Surface Controls................................................................................17
Setting Surface Controls............................................................................................21
Operating The Oven....................................................................................................26
Cleaning And Maintenance.........................................................................................45
Remove The Oven Door..............................................................................................49
Trouble Shooting........................................................................................................51
Rubber Pad Installation On Back Panel.....................................................................55
Warranty And Service...................................................................................................................56
TABLE OF CONTENTS
1
GENERAL SAFETY INSTRUCTIONS
■ Before performing any service, unplug the range
or disconnect the power supply at the household
distribution panel by removing the fuse or switching
off the circuit breaker.
■ Do not leave children alone—children should not
be left alone or unattended in an area where an
appliance is in use. They should never be allowed
to climb, sit or stand on any part of the appliance.
■ Do not store items of interest to
children above a range or on the backguard of a
range—children climbing on the range to reach
items could be seriously injured.
■ Use only dry pot holders—moist or damp pot
holders on hot surfaces may result in burns from
steam. Do not let pot holders touch hot surface
units or heating elements. Do not use a towel or
other bulky cloth in place of pot holders.
■ Never use your appliance for warming or heating
the room.
■ Do not touch the surface units, the heating elements
or the interior surface of the oven. These surfaces
may be hot enough to burn even though they are
dark in color. During and after use, do not touch,
or let clothing or other flammable materials contact
the surface units, areas nearby the surface units or
any interior area of the oven; allow sufficient time
for cooling first. Other surfaces of the appliance
may become hot enough to cause burns. Potentially
hot surfaces include the cooktop, areas facing the
cooktop, oven vent opening, surfaces near the
opening and crevices around the oven door.
■ Do not heat unopened food containers. Pressure
could build up and the container could burst,
causing an injury.
■ Do not use any type of foil or liner to cover the
oven bottom or anywhere in the oven, except as
described in this manual. Oven liners can trap heat
or melt, resulting in damage to the product and risk
of shock, smoke or fire.
■ Avoid scratching or impacting glass doors, cook
tops or control panels. Doing so may lead to glass
breakage. Do not cook on a product with broken
glass. Shock, fire or cuts may occur.
■ Cook meat and poultry thoroughly—meat to at least
an internal temperature of 160°F and poultry to at
least an internal temperature of 180°F. Cooking
to these temperatures usually protects against
foodborne illness.
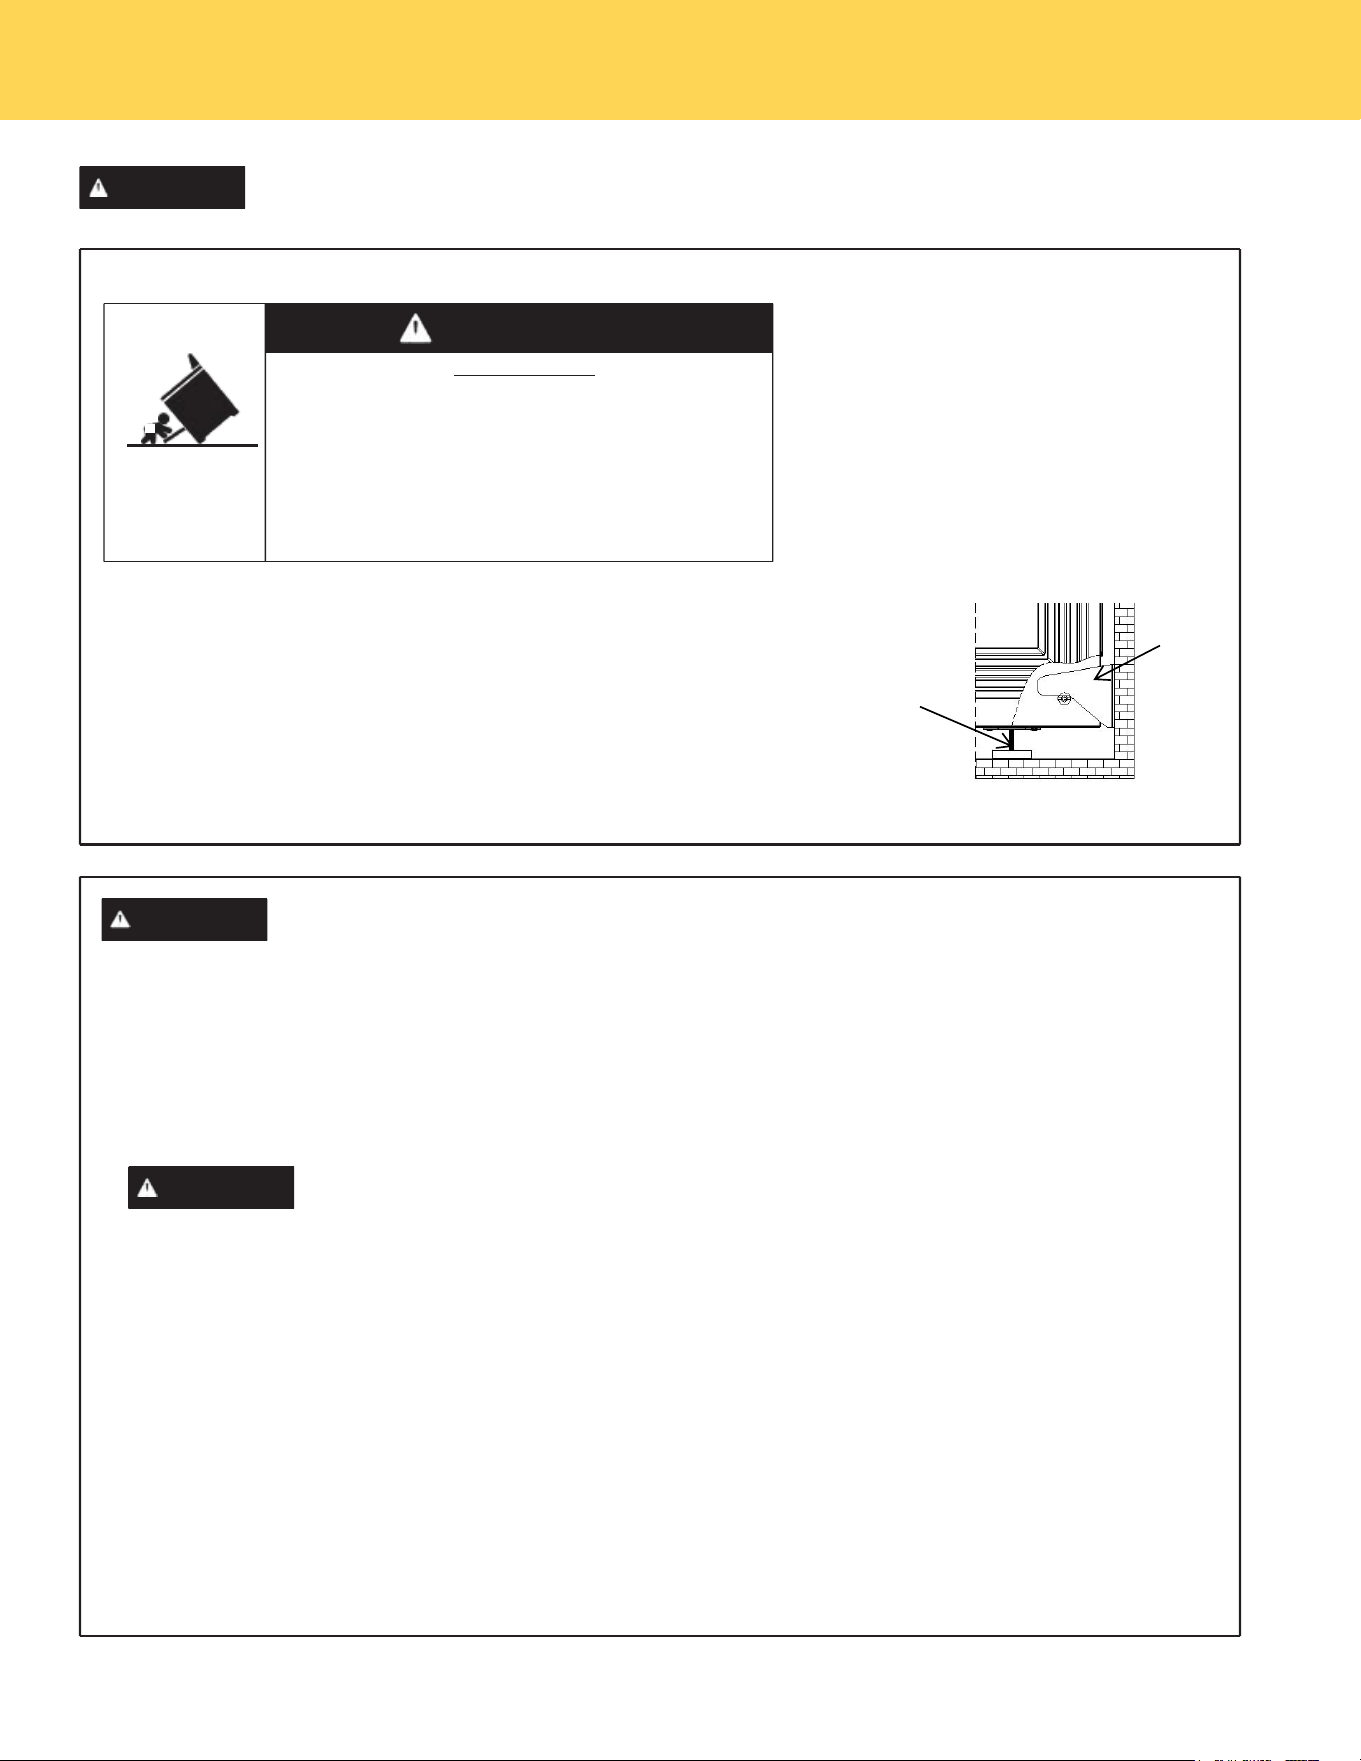
ANTI-TIP DEVICE
To reduce the risk of tipping the range,
the range must be secured by a properly
installed anti-tip bracket. See installation
instructions shipped with the bracket for
complete details before attempting to install.
For Free-Standing and Slide-In Ranges
To check if the bracket is installed and
engaged properly, look underneath the
range to see that the rear leveling leg is
engaged in the bracket. On some models, the storage drawer or kick panel
can be removed for easy inspection. If visual inspection is not possible,
slide the range forward, confirm the anti-tip bracket is securely attached to
the floor or wall, and slide the range back so the rear leveling leg is under
the anti-tip bracket.
If the range is pulled from the wall for any reason, always repeat this
procedure to verify the range is properly secured by the anti-tip bracket.
Never completely remove the leveling legs or the range will not be secured
to the anti-tip device properly.
Tip-Over Hazard
• A child or adult can tip the range and be killed.
• Install the anti-tip bracket to the wall or floor.
• Engage the range to the anti-tip bracket by sliding the
range back such that the foot is engaged.
• Re-engage the anti-tip bracket if the range is moved.
• Failure to do so can result in death or serious burns
to children or adults.
Read all safety instructions before using the product. Failure to follow these instructions may result
in fire, electrical shock, serious injury or death.
WARNING
CAUTION
WARNING
WARNING
Free-Standing and Slide-In Ranges
Anti-Tip
Bracket
Leveling Leg
IMPORTANT SAFETY INFORMATION
2
COOKTOP SAFETY INSTRUCTIONS
IN THE EVENT OF A FIRE, TAKE THE FOLLOWING
STEPS TO PREVENT INJURY AND FIRE SPREADING
■ Never leave the surface units unattended at medium
or high heat settings. Boilovers cause smoking and
greasy spillovers that may catch on fire.
■ Never leave oil unattended while frying. If allowed
to heat beyond its smoking point, oil may ignite
resulting in fire that may spread to surrounding
cabinets. Use a deep fat thermometer whenever
possible to monitor oil temperature.
■ To avoid oil spillover and fire, use a minimum
amount of oil when shallow pan-frying and avoid
cooking frozen foods with excessive amounts of ice.
■ Only certain types of glass, glass/ceramic,
earthenware or other glazed containers are suitable
for cooktop service; others may break because of
the sudden change in temperature.
■ To minimize the possibility of burns, ignition of
flammable materials and spillage, the handle of a
container should be turned toward the center of the
range without extending over nearby surface units.
■ When preparing flaming foods under a hood, turn
the fan on.
KEEP FLAMMABLE MATERIALS AWAY FROM THE RANGE
Failure to do so may result in fire or personal injury.
■ Do not use water on grease fires. Never pick up
a flaming pan. Turn the controls off. Smother a
flaming pan on a surface unit by covering the pan
completely with a well-fitting lid, cookie sheet or flat
tray. Use a multi-purpose dry chemical or foam-type
fire extinguisher.
■ If there is a fire in the oven during baking, smother
the fire by closing the oven door and turning the
oven off or by using a multi-purpose dry chemical or
foam-type fire extinguisher.
■ If there is a fire in the oven during self-clean, turn
the oven off and wait for the fire to go out. Do not
force the door open. Introduction of fresh air at self-
clean temperatures may lead to a burst of flame
from the oven. Failure to follow this instruction may
result in severe burns.
■ Do not store or use flammable materials in an oven
or near the cooktop, including paper, plastic, pot
holders, linens, wall coverings, curtains, drapes and
gasoline or other flammable vapors and liquids.
■ Never wear loose-fitting or hanging garments while
using the appliance. These garments may ignite if
they contact hot surfaces causing severe burns.
■ Do not let cooking grease or other flammable
materials accumulate in or near the range. Grease
in the oven or on the cooktop may ignite.
■ Clean ventilating hoods frequently. Grease should
not be allowed to accumulate on the hood or filter.
WARNING
WARNING
WARNING
IMPORTANT SAFETY INFORMATION
3
OVEN SAFETY INSTRUCTIONS
GLASS COOKTOP SAFETY INSTRUCTIONS
■ Stand away from the range when opening the oven
door. Hot air or steam which escapes can cause
burns to hands, face and/or eyes.
■ Do not use the oven if a heating element develops
a glowing spot during use or shows other signs
of damage. A glowing spot indicates the heating
element may fail and present a potential burn, fire,
or shock hazard. Turn the oven off immediately and
have the heating element replaced by a qualified
service technician.
■ Keep the oven vent unobstructed.
■ Keep the oven free from grease buildup. Grease in
the oven may ignite.
■ Place oven racks in desired location while oven is
cool. If rack must be moved while oven is hot, do not
let pot holder contact hot heating element in oven.
■ When using cooking or roasting bags in the oven,
follow the manufacturer’s directions.
■ Pull the oven rack to the stop-lock position when
loading and unloading food from the oven. This
helps prevent burns from touching hot surfaces of
the door and oven walls.
■ Do not leave items such as paper, cooking utensils
or food in the oven when not in use. Items stored in
an oven can ignite.
■ Never place cooking utensils, pizza or baking stones,
or any type of foil or liner on the oven floor. These
items can trap heat or melt, resulting in damage to
the product and risk of shock, smoke or fire.
■ Use care when touching the cooktop. The glass
surface of the cooktop will retain heat after the
controls have been turned off.
■ Do not cook on a broken cooktop. If the glass
cooktop should break, cleaning solutions and
spillovers may penetrate the broken cooktop and
create arisk of electric shock. Contact a qualified
technician immediately.
■ Avoid scratching the glass cooktop. The cooktop
can be scratched with items such as knives, sharp
instruments, rings or other jewelry, and rivets on
clothing.
■ Use ceramic cooktop cleaner and a non-scratch
cleaning pad to clean the cooktop. Wait until the
cooktop cools and the indicator light goes out
before cleaning. A wet sponge or cloth on a hot
surface can cause steam burns. Some cleaners can
produce noxious fumes if applied to a hot surface.
NOTE: Sugar spills are an exception. They should
be scraped off while still hot using an oven mitt
and a scraper. See the Cleaning the glass cooktop
section for detailed instructions.
■ Read and follow all instructions and warnings on the
cleaning cream label.
■ Do not place or store items that can melt or catch
fire on the glass cooktop, even when it is not being
used. If the cooktop is inadvertently turned on, they
may ignite. Heat from the cooktop or oven vent after
it is turned off may cause them to ignite also.
■ Do not place metallic objects such as knives, forks,
spoons and lids on the cooktop surface since they
can get hot.
WARNING
WARNING
IMPORTANT SAFETY INFORMATION

4
SELF-CLEANING OVEN SAFETY INSTRUCTIONS
The self-cleaning feature operates the oven at temperatures high enough to burn away food soils in the oven.
Follow these instructions for safe operation.
■ Do not touch oven surfaces during self-clean
operation. Keep children away from the oven during
self-cleaning. Failure to follow these instructions
may cause burns.
■ Before operating the self-clean cycle, remove pans,
shiny metal oven racks and other utensils from the
oven. Only gray porcelain-coated oven racks may
be left in the oven. Do not use self-clean to clean
other parts, such as drip pans or bowls.
■ Before operating the self-clean cycle, wipe grease
and food soils from the oven. Excessive amount
of grease may ignite leading to smoke damage to
your home.
■ If the self-cleaning mode malfunctions, turn the
oven off and disconnect the power supply. Have it
serviced by a qualified technician.
■ Do not clean the door gasket. The door gasket is
essential for a good seal. Care should be taken not
to rub, damage or move the gasket.
■ Do not use oven cleaners. No commercial oven
cleaner or oven liner protective coating of any kind
should be used in or around any part of the oven.
WARNING
IMPORTANT INSTRUCTIONS FOR UNPACKING AND INSTALLATION
IMPORTANT
Read and follow the below instructions and precautions for unpacking, installing, and
servicing your appliance.
Remove all tape and packaging before using the appliance. Destroy the carton and
plastic bags after unpacking the appliance. Never allow children to play with pack-
aging material. Do not remove the wiring label and other literature attached to the
appliance. Do not remove model/serial number plate.
Cold temperatures can damage the electronic control. When using this appliance for
the first time, or when the appliance has not been used for an extended period of time,
be sure the appliance has been in temperatures above 32ºF (0ºC) for at least 3 hours
before turning on the power to the appliance.
Make sure wall covering, countertop and cabinets around the range can withstand the heat
(up to 194° F) generated by the range. Discoloration, delamination or melting may occur.
This range has been designed to comply with the maximum allowable wood cabinet
temperature of 194°F.
Before installing the range in an area covered with linoleum or other synthetic floor covering,make
sure the floor covering can withstand temperatures of at least 200°F(93°C).
Use an insulated pad or 1/4 in. (0.64 cm) plywood under the range if installing the range over
carpeting.
Never modify or alter the construction of the appliance by removing the leveling
legs, panels, wire covers, anti-tip brackets/screws, or any other part of the appliance.
Be sure to have an appropriate foam type fi re extinguisher available, visible, and easily
accessible located near the appliance.
IMPORTANT SAFETY INFORMATION

5
• Avoid fi re hazard or electrical shock. Do not use an adapter plug, use an extension
cord, or remove grounding prong from the power cord. Failure to follow this warning
may cause serious injury, fire, or death.
Proper Installation—Be sure your appliance is properly installed and grounded by a
qualified technician. In the United States,install in accordance with the National
Fuel Gas Code ANSI Z223.1/NPFA No. 54,latest edition and National Electrical Code
NFPA No. 70 latest edition, and local electrical code requirements. In Canada, install in
accordance with CAN/ CGA B149.1 and CAN/CGA B149.2 and CSA Standard C22.1,
Canadian Electrical code, Part 1-latest editions and local electrical code requirements.
Install only per installation instructions provided in the literature package for this
appliance.
For personal safety, this appliance must be properly grounded. For maximum safety,the
power cord must be securely connected to an electrical outlet or junction box that is
the correct voltage, is correctly polarized and properly grounded, and protected by a
circuit breaker in accordance with local codes.
It is the personal responsibility of the consumer to have the appropriate outlet or
junction box with the correct, properly grounded wall receptacle installed by a
qualified electrician. It is the responsibility and obligation of the consumer to
contact a qualified installer to assure that the electrical installation is adequate and
is in conformance with all local codes and ordinances.
See the installation instructions packaged with this appliance for complete installation
and grounding instructions.
GROUNDING INSTRUCTIONS
• Avoid fi re hazard or electrical shock. Failure to follow this warning may cause serious
injury, fi re, or death.
WARNING
IMPORTANT INSTRUCTIONS FOR SERVICE AND MAINTENANCE
Do not repair or replace any part of the appliance unless specifically recommended in the
manuals. All other servicing should be done only by a qualified technician. This reduces
the risk of personal injury and damage to the appliance.
Always contact your dealer, distributor,service agent, or manufacturer about problems or
conditions you do not understand.
Ask your dealer to recommend a qualified technician and an authorized repair service.
Know how to disconnect the power to the appliance at the circuit breaker or fuse box in
case of an emergency.
Remove the oven door from any unused oven if it is to be stored or discarded.
Do not touch a hot oven light bulb with a damp cloth. Doing so could cause the bulb to
break. Handle halogen lights(if equipped) with paper towels or soft gloves. Disconnect
the appliance or shut off the power to the appliance before removing and replacing the
bulb.
IMPORTANT SAFETY INFORMATION

6
PROPER DISPOSAL OF YOUR APPLIANCE
Dispose of or recycle your appliance in accordance with Federal and Local Regulations. Contact your local
authorities for the environmentally safe disposal or recycling of your appliance.
Important: This appliance has been tested and found to comply with the limits for a
class B digital device, pursuant to Part 18 of the FCC rules (United States) and ICES- 001
(Canada). These limits are designed to provide reasonable protection against harmful
interference in a residential installation. This unit uses and can radiate radio frequency
energy and, if not installed and used in accordance with the instructions,may cause
harmful interference to radio communications. However there is no guarantee that
interference will not occur in a particular installation. If this unit does cause harmful
interference to radio or television reception, which can be determined by turning the unit
off and on, the user is encouraged to try to correct the interference by one or more of the
following measures:
• Reorient or relocate the receiving antennae.
• Increase distance between unit and receiver.
• Connect the unit into an outlet or a circuit different from that to which the receiver is
connected.
WARNING
California Residents: for cancer and reproductive harm information, visit
www.P65Warnings.ca.gov
IMPORTANT SAFETY INFORMATION
7
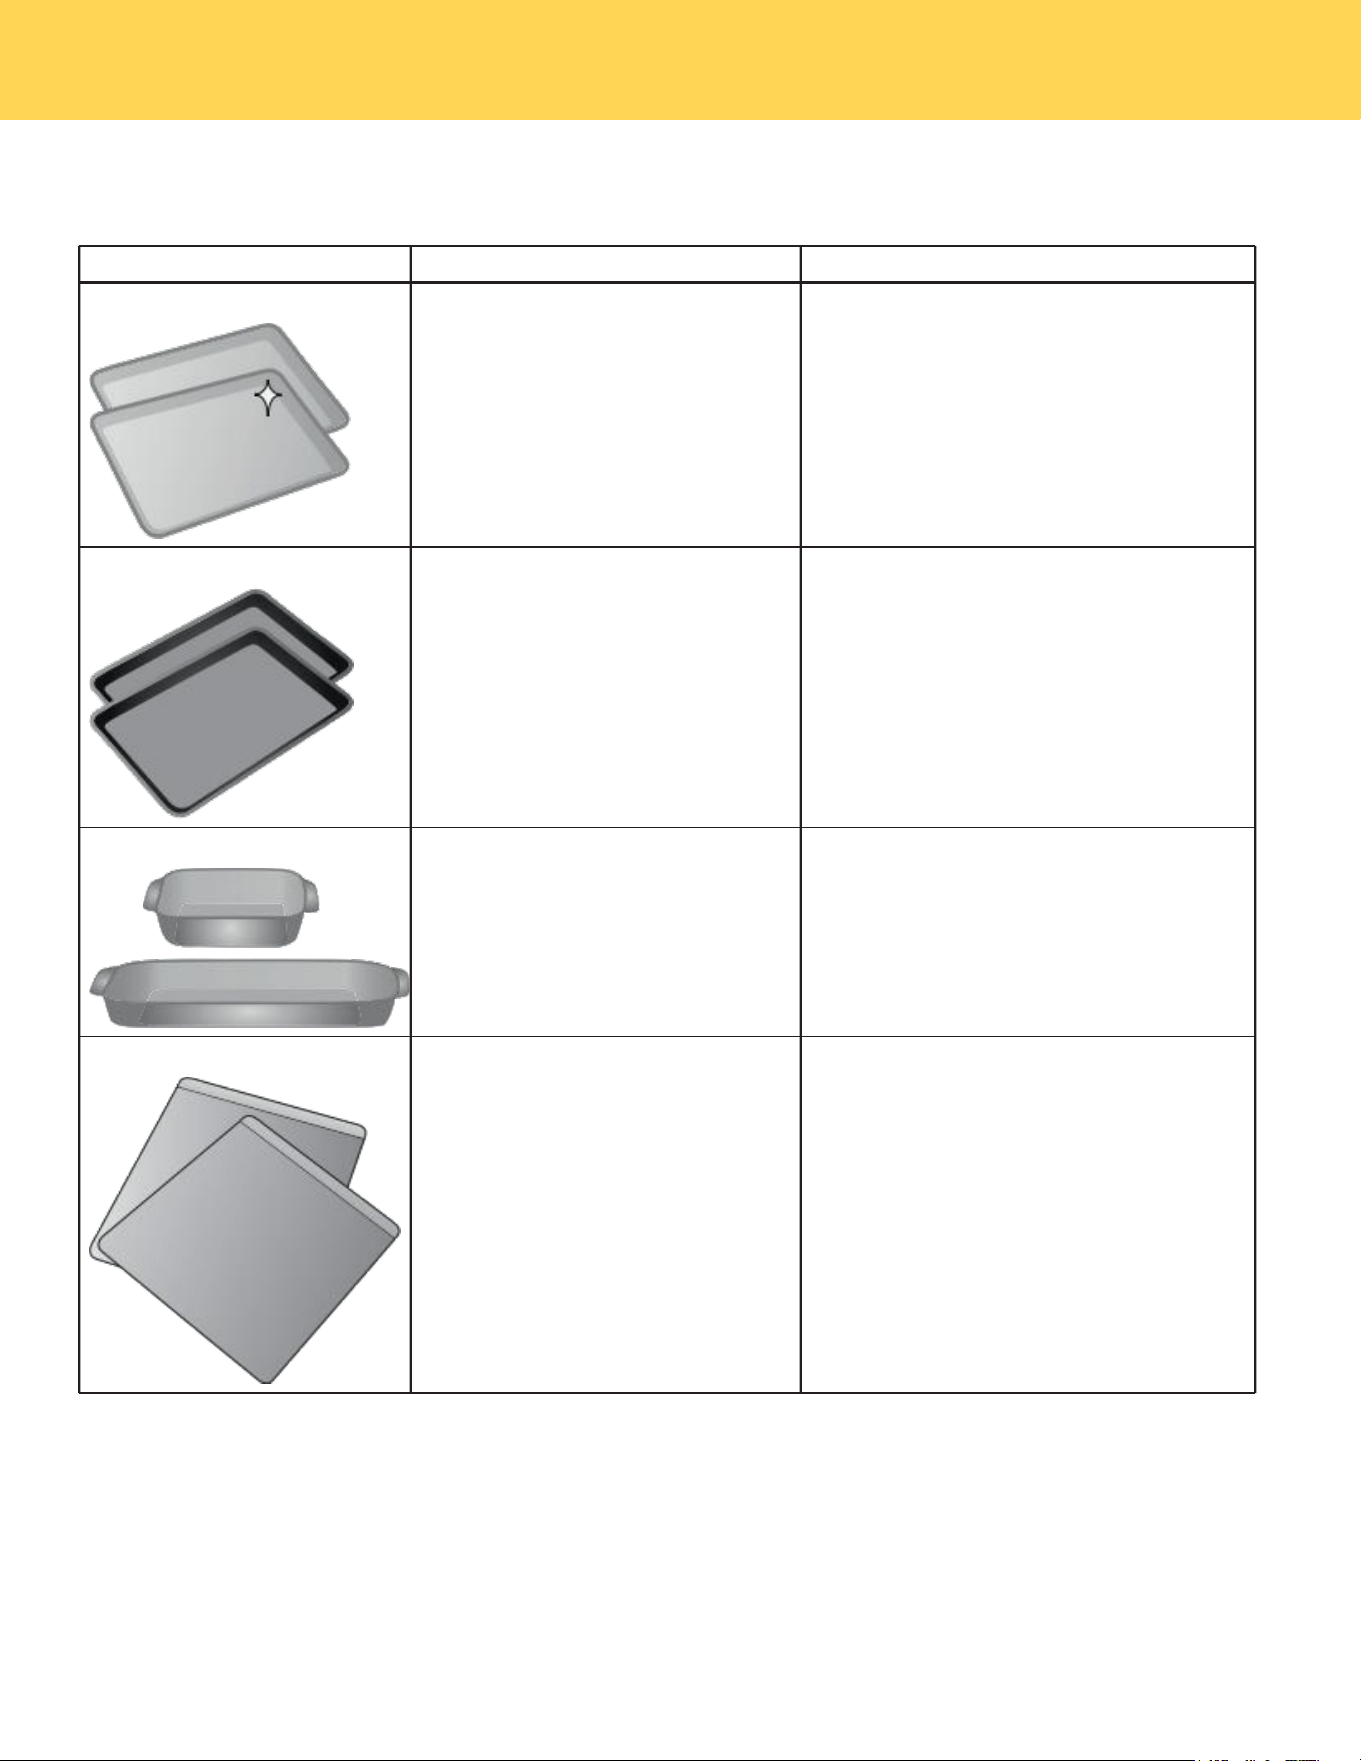
Bakeware
The material of bakeware affects how evenly and quickly it transfers heat from the pan to the food.
Material
Attributes
Recommendation
Shiny metal bakeware
Shiny, aluminum, and non-coat-
ed bakeware is the best for even
heating. It is suitable for all baked
goods.
Recommended cooking temperatures
and times are based on shiny metal
bakeware.
Dark metal bakeware
Dark bakeware cooks hotter than
shiny bakeware.
Reduce the cooking temperature by
25° F (13-14° C) when using dark bake-
ware.
Glass bakeware
Glass bakeware cooks hotter
than shiny bakeware.
Glass is convenient, as the same
piece of bakeware can be used
for cooking, serving, and storing
food.
Reduce the cooking temperature by
25° F (13-14° C) when using glass bake-
ware.
Insulated bakeware
Insulated bakeware cooks cooler
than shiny bakeware.
Insulated bakeware is designed
for baking in gas ovens.
Reduce the cooking temperature by
25° F (13-14° C) when using glass bake-
ware.
COOKING RECOMMENDATIONS
8
Condition
Attributes
Recommendation
Aging cookware
As pans age and become
discolored, cooking times may
need to be reduced slightly.
If food is too dark or overcooked, use the
minimum cook time in the recipe or packag-
ing.
If food is too light or undercooked, use the
middle to maximum cook time in the recipe
or packaging.
High altitude
Air is drier and air pressure is
lower.
Water boils at a lower tem-
perature, and liquids evapo-
rate faster.
Foods may take longer to
bake.
Doughs may rise faster.
Adjust cooking temperature, cooking time, or
recipes as needed.
Increase amount of liquid in baking recipes.
Increase cook time on cooktop. Cover dishes
to reduce evaporation.
Increase bake time or oven temperature.
Reduce amount of baking soda or baking
powder in recipe. Reduce rising time or
punch down dough and allow it to rise twice.
Situation
Recommendation
Baking
Rack placement
Follow the instructions in “Operating the oven” starting on page 26.
When using only one rack, place the rack so the food is in the center of the
oven.
Preheat
Fully preheat the oven before baking items like cookies, cakes, biscuits and
breads. Insert food immediately after the beep.
Checking food
Use the window and oven light when checking food. Opening the door may
reduce baking performance.
Bake or Convection Bake
Convection bake is the best function to use for baking on multiple racks. For
best performance, see “Convection Bake” on page 35.
Food placement
Allow at least 2 inches (5 cm) of space between bakeware for proper aircir
culation.
Result
Recommendation
Food too light
Use the middle to maximum cook time recommended on packaging or recipe.
Food too dark
Use the minimum cook time recommended on packaging or recipe.
Cooking Results
Small adjustments may fix a problem with food not being as done as you like or more done than you like.
Cooking Conditions
Conditions in your kitchen can affect the performance of your appliance when cooking food.
Cooking Tips
Use these additional tips to get the best results from your appliance.
COOKING RECOMMENDATIONS

9
Material
Recommendation
Broiling / Roasting
Broiling pan
For best results when broiling, use a broil pan with a broil pan insert de-
signed to drain the fat from the food, help avoid spatter, and reduce smok-
ing. The broiler pan will catch grease spills, and the insert helps prevent
grease splatters.
If a broiler pan and insert are not supplied with this appliance, they may be
purchased from thorkitchen.com.
Convection Cooking
Convection attributes
Convection cooking uses a fan to circulate hot air around the oven and
food. It browns food more evenly and reduces hot spots in the oven.
Convection saves time when using multiple racks or cooking several food
items at once.
Convection bake
Reduce cooking temperature by 25° F ( 13- 1 4° C ) from the recipe unless the
recipe is written for convection baking.
Preheat the oven for best results.
COOKING RECOMMENDATIONS
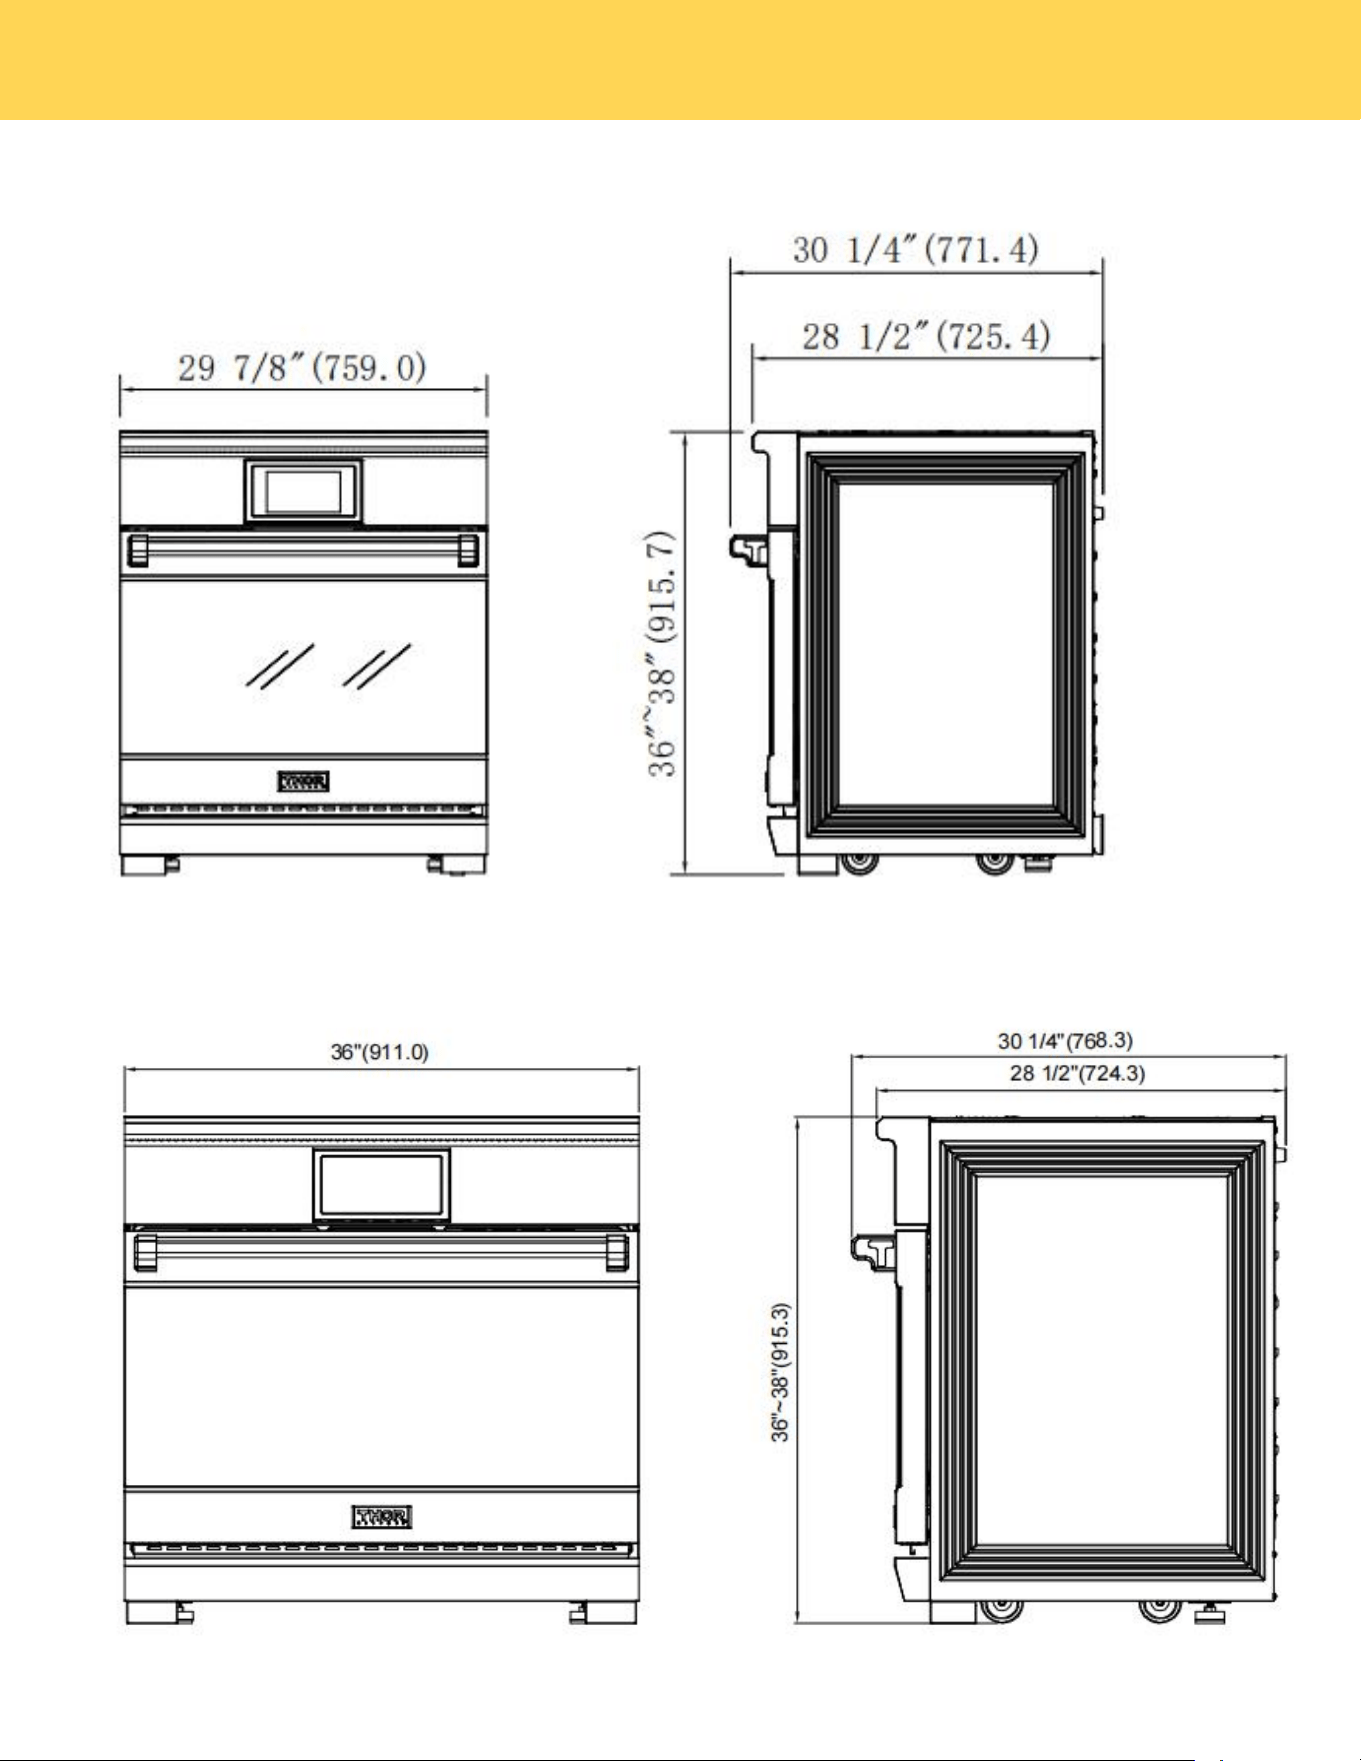
Modle:XRI36
10
E
Modle:XRI30E
PRODUCT DIMENSIONS
11
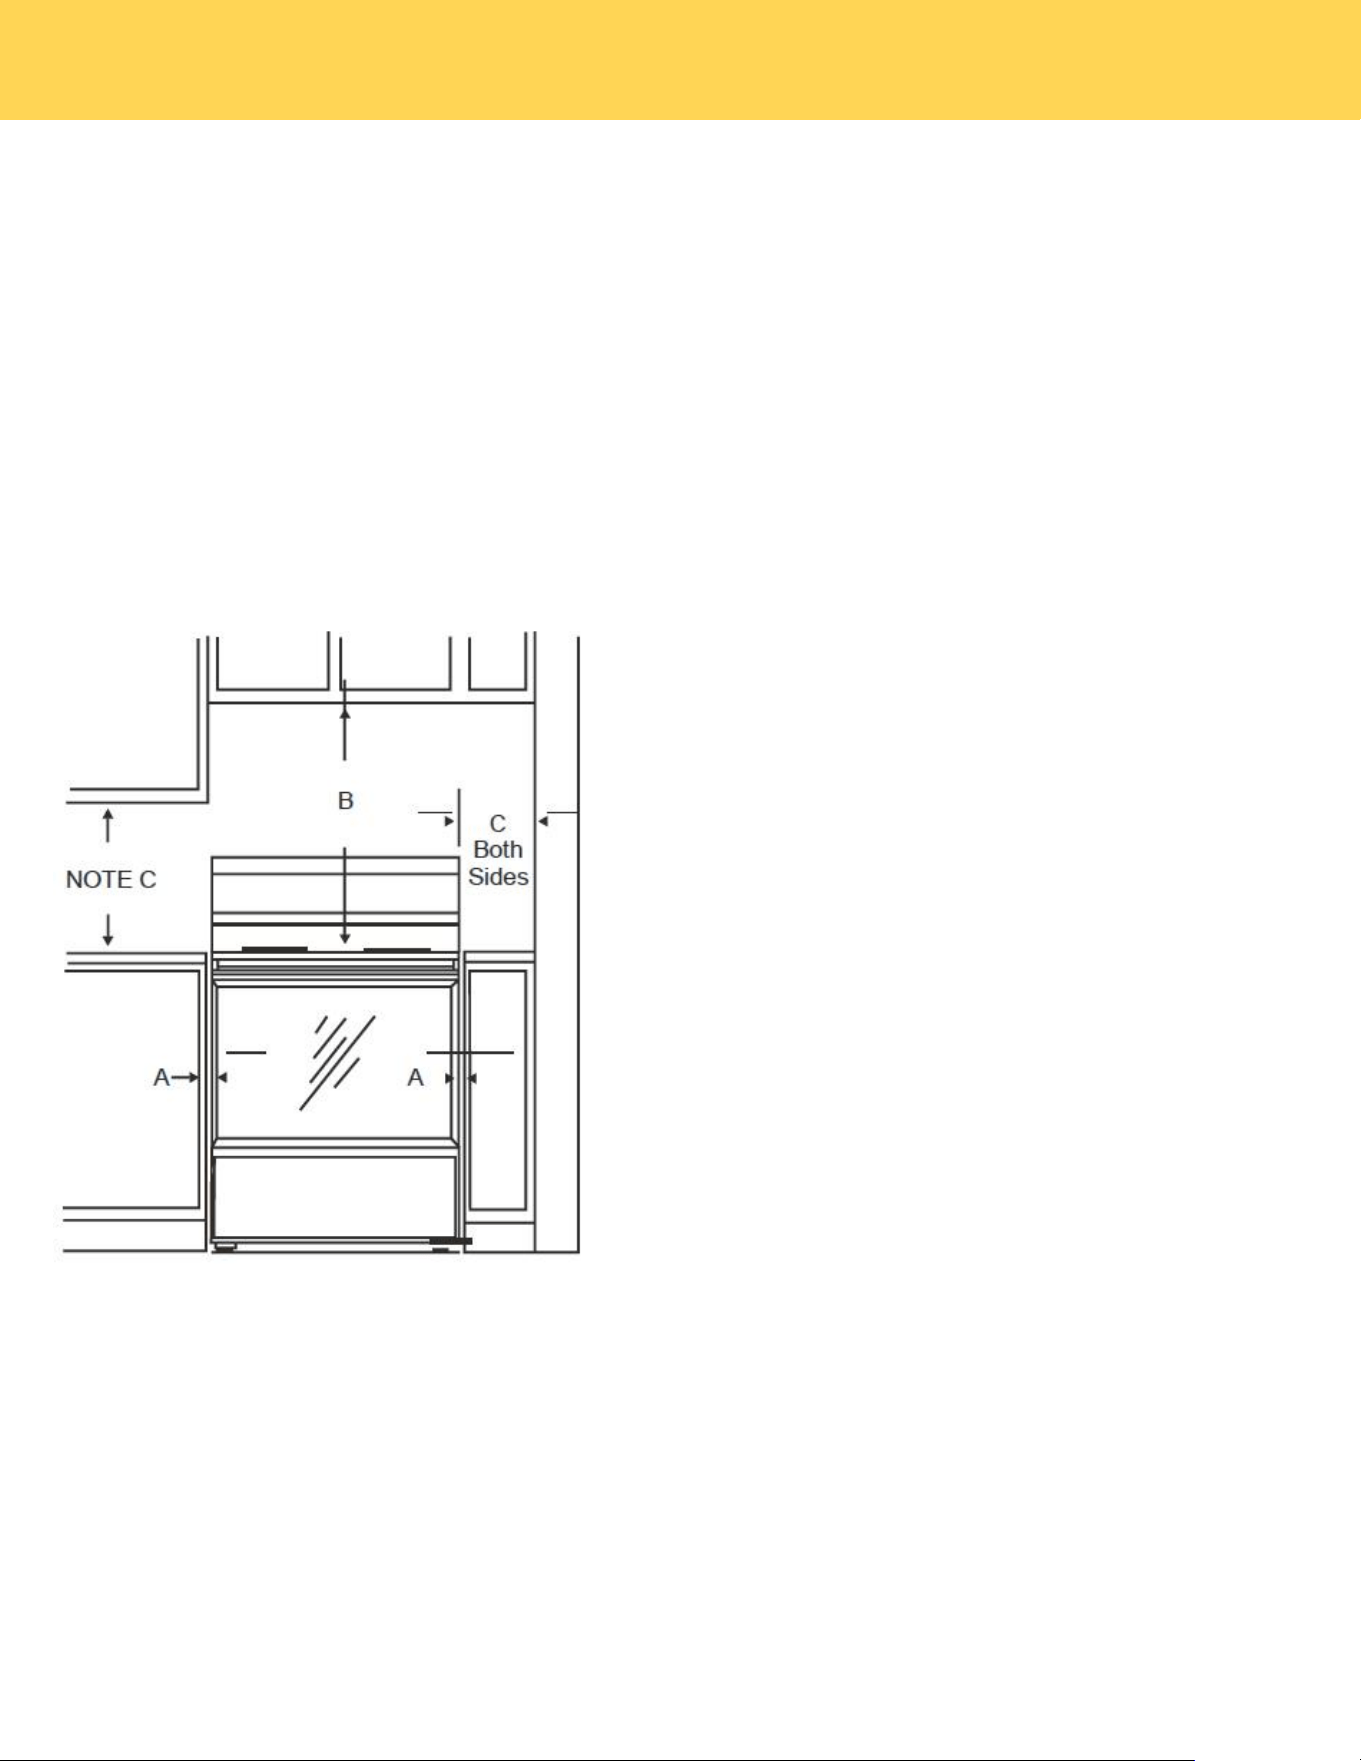
IMPORTANT
To eliminate the risk of burns or fire caused by reaching over heated surface units,cabinet storage space located above the
surface units should be avoided. If cabinet storage is to be provided, the risk can be reduced by installing a range hood that
projects horizontally a minimum of 5" beyond the bottom of the cabinets.
Minimum dimensions
MINIMUM DIMENSIONS BETWEEN COOKTOP,
WALLS AND ABOVE THE COOKTOP:
A:Make sure the wall covering, countertop, flooring, and cabinets
around the range can withstand the heat (up to 200°F) generated
by the range.
B:Allow 30”minimum clearance between surface units and
bottom of unprotected wood or metal cabinet, or allow a 24"
minimum when bottom of wood or metal cabinet is protected by
no less than 1/4" thick flame retardant mill board covered with not
less than No 28MSG sheet metal, (.015") .015" thick stainless
steel, .024" aluminum or .020" copper.
C:This appliance has been approved for 0" spacing to adjacent
surfaces above the cooktop. However, a 6" minimum spacing to
surfaces less than 15" above the cooktop and adjacent cabinet is
recommended to reduce exposure to steam, grease splatter and
heat.
To reduce the risk of burns or fire when reaching over hot surface
elements, cabinet storage space above the cooktop should be
avoided. lf cabinet storage space is to be provided above the
cooktop, the risk can be reduced by installing a range hood that
projects at least 5" beyond the front of the cabinets. Cabinets
installed above the cooktop must be no deeper than 16".
D:Allow 24"/30"/36"/48" (depending on your range width)
minimum clearance between right and left cabinets.
CHECKING THE INSTALLATION SITE
Clearances and dimensions
To install the range,refer to the following figure.
For installation in CANADA, a Free-standing range is not to be installed closer than 12mm from any adjacent surface.
PREPARING TO INSTALL THE RANGE
12
STEP 1. MEETING ELECTRICAL CONNECTION REQUIREMENTS
CAUTION
For personal safety, do not use an extension cord with this appliance.
Remove house fuse or open circuit breaker before beginning installation.
This appliance must be supplied with the proper voltage and frequency,and connected to an individual properly
grounded branch circuit, protected by a circuit breaker or fuse having amperage as specified on the rating plate. The
rating plate is located on the right of oven door.
We recommend you have the electrical wiring and hookup of your range connected by a qualified electrician. After
installation,have the electrician show you where your main range disconnect is located.
Check with your local utilities for electrical codes which apply in your area.
Failure to wire your oven according to governing codes could result in a hazardous condition. If there are no local codes,
your range must be wired and fused to meet the requirements of the National Electrical Code, ANSI/NFPA No.70–Latest
Edition.
Effective January 1,1996,the National Electrical Code requires that new construction (not existing) utilize a 4-conductor
connection to an electric range.
When installing an electric range in new construction,follow Steps for 4-wire connection.
You must use a 3-wire or 4-wire, single-phase A.C.208Y/120Volt or240/120Volt,60hertz electrical system.
If the electrical service provided does not meet the above specifications, have a licensed electrician install an approved
outlet.
Use only a 3-conductor or a 4-conductor UL-listed range cord.These cords may be provided with ring terminals on wire
and a strain relief device.
A range cord rated at 40 amps with 125/250 minimum volt range is required. A 50-amp range cord is not recommended;
however, if used, it must be labeled for compatibility with nominal 1-3/8" diameter connection openings. Care should be
taken to center the cable and strain relief within the knock out hole to keep the edge from damaging the cable.
NOTE
This appliance is manufactured ready to be installed with a 4-wire cord set.
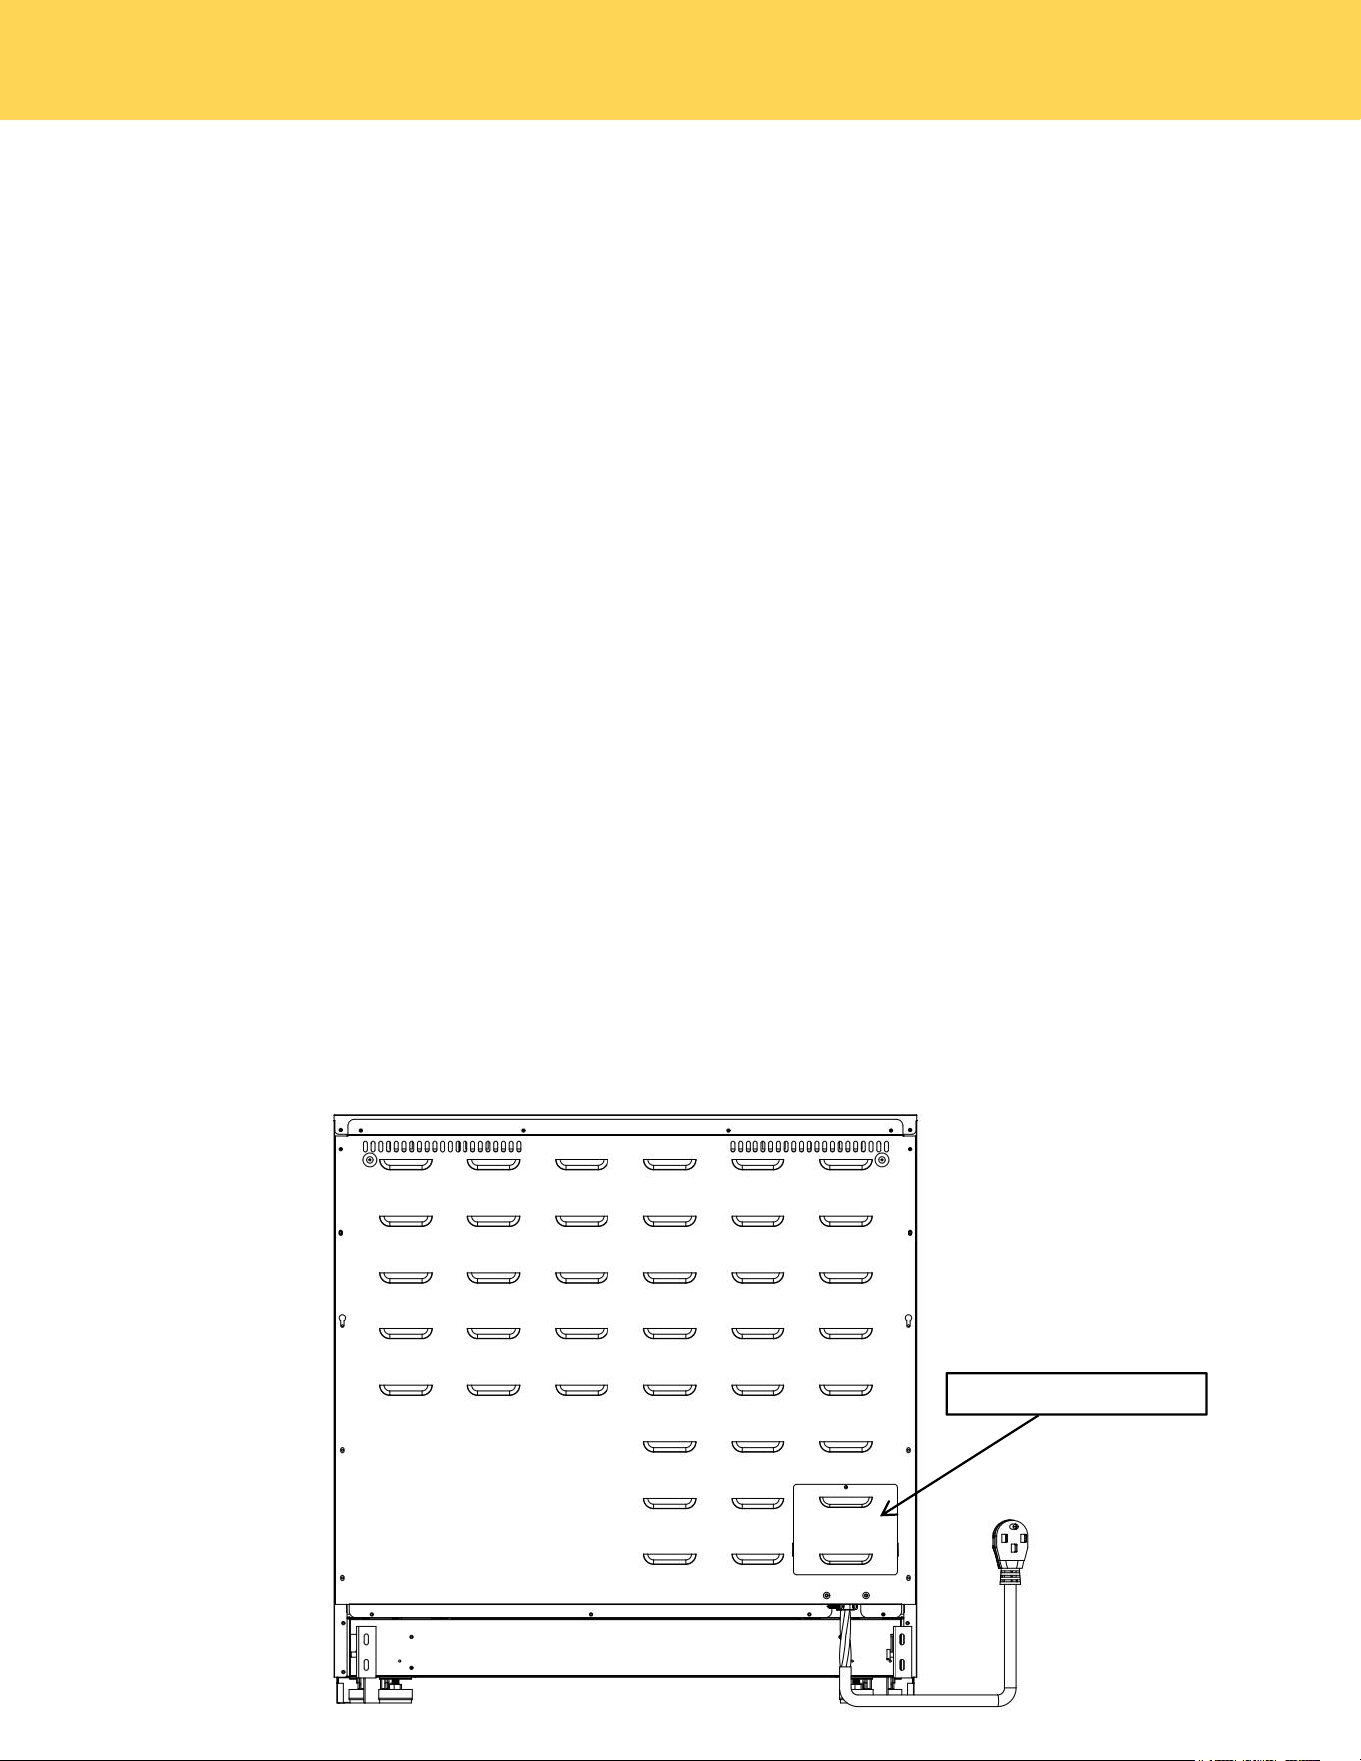
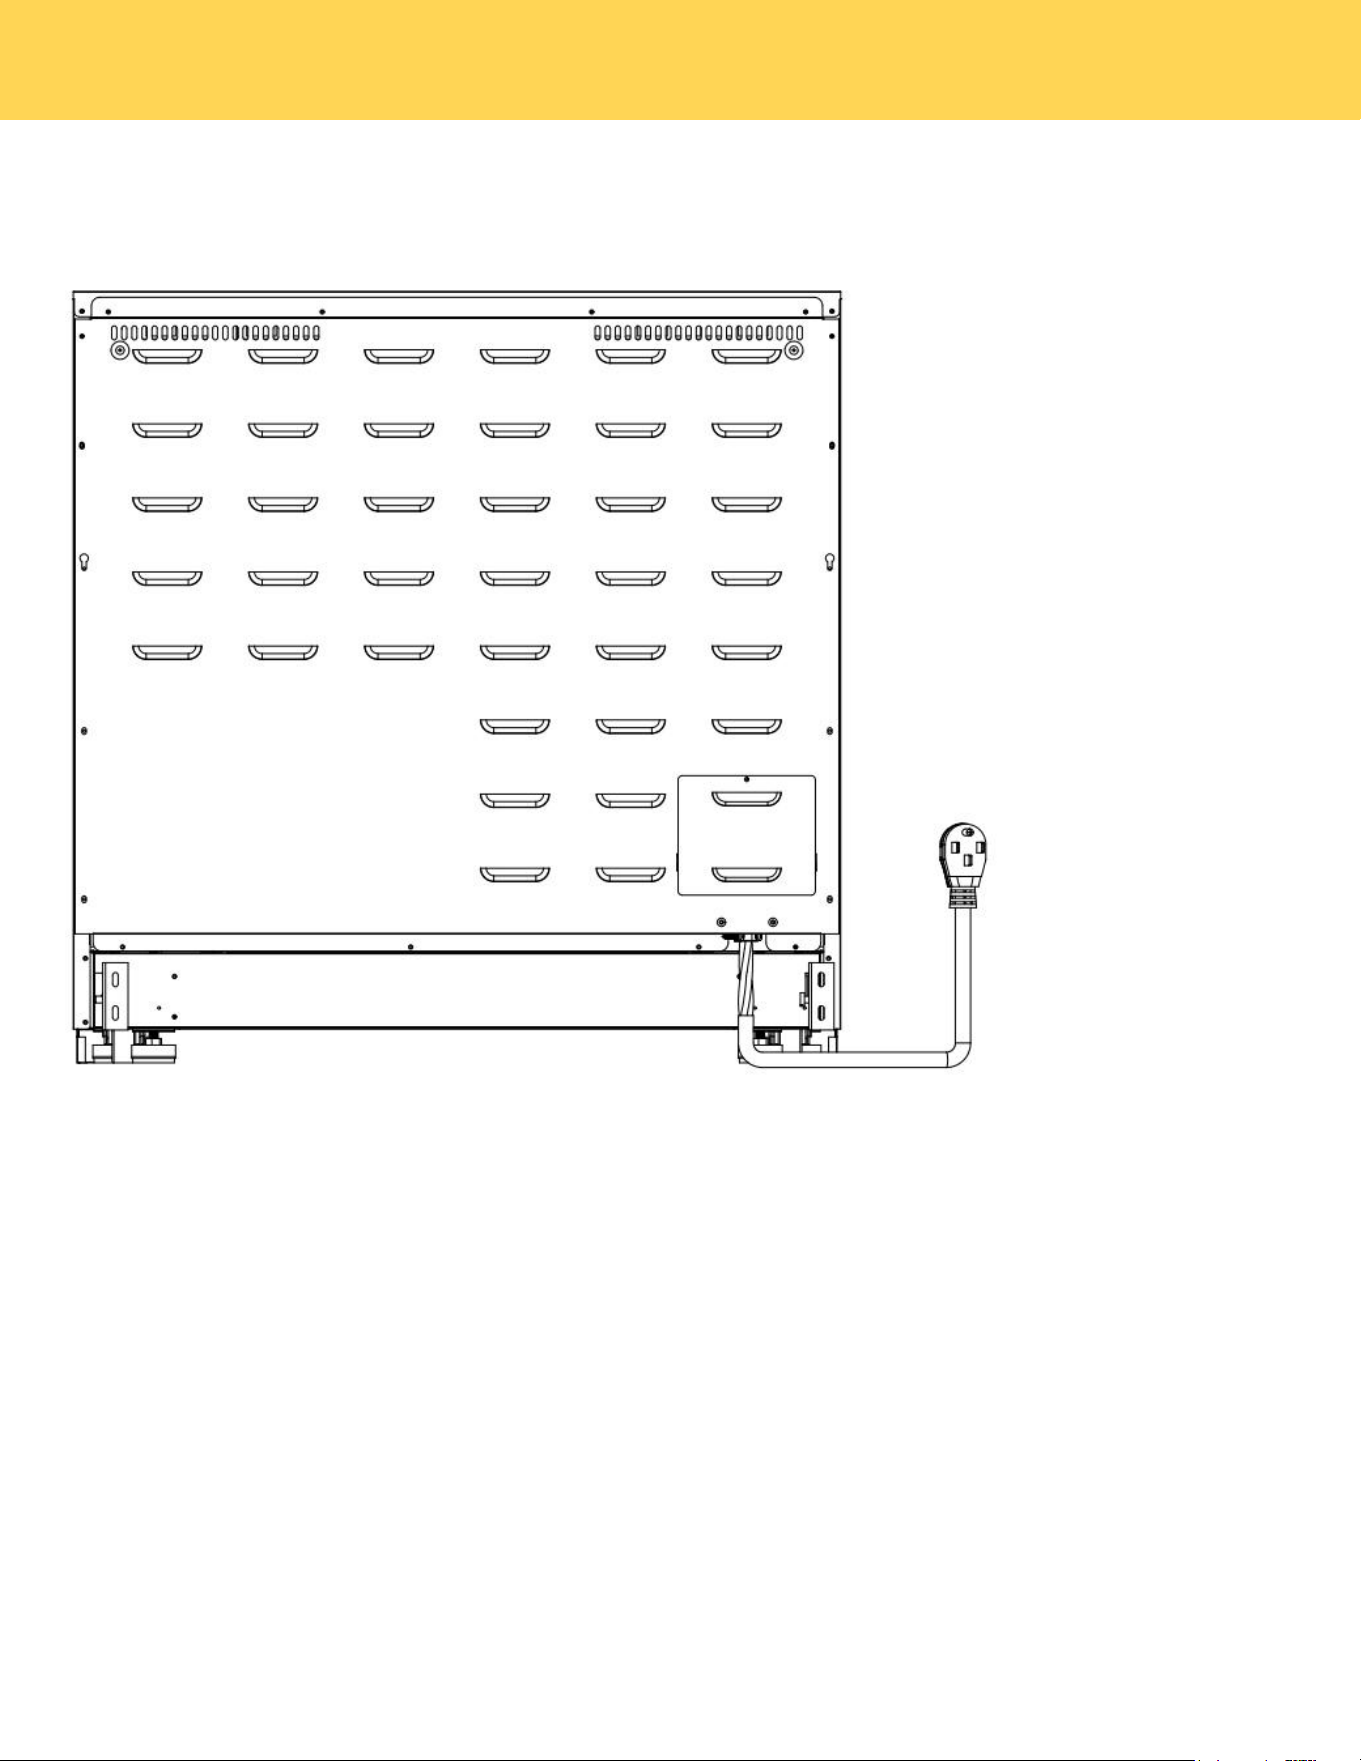
STEP 2. POWER CORD
1. Remove the rear terminal block cover and loosen the 6 screws with a screw driver. The terminal block will then be
accessible.Do not discard these screws.
Terminal block cover
CONNECTING THE POWER
13
2.For power cord installations only, hook the strain relief over the power cord hole located below the rear of the drawer body.
Insert the power cord through the strain relief and tighten the device.
• You must install the power cord with a strain relief.
• Attach the strain relief to the opening in conduit connection plate.
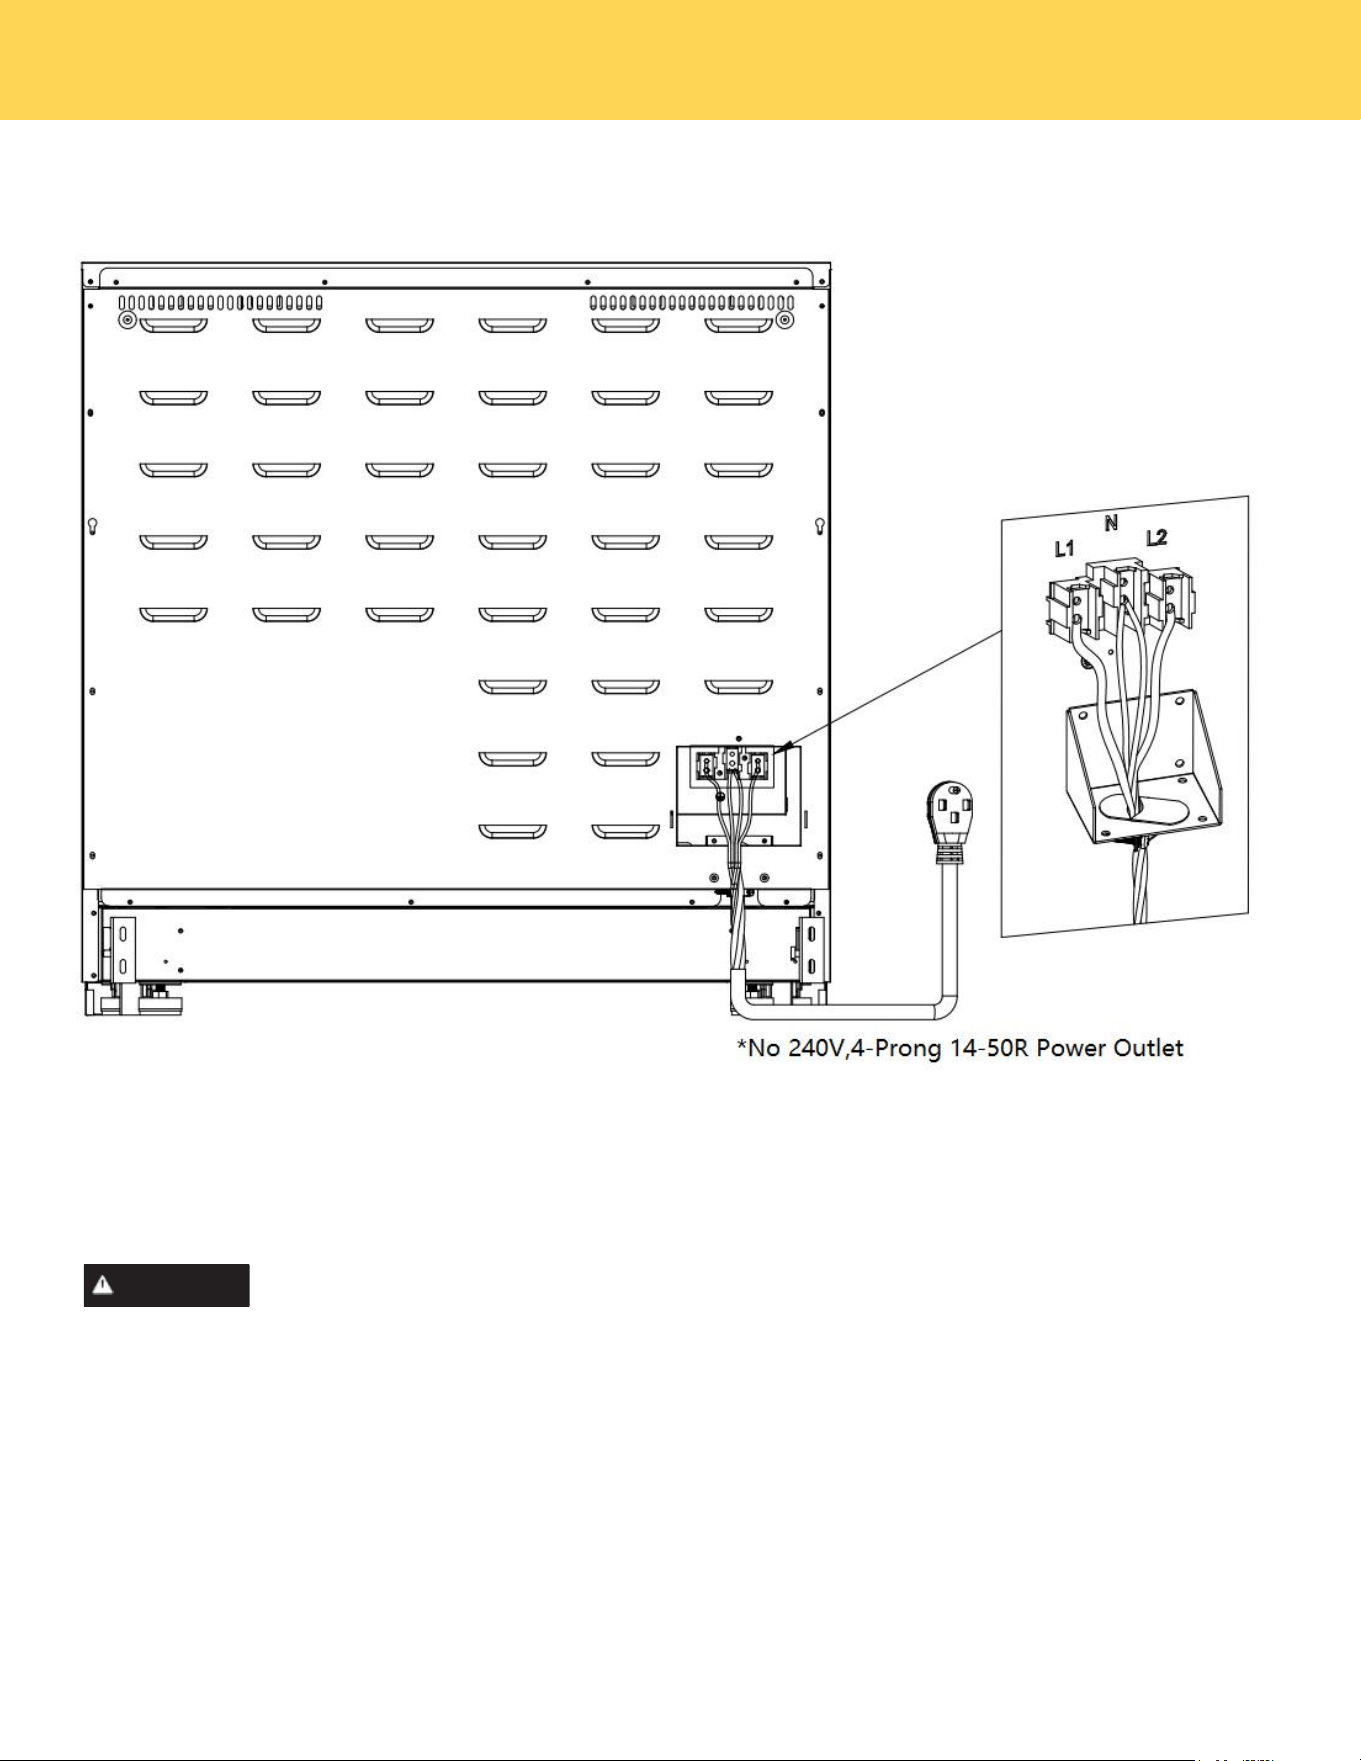
STEP 3. 4-WIRE POWER CORD INSTALLATION
WARNING
Electrical Shock Hazard
Electrical ground is required on this appliance.
Do not connect to the electrical supply until appliance is permanently grounded.
Disconnect power to the circuit breaker or fuse box before making the electrical connection.
This appliance must be connected to a grounded, metallic, permanent wiring system, or a grounding
connector should be connected to the grounding terminal or wire lead on the appliance. Failure to do any
of the above could result in a fire, personal injury or electrical shock. See below for more information on
electrical grounding.
A. Remove the 4 lower terminal screws from the terminal block.
B. Insert the 4 terminal screws through each power cord terminal and into the lower terminals of the terminal block.
Be certain to match the wire and terminals by color.
C. Tighten screws securely into the terminal block.
CONNECTING THE POWER
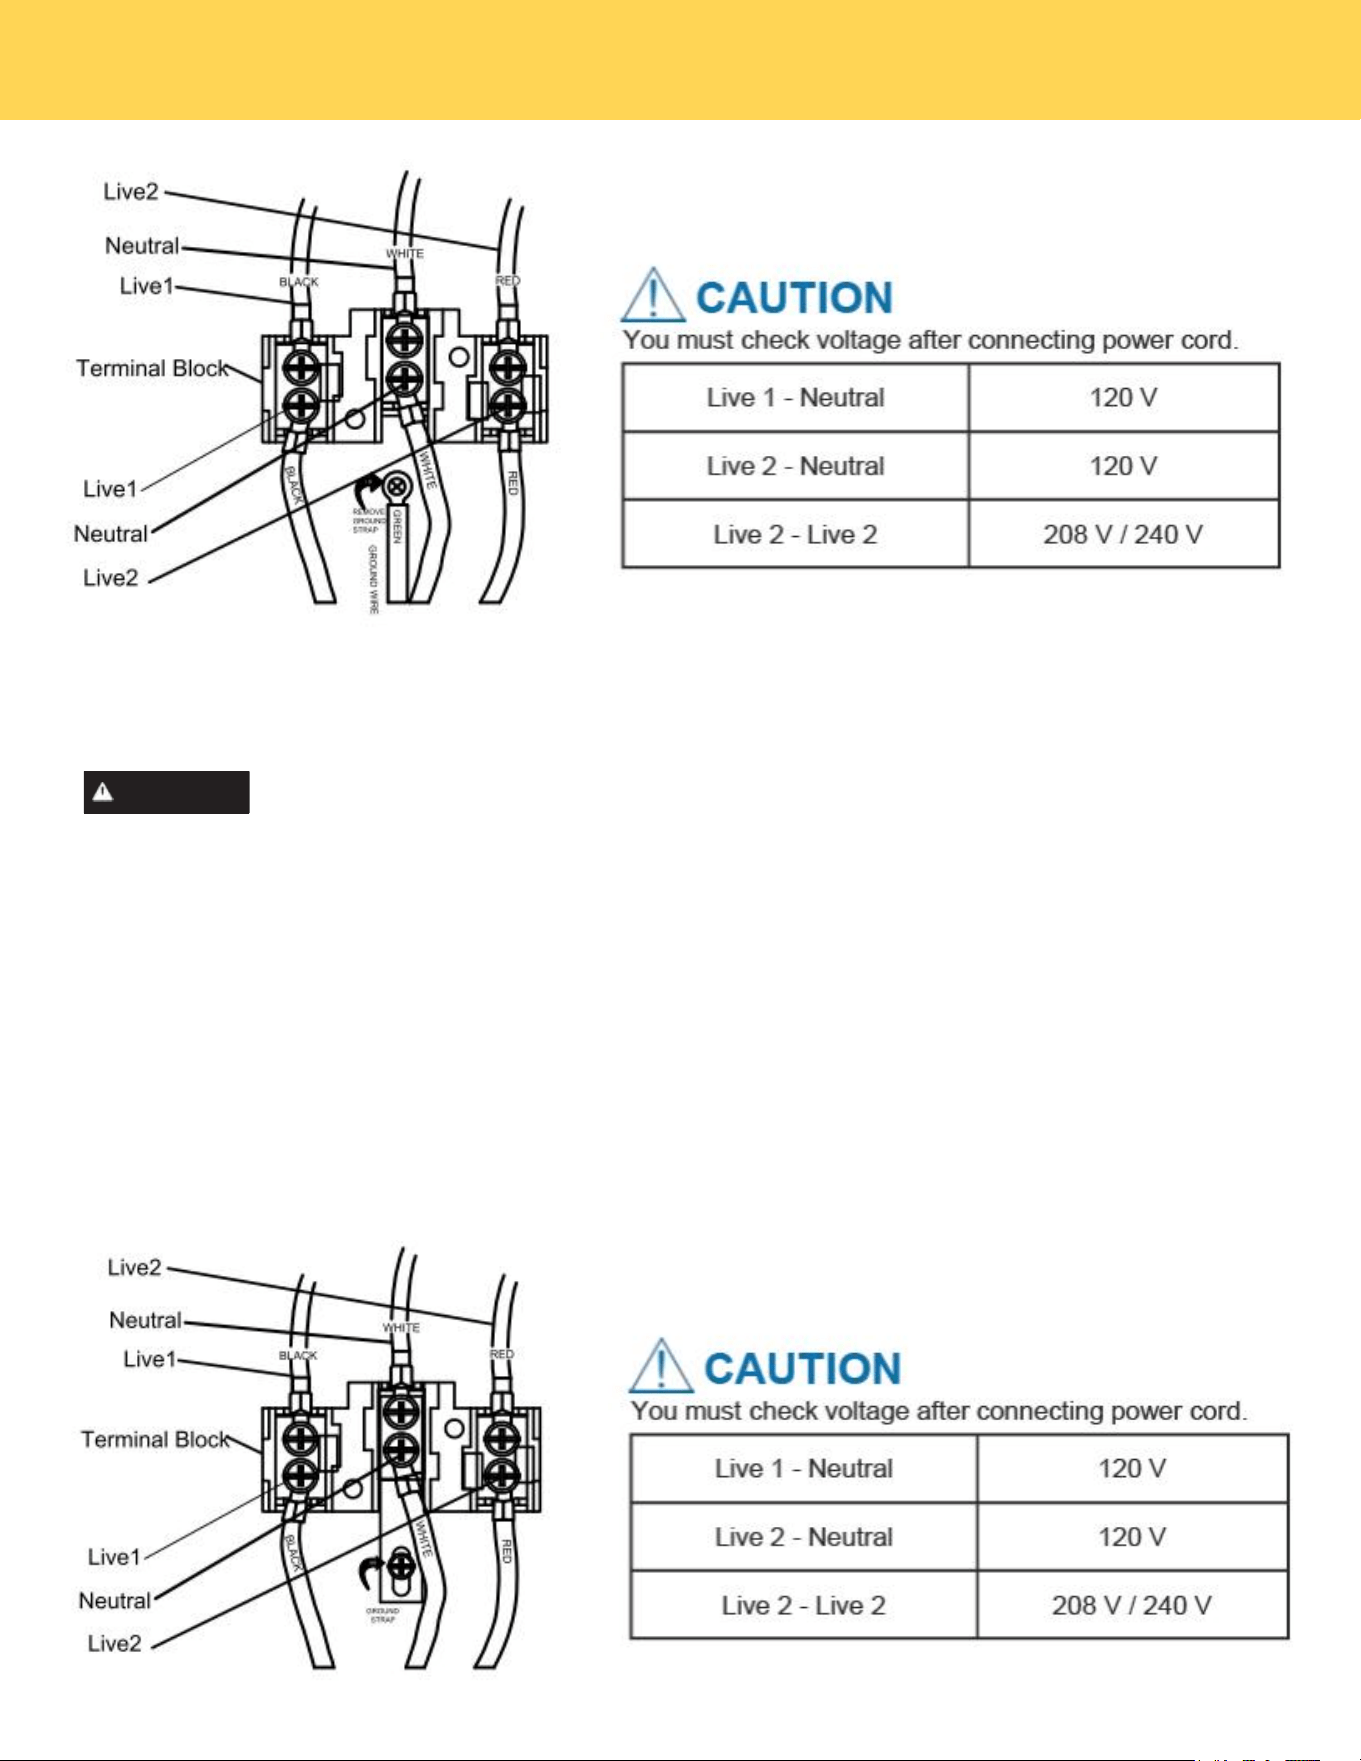
14
STEP 4 3-wire power cord
WARNING
Electrical Shock Hazard
Electrical ground is required on this appliance.
Do not connect to the electrical supply until appliance is permanently grounded.
Disconnect power to the circuit breaker or fuse box before making the electrical connection.
This appliance must be connected to a grounded, metallic, permanent wiring system, or a grounding
connector should be connected to the grounding terminal or wire lead on the appliance. Failure to do any
of the above could result in a fire, personal injury or electrical shock. See below for more information on
electrical grounding.
A. Remove the 4 lower terminal screws from the terminal block.
B.Insert the Green ground terminals together with white one.
C.Insert the 3 terminal screws through each power cord terminal and into the lower terminals of the terminal block. Be
certain to match the wire and terminals by color.
D.Tighten screws securely into the terminal block.
CONNECTING THE POWER
15
STEP 5. REPLACING THE TERMINAL BLOCK COVER
Replace the terminal block cover on the range back and tighten the screw.
CONNECTING THE POWER

16
How does induction work?
Most cooking uses radiant heat that must pass through the cookware to get food hot. Induction is a
process that induces heat with an energy reaction. When each cooking zone is turned on, power goes
to a coil under the cooktop. The powered coil creates an electromagnetic field. The electro magnetic
field reacts with compatible materials in cookware, creating heat in the cookware itself. The power level
controls the heating level, delivering precise results.
Induction Benefits
Because heat starts in the cookware instead of the cooktop, induction offers several advantages.
Cleaner cooking: Because induction works by heating the cookware and not the cooktop, spills don’t
cook or stick to the surface.
Cooler Cooktop: An induction cooktop will be cooler when you remove cookware than a conventional
cook t op would be. The only radiant heat p r o d u ced in induction is from the cookware itself, so the
kitchen stays cooler, too.
Fast Heating: Cookware will heat up faster than on a conventional electric cooktop. Pay close attention
to avoid scorching food when starting to cook. You may need to use a lower setting for cooking
food than you are used to.
Precise Control: The heat going into the cookware will change immediately when you change the set-
ting of the cooking zone.
Even Heating: Cookware will typically heat more evenly on an induction cooktop, so you are less likely to
have hot or cool spots in the cookware.
Energy Efficiency: Because induction creates heat directly in the pan, it uses less electricity than a
conventional cooktop.
Before Using Your Cooktop
Before using your cooktop for the first time, apply a ceramic cooktop cleaning cream (available in most
hardware, grocery, and department stores) to the ceramic surface. Clean and buff with a clean paper
towel. Cooktop cleaning creams leave a protective finish on the glass that will make cleaning easier
when the cooktop is soiled from cooking and help prevent scratches and abrasions.
Although induction cooking zones do not produce heat, they can become hot from contact with hot
cookware. Burns may occur if a cooking zone or the surrounding area is touched before it has cooled to a
safe temperature.
WARNING
Sounds
The magnetic field over the induction cooking zone may cause cookware to vibrate, creating a buzzing
or humming noise. These sounds are not unusual, especially at high settings.
Cookware that is not perfectly flat on the bottom may
vibrate slightly against the cooktop.
BEFORE SETTING SURFACE CONTROLS
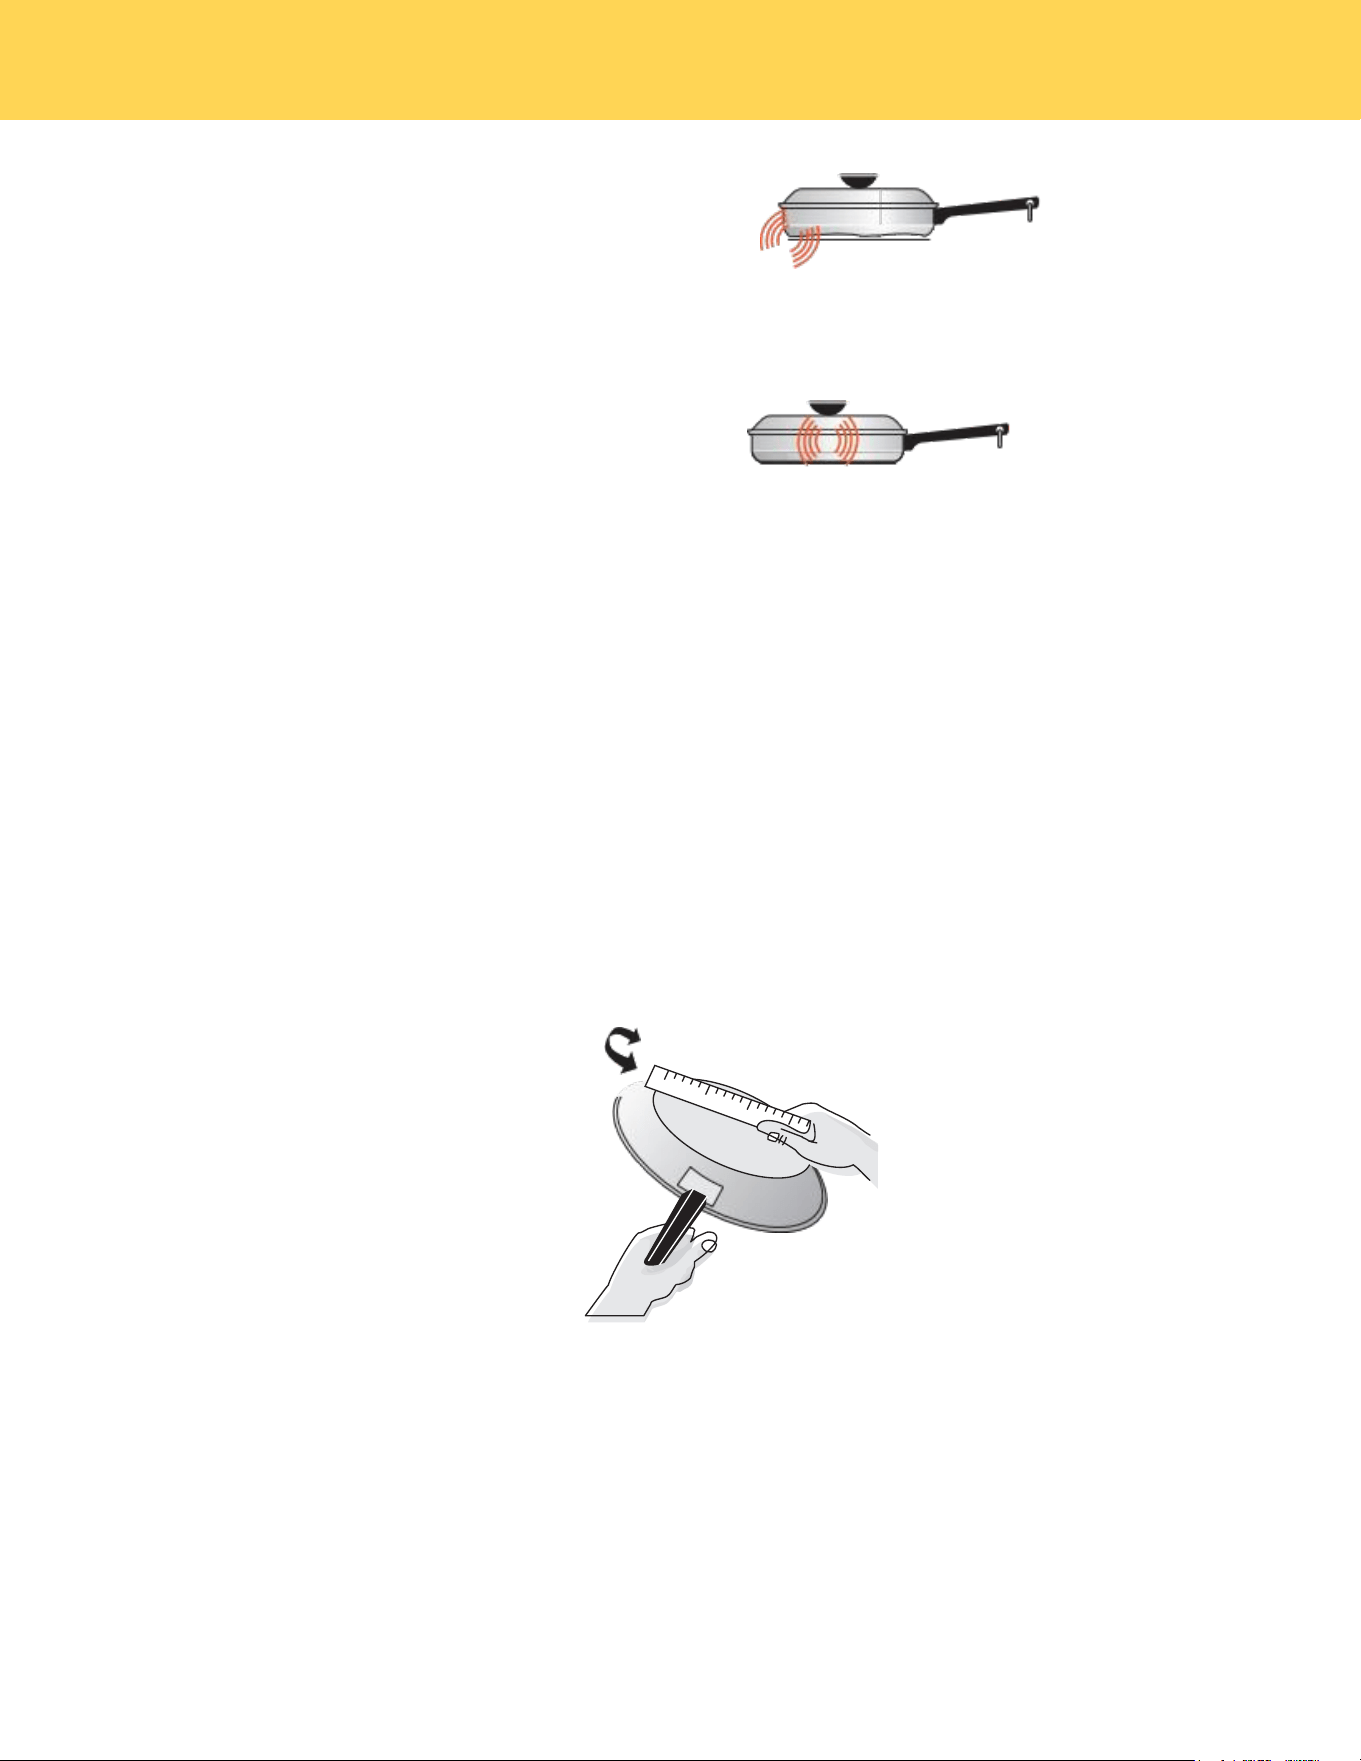
17
A loose handle may vibrate in its socket.
Multi-material cookware may allow small
vibrations in its structure.
Figure 1: Induction sounds
Sounds are less likely to occur with heavier, higher quality cookware.
An induction cooktop may also produce faint clicking sounds from the electronic switches that main-
tain the desired cooking temperature. You may also hear a fan that cools the electronics inside the
cooktop.
Make sure to review the detailed instructions for cleaning the induction cooktop in the "Care and
Cleaning" section and the "Before You Call" checklist of this Use and Care Manual.
NOTE
Using Proper Cookware
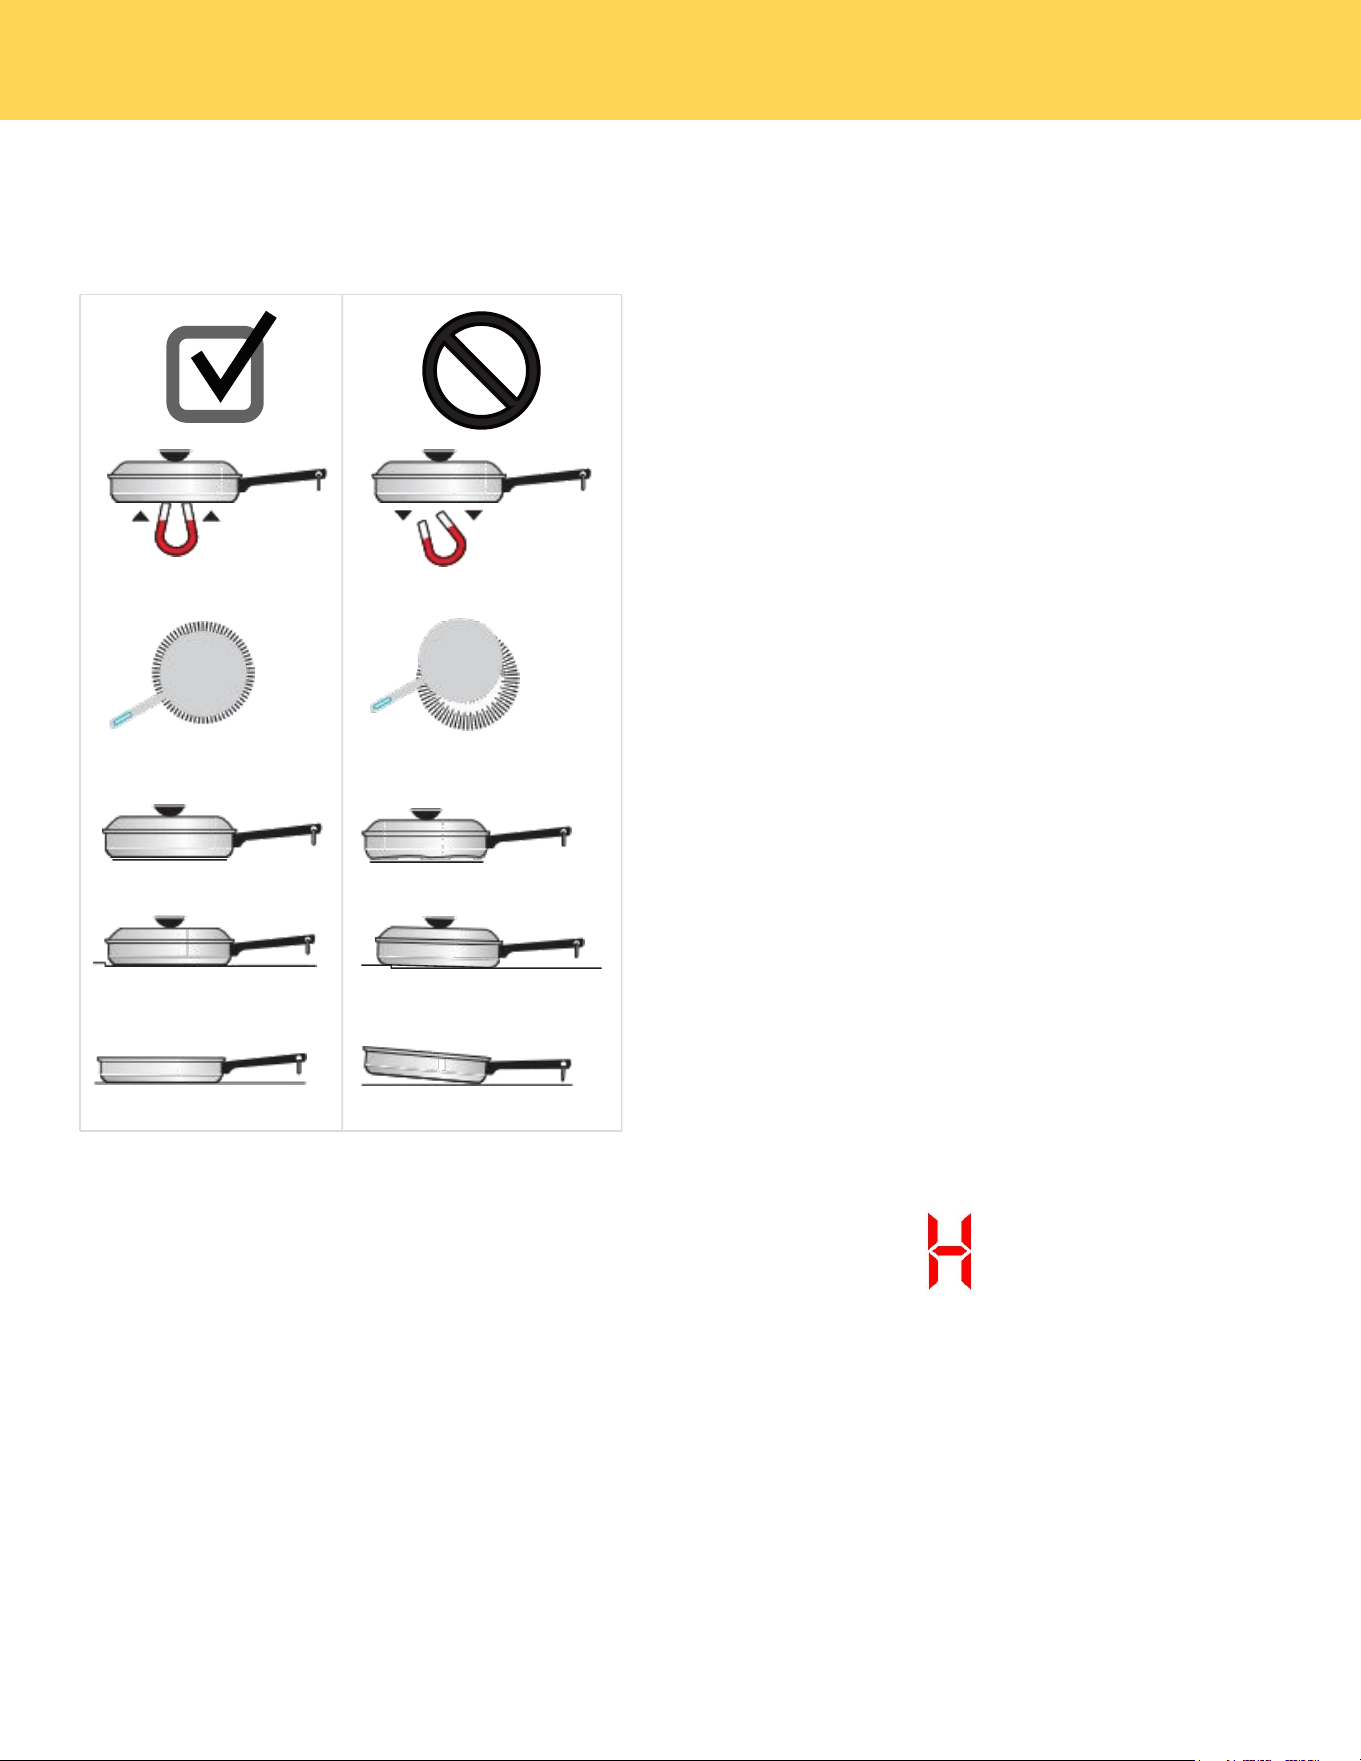
The size and type of cookware used will infl uence the heat setting needed for best cooking results.Be
sure to follow the recommendations for using proper cookware as illustrated in Figure 2.
Check for flatness by
rotating a ruler across the
bot tom of the coo kware
(see Figure 2).
Cookware should have flat
bottoms that make goo d
con tact with the entire
surface of the
heating element (see
Figure 3).
Figure 2: Testing cookware
Cookware Material Types
Cookware material is especially important when using an induction cooktop. The cookware must
contain magnetic iron or steel to work on an induction cooktop. Common materials for induction
cookware include the following:
• Stainless Steel - Slow heat conductor. Durable, easy to clean, and resists staining. Some types of
stainless steel will not work on an induction cooktop. Use the magnet test (see “Figure 4:Magnet
test”) to check stainless steel cookware.
BEFORE SETTING SURFACE CONTROLS
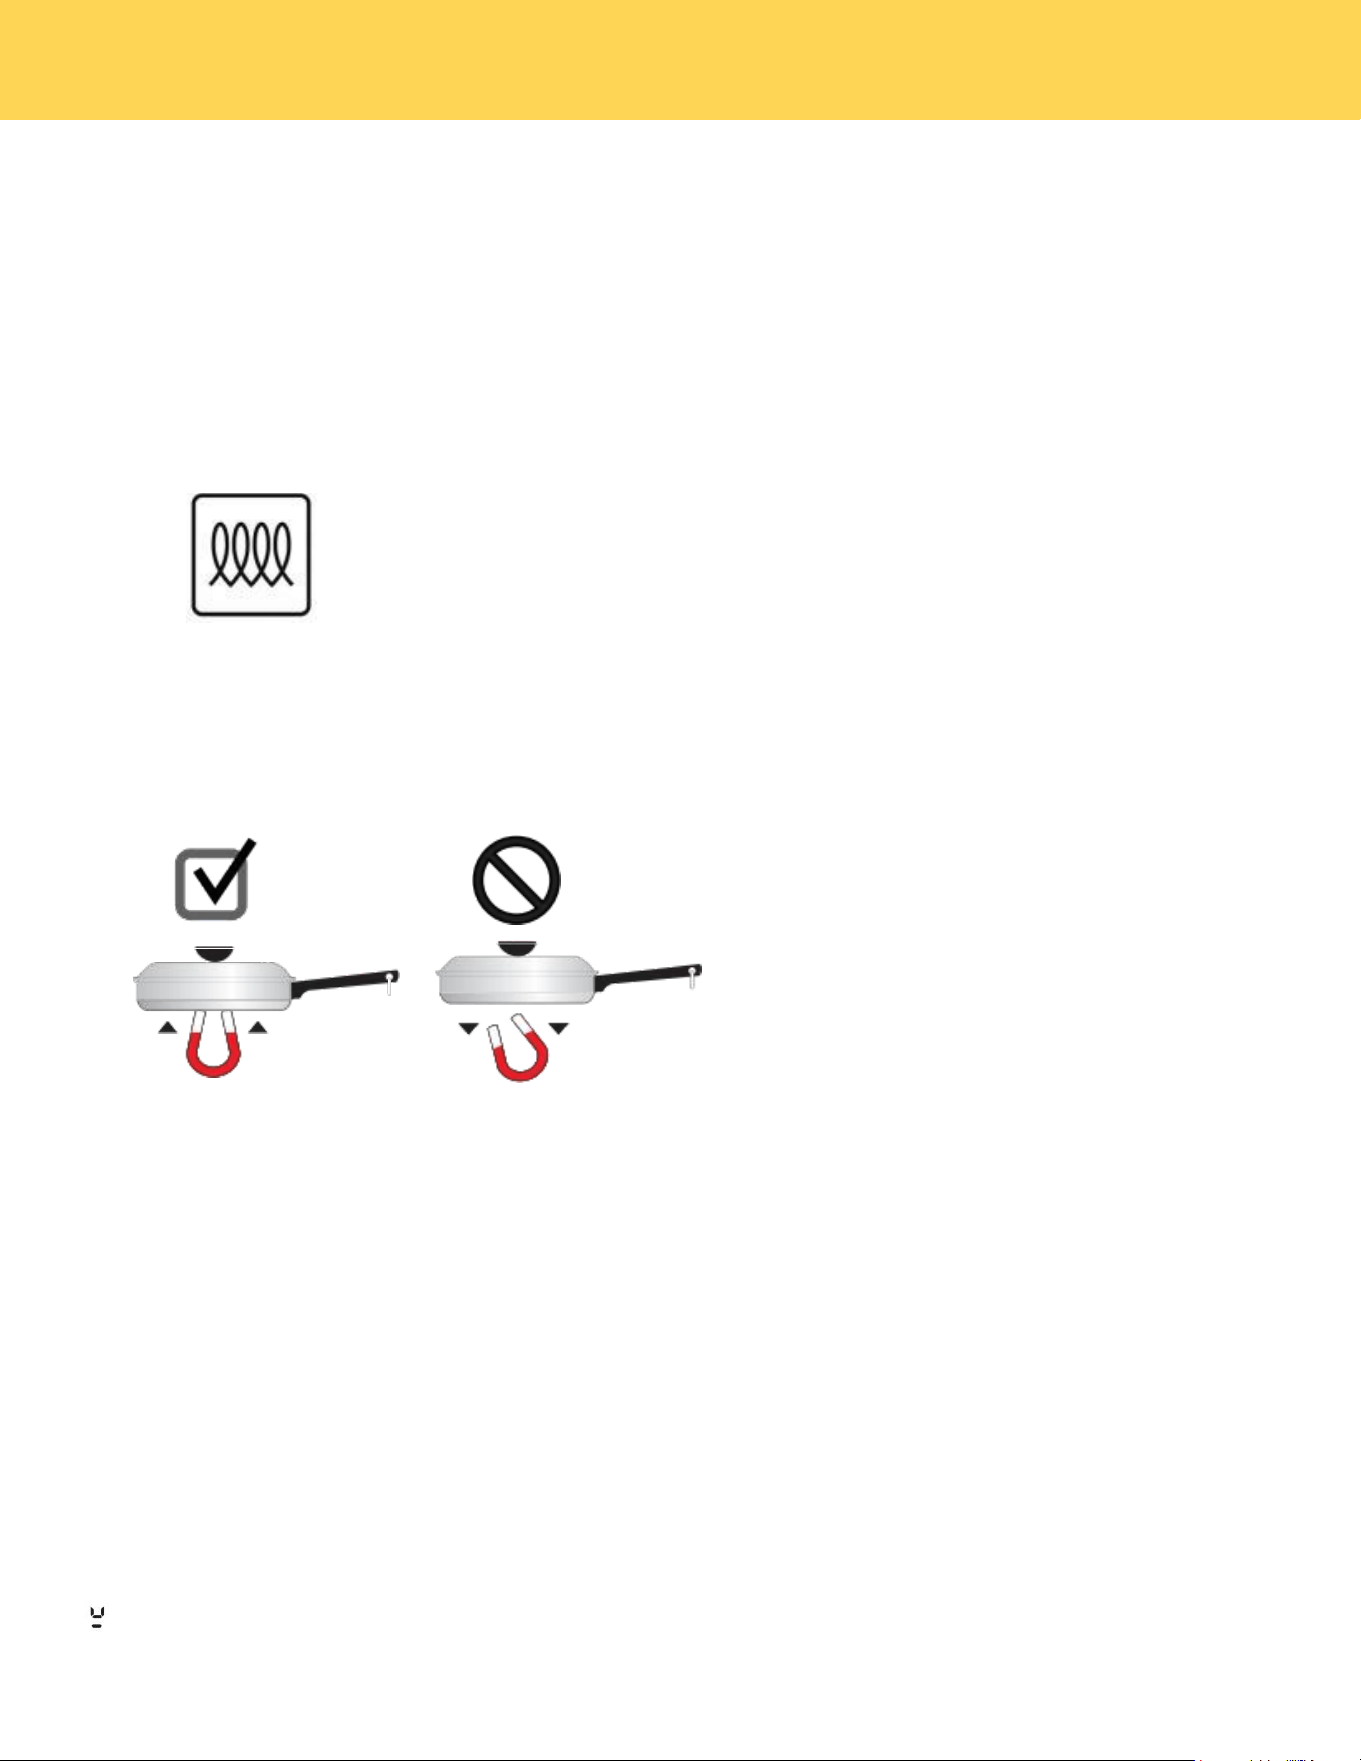
18
• Cast Iron - A slow heat conductor that retains heat very well. Cooks evenly once cooking temperature is
reached.
• Porcelain-enamel on metal - Heating characteristics will vary depending on the base material. Porcelain-
enamel on a compatible metal will work on an induction cooktop. Use the magnet test to check
porcelain-enamel cookware.
To see if a piece of cookware will work on your induction cooktop, try to stick a magnet to it. If the magnet
clings firmly to the bottom of the cookware, the cookware will work on your induction cooktop.
Cookware sold as induction-ready will often have a symbol printed on the bottom by the manufacturer.
Figure 3: Induction symbol
The Magnet Test
To see if a piece of cookware will work on your induction cooktop, try to stick a magnet to it (see Figure 4).
Magnet
Falls
Magnet
Sticks
Figure 4: Magnet test
If the magnet clings firmly to the bottom of the cookware, it will work on your induction
cooktop. If the magnet clings weakly or not at all, the cookware will not heat up on your
induction cooktop.
Proper cookware on an operating induction cooking zone will heat up very quickly. If an empty piece of
cookware is left on an operating induction cooking zone, the rapid change in temperature may warp or
damage the cookware.
CAUTION
Pan Sensing
When the cooktop is on, the cooking zones automatically detect when cookware is placed on the zone. The
control for that zone will light up, making it easy to know which section of the control to use for that cooking
zone.
Error message. Displayed if the cookware on an element is unsuitable, too small, or if no cookware has
been placed on the cooking zone.
BEFORE SETTING SURFACE CONTROLS
19
Figure 5 shows conditions that can prevent pan detection.
If you remove a pan from an active cooking zone, the zone will turn off after 30 seconds.
If the cooktop does not detect cookware in any zone for 30 seconds, the whole cooktop will turn off.
Magnet
Sticks
• Cookware base material has
good magnetic characteristics.
• Cookware centered correctly
on cooking zone.
• Flat pan bottom and straight
sides.
• Pan rests completely and is
level on the cooktop
surface.
• Pan is properly balanced.
Magnet
Falls
• Cookware base material is
non-magnetic.
• Cookware not centered on
cooking zone.
• Curved or warped pan bottoms
or sides.
• Pan bottom rests on cooktop
edge.
• Heavy handle tilts pan.
Figure 5 : Pan sensing conditions
• Although induction cooking zones do not directly generate heat, they can become hot from contact with
hot cookware. Burns may occur if a cooking zone or the surrounding area is touched before it has cooled
to a safe temperature.
• Do not place flammable items such as plastic salt and pepper shakers, spoon holders, or plastic wrapping
on top of the range when it is in use. Heat radiating from cookware could cause these items to melt or
ignite. Potholders, towels, or wooden spoons could catch fi re if placed too close to hot cookware.
• Do not use aluminum foil to line any part of the cooktop. Improper installation of these liners may result
in risk of electric shock or fi re. If these items melt on the cooktop, they will damage the cooktop.
Hot Surface Indicator
When a cooking zone is turned off, it may remain hot due
to contact with hot cookware.The Hot Surface Indicator
will activate and remain on.
Figure 6: Hot Surface indicator
CAUTION
BEFORE SETTING SURFACE CONTROLS

20
Home Canning
Be sure to read and observe all the following points when home canning with your appliance. Check
with the USDA (United States Department of Agriculture) Website and be sure to read all the
information they have available as well as follow their recommendations for home canning procedures.
• Use only a completely flat bottom canner with no ridges that radiate from the bottom center when
home canning. Heat is spread more evenly when the bottom surface is flat. Use a straight-edge to
check canner bottom.
• Make sure the diameter of the canner does not exceed 1 inch beyond the surface element markings
or burner.
• It is recommended to use smaller diameter canners on electric coil and ceramic glass cooktops and
to center canners on the burner grates.
• Start with hot tap water to bring water to boil more quickly.
• Use the highest heat setting when first bringing the water to a boil. Once boiling is achieved,
reduce heat to lowest possible setting to maintain that boil.
• Use tested recipes and follow instructions carefully. Check with your local Cooperative Agri-
cultural Extension Service or a manufacturer of glass jars for the latest canning information.
• It is best to can small amounts and light loads. Do not leave water bath or pressure canners on
high heat for an extended amount of time.
BEFORE SETTING SURFACE CONTROLS
21
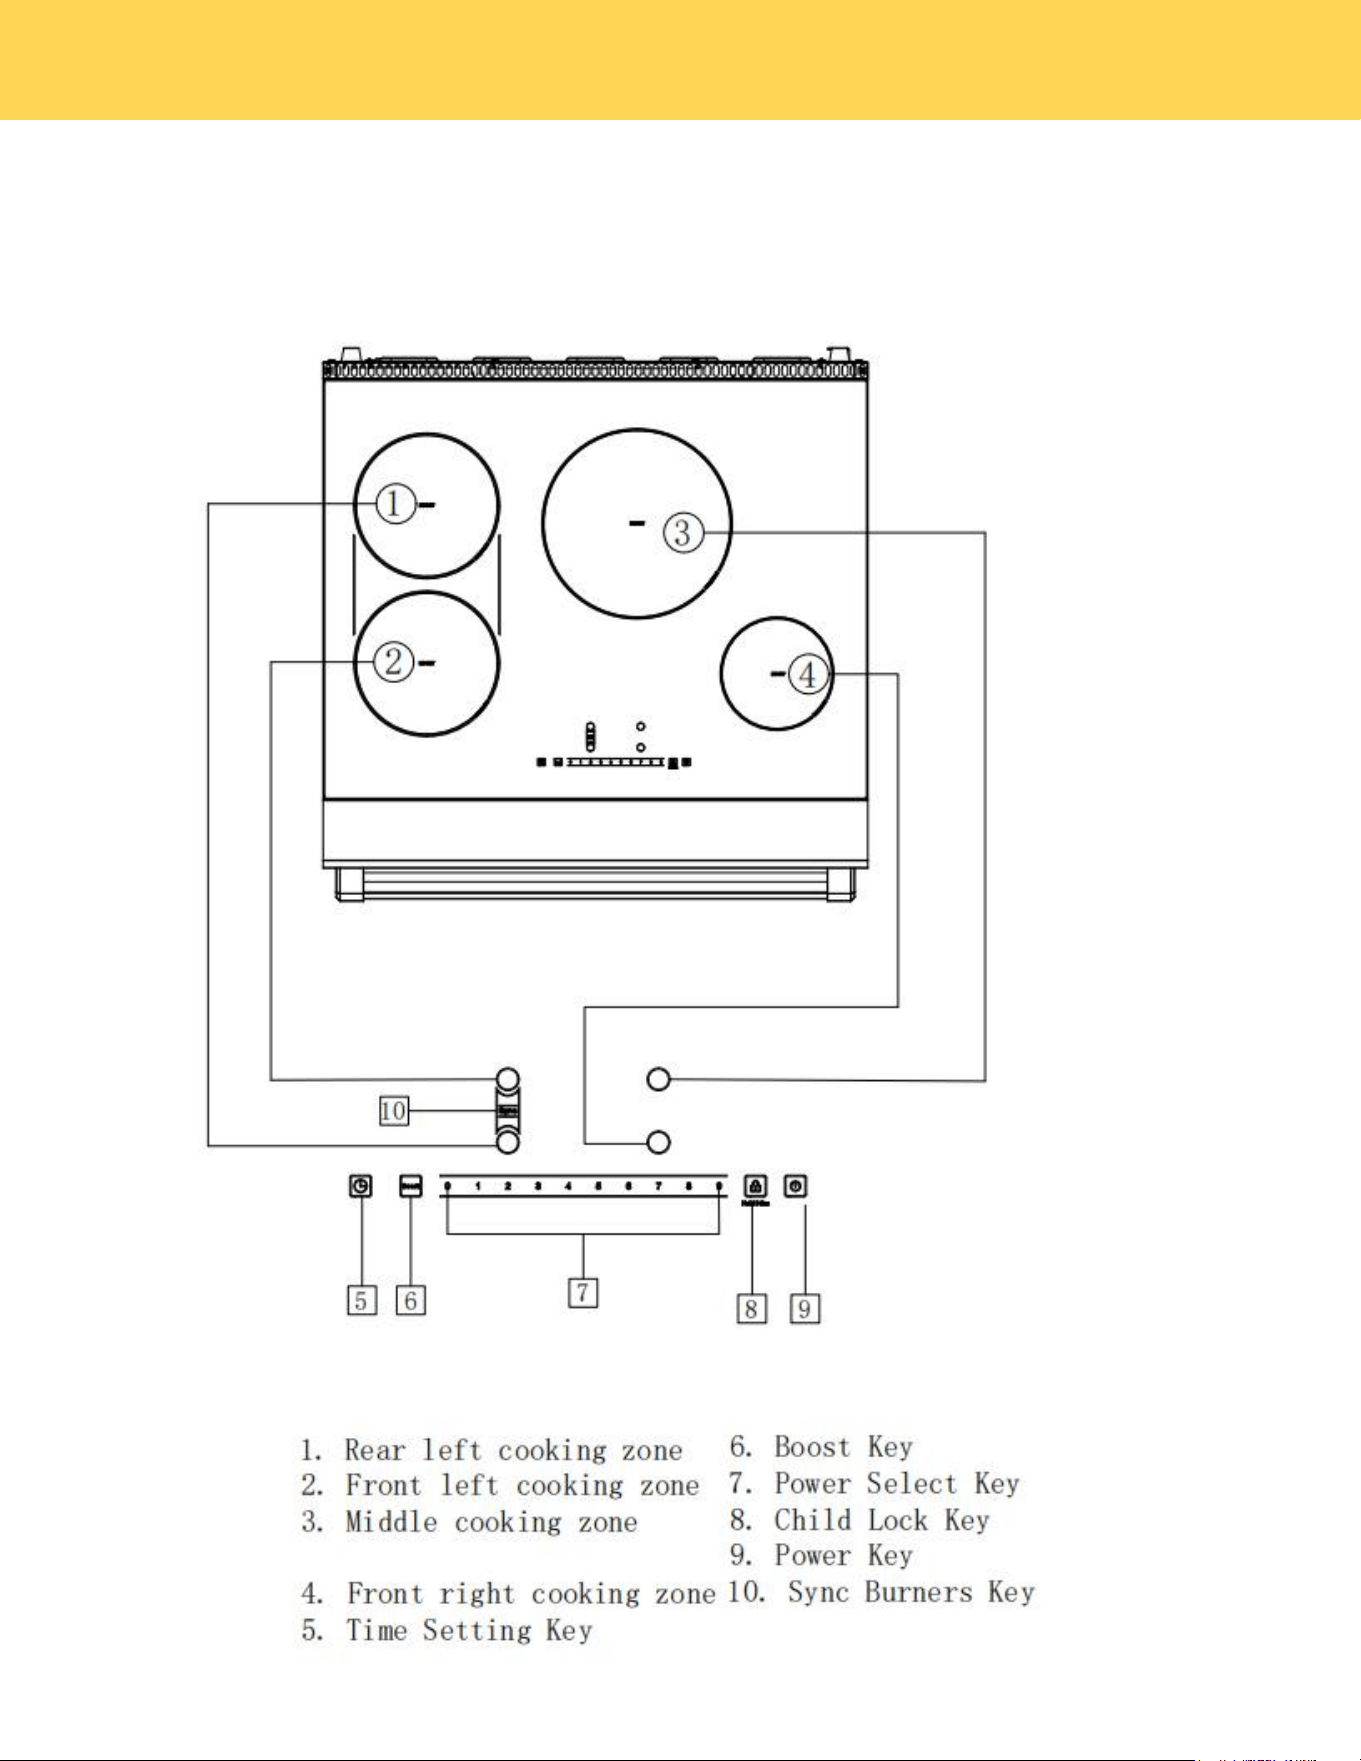
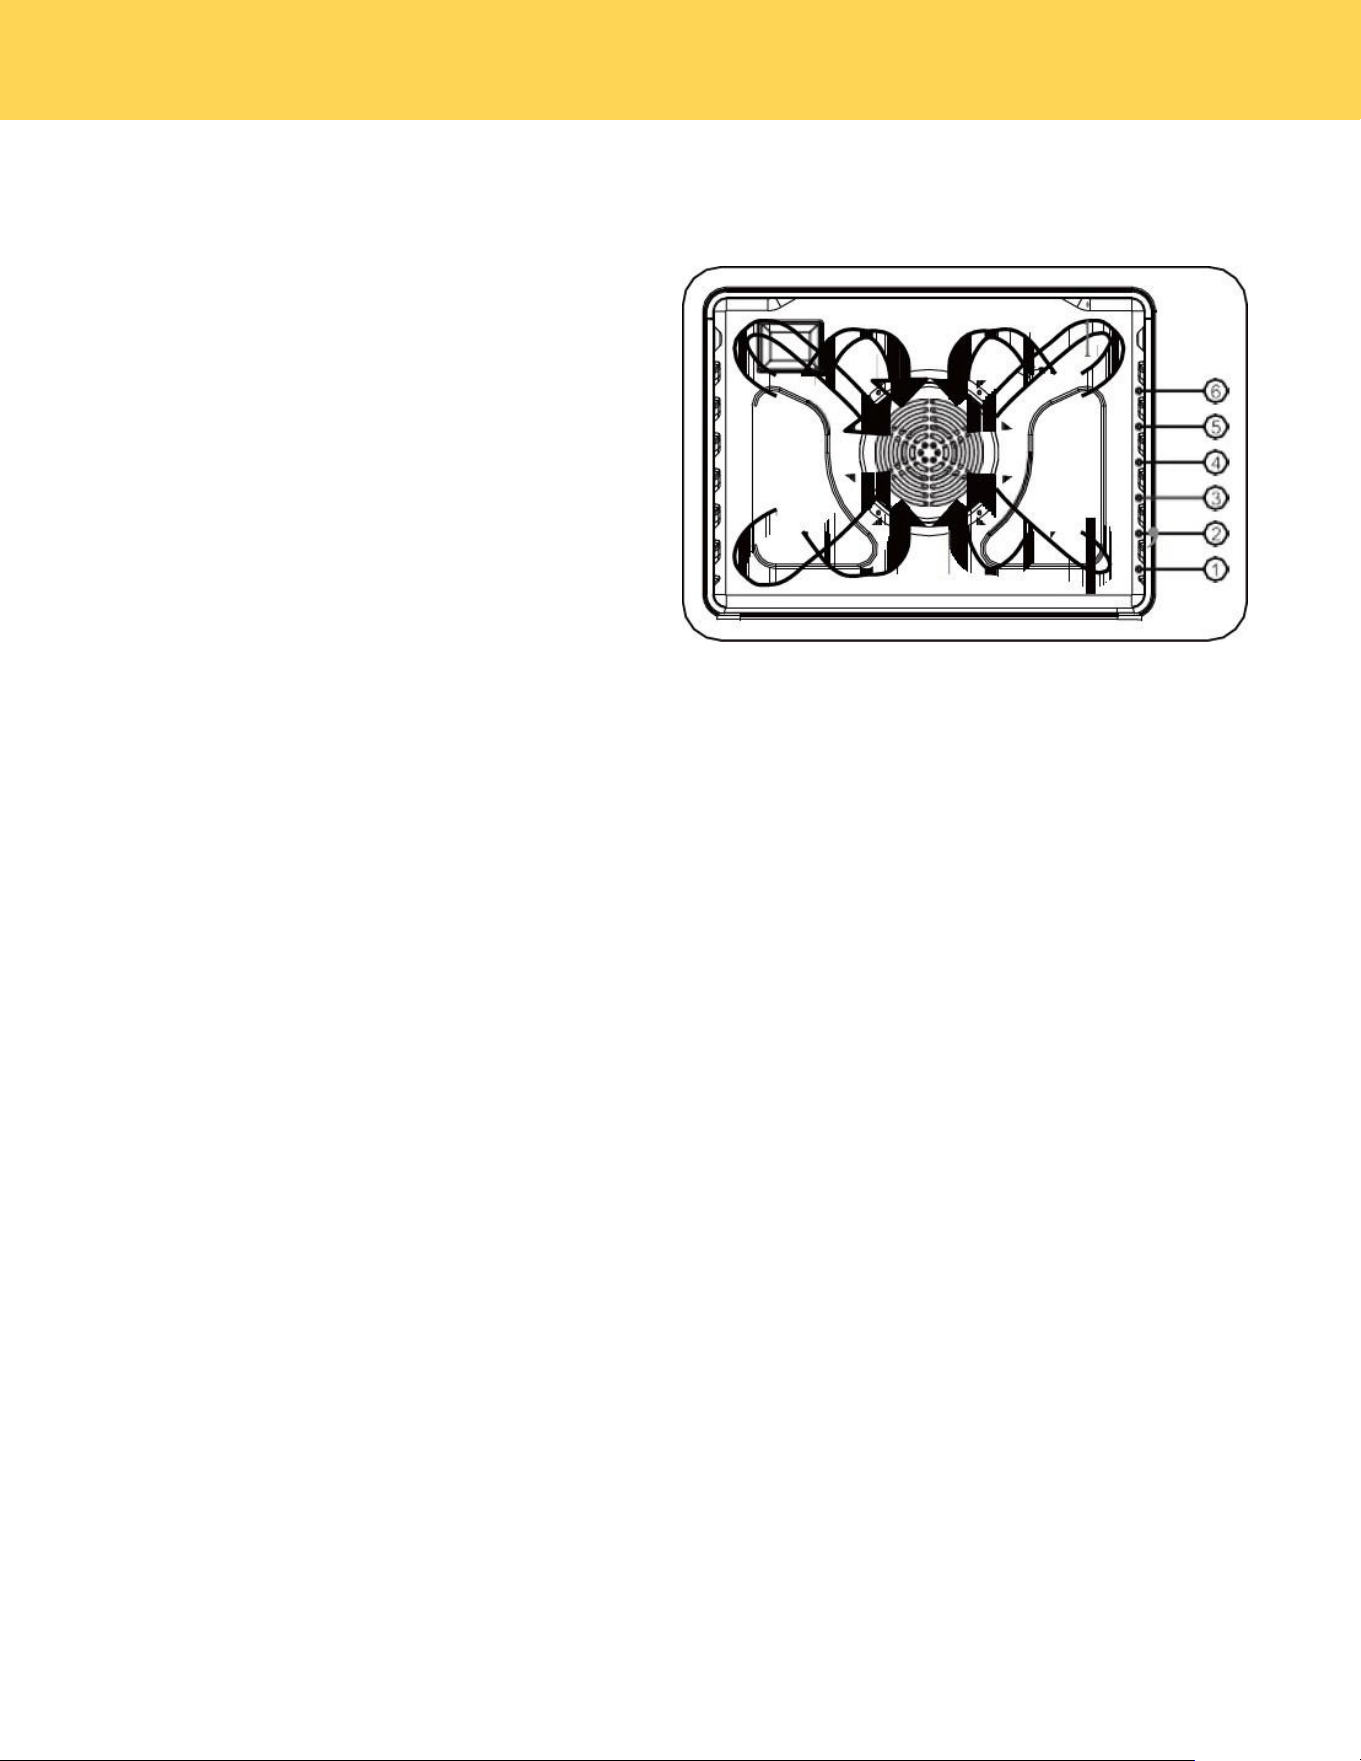
Control Panel Overview
Modle:XRI30E
SETTING SURFACE CONTROLS
22
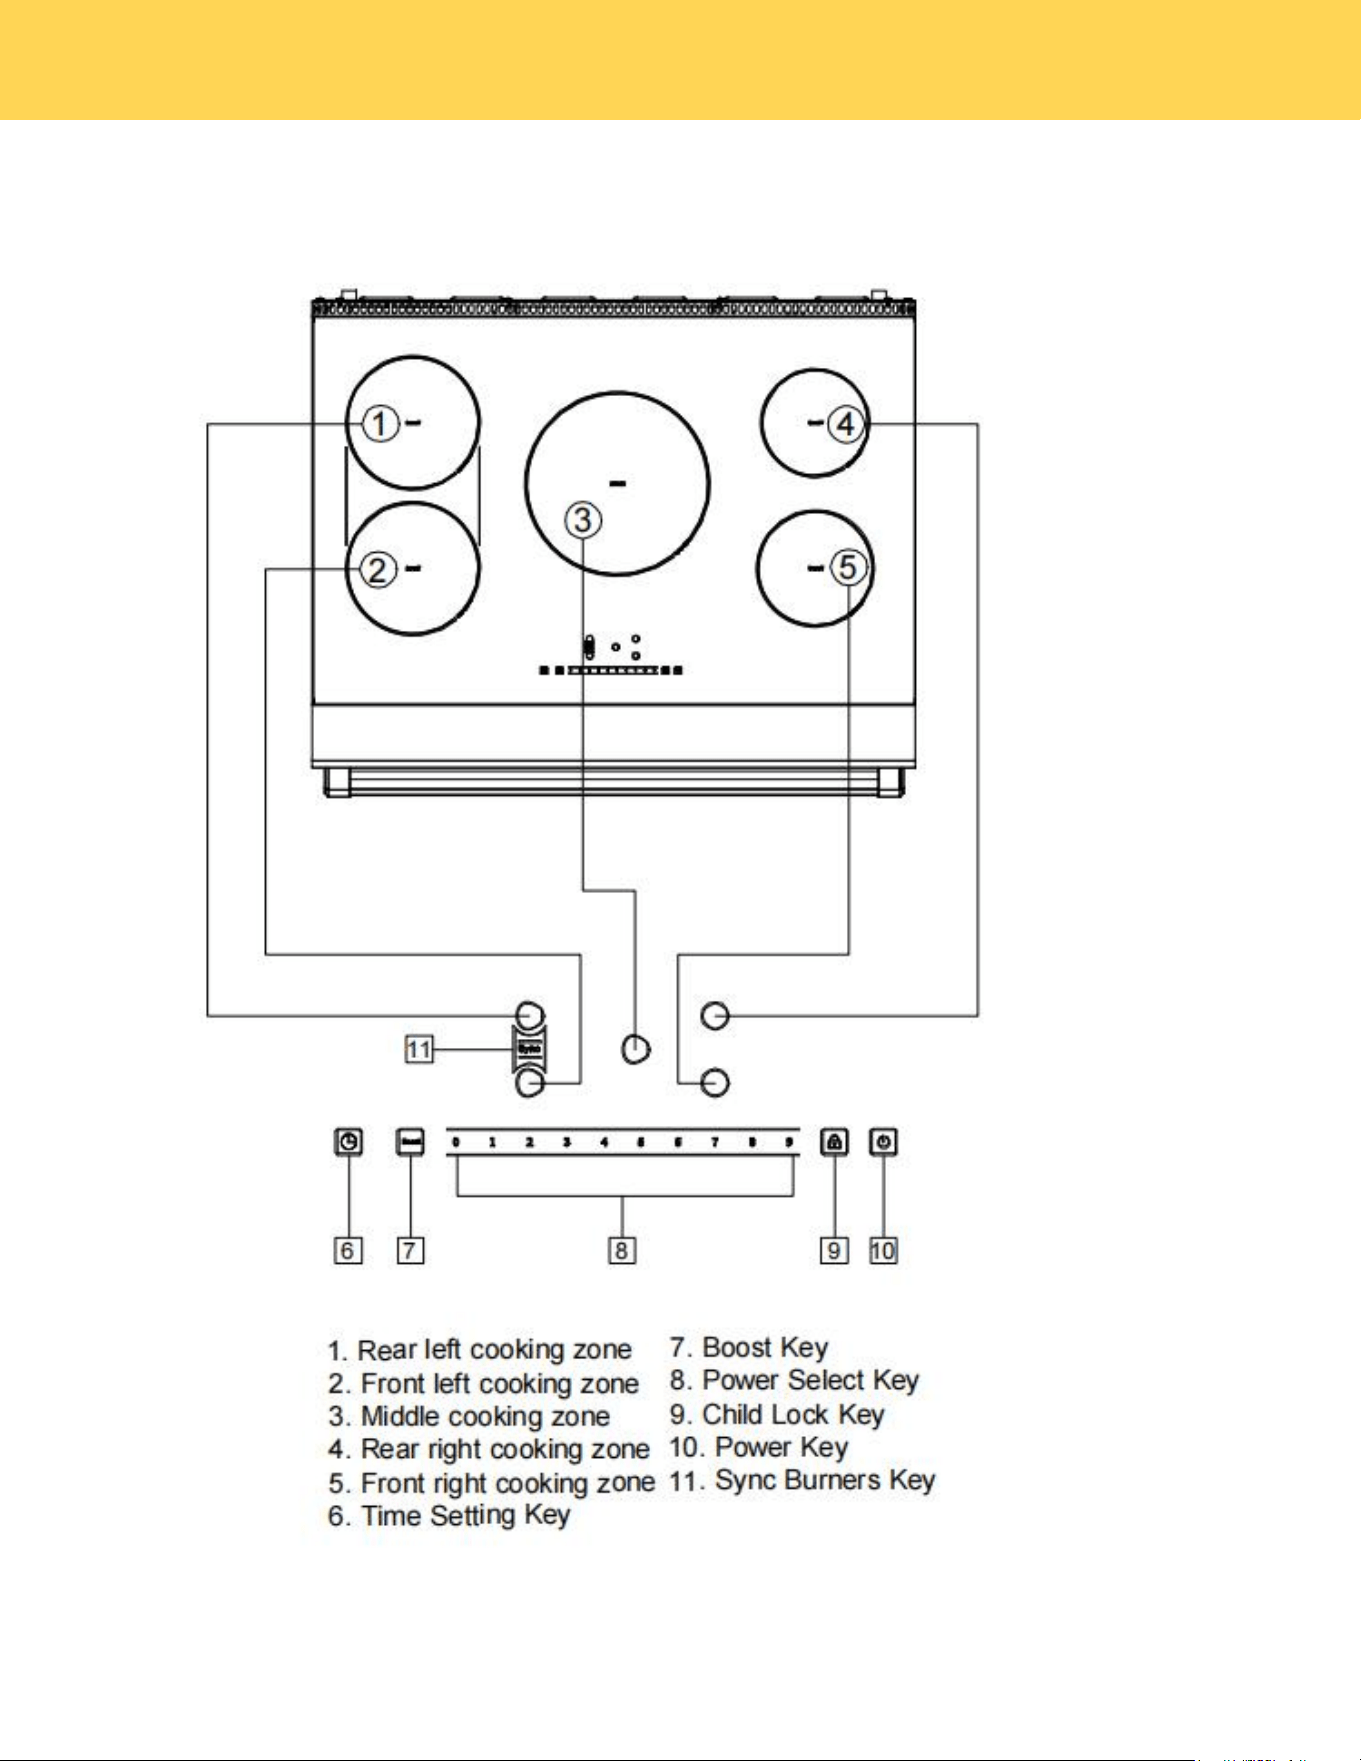
Modle:XRI36E
SETTING SURFACE CONTROLS
23
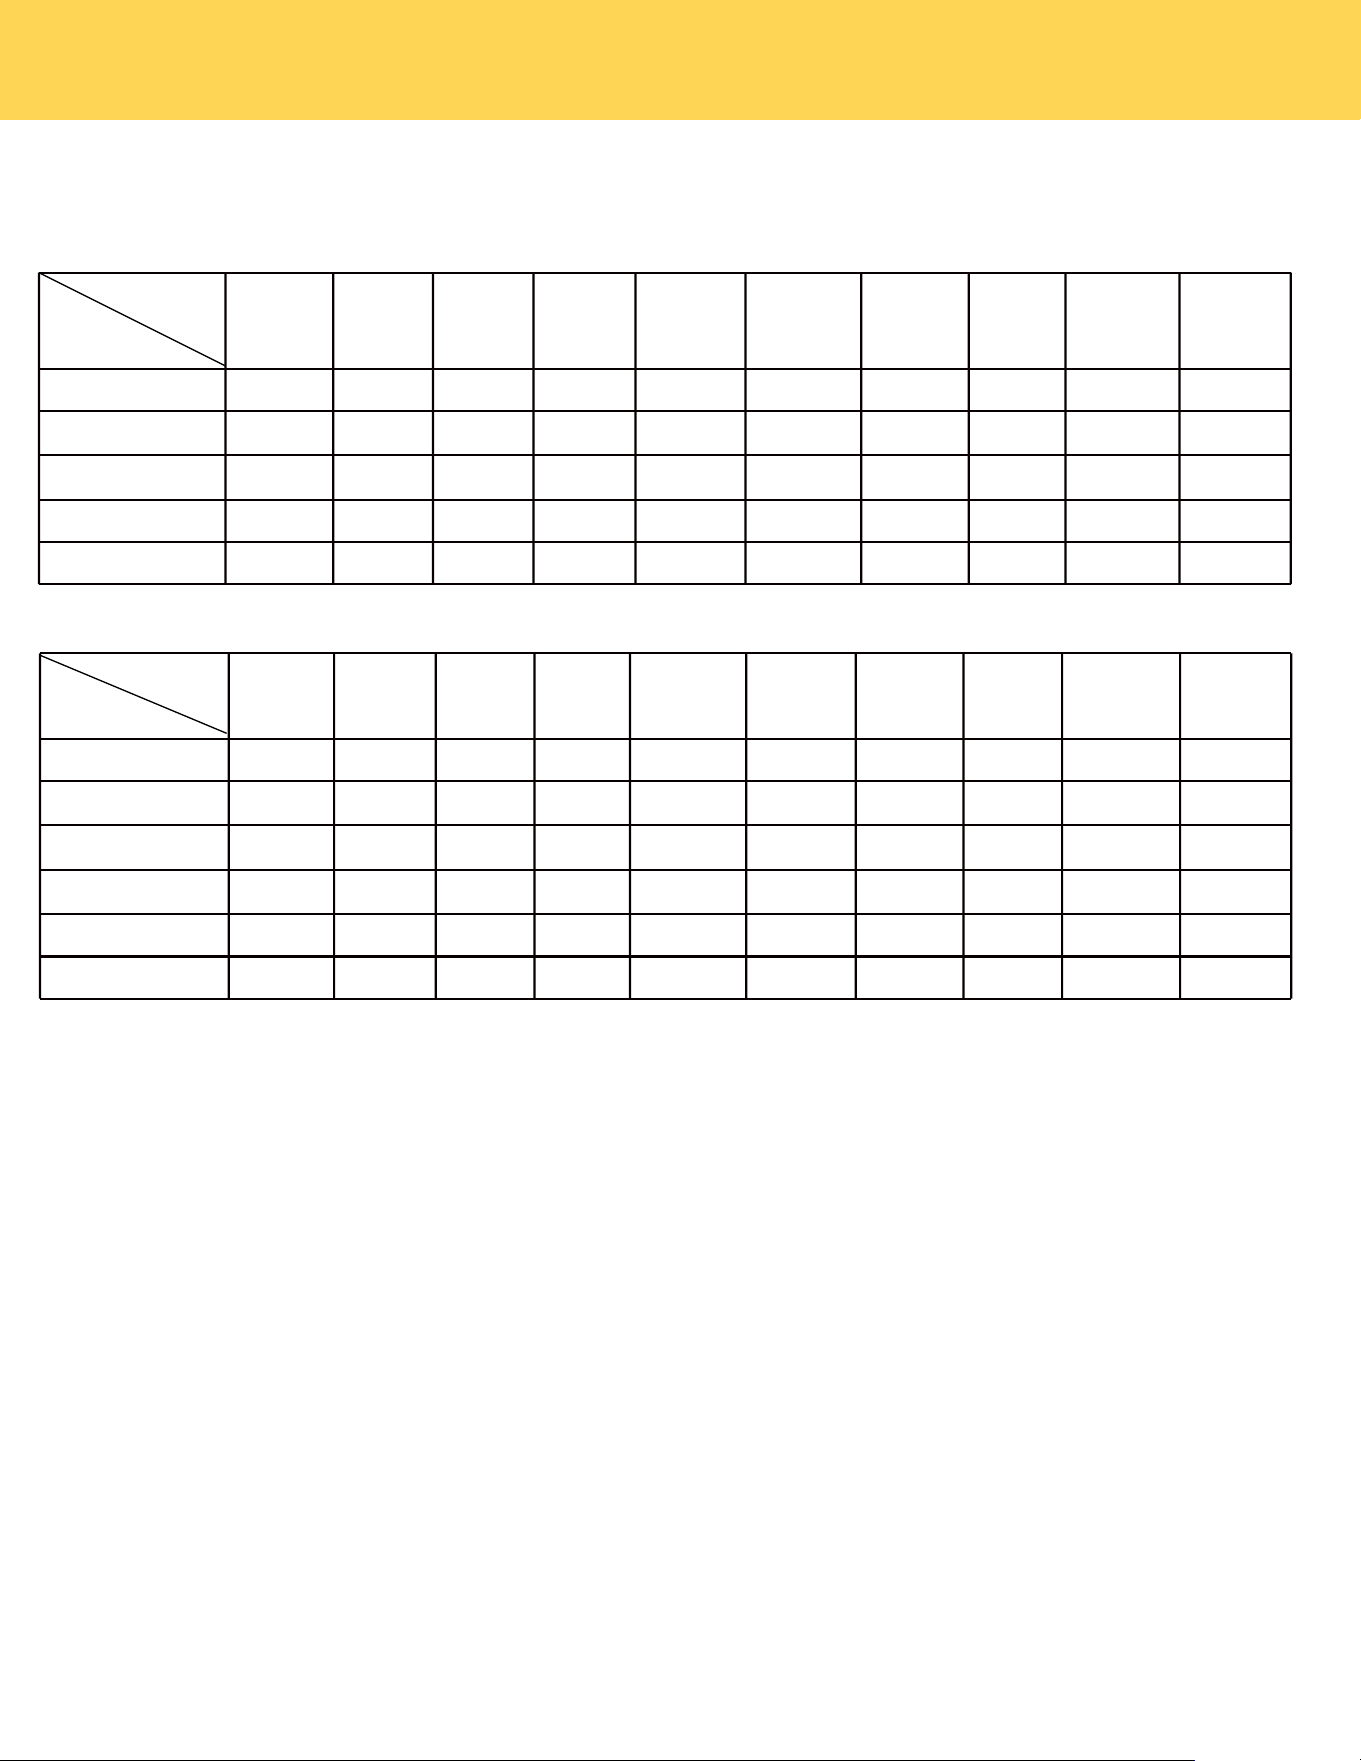
Heating Power Of Each Cooking Zone
Modle:XRI30E
Modle:XRI36E
Level
Ratedpower(W)
1
2
3
4
5
6
7
8
9
P
Rear Left
200
500
700
900
1100
1200
1400
1600
1800
2500
Front Left
200
500
700
900
1100
1200
1400
1600
1800
2500
Middle
300
500
700
900
1200
1500
2000
2500
3000
4000
Rear Right
100
400
600
800
1000
1100
1200
1300
1400
1800
Front Right
100
400
600
800
1000
1100
1200
1400
1600
2000
Sync burners
400
1000
1400
1800
2200
2400
2800
3200
3400
3600
Level
Ratedpower(W)
1
2
3
4
5
6
7
8
9
P
Rear Left
200
500
700
900
1100
1200
1400
1600
1800
2500
Front Left
200
500
700
900
1100
1200
1400
1600
1800
2500
Rear Right
300
500
700
900
1200
1500
2000
2500
3000
4000
Front Right
100
400
600
800
1000
1100
1200
1300
1400
1800
Sync burners
400
1000
1400
1800
2200
2400
2800
3200
3400
3600
Standby Mode
Switching on the cooktop and cooking zones
Upon inserting the power plug into an electric socket, the induction cooktop will make a sound once,and all the
digital lights on the cooktop will blink once, indicating the unit has entered Standby Mode.
Readiness Mode
In standby mode, press the power key, and the induction cooktop will emit a single "beep" sound, indicating it is
ready for use. If only the indicator light above the power button is illuminated and no buttons are pressed within 30
seconds, the unit will automatically return to standby mode.
Place a compatible pot or pan on the cooking zone you wish to use.
When the cooktop is ON, as described above, press the power key for the desired
cooking zone. The display will blink and show "0"..
Use the number keys to select the power level; for example, pressing the number 9 key
will display "9".
If no key is pressed within 30 seconds, the cooking zone will automatically enter
standby mode.
Pressing the Boost key will show on the display as a “P”,boosting the heating power to
the highest level.
Boost is the highest power level,designed for quickly heating or boiling larger
quantities. Boost will operate for a maximum of 10 minutes. After 10 minutes, it will
automatically revert to power level 9.
SETTING SURFACE CONTROLS

24
Child Lock
Press the child lock key to activate the function.The unit will make a “beep” sound and the indicator light will turn
on above the child lock.The controls are now locked.
Activating the Child Safety Lock during cooktop use
Child Lock prevents activation of any sensor key, except for the power key and the child lock key.
Switch Off The Child Lock
In Lock mode, press and hold the child lock key for 3 seconds. The time display will count down "3-2-1", and the
indicator light will turn off, indicating the cooktop is unlocked.
Sync Burners
Cook Time
Press the cooking zone power key, then press the time setting key. The time display will show "0".
Press the number keys to enter the value of the cooking time.The cooking zone will automatically if a key is not
pressed within 5 seconds.
When the cooking time reached,the cooking zone power will automatically shut off.
Press the Sync burners key,the burners display will both blink and show a “0”.
Use the number keys to set the power level; for example, pressing the number key "9" will display "9" on both
burner displays.If no key is pressed within 30 seconds, the cooking zone will automatically switch to standby
mode.
Press the Boost key will both show on the display as a “P”,boosting the heating power to the highest level.
Boost is the highest power level,designed for quickly heating or boiling larger quantities. Boost will operate
for a maximum of 10 minutes. After 10 minutes, it will automatically revert to power level 9.
The two left cooking zones have the Bridge feature. The Bridge indicator is available on the front left cooking
zone if both left cooking zones detect cookware. The Bridge function makes the two left cooking zones work
together to heat a long piece of cookware, like a griddle.
How to use:
Timer
Press the time setting key,the display will show”00”.
Press the number keys to enter the value of the Kitchen timer.
The Kitchen timer will will automatically shut off if a key is not pressed within 5 seconds.
Press the time setting key,the time display will blinks,then press the number key “00”.
The time display will blink for 5 seconds and then turn off.
The kitchen timer serves as an extra timer that will beep when the set time has elapsed. It does not start or stop cooking
functions. You can use the kitchen timer with any of the other cooktop functions.
How to use:
Canceling The Timer
Press the cooking zone power Key,the time display will blinks,then press the number key “00”.
The time display will blink for 5 seconds and then turn off,indicating that the cooking time of selected heating
zone has been cancelled.
Canceling The Time Of Cooking
TIPS: Press and hold the time setting key for 3 seconds,all cooking time and timing times can be cancelled.
SETTING SURFACE CONTROLS

25
A:Press the desired cooking zone power key, then press the number key "0". If no key is pressed within 5
seconds, the cooking zone will automatically turn off. The unit will then enter readiness mode.
Turn Off
B:Press the power key, and a single "beep" sound will be heard as the unit turns off, entering standby mode.
Note: Please do not pull the power plug until the cooling fan has stopped.
SETTING SURFACE CONTROLS

26
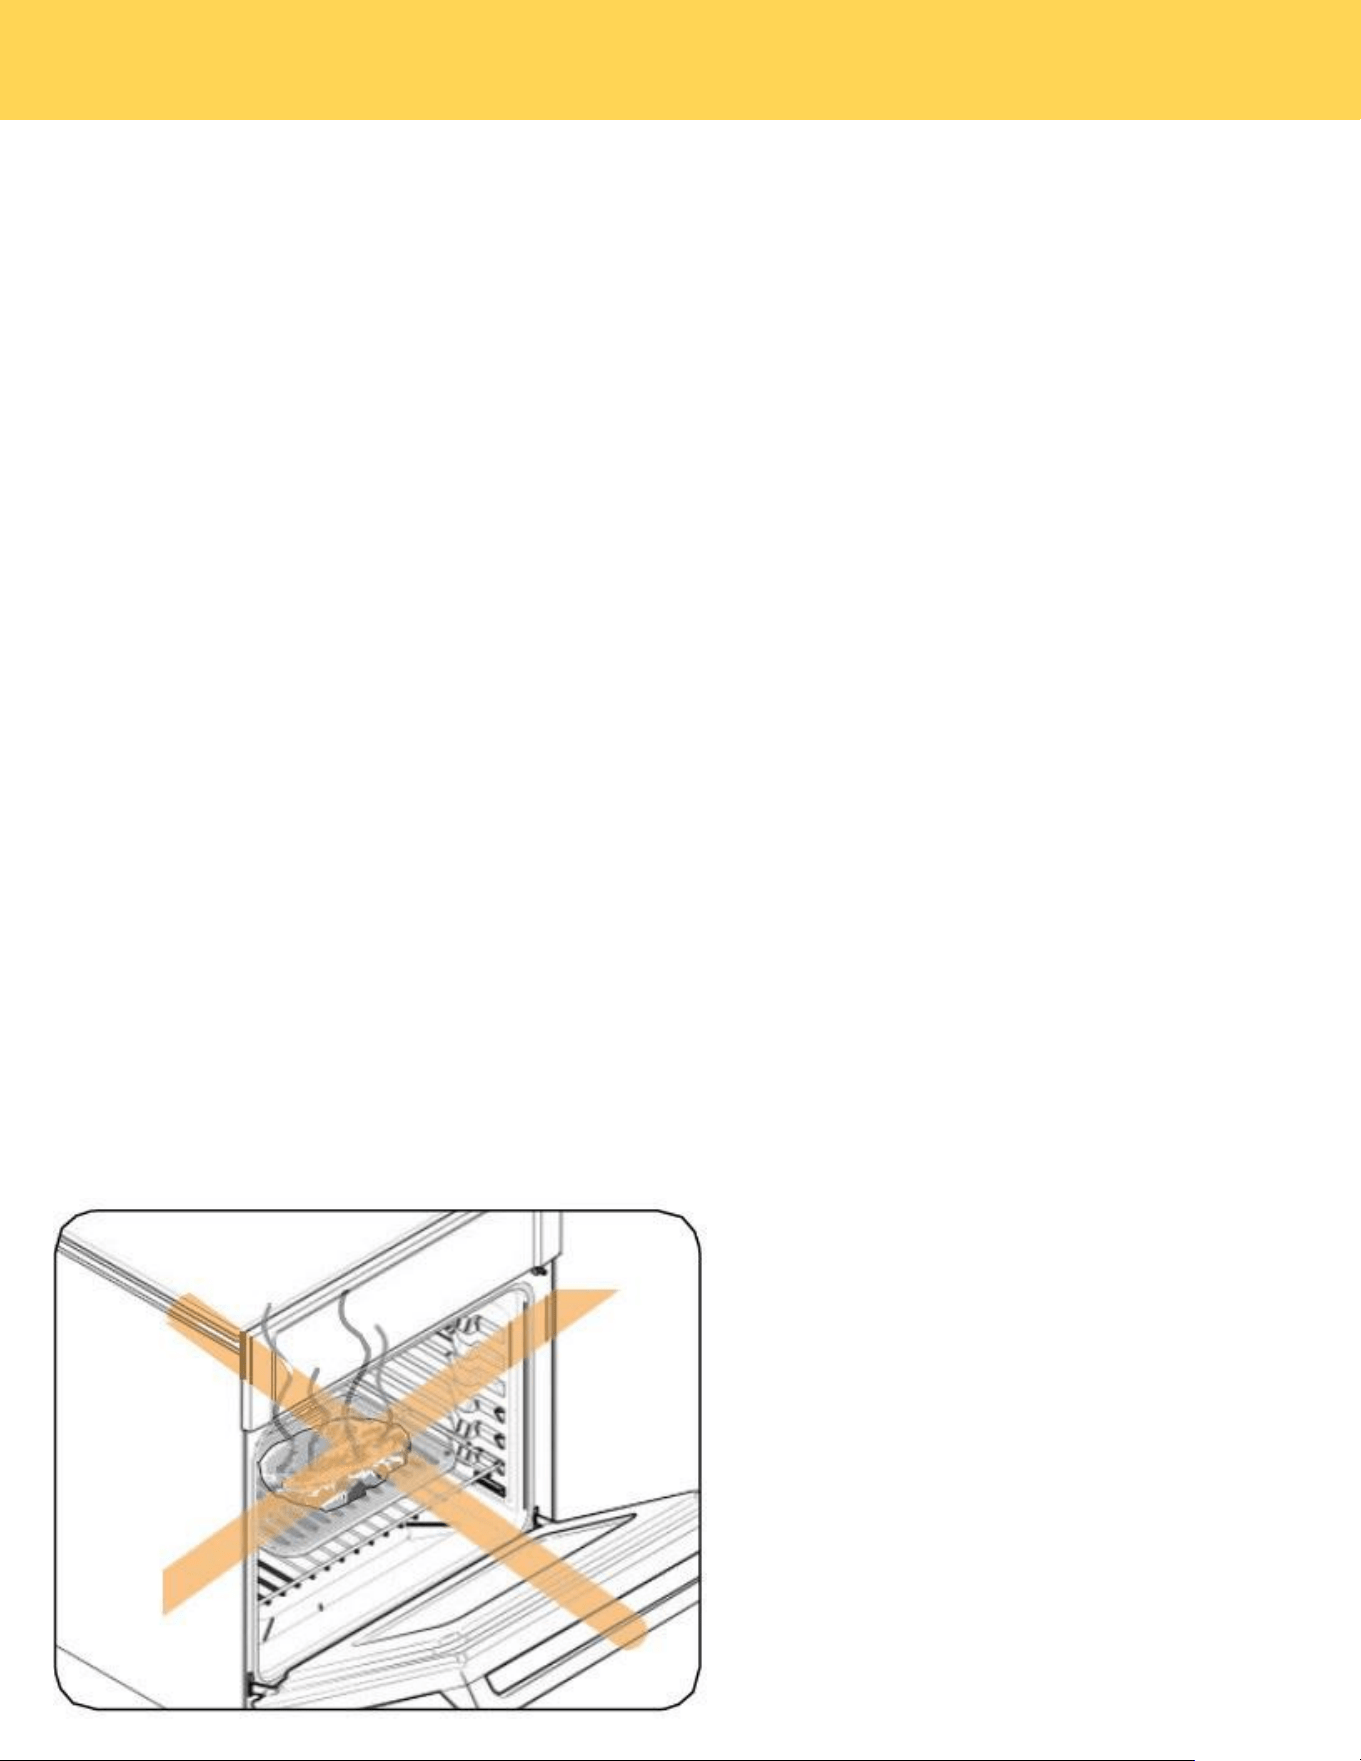
Operating The Oven
• Do not block the ducts on the rear of the range when cooking in the oven. It is important that the flow of
moist warm air from the oven and fresh air into the oven burner never be interrupted.
• Avoid touching the vent opening or near by surfaces during oven or broiler operation because they are hot. Do not place
plastics, paper or other items that could melt or burn near the oven vent.
• Use all the oven modes with the oven door closed.
• Never use aluminum foil to cover the oven shelves or to line the floor of the oven. The trapped heat can
irreversibly damage the enamel and may even cause afire.
• Do not place water, ice,or any dish or tray directly on the oven floor, as this will irreversibly damage the
enamel.
• Do not cover the slotted grid of the broil/roast pan with aluminum foil.This will catch the grease and could
cause a fire.
• Do not use plastic wrap or wax paper in the oven.
• For food safety reasons, do not leave food in the oven for longer than two hours before and after cooking
or defrosting.This is to avoid contamination by organisms which may cause food poisoning.Take care
during warmer weather.
Oven Cooking Safety Guidelines
WARNING
According to the United Sates Department of Agriculture:DO NOT hold foods at temperatures between 40ºF to 140ºF
more than 2 hours.Cooking raw foods below 275ºF is not recommended.
WARNING
NEVER cover any slots,holes or passages in the oven bottom or cover an entire rack with materials such as aluminum
foil.Doing so blocks airflow through the oven and may cause carbon monoxide poisoning. Aluminum foil linings may also
trap heat,causing a fire hazard.
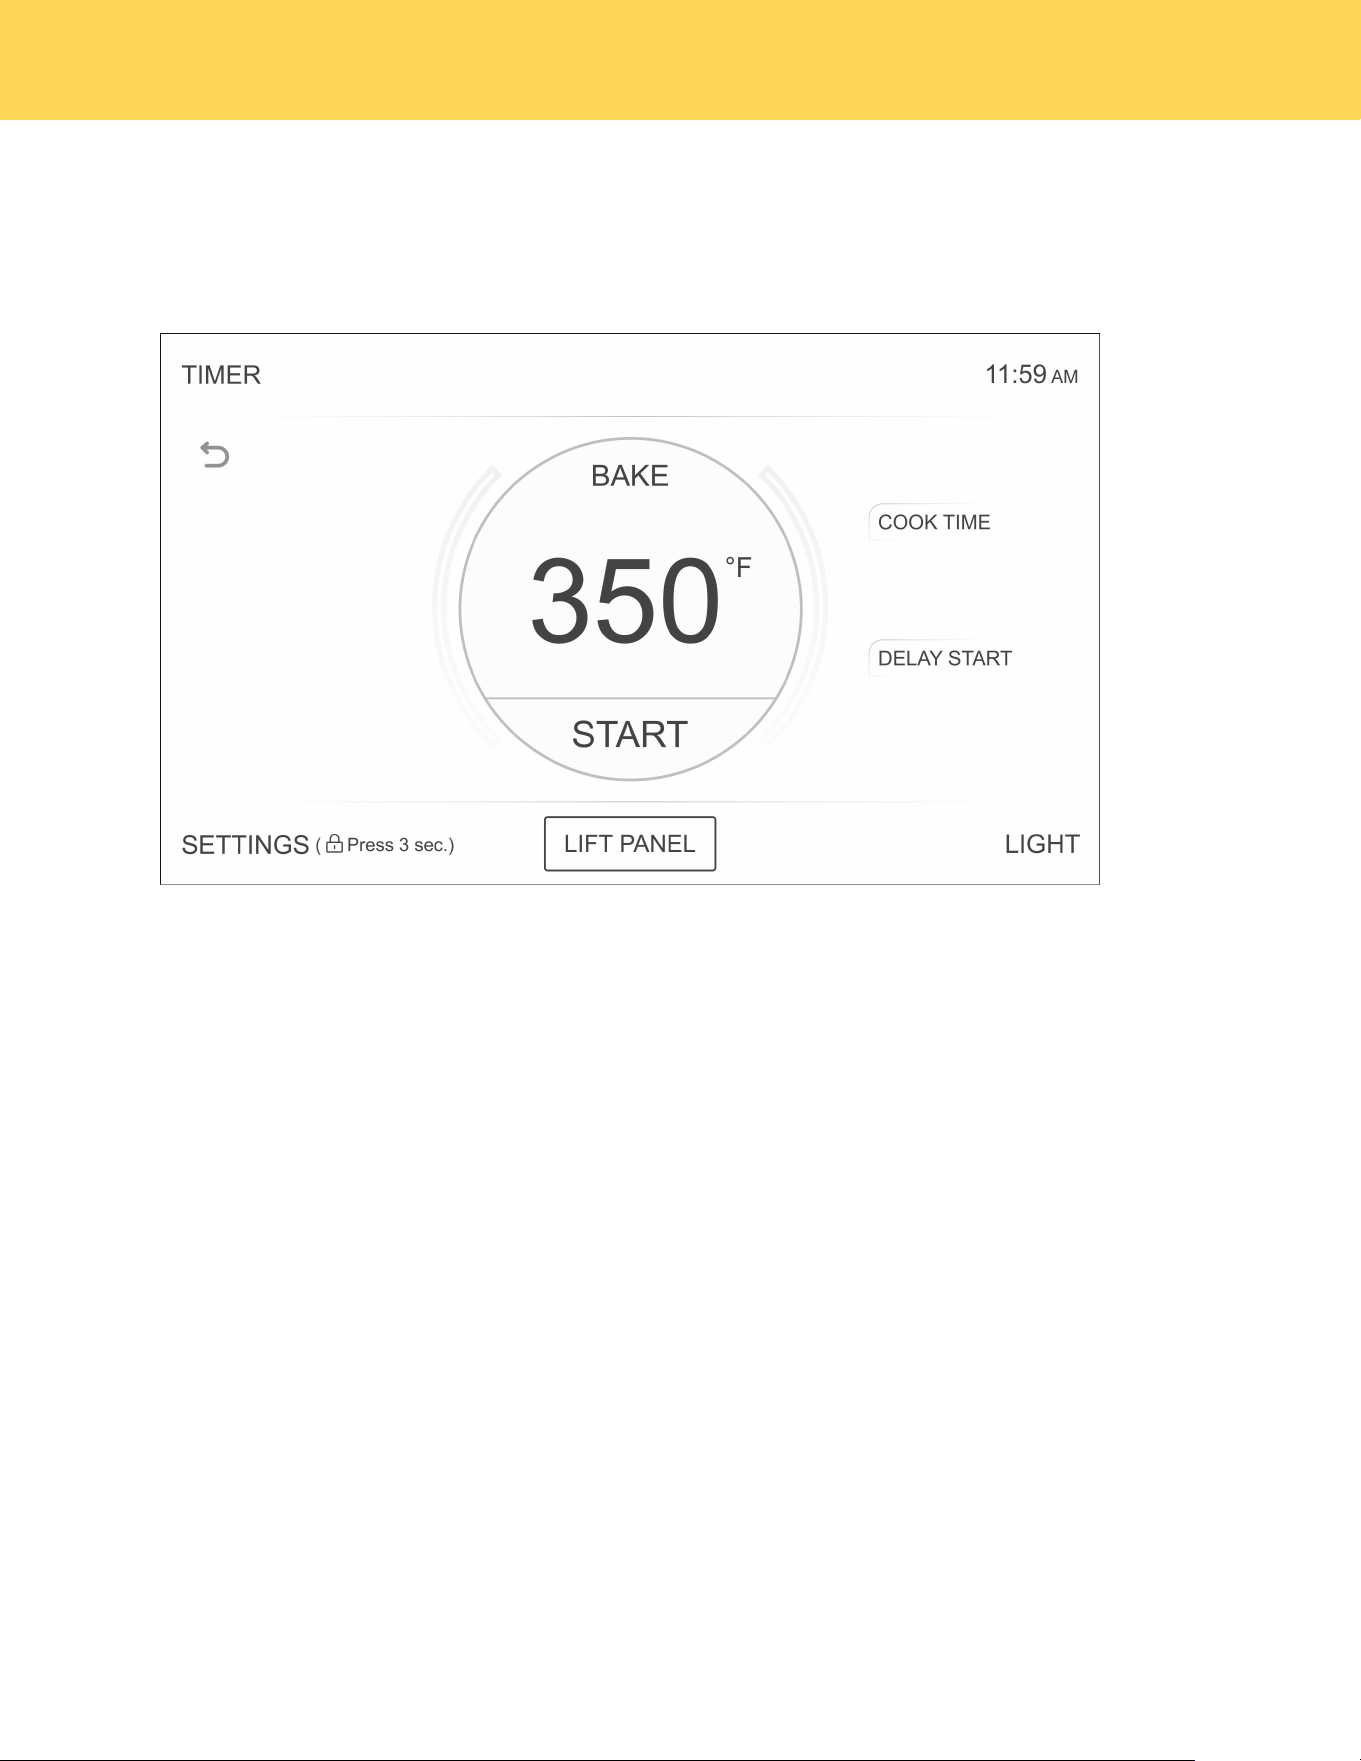
Display Screen
➊
➋
➌
➍➎
➏
➊
➋
➌
➎
➍
➏
Timer Key
Clock Display
Settings & Child Lock
Key
Oven Light Key
Lift Panel Key
Function Select Menu
OPERATING THE OVEN

27
Oven Function
Bake
This option allows the user to access traditional the traditional bake mode.
Convection Bake
Circulates the oven heat evenly and continuously for faster cooking of some foods.
Multi-Rack Bake
Multi-rack cooking in a convection oven is most beneficial around the holidays. With a convection oven, it's easy to
utilize and great for cooking your food faster.
Broil
Broil can be selected to access Broil Low and Broil High. See the Cooking Modes section for more information.
Convection Roast
Uses a convection fan to gently brown meats and poultry and seal in the juices.
Warm
Keep Warm will keep cooked food warm for serving up to 3 hours after cooking has finished.
Pizza
Pizza is specially designed to cook the perfect pizza.
Air fry
Uses hot air for great tasting crispy results without all the oil.
Proof
Creates the perfect oven environment for activating yeast in homemade bread.
Self Clean
This self-cleaning oven uses high temperatures (well above cooking temperatures) to burn off leftover
grease and residue completely or reduce them to a finely powdered ash that you can wipe away with a damp cloth.
Recipe
The Recipe function on your oven enables you to select your favorite recipe to cook..
Child Lock
Press and hold SETTINGS for three seconds to turn off the control panel to prevent the oven from accidentally
being turned on. Panel stays locked until you turn this function off.
SETTINGS
Press the SETTINGS to access the Settings. See the Settings section for more information.
Oven Light
To turn the Oven Light on or off, press the LIGHT button located at the bottom right of the panel. Both oven cavity
lights will turn on.
TIMER
Set or cancel theTIMER on the right bottom of panel.
Clock
You can press the clock display in the top of the right panel to set the clock.
LIFT PANEL
Used to lift and lower the oven control panel.
OPERATING THE OVEN
28
Setting the clock
The Clock must be set to the correct time of day for the automatic oven cooking functions to work properly.
• The time of day cannot be changed during timed cooking, delay-timed cooking, or a self-cleaning cycle.
How to set the clock
1. Touch SETTINGS ,then touch Clock to set the clock.
2. You can choose between a 12-hour or 24-hour display. The default is 12-hour.
3. Select AM or PM. (Skip this step if you are setting the clock to 24 hour display mode.)
4. Touch the number to set the current time of day.
5. Touch OK to save the changes.
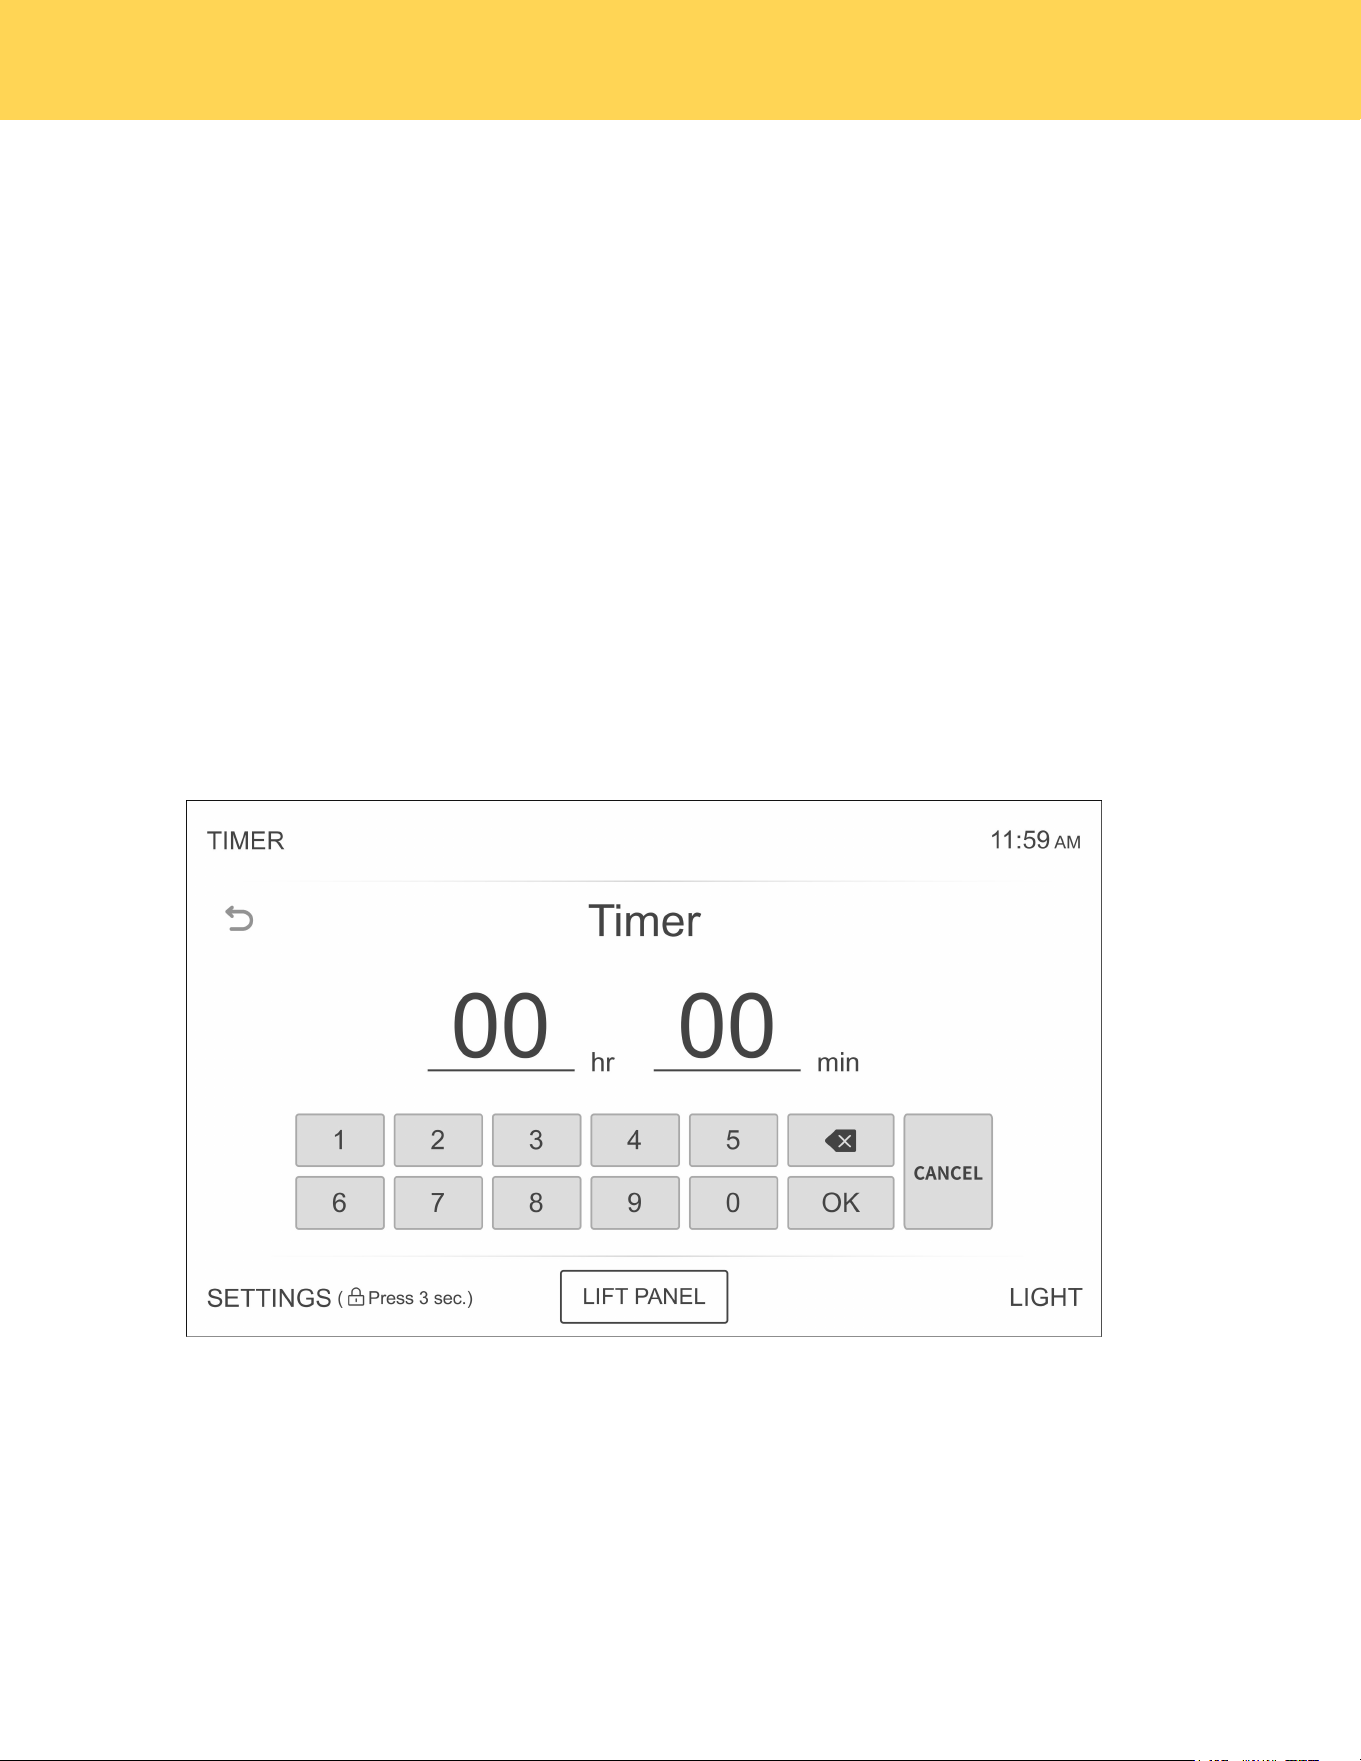
Setting the kitchen timer
The kitchen timer serves as an extra timer that will beep when the set time has elapsed. It does not start
or stop cooking functions. You can use the kitchen timer with any of the other oven functions.
How to set the timer
1. Touch TIMER .
2. Touch number keys to set the hours and minutes. The timer can be set for any amount of time from 1 minute to
24 hours. If you make a mistake, touch delete , and then enter the amount of time again.
3. Touch OK to complete the setup.
4. When the set time has elapsed, the oven will beep and the display will show End until you touch Timer
to clear setting. You can cancel the timer at any time by touching.
Control Lockout
Control Lockout lets you lock the buttons on the touch pad so they cannot be activated accidentally. You can only
activate Control Lockout when the oven is in stand by mode.
How to activate the Control Lockout:
1. Cancel or turn off all other functions.
2. Touch and hold SETTINGS for three seconds on the bottom of control panel.
The padlock icon along with the current time will be displayed.
• All other functions must be canceled before you activate Control Lockout.
How to unlock the controls:
Press and hold the Lock icon for three seconds.The padlock icon will clear from the display.
OPERATING THE OVEN
29
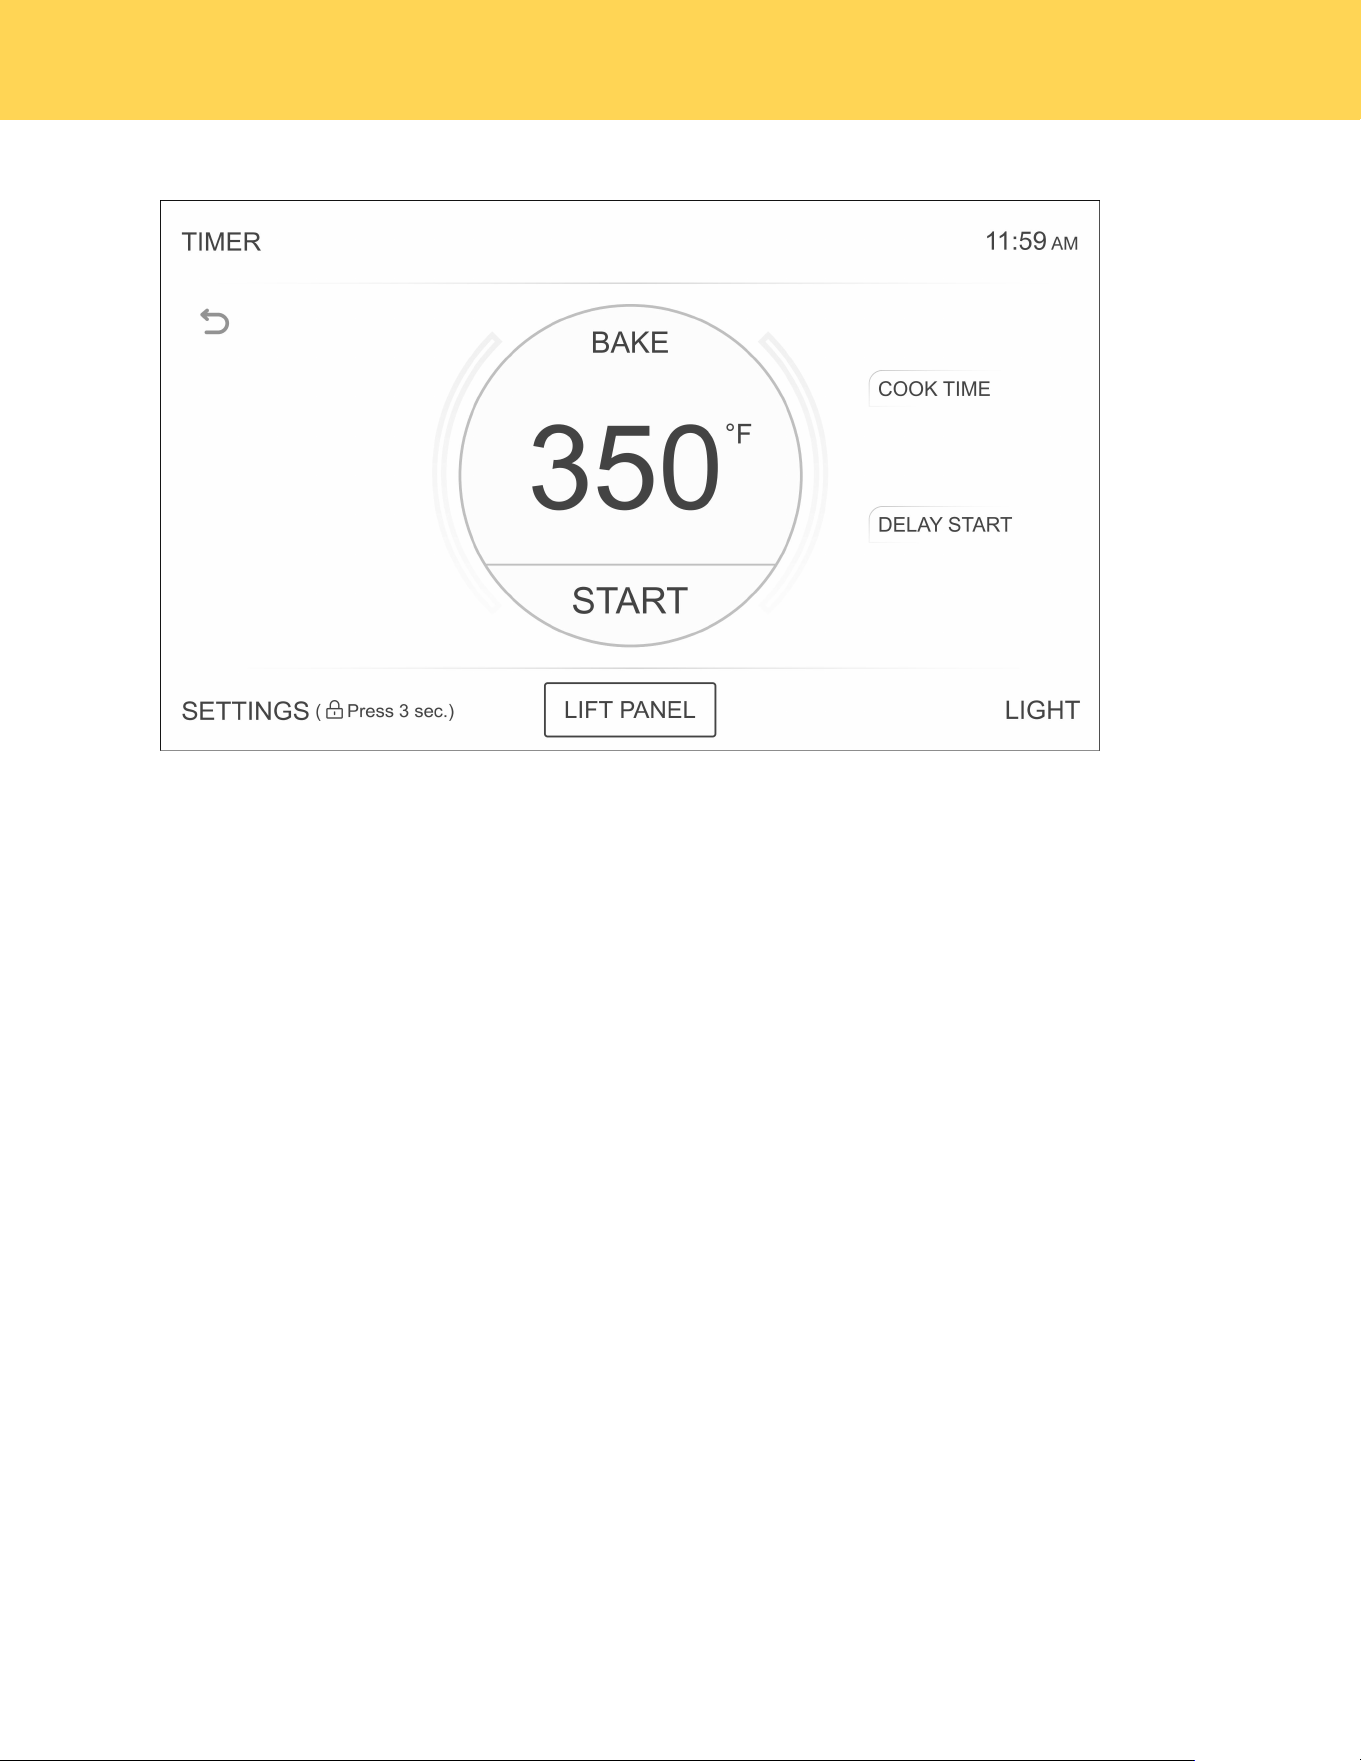
Cook Time
In Timed Cooking mode, the oven turns on immediately and cooks for the length of time you
select. At the end of the cooking time, the oven turns off automatically.
• You can use the timed Cooking only with another cooking operation.
How to set the oven for Time Cooking:
1. Choose the dired cooking function, e.g. Bake, and use the number pad to set the preferred
temperature (e.g. 400°F). The default temperature is 350°F.
2. Press COOK TIME on the top right of the cooking panel. Use the number pad to enter the
desired cooking duration in hours and minutes. The cooking time can be set from a minimum of 1
minute to a maximum of 10 hours.
3. Press START to begin preheating. The temperature display will update once the oven reaches
100°F and continue until it reaches the set temperature. When preheating is complete, a buzzer
will sound six times. (Preheating time is not included in the cooking time.)
Use caution with the Time Cooking or Delay Start features. You can use these features to cook
cured or frozen meats and most fruits and vegetables. For food that can easily spoil such as milk,
eggs, and unfrozen or fresh,fish, meat, or poultry, chill them in the refrigerator first. Even when
chilled, they should not stand in the oven for more than 1 hour before cooking begins, and should
be removed promptly when cooking is completed. Eating spoiled food can result in sickness from
food poisoning.
CAUTION
OPERATING THE OVEN

30
Delay Start
With Delay Start, the oven’s timer turns the oven on at a preset time.
How to set the oven for Delay start:
1. Position the oven racks and place the food in the oven cavity.
2. Select the desired cooking function, e.g. Bake.
3. Enter the desired cook temperature using the numeric key.
4. Enter the cooking time using the numeric key.
5. Press DELAY START at the bottom right of the cooking panel. Use the numeric keys to enter
the delay duration in hours and minutes. For example, if the current time is 3 PM and you want
the oven to start at 5 PM, set the delay time to 2 hours.
6. Touch START. The oven will automatic turn on after the Delay start time has elapsed.
• The oven light turns on automatically when the door is opened.
• You can turn the oven light on and off manually by touching the light button in the bottom left
corner of the control panel.
• The oven light turns off automatically when the door is closed.
Turning the light on and off
OPERATING THE OVEN
31
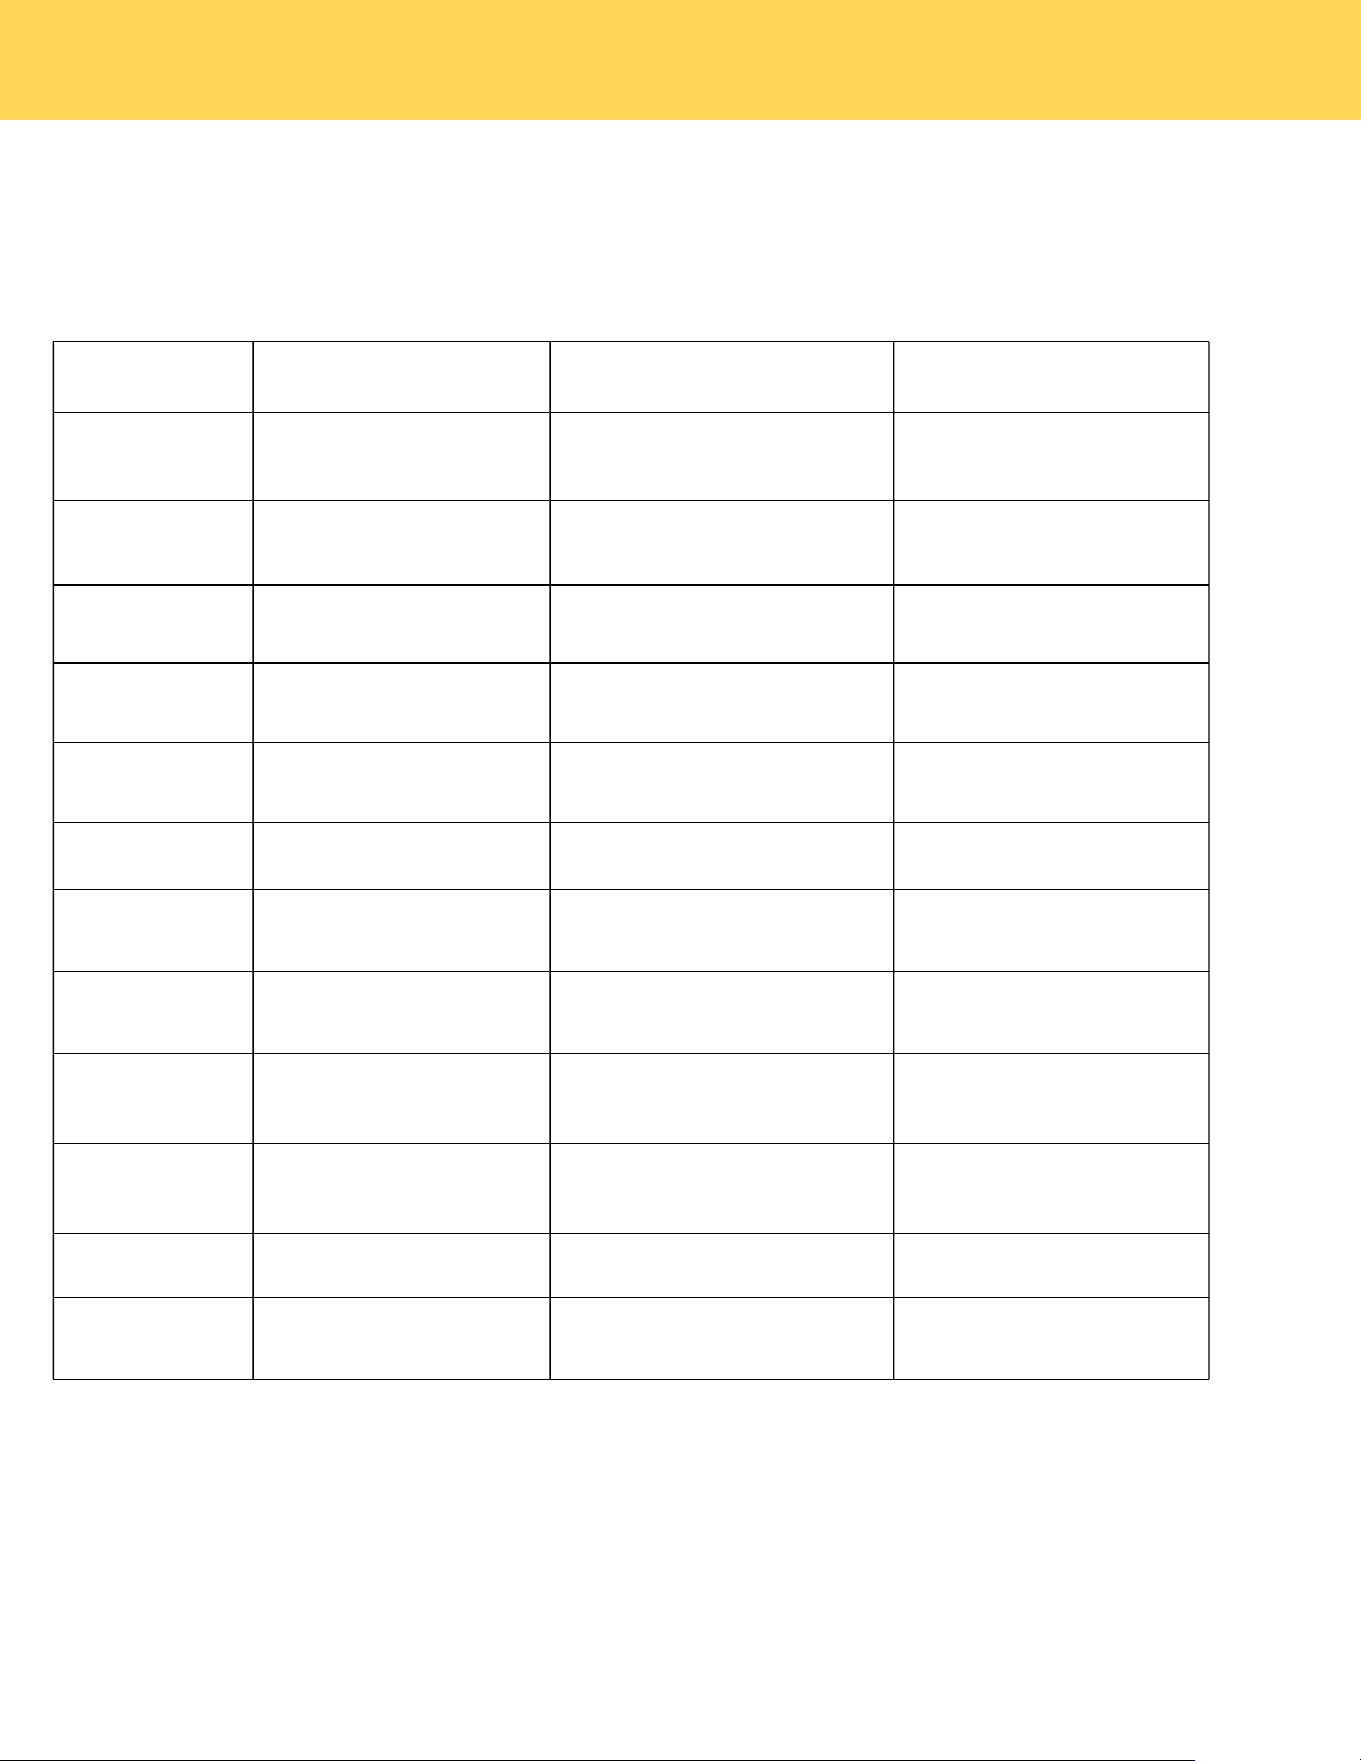
Minimum and maximum settings
Feature
Min.Temp ./Time
Max.Temp./Time
Default
Bake
175°F(79℃)
0:01 hr/min
550°F(288℃)
10:00 hr/min
350°F(177℃)
Convection Bake
175°F(79℃)
0:01 hr/min
550°F(288℃)
10:00 hr/min
325°F(163℃)
Multi-Rack Bake
175°F(79℃)
0:01 hr/min
550°F(288℃)
10:00 hr/min
325°F(163℃)
Broil Hi/Lo
Lo 400°F(204℃)
Hi 550°F(288℃)
Hi 550°F(288℃)
3:00 hr/min
Convection Roast
175°F(79℃)
0:01 hr/min
550°F(288℃)
10:00 hr/min
325°F(163℃)
Pizza
175°F(79℃)
0:01 hr/min
550°F(288℃)
10:00 hr/min
425°F(218℃)
Proof
80°F(27℃)
0:01 hr/min
95°F(35℃)
10:00 hr/min
80°F(27℃)
Air Fry
350°F(177℃)
0:01 hr/min
550°F(288℃)
10:00 hr/min
425°F(218℃)
Keep Warm
0:01 hr/min
3:00 hr/min
175°F(79℃)
Self Clean
3:00 hr/min
5:00 hr/min
3:00 hr/min
Probe
100°F(38℃)
210°F(99℃)
150°F(66℃)
Sabbath
175°F(79℃)
0:01 hr/min
550°F(288℃)
74:00 hr/min
350°F(177℃)
All of the features listed have a minimum and a maximum time or temperature setting that may be entered into the
control. An entry acceptance beep sounds each time a control button is pressed.An entry error tone (two short tones)
sounds if the entry of the temperature or time is below the minimum or above the maximum setting for the feature.
OPERATING THE OVEN
32
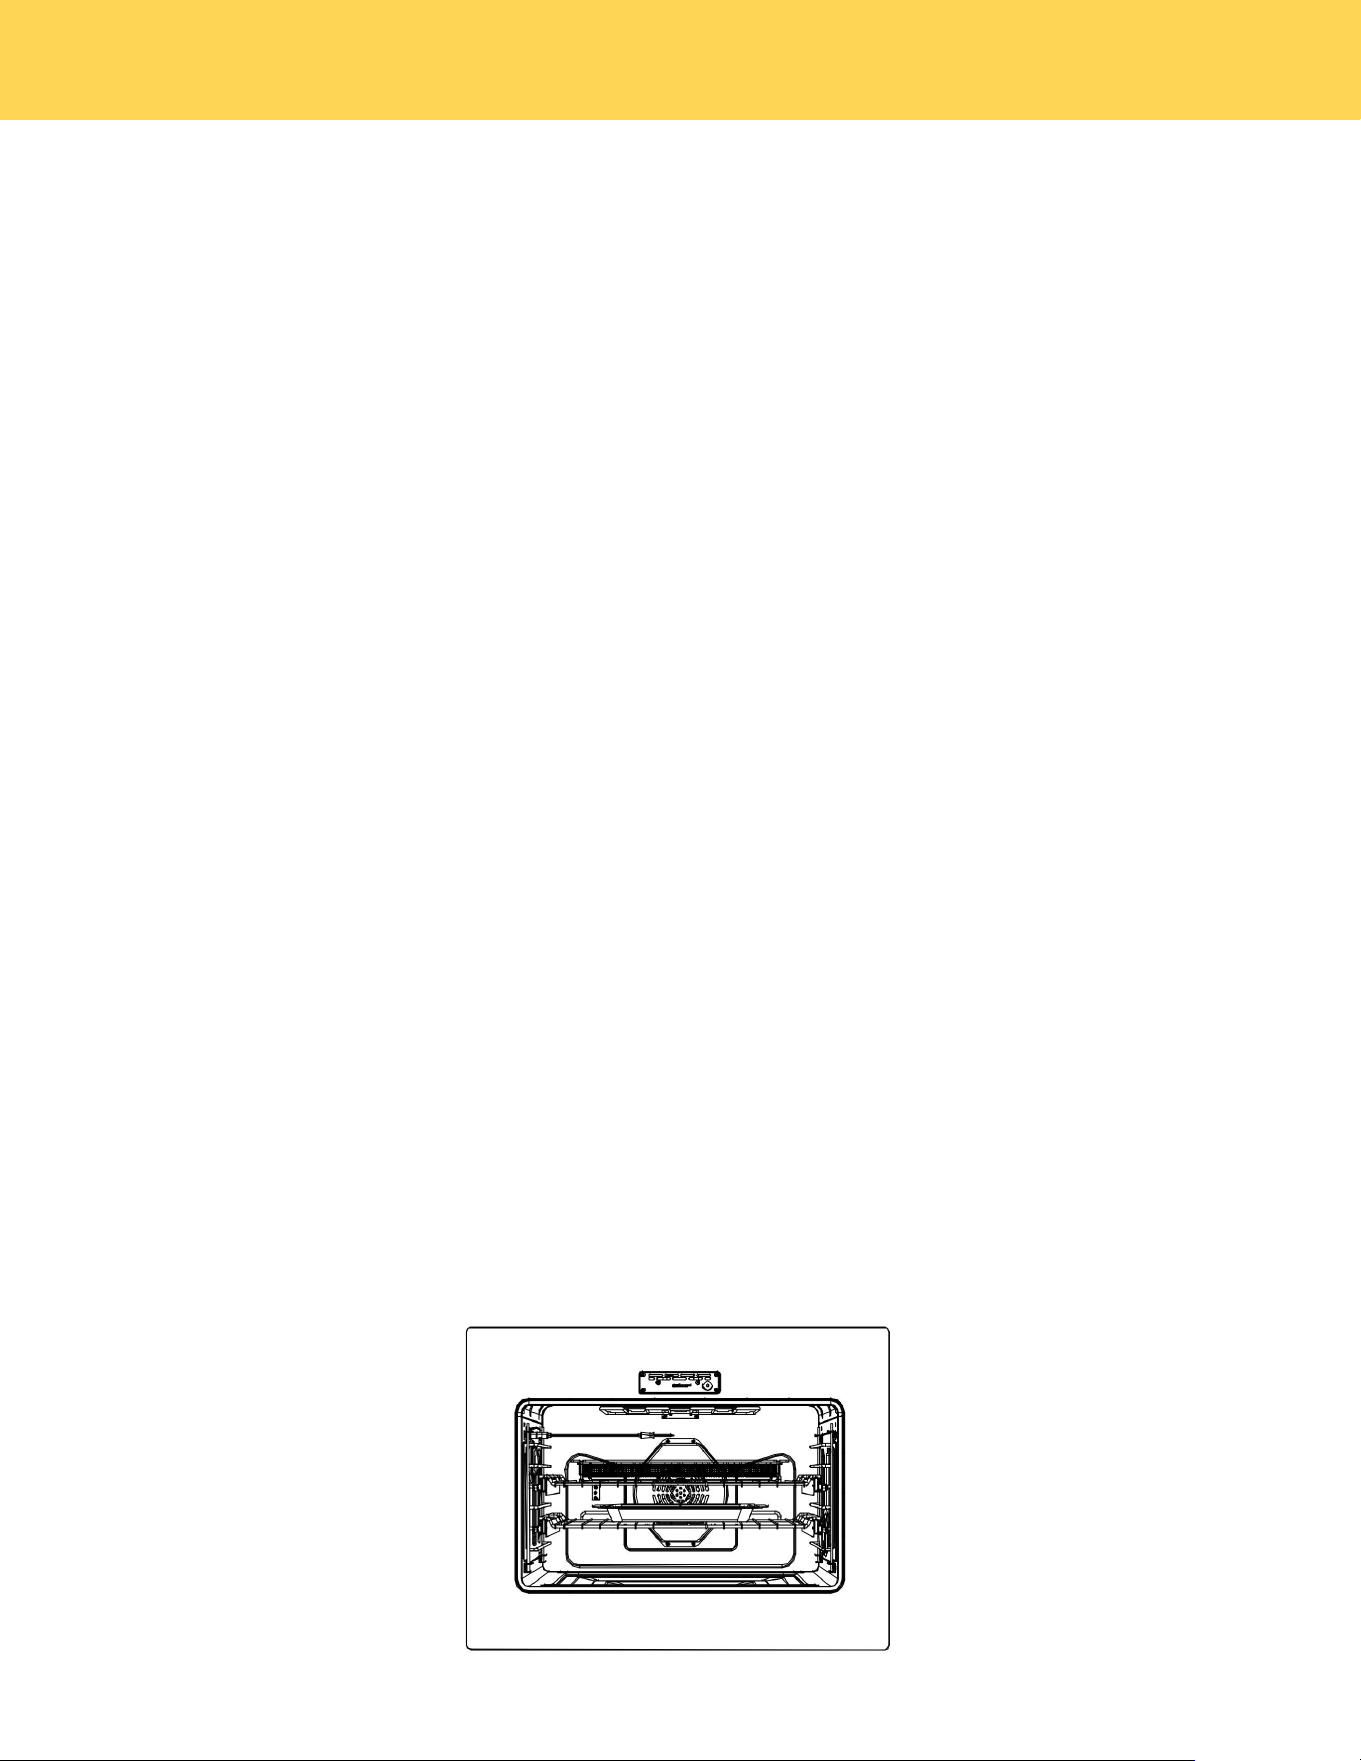
Oven Rack Positions
Centering baking pans in the oven as much as possible will
produce better results. If baking with more than
one pan, place the pans so each has at least 1" to 2” of air
space around it.When baking on a single oven rack,place the
oven rack in position 3 or 4.
When baking cakes and cookies on multiple racks,
place the oven racks in position 3 and 5.
Using Multiple Oven Racks.
Using the convection fan will provide best air movement with
multi level rack cooking.
Rack and Pan Placement
Type of Food
Rack Position
Broiling of Hamburgers
6
Broiling meats or small cuts of
poultry and fish
3 to 5
Bundt Cakes, Pound Cakes,Frozen
Pies, and Casseroles
4 or 3
Angel Food Cakes, Small Roast
2
Turkey, large Roast, Hams Fresh
Pizza
1
USING THE OVEN RACKS
OPERATING THE OVEN
33
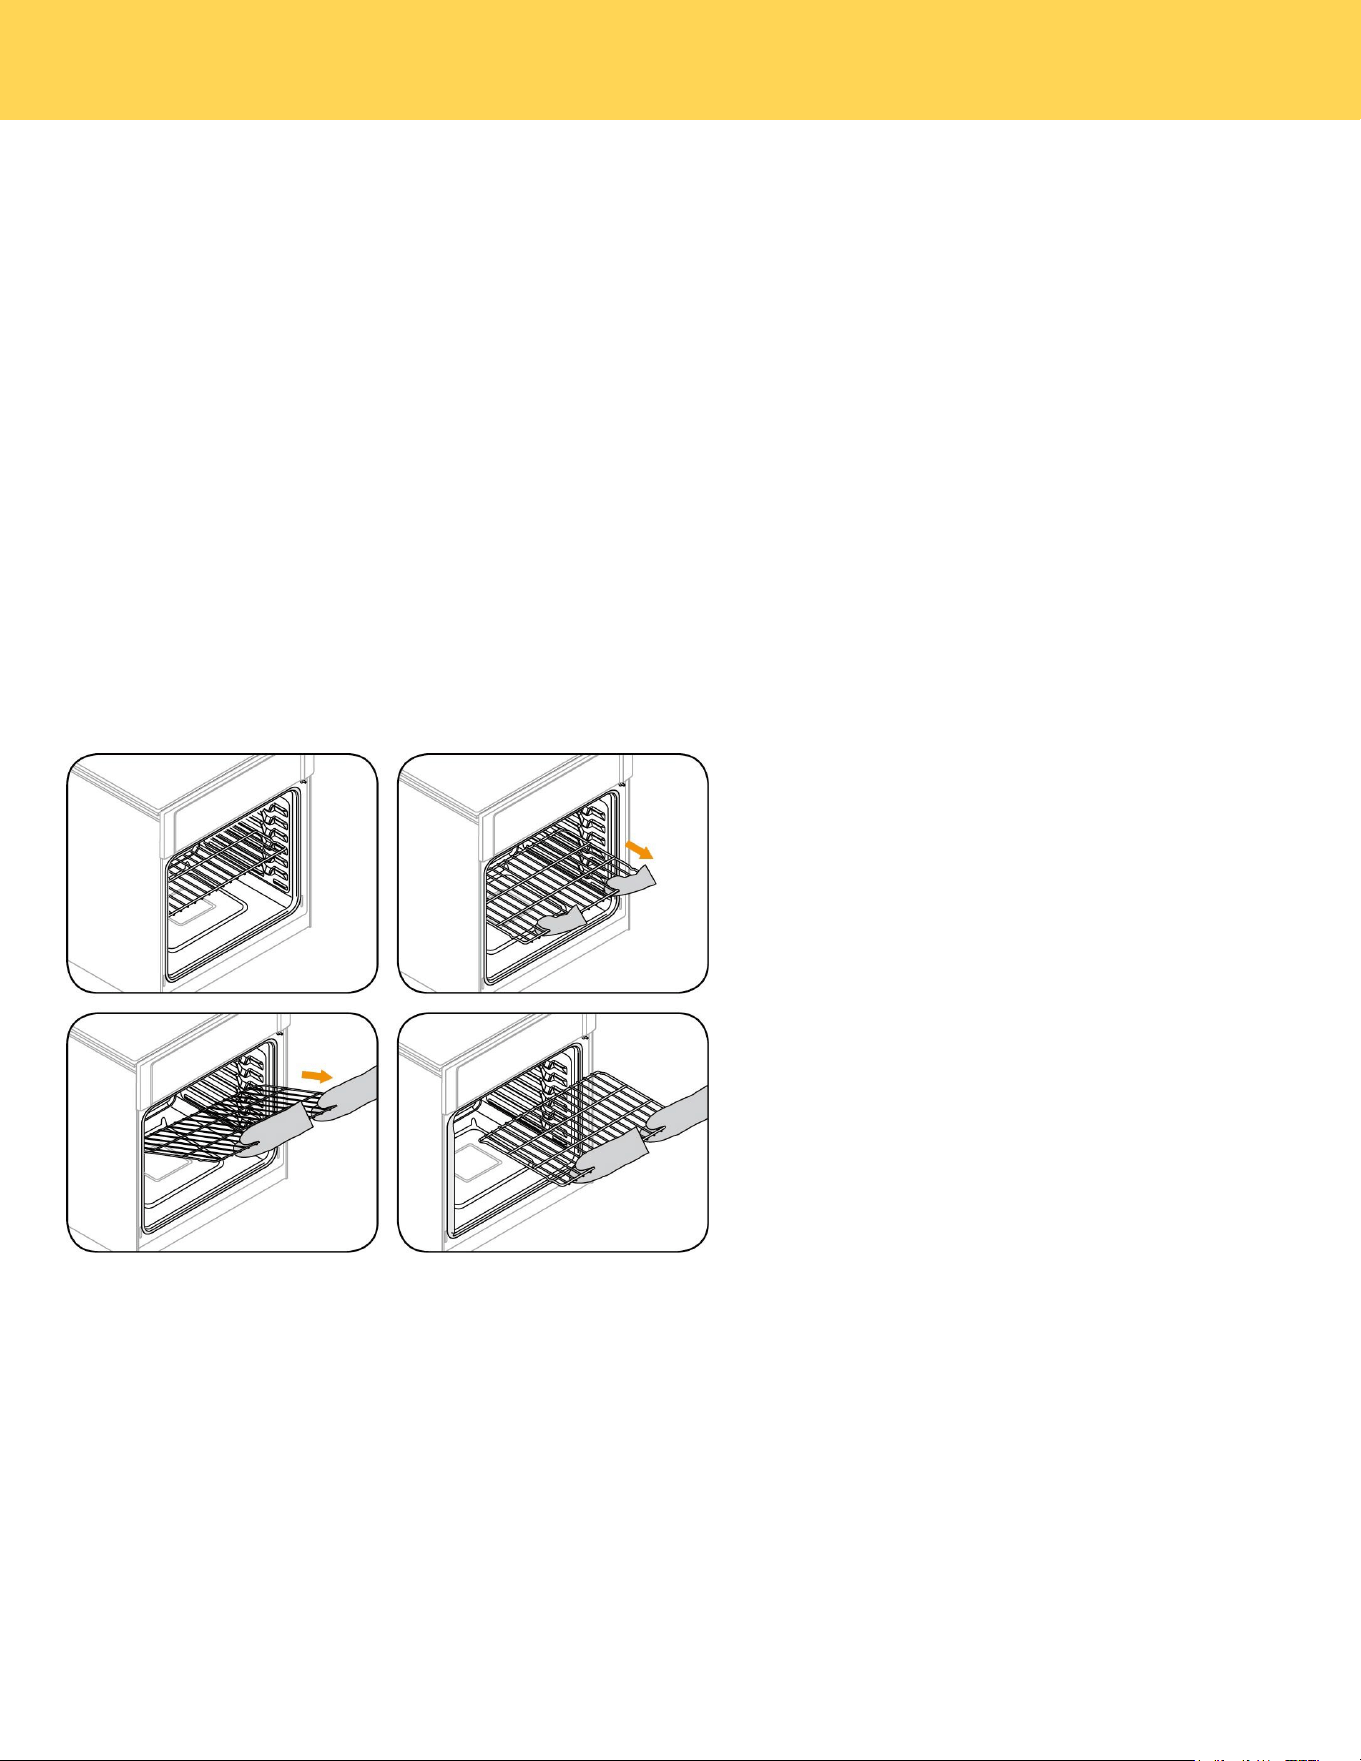
Before using the racks
Each rack has stops that need to be placed correctly on the supports. These stops will keep
the rack from coming completely out.
REMOVING THE RACKS
1. Pull the rack straight out until it stops.
2. Lift up the front of the rack, and then pull it out.
REPLACING THE RACKS
1. Place the end of the rack on the support.
2. Place the front end up and push the rack in.
• Do not cover a rack with aluminum foil or place aluminum foil on the oven bottom. This will
hamper heat circulation, resulting in poor baking, and may damage the oven bottom.
• Arrange the oven racks only when the oven is cool.
CAUTION
OPERATING THE OVEN
34
Baking
The oven can be programmed to bake at any temperature from 175°F to 550°F. Baking temperature and time will vary
depending on the ingredients and the size and shape of the baking pan used. Dark or nonstick coatings may cook faster with
more browning.
How to set the oven for baking:
1. Touch Bake.
2. Touch default temperature,then enter the temperature you want using the number key, eg. 4 0 0 and touch OK.
3. Touch START. The oven will begin preheating, and the temperature display will update as the temperature rises from
100°F to the set temperature. Once preheating is complete, a buzzer will sound six times. To cancel baking, press
CANCEL to cancel cooking.
4. When the cooking time is complete, the oven will stop operating, a buzzer will sound, and a pop-up window will indicate
that cooking has finished. (The cooking time does not include preheating.)
• To change the cooking temperature, tap the temperature value in the center of the display screen to update it, and then
press OK. The oven will continue operating with the new settings.
•To change the cooking time, tap COOK TIME on the right side of the display screen, update it, and then press OK. The
oven will continue operating with the new settings.
• If oven door is left open for more than one minute the heating elements will turn off.
• Place food in the oven after preheating if the recipe calls for it. Preheating is very important for good results when
baking cakes, cookies, pastry and breads. After the oven has reached the desired temperature, the buzzer will sound.
• If you are using an oven thermometer in the oven cavity, the temperature registered by the thermometer may differ from
the actual set oven temperature. Mechanical hanging thermometers are very slow to change and
will take up to 45 min to match what the digital read out says.This is normal.
OPERATING THE OVEN
35
Convection Baking
Tips for convection baking
The amount of time you save will vary depending on the amount and type of food you are cooking.
When baking cookies or biscuits, you should use pans with no sides or very low sides to allow the heated air to circulate
around the food. Using a pan with a dark finish will produce faster cooking times.
When using convection baking with a single rack, place the oven rack in position 3 or 4. If cooking on multiple racks, place
the oven racks in position 3 and 5. When baking a cake, using the bake mode (not the convection bake mode) will
produce better results.
How to set oven to Convection bake:
1. Touch Convection Bake . Default temp is 325°F.
2. Touch default temperature to enter the desired cooking temperature using the numeric key,then touch OK.
3. Press START to begin preheating. The temperature display will update as the oven heats up, starting from 100°F until
it reaches the set temperature. Once preheating is complete, a buzzer will sound six times. To cancel cooking, press
CANCEL.
4. When the set cooking time is reached, the oven will stop, a buzzer will sound, and a pop-up window will indicate that
cooking is complete. (Preheating time is not included in the cooking time.)
• To change the cooking temperature, tap the temperature value in the center of the display screen to update it, and then
press OK. The oven will continue operating with the new settings.
• To change the cooking time, tap COOK TIME on the right side of the display screen, update it, and then press OK. The
oven will continue operating with the new settings.
• Convention Fan turns off when the oven door is opened to prevent unwanted heat escape. If oven door is left open for
more than one minute the heating elements will turn off.
By using the Convection Bake, you will be able
to cook faster. Convection baking uses a fan to
circulate the oven's heat evenly and continuously
within the oven. This improved heat distribution
allows for even cooking and excellent results while
using multiple racks at the same time. Foods
cooked on a single oven rack will generally cook
faster and more evenly with convection baking.
Multiple oven rack cooking may have slightly
increased cooking times for some foods, but the
overall result is time saved. Breads and pastries
brown more evenly. You can program the oven for
convection baking at any temperature between 175°F
and 550°F.
Convection roasting
Convection roasting is good for cooking large tender cuts of meat uncovered. Heat comes from the top heating element.
The convection fan circulates the heated air evenly over and around the food. Meat and poultry are browned on all sides
as if they were cooked on a rotisserie. The heated air seals in juices quickly for moist and tender results while, at the
same time, creating a rich golden-brown exterior.
OPERATING THE OVEN
36
How to set the oven for convection roasting:
1. Touch Convection Roast . Touch default temperature to enter the desired cooking temperature using the numeric
key,then touch OK.
2. Press START to begin preheating. The temperature display will update as the oven heats up, starting from 100°F until
it reaches the set temperature. Once preheating is complete, a buzzer will sound six times. To cancel cooking, press
CANCEL.
3. When the set cooking time is reached, the oven will stop, a buzzer will sound, and a pop-up window will indicate that
cooking is complete. (Preheating time is not included in the cooking time.)
• To change the cooking temperature, tap the temperature value in the center of the display screen to update it, and then
press OK. The oven will continue operating with the new settings.
• To change the cooking time, tap COOK TIME on the right side of the display screen, update it, and then press OK. The
oven will continue operating with the new settings.
• Convention Fan turns off when the oven door is opened to prevent unwanted heat escape. If oven door is left open for
more than one min the heating elements will turn off.
Broiling
Broiling is a method of cooking tender cuts of meat by direct heat under the broil element of the oven. The high heat
cooks quickly and gives a rich, brown outer appearance. Broil mode is best for meats, fish, and poultry up to 1" thick.
Always preheat the oven for 5-10 minutes before broiling.Cooking time cannot be set in Broil mode, and the default
maximum working time is 3 hours.
How to set the oven for broiling:
1. Press Broil to display BROIL HIGH. Press HIGH to switch to LOW.
2. Press START to begin broiling. Broil one side until the food is browned. Turn over and broil the other side.
3. Press CANCEL to cancel broiling.
Note: If oven door is left open for more than one minute the heating elements will turn off.
Always broil with the oven door closed.
Use care when opening the door. Let hot
air from steam escape before you
remove food.
CAUTION
OPERATING THE OVEN

37
Using Warm
Warm will keep cooked food warm for serving up to 3 hours after cooking has finished.After 3 hours, the feature will shut
off automatically. You can use the Warm feature without any other cooking operations or you can set it to activate after a
timed or delay timed cooking operation.The cooking temperature is 175°F by default and cannot be set.
You should not use this feature to reheat coId food.
How to use Warm:
1. Touch Warm.
2. Touch START.
3. When the set cooking time is reached, the oven will stop, a buzzer will sound, and a pop-up window will indicate that
cooking is complete. Press CANCEL to cancel at any time to turn this feature off.
•To change the cooking time, tap COOK TIME on the right side of the display screen, update it, and then press OK. The
oven will continue operating with the new settings.
• If oven door is left open for more than one minute the heating elements will turn off.
Pizza Cooking
The Pizza function is specially designed for cooking pizza. It heats from both the top and bottom to brown food more
evenly. This system is designed to give the optimum cooking performance for pizza by automatically selecting a
combination of the broil and bake heating systems.
How to use Pizza:
1. Touch Pizza . Default temp is 425°F.
2. Touch default temperature to enter the desired cooking temperature using the numeric key,then touch OK.
3. Press START to begin preheating. The temperature display will update as the oven heats up, starting from 100°F until
it reaches the set temperature. Once preheating is complete, a buzzer will sound six times. To cancel cooking, press
CANCEL.
4. When the set cooking time is reached, the oven will stop, a buzzer will sound, and a pop-up window will indicate that
cooking is complete. (Preheating time is not included in the cooking time.)
• To change the cooking temperature, tap the temperature value in the center of the display screen to update it, and then
press OK. The oven will continue operating with the new settings.
• To change the cooking time, tap COOK TIME on the right side of the display screen, update it, and then press OK. The
oven will continue operating with the new settings.
• If oven door is left open for more than one minute the heating elements will turn off.
Proof
Bread Proof provides an optimal temperature for the bread proofing process and up to 10 hours.
How to use proofing:
1. Touch Proof. Default temp is 80°F.Press 80°F to switch to 95°F.
2. Touch START to proofing.
3. When the set cooking time is reached, the oven will stop, a buzzer will sound, and a pop-up window will indicate that
cooking is complete. Press CANCEL to cancel at any time to turn this feature off.
OPERATING THE OVEN
38
• To change the cooking time, tap COOK TIME on the right side of the display screen, update it, and then press OK. The
oven will continue operating with the new settings.
• If oven door is left open for more than one minute the heating elements will turn off.
NOTE: Use rack position 4 for Bread Proof.If the oven temperature is above 125°F(52℃), Proof will not work properly.Do
not use Proof to warm food. The proofing temp cannot keep food warm.
Air Fry
The Air Fry feature uses hot air for crispier and healthier frozen or fresh foods without any (or less than normal) oil
compared to convection modes.
The Air Fry feature works best for single rack baking with packaged and convenience foods. Make sure that you remove
the packaging from food before cooking it. You can program for temperatures between 350°F and 550°F. Leave the oven
light off when baking.
1. Arrange the food on the rack.
2. Touch Air Fry. The default temperature is 425°F. If the default temperature is the temperature you want, skip to step 4.
3. (Optional) Press the numbers for the temperature you want.
4. Touch START to cooking. If you want to cancel cooking, touch CANCEL to cancel cooking.
5. When the set cooking time is reached, the oven will stop, a buzzer will sound, and a pop-up window will indicate that
cooking is complete.
• To change the cooking temperature, tap the temperature value in the center of the display screen to update it, and then
press OK. The oven will continue operating with the new settings.
• To change the cooking time, tap COOK TIME on the right side of the display screen, update it, and then press OK. The
oven will continue operating with the new settings.
• If oven door is left open for more than one minute the heating elements will turn off.
Note:
• Place a baking sheet or tray on the rack below the Air fry tray to catch any drippings. This will help to reduce splatter and
smoke.
• Before using a baking sheet, check the maximum allowable temperature of the baking sheet.
• Air fry is designed for a single oven rack. Place food on rack position 3 for best results.
• For cooking fresh or home made foods spread the oil over a larger area more evenly, crisping up the food more
effectively.
OPERATING THE OVEN

39
Recipe
The Recipe function on your oven enables you to select your favorite recipe to cook. At the end of estimated cooking time,
check the food to see if it is done to your liking. Note that differences in food shape, preparation and preferences for
doneness can impact the time required to cook the food.
Some cycles require the food temperature probe supplied with your oven. The target temperature for the probe is
automatically set based on selections made for each food. Always check foods using a secondary food thermometer as
probe placement can impact the measured temperature. See Probe section for more details on using and positioning the
probe properly.
Recipe Chart
Type
Foods
Desserts Recipes
Butter Cutout Cookies、Apple Raspberry Almond Crumb Trat、
Applesauce Brownies
Appetizers Recipes
Bacon-Cheddar Whoopie Bites、Bacon-Egg Breakfast
Bites、Baked Jalapeno Popper Pinwheels、Bacon And Stilton Scones、Cheese Straws、Chicken
And Ham Spirals、Pow-Pow Cauliflower、
Chipotle Pumpkin Empanadas
Pizza Recipes
Caramelized Onion & Goat Cheese Pizza、Brussels Sprouts And Meyer
Lemon Pizza、Chicken Fajita Pizza、Fig And Prosciutto Pizza、Peach
Prosciutto And Goat Cheese Flatbread、Pizza With Basil Fresh Tomatoes And Mozzarella、
Poblano Shrimp Flatbread、Thin Crust Pizza Dough
Poultry Recipes
Air-Fried Bloody Mary Wings、Sticky Thai Chicken Wings、Salmon Fish、Frozen Chicken Wings、
Baked Chicken Fingers、Ore-lda Golden Fries、Homemade Potato Wedges、Brussel Sprouts、
Brined Roasted Turkey、Asian Pulled Pork
Cakes
Chocolate Praline Cake、Banana Split Mini Moist
Cakes、Basic Cheesecake、Cherry-Cream Cheese Crumb Cake Bombs 、Regular Bake
Using the temp probe
For many foods, especially roasts and poultry (beef, chicken, turkey, pork, lamb, etc), measuring the internal temperature
is the best way to determine if the food is properly cooked.
The Temp Probe lets you cook meat to the exact internal temperature you want, taking the guess work out of determining
whether a piece of meat is done or not.
This function can be used with Bake, Convection Bake or Convection Roast.
After the internal temperature of the food reaches 75°F, the increasing internal temperature will be shown in the display.
How to use the Temp Probe:
1. Preheat the oven to desired oven temperature in the desired mode.
2. Insert the probe into the thickest area of food. When making bread, cook for approximately 10 minutes before inserting
the probe.
3. Once preheating is complete, insert the probe connector into the receptacle.
OPERATING THE OVEN
40
4. Enter the temperature of the probe according to the pop-up prompt.
5. Press START to begin cooking. If you want to cancel cooking, press CANCEL.
6. When the probe temperature is reached, the oven will stop, a buzzer will sound, and a pop-up window will indicate that
cooking is complete.
• To change the probe or cooking temperature, tap the temperature value in the center of the display screen to update it,
and then press OK. The oven will continue operating with the updated settings.
• If oven door is left open for more than one minute the heating elements will turn off.
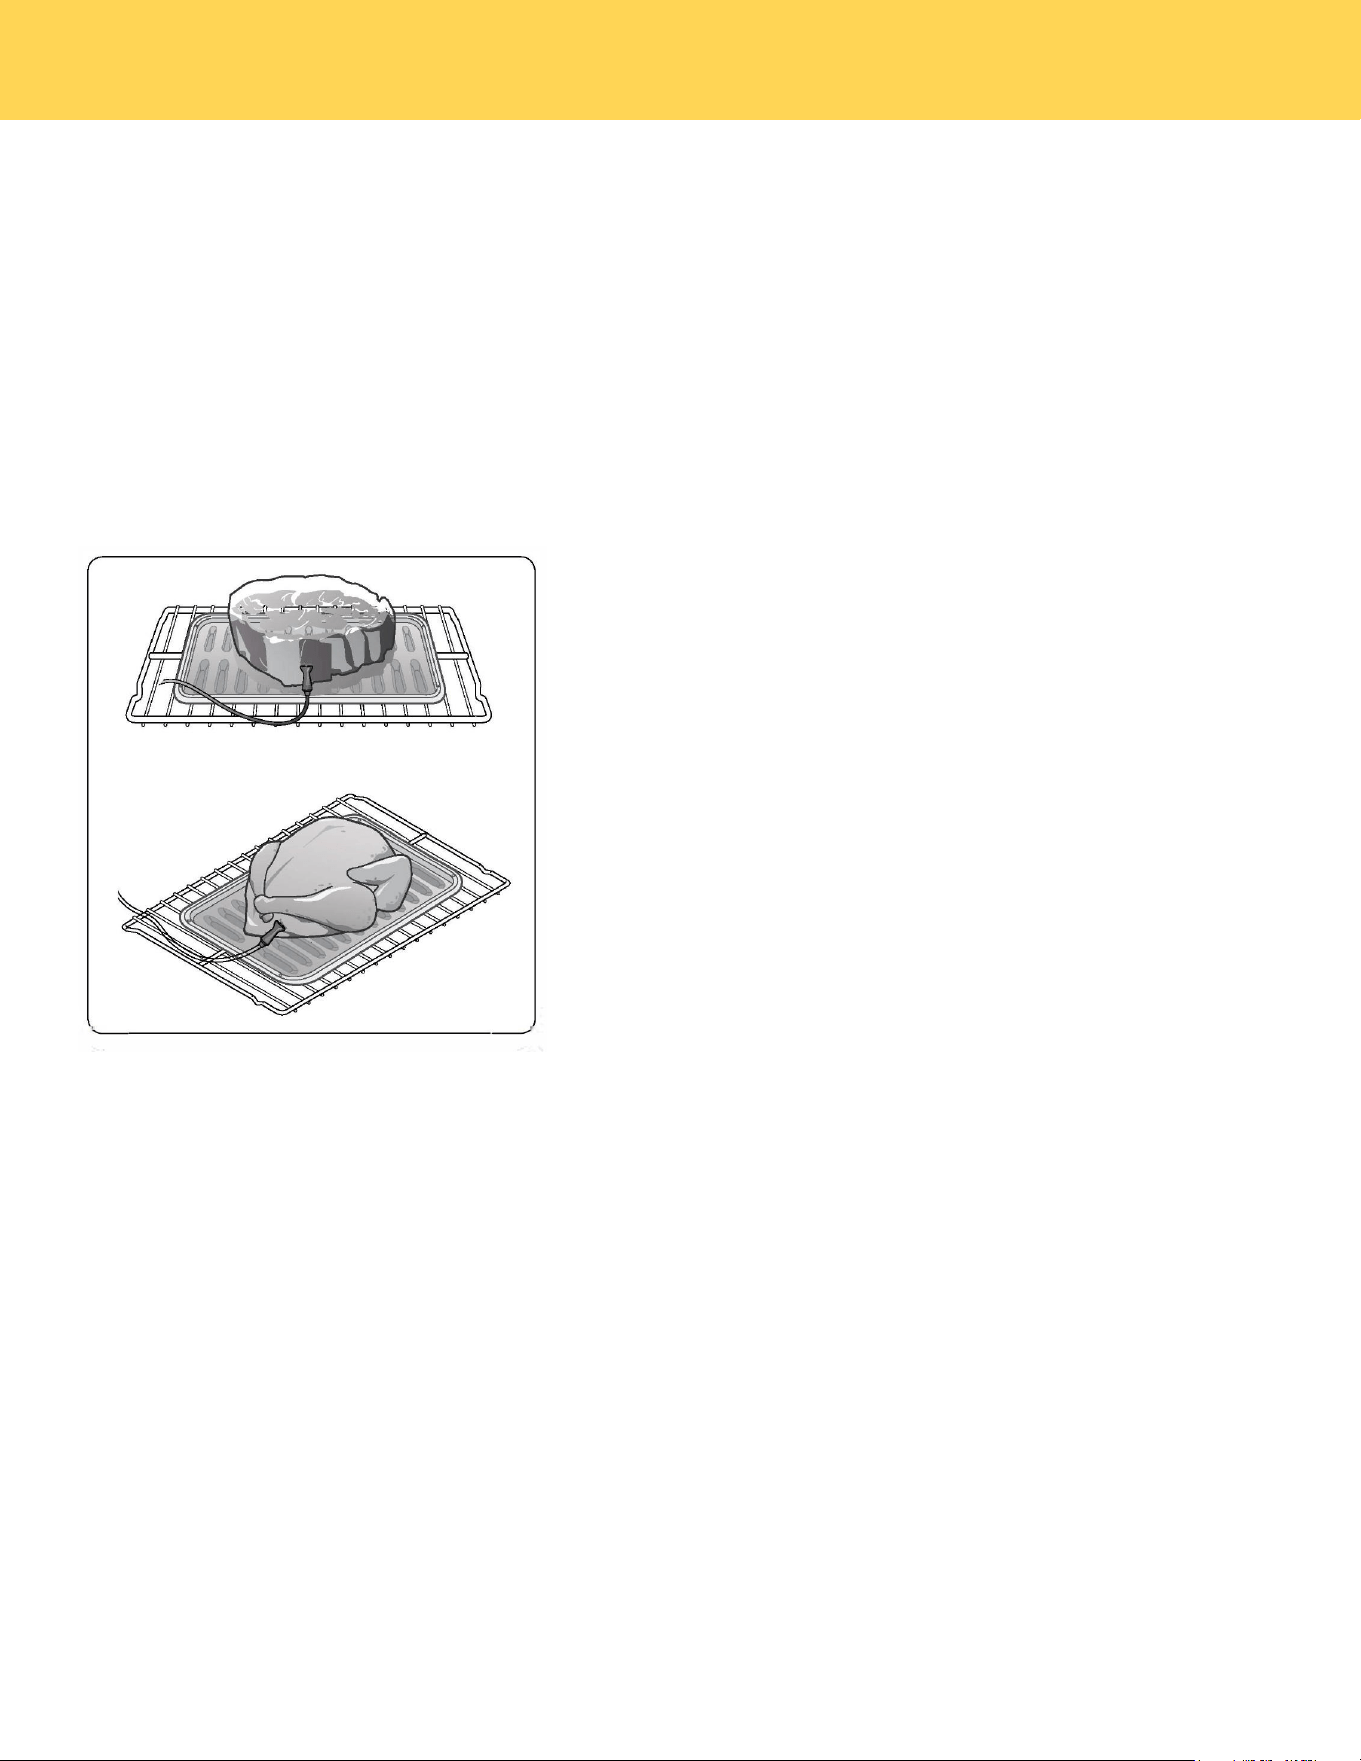
How to insert the temp probe into the meat:
Insert the probe completely into the meat as
shown in the left diagram. It should not touch
bone, fat, or gristle.
If you do not fully insert the probe into the meat,
the Temp Probe function will not work correctly
because the probe will sense the oven tempera-
ture, not the temperature of the meat.
For bone-in meats, insert the probe into the cen-
ter of the lowest and thickest portion of the piece.
For whole poultry (turkey, large chickens, etc.),
insert the probe into the thickest part of the inner
thigh, parallel to the leg.
To protect the Temp Probe's tip, be careful not to insert the probe so that the tip protrudes through the surface of the
meat. Make sure that the tip is in or near the center of the meat.
CAUTION
• Do not store the probe in the oven.
• Do not leave the probe inside the oven during a self clean orbroiling cycle, as you can permanently damage the
probe and it will no longer work.
• To avoid breaking the probe‘s tip, defrost your food completely.
• Do not use tongs when inserting or removing the probe. Tongs can damage the probe.
CAUTION
OPERATING THE OVEN
41
• Use the Temp Probe for Temp. Probe function cooking only. Do not use the Temp Probe for any other purpose.
• If you remove the Temp Probe while the Temp. Probe function is operating or insert the Temp Probe while baking
or cooking normally, cooking will stop after 1 minute.
• If you use the probe to cook frozen food, there are times when it cannot be detected.
Temp Probe table
Available Temperatures
100 to 210 °F
Type of Food
Internal Temperature
Beef / Lamb
Rare
120°F
Medium
130°F
Well Done
140°F
Pork
160°F
Poultry
165°F
Note: If you cover meat with foil and allow to rest for 10 minutes after cooking , the internal temperature will rise an
additional 5°F to 10°F degrees.
Removing the Temp Probe
Remove the temp probe plug from the socket.
CAUTION
After cooking, the Temp Probe is hot enough to cause burns.
OPERATING THE OVEN
42
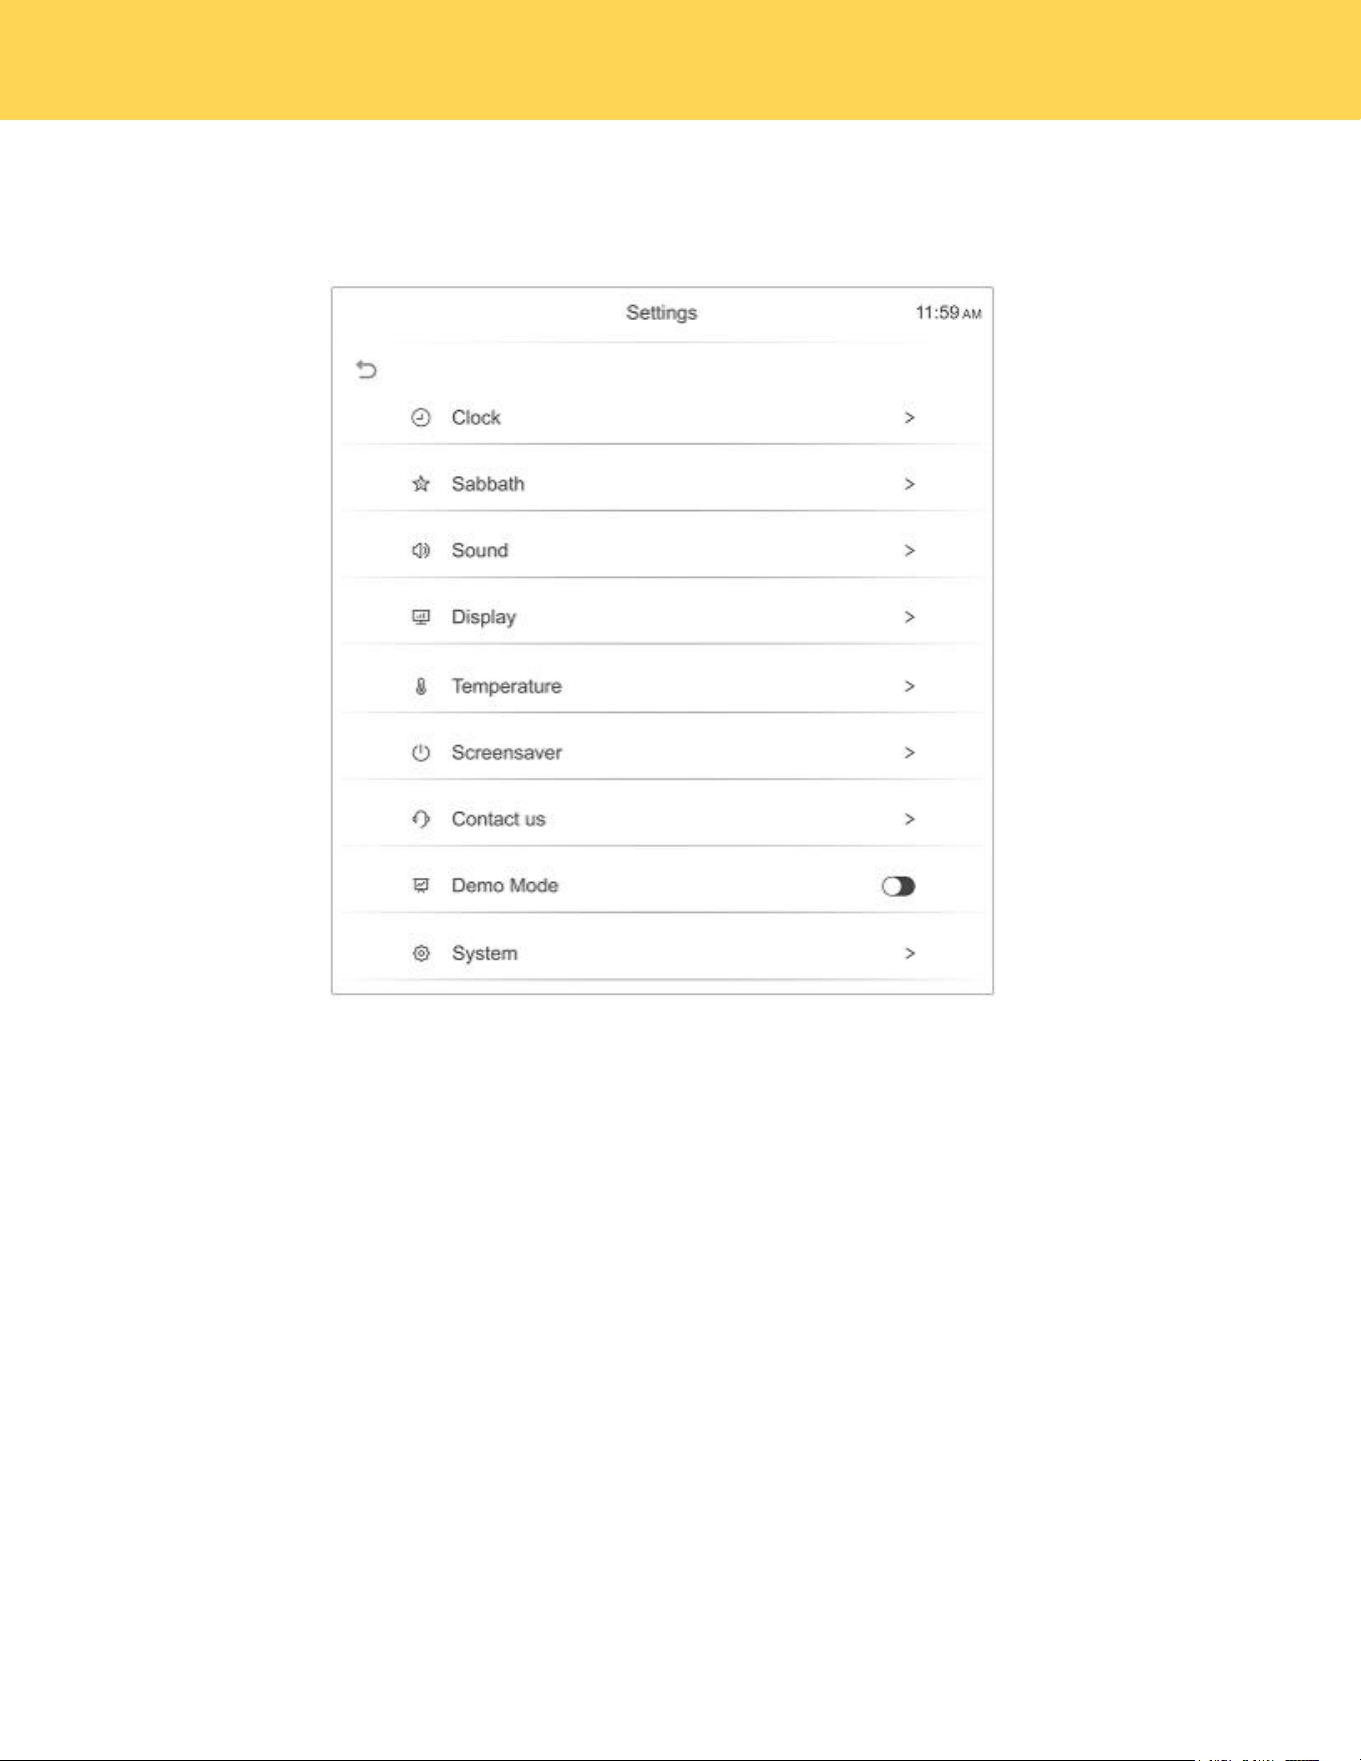
Settings
There are numerous settings that are accessed by pressing SETTINGS in the bottom left corner of the main screen.
Sabbath Feature
Sabbath mode disables the oven lights (the oven light will not turn on when the door is opened), all sounds (the
control will not beep when the screen is pressed),Convection modes,Broil modes,Warm,Proof,and all time
functions.Sabbath mode can only be used with traditional Bake.This feature conforms to Jewish Sabbath
requirements.
How to use Sabbath mode:
1. Touch SETTINGS, swipe to Sabbath mode. then set Cook temperature,Cook time and Delay start time
2. Touch START.
3. The oven will continue to cook at the preset temp and time.The oven can stay in this mode for a max of 74 hours.
4. The oven can be turned off at any time by pressing the CANCEL and confirming.
• If a power outage occurs during when the oven is in Sabbath Mode, the unit will return to Sabbath Mode when
power is restored.
• The cooking temperature and cooking time cannot be updated during Shabbat.
Sound
Adjust the volume of the oven controls.
NOTE
OPERATING THE OVEN

43
1. In standby mode, tap SETTINGS and swipe to select Sound.
2. Touch Mute to turn off the sound,or touch + and - to adjust the sound.
Display
Adjust the brightness of the display.
1. In standby mode, tap SETTINGS and swipe to select Display.
2. Touch + and - to adjust display brightness level.
Manual temperature calibration
The temperature in the oven has been calibrated at the factory. When first using the oven, be sure to follow recipe
times and temperatures. If you think the oven is too hot or too cool, you can correct the temperature in the oven.
Before correcting, test a recipe by using a temperature setting that is higher or lower than the recommended
temperature. The baking results should help you to decide how much of an adjustment is needed.
Oven temp can be adjusted up or down by 30°F from factory default setting.
1. In standby mode touch the SETTINGS,swipe to Temperature.
2. Enter the adjustment you want by repeatedly press + or - in the Adjust Temperature option.
NOTE
This adjustment will not affect the broiling or the self-cleaning temperatures.The adjustment will be retained in memory
after a power failure.
Change temperature display from Fahrenheit to Celsius
The oven has been preset at the factory to display in Fahrenheit.
1. In standby mode, tap SETTINGS and swipe to select Sound.
2. Touch (Fahrenheit) or (Celsius) as you need in the Temperature Unit.
Screensaver
Set the length of time before the display sleeps.
1. In standby mode, tap SETTINGS and swipe to select Sound.
2. Adjust the timing for the screen saver.
Demo Mode
1. In standby mode, tap SETTINGS and swipe to select Sound.
2. Click the demo mode switch to turn on the demo mode,then DEMO will display in the bottom left of the display
screen.
• This option is for use by retail establishments for display purposes only.
(The heating element does not operate).
OPERATING THE OVEN

44
Restore factory
This function returns all settings to the factory defaults.
Caution: All stored data will be deleted.
1. Touch SETTINGS in standby,swipe to System,then touch Restore factory.
2. If you want to reset data to the factory defaults, touch Restore then touch YES key to restone factory.
SELF CLEANING THE OVEN
This self cleaning oven uses high temperatures to burn off left over grease and cooking residue and completely
reduce them to a fine powdered ash that can be wiped away with a damp cloth after cycle has completed and oven
has cooled.
How to run a self clean cycle:
1. Select the Self Clean option and choose either a 3-hour normal clean or a 5-hour heavy clean.
2. Ensure all oven racks are removed, as self-cleaning can cause irreversible damage to the chrome coating, which is
not covered under the manufacturer's warranty.
3. Press START to begin the self-cleaning process.
Delayed self clean cycle:
1. Select the Self Clean option and choose either a 3-hour or 5-hour cycle as described above.
2. Select DELAY START.
3. Use the number keys to enter the desired delay time in hours and minutes. For example, to delay the start by 2
hours and 30 minutes, enter 2:30.
4. Touch START. The door will automatically lock .
5. The Self clean will start automatically after the preset time has elapsed.
NOTE:
• If one oven is used in any mode, the other oven can not enter self-clean mode.
• It is recommended to have kitchen windows open or to run a ventilation hood fan during the self clean cycle.
• All racks and broil pan and any cookware must be removed from the oven prior to running self-clean cycle.
• Wipe up debris from the oven floor and remove any large spills.
• Self-clean cycle will only clean areas where the heat can reach, Areas along the door frame, gasket area and inner
door will have to be cleaned by hand after cleaning cycle has finished.
• During self-clean, exterior surfaces may get hotter than usual, so children should be kept away.If canceled, the door
stays locked until the unit cools to a safe temperature level.
• Turning a unit off during self-clean is discouraged. Damage can occur if self-clean does not complete.
• During self-clean,the other oven cannot be used.
• After the self-clean cycle is complete, the oven door will remain locked until the cycle finishes and the temperature
drops below 500°F (260°C).
OPERATING THE OVEN

45
• Always make sure that the controls are off and all surfaces are cool before removing or cleaning any of the range parts.
This will prevent you from getting burned.
• If your range is pulled out from the wall for any reason, make sure that the anti-tip device is reengaged after your range
has been pushed back into place. Failure to take this precaution could result in your range tipping and personal injury.
Cleaning stainless steel surfaces
CAUTION
Do not use a steel-wool pad or abrasive cleaners on stainless steel surfaces. Abrasive pads and cleaners will scratch the
surface and damage the finish.
NOTE:To prevent any discolorations or grease stains, we recommend that you clean and remove any spills, spots, and
grease from your range after each use.
1. Place a small amount of a stainless steel appliance cleaner or polish on a damp cloth or damp paper towel.
2. Clean a small area, rubbing with the grain of the stainless steel, if applicable.
3. Dry and buff with a clean, dry paper towel or soft cloth.
4. Repeat as necessary.
CAUTION
• Do not use a steel-wool pad or abrasive cleaners on stainless steel surfaces. Abrasive pads and cleaners will scratch
the surface and damage the finish.
• If you previously used a mineral oil-based stainless steel appliance cleaner, wash the surface with dish washing liquid
and water before using the stainless steel cleaner or polish.
Cleaning the oven racks
Clean by hand in hot, soapy water with a plastic or soap-filled scouring pad, then dry with a soft cloth.
If a rack becomes difficult to slide, rub the side rails with wax paper or a cloth containing a small amount of cooking oil.
This helps the rack slide more easily in the tracks.
Cleaning the oven door
CAUTION
• DO NOT clean the oven door gasket. The oven door gasket is made of a woven material which is essential for a good
seal. Care should be taken not to rub, damage, or remove this gasket.
• DO NOT immerse the door in water.
• DO NOT spray or let water or the glass cleaner to enter the door vents.
• DO NOT use oven cleaners, cleaning powders, or any harsh abrasive cleaning materials on the outside of the oven door.
The oven door has multiple surfaces that require different cleaning techniques.
The gasket on the oven door frame should never be cleaned or moved to clean other surfaces.
The gasket is made of woven material which is essential for a good heat seal.
WARNING
CLEANING AND MAINTENANCE

46
1. Clean the inside door surface by hand with hot, soapy water and a soapy plastic scouring pad. Do not let moisture get
inside the door assembly.
2. Rinse and dry thoroughly with a clean, soft cloth.
3. Clean the outside door stainless steel surfaces by following the instructions in Cleaning stainless steel surfaces.
4. Clean the glass window with glass cleaner or warm, soapy water with a thorough rinse. Do not let moisture get inside
the door assembly
Cleaning the cooktop
General cleaning for induction ceramic glass cooking surfaces is considerably easier than for cooking surfaces with
radiant heating.
NOTE: To prevent accidental activation of the controls, it is recommended that you set the CHILD LOCK feature before
cleaning.
IMPORTANT
• Cleaning agents must not come into contact with the hot ceramic glass surface. All cleaning agents must be rinsed off
thoroughly with clean water.
• Do not use any aggressive cleaners such as grill or oven sprays, coarse scouring cleansers or abrasive pan cleaners.
• Clean the ceramic glass surface after each use when it is warm to the touch or cold. This will prevent spills from
becoming burnt on. Remove water marks, grease and discoloration with a glass scraper and ceramic glass cleaner.
NOTE:You may purchase glass scrapers and ceramic glass cleaners from your local hardware store.
General Cleaning
1. When it is cool, wipe the ceramic glass surface with a damp cloth and a small amount of ceramic glass cleaner.
2. Wipe dry with a clean cloth.
3. Once a week, thoroughly clean the entire ceramic-glass cooking surface with a commercially available ceramic glass
cleaner.
4. Then, wipe the ceramic glass surface using a clean, soft cloth dampened with clean water and polish dry with a clean
lint free cloth.
CLEANING AND MAINTENANCE

47
Removing Heavy Soil
To remove food that has boiled over or stubborn spills, use a glass scraper.
1. Hold the glass scraper at an angle of about 45° to the ceramic-glass surface.
2. Remove soiling by sliding the blade across the area.
3.Use a ceramic glass cleaner as described in ENERALCLEANING.
Problem Soil
Remove sugar, melted plastic, aluminum foil, or other melt-able materials with a glass scraper immediately and while still
hot, Failure to do so can cause permanent damage to the cooktop surface. lf the Cooking Zone has already cooled down,
warm it up again.
IMPORTANT
1. There is a risk of burning yourself when the glass scraper is used on a hot Cooking Zone. Use care and wear an oven
mitt.
2. Then clean the cooktop normally when it has cooled down.
CLEANING AND MAINTENANCE

48
Removing Heavy Soil
To remove food that has boiled over or stubborn spills, use a glass scraper.
1. Hold the glass scraper at an angle of about 45° to the ceramic-glass surface.
2. Remove soiling by sliding the blade across the area.3.Use a ceramic glass cleaner as described in ENERALCLEANING.
Problem Soil
Remove sugar, melted plastic, aluminum foil, or other melt-able materials with a glass scraper immediately and while still
hot, Failure to do so can cause permanent damage to the cooktop surface. lf the Cooking Zone has already cooled down,
warm it up again.
IMPORTANT
1. There is a risk of burning yourself when the glass scraper is used on a hot Cooking Zone. Use care and wear an oven
mitt.
2. Then clean the cooktop normally when it has cooled down.
NOTE: Scratches or dark marks on the ceramic glass surface caused by a pan base with sharp edges cannot be removed.
However, they do not impair the function of the cooktop.
CLEANING AND MAINTENANCE
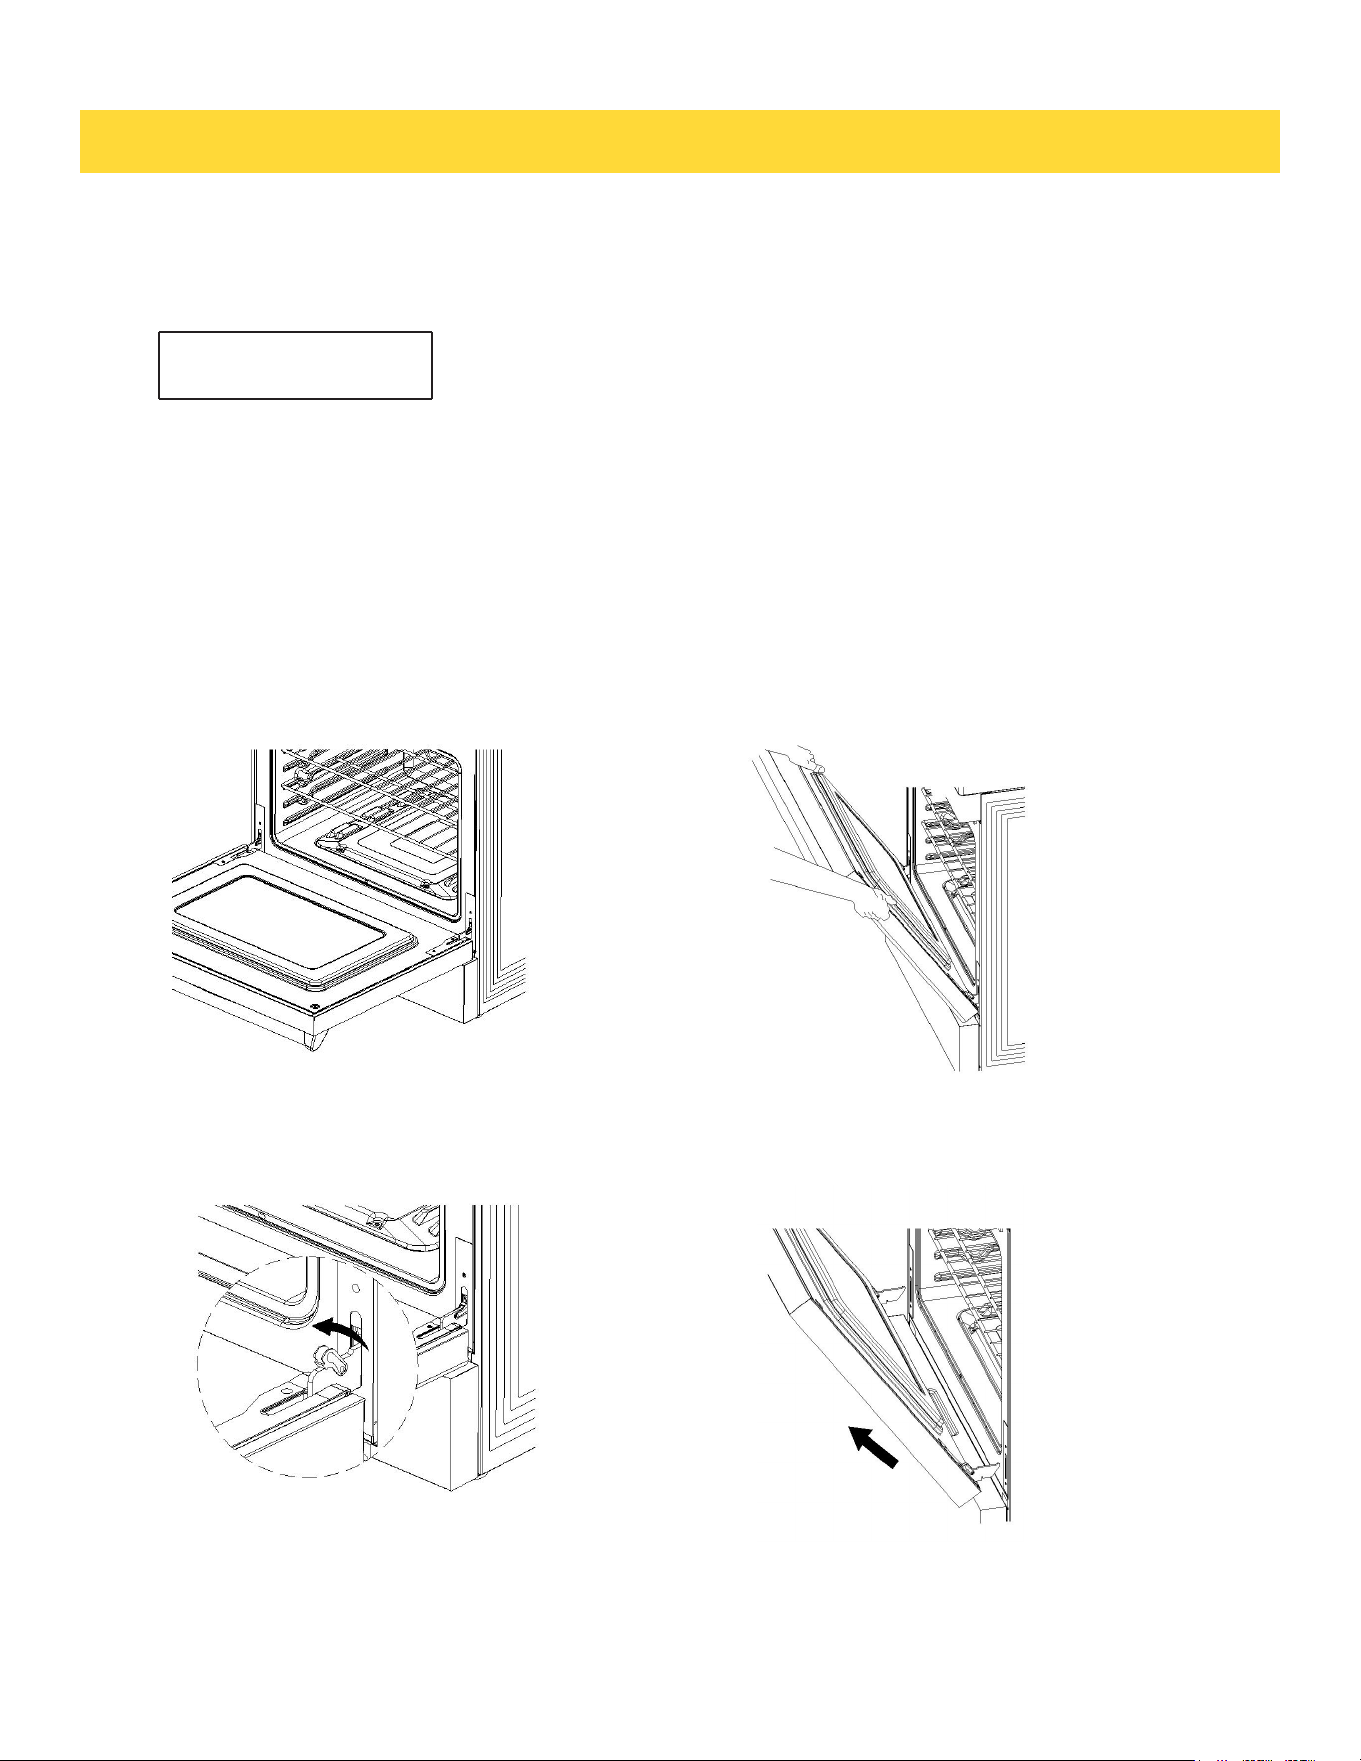
Before removing the door, ensure there is a large, clean, and protected surface in the
kitchen to rest the door on.
Caution: The oven door is heavy.
Removing the oven door
14. Removing and Replacing the Oven Door
Do not lift the oven door by its handle. Doing so may damage the door.
Make sure the oven and the door are cool before you begin to remove the door.
REMOVING AND REPLACING THE OVEN DOOR
4. Disengage the hinges and remove the
door; gently close it about halfway; place
the door on a protected surface.
IMPORTANT
3. Hold the door firmly on both sides.
2. Open the levers fully on both sides.
1. Open the door very carefully
49
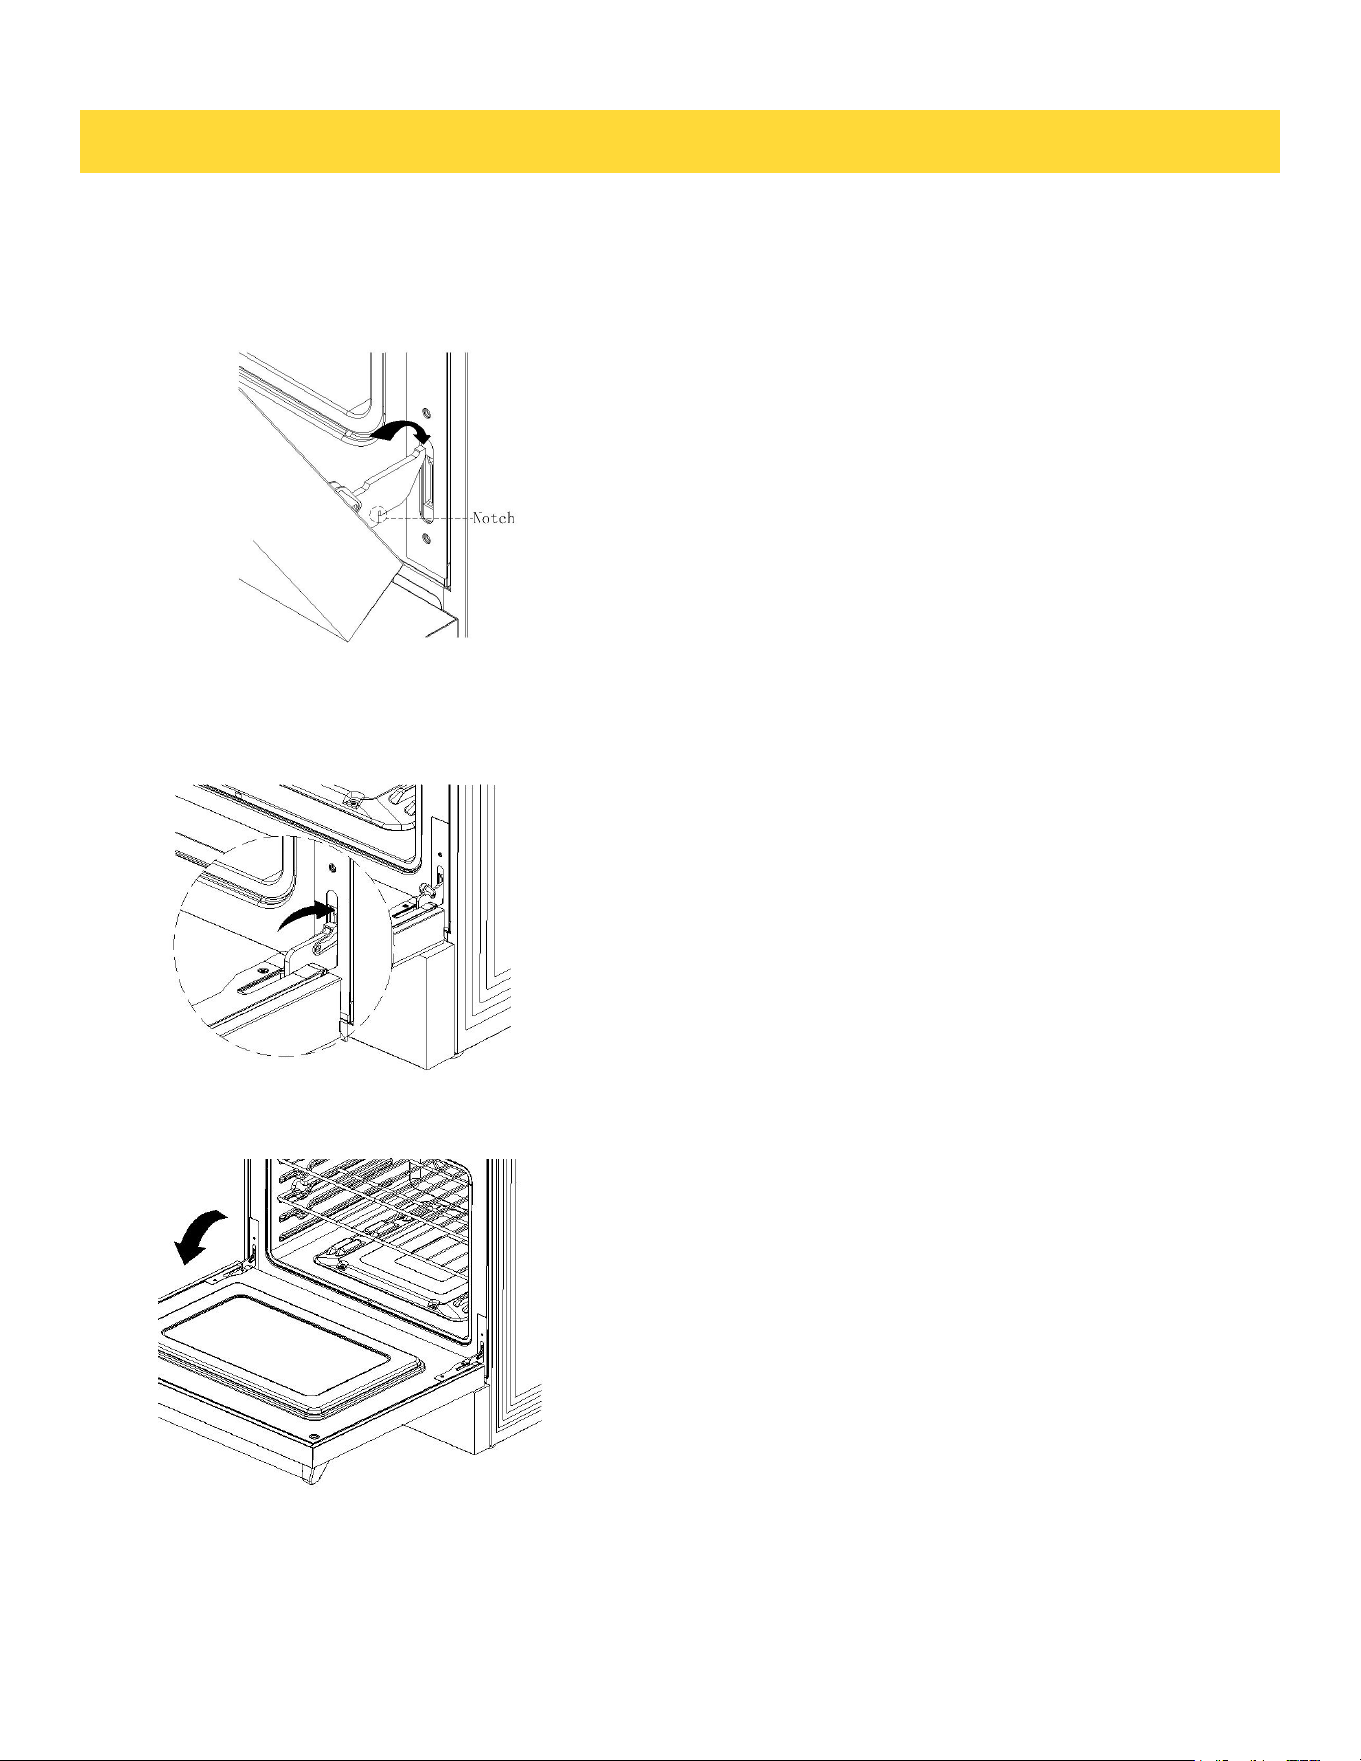
REMOVING AND REPLACING THE OVEN DOOR
Replacing the Oven Door
1. Hold the door firmly in an approximately open position.
2. Insert the hinge tongues into the slots making sure that the notches on bothsides
drop into place as shown.
3. Open the door fully.
4. Fully close the levers on the left and right hinges,then close the door.
50

51
Troubleshooting Guide
If you can’t find an answer to your problem in the chart below, or if the problem cannot be fixed,
you will need technical help. Contact your Authorized Service Center or Customer Care.
Problem
Possible causes
What to do
Cooktop
Cooktop does
not work
• Cooktop controls are locked
• Make sure lock mode is turned off
• Circuit breaker has tripped
orfuse is blown.
• Reset the circuit breaker or replace
the fuse
• Power outage
• Check house lights to confirm
power outage
• Installation wire not complete
• contact manufacturer
Cooktop does not
heat up
• No cookware or improper cookware
placement on the cooking zone
• Make sure the cookware is centered
on the cooking zone,and the cookware
is also of correct type for induction
cooking.See SELECTING
COOKWARE page
• Incorrect cookware size for
selected cooking zone
• The bottom of the cookware
must be larger enough to cover
the cooking zone
• Cookware is not properly resting
on the cooking zone
• The bottom of the cookware
must be flat and centered on the
cooking zone
• Incorrect cooking zone detected
• Make sure the correct control is ON
for the cooking zone being used
• No power to cooktop
• See “Cooktop Does not work” issue
above
Cooktop turns off
while cooking
• Internal cooktop heat sensor has
detected high temperatures inside the
cooktop,activating automatic shut off
• Make sure the cooktop vents are not
blocked
• Liquid or objects placed around the
control panel
• The cooktop panel may detect liquids
or objects obstructing it, which can
cause the cooktop to shut off.Clean up
spills or remove objects,then restart the
unit.
TROUBLE SHOOTING

52
Power boost does
not work
• Power boost is being used on
multiple cooking zones in
addition to using total power
7400w and 9600w
• This is a normal occurrence
The fans keep running
for one minute after the
unit has been switched
off
• The electrical components are
cooling down.
• This is a normal occurrence
Problem
Possible causes
What to do
Oven
The oven doesn’t work
(no heating).
• No power supply (oven light
and halos do not come on
either)
• Check that the circuit breaker
hasn’t tripped and there is no power
outage in your area. If there is a
power outage, you cannot use the
oven until power has been restored
One of the oven lights
does not come on, but
the oven works.
• The light bulb is loose
• See instructions for ‘Replacing the
oven light bulb’ in section ‘Care and
cleaning’. Instead of replacing the
bulb, simply ensure that it is secure
in its socket
• The light bulb has
blown
• Replace the bulb. See instructions
for ‘Replacing the oven light bulb’ in
section ‘Care and cleaning’
Condensation around
oven (e.g. on control
panel or top of oven
door.)
• Food has high moisture
content or local climate
(temperature, humidity) is
contributing to condensation
• Condensation is normal. You can
wipe the drops off the control panel.
If there is frequent or excessive
condensation, make sure that
cabinetry around the range is
moisture-proofed
Steam coming from
oven vents at the
back of the range.
• Moisture from food
evaporating during cooking
• This is normal, especially if you are
cooking large quantities of food in
the oven using a CONVECTION
mode
TROUBLE SHOOTING

53
The convection fan
does not come on in a
CONVECTION mode.
• Technical fault.
• Contact your Authorized
Service Center or Customer
Care.
Oven will not heat
• Oven settings are not corrected
• Follow mode selection and
clock settings as specified in
Oven Operation section of the
manual.
Foods over-cooked or
under-cooked
• Incorrect cooking time or
temperature
• Adjust time, temperature, or
rack position
‘Cracking’ or ‘Popping’
sound
• This is the sound of metal
heating and cooling
• This is normal
There is a power
failure – can I still use
the oven?
• Power outage in your home
or neighborhood
• The oven cannot be used
until power is restored
Information code
Error Code
Error Description
Solution
Cooktop
E0
• IGBT overtemperature
• Restart the cooktop,if the problem
persists,disconnect all power from
your cooktop for at least 30
seconds,then reconnect the power.If
this does not solve the problem,call
for service
E2
• Voltage below level
• Until the voltage is restored
E3
• Over voltage
• Until the voltage is restored
E7
• NTC1 open circuit
• Restart the cooktop,if the problem
persists,disconnect all power for
your cooktop at least 30
seconds,then reconnect the power.If
this does not solve the problem,call
for service
E8
• NTC1 short circuited
E9
• NTC2 open circuit
EE
• NTC2 short circuited
F
• Communication failure
TROUBLE SHOOTING
54
Error Code
Error Description
Solution
Oven
F1E1
• Communication failure
• Restart the cooktop,if the problem
persists,disconnect all power for your
cooktop at least 30 seconds,then
reconnect the power.If this does not solve
the problem,call for service
F1E3
• The modes of the display
board and the main control
board do not match
F3E1
• An open or short circuit fault occurs
on the oven temperature sensor
F3E2
•The oven fails to reach the desired
temperature during heating.
F3E3
•The oven temperature exceeds the
set limit.
F3E4
•The PCB board temperature sensor
is faulty
F3E5
•The PCB board temperature
exceeds the set limit.
F3E6
• Food probe failure
F3E7
• The thermostat overheats
F4E1
• The MCU self-test fails
F5E1
• Oven door lock failure
F5E2
• Oven door switch detection failure
F6E1
• : The heat dissipation fan's Hall
sensor is malfunctioning.
F6E2
• The linkage between the cooktop
and oven is faulty
F6E4
• The control panel expansion
function is faulty
TROUBLE SHOOTING
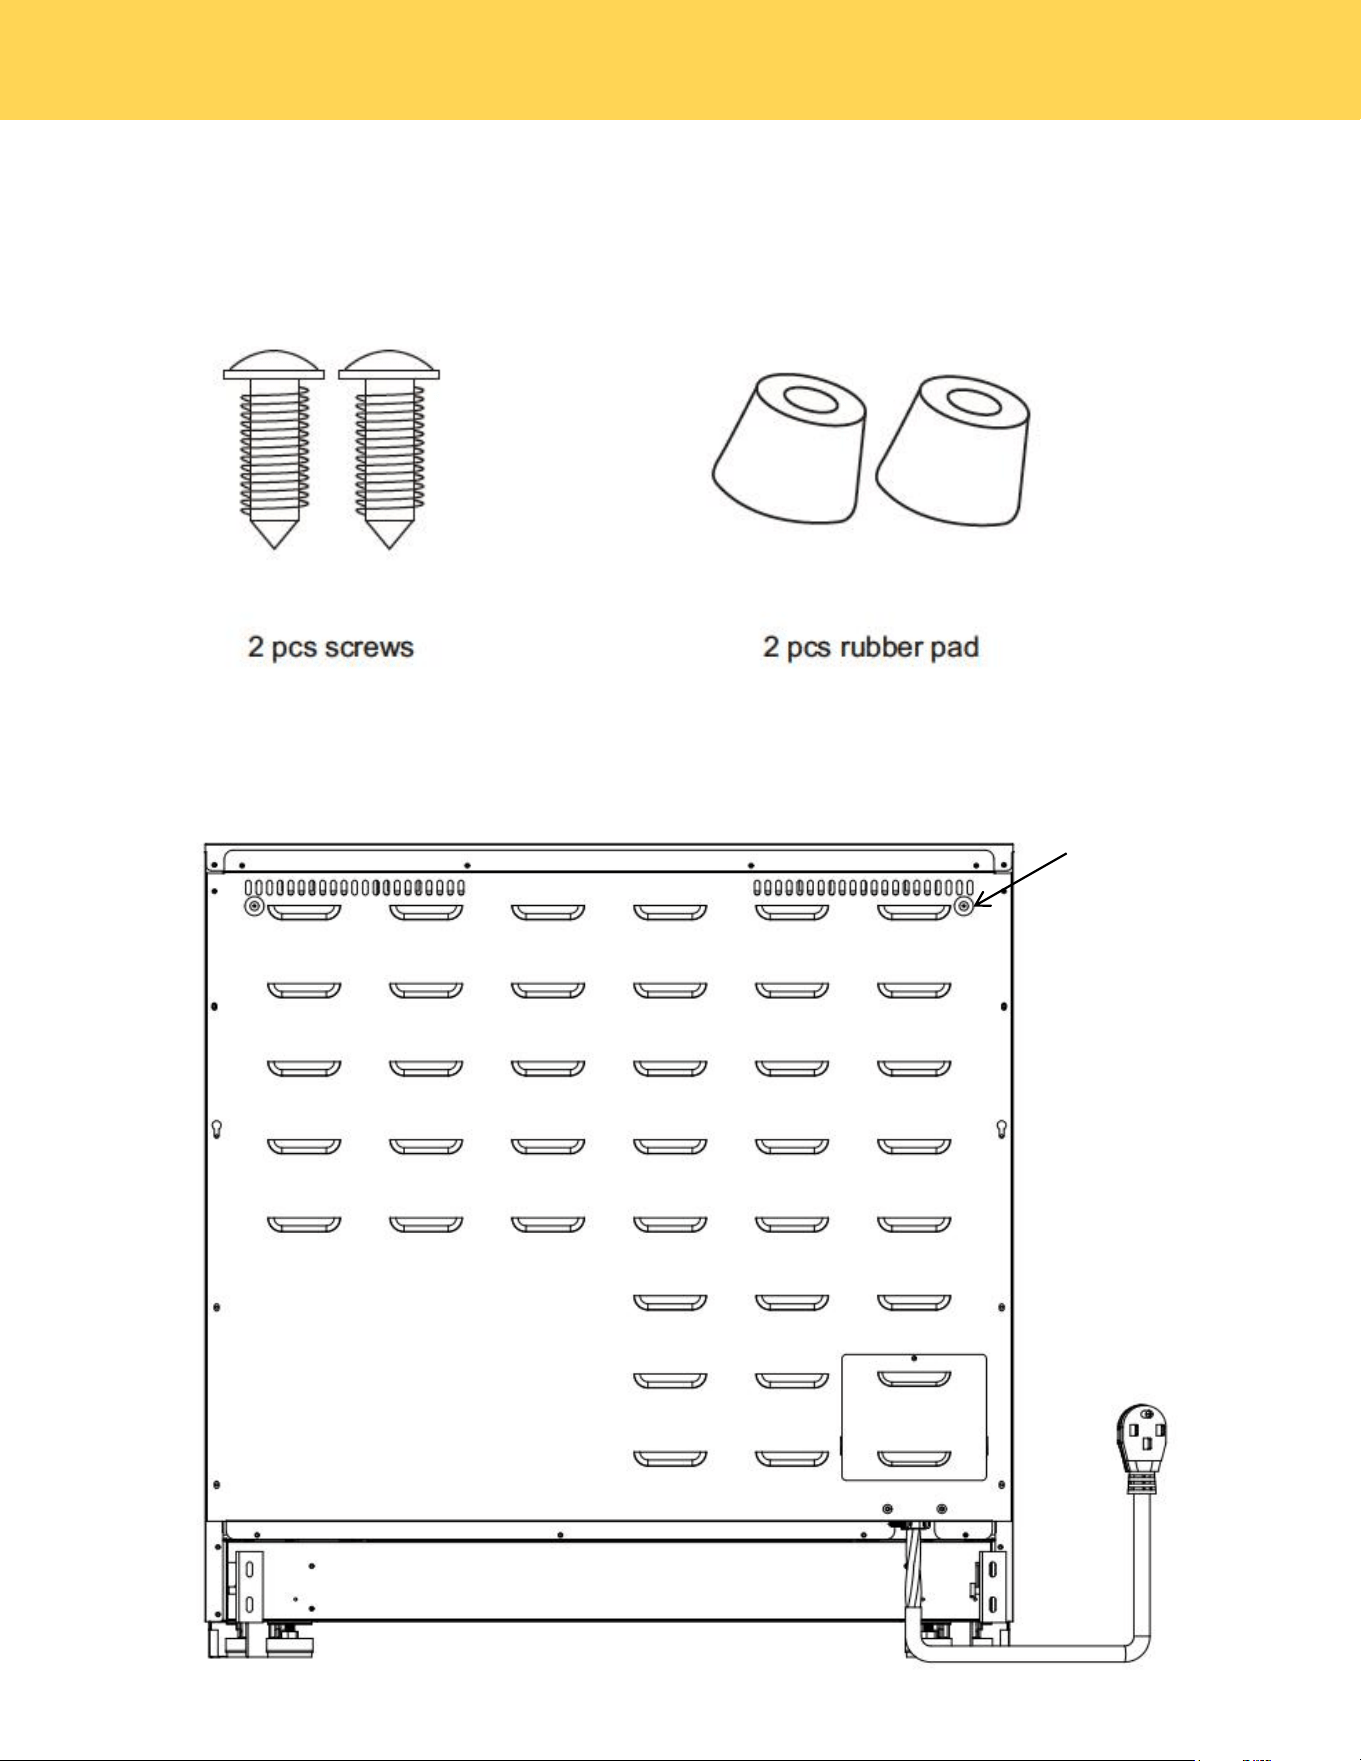
55
To prevent the range from being too close to the wall, there are 2 plastic pads offered with the 30/36 inch overview
user's manual, please find the accessories and follow the below steps
1. check the installation kit packed with manual.
2. Install 2 pcs rubber pad as showed above.
rubber pad
RUBBER PAD INSTALLATION ON BACK PANEL

Warranty & Service
This product has been manufactured by Thor International, 4651 E Airport Drive, Ontario,
California 91761.
For the most up to date warranty and service policy, please refer to our website
WWW.THORKITCHEN.COM/WARRANTY-REGISTRATION
For in-warranty service requests,please visit our website at
WWW.THORKITCHEN.COM/SERVICE
Please Note:You must provide proof ofpurchase or installation datefor any in warranty service
requests
56
WARRANTY AND SERVICE

Warranty Registration
Made Easy.
We Stand Behind
the Quality of Our
Appliances.
Reliability and customer satisfaction are our top priorities. We offer a
solid two-year warranty on both parts and labor. Enjoy professional-grade
performance with the condence that we’ve got you covered.
01
02
03
Scan the QR Code or visit thorkitchen.
com/register-your-product.
Input your purchase and product
information and select register.
That’s it. You’re all set.
Enjoy!
WARRANTY
PARTS
Questions: [email protected]