All the pictures below are for illustrations only. Specifics are subject to the actual
product.
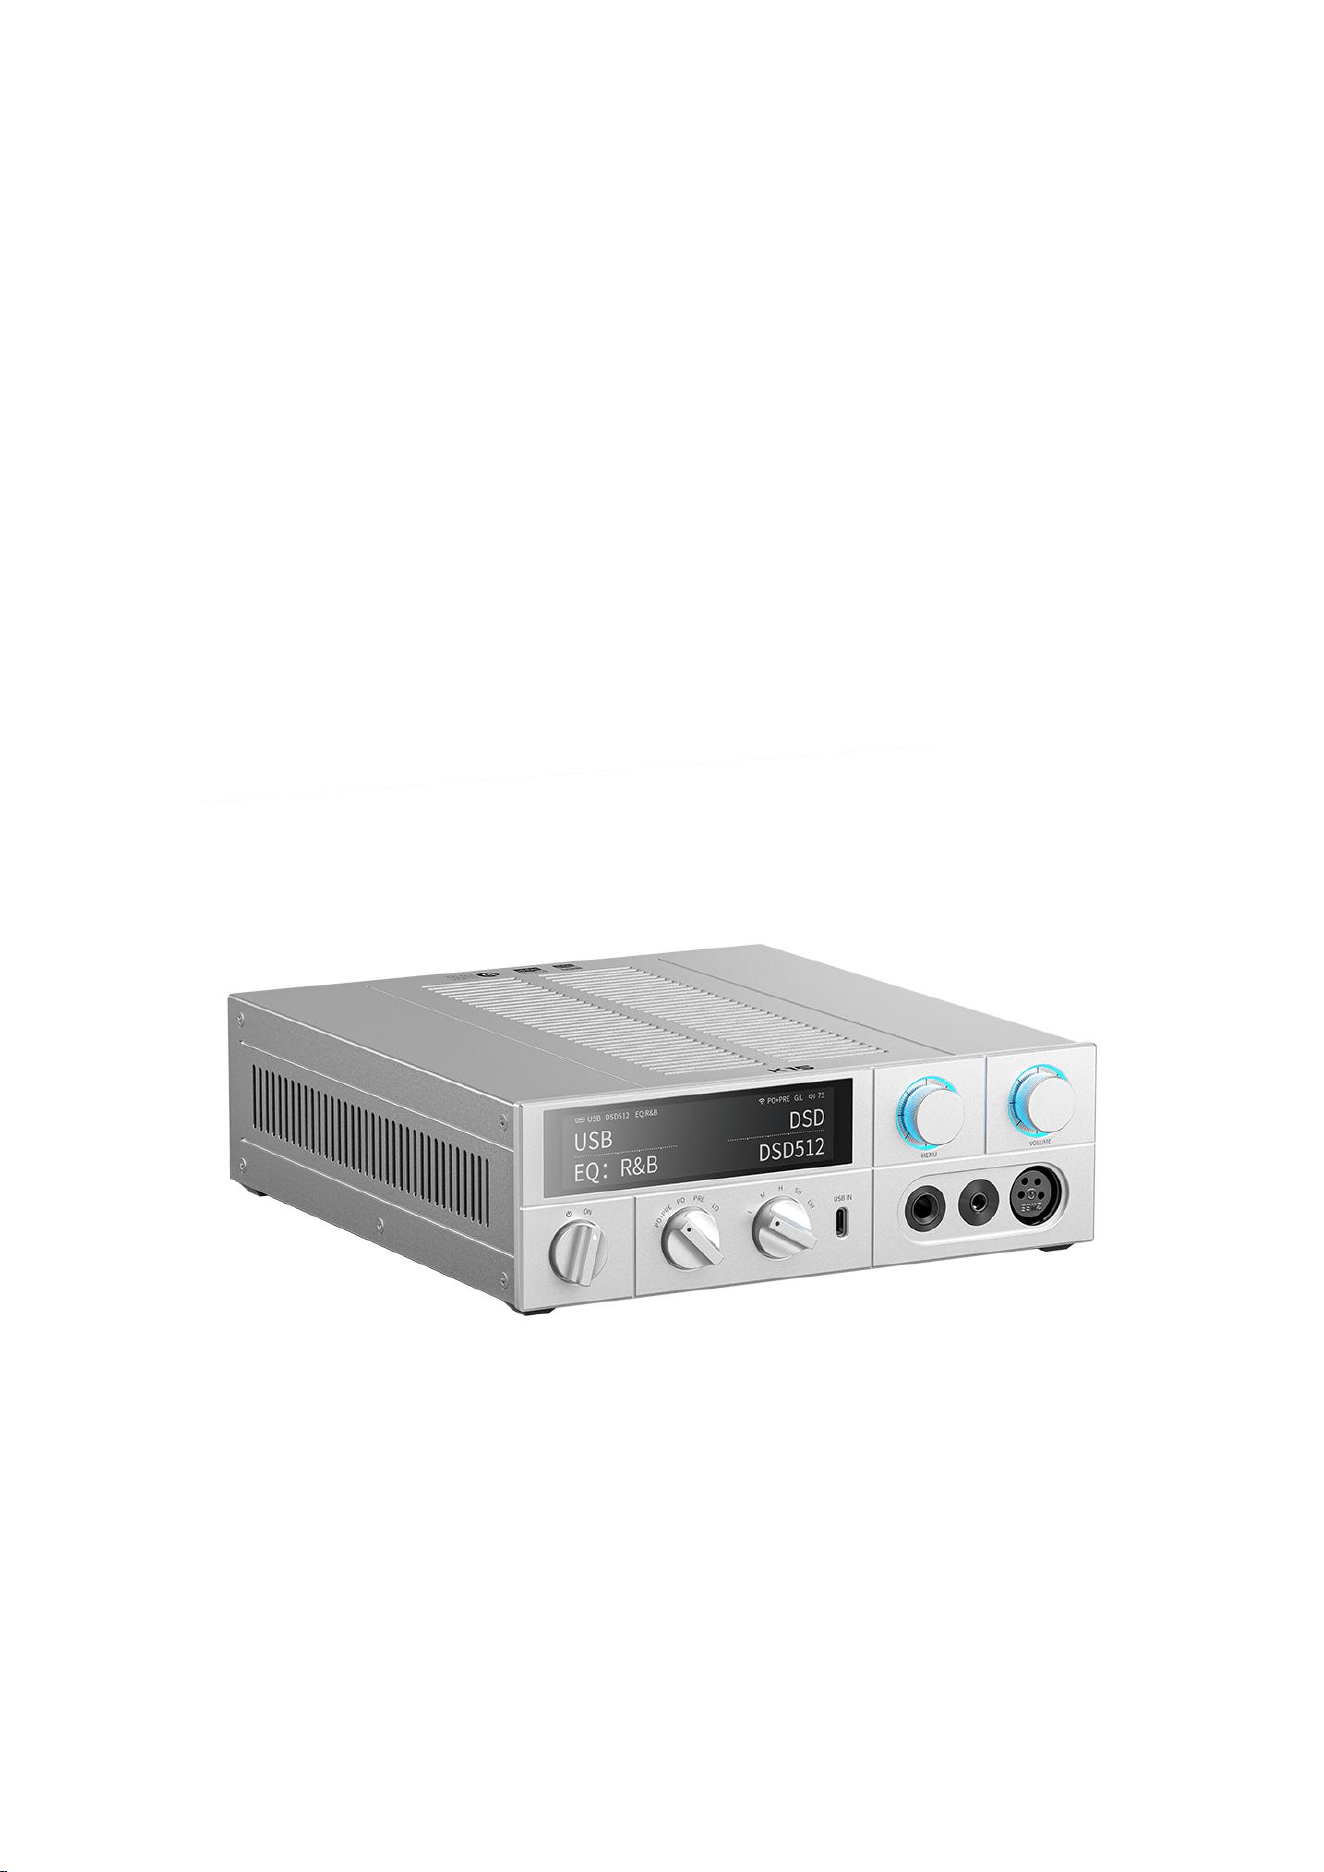
FIIO K15 complete User manual

1
Content
1. Product Introduction
................................................................................................................3
2. Operation Guide
........................................................................................................................ 5
3. Detailed Description of Buttons and Interfaces
...............................................................7
(1)Analog Output Interfaces: ..............................................................................................8
(2)Knob Functions: .................................................................................................................9
(3)Digital Input Interfaces: ................................................................................................ 11
(4)Other Interfaces: ............................................................................................................. 12
4. Main Interface Display ........................................................................................................... 12
(1)Status Bar (USB Mode as Example):.......................................................................... 12
(2)USB DAC mode interface:
............................................................................................ 13
(3)Streaming Mode Interface:
.......................................................................................... 13
(4) Local Playback Interface:
............................................................................................. 14
5. Working Modes....................................................................................................................... 15
(1)USB DAC Mode:.............................................................................................................. 15
(2)Optical Input Mode: .......................................................................................................15
(3)Coaxial Input Mode:
.......................................................................................................15
(4)Single-Ended Line Input Mode:
..................................................................................15
(5)Balanced Line Input Mode:
.......................................................................................... 16
(6)Bluetooth Receiver Mode: ............................................................................................16
(7)Streaming Mode: ............................................................................................................ 16
(8)Local Playback Mode: .................................................................................................... 17
6. Menu introduction ..................................................................................................................17
7. Network Connection .............................................................................................................. 23
8. Mobile Remote Control App: FiiO Control Installation and Usage .......................... 25
9. PEQ Function
............................................................................................................................ 27

2
(1)Adjust EQ in K15
............................................................................................................. 27
(2) App Adjustment (FiiO Control)
..................................................................................27
(3) Web Control Adjustment
............................................................................................ 28
(4)Decoder Compatibility (with PEQ Enabled)
............................................................ 30
(5)Other Notes for PEQ Usage.........................................................................................31
10. Streaming Features Introduction ..................................................................................... 32
(1)AirPlay: ............................................................................................................................... 33
(2)Roon Ready:..................................................................................................................... 33
(3)NAS Playback via Roon: ................................................................................................34
11. Protection Mechanisms ...................................................................................................... 35
12. Firmware Upgrades introduction
..................................................................................... 36
SOC Upgrade:
....................................................................................................................... 37
MCU Upgrade:
...................................................................................................................... 38

3
1. Product Introduction
(1) Overview:
The K15 decoding headphone amplifier integrated machine adopts the same retro
structural appearance as the K15, aiming to complete the product line and provide
users with a higher cost-performance product.
The K15 features rich interfaces, including dual front and rear USB inputs,
coaxial/optical inputs, Bluetooth input, streaming, local USB input, balanced input,
RCA input, and 8 other input methods.
It uses a dual power supply design, with a built-in high-performance switching
power supply module and an additional DC port for connecting an external
higher-performance power supply.
The DAC is the world's first to use two newly reproduced AK4497S chips. The
headphone amplifier circuit retains the discrete circuit design of the K15 project,
with JE243G-JE253G transistor pairs.
Additionally, the K15 incorporates numerous high-end components: ACCUSILICON
low-phase-noise femtosecond crystal oscillators, Nichicon audio-specific
capacitors, ELNA brown coupling capacitors, Rubycon film capacitors, wafer
resistors, and Emerald solid-state capacitors.
(2) Supported Sampling Rates:
USB DAC Mode: Supports PCM 768K 32Bit, DSD512, and MQA Full Decode.
Coaxial Decoding Mode: Supports PCM 192K 24Bit and DOP64.
Optical Decoding Mode: Supports PCM 96K 24Bit.
Bluetooth Reception: Supports SBC/AAC/aptX/aptX LL/aptX HD/aptX
4
Adaptive/LDAC.
Streaming Decoding: Supports up to 384kHz/32bit and DSD256 (DOP).
Local Playback: Supports up to 384kHz/32bit and DSD256.
Note 1: The sampling rate for USB decoding depends on driver settings and
computer configurations.
Note 2: Mac computers do not require driver installation. However, specific
software like Audirvana is needed to support DSD playback, with a maximum
support of DSD256.
(3) Basic Appearance Information:
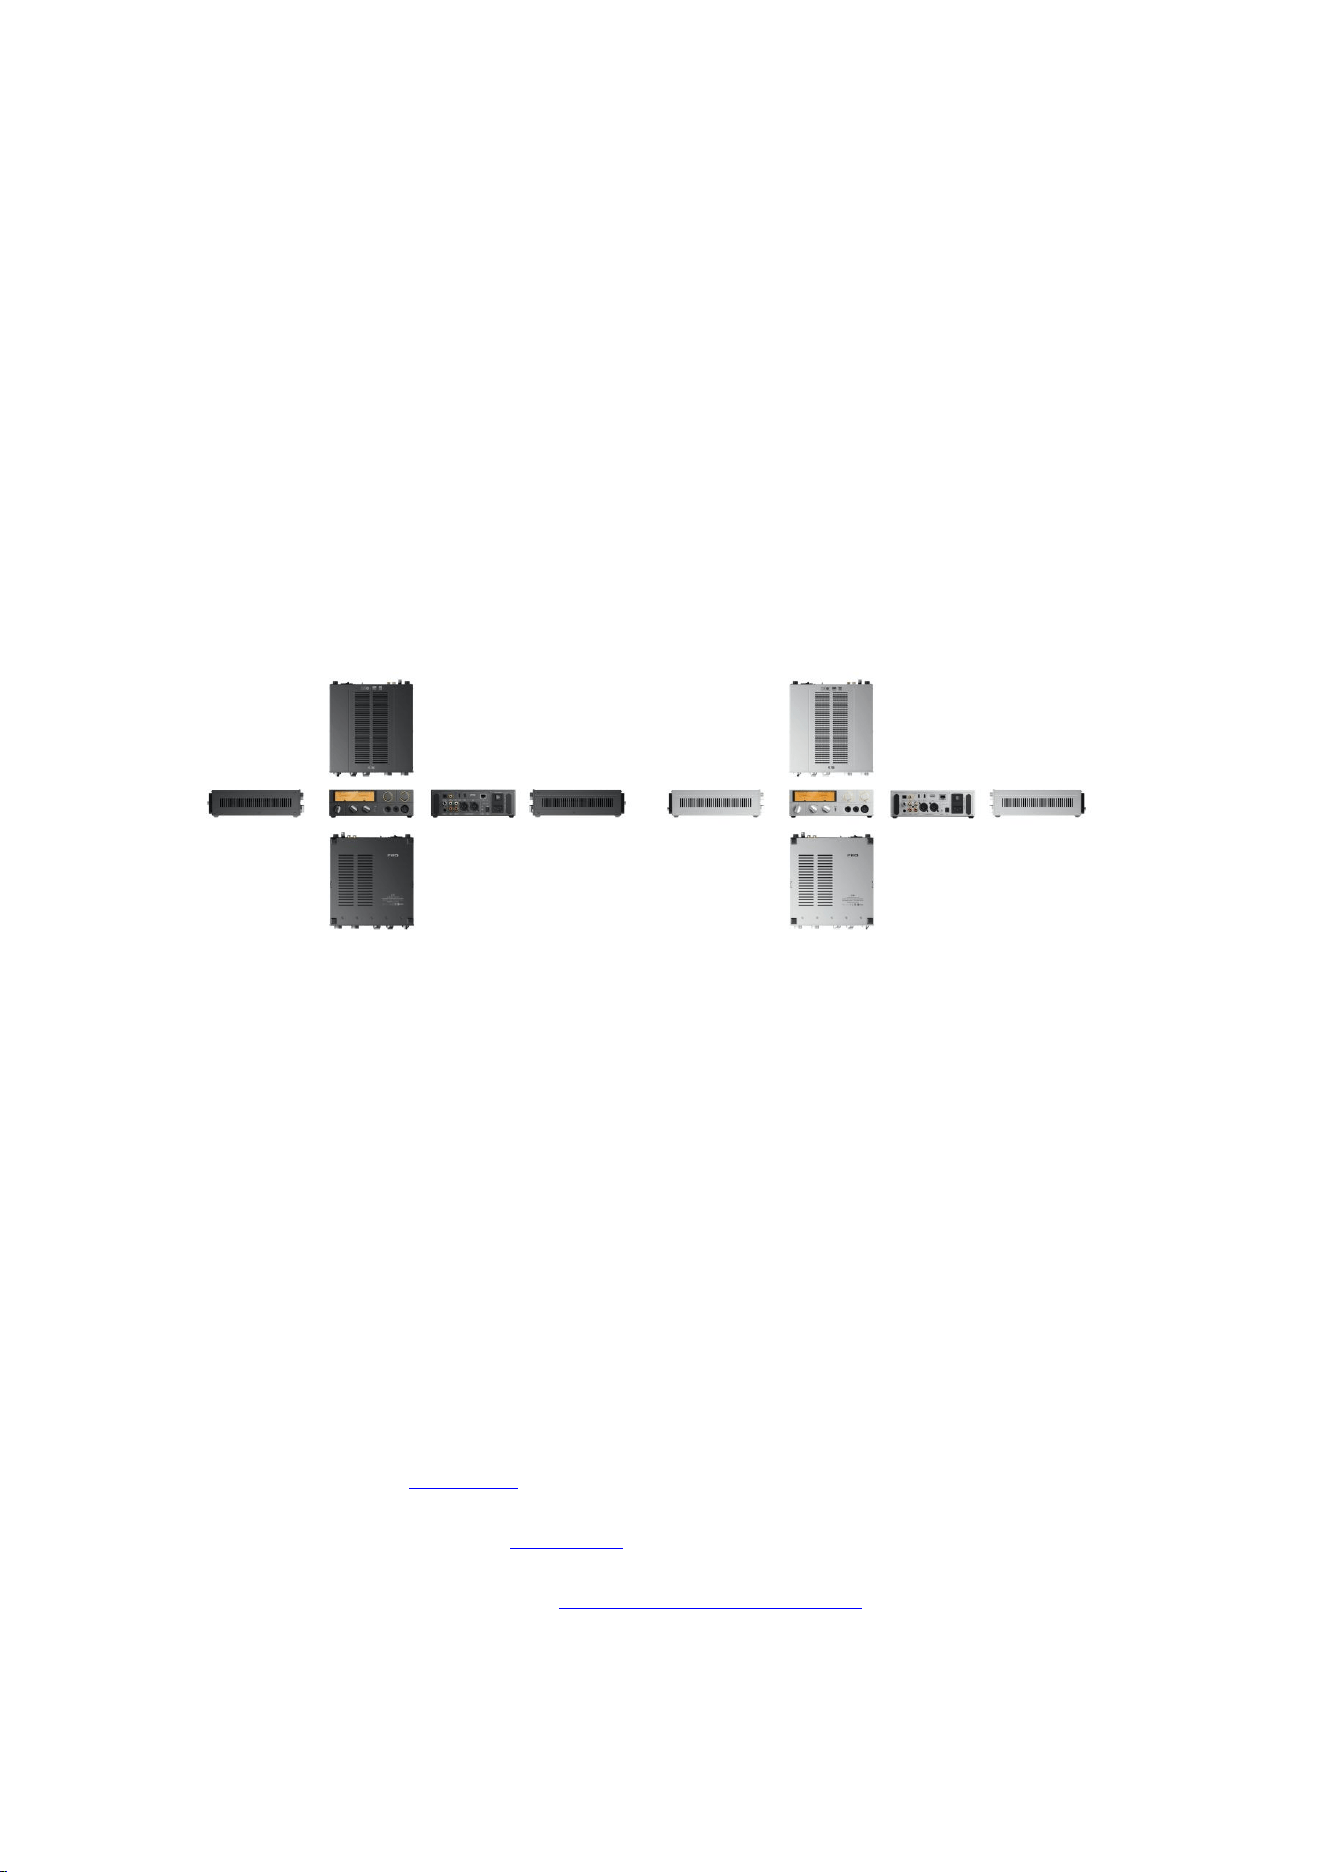
Dimensions: Approximately 244.6 x 213 x 66.8 mm.
Colors: Black, Silver.
Weight: Approximately 2100g.
Material: Front panel CNC-machined aluminum alloy, middle frame metal
stamping.
Download Links:
Quick Start Guide: Click here
USB DAC Driver Download: Click Here
K15 PEQ Adjustment Webpage: https://fiiocontrol.fiio.com/
(Note: Apple's default Safari browser cannot open the PEQ webpage. Please use a
5
Google-based browser like EDGE or Chrome.)
FiiO Control App: Click Here
K15 Firmware: To be added.
2. Operation Guide
(1)Power On, Power Off, and Standby:
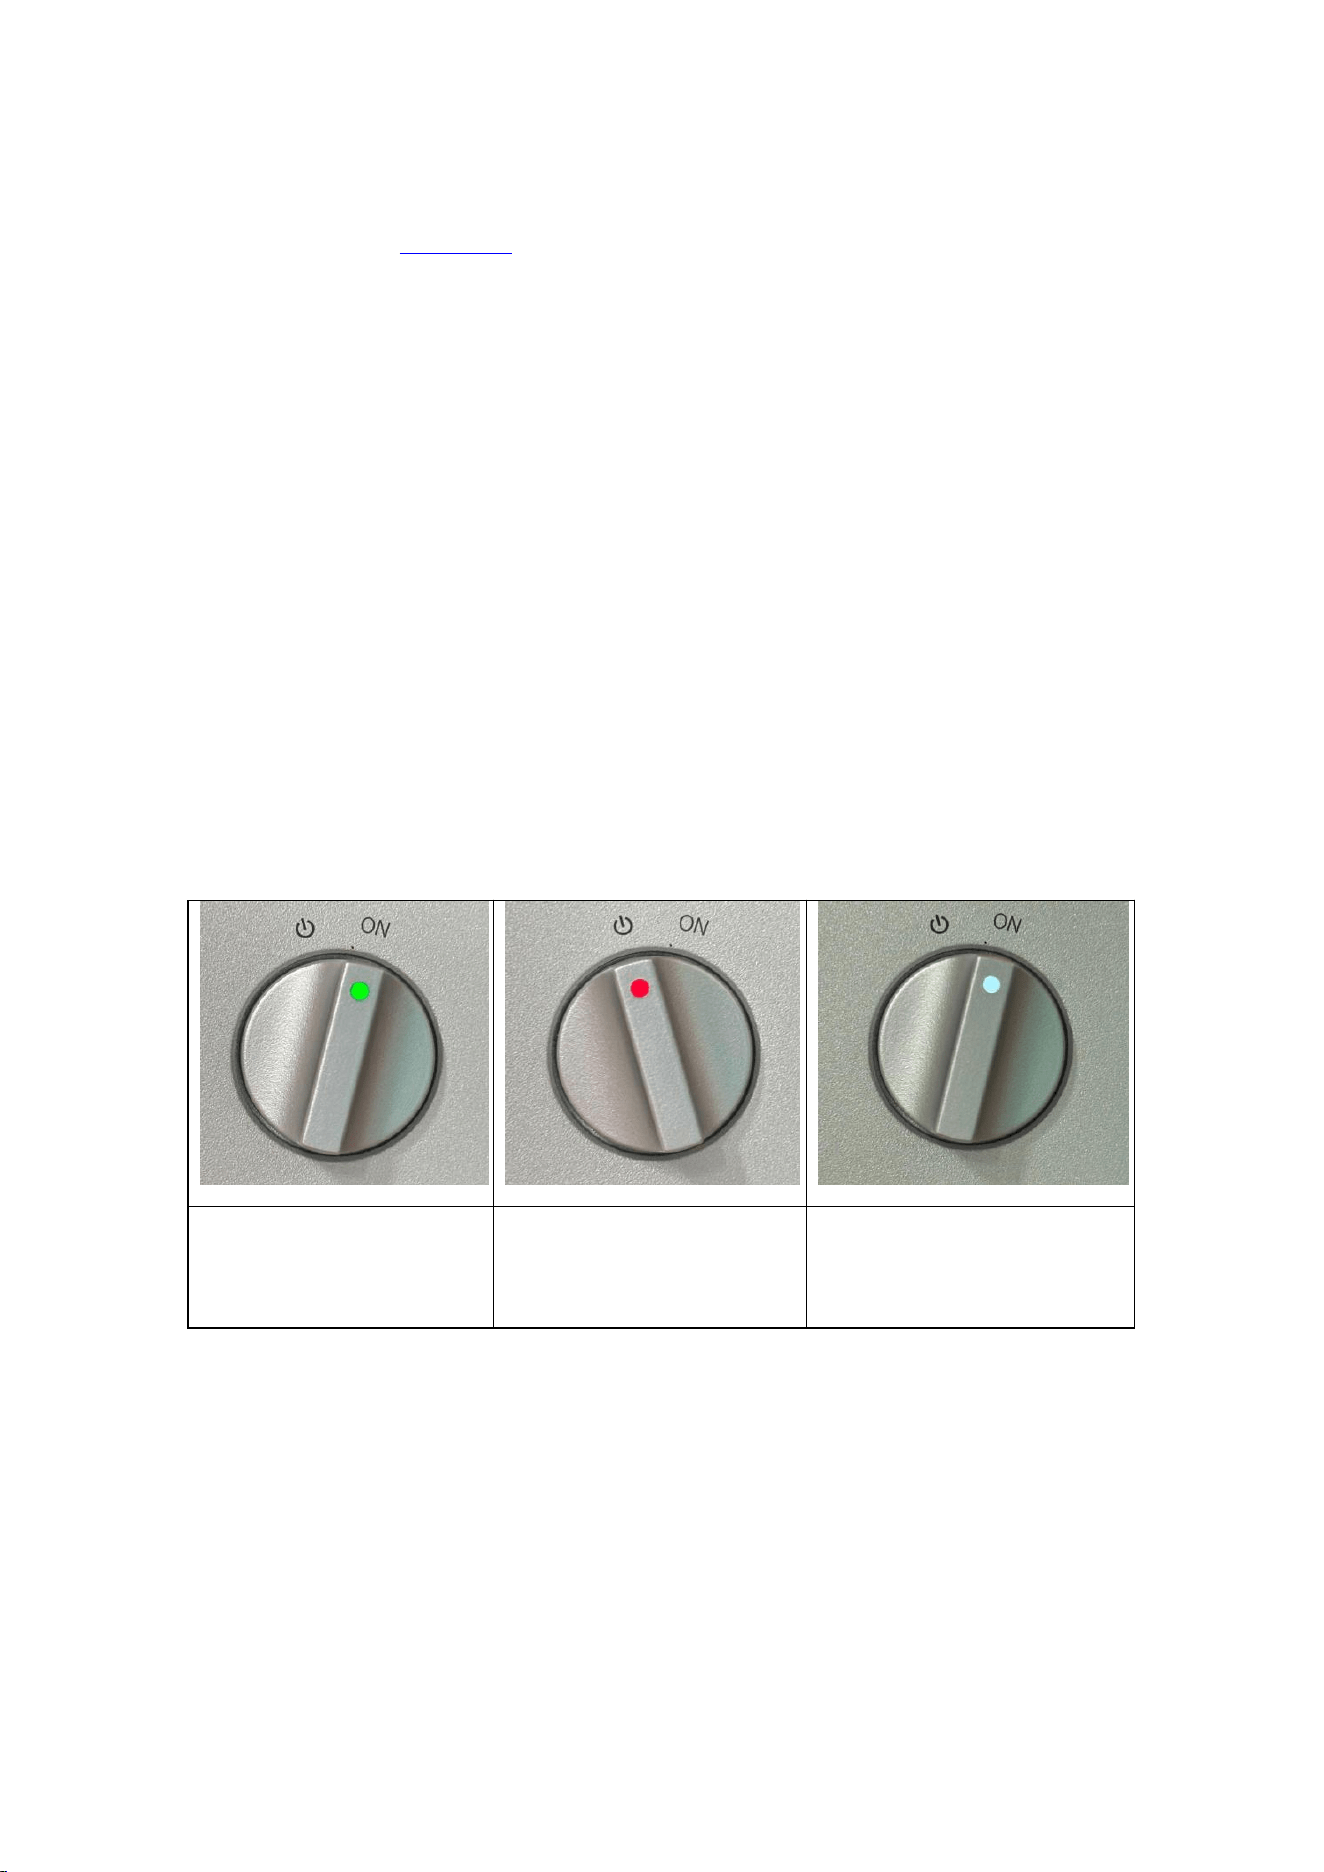
If using AC power, ensure the POWER switch on the rear panel is set to AC. Then,
toggle the rocker switch to the "-" position. The power indicator on the front panel
will light up red, indicating the power is connected but the device is off. In this state,
the infrared remote cannot turn on the K15.
For DC power, ensure the POWER switch on the rear panel is set to DC.
Standby, remote control
offers instant power-on
Power off, power supply
connected
Power on
Power On: After power is connected, turn the front panel power switch to the ON
position. The indicator will turn white, the display will light up, and the K15 will
power on.
Standby: In the powered-on state, pressing the standby button on the remote will
put the K15 into standby mode, where the main control and microcontroller units
6
operate in low-power mode.
Long-term Non-use: Turn off the rear rocker switch or disconnect the external DC
power.
(2)Touchscreen Operation:
The K15 features a 3.93-inch touchscreen display.
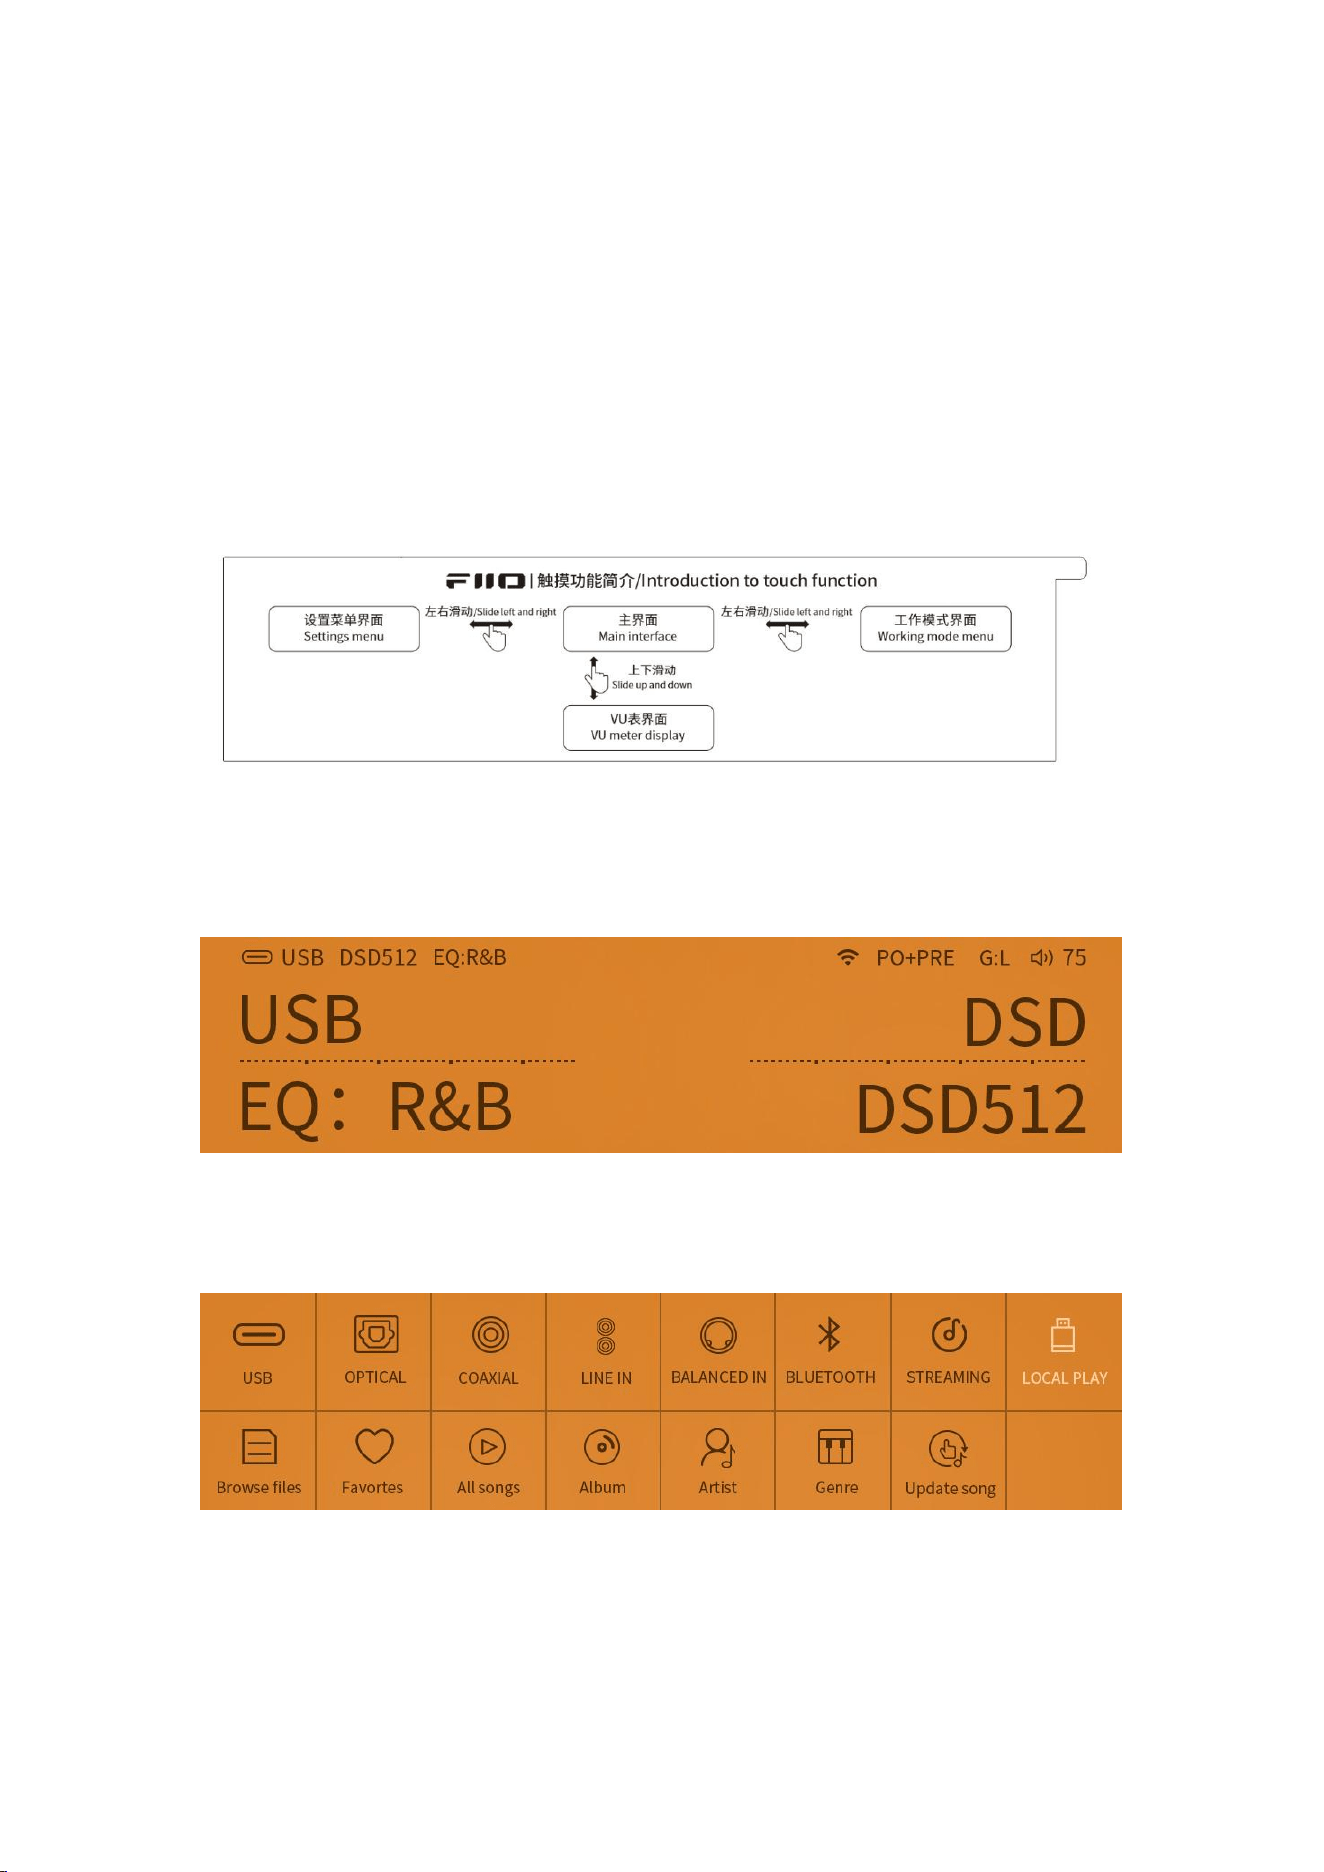
Power on to enter main Interface. For example, the USB DAC working mode main
interface:
Mode Selection Interface: Swipe left to switch between 8 working modes (USB,
Optical, Bluetooth, Streaming, Coaxial, Line Input, Balanced Input, Local Playback).
Menu Settings Interface: Swipe right to access settings for playback, equalizer,
channel balance, themes, backlight, etc.
7
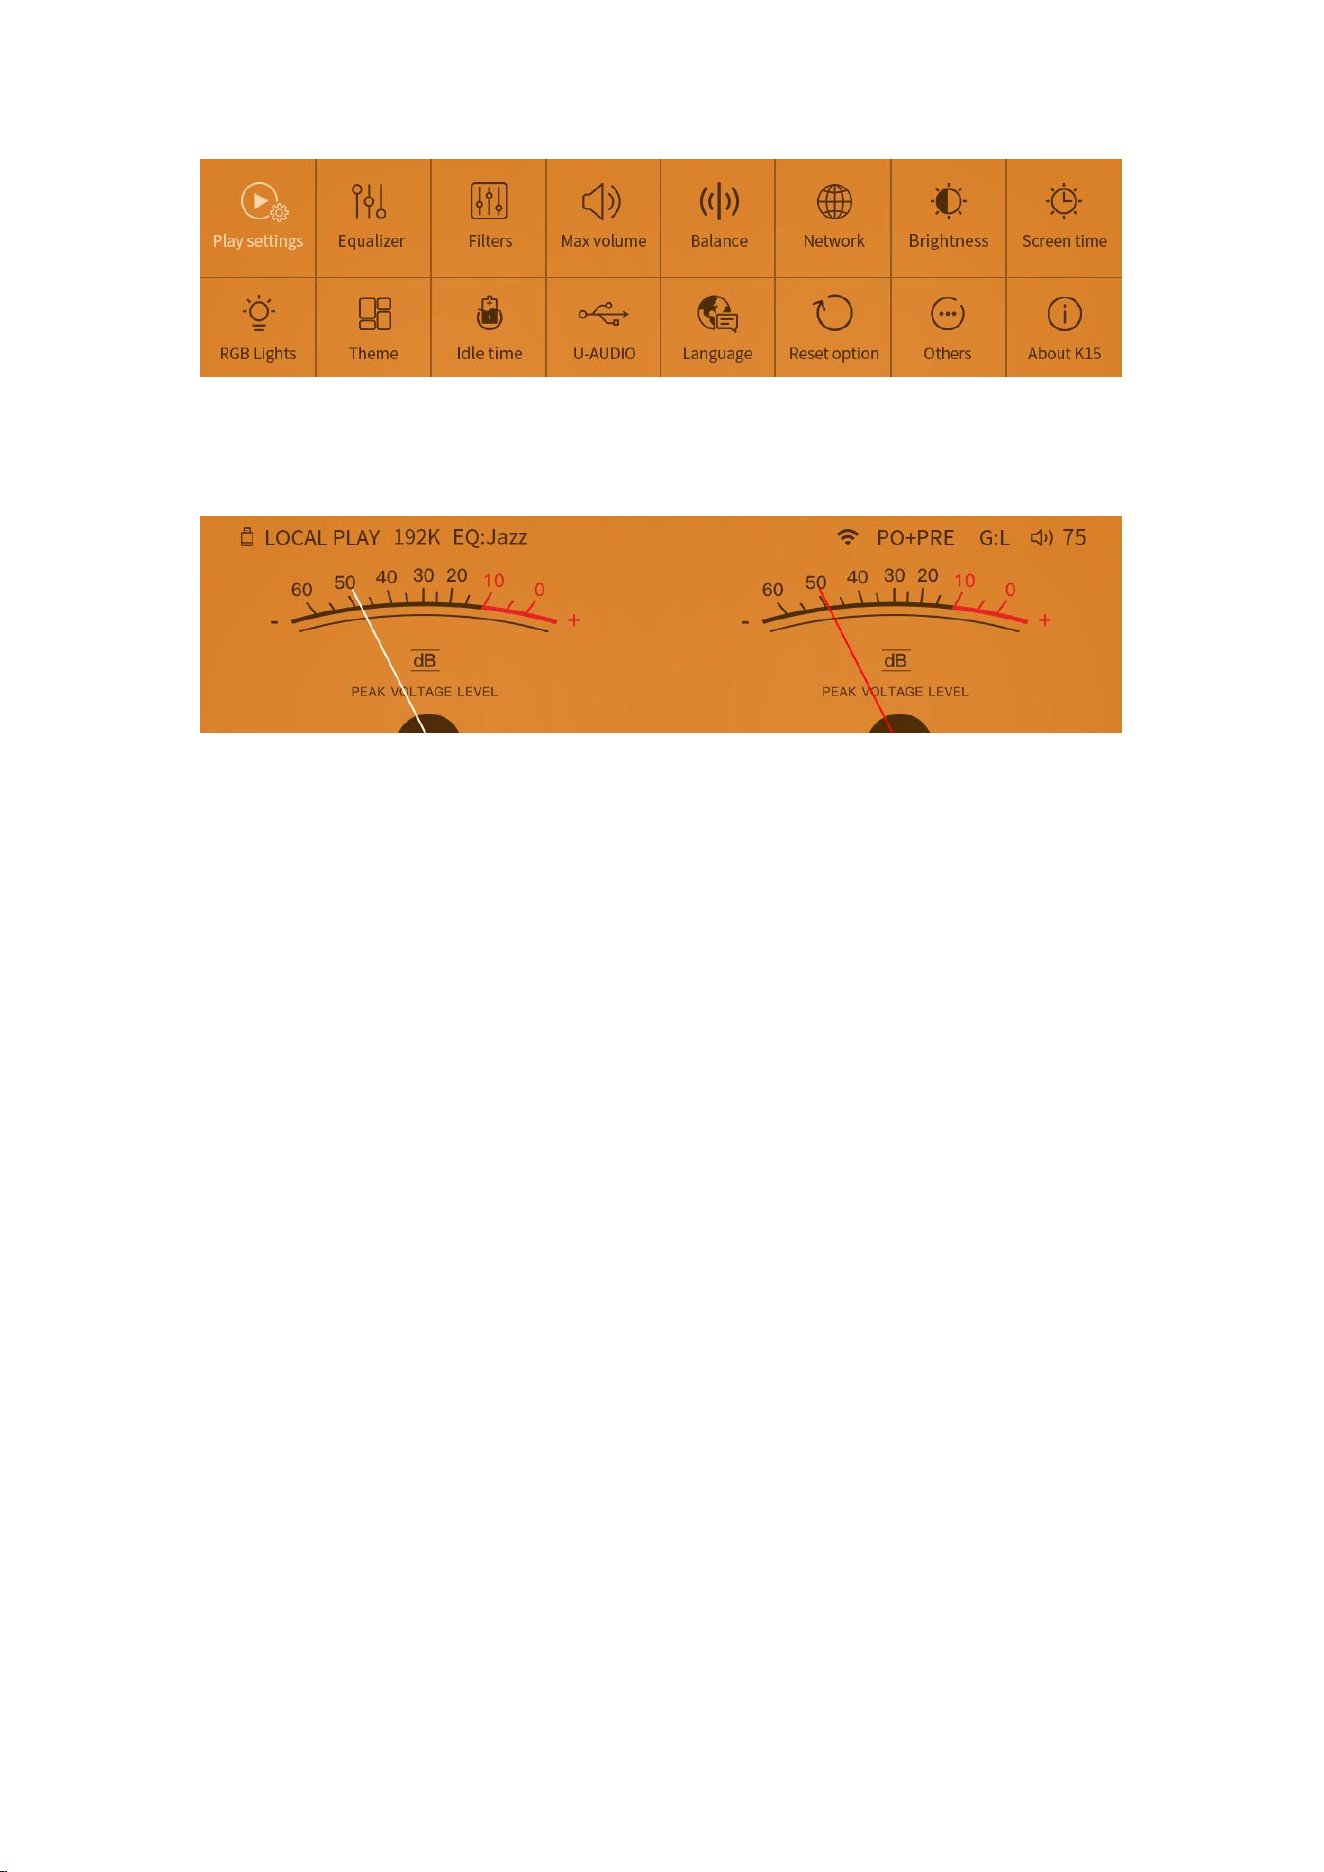
VU Meter Interface: Available in streaming or local playback modes; other modes
do not currently support VU meters (DSD is also unsupported).
3. Detailed Description of Buttons
and Interfaces
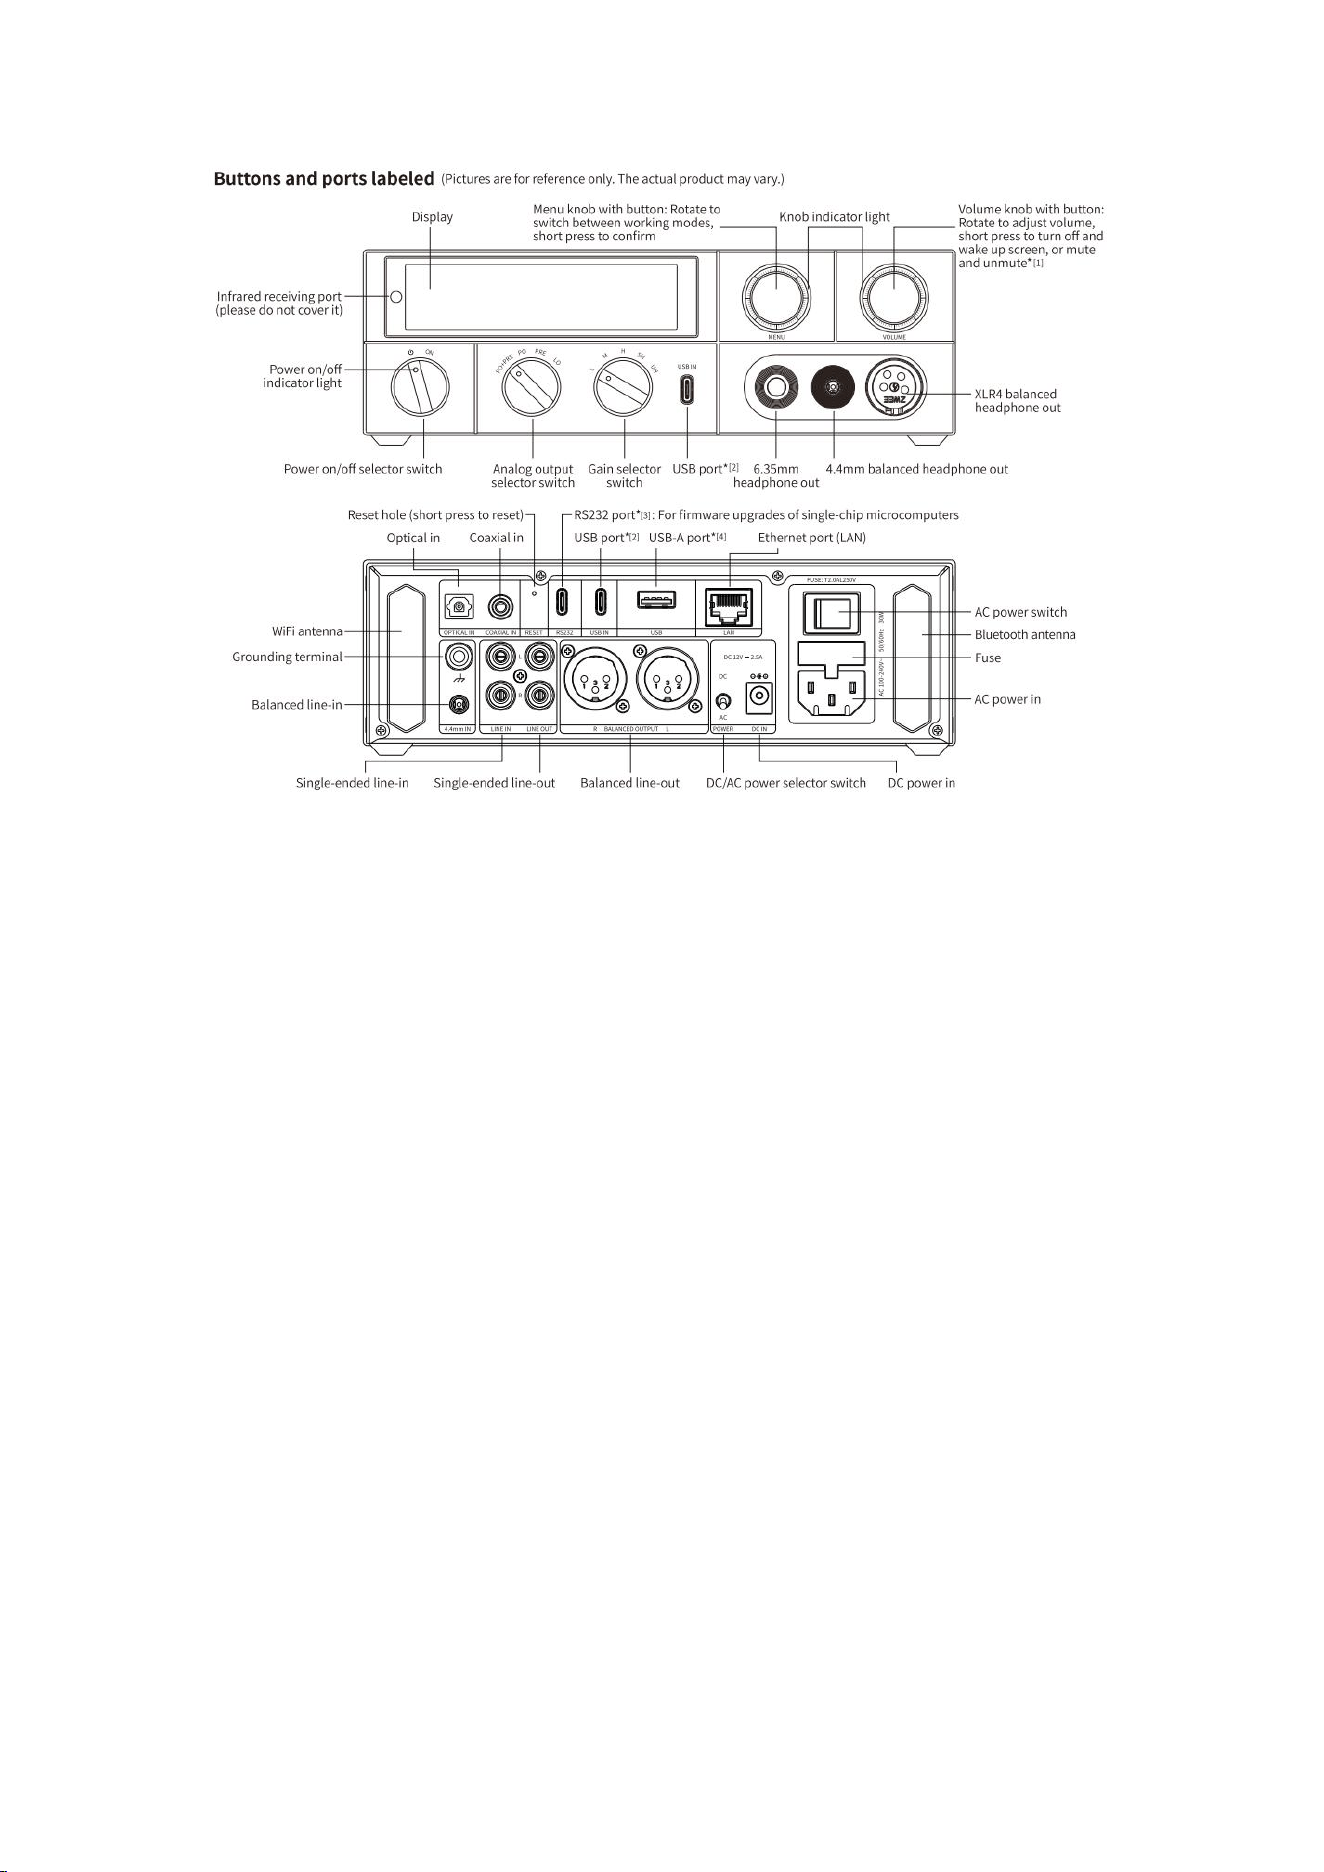
8
(1)Analog Output Interfaces:
a.Headphone Output ports:
6.35mm single-ended output: Outputs left and right positive signals (R+, L+),
directly parallel to the balanced output. Simultaneous connection of single-ended
and balanced headphones may increase load; avoid excessive volume + gain to
prevent abnormal operation.
4.4mm balanced output: Outputs left/right positive and negative signals (R+, R-,
L+, L-).
XLR4 balanced output: Outputs left/right positive and negative signals (R+, R-, L+,
L-), internally parallel to the 4.4mm balanced output.
Warning: Incorrect adapters (e.g., balanced-to-single-ended cables that short L
- and R- to ground) may trigger overload protection.

9
b.Line Output ports:
RCA single-ended output: Stereo line output (R+, L+ and ground). Maximum
output is 2.5Vrms; reduce volume in PRE mode if distortion occurs.
XLR3 balanced output: Balanced line output (R+, R-, L+, L-), suitable for active
speakers or amplifiers.
(2)Knob Functions:
a.Power on/off Selector Switch: Controls power on/off. Remote wake-up is d
isabled when the knob is in the off position.
b.Analog Output Selector Switch: Switch output PO+PRE, PO, PRE and LO
PO+PRE: Simultaneous headphone and line output, with volume and gain
adjustments affecting both.
PO: Only headphone outputs are active (6.35mm, 4.4mm, XLR4).
PRE: Only line outputs are active (RCA, XLR3), with adjustable volume (unaffected
by gain).
LO: Fixed maximum volume line output (volume and gain controls disabled). Ensure
connected devices are set to appropriate levels to avoid loud noises.
c.Gain Switch: Five levels—L (Low), M (Medium), H (High), SH (Super High),
UH (Ultra High). Gain can be achieved through software gain, which controls
the internal volume output level via software, or hardware gain, which change
s the amplification factor of the hardware circuit.
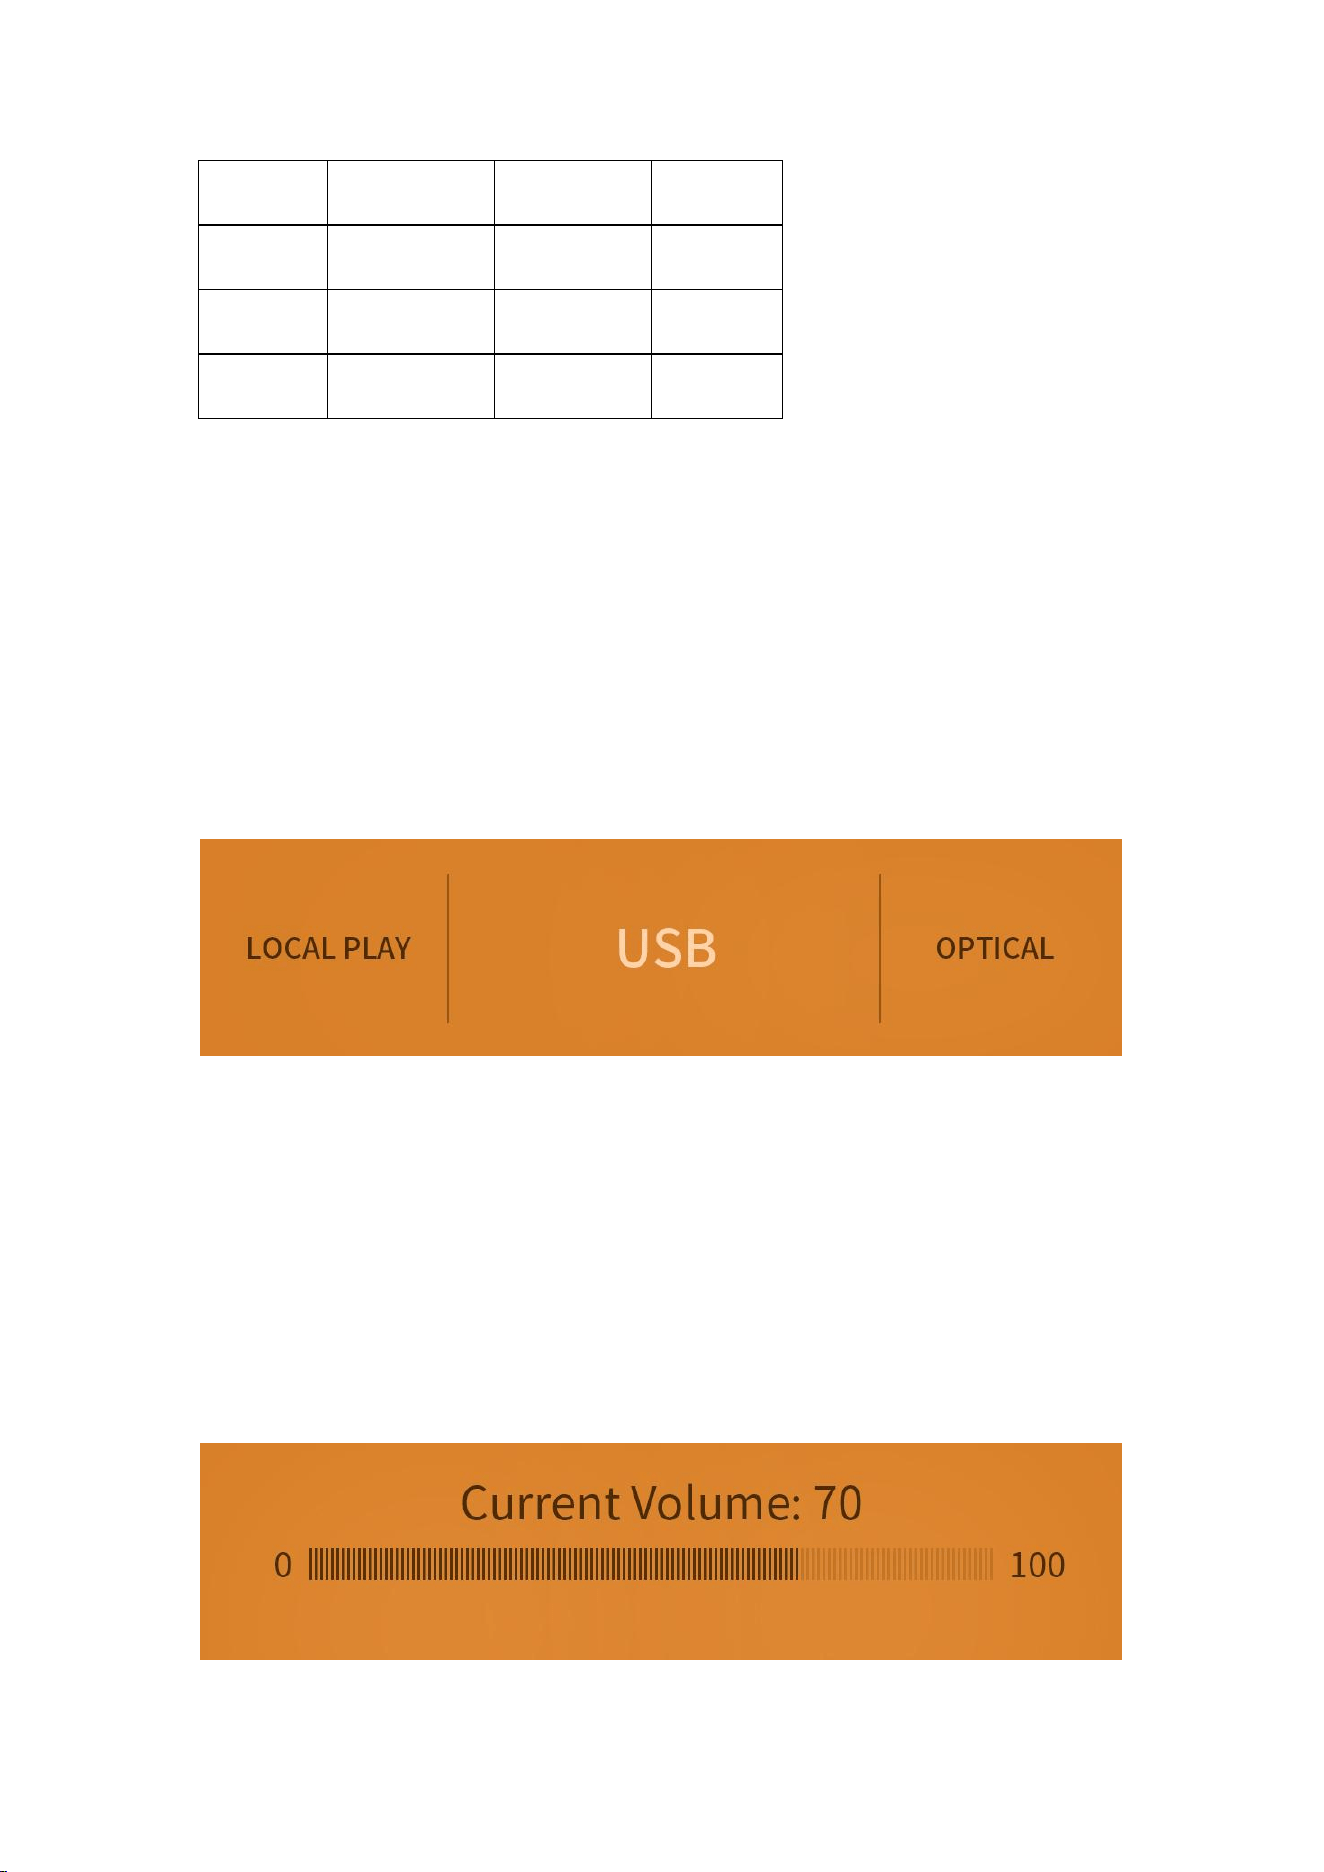
Gain
Hardware gain
Software gain
Whole gain
LOW
L=0dB
-12dB
-12dB
10
Medium
L=0dB
-6dB
-6dB
High
L=0dB
-3dB
-3dB
Super High
H=+12dB
-3dB
+9dB
Ultra High
H=+12dB
0dB
+12dB
As shown in the table above, the Ultra high mode and Super High gain mode are
hardware high gain modes. The L/M/H modes are hardware low gain modes.
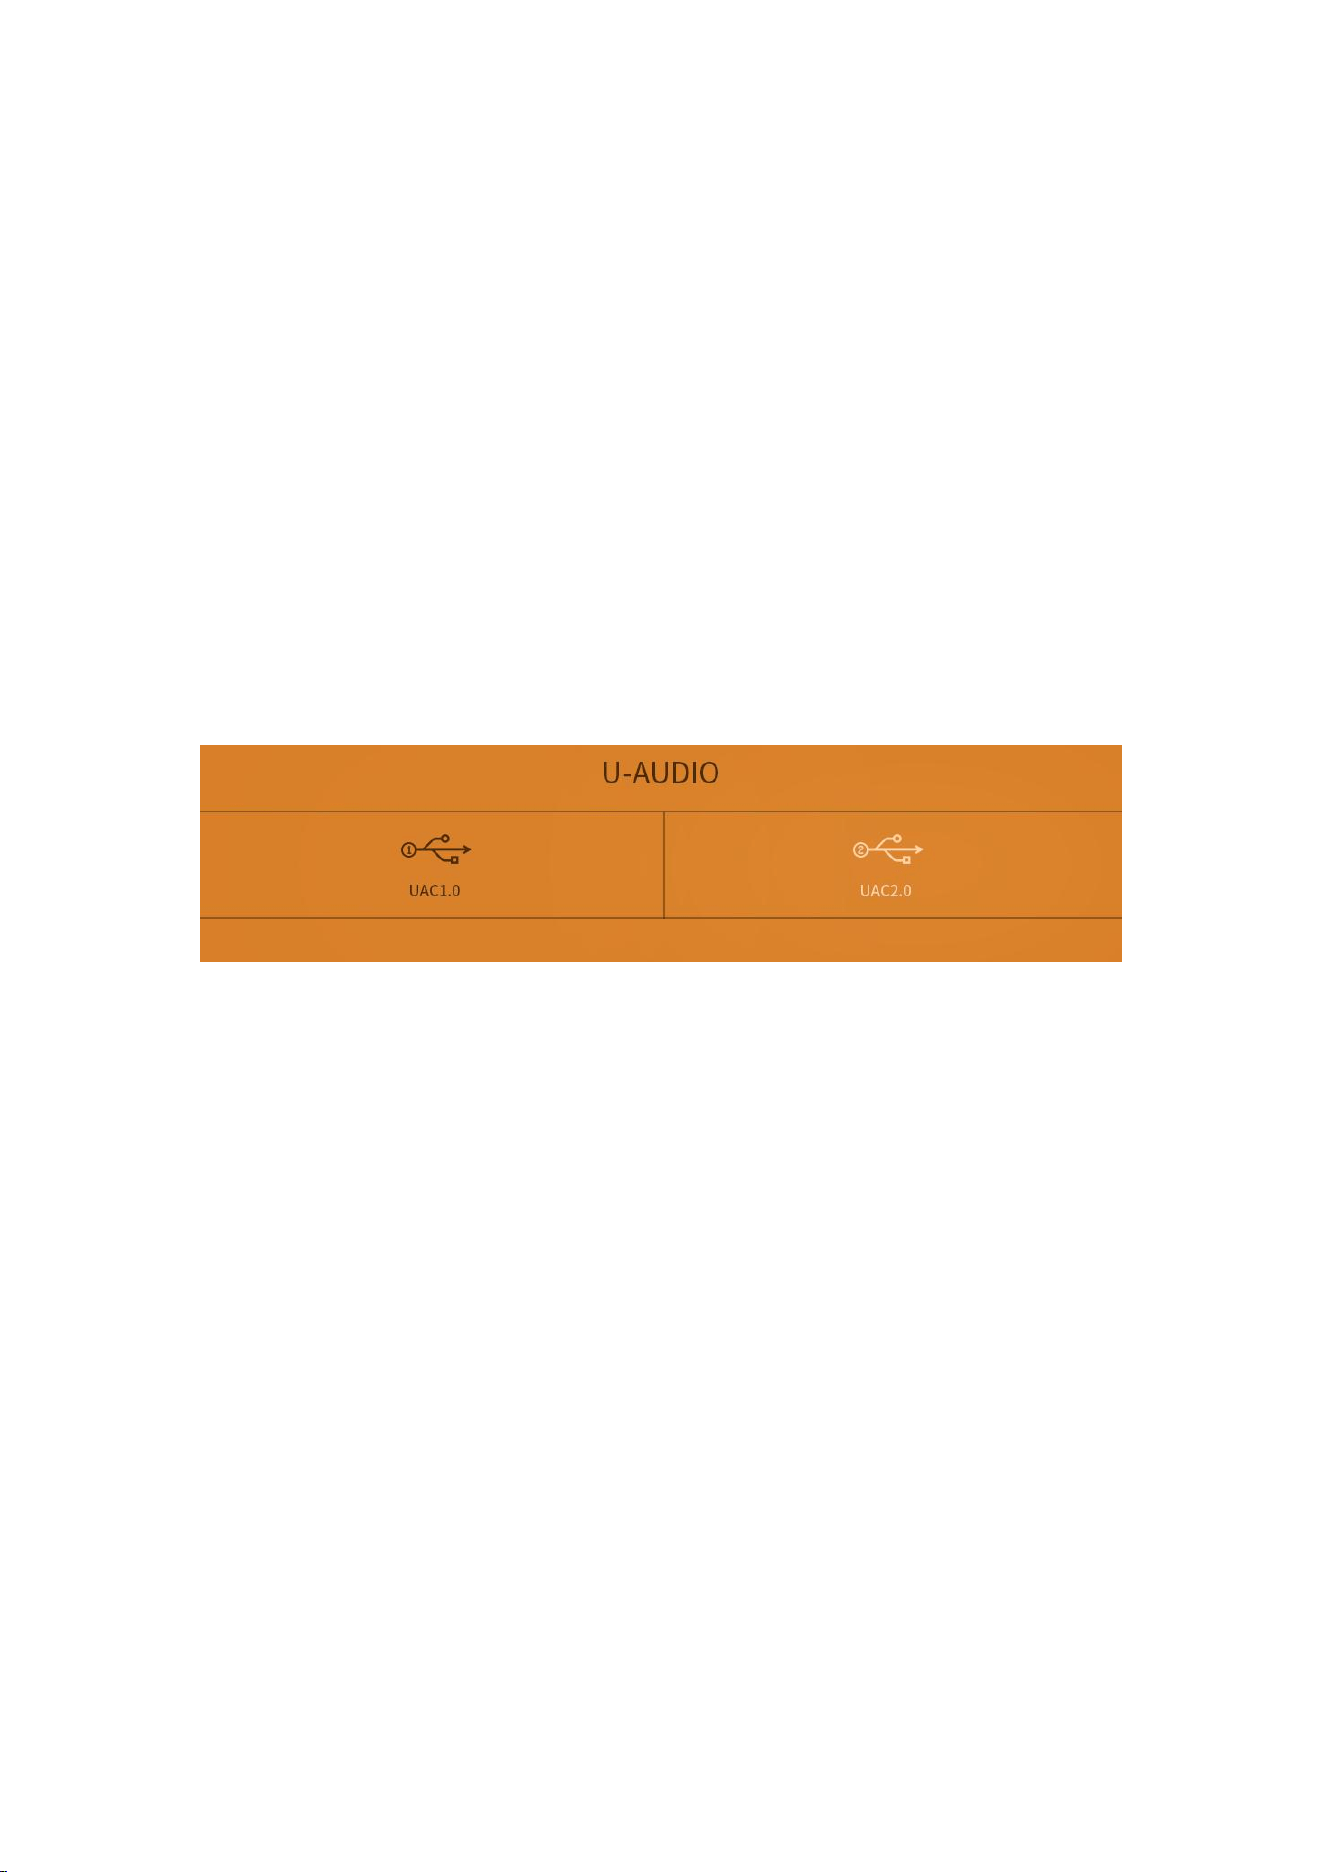
d.INPUT/MENU Knob: When rotating, the display screen pops up an input
selection menu. If no action is taken for 3 seconds after stopping at a specific input,
the device automatically enters this operating mode. When rotating and stopping
at a specific input mode, pressing the button immediately enters this operating
mode.
e.VOLUME Knob: Rotate to adjust the volume up or down. At this point, the
display screen will pop up the volume adjustment interface, as shown in the figure.
A short press on the knob will turn the screen off or on. (Note: In the Settings menu
under Other Settings, the “Short press volume knob” setting can modify the
response function of a short press on the knob, which can be selected as “Turn
off/wake up” or “Mute/unmute” functionality.)
11
(3)Digital Input Interfaces:
a.USB IN (Front/Rear): For connecting computers, phones, or players. The front
USB takes priority if both are connected.
Note:
1. Windows 10+ requires driver installation(Win7 or below is not supported.);
macOS does not.
2.PS4/PS5 requires UAC1.0 mode (set in the K15 menu).
b.RS232: For PEQ adjustment or firmware upgrades via PC.
c.COAXIAL IN: Coaxial input
d.OPTICAL IN: Optical input
e.USB HOST: Connect a USB flash drive for local playback. This interface has a
current limit of 500mA. If you need to connect an external hard drive, please use an
external power supply.
The USB flash drive capacity has been tested to support up to 256GB. (HDD tested
to support 2TB.) Supported formats include FAT32, NTFS, and exFat.
f. LAN: Ethernet port (10/100/1000Mbps).
12
(4)Other Interfaces:
RF Antennas: Right (near power input) for Bluetooth; left (near coaxial port) for
Wi-Fi (2.4G/5G dual-band). Avoid blocking antennas.
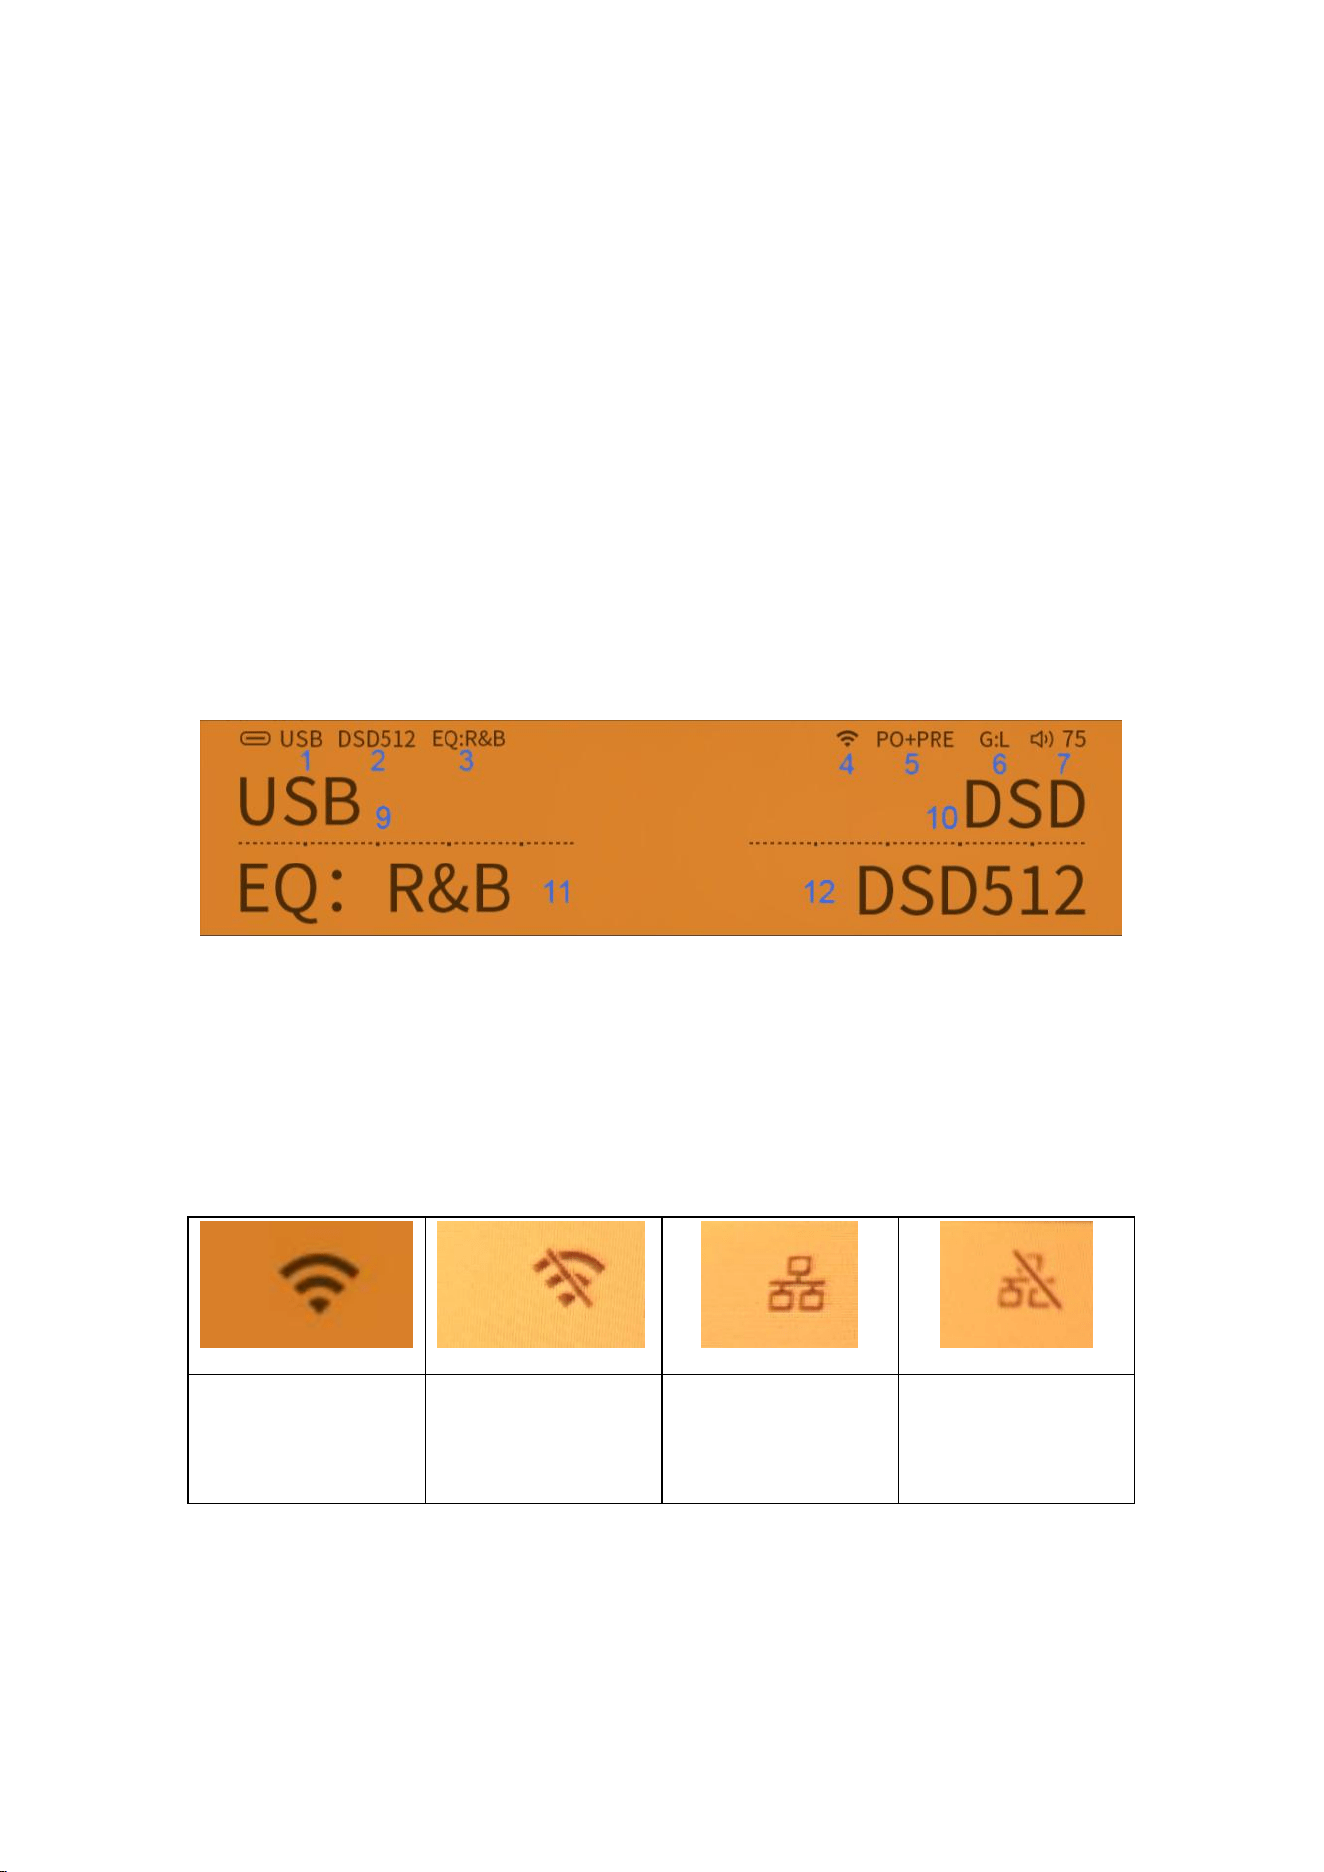
4. Main Interface Display
(1)Status Bar (USB Mode as Example):
1.Current mode (e.g., USB DAC mode).
2.Sample rate (e.g., DSD512).
3.Current EQ type
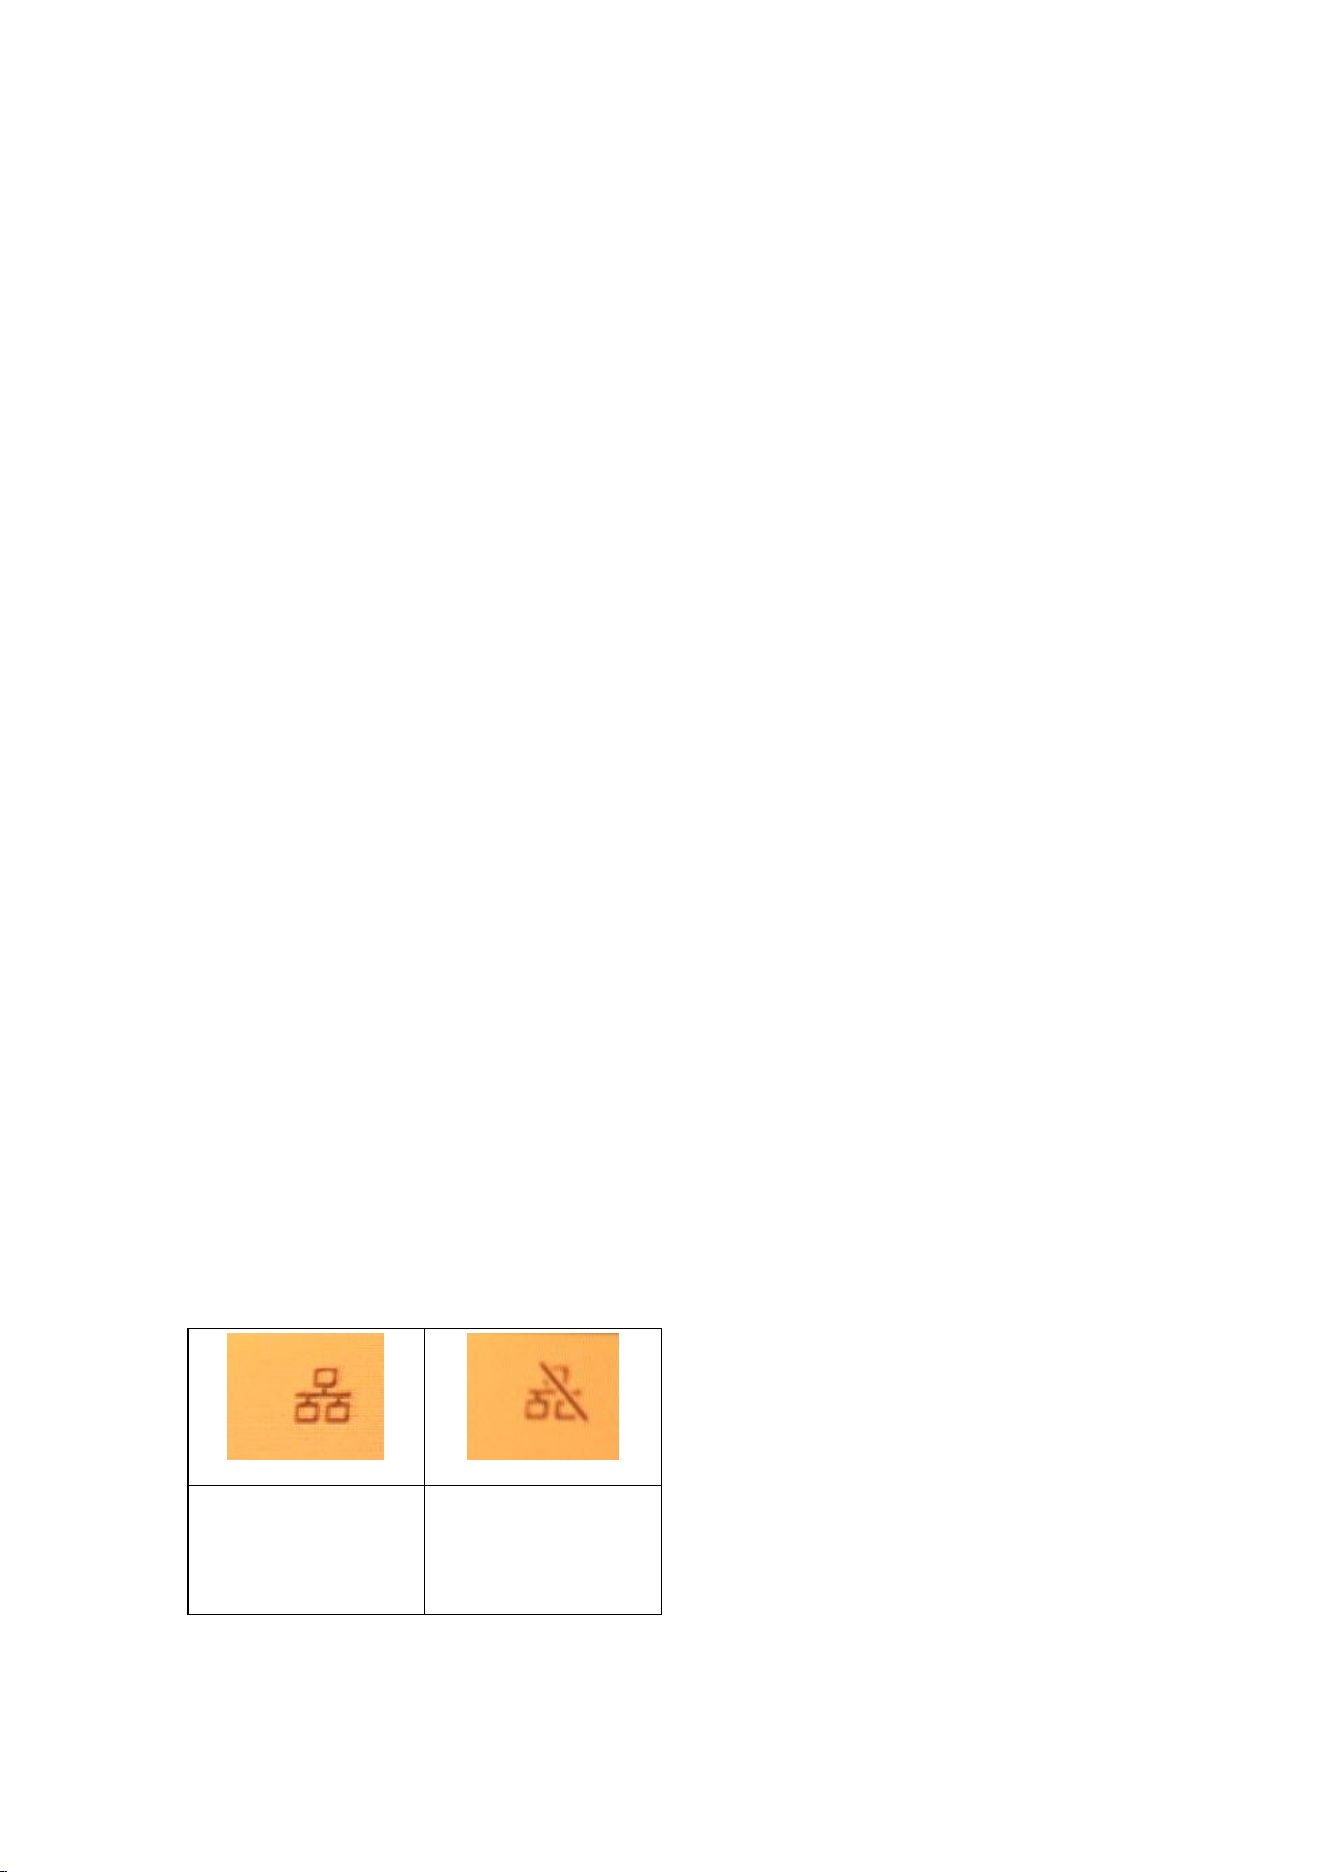
4.Network status
WiFi connected
WiFi disconnected
Ethernet
connected
Ethernet
disconnected
5.Output mode (PO+PRE/PO/PRE/LO).
6.Gain level (L/M/H/SH/UH).
13
7.Volume level (0–120).
(2)USB DAC mode interface:
9. Current working mode: USB DAC decoding mode
10. Current playback track format
11. Current EQ type
12. Current playback track sampling rate
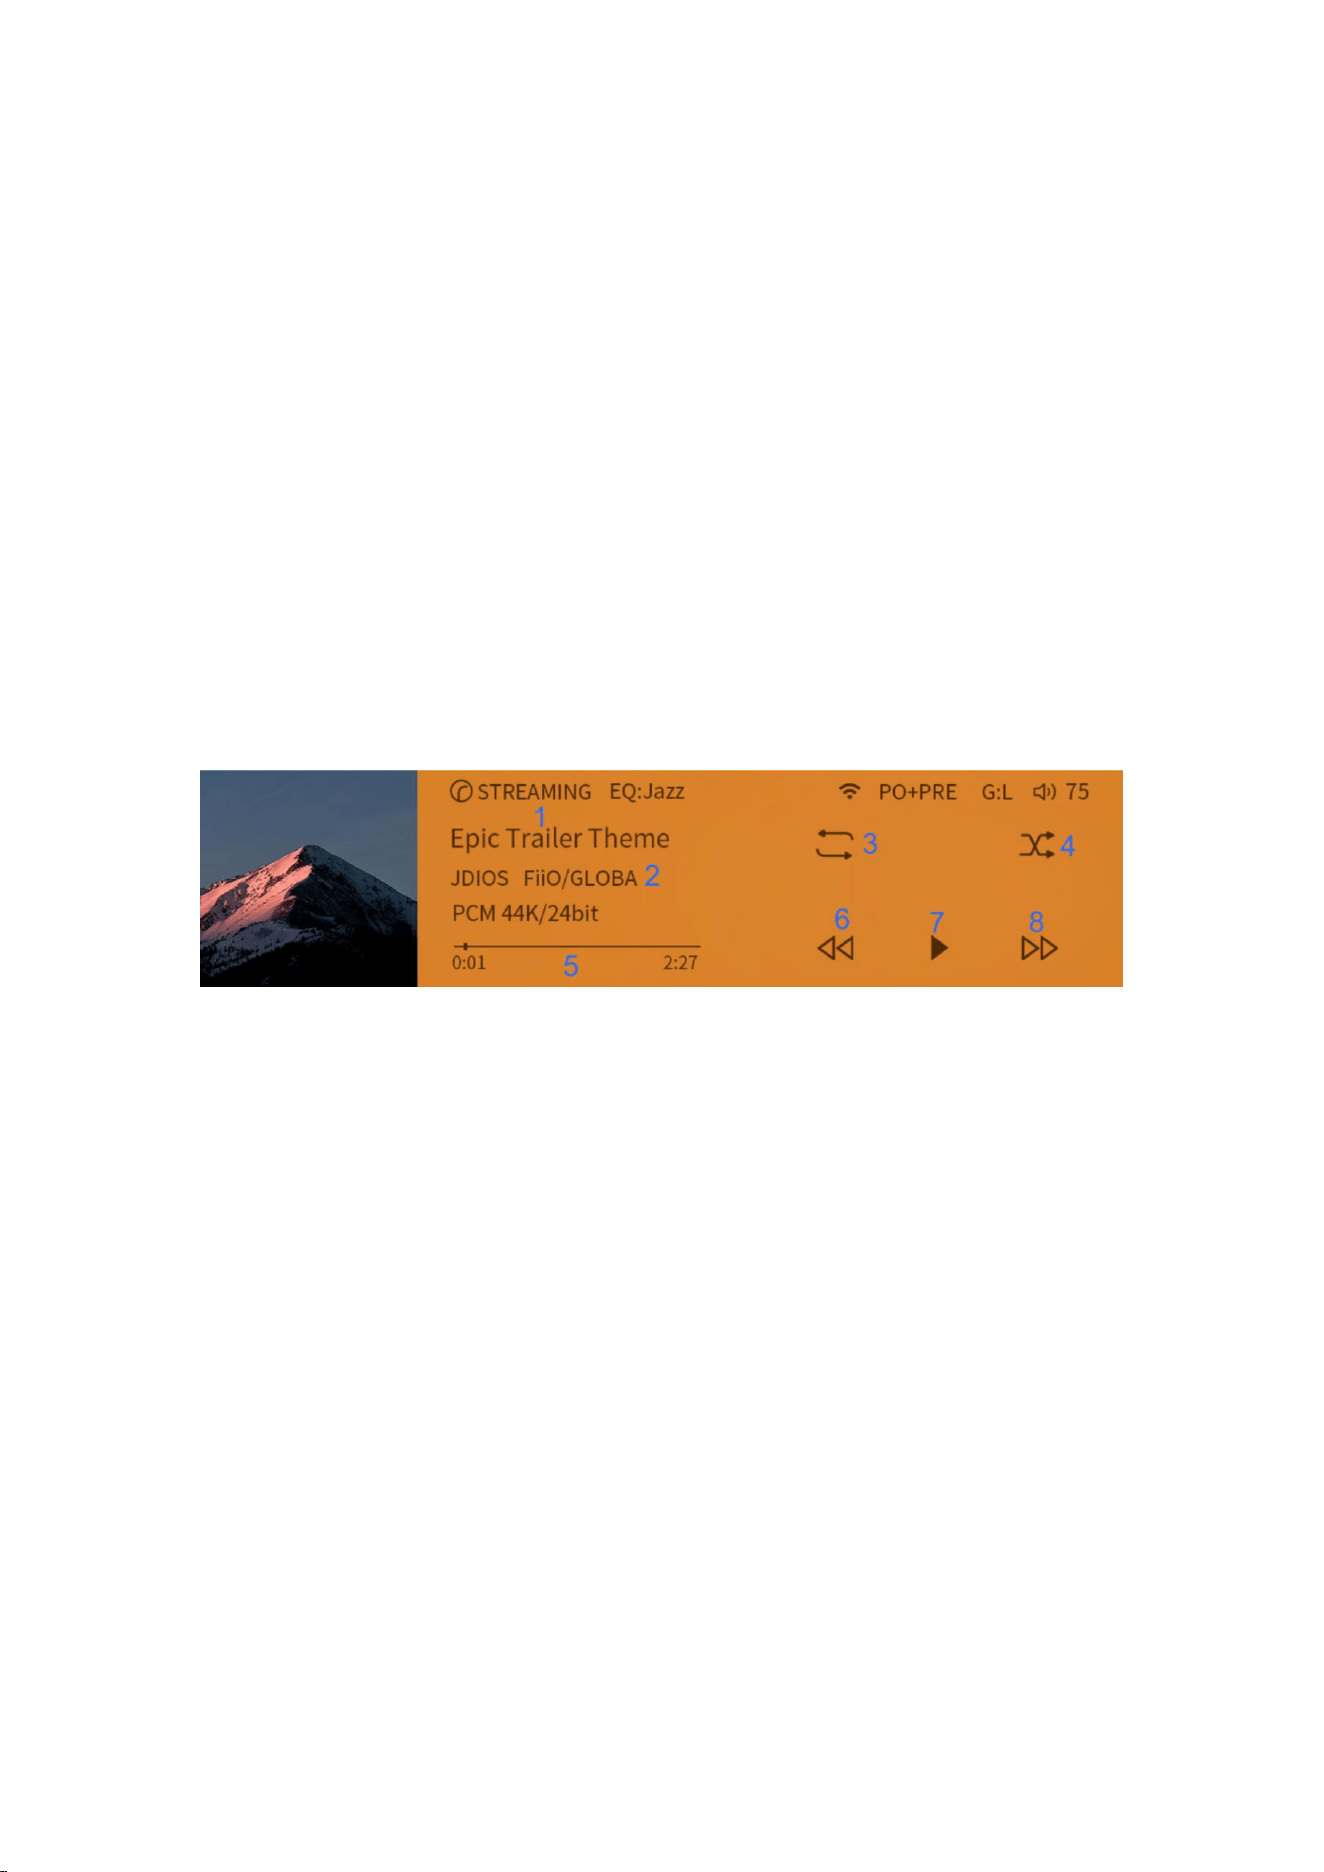
(3)Streaming Mode Interface:
1.Streaming Connection Mode: Distinguish between Airplay and Roon Ready.
2.Song Title and Artist Information: Primarily displays the song title and artist name.
However, some music playback software may display lyrics or other content after
the song title, which may cause the display to refresh depending on the software.
3.Playback Order: Can switch between sequential playback, loop playback,
single-track playback, and single-track loop. Only effective in Roon Ready mode;
Airplay does not support this feature due to protocol limitations.
4.Shuffle Play: Enable or disable shuffle mode. Only effective in Roon Ready mode;
Airplay does not support this feature due to protocol limitations.
5.Song Duration and Progress Bar
6.Previous Track
14
7.Play/Pause
8.Next Track
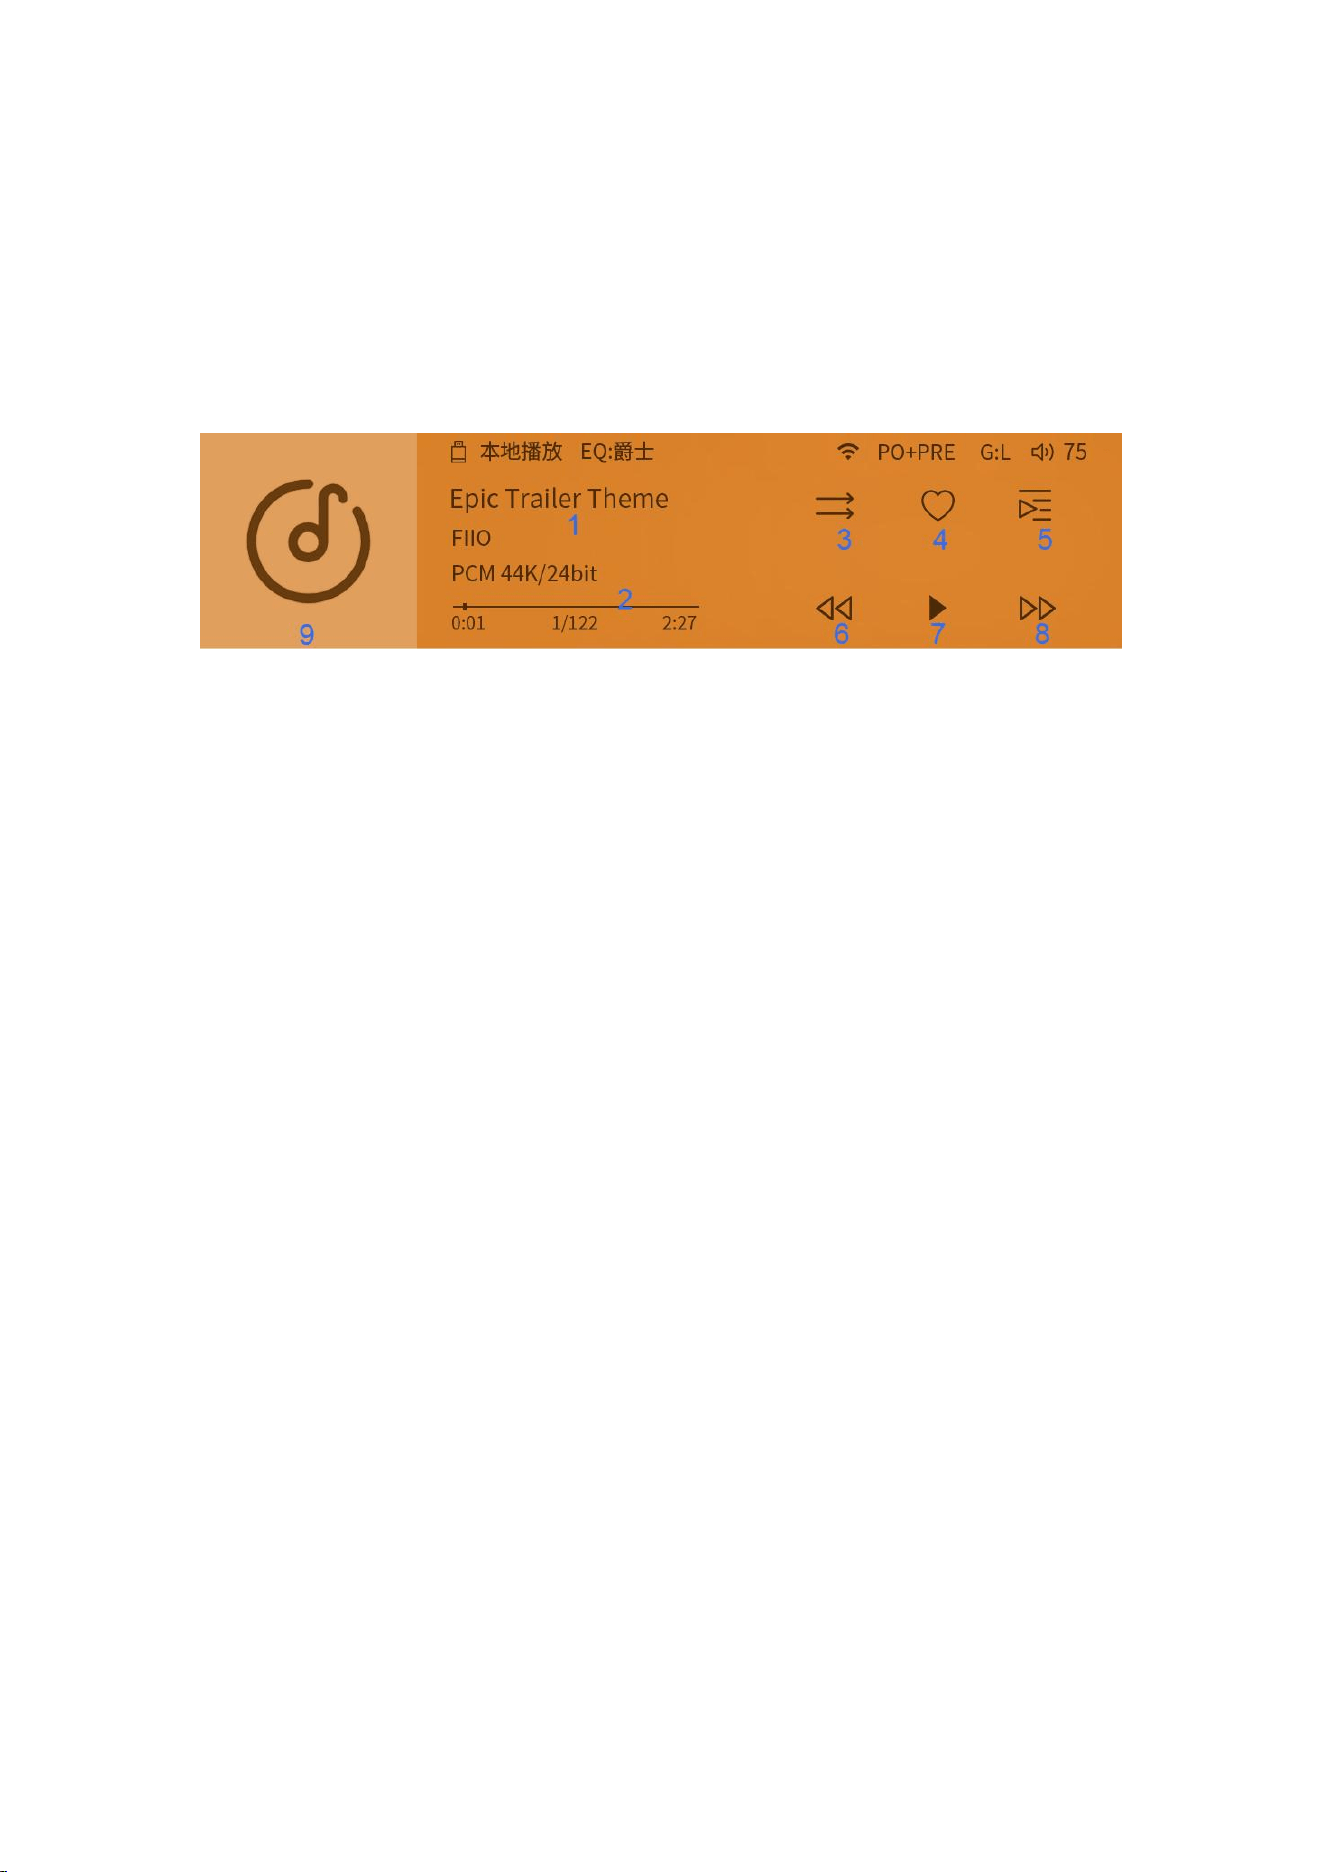
(4) Local Playback Interface:
1. Song Title
2. Song Duration and Progress Bar
3. Playback Mode: Can switch between sequential playback, loop playback, shuffle
play, single-track playback, and single-track loop.
4. Add or Remove from Favorites
5. Jump to Current Playlist
6. Previous Track
7. Play/Pause
8. Next Track
9. Cover Display: Note that the current firmware only supports JPG format covers
embedded in the track file, with a size not exceeding 1.2MB. Folder covers and
BMP/PNG format covers are not currently supported.

15
5. Working Modes
(1)USB DAC Mode:
PCM: 44.1kHz–768kHz, 16–32-bit.
DSD: DSD64–DSD512.
MQA: 8x full decode.
Multichannel WAV or other formats: Unsupported.
Mono tracks: Only ≥44.1kHz supported. For playback of tracks below 44.1kHz, use
software SRC to upsample the track to 44.1kHz or 48kHz before playback.
(2)Optical Input Mode:
PCM: 44.1kHz–96kHz;
DSD not supported
(3)Coaxial Input Mode:
PCM: 44.1kHz– 192kHz;
DSD: DSD64.
(4)Single-Ended Line Input Mode:
Single-Ended Line input mode supports single-ended headphone output and
balanced headphone output (front output switch set to PO+PRE or PO), as well as
rear panel line output (front output switch must be set to PRE or LO).

16
(5)Balanced Line Input Mode:
Balanced line input mode supports single-ended headphone output and balan
ced headphone output (front output switch set to PO+PRE or PO), as well as
rear panel line output (front output switch must be set to PRE or LO).
(6)Bluetooth Receiver Mode:
K15 uses the QCC5125 Bluetooth receiver chip, Bluetooth version 5.1, and supports
AAC/SBC/aptX/aptX-LL/aptX-HD/aptX-Adaptive/LDAC encoding formats.
(7)Streaming Mode:
Preliminary Note: K15 supports Airplay and Roon Ready streaming methods. Both
require connecting the K15 and the streaming device (e.g., phone or computer) to
the same local network.
Airplay: After connecting to an Apple device, you can stream via Airplay in Apple
Music or QQ Music.
Roon Ready: Connect the K15 and the device to the same network, then enable the
FIIO K15 in ROON CORE Settings > Audio. Supports 44.1kHz–384kHz; 16bit–32bit,
DSD64-DSD256 (DOP).
Note: K15 does not support DLNA (UPnP).
How to confirm if the device is on the same local network?
Check the IP address in the K15 Settings menu > Device Info and compare it with
the phone’s IP address. If the first three segments are the same, they are on the
same local network. For example, if the K15 IP is 192.168.123.2 and the phone IP is
17
192.168.123.3, both devices belong to the 192.168.123.xxx network segment,
confirming they are on the same local network.
(8)Local Playback Mode:
The bottom row of the input mode selection interface is only active in local
playback mode. In other modes, it is grayed out and inactive.
K15 can scan and play songs from a USB drive.
Supports decoding and playback of AAC/AIF/AIFF/APE/FLAC/MP3/WAV/DSD
formats, with maximum sampling rates of PCM384K and DSD256.
Does not support: OGG format, CUE track splitting.
Cover support: Only supports JPG format embedded covers under 1.2MB. Other
formats and external covers are not supported.
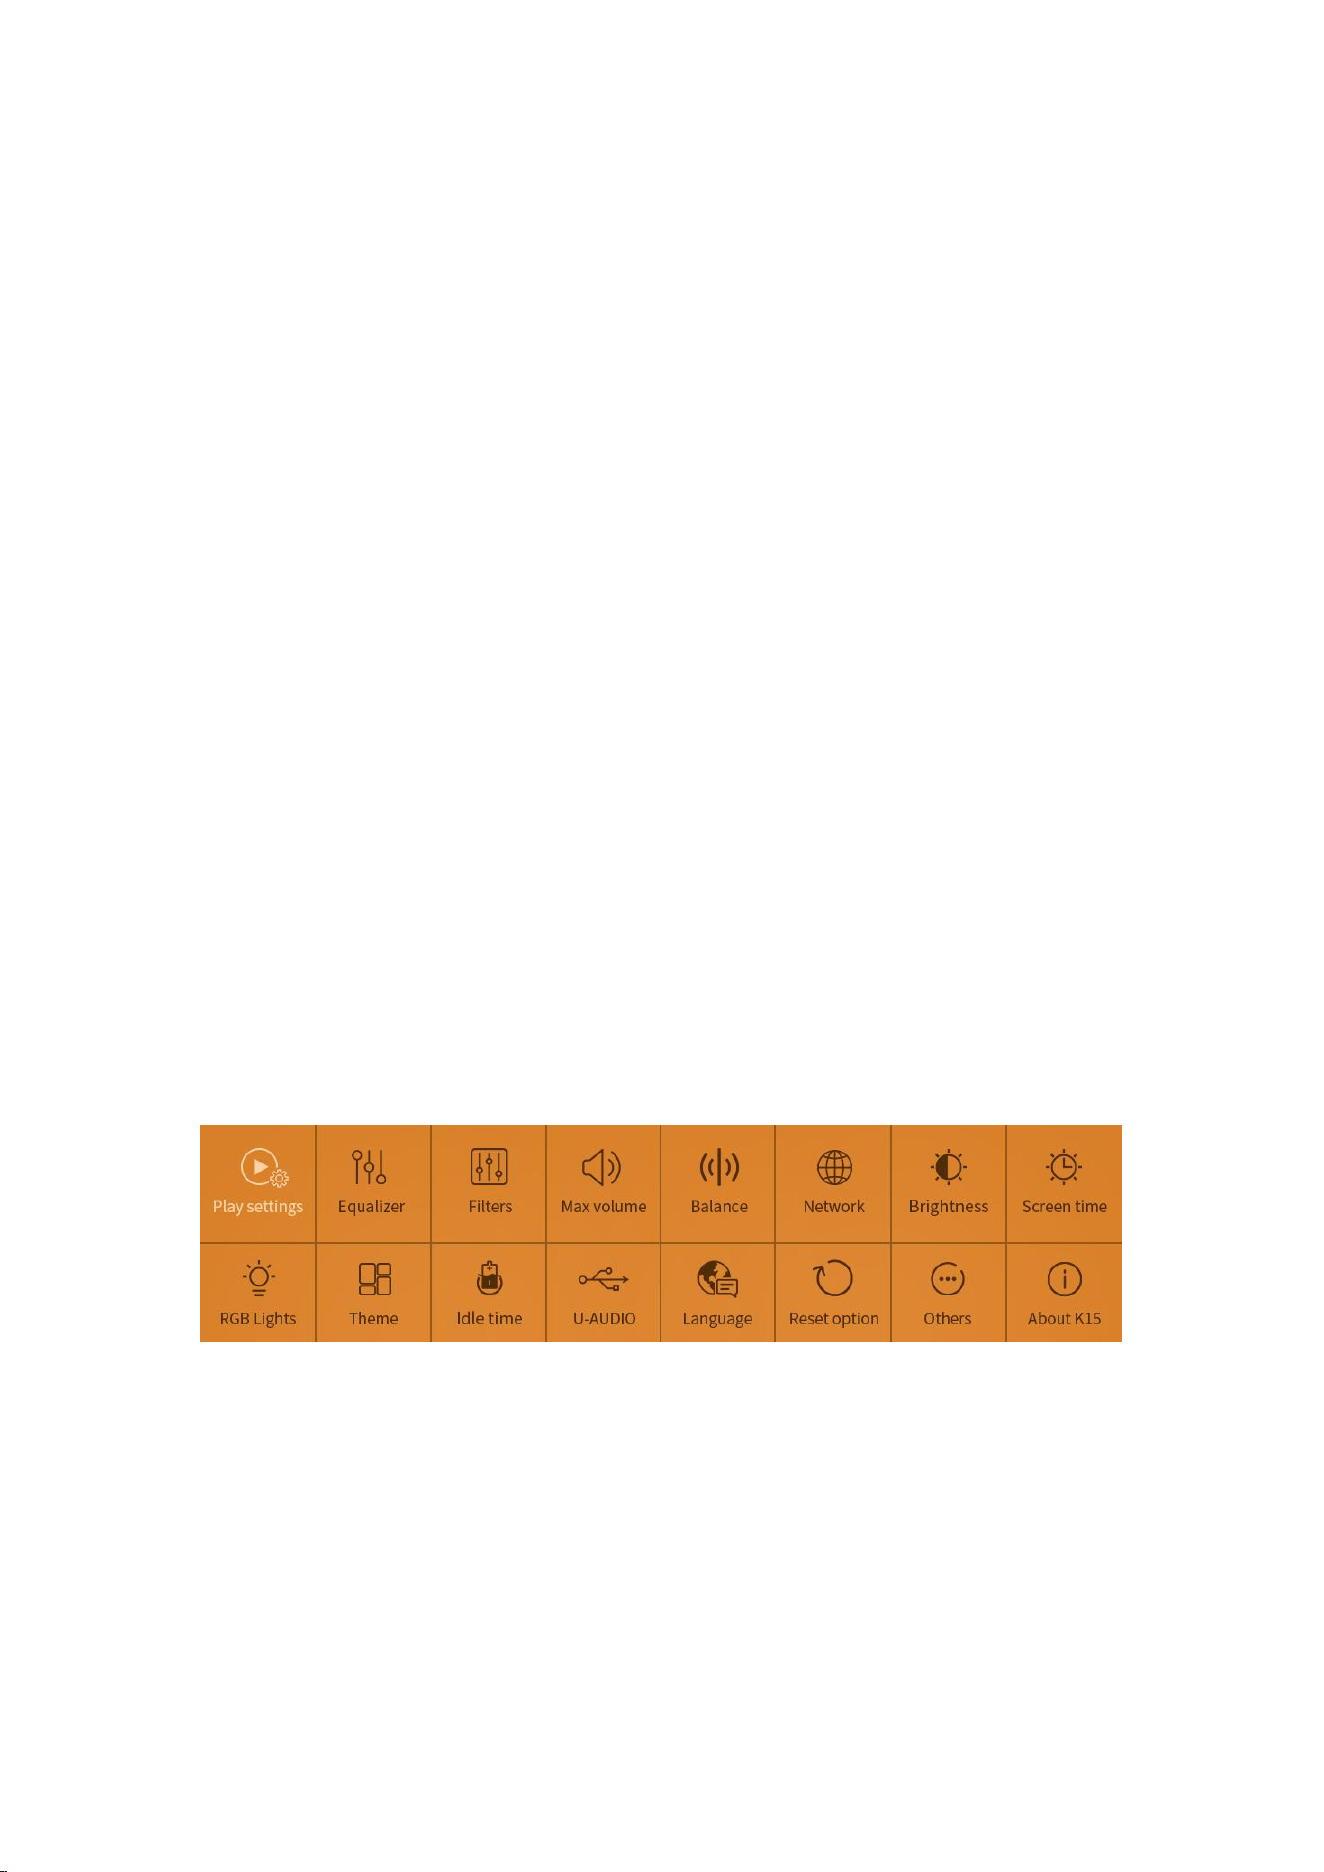
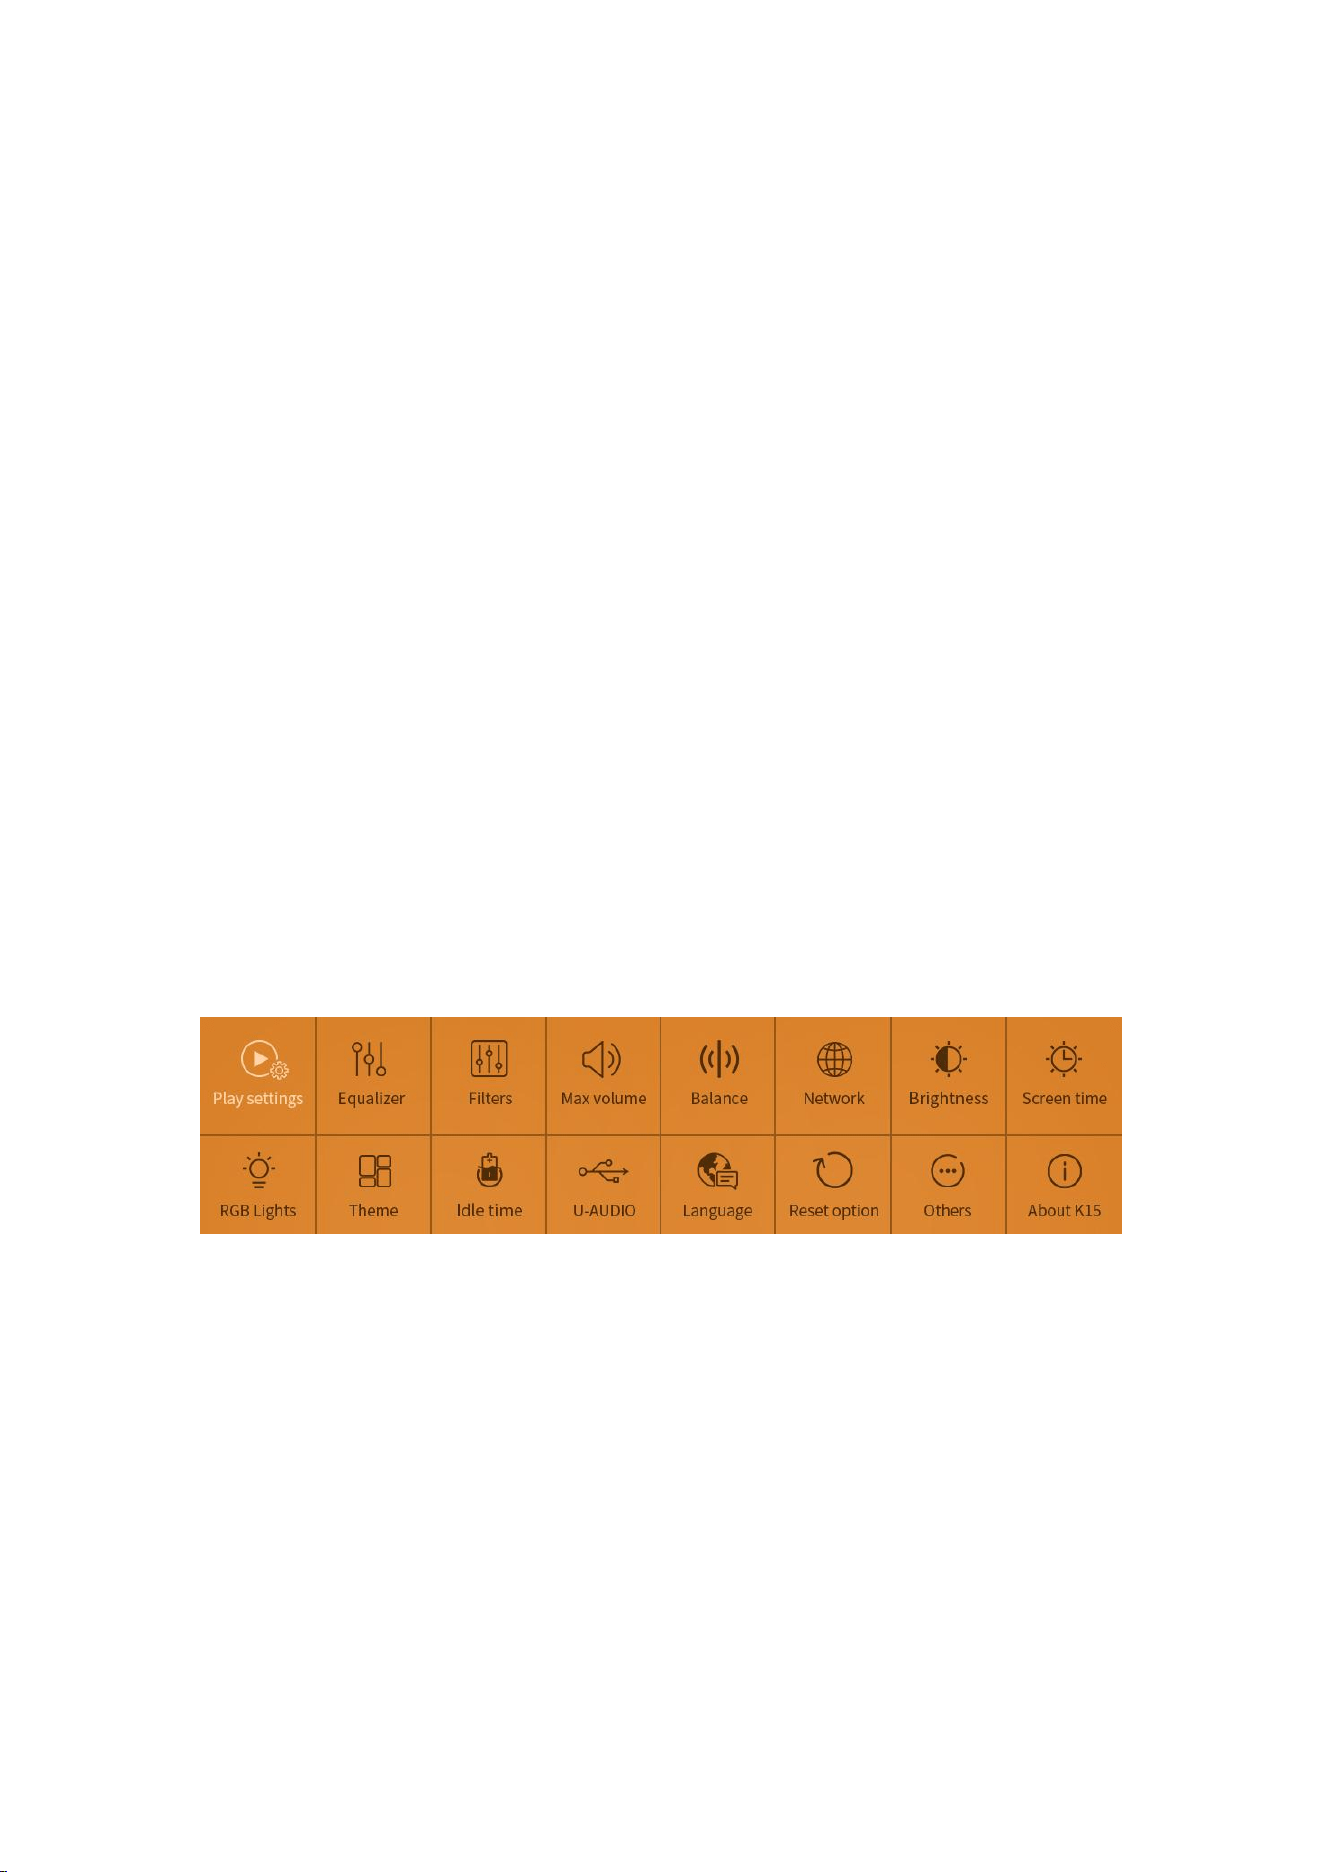
6. Menu introduction
Playback Settings:
1.Playback Mode:
Sequential Playback: Plays tracks in order and stops after the list ends.
Loop Playback: Plays tracks in order and restarts the list after completion.

18
Shuffle Playback: Randomly skips tracks within the current playlist.
Single-Track Playback: Plays only the current track and stops after completion.
Single-Track Loop: Repeats the current track indefinitely.
2.Resume Playback:
Off: Does not auto-play tracks after restarting; requires manual playback.
Position: In USB playback mode, resumes playback from the last position after
restarting.
Song: In USB playback mode, restarts playback from the beginning of the last track
after restarting.
Equalizer:
Includes 10 preset EQ curves (unmodifiable) and 10 customizable EQ slots for user
adjustments.
Filter: 6 digital filters.
Max Volume: Limits the maximum output volume to prevent accidental loud
playback.
Balance: Adjusts left/right channel volume compensation to correct imbalances.
Network: Switch between wired and wireless connections.
Brightness: Adjusts screen brightness.
Screen Time: Sets the screen auto-off timer.
RGB light: When set to "Color Follows Audio," the sampling rate follows the table
below.
Bluetooth Format Indicator Colors
SBC: Blue
AAC: Cyan

19
aptX/aptX LL: Purple
aptX-HD: Yellow
aptX Adaptive: Green
LDAC: White
Connected without detecting the codec:
Blue
Pairing: Red and blue flash alternately
Digital Input Audio Quality Indicators
Cyan: Sampling rate ≤48 kHz.
Yellow: Sampling rate >48 kHz.
Green: DSD format.
Magenta: MQA format (only supported
via USB input with EQ turned OFF).
Line in
Cyan
Theme: Currently, K15 offers two themes. Selecting a theme will trigger an
automatic restart to apply the change.
Idle time: If no data is input within the set time, K15 enters power-saving mode,
shutting down some analog circuits (digital circuits remain active). The knob light
will turn off. Playback resumes automatically when data is detected.
Note: Smart idle is unavailable in RCA and balanced line input modes.
U Audio: Supports UAC1.0 and UAC2.0.
UAC1.0: No driver required. Compatible with SWITCH, PS5, PS4, etc. Supports 44k–
96k.

20
UAC2.0: Typically used for players, phones, and PCs. On Windows, download the
FiiO driver from:
https://forum.fiio.com/note/showNoteContent.do?id=202105191527366657910&t
id=17 . Supports PCM44K–768K, DSD64–DSD512, MQA. macOS does not require
drivers.
Language: Supports Chinese, English, and Japanese.
Reset Options:The K15 allows partial resets for network settings, EQ, Bluetooth,
song library, etc., or a full "Restore Factory Settings" to revert to the original state.
Others: Includes Press the volume knob, FW update, reset options, and factory
debugging.
1.Press the volume knob: Set to toggle screen on/off or mute/unmute.
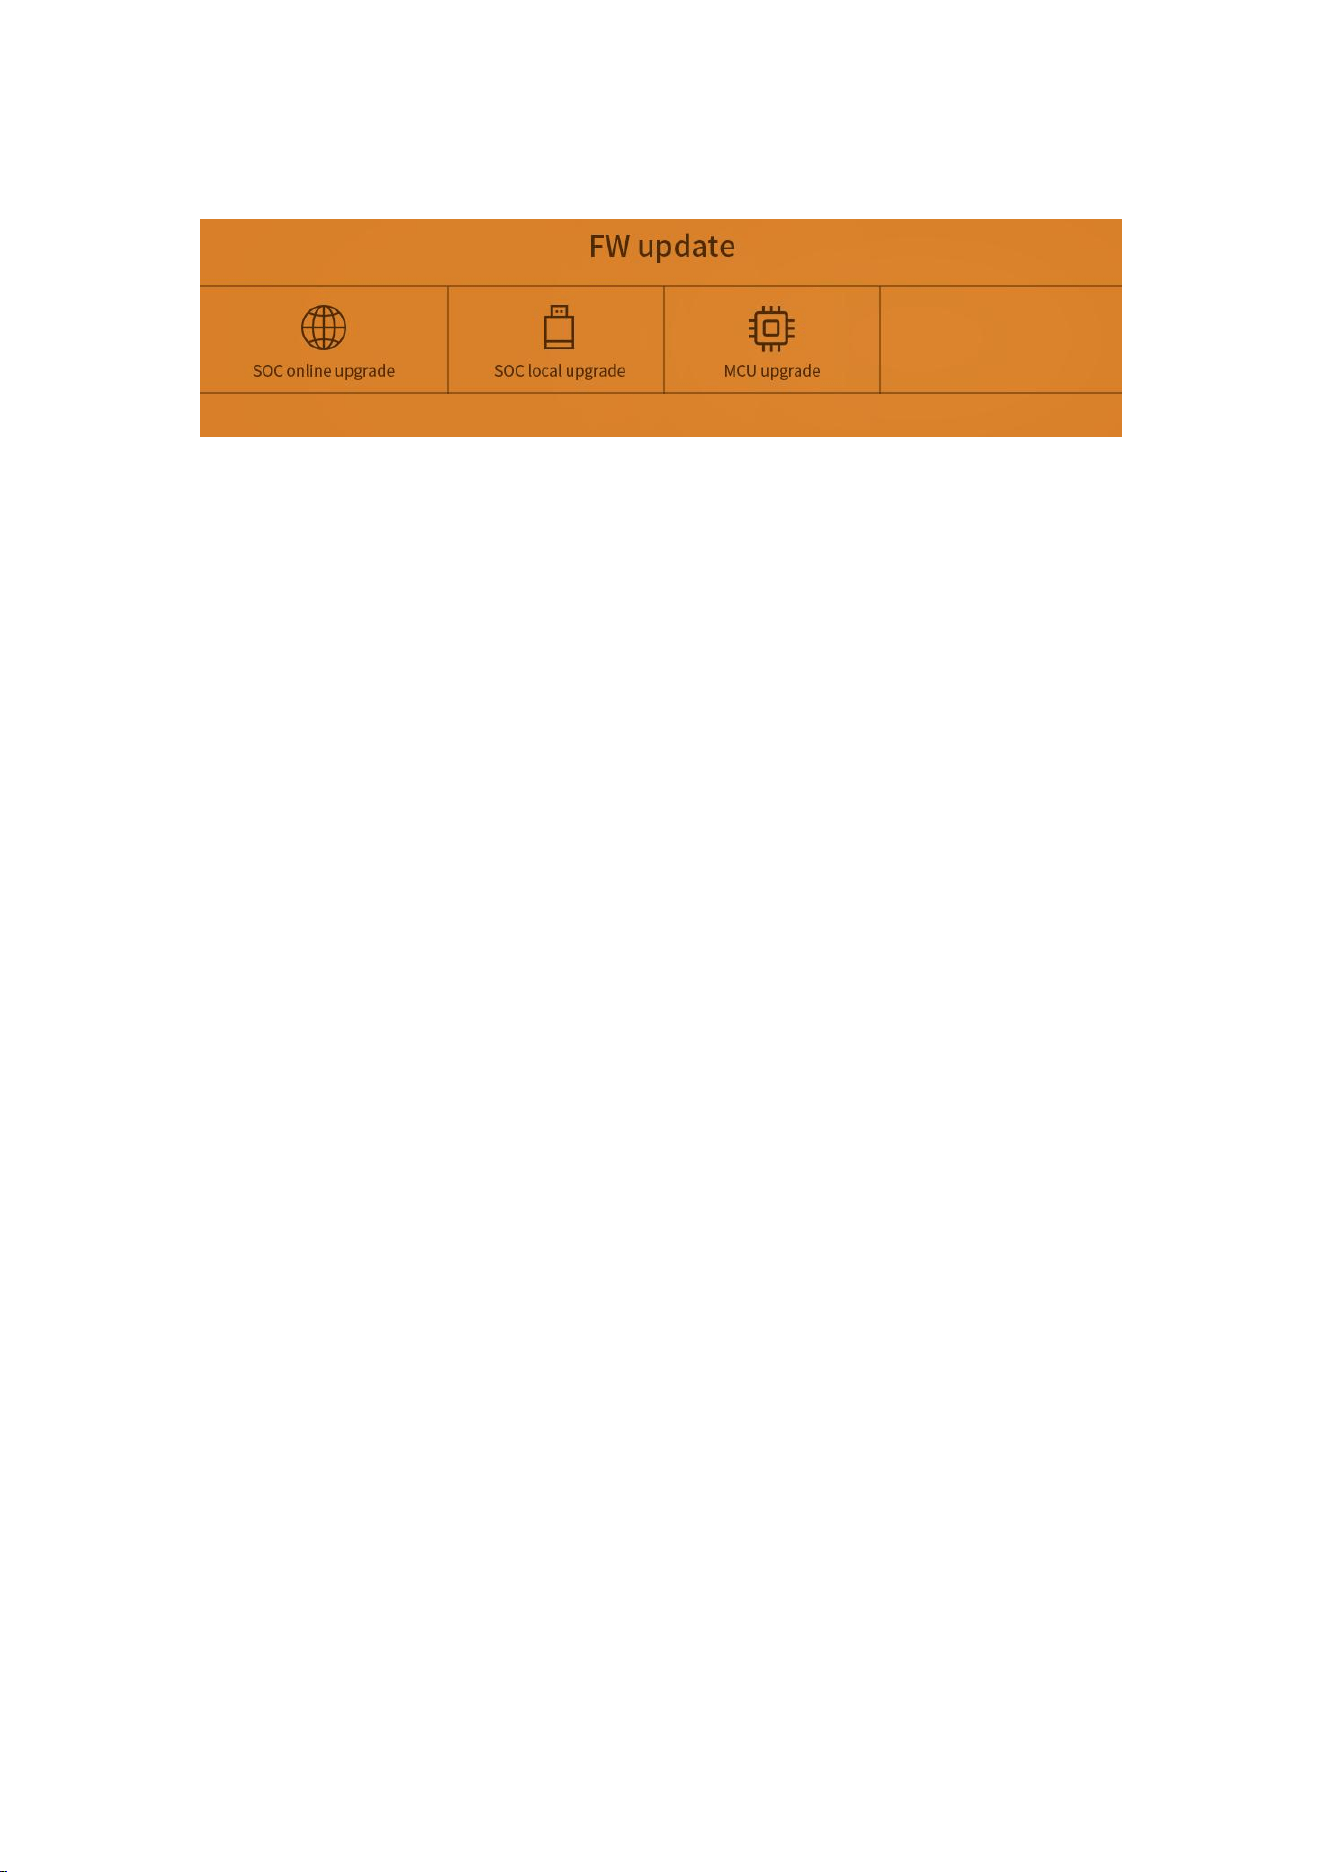
2.FW Update: Includes SOC online update, SOC local update, and MCU update.
The K15 employs a dual-master architecture:
SOC handles local playback, streaming, VU meter calculations, UI display, and
operations.MCU manages power control, mute functions, DAC control, PEQ
adjustments, etc.
Thus, separate firmware upgrades are required for the SOC and MCU.
(1)SOC Online Upgrade:
When the K15 is connected to the internet, this setting allows online updates to the
latest SOC firmware. If the SOC already has the latest version, a prompt will indicate
no update is needed.
(2)SOC Local Upgrade:

21
Insert a USB drive (formatted as FAT32) containing the unzipped SOC firmware
(a .zip file downloaded from FiiO’s website) into the K15’s rear USB-A port.
Navigate to Settings > Firmware Upgrade > SOC Upgrade to initiate the update.
Key Notes:
1.Do not rename or extract the .zip file.
2.Place the file directly in the USB root directory (no subfolders).
3.macOS users must disable Safari’s auto-unzip feature: Safari > Preferences >
General > Uncheck "Open safe files after downloading".
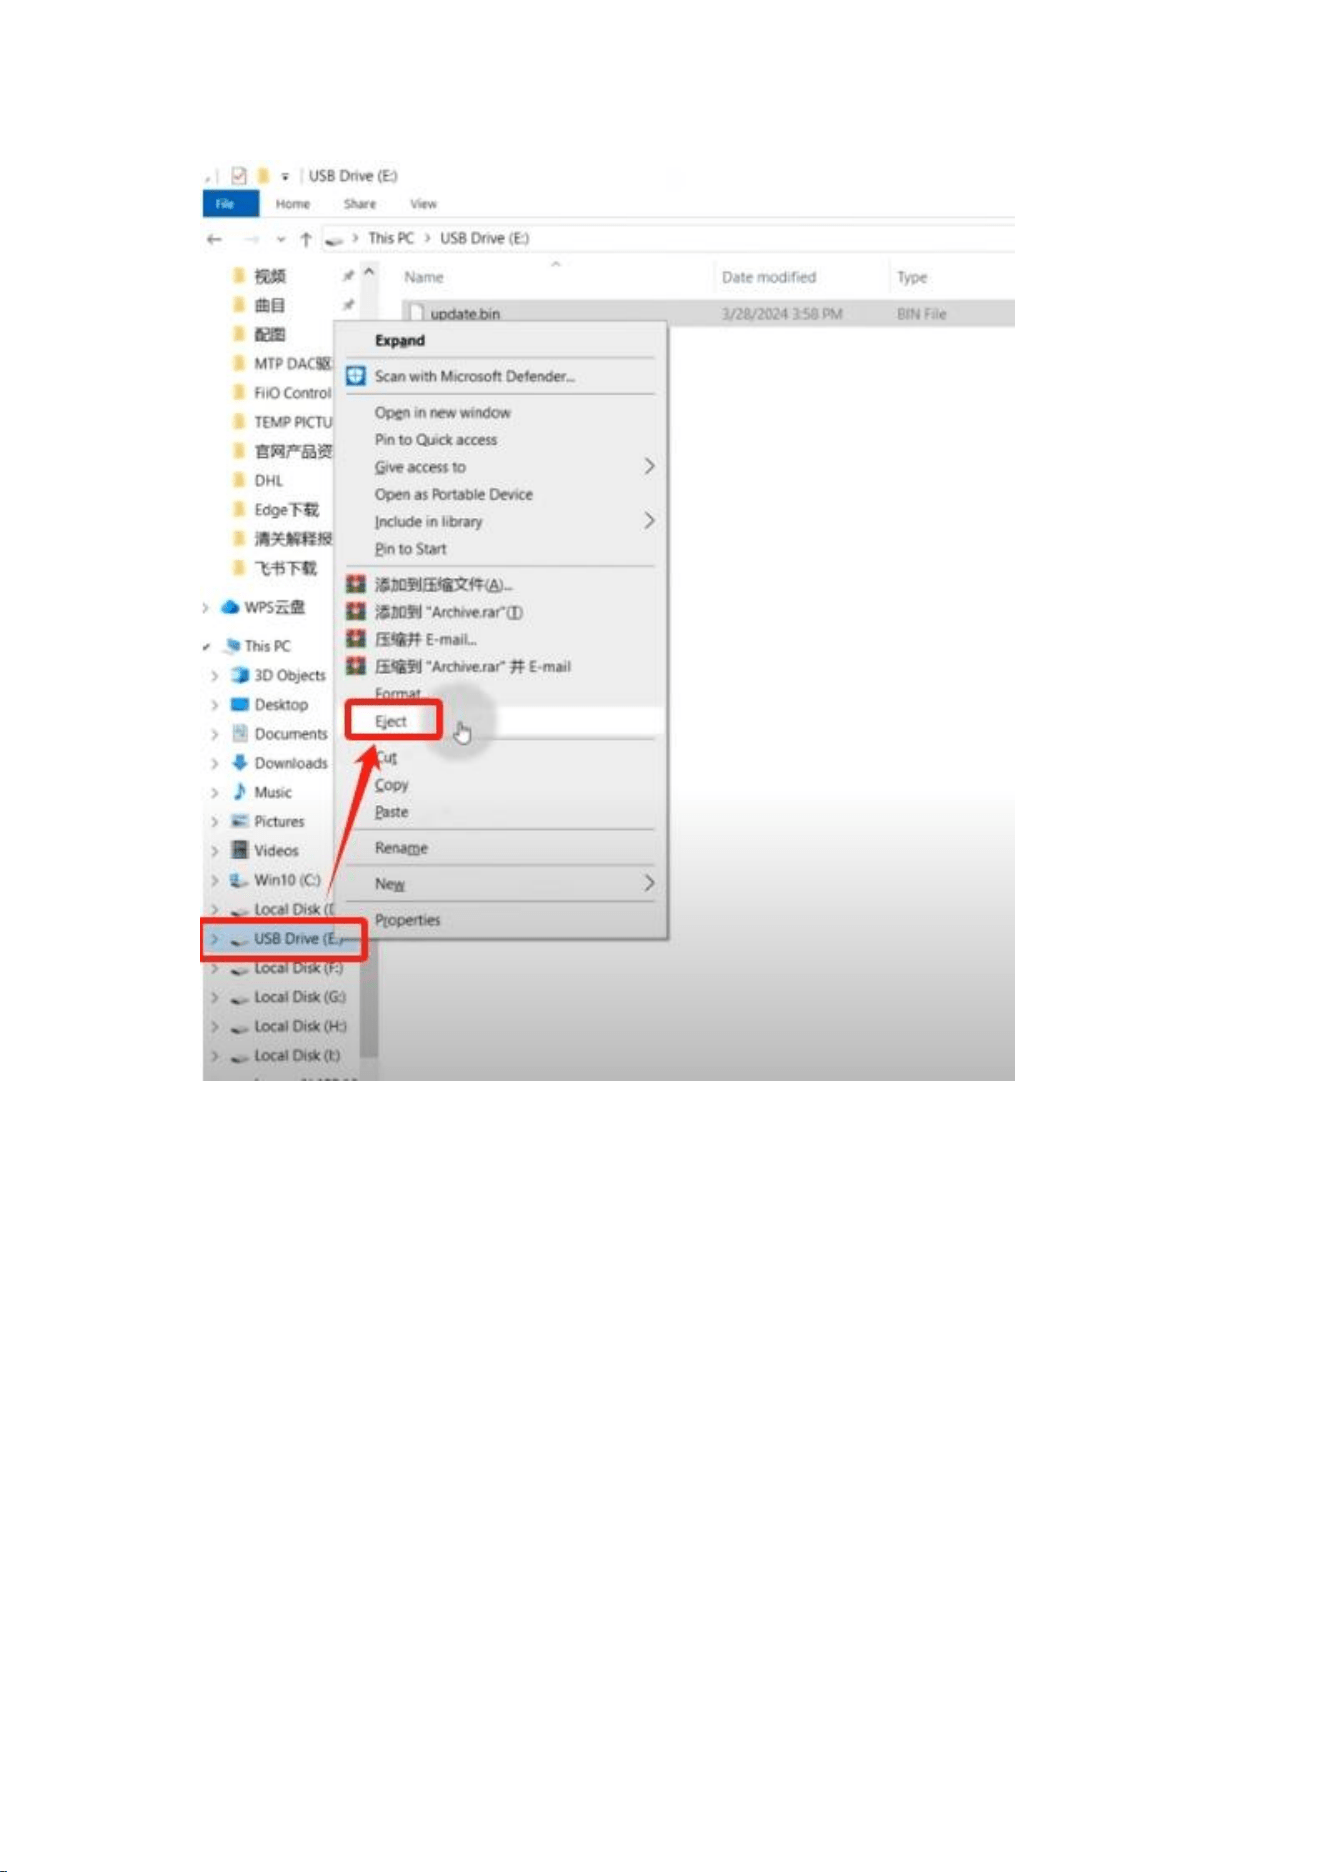
(3)MCU Upgrade:
Download the MCU firmware (a .bin file) to a computer.Connect the K15’s RS232
port to the computer via USB. Navigate to Settings > Other Settings > Firmware
Upgrade > MCU Upgrade. A virtual USB drive will appear on the computer.
Copy the .bin file into this drive, then eject the drive via "My Computer" (not the
system tray icon). The K15 will auto-reboot after upgrading.
22
Note:
1.When ejecting the USB drive, be sure to select "Eject" in "My Computer" instead
of using the disk ejection option in the lower right corner of the computer.
Otherwise, the K15 will not detect the ejection action and will not enter the
upgrade state.
2.If the K15 fails to reboot within 3 minutes, replug the USB cable and retry ejection.
3.If "Upgrade Timeout" appears, restart the process from the menu.
3.Update History:You could check the update history of previous firmwares.
4.Factory Debug:
23
For troubleshooting, insert a USB drive into the K15’s USB-A port and select
Factory Debugging. The system will save diagnostic logs (non-user data) into a
fiio_log folder on the drive. Share this folder with FiiO support for analysis.
About K15:
Displays firmware versions for MCU, SOC, FPGA, and the number of songs scanned
from a USB drive. When connected to a network, it also shows the K15’s IP address
to verify LAN connectivity with other devices.
7. Network Connection
The K15 supports both WiFi (2.4G/5G dual-band) and wired network connections.
In the "Network Settings" menu, first select the network you wish to connect to.
Wired Network:
After plugging the network cable into the Ethernet port on the back of the K15,
select "Wired Network" in the menu. The K15 will automatically connect to the
network. The wired network supports three speeds: 10M/100M/1000Mbps. Once
connected, the network icon in the status bar on the K15's main interface will
display as connected. Additionally, the network IP can be viewed in the "Device
Information" menu.
Ethernet
connected
Ethernet
disconnected
24
Wireless Network:
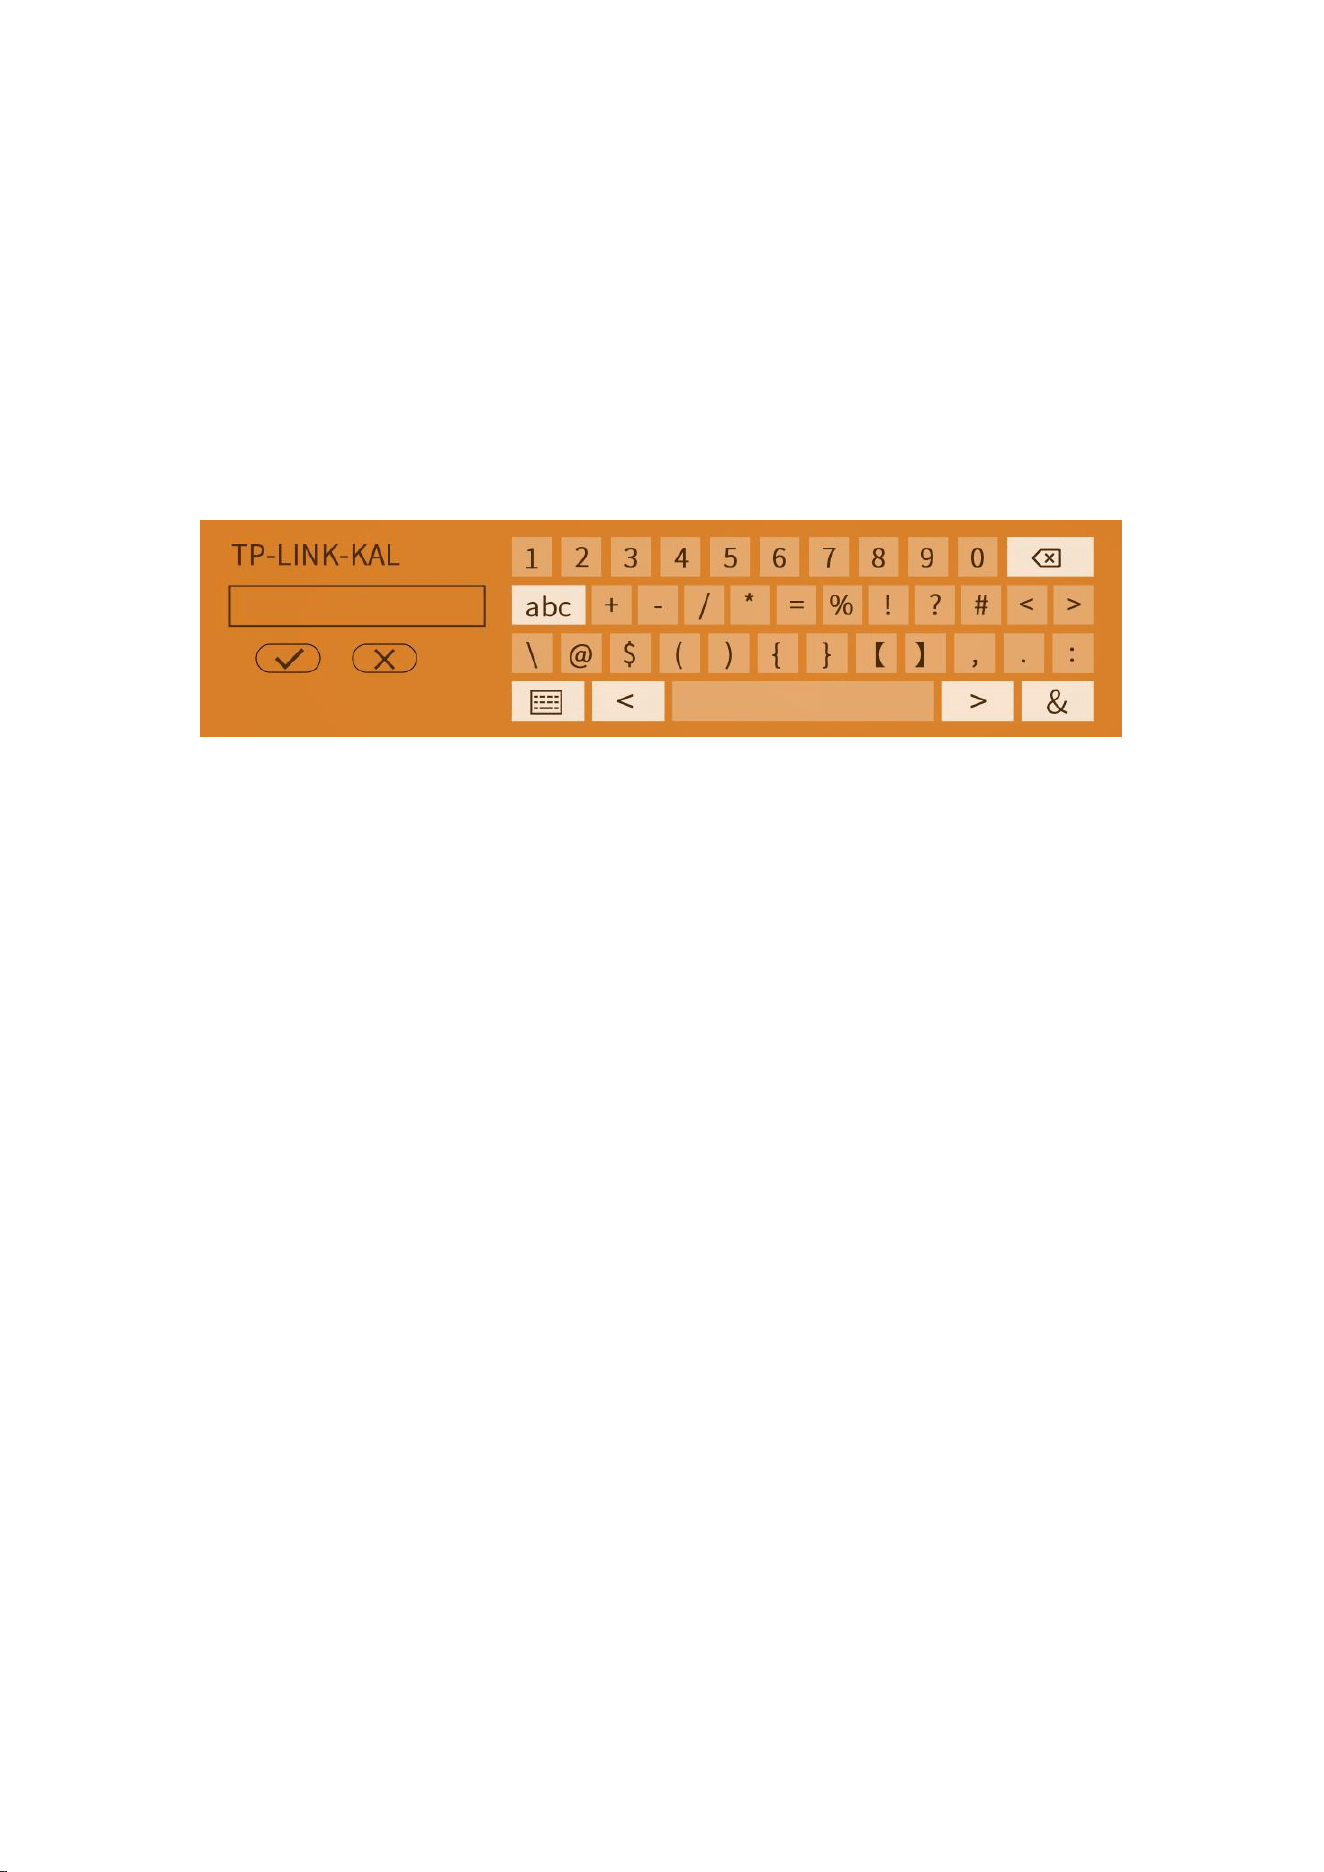
In the "Network Settings" menu, click on "Wireless Network." The K15 will search
for available WiFi networks and display a list once the scan is complete. Click on the
desired WiFi network to enter the password input screen. After entering the correct
password, confirm by selecting the √ icon, and the K15 will automatically connect
to the WiFi hotspot.
Once the wireless network is successfully connected, the WiFi icon in the status bar
on the main interface will change to "connected," and the network IP can be viewed
in the "Device Information" menu.
Notes:
1.The K15's character keyboard is simplified and does not support certain special
characters. If your password contains special characters, please modify the
password before connecting.
2.The WiFi password field on the K15 displays a maximum of 17 characters. If the
password exceeds this length, drag the gray scroll bar at the bottom to view the
remaining characters.
3.The K15 can only determine whether it is connected to a wired or wireless
network, not whether the network has internet access.
4.For router WiFi encryption settings, please select WPA2-PSK. If WPA3-PSK is
selected, the WiFi connection will fail. If you are unable to connect after entering
the correct password, check the router settings to ensure it is configured as
specified.

25
8. Mobile Remote Control App:
FiiO Control Installation and
Usage
After installing FiiO Control on your smartphone, you can remotely control the
K15's local playback, PEQ adjustments, and other functions. The steps are as
follows:
(1)Search for the "FiiO Control" app in your app store, download the latest version,
and install it.
(2)Ensure both the K15 and your smartphone are connected to the same network.
(How to confirm they are on the same network:
Check the IP address in the K15's "Device Information" menu (under Settings).
Compare it with your phone's IP address. If the first three segments match, they are
on the same local network.
Example:
K15 IP: 192.168.123.2
Phone IP: 192.168.123.3
Both devices belong to the 192.168.123.xxx subnet, confirming they are on the
same network.)
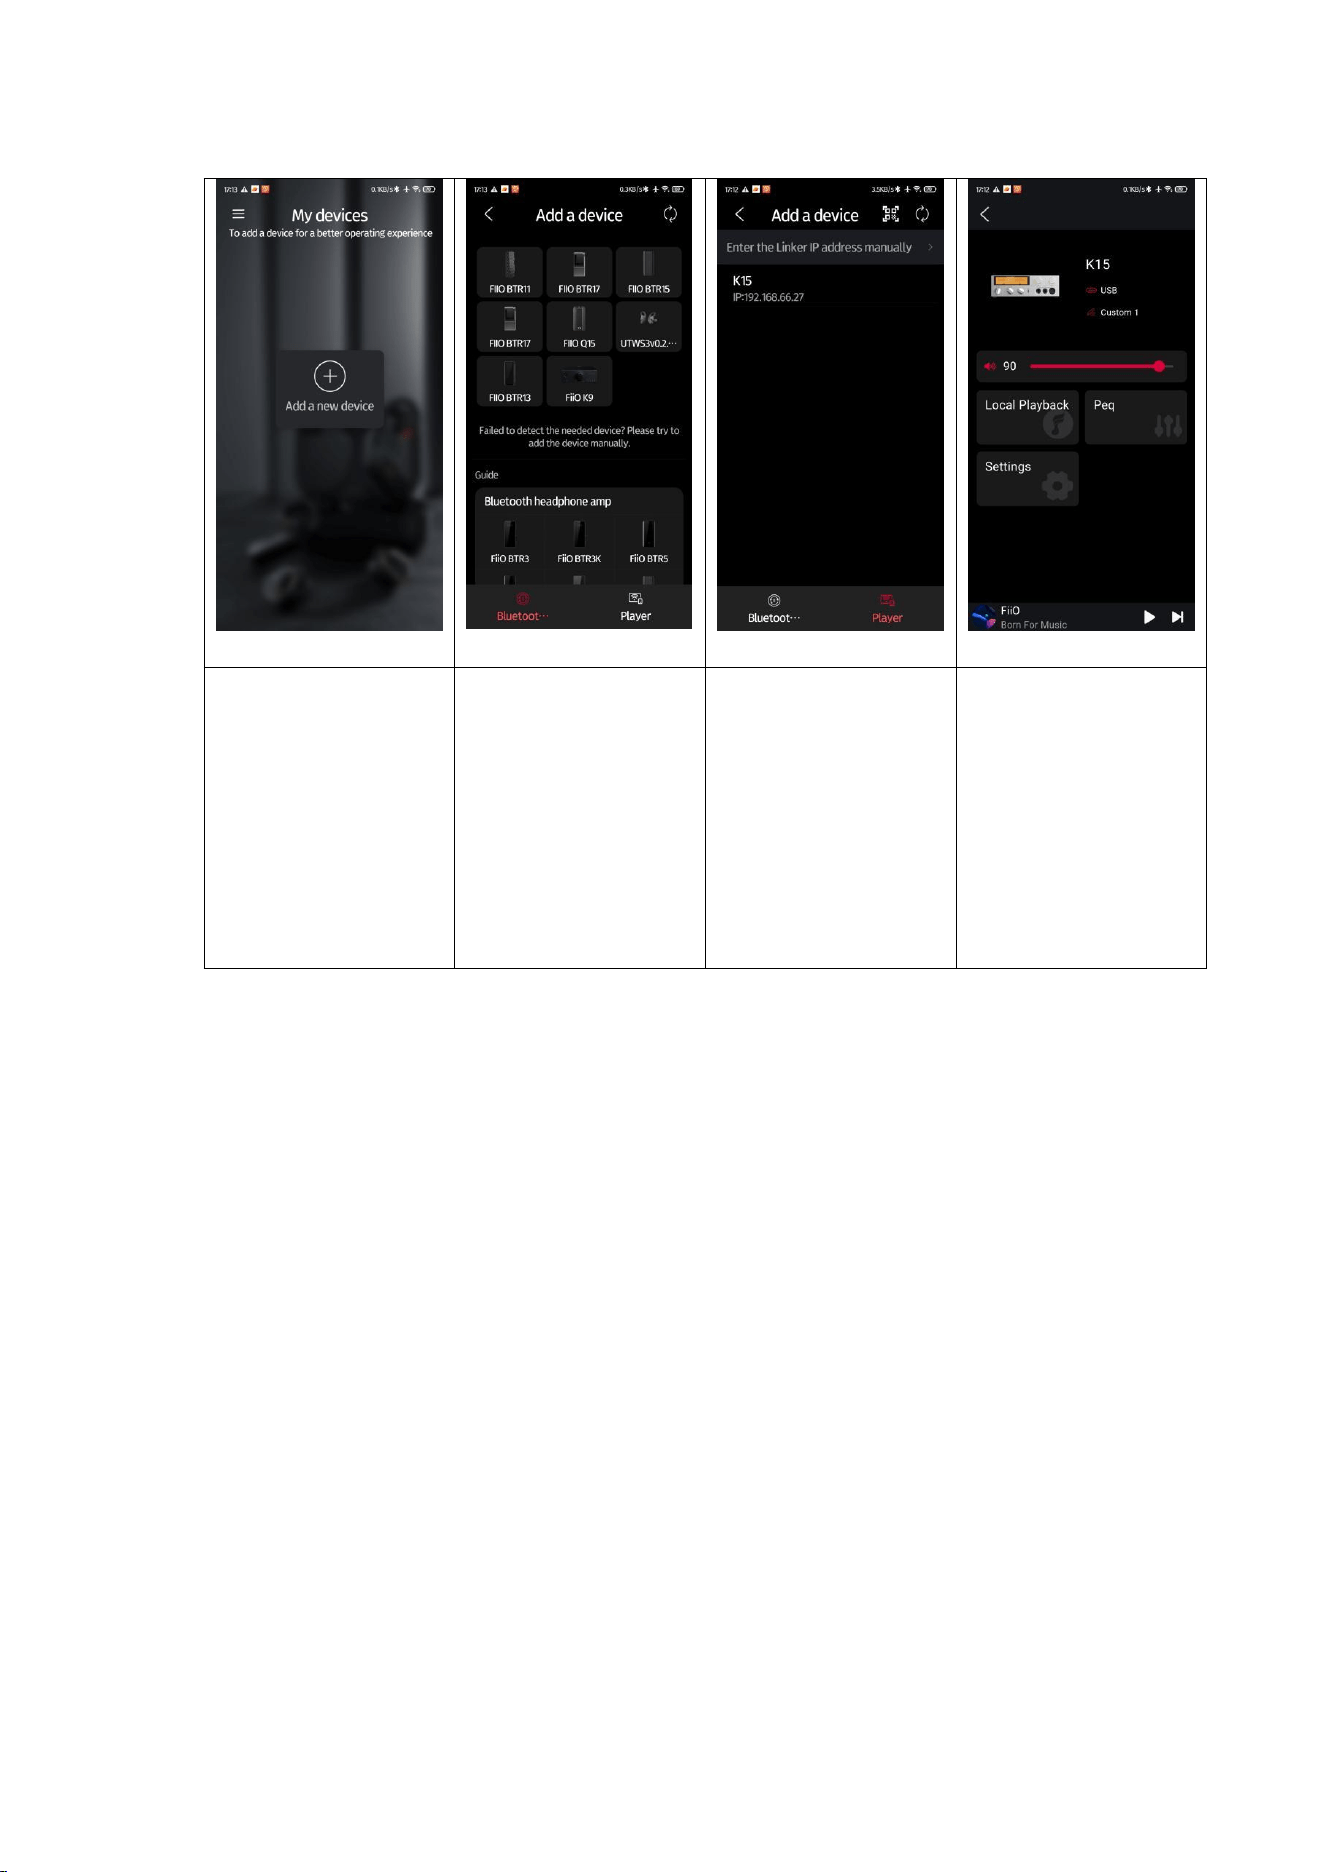
(4) Open the FiiO Control app (if prompted for permissions upon first launch, grant
the necessary permissions). Follow these steps to connect to the K15:
26
Notes:
3.1: If there are two or more K15 devices, check the IP address in the K15's "Device
Information" menu and select the correct one in the app.
3.2: If no devices appear, click the refresh icon at the top right.
3.3: If the device still does not appear after refreshing, manually enter the K15's IP
address by clicking "Manually Enter Linker Control IP" at the top of the app
interface.
3.4: To control USB playback, ensure the K15 is switched to "Local Playback" mode
first.
(5) After connecting, you will enter the app's main control interface, where you can
adjust local playback, EQ settings, volume, and more.
After opening the
app, click "Add New
Device" in the
center.
Click the "Player"
icon at the bottom
right.
Click the refresh
icon at the top right.
Once the K15 is
detected, click to
connect.
Connection
successful.
27
9. PEQ Function
FiiO engineers have developed a PEQ adjustment feature based on the XMOS
XU316 platform, supporting 10 customizable frequency bands. Through FiiO ’ s
self-developed algorithms and apps or a web interface, users can finely tune EQ
frequency points, gain, and bandwidth, enhancing playability while catering to
personalized listening preferences.
(1)Adjust EQ in K15
K15 includes 10 preset curves: Jazz, Rock, R&B, Hip-Hop, Pop, Dance, Classical,
Retro, Sibilance Reduction 1, and Sibilance Reduction 2. Access these via the menu.
Custom curves start as a flat line. After adjustment via FiiO Control App or the web
interface, they can be saved and selected directly on the K15.
(2) App Adjustment (FiiO Control)
Connect to the app, navigate to Equalizer → PEQ Settings.
Adjust curves, save, or rename them.
Note: Curve names support letters and numbers only (no special characters).
Preset curves cannot be modified or renamed.
Steps:
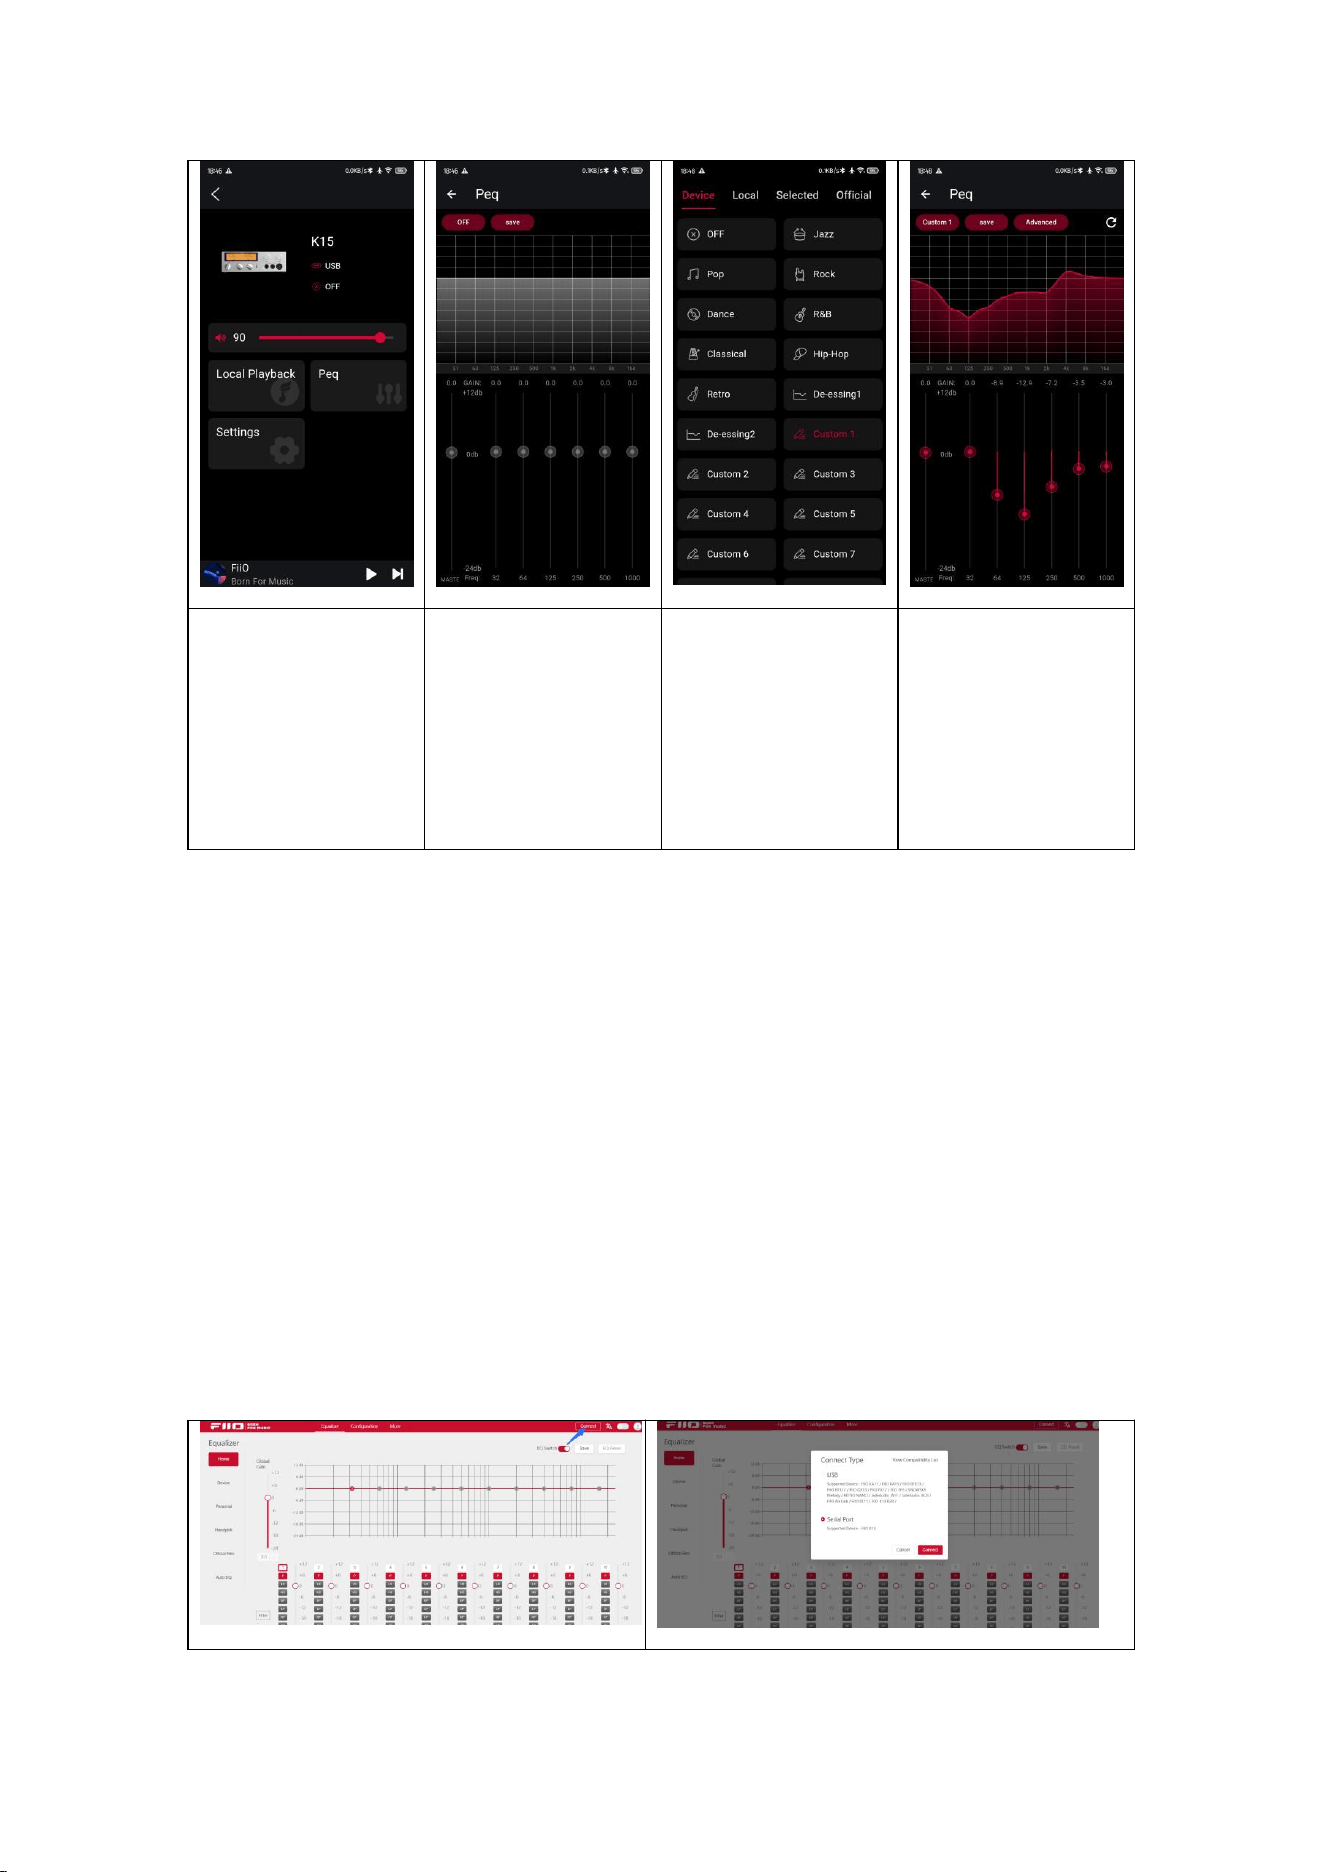
28
Click EQ to enter
PEQ adjustment
page
Tap the ‘OFF’ to
select presets.
Long-press
“ Custom ” to
rename.
Save after
adjustments
(3) Web Control Adjustment
1.Use a USB-A-to-C cable to connect K15’s RS232 port to a computer.
2.Open the PEQ page: https://fiiocontrol.fiio.com/ → Click “Connect” → Select
“Serial Port”.
Note: Requires Chromium-based browsers (e.g., Edge, Chrome). Safari is
unsupported.
Operation:
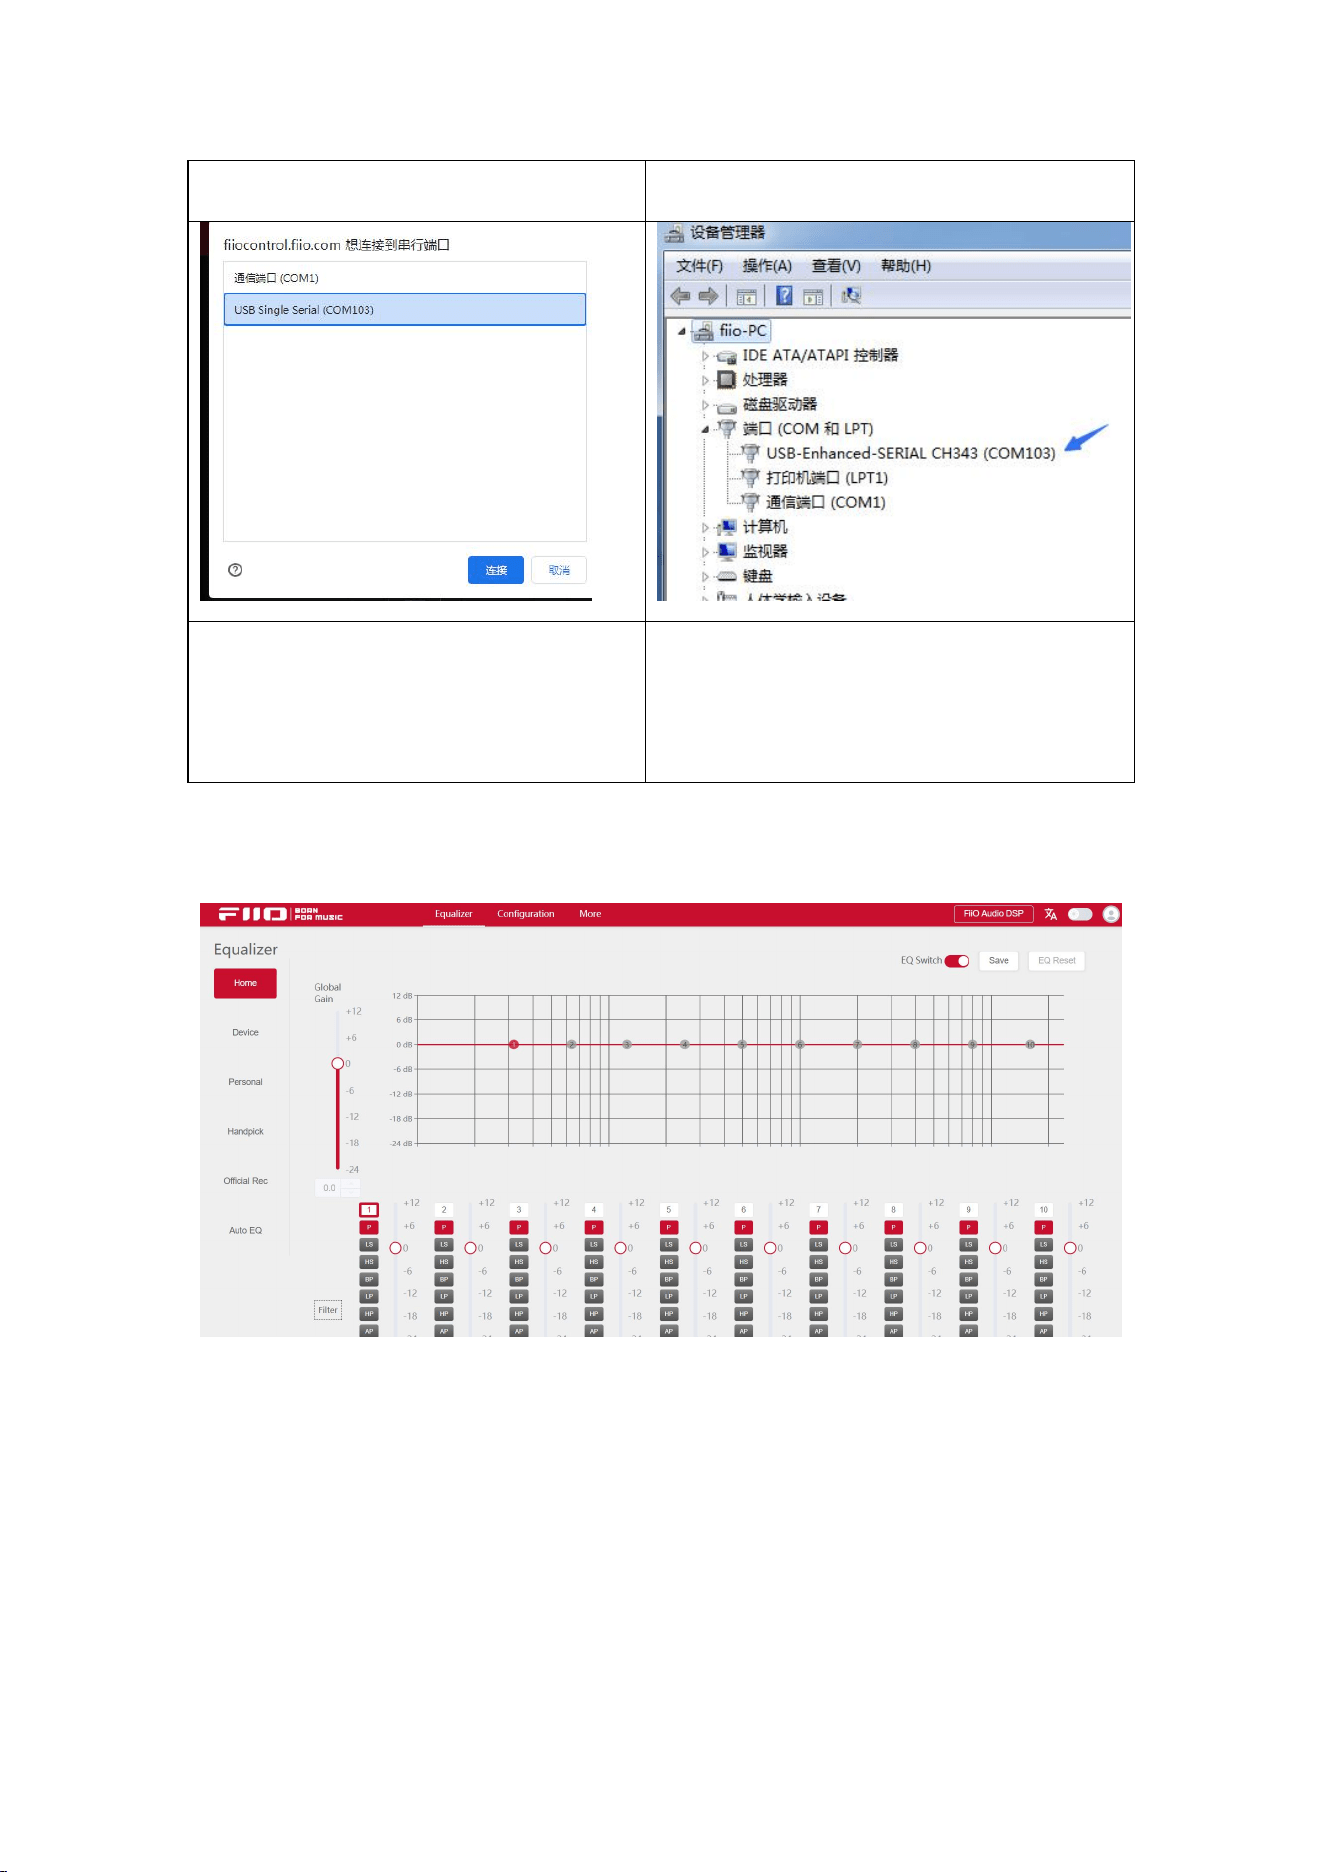
29
Click “Connect”
Click serial port then click connect
Select K15’s COM port
If you could not confirm the COM port of
K15, please go to device manager page
and replug the USB connected to the
RS232. The new added device is the K15.
3. After connection, the interface displays “FiiO Audio DSP”.
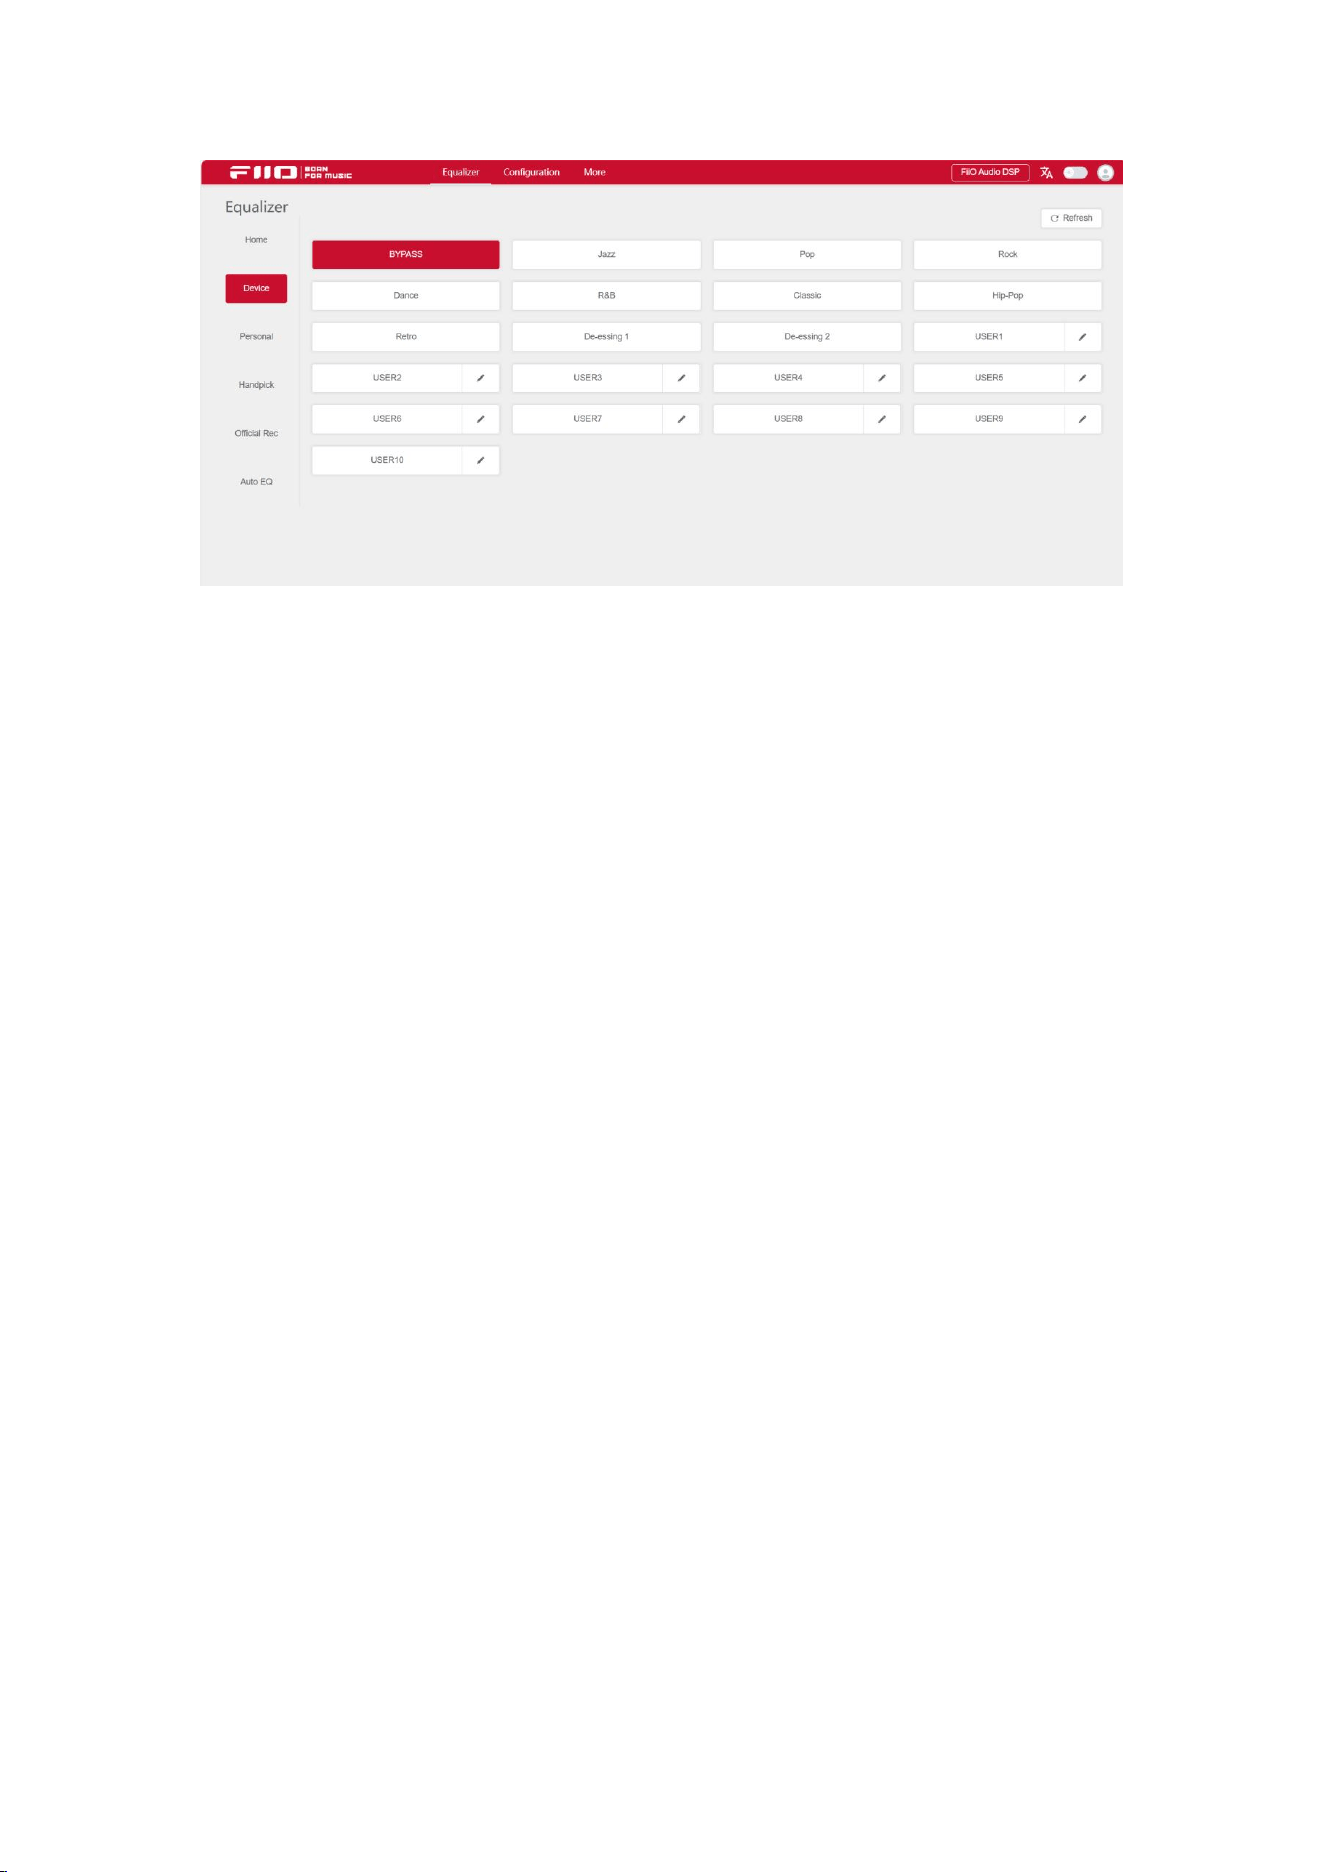
30
6. Key Notes for PEQ Parameters:
Gain Adjustment: Raising custom curves above 0dB may cause digital clipping
(distortion). Reduce “Global Gain” to compensate.
(4)Decoder Compatibility (with PEQ Enabled)
1.USB Decoding:
PCM: 44.1–192 kHz (direct processing)
352–768 kHz: Unsupported
DSD: Unsupported
MQA: Unsupported
2.Coaxial Input:
PCM: 44.1–192 kHz (direct processing)
3.Optical Input:
PCM: 44.1–96 kHz (direct processing)
4.Line-In (RCA/4.4mm):
PEQ adjustment not supported

31
5.ROON Streaming:
PCM: 44.1–192 kHz (direct)
352–384 kHz: Downsampled by ROON
DSD: Supported via sample rate conversion by ROON
6.Local Playback:
PCM: 44.1–192 kHz (direct)
352–384 kHz: Supported via sample rate conversion
DSD: DSD64–DSD128 (converted)
DSD256: Unsupported
(5)Other Notes for PEQ Usage
1.Browser Compatibility
The PEQ web interface requires Chromium-based browsers (e.g., Edge,
Chrome). Safari is not supported.
2.Format Limitations
Enabling PEQ disables MQA decoding entirely
3.Playback Interruptions
Switching PEQ ON/OFF causes:
USB Decoding:
Reconnection (playback stops; manual resume required).
Streaming Modes:
ROON Ready:

32
Auto-reconnects.
AirPlay:
Manual reconnection needed.
Local Playback:
Playback pauses (resume manually; DSD256 files show “Unsupported”
error).
Coaxial/Optical Input:
Brief audio interruption (resumes automatically).
4.Bypass Mode
Engages a flat EQ curve (no DSP processing).
Avoids playback interruptions when switching between PEQ presets.
Note: MQA remains unsupported in this mode.
10. Streaming Features
Introduction
Preface: The K15 supports two streaming methods, AirPlay and Roon Ready. Both
require the K15 and the casting device (e.g., a phone or computer) to be connected
to the same network for casting.
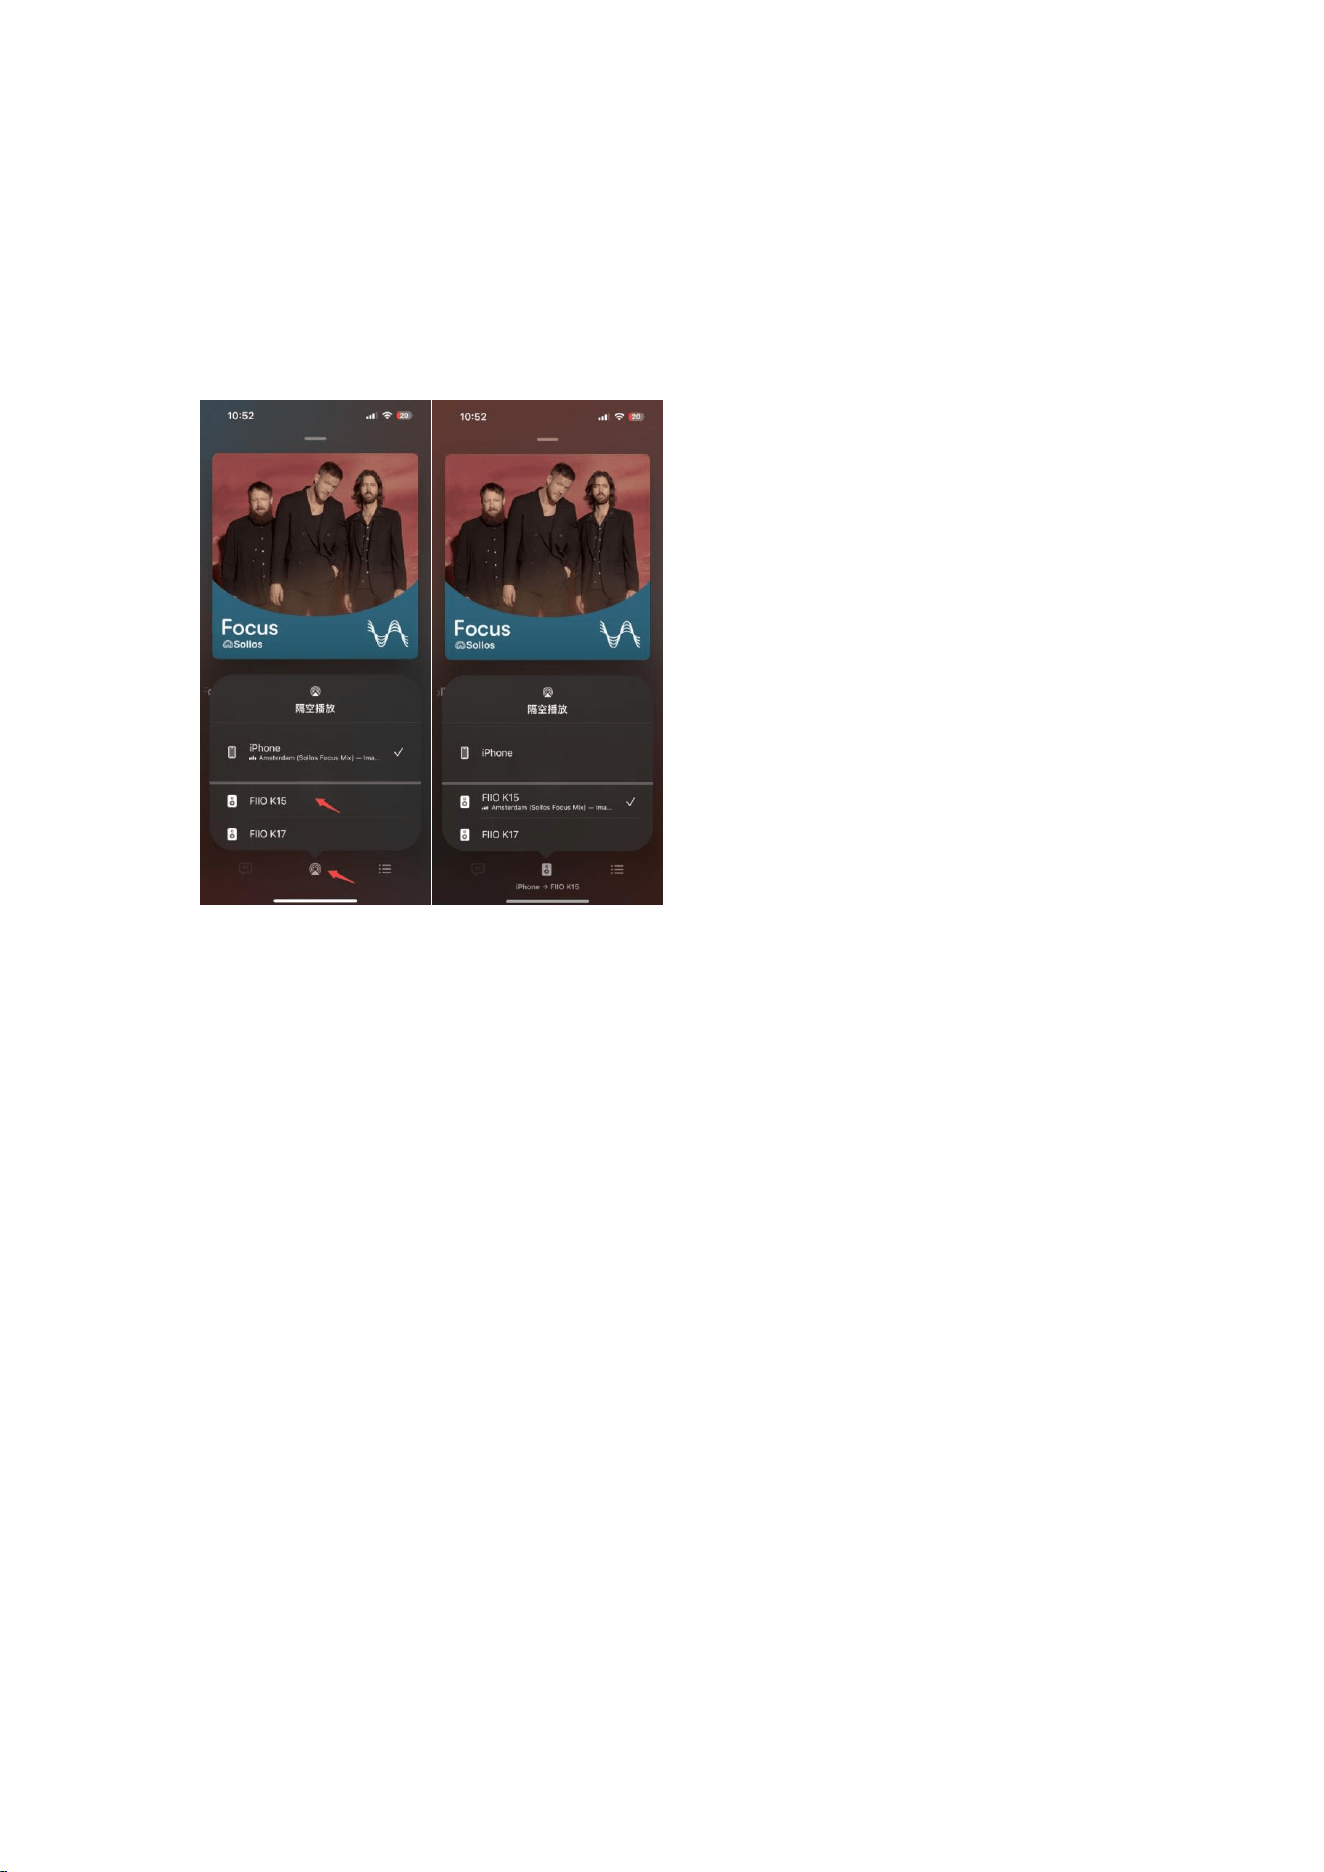
33
(1)AirPlay:
The K15 supports AirPlay 1st generation. After connecting to an Apple device, you
can remotely cast music from Apple Music or other APPs via AirPlay.
Note: The K15 runs on the AirPlay 1 protocol. After updating to iOS 18.4, the album
cover may freeze on the first song's artwork and not refresh when switching tracks.
This is an iOS issue, and we hope it will be resolved in future updates.
(2)Roon Ready:
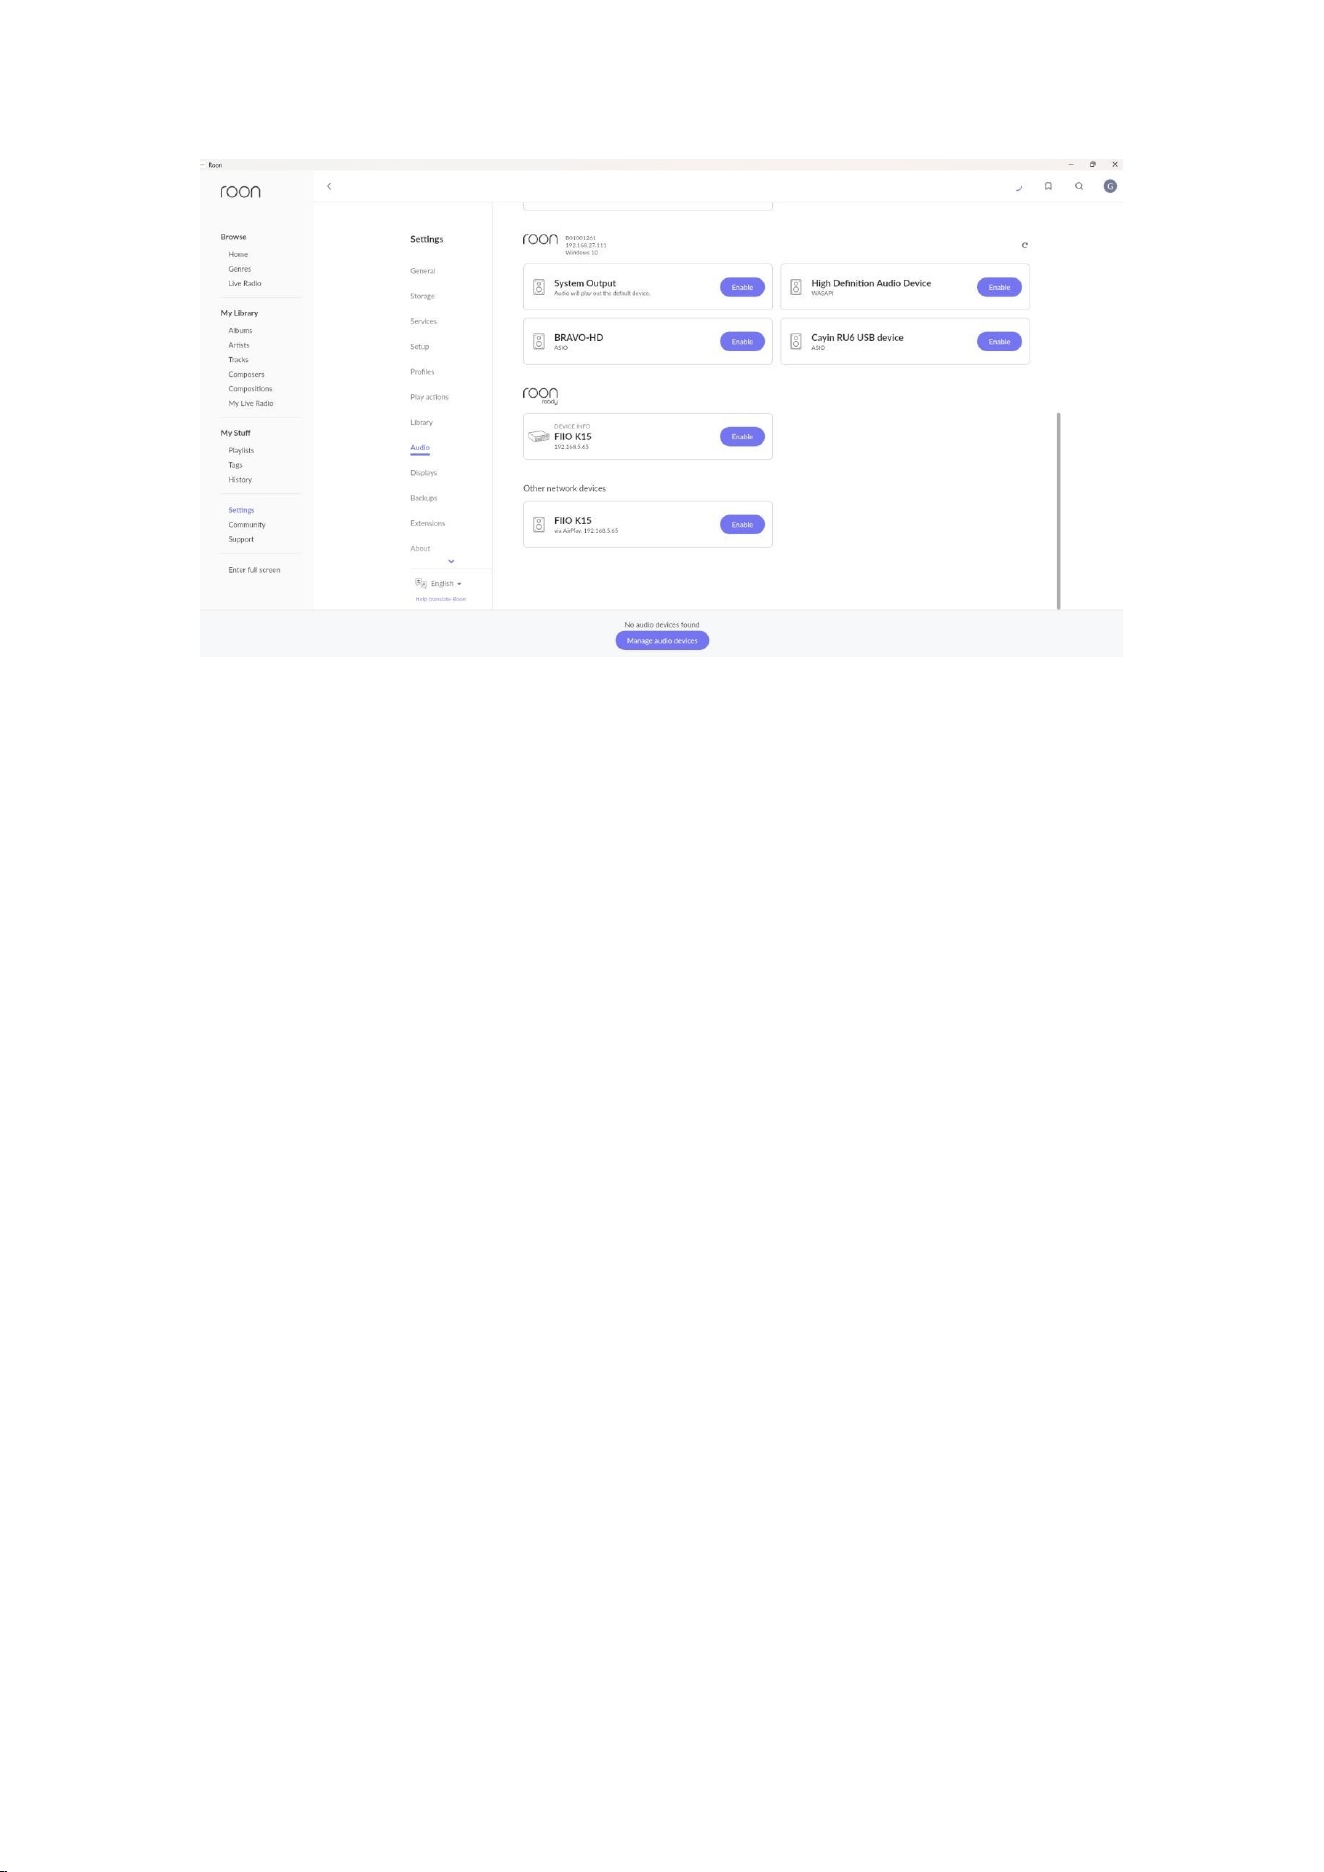
You need to install the Roon music software on your phone or computer. Then, in
the settings under "Audio," select the Roon Ready device as "FiiO K15." Once
connected, you can cast music to the K15 for playback.
34
(3)NAS Playback via Roon:
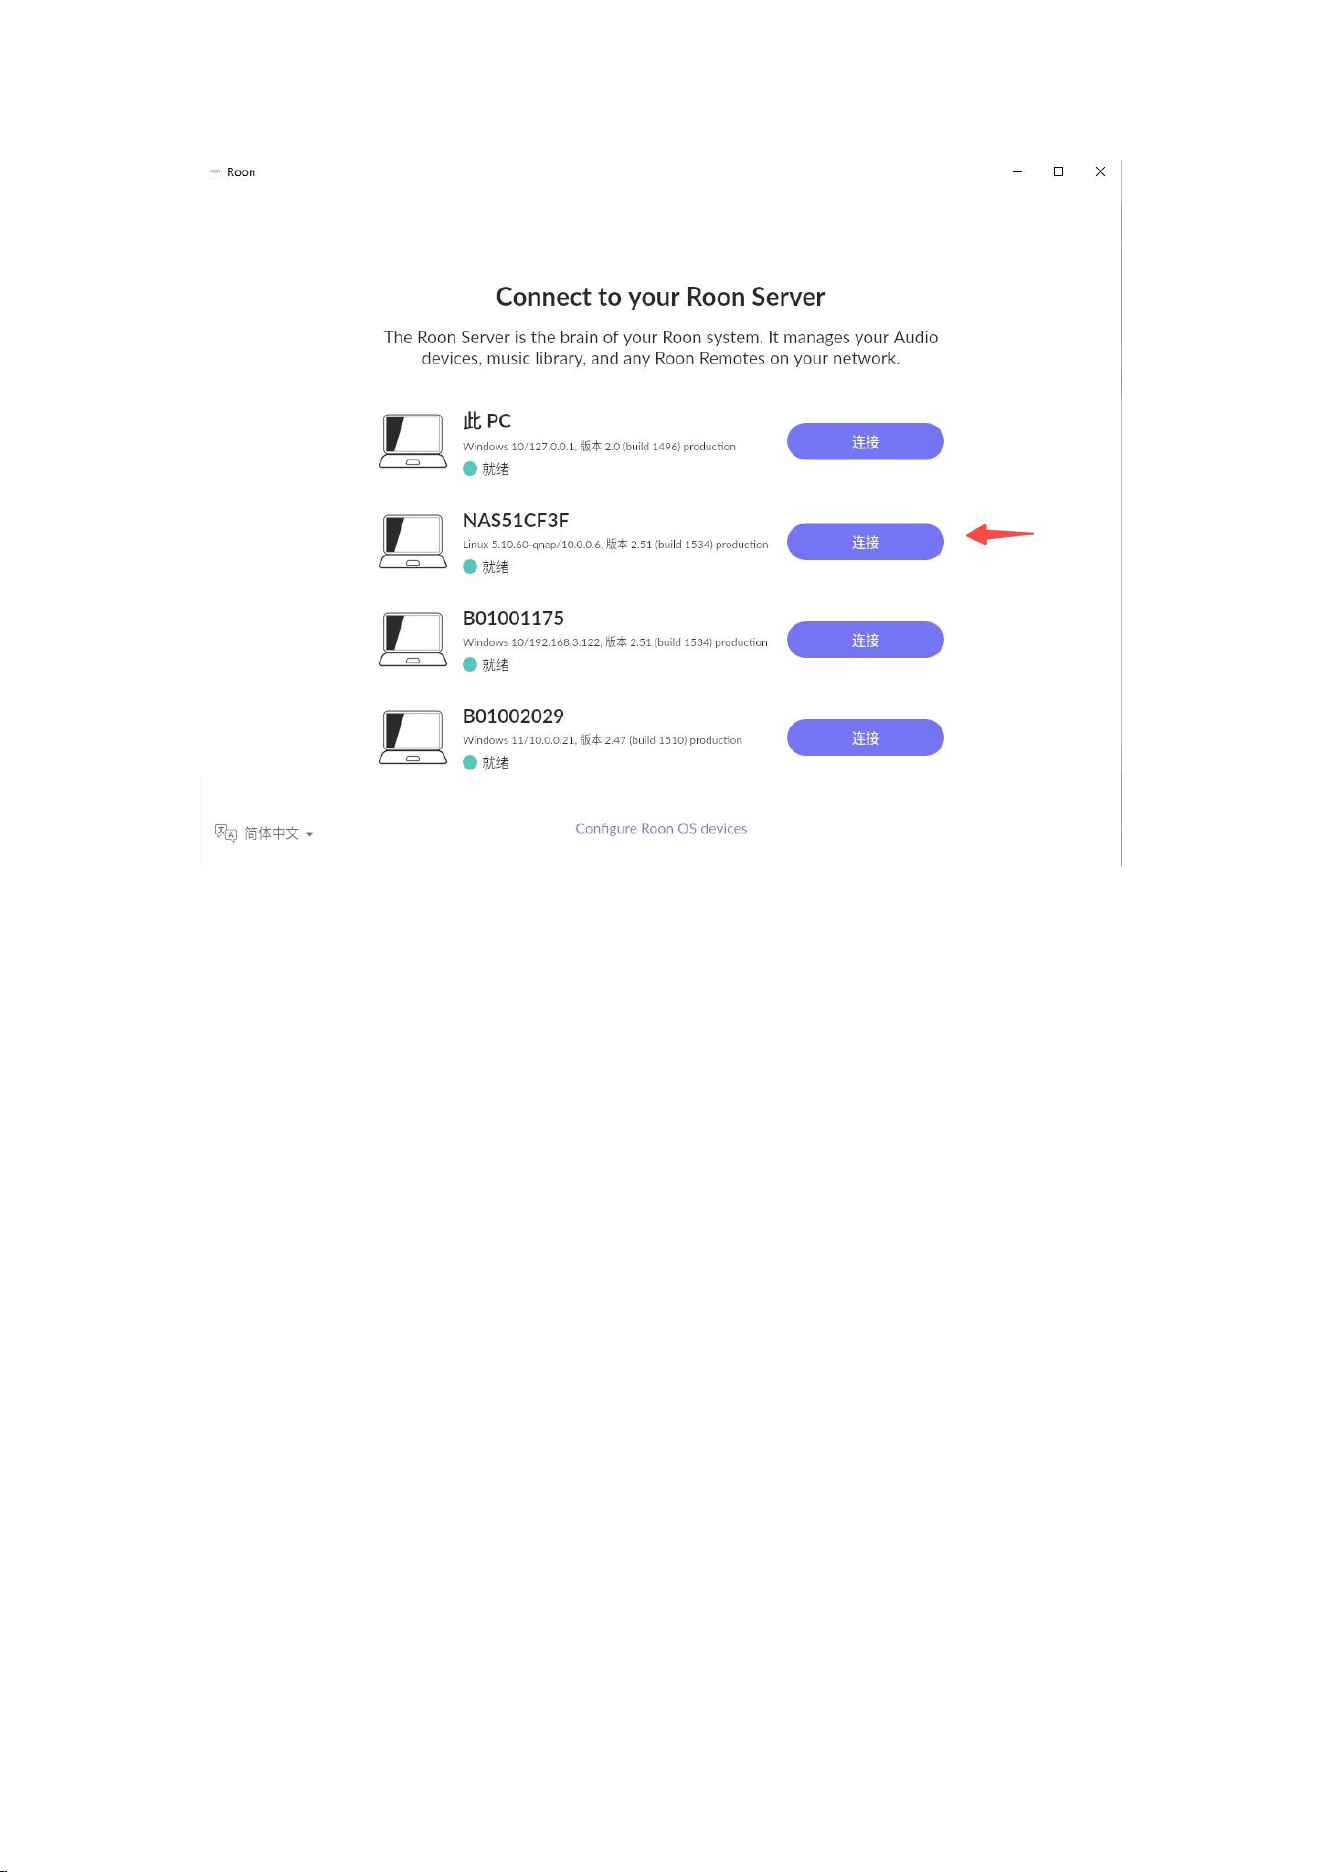
3.1. First, ensure the NAS, phone (or computer), and K15 are on the same local
network.
3.2. Install Roon Server on the NAS and the Roon music player on your phone (or
computer). In Roon's settings, select the NAS server as shown below.
[Image]
3.3. Add songs from the NAS to Roon.
3.4. Set the K15 to streaming mode and connect to your phone via Roon Ready to
access songs on the NAS.
35
11. Protection Mechanisms
(1)Overload Protection: When the headphone output interface exceeds a certain
power level, overload protection will be triggered. At this time, the K15 display will
pop up a warning message: "Overload anomaly, please power off and restart."
Please check whether the headphone wiring is abnormal or if the headphone
interface is fully inserted. After confirming everything is correct, power off and
restart the K15, then try playing again. Short circuits between channels can also
trigger overload protection. Therefore, in certain special situations, such as
repeatedly and quickly plugging and unplugging headphones, there is a small
probability of triggering overload protection.
(2)DC Protection: When the internal circuit is damaged, direct current (DC) may be
36
generated in the circuit, which could damage the headphones. The DC protection
function effectively safeguards against such abnormal conditions. If a DC
protection pop-up appears, try turning off the AC power supply and then turning it
back on to restart the K15. If the issue persists, please contact customer service for
factory repair.
(3)Temperature Protection: The K15 has a built-in temperature detection circuit.
When the device overheats and reaches the protection temperature, an
over-temperature protection alert will appear. In this case, please power off the K15
and let it rest for a while. Once the temperature has slightly decreased, you can use
it again.
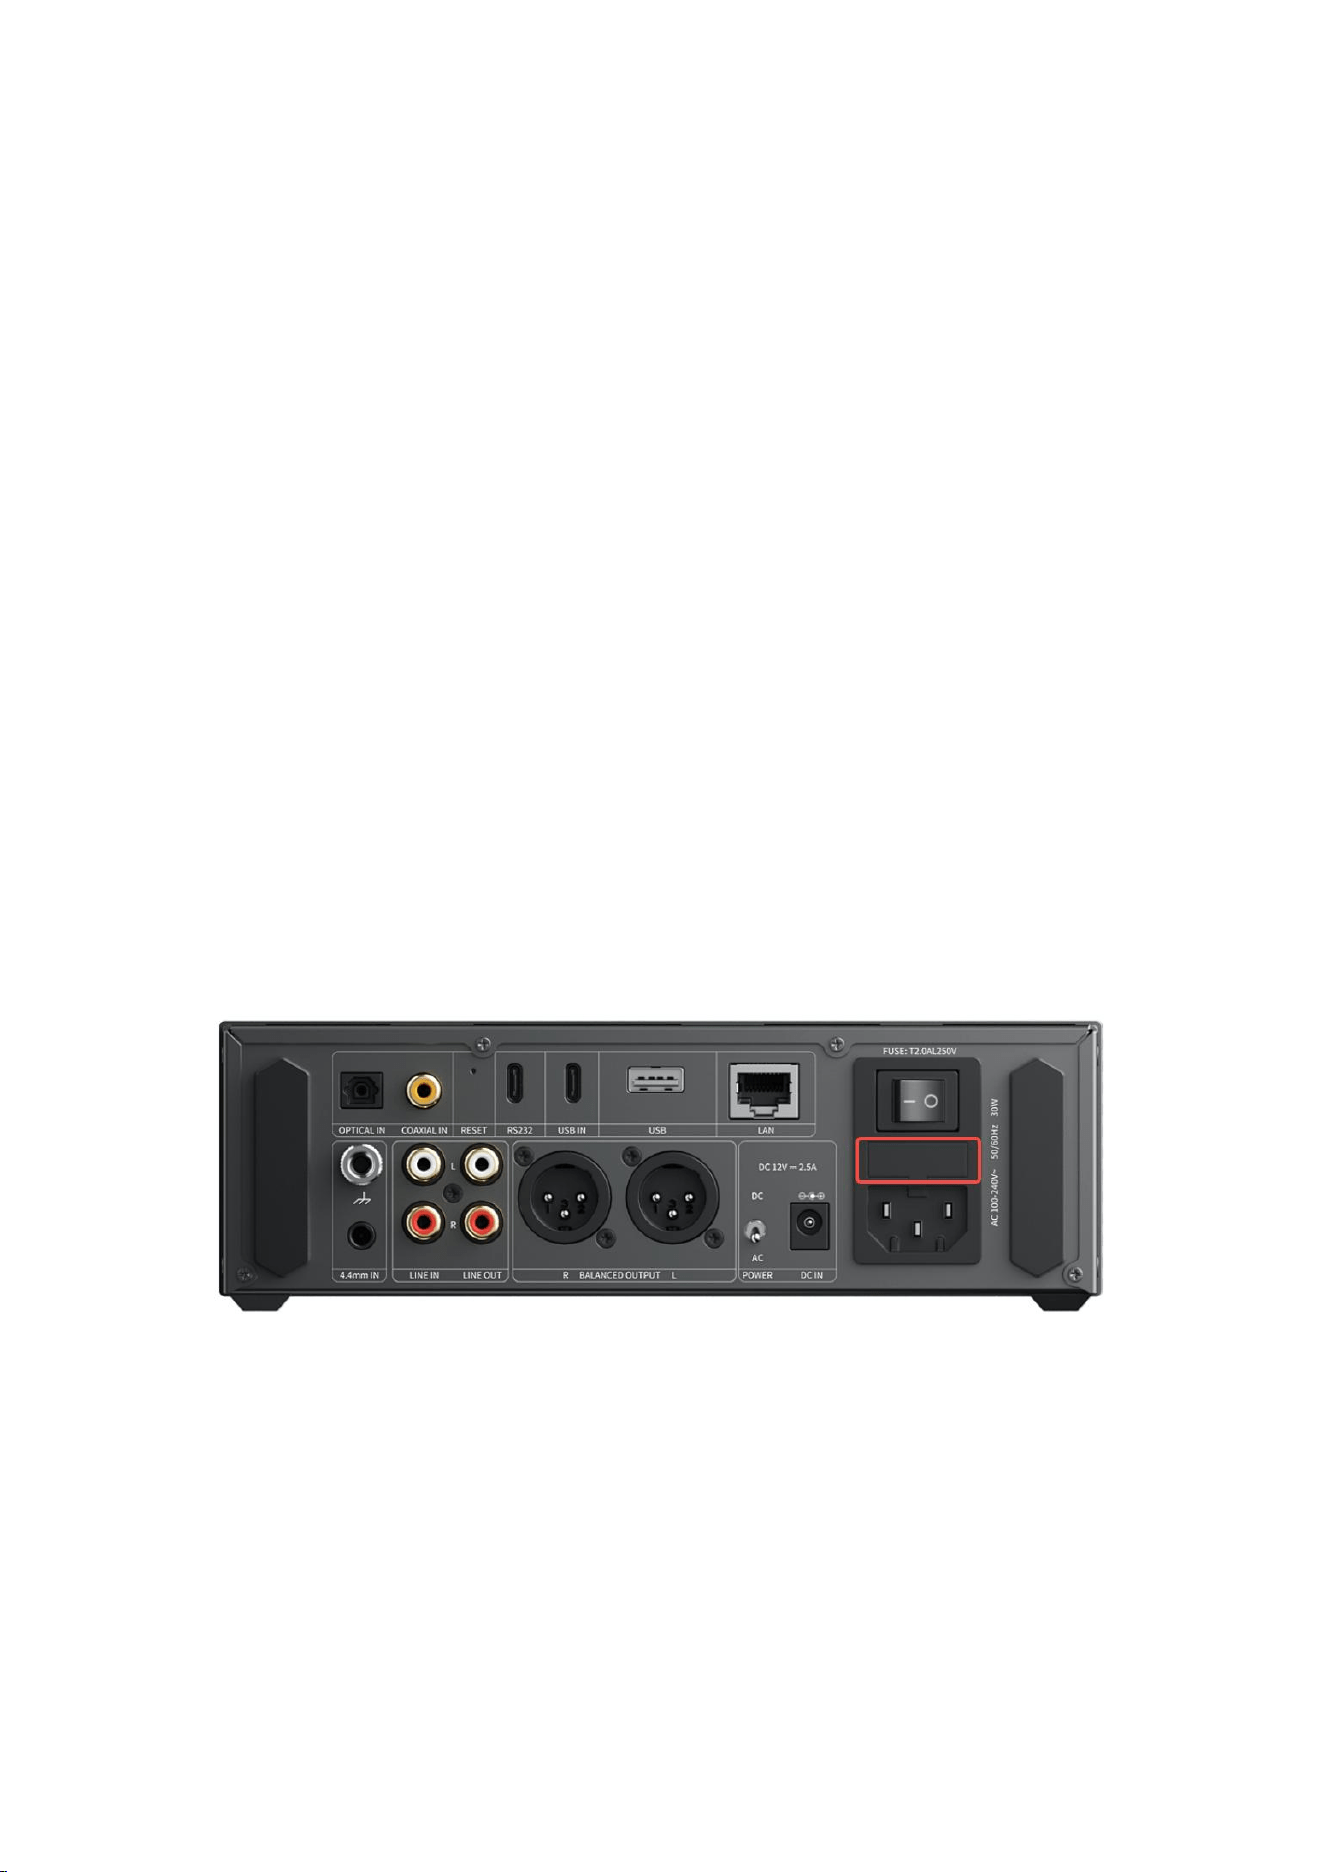
(4)AC Fuse: The K15 has a built-in fuse above the AC power socket, as shown in the
diagram. If the device shows no response when plugged in and powered on, check
whether the fuse has blown. If so, you can replace the fuse yourself. The fuse
specification is 250V 0.5A.
12. Firmware Upgrades
introduction
37
K15 supports firmware upgrades for SOC, MCU, Bluetooth chip, and XMOS316.
SOC Upgrade:
1.OTA Upgrade:
After connecting K15 to the internet or switching networks, a pop-up notification
for new firmware will appear. You can choose to cancel, remind later, or proceed
with the upgrade. Alternatively, navigate to Menu > Other Settings > Firmware
Upgrade > Main Controller Online Upgrade to initiate OTA.
If the OTA upgrade is interrupted due to network or power failure, K15 may get
stuck on a black "Updating" screen. Restarting the device will not resolve this.
Reconnect K15 to the same network used during the OTA to resume the upgrade
(resume from breakpoint).
After completion, K15 will automatically reboot.
If the upgrade remains stuck on "Updating" despite restarting or reconnecting, use
USB drive recovery:
Download the latest K15 firmware from the official link
Insert the USB drive into the rear USB-A port of K15.
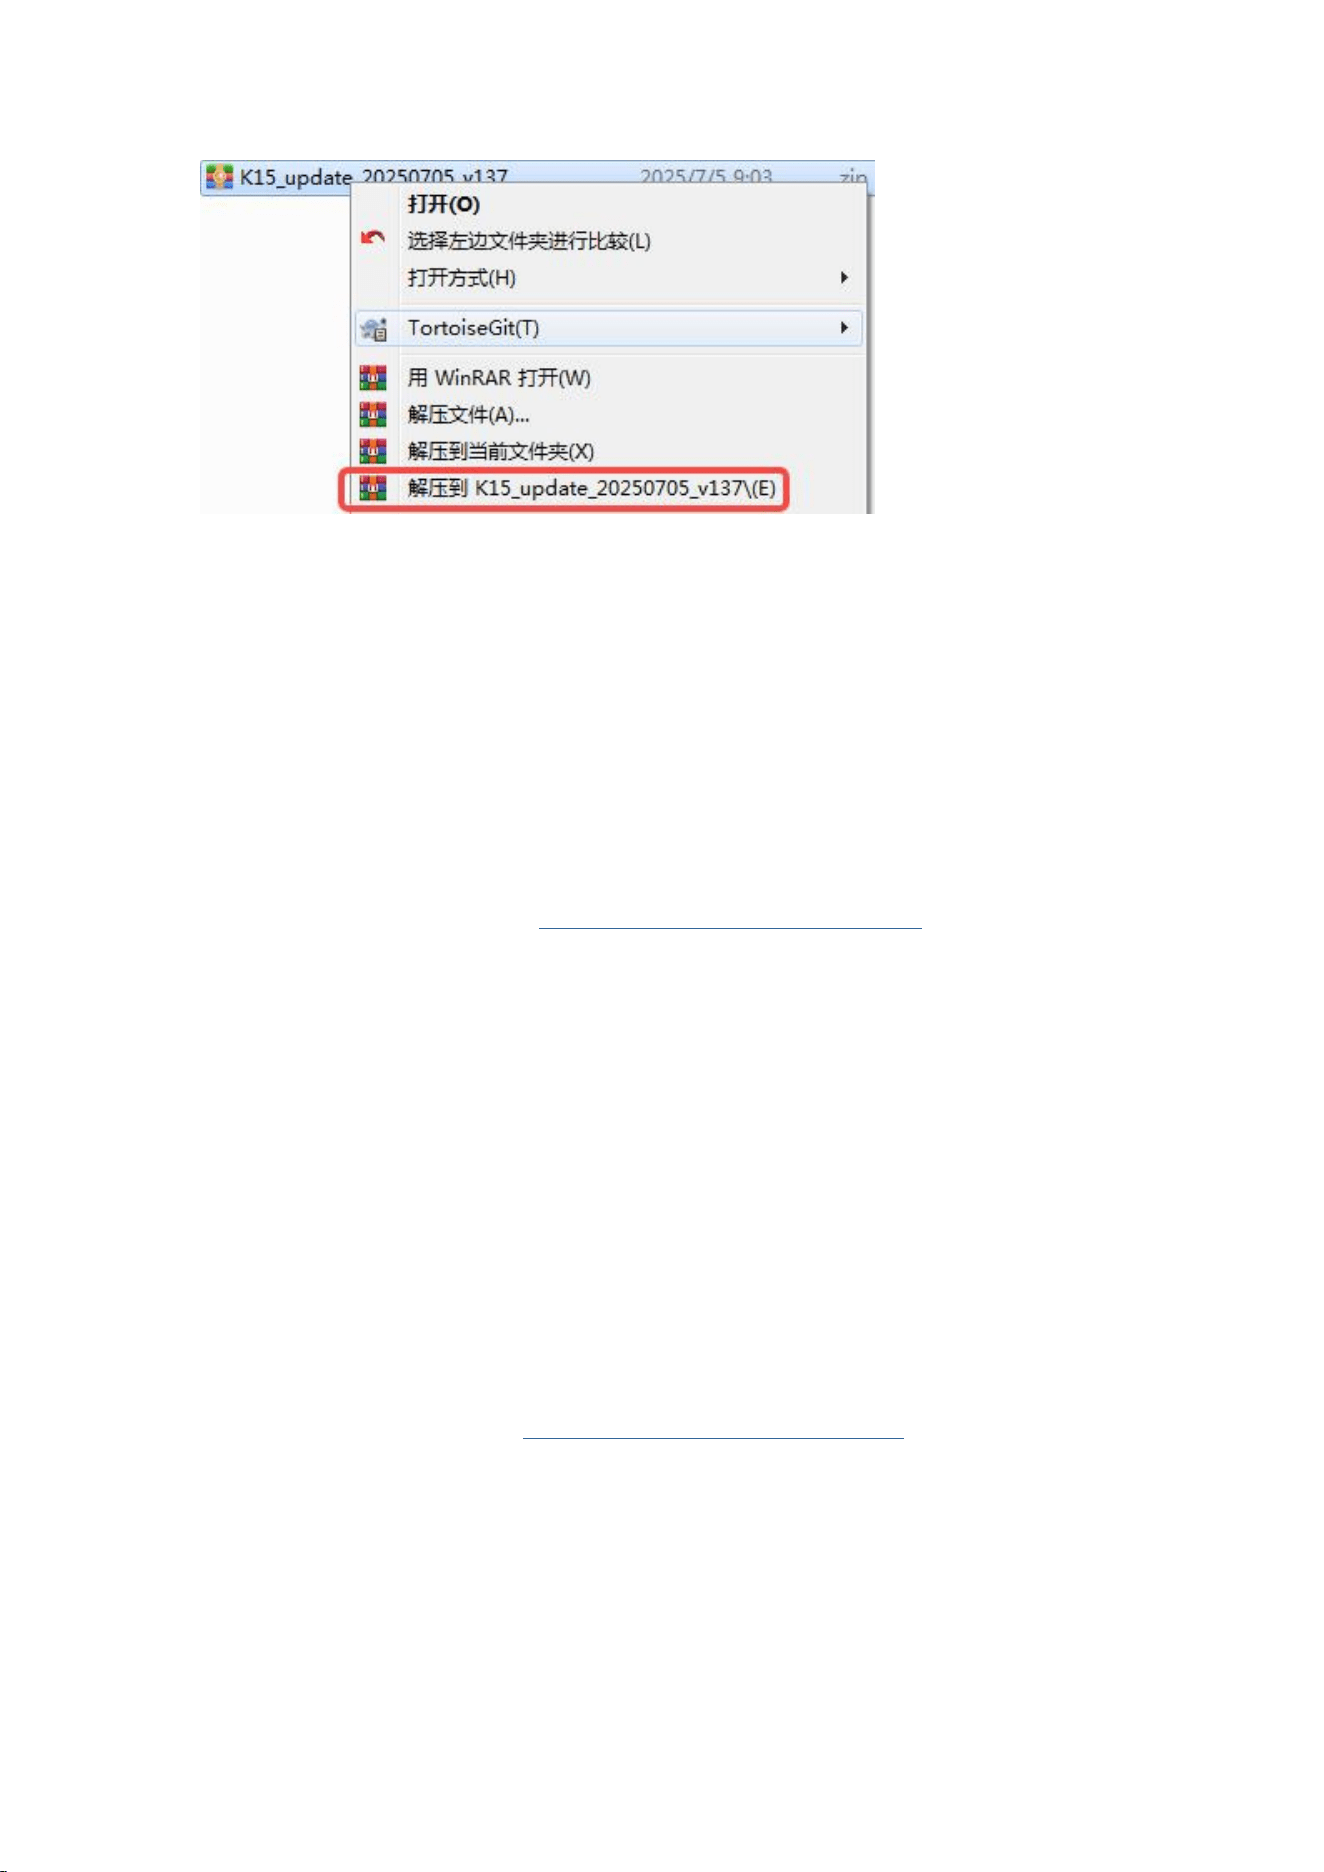
Copy the compressed file”K15_update_20250317_Vxxx” to a USB drive, manually
extract it, and rename the extracted folder to "K15_update_images".
38
With K15 powered off, hold the volume knob, then turn on the AC power switch.
K15 will boot into a black "Updating" screen—release the knob. Wait ~10 minutes
for completion.
If issues persist, please contact FiiO support.
2.USB Drive Upgrade:
Tutorial video(Same as K17): https://youtu.be/anhViDWo4Ws
Download the latest firmware and guide from Fiio ’ s website, then follow the
instructions to copy files to the USB drive. Navigate to Menu > Other Settings >
Firmware Upgrade > Main Controller Local Upgrade.
Note: Some USB drives may have compatibility issues. Try another drive or contact
support if the upgrade fails.
MCU Upgrade:
Tutorial video(Same as K17): https://youtu.be/WN-fyWZ53fQ
Notes:
Windows: After copying firmware, right-click the USB drive in "This PC" and select
"Eject". Using the system tray’s "Safely Remove" option will cause MCU upgrade
failure.