AR2146
(EVO5000AP)
User Manual
Kaonmedia Proprietary and Condential. Copyright 2017 KAON MEDIA CO., LTD. All Rights Reserved.2019-12-19 l V 1. 2


3 Kaonmedia Proprietary and Condential. Copyright 2017 KAON MEDIA CO., LTD. All Rights Reserved.
Table of Contents
10.2.3 Filtering – MAC Filtering
10.3. Parental Control
11. Service Menu
11.1. Dynamic DNS
11.2. DLNA
12. Management Setting menu
12.1. Passwords
12.2. Backup Settings
12.3. Update Software
12.4. Reset
12.5. TR-069 Client
12.6. System Log
4
6
6
6
7
9
10
10
10
10
11
11
11
13
14
15
16
17
18
19
20
21
21
22
24
26
27
28
29
29
30
32
33
34
35
36
36
37
38
39
40
41
42
43
44
45
45
46
47
48
49
50
51
52
54
1. Introduction
2. Product Overview
2.1. Product Introduction
2.2. Package Contents
2.3. Product Interfaces
2.4. Product Specication
3. Installation
3.1. Note for Placement
3.2. Hardware Set-up
3.3. Completing Set-up
4. Conguration
4.1. Note for Conguration
4.2. Conguration Set-up
5. Login
6. Home
7. Device Info Menu
7.1. Summary
7.2. WAN
7.3. LAN
7.4. Wireless
7.5. Network Statistics
8. Network Menu
8.1. Wan Service - IPoE & PPPoE
8.1.1 WAN Service - IPoE
8.1.2 WAN Service – PPPoE
8.2.1 LAN Service – IPv4 Setup
8.2.2 LAN Service – IPv6 LAN Auto Conguration
8.3. Internet Time
9. Wireless Menu
9.1. Wireless Wi-Fi
9.1.1 Wi-Fi – Primary Wi-Fi 2.4GHz & 5GHz Setting
9.1.2 Wi-Fi – Guest Wi-Fi 2.4GHz & 5GHz Setting
9.1.3 Wi-Fi – 2.4GHz & 5GHz Advanced Settings
9.2.1. Mesh – Mesh Setting
9.2.2. Mesh – Mesh Topology
10. Access Control Menu
10.1. NAT
10.1.1. NAT – Port Forwarding
10.1.2. NAT – Port Triggering
10.1.3. NAT – DMZ Host
10.2. Filtering
10.2.1. Filtering – IP Outgoing Filtering
10.2.2 Filtering – IP Incomming Filtering
········································································
·······························································
·················································
······················································
······················································
················································
············································································
····················································
························································
····················································
·······································································
··············································
·················································
······················································································
·····················································································
·······························································
······································································
···············································································
················································································
·········································································
······················································
····································································
·····································
··················································
··············································
·······································
····
·······························································
·····································································
·······························································
···
·······
·······
·············································
··········································
·······················································
··············································································
········································
··········································
···················································
······································································
·······················
·····················
······································
·······················································
····································································
····························································
···········································································
··········································
··································································
························································
······················································
············································································
·····························································
································································

4 Kaonmedia Proprietary and Condential. Copyright 2017 KAON MEDIA CO., LTD. All Rights Reserved.
Introduction
Copyright Statement
FCC Interference Statement
This user manual is designed to provide the detailed instruction on how to set-up and manage AR2146. Before the
instruction started, please check out the below notes.
AR2146 does not assume any liability arising out of the application or use of any products, or software described here-
in. Neither does it convey any license under its patent rights nor patent rights of others. AR 2146 further reserves the
right to make changes to any products described herein without notice. This publication is subject to change without
notice.
Any trademarks mentioned in this publication are used for identication purposes only and may be properties of their
respective owners.
Please note that features of AR2146 may vary slightly depending on the model and software version you have, and
on your location, language and internet service provider. All images, parameters and descriptions documented in this
guide are used for informational purposes only, and may change without notice. This publication may not be
reproduced, in whole or in part, without prior expressed written permission from KAONMEDIA Co., Ltd.
This device complies with Part 15 of the Federal Communications Commission (FCC) Rules. Operation is subject to the
following two conditions:
- This device may not cause harmful interference.
- This device must accept any interference received, including interference that may cause undesired operation.
This equipment has been tested and found to comply with the limits for a Class B digital device, pursuant to part 15 of
the FCC Rules.
These limits are designed to provide reasonable protection against harmful interference in a residential installation.
This equipment generates,
uses and can radiate radio frequency energy and, if not installed and used in accordance with the instructions, may
cause harmful interference to radio communications. However, there is no guarantee that interference will not occur in
a particular installation.
If this equipment does cause harmful interference to radio or television reception, which can be determined by turning
the equipment o and on, the user is encouraged to try to correct the interference by one or more of the following
measures:
- Reorient or relocate the receiving antenna.
- Increase the separation between the equipment and receiver.
- Connect the equipment into an outlet on a circuit dierent from that to which the receiver is connected.
- Consult the dealer or an experienced radio/TV technician for help.
This Class B digital apparatus complies with Canadian ICES-003.
Cet appareil numrique de la classe B est conforme à la norme NMB-003 du Canada.
1. Introduction

5 Kaonmedia Proprietary and Condential. Copyright 2017 KAON MEDIA CO., LTD. All Rights Reserved.
FCC Caution
Safety Warnings
Any changes or modications not expressly approved by the party responsible for compliance could void the user’s
authority to operate
this equipment.
IMPORTANT NOTE: FCC Radiation Exposure Statement:
- This equipment complies with FCC radiation exposure limits set forth for an uncontrolled environment.
- This equipment should be installed an operated with a minimum distance of 20cm between the radiator
and your body.
- This transmitter must not be co-located or operating in conjunction with any other antenna or transmitter.
- To reduce the risk of re, use only No. 26 AWG (American Wire Gauge) or larger telecommunication line cord.
- Do NOT open the device or unit. Opening or removing covers can expose you to dangerous high voltage points or
other risks.
- ONLY qualied service personnel can service the device. Please contact your vendor for further information.
- Use ONLY the dedicated power supply for your device. Connect the power cord or power adapter to the correct
supply voltage(110V AC in North America or 230V AC in Europe).
- Do NOT use the device if the power supply is damaged as it might cause electrocution.
- If the power supply is damaged, remove it from the power outlet.
- Do NOT attempt to repair the power supply. Contact your local vendor to order a new power supply.
- Place connecting cables carefully so that no one will step on them or stumble over them. Do NOT allow anything to
rest on the power cord and do NOT locate the product where anyone can walk on the power cord.
- If you wall mount your device, make sure that no electrical, gas, or water pipes will be damaged.
- Do NOT install nor use your device during a thunderstorm. There may be a remote risk of electric shock from
lightning.
- Do NOT expose your device to dampness, dust, or corrosive liquids.
- Do NOT use this product near water, for example, in a wet basement or near a swimming pool.
- Make sure to connect the cables to the correct ports.
- Do NOT obstruct the device ventilation slots, as insucient airow may harm your device.
- Do NOT store things on the device.
- Connect ONLY suitable accessories to the device.
6 Kaonmedia Proprietary and Condential. Copyright 2017 KAON MEDIA CO., LTD. All Rights Reserved.
2.2. Package Contents
2.1. Product Introduction
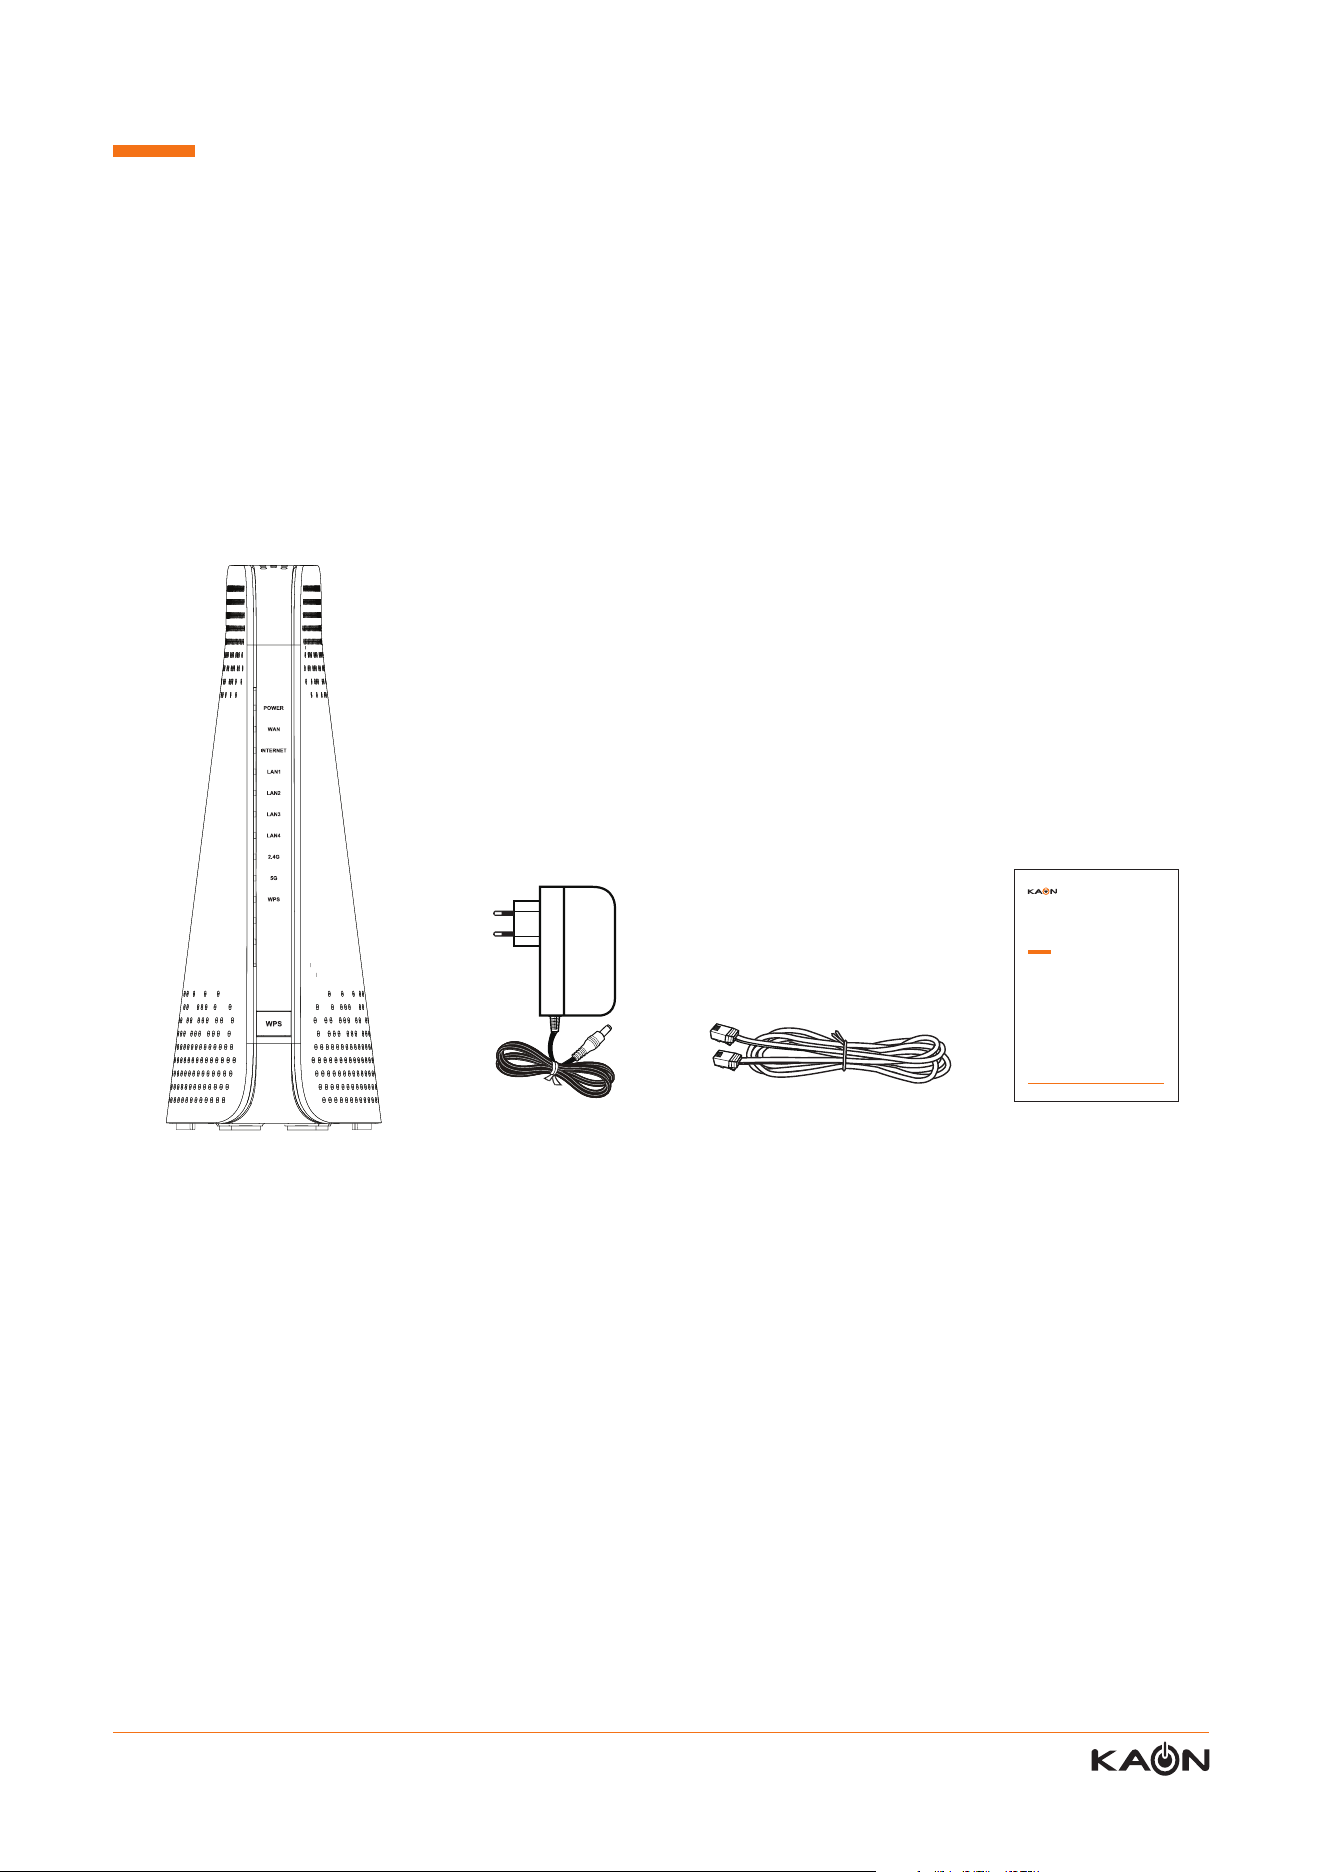
The AR2146 AP Router delivers combined Wi-Fi connection speeds up to AC2200 (450 Mbps at 2.4 GHz 802.11n and
1733 Mbps at 5 GHz 802.11ac). AR2146 is ideal for bandwidth-hungry activities such as online gaming and video
streaming, powered by a dual-core 1.5 GHz processor. High-powered ampliers with antennas provide Wi-Fi coverage
anywhere around your home, inside or out.
AR2146
RJ-45 Cable
(Ethernet Cable)
Power Adapter Quick Guide
2. Product Overview
AR2146
User Manual
Kaonmedia Proprietary and Condential. Copyright 2017 KAON MEDIA CO., LTD. All Rights Reserved.2019-12-19 l V 1. 2
7 Kaonmedia Proprietary and Condential. Copyright 2017 KAON MEDIA CO., LTD. All Rights Reserved.
2.3. Product Interfaces
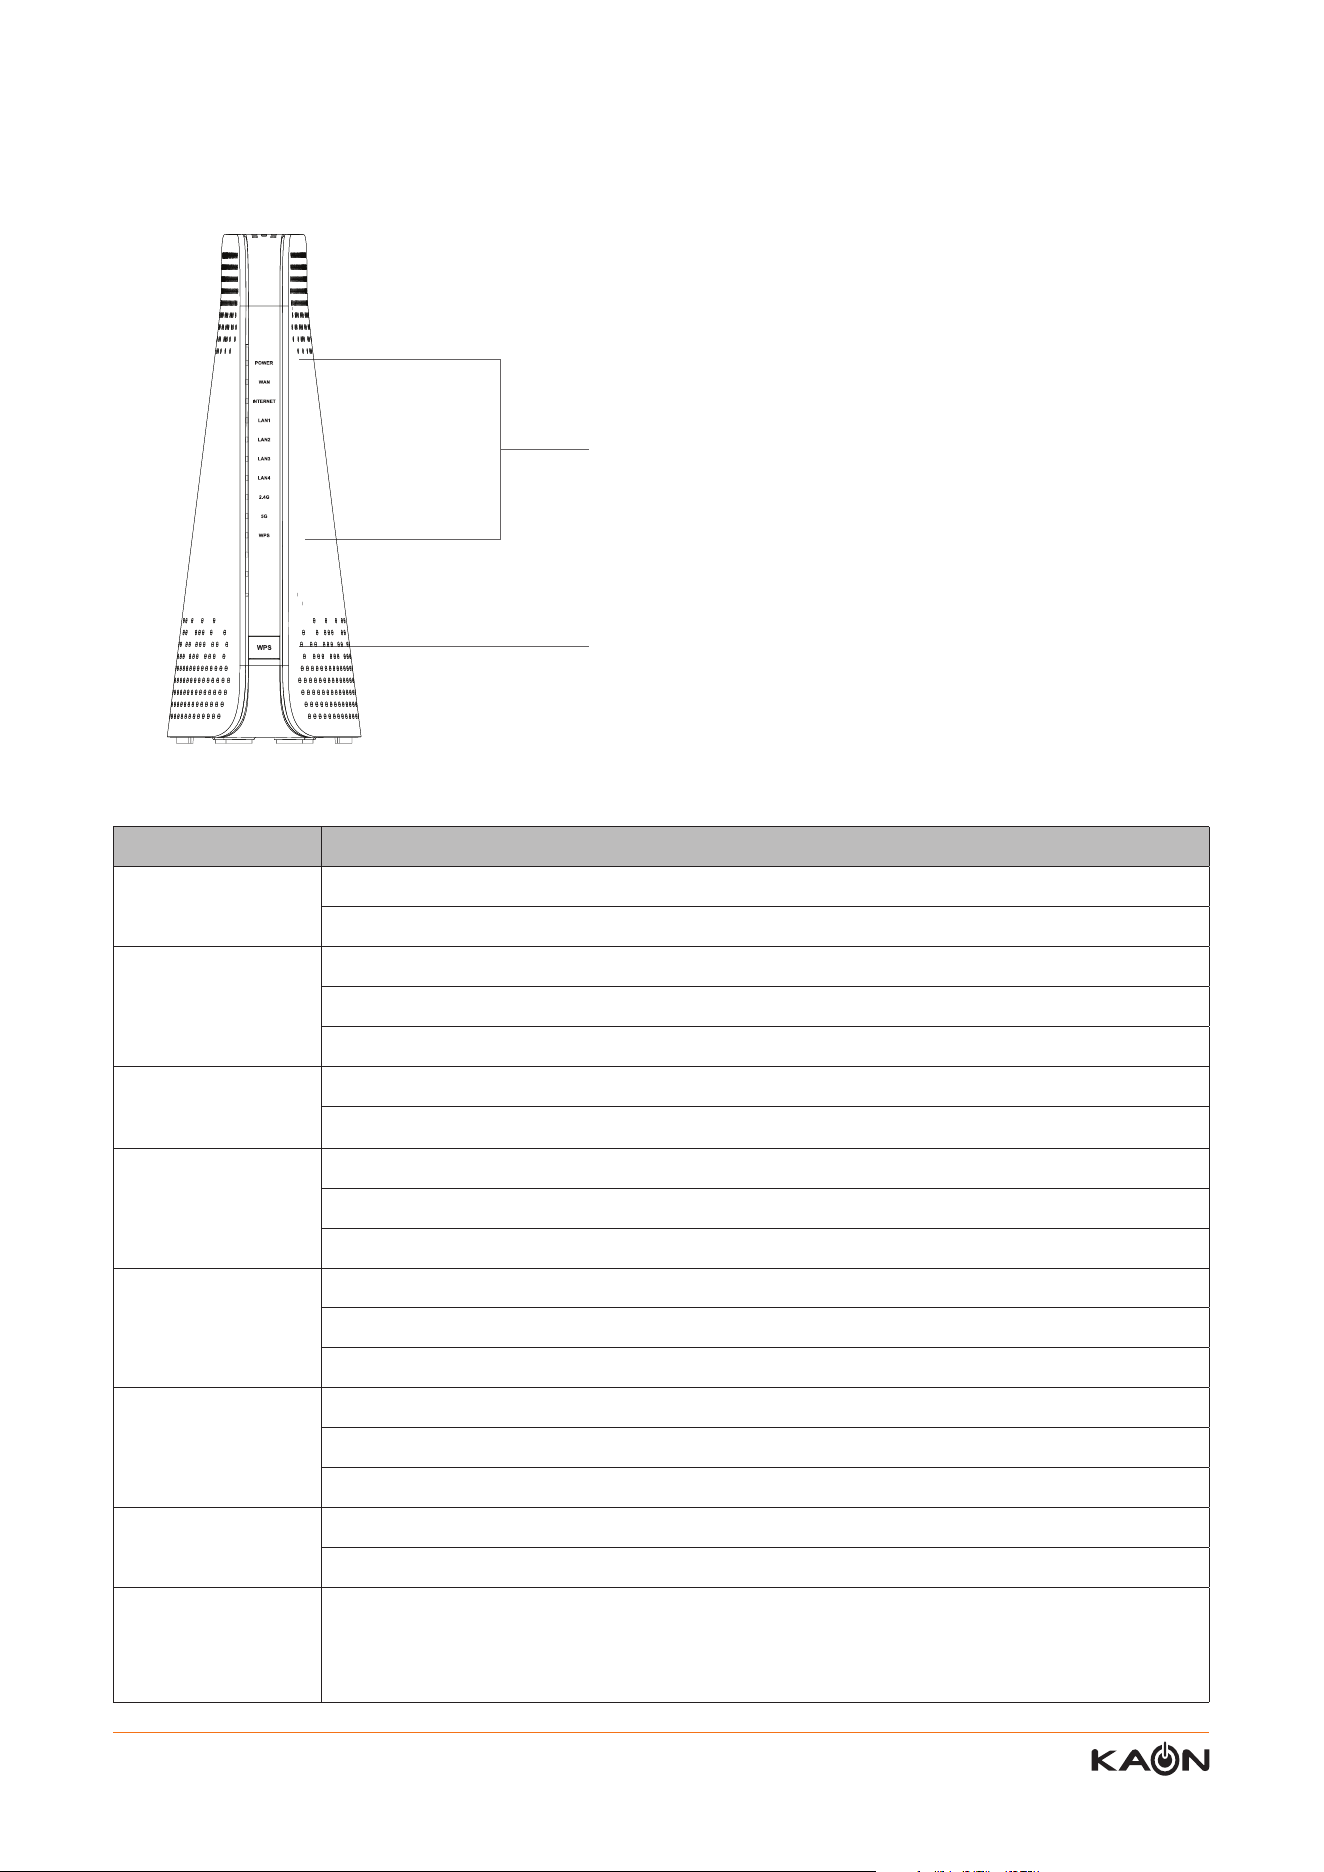
LED Description
POWER LED
Solid green – AP Router is ready
O - Power is not supplied to the router
WAN LED
Solid green - WAN interface enabled
Blinking - WAN port is sending or receiving data
O - WAN interface disabled
INTERNET LED
Solid green – The Internet connection is ready
O - Internet service is not available
LAN 1~4 LED
Solid green – A powered-on device is connected to the LAN port
Blinking - The LAN port is sending or receiving data
O – No device is connected to this LAN port
2.4G WiFi LED
Solid green – The 2.4GHz radio is operating
Blinking – The router is sending or receiving WiFi trac
O - The 2.4GHz radio is o
5G WiFi LED
Solid green – The 5GHz radio is operating
Blinking – The router is sending or receiving WiFi trac
O - The 5GHz radio is o
WPS LED
Blinking – The WPS LED blinks green during WPS process and then lights solid green
O - WPS connected successfully or connection timed out
WPS Button
This button lets you use WPS to join the Wi-Fi network without typing the Wi-Fi password
and selecting Encryption
Press and hold this button for about 2 seconds to enable the WPS function
LED & Button Descriptions
LED : Power, Wired, Wi-Fi connectivity indicator
WPS Button : For connecting Wi-Fi network without
typing the Wi-Fi password
8 Kaonmedia Proprietary and Condential. Copyright 2017 KAON MEDIA CO., LTD. All Rights Reserved.
WPS LED Descriptions
Back Panel
LED Description
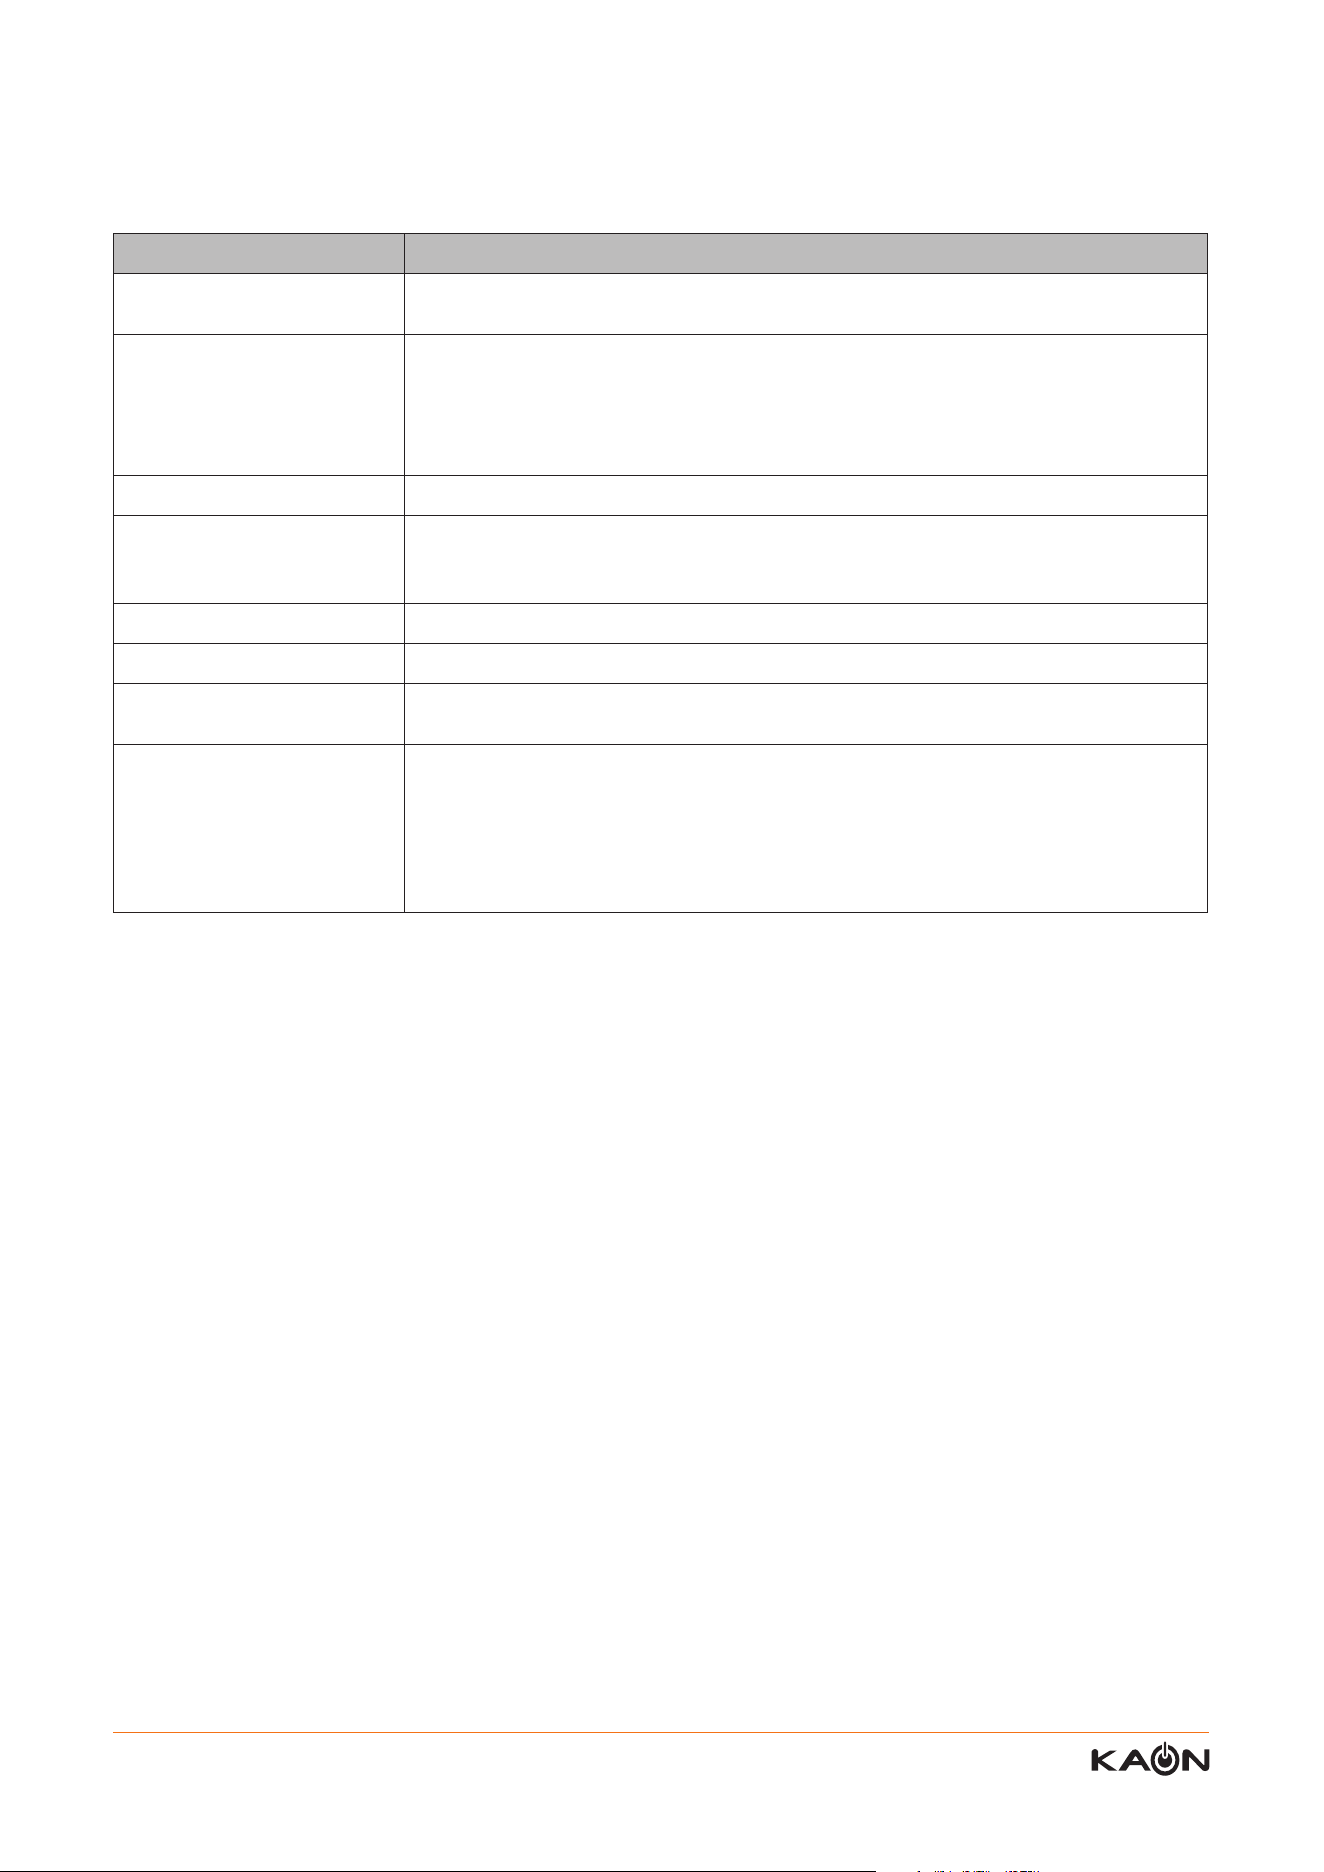
WPS LED
High rate of blinking – Wi-Fi Mesh smart connecting
O - Power is not supplied to the router
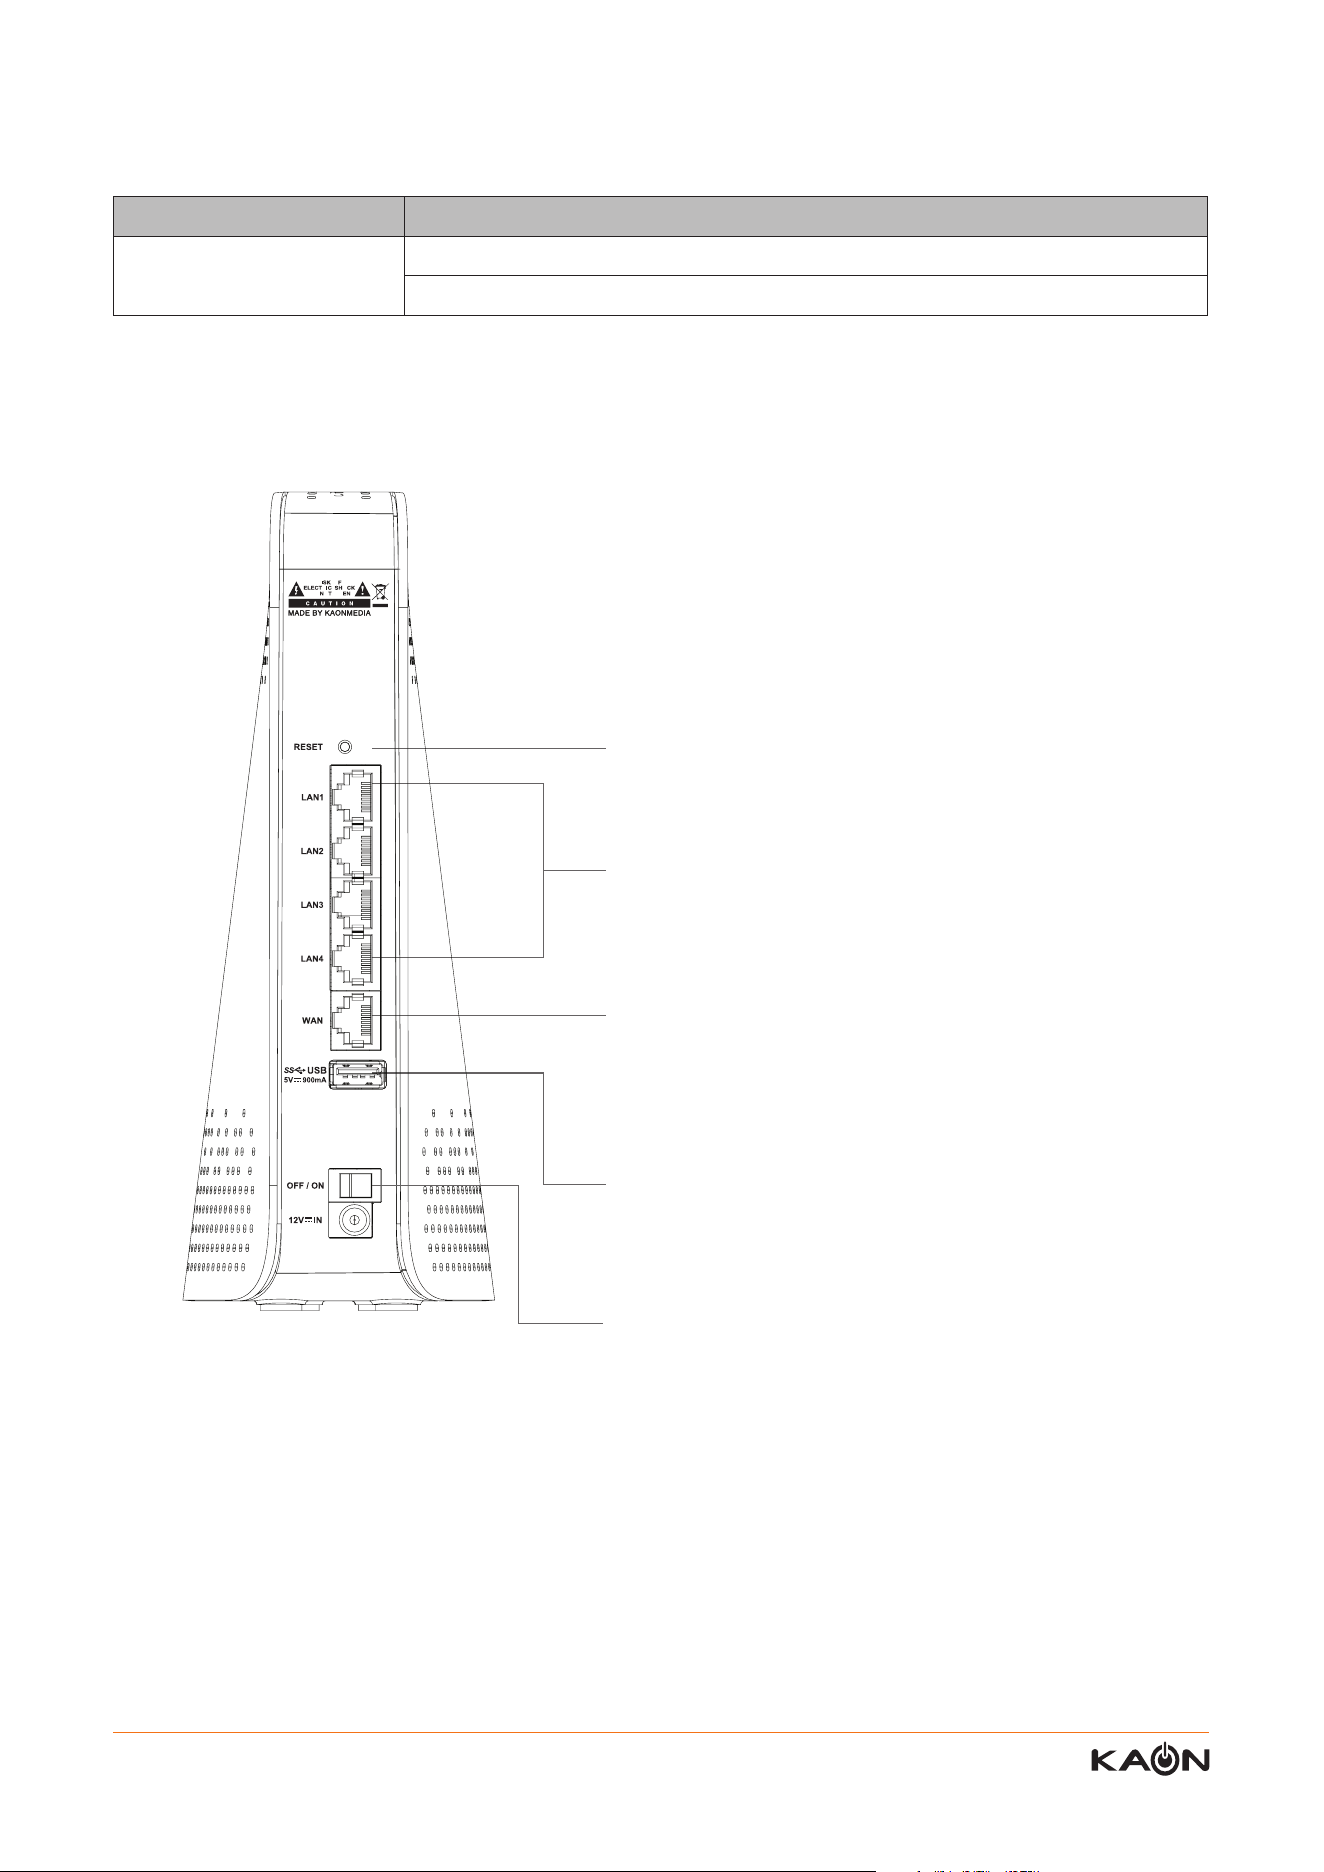
Reset Button: For resetting AR2146 to factory default
settings.
Ethernet Ports: For connecting AR2146 to your home
gateway, the Ethernet outlet or other internet devices.
Internet port (WAN) : For connecting to an ISP modem,
Gateway, or router, or and internet jack directly.
USB 3.0 : For connecting a device via USB port. It is also
compatible with USB 2.0.
Power Connector: Plug in power adapter.
9 Kaonmedia Proprietary and Condential. Copyright 2017 KAON MEDIA CO., LTD. All Rights Reserved.
2.4. Product Specication
Category Description
Memory SRAM: 256MB DDR3
NAND : 128MB
Wireless LAN Interface IEEE802.11ac (5GHz, 80MHz) up to 1.733Gbps
IEEE802.11n (2.4GHz, 40MHz) up to 450Mbps
Antenna Type : Internal Antenna 4 PCS (3 Internal Dual Band Antennas & One 5GHz
Sing Band Antenna)
Antenna Conguration : 3x3 2.4GHz & 4x4 5GHz DBDC
LAN Four 10/100/1000M Auto MDI/MDI-X RJ-45 Ports
Switch/ Button Front Panel: WPS button
Rear Panel: 4 LAN Ethernet ports, 1 x WAN ports, On/O switch, Power input, Factory
reset button (pin-hole), USB3.0
LED Power, WAN, Internet, LAN, 2.4GHz WiFi, 5GHz WiFi, WPS
Power DC12V / 2.0A
Physical Specication Device dimension: 78(35)mm x 155mm x 210mm (W x D x H)
Device weight: ???g
Environmental
Specication
Operating Environment
Temperature : 0°C to 40°C
Humidity: 20% to 90% (Non-condensing)
Storage Environment
Temperature: -30°C to 60°C
Humidity: 20% to 90% (Non-condensing)
10 Kaonmedia Proprietary and Condential. Copyright 2017 KAON MEDIA CO., LTD. All Rights Reserved.
3. Installation
3.1. Note for Placement
3.2. Hardware Set-up
3.3. Completing set-up
Before you set-up the AR2146, please thoroughly read the below placement guide for your successful internet
connection of the AR2146.
This section is for the hardware installation of the AR2146. While you proceed the installation, the internet connection
will not be available until the set-up process is fully completed.
After the hardware set-up, you should log in to the router and congure it. Please refer to the next page for the cong-
uration.
Place the router near the center area where your connected devices like computers, tablets, and mobile phone
operate. Please avoid placing the router in the closed area such as cabinet or closet. In this case,
Wi-Fi performance can deteriorate due to obstacles.
Place the router in an slightly elevated location minimizing the number of walls and ceilings between the router and
the connected devices.
Please avoid placing the router besides the below appliances or objects:
Home Security Devices or System
Fans
Microwaves
Computers
Cordless phones
Metal Objects
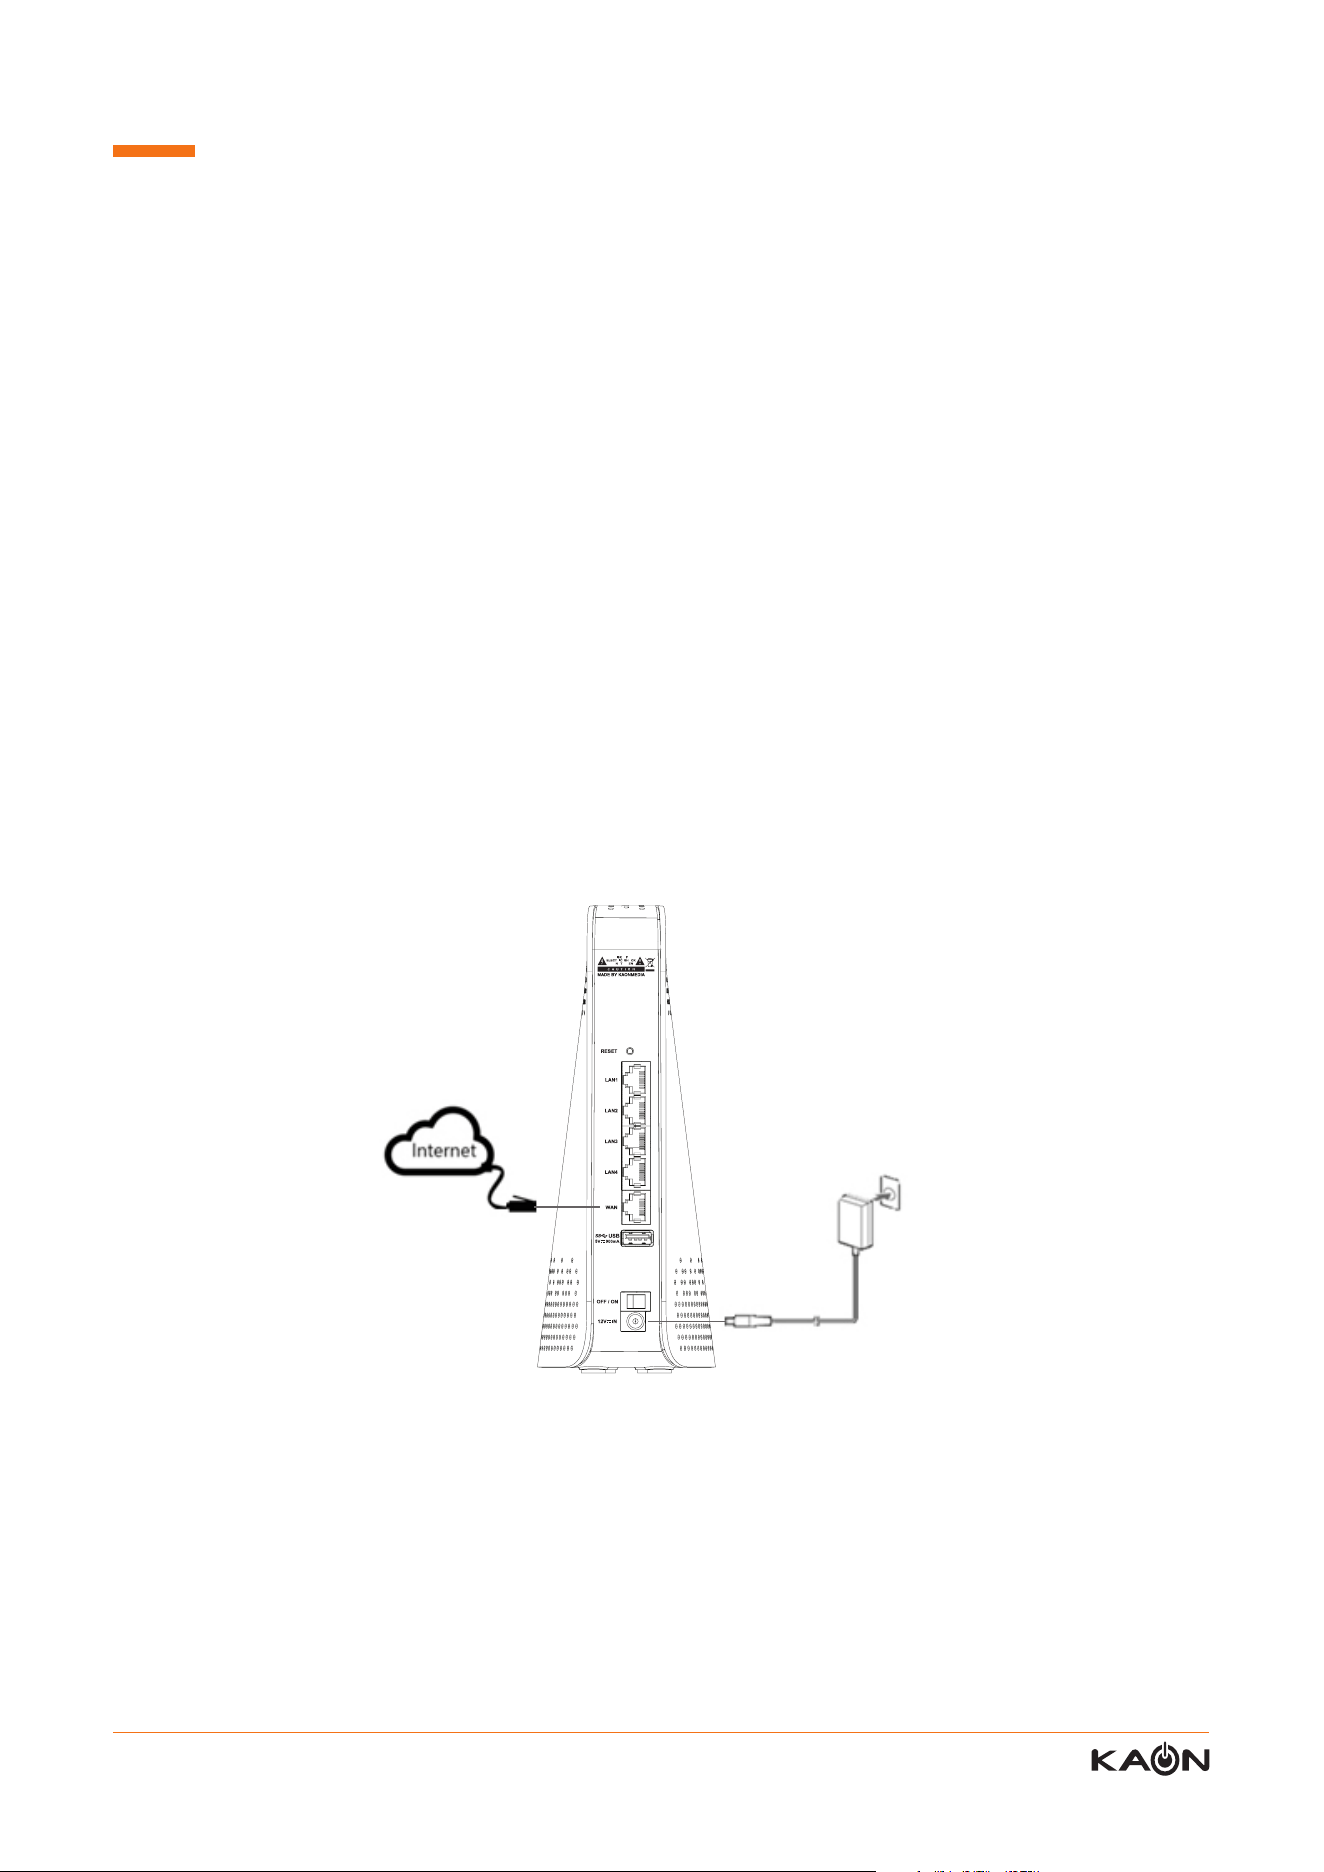
1) Place the router near the power outlet and internet line
2) Unplug your modem’s power, leaving the modem connected to the wall jack for your Internet service
3) Connect your modem to the Internet port of your router with the Ethernet cable that came with your router.
4) Connect the power adapter to your router and plug the power adapter into an outlet.
5) Press the Power On/O button on the rear panel of the router.
6) Conrm that the following LEDs are on and solid to verify the hardware is connected correctly.
11
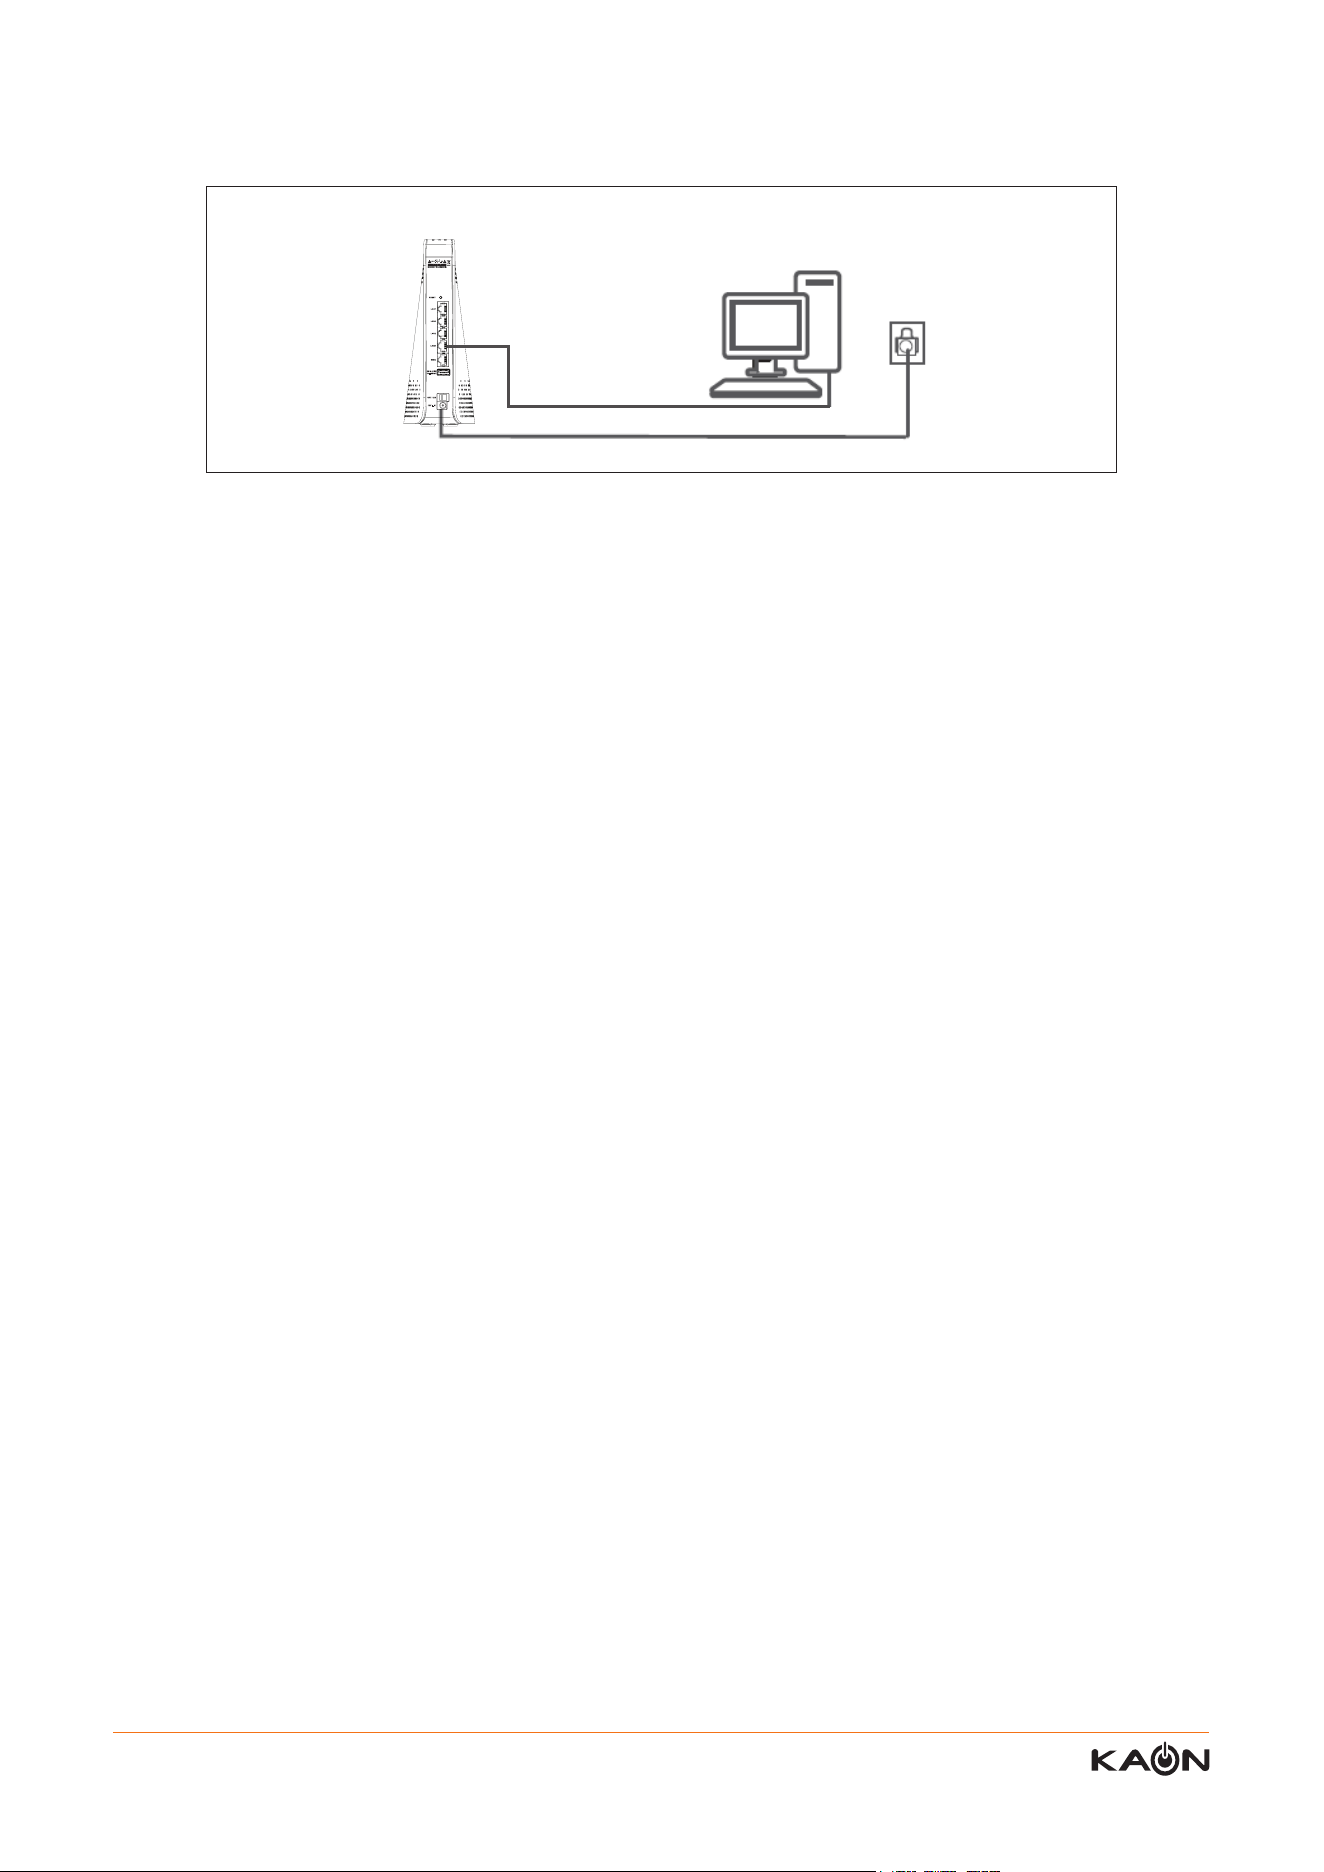
computer can connect to the AR2146 with Wi-Fi or Ethernet cable.
1. To use WPS to connect to the Wi-Fi network;
1) Make sure power is supplied to the router. (its Power LED is lit green)
2) Check the WPS instructions for your computer or wireless device.
3) Press the WPS button on the router.
4) Within two minutes, on your computer or Wi-Fi device, press its WPS button or follow its instructions for WPS con
nections.
5) Your computer connects to the Wi-Fi network.
6) The next time you connect to this network from the same computer or device.
7) The router has sent all the necessary settings, including the security password, to Computer or device, so you don’t
have to use the WPS button again.
1) Make sure that the router has power (its Power LED is lit green).
3) Join the Wi-Fi network and enter the Wi-Fi password. The password is on the router’s label. Your wireless device
gets to connect to the Wi-Fi network.
If you are using a the modem, gateway, or router provided by Internet Service Provider(ISP), depending on the mode
of those device, you need to set the AR2146 to either “bridge” mode or “router” mode so the router can work
properly. Please contact your ISP or refer to the user manual for detail settings
• In case that you are using AR2146
AR2146 or better ask ISP. Your ISP may also supply you with additional WAN
Wi-Fi Connection
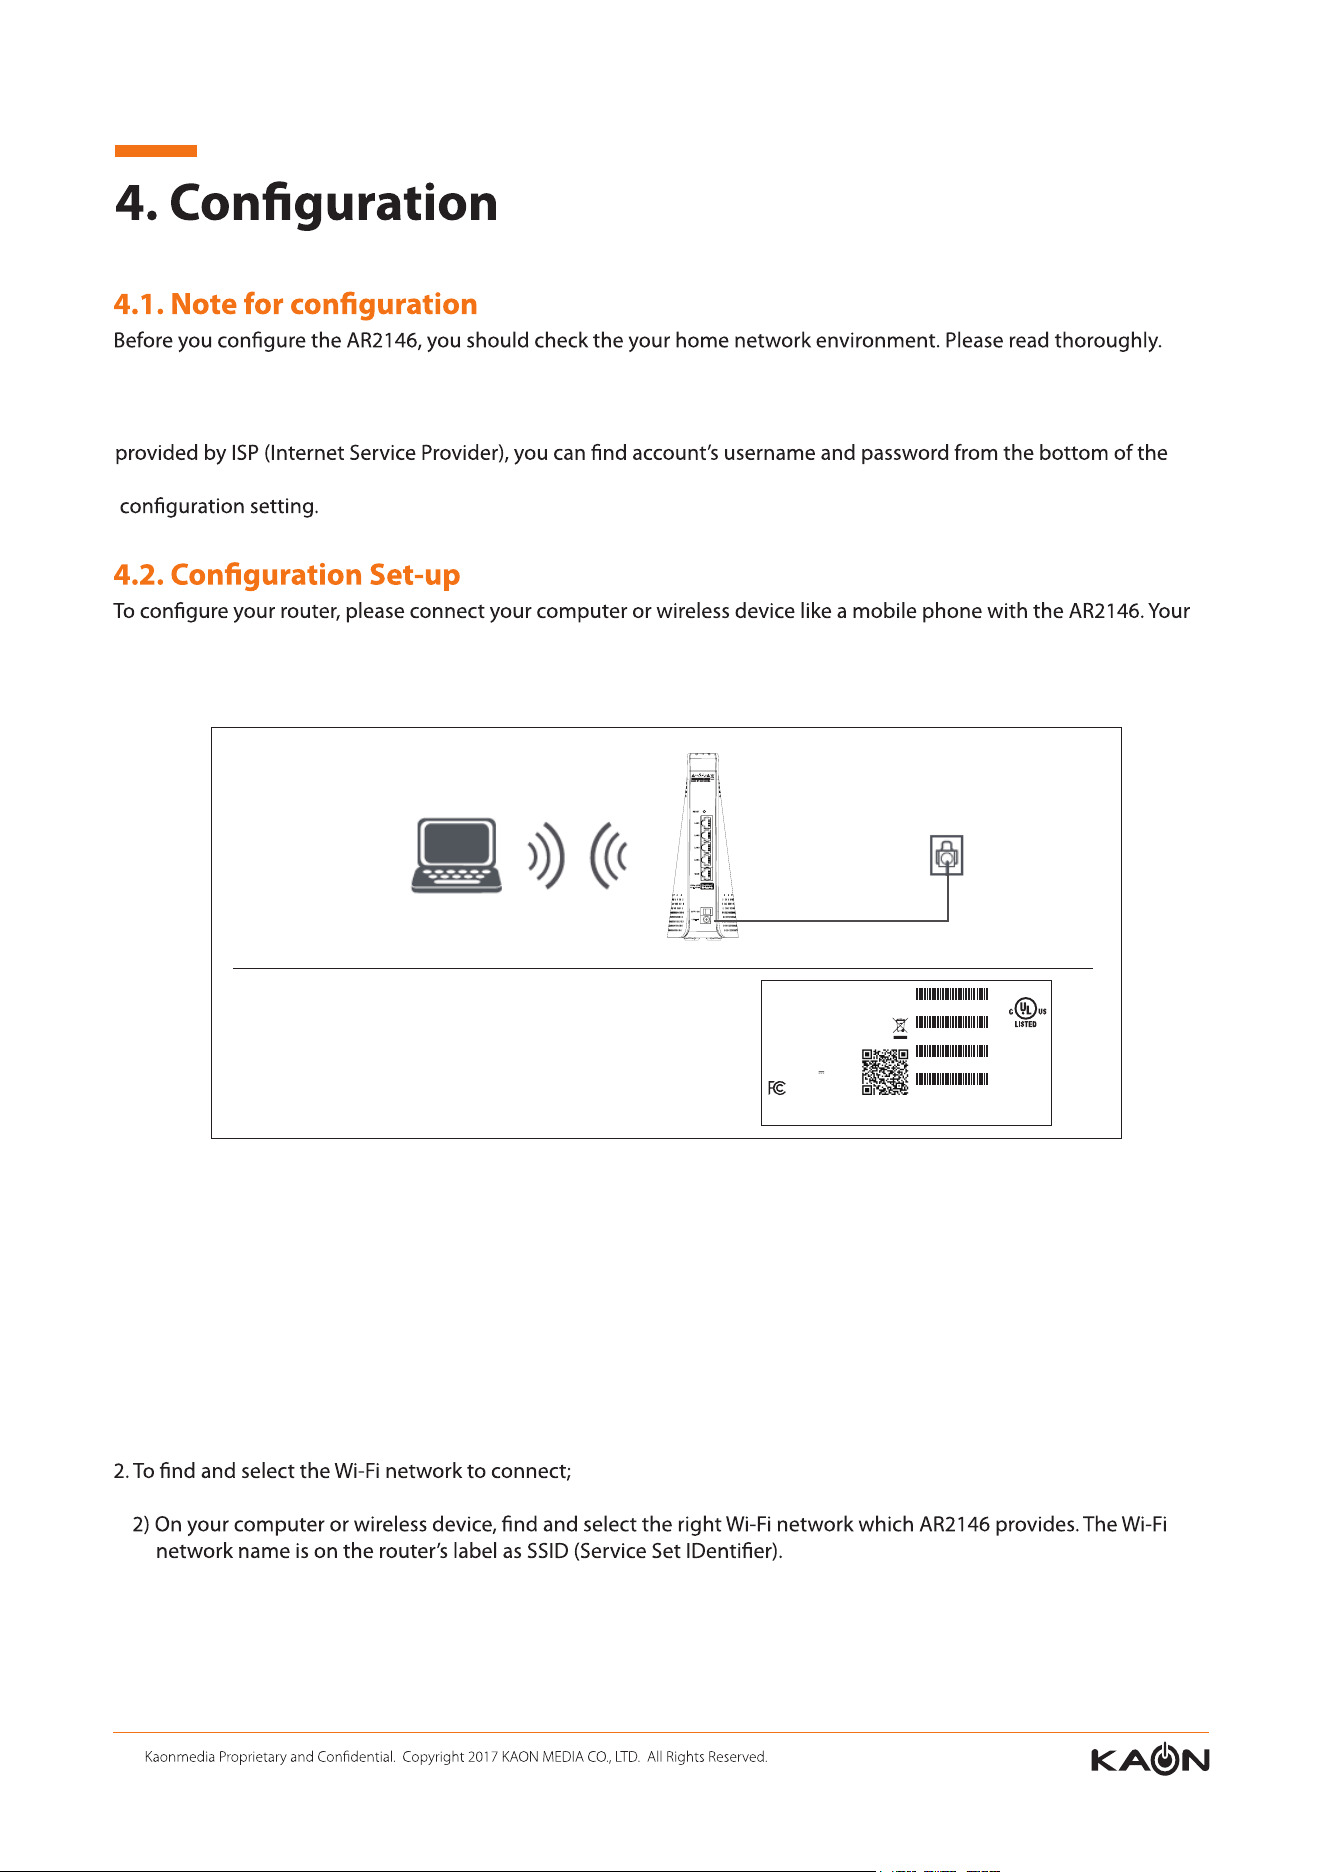
The label is attached at the bottom of the AR2146,
and gives you the log-in information, MAC address,
and serial number.
Label
E350719
ITE
Model : AR2146
Manufacturer : KAONMEDIA
Wi-Fi 2.4G SSID: KAON-xxxx-2.4G
Wi-Fi 5G SSID: KAON-xxxx-5G
Wi-Fi password : NNNNNNNN
Web server: 192.168.1.1
Username: admin
Password: password
Power Supply : 12V 2.0A
This device complies with Part 15 of the FCC Rules. Operation is subject to the following two conditions.
1) this device may not cause harmful interference, and
2) this device must accept any interference received, including interference that may cause undesired operation.
FCC ID: WQT-AR2146
S/N:XXXXNNNNNNNNN
BASE MAC:XXXXNNNNNN
2.4G Wi-Fi MAC:XXXXNNNNNNNNN
5G Wi-Fi MAC:XXXXNNNNNNNN
12 Kaonmedia Proprietary and Condential. Copyright 2017 KAON MEDIA CO., LTD. All Rights Reserved.
You can connect your computer to the router using an Ethernet cable and join the router’s local area network (LAN)
3. To connect your computer to the router using Ethernet cable:
1) Make sure power is supplied to the router. (its Power LED is lit green)
2) Connect the supplied Ethernet cable to an Ethernet port on your computer.
3) Connect the other end of the Ethernet cable to one of the numbered Ethernet ports.
4) Your computer connects to the local area network (LAN). A message may be displayed on your computer screen to
notify you that network is connected.
After completing the set-up process to connect your computer to the AR2146, you can log-in the AR2146. Please refer
to the information from the next page.
Completing Conguration Set-up
13 Kaonmedia Proprietary and Condential. Copyright 2017 KAON MEDIA CO., LTD. All Rights Reserved.
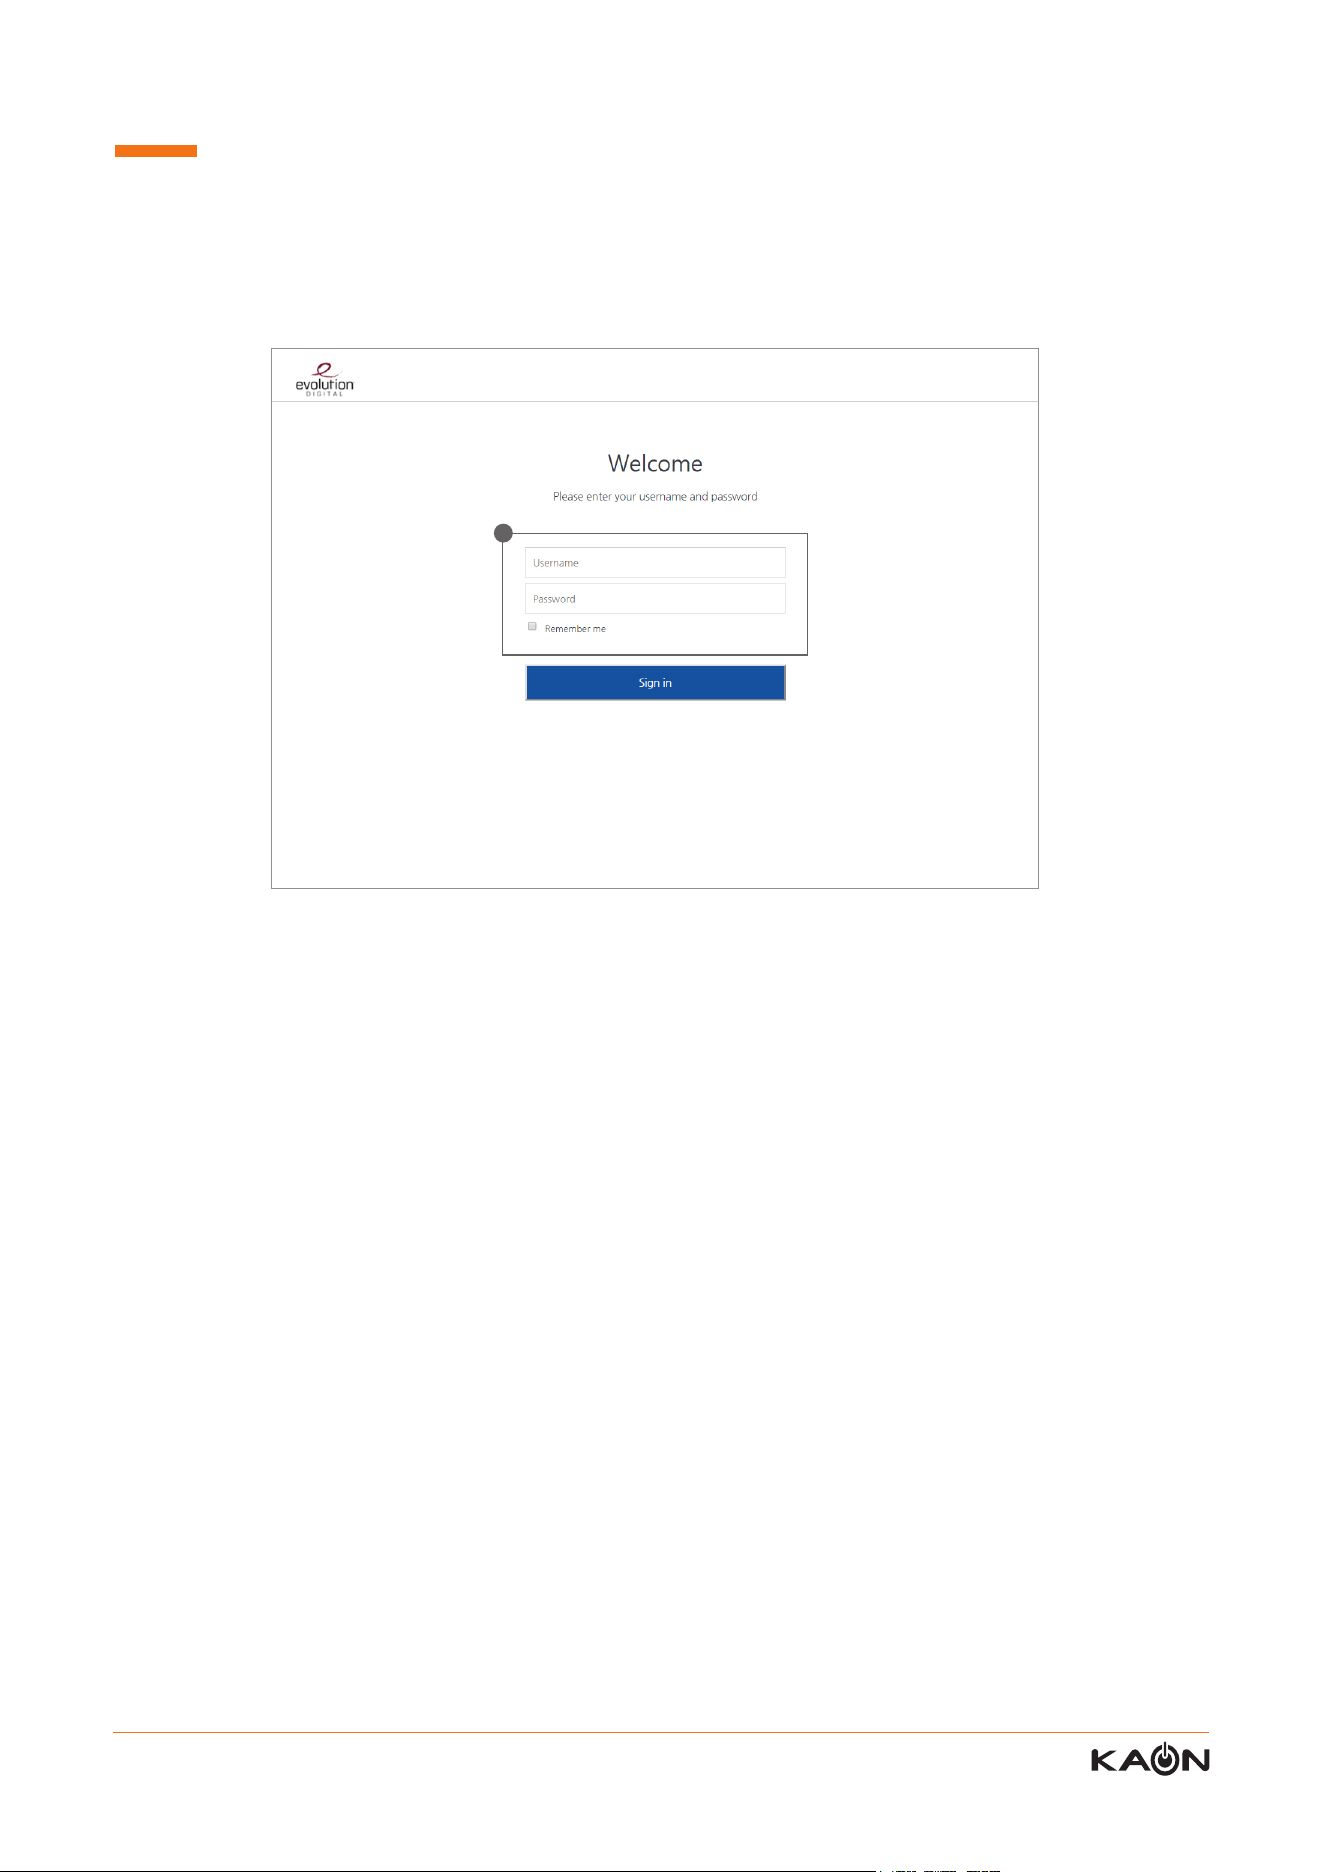
5. Login
1) Enter the default username and password and click “Sign in” to display the default landing page.
For the information of username and password, refer to the page 16. You can nd out the username and password
information on the label.
To log in to the AR2146 and make the conguration, you open an internet browser and type http://192.168.1.1
on your computer. Please make sure the your computer is connected to the AR2146.
1
14 Kaonmedia Proprietary and Condential. Copyright 2017 KAON MEDIA CO., LTD. All Rights Reserved.
6. Home
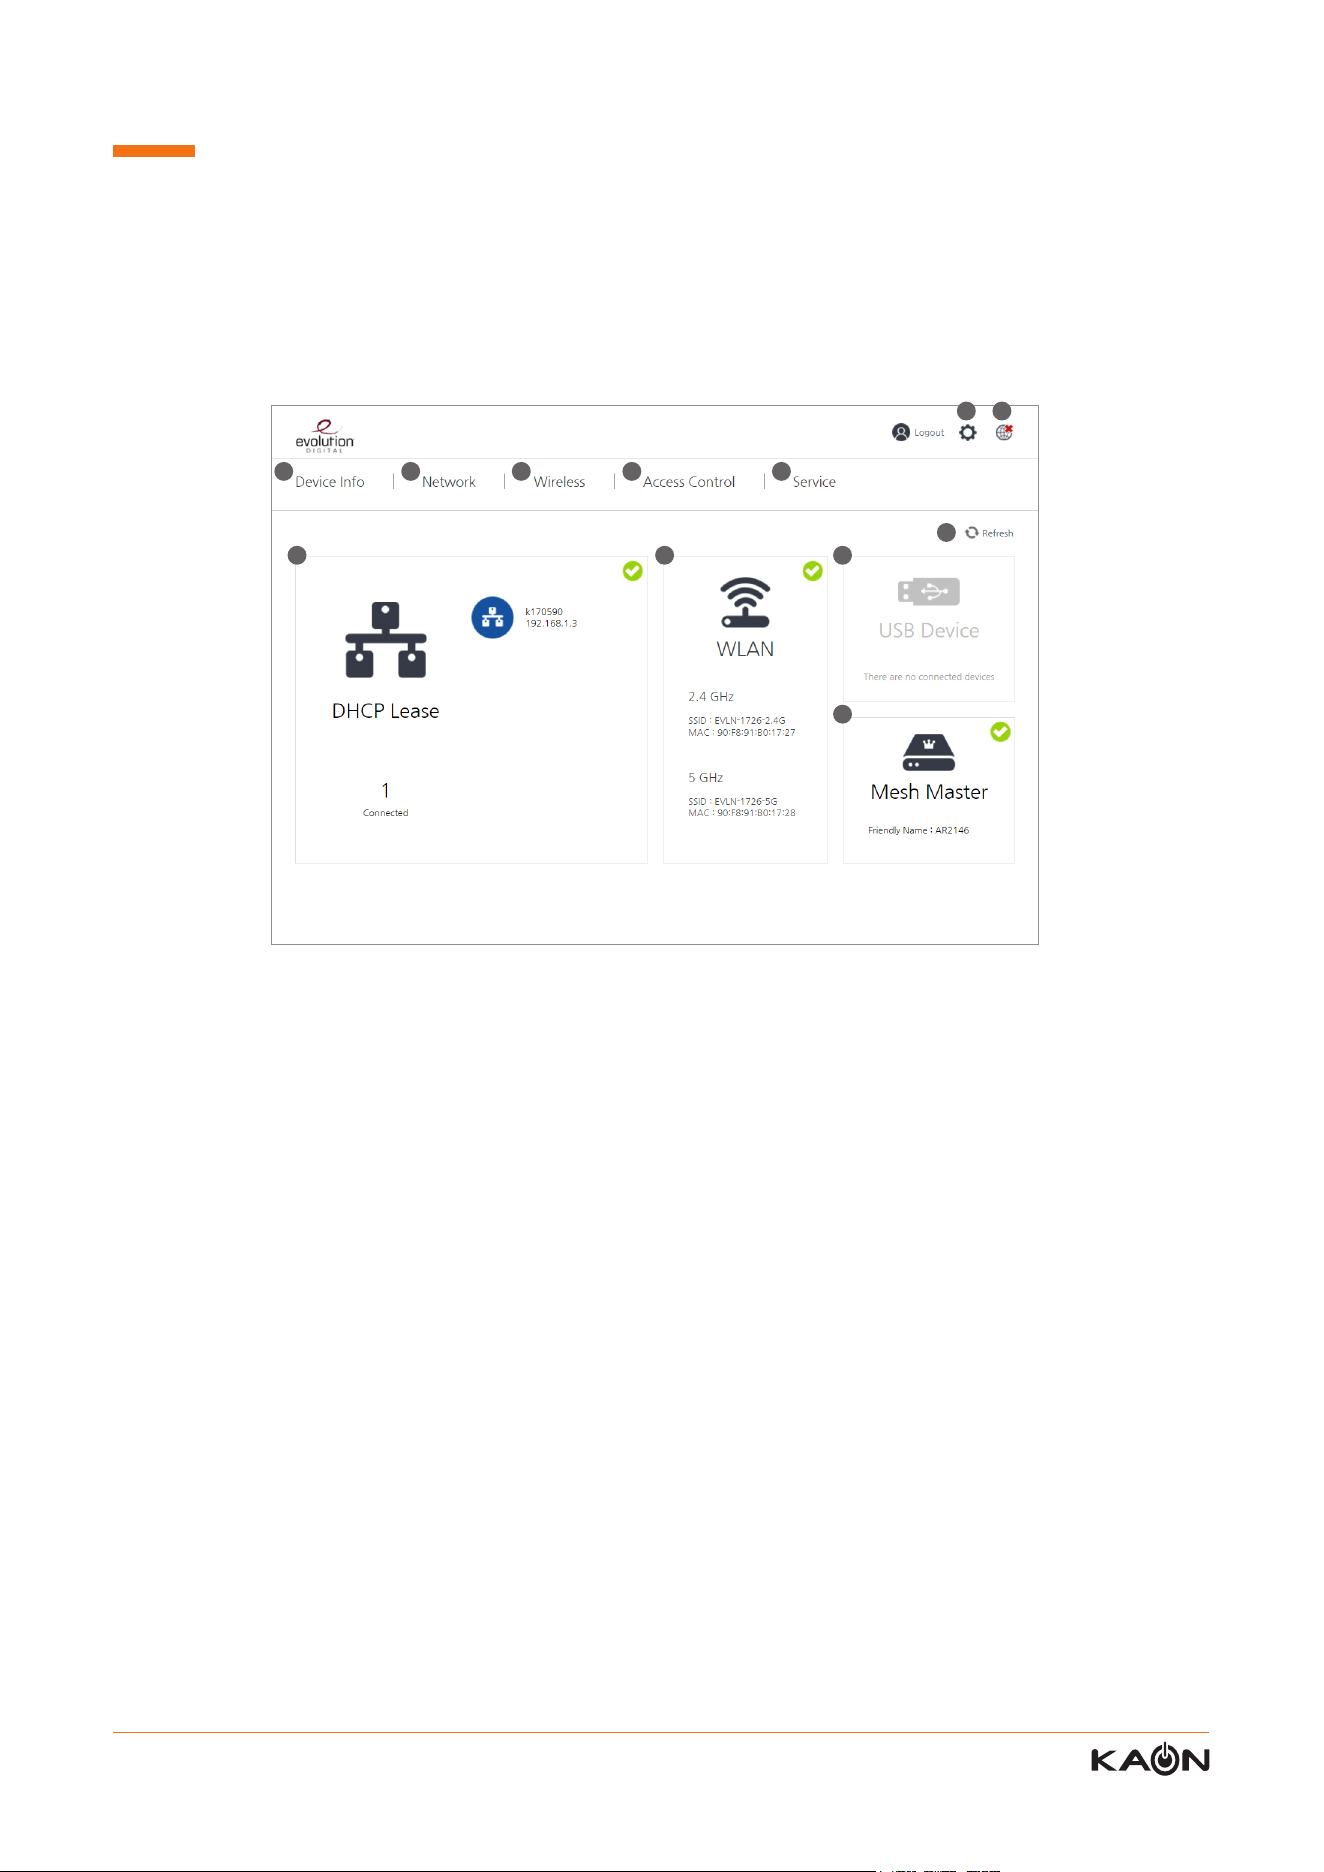
The home page is the rst page that is loaded when you log in.
When you log into the AR2146, you can check overall status.
If your AR2146 is congured for “bridge mode” (modem) operation, your PC will NOT be able to acquire an address via
CPE DHCP. Instead, manually congure your PC’s interface with an IP address on the default network (e.g., 192.168.1.1).
1
8 9 10
11
2 3 4 5
6 7
12
1) Device Info
It shows the general information about this CPE. it includes summary, WAN, LAN, and Network Statistics information.
2) Network Conguration
It shows network related information such as WAN Service, LAN Service, Internet Time.
3) Wireless Conguration
It shows Wireless interface related information such as Wi-Fi and Mesh.
4) Access Control Conguration
It shows access-control related information such as NAT, Filtering, Parental Control.
5) Service Conguration
It shows Service related information such as Dynamic DNS, DLNA.
6) Management Conguration
You can congure password, backup settings, update software, reset, TR-069 client, and system log. Go to p114 for
more information.
7) Internet Connectivity Information
It shows whether or not the AR2146 is connected to the internet.
8) DHCP Information
It displays how many clients get connected to the AR2146.
9) WLAN Information
It shows the Wi-Fi information including SSID and MAC address of each Wi-Fi interface (2.4GHz and 5GHz).
10) USB Device Information
It shows whether a USB device is connected or not.
15 Kaonmedia Proprietary and Condential. Copyright 2017 KAON MEDIA CO., LTD. All Rights Reserved.
7. Device Info Menu
This page shows the overall system information of the AR2146.
This page displays details about the hardware, software, and network information.
When you need to check the each interface’s information, you can visit this page.
11) Mesh Master Information
When AR2146 is connected with KAON repeaters with Wi-Fi Mesh, it becomes a Mesh controller (master). This icon
shows the name of WiFi Mesh.
12) Refresh Button
Click the refresh button to update the status information, then the status will be renewed.nnected or not.
16 Kaonmedia Proprietary and Condential. Copyright 2017 KAON MEDIA CO., LTD. All Rights Reserved.
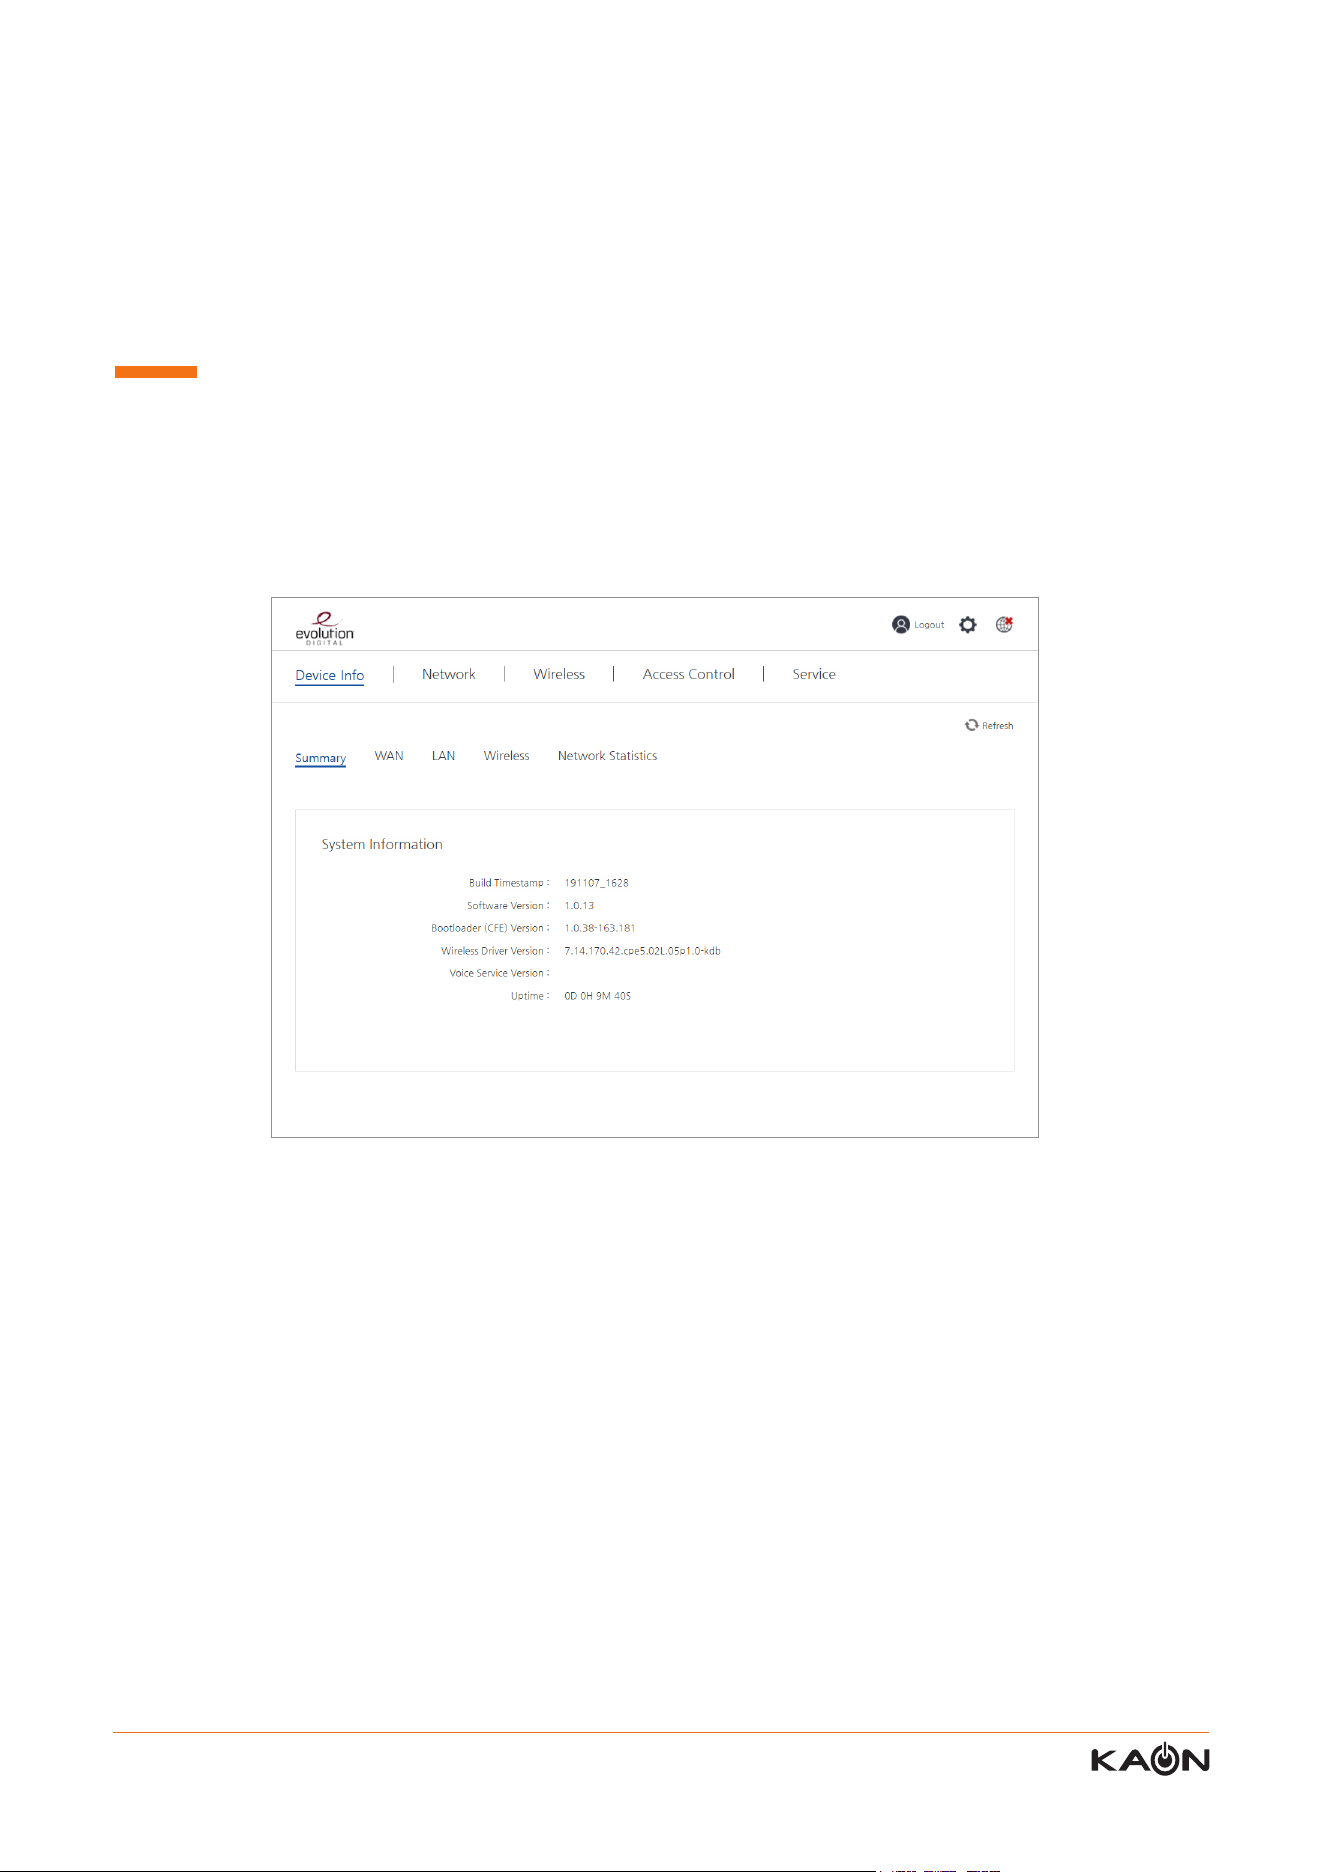
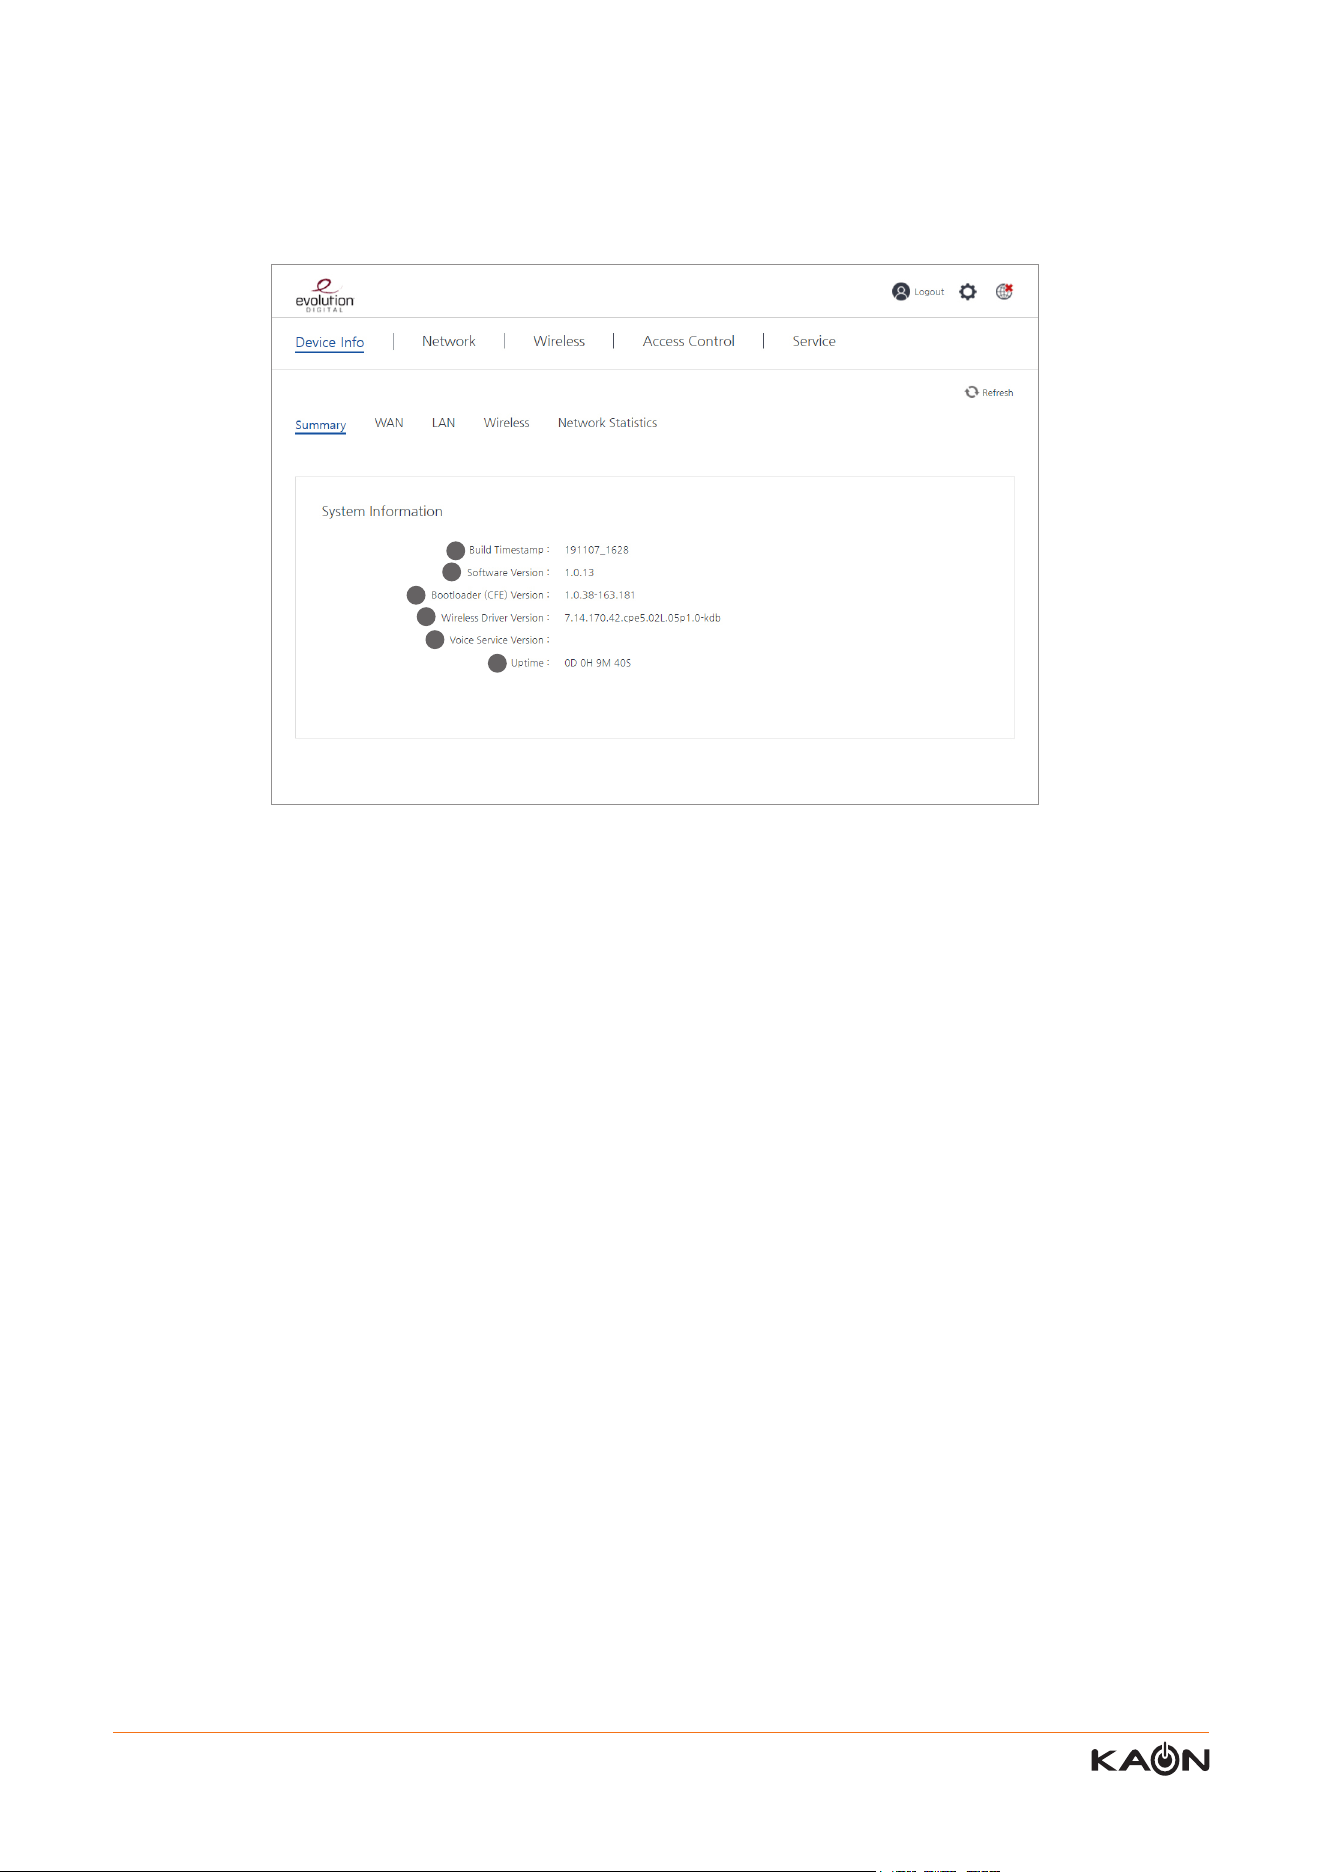
7.1. Summary
1) Build time stamp
It shows the date when the rmware is built. The format is following: YYYYMMDD_HHMM
For example, 191107_1628 means that 2019, November, 07_16:28
2) Software version
The rmware software version
3) Bootloader version
The bootloader version
4) Wireless driver version
Wireless driver version
5) Voice service version
VoIP driver version
6) Uptime
Uptime of the CPE with the following format DD:HH:MM:SS
1
2
3
4
5
6
This page shows system information.
17 Kaonmedia Proprietary and Condential. Copyright 2017 KAON MEDIA CO., LTD. All Rights Reserved.
7.2. WAN
1
2
3
4
5
6
7
8
9
10
11
12
12-1 12-2 12-3 12-4
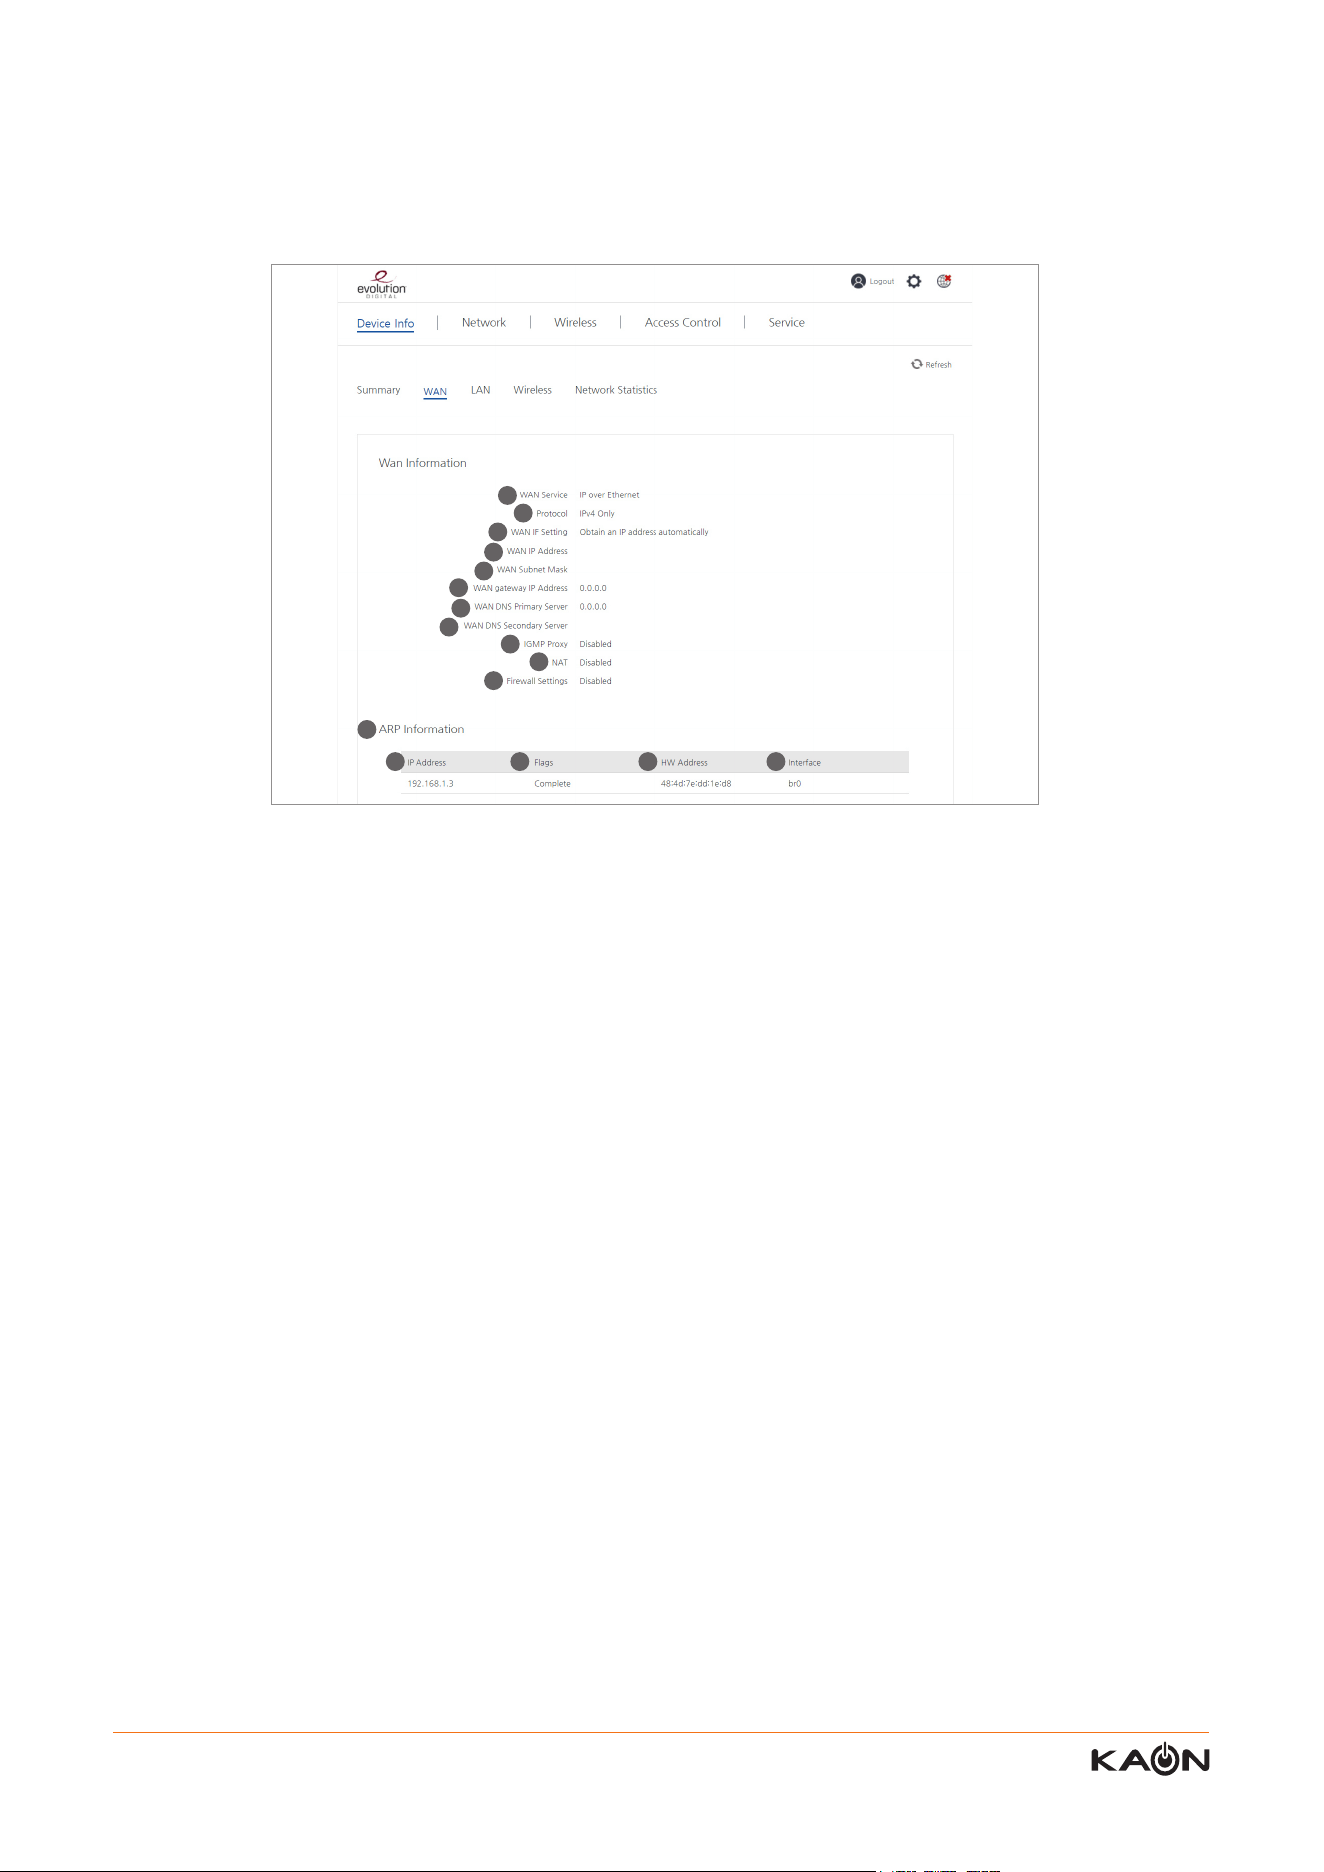
1) WAN service
It shows WAN service uses either IPoE or PPPoE.
2) Protocol
It shows this CPE uses either IPv4, IPv6, or dual-stack.
3) WAN IF setting
It shows the IP address of this CPE. it can be set manually (Static) or dynamically (provided by a server automatic).
4) WAN IP Address
The IP address of WAN interface.
5) WAN subnet mask
It shows the subnet mask information.
6) WAN gateway IP address
It shows the server IP address which provides the IP address.
7) WAN DNS primary server
It shows the primary DNS server IP address which can be provided by the server or set manually.
8) WAN DNS secondary server
It shows the secondary DNS server IP address which can be provided by the server or set manually.
9) IGMP proxy
It shows whether IGMP proxy function of the AR2146 is disabled or enabled.
10) NAT
It shows whether NAT function of the AR2146 is disabled or enabled.
11) Firewall setting
It shows whether Firewall function of the AR2146 is disabled or enabled.
12) ARP Information
It shows the IP addresses and the relevant MAC addresses which the AR2146 is connected to via (W) LAN or WAN.
12-1) IP address
It shows the IP addresses connected with the AR2146.
12-2) Flags
It shows whether ARP process is completed or not.
This page shows WAN information.
18 Kaonmedia Proprietary and Condential. Copyright 2017 KAON MEDIA CO., LTD. All Rights Reserved.
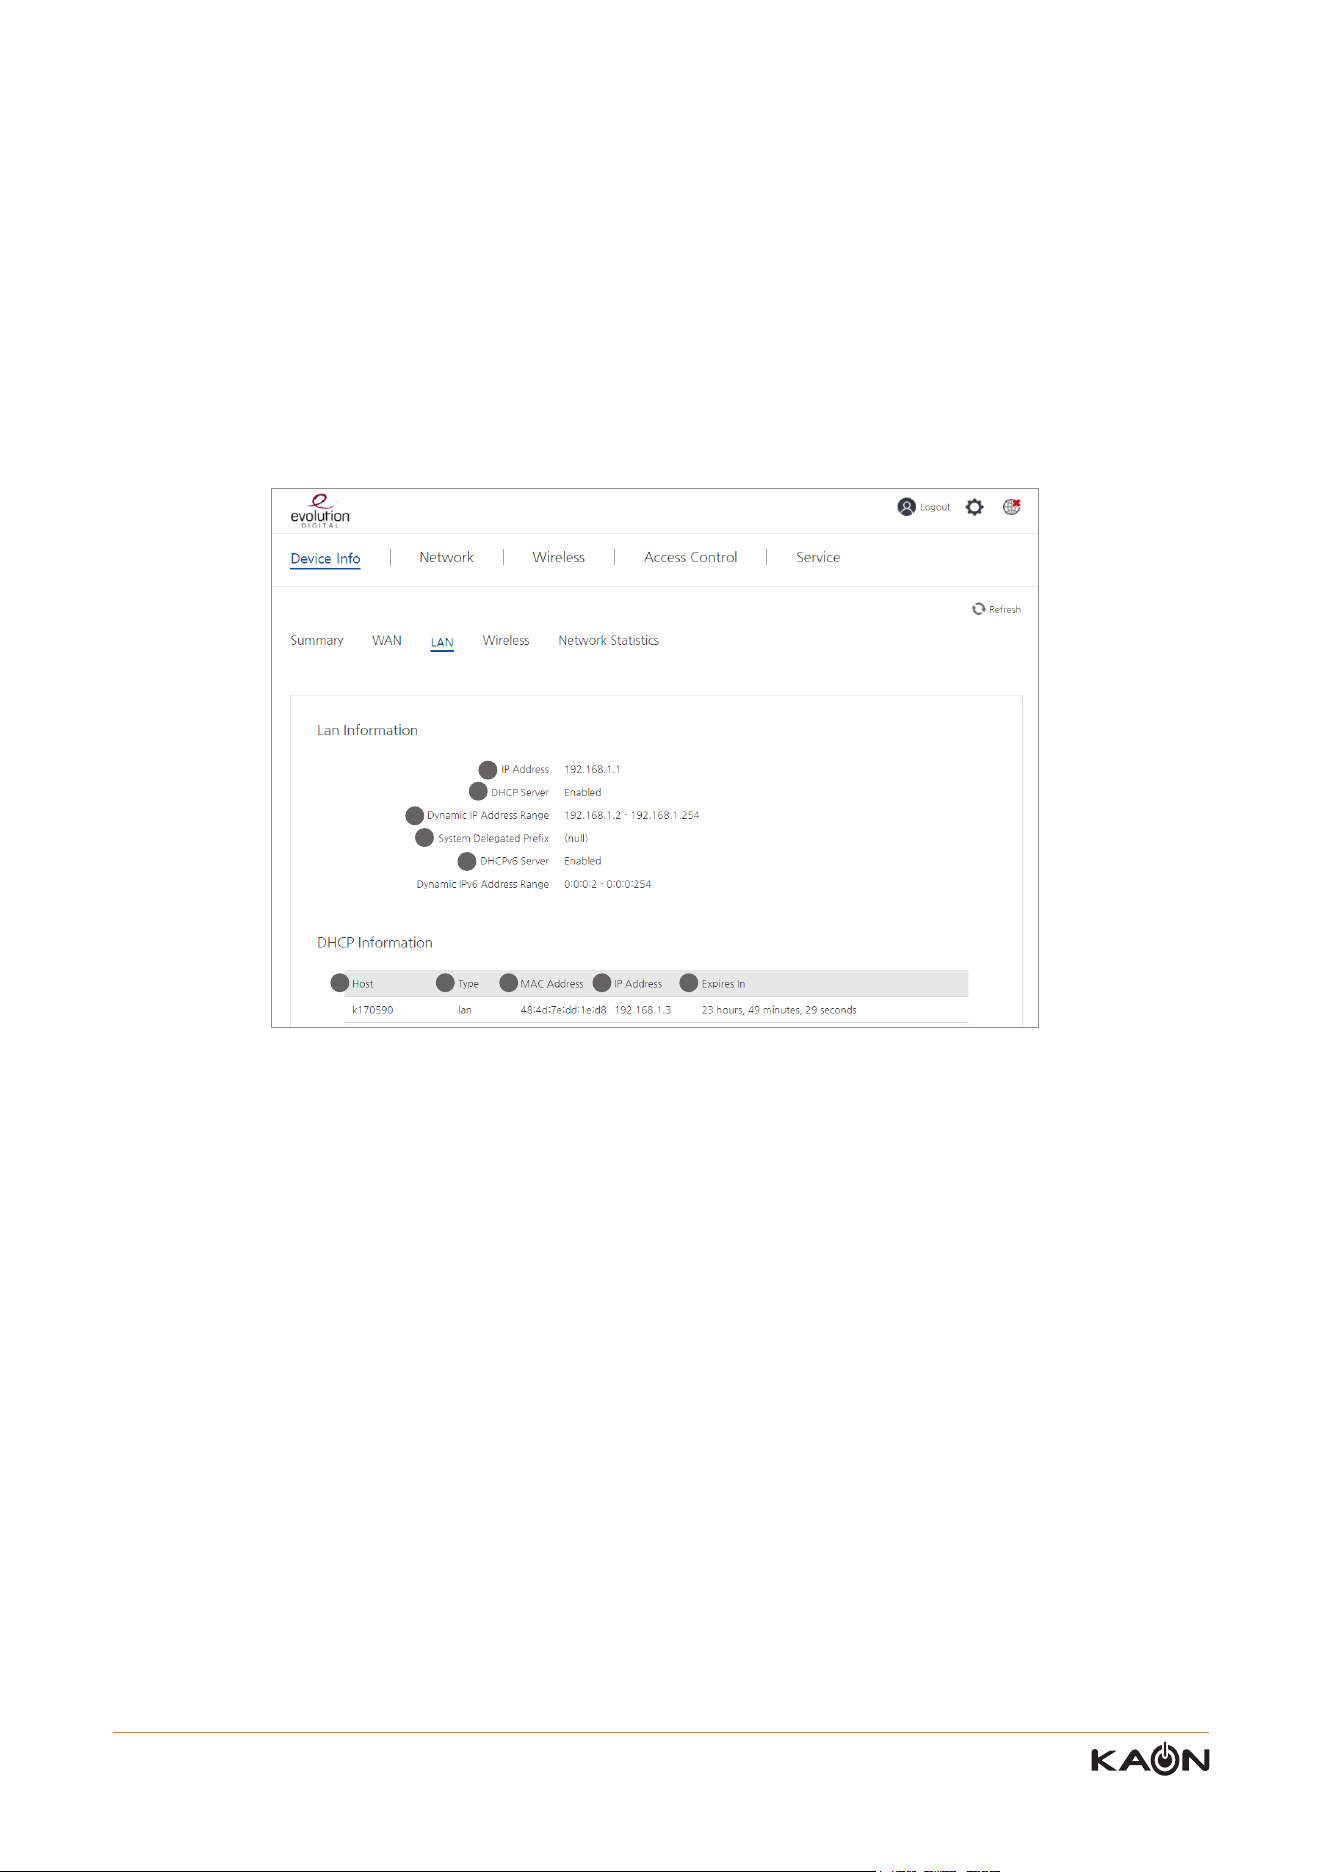
1) IP address
It shows the IP address of the AR2146 on LAN interface. This IP address become the gateway IP address of the devices
connected to the AR2146 via (W)LAN.
2) DHCP server
It shows whether the DHCP server function of the AR2146 is enabled or disabled.
3) Dynamic IP address range
It shows the dynamic IP address range for IPv4 which this CPE can provide to the connected devices.
4) DHCPv6 server
It shows whether DHCP function of this CPE is enabled or disabled for IPv6.
5) Dynamic IPv6 address range
It shows the dynamic IP address range for IPv6 which this CPE can provide to the connected devices.
6) DHCP information
It shows the DHCP IP address which the AR2146 has provided to the connected devices. This information is cached
for a congured time duration; if the devices is no longer connected after this time period, the related DHCP information
will disappear.
6-1) Host
It shows the host name of the device.
6-2) Type
It shows the type of connectivity, LAN or WLAN.
This page shows LAN and DHCP information.
7.3. LAN
12-3) HW address
It shows the MAC addresses of the connected devices.
12-4) Interface
It can shows either br0, eth, or wl.
br0 means LAN connection, eth 4 means WAN connection, and wl means WLAN connection.
1
2
3
4
5
6-1 6-2 6-3 6-4 6-5
19 Kaonmedia Proprietary and Condential. Copyright 2017 KAON MEDIA CO., LTD. All Rights Reserved.
6-3) MAC address
It shows the MAC address of the deviced.
6-4) IP address
It shows the IP address of the device.
6-5) Expires in
It shows when the DHCP lease time nish.
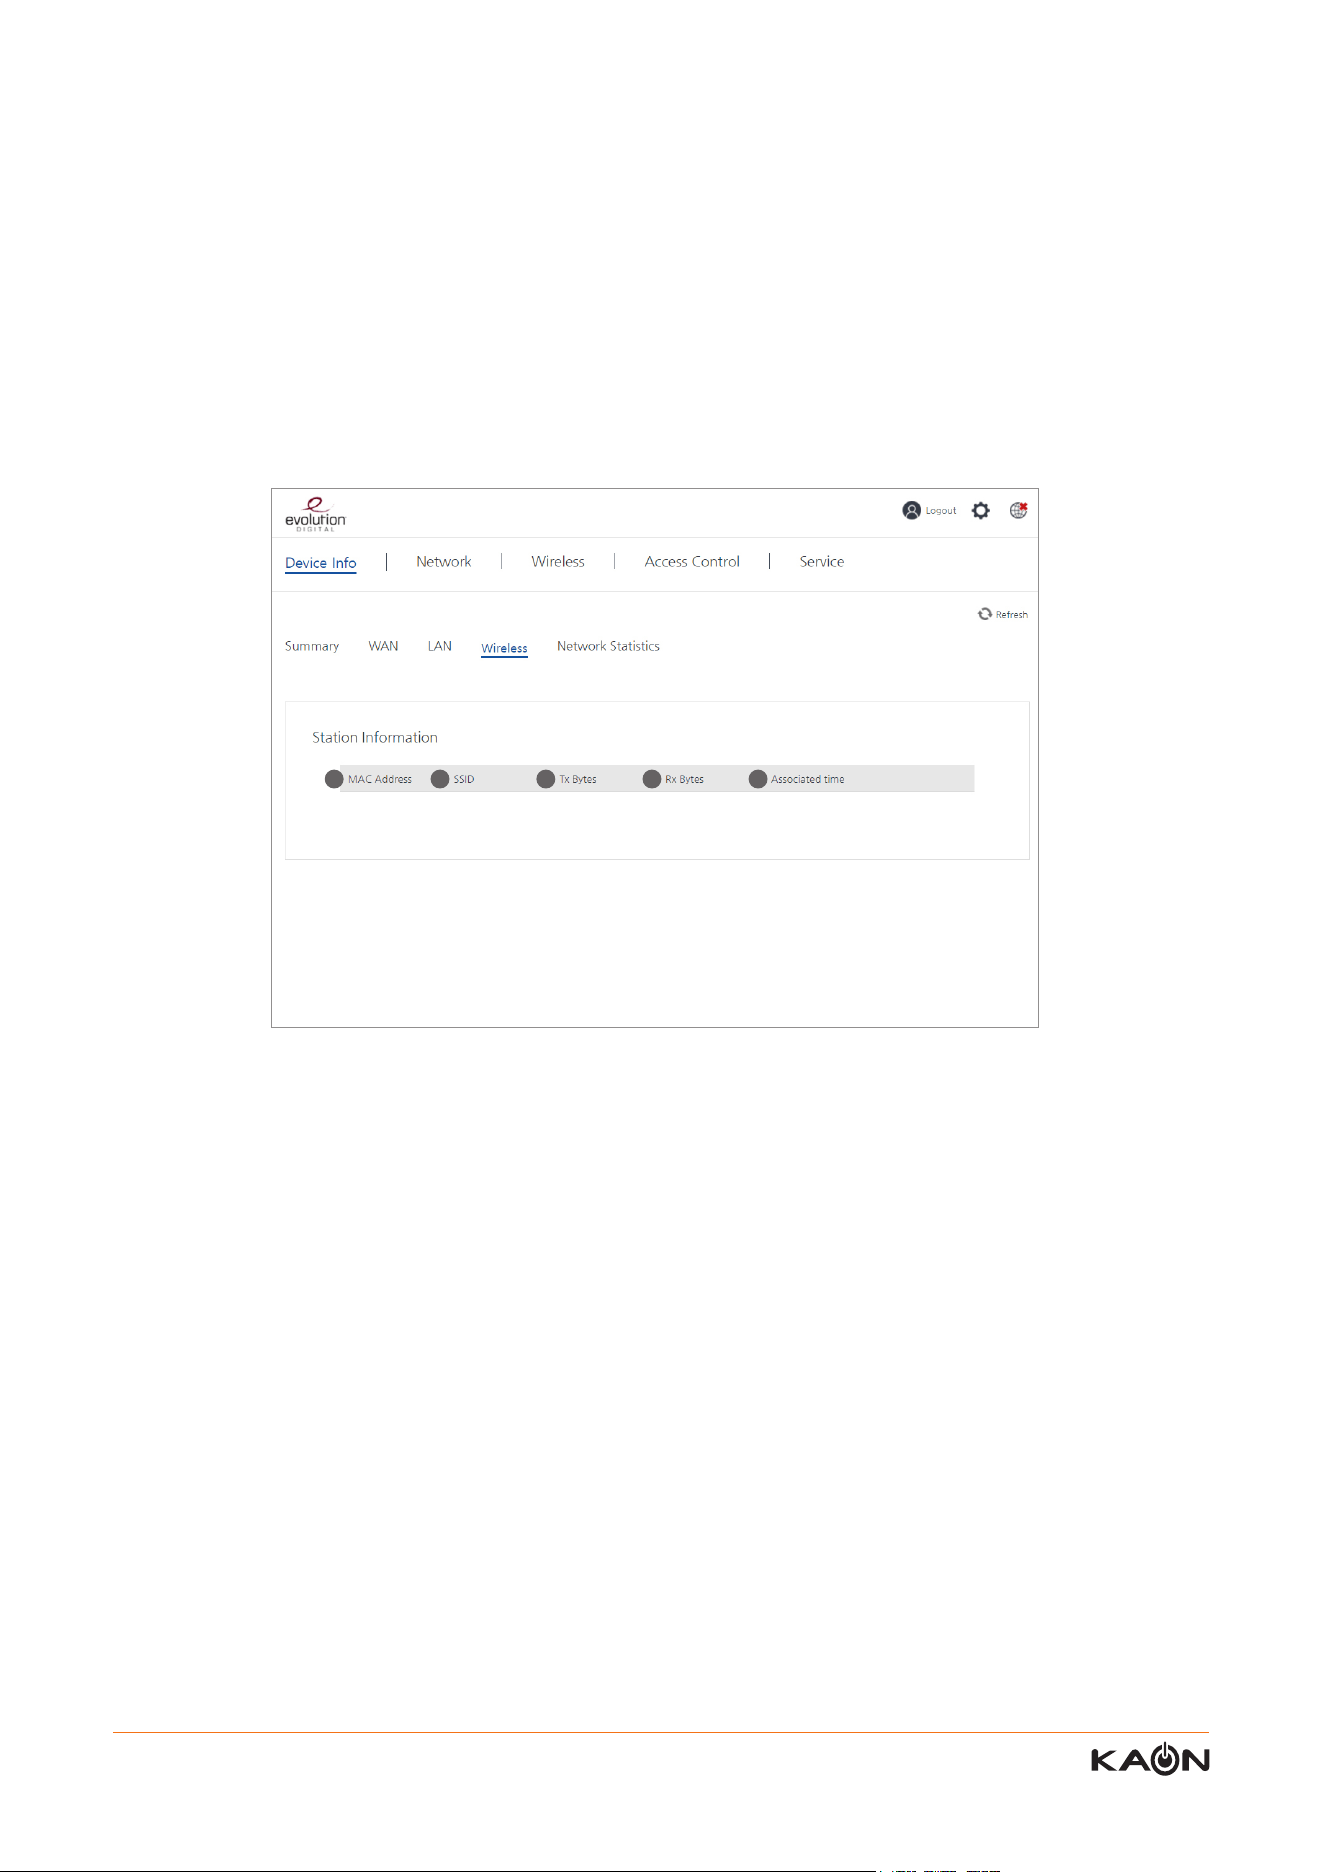
1) MAC address
It shows the MAC address of the connected device.
2) SSID
It shows the SSID name of the Wi-Fi with which the connected device use.
3) Tx Bytes
TX is an abbreviation of Transmit.
TX bytes means the total number of bytes this CPE transmitted.
4) RX Bytes
RX is an abbreviation of Receive.
RX bytes means the total number of bytes this CPE received.
5) Associated Time
It shows how long the devices connected to this CPE via WiFi.
This page shows the connected devices via WLAN (Wi-Fi).
7.4. Wireless
1 2 3 4 5
20 Kaonmedia Proprietary and Condential. Copyright 2017 KAON MEDIA CO., LTD. All Rights Reserved.
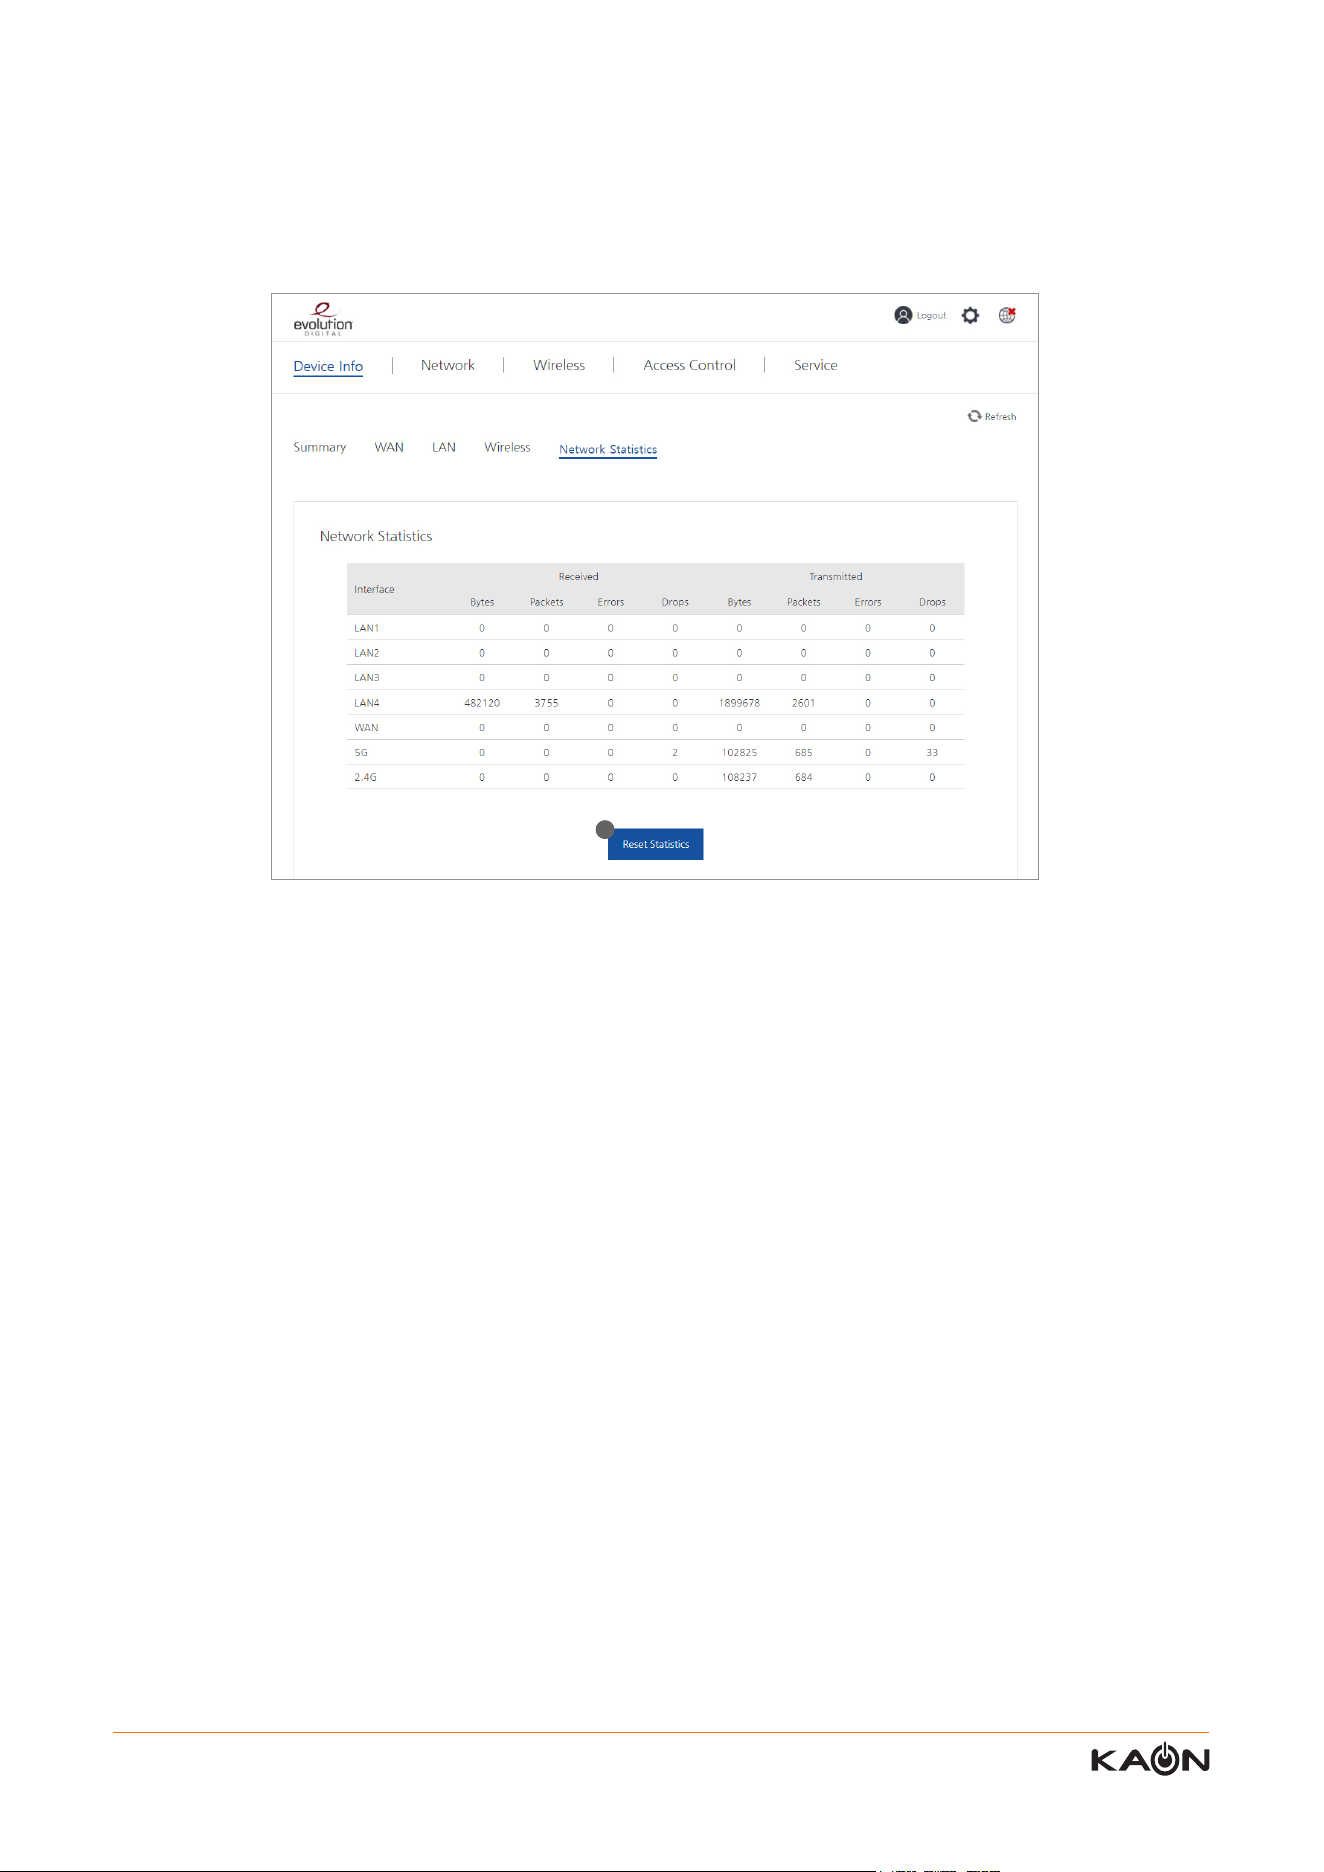
1) Reset Statistics
It resets the TX and RX statics of Network Statistics table.
This page shows the TX (transmitted) and RX (received) packet information each network interface.
You can view the received and transmitted bytes, packets, errors and drops for Network statistics.
7.5. Network Statistics
1
21 Kaonmedia Proprietary and Condential. Copyright 2017 KAON MEDIA CO., LTD. All Rights Reserved.
8. Network Menu
Network Menu page enables you to manage WAN/LAN interface setting.
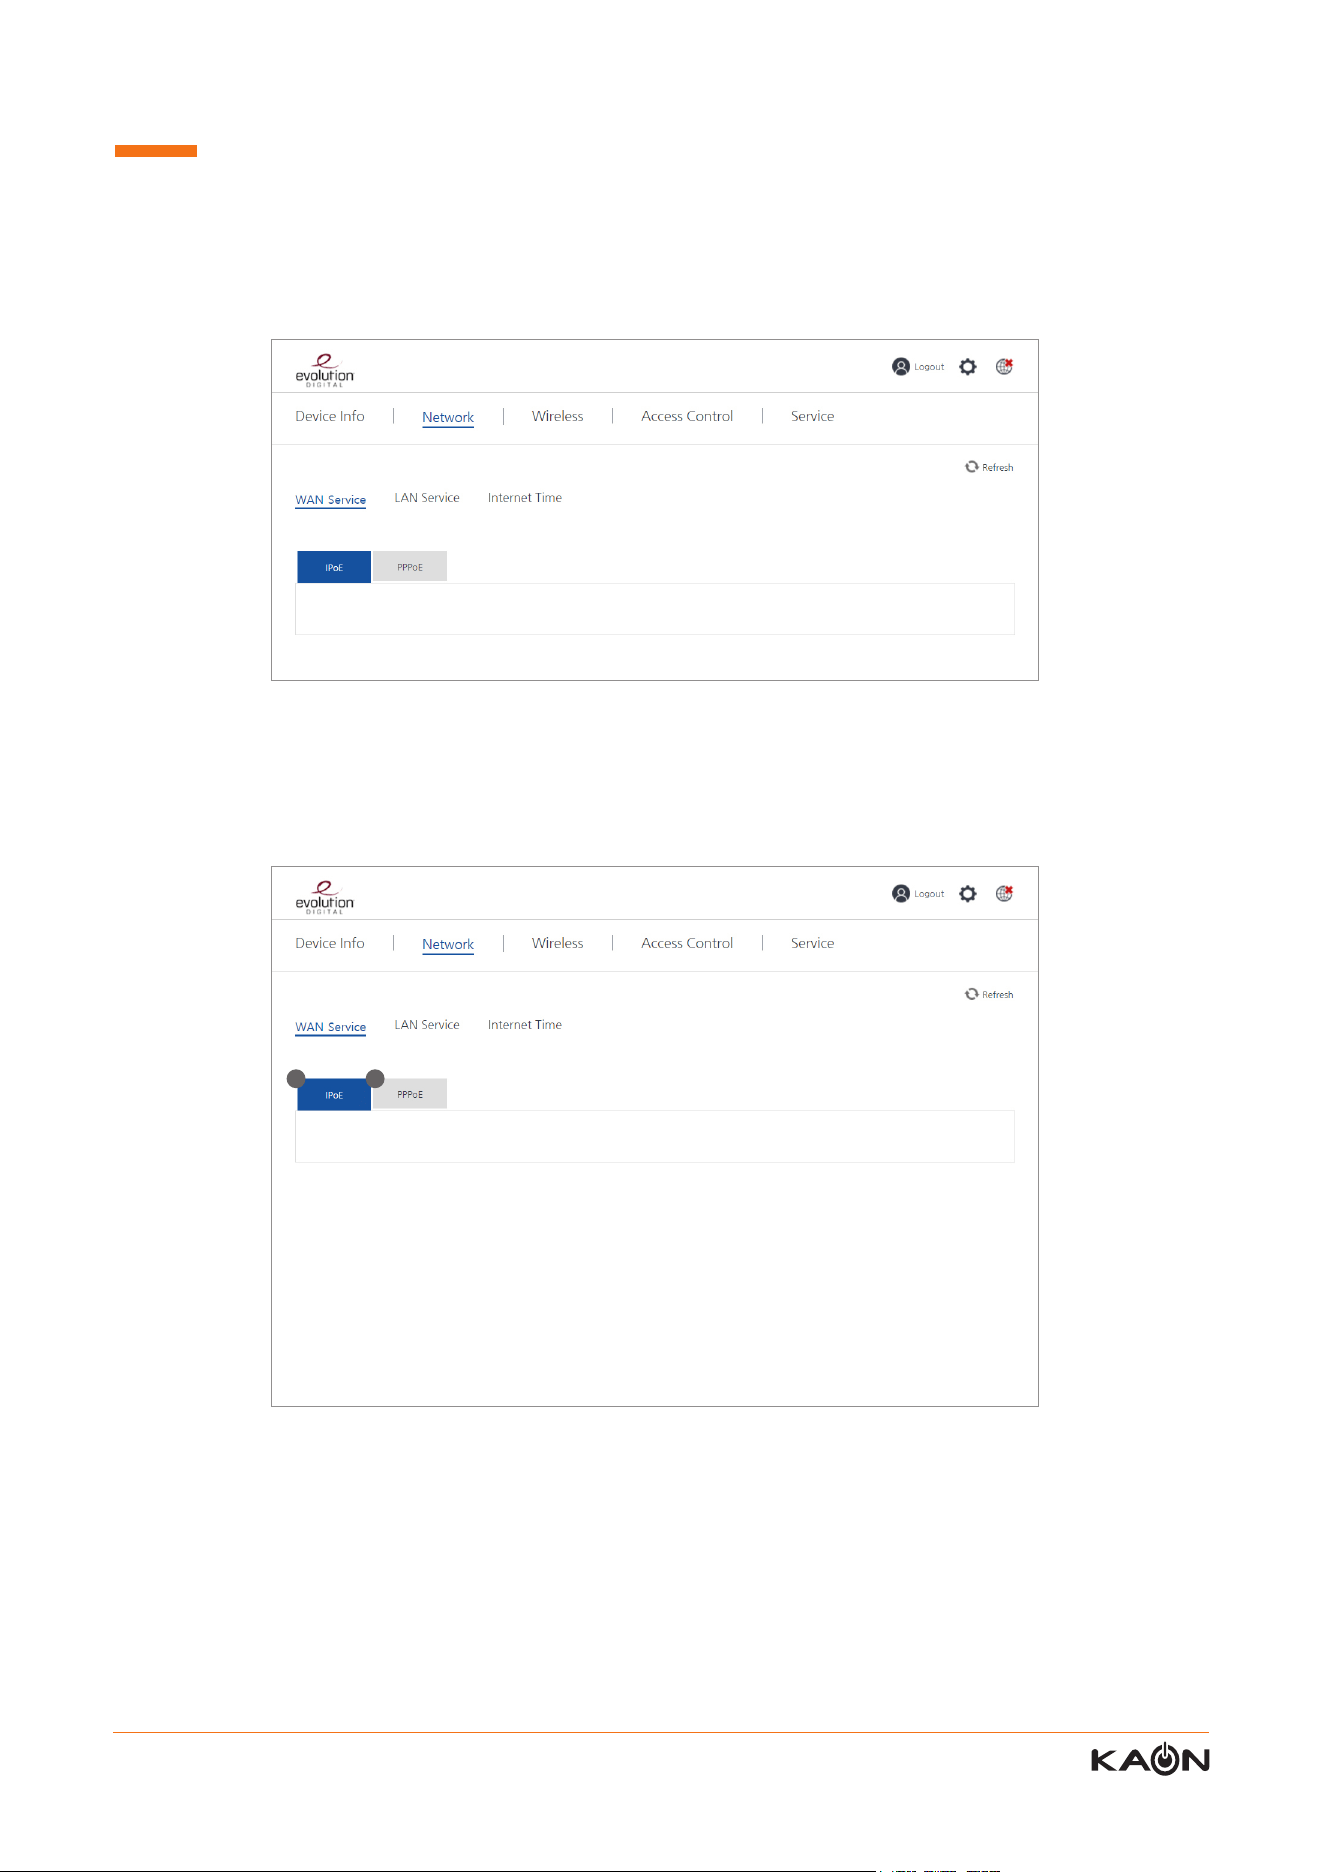
1) IPoE
Internet Protocol over Ethernet (IPoE) is a method of delivering an IP payload over an Ethernet-based access network
or an access network using bridged Ethernet over Asynchronous Transfer Mode (ATM) without using PPPoE.
2) PPPoE
The Point-to-Point Protocol over Ethernet (PPPoE) is a network protocol for encapsulating PPP frames inside Ethernet
frames.
In the WAN Service sub-menu, you can manage the IPoE & PPPoE setting.
8.1. WAN Service – IPoE & PPPoE
1 2
22 Kaonmedia Proprietary and Condential. Copyright 2017 KAON MEDIA CO., LTD. All Rights Reserved.
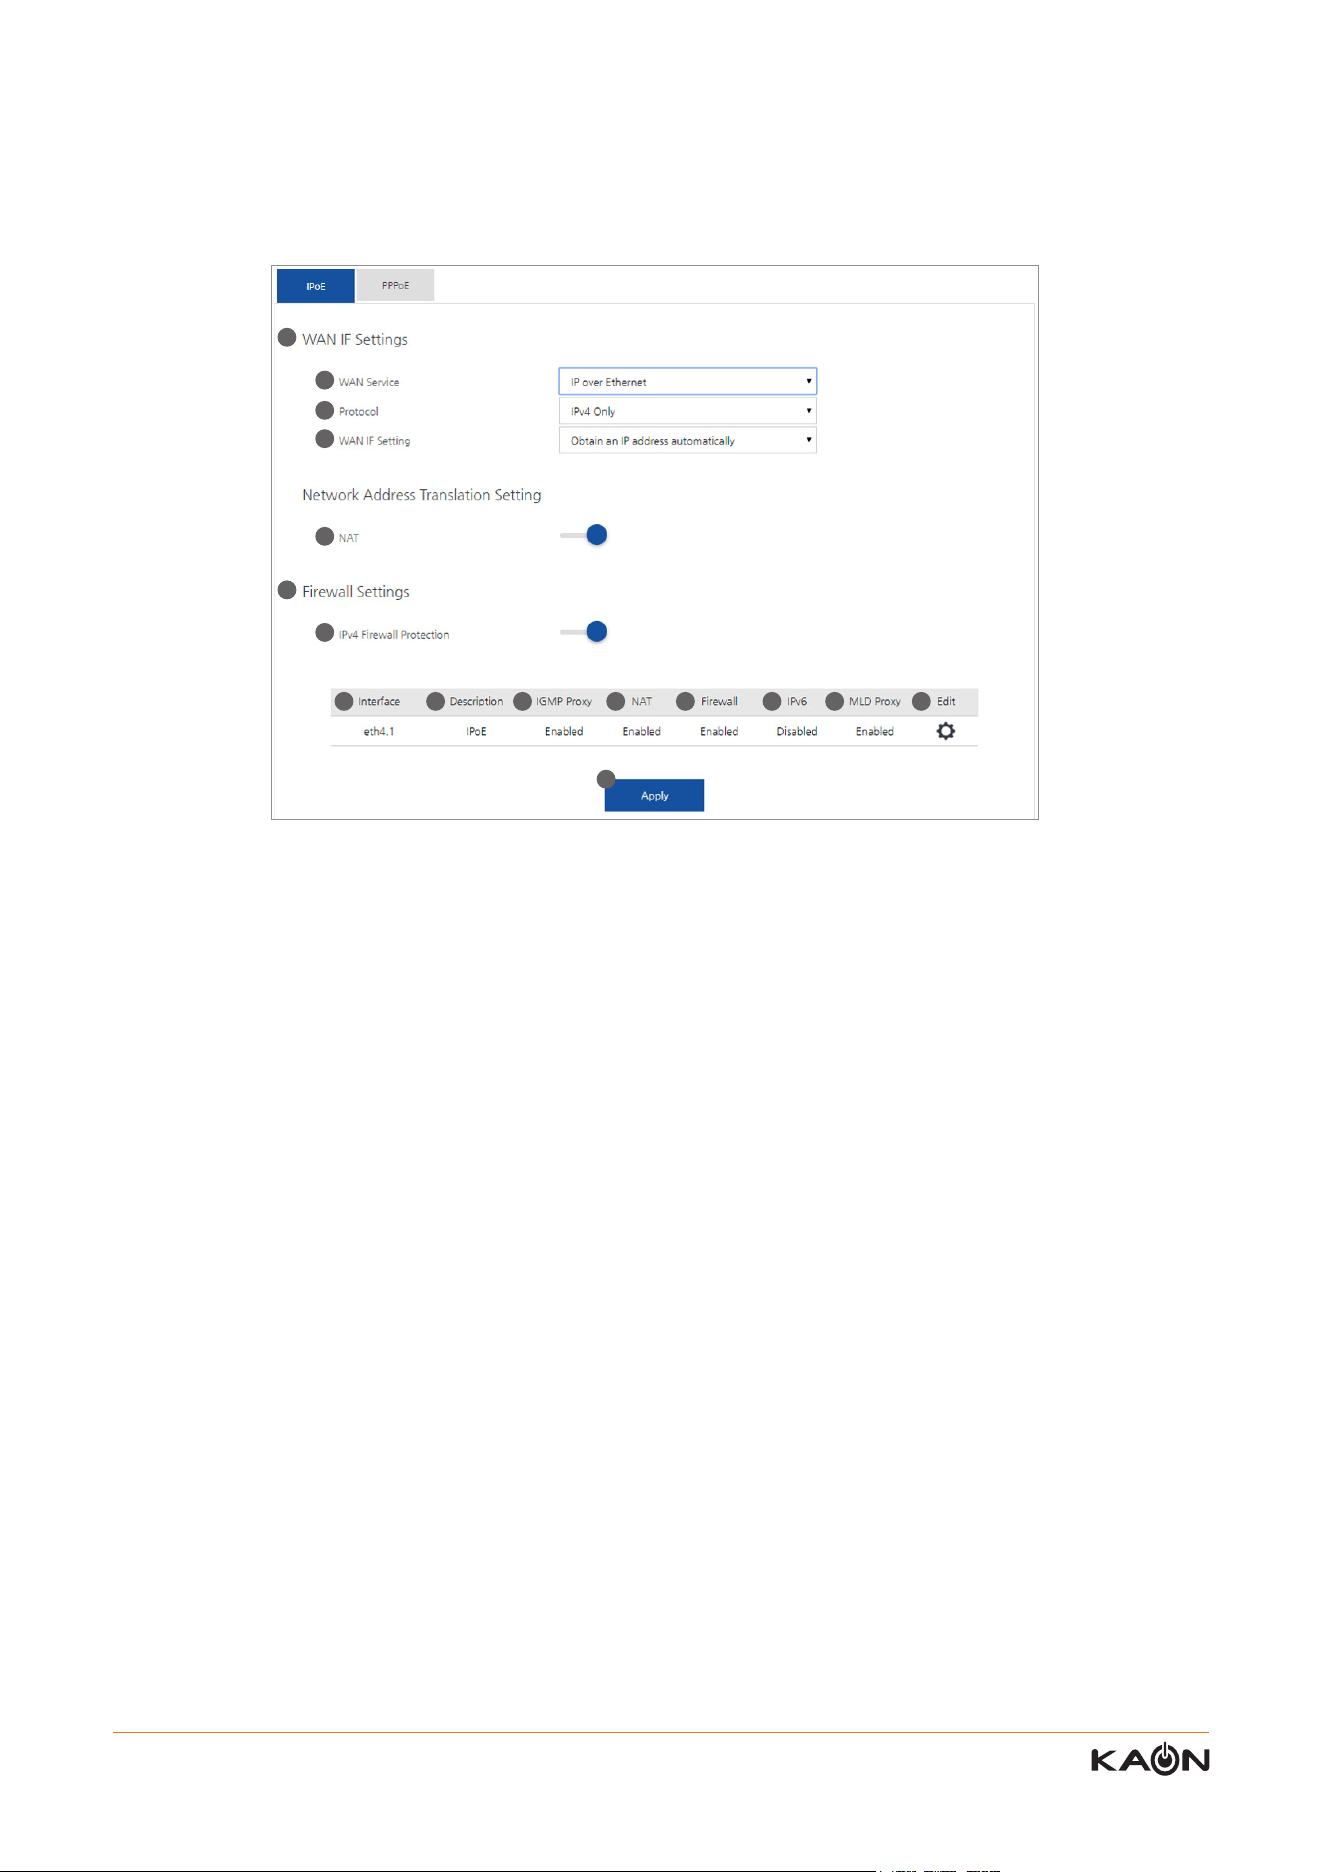
1) WAN IF Settings
You can set the WAN interface information.
1-1) WAN Service
A user can choose either “IP over Ethernet” or “Bridging” mode. When the user select “IP over Ethernet”, the user can
manually congure the rest of the menu below. When the user select “Bridging”, 802.1 P priority get set to “-1” and
802.1Q LAN ID get set to “-1” and all other parameters below become deactivated
.
1-2) Protocol
A user can select IPv4 Only , IPv4 & IPv6 (dual stack), or IPv6 only
.
1-3) WAN IF Setting
A user can select either one of the following mode; “User the following static IP address” or “obtain an IP address
automatically”
.
2) NAT
A user can enable or disable NAT (Network Address Translation) function.
3) Firewall Settings
You can set the Firewall information.
3-1) IPv4 Firewall Protection
User can enable or disable the basic rewall functions.
4) Interface
It shows the interface information like Wi-Fi interface or Ethernet interface
.
5) Description
It shows which authentication method is used e.g. IPoE or PPPoE
.
6) IGMP Proxy
It shows whether IGMP Proxy is enabled or disabled
.
7) NAT
It shows whether NAT is enabled or disabled
.
In this page, you can congure IPoE for WAN service connection.
8.1.1 WAN Service - IPoE
1
2
3
4 5 6 7 8 9 10 11
1-1
3-1
1-2
1-3
12

23 Kaonmedia Proprietary and Condential. Copyright 2017 KAON MEDIA CO., LTD. All Rights Reserved.
8) Firewall
It shows whether Firewall is enabled or disabled
.
9) IPv6
It shows whether IPv6 is enabled or disabled.
10) MLD Proxy
It shows this CPE is functioning as MLD proxy server
.
11) Edit
When a user click “Edit” button, the user can re-congure the selected WAN interface entry
.
12) Apply
When a user click “Apply” button, all the congurations the user congured will be applied to the AR2146 and a
new WAN service entry will be added to the below table
.
24 Kaonmedia Proprietary and Condential. Copyright 2017 KAON MEDIA CO., LTD. All Rights Reserved.
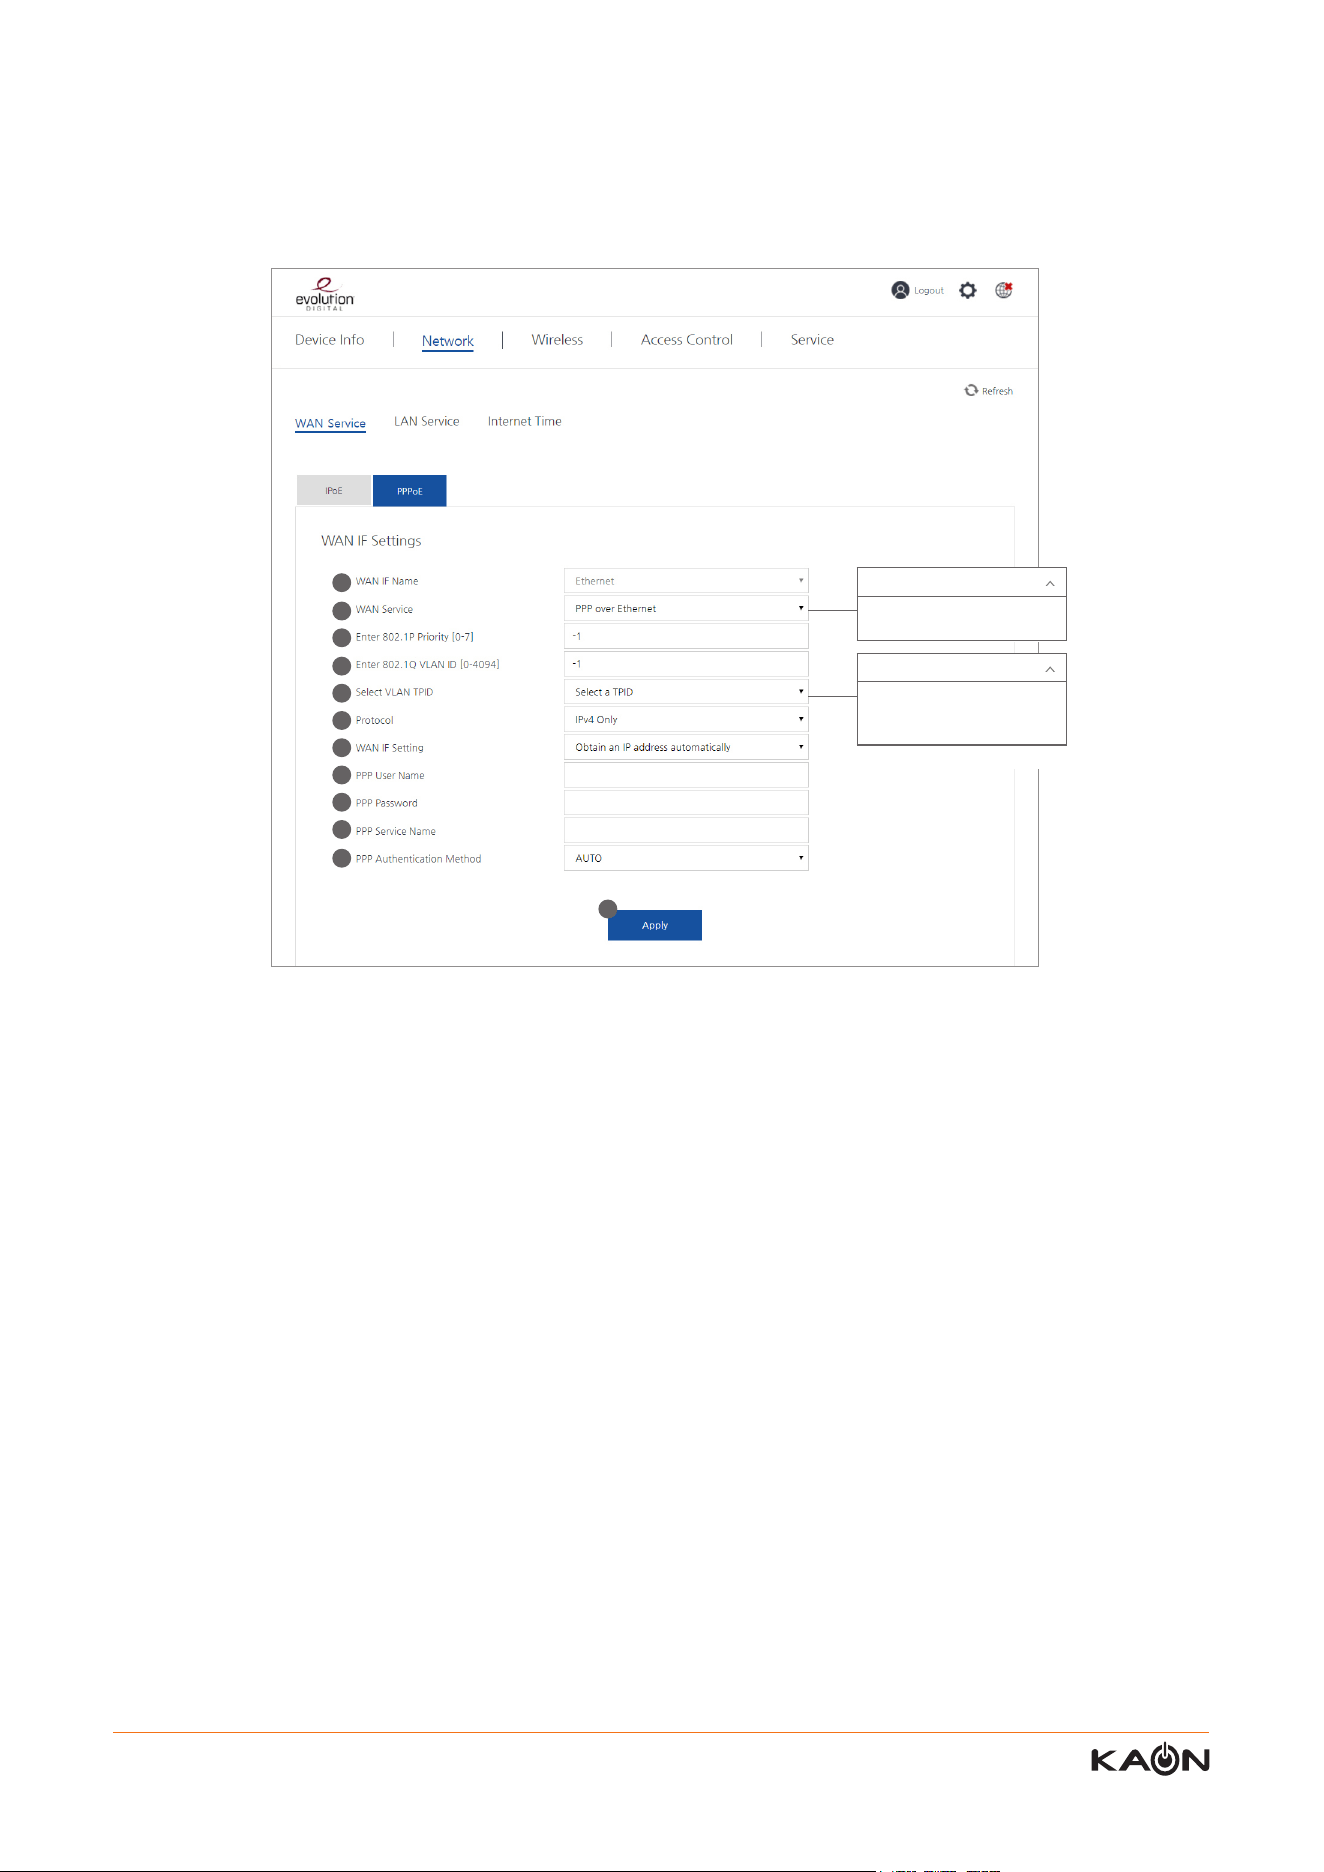
1) WAN IF Name
It shows which WAN interface to use in case the AR2146 uses multiple WAN interfaces.
2) WAN Service
User can choose how to connect to the server either via PPP over Ethernet or Bridging mode. When the user select
“PPP over Ethernet”, the user can manually congure the rest of the menu below. When the user select “Bridging”,
802.1 P priority get set to “-1” and 802.1Q LAN ID get set to “-1” and all other parameters below become deactivated.
3) Enter 802.1P Priority (0-7)
User can select the priority to the specic WAN interface he selects in the WAN IF Name. 7 is the highest priority. If the
user do not want to put any priority, the user can set “-1”
.
4) Enter 802.1Q VLAN ID (0-4094)
User can set the VLAN ID to the specic WAN interface he selects in the WAN IF Name. If the user do not want to put
any VLAN ID, the user can set “-1”
.
5) Select VLAN TPID
TPID is the tag protocol identier. User can choose either 0x8100, 0x88AB, or 0x9100.
6) Protocol
User can select IPv4 Only , IPv4 & IPv6 (dual stack), or IPv6 only.
7) WAN IF Setting
User can select either one of the following mode; Auto, RAP, CHAP, MSCHAP to obtain the IP address of the WAN
interface.
8) PPP User Name
User can enter the user name for the PPPoE to activate the network service. When the user enters the correct PPP
user name and PPP password, this CPE get authenticated by the PPP server and the internet service will be activated.
User can enter the PPPoE username and password If ISP provides and requires the PPPoE information.
8.1.2 WAN Service - PPPoE
PPP over Ethernet
PPP over Ethernet
Bridging mode
0x8100
0x8100
0x88AB
0x9100
1
2
3
4
5
6
7
8
9
10
11
12
25 Kaonmedia Proprietary and Condential. Copyright 2017 KAON MEDIA CO., LTD. All Rights Reserved.
9) PPP Password
User can enter the password for the PPPoE to activate the network service. When the user enters the correct PPP
user name and PPP password, this CPE get authenticated by the PPP server and the internet service will be activated.
10) PPP Service Name
User can make a name for this new PPP service entry.
11) PPP Authentication Method
It shows the PPP authentication method consists of Auto, PAP, CHAP, and MSCHAP.
12) Apply
When the user click “Apply” button, all the congurations the user congured will be applied to the CPE and a new
WAN service entry will be added to the below table.
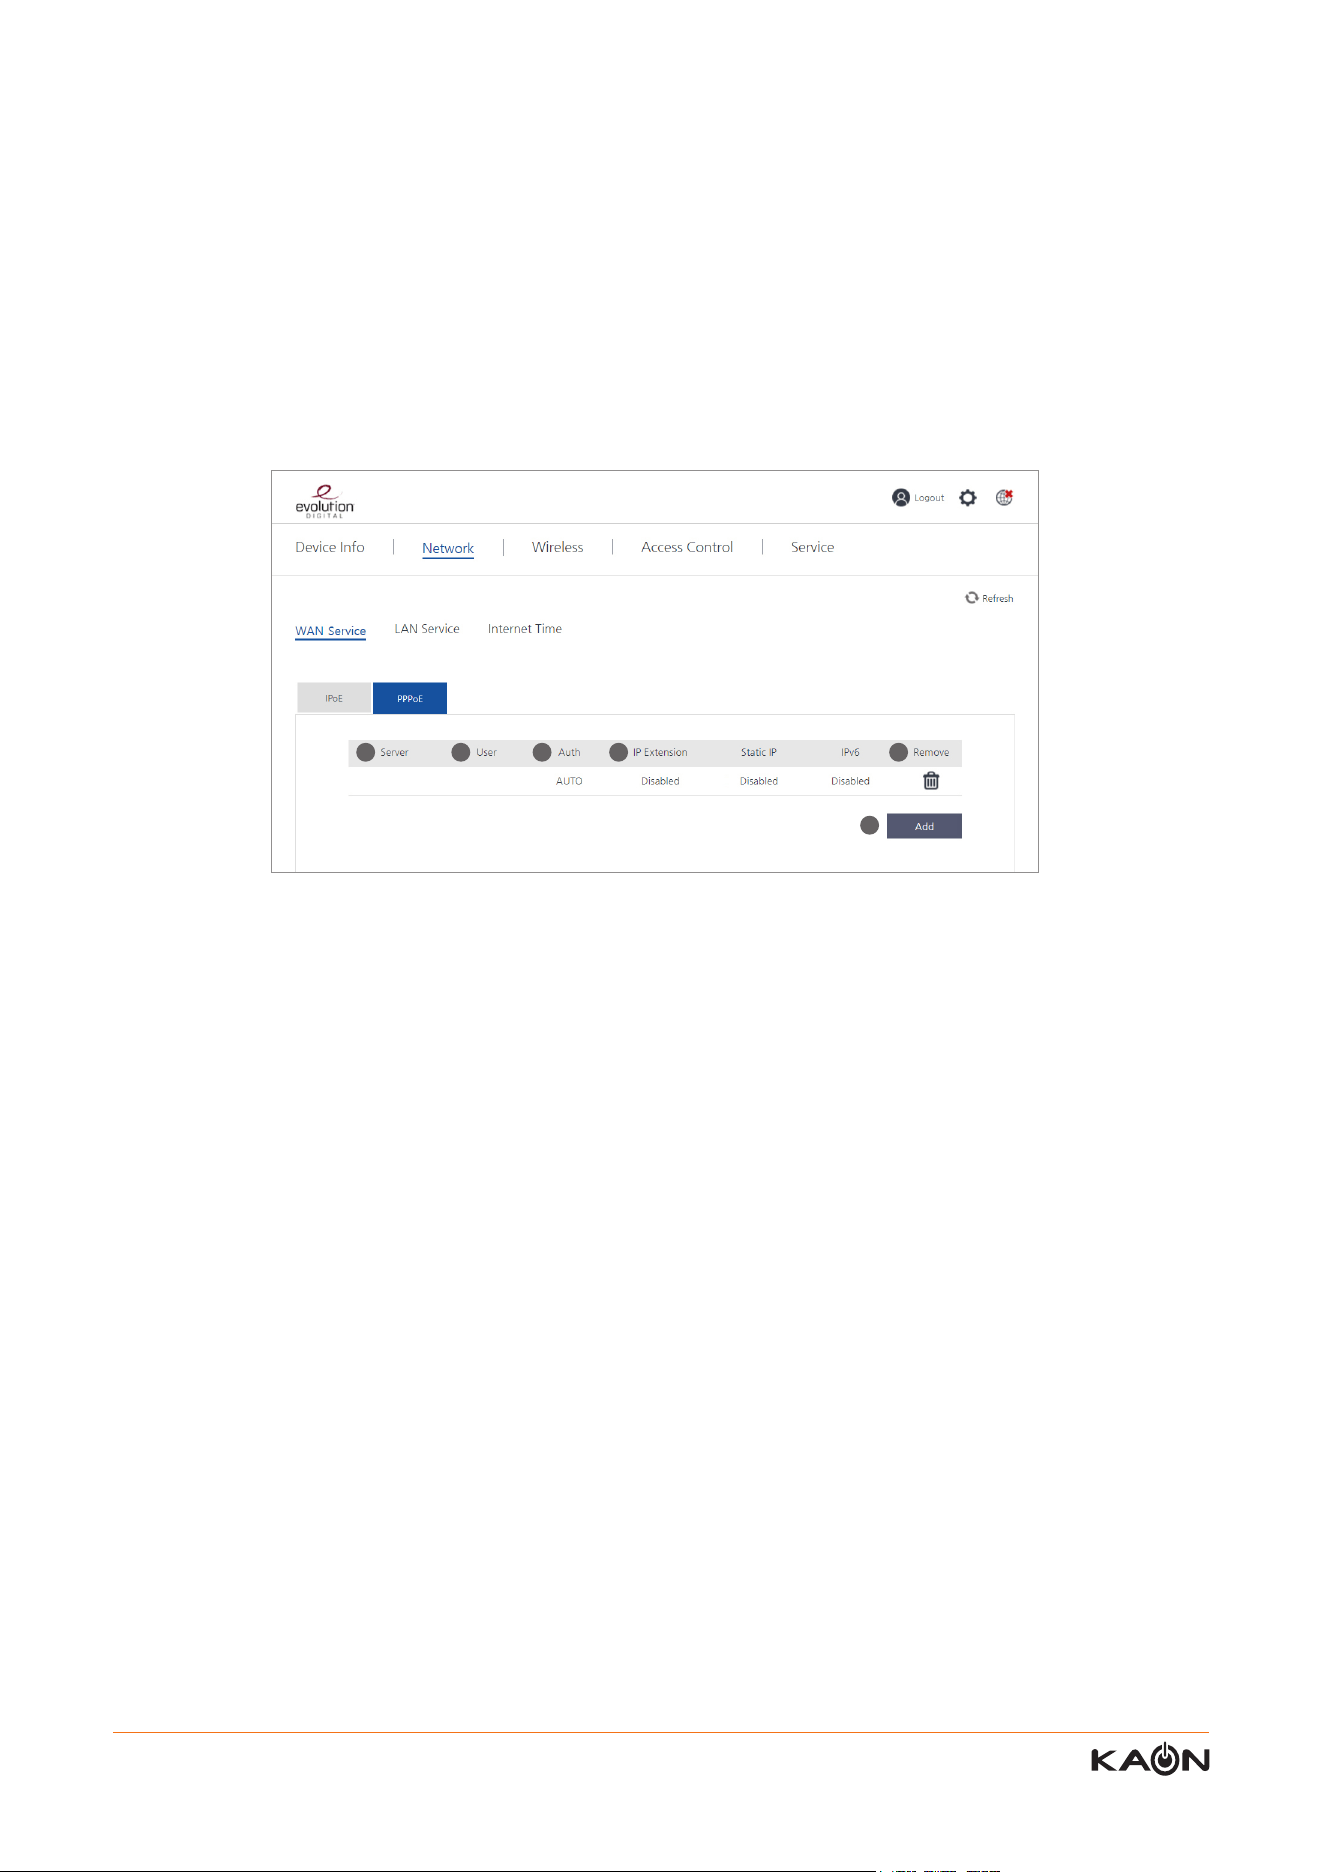
13) Server
It shows “the PPPoE Service name” a user entered in the conguration page.
14) User
It shows “the User name” the user entered in the conguration page.
15) Auto
It shows which “PPP authentication method” is used.
16) IP extension
It shows whether PPP IP Extension is enable or disabled.
Static IP
It shows whether static IP provision service is enabled or disabled.
IPv6
It shows whether IPv6 service is enabled or disabled.
17) Remove
User can remove this WAN conguration entry.
18) Add
When user click “Add” button, the user can congure another WAN service.
13 14 15 16 17
18
26 Kaonmedia Proprietary and Condential. Copyright 2017 KAON MEDIA CO., LTD. All Rights Reserved.
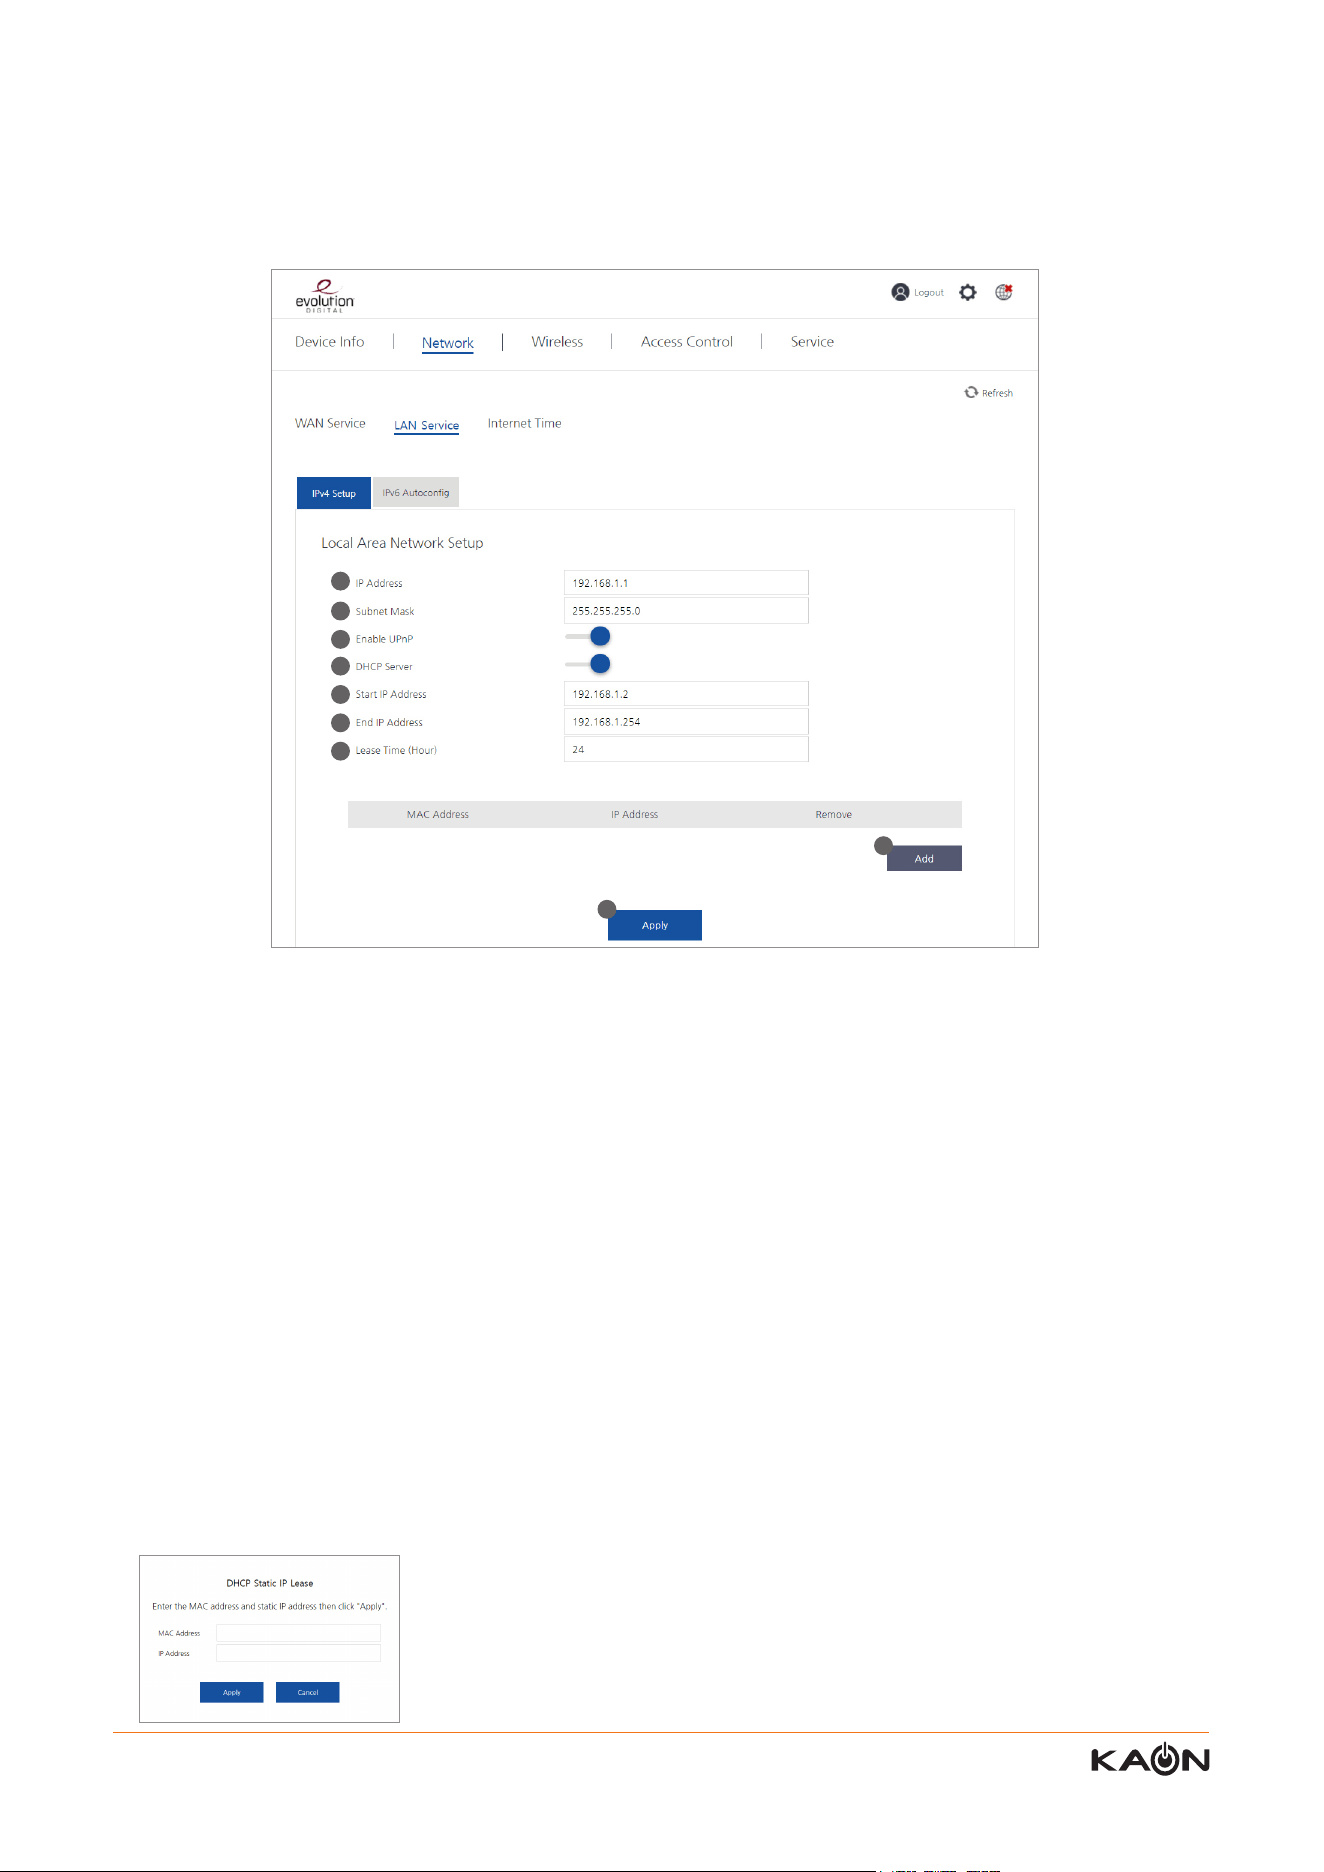
1) IP Address
It shows the IP address of the AR2146 the user congured. This IP address become the gateway IP address to the
connected devices of the AR2146.
2) Subnet Mask
It shows the subnet mask of the AR2146 the user congured.
3) Enable UPnP
User can enable or disable the UPnP function of the AR2146. UPnP oers compatibility with networking equipment,
software, and peripherals
.
4) DHCP Server
User can enable or disable the DHCP server
.
5) Start IP Address
User can congure the rst IP address of the DHCP IP range which can be provided to the connected devices.
6) End IP Address
User can congure the last IP address of the DHCP IP range which can be provided to the connected devices.
7) Lease Time (hour)
User can congure the lease time of the DHCP IP address.
8) ADD
When user click “Add” button, the pop-up screen for “DHCP Static IP Lease” will be displayed. Refer to the below image.
In the LAN Service sub-menu, you can manage the IP addresses of LAN interface.
8.2.1 LAN Service – IPv4 Setup
1
2
3
4
5
6
7
8
9
27 Kaonmedia Proprietary and Condential. Copyright 2017 KAON MEDIA CO., LTD. All Rights Reserved.
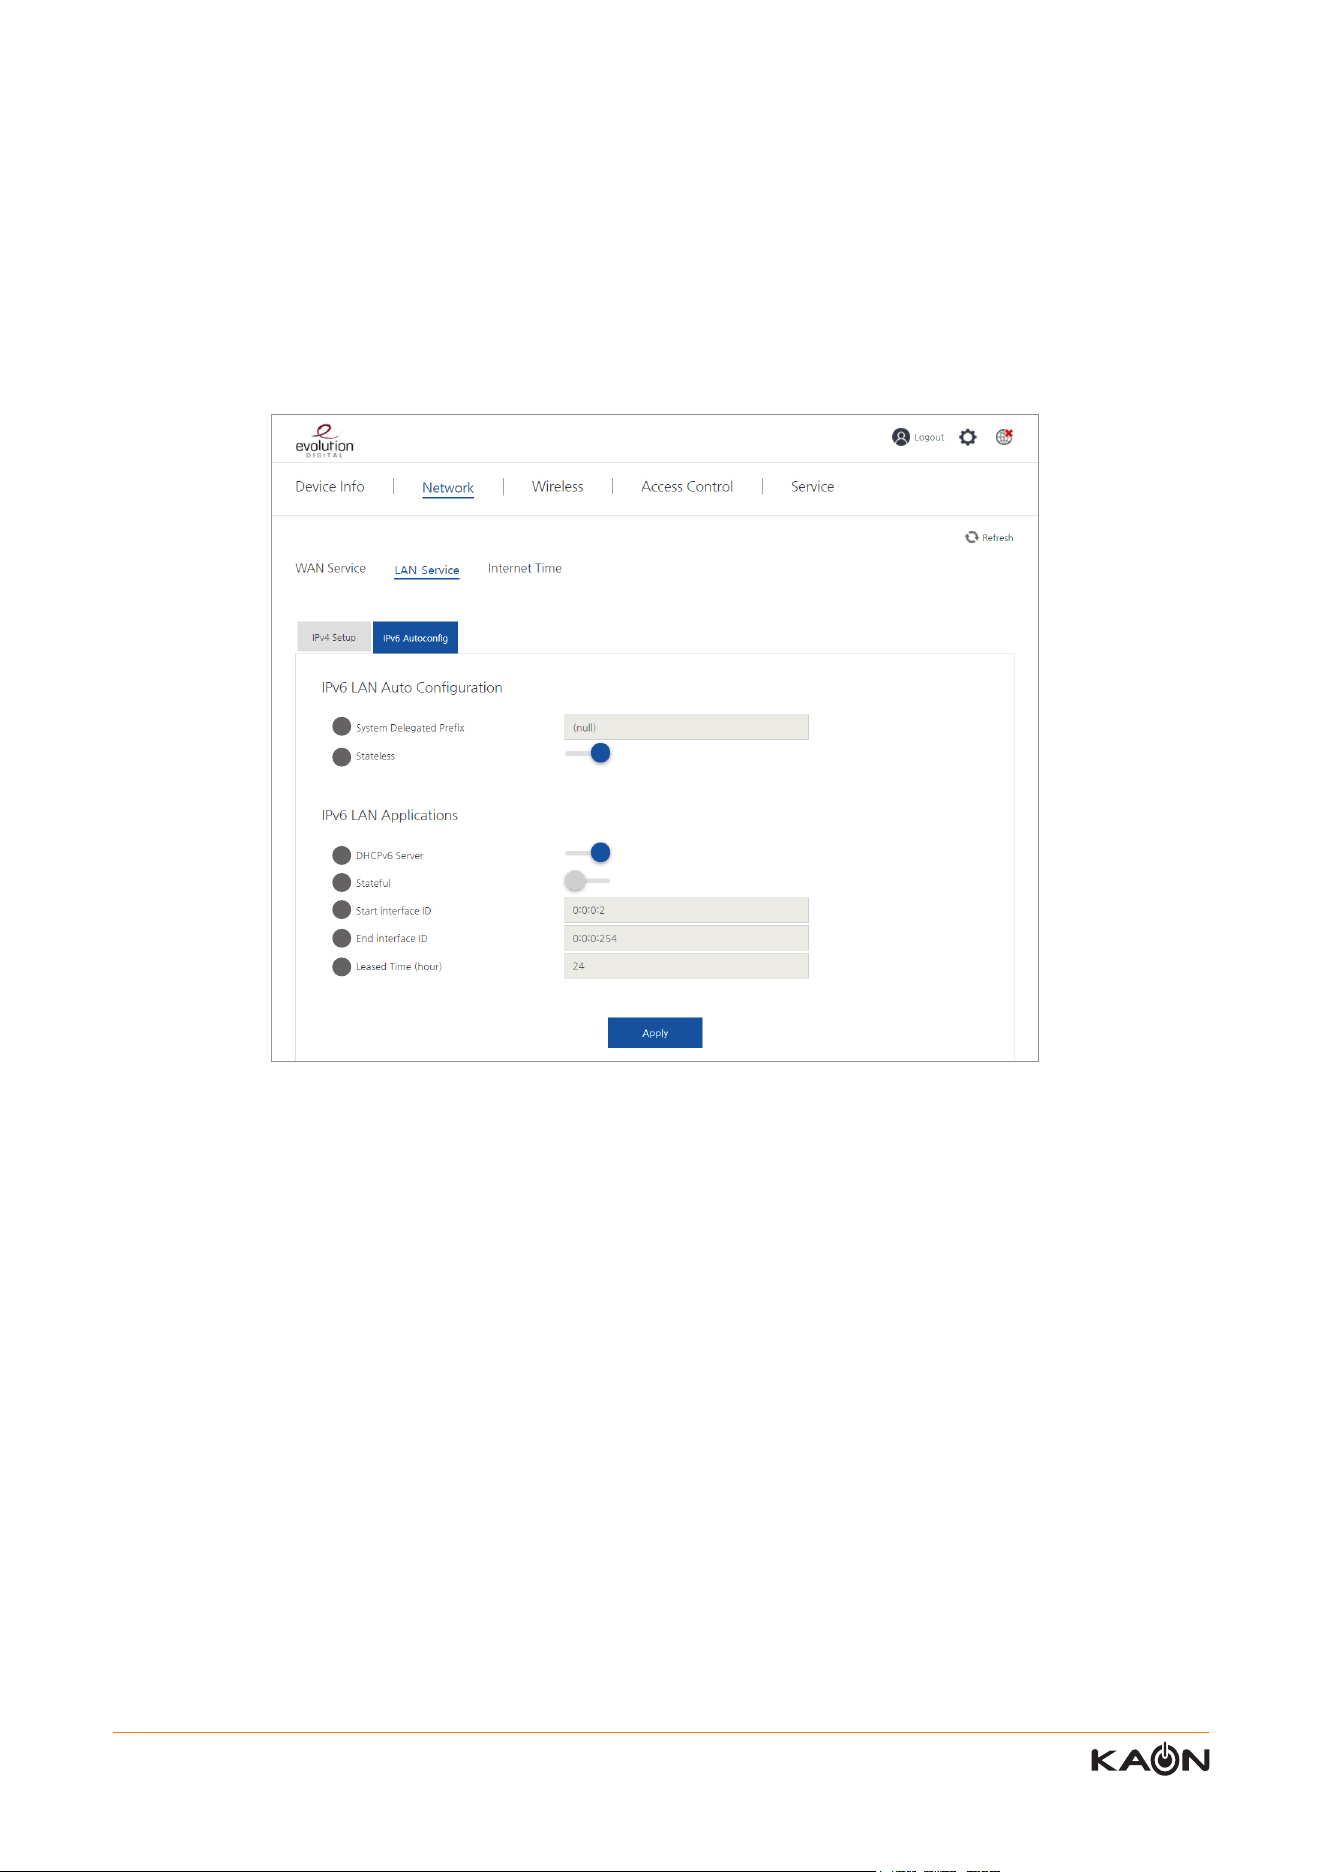
1) System delegated prex
When IPv6 IP address is given to the AR2146, it is displayed in this box.
2) Stateless
User can enable or disable the IPv6 stateless function.
3) DHCPv6 Server
User can enable or disable DHCPv6 server function of the CPE. Once it is set to Enable, the CPE will provide IPv6 IP
addresses to its connected device.
4) Stateful
User can enable or disable “stateful” function. When it is “disabled”, the following menu (start interface id, end interfact
id, leased time) will become inactive.
5) Start IP Address
Enter the starting IPv6 address for the DHCPv6 assignment.
6) End IP Address
Enter the ending IPv6 address for the DHCPv6 assignment.
7) Leased Time (Hour)
Enter the length of time for the IP address lease in hour for the DHCP IP address. .
User can congure the IPv6 information.
8.2.2 LAN Service – IPv6 LAN Auto Conguration
A user can select a specic device by clicking the MAC address from the table to and congure a specic IP address to
the device manuy.
9) Apply
When user click “Apply”, the new entry of the network conguration get applied to the CPE.
1
2
3
4
5
6
7
28 Kaonmedia Proprietary and Condential. Copyright 2017 KAON MEDIA CO., LTD. All Rights Reserved.
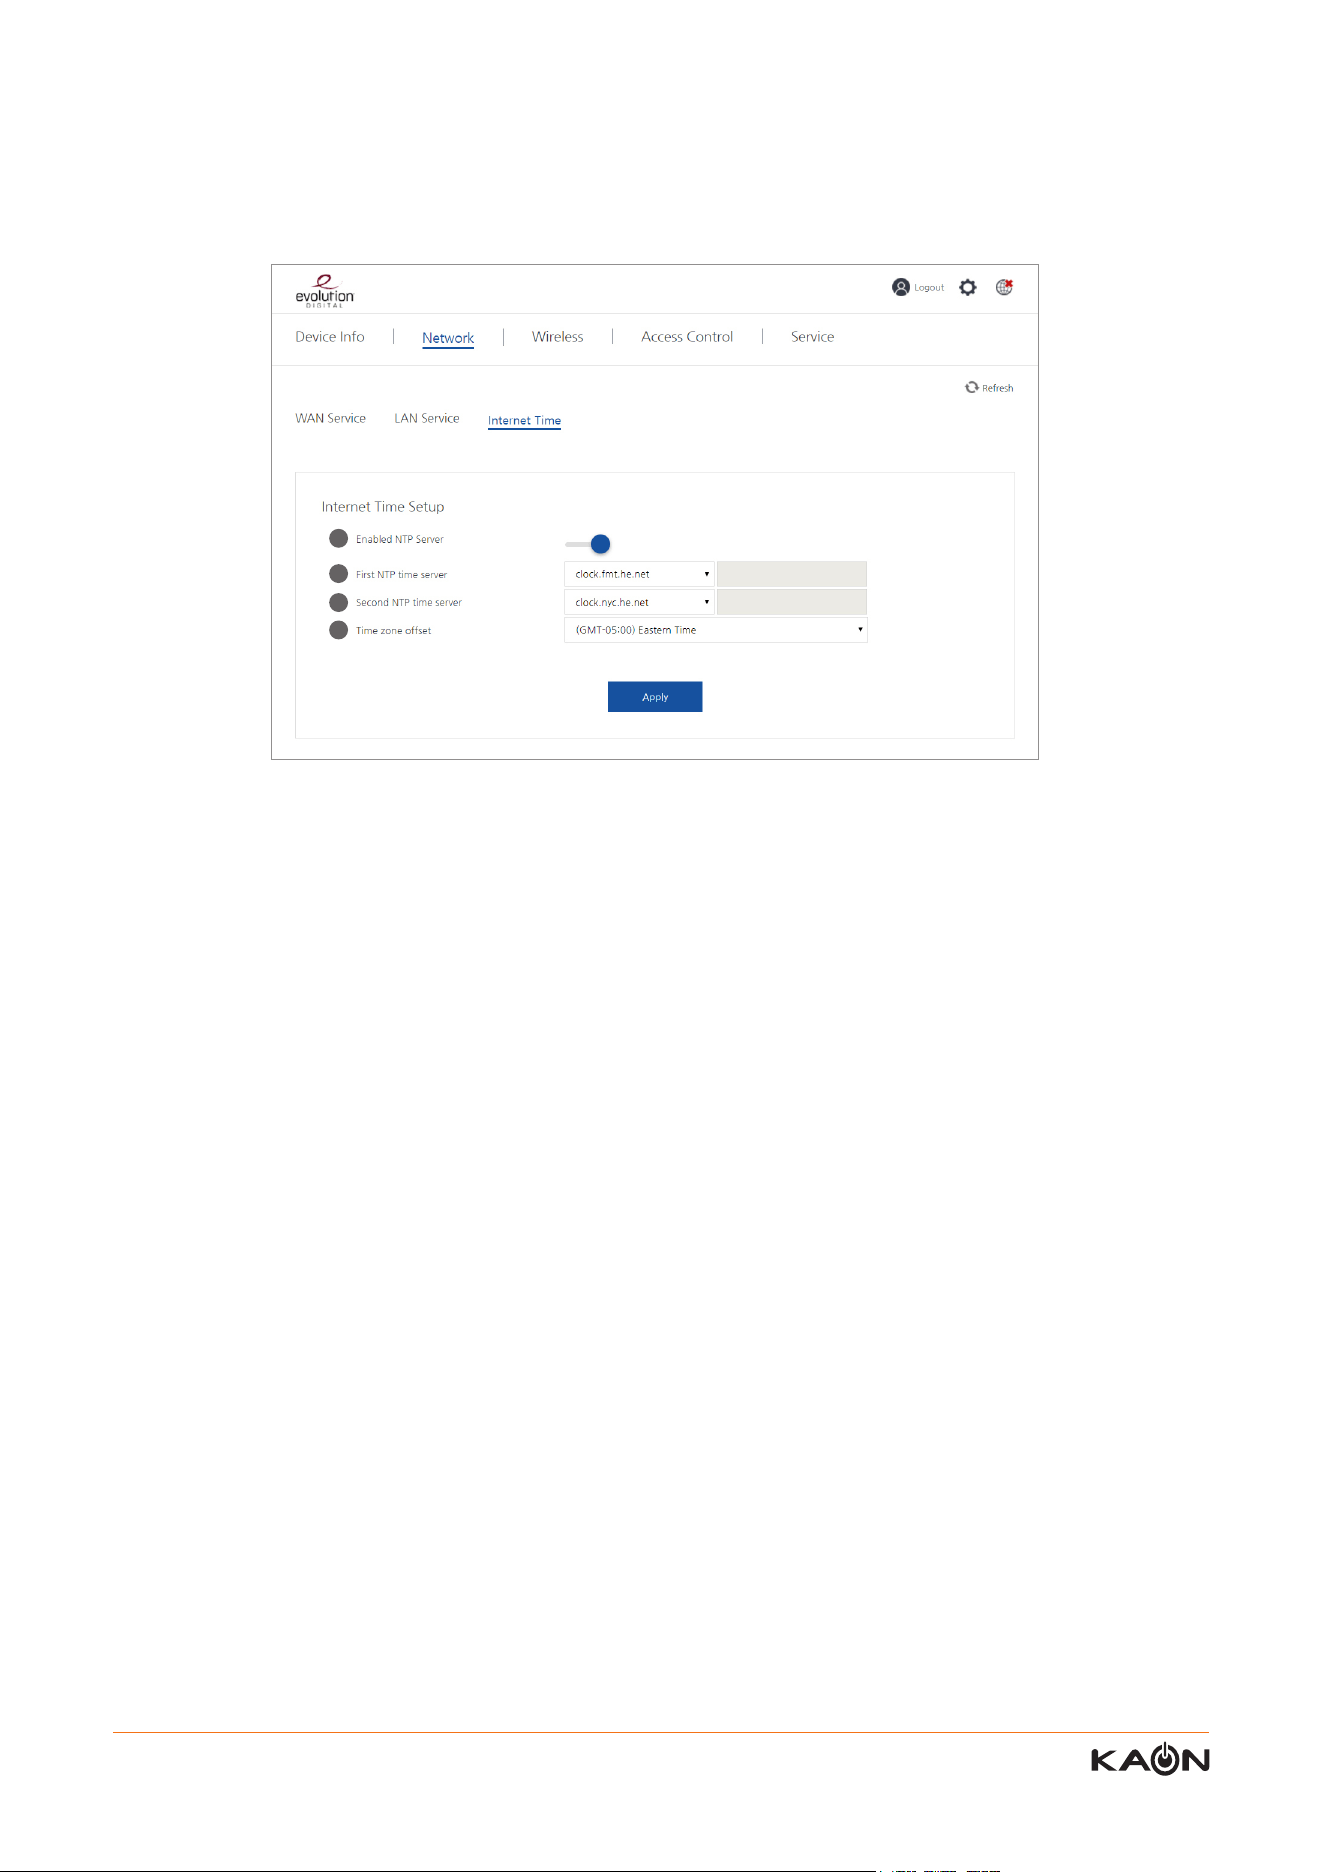
1) Enabled NTP server
User can enable or disable the NTP server function.
2) First NTP time server
User can select one of the listed NTP servers in the menu. When the user select “Other” in the menu, the user can enter
the specic NTP server IP address in the following column.
3) Second NTP time server
User can select one of the listed NTP servers in the menu. When the user select “Other” in the menu, the user can enter
the specic NTP server IP address in the following column
.
4) Time zone oset
User can select the time zone of the AR2146 according to the geographic are area.
In this page, you can congure the internet time service.
8.3. Internet Time
1
2
3
4
29 Kaonmedia Proprietary and Condential. Copyright 2017 KAON MEDIA CO., LTD. All Rights Reserved.
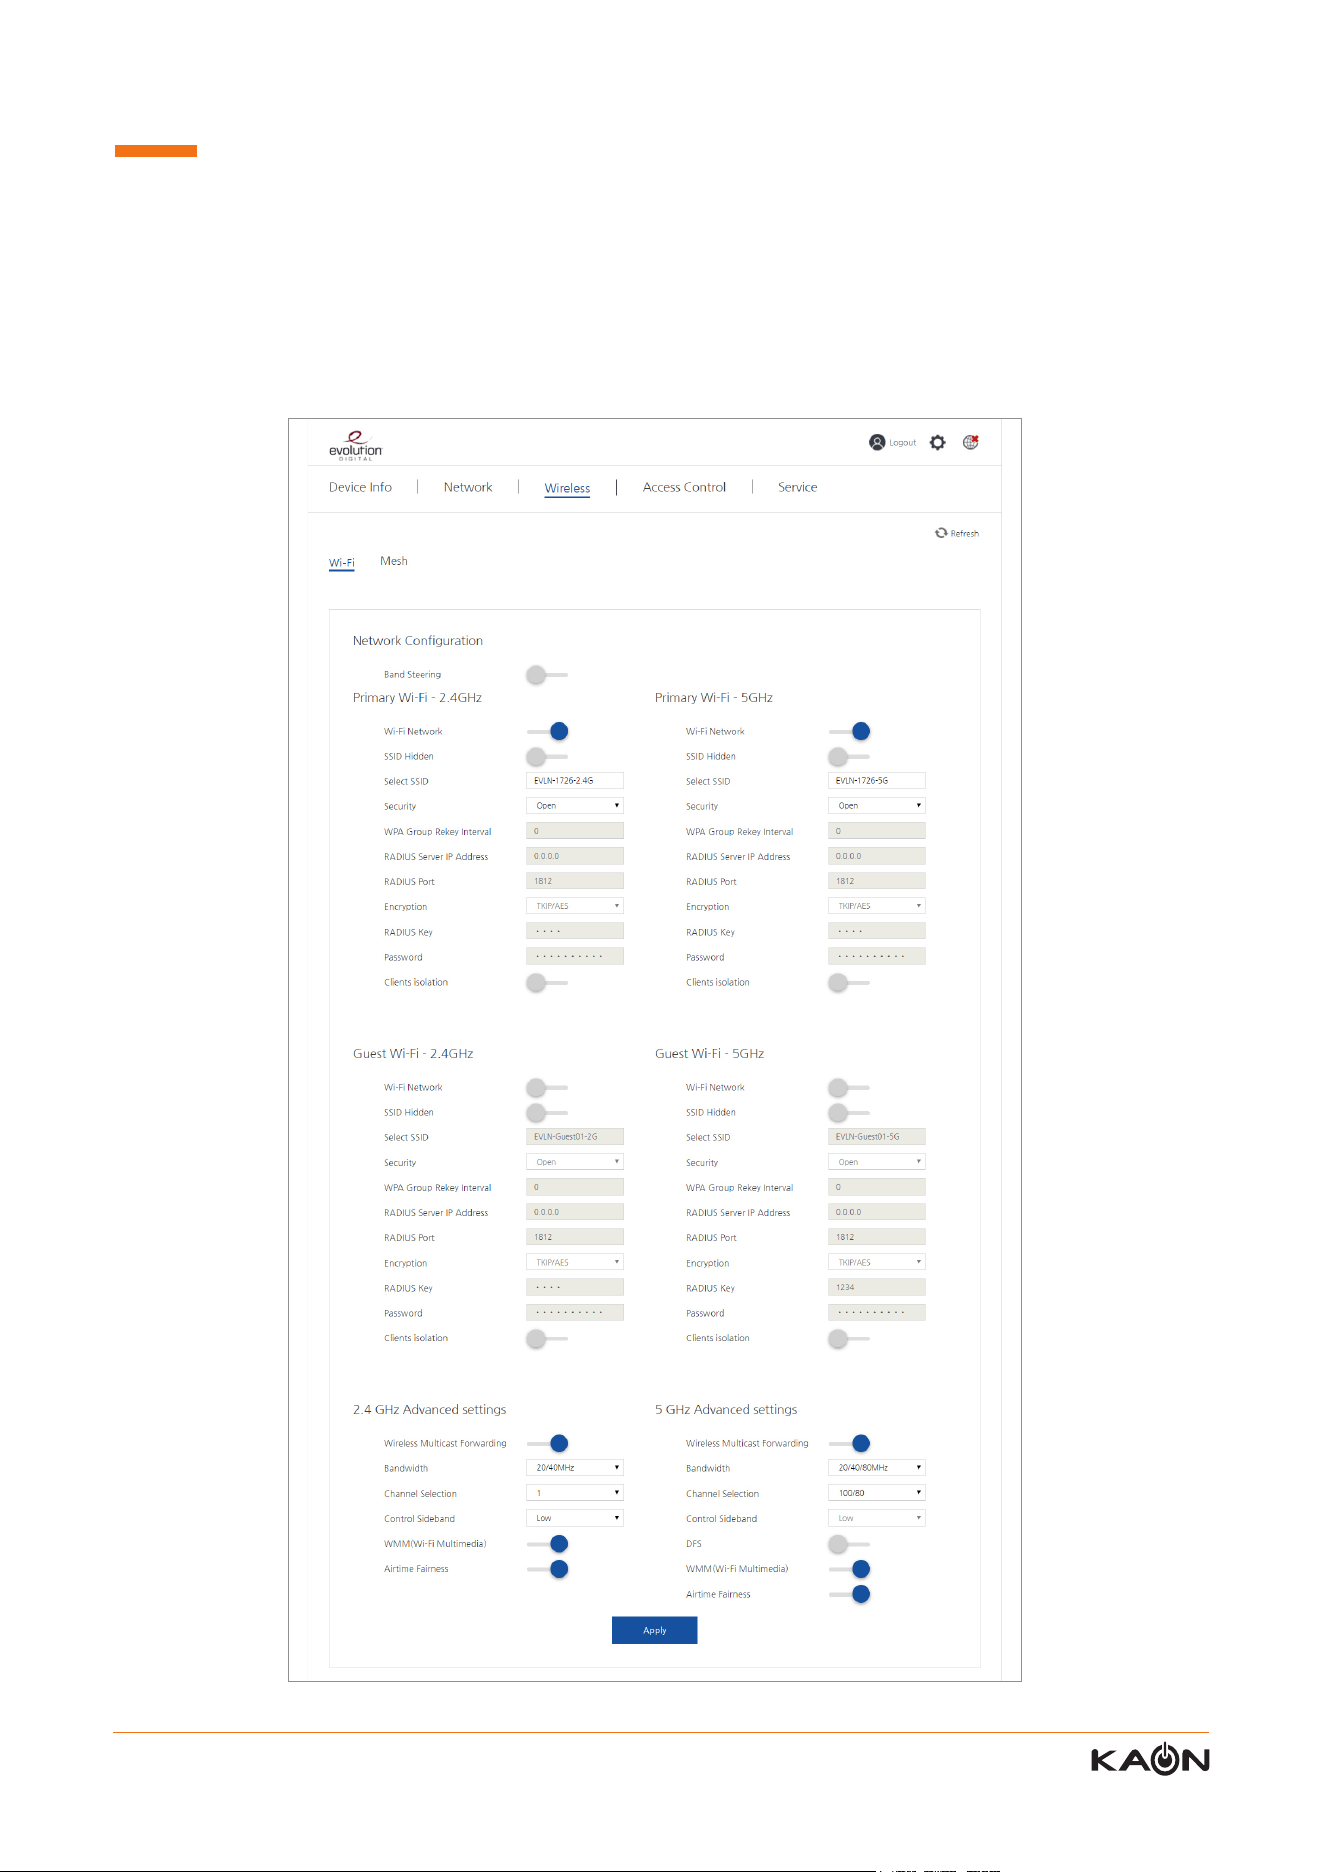
Wireless Menu page enables you to manage wireless(Wi-Fi) network setting.
There are 2 sub-menus, Wi-Fi and Mesh.
9.1 Wireless – Wi-Fi
9. Wireless Menu
30 Kaonmedia Proprietary and Condential. Copyright 2017 KAON MEDIA CO., LTD. All Rights Reserved.
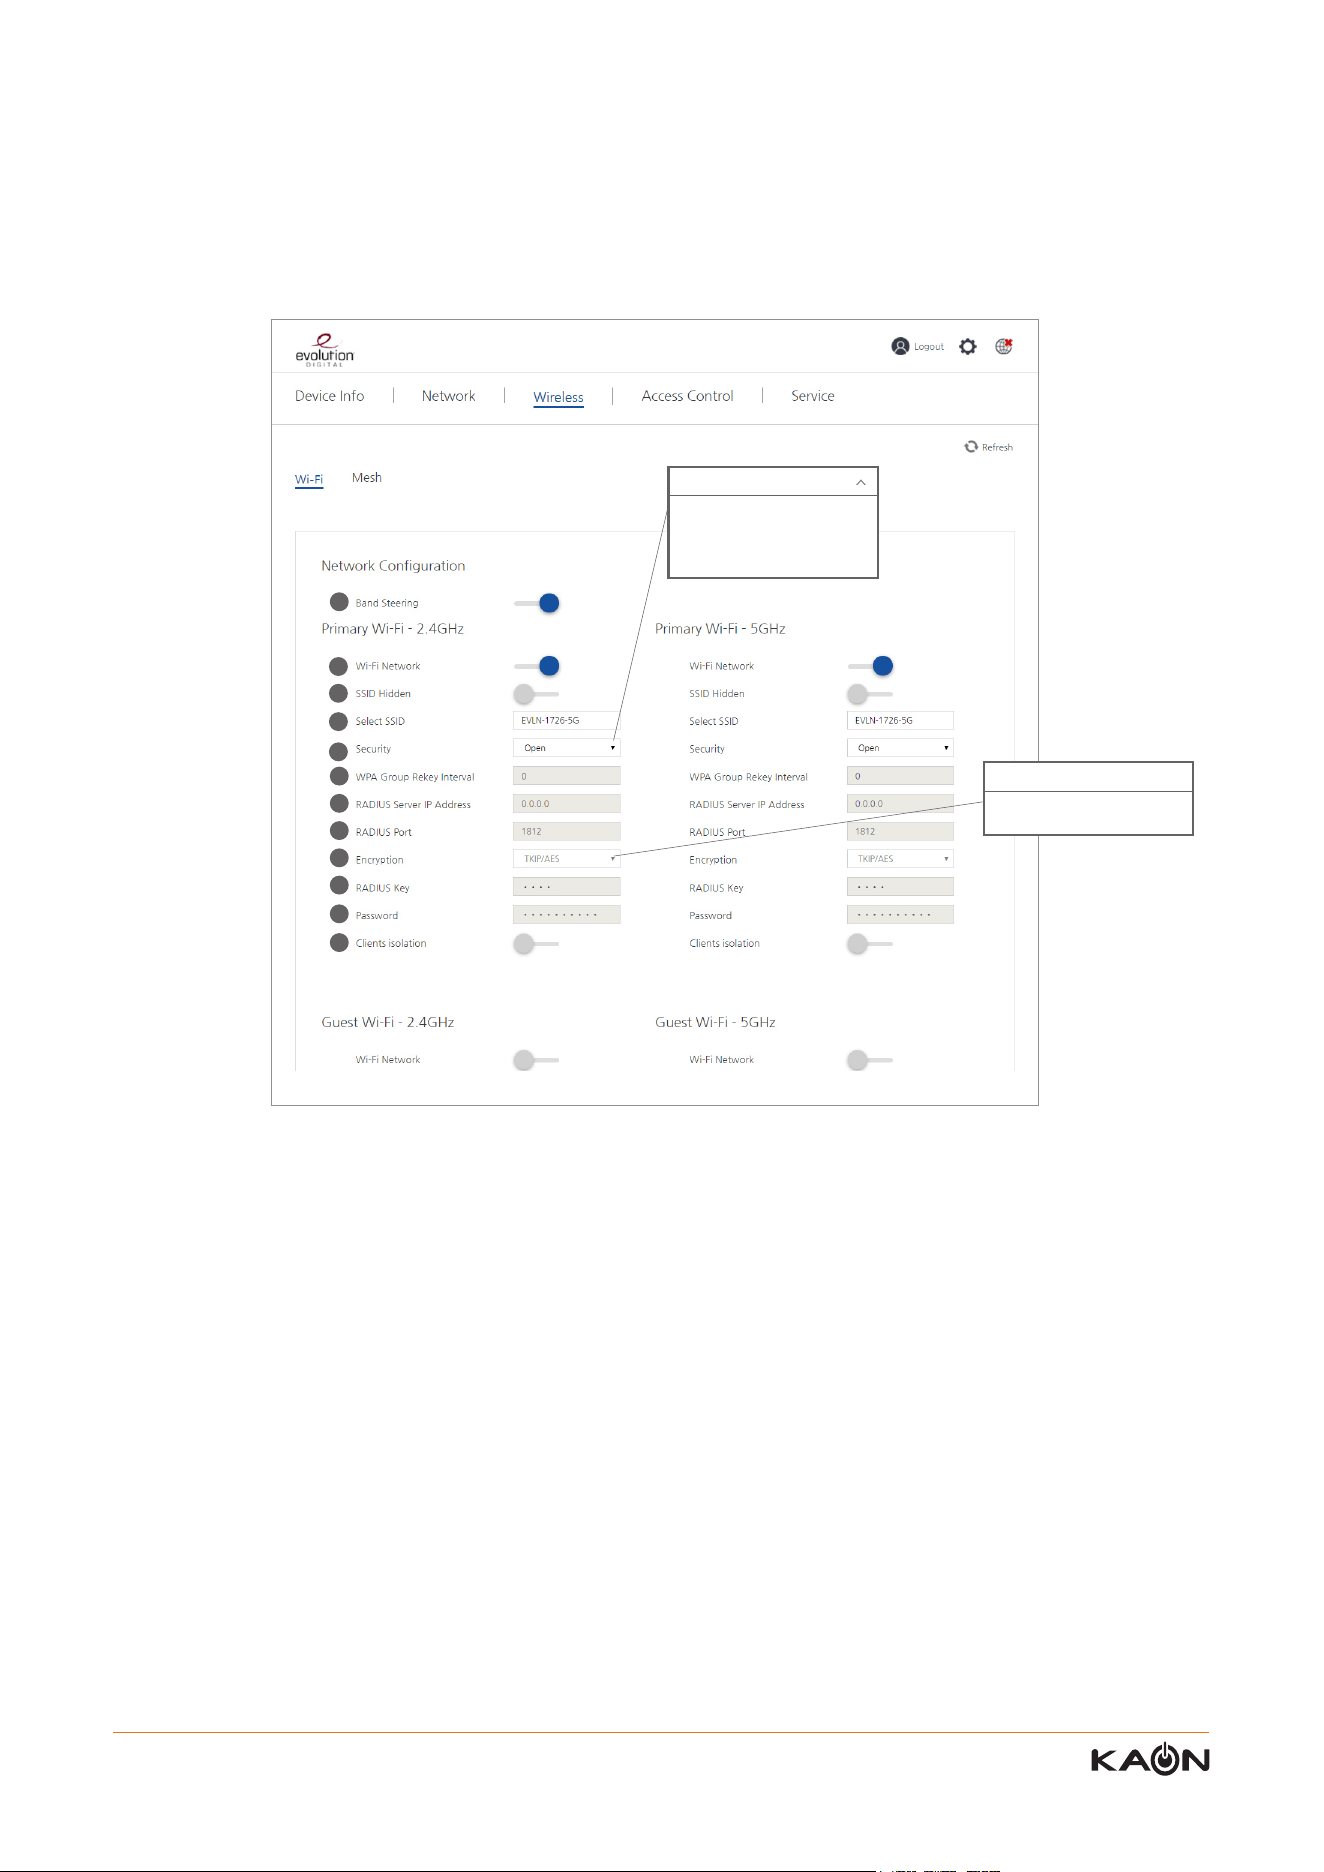
1) Band-steering
User can enable or disable band-steering function of this WiFi interface.
Once disabled, a user can make the SSID of 2.4GHz and 5GHz dierently.
When enabled, the SSID of 2.4GHz become the same name of the SSID of 5GHz.
2) WiFi network
User can enable or disable the Wi-Fi network
.
3) SSID hidden
User can hide the SSID
.
4) SSID
User can create the SSID
.
5) Security
User can select one of the following security mode: Open, WPA2-enterprise, WPA2-PSK, WPA/WPA2 encryption
.
6) WPA group rekey interval
User can congure the WPA group key renewal time.
“0” means the key is not being regenerated
The unit is second
.
7) Radius server IP address
User can congure the IP address of the radius server
.
User can congure Wi-Fi network by frequency band, 2.4GHz and 5GHz. In addition, the user can manage Guest Wi-Fi
by frequency band.
* 2.4GHz and 5GHz conguration menus are same.
9.1.1 Wi-Fi – Primary Wi-Fi 2.4GHz & 5GHz Setting
Open
Open
WPA2-enterprise
WPA2-PSK
WPA/WPA2 encryption
AES
AES
TKIP/AES
1
2
3
4
5
6
7
8
9
10
11
12