Scan to register
bellakitchenware.com
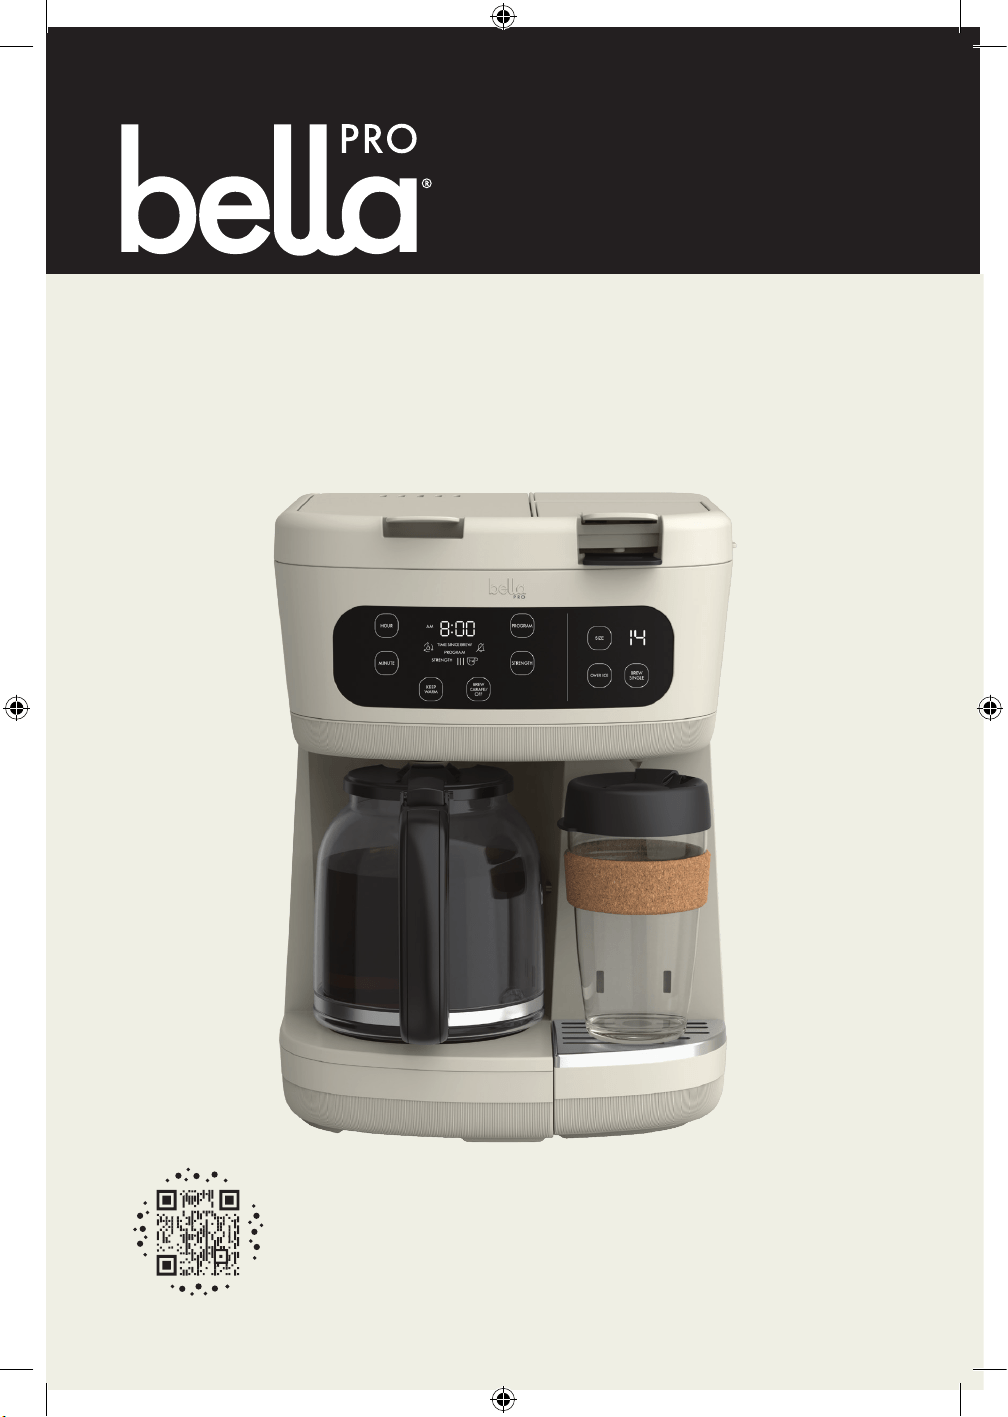
MultiBrew
Coffee Maker
Instruction Manual
90228_90283_90284_BellaPro_MultiBrew_CoffeeMaker_IM_V3_R2.indd 190228_90283_90284_BellaPro_MultiBrew_CoffeeMaker_IM_V3_R2.indd 1 2025-06-11 11:07 AM2025-06-11 11:07 AM

2
TABLE OF CONTENTS
IMPORTANT SAFEGUARDS ............................................................................................................................................... 3-4
ADDITIONAL IMPORTANT SAFEGUARDS ........................................................................................................................5
NOTES ON THE PLUG ............................................................................................................................................................. 6
NOTES ON THE CORD............................................................................................................................................................ 6
ELECTRIC POWER ..................................................................................................................................................................... 6
COFFEE YIELD ............................................................................................................................................................................ 7
REUSABLE FILTER BASKET ...................................................................................................................................................... 7
GETTING TO KNOW YOUR MULTIBREW COFFEE MAKER ........................................................................................8
TOUCH-ACTIVATED DISPLAY CONTROL PANEL ......................................................................................................9-10
BEFORE BREWING DRIP COFFEE FOR THE FIRST TIME ............................................................................................... 11
DRIP COFFEE BREWING OPERATION ...............................................................................................................................11
PAUSE & SERVE ..........................................................................................................................................................................11
BREW LATER ..........................................................................................................................................................................11-12
BEAUTIFUL HINTS FOR GREAT TASTING COFFEE ....................................................................................................... 12
BEFORE BREWING SINGLE SERVE FOR THE FIRST TIME ........................................................................................... 12
SINGLE SERVE BREWING OPERATION ......................................................................................................................12-13
SINGLE SERVE HOT WATER ................................................................................................................................................. 13
USER MAINTENANCE INSTRUCTIONS ..........................................................................................................................14
CARE & CLEANING INSTRUCTIONS ................................................................................................................................14
CLEAN .........................................................................................................................................................................................14
STORING INSTRUCTIONS ...................................................................................................................................................14
WARRANTY ...............................................................................................................................................................................15
90228_90283_90284_BellaPro_MultiBrew_CoffeeMaker_IM_V3_R2.indd 290228_90283_90284_BellaPro_MultiBrew_CoffeeMaker_IM_V3_R2.indd 2 2025-06-11 11:07 AM2025-06-11 11:07 AM

3
IMPORTANT SAFEGUARDS
When using electrical appliances, basic safety precautions shouldalways
be followed, including the following:
1. READ ALL INSTRUCTIONS.
2. Do not touch hot surface. Use handles or knobs only.
3. This Coee Maker is not intended for use by persons (including children) with
reduced physical, sensory or mental capabilities, or lack of experience
and knowledge, unless they have been given supervision or instruction
concerning use of the appliance by a person responsible for their safety.
4. Close supervision is necessary when any appliance is used by or near children.
5. In order to minimize the risk of property damage, never place the Coee
Maker under cabinets. Make sure the area several feet above the Coee
Maker is clear from all furniture or cabinetry.
6. Do not open any lid while coee is brewing. Scalding may occur if any of the
lids are lied during any coee brewing cycle.
7. Do not use outdoors.
8. Unplug Coee Maker from the electrical outlet and allow to cool before
cleaning, putting on or taking o parts.
CAUTION: There are 2 sharp needles that puncture the capsules. One is
located inside the capsule adaptor.
and the other is located on the top underside of the adaptor compartment.
To avoid risk of injury do not place ngers inside either parts. Exercise caution
when cleaning single serve capsule brewing parts.
9. To protect against re or electrical shock, do not immerse cord, plugs, or
appliance in water or other liquids.
10. Do not operate any appliance with a damaged cord or plug, or aer the
appliance malfunctions, or has been damaged in any manner. Contact
Consumer Service.
NOTE: do not attempt to repair the unit yourself. This will void the warranty.
11. The use of accessory attachments not recommended by the appliance
manufacturer may result in re, electric shock or injury to persons.
12. Never move the appliance by pulling the cord. Do not let the cord hang over
the edge of a table or counter or touch hot surfaces.
13. Stand the appliance on a table or at surface.
14. Do not use a cracked glass carafe or a carafe having a loose
orweakenedhandle.
15. Only use the glass carafe with this appliance. Handle with care as the glass
may become hot.
16. Snap lid securely onto glass carafe before serving coee.
17. Never use your Coee Maker without water in the water reservoir.
18. Do not place appliance on or near a hot gas or electric burner
orinaheatedoven.
19. The carafe is designed for use with this appliance. It must never be used
onarange top.
90228_90283_90284_BellaPro_MultiBrew_CoffeeMaker_IM_V3_R2.indd 390228_90283_90284_BellaPro_MultiBrew_CoffeeMaker_IM_V3_R2.indd 3 2025-06-11 11:07 AM2025-06-11 11:07 AM

4
20. Do NOT place carafe into a microwave oven
21. Do NOT set hot glass carafe on a wet or cold surface.
22. Do NOT clean glass carafe with cleaners, steel wool pads, or other
abrasivematerial.
23. Before unplugging, make sure that the Coee Maker is not in brewing mode.
Press the BREW CARAFE/OFF button to turn the Coee Maker o. Press the
PROGRAM button if the PROGRAM indicator light is illuminated. Press any
active BREW CARAFE/OFF or BREW SINGLE or OVER ICE button if either
indicator light is illuminated. To disconnect, immediately remove plug from
walloutlet.
24. To interrupt the brewing cycle at any time, press BREW CARAFE/OFF.
Unlessthe Coee Maker is malfunctioning, do not remove plug from wall
outlet. Unplug the power cord from the electrical outlet when the appliance
isnot in use, le unattended, or when the carafe is empty.
25. Be certain all 3 lids are down, and securely in place before operating.
26. Do not use this appliance for other than its intended use.
27. To reduce the risk of re, do not place unit over or near any portion
ofaheating or cooking appliance.
28. To reduce the risk of electric shock, do not mount over a sink.
29. To reduce the risk of re, do not store anything directly on top of the appliance
surface when the appliance is in operation.
30. Only use capsules intended for this appliance.
If the capsule does not t, do not force the capsule into the appliance.
31. WARNING: To avoid the risk of injury, do not open the brew chamber during
the brewing process.
32. The use of an accessory not evaluated for use with this appliance may
causeinjuries.
33. Do not use and extension cord.
34. Do not place in a cabinet when in use.
35. Cleaning and user maintenance shall not be performed by children
withoutsupervision.
36. WARNING: The water tank lids, and coee compartments should not be
opened during use.
37. WARNING: Do not spill on the warming plate.
38. WARNING: Do not touch hot surfaces, the warming plate is subject to residual
heat aer use.
39. If the supply cord is damaged, it must be replaced by the manufacturer, its
service agent or similarly qualied.
40. It is recommended to use a heat-resistant trivet or cutting board underneath
this appliance to avoid possible heat damage to the countertop.
FOR HOUSEHOLD USE ONLY
SAVE THESE INSTRUCTIONS
90228_90283_90284_BellaPro_MultiBrew_CoffeeMaker_IM_V3_R2.indd 490228_90283_90284_BellaPro_MultiBrew_CoffeeMaker_IM_V3_R2.indd 4 2025-06-11 11:07 AM2025-06-11 11:07 AM

5
ADDITIONAL IMPORTANT
SAFEGUARDS
WARNING: This Coee Maker generates heat and escaping steam during use.
Proper precautions must be taken to prevent the risk of burns, res, or other
injury to persons or damage to property.
1. All users of this Coee Maker must read and understand this instruction
manual before operating or cleaning this Coee Maker.
2. The cord to this Coee Maker should be plugged into a 120V AC electrical
outlet electrical outlet only.
3. Use water only in this Coee Maker! Do not put any other liquids or food
products in this Coee Maker. Do not mix or add anything to the water
placed in this Coee Maker, except as instructed in the CLEAN section of this
instruction manual to descale the Coee Maker.
4. DO NOT attempt to move a Coee Maker containing hot liquids. Allow Coee
Maker to cool completely before moving.
5. Keep Coee Maker at least 4 inches away from walls or other objects during
operation. Do not place any objects on top of Coee Maker while it is
operating. Place the Coee Maker on a surface that is resistant to heat.
6. If this appliance begins to malfunction while brewing drip coee, press
the BREW CARAFE/OFF button. Then immediately unplug the cord. If this
appliance begins to malfunction while brewing single serve, press the active
BREW SINGLE button; then immediately unplug the cord. Do not use or
attempt to repair the malfunctioning appliance. Call Consumer Service.
7. If this Coee Maker falls or accidentally becomes immersed in water or any
other liquid, unplug it immediately. Do not reach into the water! Do not use this
Coee Maker aer it has fallen into or has become immersed in water.
CAUTION: Allow 15 minutes for the Coee Maker to cool suciently before
adding water to the water reservoir.
8. Always use fresh, cool water in your Coee Maker. Warm water or other
liquids, except as listed in cleaning section, may cause damage to the
CoeeMaker.
9. DO NOT put carafe into a microwave oven.
10. DO NOT leave empty carafe on warming plate when the Coee Maker is
turned ON, as the carafe may crack or become otherwise damaged. Press
BREW CARAFE/OFF to turn Coee Maker o.
11. This Coee Maker is equipped with Pause & Serve. The ow valve is located on
the bottom of the removable lter basket and is activated when the carafe is
removed. This design makes it possible for you to remove the carafe and pour a
cup of coee before the entire carafe is brewed.
CAUTION: To prevent injury when utilizing the Pause & Serve feature,
replacecarafe within 30 seconds of removing during brewing process.
90228_90283_90284_BellaPro_MultiBrew_CoffeeMaker_IM_V3_R2.indd 590228_90283_90284_BellaPro_MultiBrew_CoffeeMaker_IM_V3_R2.indd 5 2025-06-11 11:07 AM2025-06-11 11:07 AM

6
NOTES ON THE PLUG
This appliance has a polarized plug (one blade is wider than the other). To reduce
the risk of electric shock, this plug will t in a polarized outlet only one way. If the
plug does not t fully into the outlet, reverse the plug. If it still does not t, contact a
qualied electrician. Do not modify the plug in any way.
NOTES ON THE CORD
A. A short power-supply cord (or detachable power-supply cord) is to be
provided to reduce risks resulting from becoming entangled in or tripping over
a longer cord.
B. Longer detachable power-supply cords or extension cords are available and
may be used if care is exercised in their use.
C. If a long detachable power-supply cord or extension cord is used:
1. The marked electrical rating of the detachable power-supply cord or
extension cord should be at least as great as the electrical rating of
theappliance;
2. If the appliance is of the grounded type,the extension cord should be
agrounding- type 3-wire cord;
3. The longer cord should be arranged so that it will not drape over
thecounter top or table top where it can be pulled on by children
ortripped over.
ELECTRIC POWER
If the electrical circuit is overloaded with other appliances, your appliance may
not operate properly. It should be operated on a separate electrical circuit from
otherappliances.
90228_90283_90284_BellaPro_MultiBrew_CoffeeMaker_IM_V3_R2.indd 690228_90283_90284_BellaPro_MultiBrew_CoffeeMaker_IM_V3_R2.indd 6 2025-06-11 11:07 AM2025-06-11 11:07 AM

7
COFFEE YIELD
Coee Maker: 12 (5-oz.) cups
NOTE: A 5-oz. cup is the American industry standard and is used by most Coee Maker manufacturers. To ll
your favorite over-sized mug, ll Coee Maker reservoir with enough water for 3 to 4 cups (15 to 20 ounces).
NOTE: The amount of brewed coee will always be less than the amount of water placed into the water
reservoir; as much as 10% may be absorbed by coee grounds and lter.
WARNING: TO REDUCE THE RISK OF FIRE OR ELECTRIC SHOCK, DO NOT REMOVE THE BOTTOM
COVER. NO USER-SERVICEABLE PARTS INSIDE. REPAIR SHOULD BE DONE BY AUTHORIZED SERVICE
PERSONNELONLY.
REUSABLE FILTER BASKET
1. Eco-friendly, the reusable lter basket eliminates the need for disposable papers lters.
2. The at-bottomed reusable lter basket sits easily on any at, clean surface for easy, mess-free lling.
3. Aer brewing, li to open the Coee Maker lid. Unfold the reusable lter basket handle to li it up and out of
the removable lter basket holder; discard used coee grounds, rinse and replace.
4. Fold handle down and close the Coee Maker lid.
90228_90283_90284_BellaPro_MultiBrew_CoffeeMaker_IM_V3_R2.indd 790228_90283_90284_BellaPro_MultiBrew_CoffeeMaker_IM_V3_R2.indd 7 2025-06-11 11:07 AM2025-06-11 11:07 AM
8
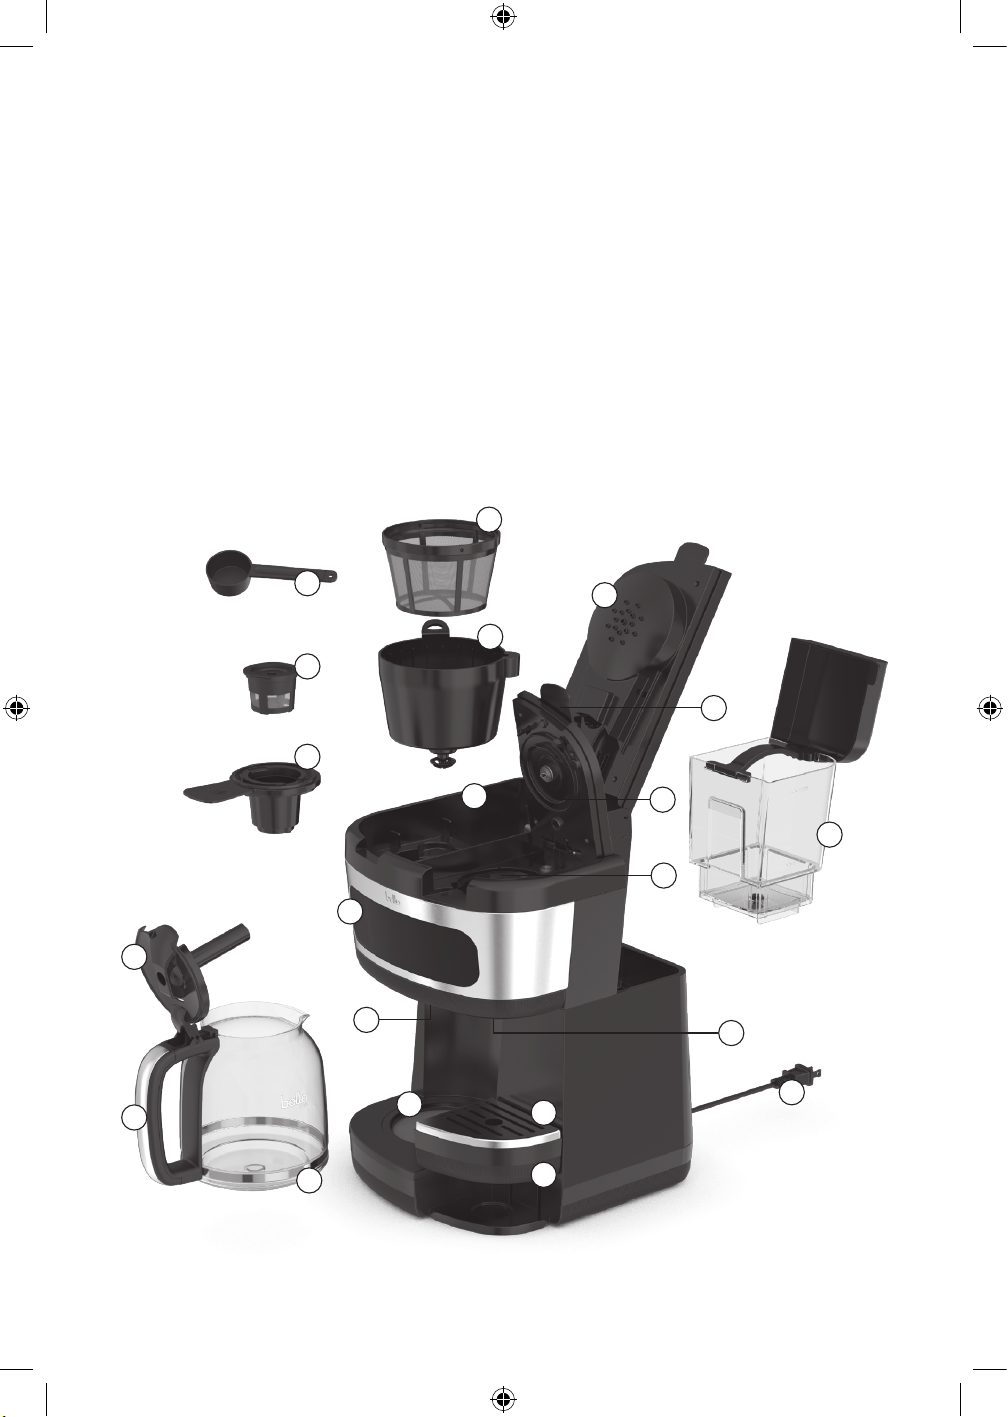
GETTING TO KNOW YOUR MULTIBREW COFFEE MAKER
Product may vary slightly from illustration.
1. Touch-Activated Display Control Panel
2. Carafe Lid
3. Carafe Handle
4. Carafe
5. Coee Scoop
6. Reusable Filter Basket with Handle
7. Removable Filter Basket Holder
8. Warming Plate
9. Shower Head
10. Water Reservoir
11. Pause & Serve Flow Valve
12. Removable Single Serve Water Tank
13. Locking Adaptor Compartment Lid
14. Top Capsule Punch
15. Adaptor Compartment
16. Single Serve Coee Spout
17. Single Serve Drip Tray Cover
18. Capsule Adaptor
19. Reusable Ground Coee Basket
20. Adjustable Height Drip Tray
21. 2-prong 120V AC plug
1
2
3
4
5
6
7
8
9
10
11
12
14
15
16
17
19
18
20
21
13
90228_90283_90284_BellaPro_MultiBrew_CoffeeMaker_IM_V3_R2.indd 890228_90283_90284_BellaPro_MultiBrew_CoffeeMaker_IM_V3_R2.indd 8 2025-06-11 11:07 AM2025-06-11 11:07 AM
9
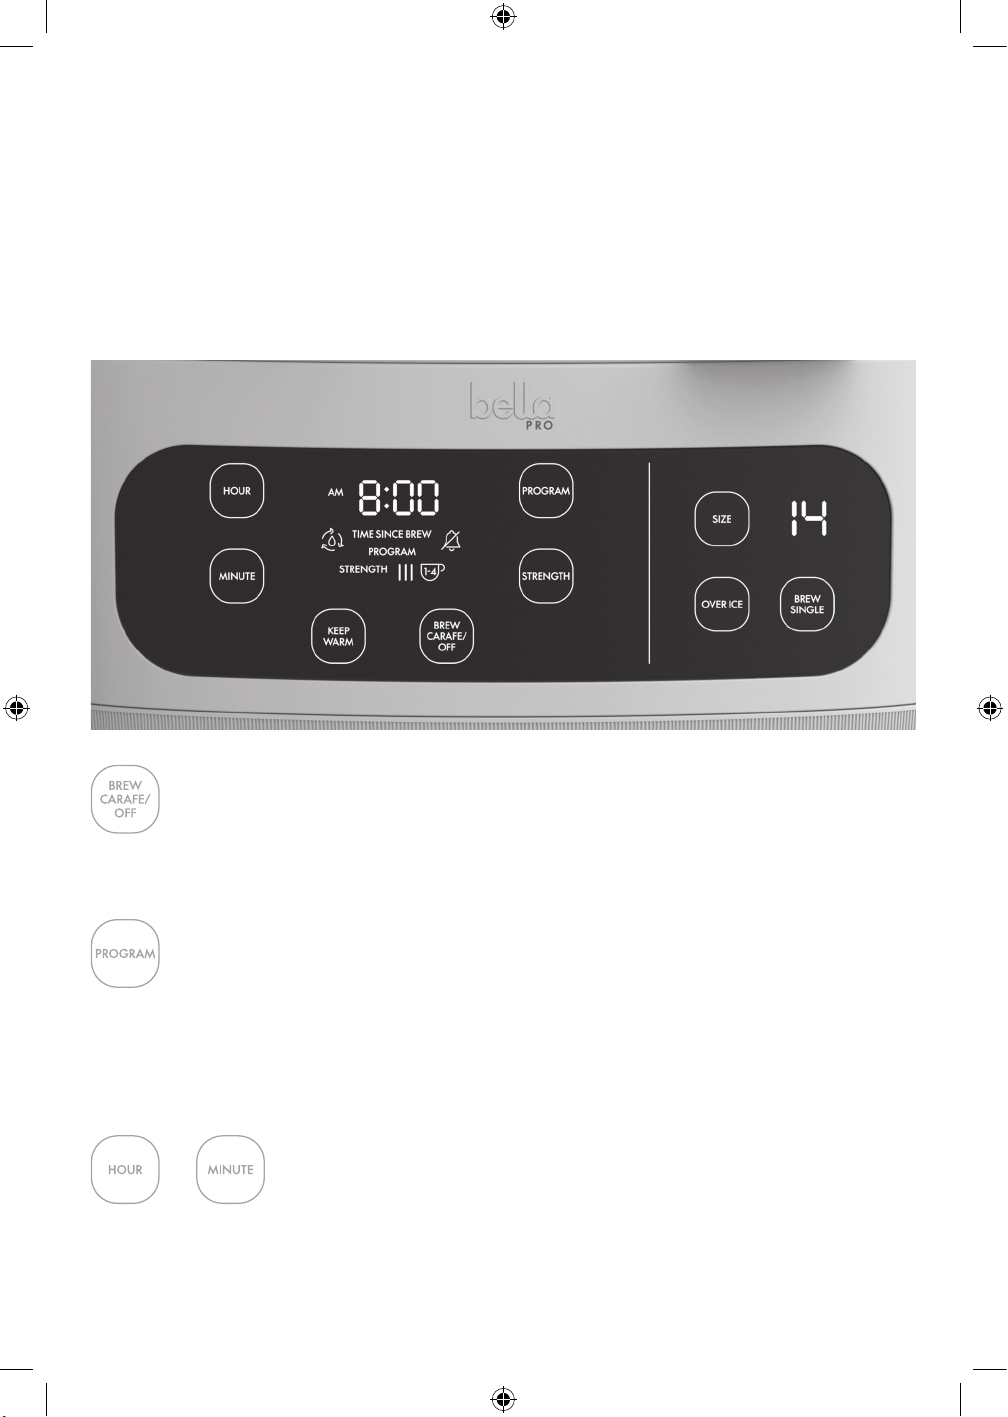
TOUCH-ACTIVATED DISPLAY CONTROL PANEL
A screen that only shows up when you need it.
1. 24-hour LED Digital Clock with AM/PM indicator.
2. SOUND OFF
3. STRENGTH
4. KEEP WARM
5. 1 - 4 CUPS
6. CLOCK
7. CLEAN
8. PROGRAM
9. SELECT
10. Brew Strength – 3 options
11. HOUR and MINUTE
12. BREW CARAFE/OFF
14. Cup size indicator (shows cup size in oz)
15. BREW SINGLE (to brew a cup)
16. OVER ICE – to brew a cup over ice
17. SIZE – to select a cup size in oz
• Press the BREW CARAFE/OFF button to activate the Drip Coee unit and coee will begin to brew.
• When the BREW CARAFE/OFF button is pressed while brewing, the unit will stop working and return
tostandbymode.
• Press and hold the PROGRAM button for 1.5 seconds to set FUTURE BREW TIME.
• Use the HOUR and MINUTE buttons to adjust the time until the desired FUTURE BREW TIME has been selected.
• Press the PROGRAM button to conrm the FUTURE BREW TIME has been set or wait 5 seconds to conrm
thetime.
• The PROGRAM button will stay illuminated indicating that the coee maker is now programmed for
futurebrew.
• Press HOUR to adjust the HOUR.
• Press MINUTE to adjust the MINUTES.
• Press and hold HOUR or MINUTE to fast reverse or fast advance time.
90228_90283_90284_BellaPro_MultiBrew_CoffeeMaker_IM_V3_R2.indd 990228_90283_90284_BellaPro_MultiBrew_CoffeeMaker_IM_V3_R2.indd 9 2025-06-11 11:07 AM2025-06-11 11:07 AM
10
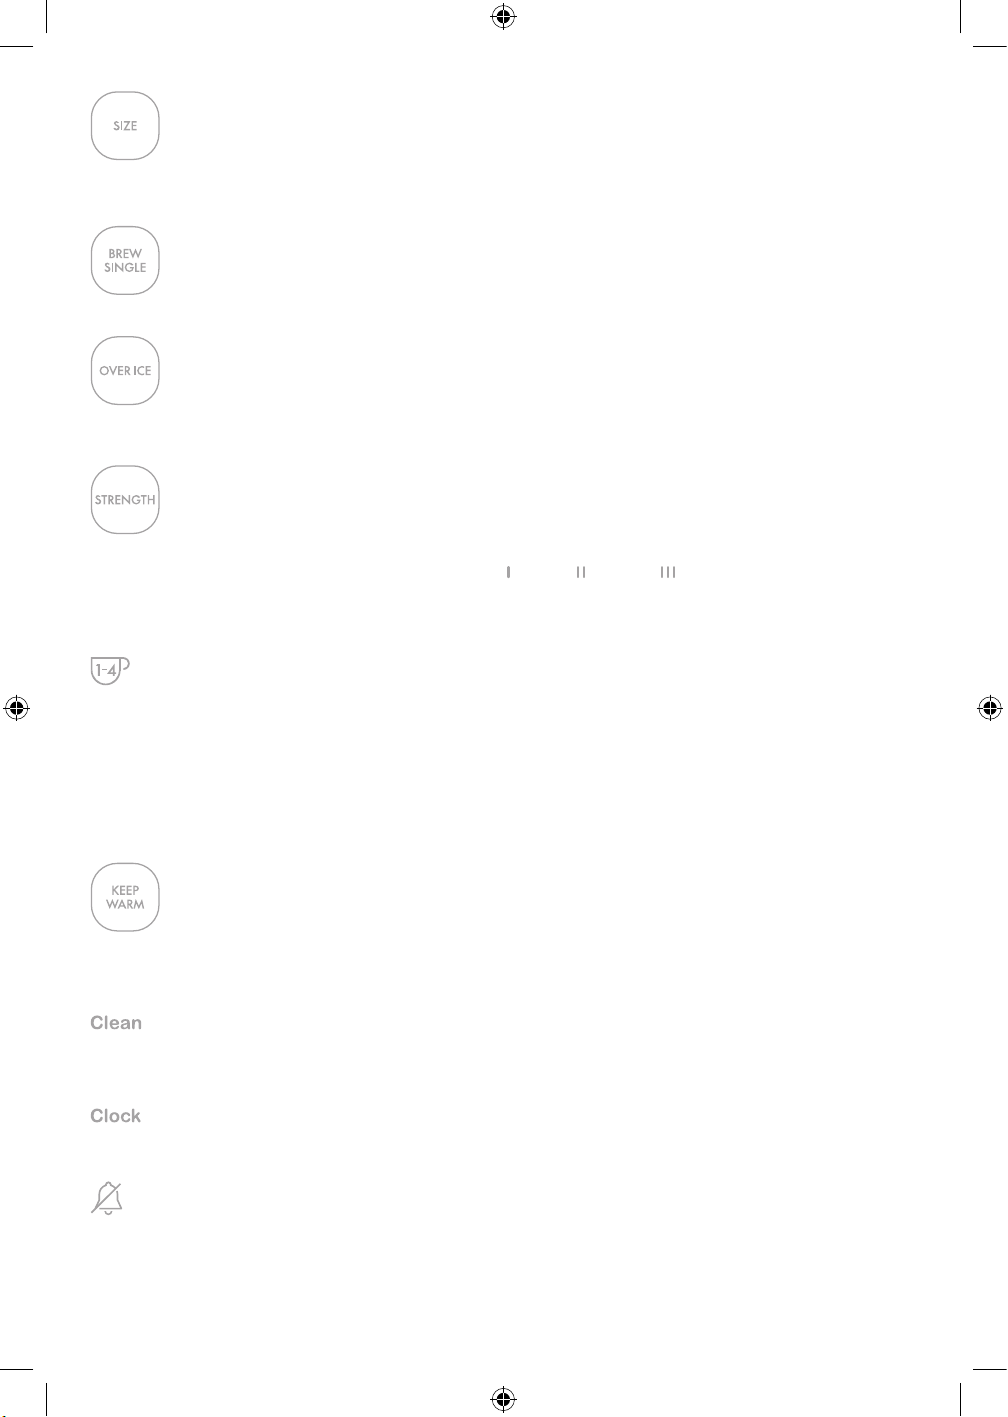
• Press the SIZE button to select the single serve brew size in oz. Press again until you reach the desired size.
Brews a 6oz, 8oz, 10oz, 12oz and 14oz cup. The default size is 8oz.
• Press the BREW SINGLE button to activate the Single Serve unit and coee will begin to brew.
• Place ice in a cup, mug or travel mug to brew over ice. Press the OVER ICE button to activate the single serve
unit and coee will begin to brew.
• Press STRENGTH until STRENGTH illuminates.
• Press STRENGTH to choose from 4 brew STRENGTHS:
Regular, Gourmet, Bold or 1-4 cups.
• The active brew strength is displayed on the control panel.
NOTE: For your convenience, the last chosen brew STRENGTH will be the default for the next carafe
ofbrewedcoee.
IMPORTANT: The 1-4 CUPS option must be programmed immediately before brewing.
• Press STRENGTH until 1-4 CUPS illuminates.
• When brewing 1 to 4 cups of coee, the 1-4 CUPS option automatically adjusts the brewing process for
maximum avor.
• Press the BREW CARAFE/OFF button to begin brewing.
NOTE: The Coee Maker will not measure water quantity. When using the 1 - 4 Cup Mode, the entire water
reservoir will brew. Always ensure to ll the water reservoir with 4 CUPS of water if you plan to use the
1-4CUPS option.
• KEEP WARM time defaults to 2:00 hours but can be adjusted from 00:00 minutes to 4:00 hours.
• Press and hold KEEP WARM until KEEP WARM time ashes.
• Press HOUR or MINUTE to adjust KEEP WARM time.
• If descaling is necessary, press and hold HOUR and MINUTE at the same time until CLEAN illuminates.
• Please follow detailed instructions in the CLEAN section of this instruction manual for optimal results.
• Aer every 150 brews, CLEAN will automatically ash.
• Press and hold HOUR or MINUTE button until CLOCK ashes.
• Press HOUR or MINUTE to set the time.
• To turn the sound o, press and hold MINUTE and PROGRAM buttons at the same until icon illuminates.
Theicon will display next to the clock on the control panel.
• To turn the sound back on, press and hold MINUTE and PROGRAM buttons at the same time. The icon will
disappear with 1 audible tone.
90228_90283_90284_BellaPro_MultiBrew_CoffeeMaker_IM_V3_R2.indd 1090228_90283_90284_BellaPro_MultiBrew_CoffeeMaker_IM_V3_R2.indd 10 2025-06-11 11:07 AM2025-06-11 11:07 AM
11
BEFORE BREWING DRIP COFFEE FOR THE FIRST TIME
1. Remove all packing material and labels from the inside and outside of the Coee Maker. Place the unit on a
at, clean surface.
2. Before preparing coee, thoroughly clean the glass carafe, carafe lid, removable lter basket, reusable lter
basket and coee scoop in hot, sudsy water. Rinse and dry. Replace disassembled parts.
NOTE: The carafe, carafe lid, removable lter basket holder and reusable lter basket are all top-rack
dishwasher safe. The coee scoop should be placed in the dishwasher alongside the cutlery.
3. Clean the inside of the Coee Maker by brewing 2 full carafes of tap water (see Brewing Coee Instructions).
Do not add the reusable lter basket or ground coee for this initial cleaning
DRIP COFFEE BREWING OPERATION
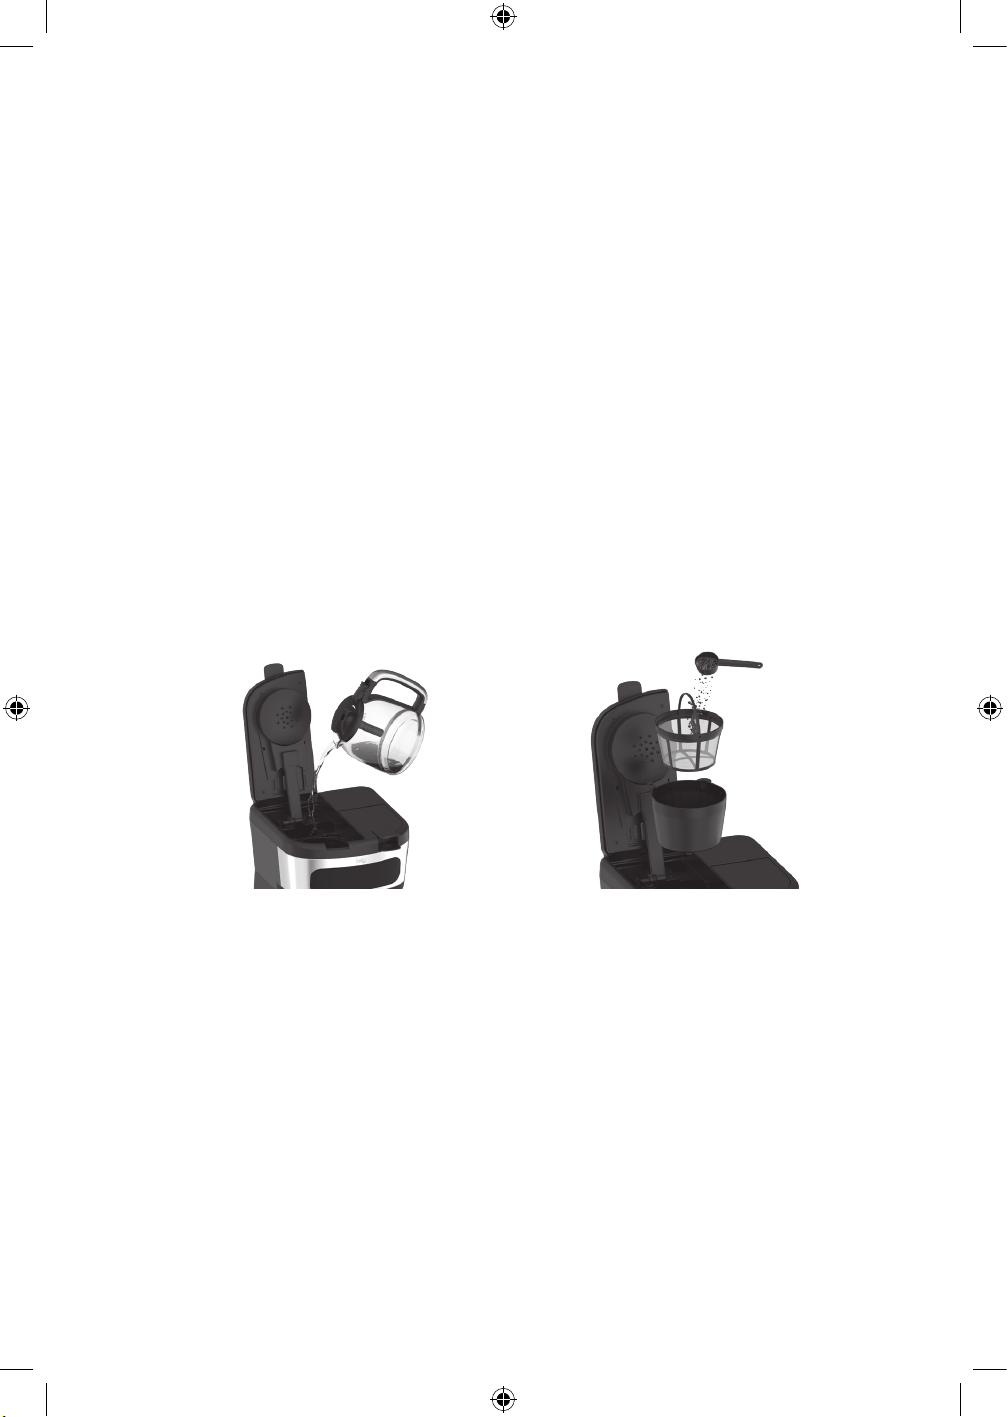
1. Fill carafe with cold tap or distilled water and carefully pour into water reservoir. (Figure. 1)
CAUTION: Never operate the Coee Maker when the water reservoir is empty.
IMPORTANT: Before brewing, always make sure water level is past the 4 cup step and add water if needed.
CAUTION: Never add water to exceed the 12-cup step.
2. Drop the removable lter basket into the housing and place the coee-lled reusable lter basket into the
removable lter. (Figure. 2)
3. Close the lid & press BREW CARAFE/OFF button. By default, Regular brew will illuminate. To adjust the brew
strength, see page 10.
4. Press the BREW CARAFE/OFF button to start brewing.
5. When brewing is complete, 3 audible tones will sound. The Coee Maker will display 0:00, as it advances to
KEEP WARM. The time will begin to count up to 2:00 hours.
IMPORTANT! Press BREW CARAFE/OFF button at any time to turn the Coee Maker o.
6. At the end of KEEP WARM, 2 audible tones will sound as the Coee Maker turns itself o within 5 minutes if no
further operation.
CAUTION: Always make sure the lid is aligned with the spout before pouring hot coee.
PAUSE & SERVE
Pause & Serve allows you to pour a cup of coee before the entire carafe is brewed. Return the carafe to the warming
plate; dripping will resume.
CAUTION: Replace carafe under the lter basket within 30 seconds to prevent overow.
BREW LATER
1. The Coee Maker can be programmed to begin brewing up to 24 hours in the future.
WARNING: Make sure the Coee Maker is set up to brew coee. Fill the water reservoir, add fresh
ground coee to the reusable lter basket, close the lid. Place the empty carafe with lid in the center of the
warmingplate.
2. Press and hold the PROGRAM button for 1.5 seconds. The last programmed FUTURE BREW TIME will begin
toash.
3. Press HOUR to adjust the HOUR.
4. Press MINUTE to adjust the MINUTES.
NOTE: Pay attention to AM and PM setting. Press the PROGRAM button or wait 5 seconds to conrm the time.
Only the PROGRAM, BREW SINGLE, OVER ICE, SIZE and STRENGTH buttons will illuminate.
5. When the pre-programmed time is reached, brewing will begin.
Figure 1 Figure 2
90228_90283_90284_BellaPro_MultiBrew_CoffeeMaker_IM_V3_R2.indd 1190228_90283_90284_BellaPro_MultiBrew_CoffeeMaker_IM_V3_R2.indd 11 2025-06-11 11:07 AM2025-06-11 11:07 AM
12
6. At the end of the brew cycle, 3 audible tones will signal completion and the Coee Maker will advance
toKEEPWARM.
7. To start brew time at the same time the next day, simply press the PROGRAM button, the PROGRAM,
BREWSINGLE, OVER ICE, SIZE and STRENGTH buttons will illuminate.
BEAUTIFUL HINTS FOR GREAT TASTING COFFEE
• A clean Coee Maker is essential for brewing great tasting coee. Regular cleaning, as described in the
CLEAN section of this instruction manual, is highly recommended.
• Always use fresh, cold water in your Coee Maker.
• Finer grinds, such as drip and ADC coee, promote fuller extraction and provide rich, full-bodied coee.
• For optimum taste, program your Coee Maker to brew coee to your preferred STRENGTH. Choose from
Regular, Gourmet, or Bold.
• For optimum brewed coee avor, buy whole beans and grind just
before brewing.
• Do not re-use coee grounds since this will greatly impair coee avor.
• Reheating coee is not recommended. Coee is at its peak
avor immediately aer brewing.
• Small oil droplets on the surface of brewed, black coee is
due to the extraction of oil from the coee grounds. Oiliness
may occur more frequently if heavily roasted coees are used.
Overextraction may also cause oiliness, indicating a need to
clean your Coee Maker.
BEFORE BREWING SINGLE SERVE FOR THE FIRST TIME
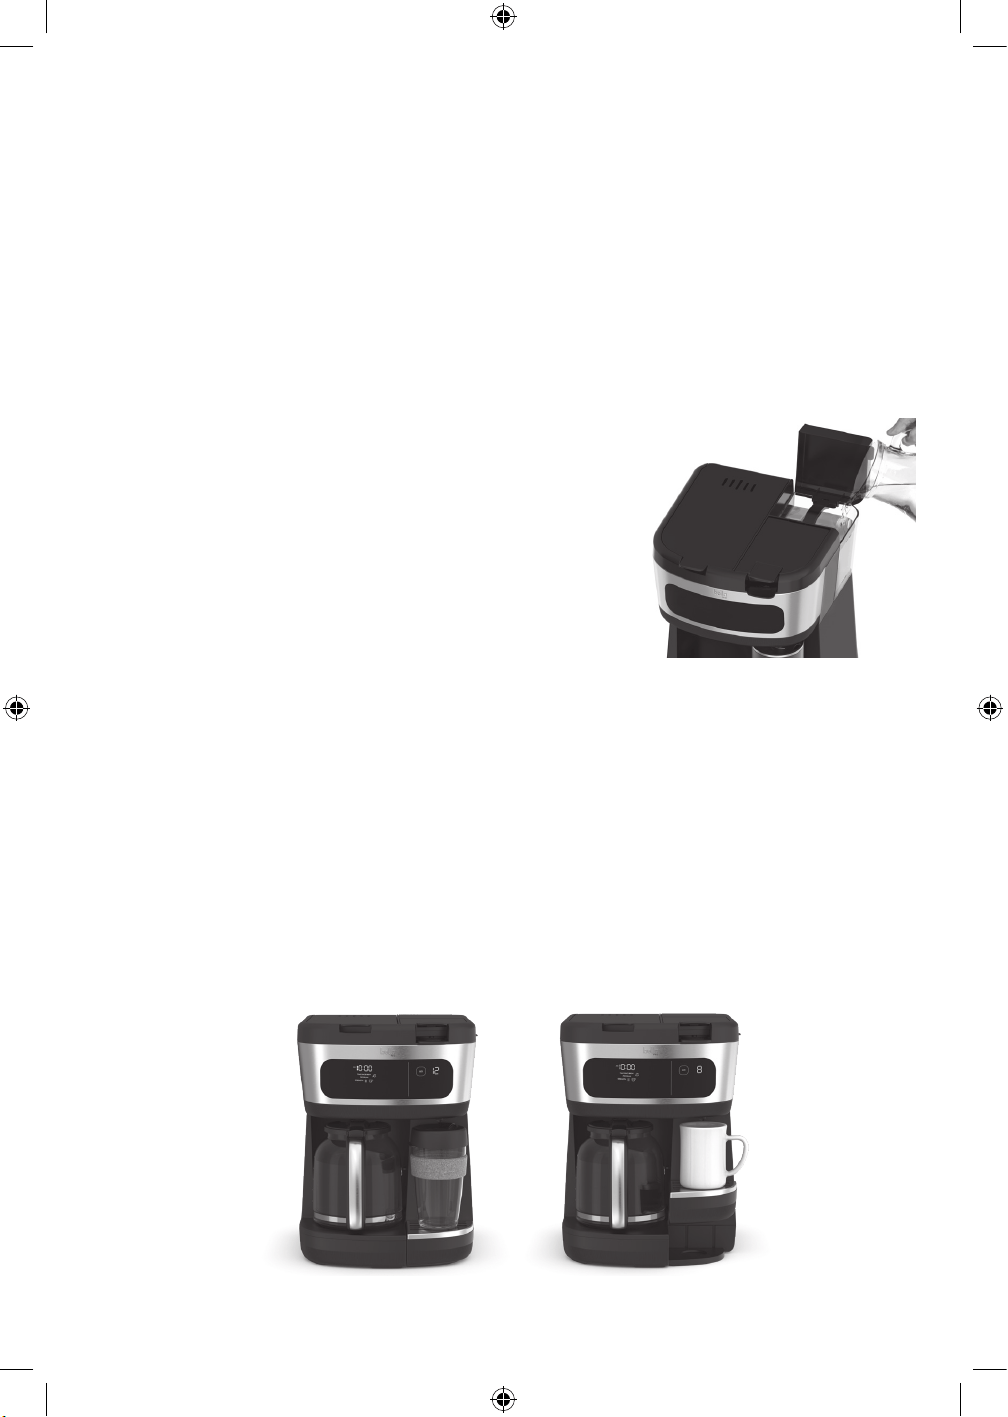
1. To pre-clean and prime the pump, ll a tall mug/cup with up
to 15 oz. cold water and add to the single serve water tank.
(SeeFigure 3.) Center the empty mug/cup on the single serve
base, directly under the coee spout.
2. Press the BREW CARAFE/OFF button, then press BREW SINGLE
button, the unit will start brewing.
3. The pump will activate, and water will begin to stream through the spout. Upon completion, all indicators lights
will illuminate.
4. The pump is now primed, and the MultiBrew single cup coee brewing system is ready for use.
SINGLE SERVE BREWING OPERATION
The capsule brewing system gives you the option to brew any pre-packaged coee pods or to use your own favorite
coee blends using the reusable ground coee basket.
1. Add cold ltered water to the single serve water tank. The water tank has MIN and MAX lines. Do not overll
the MAX ll line.
WARNING: Before heating, it is recommended the water tank be lled at least to the MIN line. To avoid
damage to your Coee Maker, never operate when the water tank is empty.
2. Center tall travel mugs/tumblers (up to 15 oz.) on the single serve base, directly under the coee spout. Center
cup/mug on the drip tray plate, directly under the coee spout. (See Figure 4.)
3. Use the front tab to unlock and open the MultiBrew adaptor compartment lid.
Figure 3
Figure 4
90228_90283_90284_BellaPro_MultiBrew_CoffeeMaker_IM_V3_R2.indd 1290228_90283_90284_BellaPro_MultiBrew_CoffeeMaker_IM_V3_R2.indd 12 2025-06-11 11:07 AM2025-06-11 11:07 AM
13
4. Insert the capsule adaptor into the adaptor compartment.
IMPORTANT: To avoid loose coee grounds, you must line up the front tube with the spout in the front of the
housing. Turn the adaptor so that it ts ush into the housing.
CAUTION: There are two sharp needles that puncture the capsules. One is located inside the capsule adapter
and the other is located on the top underside of the adapter compartment. To avoid risk of injury, do not place
ngers inside either parts. Also exercise caution when cleaning the parts.
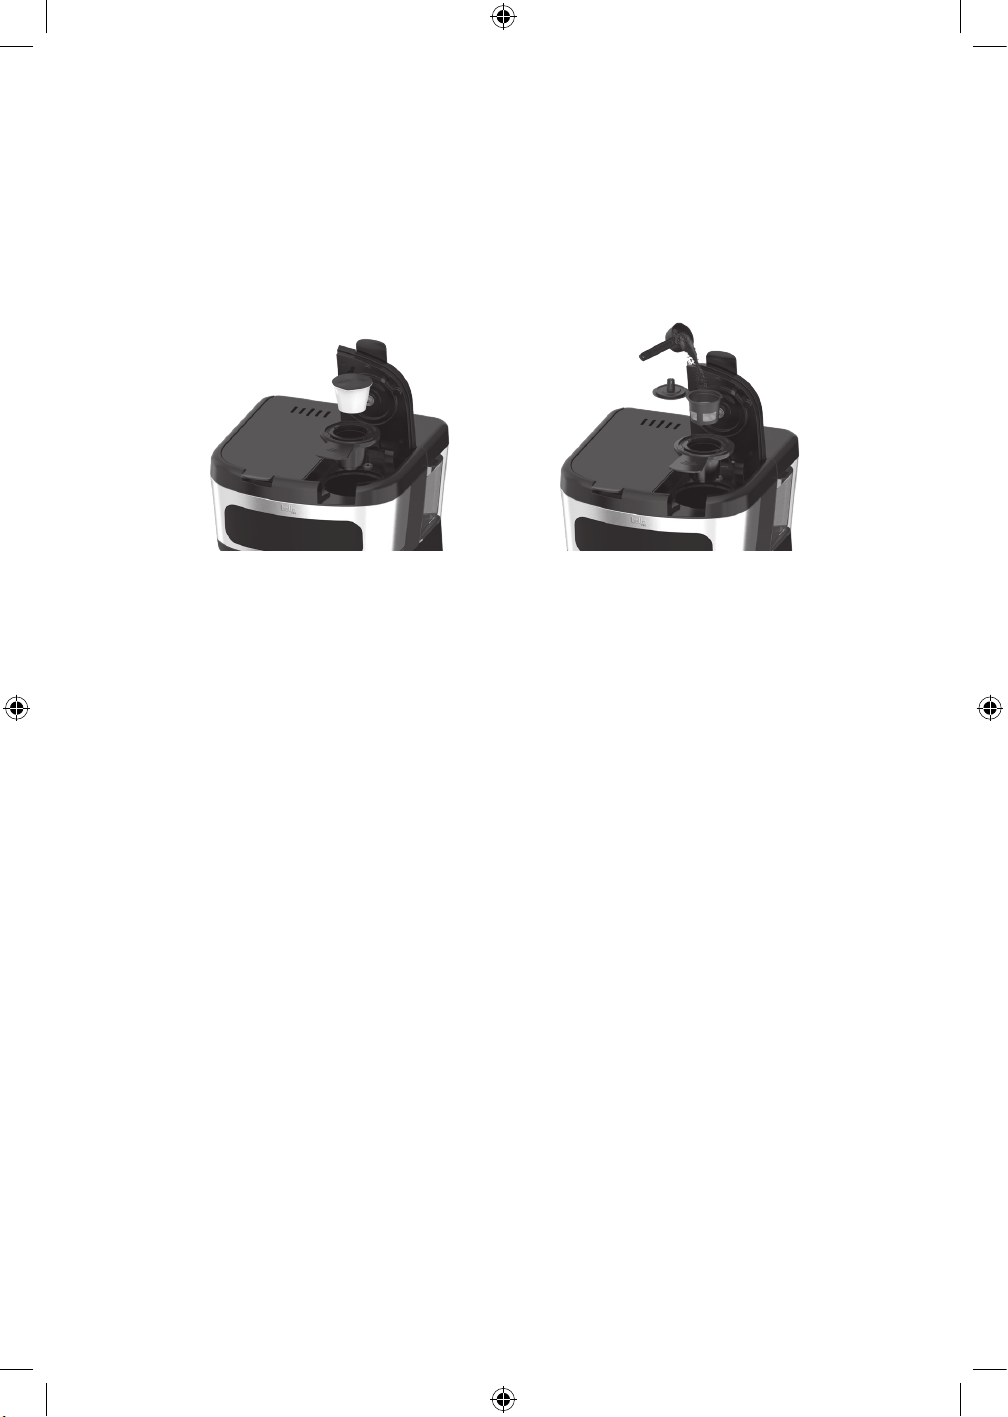
5. K-Cup Capsules: Add the capsule of your choice into the capsule adaptor. (See Figure 5.)
NOTE: Both the top and bottom of the capsule will be punctured.
6. Reusable Ground Coee Basket: Add the lled reusable ground coee basket to the adaptor compartment.
(See Figure 6.)
NOTE: For best results, when lling the reusable ground coee basket, please use medium grind.
7. Press the adaptor compartment’s lid down rmly. An audible click can be heard as the lid is locked.
8. Press the SIZE button to select the desired cup size in oz, then press the BREW SINGLE button for hot single
serve coee, or press the OVER ICE button to brew over ice.
NOTE: Upon completion of the single serve brew cycle, the BREW SINGLE or OVER ICE button will be
illuminated, while the other buttons will be o during brewing.
NOTE: To interrupt the brewing cycle at any time, press the active BREW SINGLE or OVER ICE button and all
the buttons will illuminate, the unit will go back to the standby mode.
NOTE: Iced coee volume is half of the size setting EX: 6oz size, will only brew 3 oz of coee.
NOTE: To brew Iced coee, ice cubes need to be added to the mug, or cup before brewing.
NOTE: To select the size, press the SIZE button. The display will show the 8oz default setting. To change the
size press the SIZE button again, until the desired size is reached. The other size options are: 10oz, 12oz, 14oz,
and6oz. Press the BREW SINGLE or OVER ICE button to brew coee. Unit will remember the size last used,
unless it is unplugged.
9. During pod brewing, if the water from the tank runs out the BREW SINGLE/OVER ICE/SIZE button will all ash
to indicate that user needs to add water. If water is added within 3 minutes press any button to continue the
rest of the brew cycle. If over 3 minutes has passed the unit will return to the standby mode. Press the BREW
CARAFE/OFF button to enter the standby mode at anytime the buttons are ashing.
SINGLE SERVE HOT WATER
Use your MultiBrew Coee Maker to quickly and easily dispense hot water to prepare single cups of bagged teas,
instant soups, quick cooking oats, packaged hot chocolate, hot apple cider or any food that requires boiling water.
WARNING: Before heating, it is recommended the water tank be lled at least to the MIN ll line. DO NOT EXCEED
the MAX ll line. To avoid damage to your Coee Maker, never operate your MultiBrew Coee Maker when the water
tank is empty.
IMPORTANT: To prevent tainted or “o” avors when changing hot beverages, while the unit is OFF (cool), use a damp
paper towel to completely remove any residue from the adaptor compartment.
1. Follow step 1 & 2 from Single Serve Brewing Operation (p.12)
2. Insert the capsule adaptor (without coee or capsule) into the adaptor compartment and follow step 7 & 8 from
Single Serve Brewing Operation (p.13)
3. Aer water has been heated and dispensed, indicator light will illuminate. Stir ingredients well before serving.
Figure 5 Figure 6
90228_90283_90284_BellaPro_MultiBrew_CoffeeMaker_IM_V3_R2.indd 1390228_90283_90284_BellaPro_MultiBrew_CoffeeMaker_IM_V3_R2.indd 13 2025-06-11 11:07 AM2025-06-11 11:07 AM

14
USER MAINTENANCE INSTRUCTIONS
This appliance requires little maintenance. It contains no user-serviceable parts. Any servicing requiring disassembly
other than cleaning must be performed by a qualied appliance repair technician.
CARE & CLEANING INSTRUCTIONS
1. Always make sure Coee Maker is unplugged and warming plate is cool before attempting to clean.
2. Aer every use, remove the reusable lter basket, discard used coee grounds, and rinse thoroughly.
3. Wash the reusable lter basket and glass carafe in hot, sudsy water. Pull the carafe lid out of the carafe and
scrub with a soaped kitchen brush. The carafe, carafe lid, removable lter basket holder and the reusable
lter basket are all top-rack dishwasher safe. The coee scoop should be placed in the dishwasher alongside
thecutlery.
WARNING: To avoid breakage, handle carafe with care. Avoid impact. Glass will break as a result of impact.
Use care when lling with water to avoid hitting faucet.
4. Wipe the Coee Maker exterior with a damp cloth to remove supercial stains. For stubborn stains, use a nylon
or plastic pad with a nonabrasive cleanser. Do not use metal scouring pads or abrasive cleansers.
5. Dry and replace disassembled parts. Make sure the removable lter basket holder drops down and is properly
seated into the housing.
6. Close the lid.
CLEAN
To assure optimal avor and performance of your MultiBrew Coee Maker, when used regularly, and under normal
conditions, it is recommended that the CLEAN cycle be run every 150 uses. The CLEAN will automatically ash on the
display to alert you that CLEAN is necessary.
NOTE: The entire cleaning cycle will take 30 to 40 minutes to complete.
NOTE: The MultiBrew Coee Maker has dual water tanks that must be descaled separately and as needed.
Drip Coee System
1. Combine 6 cups of white vinegar and 4 cups of cold water in the carafe and pour vinegar solution into the
water reservoir.
2. Place the empty carafe onto the warming plate.
3. Close the lid and press and hold HOUR and MINUTE at the same time until CLEAN illuminates. Press the BREW
CARAFE/OFF button. An audible tone will sound as the CLEAN cycle begins. CLEAN and BREW CARAFE/OFF
buttons will be illuminated on the display. Part of the mixture will pass through the brew cycle in a slow 3 minute
sequence. During the CLEAN cycle, the remaining mixture will be held in the Coee Maker and then dispensed
periodically for 30 minutes.
IMPORTANT! Press the BREW CARAFE/OFF button at any time to exit CLEAN function or press
BREWCARAFE/OFF button at any time to turn the Coee Maker o. At the end of CLEAN cycle, 3 audible
tones will sound, CLEAN will disappear from the display and Coee Maker will turn itself o automatically.
4. Discard water in the carafe. Wash carafe, removable lter basket and reusable lter basket in hot sudsy water.
5. Brew 2 or 3 carafes of fresh water through the Coee Maker brewing coee again.
6. Dry parts thoroughly.
7. Replace the removable lter basket in the housing, then drop the clean reusable lter basket into place.
SINGLE SERVE BREWING SYSTEM
1. Fill with 4 oz. white vinegar and 10 oz. cold water and pour vinegar solution into the single serve water tank.
2. Center a 15 oz. cup or container under the single serve coee spout.
3. Press the BREW SINGLE button. The indicator light will ash as the cleaning solution streams through the
coeespout.
4. Aer cleaning, rell the single serve water tank with fresh, cold water. Rinse thoroughly by brewing another
2to 3 (15 oz.) cups of clean, cold water.
5. Allow the MultiBrew Coee Maker to cool for 15 minutes before next use.
STORING INSTRUCTIONS
1. Never store Coee Maker while it is still plugged in.
2. Unplug Coee Maker and allow it to cool.
3. Store Coee Maker fully assembled, the reusable lter basket and removable lter basket holder in position.
Place the carafe on the warming tray. Close the lid.
4. Store Coee Maker in its box or in a cool, dry place.
90228_90283_90284_BellaPro_MultiBrew_CoffeeMaker_IM_V3_R2.indd 1490228_90283_90284_BellaPro_MultiBrew_CoffeeMaker_IM_V3_R2.indd 14 2025-06-11 11:07 AM2025-06-11 11:07 AM

15
LIMITED TWO-YEAR WARRANTY
SENSIO Inc. dba Made by Gather™ hereby warrants that for a period of TWO YEARS
from the date of delivery, this product will be free from mechanical defects in material
and workmanship, and for 90 days in respect to non-mechanical parts. At its sole
discretion, SENSIO Inc. dba Made by Gather™ will either repair or replace the product
found to be defective, or issue a refund on the product during the warranty period.
The warranty is only valid for the original retail purchaser from the date of the initial
delivery and is not transferable. Keep the original sales receipt, as proof of purchase
is required to obtain warranty validation, which commences on the date of delivery.
Retail stores selling this product do not have the right to alter, modify, or in any way
revise the terms and conditions of the warranty.
EXCLUSIONS:
The warranty does not cover normal wear of parts or damage resulting from any
of thefollowing: negligent use of the product, use of improper voltage or current,
improper routine maintenance, use contrary to the operating instructions, disassembly,
repair, or alteration by anyone other than qualified SENSIO Inc. dba Made by
Gather™ personnel. Also, the warranty does not cover Acts of God such as fire, floods,
hurricanes, or tornadoes.
SENSIO Inc. dba Made by Gather™ shall not be liable for any incidental or
consequential damages caused by the breach of any express or implied warranty.
Apart from the extent prohibited by applicable law, any implied warranty
of merchantability or fitness for a particular purpose is limited in time to the duration
of the warranty. Some states, provinces or jurisdictions do not allow the exclusion
or limitation of incidental or consequential damages, or limitations on how long an
implied warranty lasts, and therefore, the above exclusions or limitations may not apply
to you. The warranty covers specific legal rights which may vary by state, province
and/or jurisdiction.
HOW TO OBTAIN WARRANTY SERVICE:
You must contact Customer Service at our toll-free number: 1-866-832-4843.
A Customer Service Representative will attempt to resolve warranty issues over
thephone. If the Customer Service Representative is unable to resolve the problem,
you will be provided with a case number and asked to return the product to SENSIO Inc.
dba Made by Gather™. Attach a tag to the product that includes: your name, address,
daytime contact telephone number, case number, and description of the problem.
Also, include a copy of the original sales receipt. Carefully package the tagged product
with the sales receipt, and send it (with shipping and insurance prepaid) to SENSIO Inc.
dba Made by Gather™’s address. SENSIO Inc. dba Made by Gather™ shall bear no
responsibility or liability for the returned product while in transit to SENSIO Inc. dba
Made by Gather™ Customer Service Center.
90228_90283_90284_BellaPro_MultiBrew_CoffeeMaker_IM_V3_R2.indd 1590228_90283_90284_BellaPro_MultiBrew_CoffeeMaker_IM_V3_R2.indd 15 2025-06-11 11:07 AM2025-06-11 11:07 AM
For customer service questions or comments
1-866-832-4843 / help@bellahousewares.com
Sensio Inc.
dba Made by Gather
TM
New York, NY 10016/USA
90228, 90283, 90284 R2
90228_90283_90284_BellaPro_MultiBrew_CoffeeMaker_IM_V3_R2.indd 1690228_90283_90284_BellaPro_MultiBrew_CoffeeMaker_IM_V3_R2.indd 16 2025-06-11 11:07 AM2025-06-11 11:07 AM