09/25
2
3
4
4
4
4
4
5
5
5
5
6
6
6
7
7
8
8
9
10
10
10
11
11
11
11
12
12
13
13
13
13
13
13
14
14
14
14
15
15
16
16
16
16
16
16
16
17
18
19
2
3
4
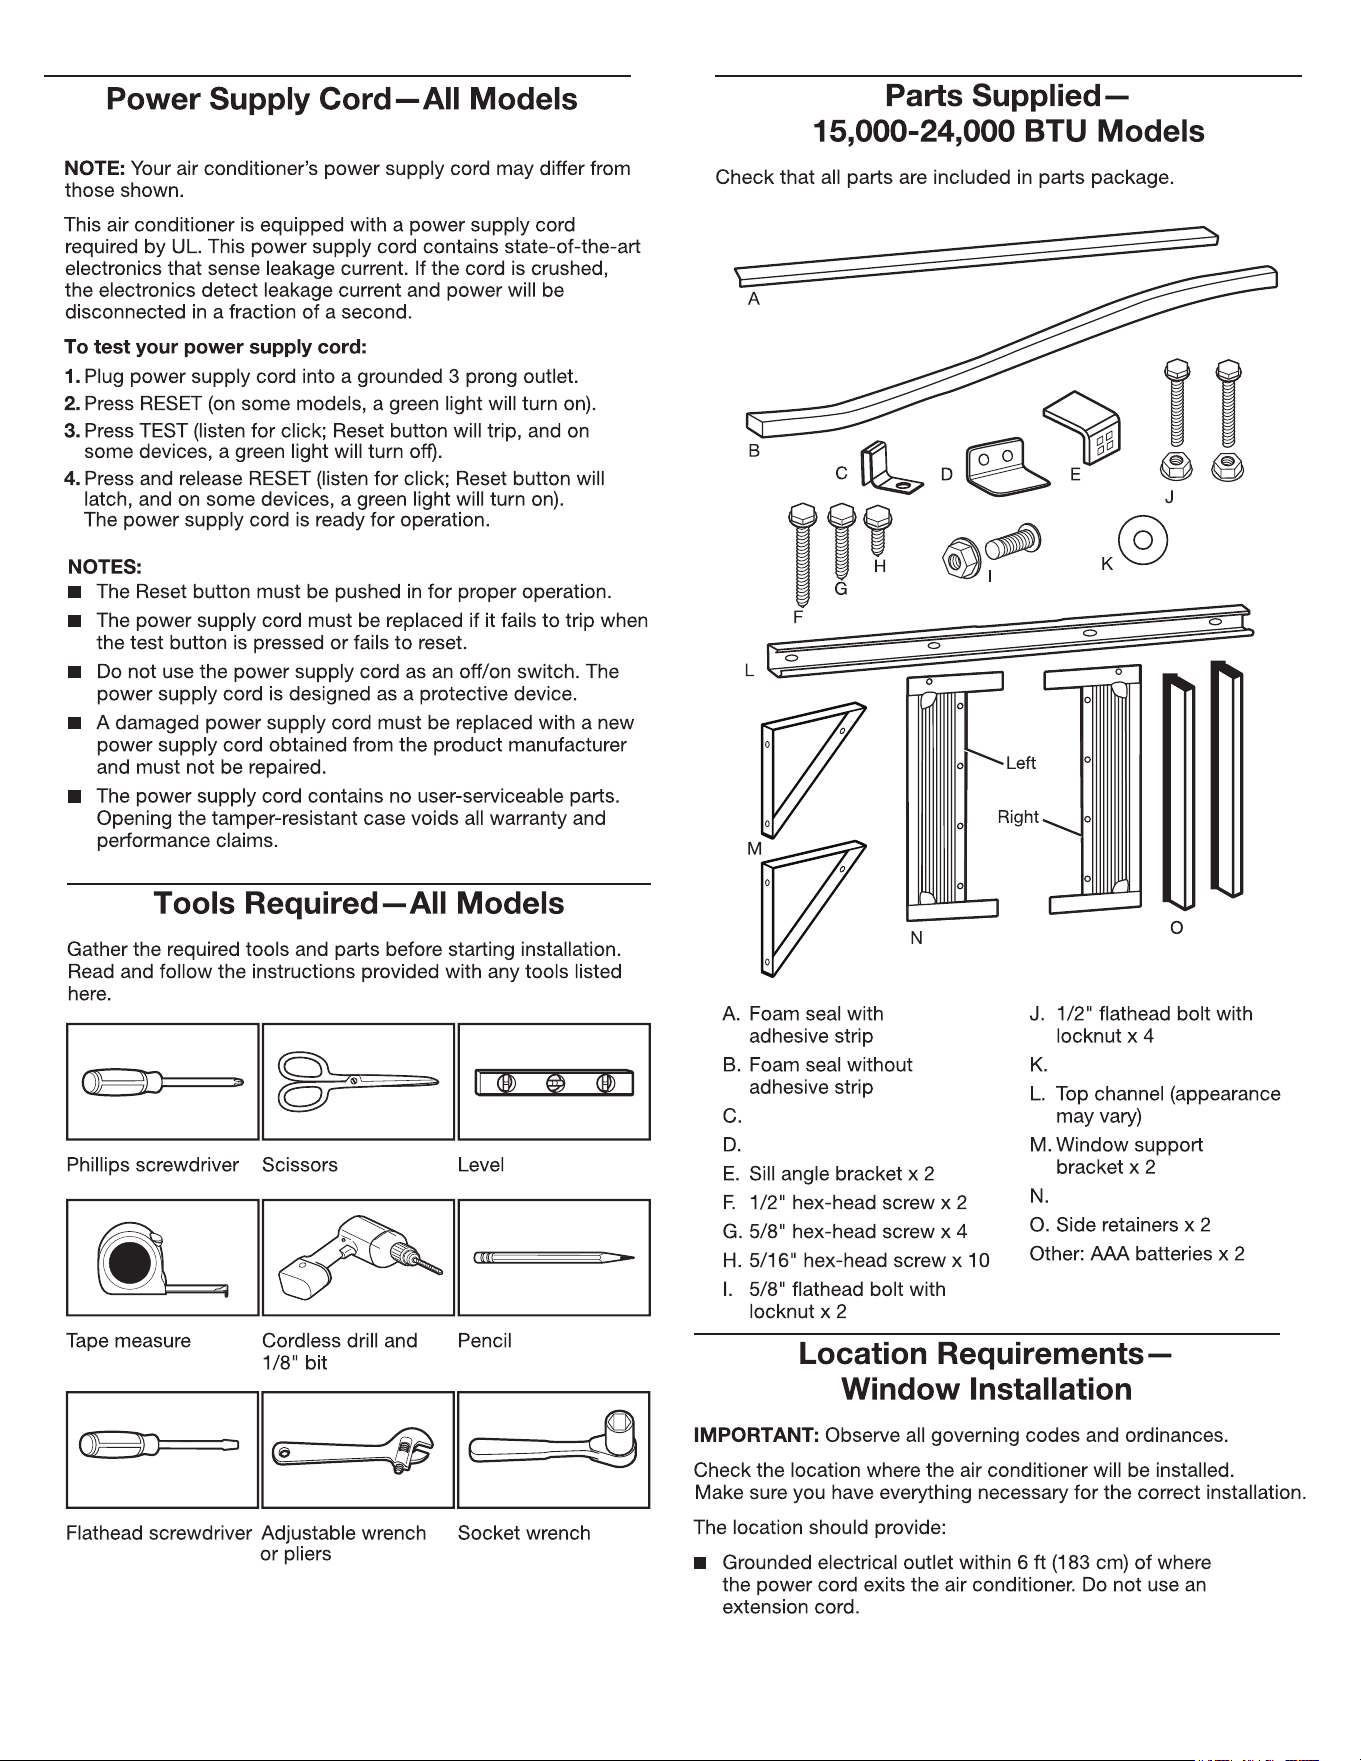
Window lock
Side panel bracket x 2
Side panels x 2
Washer x 2
5
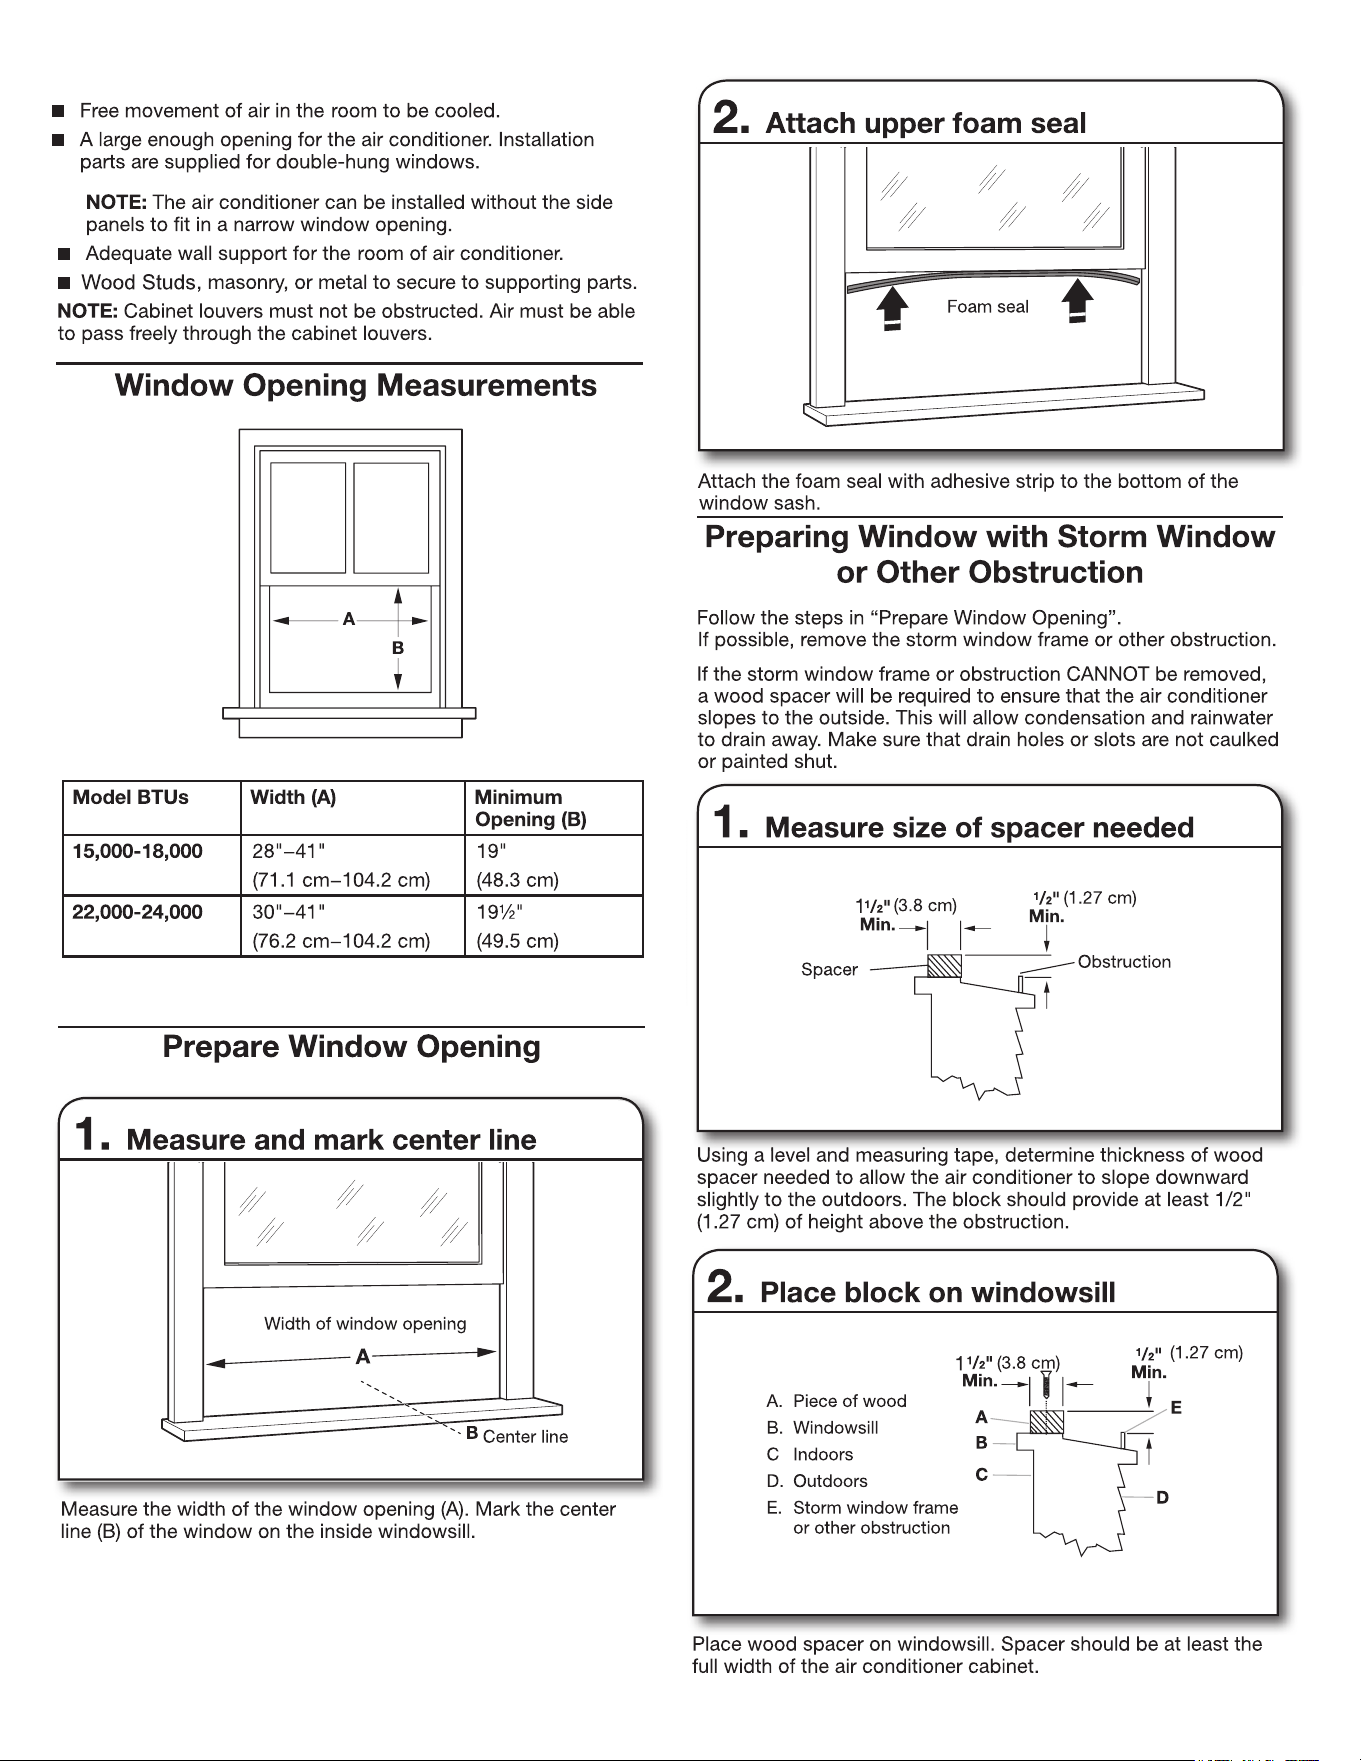
Secure the wood spacer
to the windowsill.
6
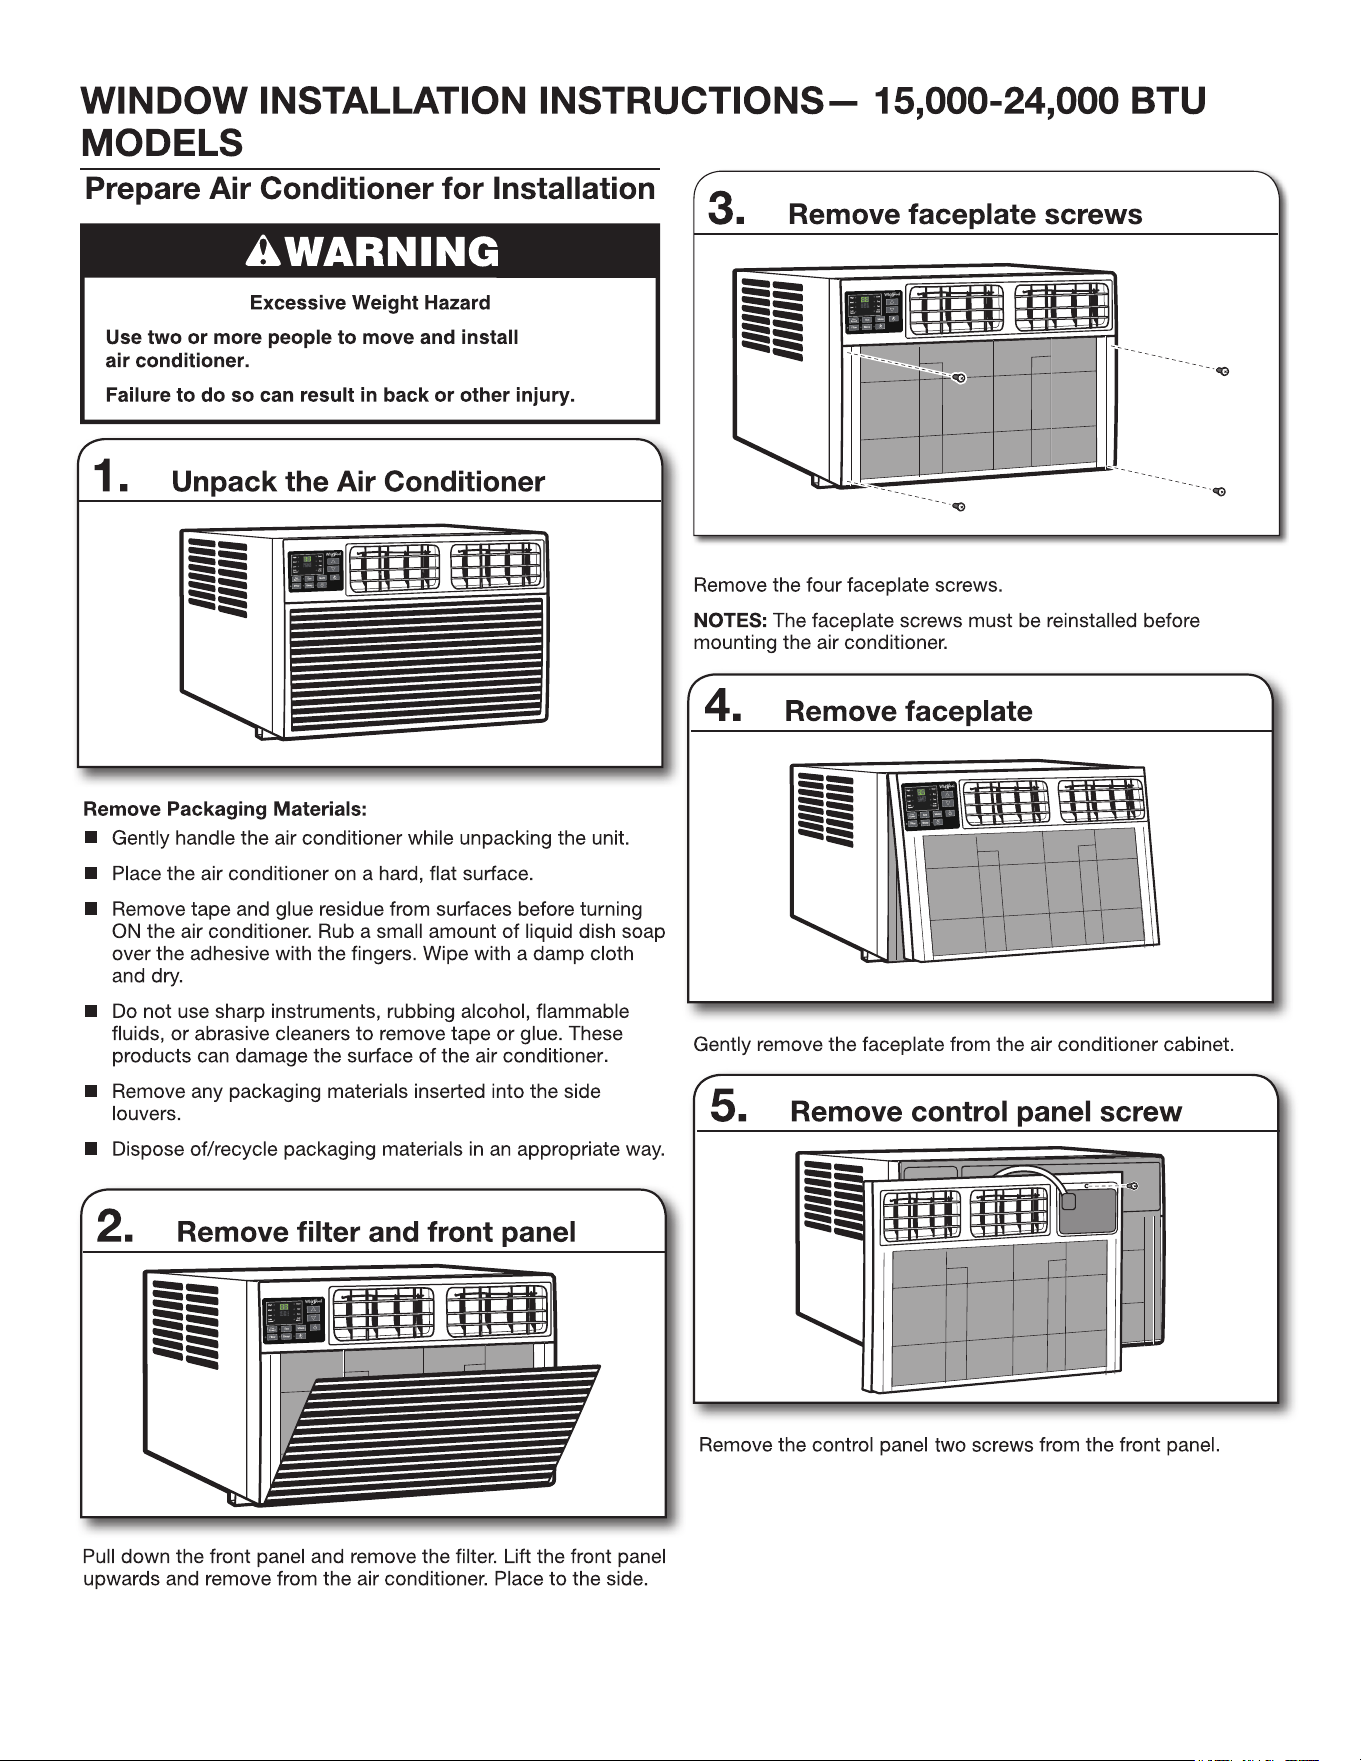
7
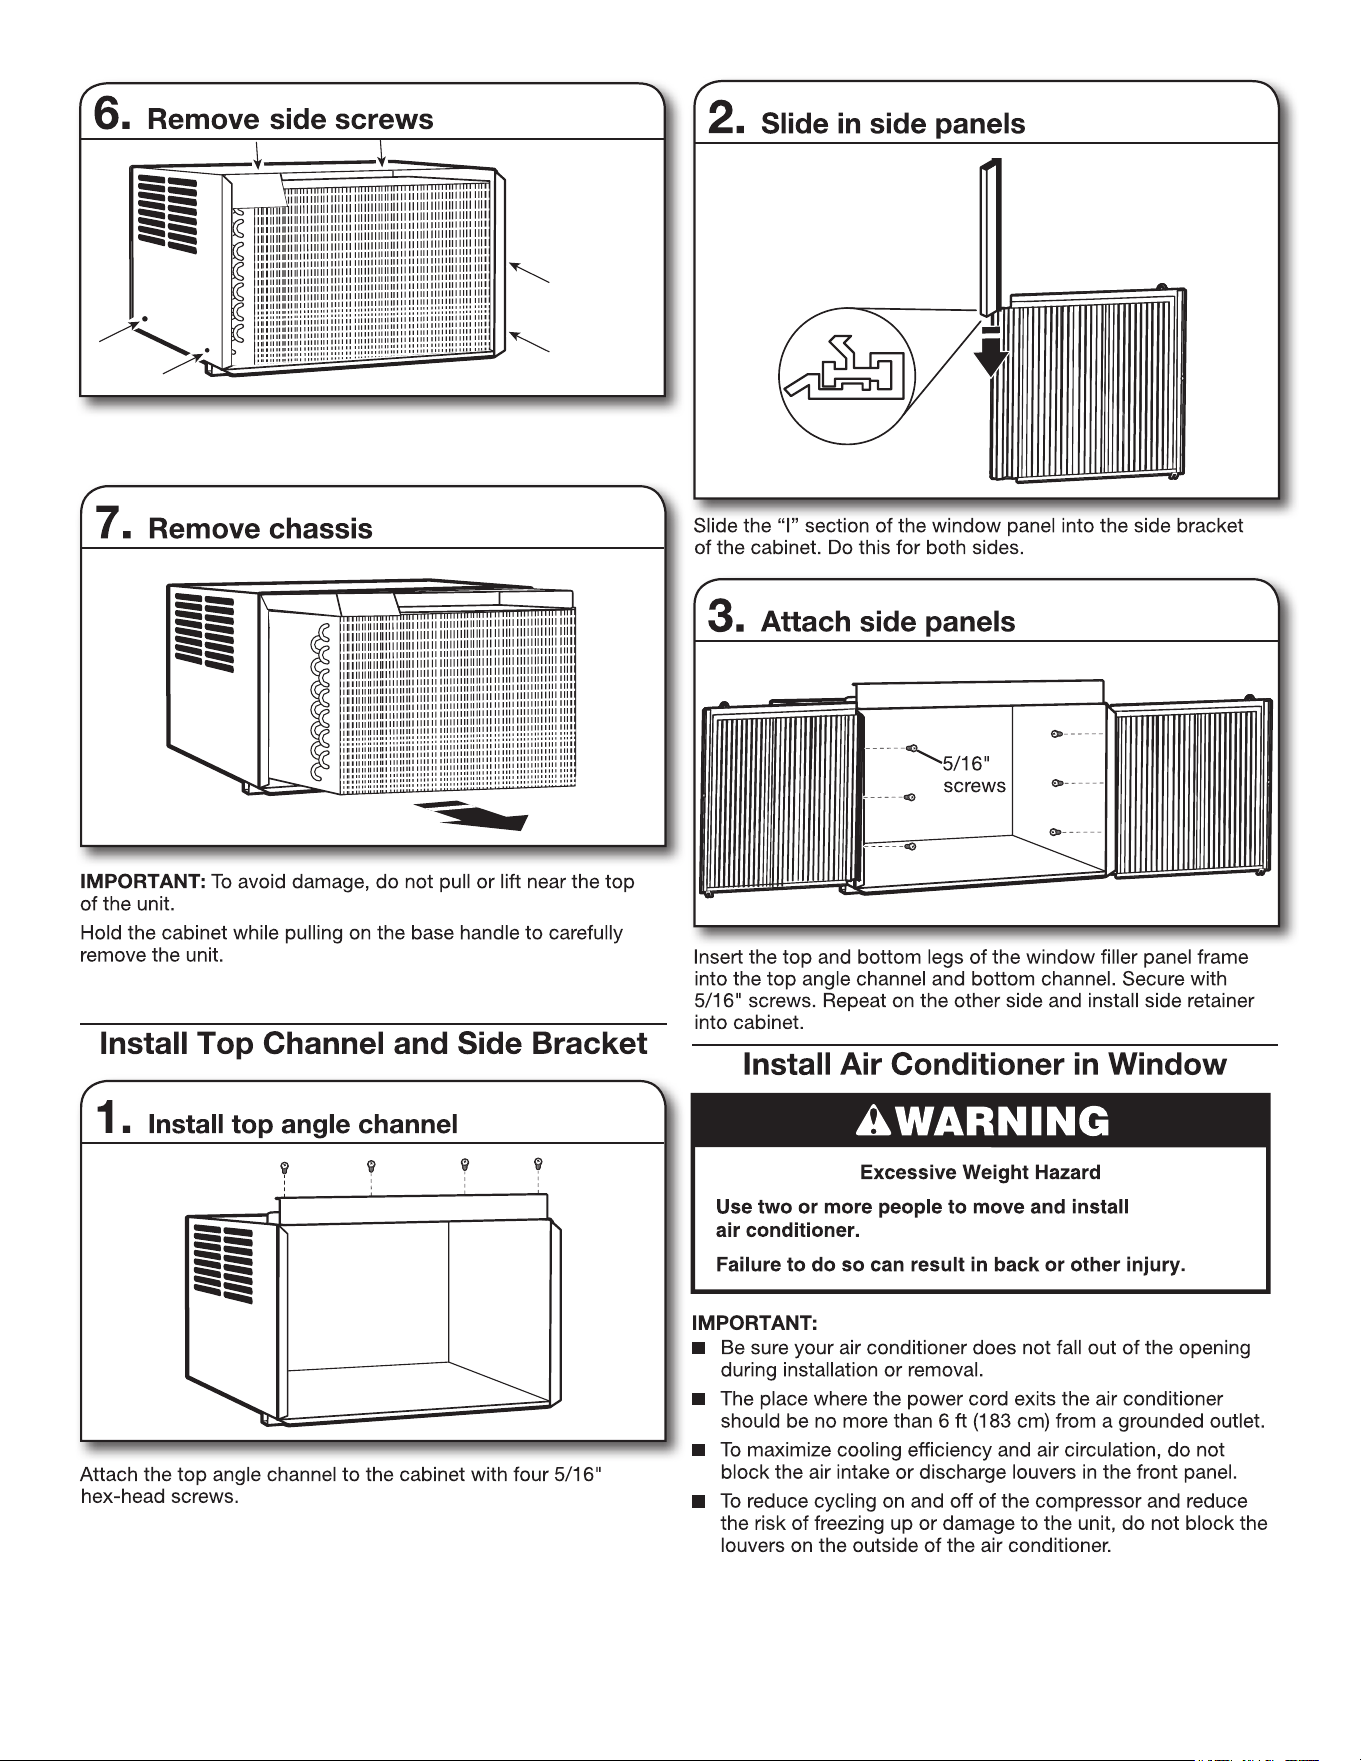
Remove six screws from the top side and left-right side
of the cabinet.
8
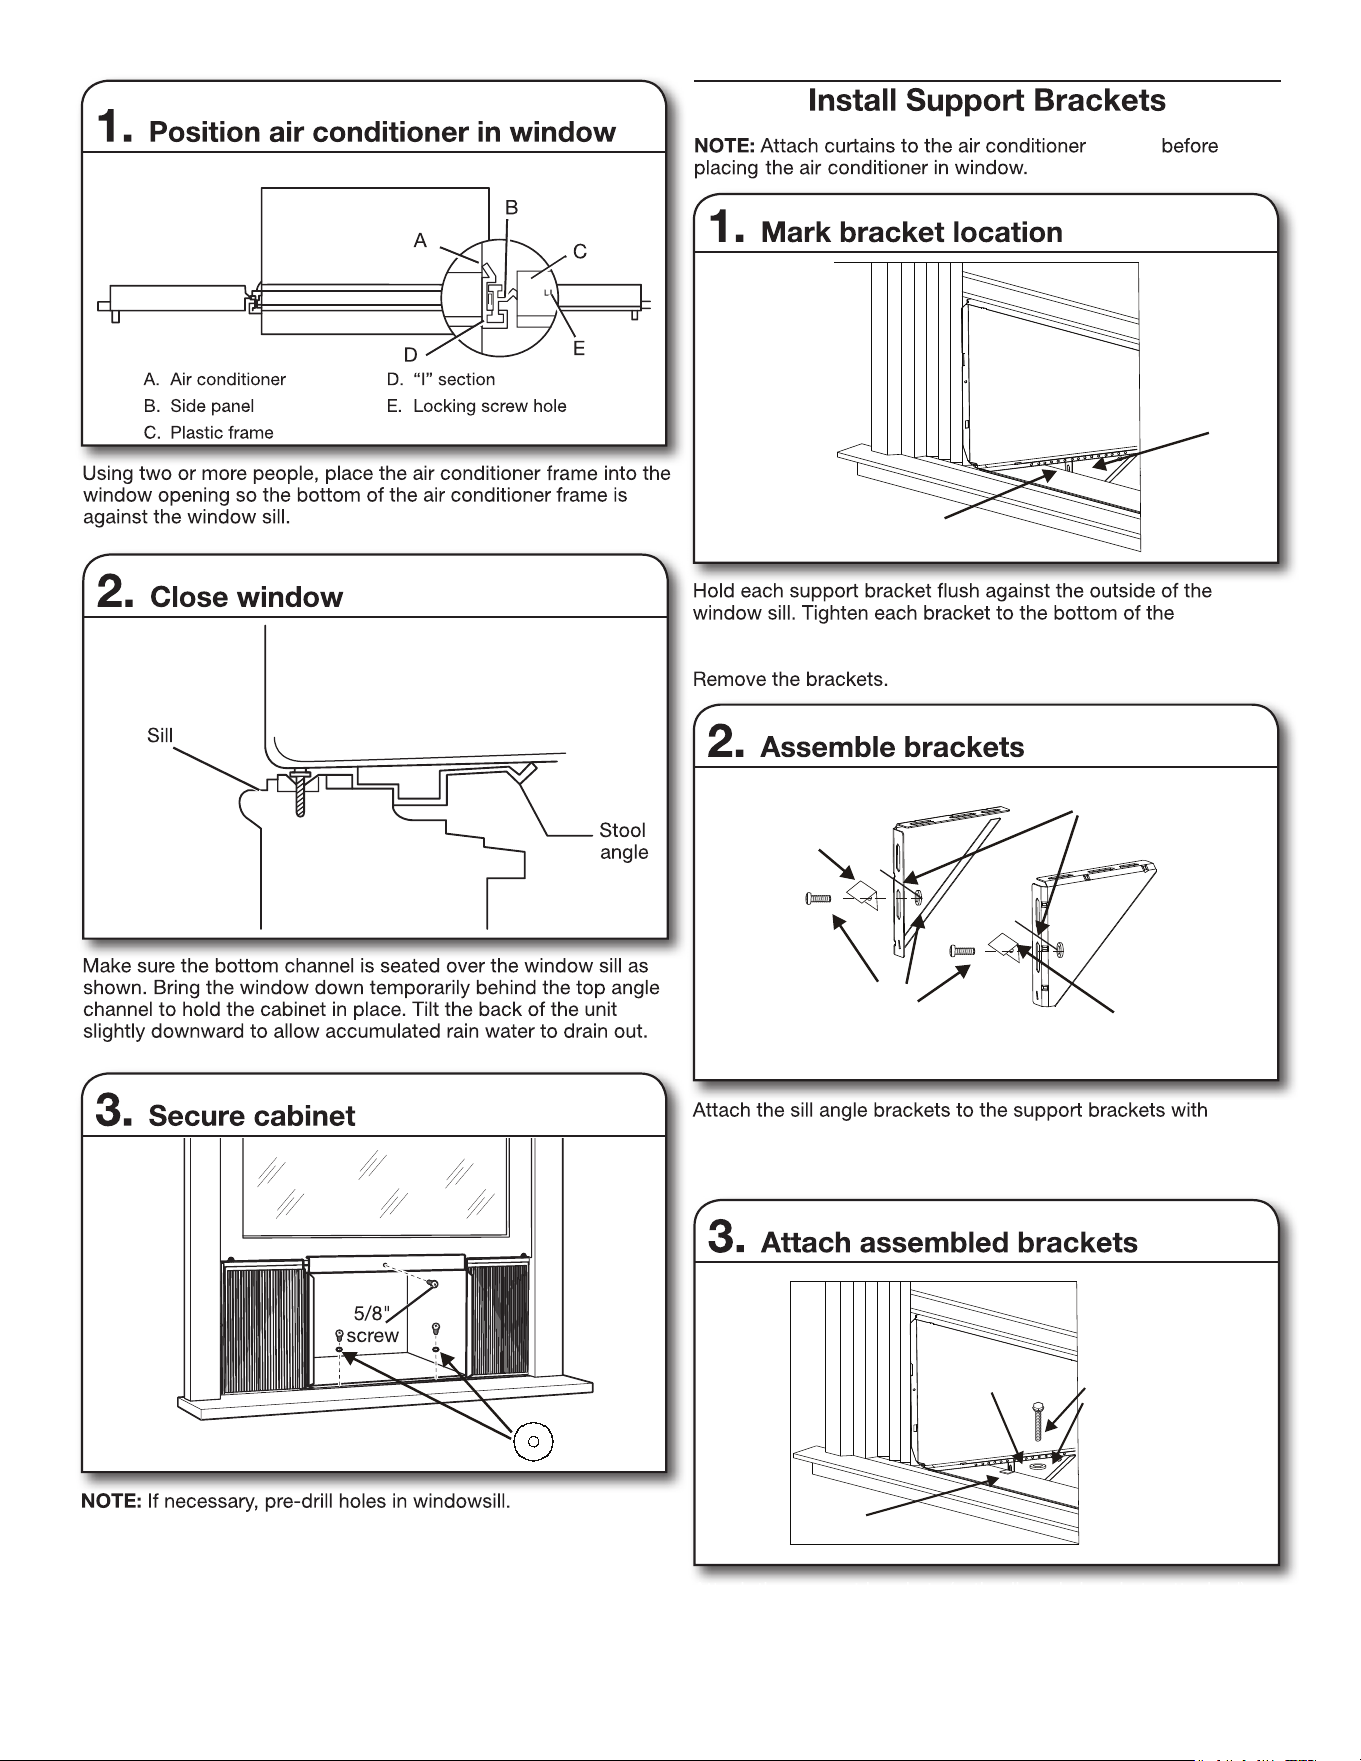
Fasten the cabinet to the windowsill using two 5/8'' hex-head
screws. Fasten the screw through the wooden spacer which
mentioned on front page. For 24,000 BTU models, the wooden
spacer should sit on a washer. Use one 5/8'' hex-head screw
to fasten the top channel to window frame.
5/8"
flathead bolt with locknut as shown. Hand tighten screws
loosely to accommodate changes that may be required later
in installation.
Washer
Mark Bracket
Sill angle
Pencil Mark
Align bracket
to pencil mark.
bracket
5/8" flathead
bolt with locknut
Sill angle bracket
Support bracket
Bolt and
Locknut
cabinet
Bracket
cabinet
with 1/2'' flathead bolt with locknut. With a pencil, mark the bracket
where the top of the window sill meets the bracket.
Attach the support brackets (with sill angle brackets attached) to
the bottom of the cabinet with 1/2" flathead bolt with locknut shown.
Ensure the sill angle brackets sit on top of the window sill as shown.
Tilt the back of the unit slightly downward to allow accumulated rain
water to drain out. Tighten all six bolts securely.
9
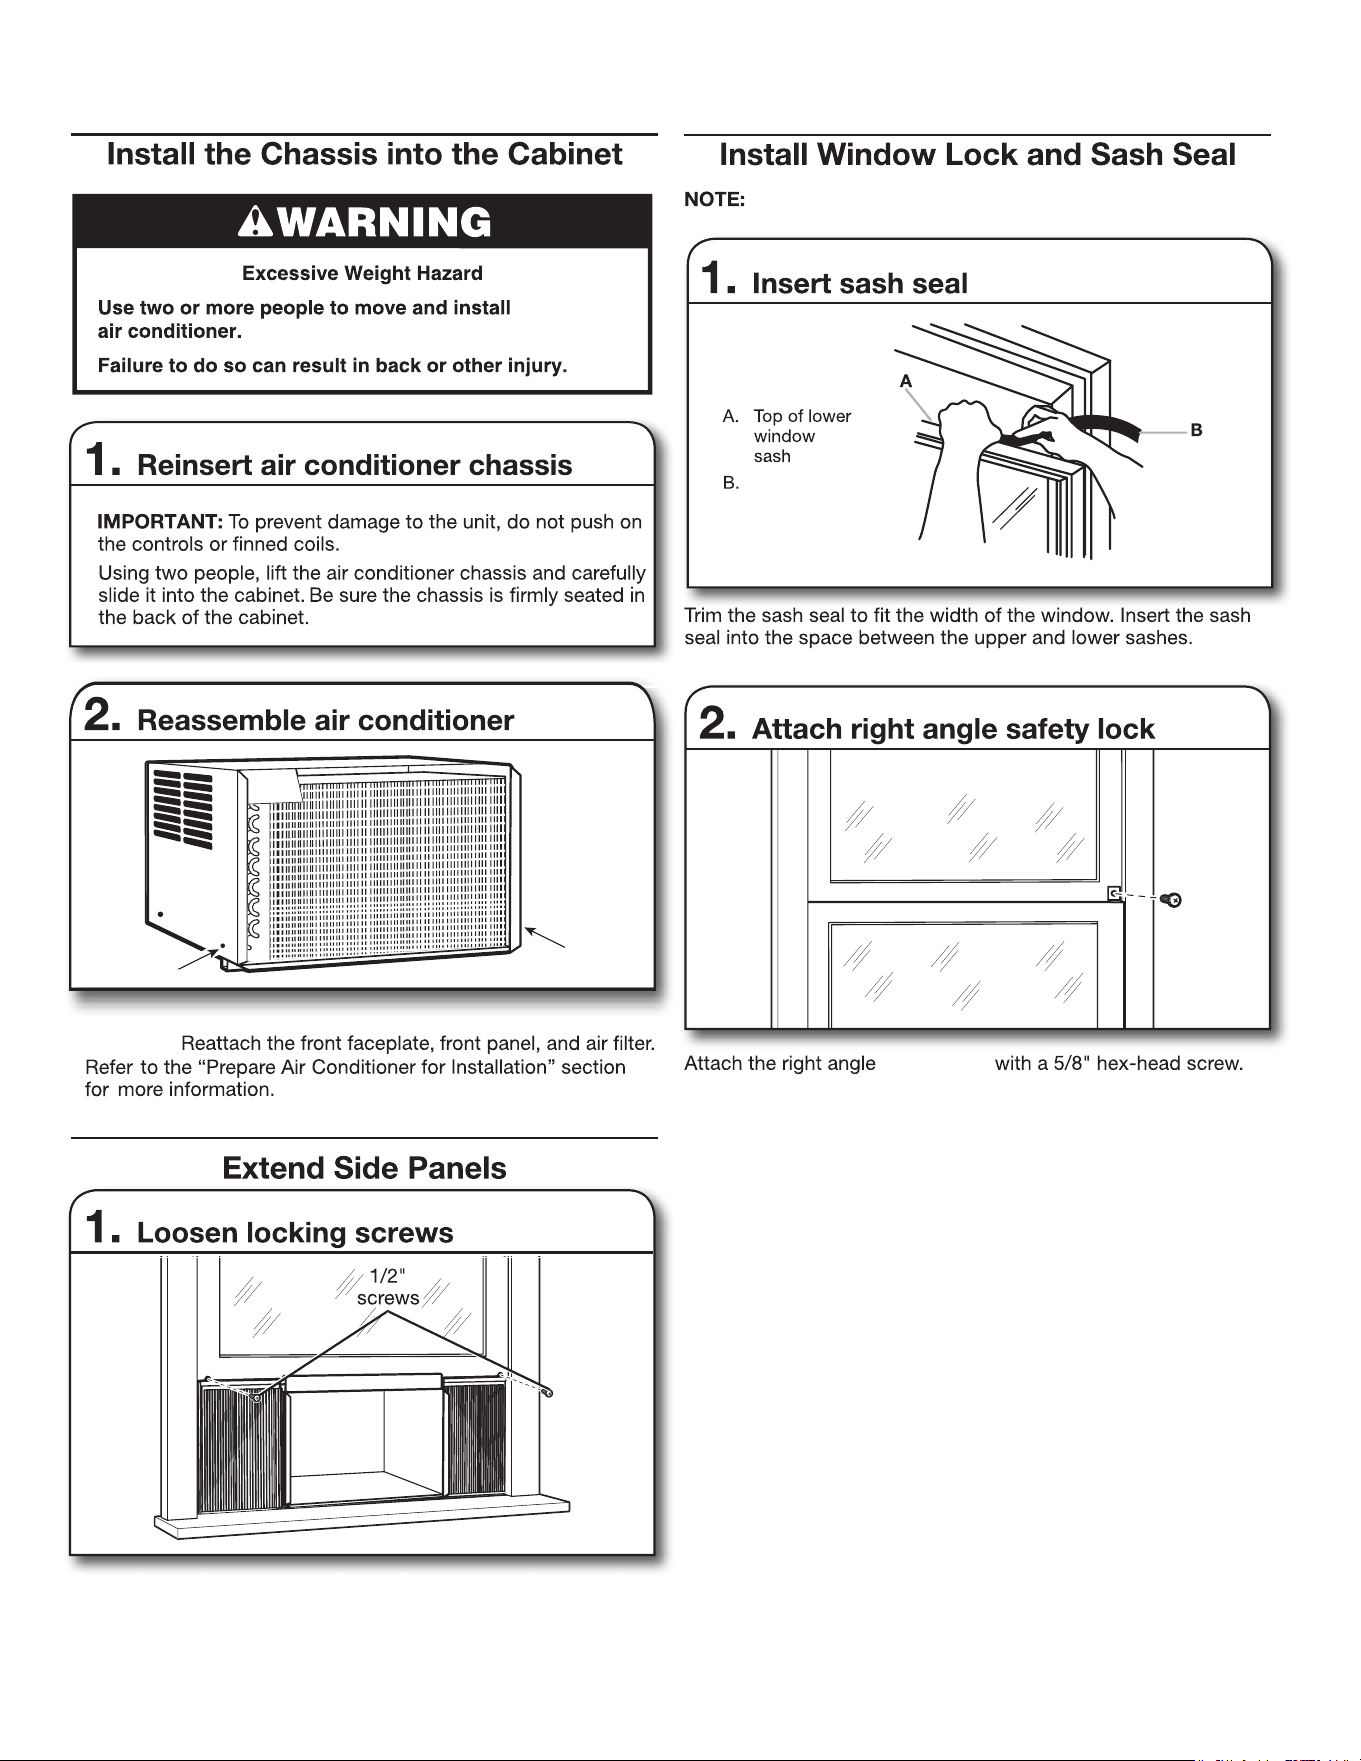
with two 1/2'' hex-head screws both left and right to window
frame.
Extend the side panel and panel frame. Fasten the side panel
window lock
Attach curtains to the air conditioner cabinet before placing
the air conditioner cabinet in window.
Sash seal
Reinstall the front two screws between the cabinet and chassis
as shown.
10
The distance between the unit and the electrical outlet
should be within 6'(180cm).
11
3 degrees
1.
2.
3.
4.
5.
12
the air
ventilation
13
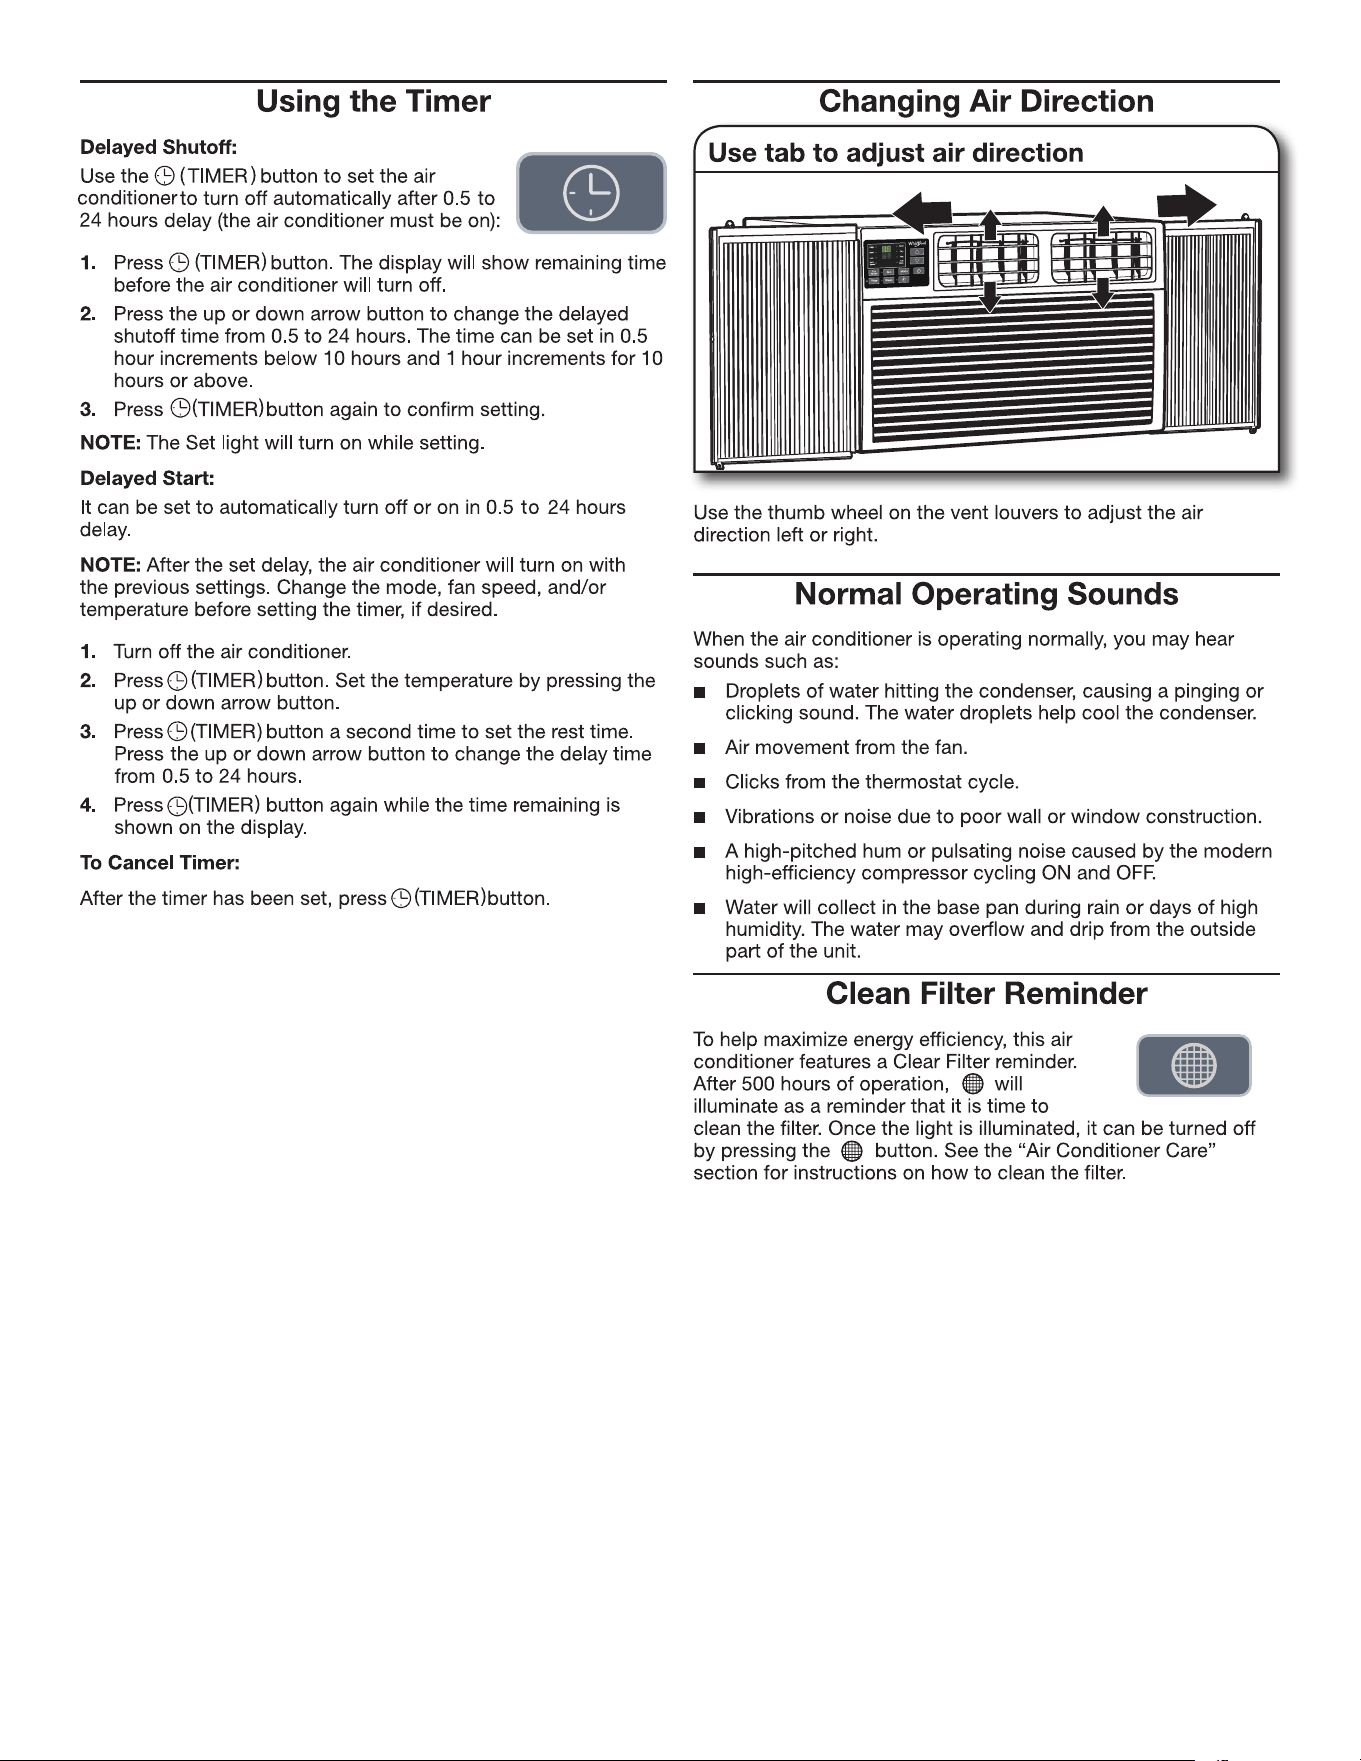
14
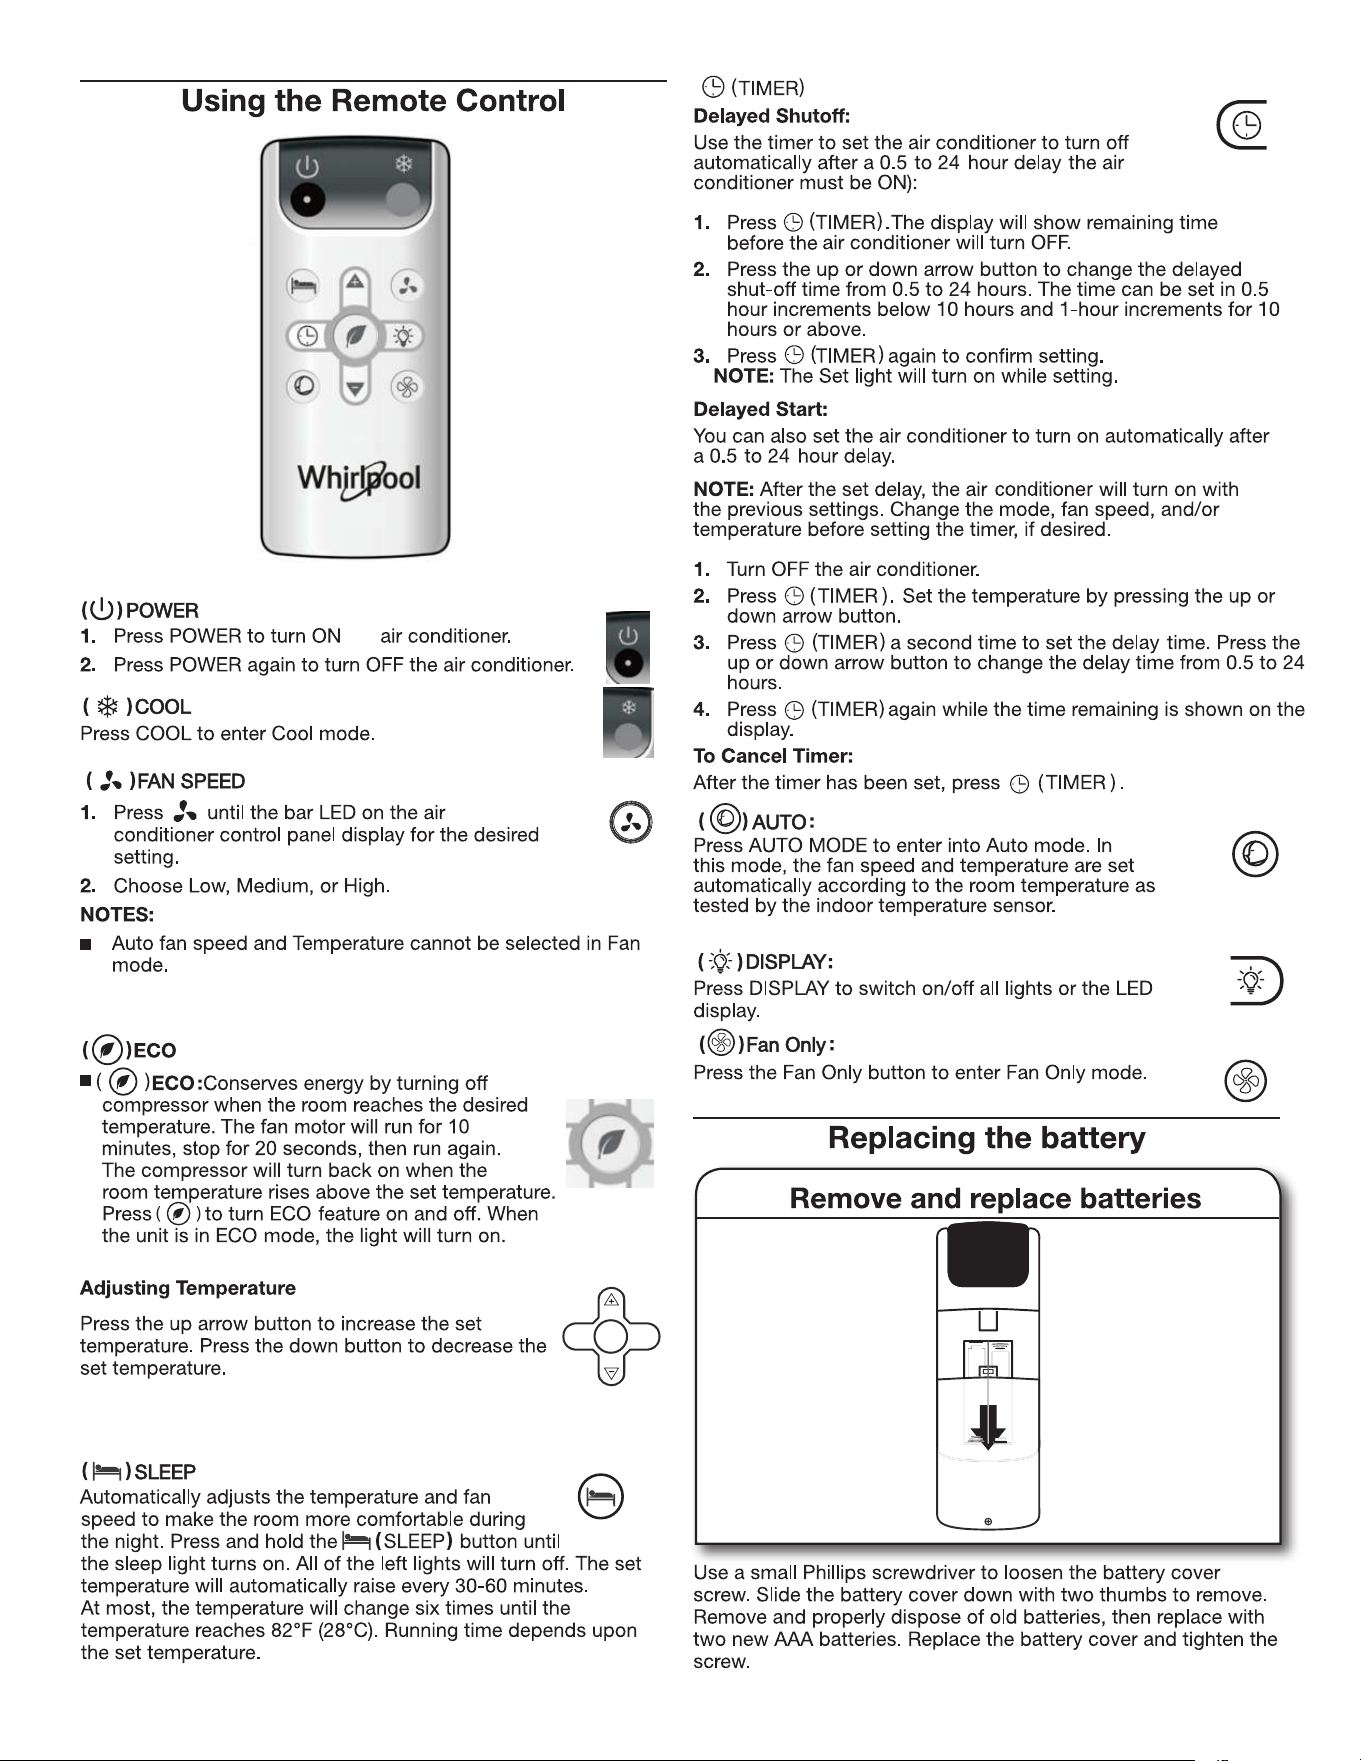
the
15
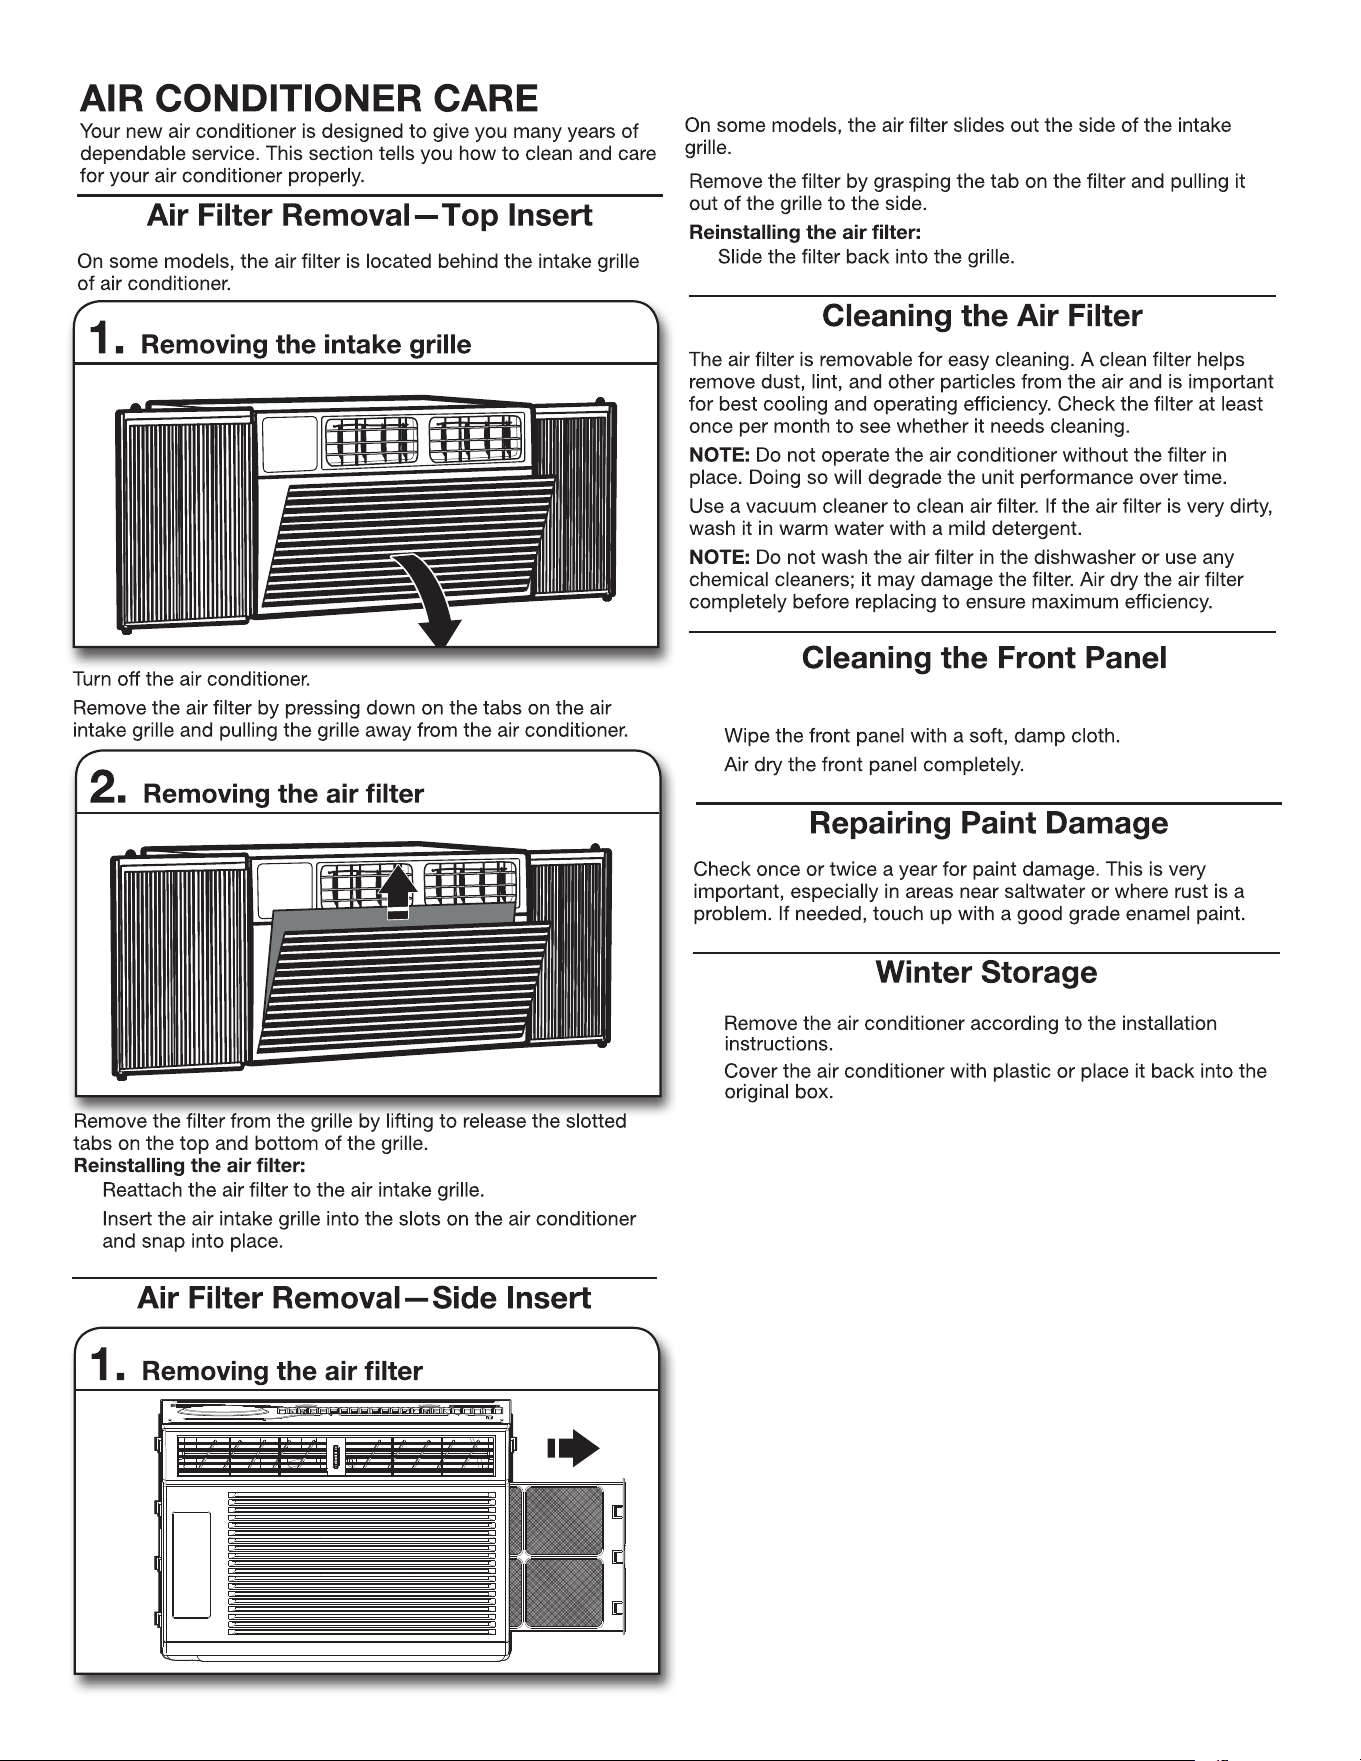
1.
1.
2.
1.
2.
1.
2.
3.
Turn off the air conditioner.
16
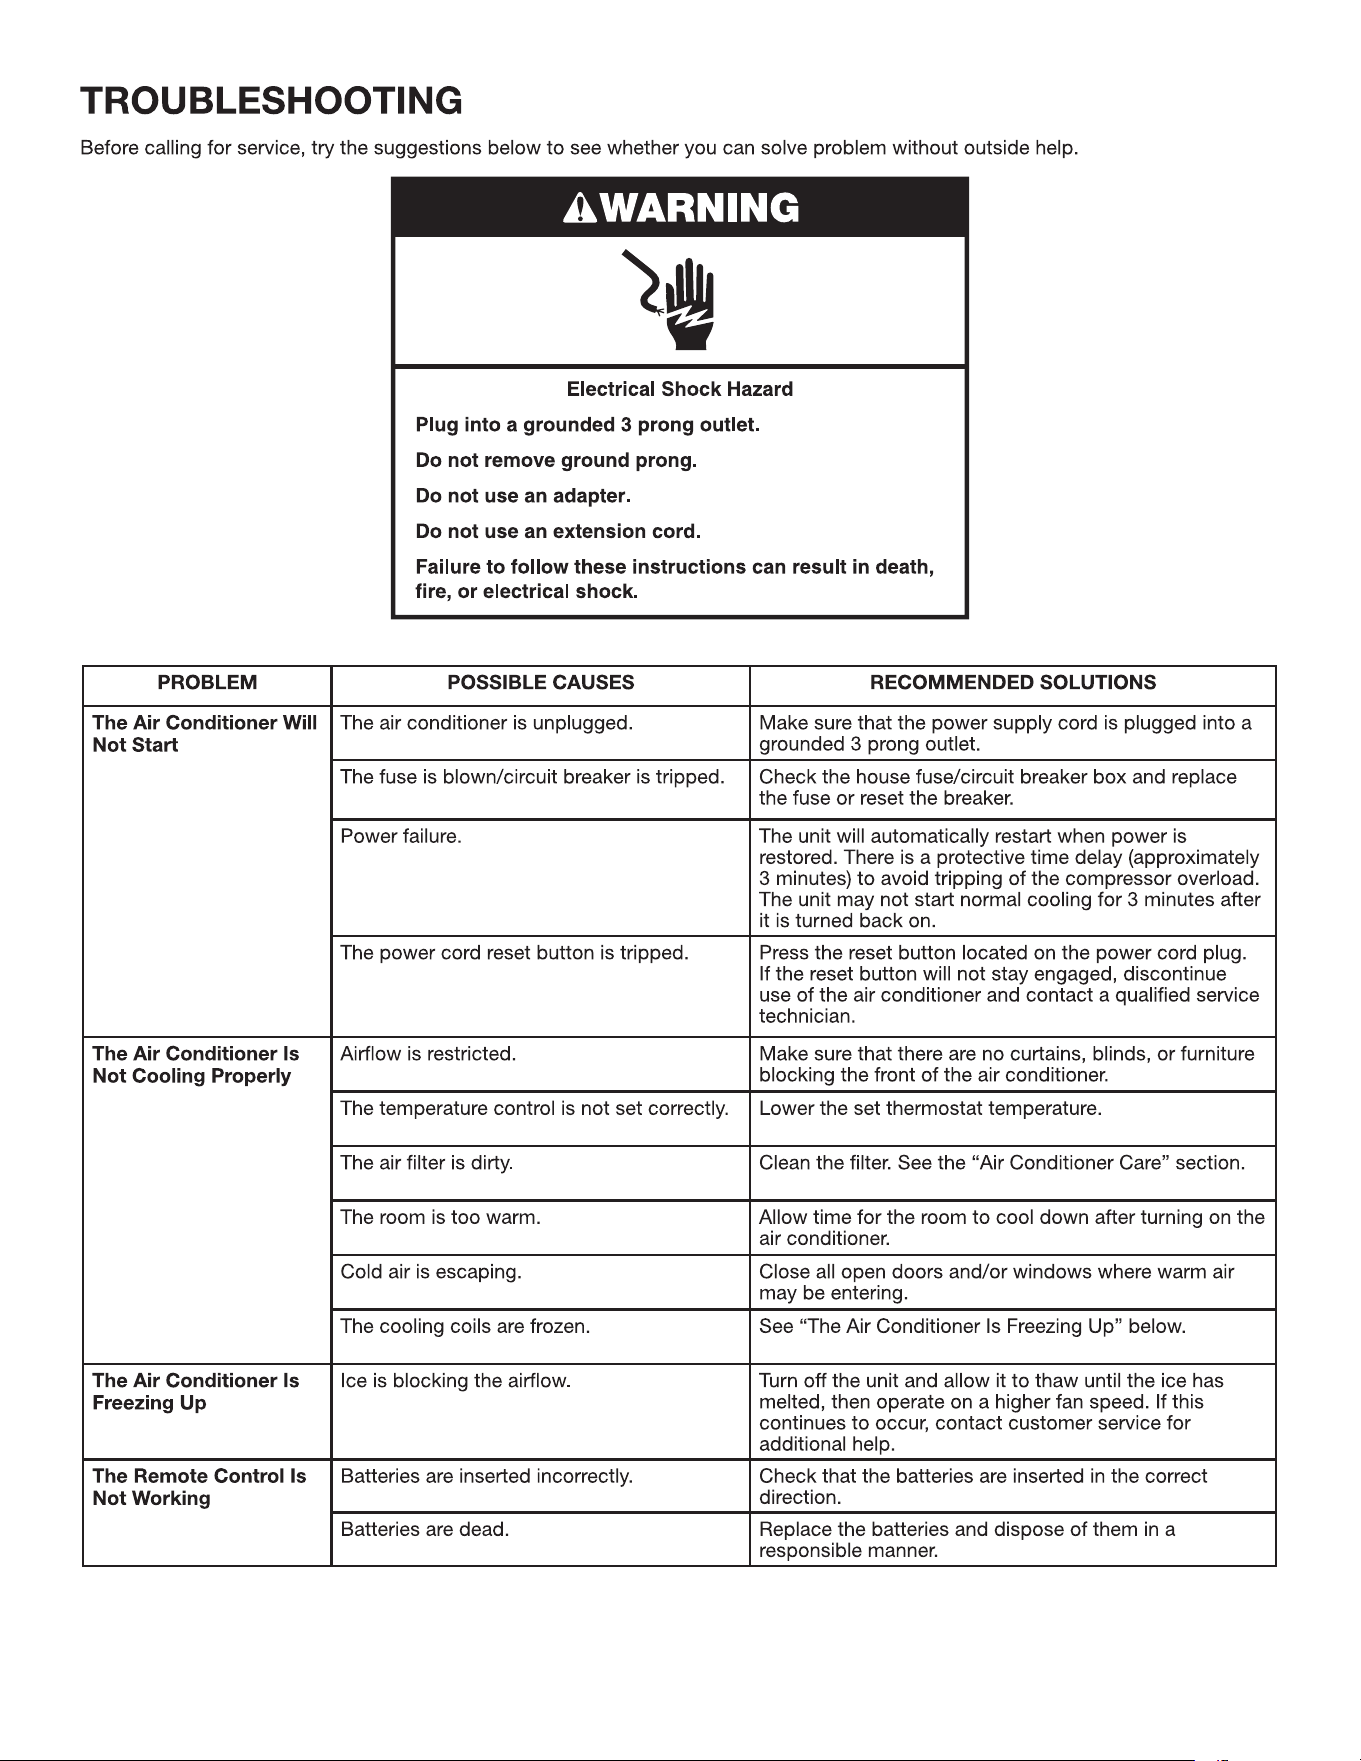
17
18
19
20
21
22
25
29
31
34
35
36
37
22
22
22
22
22
23
23
23
24
24
24
25
26
26
27
28
28
28
29
29
30
30
31
31
31
31
31
32
32
32
32
32
33
34
34
34
34
34
34
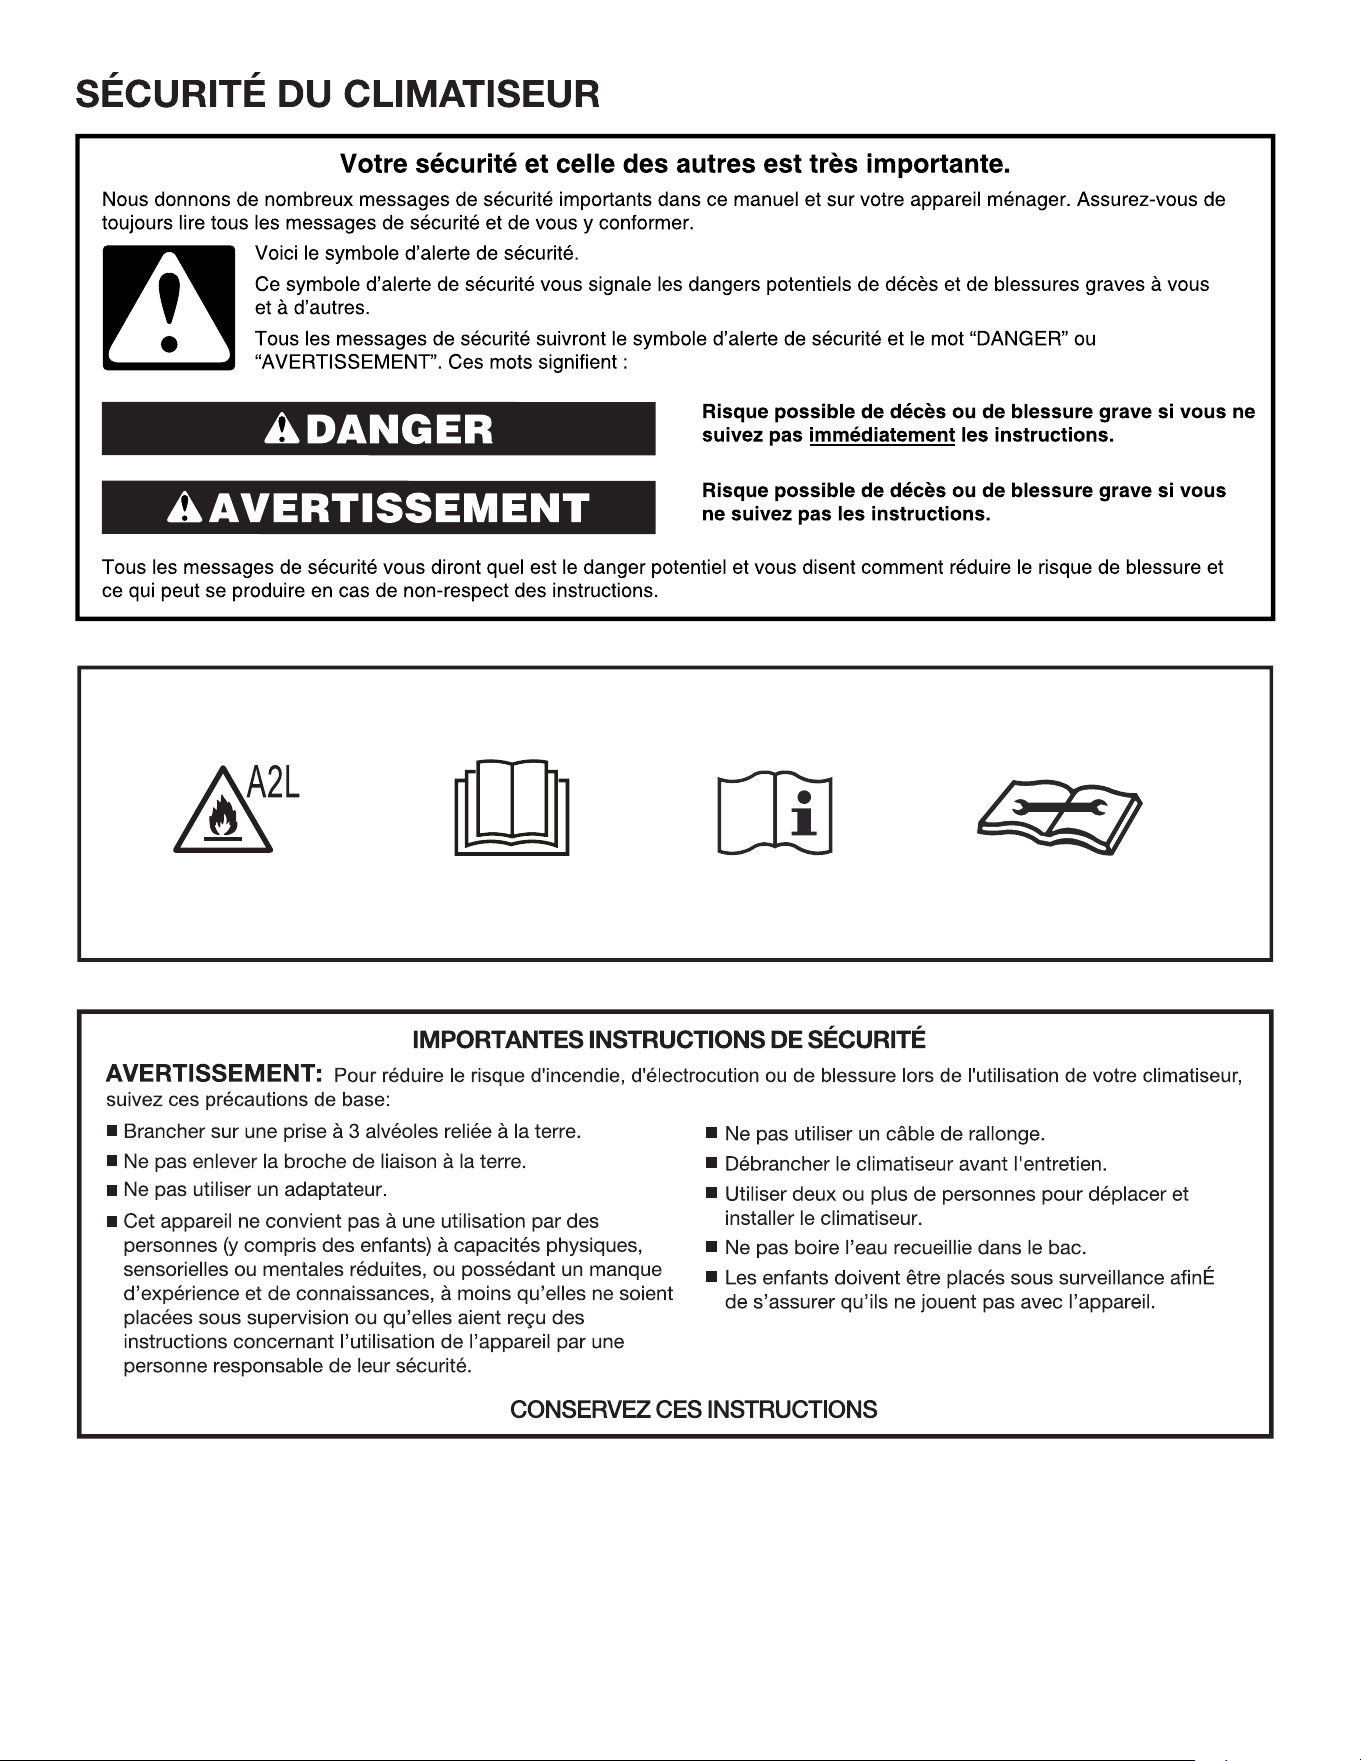
20
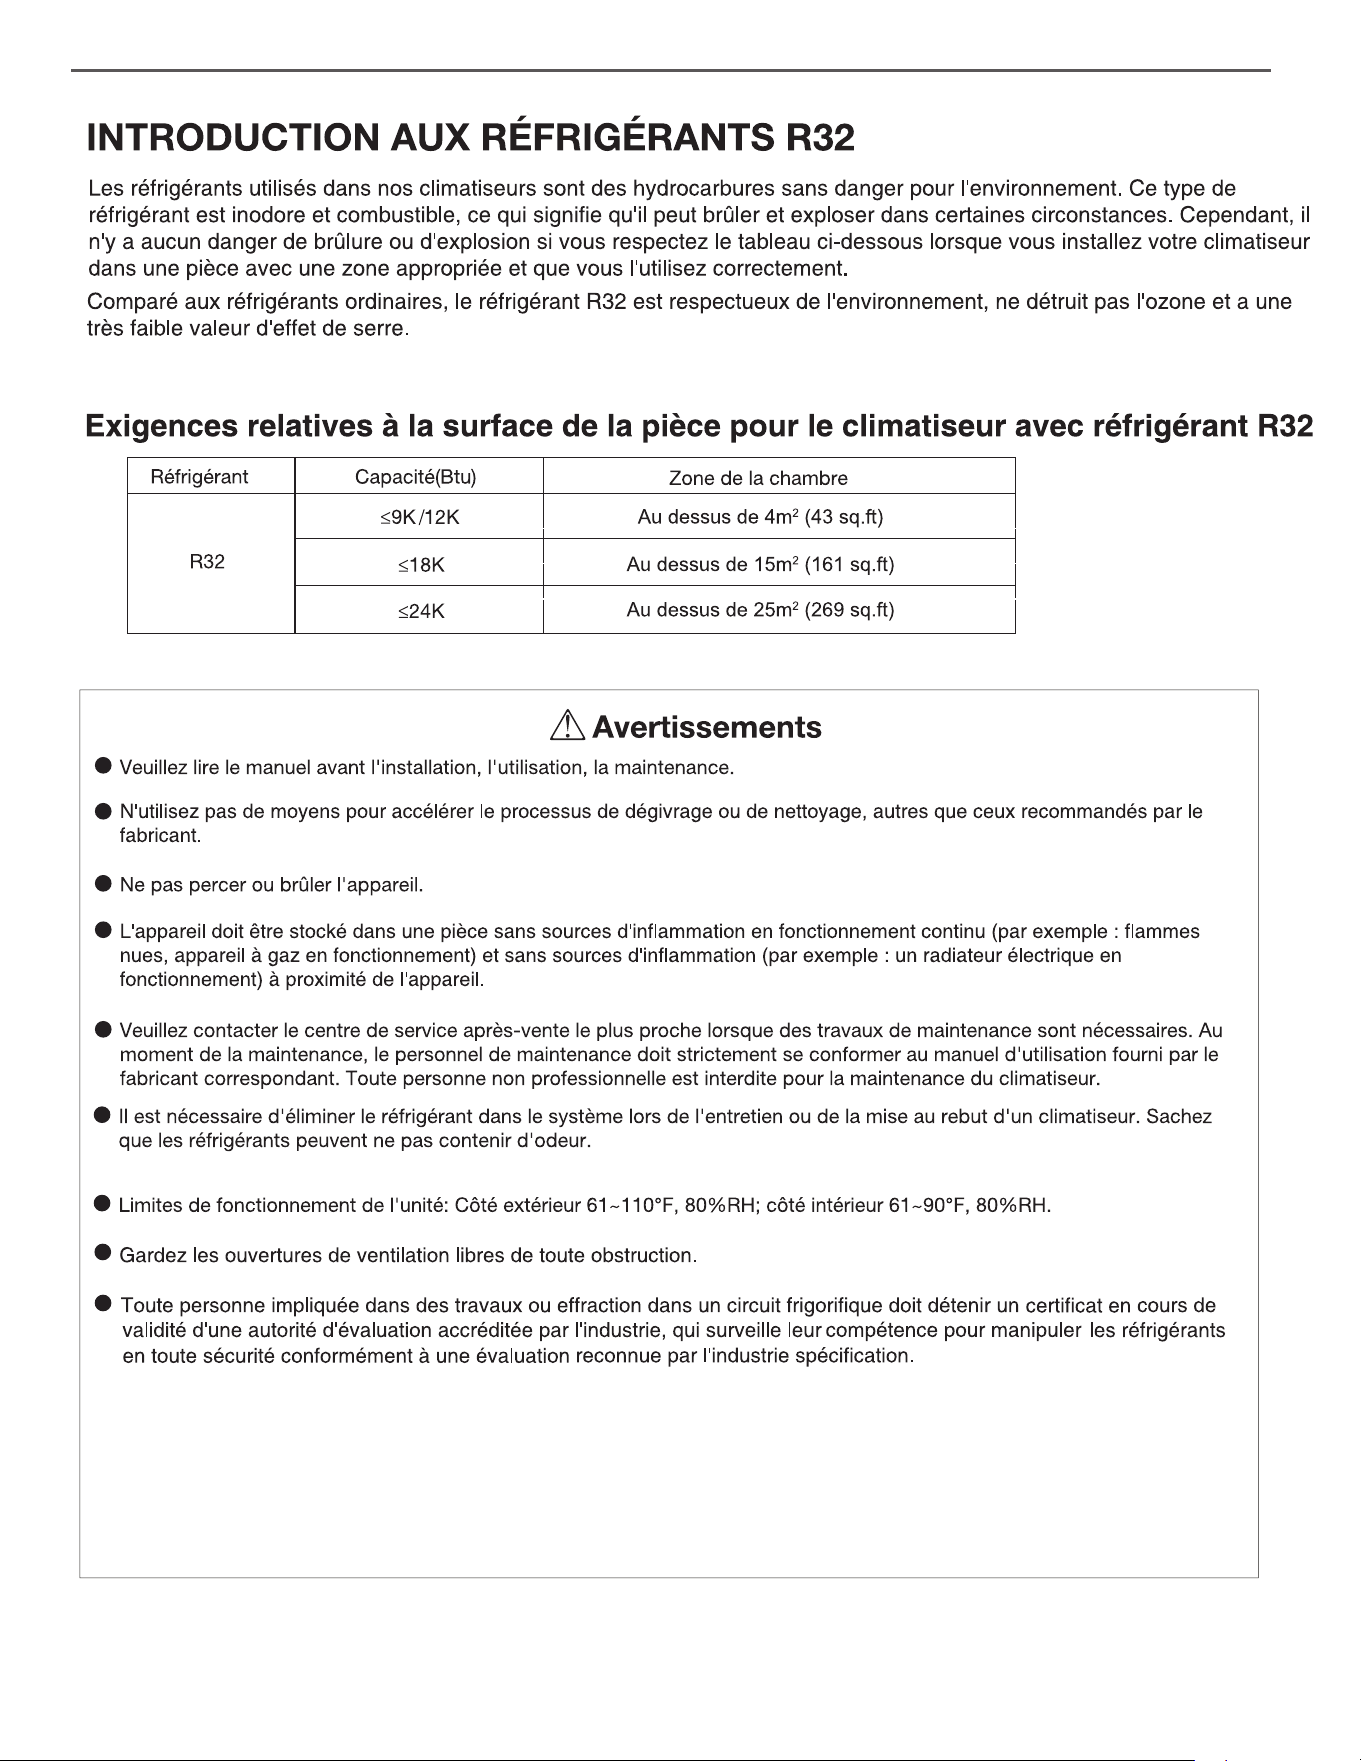
21
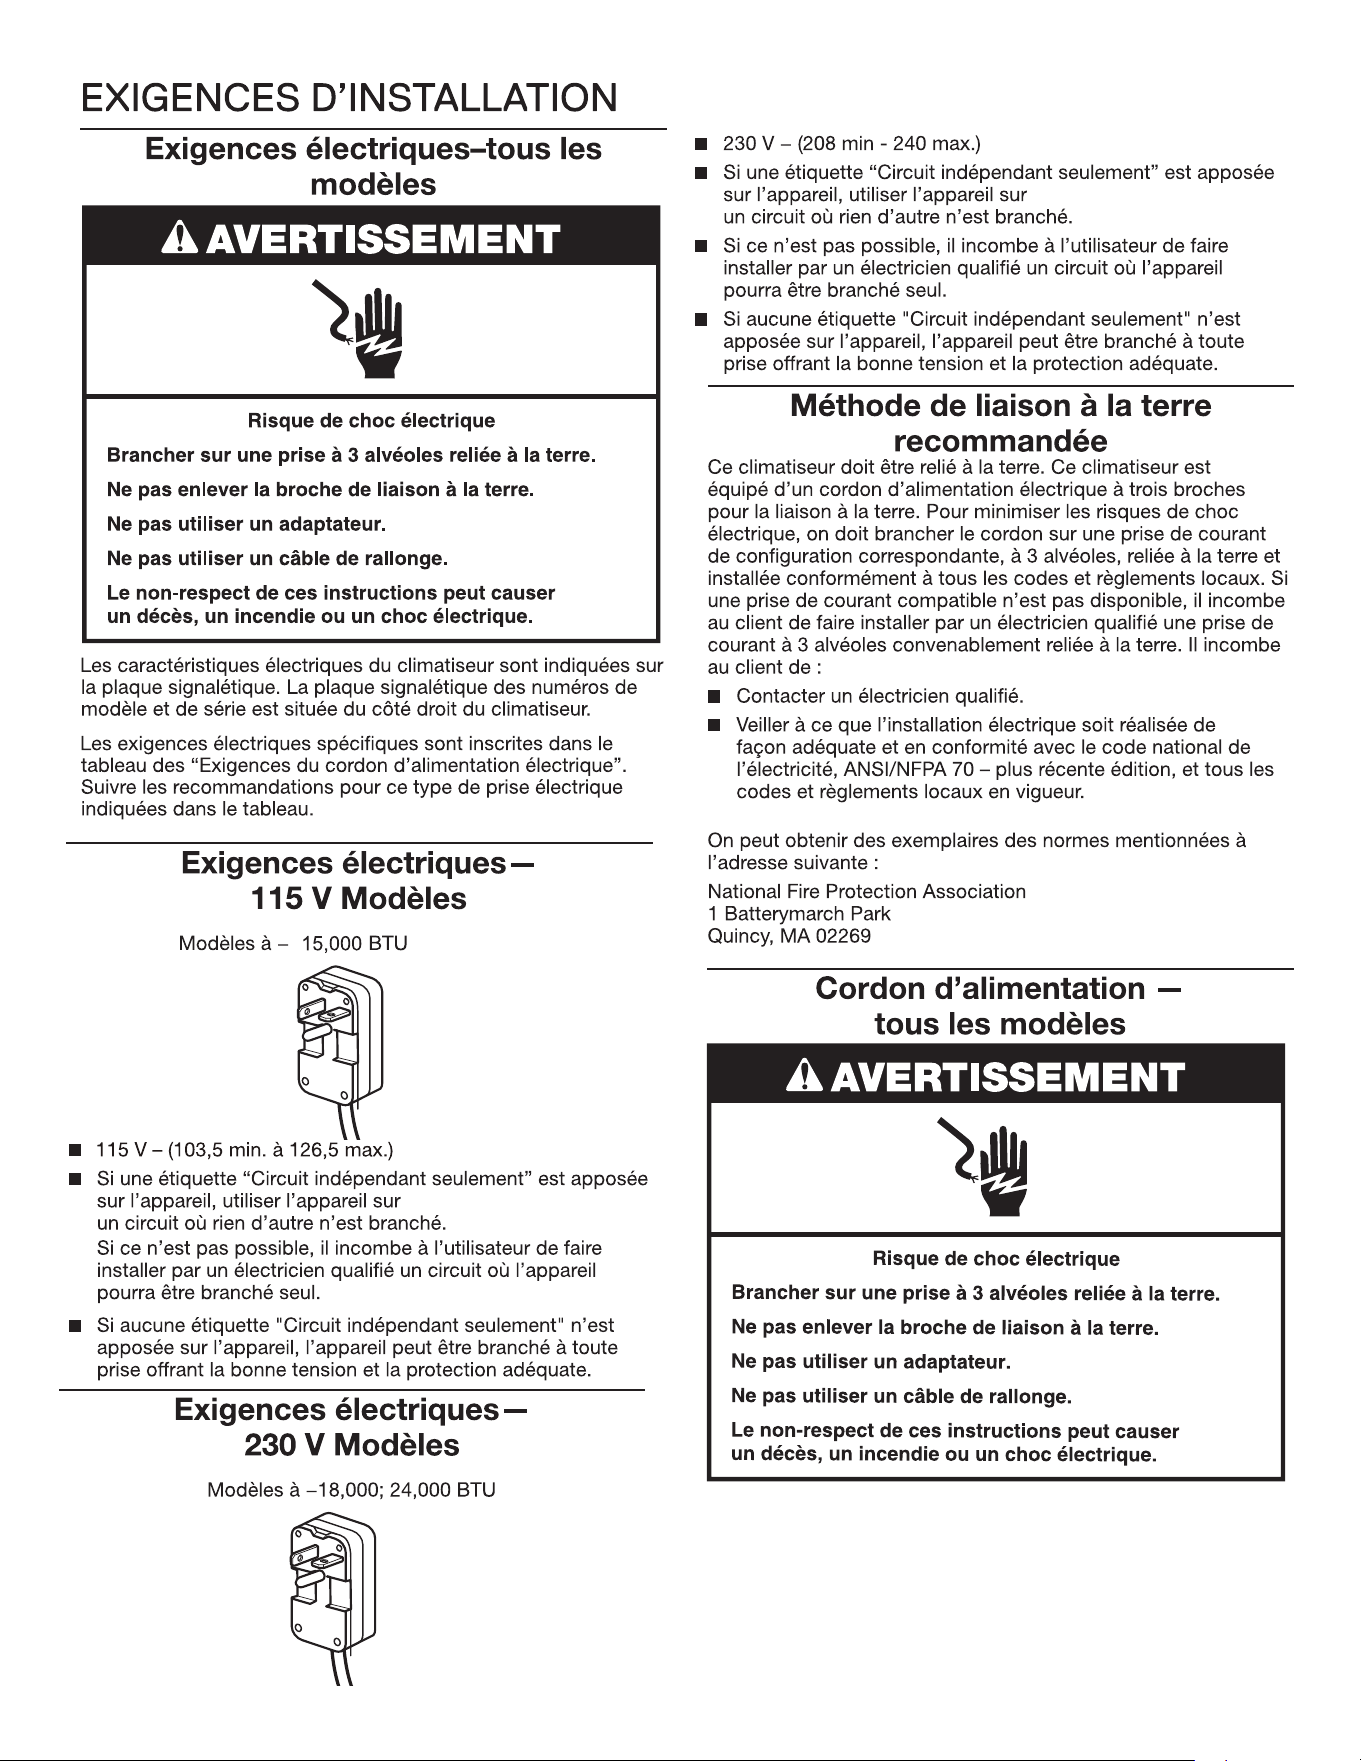
22
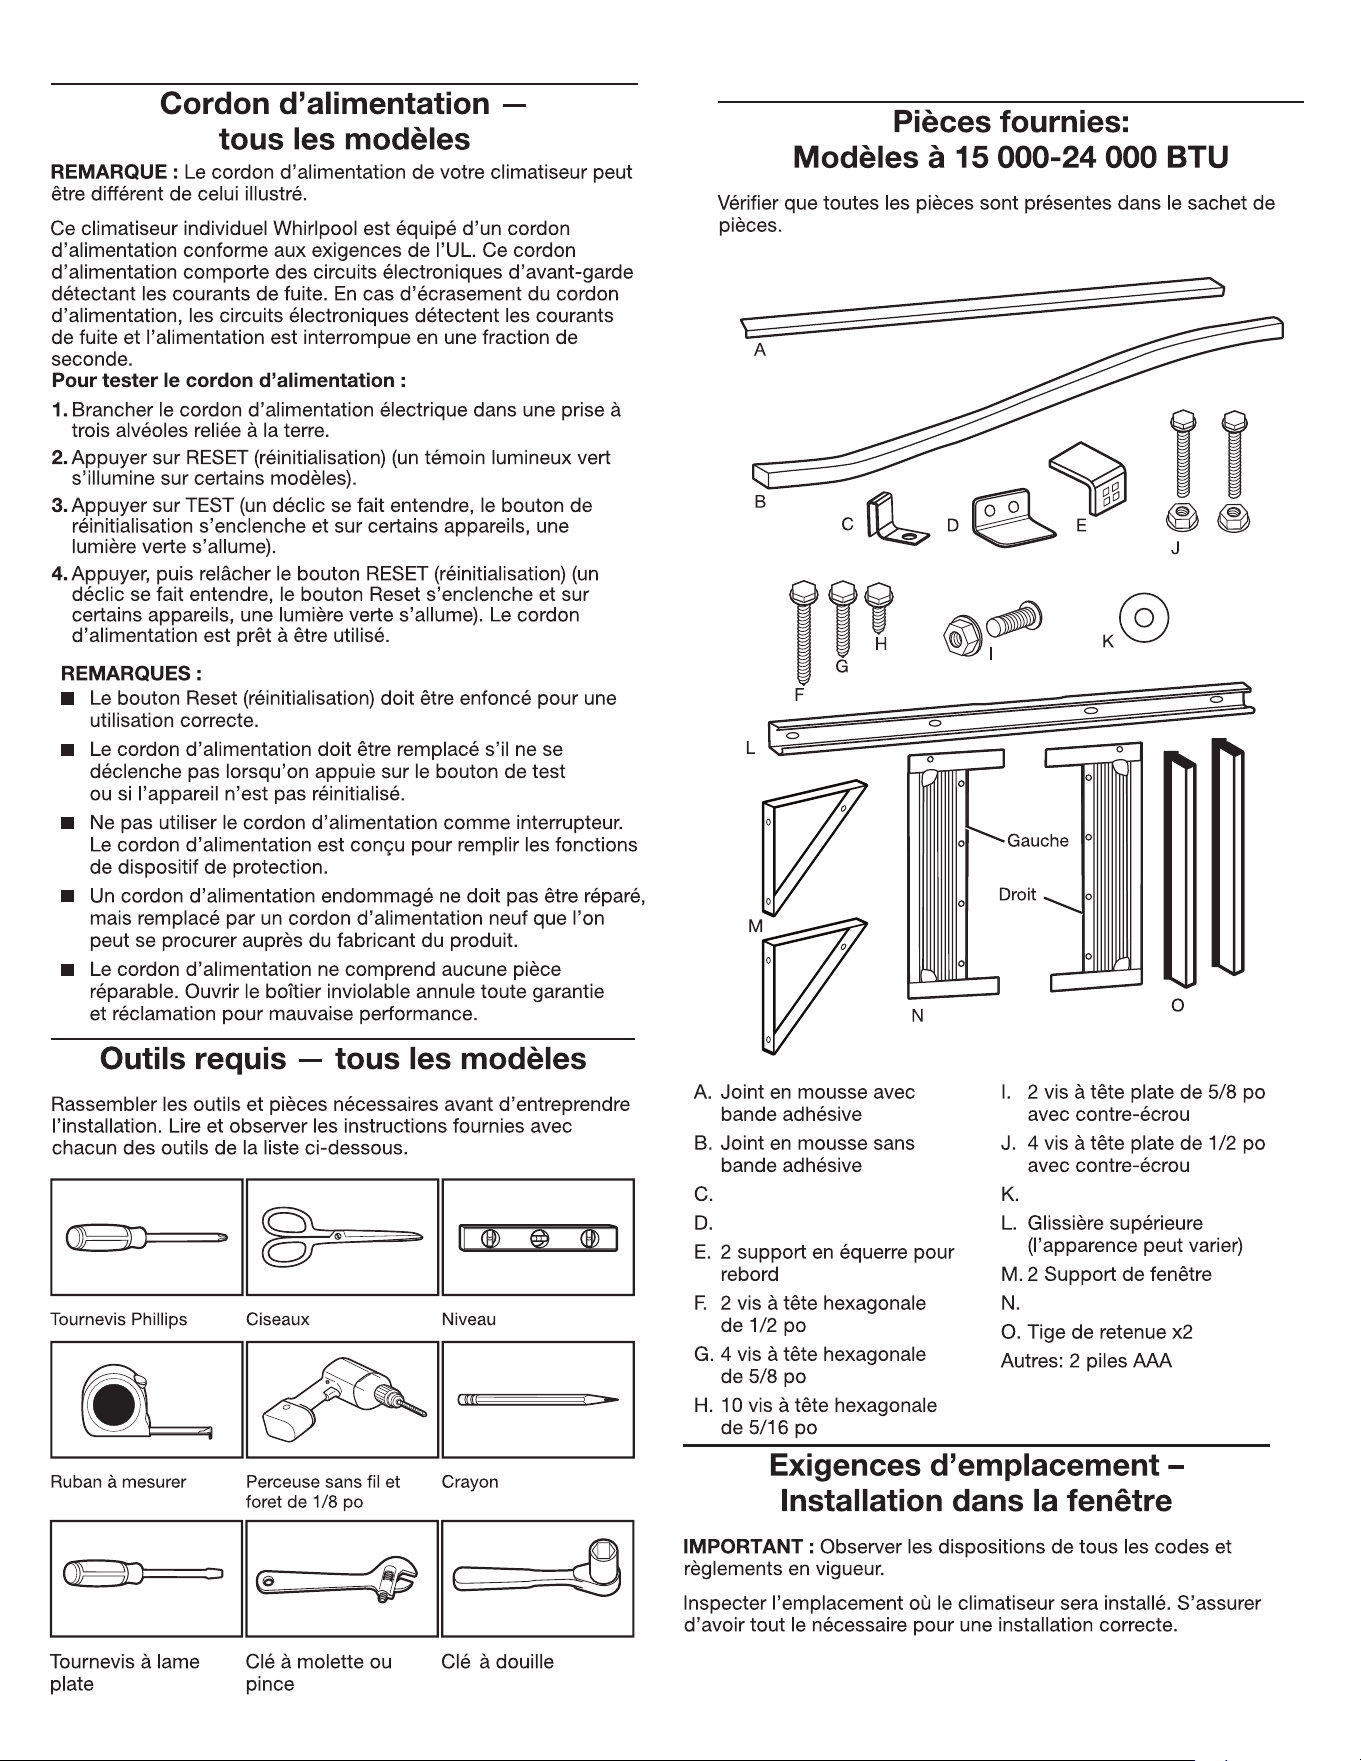
Verrou de sécurité
2 support de panneau latéral 2 machine à laver
2 des panneaux latéraux
23
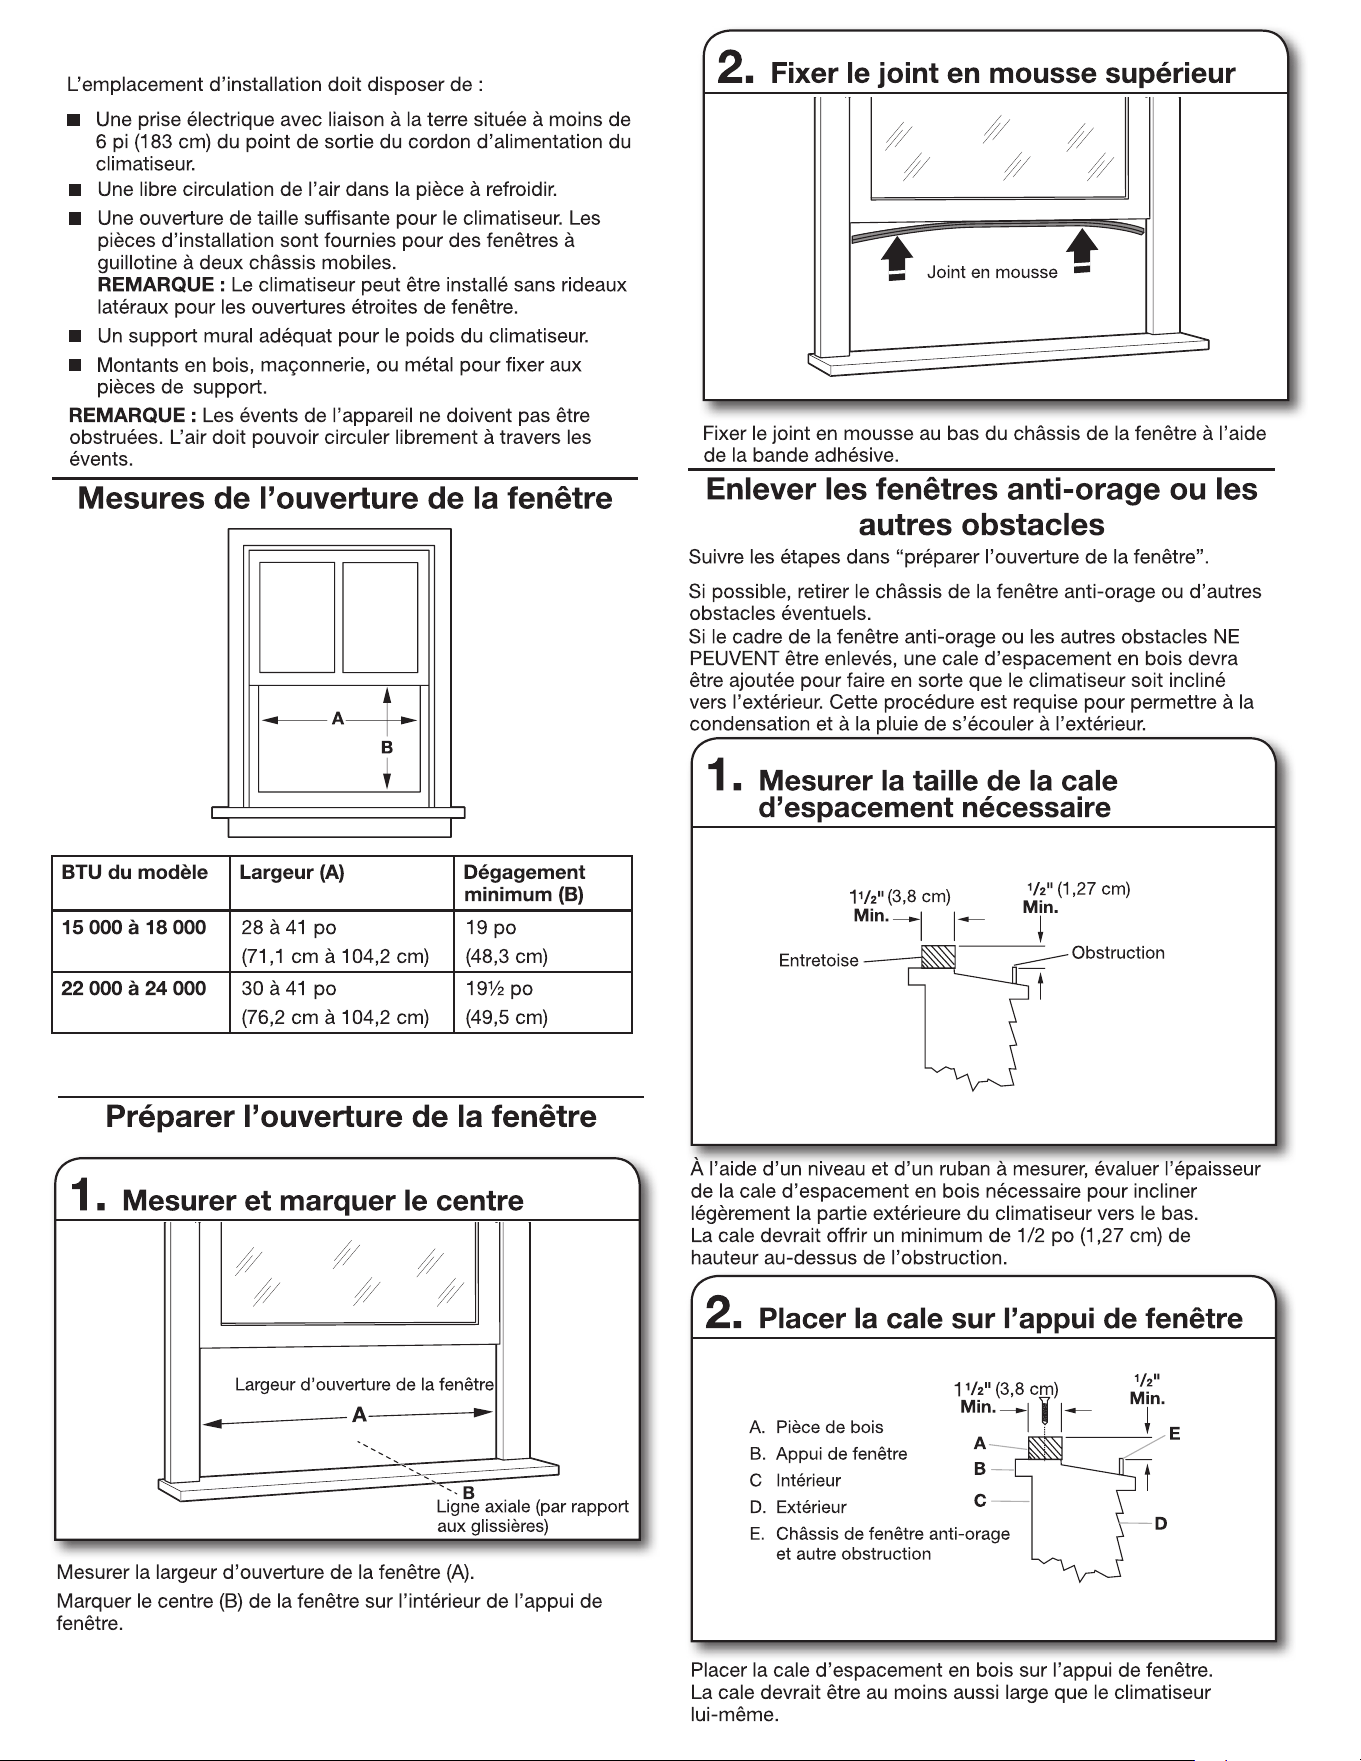
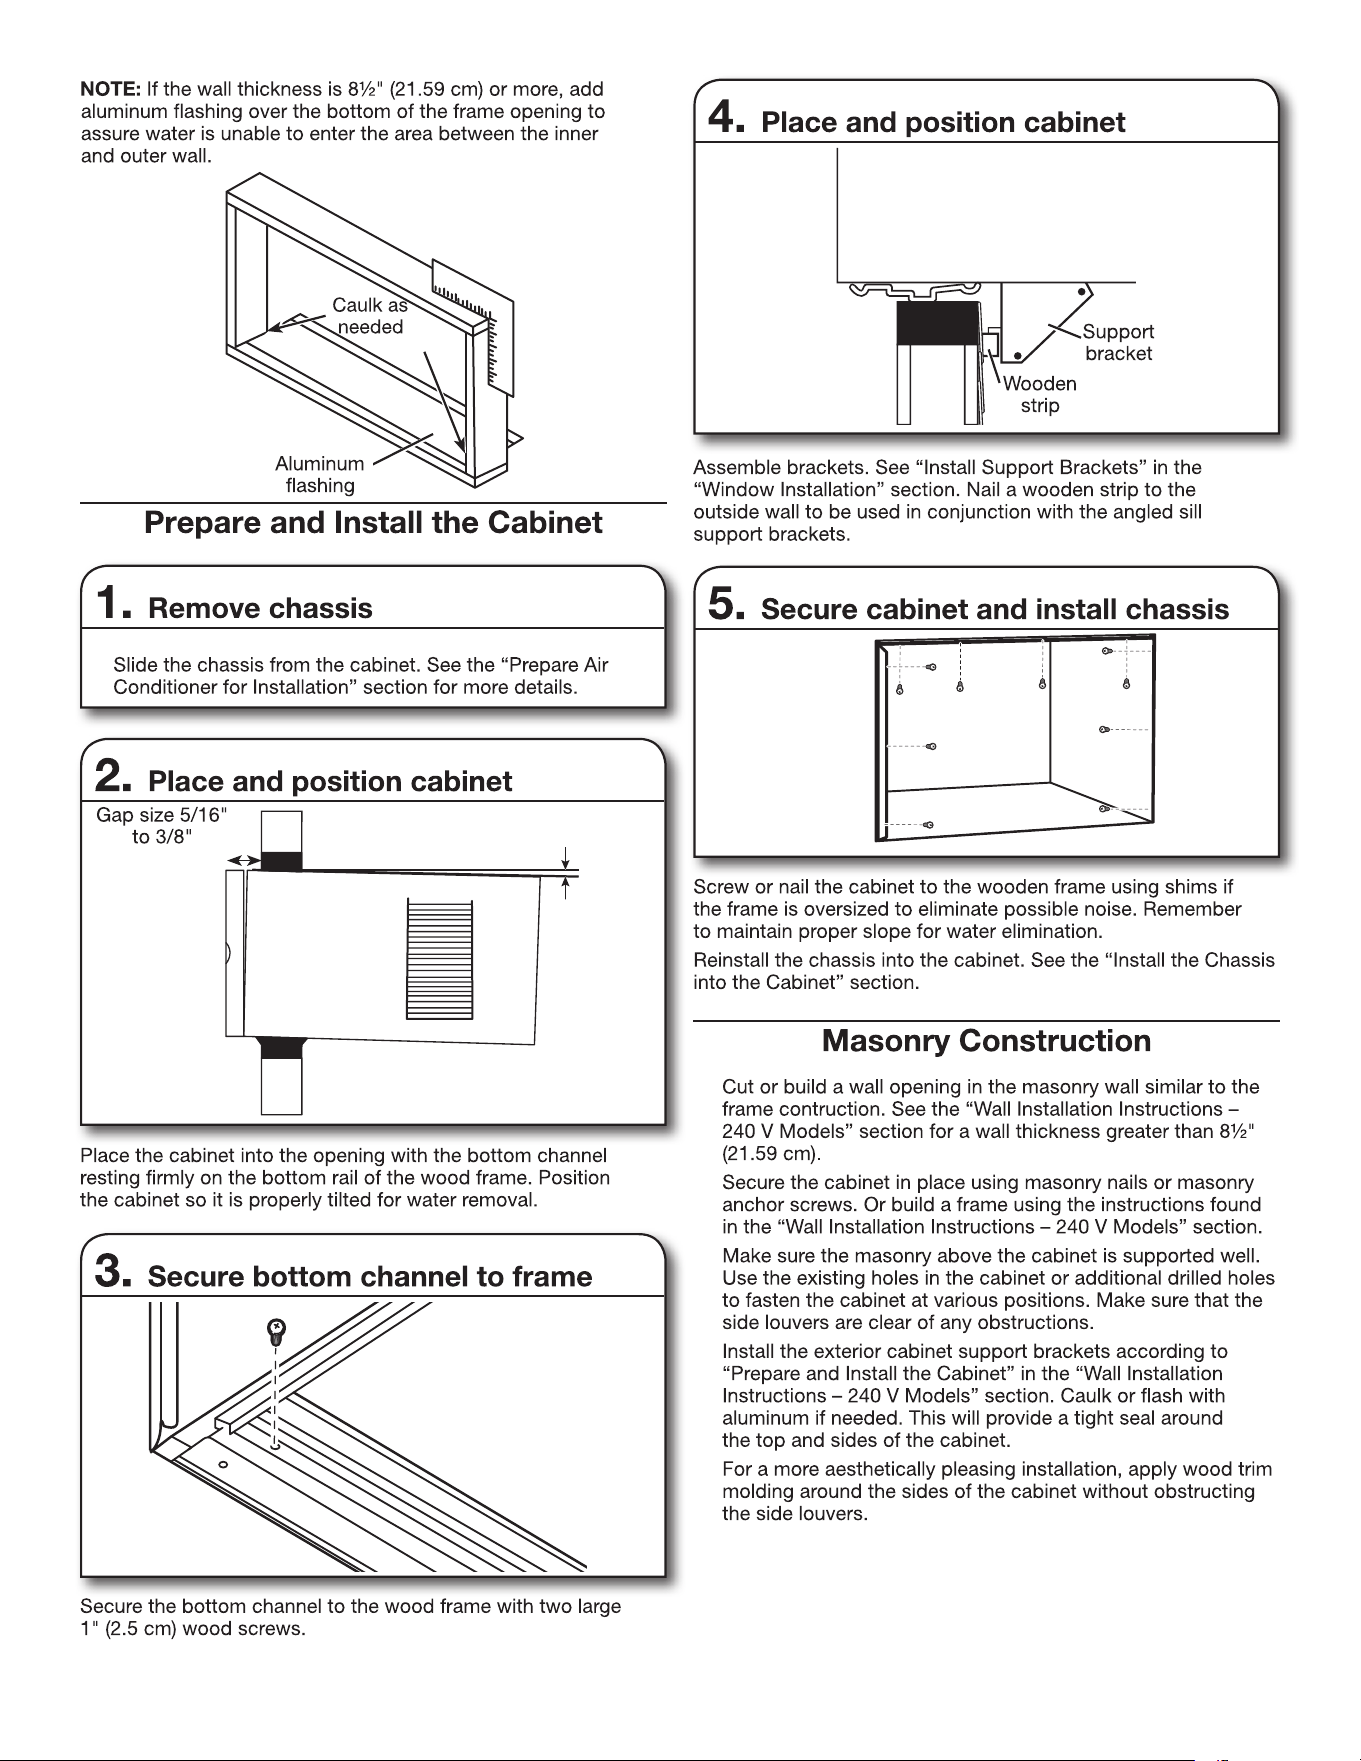
Fixez l'entretoise en bois au rebord de la fenêtre.
24
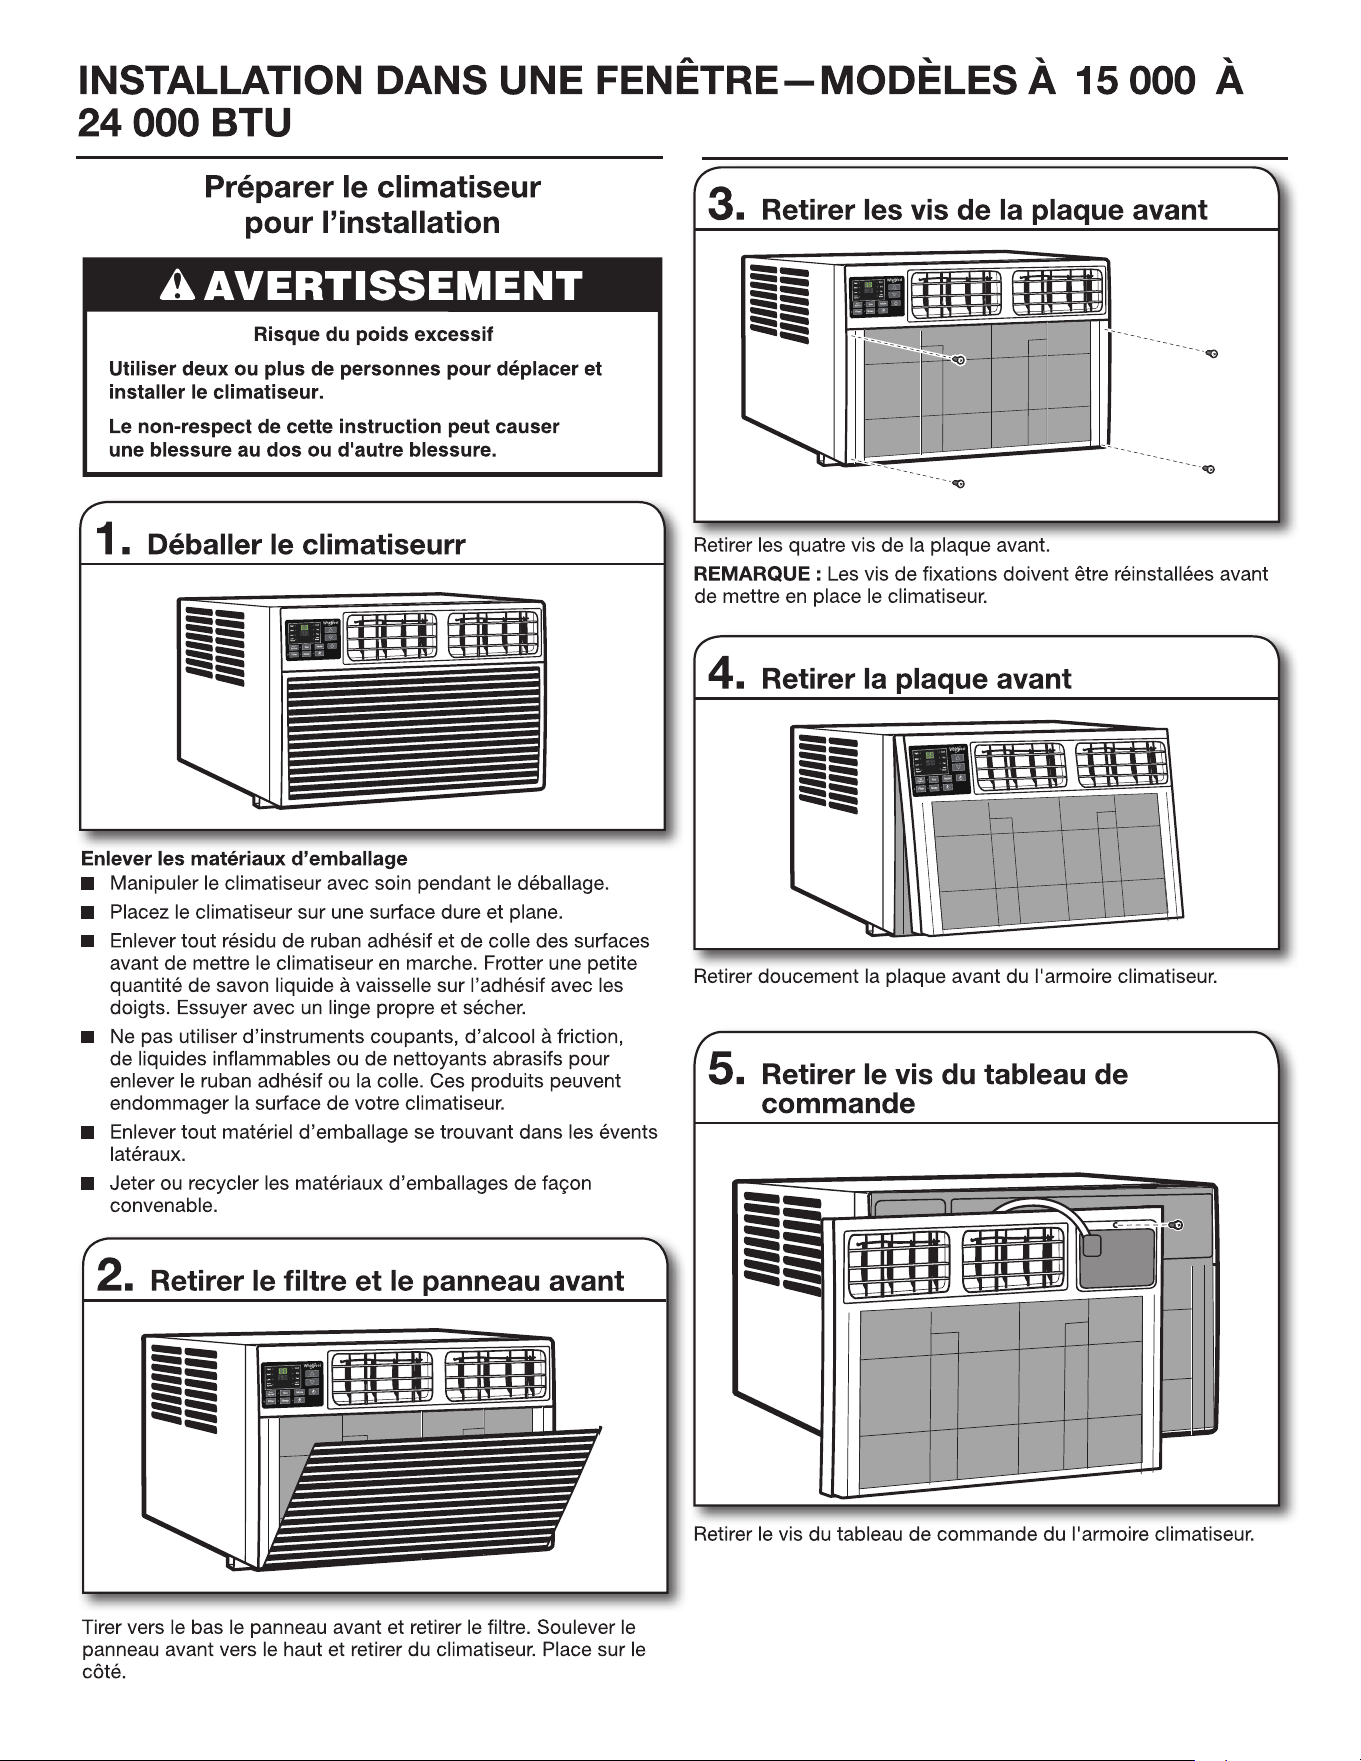
25
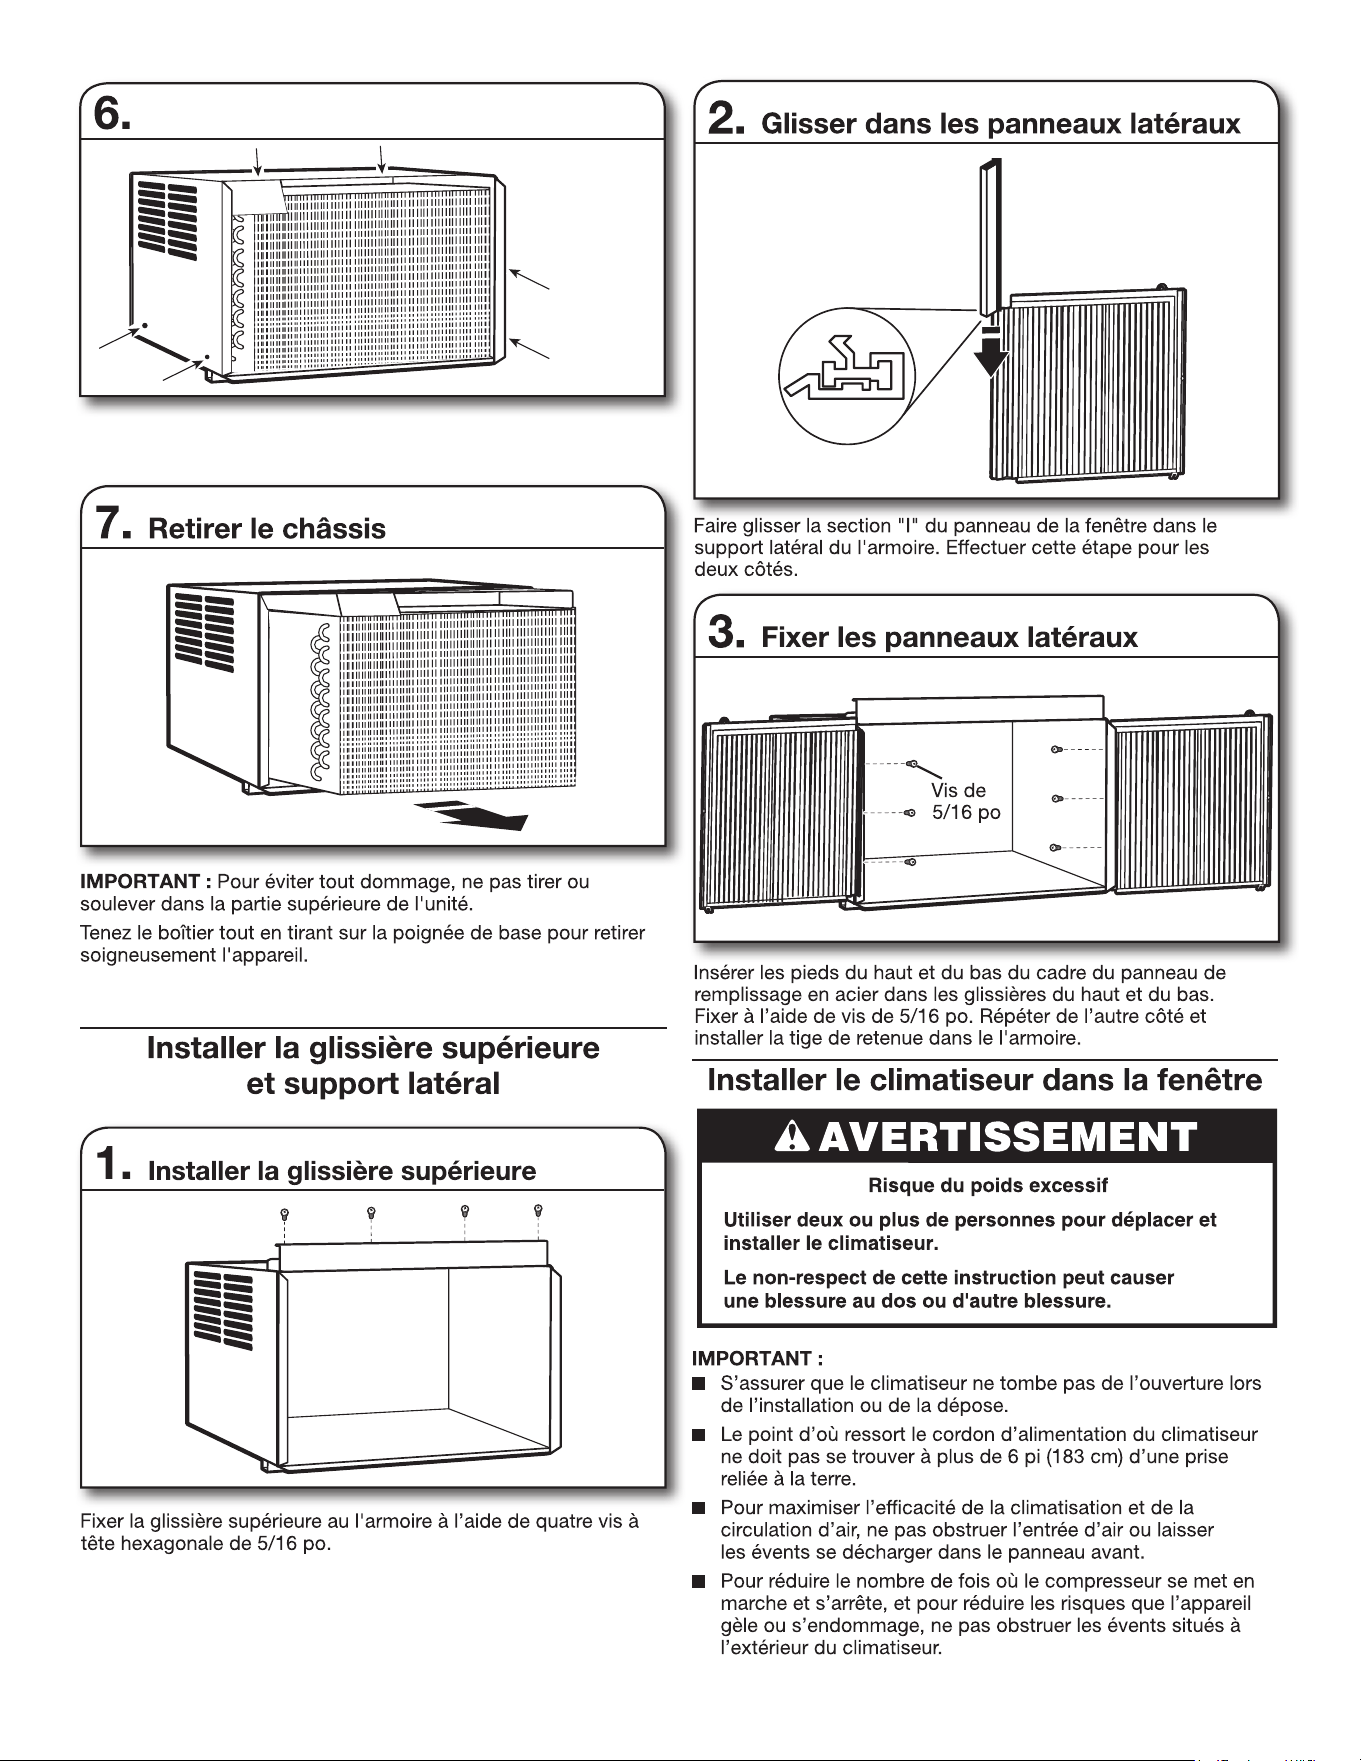
Retirez les six vis du côté supérieur et du côté gauche-droit
de l'armoire.
Enlever les vis latérales
26
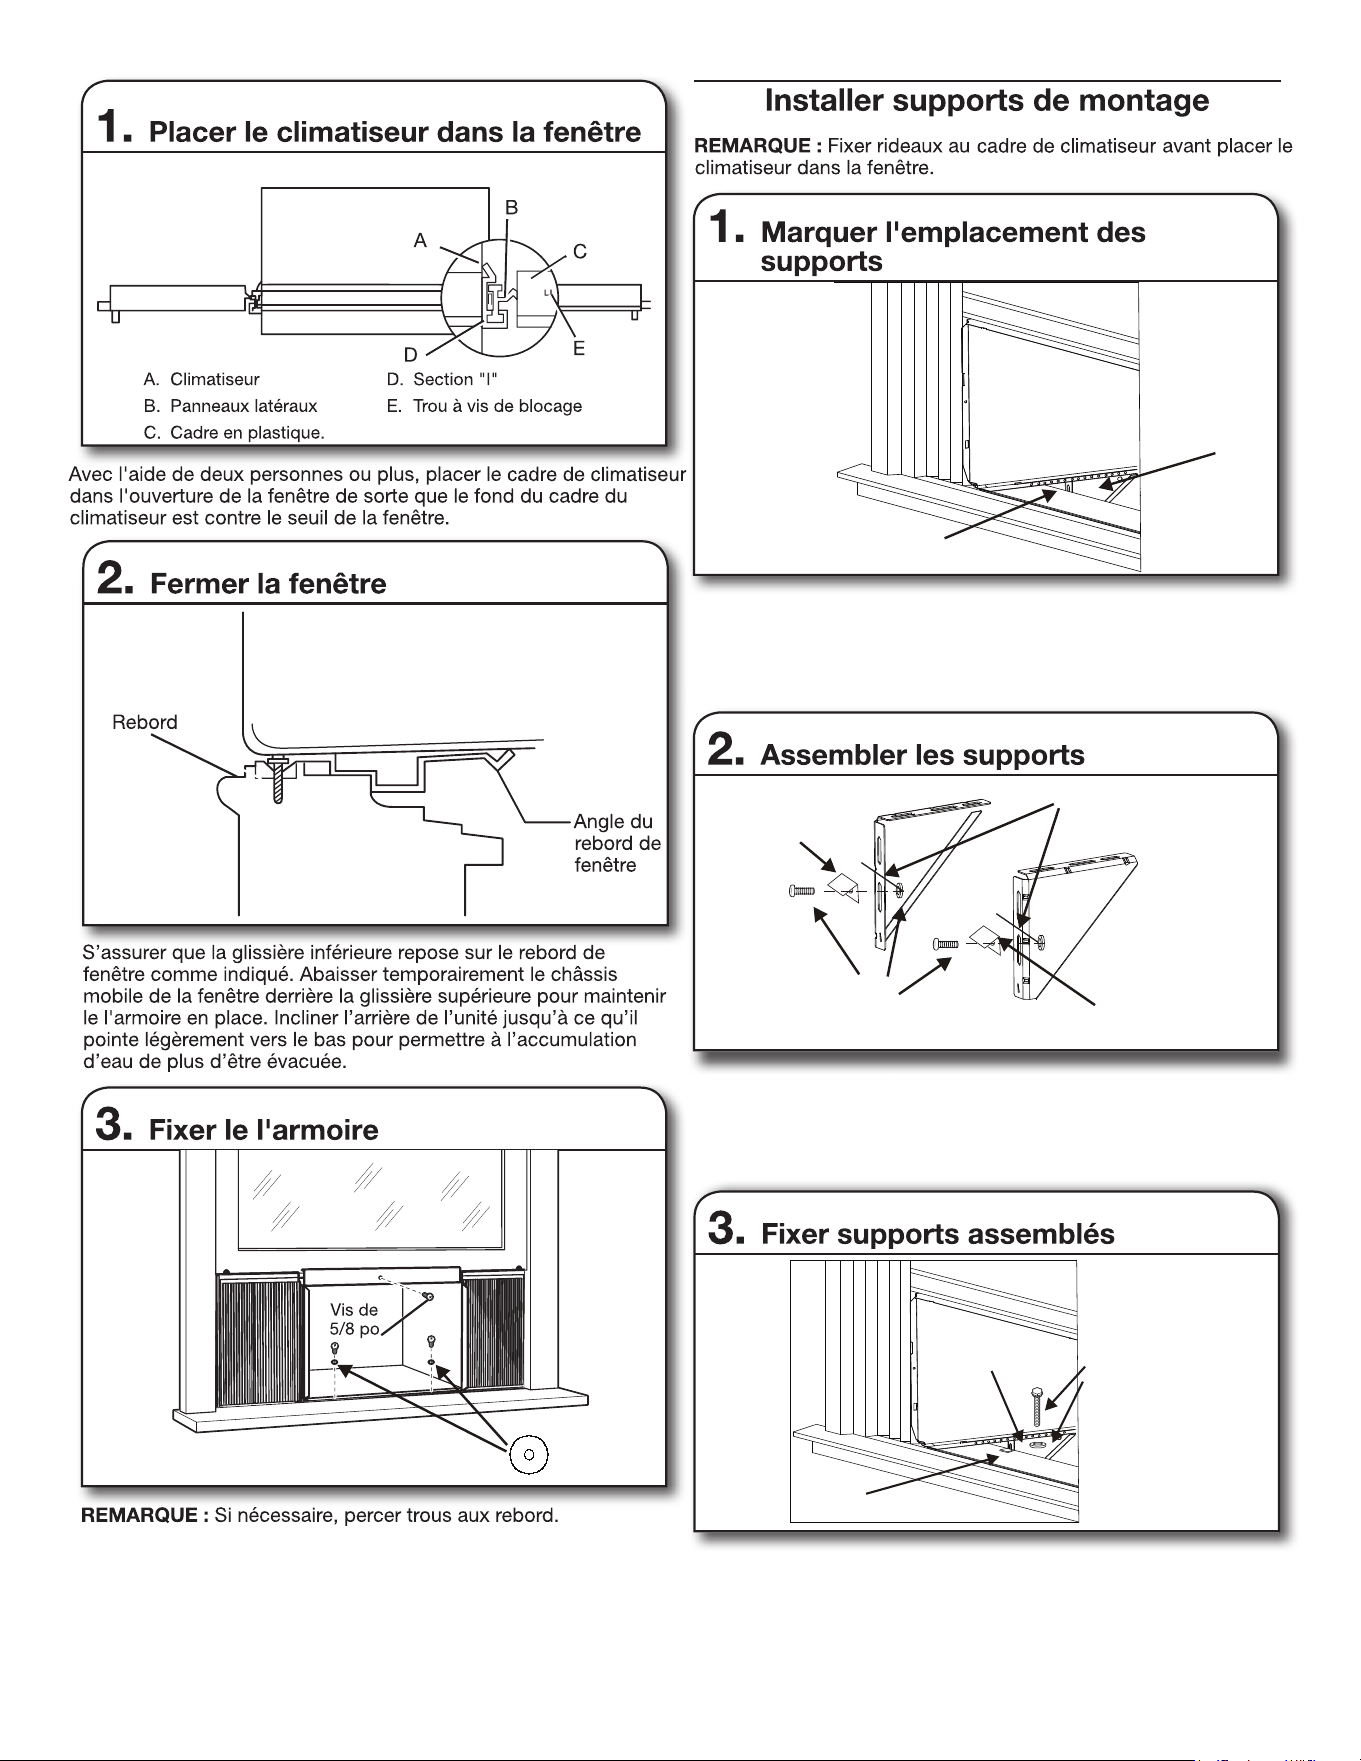
Fixez l'armoire au rebord de la fenêtre à l'aide de deux vis à
tête hexagonale 5/8''. Fixez la vis à travers l'entretoise en bois
mentionnée sur la première page. Pour les modèles de
24 000 BTU, le joint du canal inférieur doit reposer sur une
rondelle. Utilisez une vis à tête hexagonale 5/8'' pour fixer le
canal supérieur au de la fenêtre.
Marquer le support
Support
Équerre de seuil
Support support
Boulon et
contre-écrou
Équerre
tête plate 5/8"
boulon avec contre-écrou
de seuil
Marque de crayon
Alignez le
support sur
la marque au
crayon.
Machine
à laver
Maintenez chaque support de support contre l'extérieur du rebord
de la fenêtre. Serrez chaque support au bas de l'armoire avec boulon
à tête plate 1/2'' avec contre-écrou. Avec un crayon, marquez le
support où le haut du rebord de la fenêtre rencontre le support.
Retirez les crochets.
Fixez les équerres de seuil aux équerres de support avec un
boulon à tête cylindrique de 5/8" avec contre-écrou, comme illustré.
Serrez les boulons à la main. librement pour s'adapter aux
changements qui pourraient être nécessaires plus tard en mise
en place.
Fixez les supports (avec les équerres de seuil attachées) à le bas
de l'armoire avec un boulon à tête plate de 1/2" avec contre-écrou
illustré. Assurez-vous que les équerres de seuil reposent sur le
dessus du rebord de la fenêtre, comme illustré. Inclinez légèrement
l'arrière de l'appareil vers le bas pour permettre l'accumulation de
pluie l'eau à évacuer. Serrez bien les six boulons.
27
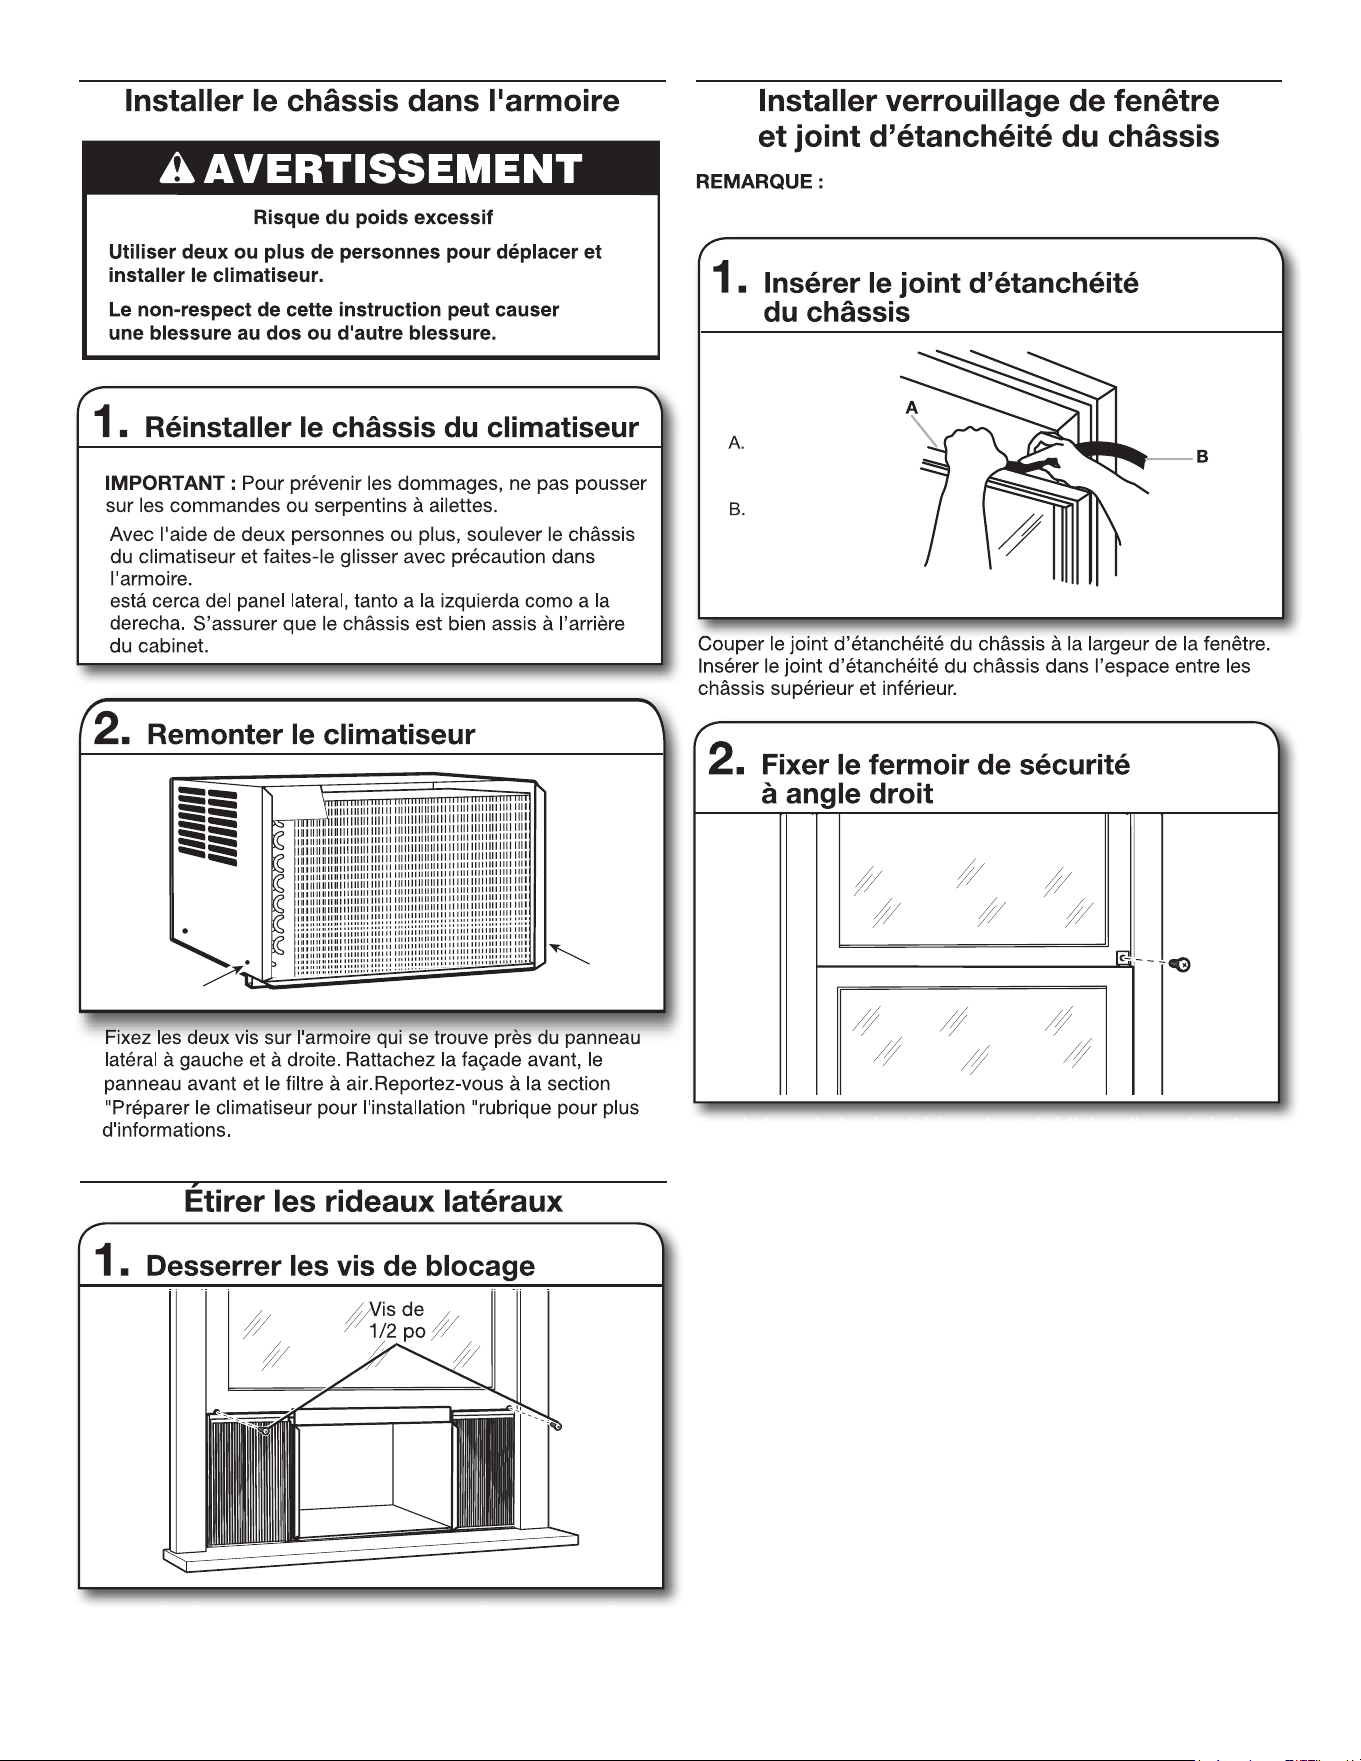
Étendez le panneau latéral et le cadre du panneau. Fixez le
panneau latéral avec deux vis à tête hexagonale 1/2'' à
gauche et à droite au cadre de la fenêtre.
Fixez le verrou de fenêtre à angle droit avec une vis à tête
hexagonale de 5/8".
Joint de châssis
Haut du châssis
inférieur de
la fenêtre
Vuelva a ajustar los dos tornillos al gabinete que
Fixez les rideaux à l'armoire du climatiseur avant
de placer l'armoire du climatiseur dans la fenêtre.
28
Fixez les rideaux au boîtier du climatiseur avant de
placer le boîtier du climatiseur dans la fenêtre.
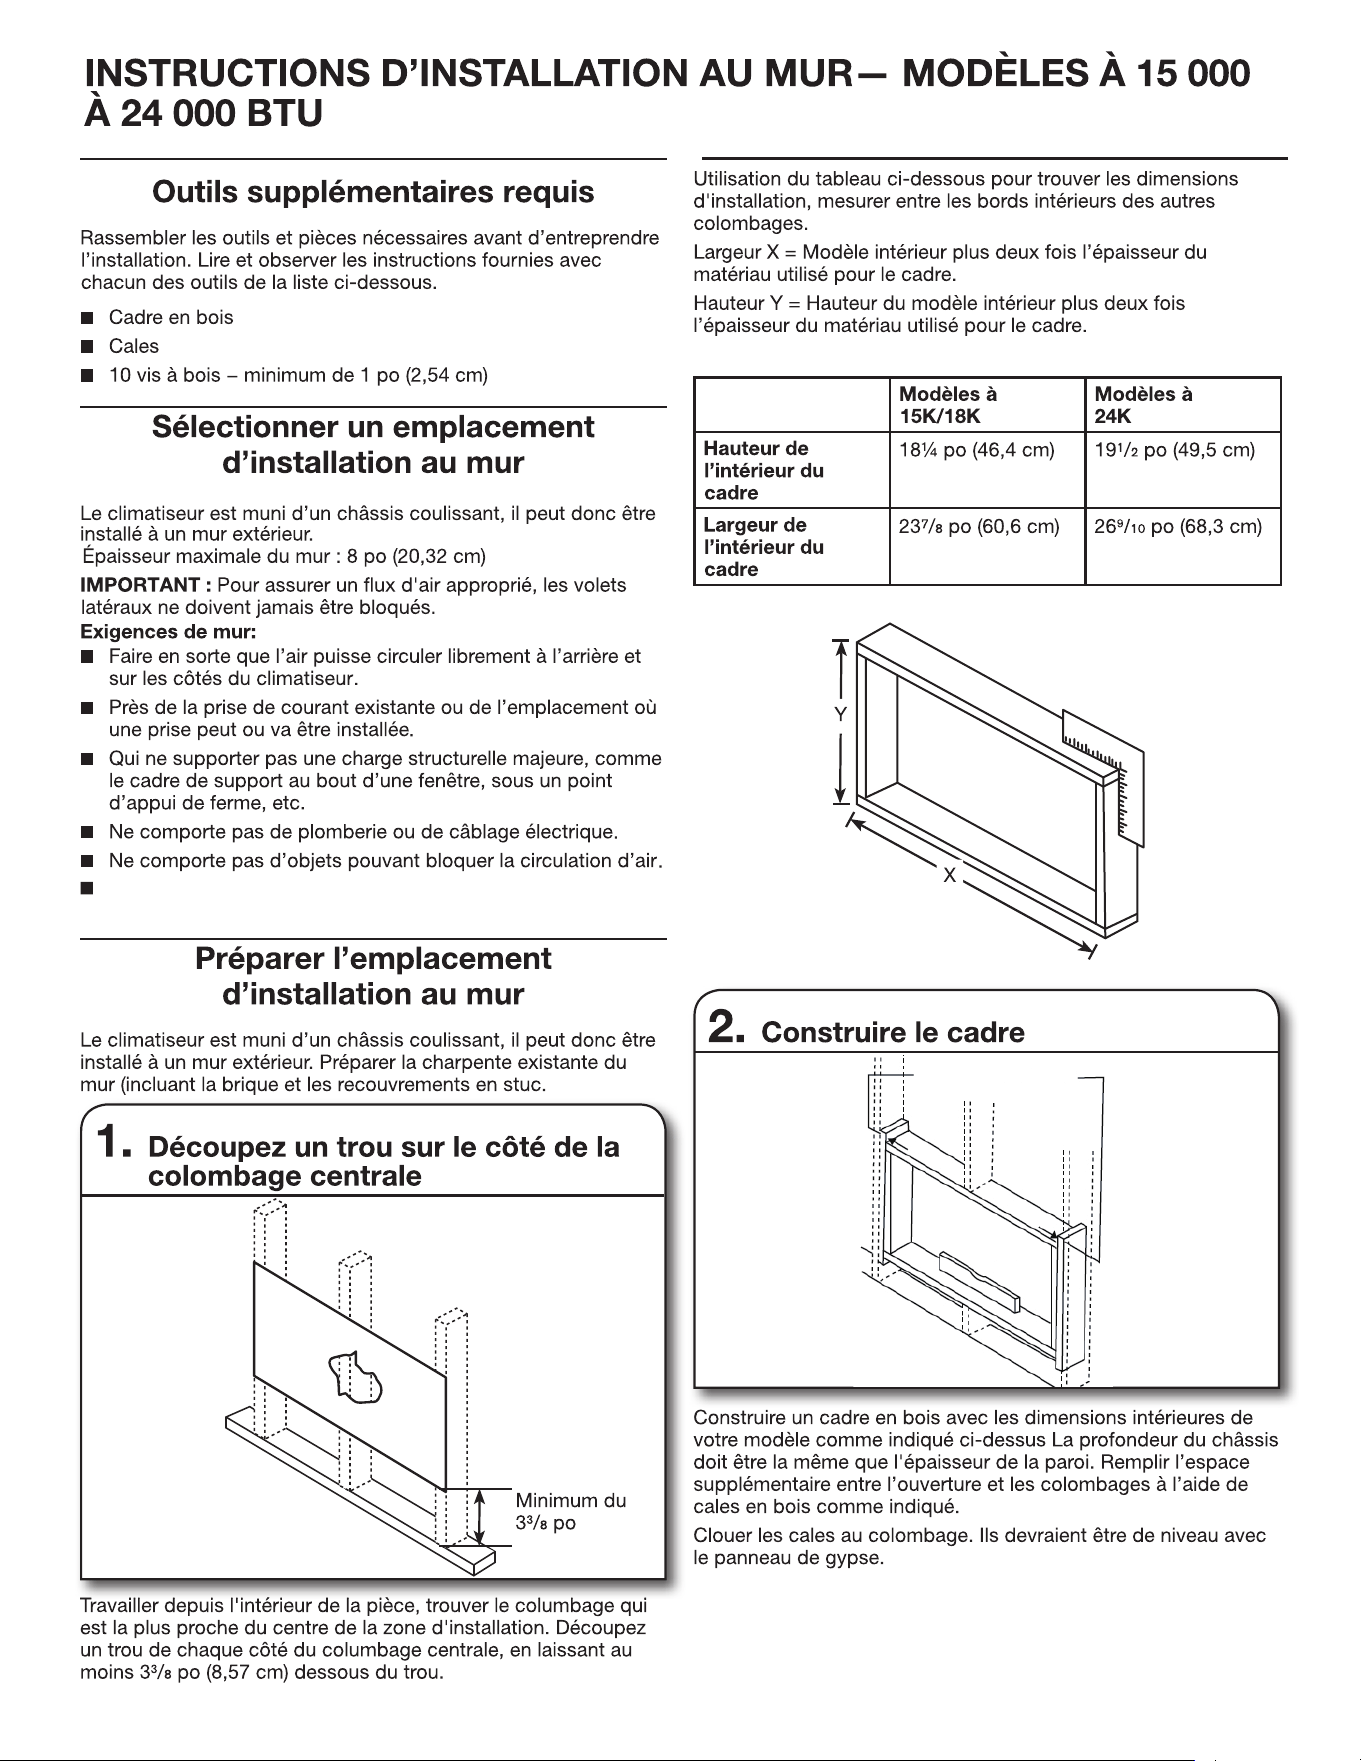
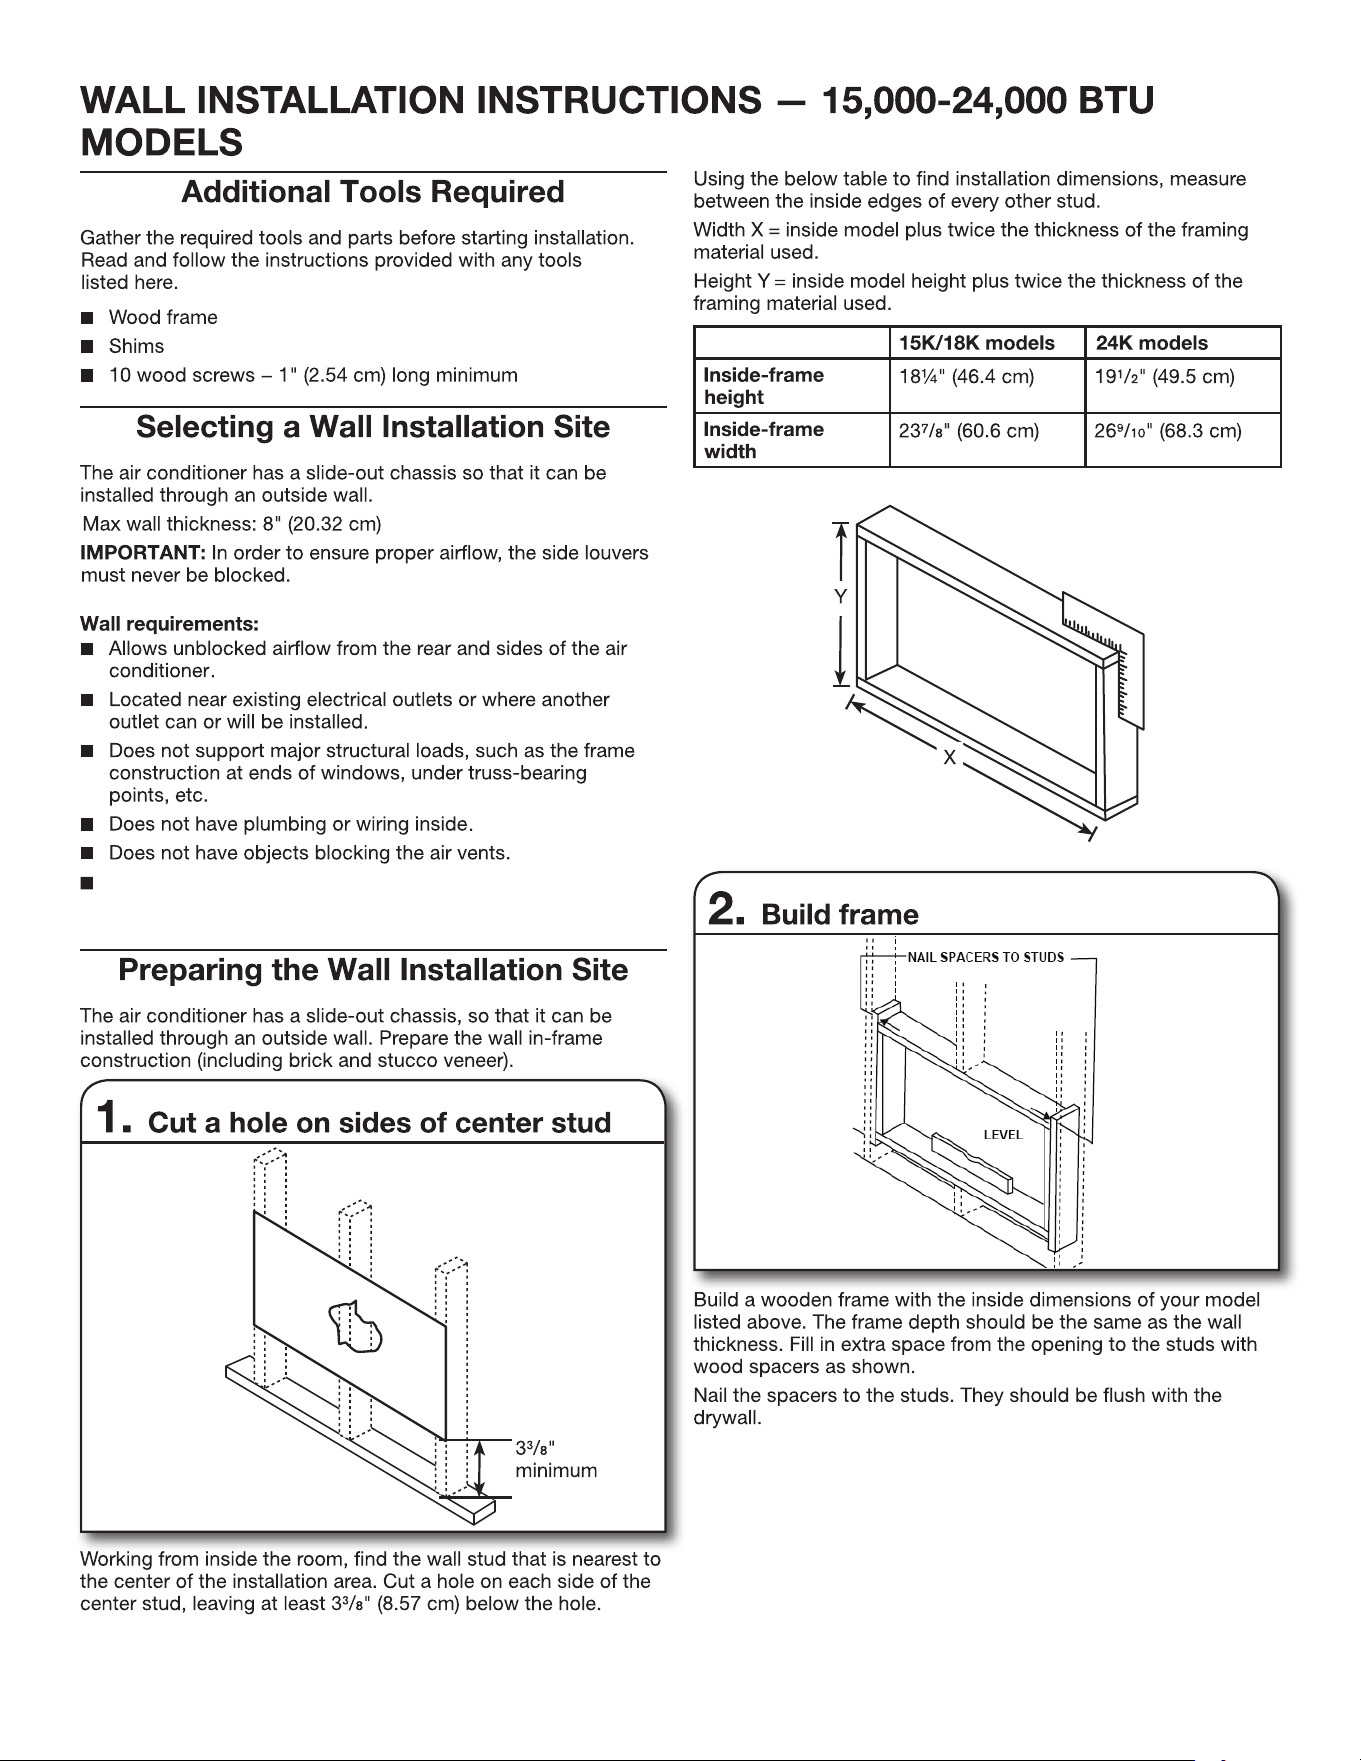
NIVEAU
CLOUS ENTRETOISES
AUX GOUJONS
La distance entre l'appareil et la prise électrique doit être
inférieure à 6' (180 cm).
29
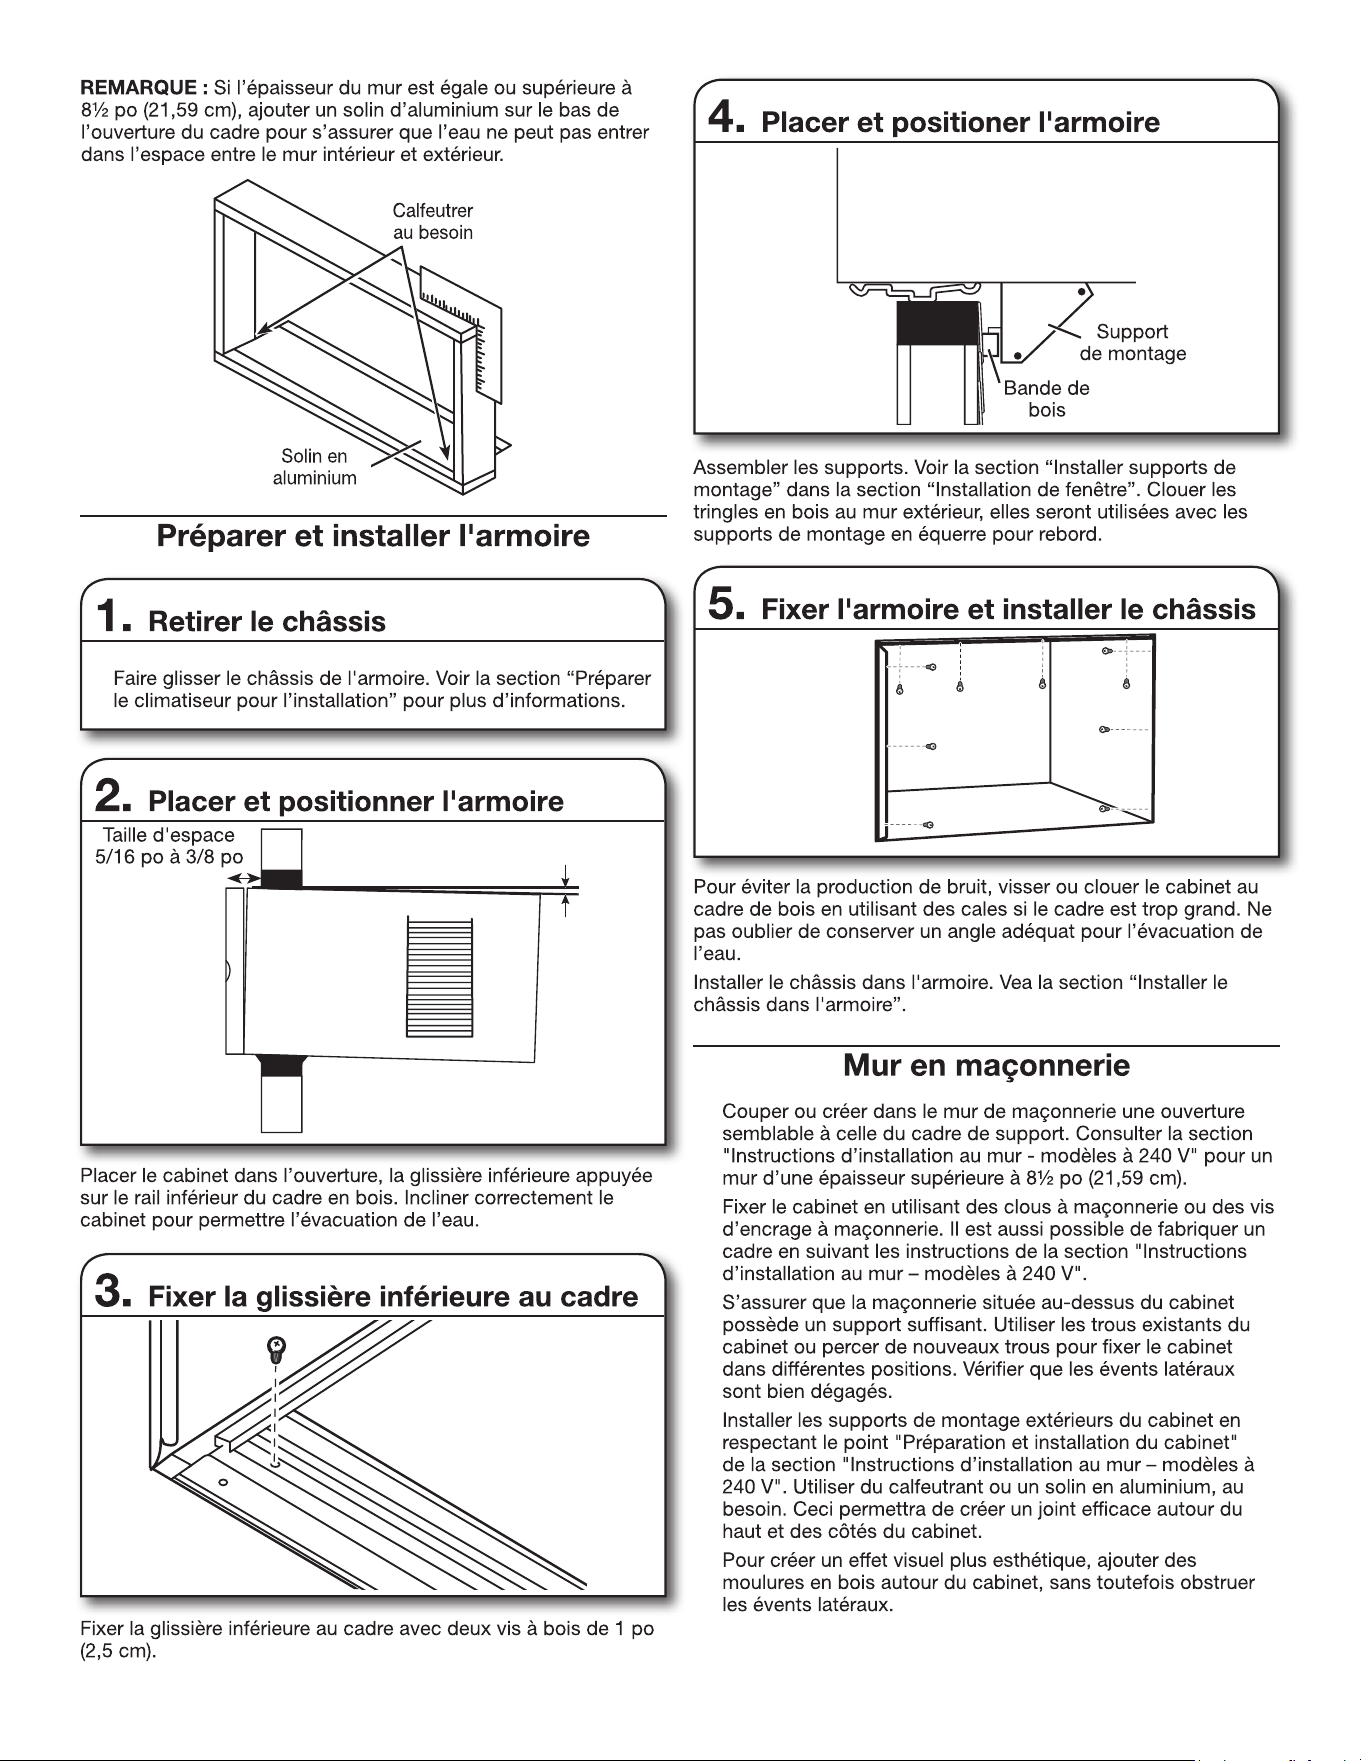
1.
2.
3.
4.
5.
3 degrés
3
0
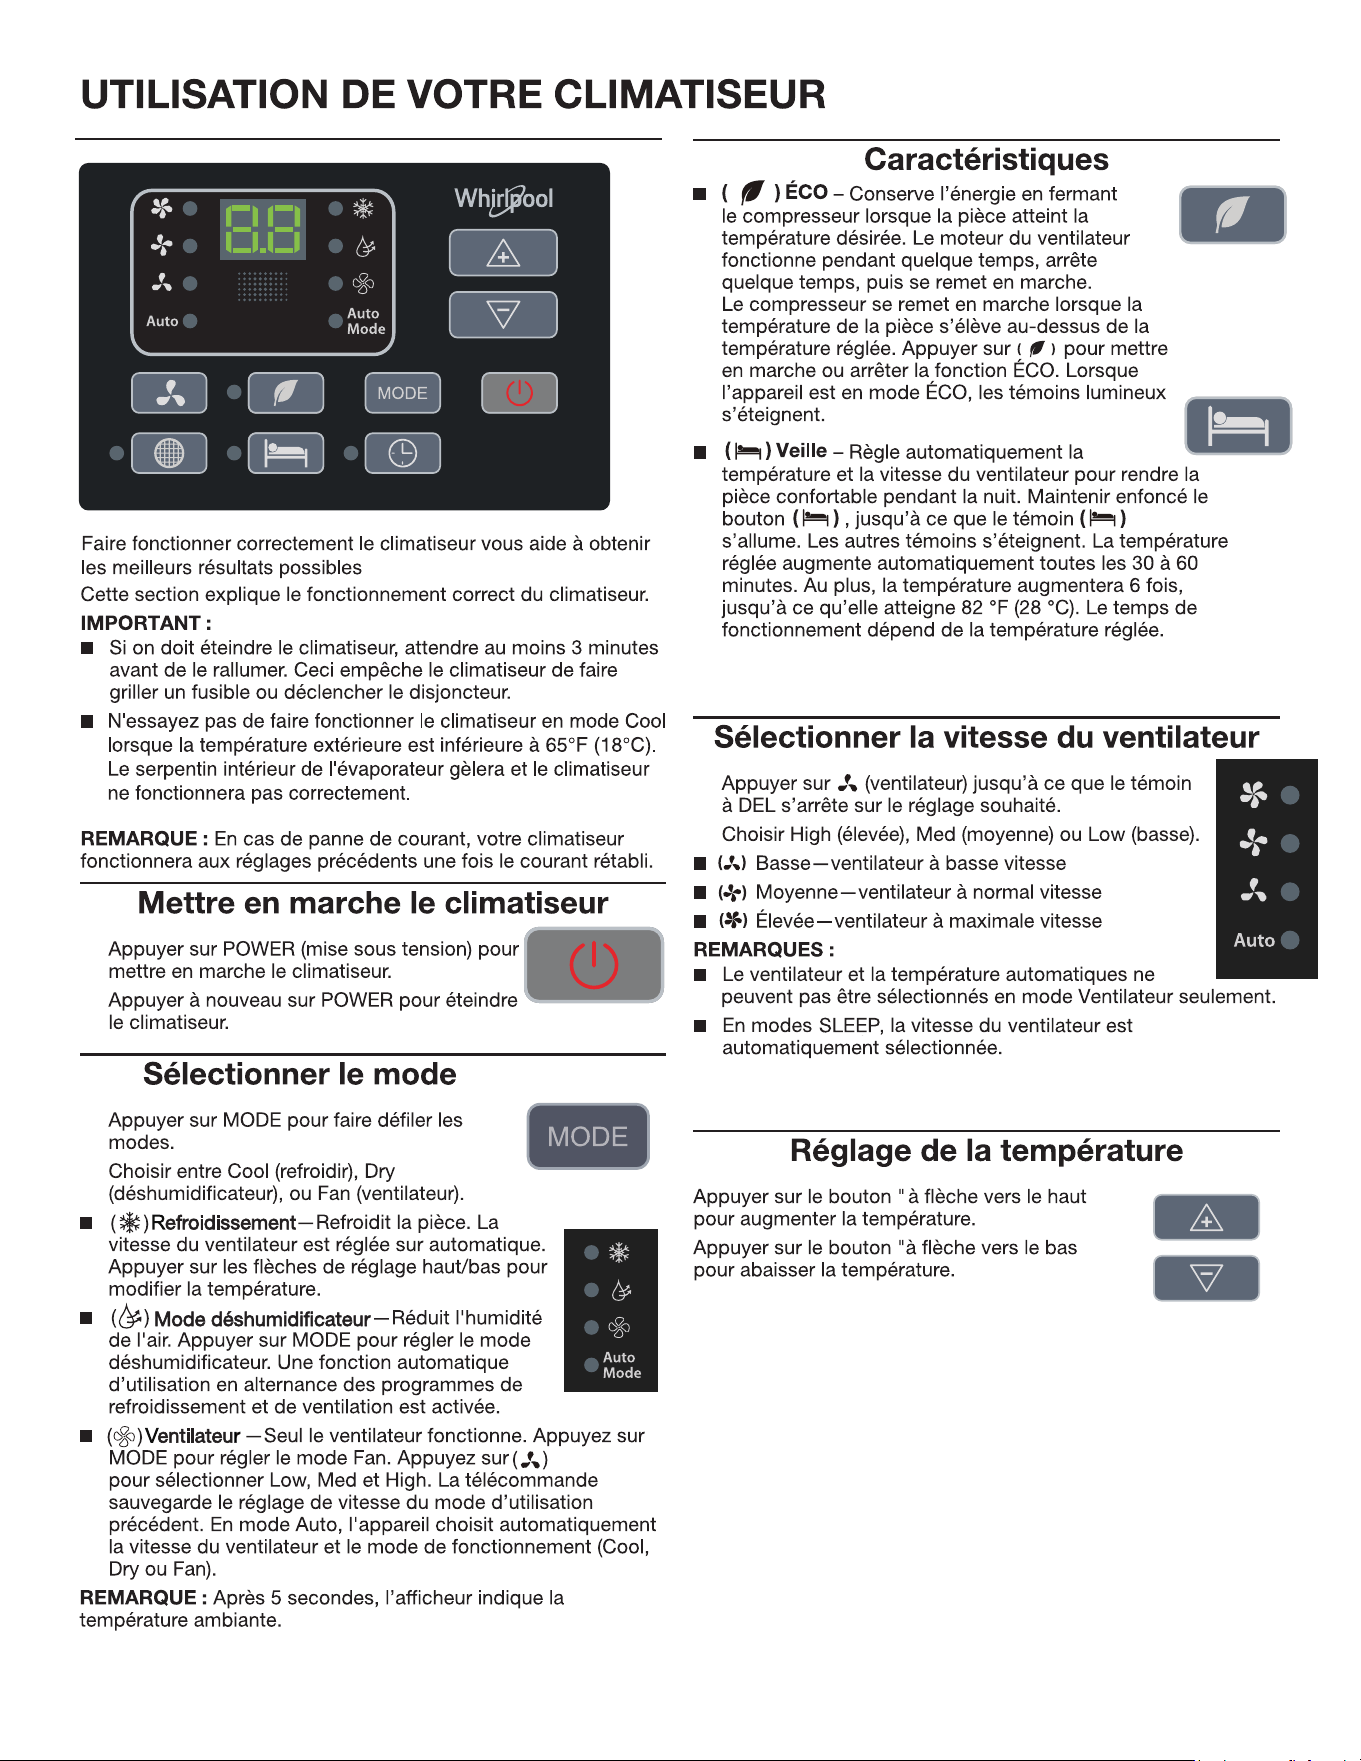
1.
2.
1.
2.
1.
2.
31
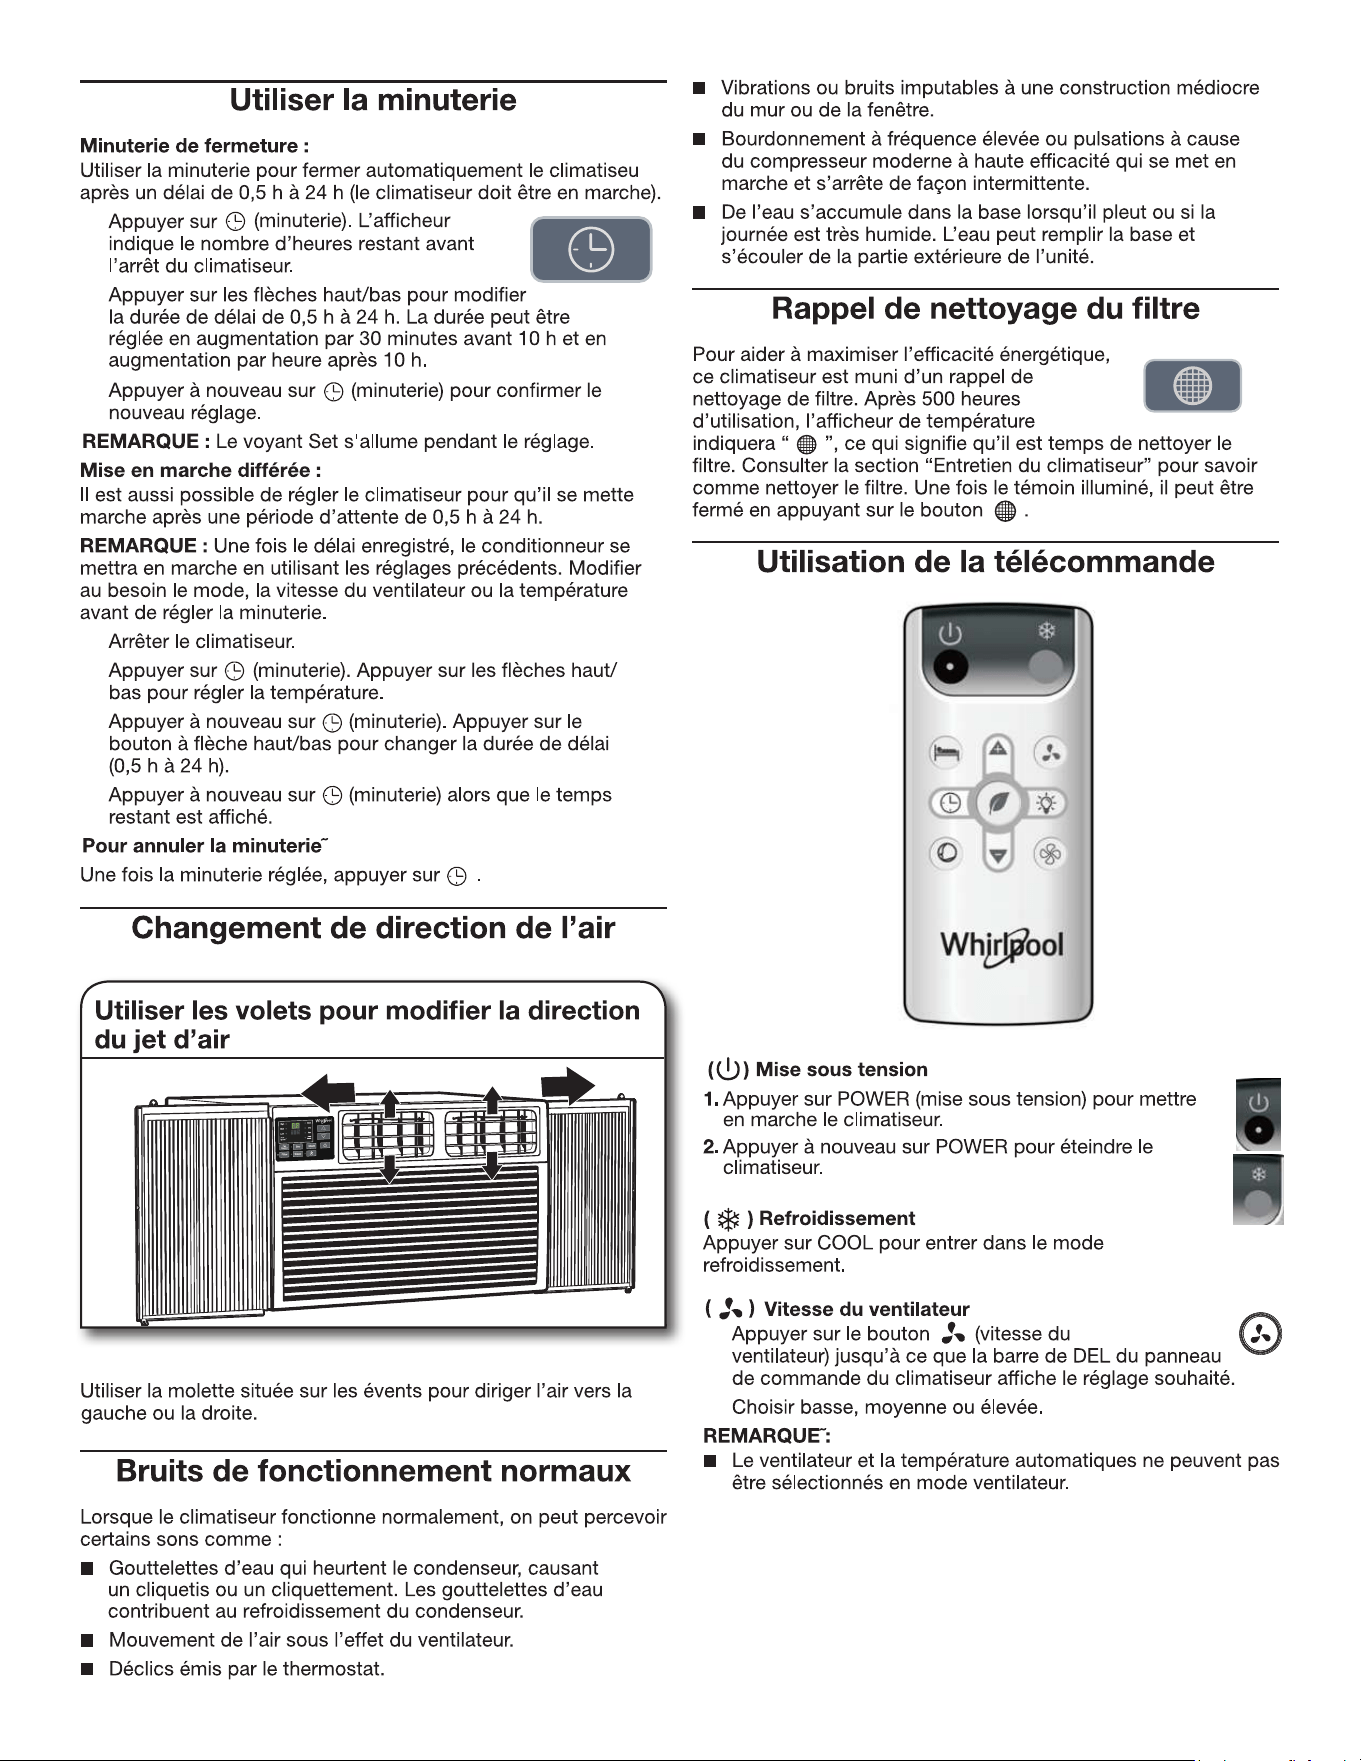
1.
1.
2.
2.
1.
2.
3.
3.
4.
32
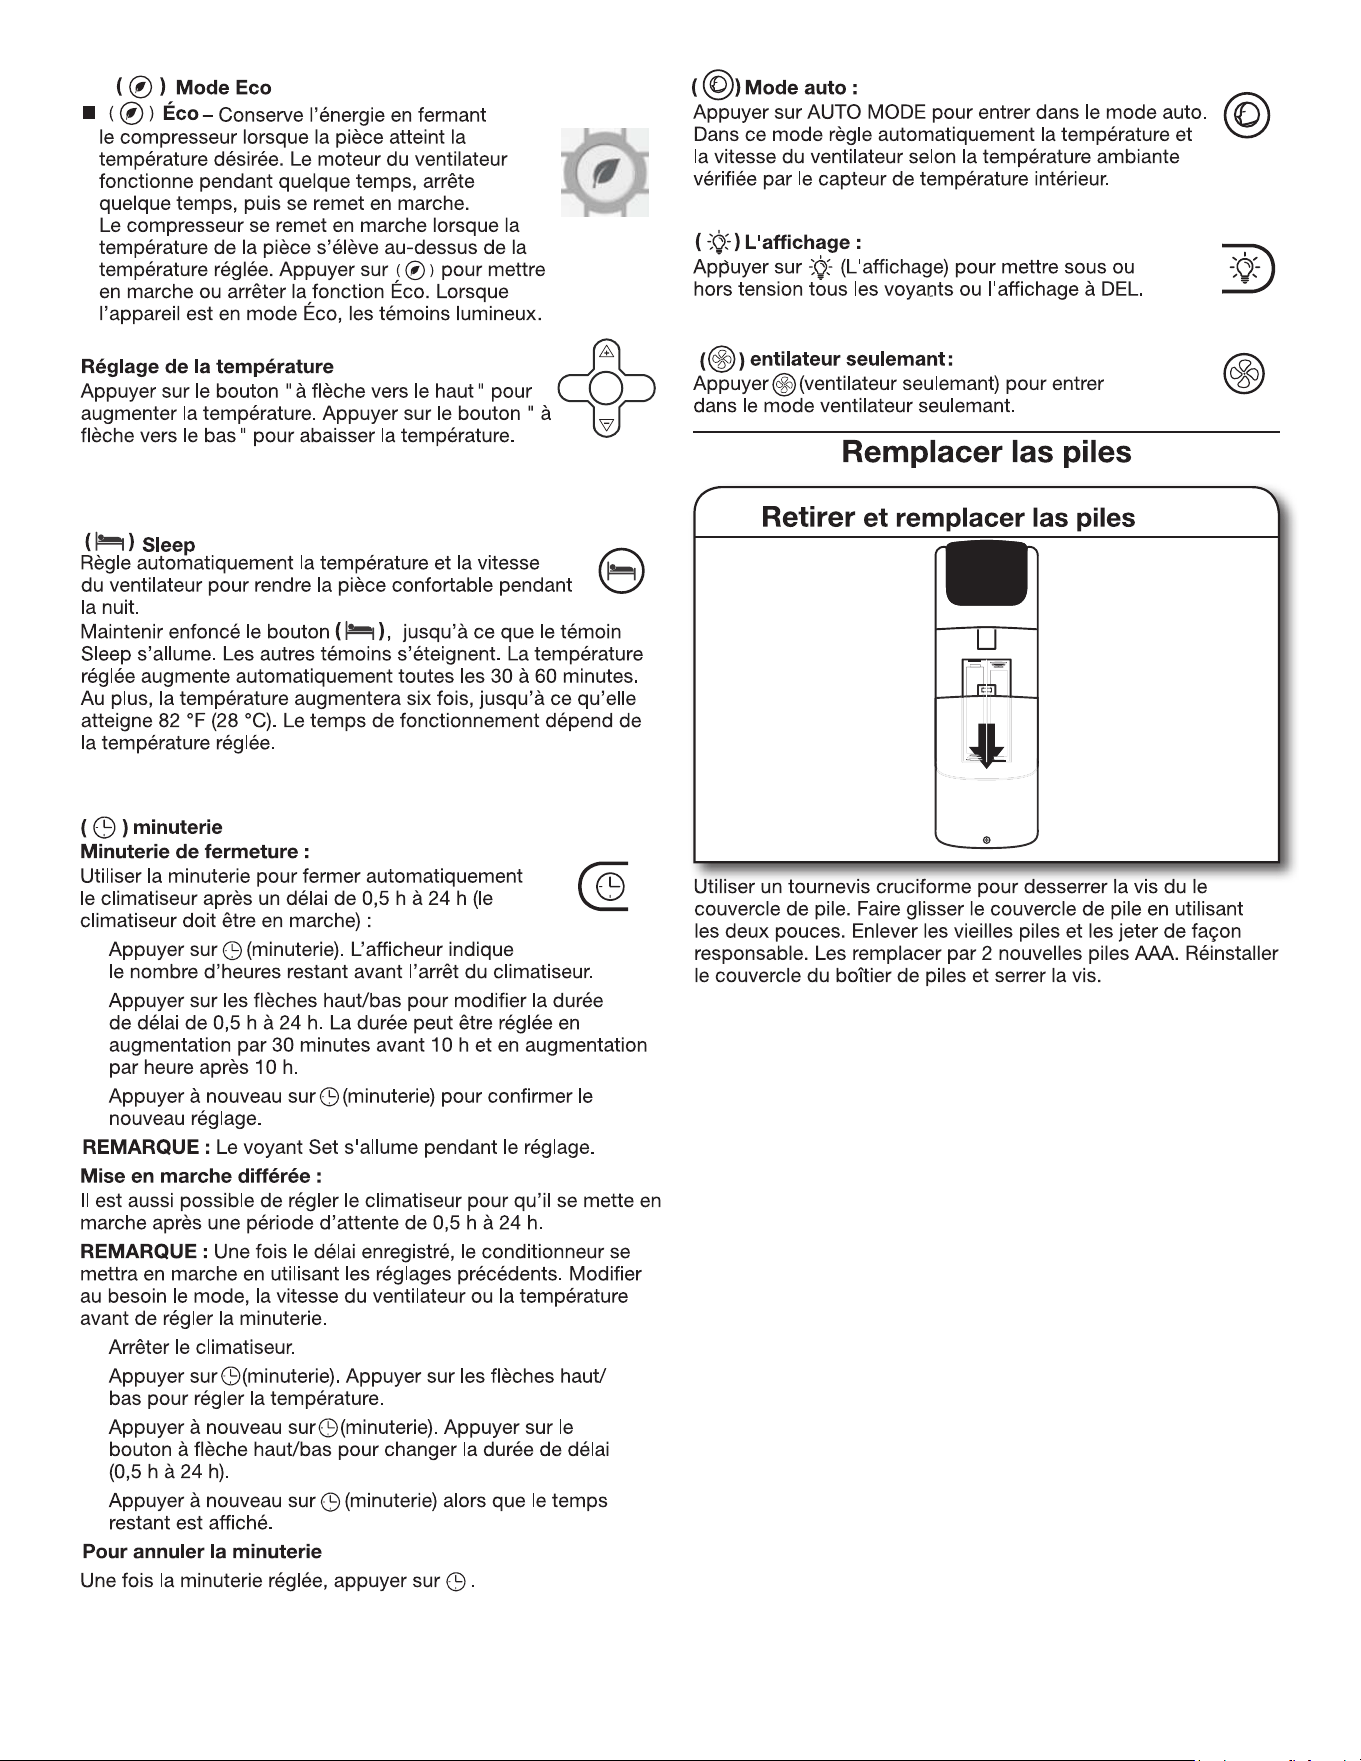
1.
2.
3.
1.
2.
3.
4.
33
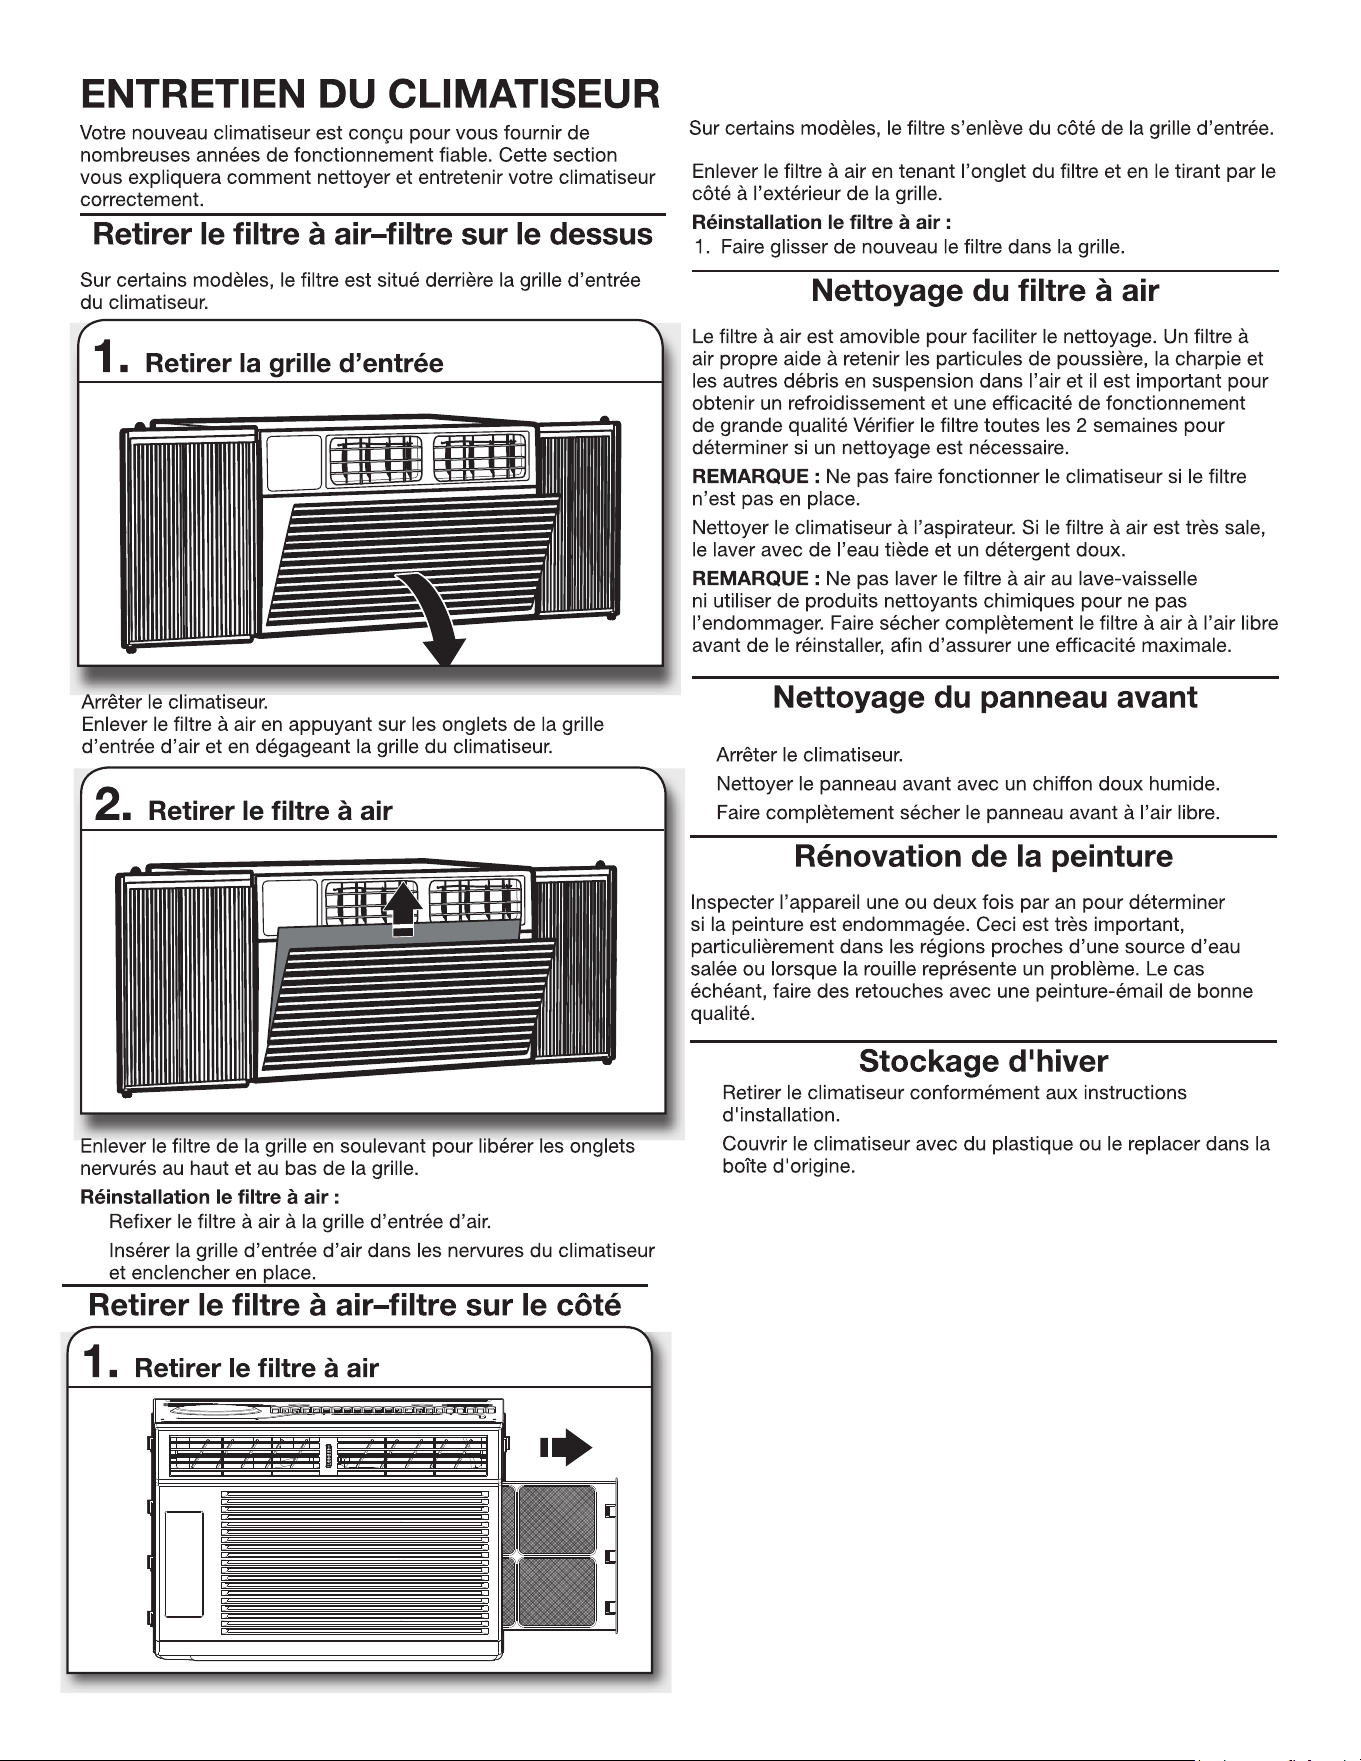
1.
2.
1.
2.
1.
2.
3.
34
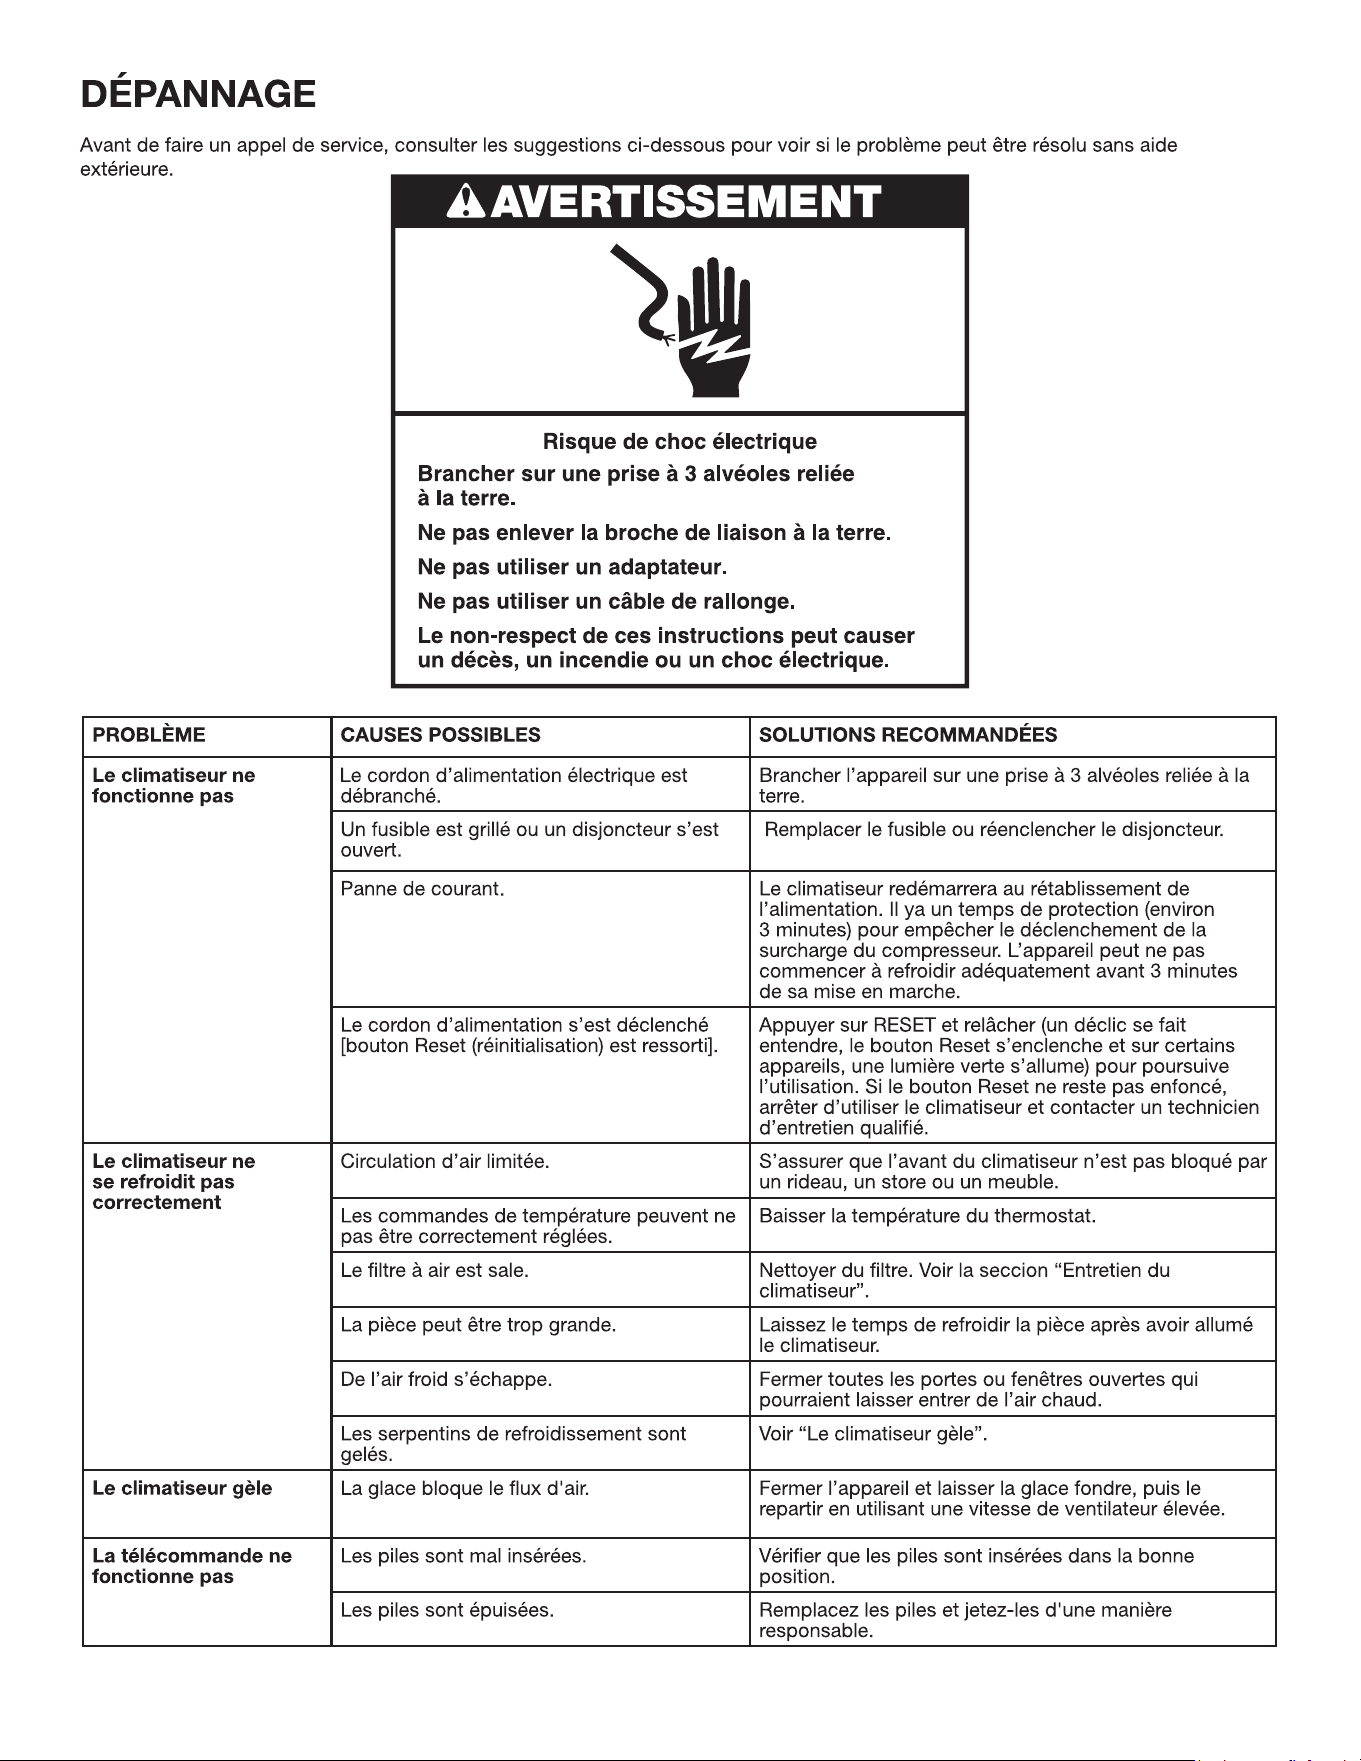
35
36
37
WHAW151CW WHAW182CW WHAW242CW
38
39
40
43
48
50
54
55
56
57
40
40
40
40
40
41
41
41
42
42
42
43
44
45
46
46
47
47
48
48
48
49
49
50
50
50
50
51
51
51
51
51
52
53
54
54
54
54
54
54
38
39
40
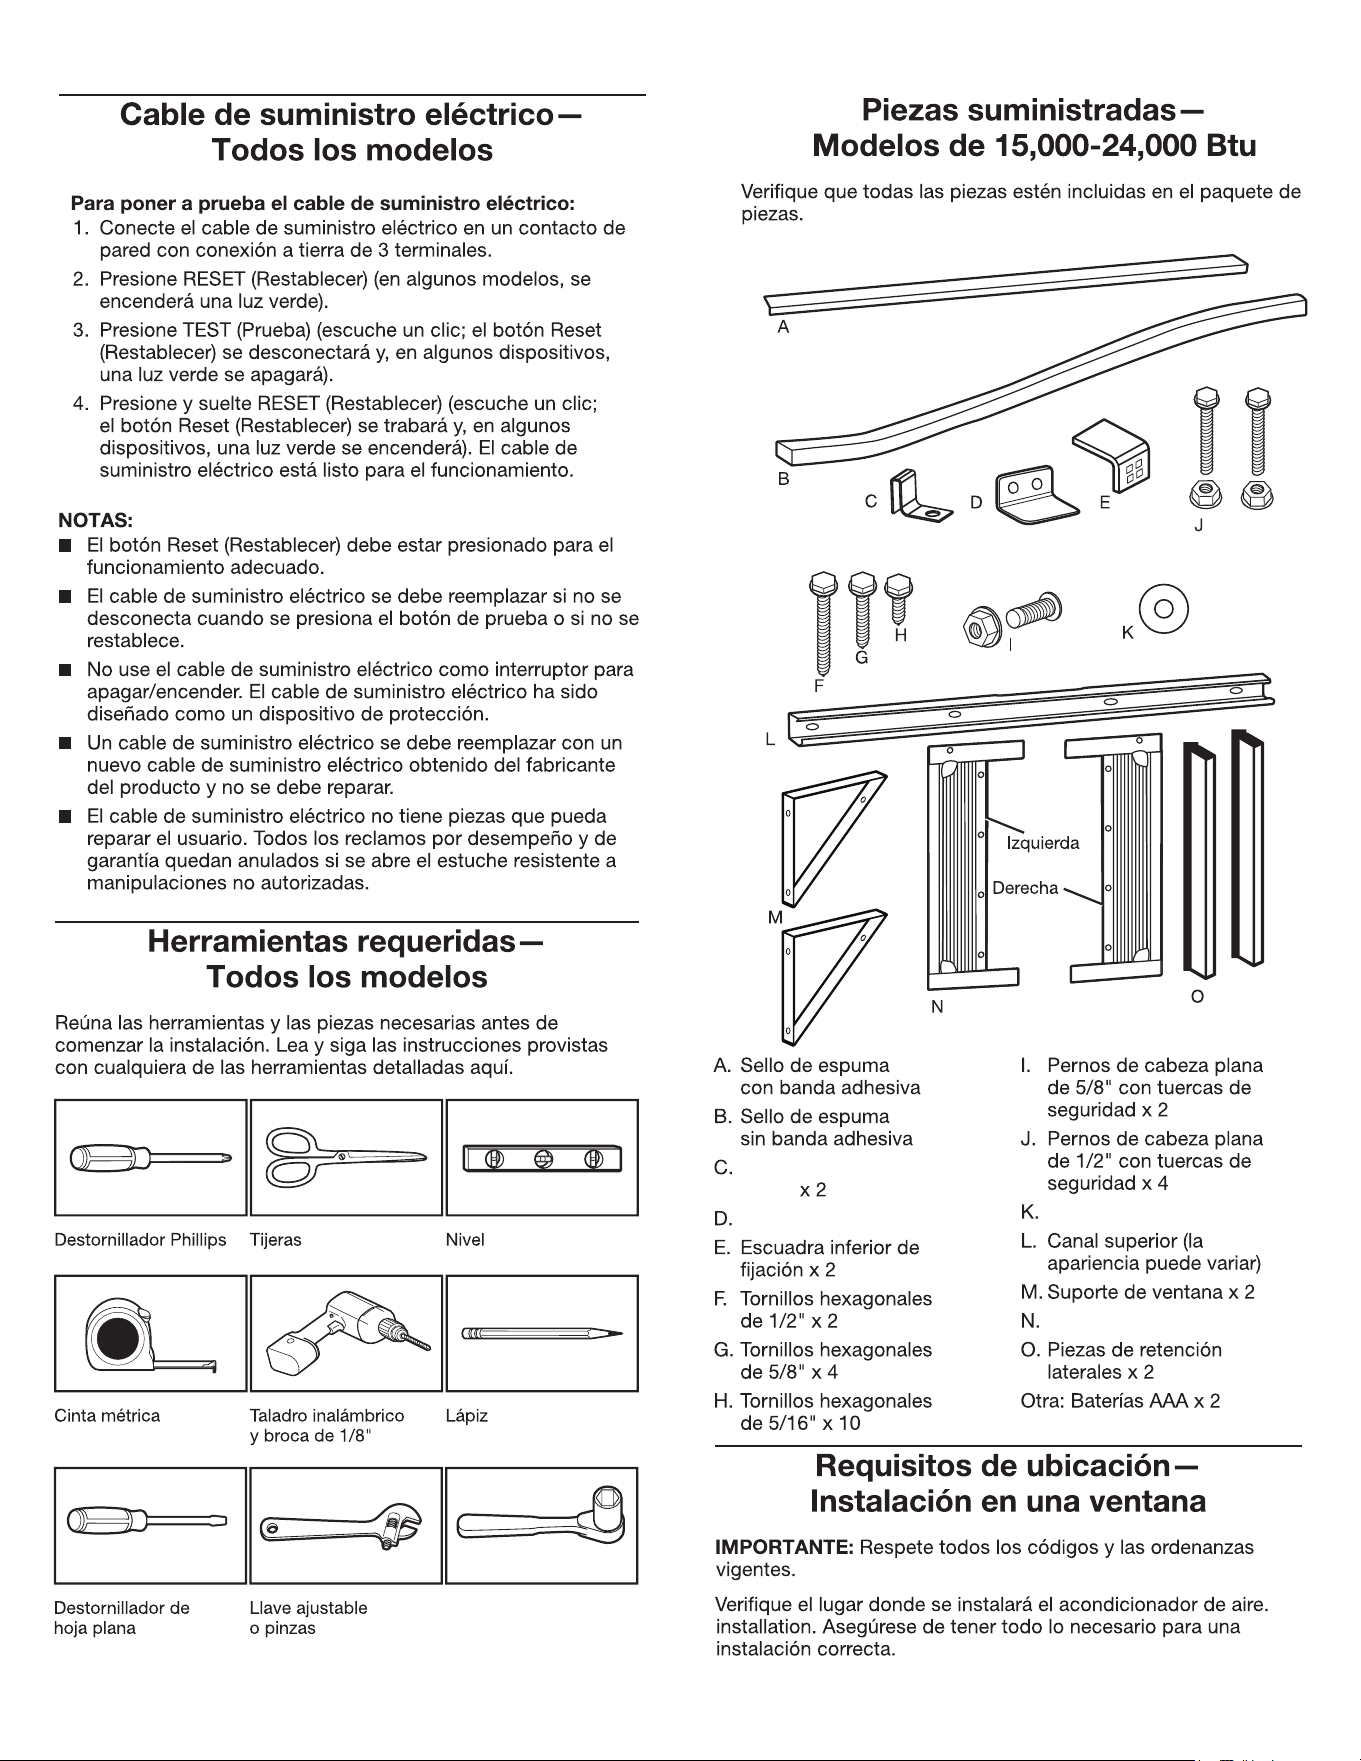
Llave de tubo
Cerradura de seguridad
Soporte del panel
lateral
Paneles laterales x 2
lavadora x 2
41
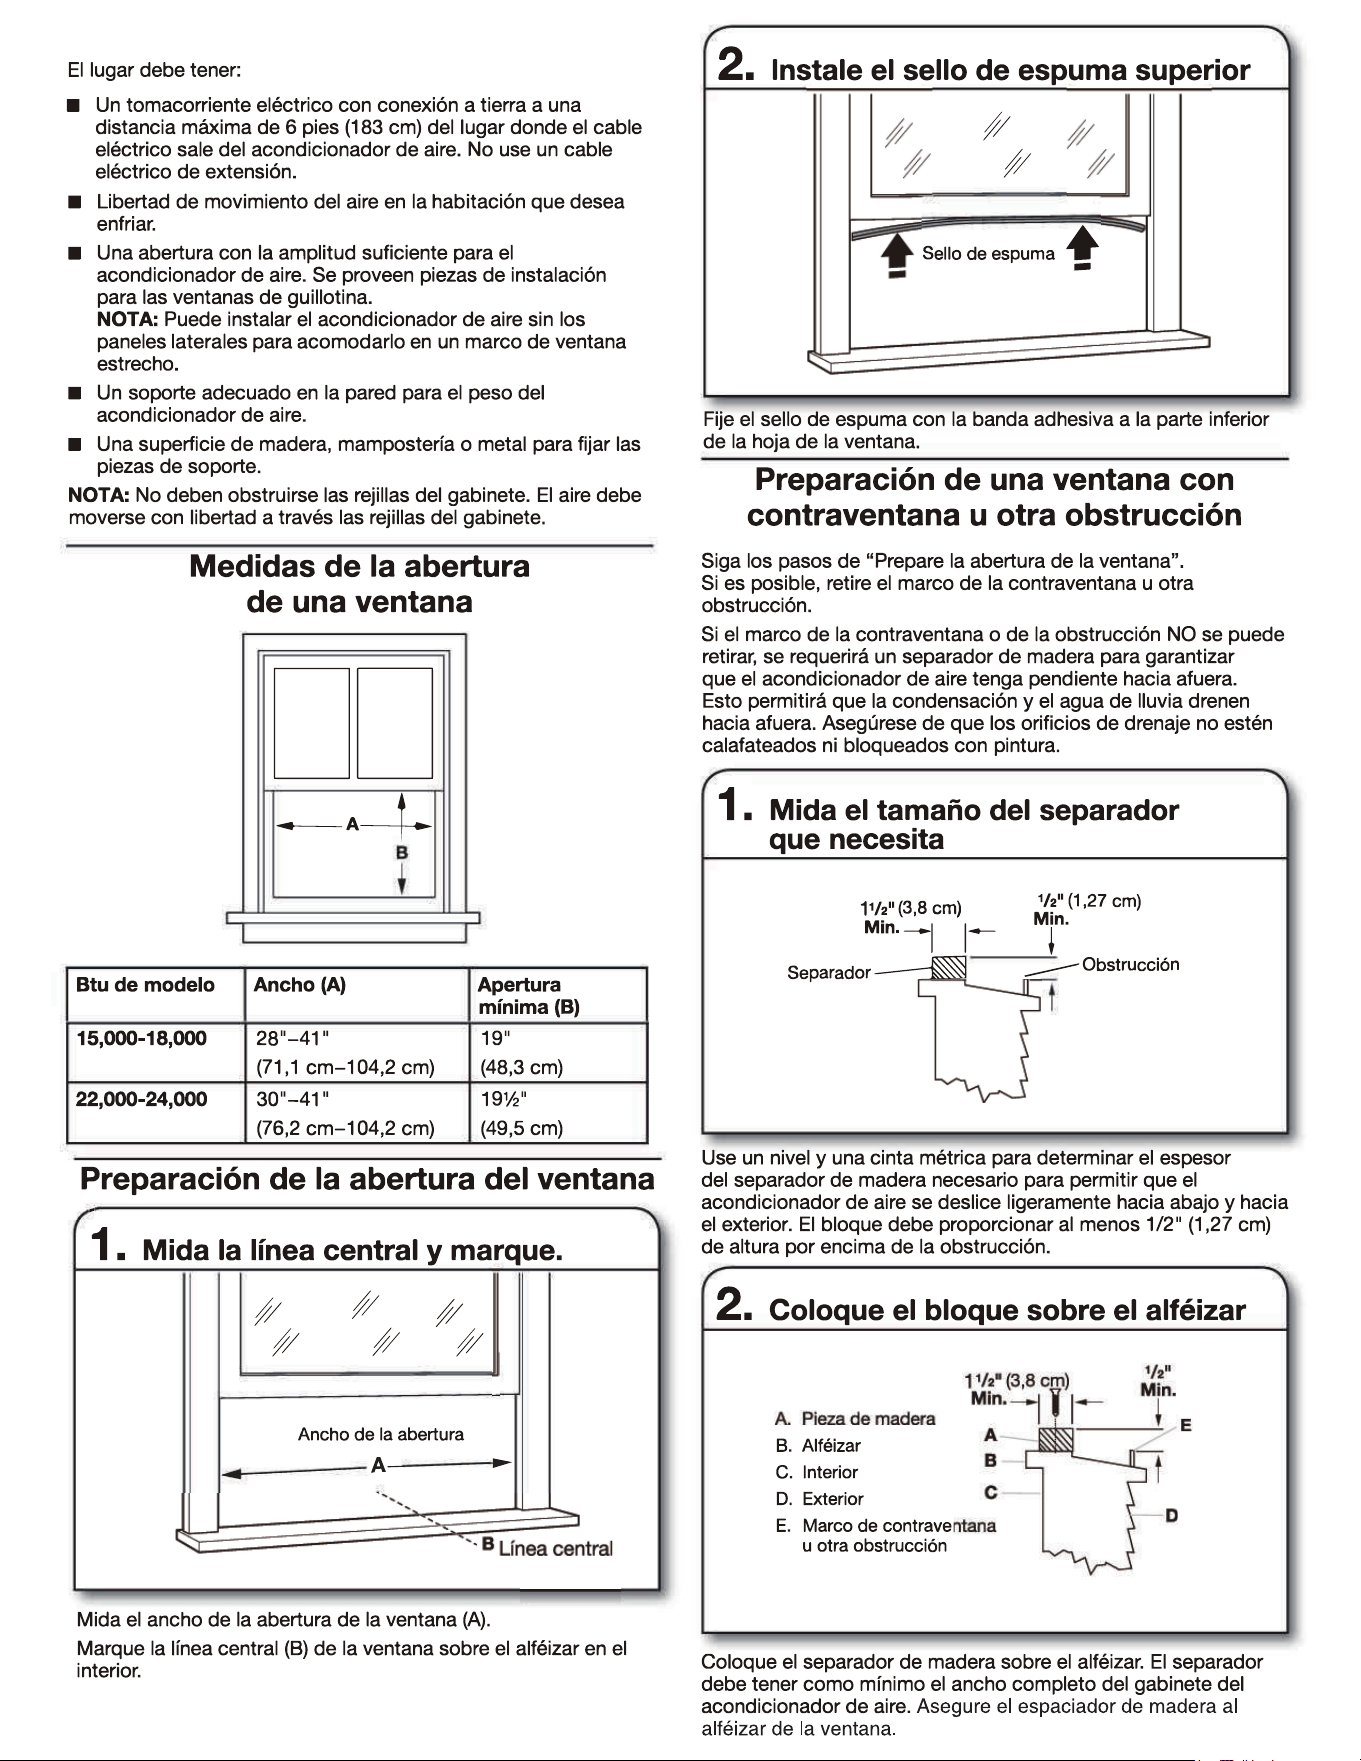
42
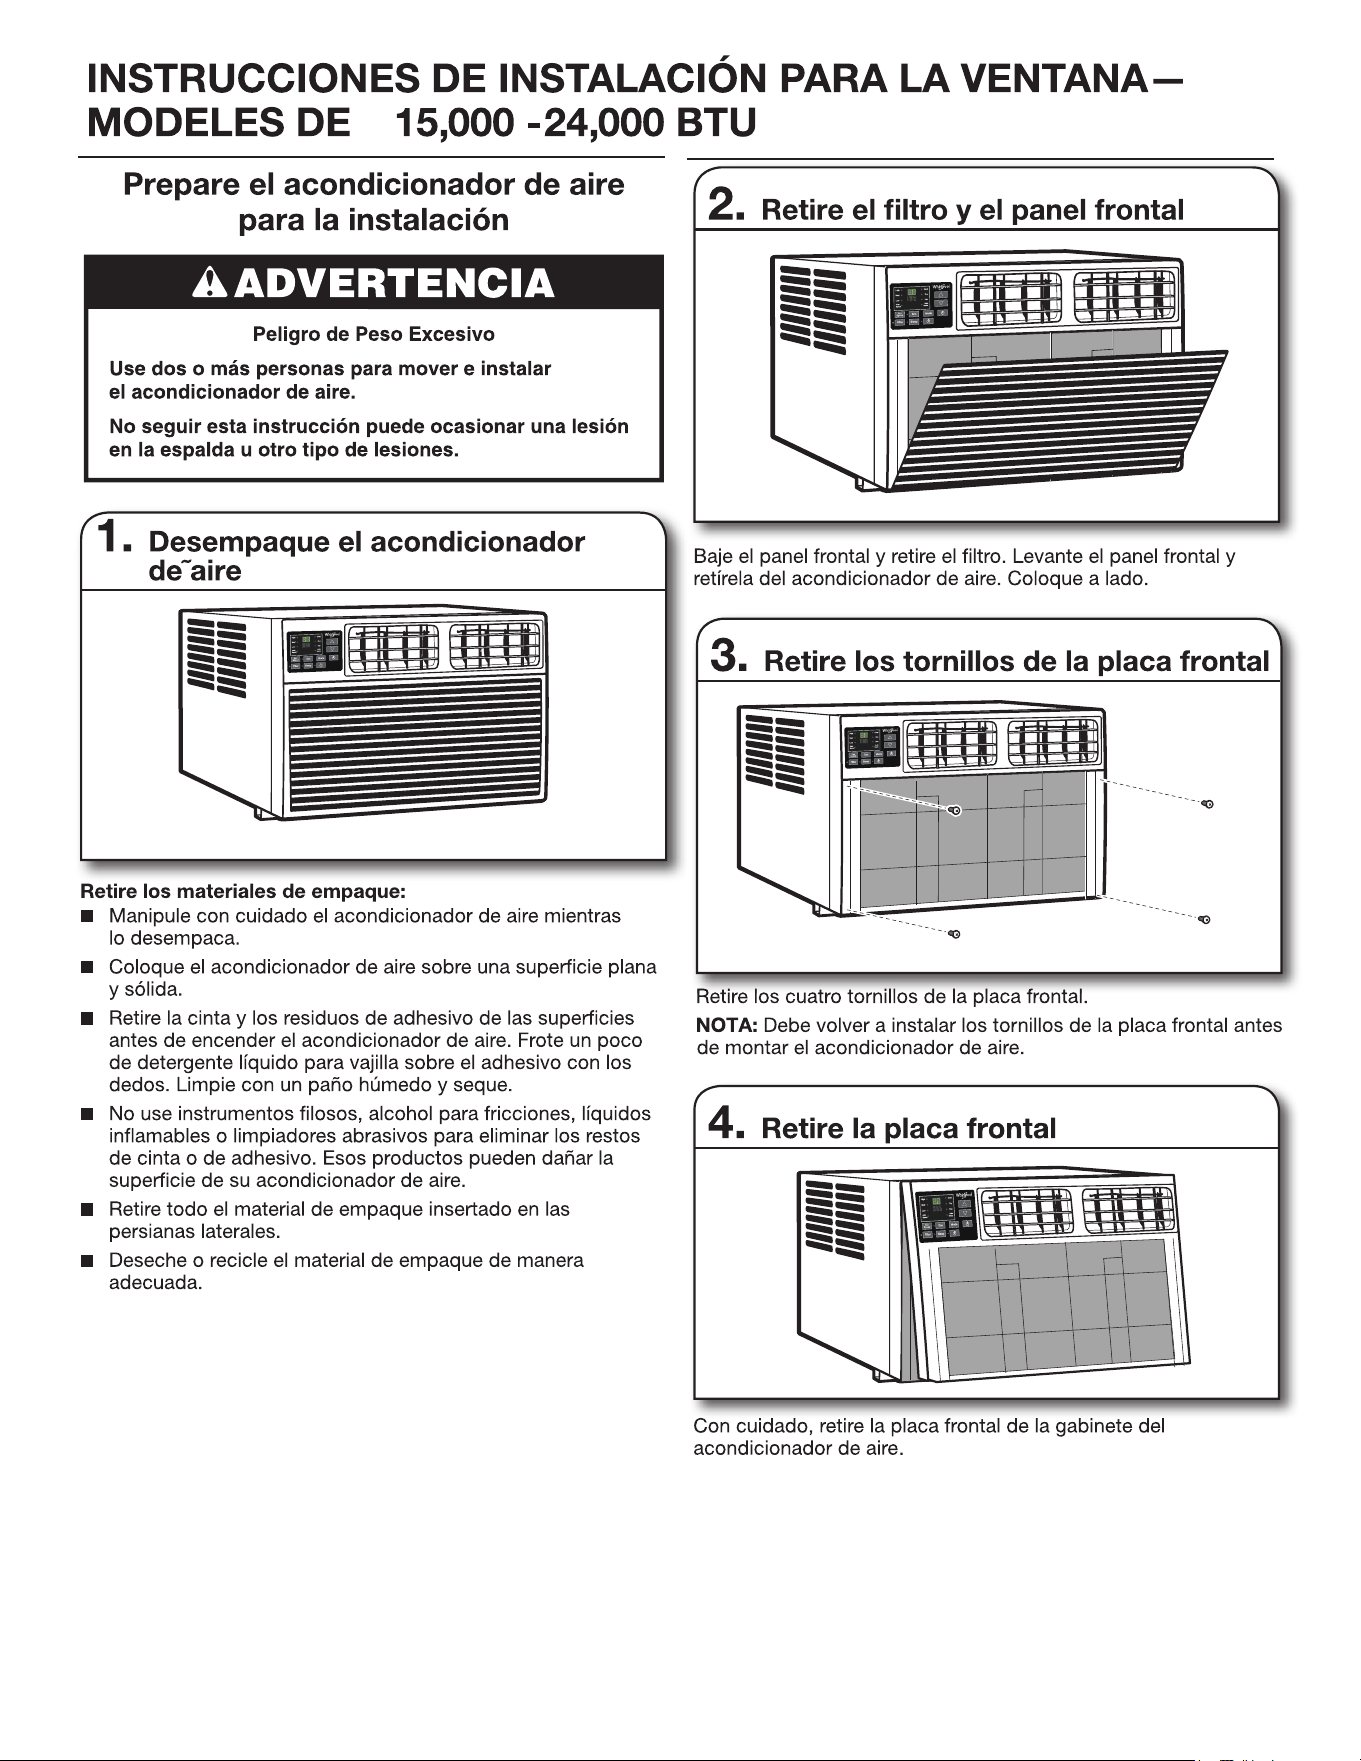
43
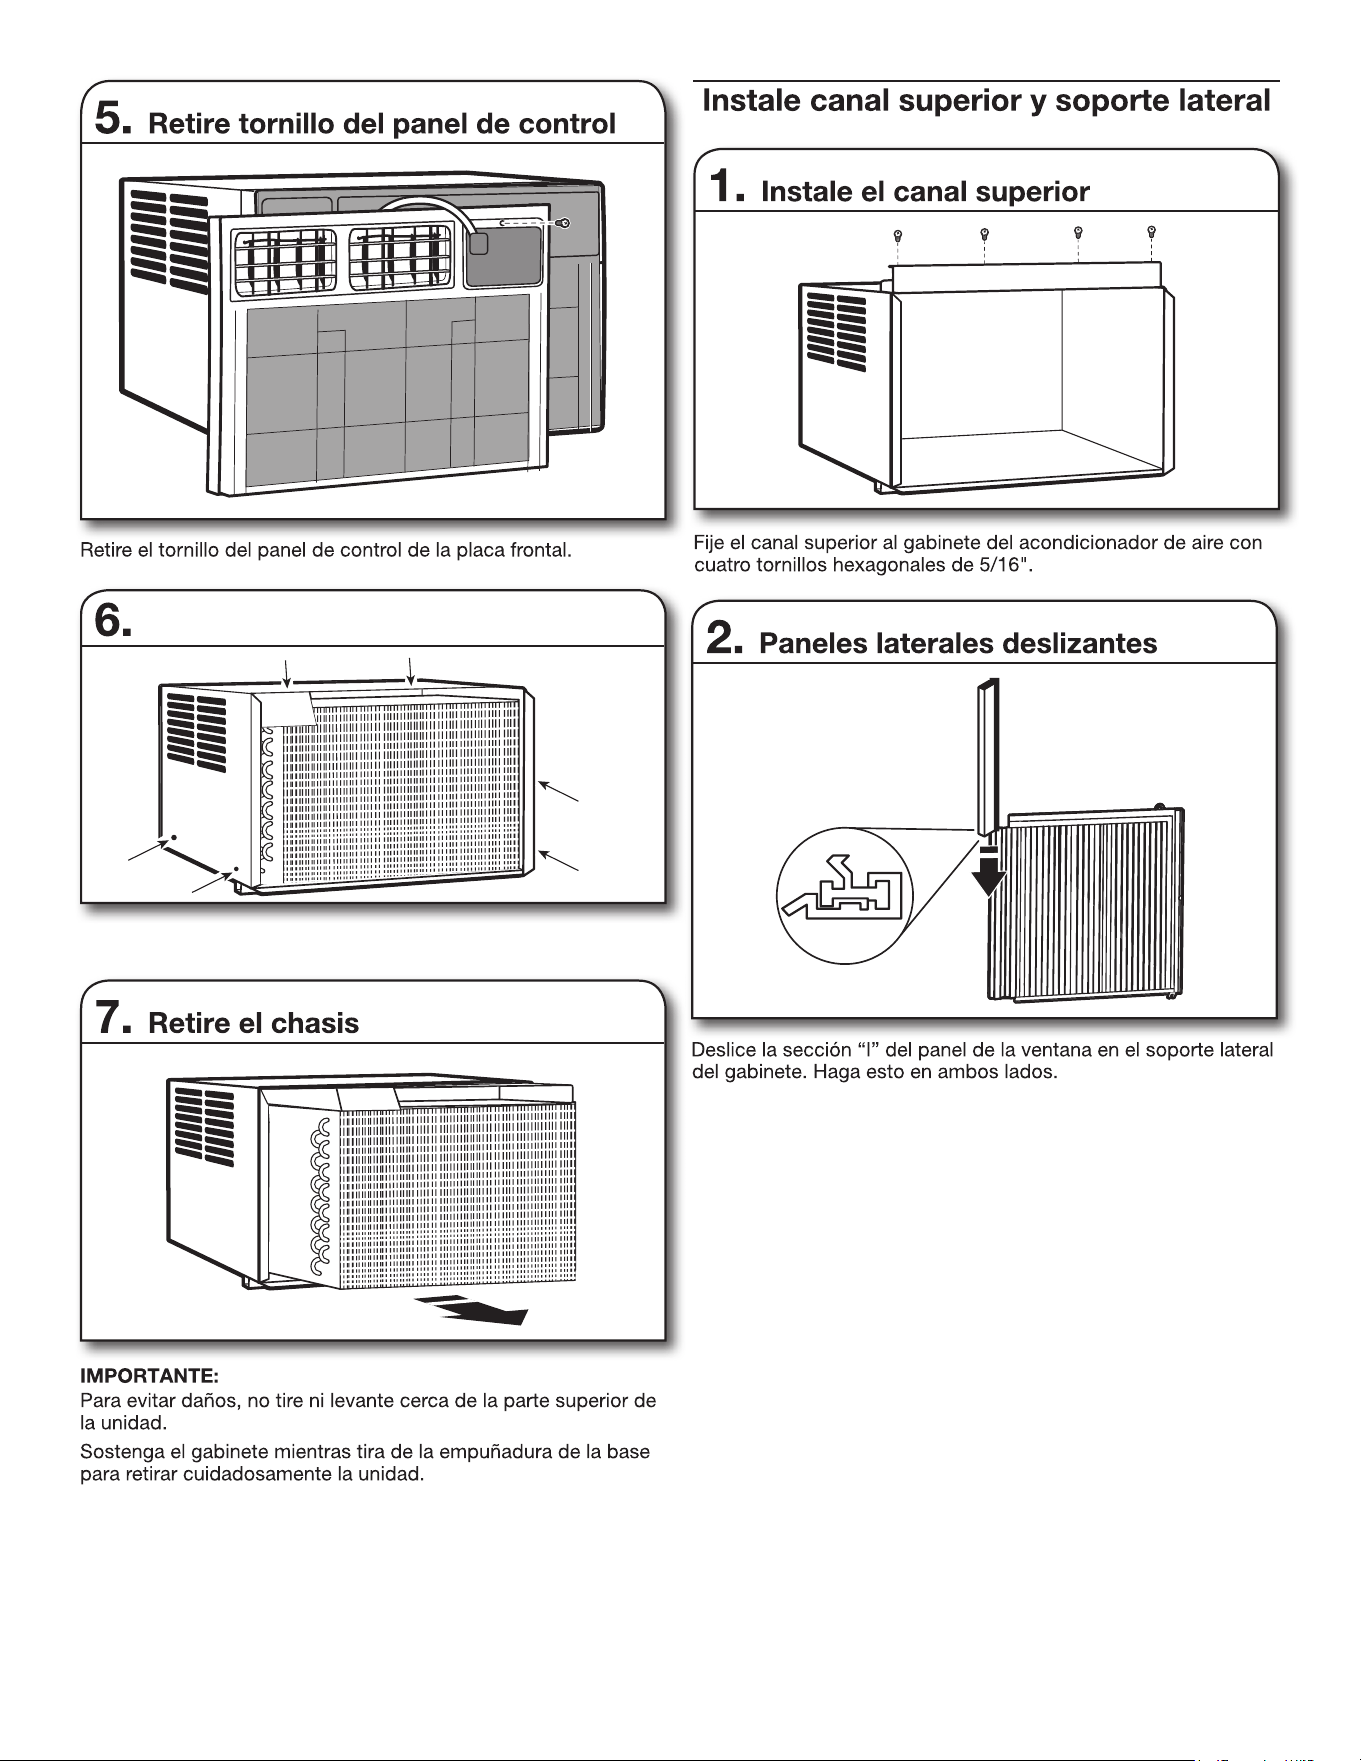
Quite los seis tornillos del lado superior y del lado izquierdo
y derecho del gabinete.
Quitar los tornillos laterales
44
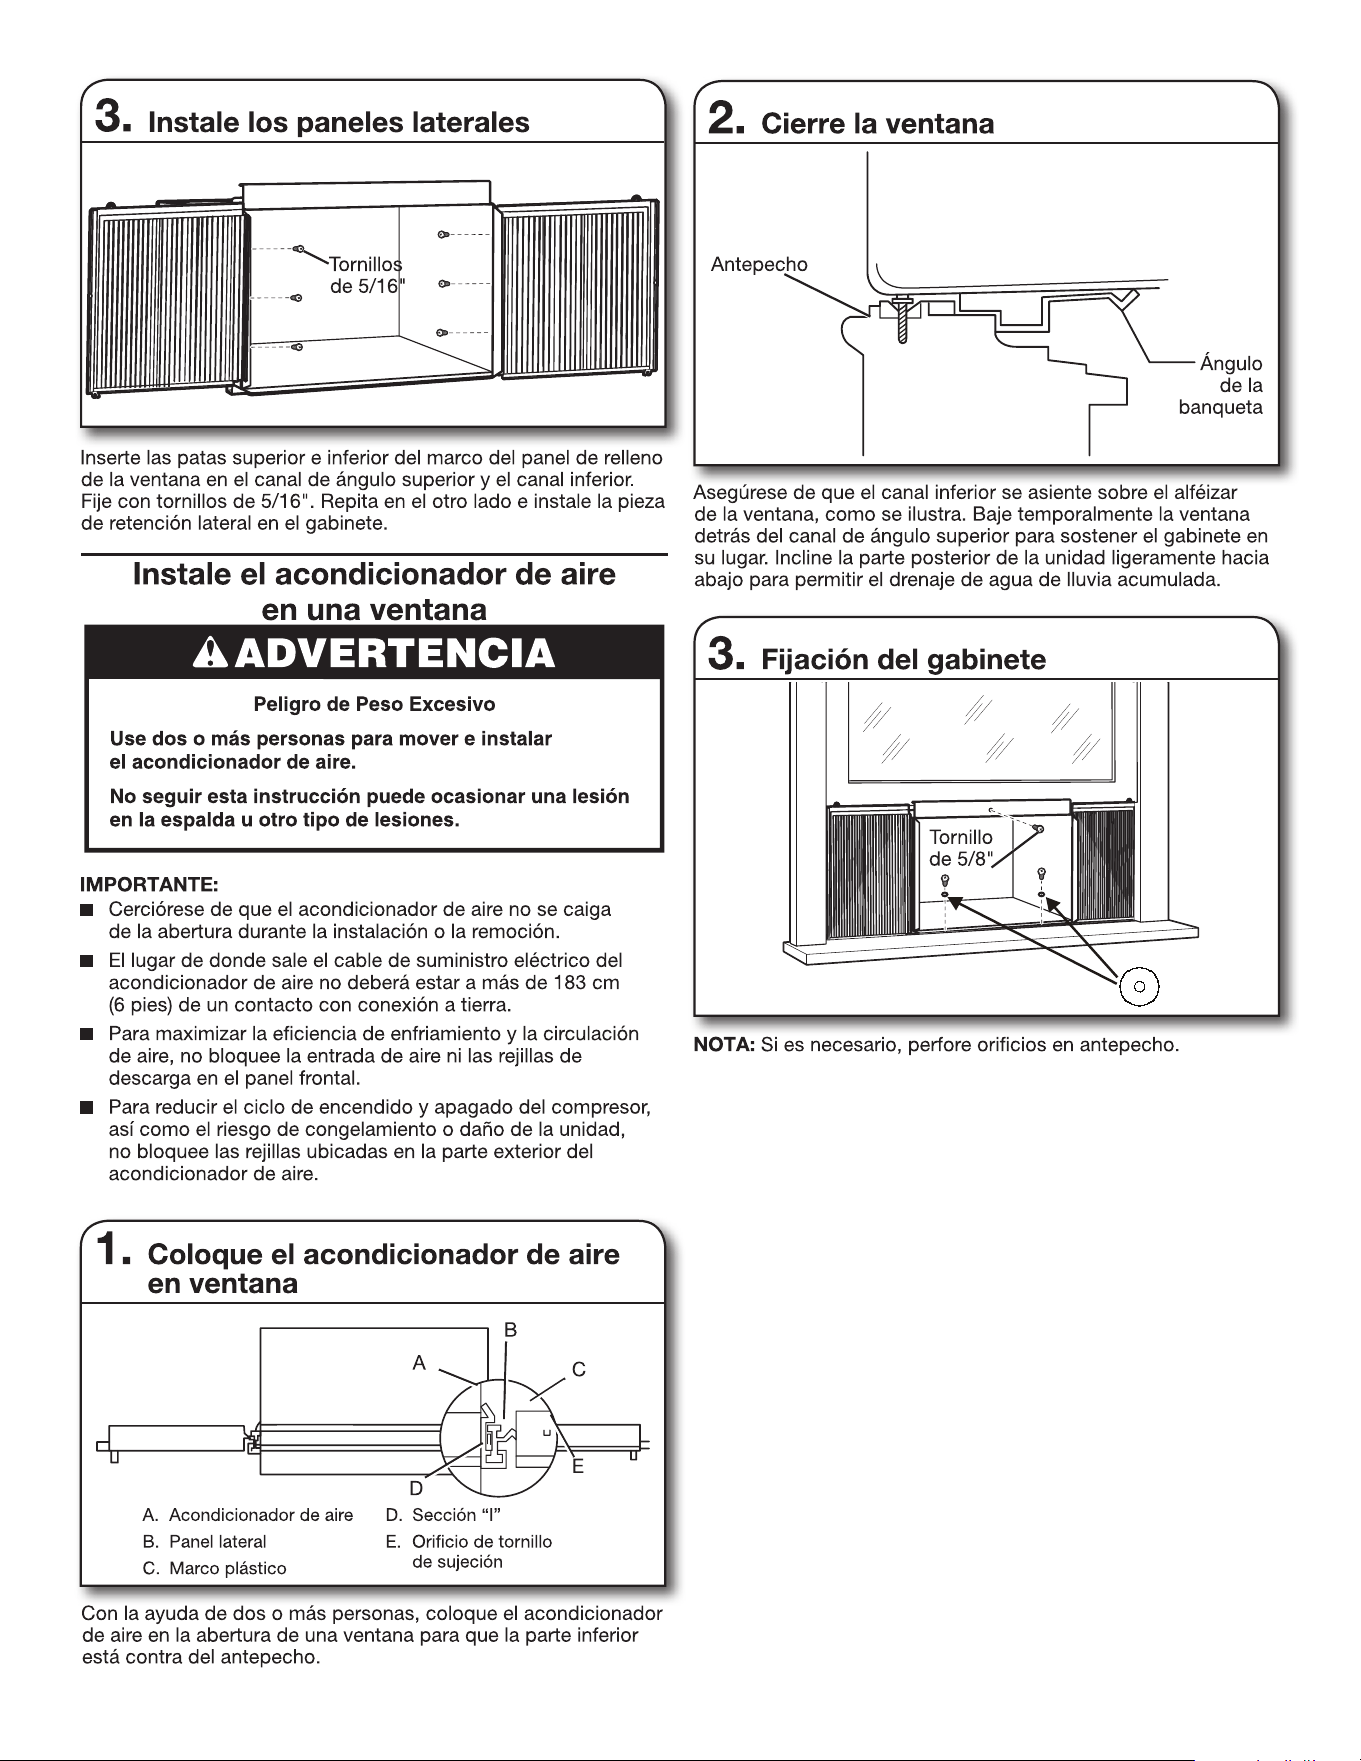
Fije el gabinete al alféizar de la ventana con dos tornillos de
cabeza hexagonal de 5/8''. Empulgueras. Apriete el tornillo a
través del espaciador de madera que mencionado en la primera
página. Para los modelos de 24,000 BTU, la madera el
espaciador debe asentarse sobre una arandela. Use un tornillo de
cabeza hexagonal de 5/8'' para sujetar el canal superior al marco
de la ventana.
Lavadora
45
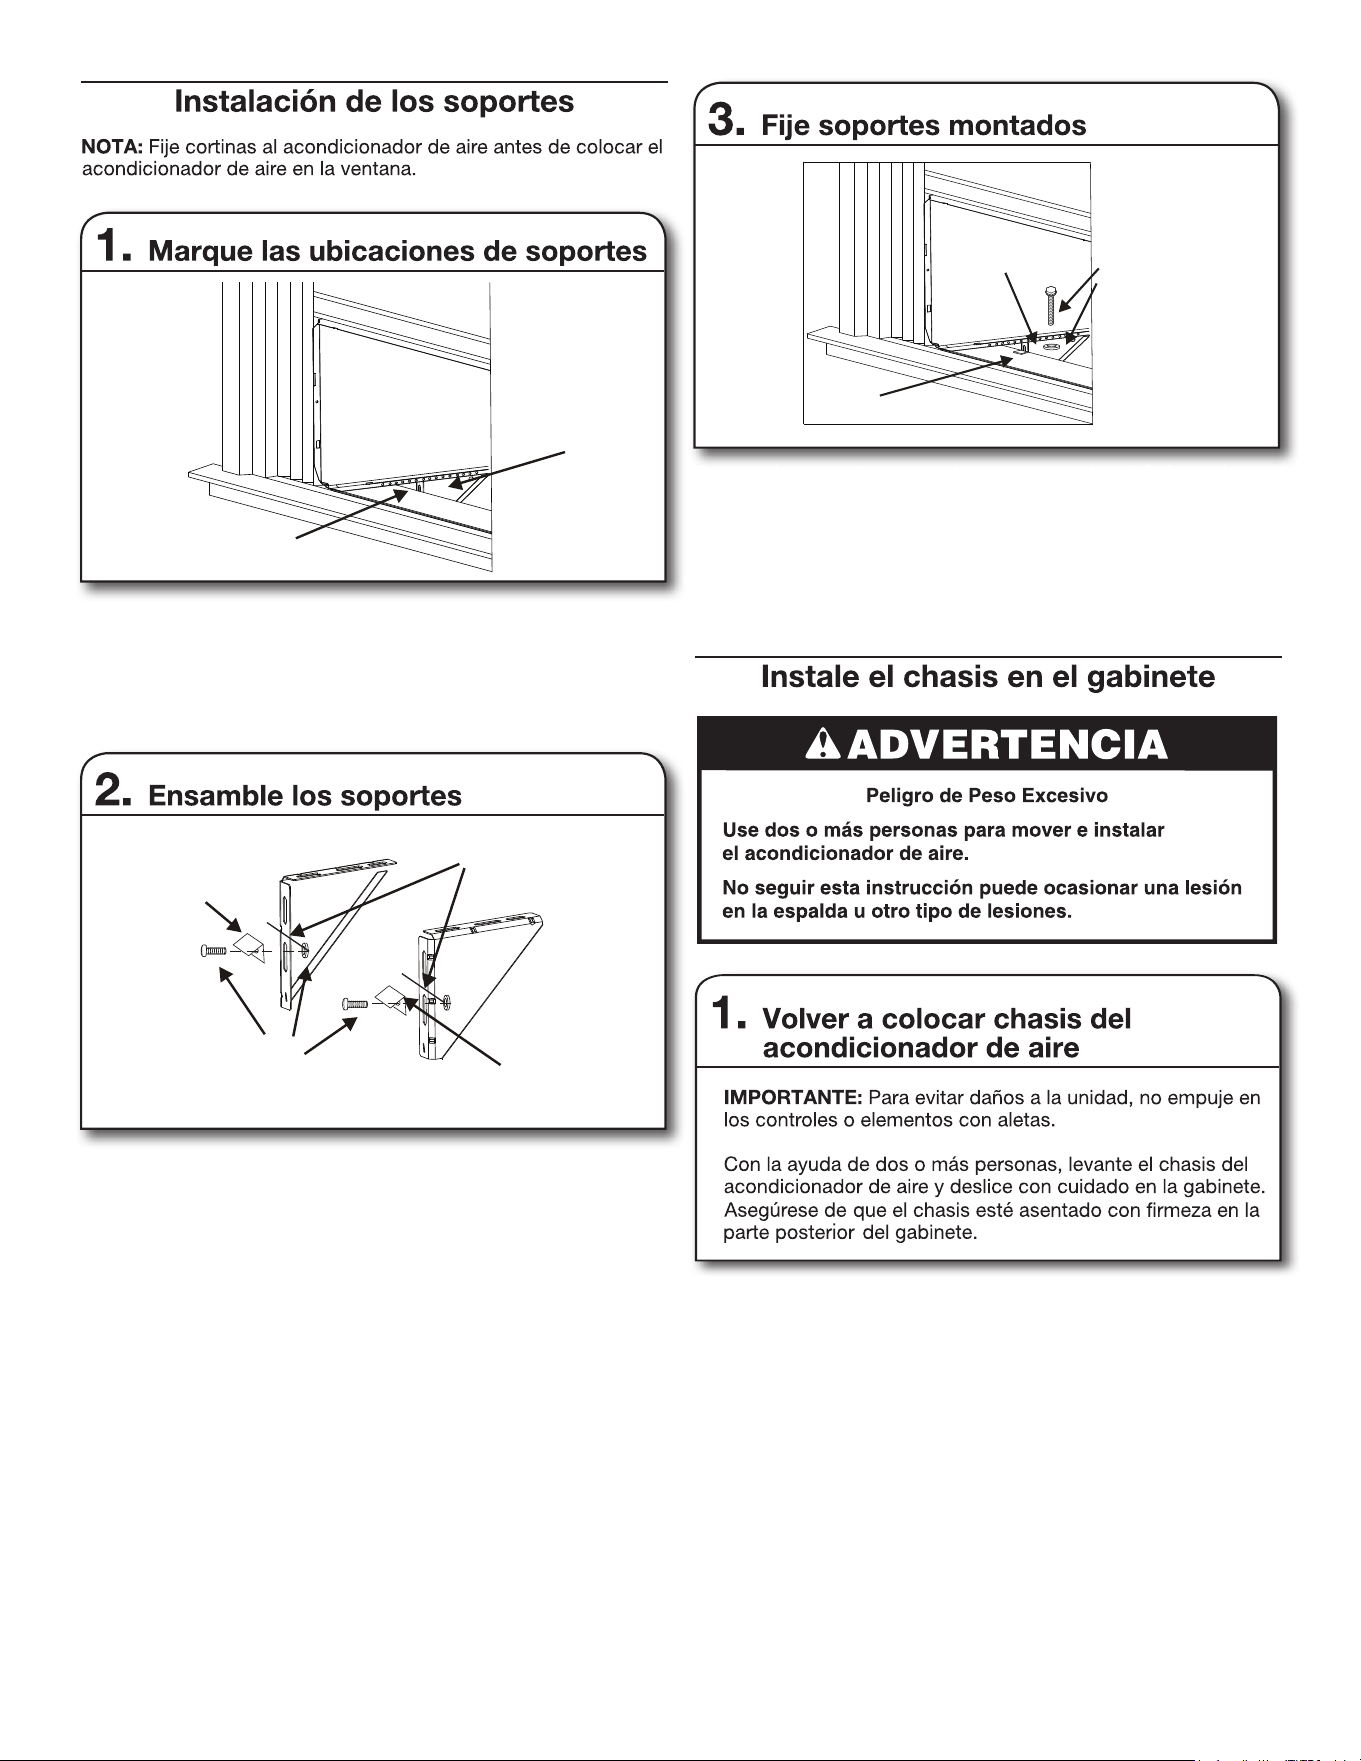
Fije los soportes (con los soportes del alféizar adjuntos) a la parte
inferior del gabinete con un perno de cabeza plana de 1/2" con
tuerca de seguridad que se muestra. Asegúrese de que los
soportes del alféizar descansen sobre el alféizar de la ventana
como se muestra. Incline la parte posterior de la unidad
ligeramente hacia abajo para permitir la acumulación de lluvia
agua para drenar. Apriete los seis pernos de forma segura.
Soporte de marca
Soporte de ángulo de alféizar
Soporte de apoyo
Perno y
Contratuerca
Soporte
Soporte de ángulo
de alféizar
Marca de lápiz
Alinee el
soporte con la
marca de lápiz.
Sostenga cada soporte de soporte al ras contra el exterior del
alféizar de la ventana. Apriete cada soporte a la parte inferior del
gabinete. con perno de cabeza plana de 1/2'' con contratuerca.
Con un lápiz, marque el soporte donde la parte superior del
alféizar de la ventana se encuentra con el soporte. Retire los
soportes.
cabeza plana de 5/8"
perno con contratuerca
Fije los soportes angulares del alféizar a los soportes de soporte
con un perno de cabeza plana de 5/8" con contratuerca como se
muestra. Apriete los tornillos a mano libremente para adaptarse
a los cambios que puedan ser necesarios más adelante en
instalación.
46
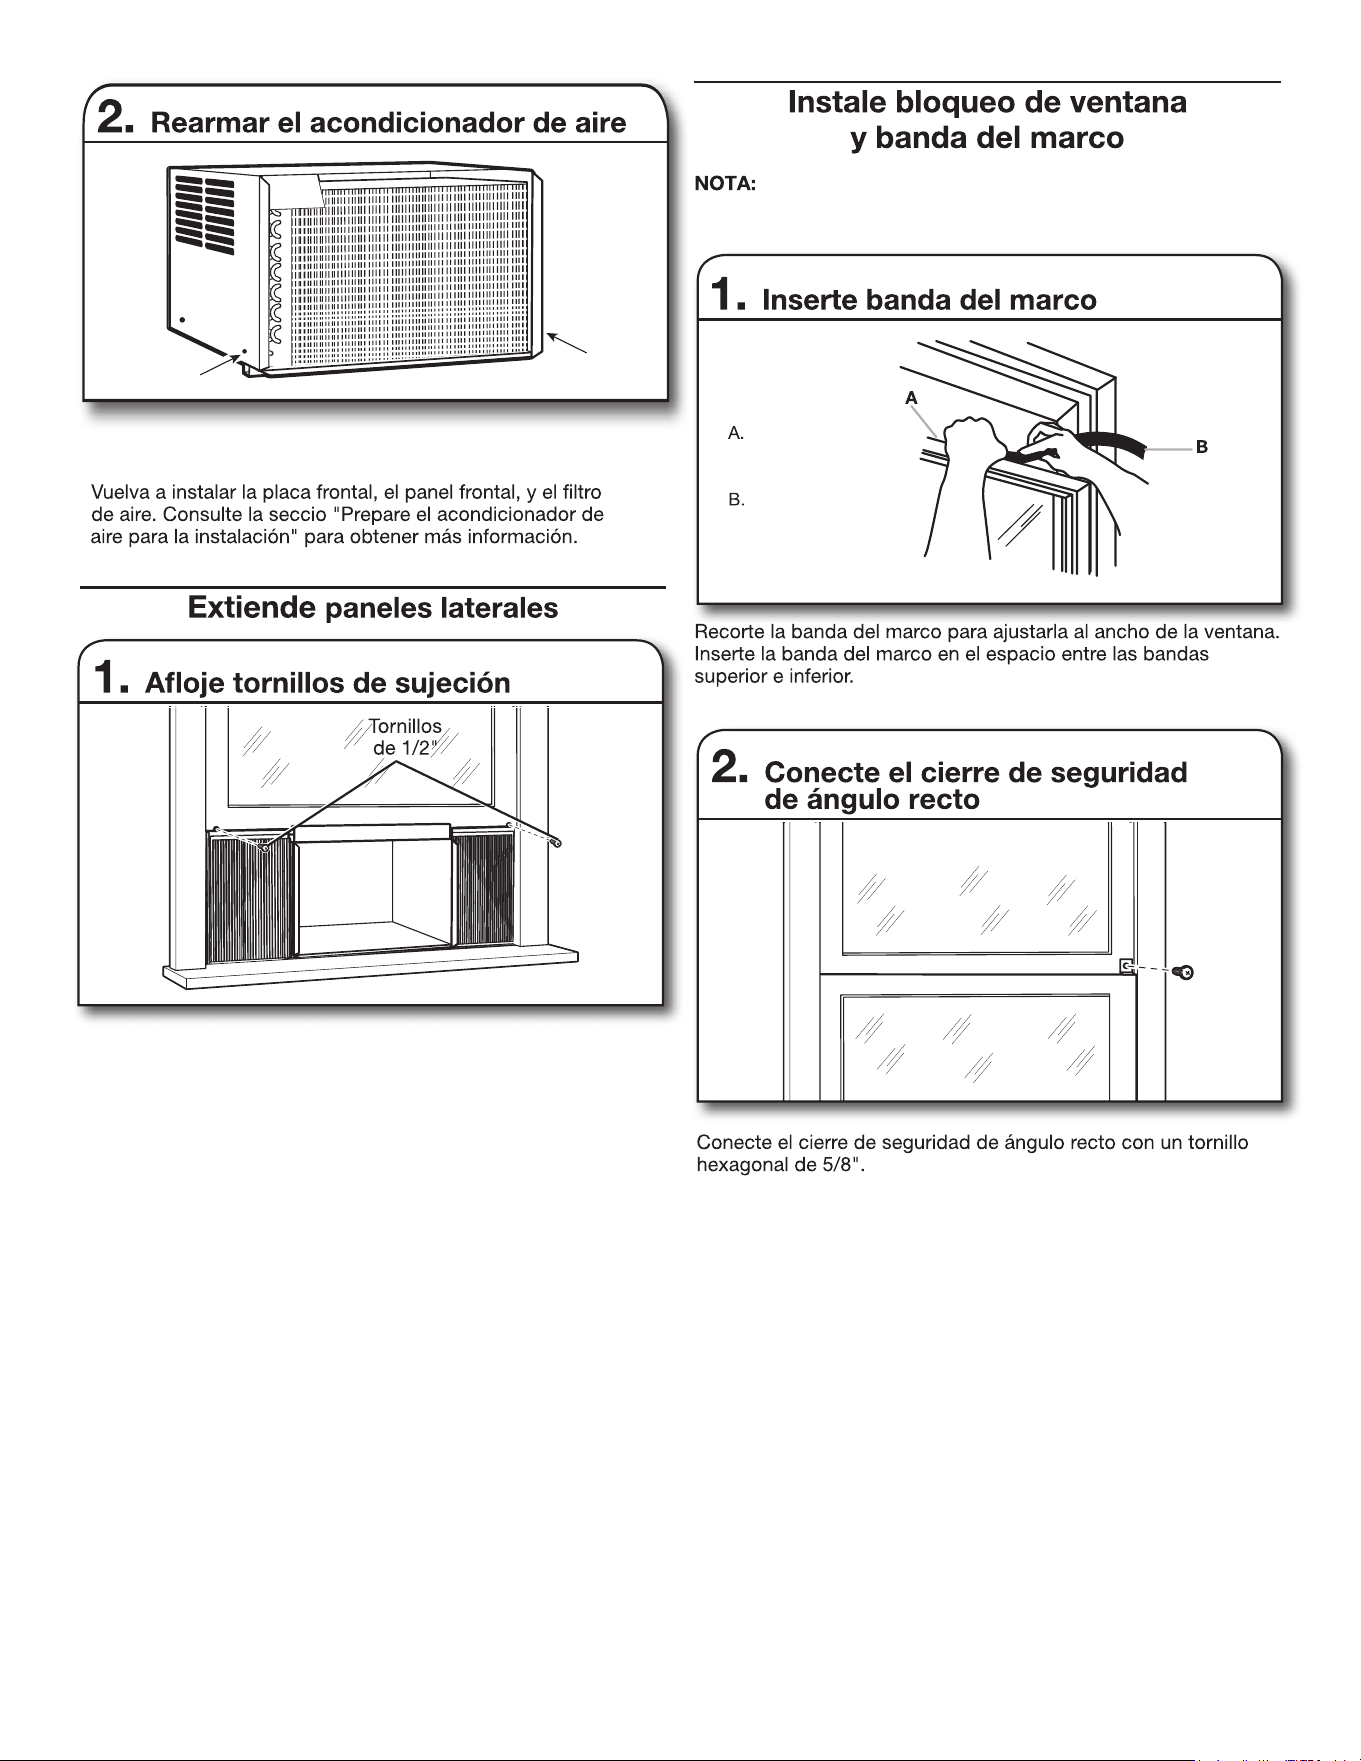
Sello de guillotina
Parte superior del
marco de la
ventana inferior
Extienda el panel lateral y el marco del panel. Sujete el panel
lateral con dos tornillos de cabeza hexagonal de 1/2'' tanto a
la derecha como a la izquierda al marco de la ventana.
Vuelva a ajustar los dos tornillos al gabinete que está cerca
del panel lateral, tanto a la izquierda como a la derecha.
Coloque cortinas en el gabinete del acondicionador de
aire antes de colocar el gabinete del aire acondicionado en la
ventana.
47
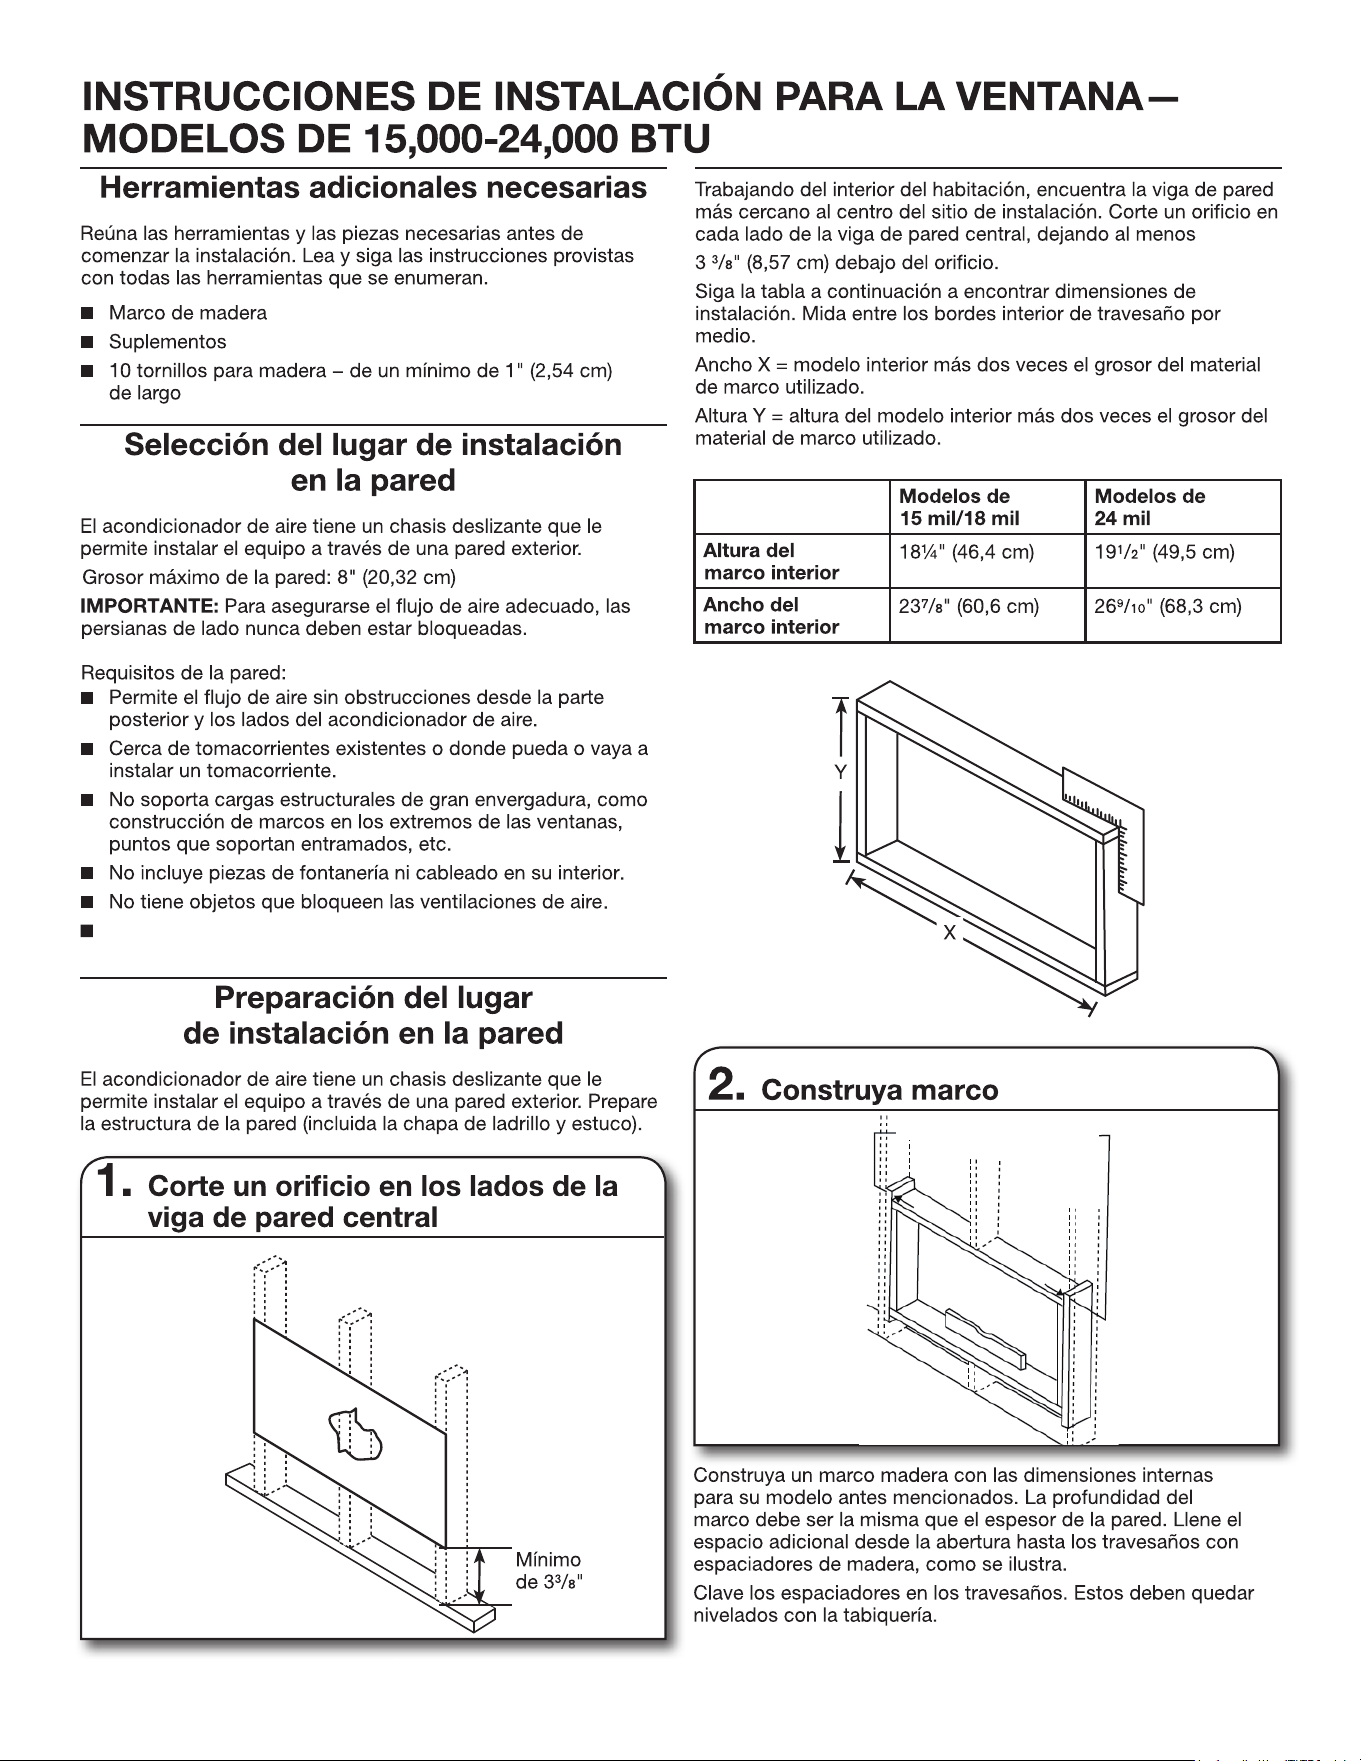
NIVEL
SEPARADORES DE CLAVOS
PARA MONTANTES
La distancia entre la unidad y el tomacorriente debe ser
de 6'(180 cm).
48
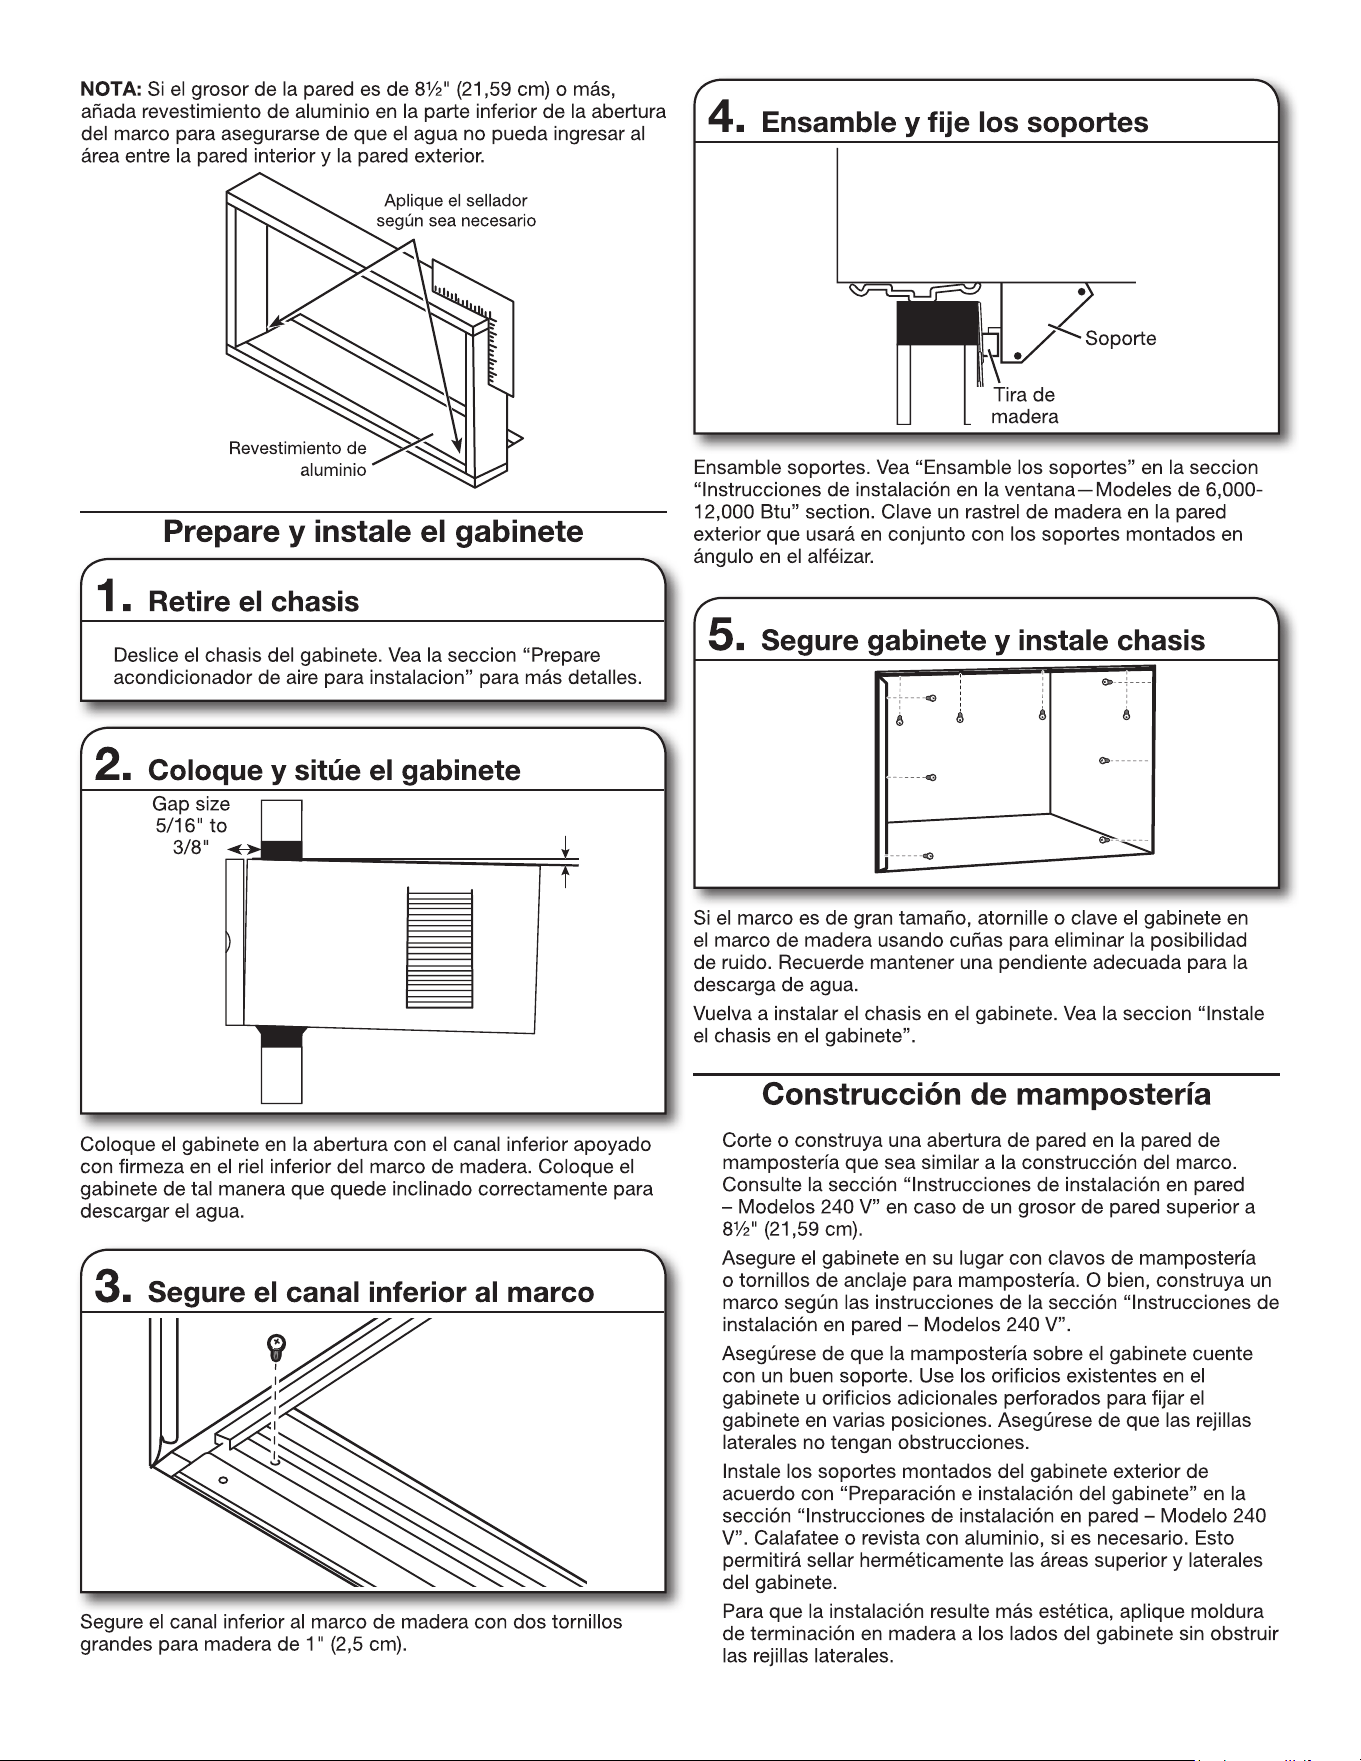
1.
2.
3.
4.
5.
3 grados
49
50
1.
2.
3.
1.
2.
3.
4.
51
1.
2.
1.
1.
2.
3.
2.
52
1.
2.
3.
4.
53
1.
2.
1.
2.
1.
2.
3.
54
55
56
57

09/25